
User's Manual
(Touch Panel Operation)

2
Touch Panel Operation
TABLE OF CONTENTS
ABOUT THIS GUIDE . . . . . . . . . . . . . . . . . . . . . . . . . . . . . . . . . . . . . . . . . . . . . . . . . . . . . . . . . . . . . . . . . . . . . . . . . . . . . . . . . . . 3
TOUCH PANEL . . . . . . . . . . . . . . . . . . . . . . . . . . . . . . . . . . . . . . . . . . . . . . . . . . . . . . . . . . . . . . . . . . . . . . . . . . . . . . . . . . . . . . . 4
• TOUCH TYPES . . . . . . . . . . . . . . . . . . . . . . . . . . . . . . . . . . . . . . . . . . . . . . . . . . . . . . . . . . . . . . . . . . . . . . . . . . . . . . . . . . . . 4
• HOME SCREEN . . . . . . . . . . . . . . . . . . . . . . . . . . . . . . . . . . . . . . . . . . . . . . . . . . . . . . . . . . . . . . . . . . . . . . . . . . . . . . . . . . . 8
• OPERATION OF FREQUENTLY USED KEYS. . . . . . . . . . . . . . . . . . . . . . . . . . . . . . . . . . . . . . . . . . . . . . . . . . . . . . . . . . . 12
• ACTION PANEL . . . . . . . . . . . . . . . . . . . . . . . . . . . . . . . . . . . . . . . . . . . . . . . . . . . . . . . . . . . . . . . . . . . . . . . . . . . . . . . . . . 13
• CONFIRMATION SCREEN FOR FAVORITE MENUS AND SETTINGS . . . . . . . . . . . . . . . . . . . . . . . . . . . . . . . . . . . . . . . 13
STOPPING/DELETING A JOB, PRIORITY PROCESSING AND CHECKING THE STATUS . . . . . . . . . . . . . . . . . . . . . . . . . . 16
• TYPES OF JOB STATUS SCREENS . . . . . . . . . . . . . . . . . . . . . . . . . . . . . . . . . . . . . . . . . . . . . . . . . . . . . . . . . . . . . . . . . . 16
• STOPPING/DELETING A JOB IN PROGRESS OR RESERVED. . . . . . . . . . . . . . . . . . . . . . . . . . . . . . . . . . . . . . . . . . . . . 18
• PRIORITY PROCESSING OF A RESERVED JOB. . . . . . . . . . . . . . . . . . . . . . . . . . . . . . . . . . . . . . . . . . . . . . . . . . . . . . . . 19
• CHECKING A RESERVED JOB OR THE JOB IN PROGRESS . . . . . . . . . . . . . . . . . . . . . . . . . . . . . . . . . . . . . . . . . . . . . . 21
• CHECKING COMPLETED JOBS . . . . . . . . . . . . . . . . . . . . . . . . . . . . . . . . . . . . . . . . . . . . . . . . . . . . . . . . . . . . . . . . . . . . . 22
• READING THE JOB LIST . . . . . . . . . . . . . . . . . . . . . . . . . . . . . . . . . . . . . . . . . . . . . . . . . . . . . . . . . . . . . . . . . . . . . . . . . . . 23
CUSTOMIZING THE DISPLAY (U/I Customize). . . . . . . . . . . . . . . . . . . . . . . . . . . . . . . . . . . . . . . . . . . . . . . . . . . . . . . . . . . . . 26
• ITEMS YOU CAN CUSTOMIZE . . . . . . . . . . . . . . . . . . . . . . . . . . . . . . . . . . . . . . . . . . . . . . . . . . . . . . . . . . . . . . . . . . . . . . 27
• GENERAL PROCEDURE FOR USING U/I CUSTOMIZE. . . . . . . . . . . . . . . . . . . . . . . . . . . . . . . . . . . . . . . . . . . . . . . . . . . 29
EDITING SHORTCUT KEYS . . . . . . . . . . . . . . . . . . . . . . . . . . . . . . . . . . . . . . . . . . . . . . . . . . . . . . . . . . . . . . . . . . . . . . . . . . . . 32
• ADDING SHORTCUT KEYS . . . . . . . . . . . . . . . . . . . . . . . . . . . . . . . . . . . . . . . . . . . . . . . . . . . . . . . . . . . . . . . . . . . . . . . . . 32
• DELETING A SHORTCUT KEY . . . . . . . . . . . . . . . . . . . . . . . . . . . . . . . . . . . . . . . . . . . . . . . . . . . . . . . . . . . . . . . . . . . . . . 35
• CHANGING A SHORTCUT KEY. . . . . . . . . . . . . . . . . . . . . . . . . . . . . . . . . . . . . . . . . . . . . . . . . . . . . . . . . . . . . . . . . . . . . . 37
• ADDING A SHORTCUT KEY IMAGE . . . . . . . . . . . . . . . . . . . . . . . . . . . . . . . . . . . . . . . . . . . . . . . . . . . . . . . . . . . . . . . . . . 40
• MOVING A SHORTCUT KEY . . . . . . . . . . . . . . . . . . . . . . . . . . . . . . . . . . . . . . . . . . . . . . . . . . . . . . . . . . . . . . . . . . . . . . . . 42
• RETURNING THE SHORTCUT KEYS TO THE FACTORY DEFAULT STATE . . . . . . . . . . . . . . . . . . . . . . . . . . . . . . . . . . 44
EDITING THE HOME SCREEN . . . . . . . . . . . . . . . . . . . . . . . . . . . . . . . . . . . . . . . . . . . . . . . . . . . . . . . . . . . . . . . . . . . . . . . . . . 46
• CHANGING THE LAYOUT PATTERN OF THE HOME SCREEN . . . . . . . . . . . . . . . . . . . . . . . . . . . . . . . . . . . . . . . . . . . . 46
• SELECTING A MFP DISPLAY PATTERN FOR THE HOME SCREEN . . . . . . . . . . . . . . . . . . . . . . . . . . . . . . . . . . . . . . . . 48
• CHANGING THE COLOR OF TEXT ON THE HOME SCREEN. . . . . . . . . . . . . . . . . . . . . . . . . . . . . . . . . . . . . . . . . . . . . . 49
• CHANGING THE BACKGROUND IMAGE OF THE HOME SCREEN . . . . . . . . . . . . . . . . . . . . . . . . . . . . . . . . . . . . . . . . . 50
• CHANGING THE FIXED KEYS. . . . . . . . . . . . . . . . . . . . . . . . . . . . . . . . . . . . . . . . . . . . . . . . . . . . . . . . . . . . . . . . . . . . . . . 53
• INCREASING THE TEXT SIZE. . . . . . . . . . . . . . . . . . . . . . . . . . . . . . . . . . . . . . . . . . . . . . . . . . . . . . . . . . . . . . . . . . . . . . . 55
• CHANGING THE LANGUAGE USED ON THE MACHINE. . . . . . . . . . . . . . . . . . . . . . . . . . . . . . . . . . . . . . . . . . . . . . . . . . 56
CHARACTER ENTRY . . . . . . . . . . . . . . . . . . . . . . . . . . . . . . . . . . . . . . . . . . . . . . . . . . . . . . . . . . . . . . . . . . . . . . . . . . . . . . . . . 57
• NAMES AND FUNCTIONS OF SOFT KEYBOARD KEYS . . . . . . . . . . . . . . . . . . . . . . . . . . . . . . . . . . . . . . . . . . . . . . . . . . 57
• SET THE KEYBOARD SETTING . . . . . . . . . . . . . . . . . . . . . . . . . . . . . . . . . . . . . . . . . . . . . . . . . . . . . . . . . . . . . . . . . . . . . 58
3
Touch Panel Operation
ABOUT THIS GUIDE
This guide explains how to operate the touch panel and customize the user interface.
Please note
• Wherever "xx-xxxxx" appears in this guide, please substitute your model name for "xx-xxxxx".
• This guide does not provide detailed explanations of the functions of the machine. For detailed information on the
names and functions that appear in this guide, see the User's Manual.
• Contents of this manual are general descriptions of products including other models. Therefore, this manual includes
descriptions of features that are not available for your model.
• Considerable care has been taken in preparing this manual. If you have any comments or concerns about the manual,
please contact your dealer or nearest authorized service representative.
• This product has undergone strict quality control and inspection procedures. In the unlikely event that a defect or other
problem is discovered, please contact your dealer or nearest authorized service representative.
• Aside from instances provided for by law, SHARP is not responsible for failures occurring during the use of the
product or its options, or failures due to incorrect operation of the product and its options, or other failures, or for any
damage that occurs due to use of the product.
Warning
• Reproduction, adaptation or translation of the contents of the manual without prior written permission is prohibited,
except as allowed under copyright laws.
• All information in this manual is subject to change without notice.
Illustrations, operation panel, touch panel, and Web pages in this guide
The peripheral devices are generally optional, however, some models include certain peripheral devices as standard equipment.
For some functions and procedures, the explanations assume that devices other than the above are installed.
This manual contains references to the fax function and Internet fax function. However, please note that the fax function
and Internet fax function are not available in some countries, regions and models.
Depending on the content, and depending on the model and what peripheral devices are installed, this may not be
usable. For details, refer to the User’s Manual.
The explanations in this manual are based on American English and the North American version of the software.
Software for other countries and regions may vary slightly from the North American version.
• The display screens, messages, and key names shown in the manual may differ from those on the actual machine due to
product improvements and modifications.
• The touch panel, illustrations, and setting screens in this manual are for reference only, and may vary by model, installed
options, settings changed from the default state, and country or region.
• Details of system settings as well as settings methods may differ depending on the model.
• This manual assumes that a full-color machine is being used. Some of the explanations may not apply to a monochrome
machine.
4
Touch Panel Operation
TOUCH PANEL
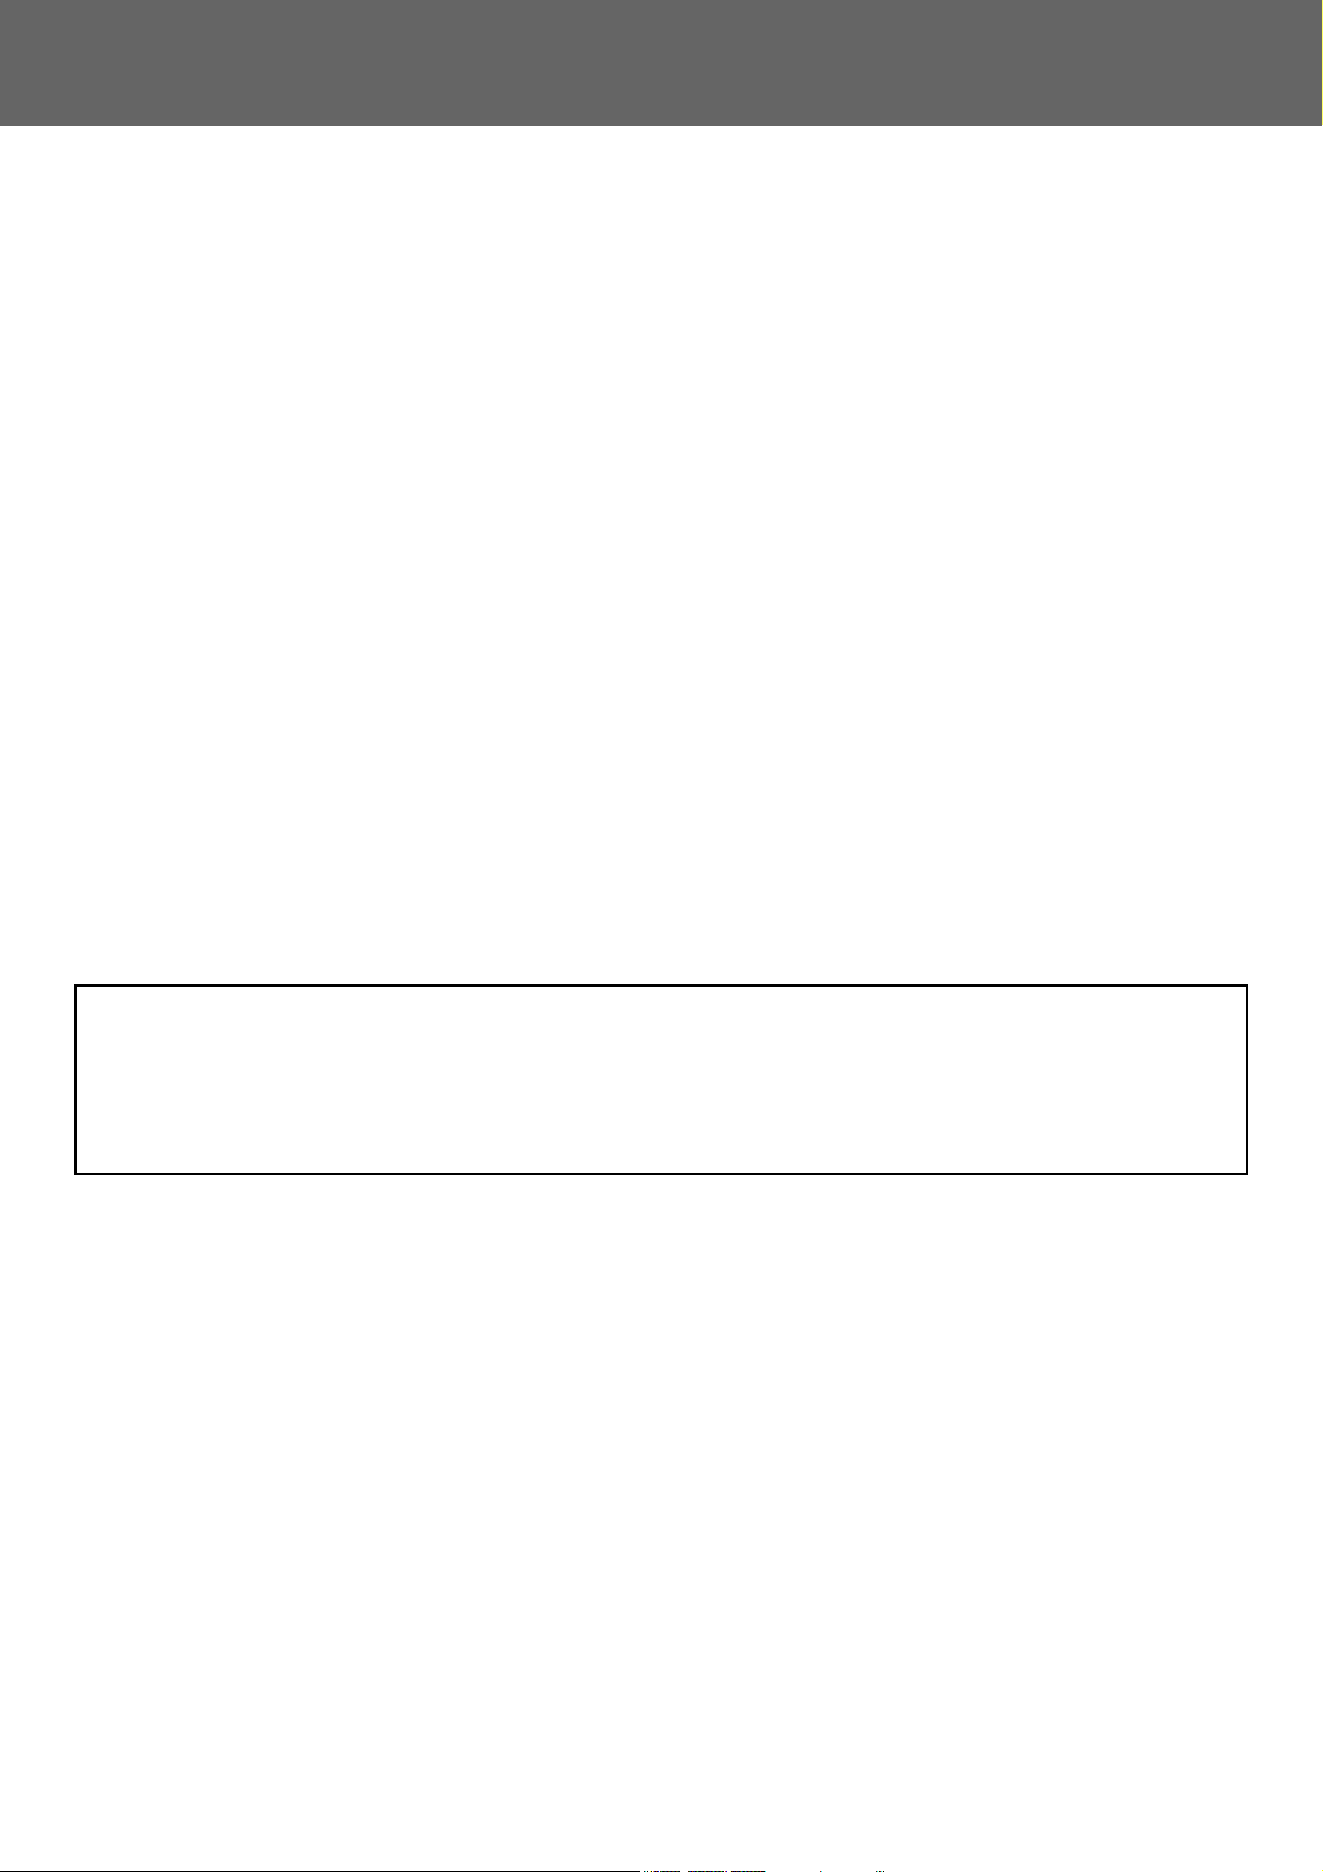
TOUCH TYPES
In addition to tapping, equivalent to conventional touching, the touch panel of the machine can be operated by long
touching, flicking and sliding.
Operation types
Tapping
Touch the panel with your
finger and then lift it quickly.
Use this method to select a
key, tab or check box.
Sliding
Slide the scroll bar (with your
finger touching the panel) to
scroll up and down a list with
a large number of items.
Long touching
Touch the panel with your
finger and hold it for a while.
Keep holding (long touching)
it on the action panel or
characters in the text box to
display characters in a
balloon.
Double tapping
Touch the screen twice. Use
this operation to enlarge the
image in the preview.
Flicking
Flick the panel to scroll a
preview image quickly.
Pinch
Touch the screen with two
fingers and move them
toward each other. This is
used to reduce the browser
and preview display.
Dragging
Drag (slide your finger
touching the panel in a
random direction) to replace
a page in the original during
preview.
Spread
Touch the screen with two
fingers and move them away
from each other. This is used
to enlarge the browser and
preview display.
Easy
Scan
File Retrieve
Others
Margin Shift
Off
Left
Down
Right
( 0~2 )
inch
1/2
Sharp OSA
No. of copies
1
Text/Printed
Photo
Photo
Text/Photo
3
Easy
Scan
File Retrieve
Data in Folder
Job Status
Send and Print
Call Eco Program
Store Data Temporarily
LINE PRINTER
Scan Or
Without ch
Quic
Store
File
Scan Or
Without
Store Data
5
Touch Panel Operation
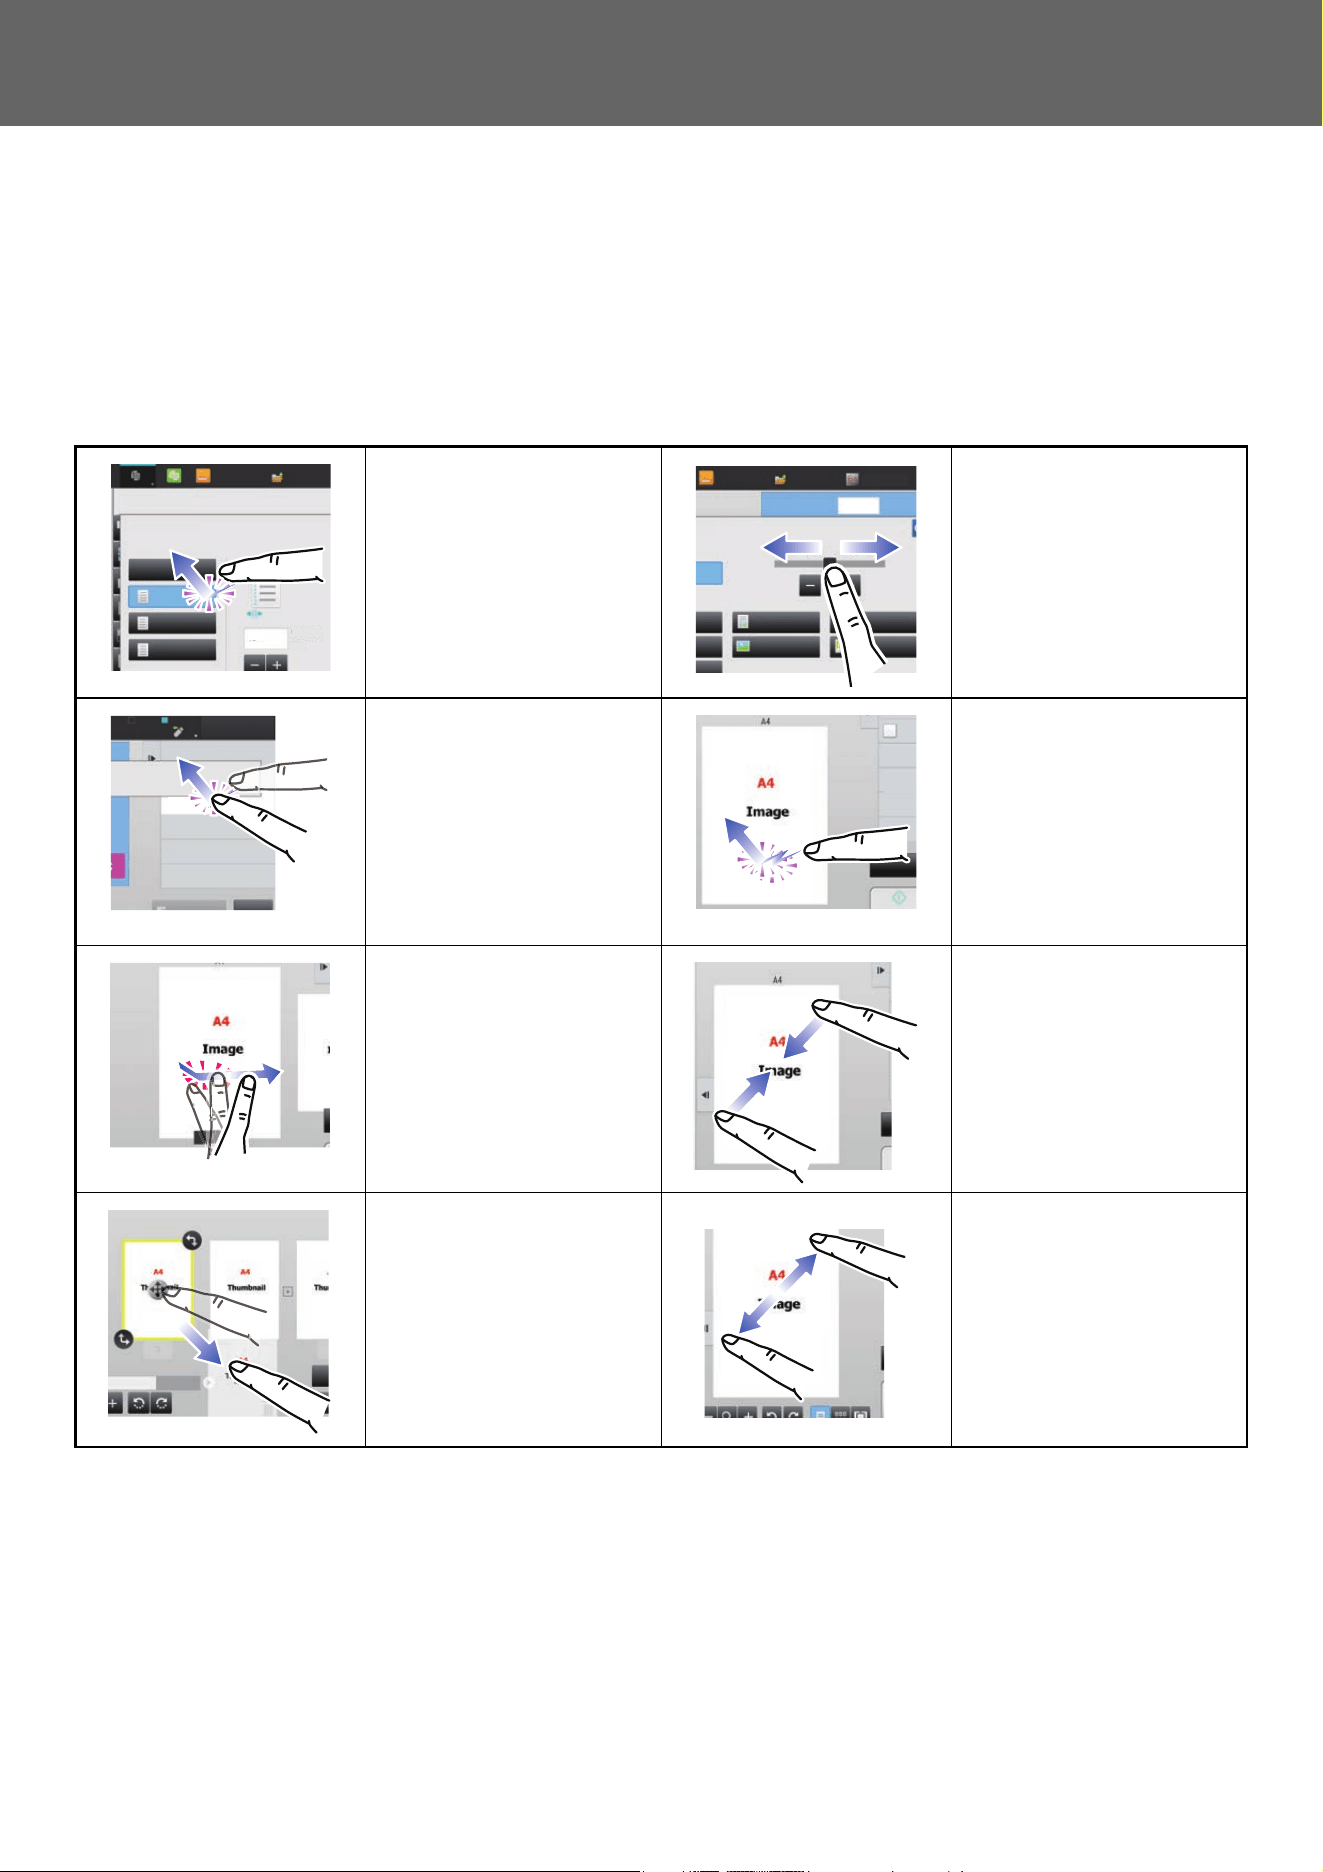
Operation on respective screens
Key (tapping)
A. Tap to select an item. The selected key turns into a different color.
B. Tap numeric keys to enter numbers.
C. Tap to increase or decrease the value. Long touching causes the value to be increased or decreased until you stop
touching.
D. Tap to enter a checkmark and enable the setting.
E. Tap here to close the screen.
List (tapping, sliding and flicking)
A. Tap to select an item. The selected item turns into a different color.
B. Slide the bar up and down.
It appears when the item does not fit in the screen.
C. Flick the key upwards or downwards. The item scrolls up or down.
Slider (sliding)
A. Slide the knob from side to side.
Others
Margin Shift
Off
Left
Right
Down
1/21/2
( 0~2 )
inch
( 0~2 )
inch
Adjust 2nd pg value to 1st.
Back
Start
Side 1 Side 2
Color
Start
CA
B/W
Preview
11x17
(A)
(B) (B)
(E)
(C)
(D)
(C)
Preview
Speaker
Start
W
ABC
Address
All
Frequent
Use
Narrow Down
All
Category
All
Sending History
Call by Search Number
Print Individual List
Call Search Number
Add New
Send Same Image
as Fax Address
Category 0
Category 1
Category 5
Category 3
Category 2
Category 4
Category 6
CA
(A)
(C)
(B)
Others
Background Adjustment
Adjust Original Background Darkness.
Preview
Start
Off
On
Touch [+] darken background.
Touch [-] erase background.
Original
Change Size/Direction.
Erase
Erase Shadow Around
Sharpness
Adjust Outline of Image
Exposure
Select Type/Exposure
Select Type/Exposure
Back
Color
Start
CA
B/W
11x17
(A)
6
Touch Panel Operation
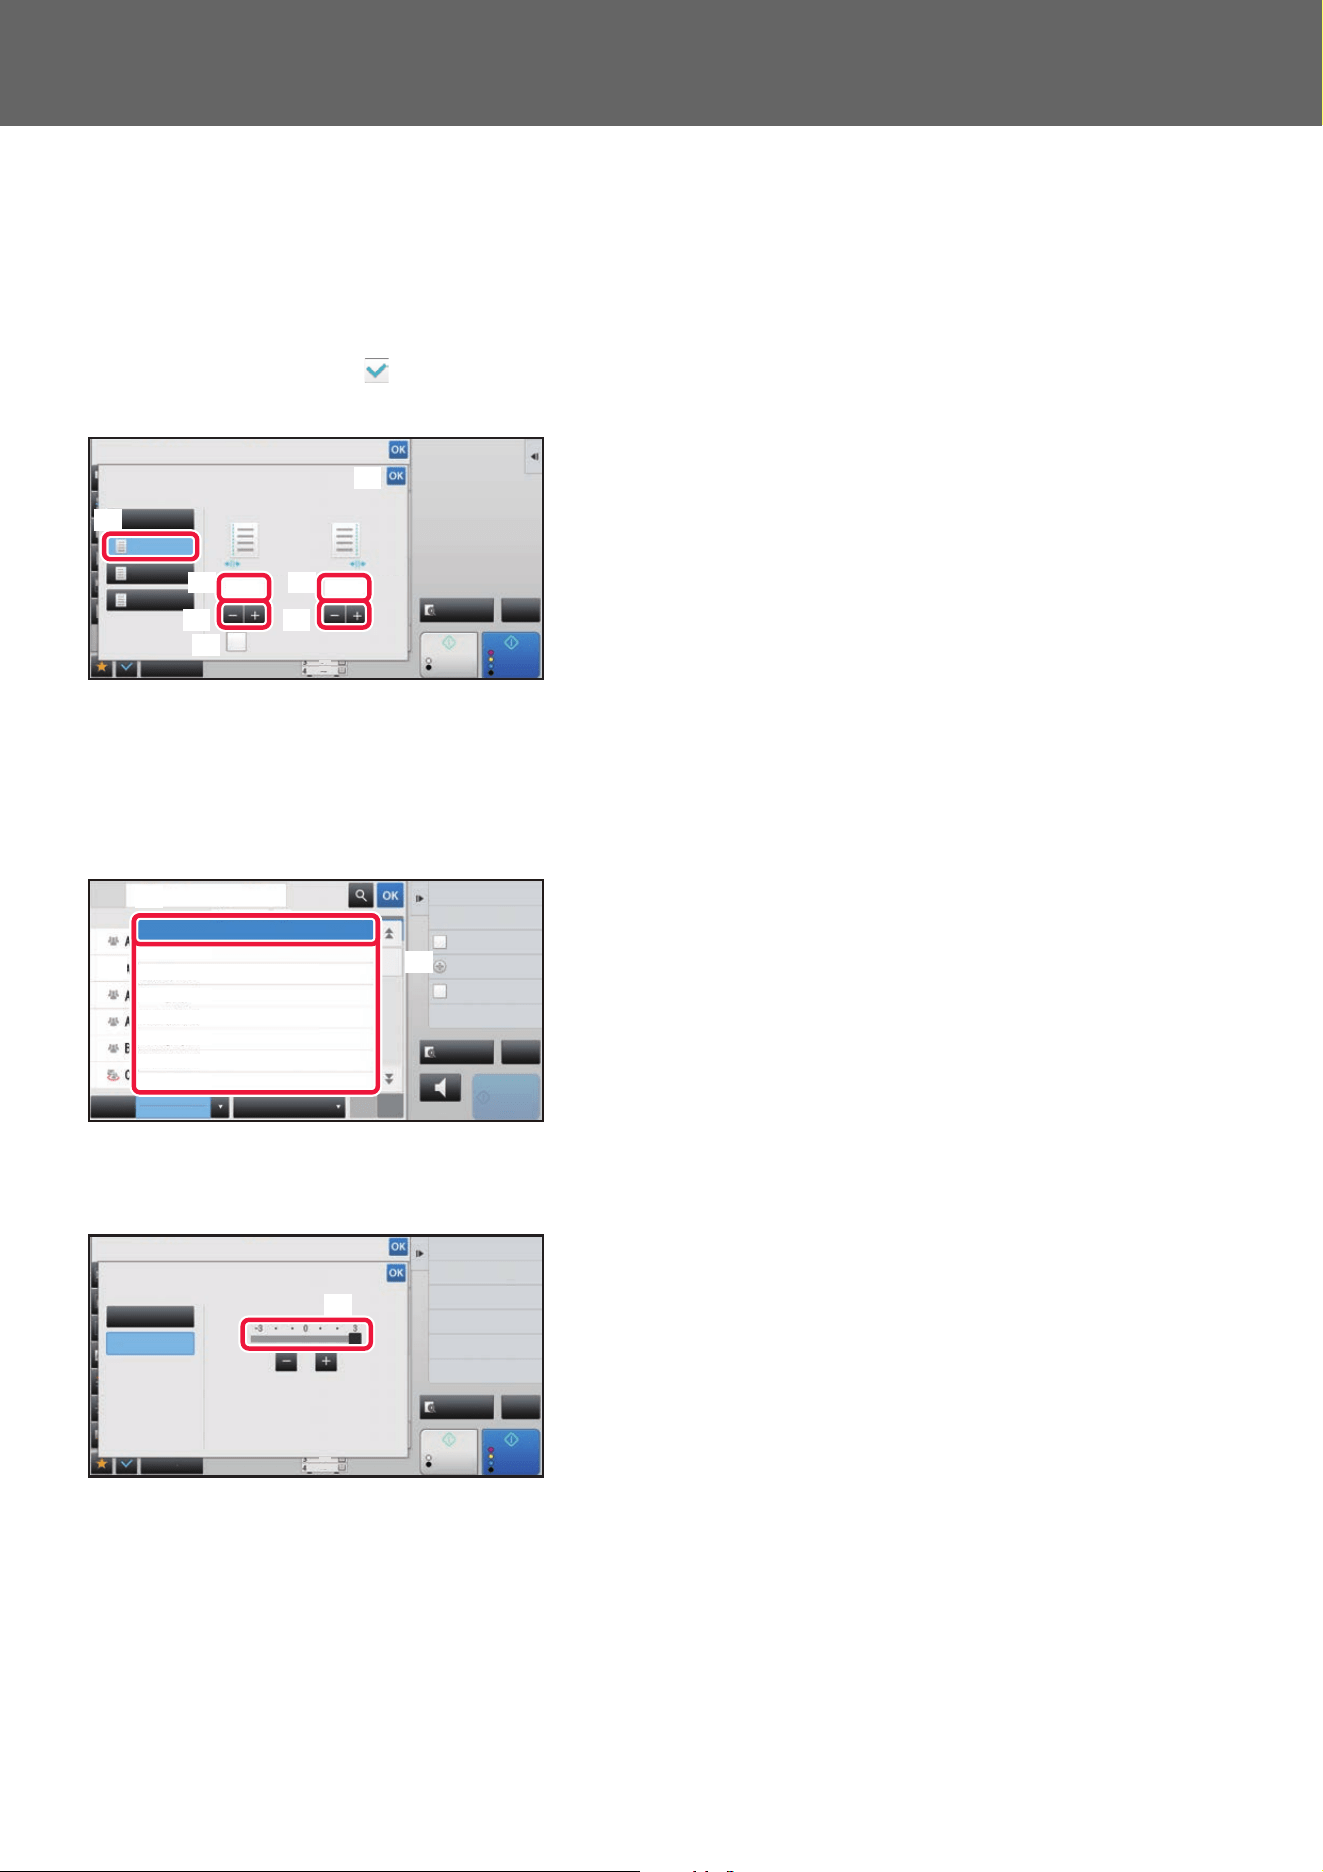
Tab (tapping)
A. Tap a tab to switch what is displayed.
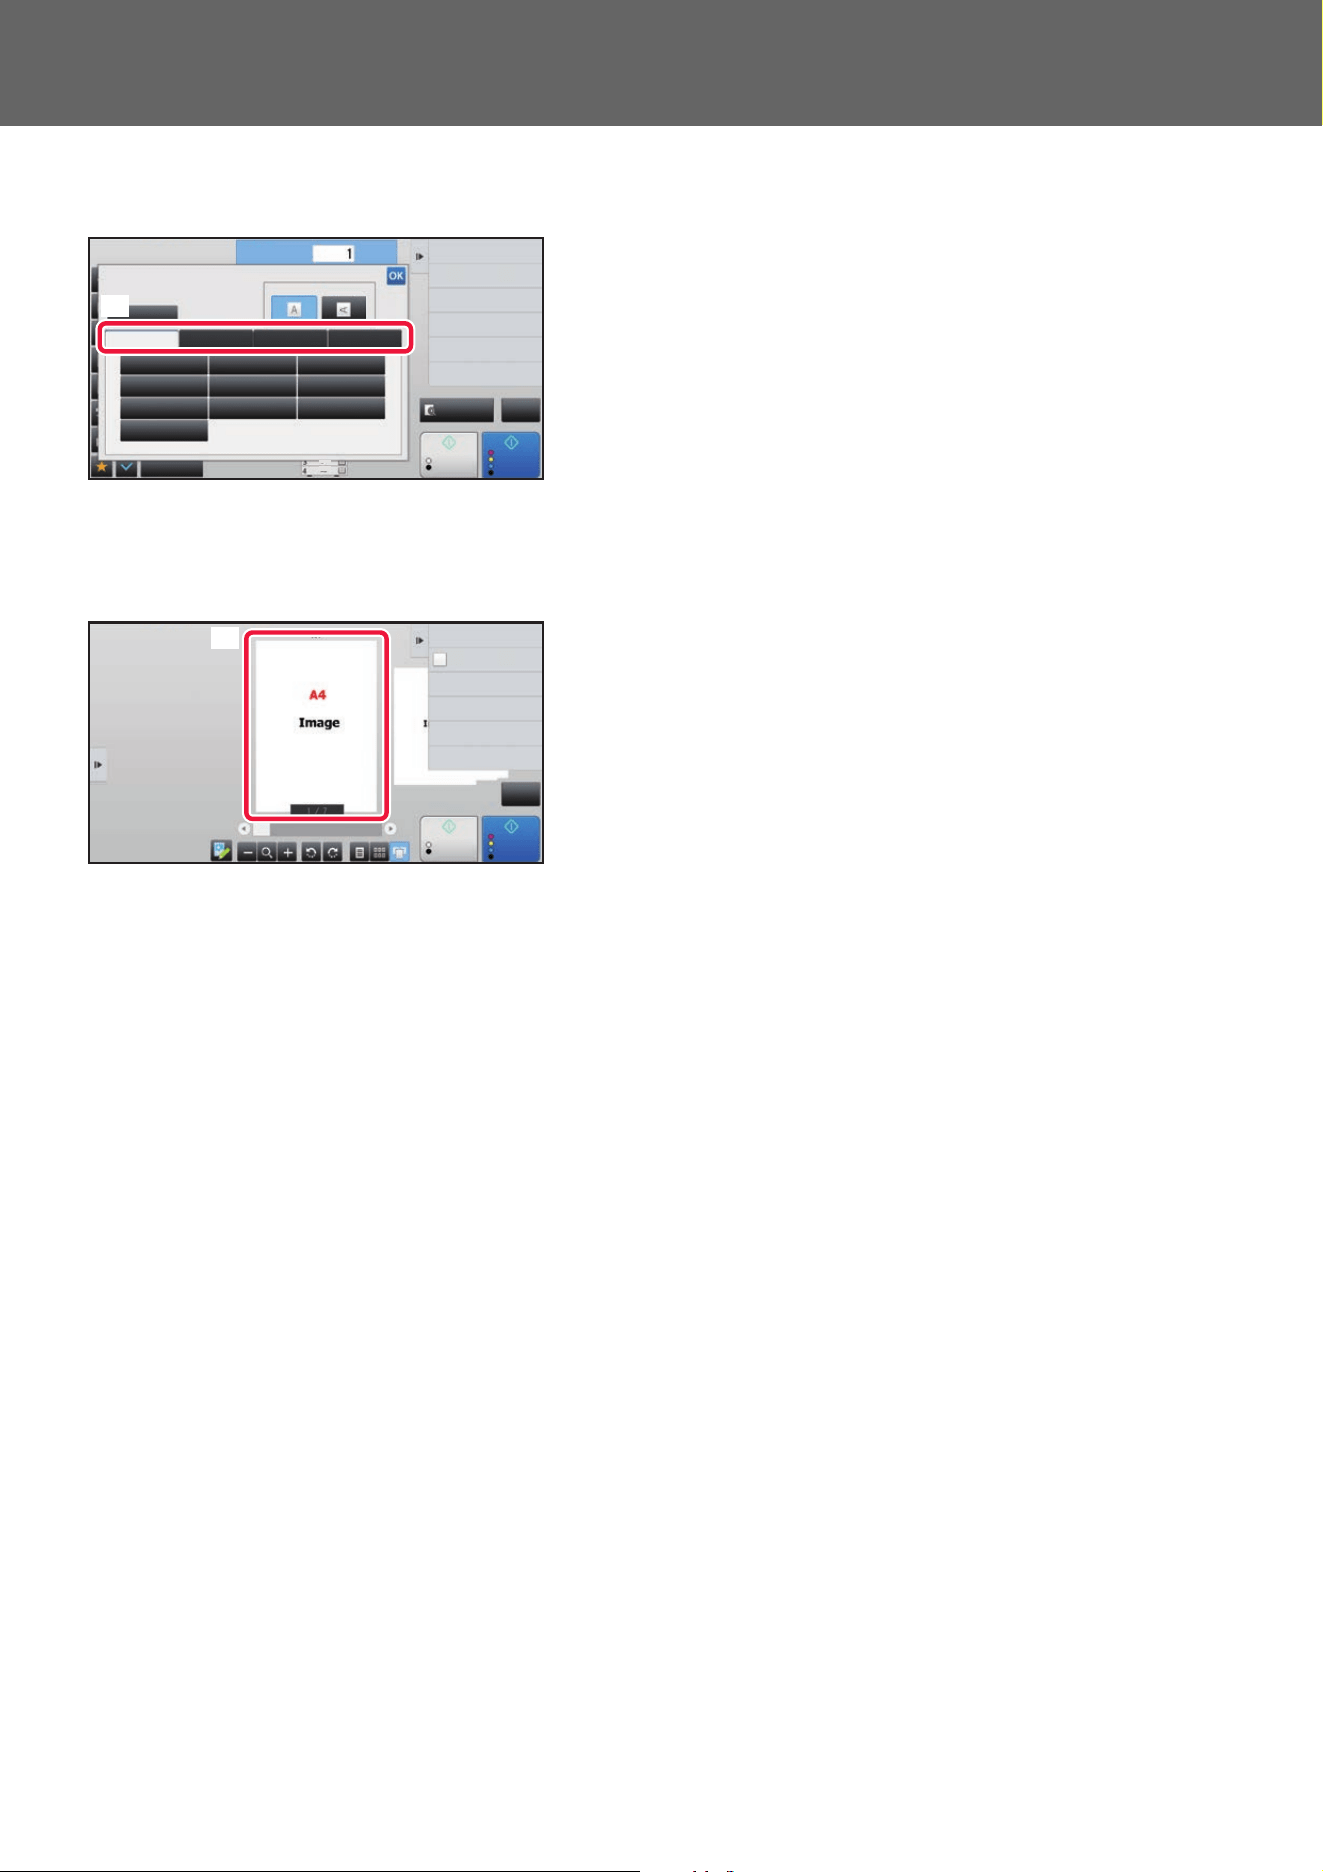
Preview screen (Double tapping/ Pinch/ Spread)
A. When a preview screen is "pinched", the screen image is reduced. When "spread", the image is enlarged.
When "Double tapping", the image is also enlarged.
Preview
Start
CA
Original
Others
Auto
Direct EntryInchAB Custom Size
Image Orientation
No. of copies
Skip Blank Page in Original
Copy Ratio
Enlarge/Reduce Copy
Blank Page Skip
Background Adjustment
2-Sided Copy
Color Mode
A3
A5
216 x 343
B5R B4
A5R A4 A3
B5 A4R 216 x 340
Color
Start
B/W
(A)
Start
Send and Print
Scan Original Again
Without change Settings
Store Data in Folder
File
Store Data Temporarily
Quick File
Start
CA
B/W Color
(A)
7
Touch Panel Operation
TAP OPERATION SETTINGS
You can configure settings for tap operation on the touch panel in “Settings (administrator)” – [System Settings] →
[Common Settings] → [Operation Settings] → [Condition Settings] → [Key Operation Setting].
Key Operation Setting
Auto Clear Setting
The time until Auto Clear activates can be set to any number of seconds from 10 to 240 in increments of 10 seconds.
If the machine is not used for the duration of time set here, the auto clear function will clear any settings that have been
selected and return the screen to the base screen of copy mode or the job status screen.
Cancel Timer
This is used to disable the auto clear function.
Key Operation Setting
• Time for Accepting Key Entry
This setting determines how long a key in the touch panel must be tapped until the key input is registered. The time
can be set from 0 to 2 seconds in increments of 0.5 seconds.
By lengthening the time setting, key input can be prevented when a key is tapped accidentally. Keep in mind,
however, that when a longer setting is selected more care is required when tapping keys to ensure that key input is
registered.
• Disable Auto Key Repeat
This is used to disable key repeat.
Key repeat causes a setting to change continuously not only each time the key is tapped but while a key is tapped.
Time for Accepting Key Entry of Long Touch
Select a time when a long key touch is detected.
Double Tap Interval Setting
Select an interval when a double tap is detected.
Keys Touch Sound
You can configure settings for keys touch sound in "Settings (administrator)" – [System Settings] → [Common Settings]
→ [Sound Settings] → [Beep Sound Settings (Common)].
Keys Touch Sound
Controls the key touch sound level, or turns the sound off.
Make Key Touch Sound at Default Setting
When you specify the exposure in the exposure adjustment screen of each mode, a bleep sounds three times when the
reference value is reached.
Screen in which setting is effective Initial value
Ratio setting screen in base screen of copy mode Ratio 100%
Exposure setting screen in base screen of copy mode
Exposure level: 3 (medium)
Exposure adjustment screen in base screen of fax, Internet fax, and network scanner
modes
Exposure adjustment screen for Scan to Local Drive in document filing mode
8
Touch Panel Operation
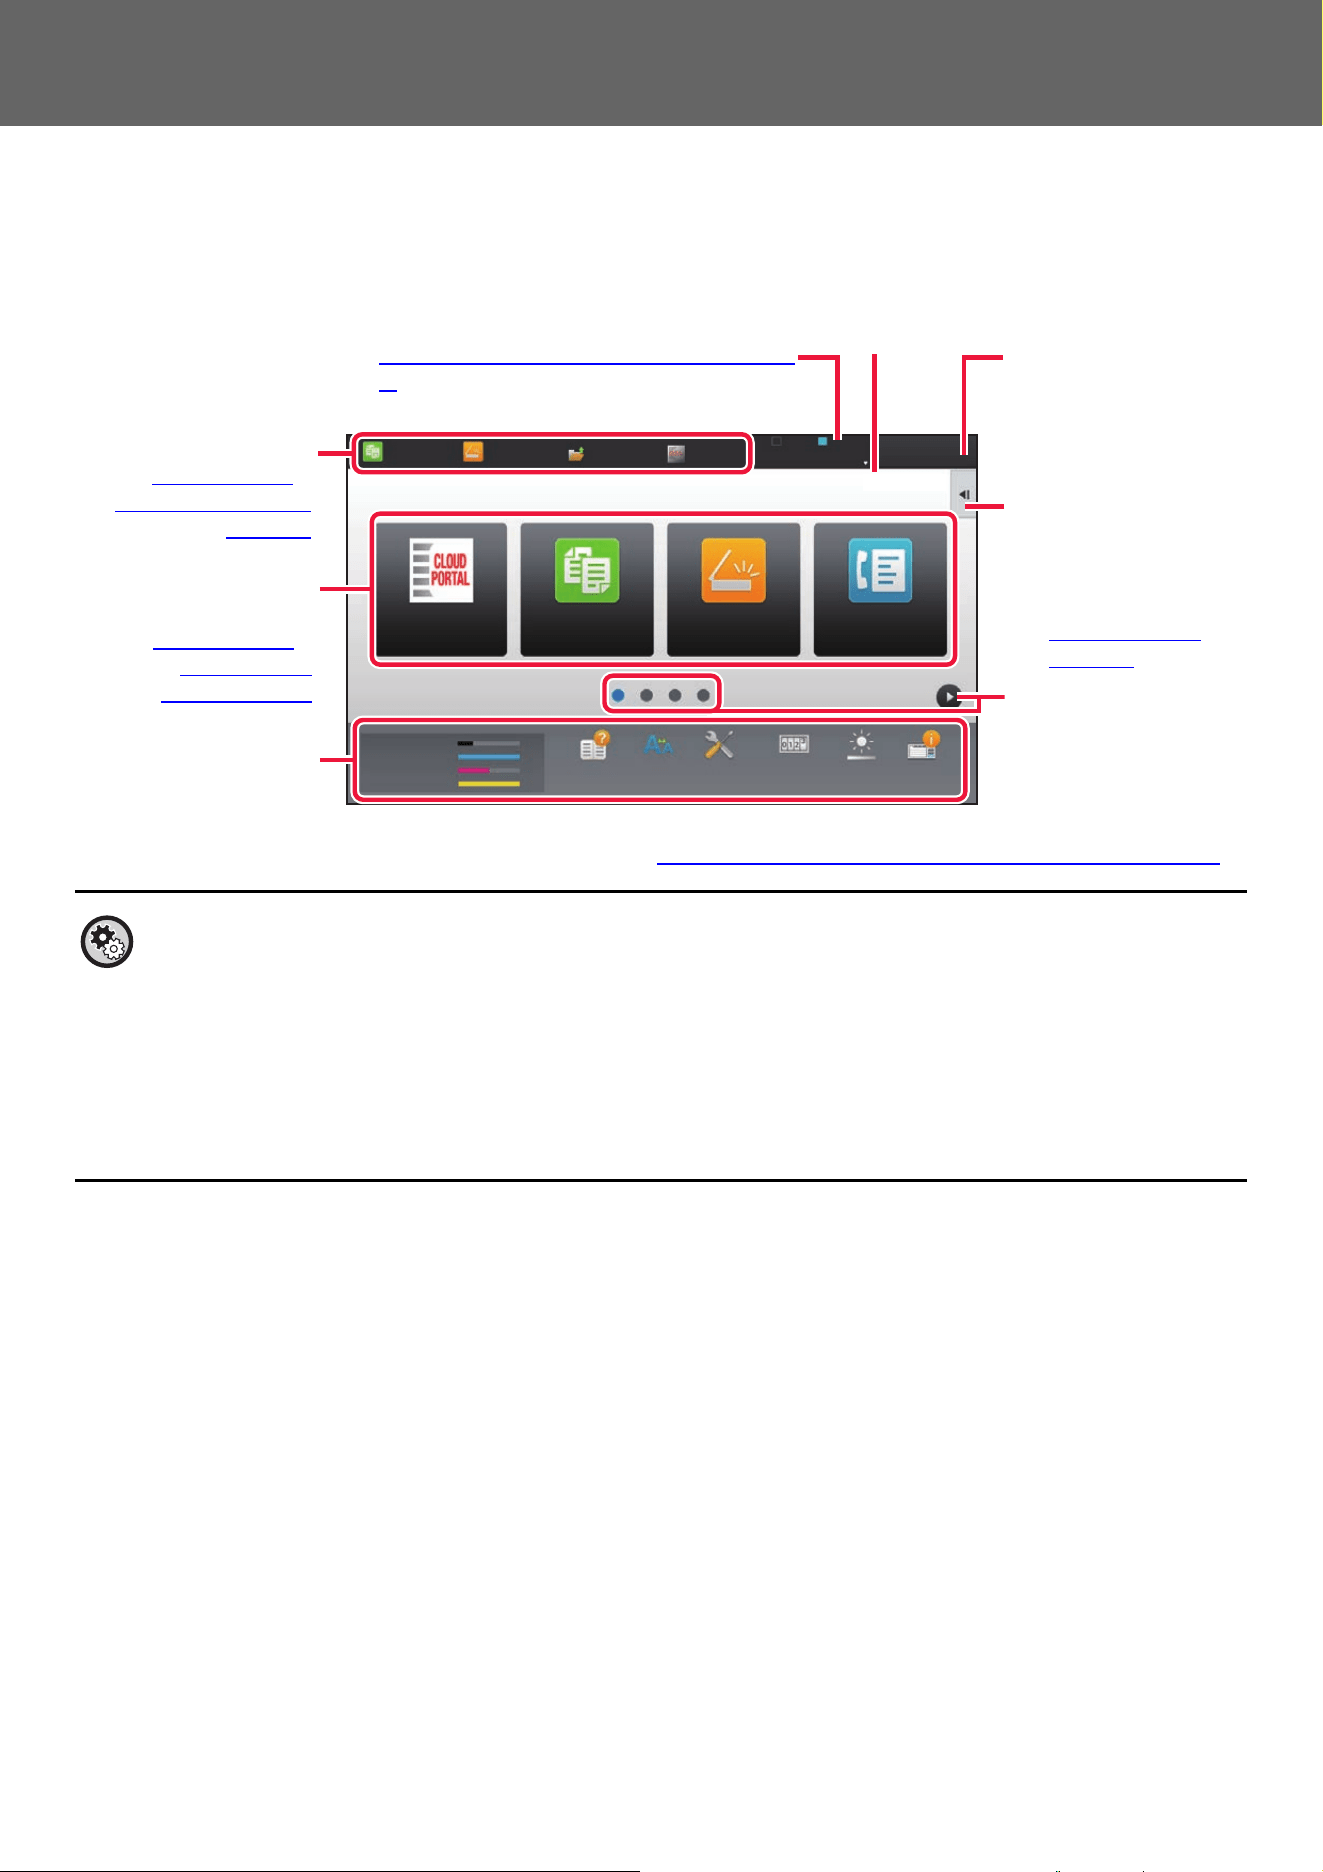
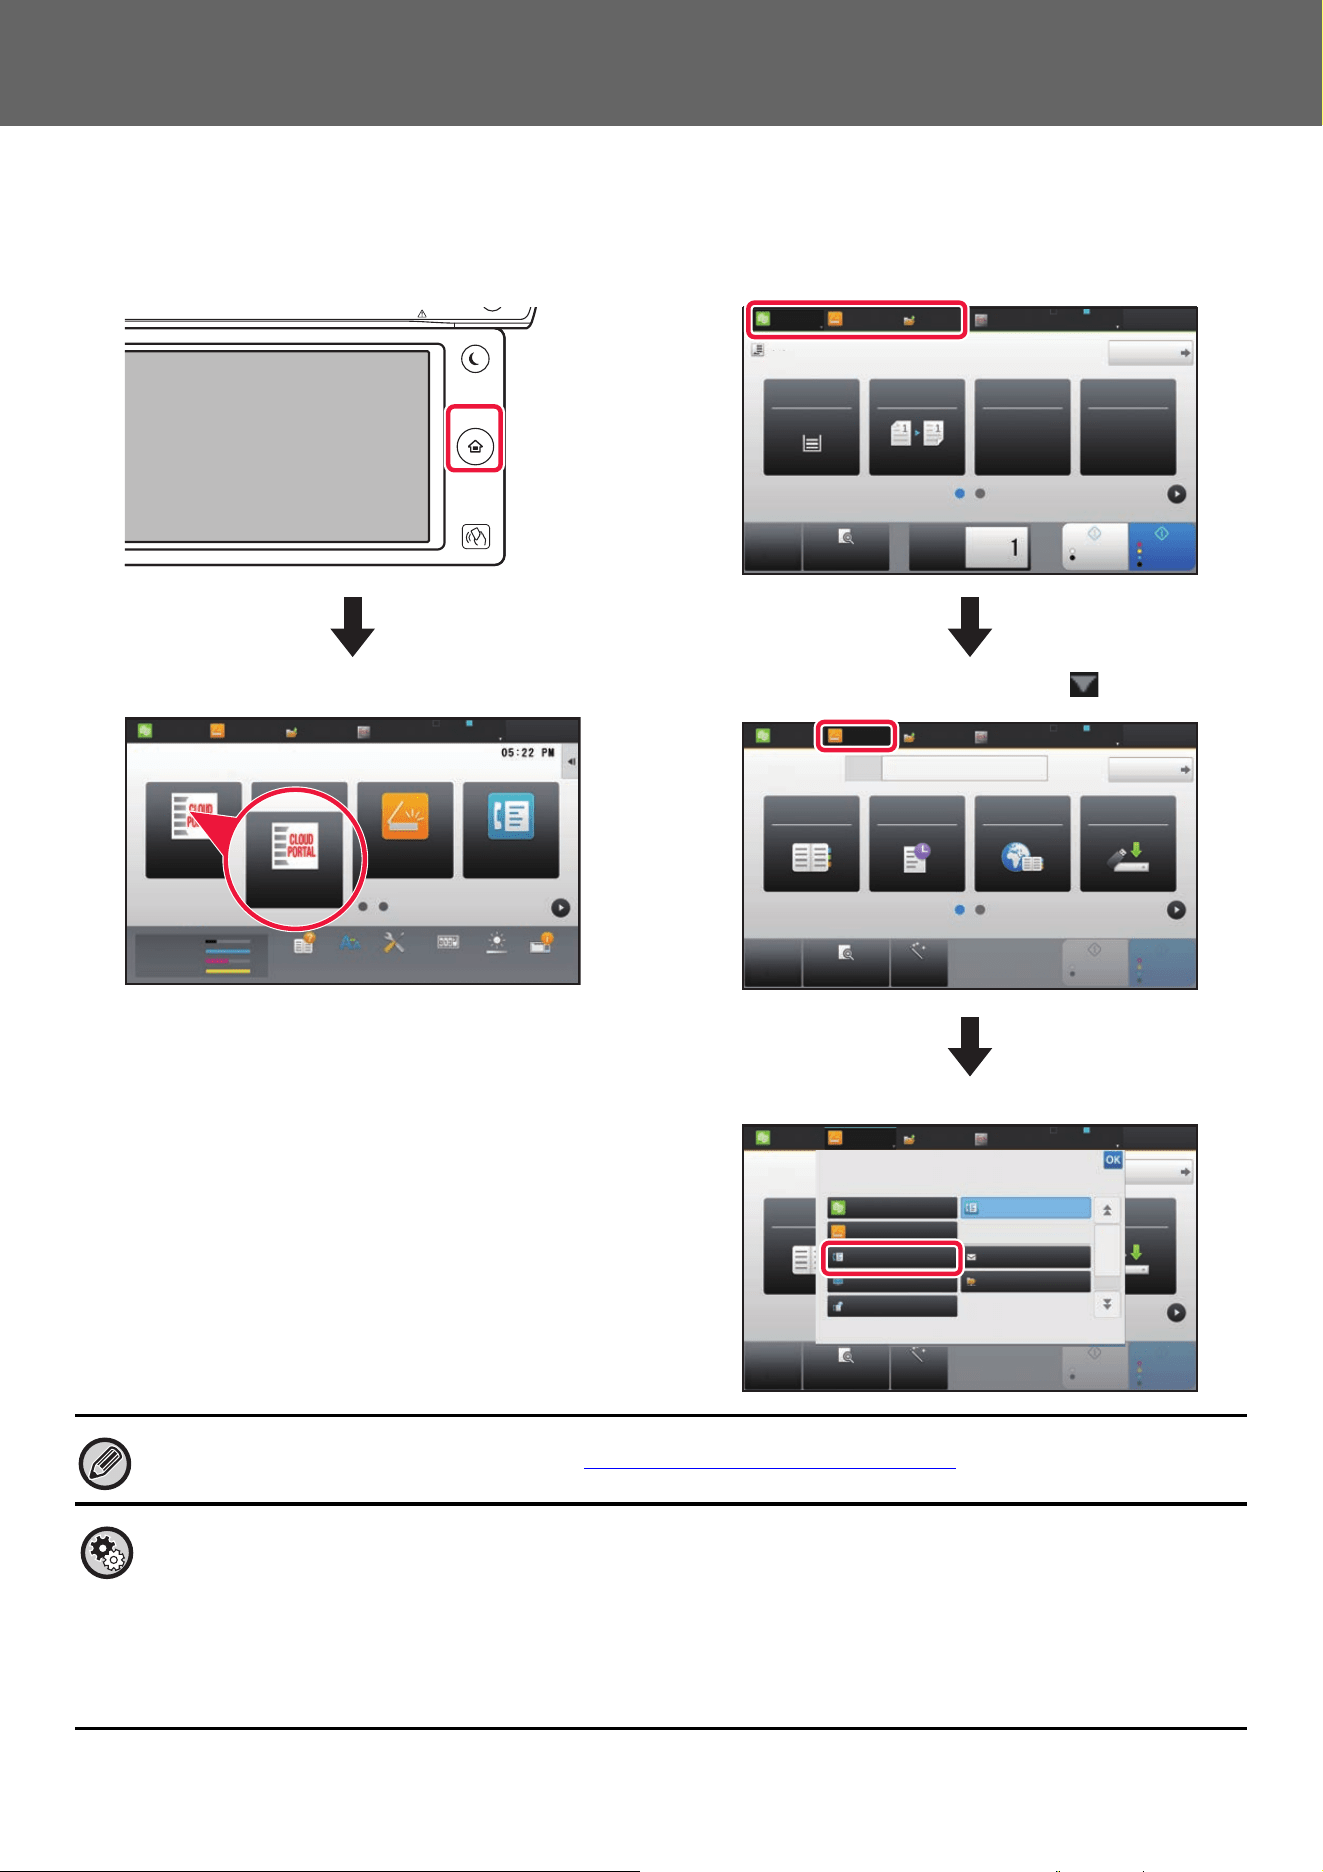
HOME SCREEN
Pressing the [Home Screen] key on the operation panel displays the home screen on the touch panel. The home screen
displays the keys for selecting modes or functions.
For procedures for adding and deleting shortcut keys, see "General procedure when using the touch panel
(page 29)".
• To set the home screen for each "Favorite Operation Group List":
In "Settings (administrator)", select [User Control] → [Access Control Settings] → [Favorite Operation Group] → [Home
Screen List].
Perform this setting when user authentication is used.
• To display the External Service Connect shortcut keys:
You can add shortcut keys for the External Service Connect functions (Google Drive, OneDrive, SharePoint Online, Gmail,
Exchange (E-Mail)) to the home screen.
These functions can be enabled in the system settings. When a function is enabled in the system settings, you can add a
shortcut key for that function to the home screen.
For details, refer to the "Cloud Connect Guide".
Toner Quantity
M
C
Bk
Y
Easy
Copy
Easy
Fax
Easy
Scan
10:15 AM
Operation
Guide
Enlarge
Display Mode
Settings Total Count LCD Control
Easy
Copy
Easy
Scan
File Retrieve
Sharp OSA
LINE PRINTER
Job Status
Job Status
CLOUD PORTAL
Tap a mode to change to
that mode.
►Chan
ging mode
from the mode display
(page 11)
Select shortcut keys for
modes or functions.
►Chan
ging mode
from the Home
screen (page 11)
Use these keys to select
functions that make the
machine easier to use.
Displays the machine's status other than the job
using icons.
► Icon
indicating the status of the machine (page
9)
Displays the job in
progress or waiting with
text or icon.
Select functions that can
be utilized in respective
modes.
Tap the tab, and the list of
function keys is
displayed.
► ACTION PANEL
(page 13)
Switch the pages for
displaying shortcut keys.
Displays the time.
9
Touch Panel Operation
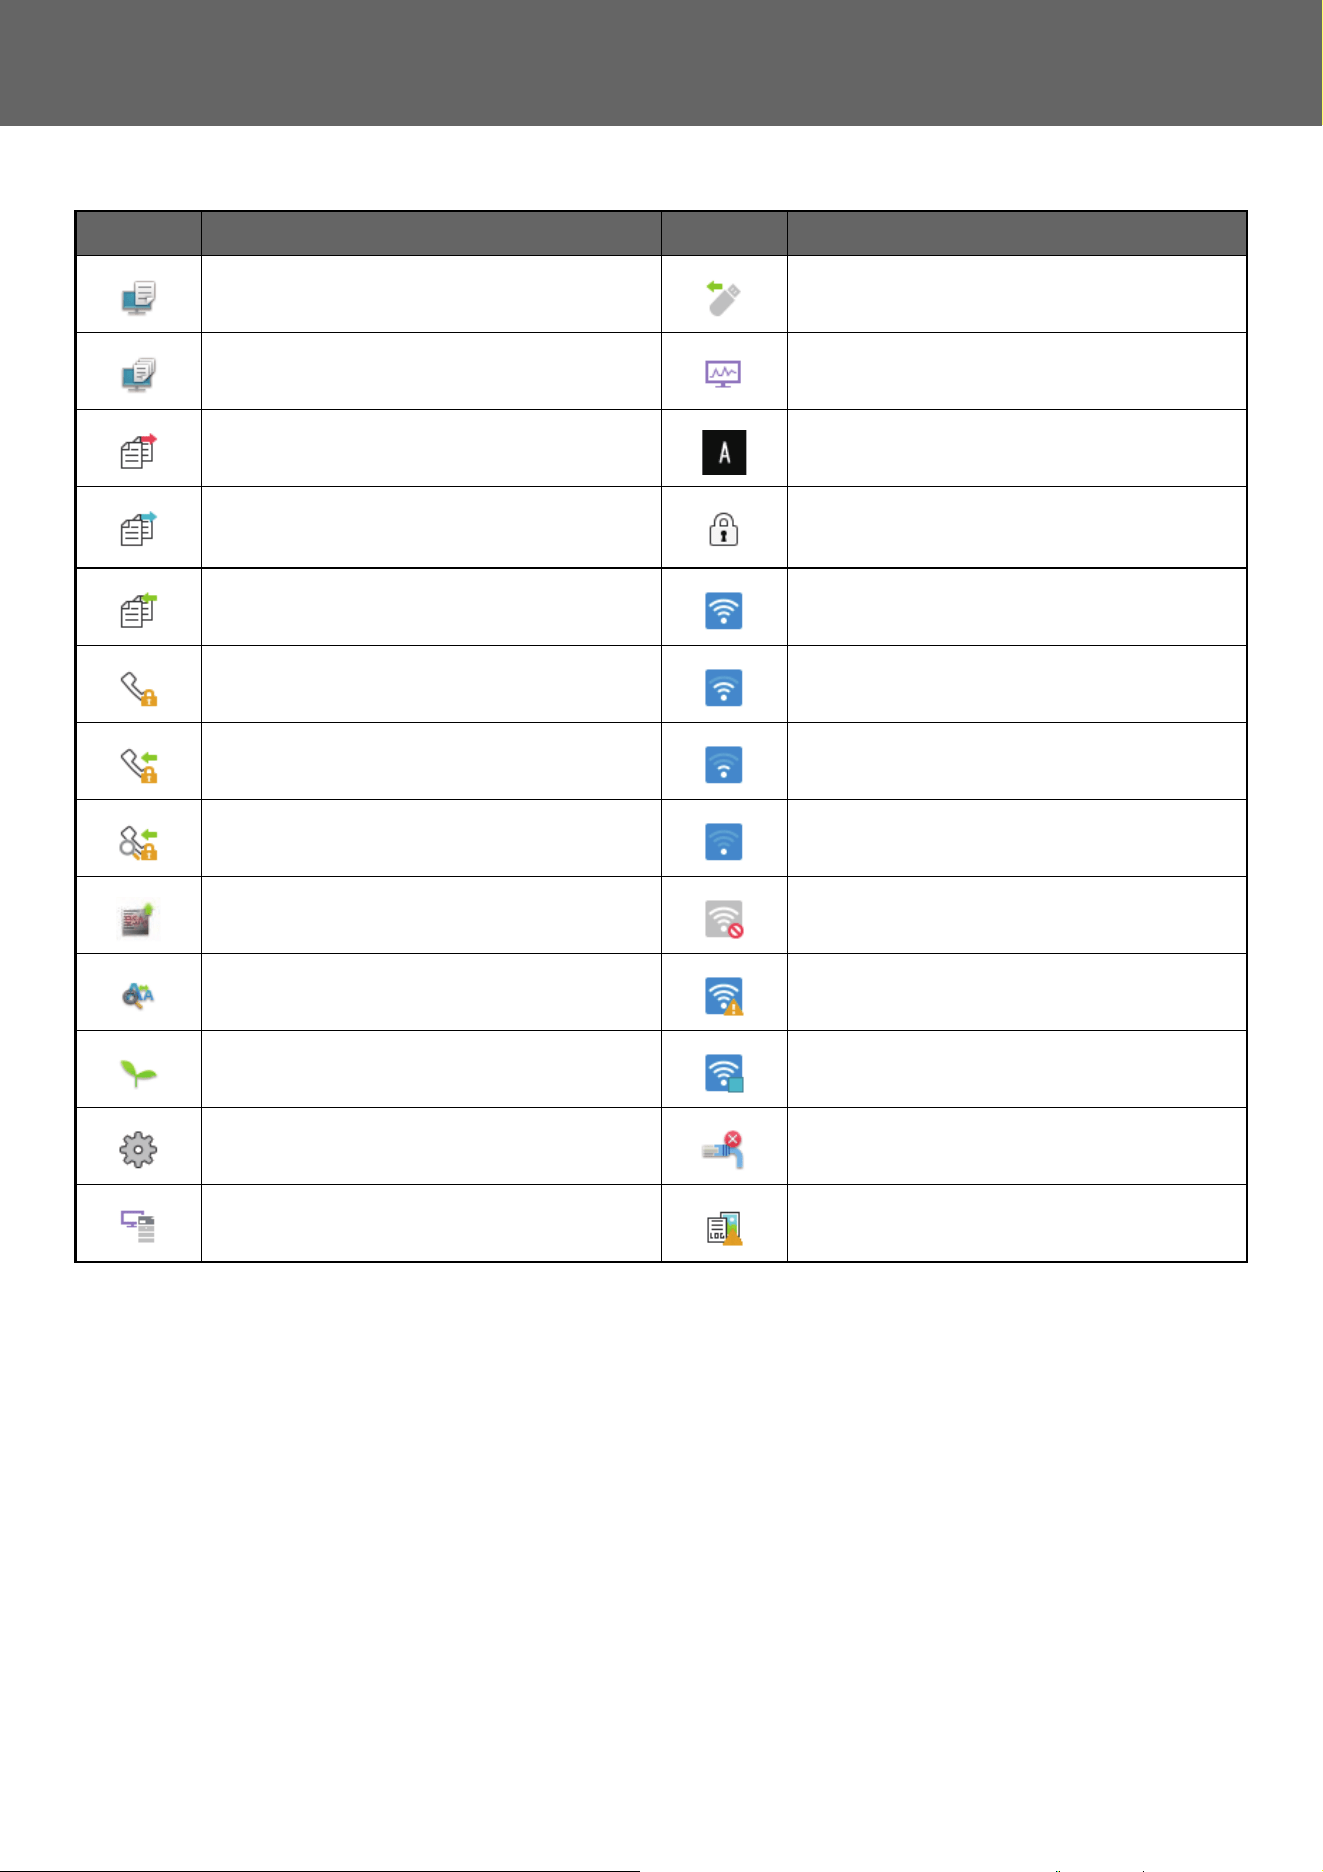
Icon indicating the status of the machine
* Contact your dealer or nearest authorized service representative.
Icon Machine status Icon Machine status
Printer data is being processed. A USB device is installed.
Printer data is being printed. The field support system is enabled.
Send data exists. Single-byte alphanumeric character entry
Forward error data exists. A data security kit is installed.
Received data exists. Connecting to the access point (Level 4)
Received confidential fax data exists. Connecting to the access point (Level 3)
Received data is held. Connecting to the access point (Level 2)
Received preview data exists. Connecting to the access point (Level 1)
OSA communication is in progress. Not connected to the access point
Enlarge display mode is enabled. Bad connection of the wireless LAN device in
the machine
*
Eco mode is enabled. Waiting for the access point
A maintenance notification is issued. A LAN cable is not connected.
Remote operation is in progress. Image job log file persistence status
10
Touch Panel Operation
Screen Display Settings
You can configure settings for tap operation on the touch panel in “Settings (administrator)” – [System Settings] →
[Common Settings] → [Operation Settings] → [Condition Settings] → [Screen Display Settings].
Enlarge Display Mode
Displays large characters on the screen.
appears in the system area when Large Character Mode is enabled.
Message Time Setting
The duration of time that messages appear in the touch panel (the time until a message is automatically cleared) can be
set to any number of seconds from 1 to 12.
Language Setting
The language that appears in the touch panel can be changed to any language.
Default Display Setting
Set the screen that appears after auto clear and login.
Display Favorite Menus as Default
You can specify to display the "Favorite" first during mode selection.
Display Action Panel as default.
Specify whether or not to display with the action panel on the screen.
Icon is displayed when LAN cable is not connected.
Show an icon when a LAN cable is not connected.
Display Confirmation Dialog when job is canceled.
Show a confirmation dialog box when a job is canceled.
Display Status Notification Message
Set whether to display a notification message when a job is completed.
Restrict Total Count display
When this setting is enabled, the total count is hidden when checking the total count from the home screen.
Switch the Number of Sets to be Displayed for Job Status
Set whether the remaining number of sets or the final number of sets is shown in the job status.
Display the estimated job start time
Specify whether or not to display the estimated start time of the job in the job status.
Alignment Order of 10-Key
Set whether the numeric keys are arranged in ascending order with "1" in the upper left corner, or "1" in the lower left corner.
Setting Display from Main Unit
Select settings for the path information of the setting destination displayed when setting mode is set on the machine.
Display Current Path
Set whether or not the current setting items are shown in the path information.
Enable link of current path
Set whether the link at the top is enabled.
MFP Display Pattern Setting
Set the background color of the touch panel. Each time you change patterns, the touch panel image at the bottom of the screen changes.
When user authentication is enabled and a display language is specified in the favorite operation group, that setting is given
priority.
11
Touch Panel Operation
CHANGING MODES
Changing mode from the Home screen
Changing mode from the mode display
Toner Quantity
M
C
Bk
Y
Operation
Guide
Enlarge
Display Mode
Settings Total Count LCD Control Job Status
LINE PRINTER
Easy
Copy
Easy
Scan
File Retrieve
Sharp OSA
Job Status
Easy
Fax
Easy
Scan
CLOUD PORTAL
CLOUD PORTAL
Press the [Home Screen] key.
Tap the mode icon.
CA
Preview
Copies
Start
Color
Start
Original
8½x11
Paper
Select
Tray 1 1 → 1
2-Sided Copy Copy Ratio Staple / Punch
100% Off
Detail
LINE PRINTER
Easy
Copy
Easy
Scan
File Retrieve
Sharp OSA
Job Status
B/W
8½x11
CA
Preview Auto Set
Original
Address Fax Number
Address Book History
Global
Address Search
Scan to USB/
Local Drive
Detail
LINE PRINTER
Easy
Copy
Easy
Scan
File Retrieve
Sharp OSA
Job Status
Start
Color
Start
B/W
8½x11
Tap on the mode display.
CA
Preview Auto Set
Original
Address Fax Number
Detail
LINE PRINTER
Easy
Copy
Easy
Scan
File Retrieve
Sharp OSA
Job Status
Start
Color
Start
Address Book
Scan to USB/
Local Drive
8½x11
Select the mode.
Network Folder
Easy Fax
Easy Scan
Easy Copy
Fax E-Mail
FTP/Desktop
Internet Fax
B/W
Tap the key that shows .
Tap for any mode desired.
For procedures for editing the home screen, see "EDITING THE HOME SCREEN (page 46)".
• Mode Key Display Setting
In "Settings (administrator)", select [System Settings] → [Common Settings] → [Operation Settings] → [Mode Key Display
Setting].
Configure settings for the display of mode keys at the top of the screen.
• Modes to Display
Select the mode keys that you want to display.
• Display Mode Keys on Home
You can enable display of the mode keys in the home screen as well.
12
Touch Panel Operation
OPERATION OF FREQUENTLY USED KEYS
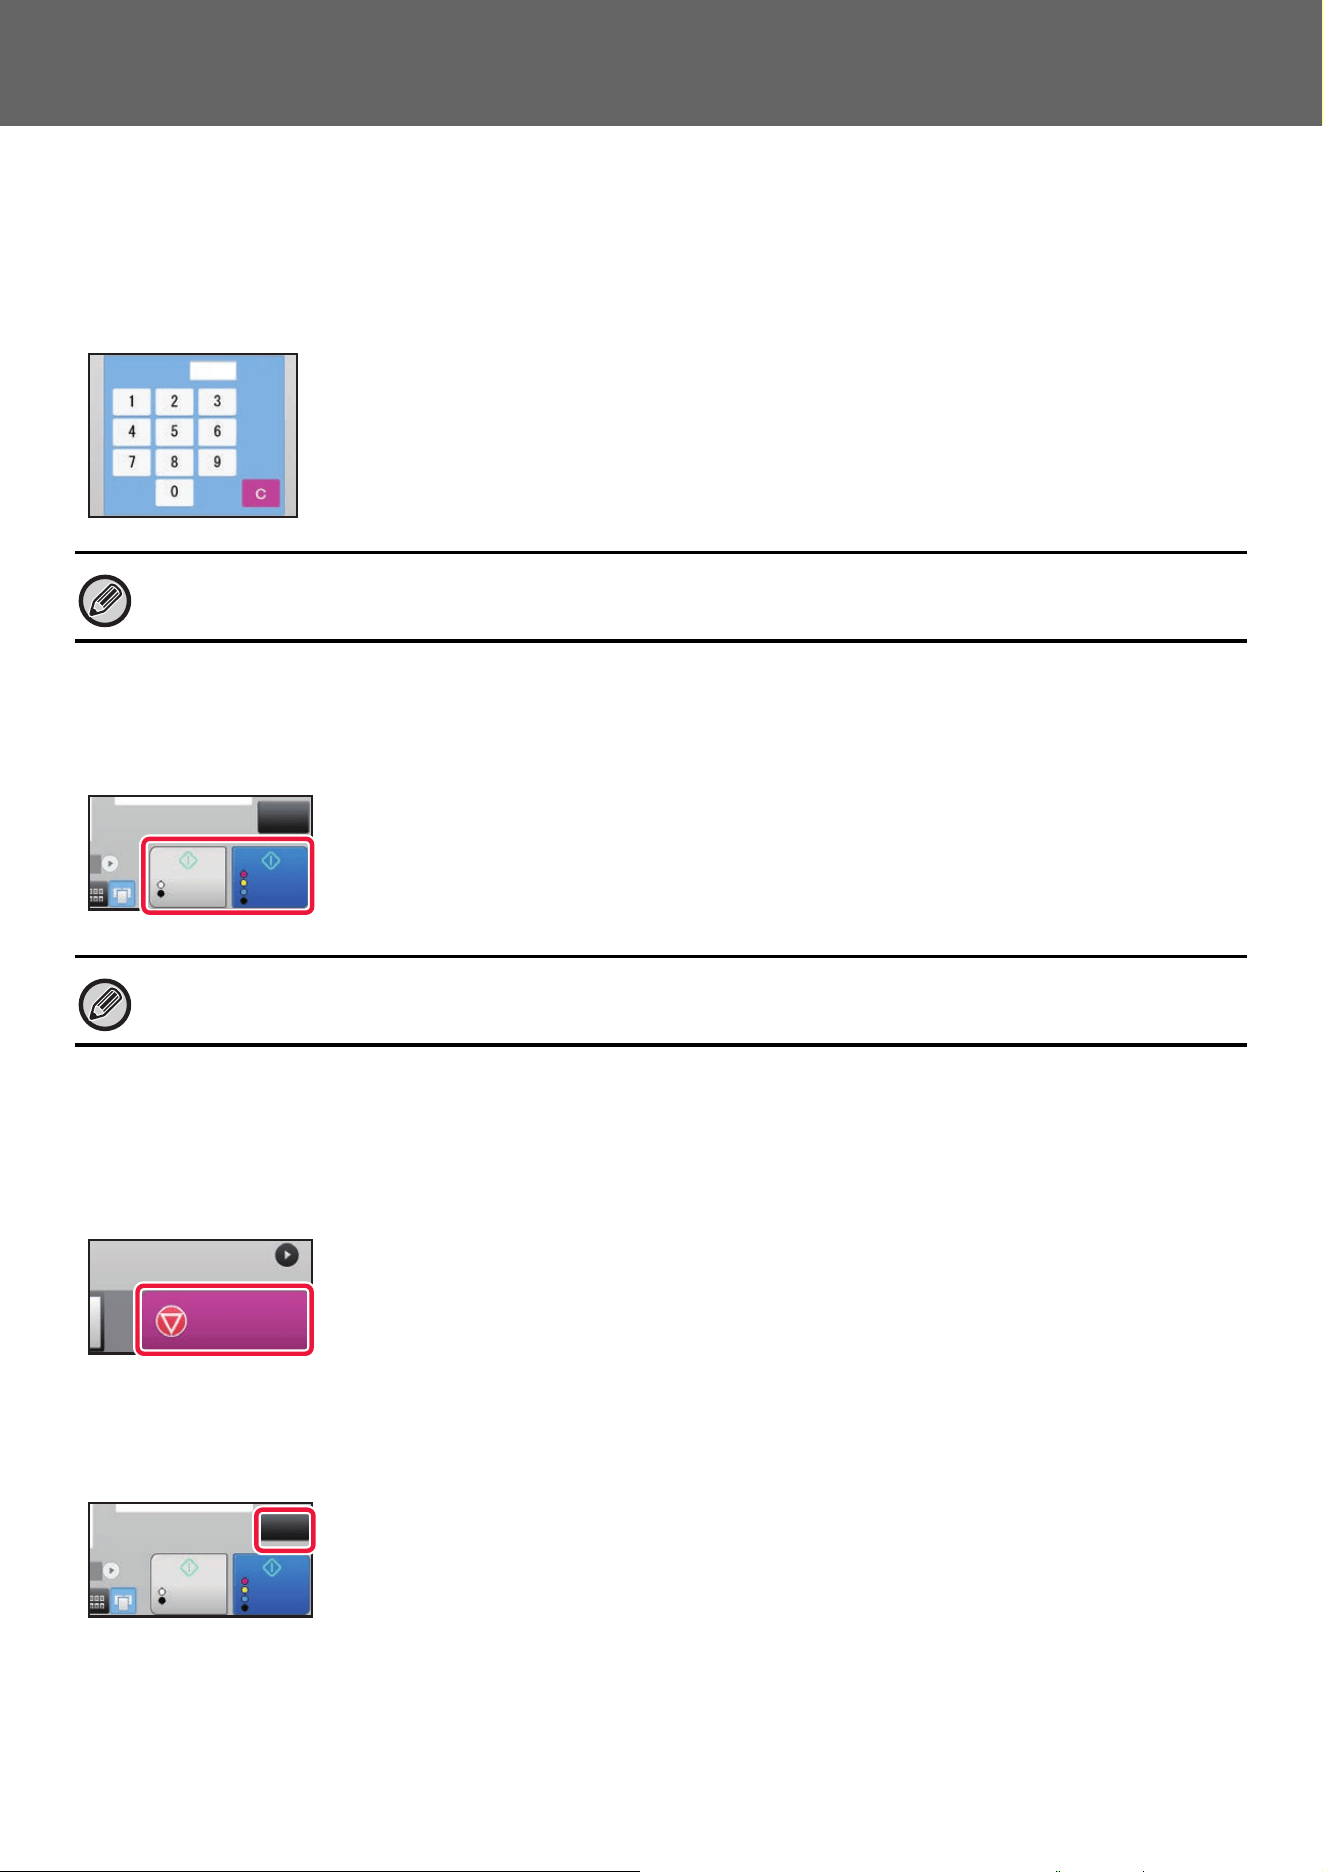
Numeric keys
Tap a number to enter it.
To clear the entered number, tap the [C] key.
[Start] key ([B/W Start] key and [Color Start] key)
Tap to perform a print or send job.
[Cancel Copy] key, [Storing Canceled] key, [Cancel Scan] key, [Sending
Canceled] key
Tap to stop copying, printing, or transmission.
[CA] key
Tap to cancel all settings and restore the initial status in each mode.
On the address screen, you can enter characters other than numbers, and a different key layout is provided. You can also
move the cursor by using the [←] and [→] keys. Tap the [C] key to delete one character to the left of the cursor.
In copy mode, [B/W Start] and [Color Start] keys are displayed.
1
No. of copies
Start
Color
Start
CA
B/W
Cancel Copy
B/W
Start
Color
Start
CA
13
Touch Panel Operation
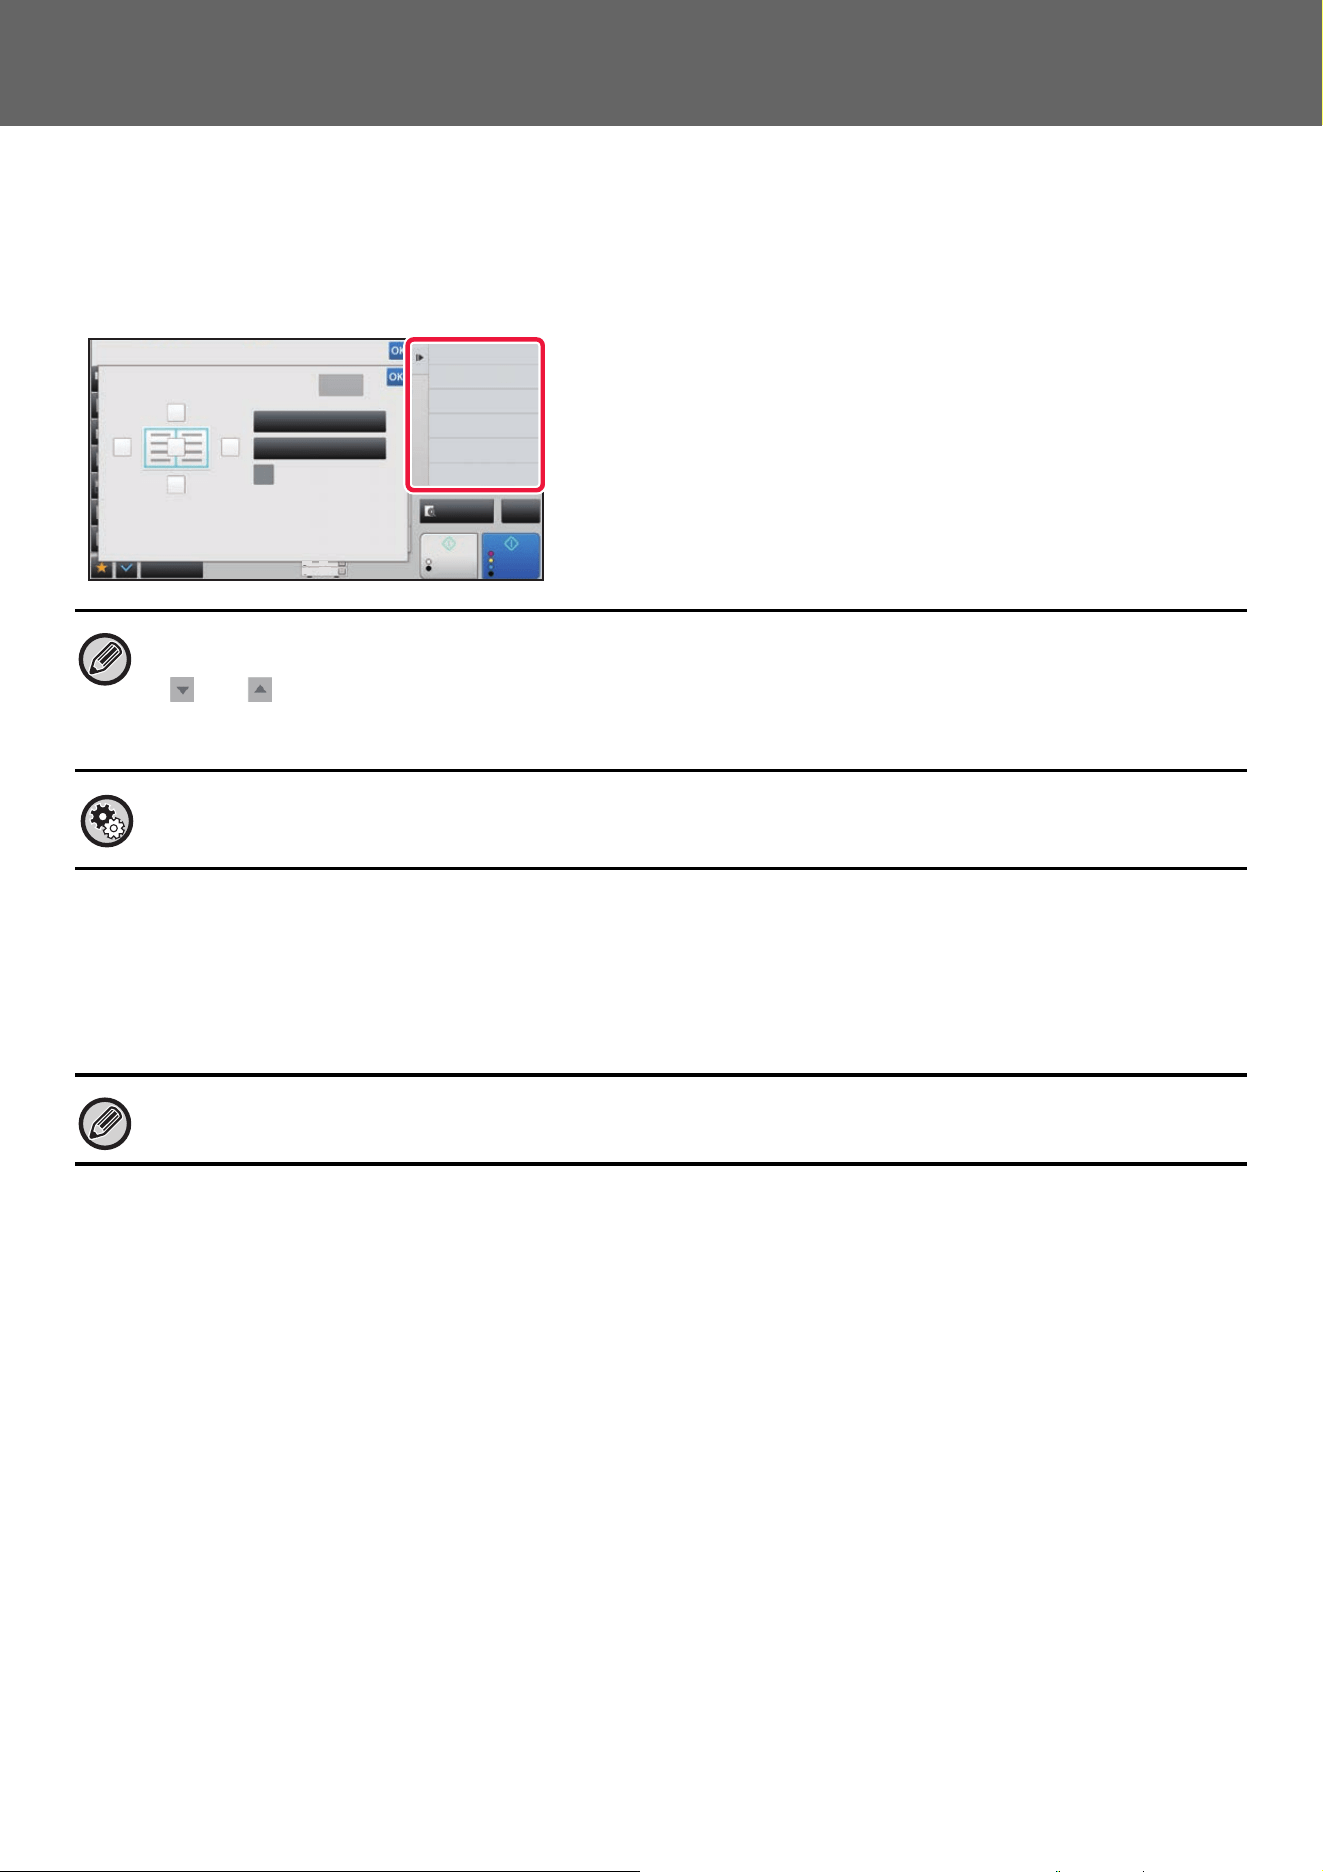
ACTION PANEL
Recommended functions are displayed on the action panel when you configure functions in each mode.
From the action panel, you can configure functions or combine the configured function with a function displayed on the
action panel.
If the action panel does not appear, tap the action panel tab.
CONFIRMATION SCREEN FOR FAVORITE MENUS AND
SETTINGS
When you register frequently used functions you have configured for copying or image sending in favorite, you can
quickly call them.
Favorite Key Setting
This setting can only be set on web pages.
In "Settings (administrator)", select [System Settings] → [Common Settings] → [Operation Settings] → [Favorite Key
Setting].
Set the information that appears when favorite keys are tapped in normal mode.
Click the Copy, Scan, Internet Fax, Fax, and Data Entry tabs to configure settings for the favorite key screens shown in
each of the normal modes.
Favorite Key Number
Sets the favorite key number.
The items appear will appear in order on the screen starting from the item that is set in No. 1.
Key Name
Enter a maximum of 20 characters for the favorite key name.
Function Menu
To set functions such as "Other Functions", select the functions from the pull-down menu.
Job Programs
To set a program, select one of the preset programs from the program list.
Not Display
You can hide a set key in the favorite key screen.
• The functions displayed on the action panel vary depending on the mode or the functions that have been configured.
• If too many functions have been configured to be displayed on the action panel, you can slide the panel vertically or tap
and to view all.
• In enlarge display mode, part of the text on the action panel may not be displayed. To display the whole text, long-touch
the partially hidden key or slide the tab of the action panel to the left.
To always display the action panel
In "Settings (administrator)", select [System Settings] → [Common Settings] → [Operation Settings] → [Condition Settings]
→ [Display Action Panel as default.].
Favorite can be used in normal mode.
Start
Color
Start
Preview
Others
Copy Like A Pamphlet
Booklet
Change Size/Direction.
Original
2-Sided Copy
Color Mode
Background Adjustment
Others
Erase
Clear
Outer Frame
Specify Frame+Center
Reverse erase position of
back face
Up
Down
RightLeft
CA
B/W
4 11x17
14
Touch Panel Operation
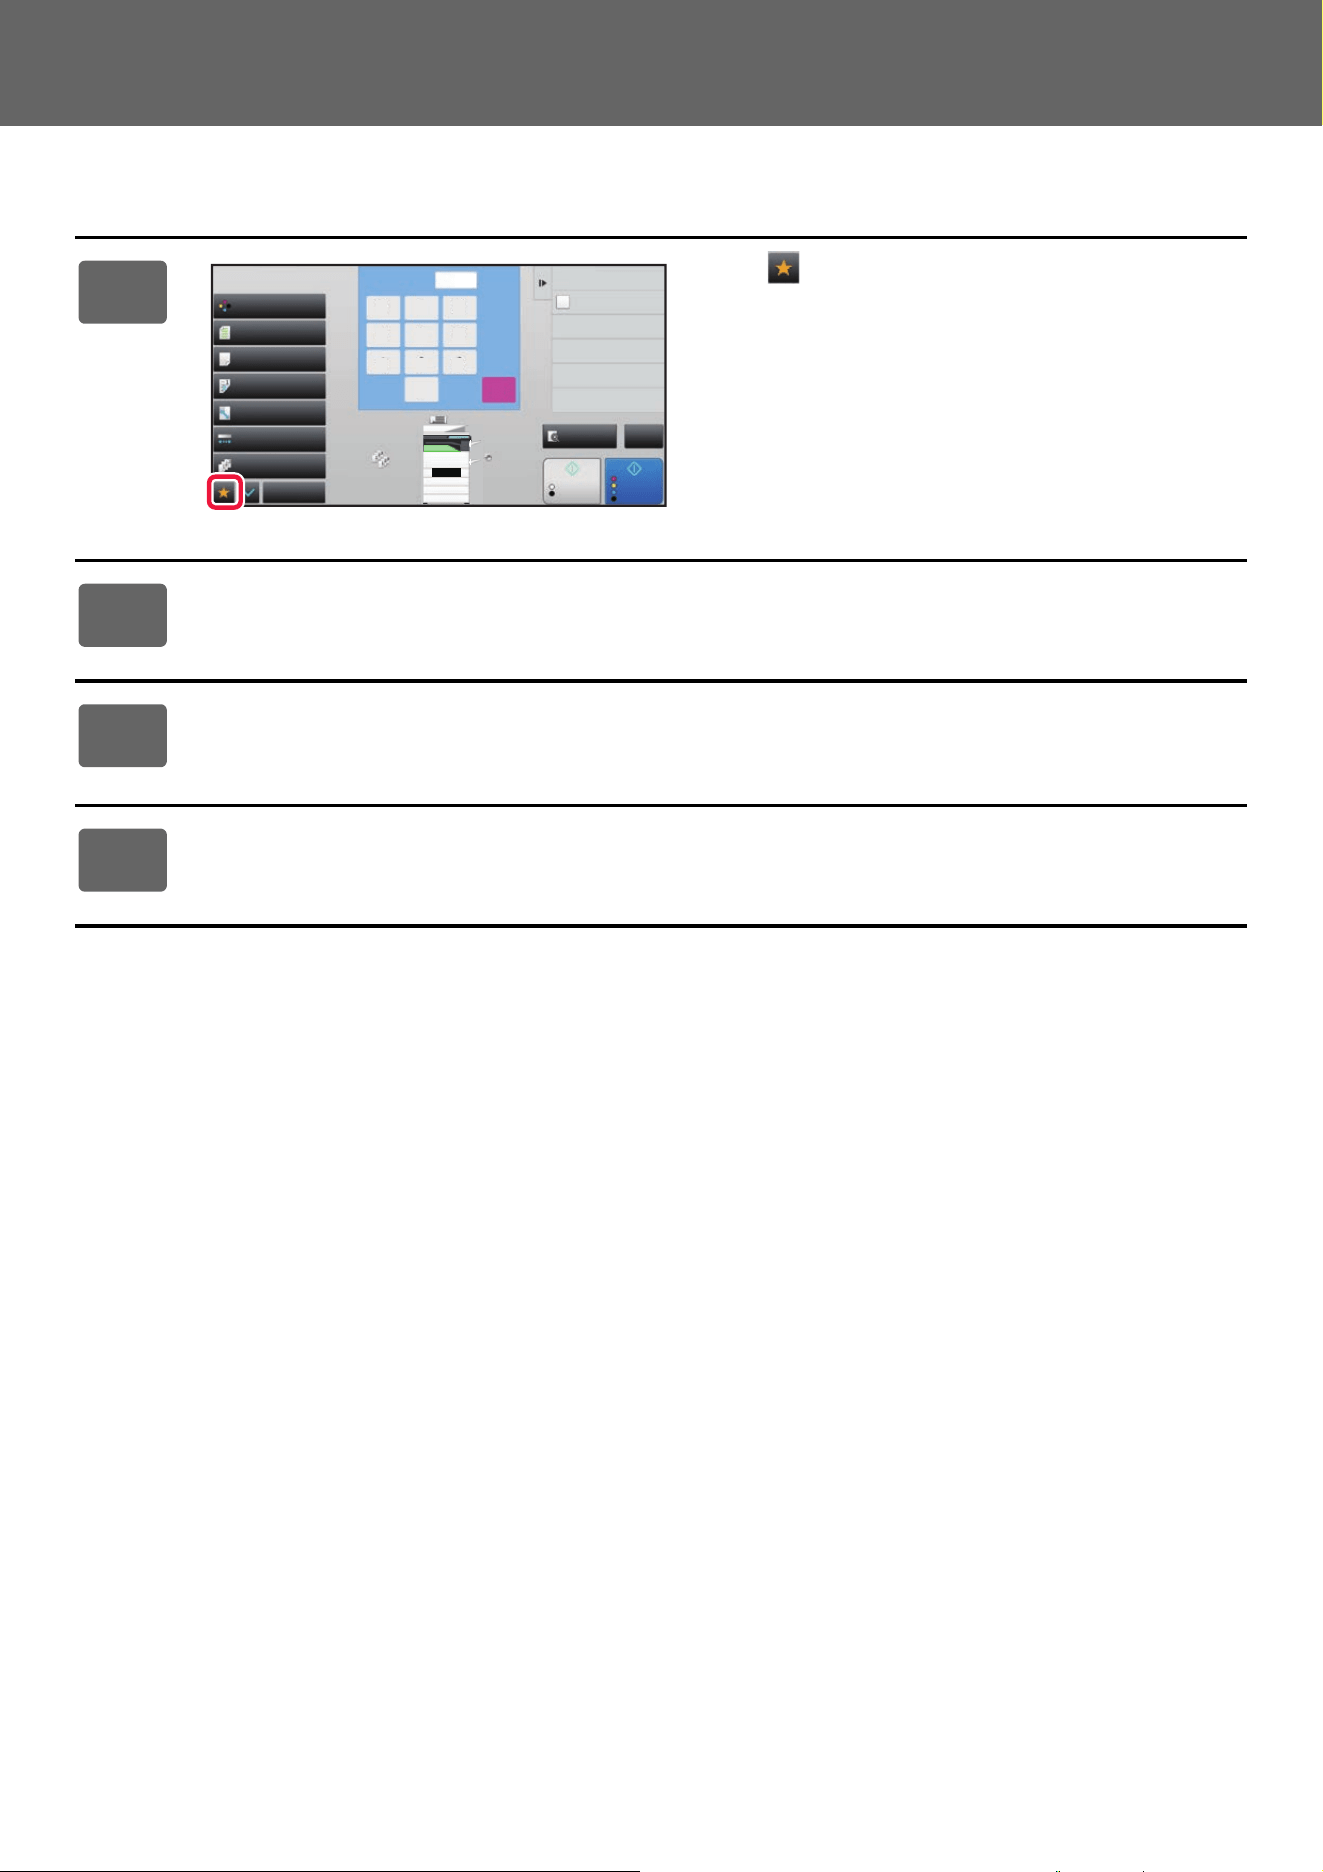
Registering a function in Favorite
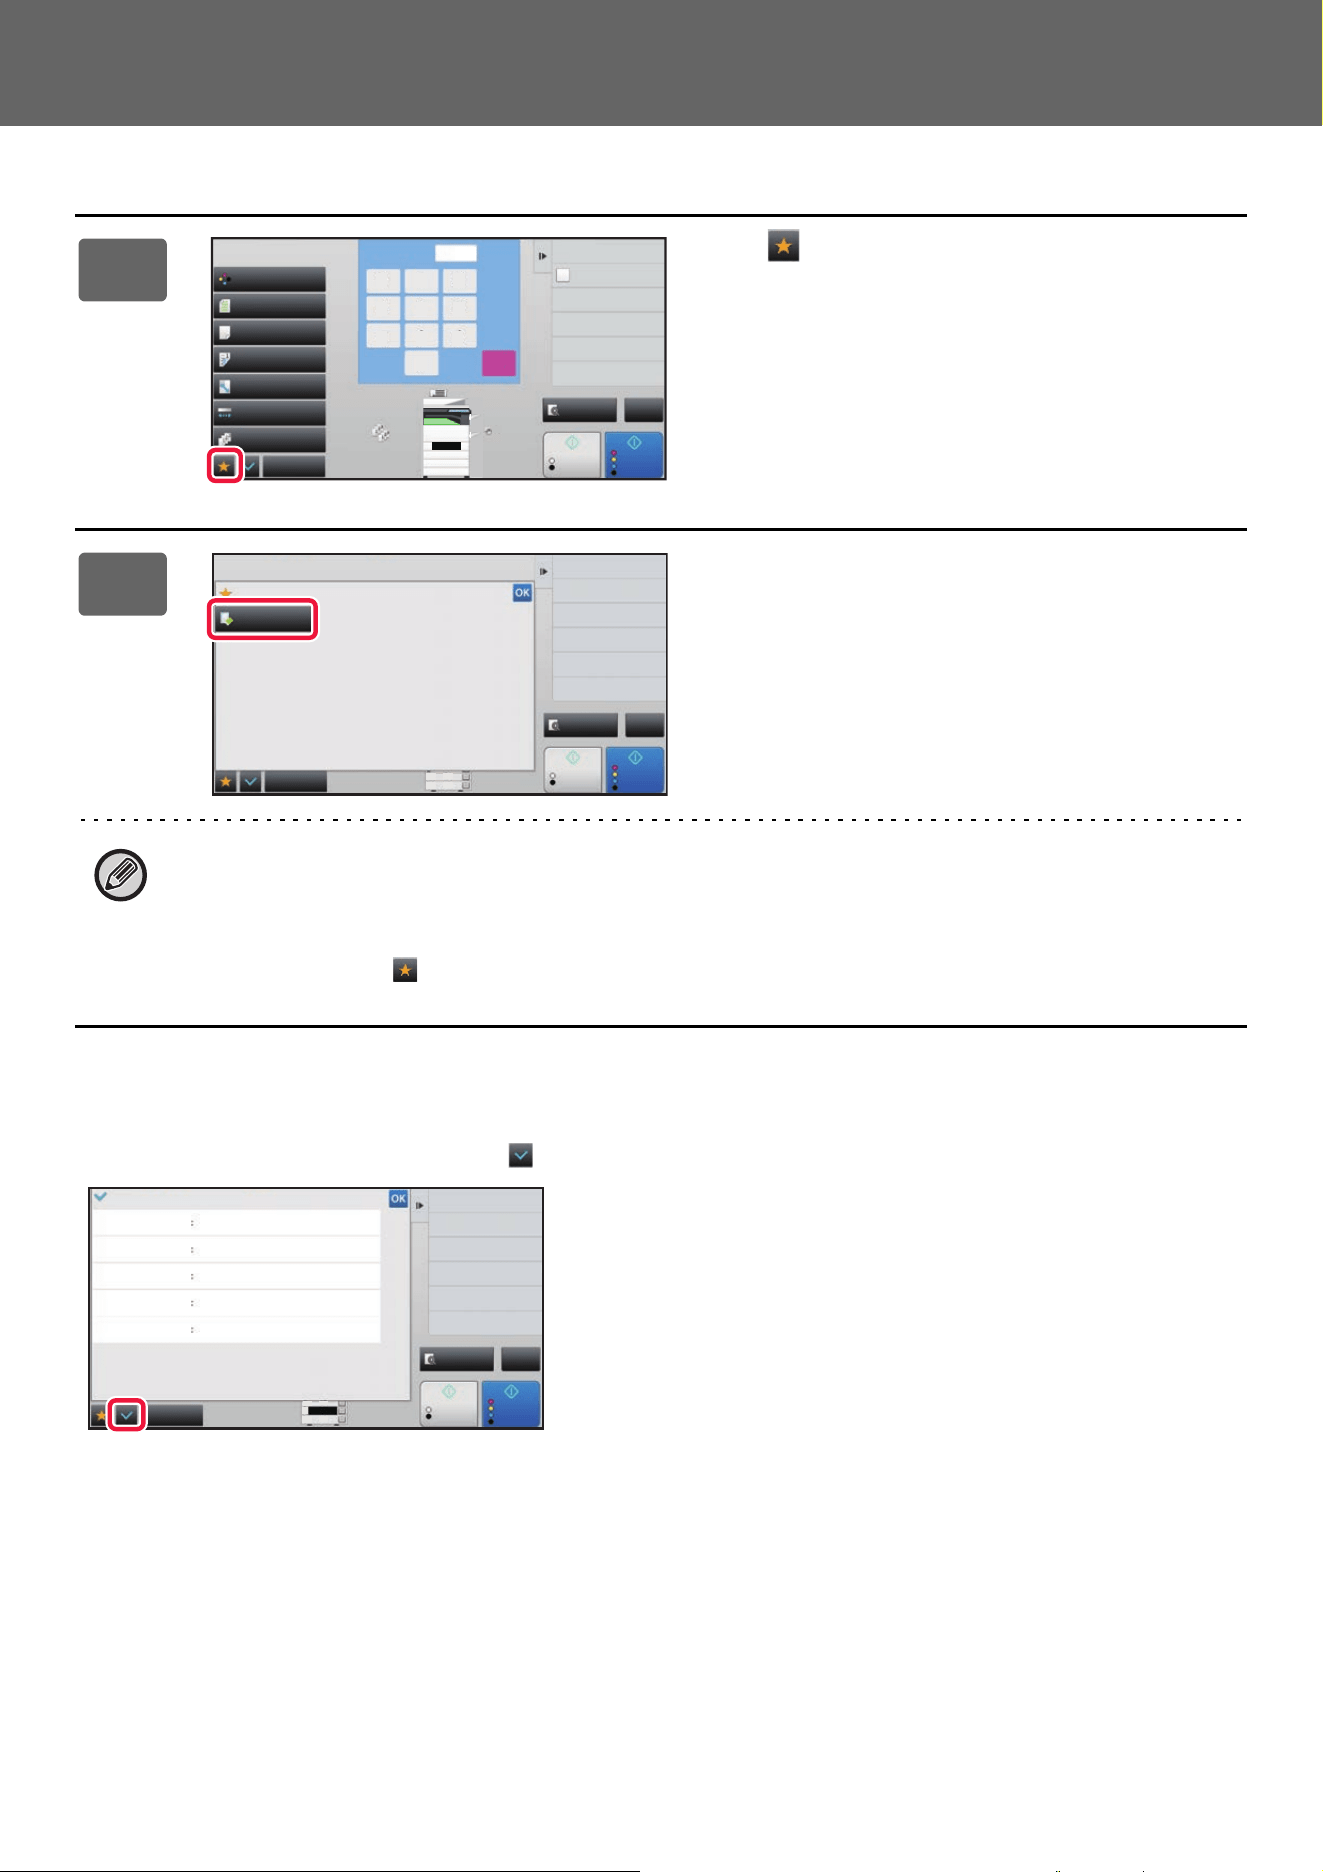
1
Tap .
2
Tap [Edit Favorite] on the action panel.
3
Tap the [Register Key] key.
Administrator rights are required.
4
Tap the key for the function you want to register.
8½x11
8½x11R
8½x14
11x17
2
1
3
4
Start
Color
Start
Preview
Color Mode
Full Color
Paper Select
Auto
Exposure
Auto
Original
Auto 8½x11
2-Sided Copy
1-Sided→1-Sided
Sort/Group
Off
Copy Ratio
100%
Others
Plain
Send and Print
Call Eco Program
Store Data in Folder
File
Store Data Temporarily
Quick File
4
7
5
8
6
9
0
C
1
No. of copies
CA
B/W
1 2 3
8½x11
15
Touch Panel Operation
Calling a function from Favorite
Confirmation Screen for Settings
You can display a list of configured functions and check them.
On the initial screen of each mode, tapping displays the setting confirmation screen.
1
Tap .
2
Tap the key for the function you want
to call.
• Favorites can be registered or edited only by authenticated users and administrators.
• Unauthenticated users can call and use the favorites registered by administrators.
Settings for calling Favorites and permitting/prohibiting editing can be configured in [User Control] → [Access Control
Settings] → [Authority Group] in "Settings (administrator)".
• To edit favorites, tap and then tap [Edit Favorite] on the action panel.
8½x11
8½x11R
8½x14
11x17
2
1
3
4
Start
Color
Start
Preview
Color Mode
Full Color
Paper Select
Auto
Exposure
Auto
Original
Auto 8½x11
2-Sided Copy
1-Sided→1-Sided
Sort/Group
Off
Copy Ratio
100%
Others
Plain
Send and Print
Call Eco Program
Store Data in Folder
File
Store Data Temporarily
Quick File
4
7
5
8
6
9
0
C
1
No. of copies
CA
B/W
1 2 3
8½x11
Others
Start
Preview
Erase
Favorite
Edit Favorite
Shift to Icon Mode
3
4
Color
Start
CA
B/W
8½x14
11x17
3
4
Start
Preview
Register Current Settings
Program Registration
Favorite Review
Original
Paper Select
2-Sided Copy
Exposure
Sort/Group
Image Orientation
8½x11
Portrait
Tray 3 Plain8½x14
Tablet:1-Sided→2-Sided
Original Image Type Text Exposure 3.0
Copy of Copy Off Color Tone Enhancement
Group
Others
Color
Start
CA
B/W
8½x14
11x17
:Off:
/
/
:
16
Touch Panel Operation
STOPPING/DELETING A JOB, PRIORITY
PROCESSING AND CHECKING THE STATUS
TYPES OF JOB STATUS SCREENS
When you tap the job status display, the job status screen appears. Tap it again to return to the previous mode.
The job status screen is divided into the following four tabs, enabling you to select a job list by tapping a desired tab.
•Print
Lists print jobs such as copying, printing from a PC, USB direct print, and printing for faxed or other received data.
•Scan
Lists send jobs of converted images for e-mail messages and FTP/Desktop send jobs.
•Fax
Lists fax send jobs using a telephone line.
• Internet Fax
Lists fax send jobs using internet.
On each tab, jobs are classified into three groups.
Jobs move among the lists according to the processing status, from [Spool], [Job Queue] and [Complete], in that order.
To switch the job list display to the display by processing status, tap the [Spool], [Job Queue] or [Complete] key as desired.
The background of the job status display changes as follows:
• Green: Job in progress
• Yellow: Warming up/waiting
• Red: Waiting for error clearing
• To prohibit the display and changing of job information of other users when user authentication is enabled
Select "Settings (administrator)" → [System Settings] → [Common Settings] → [Default Settings] → [Include Job Status in
user authentication] → [Disable display/change of other users' information in the job status] check box to .
• Job Spool Queuing
When this function is enabled, received print jobs are displayed in the spool queue of the job status screen. The jobs are
moved to the job queue after they have been analyzed by the machine. Multiple jobs that have not yet been analyzed
appear in the spool queue.
In "Settings (administrator)", select [System Settings] → [Printer Settings] → [Condition Settings] → [Job Spool Queuing
].
Job Queue
Complete
Spool
Internet FaxFaxScanPrint
Job
Job Queue
Progress / Sets
Status
Encrypt PDF
Spooling
User_1_User_1_User ---/0004
---/0004User_2_User_2_User
Back
Job Status
Back
LINE PRINTER
Easy
Copy
Operation
Guide
Enlarge
Display Mode
Settings Total Count LCD Control
LINE PRINTER
Easy
Copy
Easy
Scan
File Retrieve
Sharp OSA
Job Status
Easy
Fax
Job Status
Easy
Scan
CLOUD PORTAL
Toner Quantity
M
C
Bk
Y
Operation
Guide
Enlarge
Display Mode
Settings Total Count LCD Control Job Status
Job Queue
Complete
Spool
Job
Job Queue
Progress / Sets
Status
Encrypt PDF
Spooling
User_1_User_1_User ---/0004
---/0004User_2_User_2_User
Back
Internet FaxFaxScanPrint

17
Touch Panel Operation
• Spool list (Only displayed when a print-from computer job is received)
Lists print jobs up to the transfer to the machine from a computer. The jobs move to the Job Queue list after the
transfer is completed.
If you printed an encrypted PDF file by direct print, enter the password from here to print the file.
• Job Queue list
Lists jobs in progress and in the queue for copying, printing from a computer and printing of received fax. This list also
displays jobs in progress and in the queue for sending fax data or sending image data converted on the machine. The
jobs move to the Complete list after printing or sending is completed.
• Complete list
Lists jobs through with copying, printing or sending.
18
Touch Panel Operation
STOPPING/DELETING A JOB IN PROGRESS OR
RESERVED
1
Tap the job status display and tap the tab for the job that you wish to stop or
delete.
2
Tap the [Job Queue] key.
When you wish to stop a print job being sent from the computer, tap the [Spool] key.
3
Tap the job that you wish to stop or delete, and then tap [Stop/Delete] on the
action panel.
When a screen appears that allows you to confirm that you do want to stop the job, tap the [Cancel] key.
If the machine runs out of paper during a copy or print job, you can cancel the job from the job status screen.
To delete more than one job, operate the check box for [Enter Multi Selection Mode] on the action panel so that it looks
like .
• Printing of a received fax or Internet fax cannot be stopped.
• A job set for transfer cannot be canceled.
Job Queue
Complete
Internet FaxFaxScan
Job
Address
Set Time
Status
Print Image Sending
Activity Report
Back
0000/0002 OK
0000/000110:45 07/07
Broadcast004
Pages
Print
19
Touch Panel Operation
PRIORITY PROCESSING OF A RESERVED JOB
This function gives priority to processing of copied, faxed or image send jobs arising later to jobs already in a queue for
printing or sending.
Priority processing operation varies, as follows, depending on the job type.
• Job on the print tab
The job currently in progress is suspended to let the priority job make interruption.
• Job on the scanner/fax/Internet fax tab
The priority job is moved directly under the job currently in progress.
1
Tap the job status display and tap the job for priority processing.
2
Tap the [Job Queue] key.
3
Tap the job for priority processing and
then tap [Change Job Priority] on the
action panel.
Print
Scan Fax Internet Fax
Spool
Complete
Job Queue
Check Details of
Selected Job
Change Job Priority
Stop/Delete
Enter Multi
Selection Mode
Back
Job Job Queue Sets / Progress Status
Paper Empty
Waiting
Waiting
Waiting
Waiting
Waiting
Waiting
Waiting
Waiting
Copy
Copy
Copy
Copy
Copy
Copy
Copy
Copy
Copy
0100/0100
0000/0001
0000/0001
0000/0001
0000/0001
0000/0001
0000/0001
0000/0001
0000/0001
Print
Internet Fax
Copy
Scan Fax
Check Details of
Selected Job
Change Job Priority
Stop/Delete
Enter Multi
Selection Mode
Back
Copy
Copy
Copy
Copy
Copy
Copy
Copy
Copy
Job Job Queue Sets / Progress Status
Paper Empty
Waiting
Waiting
Waiting
Waiting
Waiting
Waiting
Waiting
Waiting
0100/0100
0000/0001
0000/0001
0000/0001
0000/0001
0000/0001
0000/0001
0000/0001
0000/0001
Job Queue
Complete
Spool
20
Touch Panel Operation
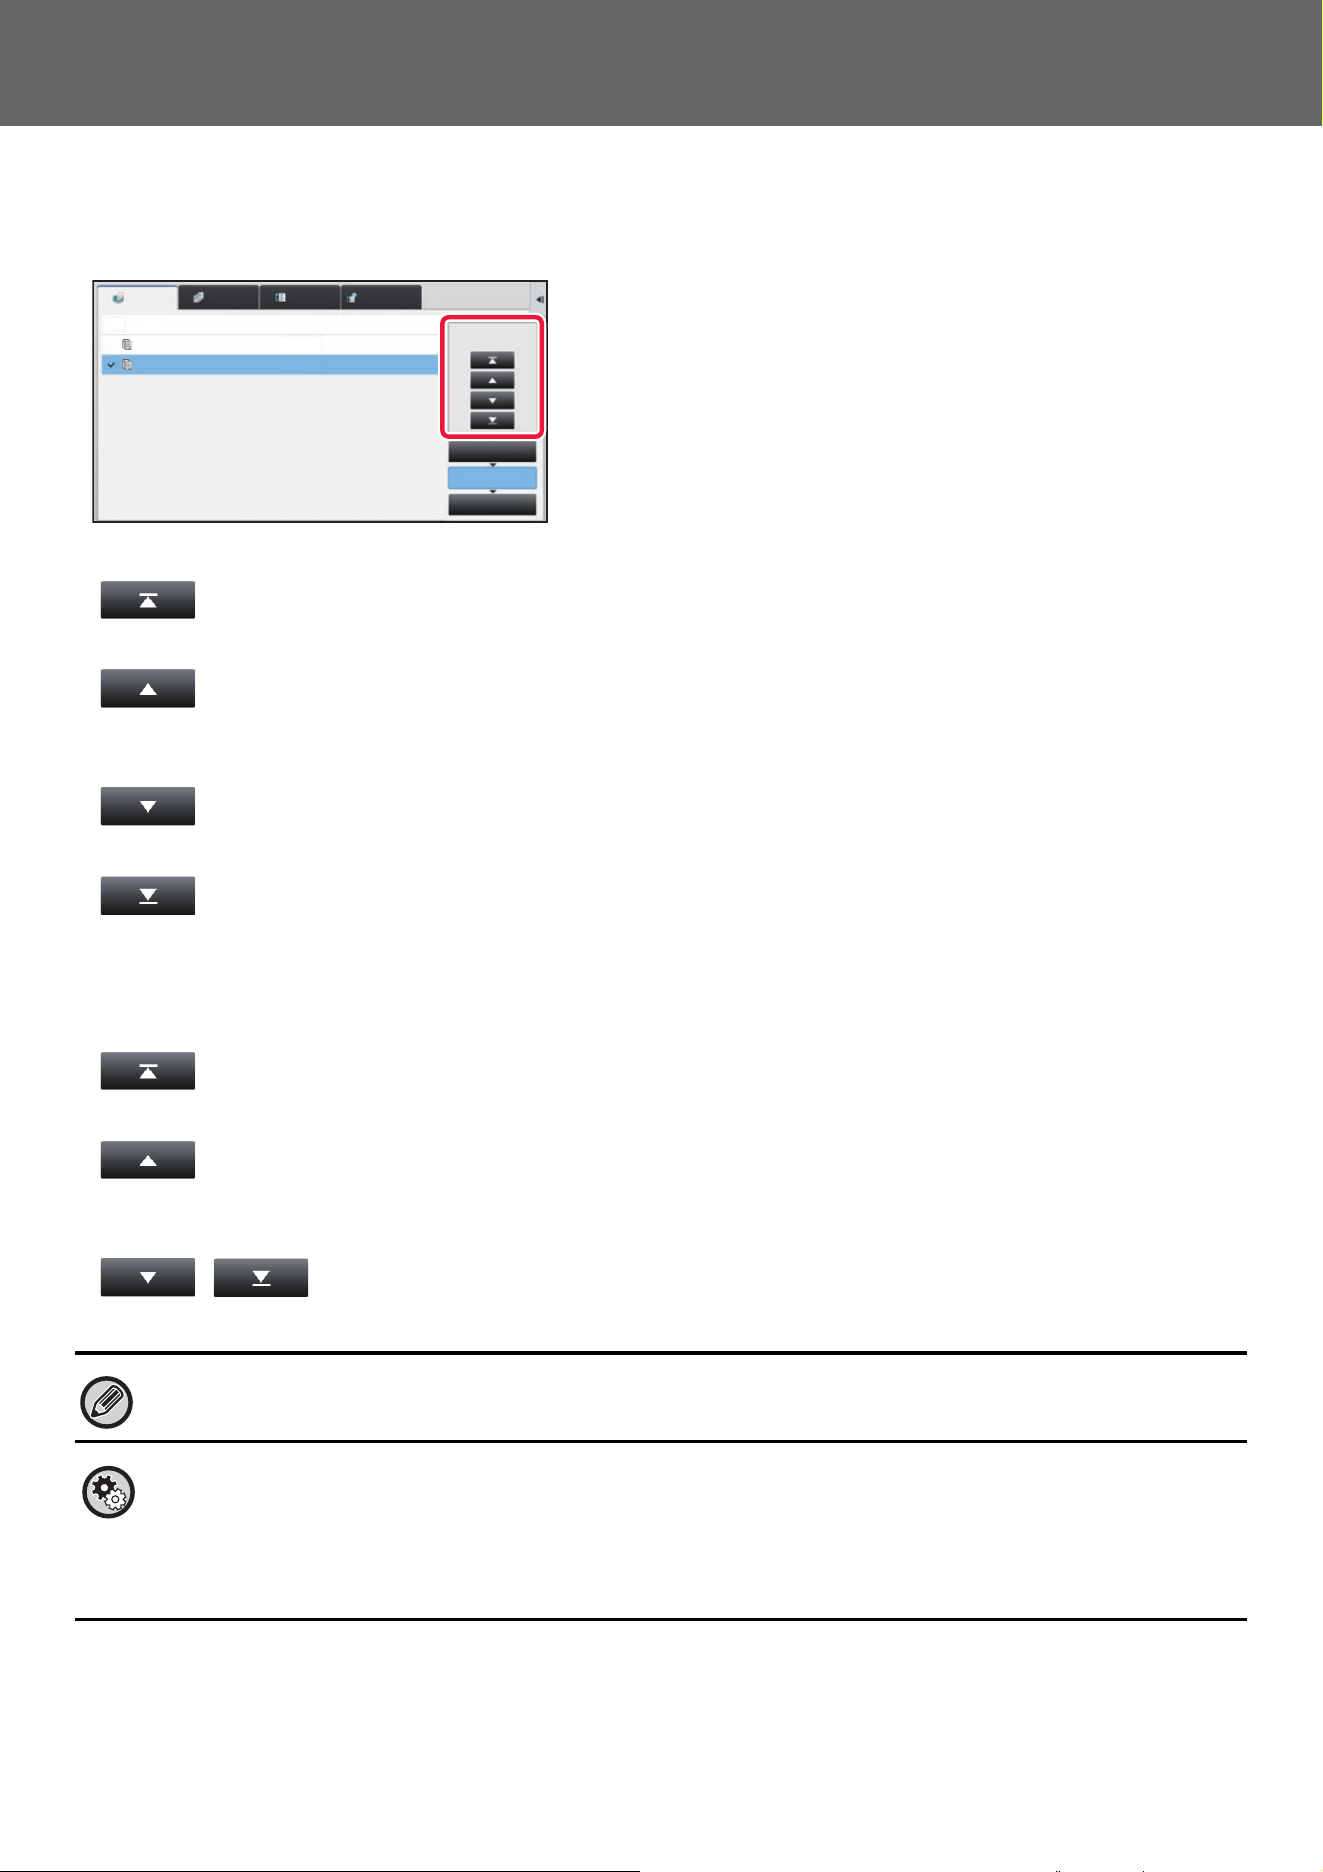
Changing the job order
If there is a job in progress, an interrupt job can be performed, or a job can be moved down in the queue to change the
job order. Tap the key of the job you want to move, and tap the "Priority Change" key.
•key
Moves the selected job to the top of the queue. The current job will be interrupted and the selected job starts.
•key
Moves the selected job up one position. When the second job from the top is selected, tapping this key interrupts the
current job and starts the selected job.
•key
Moves the selected job down one position.
•key
Moves the selected job to the bottom of the queue.
Scanner job with a timer setting
When a scanner job with a timer setting is selected, tapping the order change keys moves the job as follows.
•key
The timer setting is canceled and the job moves to the position after the job in progress (second from top).
•key
The timer setting is canceled and the job moves to the lowest position in the queue (if there are 3 jobs, the 4th
position)
• , key
These keys cannot be used.
The jobs below cannot be moved.
Job currently in progress, interrupt copy jobs, list print jobs, and jobs when Passing Prohibited is set in the system settings.
Disabling of Bypass Printing
In "Settings (administrator)", select [System Settings] → [Common Settings] → [Operation Settings] → [Disabling of Bypass
Printing].
This setting is used to disable bypass printing (printing other jobs ahead of a job that has been stopped* because the paper
required for the job is not available in any of the trays).
* This does not include cases where the paper ran out during the job.
Internet FaxFaxScanPrint
Job Job Queue
Copy
Copy
Paper Empty
Waiting
Progress / Sets Status
Job Queue
Complete
Spool
0050/0050
0000/0100
Priority Change
21
Touch Panel Operation
In print tab, you can switch the display in the "Job Queue" screen between the number of printed copies and remaining
copies to be printed for each job.
CHECKING A RESERVED JOB OR THE JOB IN
PROGRESS
To switch the display between the numbers of printed copies and remaining copies to be printed for each job:
In "Settings (administrator)", select [System Settings] → [Common Settings] → [Operation Settings] → [Condition Settings]
→ [Switch the Number of Sets to be Displayed for Job Status].
1
Tap the job status display and tap the tab for the job whose contents you
wish to check.
2
Tap the [Job Queue] key.
3
Tap the job whose contents you wish to check and then tap [Check Details of
Selected Job] on the action panel.
• Different job contents appear in different modes.
• For information on the icons displayed on the job keys or the messages displayed in "Status", see "READING THE
JOB LIST (page 23)".
Job Job Queue
Copy Paper Empty
Progress / Sets Status
Job Queue
Complete
Spool
0050/0050
Priority Change
Internet FaxFaxScanPrint
Job Job Queue Progress / Sets
Job Queue
Complete
Spool
0100/0100
0000/0001
0000/0001
0000/0001
0000/0001
0000/0001
0000/0001
0000/0001
0000/0001
Copy
Copy
Copy
Copy
Copy
Copy
Copy
Copy
Copy
Status
Paper Empty
Check Details of
Selected Job
Change Job Priority
Stop/Delete
Enter Multi
Selection Mode
Back
Waiting
Waiting
Waiting
Waiting
Waiting
Waiting
Waiting
Waiting
Internet FaxFaxScanPrint
(1)
(2)
22
Touch Panel Operation
CHECKING COMPLETED JOBS
1
Tap the job status display and tap the tab for the job whose contents you
wish to check.
2
Tap the [Complete] key.
3
Tap the job whose contents you wish
to check and then tap [Check Details
of Selected Job] on the action panel.
Jobs you can check are displayed as keys so that you can
tap them.
• Different job contents appear in different modes.
• For information on the icons displayed on the job keys or
the messages displayed in "Status", see "READING THE
JOB LIST (page 23)".
Job Queue
Complete
Spool
Priority Change
Job Queue
Copy Paper Empty
0001/0001
Progress / Sets StatusJob
Internet FaxFaxScanPrint
(1)
(2)
Job Complete Set Time Number of Prints Status
Job Queue
Complete
Spool
Check Details of
Selected Job
Send
Choose Print Settings
Back
Copy
Copy
Copy
Copy
Copy
Copy
Copy
Copy
Copy
OK
OK
OK
OK
OK
OK
OK
OK
OK
0001/0001
0001/0001
0001/0001
0001/0001
0001/0001
0001/0001
0001/0001
0001/0001
0001/0001
13:43 06/22
13:33 06/22
13:33 06/22
13:33 06/22
13:33 06/22
00:00 05/05
00:00 05/05
00:00 05/05
00:00 05/05
Internet FaxFaxScanPrint
23
Touch Panel Operation
READING THE JOB LIST
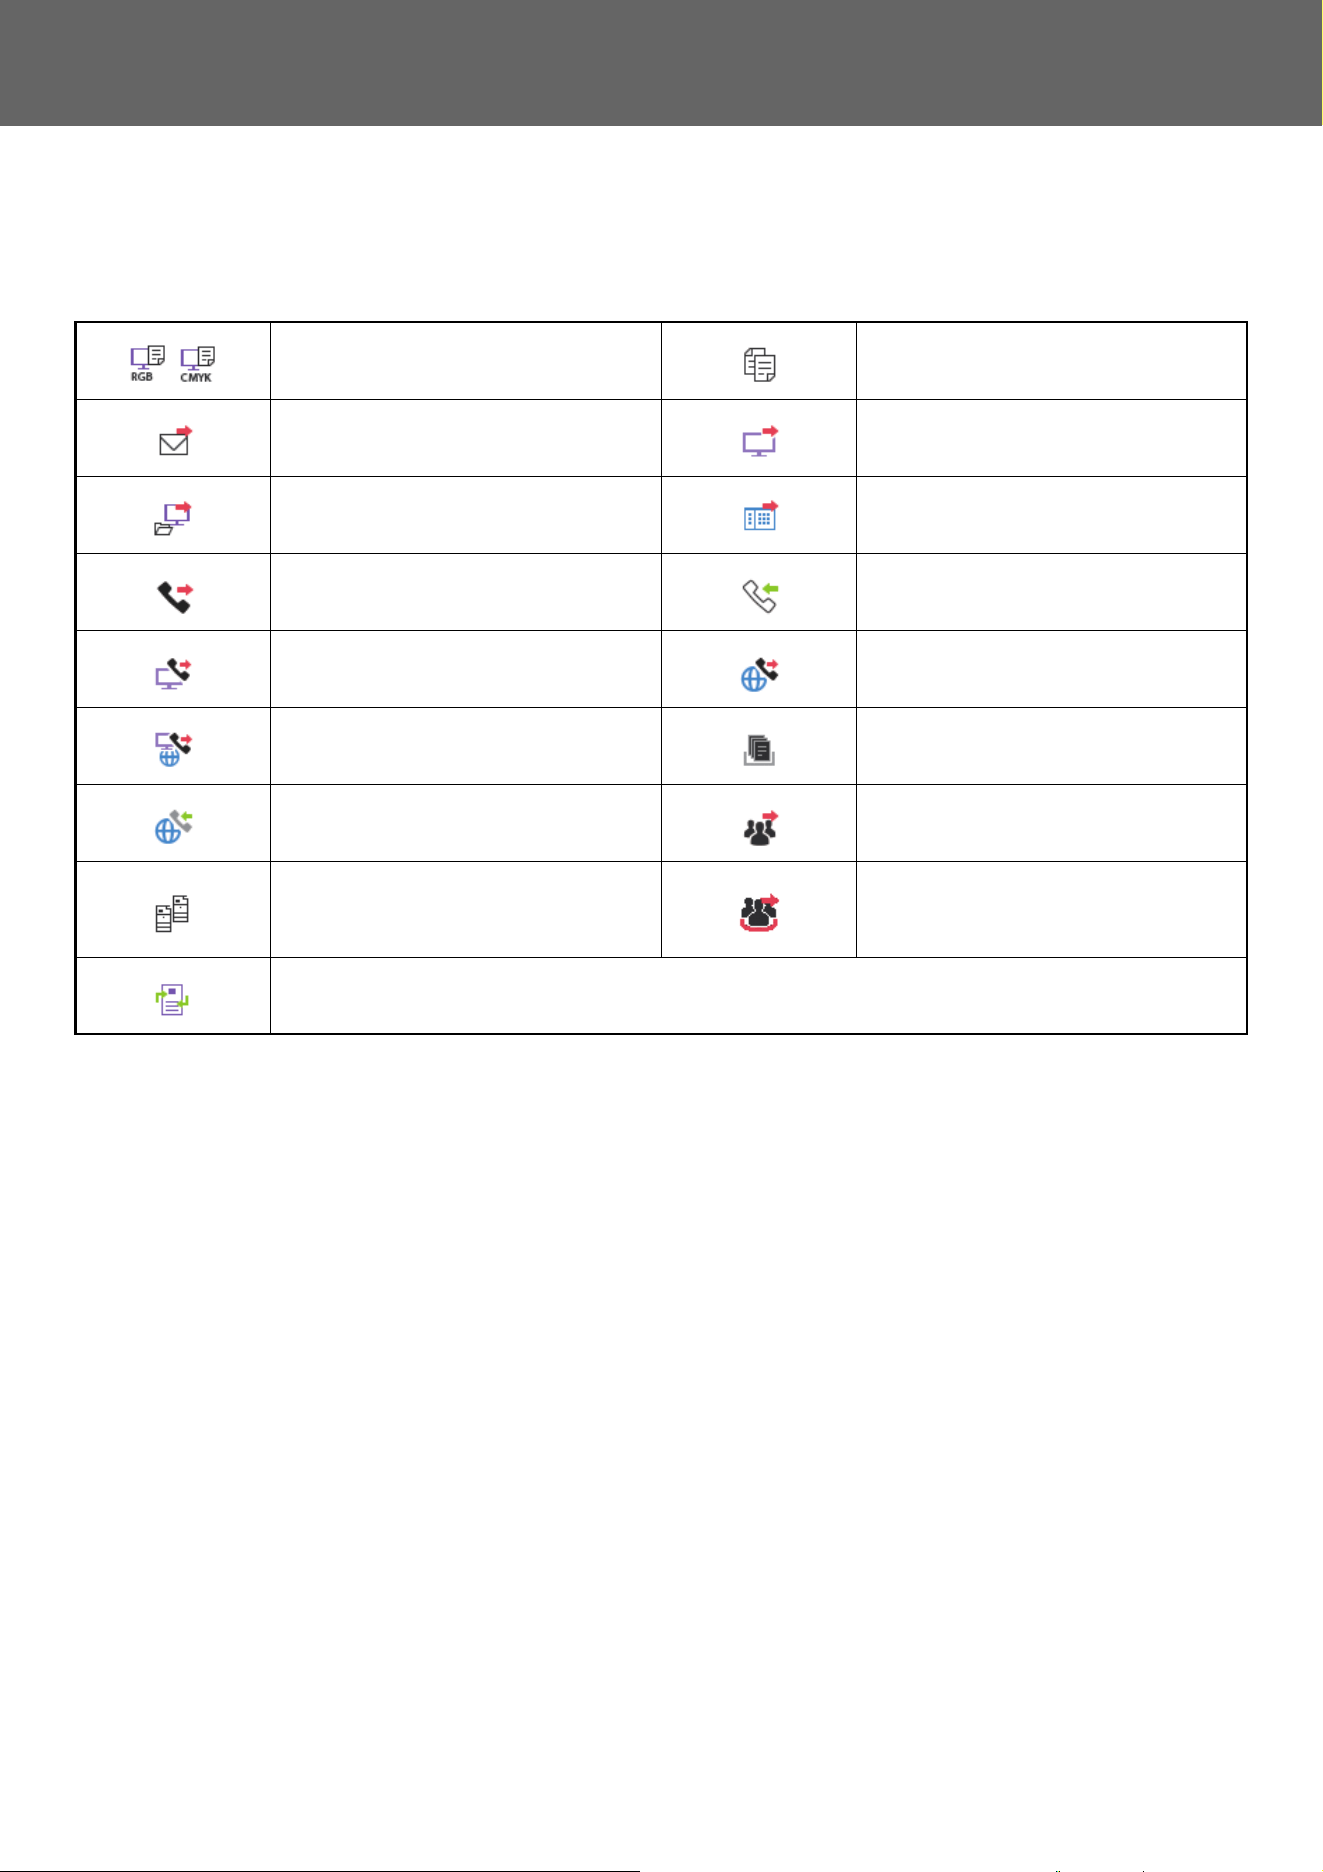
The meaning of each job icon and message displayed in "Status" is as follows:
Icons indicating the job type
* This appears in a broadcast job.
Print job (RGB/CMYK) Copy job
Scan to E-mail job Scan to FTP job
Scan to Network Folder job Scan to Desktop job
Fax transmission job Fax reception job
PC-Fax transmission job Internet fax transmission job (Including
Direct SMTP)
PC-I-Fax transmission job Scan to Local Drive file print job
Internet fax reception job (Including
Direct SMTP)
Broadcast job* Inbound routing job
Tandem copy/print job Broadcast job* Inbound routing job
(When a destination is group destination
address)
OSA Scan Job
24
Touch Panel Operation
Messages displayed in "Status"
Job in progress
Reserved job
Display Status
"Printing" Print job in progress
"Copying" Copy job in progress
"Connecting" Connecting
"Sending" Sending
"Receiving" Receiving
"Processing" Processing
"Tel" Speaking with the other party using an extension telephone
"Stopped" The job has been stopped
"Toner Empty" Toner Empty
"Paper Empty" Paper Empty
"Paper Jam" Paper jam
"Waiting" Waiting
"Warming up" Warming up
"Limit" Having reached the account limit
"Report Wait" Transmission confirmation reception timeout
"Error" An error occurred while the job was being executed
Display Status
"Waiting" The job is waiting to be executed
"Retry Mode" The job is being retried due to a communication error or other problem
"Report Wait" Waiting for confirmation of Internet fax transmission
A day and time is displayed Timer transmission job (the specified time is displayed)
25
Touch Panel Operation
Completed job
* If the receiving machine is a SHARP machine, the receiving machine will return "dispatched" if the fax was received
normally, or "processed" if reception failed.
When delivery confirmation is set for Internet Fax, the disposition feeld value indicated on the delivery confirmation
return e-mail appears.
Display Status
"OK" Normal termination
"Send OK" Transmission was completed.
"NG Ck Line" Fax line cable is not connected
"In Memory" Reception completed but the fax has not been printed.
The received data (each page) has not been printed or forwarded. (The received data has not
been deleted.)
"Received" Printed received fax data.
The fax has been received.
The received data (each file) was stored.
"Forward OK" The received data/received data (each file) has been forwarded.
"FAST" FAST transmission completed.
"Stopped" The job was stopped.
"Delete" Deleted received data in the image check screen.
"Number of successful
transmission
destinations/Total
destinations OK"
Completion of a broadcast transmission, serial polling, or inbound routing operation.
If transmission to 3 destinations was successful out of a total of 5, "003/005 OK" will appear.
"No Response" An error occurred because there was no response from the destination.
"Busy" An error occurred because the other party was busy.
"Received" E-mail other than Internet fax received
"Rejected" A fax was sent from a party that has been blocked by the anti junk fax function.
"NGxxxxxx" Transmission/reception was not successful because a communication error occurred (a 6-digit
error code appears in xxxxxx.)
"Error" An error occurred while the job was being executed.
"Limit" Jobs exceeding the maximum size of e-mail attachments
"displayed"
*
Displayed at the receiving machine when delivery confirmation is set
"dispatched"
*
Forwarded elsewhere before being displayed at the receiving machine when delivery
confirmation is set
"processed"
*
Processed without being displayed at receiving machine when delivery confirmation is set
"deleted"
*
Message deleted at receiving machine when delivery confirmation is set
"denied"
*
Receiving machine refused to notify sending machine of message processing content when
delivery confirmation is set
"failed"
*
An abnormal condition occurred when delivery confirmation is set
26
Touch Panel Operation
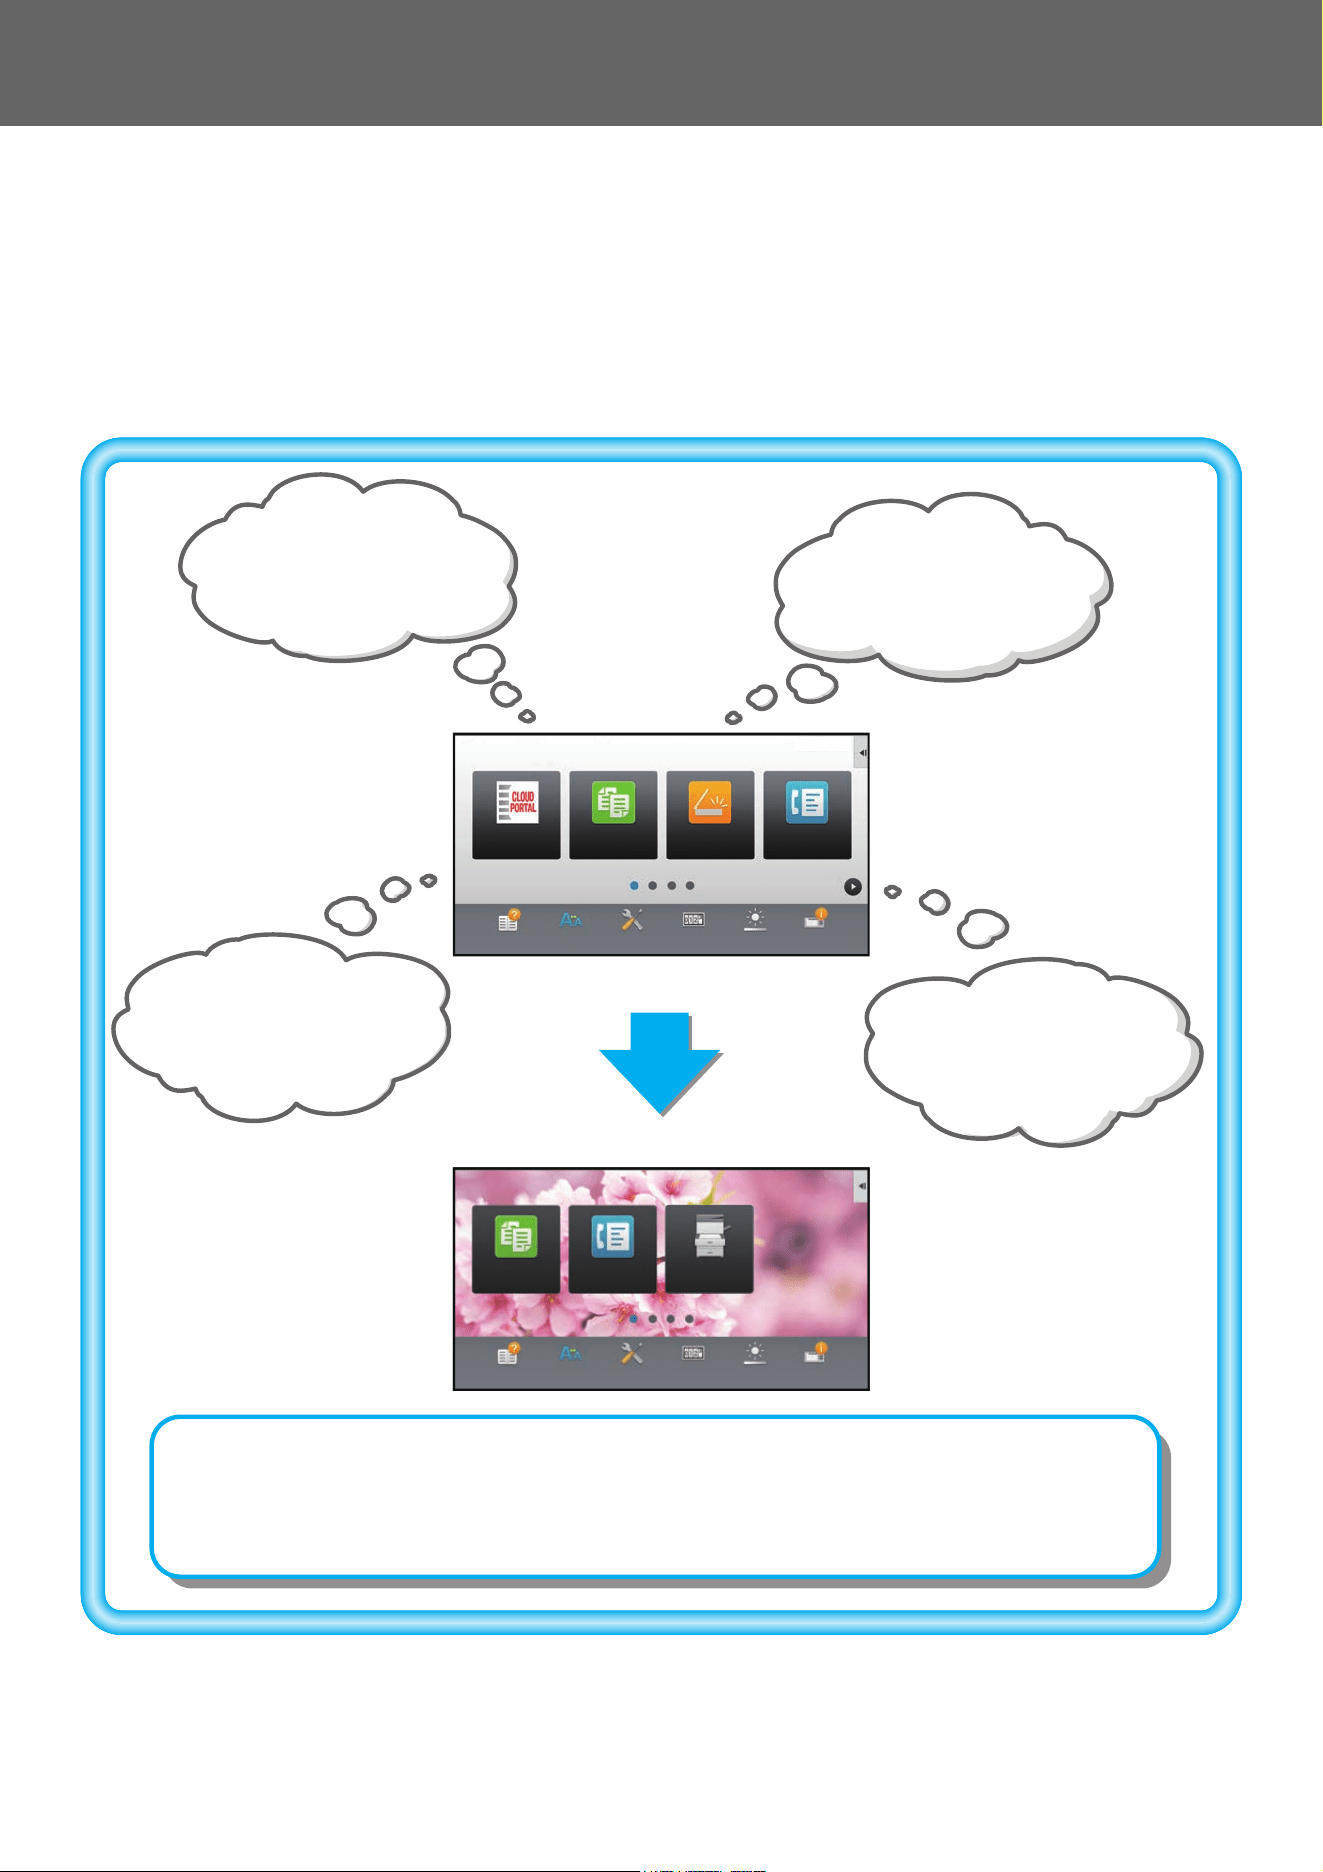
CUSTOMIZING THE DISPLAY (U/I Customize)
U/I Customize is a function that lets you customize the home screen and shortcut keys to make the machine easier to
use.
For example, if you frequently use Tandem Copy or Card Shot, there are no settings for these functions in Easy Copy
and Easy Scan. You must move to a screen with Copy or E-mail shortcut keys, select the shortcut keys, and tap the
functions.
By moving these shortcut keys to the initial page of the home screen, you can quickly select the functions.
Try customizing the display to make the machine easier to use.
Operation
Guide
Enlarge
Display Mode
Settings Total Count LCD Control
Easy
Fax
Job Status
Easy
Copy
Easy
Scan
CLOUD PORTAL
Operation
Guide
Enlarge
Display Mode
Settings Total Count
LCD Control
Easy
Fax
Tray Settings
Job Status
Easy
Copy
Toner
Remaining
M
C
Bk
Y
10:15 AM
10:15 AM
Operation
Guide
Enlarge
Display Mode
Settings Total Count LCD Control Job Status
I want to display only a
small group of keys I use.
I want a bright background.
I want to display the keys I
use most frequently on the
initial screen.
I want to check how much
toner remains.
By customizing the home screen, you can immediately access functions and settings and check
the toner level.
You can also change the background to a custom image, such as one of your favorite images.
27
Touch Panel Operation
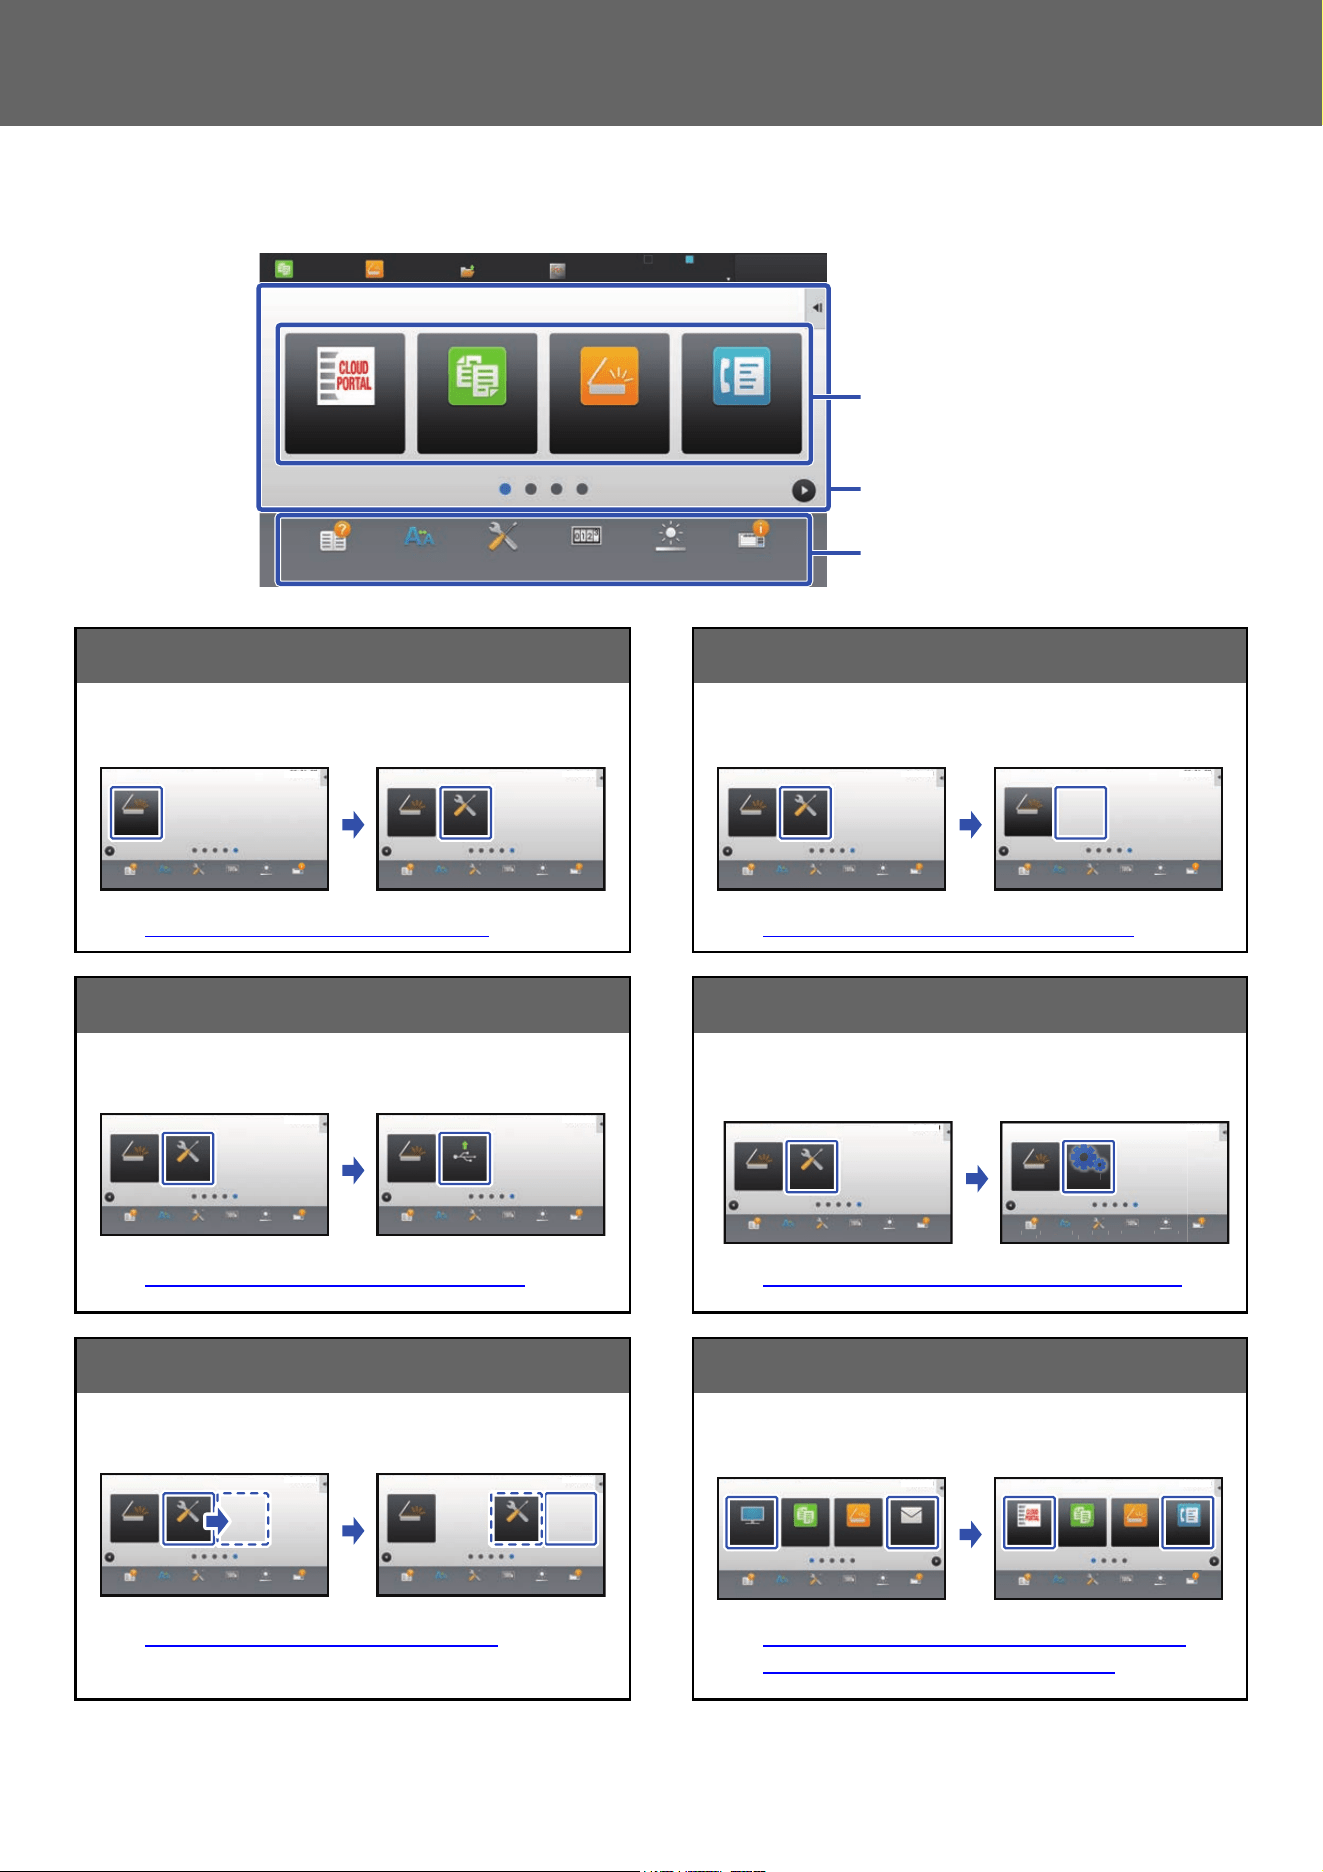
ITEMS YOU CAN CUSTOMIZE
You can customize the following items.
Add a frequently used shortcut key Delete the shortcut keys that appear
You can display functions on the home screen that do not
normally appear, and immediately select those functions.
► ADDING SHORTCUT KEYS (page 32)
You can delete and organize the shortcut keys that appear
in the home screen.
► DELETING A SHORTCUT KEY (page 35)
Change the shortcut keys that appear Change a shortcut key image to a custom image
You can change shortcut keys, and change the layout of the
shortcut keys.
► CHANGING A SHORTCUT KEY (page 37)
You can store images in advance to customize shortcut
keys.
► ADDING A SHORTCUT KEY IMAGE (page 40)
Change the layout of the shortcut keys Restore the original layout of the shortcut keys
You can change the layout of the shortcut keys by moving
the keys to positions that are easy to use.
► MOVING A SHORTCUT KEY (page 42)
If you accidentally move shortcut keys, you can restore the
keys to the factory default layout.
► RETURNING THE SHORTCUT KEYS TO THE
FACTORY DEFAULT STATE (page 44)
Operation
Guide
Enlarge
Display Mode
Settings Total Count LCD Control
Easy
Fax
Job Status
Easy
Copy
Easy
Scan
CLOUD PORTAL
LINE PRINTER
Easy
Copy
Easy
Scan
File Retrieve
Sharp OSA
Job Status
10:15 AM
Background
Shortcut Keys
Fixed Keys
PC Scan
Operation
Guide
Enlarge
Display Mode
Settings Total Count LCD Control Job Status
Settings
PC Scan
Operation
Guide
Enlarge
Display Mode
Settings Total Count LCD Control Job Status
10:15 AM 10:15 AM
PC Scan
Operation
Guide
Enlarge
Display Mode
Settings Total Count LCD Control Job Status
Settings
PC Scan
Operation
Guide
Enlarge
Display Mode
Settings Total Count LCD Control Job Status
10:15 AM 10:15 AM
Settings
PC Scan
Operation
Guide
Enlarge
Display Mode
Settings Total Count LCD Control Job Status
Print from USB
Memory
PC Scan
Operation
Guide
Enlarge
Display Mode
Settings Total Count LCD Control Job Status
10:15 AM 10:15 AM
Settings
PC Scan
Operation
Guide
Enlarge
Display Mode
Settings Total Count LCD Control Job Status
P
C
S
ca
n
O
peratio
n
Guide
Enlar
ge
Displa
y
Mod
e
S
ettin
g
s
Total Count
LCD Control
Settings
Settings
PC Scan
Operation
Guide
Enlarge
Display Mode
Settings Total Count LCD Control Job Status
10:15 AM 10:15 AM
10:15 AM 10:15 AM
Settings
PC Scan
Operation
Guide
Enlarge
Display Mode
Settings Total Count LCD Control Job Status
Settings
PC Scan
Operation
Guide
Enlarge
Display Mode
Settings Total Count LCD Control Job Status
Easy
Fax
CLOUD PORTAL
Operation
Guide
Enlarge
Display Mode
Settings Total Count LCD Control Job Status
Easy
Copy
Easy
Scan
Operation
Guide
Enlarge
Display Mode
Settings Total Count LCD Control Job Status
Easy
Copy
Easy
Scan
E-mailFTP/Desktop
10:15 AM 10:15 AM
28
Touch Panel Operation
Change the layout of the home screen Change the background color of the home screen
You can change the layout of the home screen to add more
shortcut keys.
► CHANGING THE LAYOUT PATTERN OF THE
HOME SCREEN (page 46)
You can change the background color of the home screen to
a preset pattern color.
► SELECTING A MFP DISPLAY PATTERN FOR THE
HOME SCREEN (page 48)
Change the color of the text on the home screen Change the background to a custom image
You can change the color of the text on the home screen to
white or black.
► CHANGING THE COLOR OF TEXT ON THE HOME
SCREEN (page 49)
You can change the home screen background as desired.
► CHANGING THE
BACKGROUND IMAGE OF THE
HOME SCREEN (page 50)
Change the contents of the fixed keys Enlarge displayed text
You can change the fixed keys and hide toner usage.
► CHANGING THE
FIXED KEYS (page 53)
You can enlarge the text that appears in normal mode of
copying and image send.
► INCREASING THE TEXT SIZE (page 55)
Change the language
You can change the language that is displayed.
► CHANGING
THE LANGUAGE USED ON THE
MACHINE (page 56)
10:15 AM
Operation
Guide
Enlarge
Display Mode
Settings Total Count LCD Control Job Status
10:15 AM
Easy
Copy
Easy
Fax
Easy
Scan
CLOUD PORTAL
Operation
Guide
Enlarge
Display Mode
Settings Total Count LCD Control Job Status
Easy
Fax
Fax
Easy
Copy
Easy
Scan
CLOUD PORTAL
E-mail
CopySharp OSAFTP/Desktop
Network Folder Address Book Scan to
Local Drive
Operation
Guide
Enlarge
Display Mode
Settings Total Count LCD Control
Easy
Fax
Job Status
CLOUD PORTAL
Easy
Copy
Easy
Scan
Operation
Guide
Enlarge
Display Mode
Settings Total Count LCD Control
Easy
Fax
Job Status
CLOUD PORTAL
Easy
Copy
Easy
Scan
10:15 AM 10:15 AM
Easy
Scan
Easy
Fax
Easy
Copy
CLOUD PORTAL
Operation
Guide
Enlarge
Display Mode
Settings Total Count LCD Control Job Status
Easy
Scan
Easy
Fax
Easy
Copy
CLOUD PORTAL
Operation
Guide
Enlarge
Display Mode
Settings Total Count LCD Control Job Status
10:15 AM 10:15 AM
Easy
Fax
CLOUD PORTAL
Operation
Guide
Enlarge
Display Mode
Settings Total Count LCD Control Job Status
Easy
Copy
Easy
Scan
Easy
Fax
CLOUD PORTAL
Operation
Guide
Enlarge
Display Mode
Settings Total Count LCD Control Job Status
Easy
Copy
Easy
Scan
10:15 AM
10:15 AM
Easy
Fax
Easy
Copy
CLOUD PORTAL
Operation
Guide
Enlarge
Display Mode
Settings Total Count LCD Control Job Status
Easy
Scan
10:15 AM
Easy
Fax
Easy
Copy
CLOUD PORTAL
Operation
Guide
Ton e r
Remaining
M
C
Bk
Y
Enlarge
Display Mode
Settings Total Count LCD Control Job Status
Easy
Scan
10:15 AM
Preview
Start
Scan Size
Auto Auto
Color Mode
Auto/Grayscale
Resolution
200x200dpi
File Format
PDF
Auto
Others
A4
A4
100%
Send Size
Address Book
Subject
File Name
Address Touch to input Address
Options
Sending History
Call Search Number
Call Program
Call Registered settings
Send Same Image
as Fax Address
Store Data Temporarily
Quick File
CA
Original
Preview
Start
Scan Size
Auto Auto
Color Mode
Auto/Grayscale
Resolution
200x200dpi
File Format
PDF
Original
Auto
Others
A4
A4
100%
Send Size
Address Book
Subject
File Name
Address Touch to input Address
Options
Sending History
Call Search Number
Verification Stamp
Call Program
Call Registered settings
Send Same Image
as Fax Address
Store Data Temporarily
Quick File
Exposure
CA
10:15 AM
Easy
Fax
Easy
Copy
Easy
Scan
CLOUD PORTAL
Operation
Guide
Enlarge
Display Mode
Settings Total Count LCD Control Job Status
10:15 AM
29
Touch Panel Operation
GENERAL PROCEDURE FOR USING U/I CUSTOMIZE
To change the home screen or shortcut keys, configure settings in the action panel of the home screen or on the Web
page.
The settings must be configured by the administrator of the machine.
General procedure when using the touch panel
This general procedure is not used for "CHANGING THE FIXED KEYS" (►page 53), "INCREASING THE TEXT SIZE"
(►p
age 55), or "CHANGING THE LANGUAGE USED ON THE MACHINE" (►page 56). Follow the procedures in each of
the above sections.
1
Open the action panel of the home
screen, and tap one of the displayed
items.
The items that appear on the action panel are "Edit Home",
"MFP Display Pattern Setting", and "Change Text Color On
Home Screen".
•[Edit Home]
► A
DDING SHORTCUT KEYS (page 32)
► DELETING A SHORTCUT KEY (page 35)
► CHANGING A SHORTCUT KEY (page 37)
► MOVING A SHORTCUT KEY (page 42)
► RETURNING THE SHORTCUT KEYS TO THE
FACTORY DEFAULT STATE (page 44)
• [MFP Display Pattern Setting]
► S
ELECTING A MFP DISPLAY PATTERN FOR THE
HOME SCREEN (page 48)
• [Change Text Color On Home Screen]
► CHANGING
THE COLOR OF TEXT ON THE HOME
SCREEN (page 49)
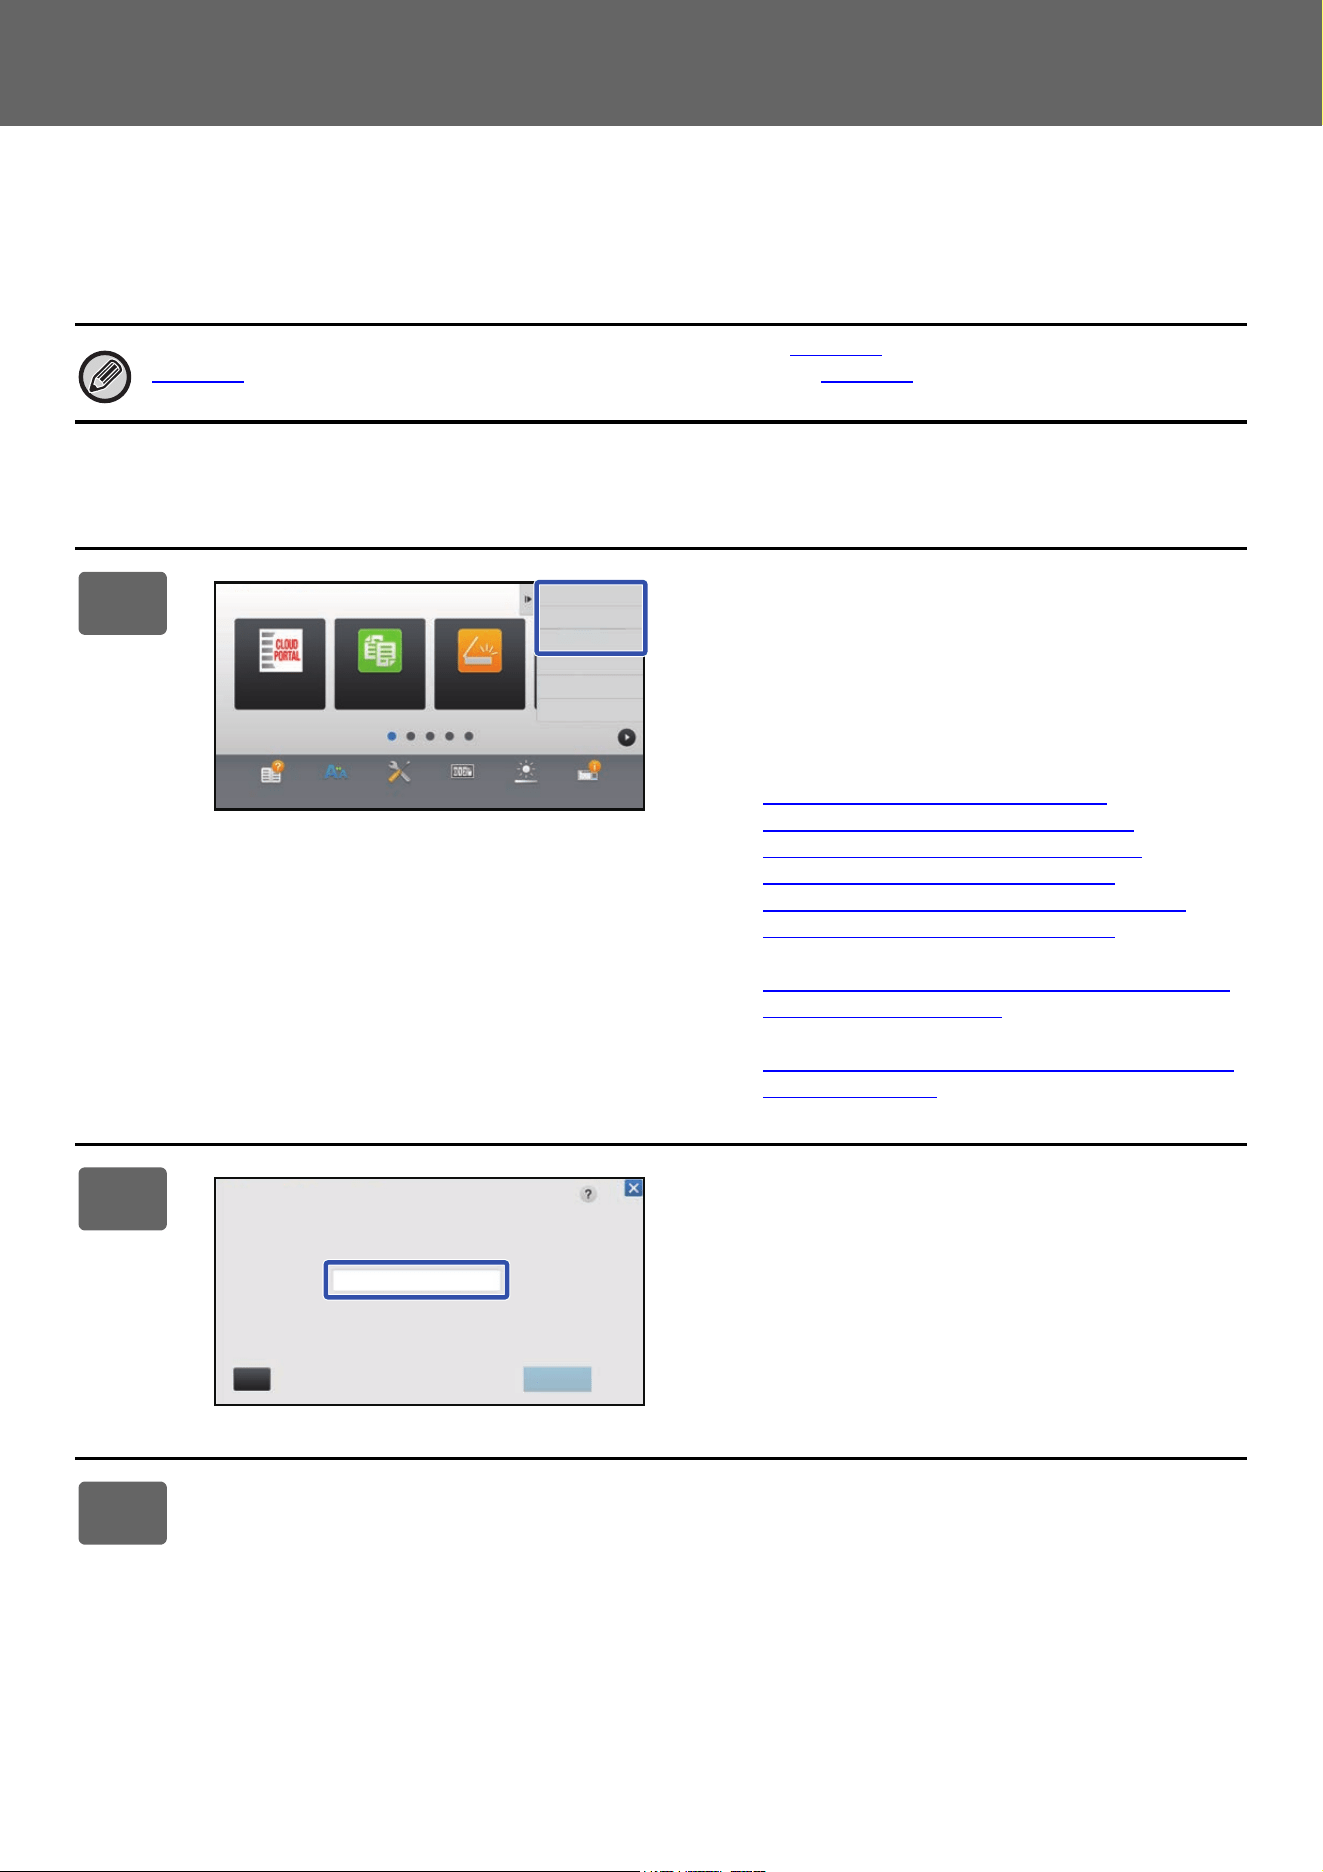
2
The administrator password screen
appears. Enter your password.
Enter the administrator password.
3
Configure the settings.
Operation
Guide
Enlarge
Display Mode
Settings Total Count LCD Control Job Status
Easy
Scan
CLOUD PORTAL
Edit Home
Change Text Color
On Home Screen
MFP Display Pattern
Setting
Easy
Copy
CA OK
Administrator Password
Please input Admin Password.
(5 or more and up to 255 characters)
Password
30
Touch Panel Operation
General procedure when using the Web page
4
After the settings are completed, tap
[Exit Home Edit Mode].
If [MFP Display Pattern Setting] or [Change Text Color On
Home Screen] is selected, tap [Finish and Return].
After all U/I customize settings are completed, tap the [Logout]
key.
1
Enter the IP address of the machine in your Web browser to access the Web
server.
In the factory default state, you must enter your user password after entering the IP address.
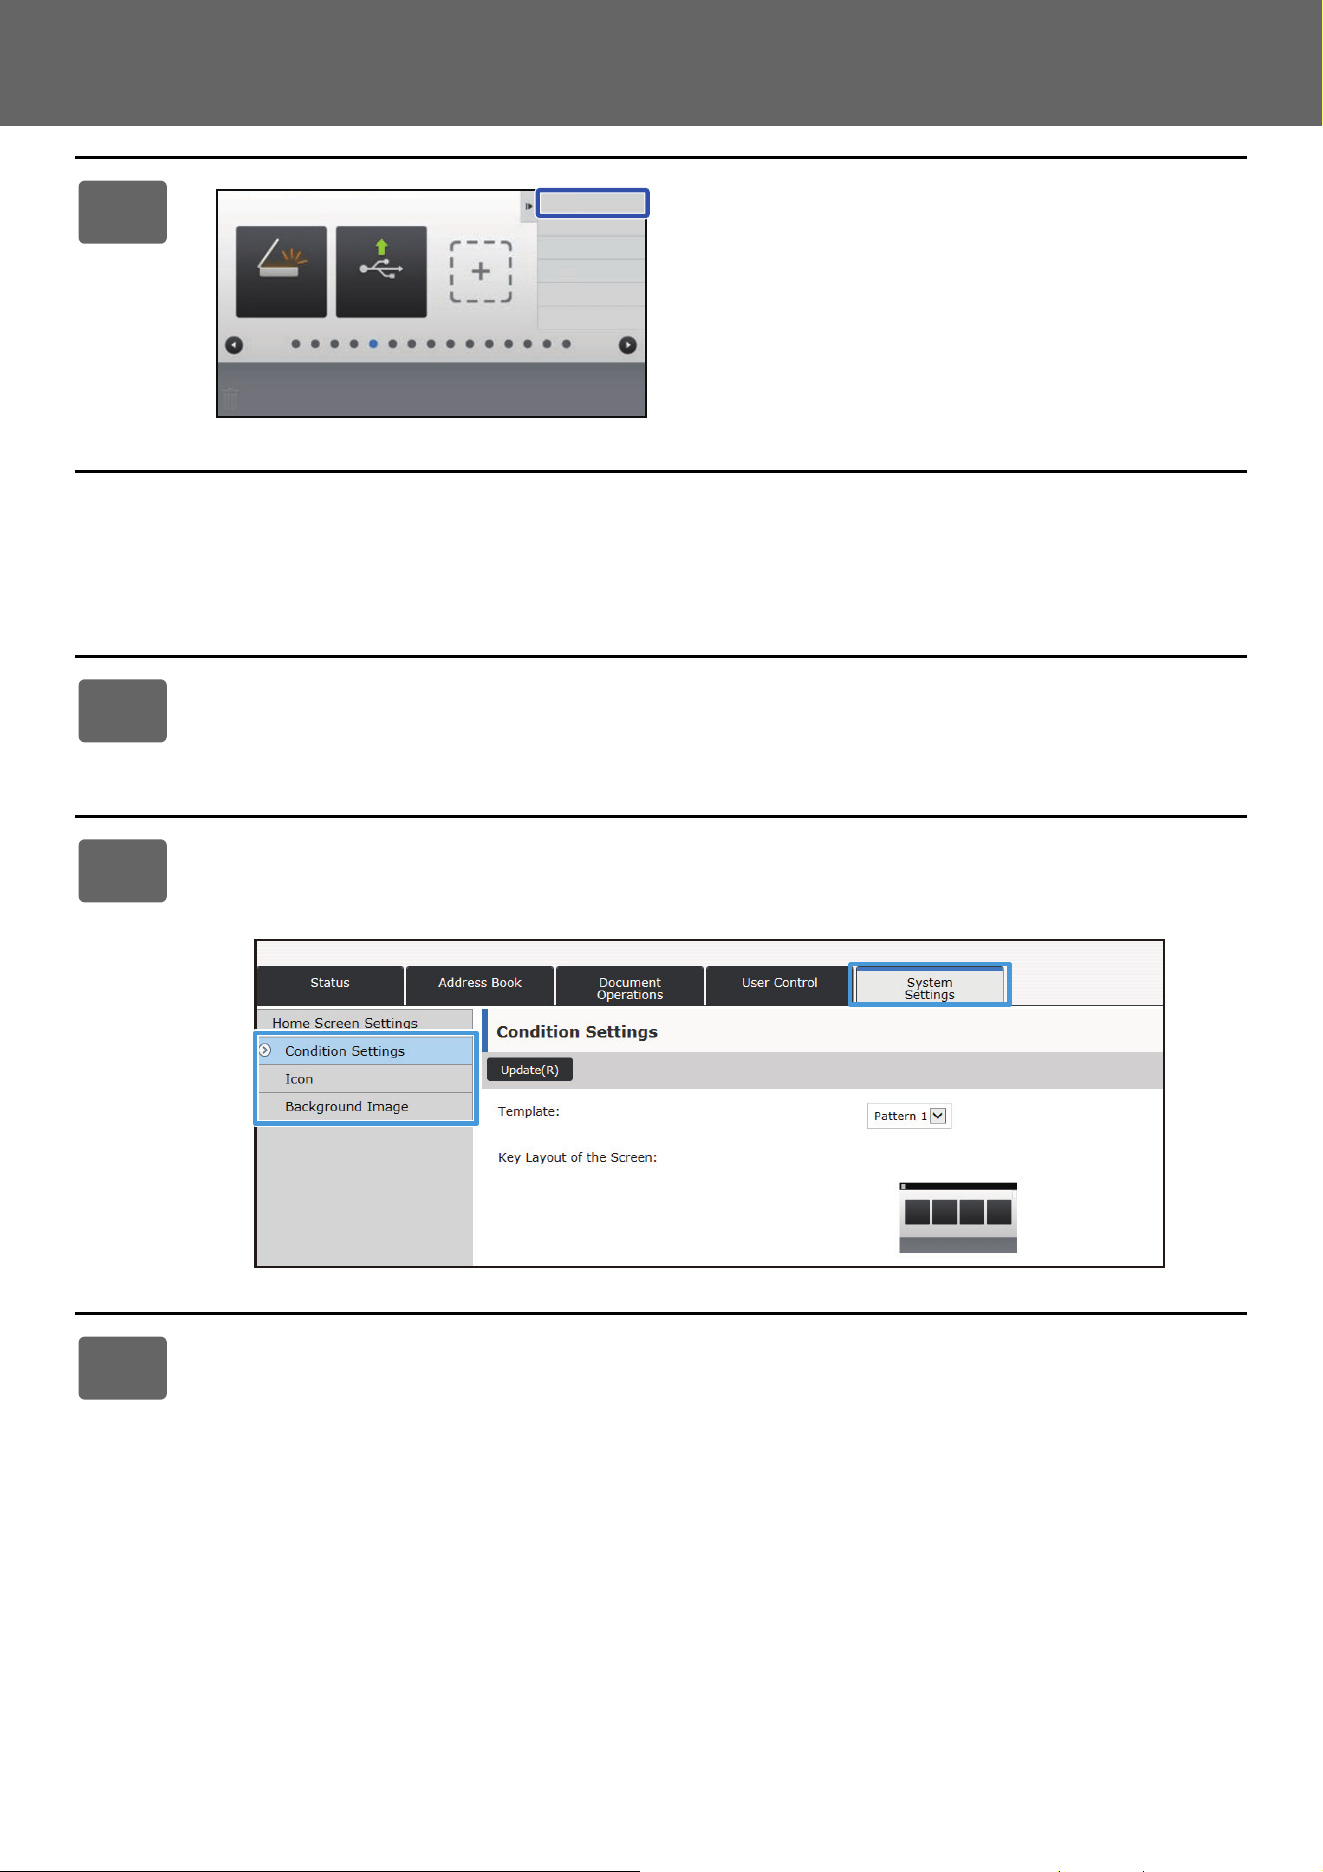
2
On the Web page, click the [System Settings] tab → [Home Screen Settings].
Some settings may require that you enter your user password after clicking [Home Screen Settings]. If you did not
perform user authentication, you must enter the administrator password.
3
Configure the settings.
Exit Home Edit Mode
Return Key Layout
to The Defaults
PC Scan Print from USB
Memory
31
Touch Panel Operation
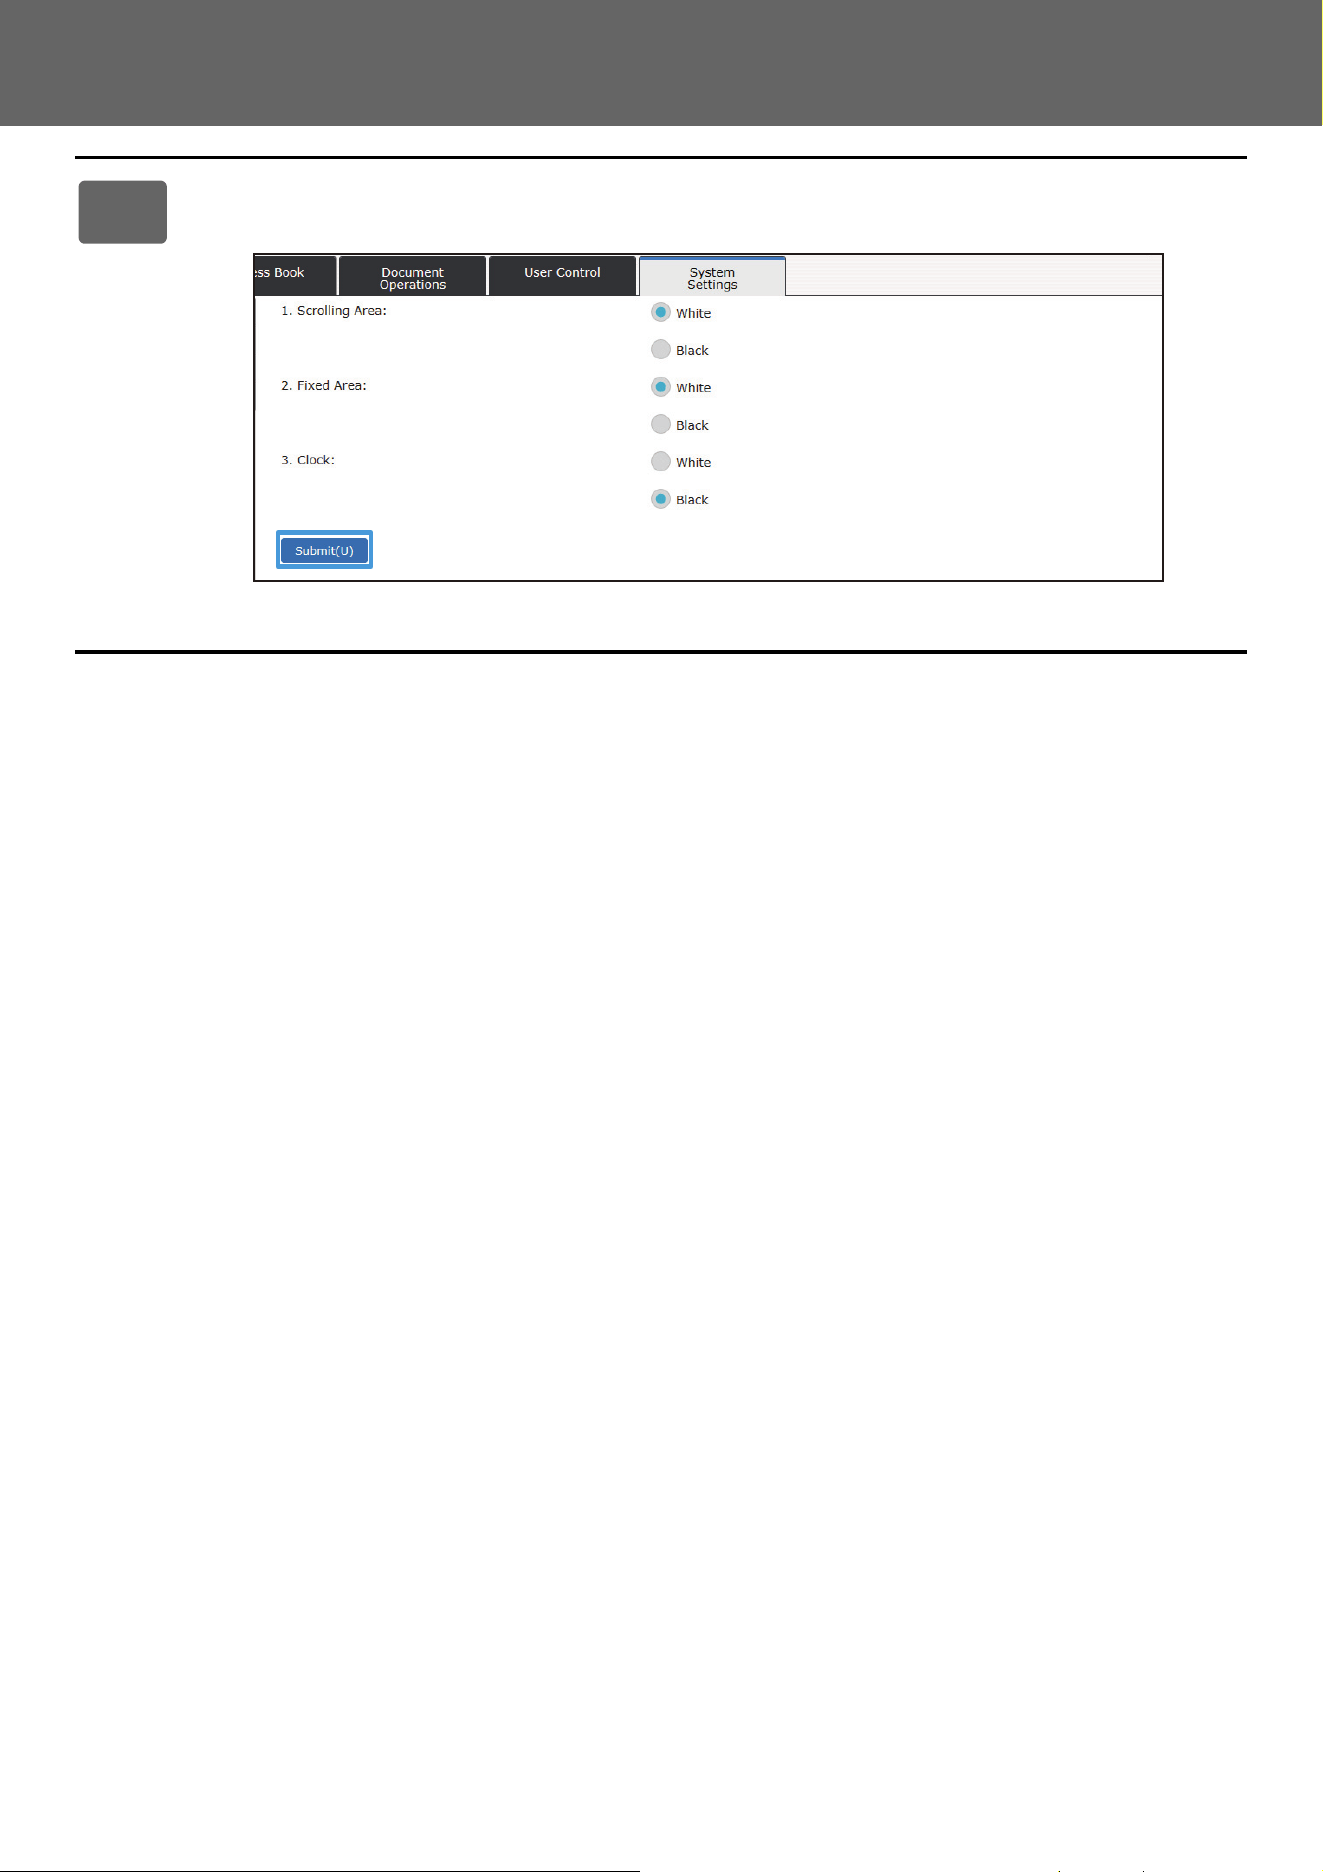
4
When you have finished configuring the settings, click the [Submit] button.
The settings are saved in the machine and applied.
When you have finished all U/I Customize settings, click the [Logout] button and close your Web browser.
32
Touch Panel Operation
EDITING SHORTCUT KEYS
You can add shortcut keys to the home screen, and delete unneeded shortcut keys.
You can also change the display order of the shortcut keys and change names and images to make the machine easier
to use.
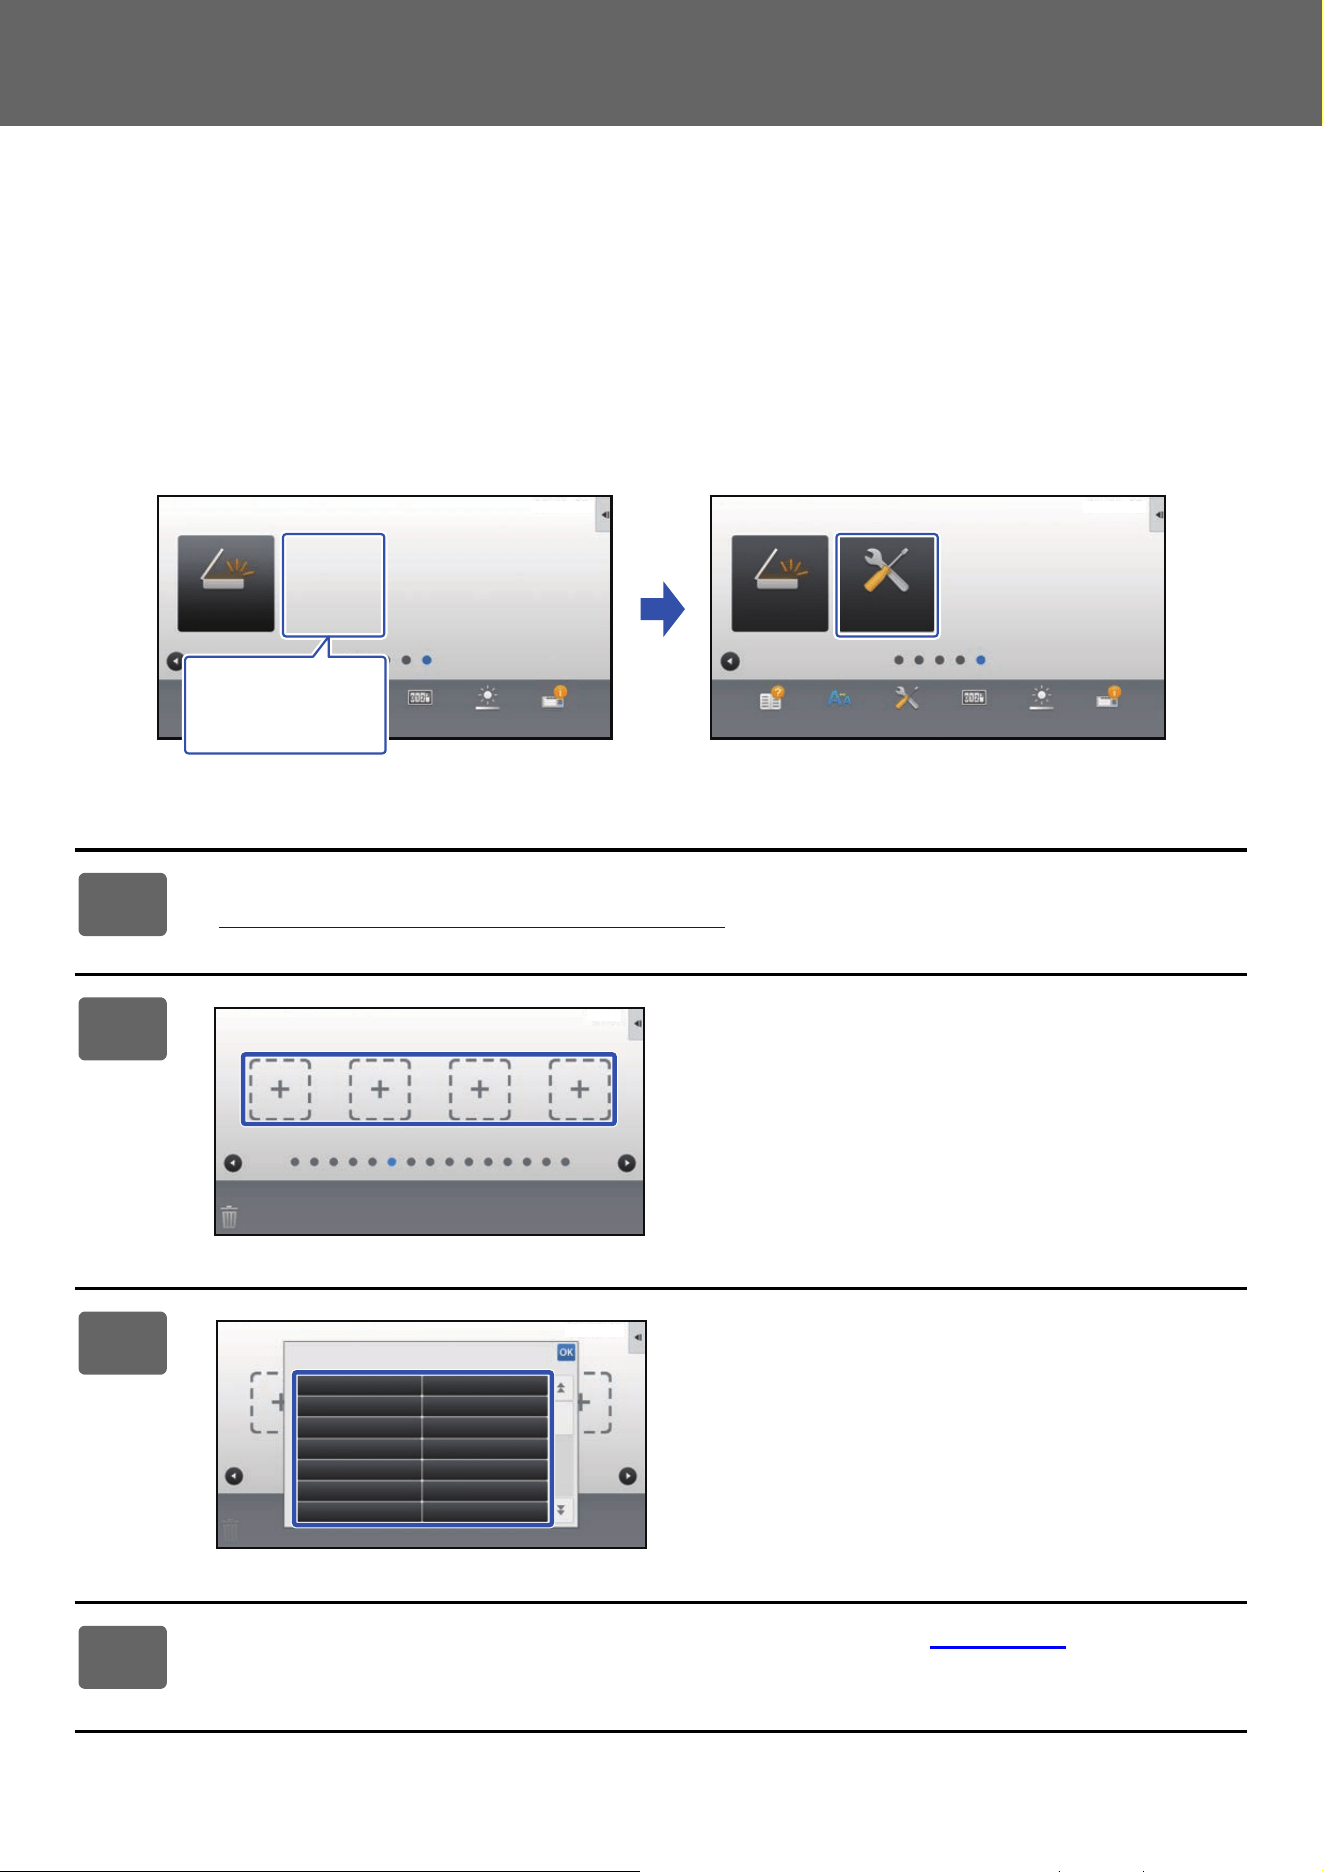
ADDING SHORTCUT KEYS
This section explains how to add a shortcut key to the home screen.
You can add a shortcut key using the touch panel, or from the Web page. In the Web page, you can change a shortcut
key image to any custom image.
From the touch panel
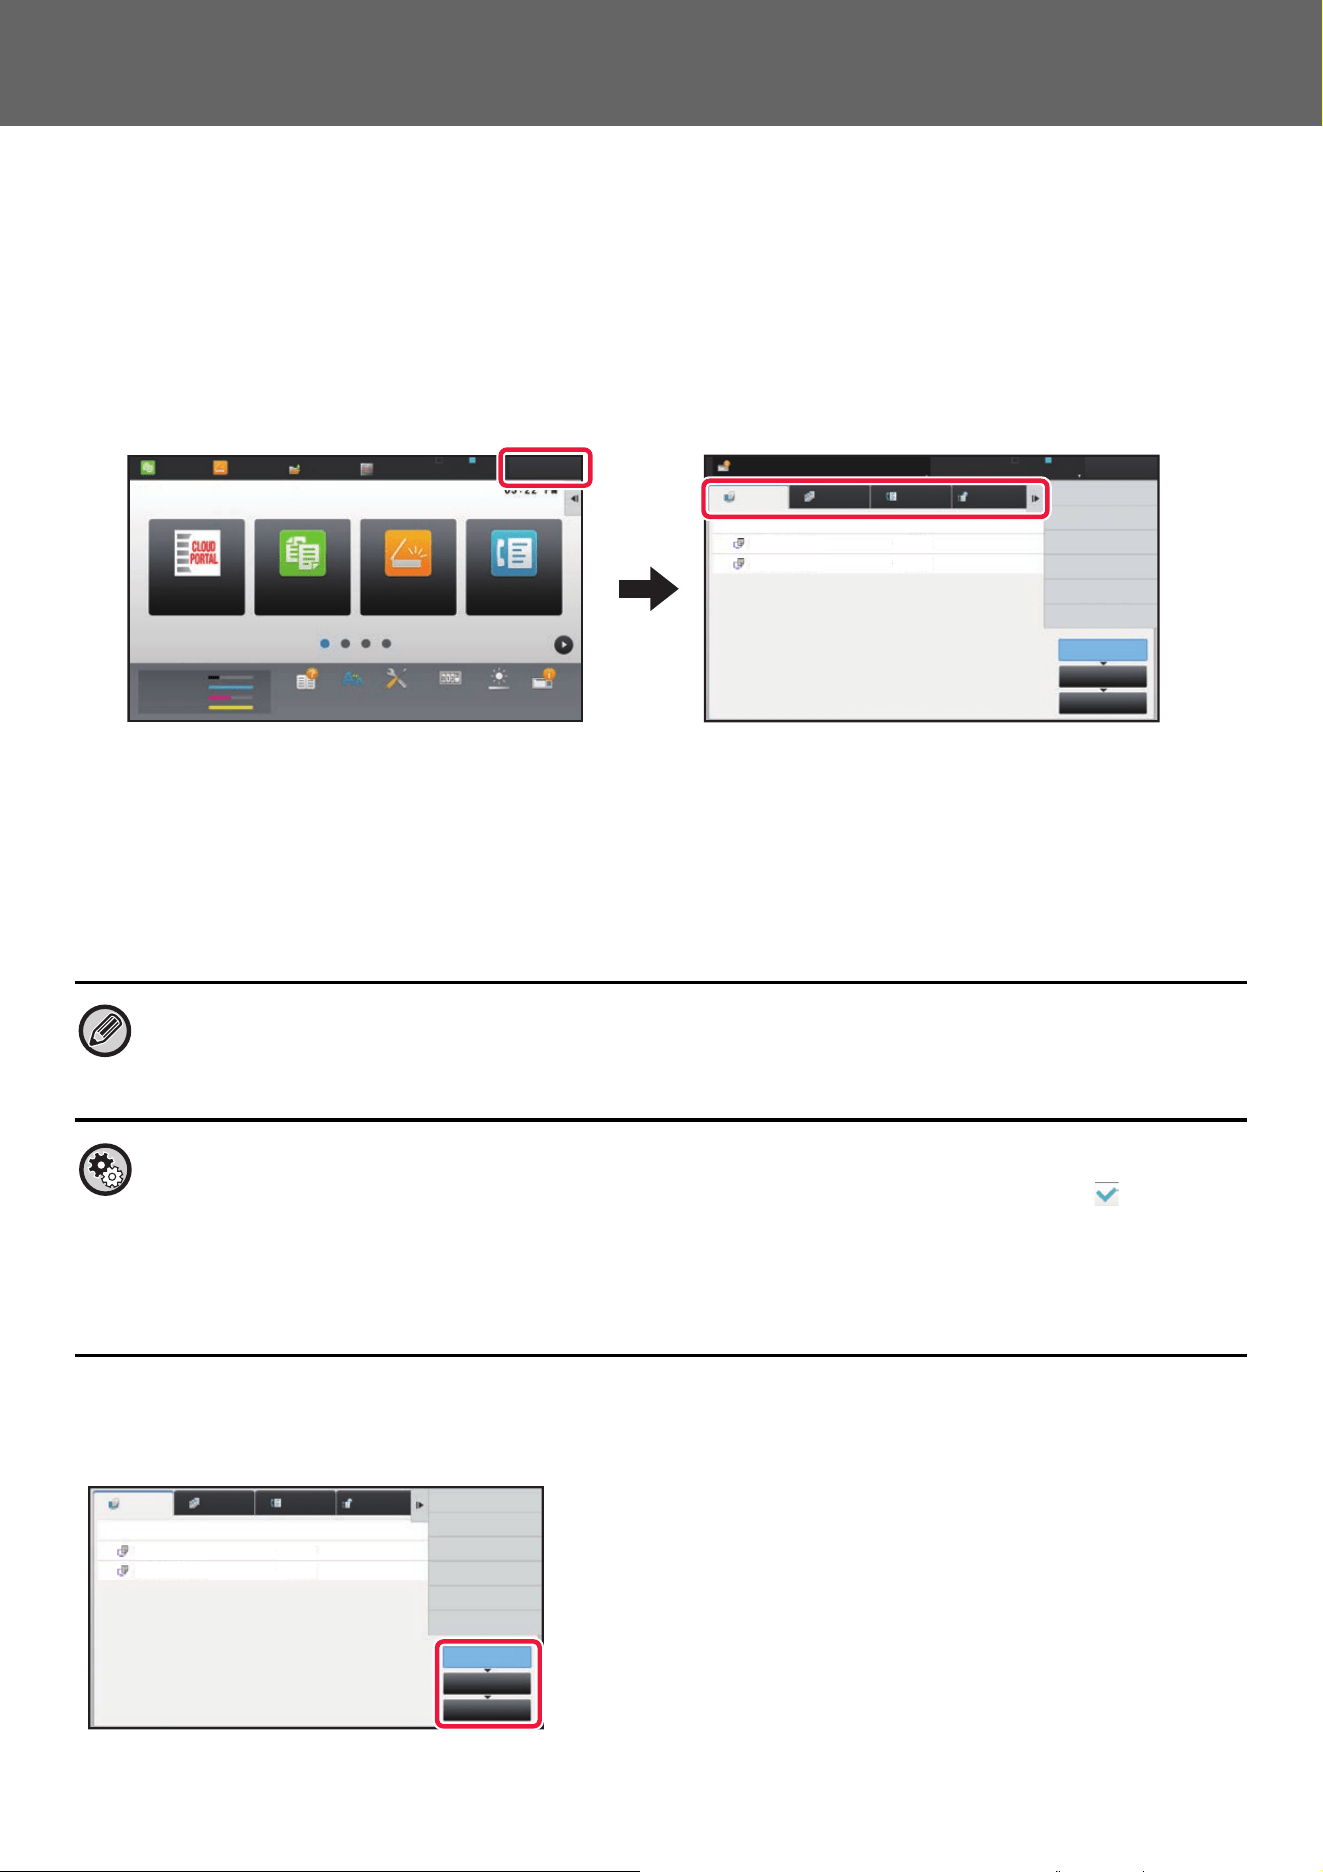
1
Open the action panel on the home screen, and tap [Edit Home].
► General procedure when using the touch panel (page 29)
2
Tap an empty shortcut key location.
3
Tap the function you want to add.
The shortcut key will be added to the selected location.
4
See "General procedure when using the touch panel" (►page 29) to exit the
settings.
PC Scan
Operation
Guide
Enlarge
Display Mode
Settings Total Count LCD Control Job Status
PC Scan
Operation
Guide
Enlarge
Display Mode
Settings Total Count LCD Control Job Status
Settings
10:15 AM 10:15 AM
I want to add the
[Settings]
shortcut key.
10:15 AM
Copy
Fax E-Mail
Internet Fax FTP/Desktop
Network Folder PC Scan
Program List
(Image Send)
Address Book
Scan to Local Drive
Scan to Ext.
Memory
Address
Control
Global
Address Search
Program List
(Copy)
Select Functions to add to Home.
10:15 AM
33
Touch Panel Operation
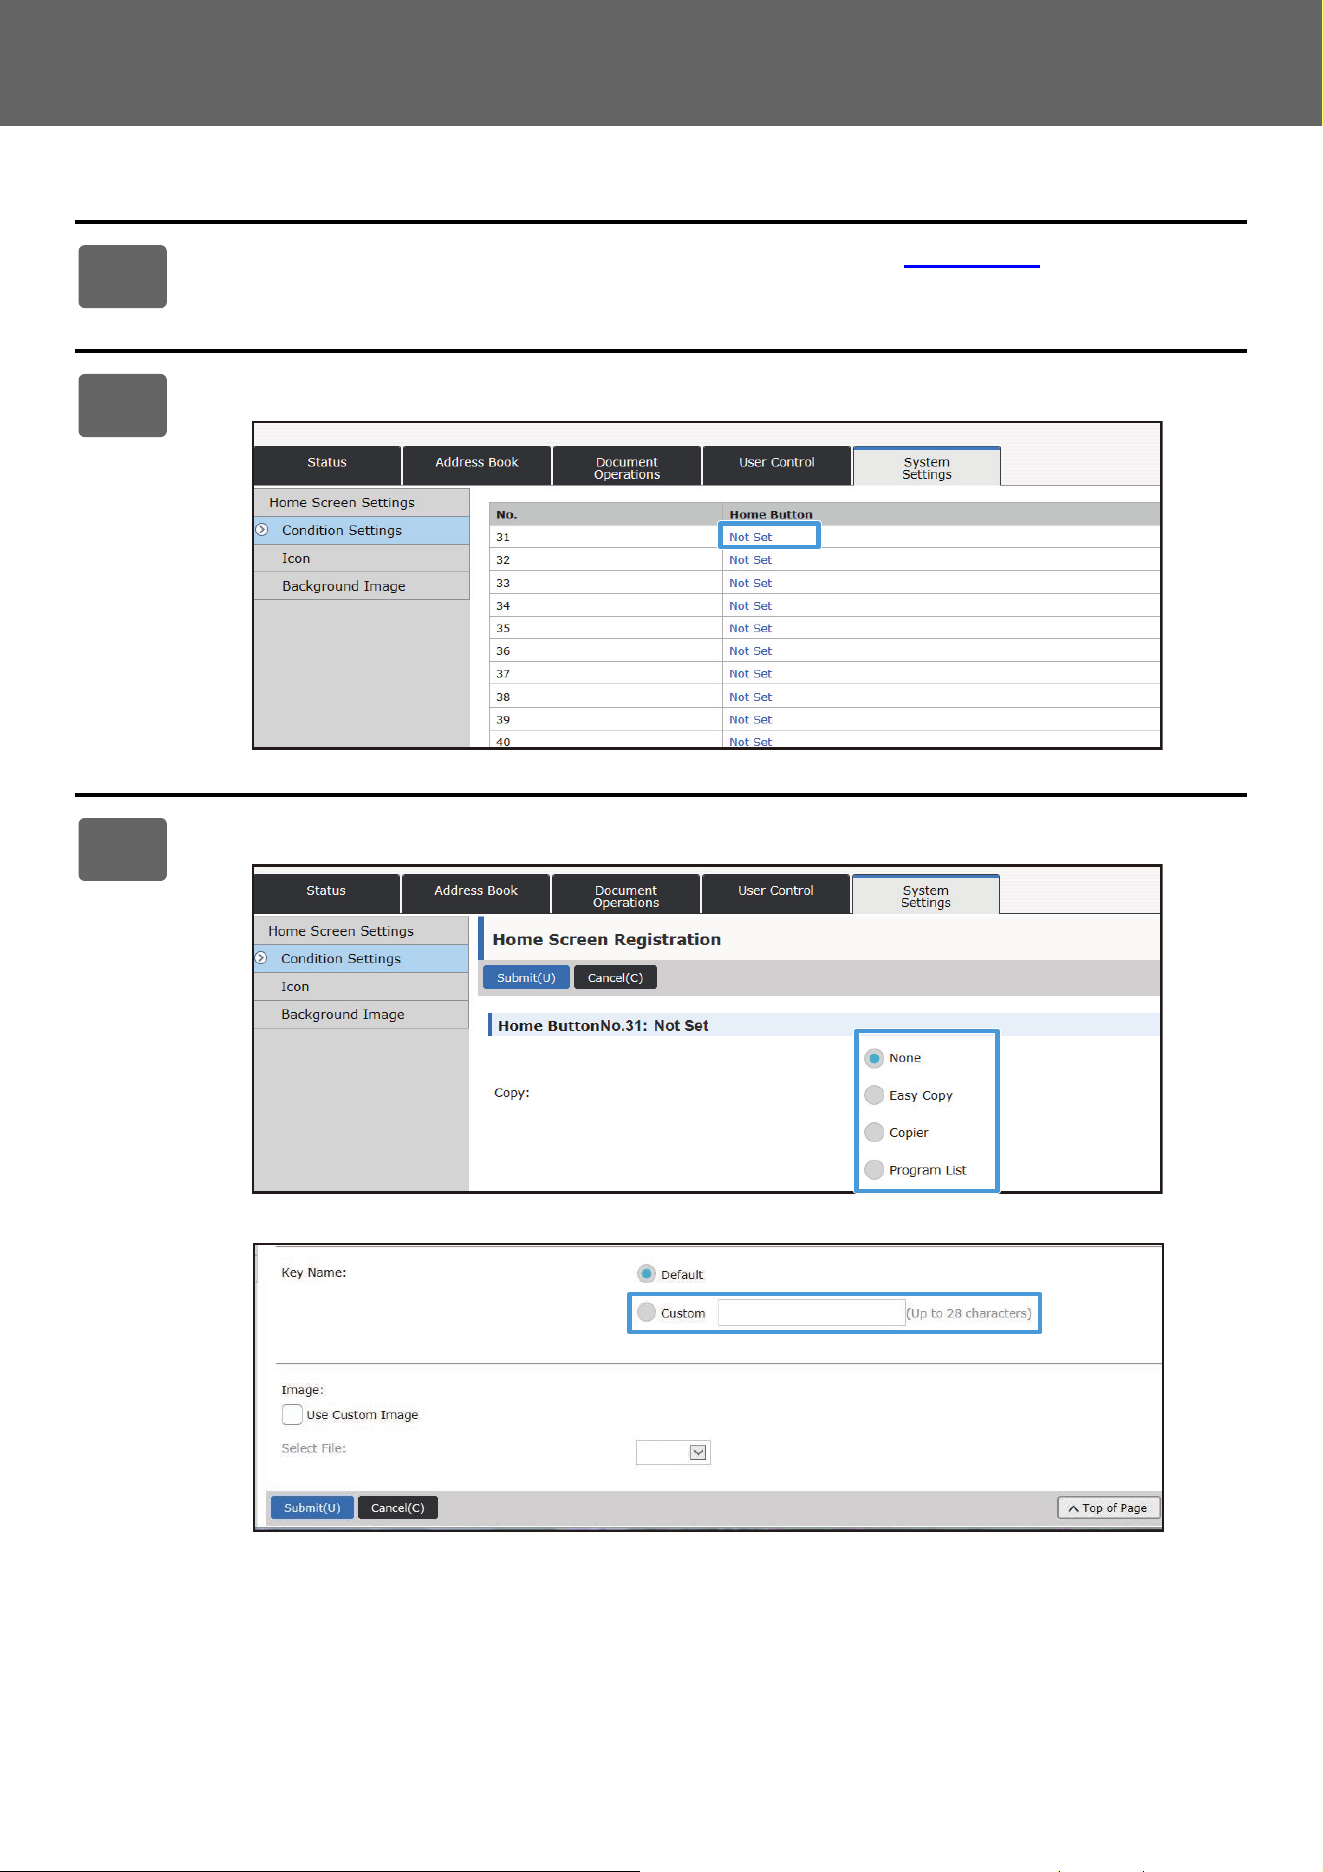
From the Web page
1
See "General procedure when using the Web page" (►page 30) to open the
settings screen.
2
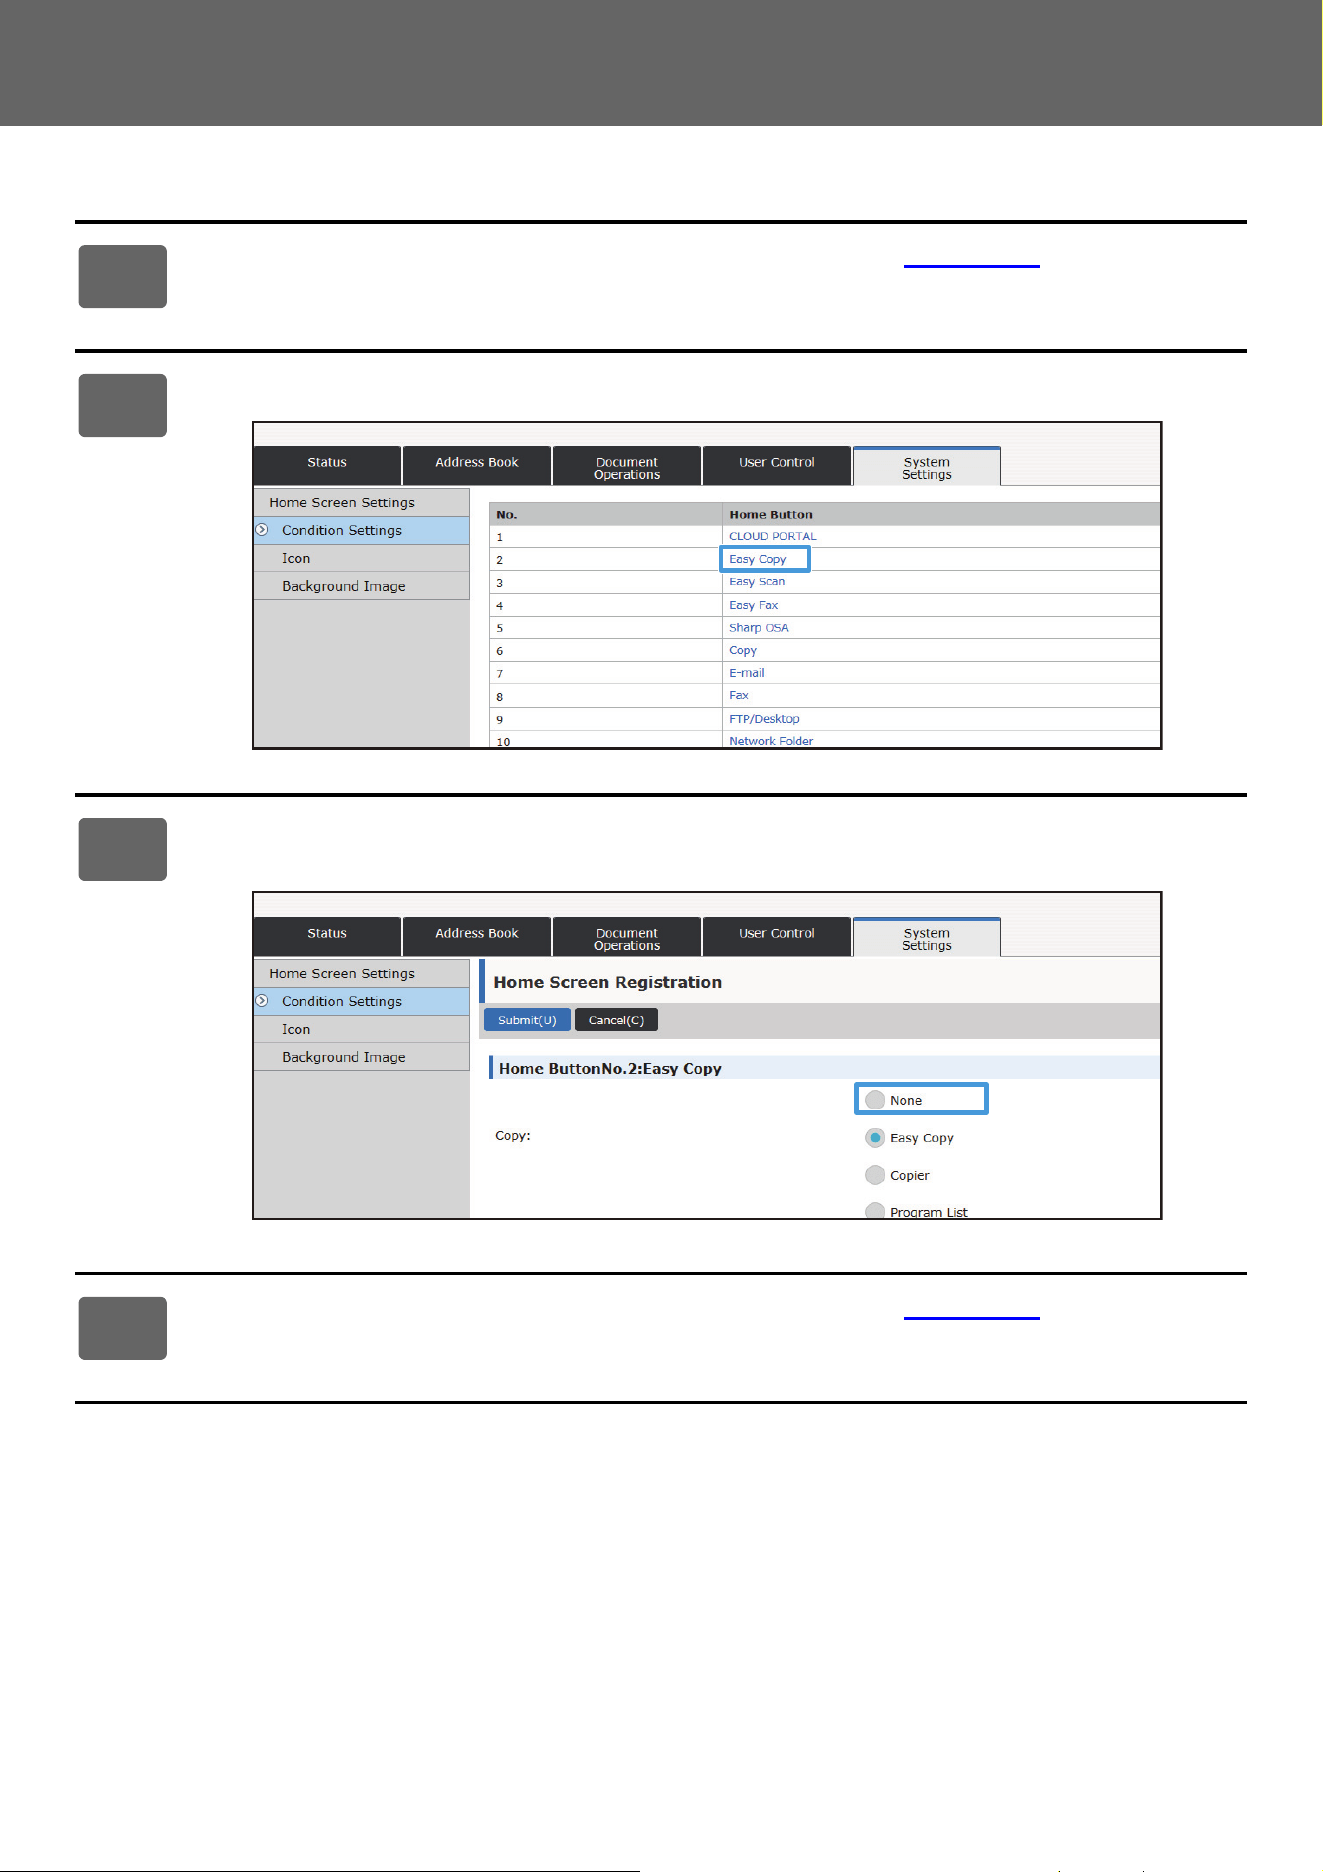
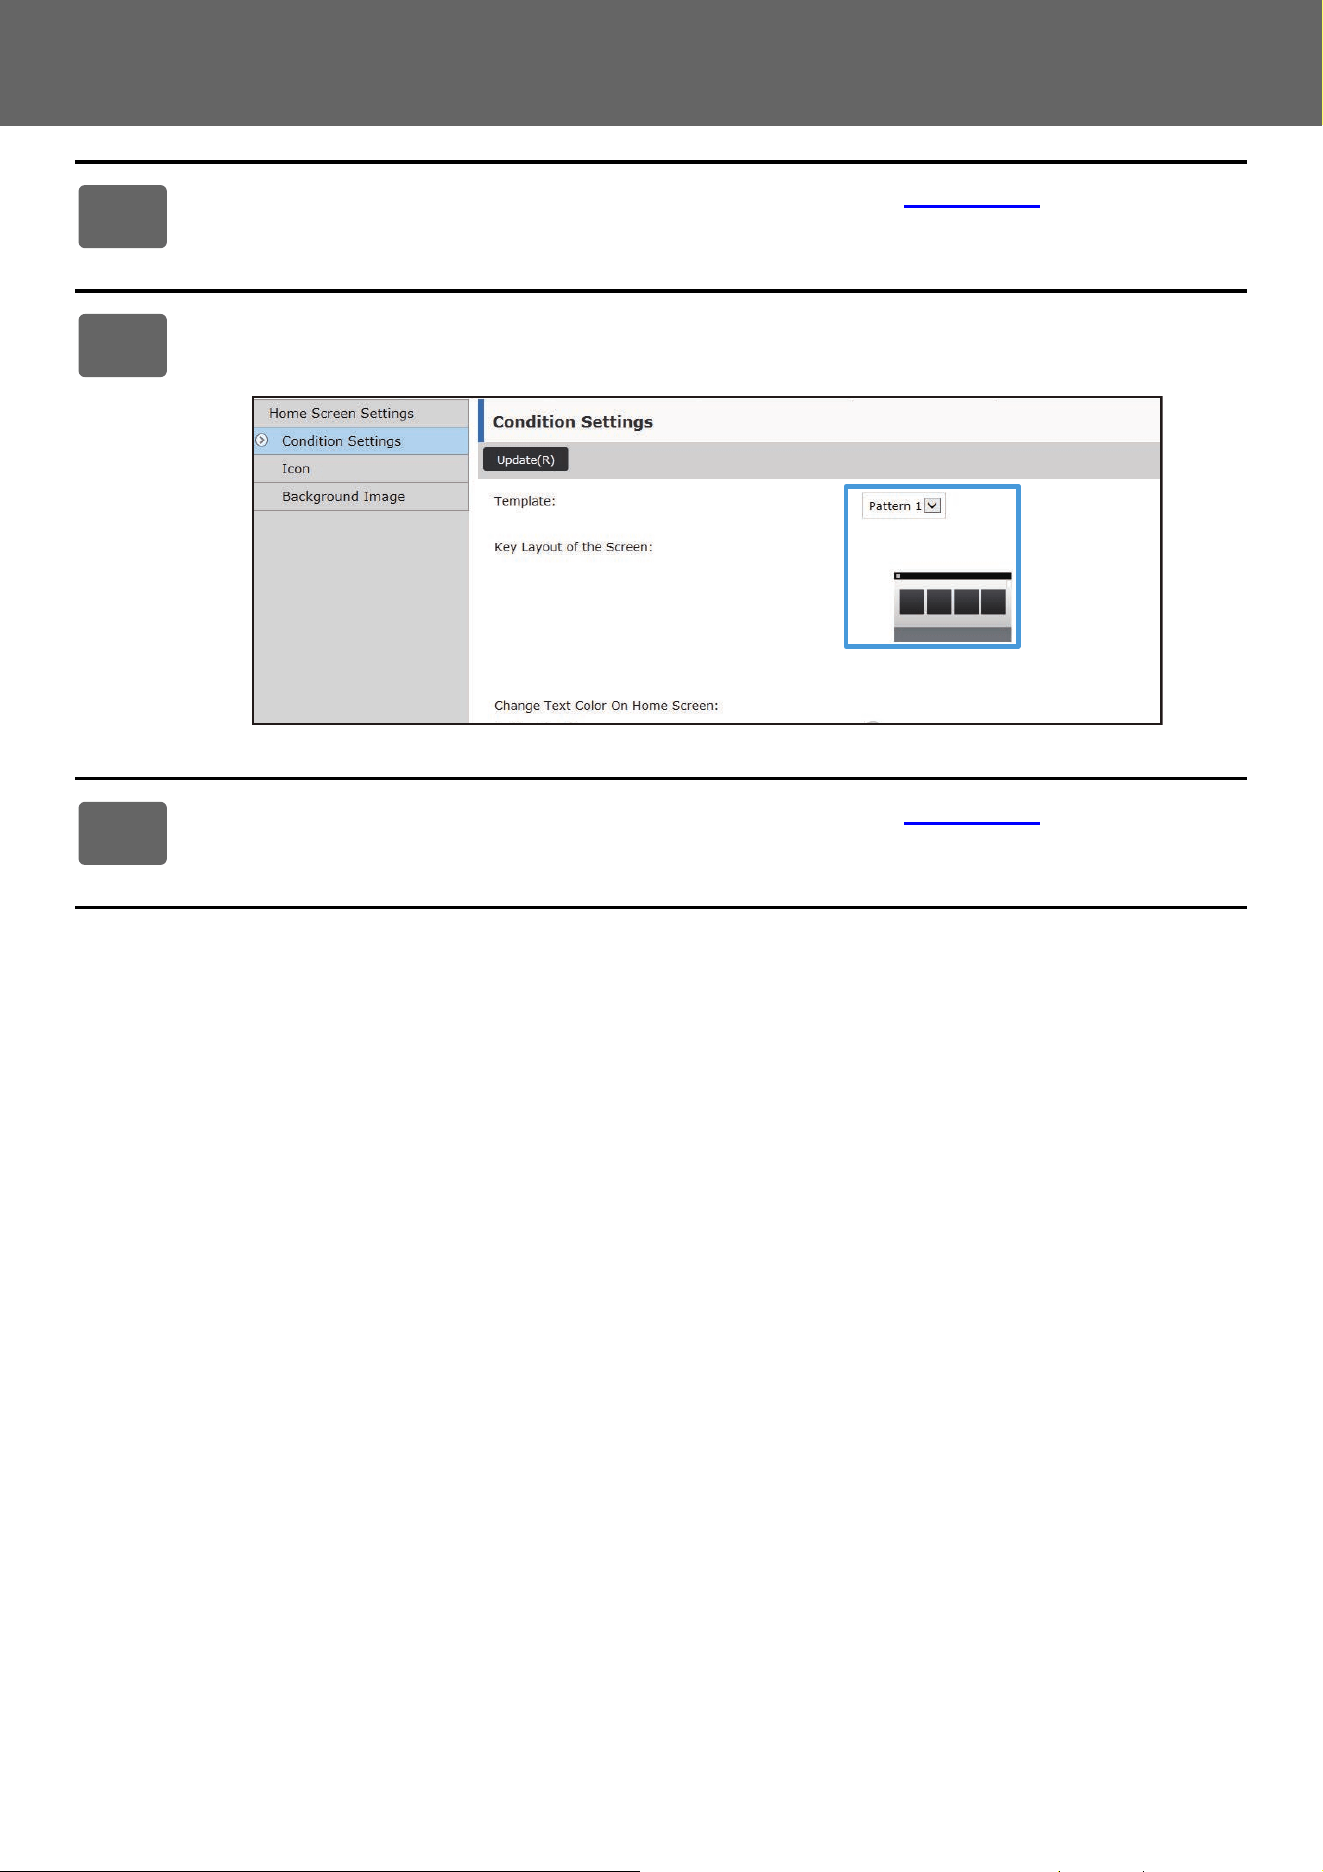
Click [Condition Settings], and click [Not Set].
3
Select the function you want to add.
To change the name of a shortcut key, select [Custom] in [Key Name] and enter the desired name in the text box.
To change the image of a shortcut key, go to the next step. If you are not changing the image, go to step 5.
AAAA.png
34
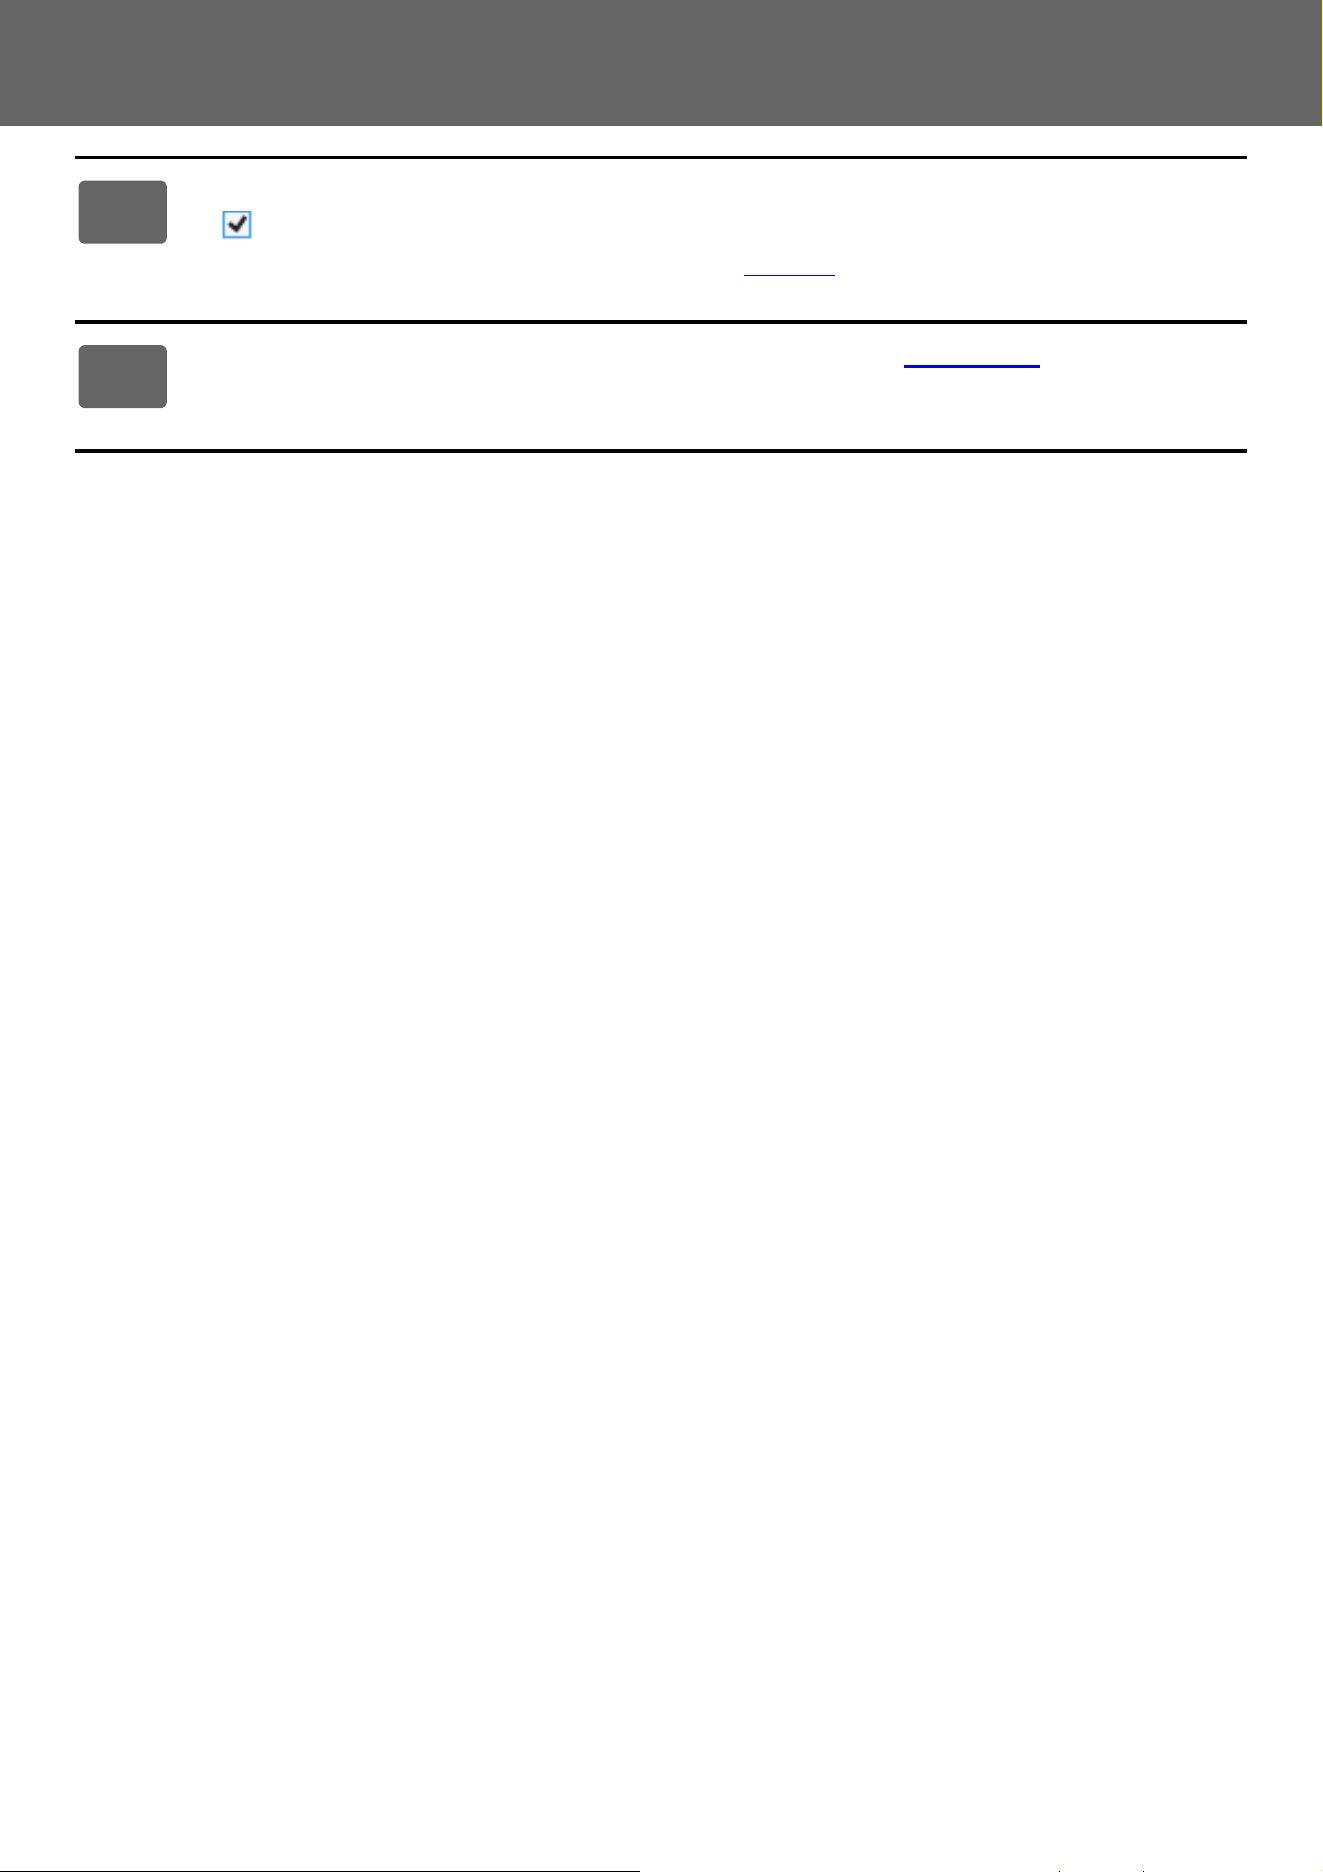
Touch Panel Operation
4
To change the image of a shortcut key, set the [Use Custom Image] checkbox
to , and select a previously added image with [Select File].
To save an image, see "ADDING A SHORTCUT KEY IMAGE" (►page 40).
5
See "General procedure when using the Web page" (►page 30) to exit the
settings.
35
Touch Panel Operation
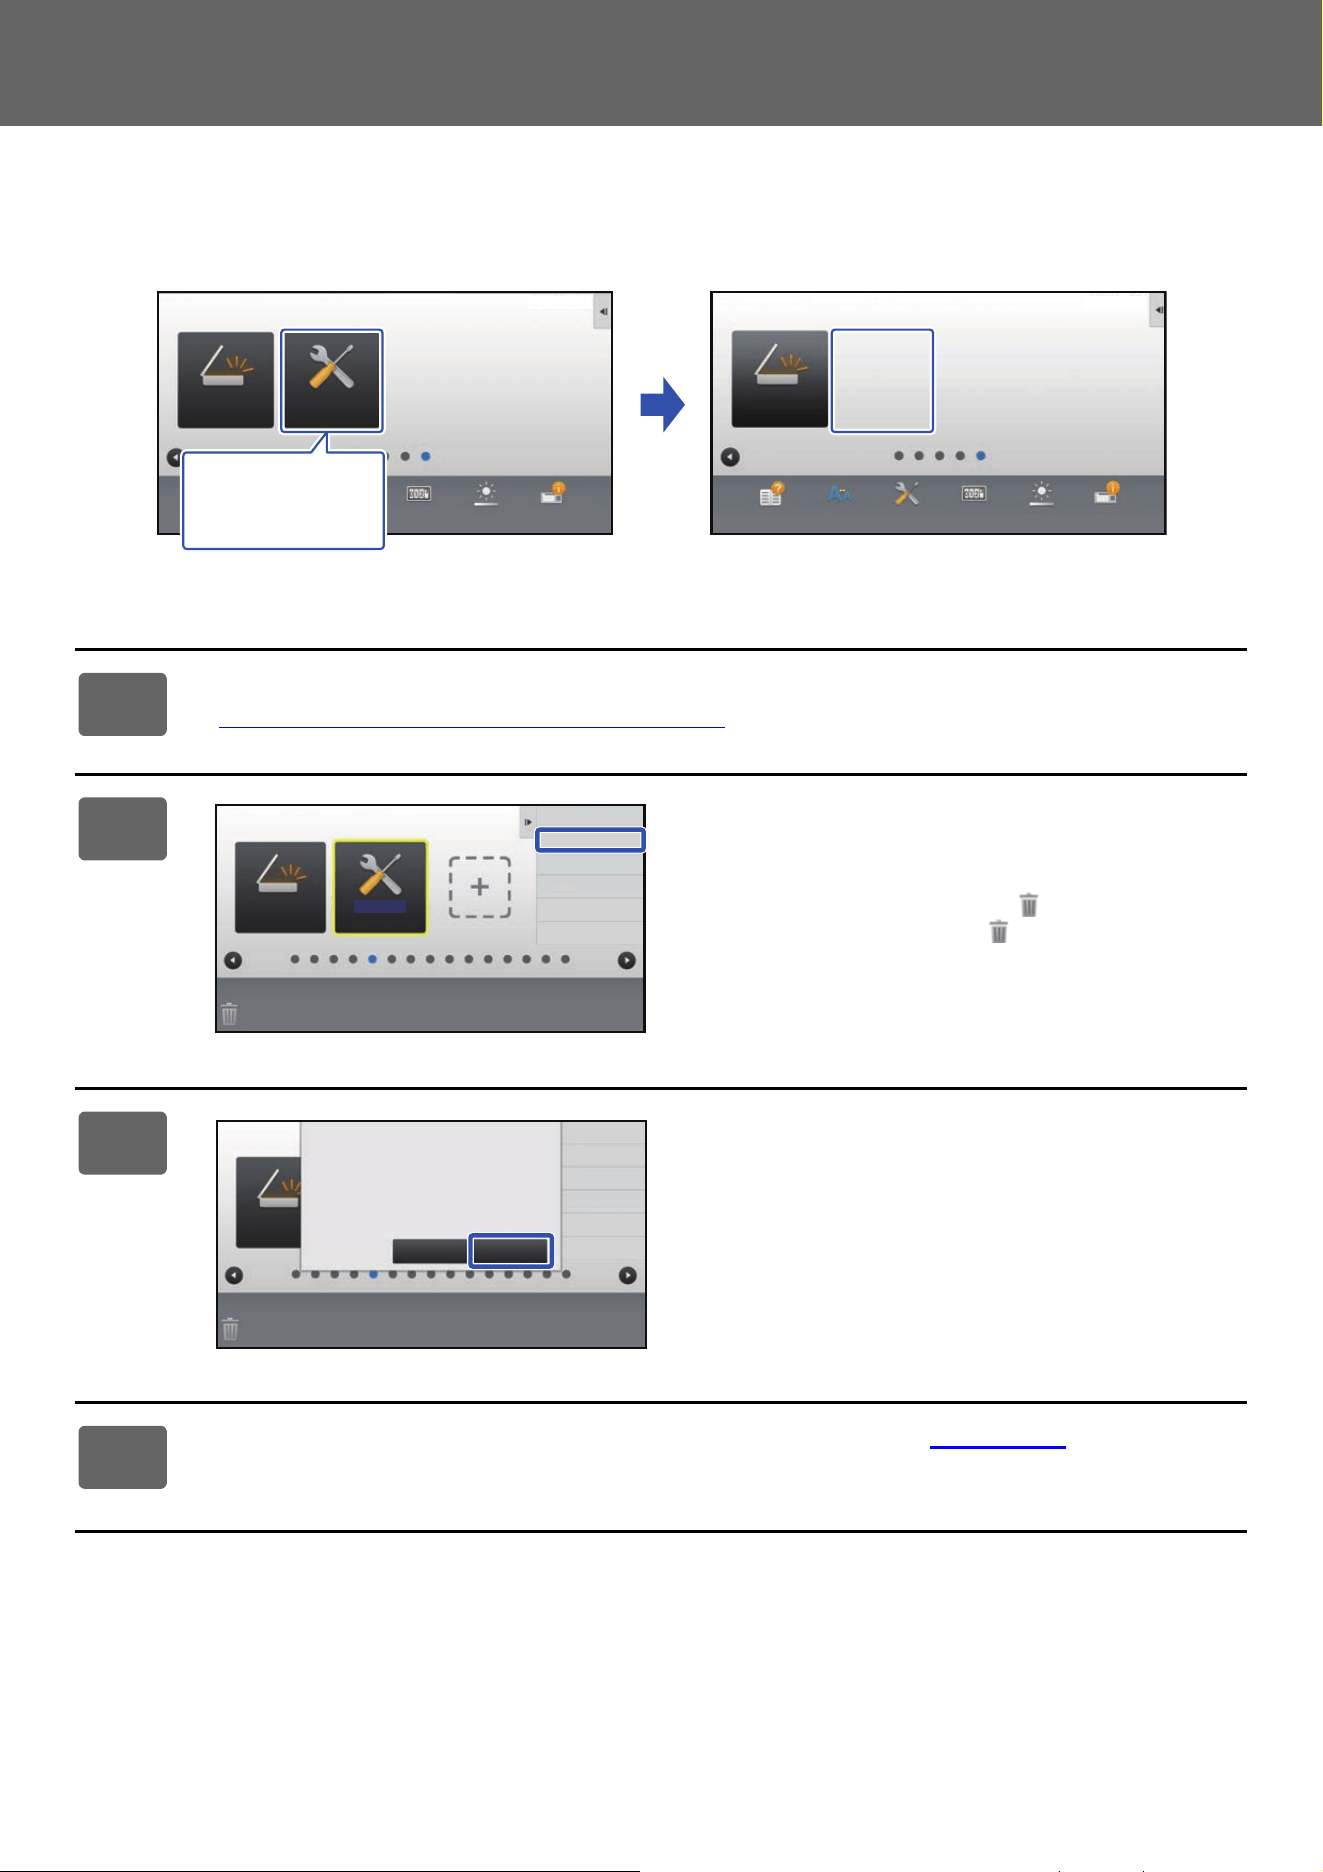
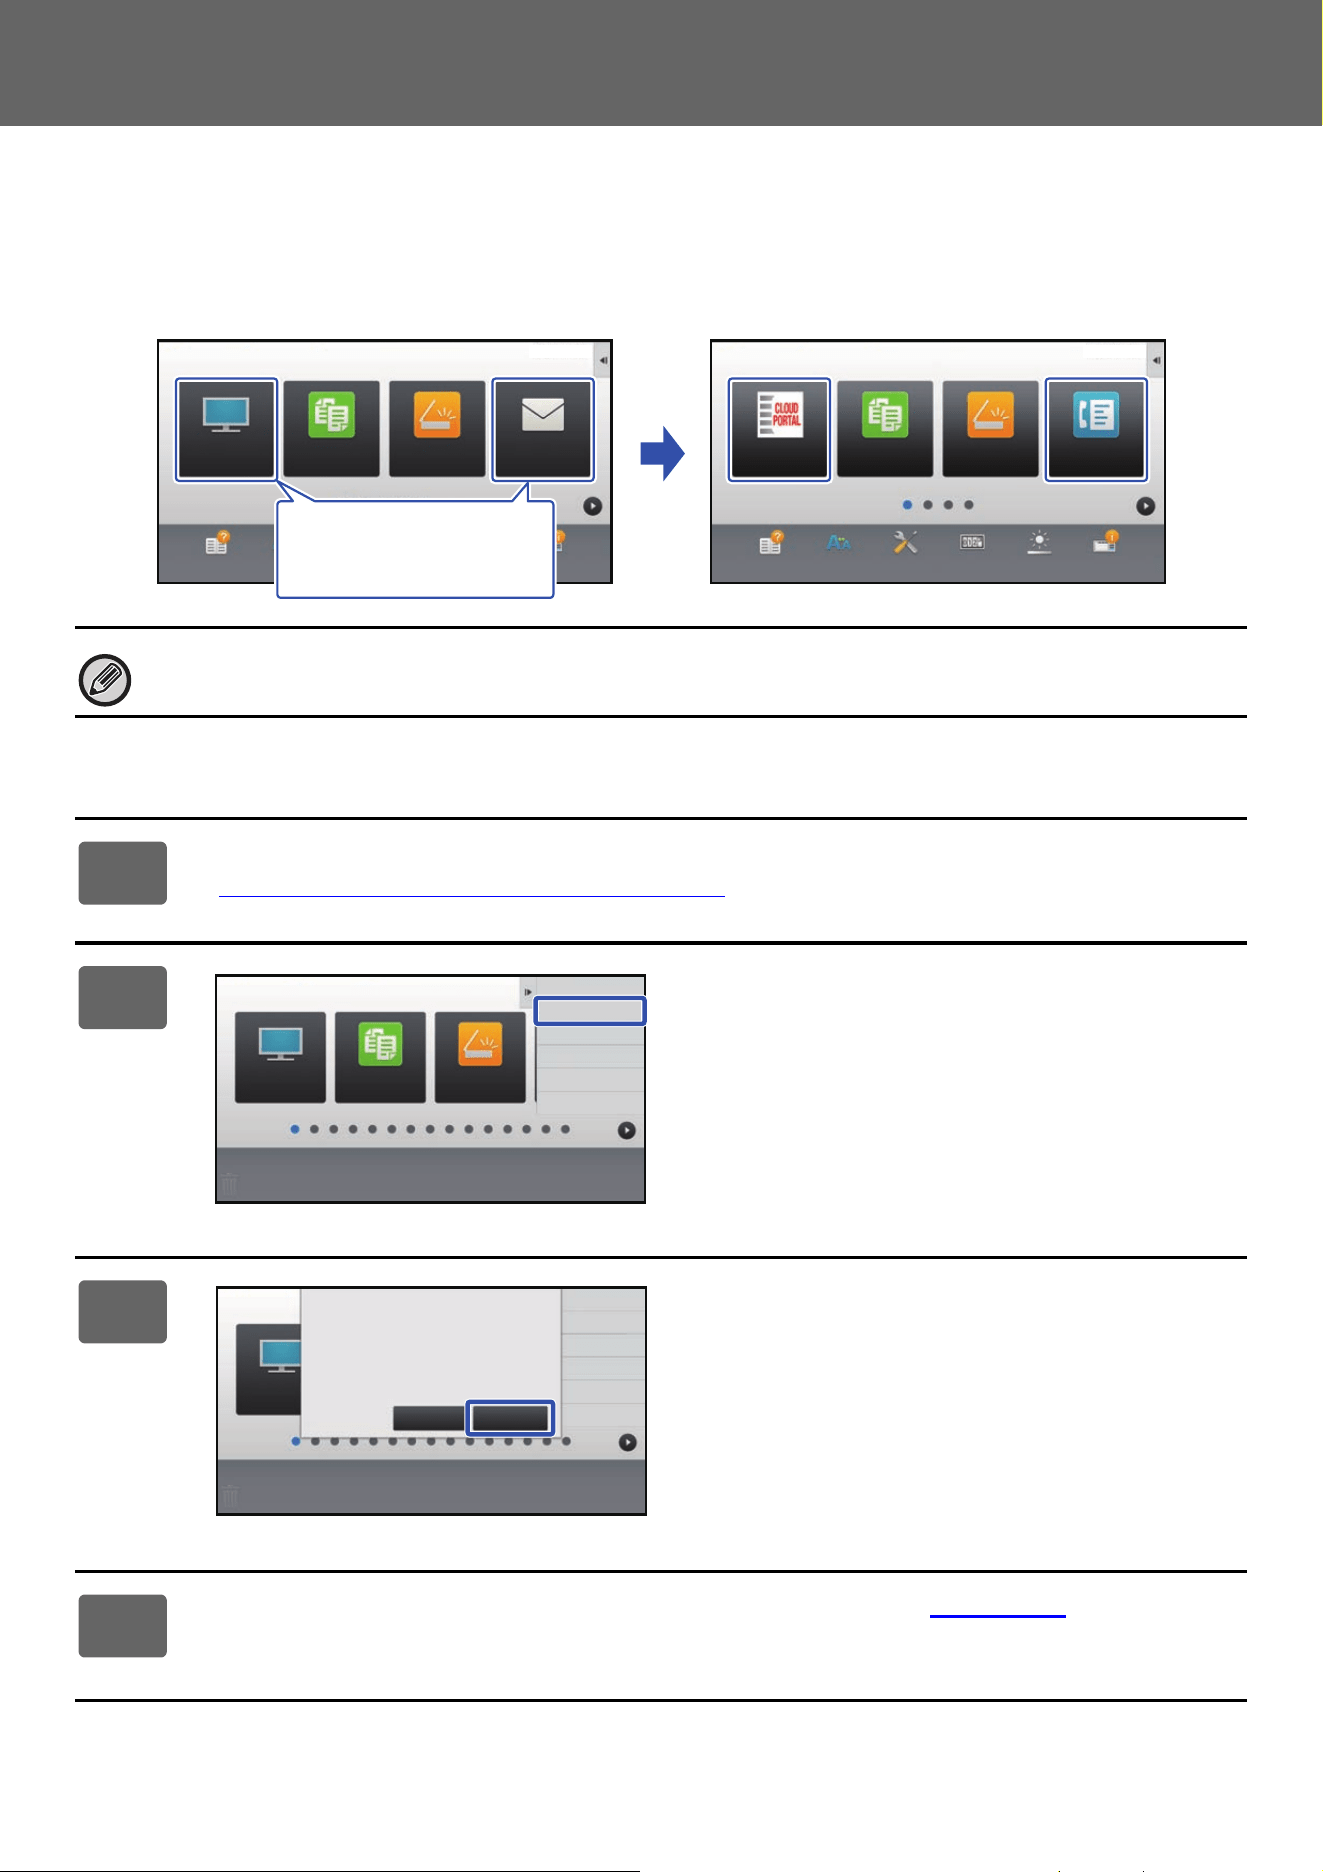
DELETING A SHORTCUT KEY
This section explains how to delete a shortcut key from the home screen.
You can delete from the touch panel or from the Web page.
From the touch panel
1
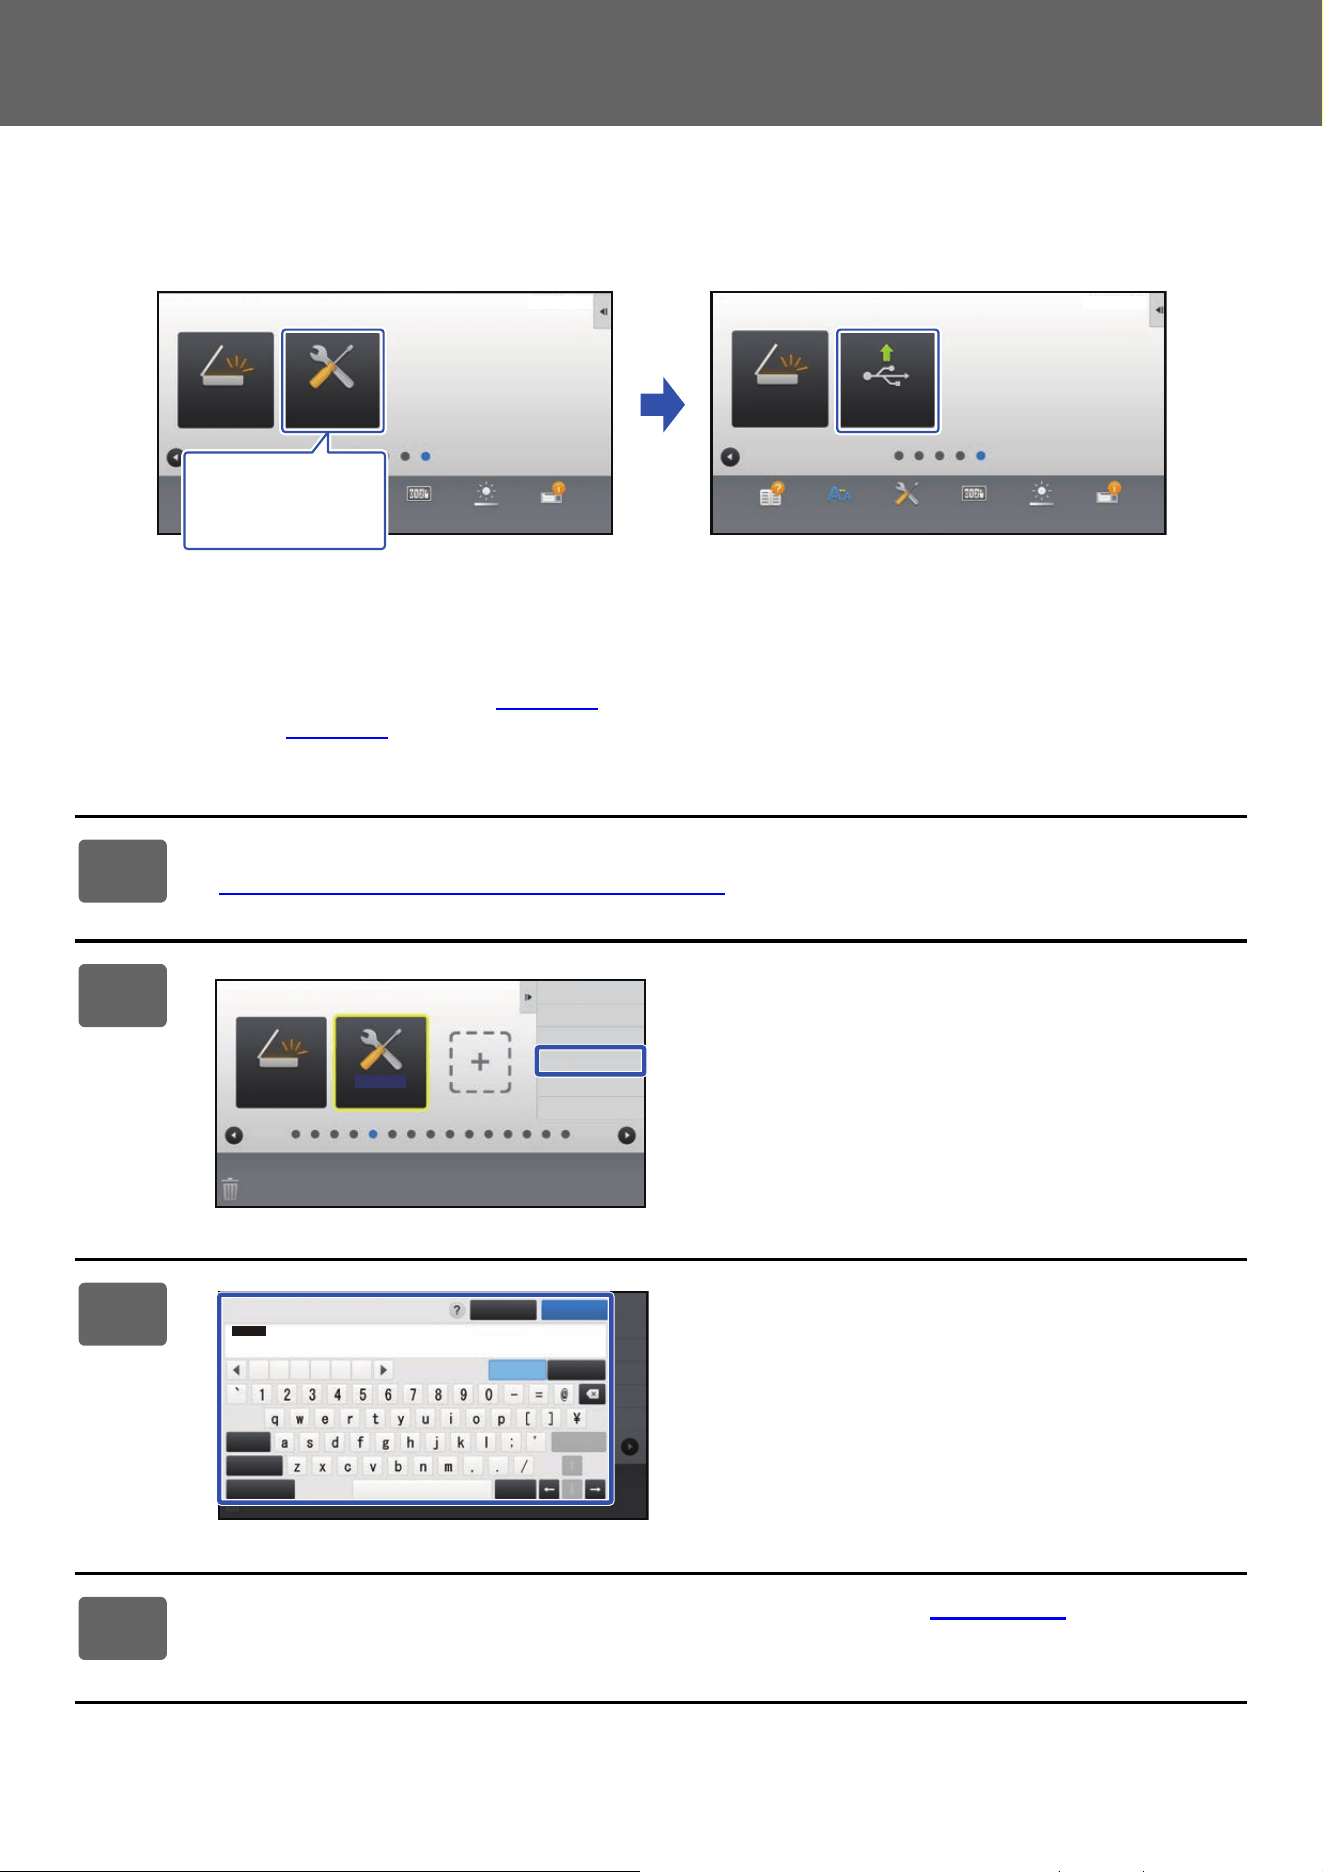
Open the action panel on the home screen, and tap [Edit Home].
► General procedure when using the touch panel (page 29)
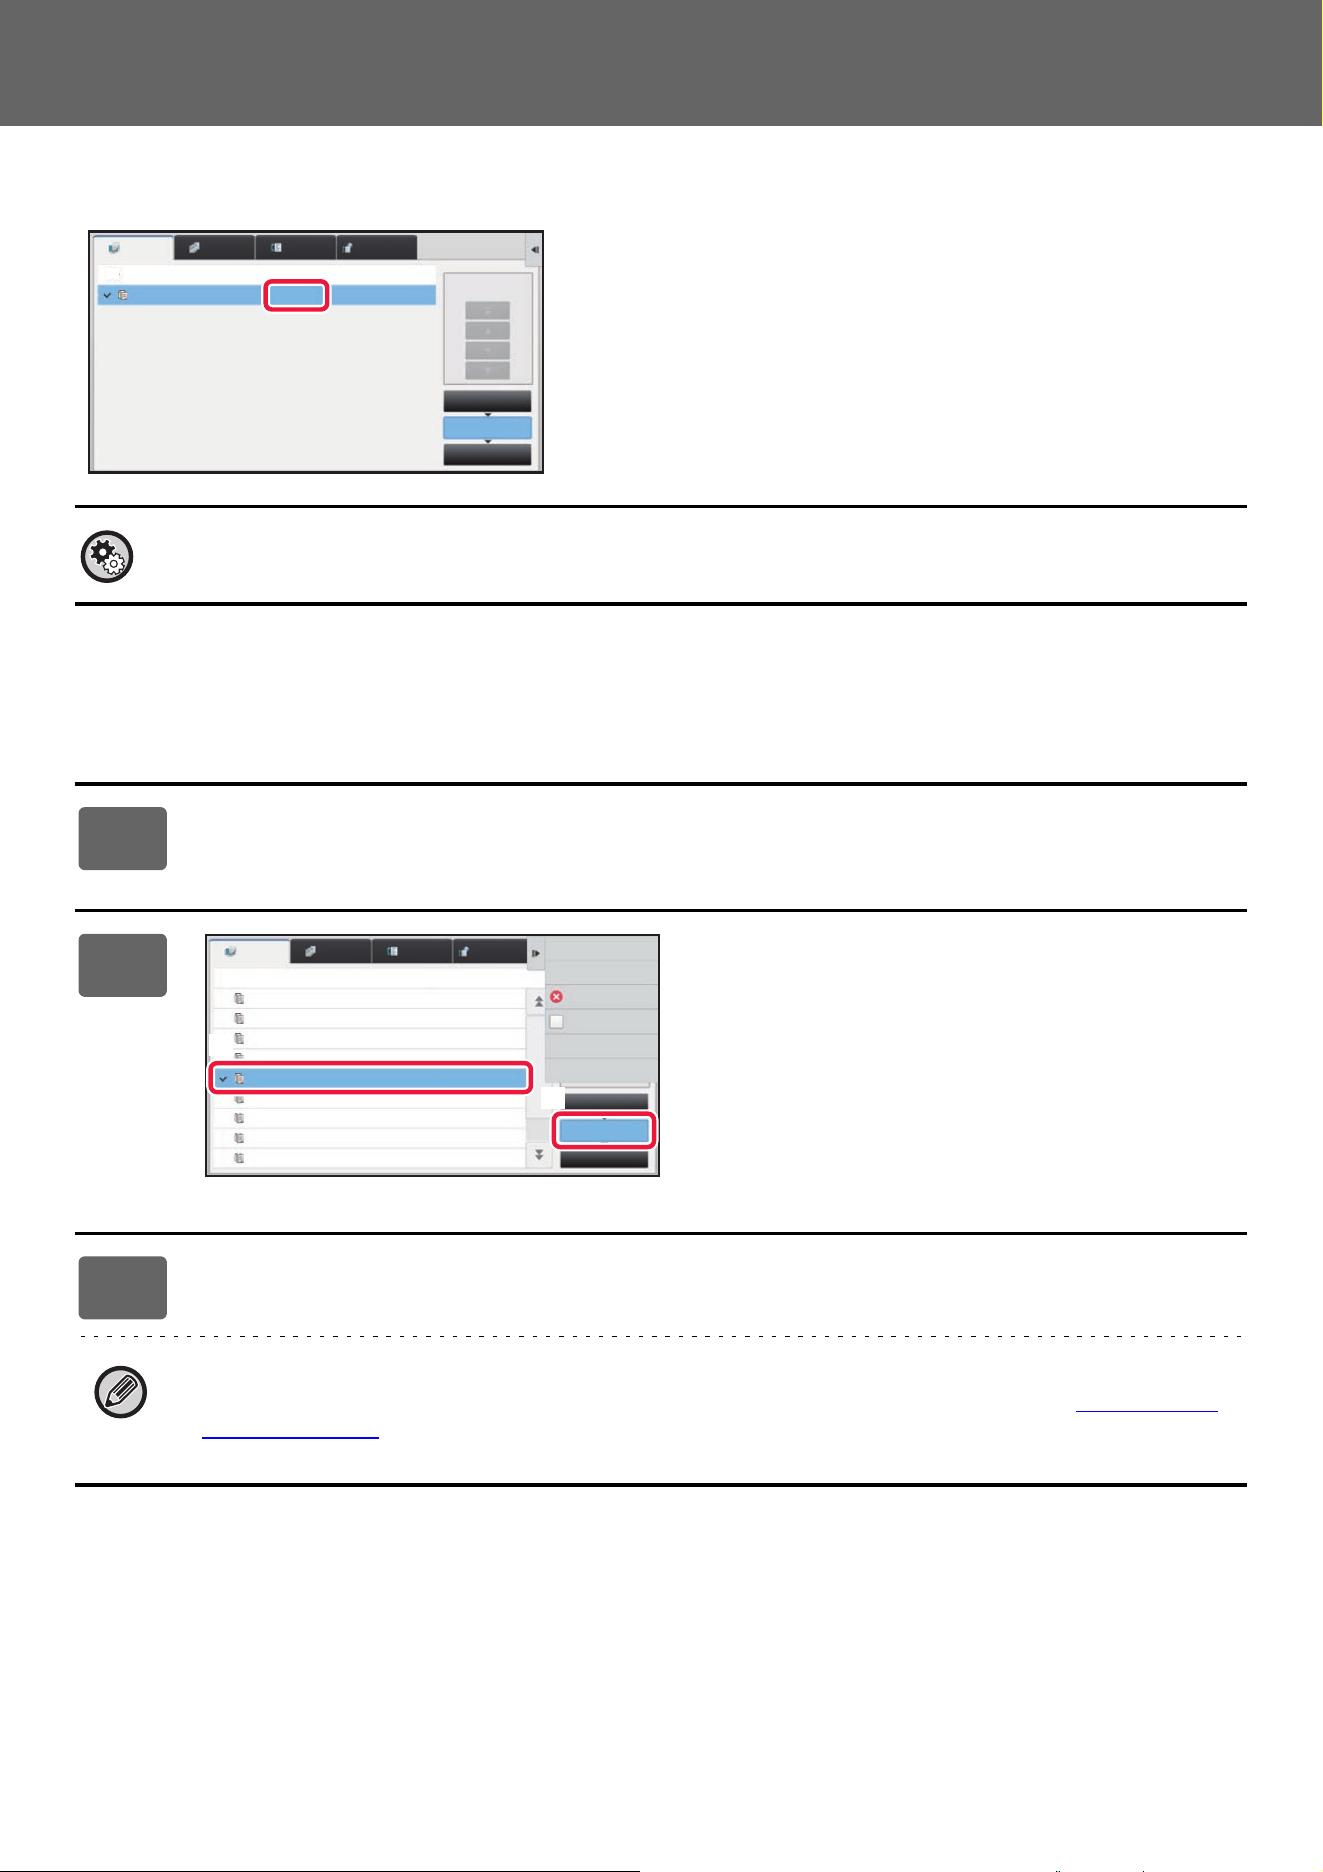
2
Tap the shortcut key you want to
delete, and tap [Delete Key].
A yellow frame appears around the selected shortcut key.
With the shortcut key selected, tap . You can also delete
by dragging the shortcut key to .
3
Tap the [Yes] key.
The selected shortcut key will be deleted.
4
See "General procedure when using the touch panel" (►page 29) to exit the
settings.
PC Scan
Operation
Guide
Enlarge
Display Mode
Settings Total Count LCD Control Job Status
Settings
PC Scan
Operation
Guide
Enlarge
Display Mode
Settings Total Count LCD Control Job Status
10:15 AM10:15 AM
I want to delete
the [Settings]
shortcut key.
Settings
PC Scan
Exit Home Edit Mode
Return Layout to Factory
Default
Delete Key
Move Key
Change Key
Name
Exit Home Edit Mode
Return Layout to Factory
Default
Delete Key
Move Key
Change Key
Name
PC Scan
Delete, OK?
Settings
Cancel Yes
36
Touch Panel Operation
From the Web page
1
See "General procedure when using the Web page" (►page 30) to open the
settings screen.
2
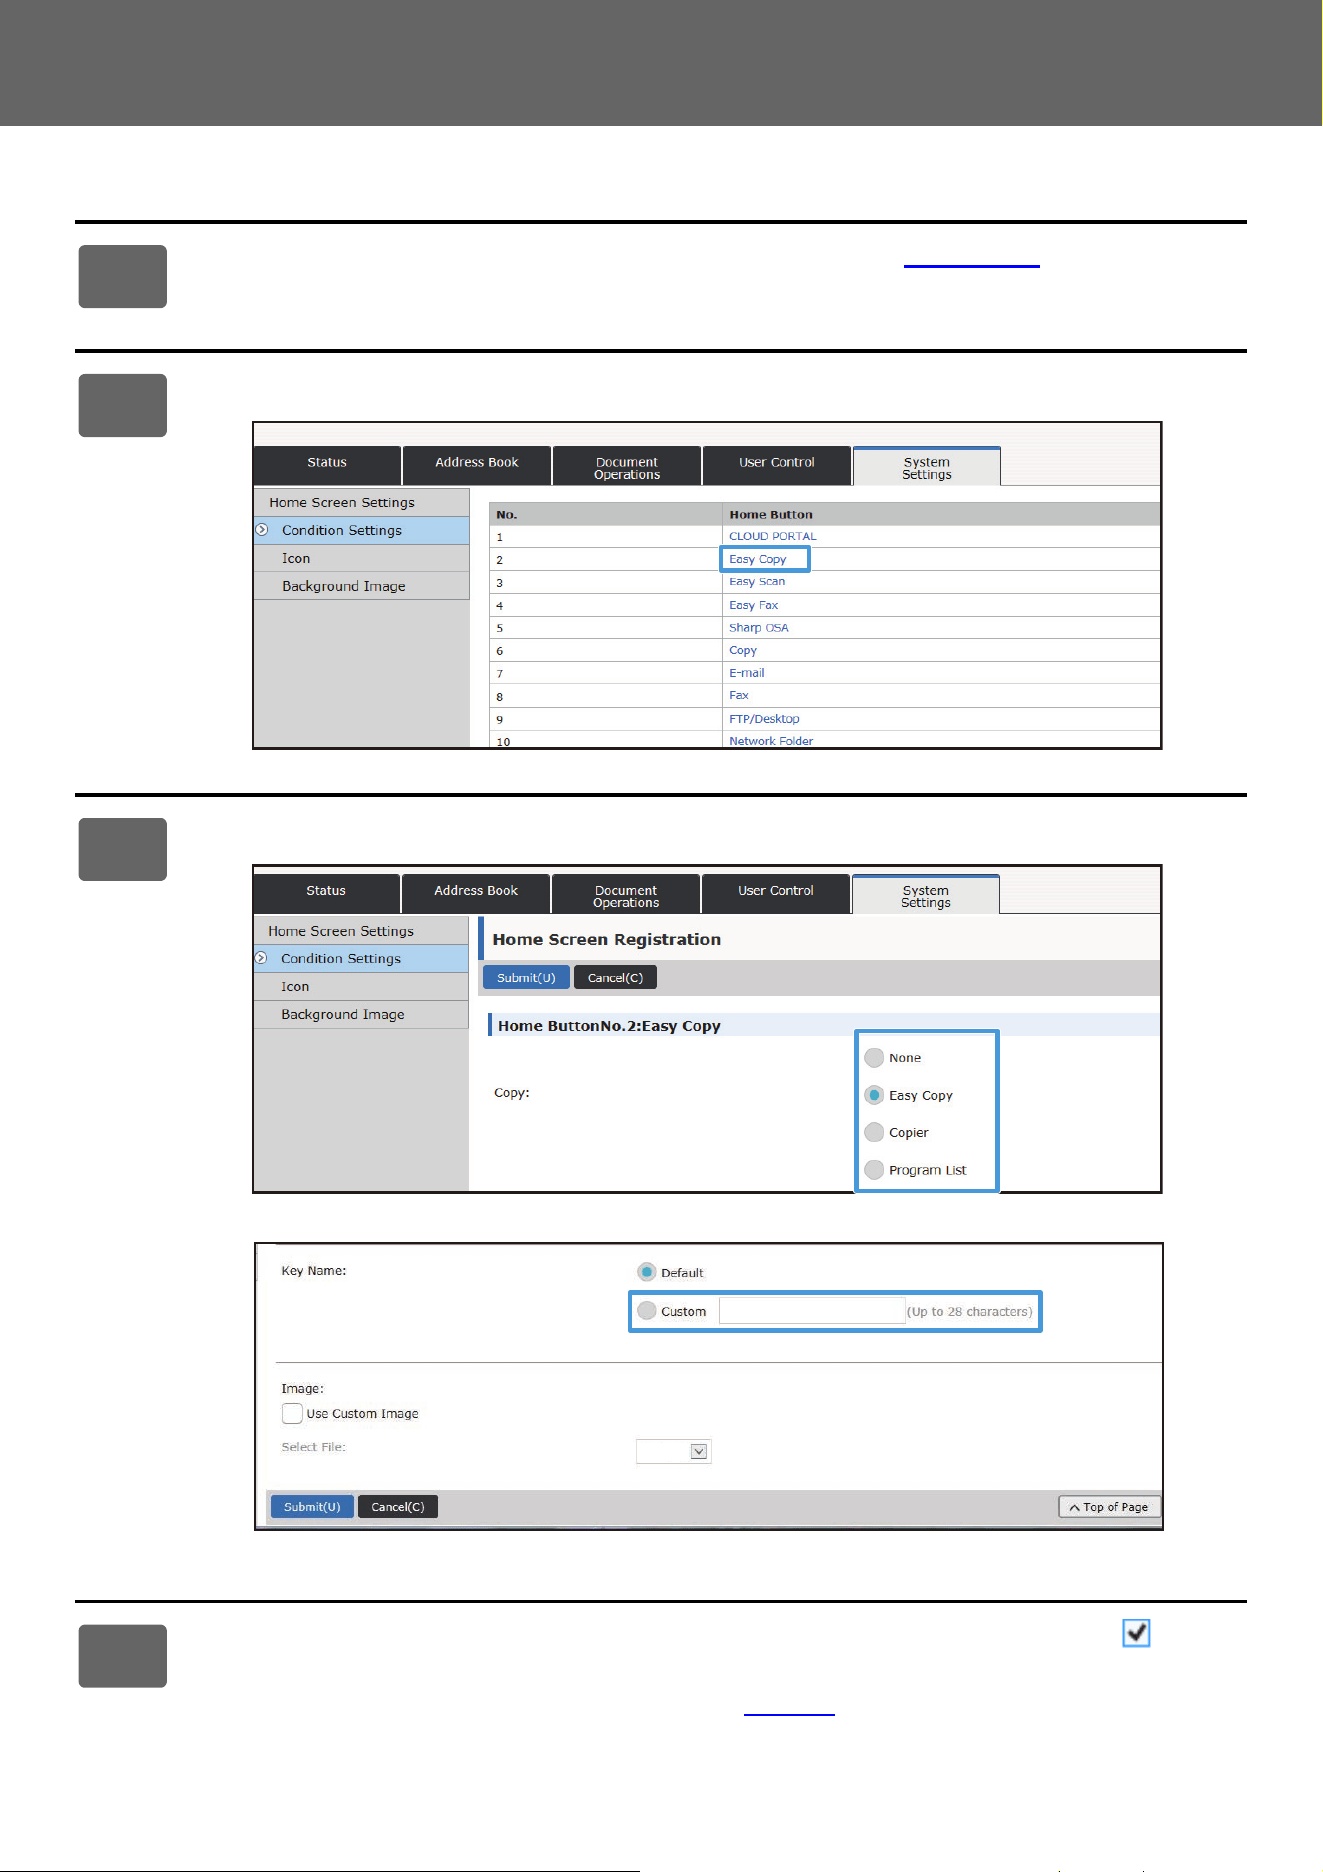
Click [Condition Settings] and click the shortcut key you want to delete.
3
Select [None] and click the [Submit] button.
When you click the [Submit] button, the [Home Screen Registration] screen closes.
4
See "General procedure when using the Web page" (►page 30) to exit the
settings.
37
Touch Panel Operation
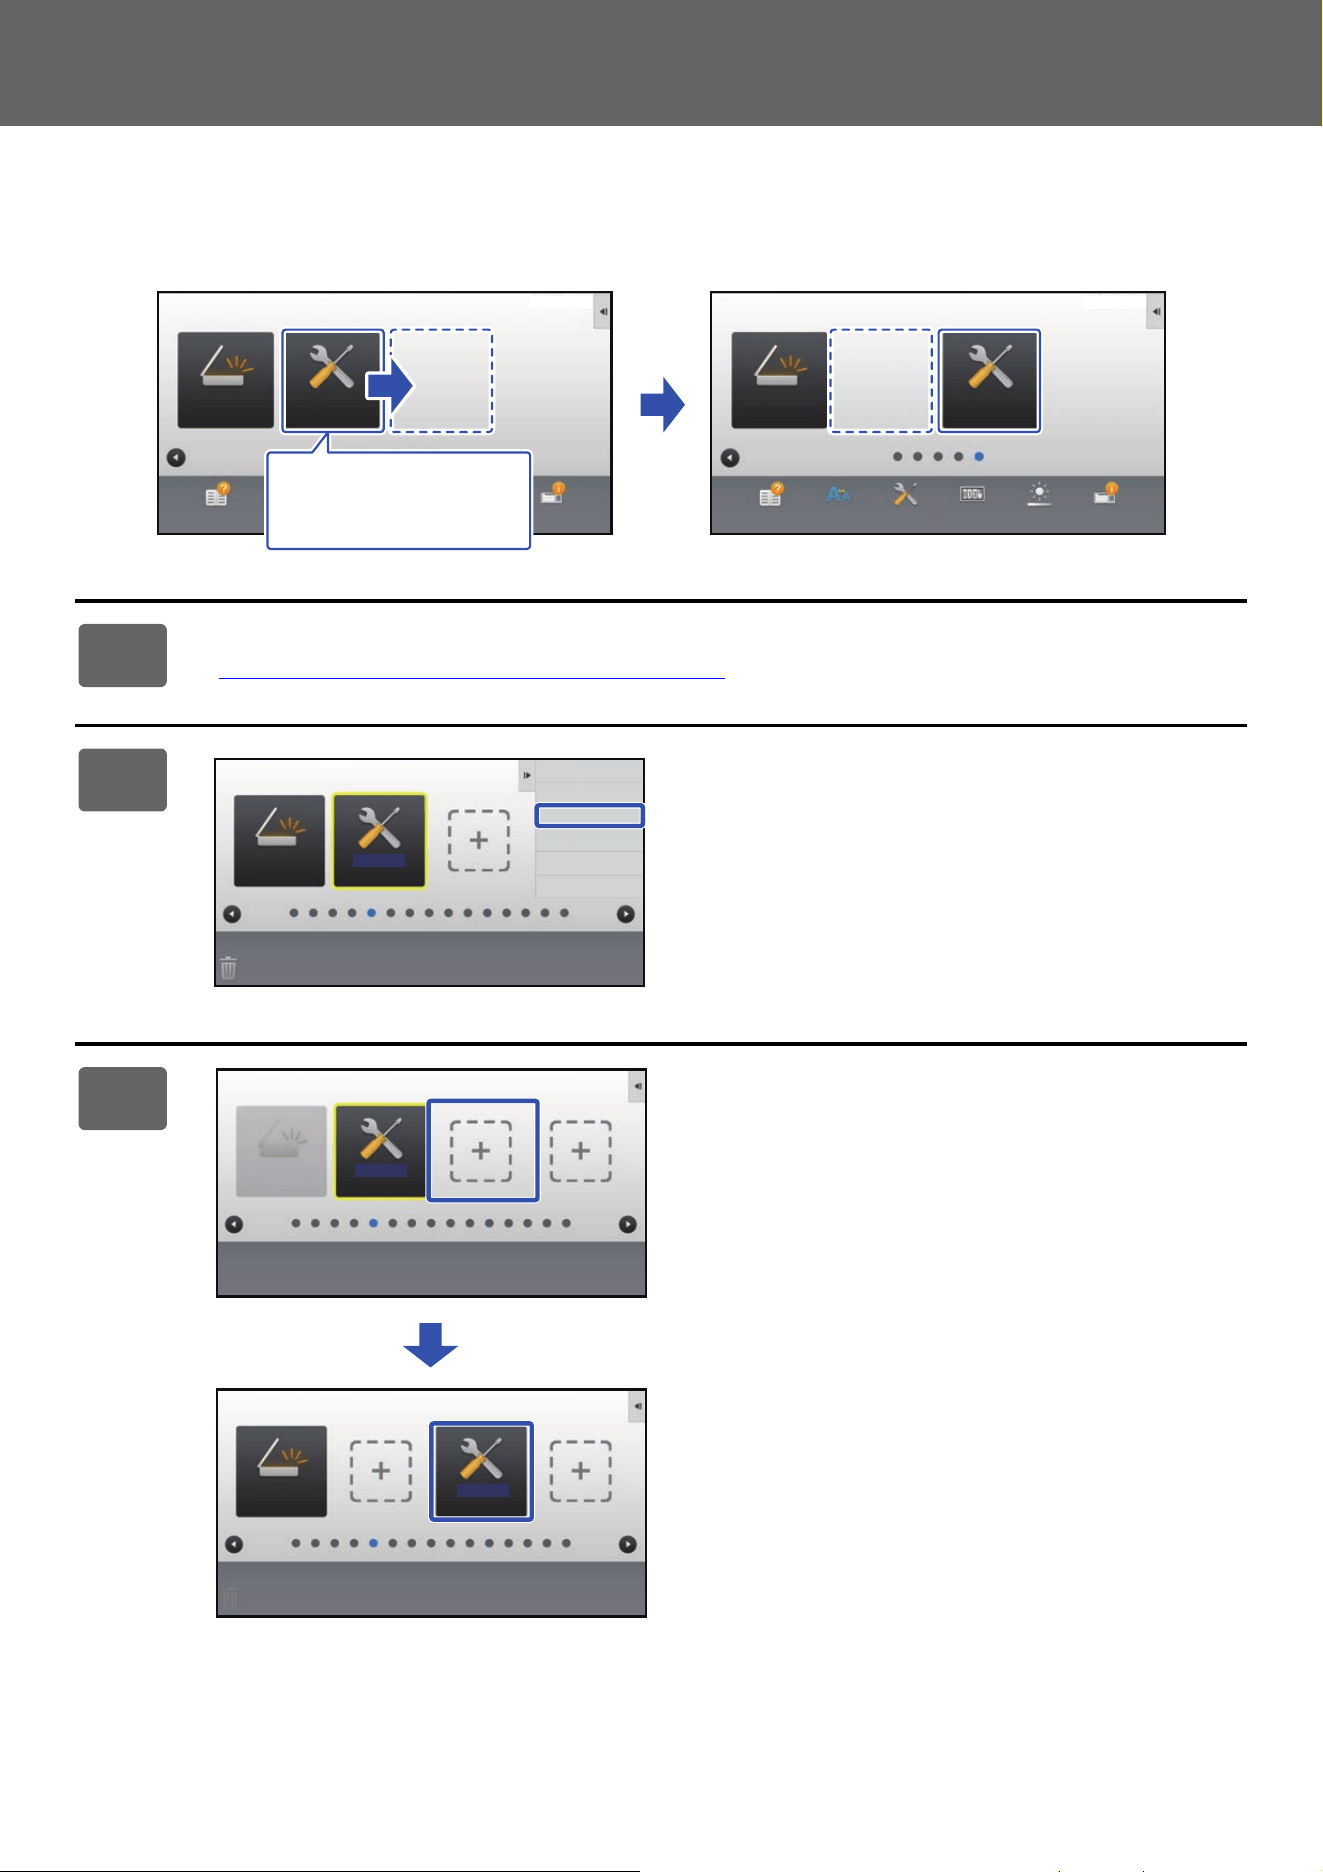
CHANGING A SHORTCUT KEY
This section explains how to change a shortcut key in the home screen.
Only the name can be changed from the touch panel. You can change the icon image from the Web page.
From the touch panel
To change a shortcut key from the touch panel, move the shortcut key in the desired location away from that location,
and then register the new shortcut key in the location that has been freed. For information about how to move shortcut
keys, see "MOVING A SHORTCUT KEY" (►pa
ge 42). For information about how to add shortcut keys, see "ADDING
SHORTCUT KEYS" (►p
age 32).
This section explains how to change the name of a shortcut key.
1
Open the action panel on the home screen, and tap [Edit Home].
► General procedure when using the touch panel (page 29)
2
Tap the shortcut key whose name you
want to change, and tap [Change Key
Name].
A yellow frame appears around the selected shortcut key.
3
Enter the new name by keyboard.
Enter the name, and tap the [OK] key.
4
See "General procedure when using the touch panel" (►page 29) to exit the
settings.
Settings
PC Scan
Operation
Guide
Enlarge
Display Mode
Settings Total Count LCD Control Job Status
PC Scan Print from USB
Memory
Operation
Guide
Enlarge
Display Mode
Settings Total Count LCD Control Job Status
10:15 AM10:15 AM
I want to change
the [Settings]
shortcut key.
Settings
PC Scan
Exit Home Edit Mode
Return Layout to Factory
Default
Delete Key
Move Key
Change Key
Name
Space
Enter
AltGr
Keyboard Select
Shift
Caps
Characters Symbols
Cancel OK
.com
Change Key
Settings
.net .org
.co.jp
.biz
.ne.jp
38
Touch Panel Operation
From the Web page
1
See "General procedure when using the Web page" (►page 30) to open the
settings screen.
2
Click [Condition Settings], and click the shortcut key you want to change.
3
Select the desired function.
To change the name of a shortcut key, select [Custom] in [Key Name] and enter the desired name in the text box.
To change the image of a shortcut key, go to the next step. If you are not changing the image, go to step 5.
4
To change the icon image, set the [Use Custom Image] checkbox to , and
select a previously added image with [Select File].
To save an image, see "ADDING A SHORTCUT KEY IMAGE" (►page 40).
AAAA.png

40
Touch Panel Operation
ADDING A SHORTCUT KEY IMAGE
To change a shortcut key image to a new image, you must first add the new image. This section explains how to add an
image. Images are added by using the Web page.
Icon images are automatically enlarged or reduced to match the size of the shortcut keys.
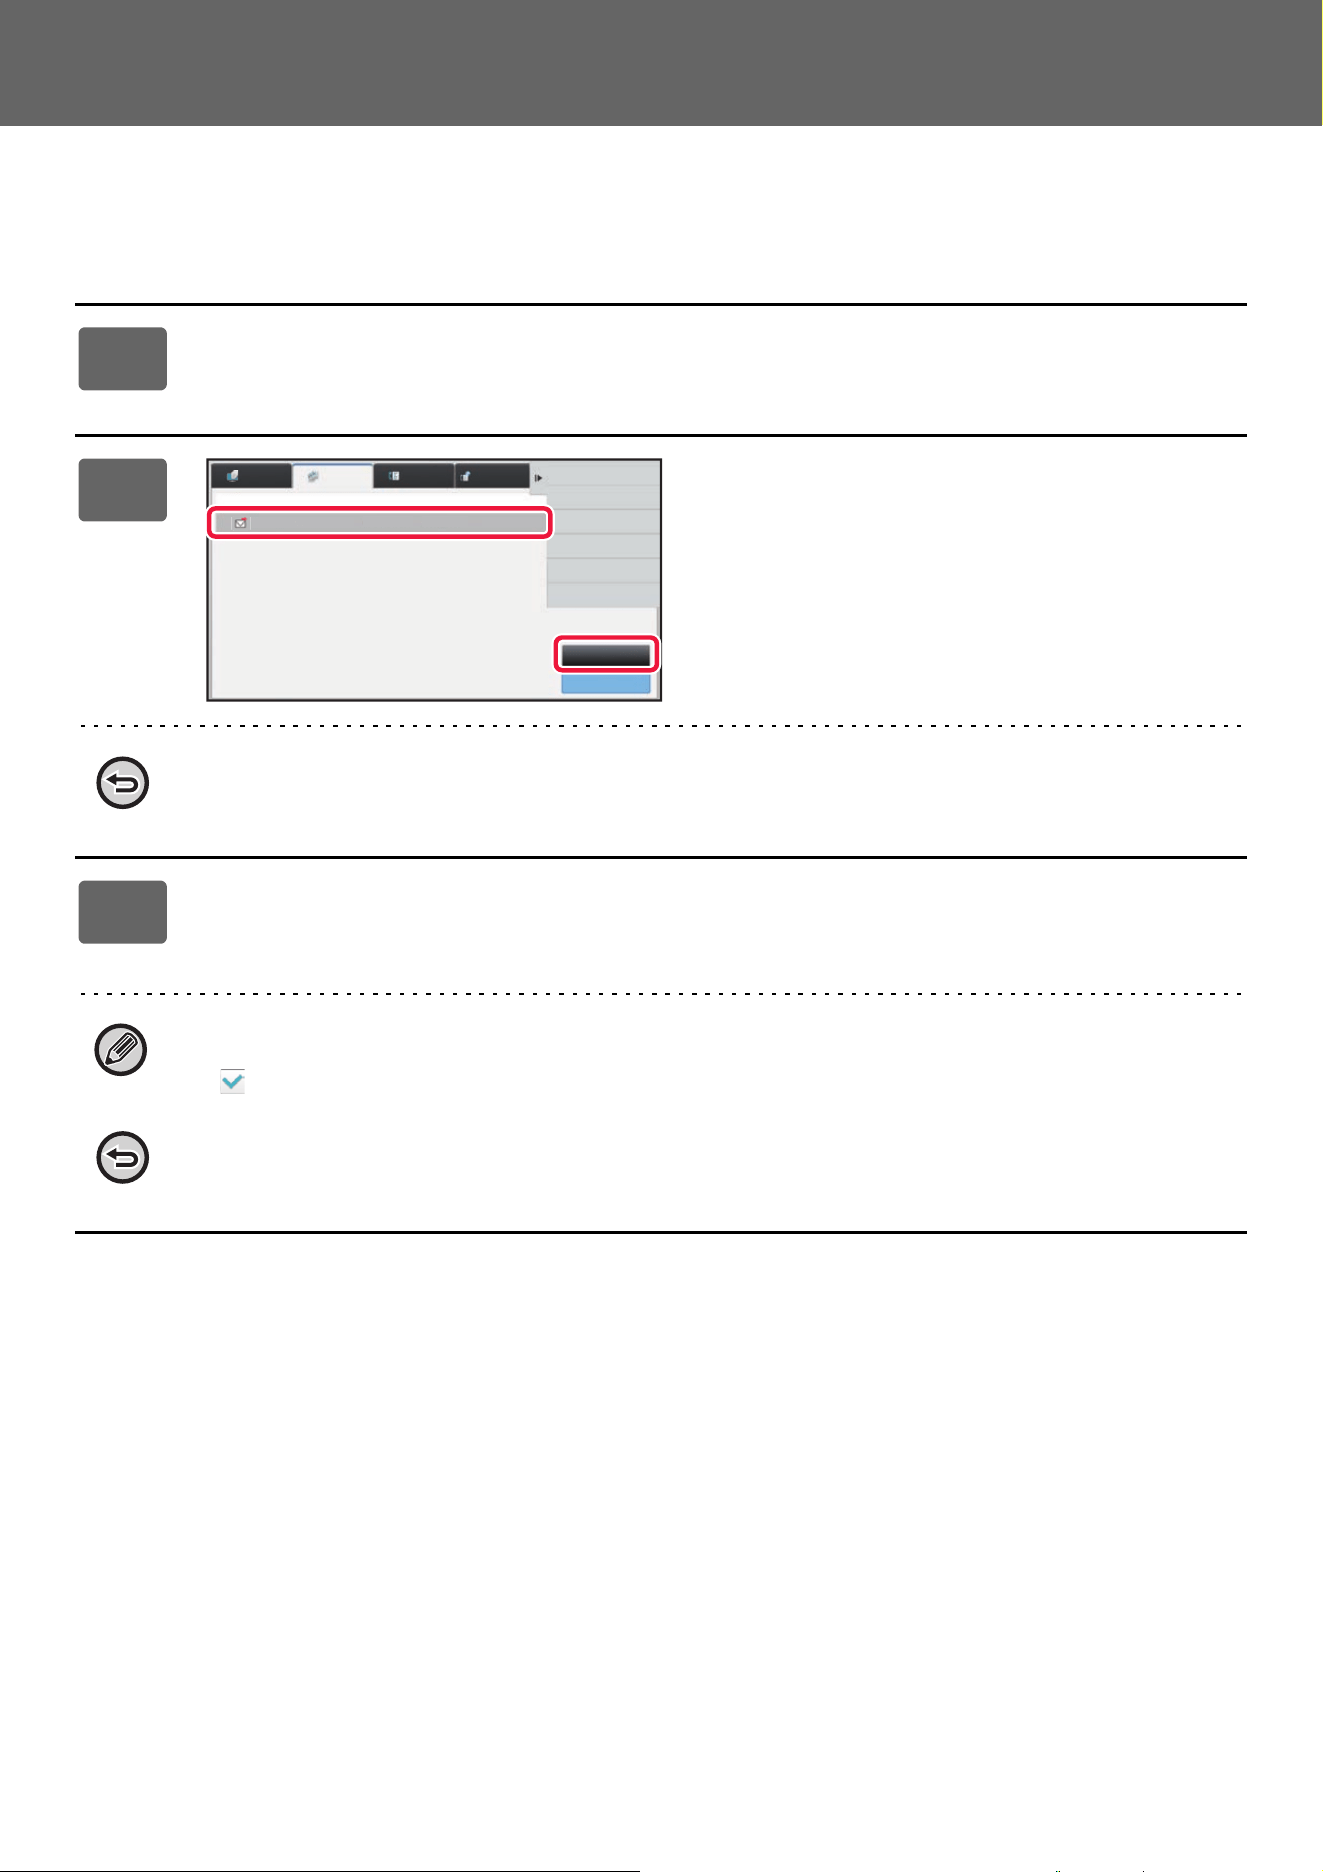
1
See "General procedure when using the Web page" (►page 30) to open the
settings screen.
2
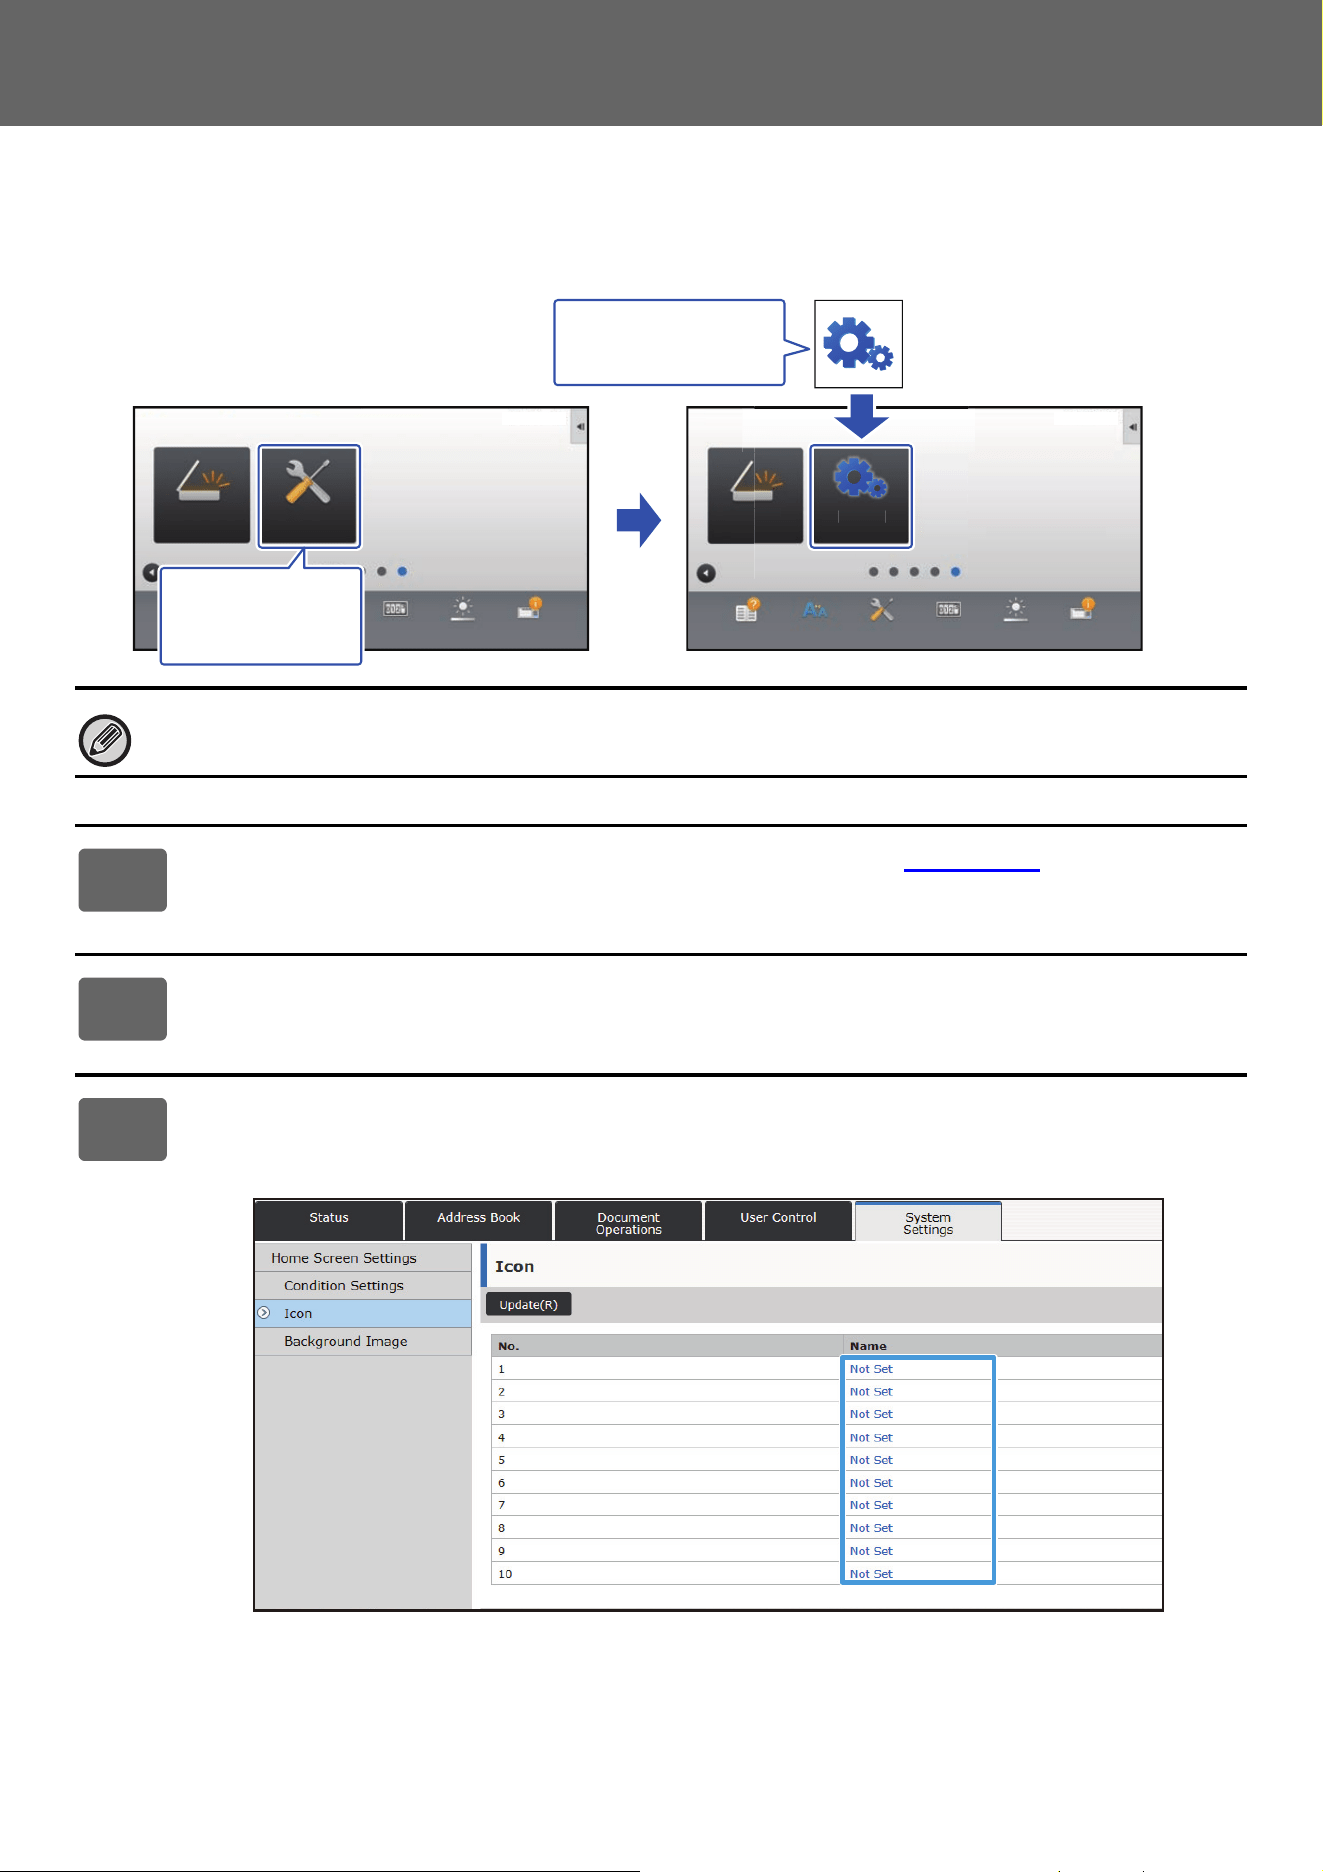
Click [Icon].
3
Select any item
If you are adding a new image, click "Not Set". If "Not Set" items are all in use, click an unneeded item in the already
added items.
Settings
PC Scan
Operation
Guide
Enlarge
Display Mode
Settings Total Count LCD Control Job Status
Settings
PC Scan
Operation
Guide
Enlarge
Display Mode
Settings Total Count LCD Control Job Status
S
ettin
g
s
Sca
n
10:15 AM 10:15 AM
I want to change
the [Settings]
shortcut key.
I want to add this
image
41
Touch Panel Operation
4
Select the file to be added in "Select File".
Click the [Browse] button, and select the image to be submitted.
• File formats that can be used are JPEG, GIF and PNG (jpeg, jpg, jpe, jfif, gif and png).
• The maximum file size of an image that can be used for a shortcut key is 50 KB.
5
See "General procedure when using the Web page" (►page 30) to exit the
settings.
42
Touch Panel Operation
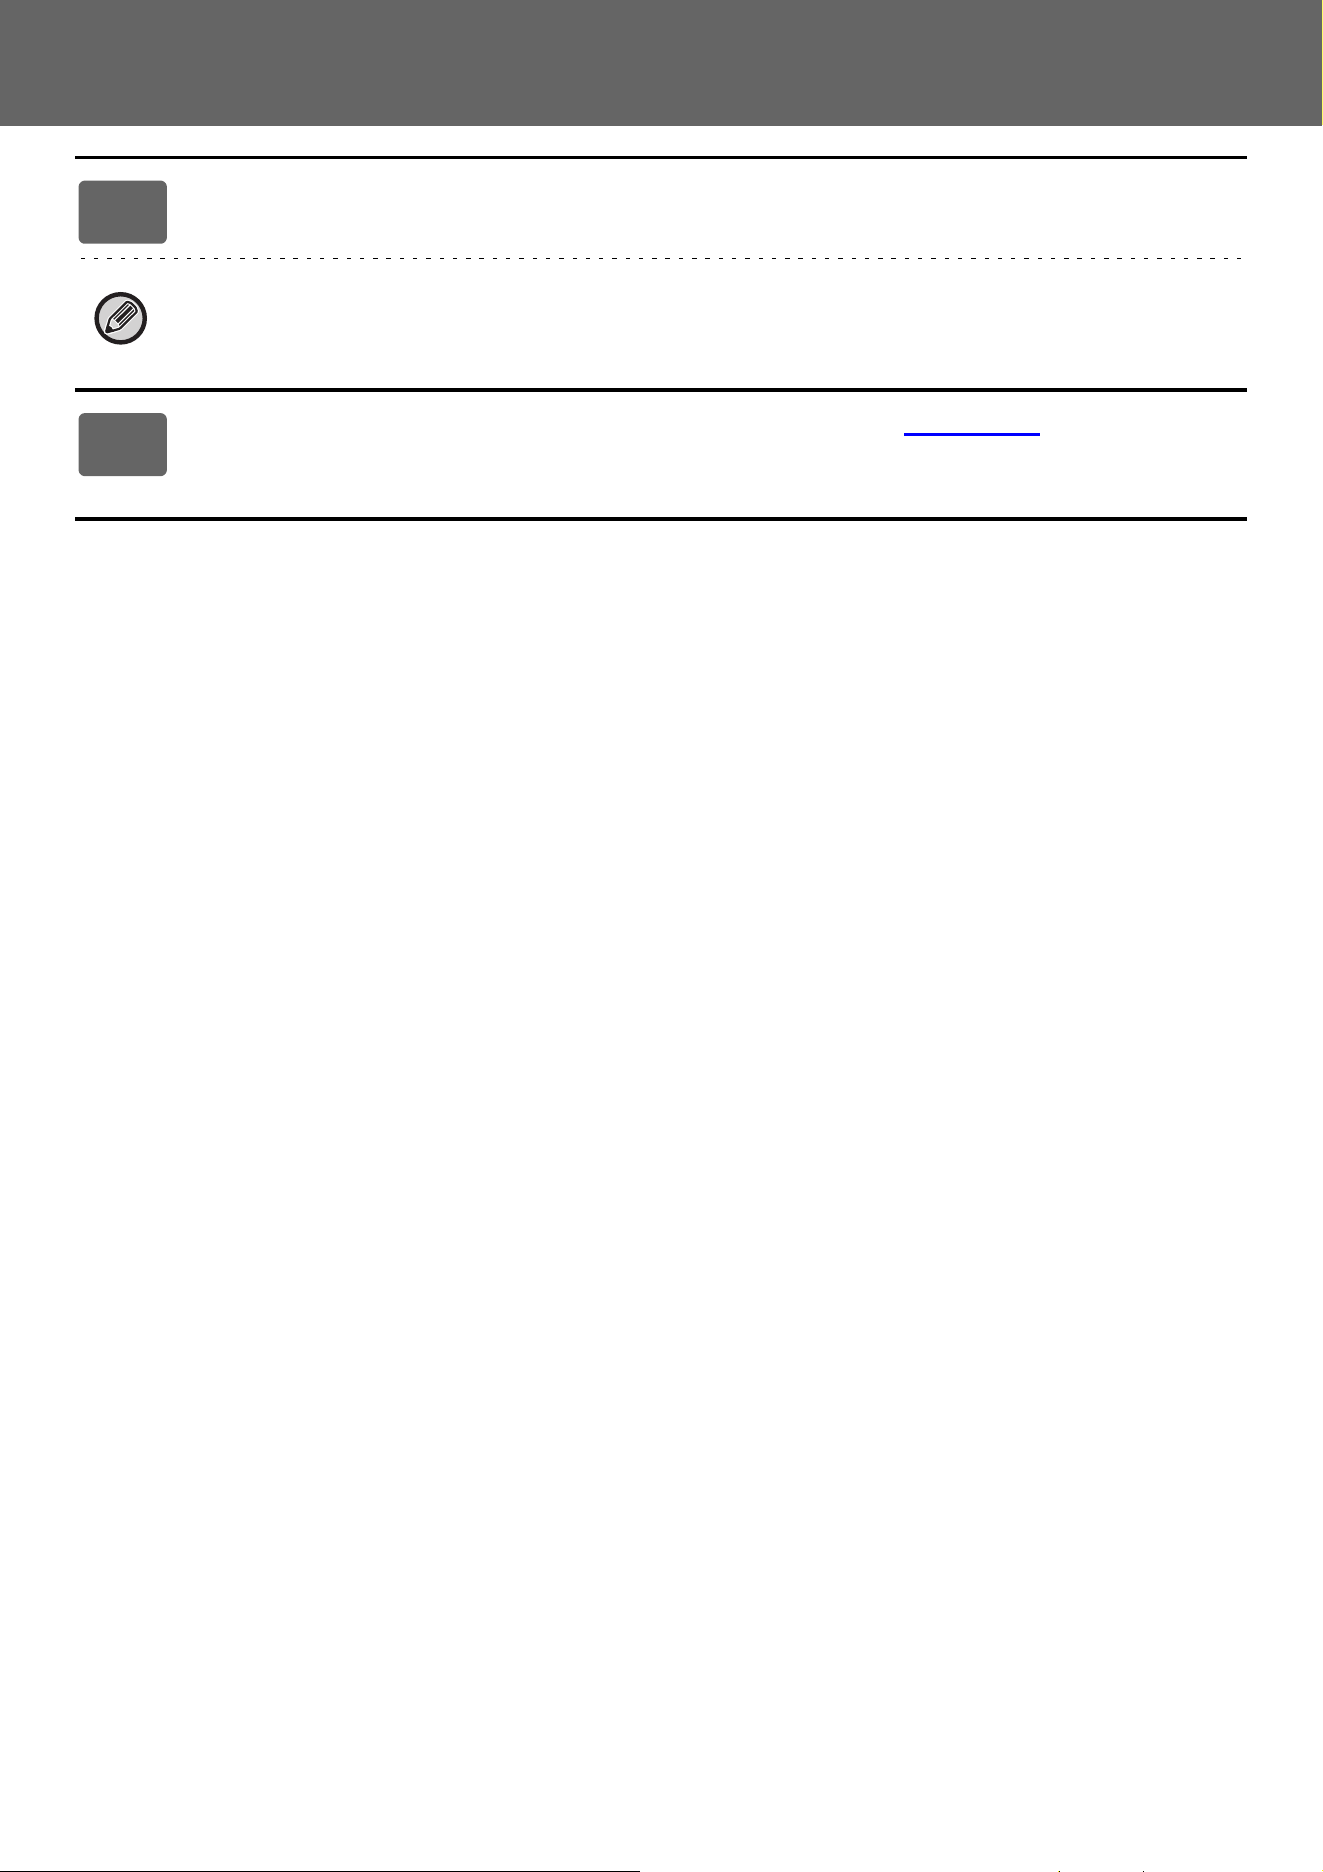
MOVING A SHORTCUT KEY
This section explains how to move a shortcut key in the home screen.
Shortcut keys are moved by using the touch panel.
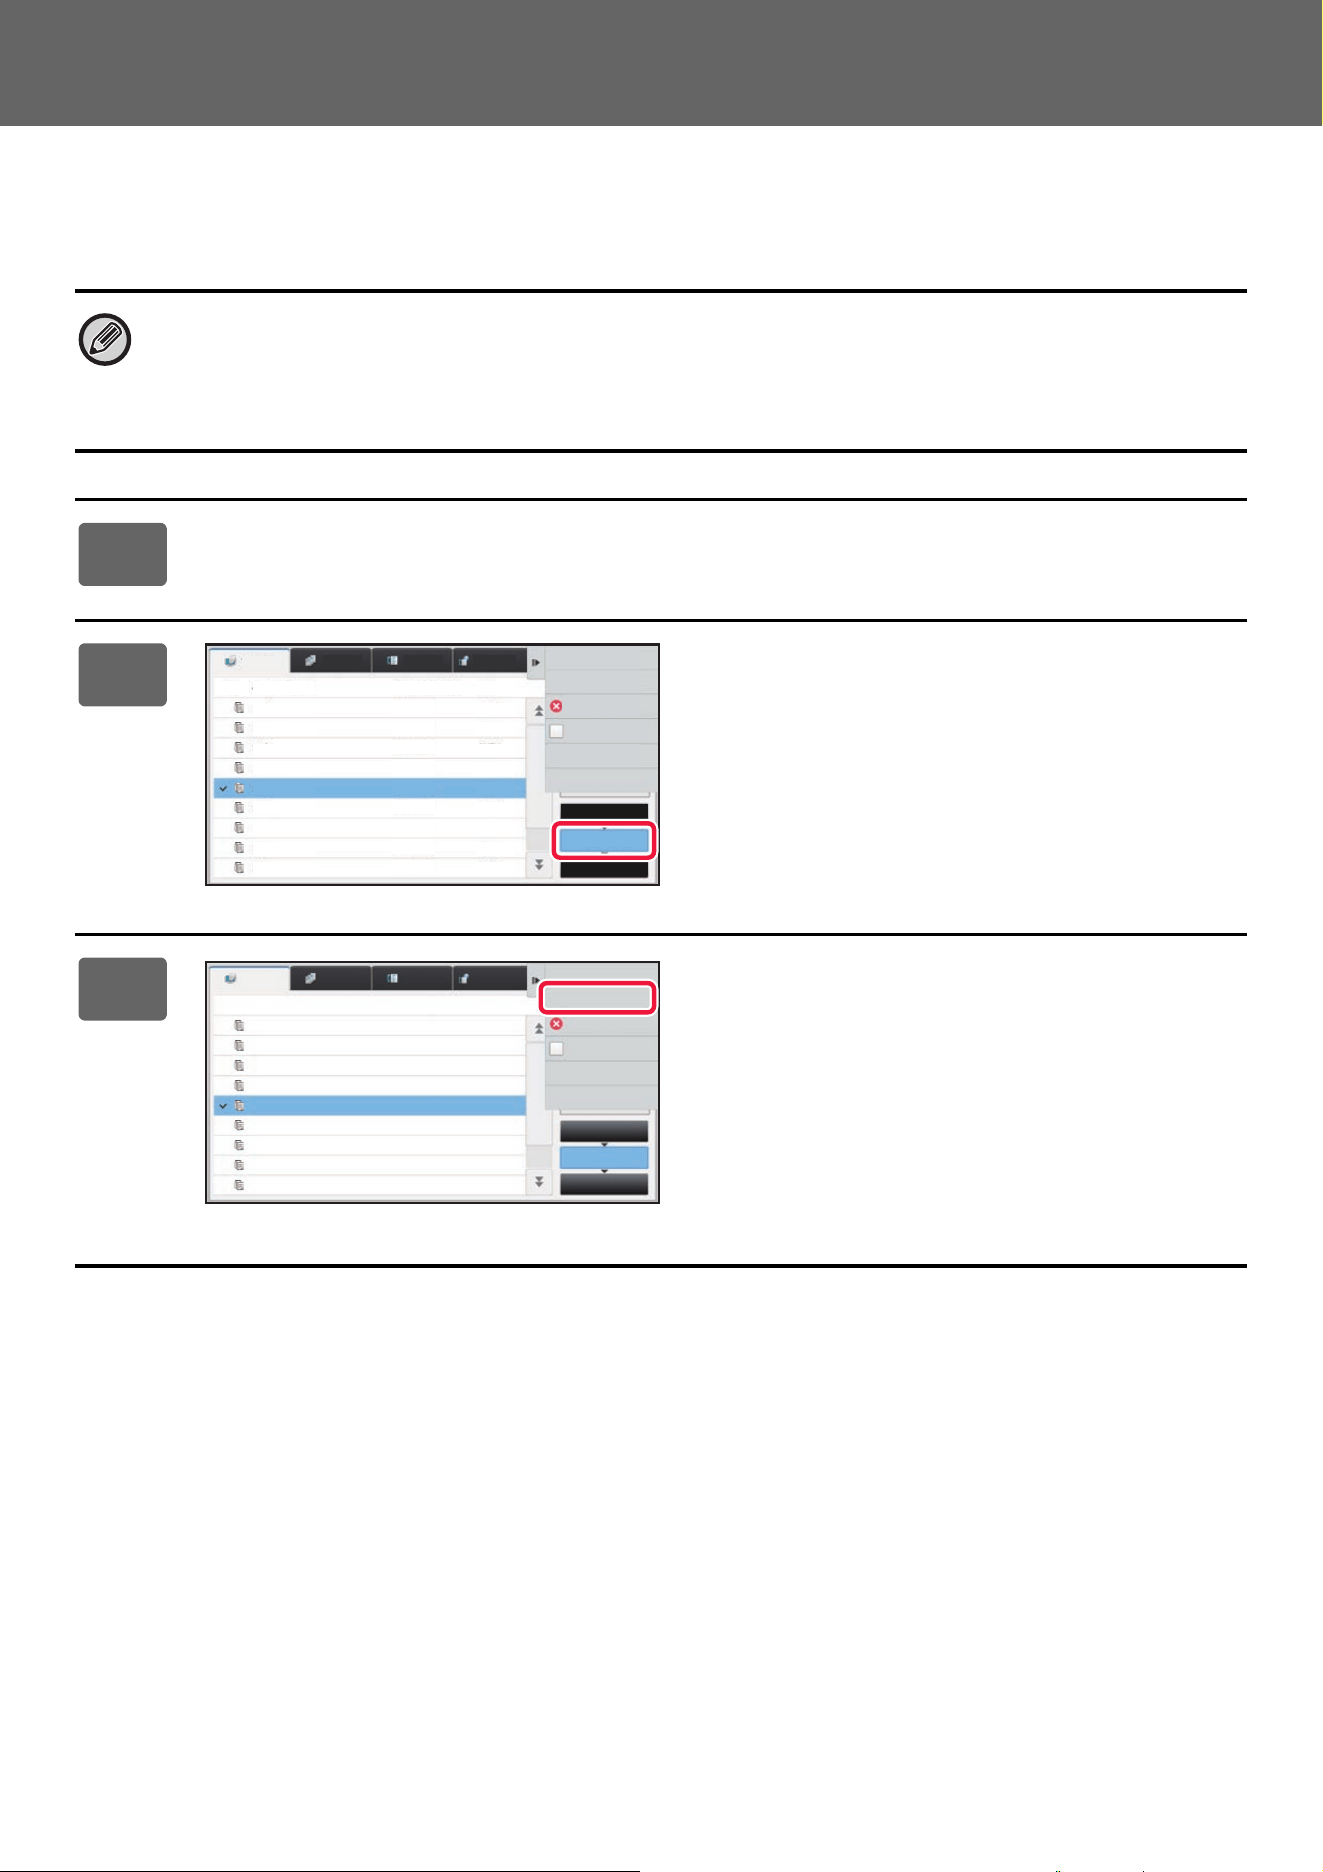
1
Open the action panel on the home screen, and tap [Edit Home].
► General procedure when using the touch panel (page 29)
2
Tap the shortcut key you want to
move, and tap [Move Key].
A yellow frame appears around the selected shortcut key.
3
Tap an empty shortcut key location
The shortcut key moves to the tapped location.
The shortcut key will not move if you tap a location that
already has a shortcut key.
Settings
PC Scan
Operation
Guide
Enlarge
Display Mode
Settings Total Count LCD Control Job Status
Settings
PC Scan
Operation
Guide
Enlarge
Display Mode
Settings Total Count LCD Control Job Status
10:15 AM 10:15 AM
I want to move the
[Settings] shortcut
key.
Settings
PC Scan
Exit Home Edit Mode
Return Layout to Factory
Default
Delete Key
Move Key
Change Key
Name
Settings
PC Scan
10:15 AM
10:15 AM
Settings
PC Scan

44
Touch Panel Operation
RETURNING THE SHORTCUT KEYS TO THE FACTORY
DEFAULT STATE
This section explains how to return the shortcut keys in the home screen to the factory default state.
This procedure can be performed from the touch panel or from the Web page.
From the touch panel
The positions, names, and images of the shortcut keys are returned to the factory default state.
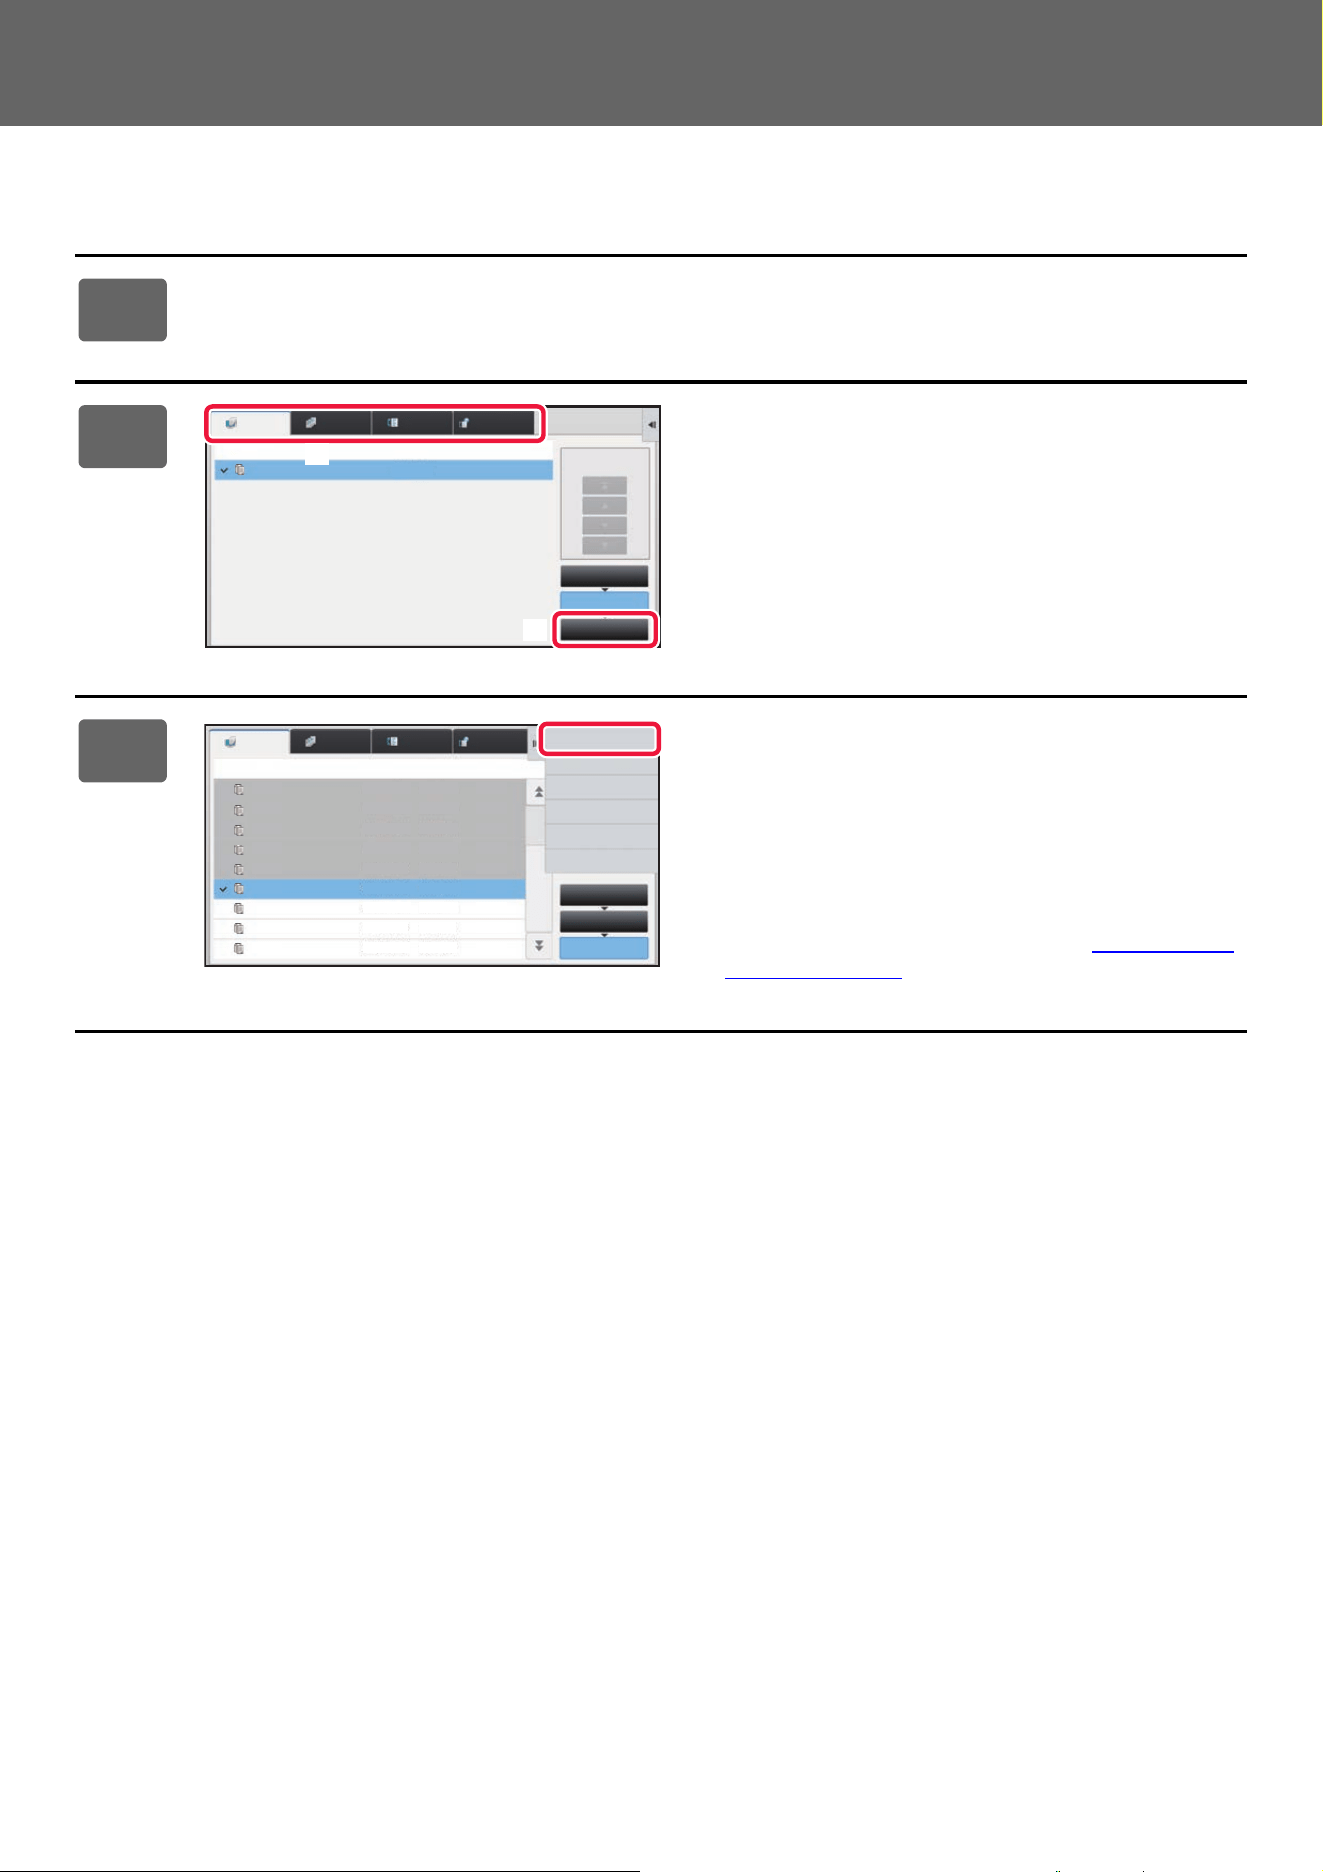
1
Open the action panel on the home screen, and tap [Edit Home].
► General procedure when using the touch panel (page 29)
2
Tap [Return Layout to Factory Default]
on the action panel.
3
Tap the [Reset] key.
The shortcut keys are returned to the factory default state.
4
See "General procedure when using the touch panel" (►page 29) to exit the
settings.
Easy
Scan
Operation
Guide
Enlarge
Display Mode
Settings
Total Count
LCD Control Job Status
Easy
Copy
E-mailFTP/Desktop
Operation
Guide
Enlarge
Display Mode
Settings
Total Count
LCD Control Job Status
Easy
Copy
Easy
Scan
Easy
Fax
CLOUD PORTAL
10:15 AM 10:15 AM
I want to return changed
shortcut keys to the
factory default state.
Easy
Copy
FTP/Desktop
Exit Home Edit Mode
Return Layout to Factory
Default
Easy
Scan
FTP/Desktop
Exit Home Edit Mode
Return Layout to Factory
Default
Reset Key Arrangement
to The Factory Defaults. OK?
Cancel Reset
45
Touch Panel Operation
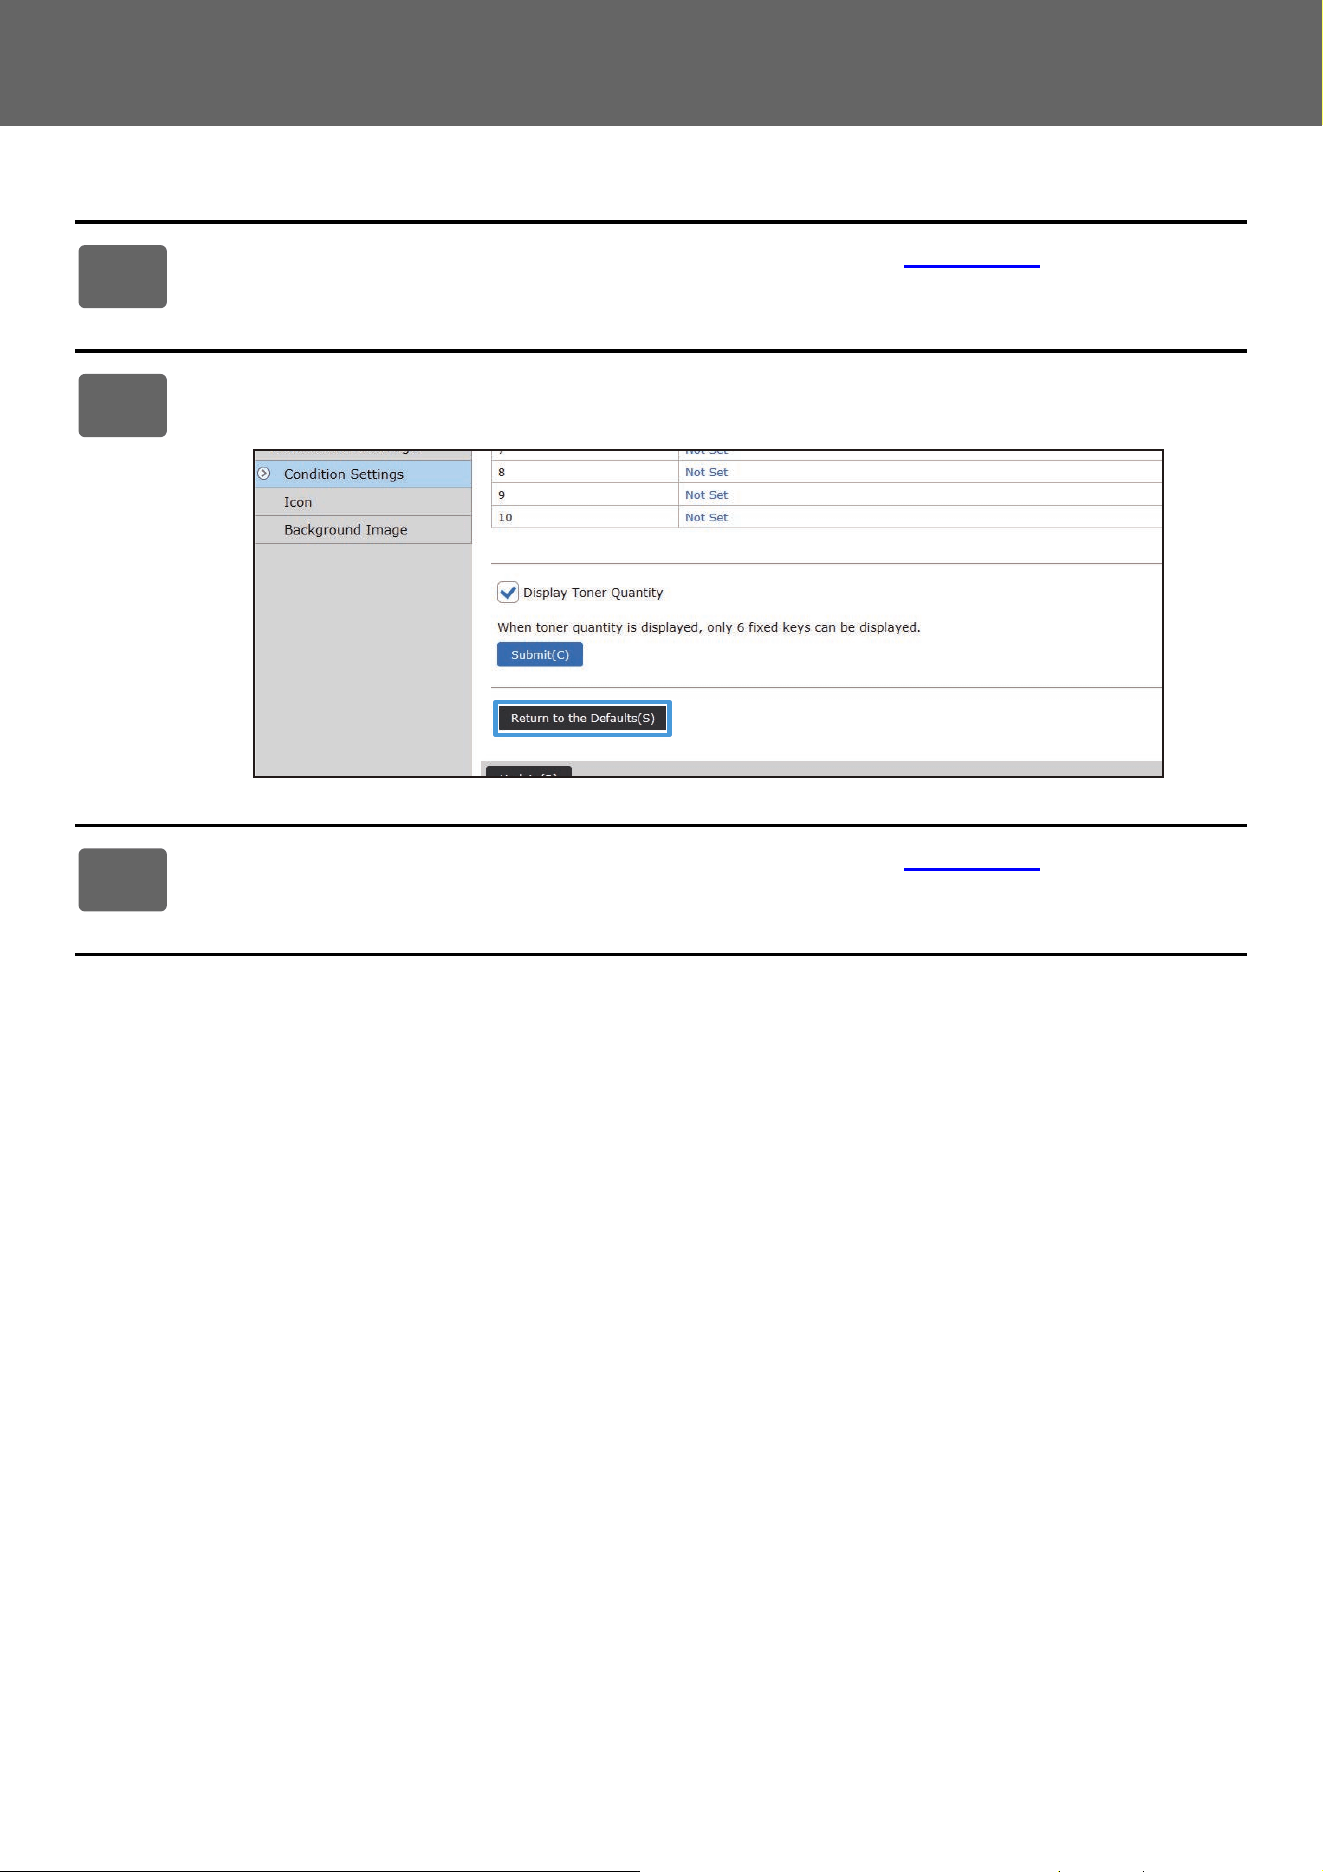
From the Web page
1
See "General procedure when using the Web page" (►page 30) to open the
settings screen.
2
Click [Condition Settings], and click the [Return to the Defaults] button.
A confirmation window appears. Click the [OK] button.
3
See "General procedure when using the Web page" (►page 30) to exit the
settings.
46
Touch Panel Operation
EDITING THE HOME SCREEN
In the home screen, you can change the number of shortcut keys shown and change shortcut keys.
This includes changing the background and text color, and changing the background to a custom image.
CHANGING THE LAYOUT PATTERN OF THE HOME
SCREEN
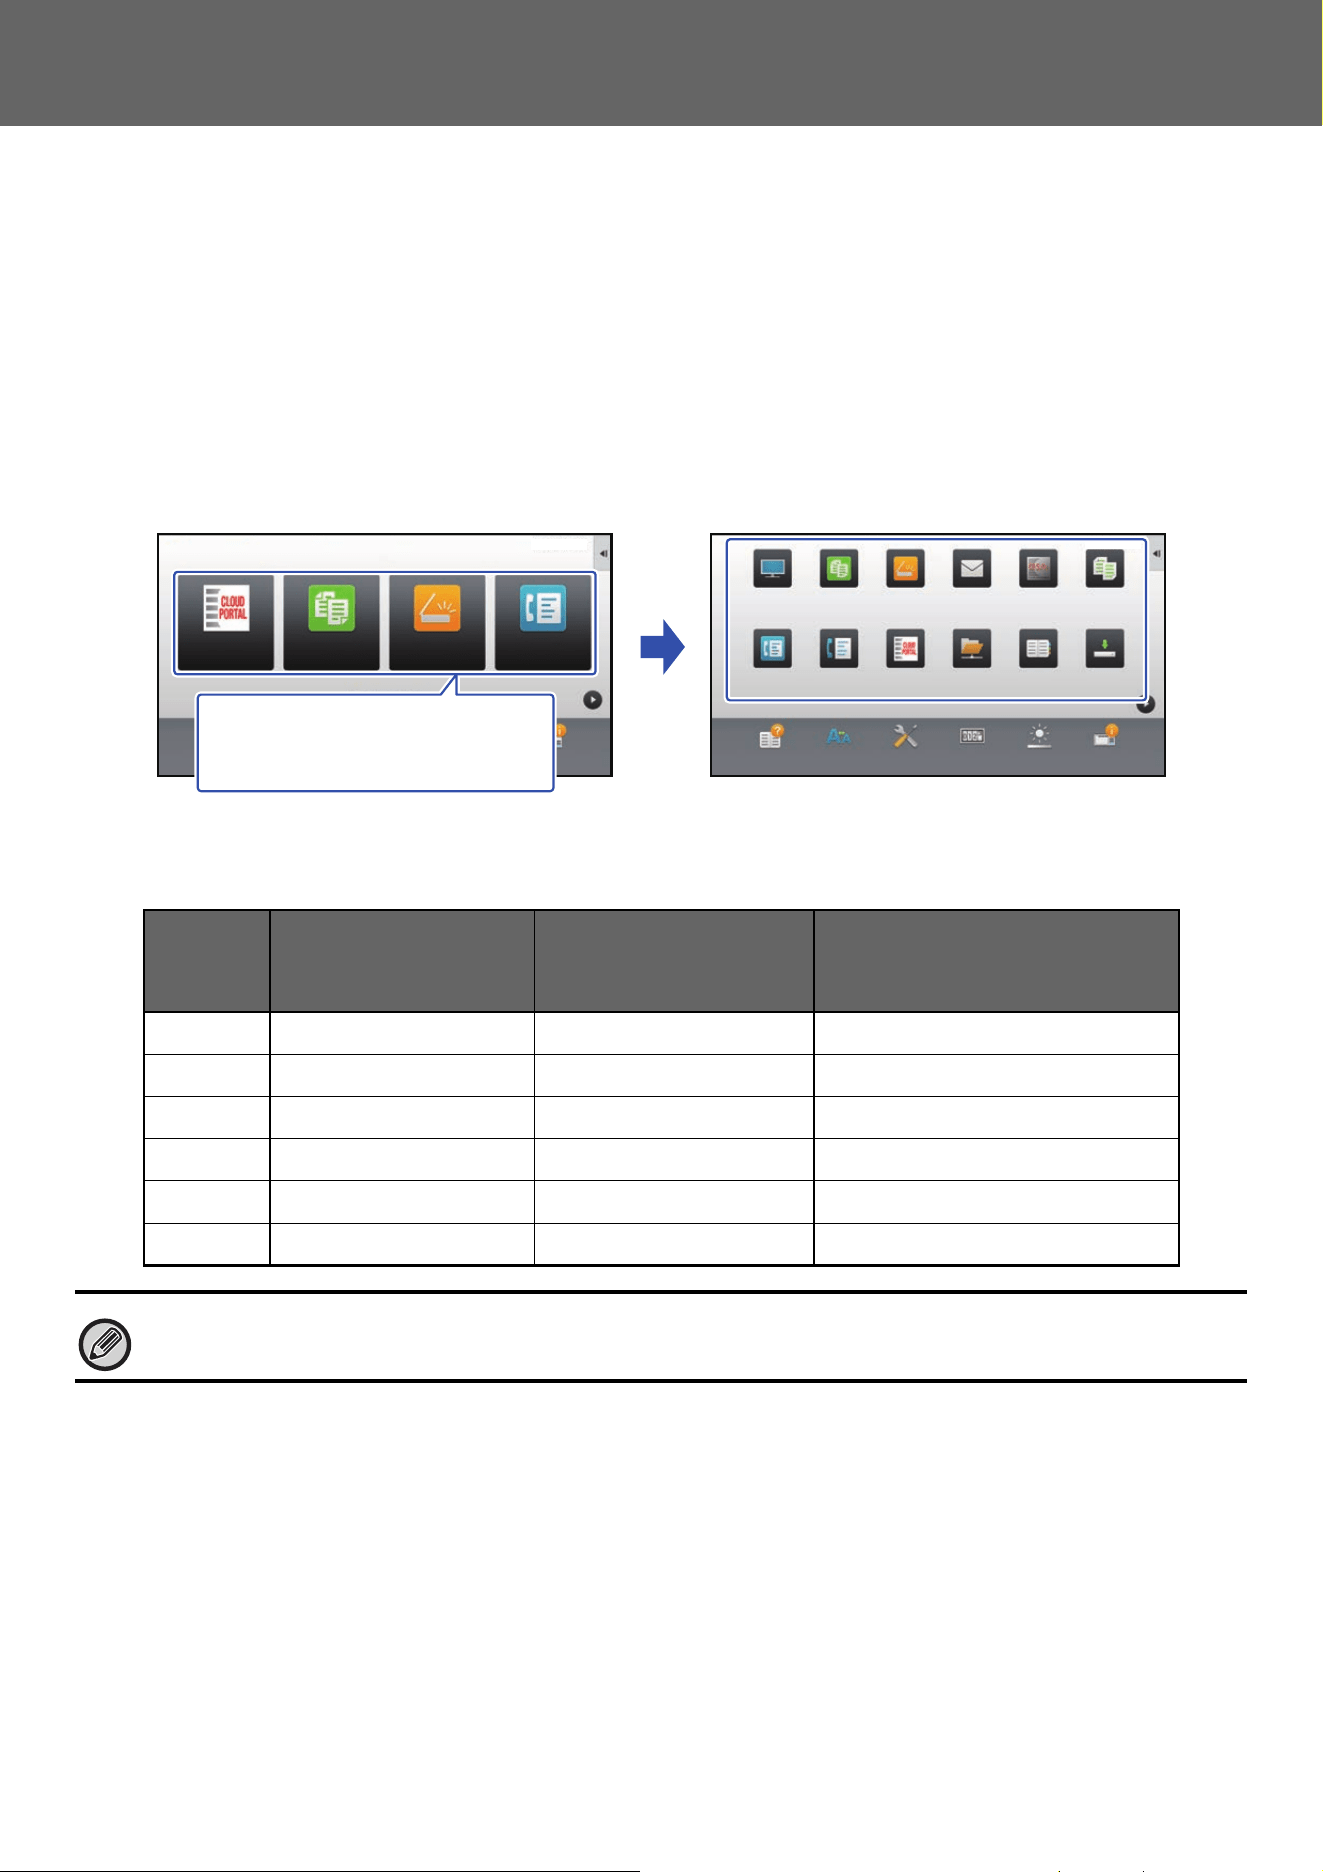
Multiple home screen layout patterns are preset in the machine. These include a layout pattern that reduces the display
size of the shortcut keys to increase the number of keys shown, and a layout pattern that eliminates the fixed key display
area to increase the number of shortcut keys shown. The layout pattern can be changed in the Web page.
Home screen layout patterns
Six layout patterns are available.
Pattern Number of shortcut
keys displayed per
screen
Fixed key area Maximum number of screens
1 4 Yes 15 screens
2 8 No 8 screens
3 8 Yes 8 screens
4 12 No 5 screens
5 12 Yes 5 screens
6 18 No 4 screens
The factory default state varies by model. For the factory default settings, refer to the system settings in the user’s manual.
Operation
Guide
Enlarge
Display Mode
Settings
Total Count
LCD Control Job StatusOperation
Guide
Enlarge
Display Mode
Settings
Total Count
LCD Control Job Status
Easy
Scan
Easy
Fax
CLOUD PORTAL
Easy
Copy
Easy
Fax
Fax
Easy
Scan
CLOUD PORTAL
E-mail
CopySharp OSAFTP/Desktop
Network Folder Address Book Scan to
Local Drive
10:15 AM
10:15 AM
Easy
Copy
I want to show more shortcut
keys in the home screen by
reducing the size of the keys.
48
Touch Panel Operation
SELECTING A MFP DISPLAY PATTERN FOR THE
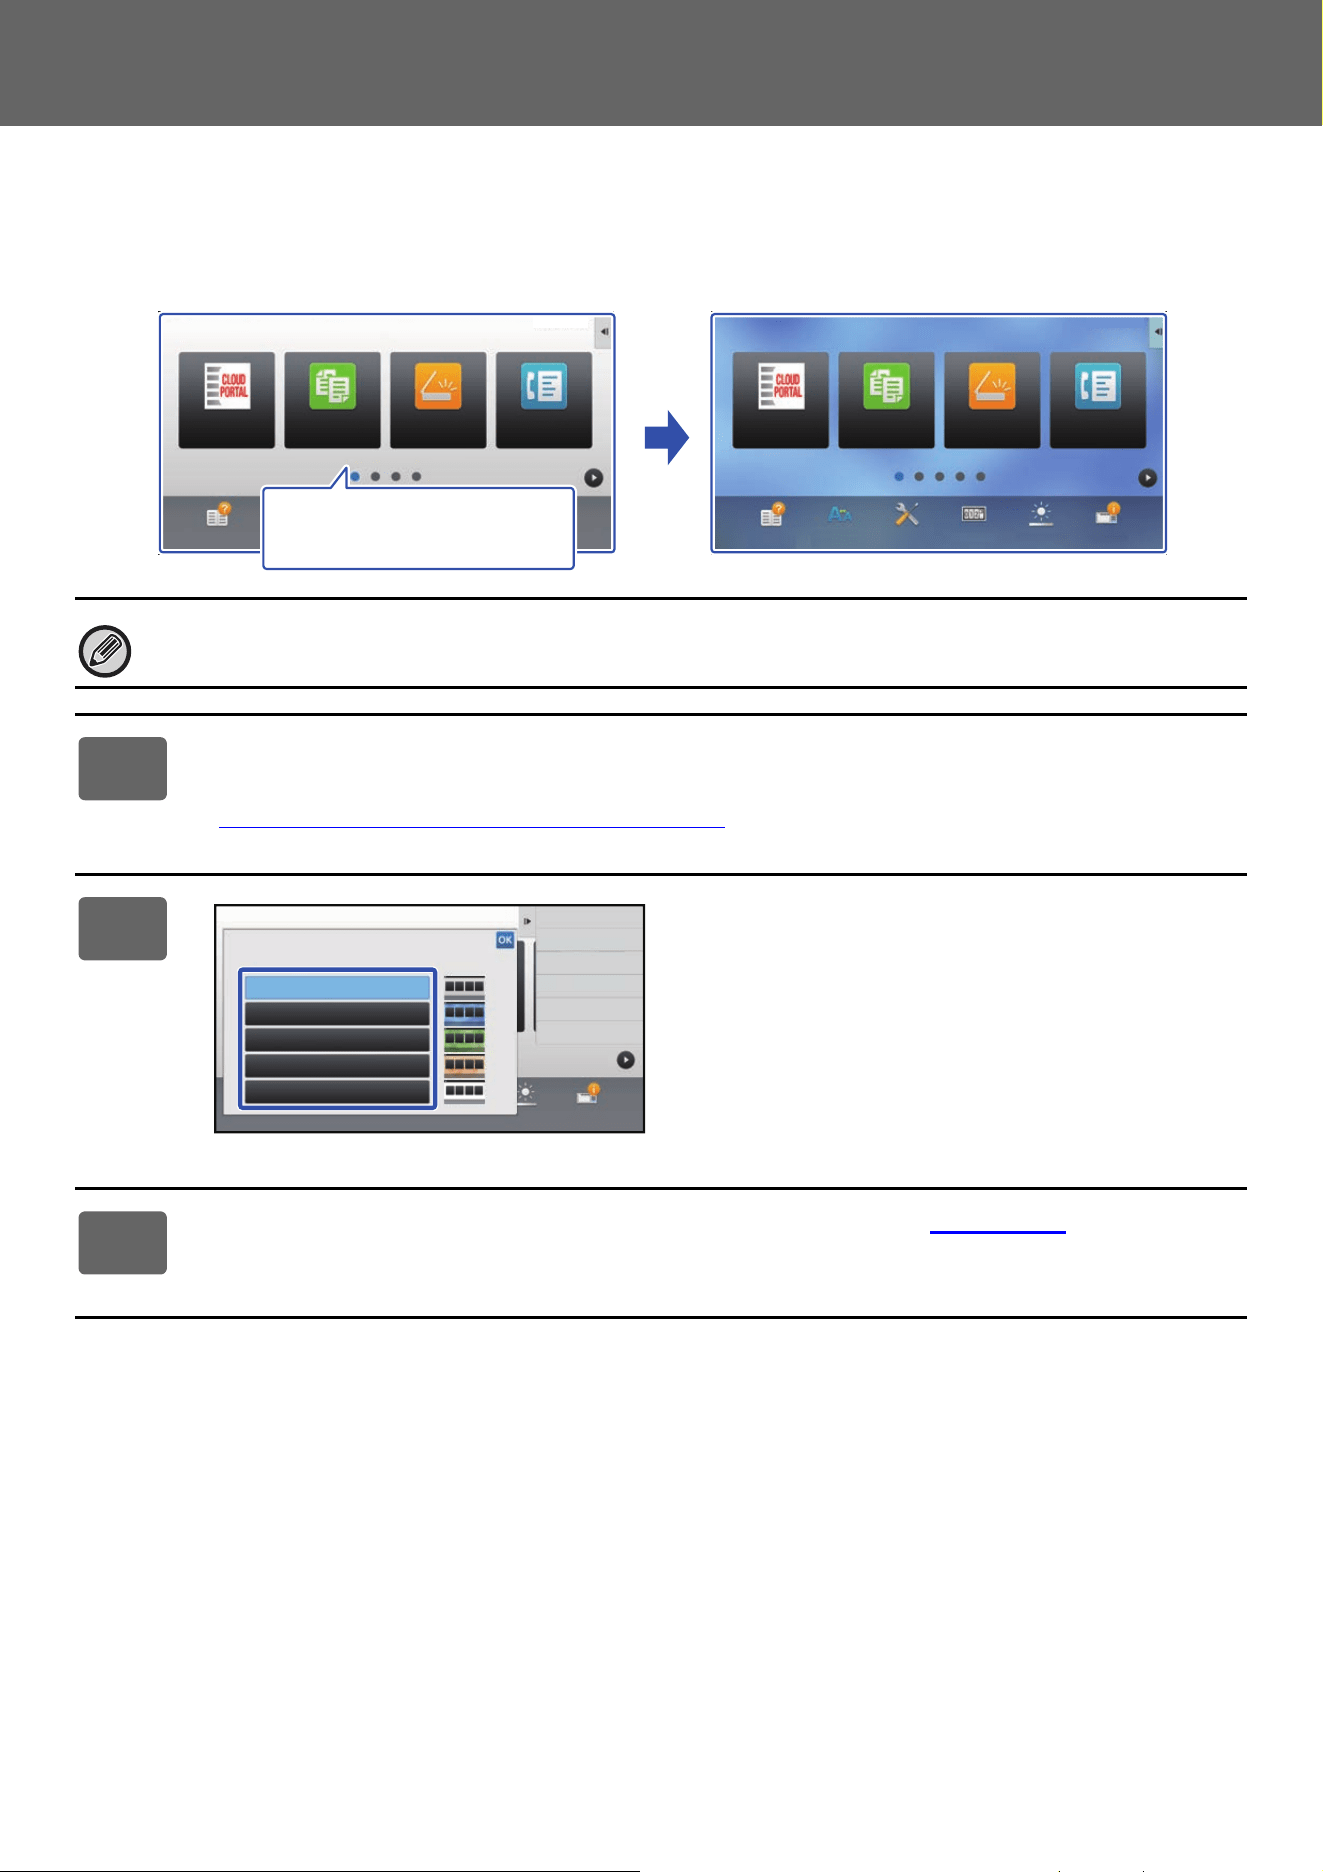
HOME SCREEN
Multiple color patterns are preset in the machine. You can change the color pattern from the touch panel.
The factory default setting is "Pattern 1".
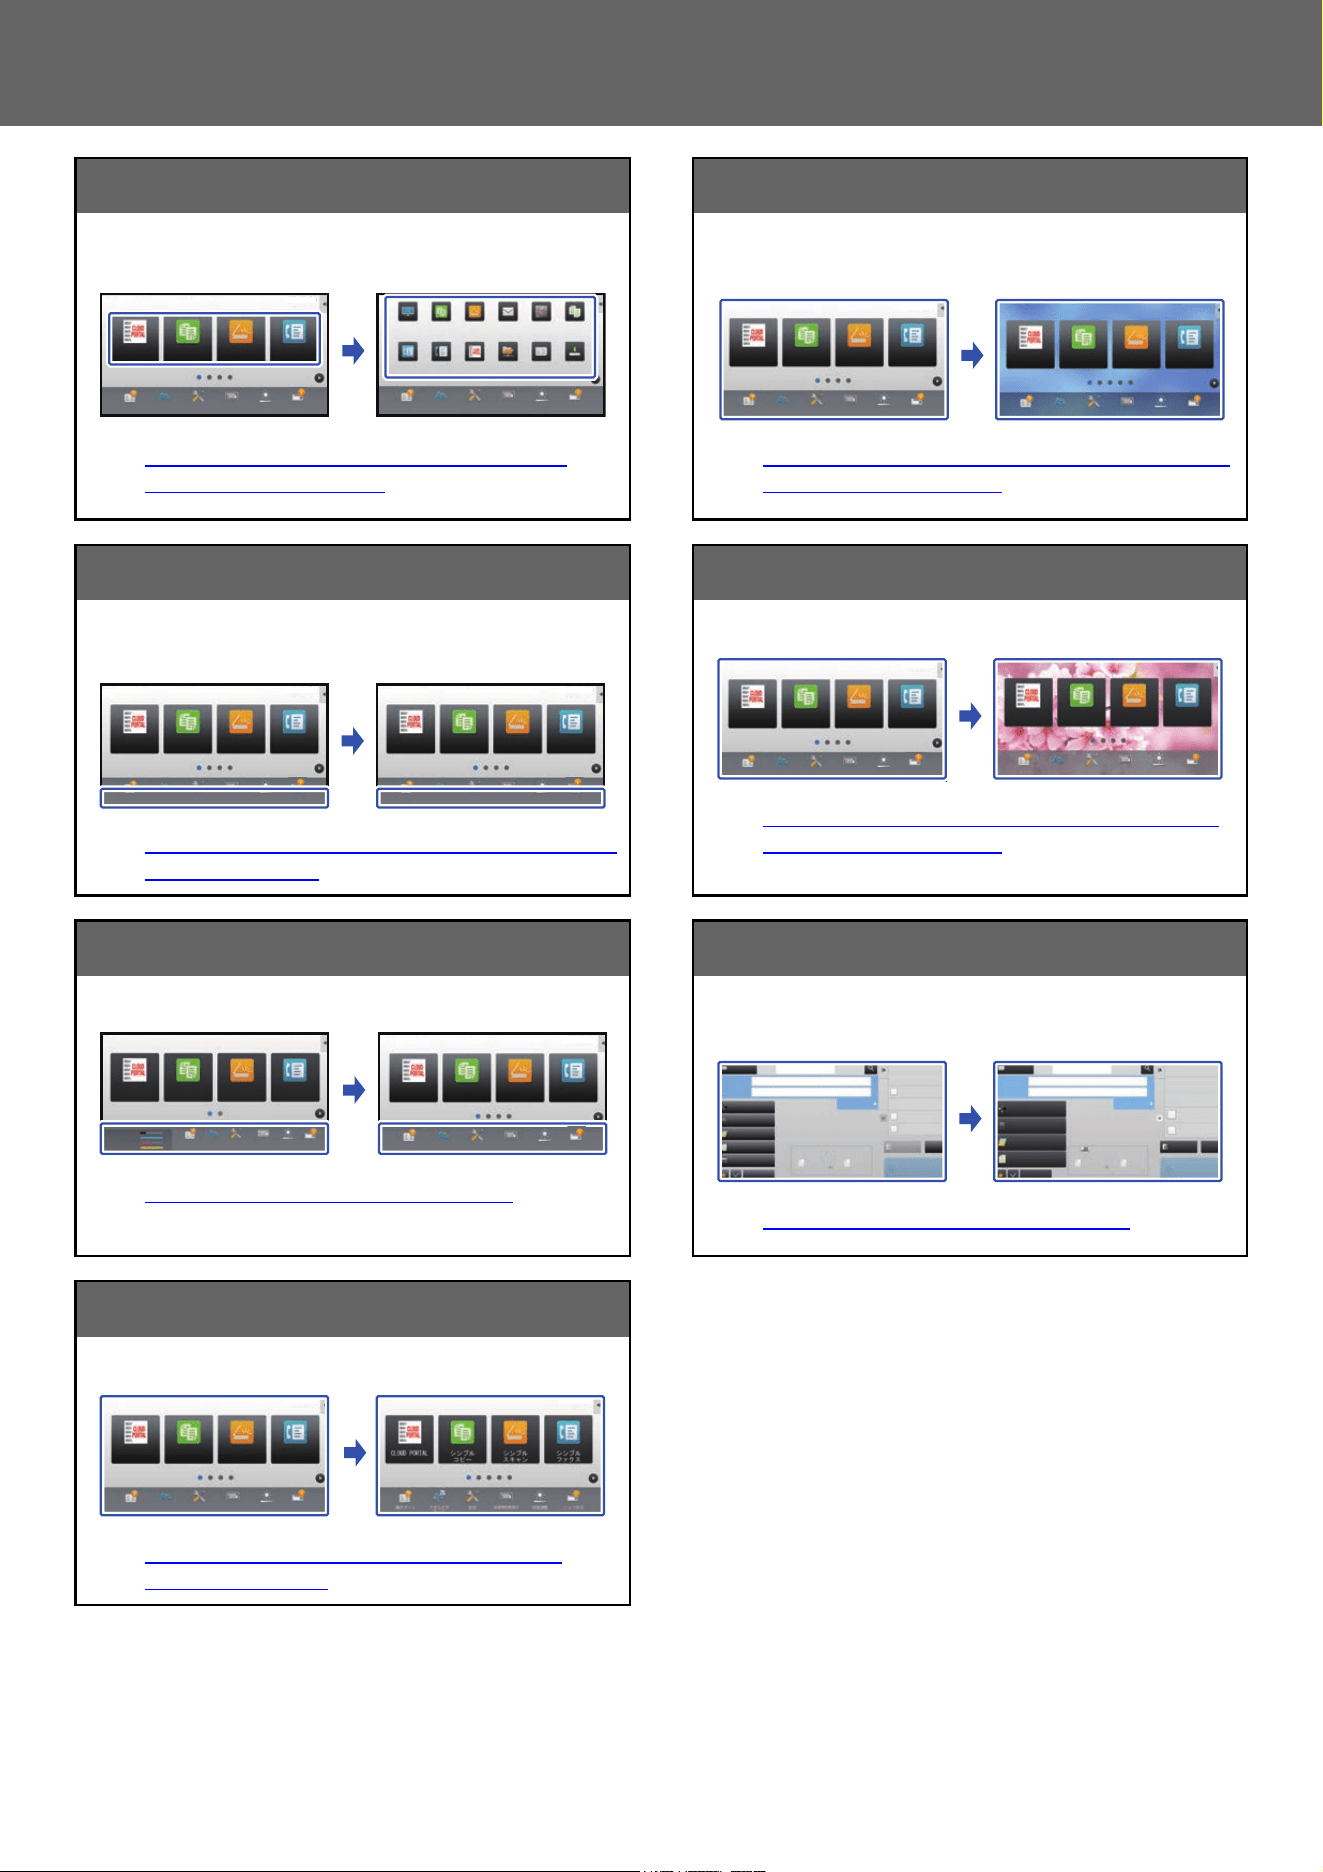
1
Open the action panel on the home screen, and tap [MFP Display Pattern
Setting].
► General procedure when using the touch panel (page 29)
2
Select the desired pattern.
3
See "General procedure when using the touch panel" (►page 29) to exit the
settings.
Operation
Guide
Enlarge
Display Mode
Settings
Total Count
LCD Control Job Status
Easy
Copy
Easy
Scan
Easy
Fax
CLOUD PORTAL
10:15 AM
Operation
Guide
Enlarge
Display Mode
Settings
Total Count
LCD Control Job Status
Easy
Copy
Easy
Scan
Easy
Fax
CLOUD PORTAL
10:15 AM
I want to change the color
pattern of the home screen.
Operation
Guide
Enlarge
Display Mode
Settings Total Count LCD Control Job Status
Exit Home Edit Mode
Pattern 1
MFP Display Pattern Setting
Pattern 2
Pattern 3
Pattern 4
Pattern 5
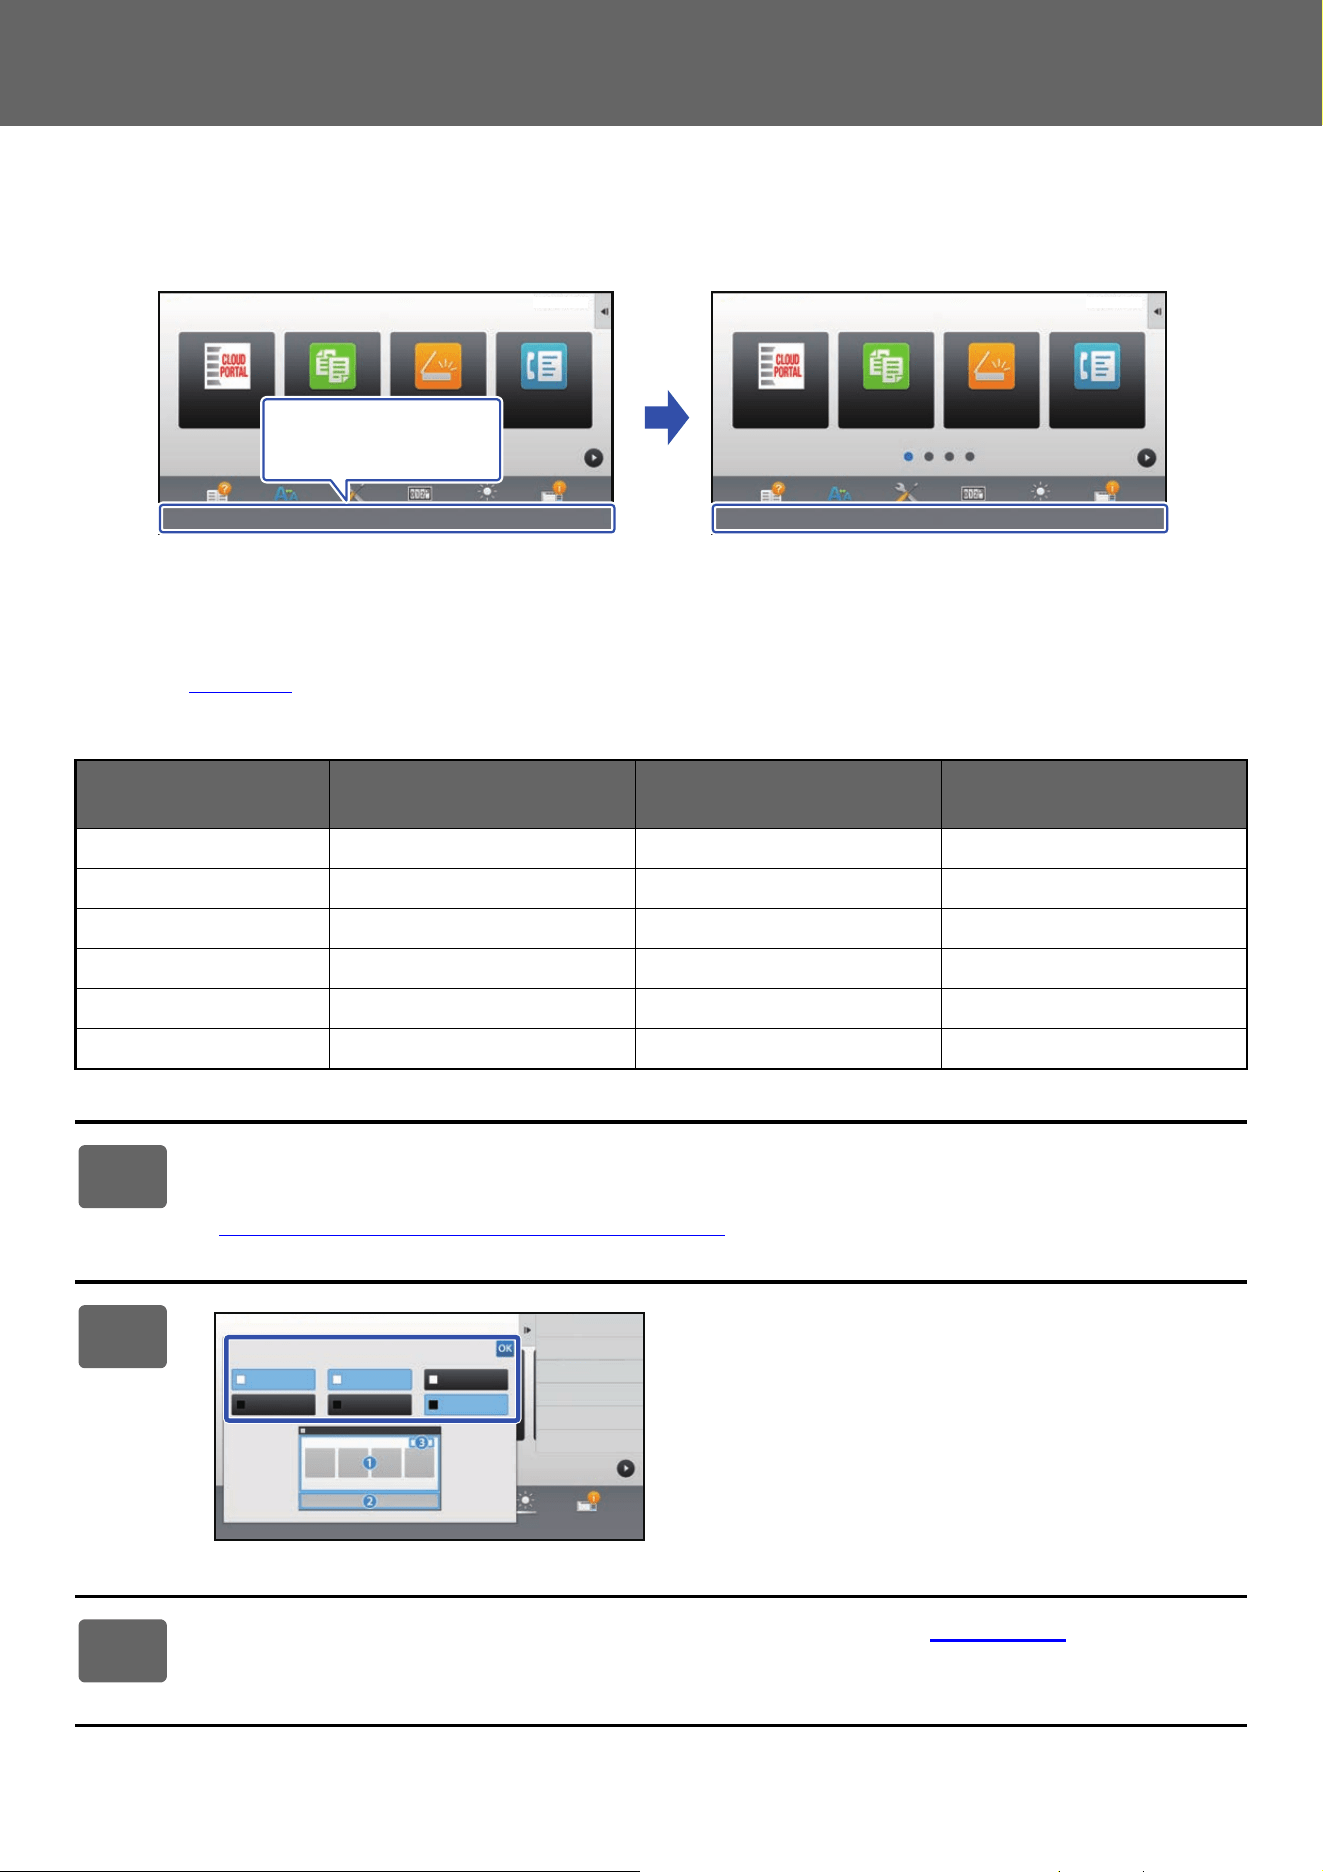
49
Touch Panel Operation
CHANGING THE COLOR OF TEXT ON THE HOME SCREEN
You can change the color of the text in shortcut keys, fixed keys, and the clock on the home screen to white or black.
The color is changed using the touch panel.
Home screen layout patterns and text colors
The color of text on the home screen varies depending on the layout pattern.
For information about layout patterns of the home screen, see "CHANGING THE LAYOUT PATTERN OF THE HOME
SCREEN" (►p
age 46).
Factory default text colors
Layout Pattern Scrolling Area
(Text color of shortcut key)
Fixed Area
(Text color of fixed keys)
Clock
(Text color of clock)
1 White White Black
2 White No Black
3 Black White Black
4 Black No Black
5 Black White Black
6 Black No Black
1
Open the action panel on the home page and tap [Change Text Color On
Home Screen].
► General procedure when using the touch panel (page 29)
2
Change the text color.
3
See "General procedure when using the touch panel" (►page 29) to exit the
settings.
Operation
Guide
Enlarge
Display Mode
Settings
Total Count
LCD Control Job Status
Easy
Copy
Easy
Scan
Easy
Fax
CLOUD PORTAL
10:15 AM
Operation
Guide
Enlarge
Display Mode
Settings
Total Count
LCD Control Job Status
Easy
Fax
CLOUD PORTAL
Easy
Copy
Easy
Scan
10:15 AM
I want to change the
text color to black.
Change Text Color On Home Screen
White
1. Scrolling Area 2. Fixed Area 3. Clock
Black
White
Black
White
Black
Operation
Guide
Enlarge
Display Mode
Settings Total Count LCD Control Job Status
Finish and Return
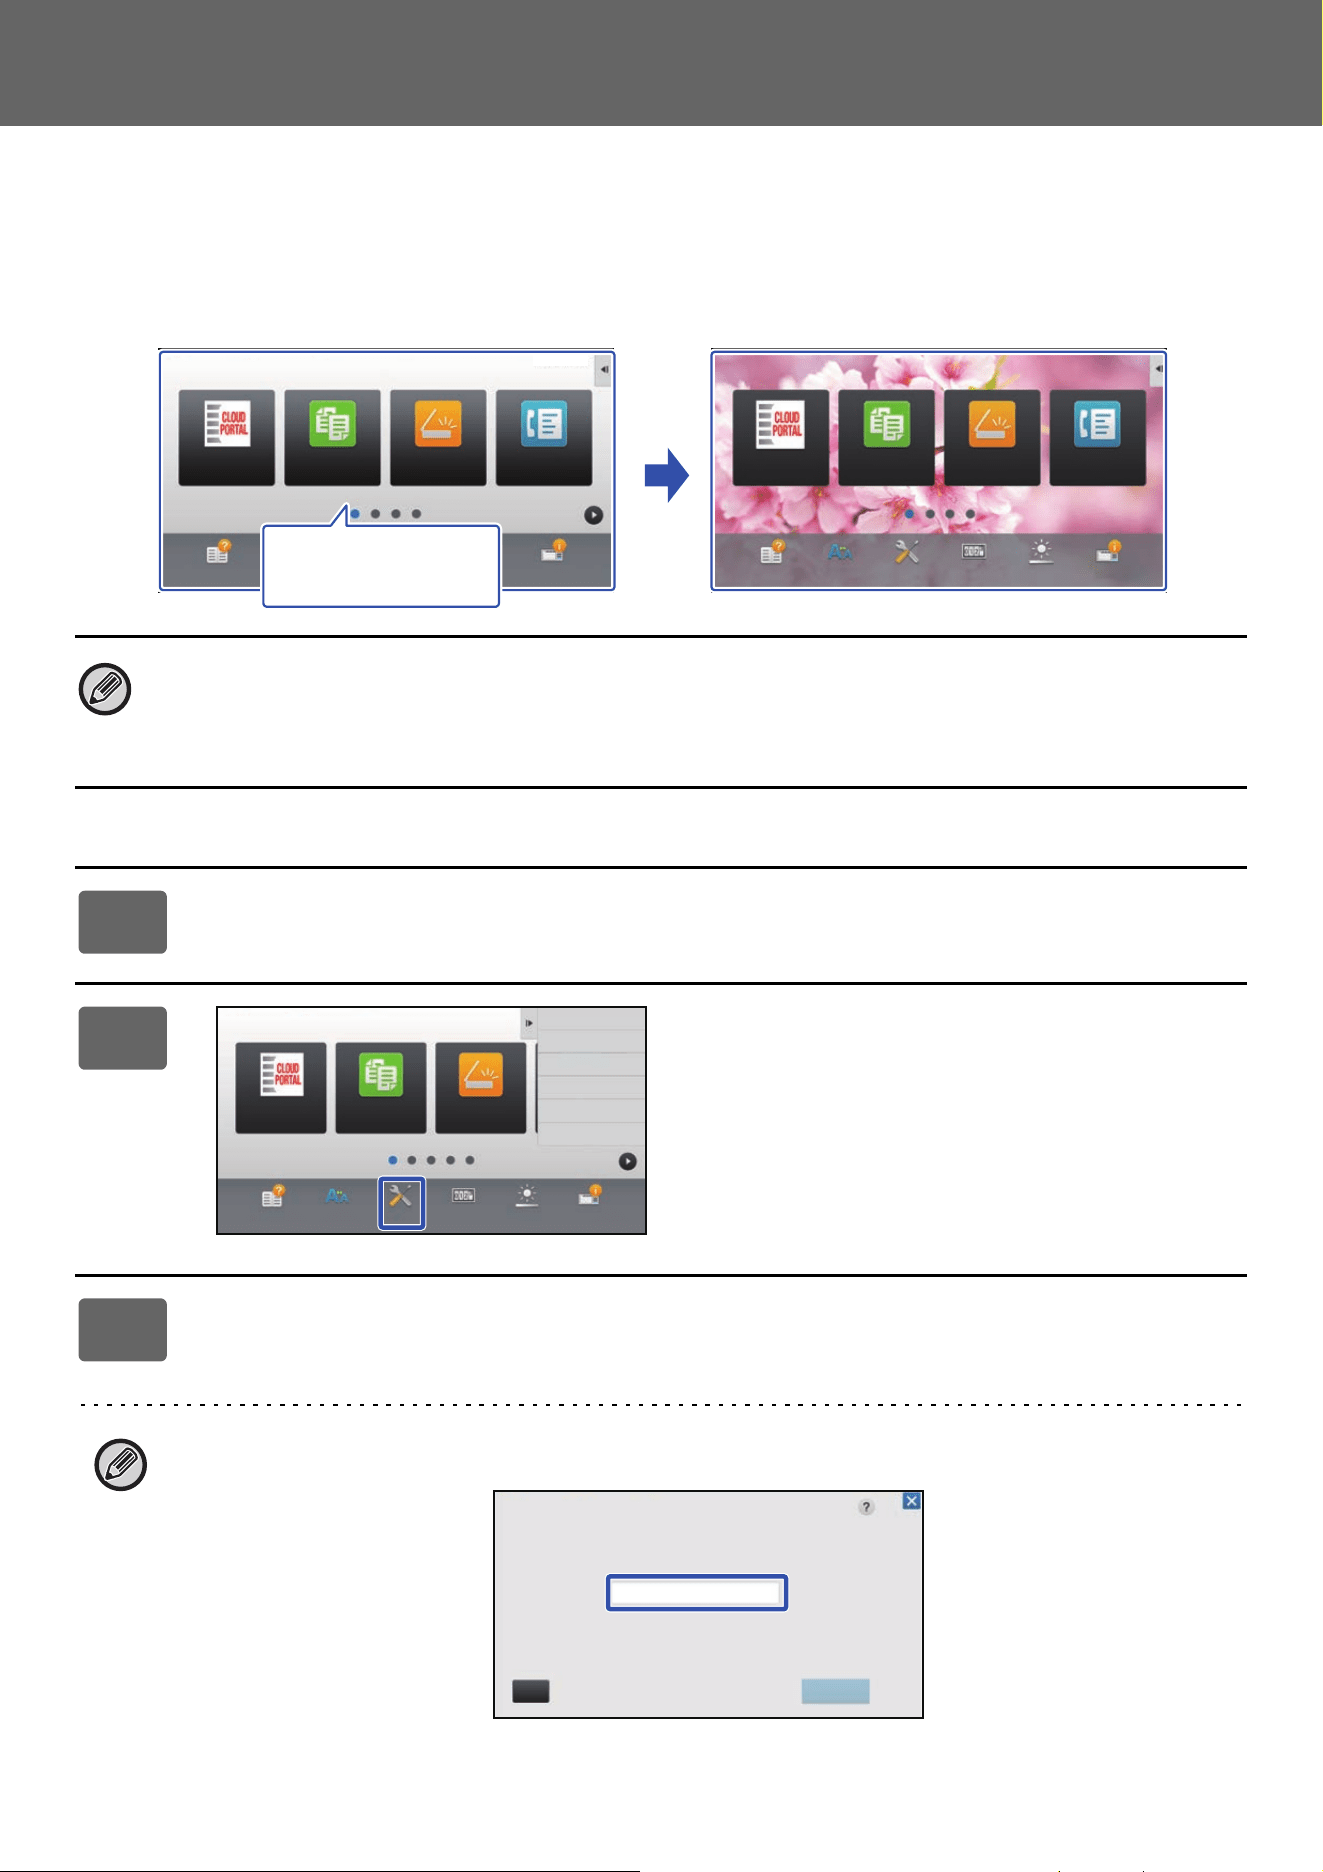
50
Touch Panel Operation
CHANGING THE BACKGROUND IMAGE OF THE HOME SCREEN
You can change the background image of the home screen to a custom image.
This procedure can be performed from the touch panel or from the Web page.
To change the image from the touch panel, first save the desired image in a USB device and connect the device to the
machine.
From the touch panel
The display size of the background image is 1024 dots x 544 dots.
The height of the image is adjusted to the display height, and the width is adjusted to the display width.
Because the height and width are enlarged/reduced separately, some images may become distorted.
If you want to display the image correctly, adjust the size of the image to the display size of the background image in
advance.
1
Connect the USB device containing the desired image to the machine.
When the USB device is connected to the machine, the popup window will be appeared. Tap the [OK] key.
2
Tap the [Settings] key on the Home
screen.
The screen changes to the settings screen.
3
Tap [System Settings] → [Home Screen Settings] → [Background Image],
and then tap [Change] key.
The "Register Background Image" screen will be appeared.
The administrator password entry screen will appear while you are selecting settings.
Enter the administrator password and log in.
Easy
Scan
Easy
Copy
Easy
Fax
CLOUD PORTAL
Operation
Guide
Enlarge
Display Mode
Settings
Total Count
LCD Control Job Status
10:15 AM
Easy
Copy
Easy
Scan
Easy
Fax
CLOUD PORTAL
Operation
Guide
Enlarge
Display Mode
Settings
Total Count
LCD Control Job Status
10:15 AM
I want to change the
background image.
Operation
Guide
Enlarge
Display Mode
Settings Total Count LCD Control Job Status
CLOUD PORTAL
Edit Home
Change Text Color
On Home Screen
MFP Display Pattern
Setting
Easy
Copy
Easy
Scan
CA OK
Administrator Password
Please input Admin Password.
(5 or more and up to 255 characters)
Password
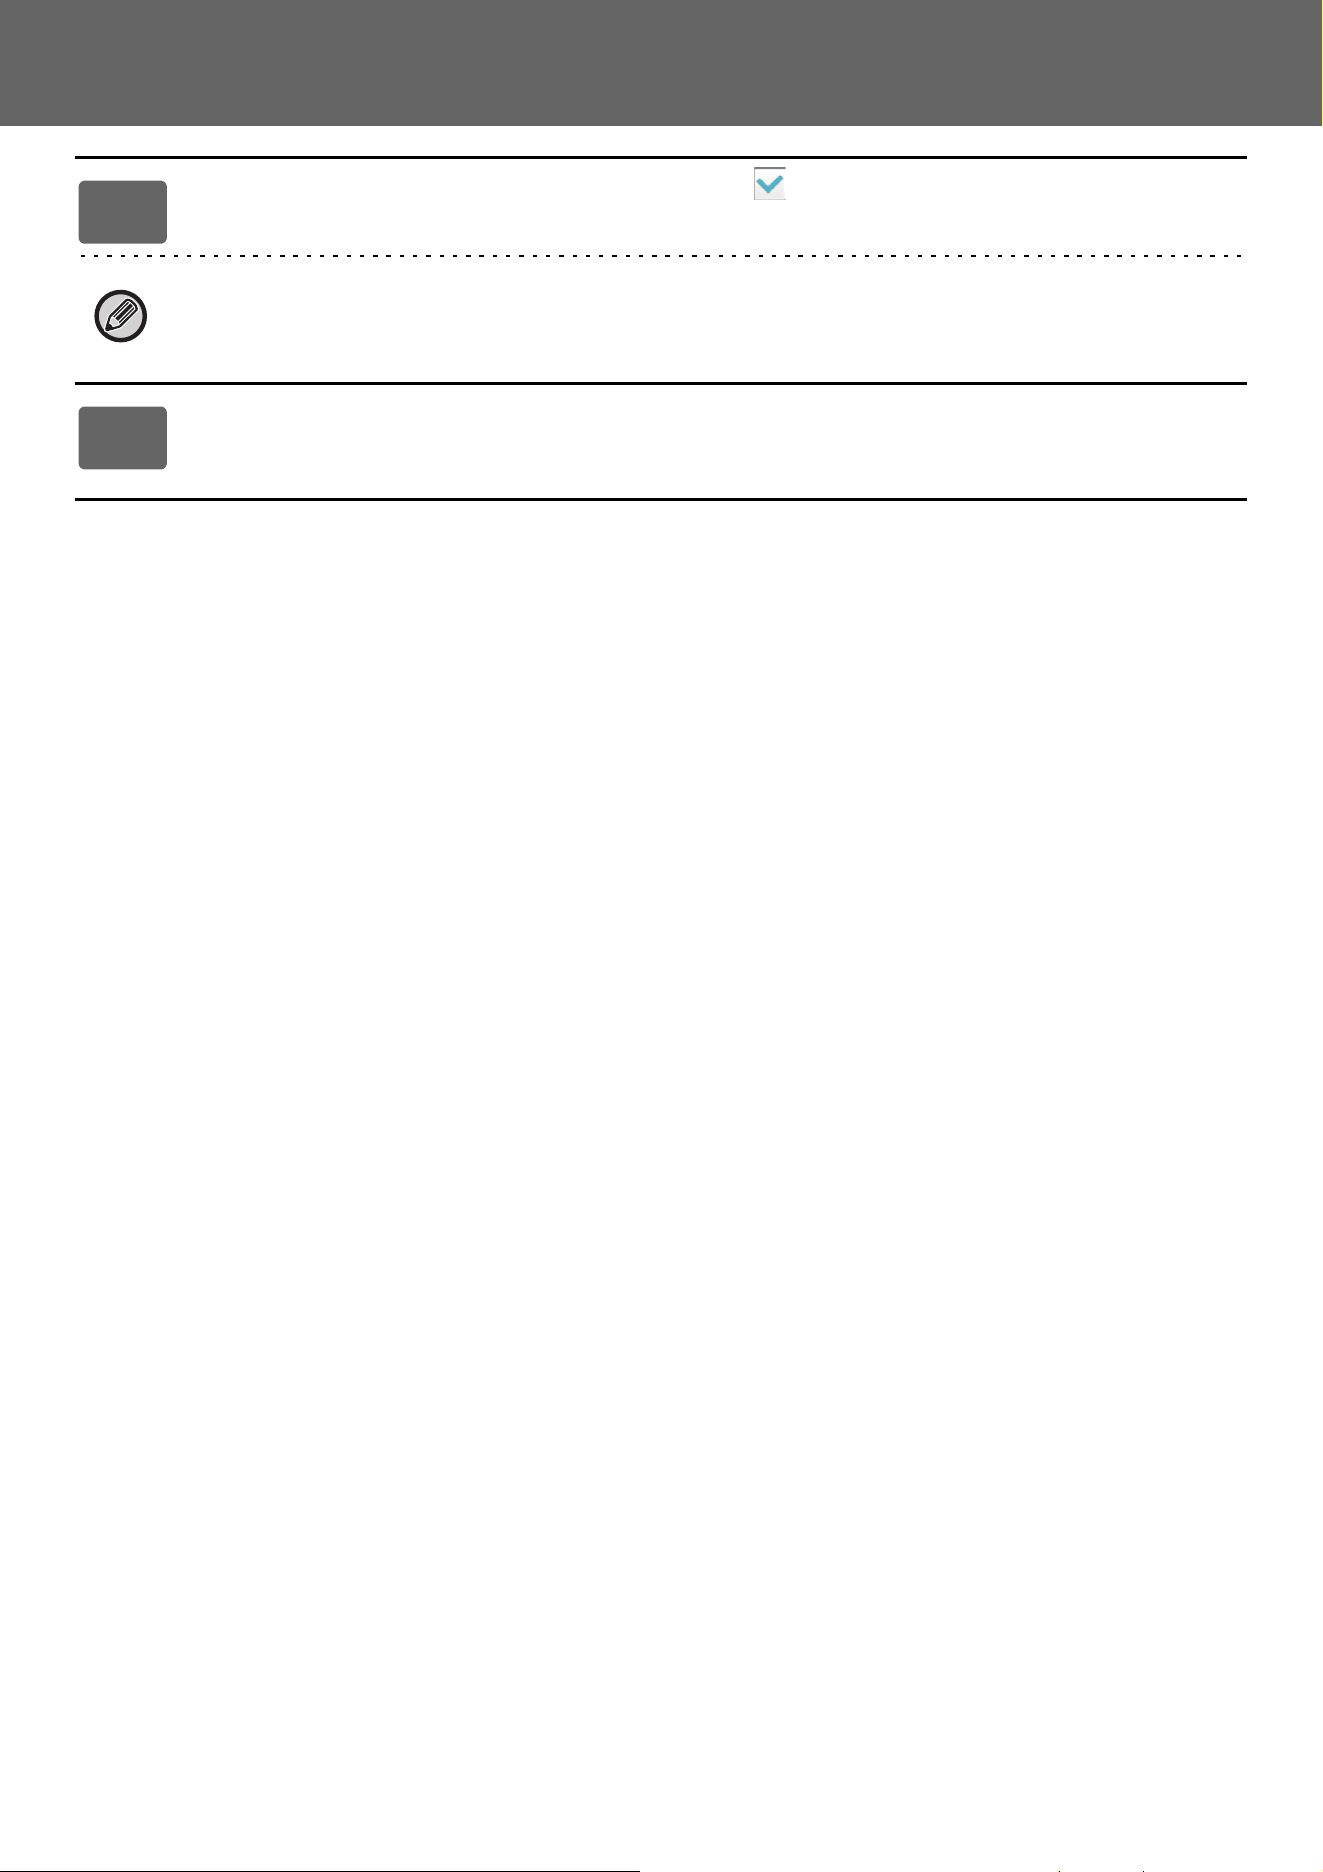
51
Touch Panel Operation
4
Set the [Use Custom Image] checkbox to , and select the desired image
with [Folder Name/File Name].
• File formats that can be used are JPEG, GIF and PNG (jpeg, jpg, jpe, jfif, gif and png).
• The maximum file size of an image that can be used for the background image is 640 KB.
5
Click the [Store] button.
After all U/I customize settings are completed, tap the [Logout] key.
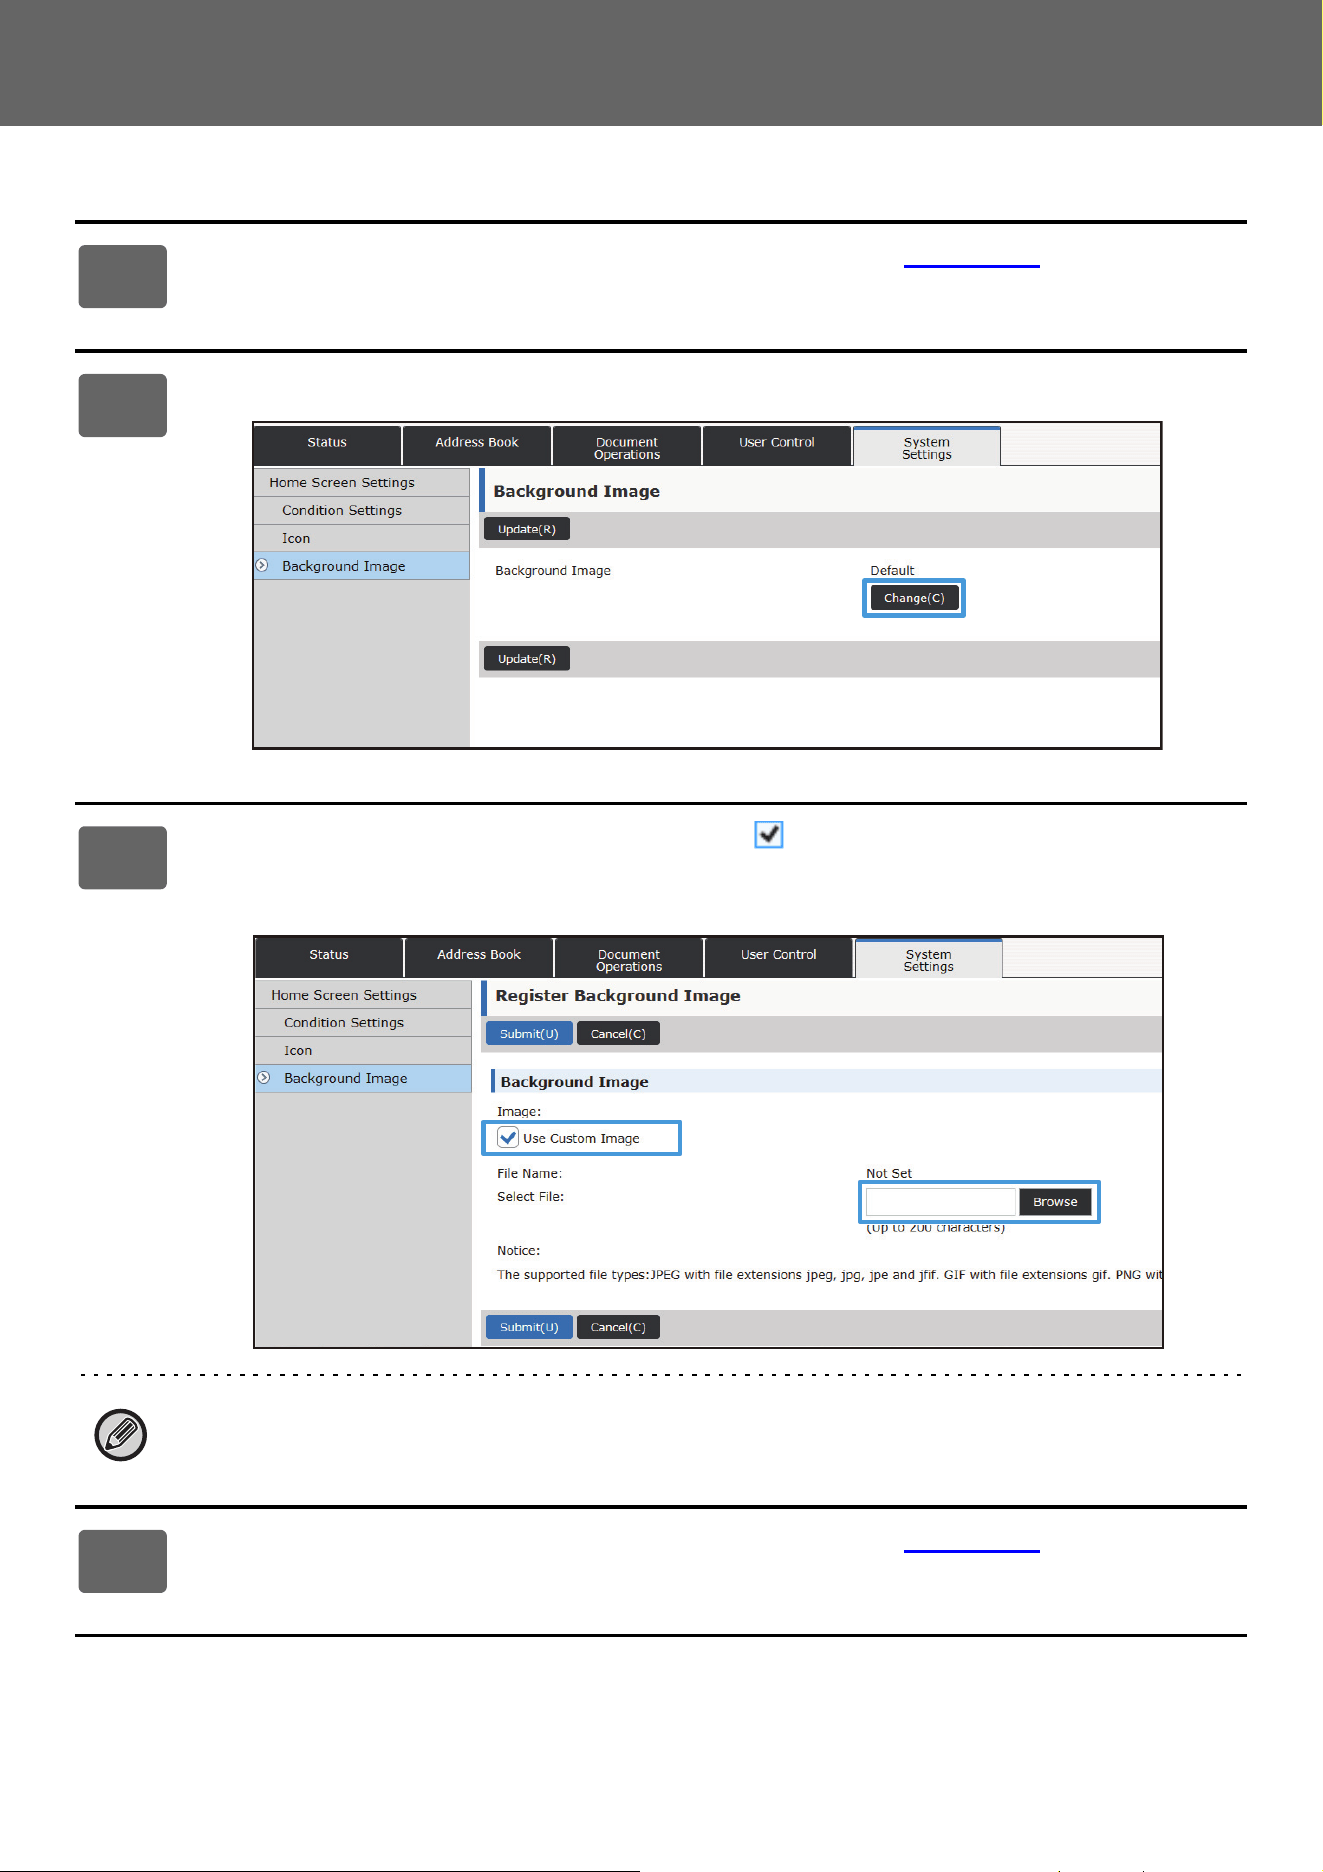
52
Touch Panel Operation
From the Web page
1
See "General procedure when using the Web page" (►page 30) to open the
settings screen.
2
Click the [Change] button in [Background Image].
3
Set the [Use Custom Image] checkbox to , and select the image with
[Select File].
Click [Browse] to select the image.
• File formats that can be used are JPEG, GIF and PNG (jpeg, jpg, jpe, jfif, gif and png).
• The maximum file size of an image that can be used for the background image is 640 KB.
4
See "General procedure when using the Web page" (►page 30) to exit the
settings.
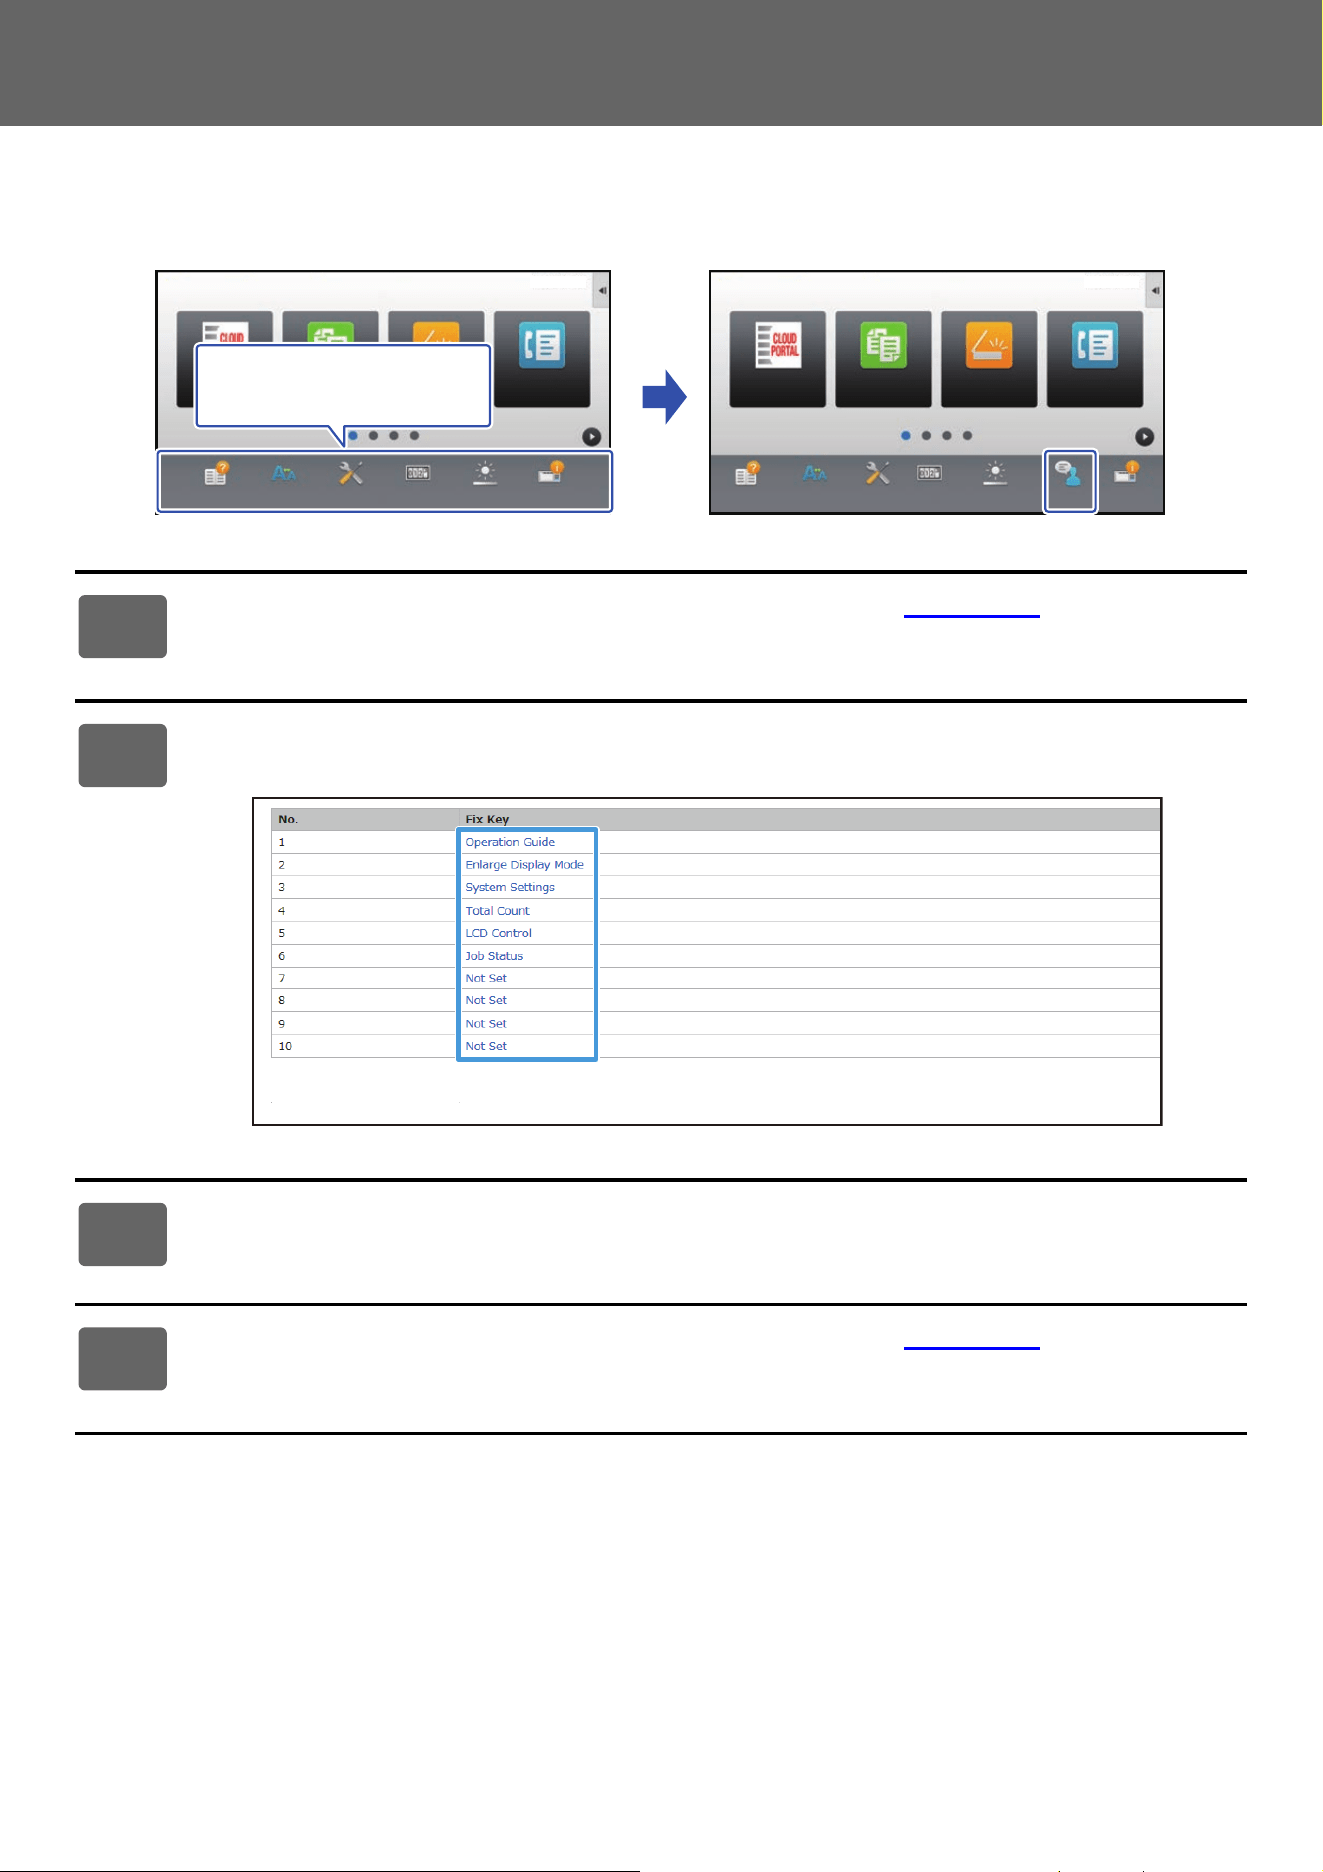
53
Touch Panel Operation
CHANGING THE FIXED KEYS
You can change the fixed keys. The fixed keys are changed using the Web page.
1
See "General procedure when using the Web page" (►page 30) to open the
settings screen.
2
Click [Condition Settings], and click the desired item under "Fix Key".
You can click [Not Set] to add a new fixed key.
3
Select the function you want to add, and click the [Submit] button.
When you click the [Submit] button, the [Home Screen Registration] screen closes.
4
See "General procedure when using the Web page" (►page 30) to exit the
settings.
Operation
Guide
Enlarge
Display Mode
Settings
Total Count
LCD Control Job StatusLanguage
Setting
Easy
Fax
CLOUD PORTAL
Easy
Scan
Easy
Copy
Easy
Fax
CLOUD PORTAL
Easy
Scan
Easy
Copy
Operation
Guide
Enlarge
Display Mode
Settings
Total Count
LCD Control Job Status
10:15 AM 10:15 AM
I want to add "Language
Setting" in the fixed key
display area.
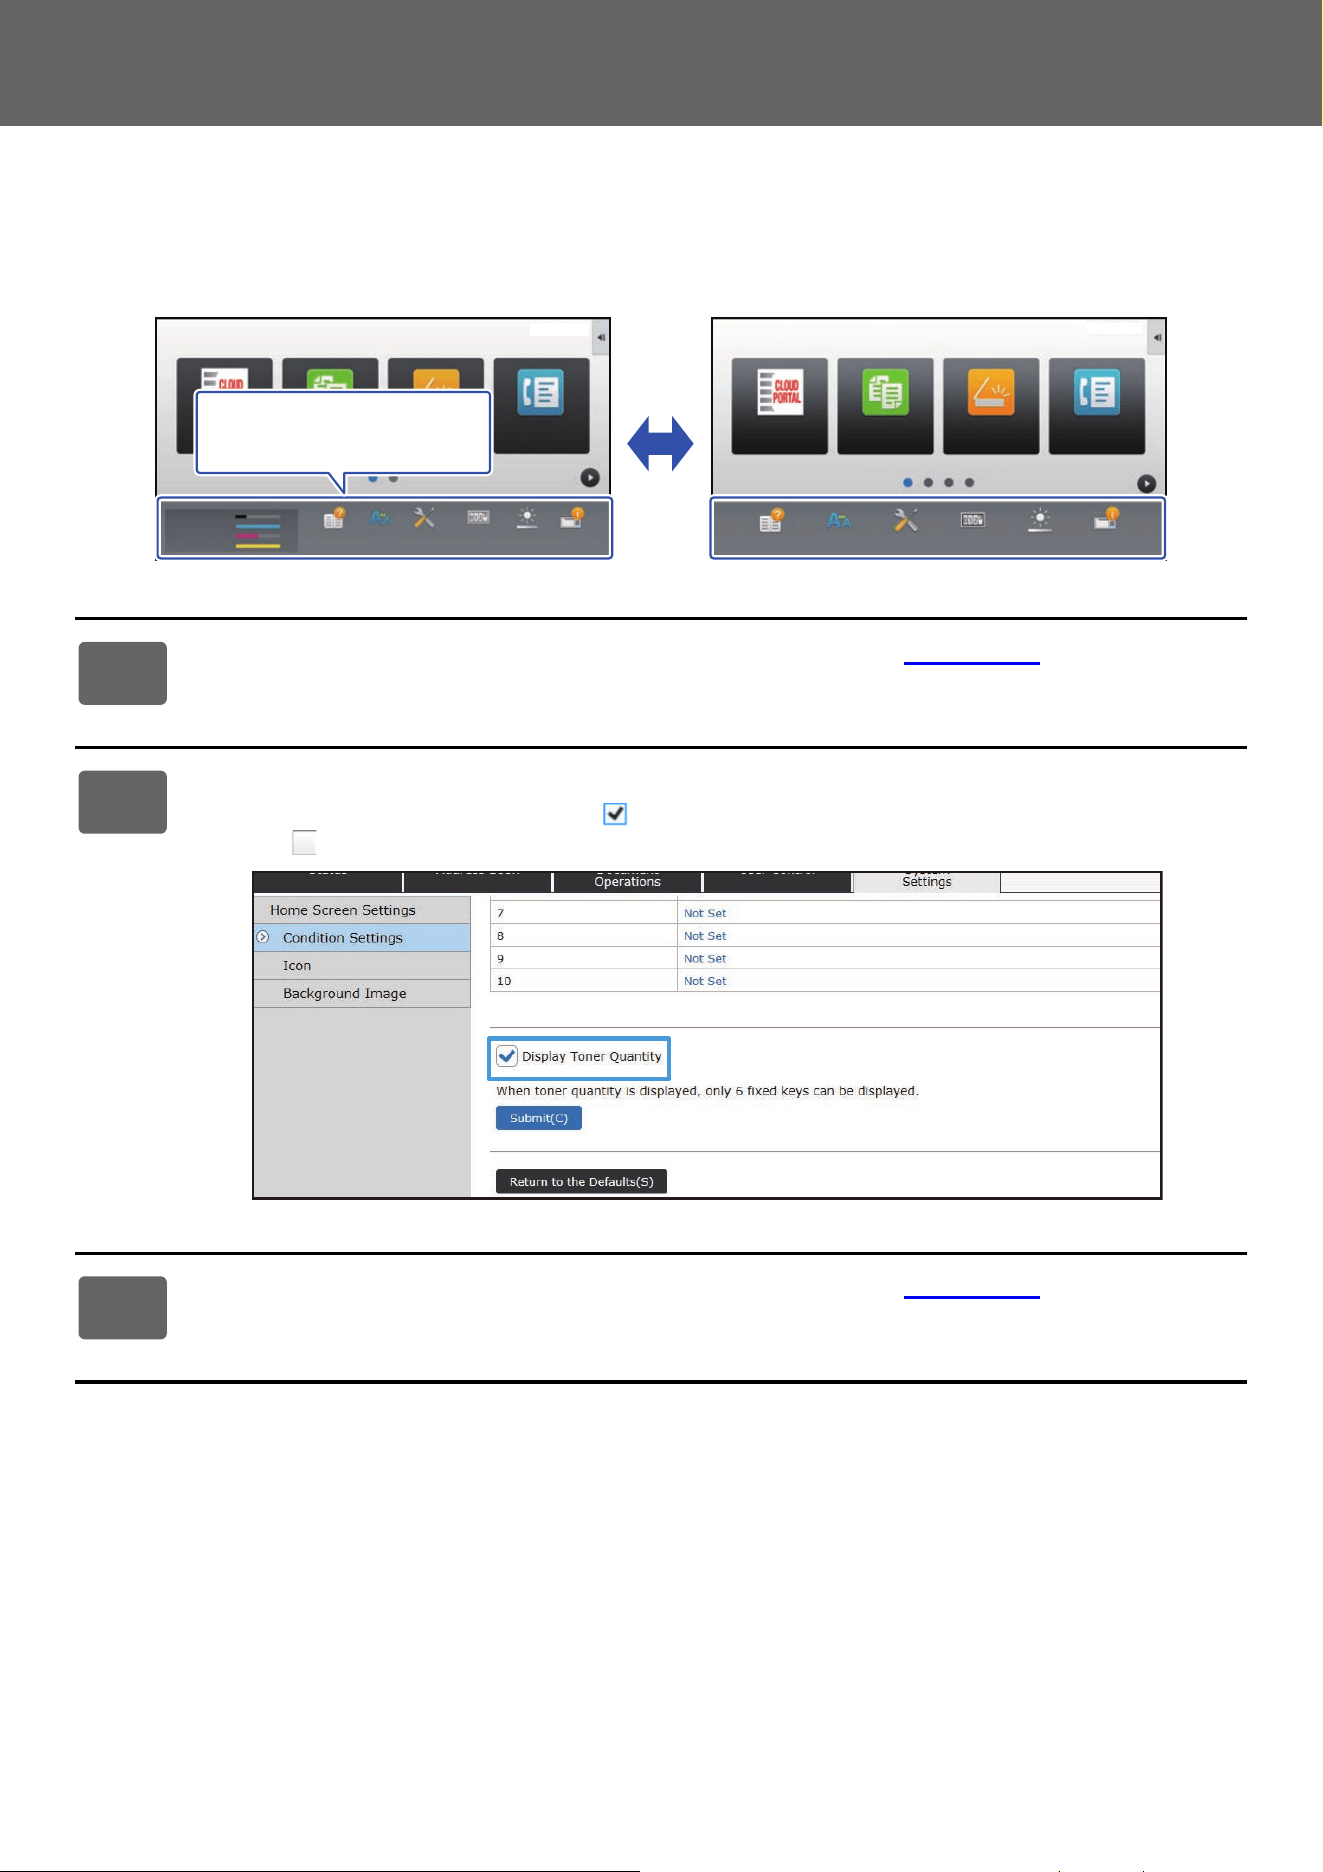
54
Touch Panel Operation
Show/hide the toner level in the fixed area
In the system settings, you can show/hide the toner level to the fixed key area.
When this setting is enabled, up to six fixed keys can be displayed. (The keys from No. 1 to No. 6 in Web page "Fix Key"
(Except when not set) are displayed. Keys after No. 6 are not displayed.)
1
See "General procedure when using the Web page" (►page 30) to open the
settings screen.
2
Click [Condition Settings] and set [Display Toner Quantity].
When the [Display Toner Quantity] checkbox is , the toner level appears. When the [Display Toner Quantity]
checkbox is , the toner level is hidden.
3
See "General procedure when using the Web page" (►page 30) to exit the
settings.
Operation
Guide
Enlarge
Display Mode
Settings
Total Count
LCD Control Job Status
Easy
Fax
CLOUD PORTAL
Toner
Remaining
M
C
Bk
Y
Easy
Scan
Easy
Copy
10:15 AM
Operation
Guide
Enlarge
Display Mode
Settings
Total Count
LCD Control Job Status
Easy
Fax
CLOUD PORTAL
Easy
Scan
Easy
Copy
10:15 AM
I want to hide the toner
level in the fixed key area
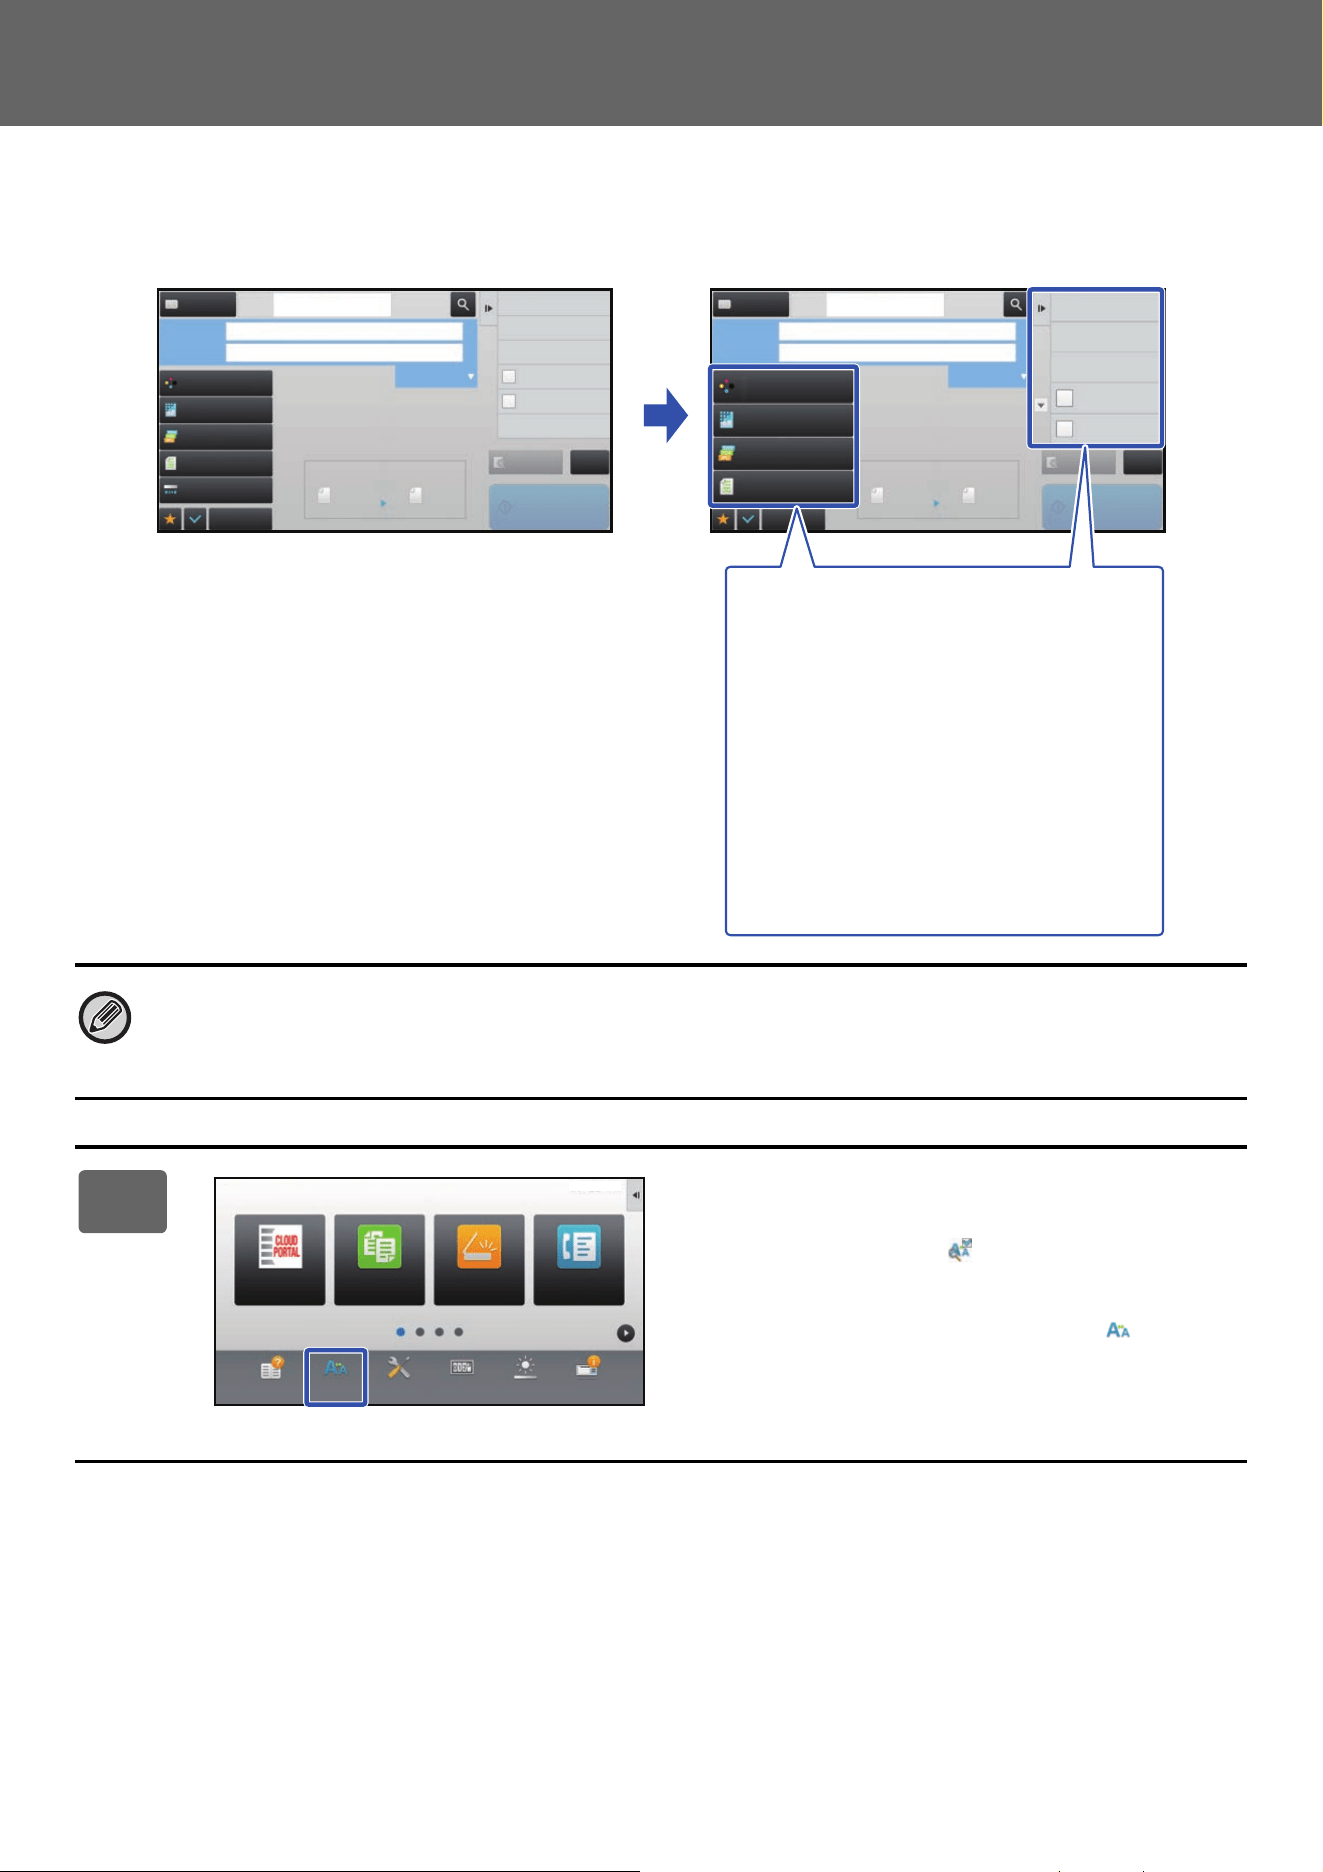
55
Touch Panel Operation
INCREASING THE TEXT SIZE
In a Normal mode screen such as copy or image send, you can enlarge the character size and interval. This function is
selected on the touch panel.
• In screens other than Normal mode of each function such as Ea
sy mode and settings, the size of characters
and keys does not change.
• Increasing the text size may decrease the number of keys displayed in the base screen and other screens of
each function.
1
Tap the [Enlarge Display Mode] key in
the home screen.
The key image changes to and enlarge display mode is
enabled.
To cancel enlarge display mode, tap the [Enlarge Display
Mode] key again. The key image changes to and
enlarge display mode is canceled.
Preview
Start
Scan Size
Auto Auto
Color Mode
Auto/Grayscale
Resolution
200x200dpi
File Format
PDF
Auto
Others
A4
A4
100%
Send Size
Address Book
Subject
File Name
Address Touch to input Address
Options
Sending History
Call Search Number
Call Program
Call Registered settings
Send Same Image
as Fax Address
Store Data Temporarily
Quick File
CA
Original
Preview
Start
Scan Size
Auto Auto
Color Mode
Auto/Grayscale
Resolution
200x200dpi
File Format
PDF
Original
Auto
Others
A4
A4
100%
Send Size
Address Book
Subject
File Name
Address Touch to input Address
Options
Sending History
Call Search Number
Call Program
Call Registered settings
Send Same Image
as Fax Address
Store Data Temporarily
Quick File
Exposure
CA
File
Store Data in Folder
Specified by System Settings Specified by System Settings
Setting keys and the action panel
are enlarged.
Setting items that no longer
appear on the action panel can
be displayed by tapping the
scroll keys.
Setting keys that no longer
appear (the [Exposure] key in this
example) can be displayed by
tapping the [Others] key.
Operation
Guide
Enlarge
Display Mode
Settings Total Count LCD Control Job Status
Easy
Copy
Easy
Scan
CLOUD PORTAL
Easy
Fax
10:15 AM

56
Touch Panel Operation
CHANGING THE LANGUAGE USED ON THE MACHINE
You can change the language used in the home screen.
This procedure is performed from the touch panel.
Before performing this procedure, add the [Language Setting] shortcut key to the home screen. To add a shortcut key,
see "ADDING SHORTCUT KEYS" (►p
age 32).
1
Tap the [Language Setting] key on the
home screen.
2
Select the desired language and tap
.
The display changes to the selected language.
Easy
Copy
Easy
Scan
Operation
Guide
Enlarge
Display Mode
Settings
Total Count
LCD Control Job Status
Easy
Fax
CLOUD PORTAL
10:15 AM 10:15 AM
I want to change the
language to Japanese.
Operation
Guide
Enlarge
Display Mode
Settings Total Count LCD Control Job Status
10:15 AM
PC Scan Language
Setting
Operation
Guide
Enlarge
Display Mode
Settings Total Count LCD Control Job Status
English Español
Français Deutsch
Italiano Nederlands
Svenska Norsk
American English
Display Language Setting
10:15 AM
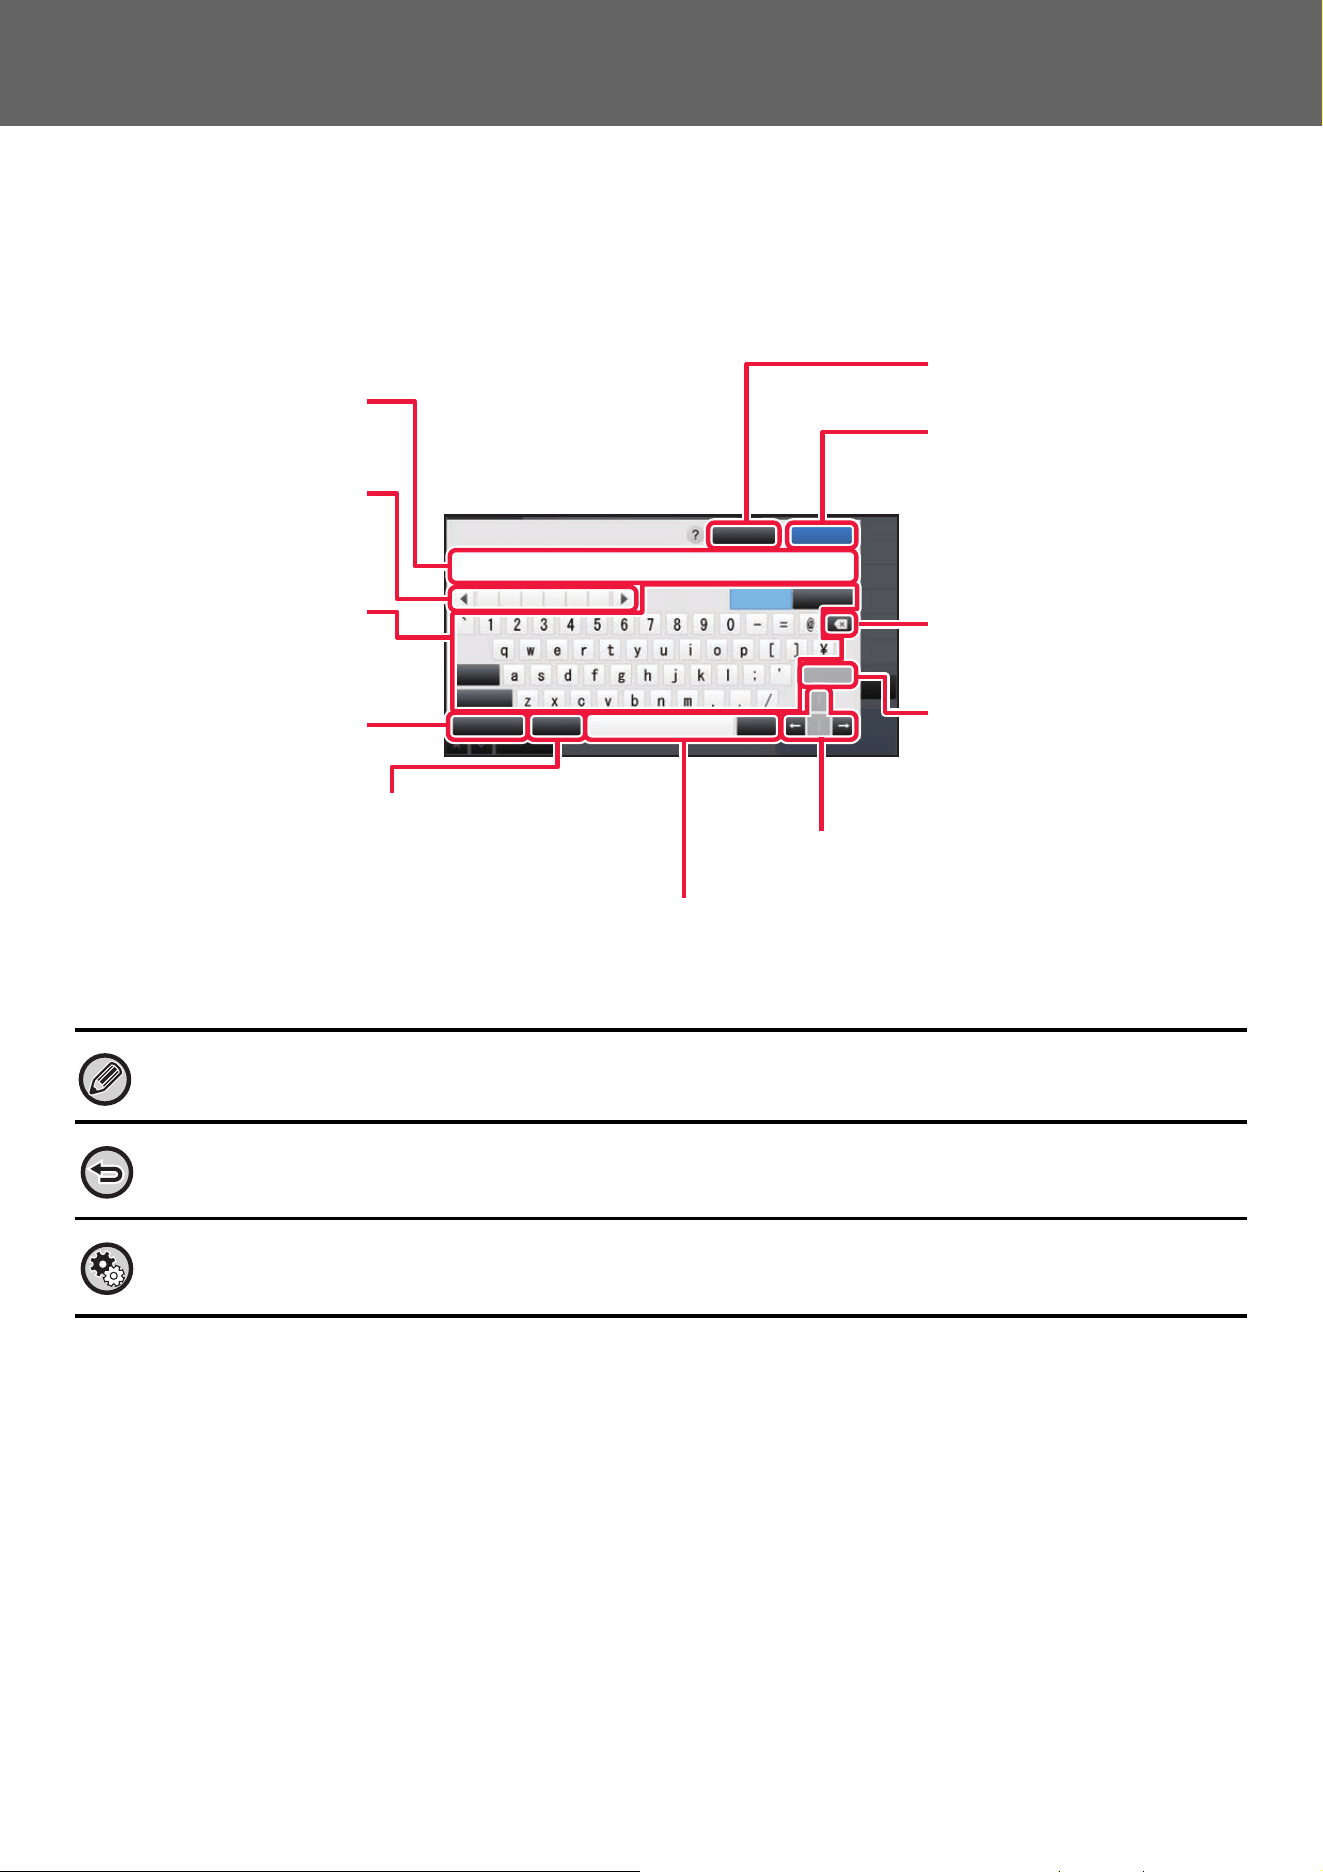
57
Touch Panel Operation
CHARACTER ENTRY
NAMES AND FUNCTIONS OF SOFT KEYBOARD KEYS
Display the soft keyboard to register the name of a file, program, folder or user.
The soft keyboard shown here is an image for your reference. Different keys may be enabled depending on the actual
situation and condition under which you enter characters.
If "External Keyboard" is selected in "Settings" → [System Settings] → [Common Settings] → [Keyboard Settings] → [Default
Keyboard Setting] → [Set Keyboard Priority], the soft keyboard will not appear.
To register words:
In "Settings (administrator)", select [System Settings] → [Common Settings] → [Keyboard Settings] → [Soft Keyboard
Template Setting].
Subject
Cancel OK
Space
Pre-set
Message
AltGr
Keyboard-
Select
Shift
Caps Enter
Characters Symbols
.com .net .org
.info
.biz
http:/
/
Displays the entered text.
Retrieves the stored words.
Use "Settings" to store words.
Tap a key to enter text.
The key types vary depending
on the selected entry mode.
Switches the key layout.
Use this to retrieve a
previously stored subject
for e-mail or pre-set text.
Converts the entered characters. The [Space] key
inserts a space between words if there are no
characters specified to be converted.
Exits the soft keyboard.
Finalizes the entered
characters and exits the soft
keyboard.
Deletes one character to the
left.
Temporarily fixes the converted
characters or inserts a line
break.
Used to move the cursor or to change the
range of the specified conversion target.

58
Touch Panel Operation
SET THE KEYBOARD SETTING
In "Settings (administrator)", select [System Settings] → [Common Settings] → [Operation Settings] → [Keyboard
Settings].
Keyboard Settings
Default Keyboard Setting
Configure settings for the keyboard used for entry on the text.
Keyboard Select
Change the key layout and display according to the set language.
Set Keyboard Priority
When an external keyboard is connected, set whether the external keyboard or the keyboard shown on the touch panel
(soft keyboard) is given priority.
Soft Keyboard Template Setting
Register a text that you frequently use when entering an address or domain name in advance. Enter a maximum of 16
characters.

2021D-EN3

