

TVSA-T
POWER SCREED
Operation Manual
HOW TO VIDEOS, MANUALS,
FINISHING GUIDES, & MORE
YEAR
W
A
R
R
A
N
T
Y
Honda Engine
on
3

2
TABLE OF CONTENTS
1. Safety Information
1.1 Laws Pertaining to Spark Arresters
1.2 Operating Safety
1.3 Safety while using Combustion Engines
1.4 Service Safety
2. Technical Data
2.1 Screed Board Data
2.2 Machine Data
3. Before Starting
3.1 Recommended Fuel
3.2 Starting Checklist
4. Assembly Guide
5. Operation
6. Aer Each Use
6.1 Clean Up
6.2 Stor age
7. Maintenance
8. Troubleshooting
9. Limited Warranty
10. How to Wet Screed
11. How to Screed Form to Form
12. Operating on Wet Concrete
13. Parts Manual
14. Tomahawk Catalog & Coupon
4
5
5
6
6
7
7
8
8
8
8
9
11
12
12
13
14
15
16
18
19
20
21
28

3
Register Your Equipment
Thank you for purchasing TOMAHAWK equipment! Your product is covered by the
TOMAHAWK Warranty policy, but in order to activate your warranty, we need you to register
your product. In addition to activating your equipment warranty, product registration will
grant you access to important product updates, streamlined customer service and more.
INCLUDED WITH YOUR REGISTRATION
☑ Equipment Warranty Activation
☑ Product Updates
☑ Streamlined Customer Service
☑ Excusive Discounts and Sales
STEPS TO REGISTER YOUR EQUIPMENT
1. Visit www.tomahawk-power.com
2. Choose “Product Registration” at the bottom of the page
3. Enter your equipment’s serial number to get started
4. Provide all required information
5. Submit Registration
Equipment Resources
Tomahawk Customer Service doesn’t stop at checkout. We understand to keep a job-site
running smoothly - the proper equipment, spare parts, instruction manuals, and more are
needed at the drop of a hat. Visit www.tomahawk-power.com to gain access to the incredible
resources below.
How To Video Library
More of a visual person? Visit our Video Library for equipment
assembly instructions, troubleshooting tips, and more!
Found on each product listing or the Service Videos Page
Manual and Assembly Guide Library
Visit our Manual Library if you are looking for a lost
operations manual or a particular spare part?
Found on each product listing or the Tomahawk Manuals Page
Service Requests
In need of a quick fix or a service center referral? Submit a
Service Request and a Tomahawk Technician will respond
shortly to get you the help you need.
Choose “Service Request” at the bottom of www.tomahawk-power.com

This manual provides information and procedures to safely operate and maintain this
equipment. For your own safety and protection from injury, carefully read, understand and
observe the safety instructions described in this manual.
Keep this manual or a copy of it with the equipment. If you lose this manual or need an
additional copy, please contact Tomahawk Power LLC or visit www.tomahawk-power.com
This equipment is built with user safety in mind; however, it can present hazards if
improperly operated and serviced. Follow operating instructions carefully. If you have
questions about operating or servicing this equipment, contact Tomahawk Power.
The information contained in this manual is based on equipment’s production at the time of
publication. Tomahawk Power reserves the right to change any portion of this information
without notice.
No part of this publication may be reproduced in any form or by any means, electronic or
mechanical, including photocopying, without express written permission from
Tomahawk Power.
Any type of reproduction or distribution not authorized by Tomahawk Power represents an
infringement of valid copyrights and will be prosecuted. We expressly reserve the right to
make technical modifications, even without due notice, which aim at improving our
machines or their safety standards.
1. Safety Information
This manual contains DANGER, WARNING, CAUTION, and NOTE callouts which must be
followed to reduce the possibility of personal injury, damage to the equipment, or improp-
er service.
This is the safety alert symbol. It is used to alert you to potential personal injury
hazards. Obey all safety messages that follow this symbol to avoid possible injury
or death.
DANGER indicates an imminently hazardous situation which, if not avoided, will
result in death or serious injury.
WARNING indicates a potentially hazardous situation which, if not avoided, could
result in death or serious injury.
CAUTION indicates a potentially hazardous situation which, if not avoided, may
result in minor or moderate injury.
DANGER
WARNING
CAUTION
4

5
CAUTION: Used without the safety alert symbol, CAUTION indicates a potentially
hazardous situation which, if not avoided, may result in property damage.
1.1 Laws Pertaining to Spark Arresters
Notice: State Health Safety Codes and Public Resources Codes specify that in certain
locations spark arresters be used on internal combustion engines that use hydrocarbon
fuels. A spark arrester is a device designed to prevent accidental discharge of sparks or
flames from the engine exhaust. Spark arresters are qualified and rated by the United
States Forest Service for this purpose.
In order to comply with local laws regarding spark arresters, consult the engine distributor
or the local Health and Safety Administrator.
1.2 Operating Safety
Familiarity and proper training are required for the safe operation of equipment!
Equipment operated improperly or by untrained personnel can be dangerous! Read
the operating instructions contained in both this manual and the engine manual and
familiarize yourself with the location and proper use of all controls. Inexperienced
operators should receive instruction from someone familiar with the equipment before
being allowed to operate the machine.
1.2.1 NEVER allow anyone to operate this equipment without proper training. People
operating this equipment must be familiar with the risks and hazards associated with it.
1.2.2 NEVER touch the engine or muffler while the engine is on or immediately aer it has
been turned off. These areas get hot and may cause burns.
1.2.3 NEVER use accessories or attachments that are not recommended by Tomahawk
Power. Damage to equipment and injury to the user may result.
1.2.4 NEVER leave machine running unattended.
1.2.5 ALWAYS be sure operator is familiar with proper safety precautions and operation
techniques before using machine.
1.2.6 ALWAYS wear ANSI Z87.1-approved safety goggles or safety glasses with side shields,
or when needed, a face shield. Use a dust mask in dusty work conditions. Also use non-skid
safety shoes, hardhat, gloves, dust collection systems, and hearing protection when
appropriate. This applies to all persons in the work area.
1.2.7 ALWAYS close fuel valve on engines equipped with one when machine is not being
operated.
1.2.8 ALWAYS store equipment properly when it is not being used. Equipment should be
stored in a clean, dry location out of the reach of children.
WARNING

6
1.2.9 ALWAYS operate machine with all safety devices and guards in place and in working
order. DO NOT modify or remove safety devices. DO NOT operate machine if any safety
devices or guards are missing or inoperative.
1.2.10 ALWAYS read, understand, and follow procedures in Operator's Manual before
attempting to operate equipment.
1.3 Safety while using Combustion Engines
Internal combustion engines present special hazards during operation and fueling!
Read and follow warning instructions in engine owner's manual and safety guidelines
below. Failure to follow warnings and DANGER safety guidelines could result in severe
injury or death.
1.3.1 DO NOT run machine indoors or in an enclosed area such as a deep trenches unless
there is adequate ventilation, through such items as exhaust fans or hoses are provided.
Gasoline exhaust from the engine contains poisonous carbon monoxide gas; exposure to
carbon monoxide can cause loss of consciousness and may lead to death.
1.3.2 DO NOT smoke while operating machine.
1.3.3 DO NOT smoke when refueling engine.
1.3.4 DO NOT refuel hot or running engine.
1.3.5 DO NOT refuel engine near open flame.
1.3.6 DO NOT spill fuel when refueling engine.
1.3.7 DO NOT run engine near open flames.
1.3.8 ALWAYS refill fuel tank in well-ventilated area.
1.3.9 ALWAYS replace fuel tank cap aer refueling.
1.3.10 ALWAYS check fuel lines and fuel tank for leaks and cracks before starting engine.
1.3.11 DO NOT run machine if fuel leaks are present or fuel lines are loose.
1.4 Service Safety
Poorly maintained equipment can become a safety hazard! In order for the
equipment to operate safely and properly over a long period of time, periodic
maintenance and occasional repairs are necessary.
1.4.1 DO NOT attempt to clean or service machine while it is running. Rotating parts can
cause severe injury.
1.4.2 DO NOT crank a flooded engine with the spark plug removed on gasoline-powered
engines. Fuel trapped in the cylinder will squirt out the spark plug opening.
DANGER
WARNING

7
1.4.3 DO NOT test for spark on gasoline-powered engines, if engine is flooded or the smell
of gasoline is present. A stray spark could ignite fumes.
1.4.4 DO NOT use gasoline or other types of fuels or flammable solvents to clean parts,
especially in enclosed areas. Fumes from fuels and solvents can become explosive.
1.4.5 ALWAYS keep area around muffler free of debris such as leaves, paper, cartons, etc. A
hot muffler could ignite them, starting a fire.
1.4.6 ALWAYS replace worn or damaged components with spare parts designed and
recommended by Tomahawk Power.
1.4.7 ALWAYS disconnect spark plug on machines equipped with gasoline engines, before
servicing, to avoid accidental start-up.
1.4.8 ALWAYS keep machine clean and labels legible. Replace all missing and hard-to-read
labels. Labels provide important operating instructions and warn of dangers and hazards.
1.4.9 ALWAYS check for damaged parts before each use. Carefully check that the screed
will operate properly and perform its intended function. Replace damaged or worn parts
immediately. Never operate the screed with a damaged part.
1.4.10 ALWAYS inspect the screed prior to placing in storage and before re-use. Store the
screed in a dry, secure place out of the reach of children when not in use.
1.4.11 ALWAYS use only accessories that are recommended by the manufacturer for use
with the screed. Accessories that may be suitable for one Screed may create a risk of injury
when used with the screed equipment.
1.4.12 ALWAYS keep boards clean when not in use and guards in place and in working
order.
2. Technical Data
2.1 Screed Board Data
For more board sizes and bundle discounts, visit www.tomahawk-power.com.
Board Model Length Width Height Weight Assembly Type
TSB4-P 4 (1224.4 mm) 5.9 in (149 mm) 3.15 in (80 mm) 8.6 lbs (3.9 kg) Bolt & Nut
TSB6-P 6 (1824.5 mm) 5.9 in (149 mm) 3.15 in (80 mm) 10.1 lbs (6.1 kg) Bolt & Nut
TSB8-P 8 (2438.4 mm) 5.9 in (149 mm) 3.15 in (80 mm) 13.7 lbs (6.2 kg) Bolt & Nut
TSB10-P 10 (3048 mm) 5.9 in (149 mm) 3.15 in (80 mm) 17.2 lbs (7.8 kg) Bolt & Nut
TSB12-P
12 (3657.6 mm) 5.9 in (149 mm) 3.15 in (80 mm) 20.5 lbs (9.3 kg) Bolt & Nut
TSB14-P 14 (4267.2 mm) 5.9 in (149 mm) 3.15 in (80 mm) 24 lbs (10.9 kg) Bolt & Nut

8
2.2 Machine Data
3. Before Starting
3.1 Recommended Fuel
The engine requires regular grade unleaded gasoline, 89 octane or higher. Use only fresh,
clean gasoline. Gasoline containing water or dirt will damage fuel system. Consult engine
owner's manual for complete fuel specifications.
3.2 Starting Checklist
Read and understand safety and operating instructions at beginning of this manual.
• Oil level in engine
• Fuel level
• Condition of air cleaner
• Tightness of external fasteners
Model TVSA-T
Vibration 7000 VPM
Drive System Flexible Sha
Fuel Tank .5 qt (.5 L)
Displacement 37.7cc
Engine Type Air-cooled 4-stroke OHC
Bore x Stroke 39 mm x 30 mm
Displacement 35.8 cm3
Net Power Output* 1.3 HP (1.0 kW) @ 7,000 rpm
Net Torque 1.2 lb- (1.6 Nm) @ 5,500 rpm
PTO Sha Rotation Counterclockwise (from PTO sha side)
Compression Ratio 8.0:1
Starting System Recoil
Fuel Type Unleaded 89 octane or hig
her
Fuel Tank Capacity 0.67 U.S. qt (.63 liter)
Oil Required SAE10W-30 or SAE10W-40
Oil Tank Capacity 3.4 US oz (100cc)
Dimensions 36" x 25" x 40" (91 x 63 x 101 cm)
W
eight 42 lbs (19kg)

9
TVSA-T: Assembly 1 www.tomahawk-power.com

10
TVSA-T: Assembly 2 www.tomahawk-power.com
** This screed’s engine has an oil capacity of 3.4 oz. DO NOT overfill the engine as this
could create excess engine smoke and further damage.

11
5. Operation
5.1 Perform all steps in sections 3.1; 3.2; and 3.3.
5.2 To start a cold engine, move the choke lever
(Figure 1) to the CLOSED position.
If restarting a warm engine leave the choke lever in
the OPEN position.
5.3 Press the priming bulb (Figure 2) repeatedly
until fuel can be seen inside the clear fuel lines.
5.4 Move the throttle lever slightly to give the
engine some speed.
5.5 Pull the starter rope (Figure 3) lightly until you
feel resistance, then pull briskly in the direction of
the arrow.
Return the starter rope gently.
5.6 Once the engine has started, open the choke
and allow engine to idle for 3 to 5 minutes to
warm-up.
Figure 1
Figure 2
Figure 3

5.2 To Stop
5.2.1 Reduce the engine speed by moving throttle completely in the opposite direction of
the arrow.
5.2.2 Let the engine idle for 2 - 3 minutes before turning it off.
5.2.3 Press the emergency stop switch on the handle.
CAUTION: In an emergency situation, turn off the engine switch immediately. In normal
conditions, do not stop the engine when the screed is at high speed or the engine
temperature will rise suddenly, possibly causing engine parts to jam or the oil to deteriorate.
5.3 Application
While concrete is being poured, a screed is used to smooth concrete and pull the excess off
the back of the form. Utilizing vibratory screeds will achieve the best results, while saving
you time and back fatigue.
This screed should be used for smoothing and striking off concrete. For floating concrete,
use a Tomahawk 48” Bull Float to level ridges and fill voids le by the screeding operation.
5.4 Operation
5.4.1 Once the engine has started and warmed up, open the throttle fully.
5.4.2 Slowly move the screed backwards watching for smooth concrete in front of the
screed.
6. Aer Each Use
6.1 Clean Up
6.1.1 Clean the screed and screed board. Clean the screed and screed board with water to
remove all concrete but take care that the engine does not get wet.
6.1.2 Clean the engine cylinder cooling fins. A broom or old brush are good tools to remove
concrete before it becomes solid.
6.1.3 Refer to the engine manual for more information about the engine.
12

13
6.2 Storage
In case of storing the screed and board for a long period of time (for more than 30 days):
6.2.1 Clean the screed as described in Section 6.1.
6.2.2 Remove the board from the screed on Page 10 in the Assembly Guide.
6.2.3 Drain the fuel tank and run the engine briefly until the fuel in the carburetor is
completely consumed.
6.2.4 Change the engine oil with fresh SAE10W-30 4 Stroke Motor Oil.
6.2.5 Clean or replace the engine air filter.
6.2.6 Store the screed and board separately in a clean, dry area.
6.2.7 Cover the screed and board completely with dry tarp.

14
7. Maintenance
Maintain the screed in accordance with the following recommended procedures. Refer to
the engine manufacturer’s instruction manual for additional information about engine
maintenance. The following chart is based on a normal operation schedule.
Check the fuel level
Clean the cylinder head
Replace the spark plug
Check the engine oil level
Inspect the fuel lines
Inspect the air filter and replace if
needed
Check and tighten the external
hardware
Change the engine oil
Check and clean the spark plug
Clean the fuel strainer
Check and adjust the valve
clearance
Change the engine oil
Clean the air filter
DAILY
BEFORE
STARTING
AFTER
FIRST 20
HOURS OR 3
MONTHS
AFTER
FIRST 50
HOURS OR 6
MONTHS
AFTER
FIRST 100
HOURS OR
EVERY YEAR
AFTER
FIRST 200
HOURS OR
EVERY
2 YEARS

15
8. Troubleshooting
Please check the list below before addressing the problems to servicing personnel
including local dealer. And if the problem continues aer the troubleshooting as described
below, call your local dealer for future assistance.
8.1 Replacement Parts
• For replacement parts and technical questions, please email Customer Service at
support@tomahawk-power.com or call (866) 577-4476.
• Not all equipment components are available for replacement. The illustrations within this
manual are a convenient reference to the location and position of parts in the assembly
sequence.
• When ordering parts, the following will be required: model number, serial number/lot date
code, and description.
• The distributor reserves the right to make design changes and/or improvements to
product lines and manuals without notice.
PROBLEM POSSIBLE CAUSE SOLUTION
The centrifugal force is too low. Increase engine speed.
There are excessive amounts of
concrete along the leading edge of
the board.
Remove the excessive concrete from
the board.
The chosen width of the board is too
large
Work with a smaller board.
Operator moving too slowly Walk backwards at a faster pace.
Too much vibration for the type of
concrete
Reduce engine
speed and walk
backwards at a faster pace.
Leaving HIGH or LOW spots during
wet screeding.
Concrete too high or low on one side?
Have workers shape the concrete
close as possible to grade. Maintain
about 1 inch of concrete across the
front of the board at all times.
Board digs into wet concrete. Is board positioned correctly?
Keep each end of the board must on
the same surface.
Vibrates insufficient and
as
a result
the concrete floor can’t be leveled and
smoothed in the proper way.
Concrete looks “WAVY” as the screed
board passes over it

9. Limited Warranty
Tomahawk Power LLC. ("We'' or "Us'') warrants to the original purchaser only ("You'' or
“Your”) that the Tomahawk product purchased will be free from material defects in both
materials and workmanship, normal wear and tear excepted, for a period of 1 year from
date of ourchase. The foregoing warranty is valid only if the installation and use of the
product is strictly in accordance with product instructions. There are no other warranties,
express or implied, including the warranty of merchantability or fitness for a particular
purpose. If the product does not comply with this limited warranty, Your sole and exclusive
remedy is that We will, at our sole option and within a commercially reasonable time,
either replace the product or product component without charge to You or refund the
purchase price (less shipping). This limited warranty is not transferable.
Limitations on the Warranty
This limited warranty does not cover: (a) normal wear and tear; (b) damage through abuse,
neglect, misuse, or as a result of any accident or in any other manner; (c) damage from
misapplication, overloading, or improper installation; (d) improper maintenance and
repair; and (e) product alteration in any manner by anyone other than Us, with the sole
exception of alterations made pursuant to product instructions and in a workmanlike
manner.
Obligations of Purchaser
You must retain Your product purchase receipt to verify date of purchase and that You are
the original purchaser. To make a warranty claim, contact Us at (866) 577-4476, identify the
product by make and model number, and follow the claim instructions that will be
provided. The product and the purchase receipt must be provided to Us in order to process
Your warranty claim. Any returned product that is replaced or refunded by Us becomes our
property. You will be responsible for return shipping costs or costs related to Your return
visit to a retail store.
Remedy Limits
Product replacement or a refund of the purchase price is Your sole remedy under this
limited warranty or any other warranty related to the product. We shall not be liable for:
service or labor charges or damage to Your property incurred in removing or replacing the
product; any damages, including, without limitation, damages to tangible personal
property or personal injury, related to Your improper use, installation, or maintenance of
the product or product component; or any indirect, incidental or consequential damages
of any kind for any reason.
16

Assumption of Risk
You acknowledge and agree that any use of the product for any purpose other than the
specified use(s) stated in the product instructions is at Your own risk.
Governing Law
This limited warranty gives You specific legal rights, and You also may have other rights
which vary from state to state. Some states do not allow limitations or exclusions on
implied warranties or incidental or consequential damages, so the above limitations may
not apply to You. This limited warranty is governed by the laws of the State of California,
without regard to rules pertaining to conflicts of law. The state courts located in San Diego
County, California shall have exclusive jurisdiction for any disputes relating to this
warranty.
17
1718
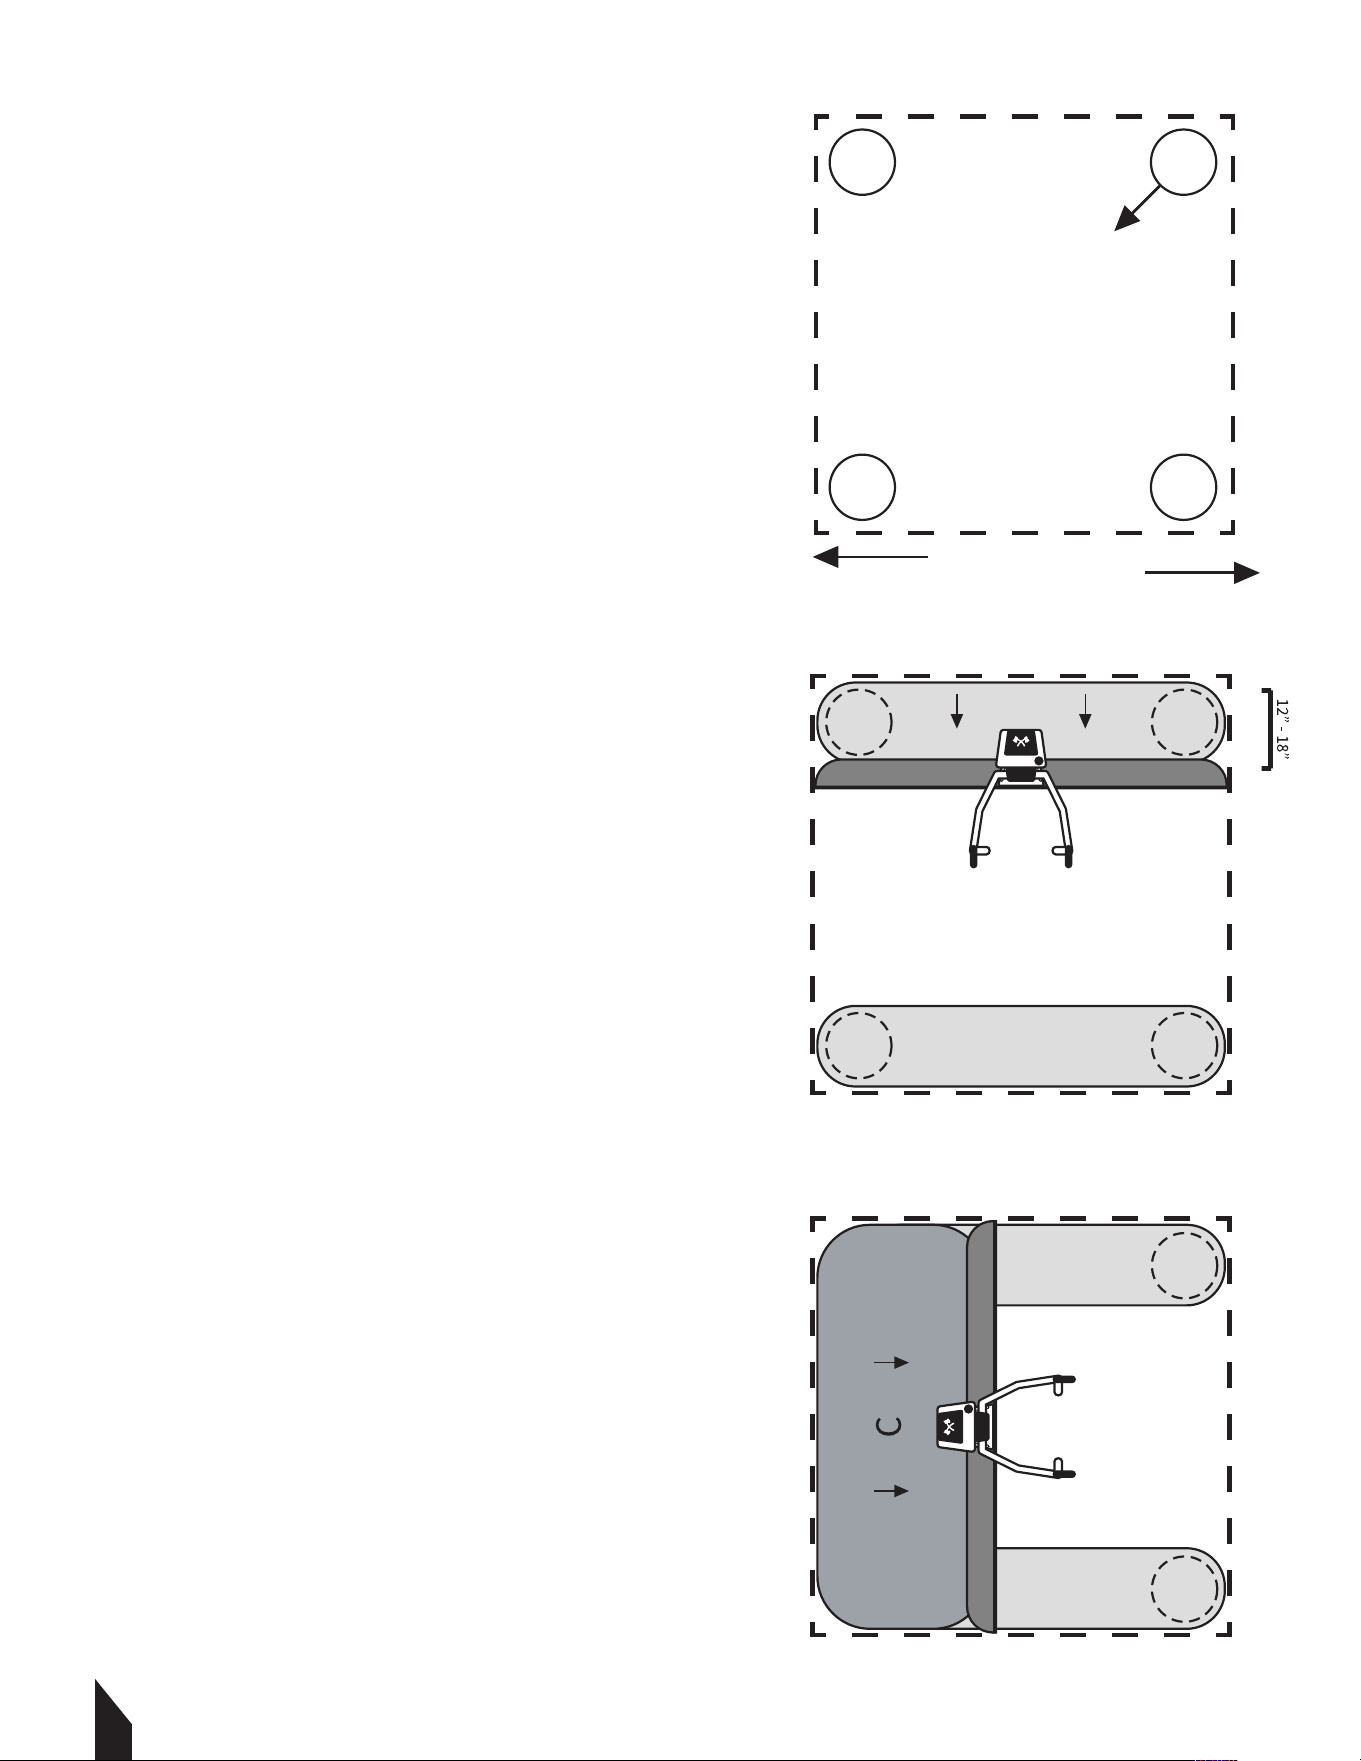
10. How to Wet Screed
10.1 Set the Elevation of the Slab
10.1.1 Use grade pins (A) to set the height of
the slab. Position in the middle of the pour.
10.1.2 To set the elevation around the walls,
use chalk lines or expansion joints.
10.1.3 In areas where there are no walls, use
form boards to set the elevation.
10.2 Make Wet Pads
10.2.1 Use the float to create wet pads around
all of the grade pins (A).
Make sure that the distance between the
wet pads is shorter than the length of the
blade being used.
10.2.2 Form rows (B) with the blade to smooth
from one wet pad to the next.
10.2.3 Aer all of the rows are formed, run the
screed blade off of the two rows leveling the
previously untouched concrete (C) in between.
Prior to running the blade off, make sure
that the height of the concrete in area (C) is
slightly taller than the wet pad rows in area
(B).
10.2.4 Once the floating is completed, the wet
pads and concrete will all be smoothed out to
the same height.
1
2
3
19
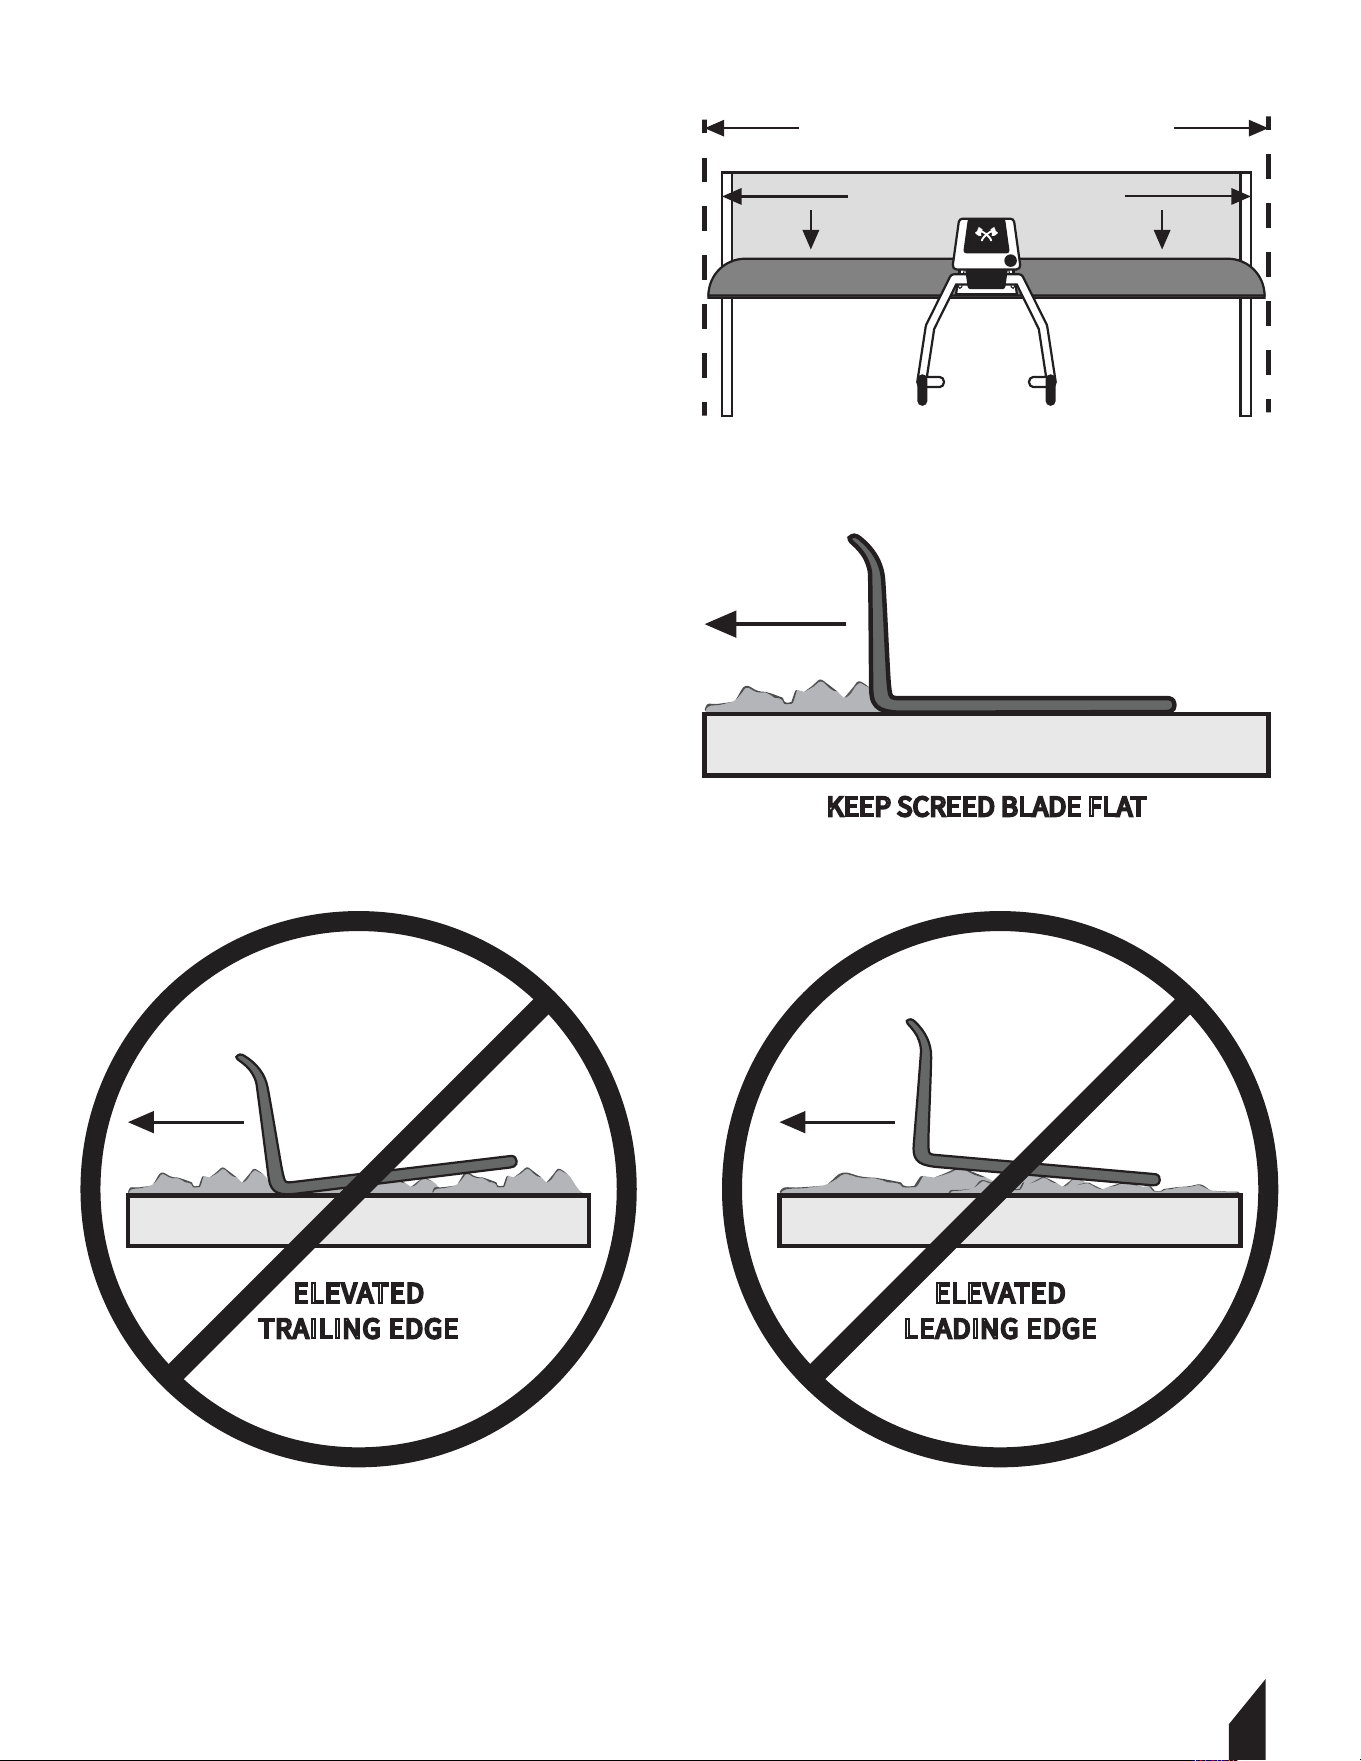
11. How to Screed Form to Form
11.1 In order to screed form to form, the
length of the blade should overlap both
form boards on each side of the pour.
11.2 When screeding off of forms, keep the
bottom of the blade as flat as possible.
11.3 Extend the life of your blade by using
the lowest vibration setting in relation to
the slump of concrete being used.
Be aware of elevated trailing edges. This
can create an area for concrete to build up,
resulting in an uneven slab elevation.
Be aware of elevated leading edges. This
can trap rocks in between the blade,
resulting in an uneven slab elevation.

12. Operating on Wet Concrete
12.1 Steps
12.1.1 To begin, pour the concrete inside
of the forms, slightly higher than the
height of the forms themselves.
12.1.2 Place the screed on top of the
concrete and start the engine.
Do not begin screeding until the engine
is warm and running on its own with
the choke OPEN.
12.1.3 Increase the engine’s RPM until the
clutch engages. The screed will then begin
to vibrate.
12.1.4 Start your screeding process by walking backwards.
(Review pages 17 and 18 for detailed instructions.)
12.1.5 While the throttle level does not require consistent contact, you can adjust the
engine’s RPM and vibration to accommodate your concrete’s moisture. Dry or low slump
concrete may require high vibrations to level and screed correctly.
12.1.6 With the concrete in front of the blade, continue walking backwards to level and
screed.
12.1.7 The blade’s roll back feature ensures concrete does not slide over the blade. Concrete
poured too high may cause the concrete to spill over the blade. If this happens, the screed
will become too heavy to pull, resulting in unevenness.
For detailed instructions on How To Wet Screed and How To Screed Form To Form, refer to
pages 17 and 18.
CAUTION: DO NOT OVER-VIBRATE CONCRETE
Have you used too much vibration? Here’s how to know:
• Concrete is spilling excessively.
• The blade is sinking below the wet pads.
• Concrete is creating ripples or “wake marks” aer screeding.
• Concrete is sliding under the form boards, creating dips and uneven form edges.
The less vibration, the better. Only use enough to comfortably pull the screed when
walking backwards to leave a smooth, level surface.
1720

21

TVSA-T EXPLOSION DIAGRAM
No. Description Qty Size or Dimension
1 Handle Assembly 1
2 Washer 2
3 Bolt 1 M6*40L
4 Nut 2 M6
5 Handle Support Pipe 1
6 Handle Suppot Pipe Rubber 1
7 Clip 1
8 Washer 2 M5
9 Bolt 1 M5x15
10 Nut 1 M5
17
22

TVSA-T EXPLOSION DIAGRAM
No. Description Qty Size or Dimension
11 Spring Washer 1 M5
12 Cap But 4 M8
13 Washer 4 M8
14 Handle Support Rubber 4
15 Washer 4 M8
16 Cap Nut 4 M8
17 Vibratory Housing Assembly 1
18 Handle Support Rubber 2
19 Washer 4 M8
20 Spring Washer 4 M8
21 But 4
22 Wire 1
23 Hose Assembly 1
24 O-Ring 1 P20
25 Bolt 4 M6*20L
26 Spring Washer 4 M6
27 Engine Plate 1
28 Clutch Housing Assembly 1
29 Engine 1 TOMAHAWK 37.7cc
30 Engine Stop Switch 1
31 Engine Electric Stop Wire 1
32 Throttl
e
Lever 1
33 Throttle Lever with Cable 1
34 Handle Rubber 2
23
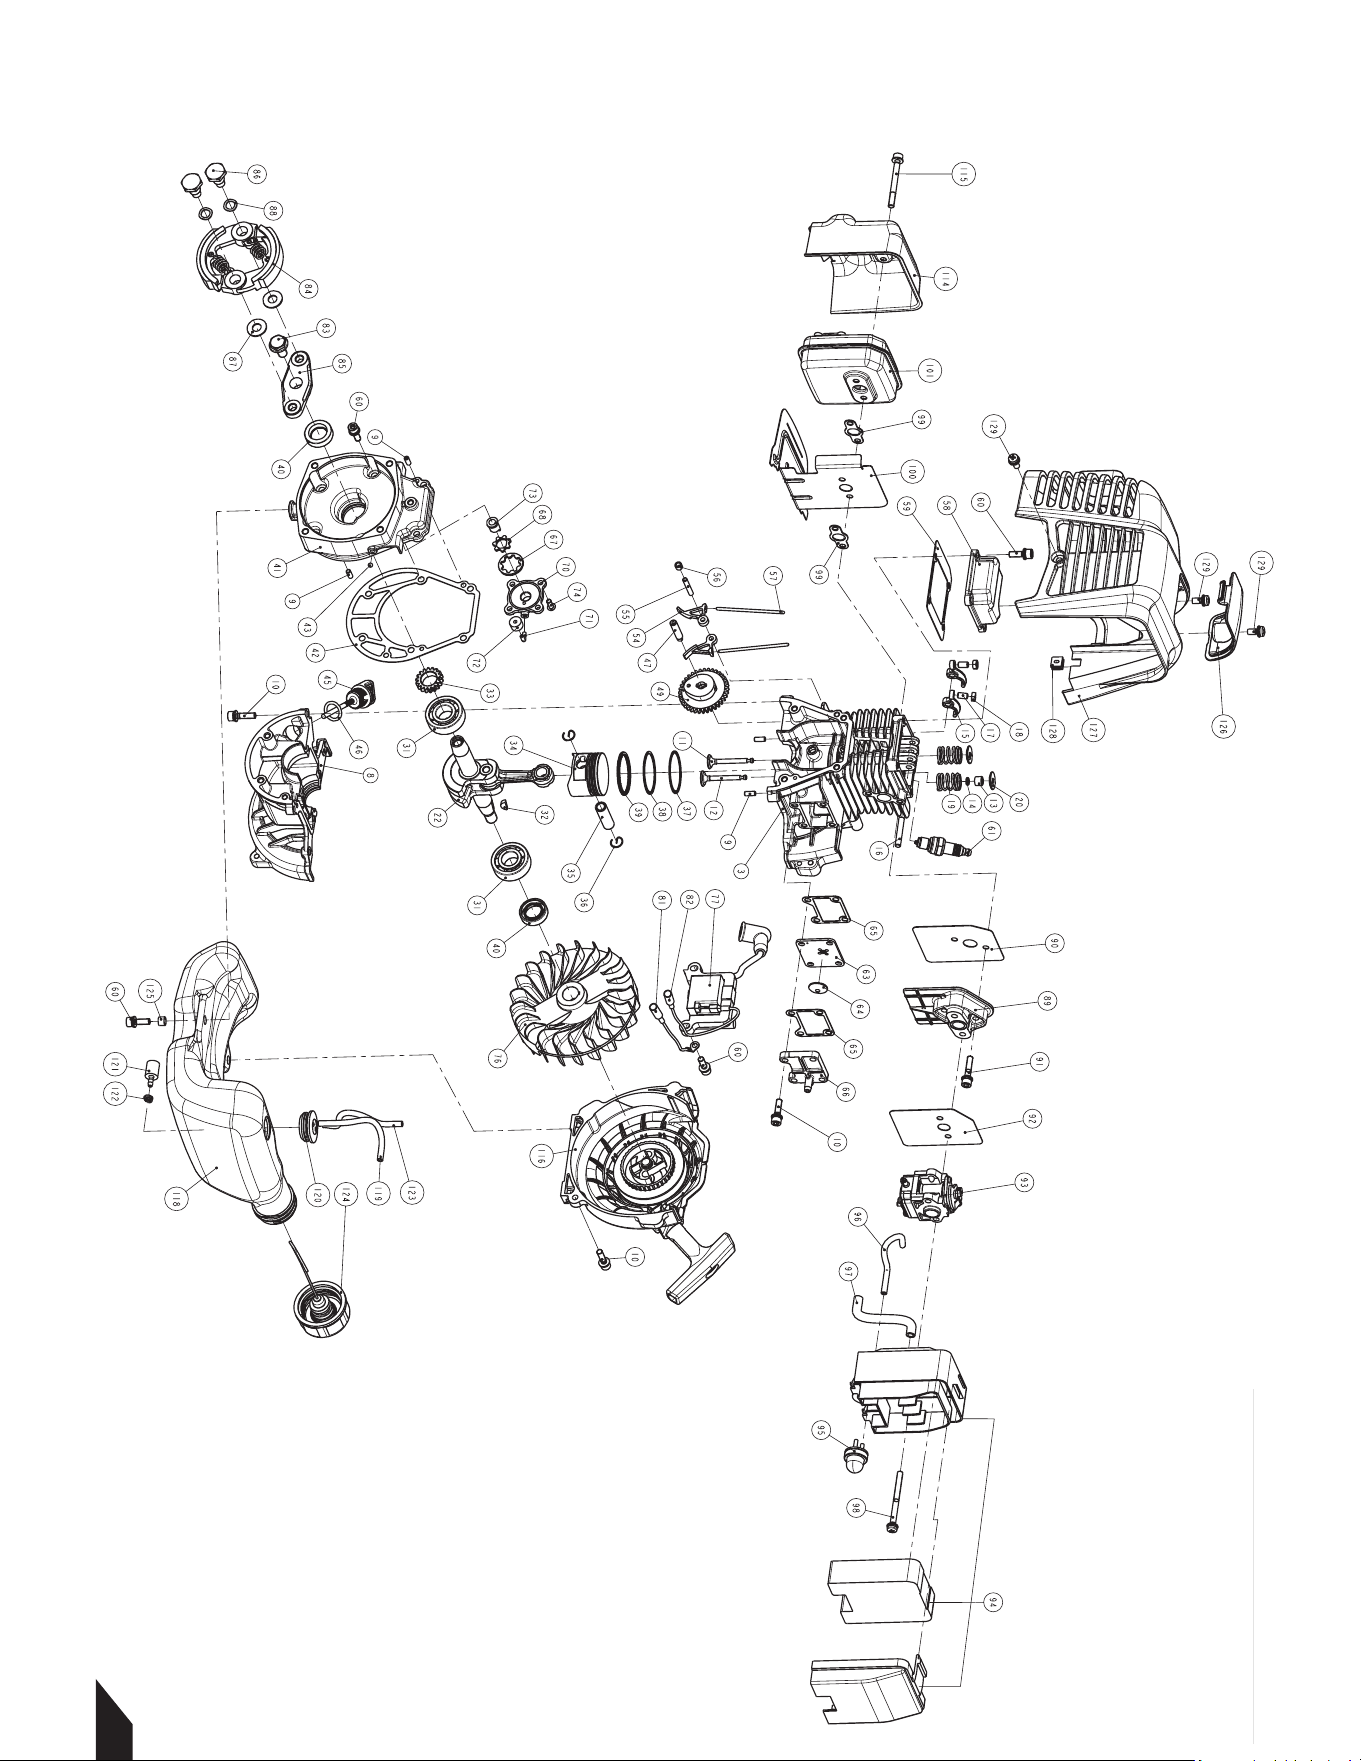
TVSA-T ENGINE DIAGRAM
24

TVSA-T ENGINE DIAGRAM
25
1 E15010000A ENGINE ASS'Y
2 E15010400A CYLINDER ASS'Y(A)
3 1 E15010410A CYLINDER COMP.
4 1 E15010411A CYLINDER BORING
5 2 139F-2.10.1-2 EXHAUST VALVE SEAT
6 3 139F-2.10.1-1 INTAKE VALVE SEAT
7 4 142F.9.3-4 VALVE GUIDE
8 2 E15010110A CRANK CASE
9 3 6032104012 KNOCK PIN
10 4 2013050520 HEXAGON SOCKET BOLT M5x20
11 139F-2.10-5 EXHAUST VALVE
12 139F-2.10-4 INTAKE VALVE
13 139F-2.10-7 COVER INTAKE VALVE
14 139F-2.10-8 RING INTAKE VALVE
15 E15010661A ROC
KER
ARM
16 E15010662A ROCKER ARM PIN
17 134F.11-17 JIB SEAT
18 139F.7-5 ADJUST NUT
19 E15010420A VALVE SPRING
20 E15010430A VALVE SPRING SAET
21 E15010300A PISTON CRANK ASS'Y
22 1 E15010320A CRANK SHAFT ASS'Y
31 2 7002306202 BALL BEARING 6202
32 3 HALF KEY
33 4 E15010314A CRANK GEAR
34 5 139F-2.3-1A PISTON
35 6 139F-2.3-4 PISTON PIN
36 7 P40.6-4 CIR CLIP
37 8 139F.9-4 1ST RING
38 9 139F.9-5 2ND RING
39 10 139F.9.3 OIL RING
40 8820152507 OIL SAEL TC TYPE 15
x25x7
41 E15010130A S
IDE COVER
42 E15010210A SIDE COVER GASKET
43 6110900040 STEEL BALL
44 E15010120A OIL CAP ASS'Y
47 E15010610A CAM SHAFT
48 E15010620A CAM GEAR ASS'Y
49 1 E15010621A CAM GEAR
54 E15010630A CAM FOLLOWER
55 E15010640A CAM FOLLOWER SHAFT
56 E15010641A ADJUSTING SPACER
57 139F-2.10-6 PUSH ROD
58 E15010710A CYLINDER HEAD COVER
59 E15010720A CYLINGER HEAD COVER GASKET
60 2013050516 HEX SOCKET HEAD CAP SCREW PS M5x20
No. LEVEL
PARTS
NO. PARTS NAME

TVSA-T ENGINE DIAGRAM
61 9500CMR5H SPARK PLUG
62 E15010740A UMBRELLA VAVLE COM
63 1 E15010741A SEPARATOR PLATE
64 2 134F.12-5 UMBRELLA CHECK VALVE
65 E15010743A SEPARATOR COVER GASKET
66 E15010744A SEPARATOR COVER
67 E15010150A OUTER ROTOR
68 E15010140A INNER ROTOR
69 E15010160A COVER PUMP COMP
72 E15010180A OIL FILTER
73 E15010144A ROLLER DRIVE SHAFT
74 GB/T 70.2-2000
75 1E48F.5.1 MAGNETO ROTOR ASS'Y
83 HEXAGON HEAD BOLTS WITH FLANGE M8xP1.25x16
84 CLUTCH AS
S'Y
89 E15015100A INS
ULATOR
90 E15015010A INSULATOR GASKET
91 2013050525 HEX SOCKET HEAD CAP SCREW PS M5x25
92 E13015030A CARBURETOR GASKET
93
CARBURETOR
(
With throttle wire fixing plat
)
94 CLEANER BODY ASS'Y(A)
95 PRIMING PUMP COMP
96 FUEL PUMP PIPE
97 E15010730A BREATHER PIPE
98 M5x60 SCREW PS
99 E15010411A MUFFLER GASKET
100 E15014120A WIND GUIDE PLATE
101 E15014000A MUFFLER ASS'Y
102 1 E15014010A MUFFLER BASE
103 2 E15014020A MUFFLER COVER ASS'Y
104 1 E15014021A MUFFLER COVER
105 2 E15014022A EXHAUST PIPE INNER PLATE
106 3 E15014030A MUFFLER FLANGE
107 4 E15014040A MUFFLER COLLAR
108 5 E15014050A BUFFLE PLATE
109 6 E15014060
A S
CREEN,SPARK
110 7 E15014070A EXHAUST PIPE GASKET
111 8 E15014080A EXHAUST PIPE PLATE
112 9 E15014090A EXHAUST PIPE
113 10 E15014100A M4 SCREW
114 E15014130A MUFFLER HEAT SHIELD
115 E15014050A HEX. SOCKET HEAD CAP SCREW P M5xP0.8x50
116 1E48F.6 RECOIL STARTER ASS'Y
117 E15017100A TANK ASS'Y
118 1 E15017110A TANK
119 2 E15017120A FUEL PIPE
120 3 E15017130A FUEL GROMMET
PARTS NO. PARTS NAMENo. LEVEL
26

TVSA-T ENGINE DIAGRAM
121 4 E15017140A PUMP FILTER BODY ASS'Y
122 5 E15017150A FUEL PIPE
123 6 E15017200A TANK CAP ASS'Y
124 7 COLLAR
125 E15016010A PLUG COVER
126 E15016000A ENGINE COVER ASS'Y
127 RUBBER PLUG
128 1103010514 CROSS RECESSED PAN HEAD SCREW PS M5X14
129 GB/T 97-1 PLAIN WASHER
130 GB/T 93 SINGLE COIL SPRING LOCK WASHERS
131 GB/T 41-2000 HEXAGON NUTS M10x P1.0
132 DUCKBILL CHECK
133 E15010745A SEPARATOR GASKET A
134 E15010746A SEPARATOR ELEMENT
No
. LEVEL P
ARTS NO. PARTS NAME
27

24
NEVER PUMP
NEVER LOSE PRESSURE
Lose the manual pump and gain the power to spray 15,000 ² in 10 minutes
or less while maintaining constant, adjustable pressure from 50-435 PSI with
your ideal concrete sealant, cure, top cast, form release, and more!
Item #: TCS6.5
6.5 GAL MOTORIZED
CONCRETE SPRAYER
www.tomahawk-power.com

Item #: JXPT46K
24” - 36” - 46”
POWER TROWELS
www.tomahawk-power.com
POWER YOUR WORLD
Perfect for concrete finishing of warehouses, decks, parking lots, and
more, adjust from 0-28 degrees with 4 Combo hardened, tempered
steel blades to achieve a matte, light gloss, or gleaming finish!

1.6HP Backpack Concrete Vibrator
Part#: TVIBH + TVW10-P
1.6 HP Honda GX35 engine
Consolidation with speeds of 10,000-12,000 VPM
Quick Connect centrifugal clutch vibrator
1” and 2” Diameter Whips Available in 10ft Length
3 Year Engine Warranty & 1 Year Product Warranty
8” Gas Powered Concrete Scarifier
Part#: TSCAR8H
5.5 HP Honda GX160 Engine
Remove traffic lines at 800 - 1,000 linear ft/hr
Tungsten Carbide Blade Kit Available
OSHA approved dust port for silica vacuum removal
3 Year Engine Warranty & 1 Year Product Warranty
36” & 46” Concrete Power Trowel
Part#: TPT36H/K & TPT46H/K
6 HP/14HP Kohler & 5.5HP/8.5HP Honda Engines
Adjust trowel blade pitch from 0-28°
60-115 RPM rotor speed for superior concrete finishes
Includes float pan and trowel blades
3 Year Engine Warranty & 1 Year Product Warranty
HAVE QUESTIONS?
Contact us. We’re here to help!
Email us at [email protected]
3,550 lbs/ft Vibratory Rammer
Part#: TR68H
3.6 HP Honda GXR120 Engine
Easily achieve a 100% compaction rating
3-in-One Fuel System with carburetor protection
13” x 11” plate for narrow trenches and corners
3 Year Engine Warranty & 1 Year Product Warranty
3,400 lbs/ft Plate Compactor
Part#: TPC90H
5.5 HP Honda GX160 Engine
Easily achieve a 100% compaction rating
22” x 20” cold, rolled steel beveled base plate
Includes 3.5 gallon water tank for asphalt compaction
3 Year Engine Warranty & 1 Year Product Warranty
3,000 lbs/ft Plate Compactor
Part#: TPC80 & TPC80H
6 HP Kohler CH260 & 5.5 HP Honda GX160 Engines
Easily achieve a 100% compaction rating
16.5” x 21.5” plate for narrow trenches and corners
Optional Honda Engine model: TPC80H
3 Year Engine Warranty & 1 Year Product Warranty
COMPACTION
6.5 Gal Backpack Concrete Sprayer
Part#: TCS6.5
Maintain constant, adjustable pressure up to 450 PSI
Achieve superior concrete finishes with even spraying
Spray 15,000 sq ft in less than 10 minutes
Compatible with major manufacturer wands
1 Year Product Warranty
1.6 HP Vibratory Concrete Screed
Part#: TVSA-H
1.6 HP Honda GX35 Engine
Aluminum Magnesium blades available from 8ft - 14ft
Finish concrete 4X faster than other screed methods
360° adjustable handle placement
3 Year Engine Warranty & 1 Year Product Warranty
6” Early Entry Green Concrete Saw
Part#: TFS6H
5.5 HP Honda GX160 Engine
Maximum cutting depth of 1 3/16 inches
OSHA compliant vacuum port for dust collection
Includes 6” early entry concrete blade
3 Year Engine Warranty & 1 Year Product Warranty
FINISHINGFINISHING
1.6HP Backpack Concrete Vibrator
Part#: TVIBH + TVW10-P
1.6 HP Honda GX35 engine
Consolidation with speeds of 10,000-12,000 VPM
Quick Connect centrifugal clutch vibrator
1” and 2” Diameter Whips Available in 10ft Length
3 Year Engine Warranty & 1 Year Product Warranty
8” Gas Powered Concrete Scarifier
Part#: TSCAR8H
5.5 HP Honda GX160 Engine
Remove traffic lines at 800 - 1,000 linear ft/hr
Tungsten Carbide Blade Kit Available
OSHA approved dust port for silica vacuum removal
3 Year Engine Warranty & 1 Year Product Warranty
36” & 46” Concrete Power Trowel
Part#: TPT36H/K & TPT46H/K
6 HP/14HP Kohler & 5.5HP/8.5HP Honda Engines
Adjust trowel blade pitch from 0-28°
60-115 RPM rotor speed for superior concrete finishes
Includes float pan and trowel blades
3 Year Engine Warranty & 1 Year Product Warranty
PRODUCT
CATALOG
HAVE QUESTIONS?
Contact us. We’re here to help!
Email us at [email protected]
3,550 lbs/ft Vibratory Rammer
Part#: TR68H
3.6 HP Honda GXR120 Engine
Easily achieve a 100% compaction rating
3-in-One Fuel System with carburetor protection
13” x 11” plate for narrow trenches and corners
3 Year Engine Warranty & 1 Year Product Warranty
3,400 lbs/ft Plate Compactor
Part#: TPC90H
5.5 HP Honda GX160 Engine
Easily achieve a 100% compaction rating
22” x 20” cold, rolled steel beveled base plate
Includes 3.5 gallon water tank for asphalt compaction
3 Year Engine Warranty & 1 Year Product Warranty
3,000 lbs/ft Plate Compactor
Part#: TPC80 & TPC80H
6 HP Kohler CH260 & 5.5 HP Honda GX160 Engines
Easily achieve a 100% compaction rating
16.5” x 21.5” plate for narrow trenches and corners
Optional Honda Engine model: TPC80H
3 Year Engine Warranty & 1 Year Product Warranty
COMPACTION
6.5 Gal Backpack Concrete Sprayer
Part#: TCS6.5
Maintain constant, adjustable pressure up to 450 PSI
Achieve superior concrete finishes with even spraying
Spray 15,000 sq ft in less than 10 minutes
Compatible with major manufacturer wands
1 Year Product Warranty
1.6 HP Vibratory Concrete Screed
Part#: TVSA-H
1.6 HP Honda GX35 Engine
Aluminum Magnesium blades available from 8ft - 14ft
Finish concrete 4X faster than other screed methods
360° adjustable handle placement
3 Year Engine Warranty & 1 Year Product Warranty
6” Early Entry Green Concrete Saw
Part#: TFS6H
5.5 HP Honda GX160 Engine
Maximum cutting depth of 1 3/16 inches
OSHA compliant vacuum port for dust collection
Includes 6” early entry concrete blade
3 Year Engine Warranty & 1 Year Product Warranty
FINISHINGFINISHING

3.7 Gallon 3HP Backpack Fogger
Part#: TMD14
Turbo Boosted Pump with 40ft + Horizontal Reach
Sprays 1 acre in 30 minutes
10X Faster than Manual Pump Sprayers
Converts to Leaf Blower with 200 MPH Air Velocity
1 Year Product Warranty
Commercial 38" Push Sweeper
Part#: TOS38
Collect up to 14.5 gallons of dust and debris
Can be used indoors & outdoors on wet or dry surfaces
Includes integrated airflow control and fine dust filter
Lightweight design, capable of fitting through doorways
1 Year Product Warranty
INVERTER SERIES
210 Amp Portable Welder Generator
Part#: TWG210A
Steady 50 - 210 Amp DC welding output
60% Duty Cycle for extended use
Suitable for welding rods from 6010 to 7024
Electric Key Start with battery included
2 Year Product Warranty
7000 Watt Generators
Part#: TG7000
7000 Max Watts, 5500 Rated Watts
Voltage Selector gives Full Wattage for 120V or 240V
Run Time of 8 hours at 50% Load
OSHA and GFCI Compliant
2 Year Product Warranty
INVERTER SERIES
Part#: TG2000i
2000 Max Watts, 1600 Rated Watts
Run Time of 8 hours on 1 gallon of gas
OSHA and GFCI Compliant
Parallel technology capable for double the power
2 Year Product Warranty
2000 Watt Inverter Generator
5 Gallon Backpack Power Sprayer
Part#: TPS25
Reach Up to 30ft Horizontal Reach
Sprays acres in 10 minutes
10X Faster than Manual Pump Sprayers
50-435 Adjustable PSI Commercial Grade Pump
1 Year Product Warranty
4.75 Gallon Battery Power Sprayer
Part#: eTPS18
Reach Up to 30ft Horizontal Reach
Sprays 6000 sq ft in 10 minutes
10X Faster than Manual Pump Sprayers
70 PSI Commercial Grade Pump
1 Year Product Warranty
4 Gal. Backpack Fertilizer Spreader
Part#: TGS30
Reach up to 30ft Horizontally
Sprays 1 acre in 30 minutes
20X Faster than push spreaders
Converts to Leaf Blower with 200 MPH Air Velocity
1 Year Product Warranty
3” Full Trash Water Pump
Part#: TW3H
Moves liquids at a rate up to 375 gal/min
Handle solids up to 1.5"
Silicone carbide seals and a chrome plated volute
8 HP engine protected by rugged all purpose frame
3 Year Engine Warranty & 1 Year Product Warranty
AND MORE GENERATORSWELDING / POWER
www.tomahawk-power.com
(866) 577-4476
ASSEMBLED IN THE
PARTS SOURCED GLOBALLY
USA
INVERTER SERIESINVERTER SERIES
Part#: TG2000i
2000 Max Watts, 1600 Rated Watts
Run Time of 8 hours on 1 gallon of gas
OSHA and GFCI Compliant
Parallel technology capable for double the power
2 Year Product Warranty
2000 Watt Inverter Generator
AND MORE POWER / WELDINGPEST CONTROL
www.tomahawk-power.com
(866) 577-4476
ASSEMBLED IN THE
PARTS SOURCED GLOBALLY
USA
USE CODE
SAVE10
AT CHECKOUT FOR
10% OFF YOUR ORDER AT
WWW.TOMAHAWK-POWER.COM
* All coupons in this manual are valid only for orders placed on www.tomahawk-power.com, unless otherwise noted. Coupon codes
may only be used once per customer and may not be combined with any other offer. Coupons may expire at any time without notice.

Tomahawk Power, LLC
San Diego, CA
Sales Support
(866) 577-4476
Equipment Support
(866) 577-4476
www.tomahawk-power.com
Tomahawk understands to keep a job-site running smoothly the proper equipment and
spare parts are needed at the drop of a hat. With same day shipping and faster
delivery times, count on Tomahawk to keep you powered throughout the day! With
long lasting parts and engines, Tomahawk equipment will be the star of your fleet for
years to come. Visit www.tomahawk-power.com to get started today!
Power Your World
FACEBOOK
facebook.com/TomahawkPowerUSA
YOUTUBE
youtube.com/TomahawkPower
INSTAGRAM
@tomahawkpower