
Tesla Model 3
PSS-TSLA 20240320v3
1/14
Important Notice
WARNING: This aftermarket plug-and-play audio system for Tesla vehicles ("Product") is intended for
installation by qualified professionals with experience in automotive electrical systems. Improper installa-
tion can result in serious damage to your vehicle, electrical system, and personal injury or death. By
purchasing and/or installing this Product, you acknowledge and agree to the following:
Installation at your own risk: You assume all responsibility and risk associated with the installa-
tion of this Product. Neither Alps Alpine North America, Inc. nor its affiliates are responsible for
any damage or injury caused by improper installation.
The installation of this product requires specialized skills and experience. We recommend that
you have the product installed by an Alpine authorized dealer
Potential for electrical damage: Improper installation can cause electrical damage to your Tesla
vehicle, including, but not limited to, blown fuses, shorts, fires, and damage to sensitive elec-
tronic components and batteries.
No warranty for improper installation: This Product's warranty is expressly limited to manufac-
turing defects and does not cover any damage caused by improper installation.
ASSUMPTION OF RISK: YOU ACKNOWLEDGE AND AGREE THAT YOU ARE KNOWINGLY ASSUM-
ING THE RISK OF DAMAGE TO YOUR TESLA VEHICLE AND/OR PERSONAL INJURY OR DEATH BY
INSTALLING THIS PRODUCT YOURSELF AND THAT INSTALLING THIS PRODUCT MAY AFFECT OR
RESULT IN TERMINATION OF YOUR LIMITED WARRANTY WITH TESLA.
LIMITATION OF LIABILITY: TO THE FULLEST EXTENT PERMITTED BY LAW, ALPS ALPINE NORTH
AMERICA, INC. AND ITS AFFILIATES SHALL NOT BE LIABLE FOR ANY DIRECT, INDIRECT, INCI-
DENTAL, CONSEQUENTIAL, OR PUNITIVE DAMAGES ARISING OUT OF OR RELATED TO THE
INSTALLATION OR USE OF THIS PRODUCT, INCLUDING, BUT NOT LIMITED TO, DAMAGE TO
YOUR TESLA VEHICLE, PERSONAL INJURY, PROPERTY DAMAGE, OR RENDERING YOUR LIMITED
WARRANTY INEFFECTIVE.
We strongly recommend consulting your Tesla owner's manual or qualified professional for specific
installation instructions. We recommend reviewing all online resources and tutorials available for your
specific Tesla model before attempting installation. If you are unsure about any aspect of the installation
process, please consult a qualified professional.
Tesla Model 3
PSS-TSLA 20240320v3
2/14
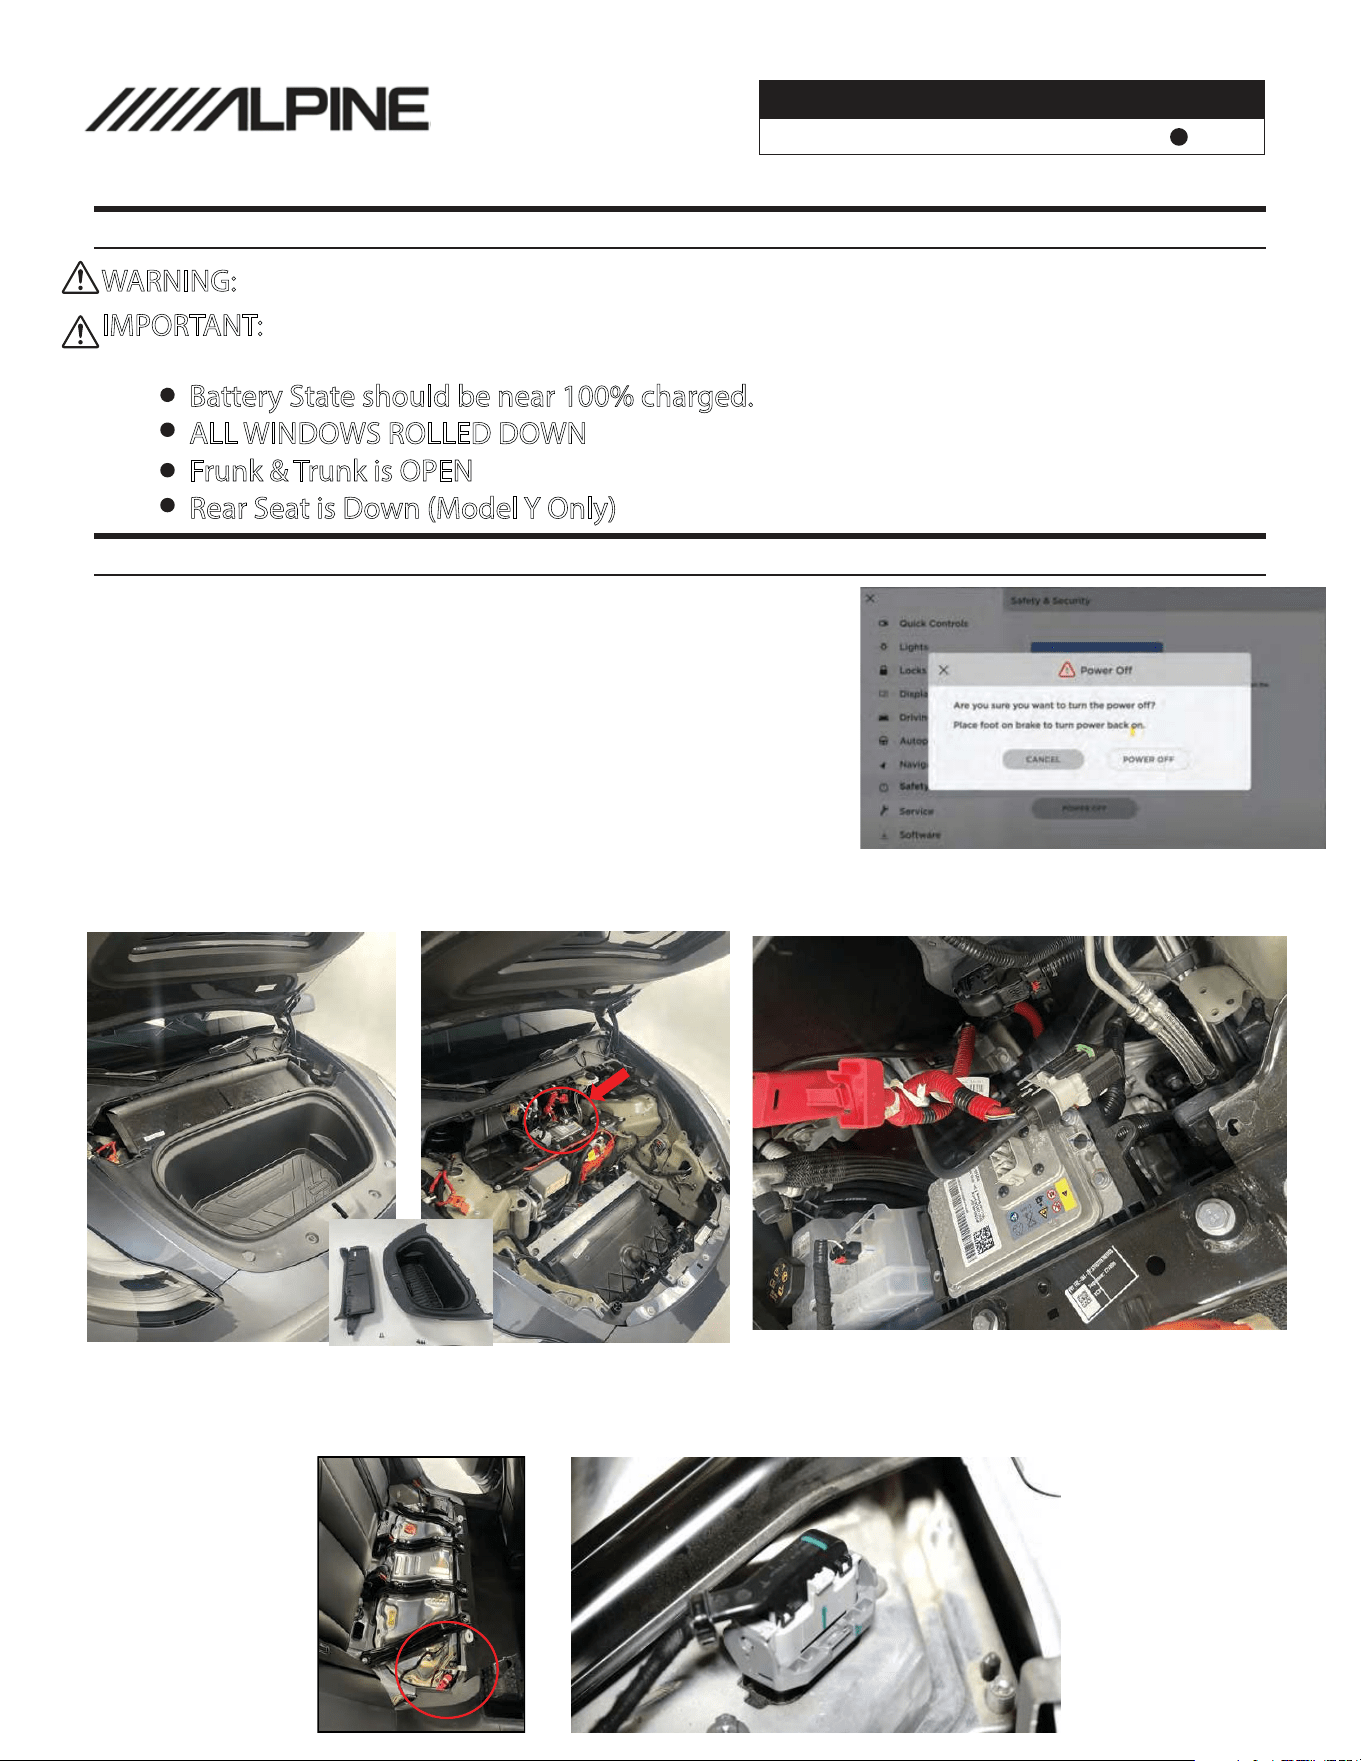
Tesla Model 3/Y Power UP & Down Procedure
WARNING: Before beginning install on your tesla follow the below procedure.
1) Turn off the Screen in Settings Following Step (A,B,C)
A) Enter the Controls Menu in bottom Left Corner
B) Tap Safety & Security Menu on the Left-Hand Menu
C) Press the Power OFF Button, and Confirm OFF
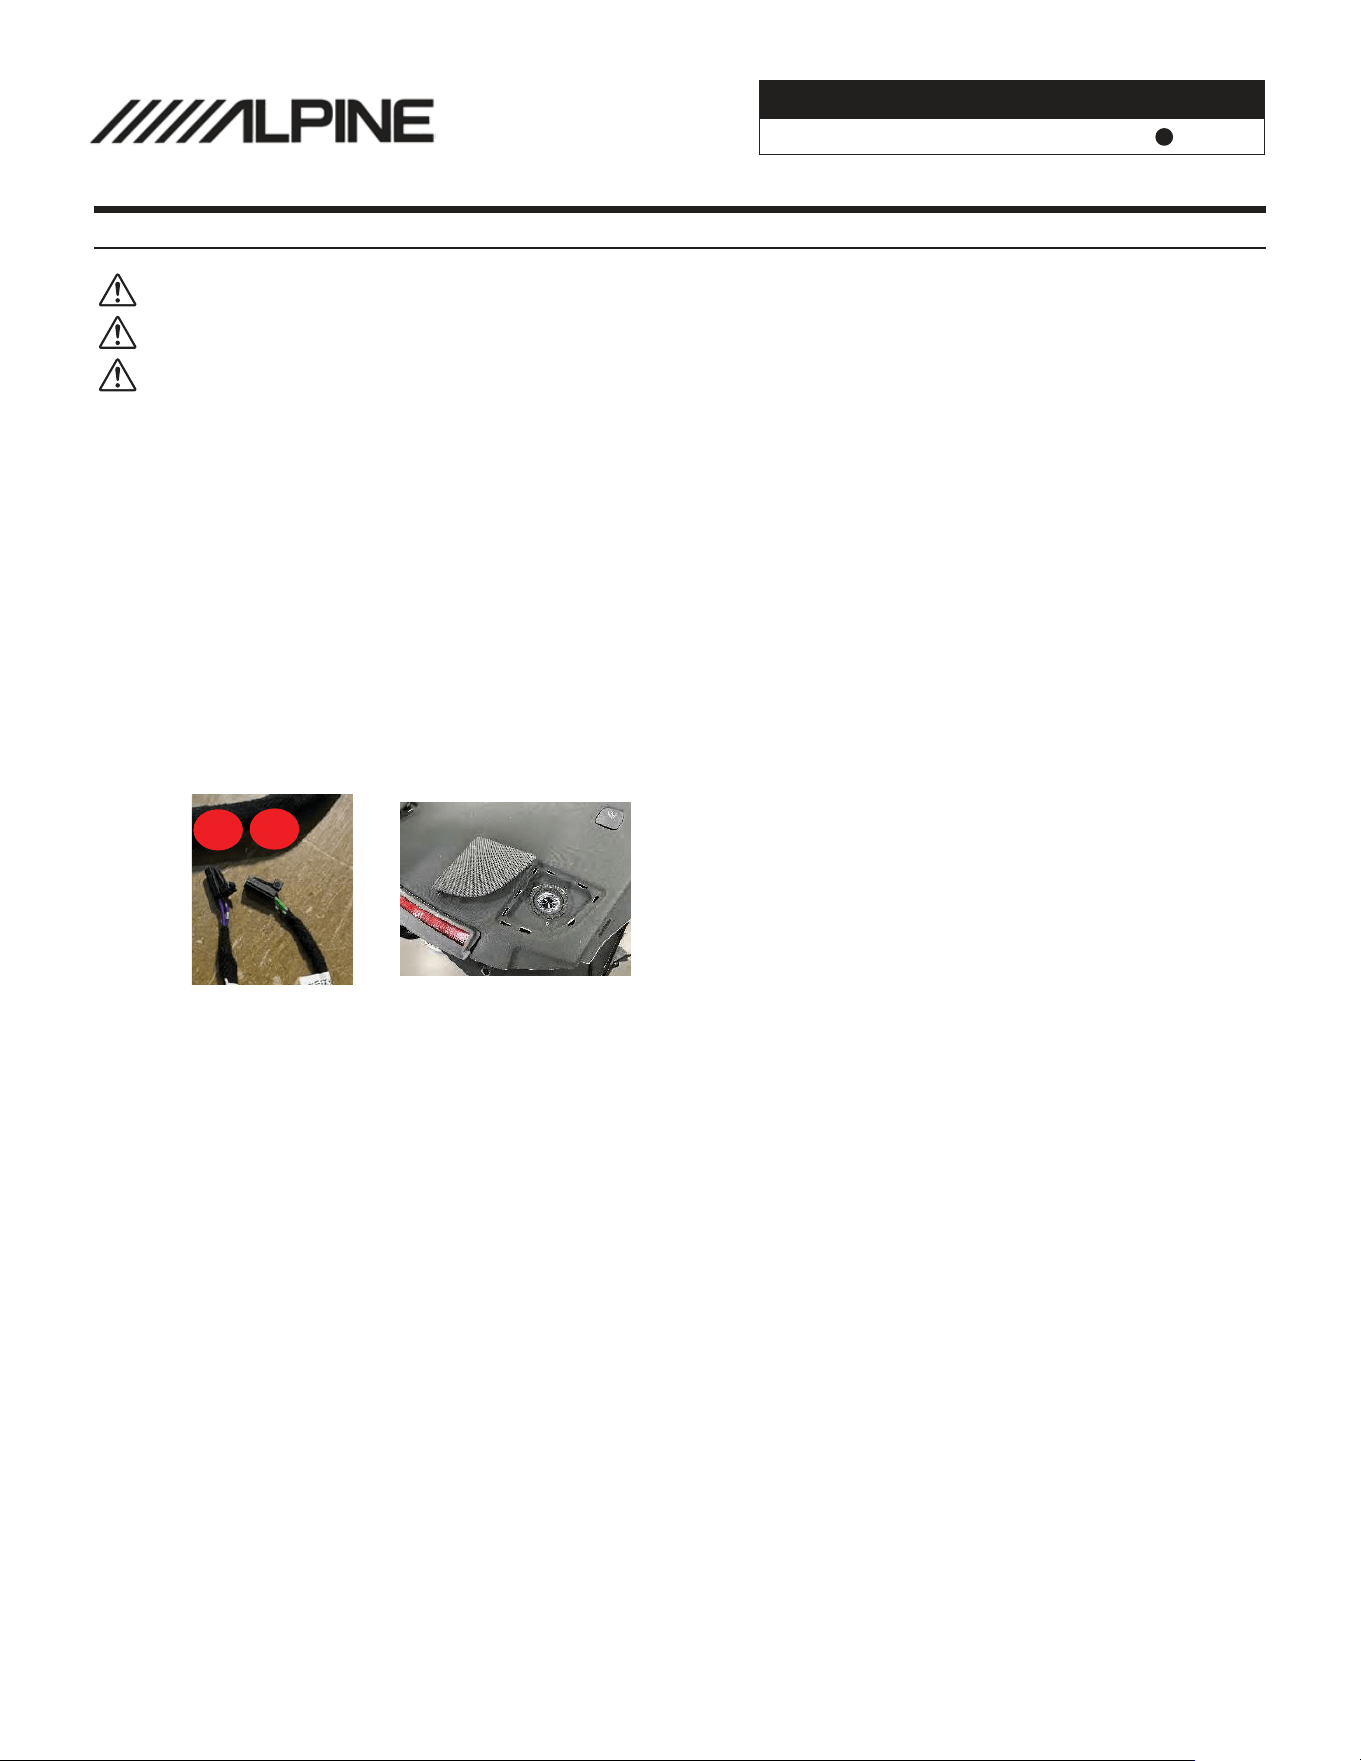
2) Access the Frunk and disconnect the low voltage battery cable. Release Tab and Pull Up.
(To access the battery use 10mm socket to remove the Cowl, Tub & Cabin Filter Housing)
3) Remove the Rear Bench Seat Cushion
4) Un-Plug the the high voltage contactor under the Rear Seat
Battery State should be near 100% charged.
ALL WINDOWS ROLLED DOWN
Frunk & Trunk is OPEN
Rear Seat is Down (Model Y Only)
Tesla Model 3/Y Power Down Procedure
IMPORTANT: Re-install ALL Factory Plugs To Their Original Location, FAILURE TO DO SO
CAN CREATE COMPUTER FAULTS.
Tesla Model 3
PSS-TSLA 20240320v3
3/14
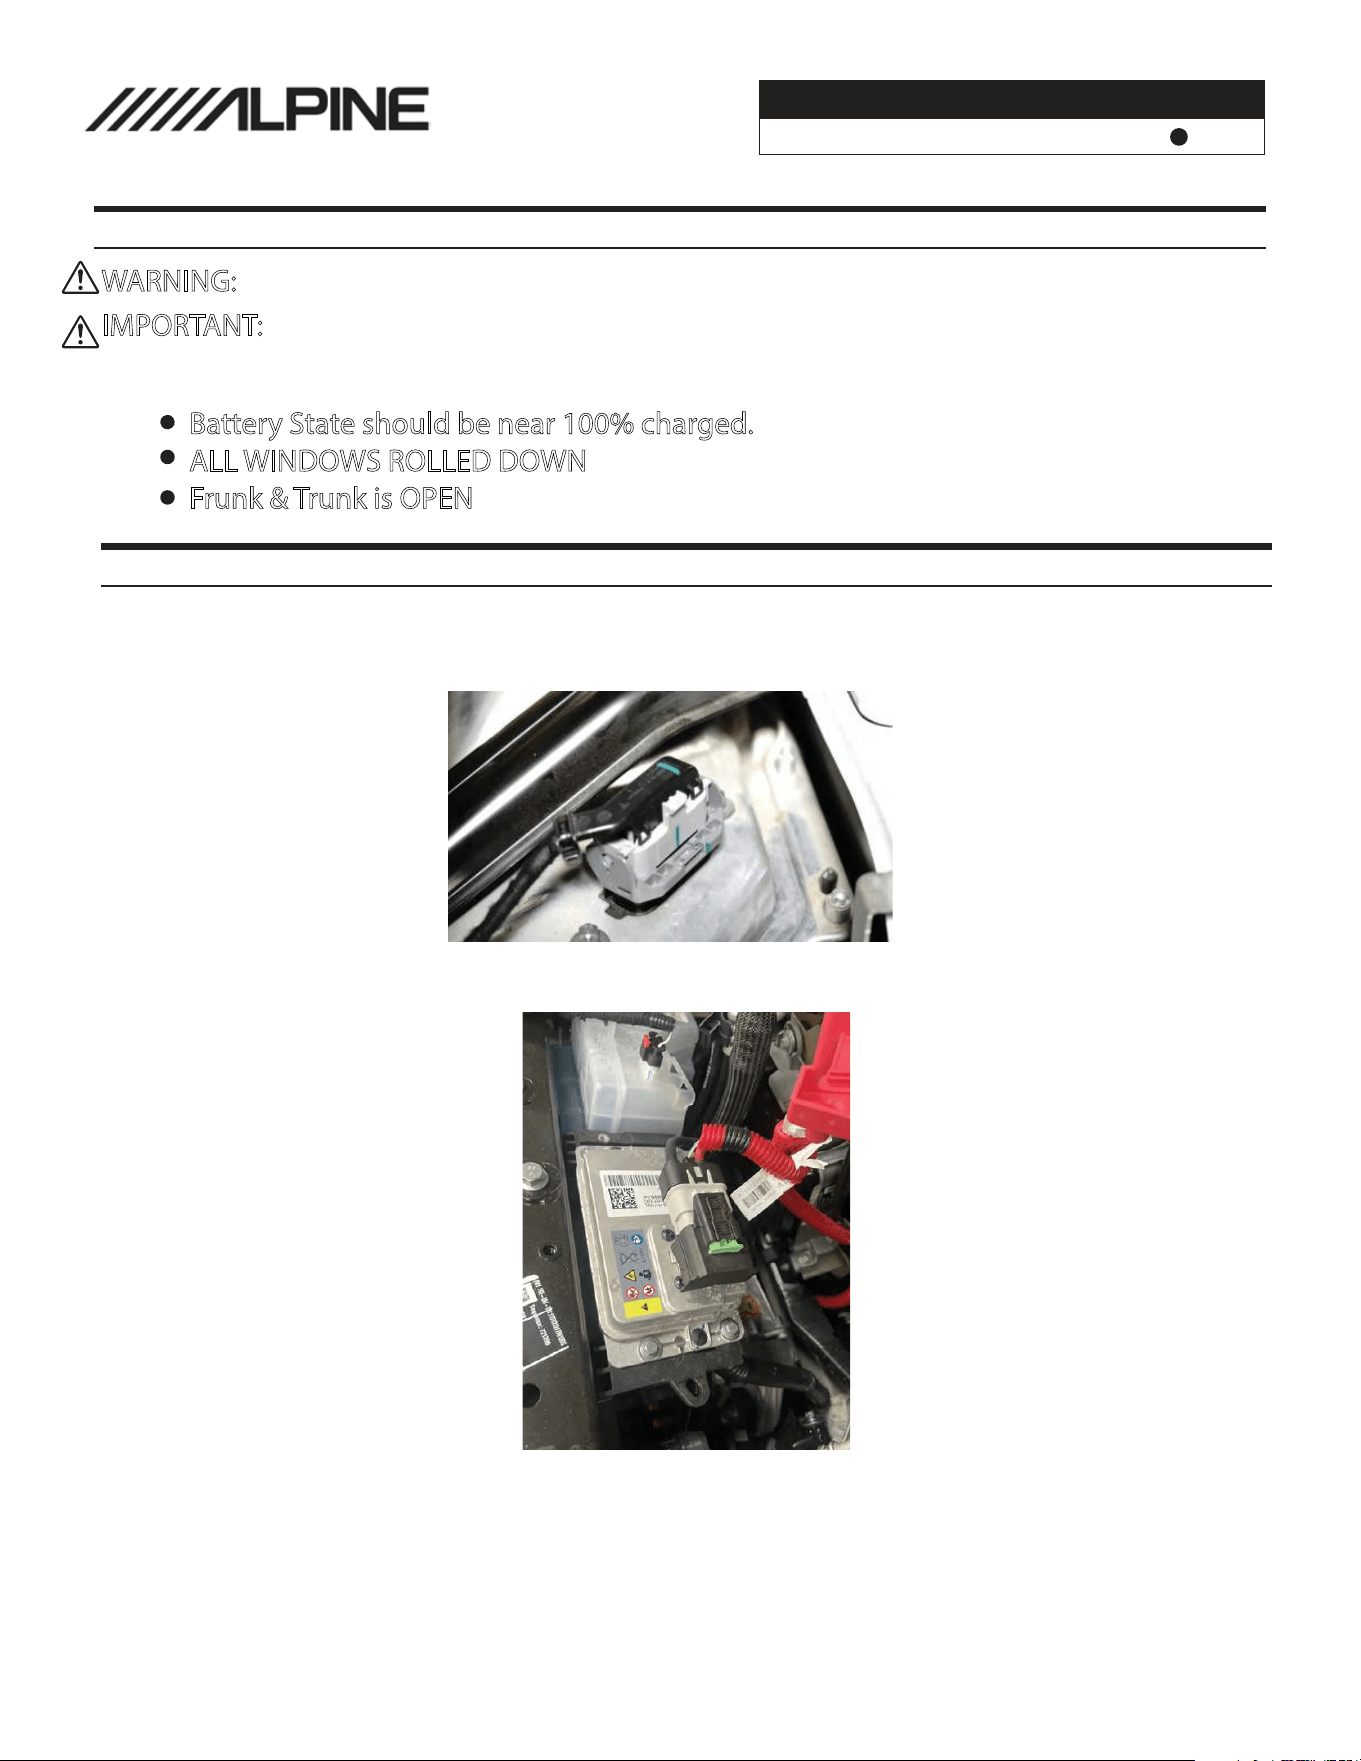
Tesla Model 3/Y Power UP & Down Procedure
WARNING: Before beginning install on your tesla follow the below procedure.
Battery State should be near 100% charged.
ALL WINDOWS ROLLED DOWN
Frunk & Trunk is OPEN
1) Under the Rear Bench Seat cushion plug- in and latch the high voltage
battery contactor pictured.
2) Access the Frunk and re-connect the low voltage battery connector.
3) Power up the vehicle pressing the brake pedal.
Tesla Model 3/Y Power Up Procedure
IMPORTANT: Re-install ALL Factory Plugs To Their Original Location, FAILURE TO DO SO
CAN CREATE COMPUTER FAULTS.
Tesla Model 3
PSS-TSLA 20240320v3
4/14
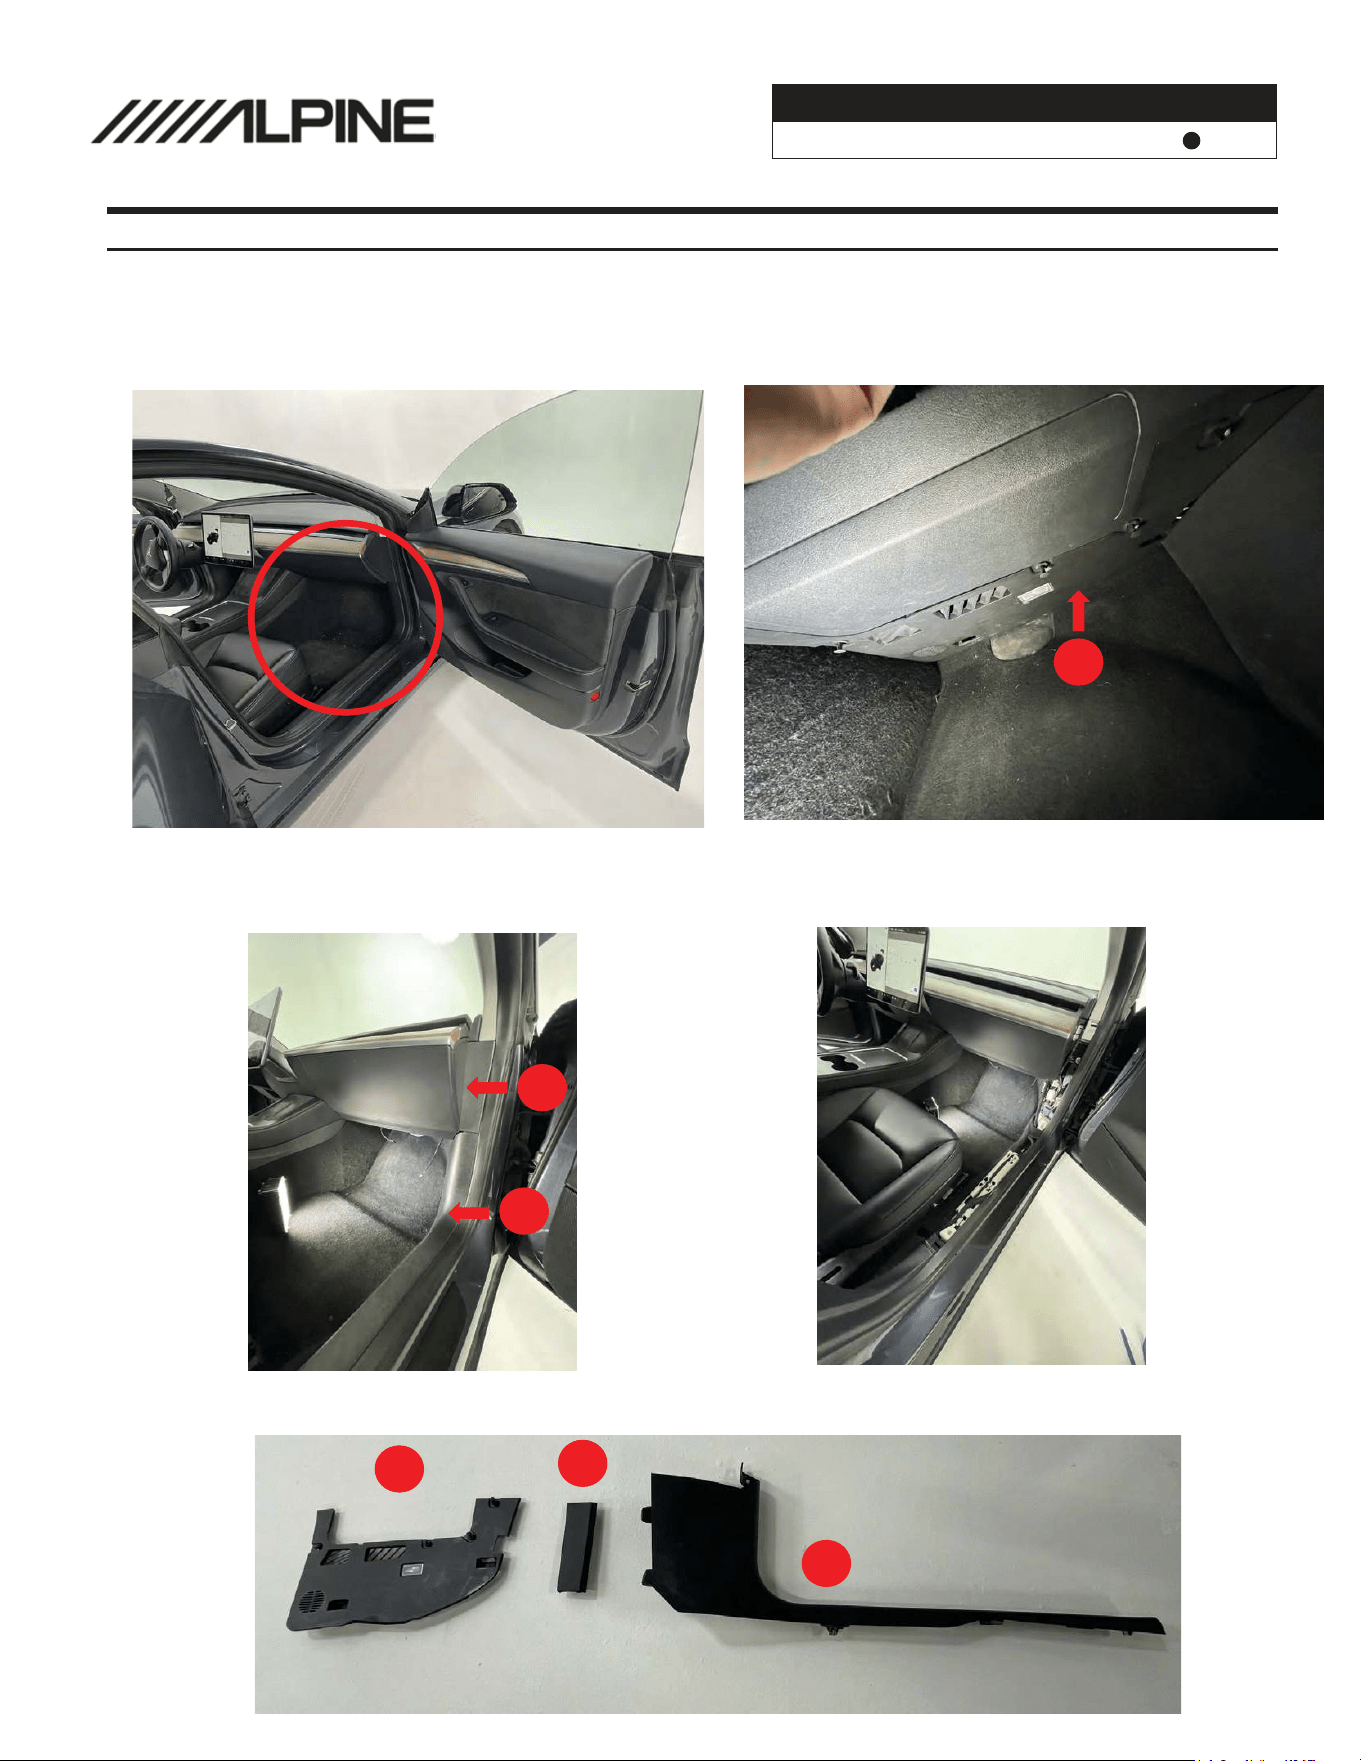
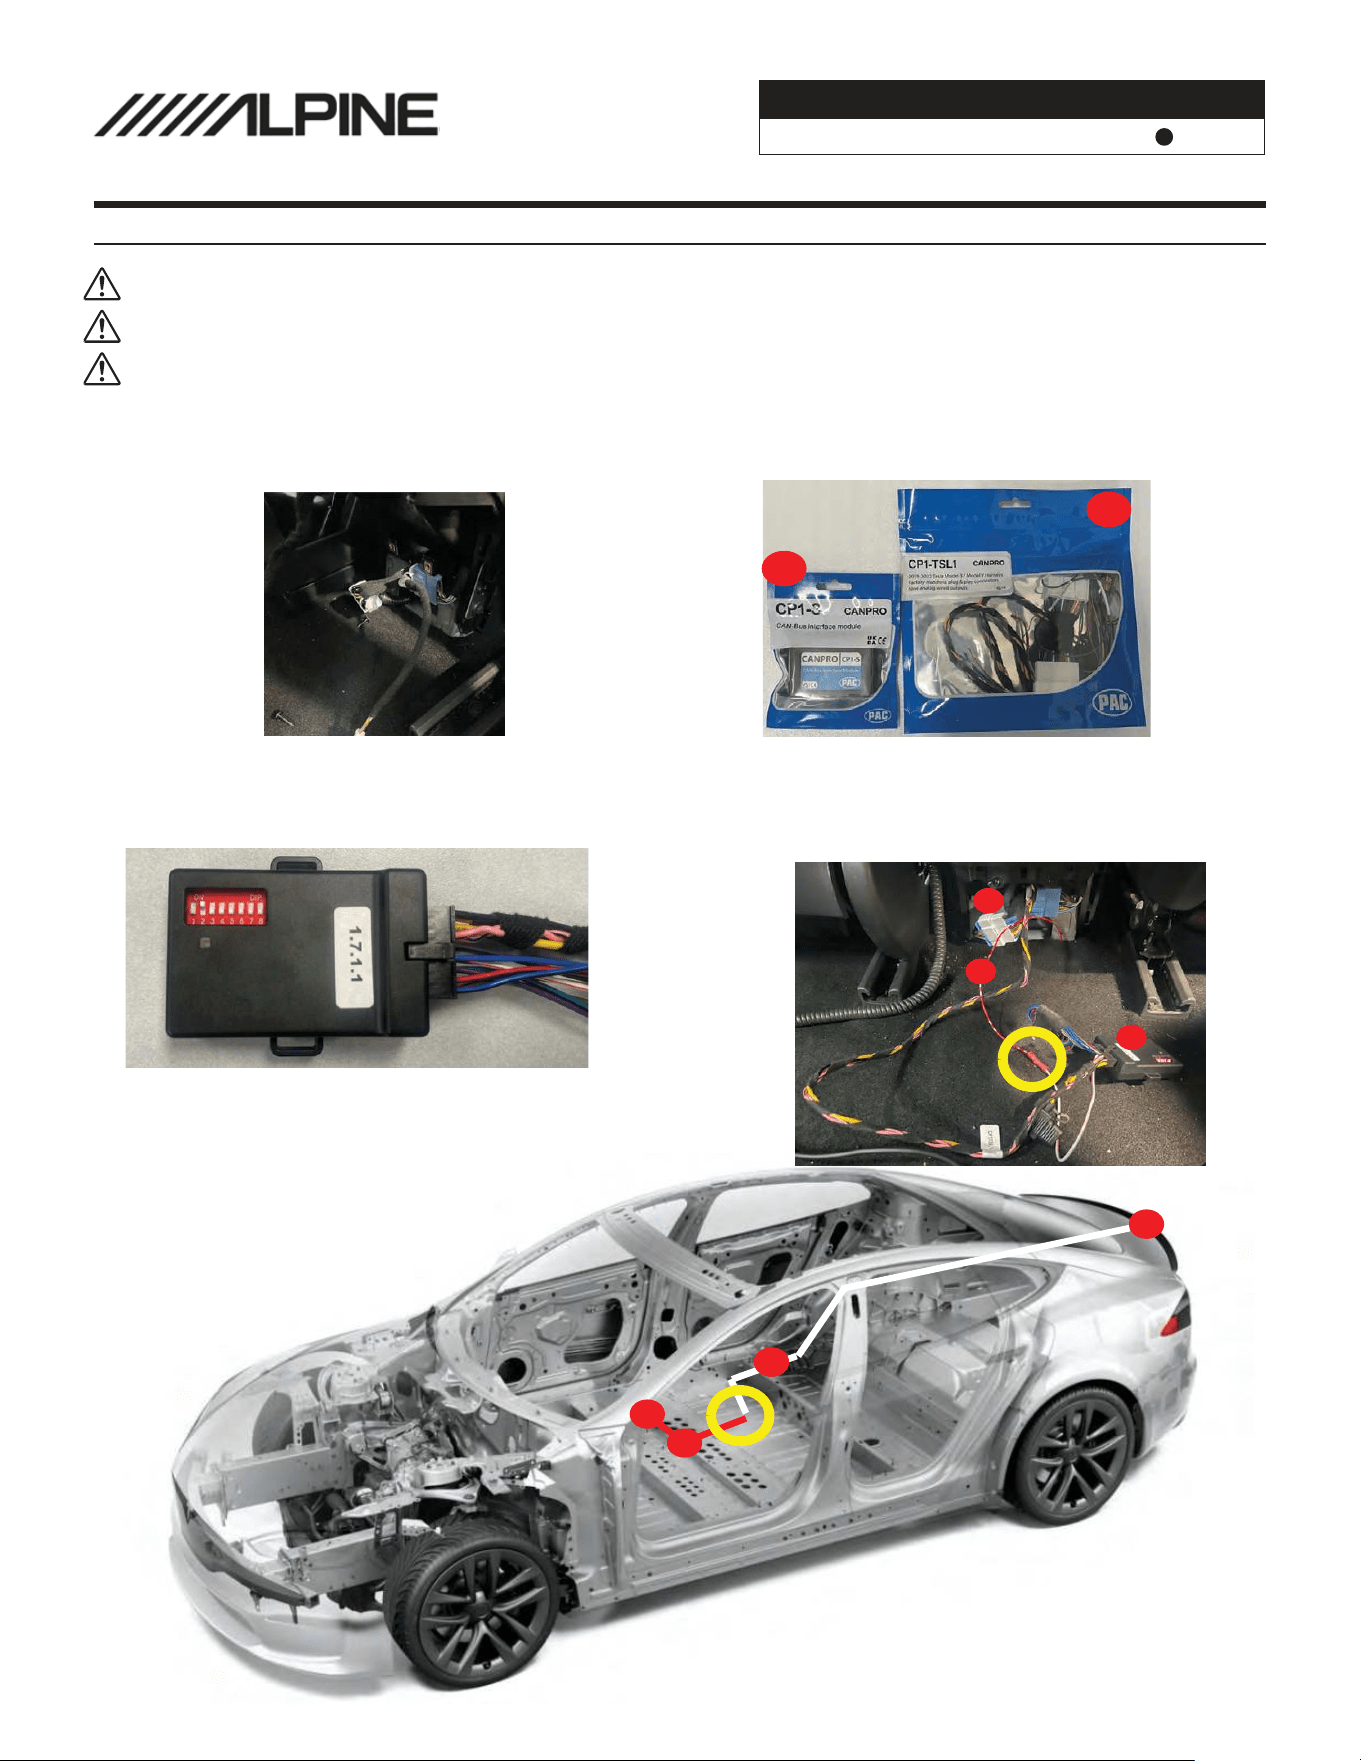
Installation Instructions (Integration Harness)
2
4
1
3
To access the front factory amplifier you need access the
front passenger kick panel.
Using a panel removal tool you will need to remove 3
panels marked below. (#1) (#2) (#3)
First remove the under dashboard trim panel (#1) by
releasing all retaining clips and pulling.
After the panel is detached unplug the speaker and
footwell light and stow the panel away,
Next remove the outer dashboard trim panel (#2) near
the door sill followed by the kick panel base board trim
(#3)
Image below shows Panel #1-3 Removed
1
2
3
1
2
3

Tesla Model 3
PSS-TSLA 20240320v3
5/14
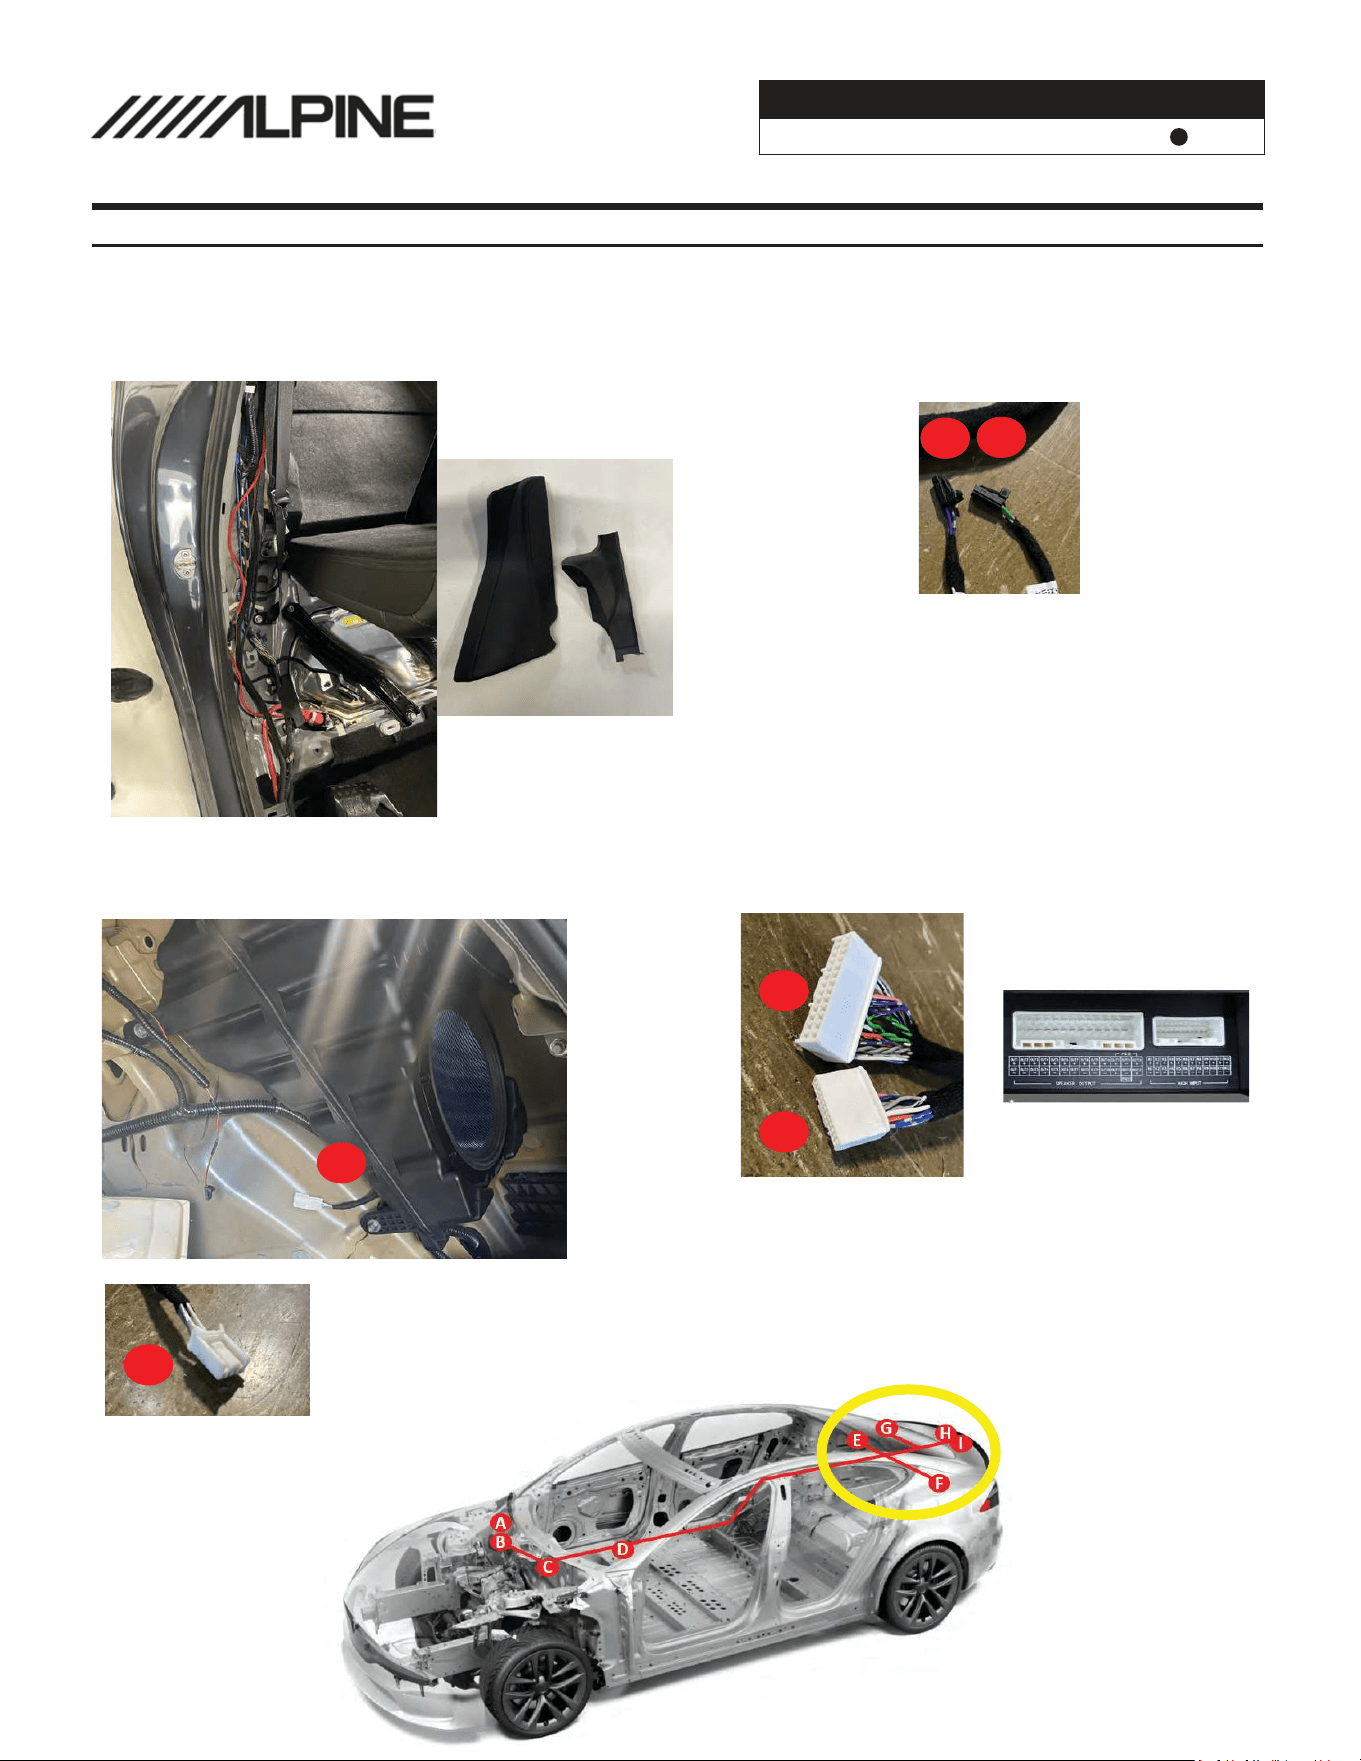
Installation Instructions (Integration Harness)
7
5
6
Inside of the upper passenger footwell locate the factory amplifi-
er pictured.
(PSS-TSLA-223) 2022+
There are two connectors on the amplifier
Disconnect the 2 bottom male connectors from factory amp and
replace with plugs (A + B) from the Alpine Tesla Harness. Transfer
the disconnected connectors into the open ends of the Alpine
Harness.
(PSS-TSLA-213) 2021 and earlier
There is one connector on the amplifier
Disconnect the single bottom male connector from factory amp
and replace with Plug (B). Transfer the disconnected factory plug
into the open end of the Alpine Harness.
A
B
Route the harness cable from the factory amp and locate
the latching plug down to the passenger kick panel and
locate the matching plug, disconnect the latch connector
and transfer it to the harness. (Plug C)
Remove the passenger side baseboard lower door trim
and locate the connector just before the base of the
B-pillar. Transfer the connections to (Plug D)
D
2022+ Model Shown
(Dual Plug Factory Amplifier)
C
C
D
D
Tesla Model 3
PSS-TSLA 20240320v3
6/14
Installation Instructions (Integration Harness)
98
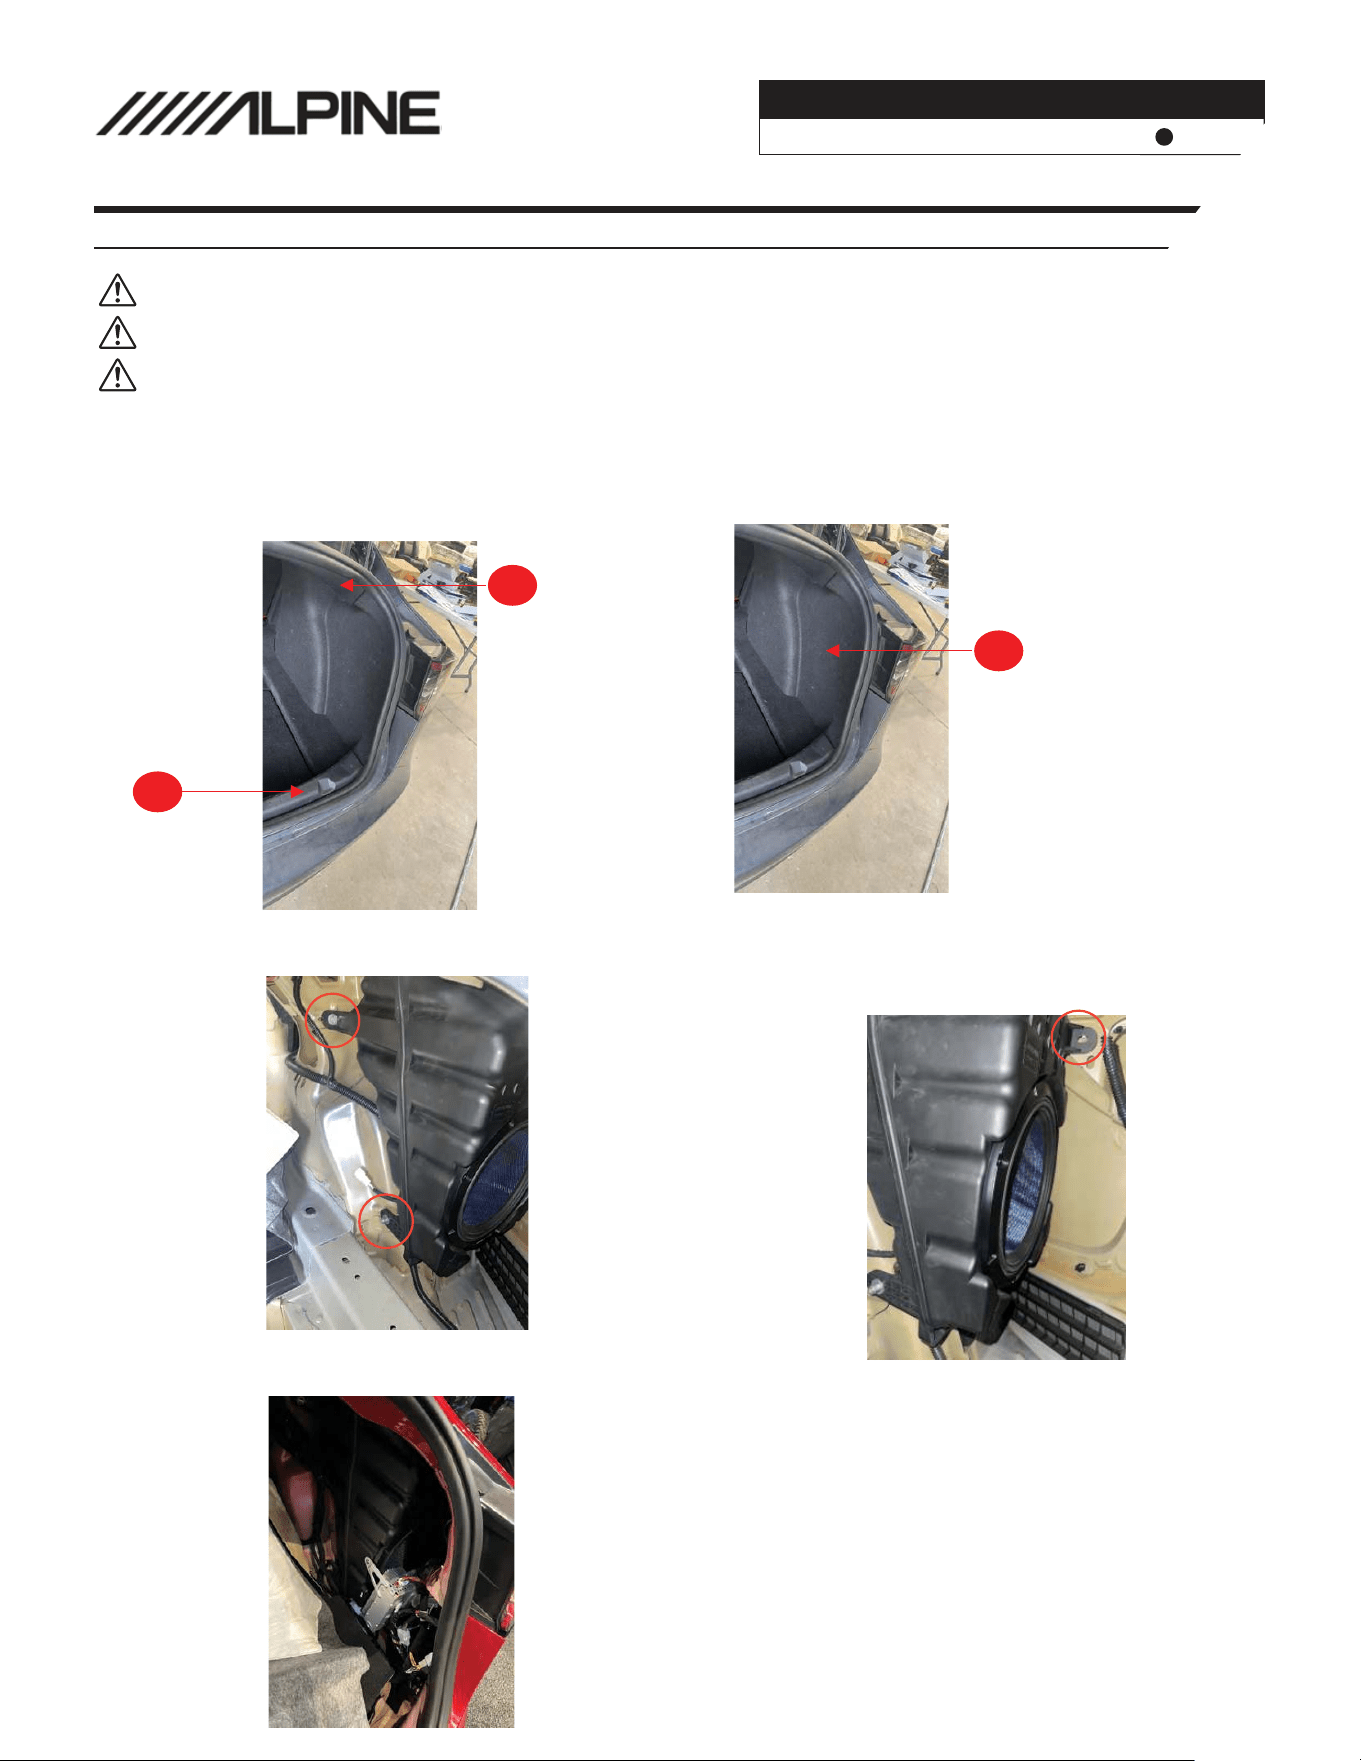
Route the harness to the trunk of the vehicle, remove the
seat cushion and trim panel pictured. Leave a proper
amount of slack so that your plugs can reach the final
amplifier mounting location.
Optional:
(Plugs E & F) are routed for rear deck speaker equipped
vehicles. (Some Model 3 Base RWD made 2021+ do not
have rear deck speakers)
1110
Route cable G behind the trunk lining trim, (Plug G)
connects to the subwoofer enclosure located behind the
rear passenger tire well.
(Plug H & I) High level input and DSP output connect to
the Alpine Amp PXE-X121-12EV
E
F
H
I
G
G

Tesla Model 3
PSS-TSLA 20240320v3
7/14
Installation Instruction (Power Harness)
IMPORTANT: For Optimal Sound Quality Sound Dampening Is Highly Recommended for Tesla Applications
4
Route 12V Power Harness (Plug J) from rear bench seat to
the trunk to the amp mounting location.
IMPORTANT: Re-install ALL Factory Plugs To Their Original Location, FAILURE TO DO SO CAN CREATE COMPUTER FAULTS.
FULLY POWER DOWN YOUR TESLA AND DISCONNECT BATTERY BEFORE CONTINUING. SEE POWER DOWN PROCEDURE
Connect the Alpine harness Positive and Negative lug to
the low voltage battery posts under the rear seat &
re-tighten hardware.
3
Route the remote trigger 18awg primary wire (M) to the
rear of the center console. Extra Length is OK
5
J
M
J
-
+
M
1
Remove the rear bench seat from the Model 3 using
the two release latches at the front of the cushion
Locate the low voltage 12V battery posts in the rear seat
passenger compartment (Under the seat) Use a socket to
remove the battery post hardware nuts
2
Positive
Negative
(Chassis Ground)
Tesla Model 3
PSS-TSLA 20240320v3
8/14
Installation Instruction (Power Harness CP1-S Module)
IMPORTANT: For Optimal Sound Quality Sound Dampening Is Highly Recommended for Tesla Applications
1
Use a panel removal tool to remove the lower rear cover
of the center console, once removed this should reveal
two large plugs.
Locate and unpack the CP1-S CANPRO and CP1-TSL1
2
IMPORTANT: Re-install ALL Factory Plugs To Their Original Location, FAILURE TO DO SO CAN CREATE COMPUTER FAULTS.
FULLY POWER DOWN YOUR TESLA AND DISCONNECT BATTERY BEFORE CONTINUING. SEE POWER DOWN PROCEDURE
Connect Harness “K” black plastic molex end with
corresponding plug of CANPRO CP1-S Module “L” .
Set dipswitch 2 to ON position
3
Disconnect factory connectors and replace the white
plastic plugs from CP1-TSL1 “K” into the rear center
console Plugs. Trim the excess length wire from “M” and
crimp together with Output #1 from CP1-S “L”
4
J
K
L
Crimp Connector
M
K
L
L
K
Crimp Connector
M
When finished tuck all excess wiring and CANPRO
module into the rear center console compartment and
re-install the lower cover using factory clips.
5

Tesla Model 3
PSS-TSLA 20240320v3
9/14
Dashboard Speaker Installation (EV-40MR-T)
IMPORTANT: For Optimal Sound Quality Sound Dampening Is Highly Recommended for Tesla Applications
1
Using a panel removal tool.
Remove dash side cover “A” followed by pillar cover “B” at
both sides of vehicle. Weather gasket can be peeled back
for easier aaccess
Use a Panel Removal Tool around the edge of the
dashboard speaker cover panel to release the factory
clips. Release the panel and pull upwards to detatch and
expose the center stage speakers.
2
3
Remove (3) T20 Torx bolts securing each factory speaker
Remove (2) T20 bolts securing the factory tweeter
Use T20 Torx. A Shallow Ratcheting Torx Bit is required.
4
If your vehicle is equiped with a center speaker connect
the Y-Harness between the center mid and tweeter &
Plug all speakers into the factory connectors
5
Secure all Alpine speakers to the dash by Re-installing all
remaining factory T20 Torx. After speakers are mounted
Install the dashboard speaker cover panel by applying
uniform pressure to engage the factory clips.
IMPORTANT: Re-install ALL Factory Plugs To Their Original Location, FAILURE TO DO SO CAN CREATE COMPUTER FAULTS.
FULLY POWER DOWN YOUR TESLA AND DISCONNECT BATTERY BEFORE CONTINUING. SEE POWER DOWN PROCEDURE
A
B
6
Re-install dash side cover “A” followed by pillar cover “B”
at both sides of vehicle.
Tesla Model 3
PSS-TSLA 20240320v3
10/14
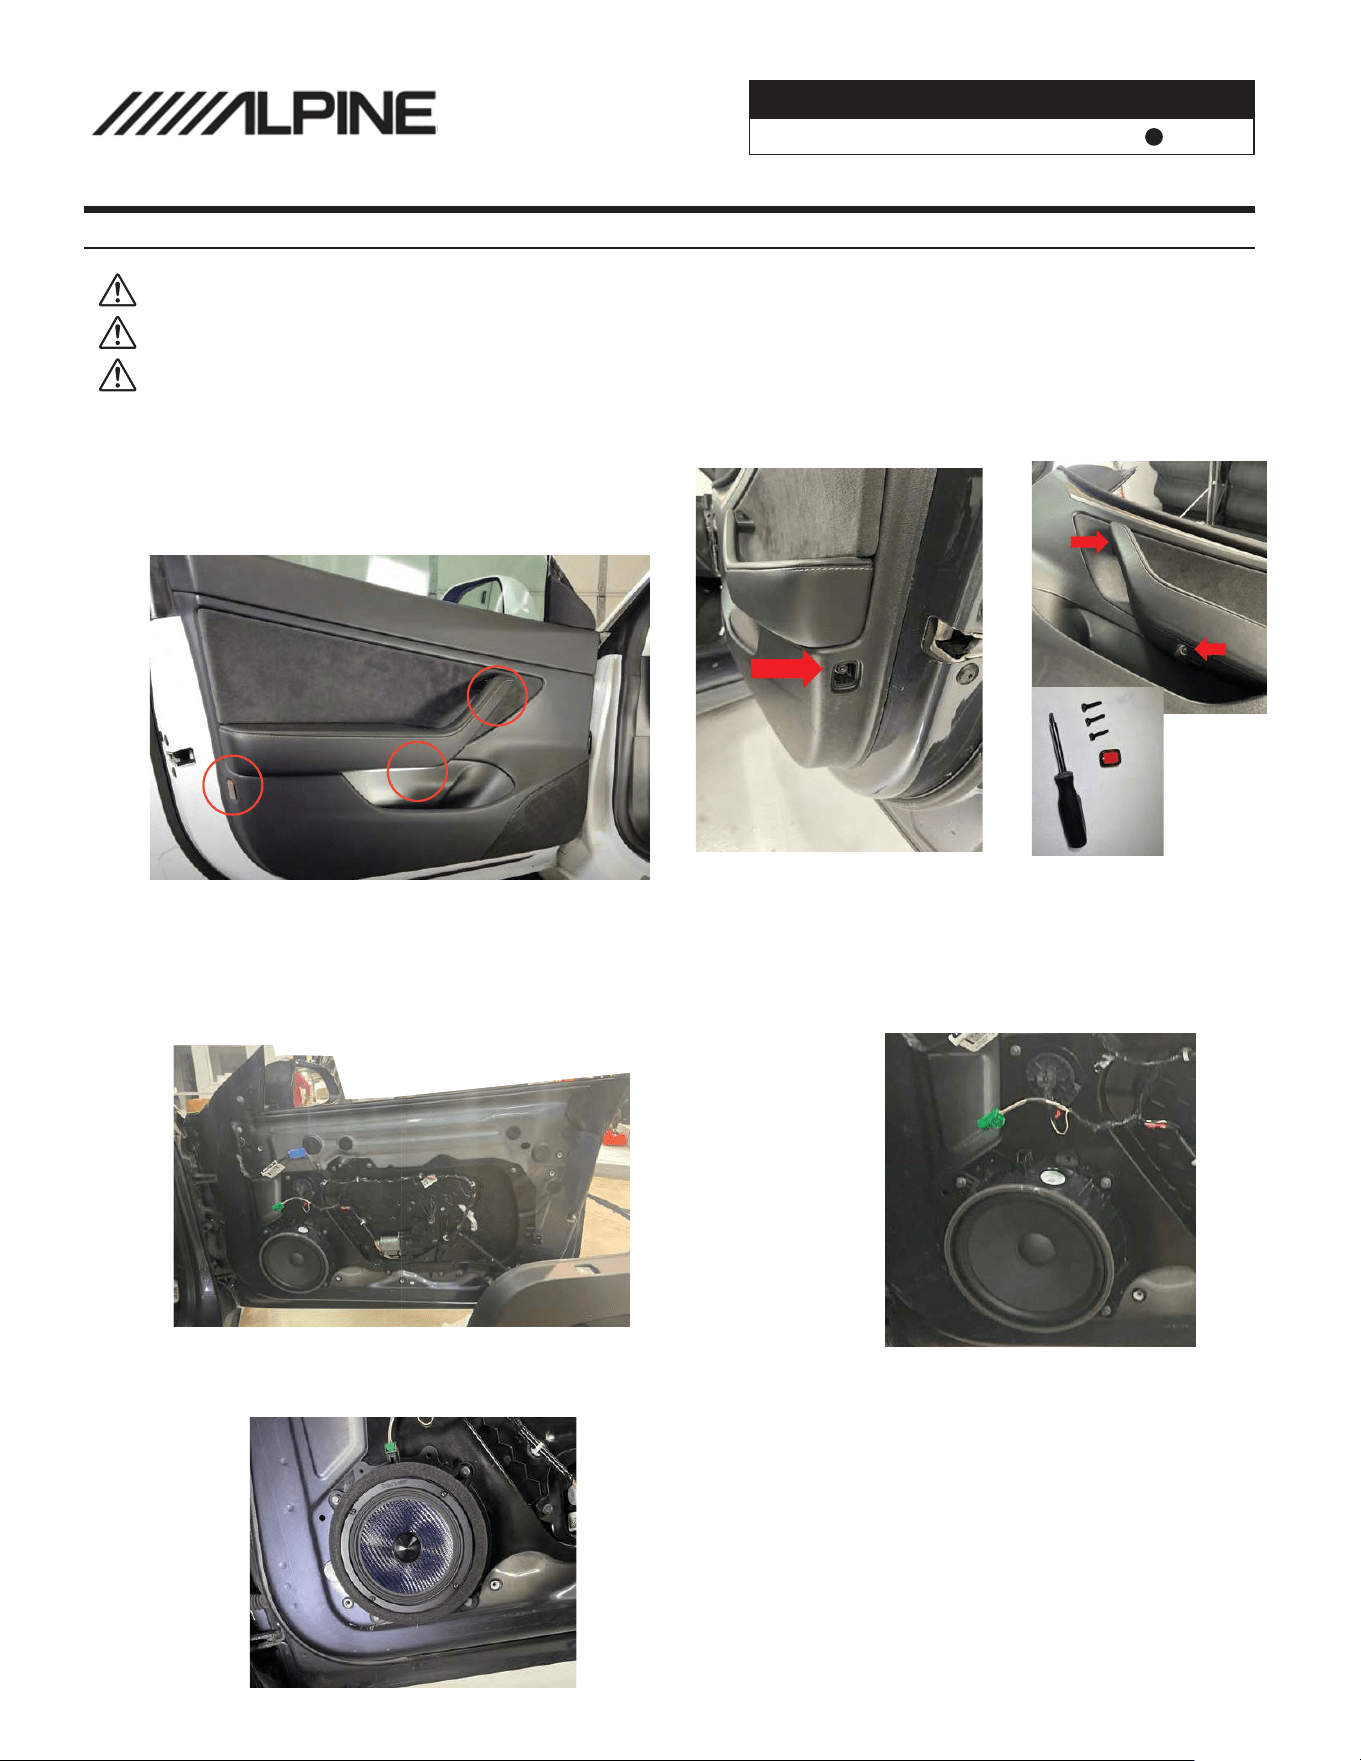
Front Door Speaker Installation (EV-65CF-T)
IMPORTANT: For Optimal Sound Quality Sound Dampening Is Highly Recommended for Tesla Applications
1
Remove the Front Door Panels
Pry the Red Reflector Clip Off Using Slim Panel Remover
Use a T30 Screw Driver Remove (3) Screws in Each Panel
(2) Screws are located under the door grip handle
(1) Screw is located behind the red reflector
2
3
Remove 4 bolts securing each factory speaker adapter.
Use 8mm Socket or T25 Torx (Varies depending on year)
The factory Adapter should then unclip easily.
4
Install the new Alpine Speaker & Adapter to the door
panel using the factory screws. Plug in green factory
speaker adapter plug
5
Plug in all remaining factory door connectors. Mount
and re-install each factory door panel using (3) T30 Torx.
Apply Pressure around the door panel to engage the
factory clips. Re-install the Red Reflector Clips
IMPORTANT: Re-install ALL Factory Plugs To Their Original Location, FAILURE TO DO SO CAN CREATE COMPUTER FAULTS.
FULLY POWER DOWN YOUR TESLA AND DISCONNECT BATTERY BEFORE CONTINUING. SEE POWER DOWN PROCEDURE
Use a Panel Removal Tool around the edge of the panel
to release the factory clips. Release the panel and pull
upwards to detatch, un-plug the factory panel connec-
tions including the green speaker plug.
(Note: Some cables are non removable leave the door
panel resting on a soft ground surface)
Tesla Model 3
PSS-TSLA 20240320v3
11/14
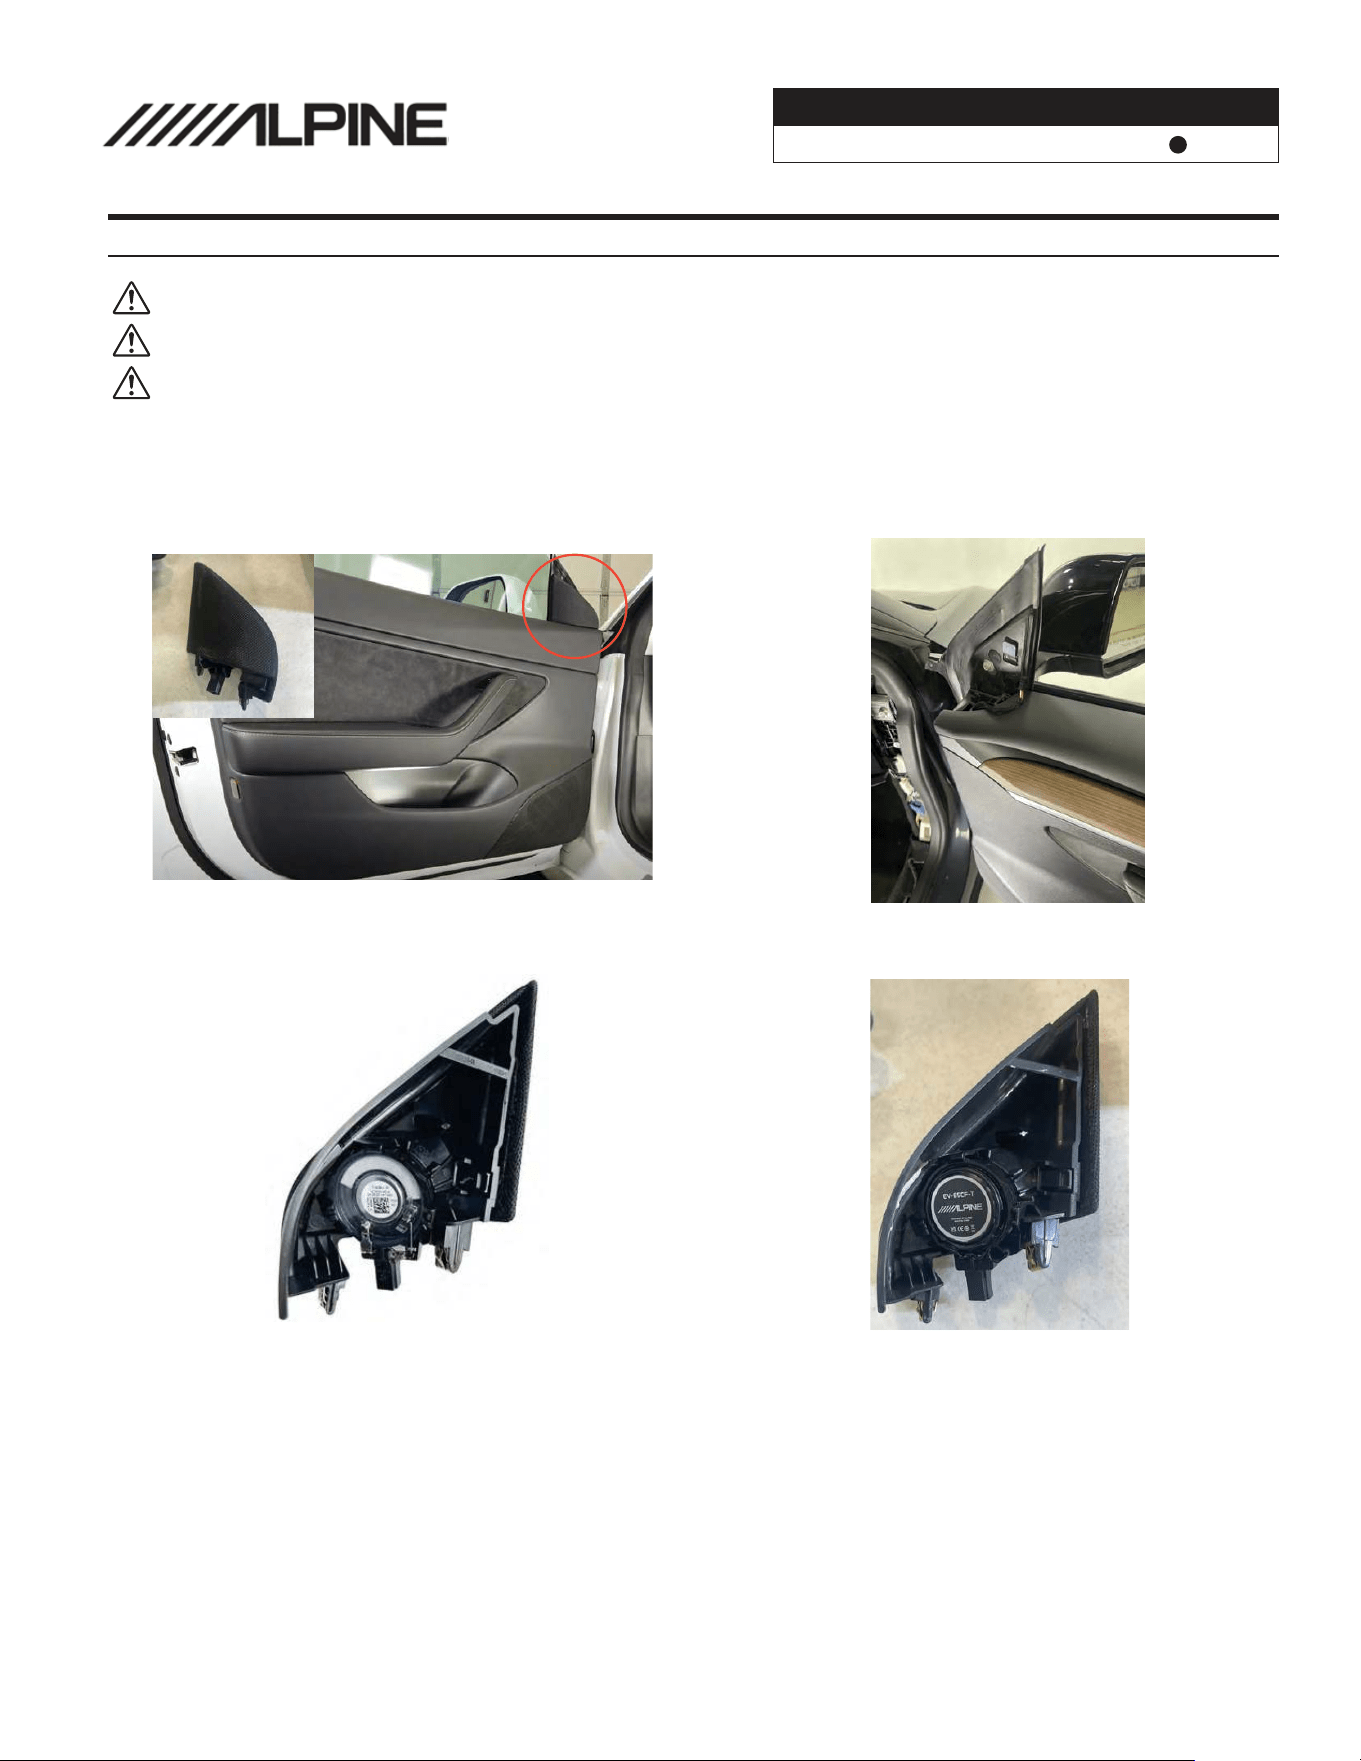
Front Door Tweeter Installation (EV-65CF-T)
FULLY POWER DOWN YOUR TESLA AND DISCONNECT BATTERY BEFORE CONTINUING. SEE POWER DOWN PROCEDURE
IMPORTANT: For Optimal Sound Quality Sound Dampening Is Highly Recommended for Tesla Applications
1
Using a panel removal tool remove the Front Tweeter
Housing Panel
Use Light Upward Pressure and Pry to Release 2 Clips.
With the Tweeter Housing un-clipped from the door
unplug the factory speaker connector. If the plug is
difficult use a small precision flat tool to release the plug
connection
2
3
Unclip the Factory Tweeter from the Housing by gently
twisting and pulling.
4
Install the new Alpine Tweeter to the housing by
positioning the lock tabs and clipping into place.
5
Plug in the original factory connector to the new alpine
tweeter and pop the housing into place using downward
pressure along the factory clips. Make sure it securely
latches into place.
IMPORTANT: Re-install ALL Factory Plugs To Their Original Location, FAILURE TO DO SO CAN CREATE COMPUTER FAULTS.
Tesla Model 3
PSS-TSLA 20240320v3
12/14
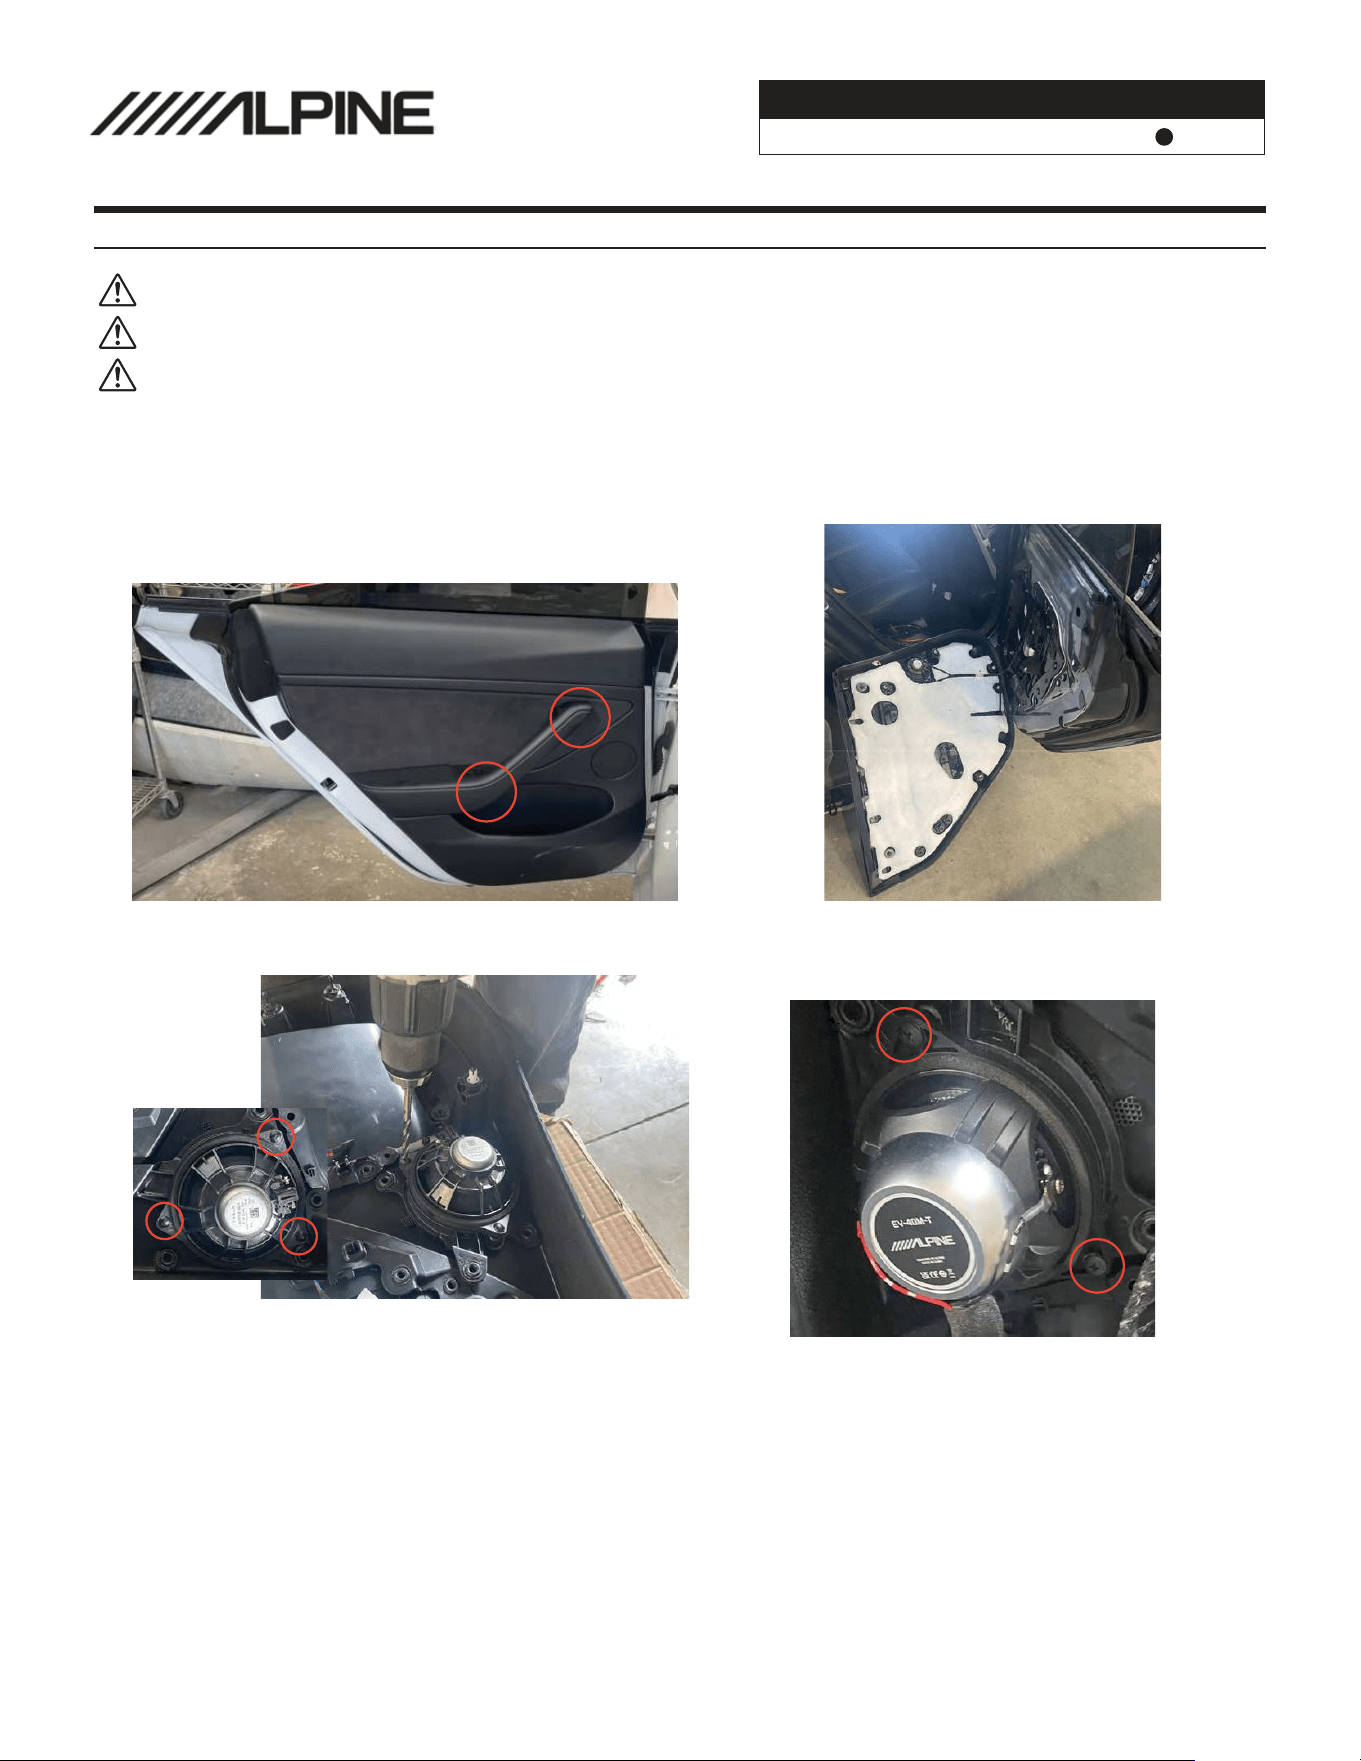
Rear Door Speaker Installation (EV-40M-T)
IMPORTANT: For Optimal Sound Quality Sound Dampening Is Highly Recommended for Tesla Applications
1
Remove the Rear Door Panels
Use a T30 Screw Driver Remove (2) Screws in Each Panel
(2) Screws are located under the door grip handle
Use a Panel Removal Tool around the edge of the panel
to release the factory clips. Release the panel and pull
upwards to detatch, un-plug the factory panel connec-
tions.
2
3
Using a Drill Bit, Drill out 3 Plastic Rivets on each Factory
Door Speaker. Use Care to not over-drill the screw boss
4
Using hand screw driver nstall the new Alpine Speaker to
the door panel using the (6) supplied phillips tapping
screws & Plug in the speaker connector
5
Plug in all remaining factory door connectors. Mount
and re-install each factory door panel using (2) T30 Torx.
Apply Pressure around the door panel to engage the
factory clips.
IMPORTANT: Re-install ALL Factory Plugs To Their Original Location, FAILURE TO DO SO CAN CREATE COMPUTER FAULTS.
FULLY POWER DOWN YOUR TESLA AND DISCONNECT BATTERY BEFORE CONTINUING. SEE POWER DOWN PROCEDURE
Drill out the Rivet
Replace 3 Rivet with Tapping Screw
Tesla Model 3
PSS-TSLA 20240320v3
13/14
Rear Hatch Speaker Installation (EV-40M-T)
IMPORTANT: For Optimal Sound Quality Sound Dampening Is Highly Recommended for Tesla Applications
1
Remove the factory deck and Rear Deck Speaker Grille
Covers
Un-install the factory rear deck speakers
2
IMPORTANT: Re-install ALL Factory Plugs To Their Original Location, FAILURE TO DO SO CAN CREATE COMPUTER FAULTS.
FULLY POWER DOWN YOUR TESLA AND DISCONNECT BATTERY BEFORE CONTINUING. SEE POWER DOWN PROCEDURE
Install the new 4” Midrange speaker into the factory
location. Use Plug (E) AND (F) to connect the speaker
leads.
3
Re-install the factory grille covers and deck into the
vehicle.
4
E
F
Tesla Model 3
PSS-TSLA 20240320v3
14/14
Model 3 Subwoofer Installation (EV-100SW3-T)
IMPORTANT: For Optimal Sound Quality Sound Dampening Is Highly Recommended for Tesla Applications
IMPORTANT: Re-install ALL Factory Plugs To Their Original Location, FAILURE TO DO SO CAN CREATE COMPUTER FAULTS.
FULLY POWER DOWN YOUR TESLA AND DISCONNECT BATTERY BEFORE CONTINUING. SEE POWER DOWN PROCEDURE
1
To access the subwoofer compartment remove the lower
plastic trim panel “A” and the upper plastic trim panel “B”
Use a Panel Removal tool to release the clips.
After removed do not lose the factory clips.
Uninstall the factory subwoofer from vehicle. Peel back
the carpet “C” to expose the factory subwoofer. Unscrew
the 2 factory bolts, if equipped with Premium audio
2
3
Mount the new subwoofer box and install the factory
hardware to the two mounting positions
4
Installed the Alpine supplied nut to the third factory bolt
location.
5
If equipped with Premium audio re-install the factory
amplifier and bolts if premium equipped.
A
B
B
C
Re-connect the factory subwoofer plug, place the carpet
into position and re-install the upper and lower plastic
trim panels.
6

