Deutsch / Français
Please visit the website WWW.AIRMSEN.COM to view the electronic version of the user manual.
Or email [email protected]. Thanks for your support.
USER MANUAL
If you are having problems using this dishwasher
Please email :
for assistance :
www.airmsen.com
Model : ZMW-DUHA01
THANK YOU FOR MAKING AIRMSEN APPLIANCES A PART OF YOUR HOME.
COMPLETE PORTABLE COUNTERTOP DISHWASHER
* HOME APPLIANCES
2
CONSTANT INNOVATION
TO ALLOW CONSUMERS TO GET BETTER PRODUCTS
Take “technology, innovation, health” as its core value, to be the preferred brand of household
products in your healthy and quality life.
AIRMSEN focus on researching, developing and manufacturing various kinds of household
supplies with advanced technologies and the idea of sustainable development, to promote
the evolution and transform of our lifestyle, to make it more healthy, green, intelligent and with
high quality, and to bring a happy, healthy and eco-friendly home life to around the world.
Among other things, registration of your appliance ensures that we can deliver important
product information and warranty details when you need them.
Register your AIRMSEN appliance now online.
Website: www.airmsen.com
SAFETY
Your safety and the safety of others is very important.
We have provided many important safety messages in this manual and on your
appliance. Always read and obey all safety messages.
All safety messages will follow the safety alert symbol.
All safety messages will tell you what the potential hazard is, tell you how to reduce
the chance of injury, and tell you what can happen if the instructions are not followed.
This is the safety alert symbol.
This symbol alerts you to potential hazards that can cause serious injury to
you and others.

3
contents
important safeguards 4
before you start 6
6 Unpacking your dishwasher
6 Checking parts
using your dishwasher 8
8 Loading the lower rack
8 Loading the upper rack
8 To remove the upper rack
9 Adding detergent
9 Adding water to dishwasher
operations 11
11 Control panel
11 Indicators
12 Starting a wash cycle
12 Cycle chart
maintenance 13
13 Cleaning
15 Drain the water from the tank
troubleshooting 16
specifications 18
warranty (U.S.A / CA) 19
customer support 20
4
important safeguards
Congratulations on your new Airmsen dishwasher. This manual contains important information on the installation, use,
and care of your appliance. Please take time to read this manual to take full advantage of your dishwasher’s many
benets and features.
Warnings and Important Safety Instructions in this manual do not cover all possible conditions and situations that may
occur. It is your responsibility to use common sense, caution, and care when installing, maintaining, and operating your
dishwasher.
WARNING
When using your dishwasher, follow basic precautions, including the following:
1. Read all instructions before using the dishwasher.
2. Use the dishwasher only for its intended function.
3. Use only detergents or wetting agents recommended for use in a dishwasher and keep them out of the reach of
children.
4. When loading items to be washed:
- locate sharp items so that they are not likely to damage the door seal, and
- load sharp knives with the handles up to reduce the risk of cut-type injuries.
5. Do not wash plastic items unless they are marked “dishwasher safe” or the equivalent. For plastic items not so marked,
check the manufacturer’s recommendations.
6. Do not touch the HEATING ELEMENT during or immediately after use.
7. Do not operate your dishwasher unless all ENCLOSURE panels are properly in place.
8. Do not tamper with the controls.
9. Do not abuse, sit on, or stand on the door or dish rack of the dishwasher.
10. To reduce the risk of injury, do not allow children to play in or on the dishwasher.
11. Under certain conditions, hydrogen gas may be produced in a hot-water system that has not been used for two weeks
or more. HYDROGEN GAS IS EXPLOSIVE. If the hotwater system has not been used for such a period, before using the
dishwasher turn on all hot-water faucets and let the water ow from each for several minutes. This will release any
accumulated hydrogen gas. As the gas is ammable, do not smoke or use an open ame during this time.
12. Remove the door to the washing compartment when removing an old dishwasher from service or discarding it.
SAVE THESE INSTRUCTIONS
important safeguards
Notice: The dishwasher passed the water test in the factory. A small amount of water remains, which is a normal
phenomenon. Please feel free to use it.
Please read this manual carefully before using the product and keep it properly.
The product, accessories, user interface and other illustrations in the manual are schematic diagrams for
reference only. Due to the update and upgrade of the product, the actual product and the diagram may be
slightly different, please refer to the material item.
WARNING: Cancer and Reproductive Harm - www.P65Warnings.ca.gov.
What you need to know about the safety instructions
California Proposition 65 Warning
5
important safeguards
• After unpacking the dishwasher, keep the packaging out of the reach of children.
• The dishwasher is extremely heavy. Do not attempt to move or carry the dishwasher by yourself. Two or more people are
needed to move a dishwasher and avoid potential injuries.
• As with any equipment using electricity, water, and moving parts, potential hazards exist.
• Do not install the dishwasher near electrical components. Keep the dishwasher away from open flames.
• Install and level your dishwasher on an uncarpeted floor that can support its weight.
• Your dishwasher must be properly grounded. Never connect it to an ungrounded outlet.
• After the dishwasher is installed, check that the drain hose is properly connected and that there is no leakage from the
hose connectors. If the drain hose is loose, it may cause property damage.
• The water supply line is susceptible to breakage. As time goes by, it becomes less flexible. Check the line periodically. If it is
swollen, torn, cut, or there is a water leak, replace it immediately.
• To safely operate this appliance, familiarize yourself with its operations and exercise care when using it.
• Do not put gasoline, solvents, or other flammable materials inside the dishwasher. Do not wash dishes exposed to these
materials.
• Keep your dishwasher detergent out of the reach of children. Detergent has an adverse effect on human organs. It
contains elements for polishing and is corrosive. Avoid letting the detergent come into contact with your skin and eyes.
• Do not push or place pressure on the door when it is open, as this may damage the dishwasher or cause harm.
• Do not allow children to play in or on the dishwasher. They may harm themselves or damage the dishwasher.
• Disconnect the power cable (or set the circuit breaker to off) before servicing your dishwasher.
• Do not repair, replace, or service any part of your dishwasher yourself. Disassembly, repairs, and modifications are
permitted by authorized service technicians only. Work done by an unauthorized person may void your warranty.
• Before disposing of your dishwasher, remove the door of the washing compartment or the door latch so that children or
small animals cannot get trapped inside.
• If the dishwasher is left unused for an extended period of time, turn off the water supply.
• This dishwasher is intended for residential use only.
SAVE THESE INSTRUCTIONS
CAUTION
WARNING
Tip-Over Hazard
Electric Shock Hazard
Before using your dishwasher
• Do not use the dishwasher until it is correctly installed.
• Do not push down on the dishwasher door when it is open.
• Do not place excessive weight on the dishwasher door when it is open.
Failure to follow these instructions can result in death, re, or electric shock:
• Electrically ground the dishwasher
• Do not use an extension cord.
6
before you start
before you start
Unpacking your dishwasher
Checking parts
Be sure to have your installer follow these instructions closely so that your new dishwasher works properly and that you’re
not at risk of injury when washing dishes.
When your dishwasher has been unpacked, make sure you’ve received all the parts shown below.
If your dishwasher was damaged during shipping, or if you do not have all the parts, contact Airmsen Customer Service at
Do not cover the air outlet and air inlet of the dishwasher to avoid machine failure.
• Once your new dishwasher has been delivered to you, carefully unpack it and check for any damage.
• If the dishwasher has been damaged. Do not install the dishwasher, and contact
Airmsen Customer Service (
Email: [email protected]
).
• If there is no damage to the product, you can proceed with the installation. If you are going to install it yourself, make
sure to read through the installation guide and follow the directions inside.
• After unpacking your dishwasher, keep the packaging out of the reach of children to ensure their safety.
WARNING
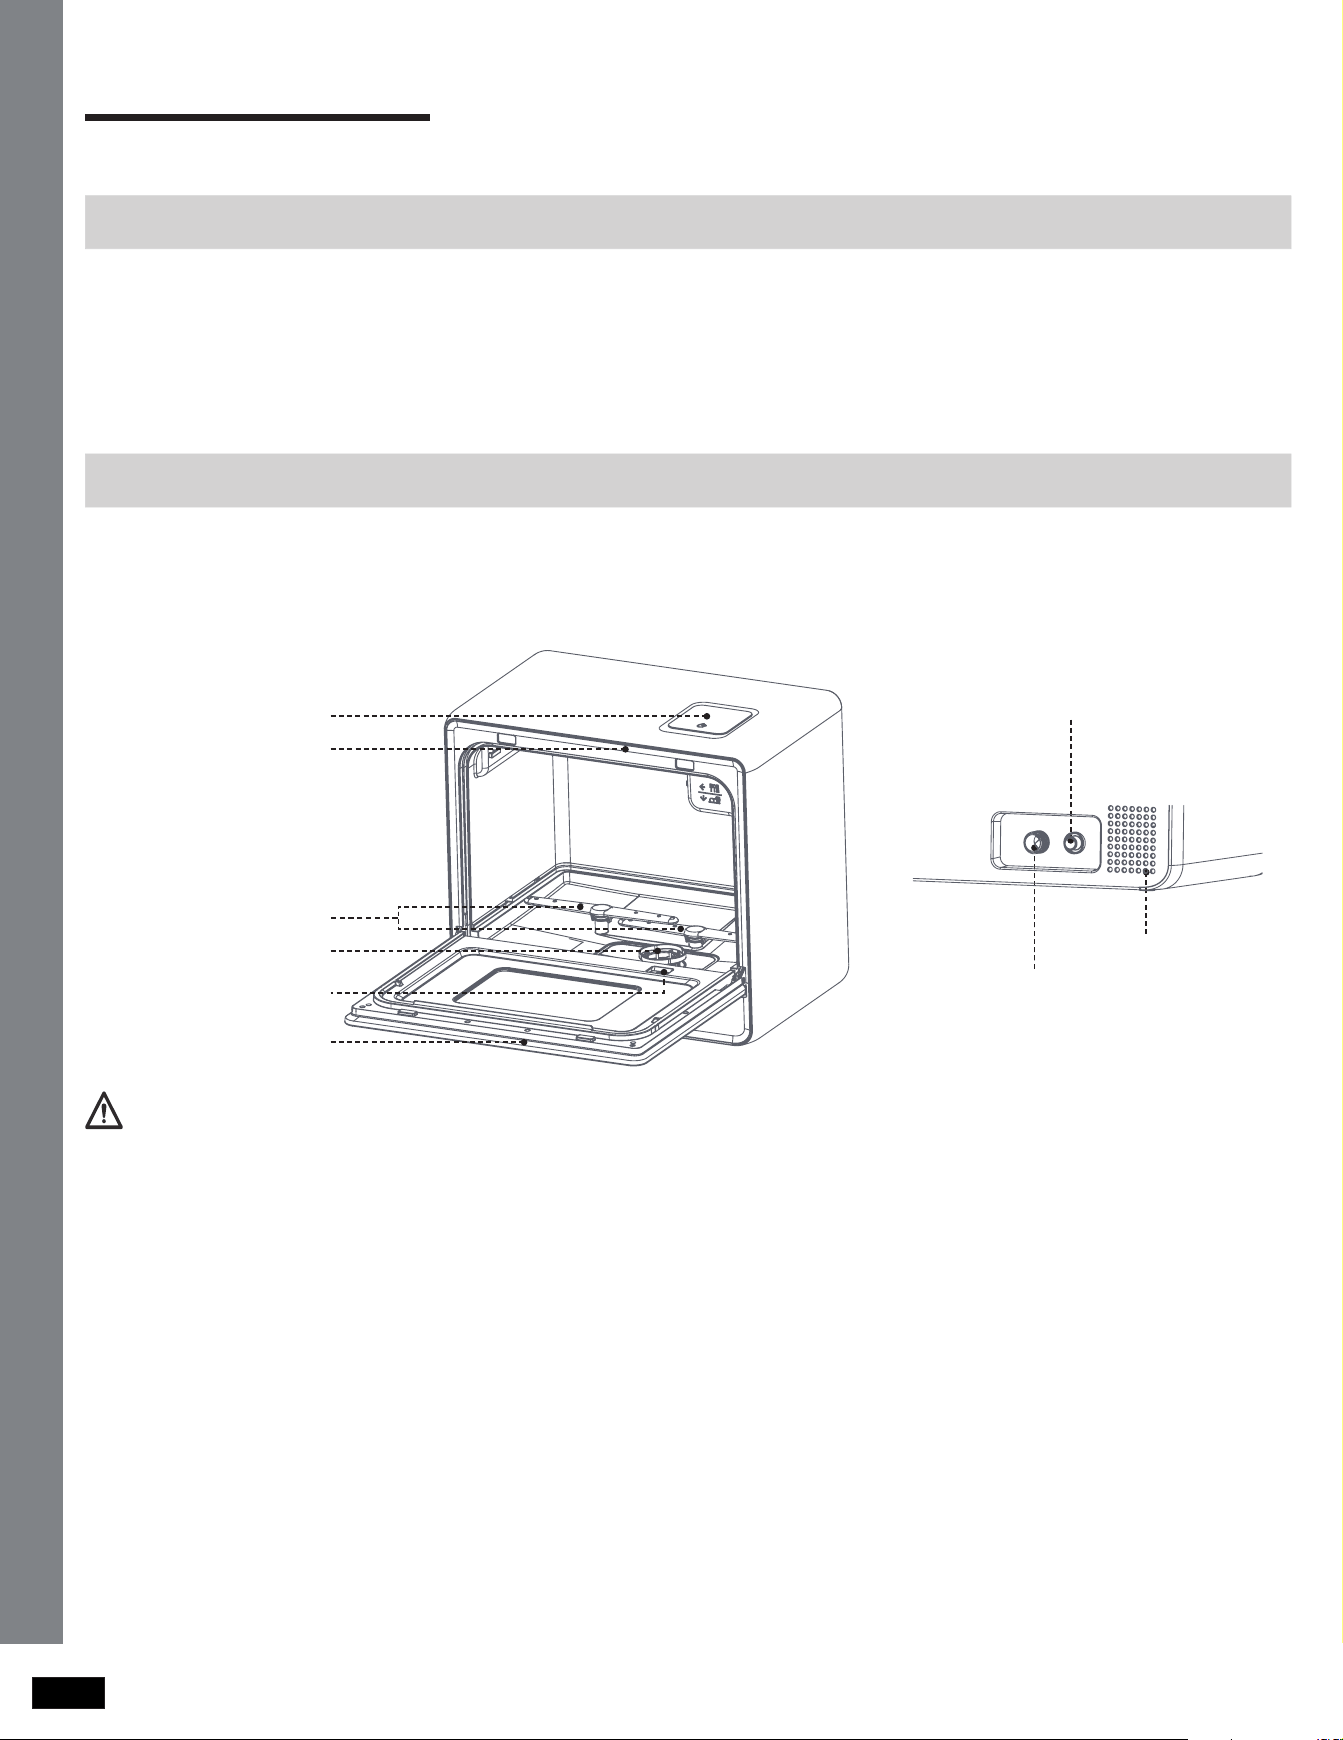
BACK
Top nozzle
Inlet pipe interface
Air intake
Drain pipe interface
Air outlet / Water tank
Lower nozzle
Filter
Detergent adding
receptacle
Door
7
before you start
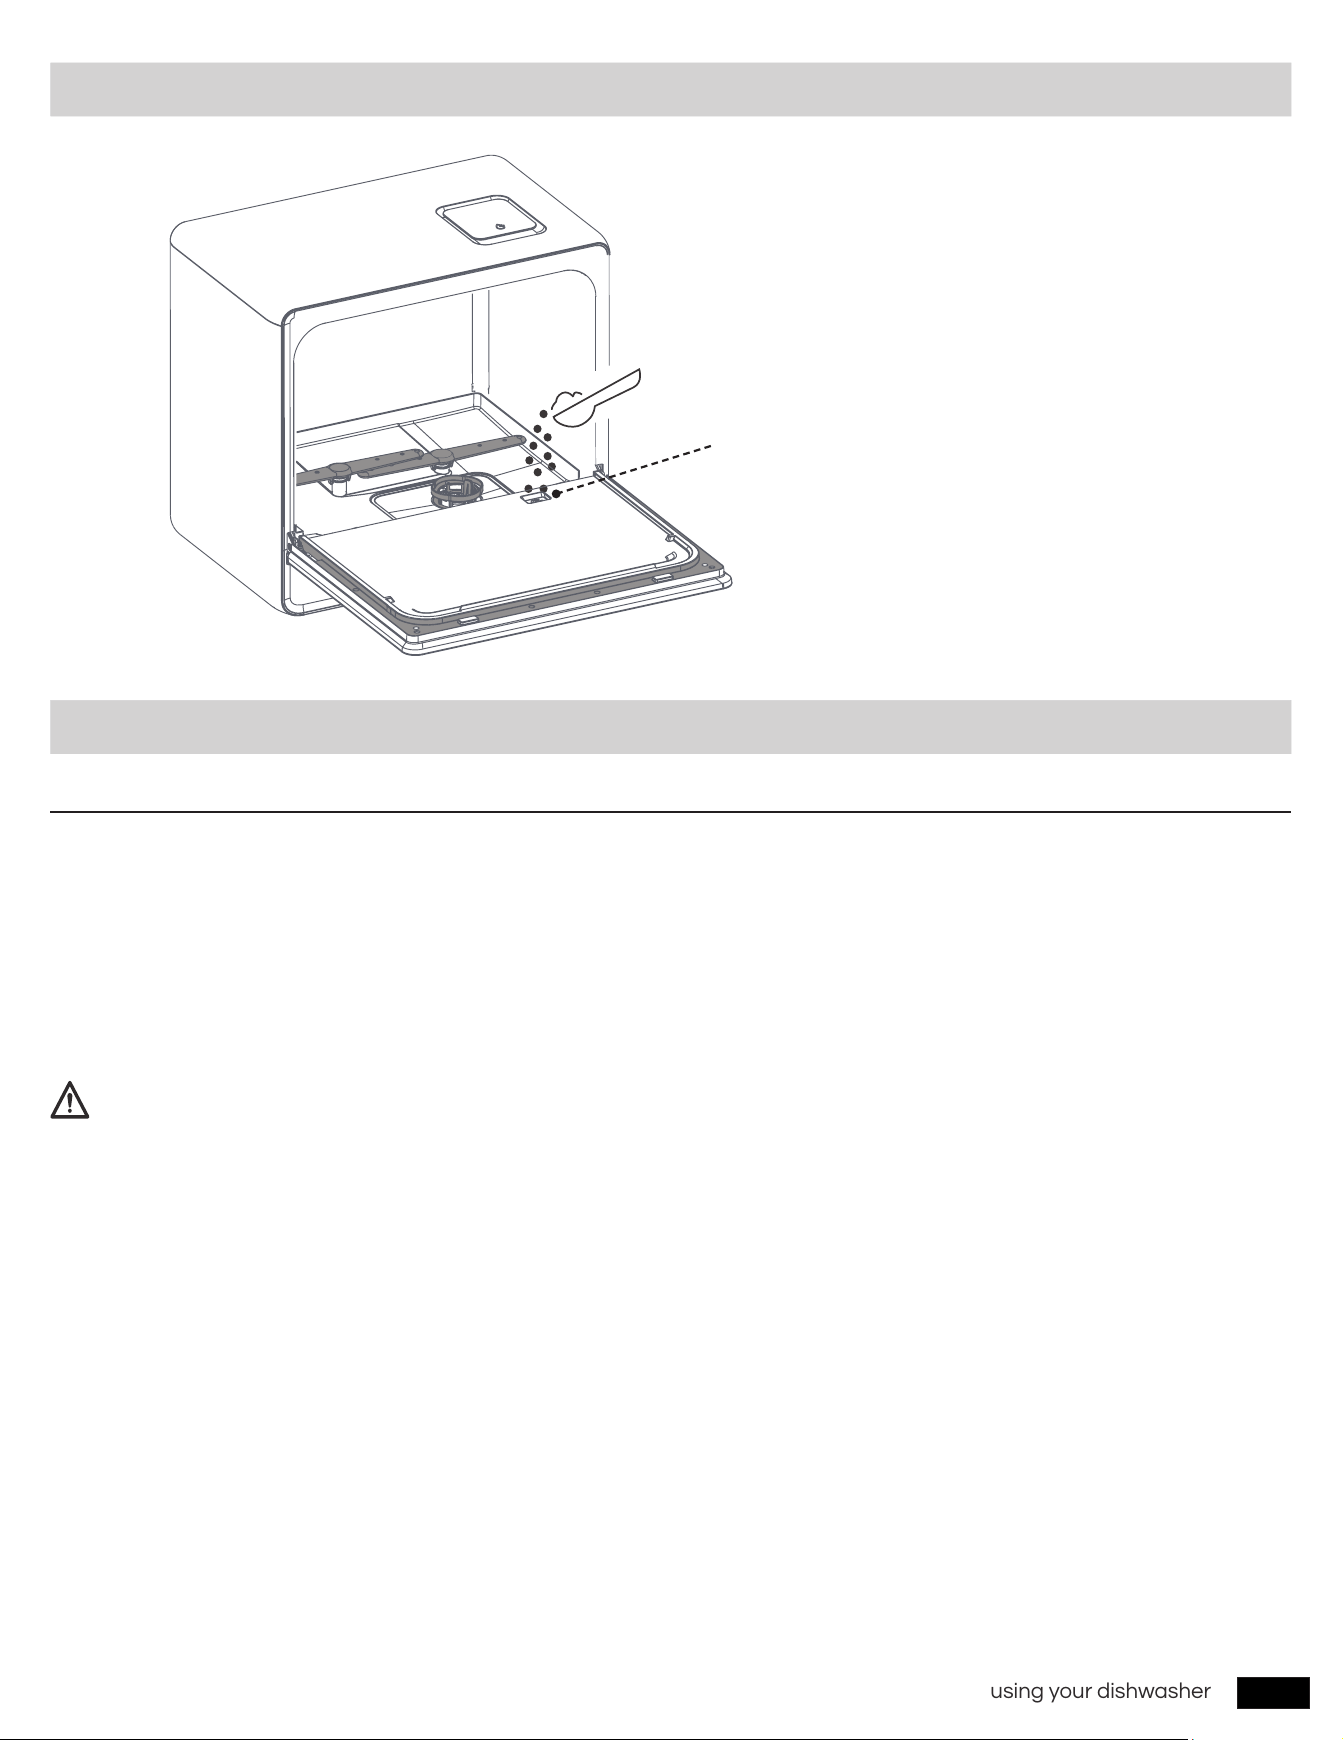
The LED light comes on when the dishwasher door is open. After the door is closed, the LED light will automatically turn off after
2 minutes. If the dishwasher door is left open for more than 5 minutes, the LED light will automatically turn off.
Wash only items such as glass, porcelain, and cutlery which the manufacturer states is dishwasher safe. Do not wash
aluminium (e.g. grease lters). The dishwasher may damage aluminium, or in extreme cases, cause a severe chemical
reaction.
Silverware that has contacted food containing sulphur may become discoloured. Food with sulphuric content include egg
yolks, onions, mayonnaise, mustard, sh, sh brine, and marinades.
Do not wash the following items in the dishwasher.
• Do not wash items that are covered with ash, sand, wax, lubricating grease, or paint. These materials will damage the
dishwasher. Ash does not dissolve and will spread inside the dishwasher.
• Remove food remains such as bones, fruit seeds, etc. and waste such as toothpicks, paper napkins, etc. from your dishes.
Food remains and waste can make noise, cause the dishwasher to malfunction, and damage your dishes and dishwasher.
• Copper, brass, tin, ivory, and aluminium items or items with adhesive.
• Non-heat resistant plastics.
• Craft items, antiques, valuable vases, and decorative glassware.
• Pottery or glazed-ceramic items.
• Wooden cutlery and crockery or items with wooden parts.
• Delicate glassware or glassware containing lead crystal. Clouding may occur on the glassware after frequent washing.
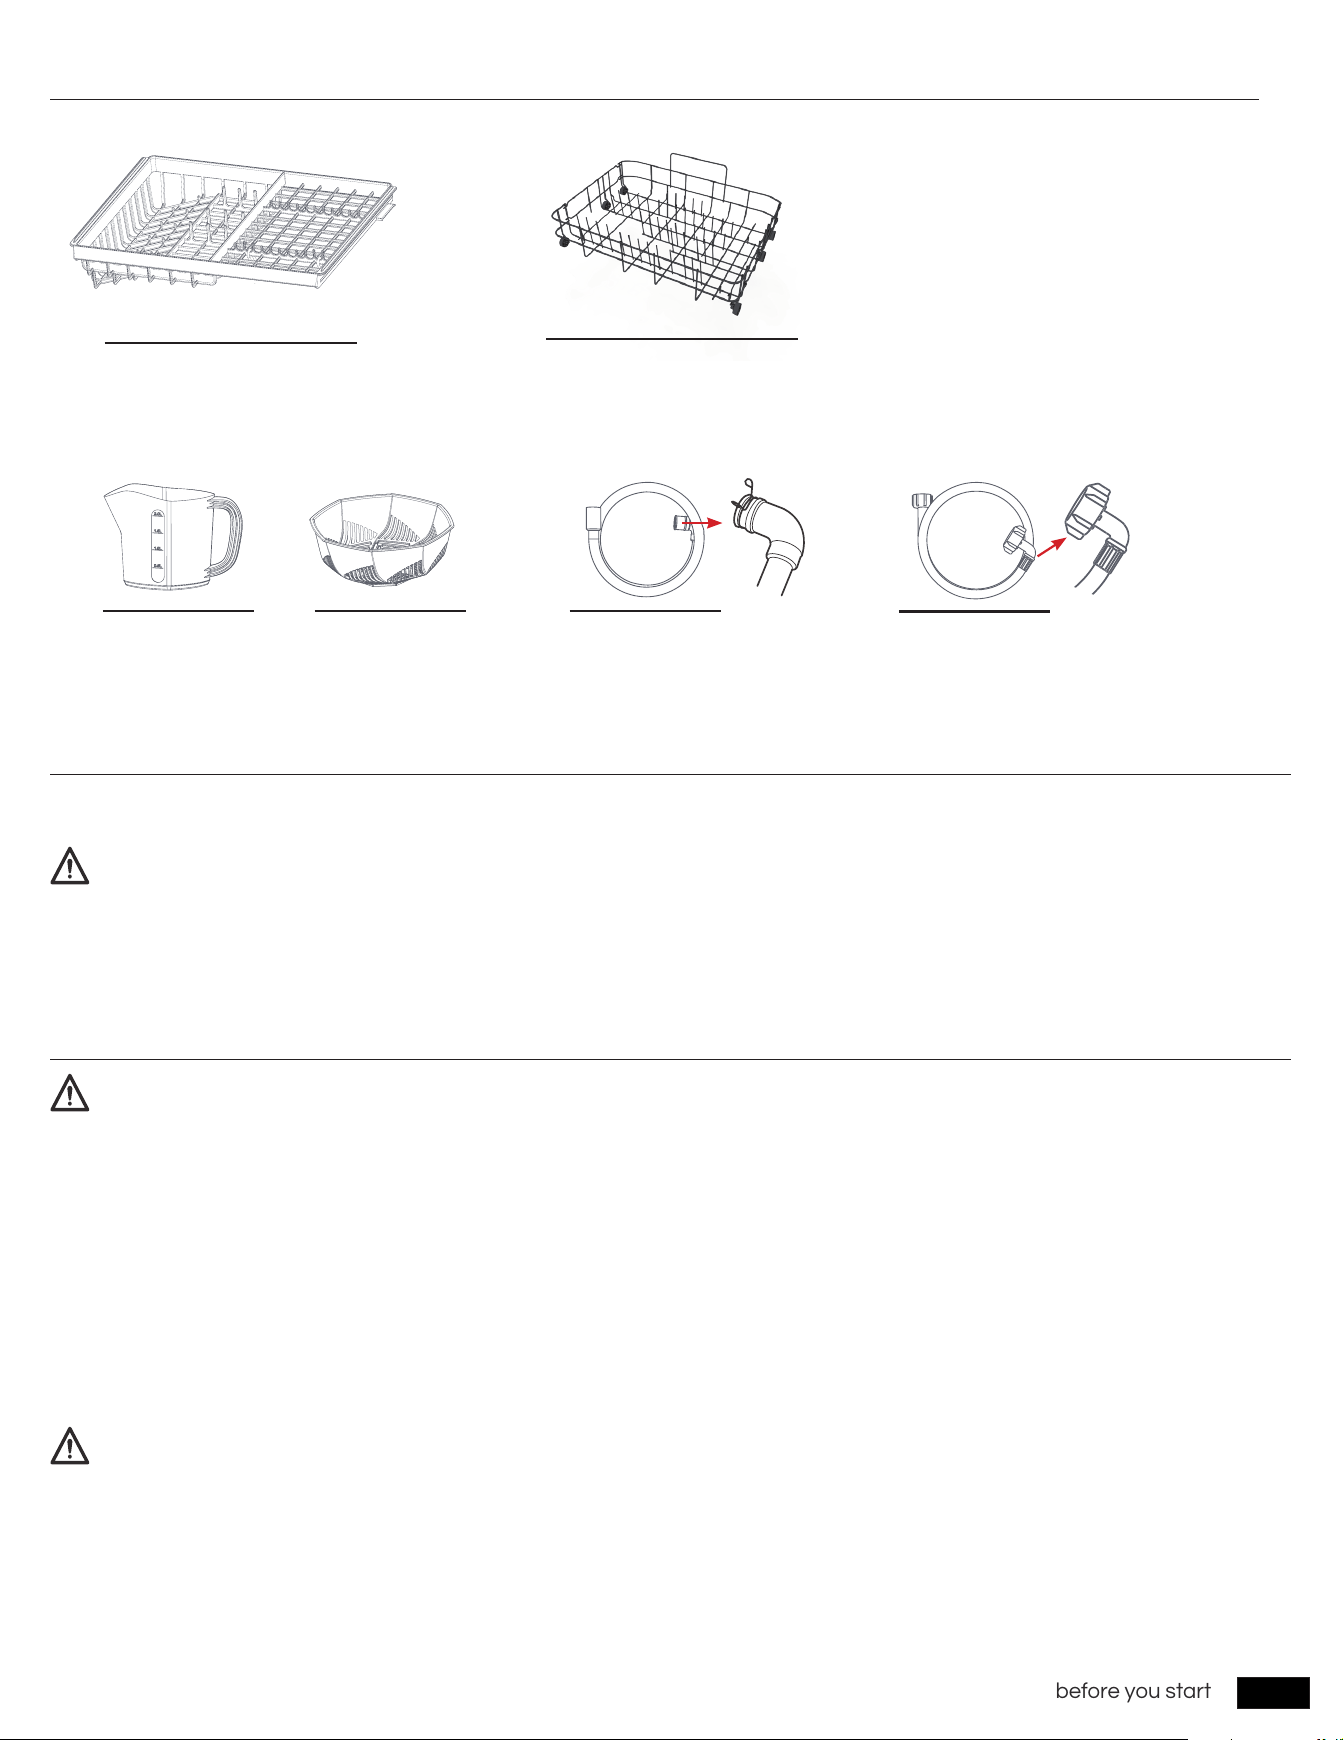
Accessories
Built-in LED lamp
Unsuitable items for the dishwashe
CAUTION
WARNING
NOTE
Drain pipePitcher Fruit basket
Upper rack
Lower rack
Inlet pipe
Notice: If you need an extension for your inlet hose or Drain hose, please purchase one at www.airmsen.com.
Connect the machine water inlet
Connect the machine drain outlet

8
operating instructions
using your dishwasher
using your dishwasher
Loading the lower rack
Loading the upper rack
To remove the upper rack
See the recommended loading
patterns below.
See the recommended loading
patterns below.
* The entire upper rack can be removed
if more space is needed on the lower
rack for larger items.
Pull the upper rack towards the front and
then remove it by pressing the elastic
buckles at the bottom of the left and right
rails and pulling it towards the front. See
the illustrations below.
9
using your dishwasher
Adding detergent
Adding water to dishwasher
Add the recommended amount of detergent
to the wash detergent compartment.
Faucet Mode
• Remove the silica gel plug from the water inlet on the back of the machine. Then, attach one end of the water inlet hose
onto water inlet of the machine.
• Connect the other end of the water inlet hose to your faucet and make sure it is fastened tightly in place. Turn on the
faucet valve.
• Press the
POWER
button to start the dishwasher and choose a wash cycle. Then, press the
START/Pause
button to
start the wash cycle.
If the included water inlet hose does not t your faucet, you may need to buy a threaded faucet adapter from a plumbing
supply manufacturer. If you are unsure of what to do, please feel free to contact our customer service team.
NOTE:
After pressing the START/Pause button, a faucet icon will appear on the display panel, indicating that the water tank is lling.
When the water tank is full, the faucet icon on the display panel will go out and the machine will sound three alarm sounds.
There is no need to add more water during the washing process.
When the machine starts running a wash cycle, it does not mean that the water tank is lled with water. Do not close the
faucet water valve. If the water tank lling process is interrupted, the machine will stop running, the red water shortage icon
and faucet icon on the display panel will ash, and an alarm will sound. After normal water lling resumes, the START/Pause
button needs to be pressed again to start the washing process.
When the water tank is lled with water, you can choose to close the faucet valve or remove the water inlet pipe according to
your needs (This is not required).
10
using your dishwasher
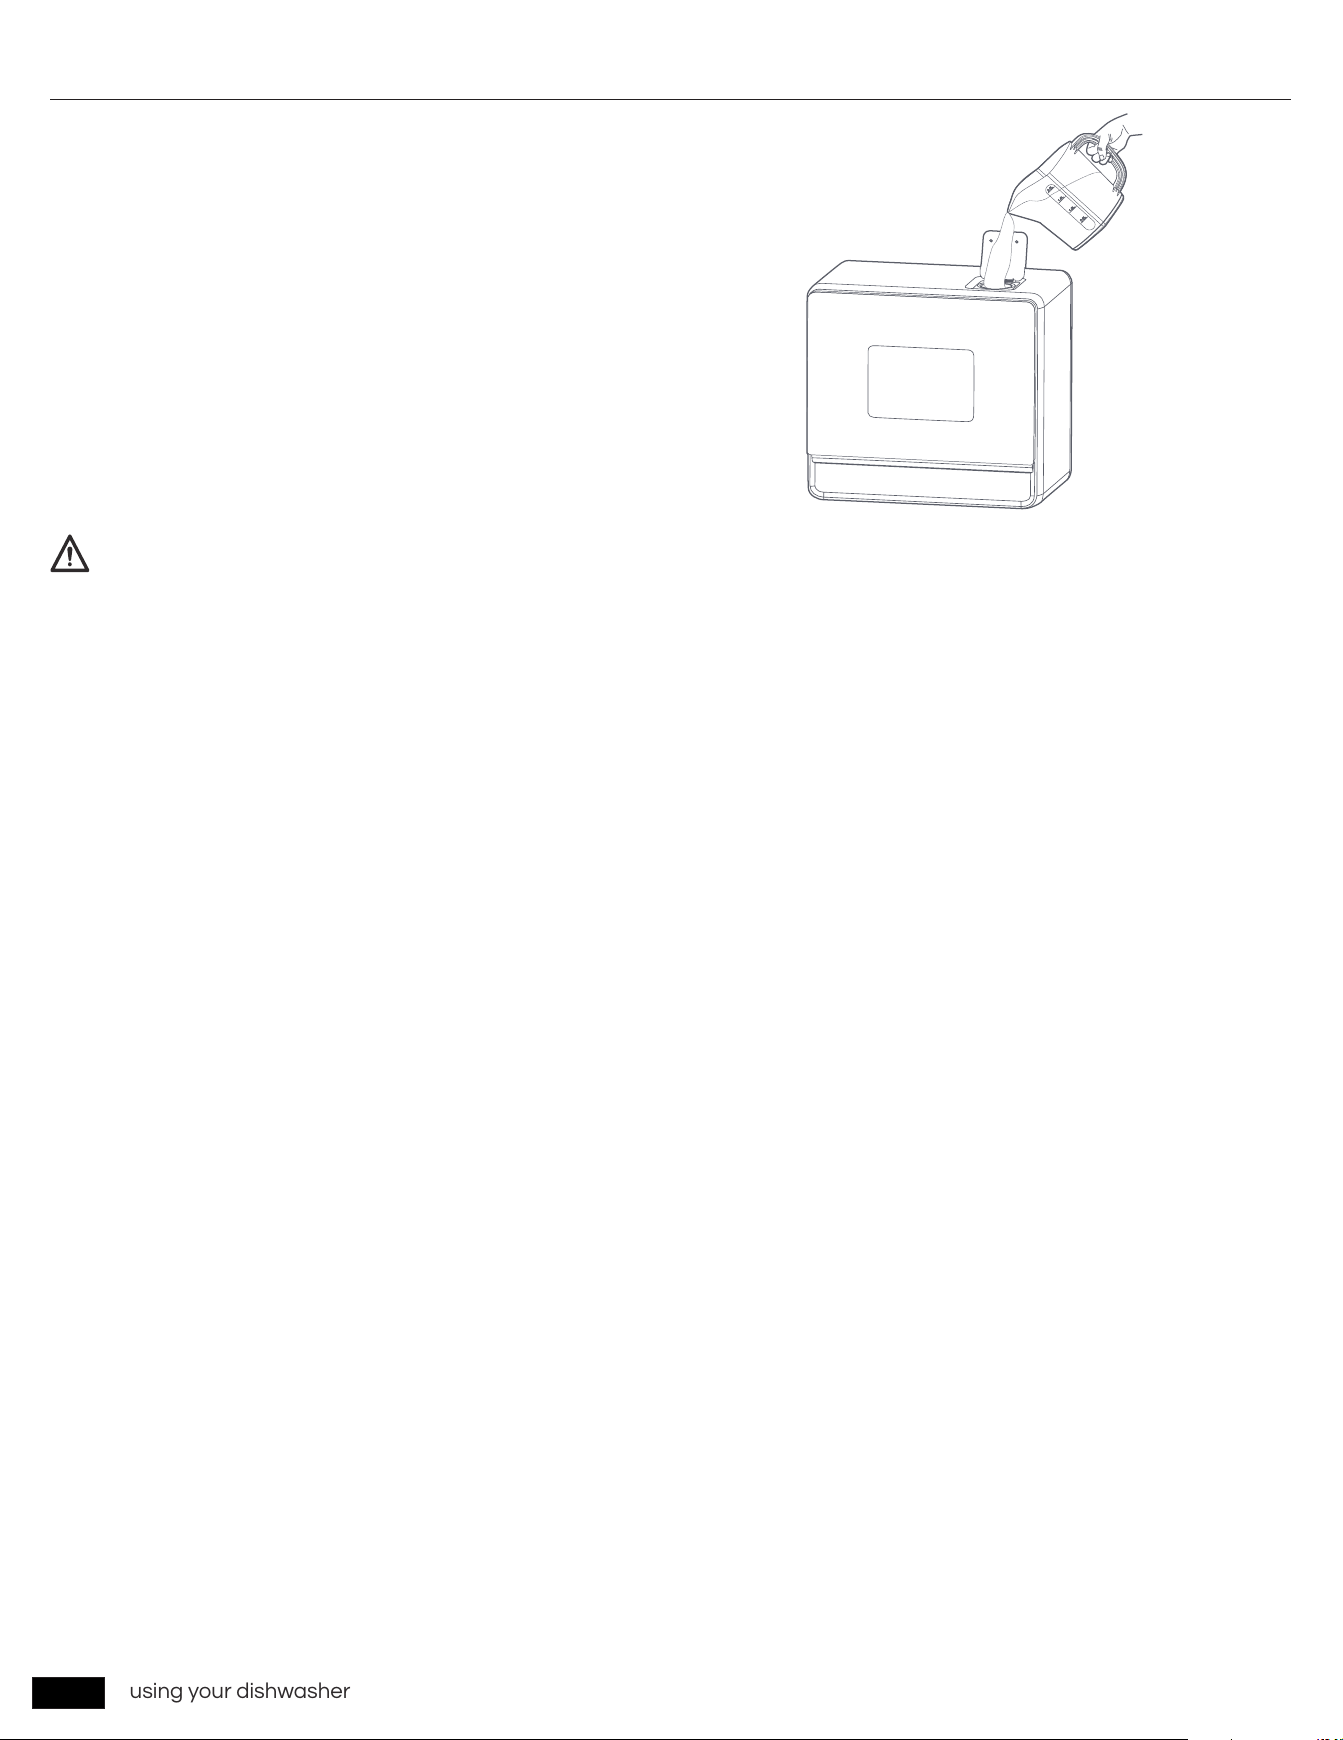
Water Tank Mode
• Open the water tank lid and fill with about 1.37 gallons(5.2 L) of
water, or approximately 3 pitchers. When the tank is full, 3 beeps
will be heard.
• Press the
POWER
button to start the dishwasher and choose a
wash cycle. Then, press the
START/Pause
button to start the
wash cycle.
If the water tank is not full when the wash cycle starts, the red water shortage indicator light on the display panel and the
faucet indicator light will ash and an alarm will sound. Once the water tank is lled, the machine will automatically restart
the wash cycle you selected with no need to press the START/Pause button again.
NOTE
11
operations
operations
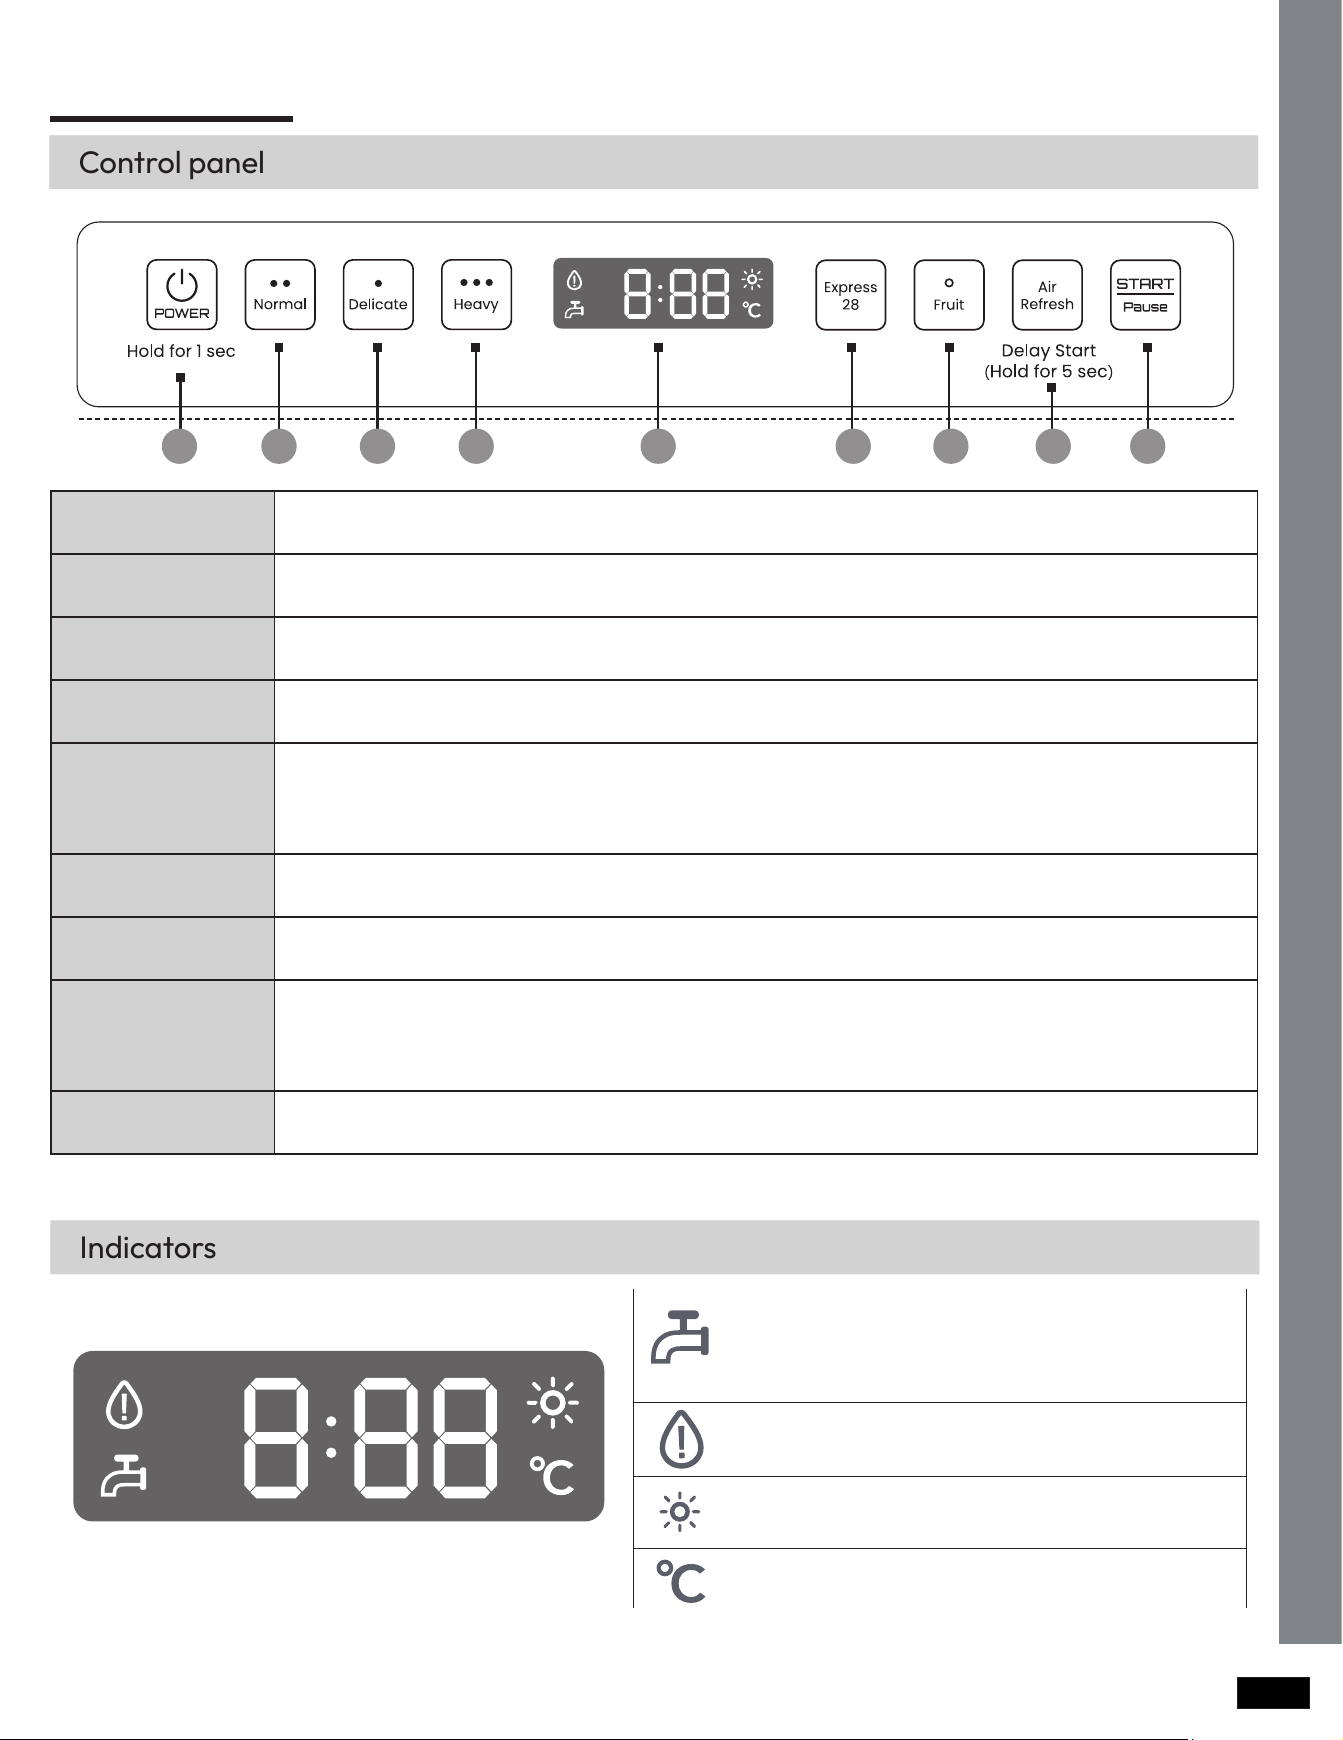
Control panel
1 2 3 4 5 6 7 8 9
1
POWER
When you press the Power button, the Cycle On light for the most recently started cycle turns on.
When the selected cycle is complete, the dishwasher powers off automatically.
2
Normal Use this cycle for normally soiled dishes.
3
Delicate
Use this cycle for soiled, fragile items such as ne glassware and crystal glass (wine glass). Do not
use this cycle for other glassware because clouding or etching may occur.
4
Heavy Use this cycle for heavily soiled dishes.
5
Display
Displays information about the current cycle including the cycle time, remaining time, Delay Start
settings, and other cycle-specic information.
If a problem occurs during operation, an information code appears with a warning sound. Refer to
the information codes on page 52.
6
Express 28' Use this cycle when you need to wash dishes quickly. It takes about 28 min.
7
Fruit
Use this mode to wash hard surface fruits with room temperature water. There is no need to add
detergent.
8
Air Refresh
• 72 hours of automatic intermittent ventilation to remove odors and facilitate storage.
• After turning on the machine and selecting the desired wash cycle, press and hold for 5
seconds to enter the schedule settings. Press the
Air Refresh
button to select the time you want
to reserve (2H-12H). Press the
START/Pause
button to start running the program.
9
START / Pause Press this button to start or pause a wash cycle.
Indicators
Icon stays on:
Water is added to the tank through
the water inlet pipe.
Icon off:
The water tank is lled with water.
Icon ashes:
Water tank is short of water.
Water tank is short of water.
Hot air drying or 72 hours ventilation cycle storage
The current water temperature in the dishwasher.
If you need to cancel the scheduled setting or the current wash cycle, please restart the machine via the POWER button.
12
operations
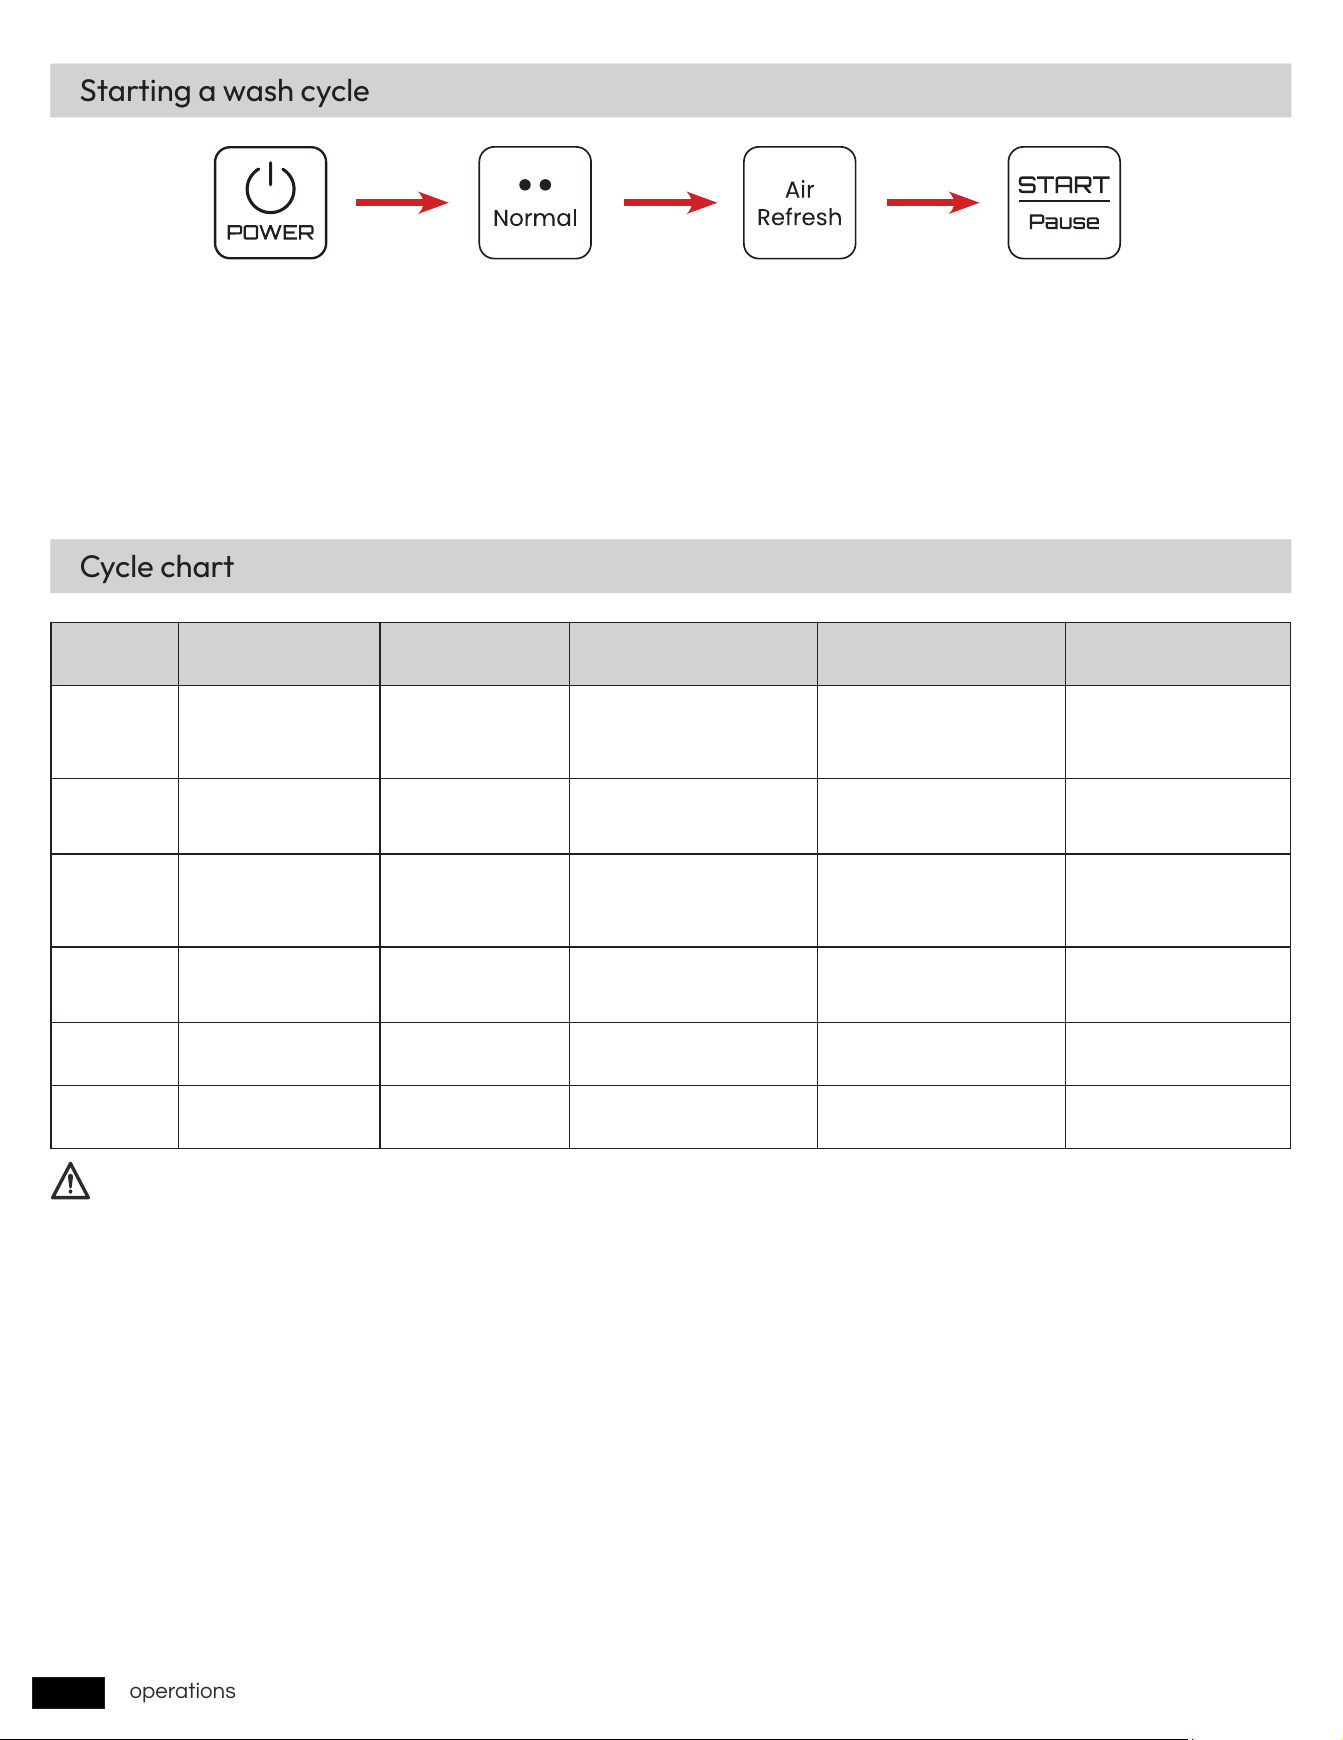
Starting a wash cycle
Cycle chart
Step 1 Step 2 Step 3 Step 4
Step1
: Press and hold for 1 second to turn on the power.
Step2
: Choose the right wash cycle.(Normal, Delicate, Heavy, Express 28’, Fruit, Air Refresh)
Step3
: Press the
Air Refresh
button to turn off/on the 72-hour air circulation storage according to your needs. According to
your needs, long press the
Air Refresh
button for 5 seconds to enter the reservation settings, and short press the
Air Refresh
button again to adjust the reservation duration.
Step4
: Press the
START/Pause
button to start the wash cycle.(During the washing process, you can still press the
Air Refresh
button to turn on/off the 72-hour air circulation storage.)
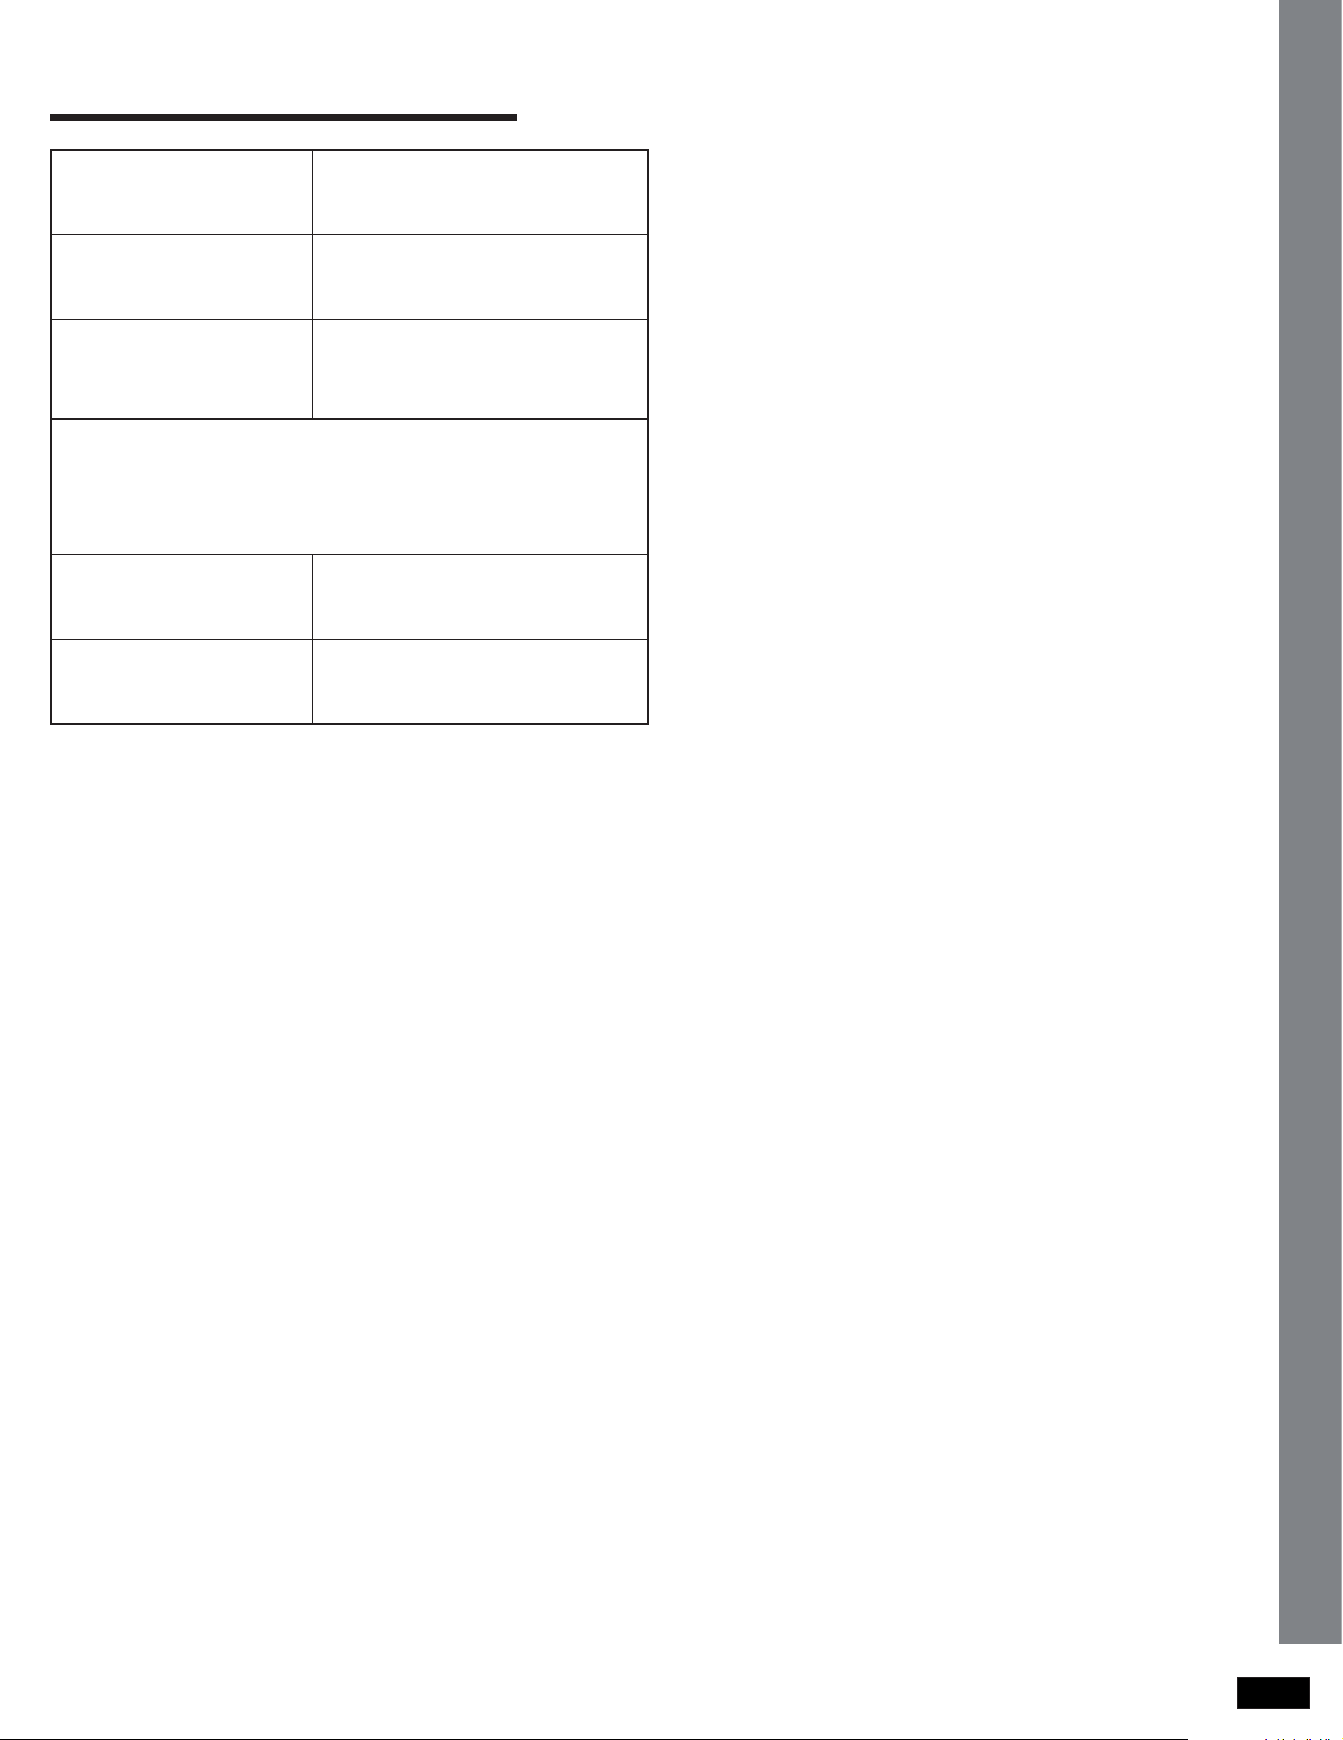
Cycle Cycle time (min) Water [Gal (L)] Cycle sequence Temp [˚F (˚C)] Available options
Normal 58 1.8/1.4 (6.8/5.2)
Mainwash > Rinse >
Rinse > Hot Rinse > Hot
Dry > End
Mainwash: 131 (55)
Hot Rinse: 154 (68)
Air Refresh (auto)
Delicate 88 1.4 (5.2)
Mainwash > Rinse > Hot
Rinse > Hot Dry > End
Mainwash: 109 (43)
Hot Rinse: 135 (57)
Air Refresh (manual)
Heavy 78 1.8/1.4 (6.8/5.2)
Mainwash > Hot Rinse >
Rinse > Hot Rinse > Hot
Dry > End
Mainwash: 131 (55)
Hot Rinse: 167 (75)
Air Refresh (auto)
Express 28' 28 1.4 (5.2)
Mainwash > Rinse > Hot
Rinse > Hot Dry > End
Mainwash: 122 (50)
Hot Rinse: 144 (62)
Air Refresh (auto)
Fruit 9 1.4 (5.2) Rinse > Rinse > End × ×
Air Refresh 60 × Hot Dry > End × Air Refresh (auto)
“1.8/1.4 (6.8/5.2)” in the above table represents the difference in water consumption between faucet mode and tank mode
under “Normal” cycle and “Heavy” cycle.
NOTE
……
13
maintenance
maintenance
Keep the dishwasher clean to improve performance, reduce unnecessary repairs, and lengthen its lifecycle.
Clean spills on the surface of the dishwasher as they occur. Use a soft, damp cloth on the control panel to gently wipe
away spills and dust.
• Do not use benzene, wax, thinner, chlorine bleach, alcohol, or other chemical substances. These materials may discolour
the surface of the dishwasher and cause stains.
• The dishwasher has electric parts inside. Do not sprinkle water directly onto the dishwasher. Protect electrical
components from coming in contact with water.
• Do not remove the front seal (the long rubber seal enclosing the opening of the dishwasher). The seal keeps the inner
side of the dishwasher sealed.
Clean the interior of the dishwasher on a regular basis to remove any dirt or food particles. Wipe inside the dishwasher
and inside the door with a wet dishcloth.
To remove white spots and odors from placemats, place an 8-ounce cup of white vinegar in the lower basket of an empty
dishwasher without detergent. Close the door and run a
Express 28’
cycle.
Use a damp cloth to remove lime scale or grease deposits inside the dishwasher. Alternatively, apply some detergent, and
then run an empty cycle using the highest rinse temperature.
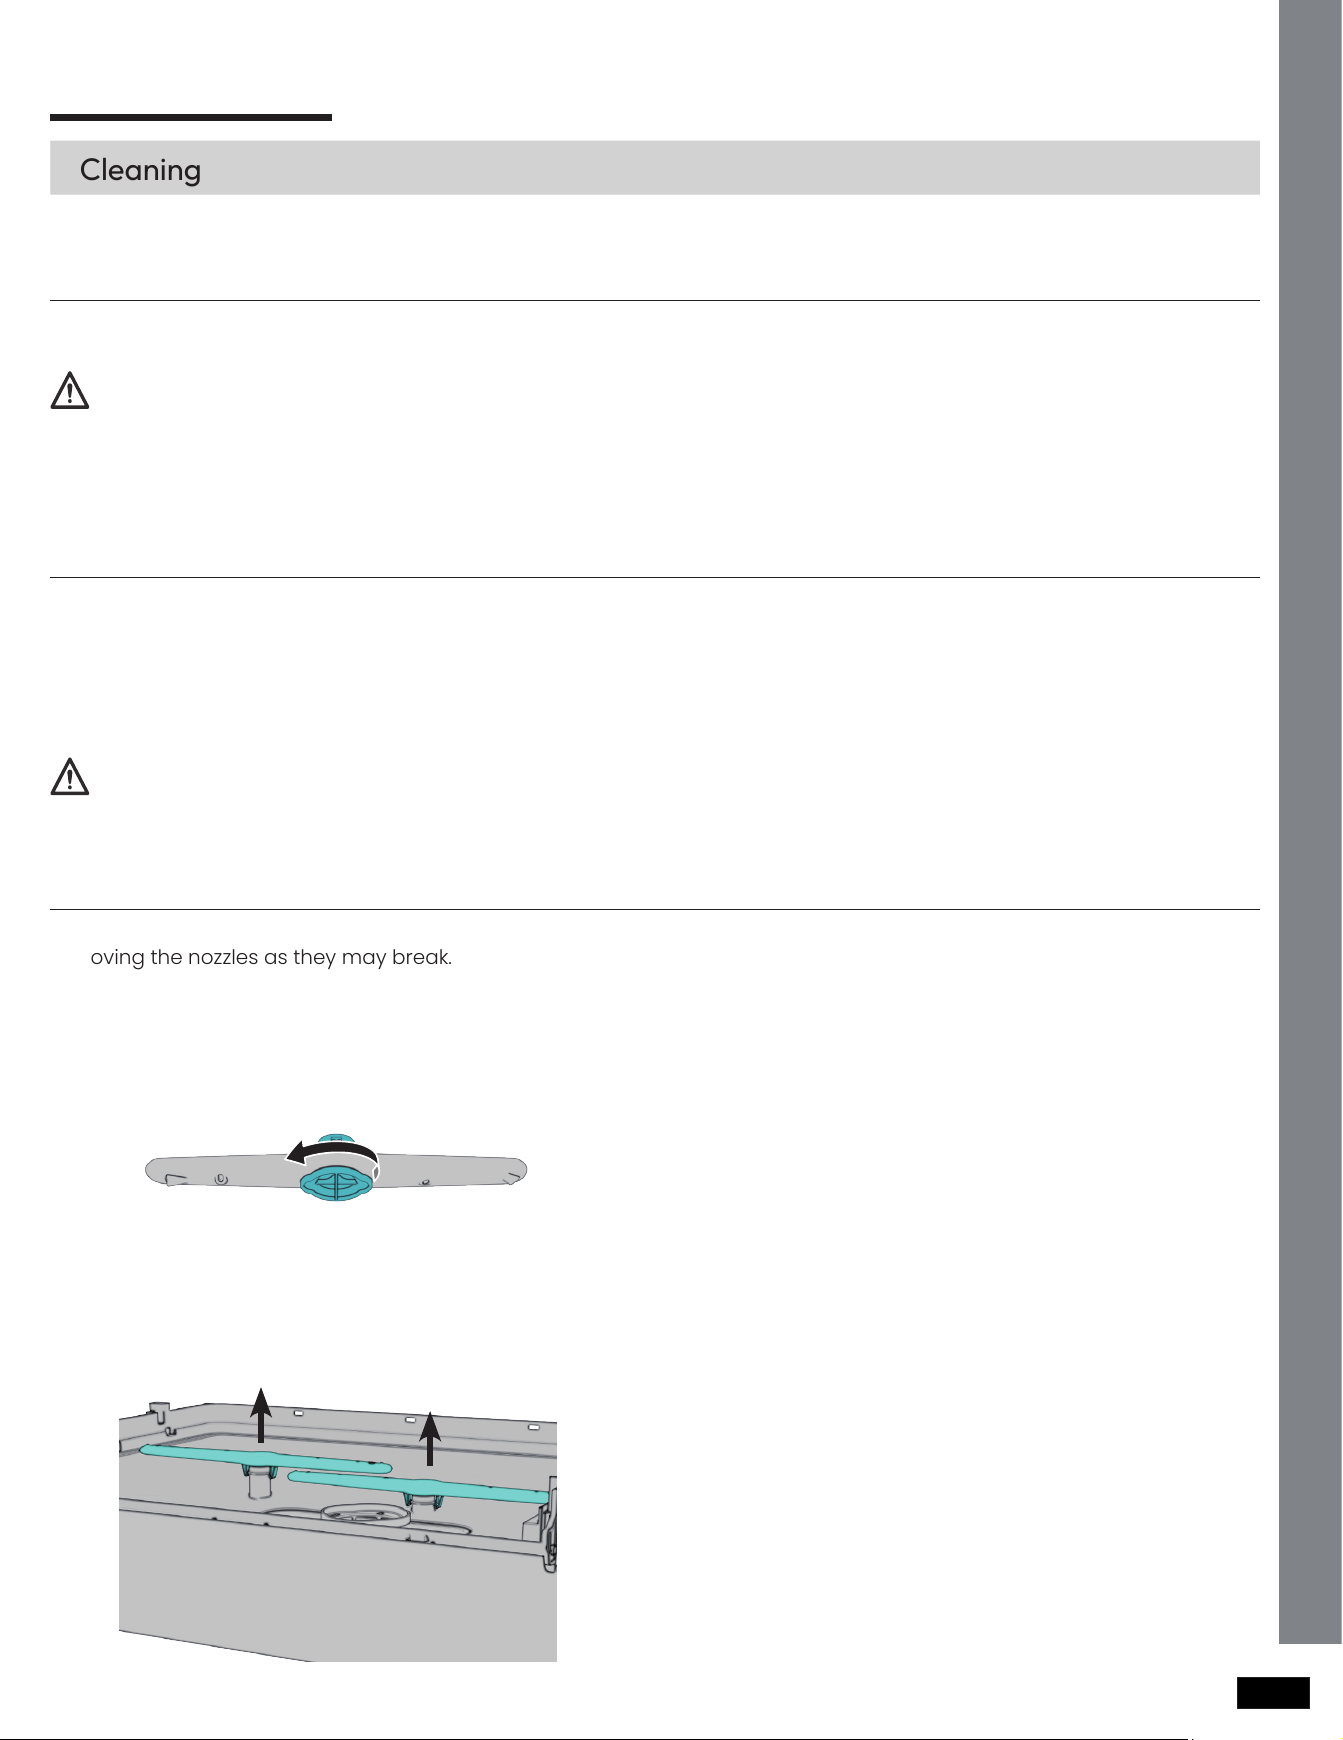
To prevent the nozzles from being clogged or if the nozzles are clogged, remove and clean each nozzle. Use caution when
removing the nozzles as they may break.
1. Open the door, and then pull out the upper rack
and lower rack. The top nozzle is visible on the top.
2. Turn counter clockwise and remove the nozzle cap,
and then remove the nozzle.
3. Unclog and clean the nozzle.
4. Reinsert the nozzle, and then tighten the cap
clockwise.
5. Rotate the nozzle by hand to make sure the nozzle
is engaged correctly.
1. Open the door, and then pull out the lower rack.
The lower nozzle is visible on the bottom.
2. Remove the nozzle by pulling upwards.
3. Unclog and clean the nozzle.
4. Reinsert the nozzle.
5. Rotate the nozzle by hand to make sure the nozzle
is engaged correctly.
CAUTION
CAUTION
Cleaning
Exterior
Interior
Nozzles
Top nozzle
Lower nozzle
14
maintenance
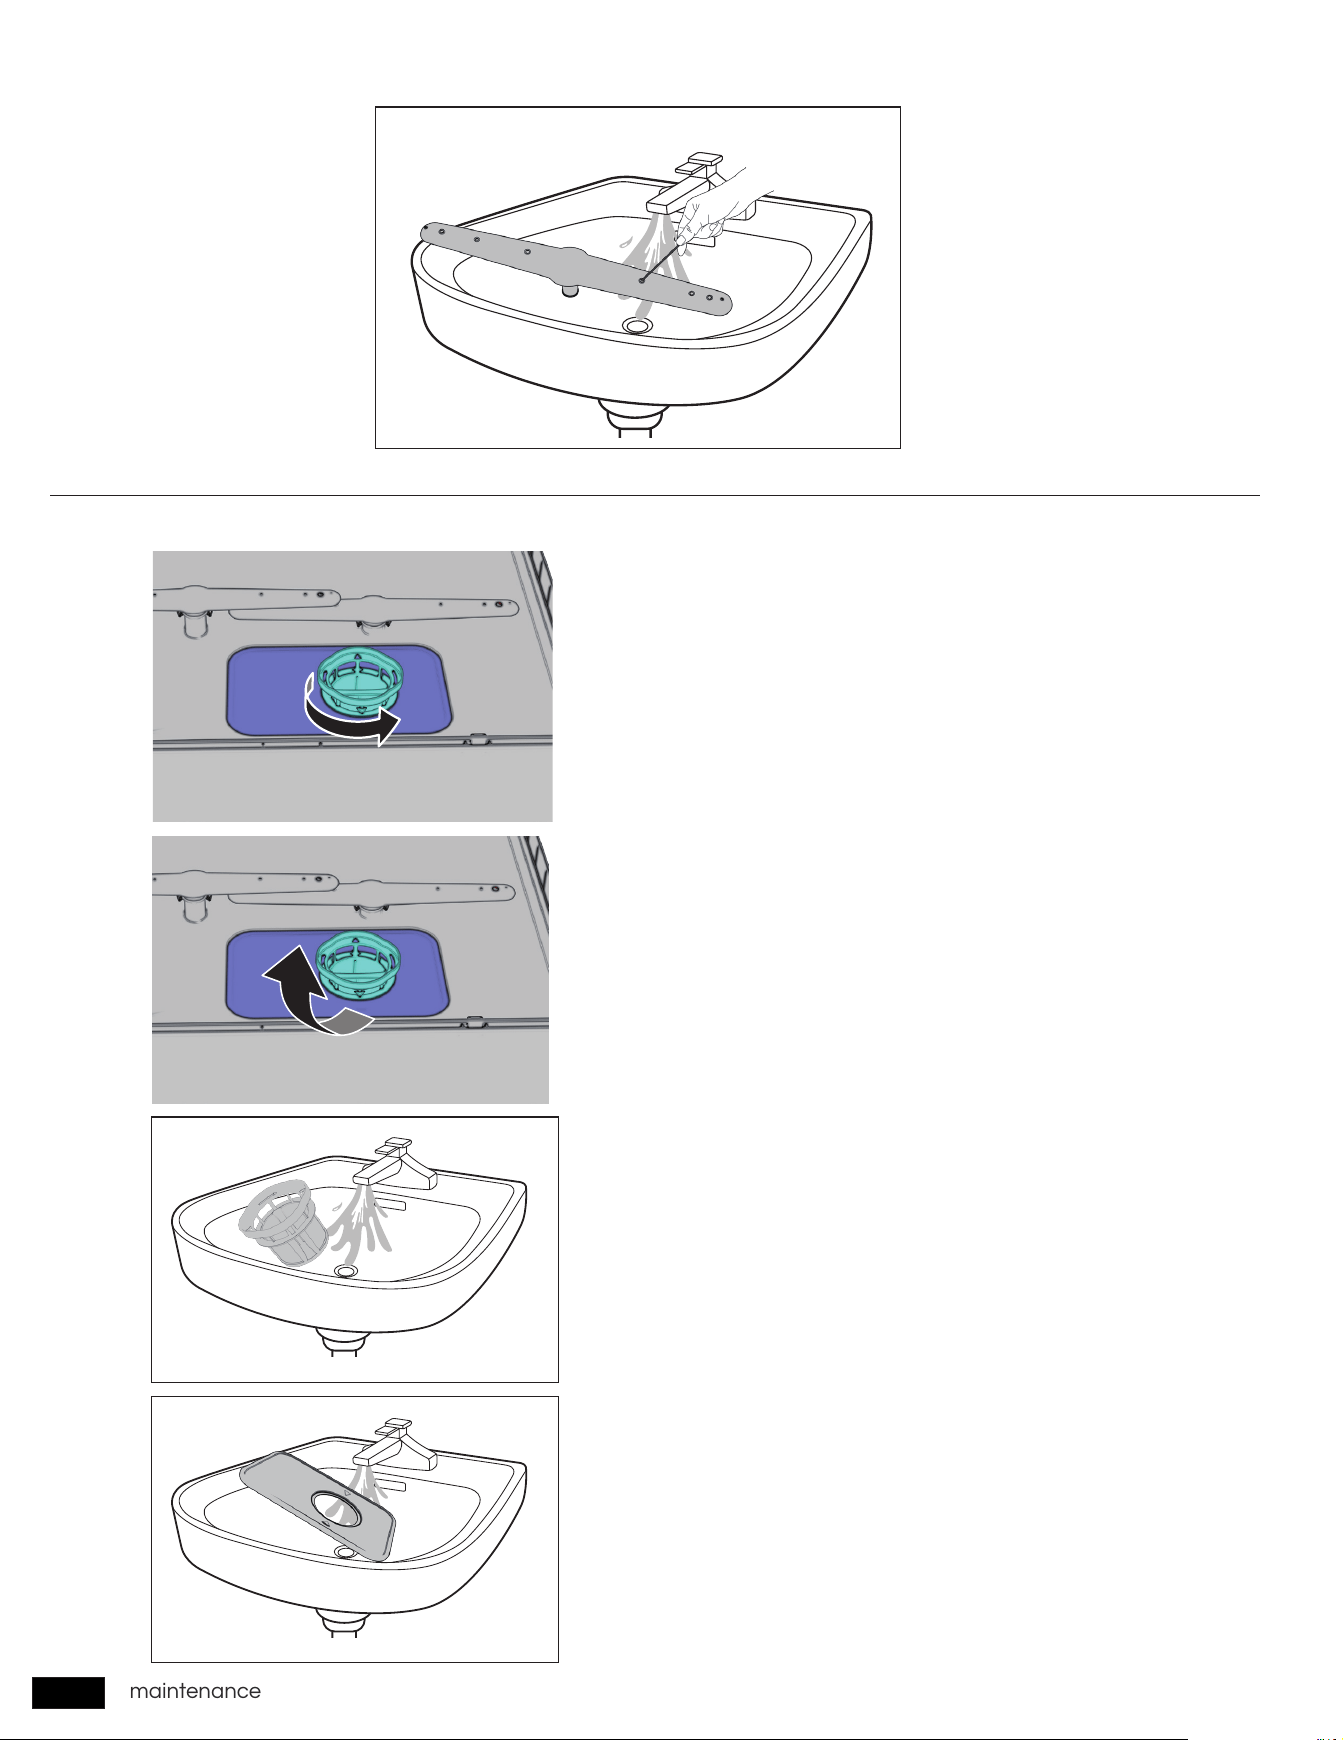
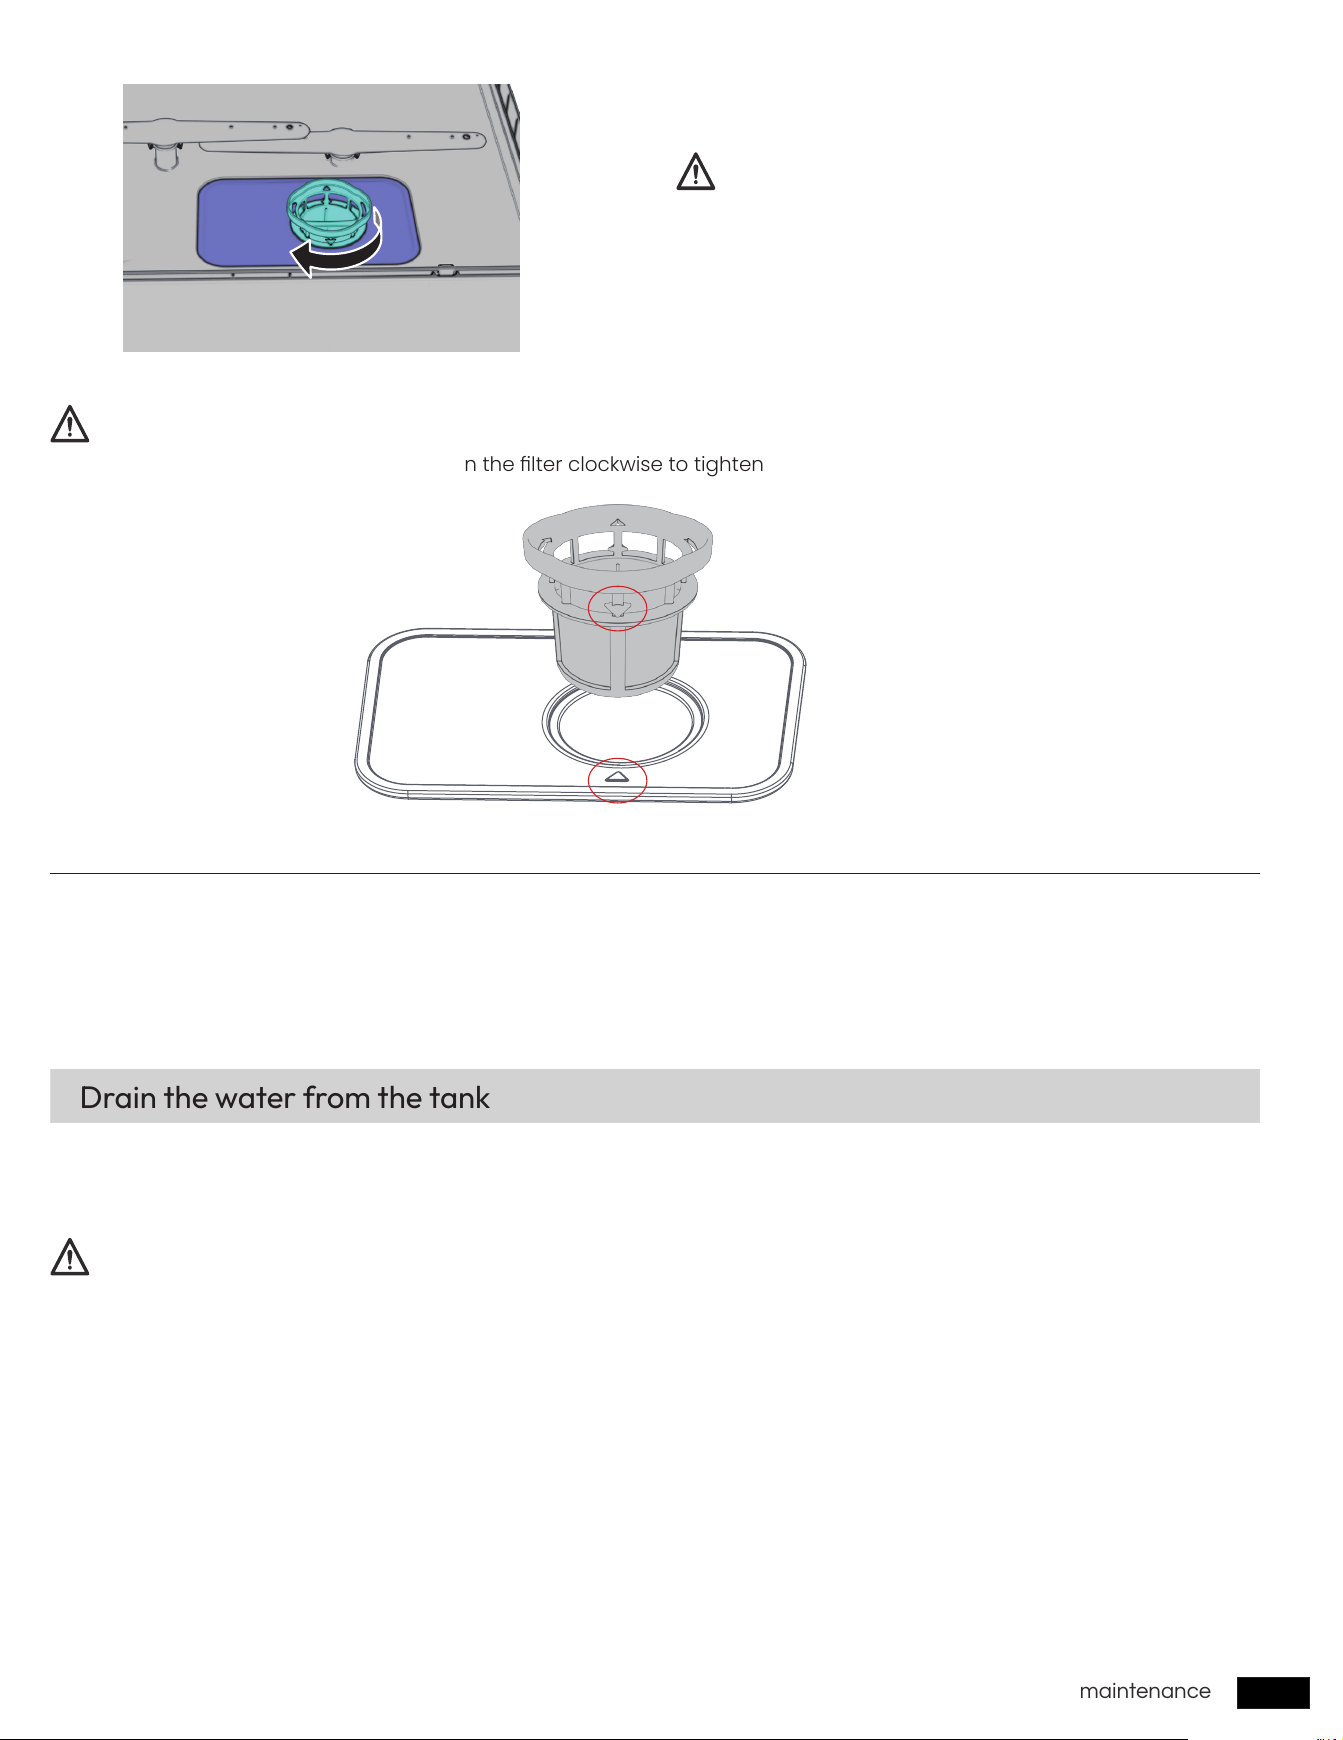
Filter
1. Open the door, and then remove the lower rack rst.
2. Turn the lter handle counterclockwise to unlock the
lter.
3. Remove the lter.
4. Remove any dirt and impurities from the lter.
5. Rinse both lters with running water, and then dry
well.
6. Reinsert the lter.
7. Turn the lter handle clockwise to lock.
We recommend cleaning the lter every month.
Clean nozzle
15
maintenance
Long-term care
CAUTION
CAUTION
CAUTION
Make sure the lter is closed properly. A loose cover
can reduce the ltering performance.
Before using the machine, you need to turn the lter clockwise to tighten the lter and align the triangle indicator arrow.
After the dishwasher is powered on, in standby mode (POWER button ashes), Hold the
Air Refresh
button and
POWER
button at the same time for 3 seconds to forcefully drain the water in the tank.
Hold the
POWER
button for 1 second to cancel forced draining.
If you will not use the dishwasher for an extended period of time, rst drain the unit completely, and then disconnect the
water hose. Shut off the water supply valve and the power outlet. Water remaining in the hoses or the internal components
can damage the dishwasher.
If you need to store your dishwasher for an extended period of time, rst drain and disconnect it. If you leave water in the
hoses and internal components, you can damage the dishwasher.
After draining and disconnecting the dishwasher, be sure to turn off the water supply valve and power outlet.
Drain the water from the tank
16
troubleshooting
troubleshooting
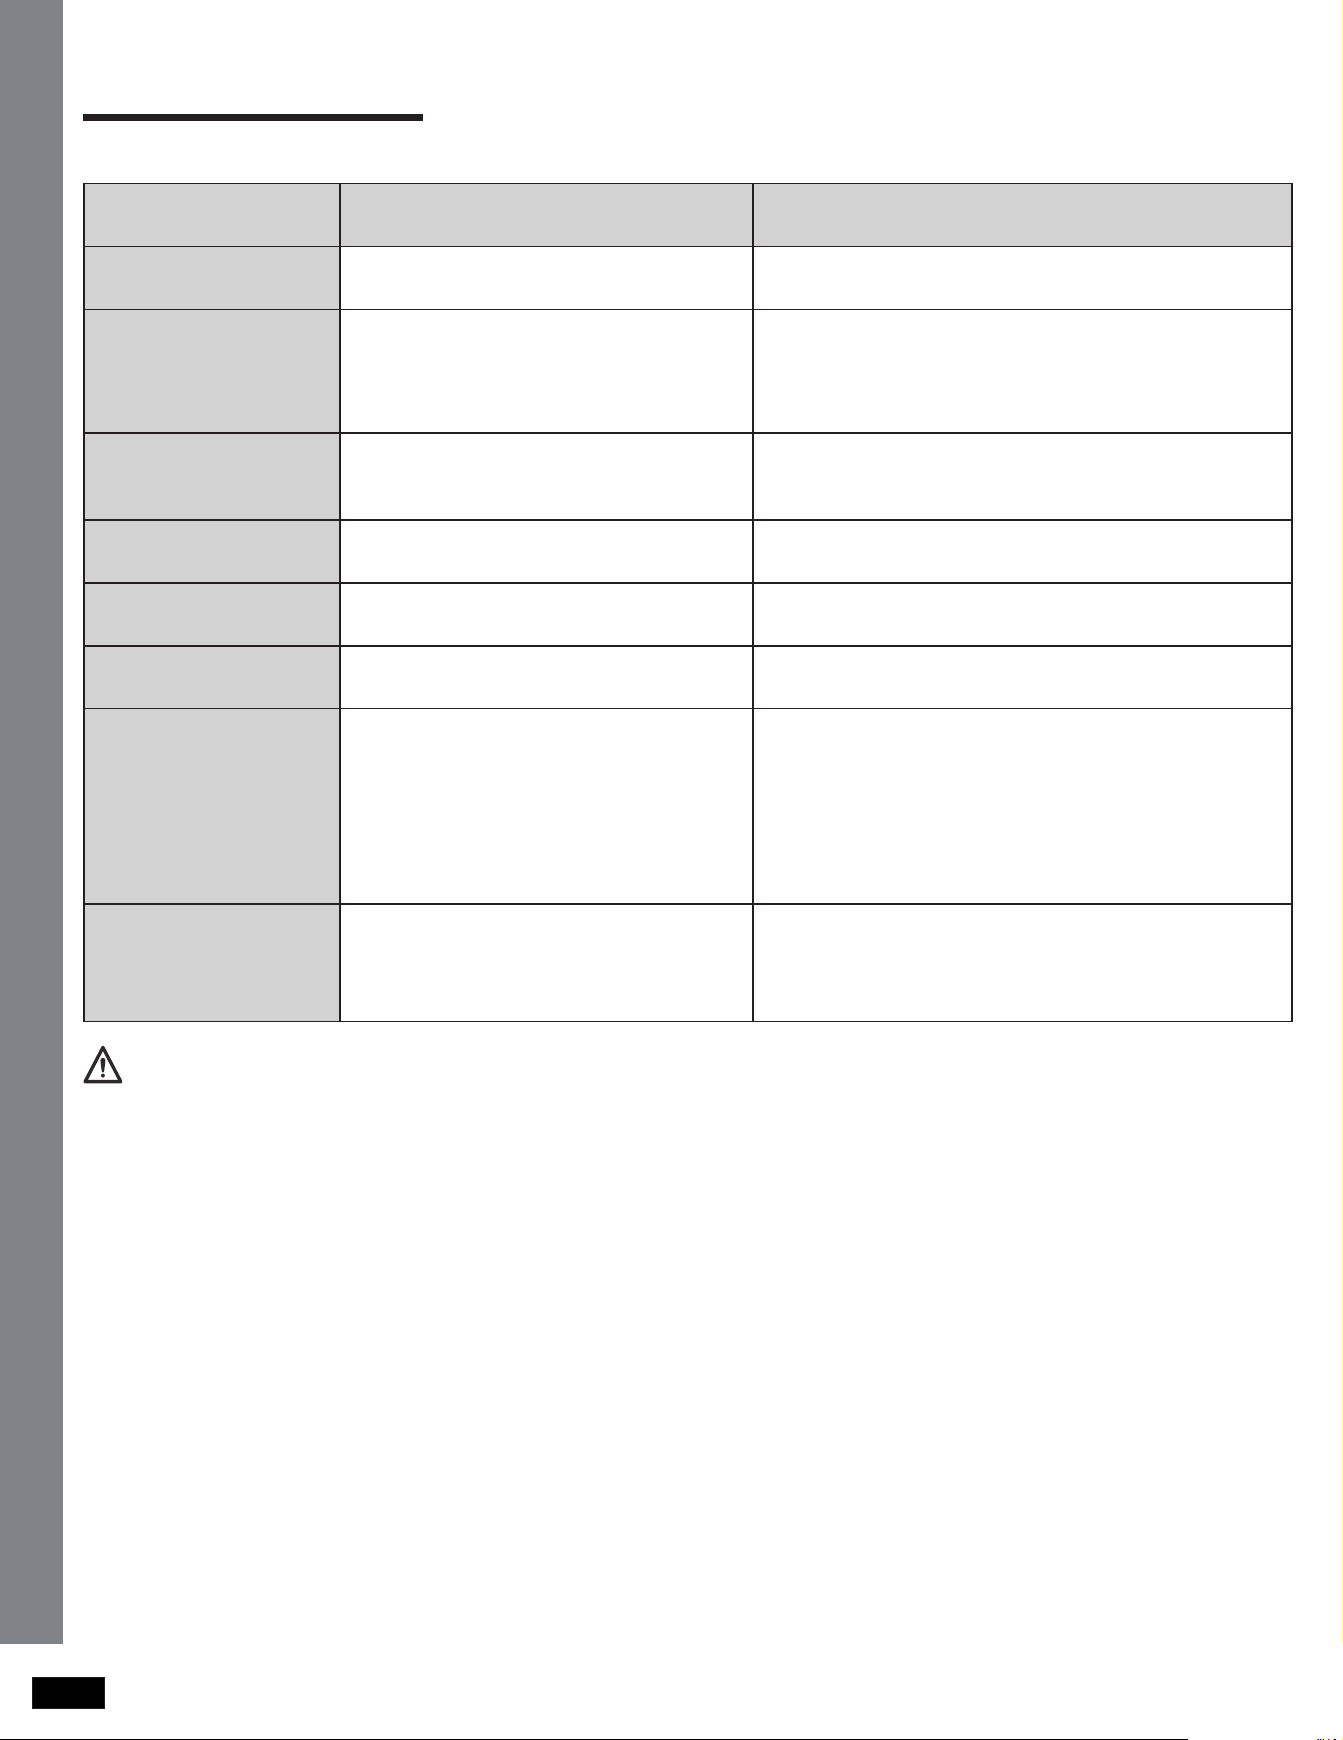
Check these solutions if your dishwasher…
Problem Possible cause Solution
Tableware not
completely dry
Tableware not set properly
According to the manual, set the tableware correctly.
See page
8
Tableware not clean
• Powder not enoug
• Tableware not set properly
• Filter jamed
• Select otherwashing mode
• Add correct powder
• According to the manual
• Clean the filter. See page
13~15
• Select the correct washing mode
Crash in the dishwasher
• Spray arm crash the tableware
• Tableware swings with the spray
water
• Pause,check che tableware
• Lay the tiny tableware on a steady position
White contamination on
the tableware
There is scale inside the dishwasher See page
13
much foam in wanshing
room
Using the wrong detergent
Please use dishwasher-specic dishwashing powder
or dishwashing tablets.
Dish basket change
colour
Tableware faded Not wash such tableware
Water shortage light on
• The water supply tap closed, or the
water supply pressure is lower than
0.04MPa.
• The water inlet pipe abnormal.
• The tank is not filled with water.
• The water inlet valve of the
dishwasher is abnormal.
• Make sure the water supply faucet is open; If the
water pressure is lower than 0.04MPa, purchase a
water inlet pump.
• Smooth the water inlet pipe without bending,
squeezing or blocking.
• See page
9~10
• Contact AIRMSEN custmer service.
Button doesn't work
• The door is not closed
• Dishwasher is running
• Door sensor fault
• Close the door
• Hold the
POWER
button for 1 second to cancel the
current wash cycle, then restart the dishwasher.
• Contact AIRMSEN custmer service.
NOTE
After you press and hold the
POWER
button to cancel a wash cycle, the machine will automatically run for a short period
of time and all buttons will be disabled.
17
troubleshooting
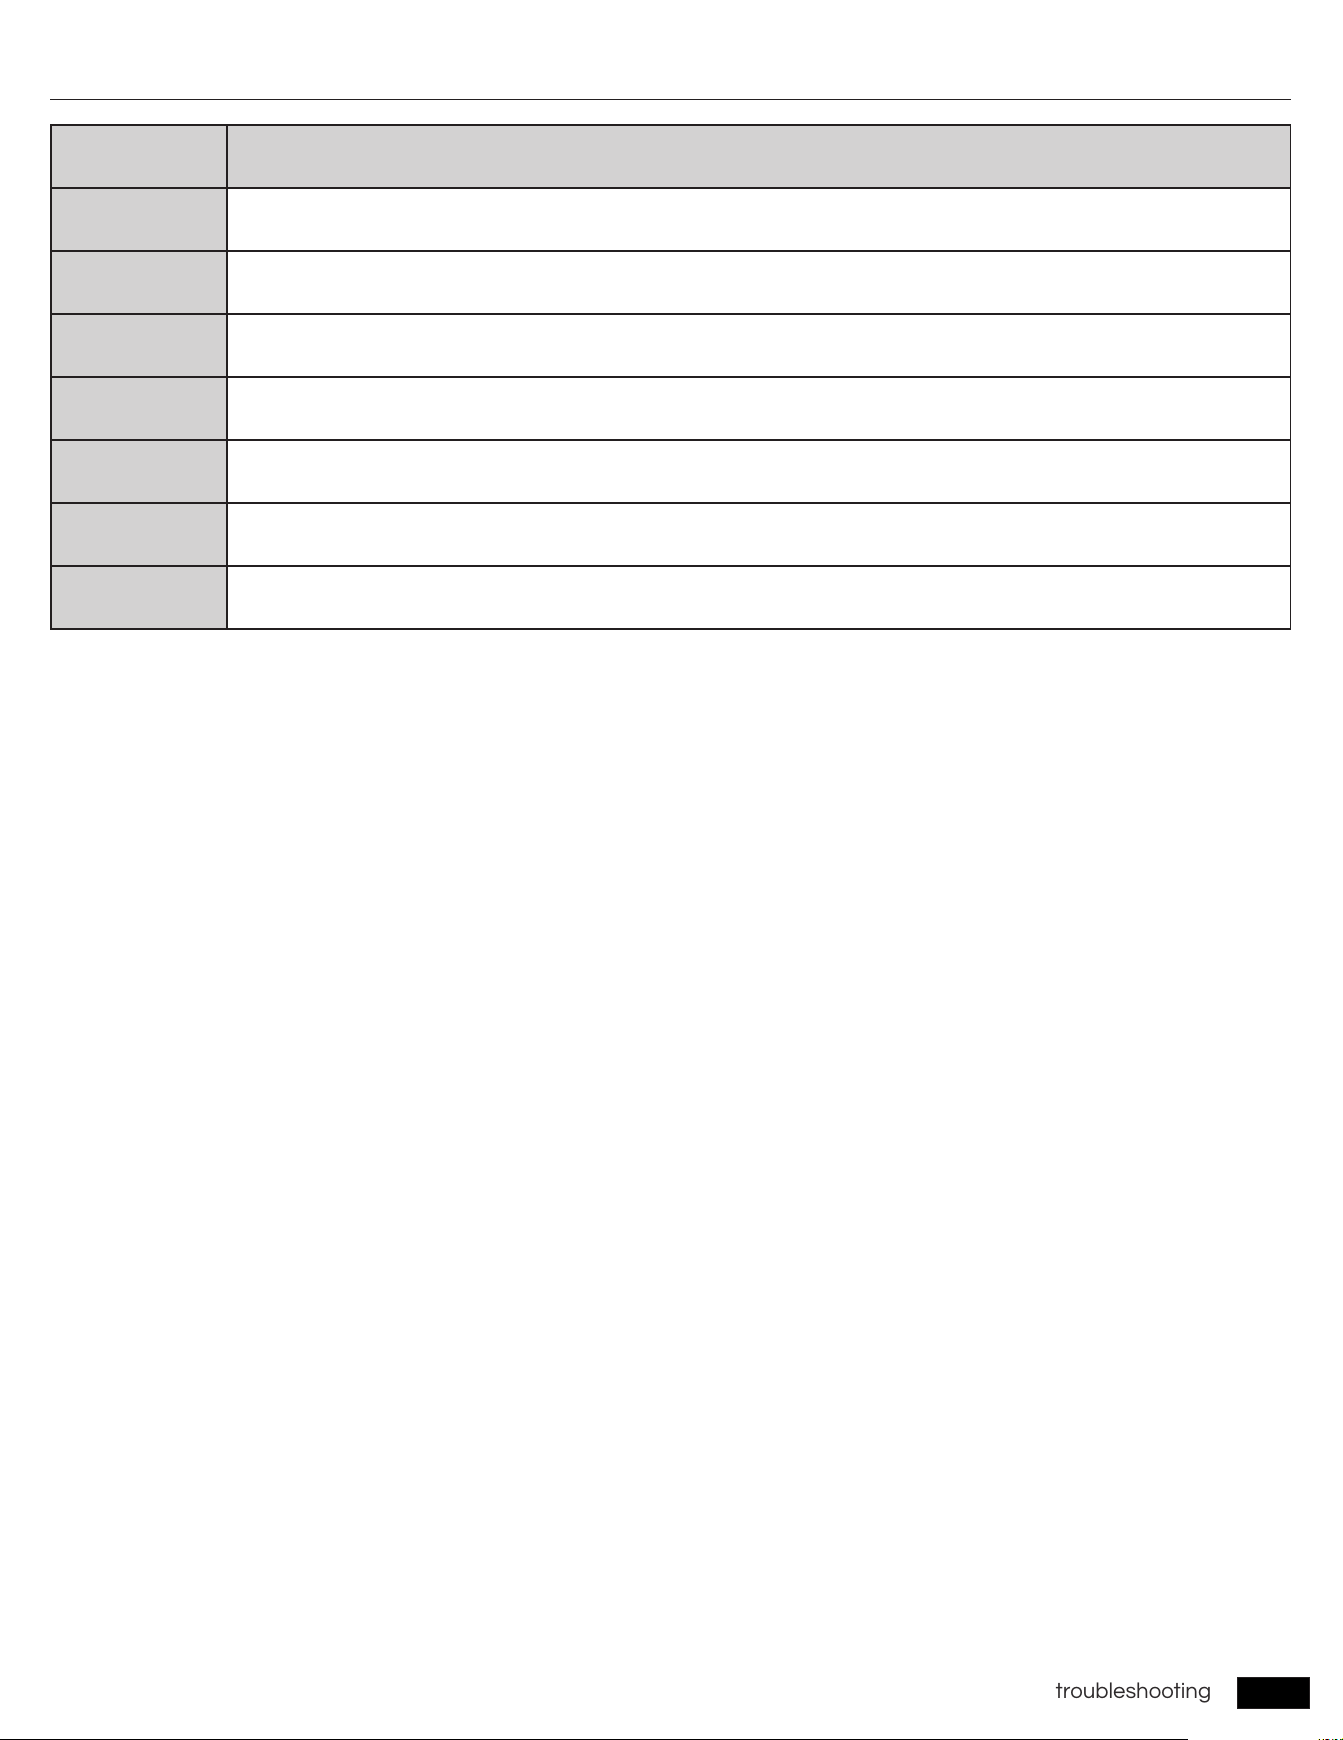
Code Action
E1
Water intake fault
Check the faucet or Try to add water;
E2
Drainage fault
E3
Overow fault
E4
Water temperature sensor fault
E5
Commuciation fault
E6
Heater fault
Reconnect power and restart dishwasher
E7
Fan fault
For any codes not listed above, email
Information codes
18
operating instructionsspecications
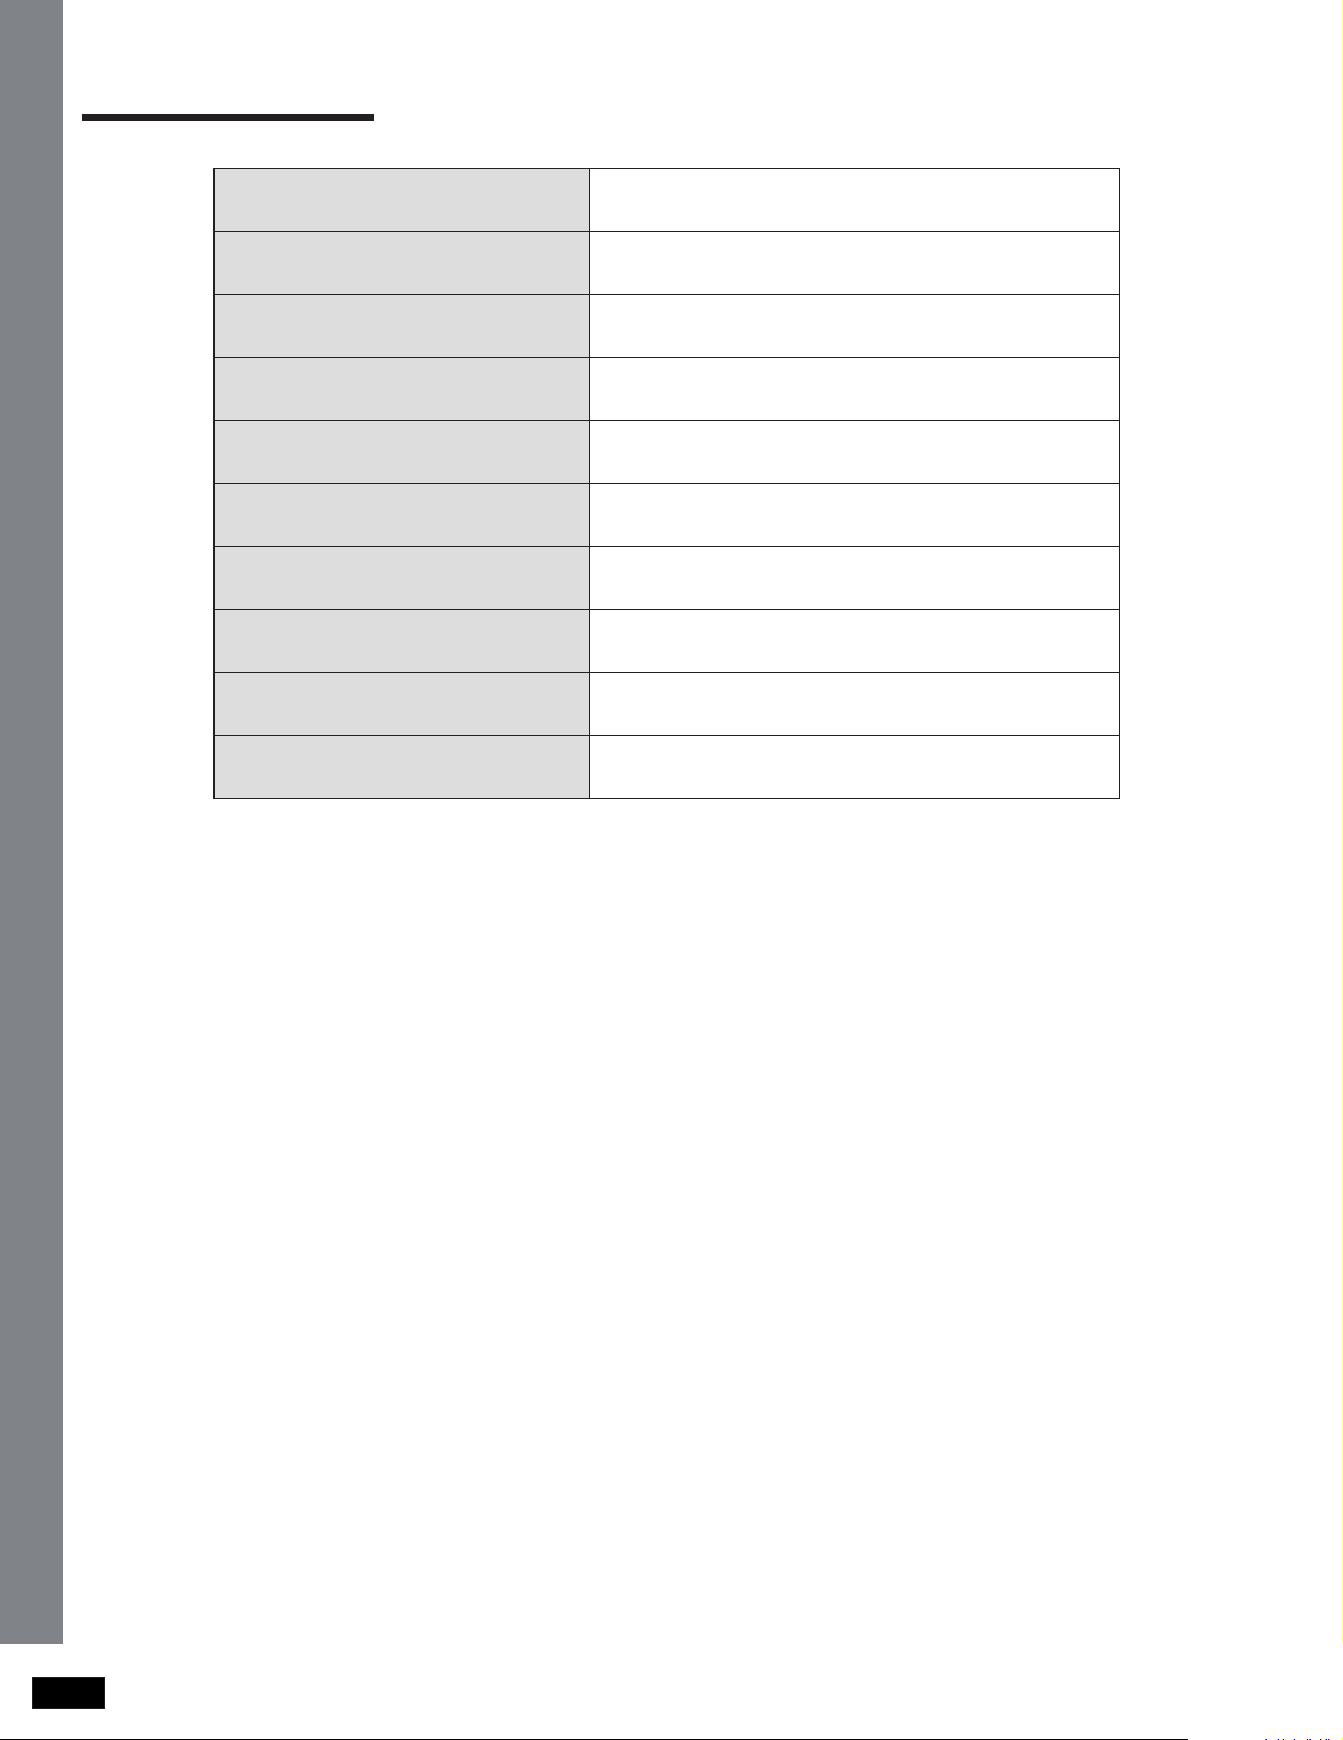
specications
Model
ZMW-DUHA01
Type
Countertop dishwasher
Power supply
120V / 60Hz AC only, 10 A circuit
Rated power
950W
Capacity
4 Place Settings
Inlet pressure
0.04 ~ 1 Mpa
Water tank capacity
1.4 gallons (5.2 L)
Dry mode
PTC hot air
Product size (H × W × D)
496 × 548 × 360 mm / 19.6 × 21.6 × 14.2 in
Product weight
15.8 kg / 35 lbs
19
warranty (U.S.A / CA)
warranty (U.S.A / CA)
Product Name
Countertop Dishwasher
Model Number
ZMW-DUHA01
Default Warranty
Period
1 year
For your own reference, we strongly recommend that you
record your order number and date of purchase.
Date of Purchase
Order Number
TERMS & POLICY
AIRMSEN warrants all products to be of the highest quality in
material, craftsmanship, and service, effective from the date
of purchase to the end of the warranty period.
AIRMSEN will replace any product found to be defective
due to manufacturer aws based on eligibility. Refunds are
available within the rst 30 days of purchase. Refunds are
only available to the original purchaser of the product. This
warranty extends only to personal use and does not extend
to any product that has been used for commercial, rental, or
any other use in which the product is not intended for. There
are no warranties other than the warranties expressly set
forth with each product.
This warranty is non-transferrable. AIRMSEN is not responsible
in any way for any damages, losses, or inconveniences
caused by equipment failure by user negligence, abuse, or
use noncompliant with the user manual or any additional
safety or usage warnings included in the product packaging
and manual.
AIRMSEN assume no liability for damage caused by the
use of the product other than for its intended use or as
instructed in the user manual. Some states do not allow
this exclusion or limitation of incidental or consequential
losses, so the foregoing disclaimer may not apply to
you. This warranty gives you specic legal rights and you
may also have other rights, which may vary from state to
state.
Defective Products & Returns
Should your product prove defective within the specied
warranty period, please contact Customer Support via
support@airmsen.com
with your order number. DO not
dispose of your product before contacting us. Once our
Customer Support Team has approved your request,
please return the unit with a copy of your invoice and
order number.
This warranty does not apply to the following:
ALL EXPRESSED AND IMPLIED WARRANTIES, INCLUDING THE
WARRANTY OF MERCHANTABILITY, ARE LIMITED TO THE
PERIOD OF THE LIMITED WARRANTY.
• Damage due to abuse, accident, alteration, misuse,
tampering, or vandalism.
• Improper or inadequate maintenance.
• Damage in return transit.
• Unsupervised use by children under 18 years of age.
20
customer support
customer support
We’re Here to Help!
Customer Support
If you encounter any issues or have any questions regarding your new product, please contact our helpful Customer
Support Team. Your satisfaction is our goal!
* Please have your order conrmation number ready before contacting Customer Support.
Email:
support@airmsen.com
Website:
www.airmsen.com
If you need to purchase product accessories, please visit
www.airmsen.com.
For product operation videos, please subscribe to AIRMSEN’s ofcial Youtube account.
https://www.facebook.com/Airmsen
https://www.youtube.com/@AIRMSEN

21

22

operating instructions

CODE NO.: AM-2312US_EN
QUESTIONS OR COMMENTS?
EMAIL OR VISIT US ONLINE AT
Printed in China