Technical Support and E-Warranty Certificate
www.vevor.com/support
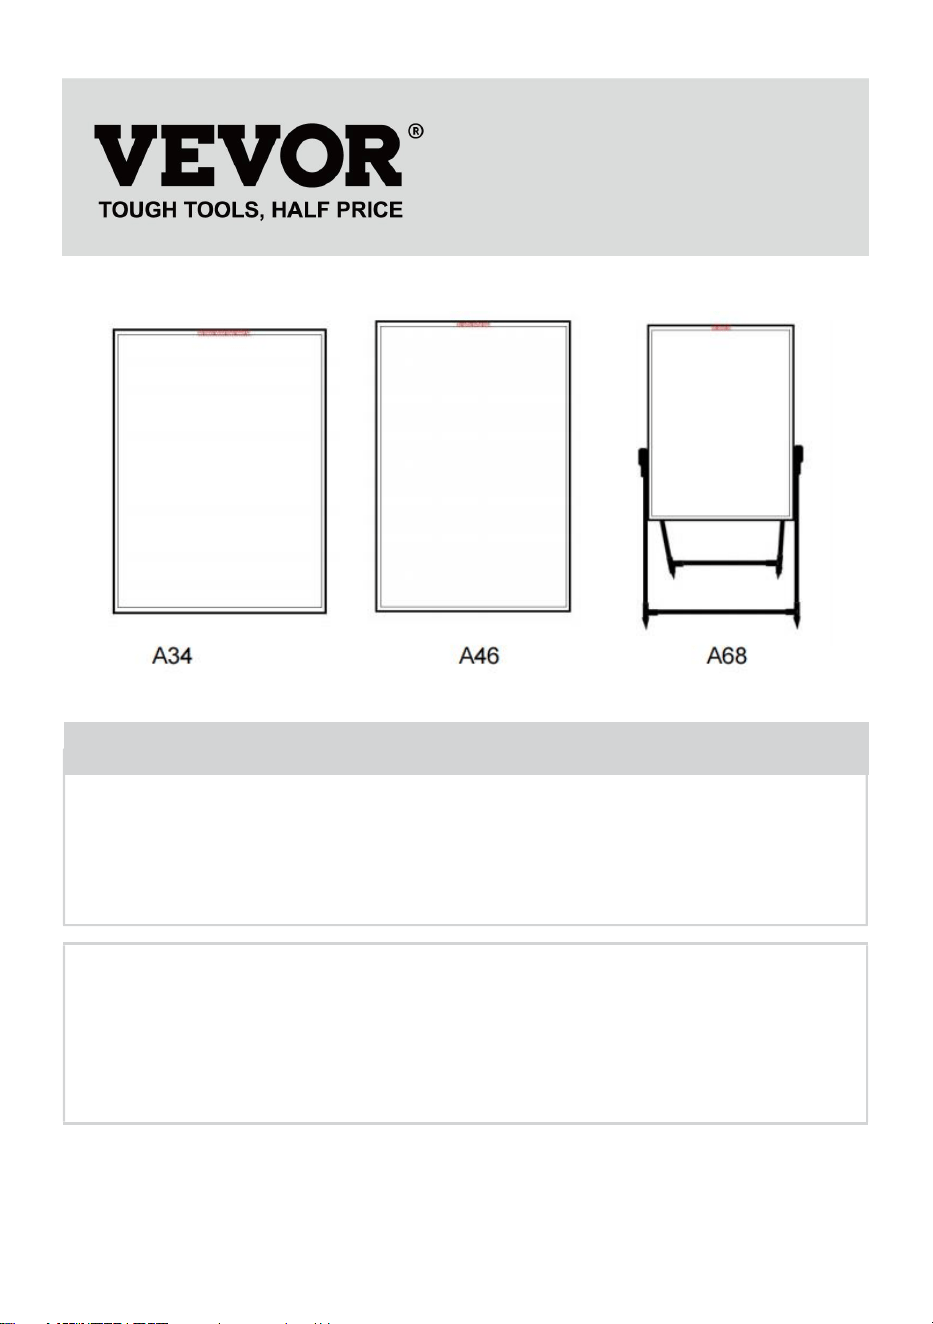
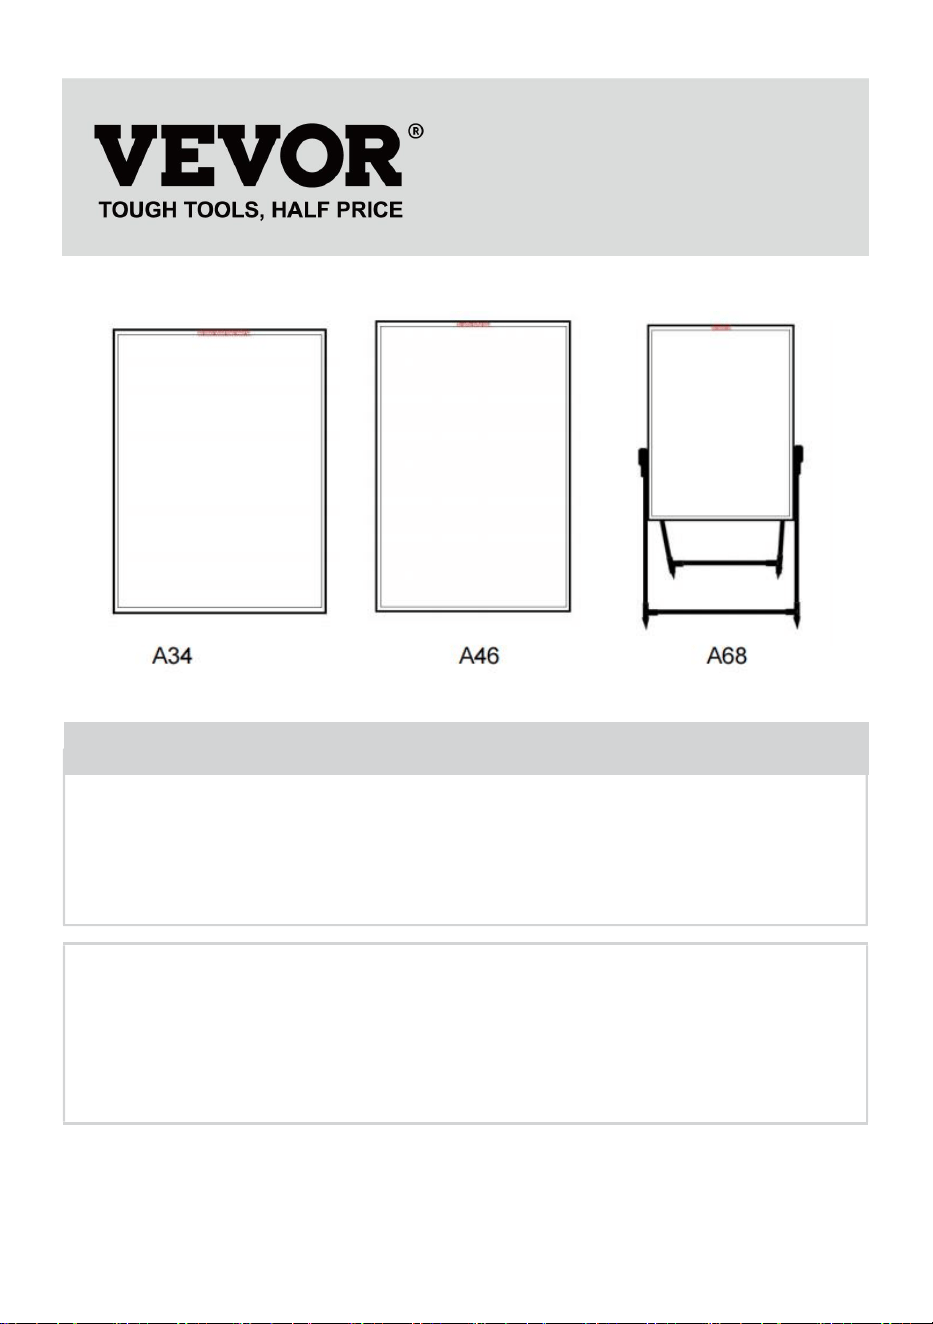
LED FLUORESCENT PLATE
MODEL: A34\A46\A68
We continue to be committed to provide you tools with competitive price.
"Save Half", "Half Price" or any other similar expressions used by us only represents an
estimate of savings you might benefit from buying certain tools with us compared to the major
top brands and does not necessarily mean to cover all categories of tools offered by us. You
are kindly reminded to verify carefully when you are placing an order with us if you are
actually saving half in comparison with the top major brands.

- 1 -
MODEL: A34\A46\A68
Have product questions? Need technical support? Please feel free to
contact us:
Technical Support and E-Warranty Certificate
www.vevor.com/support
NEED HELP? CONTACT US!
This is the original instruction, please read all manual instructions
carefully before operating. VEVOR reserves a clear interpretation of our
user manual. The appearance of the product shall be subject to the
product you received. Please forgive us that we won't inform you again if
there are any technology or software updates on our product.
LED FLUORESCENT
PLATE
- 2 -
Dear customers,
Hello, thank you for buying the LED fluorescent plate produced by our company.
After opening the product package, check whether the product is in good condition,
whether the accessories are complete, and whether it can normally glow after
powering on the product instructions are as follows:
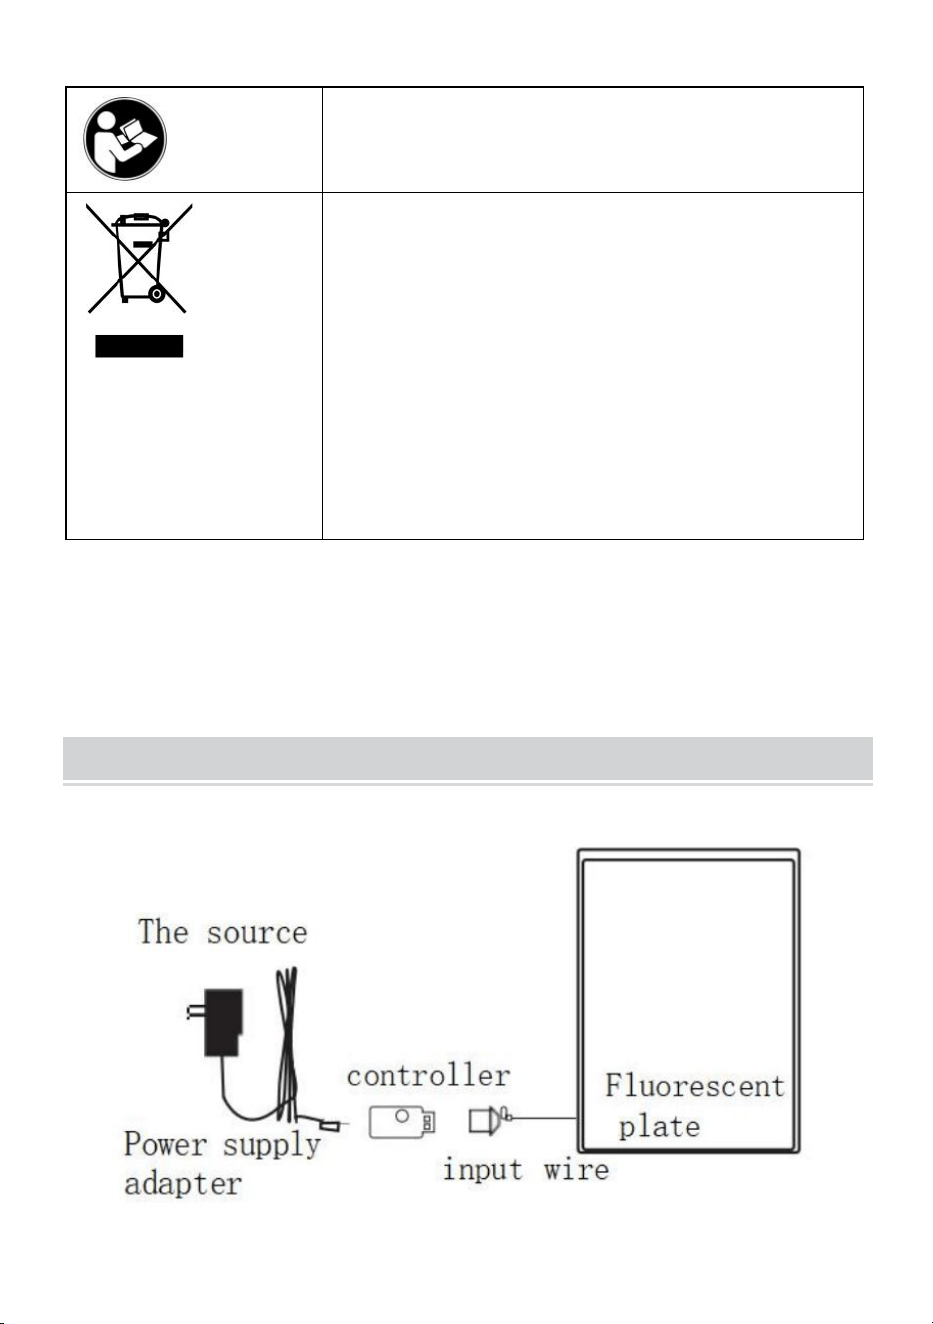
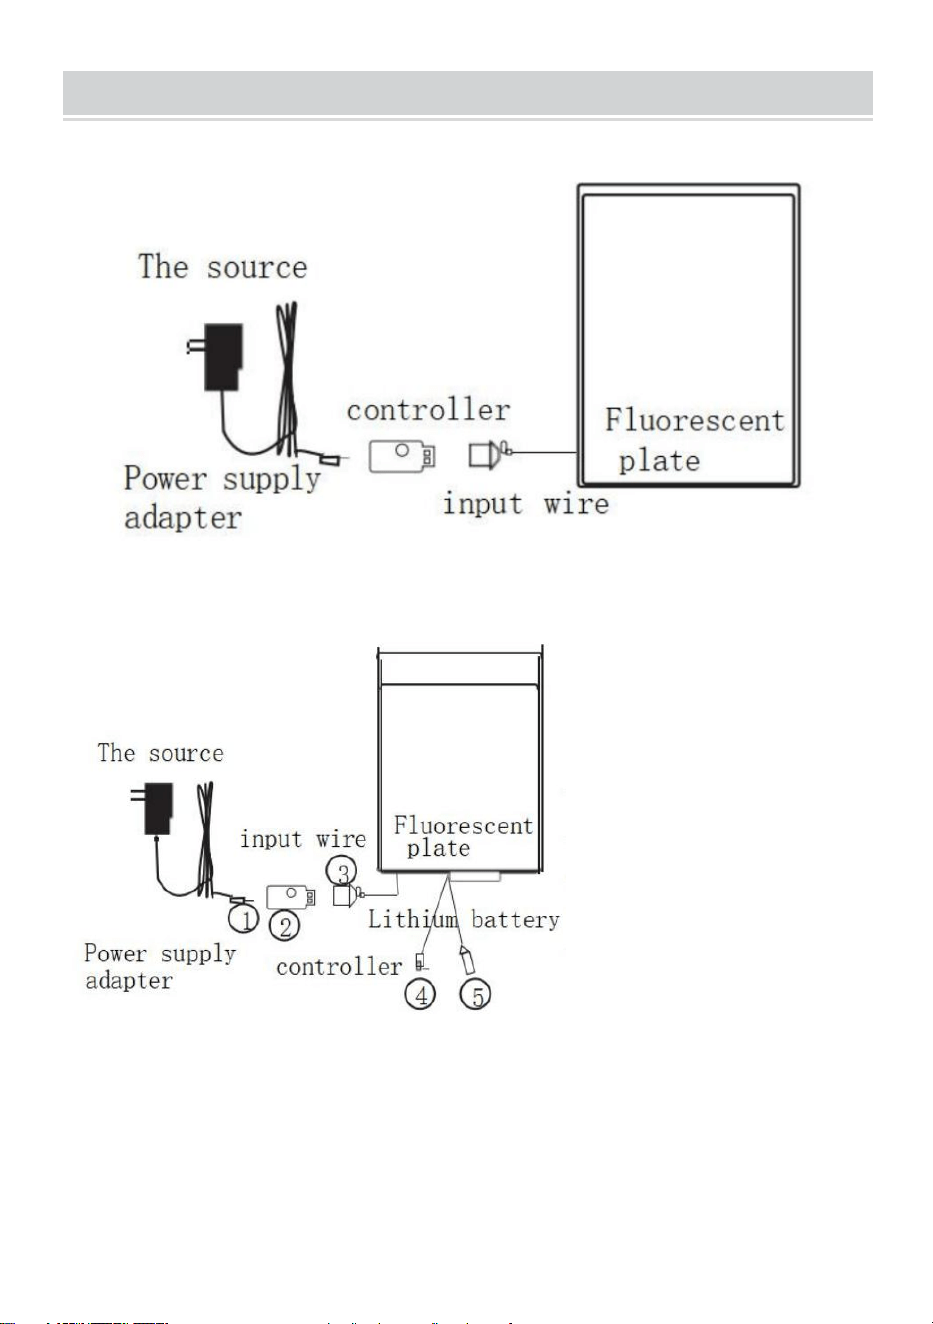
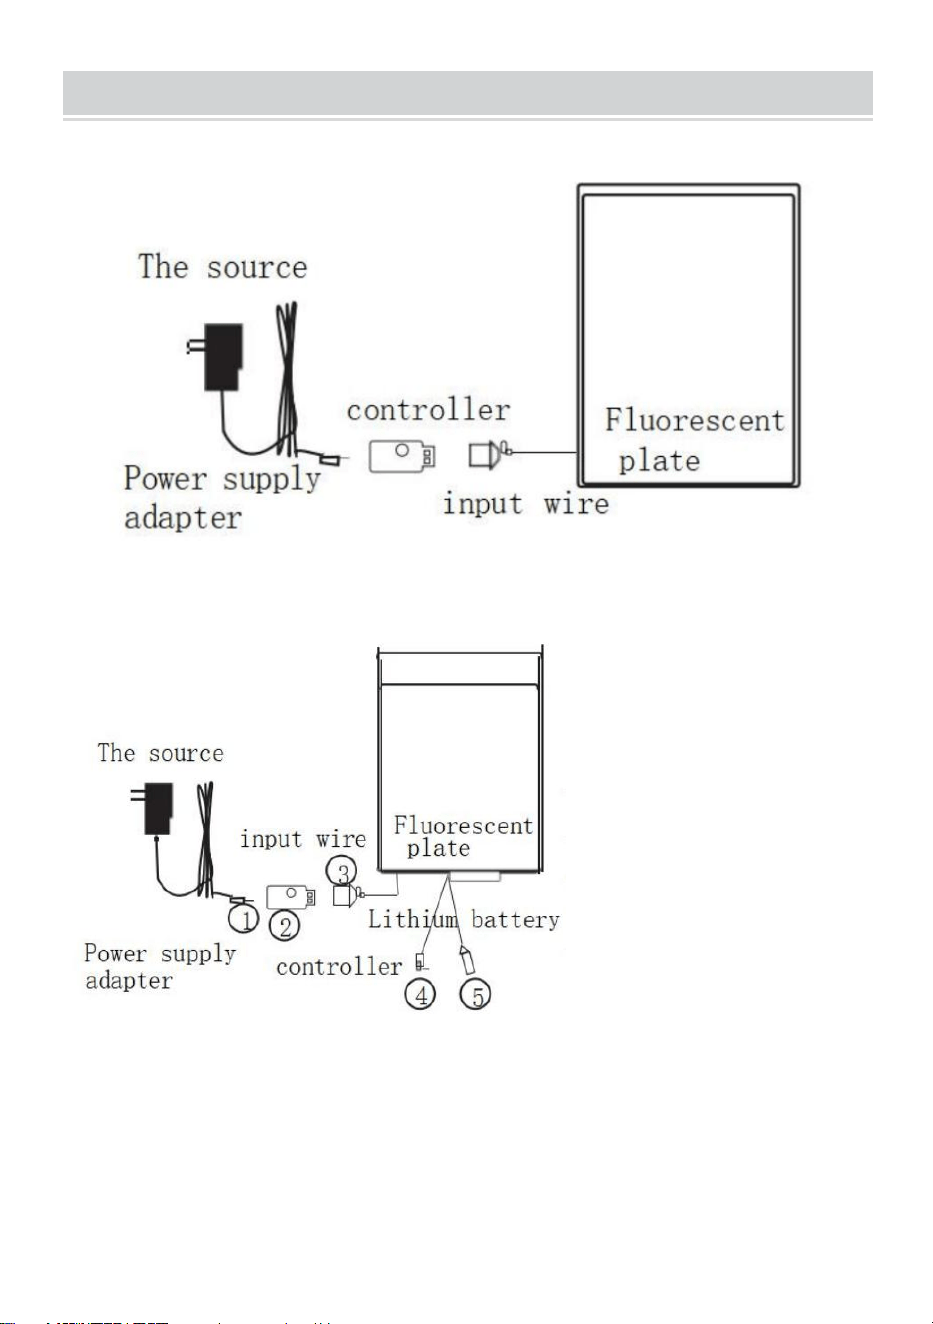
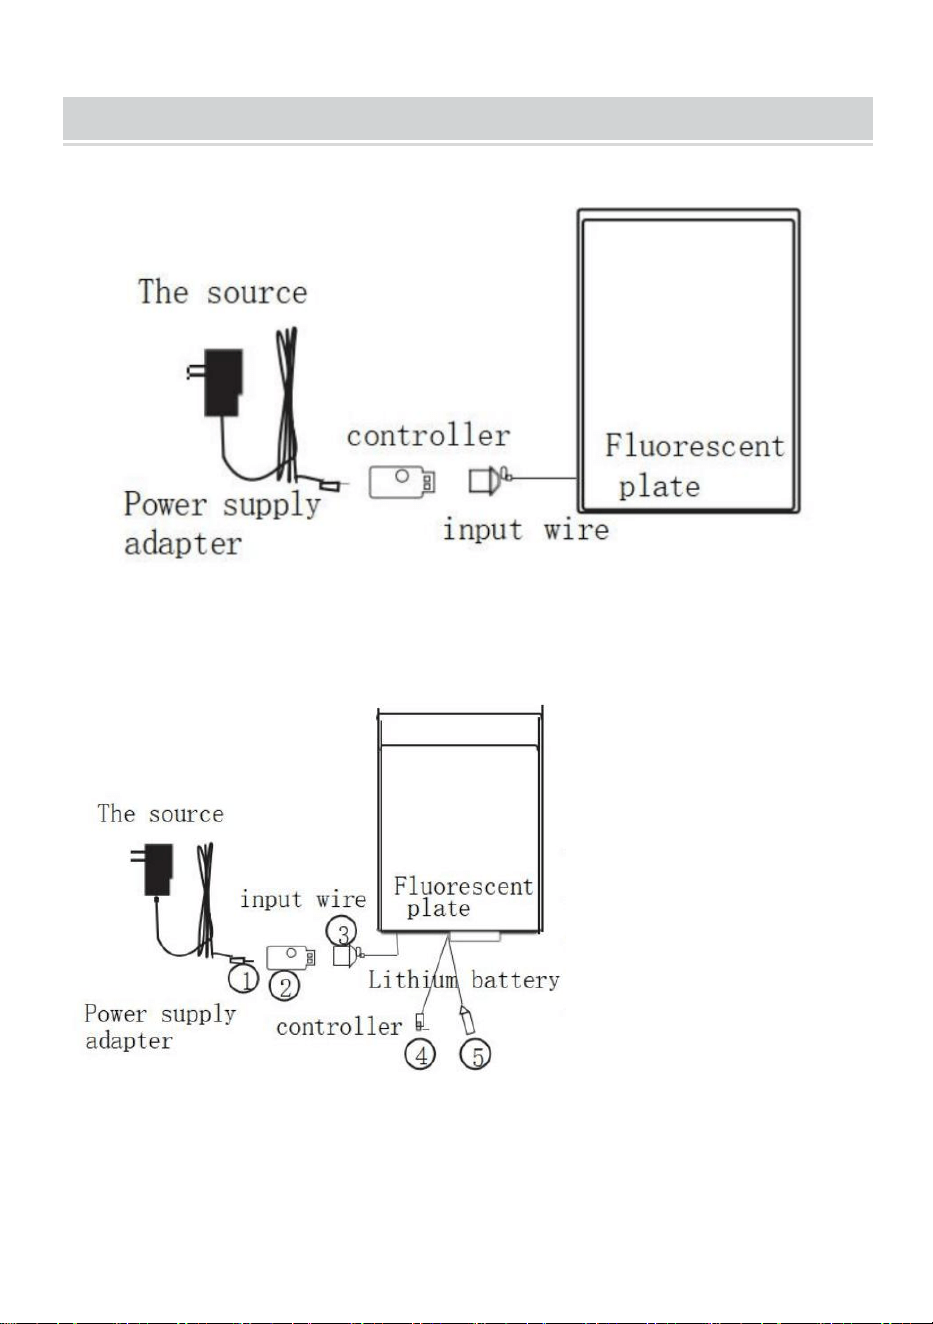
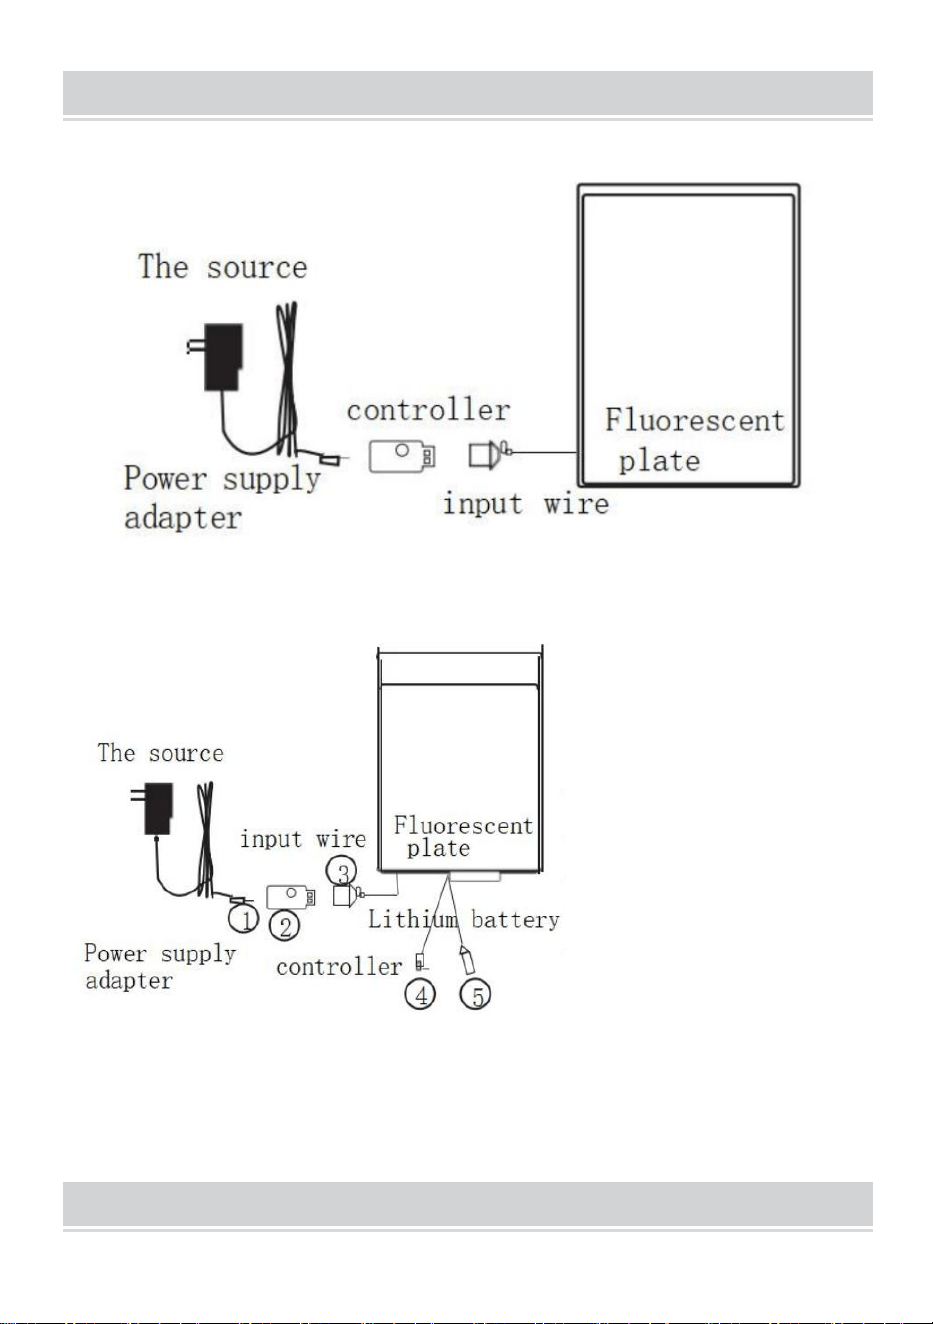
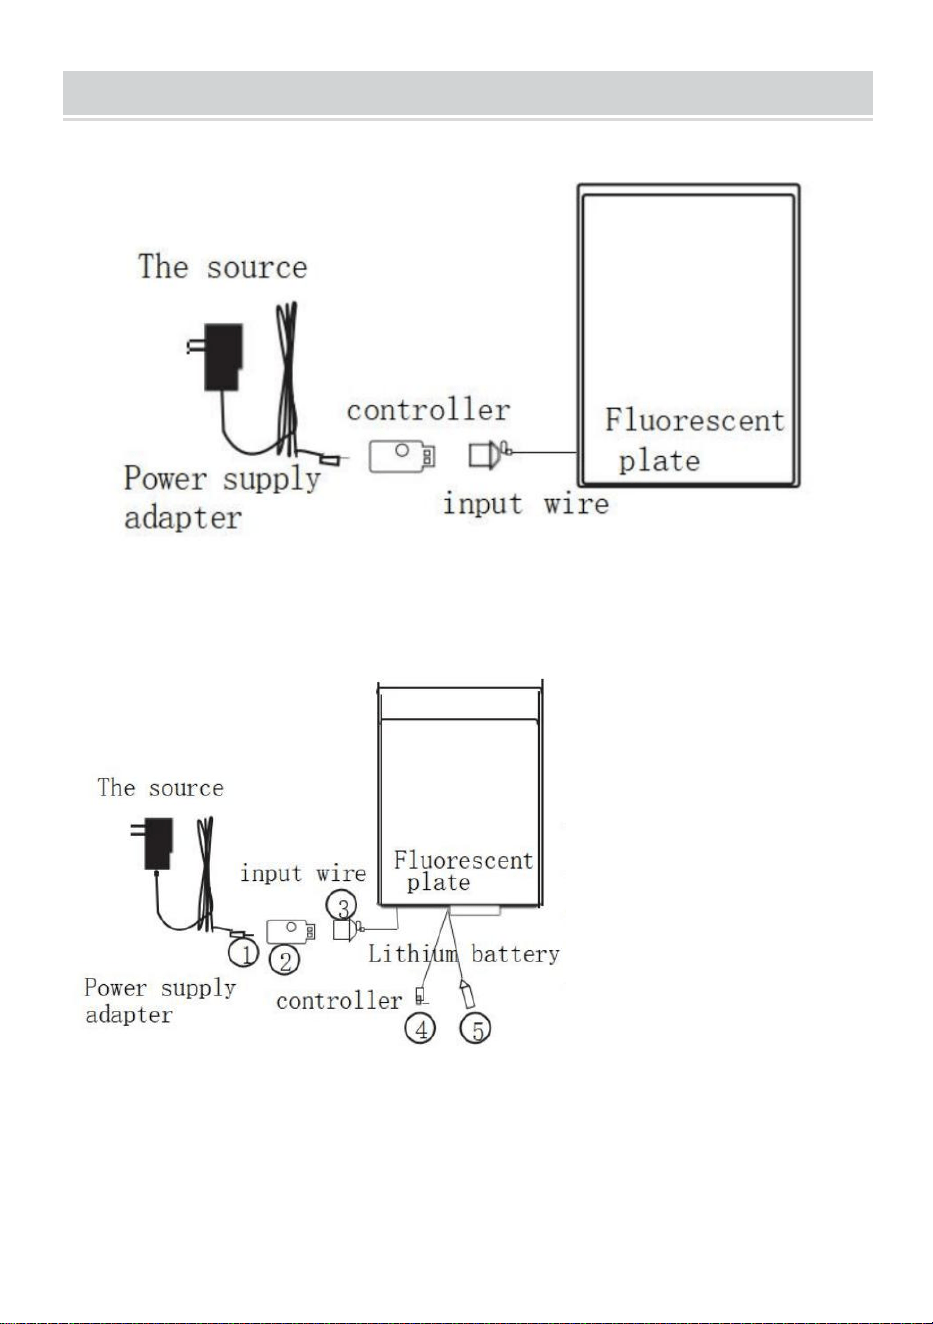
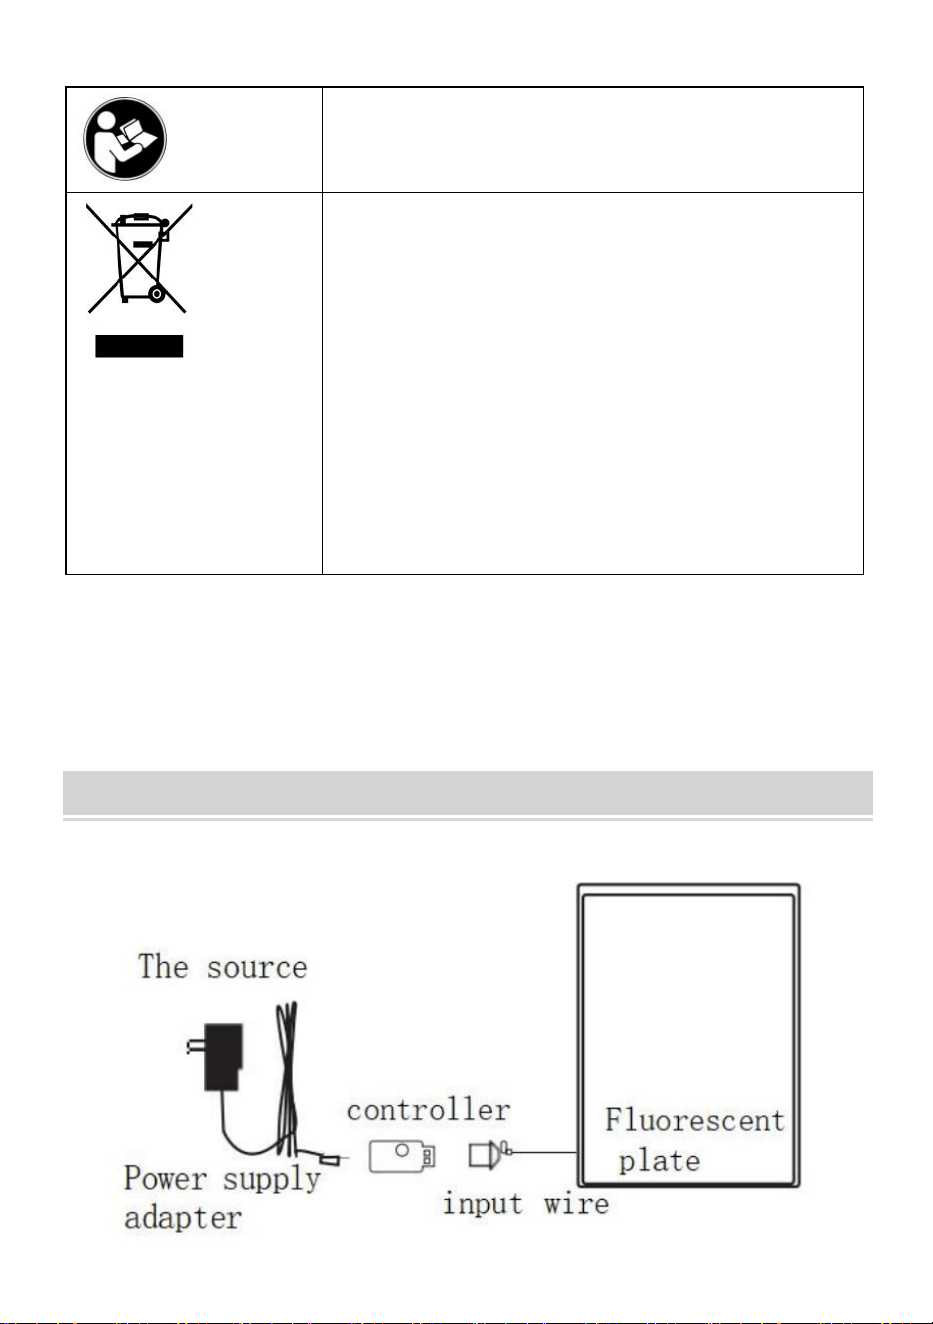
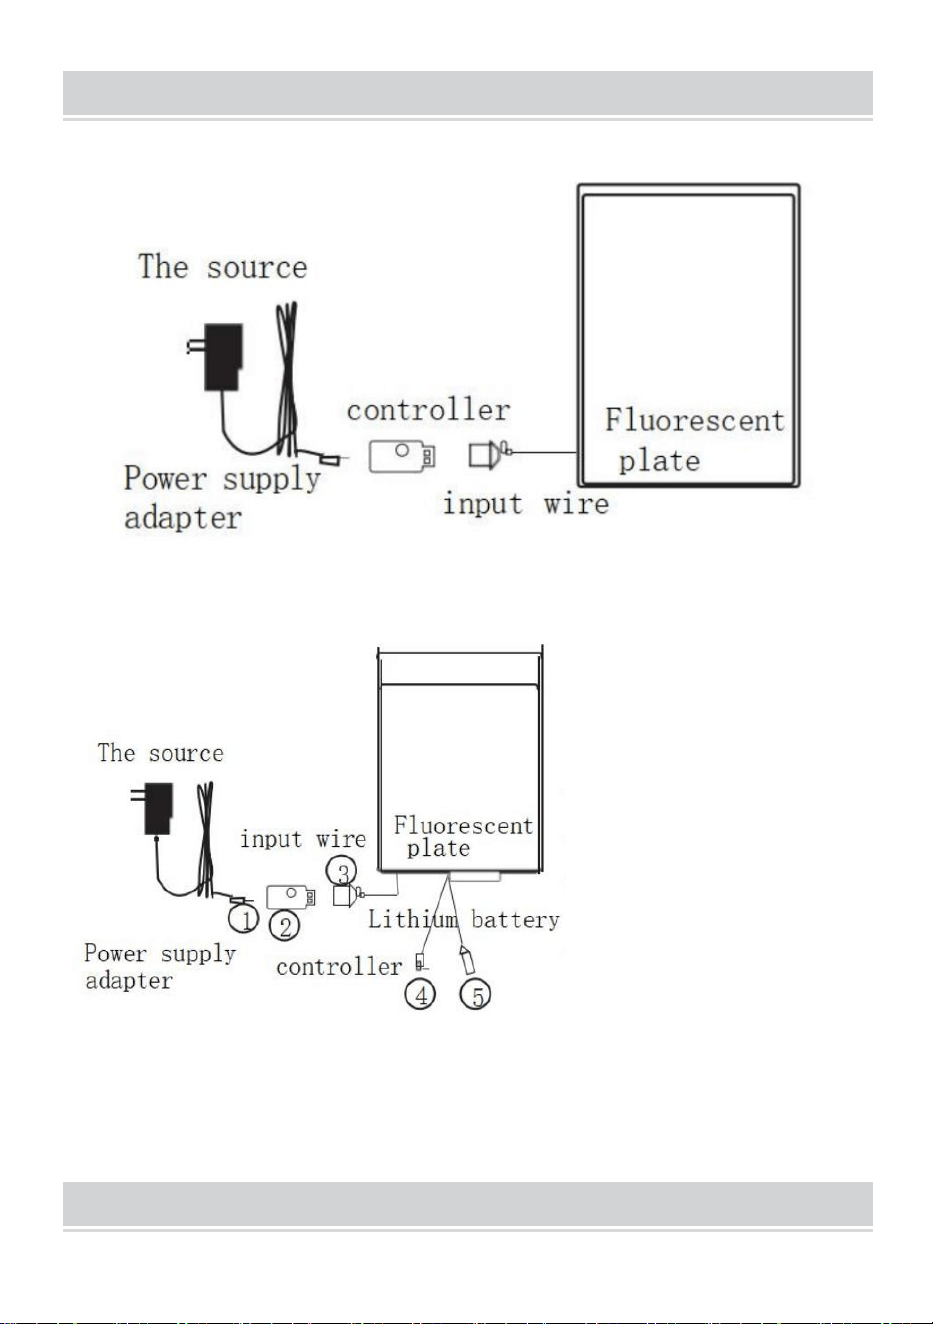
SCHEMATIC DIAGRAM OF THE CONNECTION
the fluorescent plate of the plug-in model
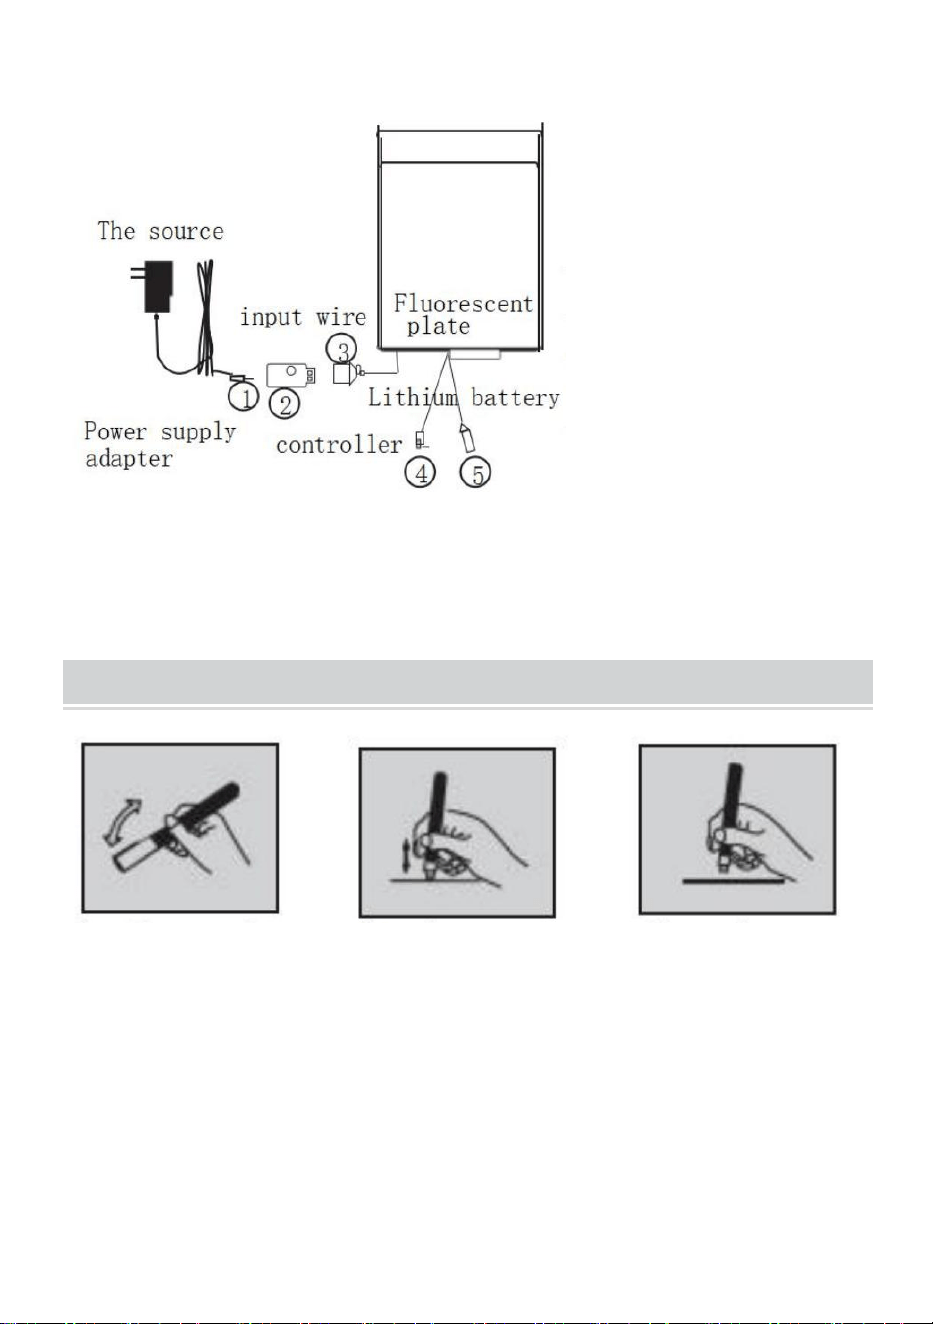
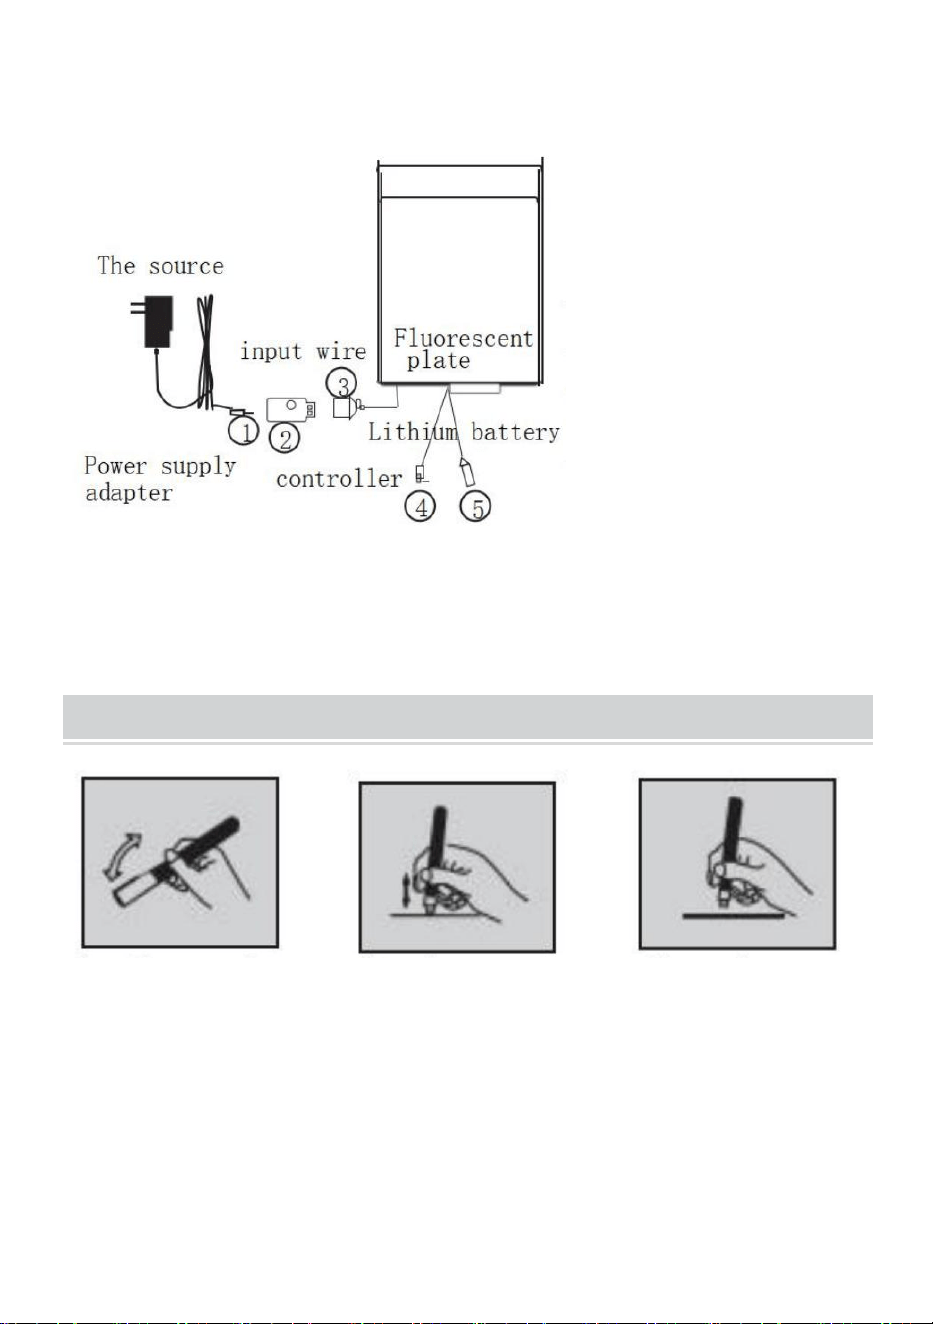
Schematic diagram of the connection of lithium electric fluorescent plate
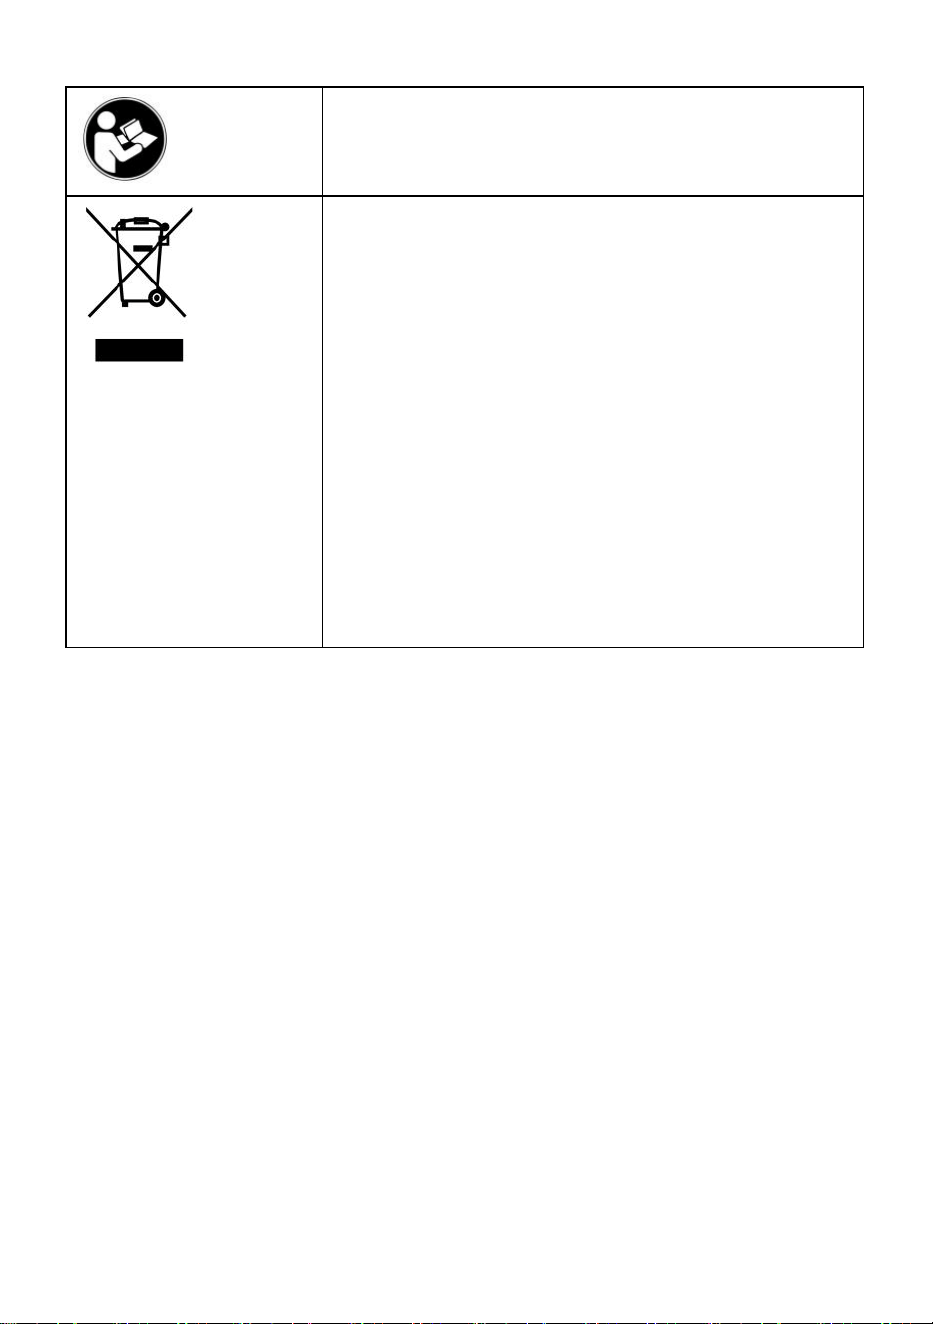
Warning-To reduce the risk of injury, user must
read instructions manual carefully.
CORRECT DISPOSAL
This product is subject to the European Directive
2012/19/EC provision. The symbol showing a
wheelie bin crossed through indicates that the
product requires separate refuse collection in the
European Union. This applies to the product and
all accessories marked with this symbol. Products
marked as such may not be discarded with normal
domestic waste, but must be taken to a collection
point for recycling electrical and electronic devices
- 3 -
Note: 1. When used, only one power supply can be connected, and do not supply
two power supplies at the same time.
2.This product is not waterproof, recommended for indoor use.
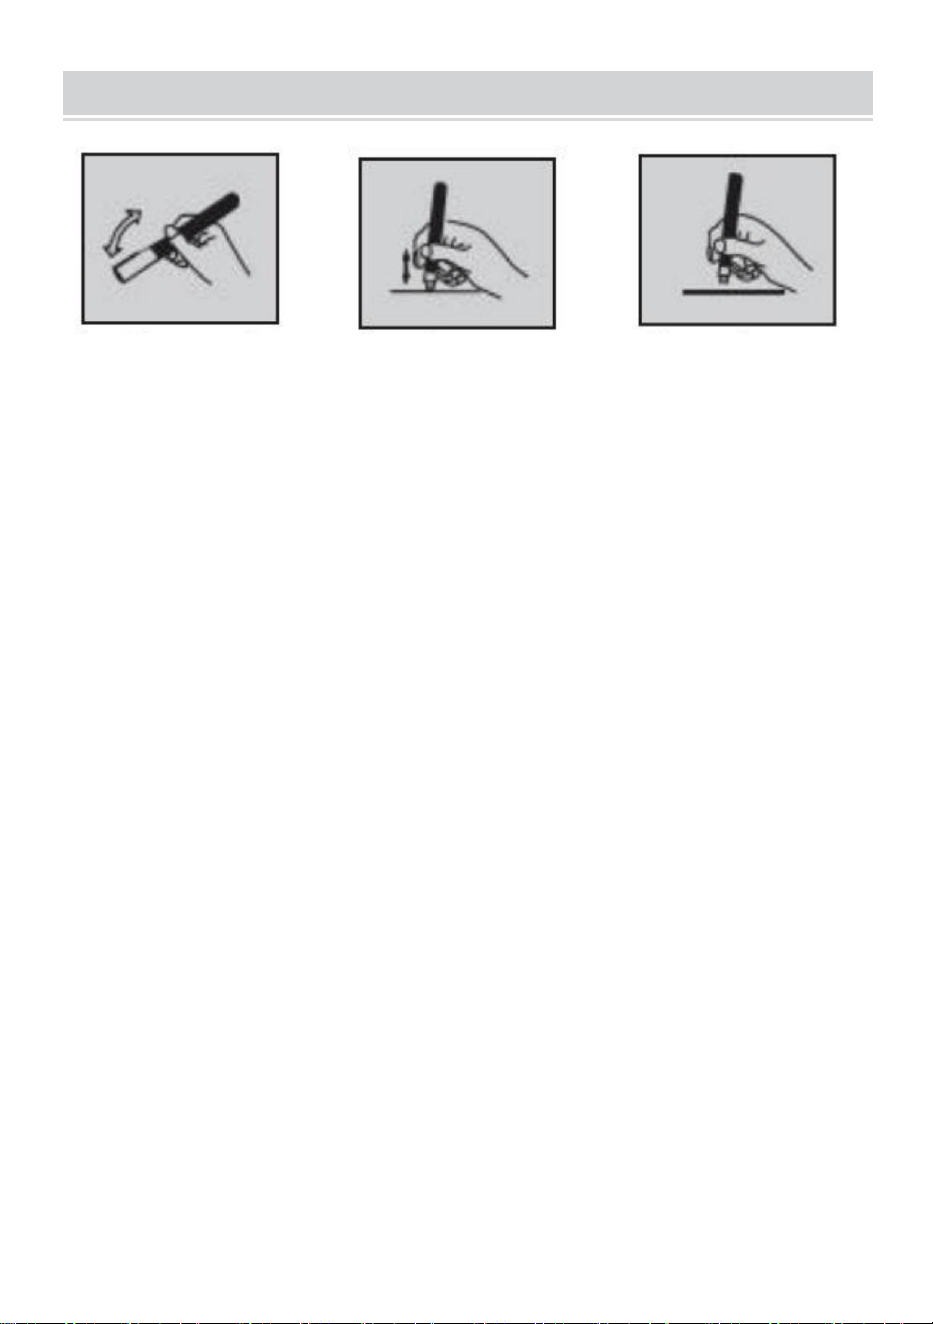
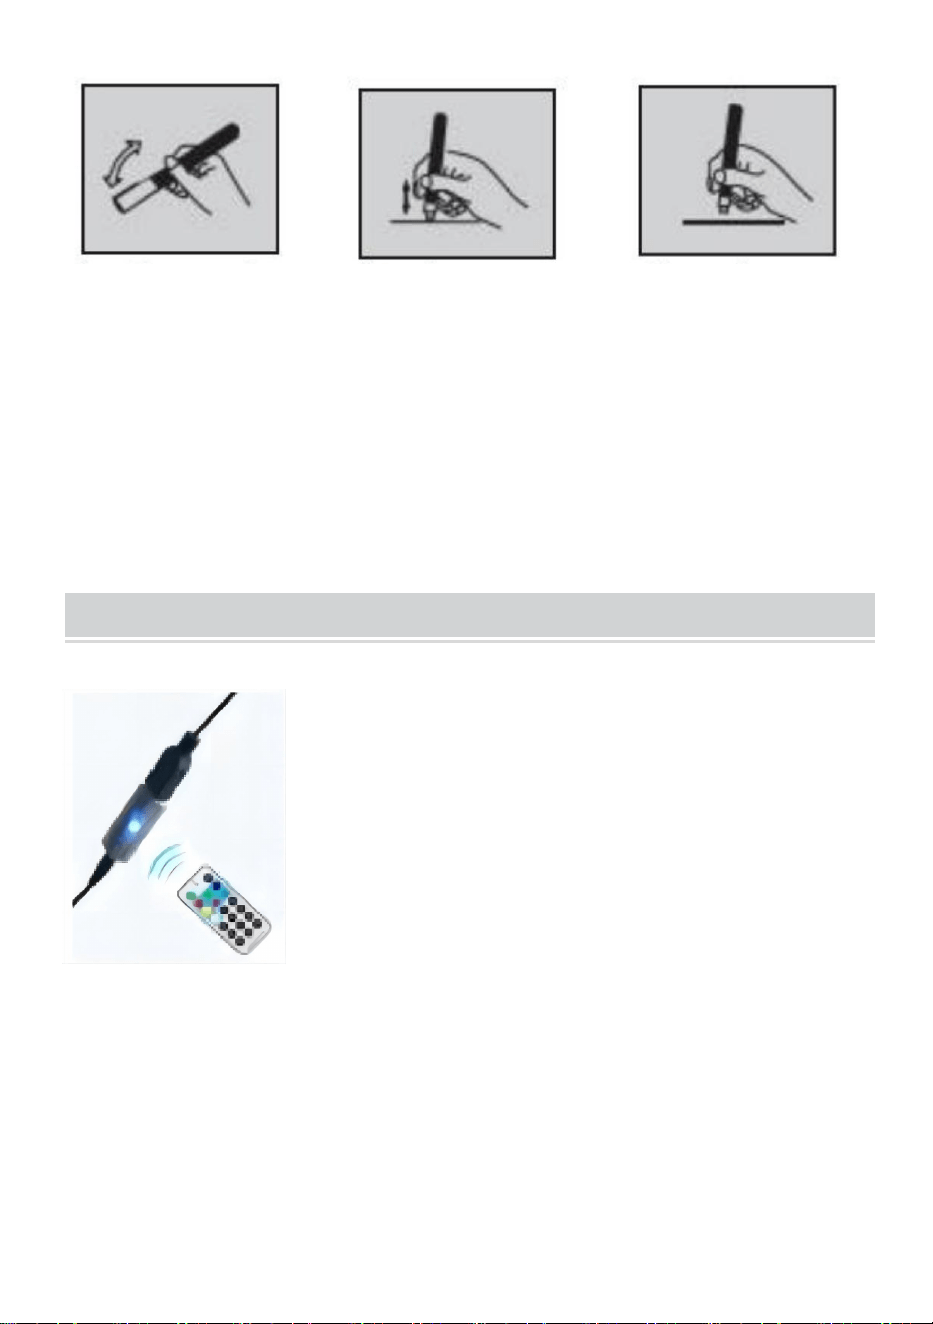
HOW TO USE HIGHLIGHTER
Suggestion: If the light is dark, 5~8mm white edges can be added to the
four sides of the glass.
A: Power supply: 1 Connect
2
Connect 3
B: Battery power supply: 4
Connect2 Connect 3
C: Battery charging: 1
Connect 5
A charge of 6 hours, full of
red light to
green
One step: rock
up and down
Two steps :
up and down
Three steps:
writing
- 4 -
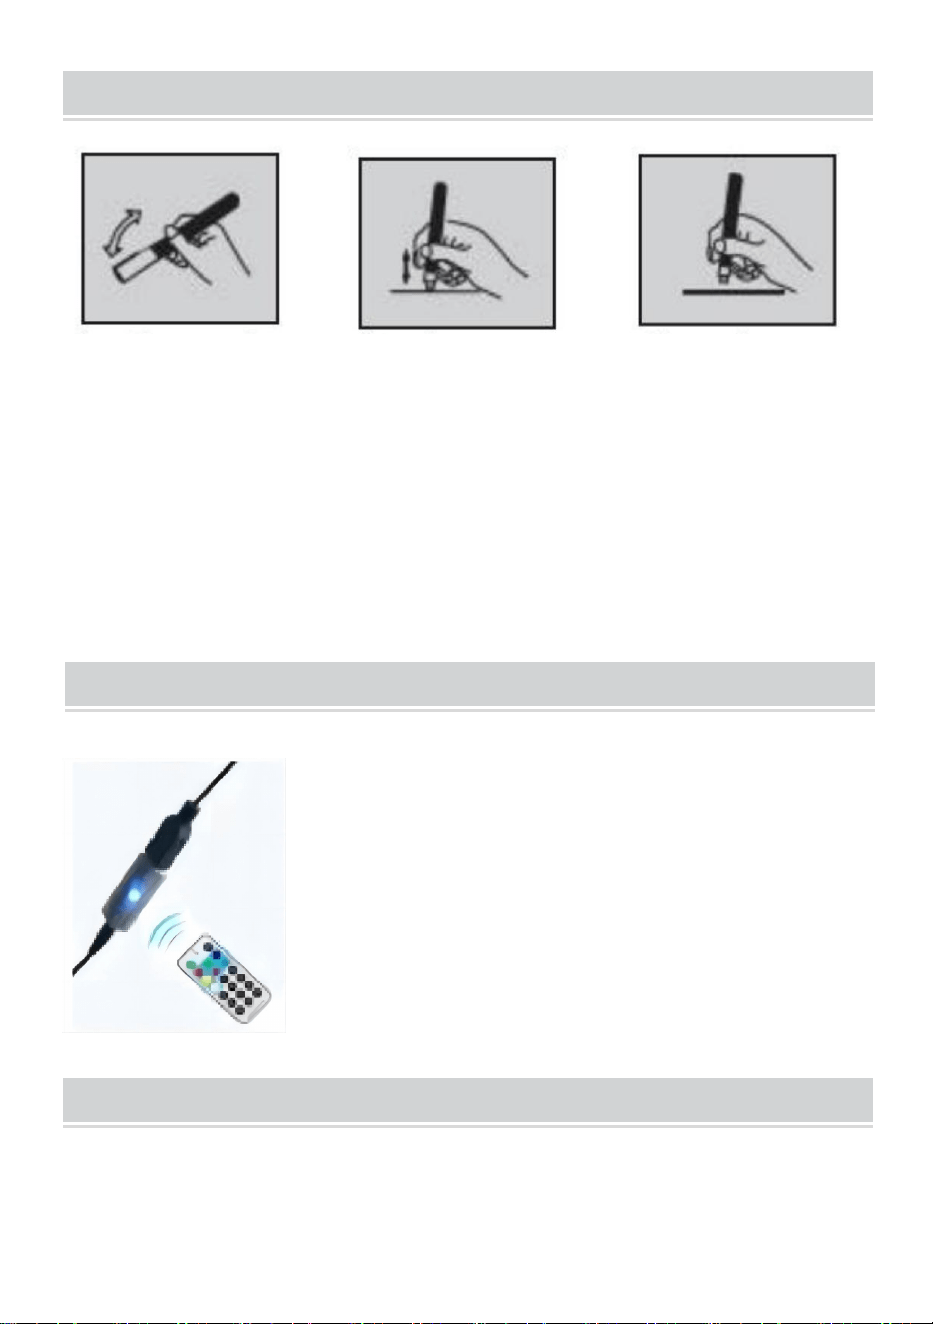
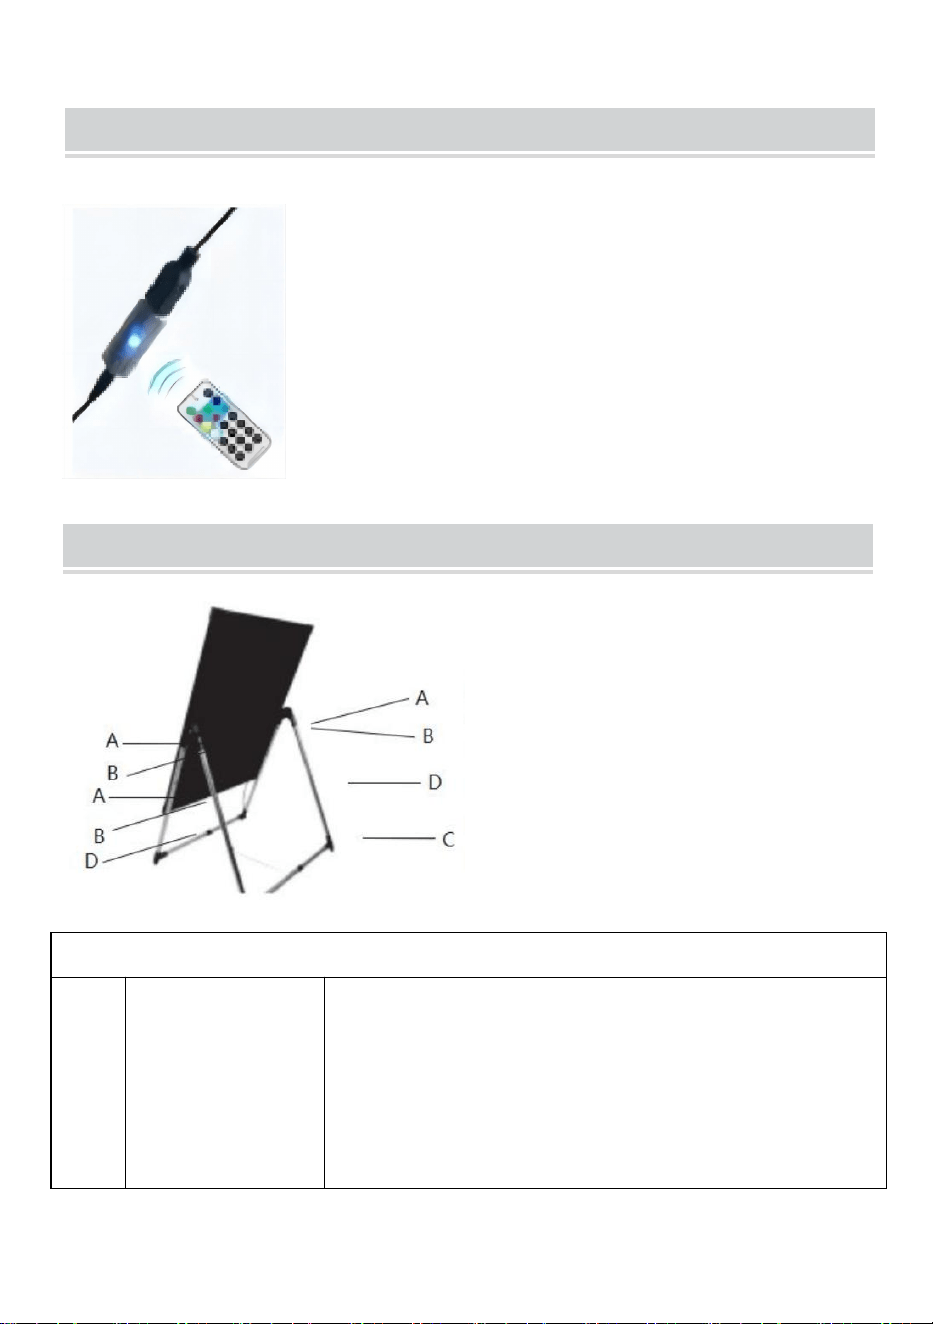
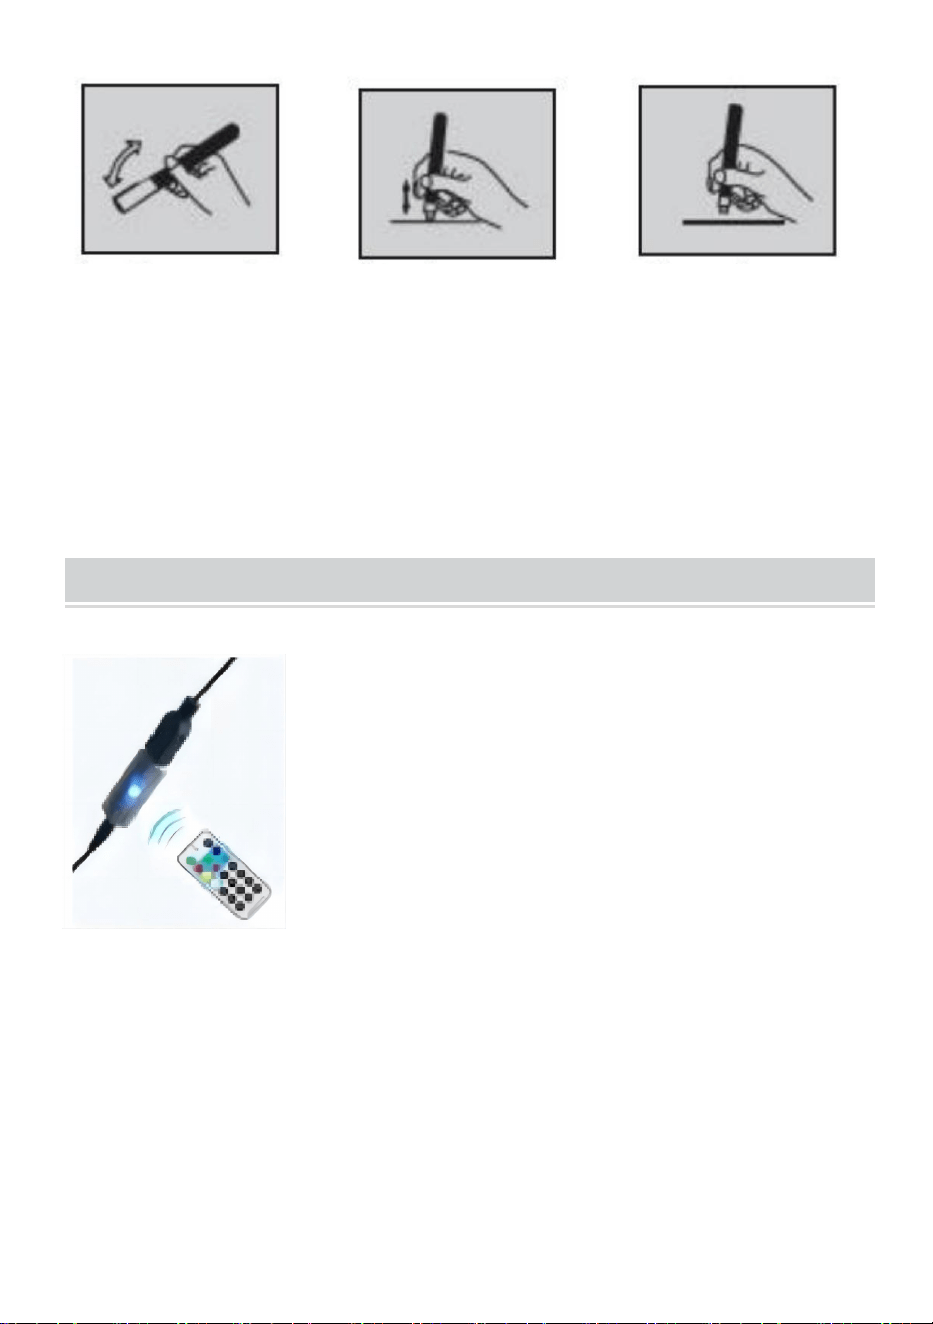
REMOTE CONTROL USE METHOD
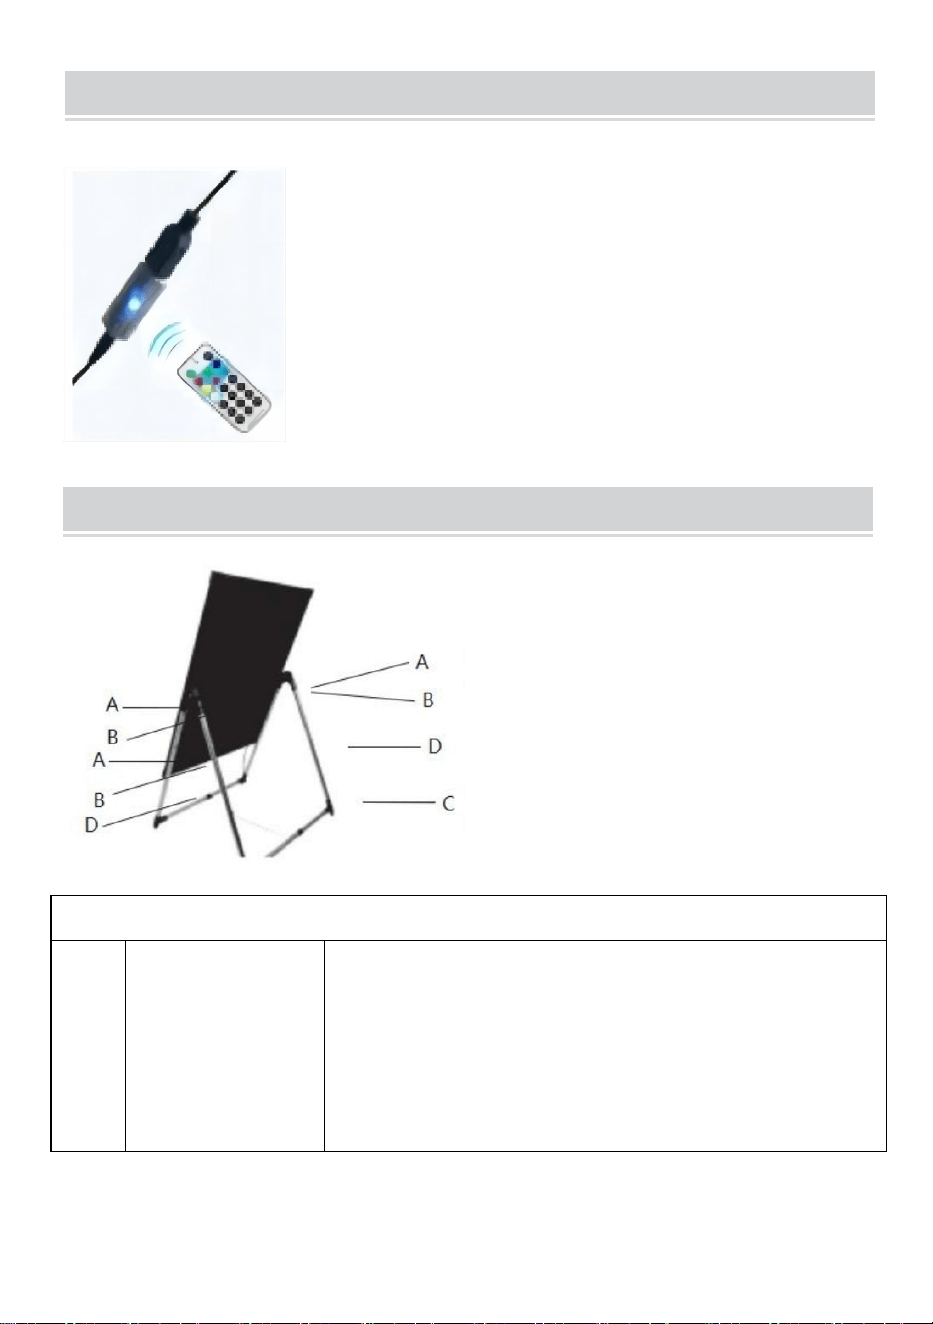
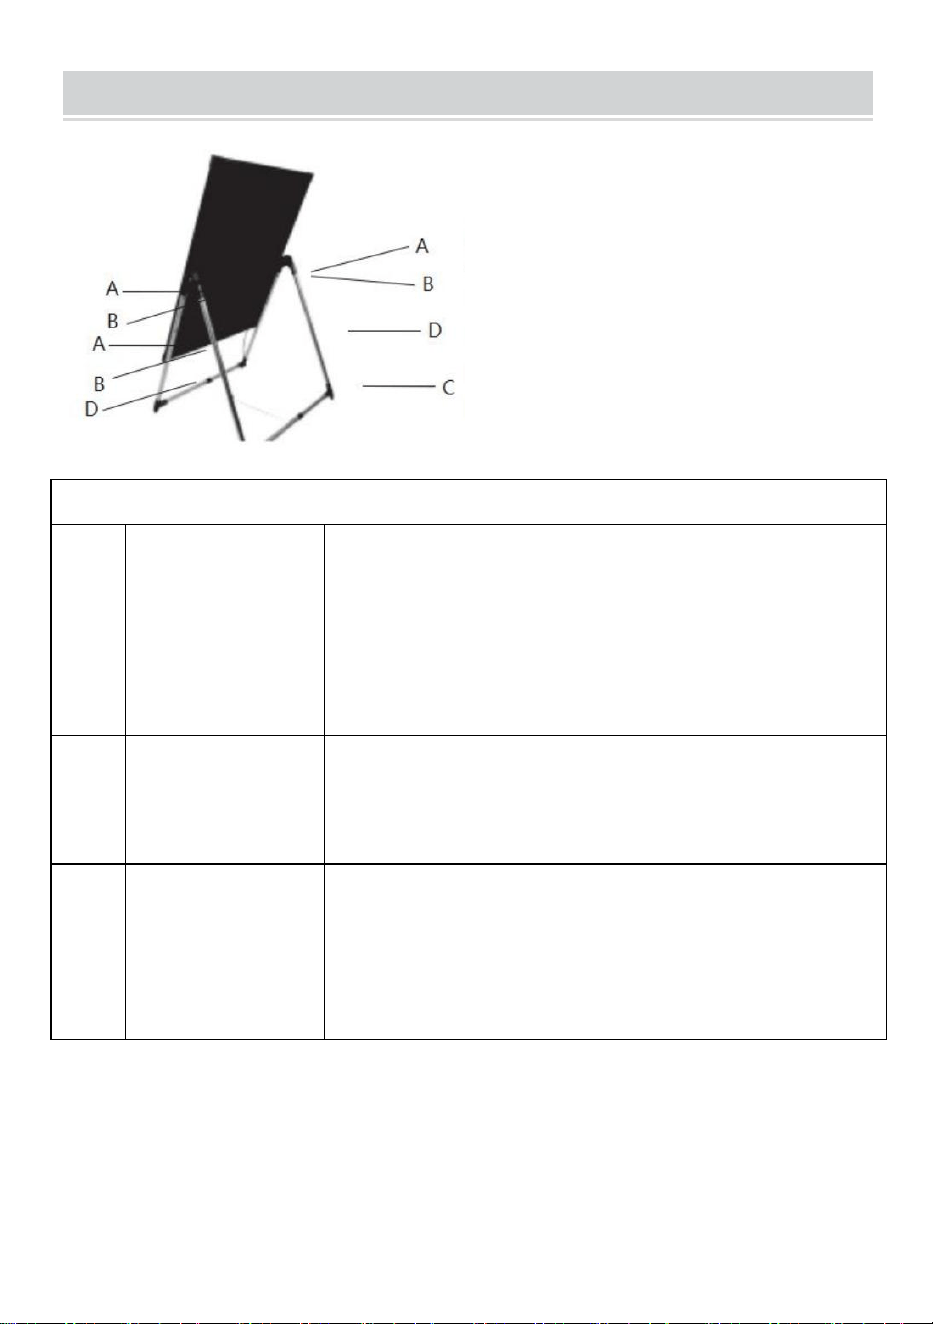
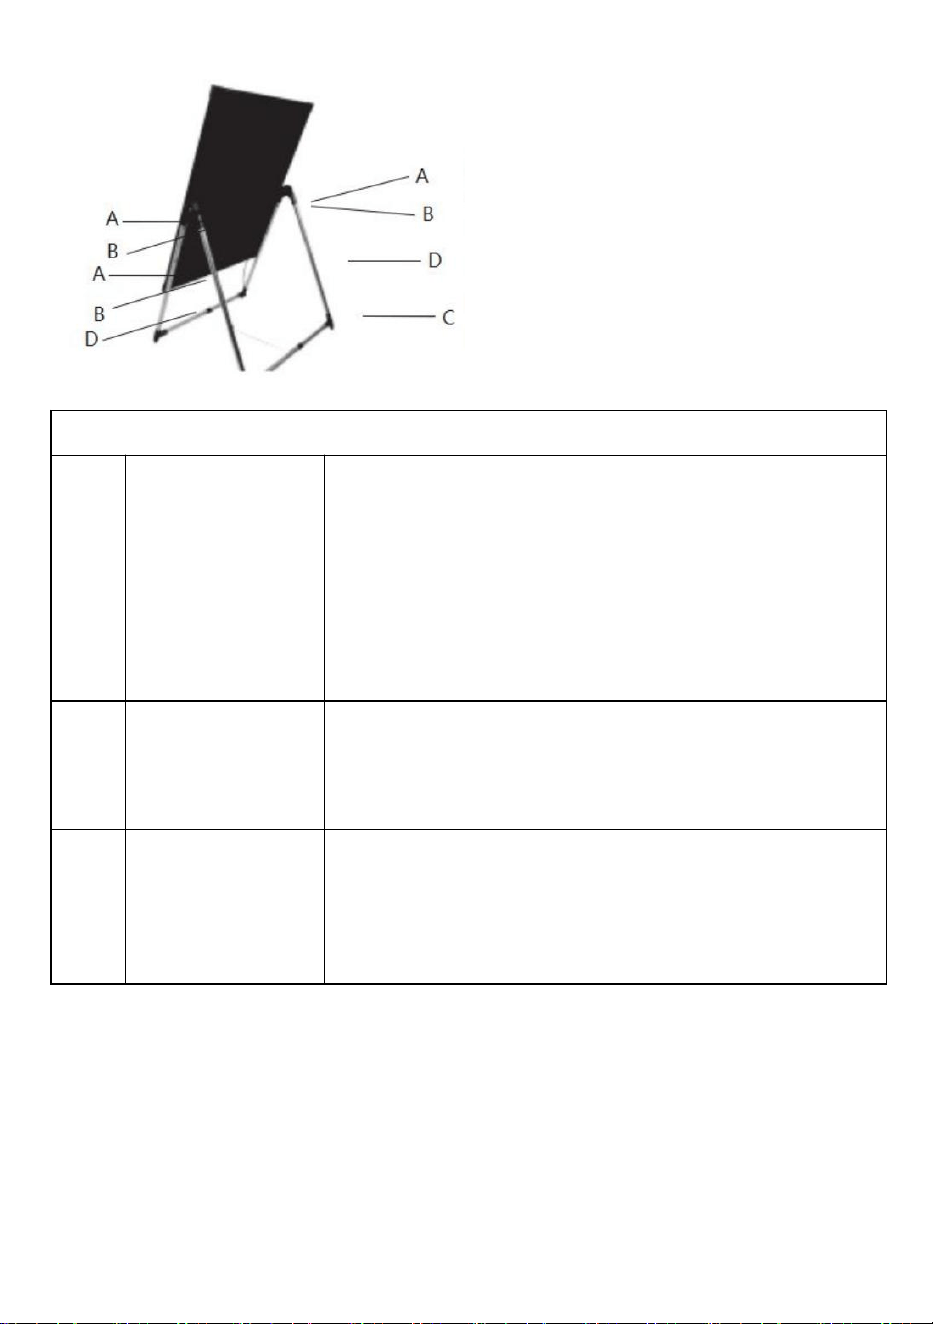
DIAGRAM OF V-BRACKET INSTALLATION
Common failure causes and solutions
1
Remote control
non-responsive
Reasons: ① : do not remove the bottom of the remote
control insulation sheet ② : the remote control is not
aligned with the product controller;
Solutions: ①: remove the bottom of the remote control
insulation sheet; ②: align the controller
1.Remove the transparent card from the remote control
before
use
2.The remote control must be aligned with the controller
3. The button above the controller can also control the
lighting
mode
4 . Color keys represent 7 fixed colors, and number keys
A=plate body fixing nut
B=bracketfixing extension
C=base Angle
D=supporrod
1. A(plate body retaining nut)and B(support
lever retaining nut).
2.
Insert D(bracket)into the four C(bottom
corner).

- 5 -
2
Highlighters don't
print ink
Cause: Not pressed in place;
Solution: Shake up and down vertically and press
several times until the ink is out
3
The display rack
is unbalanced
after installation
Cause: It is not installed properly;
Solution: beat the plastic parts at the bottom of the
bracket until the balance is adjusted
Note:
1: Do not use non-supporting original power supply;
2: Electronic products are prohibited from rain;
3: Prohibit the use of extreme environments; (such as: overheating,
humidity and other environments)
4: When hanging to ensure the product firmness, avoid falling
FCC Information
CAUTION: Changes or modifications not expressly approved by the party responsible for
compliance could void the user's authority to operate the equipment!
This device complies with Part 15 of the FCC Rules. Operation is subject to the following two
conditions:
1) This product may cause harmful interference.
2)This product must accept any interference received, including interference that may cause
undesired operation.
WARNING: Changes or modifications to this product not expressly approved by the
party.responsible for compliance could void the user's authority to operate the product.
Note: This product has been tested and found to comply with the limits for a Class B digital
device pursuant to Part 15 of the FCC Rules, These limits are designed to provide
reasonable protection against harmful interference in a residential installation.
This product generates, uses and can radiate radio frequency energy, and if not installed and
used in accordance with the instructions, may cause harmful interference to radio
communications. However, there is no guarantee that interference will not occur in a
particular installation. If this product does cause harmful interference to radio or television

- 6 -
reception,which can be determined by turning the product off and on, the user is encouraged
to try to correct the interference by one or more of the following measures.
· Reorient or relocate the receiving antenna.
· Increase the distance between the product and receiver.
· Connect the product to an outlet on a circuit different from that to which the receiver is
connected.
· Consult the dealer or an experienced radio/TV technician for assistance.
Manufacturer: Shanghaimuxinmuyeyouxiangongsi
Address: Shuangchenglu 803nong11hao1602A-1609shi, baoshanqu, shanghai
200000 CN.
Imported to AUS: SIHAO PTY LTD. 1 ROKEVA STREETEASTWOOD NSW
2122 Australia
Imported to USA: Sanven Technology Ltd. Suite 250, 9166 Anaheim Place,
Rancho Cucamonga, CA 91730
REPEC
E-CrossStu GmbH
Mainzer Landstr.69, 60329
Frankfurt am Main.
REPUK
YH CONSULTING LIMITED.
C/O YH Consulting Limited Office 147,
Centurion House, London Road,
Staines-upon-Thames, Surrey, TW18 4AX


Techniczny Certyfikat wsparcia i e-gwarancji
www.vevor.com/support
PŁYTA FLUORESCENCYJNA LED
MODEL: A34 \ A46 \ A68
We continue to be committed to provide you tools with competitive price.
"Save Half", "Half Price" or any other similar expressions used by us only represents an
estimate of savings you might benefit from buying certain tools with us compared to the major
top brands and does not necessarily mean to cover all categories of tools offered by us. You
are kindly reminded to verify carefully when you are placing an order with us if you are
actually saving half in comparison with the top major brands.

MODEL: A34 \ A46 \ A68
Have product questions? Need technical support? Please feel free to
contact us:
Technical Support and E-Warranty Certificate
www.vevor.com/support
NEED HELP? CONTACT US!
This is the original instruction, please read all manual instructions
carefully before operating. VEVOR reserves a clear interpretation of our
user manual. The appearance of the product shall be subject to the
product you received. Please forgive us that we won't inform you again if
there are any technology or software updates on our product.
LED FLUORESCENT
PLATE

Droga klienci ,
Witam , dziękuję Ty na zakup wyprodukowanej świetlówki LED przez naszą firmę.
Po otwarciu opakowania produktu należy sprawdzić , czy produkt jest w dobrym
stanie , czy akcesoria są kompletne i czy normalnie może świecić po włączeniu.
Instrukcje dotyczące produktu są następujące:
Ostrzeżenie — aby zmniejszyć ryzyko obrażeń,
użytkownik musi uważnie przeczytać instrukcję
obsługi.
PRAWIDŁOWA UTYLIZACJA
Ten produkt podlega przepisom Dyrektywy
Europejskiej 2012/19/EC. Symbol przekreślonego
kosza na śmieci oznacza, że produkt wymaga
selektywnej zbiórki śmieci na terenie Unii
Europejskiej. Dotyczy to produktu i wszystkich
akcesoriów oznaczonych tym symbolem.
Produktów oznaczonych jako takie nie można
wyrzucać razem ze zwykłymi odpadami
domowymi, lecz należy je oddać do punktu zbiórki
w celu recyklingu urządzeń elektrycznych i
elektronicznych
SCHEMATIC DIAGRAM OF THE CONNECTION
the fluorescencyjny płytka wtyczki Model
Schemat diagram z połączenie z lit elektryczna płyta fluorescencyjna
Uwaga: 1. W przypadku użycia można podłączyć tylko jeden zasilacz i nie należy
zasilać dwóch zasilaczy jednocześnie.
2. Ten produkt nie jest wodoodporny, zalecany do użytku w pomieszczeniach
zamkniętych.
A: Power supply: 1 Connect
2
Connect 3
B:Battery power supply: 4
Connect2 Connect 3
C: Battery charging: 1
Connect 5
A charge of 6 hours, full of
red light to
green
HOW TO USE HIGHLIGHTER
Sugestia: Jeśli światło jest ciemne, po czterech stronach szyby można
dodać białe krawędzie o grubości 5–8 mm.
One step: rock
up and down
Two steps :
up and down
Three steps:
writing

REMOTE CONTROL USE METHOD
DIAGRAM OF V-BRACKET INSTALLATION
Typowe przyczyny awarii i rozwiązania
1
Pilot nie reaguje
Powody: ① : nie usuwaj dolnej części arkusza
izolacyjnego pilota ② : pilot nie jest dopasowany do
sterownika produktu;
Rozwiązania: ①: zdejmij dolną część arkusza
izolacyjnego pilota; ②: wyrównaj kontroler
1.Remove the transparent card from the remote control
before
use
2.The remote control must be aligned with the controller
3. The button above the controller can also control the
lighting
mode
4 . Color keys represent 7 fixed colors, and number keys
A=plate body fixing nut
B=bracketfixing extension
C=base Angle
D=supporrod
1. A(plate body retaining nut)and B(support
lever retaining nut).
2.
Insert D(bracket)into the four C(bottom
corner).

2
Zakreślacze nie
drukują
atramentu
Przyczyna: Nie wciśnięty;
Rozwiązanie: Potrząśnij w górę i w dół w pionie i
naciśnij kilka razy, aż atrament się skończy
3
Po instalacji
stojak
ekspozycyjny nie
jest wyważony
Przyczyna: Nie jest poprawnie zainstalowany;
Rozwiązanie: uderzaj plastikowymi częściami w dolnej
części wspornika, aż wyważenie zostanie
wyregulowane
Notatka :
1: Zrób nie używać nieobsługujący oryginalny zasilacz ;
2: Produkty elektroniczne są zabronione przed deszczem;
3: Zabroń the wykorzystanie ekstremalnych środowisk ; (Jak na przykład:
przegrzanie , wilgoć i inne środowiska )
4: Kiedy wieszać, aby zapewnić trwałość produktu, należy unikać spadający
Informacje FCC
UWAGA: Zmiany lub modyfikacje, które nie zostały wyraźnie zatwierdzone przez stronę
odpowiedzialną za zgodność, mogą unieważnić uprawnienia użytkownika do obsługi
urządzenia!
To urządzenie jest zgodne z częścią 15 przepisów FCC. Działanie podlega następującym
dwóm warunkom:
1) Ten produkt może powodować szkodliwe zakłócenia.
2) Ten produkt musi akceptować wszelkie odbierane zakłócenia, w tym zakłócenia, które
mogą powodować niepożądane działanie.
OSTRZEŻENIE: Zmiany lub modyfikacje tego produktu, które nie zostały wyraźnie
zatwierdzone przez stronę odpowiedzialną za zgodność, mogą unieważnić uprawnienia
użytkownika do obsługi produktu.
Uwaga: ten produkt został przetestowany i stwierdzono, że spełnia ograniczenia dla
urządzeń cyfrowych klasy B zgodnie z częścią 15 przepisów FCC. Ograniczenia te mają na
celu zapewnienie rozsądnej ochrony przed szkodliwymi zakłóceniami w instalacjach
domowych.
Ten produkt generuje, wykorzystuje i może emitować energię o częstotliwości radiowej, a
jeśli nie zostanie zainstalowany i nie będzie używany zgodnie z instrukcją, może powodować
szkodliwe zakłócenia w komunikacji radiowej. Nie ma jednak gwarancji, że w konkretnej
instalacji nie wystąpią zakłócenia. Jeśli produkt powoduje szkodliwe zakłócenia w odbiorze
radia lub telewizji, co można stwierdzić poprzez wyłączenie i włączenie produktu, zachęca
się użytkownika do podjęcia próby skorygowania zakłóceń za pomocą jednego lub kilku z
poniższych środków.
· Zmień orientację lub położenie anteny odbiorczej.
· Zwiększ odległość pomiędzy produktem a odbiornikiem.
· Podłącz produkt do gniazdka w innym obwodzie niż ten, do którego podłączony jest
odbiornik.
· Skonsultuj się ze sprzedawcą lub doświadczonym technikiem radiowo-telewizyjnym w celu
uzyskania pomocy.
Producent: Shanghaimuxinmuyeyouxiangongsi
Adres: Shuangchenglu 803nong11hao1602A-1609shi, baoshanqu, szanghaj
200000 CN.
Import do AUS: SIHAO PTY LTD. 1 ROKEVA STREETEASTWOOD NSW 2122
Australia
Import do USA: Sanven Technology Ltd. Suite 250, 9166 Anaheim Place,
Rancho Cucamonga, CA 91730
REP
EC
E-CrossStu GmbH
Mainzer Landstr.69, 60329
Frankfurt am Main.
REP
UK
YH CONSULTING LIMITED.
C/O YH Consulting Limited Office 147,
Centurion House, London Road,
Staines-upon-Thames, Surrey, TW18 4AX


Técnico Certificado de soporte y garantía electrónica
www.vevor.com/support
PLACA FLUORESCENTE LED
MODELO: A34 \ A46 \ A68
We continue to be committed to provide you tools with competitive price.
"Save Half", "Half Price" or any other similar expressions used by us only represents an
estimate of savings you might benefit from buying certain tools with us compared to the major
top brands and does not necessarily mean to cover all categories of tools offered by us. You
are kindly reminded to verify carefully when you are placing an order with us if you are
actually saving half in comparison with the top major brands.
- 1 -
MODELO: A34 \ A46 \ A68
Have product questions? Need technical support? Please feel free to
contact us:
Technical Support and E-Warranty Certificate
www.vevor.com/support
NEED HELP? CONTACT US!
This is the original instruction, please read all manual instructions
carefully before operating. VEVOR reserves a clear interpretation of our
user manual. The appearance of the product shall be subject to the
product you received. Please forgive us that we won't inform you again if
there are any technology or software updates on our product.
LED FLUORESCENT
PLATE

- 2 -
Estimado clientes ,
Hola , Gracias tú por comprar la placa fluorescente LED producida por nuestra
empresa. Después de abrir el paquete del producto , verifique si el producto está
en buenas condiciones , si los accesorios están completos y si Normalmente
puede brillar después de encender. Las instrucciones del producto son las
siguientes:
Advertencia: para reducir el riesgo de lesiones, el
usuario debe leer atentamente el manual de
instrucciones.
ELIMINACIÓN CORRECTA
Este producto está sujeto a la disposición de la
Directiva Europea 2012/19/CE. El símbolo que
muestra un contenedor con ruedas tachado indica
que el producto requiere recogida selectiva de
basura en la Unión Europea. Esto se aplica al
producto y a todos los accesorios marcados con
este símbolo. Los productos marcados como tales
no podrán desecharse con la basura doméstica
normal, sino que deberán llevarse a un punto de
recogida para el reciclaje de aparatos eléctricos y
electrónicos.
- 3 -
SCHEMATIC DIAGRAM OF THE CONNECTION
el fluorescente placa del enchufe modelo
Esquemático diagrama de la conexión de litio placa fluorescente electrica
Nota: 1. Cuando se utiliza, solo se puede conectar una fuente de alimentación y no
suministrar dos fuentes de alimentación al mismo tiempo.
2. Este producto no es resistente al agua, recomendado para uso en interiores.
A: Power supply: 1 Connect
2
Connect 3
B:Battery power supply: 4
Connect2 Connect 3
C: Battery charging: 1
Connect 5
A charge of 6 hours, full of
red light to
green

- 4 -
HOW TO USE HIGHLIGHTER
Sugerencia: Si la luz es oscura, se pueden agregar bordes blancos de 5 a
8 mm a los cuatro lados del vidrio.
REMOTE CONTROL USE METHOD
One step: rock
up and down
Two steps :
up and down
Three steps:
writing
1.Remove the transparent card from the remote control
before
use
2.The remote control must be aligned with the controller
3. The button above the controller can also control the
lighting
mode
4 . Color keys represent 7 fixed colors, and number keys

- 5 -
DIAGRAM OF V-BRACKET INSTALLATION
Causas de fallas comunes y soluciones
1
El control remoto
no responde
Motivos: ①: no retire la parte inferior de la lámina
aislante del control remoto ②: el control remoto no
está alineado con el controlador del producto;
Soluciones: ①: retire la parte inferior de la lámina
aislante del control remoto; ②: alinear el controlador
2
Los resaltadores
no imprimen tinta
Causa: No presionado en su lugar;
Solución: Agite hacia arriba y hacia abajo
verticalmente y presione varias veces hasta que se
acabe la tinta.
3
El expositor está
desequilibrado
después de la
instalación.
Causa: No está instalado correctamente;
Solución: batir las piezas de plástico en la parte
inferior del soporte hasta ajustar el equilibrio
Nota :
1: hacer no usar fuente de alimentación original no compatible ;
2: Los productos electrónicos tienen prohibido la lluvia;
3: Prohibir el uso de ambientes extremos ; (como: sobrecalentamiento ,
humedad y otros entornos )
4: cuando colgar para asegurar la firmeza del producto, evitar descendente
A=plate body fixing nut
B=bracketfixing extension
C=base Angle
D=supporrod
1. A(plate body retaining nut)and B(support
lever retaining nut).
2.
Insert D(bracket)into the four C(bottom
corner).

- 6 -
Información de la FCC
PRECAUCIÓN: ¡ Los cambios o modificaciones no aprobados expresamente por la parte
responsable del cumplimiento podrían anular la autoridad del usuario para operar el equipo!
Este dispositivo cumple con la Parte 15 de las normas de la FCC. La operación está sujeta a
las dos condiciones siguientes:
1) Este producto puede causar interferencias perjudiciales.
2) Este producto debe aceptar cualquier interferencia recibida, incluidas las interferencias
que puedan causar un funcionamiento no deseado.
ADVERTENCIA: Los cambios o modificaciones a este producto que no estén aprobados
expresamente por la parte responsable del cumplimiento podrían anular la autoridad del
usuario para operar el producto.
Nota: Este producto ha sido probado y cumple con los límites para un dispositivo digital
Clase B de conformidad con la Parte 15 de las reglas de la FCC. Estos límites están
diseñados para brindar una protección razonable contra interferencias dañinas en una
instalación residencial.
Este producto genera, usa y puede irradiar energía de radiofrecuencia y, si no se instala y
usa de acuerdo con las instrucciones, puede causar interferencias dañinas en las
comunicaciones por radio. Sin embargo, no hay garantía de que no se produzcan
interferencias en una instalación en particular. Si este producto causa interferencias dañinas
en la recepción de radio o televisión, lo cual se puede determinar apagando y encendiendo
el producto, se recomienda al usuario que intente corregir la interferencia mediante una o
más de las siguientes medidas.
· Reorientar o reubicar la antena receptora.
· Aumentar la distancia entre el producto y el receptor.
· Conecte el producto a una toma de corriente de un circuito diferente al que está conectado
el receptor.
· Consulte al distribuidor o a un técnico experimentado en radio/TV para obtener ayuda.
Fabricante: Shanghaimuxinmuyeyouxiangongsi
Dirección: Shuangchenglu 803nong11hao1602A-1609shi, baoshanqu, shanghai
200000 CN.
- 7 -
Importado a AUS: SIHAO PTY LTD. 1 ROKEVA STREET ASTWOOD NSW 2122
Australia
Importado a EE. UU.: Sanven Technology Ltd. Suite 250, 9166 Anaheim Place,
Rancho Cucamonga, CA 91730
REP
EC
E-CrossStu GmbH
Mainzer Landstr.69, 60329
Frankfurt am Main.
REP
UK
YH CONSULTING LIMITED.
C/O YH Consulting Limited Office 147,
Centurion House, London Road,
Staines-upon-Thames, Surrey, TW18 4AX


Technisch Support- und E-Garantiezertifikat
www.vevor.com/support
LED-LEUCHTSTOFFPLATTE
MODELL: A34 \ A46 \ A68
We continue to be committed to provide you tools with competitive price.
"Save Half", "Half Price" or any other similar expressions used by us only represents an
estimate of savings you might benefit from buying certain tools with us compared to the major
top brands and does not necessarily mean to cover all categories of tools offered by us. You
are kindly reminded to verify carefully when you are placing an order with us if you are
actually saving half in comparison with the top major brands.

- 1 -
MODELL: A34 \ A46 \ A68
Have product questions? Need technical support? Please feel free to
contact us:
Technical Support and E-Warranty Certificate
www.vevor.com/support
NEED HELP? CONTACT US!
This is the original instruction, please read all manual instructions
carefully before operating. VEVOR reserves a clear interpretation of our
user manual. The appearance of the product shall be subject to the
product you received. Please forgive us that we won't inform you again if
there are any technology or software updates on our product.
LED FLUORESCENT
PLATE
- 2 -
Lieb Kunden ,
Hallo , danke Du für den Kauf der hergestellten LED-Leuchtstoffplatte durch unser
Unternehmen. Überprüfen Sie nach dem Öffnen der Produktverpackung , ob das
Produkt in gutem Zustand ist , ob das Zubehör vollständig ist und ob
Normalerweise kann es nach dem Einschalten leuchten. Die Produktanweisungen
lauten wie folgt:
Warnung: Um das Verletzungsrisiko zu verringern,
muss der Benutzer die Bedienungsanleitung
sorgfältig lesen.
RICHTIGE ENTSORGUNG
Dieses Produkt unterliegt der europäischen
Richtlinie 2012/19/EG. Das Symbol einer
durchgestrichenen Mülltonne weist darauf hin,
dass das Produkt in der Europäischen Union einer
getrennten Müllsammlung bedarf. Dies gilt für das
Produkt und alle Zubehörteile, die mit diesem
Symbol gekennzeichnet sind. Als solche
gekennzeichnete Produkte dürfen nicht über den
normalen Hausmüll entsorgt werden, sondern
müssen an einer Sammelstelle für das Recycling
von Elektro- und Elektronikgeräten abgegeben
werden
- 3 -
SCHEMATIC DIAGRAM OF THE CONNECTION
Die fluoreszierend Platte des Steckers Modell
Schematisch Diagramm von die Verbindung von Lithium elektrische
Leuchtstoffplatte
Hinweis: 1. Bei Verwendung kann nur ein Netzteil angeschlossen werden und es
dürfen nicht zwei Netzteile gleichzeitig versorgt werden.
2.Dieses Produkt ist nicht wasserdicht und wird für den Innenbereich empfohlen.
A: Power supply: 1 Connect
2
Connect 3
B:Battery power supply: 4
Connect2 Connect 3
C: Battery charging: 1
Connect 5
A charge of 6 hours, full of
red light to
green

- 4 -
HOW TO USE HIGHLIGHTER
Anregung: Wenn das Licht dunkel ist, können an den vier Seiten des
Glases 5–8 mm weiße Kanten hinzugefügt werden.
REMOTE CONTROL USE METHOD
One step: rock
up and down
Two steps :
up and down
Three steps:
writing
1.Remove the transparent card from the remote control
before
use
2.The remote control must be aligned with the controller
3. The button above the controller can also control the
lighting
mode
4 . Color keys represent 7 fixed colors, and number keys
- 5 -
DIAGRAM OF V-BRACKET INSTALLATION
Häufige Fehlerursachen und Lösungen
1
Fernbedienung
reagiert nicht
Gründe: ①: Entfernen Sie nicht die Unterseite der
Isolierfolie der Fernbedienung. ②: Die Fernbedienung
ist nicht auf den Produktcontroller ausgerichtet.
Lösungen: ①: Entfernen Sie die Unterseite der
Isolierfolie der Fernbedienung. ②: Richten Sie den
Controller aus
2
Textmarker
drucken keine
Tinte
Ursache: Nicht festgedrückt;
Lösung: Vertikal auf und ab schütteln und mehrmals
drücken, bis die Tinte austritt
3
Das
Präsentationsreg
al ist nach der
Installation
unausgeglichen
Ursache: Es ist nicht richtig installiert;
Lösung: Schlagen Sie auf die Kunststoffteile an der
Unterseite der Halterung, bis die Balance eingestellt ist
Notiz :
1: Tun nicht verwenden nicht unterstützendes Original-Netzteil;
2: Elektronische Produkte sind vor Regen geschützt.
3: Verboten Die Einsatz extremer Umgebungen ; (wie zum Beispiel:
Überhitzung , Feuchtigkeit und andere umgebungen )
A=plate body fixing nut
B=bracketfixing extension
C=base Angle
D=supporrod
1. A(plate body retaining nut)and B(support
lever retaining nut).
2.
Insert D(bracket)into the four C(bottom
corner).

- 6 -
4: Wann Hängen, um die Produktfestigkeit zu gewährleisten, vermeiden
fallen
FCC-Informationen
VORSICHT: Änderungen oder Modifikationen, die nicht ausdrücklich von der für die
Einhaltung verantwortlichen Partei genehmigt wurden, können zum Erlöschen der
Berechtigung des Benutzers zum Betrieb des Geräts führen!
Dieses Gerät entspricht Teil 15 der FCC-Bestimmungen. Der Betrieb unterliegt den
folgenden zwei Bedingungen:
1) Dieses Produkt kann schädliche Störungen verursachen.
2) Dieses Produkt muss alle empfangenen Störungen akzeptieren, einschließlich Störungen,
die zu unerwünschtem Betrieb führen können.
WARNUNG: Änderungen oder Modifikationen an diesem Produkt, die nicht ausdrücklich von
der für die Einhaltung verantwortlichen Partei genehmigt wurden, können zum Erlöschen der
Berechtigung des Benutzers zum Betrieb des Produkts führen.
Hinweis: Dieses Produkt wurde getestet und entspricht den Grenzwerten für ein digitales
Gerät der Klasse B gemäß Teil 15 der FCC-Bestimmungen. Diese Grenzwerte sollen einen
angemessenen Schutz vor schädlichen Störungen in einer Wohnanlage bieten.
Dieses Produkt erzeugt und verwendet Hochfrequenzenergie und kann diese ausstrahlen.
Wenn es nicht gemäß den Anweisungen installiert und verwendet wird, kann es schädliche
Störungen der Funkkommunikation verursachen. Es gibt jedoch keine Garantie dafür, dass
bei einer bestimmten Installation keine Störungen auftreten. Wenn dieses Produkt
schädliche Störungen beim Radio- oder Fernsehempfang verursacht, was durch Aus- und
Einschalten des Produkts festgestellt werden kann, wird dem Benutzer empfohlen, zu
versuchen, die Störung durch eine oder mehrere der folgenden Maßnahmen zu beheben.
· Richten Sie die Empfangsantenne neu aus oder versetzen Sie sie.
· Erhöhen Sie den Abstand zwischen Produkt und Empfänger.
· Schließen Sie das Produkt an eine Steckdose an, die zu einem anderen Stromkreis gehört
als dem, an den der Empfänger angeschlossen ist.
· Wenden Sie sich für Hilfe an den Händler oder einen erfahrenen Radio-/TV-Techniker.
Hersteller: Shanghaimuxinmuyeyouxiangongsi
- 7 -
Adresse: Shuangchenglu 803nong11hao1602A-1609shi, baoshanqu, Shanghai
200000 CN.
Importiert nach AUS: SIHAO PTY LTD. 1 ROKEVA STREETEASTWOOD NSW
2122 Australien
In die USA importiert: Sanven Technology Ltd. Suite 250, 9166 Anaheim Place,
Rancho Cucamonga, CA 91730
REP
EC
E-CrossStu GmbH
Mainzer Landstr.69, 60329
Frankfurt am Main.
REP
UK
YH CONSULTING LIMITED.
C/O YH Consulting Limited Office 147,
Centurion House, London Road,
Staines-upon-Thames, Surrey, TW18 4AX


Technique Assistance et certificat de garantie électronique
www.vevor.com/support
PLAQUE FLUORESCENTE LED
MODÈLE: A34 \ A46 \ A68
We continue to be committed to provide you tools with competitive price.
"Save Half", "Half Price" or any other similar expressions used by us only represents an
estimate of savings you might benefit from buying certain tools with us compared to the major
top brands and does not necessarily mean to cover all categories of tools offered by us. You
are kindly reminded to verify carefully when you are placing an order with us if you are
actually saving half in comparison with the top major brands.

- 1 -
MODÈLE: A34 \ A46 \ A68
Have product questions? Need technical support? Please feel free to
contact us:
Technical Support and E-Warranty Certificate
www.vevor.com/support
NEED HELP? CONTACT US!
This is the original instruction, please read all manual instructions
carefully before operating. VEVOR reserves a clear interpretation of our
user manual. The appearance of the product shall be subject to the
product you received. Please forgive us that we won't inform you again if
there are any technology or software updates on our product.
LED FLUORESCENT
PLATE
- 2 -
Cher clients ,
Bonjour , merci toi pour l'achat de la plaque fluorescente LED produite par notre
société. Après avoir ouvert l'emballage du produit , vérifiez si le produit est en bon
état , si les accessoires sont complets et si il peut normalement briller après la
mise sous tension. Les instructions du produit sont les suivantes :
Avertissement : Pour réduire le risque de
blessure, l'utilisateur doit lire attentivement le
manuel d'instructions.
ÉLIMINATION CORRECTE
Ce produit est soumis aux dispositions de la
directive européenne 2012/19/CE. Le symbole
représentant une poubelle barrée indique que le
produit nécessite une collecte sélective des
déchets dans l'Union européenne. Ceci s'applique
au produit et à tous les accessoires marqués de
ce symbole. Les produits marqués comme tels ne
peuvent pas être jetés avec les ordures
ménagères normales, mais doivent être déposés
dans un point de collecte pour le recyclage des
appareils électriques et électroniques.
- 3 -
SCHEMATIC DIAGRAM OF THE CONNECTION
le fluorescent plaque de la fiche modèle
Schéma diagramme de la connexion de lithium plaque fluorescente électrique
Remarque : 1. Lorsqu'il est utilisé, une seule alimentation peut être connectée et ne
pas alimenter deux alimentations en même temps.
2. Ce produit n'est pas étanche, recommandé pour une utilisation en intérieur.
HOW TO USE HIGHLIGHTER
A: Power supply: 1 Connect
2
Connect 3
B:Battery power supply: 4
Connect2 Connect 3
C: Battery charging: 1
Connect 5
A charge of 6 hours, full of
red light to
green
- 4 -
Suggestion: Si la lumière est sombre, des bords blancs de 5 à 8 mm
peuvent être ajoutés aux quatre côtés du verre.
REMOTE CONTROL USE METHOD
One step: rock
up and down
Two steps :
up and down
Three steps:
writing
1.Remove the transparent card from the remote control
before
use
2.The remote control must be aligned with the controller
3. The button above the controller can also control the
lighting
mode
4 . Color keys represent 7 fixed colors, and number keys

- 5 -
DIAGRAM OF V-BRACKET INSTALLATION
Causes de panne courantes et solutions
1
La
télécommande
ne répond pas
Raisons : ① : ne retirez pas le bas de la feuille
d'isolation de la télécommande ② : la télécommande
n'est pas alignée avec le contrôleur du produit ;
Solutions : ① : retirez le bas de la feuille isolante de la
télécommande ; ② : alignez le contrôleur
2
Les surligneurs
n'impriment pas
l'encre
Cause : Pas pressé en place ;
Solution : agitez de haut en bas verticalement et
appuyez plusieurs fois jusqu'à ce que l'encre soit
épuisée.
3
Le présentoir est
déséquilibré
après l'installation
Cause : Il n'est pas installé correctement ;
Solution : battez les pièces en plastique au bas du
support jusqu'à ce que la balance soit ajustée.
Note :
1 : Faire pas utiliser alimentation d'origine non prise en charge ;
2 : Les produits électroniques sont interdits de pluie ;
3 : Interdire le utilisation d' environnements extrêmes ; (tel que: surchauffe ,
humidité et autres environnements )
4 : Quand suspendre pour assurer la fermeté du produit, éviter chute
A=plate body fixing nut
B=bracketfixing extension
C=base Angle
D=supporrod
1. A(plate body retaining nut)and B(support
lever retaining nut).
2.
Insert D(bracket)into the four C(bottom
corner).

- 6 -
Informations FCC
ATTENTION : Les changements ou modifications non expressément approuvés par la partie
responsable de la conformité pourraient annuler le droit de l'utilisateur à utiliser
l'équipement !
Cet appareil est conforme à la partie 15 des règles FCC. L’exploitation est soumise aux deux
conditions suivantes :
1) Ce produit peut provoquer des interférences nuisibles.
2) Ce produit doit accepter toute interférence reçue, y compris les interférences susceptibles
de provoquer un fonctionnement indésirable.
AVERTISSEMENT : les changements ou modifications apportés à ce produit non
expressément approuvés par la partie responsable de la conformité pourraient annuler
l'autorité de l'utilisateur à utiliser le produit.
Remarque : Ce produit a été testé et déclaré conforme aux limites d'un appareil numérique
de classe B conformément à la partie 15 des règles de la FCC. Ces limites sont conçues
pour fournir une protection raisonnable contre les interférences nuisibles dans une
installation résidentielle.
Ce produit génère, utilise et peut émettre de l'énergie radiofréquence et, s'il n'est pas installé
et utilisé conformément aux instructions, il peut provoquer des interférences nuisibles aux
communications radio. Cependant, rien ne garantit que des interférences ne se produiront
pas dans une installation particulière. Si ce produit provoque des interférences nuisibles à la
réception radio ou télé, ce qui peut être déterminé en éteignant et rallumant le produit,
l'utilisateur est encouragé à essayer de corriger les interférences en prenant une ou
plusieurs des mesures suivantes.
· Réorientez ou déplacez l'antenne de réception.
· Augmentez la distance entre le produit et le récepteur.
· Connectez le produit à une prise sur un circuit différent de celui auquel le récepteur est
connecté.
· Consultez le revendeur ou un technicien radio/TV expérimenté pour obtenir de l'aide.

- 7 -
Fabricant: Shanghaimuxinmuyeyouxiangongsi
Adresse : Shuangchenglu 803nong11hao1602A-1609shi, baoshanqu, Shanghai
200000 CN.
Importé en Australie : SIHAO PTY LTD. 1 ROKEVA STREETASTWOOD NSW
2122 Australie
Importé aux États-Unis : Sanven Technology Ltd. Suite 250, 9166 Anaheim
Place, Rancho Cucamonga, CA 91730
REP
EC
E-CrossStu GmbH
Mainzer Landstr.69, 60329
Frankfurt am Main.
REP
UK
YH CONSULTING LIMITED.
C/O YH Consulting Limited Office 147,
Centurion House, London Road,
Staines-upon-Thames, Surrey, TW18 4AX


Technisch Ondersteuning en e-garantiecertificaat
www.vevor.com/support
LED-TL-PLAAT
MODEL: A34 \ A46 \ A68
We continue to be committed to provide you tools with competitive price.
"Save Half", "Half Price" or any other similar expressions used by us only represents an
estimate of savings you might benefit from buying certain tools with us compared to the major
top brands and does not necessarily mean to cover all categories of tools offered by us. You
are kindly reminded to verify carefully when you are placing an order with us if you are
actually saving half in comparison with the top major brands.

MODEL: A34 \ A46 \ A68
Have product questions? Need technical support? Please feel free to
contact us:
Technical Support and E-Warranty Certificate
www.vevor.com/support
NEED HELP? CONTACT US!
This is the original instruction, please read all manual instructions
carefully before operating. VEVOR reserves a clear interpretation of our
user manual. The appearance of the product shall be subject to the
product you received. Please forgive us that we won't inform you again if
there are any technology or software updates on our product.
LED FLUORESCENT
PLATE

Beste klanten ,
Hallo , bedankt Jij voor het kopen van de geproduceerde LED-fluorescentieplaat
door ons bedrijf. Controleer na het openen van de productverpakking of het
product in goede staat is , of de accessoires compleet zijn en of het kan normaal
gesproken gloeien nadat het is ingeschakeld. De instructies van het product zijn
als volgt:
Waarschuwing-Om het risico op letsel te
verminderen, moet de gebruiker de handleiding
zorgvuldig lezen.
CORRECTE VERWIJDERING
Dit product valt onder de Europese Richtlijn
2012/19/EG. Het symbool met een
doorgestreepte afvalcontainer geeft aan dat het
product in de Europese Unie een aparte
afvalinzameling vereist. Dit geldt voor het product
en alle accessoires die met dit symbool zijn
gemarkeerd. Producten die als zodanig
gemarkeerd zijn, mogen niet bij het normale
huisvuil worden weggegooid, maar moeten naar
een inzamelpunt voor recycling van elektrische en
elektronische apparaten worden gebracht
SCHEMATIC DIAGRAM OF THE CONNECTION
de fluorescerend plaat van de stekker model
Schematisch diagram van de verbinding van lithium elektrische fluorescerende
plaat
Opmerking: 1. Bij gebruik kan er slechts één voeding worden aangesloten en mogen
er niet tegelijkertijd twee voedingen worden gevoed.
2. Dit product is niet waterdicht, aanbevolen voor gebruik binnenshuis.
A: Power supply: 1 Connect
2
Connect 3
B: Battery power supply: 4
Connect2 Connect 3
C: Battery charging: 1
Connect 5
A charge of 6 hours, full of
red light to
green
HOW TO USE HIGHLIGHTER
Suggestie: Als het licht donker is, kunnen er witte randen van 5~8 mm aan
de vier zijden van het glas worden toegevoegd.
REMOTE CONTROL USE METHOD
DIAGRAM OF V-BRACKET INSTALLATION
One step: rock
up and down
Two steps :
up and down
Three steps:
writing
1.Remove the transparent card from the remote control
before
use
2.The remote control must be aligned with the controller
3. The button above the controller can also control the
lighting
mode
4 . Color keys represent 7 fixed colors, and number keys
Veel voorkomende storingsoorzaken en oplossingen
1
Afstandsbedieni
ng reageert niet
Redenen: ①: verwijder de onderkant van het
isolatieblad van de afstandsbediening niet. ②: de
afstandsbediening is niet uitgelijnd met de
productcontroller;
Oplossingen: ①: verwijder de onderkant van het
isolatieblad van de afstandsbediening; ②: lijn de
controller uit
2
Markeerstiften
drukken geen inkt
af
Oorzaak: Niet op zijn plaats gedrukt;
Oplossing: Verticaal op en neer schudden en
meerdere keren drukken totdat de inkt uit is
3
Het displayrek is
na installatie uit
balans
Oorzaak: Het is niet correct geïnstalleerd;
Oplossing: sla op de plastic delen aan de onderkant
van de beugel totdat de balans is aangepast
Opmerking :
1: Doen niet gebruik niet - ondersteunende originele voeding;
2: Elektronische producten zijn verboden tegen regen;
3: Verbieden de gebruik van extreme omgevingen ; (zoals: oververhitting ,
vochtigheid en andere omgevingen )
4: Wanneer hangen om de stevigheid van het product te garanderen, vermijd
vallen
A=plate body fixing nut
B=bracketfixing extension
C=base Angle
D=supporrod
1. A(plate body retaining nut)and B(support
lever retaining nut).
2.
Insert D(bracket)into the four C(bottom
corner).

FCC-informatie
LET OP: Wijzigingen of aanpassingen die niet uitdrukkelijk zijn goedgekeurd door de partij
die verantwoordelijk is voor naleving kunnen de bevoegdheid van de gebruiker om de
apparatuur te bedienen ongeldig maken!
Dit apparaat voldoet aan Deel 15 van de FCC-regels. De werking is onderworpen aan de
volgende twee voorwaarden:
1) Dit product kan schadelijke interferentie veroorzaken.
2)Dit product moet alle ontvangen interferentie accepteren, inclusief interferentie die een
ongewenste werking kan veroorzaken.
WAARSCHUWING: Wijzigingen of aanpassingen aan dit product die niet uitdrukkelijk zijn
goedgekeurd door de partij die verantwoordelijk is voor naleving kunnen de bevoegdheid
van de gebruiker om het product te bedienen ongeldig maken.
Opmerking: Dit product is getest en voldoet aan de limieten voor een digitaal apparaat van
Klasse B overeenkomstig Deel 15 van de FCC-regels. Deze limieten zijn bedoeld om
redelijke bescherming te bieden tegen schadelijke interferentie in een residentiële installatie.
Dit product genereert, gebruikt en kan radiofrequentie-energie uitstralen, en als het niet
wordt geïnstalleerd en gebruikt in overeenstemming met de instructies, kan het schadelijke
interferentie aan radiocommunicatie veroorzaken. Er is echter geen garantie dat er geen
interferentie zal optreden in een bepaalde installatie. Als dit product schadelijke interferentie
veroorzaakt aan radio- of televisieontvangst, wat kan worden vastgesteld door het product
uit en weer in te schakelen, wordt de gebruiker aangeraden te proberen de interferentie te
corrigeren door een of meer van de volgende maatregelen.
· Heroriënteer of verplaats de ontvangstantenne.
· Vergroot de afstand tussen het product en de ontvanger.
· Sluit het product aan op een stopcontact op een ander circuit dan dat waarop de ontvanger
is aangesloten.
· Raadpleeg de dealer of een ervaren radio-/tv-technicus voor hulp.

Fabrikant: Shanghaimuxinmuyeyouxiangongsi
Adres: Shuangchenglu 803nong11hao1602A-1609shi, baoshanqu, shanghai
200000 CN.
Geïmporteerd naar AUS: SIHAO PTY LTD. 1 ROKEVA STREETEASTWOOD
NSW 2122 Australië
Geïmporteerd naar de VS: Sanven Technology Ltd. Suite 250, 9166 Anaheim
Place, Rancho Cucamonga, CA 91730
REP
EC
E-CrossStu GmbH
Mainzer Landstr.69, 60329
Frankfurt am Main.
REP
UK
YH CONSULTING LIMITED.
C/O YH Consulting Limited Office 147,
Centurion House, London Road,
Staines-upon-Thames, Surrey, TW18 4AX


Teknisk Support och e-garanticertifikat
www.vevor.com/support
LED FLUORESCERANDE PLATTA
MODELL: A34 \ A46 \ A68
We continue to be committed to provide you tools with competitive price.
"Save Half", "Half Price" or any other similar expressions used by us only represents an
estimate of savings you might benefit from buying certain tools with us compared to the major
top brands and does not necessarily mean to cover all categories of tools offered by us. You
are kindly reminded to verify carefully when you are placing an order with us if you are
actually saving half in comparison with the top major brands.
- 1 -
MODELL: A34 \ A46 \ A68
Have product questions? Need technical support? Please feel free to
contact us:
Technical Support and E-Warranty Certificate
www.vevor.com/support
NEED HELP? CONTACT US!
This is the original instruction, please read all manual instructions
carefully before operating. VEVOR reserves a clear interpretation of our
user manual. The appearance of the product shall be subject to the
product you received. Please forgive us that we won't inform you again if
there are any technology or software updates on our product.
LED FLUORESCENT
PLATE
- 2 -
Kära kunder ,
Hej tack du för att köpa den producerade LED-lysrörsplattan av vårt företag.
Efter att ha öppnat produktförpackningen , kontrollera om produkten är i gott
skick , om tillbehören är kompletta och om det kan normalt lysa efter att ha slagits
på. Produktinstruktionerna är följande:
SCHEMATIC DIAGRAM OF THE CONNECTION
de fluorescerande pl ug - in - plattan modell
Varning - För att minska risken för skada måste
användaren läsa instruktionerna noggrant.
KORREKT AVFALLSHANTERING
Denna produkt omfattas av det europeiska
direktivet 2012/19/EG. Symbolen som visar en
soptunna korsad anger att produkten kräver
separat sophämtning i EU. Detta gäller för
produkten och alla tillbehör märkta med denna
symbol. Produkter märkta som sådana får inte
slängas tillsammans med vanligt hushållsavfall,
utan måste lämnas till en insamlingsplats för
återvinning av elektriska och elektroniska
apparater
- 3 -
Schema diagram av anslutningen av litium elektrisk fluorescerande platta
Obs: 1. När den används kan endast en strömkälla anslutas, och försörj inte två
nätaggregat samtidigt.
2.Denna produkt är inte vattentät, rekommenderas för inomhusbruk.
HOW TO USE HIGHLIGHTER
Förslag: Om ljuset är mörkt kan 5~8 mm vita kanter läggas till på glasets
fyra sidor.
A: Power supply: 1 Connect
2
Connect 3
B:Battery power supply: 4
Connect2 Connect 3
C: Battery charging: 1
Connect 5
A charge of 6 hours, full of
red light to
green
One step: rock
up and down
Two steps :
up and down
Three steps:
writing
- 4 -
REMOTE CONTROL USE METHOD
DIAGRAM OF V-BRACKET INSTALLATION
Vanliga felorsaker och lösningar
1
Fjärrkontrollen
svarar inte
Skäl: ① : ta inte bort botten av fjärrkontrollens
isoleringsark ② : fjärrkontrollen är inte inriktad med
produktkontrollern;
Lösningar: ①: ta bort botten av fjärrkontrollens
isoleringsark; ②: rikta in styrenheten
1.Remove the transparent card from the remote control
before
use
2.The remote control must be aligned with the controller
3. The button above the controller can also control the
lighting
mode
4 . Color keys represent 7 fixed colors, and number keys
A=plate body fixing nut
B=bracketfixing extension
C=base Angle
D=supporrod
1. A(plate body retaining nut)and B(support
lever retaining nut).
2.
Insert D(bracket)into the four C(bottom
corner).

- 5 -
2
Highlighters
skriver inte ut
bläck
Orsak: Inte pressad på plats;
Lösning: Skaka upp och ner vertikalt och tryck flera
gånger tills bläcket är slut
3
Displaystället är
obalanserat efter
installationen
Orsak: Den är inte korrekt installerad;
Lösning: slå plastdelarna i botten av fästet tills
balansen är justerad
Notera :
1: Gör inte använda sig av icke - stödjande original strömförsörjning;
2: Elektroniska produkter är förbjudna från regn;
3: Förbjud de användning av extrema miljöer ; (Till exempel: överhettning ,
fuktighet och andra miljöer )
4: När hängande för att säkerställa produktens fasthet, undvika faller
FCC-information
FÖRSIKTIGHET: Ändringar eller modifieringar som inte uttryckligen godkänts av den part
som ansvarar för efterlevnaden kan upphäva användarens behörighet att använda
utrustningen!
Denna enhet uppfyller del 15 av FCC-reglerna. Driften är föremål för följande två villkor:
1) Denna produkt kan orsaka skadliga störningar.
2) Denna produkt måste acceptera alla mottagna störningar, inklusive störningar som kan
orsaka oönskad funktion.
VARNING: Ändringar eller modifieringar av denna produkt som inte uttryckligen godkänts av
den part som är ansvarig för efterlevnaden kan upphäva användarens behörighet att
använda produkten.
Obs: Denna produkt har testats och befunnits överensstämma med gränserna för en digital
enhet av klass B i enlighet med del 15 av FCC-reglerna. Dessa gränser är utformade för att
ge rimligt skydd mot skadliga störningar i en bostadsinstallation.
Denna produkt genererar, använder och kan utstråla radiofrekvensenergi, och om den inte
installeras och används i enlighet med instruktionerna kan den orsaka skadliga störningar på
radiokommunikation. Det finns dock ingen garanti för att störningar inte kommer att inträffa i
en viss installation. Om denna produkt orsakar skadliga störningar på radio- eller
- 6 -
tv-mottagning, vilket kan fastställas genom att stänga av och på produkten, uppmanas
användaren att försöka korrigera störningen med en eller flera av följande åtgärder.
· Rikta om eller flytta mottagningsantennen.
· Öka avståndet mellan produkten och mottagaren.
· Anslut produkten till ett uttag på en annan krets än den som mottagaren är ansluten till.
· Kontakta återförsäljaren eller en erfaren radio/TV-tekniker för hjälp.
Tillverkare: Shanghaimuxinmuyeyouxiangongsi
Adress: Shuangchenglu 803nong11hao1602A-1609shi, baoshanqu, shanghai
200000 CN.
Importerad till AUS: SIHAO PTY LTD. 1 ROKEVA STREETEASTWOOD NSW
2122 Australien
Importerad till USA: Sanven Technology Ltd. Suite 250, 9166 Anaheim Place,
Rancho Cucamonga, CA 91730
REP
EC
E-CrossStu GmbH
Mainzer Landstr.69, 60329
Frankfurt am Main.
REP
UK
YH CONSULTING LIMITED.
C/O YH Consulting Limited Office 147,
Centurion House, London Road,
Staines-upon-Thames, Surrey, TW18 4AX


Tecnico Supporto e certificato di garanzia elettronica
www.vevor.com/support
PIASTRA LED FLUORESCENTE
MODELLO: A34 \ A46 \ A68
We continue to be committed to provide you tools with competitive price.
"Save Half", "Half Price" or any other similar expressions used by us only represents an
estimate of savings you might benefit from buying certain tools with us compared to the major
top brands and does not necessarily mean to cover all categories of tools offered by us. You
are kindly reminded to verify carefully when you are placing an order with us if you are
actually saving half in comparison with the top major brands.

- 1 -
MODELLO: A34 \ A46 \ A68
Have product questions? Need technical support? Please feel free to
contact us:
Technical Support and E-Warranty Certificate
www.vevor.com/support
NEED HELP? CONTACT US!
This is the original instruction, please read all manual instructions
carefully before operating. VEVOR reserves a clear interpretation of our
user manual. The appearance of the product shall be subject to the
product you received. Please forgive us that we won't inform you again if
there are any technology or software updates on our product.
LED FLUORESCENT
PLATE
- 2 -
Caro clienti ,
Ciao , grazie Voi per aver acquistato la piastra fluorescente LED prodotta dalla
nostra azienda. Dopo aver aperto la confezione del prodotto , verificare se il
prodotto è in buone condizioni , se gli accessori sono completi e se normalmente
può illuminarsi dopo l'accensione del prodotto, le istruzioni sono le seguenti:
Avvertenza: per ridurre il rischio di lesioni, l'utente
deve leggere attentamente il manuale di istruzioni.
CORRETTO SMALTIMENTO
Questo prodotto è soggetto alla Direttiva Europea
2012/19/CE. Il simbolo del bidone della
spazzatura barrato indica che nell'Unione
Europea il prodotto richiede la raccolta
differenziata dei rifiuti. Ciò vale per il prodotto e
tutti gli accessori contrassegnati da questo
simbolo. I prodotti contrassegnati come tali non
possono essere smaltiti con i normali rifiuti
domestici, ma devono essere portati in un punto di
raccolta per il riciclaggio di dispositivi elettrici ed
elettronici
- 3 -
SCHEMATIC DIAGRAM OF THE CONNECTION
IL fluorescente piastra del plug - in modello
Schema diagramma Di la connessione Di litio piastra fluorescente elettrica
Nota: 1. Quando utilizzato, è possibile collegare un solo alimentatore e non fornire
due alimentatori contemporaneamente.
2.Questo prodotto non è impermeabile, consigliato per uso interno.
HOW TO USE HIGHLIGHTER
A: Power supply: 1 Connect
2
Connect 3
B: Battery power supply: 4
Connect2 Connect 3
C: Battery charging: 1
Connect 5
A charge of 6 hours, full of
red light to
green
- 4 -
Suggerimento: Se la luce è scura, è possibile aggiungere bordi bianchi da
5~8 mm ai quattro lati del vetro.
REMOTE CONTROL USE METHOD
One step: rock
up and down
Two steps :
up and down
Three steps:
writing
1.Remove the transparent card from the remote control
before
use
2.The remote control must be aligned with the controller
3. The button above the controller can also control the
lighting
mode
4 . Color keys represent 7 fixed colors, and number keys

- 5 -
DIAGRAM OF V-BRACKET INSTALLATION
Cause comuni e soluzioni dei guasti
1
Il telecomando
non risponde
Motivi: ①: non rimuovere la parte inferiore del foglio
isolante del telecomando ②: il telecomando non è
allineato con il controller del prodotto;
Soluzioni: ①: rimuovere la parte inferiore del foglio
isolante del telecomando; ②: allineare il controller
2
Gli evidenziatori
non stampano
inchiostro
Causa: non premuto in posizione;
Soluzione: agitare verticalmente su e giù e premere
più volte fino alla fuoriuscita dell'inchiostro
3
Il espositore
risulta sbilanciato
dopo
l'installazione
Causa: non è installato correttamente;
Soluzione: battere le parti in plastica nella parte
inferiore della staffa fino a regolare il bilanciamento
Nota :
1: Fai non utilizzo alimentatore originale non supportato ;
2: I prodotti elettronici sono vietati dalla pioggia;
3: Proibire IL utilizzo di ambienti estremi ; (ad esempio: surriscaldamento ,
umidità e altri ambienti )
4: Quando appendere per garantire la fermezza del prodotto, evitare cadente
A=plate body fixing nut
B=bracketfixing extension
C=base Angle
D=supporrod
1. A(plate body retaining nut)and B(support
lever retaining nut).
2.
Insert D(bracket)into the four C(bottom
corner).

- 6 -
Informazioni FCC
ATTENZIONE: cambiamenti o modifiche non espressamente approvati dalla parte
responsabile della conformità potrebbero invalidare il diritto dell'utente a utilizzare
l'apparecchiatura!
Questo dispositivo è conforme alla Parte 15 delle norme FCC. Il funzionamento è soggetto
alle seguenti due condizioni:
1) Questo prodotto può causare interferenze dannose.
2)Questo prodotto deve accettare qualsiasi interferenza ricevuta, comprese le interferenze
che potrebbero causare un funzionamento indesiderato.
AVVERTENZA: cambiamenti o modifiche a questo prodotto non espressamente approvati
dalla parte responsabile della conformità potrebbero annullare l'autorità dell'utente a
utilizzare il prodotto.
Nota: questo prodotto è stato testato ed è risultato conforme ai limiti per un dispositivo
digitale di Classe B ai sensi della Parte 15 delle norme FCC. Questi limiti sono progettati per
fornire una protezione ragionevole contro interferenze dannose in un'installazione
residenziale.
Questo prodotto genera, utilizza e può irradiare energia in radiofrequenza e, se non installato
e utilizzato in conformità con le istruzioni, può causare interferenze dannose alle
comunicazioni radio. Tuttavia, non vi è alcuna garanzia che non si verifichino interferenze in
una particolare installazione. Se questo prodotto causa interferenze dannose alla ricezione
radiofonica o televisiva, cosa che può essere determinata spegnendo e accendendo il
prodotto, si consiglia all'utente di provare a correggere l'interferenza adottando una o più
delle seguenti misure.
· Riorientare o riposizionare l'antenna ricevente.
· Aumentare la distanza tra il prodotto e il ricevitore.
· Collegare il prodotto ad una presa su un circuito diverso da quello a cui è collegato il
ricevitore.
· Consultare il rivenditore o un tecnico radio/TV esperto per assistenza.
- 7 -
Produttore: Shanghaimuxinmuyeyouxiangongsi
Indirizzo: Shuangchenglu 803nong11hao1602A-1609shi, baoshanqu, shanghai
200000 CN.
Importato in AUS: SIHAO PTY LTD. 1 ROKEVA STREETEASTWOOD NSW
2122 Australia
Importato negli Stati Uniti: Sanven Technology Ltd. Suite 250, 9166 Anaheim
Place, Rancho Cucamonga, CA 91730
REP
EC
E-CrossStu GmbH
Mainzer Landstr.69, 60329
Frankfurt am Main.
REP
UK
YH CONSULTING LIMITED.
C/O YH Consulting Limited Office 147,
Centurion House, London Road,
Staines-upon-Thames, Surrey, TW18 4AX