
SCAN ME
Visit Our Website
PyleUSA.com
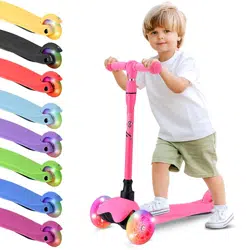
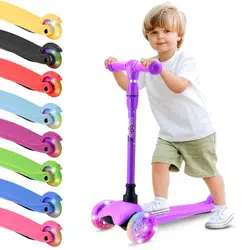
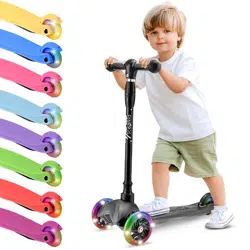
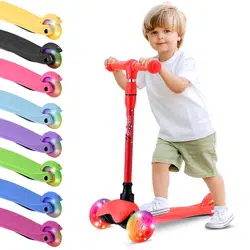
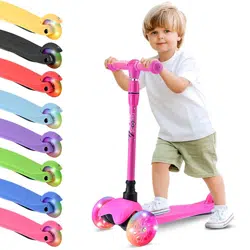
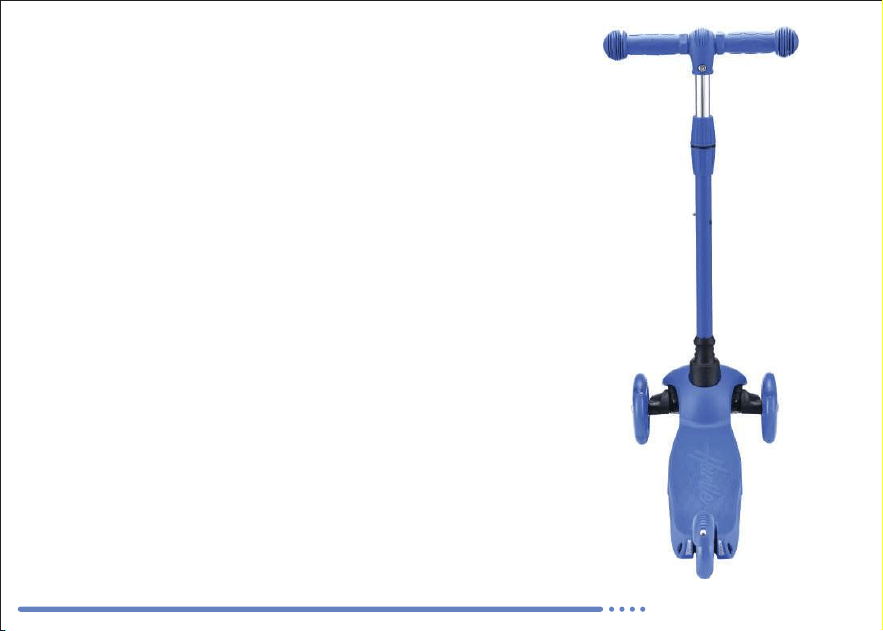
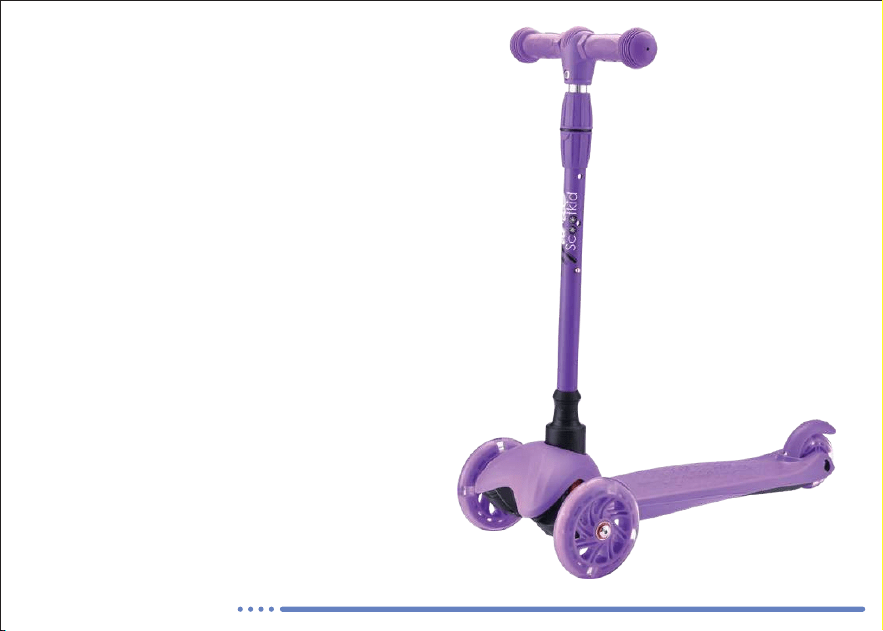
Mini Kickboard Scooter
USER GUIDE
Lightweight and Adjustable
AGES
2-5
ENG

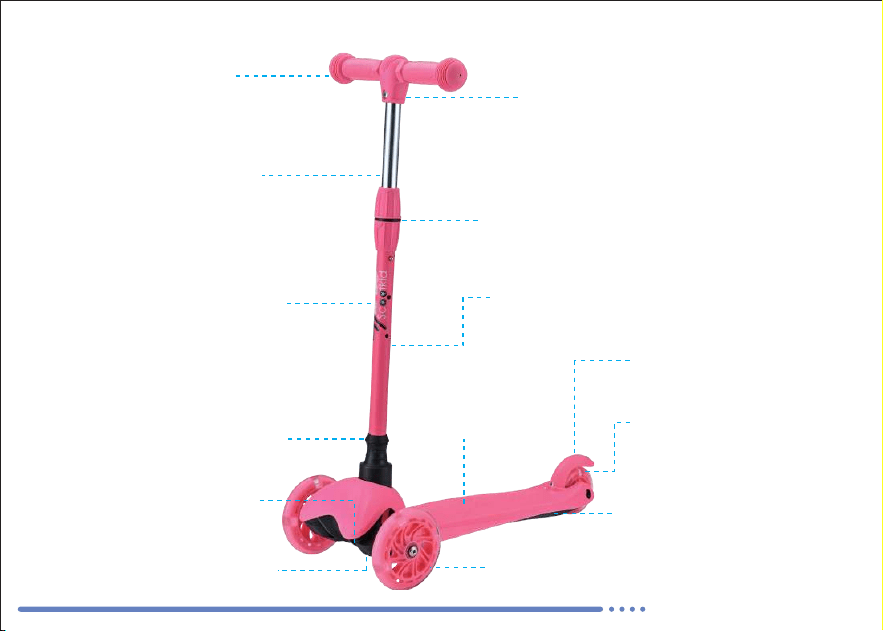
Features:
2
www.PyleUSA.com
• Mini Kick Scooter Fun
• 3-Wheel Tricycle ‘Trike’ Style
• Lightweight, Compact & Portable
• Multi-Color LED Wheel Lights Illuminate When
Rolling
• Adjustable T-Bar Handlebar Height
• Anti-Slip Wide Floor Foot-Base Deck
• Multi-Wheeled Scooter Stability
• Long-Lasting, Super Smooth Gliding Wheels
• Easy Maneuvering Lean-to-Steer Technology
• Lab Tested & Safety Certified
• Indoor/Outdoor Use
• Suitable for Ages 2-5
• Fun for Kids: Small Children & Young Toddlers

What's in the Box:
Technical Specs:
www.PyleUSA.com
3
• (1) Kids Scooter
• (1) Simple Tools for Assembly
• Construction Material: Aluminium Alloy+PP+Nylon+PU
• Wheel Type / Wheel Material: PU Wheel with LED light
• Recommended Age:2-5
• Weight Capacity: 44 lbs.
• Handlebar Height Setting: 25''- 26.57''- 28.55'' -inches
• Wheel Size:
• Front Wheel: 12 x 2,4 cm/ 4.72" x 0.94" -inches
• Rear Wheel: 8 x 2,4 cm/ 3.14" x 0.94" -inches
• Deck Size: 51 x 14 cm/ 20.08'' x 5.51'' -inches
• Net Weight/Gross Weight: 4.76/6.17 lbs./ 2.16 / 2.8 kg
• Total Scooter Size (L x W x H): 54.5 x 28.5 x 63.5 cm/ 21.46’’ x 11.22’’
x 25'' -inches

Have fun with your new scooter!
4
www.PyleUSA.com
Before operating this product, please read the
enclosed Operating Instructions completely.
Wear protective gear when riding.
Adult supervision is required for assembly and use.
GENERAL
Thank you for choosing our scooter.
You can rest assured that you have acquired a
high-quality product. We also offer you excellent
after-sales service. Before experiencing the
unique riding experience offered by your new
scooter, please read the attached instructions
carefully. Keep these instructions in a safe place
for future reference. Please note that the
product specifications are subject to change
without notice.

www.PyleUSA.com
5
Important Instructions and Warnings
IMPORTANT: Before allowing your child to use the scooter, please read the operating safety
instructions carefully. Ensure that the steering rod is fully engaged and all the screws are
tight. Also, make sure the wheels are correctly secured and show no signs of wear.
IMPORTANT: Repeatedly undoing the axle screws will reduce their effectiveness.
This may cause the screws to loosen by themselves. Always check the screws regularly and
tighten them before each use.
WARNING: Adult supervision is required. This product contains small parts when unassem-
bled.
WARNING: Use caution when riding, as skill is required to avoid falls or collisions that could
cause injury to the user or others.
WARNING: Wearing helmets and protective equipment for elbows, knees, wrists, and palms,
as well as shoes with flat rubber soles, is recommended.
WARNING: Securely close the quick-action lock and ensure it is correctly positioned.
WARNING: Do not ride down slopes.
WARNING: Children must be supervised.
WARNING: The brake may become hot.
WARNING: Maximum permissible weight: 44 lbs (20 kg).

Operating Safety Instructions
6
www.PyleUSA.com
• Your child should practice first to gain control of the scooter. We recommend practicing in a
traffic-free parking lot or open asphalt play area.
• Ensure that your child always wears a helmet, wrist, elbow, and knee pads, as well as shoes
with rubber soles. The scooter is not to be used in traffic. Maximum weight: 44 lbs (20 kg).
• Ensure that your child does not attempt any experiments or risky maneuvers.
• Riding style should always be adjusted to the rider’s personal skill level.
• Ensure that your child does not exceed speeds of 3 mph (5 km/h).
• Ensure that your child does not ride on roads, paths, or other places with motor vehicle
traffic. Do not allow any modifications or alterations to the scooter, as this may void the
warranty and compromise safety.
• Ensure that your child does not ride the scooter in the dark or at night.
• Only one child may ride the scooter at a time.
• Ensure that your child does not ride down steep hills. The brake is not designed to slow the
scooter from high downhill speeds. Always look ahead while riding so that you can quickly
stop if necessary. The brake can become hot with prolonged use. Avoid skin contact.
• The brake pad can get hot during use. Ensure that your child does not keep the brake on for
extended periods. Explain that direct skin contact with the brake pad may cause burns.
• The scooter must not be used on wet, oily, sandy, icy, rough, or uneven surfaces.
• Never use the scooter in wet conditions.
• Kerbstones and cobblestone pavements can affect your balance. It is better to dismount and
walk over them. Even lowered kerbstones can knock you off balance.
• Watch out for longitudinal and transverse grooves in the asphalt!
• The narrow wheels may get stuck in tram rails and manhole covers, causing them to lock up.
• Some metal parts may corrode over time, especially when used near the sea or left outdoors
frequently.
• The scooter may not be used on public roads. When using pedestrian walkways, stay on the
correct side according to traffic rules. Be mindful of pedestrians, wheelchair users, cyclists,
rollerbladers, and animals. Always observe traffic rules and regulations.
• The load capacity is up to 44 lbs (20 kg) of body weight.
• This scooter is for children aged 1 year and up.
• Always take care not to injure fingers when folding and unfolding the scooter.
• Explain to your child the risks and proper usage of the scooter.
• Supervise your child while they are using the scooter. HAVE FUN WITH YOUR NEW SCOOTER!
California Prop 65 Warning
WARNING:
This product may expose you to chemicals, which is known to
the state of California to cause cancer, birth defects and other
reproductive harm. Do not ingest.
For more info go to: www.P65warnings.ca.gov
www.PyleUSA.com
7

8
www.PyleUSA.com
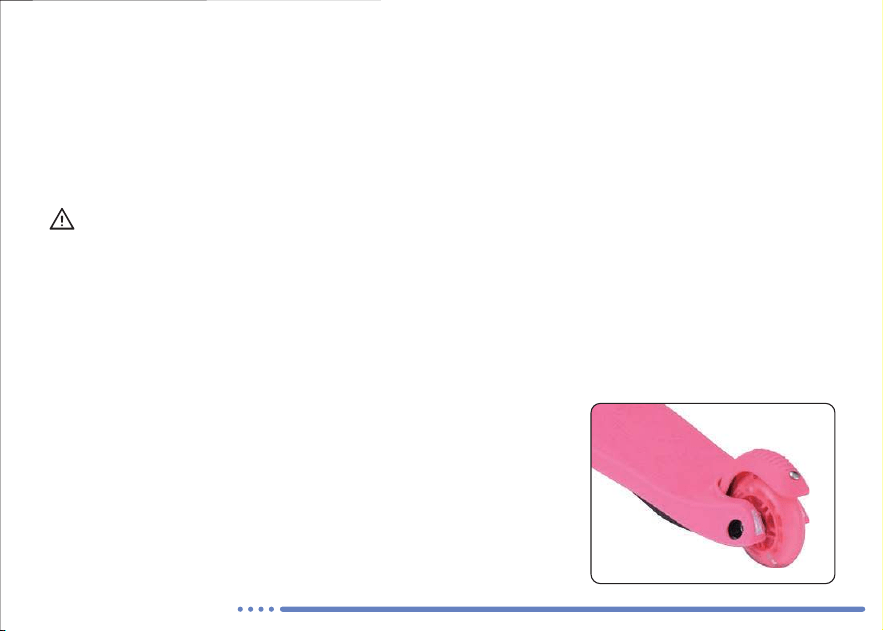
Brake
Attention: The brake and protection plate can get very hot.
Play Instructions
WARNING!
Hold onto the ends of the T-Bar or Ring Bar with your hands. You steer the board through slight
weight shifts. To get underway, stand with one leg (with the foot at approximately a 45° angle to
the direction of travel) on the board and push yourself off using the other leg. If you stand with
your right leg on the board, use your left leg to accelerate. If you stand with your left leg on the
board, use your right leg to accelerate. After gaining momentum, stand with your legs apart on
the board, so that both feet are approximately at a 45° angle to the direction of travel.
Enjoy your scooter!
Do not attempt or perform stunts, tricks, or ride/roll backward on your scooter.
It is not designed to withstand misuse, such as jumping, curb grinding, or any other type of
stunts. Racing, stunt riding, or other maneuvers, such as riding backward, increase the risk of
loss of control or may cause uncontrolled rider actions or reactions. Aggressive riding reduces
your ability to maneuver and control the scooter. Take necessary precautions and practice in a
safe area.
The brake is a friction brake designed only for reducing speed
on flat surfaces—avoid going downhill. Brake at low speed by
gently pressing your foot, resting far back on the board,
against the back wheel plate. You may need to push harder if
you are traveling faster. Be careful: if you push the brake too
hard and slow down too abruptly, you risk falling. It is best to
practice braking at walking speed.
Age: 1+ year (Recommended)
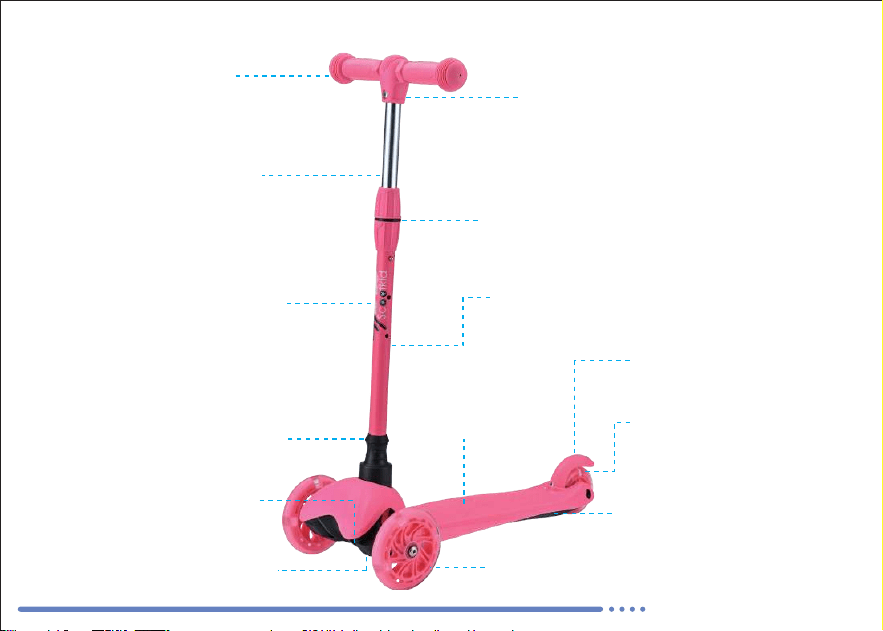
Handle Grip
Durable/Eco-friendly TPR
Adjustable T-Bar
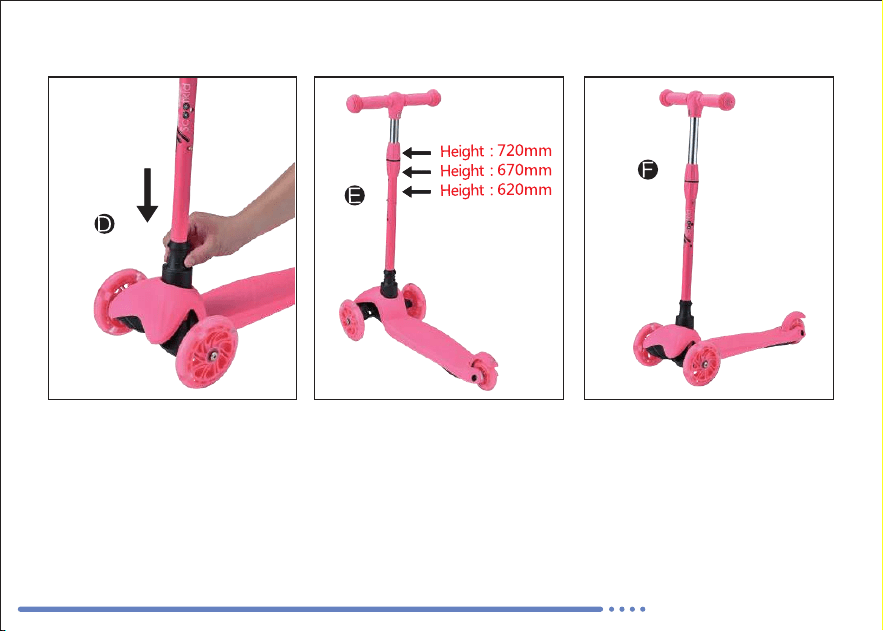
24.4 inches to 28.3 inches
(620mm to 720mm)
Non-Welding
Uses new technology instead of traditional welding.
It's more beautiful, more durable.
Color Logo/Label
Customized
Stronger Plastic Collar Clamp
Uses Reinforced GFK30 material instead of aluminum (ALU).
Metal burrs can easily hurt children's skin.
Non-Slip Deck
Handlebar/Steering Rod
Thickened aluminum (ALU) tube
Wider, more comfortable
Rear Brake
Colorful brake with stainless steel
Rear PU Wheel
4 PCS/3.15 inches (80mm)
Non-marking/Flash
Chassis
Reinforced GFK30 Stronger, with a
loading capacity of up to 44 lbs (20 kg)
Fixing Sleeve
Front PU Wheel
4.72 inches (120mm) Non-marking/Flash
Strengthens the stability of
the Handlebar and Scooter Body
Lower Mudguard
Strengthens protection of the chassis
More stable, more flexible
Lean-to-Steer Mechanism
www.PyleUSA.com
9
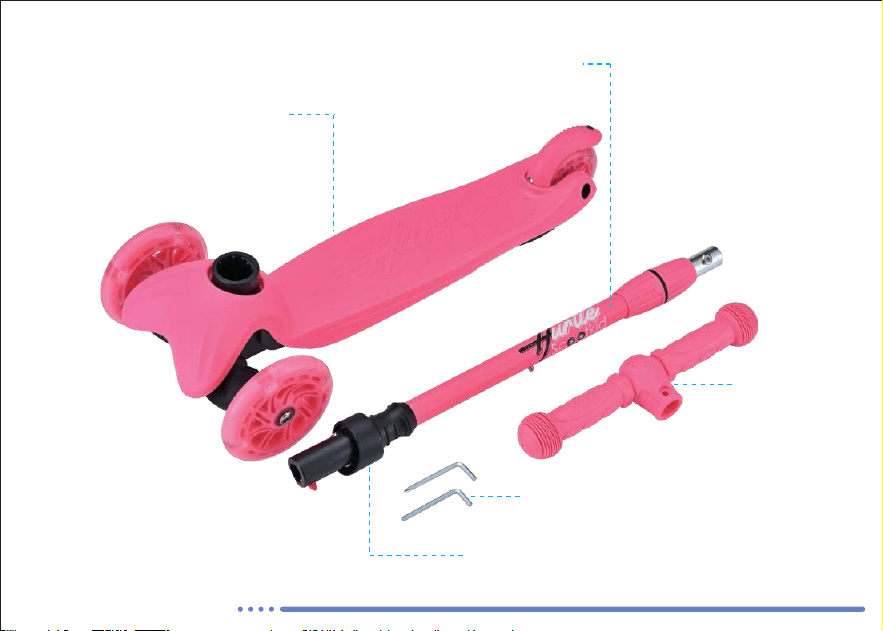
Handlebar/Steering Rod
Scooter Body
T-Bar
Allen Key
Fixing Sleeve
10
www.PyleUSA.com

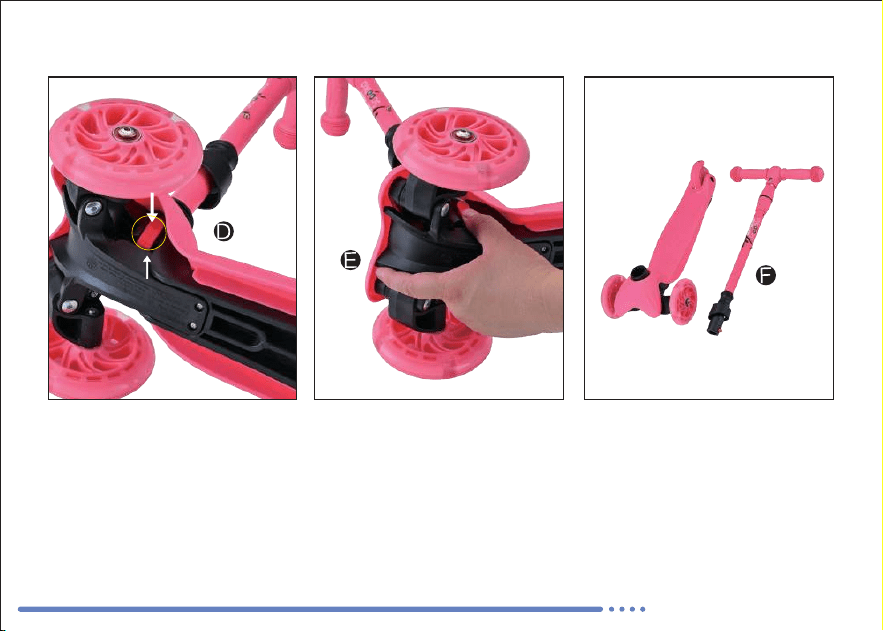
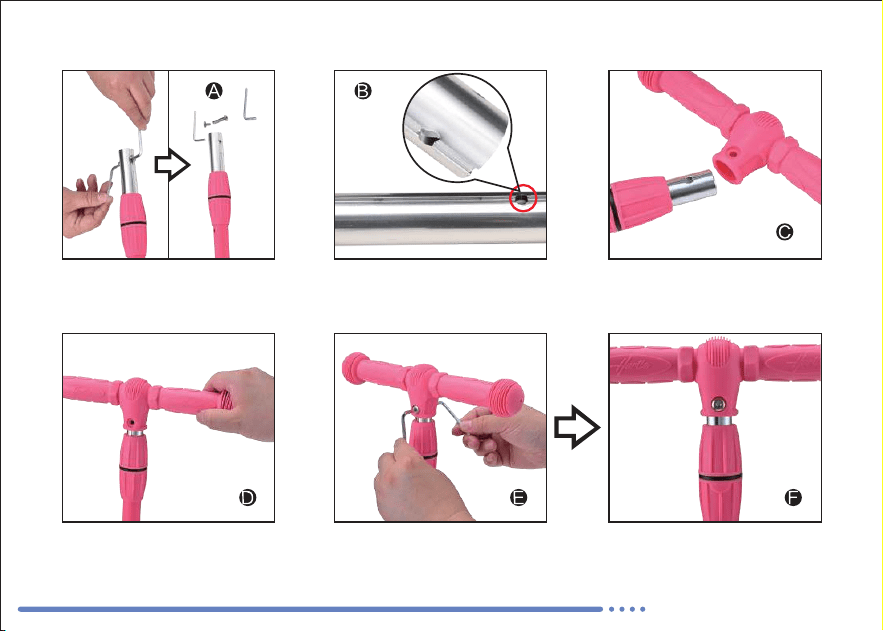
T-Bar Assembly
Insert it to the end, as shown
in the figure (D).
Use the Allen key to remove
the bolts and screws (A).
Align the grooved side of
the aluminum tube (B).
Locate the bump or arrow (C)
on the handlebar pipe gap.
Insert the bolts and screws and tighten them with the
Allen key (E & F).
www.PyleUSA.com
11

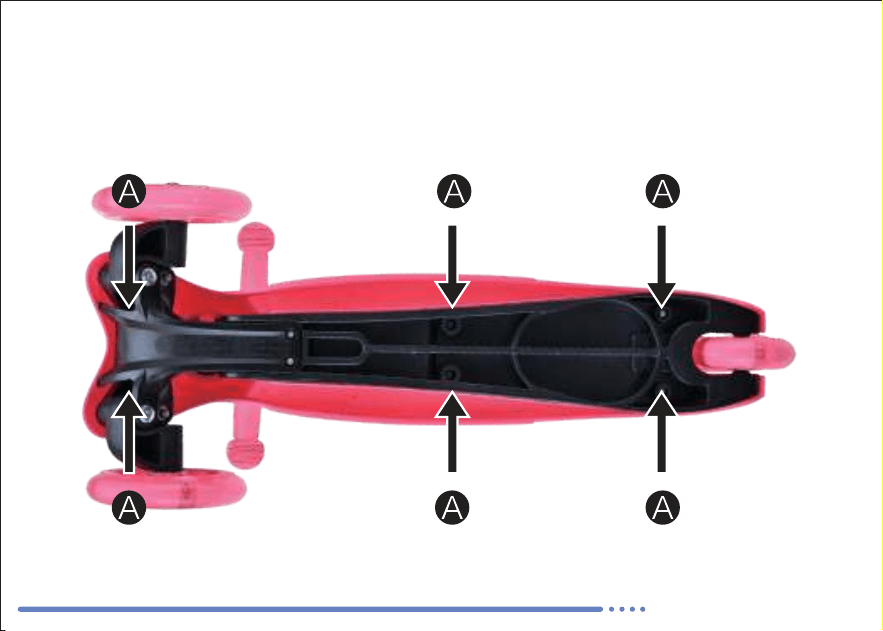
Scooter Assembly
WARNING!
Keep children at a safe distance while assembling the scooter to avoid accidental injuries.
12
www.PyleUSA.com
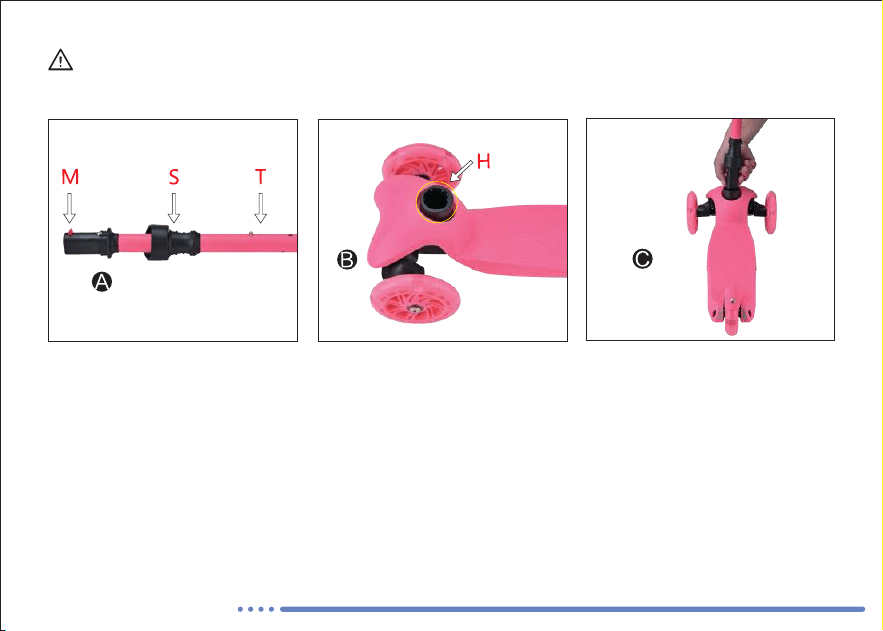
Press the Red Push Button (M)
and insert the Handlebar (T)
with the flat side facing
backward into the Scooter
Hole (H), as shown in Figure C.
Listen for a "click" sound to
ensure the Handlebar (T) is
securely locked in the Scooter
Body.
Locate the Scooter Hole (H), as
shown in Figure B.
Identify the Red Push Button
(M), Handlebar (T), and Fixing
Sleeve (S), a shown in Figure A.

Pull the Fixing Sleeve
downward to strengthen the
stability of the Handlebar (T)
and Scooter Body, as shown in
Figure D.
Adjust the Adjustable T-Bar
handlebar to one of three
heights to accompany your
child’s development, as shown
in Figure E.
Complete the Scooter
Assembly and Height
Adjustment, as shown in
Figure F.
Scooter Assembly
www.PyleUSA.com
13

Position the scooter as shown
in Figure A.
Pull the fixing sleeve upward, as shown in Figures B & C.
Scooter Disassembly
WARNING!
Keep children at a safe distance while disassembling the scooter to avoid accidental injuries.
14
www.PyleUSA.com
Scooter Disassembly
Press the Red Push Switch with one hand while using the
other hand to pull the handlebar, separating the Handle-
bar and Scooter Body, as shown in Figures D & E.
Complete the Scooter
Disassembly, as shown in
Figure F.
www.PyleUSA.com
15

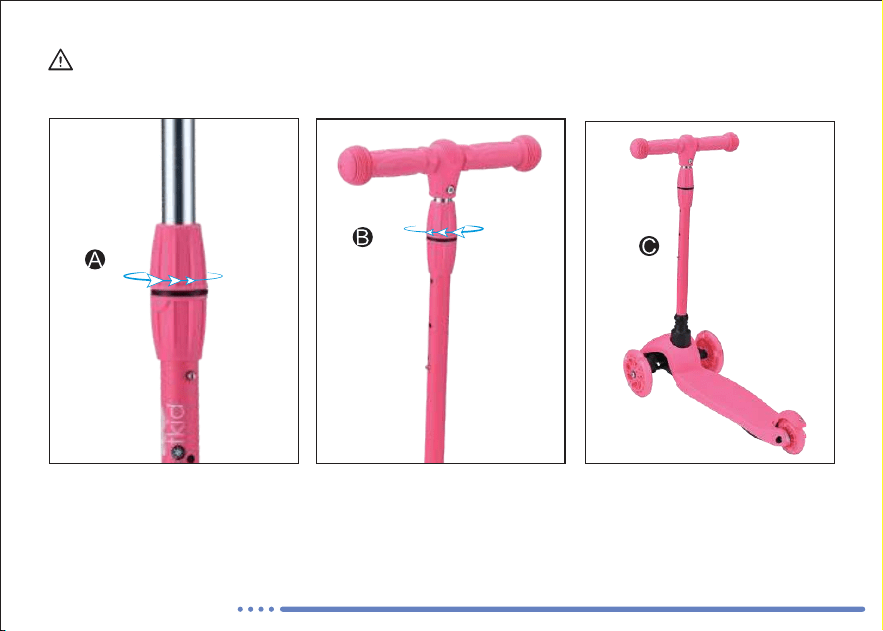
Loosen the Lever of the Collar
Clamp, as shown in Figure A.
Adjust the T-Bar according to
your child’s height. Tighten
the Collar Clamp to secure the
T-Bar after adjustment, as
shown in Figure B.
Lowest: 23 inches (585mm), as
shown in Figure C.
Height Adjustment
WARNING!
Tighten the Collar Clamp to secure the T-Bar after adjustment.
16
www.PyleUSA.com

Second: 24.4 inches (620mm), as shown
in Figure D.
Third: 26.4 inches (670mm), as shown in
Figure E.
Height Adjustment
www.PyleUSA.com
17

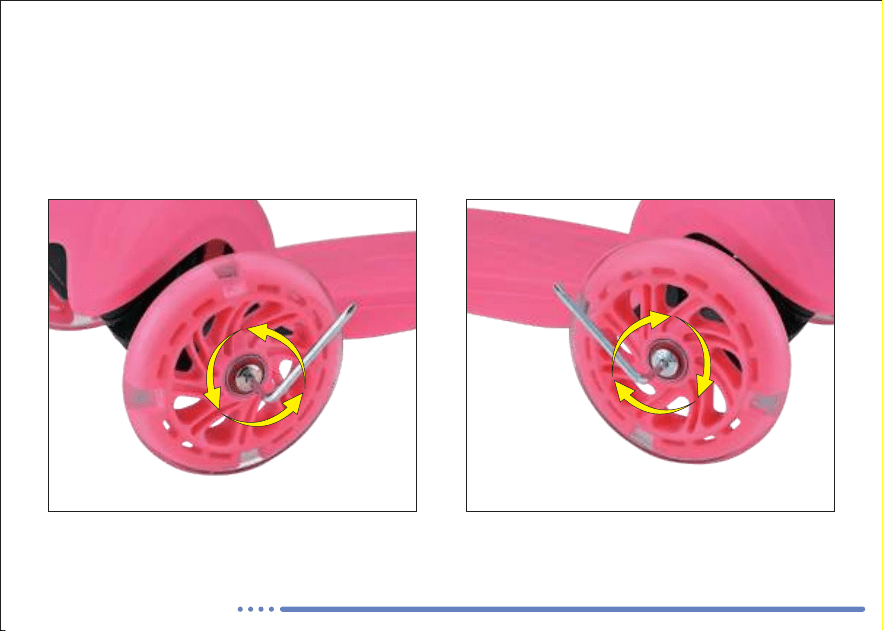
Left Wheel: Turn the Allen key count-
er-clockwise to loosen the screw.
Right Wheel: Turn the Allen key clockwise to
loosen the screw.
Maintenance Instructions
Change Wheel
18
www.PyleUSA.com
The wheels wear down over time and can be damaged if used excessively on rough surfaces.
The back wheel, on which the brake is applied, is particularly affected after several hours of
braking. For safety, check the wheels regularly and change them if necessary.
Change Deck
www.PyleUSA.com
19
1. Loosen the 6 screws (A) as shown in the picture (arrows).
2. Remove the deck and tighten the screws (A).
3. Check for a tight fit after traveling about 3 miles (5 km) with the new deck.
No one is authorized to change the terms of this warranty.
20
www.PyleUSA.com
Safety Tip
Warranty
The warranty does not cover:
The scooter is fun and safe when used correctly.
To avoid injury, wear protective gear like a helmet
and pads for your hands, elbows, and knees.
Wear shoes with a good grip to prevent slipping.
Always ride at a safe speed and stop if you encoun-
ter any potential hazards.
Your scooter comes with a three-month warranty
against defects in material and workmanship from
the date of purchase. If there's a problem, we'll
repair or replace your scooter. Contact your local
seller or distributor for assistance.
• Improper repairs or modifications
• Damage from external impacts (e.g., curbs,
obstacles)
• Misuse, unintended use, or normal wear and tear

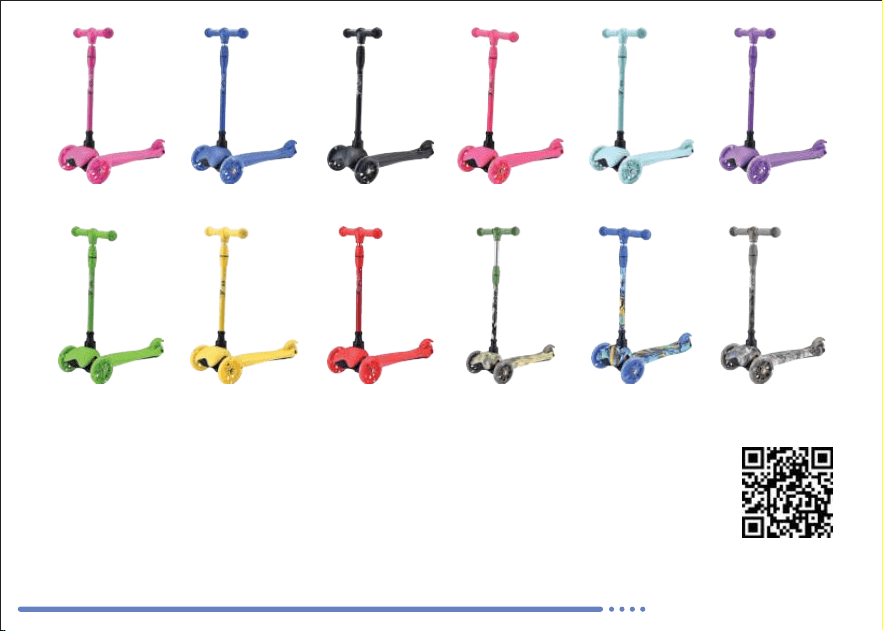
HURSC12PK
Model Number:
PyleUSA.com/pages/register
HURSC12PK
Start Here
HURSC11BL
HURSC13BK
HURSC14WM HURSC15TL
HURSC16PR
HURSC17GN HURSC18YL HURSC19RD HURSC21CM HURSC22GF HURSC23RT
Register Product
www.PyleUSA.com
21
Thank you for choosing PyleUSA. By registering your product, you ensure that you
receive the full benefits of our exclusive warranty and personalized customer support.
Complete the form to access expert support and to keep your PyleUSA purchase in
perfect condition.

Questions or Comments?
We are here to help!
Phone: 1.718.535.1800
PyleUSA.com/ContactUs

ESCANEAME
Visite nuestro
sitio web
PyleUSA.com
Mini Patinete Scooter
GUÍA DEL USUARIO
Ligero y ajustable
PARA LOS
NIÑOS DE
2-5
SPA
Características:
2
www.PyleUSA.com
• Divertido Mini Patinete Scooter
• Diseño de 3 ruedas tipo triciclo
• Ligero, compacto y portátil
• Ruedas LED multicolores que se iluminan durante el
movimiento
• Altura ajustable del manillar con barra en T
• Gran reposapiés antideslizante para mayor estabilidad
• Estabilidad del Scooter de Ruedas Múltiples
• Ruedas súper suaves y duraderas
• Tecnología de dirección basculante, fácil de maniobrar
• Seguridad probada y certificada en laboratorio
• Apto para uso interior y exterior
• Recomendado para niños de 2 a 5 años
• Diversión para niños: niños pequeños y pequeños
párvulos

Que hay en la caja:
Especificaciones técnicas:
www.PyleUSA.com
3
• (1) Scooter para niños
• (1) Kit de montaje sencillo
• Material de construcción: aleación de aluminio, PP, nailon, PU
• Tipo de ruedas/Material de las ruedas: Ruedas de PU con luces LED
• Edad recomendada: 2-5 años
• Capacidad de peso: 20 kg (44 libras)
• Altura del manillar ajustable: 25'' - 26.57'' - 28.55'' pulgadas (63.5 -
67.5 - 72.5 cm)
• Dimensiones de las ruedas:
• Rueda delantera: 12 x 2.4 cm (4.72" x 0.94" pulgadas)
• Rueda trasera: 8 x 2.4 cm (3.14" x 0.94" pulgadas)
• Dimensiones de la plataforma: 51 x 14 cm (20.08" x 5.51" pulgadas )
• Peso neto / Peso bruto: 4.76 / 6.17 libras (2.16 / 2.8 kg)
• Dimensiones totales del scooter (ancho x fondo x alto): 54.5 x 28.5
x 63.5 cm (21.46" x 11.22" x 25" pulgadas )

¡Diviértete con tu nuevo scooter!
4
www.PyleUSA.com
Antes de utilizar este producto, por favor lea completa-
mente las instrucciones de operación adjuntas.
Lleve equipo de protección durante el uso. Se requiere la
supervisión de un adulto tanto para el montaje como para el
uso.
GENERAL
Gracias por elegir nuestro scooter.
Puede estar seguro de que ha adquirido un
producto de alta calidad. También le ofrecemos
un excelente servicio posventa. Antes de
experimentar la experiencia única de conduc-
ción que le ofrece su nuevo scooter, lea
atentamente las instrucciones adjuntas. Guarde
estas instrucciones en un lugar seguro para
futuras consultas. Tenga en cuenta que las
especificaciones del producto están sujetas a
cambios sin previo aviso.

www.PyleUSA.com
5
Instrucciones y advertencias importantes
IMPORTANTE: Antes de permitir que su hijo utilice el scooter, por favor lea atentamente las
instrucciones de seguridad. Asegúrese de que el eje de dirección está completamente
encajado y que todos los tornillos estén bien apretados. Asegúrese también de que las
ruedas están bien sujetas y no muestran signos de desgaste.
IMPORTANTE: Aflojar repetidamente los tornillos del eje reduce su eficacia. Esto también
puede causar que los tornillos se aflojen solos. Compruébelos siempre con regularidad y
apriételos antes de cada uso.
ADVERTENCIA: Se requiere la supervisión de un adulto. Este producto contiene piezas
pequeñas cuando se desmonta.
ADVERTENCIA: Tenga cuidado al conducir, ya que se requiere cierta destreza para evitar
caídas o colisiones que podrían causar lesiones al usuario o a otras personas.
ADVERTENCIA: Se recomienda utilizar casco y equipo de protección para codos, rodillas,
muñecas y palmas de las manos, así como calzado con suela de goma.
ADVERTENCIA: Cierre firmemente el cierre rápido y asegúrese de que está colocado
correctamente.
ADVERTENCIA: No descienda por pendientes o cuestas pronunciadas.
ADVERTENCIA: Los niños deben estar siempre supervisados por un adulto.
ADVERTENCIA: El freno puede sobrecalentarse durante su uso.
ADVERTENCIA: Peso máximo autorizado: 44 libras (20 kg).

Instrucciones de seguridad de funcionamiento
6
www.PyleUSA.com
• Su hijo debe practicar primero para adquirir el control del scooter. Le recomendamos que
practique en un aparcamiento sin tráfico o en una zona de juegos abierta y asfaltada.
• Asegúrese de que su hijo lleve siempre casco, muñequeras, coderas y rodilleras, así como
calzado con suela de goma. El scooter no debe utilizarse en el tráfico. Peso máximo: 20 kg
(44 libras).
• Asegúrese de que su hijo no intente ningún experimento ni maniobra arriesgada.
• El estilo de conducción debe ajustarse siempre al nivel de habilidad personal del conductor.
• Asegúrese de que su hijo no supere velocidades de 5 km/h (3 mph).
• Asegúrese de que su hijo no circule por carreteras, caminos u otros lugares con tráfico de
vehículos motorizados. No permita que se realicen modificaciones o alteraciones en el
scooter, ya que pueden anular la garantía y comprometer la seguridad.
• Asegúrese de que su hijo no conduce el scooter en la oscuridad o por la noche.
• Sólo un niño puede conducir el scooter a la vez.
• Asegúrese de que su hijo no baje pendientes pronunciadas. El freno no está diseñado para
ralentizar el scooter a altas velocidades cuesta abajo. Mire siempre hacia delante mientras
conduce para poder detenerse rápidamente en caso necesario. El freno puede calentarse
con el uso prolongado. Evite el contacto con la piel.
• La pastilla de freno puede calentarse durante el uso. Asegúrese de que su hijo no mantiene
el freno accionado durante periodos prolongados. Explíquele que el contacto directo de la
piel con la pastilla de freno puede provocar quemaduras.
• El scooter no debe utilizarse sobre superficies mojadas, aceitosas, arenosas, heladas, rugosas
o irregulares.
• Nunca utilice el scooter en condiciones de humedad.
• Los bordillos y las aceras adoquinadas pueden afectar a su equilibrio. Es mejor desmontar y
caminar sobre ellos. Incluso los bordillos rebajados pueden hacerle perder el equilibrio.
• Tenga cuidado con los surcos longitudinales y transversales del asfalto.
• Las ruedas estrechas pueden atascarse en los raíles del tranvía y en las tapas de las alcantaril-
las, provocando su bloqueo.
• Algunas piezas metálicas pueden corroerse con el tiempo, especialmente si se utiliza cerca del
mar o se deja a la intemperie con frecuencia.
• El scooter no debe utilizarse en vías públicas. Cuando utilice las vías peatonales, manténgase
en el lado correcto de acuerdo con las normas de tráfico. Tenga en cuenta a los peatones,
usuarios de sillas de ruedas, ciclistas, patinadores y animales. Respete siempre las normas y
reglamentos de tráfico.
• La capacidad de carga es de hasta 20 kg (44 libras) de peso corporal.
• Este scooter es para niños a partir de 1 año.
• Tenga siempre cuidado de no hacerse daño en los dedos al plegar y desplegar el scooter.
• Explique a su hijo los riesgos y el uso adecuado del scooter.
• Supervise a su hijo mientras utiliza el scooter. ¡DIVIÉRTASE CON SU NUEVO SCOOTER!
Advertencia California Proposición 65
ADVERTENCIA:
Este producto puede exponerle a sustancias químicas que,
según el Estado de California, causan cáncer, defectos de
nacimiento y otros daños reproductivos. No ingerir.
Para más información: www.P65warnings.ca.gov
www.PyleUSA.com
7

8
www.PyleUSA.com
Freno
Atención: El freno y la placa de protección pueden calentarse mucho.
Instrucciones de juego
ADVERTENCIA!
Sujétese con las manos a los extremos de la barra T o de la barra de anillas. Dirija la tabla mediante
ligeros desplazamientos de peso. Para ponerse en marcha, colóquese con una pierna (con el pie en un
ángulo aproximado de 45° respecto al sentido de la marcha) sobre la tabla e impúlsese utilizando la
otra pierna. Si se coloca con la pierna derecha sobre la tabla, utilice la pierna izquierda para acelerar. Si
se coloca con la pierna izquierda sobre la tabla, utilice la pierna derecha para acelerar. Después de
coger impulso, colóquese con las piernas separadas sobre la tabla, de modo que ambos pies formen
aproximadamente un ángulo de 45° con respecto a la dirección de la marcha.
¡Disfrute de su scooter!
No intente ni realice acrobacias, trucos, ni conduzca/rodé hacia atrás en su
scooter. No está diseñado para soportar un uso incorrecto, como saltos, deslizarse en los bordillos o
cualquier otro tipo de acrobacias. Las carreras, la conducción acrobática u otras maniobras, como la
conducción hacia atrás, aumentan el riesgo de pérdida de control o pueden provocar acciones o
reacciones incontroladas del conductor. Una conducción agresiva reduce su capacidad para
maniobrar y controlar el scooter. Tome las precauciones necesarias y practique en una zona segura.
El freno es un freno de fricción diseñado únicamente para reducir la
velocidad en superficies planas-evite ir cuesta abajo. Frene a baja
velocidad presionando suavemente con el pie, apoyado muy atrás
en la tabla, contra la placa de la rueda trasera. Puede que tenga que
presionar con más fuerza si viaja más rápido. Tenga cuidado: si pisa
el freno con demasiada fuerza y frena bruscamente, corre el riesgo
de caerse. Es mejor practicar el frenado a velocidad de marcha.

Edad: 1+ año (recomendado)
Empuñadura
TPR duradero/respetuoso con el medio ambiente
Barra en T ajustable
24,4 pulgadas a 28,3 pulgadas
– (620 mm a 720 mm)
Sin soldadura
Utiliza una nueva tecnología en lugar de la soldadura
tradicional.
Es más bonito y duradero.
Color Logo/Etiqueta
Personalizado
Abrazadera de plástico más resistente
Utiliza material GFK30 reforzado en lugar de aluminio (ALU).
Las fresas metálicas pueden dañar fácilmente la piel de los niños.
Cubierta
antideslizante
Manillar/Dirección
Tubo de aluminio espesado (ALU)
Más ancho, más cómodo
Freno trasero
Freno de color con acero inoxidable
Rueda trasera PU
4 piezas/3,15 pulgadas (80 mm) -
4 PZ 80 mm
No deja marcas/Flash
Chasis
GFK30 reforzado más resistente, con una
capacidad de carga de hasta 20 kg (44 libras)
Manguito de fijación
Rueda delantera PU
4,72 pulgadas (120 mm) Sin marcas/Flash - 120 mm
Refuerza la estabilidad del manillar
y de la carrocería del Scooter
Guardabarros inferior
Refuerza la protección del chasis
Más estable, más flexible
Mecanismo Inclinarse
para dirigir
www.PyleUSA.com
9

Manillar/Dirección
Carrocería Scooter
Barra en T
Llave Allen
Manguito de fijación
10
www.PyleUSA.com

Montaje de la barra en T
Insértelo en el extremo,
como se muestra en la
figura (D).
Utilice la llave Allen para retirar
los pernos y tornillos (A).
Alinee el lado ranurado del
tubo de aluminio (B).
Localice la protuberancia o
flecha en la ranura del tubo del
manillar.
Introduzca los pernos y tornillos y fíjelos con la llave Allen
(E y F).
www.PyleUSA.com
11

Montaje del Scooter
¡ADVERTENCIA!
Mantenga a los niños a una distancia segura cuando monte el scooter para evitar lesiones accidentales.
12
www.PyleUSA.com
Pulse el botón rojo (M) e
inserte el manillar (T) con el
lado plano hacia atrás en el
orificio del scooter (H), como
se muestra en la figura C. Oirá
un "clic" cuando el manillar (T)
esté firmemente encajado en
el cuerpo del scooter.
Localice el orificio del scooter
(H), como se muestra en la
figura B.
Identifique el botón rojo (M),
el manillar (T) y el manguito de
fijación (S), como se muestra
en la figura A.
Tire del manguito de sujeción
hacia abajo para aumentar la
estabilidad del manillar (T)
y el cuerpo del scooter, como
se muestra en la figura D.
Ajuste el manillar en T a una
de las tres alturas, según sea
necesario, para seguir
gradualmente el crecimiento y
desarrollo del niño, como se
muestra en la figura E.
Terminez l'assemblage du
scooter et le réglage de la
hauteur, comme indiqué sur la
figure F.
Montaje del Scooter
www.PyleUSA.com
13

Coloque el scooter como se
muestra en la figura A.
Tire del manguito de fijación hacia arriba, como se muestra en las
figuras B y C.
Desmontaje del scooter
¡ADVERTENCIA!
Mantenga a los niños a una distancia segura cuando desmonte el scooter para evitar lesiones
accidentales.
14
www.PyleUSA.com

Desmontaje del scooter
Presione el pulsador rojo con una mano mientras utiliza la
otra para tirar del manillar, separando el manillar y el
cuerpo del Scooter, como se muestra en las figuras D y E.
Termine de desmontar el
scooter, como se muestra en la
figura F.
www.PyleUSA.com
15

Afloje la palanca de la
abrazadera del collarín como
se muestra en la figura A.
Ajuste la barra en T a la altura
del niño. Apriete la abrazadera
del collarín para fijar la barra
en T después del ajuste, como
se muestra en la figura B.
El más bajo: 23 pulgadas (585
mm), como se muestra en la
figura C.
Ajuste de altura
¡ADVERTENCIA!
Apriete la abrazadera del collarín para fijar la barra en T después del ajuste.
16
www.PyleUSA.com

El segundo: 24,4 pulgadas (620 mm),
como se muestra en la figura D.
El Tercero: 26,4 pulgadas (670 mm),
como se muestra en la Figura E.
Ajuste de altura
www.PyleUSA.com
17

Rueda izquierda: Gire la llave Allen en
sentido contrario a las agujas del reloj para
aflojar el tornillo.
Rueda derecha: Gire la llave Allen en el
sentido de las agujas del reloj para aflojar el
tornillo.
Instrucciones de mantenimiento
Cambiar la rueda
18
www.PyleUSA.com
Las ruedas se desgastan con el tiempo y pueden dañarse si se utilizan excesivamente sobre
superficies rugosas. La rueda trasera, sobre la que se aplica el freno, se ve especialmente
afectada por este problema después de varias horas de frenado. Para estar seguro, comprue-
be las ruedas con regularidad y cámbielas si es necesario.

Sustitución del reposapiés
www.PyleUSA.com
19
1. Afloje los 6 tornillos (A) como se muestra en la figura (flechas).
2. Retire la placa y apriete los tornillos (A).
3. Compruebe el apriete después de recorrer aproximadamente 5 km (3 millas) con el
nuevo reposapiés.

Nadie está autorizado a modificar las condiciones de esta
garantía.
20
www.PyleUSA.com
Consejos de seguridad
Garantía
La garantía no cubre:
El scooter es divertido y seguro si se utiliza correcta-
mente. Para evitar lesiones, lleva siempre equipo de
protección, como casco y protecciones para manos,
codos y rodillas. Lleva calzado con buen agarre para
evitar resbalones. Conduzca siempre a una velocidad
segura y deténgase si encuentra peligros potenciales.
El scooter tiene una garantía de tres meses contra
defectos de material y fabricación a partir de la
fecha de compra. En caso de problemas,
repararemos o sustituiremos su scooter. Póngase
en contacto con el vendedor o con su distribuidor
local autorizado para obtener asistencia.
Reparaciones o modificaciones no autorizadas
Daños debidos a impactos externos (por ejemplo,
pavimentos, obstáculos)
Uso indebido, uso no previsto o desgaste normal.

Número de modelo
HURSC12PK
PyleUSA.com/pages/register
HURSC12PK
Empiece aquí
HURSC11BL
HURSC13BK
HURSC14WM HURSC15TL
HURSC16PR
HURSC17GN HURSC18YL HURSC19RD HURSC21CM HURSC22GF HURSC23RT
Registrar producto
www.PyleUSA.com
21
¡Gracias por elegir PyleUSA! Al registrar su producto, disfrutará de todas las ventajas de
nuestra garantía exclusiva y de un servicio de atención al cliente personalizado. Rellene el
formulario para acceder a la asistencia de expertos y mantener su compra PyleUSA en
perfectas condiciones.

¿Preguntas o comentarios?
Estamos aquí para ayudarle.
Teléfono: 1.718.535.1800
PyleUSA.com/ContactUs

SCANEZ-MOI
Visitez notre
site internet
PyleUSA.com
GUIDE D’UTILISATION
Trottinette légère et réglable
Mini trottinette avec plateau large
POUR LES
ENFANTS DE
2-5
FRE

Caractéristiques :
2
www.PyleUSA.com
• Une mini trottinette pour s’amuser en toute sécurité
• Design tricycle à 3 roues pour plus de stabilité
• Léger, compact et facile à transporter
• Roues LED multicolores qui s’illuminent en mouvement
• Guidon réglable en hauteur pour s’adapter à l’enfant
• Plateau large avec surface antidérapante
• Stabilité optimale grâce à ses multiples roues
• Roues durables pour une glisse fluide et agréable
• Technologie d’inclinaison pour tourner facilement
• Testé et certifié conforme aux normes de sécurité
• Convient à un usage intérieur et extérieur
• Idéal pour les enfants de 2 à 5 ans
• Parfait pour les tout-petits et jeunes enfants

Contenu de la boîte :
Caractéristiques techniques :
www.PyleUSA.com
3
• (1) Trottinette pour enfant
• (1) Outil simple pour l’assemblage
• Matériaux de fabrication : Alliage d’aluminium + PP + Nylon + PU
• Type de roues / Matériau : Roues en PU avec éclairage LED
• Âge recommandé : 2 à 5 ans
• Poids maximum supporté : 20 kg (44 lbs)
• Réglage de la hauteur du guidon : 25'' - 26.57'' - 28.55'' pouces/
63.5 cm - 67.5 cm - 72.5 cm
• Dimensions des roues :
• Roues avant : 12 cm x 2.4 cm (4.72" x 0.94" pouces)
• Roues arrière : 8 cm x 2.4 cm (3.14" x 0.94" pouces)
• Dimensions du plateau : 51 cm x 14 cm (20.08" x 5.51" pouces)
• Poids net / brut : 4.76 / 6.17 lbs./ 2.16 kg / 2.8 kg
• Dimensions totales de la trottinette (L x l x H) : 54.5 cm x 28.5 cm x
63.5 cm (21.46" x 11.22" x 25" pouces)

Amusez-vous bien avec votre nouvelle
trottinette !
4
www.PyleUSA.com
Avant d’utiliser ce produit, veuillez lire entièrement le
guide d’utilisation fourni.
Portez des équipements de protection lorsque vous utilisez la
trottinette. La supervision d’un adulte est obligatoire pour
l’assemblage et l’utilisation.
GÉNÉRAL
Merci d’avoir choisi notre trottinette.
Vous avez opté pour un produit de haute qualité
accompagné d’un excellent service après-vente.
Avant de profiter pleinement de l’expérience
unique qu’offre votre nouvelle trottinette, lisez
attentivement les instructions fournies.
Conservez ce manuel dans un endroit sûr pour
toute future référence.
Remarque : Les spécifications du produit
peuvent être modifiées sans préavis.

www.PyleUSA.com
5
Instructions et avertissements importants
IMPORTANT: Avant de permettre à votre enfant d’utiliser la trottinette, lisez attentivement
les consignes de sécurité. Assurez-vous que la tige de direction est bien enclenchée et que
toutes les vis sont solidement fixées. Vérifiez également que les roues sont correctement
installées et ne montrent aucun signe d’usure.
IMPORTANT: Un desserrage fréquent des vis d’axe peut réduire leur efficacité et entraîner
leur relâchement. Vérifiez régulièrement les vis et resserrez-les avant chaque utilisation.
AVERTISSEMENTS: La supervision d’un adulte est obligatoire. Ce produit contient de petites
pièces lorsqu’il n’est pas assemblé.
AVERTISSEMENTS: Utilisez la trottinette avec précaution pour éviter les chutes ou collisions
susceptibles de causer des blessures.
AVERTISSEMENTS: Le port d’un casque et de protections pour les coudes, genoux,
poignets, ainsi que de chaussures à semelles en caoutchouc est fortement recommandé.
AVERTISSEMENTS: Assurez-vous de bien verrouiller le système de fermeture rapide et
vérifiez qu’il est correctement positionné.
AVERTISSEMENTS: Ne descendez pas de pentes en trottinette.
AVERTISSEMENTS: Les enfants doivent être sous la surveillance constante d’un adulte.
AVERTISSEMENTS: Le frein peut devenir chaud pendant l’utilisation.
AVERTISSEMENTS: Poids maximum autorisé : 20 kg (44 lbs).

Consignes de sécurité lors de l’utilisation
6
www.PyleUSA.com
• Votre enfant doit s’entraîner d’abord pour maîtriser la trottinette. Nous recommandons de
s’entraîner dans un parking sans circulation ou sur une aire de jeu asphaltée.
• Assurez-vous que votre enfant porte toujours un casque, des protections pour les poignets,
les coudes et les genoux, ainsi que des chaussures à semelles en caoutchouc. La trottinette
ne doit pas être utilisée dans la circulation. Poids maximum : 20 kg (44 lbs).
• Assurez-vous que votre enfant n’essaie pas d’effectuer des expériences ou des manœuvres
risquées.
• Le style de conduite doit toujours être adapté au niveau de compétence personnel de
l’utilisateur.
• Assurez-vous que votre enfant ne dépasse pas une vitesse de 5 km/h (3 mph).
• Assurez-vous que votre enfant ne roule pas sur des routes, des chemins ou d’autres endroits
où il y a du trafic automobile. N’autorisez aucune modification ou altération de la trottinette,
car cela pourrait annuler la garantie et compromettre la sécurité.
• Assurez-vous que votre enfant ne roule pas avec la trottinette dans l’obscurité ou la nuit.
• Une seule personne peut utiliser la trottinette à la fois.
• Assurez-vous que votre enfant ne descend pas des pentes raides. Le frein n’est pas conçu
pour ralentir la trottinette à grande vitesse dans les descentes. Regardez toujours devant
vous en roulant pour pouvoir vous arrêter rapidement si nécessaire. Le frein peut devenir
chaud en cas d’utilisation prolongée. Évitez tout contact avec la peau.
• Le patin de frein peut devenir chaud pendant l’utilisation. Assurez-vous que votre enfant
n’utilise pas le frein de manière continue pendant de longues périodes. Expliquez que tout
contact direct avec le patin de frein peut causer des brûlures.
• La trottinette ne doit pas être utilisée sur des surfaces mouillées, huileuses, sablonneuses,
verglacées, accidentées ou inégales.
• Ne jamais utiliser la trottinette dans des conditions humides.

• Les bordures de trottoir et les pavés peuvent affecter votre équilibre. Il est préférable de
descendre de la trottinette et de marcher. Même les bordures abaissées peuvent vous
déséquilibrer.
• Faites attention aux rainures longitudinales et transversales dans l’asphalte !
• Les roues étroites peuvent se coincer dans les rails de tramway et les couvercles de regards, ce
qui peut les bloquer.
• Certaines pièces métalliques peuvent se corroder avec le temps, en particulier lorsqu’elles
sont utilisées près de la mer ou laissées fréquemment à l’extérieur.
• La trottinette ne peut pas être utilisée sur les voies publiques. Lorsque vous utilisez les
trottoirs ou allées piétonnes, restez du bon côté conformément aux règles de circulation.
Soyez attentif aux piétons, aux utilisateurs de fauteuils roulants, aux cyclistes, aux patineurs à
roulettes et aux animaux. Respectez toujours les règles et règlements de circulation.
• La capacité de charge maximale est de 20 kg (44 lbs).
• Cette trottinette est destinée aux enfants à partir de 1 an.
• Prenez toujours soin de ne pas vous coincer les doigts en pliant ou dépliant la trottinette.
• Expliquez à votre enfant les risques et le bon usage de la trottinette.
• Surveillez votre enfant lorsqu’il utilise la trottinette. AMUSEZ-VOUS AVEC VOTRE NOUVELLE
TROTTINETTE !
Avertissement concernant la Proposition 65 de Californie
AVERTISSEMENT:
Ce produit peut contenir des substances chimiques reconnues par l’État
de Californie comme pouvant provoquer des cancers, des malforma-
tions congénitales ou d’autres problèmes liés à la reproduction. Ne pas
ingérer.
Pour plus d’informations, rendez-vous sur : www.P65warnings.ca.gov
www.PyleUSA.com
7

8
www.PyleUSA.com
Frein
Remarque: Le frein et la plaque de protection peuvent devenir très
chauds après un usage prolongé.
Instructions d’utilisation
AVERTISSEMENT:
Tenez fermement les poignées du guidon ou de la barre en T. Dirigez la trottinette en déplaçant
légèrement votre poids d’un côté à l’autre. Pour démarrer, placez un pied sur le plateau (à
environ 45° par rapport à la direction du mouvement) et poussez avec l’autre pied. Si vous
placez votre pied droit sur le plateau, poussez avec le pied gauche. Si vous placez votre pied
gauche sur le plateau, poussez avec le pied droit. Une fois lancé, positionnez vos deux pieds sur
le plateau en les écartant et en les orientant à environ 45° par rapport à la direction du mouve-
ment. Amusez-vous avec votre trottinette !
Ne tentez pas de figures ou d’acrobaties, et n’utilisez pas la trottinette en
marche arrière. Ce produit n’est pas conçu pour résister à des utilisations inappropriées comme les
sauts ou le frottement contre des bordures. Les courses, figures ou toute conduite agressive
augmentent le risque de perte de contrôle et réduisent votre capacité à diriger la trottinette en
toute sécurité. Pratiquez dans une zone sécurisée et prenez les précautions nécessaires.
Le frein fonctionne par friction et est conçu uniquement pour
réduire la vitesse sur des surfaces planes. Évitez de descendre des
pentes. Pour freiner à basse vitesse, appuyez doucement avec votre
pied sur la plaque située à l’arrière du plateau, contre la roue arrière.
À une vitesse plus élevée, vous devrez peut-être exercer une
pression plus importante. Attention : Si vous appuyez trop fort sur le
frein, vous risquez de ralentir brusquement et de tomber.
Entraînez-vous d’abord à faible vitesse.

Annotations du Diagramme 1
Guidon
Poignées ergonomiques en TPR écologique et durable
Guidon réglable
Guidon réglable : 62 cm à 72 cm)
Sans soudure
Sans soudure : technologie innovante pour une
meilleure durabilité et esthétique
Color Logo ou étiquette
Logo ou étiquette personnalisée
Collier de serrage renforcé en plastique
Collier renforcé en GFK30, plus sûr que l’aluminium
Pont antidérapant
Guidon/Tige de direction
Guidon/Tige de direction en aluminium renforcé
Plateau large et confortable
avec surface antidérapante
Frein arrière
Frein arrière coloré avec acier inoxydable
Roue arrière en PU
Roue arrière en PU (non
marquante et lumineuse)
Châssis renforcé GFK30 supportant jusqu’à
20 kg
Châssis
Manchon de fixation
Roue avant en PU
Roue avant 12 cm en PU (non marquante et lumineuse)
Manchon renforcé pour plus de stabilité
Garde-boue inférieur
Protection inférieure renforcée pour le châssis
Mécanisme d’inclinaison : stable et flexible
Mécanisme d’inclinaison
www.PyleUSA.com
9

Guidon/Tige de direction
Corps de la trottinette
Guidon en T
Clé Allen
Manchon de fixation
10
www.PyleUSA.com
Étapes de montage du guidon
Insérez-le complètement,
comme illustré (D).
Utilisez la clé Allen pour retirer
les boulons et vis (A).
Alignez le côté rainuré du
tube en aluminium (B).
Repérez la bosse ou la flèche (C)
sur la rainure du guidon.
Insérez les boulons et vis et serrez-les avec la clé Allen (E et
F).
www.PyleUSA.com
11

Montage de la trottinette
AVERTISSEMENT ! :
Gardez les enfants à distance pendant le montage.
12
www.PyleUSA.com
Appuyez sur le bouton rouge
(M) et insérez le guidon (T)
dans l’orifice (H).
Repérez l’orifice de la
trottinette (H), comme indiqué
en Figure B.
Identifiez le bouton rouge (M),
le guidon (T) et le manchon de
fixation (S), comme indiqué en
Figure A.

Tirez le manchon de fixation
vers le bas pour renforcer la
stabilité.
Ajustez le guidon en T selon la
croissance de votre enfant.
Complete el montaje del
scooter y el ajuste de la altura,
como se muestra en la Figura
F.
Assemblage du scooter
www.PyleUSA.com
13

Coloque el scooter como se
muestra en la figura A.
Tire del manguito de fijación hacia arriba, como se muestra en las
figuras B y C.
Desmontaje del scooter
¡ADVERTENCIA!
Mantenga a los niños a una distancia segura cuando desmonte el scooter para evitar lesiones
accidentales.
14
www.PyleUSA.com

Desmontaje del scooter
Presione el pulsador rojo con una mano mientras utiliza la
otra para tirar del manillar, separando el manillar y el
cuerpo del Scooter, como se muestra en las figuras D y E.
Termine de desmontar el
scooter, como se muestra en la
figura F.
www.PyleUSA.com
15

Desserrez le levier du collier,
comme montré en Figure A.
Ajustez le guidon en T selon la
taille de votre enfant. Serrez le
collier pour sécuriser le guidon
après réglage, comme montré
en Figure B.
Hauteur minimum : 23
pouces (585 mm), comme
montré en Figure C.
Ajustement de la hauteur
¡AVERTISSEMENT !
Serrez le collier pour sécuriser le guidon après réglage.
16
www.PyleUSA.com

Hauteur intermédiaire : 24,4 pouces
(620 mm), comme montré en Figure D.
Hauteur maximum : 26,4 pouces (670
mm), comme montré en Figure E.
Réglage de la hauteur
www.PyleUSA.com
17
Roue gauche : Tournez la clé Allen dans le
sens antihoraire pour desserrer la vis.
Roue droite : Tournez la clé Allen dans le
sens horaire pour desserrer la vis.
Instructions de maintenance
Remplacement des roues
18
www.PyleUSA.com
Les roues s’usent avec le temps et peuvent être endommagées si elles sont utilisées sur des
surfaces rugueuses. La roue arrière, qui subit le freinage, est particulièrement affectée après
plusieurs heures d’utilisation. Pour votre sécurité, vérifiez régulièrement l’état des roues et
remplacez-les si nécessaire.

Remplacement du plateau
www.PyleUSA.com
19
1. Dévissez les 6 vis (A) comme montré sur l’illustration (flèches).
2. Retirez le plateau et serrez les vis (A).
3. Vérifiez que le plateau est bien fixé après environ 5 km d’utilisation.

Personne n’est autorisé à modifier les termes de cette garantie.
20
www.PyleUSA.com
Conseils de sécurité
Garantie
La garantie ne couvre pas :
Votre trottinette est garantie 3 mois contre tout
défaut de fabrication ou de matériau à compter de
la date d’achat. En cas de problème, nous
réparerons ou remplacerons votre trottinette.
Contactez votre revendeur ou distributeur local
pour obtenir de l’aide.
La trottinette est amusante et sûre lorsqu’elle est utilisée
correctement. Pour éviter les blessures, portez un
casque et des protections pour les mains, les coudes et
les genoux. Portez des chaussures avec une bonne
adhérence pour éviter de glisser. Roulez toujours à une
vitesse sécuritaire et arrêtez-vous si vous rencontrez des
obstacles.
• Les réparations ou modifications inappropriées.
• Les dommages causés par des impacts externes
(ex. : bordures, obstacles).
• L’utilisation inappropriée ou l’usure normale

Numéro de modèle
HURSC12PK
PyleUSA.com/pages/register
HURSC12PK
Commencez ici
HURSC11BL
HURSC13BK
HURSC14WM HURSC15TL
HURSC16PR
HURSC17GN HURSC18YL HURSC19RD HURSC21CM HURSC22GF HURSC23RT
Enregistrement du produit
www.PyleUSA.com
21
Merci d’avoir choisi PyleUSA. En enregistrant votre produit, vous bénéficiez de notre
garantie exclusive et d’un service client personnalisé. Remplissez le formulaire pour
accéder à une assistance experte et maintenir votre achat PyleUSA en parfait état.

Questions ou commentaires ?
Nous sommes là pour vous aider !
Téléphone : 1.718.535.1800
PyleUSA.com/ContactUs

SCANSIONAMI
Visita il nostro
Sito Web
PyleUSA.com
GUIDA UTENTE
Mini monopattino Kickboard
Leggero e regolabile
PER I
BAMBINI DI
2-5
ITA

Caratteristiche:
2
www.PyleUSA.com
• Divertente monopattino Mini Kick Scooter
• Design a 3 ruote in stile triciclo
• Leggero, compatto e portatile
• Ruote LED multicolore che si illuminano
durante il movimento
• Manubrio T-Bar regolabile in altezza
• Ampia pedana antiscivolo per una maggiore
stabilità
• Scooter stabile grazie alle 3 ruote
• Ruote super fluide per una maggiore
scorrevolezza, durevoli nel tempo
• Tecnologia di sterzata con inclinazione, facile
da manovrare
• Testato in laboratorio e certificato per la
sicurezza
• Adatto per uso interno ed esterno
• Consigliato per bambini di età compresa tra 2 e
5 anni
• Perfetto per i più piccoli
Contenuto della confezione:
Specifiche tecniche:
www.PyleUSA.com
3
• (1) Monopattino per bambini
• (1) Kit semplice per l'assemblaggio
• Materiale di costruzione: Lega di alluminio, PP, nylon, PU
• Tipo di ruota / Materiale ruota: Ruote in PU con luci LED
• Età consigliata: 2-5 anni
• Capacità di peso: 20 kg (44 lbs)
• Altezza manubrio regolabile: 25'' - 26.57'' - 28.55'' pollici/ 63.5 cm -
67.5 cm - 72.5 cm
• Dimensioni ruote:
• Ruota anteriore: 12 cm x 2.4 cm (4.72" x 0.94" pollici)
• Ruota posteriore: 8 cm x 2.4 cm (3.14" x 0.94" pollici)
• Dimensioni pedana: 51 cm x 14 cm (20.08" x 5.51" pollici)
• Peso netto / Peso lordo: 4.76 / 6.17 lbs./ 2.16 kg / 2.8 kg
• Dimensioni totali del monopattino (L x P x A): 54.5 cm x 28.5 cm x
63.5 cm (21.46" x 11.22" x 25" pollici)

GENERALE
Divertiti con il tuo nuovo monopattino!
4
www.PyleUSA.com
Si prega di leggere attentamente le Istruzioni d'Uso
allegate prima di utilizzare il prodotto.
Indossare i dispositivi di protezione durante l'uso. La supervisi-
one di un adulto è necessaria sia per il montaggio che per
l'utilizzo.
Grazie per aver scelto il nostro monopattino!
Avete acquistato un prodotto di alta qualità. Per
questo, ti offriamo un eccellente servizio
post-vendita.
Prima di vivere un’esperienza unica con il tuo
nuovo monopattino, leggi attentamente le
istruzioni allegate.
Conserva queste informazioni in un luogo sicuro,
per qualsiasi futura necessità.
Si prega di notare che le specifiche del prodotto
possono essere soggette a modifiche senza
preavviso.

www.PyleUSA.com
5
Istruzioni e avvertenze importanti
IMPORTANTE: Prima di consentire al bambino di utilizzare il monopattino, leggere attenta-
mente le istruzioni di sicurezza per l'uso. Assicurarsi che l'asta dello sterzo sia completamente
inserita e che tutte le viti siano ben serrate. Assicurarsi inoltre che le ruote siano fissate
correttamente e non presentino segni di usura.
IMPORTANTE: Svitare ripetutamente le viti dell'asse ne riduce l'efficacia. Le viti potrebbero
allentarsi anche da sole. Controllarle sempre con regolarità e serrarle prima di ogni utilizzo.
AVVERTENZA: È necessaria la supervisione di un adulto. Questo prodotto contiene piccole
parti quando è smontato.
AVVERTENZA: Prestare attenzione durante la guida, in quanto è necessaria una certa abilità
per evitare cadute o collisioni che possono causare lesioni all'utilizzatore o ad altri.
AVVERTENZA: Indossare caschi e dispositivi di protezione per gomiti, ginocchia, polsi e
palmi delle mani, e scarpe con suola in gomma.
AVVERTENZA: : Chiudere saldamente il blocco rapido e assicurarsi che sia posizionato
correttamente.
AVVERTENZA: non scendere da pendii o discese molto ripide.
AVVERTENZA: : I bambini devono sempre essere sorvegliati da un adulto.
AVVERTENZA: Il freno può surriscaldarsi durante l’uso.
AVVERTENZA: Peso massimo consentito: 20 kg.

Istruzioni di Sicurezza per l'Uso
6
www.PyleUSA.com
• Pratica iniziale: Assicurati che tuo figlio si eserciti prima di utilizzare il monopattino per
acquisirne un corretto controllo. Ti consigliamo di fare pratica in un parcheggio senza
traffico o in un'area di gioco asfaltata e libera.
• Equipaggiamento protettivo: Assicurati che tuo figlio indossi sempre un casco, protezioni
per polsi, gomiti e ginocchia, oltre a scarpe con suola in gomma. Il monopattino non deve
essere utilizzato in zone trafficate. Peso massimo consentito: 44 lbs (20 kg).
• Comportamento prudente: Controlla che tuo figlio non tenti manovre rischiose o esperi-
menti. Lo stile di guida deve essere sempre adeguato alle capacità personali del conducen-
te.
• Velocità massima: Assicurati che tuo figlio non superi una velocità di 3 mph (5 km/h).
• Zone di utilizzo: Non consentire l'uso del monopattino su strade, sentieri o altre aree
trafficate.
• Modifiche al monopattino: Non sono consentite modifiche o alterazioni al monopattino,
poiché ciò potrebbe invalidare la garanzia e compromettere la sicurezza.
• Uso notturno: Assicurati che tuo figlio non utilizzi il monopattino al buio o di notte. Inoltre, il
monopattino può essere usato da un solo bambino alla volta.
• Discesa: Non consentire a tuo figlio di scendere da colline o discese molto ripide. Il freno non
è progettato per rallentare il monopattino a velocità elevate in discesa. È importante
guardare sempre avanti durante la guida per fermarsi rapidamente se necessario.
• Freno caldo: Il freno può surriscaldarsi durante l'uso prolungato. Evita qualsiasi contatto e
non toccarlo, perché può causare ustioni.
• Superficie d’uso: Il monopattino non deve essere utilizzato su superfici bagnate, oleose,
sabbiose, ghiacciate, accidentate o irregolari. Evita sempre di utilizzare il monopattino
quando è bagnato.

• Marciapiedi e pavimentazioni sconnesse: I cordoli e le superfici in pietra possono compromet-
tere l’equilibrio. È consigliabile scendere dal monopattino e attraversare camminando. Anche i
cordoli ribassati possono causare cadute.
• Fai attenzione ai solchi longitudinali e trasversali nell’asfalto! Le ruote strette potrebbero
incastrarsi nei binari del tram o nei tombini, bloccandosi improvvisamente.
• Componenti: Alcune parti metalliche potrebbero corrodersi nel tempo, soprattutto se il
monopattino viene utilizzato vicino al mare o lasciato frequentemente all'aperto.
• Utilizzo: Il monopattino non è adatto all'uso su strade pubbliche. Sui marciapiedi, mantieniti
sul lato corretto secondo le regole del traffico. Presta attenzione ai pedoni, persone in sedia a
rotelle, ciclisti, pattinatori e animali. Rispetta sempre le regole secondo le disposizioni locali.
• Capacità: Il monopattino supporta un peso corporeo massimo di 44 lbs (20 kg).
• Età consigliata: Questo monopattino è adatto ai bambini a partire da 1 anno di età.
• Fai attenzione a non schiacciarti le dita durante l'apertura e la chiusura del monopattino.
• Spiega a tuo figlio i rischi e il corretto utilizzo del monopattino. Supervisiona sempre l’utilizzo
da parte del bambino. DIVERTITI CON IL TUO NUOVO MONOPATTINO!
Avvertenza California Prop 65
AVVERTENZA:
Questo prodotto può esporre l'utente a sostanze chimiche, che è nota
allo Stato della California per causare cancro, difetti di nascita e altri
danni alla riproduzione. Non ingerire.
Per maggiori informazioni: www.P65warnings.ca.gov
www.PyleUSA.com
7

8
www.PyleUSA.com
Uso del freno
ATTENZIONE: Il freno e la piastra protettiva possono surriscaldarsi
durante l’uso.
Istruzioni per l'Uso
ATTENZIONE!
Tieni le estremità del manubrio T-Bar o Ring Bar con le mani. Sterza il monopattino effettuando lievi
spostamenti di peso. Per partire, posiziona un piede sul monopattino (con un’angolazione di circa 45°
rispetto alla direzione di marcia) e spingiti con l’altro piede. Se il piede destro è sul monopattino, usa il
sinistro per spingerti. Se il piede sinistro è sul monopattino, usa il destro per spingerti. Una volta
acquisita velocità, posiziona entrambi i piedi sul monopattino, mantenendoli separati e con
un’angolazione di circa 45° rispetto alla direzione di marcia. Divertiti con il tuo monopattino!
Il freno è a frizione ed è progettato esclusivamente per ridurre la
velocità su superfici piane. Evita di andare in discesa. Frena a bassa
velocità premendo delicatamente con il piede contro la piastra della
ruota posteriore. Se viaggi ad alta velocità, potrebbe essere
necessario applicare maggiore pressione. Fai attenzione: premere
troppo forte potrebbe rallentare improvvisamente e causare la
caduta. È consigliabile esercitarsi a frenare a velocità di camminata.
Non tentare o eseguire acrobazie, salti, o manovre pericolose all'indietro. Il
monopattino non è progettato per resistere a usi impropri come salti, grind sui cordoli o acrobazie.
Gare, manovre pericolose o guida acrobatica aumentano il rischio di perdita di controllo e possono
causare reazioni impreviste del conducente. Fai pratica in un’area sicura e prendi le necessarie
precauzioni.
Età: 1+ anno (consigliato)
Impugnatura
Barra a T regolabile
TPR durevole/ecologico Non saldabile
24.4 to 28.3pollici
(620mm fino a 720mm)
Nessun blocco/saldatura
Utilizza una nuova tecnologia al posto della saldatura
tradizionale.
È più bello da vedere e più resistente.
Logo/etichetta a colori
Personalizzato
Morsetto a collare in plastica più resistente
Utilizza materiale GFK30 rinforzato anziché alluminio (ALU).
Le bave metalliche possono facilmente lesionare la pelle dei
bambini.
Pedana antiscivolo
Manubrio/asta di guida
Tubo in alluminio (ALU) ispessito
Più ampia, più confortevole
Freno posteriore
Freno colorato in acciaio inox
Ruota posteriore
4 PZ 3.15 pollici/ 80 mm
Rinforzato GFK30 Più forte, con una capacità
di carico fino a 20 kg (44 lbs)
Telaio
Manicotto di fissaggio
Ruota anteriore
4.72 pollci (120mm) Non-segnante/Flash
Rafforza la stabilità del
manubrio e del corpo del monopattino
Parafango inferiore
Aumenta la protezione del telaio
Più stabile, più flessibile
Meccanismo di sterzo
www.PyleUSA.com
9

Manubrio/asta di sterzo
Corpo del monopattino
Barra a T
Chiave a brugola
Manicotto di fissaggio
10
www.PyleUSA.com

Come montare la Barra a T
Inserirla all'estremità, come
mostrato nella figura (D).
Utilizzare la chiave a
brugola per rimuovere i
bulloni e le viti (A).
Allineare il lato scanalato del
tubo di alluminio (B).
Individuare la protuberanza o la
freccia sulla fessura del tubo del
manubrio.
Inserire i bulloni e le viti e fissarli con la chiave a brugola (E
e F).
www.PyleUSA.com
11
Come assemblare il monopattino
ATTENZIONE!
Tenere i bambini a distanza di sicurezza durante il montaggio del monopattino per evitare
lesioni accidentali.
12
www.PyleUSA.com
Premere il pulsante rosso (M)
e inserire il manubrio (T) con il
lato rivolto all'indietro
all'indietro nel foro del
monopattino (H), come
mostrato nella Figura C.
Sentirete un “clic” quando il
manubrio (T) sarà bloccato
saldamente nel corpo del
monopattino.
Individuare il foro del
monopattino (H), come
mostrato nella Figura B.
Identificare il pulsante rosso
(M), il manubrio (T) e il
manicotto di fissaggio (S),
come mostrato nella Figura A.

Tirare il manicotto di fissaggio
verso il basso per aumentare la
stabilità del manubrio (T)
e del corpo del monopattino,
come mostrato nella Figura D.
Regolare la barra a T del
manubrio a su una delle tre
altezze, a seconda della
necessità, per seguire
gradualmente la crescita e lo
sviluppo del bambino, come
Figura E.
Completare il montaggio del
monopattino e la regolazione
dell'altezza, come mostrato
nella Figura F.
Come assemblare il monopattino
www.PyleUSA.com
13

Posizionare lo scooter come
mostrato nella Figura A.
Tirare il manicotto di fissaggio verso l'alto, come mostrato nelle
Figure B e C.
Come smontare il monopattino
ATTENZIONE!
Tenere i bambini a distanza di sicurezza quando smontate il monopattino per evitare lesioni
accidentali.
14
www.PyleUSA.com

Come smontare il monopattino
Premere il pulsante rosso con una mano mentre con l'altra
si tira il manubrio, separandolo dal corpo del monopattino,
come mostrato nelle figure D ed E.
Terminare di smontare il
monopattino, come mostrato
nella Figura F.
www.PyleUSA.com
15
Allentare la leva del morsetto a
collare come mostrato nella
Figura A.
Regolare la barra a T in base
all'altezza del bambino.
Stringere il morsetto per fissare
la barra a T dopo la regolazi-
one, come mostrato nella
Figura B.
La più bassa: 23 pollici (585
mm), come mostrato nella
Figura C.
Regolazione dell’altezza
ATTENZIONE!
Serrare il morsetto a collare per fissare la barra a T dopo la regolazione.
16
www.PyleUSA.com

La Seconda: 24,4 pollici (620 mm), come
mostrato nella Figura D.
La Terza: 26,4 pollici (670 mm), come
mostrato in Figura E.
Regolazione dell’altezza
www.PyleUSA.com
17

Ruota sinistra: Ruotare la chiave a brugola
in senso antiorario per allentare la vite.
Ruota destra: Ruotare la chiave a brugola in
senso orario per allentare la vite.
Istruzioni per la manutenzione
Sostituzione della ruota
18
www.PyleUSA.com
Le ruote si usurano con il tempo e possono danneggiarsi se utilizzate eccessivamente su
superfici ruvide. La ruota posteriore, su cui viene applicato il freno, è particolarmente
interessata da questo problema dopo diverse ore di frenata. Per sicurezza, controllate
regolarmente le ruote e cambiatele se necessario.

Sostituzione della pedana
www.PyleUSA.com
19
1. Allentare le 6 viti (A) come indicato nella figura (frecce).
2. Rimuovere il piano e serrare le viti (A).
3. Verificare la tenuta dopo aver percorso circa 3 miglia (5 km) con la nuova pedana.

Nessuno è autorizzato a modificare i termini della presente
garanzia.
20
www.PyleUSA.com
Suggerimenti per la sicurezza
Garanzia
La garanzia non copre:
Il monopattino viene fornito con una garanzia di tre
mesi contro i difetti di materiale e di fabbricazione a
partire dalla data di acquisto. In caso di problemi,
ripareremo o sostituiremo il vostro monopattino.-
Contattare il venditore o il distributore locale
autorizzato per ricevere assistenza.
Il monopattino è divertente e sicuro se utilizzato
correttamente. Per evitare infortuni, indossare sempre
dispositivi di protezione come il casco e le protezioni per
mani, gomiti e ginocchia. Indossare scarpe con una
buona tenuta per evitare di scivolare. Guidare sempre
ad una velocità sicura e fermarsi se si incontrano
potenziali pericoli.
• Riparazioni o modifiche non autorizzate
• Danni dovuti a impatti esterni (ad esempio,
marciapiedi, ostacoli)
• Uso improprio, uso non intenzionale o normale
usura.
Numero di modello
HURSC12PK
PyleUSA.com/pages/register
HURSC12PK
Inizia qui
HURSC11BL
HURSC13BK
HURSC14WM HURSC15TL
HURSC16PR
HURSC17GN HURSC18YL HURSC19RD HURSC21CM HURSC22GF HURSC23RT
Registra il Prodotto
www.PyleUSA.com
21
Grazie per aver scelto PyleUSA! Registrando il tuo prodotto, potrai usufruire di tutti i
vantaggi della nostra esclusiva garanzia e di un supporto clienti personalizzato. Compila il
modulo per accedere all’assistenza esperta e mantenere il tuo acquisto PyleUSA in
condizioni perfette.

Domande o Commenti?
Siamo qui per aiutarti!
Telefono : 1.718.535.1800
PyleUSA.com/ContactUs

SCANNE MICH
Besuchen Sie
unsere Website
PyleUSA.com
BENUTZERHANDBUCH
Leichter und verstellbarer
Mini-Kickboard-Roller
FÜR KINDER
IM ALTER VON
2-5
GER

Merkmale:
2
www.PyleUSA.com
• Mini Kick Scooter Spaß
• 3-Rad-Dreirad 'Trike' Stil
• Leicht, kompakt und tragbar
• Mehrfarbige LED-Radlichter leuchten beim
Rollen
• Verstellbare T-Bar Lenkerhöhe
• Rutschfester breiter Boden mit Fußstütze
• Stabilität des mehrrädrigen Scooters
• Langlebige, superleicht gleitende Räder
• Leicht zu manövrierende Lean-to-Steer-Tech-
nologie
• Laborgeprüft und sicherheitszertifiziert
• Verwendung im Innen-/Außenbereich
• Geeignet für Kinder von 2-5 Jahren
• Spaß für Kinder: Kleine Kinder und Kleinkinder

Inhalt der Box:
Technische Daten:
www.PyleUSA.com
3
• (1) Kinder-Roller
• (1) Einfaches Werkzeug für die Montage
• Konstruktion Material: Alu-Legierung+PP+Nylon+PU
• Rad Typ / Rad Material: PU-Rad mit LED-Licht
• Gewichtskapazität: 2-5
• Capacità di peso: 20 kg (44 lbs)
• Lenkerhöheneinstellung: 25'' - 26.57'' - 28.55'' zoll/ 63.5 cm - 67.5
cm - 72.5 cm
• Rad große:
• Vorderrad: 12 cm x 2.4 cm (4.72" x 0.94" zoll)
• Hinterrad: 8 cm x 2.4 cm (3.14" x 0.94" zoll)
• Deckgröße: 51 cm x 14 cm (20.08" x 5.51" zoll)
• Nettogewicht/Bruttogewicht: 4.76 / 6.17 lbs./ 2.16 kg / 2.8 kg
• Gesamtgröße des Scooters (L x B x H): 54.5 cm x 28.5 cm x 63.5 cm
(21.46" x 11.22" x 25" zoll)
EINLEITUNG
Viel Spaß mit deinem neuen Scooter!
4
www.PyleUSA.com
Lesen Sie die beiliegende Gebrauchsanweisung vollstän-
dig durch, bevor Sie das Produkt in Betrieb nehmen.
Tragen Sie beim Fahren eine Schutzausrüstung. Für den Aufbau
und die Benutzung ist die Aufsicht eines Erwachsenen
erforderlich.
Vielen Dank, dass Sie sich für unseren Scooter
entschieden haben. Sie können sicher sein, dass
Sie ein hochwertiges Produkt erworben haben.
Wir bieten Ihnen auch einen ausgezeichneten
Kundendienst. Bevor Sie das einzigartige
Fahrgefühl Ihres neuen Rollers erleben, lesen Sie
bitte die beigefügte Anleitung sorgfältig durch.
Bewahren Sie diese Anleitung zum späteren
Nachschlagen an einem sicheren Ort auf. Bitte
beachten Sie, dass die Produktspezifikationen
ohne Vorankündigung geändert werden
können.

www.PyleUSA.com
5
Wichtige Hinweise und Warnungen
WICHTIG: Bevor Sie Ihrem Kind erlauben, den Scooter zu benutzen, lesen Sie bitte die
Sicherheitshinweise sorgfältig durch. Stellen Sie sicher, dass die Lenkstange vollständig
eingerastet ist und alle Schrauben fest angezogen sind. Vergewissern Sie sich auch, dass die
Räder richtig befestigt sind und keine Anzeichen von Verschleiß aufweisen.
WICHTIG: Durch wiederholtes Lösen der Achsschrauben wird deren Wirksamkeit verringert.
Dies kann dazu führen, dass sich die Schrauben von selbst lockern. Überprüfen Sie die
Schrauben regelmäßig und ziehen Sie sie vor jedem Gebrauch wieder fest.
WARNUNG: Die Aufsicht eines Erwachsenen ist erforderlich. Dieses Produkt enthält im
unmontierten Zustand Kleinteile.
WARNUNG: Seien Sie beim Fahren vorsichtig, da Geschicklichkeit erforderlich ist, um Stürze
oder Zusammenstöße zu vermeiden, die zu Verletzungen des Benutzers oder anderer
Personen führen könnten.
WARNUNG: Das Tragen von Helmen und Schutzausrüstung für Ellbogen, Knie, Handgelenke
und Handflächen sowie von Schuhen mit Gummisohlen wird empfohlen.
WARNUNG: Schließen Sie den Schnellverschluss sicher und stellen Sie sicher, dass er korrekt
positioniert ist.
WARNUNG: Fahren Sie keine Hänge hinunter.
WARNUNG: Kinder müssen beaufsichtigt werden.
WARNUNG: Die Bremse kann heiß werden.
WARNUNG: Maximal zulässiges Gewicht: 20 kg.

Sicherheitshinweise für den Betrieb
6
www.PyleUSA.com
• Ihr Kind sollte zuerst üben, um die Kontrolle über den Scooter zu erlangen. Wir empfehlen,
auf einem verkehrsfreien Parkplatz oder einem offenen asphaltierten Spielplatz zu üben.
• Achten Sie darauf, dass Ihr Kind immer einen Helm, Handgelenk-, Ellbogen- und Knieschon-
er sowie Schuhe mit Gummisohlen trägt. Der Scooter darf nicht im Straßenverkehr benutzt
werden. Maximales Gewicht: 20 kg (44 lbs).
• Achten Sie darauf, dass Ihr Kind keine Experimente oder riskanten Fahrmanöver wagt. Der
Fahrstil sollte immer an die persönlichen Fähigkeiten des Fahrers angepasst werden.
• Achten Sie darauf, dass Ihr Kind eine Geschwindigkeit von 5 km/h nicht überschreitet.
• Achten Sie darauf, dass Ihr Kind nicht auf Straßen, Wegen oder anderen Plätzen mit
Kraftfahrzeugverkehr fährt. Erlauben Sie keine Modifikationen oder Veränderungen am
Roller, da dies die Garantie ungültig machen und die Sicherheit beeinträchtigen kann.
• Achten Sie darauf, dass Ihr Kind den Roller nicht im Dunkeln oder in der Nacht fährt. Es darf
immer nur ein Kind gleichzeitig mit dem Roller fahren.
• Achten Sie darauf, dass Ihr Kind nicht steile Abhänge hinunterfährt. Die Bremse ist nicht
dafür ausgelegt, den Roller bei hohen Geschwindigkeiten bergab abzubremsen. Schauen
Sie während der Fahrt immer nach vorne, damit Sie bei Bedarf schnell anhalten können. Die
Bremse kann bei längerem Gebrauch heiß werden. Vermeiden Sie Hautkontakt.
• Der Bremsbelag kann während der Benutzung heiß werden. Achten Sie darauf, dass Ihr Kind
die Bremse nicht über einen längeren Zeitraum betätigt. Erklären Sie, dass direkter Hautkon-
takt mit dem Bremsbelag zu Verbrennungen führen kann.
• Der Roller darf nicht auf nassen, öligen, sandigen, eisigen, rauen oder unebenen
Oberflächen benutzt werden. Benutzen Sie den Scooter niemals bei Nässe.
• Bordsteinkanten und Kopfsteinpflaster können Ihr Gleichgewicht beeinträchtigen. Es ist
besser, abzusteigen und über sie zu gehen. Auch abgesenkte Bordsteine können Sie aus
dem Gleichgewicht bringen.
• Achten Sie auf Längs- und Querrillen im Asphalt! Die schmalen Räder können in Straßenbahn-
schienen und Gullydeckeln stecken bleiben und dadurch blockieren.
• Einige Metallteile können mit der Zeit korrodieren, vor allem, wenn sie in Meeresnähe benutzt
oder häufig im Freien abgestellt werden.
• Der Scooter darf nicht auf öffentlichen Straßen benutzt werden. Wenn Sie Fußgängerwege
benutzen, halten Sie sich an die richtige Seite, die den Verkehrsregeln entspricht. Nehmen Sie
Rücksicht auf Fußgänger, Rollstuhlfahrer, Radfahrer, Rollerblader und Tiere. Halten Sie sich
stets an die Verkehrsregeln und -vorschriften.
• Die Tragfähigkeit beträgt bis zu 20 kg (44 lbs) des Körpergewichts.
• Dieser Scooter ist für Kinder ab 1 Jahr und älter geeignet.
• Achten Sie immer darauf, dass Sie sich beim Zusammen- und Auseinanderklappen des Rollers
nicht die Finger verletzen.
• Erklären Sie Ihrem Kind die Risiken und den richtigen Gebrauch des Scooters. Beaufsichtigen
Sie Ihr Kind, während es den Roller benutzt. DIVERTITI CON IL TUO NUOVO MONOPATTI-
NO!
Warnung California Prop 65
WARNUNG:
Dieses Produkt kann den Benutzer Chemikalien aussetzen, die im
Bundesstaat Kalifornien dafür bekannt sind, Krebs, Geburtsfehler oder
andere Fortpflanzungsschäden zu verursachen. Nicht verschlucken.
Weitere Informationen unter: www.P65warnings.ca.gov
www.PyleUSA.com
7
8
www.PyleUSA.com
Bremse
ACHTUNG! Die Bremse und die Schutzplatte können sehr heiß werden.
Spielanleitung
WARNUNG!
Halten Sie sich mit den Händen an den Enden der T-Bar oder Ring Bar fest. Sie lenken das Board durch
leichte Gewichtsverlagerungen. Um in Fahrt zu kommen, stellen Sie sich mit einem Bein (mit dem Fuß in
einem Winkel von etwa 45° zur Fahrtrichtung) auf das Board und schieben sich mit dem anderen Bein ab.
Wenn Sie mit dem rechten Bein auf dem Brett stehen, beschleunigen Sie mit dem linken Bein. Wenn Sie mit
dem linken Bein auf dem Brett stehen, beschleunigen Sie mit dem rechten Bein. Nachdem du in Schwung
gekommen bist, stellst du dich breitbeinig auf das Brett, so dass beide Füße in einem Winkel von etwa 45°
zur Fahrtrichtung stehen. Viel Spaß mit dem Scooter!
Die Bremse ist eine Reibungsbremse, die nur zum Verringern der
Geschwindigkeit auf unebenem Gelände gedacht ist - vermeiden Sie es,
bergab zu fahren. Bremsen Sie bei niedriger Geschwindigkeit, indem Sie
Ihren Fuß, der weit hinten auf dem Brett ruht, leicht gegen die Hinterrad-
platte drücken. Wenn Sie schneller fahren, müssen Sie eventuell fester
drücken. Seien Sie vorsichtig: Wenn Sie die Bremse zu stark betätigen
und zu abrupt abbremsen, riskieren Sie einen Sturz. Am besten üben Sie
das Bremsen in Schrittgeschwindigkeit.
Versuchen Sie nicht, Stunts oder Tricks auszuführen oder rückwärts mit dem Roller
zu fahren/rollen. Er ist nicht dafür ausgelegt, Missbrauch wie Springen, Bordsteinschleifen oder andere
Arten von Stunts zu widerstehen. Rennen, Stunts oder andere Manöver, wie z.B. rückwärts fahren, erhöhen
das Risiko des Kontrollverlustes oder können unkontrollierte Aktionen oder Reaktionen des Fahrers
verursachen. Aggressives Fahren reduziert Ihre Fähigkeit, den Roller zu manövrieren und zu kontrollieren.
Treffen Sie die notwendigen Vorkehrungen und üben Sie in einem sicheren Bereich.

Alter: ab 1 Jahr (empfohlen)
Griff
Verstellbarer T-Bügel
Langlebiges/umweltfreundliches TPR
24,4 Zoll bis 28,3 Zoll
(620mm bis 720mm)
Nicht schweißbar
Verwendet eine neue Technologie anstelle des
traditionellen Schweißens. Es ist schöner und
haltbarer.
Farbe Logo/Etikett
Kundenspezifisch
Stärkere Kunststoff-Halteklammer
Verwendung von verstärktem GFK30-Material anstelle von
Aluminium (ALU). Metallgrate können die Haut von Kindern
leicht verletzen.
Rutschfestes Deck
Lenker/Steuerstange
Verdicktes Aluminiumrohr (ALU)
Breitere, komfortablere
Hinterradbremse Farbige
Bremse mit Edelstahl
Hintere Bremse
Farbiges Bremsteil aus Edelstahl
Hinteres PU-Rad
4 PCS/3,15 Zoll (80 mm)
Spurlos/Flash
Verstärktes GFK30 Stärker, mit einer
Tragfähigkeit von bis zu 20 kg (44 lbs)
Fahrgestell
Lean-to-Steer-Mechanismus
Vorderes PU-Rad
4,72 Zoll (120mm) Abdruckfrei/Blitz
Stabiler, flexibler
Unterer Kotflügel
Verstärkt den Schutz des Chassis
Verstärkt die Stabilität des Lenkers
und des Scooterkörpers
Fixierhülse
www.PyleUSA.com
9

Lenker/Steuerung
Stange Scooter
Karosserie T-Bar
Inbusschlüssel
Fixierhülse
10
www.PyleUSA.com

T-Bar-Montage
Setzen Sie ihn bis zum Ende ein, wie
in der Abbildung (D) gezeigt.
Verwenden Sie den Inbusschlüs-
sel, um die Bolzen und Schrauben
(A) zu entfernen.
Richten Sie die gerillte Seite des
Aluminiumrohrs aus (B).
Suchen Sie die Beule oder den Pfeil (C)
auf dem Lenkerrohrspalt.
Setzen Sie die Bolzen und Schrauben ein und ziehen Sie sie mit dem
Inbusschlüssel fest (E & F).
www.PyleUSA.com
11

Montage des Scooters
WARNUNG!
Halten Sie Kinder beim Zusammenbau des Scooters in sicherer Entfernung,
um versehentliche Verletzungen zu vermeiden.
12
www.PyleUSA.com
Drücken Sie den roten
Druckknopf (M) und stecken
Sie den Lenker (T) mit der Seite
nach hinten in die Rolleröff-
nung (H), wie in Abbildung C
gezeigt.
Lokalisieren Sie das Loch (H)
des Rollers, wie in Abbildung B
gezeigt.
Identifizieren Sie den roten
Druckknopf (M), den Lenker (T)
und die Befestigungshülse (S),
wie in Abbildung A gezeigt.

Ziehen Sie die Befestigung-
shülse nach unten, um die
Stabilität des Lenkers (T) und
des Rollerkörpers zu
verstärken, wie in Abbildung D
dargestellt.
Stellen Sie den verstellbaren
T-Lenker auf eine von drei
Höhen ein, um die Entwick-
lung Ihres Kindes zu begleiten,
wie in Abbildung E gezeigt.
Schließen Sie den Zusammen-
bau und die Höheneinstellung
des Scooters ab, wie in
Abbildung F dargestellt.
Montage des Scooters
www.PyleUSA.com
13

Positionieren Sie den Scooter
wie in Abbildung A gezeigt.
Ziehen Sie die Fixierhülse nach oben, wie in den Abbildungen B
und C dargestellt.
Demontage des Scooters
WARNUNG!
Halten Sie Kinder bei der Demontage des Scooters in sicherer Entfernung, um versehentliche
Verletzungen zu vermeiden.
14
www.PyleUSA.com

Demontage des Scooters
Drücken Sie den roten Druckschalter mit einer Hand,
während Sie mit der anderen Hand am Lenker ziehen, um
den Lenker vom Rollergehäuse zu trennen, wie in den
Abbildungen D und E dargestellt.
Vervollständigen Sie die
Demontage des Scooters, wie
in Abbildung F dargestellt.
www.PyleUSA.com
15

Lösen Sie den Hebel der
Manschettenklemme, wie in
Abbildung A gezeigt.
Stellen Sie den T-Bügel entsprech-
end der Körpergröße Ihres Kindes
ein. Ziehen Sie die Manschettenk-
lemme fest, um den T-Bügel nach
der Einstellung zu sichern, wie in
Abbildung B dargestellt.
Niedrigste Höhe: 23 Zoll (585
m), wie in Abbildung C
dargestellt.
Höhenanpassung
WARNUNG!
Ziehen Sie die Manschettenklemme fest, um den T-Bar nach der Einstellung zu sichern.
16
www.PyleUSA.com

Zweite: 620 mm (24,4 Zoll), wie in
Abbildung D dargestellt.
Dritte: 26,4 Zoll (670 mm), wie in
Abbildung E dargestellt.
Höhenanpassung
www.PyleUSA.com
17

Linkes Rad: Drehen Sie den Inbusschlüssel
gegen den Uhrzeigersinn, um die Schraube
zu lösen.
Rechtes Rad: Drehen Sie den Inbusschlüssel
im Uhrzeigersinn, um die Schraube zu lösen.
Wartungsanweisungen
Rad wechseln
18
www.PyleUSA.com
Die Räder nutzen sich mit der Zeit ab und können bei übermäßigem Gebrauch auf rauem
Untergrund beschädigt werden. Das Hinterrad, auf das die Bremse wirkt, ist nach mehrstündi-
gem Bremsen besonders betroffen. Überprüfen Sie die Räder aus Sicherheitsgründen
regelmäßig und wechseln Sie sie bei Bedarf aus.

Deck 1 wechseln.
www.PyleUSA.com
19
1. Lösen Sie die 6 Schrauben (A) wie in der Abbildung gezeigt (Pfeile).
2. Entfernen Sie das Deck und ziehen Sie die Schrauben (A) an.
3. Prüfen Sie den festen Sitz, nachdem Sie etwa 5 km mit dem neuen Deck gefahren sind.

Niemand ist befugt, die Bedingungen dieser Garantie zu ändern.
20
www.PyleUSA.com
Sicherheitstipp
Garantie
Die Garantie deckt nicht ab:
Für Ihren Scooter gilt eine dreimonatige Garantie
auf Material- und Verarbeitungsfehler ab dem
Kaufdatum. Wenn es ein Problem gibt, werden wir
Ihren Roller reparieren oder ersetzen. Wenden Sie
sich an Ihren örtlichen Verkäufer oder Händler.
Der Scooter macht Spaß und ist sicher, wenn er richtig
benutzt wird. Um Verletzungen zu vermeiden, tragen
Sie Schutzkleidung wie einen Helm und Polster für Ihre
Hände, Ellbogen und Knie. Tragen Sie griffige Schuhe,
damit Sie nicht ausrutschen. Fahren Sie immer mit einer
sicheren Geschwindigkeit und halten Sie an, wenn Sie
auf mögliche Gefahren stoßen.
• Unsachgemäße Reparaturen oder Modifizierungen
• Schäden durch äußere Einwirkungen (z. B.
Bordsteine, Hindernisse)
• Missbrauch, unsachgemäße Verwendung oder
normale Abnutzung

Modellnummer
HURSC12PK
PyleUSA.com/pages/register
HURSC12PK
Hier starten
HURSC11BL
HURSC13BK
HURSC14WM HURSC15TL
HURSC16PR
HURSC17GN
HURSC18YL HURSC19RD HURSC21CM
HURSC22GF HURSC23RT
Produkt registrieren
www.PyleUSA.com
21
Vielen Dank, dass Sie sich für PyleUSA entschieden haben. Indem Sie Ihr Produkt
registrieren, stellen Sie sicher, dass Sie in den vollen Genuss unserer exklusiven Garantie
und unseres persönlichen Kundensupports kommen. Füllen Sie das Formular aus, um
fachkundige Unterstützung zu erhalten und Ihren PyleUSA-Kauf in perfektem Zustand zu
halten.

Fragen oder Kommentare?
Wir sind für Sie da!
Telefon: 1.718.535.1800
PyleUSA.com/ContactUs

ZESKANUJ MNIE
Odwiedź naszą
stronę internetową
PyleUSA.com
PORADNIK UŻYTKOWNIKA
Lekka i regulowana
Mini hulajnoga
DLA DZIECI OD
2-5
POL

Cechy:
2
www.PyleUSA.com
• Mini Hulajnoga do zabawy
• Konstrukcja trójkołowa z 3 kołami
• Lekka, kompaktowa i przenośna
• Wielokolorowe koła LED, które świecą podczas
jazdy
• Regulowana wysokość kierownicy z drążkiem
w kształcie litery T
• Duży antypoślizgowy podnóżek dla dodatkow-
ej stabilności
• Stabilność hulajnogi trójkołowej
• Super gładkie i wytrzymałe koła
• Technologia pochylania kierownicy ułatwiająca
manewrowanie
• Bezpieczeństwo potwierdzone testami
laboratoryjnymi
• Nadaje się do użytku wewnątrz i na zewnątrz
• Zalecana dla dzieci w wieku od 2 do 5 lat
• Zabawa dla dzieci: maluchów i małych
przedszkolaków
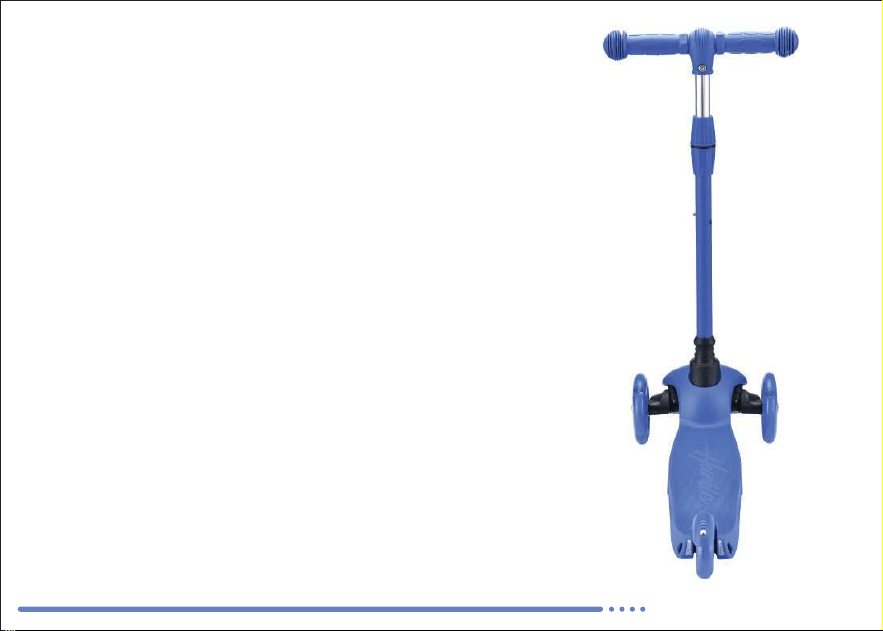
Zawartość opakowania:
Dane techniczne:
www.PyleUSA.com
3
• (1) Hulajnoga dla dzieci
• (1) Prosty zestaw montażowy
• Materiał wykonania: stop aluminium, PP, nylon, PU
• Typ kół/materiał kół: koła PU ze światłami LED
• Zalecany wiek: 2-5 lat
• Nośność: 20 kg (44 funty)
• Regulowana wysokość kierownicy: 25'' - 26.57'' - 28.55'' cali/ 63.5
cm - 67.5 cm - 72.5 cm
• Wymiary kół:
• Przednie koło: 12 cm x 2.4 cm (4.72" x 0.94" cali)
• Tylne koło: 8 cm x 2.4 cm (3.14" x 0.94" cali)
• Wymiary platformy: 51 cm x 14 cm (20.08" x 5.51" cali)
• Waga netto / waga brutto: 4.76 / 6.17 lbs./ 2.16 kg / 2.8 kg
• Wymiary całkowite hulajnogi (szer. x gł. x wys.): 54.5 cm x 28.5 cm
x 63.5 cm (21.46" x 11.22" x 25" cali)

OGÓLNE
Baw się dobrze z nowym skuterem!
4
www.PyleUSA.com
Przed użyciem tego produktu zapoznaj się w całości z
załączoną instrukcją obsługi.
Podczas użytkowania noś sprzęt ochronny. Podczas montażu i
użytkowania wymagany jest nadzór osoby dorosłej.
Dziękujemy za wybranie naszej hulajnogi.
Możesz mieć pewność, że kupiłeś produkt
wysokiej jakości. Oferujemy Ci również
doskonałą obsługę posprzedażną. Zanim
doświadczysz wyjątkowych wrażeń z jazdy, jakie
oferuje Twoja nowa hulajnoga, przeczytaj
uważnie załączone instrukcje. Zachowaj te
instrukcje w bezpiecznym miejscu do
wykorzystania w przyszłości. Pamiętaj, że
specyfikacje produktu mogą ulec zmianie bez
powiadomienia.

www.PyleUSA.com
5
Ważne instrukcje i ostrzeżenia
WAŻNE: Zanim pozwolisz dziecku korzystać z hulajnogi, przeczytaj uważnie instrukcje
dotyczące bezpieczeństwa. Upewnij się, że wał kierownicy jest w pełni zablokowany i że
wszystkie śruby są dobrze dokręcone. Upewnij się również, że kółka są dobrze zamocowane i
nie wykazują oznak zużycia.
WAŻNE: Wielokrotne luzowanie śrub osi zmniejsza ich skuteczność. Może to również
spowodować samoistne poluzowanie się śrub. Zawsze sprawdzaj je regularnie i dokręcaj
przed każdym użyciem.
OSTRZEŻENIE: Wymagany jest nadzór osoby dorosłej. Po rozmontowaniu ten produkt
zawiera małe części.
OSTRZEŻENIE: Zachowaj ostrożność podczas jazdy, ponieważ wymagana jest pewna
zręczność, aby uniknąć upadków lub kolizji, które mogą spowodować obrażenia użytkownika
lub innych osób.
OSTRZEŻENIE: Zaleca się noszenie kasku i sprzętu ochronnego na łokcie, kolana, nadgarstki i
dłonie, a także obuwia z gumową podeszwą.
OSTRZEŻENIE: Zamknij szybkozamykacz i upewnij się, że jest prawidłowo zamocowany.
OSTRZEŻENIE: Nie zjeżdżaj ze stromych zboczy.
OSTRZEŻENIE: : Dzieci muszą być zawsze pod nadzorem osoby dorosłej.
OSTRZEŻENIE: Hamulec może się przegrzać podczas użytkowania.
OSTRZEŻENIE: Maksymalna dopuszczalna waga: 20 kg (44 funty).

Instrukcje bezpiecznej obsługi
6
www.PyleUSA.com
• Twoje dziecko powinno najpierw poćwiczyć, aby uzyskać kontrolę nad hulajnogą. Zalecamy
ćwiczenie na parkingu wolnym od ruchu drogowego lub na otwartym, utwardzonym placu
zabaw.
• Upewnij się, że dziecko zawsze nosi kask, ochraniacze na nadgarstki, łokcie i kolana oraz
buty z gumową podeszwą. Hulajnoga nie powinna być używana w ruchu ulicznym.
Maksymalna waga: 20 kg (44 funty).
• Upewnij się, że dziecko nie próbuje żadnych eksperymentów ani ryzykownych manewrów.
• Styl jazdy powinien być zawsze dostosowany do poziomu umiejętności użytkownika.
• Upewnij się, że dziecko nie przekracza prędkości 5 km/h (3 mph).
• Upewnij się, że dziecko nie jeździ po autostradach, drogach lub innych miejscach, w których
odbywa się ruch pojazdów silnikowych. Nie zezwalaj na dokonywanie modyfikacji lub zmian
w hulajnodze, ponieważ może to spowodować utratę gwarancji i zagrozić bezpieczeństwu.
• Upewnij się, że dziecko nie jeździ na hulajnodze w ciemności lub w nocy.
• Jednocześnie hulajnogą może jeździć tylko jedno dziecko.
• Upewnij się, że dziecko nie zjeżdża ze stromych zboczy. Hamulec nie jest przeznaczony do
spowalniania hulajnogi przy dużych prędkościach. Podczas jazdy zawsze patrz przed siebie,
aby w razie potrzeby móc szybko zahamować. Przy dłuższym użytkowaniu hamulec może
się nagrzewać. Unikaj kontaktu ze skórą.
• Klocki hamulcowe mogą się nagrzewać podczas użytkowania. Upewnij się, że dziecko nie
trzyma wciśniętego hamulca przez dłuższy czas. Wyjaśnij, że bezpośredni kontakt skóry z
klockiem hamulcowym może spowodować oparzenia.
• Hulajnogi nie należy używać na mokrych, oleistych, piaszczystych, oblodzonych, szorstkich
lub nierównych powierzchniach.
• Nigdy nie używaj hulajnogi na mokrej nawierzchni.
• Krawężniki i kostka brukowa mogą wpływać na równowagę. Najlepiej zsiąść z hulajnogi i
przejść się po nich. Nawet spadające krawężniki mogą spowodować utratę równowagi.
• Uważaj na podłużne i poprzeczne rowki w asfalcie.
• Wąskie koła mogą utknąć w szynach tramwajowych i pokrywach studzienek, powodując ich
zablokowanie.
• Niektóre części metalowe mogą z czasem korodować, zwłaszcza jeśli są używane w pobliżu
morza lub często pozostawiane na zewnątrz.
• Hulajnoga nie powinna być używana na drogach publicznych. Korzystając z chodników dla
pieszych, trzymaj się właściwej strony zgodnie z przepisami ruchu drogowego. Uważaj na
pieszych, osoby na wózkach inwalidzkich, rowerzystów, deskorolkarzy i zwierzęta. Zawsze
przestrzegaj zasad i przepisów ruchu drogowego.
• Nośność wynosi do 20 kg masy ciała.
• Hulajnoga jest przeznaczona dla dzieci od 1 roku życia.
• Zawsze uważaj, aby nie zranić palców podczas składania i rozkładania hulajnogi.
• Wyjaśnij dziecku zagrożenia i prawidłowe korzystanie z hulajnogi.
• Nadzoruj dziecko podczas korzystania z hulajnogi. Baw się dobrze z nową hulajnogą!
Ostrzeżenie California Proposition 65
OSTRZEŻENIE:
Ten produkt może narazić Cię na działanie substancji chemicznych, o
których stan Kalifornia wie, że powodują raka, wady wrodzone i inne
szkody reprodukcyjne. Nie połykaj.
Aby uzyskać więcej informacji: www.P65warnings.ca.gov
www.PyleUSA.com
7

8
www.PyleUSA.com
Hamulec
UWAGA: Hamulec i płyta ślizgowa mogą się bardzo nagrzewać.
Instrukcje zabawy
OSTRZEŻENIE:
Przytrzymaj rękoma końce drążka T-bar lub ring bar. Kieruj hulajnogą z lekkimi przesunięciami
ciężaru ciała. Aby rozpocząć, stań jedną nogą (ze stopą ustawioną pod kątem około 45° do
kierunku jazdy) na desce i rozpędź się za pomocą drugiej nogi. Jeśli stoisz z prawą nogą na
desce, użyj lewej nogi, aby przyspieszyć. Jeśli stoisz z lewą nogą na desce, użyj prawej nogi, aby
przyspieszyć. Po nabraniu rozpędu stań na desce z rozstawionymi nogami, tak aby obie stopy
były ustawione pod kątem około 45° do kierunku jazdy.
Hamulec jest hamulcem ciernym przeznaczonym wyłącznie do
zmniejszania prędkości na płaskich powierzchniach - unikaj zjeżdżania
ze wzniesień. Hamuj przy niskiej prędkości, delikatnie naciskając stopą,
umieszczoną daleko z tyłu na desce, na płytę tylnego koła. Jeśli jedziesz
szybciej, może być konieczne mocniejsze naciśnięcie. Zachowaj
ostrożność: zbyt mocne i gwałtowne naciśnięcie hamulca grozi
upadkiem. Najlepiej jest ćwiczyć hamowanie przy prędkości
spacerowej.
Nie próbuj ani nie wykonuj akrobacji, trików ani nie jedź/tocz się do tyłu na
hulajnodze. Hulajnoga nie została zaprojektowana z myślą o niewłaściwym użytkowaniu, takim jak
skakanie, ślizganie się po krawężnikach lub inne akrobacje. Wyścigi, jazda akrobatyczna lub inne manewry,
takie jak jazda do tyłu, zwiększają ryzyko utraty kontroli lub mogą skutkować niekontrolowanymi
działaniami lub reakcjami kierowcy. Agresywna jazda zmniejsza twoją zdolność do manewrowania i
kontrolowania hulajnogi. Podejmij niezbędne środki ostrożności i ćwicz w bezpiecznym miejscu.

Wiek: 1+ rok (zalecane)
Uchwyt
Regulowany drążek w kształcie litery T
Wytrzymały TPR/
przyjazny dla środowiska
24,4 cala do 28,3 cala
- (620 mm do 720 mm)
Bez lutowania
Wykorzystuje nową technologię zamiast tradycyjnego
lutowania.
Jest ładniejsza i trwalsza.
Kolorowe logo/etykieta
Spersonalizowane
Mocniejszy plastikowy zacisk
Wykorzystuje wzmocniony materiał GFK30 zamiast aluminium
(ALU). Metalowe wiertła mogą łatwo uszkodzić skórę dzieci.
Dolny błotnik
Kierownica
Zagęszczone rury aluminiowe (ALU)
Wzmacnia ochronę podwozia
Tylny hamulec
Kolorowy hamulec ze stali nierdzewnej
Tylne koło PU
4 sztuki/3,15 cala (80 mm) - 4 PZ 80 mm
Niebrudzący/błyskający
Mocniejsze, wzmocnione GFK30 o nośności
do 20 kg (44 funtów)
Podwozie
Osłona antypoślizgowa
Przednie koło PU
4,72 cala (120 mm) Bez oznaczeń/Flash - 120 mm
Szersza, bardziej komfortowa
Mechanizm pochylania
do kierowania
Większa stabilność i elastyczność
Zwiększa stabilność
kierownicy i korpusu hulajnogi
Tuleja zaciskowa
www.PyleUSA.com
9

Kierownica
Nadwozie hulajnogi
Drążek kierowniczy
Klucz imbusowy
Tuleja mocująca
10
www.PyleUSA.com

Montaż drążka w kształcie litery T
Włóż ją do końca, jak pokazano na
rysunku (D).
Za pomocą klucza imbusowego
wykręć śruby i wkręty (A).
Wyrównaj szczelinową stronę
aluminiowej rurki (B).
Zlokalizuj występ lub strzałkę w
rowku rury kierownicy.
Włóż śruby i wkręty i zabezpiecz je kluczem imbusowym (E i F).
www.PyleUSA.com
11

Montaż hulajnogi
OSTRZEŻENIE!
Podczas montażu hulajnogi trzymaj dzieci w bezpiecznej odległości,aby uniknąć przypadkowych
obrażeń.
12
www.PyleUSA.com
Naciśnij czerwony przycisk (M)
i włóż kierownicę (T) płaską
stroną do tyłu do otworu w
hulajnodze (H), jak pokazano
na rysunku C. Usłyszysz
„kliknięcie”, gdy kierownica (T)
zostanie zablokowana w
korpusie hulajnogi.
Znajdź otwór w hulajnodze
(H), jak pokazano na rysunku B.
Zidentyfikuj czerwony przycisk
(M), kierownicę (T) i tuleję
mocującą (S), jak pokazano na
rysunku A.
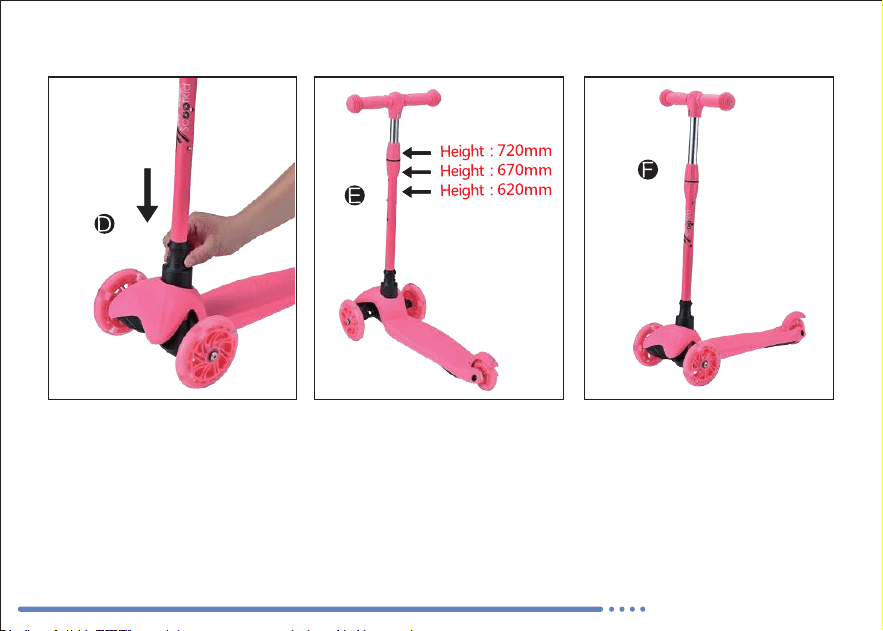
Pociągnij w dół tuleję
zaciskową, aby zwiększyć
stabilność kierownicy (T) i
korpusu hulajnogi, jak
pokazano na rysunku D.
Wyreguluj wysokość kierowni-
cy (T) i korpusu hulajnogi, jak
pokazano na rysunku D.
W razie potrzeby ustaw
kierownicę w kształcie litery T
na jednej z trzech wysokości,
aby stopniowo dostosować ją
do wzrostu i rozwoju dziecka,
jak pokazano na rysunku E.
Zakończ montaż hulajnogi i
regulację wysokości, jak
pokazano na rysunku F.
Montaż hulajnogi
www.PyleUSA.com
13
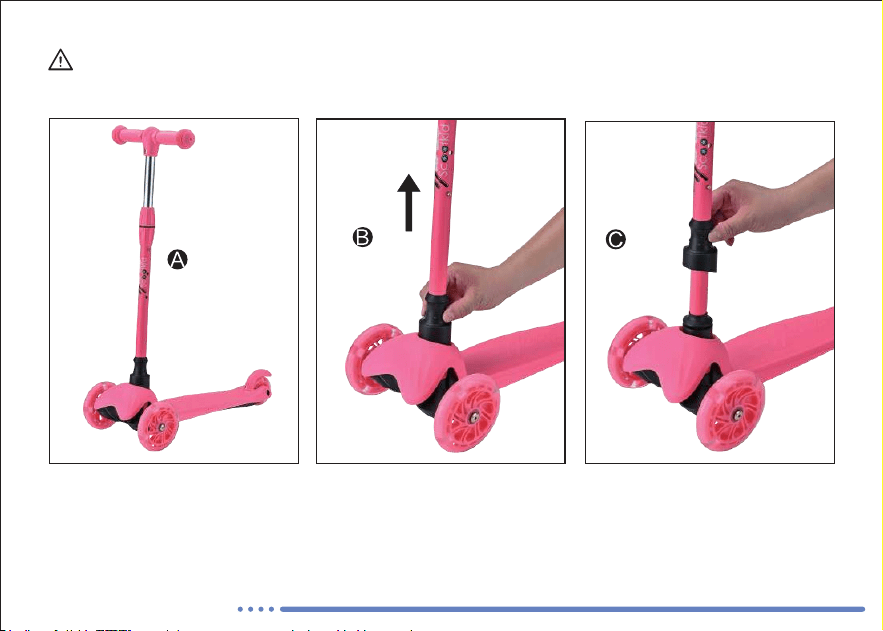
Ustaw hulajnogę w sposób
pokazany na rysunku A.
Pociągnij tuleję mocującą do góry, jak pokazano na rysunkach B i C.
Demontaż hulajnogi
OSTRZEŻENIE!
Podczas demontażu hulajnogi trzymaj dzieci w bezpiecznej odległości, aby uniknąć przypadkow-
ych obrażeń.
14
www.PyleUSA.com

Zdejmowanie hulajnogi
Naciśnij czerwony przycisk jedną ręką, a drugą ręką
odciągnij kierownicę od korpusu hulajnogi, jak pokazano
na rysunkach D i E.
Zakończ demontaż hulajnogi,
jak pokazano na rysunku F.
www.PyleUSA.com
15

Poluzuj dźwignię zacisku
kołnierza, jak pokazano na rysunku
A.
Dopasuj drążek T do wzrostu
dziecka. Dokręć zacisk kołnierza,
aby zabezpieczyć drążek T po
regulacji, jak pokazano na rysunku
B.
Najniższy: 23 cale (585 mm),
jak pokazano na rysunku C.
Regulacja wysokości
OSTRZEŻENIE!
Dokręć zacisk kołnierzowy, aby zabezpieczyć drążek T po regulacji.
16
www.PyleUSA.com

Druga: 24,4 cala (620 mm), jak pokazano
na rysunku D.
Trzecia: 26,4 cala (670 mm), jak pokaza-
no na rysunku E.
Regulacja wysokości
www.PyleUSA.com
17

Lewe koło: Przekręć klucz imbusowy w
kierunku przeciwnym do ruchu wskazówek
zegara, aby poluzować śrubę.
Prawe koło: : Przekręć klucz imbusowy w
prawo, aby poluzować śrubę.
Instrukcje dotyczące konserwacji
Wymiana koła
18
www.PyleUSA.com
Koła zużywają się z czasem i mogą ulec uszkodzeniu, jeśli są nadmiernie używane na
nierównych powierzchniach. Problem ten dotyczy w szczególności tylnego koła, na którym
uruchamiany jest hamulec, po kilku godzinach hamowania. Aby zachować bezpieczeństwo,
regularnie sprawdzaj koła i wymieniaj je w razie potrzeby.

Wymiana podnóżka
www.PyleUSA.com
19
1. Poluzuj 6 śrub (A), jak pokazano na rysunku (strzałki).
2. Zdejmij płytkę i dokręć śruby (A).
3. Sprawdź dokręcenie po przejechaniu około 5 km (3 mil) z nowym podnóżkiem.

Nikt nie jest upoważniony do zmiany warunków niniejszej
gwarancji.
20
www.PyleUSA.com
Wskazówki dotyczące bezpieczeństwa
Gwarancja
Gwarancja nie obejmuje:
Hulajnoga jest objęta gwarancją na wady
materiałowe i produkcyjne przez trzy miesiące od
daty zakupu. W przypadku wystąpienia problemu
naprawimy lub wymienimy Twoją hulajnogę. Aby
uzyskać pomoc, skontaktuj się ze sprzedawcą lub
lokalnym autoryzowanym dealerem.
Prawidłowe korzystanie z hulajnogi jest przyjemne i
bezpieczne. Aby uniknąć obrażeń, zawsze noś sprzęt
ochronny, taki jak kask oraz ochraniacze dłoni, łokci i
kolan. Noś buty o dobrej przyczepności, aby uniknąć
poślizgnięcia. Zawsze jedź z bezpieczną prędkością i
zatrzymuj się, jeśli napotkasz potencjalne zagrożenia.
• Nieautoryzowanych napraw lub modyfikacji.
• Uszkodzeń spowodowanych uderzeniami zewnętr-
znymi (np. chodniki, przeszkody).
• Niewłaściwego użytkowania, użytkowania
niezgodnego z przeznaczeniem lub normalnego
zużycia.

Numer modelu
HURSC12PK
PyleUSA.com/pages/register
HURSC12PK
Zacznij tutaj
HURSC11BL
HURSC13BK
HURSC14WM HURSC15TL
HURSC16PR
HURSC17GN HURSC18YL HURSC19RD HURSC21CM HURSC22GF HURSC23RT
Zarejestruj produkt
www.PyleUSA.com
21
Dziękujemy za wybranie PyleUSA! Rejestrując swój produkt, będziesz cieszyć się
wszystkimi zaletami naszej ekskluzywnej gwarancji i spersonalizowanej obsługi klienta.
Wypełnij formularz, aby uzyskać dostęp do wsparcia ekspertów i utrzymać swój zakup
PyleUSA w idealnym stanie.

Masz pytania lub uwagi?
Jesteśmy tutaj, aby Ci pomóc.
Telefon: 1.718.535.1800
PyleUSA.com/ContactUs

BENİ TARA
Web Sitemizi
Ziyaret Edin
PyleUSA.com
Hafif ve Ayarlanabilir
Mini Kickboard Scooter
KULLANICI KILAVUZU
ÇOCUKLAR
IÇIN
2-5
TUR

Özellikler:
2
www.PyleUSA.com
• Mini Kick Scooter Eğlencesi
• 3 - Tekerlekli Üç Tekerlekli Bisiklet 'Trike' Stili
• Hafif, Kompakt ve Taşınabilir
• Çok Renkli LED Tekerlek Işıkları Yuvarlanırken
Aydınlatır
• Ayarlanabilir T- Çubuğu Gidon Yüksekliği
• Kaymaz Geniş Zemin Ayak Tabanı Güvertesi
• Çok Tekerlekli Scooter Dengesi
• Uzun Ömürlü, Süper Pürüzsüz Kayar Tekerlekler
• Kolay Manevra Yalın-Tekerlek Teknolojisi
• Laboratuvar Testli ve Güvenlik Sertifikalı
• İç / Dış Mekan Kullanımı
• 2-5 Yaş Arası İçin Uygun
• Çocuklar İçin Eğlence: Küçük Çocuklar ve
Küçük Bebekler

Kutunun içinde ne var
Teknik Özellikler:
www.PyleUSA.com
3
• (1) Çocuk Scooter
• (1) Montaj için Basit Aletler
• Yapı Malzemesi: Alüminyum Alaşım+PP+Naylon+PU
• Tekerlek Tipi / Tekerlek Malzemesi: LED ışıklı PU Tekerlek
• Önerilen Yaş: 2-5
• Ağırlık Kapasitesi: 20 kg (44 lbs)
• Gidon Yükseklik Ayarı: 25'' - 26.57'' - 28.55'' inç/ 63.5 cm - 67.5 cm -
72.5 cm
• Tekerlek Boyutu:
• Ön Tekerlek: 12 cm x 2.4 cm (4.72" x 0.94" inç)
• Arka Tekerlek: 8 cm x 2.4 cm (3.14" x 0.94" inç)
• Güverte Boyutu: 51 cm x 14 cm (20.08" x 5.51" inç)
• Net Ağırlık/Brüt Ağırlık: 4.76 / 6.17 lbs./ 2.16 kg / 2.8 kg
• Toplam Scooter Boyutu (U x G x Y): 54.5 cm x 28.5 cm x 63.5 cm
(21.46" x 11.22" x 25" inç)

GENEL
Yeni scooter'ınızla iyi eğlenceler!
4
www.PyleUSA.com
Bu ürünü çalıştırmadan önce lütfen ekteki Kullanım
Talimatlarını tamamen okuyun.
Sürüş sırasında koruyucu giysiler giyin. Montaj ve kullanım için
yetişkin gözetimi gereklidir.
Scooter'ımızı seçtiğiniz için teşekkür ederiz.
Yüksek kaliteli bir ürün aldığınızdan emin
olabilirsiniz. Ayrıca size mükemmel bir satış
sonrası hizmet sunuyoruz. Yeni scooterınızın
sunduğu benzersiz sürüş deneyimini yaşamadan
önce, lütfen ekteki talimatları dikkatlice okuyun.
Bu talimatları ileride başvurmak üzere güvenli
bir yerde saklayın. Ürün özelliklerinin önceden
haber verilmeksizin değiştirilebileceğini lütfen
unutmayın.

www.PyleUSA.com
5
Önemli Talimatlar ve Uyarılar
ÖNEMLİ: Çocuğunuzun scooter'ı kullanmasına izin vermeden önce, lütfen çalıştırma
güvenlik talimatlarını dikkatlice okuyun. Direksiyon çubuğunun tam olarak yerine
oturduğundan ve tüm vidaların sıkı olduğundan emin olun. Ayrıca, tekerleklerin doğru
şekilde sabitlendiğinden ve herhangi bir aşınma belirtisi göstermediğinden emin olun.
ÖNEMLİ: Aks vidalarının tekrar tekrar sökülmesi etkinliklerini azaltacaktır. Bu, vidaların
kendiliğinden gevşemesine neden olabilir. Vidaları her zaman düzenli olarak kontrol edin ve
her kullanımdan önce sıkın.
UYARI: Yetişkin gözetimi gereklidir. Bu ürün demonte haldeyken küçük parçalar içerir.
UYARI: Kullanıcının veya başkalarının yaralanmasına neden olabilecek düşme veya
çarpışmalardan kaçınmak için beceri gerektiğinden, sürüş sırasında dikkatli olun.
UYARI: Dirsekler, dizler, bilekler ve avuç içleri için kask ve koruyucu ekipmanların yanı sıra
düz kauçuk tabanlı ayakkabılar giyilmesi önerilir.
UYARI: Hızlı hareket kilidini güvenli bir şekilde kapatın ve doğru konumlandırıldığından
emin olun.
UYARI: Yokuş aşağı sürmeyin.
UYARI: Çocuklar gözetim altında olmalıdır.
UYARI: Fren ısınabilir.
UYARI: : İzin verilen maksimum ağırlık: 44 lbs (20 kg).

Çalıştırma Güvenliği Talimatları
6
www.PyleUSA.com
• Çocuğunuz scooter'ın kontrolünü kazanmak için önce pratik yapmalıdır. Trafiğe kapalı bir
otoparkta veya açık asfalt oyun alanında pratik yapmasını öneririz.
• Çocuğunuzun her zaman bir kask, bilek, dirsek ve dizlik ile lastik tabanlı ayakkabılar giydiğin-
den emin olun. Scooter trafikte kullanılmamalıdır. Maksimum ağırlık: 44 lbs (20 kg).
• Çocuğunuzun herhangi bir deneme veya riskli manevra yapmadığından emin olun. Sürüş
tarzı her zaman sürücünün kişisel beceri seviyesine göre ayarlanmalıdır.
• Çocuğunuzun 3 mph (5 km/h) hızı aşmadığından emin olun.
• Çocuğunuzun yollarda, patikalarda veya motorlu araç trafiğinin olduğu diğer yerlerde sürüş
yapmadığından emin olun. Garantiyi geçersiz kılabileceği ve güvenliği tehlikeye
atabileceği için scooter üzerinde herhangi bir modifikasyon veya değişiklik yapılmasına izin
vermeyin.
• Çocuğunuzun scooter'ı karanlıkta veya geceleri sürmediğinden emin olun.
• Scooter'a aynı anda sadece bir çocuk binebilir.
• Çocuğunuzun dik yokuşlardan aşağı inmediğinden emin olun. Fren, scooter'ı yokuş aşağı
yüksek hızlarda yavaşlatmak için tasarlanmamıştır. Sürüş sırasında daima önünüze bakın,
böylece gerektiğinde hızlıca durabilirsiniz. Fren uzun süreli kullanımda ısınabilir. Cilt
temasından kaçının.
• Fren balatası kullanım sırasında ısınabilir. Çocuğunuzun freni uzun süre açık tutmadığından
emin olun. Fren balatası ile doğrudan cilt temasının yanıklara neden olabileceğini açıklayın.

• Scooter ıslak, yağlı, kumlu, buzlu, pürüzlü veya düz olmayan yüzeylerde kullanılmamalıdır.
• Scooter'ı asla ıslak koşullarda kullanmayın.
• Kaldırım taşları ve arnavut kaldırımları dengenizi etkileyebilir. İnmek ve üzerlerinden yürümek
daha iyidir. Alçaltılmış kaldırım taşları bile dengenizi bozabilir.
• Asfalttaki uzunlamasına ve enine oluklara dikkat edin!
• Dar tekerlekler tramvay raylarına ve rögar kapaklarına takılarak kilitlenmelerine neden olabilir.
• Bazı metal parçalar, özellikle deniz kenarında kullanıldığında veya sık sık açık havada
bırakıldığında zamanla paslanabilir.
• Scooter kamuya açık yollarda kullanılamaz. Yaya geçitlerini kullanırken, trafik kurallarına göre
doğru tarafta kalın. Yayalara, tekerlekli sandalye kullanıcılarına, bisikletlilere, patencilere ve
hayvanlara karşı dikkatli olun. Her zaman trafik kurallarına ve düzenlemelerine uyun.
• Yük kapasitesi en fazla 44 lbs (20 kg) vücut ağırlığıdır.
• Bu scooter 1 yaş ve üzeri çocuklar içindir.
• Scooter'ı katlarken ve açarken her zaman parmaklarınızı incitmemeye dikkat edin. -
Çocuğunuza scooter'ın risklerini ve doğru kullanımını açıklayın.
• Scooter'ı kullanırken çocuğunuzu gözetim altında tutun. Yeni scooter'inizla iyi eğlenceler!
California Proposition 65 Uyarısı
UYARI:
Bu ürün, Kaliforniya eyaletinin kansere, doğum kusurlarına ve diğer üreme
zararlarına neden olduğunu bildiği kimyasal maddelere maruz kalmanıza
neden olabilir. Yutmayın.
Daha fazla bilgi için: www.P65warnings.ca.gov
www.PyleUSA.com
7

8
www.PyleUSA.com
Fren
DIKKAT: Fren ve koruma plakası çok ısınabilir.
Oyun Talimatları
Ellerinizle T-Çubuğunun veya Halka Çubuğun uçlarını tutun. Tahtayı hafif ağırlık değişimleriyle
yönlendirirsiniz. Yola çıkmak için bir bacağınızla (ayağınız hareket yönüne yaklaşık 45° açı
yapacak şekilde) tahtanın üzerinde durun ve diğer bacağınızı kullanarak kendinizi itin. Eğer sağ
bacağınız tahtanın üzerinde duruyorsa, hızlanmak için sol bacağınızı kullanın. Sol bacağınız
tahtanın üzerindeyken duruyorsanız, hızlanmak için sağ bacağınızı kullanın. İvme kazandıktan
sonra, her iki ayağınız da hareket yönüne yaklaşık 45° açıda olacak şekilde bacaklarınızı ayırarak
tahta üzerinde durun. Scooter'ınızın keyfini çıkarın!
Fren, yalnızca düz yüzeylerde hızı azaltmak için tasarlanmış bir
sürtünme frenidir; yokuş aşağı inmekten kaçının. Düşük hızda fren
yapmak için ayağınızı hafifçe arka tekerlek plakasına doğru bastırın.
Daha hızlı seyahat ediyorsanız daha sert itmeniz gerekebilir. Dikkatli
olun: frene çok sert basarsanız ve aniden yavaşlarsanız düşme riskiyle
karşı karşıya kalırsınız. En iyisi yürüme hızında frenleme alıştırması
yapmaktır.
Scooter'ınız üzerinde akrobasi hareketleri, numaralar veya geriye doğru sürüş/yu-
varlanma denemeyin veya gerçekleştirmeyin. Zıplama, kaldırım taşlama veya diğer türden
hareketler gibi yanlış kullanımlara dayanacak şekilde tasarlanmamıştır.
UYARI!

Yaş: 1+ yıl (Önerilen)
Tutamak Kavrama
Ayarlanabilir T- Çubuğu
Dayanıklı
/çevre koşullarına uygun TPR
24,4 inç ila 28,3 inç (620 mm ila 720 mm)
Kaynaksız
Geleneksel kaynak yerine yeni teknoloji kullanır. Daha
güzel, daha dayanıklıdır.
Renkli Logo/Etiket
Özelleştirilmiş
Daha Güçlü Plastik Yaka Kelepçesi
Alüminyum (ALU) yerine Güçlendirilmiş GFK30 malzeme kullanır.
Metal çapaklar çocukların cildine kolayca zarar verebilir.
Kaymaz Güverte
Gidon/Direksiyon Çubuğu
Kalınlaştırılmış alüminyum (ALU) tüp
Daha geniş, daha konforlu
Arka Fren
Paslanmaz çelikten renkli fren
Arka PU Tekerlek
4 ADET/3,15 inç (80 mm)
İşaretsiz/Flaşlı
Güçlendirilmiş GFK30 Daha güçlü, 44 lbs'ye
(20 kg) kadar yükleme kapasitesi
Şasi
Yalın-Kalça Mekanizması
Ön PU Tekerlek
4,72 inç (120 mm) İşaretsiz/Flash
Daha istikrarlı, daha esnek
Alt Çamurluk
Şasinin korunmasını güçlendirir
Gidon ve Scooter
Gövdesinin dengesini güçlendirir
Sabitleme Kovanı
www.PyleUSA.com
9

Gidon/Direksiyon Çubuğu
Scooter Gövdesi
T-Çubuğu
Alyan Anahtar
Sabitleme Kovanı
10
www.PyleUSA.com

T-Çubuğu Montajı
Şekilde (D) gösterildiği gibi sonuna
kadar yerleştirin.
Cıvataları ve vidaları (A) çıkarmak
için Alyan anahtarı kullanın.
Alüminyum borunun yivli tarafını
hizalayın (B).
Gidon borusu boşluğu üzerindeki
çıkıntıyı veya oku (C) bulun.
Cıvataları ve vidaları takın ve Alyan anahtarı ile sıkın (E ve F).
www.PyleUSA.com
11

Scooter Montajı
UYARI!
Kazara yaralanmaları önlemek için scooter'ı monte ederken çocukları güvenli bir mesafede tutun.
12
www.PyleUSA.com
Kırmızı düğmeye (M) basın ve
Gidonu (T) düz tarafı arkaya
bakacak şekilde Şekil C'de
gösterildiği gibi Scooter
Deliğine (H) yerleştirin.
Gidonun (T) Scooter Gövdes-
ine güvenli bir şekilde
kilitlendiğinden emin olmak
için “klik” sesini dinleyin.
Şekil B'de gösterildiği gibi
Scooter Deliğini (H) bulun.
Şekil A'da gösterilen Kırmızı
Basma Düğmesini (M), Gidonu
(T) ve Sabitleme Kovanını (S)
tanımlayın.

Şekil D'de gösterildiği gibi
Gidon (T) ve Scooter Gövdesi-
nin dengesini güçlendirmek
için Sabitleme Kovanını aşağı
doğru çekin.
Ayarlanabilir T- Çubuğu
gidonu, Şekil E'de gösterildiği
gibi çocuğunuzun gelişimine
eşlik edecek şekilde üç
yükseklikten birine ayarlayın.
Scooter Montajını ve Yükseklik
Ayarını Şekil F'de gösterildiği
gibi tamamlayın.
Scooter Montajı
www.PyleUSA.com
13

Scooter'ı Şekil A'da gösterildiği
gibi konumlandırın.
Sabitleme manşonunu Şekil B ve C'de gösterildiği gibi yukarı doğru
çekin.
Scooter Montajı
UYARI!
Kazara yaralanmaları önlemek için scooter'ı monte ederken çocukları güvenli bir mesafede tutun.
14
www.PyleUSA.com

Scooter Demontajı
Şekil D ve E'de gösterildiği gibi Gidon ve Scooter Gövdesini
ayırarak gidonu çekmek için diğer elinizi kullanırken bir
elinizle Kırmızı İtme Anahtarına basın.
Scooter Sökme İşlemini Şekil
F'de gösterildiği gibi tamam-
layın.
www.PyleUSA.com
15

Şekil A'da gösterildiği gibi Yaka
Kelepçesinin Kolunu gevşetin.
T- Çubuğu çocuğunuzun boyuna
göre ayarlayın. Ayarlamadan sonra
T- Çubuğu sabitlemek için Şekil
B'de gösterildiği gibi Yaka
Kelepçesini sıkın.
En düşük: Şekil C'de
gösterildiği gibi 23 inç (585
mm).
Yükseklik Ayarı
UYARI!
Ayarlamadan sonra T-Çubuğu sabitlemek için Yaka Kelepçesini sıkın.
16
www.PyleUSA.com
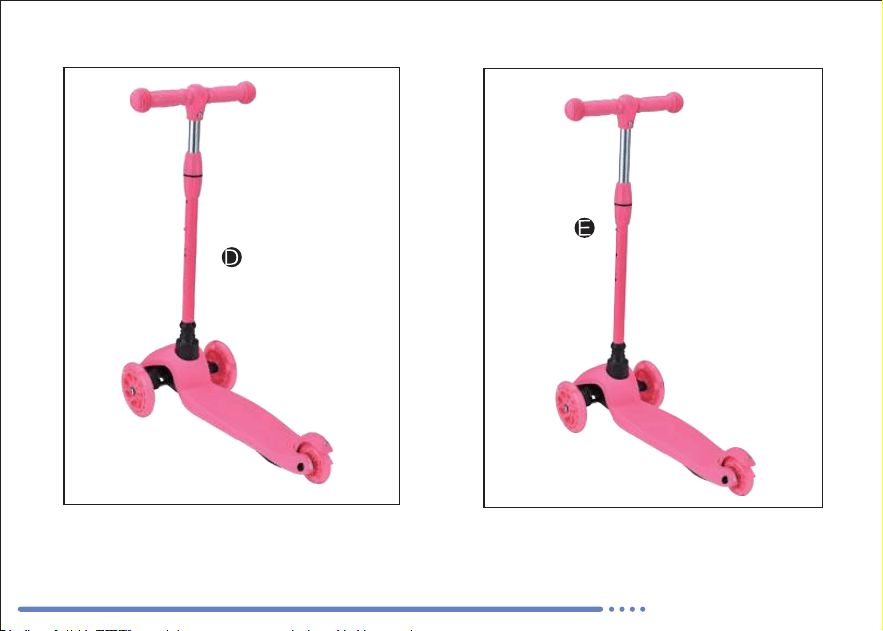
İkincisi: Şekil D'de gösterildiği gibi 24,4
inç (620 mm).
Üçüncü: Şekil E'de gösterildiği gibi 26,4
inç (670 mm).
Yükseklik Ayarı
www.PyleUSA.com
17

Sol Tekerlek: Vidayı gevşetmek için Alyan
anahtarını saat yönünün tersine çevirin.
Sağ Tekerlek: Vidayı gevşetmek için Alyan
anahtarını saat yönünde çevirin.
Bakım Talimatları
Tekerleği Değiştirme
18
www.PyleUSA.com
Tekerlekler zamanla aşınır ve pürüzlü yüzeylerde aşırı kullanılırsa hasar görebilir. Özellikle
frenin uygulandığı arka tekerlek, birkaç saatlik frenlemeden sonra etkilenir. Güvenlik için
tekerlekleri düzenli olarak kontrol edin ve gerekirse değiştirin.

Güverteyi Değiştirme
www.PyleUSA.com
19
1. 6 vidayı (A) resimde gösterildiği gibi gevşetin (oklar).
2. Güverteyi çıkarın ve vidaları (A) sıkın.
3. Yeni güverte ile yaklaşık 3 mil (5 km) seyahat ettikten sonra sıkı oturup oturmadığını
kontrol edin.

Hiç kimse bu garantinin şartlarını değiştirmeye yetkili değildir.
20
www.PyleUSA.com
Güvenlik İpucu
Garanti
Garanti kapsamına aşağıdakiler girmez:
Scooter'ınız, satın alma tarihinden itibaren
malzeme ve işçilik kusurlarına karşı üç ay garanti-
lidir. Bir sorun varsa, scooter'ınızı onarır veya
değiştiririz. Yardım için yerel satıcınıza veya
distribütörünüze başvurun.
Scooter doğru kullanıldığında eğlenceli ve güvenlidir.
Yaralanmaları önlemek için kask ve elleriniz, dirsekleriniz
ve dizleriniz için pedler gibi koruyucu giysiler giyin.
Kaymayı önlemek için iyi kavrayan ayakkabılar giyin. Her
zaman güvenli bir hızda sürün ve herhangi bir potansi-
yel tehlikeyle karşılaşırsanız durun.
• Uygunsuz onarımlar veya değişiklikler
• Dış darbelerden kaynaklanan hasarlar (örn.
kaldırımlar, engeller)
• Yanlış kullanım, istenmeyen kullanım veya normal
aşınma ve yıpranma

Model Numarası
HURSC12PK
PyleUSA.com/pages/register
HURSC12PK
Buradan başlayın
HURSC11BL
HURSC13BK
HURSC14WM HURSC15TL
HURSC16PR
HURSC17GN HURSC18YL HURSC19RD HURSC21CM HURSC22GF HURSC23RT
Ürün Kaydı
www.PyleUSA.com
21
PyleUSA'yı seçtiğiniz için teşekkür ederiz. Ürününüzü kaydettirerek, özel garantimizin ve
kişiselleştirilmiş müşteri desteğimizin tüm avantajlarından yararlanmanızı sağlarsınız.
Uzman desteğine erişmek ve PyleUSA satın alma işleminizi mükemmel durumda tutmak
için formu doldurun.

Sorularınız mı var? Sorununuz mu var?
Yardım etmek için buradayız!
Telefon: 1.718.535.1800
PyleUSA.com/ContactUs