IMPORTANT: RETAIN FOR FUTURE REFERENCE: READ CAREFULLY
I
MPORTANT : À CONSERVER POUR RÉFÉRENCE. LISEZ ATTENTIVEMENT
I
MPORTANTE : CONSERVE LAS INSTRUCCIONES PARA CONSULTAS FUTURAS: LÉALAS DETENIDAMENTE
V
IKTIGT: SPARA FÖR FRAMTIDA REFERENS: LÄS NOGGRANT
ITM. / ART. 7770900
User Guide
English
G
uía del
u
suario
Español
G
uide de
l
'utilisateur
Français
Användar-
guide
Svenska
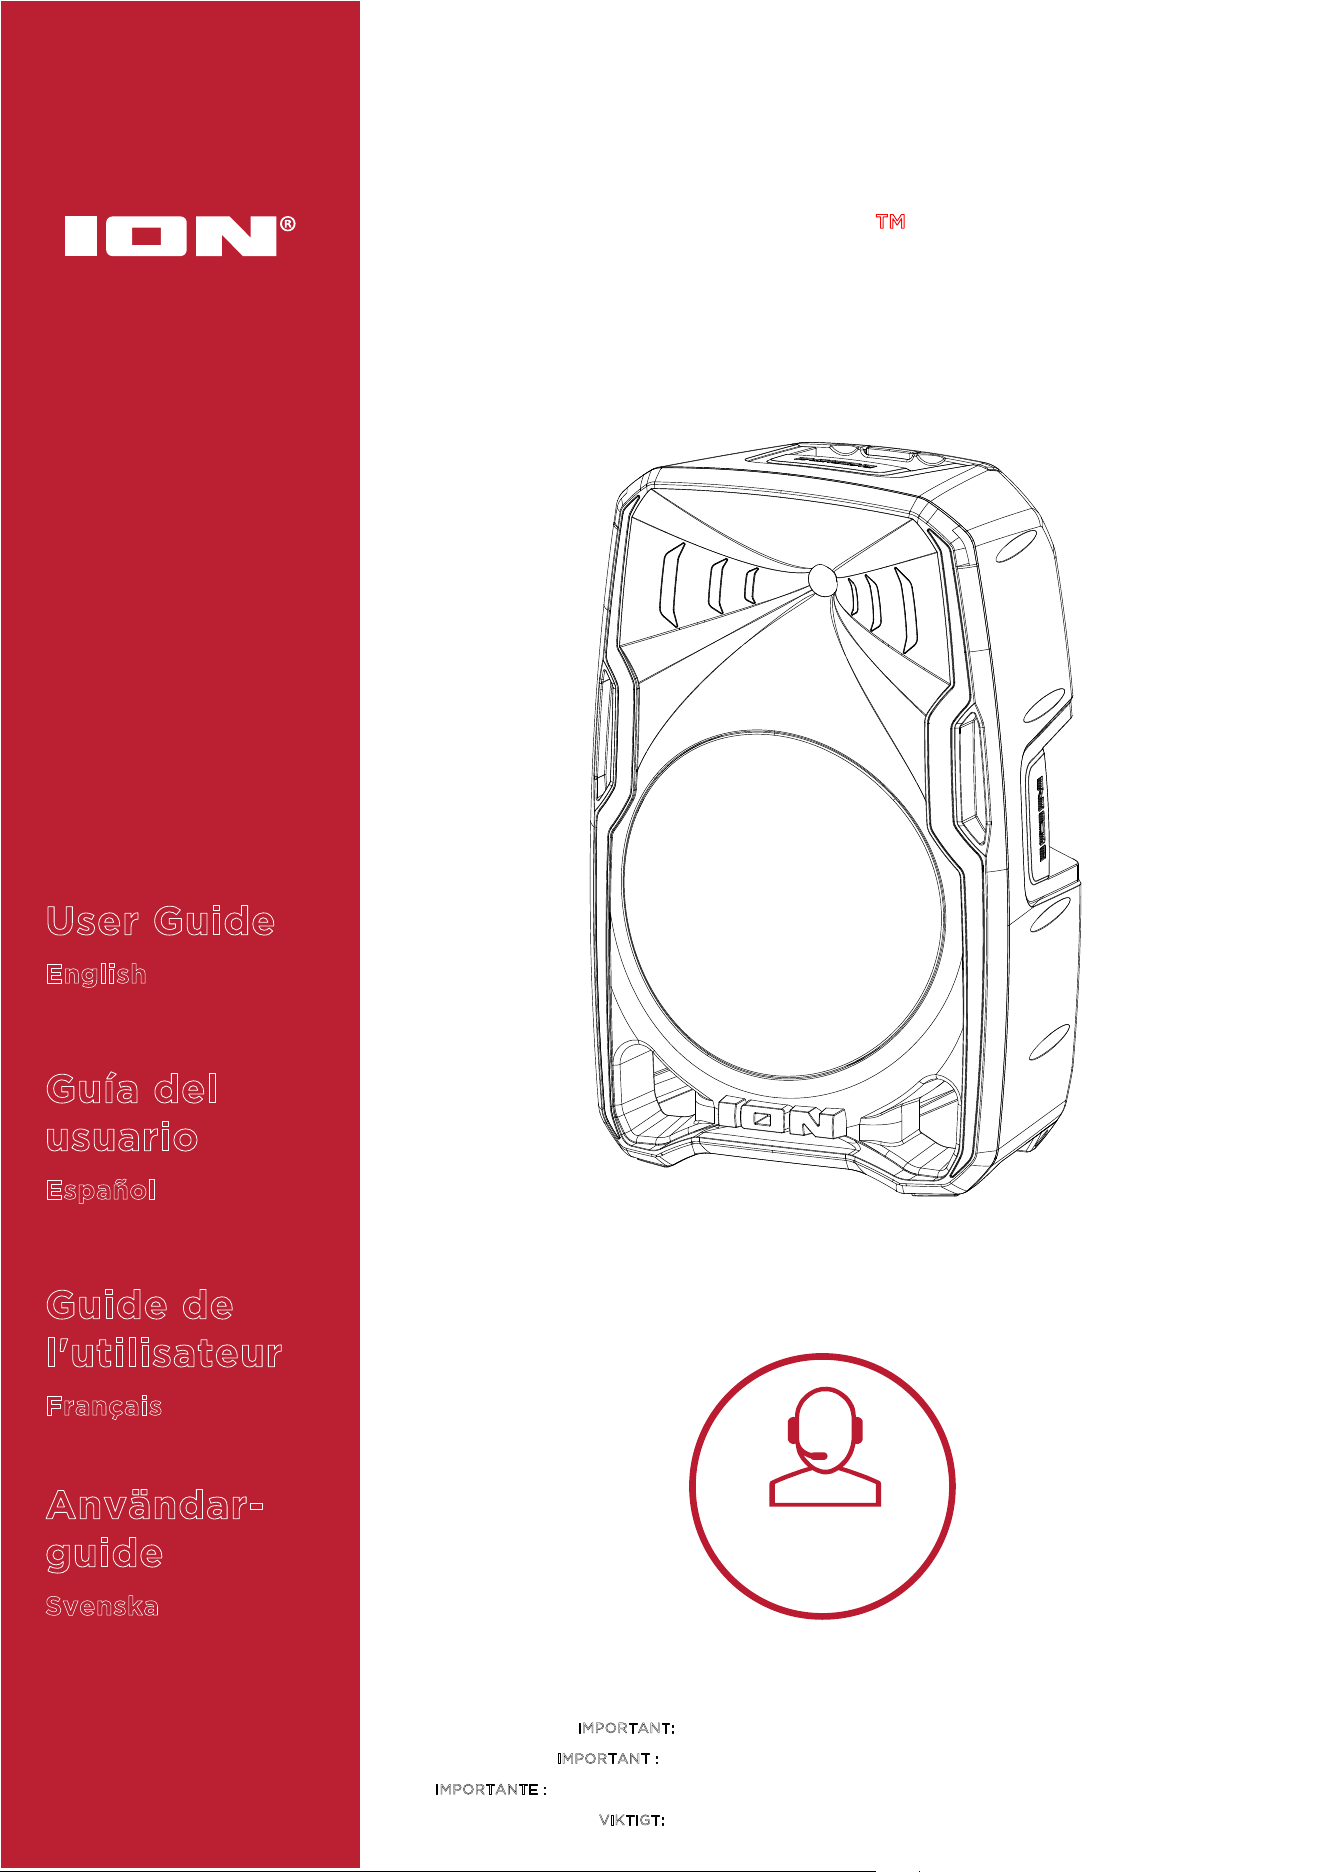
TOTAL PA™ APEX
Tap or click
for technical
support.
ionaudio.com/support

ION Audio Total PA™ Apex User Guide 2
INTRODUCTION ........................................................................ 4
Box Contents ....................................................................................................... 4
Support ................................................................................................................. 4
Charging and Battery Information ................................................................. 5
Quick Start ........................................................................................................... 6
Balancing Your Levels....................................................................................... 7
SETUP .........................................................................................8
Speaker Stand Installation ............................................................................... 8
Connection Diagram ......................................................................................... 9
FEATURES ................................................................................ 10
Rear Panel .......................................................................................................... 10
OPERATION .............................................................................. 14
Battery Care ...................................................................................................... 14
Installing Batteries Into the Wireless Mic ................................................... 14
Using the Wireless Mic ..................................................................................... 15
Using the Main Volume Knob ......................................................................... 16
Pairing a Bluetooth® Device ............................................................................ 17
Linking Two Speakers ...................................................................................... 18
Light Modes ........................................................................................................ 19
USB Mode ............................................................................................................ 21
App Control ....................................................................................................... 22
TABLE OF CONTENTS

ION Audio Total PA™ Apex User Guide 3
TROUBLESHOOTING .............................................................. 23
APPENDIX ................................................................................ 25
Technical Specifications ................................................................................. 25
Trademarks & Licenses ................................................................................... 26

ION Audio Total PA™ Apex User Guide 4
Thank you for purchasing the Total PA™ Apex. At ION, your entertainment is as important to
us as it is to you. That’s why we design our products with one thing in mind—to make your life
more fun and more convenient.
Note: Before you first use the product, please fully charge the batteries. Your unit was
purposely shipped with a reduced battery charge to ensure safe transit. For optimal charging,
power o the speaker while charging.
Use the included power cable to connect the unit to a power outlet and let it charge for up to
5 hours. This helps ensure the longest life for your battery.
Box Contents
Total PA™ Apex
Power Cable (150 cm / 5 ft.)
Wireless Microphone
Speaker Stand
Quickstart Guide
Support
For the latest information about this product (documentation, technical specifications, system
requirements, compatibility information, etc.) and product registration, visit
ionaudio.com.
For additional product support, visit
ionaudio.com/support.
INTRODUCTION
ION Audio Total PA™ Apex User Guide 5
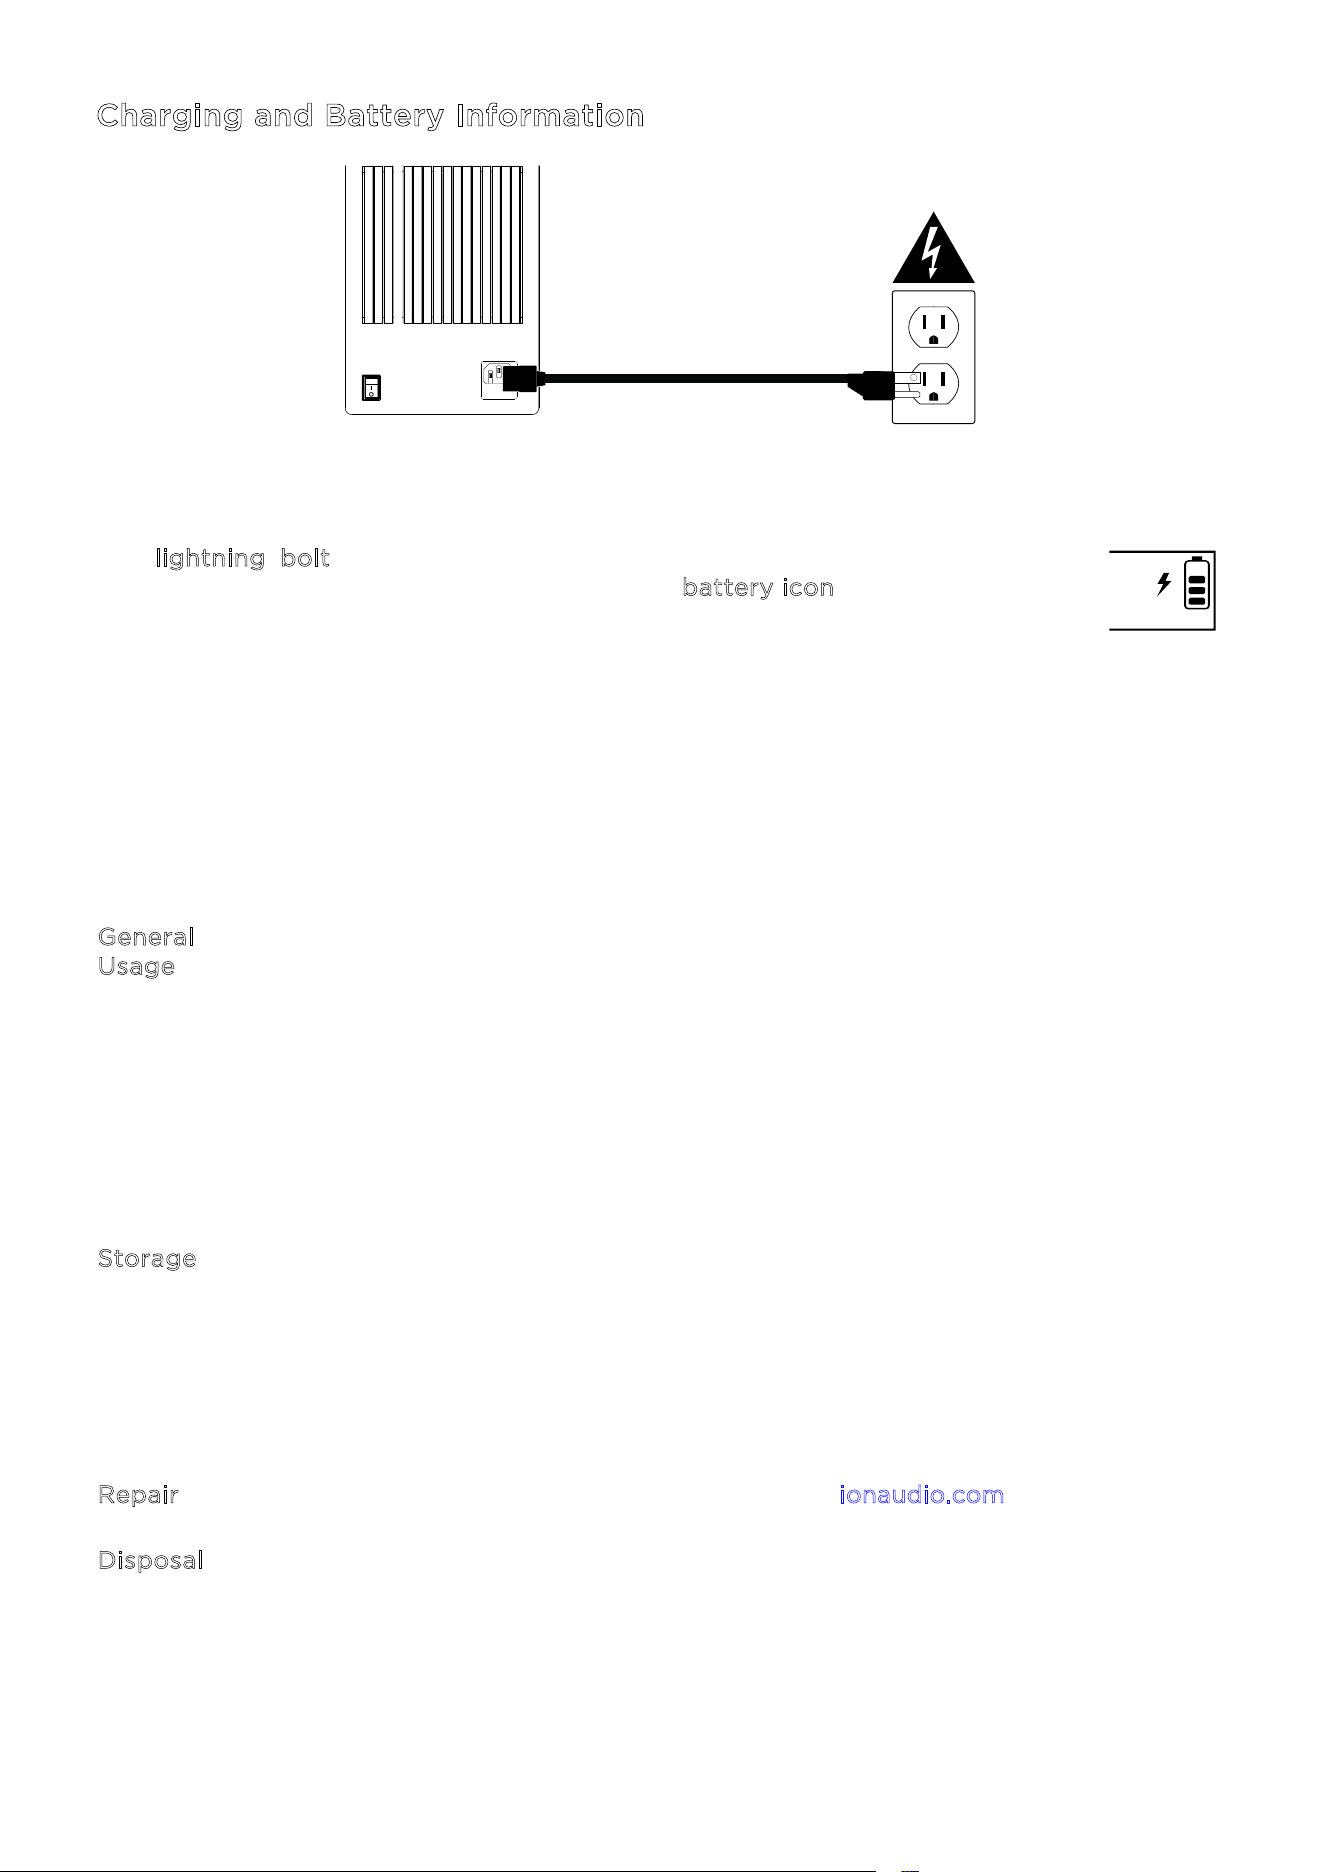
Charging and Battery Information
For the quickest charging time, power o Total PA™ Apex and use the included power cable
to connect the speaker to a power outlet. A full charge can take up to 5 hours.
The l
ightning bolt icon on the display will light up when Total PA™ Apex is
connected to a power source and charging. The b
attery icon will fill to display the
battery life percentage. When charging is complete, the lightning bolt icon will
disappear, and the battery icon will be completely filled.
If no audio is played through Total PA™ Apex for 20 minutes, the unit will enter a standby
mode to conserve battery life. This may mean the Bluetooth signal is paused, no audio is
coming through a device connected to the aux port, or the volume is set to 0. To wake the
unit, simply resume audio signal or press any button.
Here are some other recommendations for getting the longest life from the internal battery.
General
U
sage
Fully charge the battery before using it.
Avoid full discharge of the battery if possible. Li-Ion batteries are maintenance-
free, and the battery will last longest when operating between 30 and 80 percent
charged.
Do not use the product while charging the battery.
Do not charge the battery in exceedingly hot (greater than 90°F/32°C) or
exceedingly cold (less than 32°F/0°C) temperatures.
S
torage For best product longevity, do not store at exceedingly hot (greater than
90°F/32°C) or exceedingly cold (less than 32°F/0°C) temperatures.
For best product longevity, store product with a 50% battery charge.
If you leave the battery level low and do not charge it for 6 months, it may
permanently lose capacity.
R
epair If the battery fails to charge, contact ION Audio at ionaudio.com.
D
isposal Bring the unit to a recycling center or dispose of in accordance with local
ordinances.
ON
ALLUMER
OFF
ÉTEINORE
ION Audio Total PA™ Apex User Guide 6
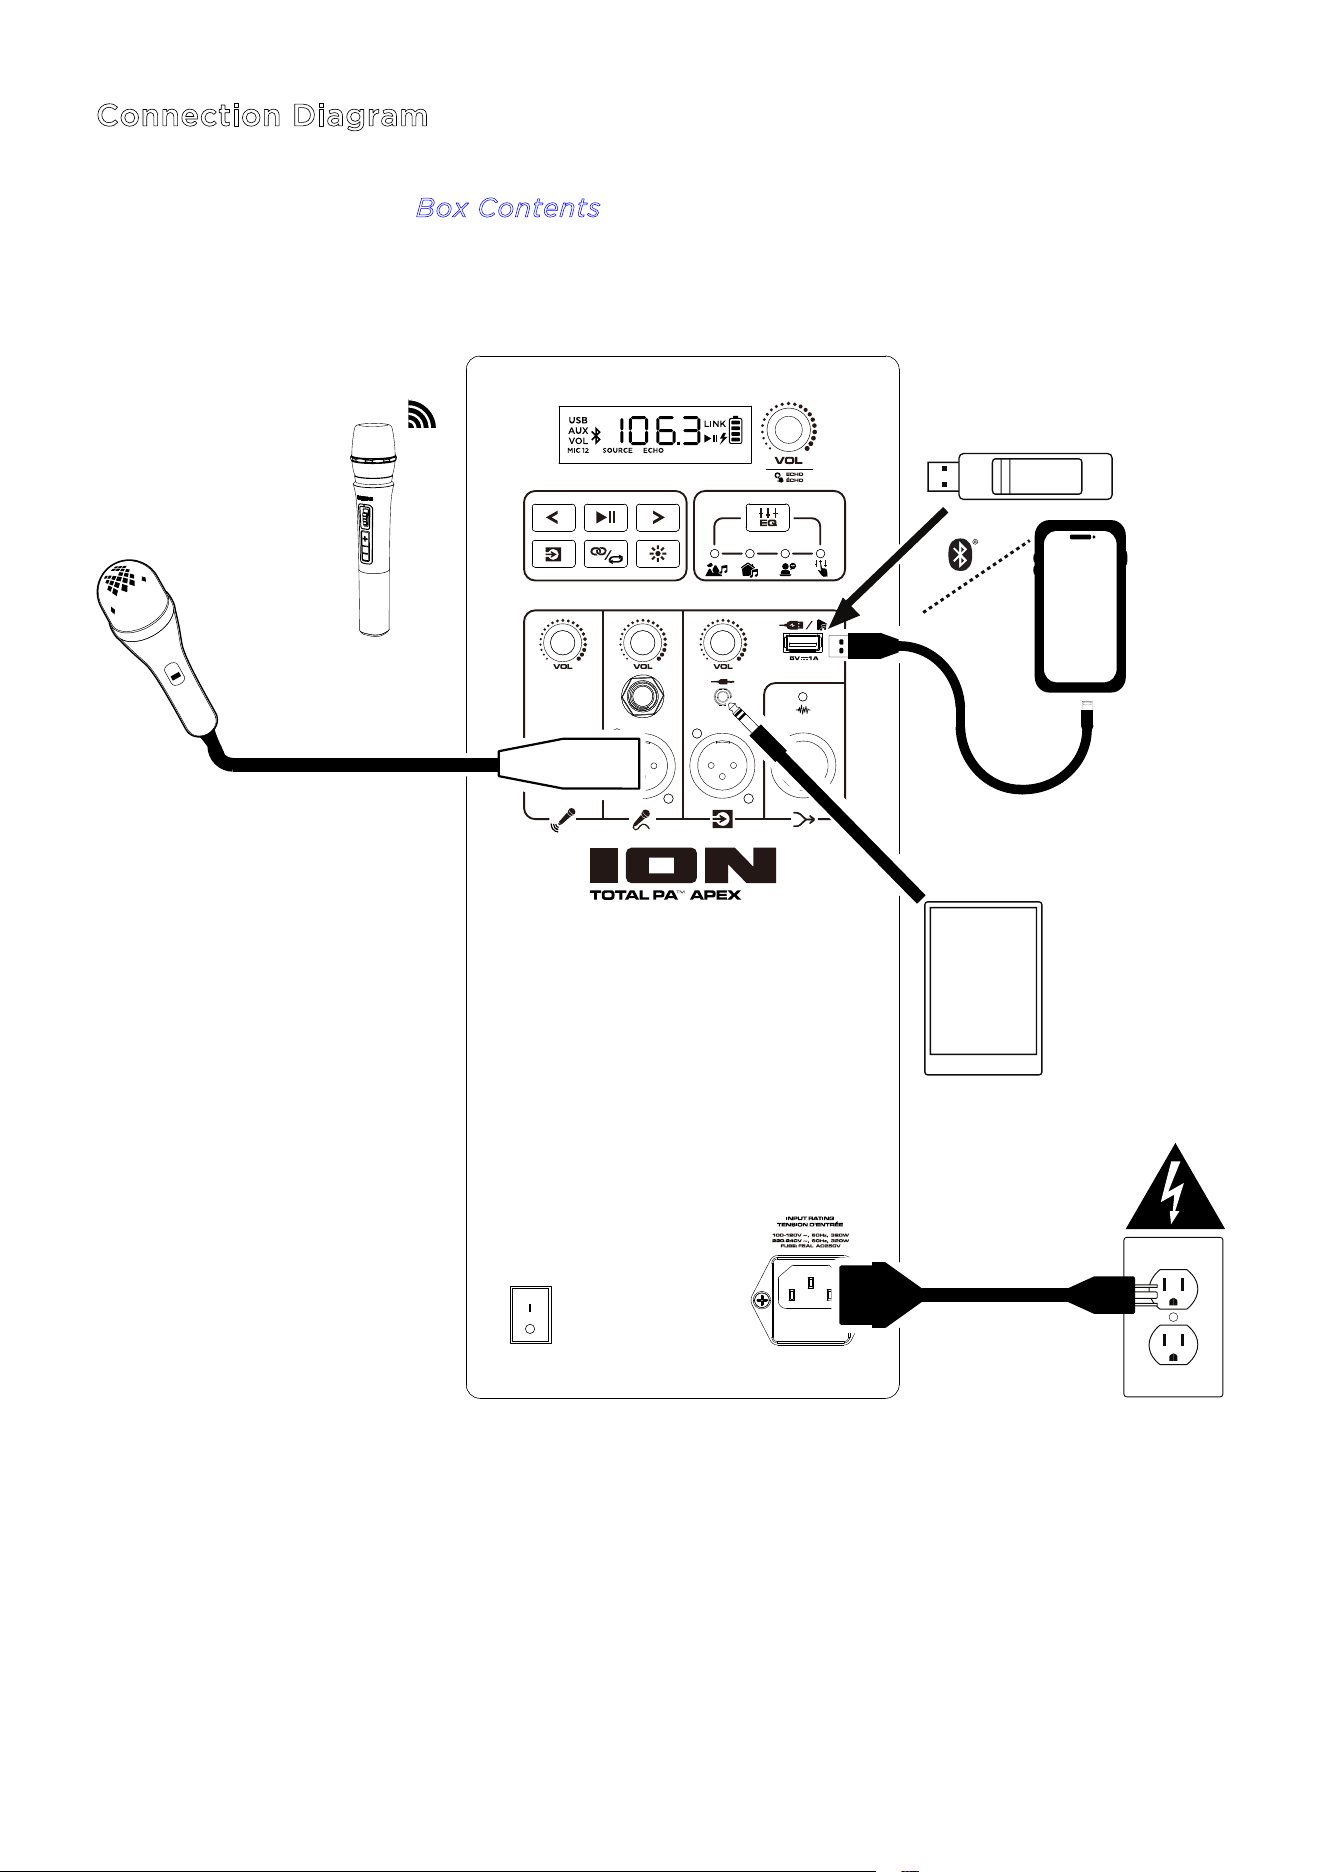
Quick Start
1. Make sure all items listed in the Box Contents are included in the box. Look in the box under
the foam sheet for the power cable and microphone.
2. Study the C
onnection Diagram.
3. Make sure all input devices (such as microphones, CD players, or digital media players) are
turned o with their volume settings set to “zero.”
4. Connect all devices as shown in the C
onnection Diagram.
5. Switch everything on in the following order:
a. Audio input devices (e.g. microphones, instruments, CD players)
b. Total PA™ Apex
6. Adjust the level of your connected devices. Turn audio source (microphone, instruments,
Bluetooth devices) volume all the way up. Then, adjust the S
ource Volume knob for the
selected channel on Total PA™ Apex to an appropriate level. Finally, adjust the M
ain
V
olume on Total PA™ Apex to an appropriate level. For a detailed step-by-step process
for setting your levels, please refer to the B
alancing Your Levels section on the following
page.
7. When you are finished using Total PA™ Apex, switch everything o in the following order:
a. Total PA™ Apex
b. Audio input devices
ION Audio Total PA™ Apex User Guide 7
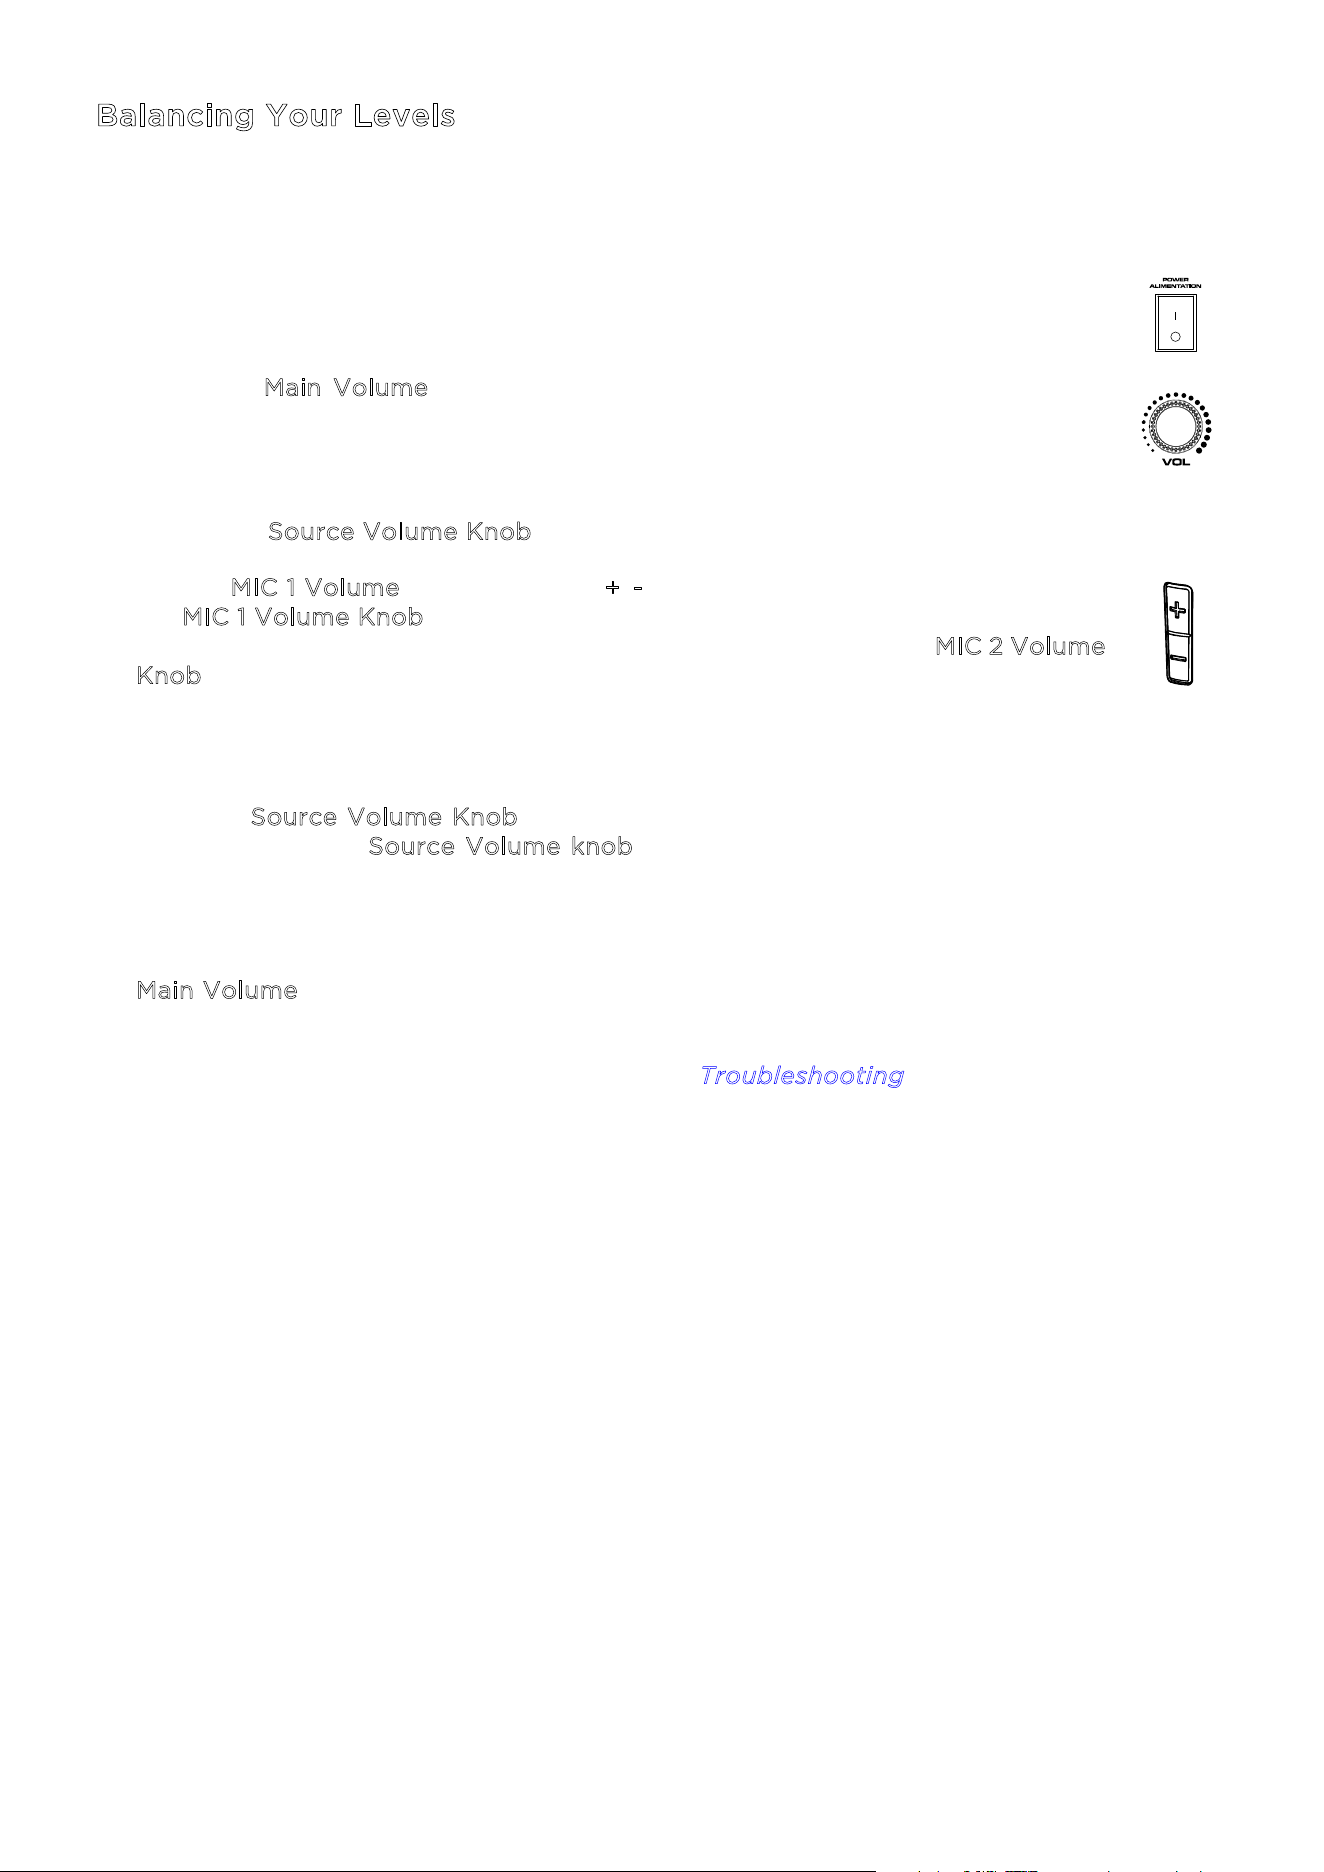
Balancing Your Levels
This process shows how you can quickly balance your microphone signal(s) and the
signal from your Source Device (Bluetooth, Aux, USB). Levels for the microphones,
source, and main volume can be set anywhere between 0 to 30.
1. Power on Total PA™ Apex and the wireless microphone. Connect your preferred
Bluetooth, Aux device, or USB drive.
2. Using the M
ain Volume on the speaker, set the volume to around 10 or lower
while balancing your levels. This will allow you to set your levels to a clear and
audible level without being overpowering. You can adjust it again later once a
balance has been achieved.
3. Adjust the S
ource Volume Knob down to 0. We’ll turn this up in a later step.
4. Set the M
IC 1 Volume using either the +/- volume control on the microphone or
the M
IC 1 Volume Knob on the speaker. Setting the level to 25 is a good starting
point if you're unsure. If using a second, wired microphone, use the M
IC 2 Volume
K
nob to set the levels the same way until both microphones are clearly audible.
5. Now, set the volume on your Aux or Bluetooth source device (phone, tablet, etc.)
to 100%. This will guarantee a strong signal.
6. With the S
ource Volume Knob still set to 0, start playback on your device and
slowly turn up the S
ource Volume knob on the speaker until it reaches a clear
and audible level. If you are using a microphone, set the source volume level to
where you can still hear the microphone above the music.
7. Once the microphone and audio source are clearly audible and balanced, use the
M
ain Volume knob to set the overall output level of the speaker to your desired
volume.
For specific troubleshooting steps, please see the T
roubleshooting section.
ION Audio Total PA™ Apex User Guide 8
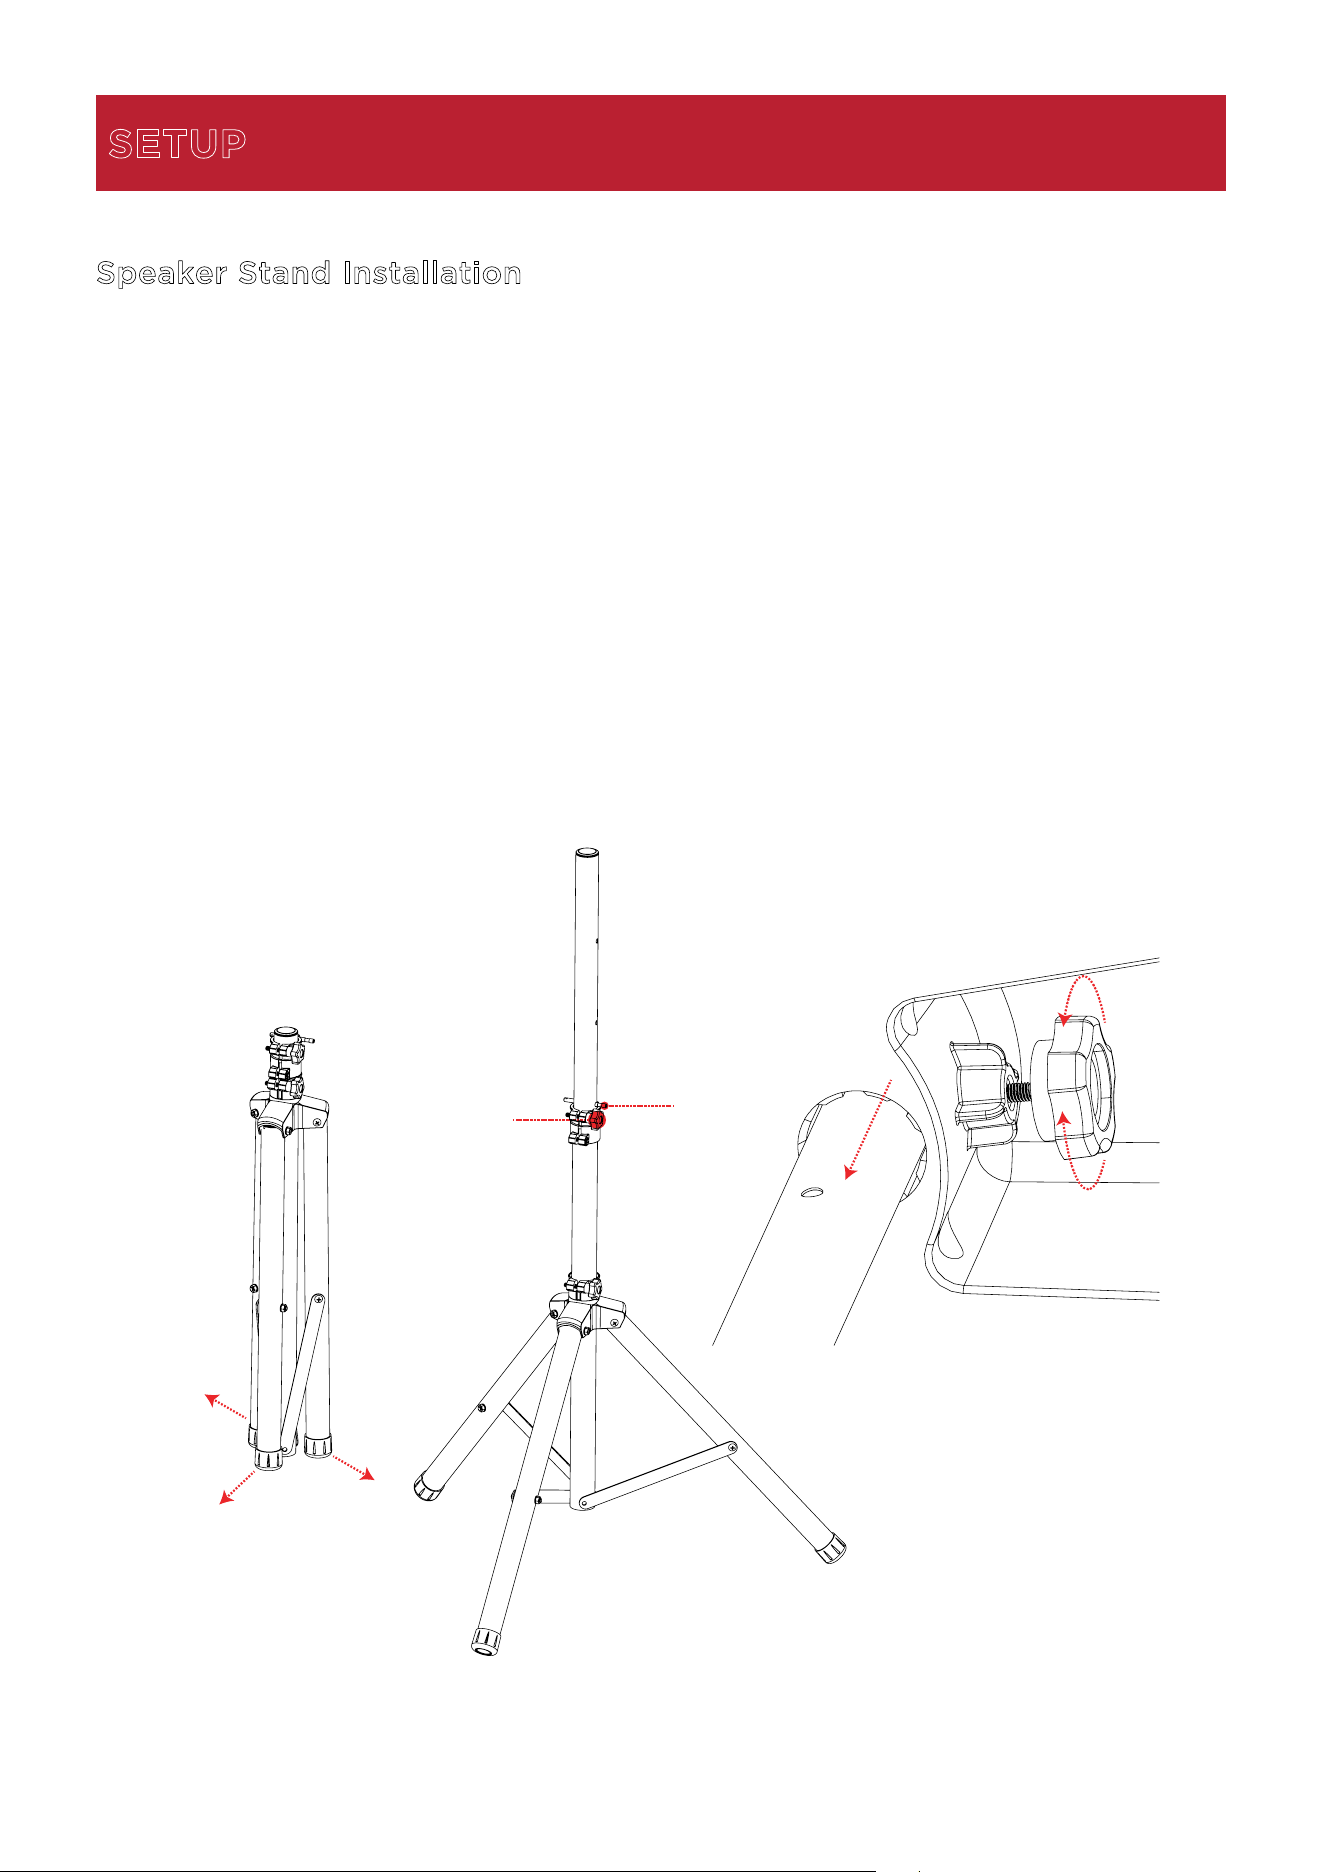
Speaker Stand Installation
1.
Fully extend the speaker stand tripod legs on a flat, stable surface.
2.
Raise the mounting pole up to the appropriate height needed and tighten the side
adjustment knob.
3.
Insert the pin into the bottom pin-hole so the mounting pole stays at your set height.
4.
On the Total PA™ Apex, adjust the bottom knob counter-clockwise so the screw is not
blocking the opening.
5.
Line up the Total PA™ Apex mounting hole with the speaker stand pole and place on the
pole.
6.
Tighten the mounting knob clockwise on Total PA™ Apex to secure it to the pole.
SETUP
1
2
3
5
4
6
ION Audio Total PA™ Apex User Guide 11
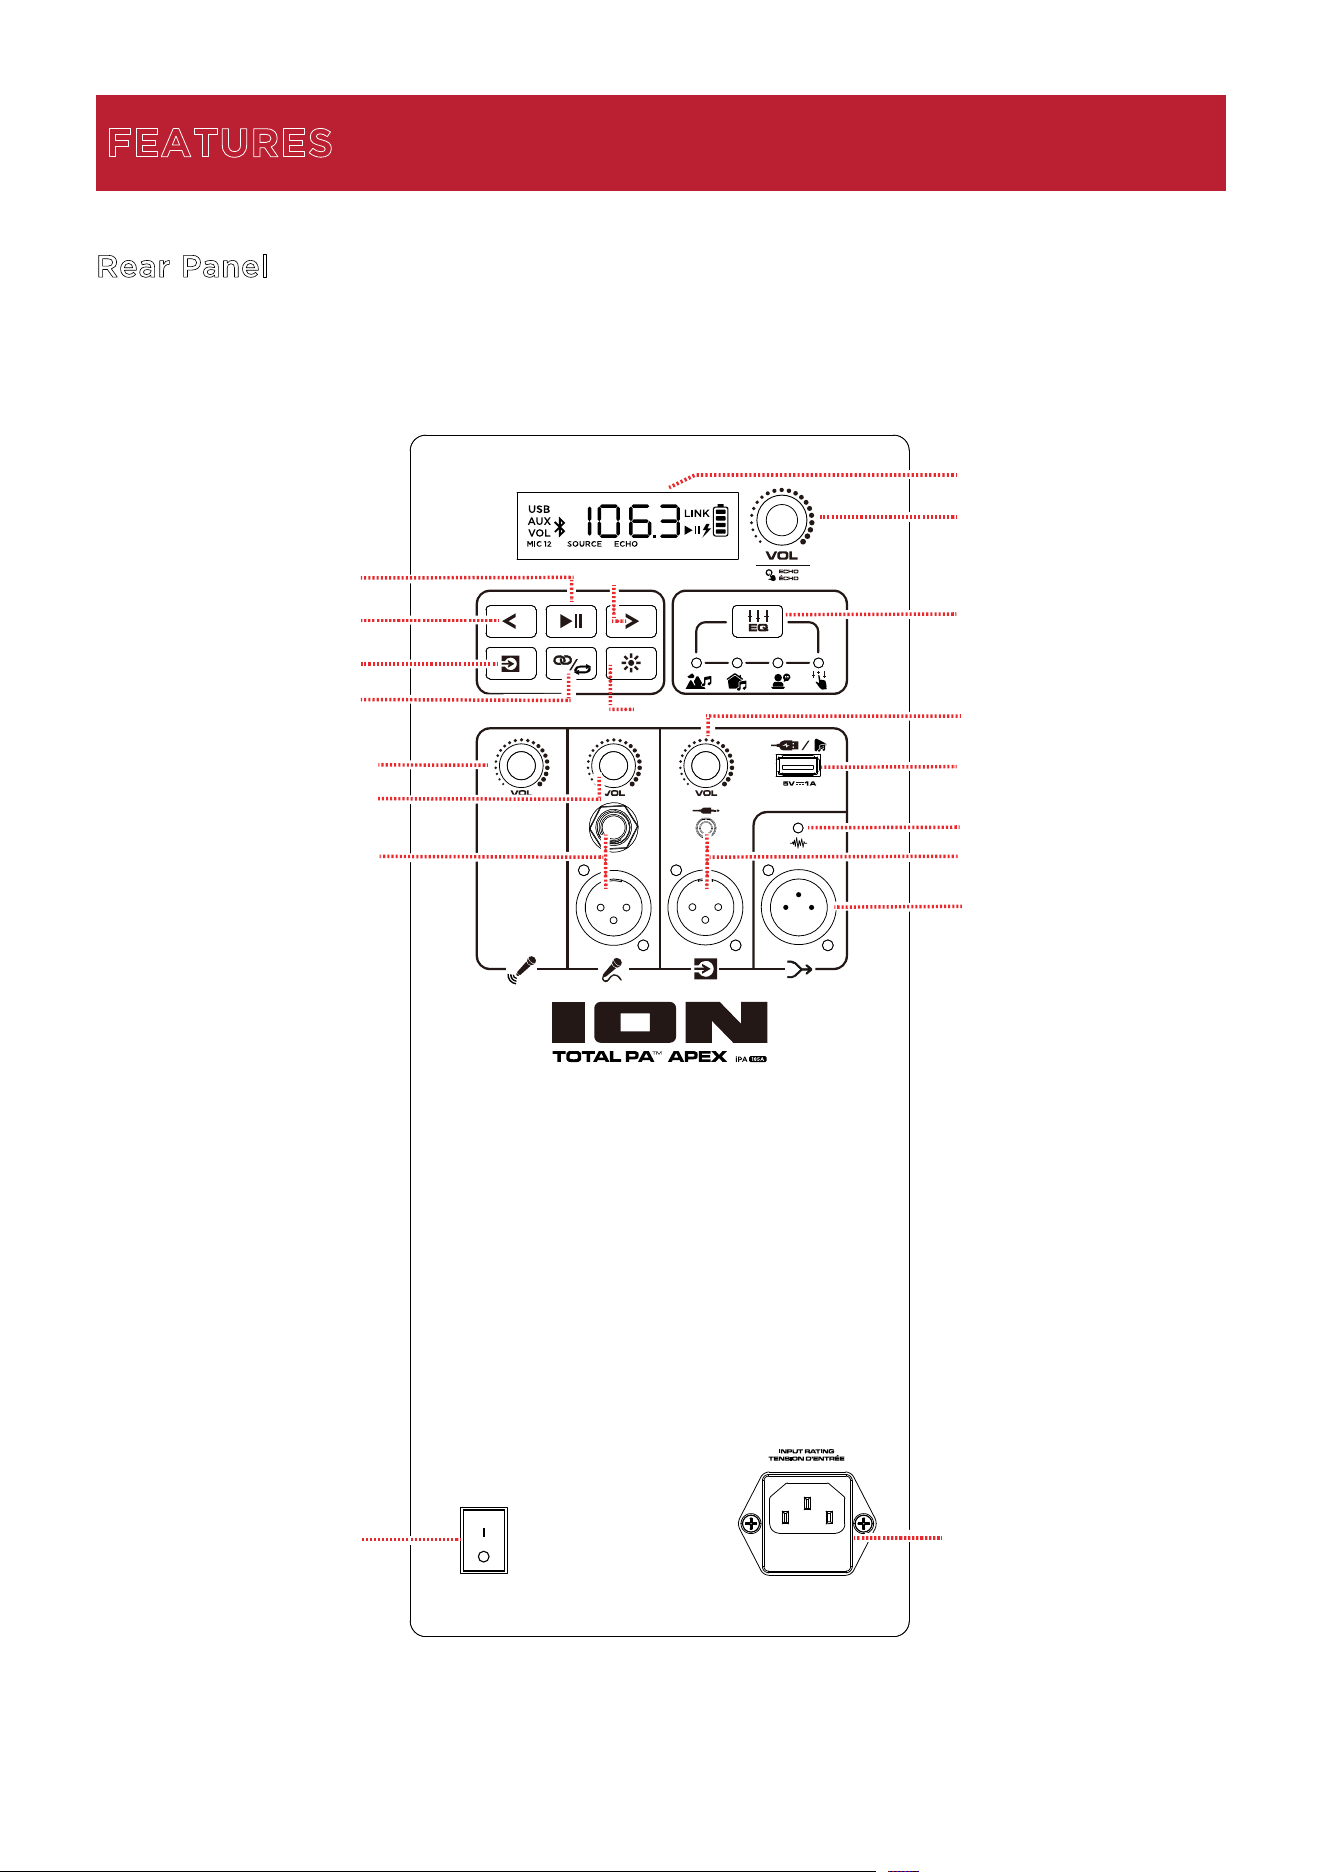
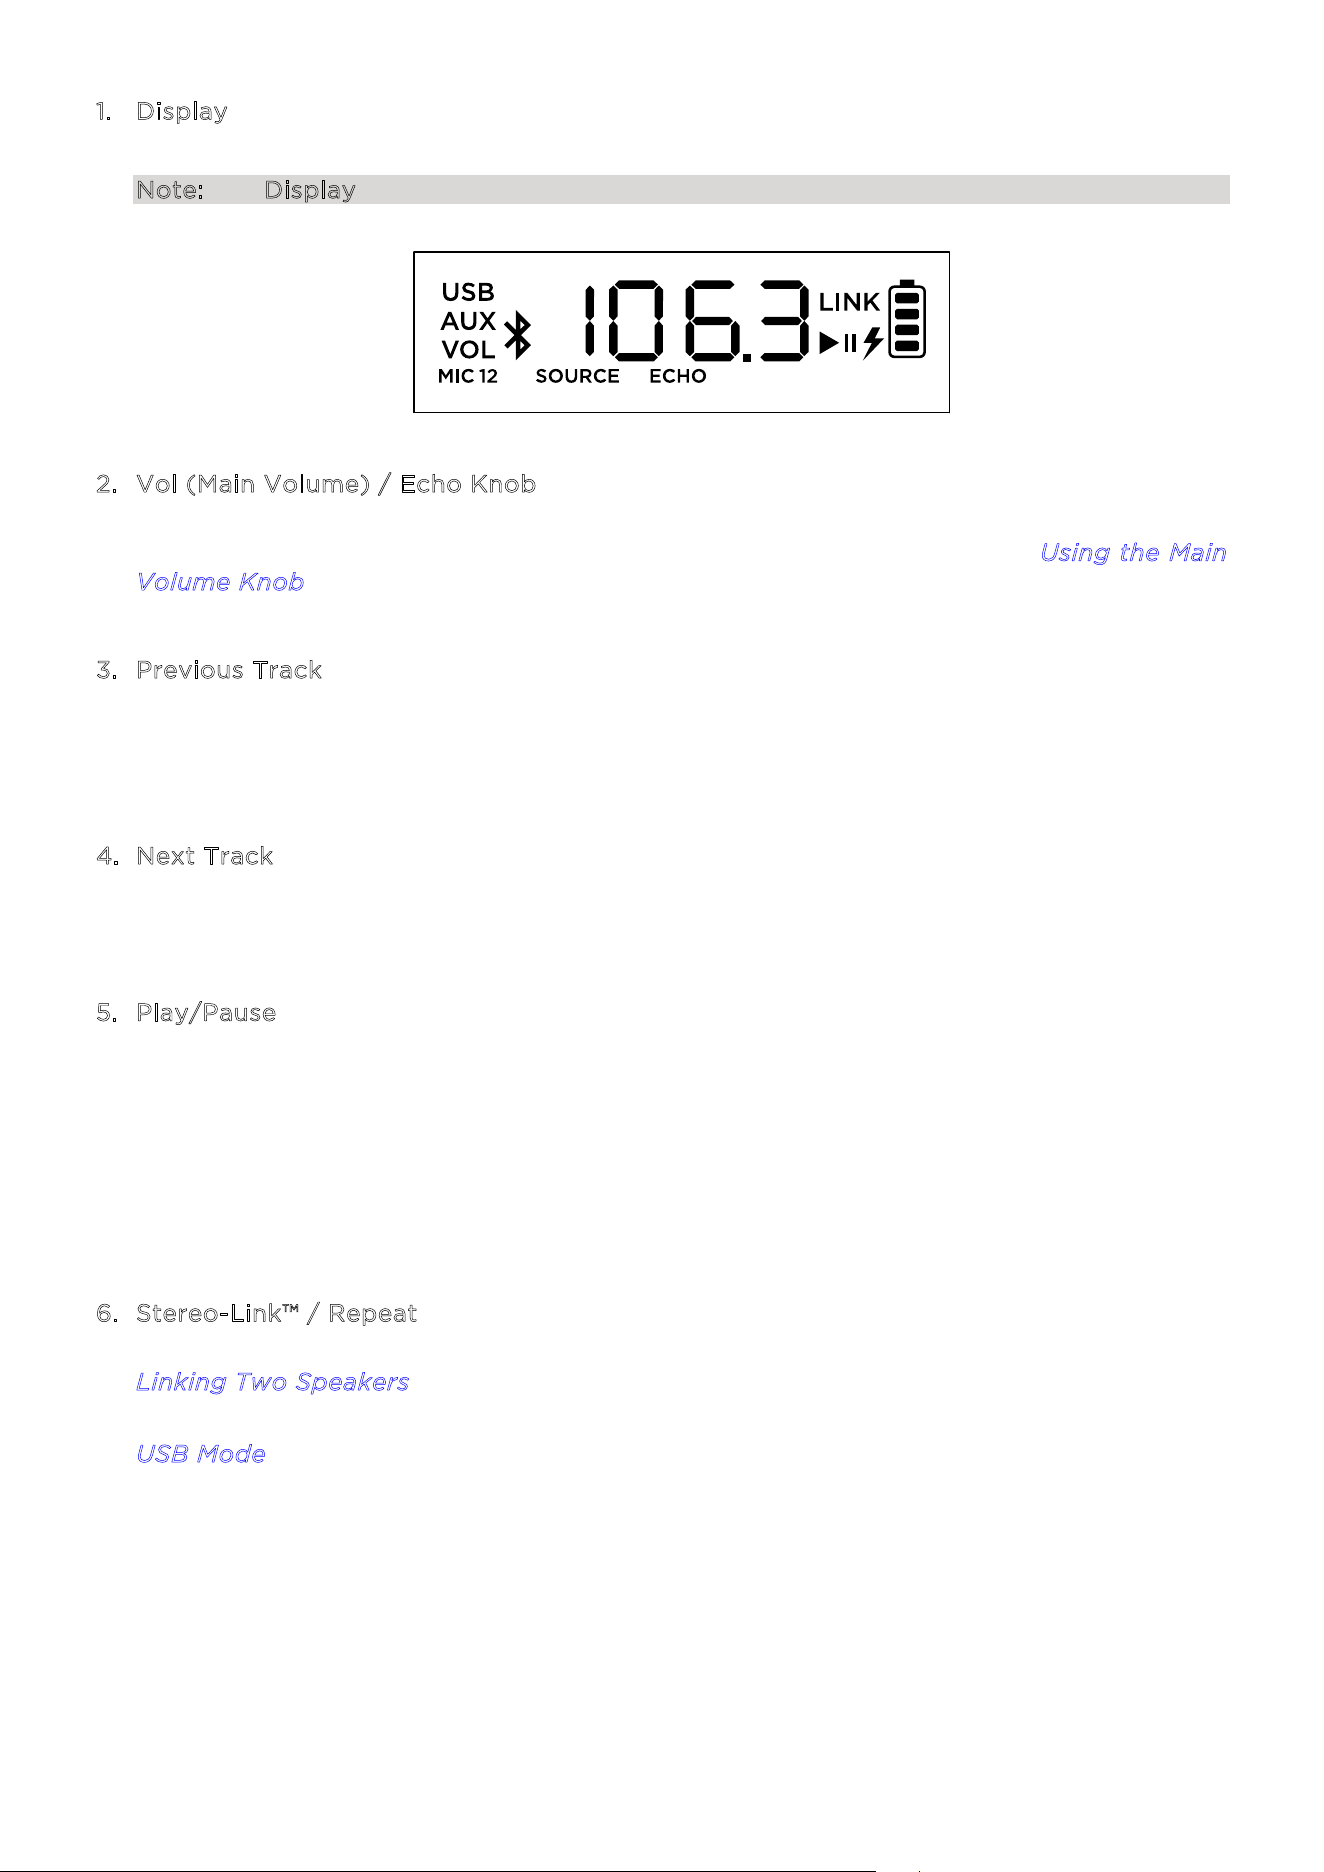
1. Display
This screen shows information relevant to Total PA™
Apex’s current operation.
Note: The Display comes with a plastic protector on it. Remove this for optimal viewing.
2. Vol (Main Volume) / Echo Knob
Turn this knob to adjust the Main Volume (overall output) of the loudspeaker. Press the
knob and turn to cycle through to select the Echo eect. See the section U
sing the Main
V
olume Knob for more details.
3
. Previous Track
When USB or Bluetooth is selected as the audio source, press this button to go to the
previous track in the playlist. Press the button again within one second to skip to the
previous track.
4
. Next Track
When USB or Bluetooth is selected as the audio source, press this button to go to the next
track in the playlist.
5
. Play/Pause
When USB is selected as the audio source, press this button to play/pause the currently
selected track. Double-press this button to stop playback and return to the beginning of
the track list.
When Bluetooth is selected as the audio source, press this button to play/pause the
currently selected track.
Press and hold this button for three seconds to turn voice prompts on or o.
6
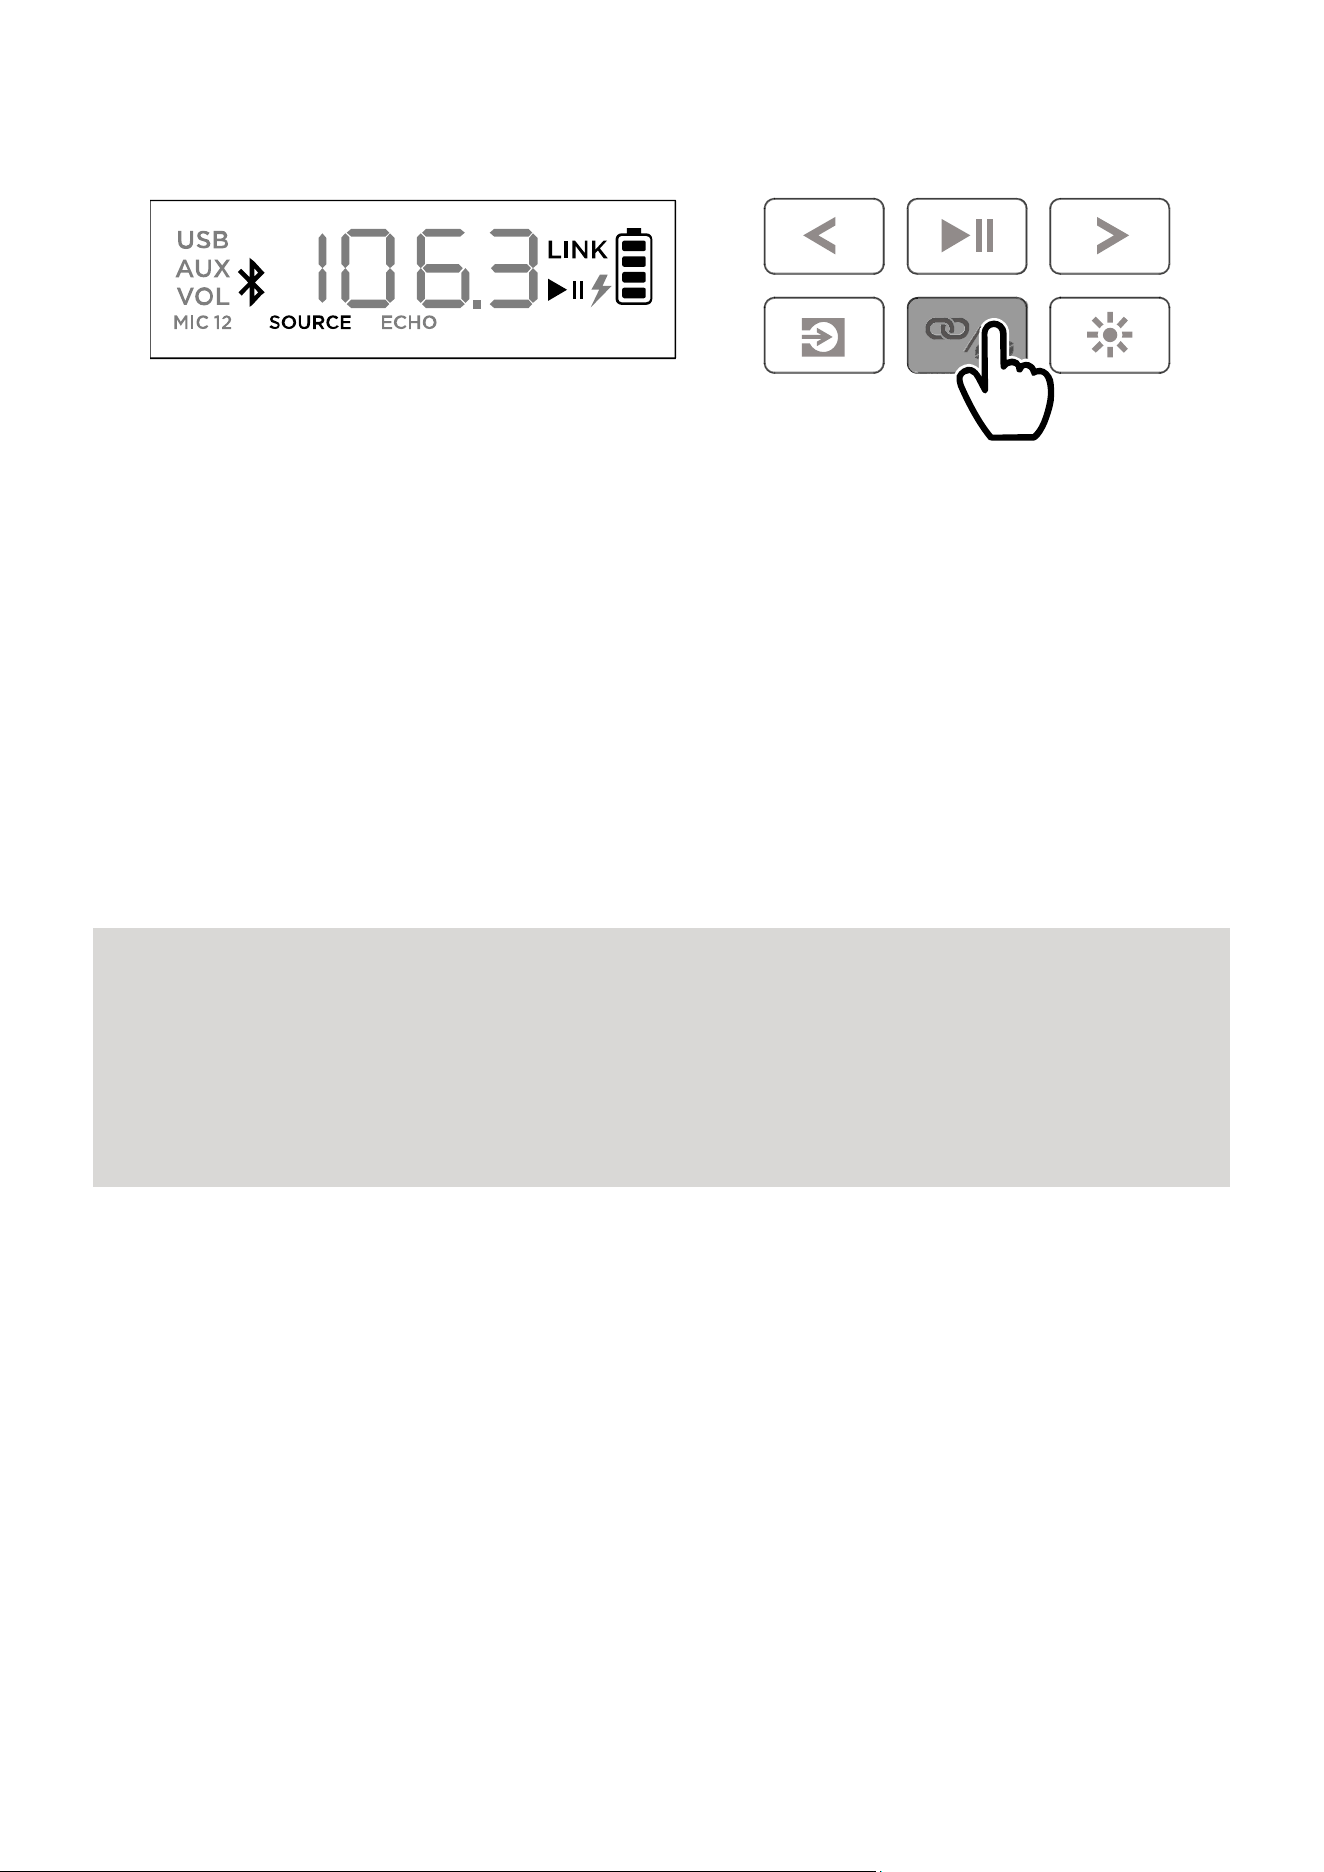
. Stereo-Link™ / Repeat
Press and hold this button to start stereo linking to another Total PA™ Apex. See the section
L
inking Two Speakers for more details.
In USB mode, press this button to repeat a single track, folder, or all tracks. See the section
U
SB Mode for more details.
ION Audio Total PA™ Apex User Guide 12
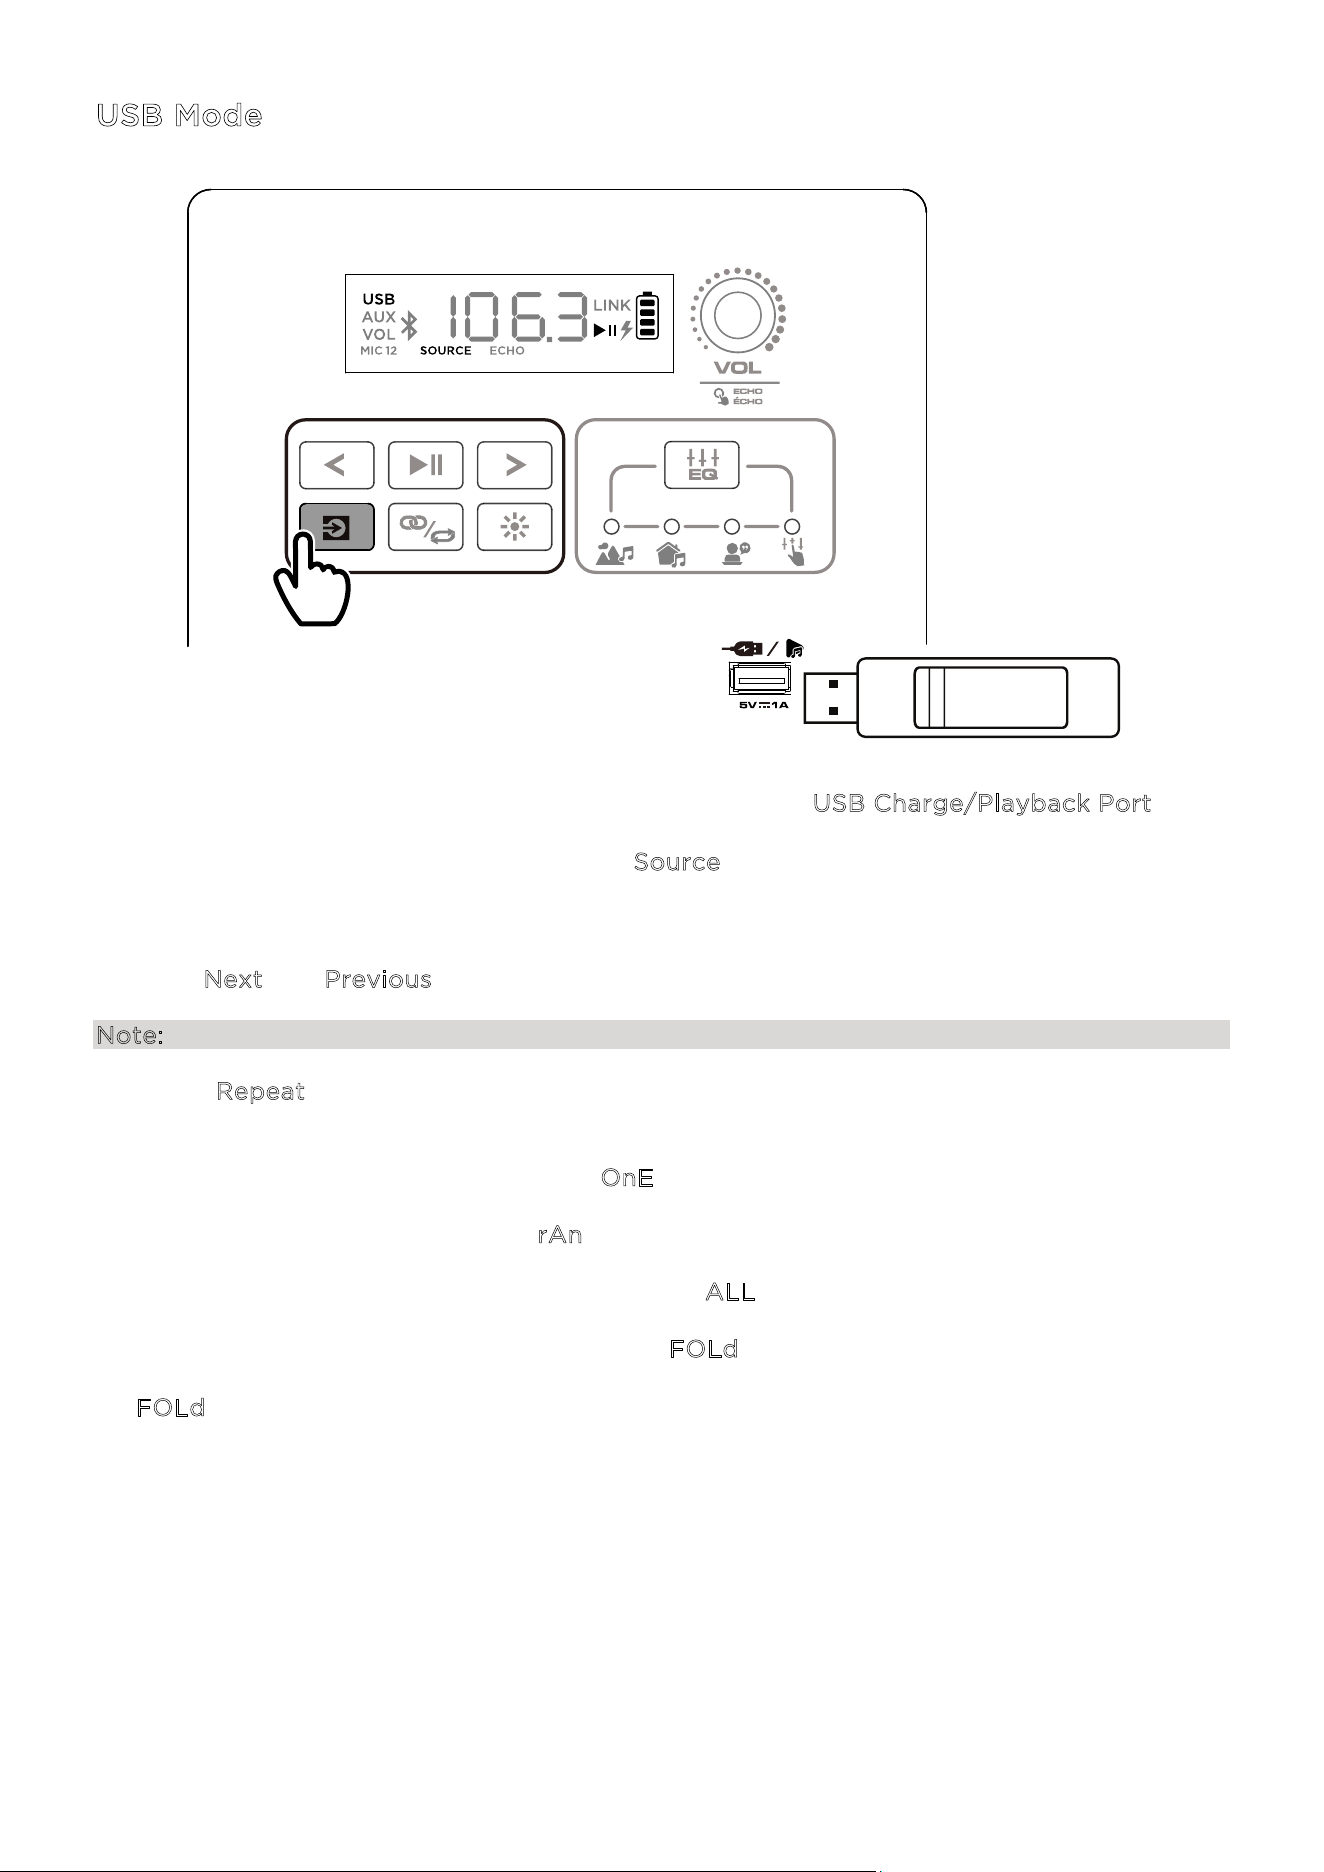
7. Source
Press this button to select the audio source to use: USB, AUX, or Bluetooth. The default
source when powering on Total PA™ Apex is Bluetooth. The USB source is only selectable if
a USB drive is plugged into Total PA™ Apex; otherwise, the Source button will toggle
between Bluetooth and Aux.
To disconnect a connected Bluetooth device, double-press this button.
8
. Lights
Press this button to select how the lights on the front panel function. See the section L
ight
M
odes for more details.
Note: For the best lighting eect, you may need to adjust the volume of your device and/or
the Source volume.
9
. EQ
Press this button to cycle through these EQ presets:
• O
utdoor: enhanced bass and high frequencies.
• I
ndoor: slight bass boost and flat high frequencies.
• V
ocal: bass is rolled o with an enhanced midrange.
• F
lat: a flat frequency response (custom EQ setting is adjustable and can be uploaded
from the App).
1
0. USB Charge/Playback Port
You can use this port for charging a USB device, such as a tablet or smartphone. To charge
a device that is streaming music via Bluetooth, pause the music first and then wait for it to
reconnect after the USB cable is inserted.
Connect your USB flash drive here to play music. Use the SOURCE Volume knob to adjust
the volume. Press the S
tereo-Link™ / Repeat button to cycle through the five
repeat/shue options. See the section U
SB Mode for more details.
Note: Your USB drive cannot be more than 512 GB and it must contain playable MP3 files
in order for its data to appear properly in the Display. When you connect a USB drive with
MP3 files, Total PA™ Apex will order the files alphabetically by folder on the root directory
and then by track name in the folder.
1
1. MIC 1 Wireless Mic Volume
Adjust the volume of the included wireless mic using this knob. See the section U
sing the
W
ireless Mic for more details on setting up and turning on the microphone.
1
2. MIC 2 Volume
Adjust the volume of the microphone or mic-level
source connected to the M
IC 2 Inputs using this
knob.
TIP: For proper audio level mixing
tips for MIC 1, MIC 2, and other Source
volumes, see the section Balancing
Your Levels.
ION Audio Total PA™ Apex User Guide 13
1
3. MIC 2 Inputs (6.35 mm / 1/4” & XLR)
Connect a microphone or mic-level source to these inputs.
1
4. Source Volume
Adjust the volume of devices connected to the A
ux Inputs or a Bluetooth source.
1
5. Aux Inputs (3.5 mm / 1/8” & XLR)
Connect a CD player, MP3 player, or other audio source to these line-level inputs.
1
6. Mix Out (XLR)
Connect this output to a speaker, mixer, or recorder. All sound from the speaker (including
the echo eect but excluding volume and EQ adjustments) will be what is heard on the
connected device.
1
7. Clip LED
The Clip LED will flash red if the signal from the input jacks or M
edia Panel audio source is
clipping (distortion from an overly loud signal). If this happens, decrease the setting of the
M
ain Volume or the volume for the Aux/Mic Input (if a loud device is plugged into either).
1
8. Power Switch
Flip this switch to toggle the speaker’s power on or o.
Note: If no input signal is played from any source (including the mic input) for 20 minutes,
the speaker will go into Low Power Mode. In Low Power Mode the display will go dark.
After 50 minutes of inactivity, the speaker will go into sleep mode and you will need to
turn the speaker o and back on again to wake it up. The speaker will return to normal
operation once an input receives a signal.
1
9. Power Cable Input (IEC)
Insert the included power cable here to power the unit.
1
2
2
3
-
+
+
-
ION Audio Total PA™ Apex User Guide 14
Battery Care
Follow the instructions below for best results when replacing the wireless mic batteries:
• Clean the battery contacts and also those in the wireless mic battery compartment prior
to battery installation.
• Replace both batteries at the same time.
• Remove batteries from the wireless mic if it will not be used for an extended period of time.
• Promptly remove depleted batteries.
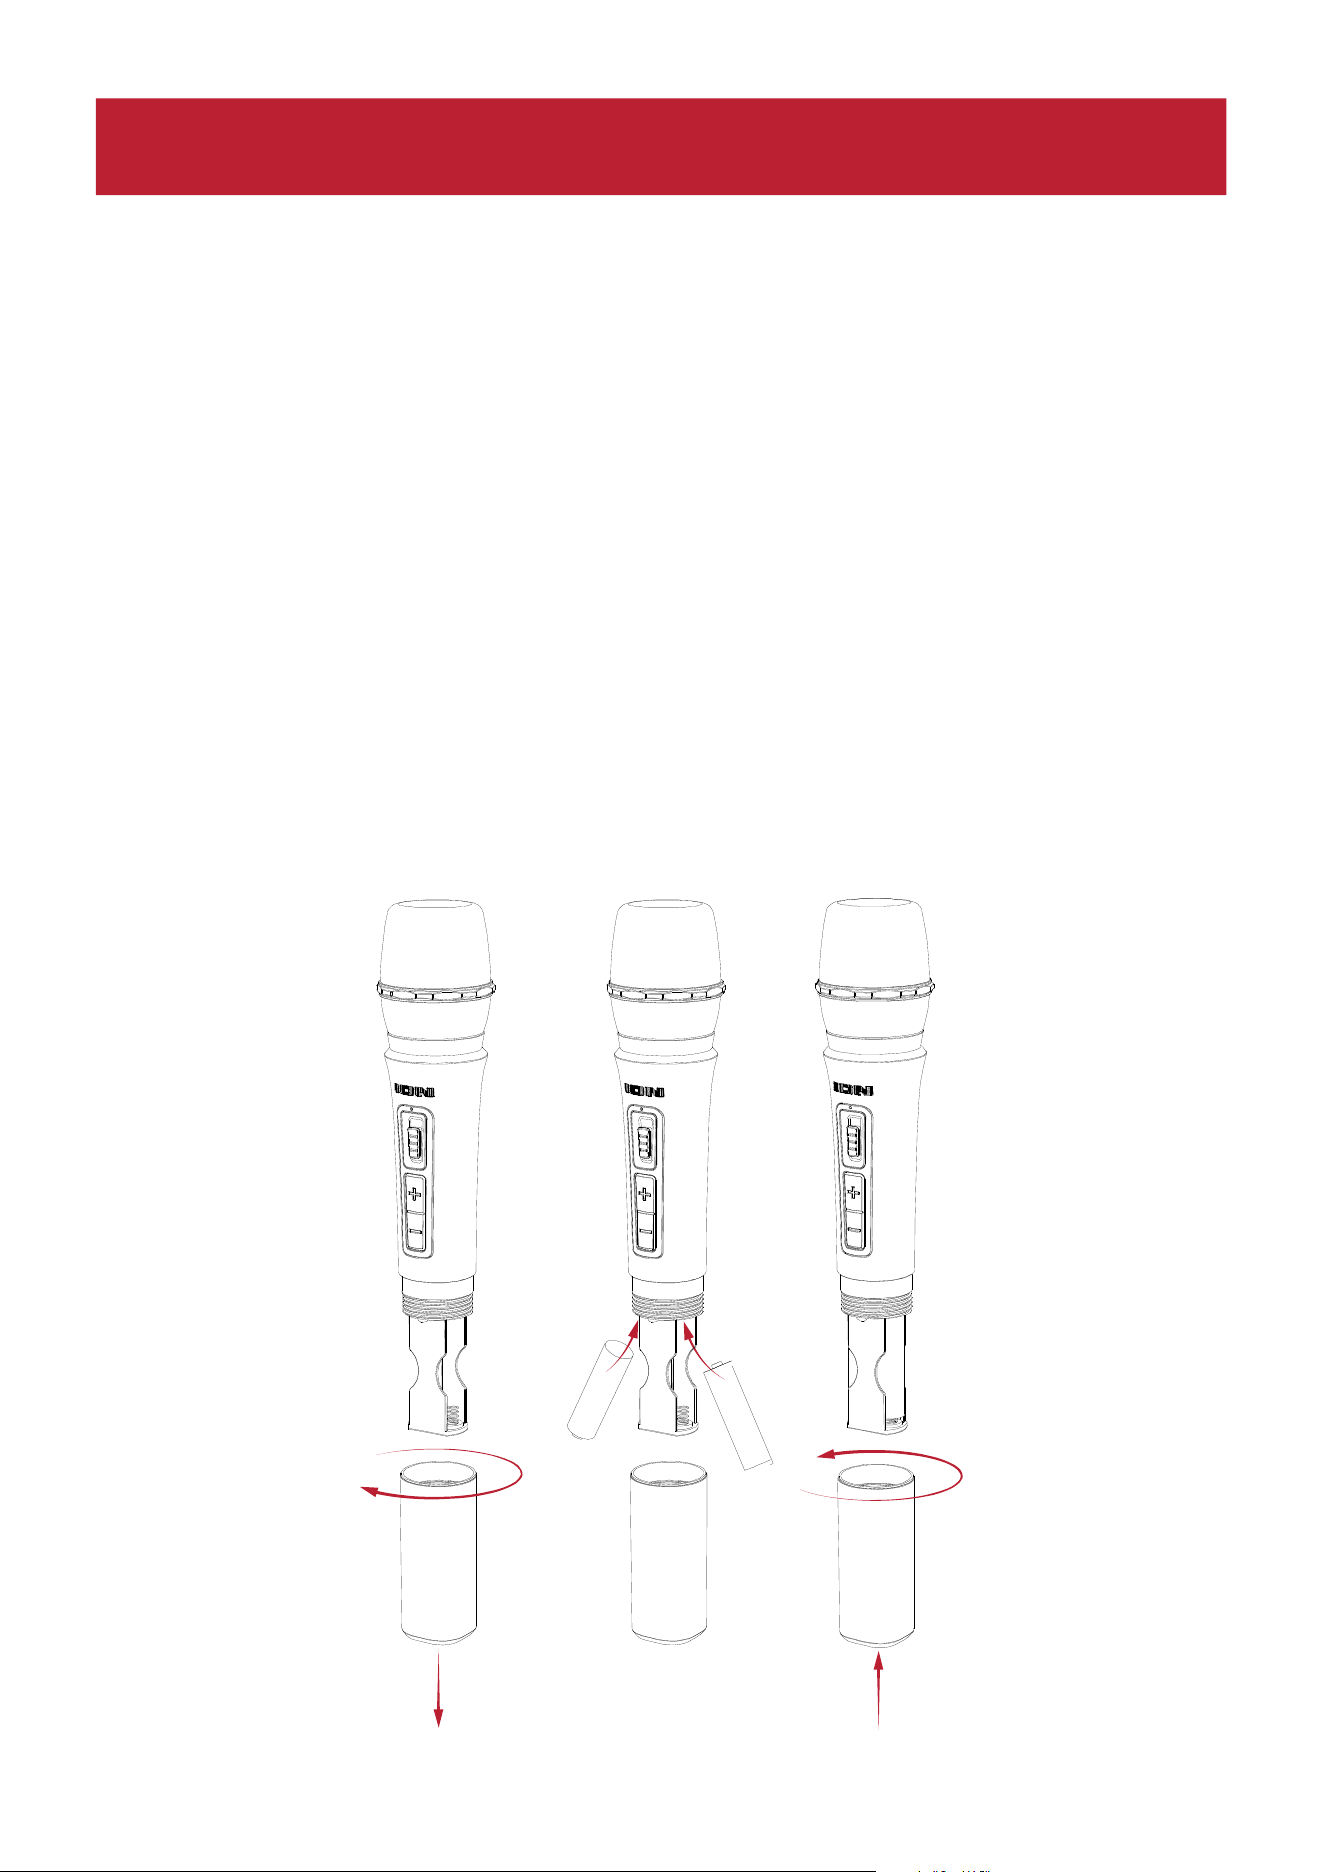
Installing Batteries Into the Wireless Mic
1. Remove the battery compartment cover by turning it clockwise.
2. Install two fresh AA alkaline batteries (not included) in the orientation indicated in the
compartment.
3. Reattach the battery cover by turning it counterclockwise.
1
2
2
3
-
+
+
-
OPERATION

ION Audio Total PA™ Apex User Guide 15
Using the Wireless Mic
1. Power
on the wireless microphone by toggling the mic’s on/o switch up. The power
indicator LED will flash blue if pairing to the speaker and will be solid blue when connected
to the speaker.
2. The microphone should pair automatically if Total PA™ Apex is powered on. If it does
not,
press and
hold the +
and - buttons simultaneously for three seconds to reset mic pairing.
3. Press
the +
/- controls on the microphone or turn the MIC 1 Volume knob to adjust the mic
level. If you cannot hear the microphone over your audio source, you may need to
decrease
the SOURCE Vol
ume level or increase the microphone volume
.
Note: The wireless microphone will only connect to one Stereo-Linked™ speaker (the closest
speaker). If using two Total PA™ Apex speakers you will need to connect the first speaker's
Mix Out to the second speaker's XLR Source input.
TIP: For more details on balancing your volume levels, see the section Balancing Your Levels.
Note: A blue and red indicator will appear on the wireless mic when the battery is low and will
flash red when it is almost empty.
W
ireless Mic LED Indicator:
S
low flashing blue LED: The wireless mic is powered on and not in pairing mode.
Q
uick flashing blue LED: The wireless mic is attempting to pair with the speaker.
S
olid blue LED: The wireless mic is paired with the speaker.
Q
uick flashing red LED: This indicates the battery level is low for the wireless mic.
1 - TOGGLE SWITCH UP 2 - PRESS
- - - - -
3 - PRESS
AND
HOLD
3 - TURN
ION Audio Total PA™ Apex User Guide 16
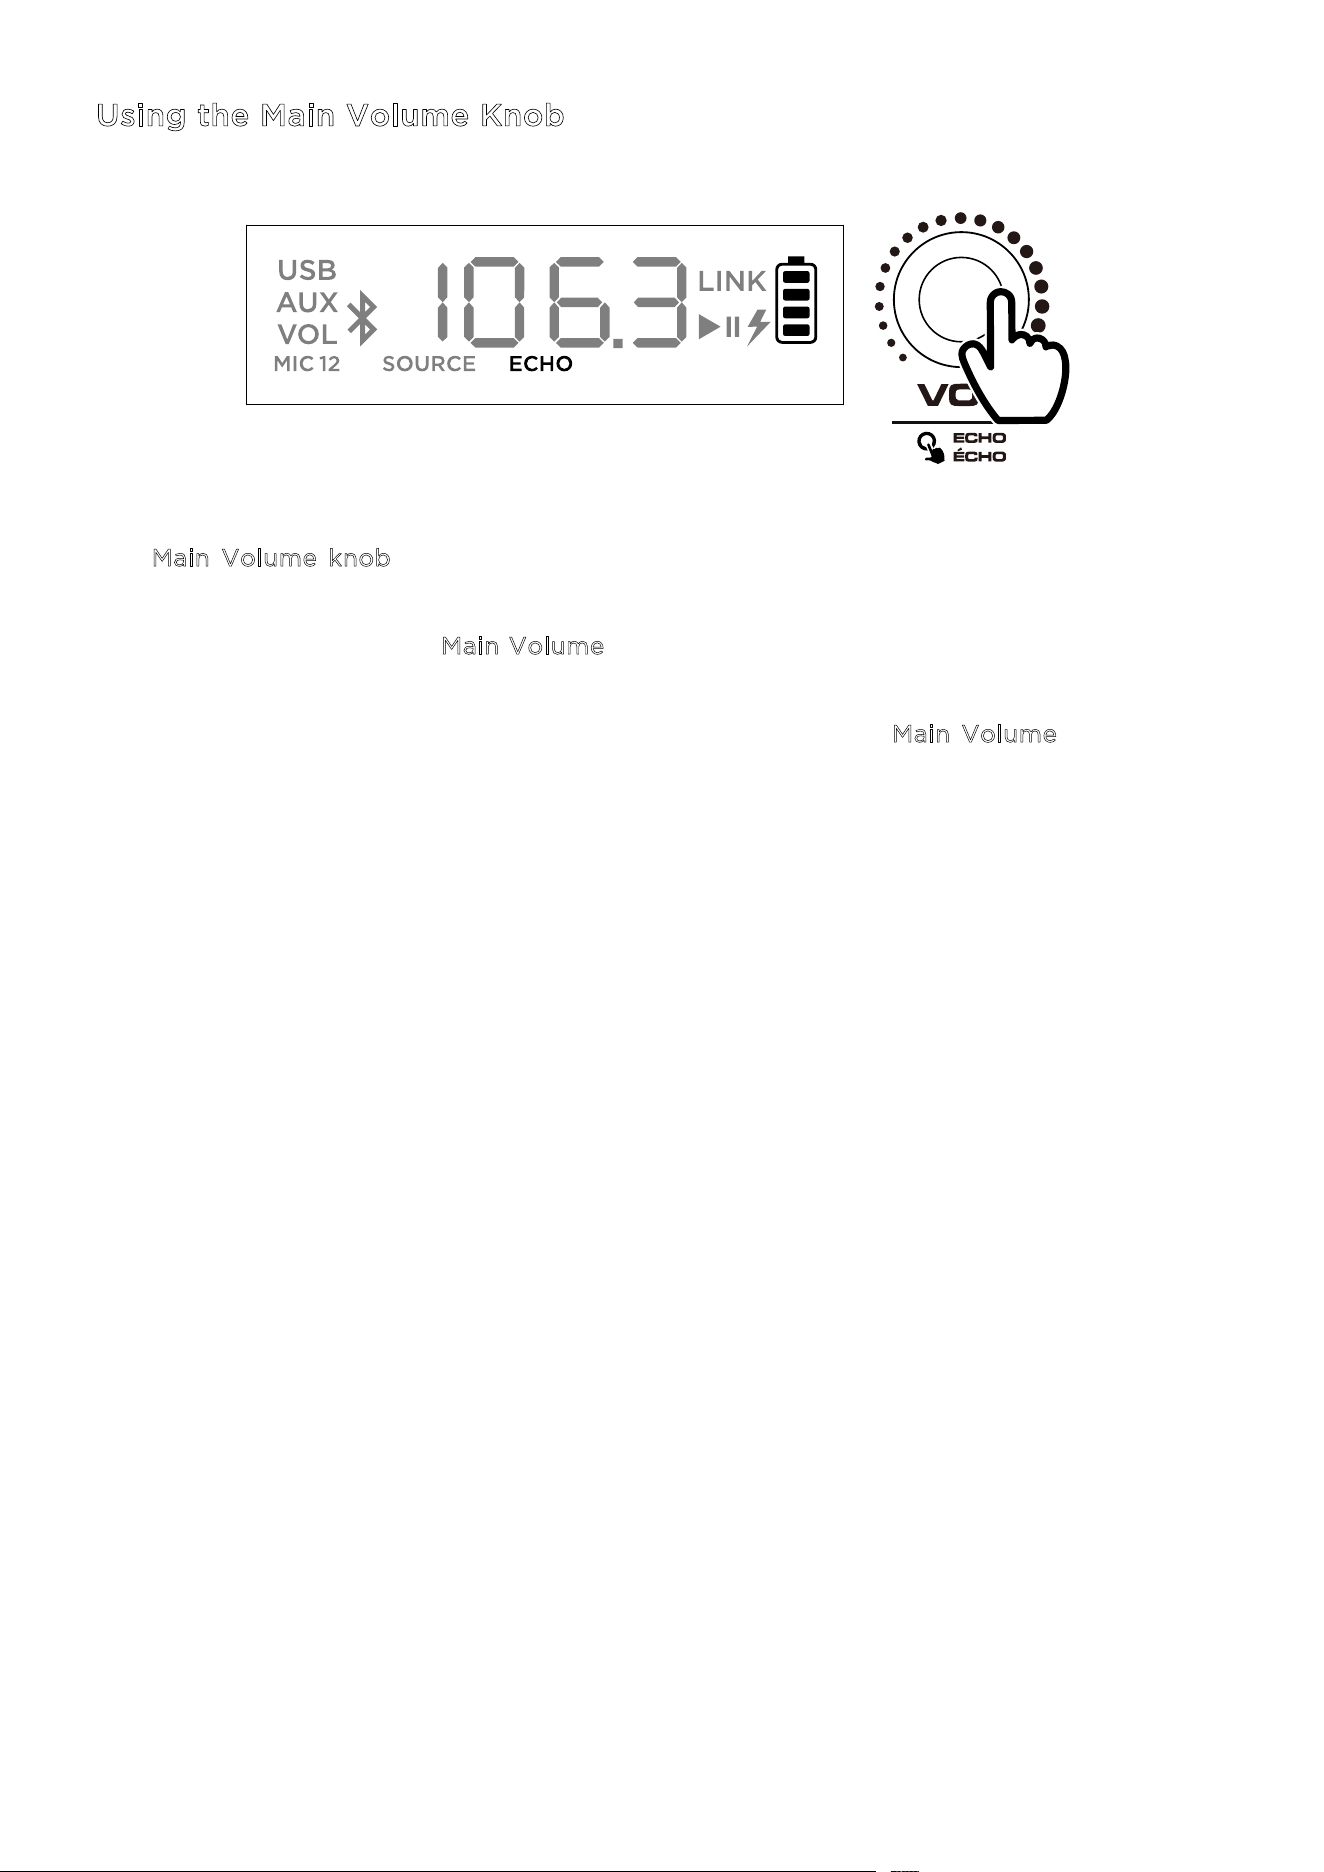
Using the Main Volume Knob
The M
ain Volume knob defaults to controlling the Main Volume for all channels. Press the
knob to toggle to the Echo function and rotate the knob to change the setting.
If there is no activity on the M
ain Volume knob for five seconds, the function will go back to
Main Volume.
To factory reset the speaker to default settings, hold down the M
ain Volume knob for five
seconds. The speaker will power cycle and the reset will be successful.
ION Audio Total PA™ Apex User Guide 17
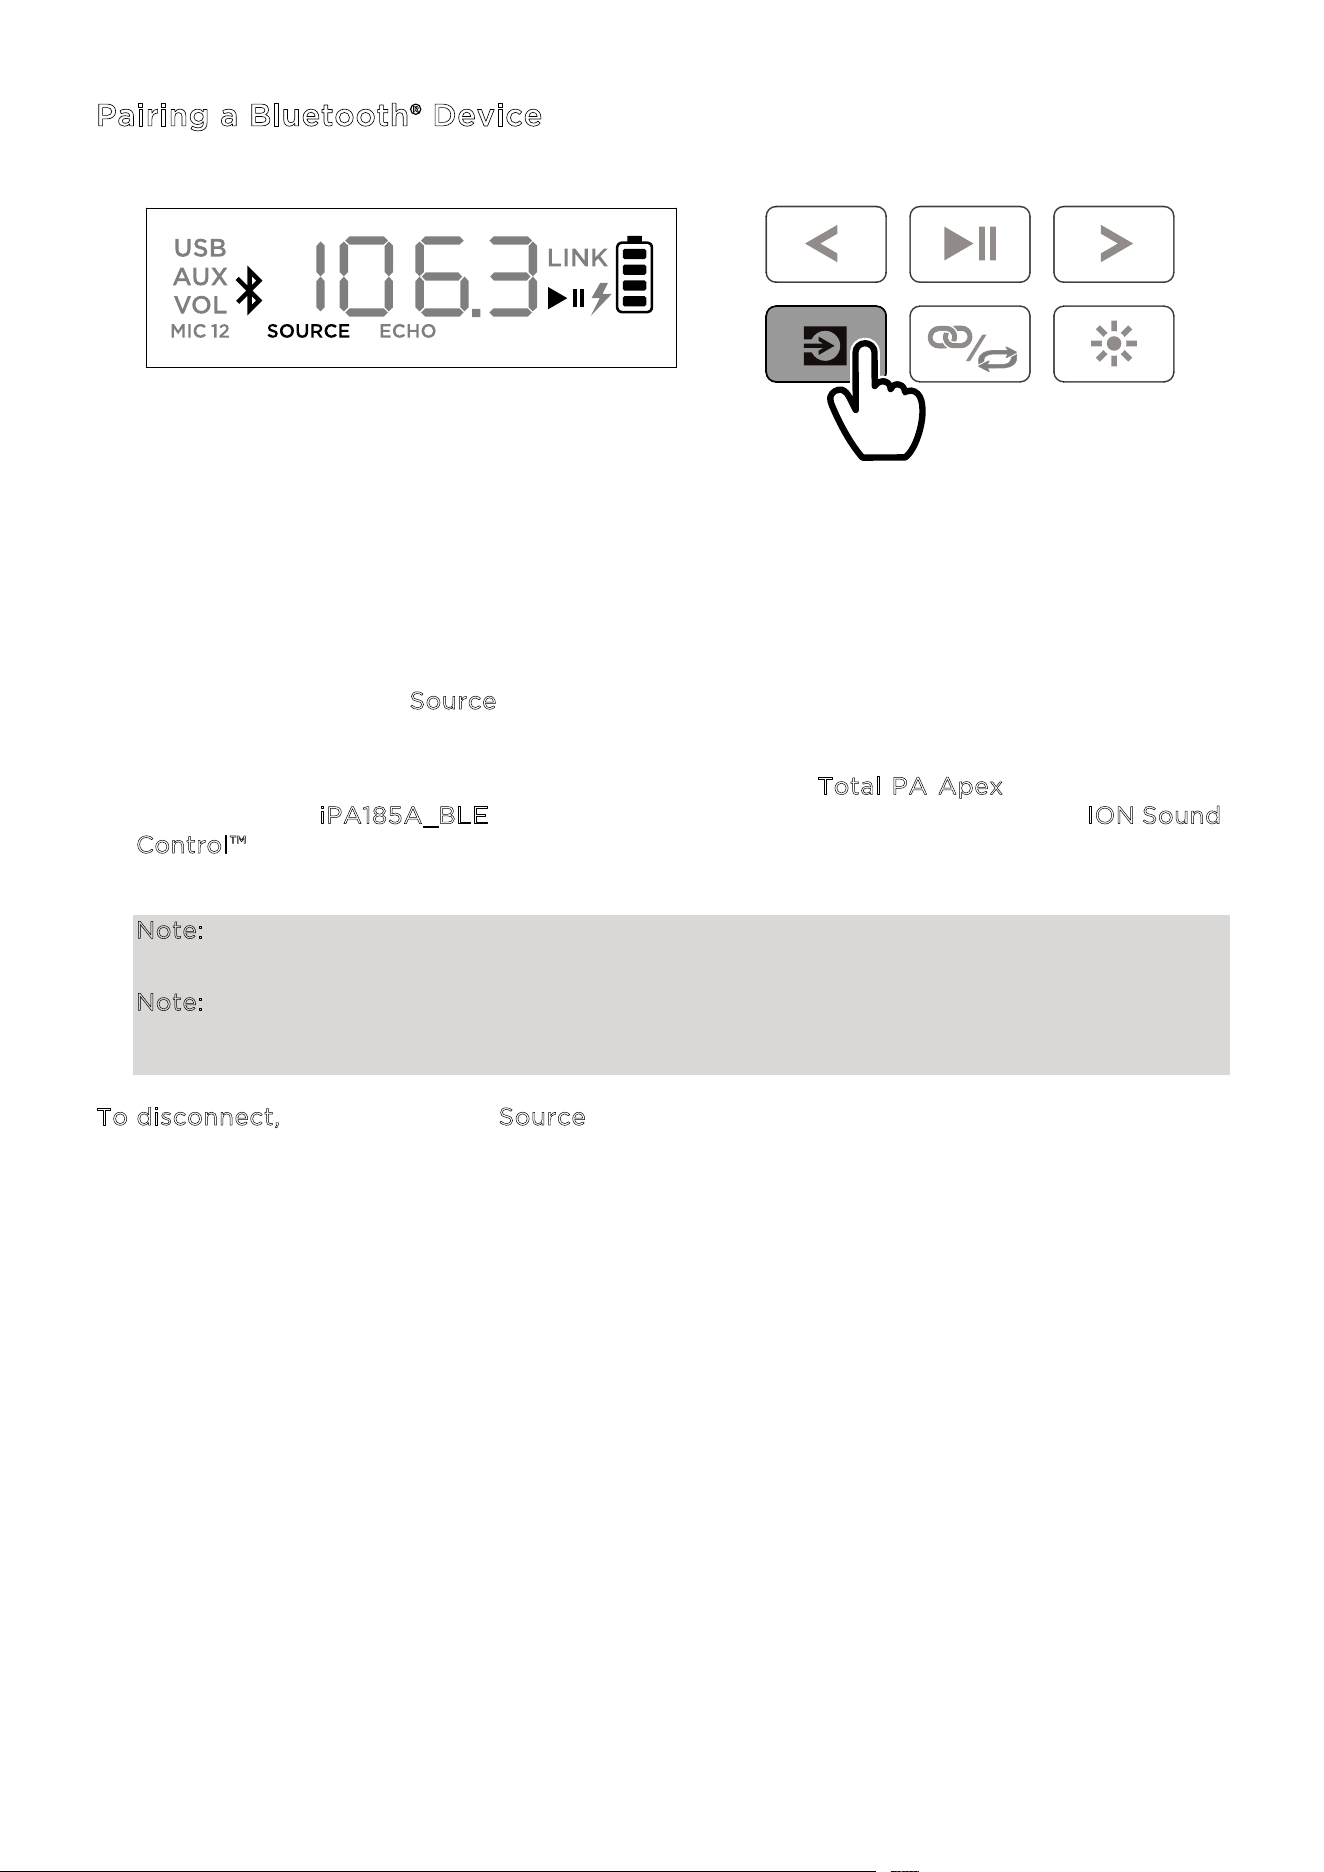
Pairing a Bluetooth® Device
1. Power on the Total PA™ Apex by flipping the power switch on.
2. When the unit is first turned on, it will automatically enter Bluetooth pairing mode. If
necessary, press the S
ource button to select Bluetooth mode. If voice prompts are
enabled, you will hear “Bluetooth Pairing.”
3. Navigate to your device’s Bluetooth setup screen, find T
otal PA Apex, and connect. Do
not connect to i
PA185A_BLE; this is reserved exclusively for connecting to the ION Sound
C
ontrol™ app. When connected, the Bluetooth icon on the display will flash and you will
hear “Bluetooth Connected”.
Note: If you experience trouble in connecting, select “Forget this Device” on your
Bluetooth device and try to connect again.
Note: The volume of Total PA™ Apex does not aect your Bluetooth device volume. For
the best sound quality, set your input source volume to 100% and use the Source and Main
Volume control of the speaker to adjust the volume.
To disconnect, double press the Source button on Total PA™ Apex.
PRESS
ION Audio Total PA™ Apex User Guide 18
Linking Two Speakers
1. Power on both Total PA™ Apex speakers by flipping the power switches on. Make sure they
are in Bluetooth pairing mode and not connected to a device.
2. Double-press the Stereo-Link™ / Repeat button on one speaker (the primary speaker
which will control both) and then the Stereo-Link™ / Repeat button on the secondary
speaker to enter Stereo-Link™ mode. Once a link has been established, the word LINK will
appear on both speaker displays.
3. Connect to the primary speaker via Bluetooth.
To disconnect, double press the Stereo-Link™ / Repeat button.
Note: The speakers should be within 26 m (85’) of each other to properly link.
Note: The wireless microphone will only connect to one Stereo-Linked™ speaker (the closest
speaker). If using two Total PA™ Apex speakers you will need to connect the first speaker's
Mix Out to the second speaker's XLR Source input.
Note: Total PA™ Apex is not compatible with previous ION PA models. To link to a previous
model, you will need to use an XLR cable (not included). Connect the XLR cable to the MIX
Out XLR port on the Total PA™ Apex to the XLR In port on the previous model.
DOUBLE-PRESS

ION Audio Total PA™ Apex User Guide 19
Light Modes
Total PA™ Apex has two side lights, six tweeter lights, and four woofer lights. All LEDs are
individually controllable.
When the speaker is first powered on, a red light will move from the bottom of the speaker
toward the top, lighting up all LEDs. Once all LEDs are lit up, the lights will hold for two
seconds before fading out.
After the power on light eect, all LEDs will fade in and out blue until a Bluetooth device is
connected to the speaker. When paired, all LEDs will flash blue two times before going back
to the last selected light mode.
Press the Lights button to toggle between twelve modes for the LEDs on Total PA™ Apex.
Note: For the best lighting eect, you may need to increase the volume of your connected
device or input source.
• R
ainbow Chase - Beat Sync: A rainbow of colors will spin around the speaker LEDs
counterclockwise. The more bass in the music, the faster the speed of the spinning rainbow
pattern.
• S
tarlight: All LEDs will flash a random color light and slowly fade away. The more bass in
the music, the faster the speed of the flashing lights.
• F
ire Pit: The lights will flicker red, yellow, and orange and the side lights rise up and down.
The level of the “fire” is based on the amount of bass in the music.
• R
ain Drops: The tweeter and side LEDs will drop a color from top to bottom. Once the color
hits the bottom LED, the woofer lights splash like water with the same raindrop color,
repeating side to side. Four raindrops streaks will fall at the same time.
• C
rossfade: The woofer and tweeter lights will crossfade left and right while the side lights
will crossfade up and down.
• B
ouncing Stars: Light streaks will flow down the sides. When they meet at the middle
bottom part of the speaker, they will bounce back up to the top in the next color in the
spectrum and flow downward again. Woofer lights will pulse with the new color when the
light streaks bounce in the middle areas, repeating down the color spectrum.
• H
orizontal Waves – Beat Sync: Three waves of one color will pass by and after they have
gone from the top left side to the bottom right side new waves in the next color with appear.
Waves will speed up or slow based on the amount of bass in the music.
PRESS

ION Audio Total PA™ Apex User Guide 20
• Beat Sync: All LEDs will move up and down in speed based on the bass level in the music.
The color will fade throughout the color spectrum.
• T
wo-Tone Cycle: One side of the LEDs (including two from the tweeter light and one from
the side light) will show one color while the other side will light up with a nearby color from
the color spectrum.
• C
olor Cycle: All LEDs will hold the same color while cycling through the color spectrum.
• S
tatic Color: All LEDs will stay the same color (the color can be adjusted from the ION
Sound Control™ app). By default the color is blue. There are the 15 colors that can be selected
from the I
ON Sound Control™ app.
• R
andom: The LEDs will cycle through all light modes randomly (except Static Color),
changing every ten seconds.
• O
ff: All LEDs are o.
ION Audio Total PA™ Apex User Guide 21
USB Mode
When a USB drive with compatible files is inserted into the USB Charge/Playback Port, Total
PA™ Apex will automatically switch to USB mode. If the USB drive has already been inserted
and you are using another mode, press the S
ource button until USB mode is selected. Total
PA™ Apex will automatically play the first compatible MP3 file. Files are played in alphabetical
order of what is on the root level, then alphabetical by folder, and then alphabetical by track
name. Media playback will stop when all media has been played on the USB drive. Press and
hold the N
ext and Previous buttons to fast forward or rewind within the song.
Note: The USB drive must have playable MP3 files for it to appear on the media panel’s display.
Press the R
epeat button to cycle through the repeat shue options (abbreviations will show
on the display):
• Play the current USB track on repeat (O
nE). This is the default mode when powered on.
• Play the tracks in random order (r
An).
• Play all the tracks on the USB drive on repeat (A
LL).
• Play the current folder’s tracklist on repeat (F
OLd). The folder used is based on what song
is playing when it is activated. For instance, if a song playing is on the root level, selecting
F
OLd will repeat only songs at the root level. If a song is in folder “A”, then only songs in
folder “A” will be repeated.
PRESS
ION Audio Total PA™ Apex User Guide 22
App Control
IMPORTANT: To ensure the best possible experience with the app, use the most current
Android OS or iOS on your device.
Follow these steps to download the free app on your device:
1. Open the Apple App Store or Google Play on your device. Then, search for the I
ON Sound
C
ontrol™ app.
2. Follow the on-screen instructions to download and install the app. Once downloaded, the
I
ON Sound Control™ app will appear on your device's home screen.
3. Connect your device to Total PA™ Apex via Bluetooth. See the P
airing a Bluetooth® Device
section to learn how to do this.
4. Open the ION Sound Control™ app. If prompted, allow the app to access your device's
Bluetooth and Location Services.
5. Select the T
otal PA™ Apex icon to go to the next screen, where you can use the app to
control various functions of the speaker such as:
• M
ain Volume: Adjust the main speaker output volume.
• S
ource Selection: Select the source to use: Bluetooth, USB, or Aux.
• S
ource Volume: Adjust the incoming volume for Bluetooth, USB, and Aux sources.
• M
ic 1 Volume:
Adjust the volume for the wireless mic.
• M
ic 2 Volume: Adjust the volume for the 6.35 mm / 1/4”and XLR microphone inputs.
• E
Q: Adjust the speaker's equalization.
• M
ic Echo: Turn the mic echo eect on/o.
• V
oice Prompts: Enable or disable the voice prompts.
• S
upport: Visit ionaudio.com, contact Technical Support, and view Warranty
information and Frequently Asked Questions.
• L
ight Effect: Choose the lighting eect.
• O
ver-The-Air Firmware Updates: Stay up to date with the latest firmware installation.
ION Audio Total PA™ Apex User Guide 23
I
f the sound is distorted: You may need to adjust the levels of your sources and Total PA™
Apex for proper mixing.
i. First, turn your source volume all the way up.
ii. Then, adjust the selected C
hannel Volume (VOL) knob on Total PA™ Apex to an
appropriate level.
iii. Finally, adjust the M
ain Volume to an appropriate level.
If the sound is still distorted, try lowering the volume control of your sound source, then
lowering the C
hannel Volume (VOL) knob on Total PA™ Apex of the channel in use.
I
hear a hum when cables are connected:
• Disconnect cables from the input jacks to see if it’s a faulty cable.
• Make sure the signal cables are not placed near power cables.
• Connect all audio equipment power cables to outlets which share a common ground.
I
f there is too much bass: Try adjusting the EQ control on your sound source or on Total PA™
Apex to lower the bass level. This will allow you to play the music louder before clipping
(distortion) occurs.
W
hat do I do if the wireless mic is not working?:
• Check to see that the batteries are properly installed.
• Install two fresh AA batteries (not included) in the orientation indicated in the
compartment. The microphone should pair automatically if Total PA™ Apex is powered on.
If it does not, press and hold the +
and – buttons on the microphone for 3 seconds to reset
mic pairing.
I
f there is a high-pitched whistling noise when using microphones: This is probably
feedback. Point the microphone away from the speaker.
I
f you can’t hear the microphone over the music volume:
i. First, turn down the volume from your source using the appropriate C
hannel Volume
(
VOL) knob on Total PA™ Apex.
ii. Then, make sure your microphone volume is turned all the way up (if applicable), and
then turn up the appropriate C
hannel Volume (VOL) knob on Total PA™ Apex where
the microphone is connected.
TROUBLESHOOTING

ION Audio Total PA™ Apex User Guide 24
I
f you cannot connect your audio device to Total PA™ Apex via Bluetooth:
• Have your audio device (e.g., smartphone or tablet) and Total PA™ Apex as close together
as possible while trying to connect. Make sure both the audio device and Total PA™ Apex
are unobstructed by walls, furniture, etc.
• Reset the Bluetooth connection on Total PA™ Apex to disconnect Total PA™ Apex from
any other audio device and restart the search process. If this does not work right away,
power o Total PA™ Apex and then power it back on. See P
airing a Bluetooth® Device for
more information.
• Reset the Bluetooth connection on your audio device by turning Bluetooth o and back
on. You can find this under the Bluetooth menu in the Settings for your phone or other
audio device.
If this does not work, and you have connected to Total PA™ Apex before, find Total PA™
Apex in the list of available or previously connected devices in your audio device's
Bluetooth menu, tap the "gear" or “i” icon located next to it and then select U
npair or
F
orget. Turn Total PA™ Apex o and back on and try pairing again once it reappears in
your available devices list.
Note: If Total PA™ Apex has been paired to another audio device recently that is still within
range, you may need to repeat this process with that audio device to fully disconnect.
I
f you experience audio dropouts while playing music from a Bluetooth device, this may be
happening because your unit is trying to link to another speaker. This can occur if you power
o a speaker that was linked to your unit or if you have just turned on your unit and it is in
Stereo-Link
™
mode. To stop the audio dropouts, exit Stereo-Link
™
mode by double-pressing
the S
tereo-Link
™
/ Repeat button. Alternatively, you can wait for your unit to link to another
speaker if there is one within range.

ION Audio Total PA™ Apex User Guide 25
Technical Specifications
S
peakers Low Frequency: 305 mm / 12.0”
H
igh Frequency: 25.4 mm / 1.0”
Frequency Response 50 Hz – 20 kHz
Wireless Technology Bluetooth®
- Classic Audio
Wireless Range * Bluetooth® Range: Up to 30.5 m / 100 ft.
T
WS Range: Up to 23 m / 75 ft.
Wireless Microphone Range* 30.5 m / 100 ft.
USB Audio: Music playback from USB drive
S
upported File System: FAT32
S
upported File Type: MP3
M
aximum File Size: 4 GB
M
aximum USB Drive Size: 512 GB
Battery Battery Capacity: 11.1 V, 6000 mAh
B
attery Life: 6-8 hours (50% volume, lights o) **
C
harge Time: Up to 5 hours
Power Cable: IEC 320 C13
I
nput Voltage: 100-240 VAC, 50/60 Hz, 320 W
F
use: F5AL AC250V
Dimensions
(width x depth x height)
16.21” x 12.50” x 25.63” / 411.7 x 317.5 x 651 mm
Weight 13.2 kg / 29.15 lbs.
Specifications are subject to change without notice.
* Bluetooth and wireless reception and range are aected by walls, obstructions, and
movement. For optimal performance, place the product in the center of the room so it is
unobstructed by walls, furniture, etc.
** Battery life may vary based on temperature, age, and volume usage of product.
APPENDIX

ION Audio Total PA™ Apex User Guide 26
Trademarks & Licenses
ION Audio is a trademark of inMusic Brands, Inc., registered in the U.S. and other countries. App Store is a trademark of Apple
Inc., registered in the U.S. and other countries.
Android and Google Play are registered trademarks of Google Inc.
The Bluetooth word mark and logos are owned by the Bluetooth SIG, Inc. and any use of such marks by ION Audio is under
license.
All other product names, company names, trademarks, or trade names are those of their respective owners.
Distributed by:
Costco Wholesale Corporation
P.O. Box 34535
Seattle, WA 98124-1535
USA
1-800-774-2678
www.costco.com
Costco Wholesale Canada Ltd.*
415 W. Hunt Club Road
Ottawa, Ontario
K2E 1C5, Canada
1-800-463-3783
www.costco.ca
* faisant aaire au Québec sous
le nom les Entrepôts Costco
Importado por:
Importadora Primex S.A. de C.V.
Blvd. Magnocentro No. 4
San Fernando La Herradura
Huixquilucan, Estado de México
C.P. 52765
RFC: IPR-930907-S70
(55)-5246-5500
www.costco.com.mx
Costco Wholesale Australia Pty Ltd
17-21 Parramatta Road
Lidcombe NSW 2141
Australia
www.costco.com.au
Costco Wholesale UK Ltd /
Costco Online UK Ltd
Hartspring Lane
Watford, Herts
WD25 8JS
United Kingdom
01923 213113
www.costco.co.uk
Costco Wholesale Spain S.L.U.
Polígono Empresarial Los Gavilanes
C/ Agustín de Betancourt, 17
28906 Getafe (Madrid) España
NIF: B86509460
900 111 155
www.costco.es
Costco Wholesale Iceland ehf.
Kauptún 3-7, 210 Gardabaer
Iceland
www.costco.is
Costco France
1 avenue de Bréhat
91140 Villebon-sur-Yvette
France
01 80 45 01 10
www.costco.fr
Costco Wholesale Japan Ltd.
2 Kakuchi, 2 Gaiku, Kaneda-Nishi
361 Urikura, Kisarazu shi
Chiba, 292-0007 Japan
0570-200-800
www.costco.co.jp
Costco Wholesale Korea, Ltd.
40, Iljik-ro
Gwangmyeong-si
Gyeonggi-do,
14347, Korea
1899-9900
www.costco.co.kr
Costco Wholesale New Zealand Limited
2 Gunton Drive
Westgate Auckland 0814
New Zealand
www.costco.co.nz
Costco (China) Investment Co., Ltd.
Room 01 Mezzanine
No. 5178, Kang Xin Highway
Pudong New District
Shanghai
China 201315
+86-21-6257-7065
Costco Wholesale Sweden AB
Box 614
114 11 Stockholm
Sweden
www.costco.se
M
ADE IN CHINA

ION Audio Total PA™ Apex User Guide 27
INTRODUCCIÓN ...................................................................... 29
Contenido de la caja ........................................................................................ 29
Soporte técnico ................................................................................................ 29
Información sobre la carga de la batería .................................................. 30
Guía de inicio rápido ........................................................................................ 31
Balancear sus niveles ...................................................................................... 32
MONTAJE ................................................................................. 33
Instalación del soporte del altavoz .............................................................. 33
Diagrama de conexiones ................................................................................ 34
FUNCIONES ............................................................................. 35
Panel trasero ..................................................................................................... 35
FUNCIONAMIENTO ................................................................. 39
Cuidado de las pilas ........................................................................................ 39
Instalación de baterías en el micrófono inalámbrico .............................. 39
Uso del micrófono inalámbrico .................................................................... 40
Uso de la perilla de volumen principal ....................................................... 41
Emparejamiento de un dispositivo Bluetooth® ......................................... 42
Emparejamiento de dos altavoces ............................................................... 43
Modos de iluminación .................................................................................... 44
Modo USB ......................................................................................................... 46
Control por app ................................................................................................ 47
ÍNDICE

ION Audio Total PA™ Apex User Guide 28
SOLUCIÓN DE PROBLEMAS .................................................. 48
APÉNDICE................................................................................ 50
Especificaciones técnicas ............................................................................ 50
Marcas comerciales y licencias ...................................................................... 51

ION Audio Total PA™ Apex User Guide 29
Gracias por adquirir el altavoz Total PA
MR
Apex. En ION, damos tanta importancia a su
entretenimiento como usted. Por ello, diseñamos nuestros productos con un solo propósito:
lograr que su vida sea más cómoda y divertida.
Nota: Antes de usar el producto por vez primera, cargue completamente la batería. Para
garantizar un transporte seguro, le enviamos deliberadamente la batería de su unidad con
bajo nivel de carga. Para cargar óptimamente la batería, mantenga el altavoz apagado durante
la carga.
Use el cable de alimentación incluido para conectar la unidad a una toma de corriente y deje
que la batería se cargue durante no más de 5 horas. Así contribuirá a asegurar la máxima
duración de su batería.
Contenido de la caja
Altavoz Total PA
MR
Apex
Cable de alimentación (150 cm / 5 pies)
Micrófono inalámbrico
Soporte del altavoz
Guía de inicio rápido
Soporte técnico
Si desea consultar la información más reciente de este producto (documentación,
especificaciones técnicas, requisitos del sistema, compatibilidad, etc.) y registrar el producto,
visite la web: i
onaudio.com.
Para obtener un mayor soporte técnico para el producto, visite la página web:
i
onaudio.com/support.
INTRODUCCIÓN
ION Audio Total PA™ Apex User Guide 30
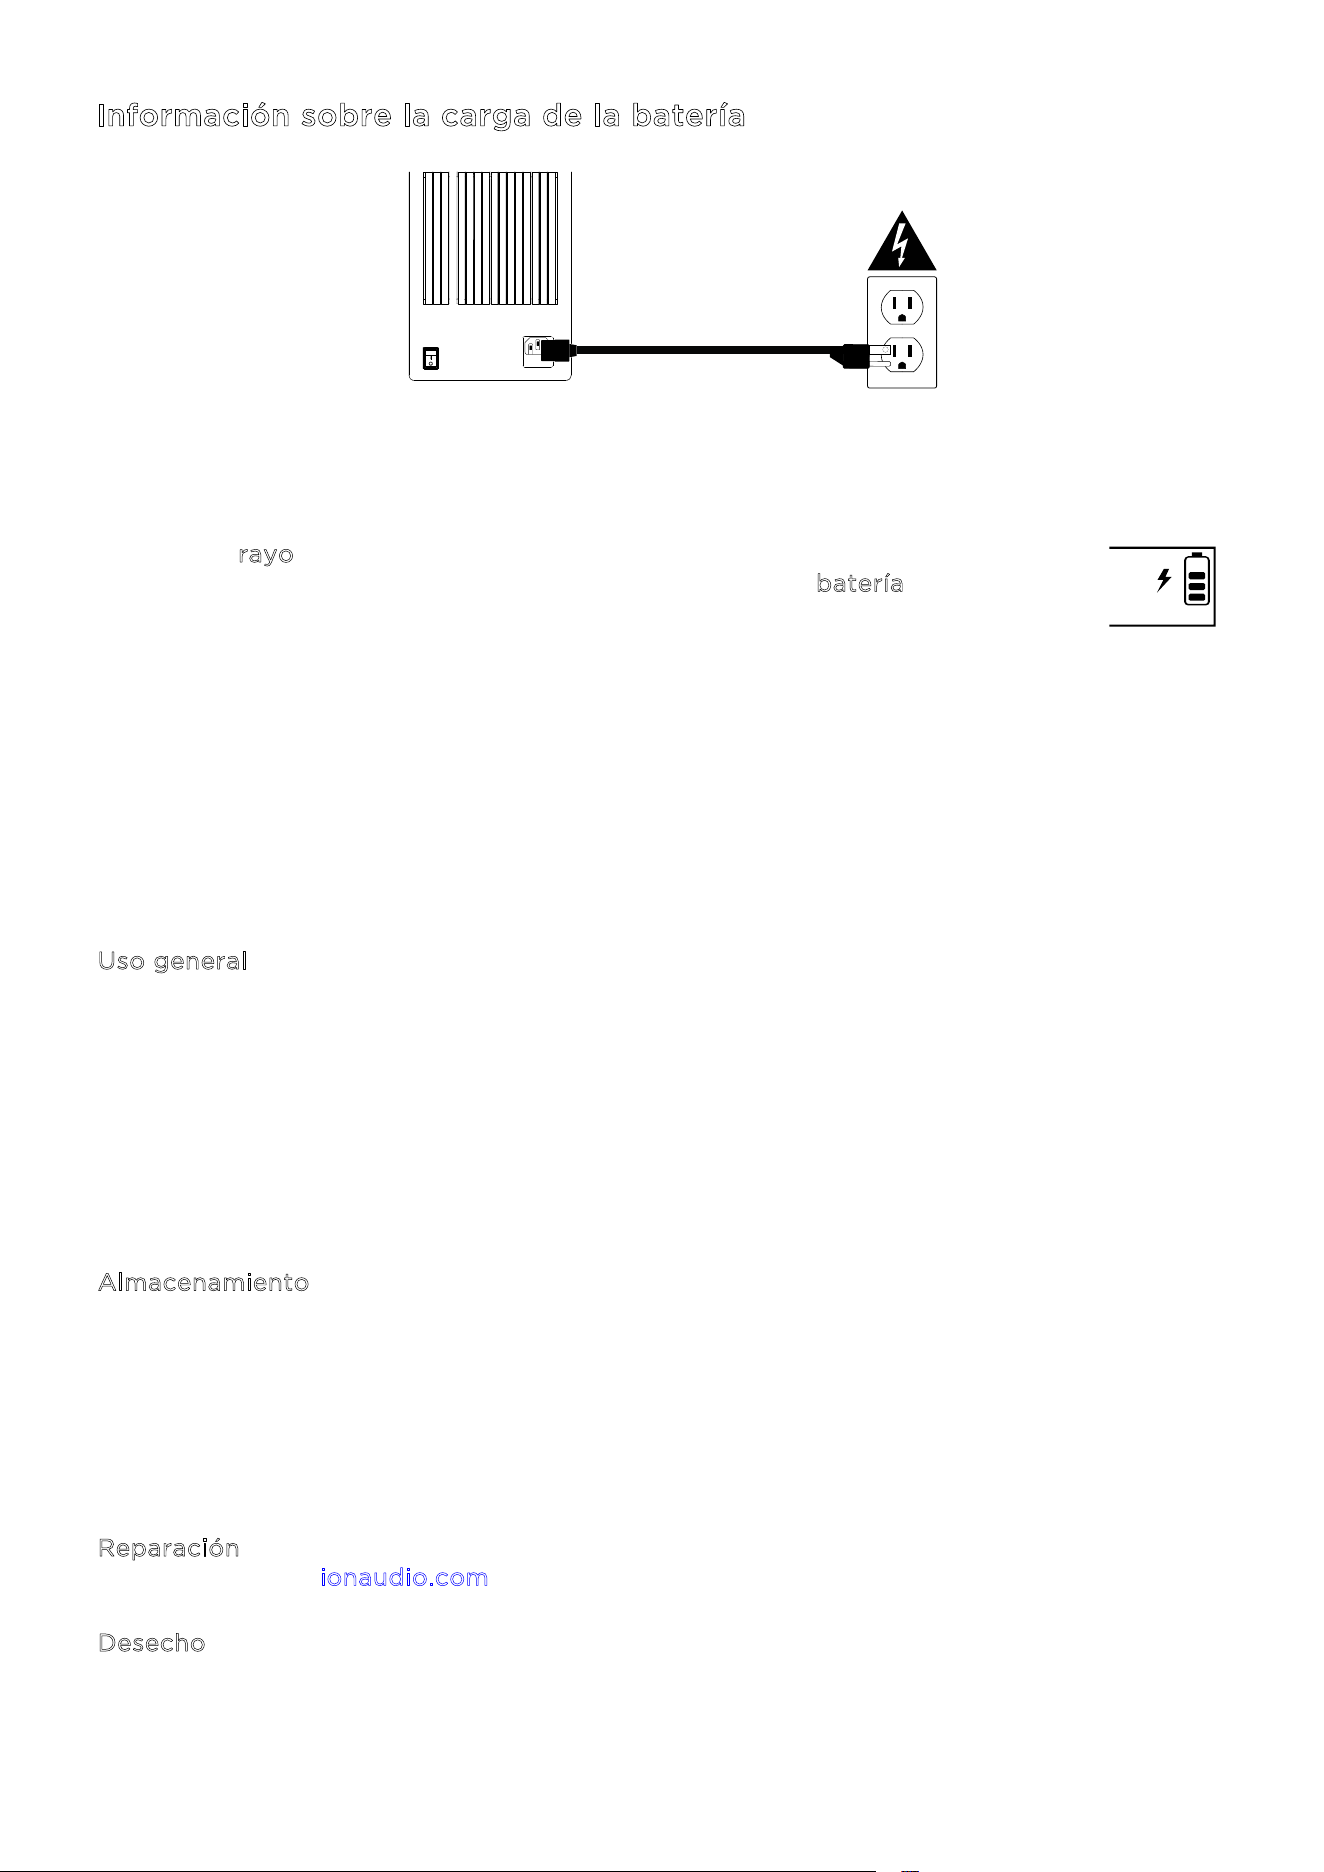
Información sobre la carga de la batería
Para cargar el altavoz Total PA
MR
Apex de la forma más rápida posible, apáguelo y use el cable
de alimentación incluido para conectar el altavoz a una toma de corriente. La carga completa
puede tardar hasta 5 horas.
El icono de r
ayo en la pantalla se iluminará al conectar el altavoz Total PA
MR
Apex
a una fuente de alimentación e iniciar la carga. El icono de b
atería se irá llenando
para mostrar el porcentaje de carga de la batería. Al completar la carga, el icono
de rayo desaparecerá y el icono de batería se mostrará totalmente lleno.
Si no se reproduce audio a través del altavoz Total PA
MR
Apex durante 20 minutos, la unidad
entrará en modo standby para ahorrar batería. En este modo, la señal de Bluetooth puede
quedar suspendida, no entra audio a través de un dispositivo conectado al puerto AUX o el
volumen está en 0. Para reactivar la unidad, simplemente reanude la entrada de la señal de
audio o pulse cualquier botón.
A continuación, presentamos algunas otras recomendaciones para obtener la máxima
duración de la batería interna.
U
so general Cargue completamente la batería antes de usarla.
Si es posible, evite que la batería se descargue del todo. Las baterías de
ion-litio no requieren mantenimiento y la batería tendrá su máxima
duración si funciona con una carga entre el 30 % y el 80 %.
No use el producto durante la carga de la batería.
No cargue la batería a temperaturas excesivamente altas (más de
32 °C/90 °F) o excesivamente bajas (menos de 0 °C/32 °F).
A
lmacenamiento Para conseguir la más larga vida útil del producto, no lo almacene a
temperaturas excesivamente altas (más de 32 °C/90 °F) o excesivamente
bajas (menos de 0 °C/32 °F).
Con el mismo fin, almacene el producto con la batería cargada al 50 %.
Si deja la batería sin usar con un bajo nivel de carga y no la recarga durante
6 meses, es posible que pierda capacidad permanentemente.
R
eparación Si la batería no se carga, contacte con ION Audio enviando un mensaje a
i
onaudio.com.
D
esecho Lleve la unidad a un centro de reciclaje o deséchela de conformidad con
las ordenanzas locales.
ON
ALLUMER
OFF
ÉTEINORE
ION Audio Total PA™ Apex User Guide 31
Guía de inicio rápido
1. Compruebe que todos los artículos indicados en la lista Contenido de la caja están
incluidos en la caja. En esta caja, busque el cable de alimentación y los micrófonos debajo
de la plancha de gomaespuma.
2. Observe detenidamente el d
iagrama de conexiones.
3. Compruebe que todos los dispositivos de entrada de audio (como micrófonos,
reproductores de CD o reproductores de medios digitales) están apagados y tienen su
respectivo ajuste de volumen en "cero".
4. Conecte todos los dispositivos según se indica en el d
iagrama de conexiones.
5. Encienda los dispositivos en el siguiente orden:
a. Dispositivos de entrada de audio (por ejemplo, micrófonos, instrumentos, reproductores
de CD)
b. Altavoz Total PA
MR
Apex
6. Ajuste el nivel de volumen de sus dispositivos conectados. Aumente al máximo el volumen
de su fuente de audio (micrófono, instrumentos, dispositivos Bluetooth). Seguidamente,
ajuste la perilla de v
olumen de la fuente para el canal seleccionado en el altavoz
Total PA
MR
Apex
a un nivel adecuado. Por último, ajuste el volumen principal en el altavoz
Total PA
MR
Apex a un nivel adecuado. Encontrará una explicación detallada paso a paso
del proceso para ajustar sus niveles de volumen en la sección B
alancear sus niveles en la
página siguiente.
7. Cuando termine de usar el altavoz Total PA
MR
Apex, apague los dispositivos en el siguiente
orden:
a. Altavoz Total PA
MR
Apex
b. Dispositivos de entrada de audio
ION Audio Total PA™ Apex User Guide 32
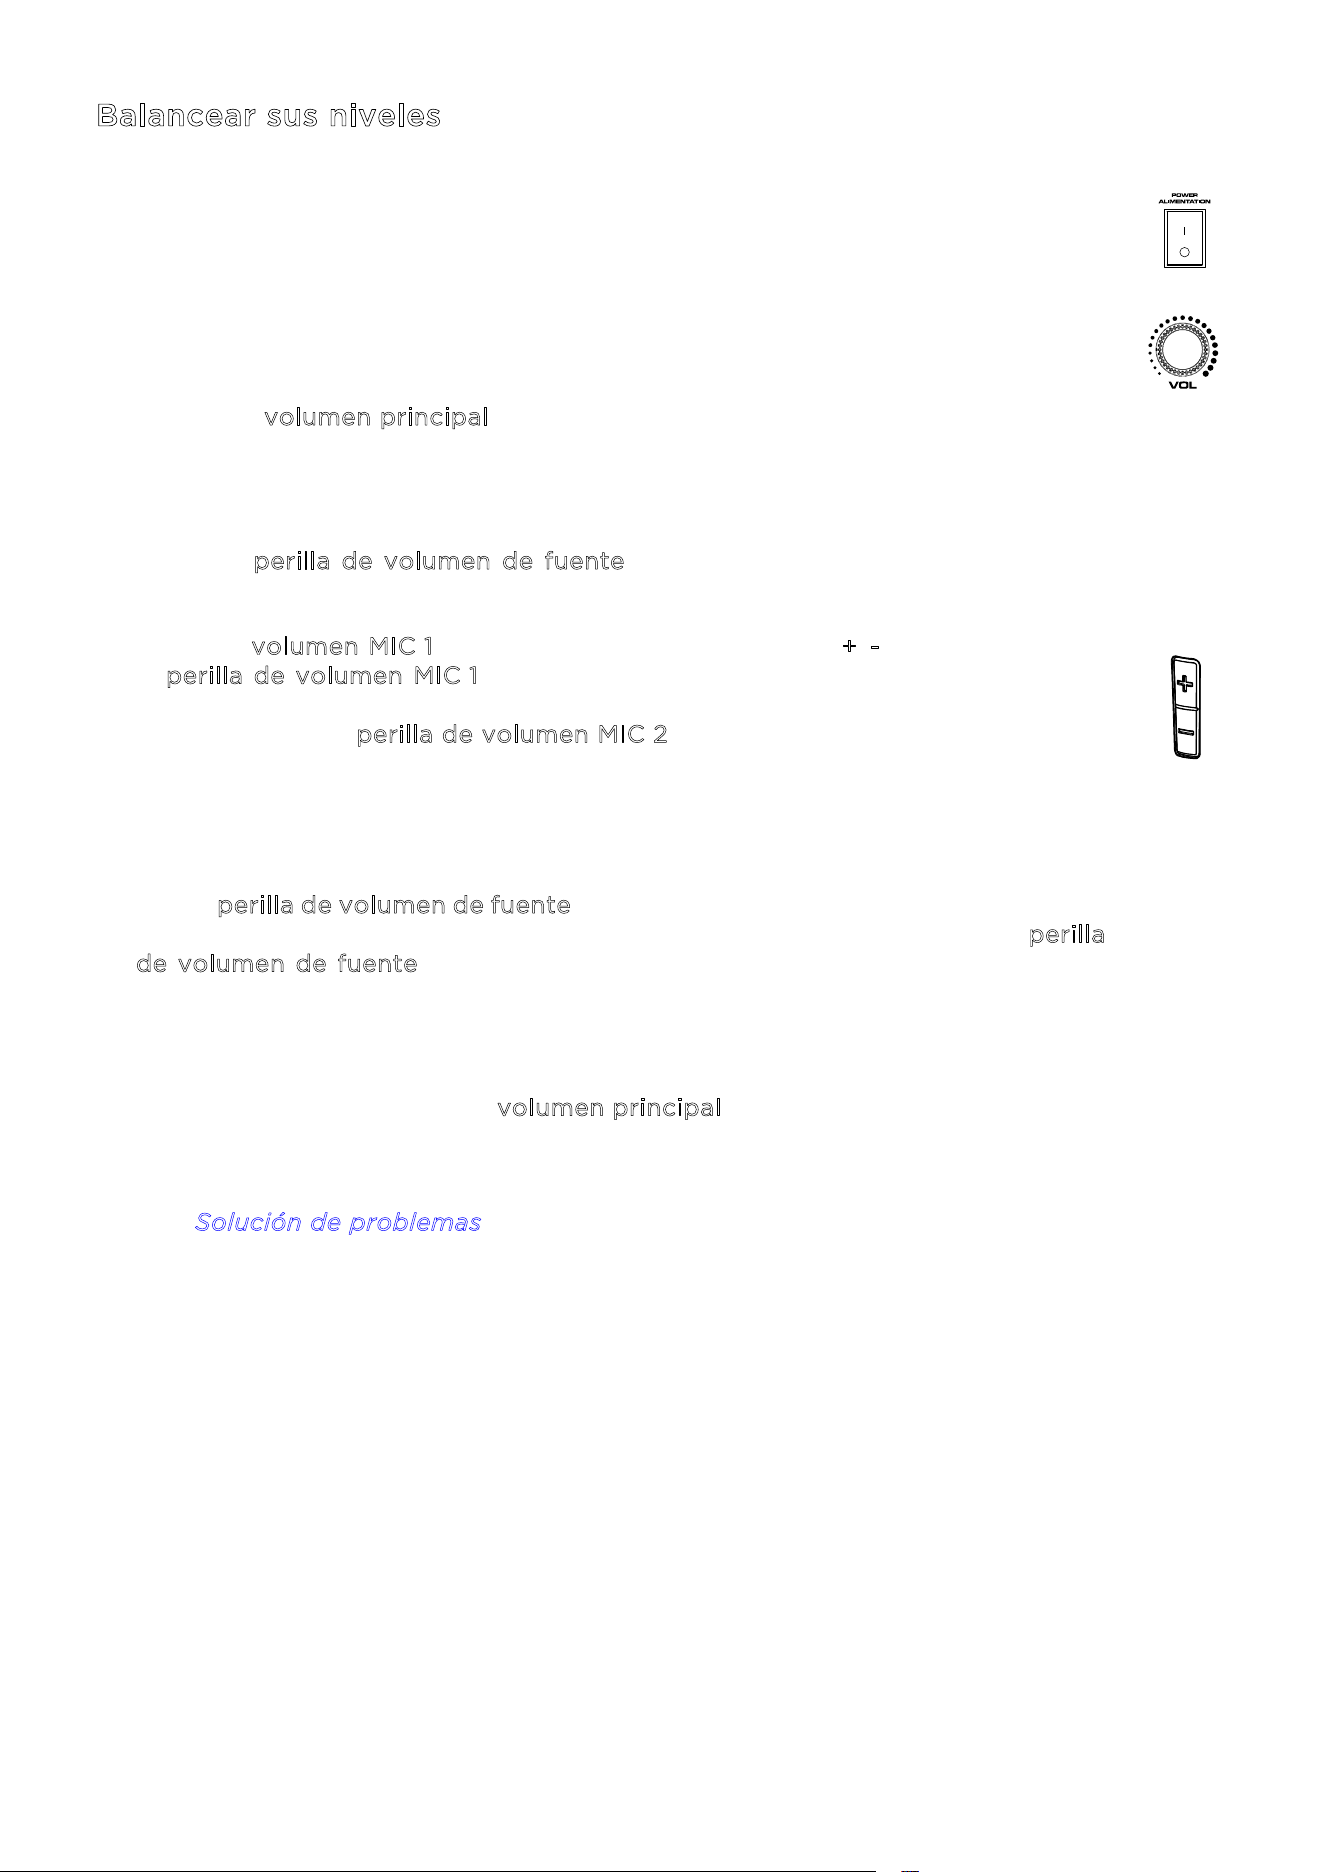
Balancear sus niveles
Se muestra cómo balancear rápidamente la señal o señales de su micrófono y la
señal de su dispositivo de fuente de audio (Bluetooth, AUX, USB). Los niveles para
los micrófonos, fuente de audio y volumen principal pueden ajustarse en cualquier
valor entre 0 y 30.
1. Encienda el altavoz Total PA
MR
Apex y el micrófono inalámbrico. Conecte la
fuente de Bluetooth, dispositivo auxiliar o unidad USB que prefiera.
2. Usando el v
olumen principal en el altavoz, ajuste el volumen aproximadamente
en 10 o menos al balancear sus niveles. De esta manera, podrá ajustar un nivel
claro y audible que no resulte excesivo. Puede reajustar ese nivel posteriormente,
tras establecer el balance.
3. Ajuste la p
erilla de volumen de fuente en 0. Aumentaremos este valor en un
paso posterior.
4. Ajuste el v
olumen MIC 1 mediante el control de volumen +/- en el micrófono o
la p
erilla de volumen MIC 1 en el altavoz. En caso de dudas, ajustar este nivel
en 25 es un buen punto de partida. Si está usando un segundo micrófono
conectado, use la p
erilla de volumen MIC 2 para ajustar los niveles de la misma
manera hasta que ambos micrófonos tengan un volumen claramente audible.
5. Ahora ajuste el volumen de su dispositivo auxiliar o dispositivo de fuente de
Bluetooth (smartphone, tablet, etc.) a 100 %. Así asegurará una fuerte señal.
6. Con la p
erilla de volumen de fuente ajustada todavía en 0, inicie la reproducción
en su dispositivo y vaya aumentando gradualmente el volumen girando la p
erilla
d
e volumen de fuente en el altavoz hasta alcanzar un nivel claro y audible. Si
está usando un micrófono, ajuste el nivel de volumen de la fuente hasta el punto
en el que todavía pueda oír el micrófono por encima de la música.
7. Una vez que el micrófono y la fuente de audio sean claramente audibles y estén
balanceados, use la perilla de v
olumen principal para ajustar el nivel de la salida
general del altavoz al volumen deseado.
Si desea conocer los pasos específicos para solucionar problemas, consulte la
sección S
olución de problemas.
ION Audio Total PA™ Apex User Guide 33
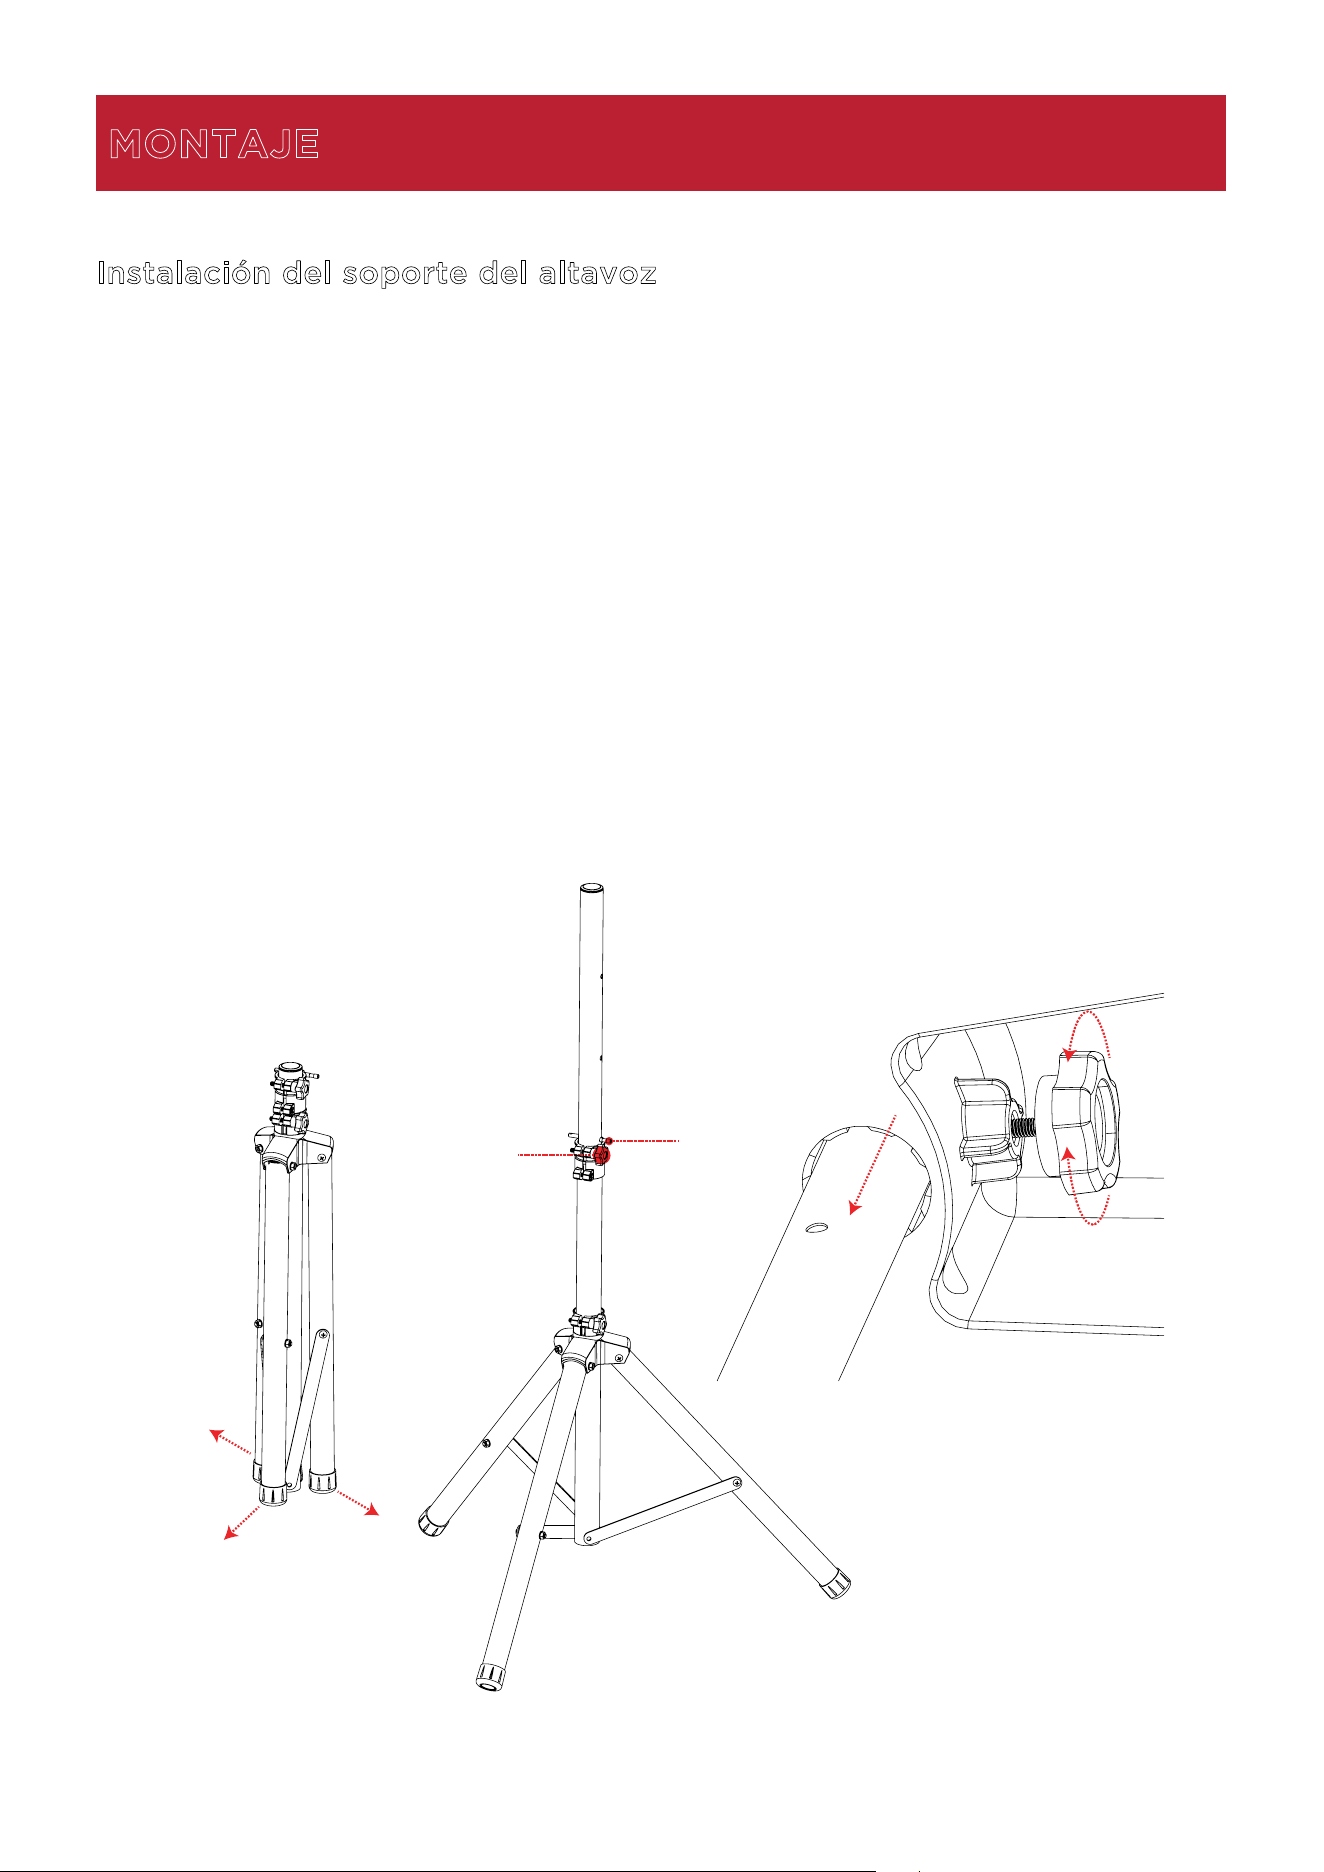
Instalación del soporte del altavoz
1.
Extienda completamente las patas del trípode del soporte del altavoz sobre una superficie
plana y estable.
2.
Eleve el mástil de montaje a la altura adecuada necesaria y apriete la perilla de ajuste
lateral.
3.
Inserte el pasador en el orificio del pasador en la parte inferior, de forma que el mástil de
montaje se mantenga a la altura ajustada.
4.
En el altavoz Total PA
MR
Apex, ajuste la perilla inferior en sentido contrario a las agujas del
reloj, de forma que el tornillo no quede bloqueando la abertura.
5.
Alinee el orificio de montaje del altavoz Total PA
MR
Apex con el mástil del soporte del
altavoz y coloque el altavoz sobre el mástil.
6.
Apriete la perilla de montaje en el sentido de las agujas del reloj en el altavoz
Total PA
MR
Apex para fijarlo al mástil.
MONTAJE
1
2
3
5
4
6
ON
ALLUMER
OFF
ÉTEINORE
ION Audio Total PA™ Apex User Guide 34
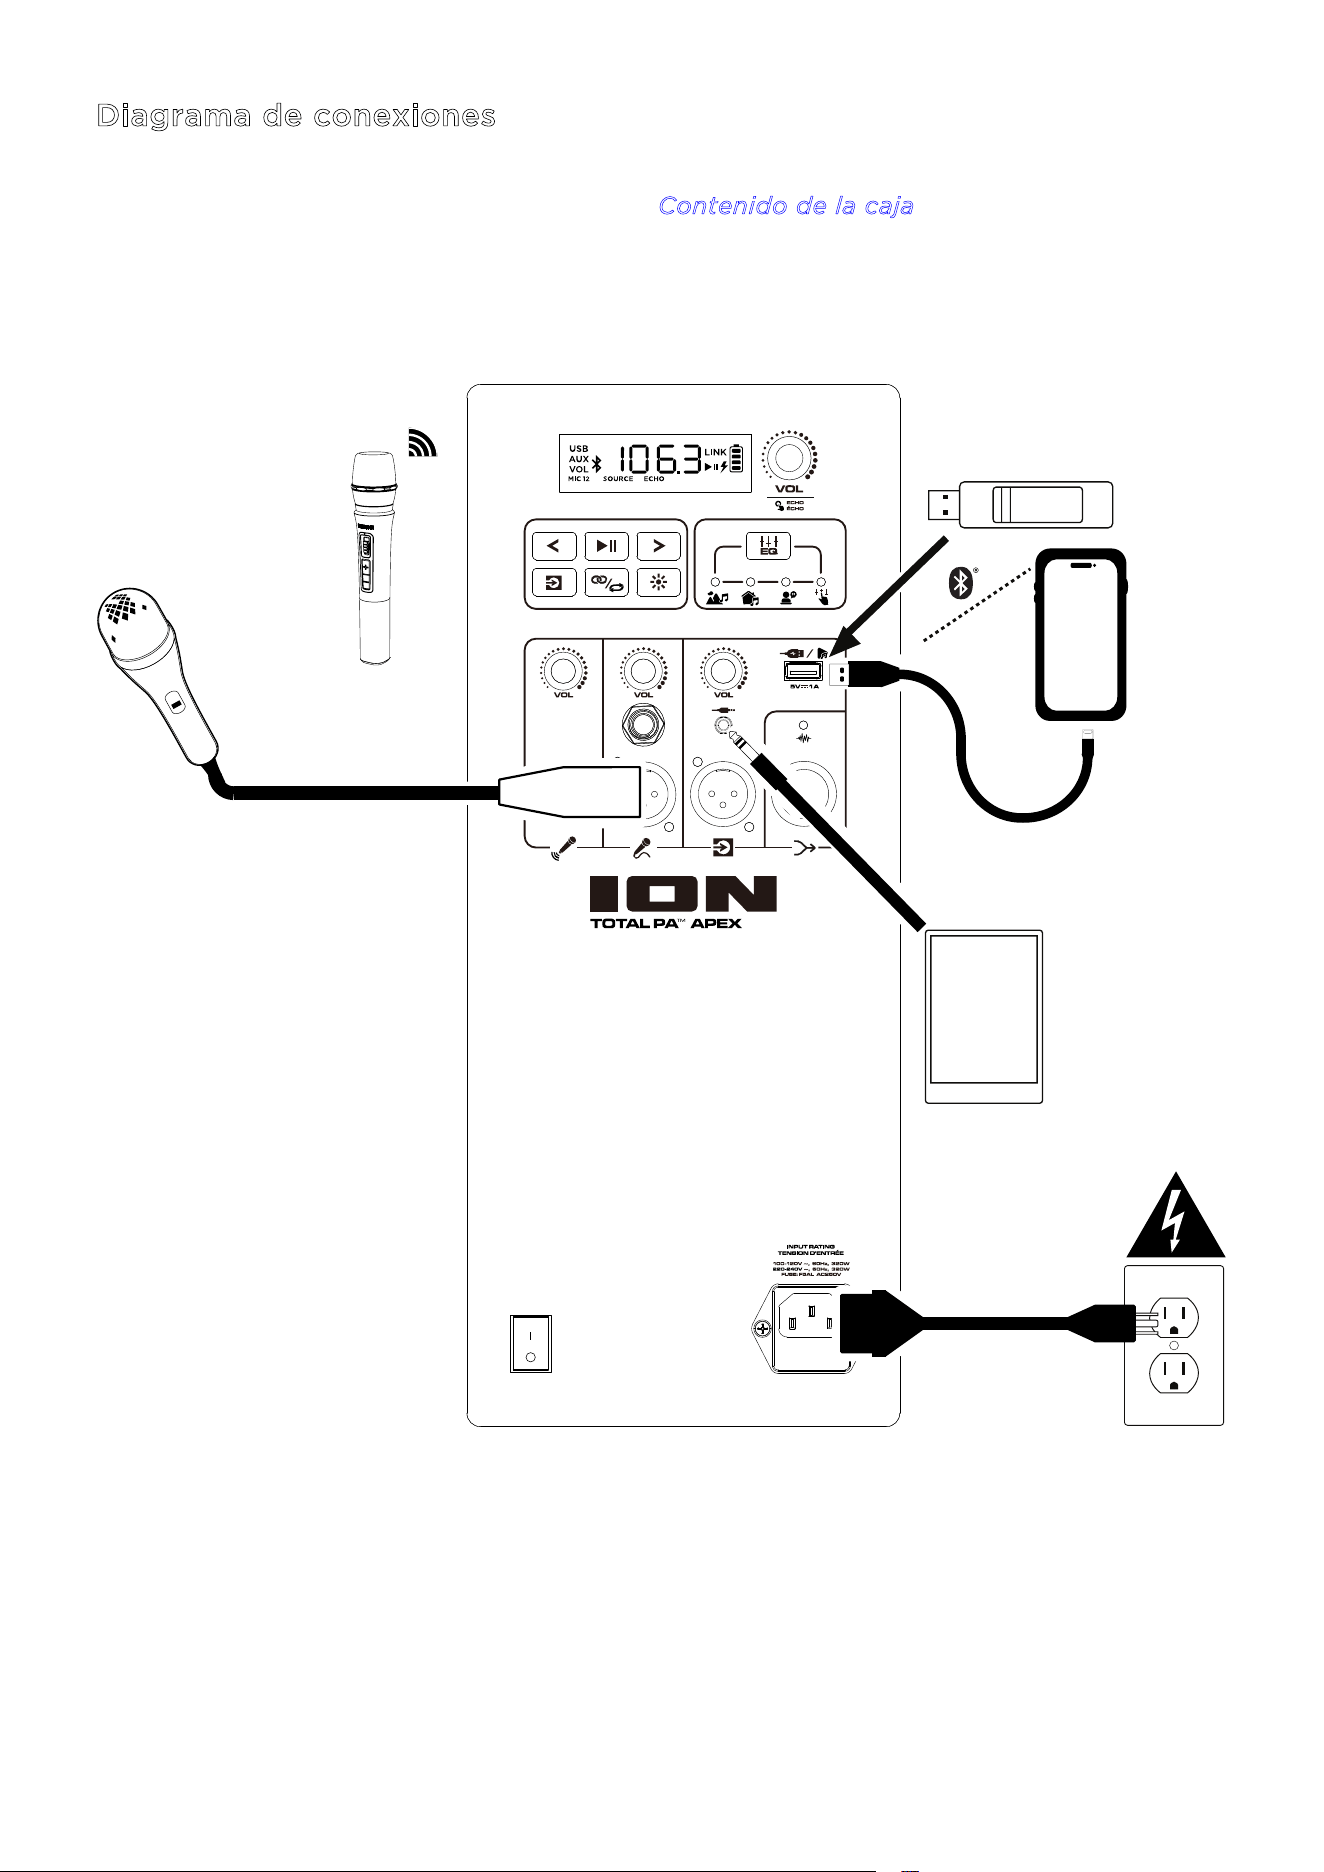
Diagrama de conexiones
Los artículos que no están incluidos en la lista C
ontenido de la caja se venden por separado.
Tablet
Unidad USB (límite de
512 GB y compatible solo
con archivos MP3)
Smartphone
(cargando)
Fuente de
alimentación
Micrófono
Micrófono
inalámbrico
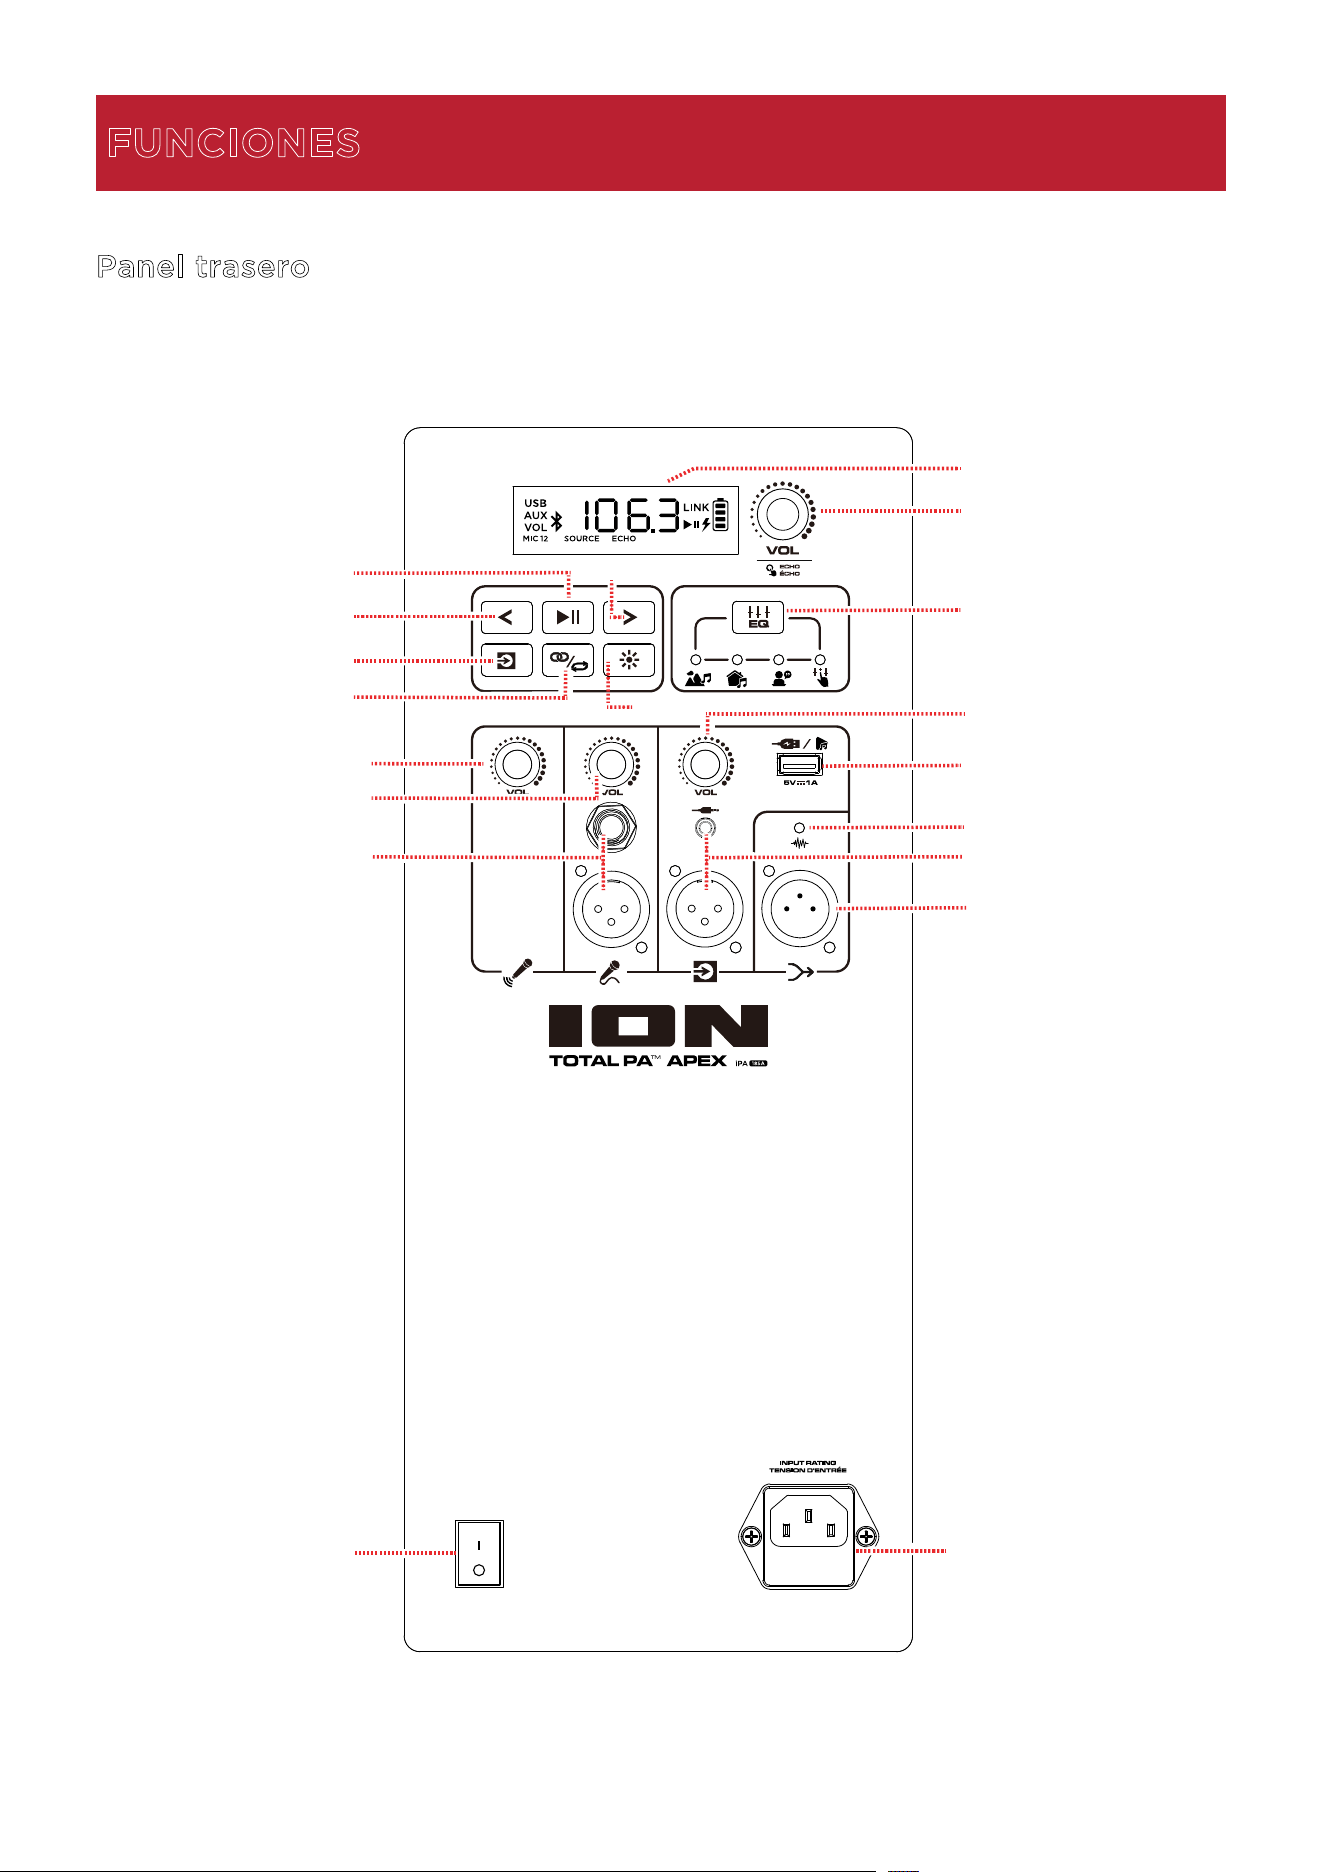
ION Audio Total PA™ Apex User Guide 36
1
. Display
This
En esta pantalla se muestra información relevante sobre el funcionamiento del altavoz
Total PA
MR
Apex en cada momento.
Nota: El display se entrega cubierto por un protector de plástico. Quite este protector
para poder ver el display óptimamente.
2. Vol (volumen principal) / Perilla Echo
Gi
re esta perilla para ajustar el volumen principal (salida general) del altavoz. Pulse la perilla
y gírela para seleccionar el efecto eco. Encontrará los detalles en la sección U
so de la
p
erilla de volumen principal.
3
. Pista anterior
Al
seleccionar USB o Bluetooth como la fuente de audio, pulse este botón para ir a la pista
anterior en la lista de reproducción. Pulse nuevamente este botón de inmediato para saltar
a la pista anterior.
4
. Pista siguiente
Al
seleccionar USB o Bluetooth como la fuente de audio, pulse este botón para ir a la pista
siguiente en la lista de reproducción.
5
. Reproducir/Detener
Al
seleccionar USB como la fuente de audio, pulse este botón para reproducir o detener la
pista que esté seleccionada en ese momento. Pulse dos veces este botón para detener
la
reprod
ucción y regresar al inicio de la lista de pistas.
Al seleccionar Bluetooth como la fuente de audio, pulse este botón para reproducir o
detener la pista que esté seleccionada en ese moment
o.
Pulse
y mantenga pulsado este botón durante tres segundos para activar o desactivar las
indicaciones de voz.
6
. Stereo-Link
MR
/ Repetir
Pulse
y mantenga pulsado este botón para iniciar el emparejamiento estéreo con otro
altavoz Total PA
MR
Apex. Encontrará los detalles en la sección Emparejamiento de dos
a
ltavoces.
En
el modo USB, pulse este botón para repetir una pista individual, una carpeta o todas las
pistas. Encontrará los detalles en la sección M
odo USB.
ION Audio Total PA™ Apex User Guide 37
7. Fuente
Pulse este botón para seleccionar la fuente de audio que desee usar: USB, AUX o Bluetooth.
La fuente predeterminada al encender el altavoz Total PA
MR
Apex es Bluetooth. La fuente
USB solo puede seleccionarse si hay una unidad USB conectada al altavoz
Total PA
MR
Apex; en caso contrario, con el botón Fuente se podrá seleccionar Bluetooth y
AUX.
Para desconectar un dispositivo Bluetooth conectado, pulse dos veces este botón.
8
. Luces
Pulse este botón para seleccionar cómo deben funcionar las luces en el panel frontal.
Encontrará los detalles en la sección M
odos de iluminación.
Nota: Para lograr el mejor efecto de iluminación, puede ser necesario ajustar el volumen
de su dispositivo y/o el volumen de la fuente.
9
. EQ
Pulse este botón para cambiar entre los siguientes presets de ecualización:
• E
xterior: altas frecuencias y graves mejorados.
• I
nterior: leve acentuación de los graves y altas frecuencias planas.
• V
ocal: los graves se atenúan con un rango medio mejorado.
• P
lana: la respuesta de frecuencia plana (la configuración de ecualización personalizada
puede ajustarse y puede cargarse desde la app).
1
0. Puerto USB para carga/reproducción
Puede usar este puerto para cargar un dispositivo USB, como una tablet o un smartphone.
Para cargar un dispositivo que esté transmitiendo música en streaming a través de
Bluetooth, detenga primero la música y seguidamente espere que se vuelva a conectar tras
insertar el cable USB.
Conecte aquí su unidad flash USB para reproducir música. Use la perilla de volumen de
FUENTE para ajustar el volumen. Pulse el botón S
tereo-Link
MR
/ Repetir para ir cambiando
entre las cinco opciones de repetición/selección aleatoria. Encontrará los detalles en la
sección M
odo USB.
Nota: Su unidad USB no puede almacenar más de 512 GB y debe contener archivos MP3
reproducibles para que sus datos puedan aparecer correctamente en el display. Al
conectar una unidad USB que contenga archivos MP3, el altavoz Total PA
MR
Apex ordenará
alfabéticamente los archivos por carpeta en el directorio raíz y seguidamente por nombre
de pista en la carpeta.
1
1. Volumen del micrófono inalámbrico MIC 1
Use esta perilla para ajustar el volumen del micrófono inalámbrico incluido. Encontrará los
detalles en la sección U
so del micrófono inalámbrico donde se explica la configuración y
el encendido del micrófono.
ION Audio Total PA™ Apex User Guide 38
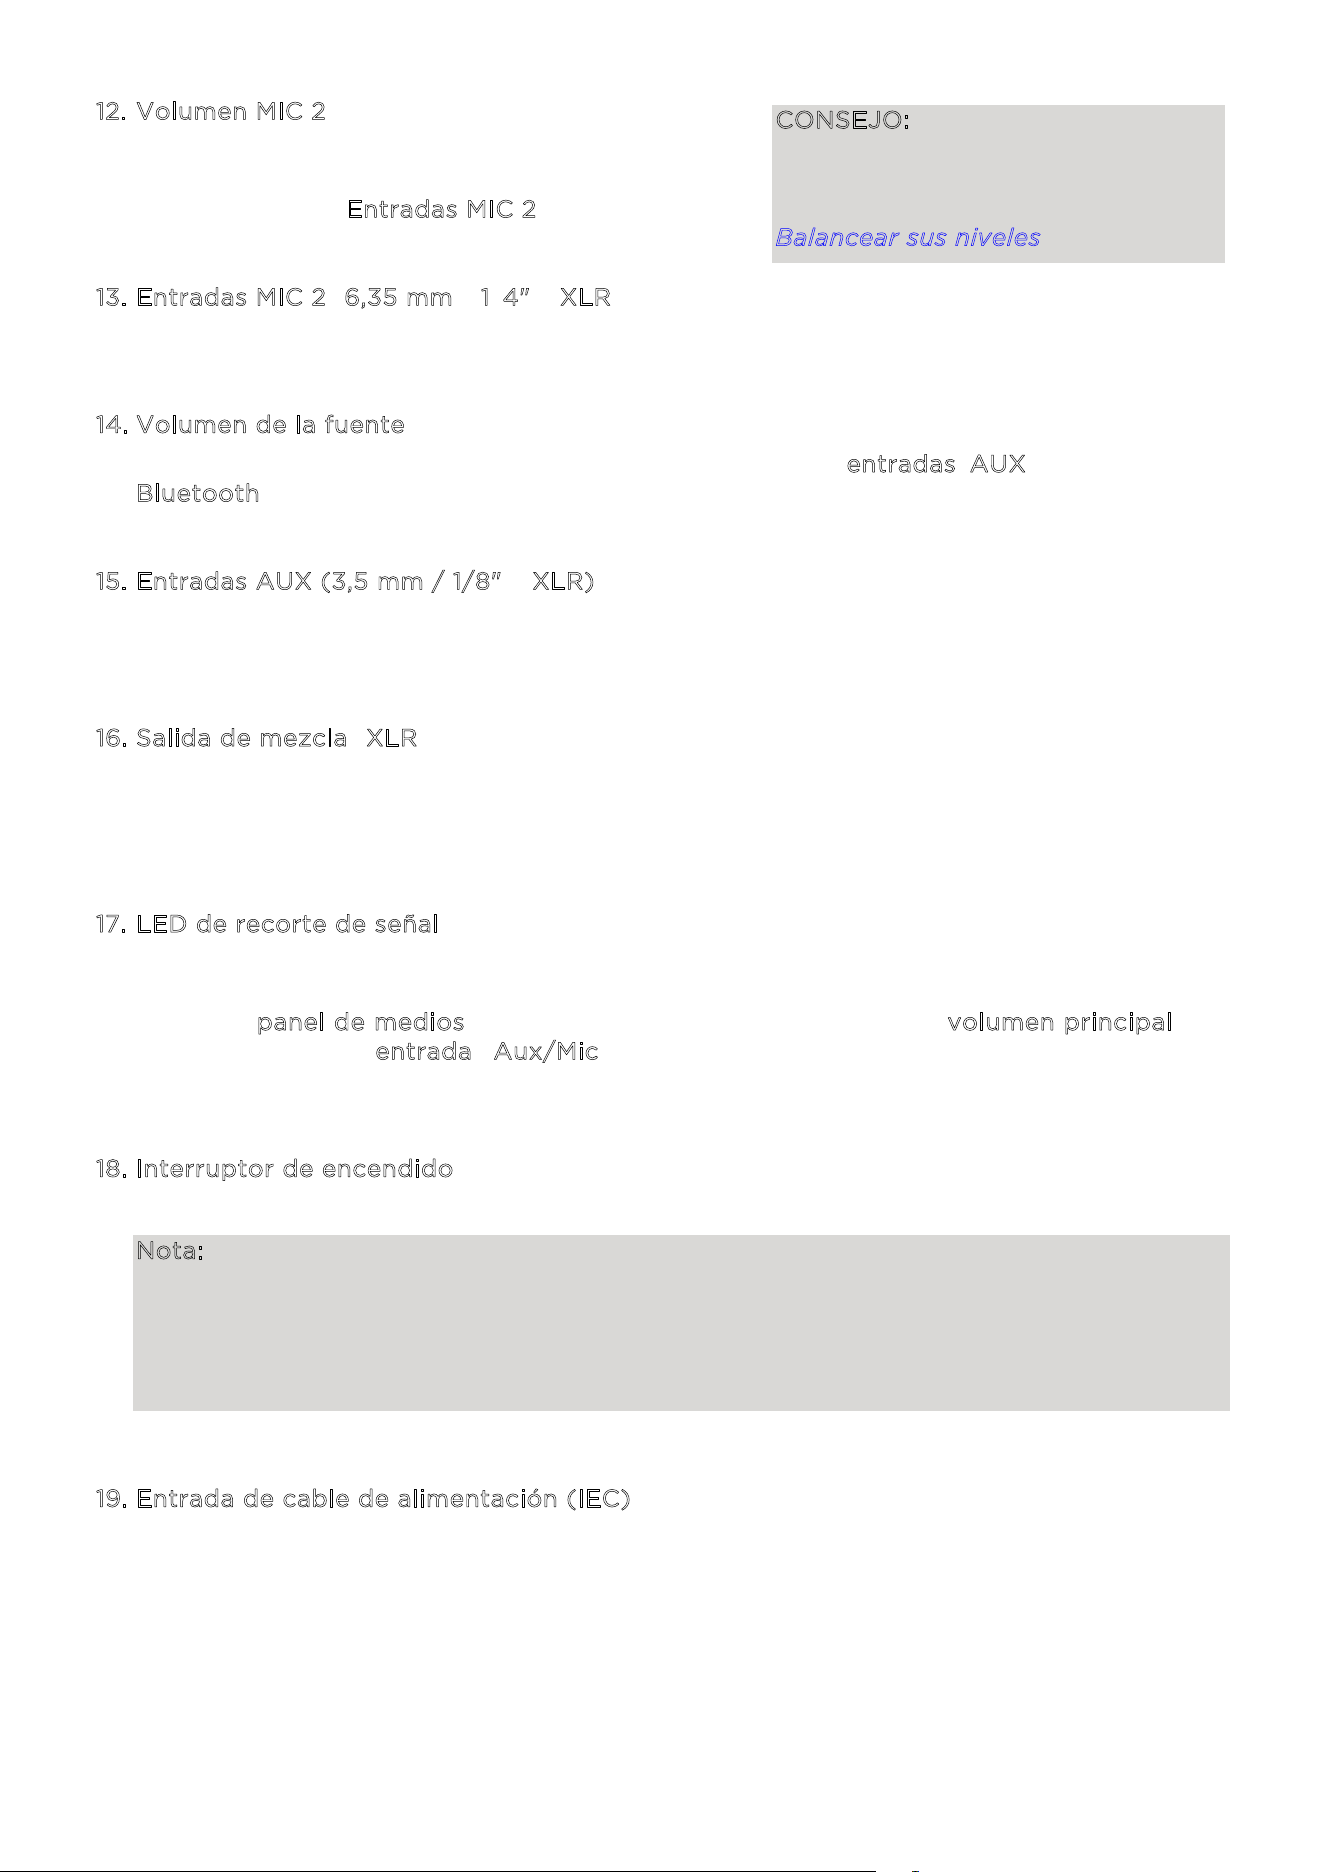
12. Volumen MIC 2
Use esta perilla para ajustar el volumen del
micrófono o de la fuente de nivel de micrófono
conectados a las E
ntradas MIC 2.
1
3. Entradas MIC 2 (6,35 mm / 1/4" y XLR)
Conecte a estas entradas un micrófono o una fuente de nivel de micrófono.
1
4. Volumen de la fuente
Ajuste el volumen de los dispositivos conectados a las e
ntradas AUX o a una fuente
B
luetooth.
1
5. Entradas AUX (3,5 mm / 1/8" y XLR)
Conecte un reproductor de CD, un reproductor de MP3 u otra fuente de audio a estas
entradas de nivel de línea.
1
6. Salida de mezcla (XLR)
Conecte esta salida a un altavoz, mezclador o grabadora. En el dispositivo conectado se
escuchará todo el sonido del altavoz (incluido el efecto eco, pero excluyendo los ajustes
de volumen y EQ).
1
7. LED de recorte de señal
El LED de recorte de señal parpadeará en rojo, si se recorta la señal (la distorsión
procedente de una señal excesivamente fuerte) de los jacks de entrada o de la fuente de
audio del p
anel de medios. Si esto ocurre, disminuya el ajuste del volumen principal o el
volumen para la e
ntrada Aux/Mic (si se conecta un dispositivo con una señal
excesivamente fuerte a alguna de estas dos entradas).
1
8. Interruptor de encendido
Accione este interruptor para encender o apagar el altavoz.
Nota: Si durante 20 minutos no se reproduce ninguna señal de entrada de ninguna fuente
(incluida la entrada MIC), el altavoz entrará en el modo de bajo consumo. En este modo, la
pantalla se oscurecerá. Tras 50 minutos de inactividad, el altavoz entrará en el modo de
suspensión y usted deberá apagar y volver a encender el altavoz para salir de este modo.
El altavoz reanudará su funcionamiento normal una vez que comience a recibir una señal
por alguna entrada de audio.
1
9. Entrada de cable de alimentación (IEC)
Inserte aquí el cable de alimentación incluido para suministrar corriente eléctrica a la
unidad.
CONSEJO: Encontrará los consejos
para mezclar adecuadamente el nivel
de audio para el MIC 1, MIC 2 y otros
volúmenes de fuente en la sección
Balancear sus niveles.
1
2
2
3
-
+
+
-
ION Audio Total PA™ Apex User Guide 39
Cuidado de las pilas
Siga estas instrucciones para obtener los mejores resultados al sustituir las pilas del micrófono
inalámbrico:
• Antes de instalarlas, limpie los contactos de las pilas y los contactos del compartimento de
pilas del micrófono inalámbrico.
• Sustituya ambas pilas a la vez.
• Extraiga las pilas del micrófono inalámbrico, si no lo va a usar durante un tiempo
prolongado.
• Extraiga inmediatamente las pilas agotadas.
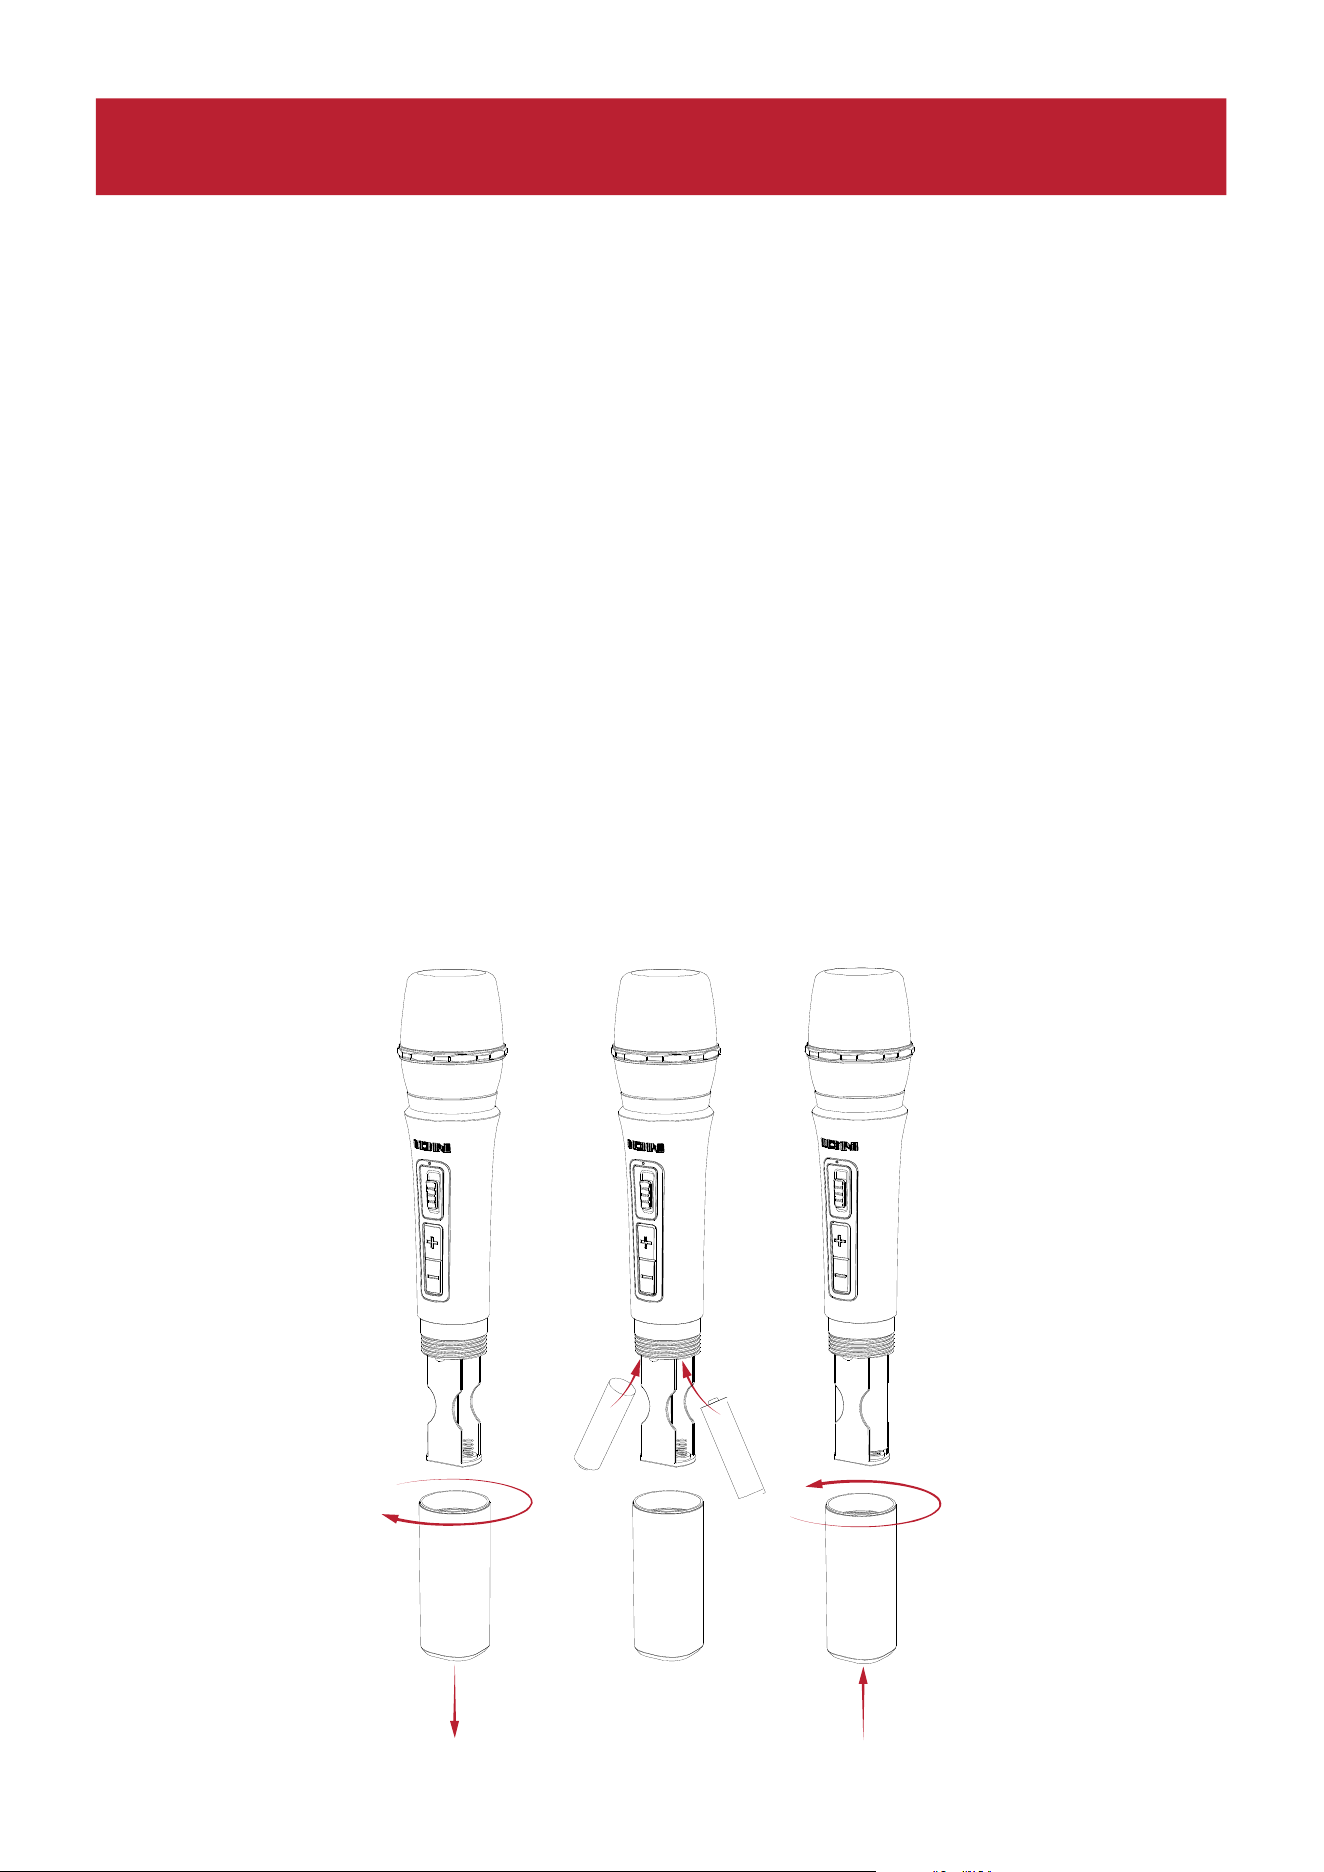
Instalación de baterías en el micrófono inalámbrico
1. Retire la tapa del compartimento de baterías girándola en el sentido de las agujas del reloj.
2. Instale dos baterías alcalinas AA nuevas (no incluidas) siguiendo la orientación de los polos
indicada en el compartimento.
3. Vuelva a colocar la tapa del compartimento de baterías en su sitio girándola en sentido
contrario a las agujas del reloj.
1
2
2
3
-
+
+
-
FUNCIONAMIENTO
ION Audio Total PA™ Apex User Guide 40
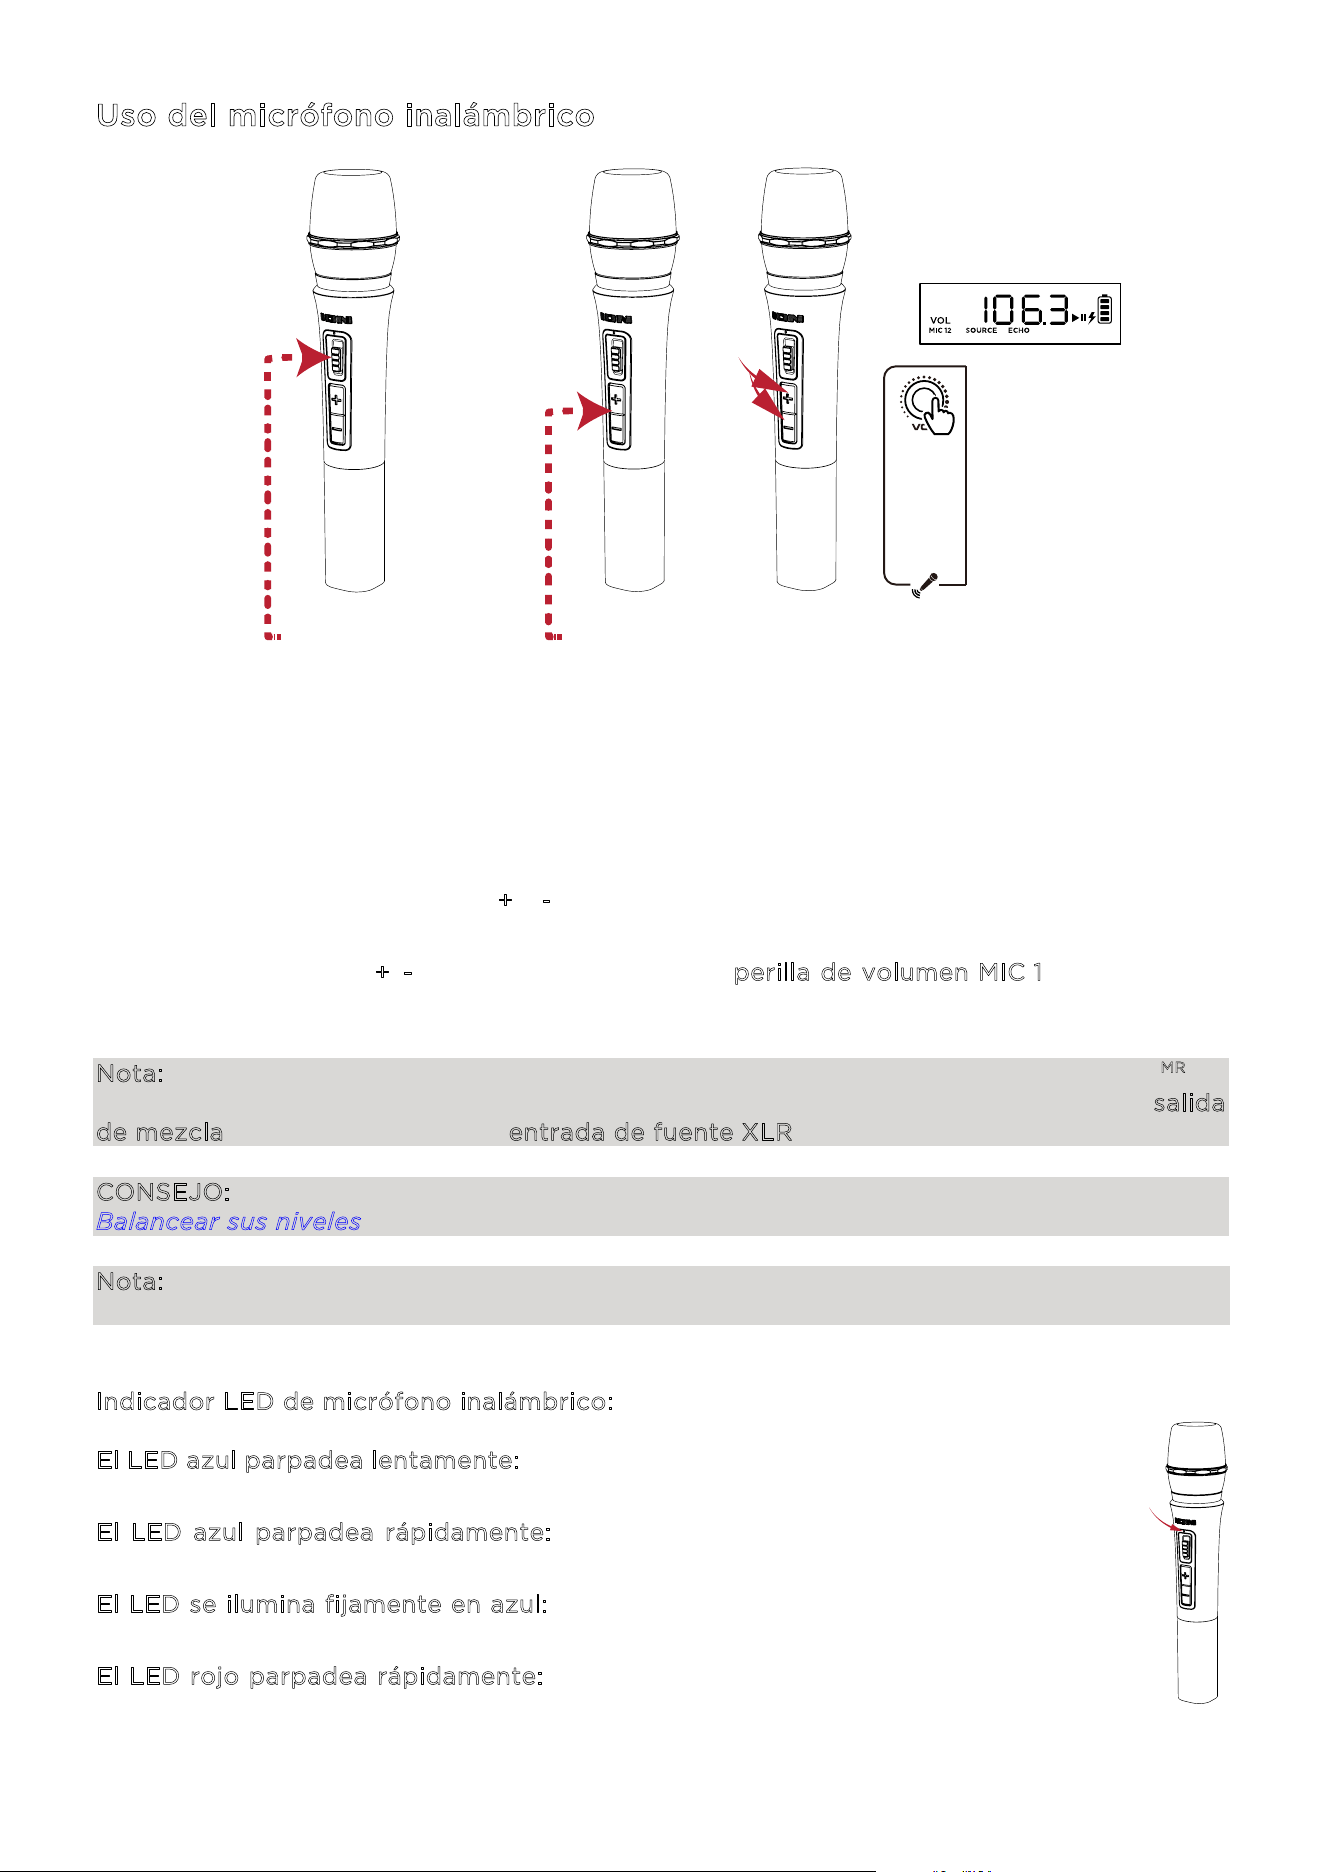
Uso del micrófono inalámbrico
1. Encienda el micrófono inalámbrico accionando el interruptor de encendido/apagado del
micrófono. El LED indicador de encendido del micrófono parpadeará en azul si se está
emparejando con el altavoz y se iluminará permanentemente en azul al conectarse al
altavoz.
2. El micrófono debería emparejarse automáticamente, si el altavoz Total PA
MR
Apex está
encendido. Si no se empareja automáticamente, pulse y mantenga pulsados
simultáneamente los botones +
y - durante tres segundos para reiniciar el emparejamiento
del micrófono.
3. Pulse los controles +
/- en el micrófono o gire la perilla de volumen MIC 1 para ajustar el
nivel del micrófono. Si no puede oír el micrófono por encima de su fuente de audio, puede
ser necesario bajar el nivel del volumen de la fuente o aumentar el volumen del micrófono.
Nota: El micrófono inalámbrico únicamente se conectará a un solo altavoz Stereo-Link
MR
(el
altavoz más cercano). Si se usan dos altavoces Total PA
MR
Apex, se deberá conectar la salida
de mezcla del primer altavoz a la entrada de fuente XLR del segundo altavoz.
CONSEJO: Encontrará los detalles sobre cómo balancear los niveles de volumen en la sección
Balancear sus niveles.
Nota: Un indicador azul y rojo aparecerá en el micrófono inalámbrico, si a la batería le queda
poca carga y ese indicador parpadeará en rojo, si está casi agotada.
Indicador LED de micrófono inalámbrico:
E
l LED azul parpadea lentamente: el micrófono inalámbrico está encendido, pero no
está en modo de emparejamiento.
E
l LED azul parpadea rápidamente: el micrófono inalámbrico está emparejándose
con el altavoz.
E
l LED se ilumina fijamente en azul: el micrófono inalámbrico está emparejado con
el altavoz.
E
l LED rojo parpadea rápidamente: esto indica un bajo nivel de carga en la batería
del micrófono inalámbrico.
1
2
2
3
-
+
+
-
1 - ACCIONE EL
INTERRUPTOR PARA ENCENDERLO
2 - PULSE
- - - - -
3 - PULSE Y
MANTENGA
PULSADO
3 - GIRE

ION Audio Total PA™ Apex User Guide 41
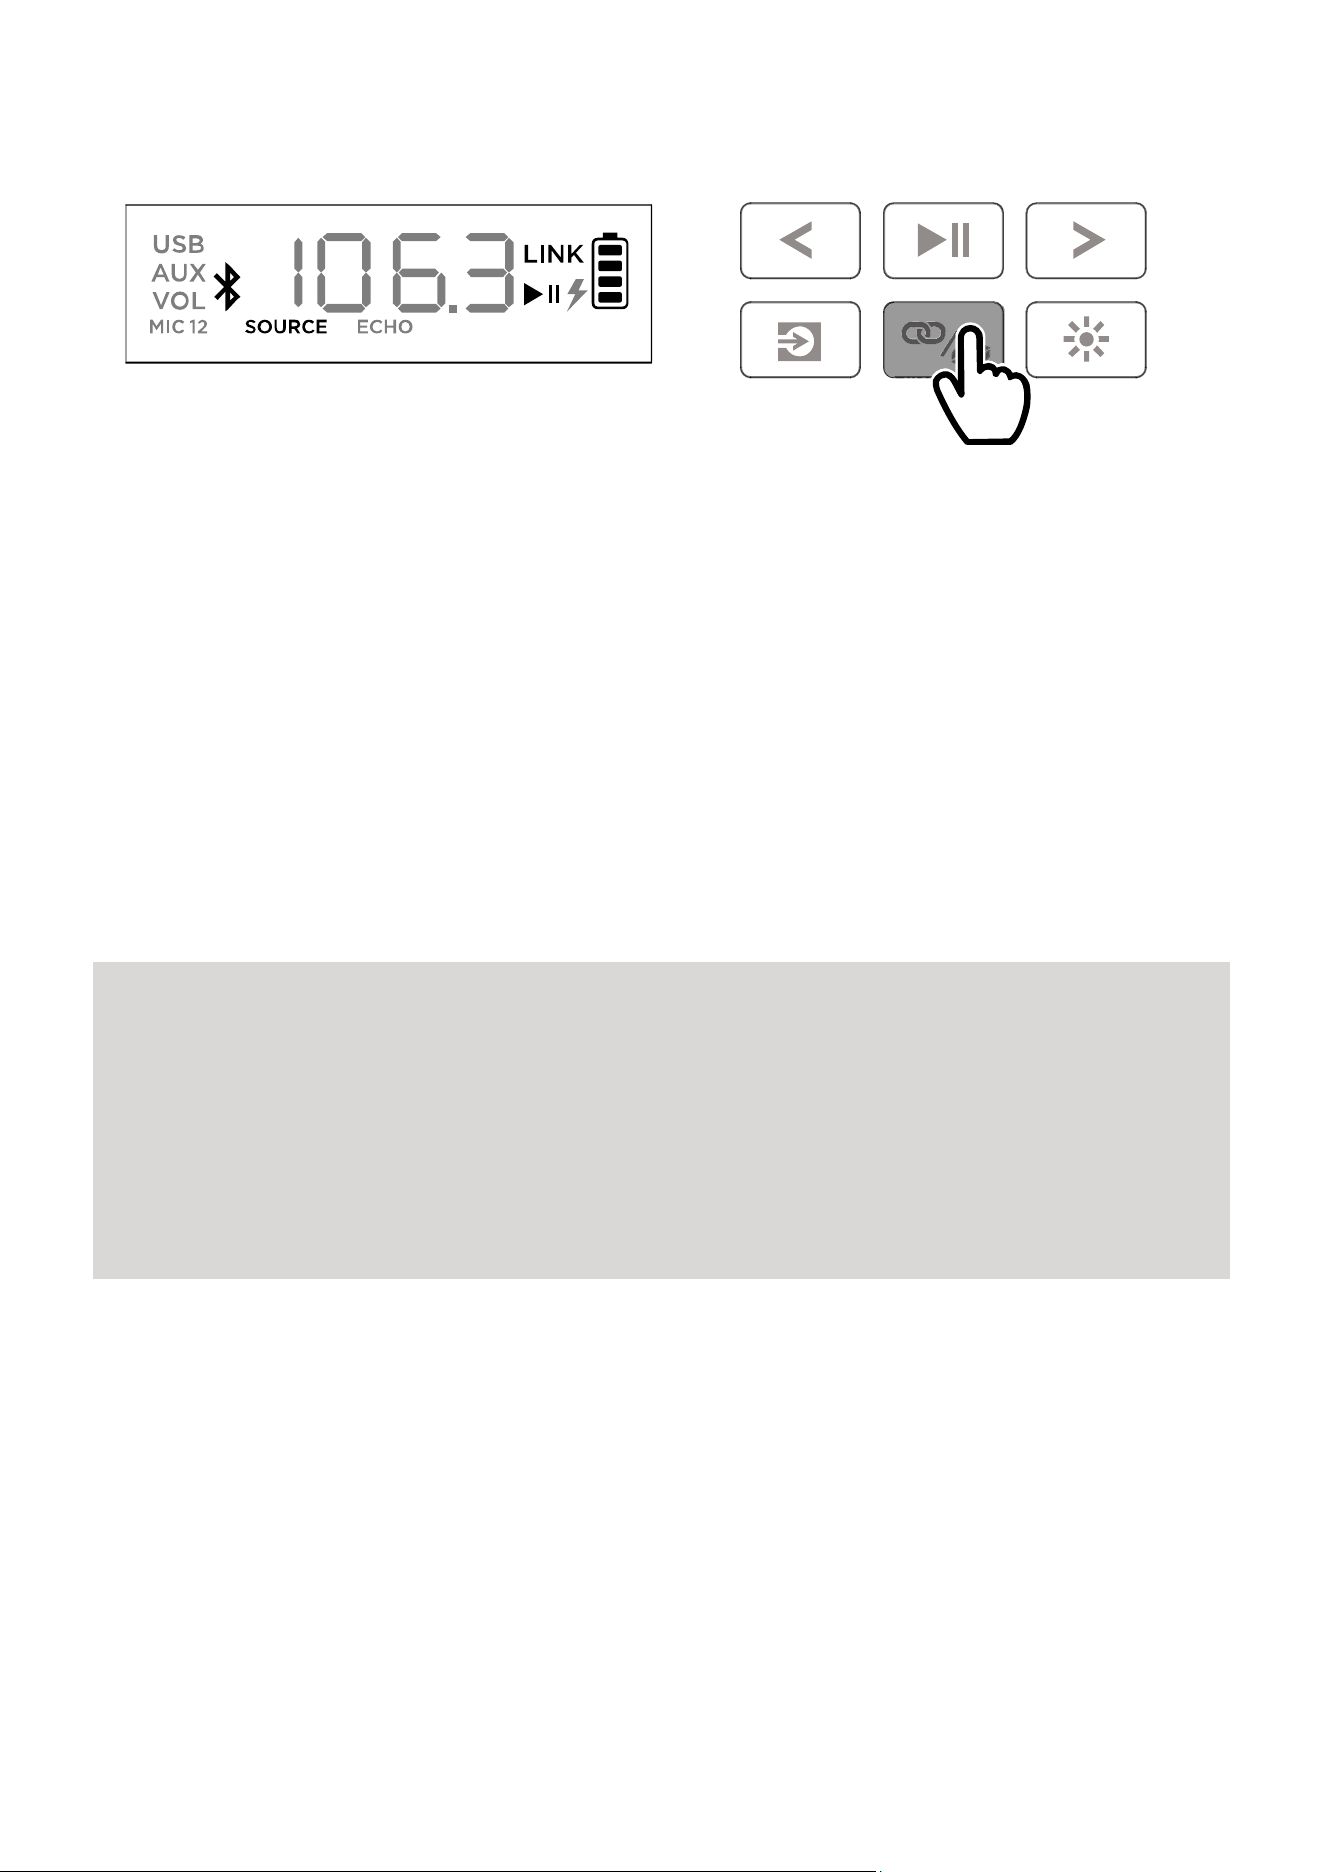
Uso de la perilla de volumen principal
De forma predeterminada, con la p
erilla de volumen principal se controla el volumen principal
para todos los canales. Pulse esta perilla para activar la función Eco y gire esta perilla para
cambiar el ajuste.
Si durante cinco segundos no se produce ninguna actividad con la p
erilla de volumen
p
rincipal, quedarán desactivadas estas funciones especiales.
Para restablecer los ajustes de fábrica del altavoz, mantenga pulsada la p
erilla de volumen
p
rincipal durante cinco segundos. El altavoz se apagará y se encenderá y el restablecimiento
se efectuará correctamente.

ION Audio Total PA™ Apex User Guide 42
Emparejamiento de un dispositivo Bluetooth®
1. Encienda el altavoz Total PA
MR
Apex accionando el interruptor de encendido.
2. Cuando la unidad se enciende por primera vez, entra automáticamente en el modo de
emparejamiento Bluetooth. En caso necesario, pulse el botón F
uente para seleccionar el
modo Bluetooth. Si las indicaciones de voz están habilitadas, oirá las palabras "Bluetooth
Pairing" (Emparejamiento Bluetooth).
3. Vaya hasta la pantalla de configuración de Bluetooth de su dispositivo, encuentre el
altavoz T
otal PA Apex y establezca la conexión con él. No lo conecte a iPA185A_BLE;
pues esta opción está reservada exclusivamente para conectar la app I
ON
S
ound Control
MR
. Si está conectado, el icono de Bluetooth en el display parpadeará y se
escucharán las palabras "Bluetooth Connected" (Bluetooth conectado).
Nota: Si tiene algún problema para establecer la conexión, seleccione "Forget this Device"
(Descartar este dispositivo) en su dispositivo Bluetooth y trate nuevamente de establecer
la conexión.
Nota: El volumen del altavoz Total PA
MR
Apex no afecta al volumen de su dispositivo
Bluetooth. Para conseguir la mejor calidad de sonido, ajuste el volumen de la fuente de
entrada al 100 % y use el control de fuente de audio y del volumen principal del altavoz
para ajustar el volumen.
Para desconectar, pulse dos veces el botón Fuente en el altavoz Total PA
MR
Apex.
PULSE
ION Audio Total PA™ Apex User Guide 43
Emparejamiento de dos altavoces
1. Encienda ambos altavoces Total PA
MR
Apex accionando los interruptores de encendido.
Compruebe que están en el modo de emparejamiento Bluetooth y no están conectados a
un dispositivo.
2. Pulse dos veces el botón Stereo-Link
MR
/ Repetir en un solo altavoz (el altavoz primario
que controlará ambos altavoces) y pulse seguidamente el botón Stereo-Link
MR
/ Repetir
en el segundo altavoz para entrar en el modo Stereo-Link™. Una vez que se haya efectuado
el emparejamiento, la palabra LINK aparecerá en los displays de ambos altavoces.
3. Conéctese al altavoz primario a través de Bluetooth.
Si desea desconectarse, pulse dos veces el botón Stereo-Link
MR
/ Repetir.
Nota: Para lograr emparejarlos correctamente, los altavoces deberían estar a menos de 26 m
(85 pies) de distancia entre sí.
Nota: El micrófono inalámbrico únicamente se conectará a un solo altavoz Stereo-Link
MR
(el
altavoz más cercano). Si se usan dos altavoces Total PA
MR
Apex, se deberá conectar la salida
de mezcla del primer altavoz a la entrada de fuente XLR del segundo altavoz.
Nota: El altavoz Total PA
MR
Apex no es compatible con los modelos de PA anteriores de ION.
Para emparejar con un modelo anterior, deberá utilizar un cable XLR (no incluido). Conecte el
cable XLR al puerto XLR de la salida de mezcla en el altavoz Total PA
MR
Apex y al puerto de
entrada XLR en el modelo anterior.
PULSAR DOS VECES
ION Audio Total PA™ Apex User Guide 44
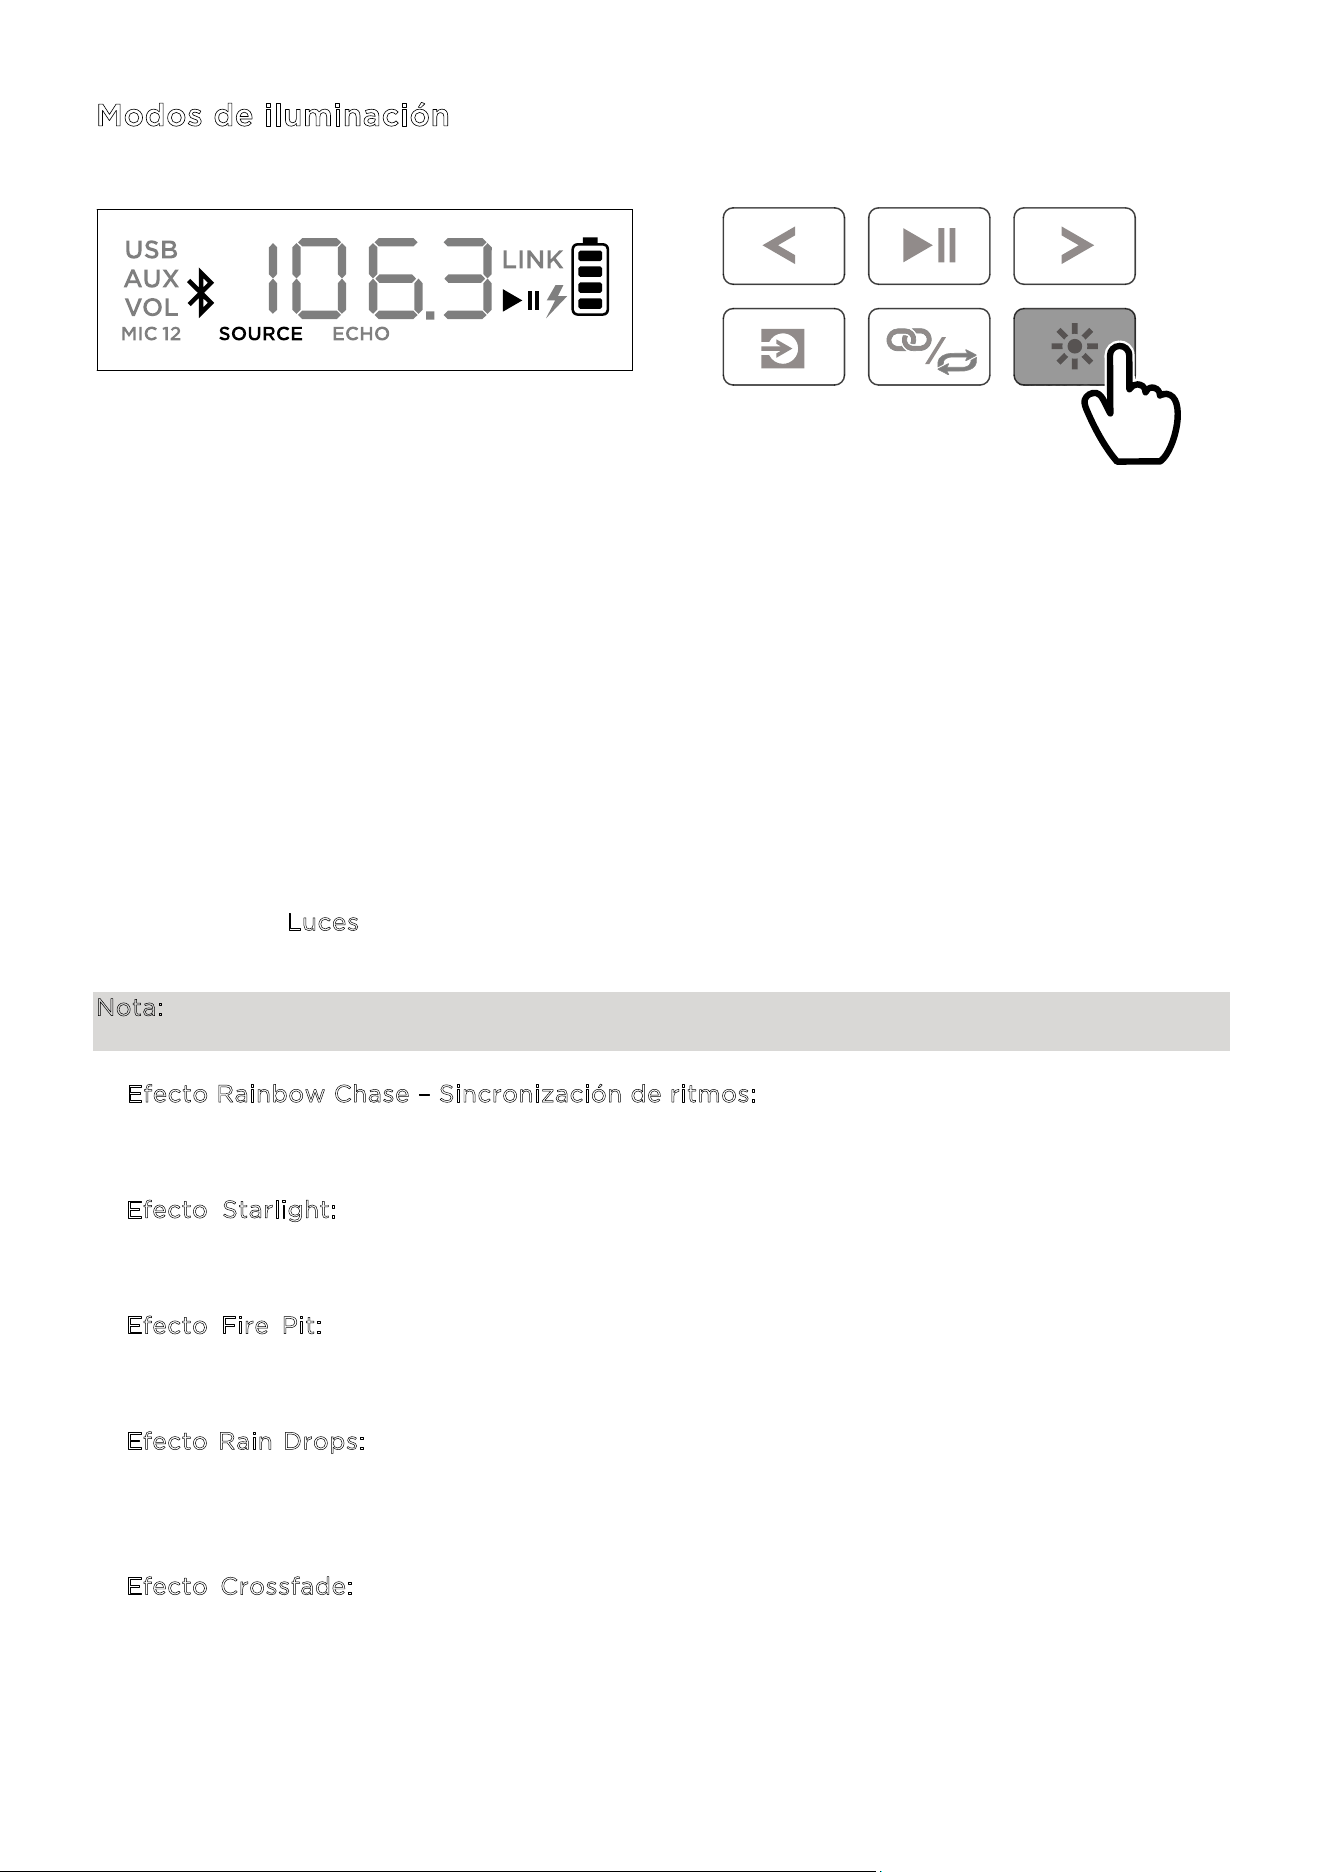
Modos de iluminación
El altavoz Total PA
MR
Apex tiene dos luces laterales, seis luces de tweeter y cuatro luces de
woofer. Todos los LED pueden controlarse individualmente.
Al encender el altavoz por primera vez, una luz roja se moverá desde la parte inferior del
altavoz hacia arriba, iluminando todos los LED. Una vez que todos los LED están iluminados,
las luces se mantendrán iluminadas durante dos segundos antes de apagarse.
Después de activar un efecto de iluminación, todos los LED se iluminarán y atenuarán en azul
hasta que se conecte un dispositivo Bluetooth al altavoz. Si están emparejados, todos los LED
parpadearán en azul dos veces antes de regresar al modo de iluminación que se haya
seleccionado la última vez.
Pulse el botón Luces para ir cambiando entre los doce modos para los LED en el altavoz
Total PA
MR
Apex.
Nota: Para conseguir el mejor efecto de iluminación, puede ser necesario aumentar el volumen
de su dispositivo conectado o de su fuente de entrada de audio.
• E
fecto Rainbow Chase – Sincronización de ritmos: un arcoíris de colores girará alrededor
de los LED del altavoz en sentido contrario a las agujas del reloj. Cuantos más graves
contenga la música, mayor será la velocidad de giro del patrón de arcoíris.
• E
fecto Starlight: todos los LED parpadearán con una luz de color aleatorio y se irán
atenuando lentamente. Cuantos más graves contenga la música, más rápidamente
parpadearán las luces.
• E
fecto Fire Pit: las luces destellarán en rojo, amarillo y naranja, mientras que las luces
laterales ascienden y descienden. El nivel de las "llamas" depende de la cantidad de graves
que contenga la música.
• E
fecto Rain Drops: los LED del tweeter y de los laterales muestran una gota de color de
arriba abajo. Una vez que esa gota de color llega al LED inferior, las luces del woofer se
proyectan salpicando como agua del mismo color, y la secuencia se repite de lado a lado.
Al mismo tiempo, se verán cuatro rachas de gotas de lluvia.
• E
fecto Crossfade: las luces del woofer y del tweeter aparecerán y se desvanecerán en
ambos lados, mientras que las luces laterales harán lo mismo arriba y abajo.
PULSE
ION Audio Total PA™ Apex User Guide 45
• Efecto Bouncing Stars: las rachas de luces descenderán por los lados. Al encontrarse en la
parte inferior central del altavoz, rebotarán adquiriendo el siguiente color del espectro y
volverán a descender. Las luces del woofer pulsarán con el nuevo color cuando las rachas
de luces reboten en las áreas centrales, repitiendo la secuencia con el siguiente color del
espectro.
• O
ndas horizontales – Sincronización de ritmos: tres ondas de un solo color pasarán de
largo y cuando hayan descendido desde el lado superior izquierdo hacia el lado inferior
derecho, aparecerán nuevas ondas que tendrán el siguiente color del espectro. Las ondas
se acelerarán o desacelerarán dependiendo de la cantidad de graves que contenga la
música.
• S
incronización de ritmos: todos los LED se iluminarán subiendo y bajando a una velocidad
acorde con el nivel de graves que contenga la música. Los colores se difuminarán
cambiando de uno a uno por todo el espectro cromático.
• C
iclo de dos tonos: un lado de los LED (incluidos dos LED de las luces del tweeter y un
LED de la luz lateral) mostrará un solo color, mientras que el otro lado se iluminará con un
color afín del espectro de colores.
• C
iclo de colores: todos los LED lucirán el mismo color a la vez, mientras que van
adquiriendo cada color del espectro.
• C
olor estático: todos los LED lucirán el mismo color (este color puede ajustarse mediante
la app ION Sound Control
MR
). De forma predeterminada, este color es el azul. Hay 15 colores
que pueden seleccionarse mediante la app I
ON Sound Control
MR
.
• A
leatorio: los LED irán cambiando aleatoriamente cada diez segundos pasando por todos
los modos de iluminación (excepto el modo de color estático).
• A
pagados: todos los LED estarán apagados.
ION Audio Total PA™ Apex User Guide 46
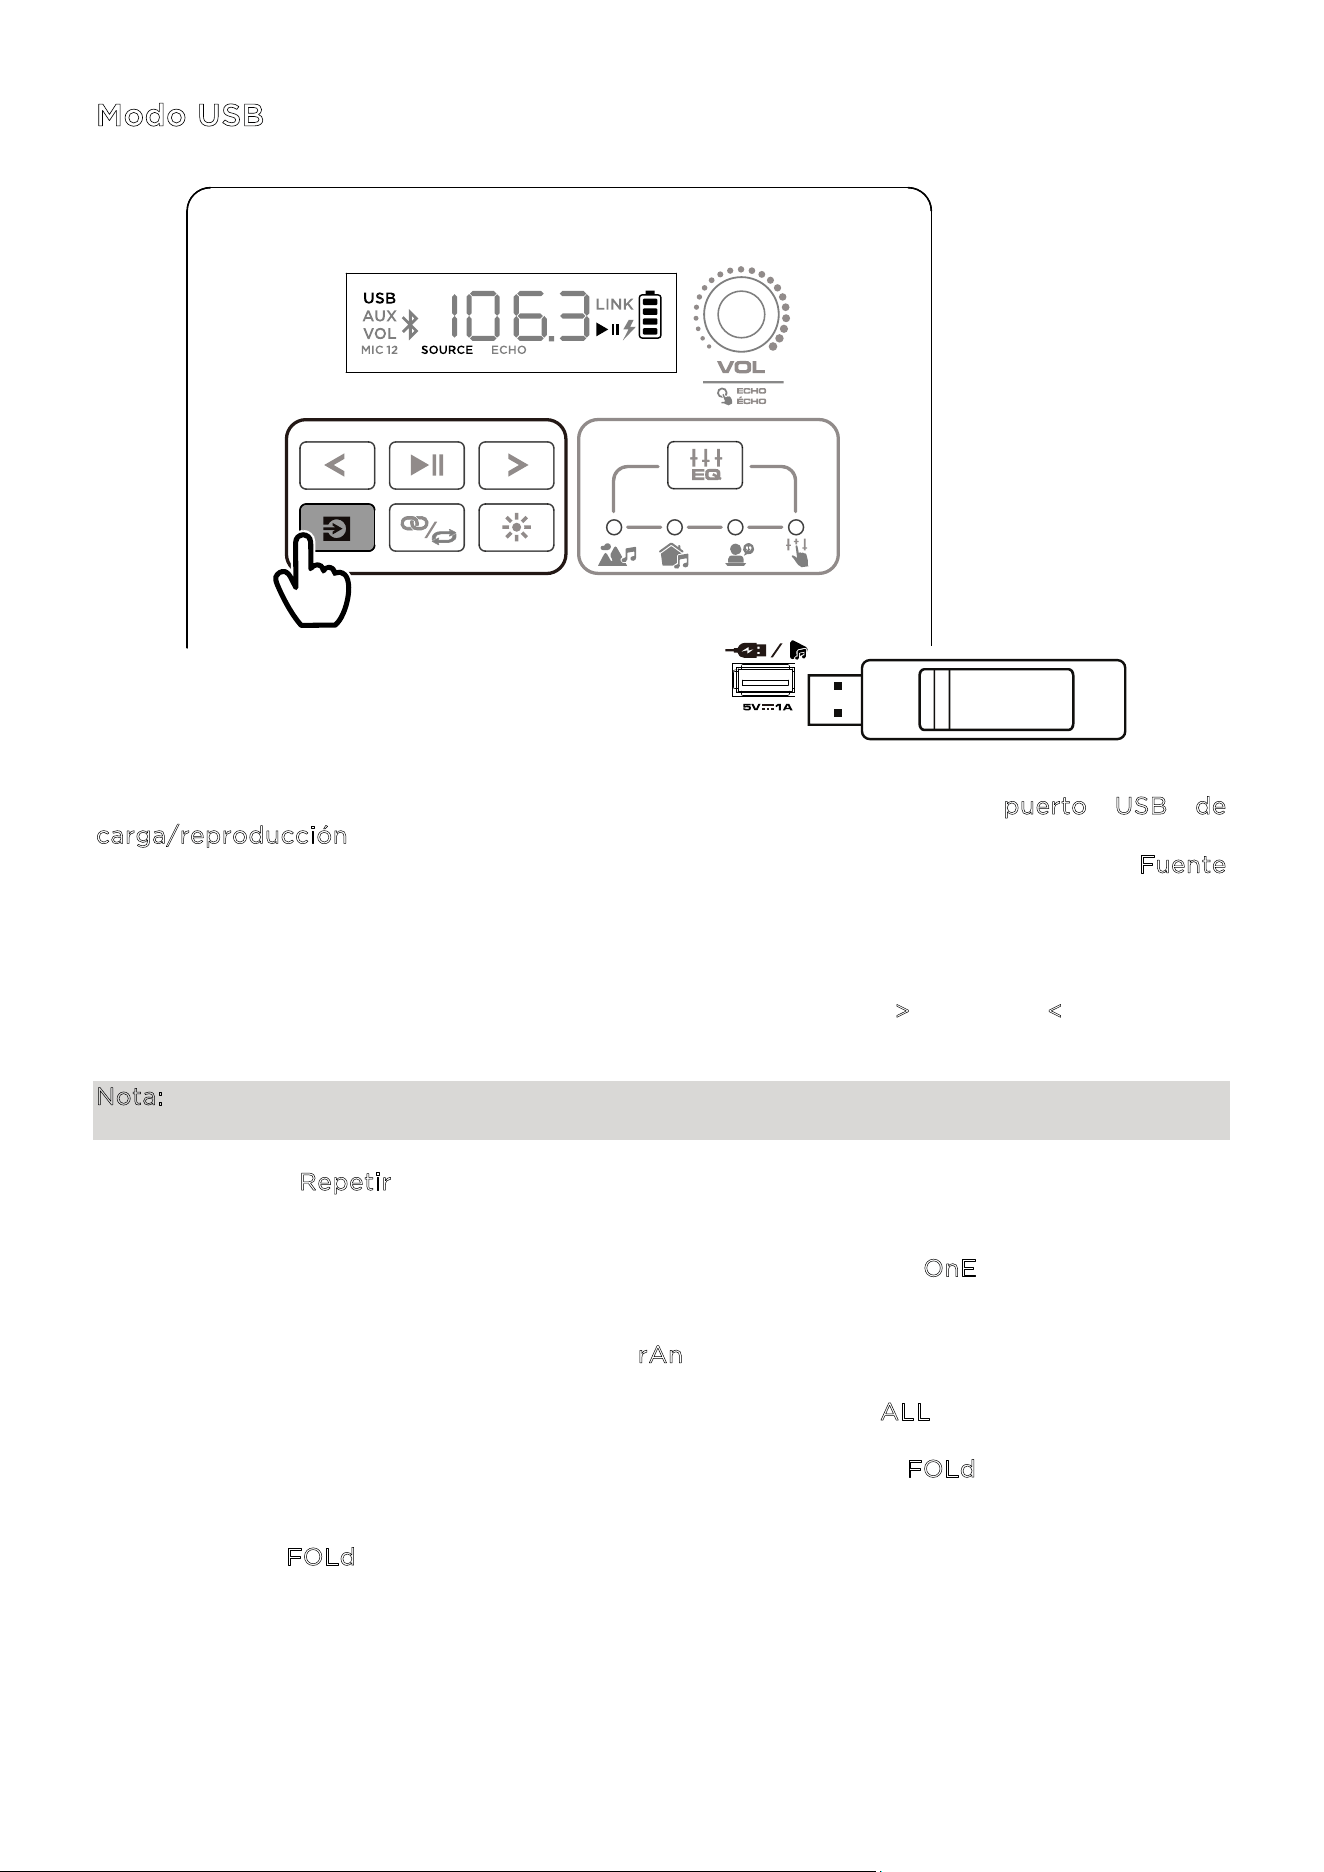
Modo USB
Al insertar una unidad USB con archivos compatibles en el puerto USB de
c
arga/reproducción, el altavoz Total PA
MR
Apex cambiará automáticamente al modo USB. Si
la unidad USB ya se había insertado y usted está usando otro modo, pulse el botón F
uente
hasta seleccionar el modo USB. El altavoz Total PA
MR
Apex reproducirá automáticamente el
primer archivo MP3 compatible. Los archivos se reproducen en orden alfabético en el nivel del
directorio raíz, luego en orden alfabético por carpeta y después en orden alfabético por
nombre de pista. La reproducción de medios se detendrá cuando se hayan reproducido todos
los medios en la unidad USB. Pulse y mantenga pulsados el botón >
o el botón < para avanzar
o retroceder dentro de una canción.
Nota: La unidad USB deberá tener archivos MP3 reproducibles para que pueda aparecer en el
display del panel de medios.
Pulse el botón R
epetir para ir cambiando por las opciones de selección aleatoria con
repetición (se mostrarán abreviaturas en el display):
• Reproducir la pista actual tomada del USB con repetición (O
nE). Este es el modo
predeterminado cuando se enciende el altavoz.
• Reproducir las pistas en orden aleatorio (r
An).
• Reproducir todas las pistas en la unidad USB con repetición (A
LL).
• Reproducir la lista de pistas de la carpeta actual con repetición (F
OLd). Se usará la carpeta
en la que esté la canción que se está reproduciendo en el momento de activar este modo.
Por ejemplo, si se está reproduciendo una canción en el nivel del directorio raíz, al
seleccionar F
OLd se repetirán solamente las canciones incluidas en ese nivel. Si una
canción está en la carpeta "A", entonces se reproducirán solamente las canciones incluidas
en esa carpeta.
PULSE
ION Audio Total PA™ Apex User Guide 47
Control por app
IMPORTANTE: Para aprovechar la app al máximo, use la versión más actualizada del sistema
operativo Android o iOS en su dispositivo.
Siga estos pasos para descargar la app gratuita en su dispositivo:
1. Abra la Apple App Store o Google Play en su dispositivo. Seguidamente, busque la app
I
ON Sound Control
MR
.
2. Siga las instrucciones que aparecerán en pantalla para descargar e instalar la app. Una vez
descargada, la app I
ON Sound Control
MR
aparecerá en la pantalla de inicio de su
dispositiv
o.
3. Conecte
su dispositivo al altavoz Total PA
MR
Apex mediante Bluetooth. Consulte la sección
E
mparejamiento de un dispositivo Bluetooth® para saber cómo hacerlo.
4. Abra la app ION Sound Control
MR
. Si la app se lo indica, permita que la app acceda al
Bluetooth de su dispositivo y a los servicios basados en la ubicación.
5. Seleccione el icono del altavoz T
otal PA
MR
Apex para pasar a la siguiente pantalla, en la
que podrá usar la ap
p para controlar varias funciones en el altavoz como, por ejempl
o:
• V
olumen principal: ajuste el volumen de salida del altavoz principal.
• S
elección de fuente: seleccione la fuente que desea usar: Bluetooth, USB o AUX.
• V
olumen de la fuente: ajuste el volumen de entrada para las fuentes de Bluetooth,
USB y AU
X.
• V
olumen MIC 1: ajuste el volumen del micrófono inalámbrico.
• V
olumen MIC 2: ajuste el volumen para las entradas de micrófono de 6,35 mm / 1/4"
y XLR.
• E
Q: ajuste la ecualización del altavoz.
• E
co del micrófono: active o desactive el efecto eco del micrófono.
• I
ndicaciones de voz: habilite o deshabilite las indicaciones de voz.
• S
oporte técnico: visite la web ionaudio.com, contacte con nuestro servicio de
soporte técnico y consulte la información sobre la garantía y las preguntas frecuentes.
• E
fecto de iluminación: elija el efecto de iluminación.
• A
ctualizaciones inalámbricas del firmware: mantenga su altavoz actualizado
instalando
el firmware más reci
ente.
ION Audio Total PA™ Apex User Guide 48
S
i hay distorsión en el sonido: es posible que tenga que ajustar los niveles de sus fuentes y
del altavoz Total PA
MR
Apex para lograr una mezcla correcta.
i. Primero, suba al máximo el volumen de la fuente.
ii. Seguidamente, ajuste con la perilla el v
olumen del canal (VOL) seleccionado en el
altavoz Total PA
MR
Apex a un nivel adecuado.
iii. Por último, ajuste
el v
olumen principal a un nivel adecuado.
Si
continúa la distorsión del sonido, trate de bajar el control del volumen de su fuente
de sonido, y después trate de bajar con la perilla el v
olumen del canal (VOL) que se
esté
usando en el altavoz Total PA
MR
Apex.
S
i escucha un zumbido al conectar los cables:
• Desconecte los cables de los jacks de entrada para ver si se trata de un cable defectuoso.
• Compruebe que los cables de señal no están colocados cerca de los cables de
alimentación.
• Conecte
todos los cables de alimentación del equipo de audio a las salidas que compa
rten
una tierra
común.
S
i el nivel de graves es excesivo: trate de ajustar el control de ecualización en su fuente de
sonido o en el altavoz Total PA
MR
Apex para bajar el nivel de graves. De esta forma, usted
podrá reproducir la música con más volumen antes de que ocurra el recorte de la señal (por
la distorsión).
¿
Qué hacer si el micrófono inalámbrico no funciona?:
• Compruebe que las baterías están instaladas correcta
mente.
• Insta
le dos baterías AA nuevas (no incluidas) siguiendo la orientación de los polos
indicada
en el compartimento. El micrófono debería emparejarse automáticamente, si el altavoz
Total PA
MR
Apex está encendido. Si no lo hace, pulse y mantenga pulsados los botones +
y
–
en el micrófono durante 3 segundos para reiniciar el emparejamiento del micrófono.
S
i al usar micrófonos se produce un ruido de silbido con tonos muy agudos: esto indica
probablemente una retroalimentación acústica. Oriente el micrófono alejándolo del altavoz.
S
i no se puede oír el micrófono por encima del volumen de la música:
i. Primero, baje el volumen de su fuente de audio usando la perilla del v
olumen del canal
(
VOL) correspondiente en el altavoz Total PA
MR
Apex.
ii. Seguidamente,
compruebe que el volumen de su micrófono está en su máximo n
ivel
(según
corresponda) y después gire la perilla del v
olumen del canal (VOL)
co
rrespondiente para aumentar ese volumen en el altavoz Total PA
MR
Apex al que está
conectado el micrófon
o.
SOLUCIÓN DE PROBLEMAS
ION Audio Total PA™ Apex User Guide 49
Si no puede conectar su dispositivo de audio al altavoz Total PA
MR
Apex mediante
B
luetooth:
• Al intentar establecer la conexión, acerque tanto como sea posible el dispositivo de audi
o
(por
ejemplo, su smartphone o tablet) al altavoz Total PA
MR
Apex. Asegúrese de que ni el
dispositivo de audio ni el altavoz Total PA
MR
Apex están obstaculizados por paredes,
muebles, etc
.
• Reinicie la conexión Bluetooth en el altavoz Total PA
MR
Apex para desconectar el
Total PA
MR
Apex de cualquier otro dispositivo de audio y reinicie el proceso de búsqueda.
Si esta medida no da resultado de inmediato, apague el altavoz Total PA
MR
Apex y vuelva
a encenderlo. Consulte la sección E
mparejamiento de un dispositivo Bluetooth® donde
encontrar
á más información.
• Reinicie la conexión Bluetooth en su dispositivo de audio desactivando y volviendo a
activar Bluetooth. Puede encontrar esta opción en el menú de Bluetooth en los ajustes de
su smartphone u otro dispositivo de audio.
Si esta medida no da resultado y usted ya se ha conectado al altavoz Total PA
MR
Apex,
encuentre el altavoz Total PA
MR
Apex en la lista de dispositivos disponibles o previamente
co
nectados en el menú de Bluetooth de su dispositivo de audio, toque el icono de
engranaje o el icono de “i” junto al menú y seleccione U
npair (Desemparejar) o Forget
(D
escartar). Apague y encienda el altavoz Total PA
MR
Apex y trate de efectuar nuevamente
el emparejamiento, una vez que este altavoz vuelva a aparecer en su lista de dispositivos
disponibles.
Nota: Si el altavoz Total PA
MR
Apex ha sido emparejado recientemente con otro dispositivo
de audio que todavía se encuentra dentro del alcance de Bluetooth, puede ser necesario
repetir este proceso con ese dispositivo de audio para desconectarlo totalmente.
S
i tiene pérdidas de audio al reproducir música desde un dispositivo Bluetooth, es posible
que esto esté ocurriendo debido a que su unidad está intentando emparejarse con otro
altavoz. Esto puede suceder si usted apaga un altavoz que estaba emparejado con su unidad
o si usted acaba de encender su unidad y esta está en modo Stereo-Link
MR
. Para detener las
pérdidas de audio, salga del modo Stereo-Link
MR
pulsando dos veces el botón Stereo-Link
MR
/
Repetir. Como alternativa, puede esperar a que su unidad se empareje con otro altavoz, si
hay algún otro altavoz a su alcance.

ION Audio Total PA™ Apex User Guide 50
Especificaciones técnicas
Altavoces Baja
frecuencia: 305 mm / 12,0”
Alta frecuencia: 25,4 mm / 1,0”
Respuesta de frecuencia 50 Hz – 20 kHz
Tecnología inalámbrica Bluetooth®
-
Audio Clásico
Alcance inalámbrico * Alcance de Bluetooth®: hasta 30,5 m / 100 pies
Alcance de TWS: hasta 23 m / 75 pies
Alcance del micrófono inalámbrico* 30,5 m / 100 pies
USB Audio: reproducción de música desde unidad USB
Sistema de archivos compatible: FAT32
Tipo de archivo compatible: MP3
Tamaño máximo de los archivos: 4 GB
Capacidad máxima de la unidad USB: 512 GB
Bateria Capacidad de la batería: 11,1 V, 6000 mAh
Duración de la batería: 6-8 horas (con el volumen al
50 % y las luces apagadas) **
Tiempo de carga: hasta 5 horas
Fuente de alimentación Cable: IEC 320 C13
Tensión de entrada: 100-240 VCA, 50/60 Hz, 320 W
Fusible: F5AL AC250V
Dimensiones
(ancho x profundidad x altura)
411,7 x 317,5 x 651 mm / 16,21" x 12,50" x 25,63"
Peso 13,2 kg / 29,15 lb
Las especificaciones están sujetas a cambios sin aviso previo.
* La recepción y el alcance de las señales inalámbricas y Bluetooth son afectados por paredes,
obstáculos
y movimientos. Para obtener un rendimiento óptimo, coloque el producto en el
centro de la habitación, de forma que no sea obstaculizado por paredes, muebles, etc.
** La duración de las pilas puede variar en función de la temperatura, el tiempo de uso y el
manejo del volumen del producto.
APÉNDICE

ION Audio Total PA™ Apex User Guide 51
Marcas comerciales y licencias
ION Audio es una marca comercial de inMusic Brands, Inc., registrada en Estados Unidos y otros países. App Store es una marca
comercial de Apple Inc., registrada en Estados Unidos y otros países.
Android y Google Play son marcas comerciales registradas de Google Inc.
La marca y el logotipo de Bluetooth son propiedad de Bluetooth SIG, Inc. y cualquier uso de tal marca o logotipo por parte de
ION Audio está sujeto a licencia.
Todos los demás nombres de productos, nombres de empresas, marcas comerciales o denominaciones comerciales pertenecen
a sus respectivos propietarios.
Distributed by:
Costco
Wholesale Corporation
P.O. Box 34535
Seattle, WA 98124-1535
USA
1-800-774-2678
www.costco.com
Costco Wholesale Canada Ltd.*
415 W. Hunt Club Road
Ottawa, Ontario
K2E 1C5, Canada
1-800-463-3783
www.costco.ca
* faisant aaire au Québec
sous
le
nom
les Entrepôts Costco
Importado
por:
Importadora Primex S.A. de C.V.
Blvd. Magnocentro No. 4
San Fernando La Herradura
Huixquilucan, Estado de México
C.P. 52765
RFC: IPR-930907-S70
(55)-5246-5500
www.costco.com.mx
Costco Wholesale Australia Pty Ltd
17-21 Parramatta Road
Lidcombe NSW
2141
Aus
tralia
www.costco.com.au
Costco Wholesale UK Ltd /
Costco Online UK Ltd
Hartspring Lane
Watford, Herts
WD25 8JS
United Kingdom
01923 213113
www.costco.co.uk
Costco Wholesale Spain S.L.U.
Polígono Empresarial Los Gavilanes
C/ Agustín de Betancourt, 17
28906 Getafe (Madrid) España
NIF: B86509460
900 111 155
www.costco.es
Costco Wholesale Iceland ehf.
Kauptún 3-7, 210 Gardabaer
Iceland
www.costco.is
Costco France
1 avenue de Bréhat
91140 Villebon-sur-Yvette
France
01 80 45 01 10
www.costco.fr
Costco Wholesale Japan Ltd.
2 Kakuchi, 2 Gaiku, Kaneda-Nishi
361 Urikura, Kisarazu shi
Chiba, 292-0007 Japan
05
70-200-80
0
www.costco.co.jp
Costco Wholesale Korea, Ltd.
40, Iljik-ro
Gwangmyeong-si
Gyeonggi-do, 14347, Korea
1899-9900
www.costco.co.kr
Costco Wholesale New Zealand Limited
2 Gunton Drive
Westgate Auckland 0814
New Zealand
www.costco.co.nz
Costco (China) Investment Co., Ltd.
Room 01 Mezzanine
No. 5178, Kang Xin Highway
Pudong New District
Shanghai
China 201315
+86-21-6257-7065
Costco Wholesale Sweden AB
Box 614
114 11 Stockholm
Sweden
www.costco.se
H
ECHO EN CHINA

ION Audio Total PA™ Apex User Guide 52
INTRODUCTION ...................................................................... 54
Contenu de l'emballage .................................................................................. 54
Assistance .......................................................................................................... 54
Charge et informations sur la batterie ........................................................ 55
Démarrage rapide ............................................................................................ 56
Équilibrage des niveaux ................................................................................. 57
INSTALLATION ........................................................................ 58
Installation du pied de haut-parleur ............................................................ 58
Schéma de connexion ..................................................................................... 59
FONCTIONS ............................................................................. 60
Panneau arrière ............................................................................................... 60
UTILISATION ........................................................................... 64
Changement des pile ..................................................................................... 64
Installation des piles dans le micro sans fil ............................................... 64
Utilisation du micro sans fil ........................................................................... 65
Utilisation de la molette de volume principal ........................................... 66
Appairage d'un appareil Bluetooth® ............................................................ 67
Relier deux haut-parleurs ............................................................................... 68
Modes lumineux ................................................................................................ 69
Mode USB............................................................................................................ 71
Application de commande ............................................................................. 72
TABLE DES MATIÈRES

ION Audio Total PA™ Apex User Guide 53
RÉSOLUTION DES PROBLÈMES ............................................. 73
ANNEXE ....................................................................................75
Spécifications techniques .............................................................................. 75
Marques et licences ......................................................................................... 76
ION Audio Total PA™ Apex User Guide 54
Merci d'avoir acheté le Total PA
MC
Apex. ION prend très au sérieux votre divertissement. C'est
pourquoi nos produits sont conçus pour rendre votre vie plus amusante et plus pratique.
Remarque : veuillez recharger les batteries avant d'utiliser le produit. Votre appareil a été
intentionnellement expédié avec une charge de batterie réduite pour assurer un transport en
toute sécurité. Pour une ecacité optimale, éteignez le haut-parleur pendant la charge.
Utilisez le câble électrique inclus pour brancher l'appareil sur une prise électrique, et laissez-
le en charge, ce qui peut prendre cinq heures au maximum. Ceci permet de prolonger la durée
de vie de la batterie.
Contenu de l'emballage
Total PA
MC
Apex
Câble électrique (150 cm / 5 ft.)
Micro sans fil
Pied de haut-parleur
Guide de démarrage rapide
A
ssistance
Pour obtenir les informations les plus récentes sur ce produit (documentation, caractéristiques
techniques, configuration requise, compatibilité, etc.) et pour enregistrer votre produit,
rendez-vous sur i
onaudio.com.
Pour davantage d'aide, rendez-vous sur i
onaudio.com/support.
INTRODUCTION
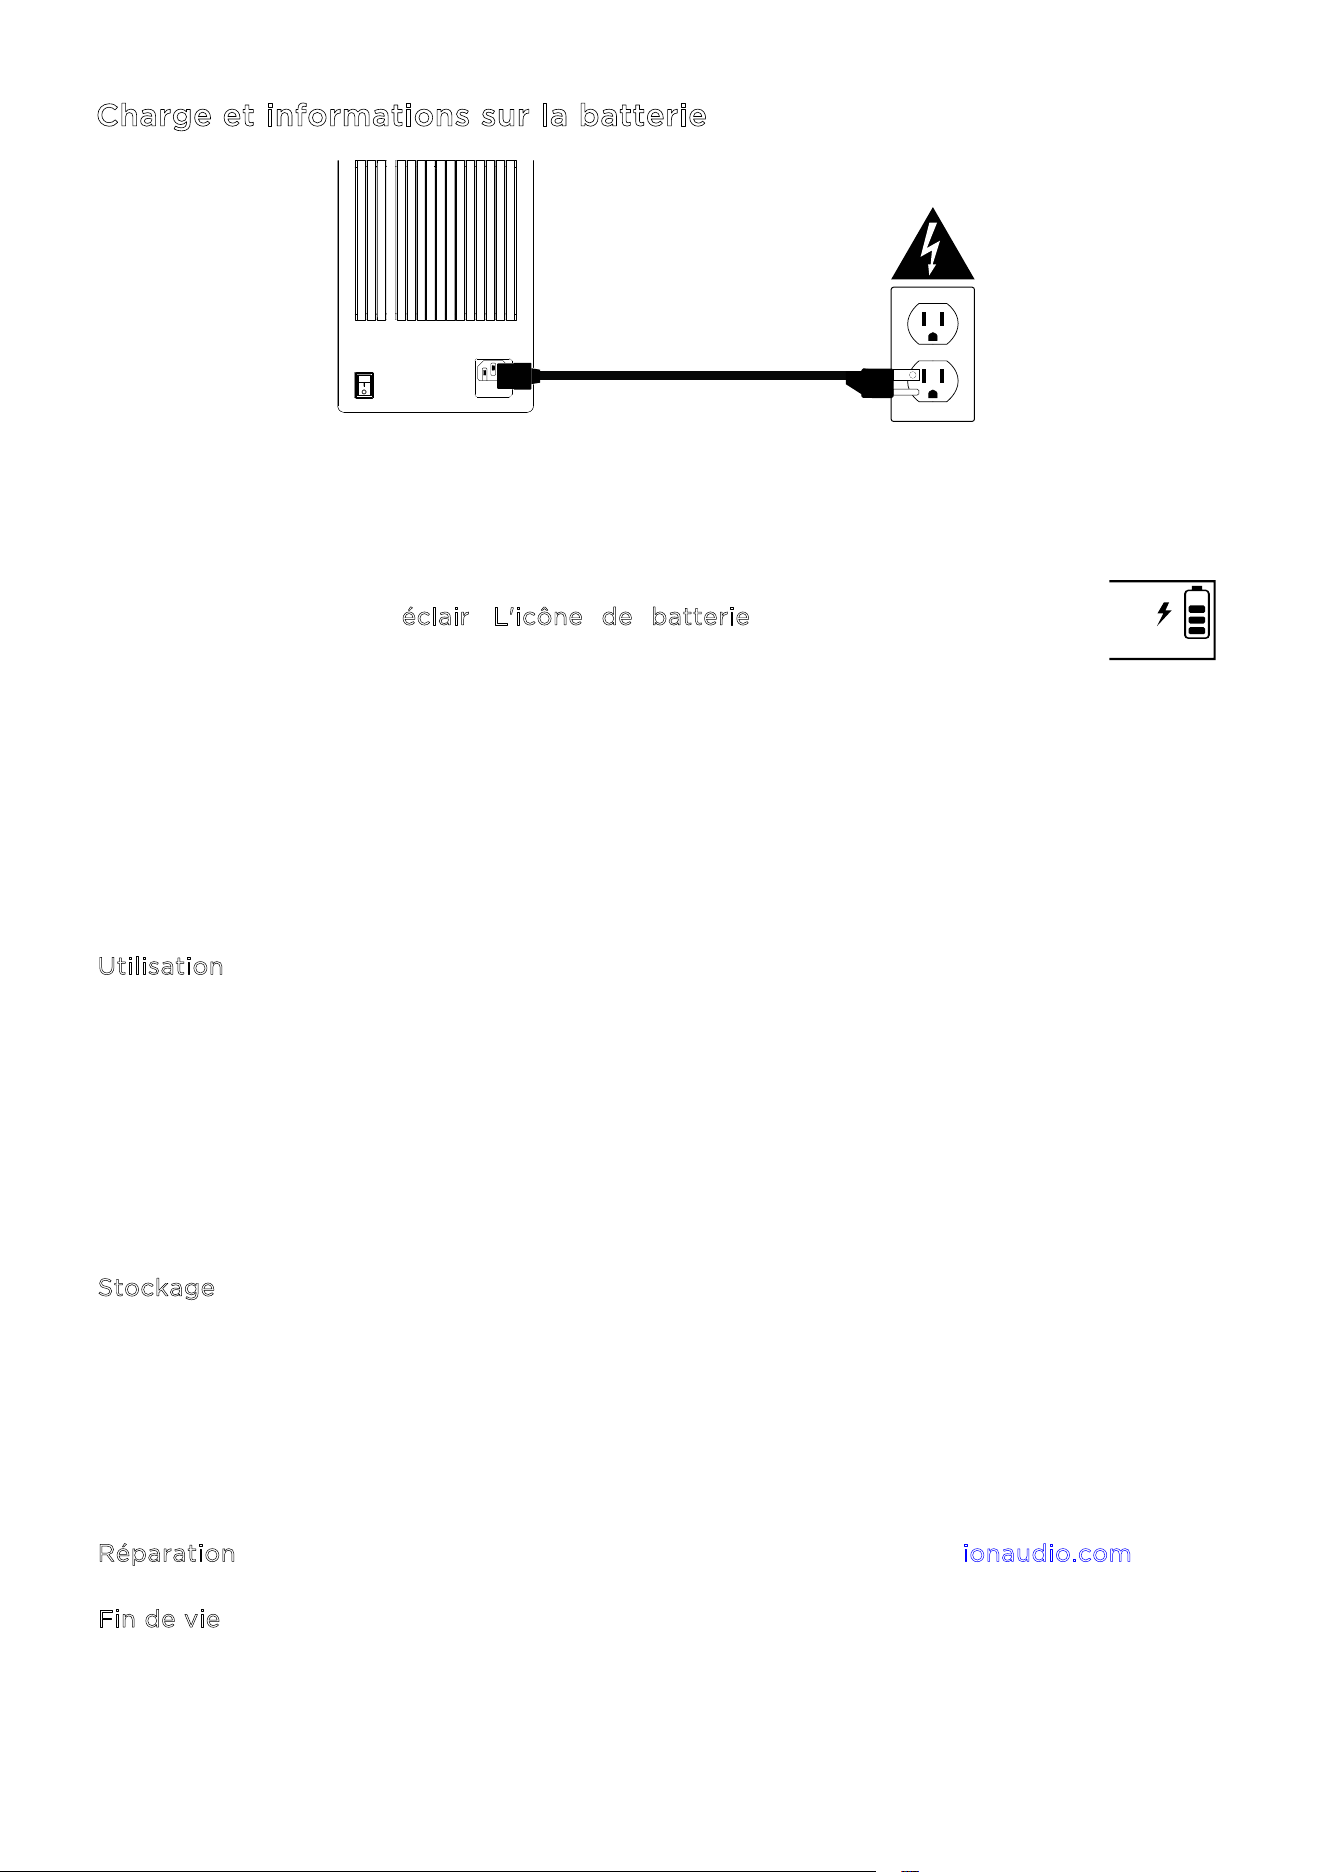
ION Audio Total PA™ Apex User Guide 55
Charge et informations sur la batterie
Pour bénéficier du temps de charge le plus court possible, éteignez le Total PA
MC
Apex et
utilisez le câble électrique fourni pour brancher le haut-parleur sur une prise. Une charge
complète peut prendre jusqu'à cinq heures.
Lorsqu'il est relié à une source d'alimentation et qu'il se recharge, l'écran du Total
PA
MC
Apex ache un éclair. L'icône de batterie se remplit pour indiquer
l'autonomie restante. La charge est terminée lorsque l'icône d'éclair disparaît et
que l'icône de batterie est pleine.
Si le Total PA
MC
Apex ne diuse aucun son pendant 20 minutes, il se met en veille pour
économiser la batterie. Cela se produit lorsque le signal Bluetooth est mis en pause, qu'aucun
son n'est diusé par un appareil branché sur le port AUX, ou que le volume est au minimum.
Pour sortir l'appareil du mode de veille, relancez le signal audio ou appuyez sur un bouton.
Voici quelques conseils pour optimiser la durée de vie de la batterie.
Utilisation Chargez complètement la batterie avant d'utiliser l'appareil.
Évitez de décharger complètement la batterie. Les batteries lithium-ion ne
nécessitent aucun entretien, et elles durent le plus longtemps lorsqu'elles
fonctionnent entre 30 et 80 % de charge.
N'utilisez pas l'appareil lors de la charge.
Ne chargez pas la batterie lorsqu'il fait trop chaud (plus de 32 °C/90 °F) ou trop
froid (moins de 0 °C/32 °F).
S
tockage Pour une durée de vie optimale, ne stockez pas l'appareil à des températures
trop élevées (plus de 32 °C/90 °F) ou trop basses (moins de 0 °C/32 °F).
Pour une durée de vie optimale, stockez l'appareil avec une batterie chargée à
50 %.
La batterie peut perdre en capacité si vous la laissez avec une charge faible sans
la recharger pendant six mois.
R
éparation Si la batterie ne se recharge plus, contactez ION Audio sur ionaudio.com.
F
in de vie Apportez l'appareil dans un centre de recyclage ou mettez-le au rebut en
respectant les règles locales.
ON
ALLUMER
OFF
ÉTEINORE

ION Audio Total PA™ Apex User Guide 56
Démarrage rapide
1. Vérifiez que tous les éléments indiqués dans la liste Contenu de l'emballage sont bien
présents. Vous trouverez le câble électrique et le micro dans la boîte sous la mousse.
2. Regardez le S
chéma de connexion.
3. Vérifiez que tous les périphériques d'entrée (micros, lecteurs CD, lecteurs MP3, etc.) sont
bien éteints et que leur volume est au minimum.
4. Branchez tous les périphériques comme indiqué dans le S
chéma de connexion.
5. Allumez tout dans l'ordre suivant :
c. Périphériques d'entrée (micros, instruments, lecteurs CD, etc.)
d. Total PA
MC
Apex
6. Réglez le volume des périphériques connectés. Mettez le volume des sources audio
(micros, instruments, appareils Bluetooth, etc.) au maximum. Utilisez ensuite la molette de
v
olume source du canal sélectionné sur le Total PA Apex
MC
pour obtenir le volume désiré.
Enfin, réglez le V
olume principal du Total PA Apex
MC
pour obtenir le volume désiré. Vous
trouverez la procédure détaille du réglage des niveaux dans la section É
quilibrage des
n
iveaux à la page suivante.
7. Lorsque vous avez fini d'utiliser le Total PA
MC
Apex, éteignez tout dans l'ordre suivant :
c. Total PA
MC
Apex
d. Périphériques d'entrée audio
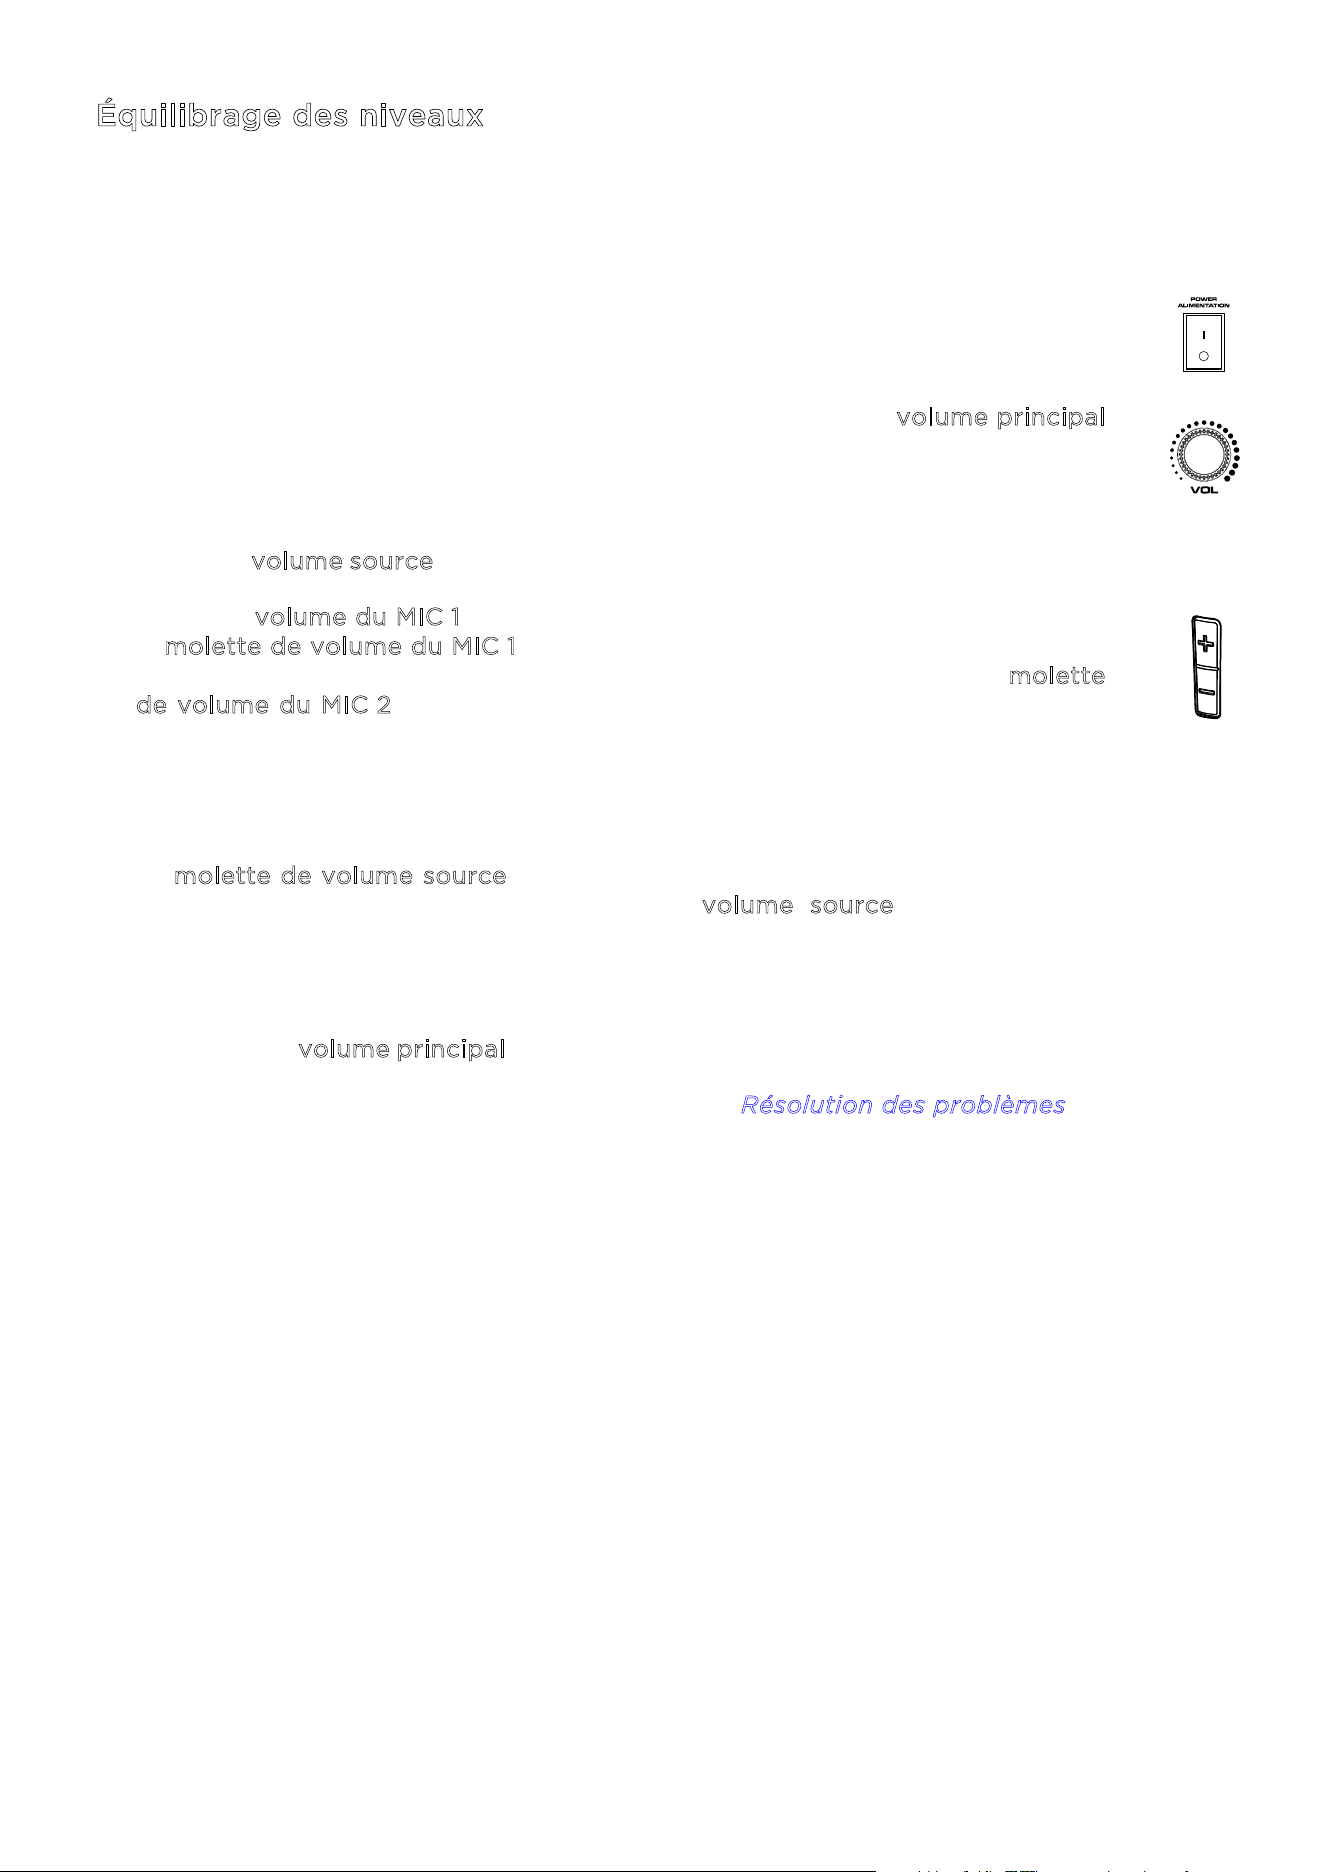
ION Audio Total PA™ Apex User Guide 57
Équilibrage des niveaux
Le processus ci-dessous explique comment équilibrer rapidement le signal du ou
des micros et le signal de votre périphérique source (Bluetooth, AUX, USB). Le
niveau des micros et de la source et le volume principal peuvent être réglés de zéro
à 30.
1. Allumez le Total PA
MC
Apex et le micro sans fil. Connectez votre périphérique
Bluetooth ou AUX, ou un support USB.
2. Pendant que vous équilibrez les niveaux, utilisez la molette de v
olume principal
du haut-parleur pour régler le volume, sans dépasser dix. Cela vous permettra
de régler vos niveaux à un volume clair et audible, sans être trop puissant. Vous
pouvez le modifier à nouveau une fois le bon équilibre trouvé.
3. Réglez le v
olume source sur zéro. Nous l'augmenterons dans une étape suivante.
4. Réglez le v
olume du MIC 1 en utilisant le contrôle de volume +/1 sur le micro ou
la m
olette de volume du MIC 1 sur le haut-parleur. Un volume de 25 est un bon
point de départ. Si vous avez un second micro, câblé, celui-ci, utilisez la m
olette
d
e volume du MIC 2 pour régler les niveaux de la même façon, jusqu'à ce que
les deux micros soient parfaitement audibles.
5. Réglez le volume de votre périphérique AUX ou Bluetooth (téléphone, tablette,
etc.) sur 100 %. Ceci assurera un bon signal.
6. La m
olette de volume source étant toujours à zéro, lancez la lecture sur votre
périphérique, puis augmentez lentement le v
olume source du haut-parleur
jusqu'à atteindre un niveau clair et audible. Si vous utilisez un micro, réglez le
volume source afin que le micro soit toujours audible par-dessus la musique.
7. Une fois que le micro et la source audio sont bien audibles et équilibrés, utilisez
la molette de v
olume principal pour régler le niveau global de votre haut-parleur.
Pour obtenir plus d'aide, veuillez consulter la section R
ésolution des problèmes.
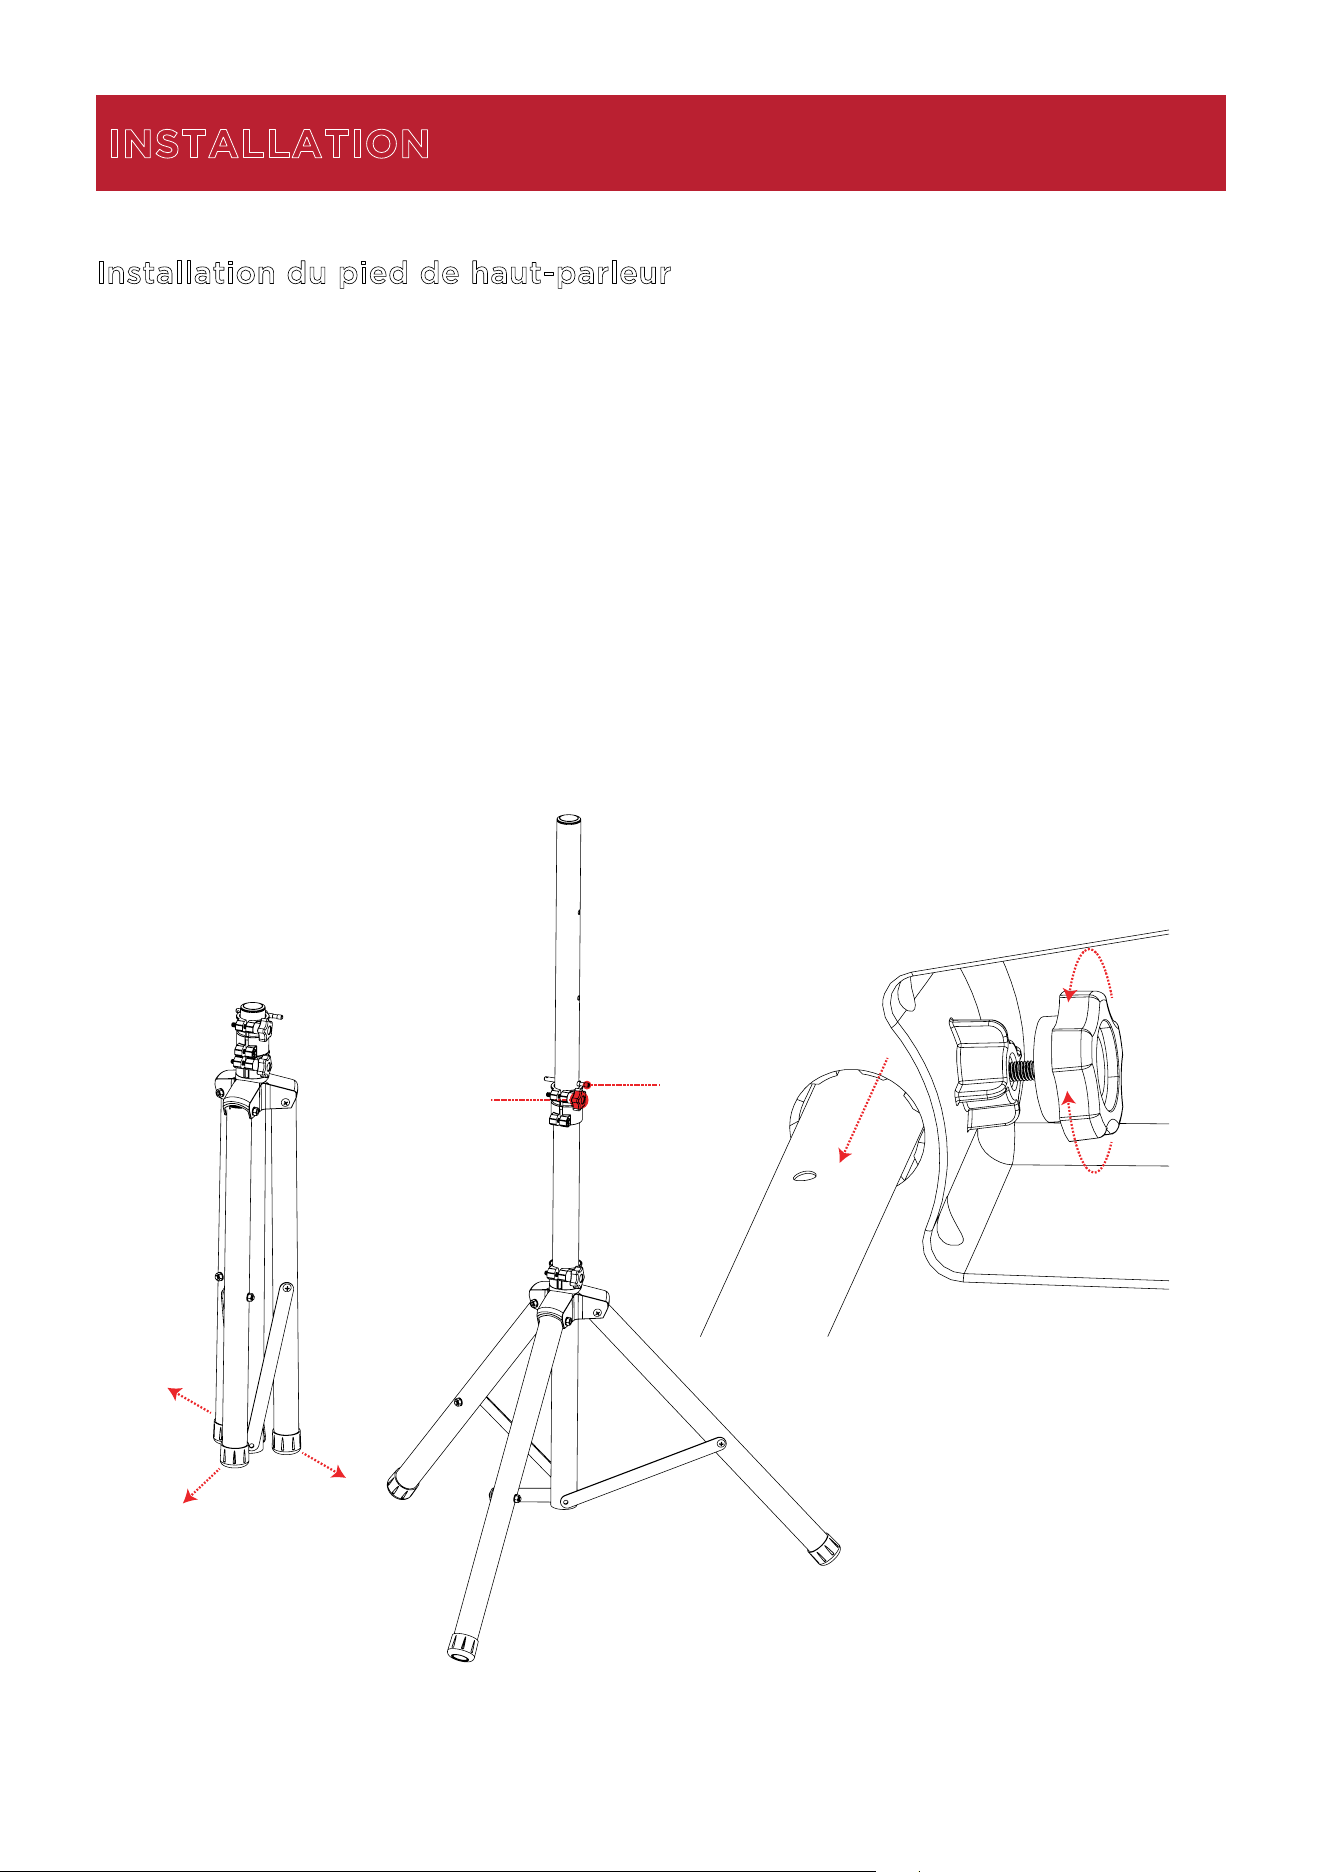
ION Audio Total PA™ Apex User Guide 58
Installation du pied de haut-parleur
1.
Déployez complètement le trépied sur une surface plane et stable.
2.
Relevez le la perche de montage à la hauteur souhaitée, puis serrez la molette de réglage
latérale.
3.
Insérez la goupille dans le trou du bas afin que la perche reste à la bonne hauteur.
4.
Dévissez la molette à la base du Total PA
MC
Apex pour que la vis ne bloque pas le passage.
5.
Alignez le manchon de montage du Total PA
MC
Apex avec la perche, puis posez-le.
6.
Serrez la molette de montage du Total PA
MC
Apex pour le fixer à la perche.
INSTALLATION
1
2
3
5
4
6
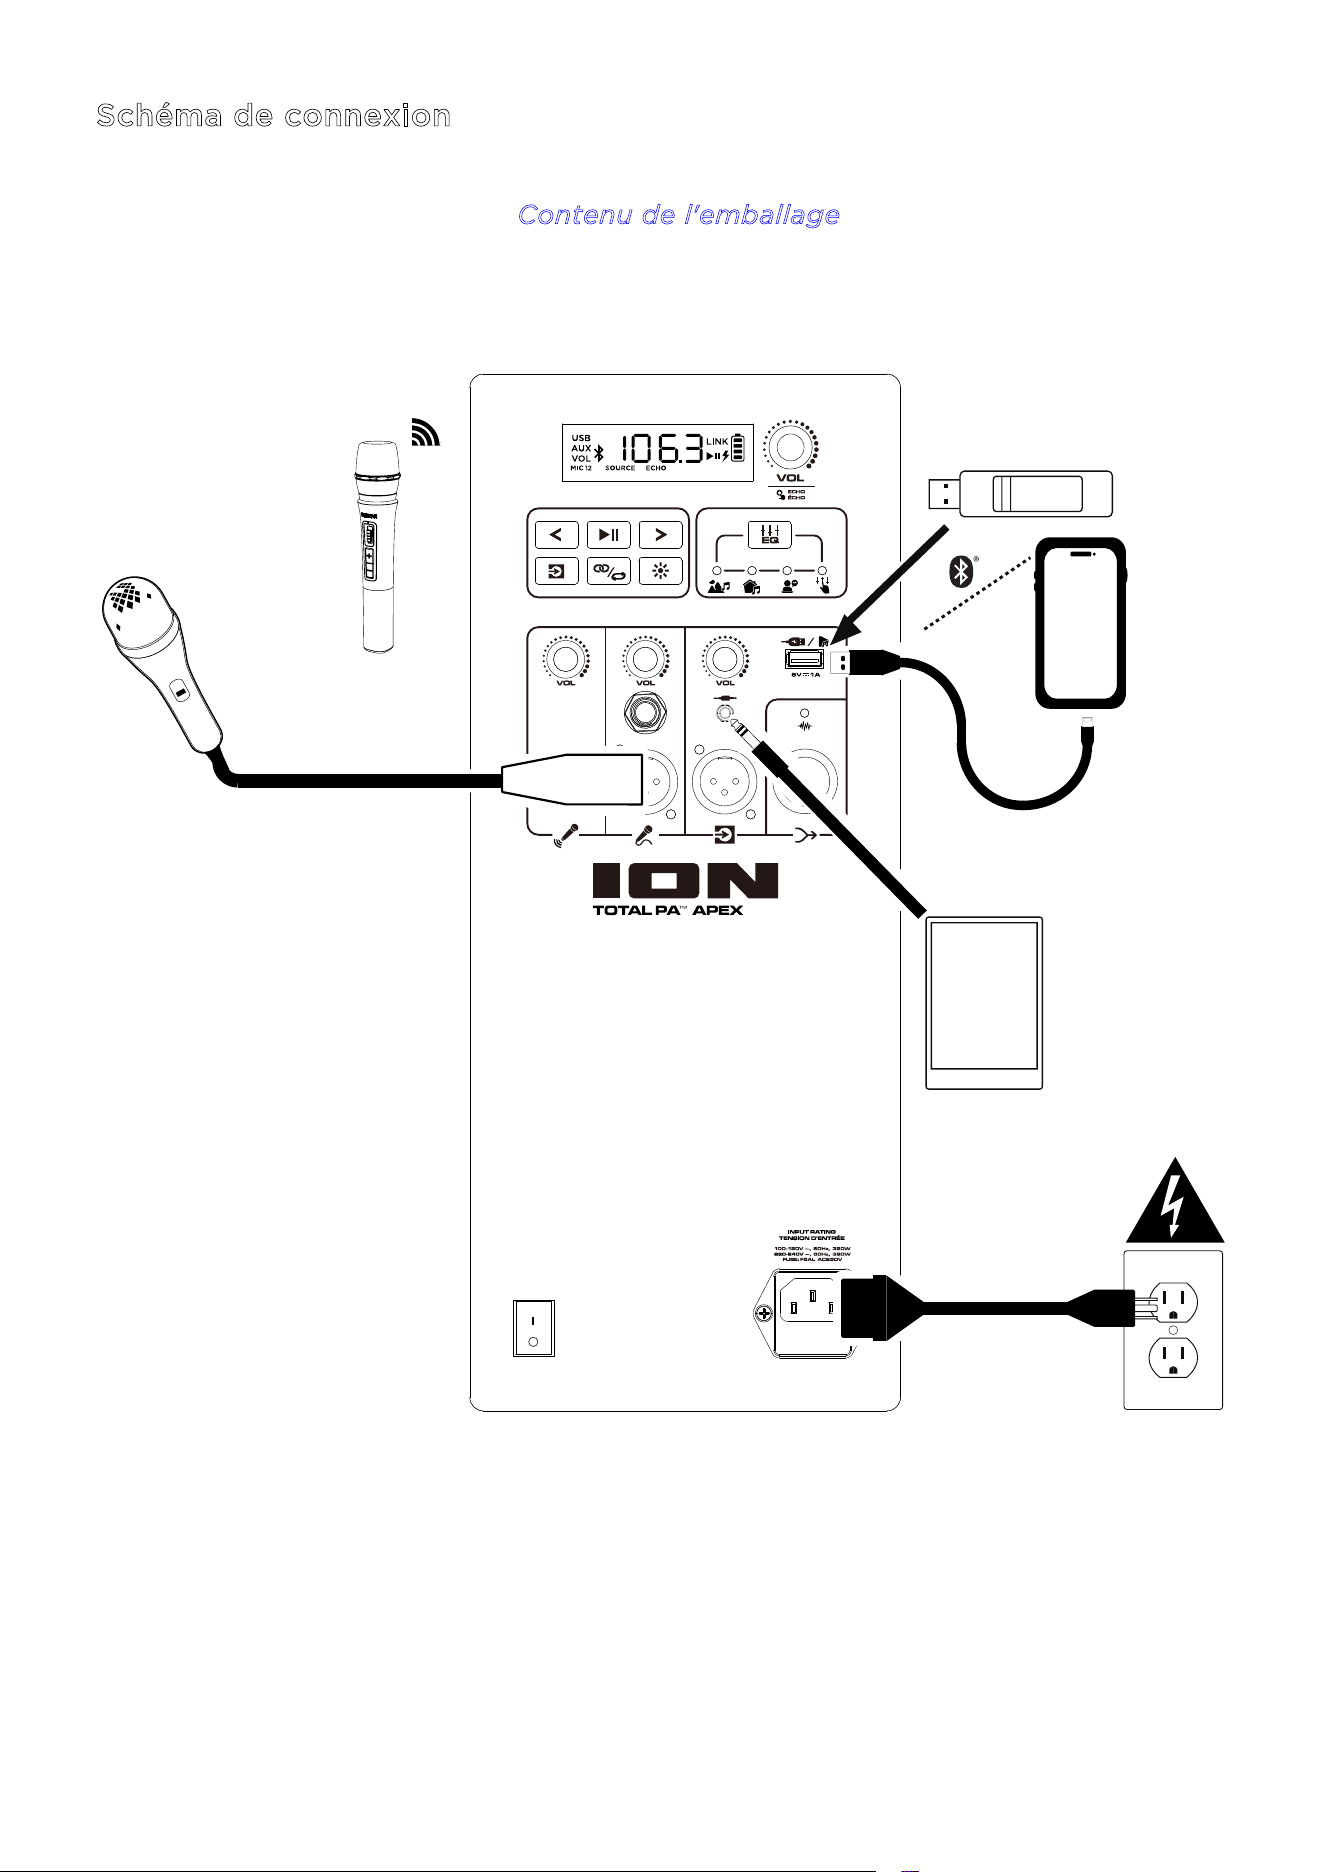
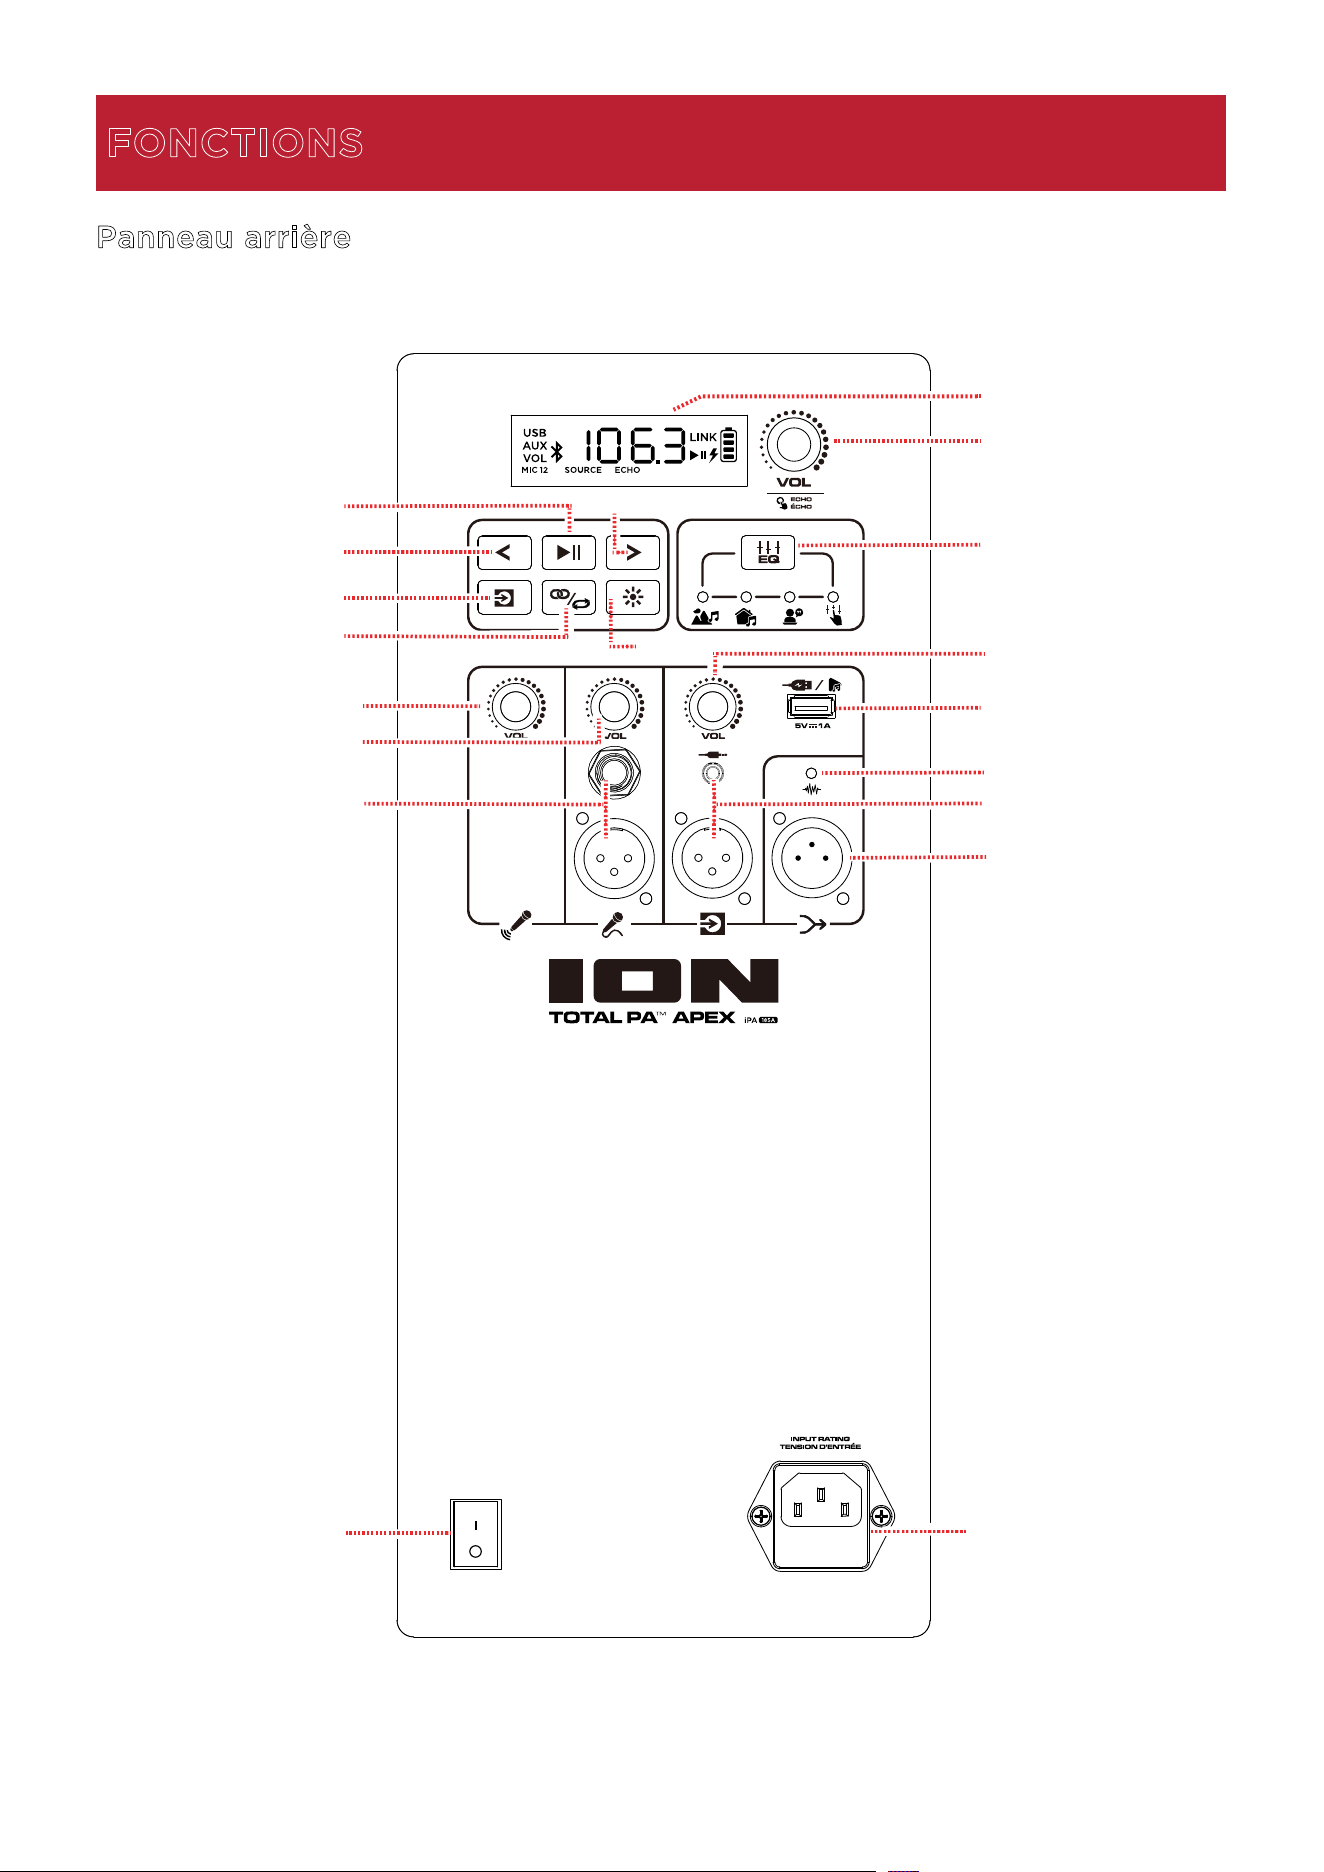
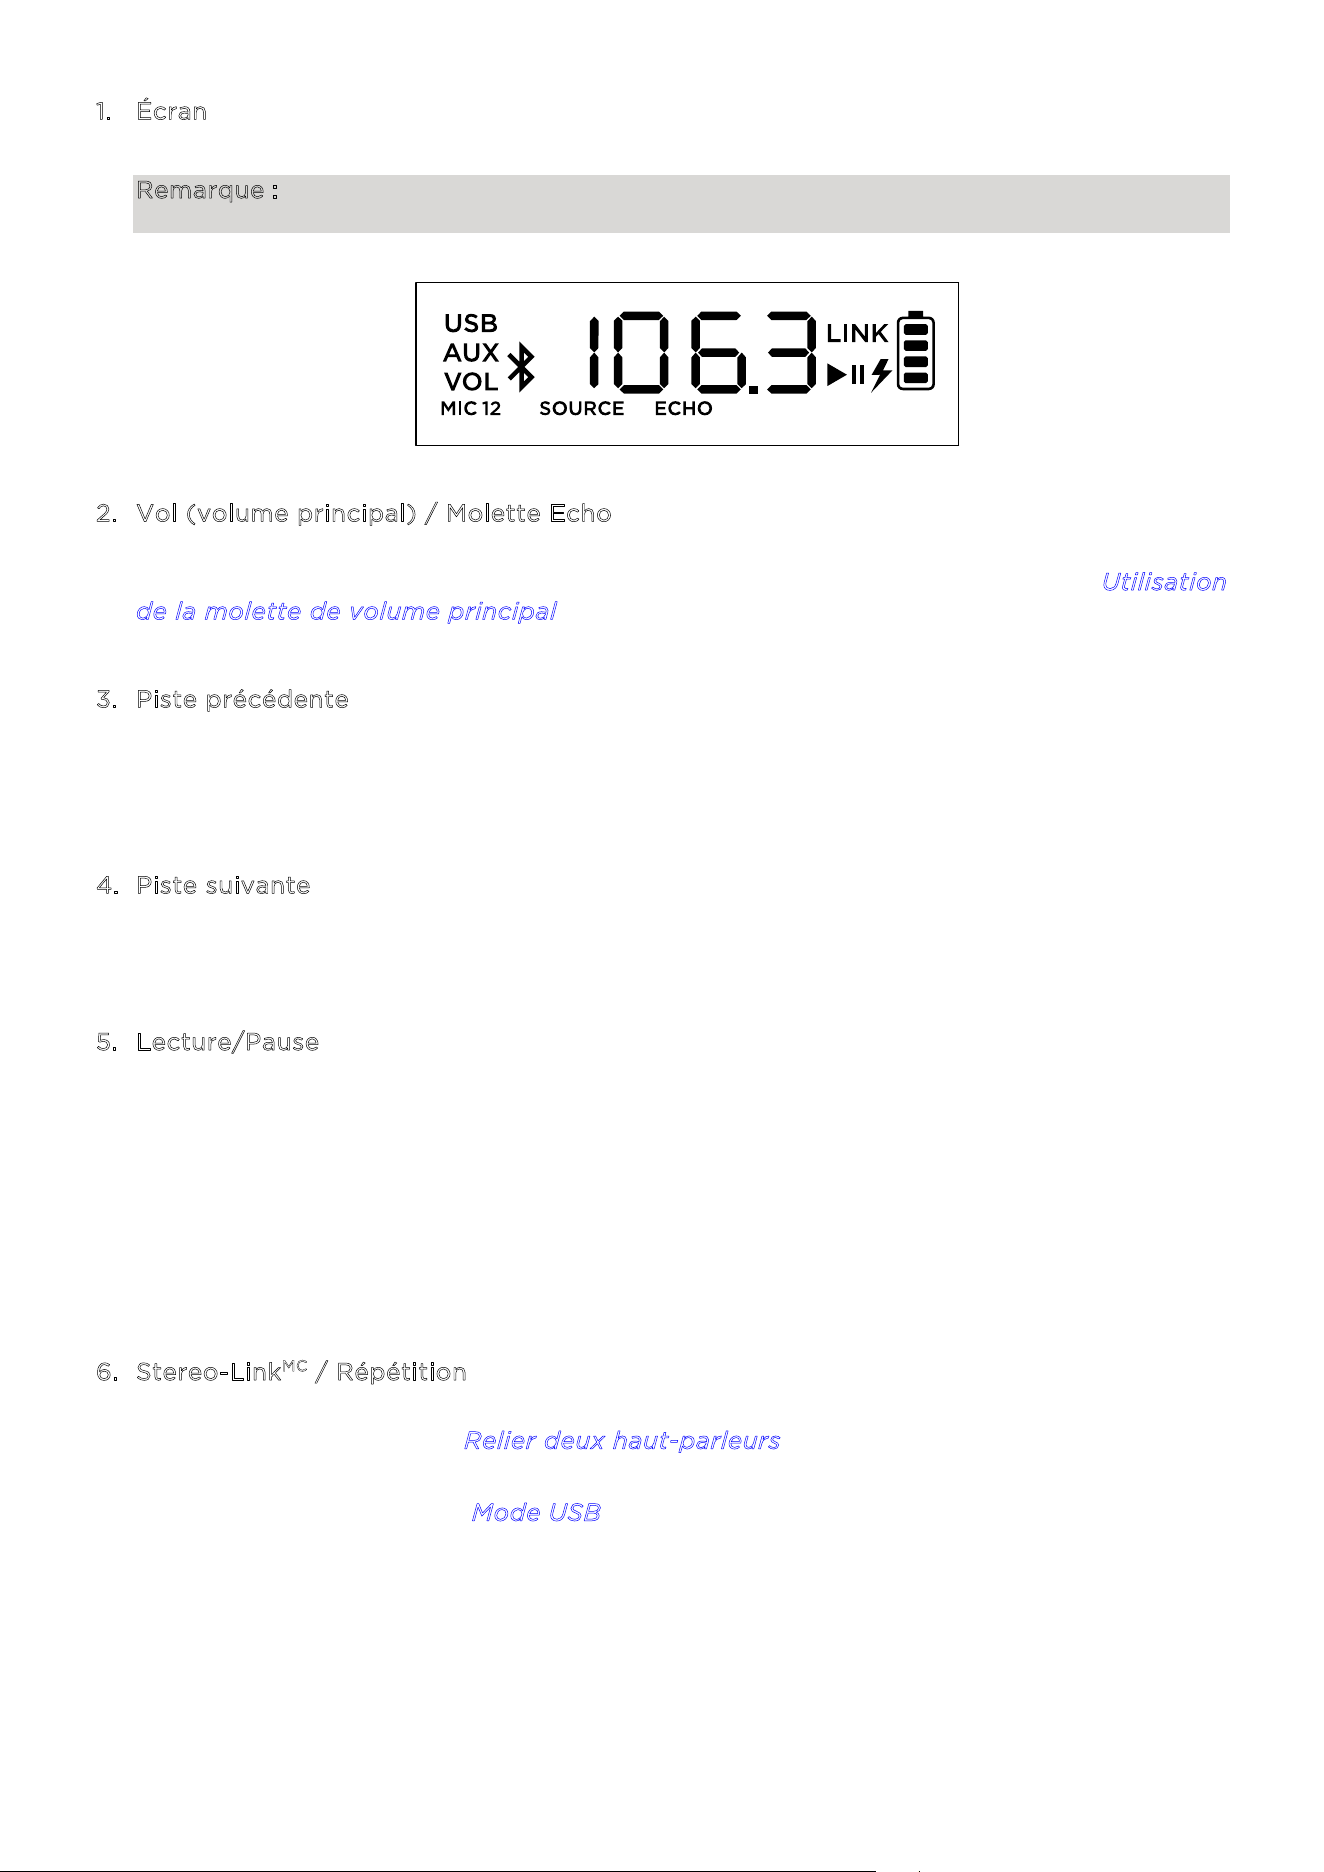
ION Audio Total PA™ Apex User Guide 61
1. Écran
Cet écran ache des informations sur le fonctionnement du Total PA
MC
Apex.
Remarque : L'écran est protégé par une feuille de plastique. Retirez-la pour bénéficier d'un
achage optimal.
2. Vol (volume principal) / Molette Echo
Utilisez cette molette pour ajuster le volume principal du haut-parleur. Appuyez sur la
molette et faites-la tourner pour sélectionner l'eet Echo. Consultez la section U
tilisation
d
e la molette de volume principal pour plus de détails.
3
. Piste précédente
Lorsque USB ou Bluetooth est sélectionné comme source audio, appuyez sur ce bouton
pour revenir à la piste précédente dans la liste de lecture. Appuyez une deuxième fois dans
la seconde qui suit pour passer à la piste précédente.
4
. Piste suivante
Lorsque USB ou Bluetooth est sélectionné comme source audio, appuyez sur ce bouton
pour passer à la piste suivante dans la liste de lecture.
5
. Lecture/Pause
Lorsque USB est sélectionné comme source audio, appuyez sur ce bouton pour lire ou
mettre en pause la piste actuelle. Appuyez deux fois pour arrêter la lecture et revenir au
début de la liste de lecture.
Lorsque Bluetooth est sélectionné comme source audio, appuyez sur ce bouton pour lire
ou mettre en pause la piste actuelle.
Maintenez la touche pendant trois secondes pour activer ou désactiver les messages
vocaux.
6
. Stereo-Link
MC
/ Répétition
Maintenez ce bouton enfoncé pour lancer la connexion stéréo avec un autre Total PA
MC
Apex. Consultez la section R
elier deux haut-parleurs pour plus de détails.
En mode USB, appuyez sur ce bouton pour répéter une piste, un dossier ou toutes les
pistes. Consultez la section M
ode USB pour plus de détails.
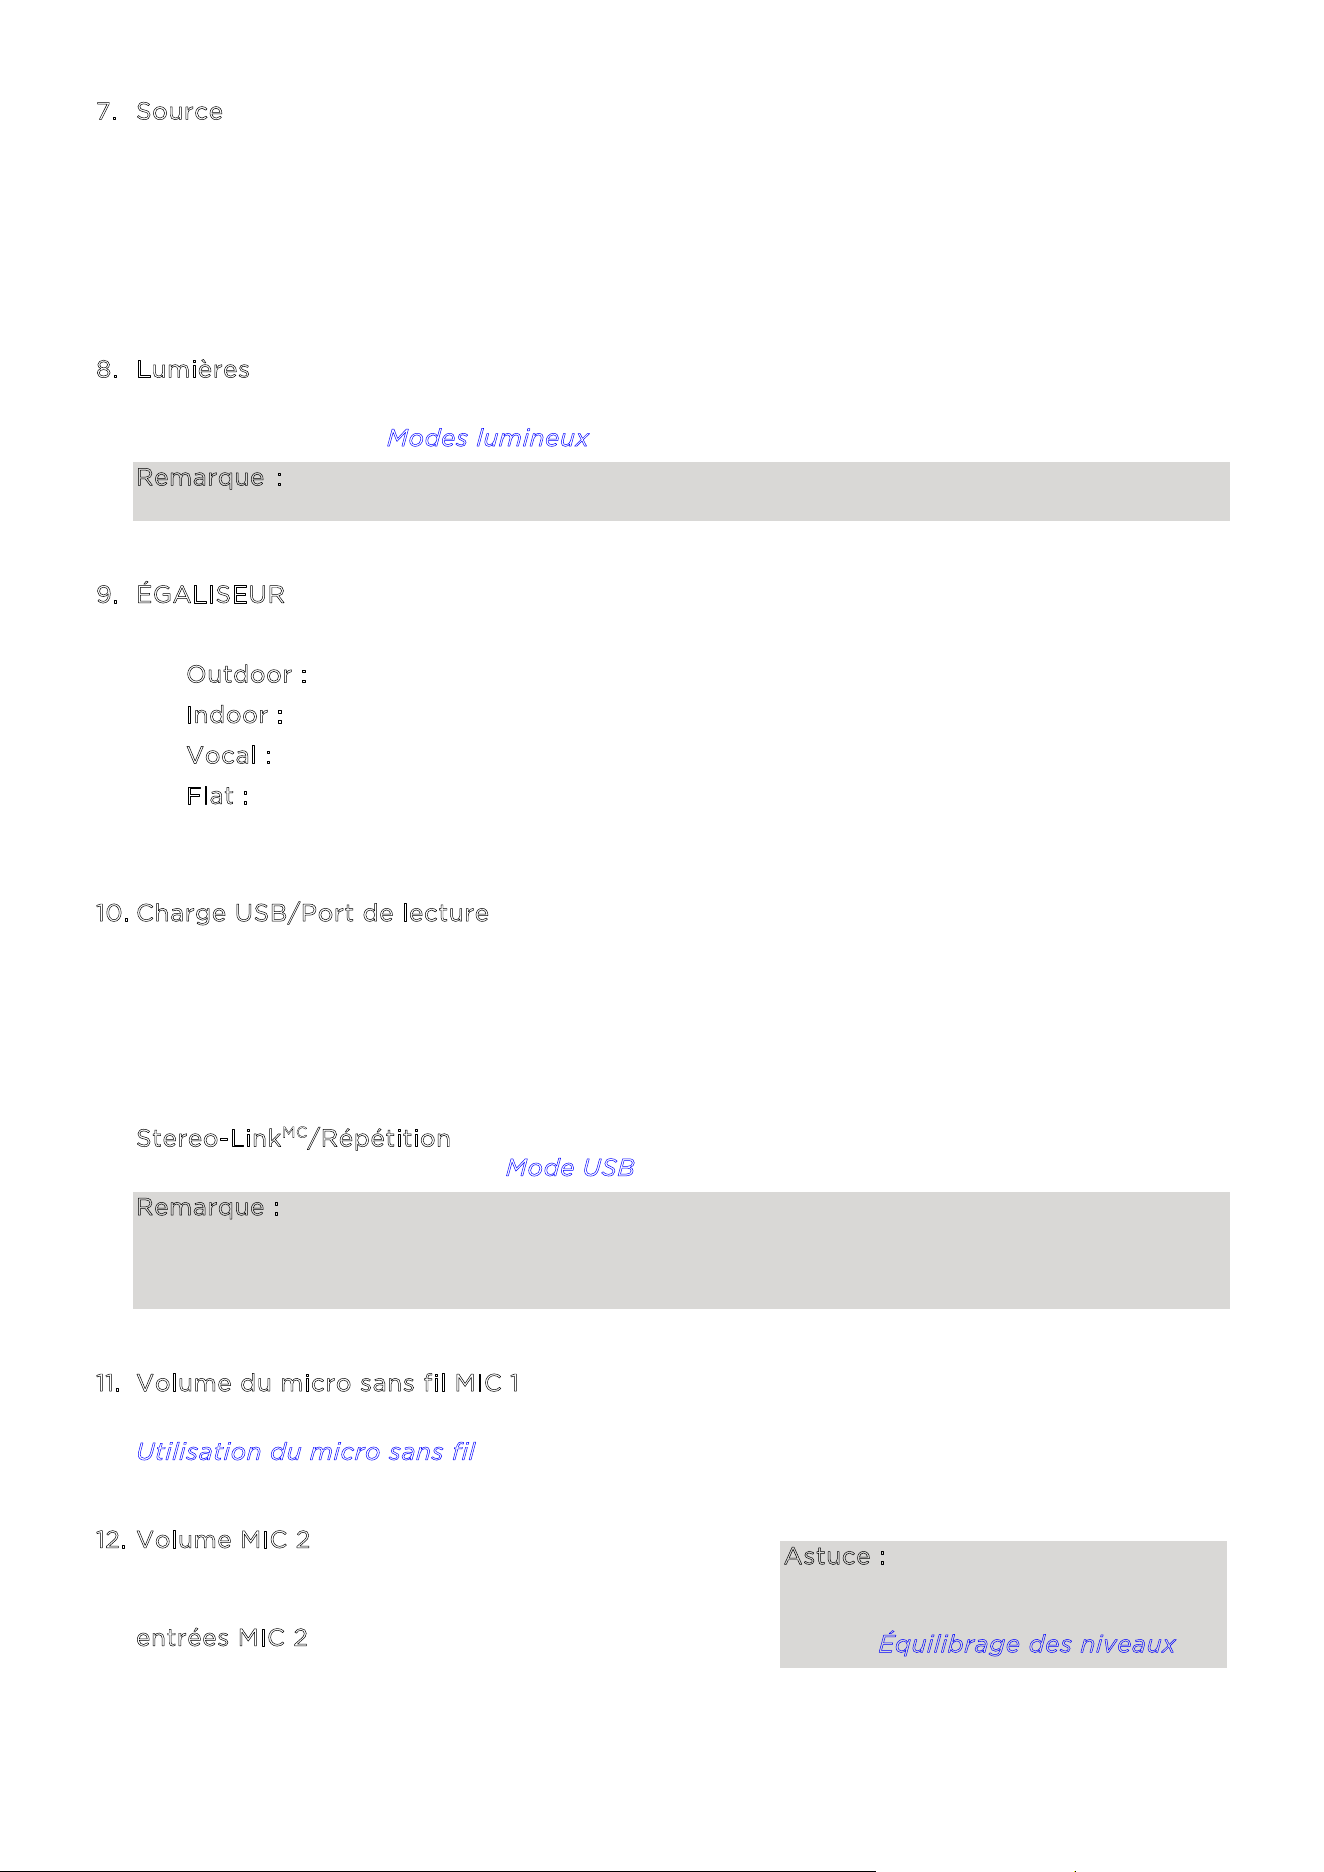
ION Audio Total PA™ Apex User Guide 62
7. Source
Appuyez
sur ce bouton pour choisir la source audio à utiliser : USB, AUX ou Bluetooth. Lors
de l'allumage du Total PA
MC
Apex, la source est toujours Bluetooth. La source USB ne peut
être sélectionnée que lorsqu'un support USB est branché sur le Total PA
MC
Apex ; sinon, le
bouton Source permet de choisir entre Bluetooth et AUX.
Pour déconnecter un périphéri
que Bluetooth, appuyez deux fois sur ce bouton.
8
. Lumières
Appuyez
sur ce bouton pour définir le comportement des lumières sur la face avant.
Consultez la section M
odes lumineux pour plus de détails.
Remarque : pour obtenir les meilleurs eets lumineux possibles, il peut être nécessaire
d'ajuster le volume du périphérique ou le volume Source.
9
. ÉGALISEUR
Appuyez sur ce
bouton pour choisir parmi les diérents préréglages d'égalisation :
• O
utdoor : fréquences hautes et basses augmentées.
• I
ndoor : légère augmentation des basses et hautes fréquences plates.
• V
ocal : basses atténuées et les médiums augmentés.
• F
lat : une réponse en fréquence plate (l'égalisation peut être modifiée et envoyée
depuis l'applicat
ion).
1
0. Charge USB/Port de lecture
Utili
sez ce port pour charger un périphérique doté d'une prise USB, comme une ta
blette
ou
un smartphone. Pour recharger un périphérique qui streame de la musique en
Bluetooth,
met
tez la musique en pause, puis attendez qu'il se reconnecte une fois le câble USB
branché.
C'est ici que vous devez brancher votre support USB pour lire de la musique. Utilisez la
molette de volume SOURCE pour régler le volume. Appuyez sur le bouton
S
tereo-Link
MC
/Répétition pour choisir l'une des cinq options de répétition ou lecture
aléa
toire. Consultez la section M
ode USB pour plus de détails.
Remarque : Votre support USB ne doit pas faire plus de 512 Go et doit contenir des fichiers
MP3 files pour que ses données s'achent correctement à l'écran. Lorsque vous branchez
un support USB contenant des fichiers MP3, le Total PA
MC
Apex organisera les fichiers
alphabétiquement par dossier à la racine, puis selon le titre des fichiers.
1
1. Volume du micro sans fil MIC 1
Utili
sez cette molette pour régler le volume du micro sans fil inclus. Consultez la section
U
tilisation du micro sans fil pour plus de détails sur la mise en marche du micro.
1
2. Volume MIC 2
Cette
molette permet de régler le volume du micro
ou de la source de niveau micro branchée sur
les
e
ntrées MIC 2.
Astuce : pour bien équilibrer les
volumes du MIC 1, du MIC 2 et
d'autres sources, consultez la
section Équilibrage des niveaux.

ION Audio Total PA™ Apex User Guide 63
13. Entrées MIC 2 (6,35 mm / 1/4” et XLR)
Utilisez ces entrées pour brancher un micro ou une source de niveau micro.
1
4. Volume source
Permet de régler le volume des périphériques connectés aux e
ntrées AUX ou par
B
luetooth.
1
5. Entrées AUX (3,5 mm / 1/8” et XLR)
Branchez un lecteur CD, un lecteur MP3 ou une autre source audio à ces entrées de niveau
ligne.
1
6. Sortie mixage (XLR)
Reliez cette sortie à un haut-parleur, un mixeur ou un enregistreur. Le son produit par le
haut-parleur (y compris l'eet d'écho, mais pas les réglages de volume et d'égalisation)
sera transmis à l'appareil branché.
1
7. LED de saturation
Cette lumière rouge clignotera lorsque le signal des entrées ou de la source indiquée sur
l'écran sature (distorsion causée par un signal trop fort). Si cela se produit, diminuez le
v
olume principal ou celui de l'entrée AUX ou MIC (si un périphérique trop fort y est
branché).
1
8. Interrupteur d'alimentation
Utilisez cet interrupteur pour allumer ou éteindre le haut-parleur.
Remarque : si aucun signal n'est envoyé par une source (y compris l'entrée micro) pendant
20 minutes, le haut-parleur se mettra en mode Économie d'énergie. Dans ce mode, l'écran
s'éteindra. Après 50 minutes d'inactivité, le haut-parleur se mettra en veille, et vous devrez
l'éteindre puis le rallumer pour pouvoir l'utiliser à nouveau. Le haut-parleur reprendra un
fonctionnement normal lorsqu'une entrée recevra un signal.
1
9. Prise électrique (IEC)
Branchez le câble électrique inclus ici pour alimenter l'appareil.
1
2
2
3
-
+
+
-
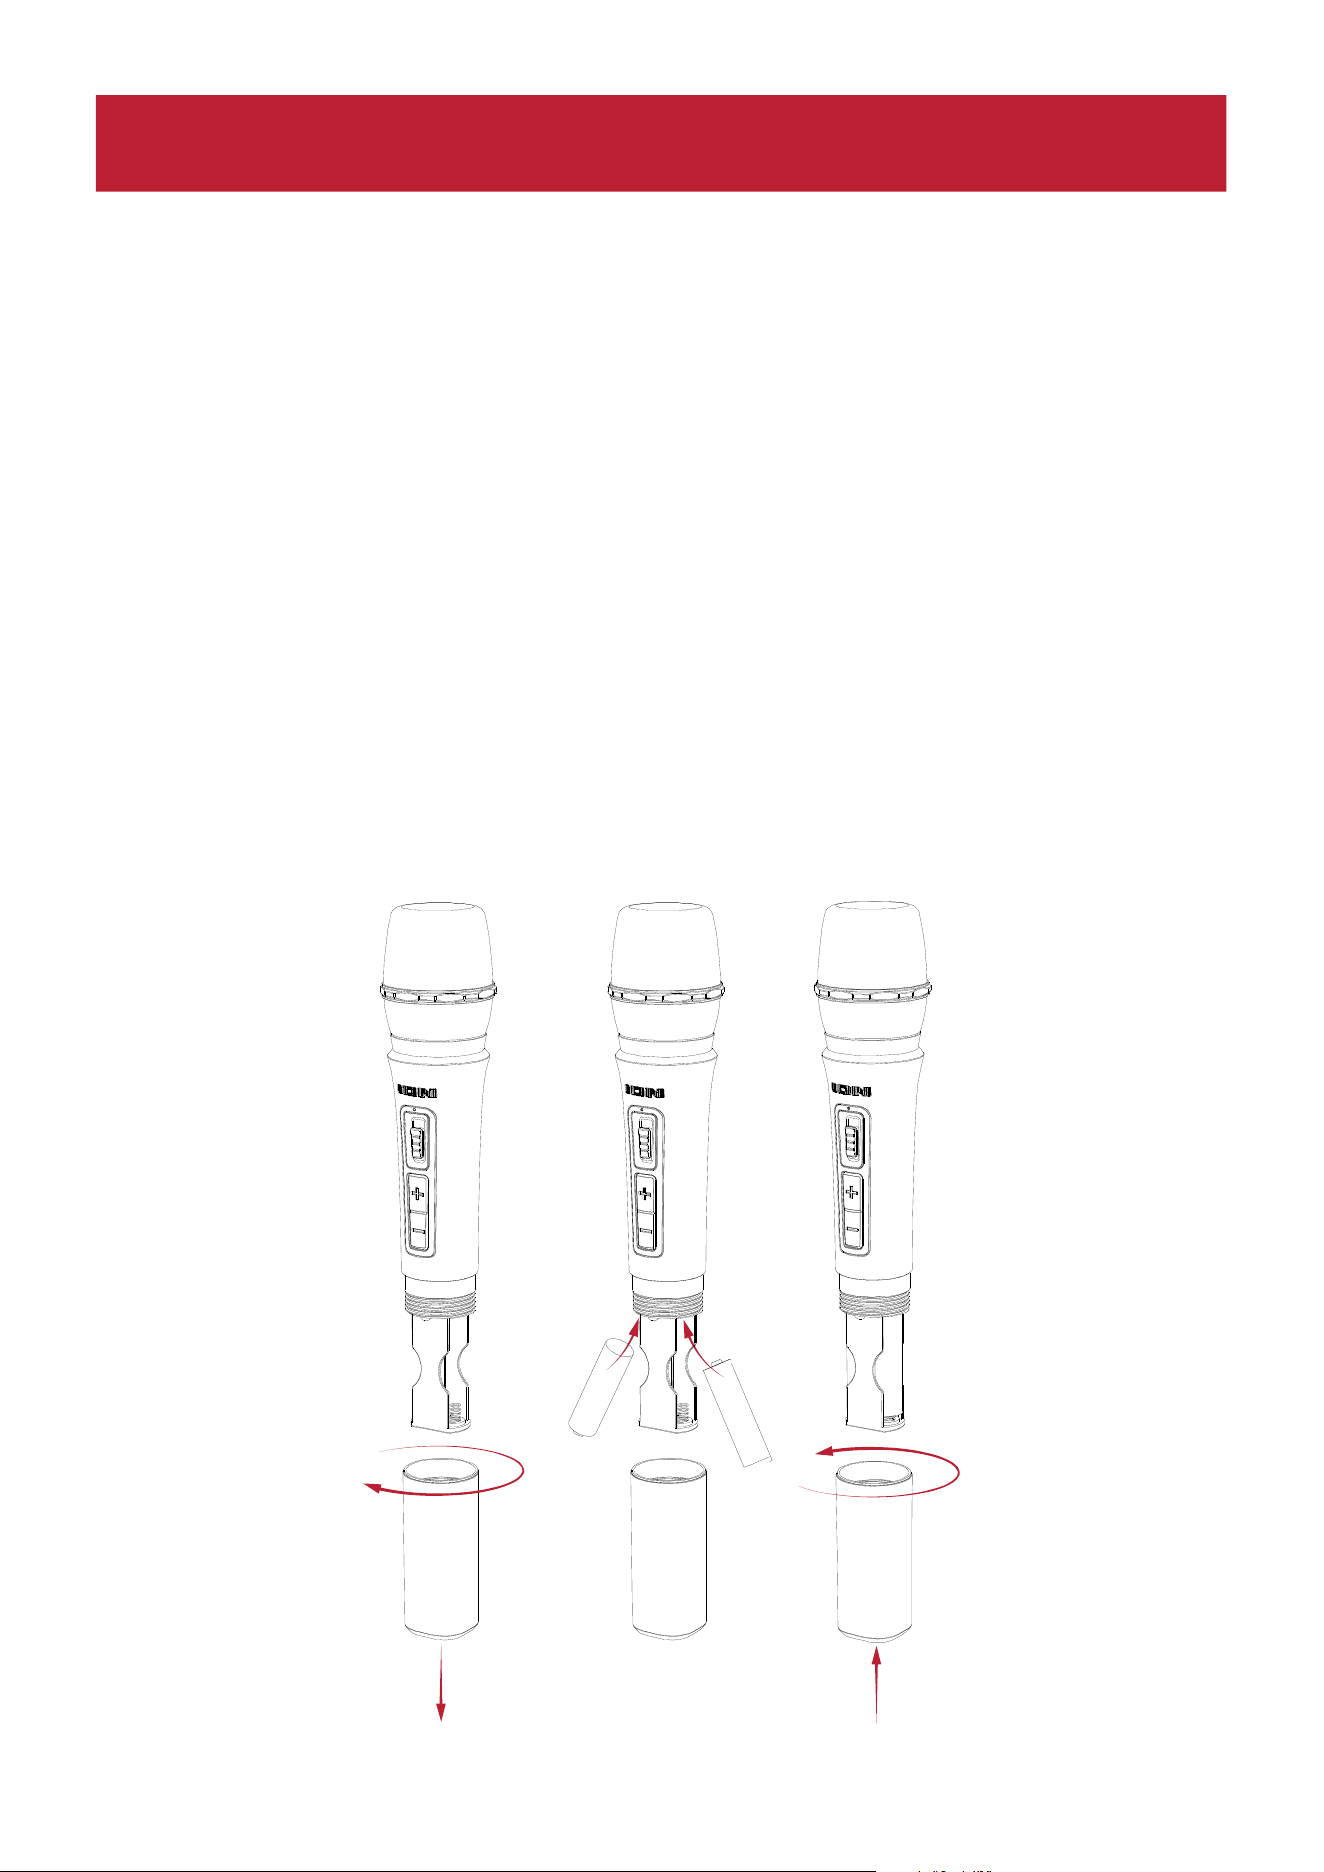
ION Audio Total PA™ Apex User Guide 64
Changement des piles
Suivez les instructions suivantes pour obtenir les meilleurs résultats possibles lors du
changement des piles du micro sans fil :
• Avant d'insérer les piles, nettoyez les contacts des piles et ceux du compartiment à piles
du micro sans fil.
• Changez les deux piles en même temps.
• Retirez les piles du micro sans fil s'il va rester inutilisé pendant une longue période.
• Retirez sans attendre les piles vides.
Installation des piles dans le micro sans fil
1. Dévissez le cache du compartiment à piles.
2. Insérez deux piles alcalines AA neuves (non incluses) dans le sens indiqué.
3. Revissez le cache du compartiment.
1
2
2
3
-
+
+
-
UTILISATION
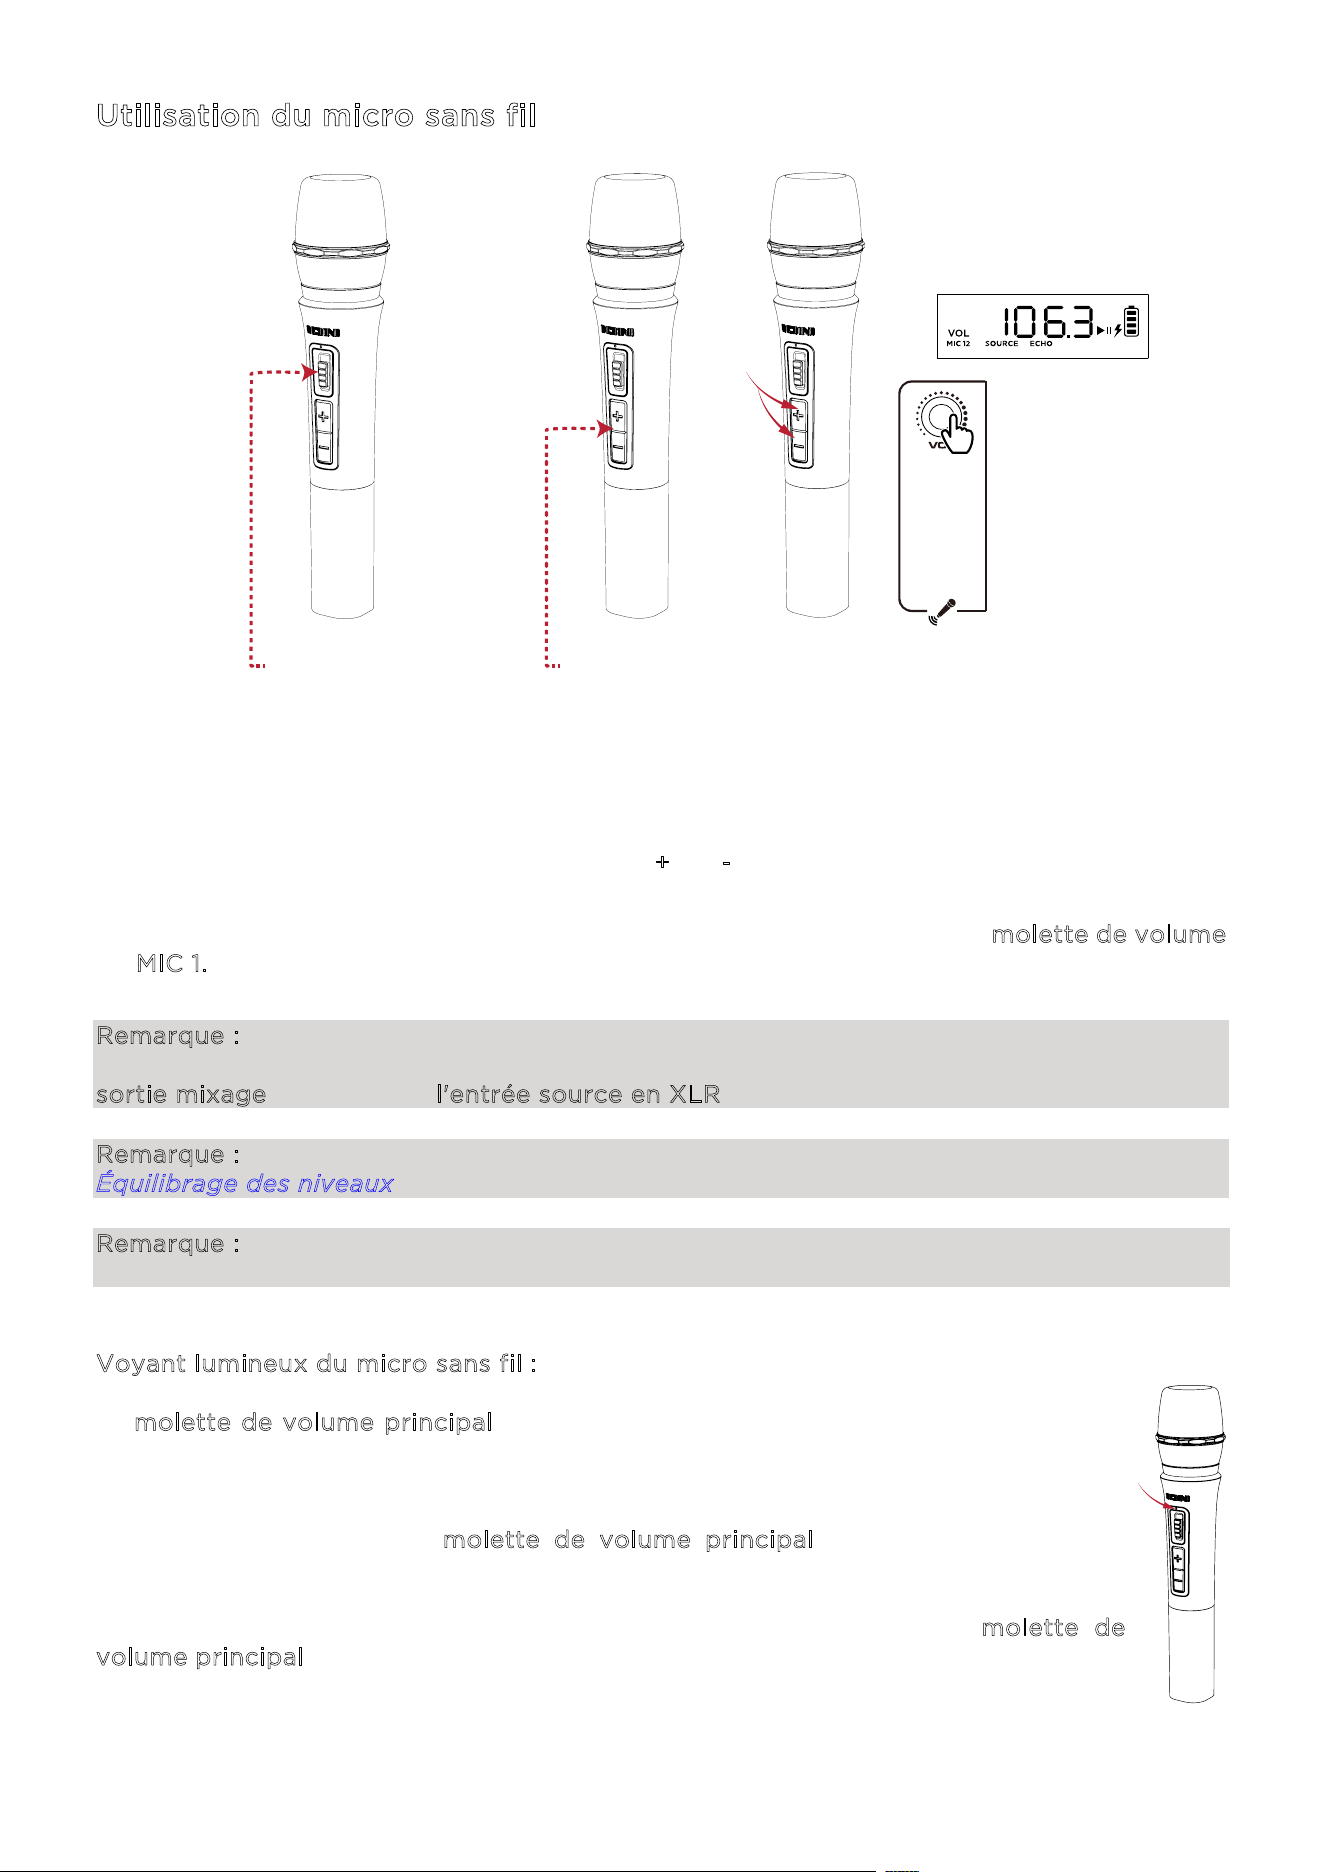
ION Audio Total PA™ Apex User Guide 65
Utilisation du micro sans fil
1. Allumez le micro sans fil en basculant l'interrupteur vers le haut. Le voyant d'alimentation
bleu clignote lorsqu'il se connecte au haut-parleur, et reste allumé lorsqu'il est connecté.
2. Si le Total PA
MC
Apex est allumé, le micro devrait s'y connecter automatiquement. Si ce
n'est pas le cas, maintenez les boutons +
et - appuyés pendant trois secondes pour
réinitialiser la connexion.
3. Réglez le volume du micro en utilisant les boutons + et - du micro ou la m
olette de volume
M
IC 1. Si votre source audio est trop forte par rapport au micro, baissez le volume SOURCE
ou augmentez le volume du micro.
Remarque : le micro sans fil ne peut être connecté qu'à un seul haut-parleur (le plus proche)
en Stereo-Link
MC
. Si vous utilisez deux haut-parleurs Total PA
MC
Apex, vous devrez relier la
sortie mixage du premier à l'entrée source en XLR du second.
Remarque : pour savoir comment équilibrer les niveaux de volume, consultez la section
Équilibrage des niveaux.
Remarque : un voyant bleu et rouge apparaîtra sur le micro sans fil lorsque li niveau des piles
es faible, et il clignotera en rouge lorsqu'elles seront presque épuisées.
Voyant lumineux du micro sans fil :
La m
olette de volume principal contrôle par défaut le volume principal de tous les
canaux. Appuyez sur la molette pour activer ou désactiver l'eet d'écho, et faites-la
tourner pour changer le réglage.
Si vous ne touchez pas la m
olette de volume principal pendant cinq secondes,
l'achage reviendra au volume principal.
Pour rétablir les paramètres d'origine du haut-parleur, maintenez la m
olette de
v
olume principal enfoncée pendant cinq secondes. Le haut-parleur se rallumera, et la
réinitialisation sera eectuée.
1
2
2
3
-
+
+
-
1 - BASCULEZ
L'INTERRUPTEUR VERS LE HAUT
2 - APPUYEZ
- - - - -
3 -
MAINTENEZ
APPUYÉ
3 - TOURNEZ
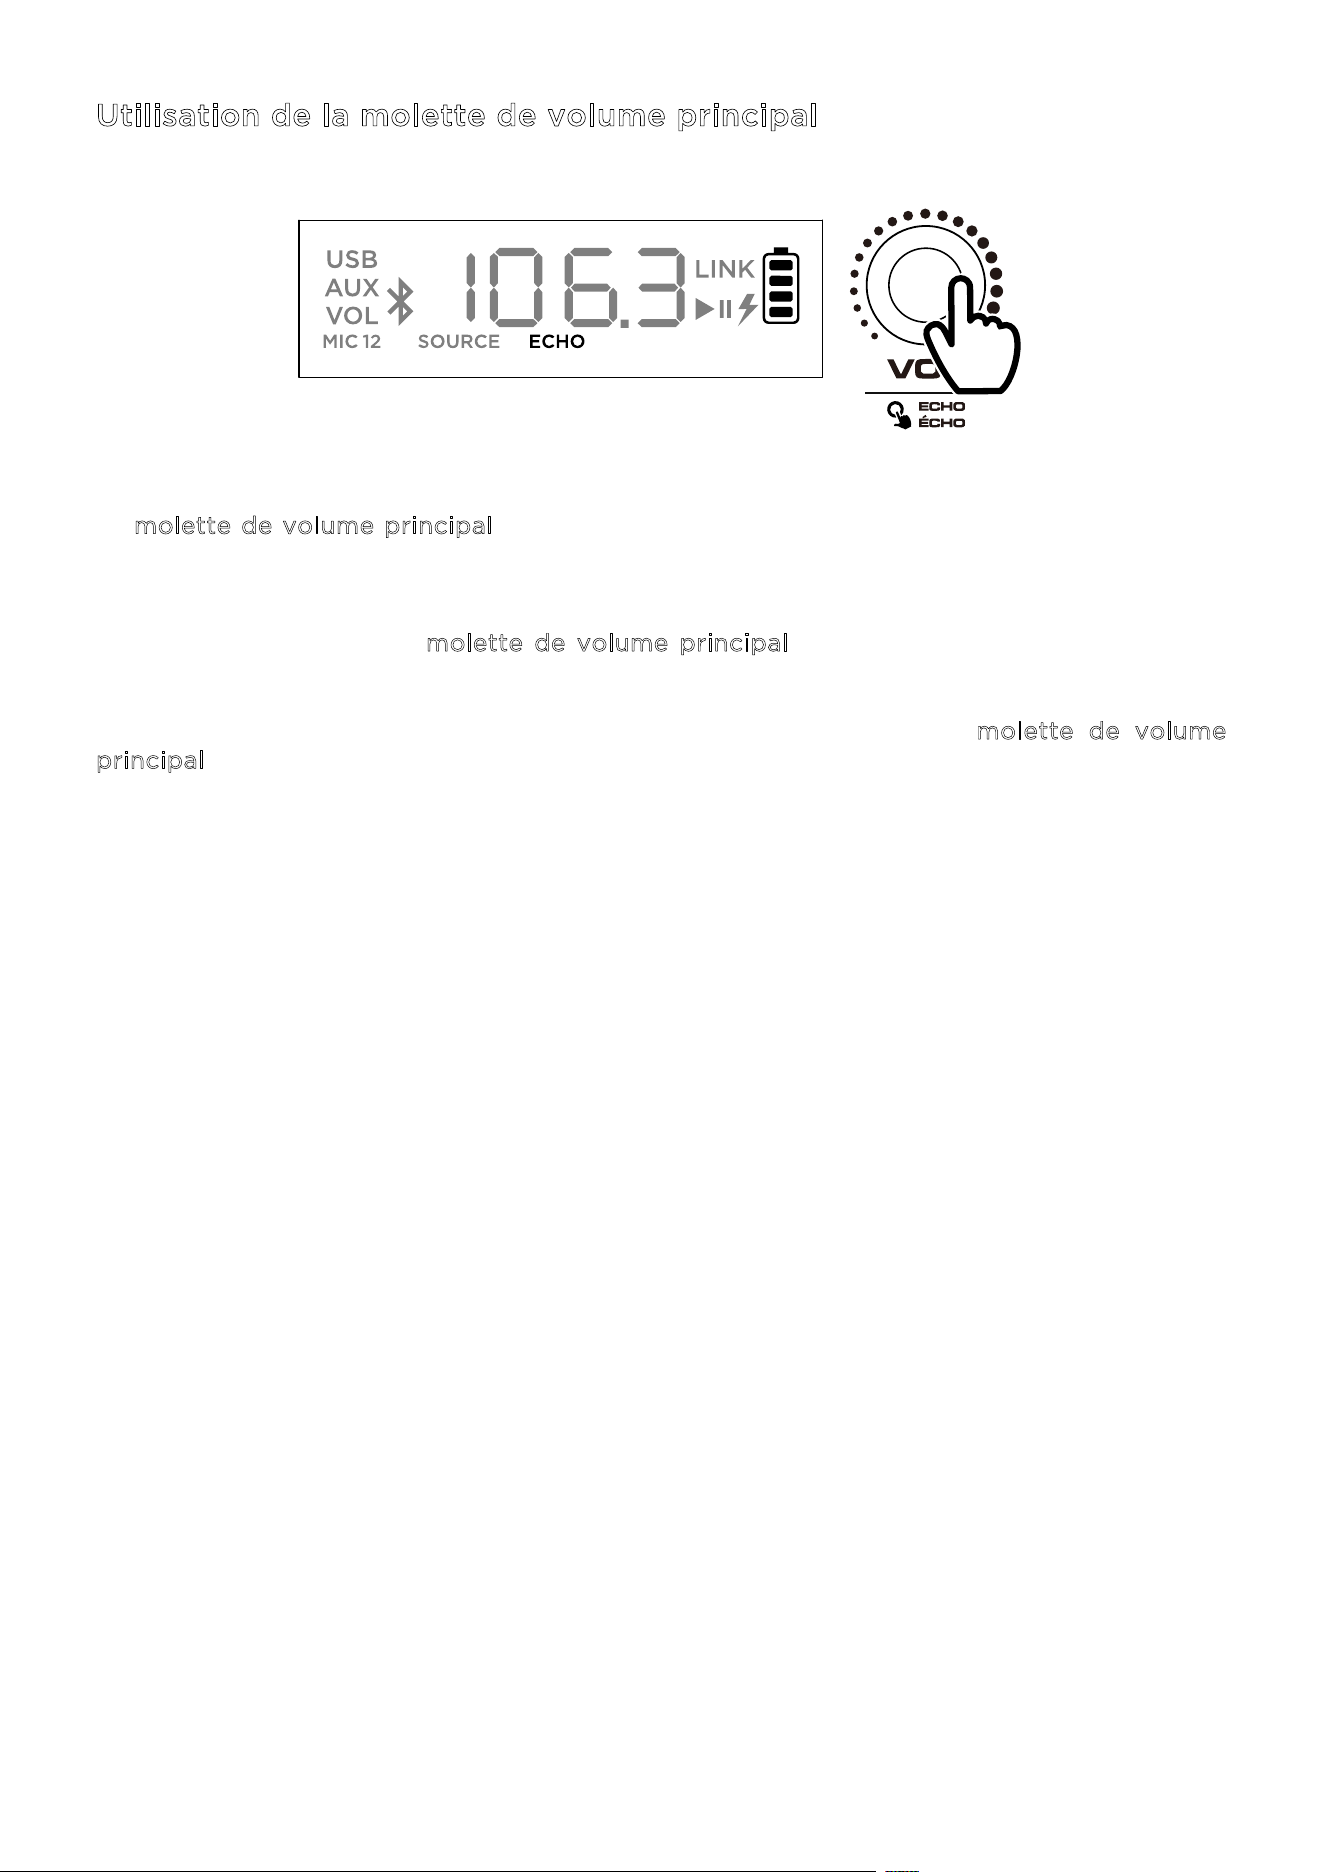
ION Audio Total PA™ Apex User Guide 66
Utilisation de la molette de volume principal
La m
olette de volume principal contrôle par défaut le volume principal de tous les canaux.
Appuyez sur la molette pour activer ou désactiver l'eet d'écho, et faites-la tourner pour
changer le réglage.
Si vous ne touchez pas la m
olette de volume principal pendant cinq secondes, l'achage
reviendra au volume principal.
Pour rétablir les paramètres d'origine du haut-parleur, maintenez la m
olette de volume
p
rincipal enfoncée pendant cinq secondes. Le haut-parleur se rallumera, et la réinitialisation
sera eectuée.
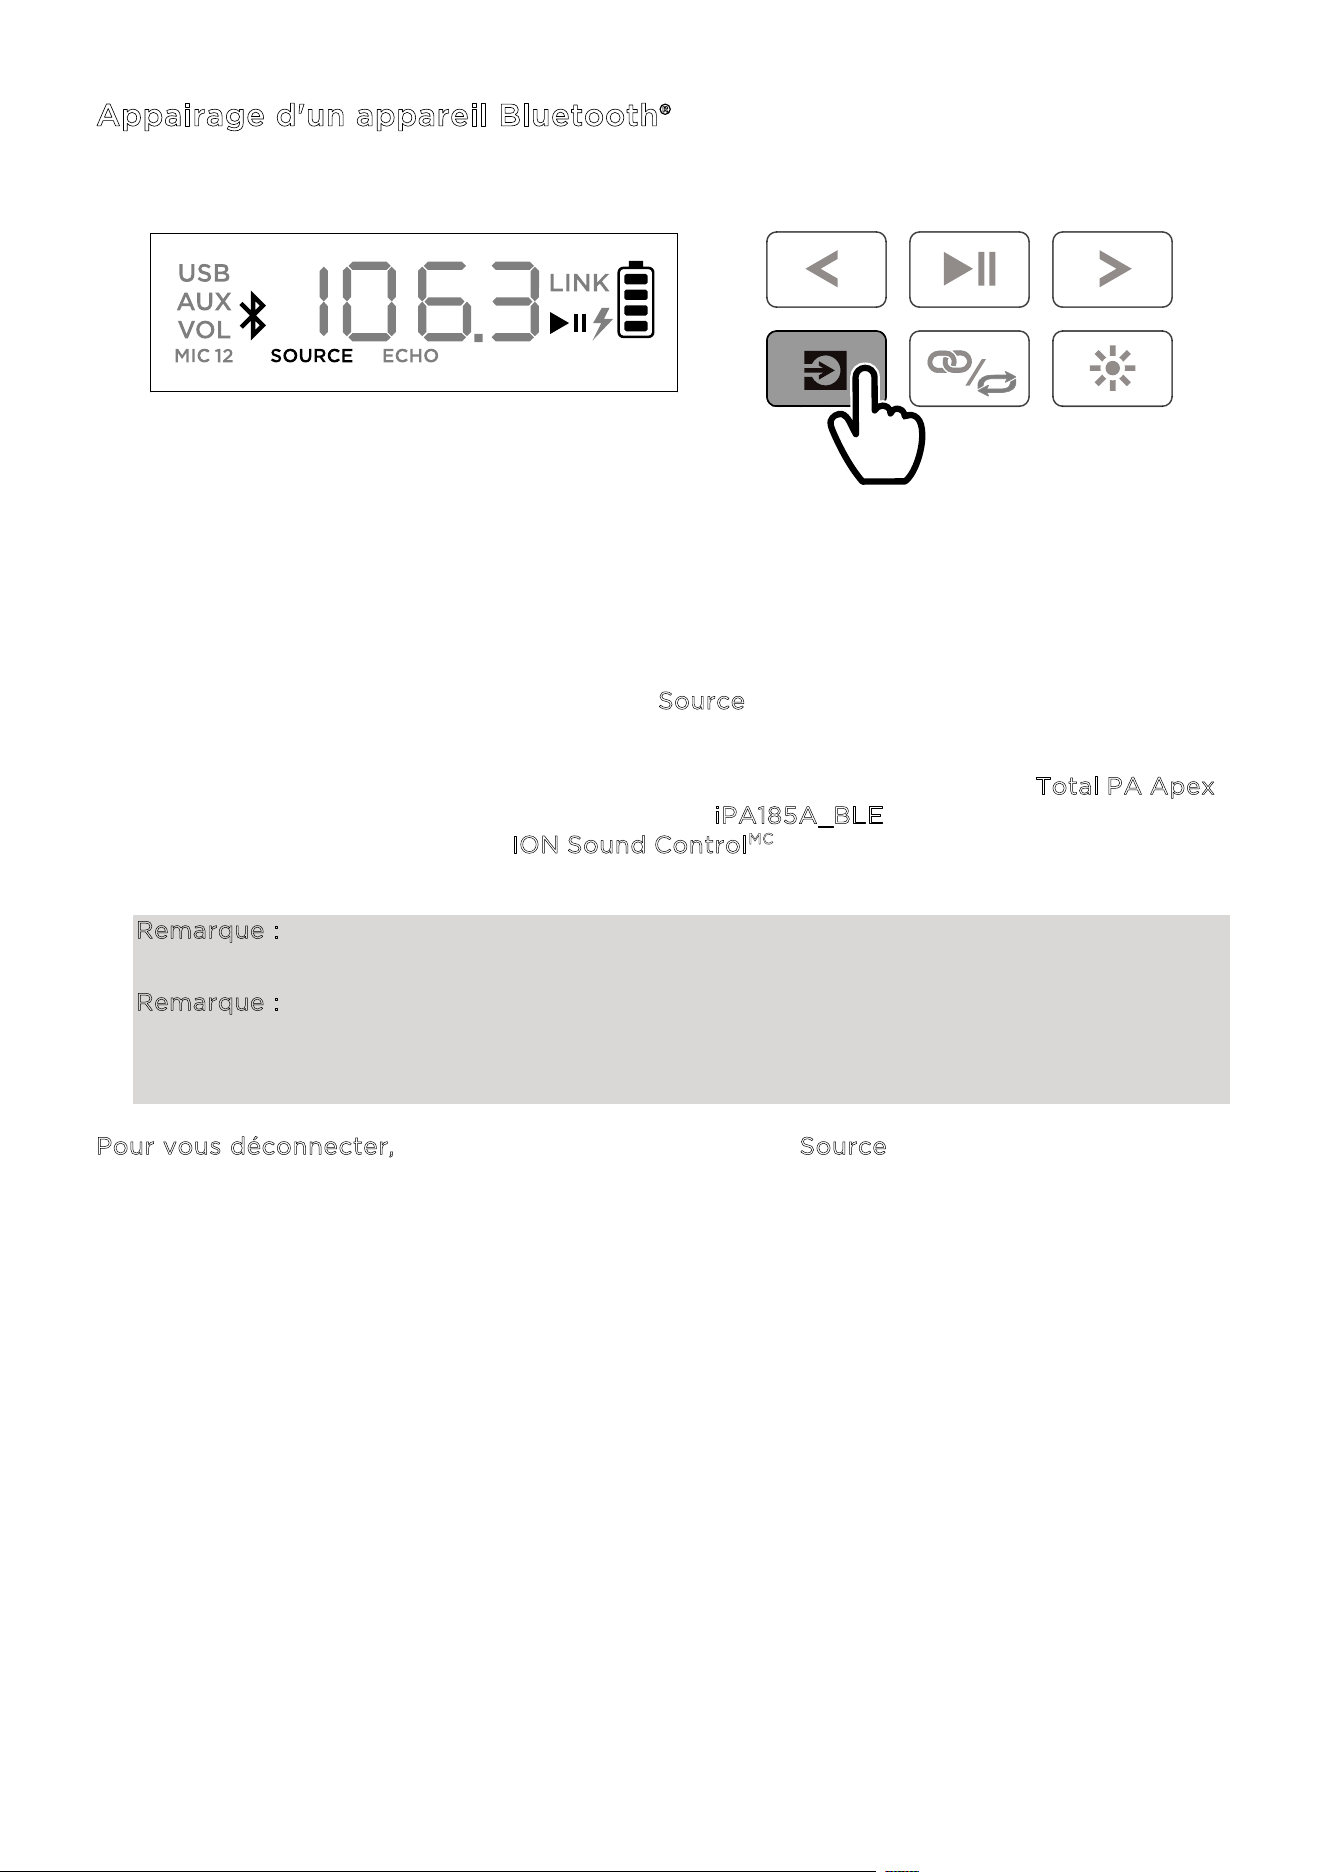
ION Audio Total PA™ Apex User Guide 67
Appairage d'un appareil Bluetooth®
1. Allumez le Total PA
MC
Apex en utilisant l'interrupteur d'alimentation.
2. Lorsque le haut-parleur est allumé, il est automatiquement en mode d'appairage
Bluetooth. Appuyez si besoin sur le bouton S
ource afin de sélectionner le mode Bluetooth.
Si les messages vocaux sont activés, vous entendrez « Bluetooth pairing ».
3. Ouvrez l'écran de configuration du Bluetooth sur votre appareil, trouvez le T
otal PA Apex,
puis connectez-vous. Ne vous connectez pas à i
PA185A_BLE ; celui-ci sert uniquement à
la connexion avec l'application I
ON Sound Control
MC
. Une fois la connexion établie, l'icône
Bluetooth clignote à l'écran et vous entendez « Bluetooth Connected ».
Remarque : si vous rencontrez des dicultés à vous connecter, sélectionnez « Oublier cet
appareil » sur votre appareil Bluetooth, puis essayez à nouveau de vous connecter.
Remarque : le volume du Total PA Apex
MC
n'a aucun impact sur le volume de votre appareil
Bluetooth. Pour bénéficier de la meilleure qualité sonore possible, réglez le volume de la
source à 100 %, puis utilisez les commandes de volume source et principal pour ajuster le
volume.
Pour vous déconnecter, appuyez deux fois sur le bouton Source du Total PA Apex
MC
.
APPUYEZ

ION Audio Total PA™ Apex User Guide 68
Relier deux haut-parleurs
1. Allumez les deux haut-parleurs Total PA
MC
Apex en actionnant leur interrupteur
d'alimentation. Vérifiez qu'ils sont bien en mode d'appairage Bluetooth et qu'ils ne sont
pas connectés à un appareil.
2. Appuyez deux fois sur le bouton Stereo-Link
MC
/répétition d'un des haut-parleurs (le haut-
parleur principal qui contrôlera les deux), puis sur le bouton Stereo-Link
MC
/répétition du
deuxième afin d'entre en mode Stereo-Link
MC
. Lorsque le lien a été établi, le mot LINK
s'affiche sur l'écran des deux haut-parleurs.
3. Connectez-vous au haut-parleur principal par Bluetooth.
Pour vous déconnecter, appuyez deux fois sur le bouton Stereo-Link
MC
/répétition.
Remarque : pour que la connexion soit bonne, les haut-parleurs doivent être à 26 m (85') au
maximum l'un de l'autre.
Remarque : le micro sans fil ne peut être connecté qu'à un seul haut-parleur (le plus proche)
en Stereo-Link
MC
. Si vous utilisez deux haut-parleurs Total PA
MC
Apex, vous devrez relier la
sortie mixage du premier à l'entrée source en XLR du second.
Remarque : le Total PA
MC
Apex n'est pas compatible avec les précédents modèles de haut-
parleurs ION. Pour connecter un modèle plus ancien, vous devez utiliser un câble XLR (non
inclus). Branchez le câble XLR à la sortie mixage du Total PA
MC
Apex et au port XLR de l'ancien
modèle.
APPUYEZ DEUX FOIS
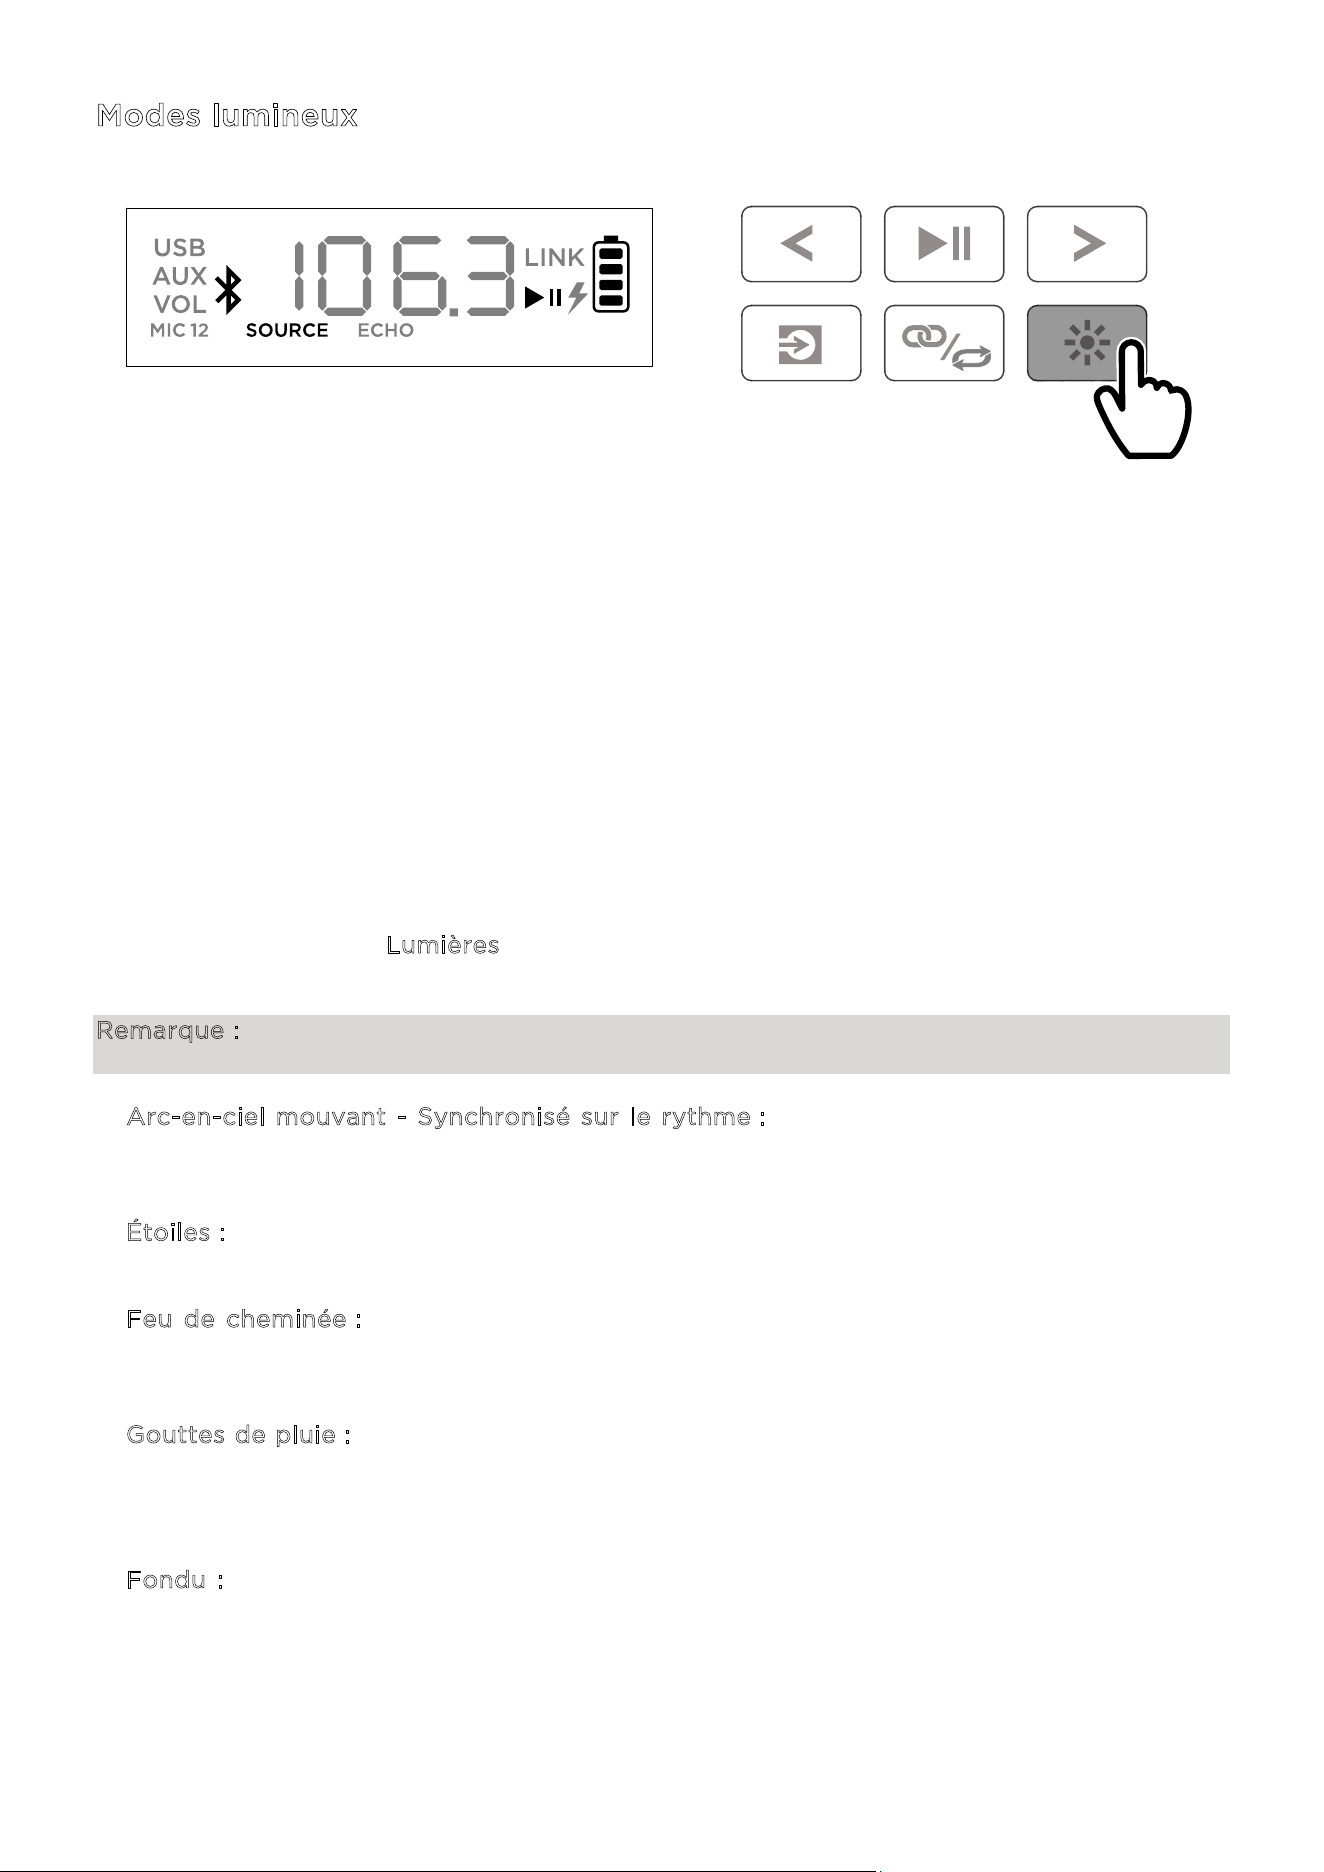
ION Audio Total PA™ Apex User Guide 69
Modes lumineux
Le Total PA
MC
Apex est doté de deux lumières sur les côtés, six lumières de haut-parleur
d'aigus et quatre lumières de haut-parleur de basses. Toutes les LED peuvent être contrôlées
individuellement.
Lorsque le haut-parleur est allumé, une lumière rouge s'élève du bas vers le haut de l'appareil,
utilisant toutes les LED. Après être restées allumées pendant deux secondes, les LED
commencent à s'estomper.
Après cette animation de démarrage, toutes les LED clignotent lentement en bleu jusqu'à ce
qu'un appareil Bluetooth soit connecté au haut-parleur. Une fois l'appairage eectué, toutes
les LED clignotent en bleu deux fois, avant de revenir au mode lumineux sélectionné en
dernier.
Appuyez sur le bouton Lumières pour choisir parmi les douze modes de LED du Total PA
MC
Apex.
Remarque : pour obtenir les meilleurs effets lumineux possibles, il peut être nécessaire
d'augmenter le volume de votre appareil connecté ou de la source d'entrée.
• A
rc-en-ciel mouvant - Synchronisé sur le rythme : les couleurs de l'arc-en-ciel tournent
dans le sens inverse des aiguilles d'une montre autour du haut-parleur. Plus la musique
contient de fréquences basses, plus la lumière tourne vite.
• É
toiles : toutes les LED scintillent d'une couleur aléatoire. Plus la musique contient de
fréquences basses, plus cet eet est rapide.
• F
eu de cheminée : les lumières scintillent en rouge, jaune et orange, et les lumières des
côtés montent et descendent. Le niveau du « feu » est déterminé par les fréquences basses
de la musique.
• G
outtes de pluie : Des lumières colorées tombent des LED du haut-parleur d'aigus et des
côtés. Lorsque les lumières atteignent les LED du bas, celles du haut-parleur de basses
éclaboussent comme de l'eau avec la même couleur, se répétant de bord à bord. Quatre
sources de gouttes de pluie tombent en même temps.
• F
ondu : les lumières du haut-parleur de basses et du haut-parleur d'aigus se fondent de
droite à gauche, et les lumières des côtés se fondent de haut en bas.
APPUYEZ

ION Audio Total PA™ Apex User Guide 70
• Étoiles rebondissantes : des lumières s'écoulent sur les côtés. Lorsqu'elles se rejoignent au
milieu de la partie inférieure du haut-parleur, elles rebondissent vers le haut en prenant la
couleur suivante du spectre avant de retomber. Les lumières du haut-parleur de basses
palpitent dans la nouvelle couleur lorsque les lumières rebondissent au centre, se répétant
en suivant les couleurs du spectre.
• V
agues horizontales - Synchronisé sur le rythme : trois vagues d'une couleur passent et,
après s'être déplacées du coin supérieur gauche au coin inférieur droit, de nouvelles vagues
de la couleur suivante apparaissent. Les vagues s'accélèrent ou ralentissent en fonction des
fréquences basses de la musique.
• S
ynchronisé sur le rythme : toutes les LED montent et descendent en fonction des
fréquences basses de la musique. La couleur passera par tout le spectre.
• C
ycle bicolore : un côté des LED (dont deux du haut-parleur d'aigus et une de la lumière
latérale) ache une couleur tandis que l'autre côté ache avec une couleur voisine du
spectre.
• C
ycle de couleurs : toutes les LED gardent la même couleur tout en parcourant le spectre.
• C
ouleur fixe : toutes les LED restent de la même couleur (celle-ci peut être définie dans
l'application ION Sound Control
MC
). La couleur par défaut est le bleu. Vous pouvez choisir
parmi quinze couleurs dans l'application ION Sound Control
MC
.
• A
léatoire : les LED passent par tous les modes lumineux de façon aléatoire (à part Couleur
fixe) en changeant toutes les dix secondes.
• É
teint : toutes les LED s'éteignent.
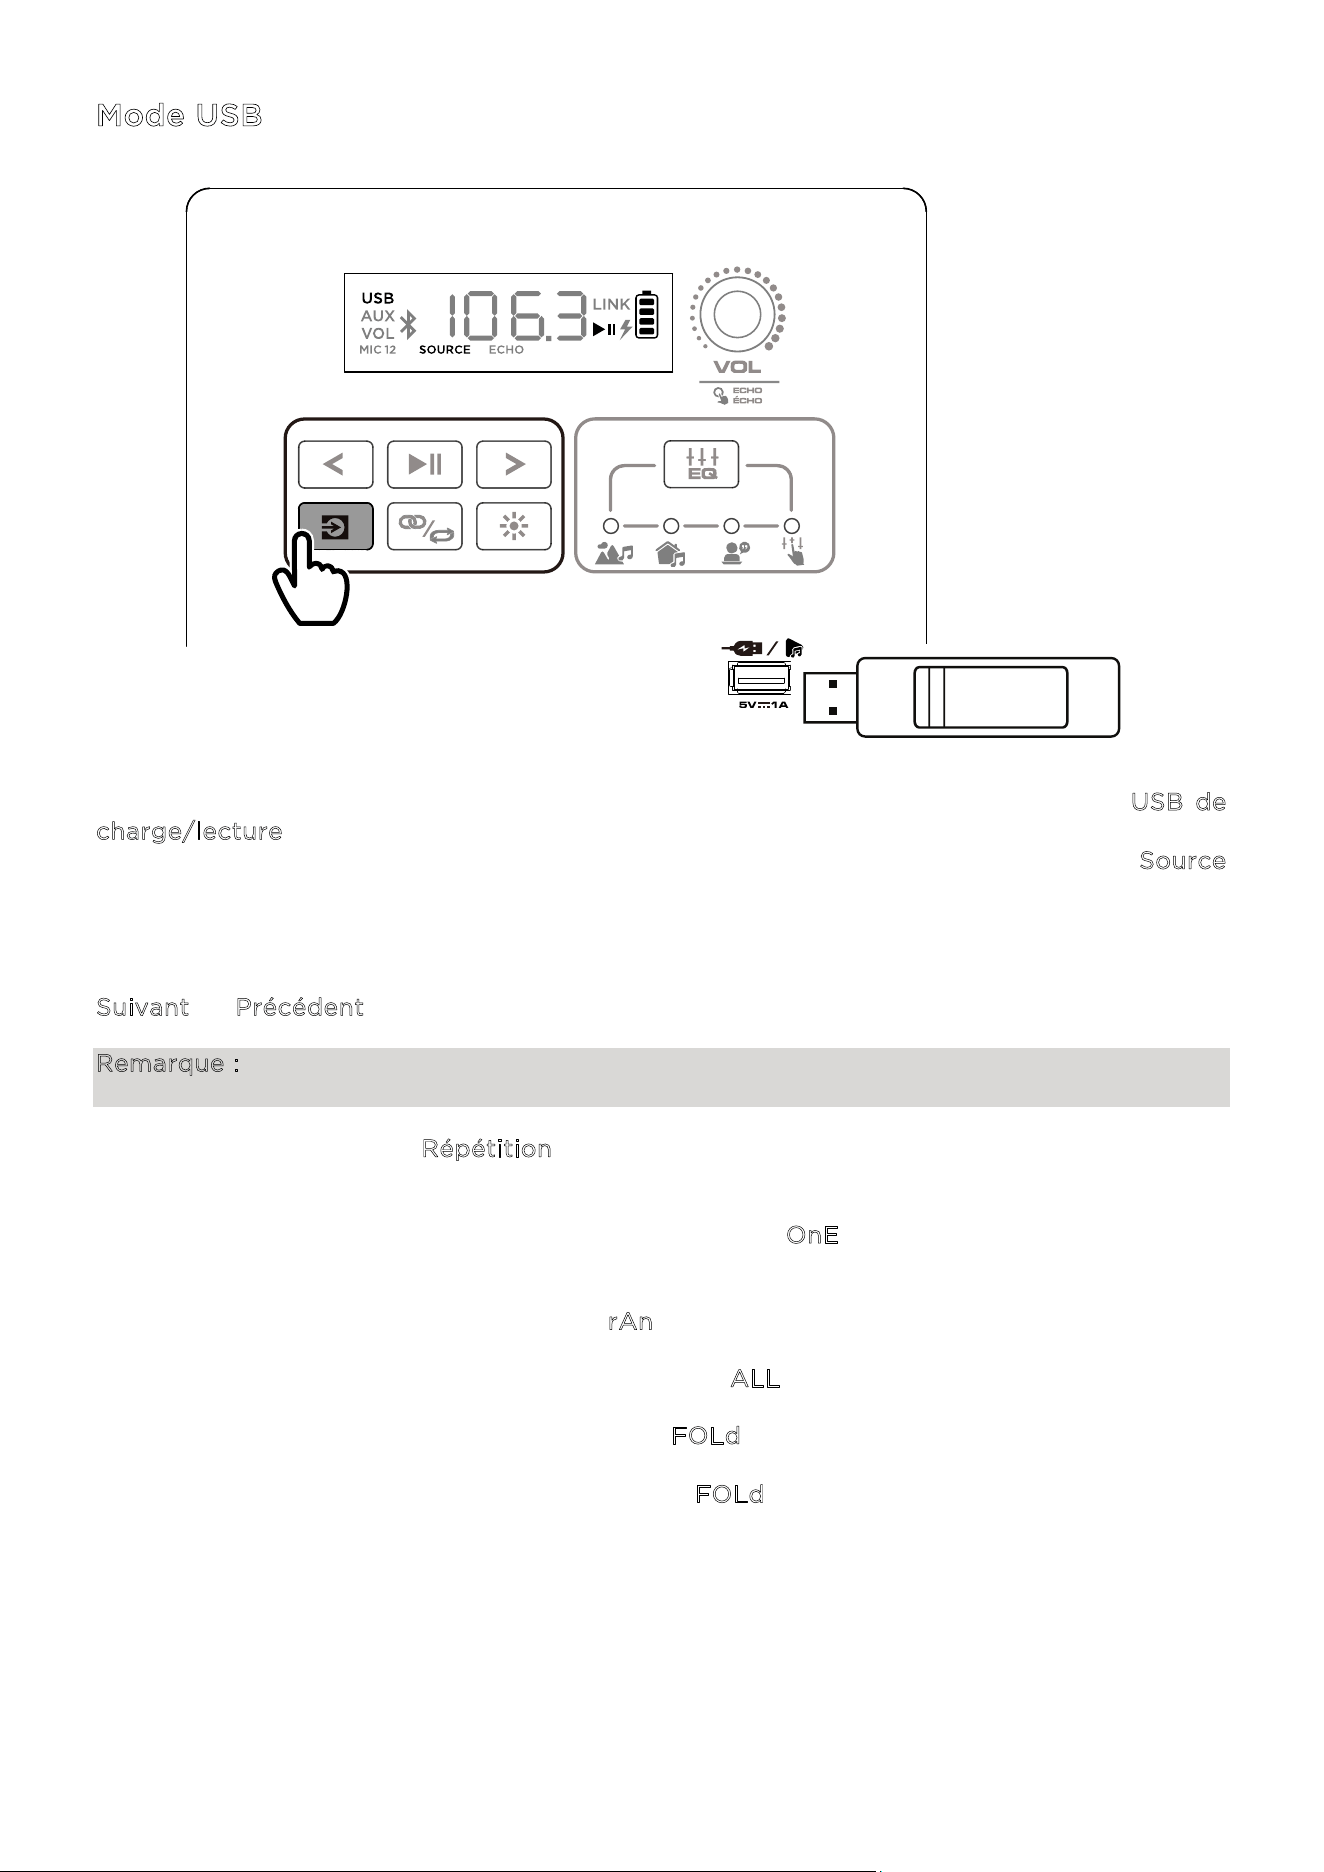
ION Audio Total PA™ Apex User Guide 71
Mode USB
Lorsqu'un support USB contenant des fichiers compatibles est inséré dans le port USB de
c
harge/lecture, le Total PA
MC
Apex passe automatiquement en mode USB. Si le support USB
est déjà inséré et que vous utilisez actuellement un autre mode, appuyez sur le bouton S
ource
jusqu'à ce que le mode USB soit sélectionné. Le Total PA
MC
Apex lira automatiquement le
premier fichier MP3 compatible. Les fichiers sont lus sont lus dans l'ordre alphabétique à la
racine, puis alphabétiquement par dossier, puis alphabétiquement par piste. La lecture prend
fin une fois que tous les fichiers du support USB ont été lus. Maintenez appuyé le bouton
S
uivant ou Précédent pour avancer ou reculer dans une piste.
Remarque : le support USB doit contenir des fichiers MP3 compatibles pour qu'elle apparaisse
à l'écran.
Appuyez sur le bouton R
épétition pour choisir parmi les options de répétition (des
abréviations seront achées à l'écran) :
• Lire en boucle la piste actuelle du support USB (O
nE). C'est le mode par défaut à
l'allumage.
• Lire les pistes dans un ordre aléatoire (r
An).
• Lire en boucle toutes les pistes du support USB (A
LL).
• Lire en boucle les pistes du dossier actuel (F
OLd). Le dossier utilisé est basé sur la piste
en cours de lecture au moment de l'activation. Par exemple, lorsqu'une piste à la racine du
support est en cours de lecture, l'activation de F
OLd ne répétera que les pistes de la racine.
Si la piste est dans le dossier A, seules les pistes du dossier A seront répétées.
APPUYEZ
ION Audio Total PA™ Apex User Guide 72
Application de commande
IMPORTANT : pour garantir la meilleure utilisation possible de l'application, veuillez utiliser la
version la plus récente d'Android ou d'iOS sur votre appareil.
Suivez les étapes suivantes pour télécharger l'application gratuite sur votre appareil :
1. Ouvrez l'App Store d'Apple ou Google Play sur votre appareil, puis cherchez l'application
I
ON Sound Control
MC
.
2. Suivez les instructions à l'écran pour télécharger et installer l'application. Une fois
téléchargée, l'application I
ON Sound Control
MC
apparaîtra sur l'écran d'accueil de votre
appareil.
3. Connectez votre appareil au Total PA
MC
Apex par Bluetooth. Consultez la section
A
ppairage d'un appareil Bluetooth® pour découvrir comment faire.
4. Lancez l'application ION Sound Control
MC
. Si nécessaire, accordez à l'application le droit
d'accéder aux services Bluetooth et de localisation de votre appareil.
5. Appuyez sur l'icône T
otal PA
MC
Apex pour passer à l'écran suivant, où vous pouvez utiliser
l'application pour contrôler plusieurs fonctions du haut-parleur :
• V
olume principal : réglez le volume du haut-parleur principal.
• S
élection de source : choisissez la source à utiliser (Bluetooth, USB ou AUX).
• V
olume de source : réglez le volume entrant pour les sources Bluetooth, USB et AUX.
• V
olume Mic 1 : réglez le volume du micro sans fil.
• V
olume Mic 2 : réglez le volume des entrées des micros 6,35 mm (1/4") et XLR.
• E
Q : réglez l'égalisation du haut-parleur.
• É
cho du micro : activez ou désactivez l'eet d'écho du micro.
• M
essages vocaux : activez ou désactivez les messages vocaux.
• A
ssistance : allez sur ionaudio.com pour contacter l'assistance technique et consulter
les informations de garantie et les questions fréquentes.
• E
ffet lumineux : choisissez l'eet lumineux.
• M
ises à jour du micrologiciel : restez à jour grâce à l'installation du dernier
micrologiciel.
ION Audio Total PA™ Apex User Guide 73
S
i le son est déformé : il peut être nécessaire d'ajuster le niveau de vos sources et du Total
PA
MC
Apex pour un mixage correct.
i. Commencez par régler le volume de la source au maximum.
ii. Ensuite, utilisez la molette de v
olume de canal (VOL) du Total PA
MC
Apex pour
atteindre un niveau approprié.
iii. Enfin, réglez le v
olume principal à un niveau approprié.
Si le son est encore déformé, essayez de baisser le volume de la source, puis le v
olume
d
e canal (VOL) du Total PA
MC
Apex sur le canal en cours d'utilisation.
J
'entends un bourdonnement quand des câbles sont branchés :
• Débranchez les câbles des prises d'entrée pour vérifier s'il s'agit d'un câble défectueux.
• Vérifiez que les câbles audio ne sont pas près de câbles électriques.
• Branchez les câbles électriques de tout l'équipement audio sur des prises qui partagent la
même mise à la terre.
S
'il y a trop de basses : essayez d'ajuster l'égalisation de la source ou sur le Total PA
MC
Apex
afin de diminuer le niveau de basses. Cela vous permettra de jouer la musiquer plus fort avant
qu'elle ne sature (distorsion).
Q
ue faire si le micro sans fil ne fonctionne pas ?
• Vérifiez qu'il contient des piles.
• Insérez deux piles AA neuves (non incluses) dans le sens indiqué. Si le Total PA
MC
Apex est
allumé, le micro devrait s'y connecter automatiquement. Si ce n'est pas le cas, maintenez
appuyés les boutons +
et - du micro pendant trois secondes pour réinitialiser la connexion.
S
i vous entendez un sifflement aigu lors de l'utilisation d'un micro : c'est probablement un
eet Larsen. Ne dirigez pas le micro vers le haut-parleur.
S
i la musique est plus forte que le micro :
i. Commencez par baisser le volume de la source en utilisant la molette de v
olume de
c
anal (VOL) du Total PA
MC
Apex.
ii. Ensuite, vérifiez que le volume du micro est au maximum (le cas échéant), puis
augmentez le v
olume de canal (VOL) correspondant sur le Total PA
MC
Apex.
RÉSOLUTION DES PROBLÈMES
ION Audio Total PA™ Apex User Guide 74
So vous n'arrivez pas à connecter votre appareil audio au Total PA
MC
Apex par Bluetooth :
• Rapprochez autant que possible votre appareil (smartphone, tablette, etc.) du Total PA
MC
Apex
lors de la tentative de connexion. Vérifiez qu'il n'y a aucun obstacle entre l'appareil
et le Total PA
MC
Apex (murs, meubles, etc.).
• Réinitialisez la connexion Bluetooth sur le Total PA
MC
Apex afin de le déconnecter de tous
les autres appareils audio, puis relancez le processus de recherche. Si cela ne fonctionne
pas immédiatement, éteignez le Total PA
MC
Apex, puis rallumez-le. Consultez la section
A
ppairage d'un appareil Bluetooth® Device pour plus de détails.
• Réinitialisez la connexion Bluetooth sur votre appareil audio en désactivant et réactivant
le Bluetooth. Vous le trouverez dans le menu Bluetooth des paramètres de votre téléphone
ou autre appareil audio.
Si cela ne fonctionne pas, mais que vous aviez déjà réussi à vous connecter au Total PA
MC
Apex
, trouvez le Total PA
MC
Apex dans la liste des appareils disponibles ou connus dans
le menu Bluetooth de votre appareil audio, appuyez sur l'icône d'engrenage ou l'icône « i »
à côté, puis sélectionnez D
issocier ou Oublier. Éteignez puis rallumez le Total PA
MC
Apex,
puis réessayez de le connecter lorsqu'il apparaît dans la liste des appareils disponibles.
Remarque : si le Total PA
MC
Apex a récemment été associé à un autre appareil audio qui
est toujours à portée, il peut être nécessaire de répéter ce processus avec cet appareil
audio pour que la déconnexion soit complète.
S
i le son se coupe lors de la lecture depuis un appareil Bluetooth, cela peut être dû au fait
que votre haut-parleur essaie de se connecter à un autre haut-parleur. Cela peut se produire
lorsque vous éteignez un haut-parleur qui était connecté à votre haut-parleur, ou si vous venez
d'allumer votre haut-parleur et qu'il est en mode Stereo-Link
MC
Pour mettre fin aux coupures,
quitter le mode Stereo-Link
MC
en appuyant deux fois sur le bouton Stereo-Link
MC
/répétition.
Sinon, vous pouvez attendre que votre haut-parleur se connecte à un autre haut-parleur, s'il y
en a un à portée.

ION Audio Total PA™ Apex User Guide 75
Spécifications techniques
Haut-parleurs Basses fréque
nces : 305 mm / 12,0”
Hautes fréquences : 25,4 mm / 1,0”
Réponse en fréquence 50 Hz – 20 kHz
Technologie sans fil Bluetooth®
- Audio Classique
Portée sans fil * Portée* Bluetooth® : jusqu'à 30,5 m / 100 ft.
Portée TWS : Up to 23 m / 75 ft.
Portée du micro sans fil* 30,5 m / 100 ft.
USB Audio : lecture de musique depuis un support USB
Système de fichiers : FAT32
Type de fichiers : MP3
Taille maximale des fichiers : 4 Go
Capacité maximale du support USB : 512 Go
Batterie Capacité de la batterie : 11,1 V, 6000 mAh
Autonomie de la batterie : de six à huit heures (50% de
volume, lumières éteintes) **
Temps de charge : jusqu'à cinq heures
Alimentation Câble : IEC 320 C13
Entrée : 100-240 V CA, 50/60 Hz, 320 W
Fusible : F5AL AC250V
Dimensions
(largeur x profondeur x hauteur)
16,21” x 12,50” x 25,63” / 411,7 x 317,5 x 651 mm
Poids 13,2 kg / 29,15 lb
Les détails peuvent être modifiés sans préavis.
* La
réception et la portée Bluetooth et sans fil peuvent être impactées par les murs,
les obstructions et les mouvements. Pour des performances optimales, placez l'appareil au
centre de la pièce de manière à ce qu'il ne soit pas bloqué par des murs, des meubles, etc.
** La durée de vie des piles peut varier en fonction de la température, de l'âge et de l'utilisation
de l'appareil.
ANNEXE

ION Audio Total PA™ Apex User Guide 76
Marques et licences
ION Audio est une marque de inMusic Brands, Inc. déposée aux États-Unis et dans d'autres pays. App Store est une marque de
Apple Inc. déposée aux États-Unis et dans d'autres pays.
Android et Google Play sont des marques déposées de Google Inc.
Le terme et les logos Bluetooth sont la propriété de Bluetooth SIG, Inc. et l'utilisation de ces marques par ION Audio est faite
sous licence.
Tous les autres noms de produits, noms de sociétés, marques ou appellations commerciales appartiennent à leurs propriétaires
respectifs.
Distributed by:
Costco Wholesale Corporation
P.O. Box 34535
Seattle, WA 98124-1535
USA
1-800-774-2678
www.costco.com
Costco Wholesale Canada Ltd.*
415 W. Hunt Club Road
Ottawa, Ontario
K2E 1C5, Canada
1-800-463-3783
www.costco.ca
* faisant aaire au Québec sous
le nom les Entrepôts Costco
Importado por:
Importadora Pri
mex S.A. de C.V.
Blvd. Magnocentro No. 4
San Fernando La Herradura
Huixquilucan, Estado de México
C.P. 52765
RFC: IPR-930907-S70
(55)-5246-5500
www.costco.com.mx
Costco Wholesale Australia Pty Ltd
17-21 Parramatta Road
Lidcombe NSW 2141
Australia
www.costco.com.au
Costco Wholesale UK Ltd /
Costco Online UK Ltd
Hartspring Lane
Watford, Herts
WD25 8JS
United Kingdom
01923 213113
www.costco.co.uk
Costco Wholesale Spain S.L.U.
Polígono Empresarial Los Gavilanes
C/ Agustín de Betancourt, 17
28906 Getafe (Madrid) España
NIF: B86509460
900 111 155
www.costco.es
Costco Wholesale Iceland ehf.
Kauptún 3-7, 210 Gardabaer
Iceland
www.costco.is
Costco France
1 avenue de Bréhat
91140 Villebon-sur-Yvette
France
01 80 45 01 10
www.costco.fr
Costco Wholesale Japan Ltd.
2 Kakuchi, 2 Gaiku, Kaneda-Nishi
361 Urikura, Kisarazu shi
Chiba, 292-0007 Japan
0570-200-800
www.costco
.co.jp
Costco Wholesale Korea, Ltd.
40, Iljik-ro
Gwangmyeong-si
Gyeonggi-do, 14347, Korea
1899-9900
www.costco.co.kr
Costco Wholesale New Zealand Limited
2 Gunton Drive
Westgate Auckland 0814
New Zealand
www.costco.co.nz
Costco (China) Investment Co., Ltd.
Room 01 Mezzanine
No. 5178, Kang Xin Highway
Pudong New District
Shanghai
China 201315
+86-21-6257-7065
Costco Wholesale Sweden AB
Box 614
114 11 Stockholm
Sweden
www.costco.se
F
ABRIQUÉ EN CHINE

ION Audio Total PA™ Apex User Guide 77
INTRODUKTION ...................................................................... 79
Förpackningens innehåll ................................................................................ 79
Support ............................................................................................................... 79
Laddning och batteriinformation ................................................................ 80
Snabbstart ........................................................................................................ 80
Balansera dina nivåer ...................................................................................... 82
INSTALLATION ........................................................................ 83
Installation av högtalarstativ ......................................................................... 83
Anslutningsschema .......................................................................................... 84
FUNKTIONER...........................................................................
85
Bakpanel ............................................................................................................. 85
DRIFT ....................................................................................... 89
Batterivård ......................................................................................................... 89
Installera batterier i den trådlösa mikrofonen .......................................... 89
Använda den trådlösa mikrofonen ............................................................. 90
Använda huvudvolymratten .......................................................................... 91
Parkoppla en Bluetooth®-enhet .................................................................... 92
Länka två högtalare ......................................................................................... 93
Ljuseffekter ....................................................................................................... 94
USB-läge ............................................................................................................. 96
Appkontroll ....................................................................................................... 97
INNEHÅLLSFÖRTECKNING

ION Audio Total PA™ Apex User Guide 78
FELSÖKNING ........................................................................... 98
APPENDIX .............................................................................. 100
Tekniska specifikationer ............................................................................... 100
Varumärken och licenser ............................................................................... 101
ION Audio Total PA™ Apex User Guide 79
Tack för att du har köpt Total PA™ Apex. Hos ION är din underhållning lika viktig för oss som
den är för dig. Därför designar vi våra produkter med ett enda mål i åtanke – att göra ditt liv
roligare och mer bekvämt.
Obs: Ladda batterierna helt innan du använder produkten för första gången. Enheten har
medvetet skickats med en reducerad batteriladdning för att säkerställa säker transport. För
optimal laddning, stäng av högtalaren medan den laddas. you first use the product, please
fully charge the batteries. Your unit was purposely shipped with a reduced battery charge to
ensure safe transit. For optimal charging, power o the speaker while charging.
Använd den medföljande strömkabeln för att ansluta enheten till ett eluttag och låt den ladda
i upp till 5 timmar. Detta hjälper till att säkerställa längsta möjliga livslängd för batteriet.
Förpackningens innehåll
Total PA™ Apex
IEC320 C13 strömkabel (150 cm / 5 fot)
Trådlös mikrofon
Högtalarstativ
Snabbstartsguide
Support
För den senaste informationen om denna produkt (dokumentation, tekniska specifikationer,
systemkrav, kompatibilitetsinformation, osv.) och produktregistrering, se i
onaudio.com.
För ytterligare produktsupport, besök i
onaudio.com/support.
INTRODUKTION
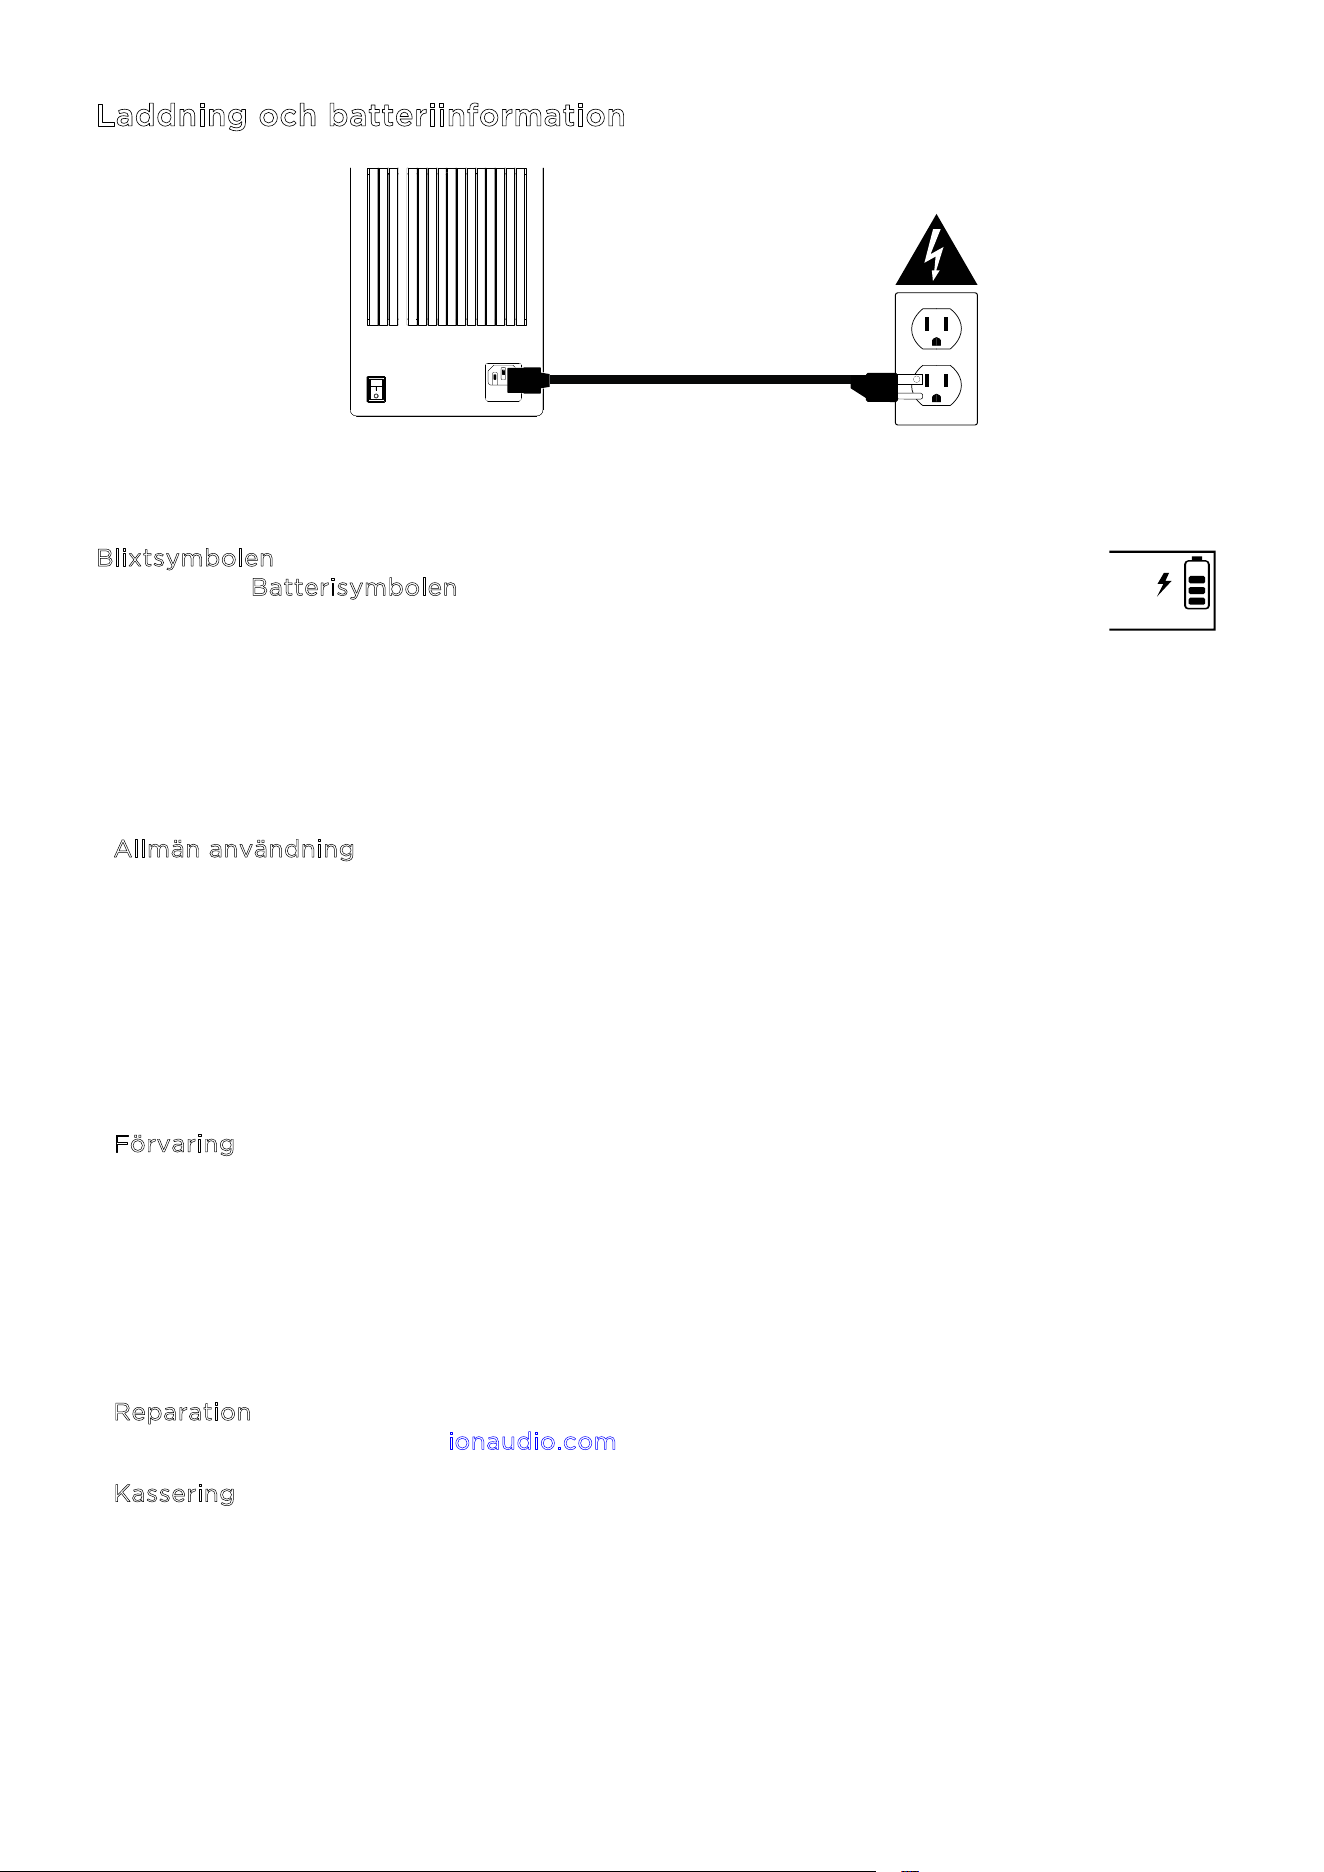
ION Audio Total PA™ Apex User Guide 80
Laddning och batteriinformation
För snabbast möjliga laddningstid, stäng av Total PA™ Apex och använd den medföljande
strömkabeln för att ansluta högtalaren till ett eluttag. En full laddning kan ta upp till 5 timmar.
B
lixtsymbolen på skärmen tänds när Total PA™ Apex är ansluten till en strömkälla
och laddas. B
atterisymbolen fylls för att visa batteriets livslängdsprocent. När
laddningen är klar försvinner blixtsymbolen, och batterisymbolen är helt fylld.
Om inget ljud spelas genom Total PA™ Apex under 20 minuter går enheten in i standbyläge
för att spara batteri. Detta kan innebära att Bluetooth-signalen är pausad, inget ljud kommer
från en enhet ansluten till aux-porten, eller att volymen är inställd på 0. För att väcka enheten,
återuppta helt enkelt ljudsignalen eller tryck på valfri knapp.
Allmän användning Ladda batteriet helt innan du använder det.
Om möjligt, undvik att ladda ur batteriet helt. Litiumjonbatterier
är underhållsfria, och batteriet håller längst när det används
mellan 30 och 80 procents laddning.
Använd inte produkten medan batteriet laddas.
Ladda inte batteriet i extremt höga (över 32 °C /90 °F) eller
extremt låga (under 32 °F/0 °C) temperaturer.
F
örvaring För bästa produktlivslängd, förvara inte produkten vid extremt
höga (över 90 °F/32 °C) eller extremt låga (under 32 °C /90 °F)
temperaturer.
För bästa produktlivslängd, förvara produkten med 50 %
batteriladdning.
Om batterinivån är låg och du inte laddar det på 6 månader kan
det permanent förlora kapacitet.
R
eparation Om batteriet inte går att ladda, kontakta ION Audio på
i
onaudio.com.
K
assering Lämna enheten till en återvinningscentral eller kassera den i
enlighet med lokala föreskrifter.
ON
ALLUMER
OFF
ÉTEINORE

ION Audio Total PA™ Apex User Guide 81
Snabbstart
1. Kontrollera att alla föremål som anges i Förpackningens innehåll finns med i
förpackningen. Titta under skumarket i lådan för att hitta strömkabeln och
mikrofonerna.
2. Studera A
nslutningsschemat.
3. Kontrollera att alla ingångsenheter (såsom mikrofoner, CD-spelare eller digitala
mediespelare) är avstängda och att deras volyminställningar är satta till ”noll”.
4. Anslut alla enheter enligt A
nslutningsschemat.
5. Slå på allt i följande ordning:
a. Ljudingångsenheter (till exempel mikrofoner, instrument, CD-spelare)
b. Total PA™ Apex
6. Justera volymen på dina anslutna enheter. Ställ in ljudkällans (mikrofon, instrument,
Bluetooth-enheter) volym på högsta nivå. Justera sedan S
ource-volymratten för den
valda kanalen på Total PA Apex till en lämplig nivå. Slutligen, justera h
uvudvolymen på
Total PA™ Apex till en lämplig nivå. För en detaljerad steg-för-steg-beskrivning för att
ställa in dina nivåer, se avsnittet B
alansera dina nivåer på nästa sida.
7. När du är klar med att använda Total PA™ Apex, stäng av allt i följande ordning:
a. Total PA™ Apex
b. Ljudingångsenheter
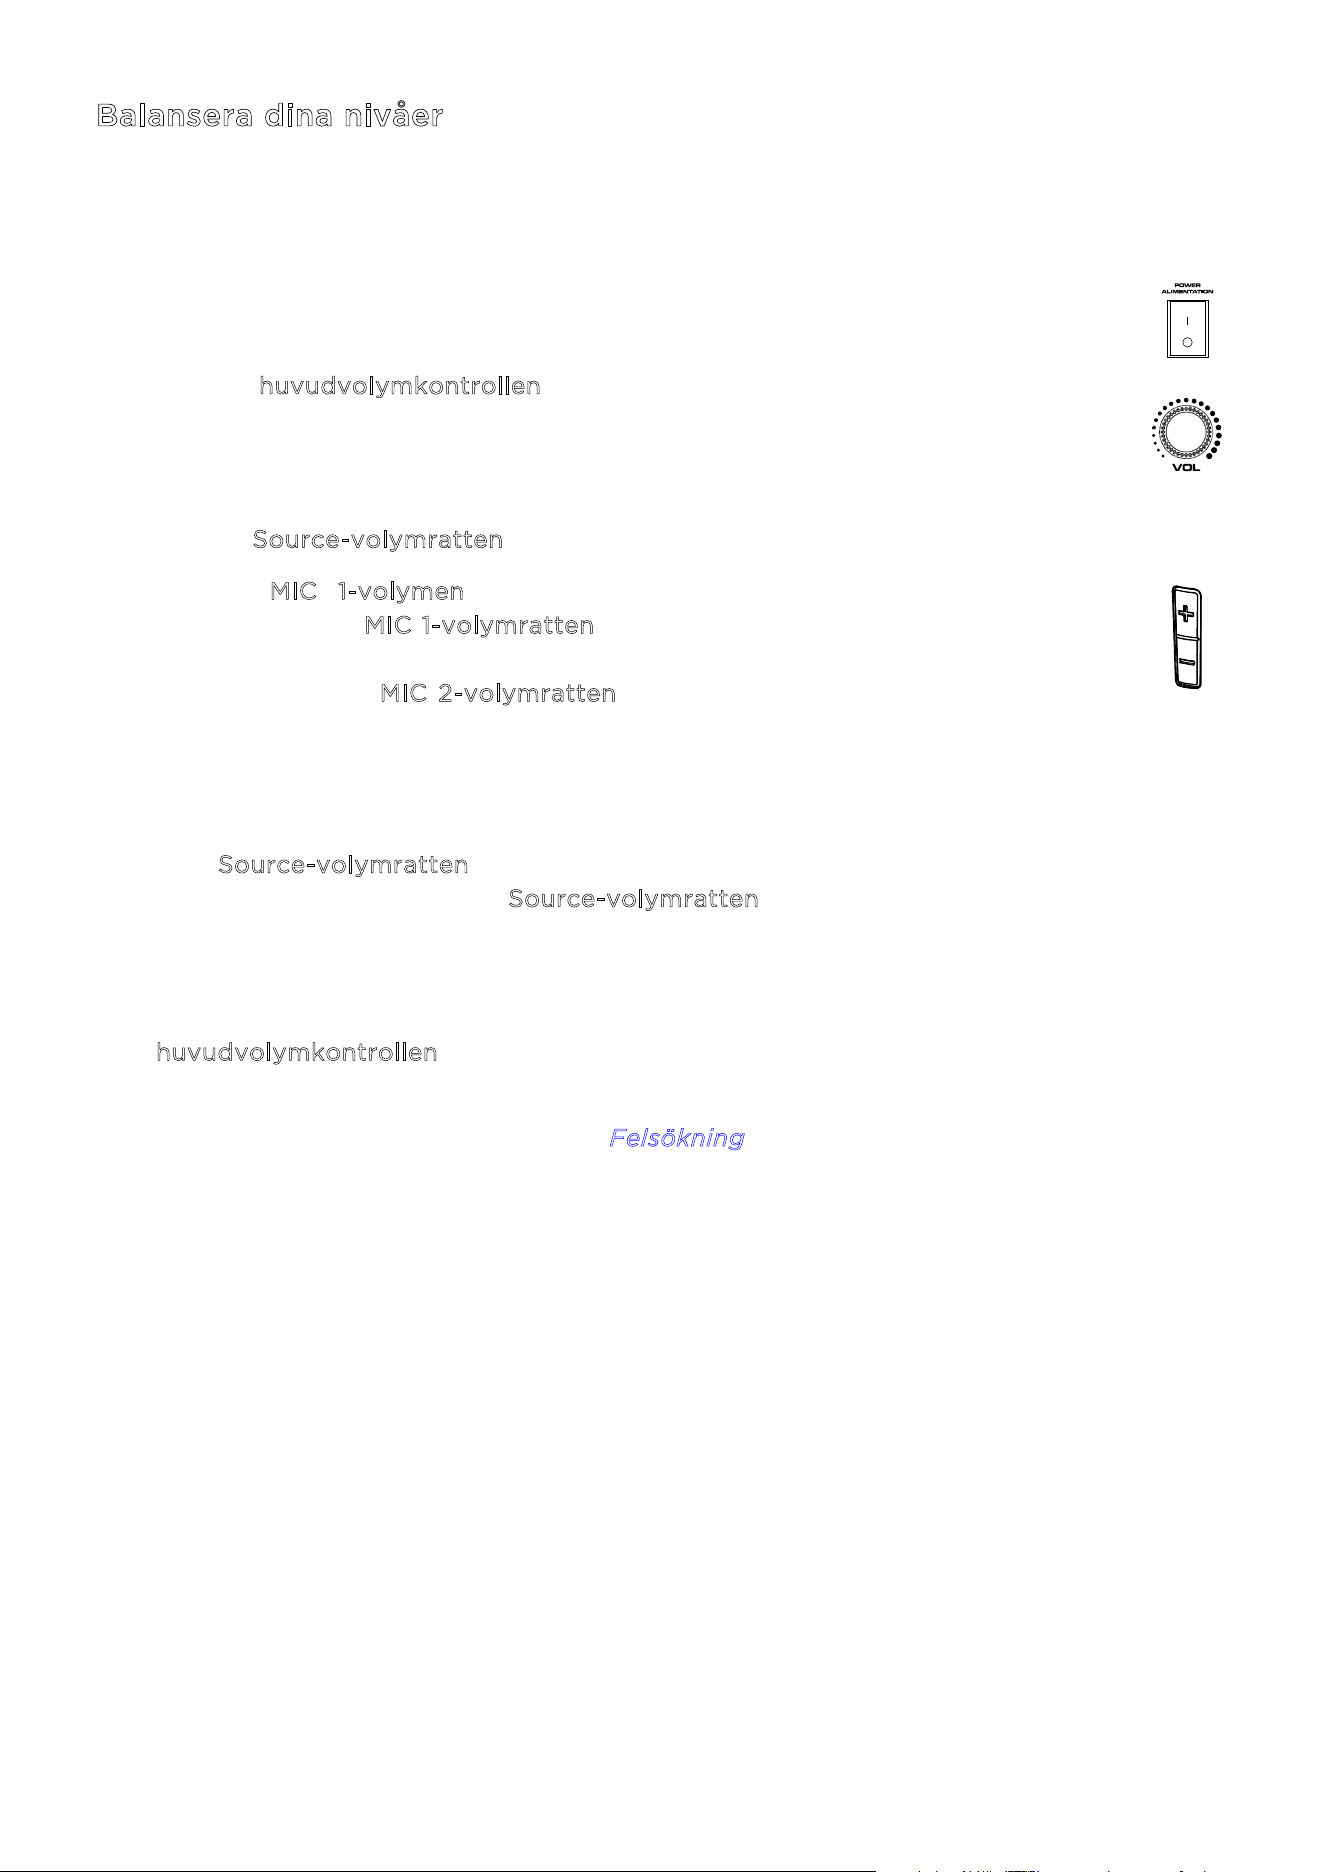
ION Audio Total PA™ Apex User Guide 82
Balansera dina nivåer
Den här processen visar hur du snabbt kan balansera din mikrofonsignal och signalen från din
källenhet (Bluetooth, Aux, USB). Nivåerna för mikrofonerna, källan och huvudvolymen kan
ställas in mellan 0 och 30.
1. Slå på Total PA Apex och den trådlösa mikrofonen. Anslut din föredragna
Bluetooth-, Aux- eller USB-enhet.
2. Använd h
uvudvolymkontrollen på högtalaren och ställ in volymen på cirka 10
eller lägre medan du balanserar dina nivåer. Detta gör att du kan ställa in
nivåerna till en tydlig och hörbar nivå utan att de blir överväldigande. Du kan
justera detta igen senare när en balans har uppnåtts.
3. Justera S
ource-volymratten till 0. Vi kommer att höja den i ett senare steg.
4. Ställ in M
IC 1-volymen med hjälp av antingen +/- volymkontrollen på
mikrofonen eller M
IC 1-volymratten på högtalaren. Att ställa in nivån på 25 är
en bra utgångspunkt om du är osäker. Om du använder en andra, trådbunden
mikrofon, använd M
IC 2-volymratten för att ställa in nivåerna på samma sätt
tills båda mikrofonerna är tydligt hörbara.
5. Ställ nu in volymen på din Aux- eller Bluetooth-källenhet (telefon, surfplatta,
osv.) till 100 %. Detta garanterar en stark signal.
6. Med S
ource-volymratten fortfarande inställd på 0, starta uppspelning på din
enhet och vrid långsamt upp S
ource-volymratten på högtalaren tills den når en
tydlig och hörbar nivå. Om du använder en mikrofon, ställ in källans volymnivå
så att du fortfarande kan höra mikrofonen över musiken.
7. När mikrofonen och ljudkällan är tydligt hörbara och balanserade, använd
h
uvudvolymkontrollen för att ställa in högtalarens ljudutgångsnivå till önskad
volym.
För specifika felsökningssteg, se avsnittet F
elsökning.
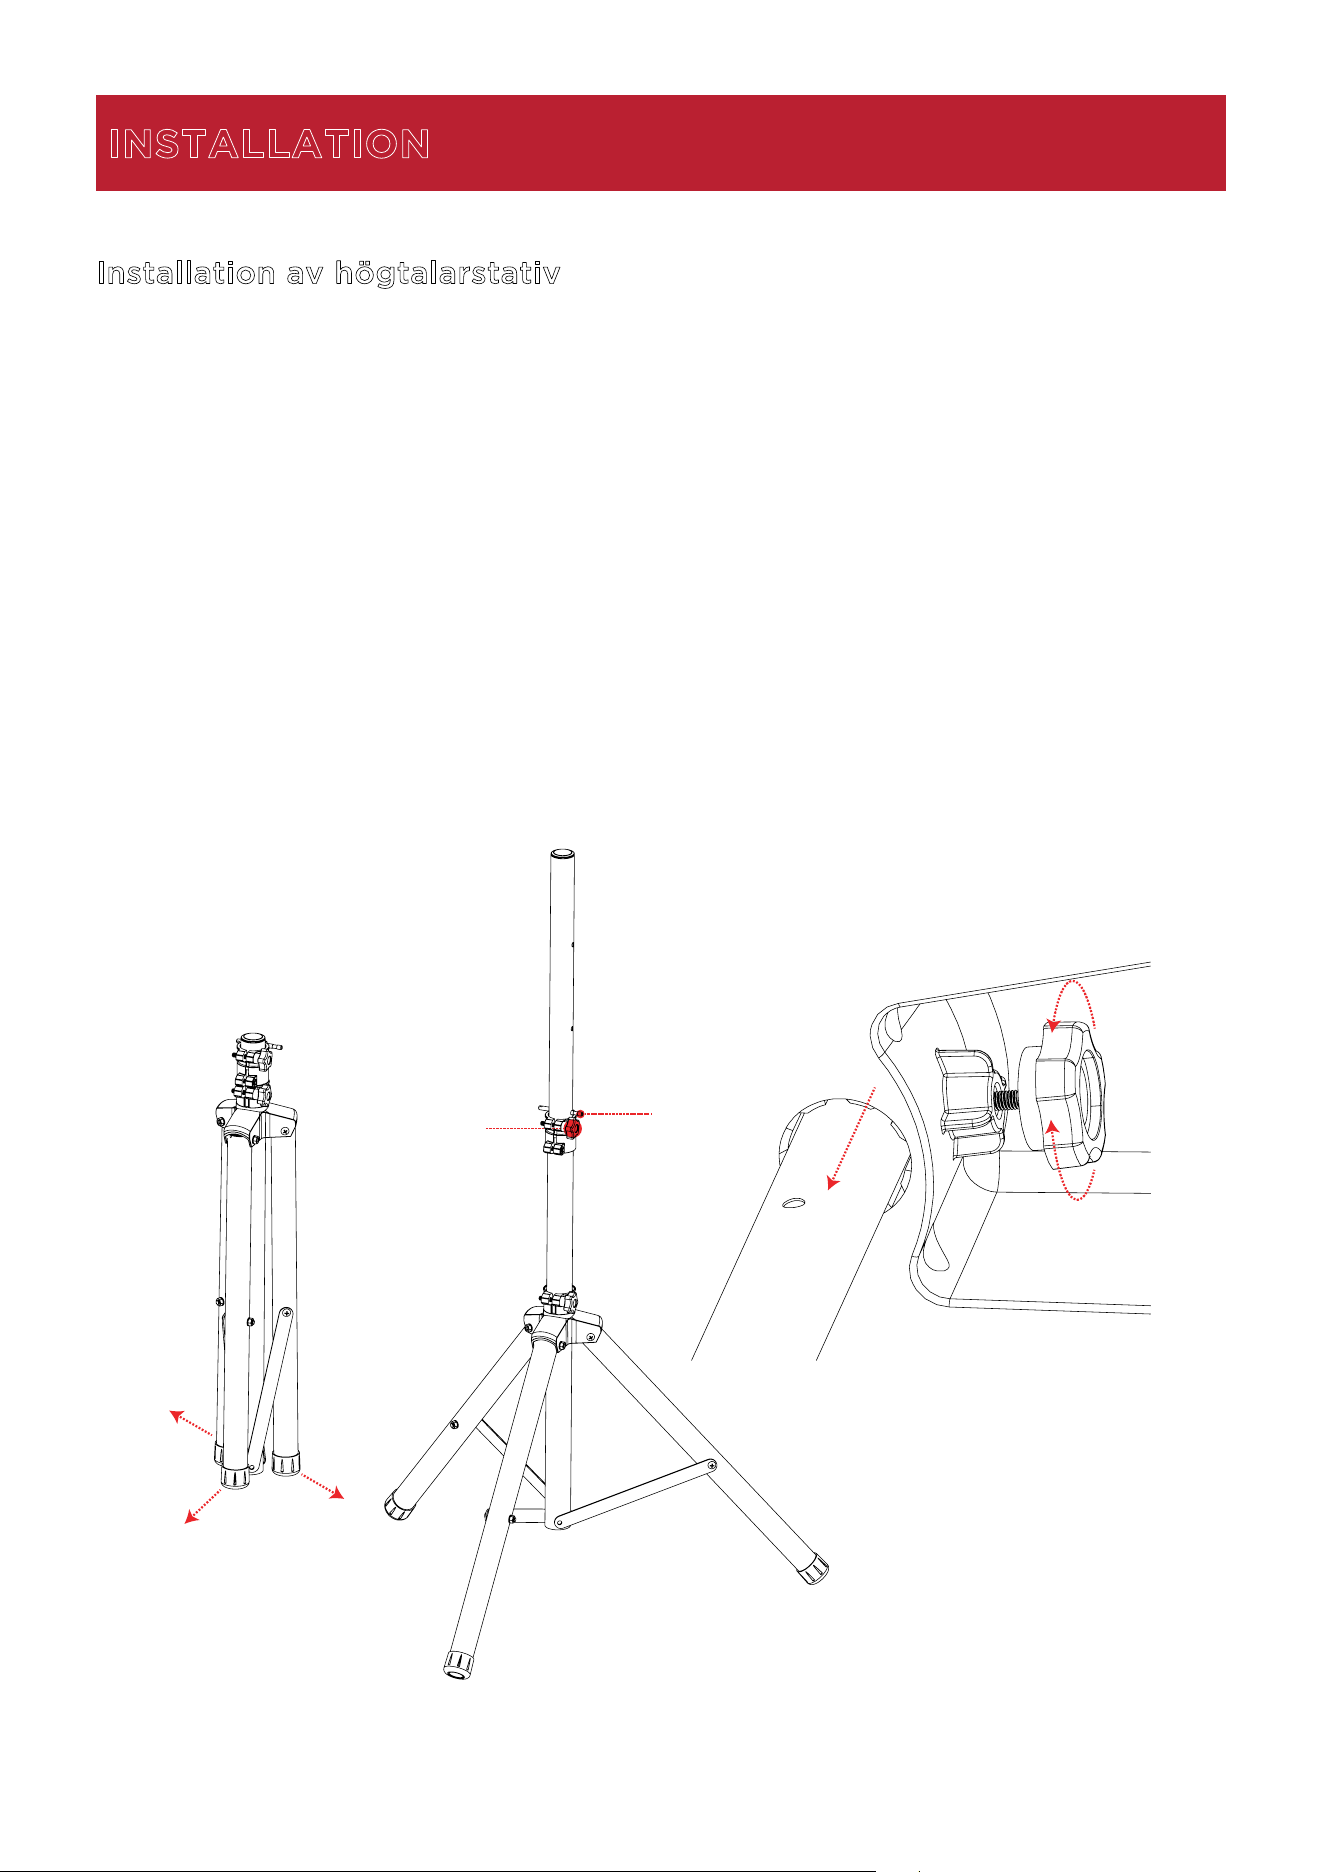
ION Audio Total PA™ Apex User Guide 83
Installation av högtalarstativ
1.
Fäll ut högtalarstativets tre ben helt på en plan och stabil yta.
2.
Höj monteringsstången till önskad höjd och dra åt justeringsratten på sidan.
3.
Sätt in sprinten i det nedre sprinthålet så att monteringsstången stannar på den inställda
höjden.
4.
På Total PA™ Apex, justera den nedre ratten moturs så att skruven inte blockerar
öppningen.
5.
Rikta in Total PA™ Apex monteringshål med högtalarstativets stång och placera den på
stången.
6.
Dra åt monteringsratten medurs på Total PA™ Apex för att säkra den på stången.
INSTALLATION
1
2
3
5
4
6
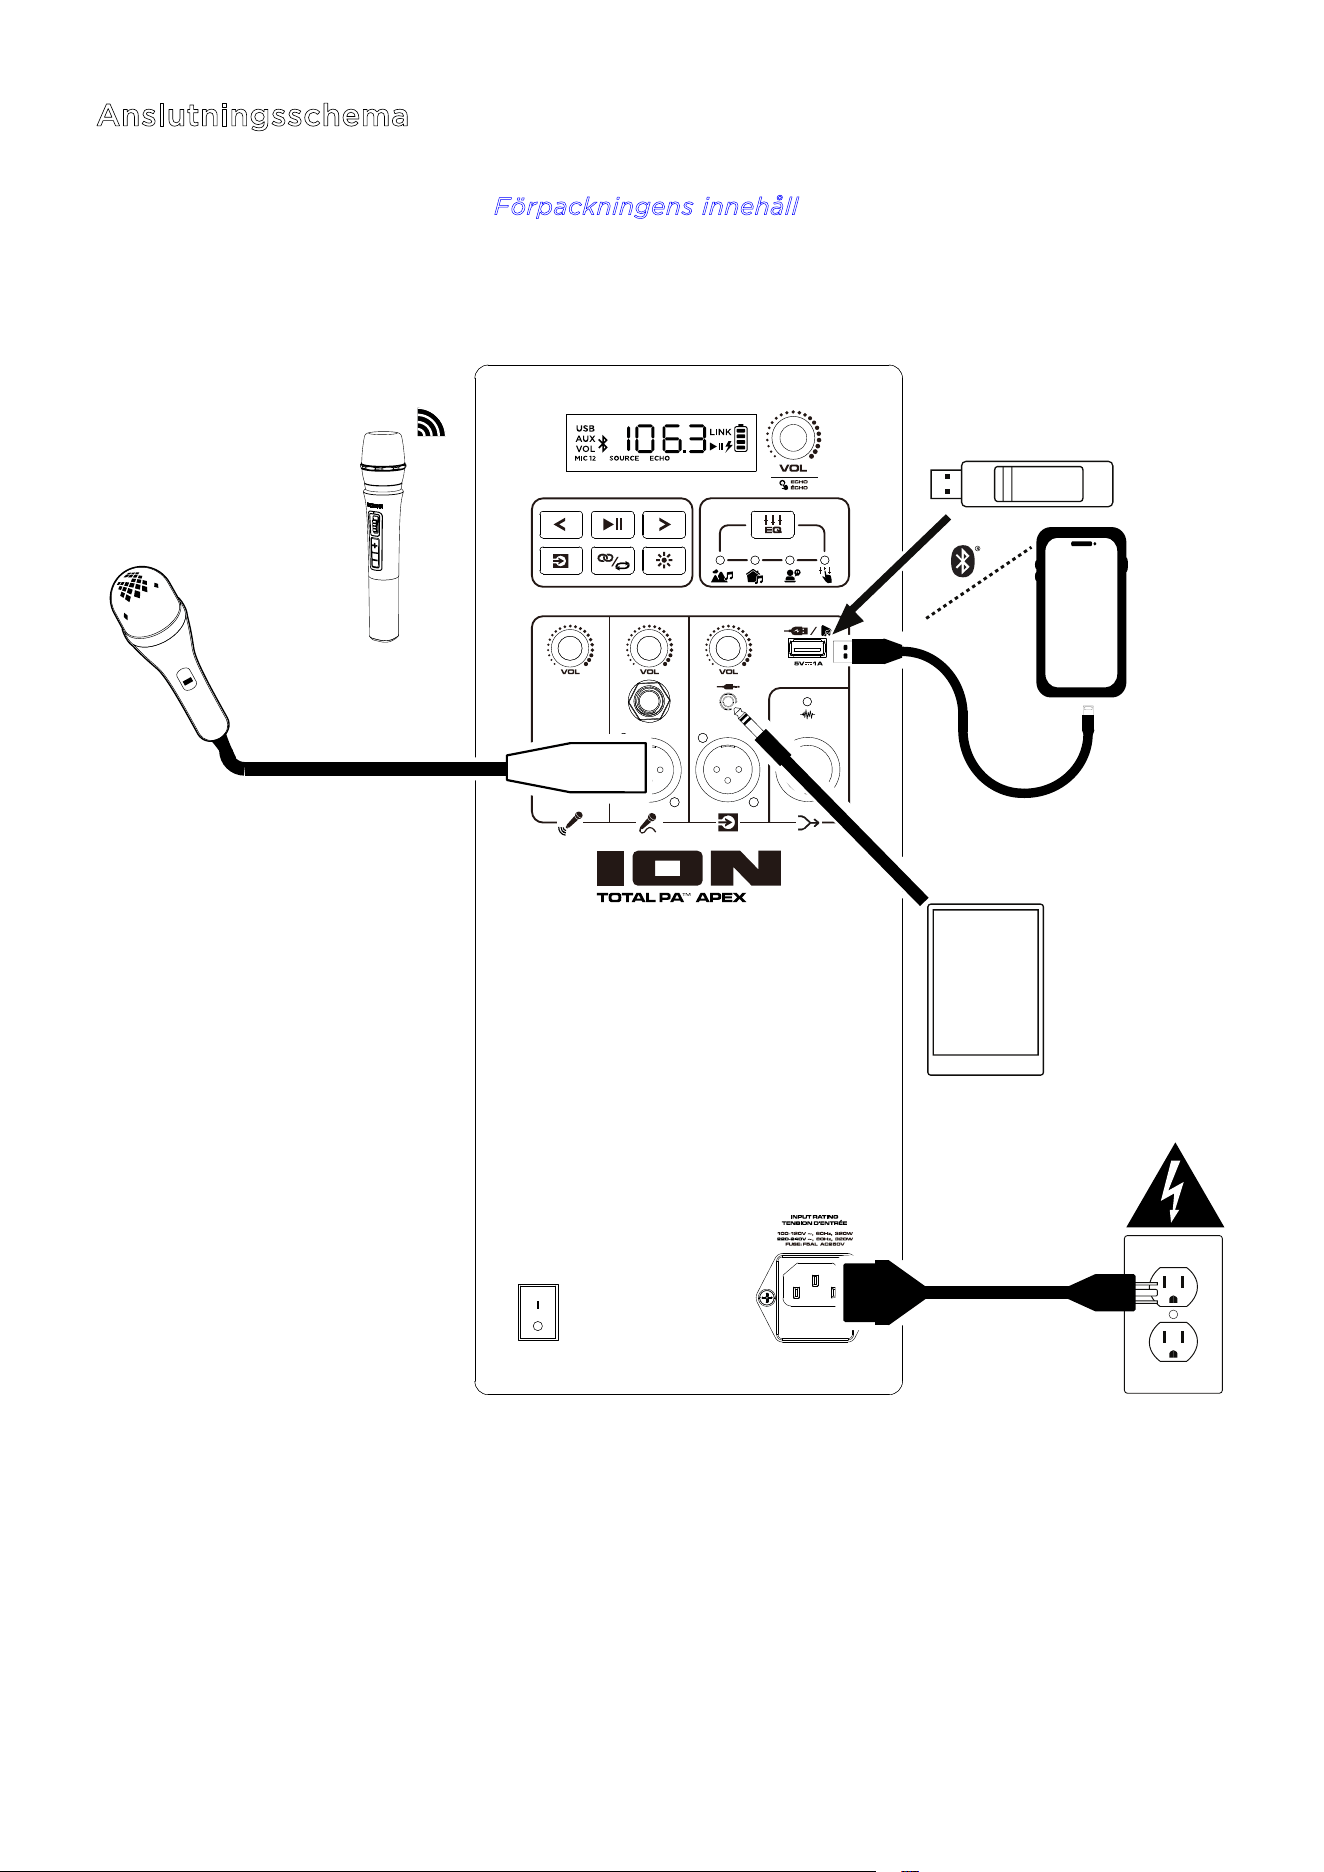
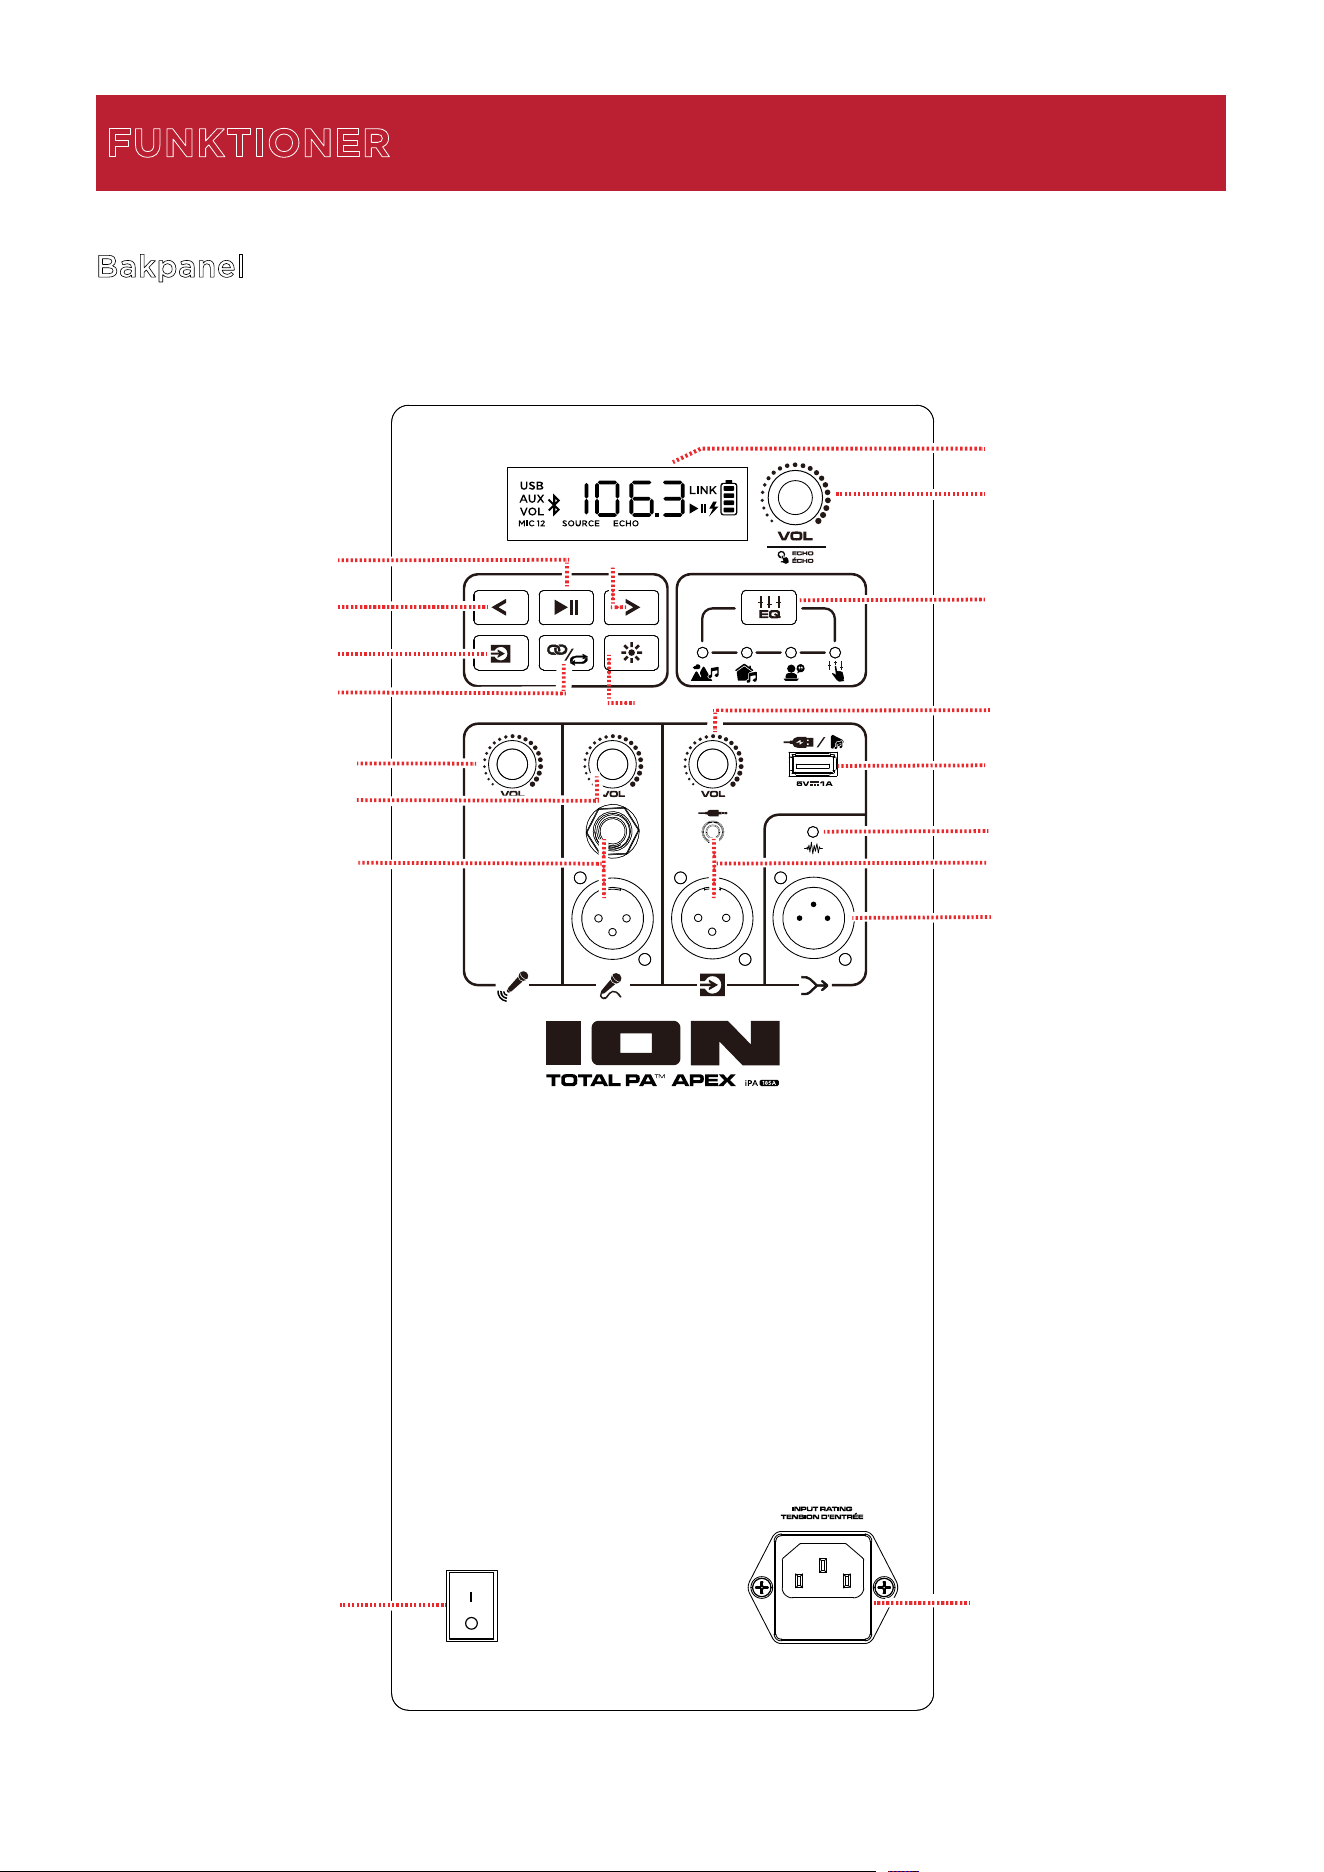
ION Audio Total PA™ Apex User Guide 86
1. Skärm
Denna
skärm visar information som är relevant för den aktuella funktionen i Total PA
™
Apex.
Obs: Skärmen levereras med ett plastskydd. Ta bort detta för optimal visning.
2
. Vol (Huvudvolym) / Echo-ratt
Vrid
denna ratt för att justera högtalarens huvudvolym (ljudutgång). Tryck på ratten och
vrid för att växla till att välja ekoeekten. Se avsnittet A
nvända huvudvolymratten för mer
inform
ation.
3
. Föregående spår
När
USB eller Bluetooth är vald som ljudkälla, tryck på denna knapp för att gå till
föregående spår i spellistan. Tryck på knappen igen inom en sekund för att hoppa till
föregående spår.
4
. Nästa spår
När
USB eller Bluetooth är vald som ljudkälla, tryck på denna knapp för att gå till nästa spår
i spellistan.
5
. Spela/Pausa
När
USB är vald som ljudkälla, tryck på denna knapp för att spela/pausa det aktuella spåret.
Dubbeltryck på denna knapp för att stoppa uppspelningen och återgå till början
av
spelli
s
tan.
När Bluetooth är vald som ljudkälla, tryck på denna knapp för att spela/pausa det aktuella
spåret.
Håll ned
denna knapp i tre sekunder för att slå på eller av röstmeddeland
en.
6
. Stereo-Link™ / Upprepa
Håll
ned denna knapp för att starta stereo-länkning till en annan Total PA™ Apex. Se avsnittet
L
änka två högtalare för mer information.
I USB-läge, tryck på denna knapp för att upprepa ett enskilt spår, en mapp eller alla spår. Se
avsnittet U
SB-läge för mer information.
ION Audio Total PA™ Apex User Guide 87
7. Source Källa
Tryck på denna knapp för att välja vilken ljudkälla som ska användas: USB, AUX eller
Bluetooth. Standardkällan när Total PA™ Apex startas är Bluetooth. USB-källan är endast
valbar om en USB-enhet är ansluten till Total PA™ Apex; annars växlar knappen mellan
Bluetooth och AUX.
För att koppla bort en ansluten Bluetooth-enhet, dubbeltryck på denna knapp.
8
. Ljus
Tryck på denna knapp för att välja hur ljusen på frontpanelen ska fungera. Se avsnittet
L
juseffekter för mer information.
Obs: För bästa ljuseekt kan du behöva justera volymen på din enhet och/eller källans
volym.
9
. EQ
Tryck på denna knapp för att växla mellan dessa EQ-förinställningar:
• U
tomhus: förstärkt bas och höga frekvenser.
• I
nomhus: lätt basförstärkning och jämna höga frekvenser.
• R
öst: reducerad bas med förstärkt mellanregister.
• N
eutral: en jämn frekvensrespons (anpassad EQ-inställning kan justeras och laddas
upp från appen).
1
0. USB-laddnings-/uppspelningsport
Du kan använda denna port för att ladda en USB-enhet, såsom en surfplatta eller
smartphone. För att ladda en enhet som strömmar musik via Bluetooth, pausa musiken
först och vänta sedan på att den återansluter efter att USB-kabeln har anslutits.
Anslut ditt USB-minne här för att spela musik. Använd SOURCE-volymratten för att justera
volymen. Tryck på S
tereo-Link™ / Upprepa-knappen för att växla mellan de fem
alternativen för upprepning/slumpvis uppspelning. Se avsnittet U
SB-läge för mer
information.
Obs: Ditt USB-minne får inte vara större än 512 GB och det måste innehålla spelbara
MP3-filer för att dess data ska visas korrekt i skärmen. När du ansluter ett USB-minne med
MP3-filer kommer Total PA™ Apex att sortera filerna alfabetiskt efter mapp i rotkatalogen
och därefter efter spårnamn i mappen.
1
1. MIC 1 Trådlös mikrofonvolym
Justera volymen för den medföljande trådlösa mikrofonen med denna ratt. Se avsnittet
A
nvända den trådlösa mikrofonen för mer information om hur du ställer in och slår på
mikrofonen.
1
2. MIC 2 Volym
Justera volymen för mikrofonen eller ljudkällan
med mikrofonnivå som är ansluten till
M
IC 2-ingångarna med denna ratt.
TIPS: För tips om korrekt
ljudnivåmixning för MIC 1, MIC 2 och
andra ljudkällor, se avsnittet
Balansera dina nivåer.
ION Audio Total PA™ Apex User Guide 88
1
3. MIC 2 Ingångar (6,35 mm / 1/4 tum & XLR)
Connect a microphone or mic-level source to these inputs.
1
4. Källans volym
Justera volymen på enheter som är anslutna till A
ux-ingångarna eller en Bluetooth-källa.
1
5. Aux-ingångar (3,5 mm / 1/8 tum & XLR)
Anslut en CD-spelare, MP3-spelare eller annan ljudkälla till dessa linjenivåingångar.
1
6. Mix Out (XLR)
Anslut denna utgång till en högtalare, mixer eller inspelningsenhet. Allt ljud från högtalaren
(inklusive ekoeekten men exklusive volym- och EQ-justeringar) kommer att återges på
den anslutna enheten.
1
7. Clip LED
The Clip LED-lampan blinkar rött om signalen från ingångsuttagen eller ljudkällan på M
edia
P
anel klipper (distorsion på grund av för hög signalnivå). Om detta inträar, sänk
h
uvudvolymen eller volymen för Aux/Mic-ingången (om en högljudd enhet är ansluten till
någon av dem).
1
8. Strömbrytare
Vrid denna brytare för att slå på eller stänga av högtalaren.
Obs: Om ingen ingångssignal spelas från någon källa (inklusive mikrofoningången) under
20 minuter, kommer högtalaren att gå in i energisparläge. I energisparläge blir skärmen
mörk. Efter 50 minuters inaktivitet går högtalaren in i viloläge, och du måste stänga av och
slå på högtalaren igen för att väcka den. Högtalaren återgår till normal drift så snart en
ingång tar emot en signal.
1
9. Strömkabelingång (IEC)
Anslut den medföljande strömkabeln här för att strömförsörja enheten.
1
2
2
3
-
+
+
-

ION Audio Total PA™ Apex User Guide 89
Batterivård
Följ instruktionerna nedan för bästa resultat vid byte av batterier i den trådlösa mikrofonen:
• Rengör batterikontakterna samt kontakterna i batterifacket på den trådlösa mikrofonen
innan du installerar batterierna.
• Byt ut båda batterierna samtidigt.
• Ta ut batterierna ur den trådlösa mikrofonen om den inte ska användas under en längre
tid.
• Avlägsna förbrukade batterier omedelbart.
Installera batterier i den trådlösa mikrofonen
1. Ta bort batterifackets lock genom att vrida det medurs.
2. Sätt i två nya AA-alkaliska batterier (medföljer ej) enligt den angivna riktningen i facket.
3. Sätt tillbaka batterilocket genom att vrida det moturs.
1
2
2
3
-
+
+
-
DRIFT
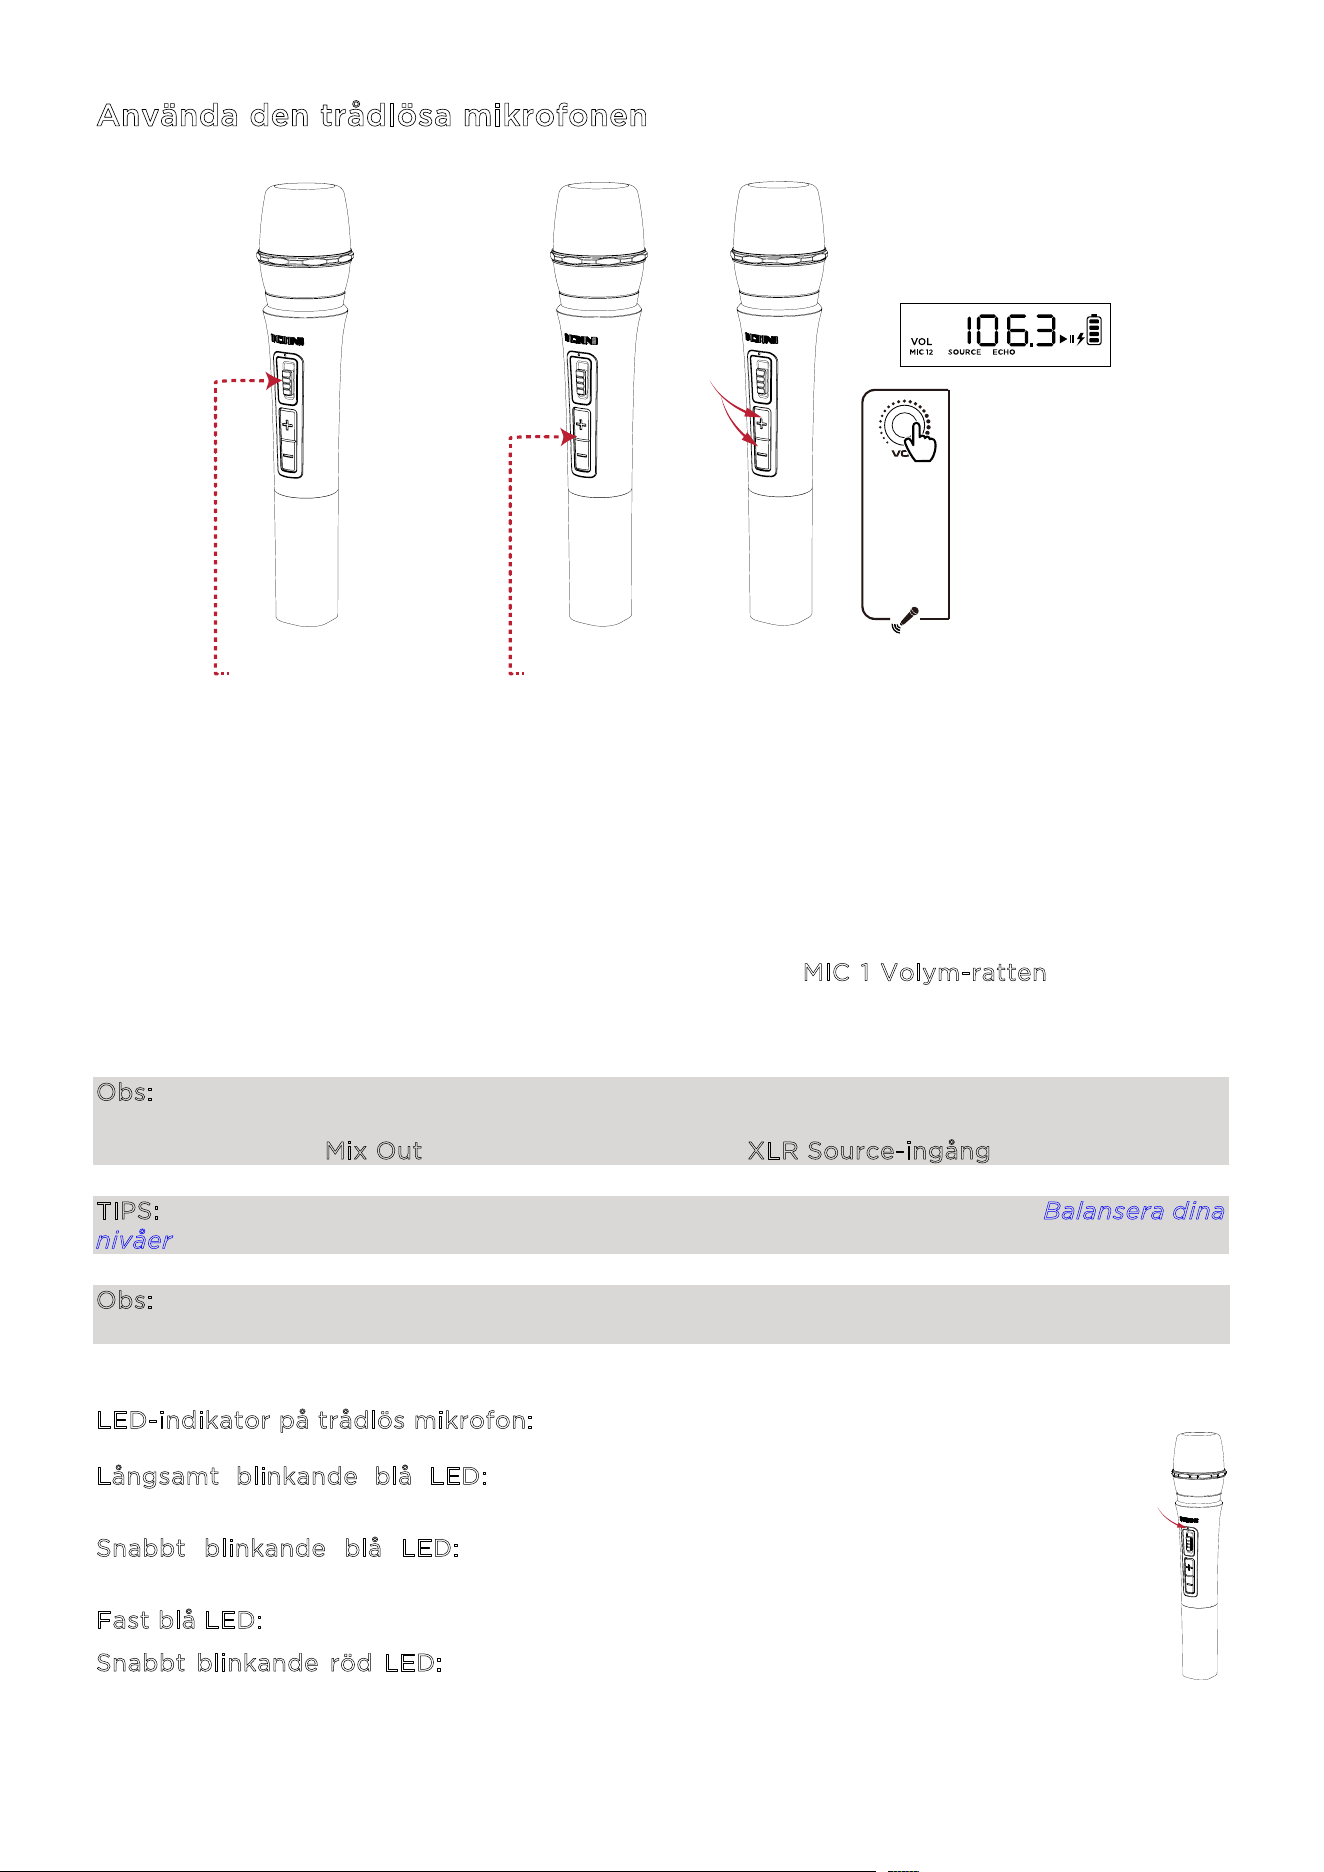
ION Audio Total PA™ Apex User Guide 90
Använda den trådlösa mikrofonen
1. Slå
på den trådlösa mikrofonen genom att skjuta mikrofonens på/av-vippbrytare u
ppåt.
Strö
mindikatorns LED-lampa blinkar blått om den håller på att parkopplas med högtalaren
och lyser med ett fast blått sken när den är ansluten till högtalaren.
2. Mikrofonen bör parkopplas automatiskt om Total PA™ Apex är påslagen. Om den inte gör
det, tryck och håll in knapparna + och - samtidigt i tre sekunder för att återställa
mikrofonens parkop
pling.
3. Tryck på +/- kontrollerna på mikrofonen eller vrid på M
IC 1 Volym-ratten för att justera
mikrofonens ljudnivå. Om du inte kan höra mikrofonen över din ljudkälla kan du behöva
sänka SOURCE-volymnivån eller höja mikrofonens volym.
Obs: Den trådlösa mikrofonen kommer endast att ansluta till en Stereo-Link™ högtalare (den
närmaste högtalaren). Om du använder två Total PA™ Apex-högtalare måste du ansluta den
första högtalarens Mix Out till den andra högtalarens XLR Source-ingång.
TIPS: För mer information om hur du balanserar dina volymnivåer, se avsnittet Balansera dina
nivåer.
Obs: En blå och röd indikator visas på den trådlösa mikrofonen när batteriets laddningsnivå
är låg, och blinkar rött när batteriet nästan är tomt.
L
ED-indikator på trådlös mikrofon:
L
ångsamt blinkande blå LED: Den trådlösa mikrofonen är påslagen och inte i
parkopplingsläge.
S
nabbt blinkande blå LED: Den trådlösa mikrofonen försöker parkoppla med
högtalaren.
F
ast blå LED: Den trådlösa mikrofonen är parkopplad med högtalaren.
S
nabbt blinkande röd LED: Detta indikerar att batterinivån är låg för den trådlösa
mikrofonen.
1
2
2
3
-
+
+
-
1 - VIPPBRYTARE UPP 2 - TRYCK
- - - - -
3 -
TRYCK OCH
HÅLL IN
3 - VRID
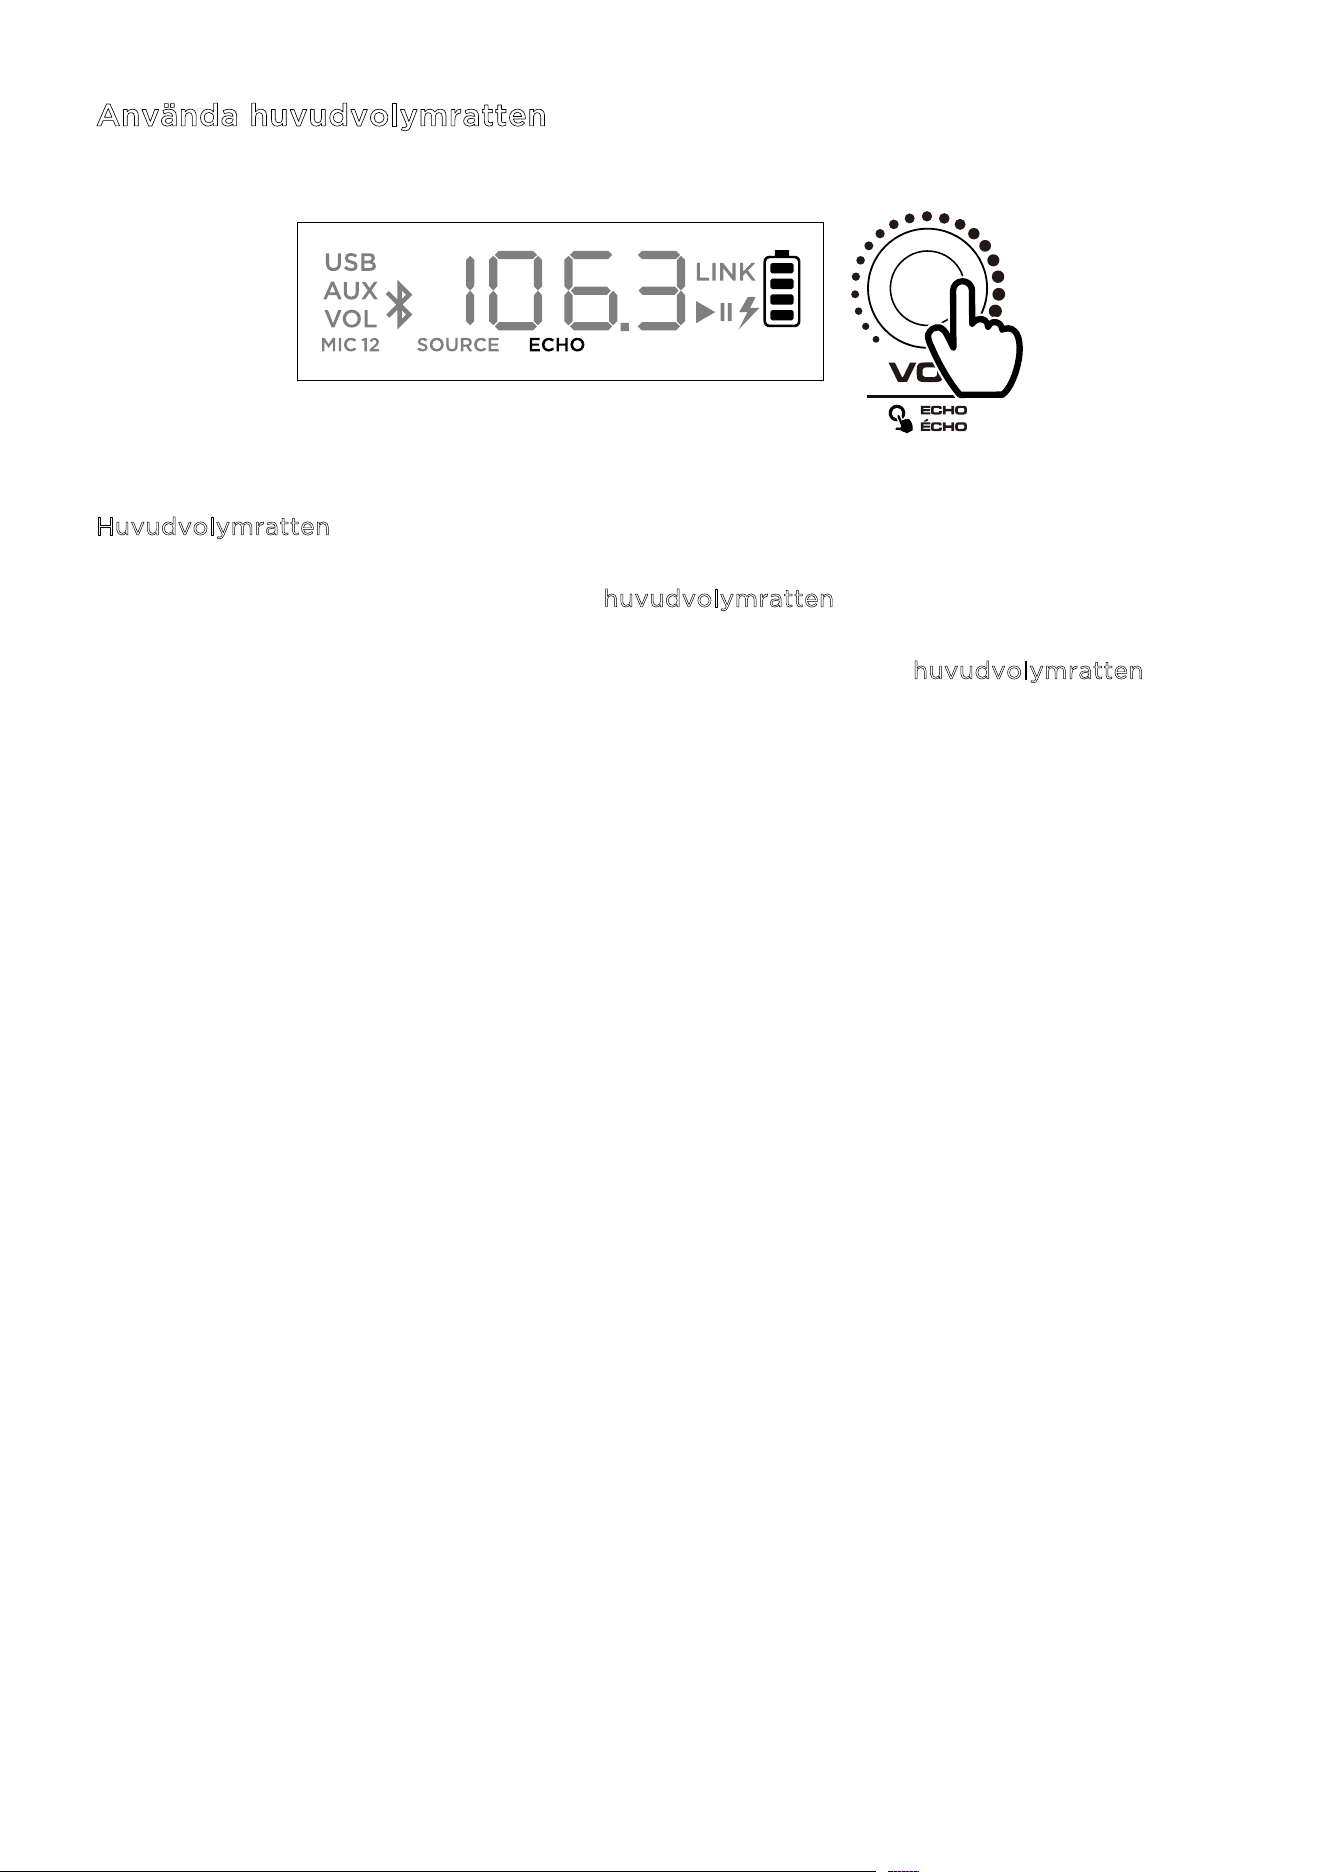
ION Audio Total PA™ Apex User Guide 91
Använda huvudvolymratten
H
uvudvolymratten är som standard inställd på att kontrollera huvudvolymen för alla kanaler.
Tryck på ratten för att växla till ekofunktionen och vrid ratten för att ändra inställningen.
Om det inte sker någon aktivitet på h
uvudvolymratten under fem sekunder, återgår
funktionen till huvudvolym.
För att återställa högtalaren till fabriksinställningarna, håll ned h
uvudvolymratten i fem
sekunder. Högtalaren kommer att starta om, och återställningen kommer att slutföras.
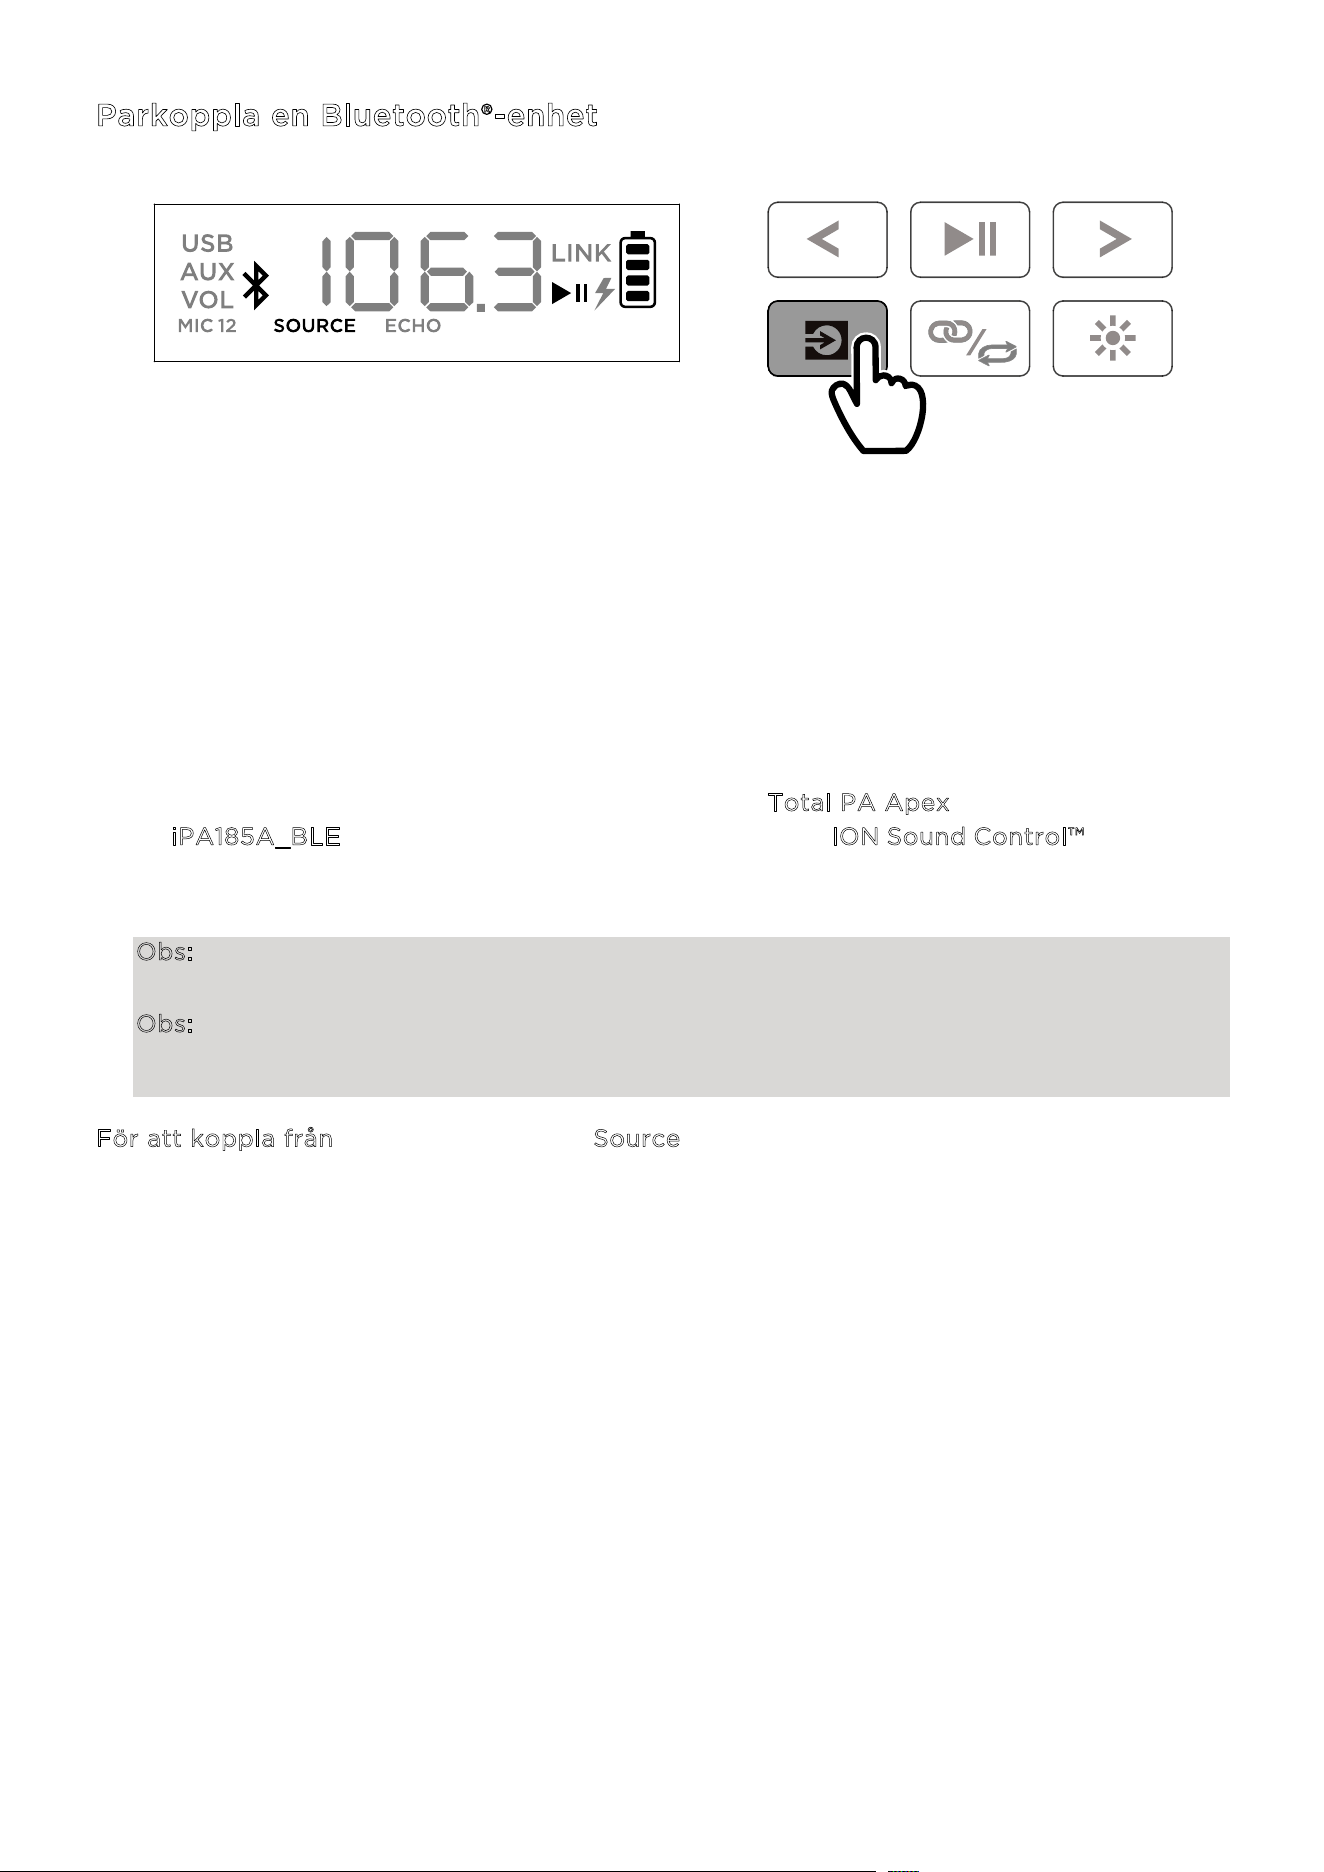
ION Audio Total PA™ Apex User Guide 92
Parkoppla en Bluetooth®-enhet
1. Slå på To
tal PA™ Apex med strömbryta
ren.
2. När enheten slås på för första gången går den automatiskt in i Bluetooth-parningsläge. Om
det behövs, tryck på Source-knappen för att välja Bluetooth-läge. Om röstmeddelanden är
aktiverade hör du ”Bluetooth Pairing.”
3. Öppna Bluetooth-inställningarna på din enhet, hitta T
otal PA Apex och anslut. Anslut inte
till i
PA185A_BLE; detta är endast avsett för anslutning till ION Sound Control™-appen. När
anslutningen är klar blinkar Bluetooth-ikonen på skärmen och du hör ”Bluetooth
Connected
.”
Obs: Om du har problem med att ansluta, välj ”Glöm den här enheten” på din Bluetooth-
enhet och försök att ansluta igen.
Obs: Volymen på Total PA™ Apex påverkar inte volymen på din Bluetooth-enhet. För bästa
ljudkvalitet, ställ in volymen på din ingångskälla till 100 % och använd Source- och
huvudvolymrattarna på högtalaren för att justera volymen.
För att koppla från, tryck två gånger på Source-knappen på Total PA™ Apex.
TRYCK
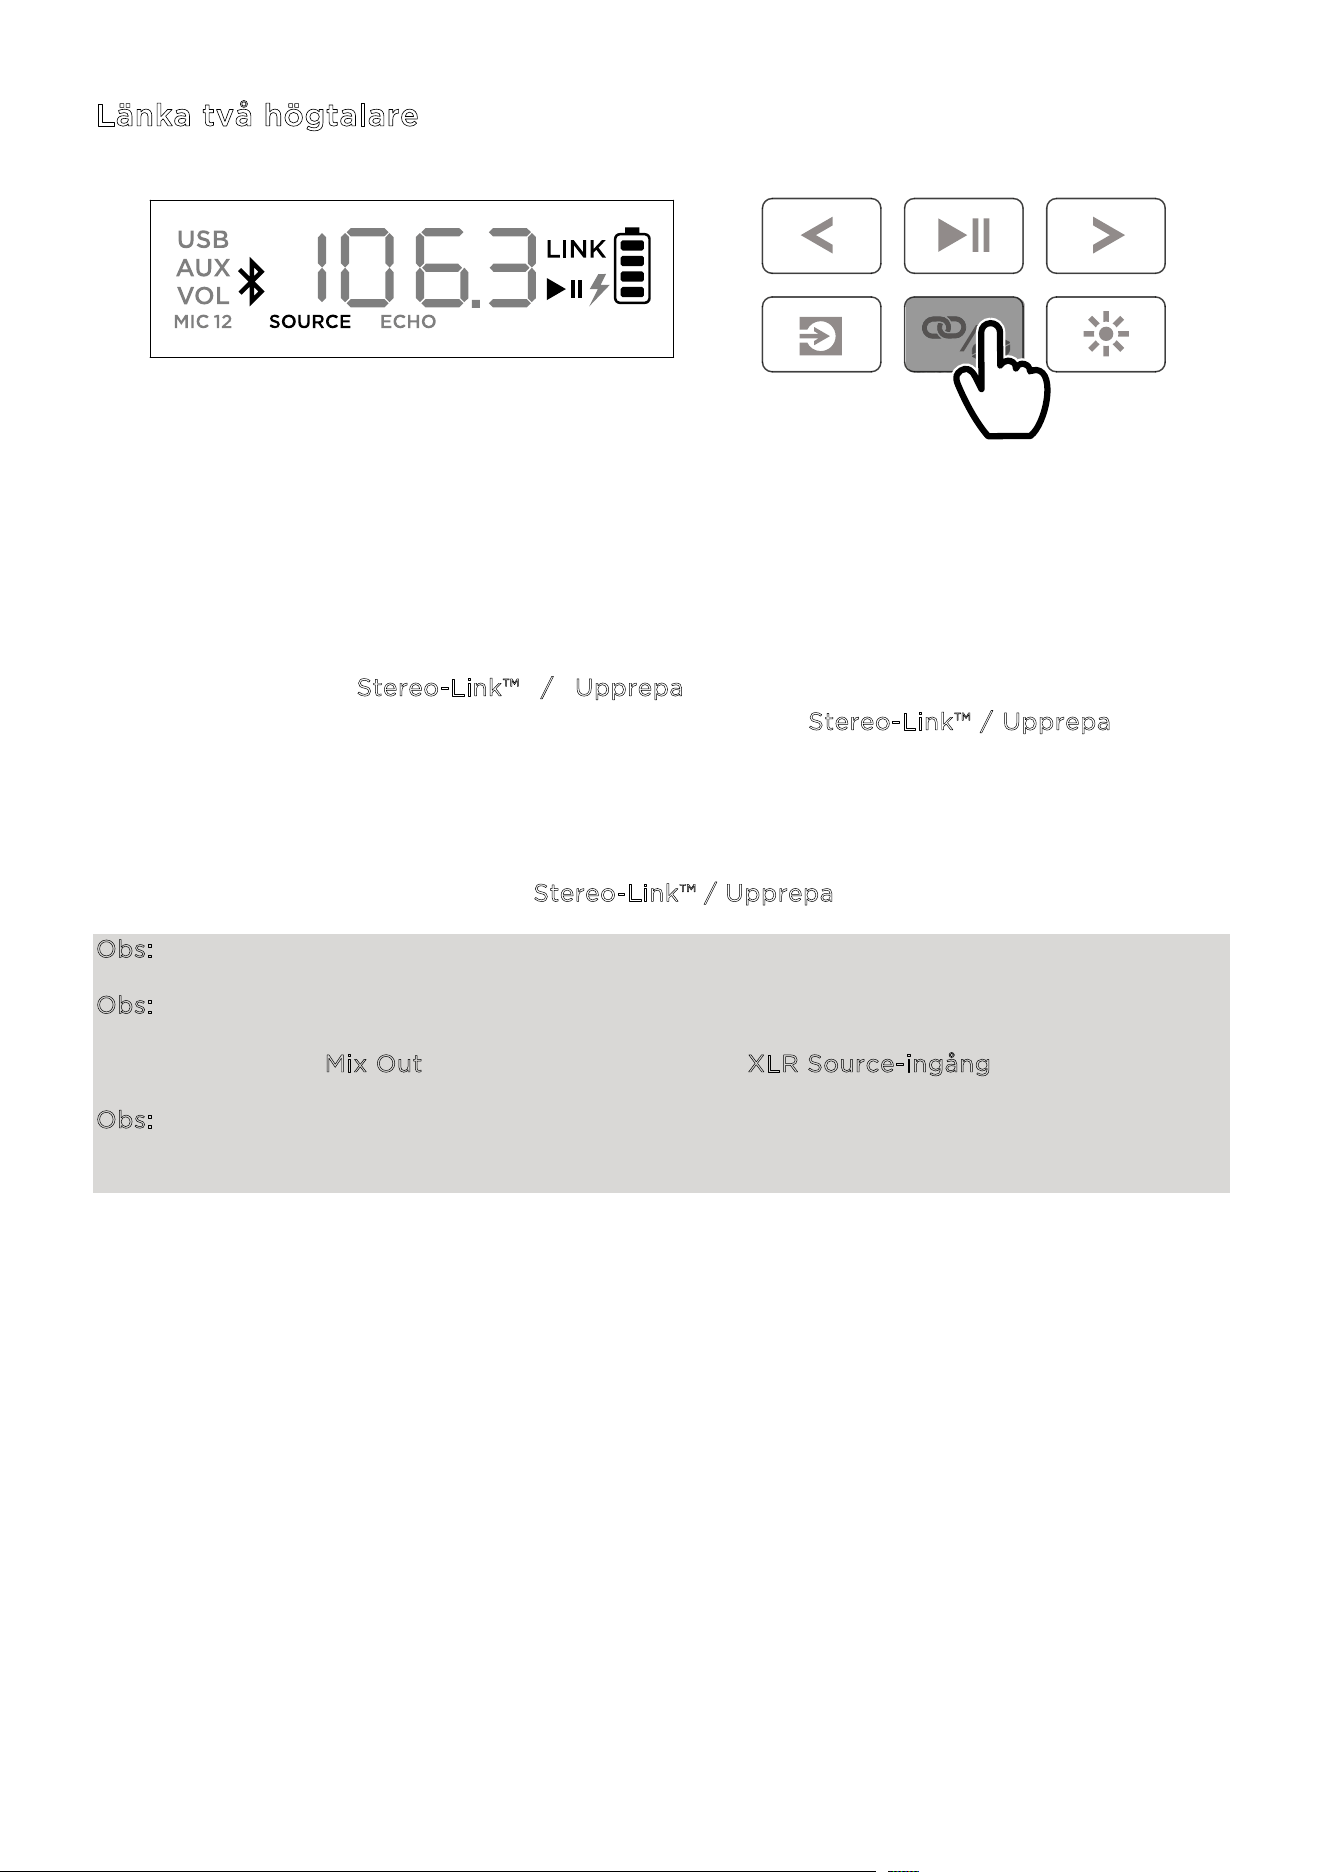
ION Audio Total PA™ Apex User Guide 93
Länka två högtalare
1. Slå på båda Total PA™ Apex-högtalarna med strömbrytarna. Se till att de är i Bluetooth-
parningsläge och inte anslutna till någon en
het.
2. Du
bbeltryck på S
tereo-Link™ / Upprepa-knappen på en högtalare (den primära
högtalaren som kommer att styra båda) och sedan på S
tereo-Link™ / Upprepa-knappen
på den sekundära högtalaren för att gå in i Stereo-Link™-läge. När en länk har upprättats
kommer ordet LINK att visas på båda högtalarnas skärmar.
3. Anslut till den primära högtalaren via Bluetooth.
För att koppla bort, dubbeltryck på S
tereo-Link™ / Upprepa-knappen.
Obs: Högtalarna bör vara inom 26 m (85 fot) från varandra för att länka korrekt.
Obs: Den trådlösa mikrofonen kommer endast att ansluta till en Stereo-Link™ högtalare (den
närmaste högtalaren). Om du använder två Total PA™ Apex-högtalare måste du ansluta den
första högtalarens Mix Out till den andra högtalarens XLR Source-ingång.
Obs: Total PA™ Apex är inte kompatibel med tidigare ION PA-modeller. För att länka till en
tidigare modell måste du använda en XLR-kabel (medföljer ej). Anslut XLR-kabeln till MIX Out
XLR-porten på Total PA™ Apex och till XLR In-porten på den tidigare modellen.
DUBBELTRYCK
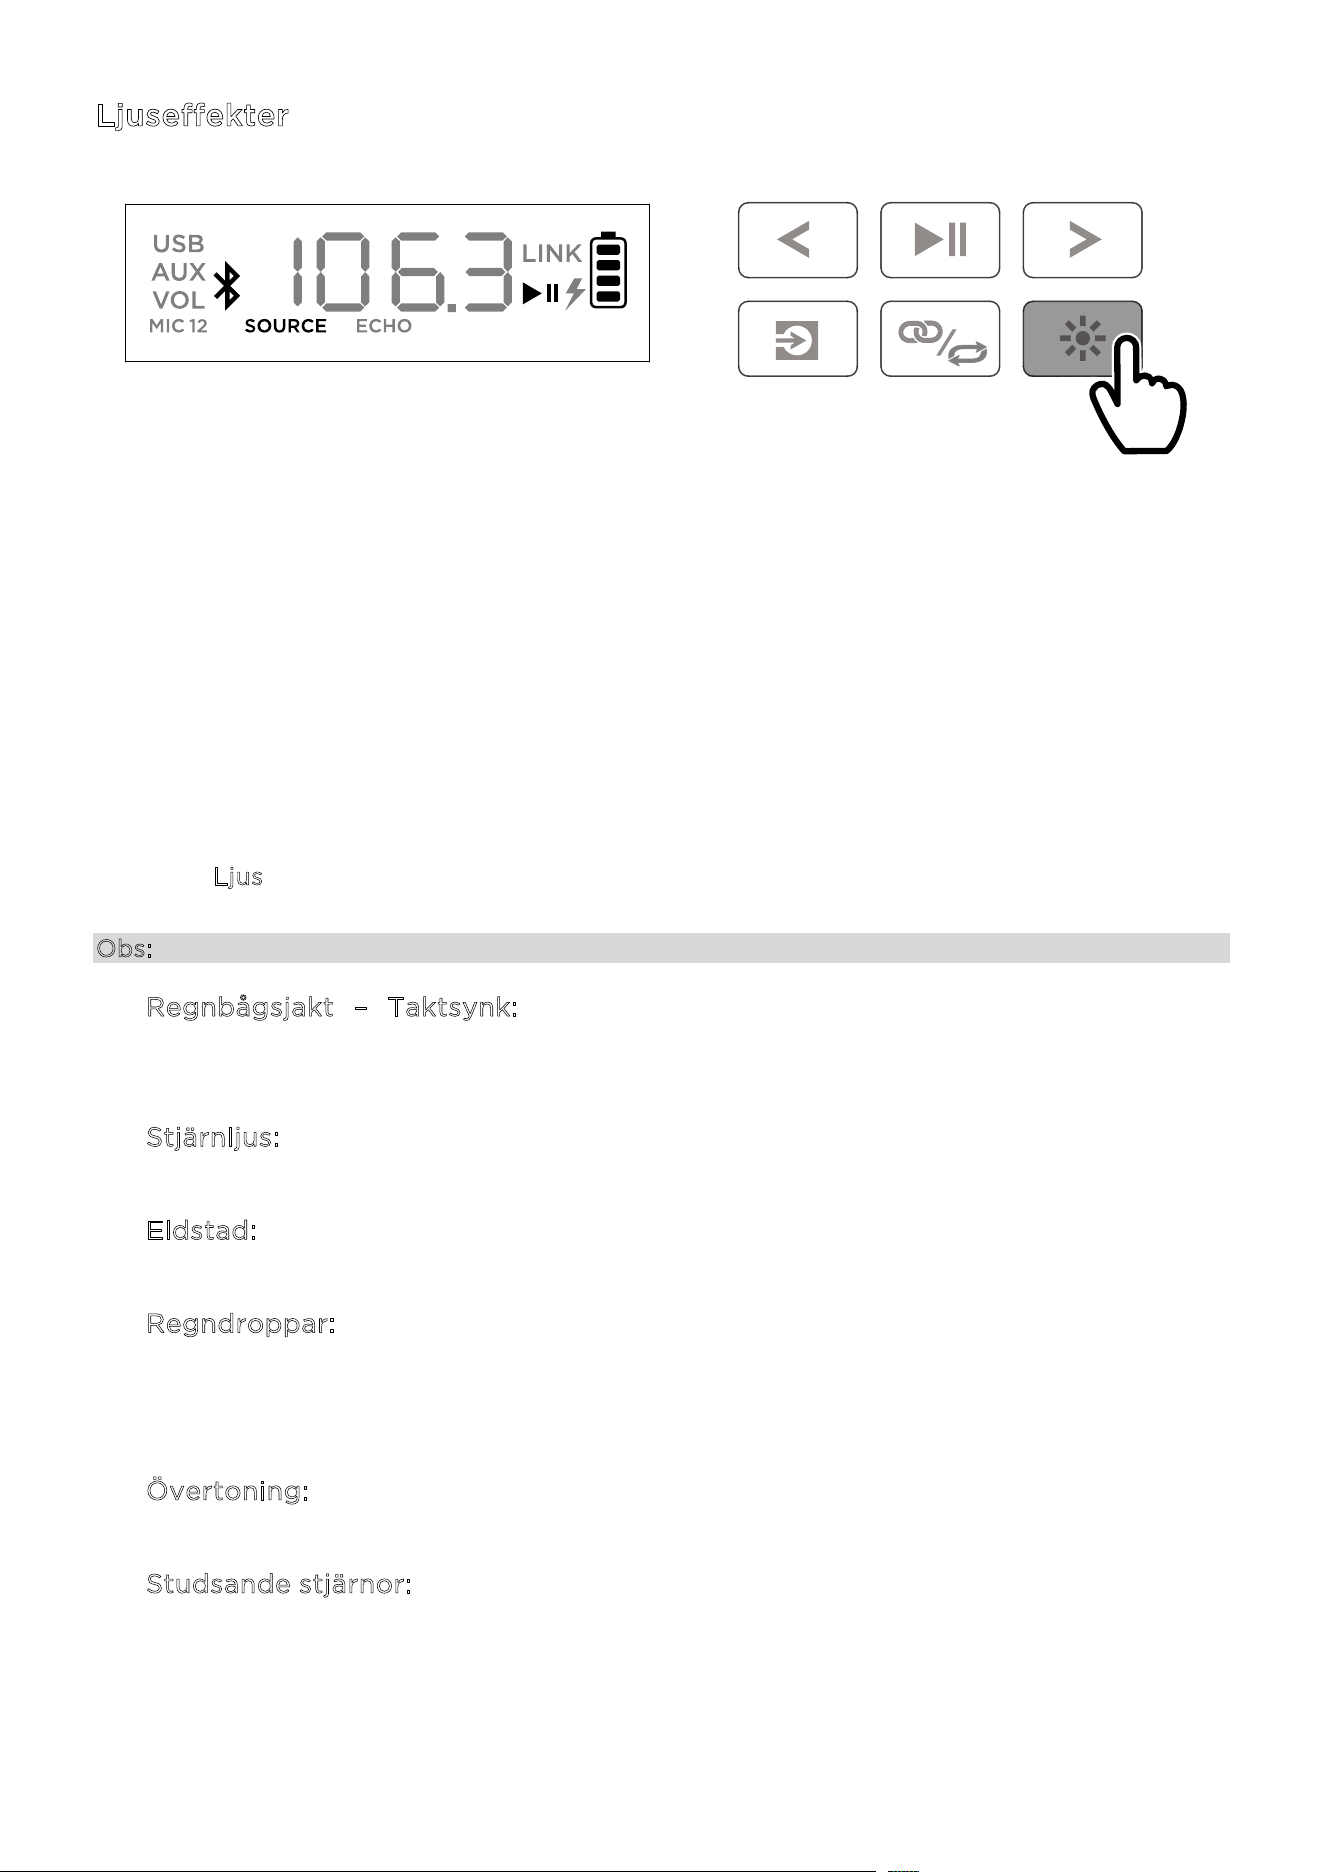
ION Audio Total PA™ Apex User Guide 94
Ljuseffekter
Total PA™ Apex har två sidoljus, sex diskanthögtalarljus och fyra bashögtalarljus. Alla
LED-lampor kan styras individuellt.
När högtalaren slås på för första gången, kommer ett rött ljus att röra sig från botten av
högtalaren mot toppen och tända alla LED-lampor. När alla LED-lampor är tända, kommer
ljusen att stanna kvar i två sekunder innan de tonas ut.
Efter ljuseekten vid uppstart kommer alla LED-lampor att tona in och ut i blått tills en
Bluetooth-enhet ansluts till högtalaren. När enheten är ihopkopplad, blinkar alla LED-lampor
blått två gånger innan de återgår till det senast valda ljusläget.
Tryck på Ljus-knappen för att växla mellan tolv olika lägen för LED-lamporna på Total PA™
Apex.
Obs: För bästa ljuseekt kan du behöva öka volymen på din anslutna enhet eller ljudkälla.
• Regnbågsjakt – Taktsynk: En regnbåge av färger snurrar runt högtalarens
LED-lampor moturs. Ju mer bas i musiken, desto snabbare snurrar
regnbågsmönstret.
• S
tjärnljus: Alla LED-lampor blinkar i en slumpmässig färg och tonas sedan
långsamt ut. Ju mer bas i musiken, desto snabbare blinkar ljusen.
• E
ldstad: Ljusen fladdrar i rött, gult och orange, och sidoljuset rör sig upp och ner.
Intensiteten i ”elden” anpassas efter hur mycket bas det är i musiken.
• R
egndroppar: Diskant- och sidoljuset låter en färg falla från toppen till botten. När
färgen når botten-LED-lampan, "stänker" bashögtalarens ljus som vattenstänk i
samma regndroppsfärg. Eekten upprepas växelvis från sida till sida. Fyra
regndroppsstrimmor faller samtidigt.
• Ö
vertoning: Ljuset från bashögtalarna och diskanthögtalarna tonas in och ut från
vänster till höger, medan sidoljuset tonas in och ut i en vertikal rörelse.
• S
tudsande stjärnor: Ljusstrimmorna rör sig nedåt längs sidorna. När de möts i den
nedre mitten av högtalaren studsar de tillbaka upp till toppen i nästa färg i
spektrumet och rör sig sedan nedåt igen. Bashögtalarljuset pulserar i den nya
färgen när ljusstrimmorna studsar i mitten, och detta upprepas genom
färgspektrumet.
TRYCK

ION Audio Total PA™ Apex User Guide 95
• Horisontella vågor – Taktsynk: Tre vågor i en färg passerar, och när de har rört
sig från övre vänstra sidan till nedre högra sidan, dyker nya vågor upp i nästa färg.
Våghastigheten ökar eller minskar beroende på mängden bas i musiken.
• T
aktsynk: Alla LED-lampor rör sig upp och ner i hastighet baserat på basnivån i
musiken. Färgen skiftar genom färgspektrumet.
• T
våfärgscykel: LED-lamporna på ena sidan (inklusive två från diskantljuset och en
från sido-LED-ljuset) visar en färg, medan lamporna på den andra sidan lyser i en
närliggande färg.
• F
ärgcykel: Alla LED-lampor håller samma färg medan de växlar genom
färgspektrumet.
• S
tatisk färg-läge: Alla LED-lampor förblir i samma färg (färgen kan justeras via
ION Sound Control™-appen). Som standard är färgen blå. Det finns 15 färger som
kan väljas från I
ON Sound Control™-appen.
• S
lumpmässigt läge: LED-lamporna växlar slumpmässigt mellan alla ljuslägen
(förutom Static Color) och ändras var tionde sekund.
• A
v-läge: Alla LED-lampor är avstängda.
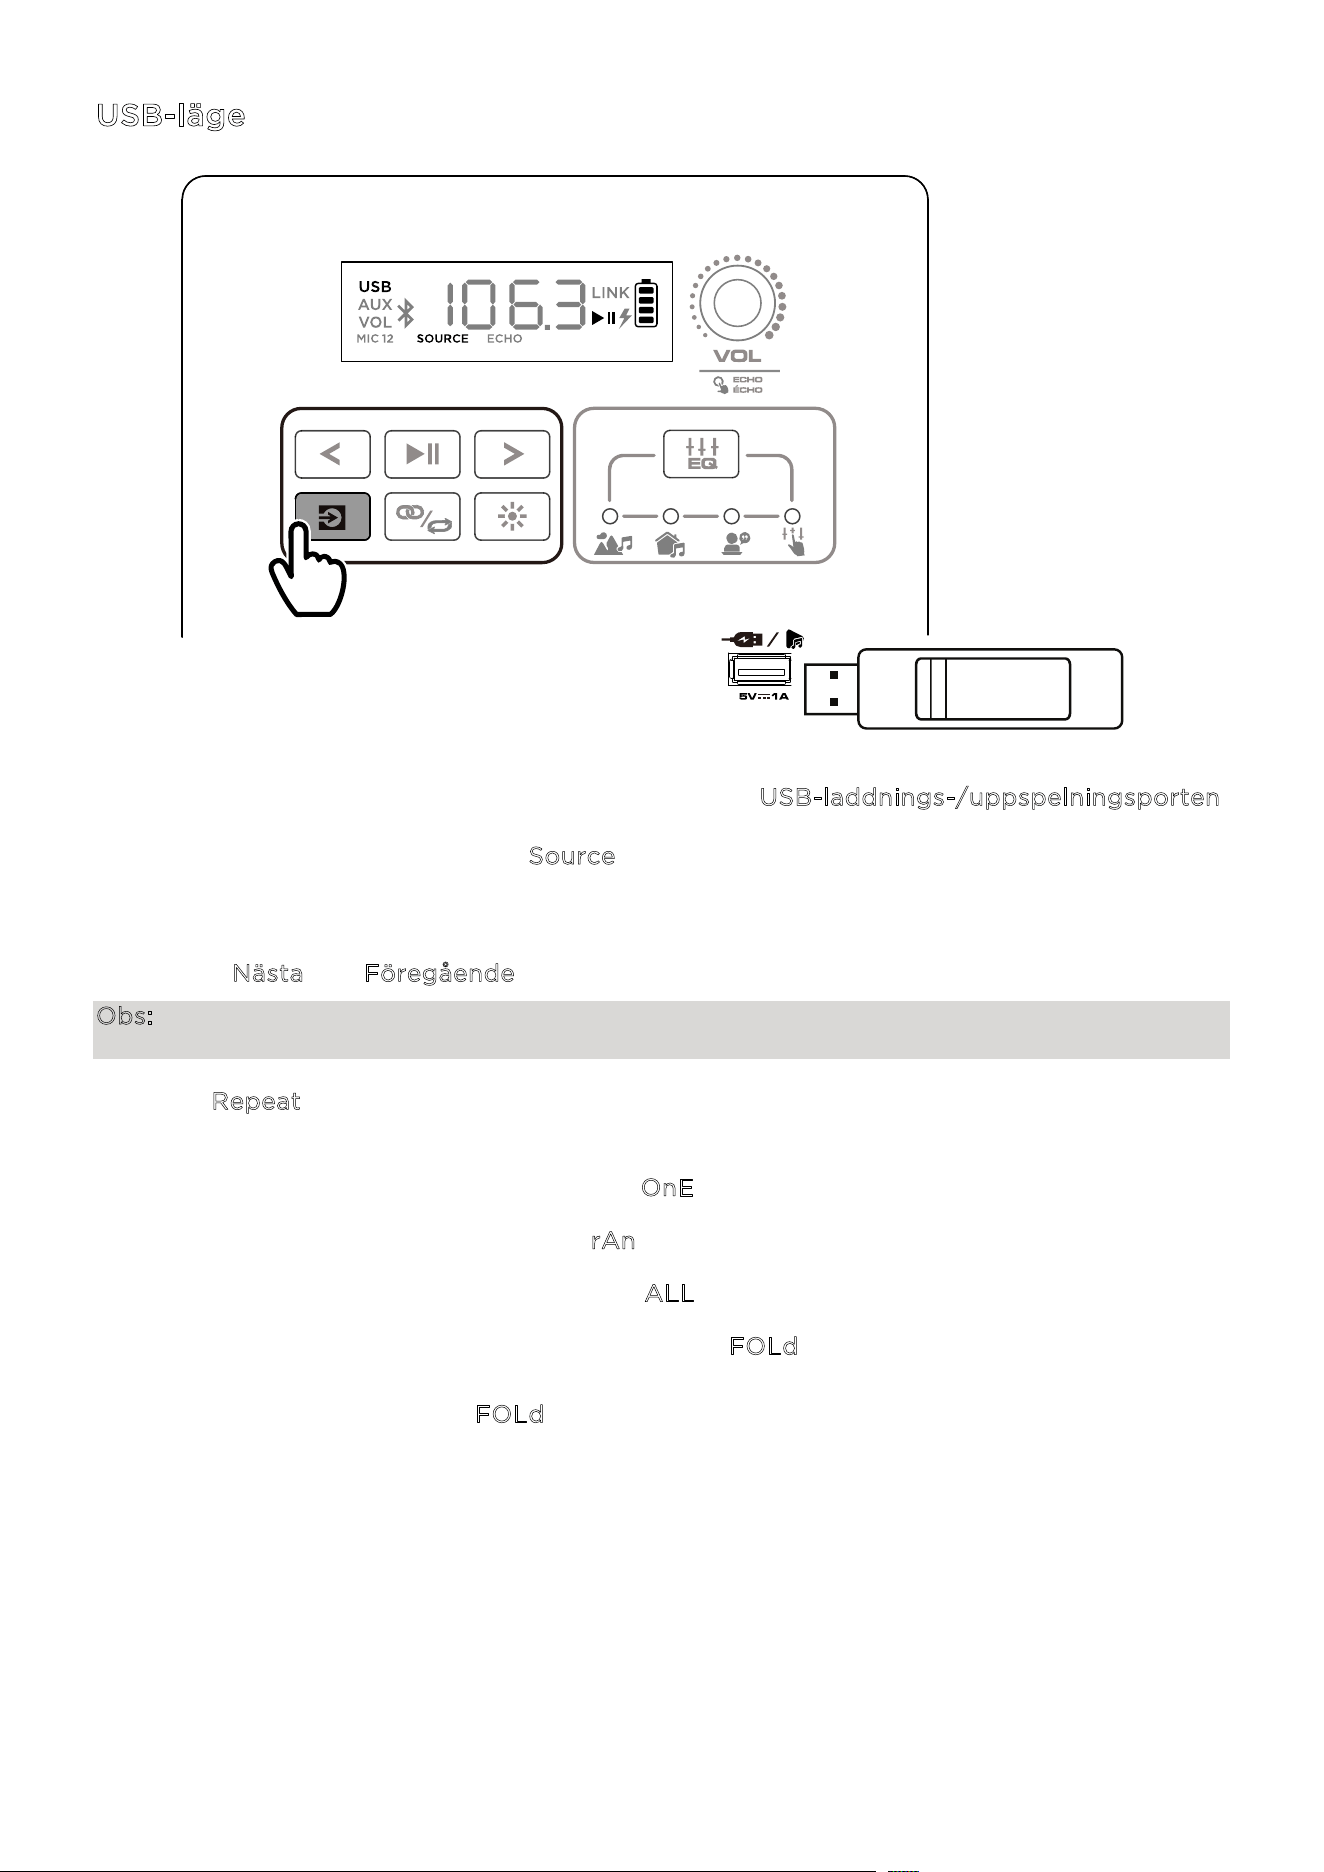
ION Audio Total PA™ Apex User Guide 96
USB-läge
När ett USB-minne med kompatibla filer sätts in i USB-laddnings-/uppspelningsporten,
växlar Total PA™ Apex automatiskt till USB-läge. Om USB-minnet redan är isatt och du
använder ett annat läge, tryck på S
ource-knappen tills USB-läget är valt. Total PA™ Apex
spelar automatiskt upp den första kompatibla MP3-filen. Filer spelas upp i alfabetisk ordning
på rot-nivån, därefter alfabetiskt efter mapp och sedan alfabetiskt efter spårnamn.
Uppspelningen av media stoppas när allt innehåll på USB-minnet har spelats upp. Håll
knapparna N
ästa och Föregående intryckta för att spola framåt eller bakåt i låten.
Obs: USB-minnet måste innehålla spelbara MP3-filer för att det ska visas på mediepanelens
skärm.
Tryck på R
epeat-knappen för att växla mellan alternativen för upprepning och slumpmässig
uppspelning (förkortningar visas på skärmen):
• Spela det aktuella USB-spåret på repeat (O
nE). Detta är standardläget vid uppstart.
• Spela spåren i slumpmässig ordning (r
An).
• Spela alla spår på USB-minnet på repeat (A
LL).
• Spela den aktuella mappens spårlista på repeat (F
OLd). Mappen som används baseras på
vilken låt som spelas när funktionen aktiveras. Till exempel, om en låt som spelas finns på
rot-nivån, kommer valet av F
OLd att endast upprepa låtar på rot-nivån. Om en låt finns i
mapp ”A”, kommer endast låtar i mapp ”A” att upprepas.
TRYCK
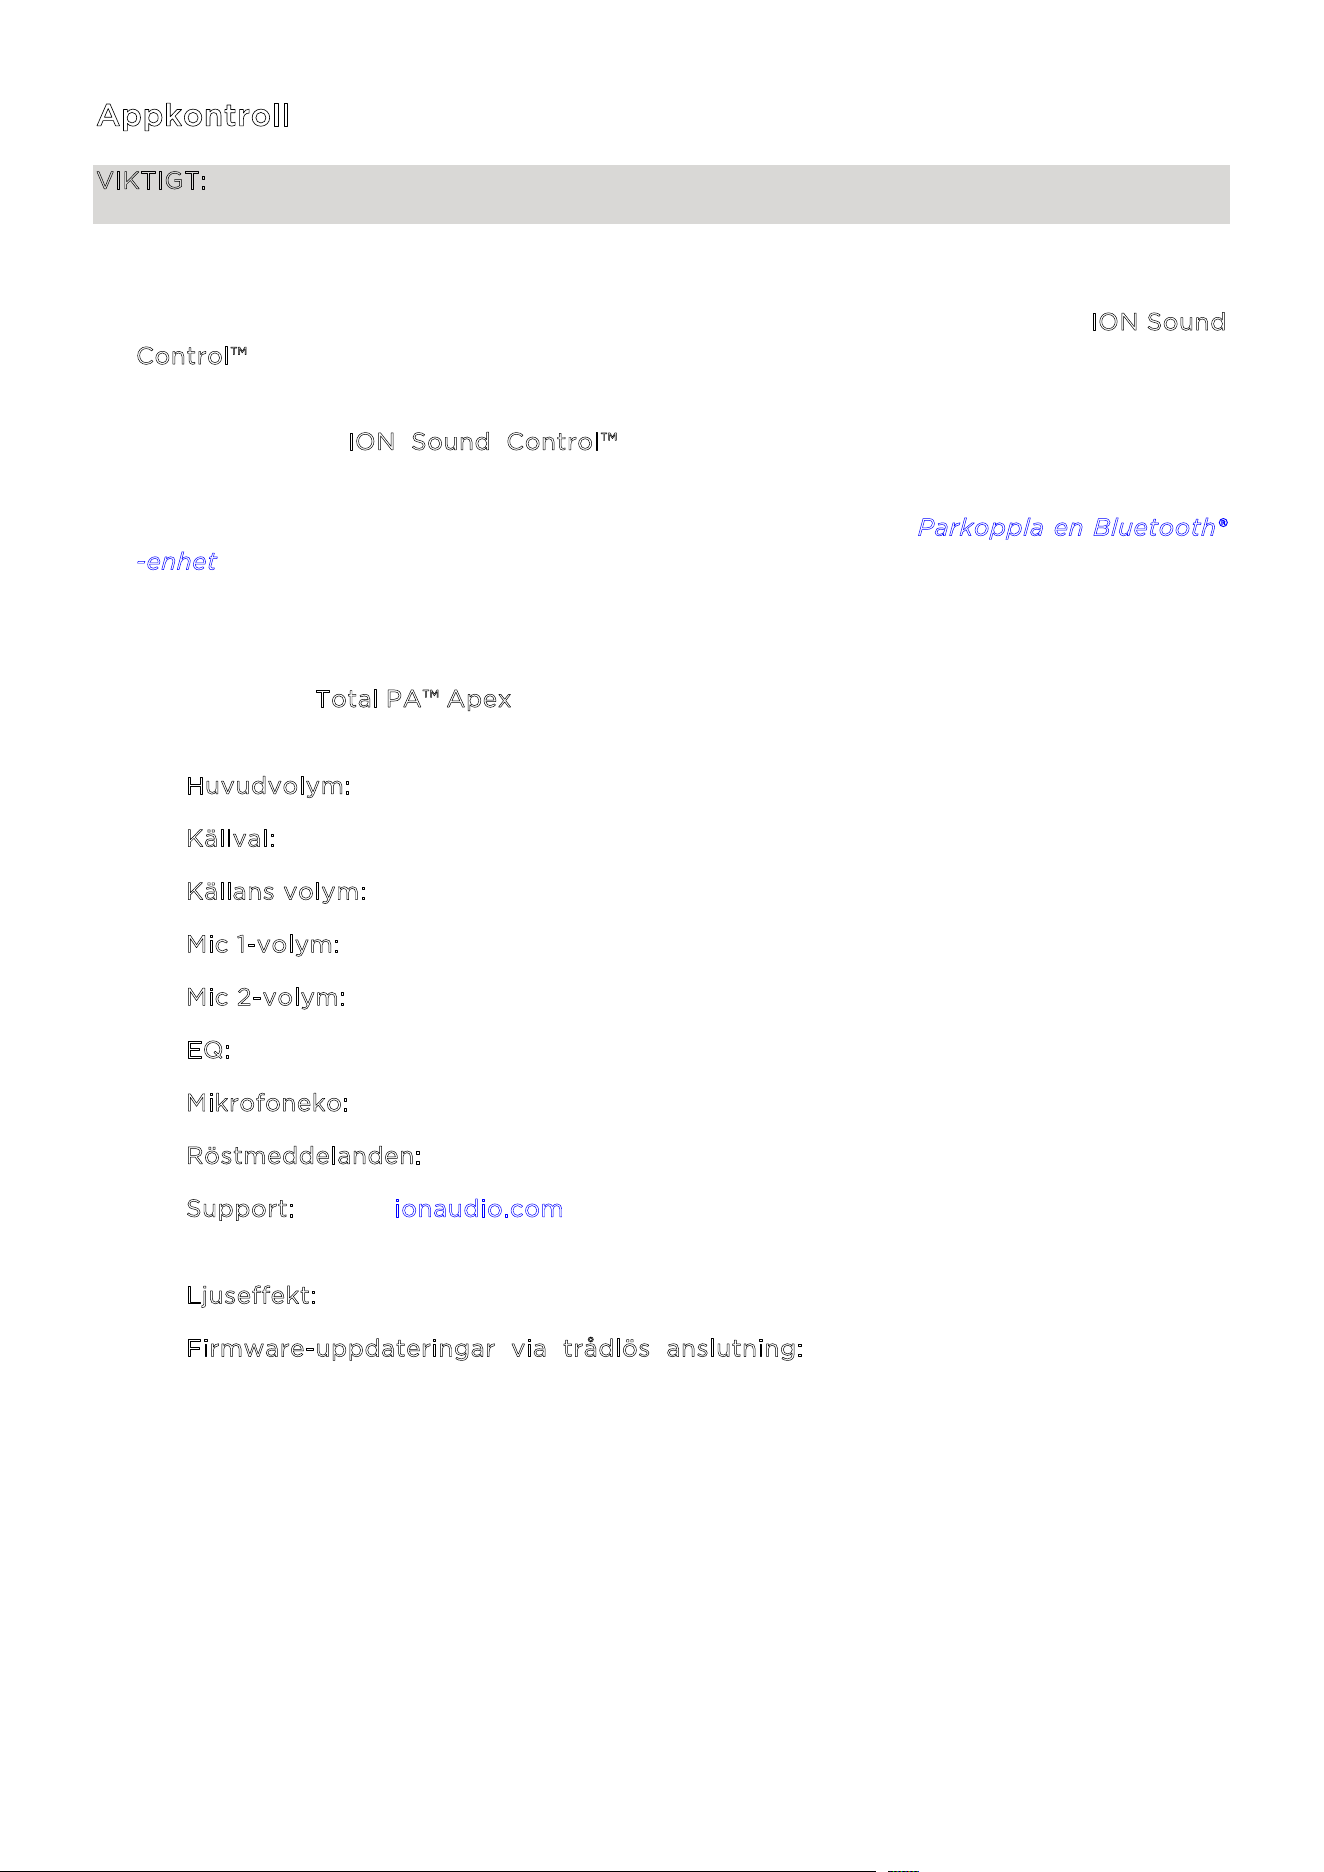
ION Audio Total PA™ Apex User Guide 97
Appkontroll
VIKTIGT: För att säkerställa bästa möjliga upplevelse med appen, använd den senaste
versionen av Android OS eller iOS på din enhet.
Följ dessa steg för att ladda ner den kostnadsfria appen till din enhet:
1. Öppna Apple App Store eller Google Play på din enhet. Sök sedan efter appen I
ON Sound
C
ontrol™.
2. Följ instruktionerna på skärmen för att ladda ner och installera appen. När nedladdningen
är
klar kommer I
ON Sound Control™-ikonen att visas på din enhets hemskärm. Följ
instruktionerna på skärmen för att ladda ner och installera
appen.
3. Anslut
din enhet till Total PA™ Apex via Bluetooth. Se avsnittet P
arkoppla en Bluetooth®
-
enhet för att lära dig hur du gör detta.
4. Öppna appen ION Sound Control™. Om du blir ombedd, tillåt appen att få åtkomst till din
enhets Bluetooth och platstjänster.
5. Välj ikonen för T
otal PA™ Apex för att gå vidare till nästa skärm, där du kan använda appen
för att
styra olika funktioner på högtalaren
, såsom:
• H
uvudvolym: Justera högtalarens huvudutgångsvolym.
• K
ällval: Välj vilken källa som ska användas: Bluetooth, USB eller Aux.
• K
ällans volym: Justera inkommande volym för Bluetooth-, USB- och Aux-källor.
• M
ic 1-volym: Justera volymen för den trådlösa mikrofonen.
• M
ic 2-volym: Justera volymen för 6,35 mm / 1/4 tum- och XLR-mikrofoningångarna.
• E
Q: Justera högtalarens equalizer.
• M
ikrofoneko: Slå på/av mikrofonekoeekten.
• R
östmeddelanden: Aktivera eller inaktivera röstmeddelanden.
• S
upport: Besök ionaudio.com, kontakta teknisk support och se garantinformation
samt vanliga frågor.
• L
juseffekt: Välj ljuseekt.
• F
irmware-uppdateringar via trådlös anslutning: Håll din enhet uppdaterad med
senaste firmware.
ION Audio Total PA™ Apex User Guide 98
O
m ljudet är förvrängt: Du kan behöva justera nivåerna på dina ljudkällor och Total PA™ Apex
för att få en korrekt mixning.
i. Börja med att höja volymen på din ljudkälla till max.
ii. Justera sedan v
olymratten (VOL) för den valda kanalen på Total PA™ Apex till en
lämplig nivå.
iii. Slutligen,
justera h
uvudvolymen till en lämplig nivå.
Om ljudet fortfarande är förvrängt, prova att sänka volymen på din ljudkälla och därefter sänka
v
olymratten (VOL) för den aktuella kanalen på Total PA™ Apex.
J
ag hör ett brummande ljud när kablar är anslutna:
• Koppla bort kablarna från ingångsuttaget för att kontrollera om det är en defekt kabel.
• Se till att signalkablarna inte ligger nära strömkabla
r.
• Anslut alla ljudutrustningens strömkablar till uttag som delar en gemensam jord.
O
m det är för mycket bas: Prova att justera EQ-kontrollen på din ljudkälla eller på Total PA™
Apex för att sänka basnivån. Detta gör att du kan spela musiken starkare innan klippning
(förvrängning) uppstår.
V
ad gör jag om den trådlösa mikrofonen inte fungerar?
• Kontrollera att batterierna är korrekt in
stallerade.
• Sätt
i två nya AA-batterier (medföljer ej) enligt den angivna orienteringen i
batterifacket. Mikrofonen bör paras automatiskt om Total PA Apex är påslagen. Om de
n
inte
gör det, håll ned + och – knapparna på mikrofonen i 3 sekunder för att återställa
mikrofonens parkoppling.
O
m det uppstår ett högfrekvent visslande ljud när mikrofoner används: Detta är troligen
rundgång. Rikta mikrofonen bort från högtalaren.
O
m du inte kan höra mikrofonen över musikvolymen:
i. Börja med att sänka volymen från din ljudkälla med hjälp av lämplig v
olymratt (VOL)
för kan
alen på Total PA™ Apex.
ii. Kontrollera sedan att mikrofonens volym är inställd på max (om tillämpligt) och
höj
därefter v
olymratten (VOL) för den kanal på Total PA™ Apex där mikrofonen är
ansluten.
FELSÖKNING
ION Audio Total PA™ Apex User Guide 99
Om du inte kan ansluta din ljudenhet till Total PA™ Apex via Bluetooth:
• Placera din ljudenhet (till exempel smartphone eller surfplatta) och Total PA™ Apex så
nära varandra som möjligt när du försöker ansluta. Se till att både ljudenheten och Total
PA™ Apex inte blockeras av väggar, möbler osv.
• Återställ Bluetooth-anslutningen på Total PA™ Apex för att koppla bort Total PA™ Apex
från andra ljudenheter och starta om sökprocessen. Om detta inte fungerar direkt, stäng
av Total PA™ Apex och slå sedan på den igen. Se avsnittet P
arkoppla en Bluetooth®
-
enhet för mer information.
• Återställ Bluetooth-anslutningen på din ljudenhet genom att stänga av och slå på
Bluetooth igen. Detta hittar du under Bluetooth-menyn i inställningarna för din telefon
eller annan ljudenhet.
Om detta inte fungerar, och du tidigare har anslutit till Total PA™ Apex, leta upp Total PA™
Apex i listan över tillgängliga eller tidigare anslutna enheter i Bluetooth-menyn på din
ljudenhet. Tryck på ”kugghjulet” eller ”i”-ikonen bredvid den och välj sedan K
oppla bort eller
G
löm. Stäng av och slå på Total PA™ Apex igen och försök para ihop den på nytt när den
dyker upp i listan över tillgängliga enheter.
Obs: Om Total PA™ Apex nyligen har parats ihop med en annan ljudenhet som fortfarande är
inom räckhåll kan du behöva upprepa denna process med den ljudenheten för att koppla bort
den helt.
O
m du upplever ljudavbrott när du spelar musik från en Bluetooth-enhet kan detta bero på
att din enhet försöker ansluta till en annan högtalare. Detta kan inträa om du stänger av en
högtalare som var länkad till din enhet eller om du precis har slagit på din enhet och den är i
Stereo-Link™-läge. För att stoppa ljudavbrotten, avsluta Stereo-Link™-läget genom att
dubbeltrycka på knappen S
tereo-Link™ / Upprepa. Alternativt kan du vänta tills din enhet
länkar till en annan högtalare om det finns en inom räckhåll.
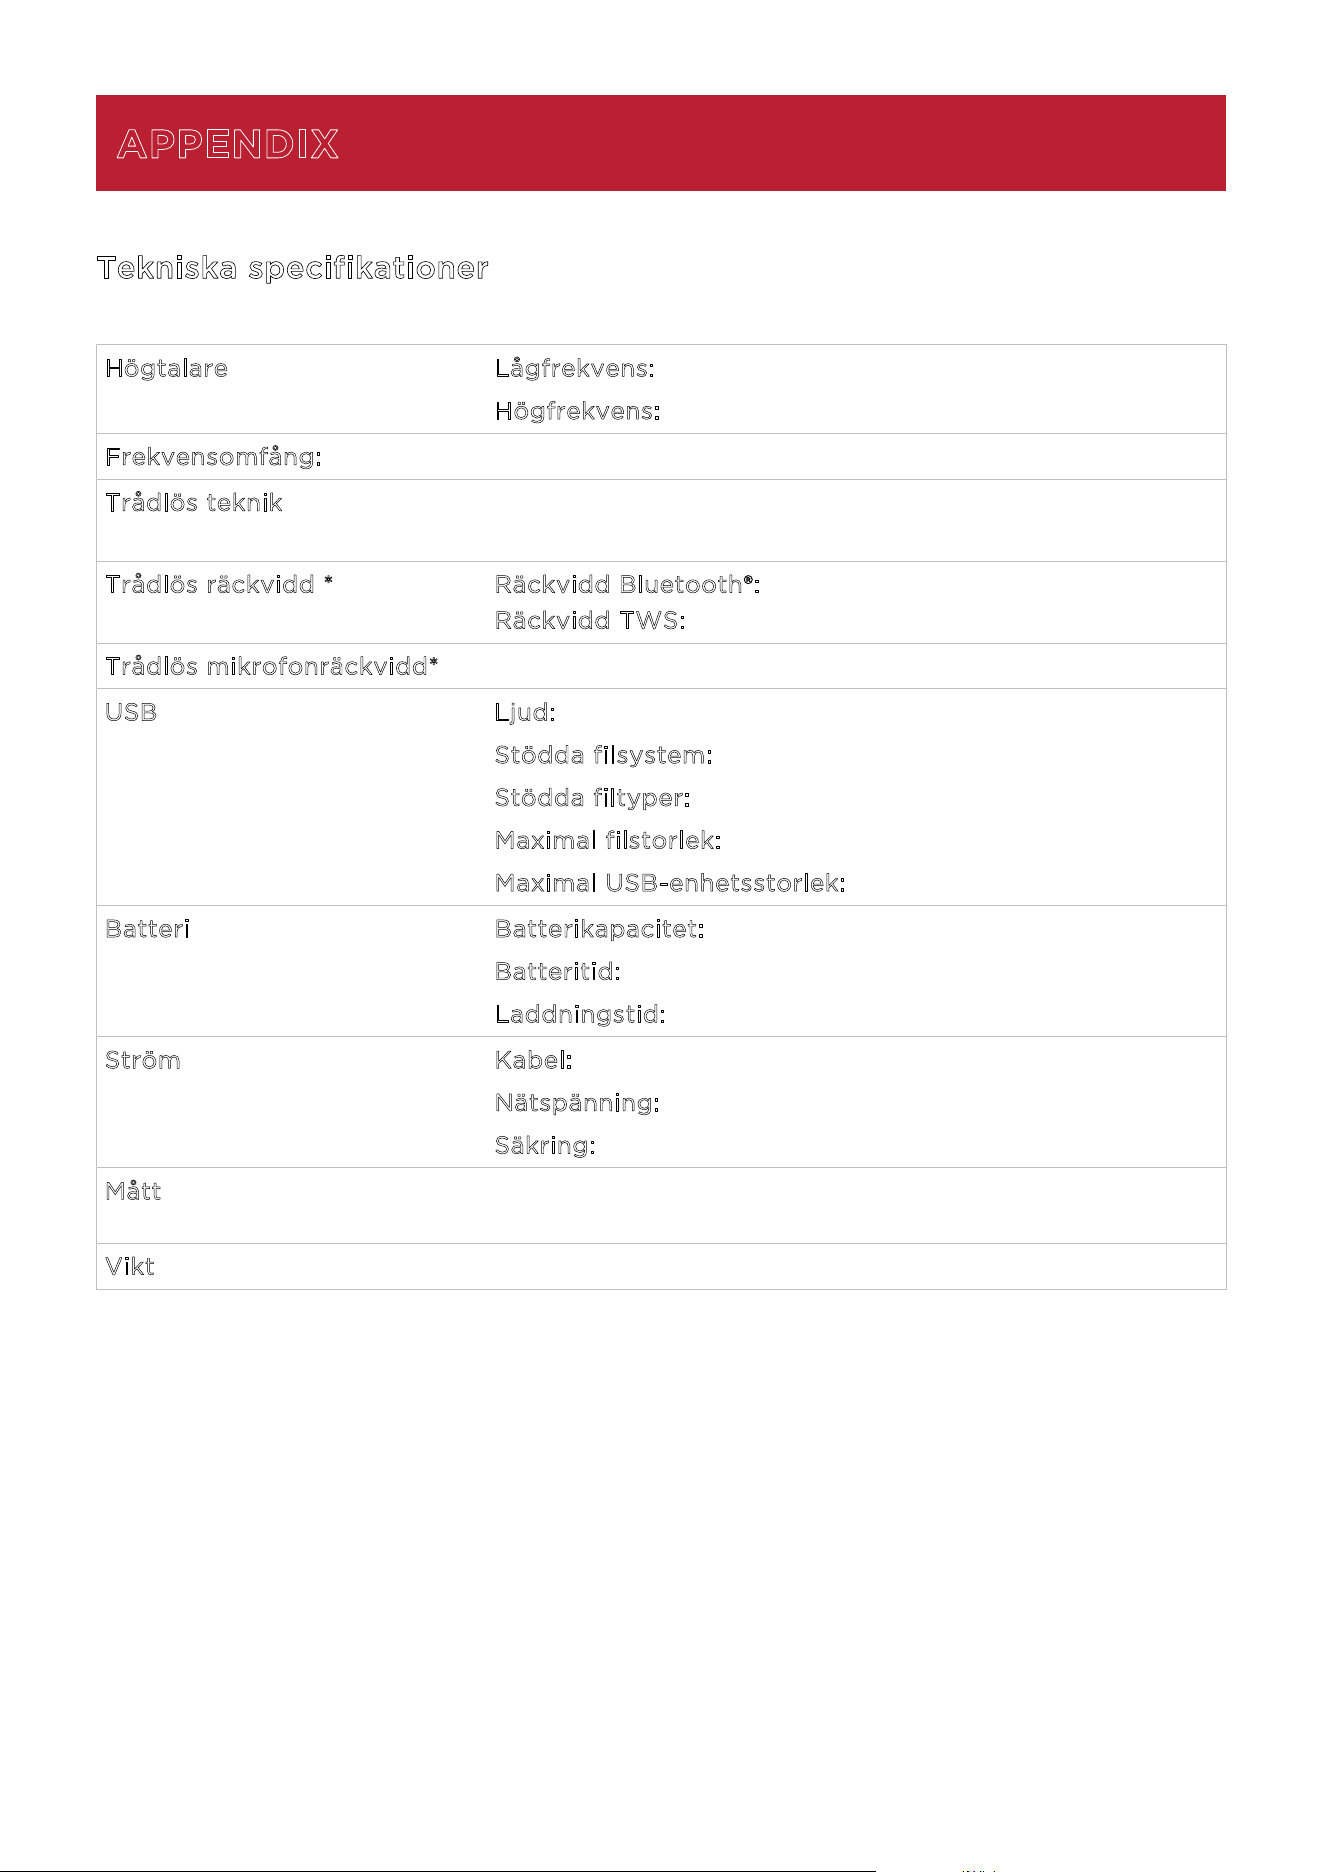
ION Audio Total PA™ Apex User Guide 100
Tekniska specifikationer
H
ögtalare Lågfrekvens: 305 mm / 12,0 tum
H
ögfrekvens: 25,4 mm / 1,0 tum
Frekvensomfång: 50 Hz – 20 kHz
Trådlös teknik Bluetooth®
- Klassiskt ljud
Trådlös räckvidd * Räckvidd Bluetooth®: Upp til 30,5 m / 100 fot.
R
äckvidd TWS: Upp til 23 m / 75 fot.
Trådlös mikrofonräckvidd* 30,5 m/ 100 fot.
USB Ljud: Musikuppspelning från USB-enhet
S
tödda filsystem: FAT32
S
tödda filtyper: MP3
M
aximal filstorlek: 4 GB
M
aximal USB-enhetsstorlek: 512 GB
Batteri Batterikapacitet: 11,1 V, 6000 mAh
B
atteritid: 6–8 timmar (50 % volym, lampor avstängda) **
L
addningstid: Upp till 5 timmar
Ström Kabel: IEC 320 C13
N
ätspänning: 100–240 VAC, 50/60 Hz, 320 W
S
äkring: F5AL AC250V
Mått
(bredd x djup x höjd)
411,7 x 317,5 x 651 mm / 16,21 x 12,50 x 25,63 tum
Vikt 13,2 kg / 29,15 pund.
Spec
ifikationer kan ändras utan föregående meddelande.
* Bluetooth-och trådlös mottagning samt räckvidd påverkas av väggar, hinder och rörelse.
För
bästa
prestanda, placera produkten i mitten av rummet så att den inte blockeras av väggar,
möbler osv.
**
Batteritiden kan variera beroende på temperatur, ålder och hur mycket produkten används.
APPENDIX

ION Audio Total PA™ Apex User Guide 101
Varumärken och licenser
ION Audio är ett varumärke som tillhör inMusic Brands, Inc., registrerat i USA och andra länder.
App Store är ett varumärke som tillhör Apple Inc., registrerat i USA och andra länder.
Android och Google Play är registrerade varumärken som tillhör Google Inc.
Egennamnet Bluetooth och Bluetooth-logotyperna ägs av Bluetooth SIG, Inc., och all användning av dessa märken av ION
Audio sker under licens.
Alla andra produktnamn, företagsnamn, varumärken eller handelsnamn tillhör respektive ägare.
Distributed by:
Costco Wholesale Corporation
P.O. Box 34535
Seattle, WA 98124-1535
USA
1-800-774-2678
www.costco.com
Costco Wholesale Canada Ltd.*
415 W. Hunt Club Road
Ottawa, Ontario
K2E 1C5, Canada
1-800-463-3783
www.costco.ca
* faisant aaire au Québec sous
le nom les Entrepôts Costco
Importado por:
Importadora Primex S.A. de C.V.
Blvd. Magnocentro No. 4
San Fernando La Herradura
Huixquilucan, Estado de México
C.P. 52765
RFC: IPR-930907-S70
(55)-5246-5500
www.costco.com.mx
Costco Wholesale Australia Pty Ltd
17-21 Parramatta Road
Lidcombe NSW 2141
Australia
www.costco.co
m.au
Costco Wholesale UK Ltd /
Costco Online UK Ltd
Hartspring Lane
Watford, Herts
WD25 8JS
United Kingdom
01923 213113
www.costco.co.uk
Costco Wholesale Spain S.L.U.
Polígono Empresarial Los Gavilanes
C/ Agustín de Betancourt, 17
28906 Getafe (Madrid) España
NIF: B86509460
900 111 155
www.costco.es
Costco Wholesale Iceland ehf.
Kauptún 3-7, 210 Gardabaer
Iceland
www.costco.is
Costco France
1 avenue de Bréhat
91140 Villebon-sur-Yvette
France
01 80 45 01 10
www.costco.fr
Costco Wholesale Japan Ltd.
2 Kakuchi, 2 Gaiku, Kaneda-Nishi
361 Urikura, Kisarazu shi
Chiba, 292-0007 Japan
0570-200-800
www.costco.co.jp
Costco Wholesale Korea, Ltd.
40, Iljik-ro
Gwangmyeong-si
Gyeonggi-do, 14347, Korea
1899-9900
www.costco.co.kr
Costco Wholesale New Zealand Limited
2 Gunton Drive
Westgate Auckland 0814
New Zealand
www.costco.co.nz
Costco (China)
Investment Co., Ltd.
Room 01 Mezzanine
No. 5178, Kang Xin Highway
Pudong New District
Shanghai
China 201315
+86-21-6257-7065
Costco Wholesale Sweden AB
Box 614
114 11 Stockholm
Sweden
www.costco.se
T
ILLVERKAD I KINA