
SHOWER SYSTEMS WITH RAINSYNC
Installation Guide and User Manual
1.0.1


ZLINE Kitchen and Bath provides Attainable Luxury, where the kitchen and bath of your dreams
is never out of reach. Through our unique designs and unparalleled quality, we’re dedicated to
providing you an elevated experience in the heart of your home. With an endless selection of
features and finishes, our inspiration is your reality.
ZLINE is fueled by a passion for innovation; A relentless pursuit of bringing the highest end
luxury designs and professional features into everyone’s homes. Because we continually strive
to improve our products, we may change specifications and designs without prior notice.

WARRANTY
COVERAGE
ZLINE Kitchen and Bath shower systems have a limited lifetime warranty from the original
purchase date for the original purchaser of the product.
TERMS
This warranty applies only to the original purchaser of a shower system installed for normal
residential use. This is defined as a single-family, residential dwelling in a non-commercial
setting. Commercial settings include but are not limited to: schools, churches, hotels,
restaurants, vacation rentals such as Airbnb, day care centers, private clubs, fire stations,
common areas in multi-family dwellings, nursing homes, food service locations, and
institutional food service locations such as hospitals or correction facilities. This warranty is
non-transferable and will not be extended based on the date of installation. The warranty
applies only to products installed in the continental United States and the District of
Columbia.
Warranty shall not apply and ZLINE Kitchen and Bath is not responsible for damage
resulting from negligence, improper maintenance, misuse, abuse, alteration of or tampering
with the appliance, accident, natural disaster, improper installation, or installation not in
accordance with the instructions contained in the manual, or the local codes.
WHAT IS NOT COVERED
1. Installation or start-up, damages, or problems caused by improper installation or use.
2. Installation in any commercial or non-residential application.
3. Removal or re-installation cost.
4. Aesthetic damage, scratches, or natural wear caused by normal use.
5. Second-hand, open box products or products purchased from an unauthorized
retailer.

TABLE OF CONTENTS
SAFETY INSTRUCTIONS 1
BLISS SHOWER SYSTEM (BLS-SHS) 2
ZLINE SHOWER FAUCET 22
BLISS SHOWER FAUCET (BLS-SHF) 27
EL DORADO SHOWER SYSTEM (ELD-SHS) 41
EL DORADO SHOWER FAUCET (ELD-SHF) 61
TROUBLESHOOTING 75

1
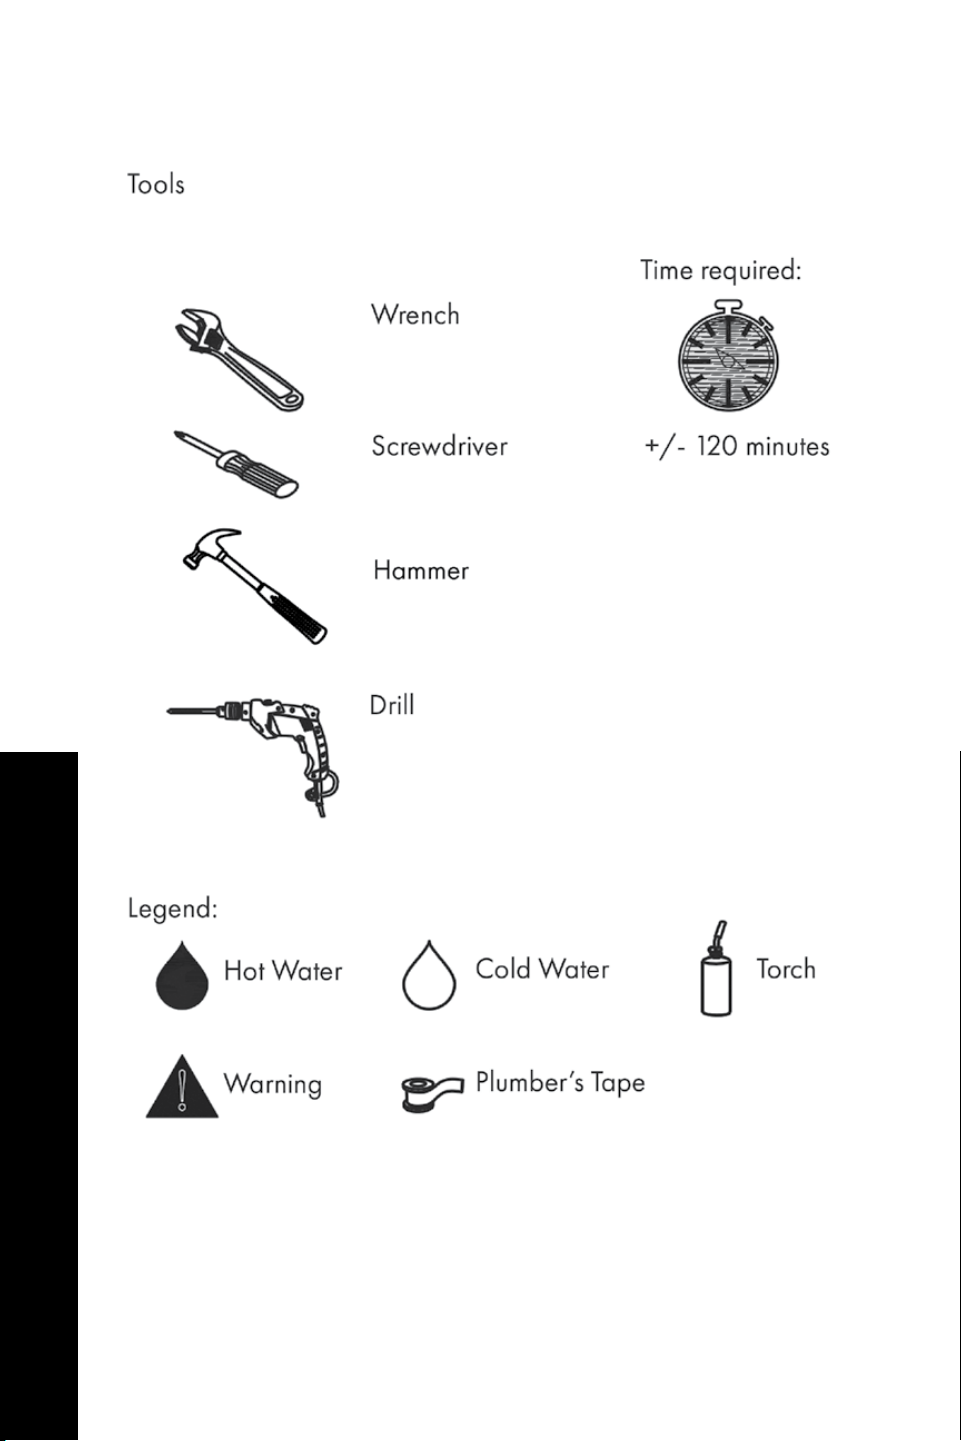
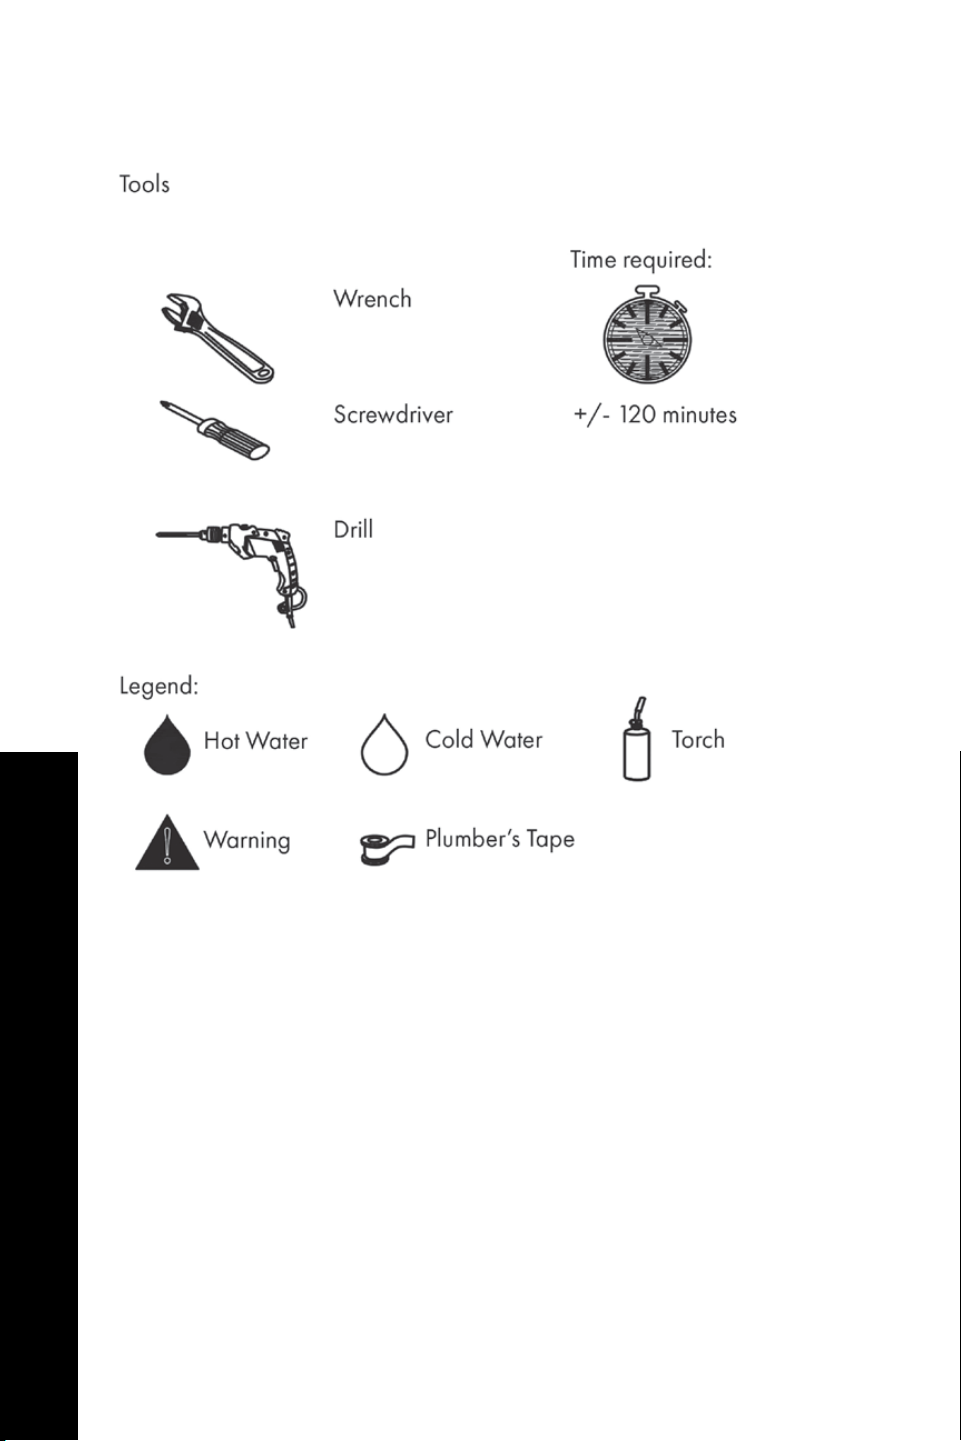
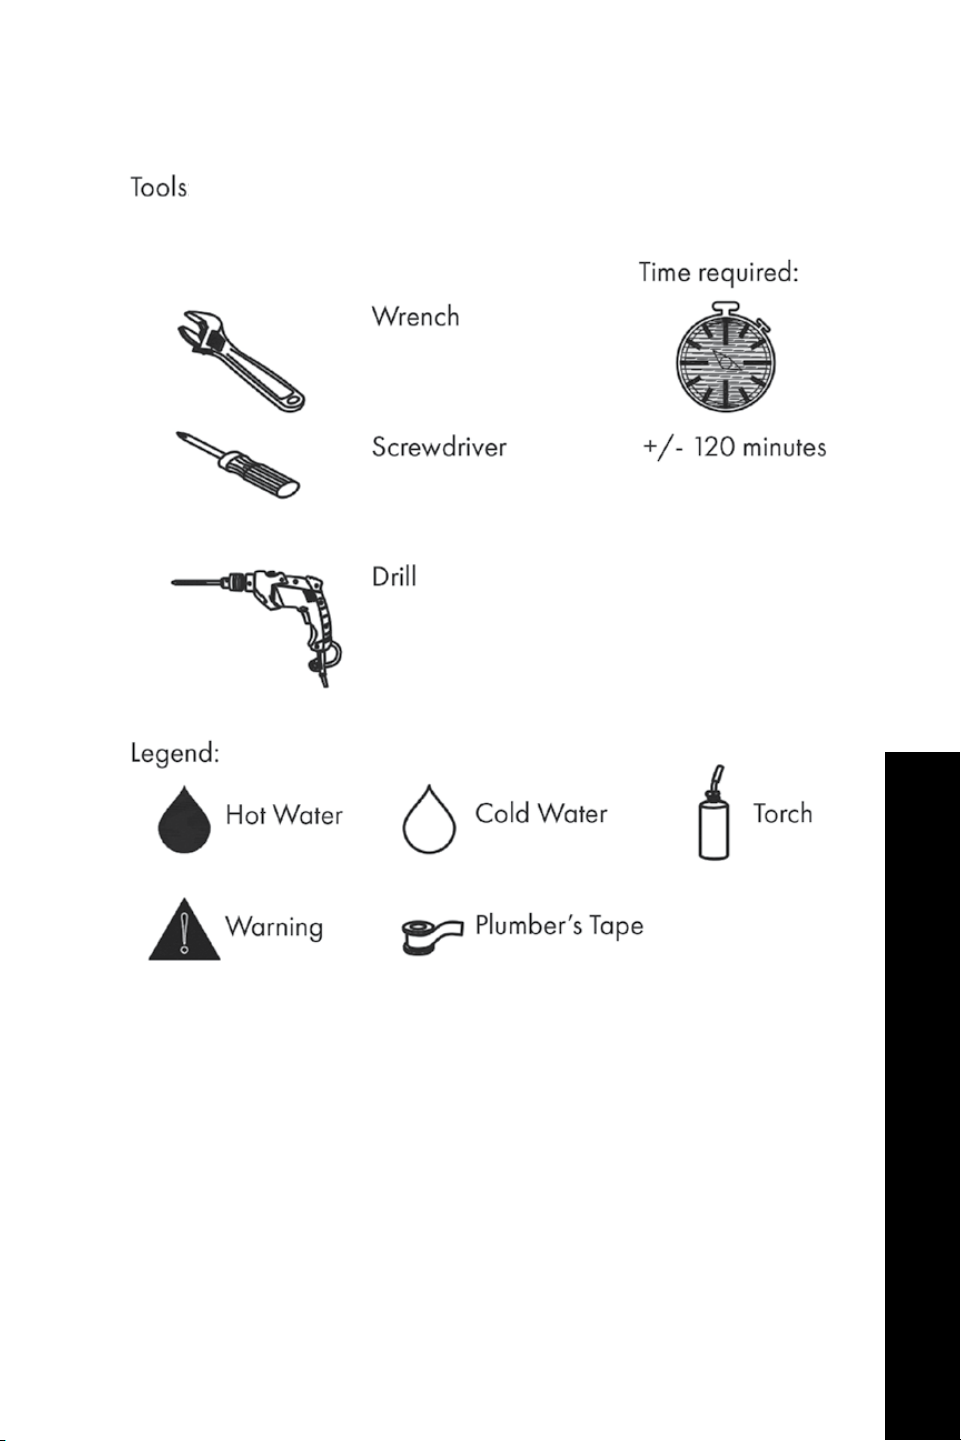
PRIOR TO INSTALLATION
• Make sure that the cold and hot water lines are turned off.
• Wrap all threaded connections with Teflon tape. Always wrap in a clockwise
direction.
• Cover your drain to avoid losing parts.
• Do not disassemble the main system body, as it has been installed and
commissioned correctly and precisely before delivery to the factory.
• To keep the system from jamming, flush the water pipe before installation.
Operating conditions: Working pressure at 0.05-1.0 MPa (including cold and hot
water pressure) with applicable water temperature: 39.2°F - 194°F.
CARE AND MAINTENANCE
To keep the product clean and shining, follow the steps below:
1. Rinse clean with water and dry with a soft cloth.
2. Do not clean with soaps, acid, polish, abrasives, or harsh cleaners.
3. Do not use cloth with a coarse surface.
4. Unscrew the aerator and clean when necessary.
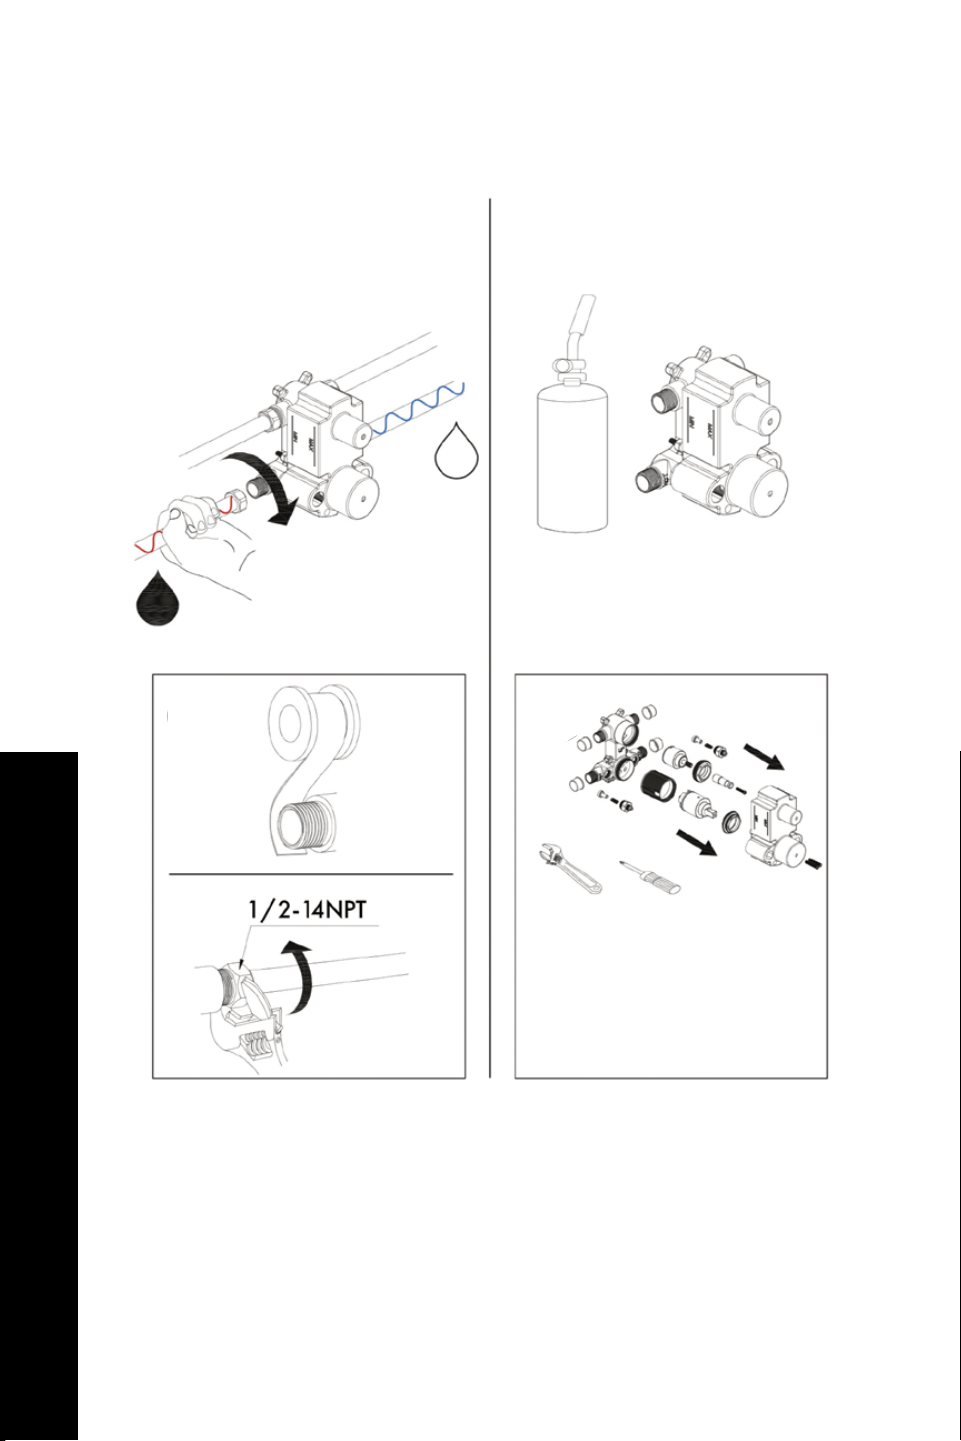
• If soldering the water connections when installing the system, remove the
O-rings, cartridges, and washers before applying any heat.
• Protect your eyes when cutting or soldering.
• Do not over tighten screws/nuts. Finger tighten, then use a wrench/screwdriver
to tighten the fixing screw/nut until snug.
SAFETY INSTRUCTIONS
General Safety
2
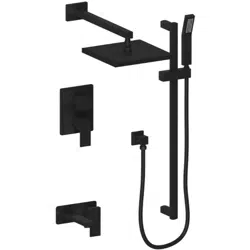
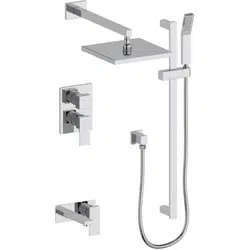
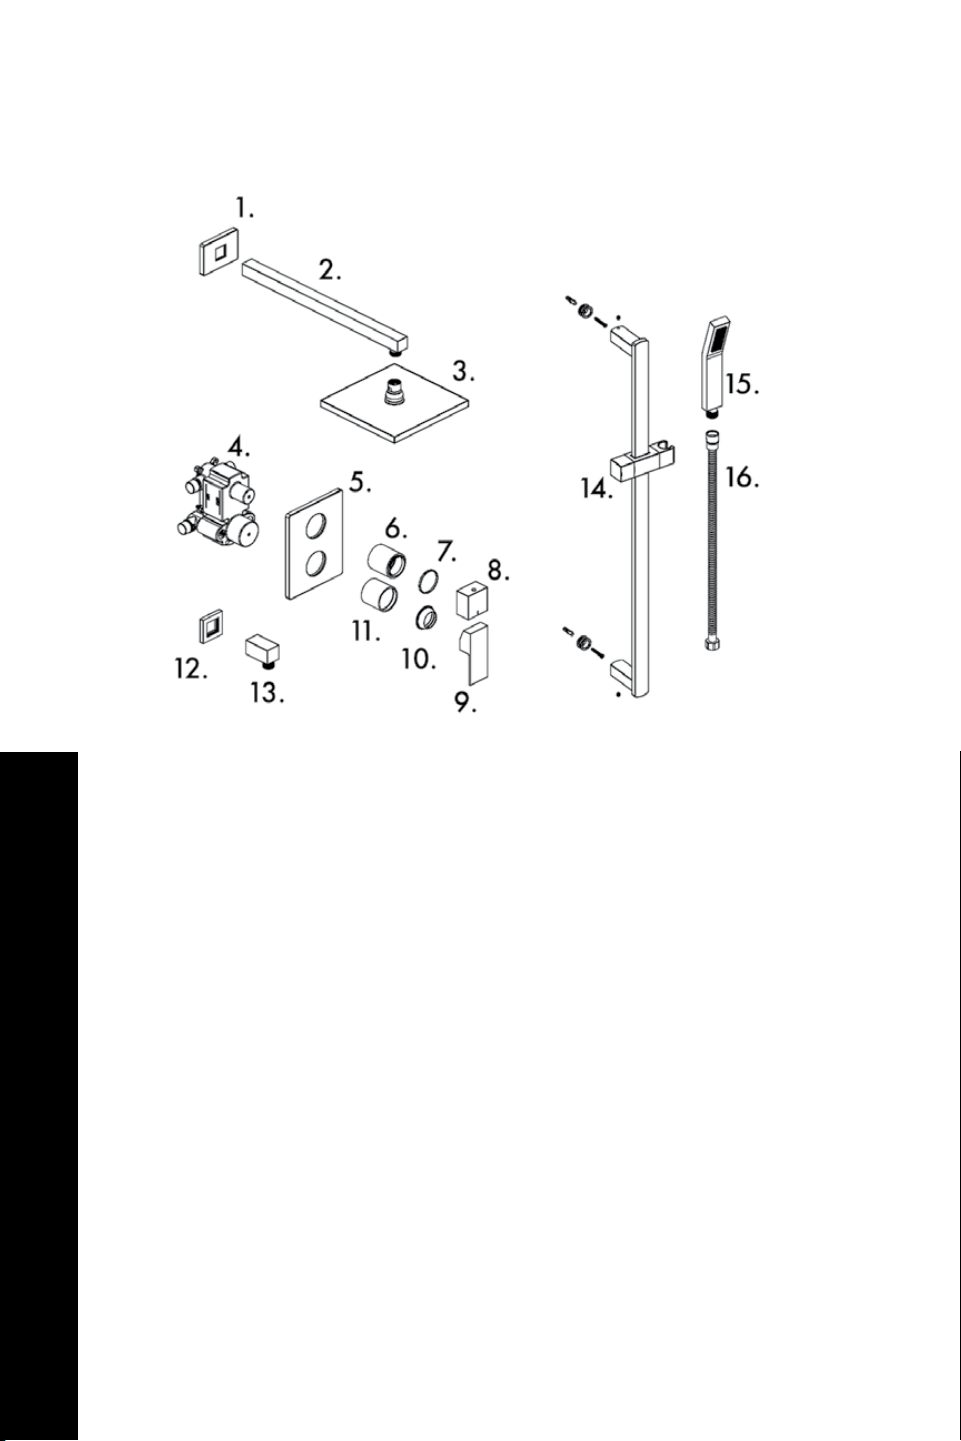
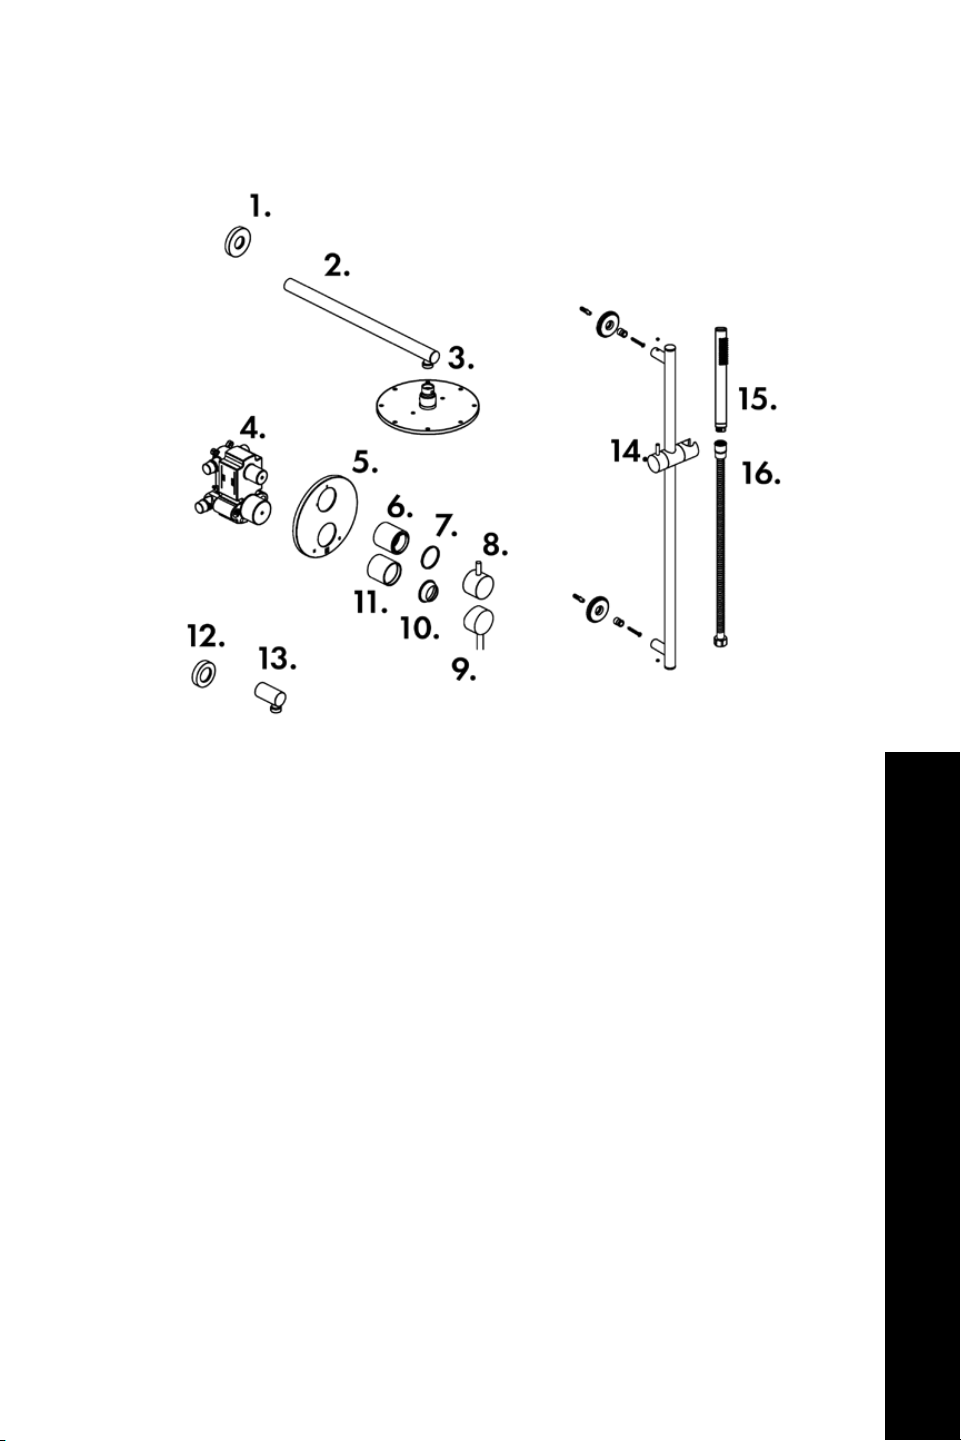
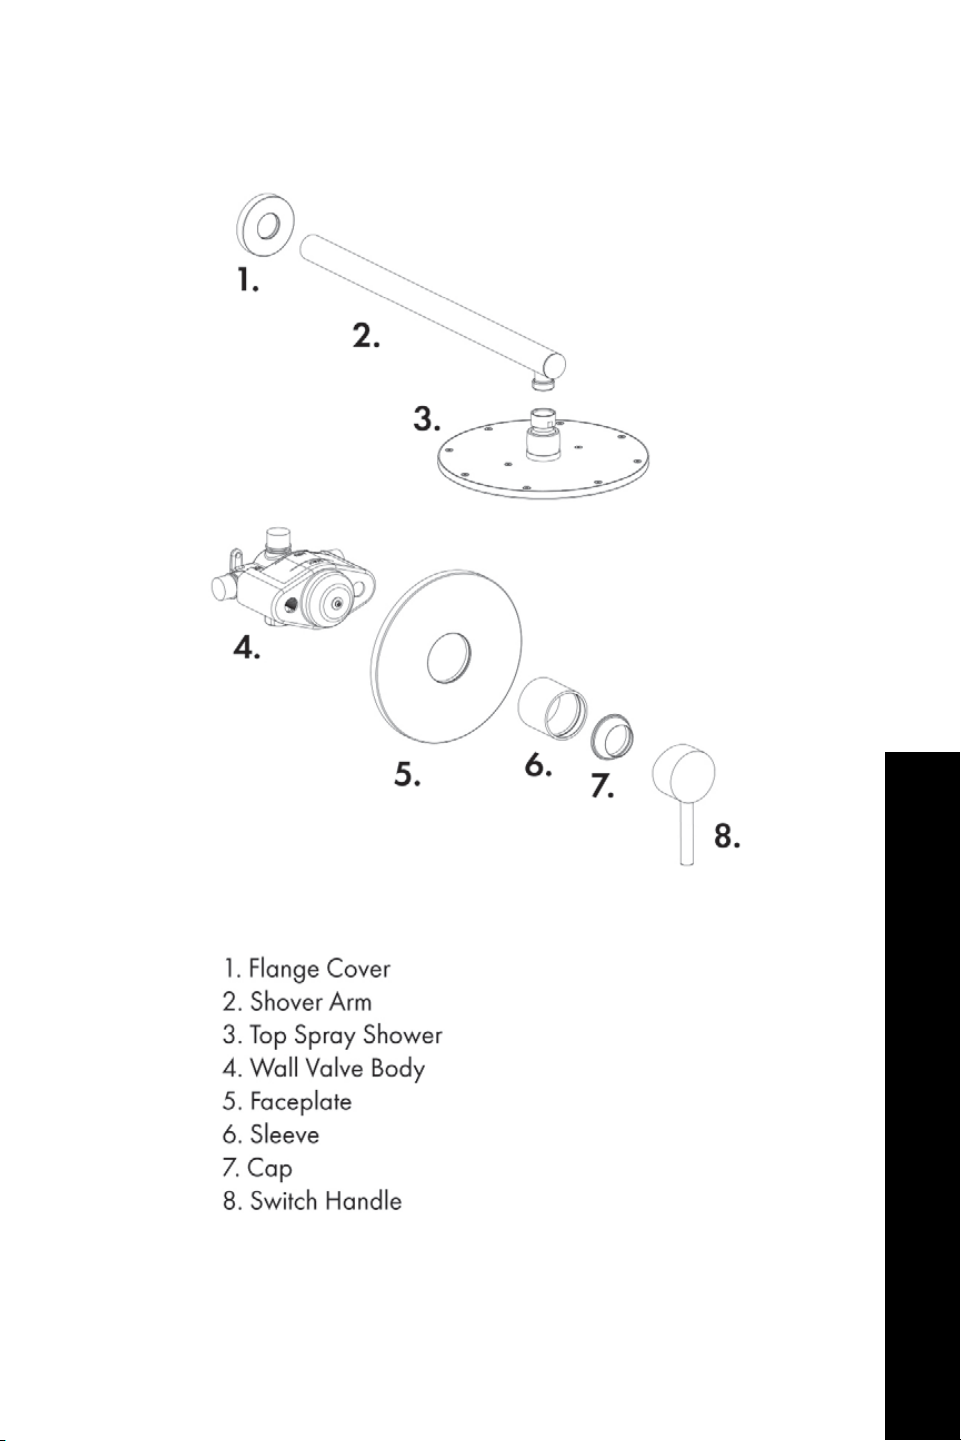
BLISS SHOWER SYSTEM (BLSSHS)
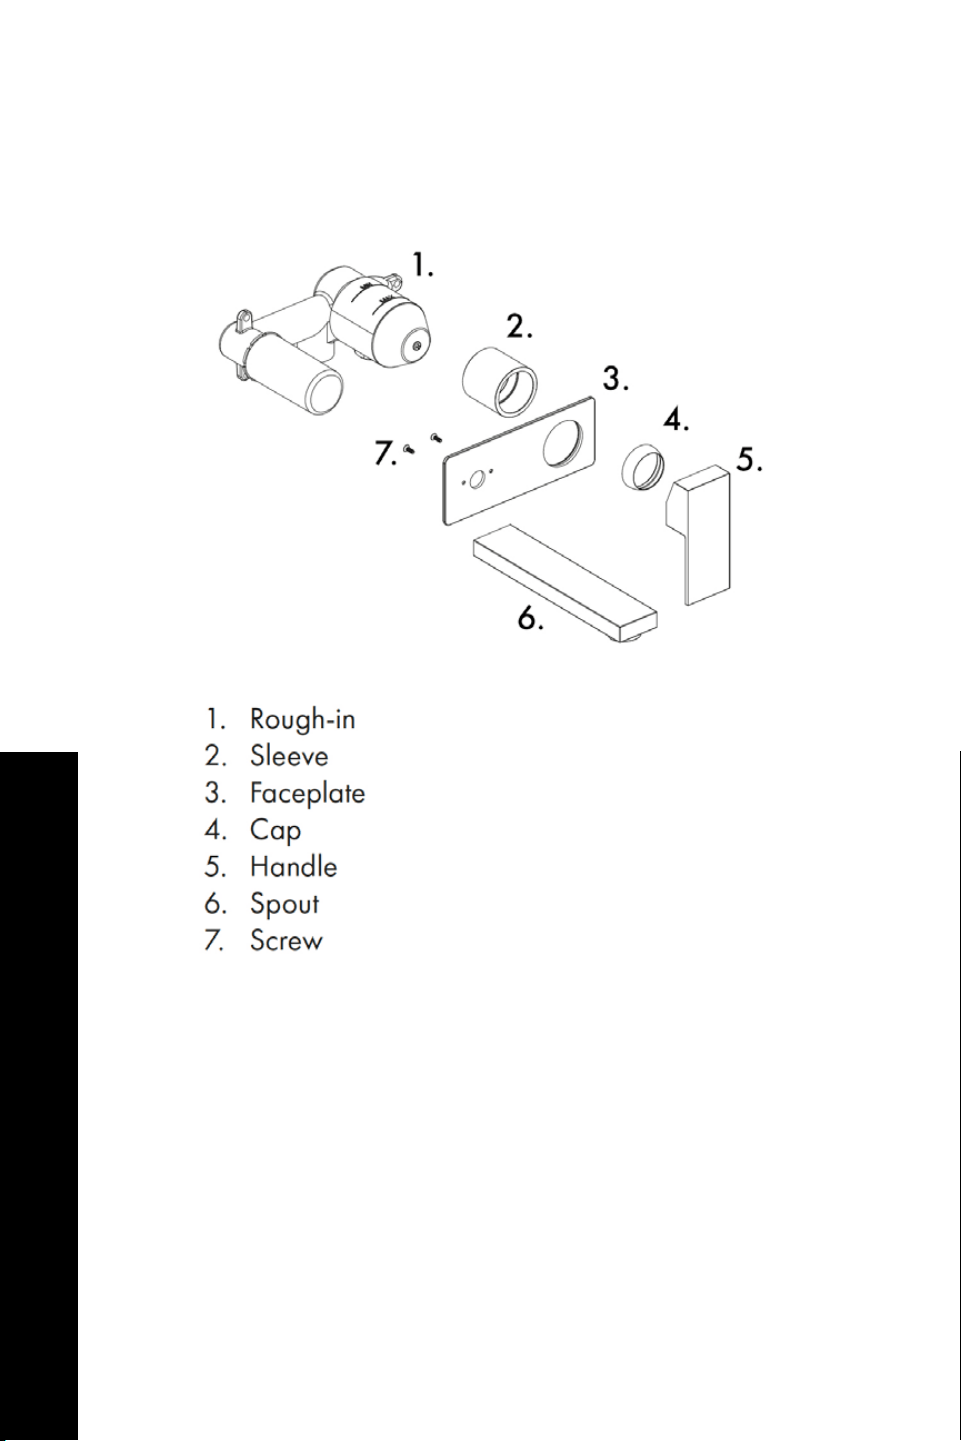
Bliss Shower System Product Specifications
1. Flange cover
2. Shower arm
3. Top spray shower
4. Wall valve body
5. Faceplate
6. Sleeve
7. Washer
8. Water control handle
9. Switch handle
10. Cap
11 . Sleeve
12 . Flange cover
13. Angle valve
14 . Shower rail
15. Shower handle
16. Hose
3
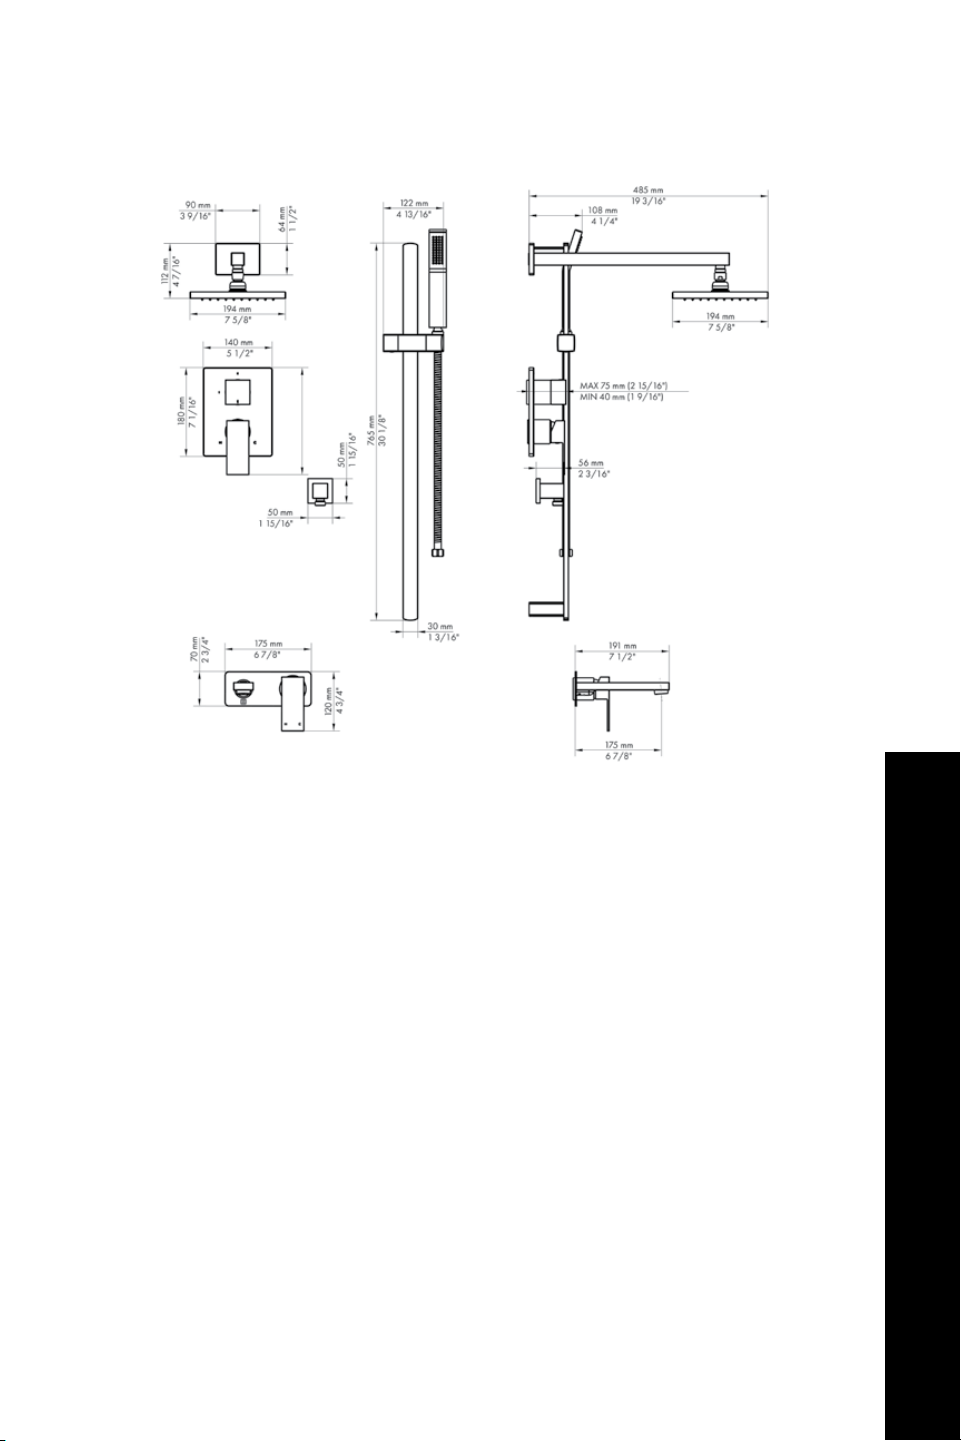
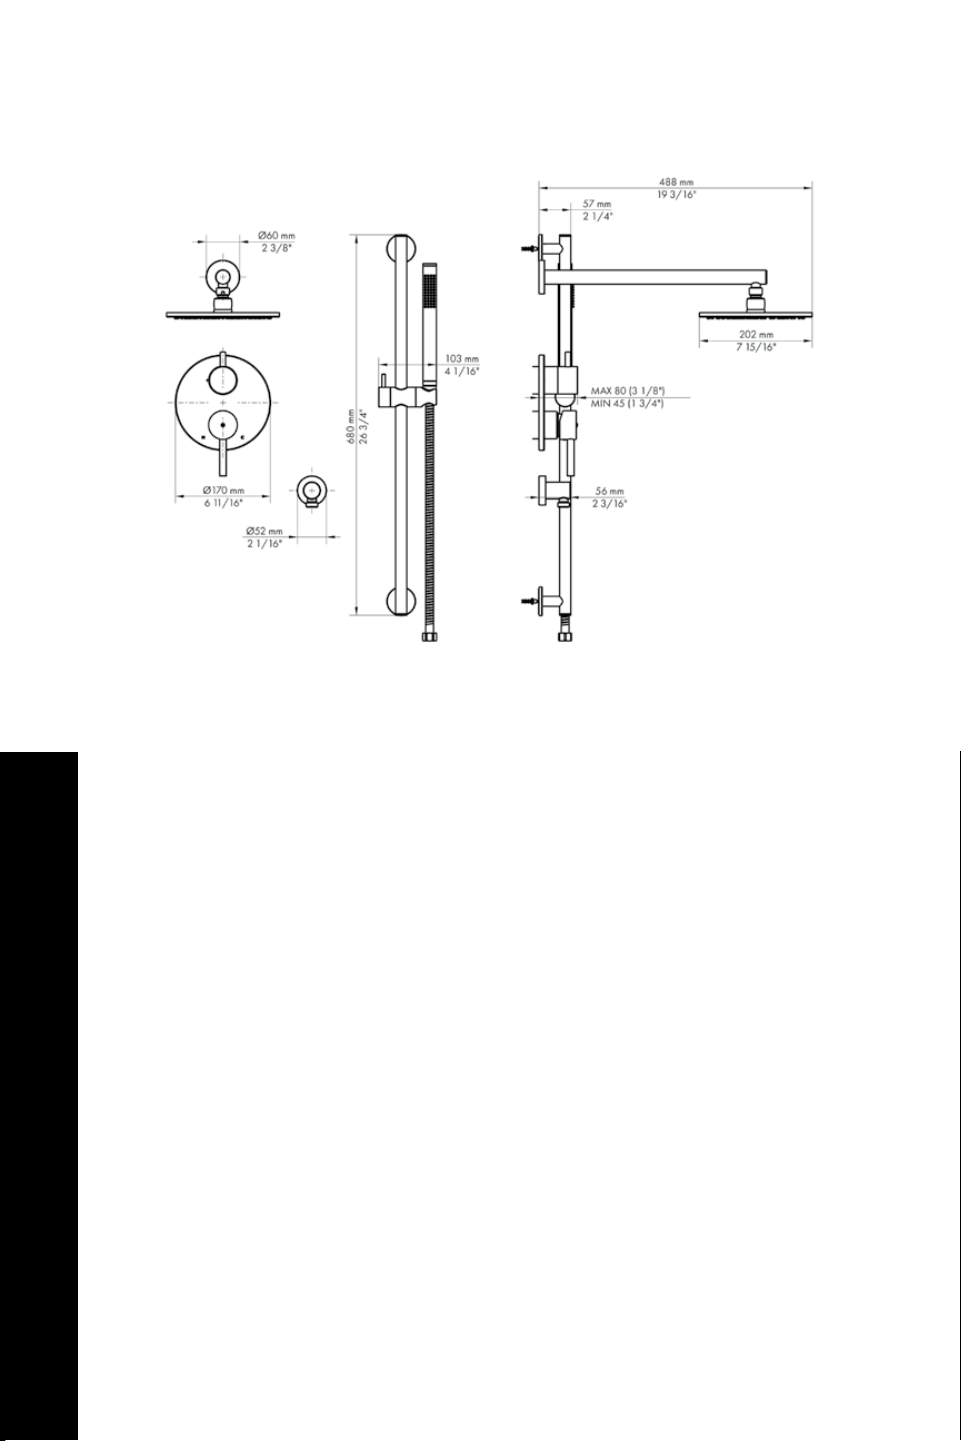
BLISS SHOWER SYSTEM (BLSSHS)
Bliss Shower System Product Specifications
4
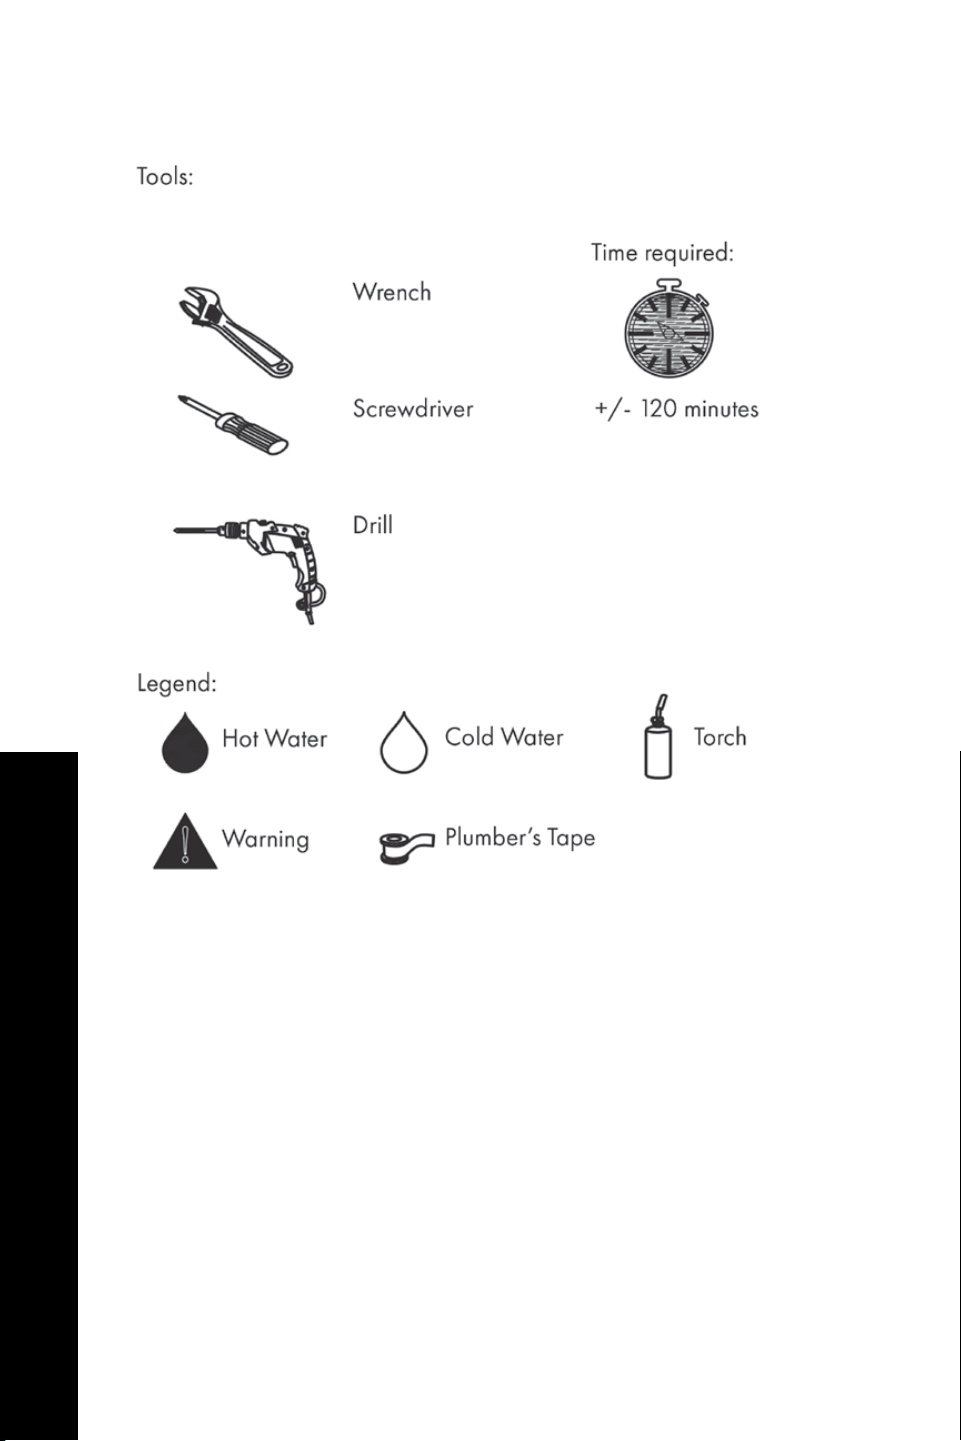
BLISS SHOWER SYSTEM (BLSSHS)
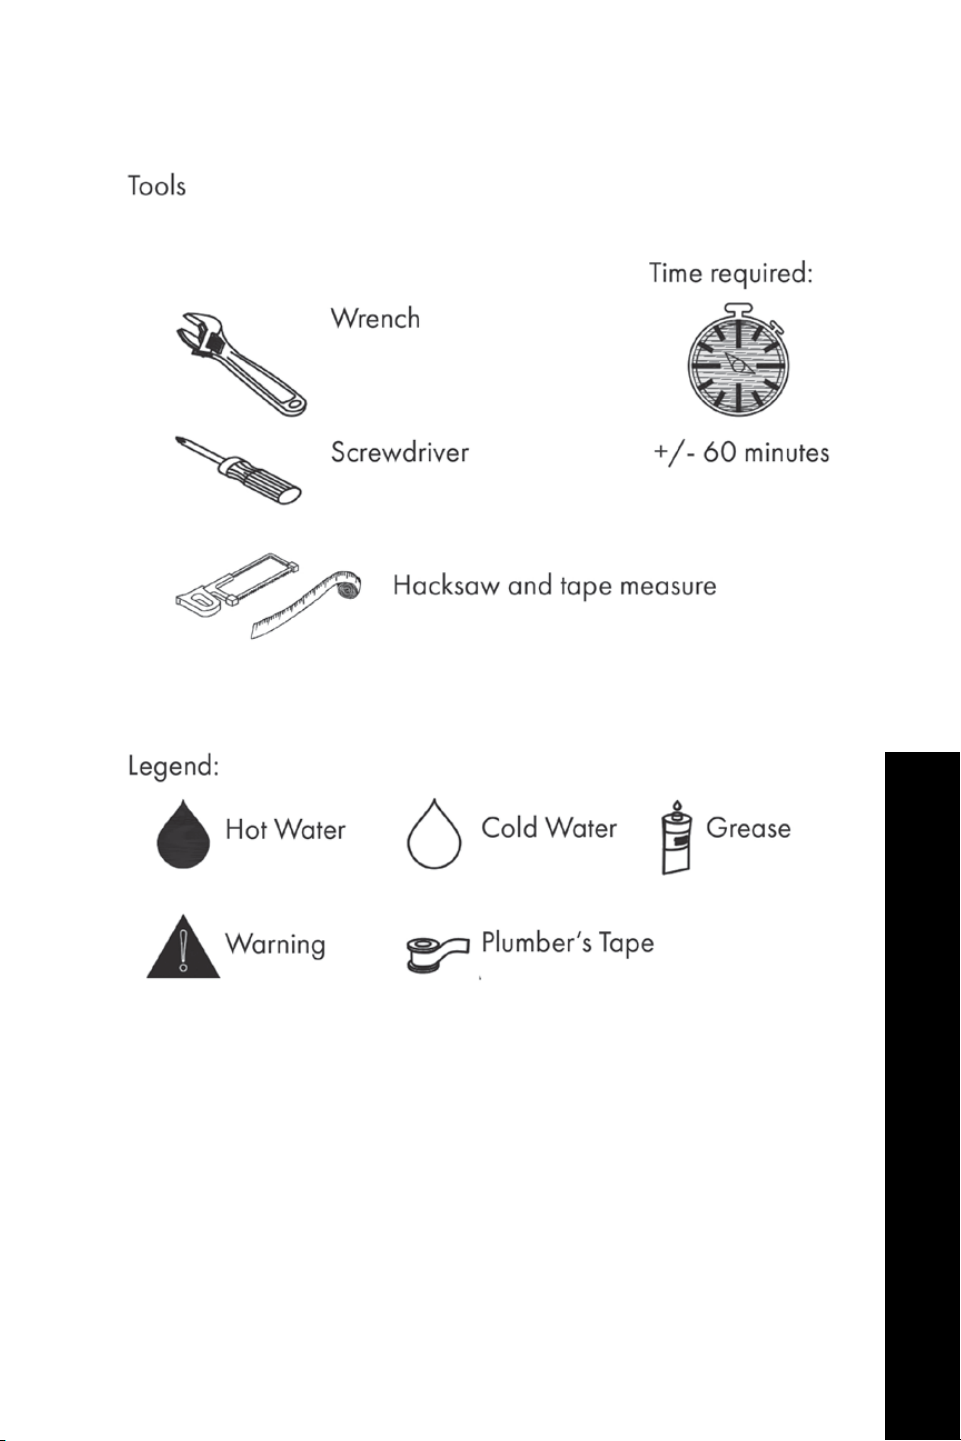
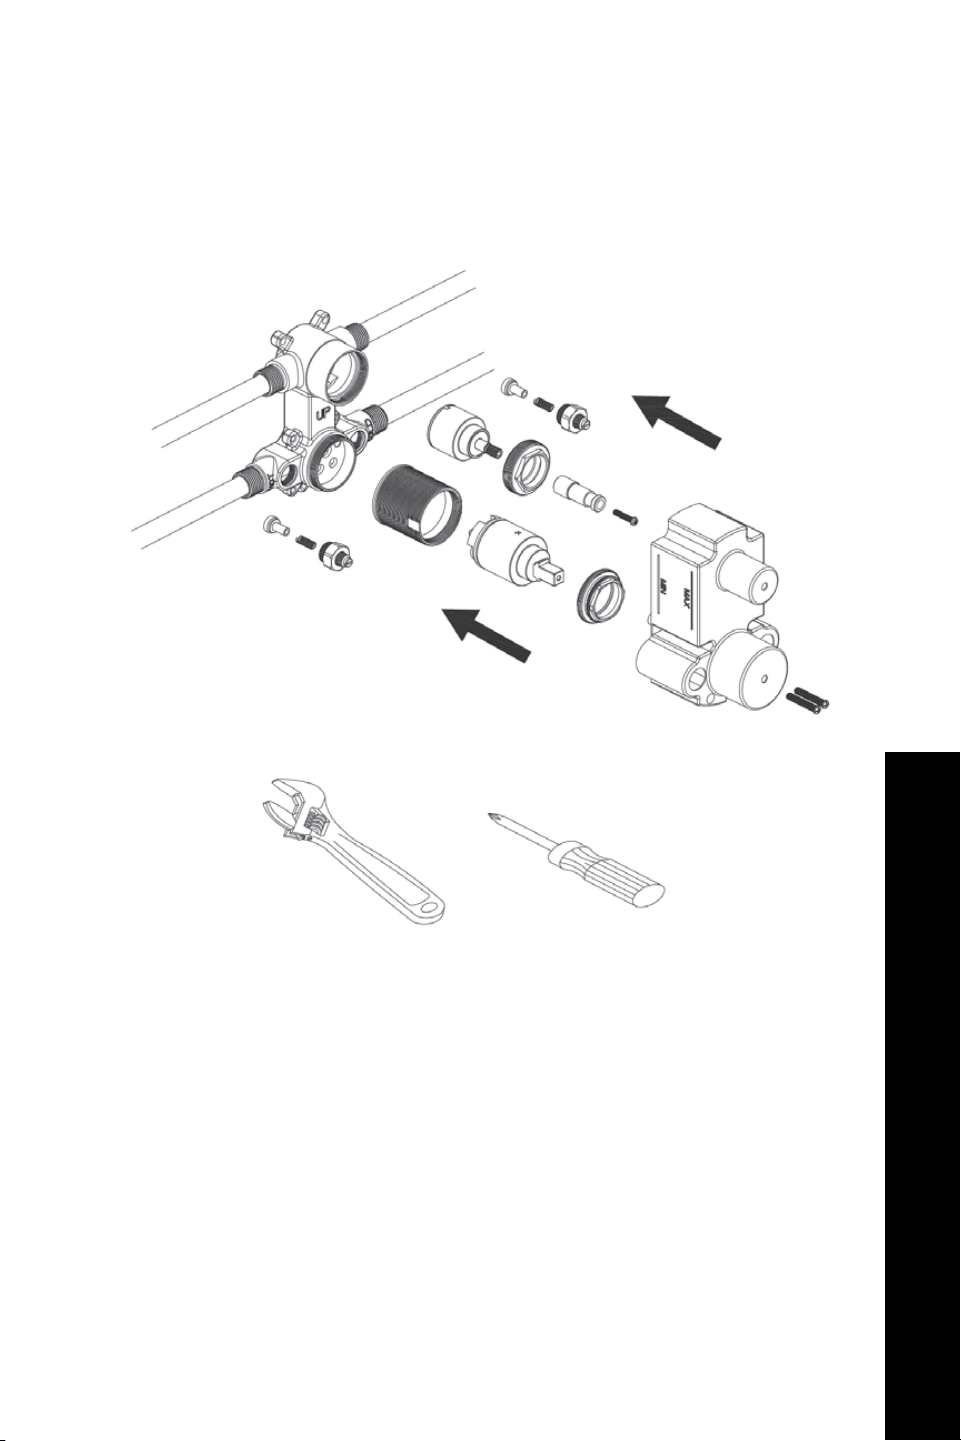
Bliss Shower System Tools
needed:

5
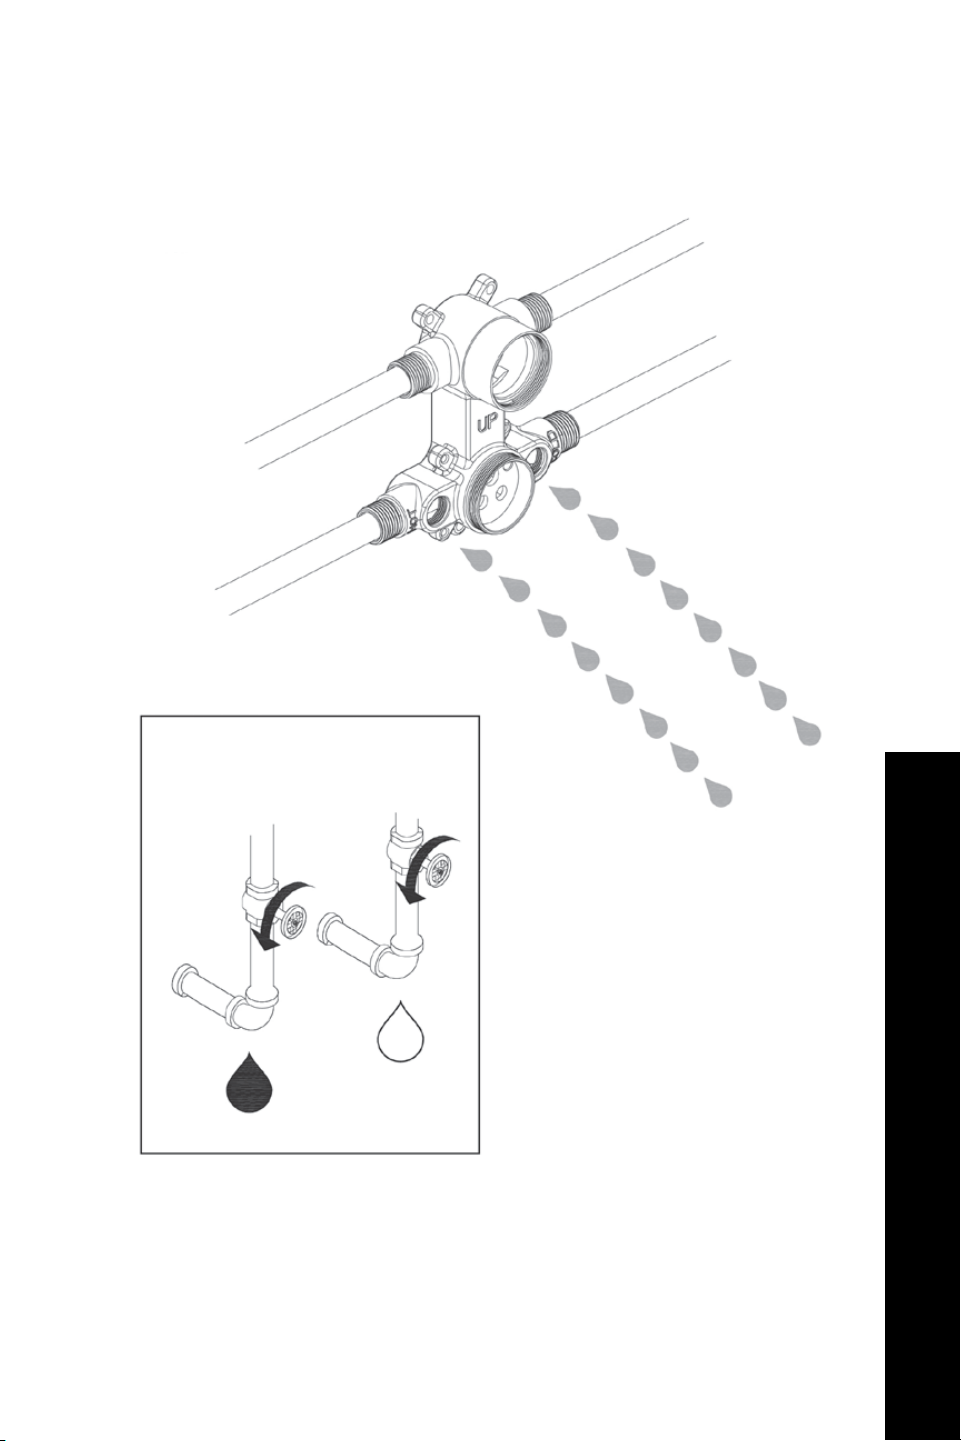
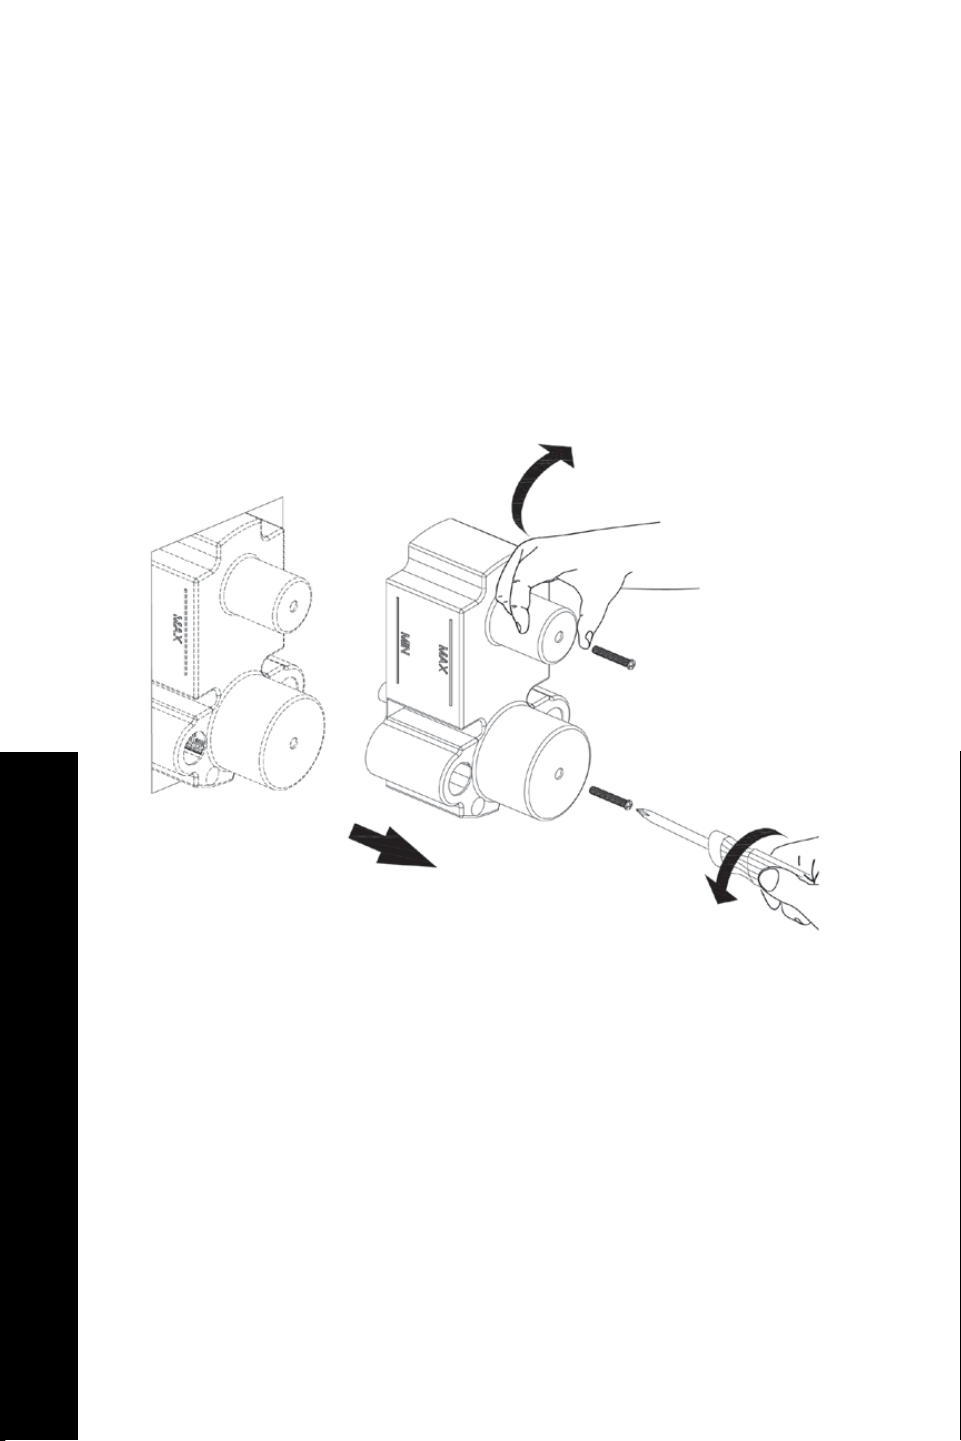
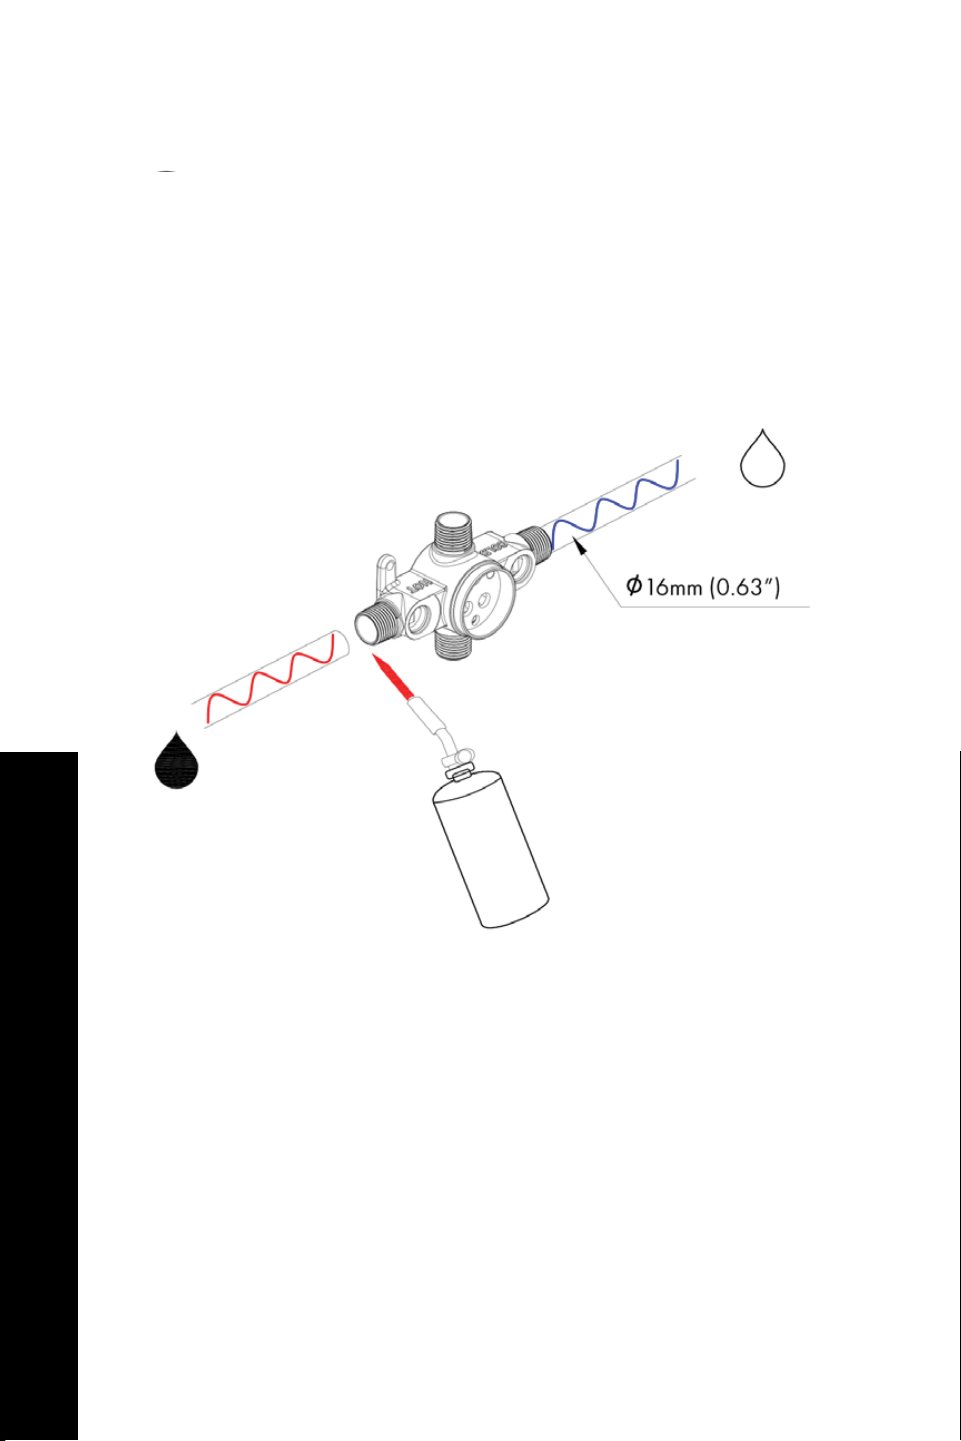
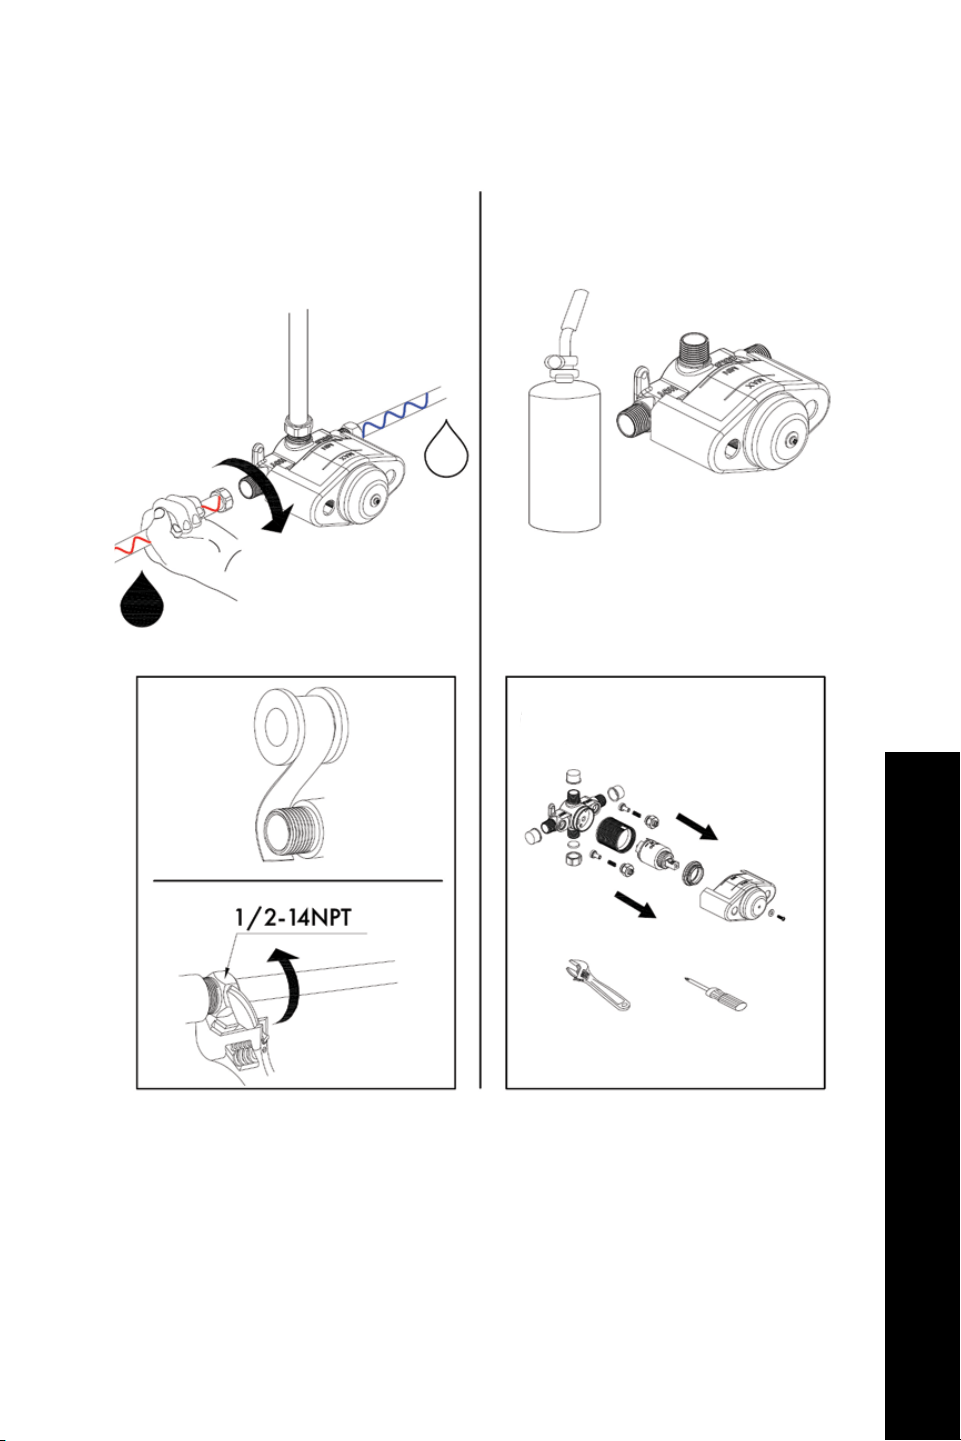
Slide the sleeves onto the pipes and then insert pipes into the wall valve. Tighten the
ring around the pipes with the wrench. NOTE: If brazing is involved, you must remove
the internal valve components prior to the brazing. Please note the original position of
the cartridge.
BLISS SHOWER SYSTEM (BLSSHS)
Bliss Shower System Installation
1. 1c.
1d.1b.

6
BLISS SHOWER SYSTEM (BLSSHS)
Bliss Shower System Installation
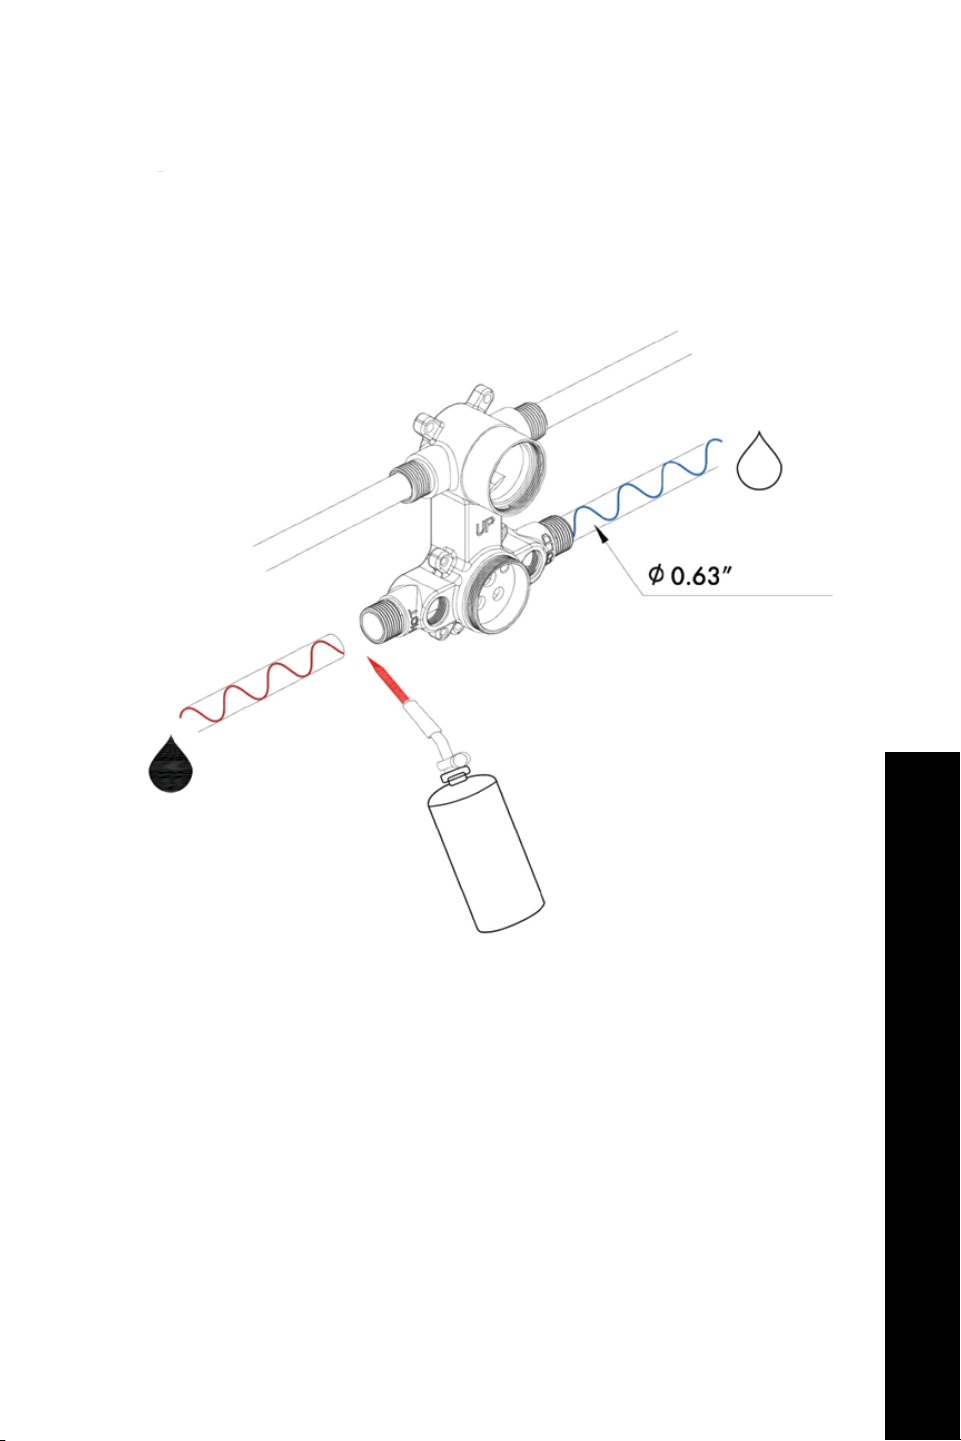
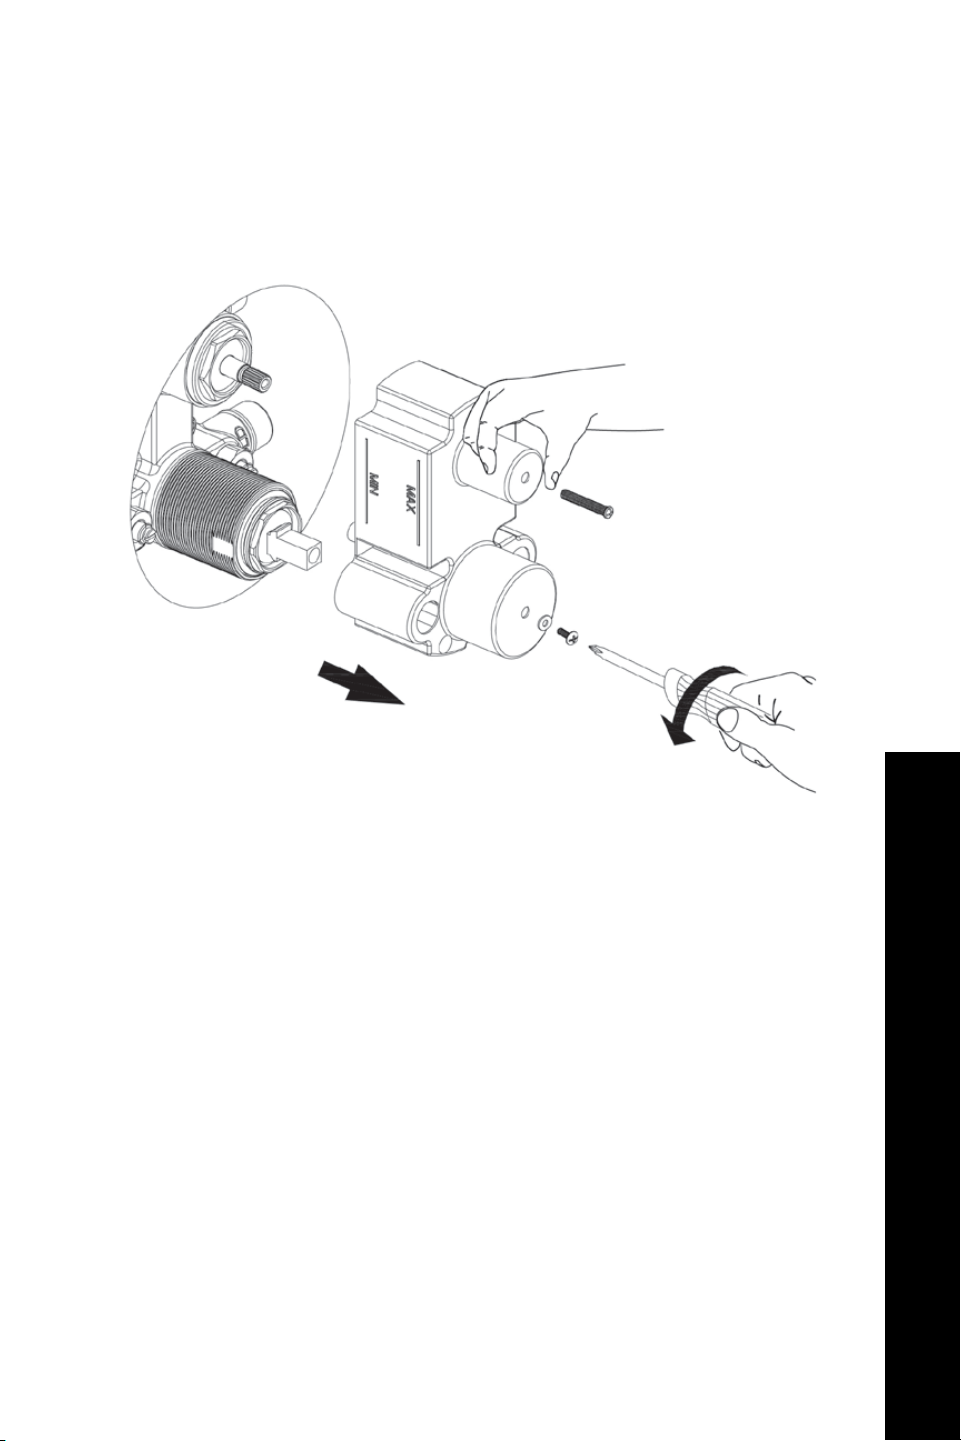
Braze the copper together.
2.
7
BLISS SHOWER SYSTEM (BLSSHS)
Bliss Shower System Installation
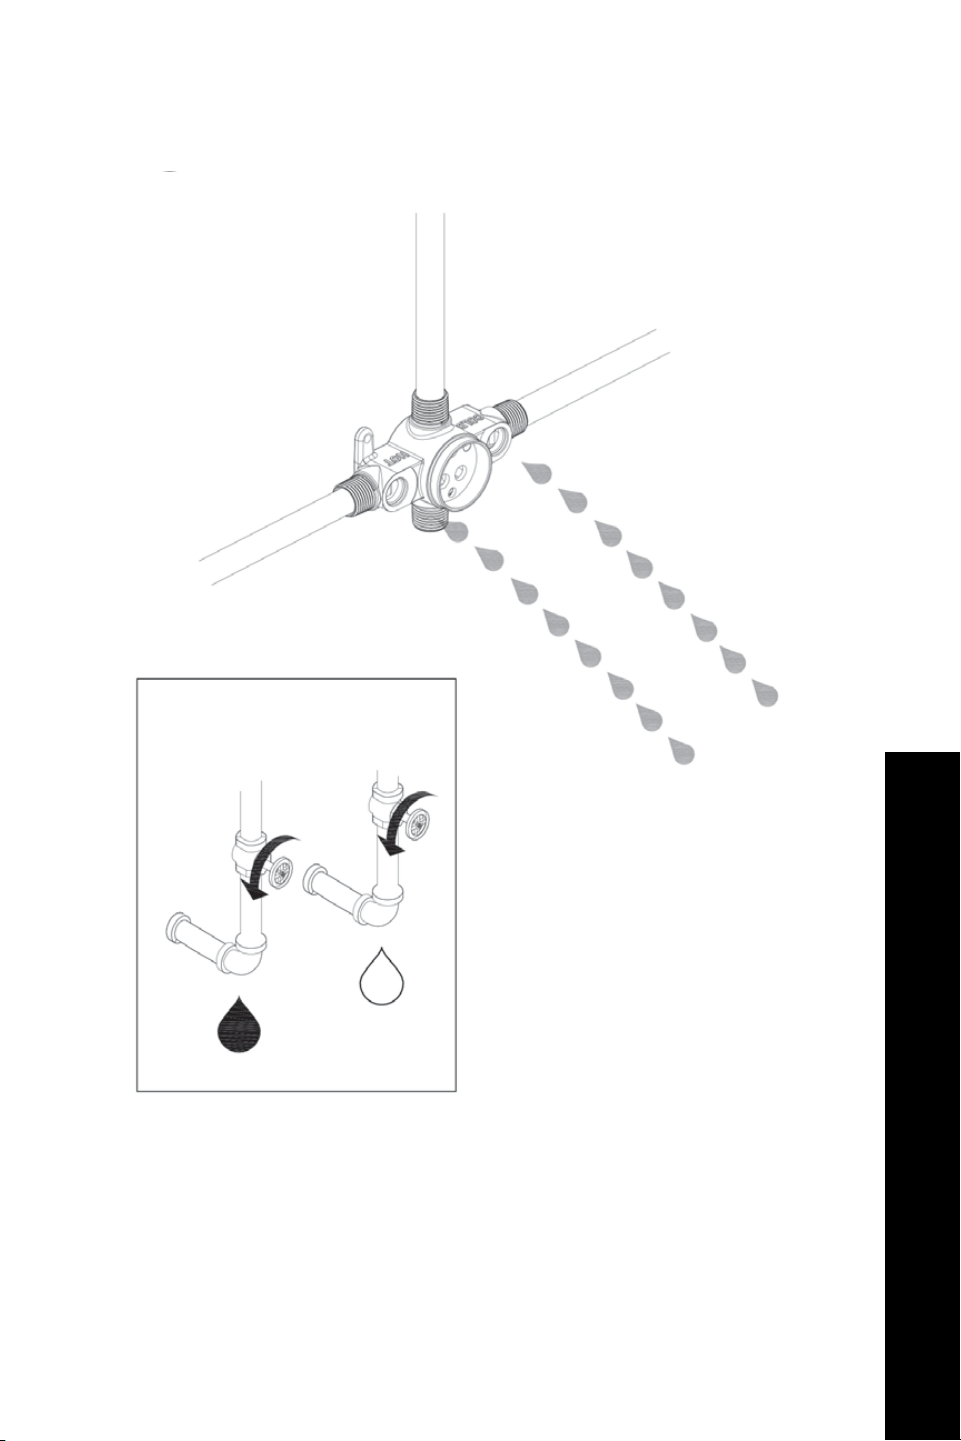
After brazing, purge the water supply system for 30 seconds.
3.
3a.
8
BLISS SHOWER SYSTEM (BLSSHS)
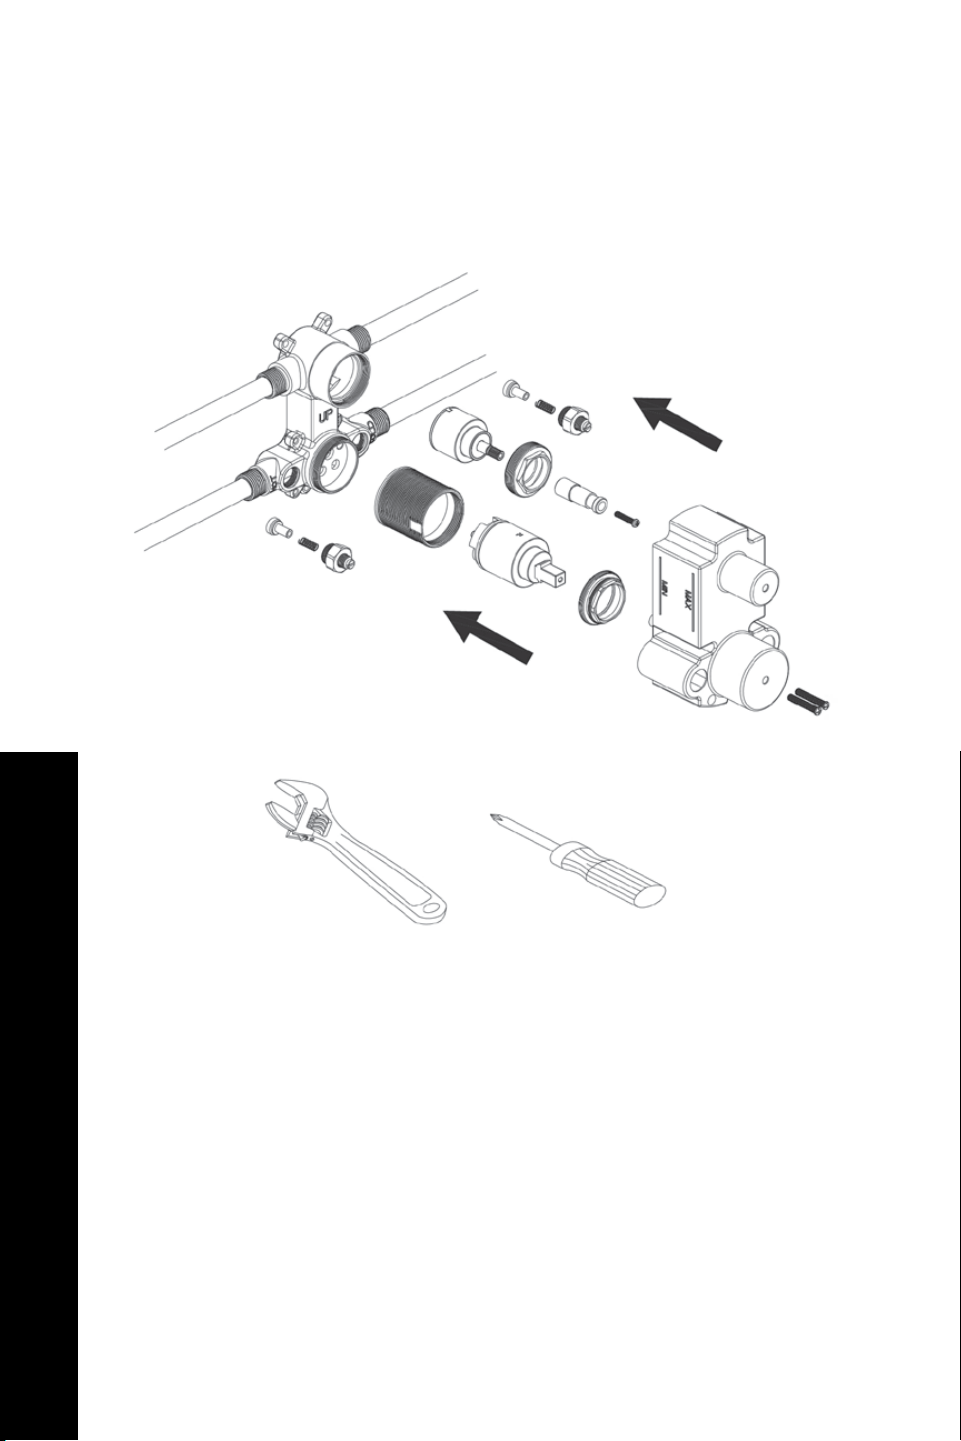
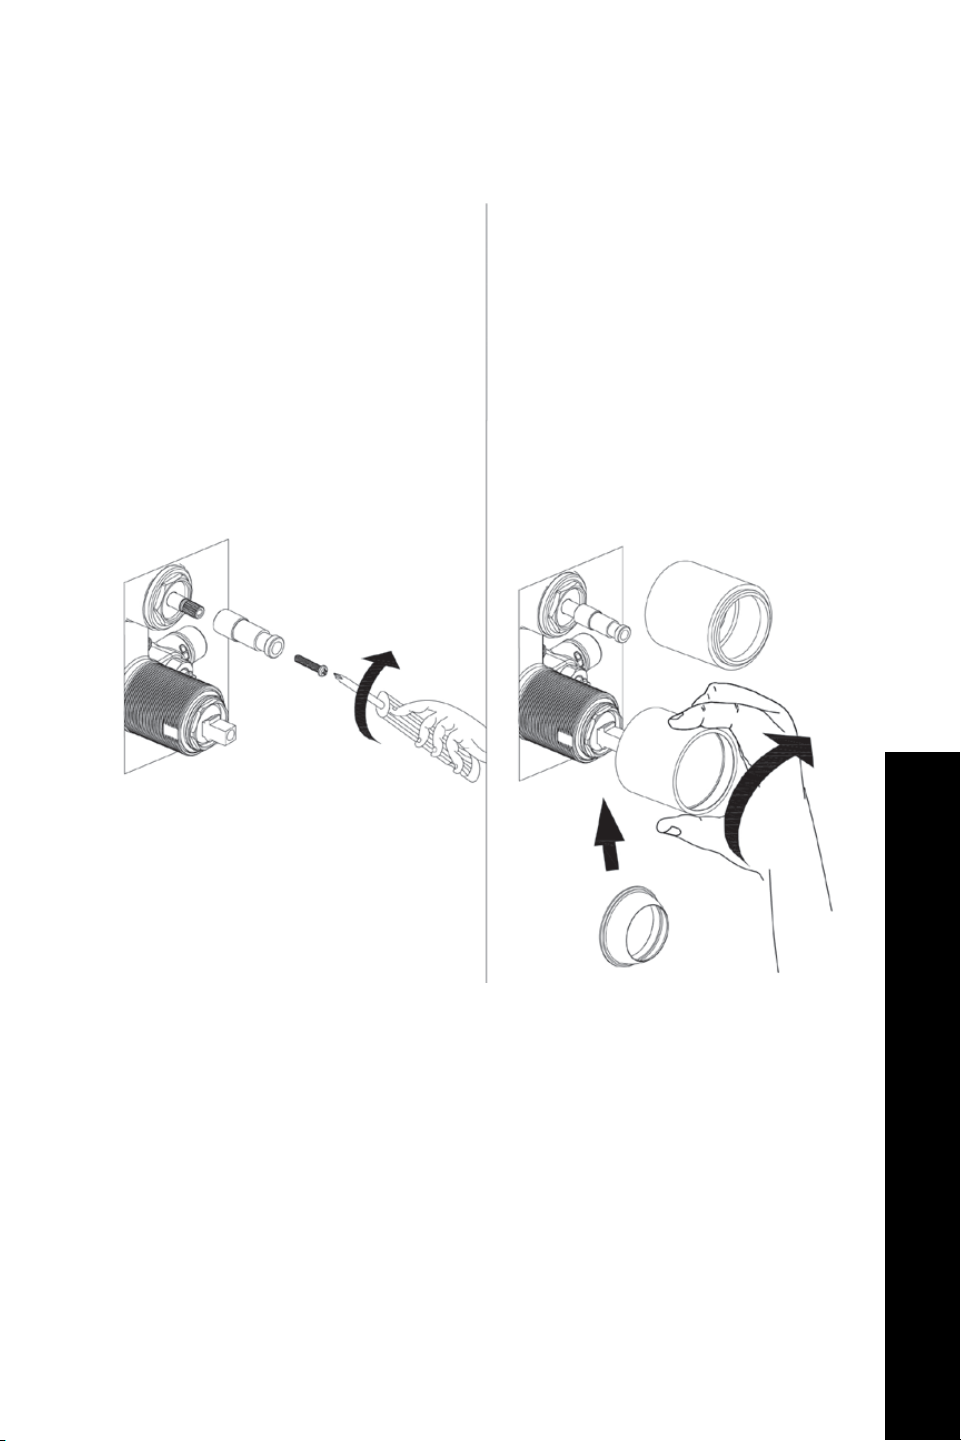
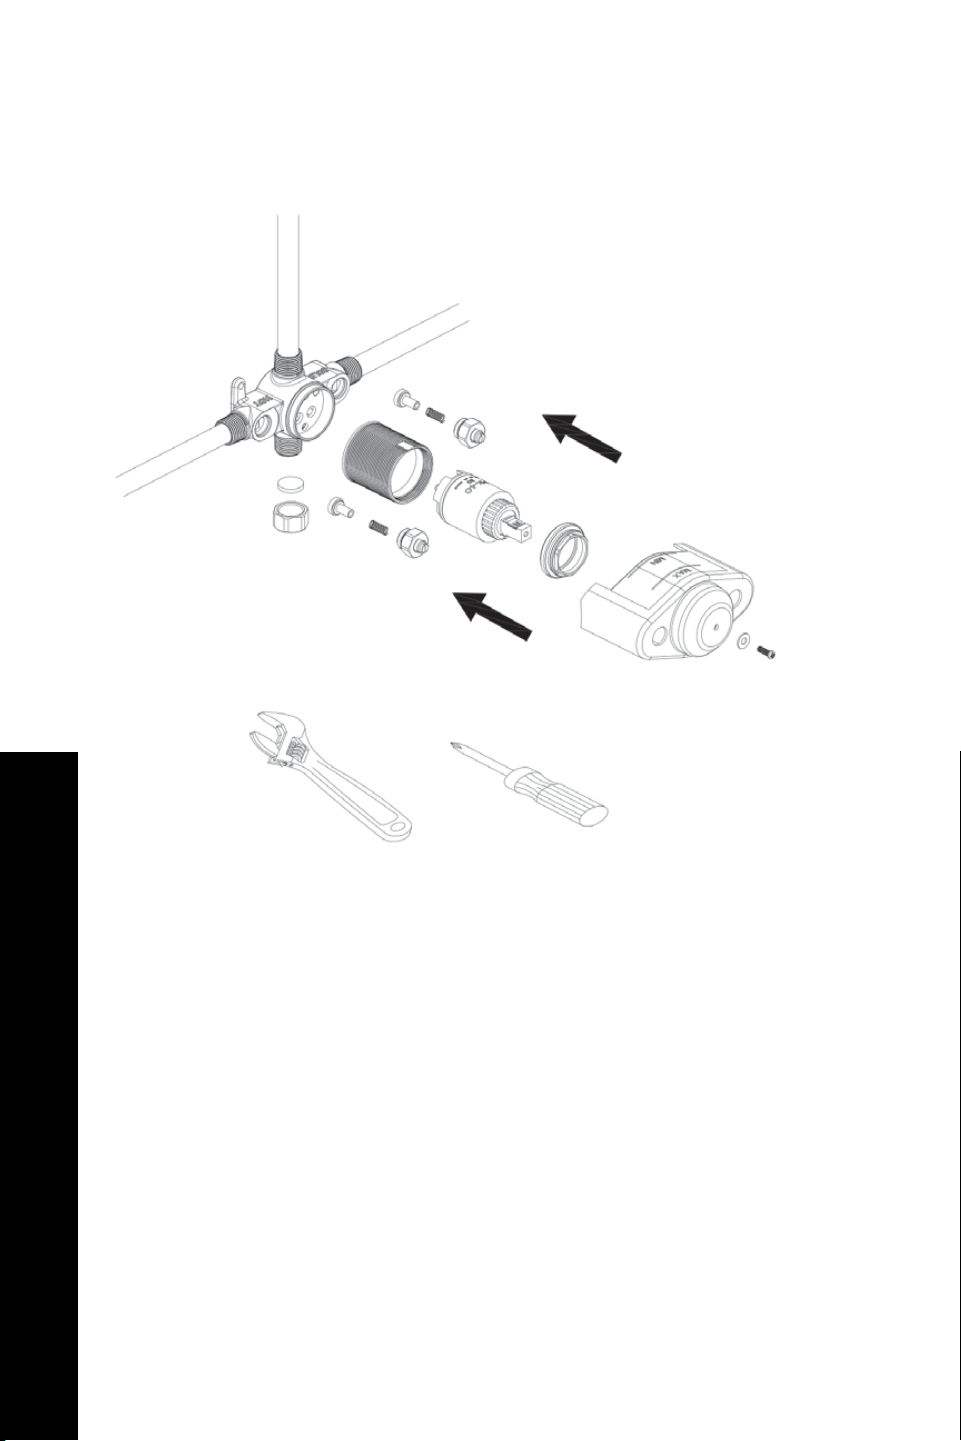
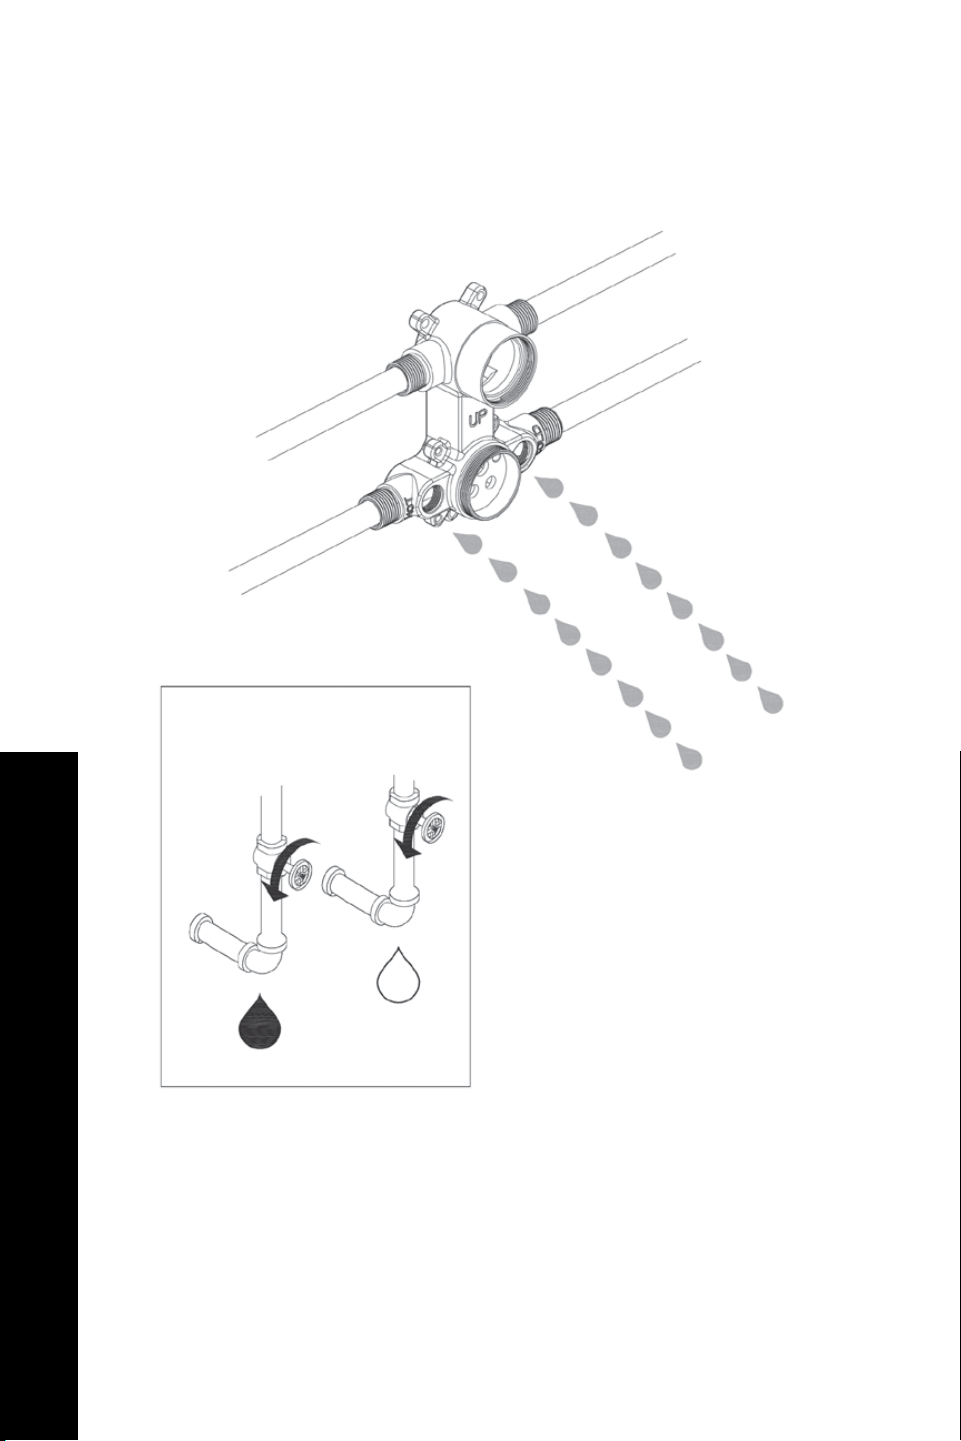
Reinstall the valve components into their original positions.
Bliss Shower System Installation
4.
9
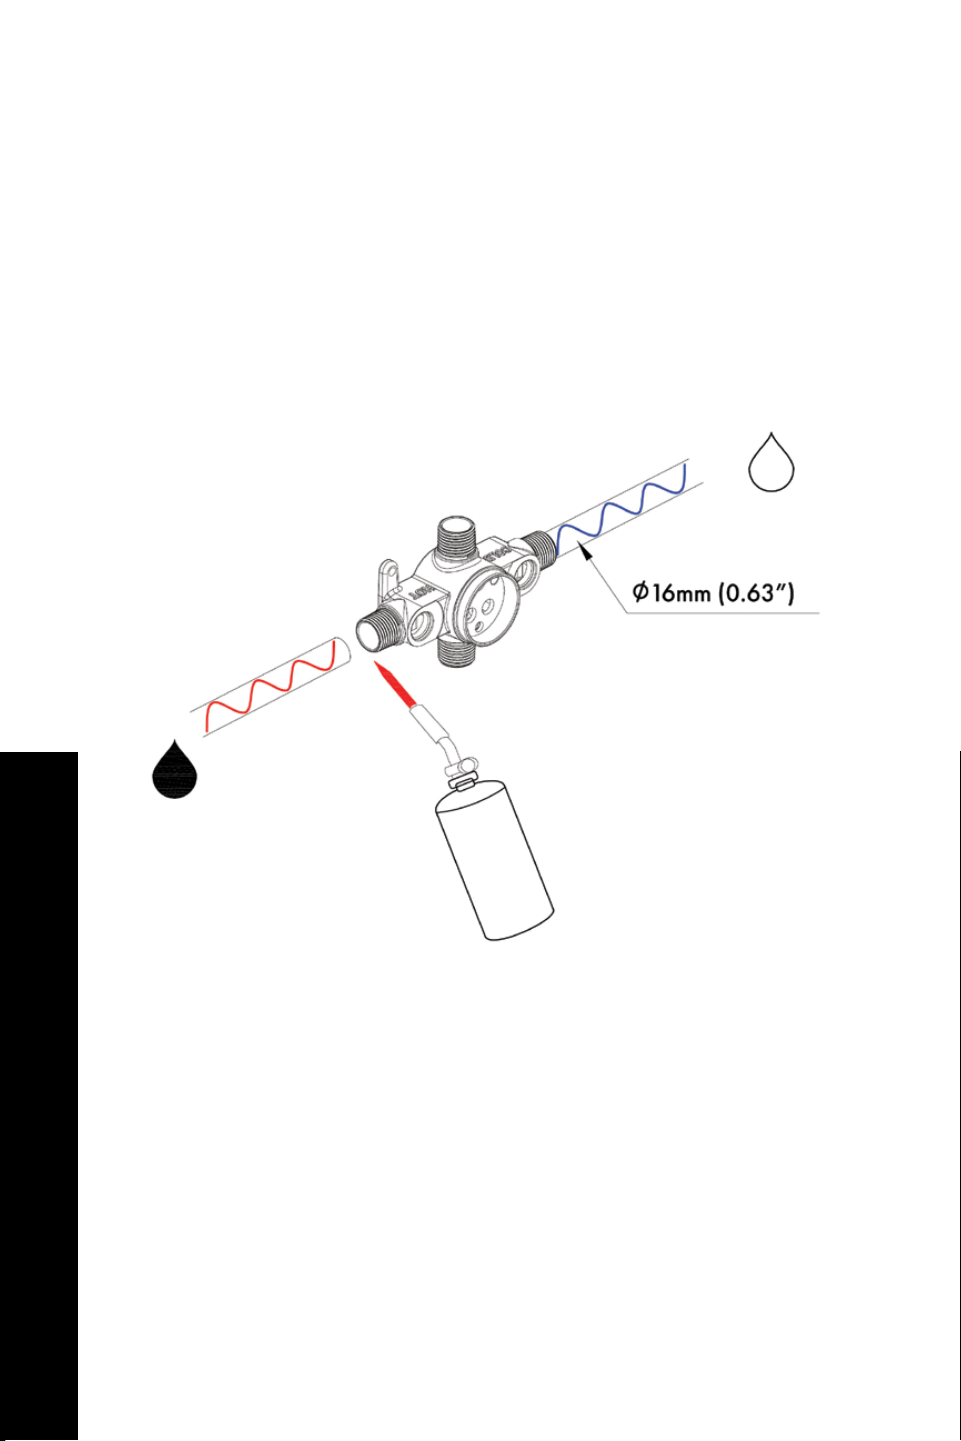
BLISS SHOWER SYSTEM (BLSSHS)
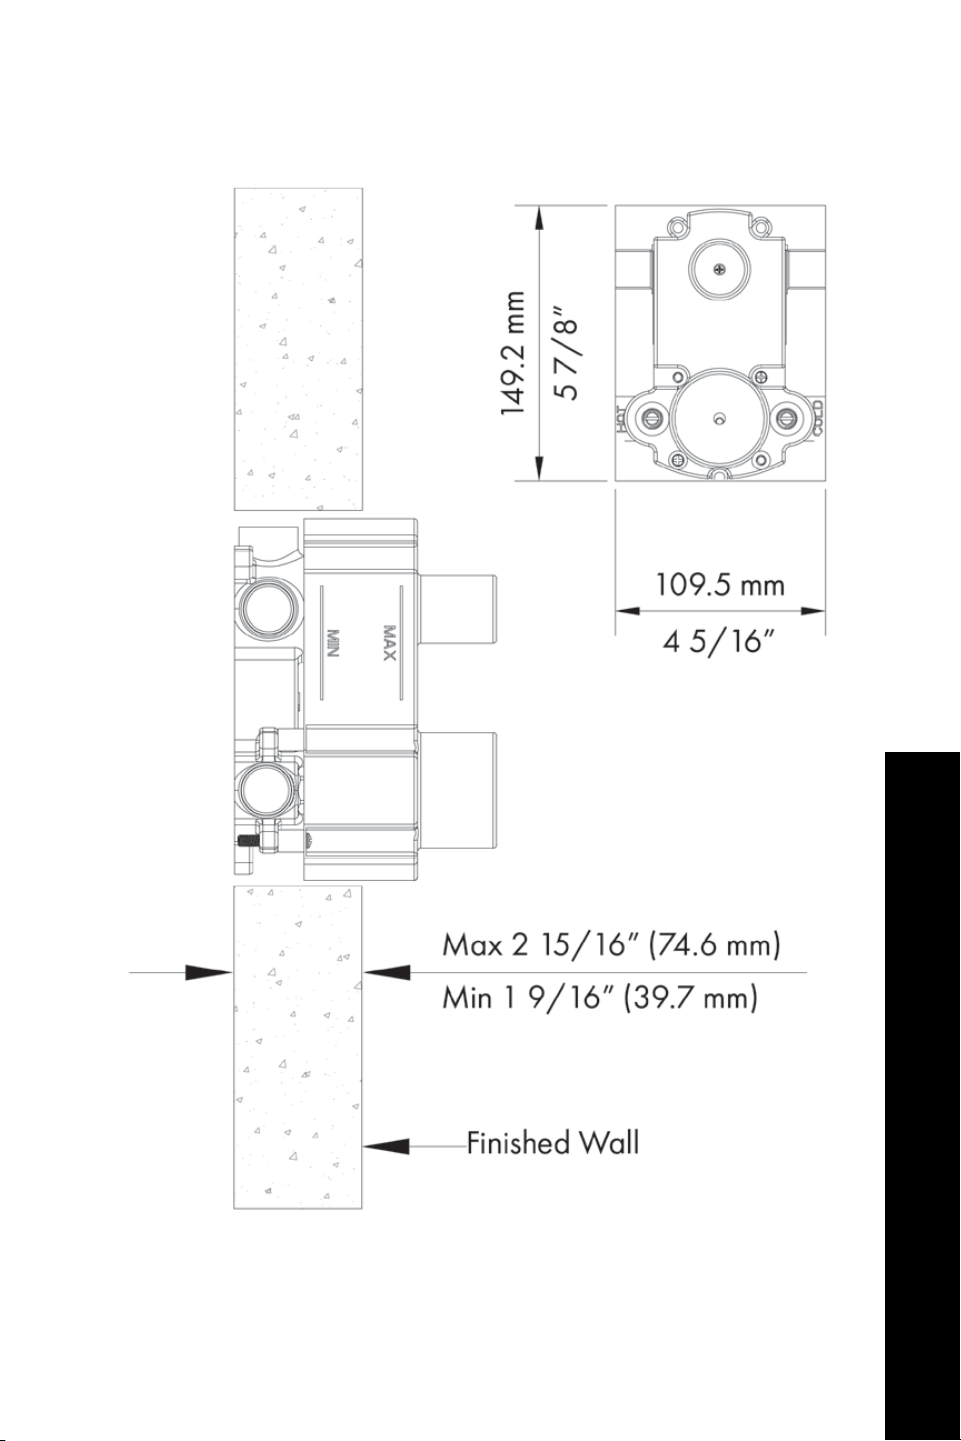
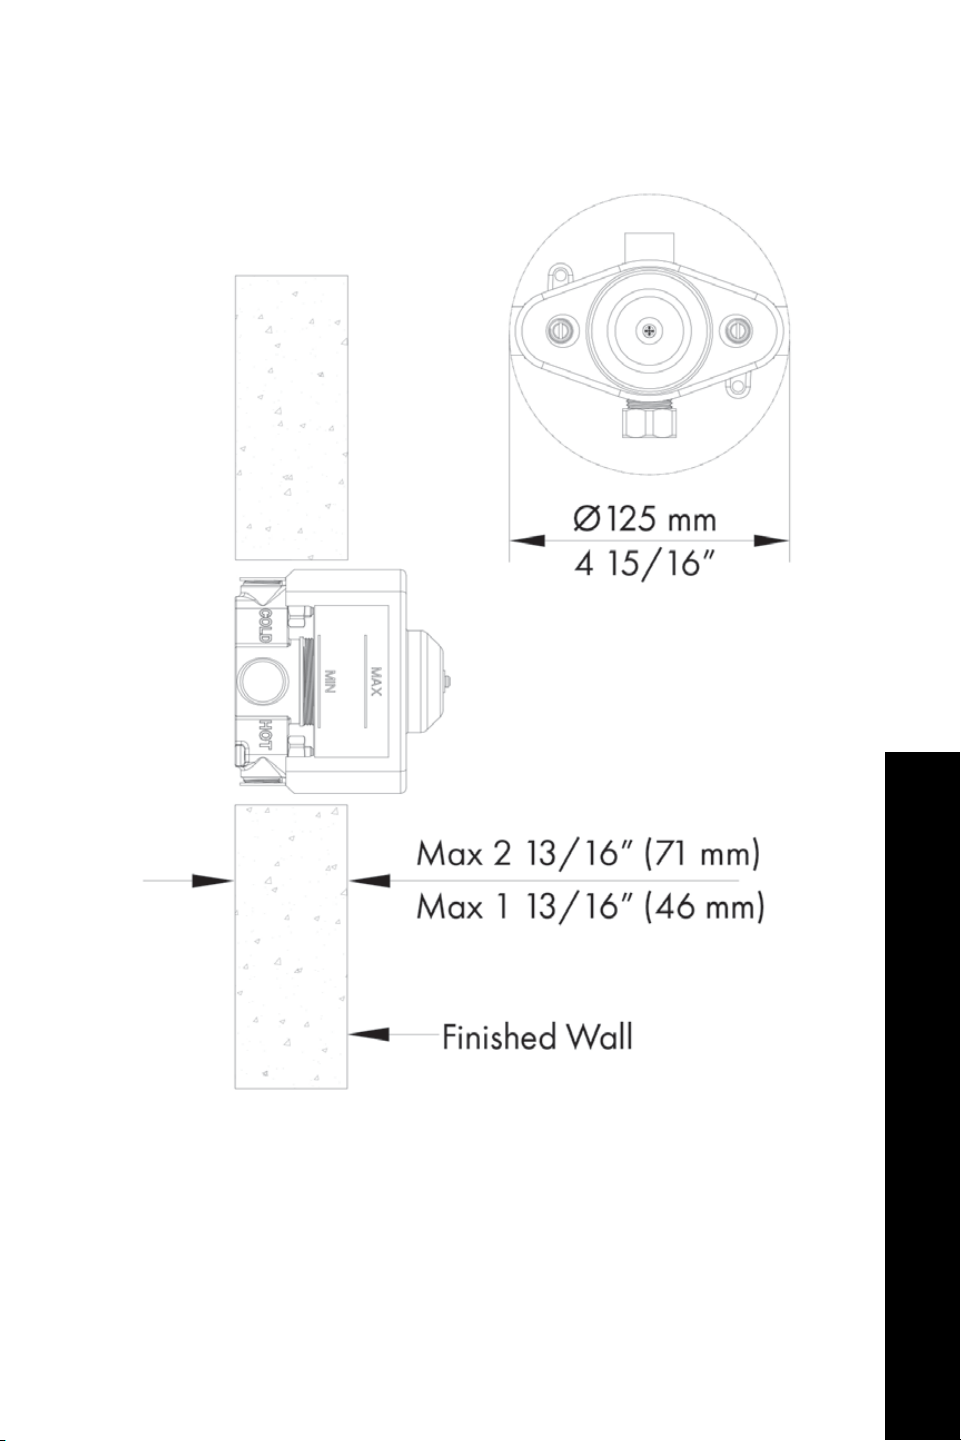
Use this diagram to understand the placement of the wall valve.
Bliss Shower System Installation
5.
10
BLISS SHOWER SYSTEM (BLSSHS)
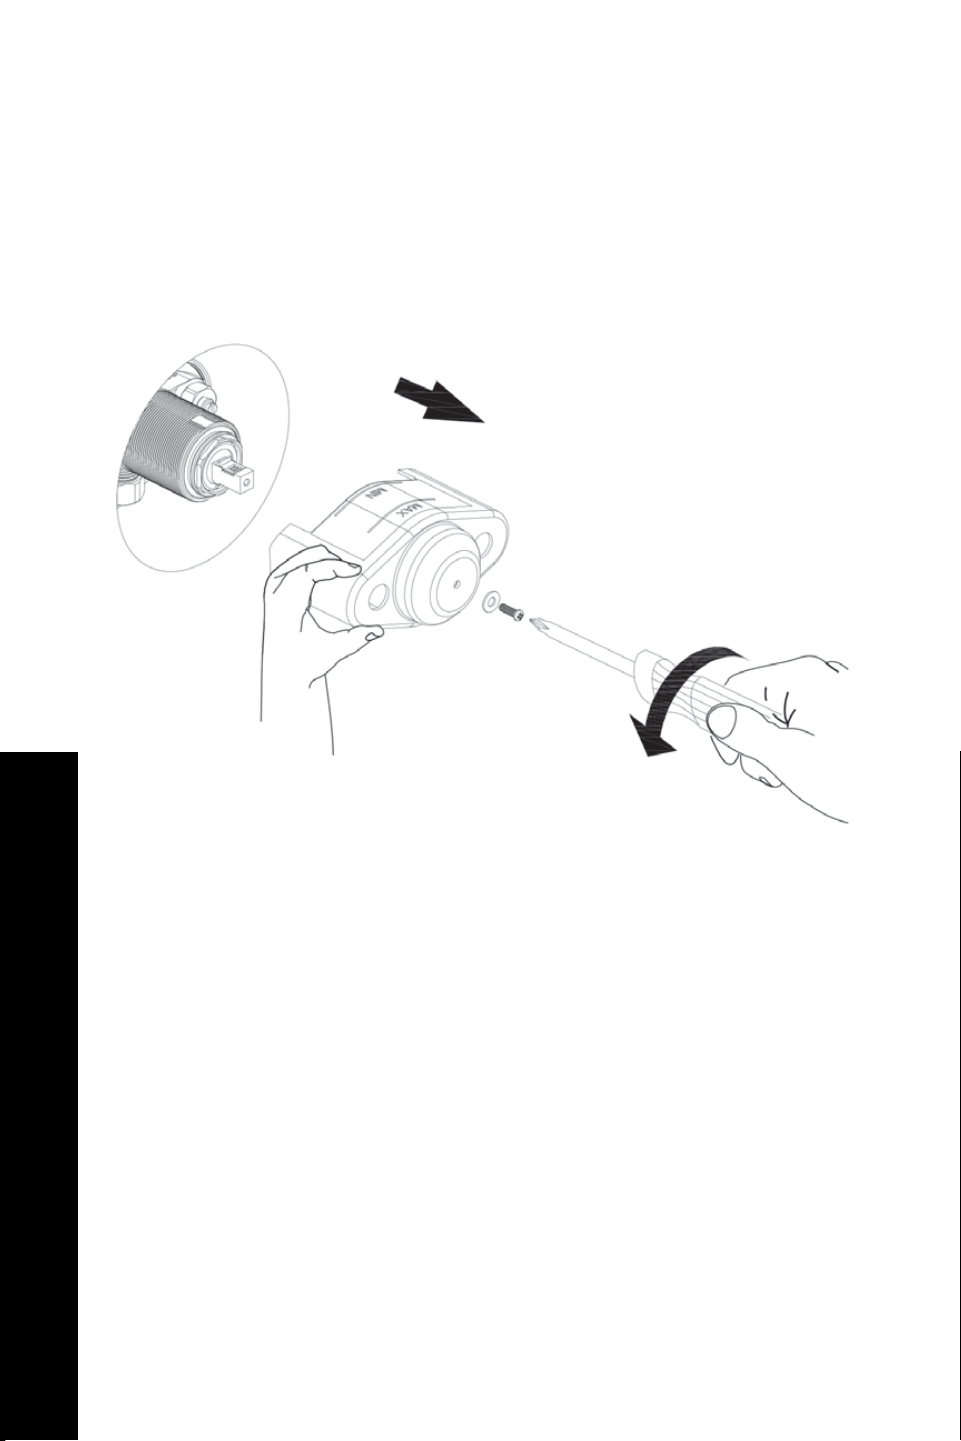
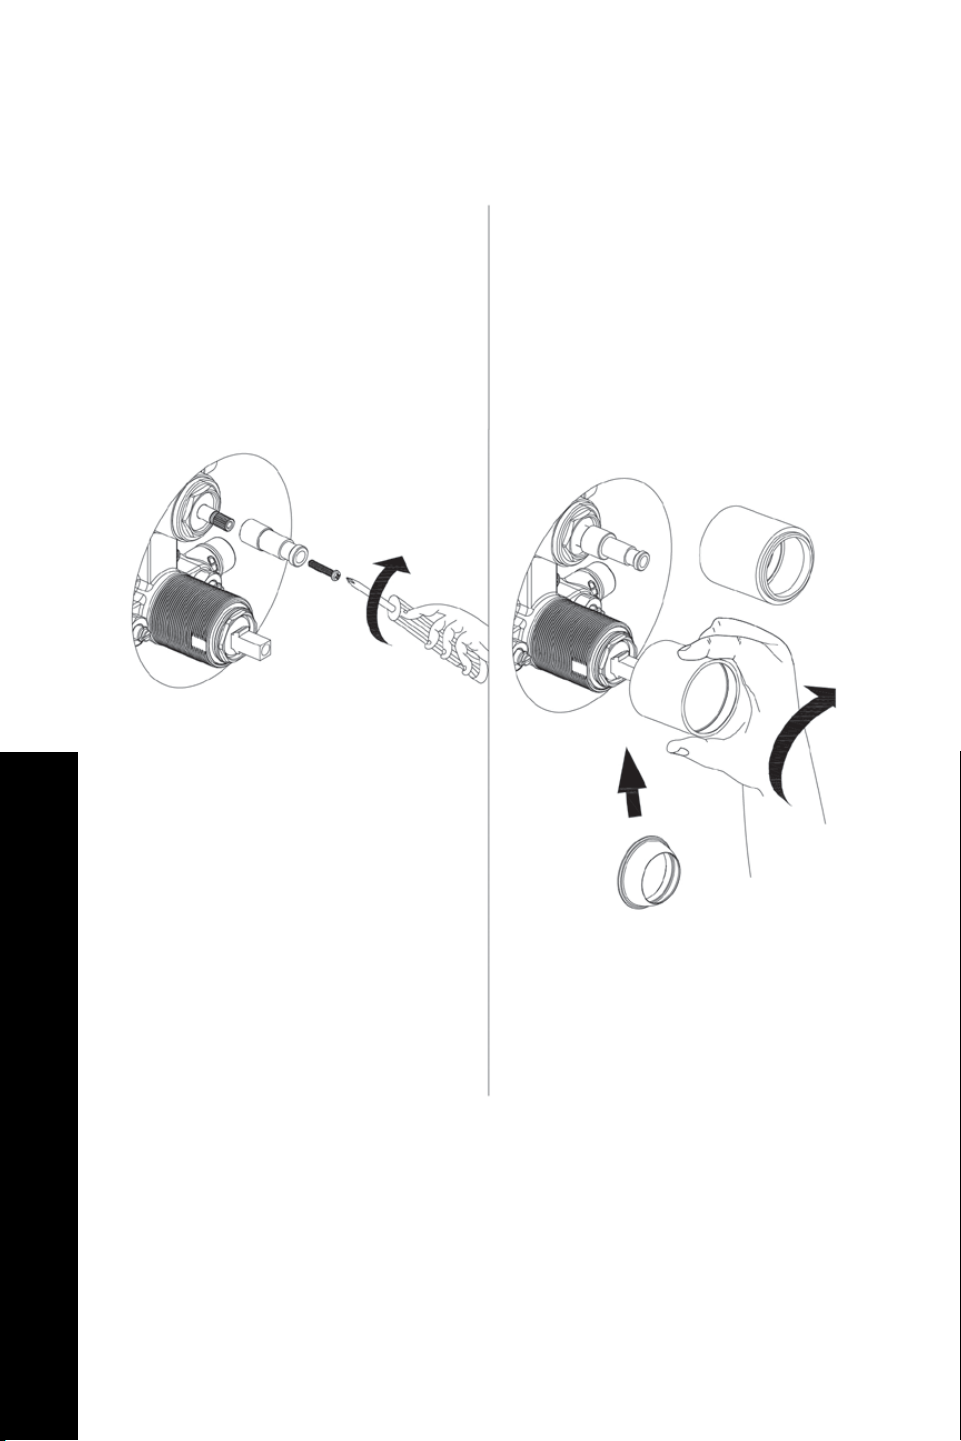
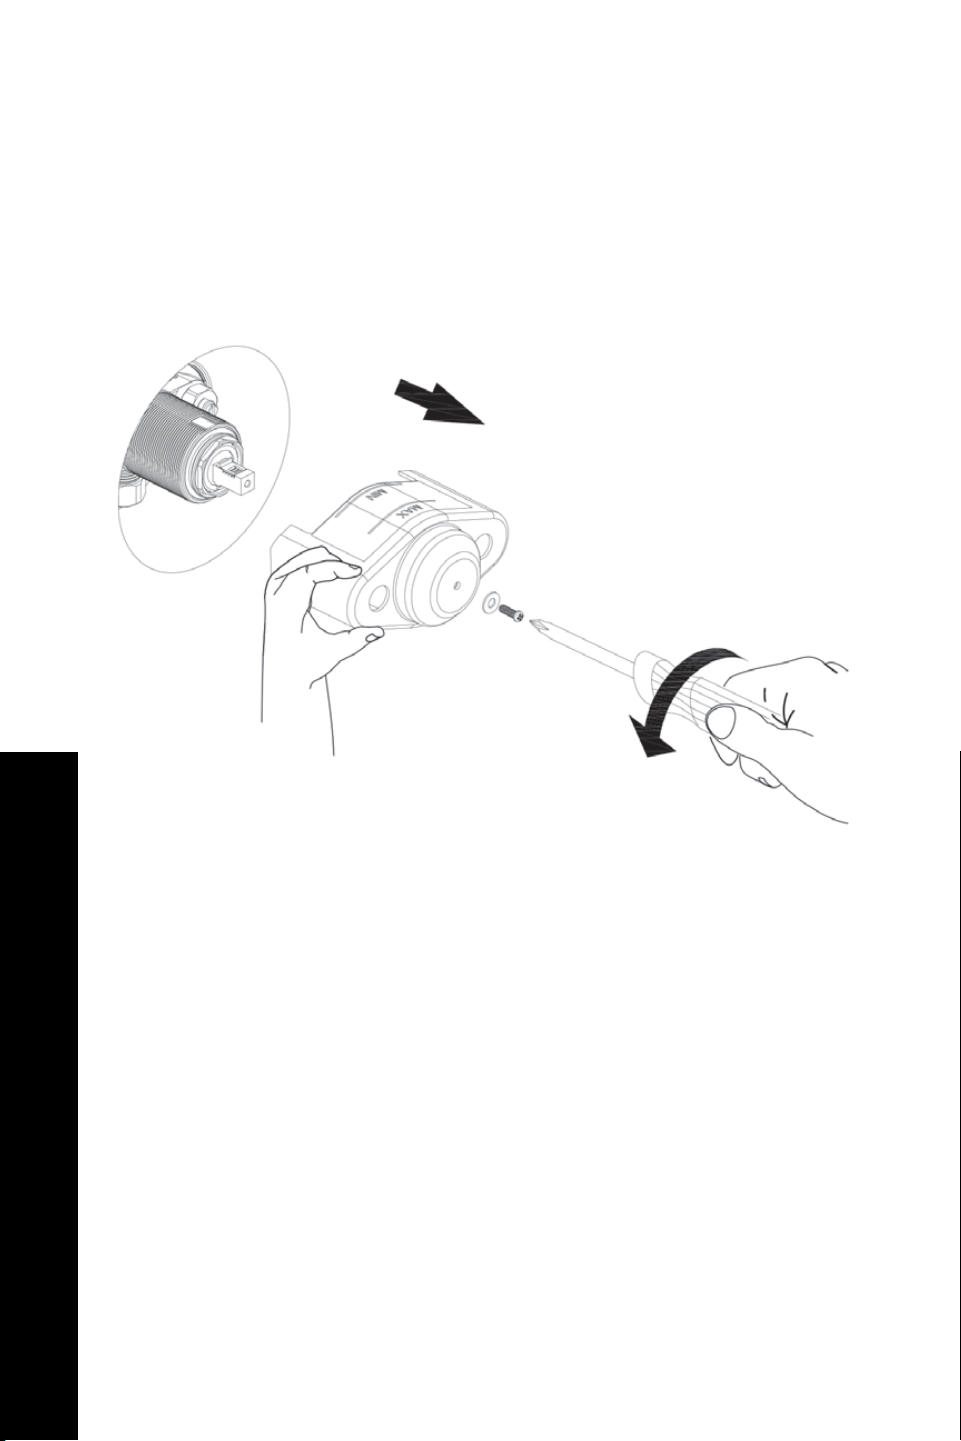
Screw the wall valve body into the system with a screwdriver. Do not overtighten.
Bliss Shower System Installation
6.
11
BLISS SHOWER SYSTEM (BLSSHS)
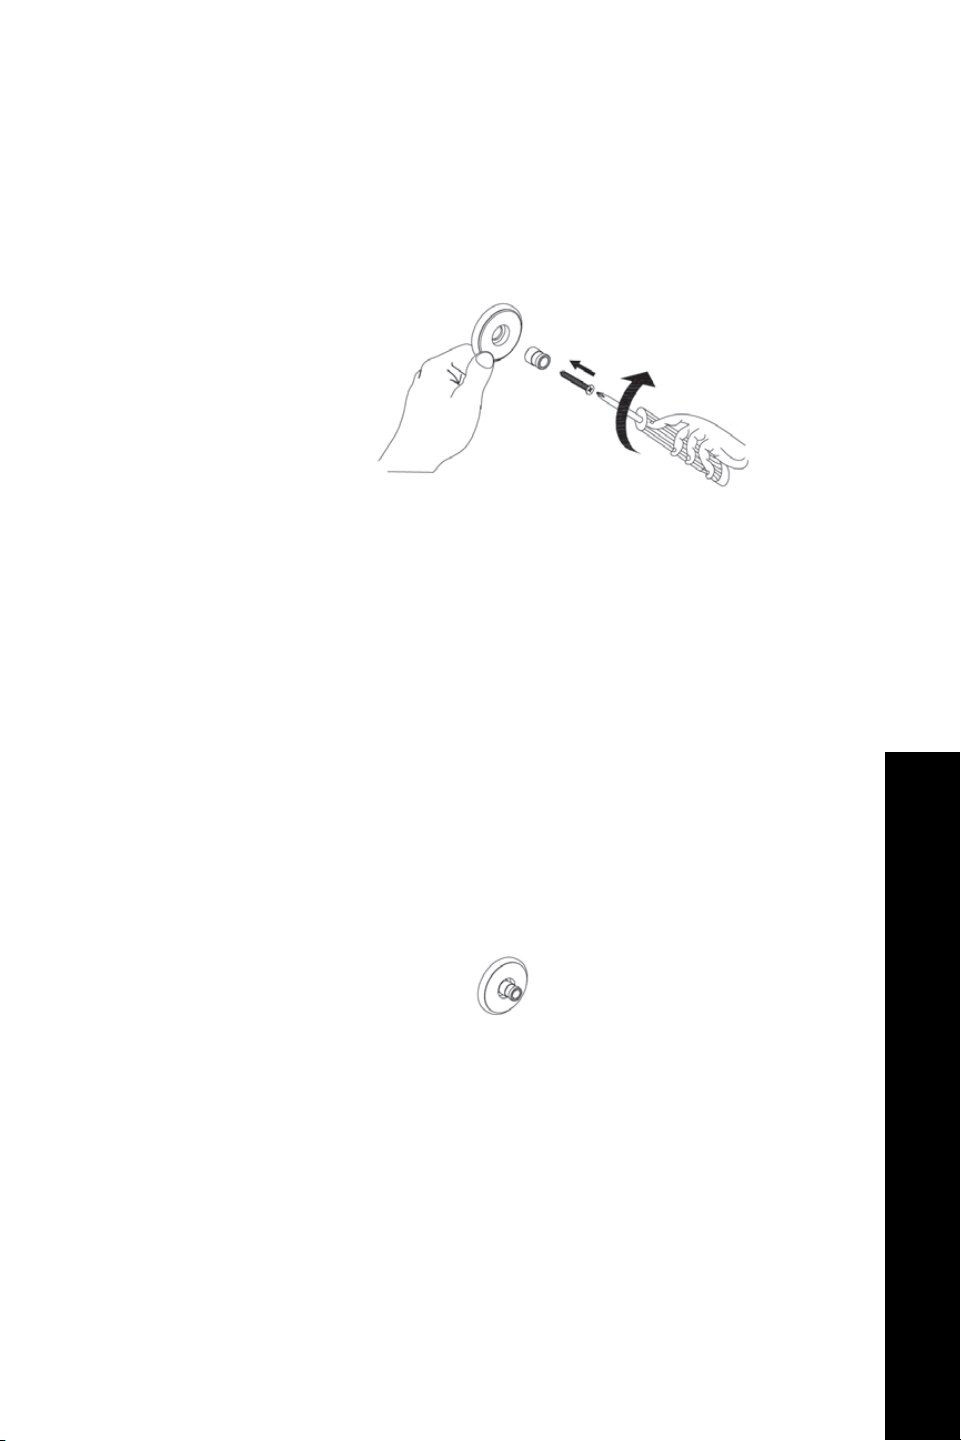
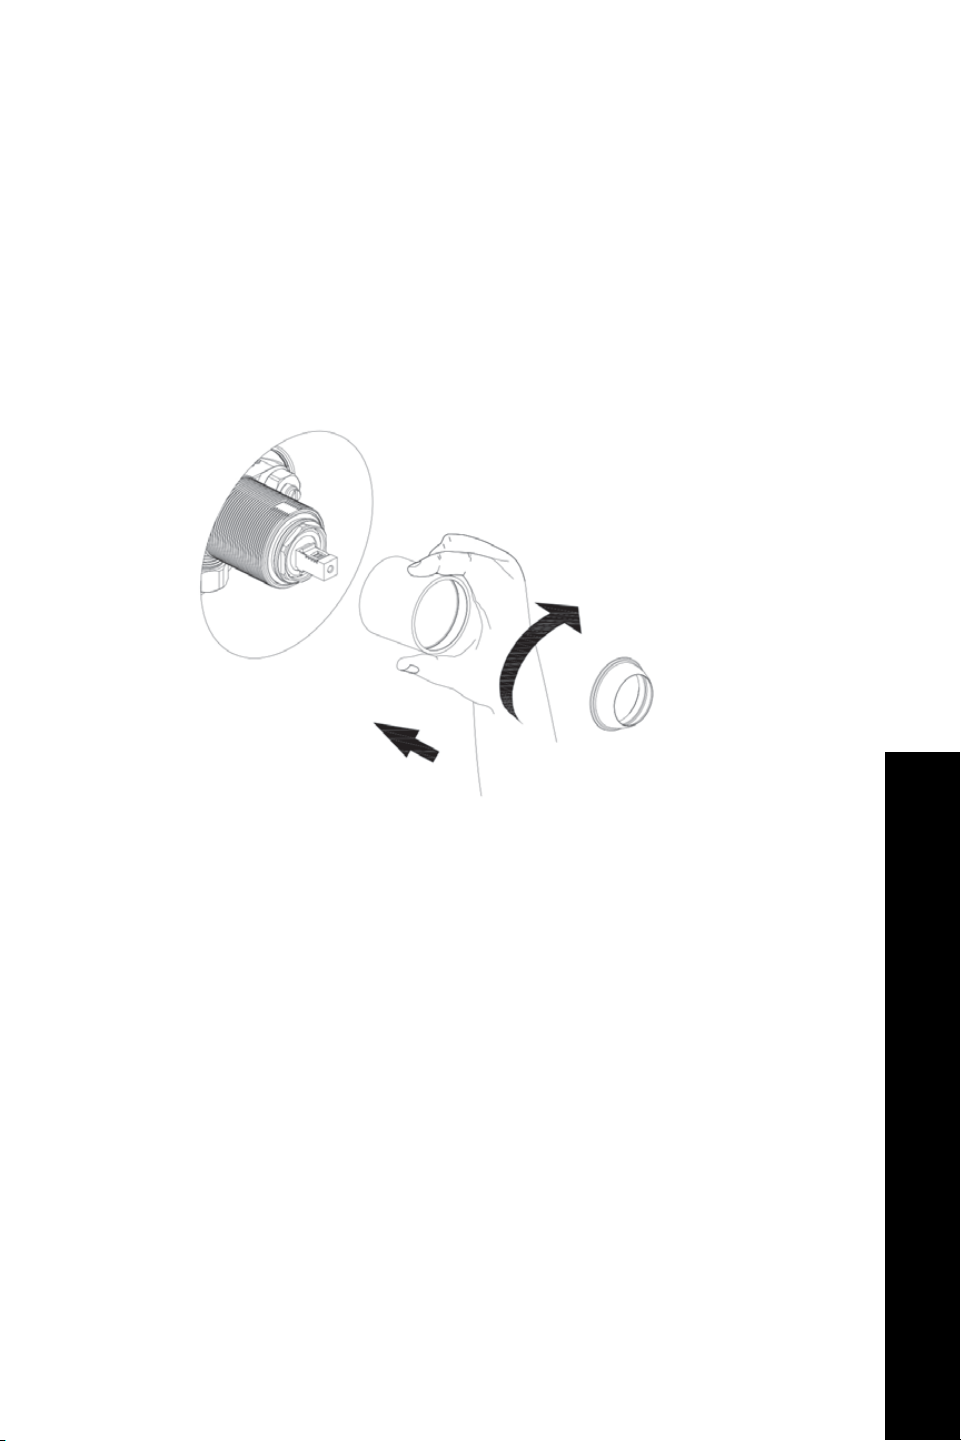
Screw the sleeve and washer into the wall valve body.
Bliss Shower System Installation
7a. 7b.
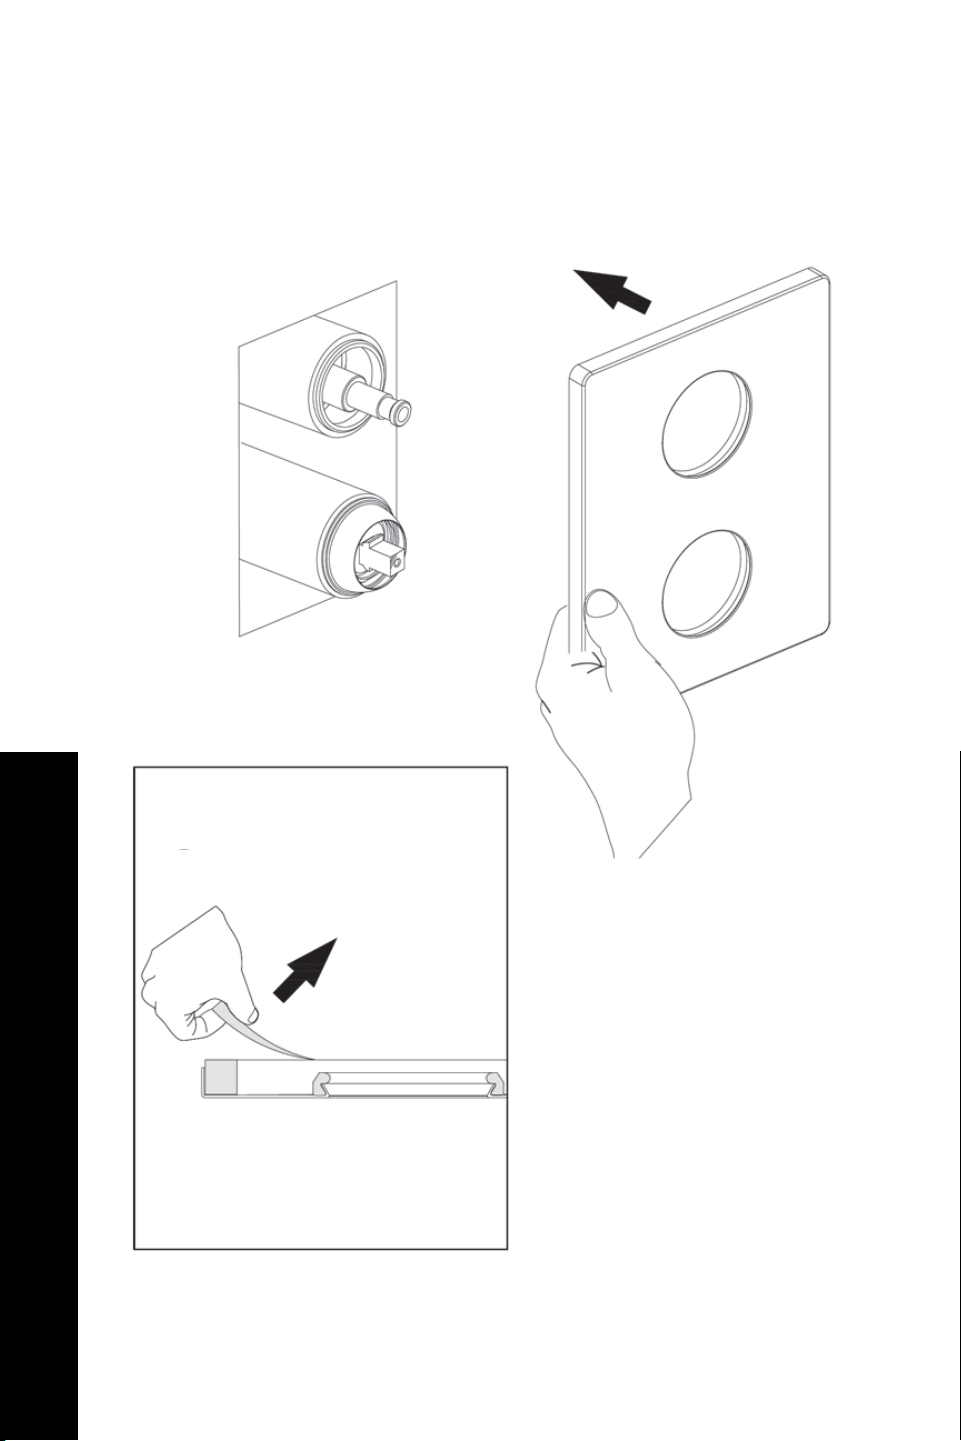
12
BLISS SHOWER SYSTEM (BLSSHS)
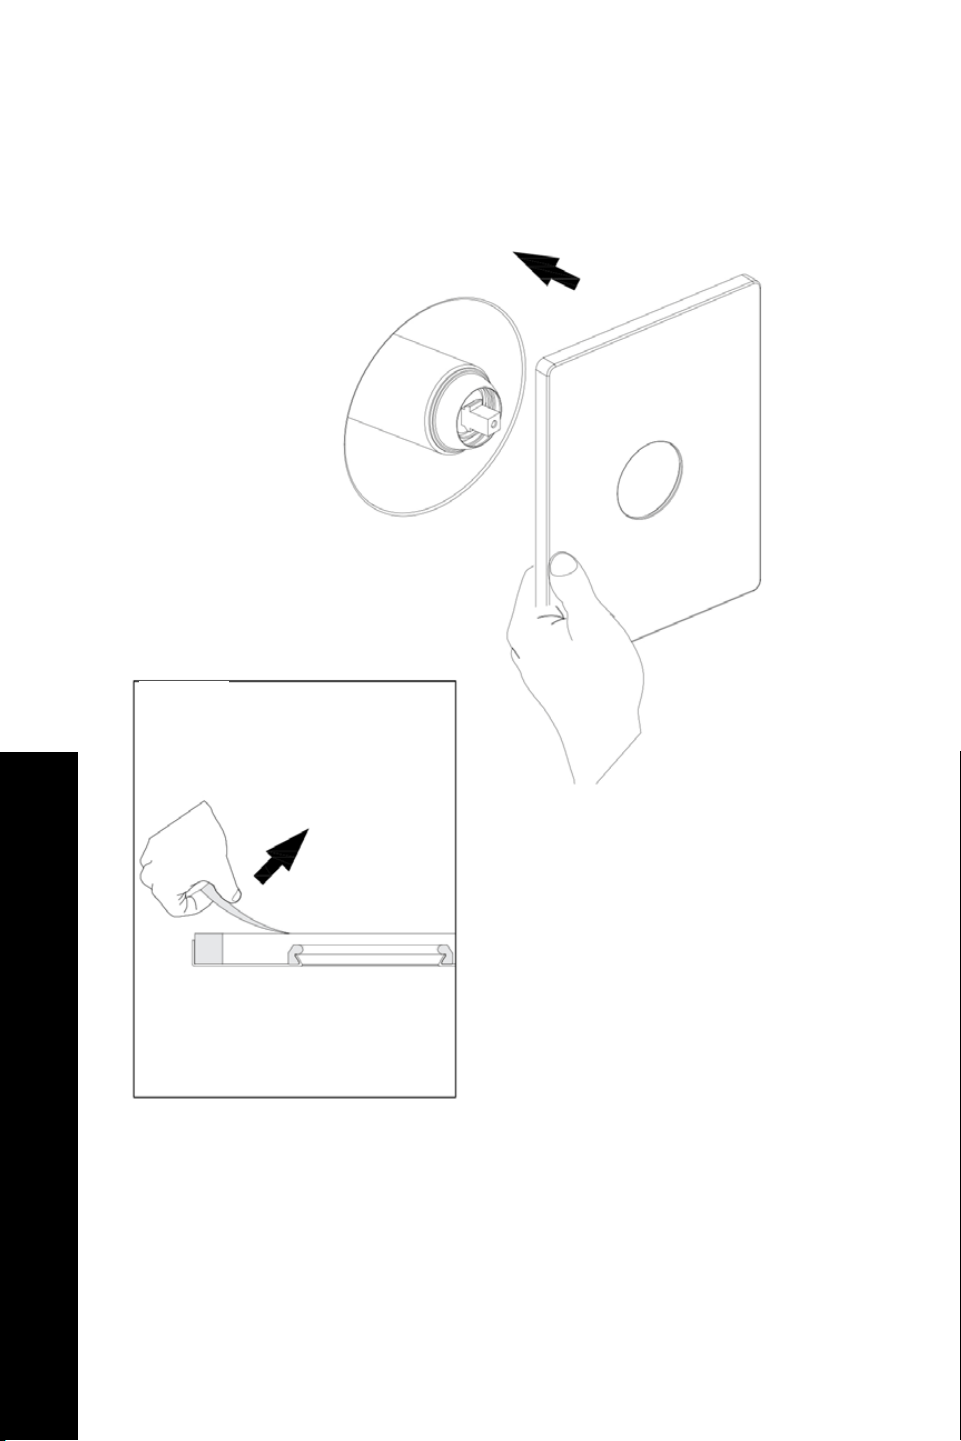
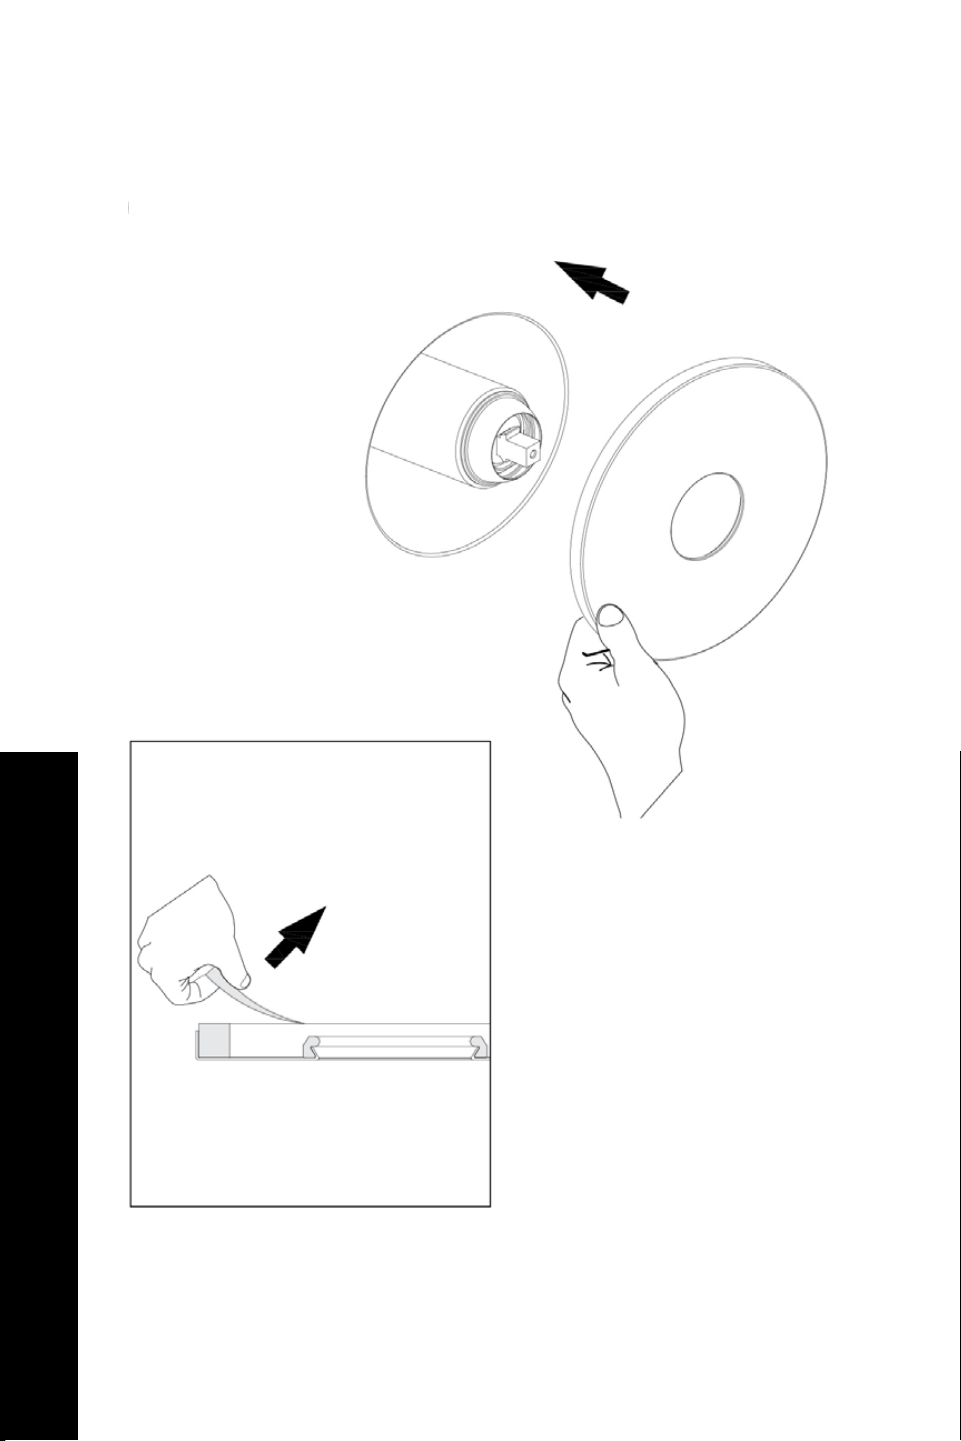
Attach the face plate and remove the plastic.
Bliss Shower System Installation
8.
8a.
13
BLISS SHOWER SYSTEM (BLSSHS)
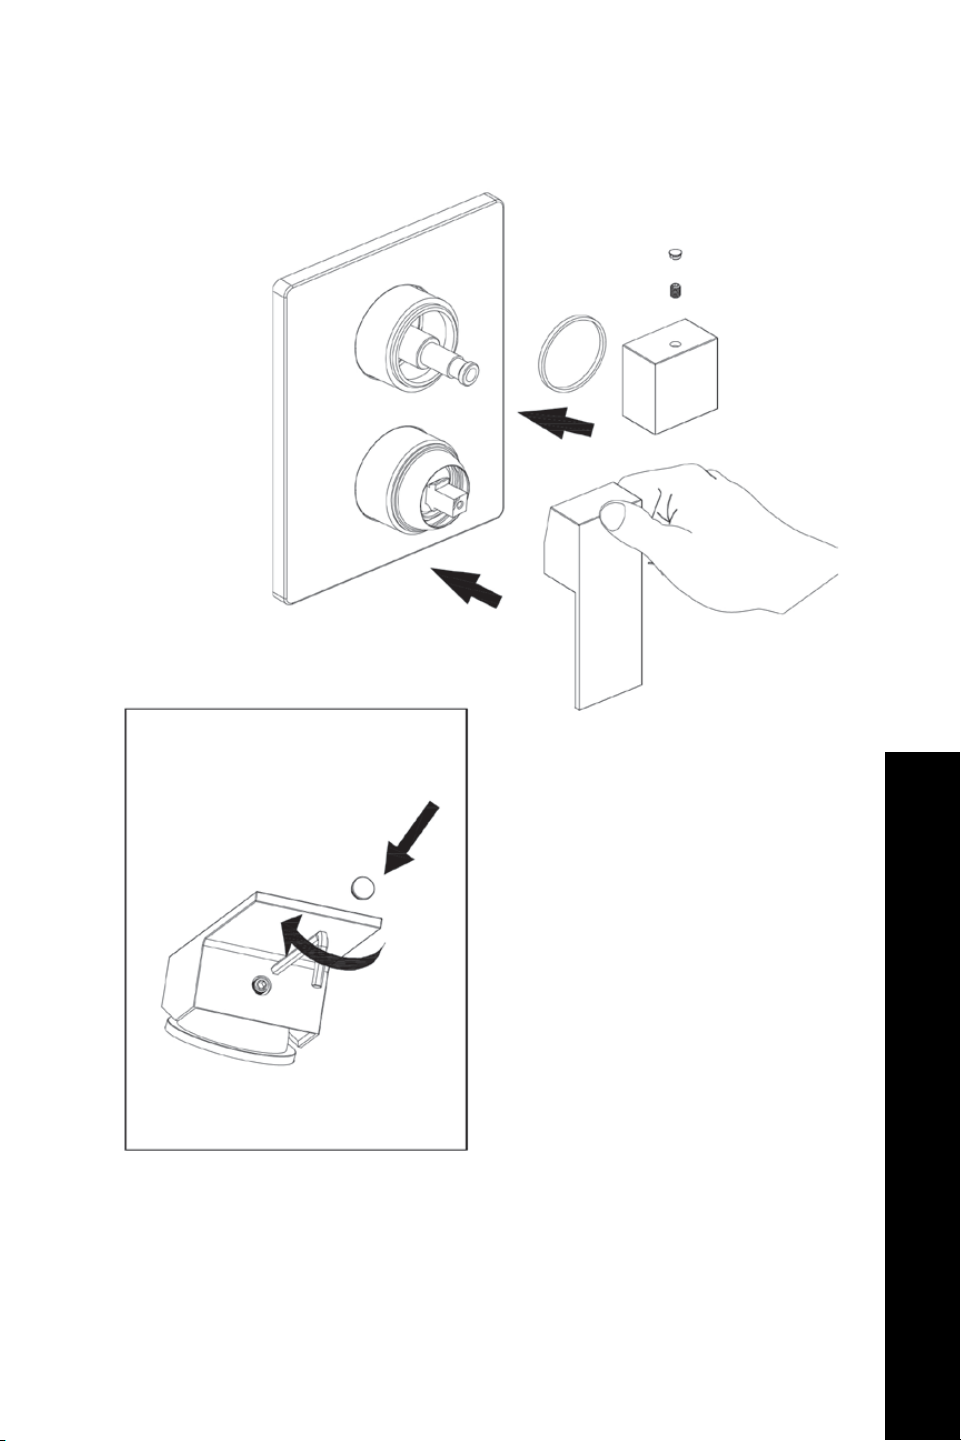
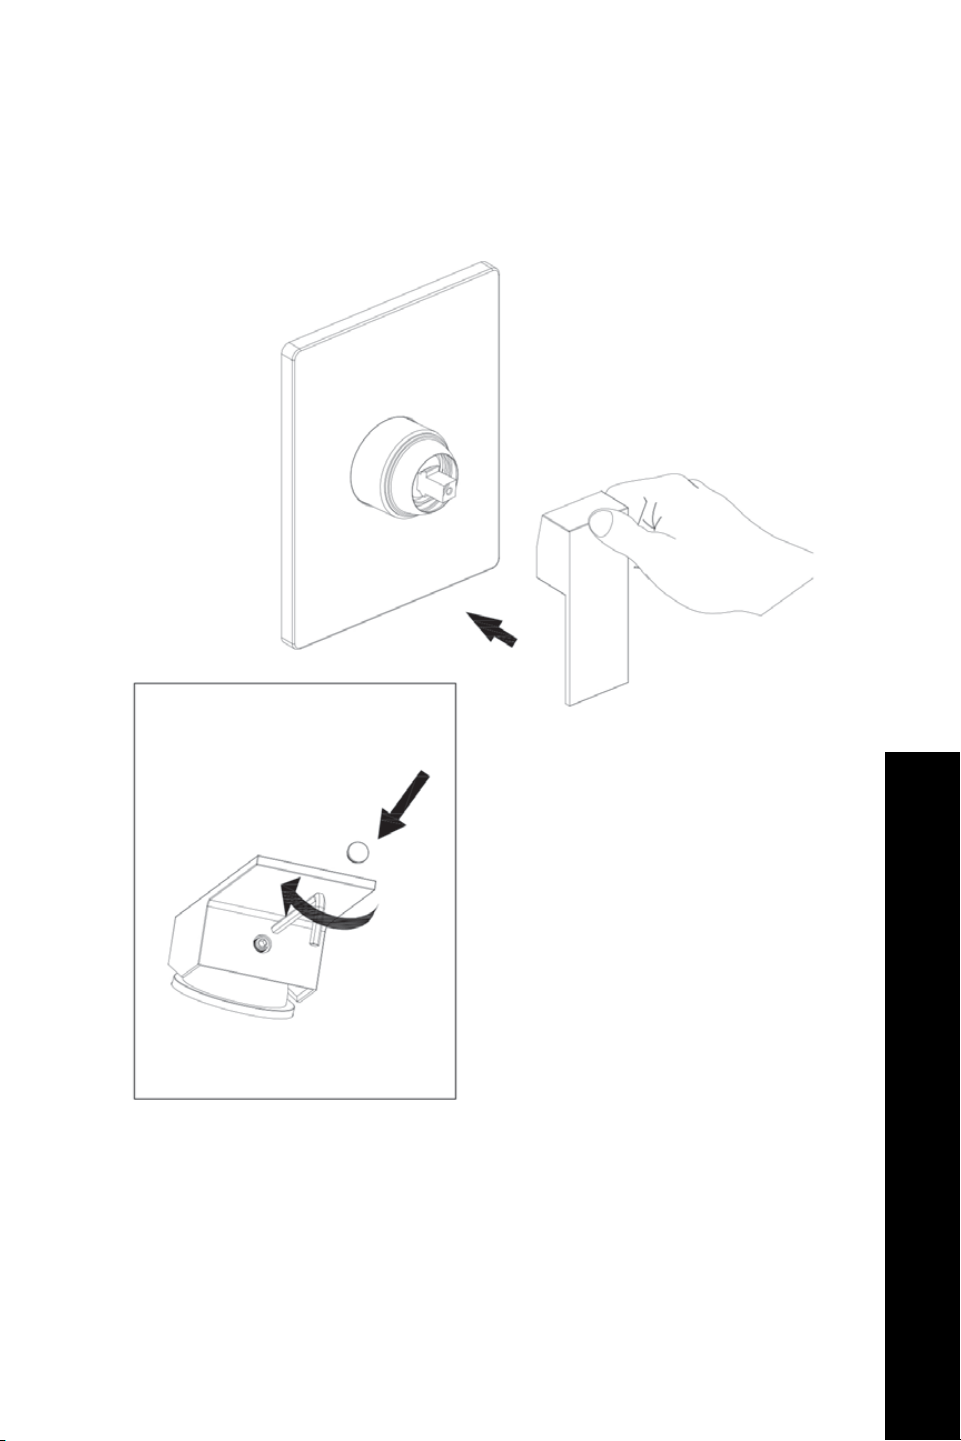
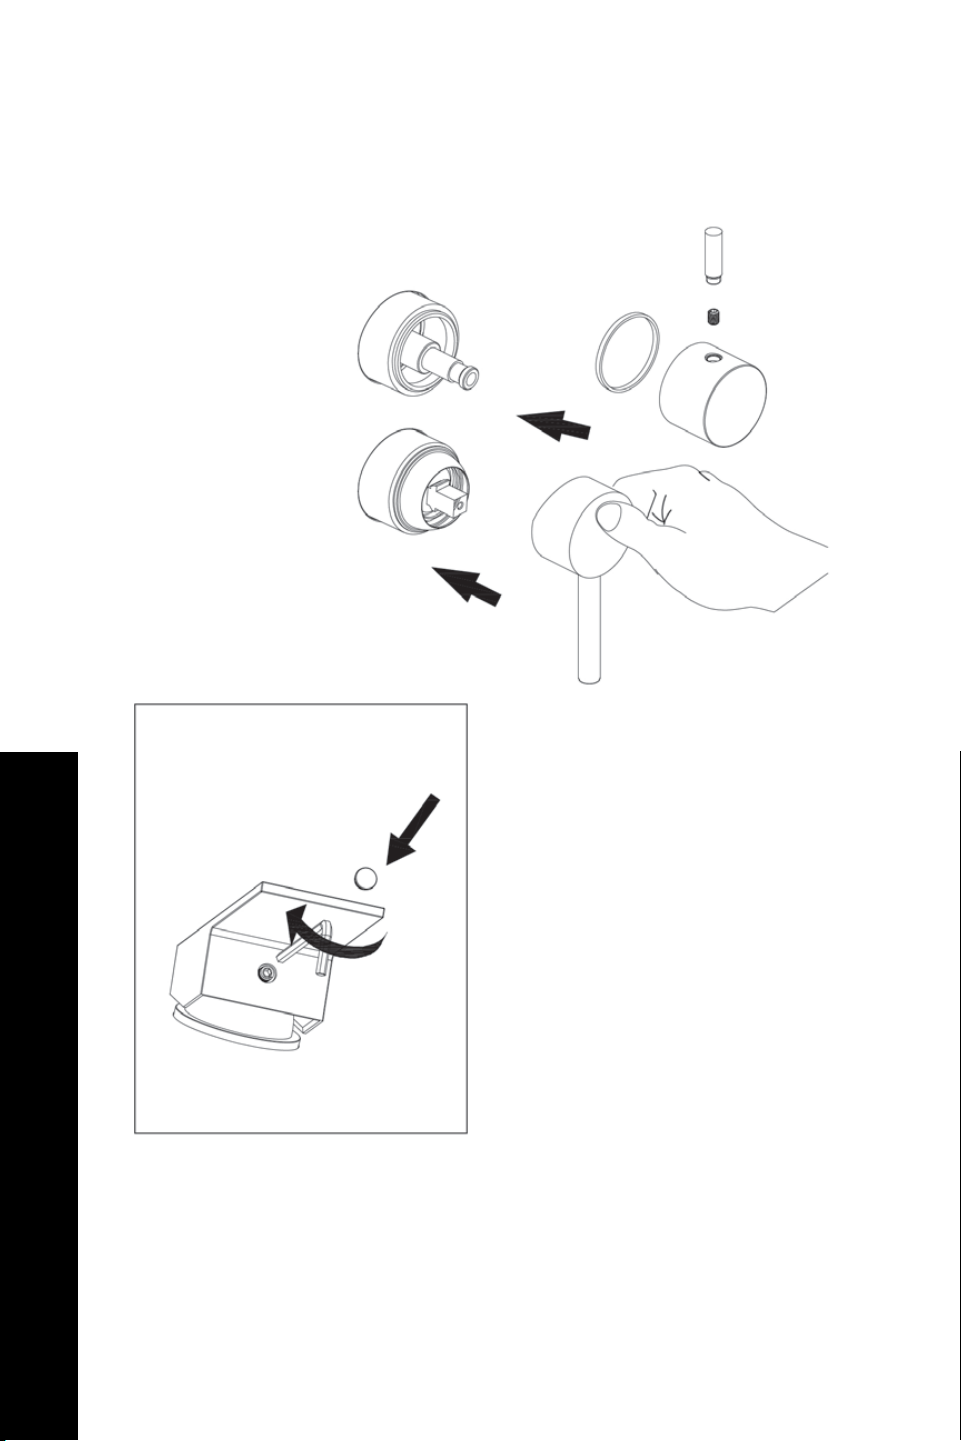
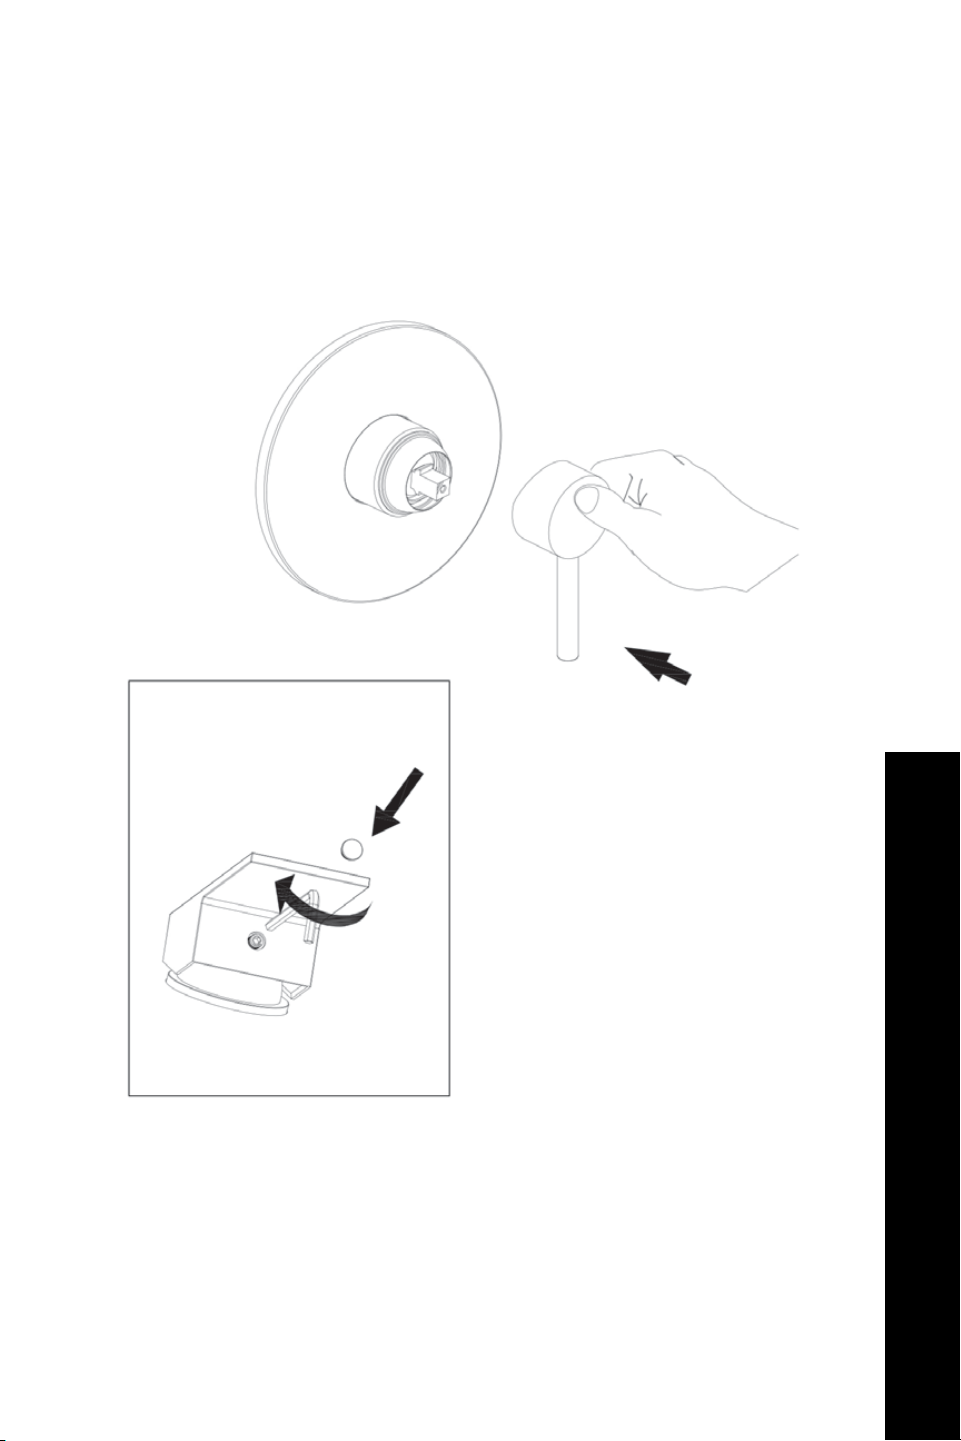
Attach the water control handle.
Bliss Shower System Installation
9.
9a.

14
BLISS SHOWER SYSTEM (BLSSHS)
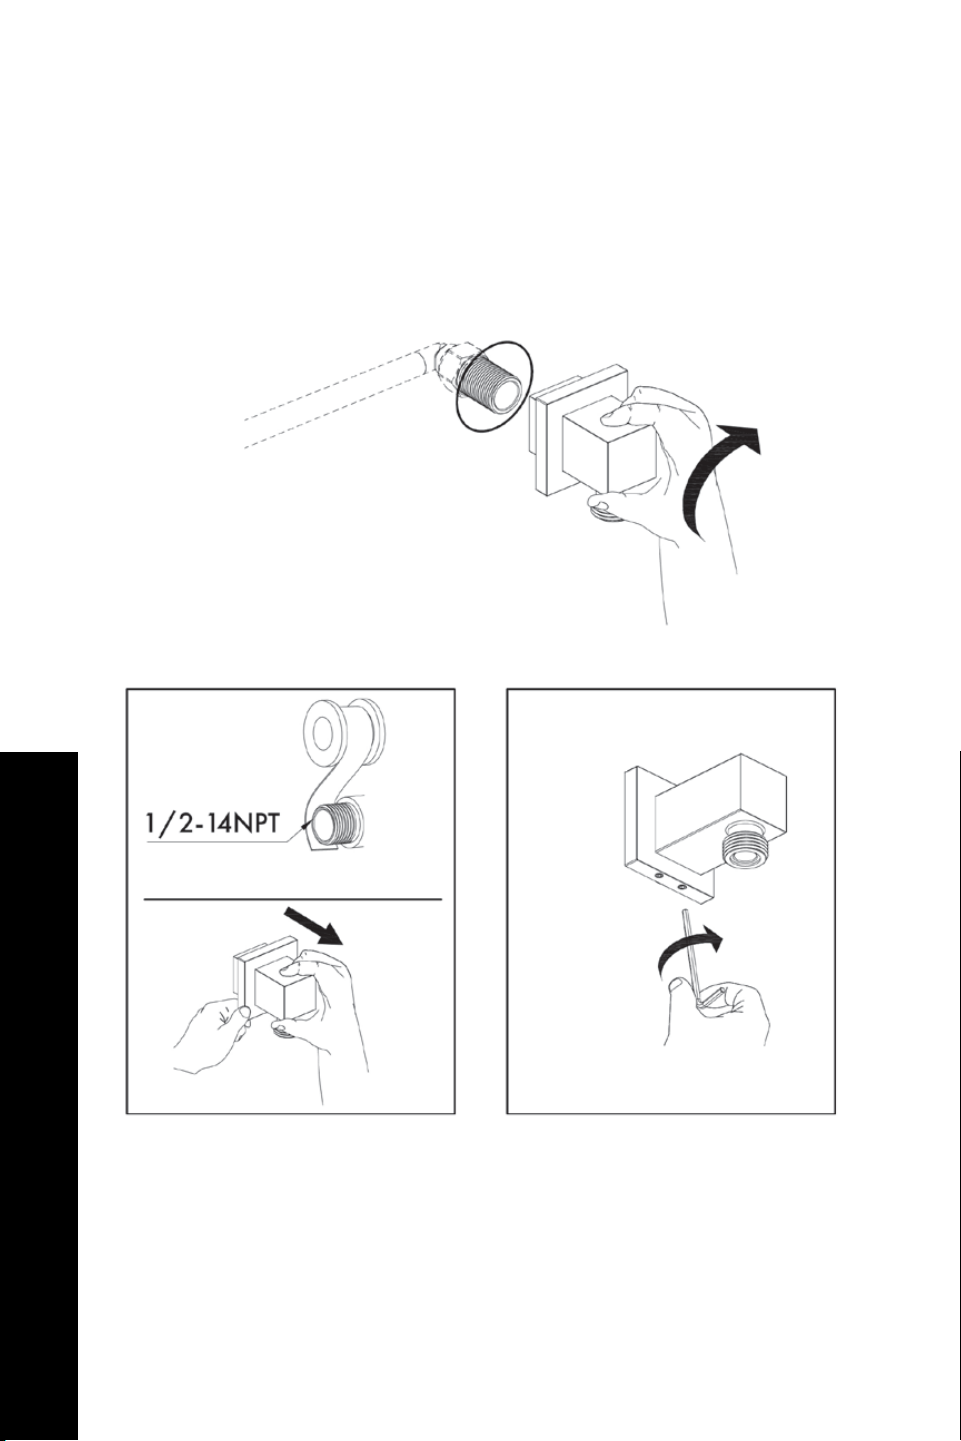
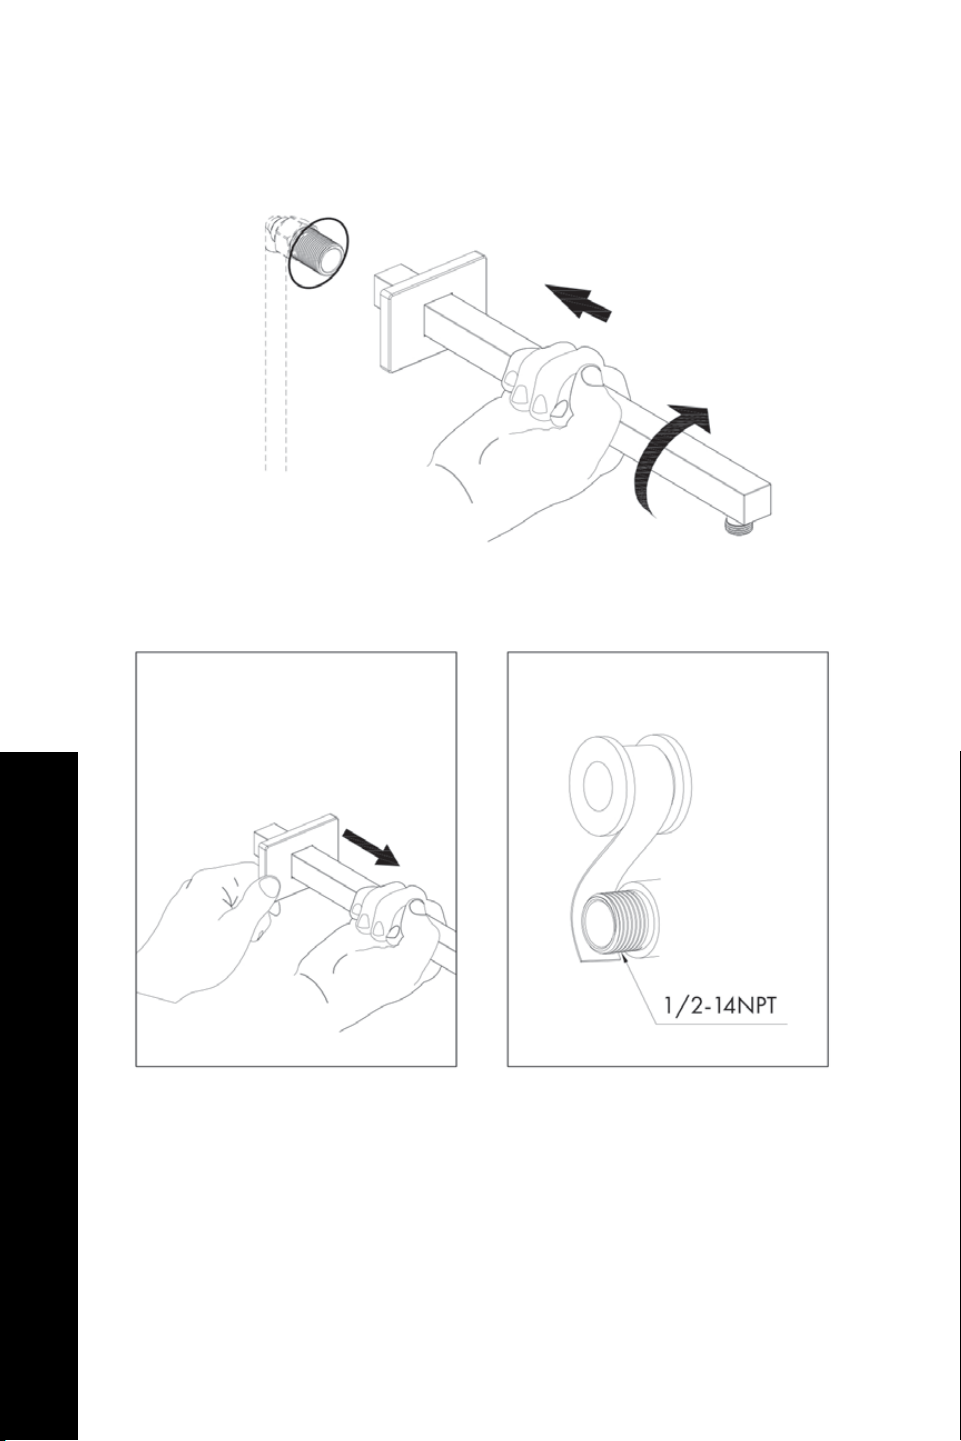
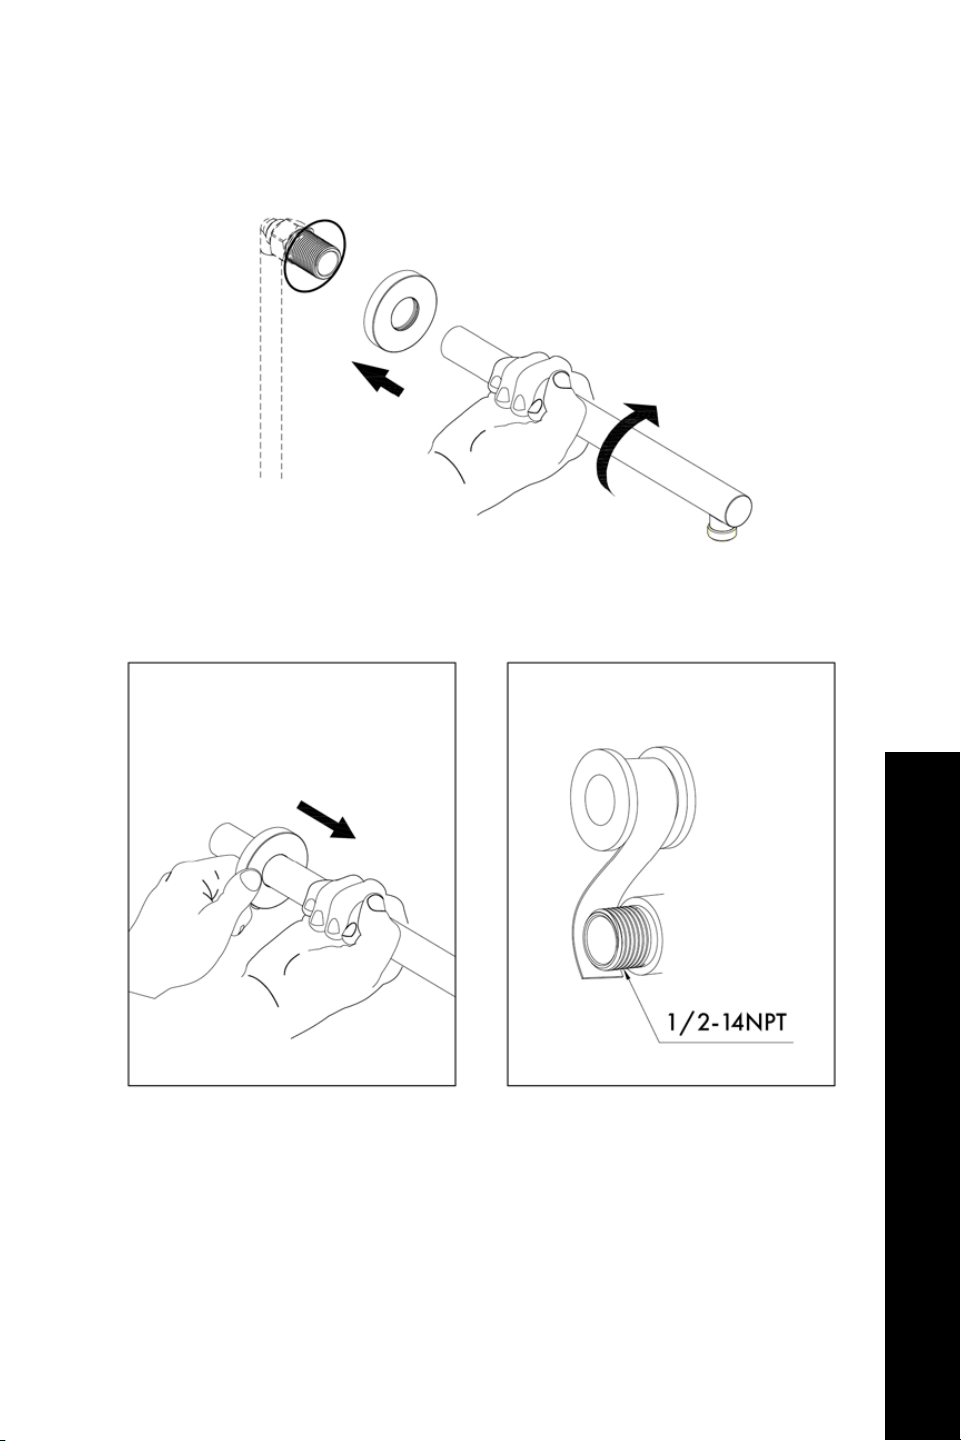
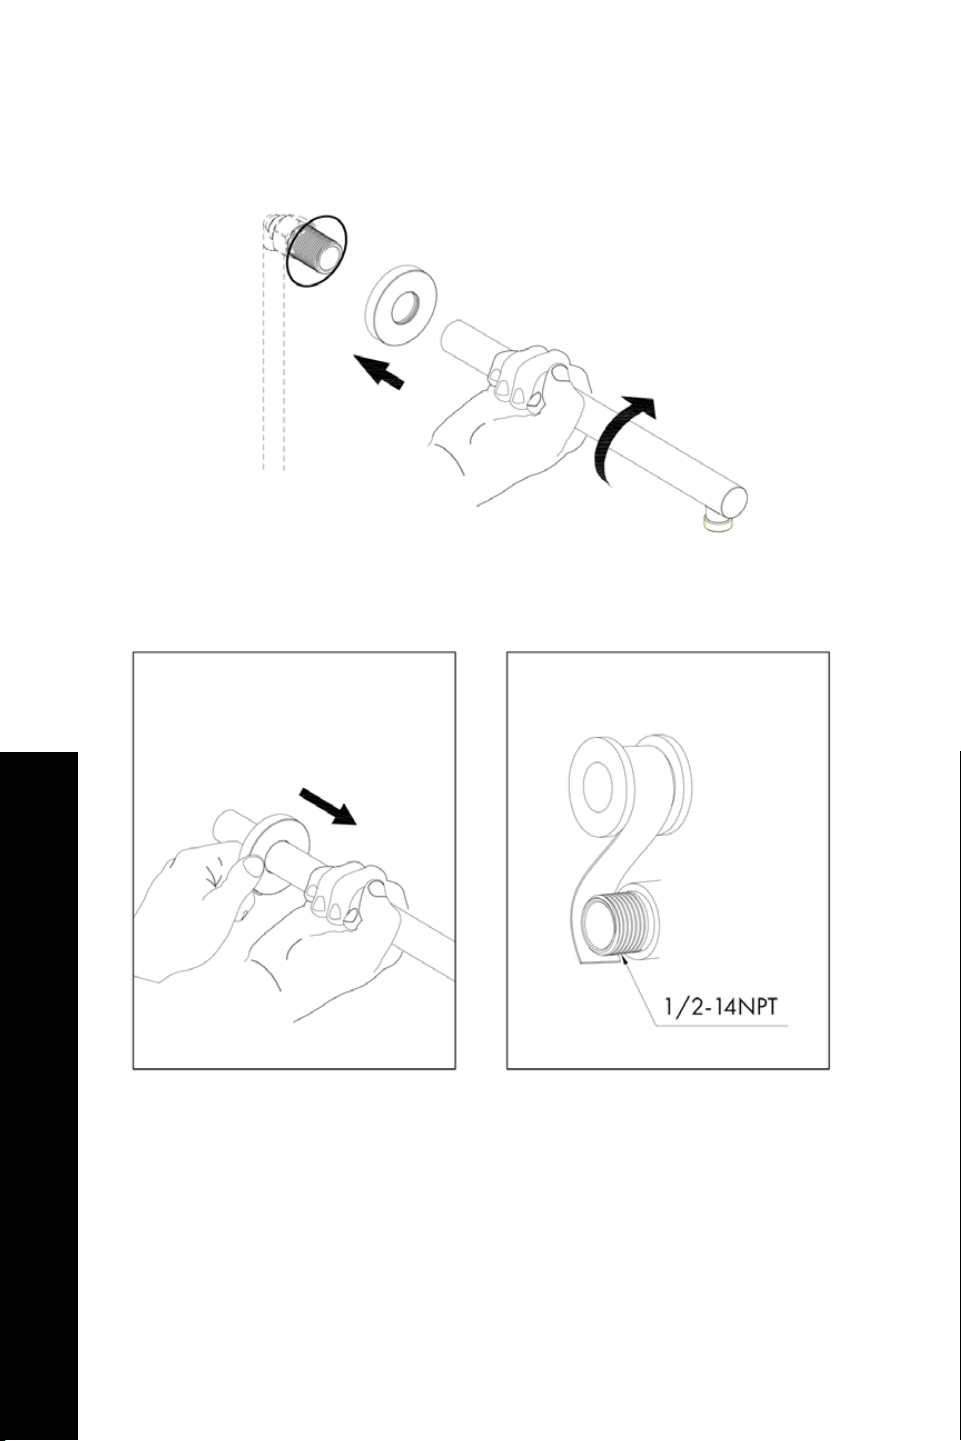
Connect the flange cover to the spout in the wall. Secure with plumber’s tape to
prevent leaks.
Bliss Shower System Installation
10.
10b.10a.
15
BLISS SHOWER SYSTEM (BLSSHS)
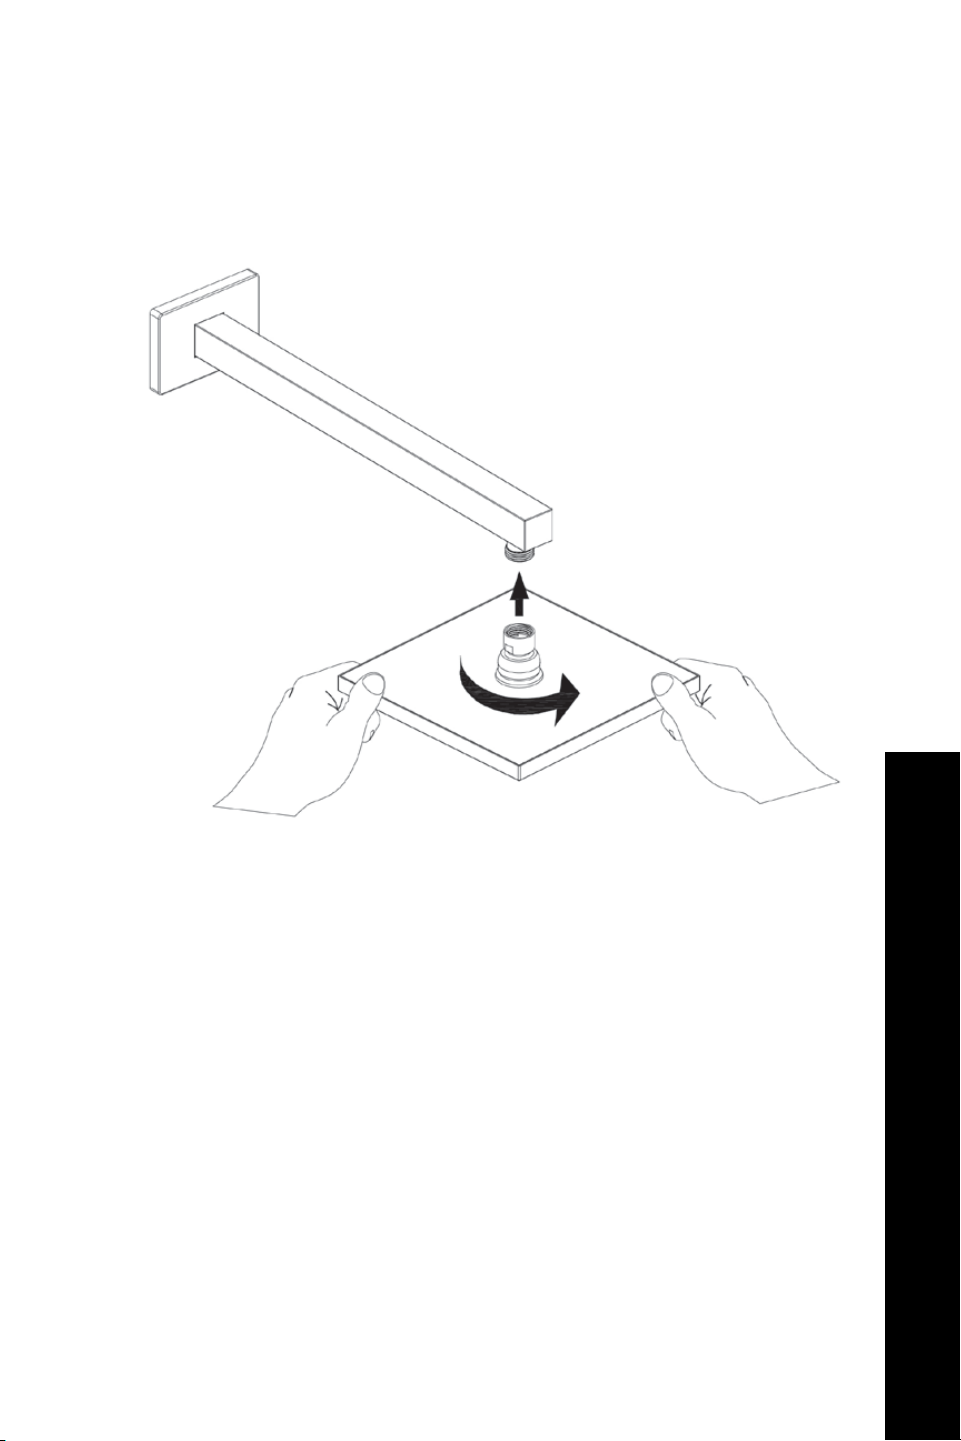
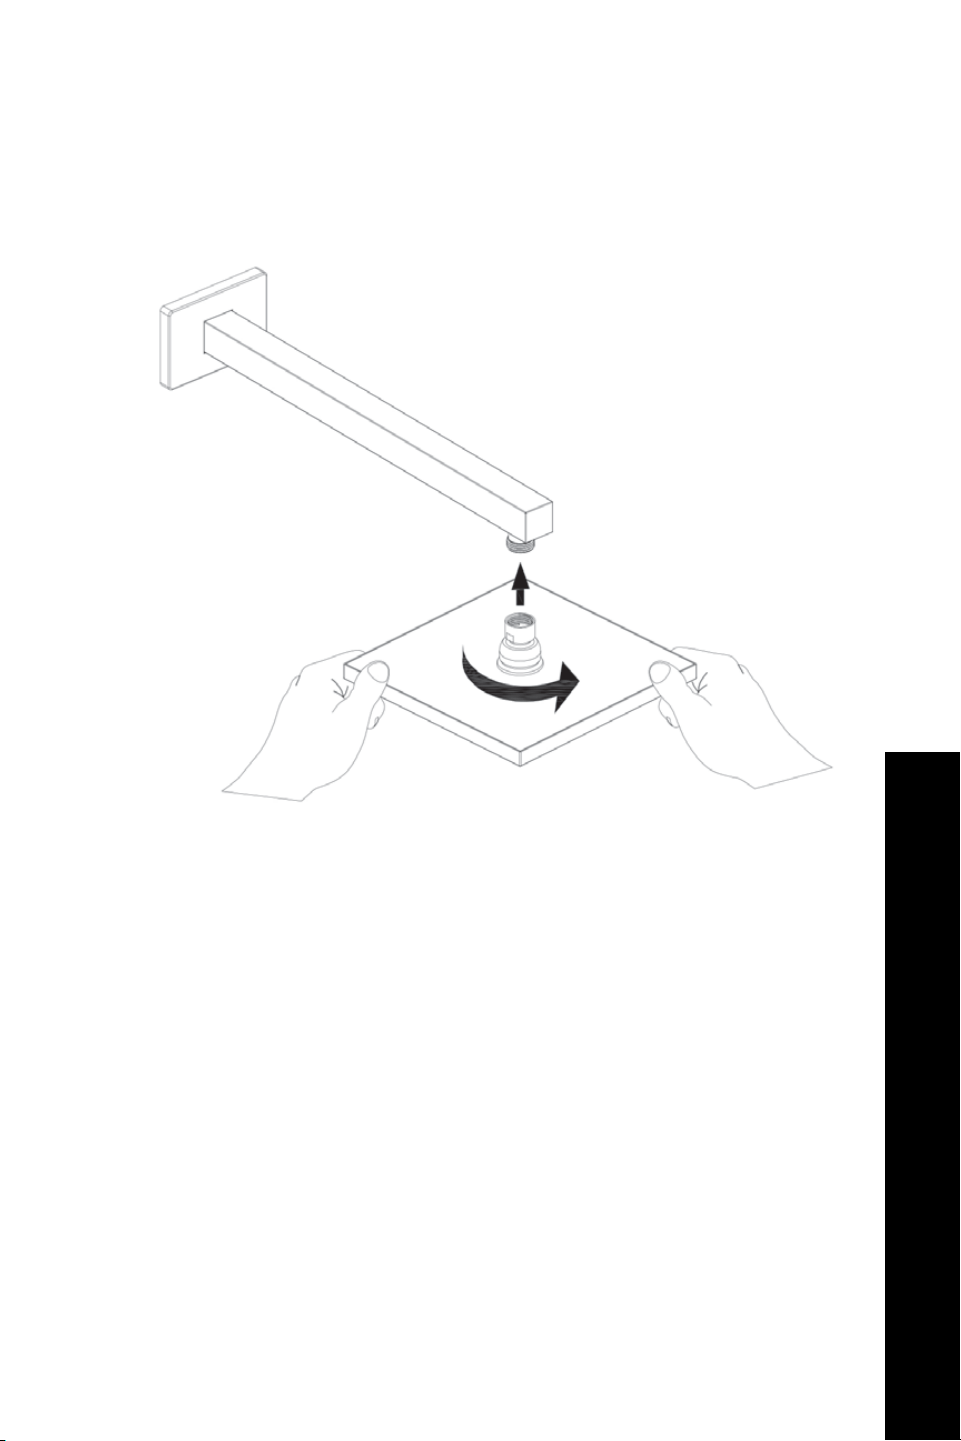
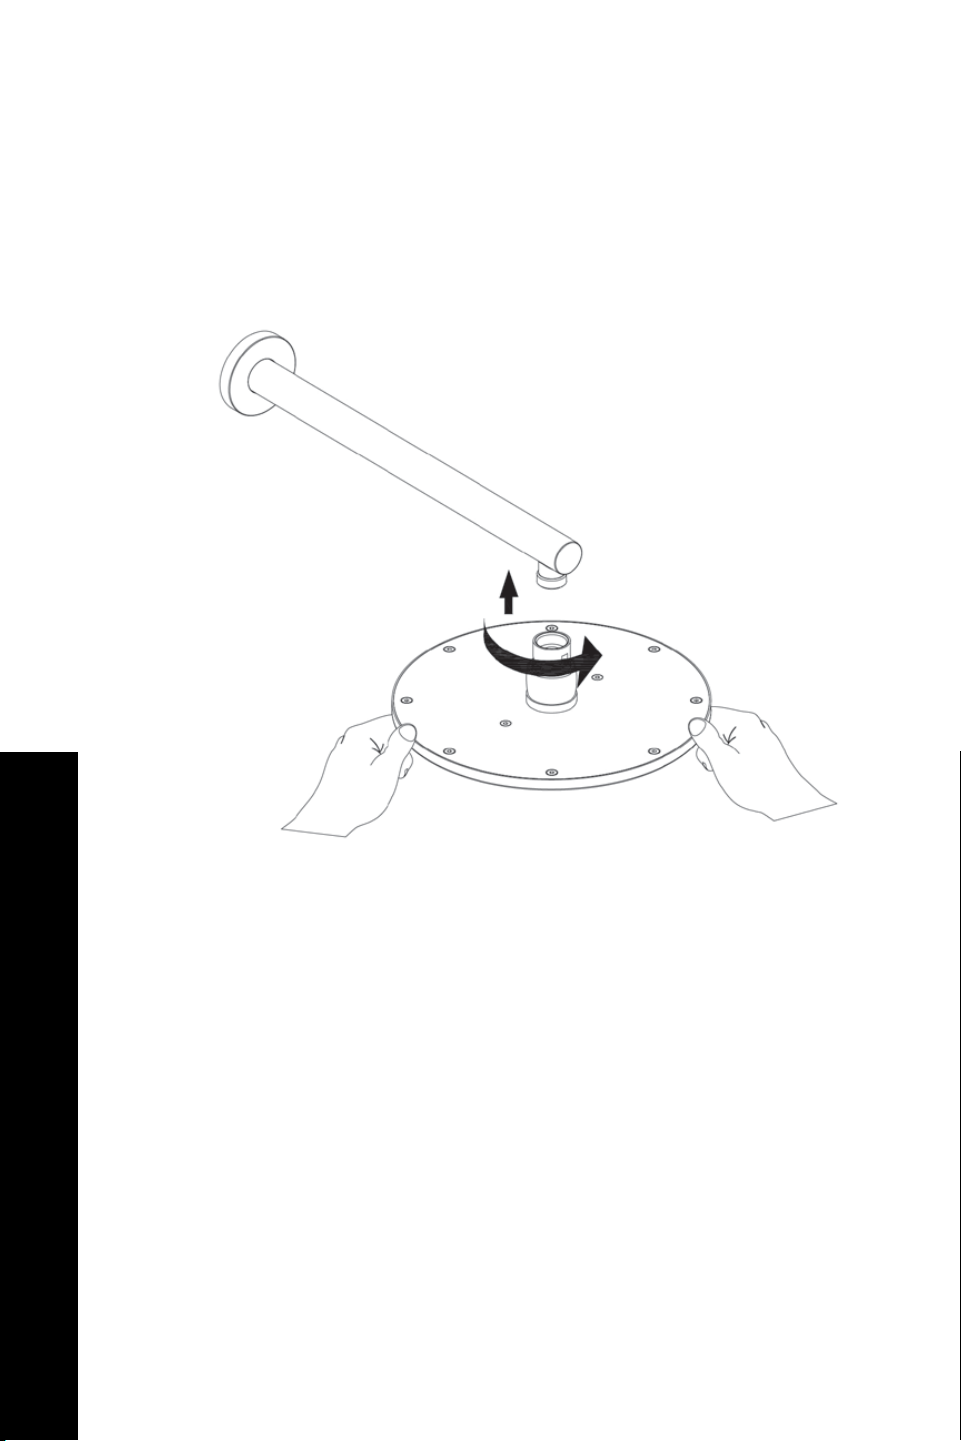
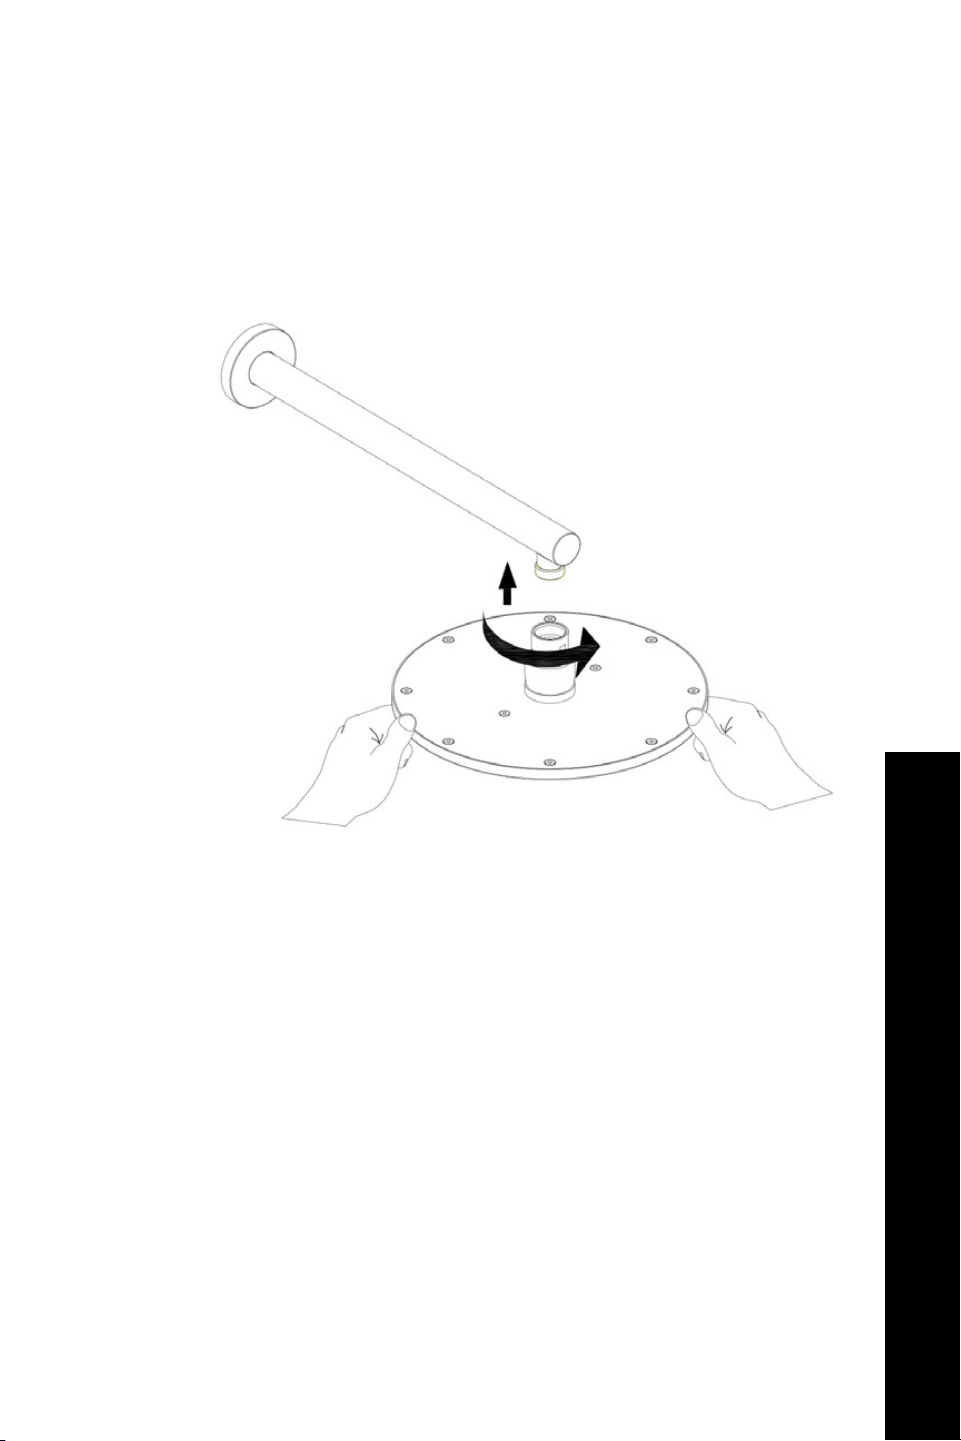
Twist the top spray shower into the shower arm.
Bliss Shower System Installation
11 .
16
BLISS SHOWER SYSTEM (BLSSHS)
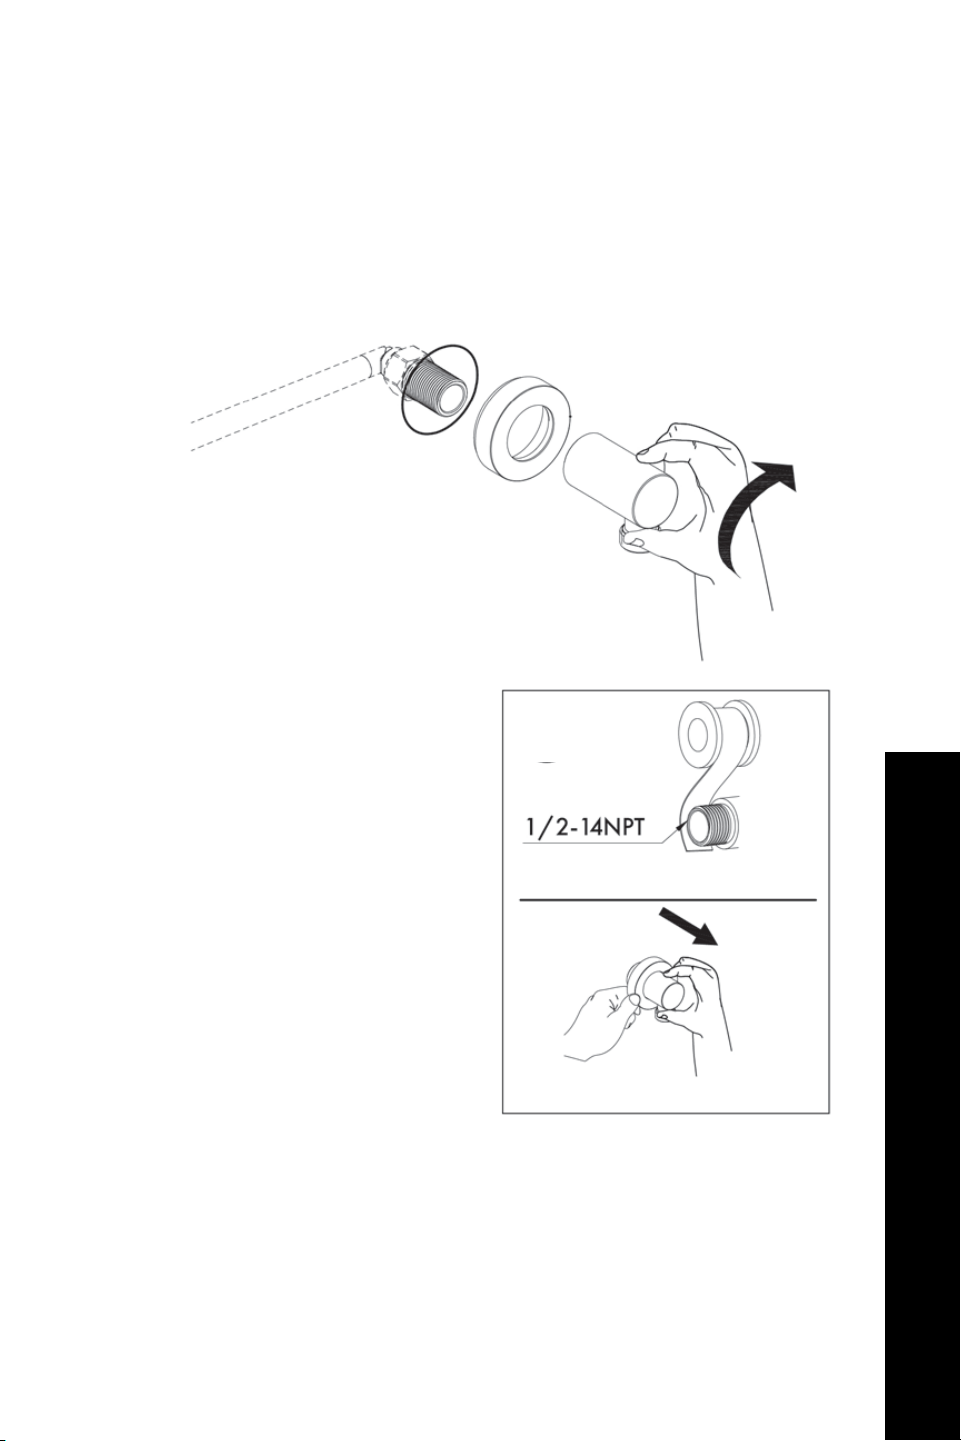
Connect the angle valve to the flange cover and screw together. Secure with
plumber’s tape to prevent leaks.
Bliss Shower System Installation
12 .
12 b .12a.
17
BLISS SHOWER SYSTEM (BLSSHS)
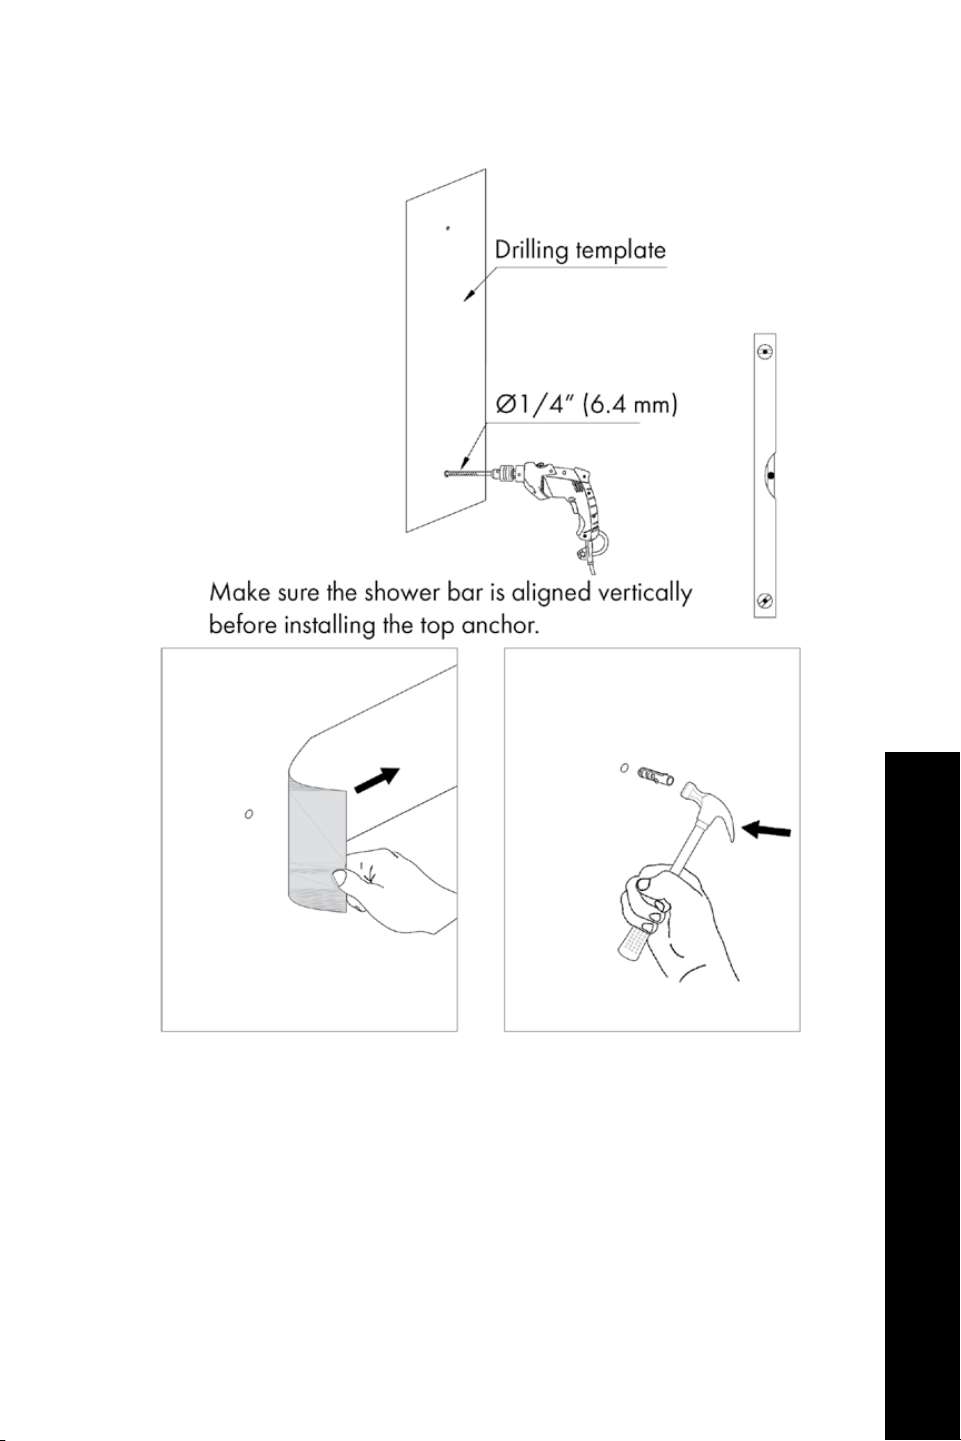
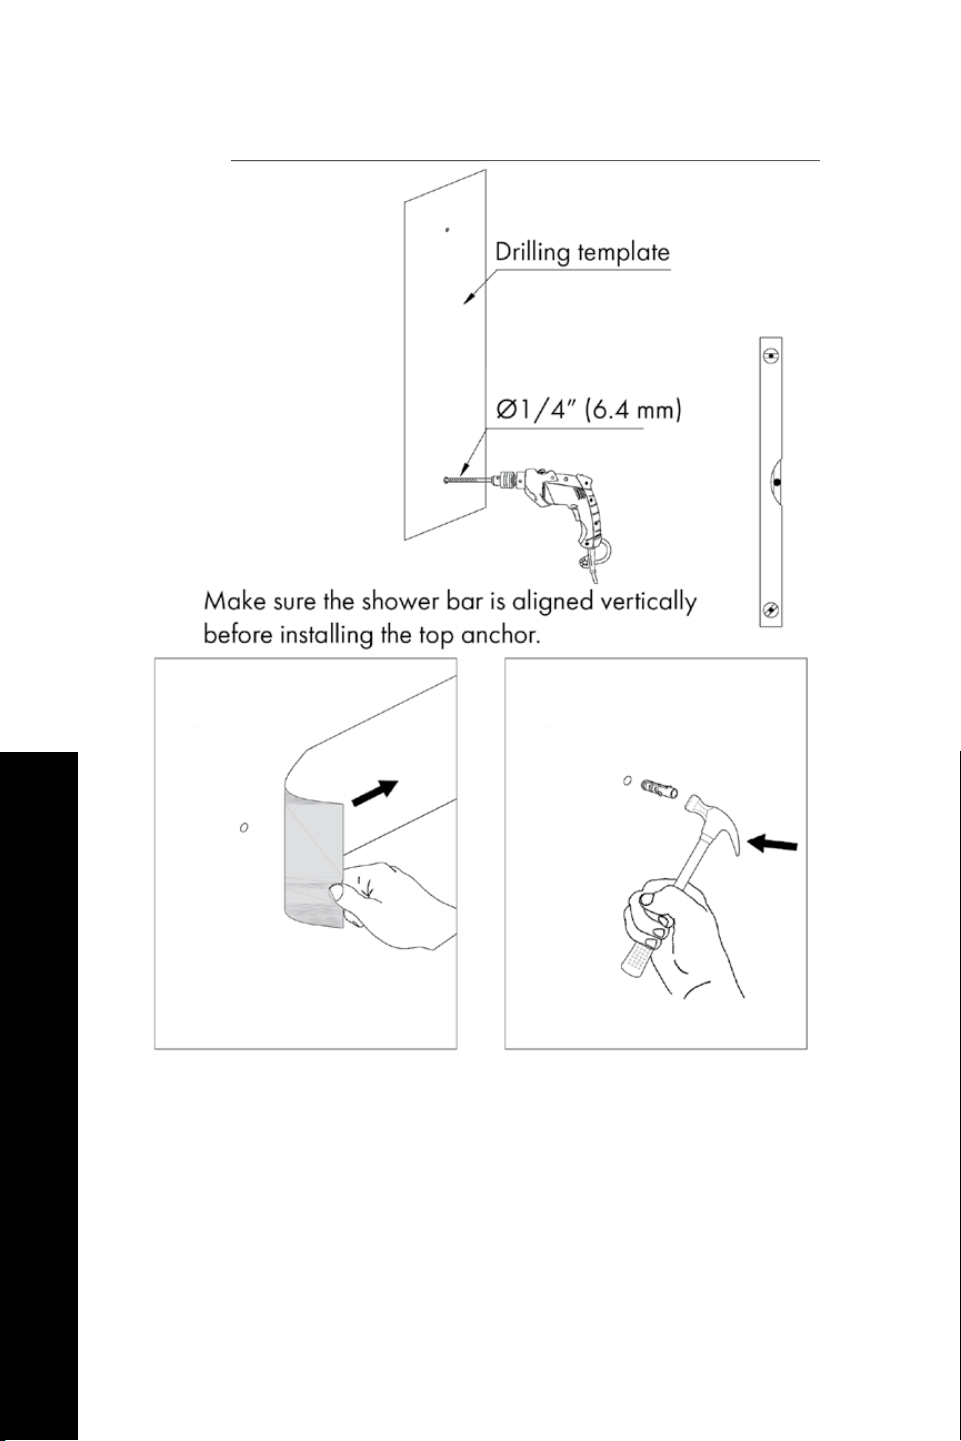
Use a pencil to mark the mounting holes on the wall. Use a hammer to put the screws
in.
Bliss Shower System Installation
13.
13a. 13.
18
BLISS SHOWER SYSTEM (BLSSHS)
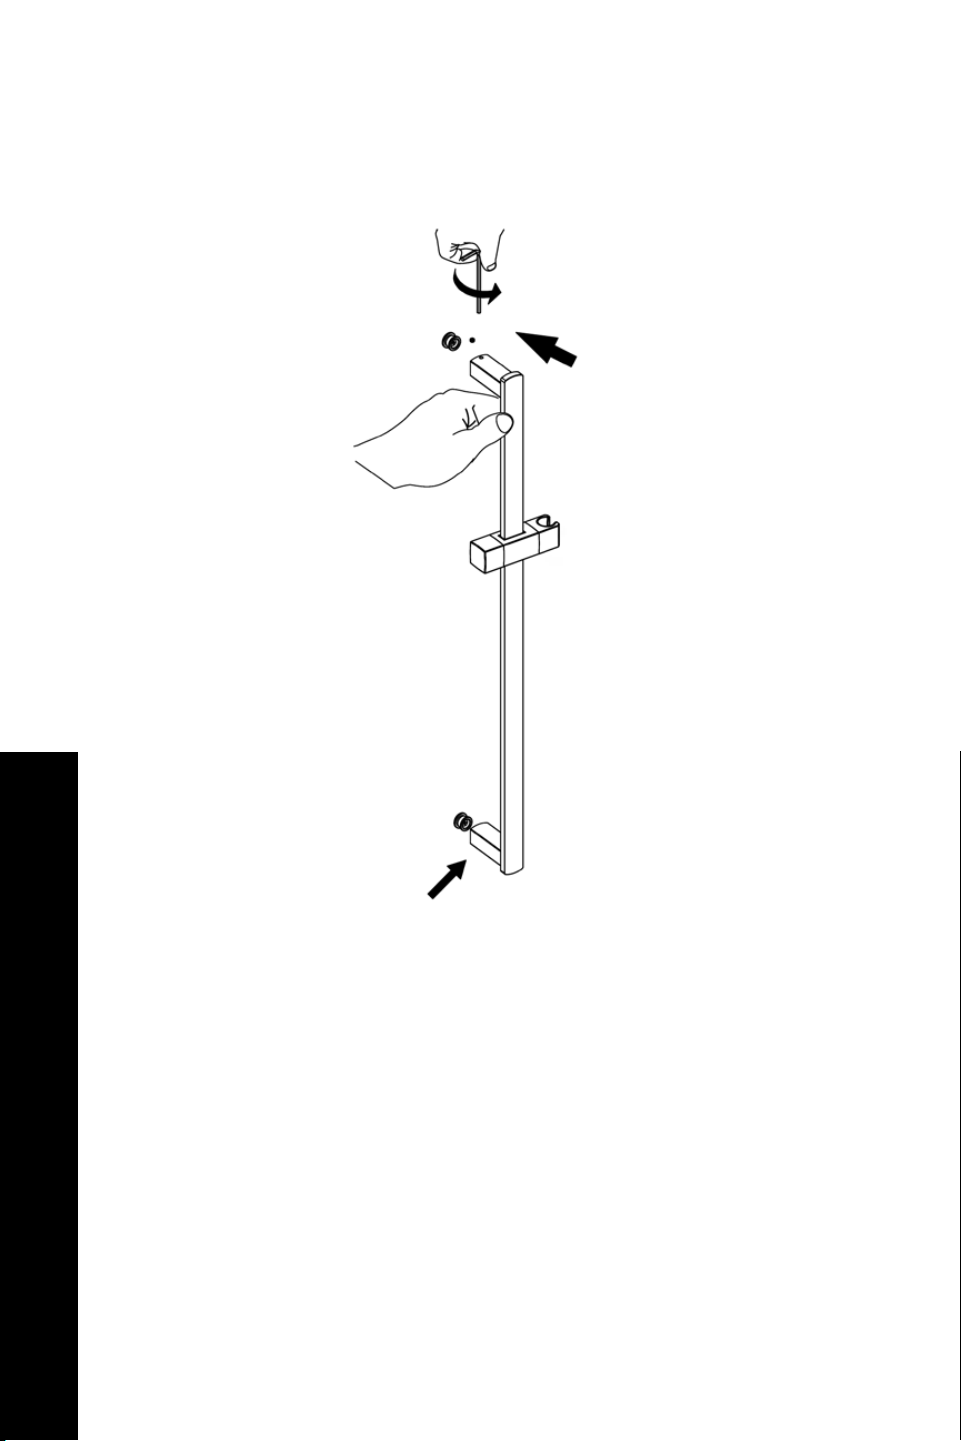
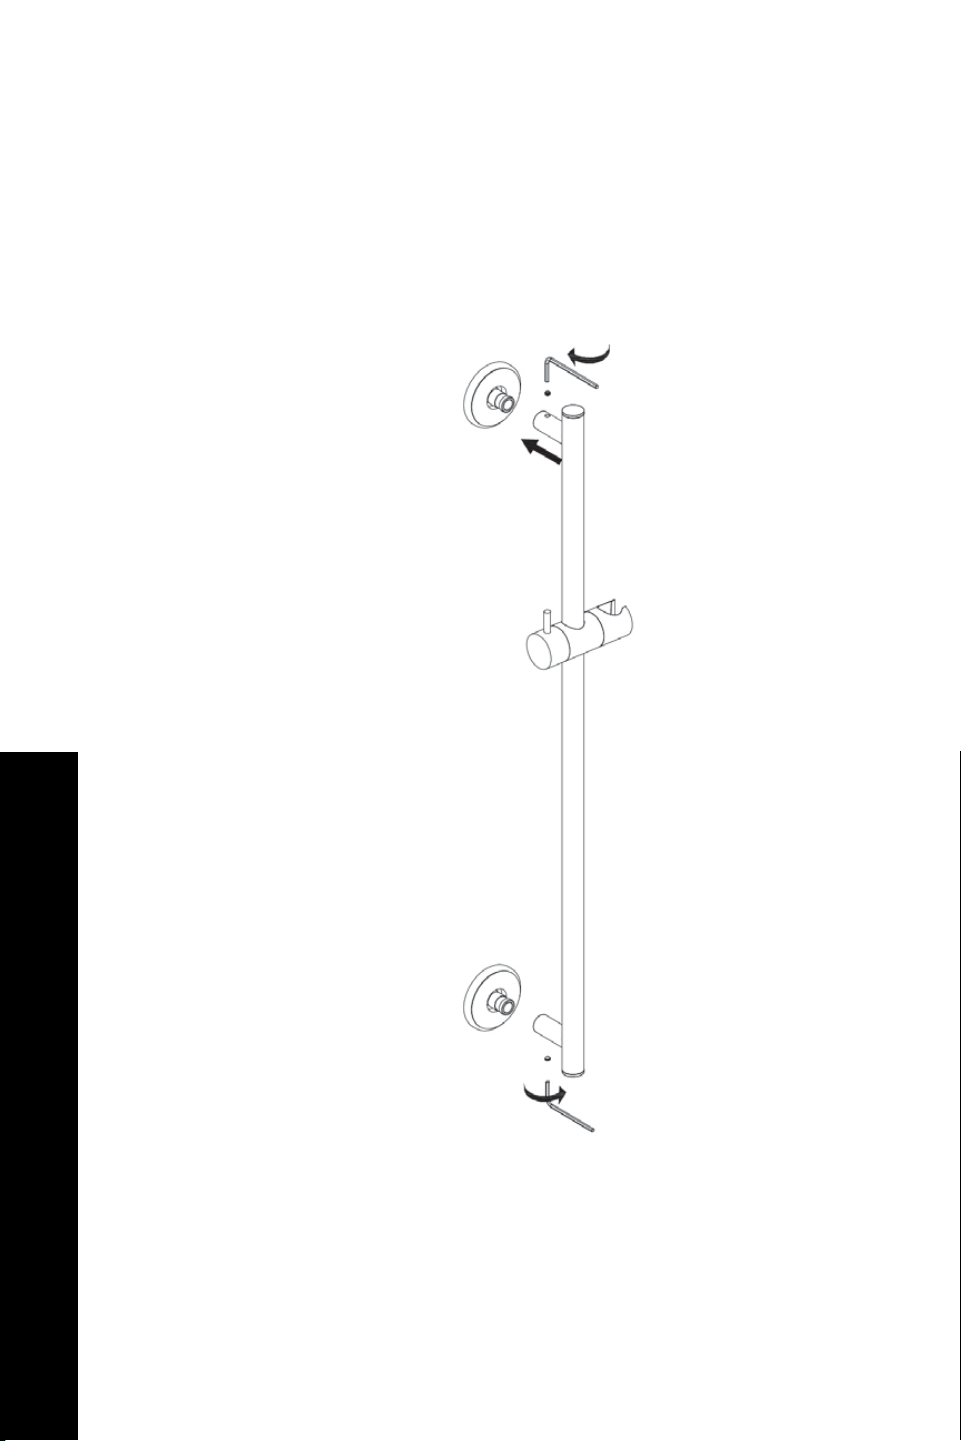
Screw the shower rail into the wall.
14.
Bliss Shower System Installation
19
BLISS SHOWER SYSTEM (BLSSHS)
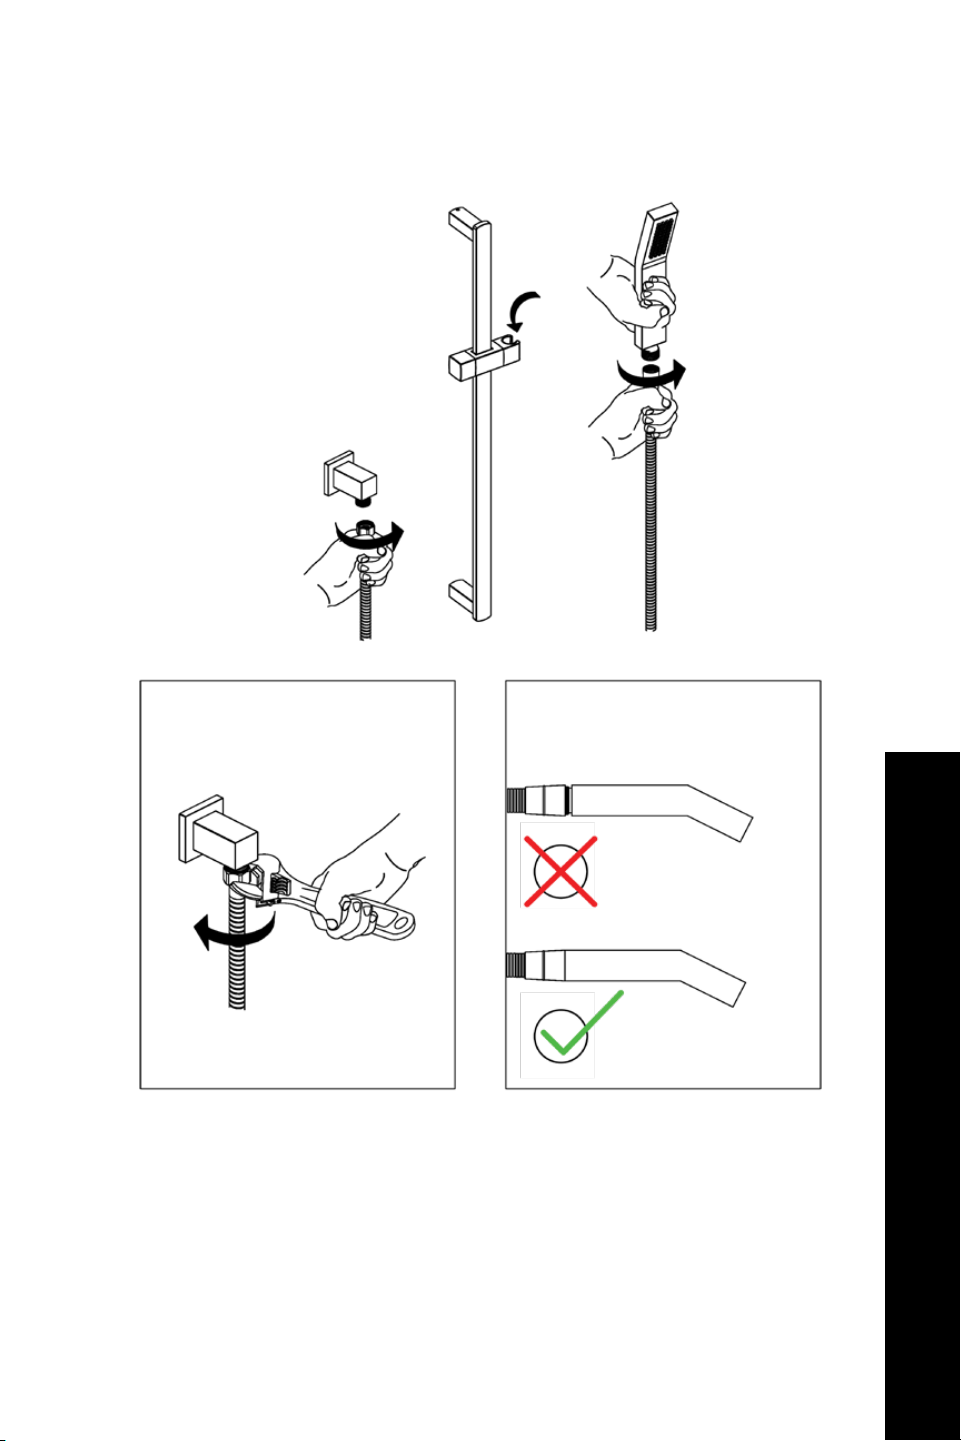
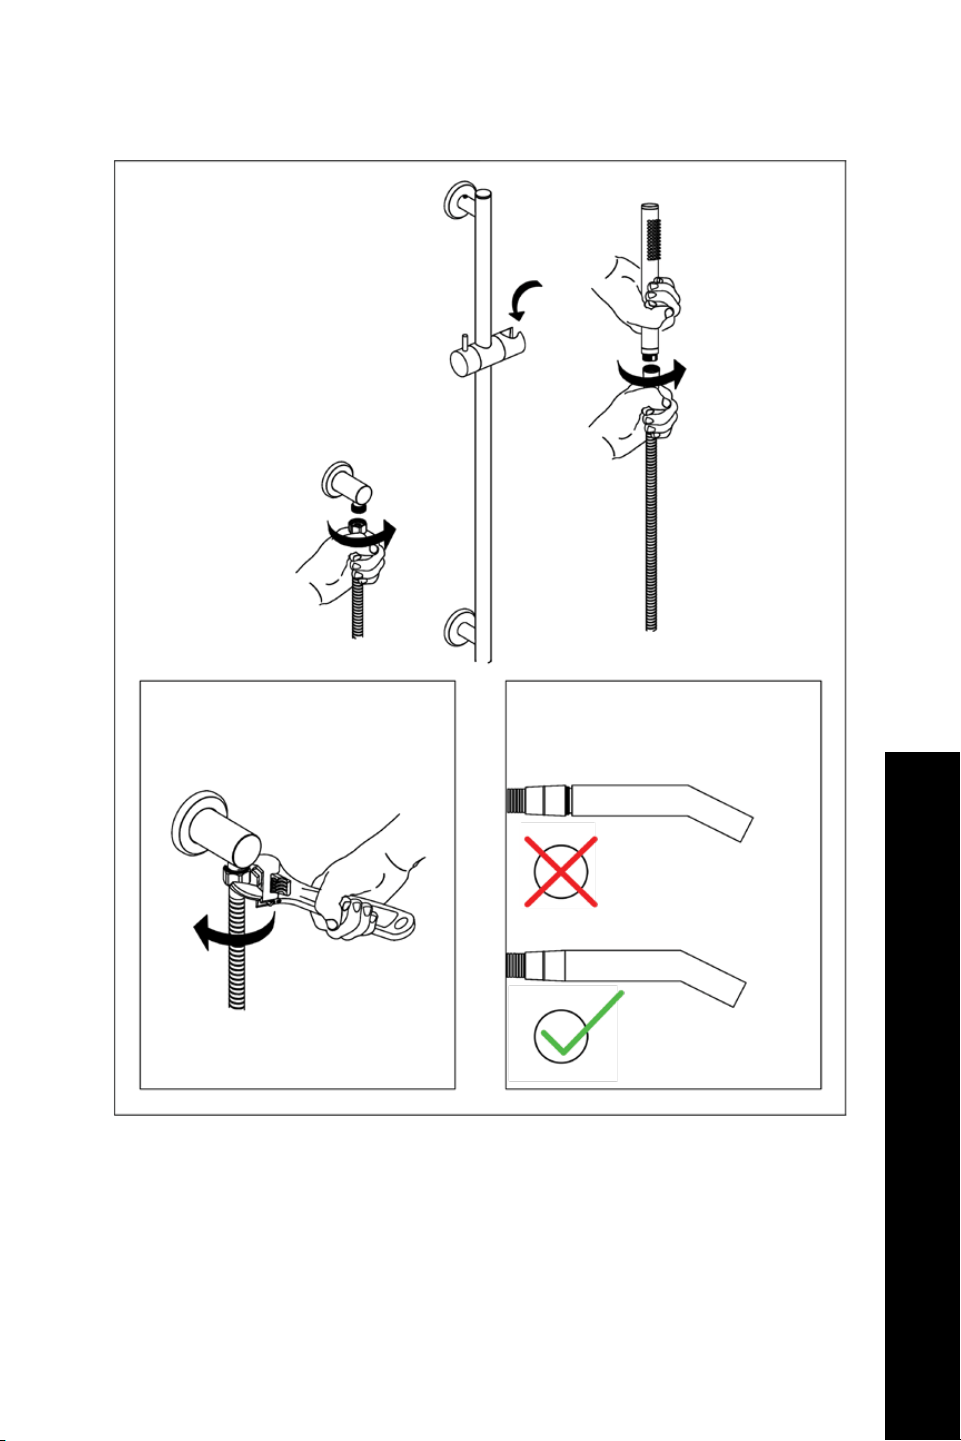
Connect the shower handle to the shower rail. Tighten with a wrench.
15.
15a. 15b .
Bliss Shower System Installation
20
BLISS SHOWER SYSTEM (BLSSHS)
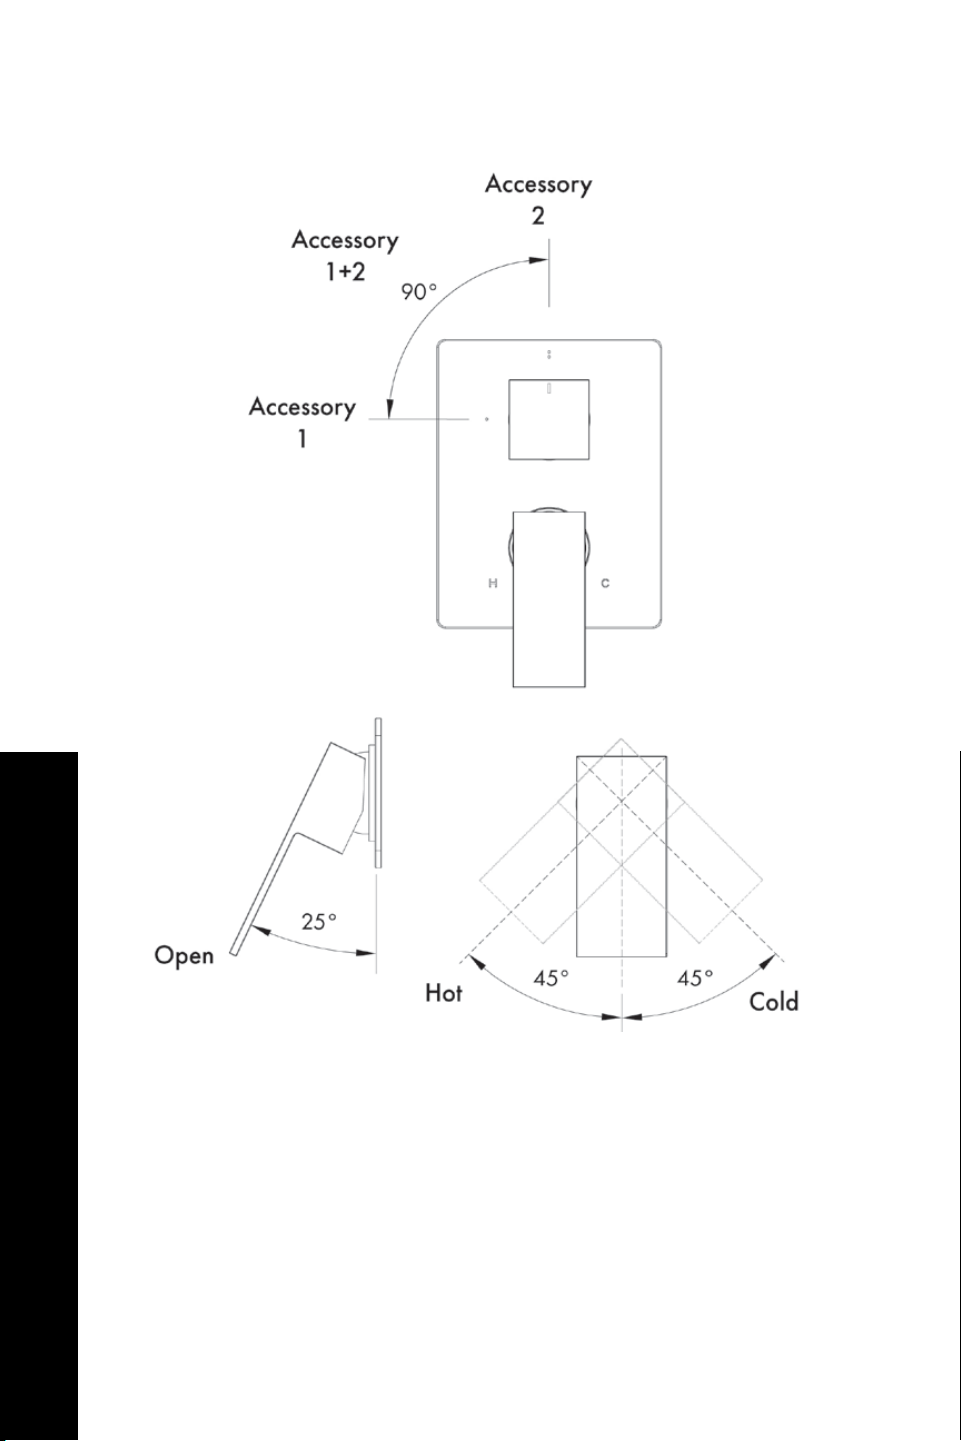
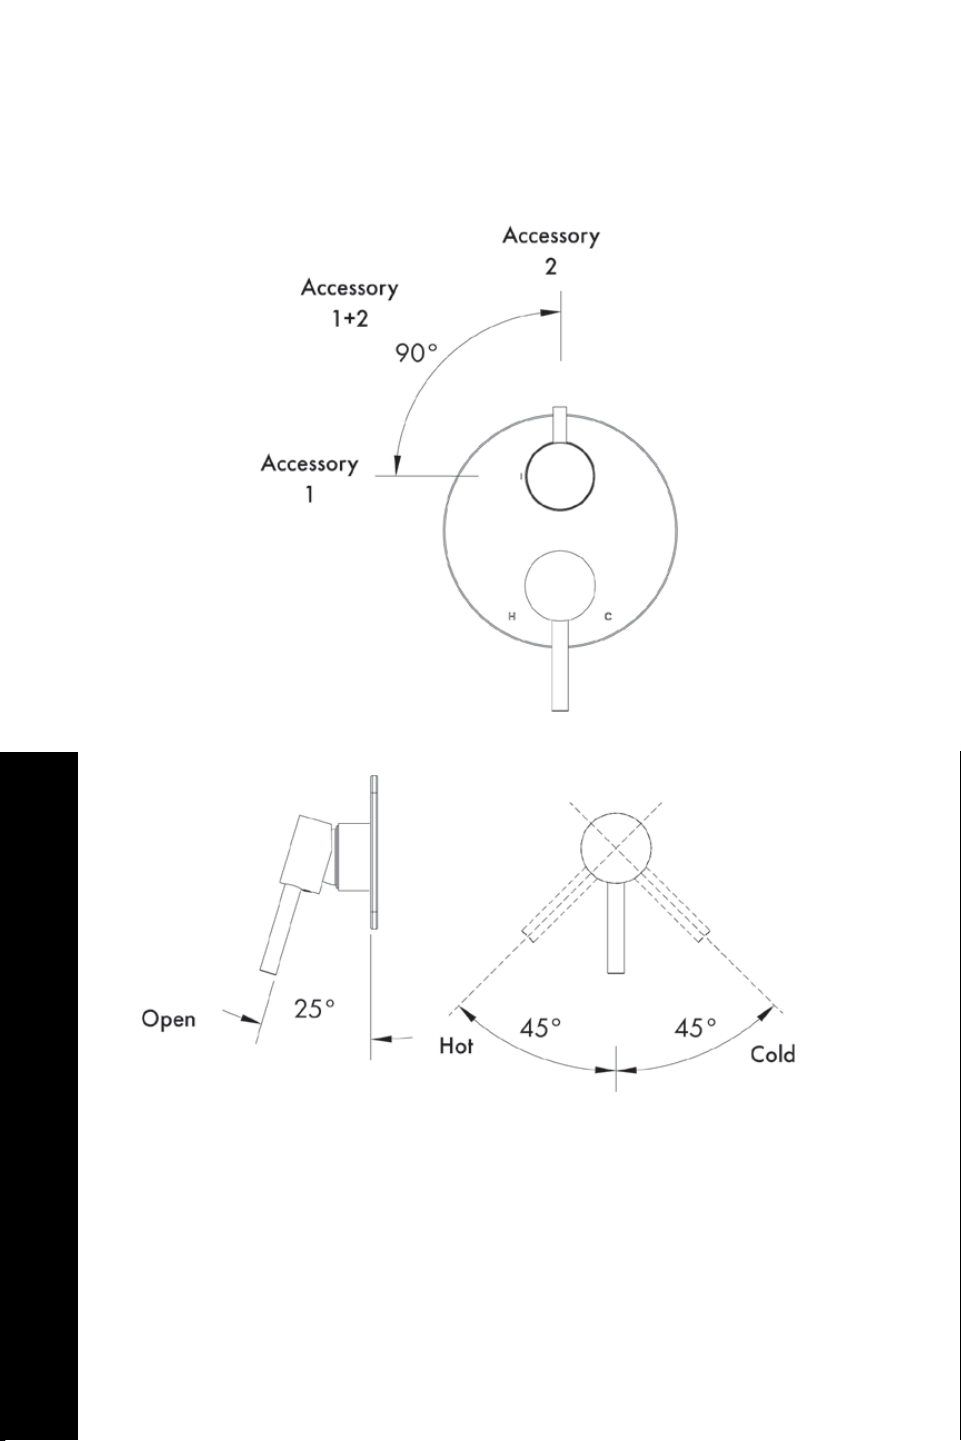
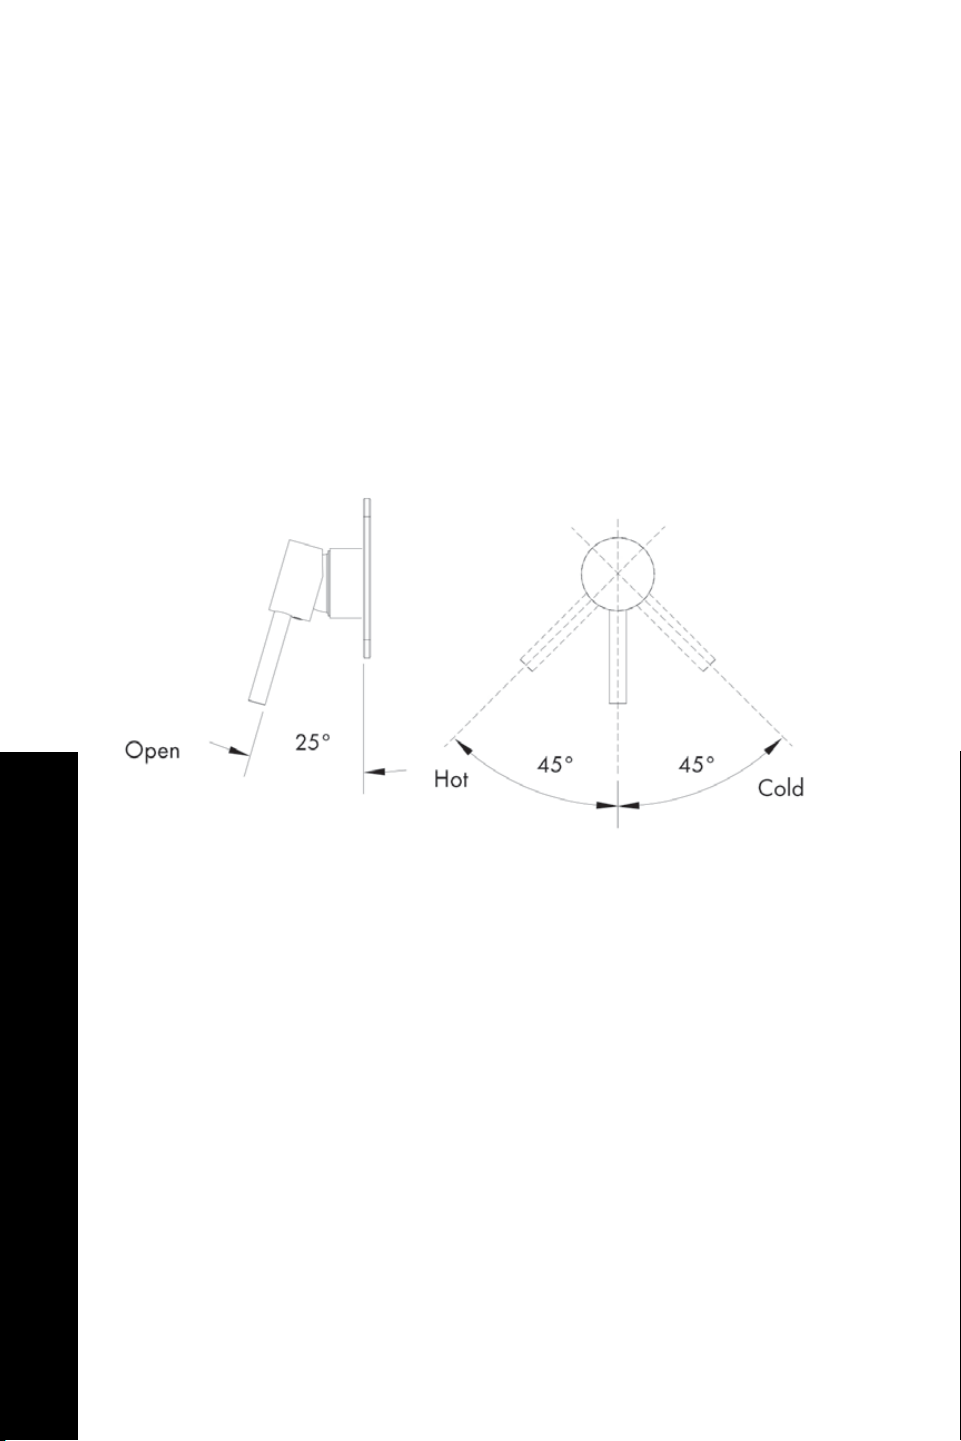
Review the diagram to understand the hot, cold, and open settings.
16.
Bliss Shower System Installation

22
ZLINE SHOWER FAUCET
ZLINE Shower Faucet Product Specifications
23
ZLINE SHOWER FAUCET
ZLINE Shower Faucet Tools
needed:
24
ZLINE SHOWER FAUCET
ZLINE Shower Faucet Installation
1.
3.
3a. 3b.
2.
4.
1a. 1b.
25
ZLINE SHOWER FAUCET
ZLINE Shower Faucet Installation
5.
5a.
7a.
7.
6.
8.
26
ZLINE SHOWER FAUCET
ZLINE Shower Faucet Installation
9.
11 .
11a.
10.
10a.
12 .
27
Bliss Shower Faucet Product Specifications
BLISS SHOWER FAUCET (BLSSHF)
28
BLISS SHOWER FAUCET (BLSSHF)
Bliss Shower Faucet Tools
needed:

29
Slide the sleeves onto the pipes and then insert pipes into the wall valve. Tighten the
ring around the pipes with the wrench.
BLISS SHOWER FAUCET (BLSSHF)
Bliss Shower Faucet Installation
1. 1c.
1b. 1d.
30
Braze the copper together.
BLISS SHOWER FAUCET (BLSSHF)
Bliss Shower Faucet Installation
2.
31
After brazing, purge the water supply system for 30 seconds.
BLISS SHOWER FAUCET (BLSSHF)
Bliss Shower Faucet Installation
3.
3a.
32
Reinstall the valve components into their original positions.
BLISS SHOWER FAUCET (BLSSHF)
Bliss Shower Faucet Installation
4.
33
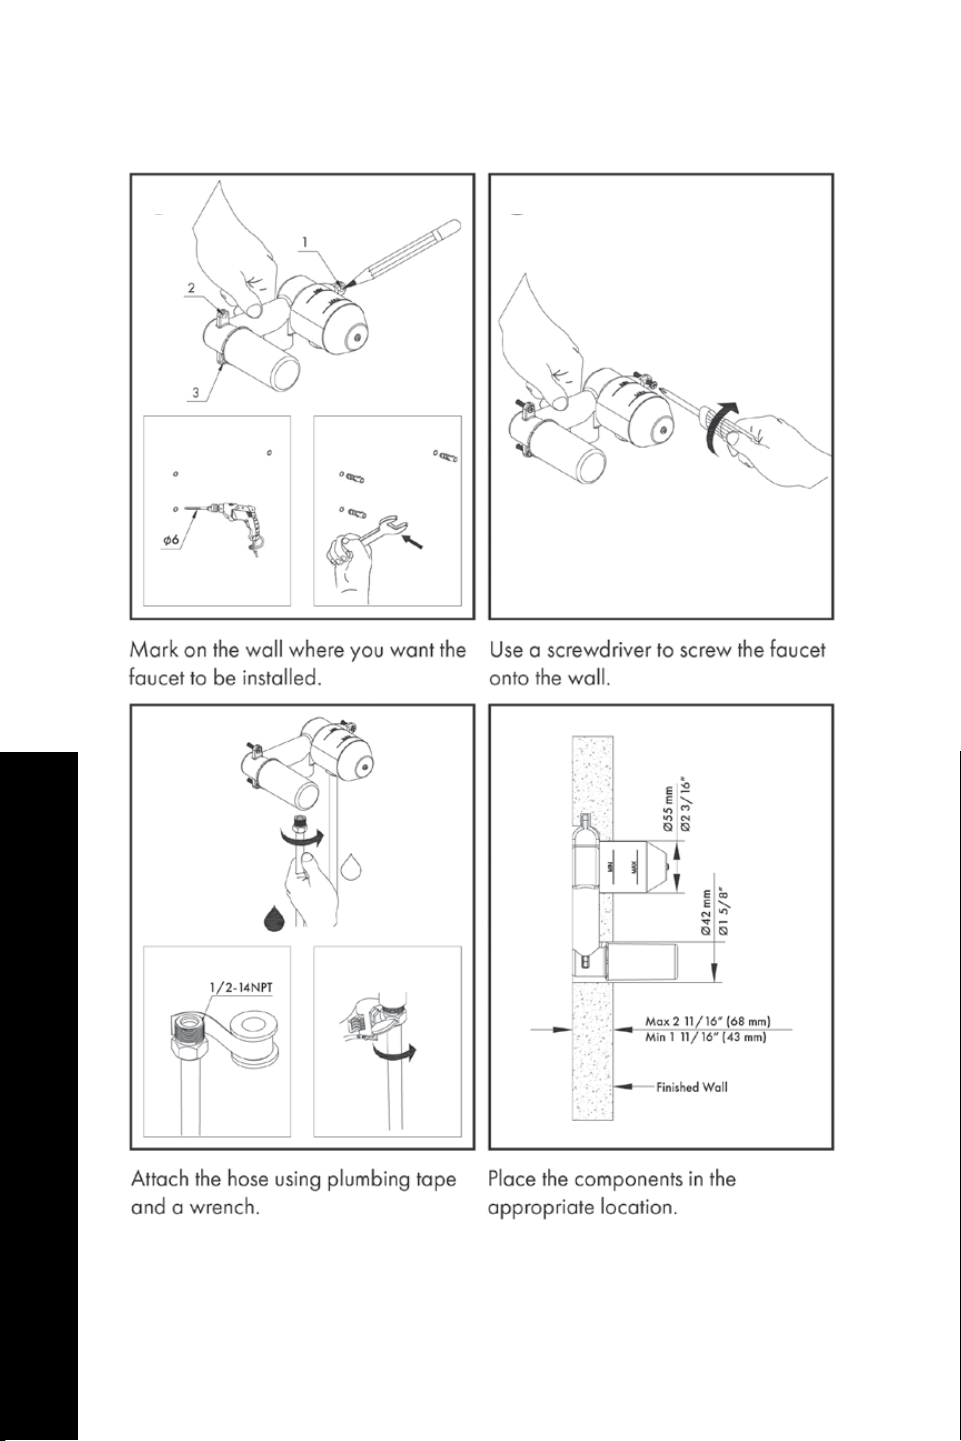
Screw the wall valve body into the system with a screwdriver. Do not overtighten.
BLISS SHOWER FAUCET (BLSSHF)
Bliss Shower Faucet Installation
5.
34
Place the components in the appropriate location.
BLISS SHOWER FAUCET (BLSSHF)
Bliss Shower Faucet Installation
6.

35
Screw the sleeve and washer into the wall valve body.
BLISS SHOWER FAUCET (BLSSHF)
Bliss Shower Faucet Installation
7.
36
Attach the face plate and remove the plastic.
BLISS SHOWER FAUCET (BLSSHF)
Bliss Shower Faucet Installation
8.
8a.
37
Attach the water control handle.
BLISS SHOWER FAUCET (BLSSHF)
Bliss Shower Faucet Installation
9.
9a.
38
Connect the flange cover to the spout in the wall. Secure with plumber’s tape to
prevent leaks.
BLISS SHOWER FAUCET (BLSSHF)
Bliss Shower Faucet Installation
10.
10b.10a.
39
Twist the top spray shower into the shower arm.
BLISS SHOWER FAUCET (BLSSHF)
Bliss Shower Faucet Installation
11 .

40
Review the diagram to understand the hot, cold, and open settings.
BLISS SHOWER FAUCET (BLSSHF)
Bliss Shower Faucet Installation
12 .
41
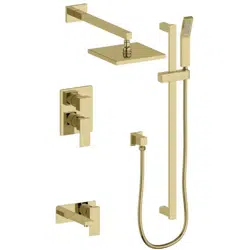
EL DORADO SHOWER SYSTEM (ELDSHS)
El Dorado Shower System Product Specifications
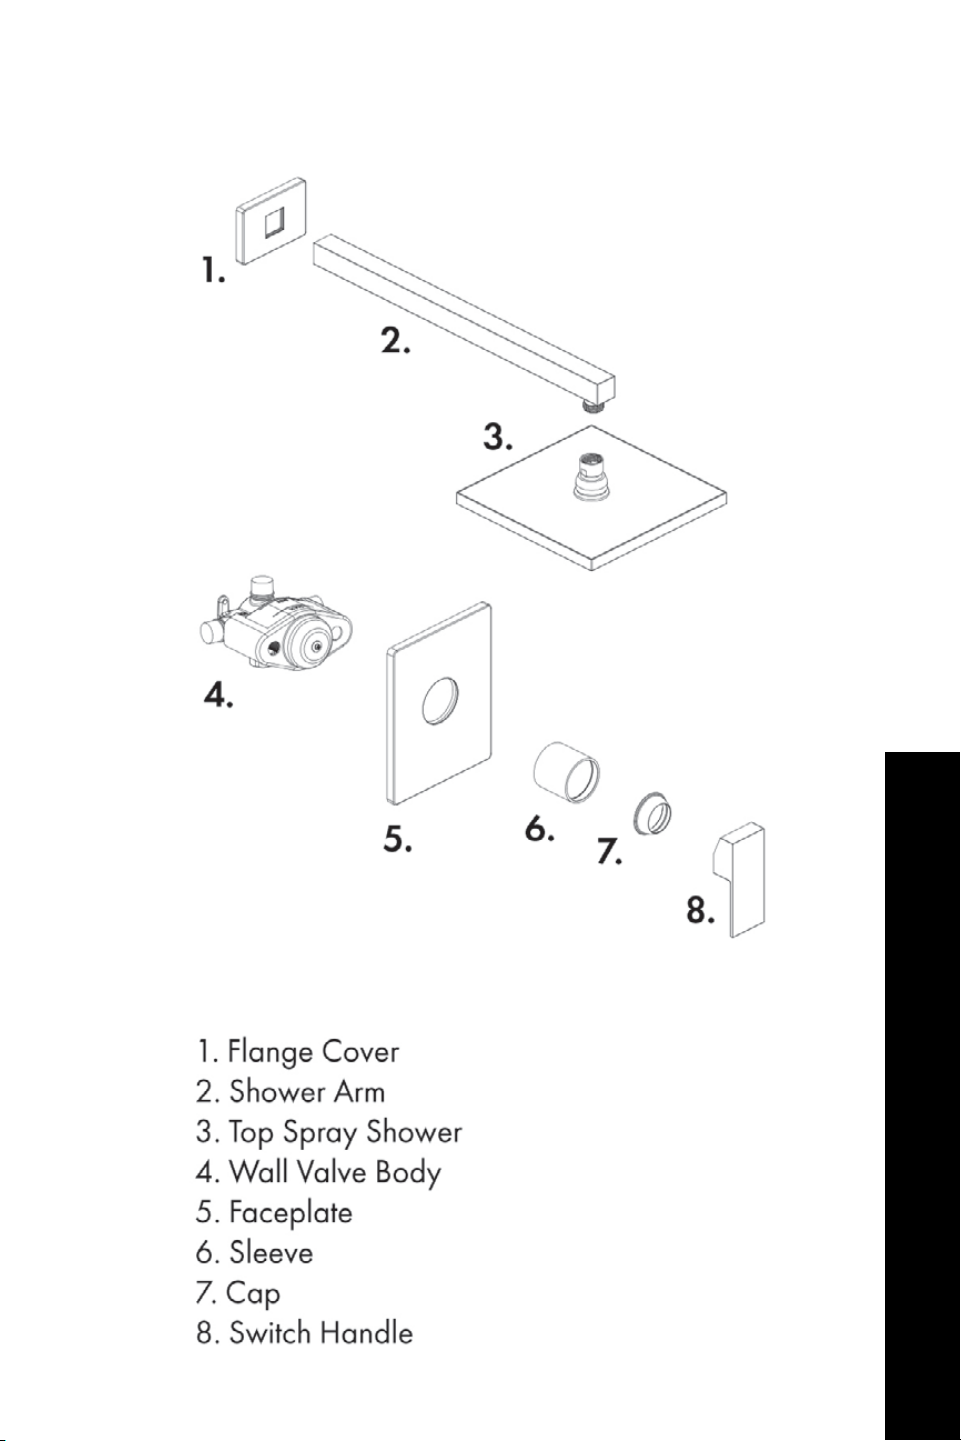
1. Flange cover
2. Shower arm
3. Top spray shower
4. Wall valve body
5. Faceplate
6. Sleeve
7. Washer
8. Water control handle
9. Switch handle
10. Cap
11 . Sleeve
12 . Flange cover
13. Angle valve
14 . Shower rail
15. Shower handle
16. Hose
42
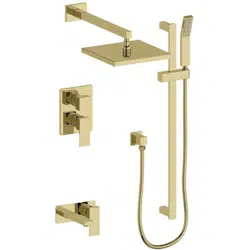
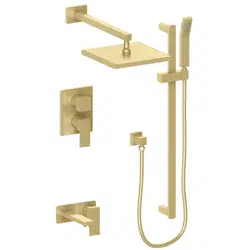
EL DORADO SHOWER SYSTEM (ELDSHS)
El Dorado Shower System Product Specifications
43
EL DORADO SHOWER SYSTEM (ELDSHS)
needed:
El Dorado Shower System Tools
44
EL DORADO SHOWER SYSTEM (ELDSHS)
Slide the sleeves onto the pipes and then insert pipes into the wall valve. Tighten the
ring around the pipes with the wrench.
El Dorado Shower System Installation
1. 1c.
1b.
1d.
45
EL DORADO SHOWER SYSTEM (ELDSHS)
Braze the copper together.
El Dorado Shower System Installation
2.
46
EL DORADO SHOWER SYSTEM (ELDSHS)
After brazing, purge the water supply system for 30 seconds.
El Dorado Shower System Installation
3.
3a.
47
EL DORADO SHOWER SYSTEM (ELDSHS)
Reinstall the valve components into their original positions.
El Dorado Shower System Installation
4.

48
EL DORADO SHOWER SYSTEM (ELDSHS)
Screw the wall valve body into the system with a screwdriver. Do not overtighten.
El Dorado Shower System Installation
5.
49
EL DORADO SHOWER SYSTEM (ELDSHS)
Place the components in the appropriate location.
El Dorado Shower System Installation
6.
50
EL DORADO SHOWER SYSTEM (ELDSHS)
Screw the sleeve and washer into the wall valve body.
El Dorado Shower System Installation
7a. 7b.

51
EL DORADO SHOWER SYSTEM (ELDSHS)
Attach the face plate and remove the plastic.
El Dorado Shower System Installation
8.
8a.
52
EL DORADO SHOWER SYSTEM (ELDSHS)
Attach the Water control handle.
El Dorado Shower System Installation
9.
9a.
53
EL DORADO SHOWER SYSTEM (ELDSHS)
Connect the flange cover to the spout in the wall. Secure with plumber’s tape to
prevent leaks.
El Dorado Shower System Installation
10.
10b.10a.
54
EL DORADO SHOWER SYSTEM (ELDSHS)
Twist the top spray shower into the shower arm.
El Dorado Shower System Installation
11 .
55
EL DORADO SHOWER SYSTEM (ELDSHS)
Connect the angle valve to the flange cover and screw together. Secure with
plumber’s tape to prevent leaks.
El Dorado Shower System Installation
12 .12 .
12a.
56
EL DORADO SHOWER SYSTEM (ELDSHS)
Use a pencil to mark the mounting holes on the wall. Use a hammer to put the screws
in.
El Dorado Shower System Installation
13.
13a. 13b .
57
EL DORADO SHOWER SYSTEM (ELDSHS)
Connect the components of the shower rail.
El Dorado Shower System Installation
14.
58
EL DORADO SHOWER SYSTEM (ELDSHS)
Screw the shower rail into the wall.
El Dorado Shower System Installation
15.
59
EL DORADO SHOWER SYSTEM (ELDSHS)
Connect the shower handle to the shower rail. Tighten with a wrench.
El Dorado Shower System Installation
16.
16a. 16b .
60
EL DORADO SHOWER SYSTEM (ELDSHS)
Review the diagram to understand the hot, cold, and open settings.
El Dorado Shower System Installation
17.
61
EL DORADO SHOWER FAUCET (ELDSHF)
El Dorado Shower Faucet Product Specifications
62
EL DORADO SHOWER FAUCET (ELDSHF)
El Dorado Shower Faucet Installation
63
EL DORADO SHOWER FAUCET (ELDSHF)
Slide the sleeves onto the pipes and then insert pipes into the wall valve. Tighten the
ring around the pipes with the wrench. NOTE: If brazing is involved, you must remove
the internal valve components prior to the brazing. Please note the original position of
the cartridge.
El Dorado Shower Faucet Installation
1. 1c.
1d.1b.
64
Braze the copper together.
EL DORADO SHOWER FAUCET (ELDSHF)
El Dorado Shower Faucet Installation
2.

65
After brazing, purge the water supply system for 30 seconds.
EL DORADO SHOWER FAUCET (ELDSHF)
El Dorado Shower Faucet Installation
3.
3a.

66
Reinstall the valve components into their original positions.
EL DORADO SHOWER FAUCET (ELDSHF)
El Dorado Shower Faucet Installation
4.

67
Use this diagram to understand the placement of the wall valve.
EL DORADO SHOWER FAUCET (ELDSHF)
El Dorado Shower Faucet Installation
5.
68
EL DORADO SHOWER FAUCET (ELDSHF)
Place the components in the appropriate location.
El Dorado Shower Faucet Installation
6.
69
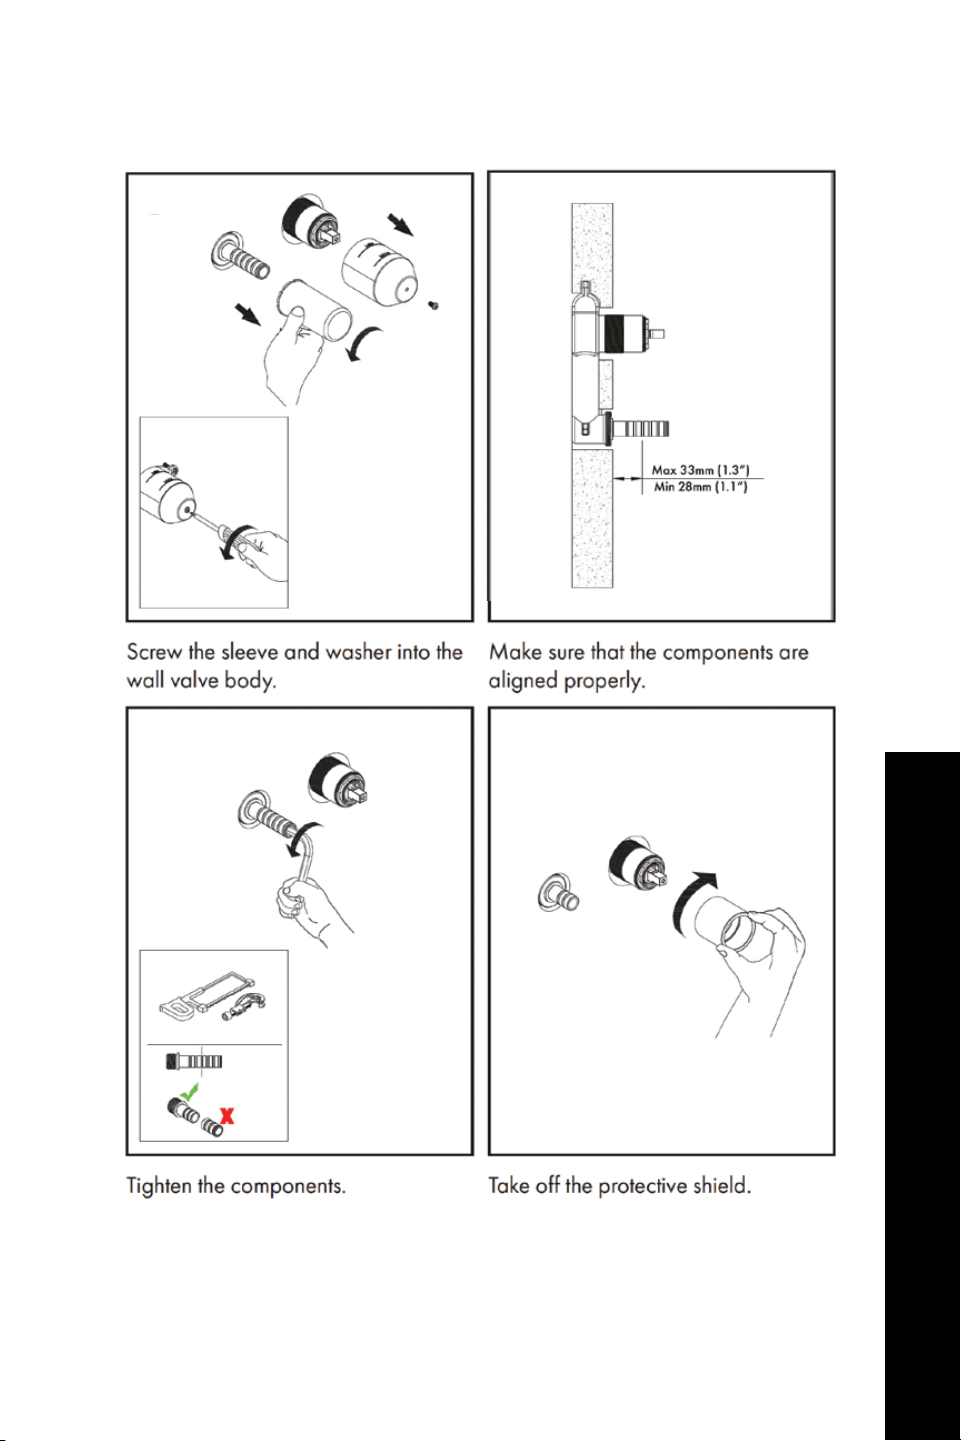
Screw the sleeve and washer into the wall valve body.
EL DORADO SHOWER FAUCET (ELDSHF)
El Dorado Shower Faucet Installation
7.
70
Attach the face plate and remove the plastic.
EL DORADO SHOWER FAUCET (ELDSHF)
El Dorado Shower Faucet Installation
8.
8a.
71
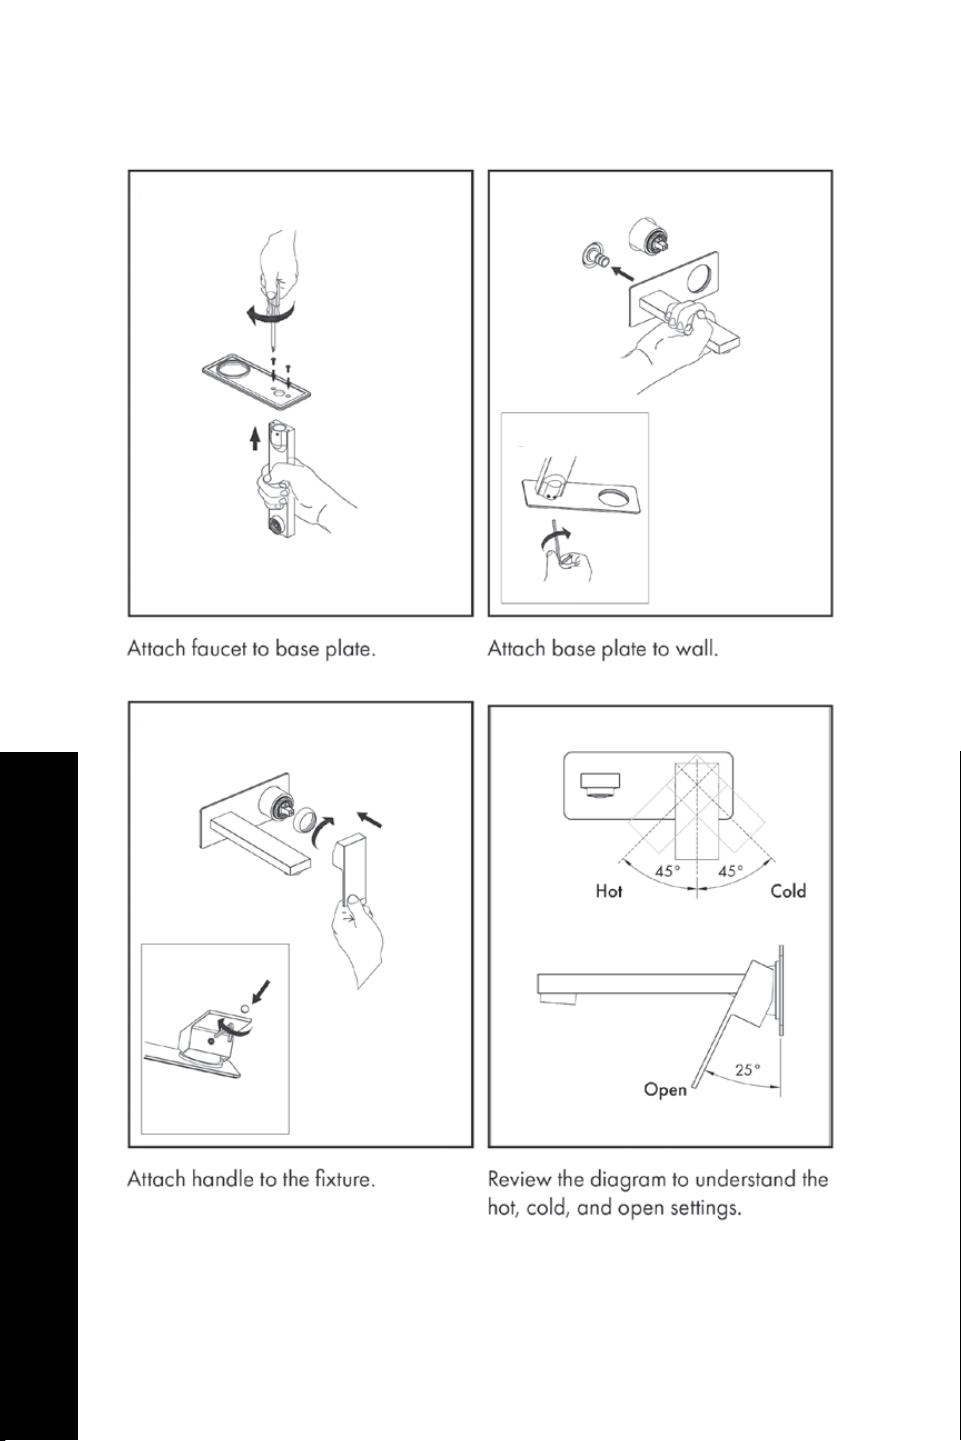
Attach the Water control handle.
EL DORADO SHOWER FAUCET (ELDSHF)
El Dorado Shower Faucet Installation
9.
9a.
72
Connect the flange cover to the spout in the wall. Secure with plumber’s tape to
prevent leaks.
EL DORADO SHOWER FAUCET (ELDSHF)
El Dorado Shower Faucet Installation
10.
10b.10a.
73
Twist the top spray shower into the shower arm.
EL DORADO SHOWER FAUCET (ELDSHF)
El Dorado Shower Faucet Installation
11 .
74
Review the diagram to understand the hot, cold, and open settings.
EL DORADO SHOWER FAUCET (ELDSHF)
El Dorado Shower Faucet Installation
12 .

75
TROUBLESHOOTING
PROBLEM POSSIBLE CAUSE SOLUTION
There is leakage under the
handle.
The locking nut has come
loose.
Unscrew the lever on the
handle by hand. Loosen set
screw with a hex wrench.
Remove the handle and
unscrew trim cap by hand.
Tighten locking nut with an
adjustable wrench.
Water will not shut off
completely.
Cartridge may be
defective.
Unscrew the level on the
handle by hand. Loosen set
screw with a hex wrench.
Remove the handle and
unscrew trim cap by hand.
Unscrew the locking nut
with an adjustable wrench.
Remove ceramic disc
cartridge. Check for cracks.
There is a leak between
the spray head and the
hose.
The spray head may be
loose or the washer is not
seated correctly in the
hose connection.
Tighten the spray head
by hand until snug. Make
sure the washer is seated
correctly.
Troubleshooting