Please Read and Save this Use and Care Manual
Por Favor Lea y Guarde este Instructivo Antes de Usar el Producto
Air Fryer
USE AND CARE INSTRUCTIONS
Freidora sin Aceite
MANUAL DE INSTRUCCIONES
Model/Modelo: GAU-80112

Freidora Eléctrica sin Aceite
MANUAL DE INSTRUCCIONES
2
Table of Contents
Page
Important Safeguards 3
Learning about your Air Fryer 6
Before First Use 7
How to Use your Air Fryer 8
Suggested Cooking Guide 9-12
Care and Cleaning 13
Storage and Maintenance 13
Recipes 14-16
Need Help? 17
Warranty 17

Air Fryer
USE AND CARE INSTRUCTIONS
3
IMPORTANT SAFEGUARDS
When using an Air Fryer, basic safety precautions should always be followed, including the following:
Read all instructions before use.
• Close supervision is necessary when any Air Fryer is used near children.
• Allow to cool before putting on or taking off parts, and before cleaning the Air Fryer.
• The appliance needs approximately 30 minutes to cool down before cleaning.
• This Air Fryer is not intended for use by persons (including children) with reduced physical,
sensory or mental capabilities, or lack of experience and knowledge, unless they have been given
supervision or instruction concerning use of the pressure cooker by a person responsible for
their safety.
• The use of attachments not recommended by the Air Fryer manufacturer may cause fire or injuries.
• Unplug from outlet when not in use and before cleaning.
• Do not operate any appliance with a damaged cord or plug or after the appliance malfunctions or
has been damaged in any manner.
• Do not use this Air Fryer for anything other than its intended use.
• Do not use outdoors. Household use only.
• Do not let cord hang over edge of table or counter or touch hot surfaces.
• Do not place on or near a hot gas or electric burner, or in a heated oven.
• To disconnect the appliance, turn both the timer dial and temperature dial to OFF. Then remove
plug from wall outlet.
• Never touch the appliance with wet or damp hands.
• To protect against electric shock do not immerse cord, plugs, or base in water or other liquid.
• The appliance has a build in timer, it will automatically shut down the appliance when count down
to zero. You can manually switch off the appliance by turning timer knob to zero anticlockwise.
• Extreme caution must be used when moving an appliance containing hot liquids or other hot oils.
• Always make sure frying basket drawer is fully closed, with the frying basket handle locked
securely in the drawer, while air fryer is in operation. Air Fryer will not operate unless
the frying basket drawer is fully closed.
CAUTION: After hot air frying, the frying basket and frying basket drawer and the cooked foods

Freidora Eléctrica sin Aceite
MANUAL DE INSTRUCCIONES
4
are hot. Extreme caution must be used when handling the hot Air Fryer basket/drawer.
• Never operate the appliance near any flammable materials.
• Do not place anything on top of the appliance while it is operating or while it is hot.
• This appliance is hot during operation and retains heat for some time after turning OFF. Do not
touch hot surfaces.
• If this appliance falls or accidentally becomes immersed in water, unplug it from the wall outlet
immediately.
• Never attempt to open the frying basket drawer while the appliance is operating.
• The basket drawer and the removable tray have a nonstick surface. To avoid scratching the
surface use wooden or plastic utensils.
• Do not leave this appliance unattended during use.
• Place the Air Fryer on a flat, heat-resistant work area.
• Do not obstruct the air outlet or air inlets on the back and sides of the Air Fryer, with any objects.
• Keep appliance at least 4 inches away from walls or other objects during operation.
• Always use the frying basket handle to open frying basket drawer.
• Never present the basket holder without the frying basket. Check that the frying basket is in the
correct position.
• After air frying, make sure to place the frying basket drawer on a flat, heat-resistant surface
before pressing the basket release button. WARNING: Under- or over-filling the frying basket
may damage the Air Fryer and could result in serious personal injury.
• During hot air frying, hot steam is released through the air outlet openings. Keep your hands and
face at a safe distance from the steam and form the air outlet openings. Also, be careful of hot
steam and air when you remove the basket from the appliance.
SAVE THESE INSTRUCTIONS
THIS PRODUCT IS INTENDED FOR HOUSEHOLD USE ONLY

Air Fryer
USE AND CARE INSTRUCTIONS
5
POLARIZED PLUG
This appliance has a polarized plug (one blade is wider than the other). To reduce the risk of electric shock,
this plug will fit into a polarized outlet only one way. If the plug does not fit correctly into the outlet, flip it. If
it still does not fit, contact a qualified electrician. Do not attempt to defeat this safety feature by modifying
the plug in any way.
EXTENSION CORD USE
A short power-supply cord is provided to reduce the risk resulting from becoming entangled or tripping
over a longer cord.
The use of an extension cord is not recommended. However, longer extension cords may be used if care
is exercised.
• If an extension cord is used,
a. The leveled electrical rating of the cord set or extension cord should be at least as great
as the electrical rating of the appliance.
b. The cord should be arranged so that it will not drape over the countertop or tabletop
where it can be pulled on by children or tripped over unintentionally.
ELECTRIC POWER
If the electrical circuit is overloaded with other appliances, your appliance may not operate properly. It
should be operated on a separate electrical circuit from other appliances.
TAMPER-RESISTANT SCREW
Warning: This appliance is equipped with a tamper-resistant screw to prevent removal of the outer cover.
To reduce the risk of fire or electric shock, do not attempt to remove the outer cover. There are no user
serviceable parts inside.
ELECTROMAGNETIC FIELDS (EMF)
This appliance complies with all standards regarding electromagnetic fields (EMF). If handled properly and
according to the instructions in this user manual, the appliance is safe to use based on scientific evidence
available today.
Freidora Eléctrica sin Aceite
MANUAL DE INSTRUCCIONES
6
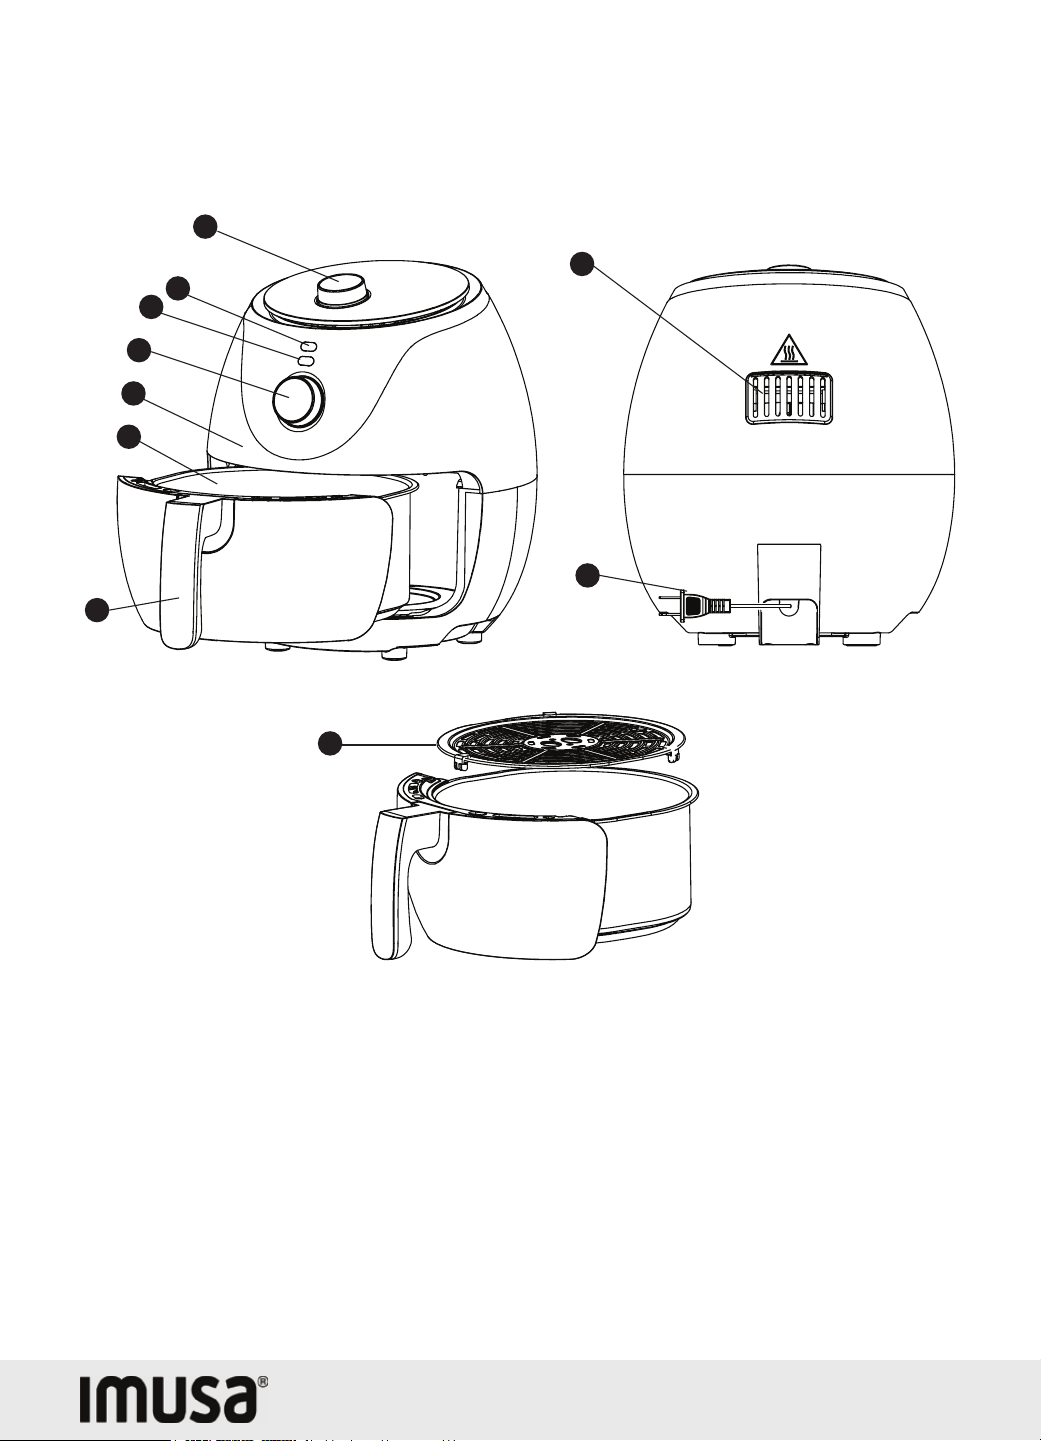
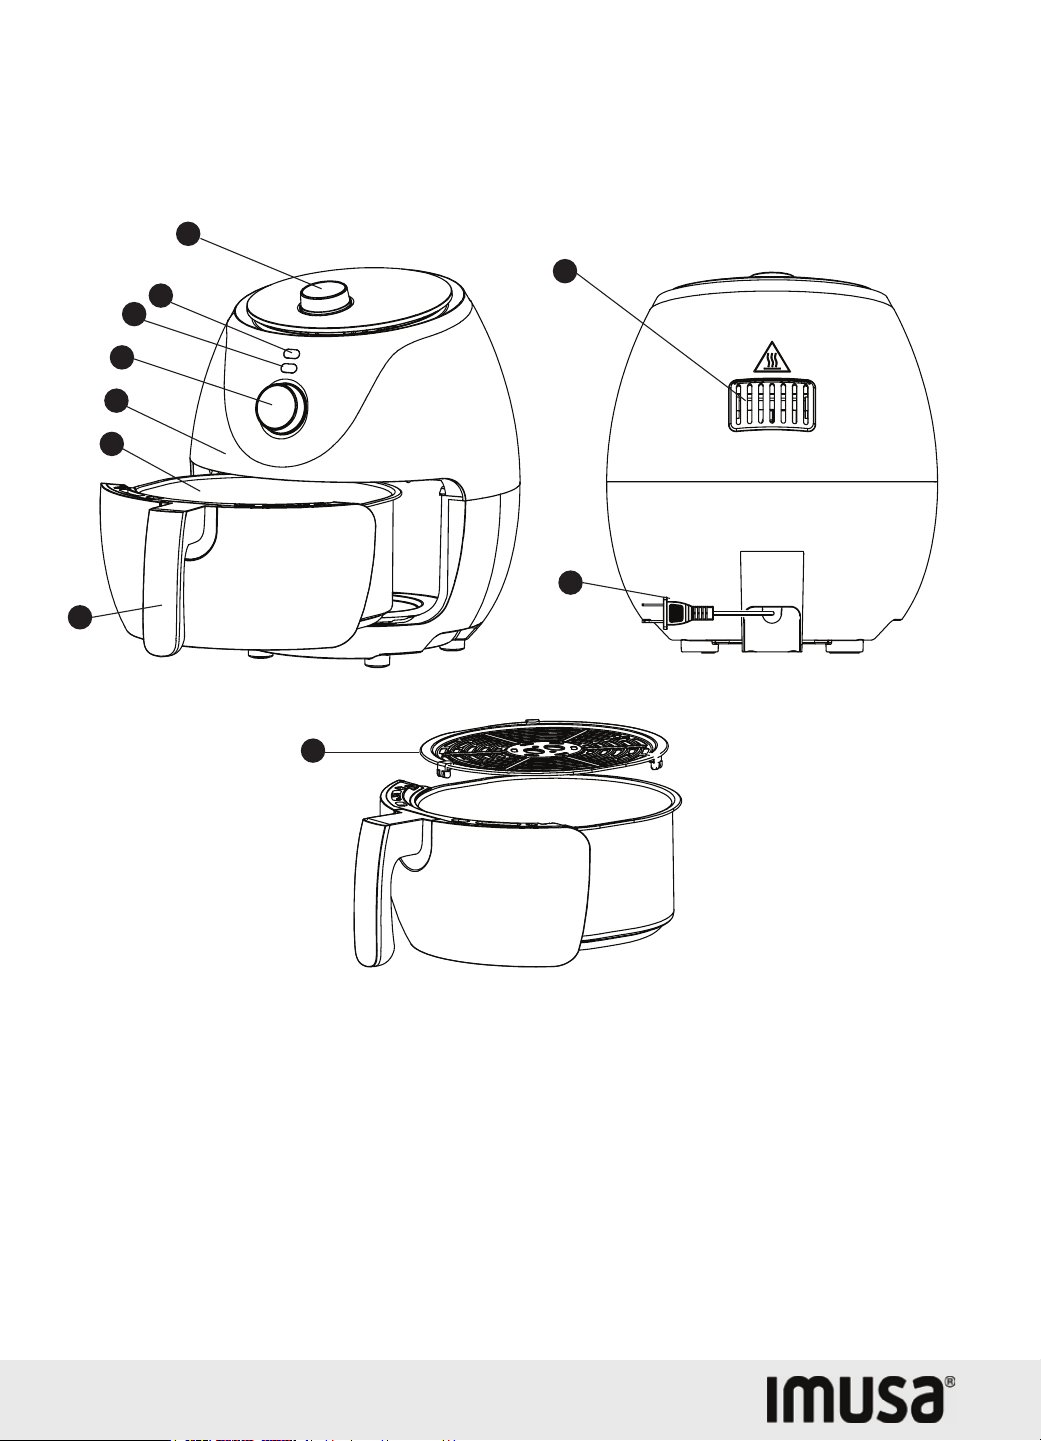
LEARNING ABOUT YOUR AIR FRYER
Product may vary slightly from what is illustrated.
1. Temperature Control Dial
2. Power Indicator Light
3. Heating Indicator Light
4. 60-minute Timer Dial
5. Fryer Basket Housing
6. Fryer Basket
7. Basket Handle
8. Removable Metal Insert Tray
9. Air Outlet Opening
10. Power Cord
1
9
10
8
2
3
4
5
6
7

Air Fryer
USE AND CARE INSTRUCTIONS
7
Control Dials
Temperature Control Dial
• Select air frying temperatures from 175°F to 390°F. Temperatures can be adjusted at any time.
• The Green Heating up light will turn on once the set temperature is reached.
• The Green Heating up light and heating element cycle will turn on and off to maintain the selected
temperature.
30 Minute Countdown Timer Dial
• Once the timer dial is set, the Red and Green Power light will turn on to show the Air Fryer is
powered on. Once the temperature dial is set the green light will turn off till the temperature
is reached.
• To ensure even cooking/browning, open the frying basket drawer halfway through the cooking time
to check the food and turn it over or shake it.
Caution: When you pull the drawer basket out from the Air Fryer body, the Red power light and
the Air Fryer will turn OFF. The timer will continue to count down when the drawer is opened.
• Heating will resume when the drawer is placed back in the unit.
• One beeping sound will announced when the air frying time has reached 0. The Air Fryer will turn
OFF automatically. Both the Red power light and the green heating up light will turn off. Caution:
When all air frying is finished, turn both the temperature control dial and the timer dial to
0 (OFF). Unplug the Air Fryer when not in use.
BEFORE FIRST USE
• Remove all packing material and stickers from the product and save instruction manual. Check
that there is no packaging underneath and around the frying basket and drawer. Caution:
Tear up all plastic bags as they can pose a risk to children.
• Wash frying basket and drawer in hot, soapy water. Wipe Air Fryer body with a damp cloth. Dry all
parts thoroughly. Caution: Do not immerse the air fryer body in water.
• To unlock and remove the frying basket (6) from the drawer, grab the handle of the basket (7)
pulling the frying basket handle forward and out of the drawer (5).

Freidora Eléctrica sin Aceite
MANUAL DE INSTRUCCIONES
8
HOW TO USE YOUR AIR FRYER
• Place the Air Fryer on a level, heat-resistant work surface, nearby an electrical outlet.
• Pull the handle of the basket drawer to open the removable frying basket drawer; then remove the
drawer from the Air Fryer and place on a flat, clean surface.
• Place the food inside the removable insert tray fryer. Do not overfill the removable fryer basket with
food. To guarantee proper cooking and maintaining air circulation, never fill the removable fryer
basket more than 2/3 full. When air frying fresh vegetables, do not add more than 3 cups of
food to the frying basket.
• Insert the assembled removable frying basket drawer into the front of the Air Fryer. Always make
sure the frying basket drawer is fully closed.
• Plug the cord in the wall outlet.
• Select air frying temperature from 175°F to 390°F.
• Turn timer dial to the desired air frying time plus 3 minutes for preheat if the Air Fryer is cold. The
Green heating up light and the Red power light will illuminate; the Air Fryer will begin heating
Caution: The Air Fryer will not heat up if the timer dial has not been set.
The Green Heating up light will turn off when the set temperature is reached.
Note: During air frying, the Green Heating up light will cycle on and off as proper air frying temperature is
preserved.
• To ensure even cooking/browning, open the basket drawer halfway through the cooking time. take
out the frying basket from housing drawer to turn or shake foods in the frying basket.
Return the frying basket into the housing drawer and adjust temperature if needed. The timer
will continue to count down when the drawer is opened, but the Air Fryer will stop heating until
the basket drawer is replaced.
Caution: Extreme caution must be used when handling the hot frying basket and drawer.
Caution: Always use oven mitts when handling the hot air fryer basket.
Caution: Hot oil can collect at the base of the drawer. To avoid risk of burns or personal injury, or to avoid
oil from contaminating air fried foods, always unlock and remove the frying basket from the drawer before
emptying. NEVER turn the drawer upside down with the frying basket attached.
Note: The Air Fryer can be turned OFF at any time by turning the timer dial to 0.
• One beeping sound will announced when the air frying time has reached 0. The Air Fryer will turn

Air Fryer
USE AND CARE INSTRUCTIONS
9
OFF automatically. Both the Red power light and the green heating up light will turn off.
• Shake the frying basket/drawer and check food for browning and doneness. If additional air frying
is needed, adjust temperature if desired, and set timer for 3 to 5-minute increments until
fully cooked.
• Always let the cooked food rest for 10 to 15 seconds before removing the basket drawer from Air
Fryer or food from frying basket
• When air frying is finished, remove the drawer from the machine and place on a flat, heat resistant
surface. Then remove frying basket from the drawer.
• Empty air fried foods out onto serving plate. Immediately return the frying basket to the drawer and
lock into place. Continue with subsequent batches, if any.
Note: When the next batch is ready, the Air Fryer’s wattage heating system will quickly heat
and recover.
• When all air frying is finalized, turn both the temperature control dial and the timer dial to 0 (OFF).
Both the Red Power light and the Green Heating up light will turn off.
• Unplug the Air Fryer when not in use.
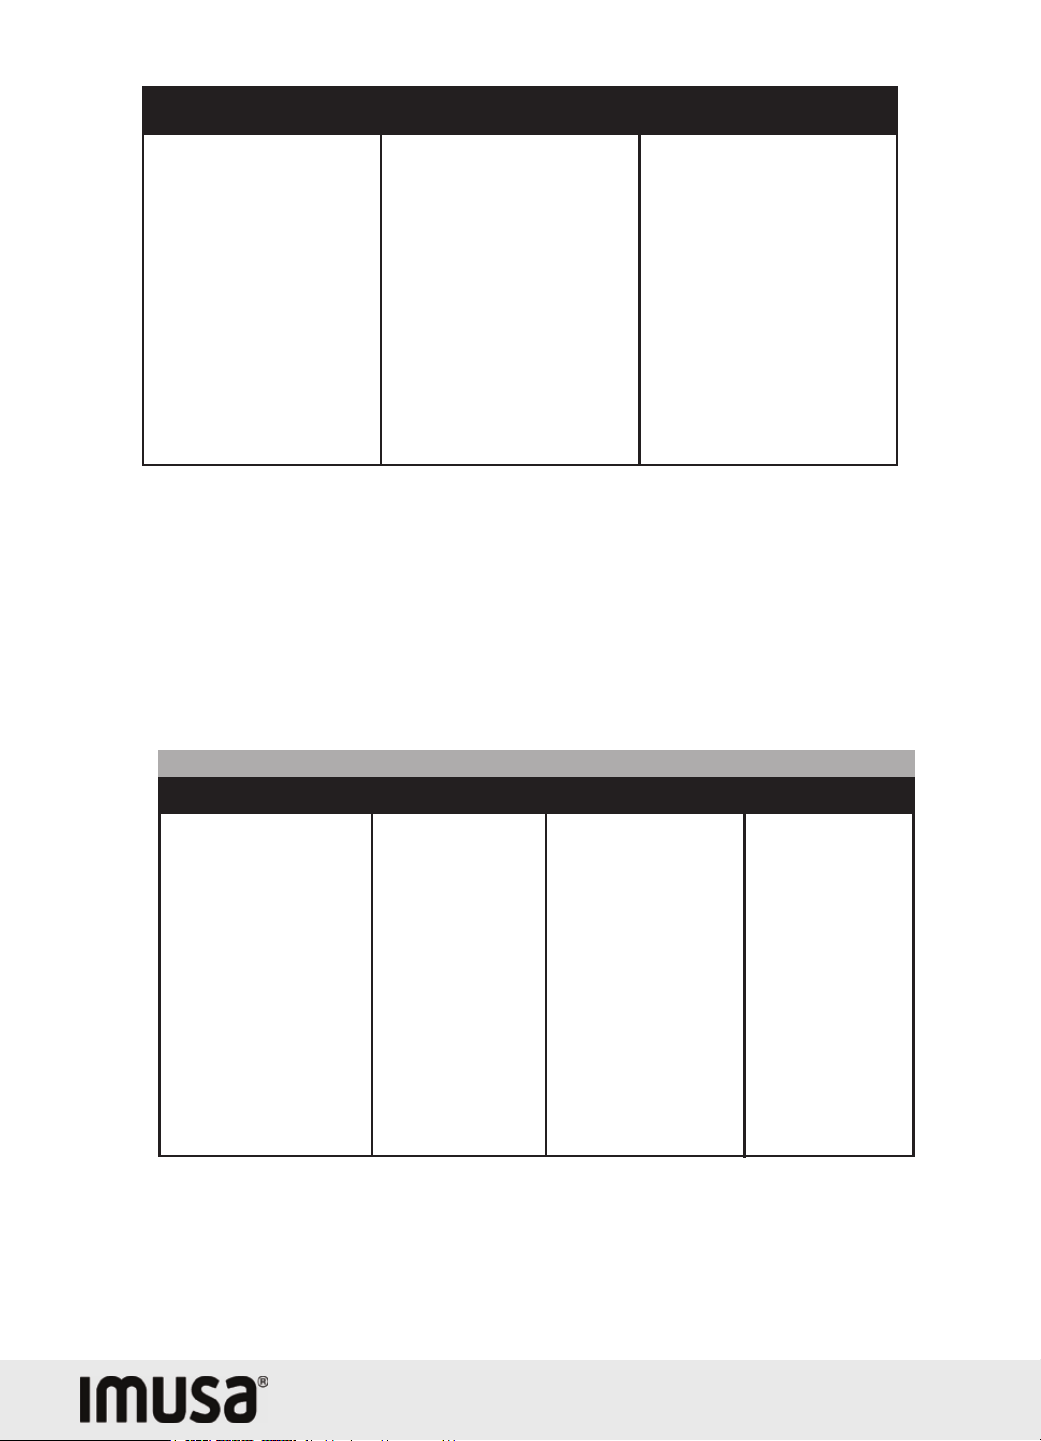
SUGGESTED COOKING GUIDE
Important Note: Unless food is pre-packaged and pre-oiled, for browned and crispy results, all foods
should be lightly oiled before air frying.
• Oil may be sprayed or brushed onto foods.
• To ensure crispy results, make sure foods are dried before adding oil.
• Cut pieces smaller to create more surface area for crispier results.
• When cooking fillets (such as steak, chicken breast & fish fillet) make sure not to stack multiple
layers as it will only cook what is placed on the base layers. Do not stack one on top of another.
• Always add an additional 3 minutes to the air fryer timer to preheat.
Caution: Never fill the removable frying Basket/Tray above FULL line.
Freidora Eléctrica sin Aceite
MANUAL DE INSTRUCCIONES
10
French Fries
Roast
Shrimp
Bake
Chicken
Steak
Fish
Asparagus
Bell Pepper
Pepper Broccoli**
Brussels Sprouts
Chopped Carrots
Cauliflower
Corn
Eggplant
Mixed Vegetables
Zucchini
8 - 10 minutes
12 - 15 minutes
15 - 20 minutes
10 - 12 minutes
10 - 15 minutes
5 - 6 minutes
8 - 10 minutes
8 - 10 minutes
15 - 20 minutes
8 - 10 minutes
SHAKE
TURNOVER
SHAKE
SHAKE
SHAKE
SHAKE
TURNOVER
TURNOVER
SHAKE
TURNOVER
390°
320°
390°
360°
390°
390°
390°
390°
390°
350°
390º
350º
330º
310º
360º
390º
350º
5 - 20 minutes
20 - 25 minutes
8 - 15 minutes
20 -30 minutes
20- 25 minutes
10 - 15 minutes
10 - 15 minutes
FOOD
FOOD
TEMPERATURE ºF
Vegetables
TEMPERATURE ºF
APPROX. TIME
APPROX. TIME ACTION
Cooking Timetable
Caution: Always use a meat thermometer to ensure that meat, poultry and fish are cooked thoroughly
before eating. The following charts are intended as guides only. The quantity of food air fried at one
time, the thickness or density of the food, and whether the food is fresh, defrosted, or frozen may alter
the total cooking time necessary.
Air Fryer
USE AND CARE INSTRUCTIONS
11
Baby Back BBQ Ribs**
Catfish
Chicken Breast
Chicken Buffalo Wings**
Drumsticks (Chicken)
Hamburger Patty
Italian Suasages
Pork Chops
Salmon
Steak with Onions**
Turkey Meatballs
Home-made Fries
Home-made Potato Cubes
Sweet Potatoes Fries
Thick French Fries (Frozen)
Thin French Fries (Frozen)
20 - 25 minutes
10 - 15 minutes
10 - 20 minutes
25 - 30 minutes
20 - 25 minutes
7 - 15 minutes
13 - 15 minutes
10 - 15 minutes
7 - 10 minutes
10 - 15 minutes
10 - 15 minutes
10 - 15 minutes
15 - 20 minutes
8 - 10 minutes
15 - 20 minutes
10 - 15 minutes
TURNOVER
TURNOVER
TURNOVER
TURNOVER
TURNOVER
TURNOVER
TURNOVER
TURNOVER
TURNOVER
TURNOVER
SHAKE
SHAKE
SHAKE
SHAKE
SHAKE
SHAKE
325°
350°
360°
390°
360°
360°
390°
375°
390°
390°
375°
390°
350°
390°
390°
390°
Meat, Poultry, Fish
Potatoes and Fries
FOOD TEMPERATURE ºF APPROX. TIME ACTION
FOOD TEMPERATURE ºF APPROX. TIME ACTION
Cheese Sticks (Frozen
Chicken Nuggets (Frozen
Churros
Croquettes (Frozen)
Cupcakes
Donut
Dumplings/Pot Stickers
Turnovers
Fish Sticks (Frozen)
Onion Rings (Frozen)
Spring Rolls
Tostones (Frozen)**
10 - 15 minutes
8 - 12 minutes
6 - 10 minutes
6 - 10 minutes
20 - 25 minutes
6 - 10 minutes
10 - 15 minutes
8 - 10 minutes
10 - 15 minutes
8 - 10 minutes
8 - 12 minutes
15 - 17 minutes
SHAKE
SHAKE
SHAKE
TURNOVER
-
TURNOVER
TURNOVER
TURNOVER
TURNOVER
SHAKE
TURNOVER
TURNOVER
350°
375°
375°
375°
310°
320°
350°
375°
390°
375°
390°
390°
FOOD
Snacks
TEMPERATURE ºF APPROX. TIME ACTION
**See Recipes from our Imusa Chef Team

Freidora Eléctrica sin Aceite
MANUAL DE INSTRUCCIONES
12
CARE AND CLEANING
• Unplug the cord of the air fryer.
• Allow the Air Fryer to cool completely before cleaning.
• Wipe the outside of the appliance with a warm, damp cloth and mild soap.
• Clean the fryer Basket and the insert with hot water, a mild detergent, and a nonabrasive sponge.
• Never use bleach or chlorine products.
• Do not use any abrasive cleaners or metal pads to clean the air fryer removable basket because it
will damage its nonstick surface.
• Never spray or apply a cleaner directly onto or into the air fryer.
• The Air fryer or any of its parts are not dishwasher safe.
STORAGE AND MAINTENANCE
• Always allow the Air Fryer to cool completely before storing. Never store the Air fryer if is hot or not
clean properly.
• Store your Air Fryer in a dry location, such as on a countertop, or on a cupboard shelf.
• Other than recommended cleaning, no further user maintenance should be necessary.

Air Fryer
USE AND CARE INSTRUCTIONS
13
RECIPES
Air Fryer Buffalo Style Wings (Serves 2)
By Imusa Chef Team
Ingredients:
• 12 pieces (about 1 ½ lb.) chicken wings, tips trimmed
• Salt and pepper
• Cup Buffalo Wing Sauce (any brand will do)
• 2 Tablespoon of butter
• Peeled and cut carrots and celery, for serving
• Chunky blue cheese dressing, for serving
Directions:
• Pre-heat your IMUSA Air Fryer on 400F for 5 minutes.
• In the meantime, dry chicken wings thoroughly with paper towel and season lightly with salt and
pepper. Place in Air Fryer and cook for 15 minutes. Toss wings and cook another 15 minutes until
browned and crispy.
• In the meantime, in a small saucepan, heat up buffalo wing sauce and butter until melted. Once
wings are finished cooking place sauce in a bowl and add in wings. Toss well and serve immediately
with carrots, celery and blue cheese dressing.
Air Fryer Garlic Tostones (Serves 2-4)
by Imusa Chef team
Ingredients:
• 1 lb. pre-fried frozen Tostones.
• 1 Tablespoon of Canola or Corn oil
• 1 teaspoon of salt
• ½ teaspoon coarse garlic powder with parsley
Directions:
• Add Tostones to a large bowl and mix Canola oil.
• Add Tostones to your IMUSA Air Fryer and cook on 400F until crispy, about 15 minutes, mixing
halfway through.
• Remove and sprinkle salt and garlic powder.

Freidora Eléctrica sin Aceite
MANUAL DE INSTRUCCIONES
14
• Serve immediately.
Air Fryer Salt and Pepper Broccoli (Serves 2-4)
by Imusa Chef team
Ingredients:
• 1 lb. broccoli florets
• Salt and pepper
• 3 Tablespoon of olive oil
Directions:
• Pre-heat your IMUSA Air Fryer on 400F for 5 minutes.
• In the meantime, wash the broccoli with cold water and lightly drain. The excess water will allow it
to steam in the Air Fryer.
• Place wet broccoli in a large bowl and coat with olive oil and season evenly with salt and pepper to
taste. Place inside pre-heated Air Fryer.
• Cook for 15-20 minutes until browned and fully cooked.
Air Fryer Steak with Browned Onions (Serves 2)
by Imusa Chef team
Ingredients:
• 1 ½ to ¾ lb. flank or skirt steak
• Salt and Pepper
• 1 large onion, cut into ½-inch slices
• ½ teaspoon of dried thyme
• 1 Tablespoon of olive oil
Directions:
• Pre-heat your IMUSA Air Fryer on 400F for 5 minutes.
• In the meantime, mix sliced onions with thyme and ½ tsp. salt and ¼ tsp. black pepper in a small
bowl. Set aside.
• Season steak generously with salt and pepper and place in pre-heated Air Fryer. Cook for 5 minutes,
then flip and cook for 5 more minutes. Add onions on top and cook for 10 more minutes, until
onions are brown and steak is cooked to desired doneness.

Air Fryer
USE AND CARE INSTRUCTIONS
15
Air Fryer Barbecue Baby Back Ribs (Serves 2)
by Imusa Team
Ingredients:
• 1 Rack of baby back ribs
• Thick and bold barbecue sauce of your choice
Wet-rub:
• 2 Tablespoon of Olive oil
• 1 Tablespoon of Garlic poder
• 1 Tablespoon of Ground cumin
• 1 teaspoon of Ground coriander
• 1 teaspoon of Paprika
• 1 teaspoon of Kosher salt
• 1 teaspoon of Freshly ground black pepper
• ½ teaspoon of Cayenne pepper
Directions:
• Make wet rub by mixing all of the ingredients together. Alternatively you can mix 3 Tablespoon. of
your favorite dry-rub with 2 Tablelspoon. olive oil.
• Remove membrane from back of ribs and check to see if the larger ribs will fit on its side in the
IMUSA air fryer. If not, cut off the ribs that don’t fit to be placed on its side so it fits.
• Rub wet-rub throughout ribs and place the rack inside the air fryer by curling it into itself, trying to
keep it from touching the sides of the air fryer.
• Cook for 15 minutes at 325F. Remove carefully and place on cutting board. Allow to cool slightly,
then cut each individual rib and brush a thick coating of barbecue sauce throughout each piece. Pile
ribs back into the air fryer and cook for another 10 minutes.
• Remove ribs and allow to cool for 5-10 minutes before serving.

Freidora Eléctrica sin Aceite
MANUAL DE INSTRUCCIONES
16
NEED HELP?
• For service, repairs, or any questions regarding your pressure cooker, call the number on the last
page of this manual. Please DO NOT return the product to the place of purchase. Also, please DO
NOT mail product back to manufacturer. You may also want to consult the website listed on the last
page of this manual.
1 YEAR LIMITED WARRANTY
• What does it cover?
• Manufacturer defects in materials or workmanship (returns will only be accepted if due to a
manufacturer defect and will not be accepted after 1 year from date of purchase. Returns will only
be accepted with original receipt).
• Applies only to products purchased and used in the United States, Hawaii or Alaska.
How do you get service?
• Save your receipt as proof of date of purchase.
• Email customerser[email protected], or call 1-800-850-2501.
• If you need parts or accessories, please contact us via email or phone.
Warranty does NOT cover:
• Damage from commercial use.
• Damage from misuse, abuse, or neglect.
• Products that have been modified in any way.
• Other accessory items that are packed with the unit.
• Damage due to accidents or repairs.

Air Fryer
USE AND CARE INSTRUCTIONS
17
Índice
Página
Instrucciones Importantes de Seguridad 19
Aprenda Acerca de su Freidora sin Aceite 22
Antes de Usar por Primera Vez 23
Como Usar su Freidora sin Aceite 24
Guia de Cocción Sugerida 26
Cuidado y Limpieza 28
Almacenamiento y Mantenimiento 28
Recetas 30-33
¿Necesita Ayuda? 34
Garantía 34

Freidora Eléctrica sin Aceite
MANUAL DE INSTRUCCIONES
18
INSTRUCCIONES IMPORTANTES DE SEGURIDAD
Cuando se utilizan una freidora sin aceite, siempre se deben respetar ciertas medidas de seguridad
incluyendo las siguientes:
• Lea todas las instrucciones antes de utilizar el producto.
• Todo aparato eléctrico usado cerca de los niños requiere la supervisión de un adulto.
• El aparato necesita aproximadamente 30 minutos para enfriarse antes de limpiarlo.
• Este freidora no está diseñada para ser usada por personas (incluyendo niños) con capacidad física
limitada, mental o sensoriales disminuidas y falta de experiencia o conocimiento que les impida
utilizar el aparato con toda seguridad sin supervisión o instrucción.
• El uso de accesorios no recomendados por el fabricante puede causar riesgo de incendio, descarga
eléctrica o lesiones personales.
• Desconecte el aparato de la toma de corriente cuando no esté en uso y antes de limpiarlo. Espere
que el aparato se enfríe antes de instalar, retirar las partes o limpiarlo.
• No utilice ningún aparato si el cable o el enchufe se encuentra dañado, si el aparato no funciona
correctamente, o si ha sufrido algún daño en general.
• Este aparato se debe utilizar únicamente para el fin previsto.
• No lo use al aire libre, uso doméstico solamente.
• No permita que el cable del aparato cuelgue del borde de la mesa o del mostrador ni que entre en
contacto con las superficies calientes.
• No lo coloque la freidora sobre o cerca de un quemador de gas o eléctrico caliente, o en un horno
caliente.
• Para desconectar, gire tanto el temporizador (control de tiempoo) cómo el regulador de temperatura
a (0). Luego retire el enchufe de la toma de corriente.
• Nunca toque el aparato con las manos mojadas o húmedas.
• Para protegerse contra descargas eléctricas, no sumerja el cable, los enchufes o la base en agua
o otro líquido.
• El aparato tiene un Temporizador (control de tiempo) adaptado, el cual se apagará automáticamente
iniciando una cuenta regresiva hasta llegar a cero (0). Puede apagarse manualmente girando la
perilla del temporizador hacia el cero en sentido contrario a las agujas del reloj.
• Se debe tener mucho cuidado al mover un electrodoméstico que contenga o genere líquidos o
aceites calientes.

Air Fryer
USE AND CARE INSTRUCTIONS
19
• Asegúrese siempre de que el sostenedor de la cesta de freír esté completamente cerrado, con la
manija de la cesta de freir bloqueada de forma segura en el sostenedor, mientras la freidora de
aire está en funcionamiento. La freidora de aire no funcionará a menos que el sostenedor de la
cesta para freir esté completamente cerrado.
PRECAUCIÓN: Después de freir con aire caliente, la cesta de freir, y los alimentos cocidos están calientes.
Se debe tener mucho cuidado al manipular la cesta de la freidora de aire caliente.
• Nunca opere el aparato cerca de materiales inflamables.
• No coloque nada encima del aparato mientras está en funcionamiento o mientras está caliente.
• Este electrodoméstico estára caliente durante el funcionamiento y retiene el calor durante un tiempo
después de apagar.
• Si este electrodoméstico se cae o se sumerge accidentalmente en agua, desenchúfelo
inmediatamente de la toma de corriente.
• El sostenedor de cesta y La cesta tienen una superficie antiadherente. Para evitar arañar la superficie,
use utensilios de madera o de plástico.
• No deje este aparato desatendido durante el uso.
• Coloque la freidora de aire en un área de trabajo plana y resistente al calor.
• No obstruya la salida de aire o las entradas de aire en la parte posterior de la Freidora, con cualquier
objeto.
• Mantenga el electrodoméstico a una distancia minima de 4 pulgadas de las paredes o otros objetos
durante el funcionamiento.
• Siempre use la manija de la cesta de freir para abrir el sostenedor de la cesta.
• Nunca introduzca el sostenedor de cesta sin la cesta de freir. Verifique de que la cesta de freir esté
en su posición correcta.
• Después de freir con aire, asegúrese de colocar el sostenedor de la cesta sobre una superficie
plana y resistente al calor antes de presionar el botón de liberación de la cesta. ADVERTENCIA:
Al llenar de insuficiente o excesiva comida la cesta, la freidora puede dañarse y provocar lesiones
personales graves.
• Durante la fritura con aire caliente, se libera vapor caliente a través de las aberturas de salida de
aire. Mantenga sus manos y cara a una distancia segura del vapor y las aberturas de salida de aire.
Además, tenga cuidado con el vapor y el aire caliente cuando retire la cesta del aparato.
CONSERVE ESTAS INSTRUCCIONES
ESTE APARATO ES PARA USO DOMÉSTICO ÚNICAMENTE

Freidora Eléctrica sin Aceite
MANUAL DE INSTRUCCIONES
20
ENCHUFE POLARIZADO
Este aparato tiene un enchufe polarizado (un contacto es más ancho que el otro). Para reducir el riesgo de
choque eléctrico, este enchufe entra en un contacto polarizado de una sola manera. Si el enchufe no entra
correctamente, inviértalo. Si aún así no encaja, busque la ayuda de un electricista calificado. No intente
hacerle ninguna modificación al enchufe.
USO DE UN CABLE DE EXTENSIÓN
El producto viene con un cable corto de suministro de potencia para reducir el riesgo que resulta de
enredarse o tropezarse con un cable más largo.
No se recomienda el uso de un cable de extensión. Sin embargo, puede usarse un cable de extensión si
se emplea el cuidado requerido.
• Si se usa un cable de extensión:
a) El voltaje eléctrico del cable de extensión debe ser como mínimo igual al voltaje
del aparato.
b) El cable de extensión debe acomodarse de modo que no cuelgue del mostrador o
de la mesa, para evitar que un niño tire del mismo o se tropiece sin intención.
CABLE ELÉCTRICO
Si se recarga el circuito eléctrico con otros electrodomésticos, es posible que este aparato no funcione
correctamente. Se debe utilizar en un circuito eléctrico separado de los otros electrodomésticos.
TORNILLO DE SEGURIDAD
Advertencia: Este aparato cuenta con un tornillo de seguridad para evitar que se remueva de la cubierta
exterior del mismo. A fin de reducir el riesgo de incendio o descarga eléctrica, por favor no trate de
remover la cubierta exterior. Este producto no contiene piezas reemplazables en su interior.
CAMPOS ELECTROMAGNÉTICOS (EMF)
Este aparato cumple con todas las normas sobre campos electromagnéticos (EMF). Si se maneja
correctamente y de acuerdo con las instrucciones en este manual del usuario, el dispositivo es seguro de
usar basado en la evidencia científica disponible en la actualidad.
•
•
Air Fryer
USE AND CARE INSTRUCTIONS
21
APRENDA SOBRE SU FREIDORA ELECTRICA SIN ACEITE
El producto puede variar ligeramente al ilustrado.
1. Control de Temperatura
2. Indicador de Encendido
3. Indicador de Calentamiento
4. Temporizador (60-minutos)
5. Almacenamiento de la Cesta
6. Cesta de Freir
7. Asa de Cesta de Freír
8. Bandeja de insercion
9. Aberturas de Salida de Aire
10. Cable de Corriente
1
9
10
8
2
3
4
5
6
7

Freidora Eléctrica sin Aceite
MANUAL DE INSTRUCCIONES
22
MARCADORES DE CONTROL
Control de Temperatura
• Seleccione temperaturas de fritura de aire de 175 °F a 390 °F. Las temperaturas se pueden ajustaren
cualquier momento.
• La luz de calentamiento verde se apagará una vez que se alcance la temperatura establecida.
• La luz de calentamiento verde se encenderá y apagará de acuerdo del ciclo de calentamiento para
mantener la temperatura seleccionada.
Temporizador De Cuenta Regresiva De 60 Minutos
• Una vez que se configura el temporizador, la luz Roja y Verde de indicador se encenderá para
mostrar que la freidora de aire está encendida. Una vez que se configura la temperatura en el
control, la luz verde se apagará hasta que alcance la temperatura deseada.
• Para asegurar una cocción / tostado uniforme, abra el sostenedor de la cesta de freír a la mitad del
• tiempo de cocción para revisar los alimentos y voltearlos o sacudirlos.
• Precaución: Cuando saque la cesta del sostenedor del cuerpo de la freidora de aire, la luz
• de encendido Rojo y la freidora de aire se apagarán. El temporizador continuará la cuenta
• regresiva cuando aun cuando el sostenedor no este adentro de la freidora.
• La calefacción empesara de nuevo cuando el sostenedor vuelva a colocarse en la unidad.
• Se anunciará un pito cuando el tiempo de freido de aire haya alcanzado 0. La freidora de aire se
apagará automáticamente. Tanto la luz de encendido aRojodo como la luz verde de calentamiento
se apagarán.
Precaución: Cuando termine de freír, gire el control de temperatura y el temporizador a 0 (OFF).
Desconecte la freidora de aire cuando no esté en uso.
ANTES DE UTILIZAR POR PRIMERA VEZ
• Retire todo el material de empaque y las calcomanías adheridas al producto y conserve el manual
de instrucciones.
Precaución: Arranque todas las bolsas de plástico ya que pueden representar un riesgo para los niños.
• Lave la cesta y el sostenedor de la cesta de freír con agua caliente y jabón. Limpie el cuerpo de la
freidora de aire con un paño húmedo. Seque todas las partes completamente
Precaución: no sumerja el cuerpo de la freidora de aire en agua.

Air Fryer
USE AND CARE INSTRUCTIONS
23
• Para desbloquear y retirar la cesta de freír (6) del almacenamiento: agare el asa (7) de la cesta de
freir, deslice la cesta hacia adelante para retirar del almacenamiento (5).
• Presione el botón de liberación de la cesta (3) con el pulgar mientras levantas la manija del cesto de
freír hacia arriba y hacia afuera del cajón (4).
CÓMO USAR SU FREIDORA SIN ACEITE
• Coloque la freidora de aire en una superficie de trabajo nivelada y resistente al calor, cerca de una
toma de corriente.
• Tire de la manija del sostenedor de la cesta para abrir el sostenedor de la cesta de freír extraíble;
luego retire el sostenedor de la freidora de aire y colóquelo en una superficie plana y limpia.
• Coloque la comida dentro de la cesta de la freidora. No llene demasiado la cesta de la freidora con
alimentos. Para garantizar una cocción adecuada y mantener la circulación de aire, nunca llene la
cesta de la freidora más de 2/3 de su capacidad. Al freír las verduras frescas, no agregue más de 3
tazas de comida a la cesta de freír.
• Inserte el sostenedor de la cesta en la parte delantera de la freidora. Siempre asegúrese de que el
sostenedor de la cesta para freír esté completamente cerrado.
• Enchufe el cable en la toma de corriente.
• Seleccione la temperatura de freido de aire de 175 ° F a 390 ° F.
• Gire el temporizador al tiempo de freido de aire deseado más 3 minutos para precalentar si la
freidora de aire está fría. La luz de calentamiento verde y la luz de encendido Rojo se iluminarán; la
freidora comenzará a calentar.
Precaución: La freidora de aire no se calentará si no se ha ajustado el temporizador.
• La luz de calentamiento verde se apagará cuando se alcance la temperatura establecida
Nota: Durante la fritura con aire, la luz de calentamiento verde se encenderá y apagará con la
• temperatura adecuada de freido de aire.
• • Para asegurar una cocción/tostado uniforme, abra la cesta de frieir a la mitad del
• tiempo de cocción y verifique si la comida esta como se desea. Levante la cesta de
• freír del sostenedor de la cesta para freír para dar vuelta o agitar los alimentos en la
• cesta de freír. Una vez completado, devuelva la cesta de freír al almacen de la cesta de freír. Ajuste
la temperatura si es necesario. El temporizador continuará la cuenta regresiva cuando se quite
el sostenedor de la freidora, pero la freidora dejará de calendar hasta que se vuelva a colocar el
sostenedor.

Freidora Eléctrica sin Aceite
MANUAL DE INSTRUCCIONES
24
Precaución: Se debe tener extrema precaución al manipular la cesta y el sostenedor de la cesta
de freír en caliente.
Precaución: Siempre use guantes para horno cuando maneje la cesta de la
• freidora de aire caliente.
Precaución: El aceite caliente puede acumularse en la base del sostenedor de la cesta. Para evitar
• el riesgo de quemaduras o lesiones personales, o para evitar que el aceite contamine alimentos
• fritos con aire, siempre destrabe y retire la cesta de freír del sostenedor antes de vaciarlo.
• Nunca voltee el sostenedor boca abajo con el cesto de freír atado.
Nota: La freidora de aire se puede apagar en cualquier momento girando del temporizador a 0.
• Se anunciará un pito cuando el tiempo de freido de aire haya alcanzado 0. La freidora de aire se
apagará automáticamente. Tanto la luz de encendido Rojo como la luz verde de calentamiento se
apagarán.
• Agite la cesta y sostenedor de cesta de freír y compruebe que los alimentos estén dorados. Si es
necesario freír con aire adicional, ajuste la temperatura si lo desea, y configure el temporizador para
incrementos de 3 a 5 minutos hasta que esté completamente cocido.
• Deje siempre reposar la comida cocida durante 10 a 15 segundos antes de retirar el sostenedor de
la freidora o la comida del cesto de freír.
• · Cuando termine de freír, retire el sostenedor de la máquina y colóquelo sobre una superficie plana
y resistente al calor. Luego retire la cesta de freír del sostenedor.
• · Vacíe los alimentos fritos en un plato para servir. Inmediatamente devuelva la cesta de freír al
• sostenedor y asegúrela en su lugar. Continúe con las porciones siguientes, si corresponde.
Nota: Deslice la Protector del botón deslizante hacia atrás sobre el botón de liberación de la
• canasta para evitar la liberación accidental de la canasta de freír.
• Nota: Cuando la siguiente porcion esté lista, el sistema de calefacción de vatios de la freidora se
calentará y recuperará rápidamente.
• Cuando finalize toda la fritura con aire, gire tanto el control de temperatura como el temporizador a
0 (OFF). Tanto la luz de encendido aRojodo como la luz verde de calentamiento se apagarán.
• Desconecte la freidora de aire cuando no esté en uso.

Air Fryer
USE AND CARE INSTRUCTIONS
25
GUÍA DE COCCIÓN SUGERIDA
• Importante: A menos que los alimentos estén preenvasados y preengrasados, para obtener
resultados dorados y crujientes, todos los alimentos deben estar ligeramente engrasados antes de
freír con aire.
• El aceite puede rociarse o cepillarse sobre los alimentos.
• Para garantizar resultados crujientes, asegúrese de que los alimentos estén secos antes de agregar
aceite.
• Corte las piezas más pequeñas para crear más área de superficie para obtener mejor resultados.
• Cuando cocine filetes (como filete de carne, pechuga de pollo y filete de pescado) asegúrese de
no amontonar los filetes uno encima del otro. La freidora de aire solo cocinará los filetes que se
encuentran en la parte superior expuesta al aire caliente.
• Agregue siempre 3 minutos adicionales al tiempo de freidura de aire para permitir que la freidora
sin aceite se precaliente.
Precaución: Nunca llene la cesta por encima de la línea completa.
Papas Fritas
Asado
Camarónes
Hornear
Pollo
Filete
Pescado
390º
350º
330º
310º
360º
390º
350º
5 - 20 minutos
20 - 25 minutos
8 - 15 minutos
20 -30 minutos
20- 25 minutos
10 - 15 minutos
10 - 15 minutos
COMIDA TEMPERATURA ºF TIEMPO APPROXIMADO
Freidora Eléctrica sin Aceite
MANUAL DE INSTRUCCIONES
26
Tiempos de Cocción
Precaución: Utilice siempre un termómetro para carne para asegurarse de que la carne, las aves de corral
y el pescado estén bien cocidos antes de comer. Los siguientes tiempoes de coccion son solo guías.
La cantidad de alimento frito al mismo tiempo, el grosor o la densidad del alimento, y si el alimento está
fresco, descongelado o congelado, puede alterar el tiempo total de cocción necesario.
Espárragos
Pimientos
Brócoli con Sal/Pimienta**
Coles de Bruselas
Zanahorias Picadas
Coliflor
Maíz
Berenjenas
Verduras Mixtas
Calabacein
Alitas de Pollo Bufalo**
Costillas BBQ**
Bagre
Bistec con Cebollas Doradas **
Pechuga de Pollo
Muslos de Pollo
Hamburguesas Salchicchas
Salchichas Italianas
Chuletas de Cerdo
Salmeon
Albóndigas de Pavo
Papas Fritas Caseras
Cubos de Papas Caseras
Patatas Dulces Fritas
Papas Fritas Gruesas (congeladas)
Papas Fritas Finas (congeladas)
8 - 10 minutos
12 - 15 minutos
15 - 20 minutos
10 - 12 minutos
10 - 15 minutos
5 - 6 minutos
8 - 10 minutos
8 - 10 minutos
15 - 20 minutos
8 - 10 minutos
20 - 25 minutoss
10 - 15 minutos
10 - 20 minutos
25 - 30 minutos
20 - 25 minutos
7 - 15 minutos
13 - 15 minutos
10 - 15 minutos
7 - 10 minutos
10 - 15 minutos
10 - 15 minutos
10 - 15 minutos
15 - 20 minutos
8 - 10 minutos
15 - 20 minutos
10 - 15 minutos
AGITAR
VOLTEAR
AGITAR
AGITAR
AGITAR
AGITAR
VOLT EAR
VOLTEAR
VOLTEAR
VOLTEAR
VOLTEAR
VOLTEAR
VOLTEAR
VOLTEAR
VOLTEAR
VOLTEAR
VOLTEAR
VOLTEAR
AGITAR
AGITAR
AGITAR
AGITAR
AGITAR
AGITAR
390º
320º
390º
360º
390º
390º
390º
390º
390º
350º
325º
350º
360º
390º
360º
360º
390º
375º
390º
390º
375º
390º
350º
390º
390º
390º
COMIDAS
Verduras
Papas y Papas Fritas
TEMPERATURA ºF TIEMPO APROXIMADO ACCION
COMIDAS TEMPERATURA ºF ACTION
COMIDAS TEMPERATURA ºF TIEMPO APROXIMADO ACCION
Carne, Aves de Corral, Pescado
TIEMPO APROXIMADO
COMIDAS TEMPERATURA ºF ACCION
Air Fryer
USE AND CARE INSTRUCTIONS
27
TIEMPO
Palitos de Queso
Nuggets de Pollo (congelados)
Churros
Croquetas (congeladas)
Ponquesitos
Donas
Dumplings/Pot Stickers
Turnovers
Palitos de Pescados (congelados)
Anillos de Cebolla (congelados)
Spring Rolls
Tostones (congelados)**
10 - 15 minutos
8 - 12 minutos
6 - 10 minutos
6 - 10 minutos
20 - 25 minutos
6 - 10 minutos
10 - 15 minutos
8 - 10 minutos
10 - 15 minutos
8 - 10 minutos
8 - 12 minutos
15 - 17 minutos
AGITAR
AGITAR
AITAR
VOLTEAR
-
VOLTEAR
VOLTEAR
VOLTEAR
VOLTEAR
AGITAR
VOLTEAR
VOLTEAR
350º
375º
375º
375º
310º
320º
350º
375º
390º
375º
390º
390º
COMIDA
Aperitivos
TEMPERATURA ºF
TIEMPO APROXIMADO
ACCION
**Vea las recetas de nuestro equipo Chef de Imusa
CUIDADO Y LIMPIEZA
• Desenchufe el cable de la Freidora de aire.
• Permita que la freidora de aire se enfríe completamente antes de limpiarla.
Nota: La separación de la cesta y del sostenedor de la cesta de freido extraíble les permitirá
enfriarse más rápido
• Limpie la parte exterior del aparato con un paño tibio húmedo y jabón suave.
• Limpie el sostenedor de la cesta y la cesta de freír con agua caliente, un detergente suave y
una esponja no abrasiva.
• Nunca use cloro ni productos de cloro.
• No utilice limpiadores abrasivos ni almohadillas metálicas para limpiar la cesta de la freidora
de aire, ya que dañaría su superficie antiadherente.
• Nunca rocíe ni aplique un limpiador directamente sobre o dentro de la freidora de aire.
• La freidora de aire o cualquiera de sus partes no son aptas para lavavajillas.
ALMACENAMIENTO Y MANTENIMIENTO
• Siempre permita que la freidora de aire se enfríe completamente antes de guardarla. Nunca

Freidora Eléctrica sin Aceite
MANUAL DE INSTRUCCIONES
28
almacene la freidora de aire si está caliente o si no la limpia correctamente.
• Guarde su freidora de aire en un lugar seco, como encima de una mesa, el mostrador o en el
estante de un armario.
• Adicional a la limpieza recomendada, no se requiere ningún mantenimiento especial.

Air Fryer
USE AND CARE INSTRUCTIONS
29
RECETAS
Alitas de Pollo Bufalo (Sirve 2)
Por equipo chef de Imusa
Ingredientes:
• 12 piezas (alrededor de 1 ½ libra.) alitas de pollo, con las puntas recortadas
• Sal y pimienta
• ½ taza Salsa de ala de búfalo (cualquier marca servirá)
• 2 cucharadas de mantequilla
• Zanahorias peladas y cortadas y apio, para servir
• Aderezo de queso azul grueso, para servir
Direcciones:
• Precaliente su freidora de aire IMUSA a 400 ° F durante 5 minutos.
• Mientras tanto, seca las alitas de pollo a fondo con una toalla de papel y condimenta suavemente
con sal y pimienta. Coloque en la freidora de aire y cocine por 15 minutos. Mezcle las alas y cocine
otros 15 minutos hasta que estén doradas y crujientes.
• Mientras tanto, en una olla pequeña, caliente la salsa de ala de búfalo y la mantequilla hasta que
se derrita. Una vez que las alitas estén terminadas, coloque la salsa en un bol y agregue las alas.
Mezcle bien y sirva inmediatamente con zanahorias, apio y aderezo de queso azul.
Tostones con Ajo (Sirve de 2 a 4)
Por equipo chef de Imusa
Ingredientes:
• 1 libra de tostones congelados pre fritos
• 1 cuchara de Aceite de canola o maíz
• 1 cucharadita sal
• ½ cucharadita ajo grueso en polvo con perejil

Freidora Eléctrica sin Aceite
MANUAL DE INSTRUCCIONES
30
Direcciones:
• Agregue tostones a un tazón grande y mezcle con aceite de canola.
• Agregue los tostones a su freidora de aire IMUSA y cocine a 400 ° F hasta que estén crujientes,
unos 15 minutos, mezclándolos hasta la mitad.
• Retire y espolvoree sal y ajo en polvo.
• Servir inmediatamente.
Brócoli con Sal y Pimienta (Sirve de 2 a 4)
Por equipo chef de Imusa
Ingredientes:
• 1 libra de florecillas de brócoli
• Sal y pimienta
• 3 cucharadas aceite de oliva
•
Direcciones:
• Precaliente su freidora de aire IMUSA a 400 ° F durante 5 minutos.
• Mientras tanto, lave el brócoli con agua fría y drene ligeramente. El exceso de agua le permitirá
cocer al vapor en la freidora de aire.
• Coloque el brócoli mojado en un tazón grande y cúbralo con aceite de oliva y sazone uniformemente
con sal y pimienta al gusto. Coloque dentro de la freidora de aire ya precalentada.
• Cocine por 15-20 minutos hasta que estén dorados y completamente cocidos.
Bistec con Cebollas Doradas (Sirve 2)
Por equipo chef de Imusa
Ingredientes:
• 1 ½ a ¾ lb. filete de flanco o falda
• Sal y pimiento

Air Fryer
USE AND CARE INSTRUCTIONS
31
• 1 cebolla grande, cortada en rodajas de ½ pulgada
• ½ cucharadita tomillo seco
• 1 Tblsp. aceite de oliva
Direcciones:
• Precaliente su freidora de aire IMUSA a 400 ° F durante 5 minutos.
• Mientras tanto, mezcle las cebollas rebanadas con tomillo y ½ cucharadita. sal y ¼ cdta. pimienta
negra en un tazón pequeño. Dejar a un lado.
• Sazone la carne generosamente con sal y pimienta y colóquela en la freidora de aire ya precalentada.
Cocine por 5 minutos, luego voltee y cocine por 5 minutos más. Agregue las cebollas en la parte
superior y cocine durante 10 minutos más, hasta que las cebollas estén doradas y el filete esté
cocido hasta el punto deseado.
Costillitas con Salsa Barbacoa (Sirve 2)
Por equipo chef de Imusa
Ingredientes:
• 1 costillitas
• Salsa de barbacoa gruesa y audaz de su elección
• Frotar en húmedo:
• 2 cucharas de Aceite de oliva
• 1 cuchara de Polvo de ajo
• 1 cucharadita Comino molido
• 1 cucharadita Cilantro molido
• 1 cucharadita Pimentón
• 1 cucharadita Sal kosher
• 1 cucharadita Pimienta negra recién molida
• ½ cucharadita pimienta de cayena
Direcciones:
• Haga un masaje húmedo mezclando todos los ingredientes. Alternativamente, puedes mezclar 3

Freidora Eléctrica sin Aceite
MANUAL DE INSTRUCCIONES
32
cucharas. de su frote seco favorito con 2 cucharas. De aceite de oliva.
• Retire la membrana de la parte posterior de las costillas y verifique si las costillas más grandes
encajarán de lado en la freidora de aire IMUSA. De lo contrario, corte las costillas que no se ajustan
para colocarlas de lado para que quepan.
• Frote con un paño húmedo las costillas y coloque la rejilla dentro de la freidora doblándola sobre sí
misma, tratando de evitar que toque los lados de la freidora.
• Cocine por 15 minutos a 325F. Retire con cuidado y coloque en la tabla de cortar. Deje que se enfríe
un poco, luego corte cada costilla individual y coloque una capa gruesa de salsa de barbacoa a
lo largo de cada pieza. Vuelva a colocar las costillas en la freidora de aire y cocine por otros 10
minutos.
• Retire las costillas y deje enfriar durante 5-10 minutos antes de servir.

Air Fryer
USE AND CARE INSTRUCTIONS
33
¿NECESITA AYUDA?
• Para servicio, reparaciones o preguntas relacionadas al producto, llame al número que se encuentra
en la parte de atrás de este manual. Por favor, NO devuelva el producto al fabricante. Adicionalmente,
puede consultar la página de internet que se encuentra en la parte de atrás de este manual.
1 AÑO DE GARANTÍA LIMITADA
• ¿Qué cubre la garantía?
• Cualquier defecto de materiales o de mano de obra (devoluciones sólo se aceptarán si se debe
a un defecto del fabricante, y no serán aceptadas después de 1 año desde la fecha de compra.
Devoluciones sólo se aceptarán con el recibo original).
• Aplica solo a productos comprados y usados en los Estados Unidos, Hawaii o Alaska.
• ¿Cómo se obtiene servicio?
• Conserve el recibo original de la compra.
• Escriba un correo electrónico a customerser[email protected], o llame a
• 1-800-850-2501.
• Si necesita partes o accesorios por favor llámenos o escríbanos un correo electrónico.
• Esta garantía NO cubre:
• Daños ocasionados por el uso comercial del producto.
• Daños por mal uso, abuso o negligencia.
• Productos que han sido alterados de alguna manera.
• Otros accesorios empacados con el aparato.
• Daños ocasionados por accidentes o reparaciones.

Freidora Eléctrica sin Aceite
MANUAL DE INSTRUCCIONES
34
ELECTRIC AIR FRYER
FREIDORA ELÉCTRICA SIN ACEITE
INSTRUCTION MANUAL
MANUAL DE INSTRUCCIONES
If you have any questions, please contact us at:
Para mayor información puede contactarnos a:
IMUSA USA, LLC
Doral, FL 33178
1-800-850-2501
www.imusausa.com
GAU-80112 1200W 120V 60Hz