Congratulations on purchasing your new product. To ensure
proper operation, please read this instruction manual
carefully before using this product. Keep this manual in a
safe place for future reference.
COMPACT DRYER
Instruction Manual
after-sales-services
@hotmail.com

Congratulations
Dear Customer:
Welcome to the our family. Thank you for purchasing one of our products.
Our goal is to provide you with superior service. If there is anything missing from or
wrong with your order, or if you have any questions about using our product,
PLEASE contact us.
Email: [email protected]
Our team is available 24/7 to address your questions, comments, and concerns.
Your satisfaction is our ultimate goal. We want to make everything right so you'll
share your positive experience with other shoppers.
If you experience any problems, please send an email to
Our mission:
* To be the most trusted appliance brand.
* To create practical, compact appliances that better your life.

Safety Precautions
This appliance is not intended for use by persons
(including children) with reduced physical,
sensory or mental capabilities, or lack of
experience and knowledge, unless they have been
given supervision or instructions concerning the
use of the appliance by a person responsible for
their safety.
Do not allow children to play on or in the
appliance. Close supervision of children is
necessary when the appliance is used near
children.
INDOOR USE ONLY - this appliance is not
intended for outdoor use.
Do not place open flame sources, such as
candles, on the appliance.
Do not place the appliance or cord near heat
sources such as radiators, heaters, air ducts or
direct sunlight.
Do not block any of the ventilation openings.
Ensure that vents are not covered by newspapers,
tablecloths, curtains, etc.
Do not run the cord under floor coverings.
Instead, arrange the cord away from areas with
high traffic where it will not become a trip
hazard.
Please disconnect the appliance, turn the
appliance off, switch off the power outlet and
remove the plug from the power outlet.
Do not misuse the cord. Never carry the
appliance by the cord or pull on it to disconnect it
from the outlet. Instead, grasp the plug and
gently pull to disconnect.
Do not operate the appliance if it has a damaged
cord or plug; if the appliance malfunctions; or if it
has been dropped or damaged in any way.
Consult the manufacturer.
Do not attempt to repair, disassemble or modify
this appliance. The warranty becomes void if not
serviced or repaired by a qualified person.
To reduce the risk of fire, electric shock, and/or
injury to persons when using electrical appliances,
basic safety precautions should always be
followed, including:
Read all the instructions carefully, even if you are
familiar with the appliance.
Important Safeguards
For Your Safety
Do not reach into the appliance if the drum is
moving.
Before putting items that have been soiled by
flammable liquids into the dryer, please wash them
thoroughly with detergent in advance.
Do not excessively bend, stretch, twist or bind the
power cord or place heavy objects on it.
This appliance is only to be serviced by a qualified
person. There are no user-serviceable parts inside.
Do not install in a tight-fitting cabinet.
Do not overload the tumble dryer.
Do not dry articles that have been previously
cleaned in, washed in, soaked in, or spotted with
gasoline, dry-cleaning solvents, or other flammable
or explosive substances, as they give off vapors
that could ignite or explode.
Before the appliance is removed from service or
discarded, remove the door to the drying
compartment.
Do not install or store this appliance where it will
be exposed to direct sunlight.
Do not tamper with the controls.
Do not repair or replace any part of the appliance or
attempt any servicing unless specifically
recommended to do so in the user-maintenance
instructions or in published user-repair instructions
that you understand and have the skills to carry
out.
Do not use fabric softeners or products to
eliminate static unless recommended by the
manufacturer of the fabric softener or product.
Do not use heat to dry articles containing foam
rubber or similarly textured rubber-like materials.
Keep area around the exhaust opening and adjacent
surrounding areas free from the accumulation of
lint, dust, and dirt.
The interior of the appliance and exhaust duct
should be cleaned periodically by a qualified service
person.
Do not place items exposed to cooking oils in your
dryer. Items contaminated with cooking oils may
contribute to a chemical reaction that could be a
fire hazard.
Ensure that foreign objects do not find their way
into the tub of the tumble dryer.
Clean the lint screen before or after each load.
02

Oil-affected items can ignite spontaneously, especially when exposed to heat sources
such as in a tumble dryer. The items become warm, causing an oxidation reaction in the
oil. This oxidation creates heat, and if the heat cannot escape, the items can become hot
enough to catch fire. Piling, stacking or storing oil-affected items can prevent heat from
escaping and become a fire hazard.
If it is unavoidable that fabrics containing vegetable or cooking oil, or items that have been contaminated
by haircare products are placed in a tumble dryer, they should first be washed in hot water with extra
detergent. This will reduce, but not eliminate, the hazard.
Do not dry unwashed items in the tumble dryer.
Items that have been soiled with substances such as cooking oil, acetone, alcohol, petrol, kerosene, spot
removers, turpentine, waxes and wax removers should be washed in hot water with an extra amount of
detergent before being dried in the tumble dryer.
Fabric softeners, or similar products, should be used as specified by the fabric softener instructions.
The final part of a tumble dryer cycle occurs without heat (cool down cycle) to ensure that the items are
left at a temperature that won’t damage the items.
WARNING: Never stop a tumble dryer in the process of the drying cycle unless all the items are quickly
removed and spread out so that the heat is dissipated.
Installation of the clothes dryer must be performed by a qualified installer.
Install clothes dryer according to the manufacturer’s instructions and local codes.
Do not install a clothes dryer with flexible plastic venting materials. If flexible metal (foil type) duct is
installed, it must be of a specific type identified by the appliance manufacturer as suitable for use with
clothes dryers. Flexible venting materials are known to collapse, be easily crushed, and trap lint. These
conditions will obstruct the clothes dryer’s airflow and increase the risk of fire.
To reduce the risk of severe injury or death, follow all the installation instructions.
Connect to Individual Branch Circuit.
This appliance must be grounded. In the event of malfunction or breakdown, grounding will reduce the risk
of electric shock by providing a path of least resistance for the electric current. This appliance is equipped
with a cord having an equipment-grounding conductor and grounded in accordance with all local codes
and ordinances.
Improper connection of the equipment-grounding conductor may cause electric shock. Check with a
qualified electrician or service representative if you are not sure as to whether the appliance is properly
grounded. Do not modify the plug provided with the appliance: if it does not fit the outlet, have a proper
outlet installed by a qualified electrician.
Appliance must be placed on a steady, flat surface. Do not place the dryer on carpet as this will block the
intake. There should be at least 10cm between the dryer and the walls.
Caution, danger
This dryer cannot be used upside down
WARNING
WARNING
Warning
Fire Hazard
03
This dryer cannot be used upside down.
Where to place your dryer:
Place the dryer in a dry well-ventilated area.
It should be positioned away from heat sources
and direct sunlight.
If the dryer is not wall-mounted, it must be
placed on a firm, flat surface. Do not place the
dryer on a carpet as this will block the intake.
There should be at least 15cm between the dryer
and the walls.
The dryer comes with fixed legs that need to be
assembled to ensure stability.
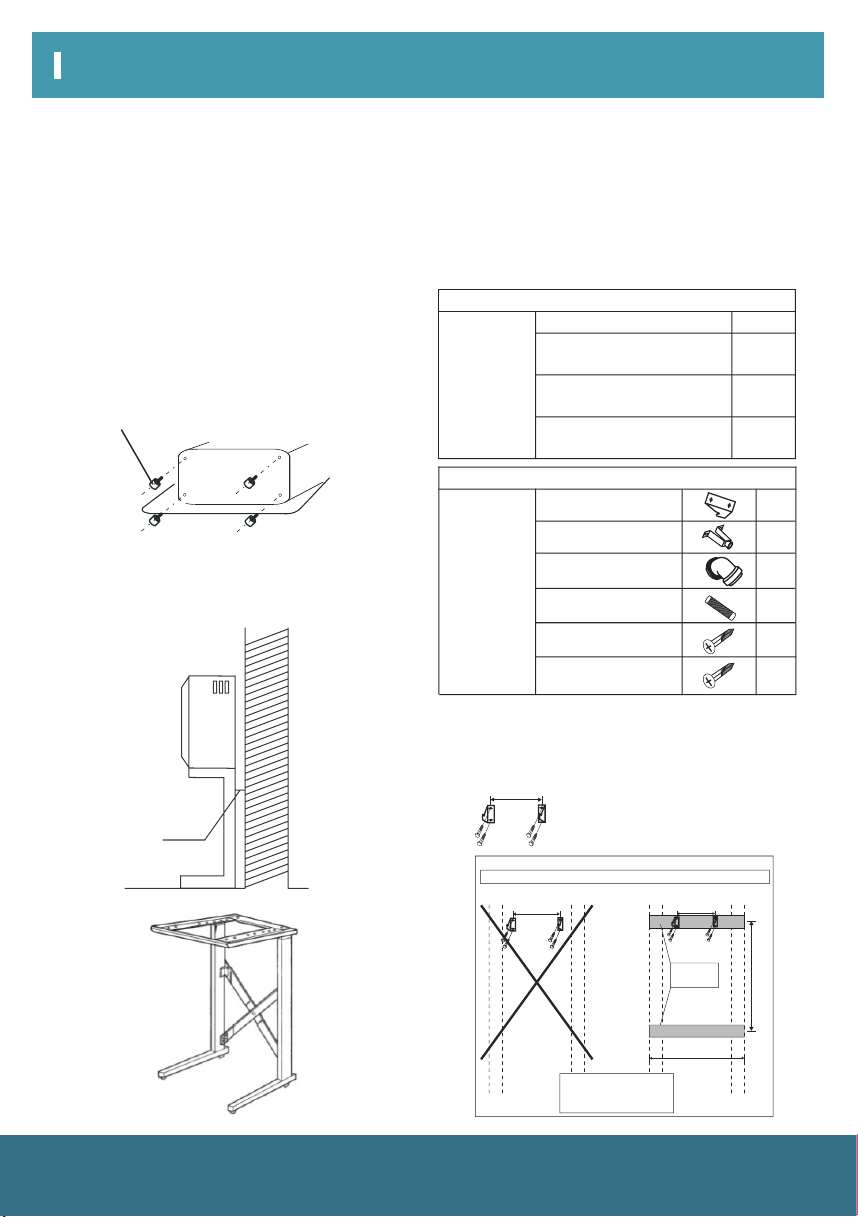
1. Determine the dryer position on your wall and
mark required bracket position. The dryer should
not be directly placed on top of a washing machine.
* A minimum of 50mm is needed between the top
of the dryer and the ceiling for ease of installation.
* If mounting above a washing machine, allow
sufficient room to open the lid of the washer.
2. Fix the wall hanging brackets (2 supplied) to
the wall securely (e.g., into the stud). Fit a timber
slat between the studs to mount the brackets
onto the stud position is too wide.
If the dryer is rack-mounted, a secure bracket is
required to ensure stability and to prevent
vibration. At least 15cm between the dryer and
walls is required (Bracket is not included).
Leg
15cm
445mm
445mm
Stud
Stud
Stud
Stud
445mm
25x75mm
Timber
570mm
480mm
Fig. 1
Ceiling
Installation Instructions Wall Mounting Instructions
Installation
Tools Required
Wall Mounting Kit Includes
Description
Hanging brackets
Plastic spacers
Exhaust connector
Exhaust pipe
12mm Long Screws
25mm Long Screws
1
1
1
1
2
2
1
4
4
4
Tools &
parts
required for
plaster/
wooden wall
Drill & 3mm Bit
Philips Head screwdriver
Wood Screws, 12x 50mm
Timber screws
Helper to lift dryer onto wall
Ensure brackets
aresecurely fastened. Fit
Timber slats if necessary
04
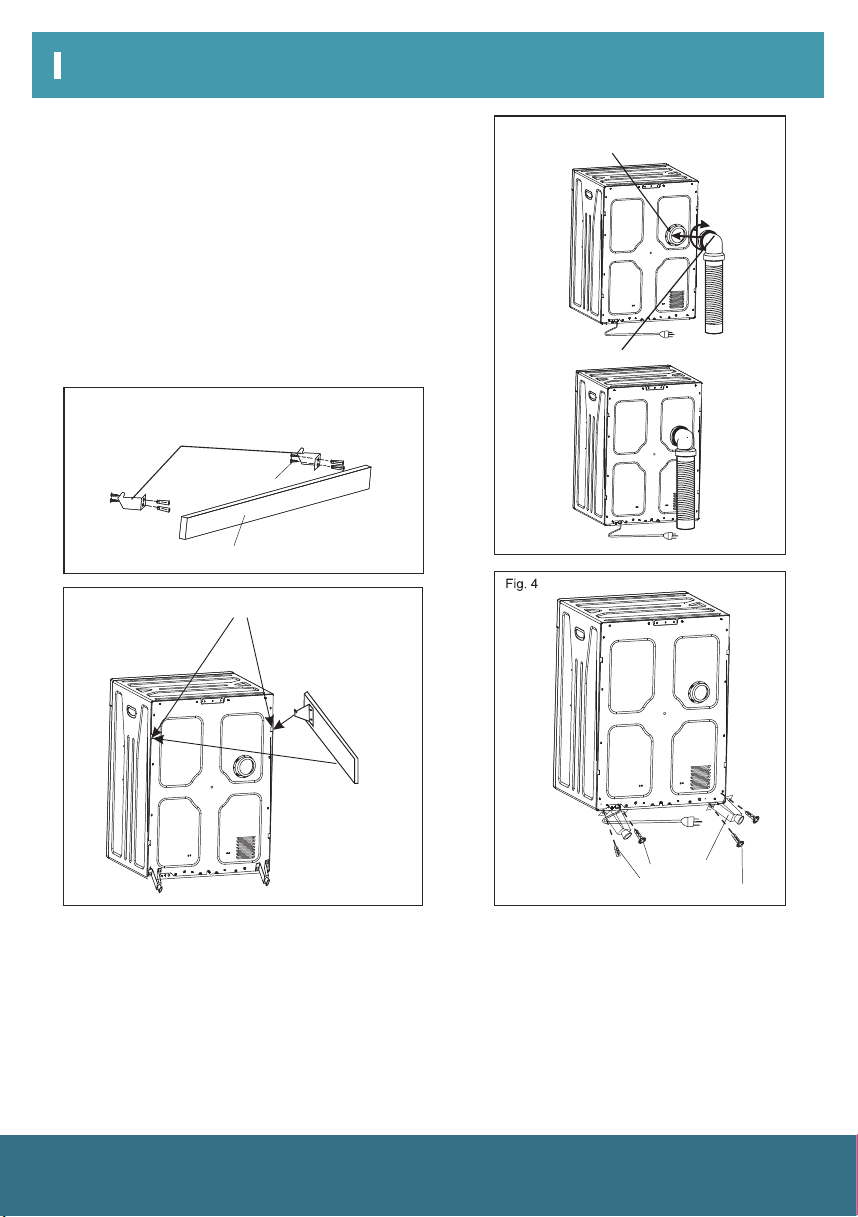
3. To install the hanging hook to timber, start at Fig
2.
4. Align hanging hooks and fasten screws tightly.
5. Please adjust the exhaust connector direction,
then, match the exhaust connector onto the
connector. Please refer to Fig 3.
6. Turn the exhaust connector clockwise, until it
inserts into the connector's groove.
7. Use the 4 X 12mm screws (provided) to fix the 2
spacers as per Fig 4.
8. With assistance, mount the dryer on wall
bracket. See Fig.5.
The appliance shall not be exhausted into a chimney, a wall, a ceiling, an attic, a crawl space, or a
concealed space of a building.
Only rigid or flexible metal duct shall be used for exhausting.
In Canada, only foil-type flexible ducts, if any, specifically identified for use with the appliance by
the manufacturer, should be used. In the United States, only foil-type flexible ducts, if any,
specifically identified for use with the appliance by the manufacturer and that comply with the
outline for Clothes Dryer Transition Duct, Subject 2158A, shall be used.
The total length of the flexible metal duct shall not exceed 2.4 m.
The duct shall not assembled with screws or other fastening means that extend into the duct and
catch lint.
Fig. 2
Fig. 3
Fig. 5
Hanging Hook
Connector base
Exhaust Connector & Flexible Pipe
Spacers
12mm long screws
Wall bracket mounting points
25mm long screws
Timber(not included)
Installation
05
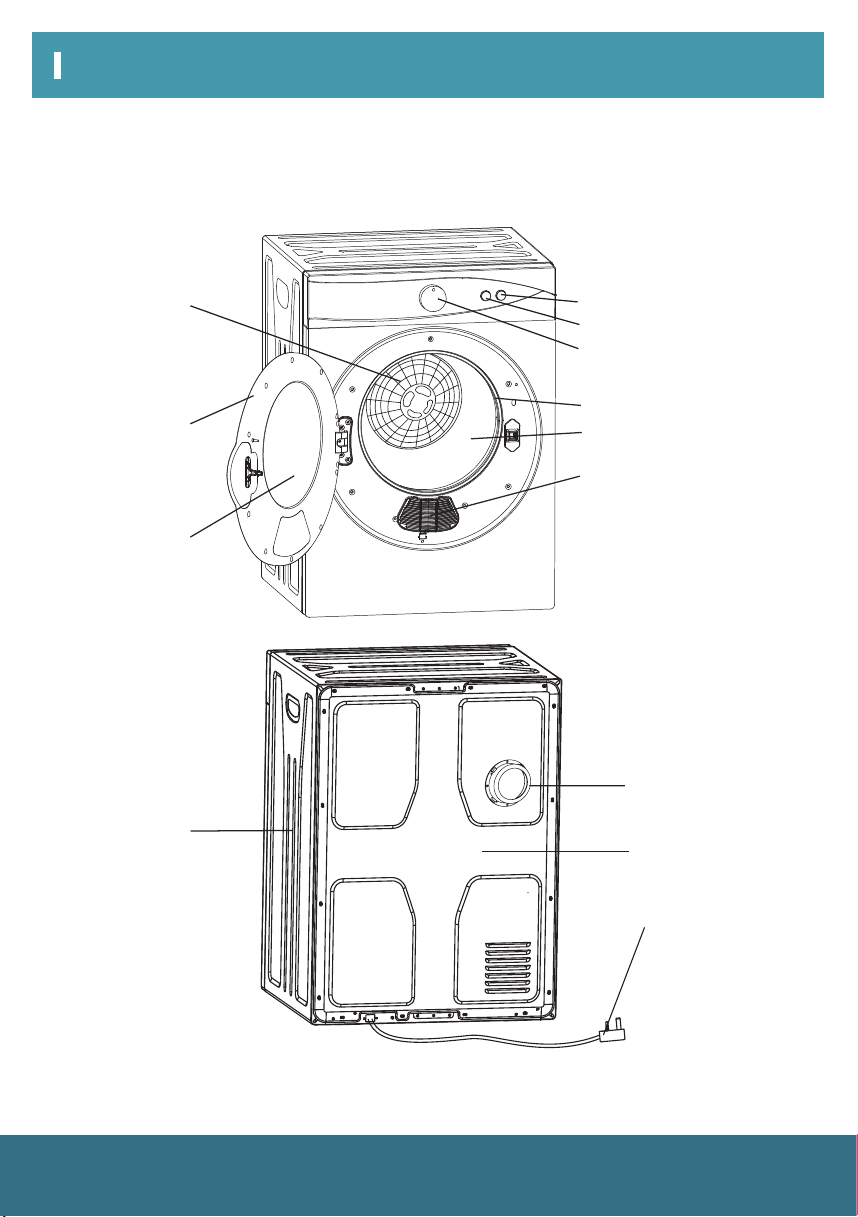
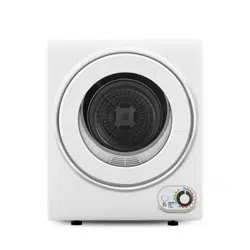
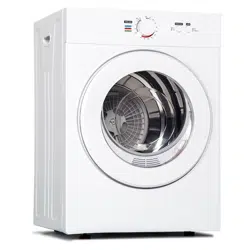
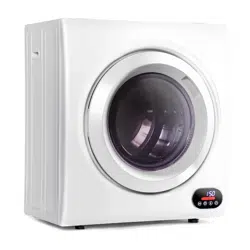
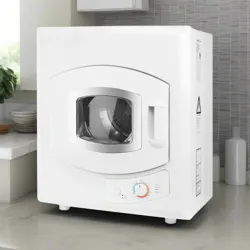
Names of Components
Lint Filter
Door
Window
Casing
Exhaust vent
Back cover
Power cable
and plug
Mode
Sensor Dry
Timer selector knob
Air lntake Shroud
Drum
Door Gasket
Setup & Use
06

The unit is required to be plugged into a three pin
socket that is reliably grounded.
Plug the power cord into the socket.
Check the items to be dried do not have
combustible materials or foreign objects within
them i.e.: lighters, hairpins, coins.
Turn items with zippers inside out and fasten the
buckles.
Dryer heat may permanently set stains, ensure
you check prior to drying that stains are removed
Separate dark and light colored items as you
would do when washing.
For best results load the dryer with similar
fabrics. Place small delicate items in a mesh bag
and do not overload the dryer.
The maximum mass is 6.6 lbs ilogram's of dry
textile material for the dryer and do not overload.
The laundry dryer is intended only for drying
textile material washed in water.
It is recommended that items are placed into the
dryer one at a time. This ensures they are not
tangled which results in uneven drying. When
closing the dryer door prior to starting the unit
ensures that items are not jammed in the door.
Operating your dryer
Drying time
reference table
Electrical Requirements
Loading the dryer
Prior to loading the dryer check that the items do
not have the following symbols anywhere on
them. If they do, do not laundry dry these items.
Drying Capacity
1.1 lbs. 30 Minutes
60 Minutes
200 Minutes
2.2 lbs.
6.6 lbs.
120 Minutes4.4 lbs.
Approximate Drying Times
Drying times can be affected by many factors,
such as material, bulkiness, how full the dryer is
etc. The above list is only a guide only.
Tips before drying
Dry flat Dry
Do not tumble dry Hang to dry Drip dry
Dry in the shade
Setup & Use
07
Delicate items should be placed into a nylon net
bag prior to drying. It is not recommended to dry
under wire bras in this unit.
To ensure you get the most out of the
Anti-wrinkle function do not overload the
dryerand remove the dried items from the dryer
immediately and hang on coat hangers. Iron the
items if desired.
To minimize the risk of fire in a tumble dryer, the
following should be observed:
Oil-affected items can ignite spontaneously,
especially when exposed to heat sources such as
in a laundry dryer. The items become warm,
causing an oxidation reaction in the oil. Oxidation
creates heat. If the heat cannot escape, the items
can become hot enough to catch fire. Piling,
stacking or storing oil-affected items can
prevent heat from escaping and so create a fire
hazard.
Items that have been spotted or soaked with
vegetable or cooking oil constitute a fire
hazard and should not be placed in a laundry
dryer.
Ensure that foreign objects do not find their way
into the dryer. All pockets should be emptied,
buttons, buckles and zips fastened. This will also
help reduce impact noise when the items hit
against the turning drum.
Do not add items into the dryer whilst it is in
operation.
If drying large items such as a blanket, it is
recommended that from time to time you open
the dryer door, shake the item, place the item
hack in the dryer and close the door. This will
ensure even drying
Flip over clothes
Operation Precautions
Setup & Use
08

Items containing foam rubber (also known as latex foam) or similarly textured rubber, like materials
should not be dried in a compact dryer on a heat setting.
Foam rubber materials can, when heated, produce fire by spontaneous combustion.
Fabric softeners or similar products should not be used in a compact dryer to eliminate the effects of
static electricity unless this practice is specifically recommended by the manufacturer of the fabric
softener or product
Undergarments that contain metal reinforcements should not be placed in a compact dryer.
Damage to the compact dryer can result if metal reinforcements come loose during drying. When available
a drying rack could be used for such items.
Plastic articles such as shower caps or babies' waterproof napkin covers should not be placed in a
compact dryer.
Rubber-backed articles, clothes fitted with foam rubber pads, pillows, galoshes and rubber-coated
tennis shoes should not be placed in a compact dryer.
The 'cool down' cycle of compact dryers should be used to reduce the temperature of the items. They
should not be removed from the compact dryer or piled or slacked while hot.
Items that have been previously cleaned in, washed in, soaked in or spotted with petrol/gasoline,
dry-cleaning solvents or other flammable or explosive substances should not be placed in a compact dryer.
Highly flammable substances commonly used in domestic environments include acetone, denatured
alcohol, petrol/gasoline, kerosene, spot removersfsome brands), turpentine, waxes and wax removers.
Setup & Use
09
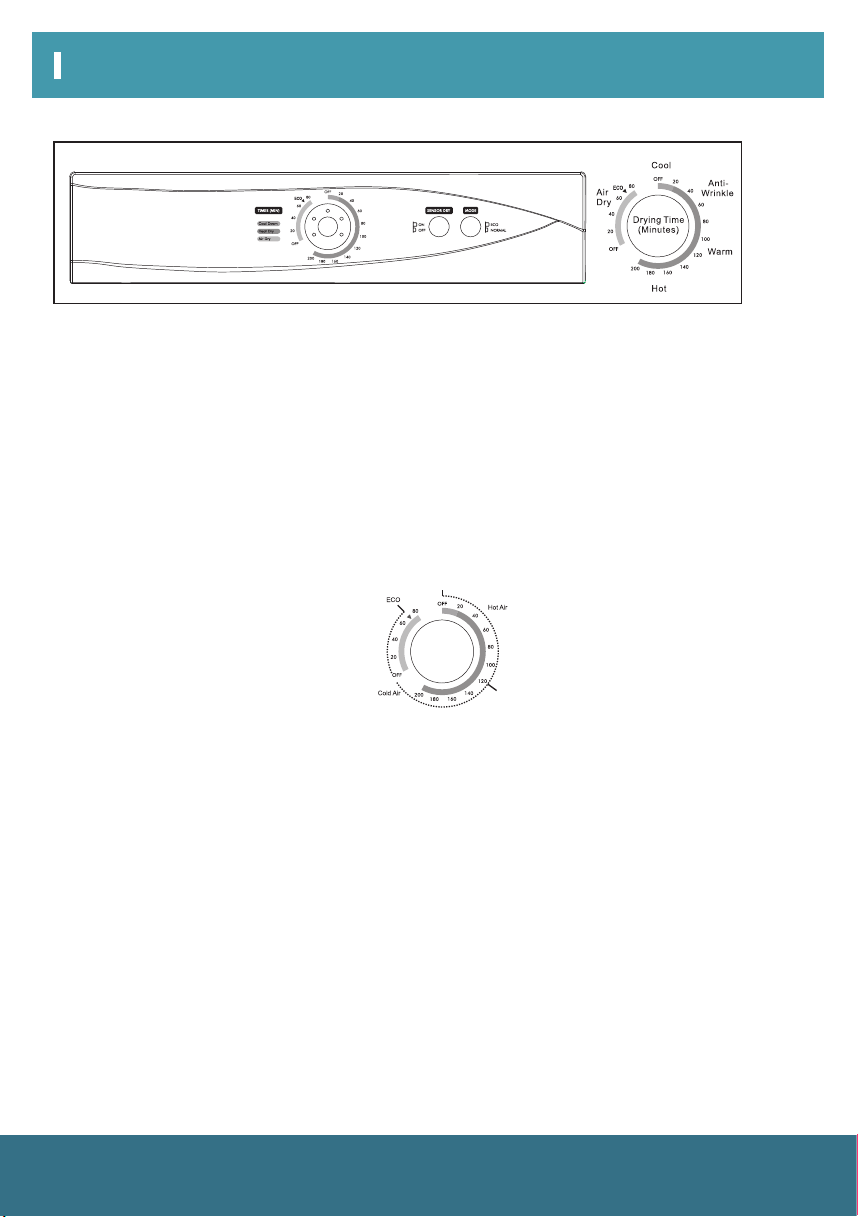
NORMAL: By default, the dryer operates under the 'NORMAL' mode (the mode button is pressed), in
combination with the presets.
‘SENSOR DRY’ and ‘TIMER', for optimal drying performance. The 'SENSOR DRY’ function can be adjusted to
your drying needs by using the dial and temperature guidelines.
ECO: The dryer operates using an energy-saving mode, independent of the 'SENSOR DRY' and the 'TIMER'
functions. The dryer will automatically run in 'ECO' mode for a total duration of 270 minutes. The dryer will
begin airdrying the laundry for 150 minutes with cool air, followed by another 120 minutes using hot air by
activating the heating element. Simply open and load the dryer, close the door, then depress the 'Mode' button,
and the dryer will run in the 'ECO' mode.
The timer knob should be set to 70 minutes in the gray section to prevent the unit from continued running after
the ECO Mode cycle. If the timer moves past the OFF position while the ECO mode is running, the dryer will
continue running until the timer reaches 'OFF’ at the top of the dial. If this happens, it can be manually stopped.
When the unit is running in ECO mode, opening and closing the door will not affect remaining time. The unit
will remember the remaining time and resume drying in ECO mode. If the unit loses power or is turned off, ECO
mode will reset and restart.
ON: When the drying time reaches 120 minutes, the sensor dry function measures the moisture and humidity
levels during the cycle and automatically adjusts the heating time for a more efficient drying performance. As a
result, the dryer may stop generating heat in advance of the 'TIMER' preset, but the preset cycle continues by
pushing cool air until the drying time finished in the 'OFF' position.
OFF: The dryer operates according to the time set by the 'TIMER' until the preset finished in the 'OFF' position.
Control Panel Functions
MODE SELECTOR
SENSOR DRY SELECTOR
OFF: When the 'TIMER' is in the 'OFF' position, the power is not supplied to the unit. Turning the dial clockwise
to the desired program will start the dryer.
COOL: This setting is generally used to cool items that have just been dried to help prevent creasing. It will
generate cool air, instead of the motor pushing heat into the drum of the dryer.
ANTI-WRINKLE: For laundry loads that are difficult to iron (e.g., cotton shirts and linen), set the 'TIMER'
between 30-60 minutes, depending on the load size. Once the cycle stops, the items will still contain moisture,
thereby making the ironing process easier.
WARM: This setting is used to dry and cool, and depending on the material, leave items wrinkle free. Set the
'TIMER' by turning the dial clockwise between 60-150 minutes.
HOT: This setting is used for drying large quantities or bulky items (i.e., the dryer drum is more than 1/2 full).
Set the 'TIMER' by turning the dial clockwise to 150 minutes.
AIR FRY: This setting is used with our anu heat to freshen items by letting cool air move through it (e.g.,
clothes that have been stored for an extended period of time).
NOTE: ALWAYS make sure items being dried have gone through the Spin cycle in the washing machine first.
NOTE: This is a 120-volt dryer. Drying times will be longer than a 220-volt dryer.
TIME SETTING
Set up & Use
10
Maintenance
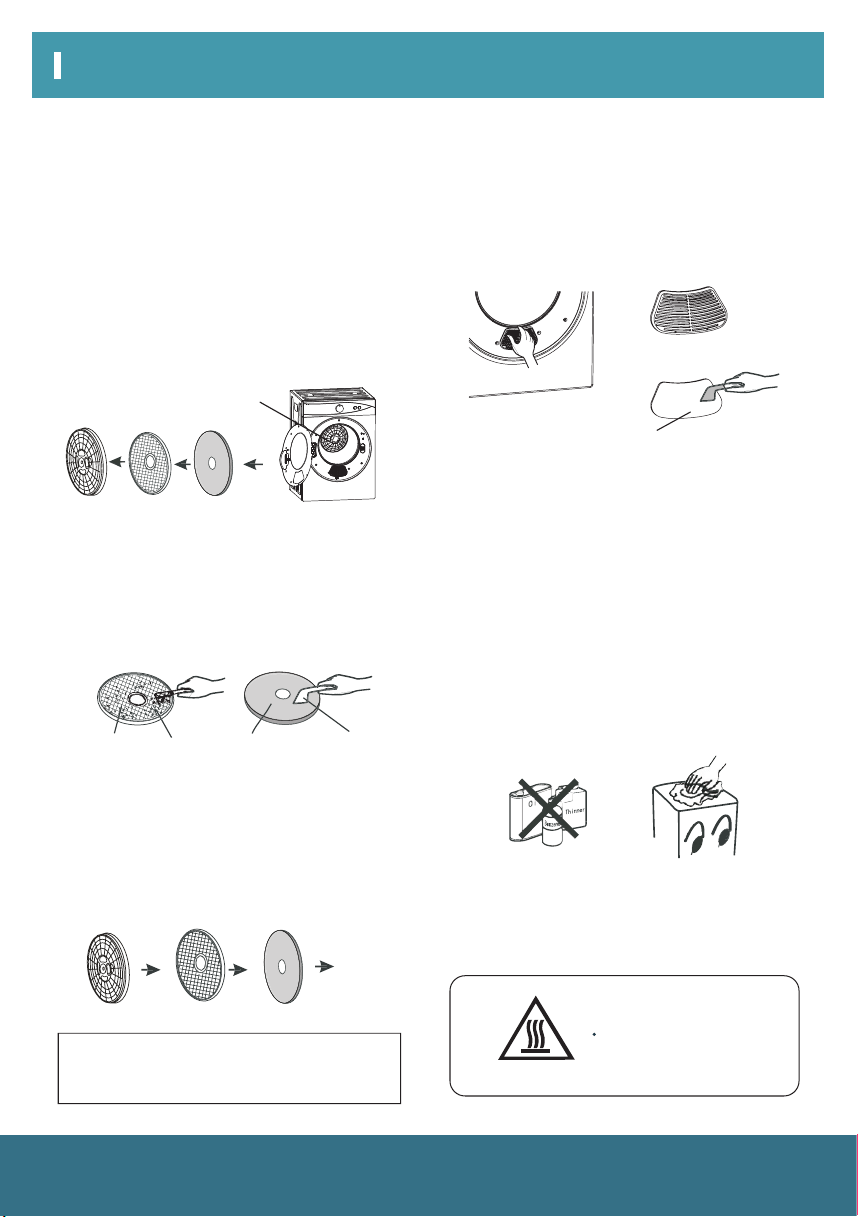
Cleaning the Lint Filter
1. Removing the filters
2. Cleaning the filter
Cleaning the interior & exterior
of the dryer
WARNING:
Regularly clean the lint trap
CAUTION! HOT SURFACE
PLEASE READ THE INSTRUCTIONS
Do not touch the intake during
the drying cycle due to high temperatures
Please unplug the power cord prior to any
cleaning. The lint filter must be in place whenever
drying. It must be cleaned before every use.
Air Intake Shroud
Air Intake Filter
Remove by pulling outwards with your fingers,
inserted into the four holes around the exhaust
vent shroud. The filter has 3 parts: Exhaust vent
shroud, lint filter and exhaust filter (as shown in
Figure l).
Separate "exhaust vent shroud", “lint filter” and
“exhaust filter”. Clean the lint on the lint filter
and exhaust filter with a soft brush or vacuum
cleaner. Do not damage the filters (See figure 2).
Slightly push upwards with your thumb until
the latch hook disconnects, then remove.
Do not wash with water.
Do not use thinners, gasoline or alcohol.
Do not use any type of spray cleaner when
cleaning the interior. If dryer drum becomes
stained, clean the drum with a damp cloth.
Remove any residue before drying the next
load. Clean the cabinet with mild soap and
water. Do not use harsh or abrasive cleaners, as
this could damage the dryer.
3. Re-installing the filter
After cleaning, assemble in the sequence of
“exhaust filter – lint filter – exhaust vent shroud”,
align the recesses in the center with the
projection in the center of the drum. Make sure
that it is firmly inserted (see Figure 3).
Note: The filter fixed in the bottom of the drum
should also be cleaned with a soft brush.
The fitter fixed in the
bottom of the drum
Exhaust
vent shroud
Lint
Filter
Lint Filter Lints
Exhaust
Filter
Exhaust Filter Dust Cleaner
Figure 1
Figure 3
Cleaning of the Air Intake Filter
The filter should be cleaned once a month.
Remove by pulling outwards holding the upper
and lower ends of the air intake shroud. Remove
the filter inside the shroud and clean it with a
soft brush. Reassemble and install as before.
11
Troubleshooting
Review the following pages before calling for service.
Problem
Timer knob does
not turn
Drum does not turn
Hot air is not
blowing out
The laundry is not
thoroughly dried
Dryer does not start
Possible Cause
Is the power cord inserted firmly?
Is the timer incorrectly set on cold air?
Is the door closed?
Is the power cord inserted?
Does the receptacle have power?
Are the front and back filters clogged?
Is there too many items in the dryer?
Have items been added whilst the
dryer was in operation?
Has the laundry become twisted whilst
drying?
Has the dryer been placed in a small
and badly ventilated area?
Have you set the dryer to Antiwrinkle?
Is there a power failure?
Is the power cord inserted firmly?
Is the door closed?
Is the timer in the OFF position?
Try again when there is power.
Insert the power cord firmly.
Close the door.
Set the dry time.
Clean the filter.
Reduce the amount of items in
the dryer.
Re-dry the items again
Untangle the items and re-dry.
Place the dryer in a
well-vented area.
Try using 'Warm' or 'Hot'
setting instead.
Close the door.
Insert the power cord firmly.
Check the power cord
receptacle.
Insert the power cord firmly.
Set the timer to hot air.
What to do
Dryer Technical Specifications
Troubleshooting
SKU
Drying Capacity
Voltage
Rated Input
ZX-CD-7
6.6 LBS
120V- 60Hz
1020W
NOTE: Consistent with our continuing
product development policy,
improvements may have been made which
render the contents of this package
slightly different to that shown.
12

We offers a limited 1-year warranty ("warranty period") on all of our products purchased new and unused
from us with an original proof of purchase and where a defect has arisen, wholly or substantially, as a
result of faulty manufacture, parts, or workmanship during the warranty period. The warranty does not
apply where damage is caused by other factors, including without limitation:
(a) normal wear and tear;
(b) abuse, mishandling, accident, or failure to follow operating instructions;
(c) exposure to liquid or infiltration of foreign particles;
(d) servicing or modifications of the product other than by our company;
Our warranty covers all costs related to restoring the proven defective product through repair or
replacement of any defective part and necessary labor so that it conforms to its original specifications. A
replacement product may be provided instead of repairing a defective product. Our sole obligation under
this warranty is limited to such repair or replacement. A receipt indicating the purchase date is required for
any claim, so please keep all receipts in a safe place. Although greatly appreciated, the product registration
is not required to activate any warranty, and product registration does not eliminate the need for the
original proof of purchase. The warranty will be voided if repairs are performed by a non-authorized third
party and/or if spare parts other than those provided by the Company are used. You may also arrange for
service after the warranty expires, at an additional cost.These are our general terms for warranty service,
but we always urge our customers to reach out to us with any issue, regardless of warranty terms. If you
have an issue with our products, please contact us ([email protected]), and we will do our
best to resolve it for you.
Warranty and Service
13