©2024 BARSKA®
855 Towne Center Drive | Pomona, CA 91767
08/24
BC805
Night Vision
2 3
Note: All information, feature, and specication displayed herein are based on the
data available at the time of publishing, thus they are subject to change without
notice. All product pictures displayed herein are for illustration purposes only. The
actual product may vary due to different circumstances
Table Of Contents
NV-1 Monocular 3
Parts 3
Battery And SD Card Installation 4
Setting Up Your Night Vision Device 4
Taking Photos 4
Taking Videos 4
Using Playback Mode 5
Charging The Battery 5
Turn Off The Button Backlit 5
Turn Off The Device 5
Connect To A Computer 5
Set-Up Menu 5
Specication 6
NV-2 Binocular 7
Parts 7
Battery And SD Card Installation 8
Setting Up Your Night Vision Device 8
Taking Photos 8
Taking Videos 8
Using Playback Mode 9
Charging The Battery 9
Turn Off The Button Backlit 9
Turn Off The Device 9
Connect To A Computer 9
Set-Up Menu 9
Specication 10
Warranty 11
*Actual model may vary
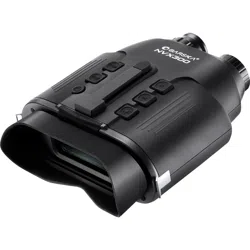
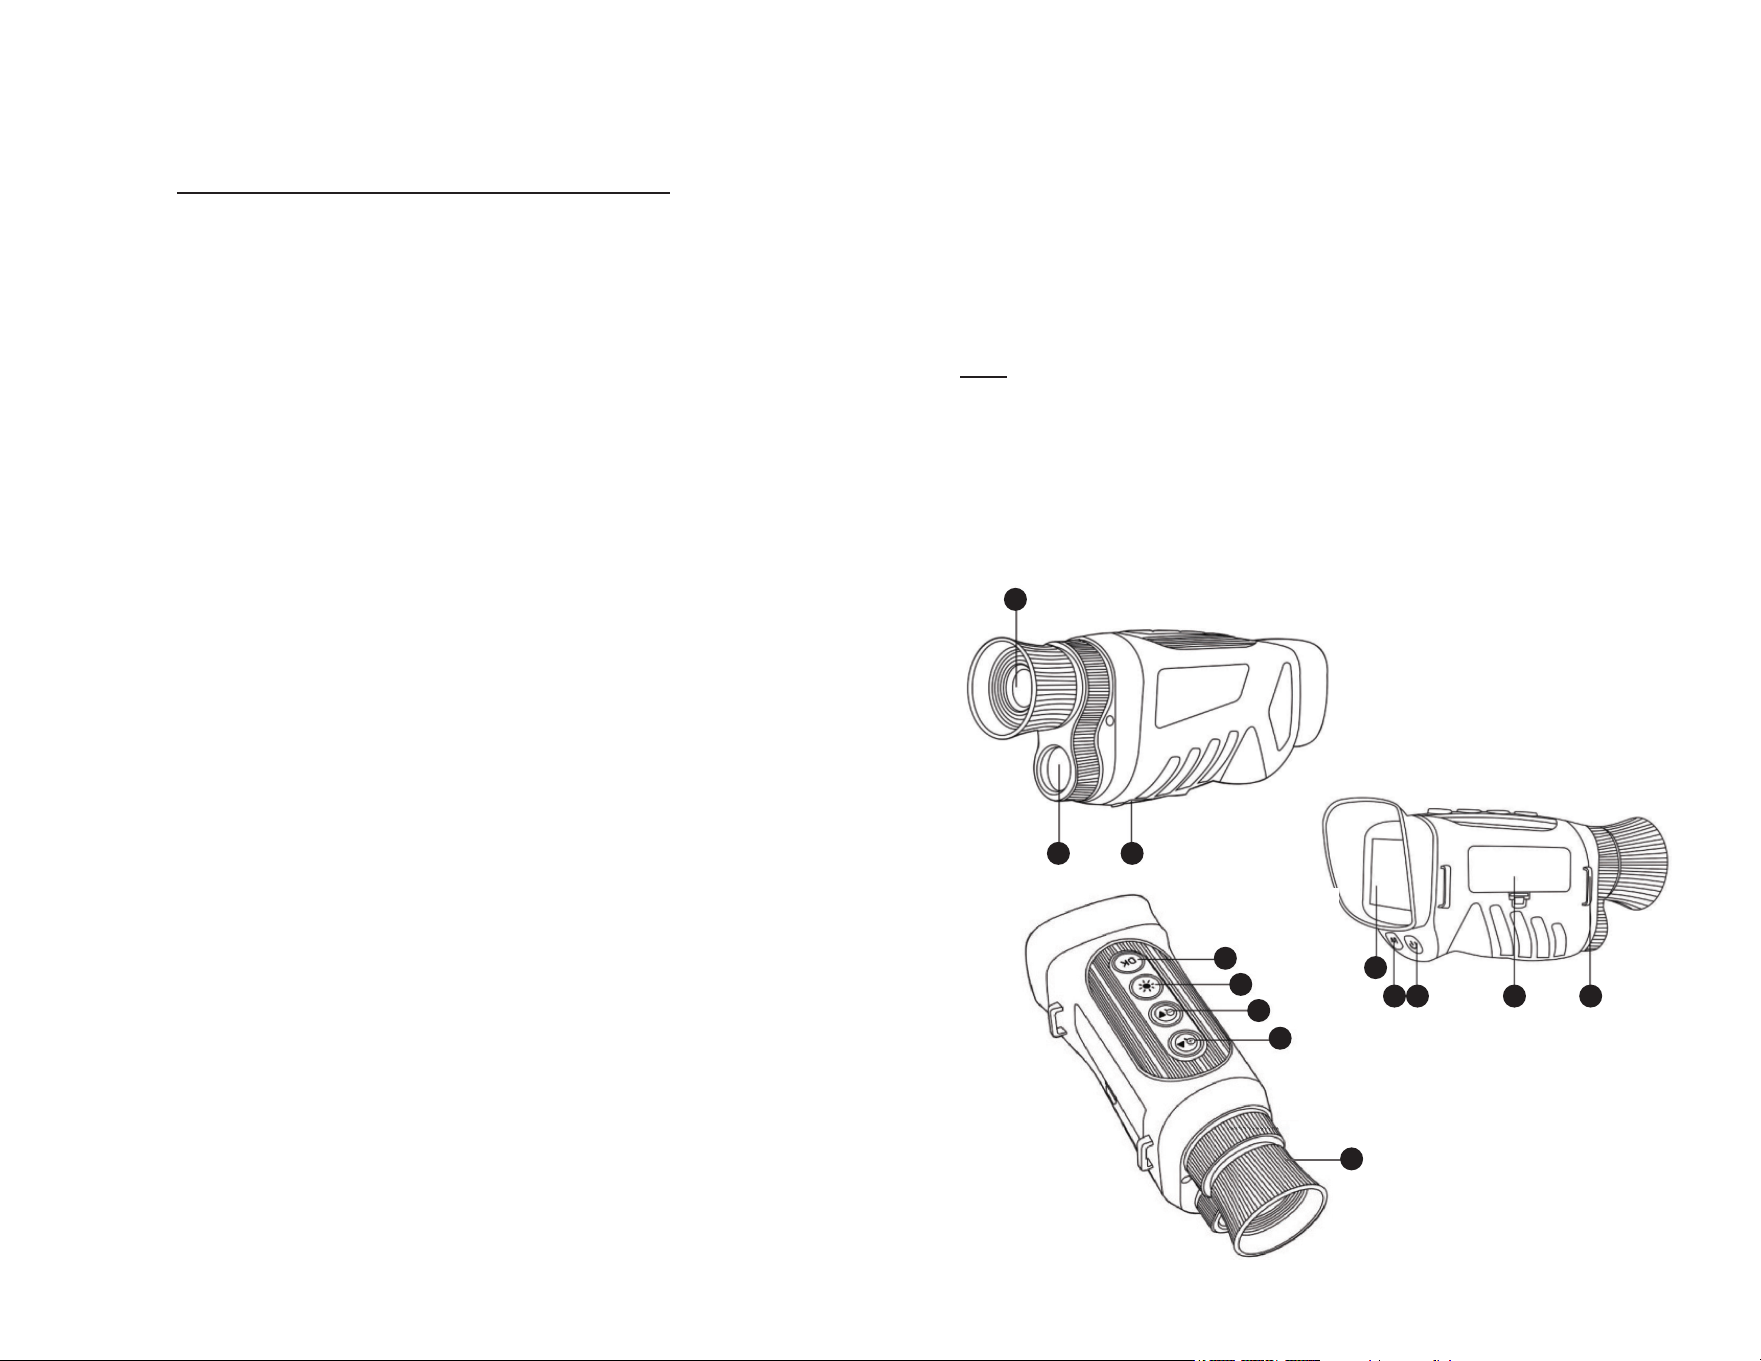
Parts
1. Objective lens
2. IR light
3. Type-C/Micro SD card slot
4. Display
5. Menu/mode button
6. Power on/off
7. Battery cover
8. Strap hook
9. Focus ring
10. Up/IR+/zoom in
11. Down/IR-/zoom out
12. IR light on/off button
13. OK button
How To Use NV-1 Monocular
Please read this instruction manual carefully before using the instrument.
Thank you for purchasing the Night Vision Binocular. This user guide is intended
to provide you with guidelines to ensure that operation of this product is safe
and does not a post risk to the user. Any use that does not conform to the
guidelines described in this user guide may void the limited warranty. Please read
all directions before using the product and retain this guide for reference. This
product is indeed for domestic use only. It is not intended for commercial use.
This product is covered by a limited one-year warranty.
1
2 3
13
12
11
10
4
5 6 7 8
9

4 5
Battery And SD Card Installation
Install Battery
Remove the battery compartment cover cap. Insert battery
Install Micro SD Card
Open the rubber cap covering the USB port and Micro SD slot, and insert a micro
SD card (up to 128GB, class 10 or greater for best results with video les) into
the Micro SD slot.
If you will only use night vision binocular for “live” viewing and do not wish to use
it for photos/videos, the unit will function normally without a card.
WARNING Never look at the sun through this night vision unit (or any other
optional instrument). It may permanently damage your eyes as well as the
unit.
Setting Up Your Night Vision Device
1. Press the power button for three seconds to turn on the NV binocular.
2. Look at the LCD viewing screen.
3. Adjust the sharpness by turing the focus wheel in either direction until it
becomes clear.
4. Zoom up to 8x by pressing and holding the zoom in button until you reach your
desired level. If you keep pressing the zoom out button, you will zoom down to
the default of 1x.
5. When using the binoculars at night, the lens should automatically adjust to the
brightness level. Tap the IR button to turn on the IR lamp, tap the up button or
down button to adjust the IR brightness from levels 1-7. Tap the IR button
again to turn off the night vision mode.
Taking Photos
1. When you power on your binoculars, it will automatically start in photo mode.
You should see the camera icon in the upper left corner of your LCD screen.
If you do not see the camera icon, short press the until it appears.
2. Adjust the sharpness by turning the focus wheel. For nighttime use, tap IR
button to turn on the IR light, adjust the brightness by pressing the
up/down button.
3. Press the ok button to capture the images.
Taking Videos
1. With the power on, short press the “M” button until you see the video icon in
the upper left corner of your screen.
2. Adjust the sharpness by turning the focus wheel, and for nighttime use, tap IR
button to turn on the IR light, adjust the brightness by pressing the
up/down button.
3. Press the ok button to capture the video.
Using Playback Mode
1. With the power on, short press the “M” button until you see the playback icon
in the upper left corner of you screen.
2. The last le that has been saved will be displayed on the LCD screen. If it is a
photo, the le sufx JPG will appear in the upper middle of the screen. For a
video, the le sufx AVI will appear on the upper middle of the screen.
3. Use the up and down buttons to navigate through the saved les on your
SD card.
4. Long press the “M” button to enter the menu of delete, press ok to enter sub-
menu, use the up/down button to choose “delete current” or “delete all” and
press the ok button to conrm.
Charging The Battery
Connect to the camera to the AC adaptor, using the dedicated USB cable
supplied. The camera can be charged by connecting the camera to a computer
using the dedicated USB cable.
Turn Off The Button Backlit
When you power on your binocular, the button backlit will automatically light up.
Short press the power button to turn off the button backlit.
Turn Off The Device
Press and hold the power button until the screen off.
Connect To A Computer
Connect the camera to PC by using USB cable and turn on the camera, the PC
can read the les in this camera.
6 7
Set-Up Menu
Pressing and holding the “M” button will take you to the small setup menu. Here
you can set the photo resolution, video resolution, date, backlight and language.
Once in the setup menu, you can use the up/down buttons to choose setting
project and press ok button to user sub-menu. Within a sub-menu, you can
scroll from one item to another using the up/down button. The ok button is for
conrmation and exit.
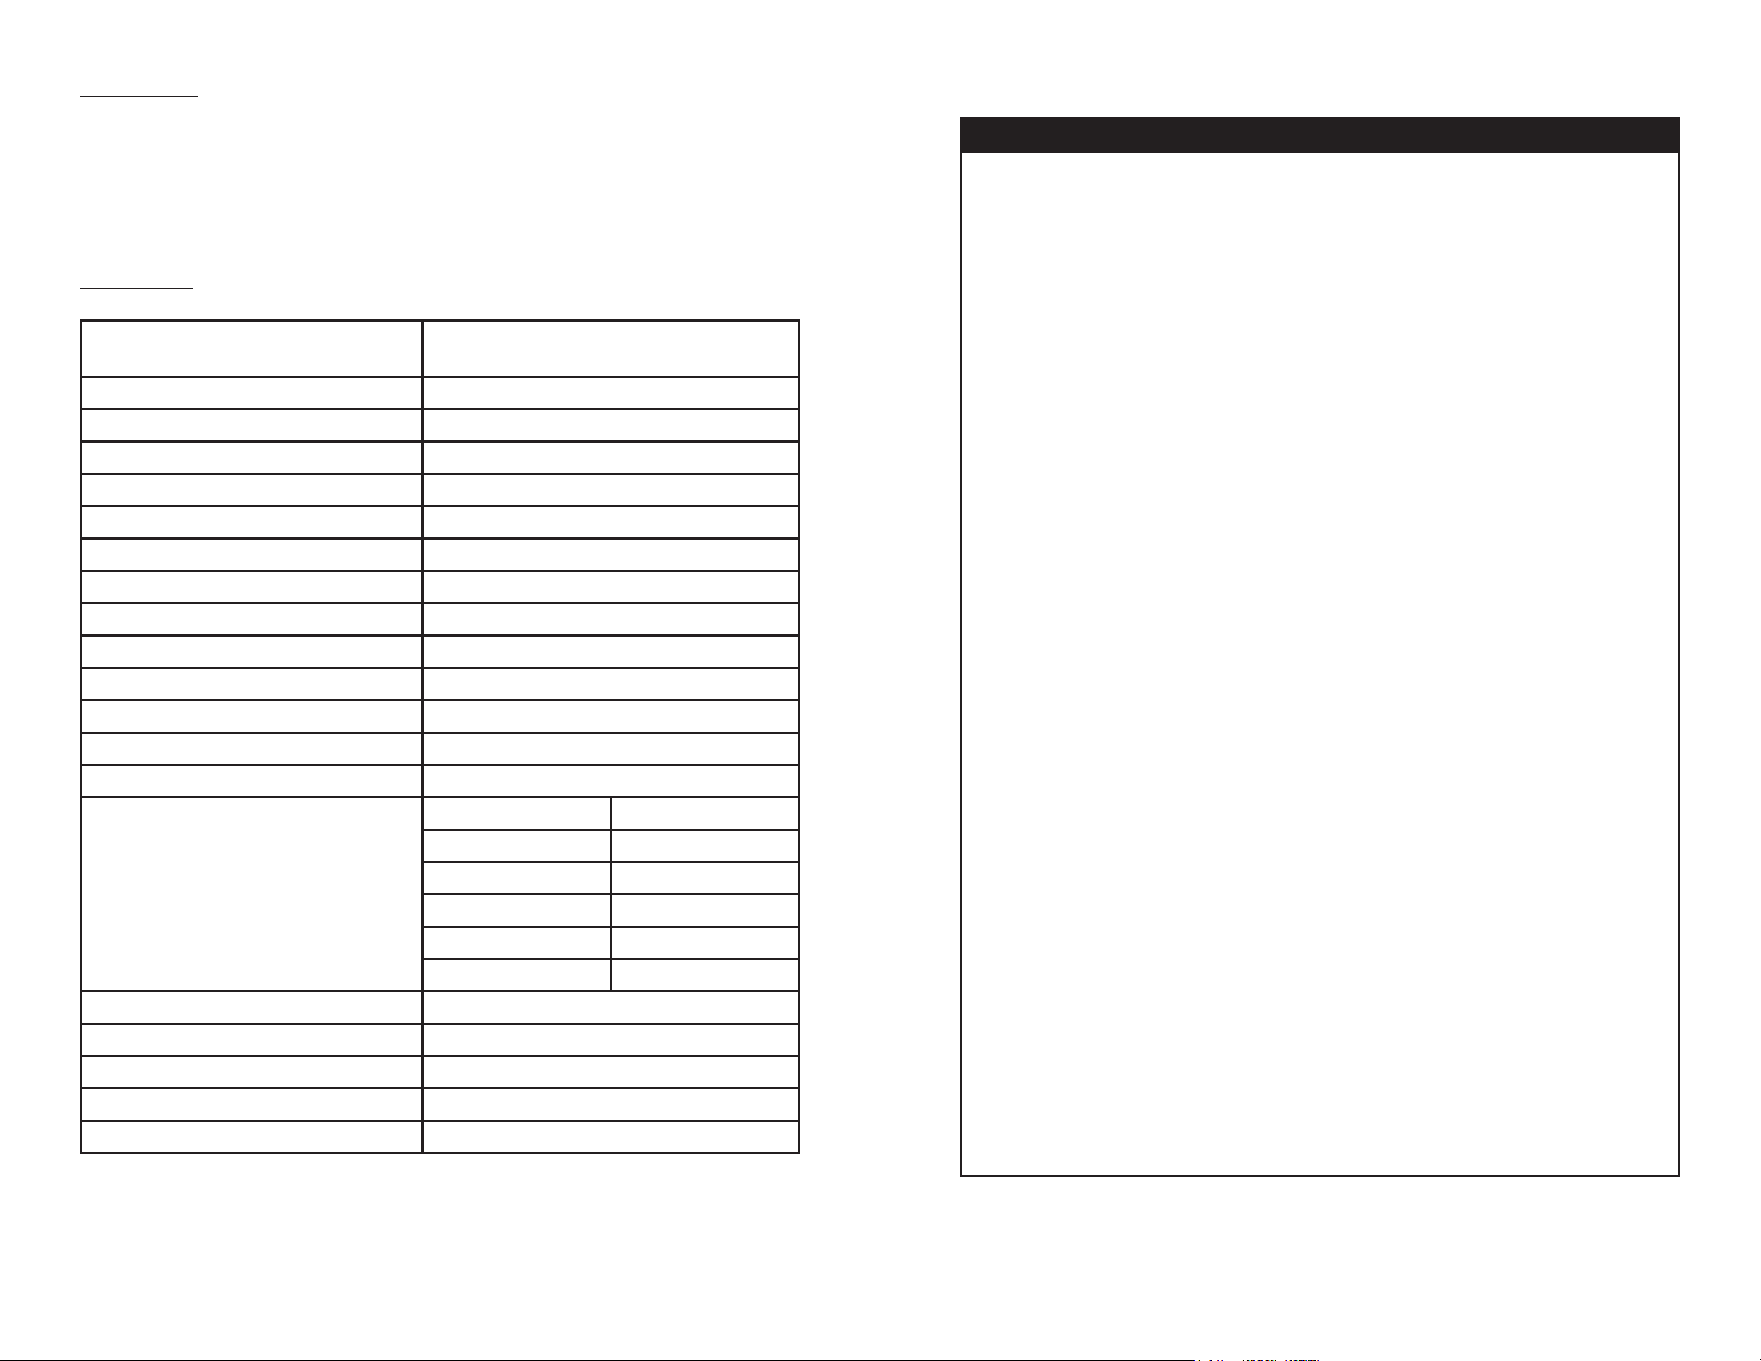
Specication
Field of application
Camping and outdoor leisure, wildlife
observation, hunting
Optical magnication 6x
Digital zoom 8x
Lens diameter 25mm
Field of view 10°
Image sensor CMOS
IR Illuminator power/wavelength 3W/850nm
Max. viewing distance 250-300 Meters for night
Photo resolution 48M, 30M, 25M, 20M, 10M, 8M, 5M 3M
Photo format JPG
Video resolution 2.5K UHD, 1080FHD, 1080P, 720P
Video format AVI
Display 2 inch IPS screen
Operating temperature -30° up to +60°C
Language
English Japanese
French Spanish
Portuguese German
Korean Italian
Chinese Russian
Arabic
Recording during the day Color
Recording at night Black and white
Memory Micro SD card, max to 128 GB
Port Type-C
Battery Built-in rechargeable lithium battery
How To Use NV-2 Binocular
Please read this instruction manual carefully before using the instrument.
Thank you for purchasing the Night Vision Binocular. This user guide is intended
to provide you with guidelines to ensure that operation of this product is safe and
does not a post risk to the user. Any use that does not conform to the guidelines
described in this user guide may void the limited warranty. Please read all
directions before using the product and retain this guide for reference. This
product is indeed for domestic use only. It is not intended for commercial use.
This product is covered by a limited one-year warranty. Coverage is subject to
limits and exclusions. See warranty for details.
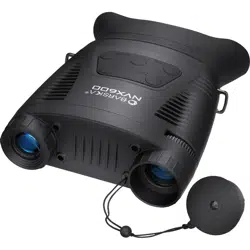
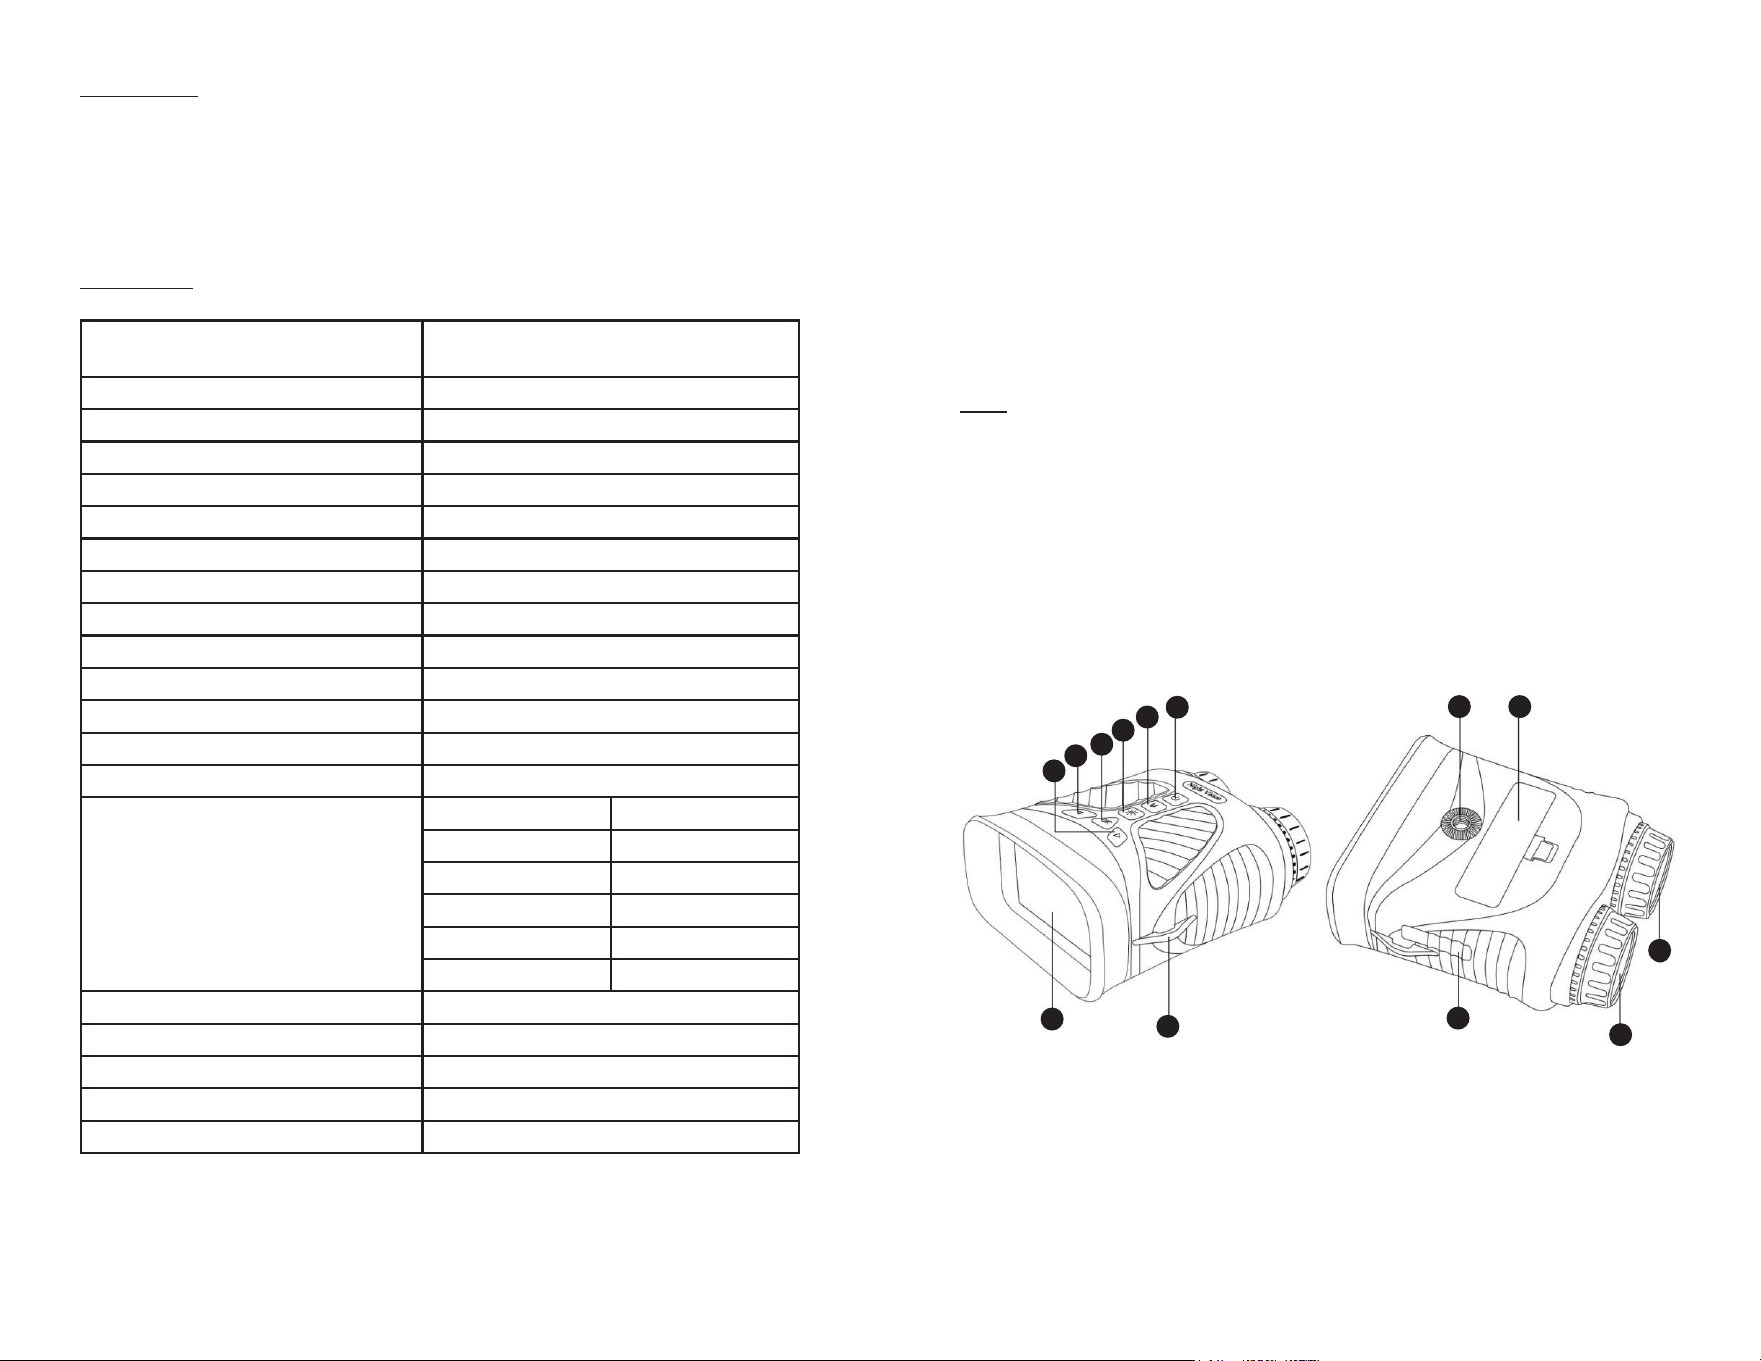
Parts
1. Display
2. Strap hook
3. Right button/IR-/Zoom -
4. Left button/IR+/Zoom +
5. Ok button
6. IR light on/off button
7. Menu/mode button
8. Power on/off
9. Type-C USB port / micro SD
card slot
10. Focus ring
11. IR light
12. Battery cover
13. Tripod hole
1
2
3
4
5
6
7
8
9
10
11
13 12

8 9
Battery And SD Card Installation
Install Battery
Remove the battery compartment cover cap. Insert battery
Install Micro SD Card
Open the rubber cap covering the USB port and Micro SD slot, and insert a
micro SD card (up to 128GB, class 10 or greater for best results with video les)
into the Micro SD slot (metal contacts facing down, see card icon right of slot for
correct orientation).
If you will only use night vision binocular for “live” viewing and do not wish to use
it for photos/videos, the unit will function normally without a card.
WARNING Never look at the sun through this night vision unit (or any other
optional instrument). It may permanently damage your eyes as well as the
unit.
Setting Up Your Night Vision Device
1. Press the power button for three seconds to turn on the NV binocular.
2. Look at the LCD viewing screen.
3. Adjust the sharpness by turing the focus wheel in either direction until it
becomes clear.
4. Zoom up to 8x by pressing and holding the left button until you reach your
desired level. If you keep pressing the right button, you will zoom down to the
default of 1x.
5. When using the binoculars at night, the lens should automatically adjust to the
brightness level. Tap the IR button to turn on the IR lamp, tap the left button or
right button to adjust the IR brightness from levels 1-7. Tap the IR button again
to turn off the night vision mode.
Taking Photos
1. When you power on your binoculars, it will automatically start in photo mode.
You should see the camera icon in the upper left corner of your LCD screen.
If you do not see the camera icon, short press the menu/mode button until
it appears.
2. Adjust the sharpness by turning the focus wheel and for nighttime use, tap IR
button to turn on the IR light, adjust the brightness by pressing the
left/right button.
3. Press the ok button to capture the images.
Taking Videos
1. With the power on, short press the menu/mode button until you see the video
icon in the upper left corner of your screen.
2. Adjust the sharpness by turning the focus wheel, and for nighttime use, tap IR
button to turn on the IR light, adjust the IR light brightness by pressing the
left/down button.
3. Press the ok button to capture the video.
Using Playback Mode
1. With the power on, short press the menu/mode button until you see the
playback icon in the upper left corner of you screen.
2. The last le that has been saved will be displayed on the LCD screen. If it is a
photo, the le sufx JPG will appear in the upper middle of the screen. For a
video, the le sufx AVI will appear on the upper middle of the screen.
3. Use the left and right buttons to navigate through the saved les on your
SD card.
4. Long press the “M” button to enter the menu of delete, press ok to enter sub-
menu, use the left/right button to choose “delete current” or “delete all” and
press the ok button to conrm.
Charging The Battery
Connect to the camera to the AC adaptor, using the dedicated USB cable
supplied. The camera can be charged by connecting the camera to a computer
using the dedicated USB cable.
Turn Off The Button Backlit
When you power on your binocular, the button backlit will automatically light up.
Short press the power button to turn off the button backlit.
Turn Off The Device
Press and hold the power button until the screen off.
Connect To A Computer
Connect the camera to PC by using USB cable and turn on the camera, the PC
can read the les in this camera.
10 11
Set-Up Menu
Pressing and holding the menu button will take you to the small setup menu.
Here you can set the photo resolution, video resolution, date, backlight and
language. Once in the setup menu, you can use the left/right buttons to choose
setting project and press ok button to user sub-menu. Within a sub-menu, you
can scroll from one item to another using the left/right button. The ok button is for
conrmation and exit.
Specication
Field of application
Camping and outdoor leisure, wildlife
observation, hunting
Optical magnication 10x
Digital zoom 8x
Lens diameter 43mm
Field of view 10°
Image sensor CMOS
IR Illuminator power/wavelength 3W/850nm
Max. viewing distance 250-300 Meters for night
Photo resolution 40M, 30M, 25M, 20M, 10M, 8M, 5M 3M
Photo format JPG
Video resolution 2.5K UHD, 1080FHD, 1080P, 720P
Video format AVI
Display 3 inch IPS screen
Operating temperature -30° up to +55°C
Language
English Japanese
French Spanish
Portuguese German
Korean Italian
Chinese Russian
Arabic
Recording during the day Color
Recording at night Black and white
Memory Micro SD card, max to 128 GB
Port Type-C
Battery Built-in rechargeable lithium battery
NIGHT VISION
BARSKA® Optics, as manufacturer, warrants this new precision optical product to be
free of original defects in materials and/or workmanship for the length of time specied
by this warranty. This warranty does not include damage caused by abuse, improper
handling, installation, maintenance, normal wear-and-tear, unauthorized repairs or
modications and tampering in anyway.
This warranty applies only to products purchased within the United States, excluding
Alaska, the Hawaiian Islands and all U.S. territories in the Caribbean and the Pacic.
In the event of a defect within 30 days, the consumer must return the defective unit to
the BARSKA dealer (the place of purchase) at his/her own expense.
Beyond 30 days, BARSKA products should be sent to the following address for
warranty repairs. Products must be packed carefully and sturdily to prevent damage in
transit, and returned freight prepaid to:
BARSKA® OPTICS
Repair Department
855 Towne Center Drive
Pomona, CA 91767
For additional and updated information
please visit our website at www.barska.com
Please email [email protected] or call 1-909-445-8168 (Press 3 for Customer Service)
for Return Merchandise Number (RMA#) before any returns.
NOTE: All merchandise received without a valid RMA # will be returned to shipper at
his/her own expense.
Please include all of the following when returning BARSKA products for service and/or
replacement:
1. Please write your complete details (Name, Address, Telephone #, E-mail address,
RMA#, etc.)
2. Purchase receipt or Proof of Purchase. (Original/Copy)
3. A brief explanation of the defect.
4. A Check/Money Order of $25.00 to cover inspection, shipping and handling.
*Please allow 6-8 weeks for delivery.
This product will either be replaced or repaired at the discretion of the warrantor. If it’s
a discontinued item, we will replace the product with an equivalent product. Should
the repair not be covered by this warranty, an estimate will be sent for your approval.
Non-warranty repairs or refurbishing of your optical products are always provided at a
reasonable cost.
BARSKA® Optics shall not be liable for any consequential, incidental and/or contingent
damages whatsoever. We will not pay shipping, insurance or transportation charges
from you to us, or any import fees, duties and or taxes. This warranty supersedes all
previous BARSKA® Optics warranties.
BC807
1 YEAR LIMITED WARRANTY
08/24 ©2024 BARSKA®