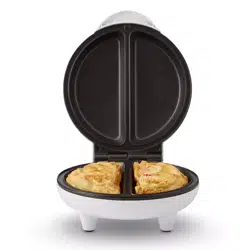
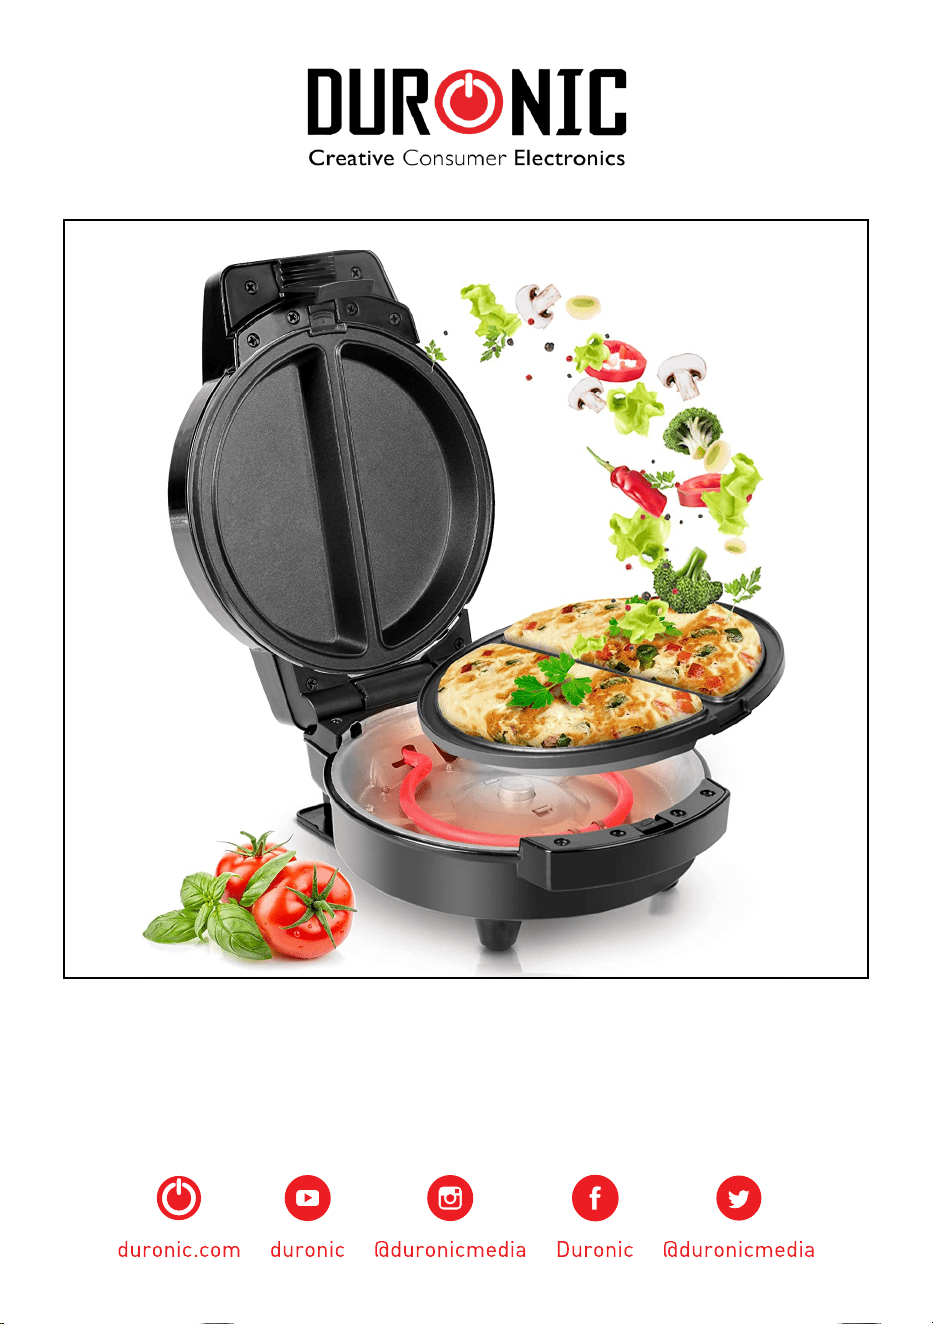
OM60 - Omelette Maker
PLEASE READ ALL THE INSTRUCTIONS BEFORE USE

2

3
English Manual
Manuel d’utilisation en français
Gebrauchsanleitung auf Deutsch
Manual de Instrucciones en Español
Manuale D’istruzioni In Italiano
Instrukcja obsługi. Polski
4
13
22
31
40
49
Contents

4
English Manual

5
Safety Instructions
• This appliance is for indoor/household use only. Do not use outdoors.
• The OM60 Omelette Maker is only for domestic use, it is not for
commercial use.
• This appliance is not intended for use by persons (including children) with
reduced physical, sensory or mental capabilities, or lack of experience
and knowledge, unless they have been given supervision or instruction
concerning use of the appliance by a person responsible for their safety.
• Do not operate this appliance if the power cable or plug is damaged. If
either is damaged, return it to Duronic for service or repair by professional
technician.
• Please ensure the mains power supply is 220-240V / 50Hz.
• Never try to replace the parts or repair the unit by yourself.
• To reduce the risk of electric shock, never operate this product near water,
with wet hands, spill liquid on the appliance or submerge it in water or any
other liquid.
• Do not use the unit near gas or other inammable materials (such as
benzene, paint thinner, sprays, etc.)
• Do not place an appliance on or near a hot gas or on a heated oven.
• Do not touch the cooking hotplates when hot. Use the handle to safely
hold or move the Omelette Maker.
• Unplug from the mains power outlet when not in use and also before
cleaning. Allow to cool down before putting on or taking off parts.
• Do not let the power cable hang over the edge of a table or counter, or
touch a hot surface.
• Pay close attention to the appliance whilst in use, never leave it
unattended.
• Do not use any accessories or attachments that did not come with the
Omelette Maker, as this can pose a risk of injury or can damage the
machine.
• Do not leave the appliance unattended when switched on.
• Do not use appliance for anything other than the intended use.
PLEASE READ THIS MANUAL CAREFULLY BEFORE USING AND RETAIN
IT FOR FUTURE REFERENCE

6
Safety Instructions (Continued)
• Always attach plug to appliance rst, then plug the cable into the wall
outlet. To disconnect, remove plug from wall outlet.
• This appliance is only to be operated in the closed position.
• When setting up your Omelette Maker, ensure that it is placed on a at,
even and dry surface.
• The appliance is not intended to be operated by means of an external
timer or separate remote-control system.
• The temperature of the outside cover surfaces may be high when the
appliance is operating.
PLEASE NOTE: You may notice a faint smoke or odour when rst using the
OM60 Omelette Maker. This is completely normal and should disappear after
the rst few uses.
7
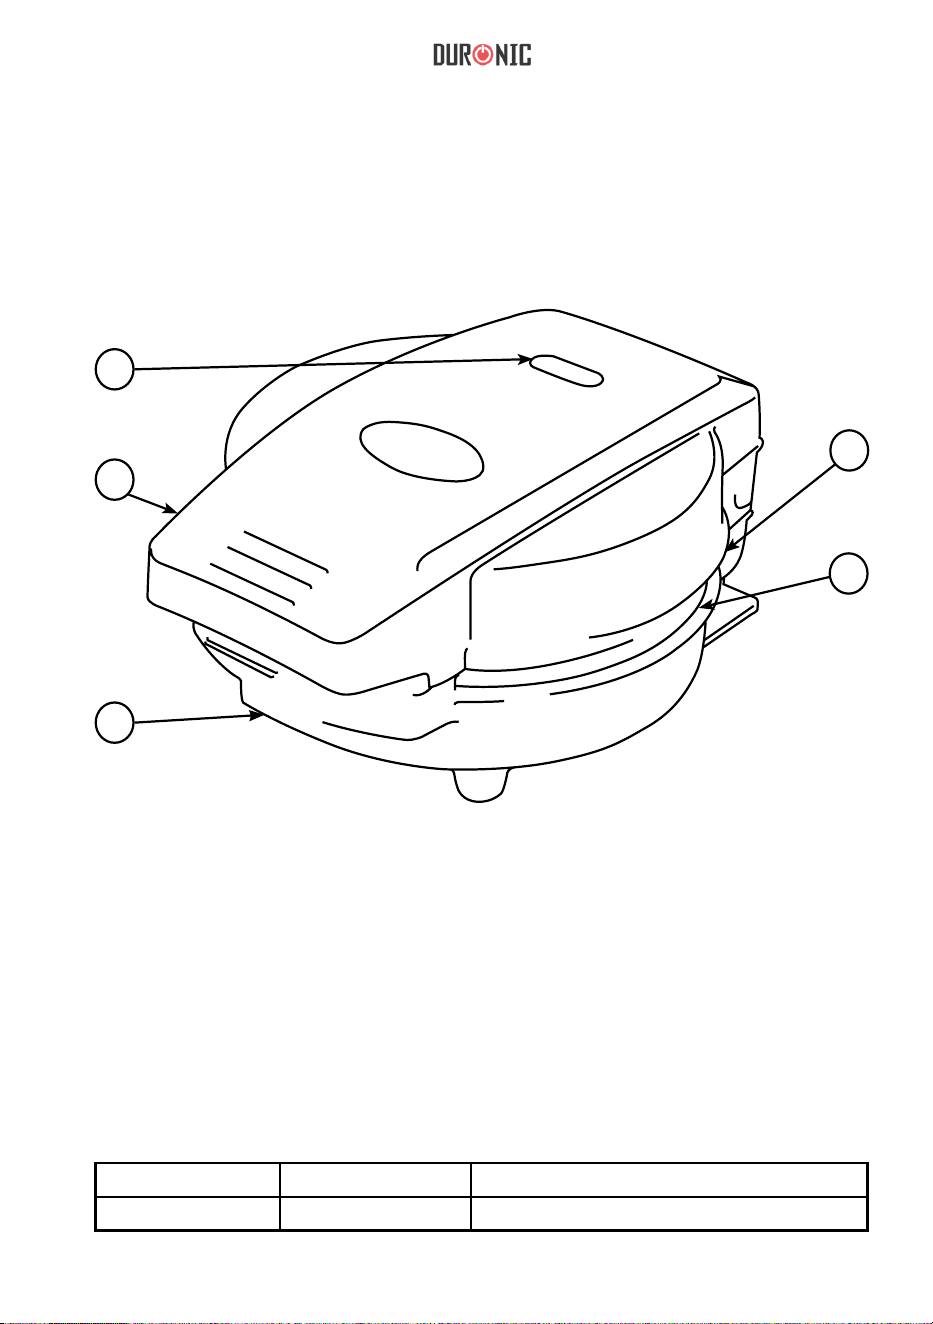
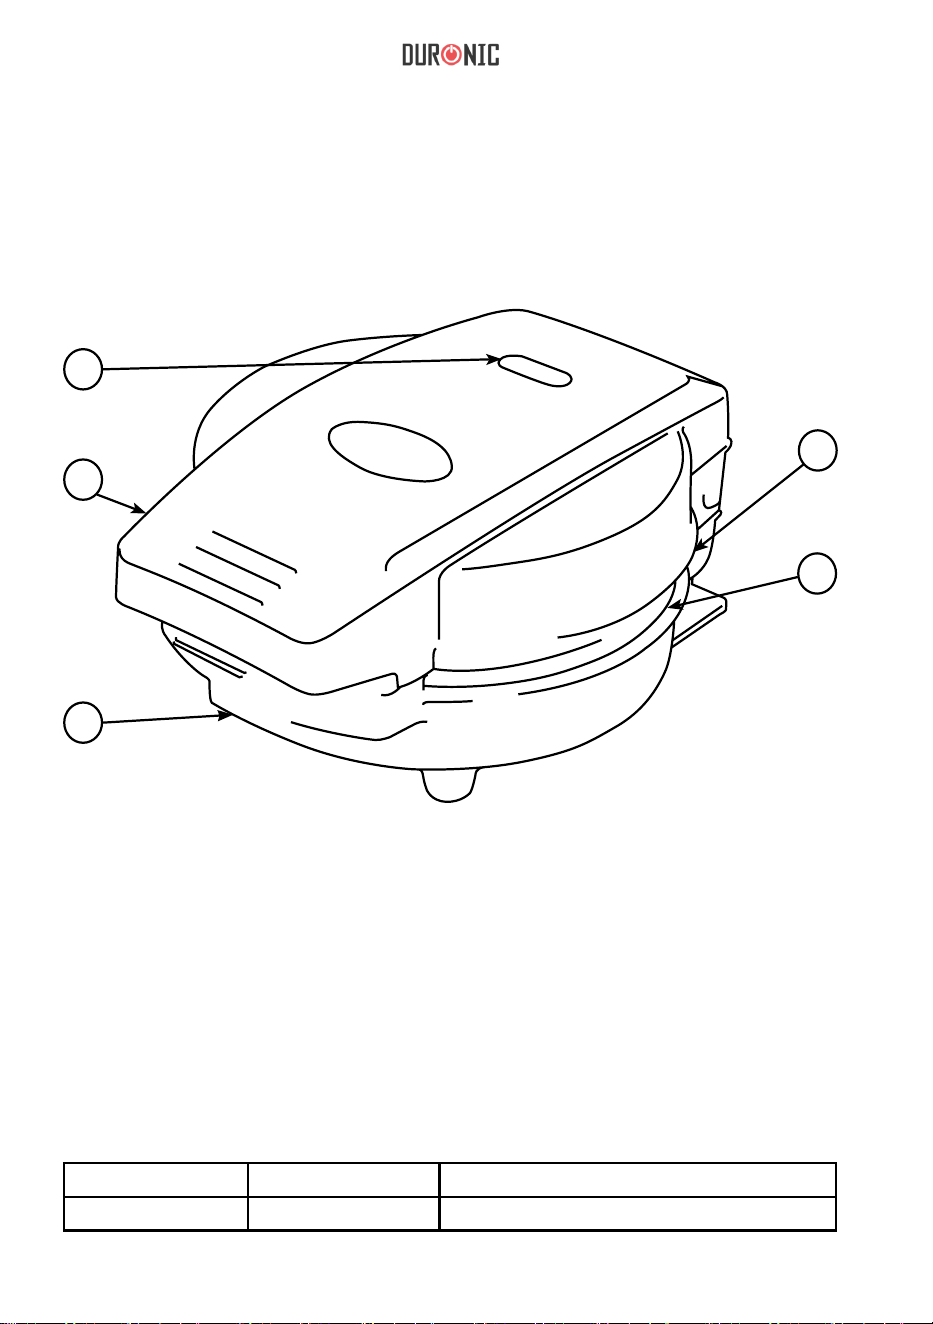
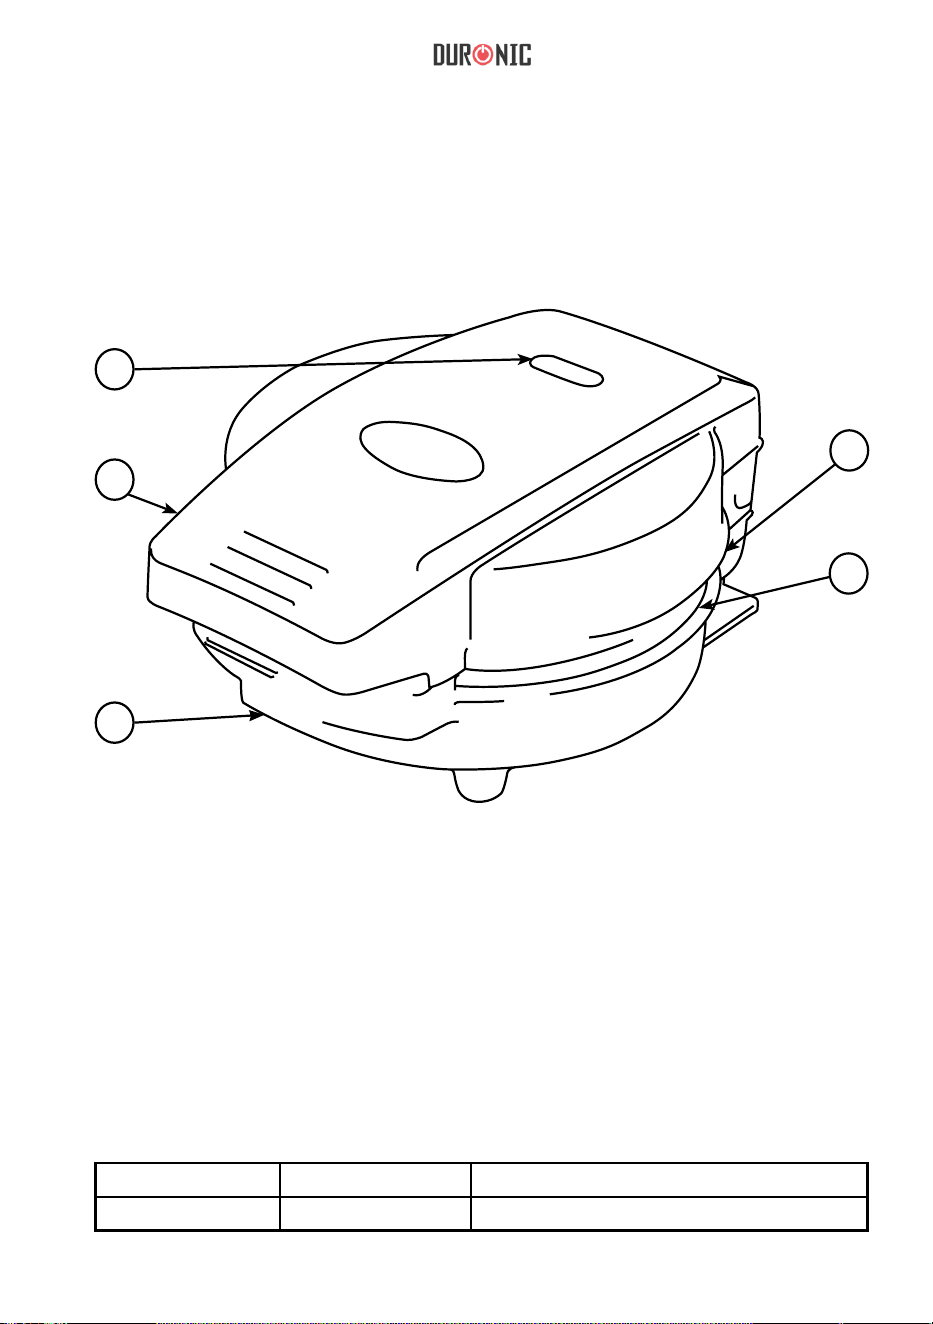
1) ‘Ready’ light indicator
2) Handle
3) Bottom cover
1
2
3
5
4
4) Top cover
5) Cooking hotplates
MODEL POWER VOLTAGE RATING
OM60 600W 220-240V / 50Hz
Features and Specications

8
How to Use
FIRST USE
Unpack your OM60 Omelette Maker and set the packaging aside. Open the
lid, clean the cooking surfaces thoroughly by wiping them with a damp sponge
and dry the surfaces with a paper towel.
HOW TO MAKE OMELETTES
Plug the power cable into a mains outlet and allow the Omelette Maker to
preheat while you prepare the eggs and other ingredients.
The indicator light will illuminate when the plug is connected to the mains
outlet; it will stay on during preheating, then the indicator light will go off when
appliance has heated up to the optimal temperature. It will take around 3
minutes to heat up, then the red light will turn off to indicate that the Omelette
Maker is ready for use.
1. Four large eggs will make two omelettes.
2. Carefully pour the egg mixture into the hotplates (careful not to
overll) along with any other ingredients you wish to add to your
omelette. If you are using vegetables or ingredients that require more
cooking than the egg, cook these ingredients rst in the hotplates for
a couple of minutes before adding the egg mixture.
3. Close the lid gently. Cook the egg mixture for around 2-3 minutes.
4. Remove the cooked omelettes from the hotplates with a plastic or
wooden spatula. Be careful with your omelettes, as they will be quite
hot. Allow to cool for a few minutes before enjoying.
The hotplates are non-stick so you do not normally need to add anything
to grease them. However, if you nd your ingredients stick to the plates
too much, you may need to wipe a very small amount of cooking oil with
a pastry brush onto the hotplates.
If you wish to continue making omelettes, the next batch will cook more
quickly as the hotplates will already be hot.

9
Cleaning and Maintenance
Always unplug the Omelette Maker from power source and wait until it cools
down before cleaning.
There is no need to take your Omelette Maker apart for cleaning after every
use. Simply dry the hotplates with a paper towel to absorb excess oil. Brush
away any crumbs from the grooves, and then wipe the hotplates with damp
cloth and mild soap.
For a deeper clean, the hotplates can be removed and washed by hand in
warm water and soap. Then dry with a towel. Only place the hotplates back in
the machine once they are fully dry. To clean handles and other parts of the
machine, use a damp (well wrung) cloth with mild soap.
5. Unplug the power cable after cooking, and allow the Omelette Maker
to cool down before cleaning.
CAUTION:
• Cooking surface is hot; handle with care.
• Always use protective, heat-resistant, gloves or mitts when
handing this product to avoid steam or other burns.
• Always remove the food from the omelette maker by using a
plastic heatproof spatula or tongs.
CAUTION:
• Never immerse the machine in water.
• Avoid using sharp utensils, steel wool, metal scouring pads or
abrasive cleaners as they will scratch the non-stick surface.
• Do not use cleansers or oven cleaners on the heating plates.

10
Basic Omelette Recipe
Makes two omelettes
Cheese & Bacon Omelette Recipe
Makes two omelettes
INGREDIENTS:
• 4 large eggs
• Fresh or dried herbs – chives work particularly well
• Salt and pepper, according to taste
METHOD:
Plug in the Omelette Maker. Break the eggs into a measuring jug or bowl
and beat well. Season with salt and pepper and then add the herbs. Stir well.
Lightly oil the hotplates if needed. Pour the egg mixture into the hotplates
dividing it in equal amounts . Close the lid by its handle. Leave to cook for 2-3
minutes.
INGREDIENTS:
• 4 large eggs
• Handful of grated cheddar cheese
• 2-4 rashers of bacon, cut into small strips
• Salt and pepper, according to taste
METHOD:
Plug in the Omelette Maker. Break the eggs into a measuring jug or bowl and
beat well. Season with salt and pepper and then add the cheese. Stir well.
Lightly oil the cooking hotplates if needed. Add the sliced bacon, dividing it
equally between the two hotplates and gently fry. Once the bacon is just about
done, pour equal amounts of the egg mixture into each hotplate. Close the lid
by its handle. Leave to cook for 2-3 minutes.

11
Tomato and Feta Omelette Recipe
Makes two omelettes
INGREDIENTS:
• 4 large eggs
• 50g of feta cheese, cut into small cubes
• 6 cherry tomatoes, sliced in half
• 2 spring onions, nely chopped
• Salt and pepper, according to taste
METHOD:
Plug in the Omelette Maker. Break the eggs into a measuring jug or bowl and
beat well. Season with salt and pepper and then add the cheese. Stir well.
Lightly oil the hotplates. Add the sliced tomatoes, dividing it equally between
the two hotplates and gently fry for 2 minutes. Pour equal amounts of the egg
mixture into each hotplate. Close the lid by its handle. Leave to cook for 2-3
minutes.

12
Warranty
1 Year Guarantee from Shine-Mart Ltd, Trademark owners of Duronic Products.
NOTE: THESE STATEMENTS DO NOT AFFECT YOUR STATUTORY RIGHTS AS A
CONSUMER
This product has been manufactured under the strictest or quality control procedures, and
using the highest quality of materials, to ensure excellent performance and reliability. It will
give very good and long lasting service, provided it is properly used and maintained. The
product is guaranteed for 1 years from the date of original purchase. If any defect arises due
to a faulty materials or poor workmanship, the faulty product must be returned to the original
place of purchase. Refund or replacement is at the discretion of that company.
Duronic Products are offered with a 1 year guarantee under the following conditions:
1. The product must be returned to the retailer with original proof of purchase.
2. The product must be installed and used in accordance with the instructions
contained in this operating manual.
3. It must be used only for domestic purposes.
4. It does not cover wear and tear, malicious damage, misuse, neglect,
inexpert repairs or consumable parts.
5. Shine-Mart Ltd has no responsibilities for accidental or consequential loss or damage.
6. Shine-Mart Ltd are not liable to carry out any type of servicing work,
under the guarantee
7. Valid in the UK only
This product is tted with CE:1363 plug and fuse
Imported by Shine-Mart Ltd, RM3 8SB
Information on waste Disposal for Consumers of
Electrical & Electronic Equipment.
This mark on a product and/or accompanying documents indicates that when it
is to be disposed of, it must be treated as Waste
Electrical & Electronic Equipment, (WEEE).
Any WEEE marked products must not be mixed with general household waste,
but kept separate for the treatment, recovery and recycling of the materials used.
For proper treatment, recovery and recycling; please take all WEEE marked
waste to your Local Authority Civic waste site,
where it will be accepted free of charge.
If customers dispose of Waste Electrical & Electronic Equipment correctly, they
will be helping to save valuable resources and preventing any potential negative
effects upon human health and the environment, of any hazardous materials that
the waste may contain.

13
Manuel d’utilisation en français

14
de sécuritéInstructions
• Cet appareil est conçu pour un usage intérieur. N’utilisez pas à l’extérieur.
• La Poêle à Omelette OM60 est conçue pour un usage domestique et ne peut être
utilisé à des fins commerciales.
• Ce produit n’est pas conçu pour être utilisé par des personnes, y compris des
enfants, dont les capacités physiques, sensorielles ou mentales sont limitées ou
qui manquent de savoir et d’expérience, à moins qu’elles ne soient supervisées ou
qu’elles aient reçu les instructions nécessaires à l’utilisation de cet appareil par la
personne responsable de leur sécurité.
• N’utilisez pas l’appareil si le câble ou la prise sont endommagés et/ou ne
fonctionnent pas correctement. Si l’un des deux est abimé, contactez Duronic ou
faites réparer l’appareil par un professionnel.
• Assurez-vous que le voltage soit de 220V-240V/50Hz.
• N’essayez jamais de remplacer des éléments ou réparer l’appareil vous-même.
• Afin de réduire les risques d’électrocutions, n’utilisez jamais ce produit à
proximité d’eau et/ou avec des mains humides, ne renversez pas de liquide sur
l’appareil et ne le submergez pas sous l’eau ou tout autre liquide.
• N’utilisez pas l’appareil près du gaz ou tout autre combustible (comme du
benzène, du diluant pour peinture, du spray, etc.).
• Ne placez pas l’appareil sur ou à proximité de gaz chaud ou d’un four chaud.
• Ne touchez pas les plaques de cuisson lorsqu’elles sont chaudes. Utilisez la
poignée pour tenir ou déplacer la poêle à omelette en toute sécurité.
• Débranchez l’appareil de la prise lorsqu’il n’est pas en cours d’utilisation et avant
de le nettoyer. Laissez l’appareil refroidir avant de le toucher.
• Ne laissez pas le câble pendre du bord d’une table ou d’un comptoir ou toucher
une surface chaude.
• Ne laissez pas l’appareil sans surveillance lorsque celui-ci est en cours d’usage.
• N’utilisez pas d’accessoires qui n’ont pas été fournis avec la Poêle à Omelette
car cela pose des risques d’accidents ou peut endommager l’appareil.
Veuillez lire attentivement ce manuel avant d’utiliser le produit et gardez-le
pour référence future.

15
Instructions de sécurité (Suite)
• N’utilisez pas l’appareil pour un autre usage que celui prévu lors de sa
conception.
• Raccordez toujours le câble à l’appareil avant de le brancher dans une
prise. Pour débrancher l’appareil, débranchez le câble de la prise.
• Cet appareil doit seulement être utilisé dans la position fermée.
• Lorsque vous installez votre Poêle à Omelette, assurez-vous qu’elle soit
placée sur une surface plate et sèche.
• Cet appareil n’a pas été conçu pour être contrôlé par un minuteur externe
ou une télécommande.
• La température des surfaces extérieures peut être chaude lorsque
l’appareil est en cours d’usage.
ATTENTION : Vous pourriez remarquer un peu de fumée ou une odeur
particulière lors de votre première utilisation de la Poêle à Omelette OM60.
Ceci est complétement normal et devrait disparaitre après quelques
utilisations.
16
1) Signal
2) Poignée
3) Couvercle
1
2
3
5
4
4) Couvercle
5) Plaques
lumineux
inférieur
supérieur
de cuisson
MODÈLE PUISSANCE TENSION
OM60 600W 220-240V / 50Hz
Aperçu des éléments
NOMINALE

17
Comment
PREMIÈRE
COMMENT
1.
utiliser la Poêle à Omelette
UTILISATION
Déballez votre Poêle à Omelette OM60 et laissez l’emballage de côté.
Ouvrez le couvercle et nettoyez toutes les surfaces de cuisson à l’aide d’une
éponge humide. Séchez-les avec des serviettes en papier.
CUIRE DES OMELETTES
Branchez le câble dans la prise et laissez l’appareil préchauffer pendant que
vous préparez vos œufs et autres aliments.
Le signal lumineux s’allume lorsque l’appareil est branché. Il reste allumé
pendant que la Poêle préchauffe et s’éteint quand la température de cuisson
idéale est atteinte. L’appareil prend environ 3 minutes à préchauffer.
Quatre gros œufs vont donner deux omelettes.
2. Versez prudemment le mélange d’œufs et vos autres ingrédients sur
les plaques de cuisson en faisant attention à ne pas déborder. Si vous
cuisinez des légumes ou ingrédients qui nécessitent un temps de
cuisson plus long que les œufs, cuisez-les quelques minutes sur les
plaques de cuissons avant d’ajouter vos œufs.
3. Fermer doucement le couvercle. Laissez cuire pendant 2 à 3
minutes.
4. Retirez votre omelette des plaques de cuisson avec une spatule
en plastique ou en bois. Soyez prudent car votre omelette est très
chaude ; laissez la température baisser avant de déguster.
Les plaques de cuisson sont non adhésives donc vous ne devez
généralement pas ajouter de matière grasse. Cependant, si vous
constatez que les ingrédients restent attachés, vous pouvez étaler un
peu d’huile de cuisson à l’aide d’un pinceau à pâtisserie sur les
plaques de cuisson.
Si vous souhaitez continuer à faire des omelettes, la prochaine
fournée sera cuite plus rapidement étant donné que les plaques de
cuisson seront déjà chaudes.

18
Nettoyage et Maintenance
Débranchez toujours la Poêle à Omelette et laissez-la refroidir avant de la
nettoyer.
Il n’est pas nécessaire de détacher votre appareil pour le nettoyage après
chaque usage. Séchez simplement les plaques de cuisson avec des serviettes
en papier afin de récolter les excès de graisses. Brossez les miettes des
rainures et essuyez les plaques à l’aide d’un tissu humide et un peu de savon.
Pour un nettoyage plus en profondeur, les plaques de cuisson peuvent être
retirées et lavées à la main avec du savon et l’eau chaude. Séchez ensuite
avec un essui. Ne replacez les plaques dans la machine qu’une fois qu’elles
sont tout à fait sèches. Pour nettoyer les poignées et autres parties de
l’appareil, utilisez un tissu humide (bien essoré) et un peu de savon.
5. Débranchez le câble une fois que vous avez terminé. Laissez la
Poêle à Omelette refroidir avant de la nettoyer.
ATTENTION :
• Les plaques de cuisson sont chaudes, procédez avec prudence.
• Utilisez toujours des gants protecteurs résistants à la chaleur ou
des maniques lorsque vous utilisez cet appareil afin d’éviter la
vapeur et autres risques de brulures.
• Retirez toujours la nourriture à l’aide d’un instrument de cuisine
résistant à la chaleur.
ATTENTION:
• Ne submergez jamais l’appareil sous l’eau.
• Evitez d’utiliser des ustensiles pointus, de la laine d’acier, des
tampons à récurer en métal ou des nettoyants abrasifs car ils vont
abîmer la surface non adhésive.
• N’utilisez pas de nettoyants ou nettoyants pour four sur les plaques
de cuisson.

19
Recette
Pour deux omelettes
Omelette au
Pour deux omelettes
INGRÉDIENTS:
de l'Omelette de base
fromage et au lard
• 4 gros œufs.
• Des herbes fraiches ou sèches. La ciboulette
fonctionne particulièrement bien.
• Du sel et du poivre.
:
Branchez la Poêle à Omelette. Cassez les œufs dans un bol et battez-les.
Assaisonnez à votre goût et ajoutez les herbes. Mélangez bien. Graissez
légèrement les plaques de cuisson si nécessaire. Versez le mélange d’œufs
sur les plaques de cuisson en divisant équitablement. Fermez le couvercle à
l’aide de la poignée et laissez cuire pendant 2-3 minutes.
MÉTHODE
INGRÉDIENTS :
• 4 gros œufs.
• Une poignée de cheddar râpé.
• 2 à 4 tranches de lard coupées en bandelettes.
• Du sel et du poivre.
:
Branchez la Poêle à Omelette. Cassez les œufs dans un bol et battez-les.
Assaisonnez à votre goût et ajouter le fromage. Mélangez bien. Graissez
légèrement les plaques de cuisson si nécessaire. Divisez le lard entre les
plaques de cuissons et laissez-le cuire. Une fois qu’il est presque cuit,
répartissez le mélange d’œufs entre les plaques de cuisson. Fermer le
couvercle à l’aide de la poignée et laissez cuire pendant 2-3 minutes.
MÉTHODE

20
Omelette à
Pour deux omelettes
INGRÉDIENTS
la Feta et à la tomate
:
• 4 gros œufs.
• 50 g de Feta coupés en petits cubes.
• 6 tomates cerises coupées en deux.
• 2 oignons jeunes finement hachés.
• Du sel et du poivre.
:
Branchez la Poêle à Omelette. Cassez les œufs dans un bol et battez-les.
Assaisonnez à votre goût et ajoutez le fromage. Mélangez bien. Graissez
légèrement les plaques de cuisson si nécessaire. Ajoutez les tomates cerises,
réparties entre les plaques, et laissez cuire 2 minutes. Répartissez le mélange
d’œufs entre les plaques de cuisson. Fermez le couvercle à l’aide de la poignée
et laissez cuire pendant 2-3 minutes.
MÉTHODE

21
Garantie
Garantie et service après-vente
1 an de garantie de la part de Shine-Mart Ltd, propriétaire de la marque Duronic.
NOTE : CES DÉCLARATIONS N’AFFECTENT EN RIEN VOTRE DROIT STATUTAIRE EN
TANT QUE CONSOMMATEUR
Ce produit a été produit en suivant les procédures de contrôle de qualité les plus strictes en
utilisant des matériaux de qualité pour assurer durabilité et performance. Cet appareil vous
offrira d
e longues années de service tant que vous utilisez correctement cette machine et
suivez les instructions de maintenance contenues dans ce manuel. Ce produit est garantit
pour 1 an à partir de la date originelle d’achat. Si ce produit était endommagée en raison
d’un problème électrique ou d’une fabrication imparfaite, le produit défectueux peut être
remplacé ou réparé au vendeur à la discrétion du vendeur, du revendeur ou de la marque
sous conditions:
1. Le produit doit être retourné avec la preuve originale d’achat.
2. Le produit doit être installé et utilisé en accord avec les instructions contenues dans ce
manuel d’utilisation.
3.
Le produit doit être réservé à un usage domestique.
4. La garantie ne protège pas contre les dommages dus à l’usure normale, l’utilisation
malveillante de l'appareil, la mauvaise utilisation d'un élément, les réparations
conduites par des non-experts ainsi que
les p
ièces consommables.
5. Shine-Mart Ltd ne porte pas de responsabilité pour tout dommage ou perte accidentel ou
conséquent causé par ce produit.
6. Shine-Mart Ltd se dégage de toute responsabilité en matière de réparation durant la
période de garantie.
7. Valide dans toute l’Union Européenne.
Ce produit est fourni avec une prise européenne
Importé par Shine-Mart Ltd, RM3 8SB.
Ce symbole apparaît sur le produit et/ou les documents accompagnant ce produit
pour indiquer que le processus de destruction de ce produit doit être traité
conformément aux règles de gestion des déchets électriques et électroniques
(WEEE). Les produits marqués WEEE ne doivent pas être mélangés avec les
déchets ménagers et doivent être séparés pour procéder au traitement et
recyclage des composants. Afin de recycler ce produit, veuillez déposer tous les
composants marqués WEEE au site de recyclage le plus proche où ce produit
sera repris gratuitement. Ce geste a pour but d'aider la préservation des
ressources précieuses et prévient les potentiels effets négatifs que ces
composants ou tout autre composant dangereux ont sur la santé et
l’environnement.
Suivez-nous sur
www.duronic.com @duronic_france Duronic France @Duronic_France

22
Gebrauchsanleitung auf Deutsch

23
•
Sicherheitshinweise
•
Dieses Gerät ist nur für den Haushaltsgebrauch bestimmt. Nicht im Freien
verwenden.
•
OM60 Omelette Maker ist nur für den Hausgebrauch bestimmt, nicht für den
gewerblichen Gebrauch.
•
Dieses Gerät ist nicht für Personen (einschließlich Kinder) mit
eingeschränkter körperlicher, sensorischer oder geistiger Leistungsfähigkeit
oder mangelnder Erfahrung vorgesehen, es sei denn, sie wurden von einer
für ihre Sicherheit verantwortlichen Person beaufsichtigt oder in Bezug auf die
Verwendung des Geräts angewiesen .
•
Nutzen Sie dieses Gerät nicht, wenn das Netzkabel oder der Stecker
beschädigt ist. Wenn einer der beiden beschädigt ist, senden Sie ihn zur
Reparatur durch einen professionellen Techniker an Duronic zurück.
•
Stellen Sie sicher, dass die Netzspannung 220-240 V / 50 Hz beträgt.
•
Versuchen Sie nicht, Teile auszutauschen oder das Gerät selbst zu reparieren.
•
Um das Risiko eines Stromschlags zu verringern, verwenden Sie dieses
Produkt nicht in der Nähe von Wasser oder mit nassen Händen, keine
Flüssigkeit auf das Gerät verschütten oder in Wasser oder andere Flüssigkeit
tauchen.
Verwenden Sie das Gerät nicht in der Nähe von Gas oder anderen
brennbaren Materialien
•
•
Berühren Sie nicht die Kochplatten, wenn diese heiß sind. Verwenden Sie
den Griff, um den Omelette Maker zu bewegen.
•
Ziehen Sie den Netzstecker aus der Steckdose, wenn es nicht benutzen wird
sowie vor der Reinigung.
•
Lassen Sie das Netzkabel nicht über die Kante eines Tisches oder einer
Theke hängen und keine heiße Oberfläche berühren.
•
Lassen Sie das Gerät während des Gebrauchs nicht unbeaufsichtigt.
•
Verwenden Sie kein Zubehör, das nicht mit dem Omelette Maker
geliefert wurde, da dies zu Verletzungen führen oder die Maschine
beschädigen kann.
•
Lassen Sie das Gerät beim Einschalten nicht unbeaufsichtigt.
Verwenden Sie das Gerät nur für den vorgesehenen Zweck.
Bitte lesen Sie dieses Handbuch sorgfältig durch, bevor Sie dieses Produkt
verwenden, und bewahren Sie es zum späteren Nachschlagen auf.

24
•
Sicherheitshinweise
Stecken Sie immer zuerst den Stecker in das Gerät und dann das Kabel in
die Steckdose.
•
•
Dieses Gerät darf nur in geschlossener verwendet werden.
Stellen Sie beim Aufstellen Ihres Omelette Maker sicher, dass sich
dieser auf einer ebenen und trockenen Oberfläche befindet.
•
•
Das Gerät darf nicht mit einem externen Timer oder einer separaten
Fernbedienung betrieben werden.
BITTE BEACHTEN SIE: Bei der ersten Verwendung des OM60 Omelette
Maker können Sie einen leichten Rauch Geruch bemerken. Dies ist völlig
normal und sollte nach den ersten Anwendungen verschwinden.
Die Außenflächen kann wöhrend des Betriebs sehr heiß werden.

25
1) Leuchtanzeige
2) Griff
3) Untere
1
2
3
5
4
4) Obere
5) Kochplatten
Abdeckung
Abdeckung
MODELL
OM60 600W 220-240V / 50Hz
Merkmale und Spezifikationen
VERSORGUNGSSPANNUNG
LEISTUNG

26
Entnehmen Sie den Omelett Maschine aus der Verpackung und entfernen Sie das
Verpackungsmaterial vollständig. Prüfen Sie den Omelett Maschine auf
Beschädigungen. Bei Beschädigungen darf der Omelett Maschine nicht in Betrieb
genommen werden. Reinigen Sie den Omelett Maschine, wie im Kapitel
„Reinigung“ beschrieben.
1.
Inbetriebnahme
VOR DER INBETRIEBNAHME
INBETRIEBNAHME
Stecken Sie das Netzkabel in eine Steckdose und lassen Sie den Omelette
Maschine vorheizen, während Sie die Eier und die andere Zutaten zubereiten.
Sobald der Stecker in die Steckdose angeschlossen wird, leuchtet die
Leuchtanzeige auf. Sobald das Gerät die korrekte Temperatur erreicht
schaltet es sich aus. Der Aufheizen Prozess dauert ca. 3 Minuten.
Vier
2.
große Eier ergeben zwei Omeletts.
Gießen Sie die Eimischung vorsichtig zusammen mit allen anderen
Zutaten in die Kochplatten (achten Sie darauf, dass sie nicht überlaufen).
Wenn Sie Gemüse oder Zutaten verwenden, die eine längere Kochzeit
benötigen, kochen Sie diese Zutaten zunächst einige Minuten in den
Kochplatten, bevor Sie die Eimischung hinzufügen.
3. Schließen
4.
Sie den Deckel vorsichtig. Die Eimischung ca. 2-3 Minuten
kochen lassen.
Die Kochplatten sind antihaftbeschichtet, sodass Sie kein Fette
hinzufügen müssen. Falls nötig, kann eine kleine Mänge an Fett
hinzufügt werden.
Entfernen Sie die gekochten Omeletts mit einem Plastik- oder
Holzspatel von den Kochplatten.
Falls Sie weitere Omeletts kochen möchten, beachten Sie das die
Kochzeit weniger als 3 Minuten beträgt, da das Gerät bereits eine sehr
hohe Temperatur erreicht hat.

27
5.
Reinigung und Instandhaltung
Trennen Sie den Omelette Maker immer vom Strom und lassen Sie das
Gerät abgekühlt, bevor Sie diesen reinigen.
Sie müssen Ihren Omelette Maker nicht nach jedem Gebrauch zur
Reinigung auseinander nehmen. Trocknen Sie die Kochplatten einfach mit
einem Papiertuch, um überschüssiges Öl aufzunehmen. Entfernen Sie
alle Krümel von den Rillen und wischen Sie die Kochplatten mit einem
feuchten Tuch ab.
Für eine gründlichere Reinigung können die Kochplatten entfernt und von
Hand in warmem Wasser gewaschen werden. Dann mit einem Tuch
trocknen. Setzen Sie die Kochplatten erst wieder in die Maschine ein, wenn
sie vollständig trocken sind. Verwenden Sie zum Reinigen der Griffe und
anderer Teile der Maschine ein feuchtes (gut ausgewrungenes) Tuch mit.
Lassen Sie den Omelette Maker vor dem Reinigen abkühlen.
ACHTUNG:
•
•
Kochfläche ist sehr heiß.
•
Verwenden Sie immer hitzebeständige Handschuhe um
Verbrennungen zu vermeiden.
ACHTUNG
•
Nehmen Sie die Lebensmittel immer mit einem
hitzebeständigen Kunststoffspatel oder einer Zange aus
dem Omelette-Hersteller.
•
Tauchen Sie die Maschine niemals in Wasser.
•
Verwenden Sie keine scharfen Utensilien, Stahlwolle,
Scheuerschwämme oder Scheuermittel, da diese die
Antihaftoberfläche zerkratzen.
Verwenden Sie keine Ofenreiniger für die Heizplatten.

28
•
Klassisches Omelett Rezept Omelettrezept
Für zwei Omeletts
ZUTATEN:
Käse & Speck Omelett
Für zwei Omeletts
•
4 große Eier
•
Frische oder getrocknete Kräuter - Schnittlauch
•
Salz und Pfeffer nach Geschmack
ZUBEREITUNG:
Stecken Sie den Omelette Maker ein. Geben Sie die Eier in eine Schüssel
und gut mischen. Mit Salz und Pfeffer würzen und die Kräuter hinzufügen.
Gut umrühren. Bei Bedarf die Kochplatten leicht einölen. Gießen Sie die
Eimischung in die Kochplatten und teilen Sie sie in gleichen Mengen.
Schließen Sie den Deckel. Für 2-3 Minuten kochen lassen.
ZUTATEN:
•
4 große Eier
•
Handvoll geriebener Cheddar
•
2-4 Speckstreifen in kleine Streifen schneiden
ZUBEREITUNG:
Salz und Pfeffer nach Geschmack
Stecken Sie den Omelette Maker ein. eben Sie die Eier in eine Schüssel
und gut mischen. Mit Salz und Pfeffer würzen und den Käse hinzufügen. Gut
umrühren. Bei Bedarf die Kochplatten leicht einölen. Fügen Sie den
geschnittenen Speck hinzu, teilen Sie ihn gleichmäßig auf die beiden
Kochplatten auf und braten Sie ihn vorsichtig an. Sobald der Speck fast
fertig ist, gießen Sie die Eimischung. Schließen Sie den Deckel. Für 2-3
Minuten kochen lassen.

29
•
Tomaten und Feta Omelett
Für zwei Omeletts
ZUTATEN:
•
4 große Eier
•
50 g Feta-Käse, in kleine Würfel geschnitten
•
6 Kirschtomaten, halbiert
•
2 Frühlingszwiebeln, fein gehackt
ZUBEREITUNG:
Salz und Pfeffer nach Geschmack
Stecken Sie den Omelette Maker ein. eben Sie die Eier in eine Schüssel
und gut mischen. Mit Salz und Pfeffer würzen und den Käse hinzufügen.
Gut umrühren. Die Kochplatten leicht einölen. Fügen Sie die geschnittenen
Tomaten hinzu, verteilen Sie sie gleichmäßig auf die beiden Kochplatten
und braten Sie sie vorsichtig 2 Minuten lang. Gießen Sie gleiche Mengen
der Eimischung in die Kochplatte. Schließen Sie den Deckel. Für 2-3
Minuten kochen lassen.
30
Shine-Mart Ltd, der Markeninhaber von Duronic Produkten, bietet 1 Jahr Gewährleistung.
HINWEIS: DIESE BEDINGUNGEN BEEINFLUSSEN IHRE GESETZLICHE RECHTE ALS
VERBRAUCHER NICHT
Dieses Produkt wurde unter strengen Qualitätskontrollen produziert und aus hochwertigen
Materialien hergestellt, um ausgezeichnete Leistung und Zuverlässigkeit zu gewährleisten.
Sofern das Produkt korrekt benutzt und gewartet wird, kann eine langlebige Lebensdauer
erwartet werden.
Das Produkt hat eine Gewährleistung von einem Jahr ab Kaufdatum. Beim Auftreten eines
Schadens, der von fehlerhalten Materialien oder Verarbeitung verursacht wurde, sollte das
defekte Produkt an den ursprünglichen Verkäufer zurückgegeben werden. Die Erstattung
oder Umtausch erfolgt nach Vorschriften des Unternehmens.
Duronic Produkte haben 1 Jahr Gewährleistung unter folgenden Bedingungen:
1. Das Produkt muss mit dem Kaufnachweis zurückgegeben werden.
2. Das Produkt muss unter den Anweisungen und Anleitungen installiert und benutzt
worden sein.
3. Es muss ausschließlich für den Hausgebrauch genutzt worden sein.
4. Natürliche Abnutzung oder Verschleiß, böswillige Beschädigung, Missbrauch,
Vernachlässigung und unsachgemäße Reparaturen sind von der Gewährleistung
ausgeschlossen.
5. Shine-Mart Ltd übernimmt keine Verantwortung für zufällige oder Folgeschäden.
6. Shine-Mart Ltd ist nicht für Wartungsarbeiten zuständig. Diese fallen nicht unter die
Gewährleistung.
7. Gültig in der EU
Dieses Produkt ist mit tted CE geprüfte Typ-F
Euro Stecker/BS Stecker ausgestattet
Von Shine-Mart Ltd, RM3 8SB importiert
Information über Abfalllagerung für Verbraucher von elektronischen Geräten.
Dieses Zeichen auf dem Produkt und/oder auf mitgelieferte Dokumenten
zeigt, dass, wenn eine Entsorgung erfolgt, das Gerät an einer Elektro- und
Elektronikgeräte-Abfall-Sammelstelle (WEEE) abgegeben werden muss.
Um eine weitere Behandlung und Weiterverarbeitung der Materialien zu
gewährleisten dürfen diese WEEE-markierten Produkte nicht mit dem Hausmüll
vermischt werden.
Für die korrekte Behandlung, Aufbereitung und Wiederverwendung geben Sie
alle WEEE-markierten Produkte zur kommunalen Abfallbeseitigungsanlage.
Dort können Sie diese kostenlos abgeben.
Wenn die Beseitigung von Elektro-und Elektronik-Altgeräten korrekt
durchgeführt wird, tragen Sie zur Gewinnung von wertvollen Ressourcen
bei, sowie einer möglichen Vermeidung von negativen Auswirkungen auf
Gesundheit und Umwelt.
Gewährleistung
Folgen Sie Uns

31
Manual De Instrucciones En Español

32
•
Instrucciones de seguridad
•
Utilice este aparato en un espacio interior/doméstico.
•
Este aparato no se ha creado con un fin comercial o industrial. Su uso es
doméstico.
•
No se recomienda la operación de este aparato por personas adultas o
niños con capacidades físicas, sensoriales o mentales reducidas a
menos que se encuentren bajo la supervisión de una persona
responsable de su seguridad.
•
Nunca utilice el aparato si el cable o la unidad no funcionan correctamente.
Si la máquina o el cable se ha estropeado, devuélvalo al servicio de Duronic
o póngase en contacto con un técnico profesional para repararlo.
•
Asegúrese de que la tensión de la corriente es compatible con la indicada.
•
No intente reemplazar alguna pieza o reparar el aparato usted mismo.
•
Para evitar el riesgo de descarga eléctrica, nunca utilice este producto
cerca del agua, con las manos mojadas, no derrame líquidos sobre el
aparato ni lo sumerja en agua o cualquier otro líquido.
Nunca opere la unidad cerca de gases o sustancias inflamables (alcohol,
sprays, etc.).
•
•
No coloque el aparato cerca de un horno precalentado.
•
No toque la superficie de cocción si está caliente. Use las asas para
mover la máquina o sostenerla.
•
Siempre que no esté en uso o vaya a limpiarlo, desconecte la máquina de
la corriente. Deje que se enfríe antes de poner o quitar alguna parte.
•
No se aconseja que el cable de alimentación cuelgue sobre el borde
de una mesa o que toque una superficie caliente.
•
Preste mucha atención al aparato mientras lo usa, nunca lo deje
desatendido.
•
No utilice ningún accesorio que no se incluya con el aparato, ya que
puede suponer un riesgo de lesiones o puede dañar el aparato.
•
No deje el aparato desatendido cuando esté encendido.
Lea este manual con atención y consérvelo para futuras consultas
No utilice el aparato para nada que no sea el uso indicado.

33
•
Instrucciones de seguridad
Siempre coloque primero el enchufe en el aparato y luego enchufe el
cable en la toma de corriente de la pared. Para desconectarlo, retire el
enchufe de la toma de corriente.
•
•
Para hacer tortillas, el aparato debe estar en la posición cerrada.
Utilice el aparato sobre una superficie plana, estable y resistente al
calor.
•
•
El aparato no debe operarse mediante un temporizador externo o
un sistema de control remoto separado.
AVISO: al utilizar por primera vez la máquina para hacer tortillas OM60
puede aparecer un ligero humo u olor. Esto es completamente normal y
debería desaparecer después de los primeros usos.
La temperatura de las superficies de la cubierta exterior puede ser
alta cuando el aparato está en funcionamiento.

34
1
2
3
5
4
1) Luz indicadora «listo»
2) Asa
3) Placa externa inferior
4) Placas de cocción
5) Placa externa superior
MODELO POTENCIA VOLTAJE
OM60 600W 220-240V / 50Hz
Características y especificaciones

35
Saca la máquina para hacer tortillas de la caja. Ábrela, limpia las placas de
cocción con un trapo húmedo y sécalo todo bien antes de usarlo.
Instrucciones
Primer uso de la máquina
CÓMO HACER TORTILLAS
Enchufe el cable de alimentación en una toma de corriente y deje que
el aparato se precaliente mientras usted prepara los ingredientes.
La luz indicadora se iluminará cuando el enchufe esté conectado a la toma
de corriente. Permanecerá encendida durante el precalentamiento, y se
apagará cuando el aparato se haya calentado a la temperatura óptima.
Tardará unos 3 minutos en calentarse, y una vez lo esté, la luz roja se
apagará para indicar que el aparato está listo para su uso.
2.
1. Cuatro huevos grandes harán 2 tortillas.
Con cuidado de no sobrepasar, vierta la mezcla de huevos en la
placa de cocción, así como cualquier otro ingrediente que desee
añadir a su tortilla. Si utiliza verduras o ingredientes que
requieran más cocción que el huevo, cocínelos antes en las
mismas placas de cocción de la máquina un par de minutos.
3. Cierre
4.
la máquina para que la tortilla se haga (2 a 3 minutos).
Las placas son antiadherentes, por lo que normalmente no es
necesario añadir nada para engrasarlas. Sin embargo, si ve que los
ingredientes se adhiere demasiado a las placas, pase una pequeña
cantidad de mantequilla o aceite con un pincel de repostería o un
papel impregnado.
Retire las tortillas de las placas de cocción con una espátula de
plástico o de madera. Tenga cuidado con las tortillas, ya que
estarán muy calientes. Déjelas enfriar durante unos minutos
antes de disfrutar.
Si desea seguir haciendo tortillas, la siguiente tanda se cocinará más
rápido ya que las placas ya estarán calientes.

36
5.
Limpieza y Mantenimiento
Antes de limpiar la máquina para hacer tortillas, asegúrese de que está
apagada y desenchufada.
No hace falta una limpieza a fondo tras cada uso. Pase un papel para
absorber los restos de grasa que quedan. Limpie las migajas que haya y
con un trapo húmedo, limpie las placas de cocción.
Para una limpieza más profunda, las placas pueden quitarse y lavase a
mano con agua tibia y jabón. Después, séquelas bien antes de volver a
ponerlas en la máquina. Para limpiar los mangos y otras partes de la
máquina, use un paño húmedo (bien escurrido) con jabón.
Una vez haya finalizado, desconecte el cable y deje que la máquina
se enfríe antes de limpiarla.
AVISO:
•
•
La superficie de cocción está caliente, tenga mucho cuidado.
•
Utilice siempre guantes o manoplas resistentes al calor cuando
use este producto para evitar que el vapor le queme.
AVISO:
•
Retire siempre la comida de la máquina con una espátula
o pinzas de plástico resistente al calor.
•
Nunca sumerja la máquina en agua.
•
Evite el uso de utensilios afilados, acero, estropajos metálicos o
limpiadores abrasivos ya que rayarán la superficie
antiadherente.
No utilice productos de limpieza para hornos.

37
INGREDIENTES:
•
Receta de tortilla francesa clásica
Para dos raciones
Receta de tortilla de queso con beicon
Para dos raciones
•
4 huevos grandes
•
Especias (el orégano le da un toque diferente)
INGREDIENTES:
•
Sal y pimienta al gusto
Enchufe la máquina para hacer tortillas. Mientras esta se calienta, rompa
los huevos en una jarra o tazón y bátalos bien, eche la sal, pimienta y
especias al gusto y mézclelo todo bien. Eche un poco de aceite en las
placas si lo cree necesario. Vierte la mezcla y cierre la tapa. Dejar cocer
durante 2-3 minutos.
INSTRUCCIONES:
•
4 huevos grandes
•
Un puñado de queso cheddar rallado
•
2-4 trozos de beicon cortados en pequeñas tiras
Sal y pimienta al gusto
Enchufe la máquina para hacer tortillas. Mientras esta se calienta, rompa los
huevos en una jarra o tazón y bátalos bien, eche la sal, pimienta, especias
al gusto, el queso y mézclelo todo bien. Eche un poco de aceite en las
placas si lo cree necesario. Reparta el beicon por las placas de cocción y
deje que se haga. Una vez esté casi echo, vierte la mezcla y cierre la tapa.
Dejar cocer durante 2-3 minutos.
INSTRUCCIONES:

38
INGREDIENTES:
•
Receta de tortilla de tomate y queso feta
Para dos raciones
•
4 huevos grandes
•
50g de queso feta cortado en pequeños trocitos
•
6 tomates cherry cortados por la mitad
•
2 cebollas picadas
Sal y pimienta al gusto
Enchufe la máquina para hacer tortillas. Mientras esta se calienta, rompa
los huevos en una jarra o tazón y bátalos bien, eche la sal, pimienta,
especias al gusto, el queso y mézclelo todo bien. Eche un poco de aceite
en las placas si lo cree necesario. Reparta los tomates por las placas de
cocción y deje que se haga. Una vez esté casi echo, vierte la mezcla y
cierre la tapa. Dejar cocer durante 2-3 minutos.
INSTRUCCIONES:

39
Síguenos
NOTA: ESTAS DECLARACIONES NO AFECTAN SUS DERECHOS LEGALES COMO
CONSUMIDOR
Este producto ha sido fabricado bajo las más estrictas control de calidad y utilizando
materiales de
alta calidad para asegurar conabilidad y excelente funcionamiento. Le dará buen servicio y
una larga duración, siempre y cuando se utilice correctamente y sea bien mantenido.
El producto está garantizado por 1 año desde la fecha de compra original. Si surge
cualquier defecto debido a un error/defecto de fábrica o mano de obra, entonces el producto
debe ser devuelto al lugar original de compra. Reembolso o reemplazo es a discreción de la
compañía.
Productos Duronic se ofrecen con una garantía de 1 año bajo las siguientes condiciones:
1. El producto debe ser devuelto al vendedor con comprobante de compra original.
2. El producto debe instalarse y usarlo según las instrucciones
contenidas en este manual.
3. Este aparato es únicamente de uso doméstico.
4. No cubre desgaste, daños maliciosos, uso indebido, negligencia,
reparaciones inexpertas o partes consumibles.
5. Shine-Mart Ltd no será responsable por cualquier daño consecuente,
accidentes o pérdidas.
6. Shine-Mart Ltd no es responsable ah llevar a cabo cualquier tipo de
servicio, bajo la garantía.
7. Valido solamente dentro de la (EU).
Este producto esta equipado con enchufe/fusible Europeo
Importado por Shine-Mart Ltd, RM3 8SB
Información sobre la eliminación de residuos para los consumidores
de equipos eléctricos y eléctricos:
Esta marca en un producto y/o documentos adjuntos indica que cuando se va a
desechar, se debe tratar como equipos residuos eléctricos y electrónicos (RAEE)
Cualquier producto marcado (RAEE) no debe ser mezclado con la basura
doméstica, sino separado para el tratamiento, recuperación y reciclaje
de los materiales utilizados.
Para el tratamiento adecuado, recuperación y reciclaje; por favor, tome todos los
productos (RAEE) y llévelo al sitio de residuos de su
Autoridad Local, donde será aceptado de forma gratuita.
Si los clientes desechan los residuos eléctricos y electrónicos correctamente,
ayudar a ahorrar valiosos recursos y prevenir los efectos negativos sobre la salud
humana y el medio ambiente, de materiales peligrosos que pueden
contener los residuos
Garantía

40
Manuale D’istruzioni In Italiano

41
•
Istruzioni di sicurezza
•
Questo prodotto è solo per uso interno / domestico. Non usare all'aperto.
•
OM60 piastra per omelette è solo per uso domestico, non per uso
commerciale.
•
- Questo prodotto non è destinato all'uso da parte di persone (compresi i
bambini) con ridotte capacità fisiche, sensoriali o mentali o mancanza di
esperienza e conoscenza, a meno che non siano state sottoposte a
supervisione o istruzione relative all'uso dell'elettrodomestico da parte di
una persona responsabile della loro sicurezza.
•
Non utilizzare questo apparecchio se il cavo di alimentazione o la spina
sono danneggiati. Se uno dei due è danneggiato, restituirlo a Duronic
per assistenza o riparazione da parte di un tecnico professionista.
•
Accertarsi che l'alimentazione di rete sia 220-240 V / 50 Hz.
•
Non tentare mai di sostituire parti e riparare l'unità da soli.
•
Per ridurre il rischio di scosse elettriche, non utilizzare mai questo prodotto
vicino all'acqua, con le mani bagnate, versare liquidi sull'apparecchio o
immergerlo in acqua o altri liquidi.
Non utilizzare il prodotto vicino a gas o altri materiali infiammabili
(come benzene, diluenti, spray, ecc.)
•
•
Non posizionare il prodotto sopra o vicino ad un fornello a gas caldo o
su un forno riscaldato.
•
Non toccare le piastre di cottura calde. Utilizzare la maniglia per
spostare in sicurezza la piastra.
•
Scollegare dalla presa di corrente quando non è in uso e anche prima di
pulirlo. Lasciare raffreddare prima di mettere o togliere le parti.
•
Non lasciare che il cavo di alimentazione penda dal bordo di un tavolo o di
un bancone, né tocchi una superficie calda.
•
Non utilizzare accessori o accessori non forniti con il prodotto, in
quanto ciò può comportare il rischio di lesioni o danni alla macchina.
•
Questo apparecchio deve essere utilizzato solo chiuso.
•
Non lasciare l'apparecchio incustodito quando è acceso.
Leggere attentamente questo manuale prima di utilizzare questo prodotto e
conservarlo per riferimento futuro.
Non utilizzare l'apparecchio per scopi diversi dall'uso previsto.

42
•
Istruzioni di sicurezza
Questo apparecchio deve essere utilizzato solo chiuso.
•
•
Prima dell’utilizzo, assicurarsi che sia posizionato su una superficie piana,
uniforme e asciutta.
L'apparecchio non è progettato per essere utilizzato mediante un
timer esterno o un sistema di controllo remoto separato.
•
La temperatura delle superfici esterne del coperchio può essere
elevata quando l'apparecchio è in funzione.
NB: potresti notare un leggero odore di fumo quando si utilizza per la
prima volta. Questo è del tutto normale e dovrebbe scomparire dopo i
primi utilizzi.
43
1) Indicatore
2) Maniglia
3) Copertura
1
2
3
5
4
4) Coperchio
5) Piastre
luminoso
inferiore
superiore
per cottura
MODELLO ALIMENTAZIONE
OM60 600W 220-240V / 50Hz
Caratteristiche e specifiche
POTENZA

44
Disimballare la piastra per omelette e mettere da parte l'imballaggio. Aprire il
coperchio superiore, pulire accuratamente le superfici di cottura pulendo le
piastre con un panno umido e asciugare la superfice con un tovagliolo di
carta.
1.
Utilizzo
Primo utilizzo
Come preparare un’omelette
Accendere la piastra e lasciare che si riscaldi. Nel frattempo, preparare
le uova e gli altri ingredienti.
L’indicatore luminoso rimarrà acceso durante tutto il processo di
riscaldamento della piastra, una volta trascorsi circa 3 minuti, e la piastra
avrà raggiunto la temperatura ottimale per la cottura, questa si spegnerà.
Con
2.
quattro uova grandi potrete preparare circa due frittate.
Versare con cura il composto di uova sulla piastre di cottura (facendo
attenzione a non riempire eccessivamente) insieme ad eventuali altri
ingredienti che si desidera aggiungere alla frittata. Se si utilizzano
verdure o ingredienti che richiedono una cottura maggiore rispetto
all'uovo, cuocerli nelle piastre di cottura per un paio di minuti prima di
aggiungere le uova.
3. Chiudere
4.
delicatamente il coperchio. Cuocere l’omelette per circa 2-3
minuti.
Le piastre antiaderenti non richiedono l’aggiunta di olio, ma se si
desidera è possibile versare una piccola quantità di olio sulla piastra.
Rimuovere l’omelette cotte dalle piastre di cottura con una spatola
di legno. Lasciare raffreddare per alcuni minuti prima di servire.
Se a questo punto si continua con la preparazione di altre omelette,
lasciare cuocere per un tempo minore, dato che la piastra avrà
raggiunto una temperatura alta.

45
5.
Pulizia e manutenzione
Scollegare sempre la piastra dalla fonte di alimentazione e attendere che
si raffreddi prima di pulirla.
Non è necessario smontare le piastre per la pulizia dopo ogni utilizzo.
Basta asciugare le piastre con un tovagliolo di carta per assorbire l'olio in
eccesso. Rimuovere eventuali briciole dalle scanalature e pulire le piastre
con un panno umido e sapone neutro.
Per una pulizia più profonda, le piastre possono essere rimosse e lavate a
mano con acqua calda e detersivo per piatti. Asciugare con un panno.
Riposizionare le piastre nella macchina solo quando sono completamente
asciutte. Per pulire le impugnature e le altre parti della macchina, utilizzare
un panno umido (ben strizzato) con sapone neutro.
Scollegare il cavo di alimentazione dopo la cottura e lasciare che si
raffreddi prima di proseguire con la pulizzia.
ATTENZIONE
•
•
La superficie di cottura è calda; maneggiare con cura.
•
Usare sempre guanti protettivi, resistenti al calore, quando si
utilizza questo prodotto per evitare che i vapori possano
causare ustioni.
ATTENZIONE:
•
Rimuovere sempre i residui usando una spatola o una
pinza di plastica resistente al calore.
•
Non immergere mai la macchina in acqua.
•
Evitare l'uso di utensili affilati, lana d'acciaio, spugne
abrasive in metallo o detergenti abrasivi poiché graffieranno
la superficie antiaderente.
Non utilizzare detergenti per forno sulle piastre di riscaldamento.

46
•
Ricetta per omelette
Per due omelette
Ingredienti:
Omelette con formaggio e bacon
Per due omelette
•
4 uova
Condire con sale e pepe, a seconda dei gusti
•
Preparazione:
Collegare la piastra ad una presa di corrente e lasciare che si riscaldi.
In una ciotola versare le uova, aggiungere i condimenti graditi e sbattere
bene. Se necessario aggiungere una piccola quantità di olio sulla piastra e
versare metà della miscela. Chiudere il coperchio e lasciare cuocere per
circa 2-3 minuti.
Ingredienti:
•
4 uova
•
Manciata di formaggio cheddar grattugiato
•
2-4 fette di bacon, tagliate a striscioline
Sale e pepe
Preparazione:
Collegare la piastra ad una presa di corrente e lasciare che si riscaldi. In una
ciotola versare le uova, aggiungere il formaggio, sale e il pepe sbattere
bene. Se necessario aggiungere una piccola quantità di olio sulla piastra e
iniziare la cottura del bacon. Quando il bacon sarà quasi a fine cottura
versare metà della miscela. Chiudere il coperchio e lasciare cuocere per
circa 2-3 minuti.

47
•
Omelette con pomodori e feta
Per due omelette
Ingredienti:
•
4 uova
•
50 g di formaggio feta, tagliato a cubetti
•
6 pomodorini, tagliati a metà
•
2 cipollotti, tritati finemente
Sale e pepe
Preparazione:
Collegare la piastra ad una presa di corrente e lasciare che si riscaldi. In
una ciotola versare le uova, aggiungere il formaggio, sale e pepe e sbattere
bene. Se necessario aggiungere una piccola quantità di olio sulla piastra e
versare iniziare con la cottura dei pomodorini per circa 2 minuti. Trascorso il
tempo di cottura aggiungere metà della miscela di uova e formaggio.
Chiudere il coperchio e lasciare cuocere per circa 2-3 minuti.
48
Questo prodotto è garantito per una durata determinata con il distributore a partire dalla data
di acquisto contro ogni difetto derivante da difetti di fabbricazione o dei materiali. Questa
garanzia non copre difetti o danni derivanti da installazione impropria, uso improprio o usura
anomala del prodotto.
L’apparecchio deve essere restituito nella sua confezione originale e accompagnato dalla
ricevuta e deve essere stato utilizzato in modo corretto. È importante rispettare le istruzioni
per l’uso e le precauzioni di sicurezza indicate di seguito. Inoltre, non possiamo garantire
l’apparecchio se è stato modicato o riparato dall’acquirente o da terzi.
1 anno di garanzia da Shine-Mart Ltd, proprietari del marchio commerciale Duronic.
NOTA: QUESTE DICHIARAZIONI NON INFLUISCONO SUI DIRITTI LEGALI DEL
CONSUMATORE
Questo prodotto è stato realizzato con le rigorose procedure del controllo qualità, e
utilizzando materiali di altissima qualità, per garantire afdabilità e prestazioni eccellenti.
Vi regalerà un servizio ottimo e a lungo termine, purchè venga opportunamente usata e
mantenuta. Il prodotto è garantito per 1 anno dalla data di acquisto. Se sorge qualche
difetto a causa di materiali difettosi o scarsa manodopera, il prodotto difettoso dovrà essere
restituito al luogo originale di acquisto. Il rimborso o la sostituzione sono a discrezione
dell’azienda. I prodotti Duronic offrono 1 anno di garanzia alle seguenti condizioni:
1. Il prodotto deve essere restituito al rivenditore con la prova d’acquisto originale
2. Il prodotto deve essere installato e usato seguendo le istruzioni contenute nel manuale.
3. Il prodotto va utilizzato solo per scopi domestici. Non è da utilizzarsi per uso commerciale.
4. La garanzia non copre usura, danni volontari, abuso, negligenza, riparazioni
inesperte o consumo dei materiali.
5. Shine-Mart Ltd non è responsabile per Danni accidentali o consequenziali.
6. Shine-Mart Ltd non è tenuta a eseguire qualsiasi tipo di riparazione, ai sensi
della garanzia.
7. Termini validi in tutta l’unione europea *Ci riserviamo il diritto di modicare le sopracitate
condizioni Per parti di ricambio si prega di consultare il sito www.duronic.com
Corretto smaltimento del prodotto.
Qusto prodotto è inclusivo di spina certicata CE
importata da Shine-Mart Ltd, RM3 8SB
Questo segno su un prodotto o su documenti indica che quando deve essere
smaltito, deve essere trattato come i riuti elettrici ed elettronici (WEEE)
Tutti I prodotti marcati WEEE non devono essere buttati nei riuti domenistici
generici, ma separati per il trattamento, il recupero
e il riciclaggio dei materiali utilizzati.
Per un corretto trattamento, recupero e riciclaggio; si prega di portare tutti I
prodotti marcati WEEE al Vostro centro smaltimenti riuti autorizzato, dove
saranno accettati gratuitamente.
Se i consumatori sono propensi allo smaltimento corretto di riuti elettrici ed
elettronici, aiuteranno a salvare risorse importanti e a prevenire i potenziali
effetti negativi sulla salute umana e sull’ambiente di tutti i materiali pericolosi
che i riuti possono contenere.
Garanzia
Seguici

49
Instrukcja obsługi. Polski

50
•
Bezpieczeństwo użytkowania
•
Urządzenie przeznaczone wyłącznie do użytku domowego. Nie stosuj na
świeżym powietrzu.
Urządzenie przeznaczone do użytku domowego. Nie nadaje się do
zastosowania komercyjnego.
•
Urządzenie nie jest przeznaczone do obsługi przez osoby (również dzieci)
o ograniczonych zdolnościach fizycznych, sensorycznych i psychicznych
oraz z niewystarczającą wiedzą i doświadczeniem, chyba że znajdują się
pod opieką lub zostały przeszkolone w zakresie użytkowania urządzenia
przez osobę odpowiedzialną za ich bezpieczeństwo.
•
Nigdy nie włączaj urządzenia, gdy przewód zasilający lub wtyczka są
uszkodzone. Skontaktuj się z Duronic w celu naprawy lub skontaktuj się
z wykwalifikowanym technikiem.
•
•
Upewnij się, że napięcie sieci domowej jest zgodne 220-240V / 50Hz.
•
Nigdy nie próbuj samodzielnie wymieniać części lub naprawiać urządzenia.
•
Aby zapobiec ryzuku porażenia prądem nie operuj urządzenia mając
mokre ręce, nie zanurzaj urządzenia w wodzie lub innych płynach.
•
Nie używaj urządzenia blisko gazu lub innych materiałów palnych
(jak benzyna, spreje, rozcieńczalnik do farb etc.).
•
Nie umieszczaj urządzenia blisko kuchenek, piekarników elektrycznych i
gazowych lub innych gorących powierzchni.
Nie dotykaj gorącej powierzchni palników. Użyj uchwytu, aby bezpiecznie
przenieść urządzenie.
•
•
Odłącz urządzenie z gniazdka zasilającego, kiedy urządzenie nie jest już w
użyciu lub przed przystąpieniem do czyszczenia. Odczekaj, zanim ostygnie
przed montażem lub demontażem elementów.
Nie pozwól, aby przewód zasilający swobodnie zwisał z krawędzi blatu
lub dotykał gorących powierzchni.
•
Nigdy nie pozostawiaj włączonego urządzenia bez nadzoru.
•
•
Stosuj wyłącznie dodatki rekomendowane lub dostarczone przez
producenta. Użytkowanie niefabrycznych elementów może spowodować
uszkodzenie urządzenia lub uszkodzenia ciała.
•
Zachowaj szczególną ostrożność, gdy urządzenie jest włączone.
PRZED UŻYCIEM ZAPOZNAJ SIĘ Z INSTRUKCJĄ OBSŁUGI
I ZACHOWAJ JĄ DO WGLĄDU
Nie używaj urządzenia do celów innych niż zaznaczono to w instrukcji.

51
•
Bezpieczeństwo użytkowania C.D.
•
Aby podłączyć urządzenie w pierwszej kolejności podłącz przewód
zasilający do urządzenia, następnie podłącz wtyczkę do gniazdka
elektrycznego. Odłączając urządzenie w pierwszej kolejności odłącz
wtyczke od gniazdka.
•
Urządzenie może być użytkowane wyłącznie w zamkniętej formie.
Użytkuj urządzenie na suchej, płaskiej i stabilnej powierzchni.
•
•
Urządzenie nie jest przeznaczone do obsługi za pomocą zewnętrznego
timera lub oddzielnego systemu zdalnego sterowania.
Zewnętrzną obudowa urządzenia może się nagrzewać w czasie
pracy urządzenia.
UWAGA: Podczas pierwszego korzystania z urządzeniagofrownicy możesz
zauważyć delikatny dym lub zapach. Jest to całkowicie normalne i powinno
zniknąć po kilku pierwszych zastosowaniach.

52
1) Lampka
2) Blokada
3) Dolna
1
2
3
5
4
4) Górna
5) Panele grzewcze
gotowości
rączk
obudowa
pokrywka
MODEL
OM60 600 W 220-240V / 50 Hz
MOC NAPIĘCIE
Elementy i specyfikacja

53
Odpakuj WM60 i odłóż na bok elementy opakowania. Otwórz pokrywkę i
przeczyść powierzchnię grzewczą wilgotną gąbką i osusz papierowym
ręcznikiem.
JAK PRZYGOTOWAĆ OMLETY
Podłącz przewód zasilający do głównego gniazdka i odstaw urządzenie, aby
wstępnie się nagrzało. W międzyczasie przygotuj jajka i inne składniki.
1.
PIERWSZE UŻYCIE
Obsługa
Wskaźnik gotowości będzie święcił, gdy przewód zasilający zostanie
podłączony do gniazdka. Lampka pozostanie włączona podczas wstępnego
podgrzewania, następnie wyłączy się, gdy urządzenie osiągnie
odpowiednią temperaturę. Czas nagrzewania wynosi ok. 3 min, po tym
czasie czerwona lampka wyłączy się co jest oznaką gotowości urządzenia
do użycia.
Z dwóch dużych jaj możesz przygotować dwa
omlety.
2.
Ostrożnie przelej miksturę jajeczną z wszystkimi składnikami,
jakie chcesz dodać do omletu na powierzchnię grzewczą
(uważaj, aby nie przepełnić talerzy grzewczych). Jeżeli
chcesz użyć warzyw lub innych składników, które wymagają
dłuższego czasu przygotowania niż jajka, wstępnie podsmaż
te składniki w urządzeniu lub na patelni przed gotowaniem
omletów.
3. Delikatnie
4.
zamknij pokrywkę. Podpiekaj miksturę przez ok. 2-3 min.
Panele grzewcze pokryte są nieprzywierającą powierzchnią, więc nie
ma konieczności dodawania tłuszczu. Jednakże, jeżeli widzisz, że
składniki za bardzo przywierają do powierzchni, dodaj odrobinę oleju
lub roztopionego masła na panele.
Jeżeli chcesz przygotować kolejne omlety następne sztuki będą
przygotowywane szybciej, ponieważ panele są mocno nagrzane.
Przełóż omlety przy pomocy plastikowej lub drewnianej szpatułki.
Zachowaj ostrożność, ponieważ omlety będą gorące. Przed
podaniem odstaw do schłodzenia.

54
5.
Czyszczenie i Pielęgnacja
Przed przystąpieniem do czyszczenia urządzenia odłącz je od zasilania i
odstaw do ostudzenia.
Nie ma konieczności dokładnego czyszczenia urządzenia po każdym
użyciu. Osusz powierzchnię grzewczą ręcznikiem papierowym, aby
usunąć pozostałości oleju. Omieć urządzenie z okruszków, które mogły
się zgromadzić w rowkach, a następnie przetrzyj powierzchnię wilgotną
ściereczką z dodatkiem delikatnego detergentu.
W celu przeprowadzania gruntownego czyszczenia panele grzewcze mogą
zostać zdemontowane i ręcznie umyte w ciepłej wodzie z płynem. Po
przeczyszczeniu osusz suchym ręcznikiem. Zamontuj z powrotem panele,
dopiero gdy są całkowicie osuszone. W celu oczyszczenia uchwytów i
innych elementów użyj wilgotnej (dobrze wykręconej) ściereczki z
dodatkiem delikatnego mydła.
Odłącz urządzenie z gniazdka zasilającego i odstaw gofrownicę do
przestudzenia przed przystąpieniem do czyszczenia.
UWAGA:
•
•
Powierzchnia grzewcza mocno się nagrzewa, zachowaj
szczególną ostrożność.
•
Zawsze używaj rękawic ochronnych odpornych na wysokie
temperatury lub chwytaków kuchennych podczas
przenoszenia tego produktu, aby uniknąć oparzeń lub
innych obrażeń.
UWAGA:
•
Zawsze usuwaj wszystkie pozostałości jedzenia przy
użyciu szpatułki lub szczypiec z żaroodpornego materiału.
•
Nigdy nie zanurzaj urządzenia w wodzie.
•
Unikaj używania szorstkich myjek, druciarek lub ściernych
środków czyszczących, aby nie porysować powierzchni
nieprzywierającej.
Nie używaj agresywnych środków czyszczących, w tym do
czyszczenia piekarników, na płytach grzewczych.

55
•
Podstawowy przepis na omlety
dwie sztuki
SKŁADNIKI:
Omlet z bekonem i serem
dwie sztuki
•
4 duże jajka
•
Świeże lub suszone zioła - szczypiorek będzie pasował wyśmienicie
•
Sól i pieprz do smaku
Wykonanie:
Podłącz urządzenie do zasilania. Rozbij jajka, umieść w misce lub kielichu i
ubij. Dopraw solą i pieprzem, dodaj zioła. Dobrze przemieszaj. Dodaj
odrobinę oleju na panele grzewcze, jeżeli to konieczne. Następnie przelej
miksturę na każdy z paneli grzewczych, dzieląc masę po równo na dwa
omlety. Zamknij pokrywkę i zablokuj. Pozostaw do pieczenia przez 2-3
minuty.
SKŁADNIKI:
•
4 duże jajka
•
Ser - podzielony na kawałki lub starty na tace
•
2-4 plastry bekonu, pocięte na małe paski
Podłącz urządzenie do zasilania. Rozbij jajka, umieść w misce lub kielichu i
ubij. Dopraw solą i pieprzem, dodaj zioła. Dobrze przemieszaj. Dodaj
odrobinę oleju na panele grzewcze, jeżeli to konieczne. Dodaj pokrojony
bekon, dzieląc równo na dwa panele i podsmaż. Gdy bekon jest już prawie
gotowy przelej mase jajeczną. Zamknij pokrywkę i zablokuj. Pozostaw do
pieczenia przez 2-3 minuty.
sól i pieprz do smaku
Wykonanie:

56
•
Omlet z Pomidorami i Fetą
dwie sztuki
SKŁADNIKI:
•
4 duże jajka
•
50 g sera feta, pokrojonego na kawałki
•
6 pomidorków cherry, podzielonych na połowy
•
2 zielone cebulki, posiekane
Podłącz urządzenie do zasilania. Rozbij jajka, umieść w misce lub kielichu i
ubij. Dopraw solą i pieprzem, dodaj zioła. Dobrze przemieszaj. Dodaj odrobinę
oleju na panele grzewcze. Dodaj
sól i pieprz do smaku
Wykonanie:
pokrojone pomidory, dzieląc je równo na dwie
porcje i podsmażaj przez 2 minuty. Następnie, przelej równą porcję masy
jajecznej na każdy z paneli. Zamknij pokrywkę i zablokuj. Pozostaw do
smażenia przez 2 min.

57
Warunki Gwarancji
1 Rok Gwarancji firmy Shine-Mart LTD, marki handlowej Duronic Products.
UWAGA: ten dokument nie wpływa na twoje ustawowe prawo jako konsumenta.
Ten produkt został wykonany zgodnie z restrykcyjnymi normami kontroli i wykorzystuje
najwyższej jakości materiały dla uzyskania doskonałej wydajności i niezawodności.
Długotrwałość produktu zostaje osiągnięta przez właściwe użytkowanie i konserwację.
Gwarancja obejmuje 1 rok od daty zamówienia. Jeżeli jakikolwiek defekt powstanie ze
względu na wadliwość materiału lub niewłaściwe wykonanie to uszkodzony produkt musi
zostać dostarczony do miejsca, z którego został zamówiony. Zwrot pieniędzy lub wymiana
produktu jest w gestii firmy.
Duronic Products oferuje jeden rok gwarancji na podstawie poniższych warunków:
1. Produkt musi zostać zwrócony do sprzedawcy z oryginalnym dowodem zakupu.
2. Produkt był instalowany i użytkowany zgodnie z instrukcją obsługi.
3. Produkt użytkowany był wyłącznie w celach domowych.
4. Gwarancja nie obejmuje naturalnego zużycia się produktu, celowego uszkodzenia,
niewłaściwego użycia, zaniedbania, niewłaściwych napraw lub części eksploatacyjnych.
5. Shine-Mart Ltd. nie ponosi odpowiedzialności za przypadkowe albo celowe zgubienie
produktu lub jego uszkodzenie.
6. Firma Shine-Mart Ltd nie jest zobowiązana do przeprowadzania jakichkolwiek prac
serwisowych w ramach gwarancji.
7. Obowiązuje na obszarze Unii Europejskiej.
Ten produkt jest wyposażony we wbudowaną wtyczkę typu Euro-Plug / BS z
certyfikatem CE importowaną przez Shine-Mart Ltd, RM3 8SB
Informacja o odpadach i utylizacja dla użytkowników sprzętu elektrycznego i
elektronicznego.
Usuwanie wyeksploatowanych urządzeń elektrycznych i elektronicznych (dotyczy
krajów Unii Europejskiej i innych krajów europejskich z wydzielonymi systemami
zbierania odpadów). Ten symbol na produkcie lub jego opakowaniu oznacza, że
produkt nie powinien być zaliczany do odpadów domowych. Należy go przekazać
do odpowiedniego punktu, który zajmuje się zbieraniem i recyklingiem urządzeń
elektrycznych i elektronicznych. Prawidłowe usunięcie produktu zapobiegnie
potencjalnym negatywnym konsekwencjom dla środowiska naturalnego i zdrowia
ludzkiego, których przyczyną mogłoby być niewłaściwe usuwanie produktu.
Recykling materiałów pomaga w zachowaniu surowców naturalnych.
Śledź Nas