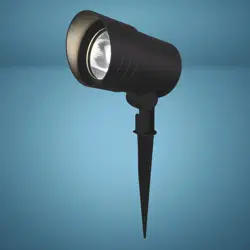
Item #1007 891 726
Model #L08157
Use and Care Guide
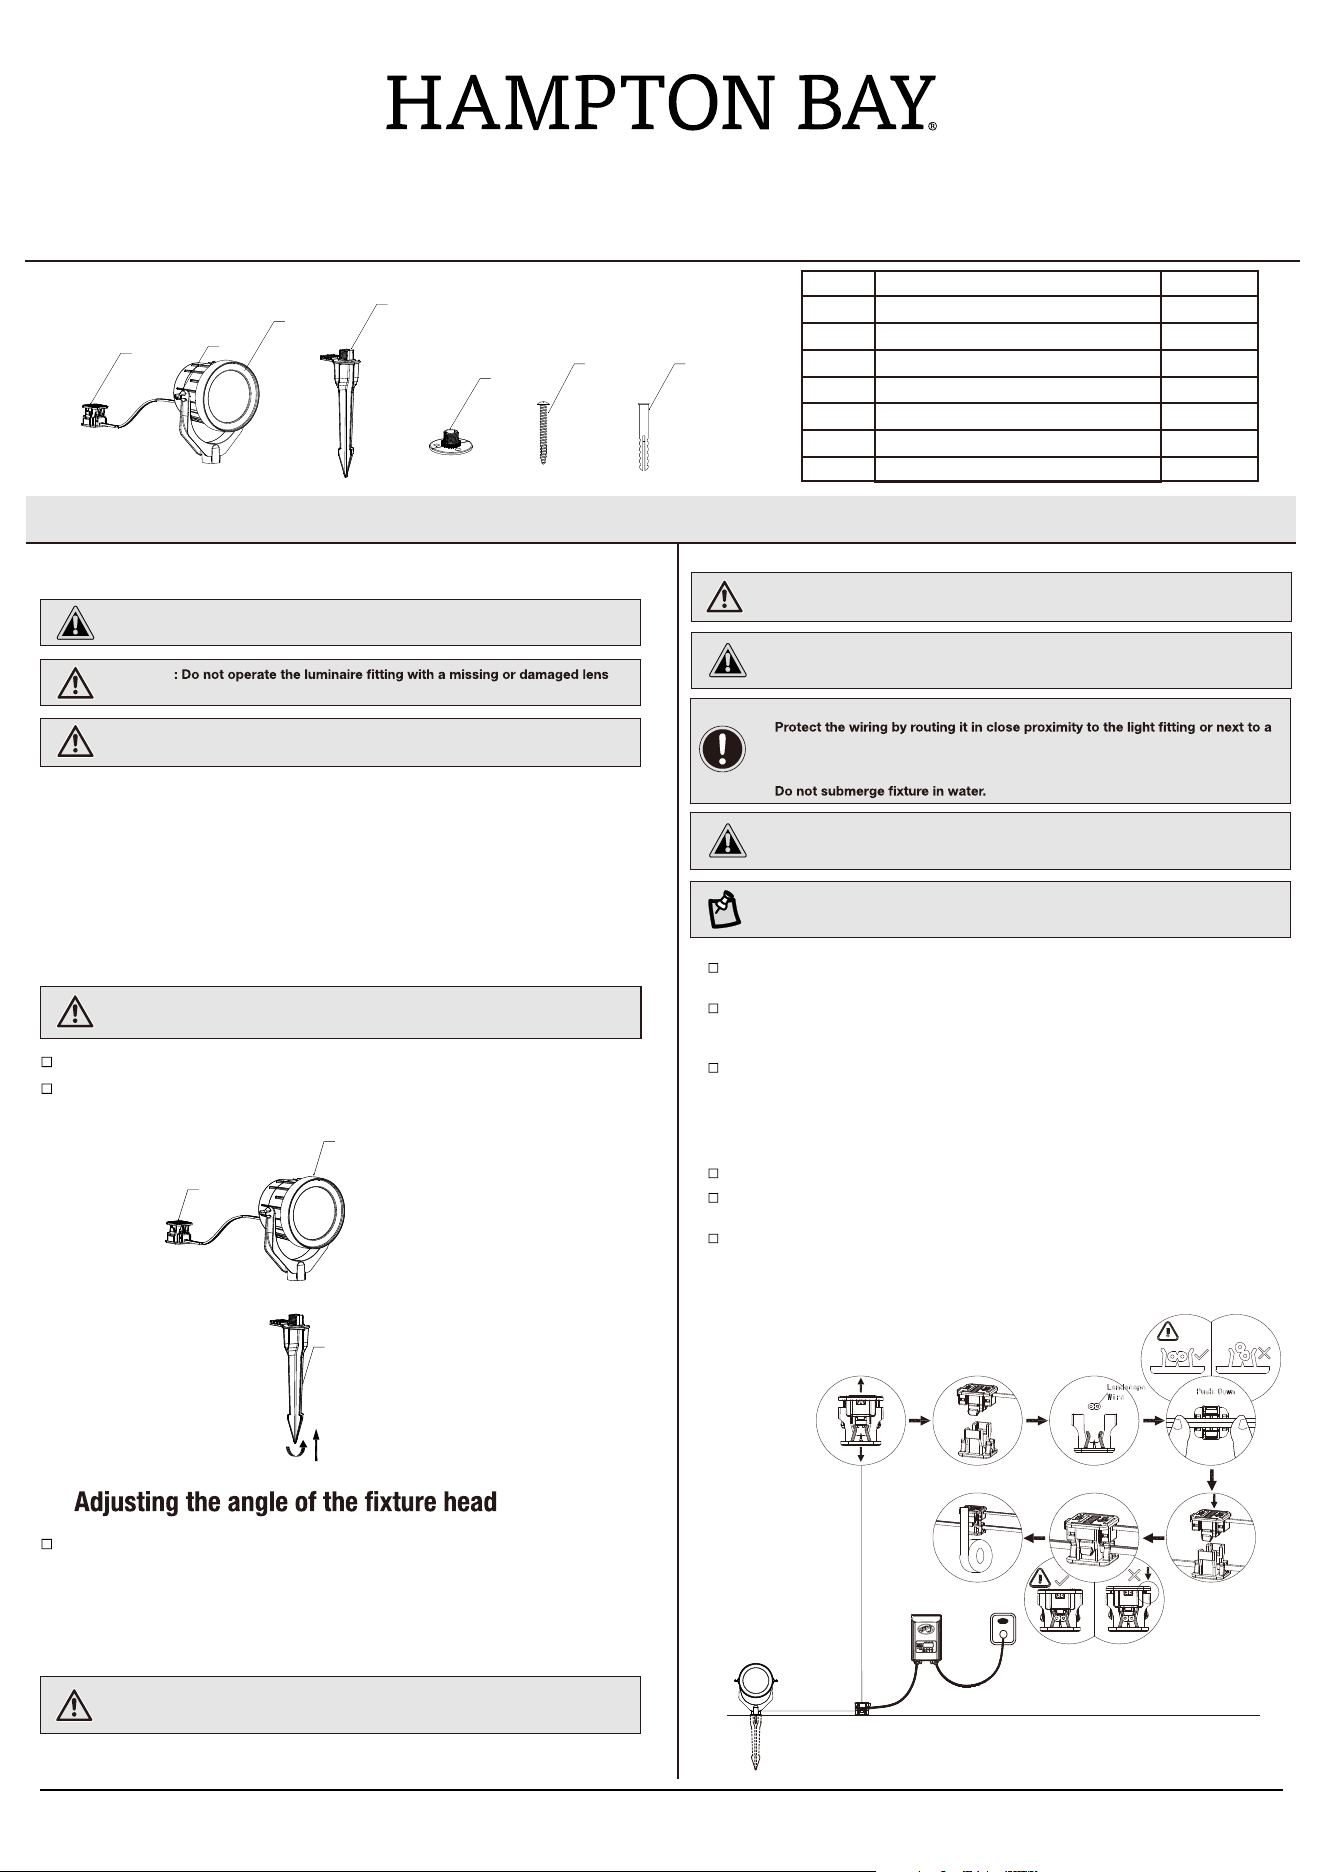
PACKAGE CONTENTS
Assembly and Installation
1
Attaching and installing the light
CAUTION: The wire from the low-voltage power unit shall be 12-18 AWG type
underground low energy circuit cable or SPT2W.
IMPORTANT:
•
building structure such as a house or deck.
• The landscape wire and connector can also be hidden under stone or buried
.)mc 42.51( .ni 6 fo htped mumixam a ta ssarg rednu
•
WARNING: Risk of Electric Shock. Install all luminaires 10 ft. (3.05 m) or more
from a pool, spa or fountain.
Only for use with low voltage power units with a maximum output rating of 12V,
.yradnoces rep W003
For landscape lighting systems only. Outdoor use only. The device is accepted
as a component of a landscape lighting system where the suitability of the
combination shall be determined by CSA or local inspection authorities
having jurisdiction.
ETL listed under model # L08157.
Please read and save these instructions
Part Description Quantity
A
Light
1
B 1
C 1
Steel Support
Spike
D
Screws
3
E 3
F 1
Connectors
G 2
Adjustment screw
Expands
Attach spike (B) and light (A) together by turning them
Loosen the adjustment screw(G) by turning it conterclockwise.
Adjust the head to the desired angle. Re-tighten the adjustment
screw (G) when finished.
Carefully remove the fixture from its protective packaging.
WARNING: Never push the fixture into the ground by the light (A) or use a
hammer to insert the spike (B) into the ground.
counterclockwise.
CAUTION: Safe for outdoor operation.
3
Connecting the wires
2
WARNING: The wire connector (F) contacts have sharp edges for piercing the
main low-voltage cable. To avoid injury, do not touch the metal contacts.
WARNING
or bulb protector.
WARNING: Install in accordance with all local codes and ordinances.
IMPORTANT SAFETY INSTRUCTIONS
Press the top half of the connector into the bottom half until it clicks into
place and is secure. This will pierce the low voltage wire and connect
the light to the transformer.
Align the low-voltage wire and fit it into the connector bottom half as sh-
own below.
Test the connection by plugging in the transformer to see if the light tu-
rns on. If it does, unplug the transformer and continue the installation. If
it does not, unplug the transformer and check the connection between
the transformer and low-voltage wire, reinstall the connector, and ensure
power is available to the outlet you are using.
Once the connection is secure, repeat the process for the remaining lights.
Once all lights are connected, it is recommended to wrap each connector
with electrical tape for additional protection.
After all fixtures are installed, turn on the transformer by plugging it into
an outlet.
1
CAUTION: Be careful ! The wire stabs are very sharp!
LV LED SMART FLOOD LIGHT
Note: If you want to install this with your existing low-voltage lighting system,
plug the lights into your existing 18AWG to 12AWG SPT-2W wiring.
A
G
F
B
C
D
E
A
B
F
2
1
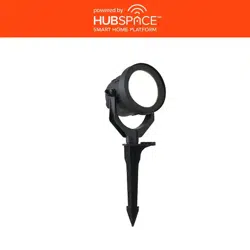
Download the Hubspace app
TM
Download the Hubspace app from the device’s
App Store or the Google Play Store to your mobile
device.
Turn on the Bluetooth
®
and Wi-Fi
®
functions of the
smart device to ensure the Wi-Fi
®
signal at home is
stable and reliable.
Open the Hubspace app.
NOTICE: To register, enter your email address
and a password. Or, login if you already have an
account.
NOTICE: Bluetooth enabled smart devices
typically have a range of approximately 33 ft.
(10 m). Attempting to pair your smart device to
the flood light beyond the intended range can
result in inconsistent performance or failure to
connect.
Controlling the Light with Bluetooth
®
wireless technology and Wi-Fi
®
network
2
Select and pair the LED flood light
In the Hubspace app screen, tap the plus
sign “+” in the upper right corner.
Scan your product’s QR code or quick start
guide. If the QR code cannot be scanned for
some reason, you can enter the code manually.
Tap Enter Code and follow the instructions.
Name the LED flood light identified and assign
it to a room, for example “Flood light”.
Connect your device to power and follow
the instructions on screen.
NOTICE FOR LIGHTING AND
FAN PRODUCTS ONLY:
If you are unable to access the QR
code for your light, you can put it into
discovery mode with the following
sequence:
In the Hubspace app, tap the plus
sign in the upper right corner and
follow the instructions to discover
devices. More than one device
can be added at a time using this
method.
Switch the device off and on 5
times. The light will pulse to show
that it can now be discovered.
Flood light
Tap to select a room
3
Care and Cleaning
CAUTION: Before attempting to clean the fixture, disconnect the power to the fixture.
Clean the fixture with a soft, dry cloth.
Do not use cleaners with chemicals, solvents, or harsh abrasives.
Troubleshooting
WARNING: Before doing any work on the fixture, disconnect power to the light fixture.
Minor problems often can be fixed without the help of an electrician.
Problem Possible Cause Solution
The fixture will not light.
The power is off. Ensure the power supply is on.
The circuit breaker is off. Ensure the circuit breaker is in the on position.
There is a bad connection.
Check to ensure proper wire connections are made.
Contact a qualified electrician.
There is a defective switch. Contact a qualified electrician.
The fuse blows or the circuit
breaker trips when the light is
turned on.
The wires are crossed or the power
wire is grounding out.
Check the wire connections.
Contact a qualified electrician or call customer service
1-877-592-5233
.
The light fixture flickers or
makes a buzzing sound.
The dimmer circuit is not compatible
with the product.
Check the product page at HomeDepot.com for a list of
compatible dimmers.
The dimming circuit is set outside the
dimming range of the product.
Turn or slide the dimmer switch to adjust the light output until
the flickering or buzzing stops.
The Bluetooth flood light will
not pair with a smart device.
The Bluetooth feature is turned off on
the smart device.
Ensure the Bluetooth function is turned on within the device
settings. A Bluetooth symbol should be visible somewhere on
the device screen.
Charge up the device being paired with the flood light. Smart
power management may have turned off the Bluetooth function
when low on power.
The smart device is out of range of the
Bluetooth flood light.
Be sure the flood light is within 33 ft. (10 m) of the smart
device.
The smart device is not discoverable.
Turn on “Discoverable” mode on the device to allow the
flood light and smart device to recognize each other.
The smart device did not automatically
connect to the Bluetooth flood light.
Confirm the device’s “Discoverable” mode is turned on to allow
the flood light and smart device to recognize each other.
Go to the pairing list on the device and manually connect the
device to the flood light.
The flood light is not powered on.
Make sure the flood light is properly connected and the power
is turned on.
Ensure the circuit breaker is in the on position.
Interference is causing confusion with
the connection.
Power both the device and the flood light off and back on.
Delete the flood light from the smart device and rediscover it.
Move away from Wi-Fi routers or computers that could be
causing interference.
Hubspace device use question.
My Hubspace device is not connecting
to Wi-Fi.
Make sure your device is connected to a power source.
Your Internet connection or Wi-Fi network may be down.
My device cannot find any Wi-Fi
networks.
Make sure you have a 2.4GHz capable Wi-Fi network within
range of the device you are trying to add.
NOTE: Most LED landscape lighting fixtures can operate with full illumination from 9V down to as little as 6V. It is possible to have
extended length runs with LED fixtures that go beyond the specifications shown in the guidelines above. Additional landscape
lighting cable can be purchased at your local Home Depot store.
4
Hubspace device use question.
A device is on another account. How do
I transfer it?
Scan the QR code and it will transfer to your account.
My device is offline for long periods of
time.
Make sure your Wi-Fi signal strength is sufficient. You may
need to move your router, use mesh Wi-Fi, or Wi-Fi extenders.
The device is on and I scanned the QR
code, but the app cannot connect to it.
Turn off Bluetooth on your phone and turn it back on. Then,
scan the QR code.
Can I scan the same QR code to add
multiple products?
No. Each product has a unique QR code.
Problem Possible Cause Solution
Hubspace device use question.
My device is in a location that does not
have Wi-Fi. Can I still use it with the
Hubspace app?
Yes:
Use the app on a phone with an Internet connection like LTE.
The phone must be within Bluetooth range of your Hubspace device.
I cannot find the QR code.
Look for it where other stickers are on the product. A copy of
the QR code is also included in your device’s documentation.
The QR code has become damaged.
How do I add the device?
Under the QR code are numbers. You can enter those in
manually instead of scanning the code.
How do I reset the device?
Remove the device from your account, then add it back.
Devices also reset when they transfer to a new account.
Warranty
WHAT IS COVERED
purchase. This warranty applies only to the original consumer and only to products used in normal use and service. If this product is found to be
The manufacturer warrants this lighting fixture to be free from defects in materials and workmanship for a period of five (5) years from the date of
defective, the manufacturer’s only obligation, and your exclusive remedy, is the repair or replacement of the product at the manufacturer’s discretion,
provided that the product has not been damaged through misuse, abuse, accident, modifications, alterations, neglect or mishandling.
WHAT IS NOT COVERED
This warranty shall not apply to any product that is found to have been improperly installed,
alteration or faulty installation, or any other failure not relating to faulty material or workmanship. This warranty shall not apply to the finish on any
set up, or used in any way not in accordance with the
instructions supplied with the product. This warranty shall not apply to a failure of the product as a result of an accident, misuse, abuse, negligence,
portion of the product, such as surface and/or weathering, as this is considered normal wear and tear.
disclaims any warranty, whether express or implied, of fitness for a particular purpose, other thanThe manufacturer does not warrant and
the warranty contained herein. The manufacturer specifically disclaims any liability and shall not be liable for any consequential or incidental loss or
specifically
damage, including but not limited to any labor / expense costs involved in the replacement or repair of said product.
Contact the Customer Service Team at 1-877-592-5233 or visit HOMEDEPOT.COM/HUBSPACE
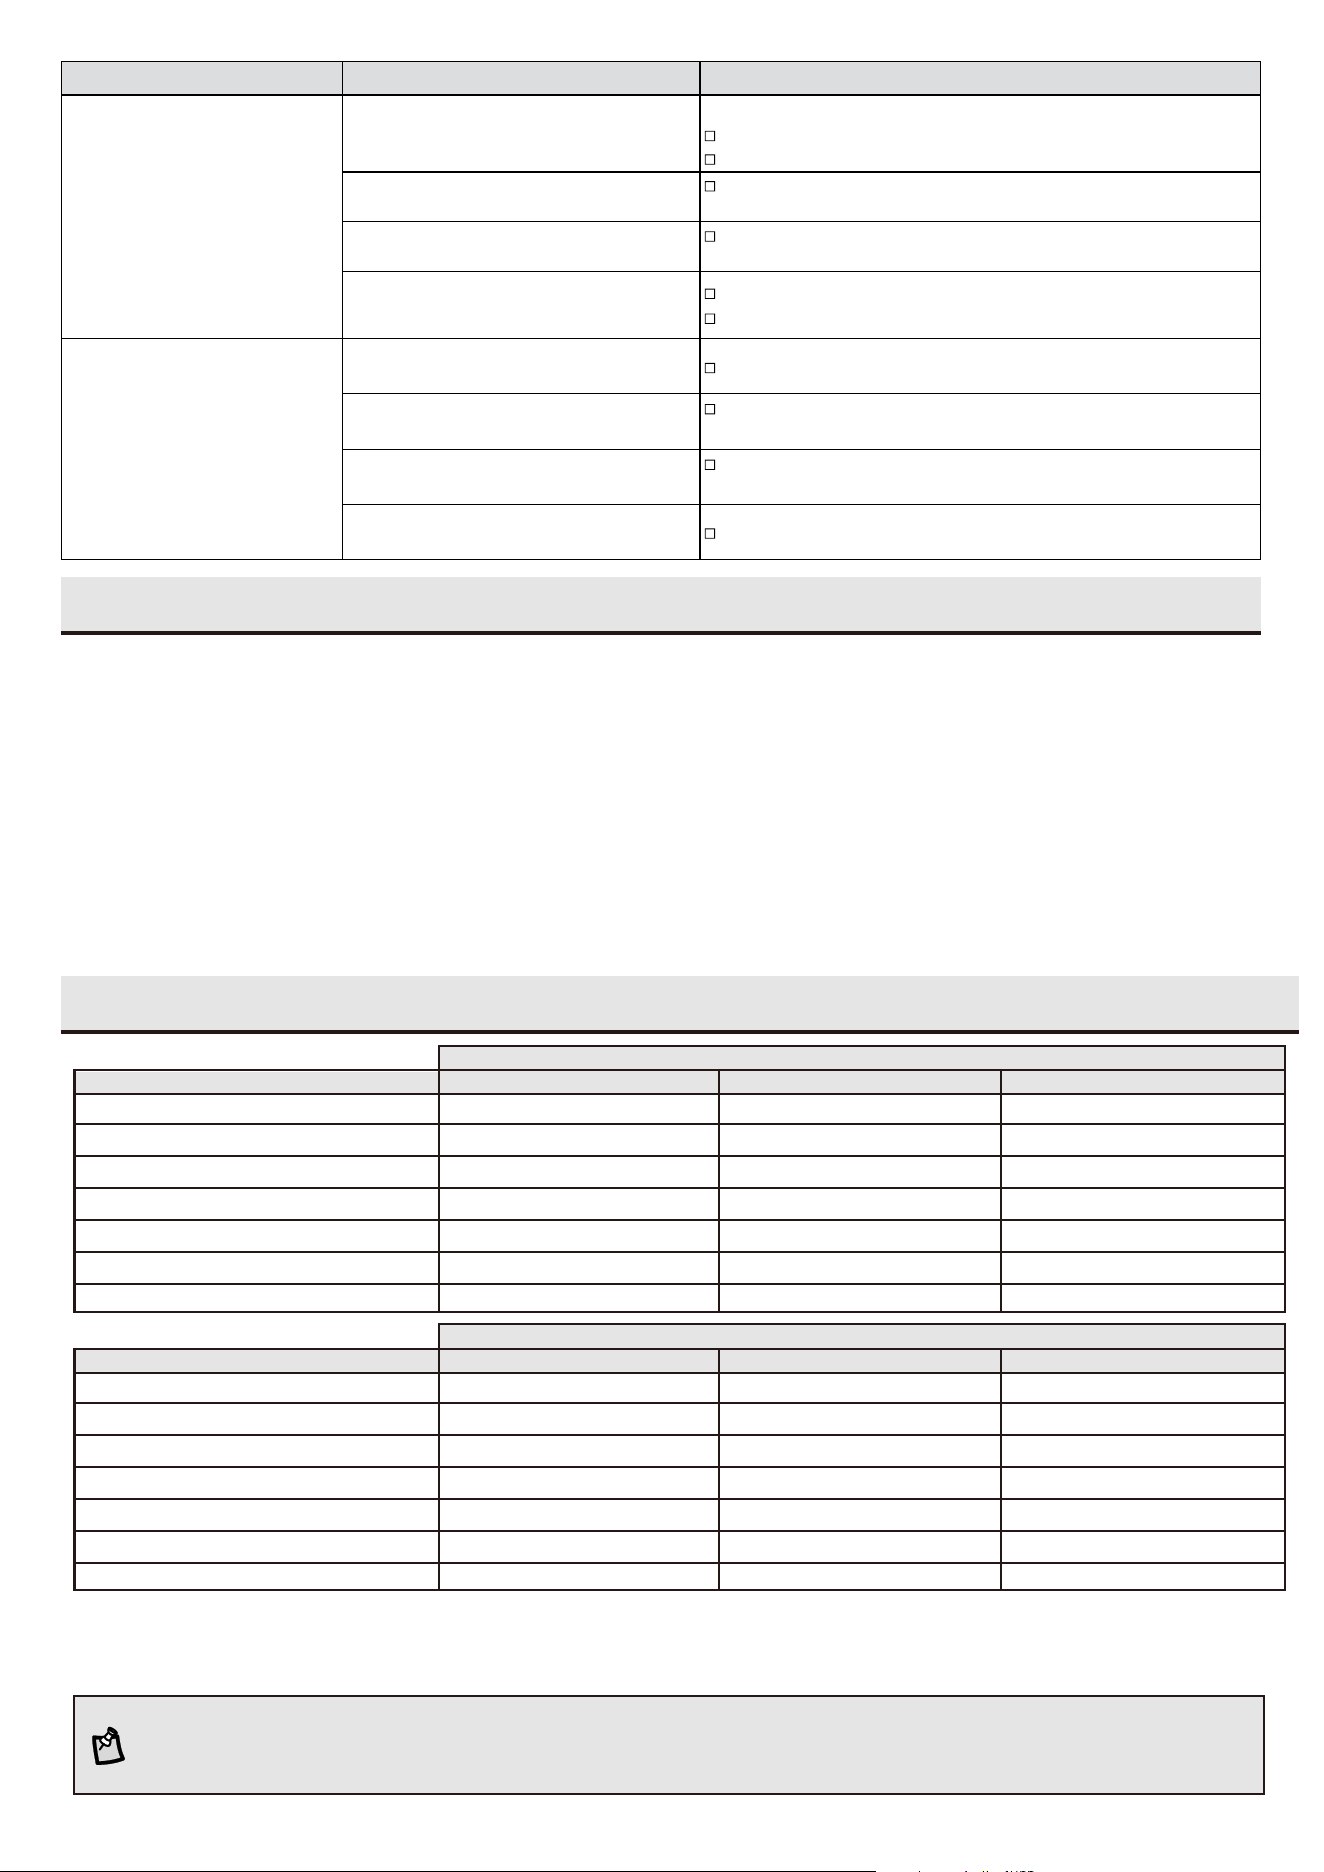
Cable Selection
Total Fixture Wattage
0-60 Watts
61-120 Watts
121-180 Watts
181-240 Watts
241-300 Watts
600W Transformer = (2X300) Watts
900W Transformer = (3X300) Watts
51-100 feet
Cable Length
101-150 feet
16 AWG 16 AWG 14 AWG
16 AWG 14 AWG 12 AWG
14 AWG 12 AWG NOT RECOMMENDED
14 AWG 12 AWG NOT RECOMMENDED
12 AWG NOT RECOMMENDED NOT RECOMMENDED
12 AWG NOT RECOMMENDED NOT RECOMMENDED
12 AWG NOT RECOMMENDED NOT RECOMMENDED
0-50 feet
12-VOLT TAP
Total Fixture Wattage
0-60 Watts
61-120 Watts
121-180 Watts
181-240 Watts
241-300 Watts
600W Transformer = (2X300) Watts
900W Transformer = (3X300) Watts
51-100 feet
Cable Length
101-150 feet
16 AWG* 16 AWG 16 AWG
16 AWG* 16 AWG 12 AWG
14 AWG* 14 AWG 12 AWG
14 AWG* 14 AWG 12 AWG
12 AWG* 12 AWG NOT RECOMMENDED
12 AWG* 12 AWG NOT RECOMMENDED
12 AWG* 12 AWG NOT RECOMMENDED
0-50 feet
15-VOLT TAP
This data is provided as a general guideline. Actual performance will depend on the installation layout, the fixtures, and the
condition of the cable.
* NOT RECOMMENDED FOR HALOGEN LANDSCAPE LIGHTS