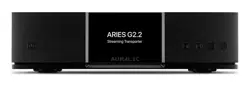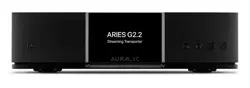
ARIES G2.2
Streaming Transporter
User’s Guide


1
Copyright © 2008-2023 AURALIC LIMITED (AURALiC) and licensors.
All rights reserved. No part of this publication including but not limited to, graphics, text,
code or interactive features, may be reproduced without the express written permission
from AURALiC or its licensors. The content of this manual is provided for information use
only, is subject to change without notice, and should not be construed as a commitment
by AURALiC. AURALiC assumes no responsibility or liability for any errors or inaccuracies
that may appear in this manual. AURALiC, inspire the music, Lightning Streaming, Purer-
Power, ORFEO and their graphic logos are trademarks or registered trademarks of
AURALiC in the United States and/or other countries. AURALiC's trademarks may not be
used in connection with any product or service that is not AURALiC's, in any manner that
is likely to cause confusion among customers or in any manner that disparages or
discredits AURALiC. All other trademarks not owned by AURALiC that appear on this site
are the property of their respective owners, who may or may not be affiliated with,
connected to, or sponsored by AURALiC.

2
Welcome
Congratulations on your purchase of the AURALiC ARIES G2.2 wireless streaming
transporter. Please take some time to read through this manual which provides a
comprehensive, thorough overview of the products features and functions.
Our award-winning ARIES products have led the world of high-resolution streaming since
their introduction in 2014 and have become the premier choice for high-performance
music enthusiasts worldwide. The ARIES G2.2 is the culmination of nearly 10 years of
research and development. As we continually pioneer technologies to improve our
hardware designs and software platform, each product release keeps us solidly at the
forefront of streaming technology. The G2.2 release of the ARIES has seen a complete
hardware upgrade, including a significant increase in processing power, which will
provide the ability to accommodate future streaming features and keep you on the
cutting edge of technology for years to come.
Providing endless avenues for musical exploration, the ARIES G2.2 has the flexibility to
connect music stored locally, or from online services. Our advanced Lightning Streaming
Platform lets you take advantage of features like On-Device Playlists, Memory Caching,
Gapless Playback, and Bit-Perfect Multi-Room functionality. It also offers advanced
features like resampling, parametric EQ, and virtual speaker placement, essential tools
to sculpt and refine your listening environment.
Based on the values of choice, natural sound, and reliability, our philosophy is a
fundamental part of every product we design. To fully incorporate our philosophy into
our products, we created the Lightning Streaming Platform as our unique ecosystem.
This platform allows you to choose from an extensive variety of streaming services. It
also provides the freedom to choose from various software options to control your
music. Sonically, we engineer both our software and hardware to ensure a neutral and
natural sound giving you the ability to tailor your musical taste through speaker choice
and room setup. With complete control over our ecosystem, we can quickly and easily
adapt to developments in music streaming technology.
Keeping your ARIES G2.2 current is easy with our over-the-air software updates. We
regularly add new features and services, allowing you to relax and enjoy state-of-the-art
streaming music. When connected to the internet, your ARIES G2.2 will automatically
download and install new updates as we release them, ensuring you always have the
latest software.
Welcome to the AURALiC community. We sincerely hope the ARIES G2.2 gives you years
of listening pleasure.

3
Table of Contents
Welcome ................................................................................................................... 2
Understanding the Technology .................................................................................. 5
Network Requirements ............................................................................................. 6
Warranty ................................................................................................................... 7
Unpacking ................................................................................................................. 9
Placement and Cabling .............................................................................................. 9
Placement ......................................................................................................................... 9
Check Your AC Mains Voltage .......................................................................................... 10
Fuse Specification ............................................................................................................ 10
Cabling ............................................................................................................................ 11
Front Panel .............................................................................................................. 14
Power Management ................................................................................................ 15
Power On/Off .................................................................................................................. 15
Standby ........................................................................................................................... 15
Sleep ............................................................................................................................... 15
Force Off .......................................................................................................................... 15
Connect ARIES G2.2 to a Home Network .................................................................. 16
Use Lightning DS Setup Guide .......................................................................................... 16
Use Lightning Web Control Interface ................................................................................ 18
Use Front Panel Control ................................................................................................... 21
Setup Music Library and Streaming Service .............................................................. 24
Setup Lightning Server ..................................................................................................... 24
Use Other UPnP/DLNA Media Server ............................................................................... 25
Add Streaming Service in Lightning DS ............................................................................. 26
Display and Operation ............................................................................................. 28
Welcome Screen .............................................................................................................. 28
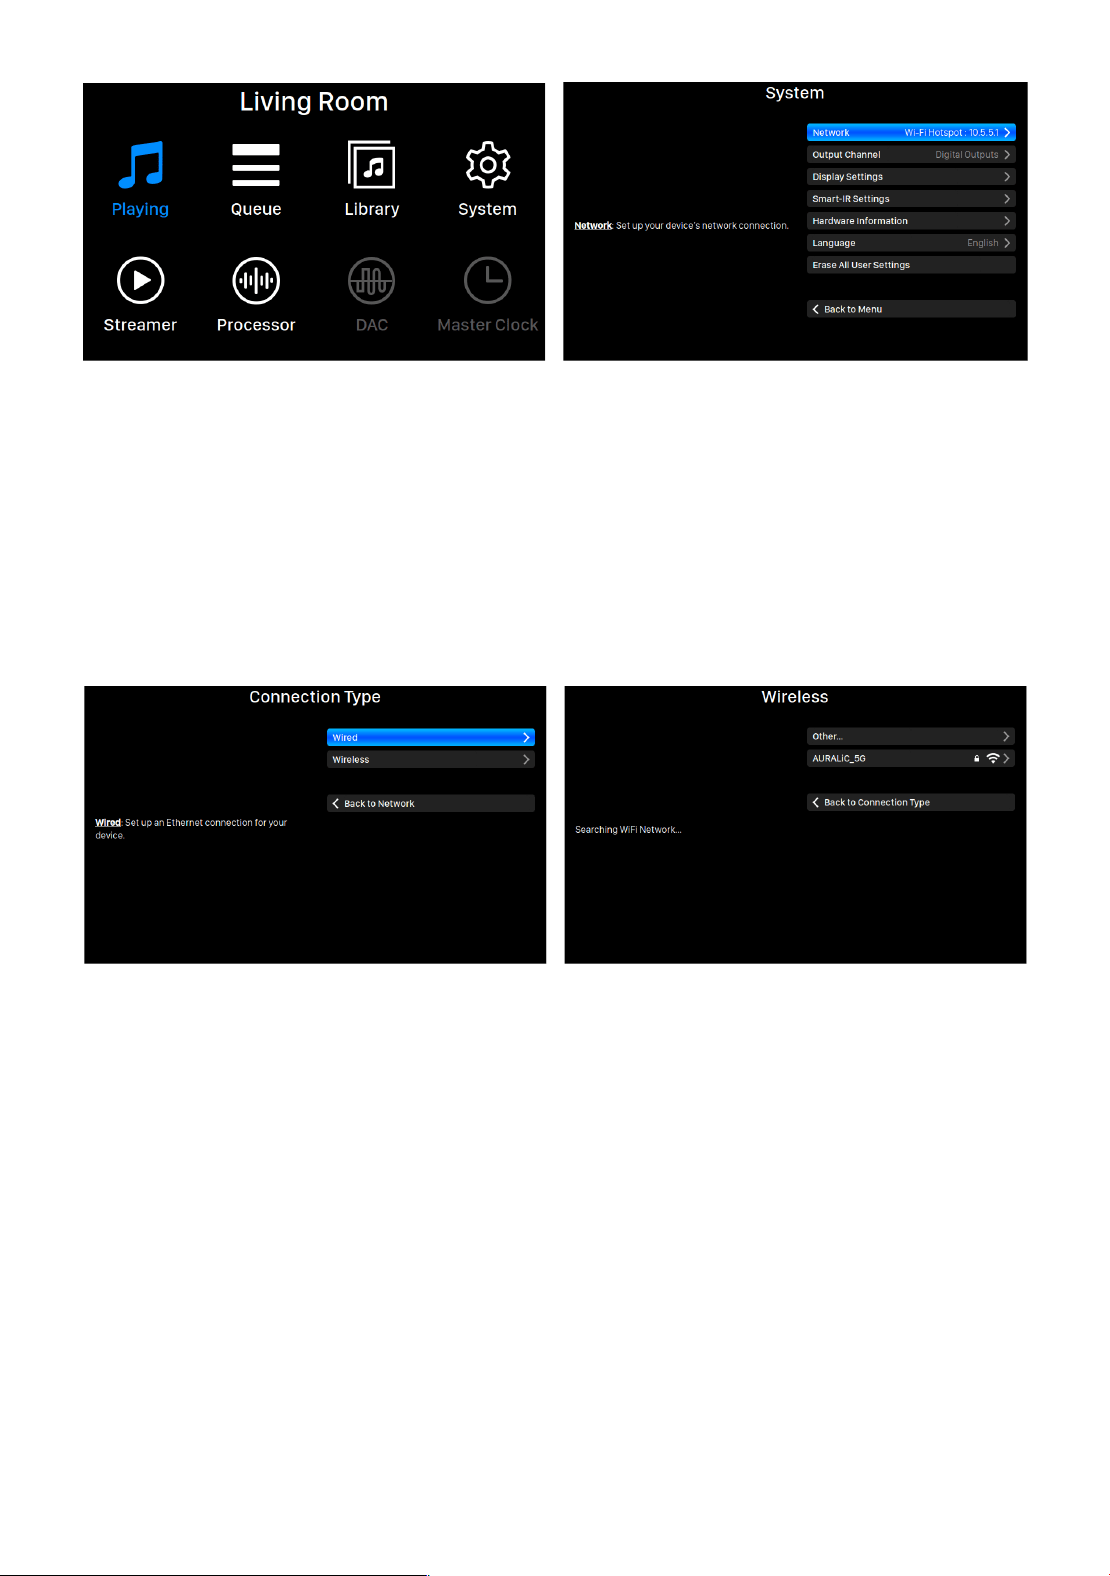
Main Menu ...................................................................................................................... 28
Playing ............................................................................................................................. 30
Queue .............................................................................................................................. 30
Library ............................................................................................................................. 31
System ............................................................................................................................. 31
Streamer .......................................................................................................................... 32
Processor ......................................................................................................................... 33
DAC and Master Clock ..................................................................................................... 33
Lightning Web Control Interface .............................................................................. 35
Smart-IR Remote Control ......................................................................................... 37

4
Lightning DS ............................................................................................................ 38
Main Interface ................................................................................................................. 38
Album Information .......................................................................................................... 39
Playback Control .............................................................................................................. 40
Queue Interface ............................................................................................................... 41
Side Menu ....................................................................................................................... 42
Use with Other Software ......................................................................................... 44
Device Activation and Deactivation ......................................................................... 45
Cleaning .................................................................................................................. 46
Support & Contact ................................................................................................... 47
Specifications .......................................................................................................... 48
AURALiC Product Registration Form ........................................................................ 49

5
Understanding the Technology
AURALiC streaming devices have the ability to work with different technologies and
control software. The most common way to operate your new streamer is in Lightning
mode. This is when you take full advantage of our Lightning Streaming Platform by
controlling it with our iOS App Lightning DS or another OpenHome protocol based
control software. When operating in Lightning mode, there are three fundamental
elements to the system: Renderer, Server, and Controller. The Renderer is the physical
device that plays the music, e.g. ARIES G2.2. The Server provides the music library. When
playing files stored locally on your network, the server can be our Lightning Server or
any other DLNA-based server. If you use an internet streaming service like Qobuz, Tidal,
or Amazon Music, that platform acts as the server as well.
The Controller is the software you use to browse and select music. With AURALiC
products, you have the freedom to choose from a number of different Controller
options. When operating in Lightning mode, you can use our Lightning DS App or any
OpenHome protocol based software such as BubbleUPnP or Kazoo as your controller.
Operating in this mode allows the Renderer to fetch the music data directly from the
Server without passing through the Controller. Since Lightning mode is an integral part
of our system, it allows us to apply some advanced technologies, like our memory cache,
to optimize the sound quality. This feature preloads the music data from the server into
the Renderer’s memory, allowing it to be played bit-perfect from the most pristine
environment possible.
Your AURALiC streamer can also work in many ways other than Lightning mode. If you
prefer the Roon ecosystem, the ARIES G2.2 will operate seamlessly as a certified
RoonReady endpoint. It also works directly with TIDAL Connect, Spotify Connect, and
provides the option of an AirPlay or Bluetooth connection. Each of these systems has its
own specific operating environment, which requires us to bypass our memory cache
system. Some of the other processing features available via Lightning mode may be
disabled as well. Your ARIES G2.2 will sound slightly different when using these software
options, but not necessarily worse. Each of these systems uses its own technology to
optimize for sound quality.

6
Network Requirements
Our Lightning streaming technology utilizes SSDP (Simple Service Discovery Protocol), a
network package that facilitates communication between Lightning DS and your
streaming device. However, poorly designed routers and network switches often
mishandle SSDP, causing issues. We have encountered WiFi routers that fail to broadcast
SSDP messages effectively between Ethernet and WiFi connected devices or within the
same WiFi network. If you are using a low-cost WiFi router provided by your ISP, it is
likely to be insufficient for this task, resulting in difficulties finding the streaming
device within Lightning DS or experiencing significant delays in device detection.
The ability to stream Netflix or play Pandora on your smart speaker does not necessarily
guarantee that your router can handle specific multicasting (SSDP) messages without
dropouts or block certain (IGMP/ICMP) data packets that AURALiC Lightning devices rely
on for optimal performance. In many cases, lower-performing routers provided by your
Internet Service Provider may struggle with this type of traffic due to their firmware
limitations. Additionally, a weak WiFi connection can also impact the transmission of
these UDP discovery data packets, even if your other data connections appear to be
functioning as they should.
We recommend upgrading to a high-performance aftermarket router manufactured by
reputable brands like Netgear, ASUS, or Linksys to resolve these issues and ensure the
best streaming experience.
It's worth noting that some enterprise-level network routers and switches implement
additional security measures that require specific configuration to enable SSDP
messages, those security measures may also block IGMP/ICMP messages which are
essential for your AURALiC devices to join your network properly. If you are using this
type of equipment, we advise consulting an IT professional for assistance in setting up
the firewall policy correctly.

7
Warranty
AURALiC offers a 1-Year factory limited warranty from the date of purchase as a general.
For devices originally sold and used in EUC or UK, AURALiC offers a 2-Year factory limited
warranty from the date of purchase.
The warranty will be extended to three years if the original owner completes the product
registration within 30 days from purchase. You could either activate the device inside
Lightning DS software under your AURALiC account or fill out the ‘AURALiC Product
Registration Form’ on page 49 and send it back to [email protected] to finish the
registration. This extended warranty is nontransferable and for the original owner only.
We recommend registering your device using Lightning DS as it provides the easiest way
to complete the registration process. AURALiC values your privacy and does not collect
any personal sensitive data during the registration process. To register your device, you
will need to provide a valid email address, your name, and the country you are living in.
For detailed instructions on how to activate and deactivate your device, please refer to
the 'Device Activation and Deactivation' on page 45.
Warranty coverage includes all parts and labor. Warranty is void if damage is due to
abuse, neglect or unauthorized modifications. Costs associated with the return of this
product are the sole responsibility of the owner. All repair work must be carried out by
AURALiC or by an authorized AURALiC repair agency. Work done by unauthorized
persons will void any and all warranty coverage.
AURALiC products are uniquely identified with a serial number (S/N) printed on the label
attached under the unit. This number is required to validate your warranty. Please
provide your serial number if service is required.
Before the product can be returned for service, an RMA (Return Material Authorization)
number must be issued by AURALiC. Contact your dealer or AURALiC for further
information. Units without an RMA number will not be accepted for service.

8
IMPORTANT SAFETY INSTRUCTIONS
l All safety and operating instructions must be read before actual operation, and
retained for future reference.
l This product should be connected only to the type of power source indicated on
the back of the unit. If you are not sure of the type of your mains power supply,
please consult your dealer or local power company.
l To completely disconnect this product from the AC mains, disconnect the power
supply cord plug from the AC receptacle.
l Do not use the product near water, i.e. near a bathtub, kitchen sink, laundry tub,
in a wet basement, near a swimming pool etc.
l Do not install the product near heat sources such as radiators, heat registers,
stoves, or other apparatus that produce heat. See “Placement and Cabling” on
page 9.
l Do not let objects or liquids fall into the product. Do not expose the product to
dripping or splashing. Do not place a vessel containing liquid on top of the
product.
l Clean only with a soft, dry cloth.
l Do not attempt to service this product yourself. Opening or removing covers may
expose you to dangerous voltage. Refer all servicing to authorized service
personnel. See ‘Support & Contact’ on page 47.
9
Unpacking
Please check that the following items are in the box:
l ARIES G2.2
l AC Power Cord
l Wi-Fi Antennas (2 pieces)
l User’s Guide
Carefully unpack the box. If anything is missing or damaged, please notify your AURALiC
dealer as soon as possible. Once you have inspected everything, return all the packing
materials to the box, and store it in a safe place. You will want to retain the box and
packaging as they are specially designed to protect the unit during transportation and
shipping.
ONLY SHIP THIS PRODUCT IN ITS ORIGINAL PACKAGING!
Placement and Cabling
Placement
ARIES G2.2 should be placed on a solid and stable surface with good ventilation. Do not
install this product near any heat source, such as a radiator or wood stove, or directly
above an amplifier that creates significant heat.
Ventilation Requirement
ARIES G2.2 dissipates up to 50 Watts of power during normal operation.
It should be installed in a space with at least one inch of clearance
above, behind and on both sides of its enclosure to provide adequate
ventilation. Avoid placing it directly above other equipment that
produces heat.
Due to the distinctive foot damper design of the ARIES G2.2, it is essential to avoid
placing any objects on top of the device. The springs within the chassis foot damper are
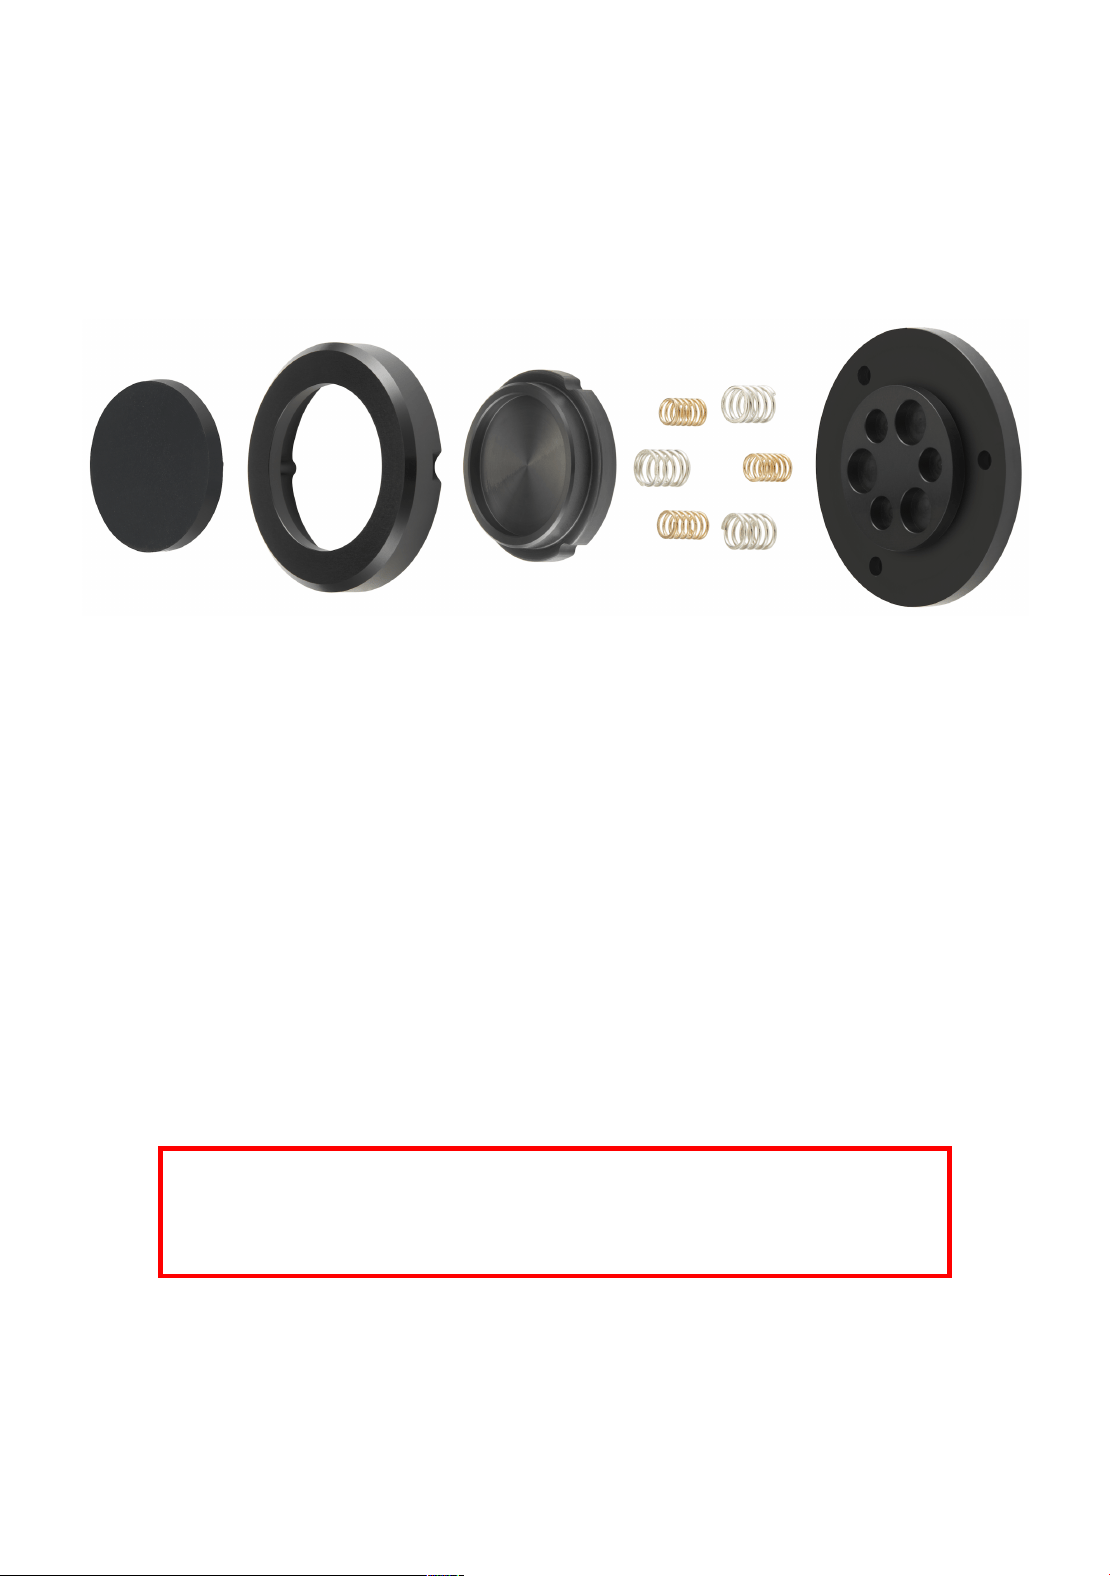
10
precisely calibrated according to the weight of the ARIES G2.2. Adding extra weight to
the unit will compress the springs, leading to a significant impact on the damper
performance and potentially compromising the sound quality. It is crucial to refrain from
placing additional weight on the machine to ensure optimal performance and preserve
the integrity of the sound quality.
ARIES G2.2 chassis foot damper system
Check Your AC Mains Voltage
ARIES G2.2 is shipped with its mains voltage preset for operation in the destination
country. The mains voltage setting is written on the back of the unit, besides the power
cord socket. There is a jumper inside the machine to set the mains voltage between 110-
120V and 220-240V. If it needs to be changed, contact us to obtain additional
information.
The power cord has a three-wire grounding type plug (a plug having a third pin for
grounding). It will only fit into a grounded power outlet. If you are unable to insert the
plug fully into the outlet, contact your dealer or AURALiC. Do not defeat the safety
purpose of the grounded plug.
ARIES G2.2 MUST BE USED WITH THE CORRECT
MAINS VOLTAGE AND PROPERLY EARTHED!
Fuse Specification
The fuse used inside ARIES G2.2 is one single T1A/250V (1A slow blow) with size of
5*20mm. The fuse is located inside the fuse box at the IEC AC power socket:
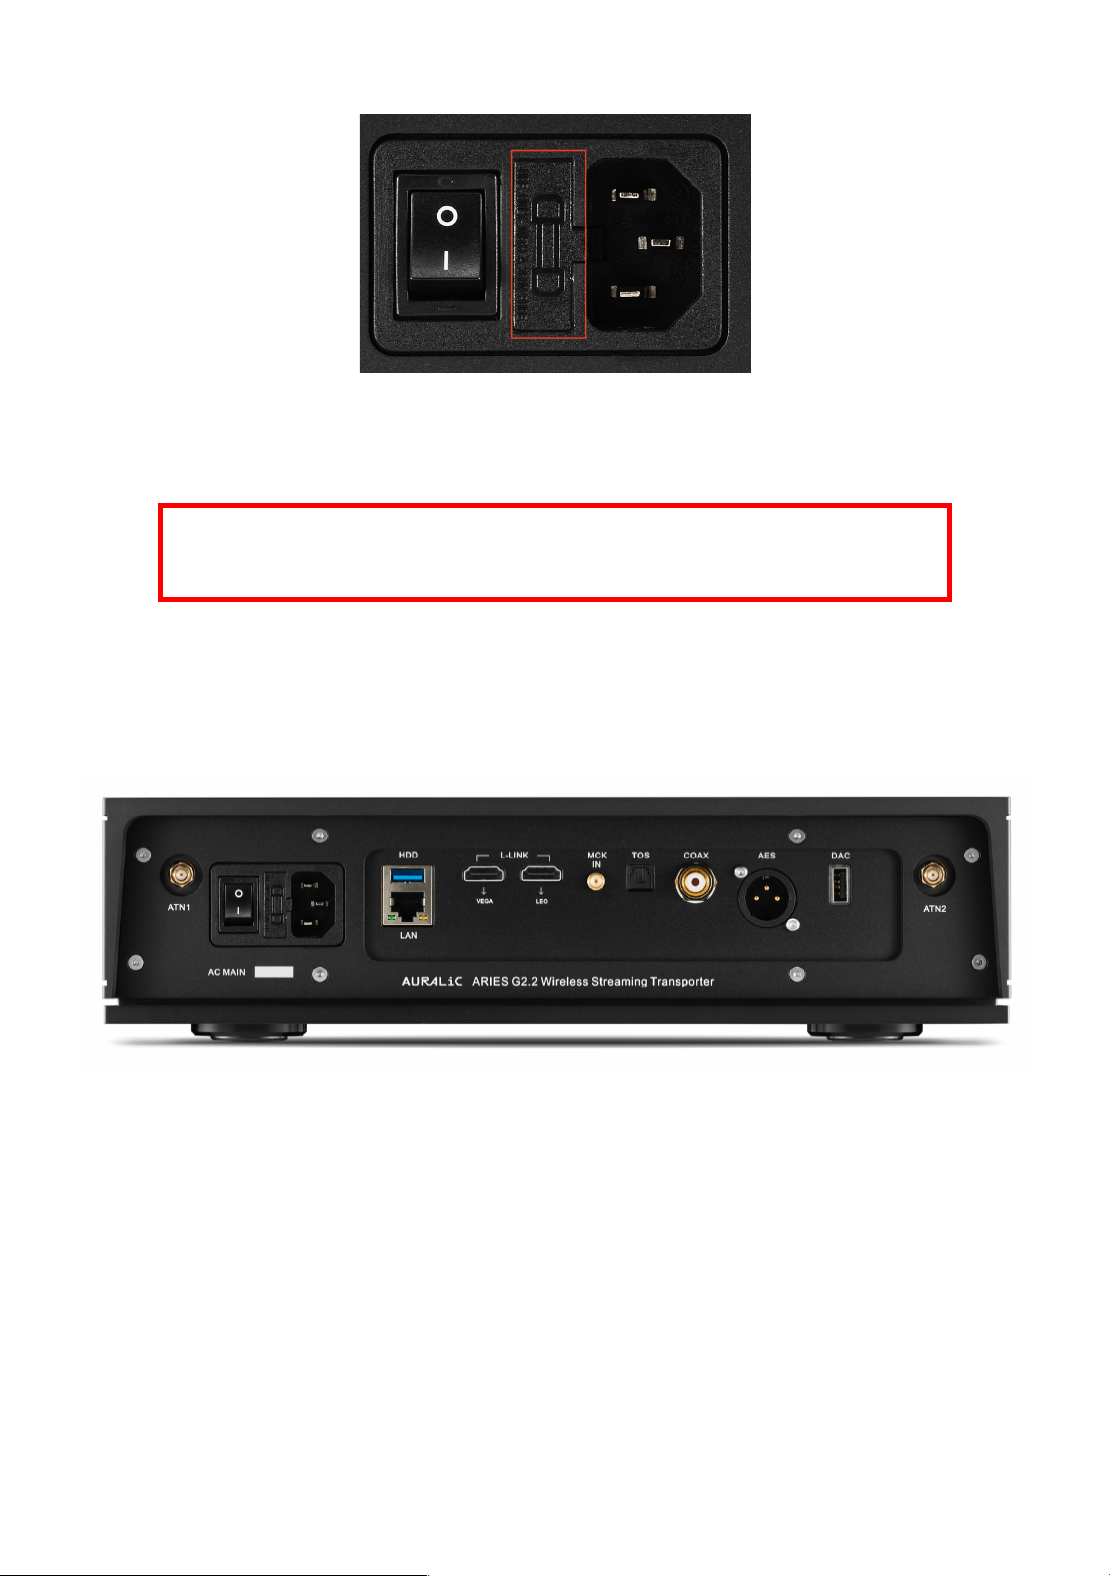
11
It is crucial to replace a fuse with the same rating when necessary. Failure to do so can
lead to serious hazards, including but not limited to electric shock, fire, and explosion.
ONLY REPLACE FUSE WITH THE SAME RATING!
Cabling
The I/O ports on the rear of ARIES G2.2:
• IEC Power Socket and Main Switch
Power cable connection. Double-check the AC MAIN voltage rating directly below
the power socket before connecting to your wall outlet. Please do not use heavy
aftermarket power cables without proper support. Excessive cable weight may
damage the power cord socket.
The toggle power switch cuts off all power to the unit when the side labeled ‘O’ is
toggled and connects power to the unit when the side labeled ‘I’ is toggled. Please
make sure to power off all units in your system before changing any cables. Failure
to do this may result in permanent damage to your streamer and void any warranty.

12
ALWAYS POWER OFF ARIES G2.2 BEFORE CABLING!
• ATN1 and ATN2
These are the connections for the two Wi-Fi antennas that are included in the box
with the ARIES G2.2. These antennas also provide access to the Bluetooth connection.
Once the antennas are installed, you will be able to join your home wireless network.
We always recommend wireless network as a preferred connection if your network
infrastructures meet requirements mentioned at the beginning of this user’s guide.
• LAN
This Gigabit Ethernet connection is supplied in case you would like to connect the
ARIES G2.2 to a wired network.
• HDD
This USB 3.0 port is for connecting removable USB storage devices. When you
connect a USB drive to this port, the internal Lightning Server will read the content
on the drive and index the music files automatically. This connection provides 1.5
amps of power, allowing for a wide range of external storage options. Our platform
supports drives formatted as FAT32, exFAT, NTFS, Linux Ext2/3/4, HFS+, and APFS
(Apple File System).
• AES, COAX and TOS
The AES/EBU, Coaxial, and Toslink output ports are used to connect to a DAC with a
matching input. These are all driven by the same Femto Clock source, but they are
individually buffered so they can be used together. Select ‘Digital Outputs’ as the
output channel inside the device menu to activate them. The maximum sampling
rate supported by AES, Coaxial, and Toslink is 24bit/192kHz PCM or DSD64 (DoP).
• DAC
The USB Audio Host port features our 2
nd
generation galvanic isolation with
improved DAC compatibility and further optimized noise isolation and jitter
performance. Once connected, select your DAC’s name as the output channel inside
the device menu to enable it. Please refer to your DAC’s specifications for the
maximum sampling rate it supports.

13
• L-LINK
Lightning Link is the preferred connection method if you use the ARIES G2.2 with
other AURALiC products that support Lightning Link. The ARIES G2.2 has two
Lightning Link connections labeled VEGA and LEO. The VEGA connection is used to
send the output data stream to our VEGA DAC or SIRIUS processor. The connection
labeled LEO is for communication with our LEO GX.1 Reference Master Clock, which
is used together with the MCK-IN clock input connection.
When using ARIES, VEGA and LEO together, please always connect your LEO directly
to the VEGA in order to take full advantage of its performance.
Lightning Link uses an HDMI connector, but it is neither an HDMI port nor an I2S
output. Please do not attempt to connect it to any HDMI or I2S device. Select
‘Lightning Link’ as the output channel inside the device menu to activate it. The
maximum sampling rate supported by Lightning Link is 32Bit/384kHz PCM or DSD512.
• MCK IN
Clock signal input for AURALiC LEO Reference Master Clock. Adding LEO to your
ARIES G2.2 will boost digital output performance; this however will not affect the
USB output. MCK IN is not compatible with other clock product, such as a 10M
reference clock.
Note: ARIES G2.2 can only work with LEO version 2.1 and above. You can check your
LEO’s version at its front display when powered up. Please contact AURALiC to have
your LEO updated if you have an earlier one.
14
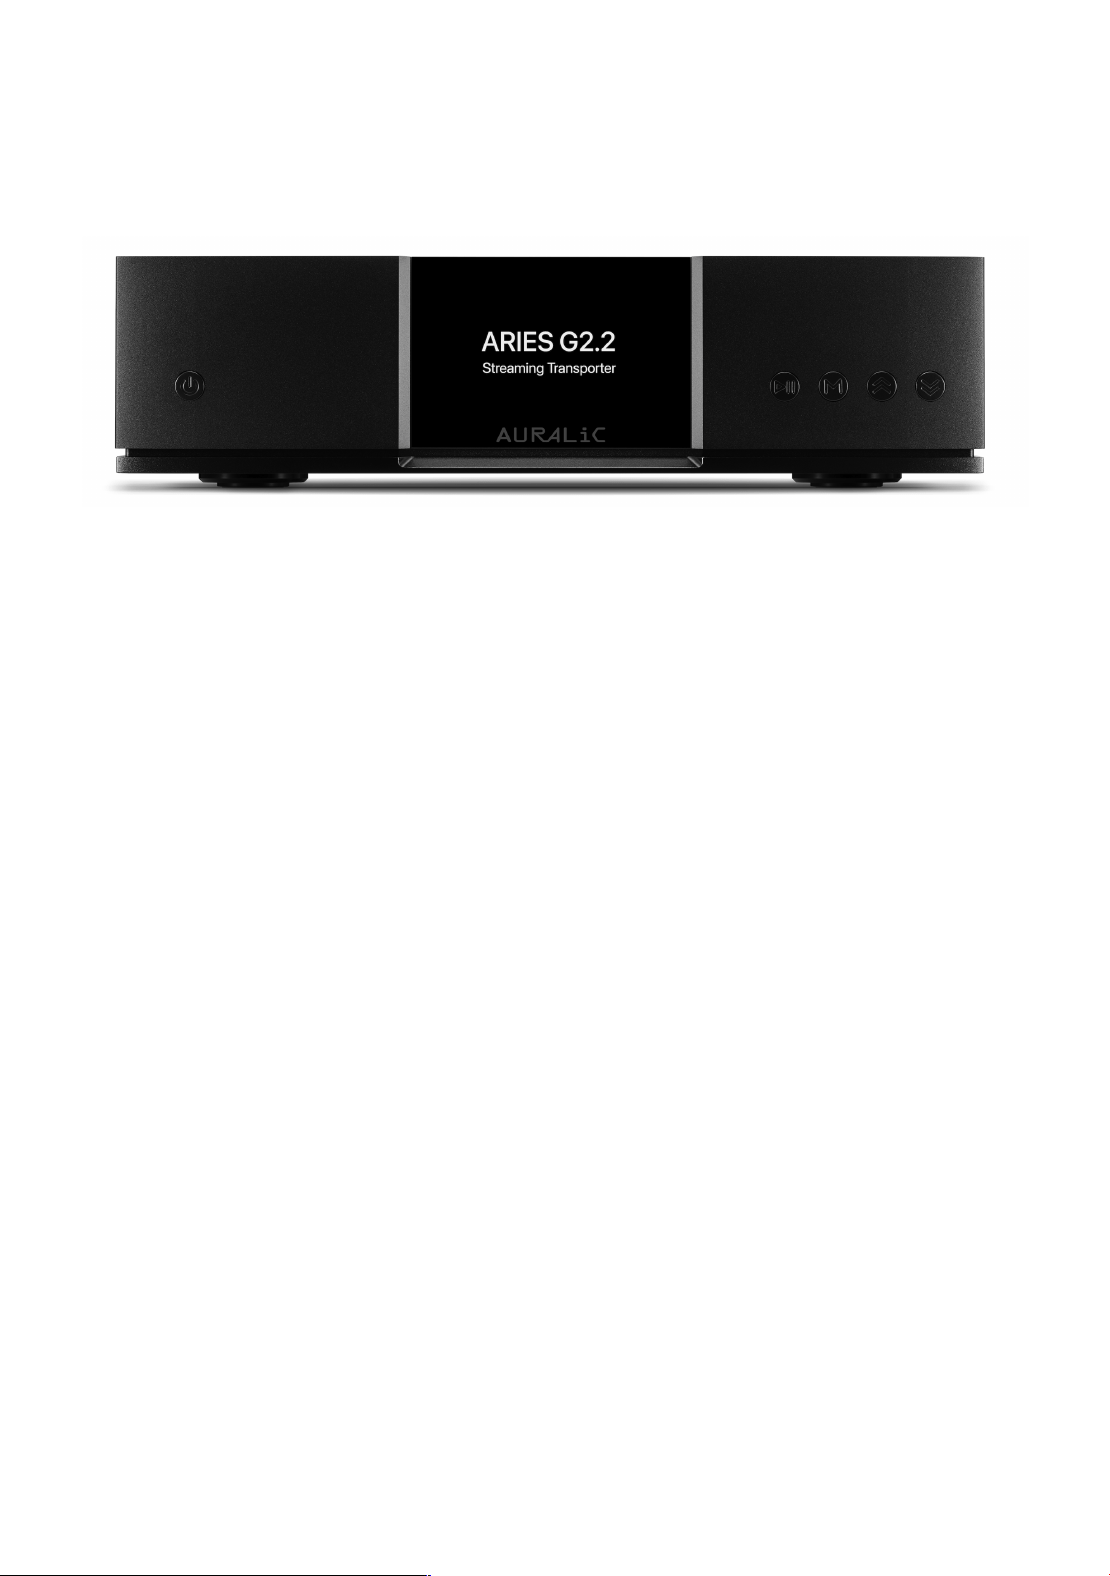
Front Panel
The front panel of ARIES G2.2:
• ‘Power’ Button
The ‘Power’ button controls the power status of your ARIES G2.2. Please refer to
Power Management’ on page 15 for detailed information.
• ‘Play’ Button
The ‘Play’ button has two functions: in ‘Playing’ interface, this button will play/pause
the current track. When navigating menus, use this button to confirm selections.
• ‘M’ Button
The ‘M’ button has two functions: in ‘Playing’ interface, the ‘M’ button returns to
the home menu. When navigating menus, this button steps backwards to the
previous menu level (brief press) or exits to the Home Menu (long press).
• ‘Up’ and ‘Down’ Buttons
The ‘Up’ and ‘Down’ buttons have two functions: in ‘Playing’ interface, they adjust
volume up and down. When navigating menus, use these buttons to highlight menu
items.
• Front Panel Display
The 4-inch high-resolution true color display on the front panel gives you full access
to ARIES G2.2 settings as well as displaying enriched metadata.

15
Power Management
ARIES G2.2 is equipped with advanced power management system which allows true
on/off, low power standby and sleep mode.
Power On/Off
The AC power to your ARIES G2.2 can be controlled using the toggle switch located on
the back of the device. This switch directly manages the flow of AC power to the unit.
We recommend completely switching off the device using the toggle switch if you do
not plan to use it for an extended period, such as during a vacation trip.
Standby
Once the toggle switch is set at ‘I’ position, your ARIES G2.2 will enter standby mode
automatically. The standby mode uses very little power as most of the circuits inside the
machine are powered off. In standby mode, your machine is off from network and will
not react to any programmed IR remote control command.
To wake the machine from standby mode, press the ‘Power’ button briefly on the front
panel. Within a few seconds, the front display will illuminate, and your ARIES G2.2 will
begin the boot-up process.
Sleep
Sleep mode allows most circuits inside your ARIES G2.2 to remain powered on while
staying connected to your home network. In this mode, the device will appear in
Lightning DS as a device under sleep mode.
To wake the machine from sleep mode, you have multiple options. You can use Lightning
DS app, utilize a programmed IR remote control, or simply press the ‘Power’ button
briefly on the front panel.
Force Off
In the rare event that your ARIES G2.2 becomes unresponsive or fails to start, you can
perform a force off operation by pressing and holding the ‘Power’ button for 7 seconds.
This action will reset the system put the ARIES G2.2 back into standby mode. To restart
the device, simply press the ‘Power’ button briefly once again, and it will begin the boot-
up process.
16
Connect ARIES G2.2 to a Home Network
Connecting your ARIES G2.2 to your home network is a relatively easy process. There are
three different methods you can use for setup: Lightning DS setup guide, Lightning web
control interface, or device front panel control.
Before proceeding with the setup of your ARIES G2.2, it’s important to ensure that ICMP
(Internet Control Message Protocol) and IGMP (Internet Group Management Protocol)
packets are not being blocked on your router/firewall/switch. Your ARIES G2.2 will not
be able to join home network if ICMP/IGMP is disabled.
Use Lightning DS Setup Guide
Lightning DS is the control software that AURALiC created to use with its streaming
devices. You can install Lightning DS on any iPad or iPhone running iOS 11 or above.
Lightning DS can also be installed on any Mac computer with Apple Silicon processor.
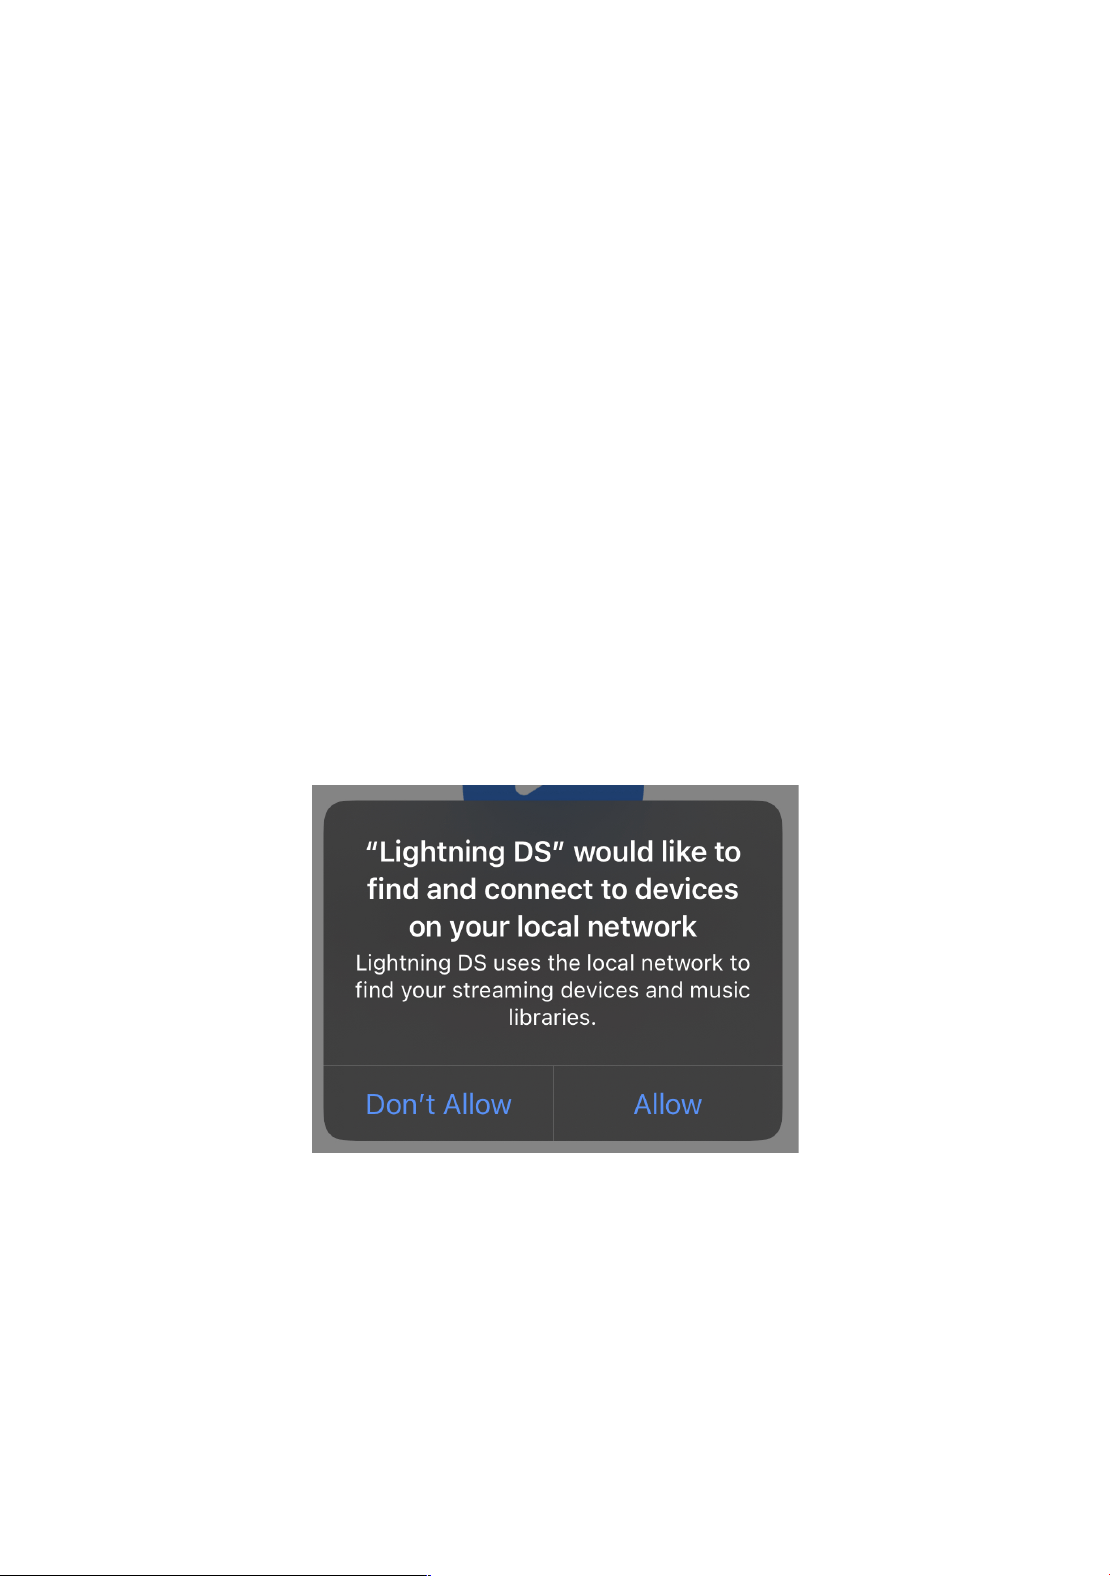
To begin, download Lightning DS from the Apple App Store. Once it is installed and you
open the App, a window will pop up with this message:
Please make sure you choose ‘Allow’. Lightning DS will not be able to connect to your
ARIES G2.2 if you choose ‘Don’t Allow’ option.
Next, you will be prompted to select your language. Once you have selected your
language preference, Lightning DS will display the End User License Agreement (EULA.)
Please read this agreement carefully and select ‘Agree’. If you do not agree with the
EULA, please return your unit to the seller immediately.
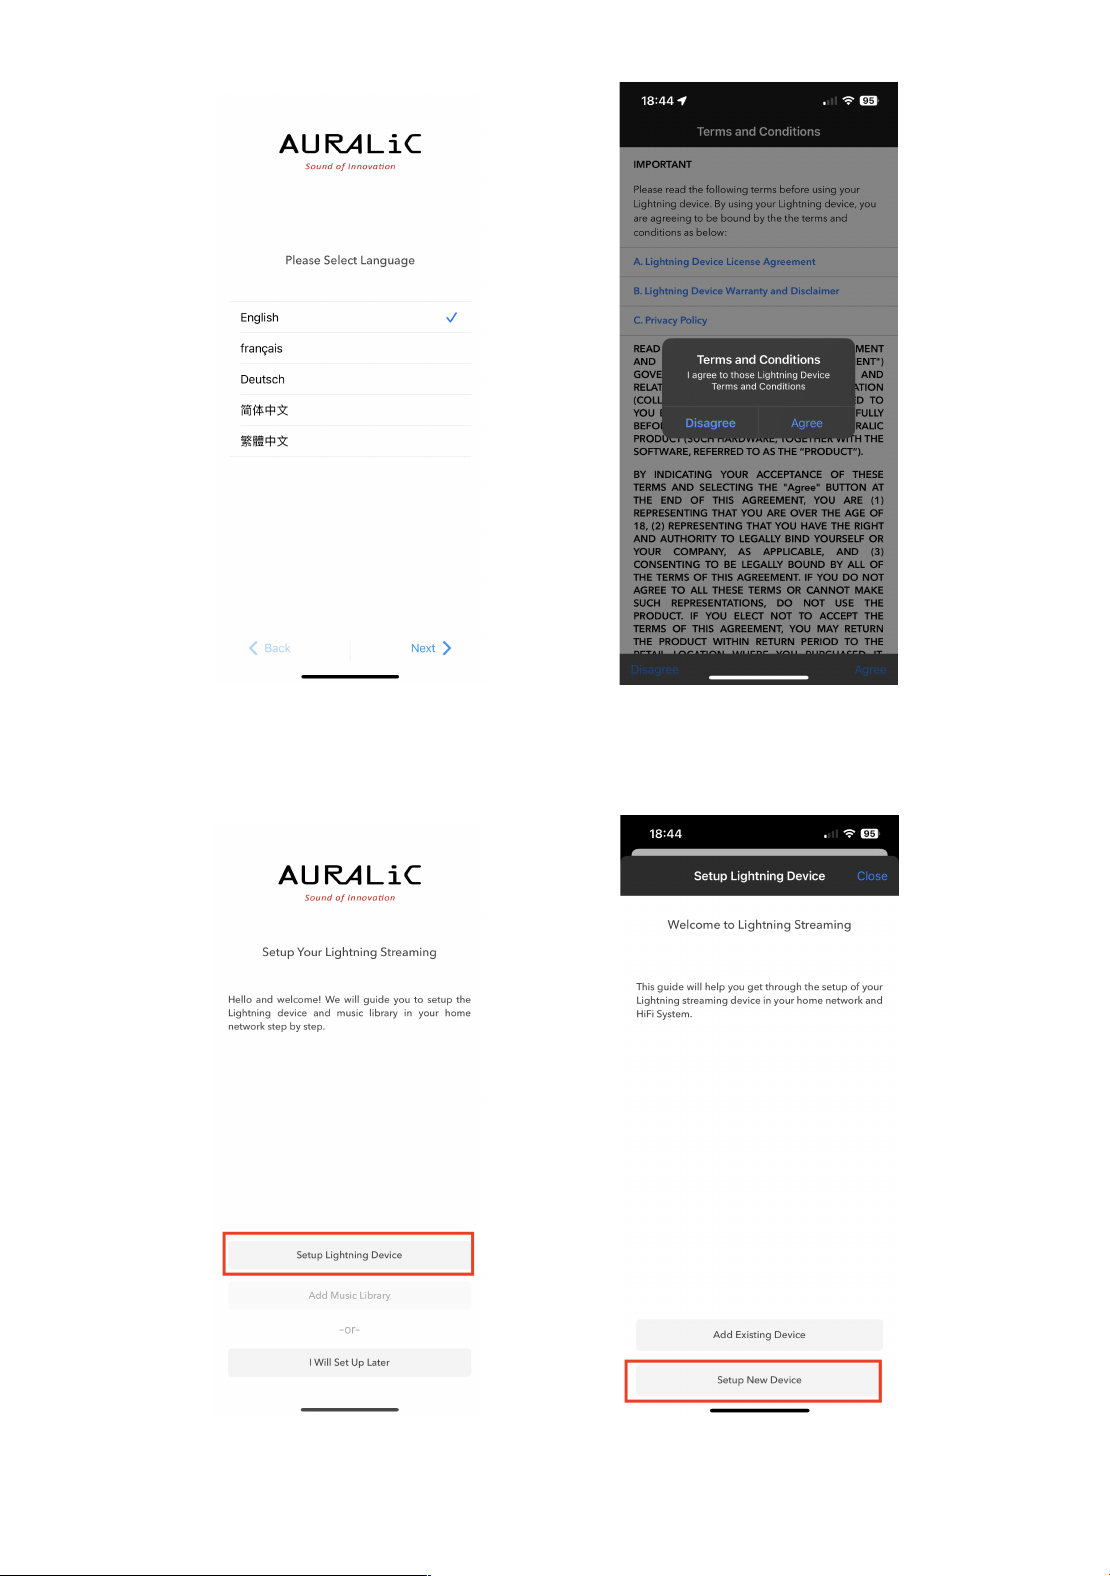
17
At the welcome screen, choose ‘Setup Lightning Device’ option then select ‘Setup New
Device’ to start a step-by-step setup guide. It will lead you to configure your ARIES
G2.2 to join your home network.
18
Use Lightning Web Control Interface
All AURALiC streaming devices come with an HTML5-based hardware control interface,
allowing you to configure the device to connect to your home network. To begin using
the web control interface, follow these steps:
Connect the power cord to your ARIES G2.2, switch on the main power by putting toggle
switch to the ‘I’ position, press the ‘Power’ button on the front panel to start up the
device.
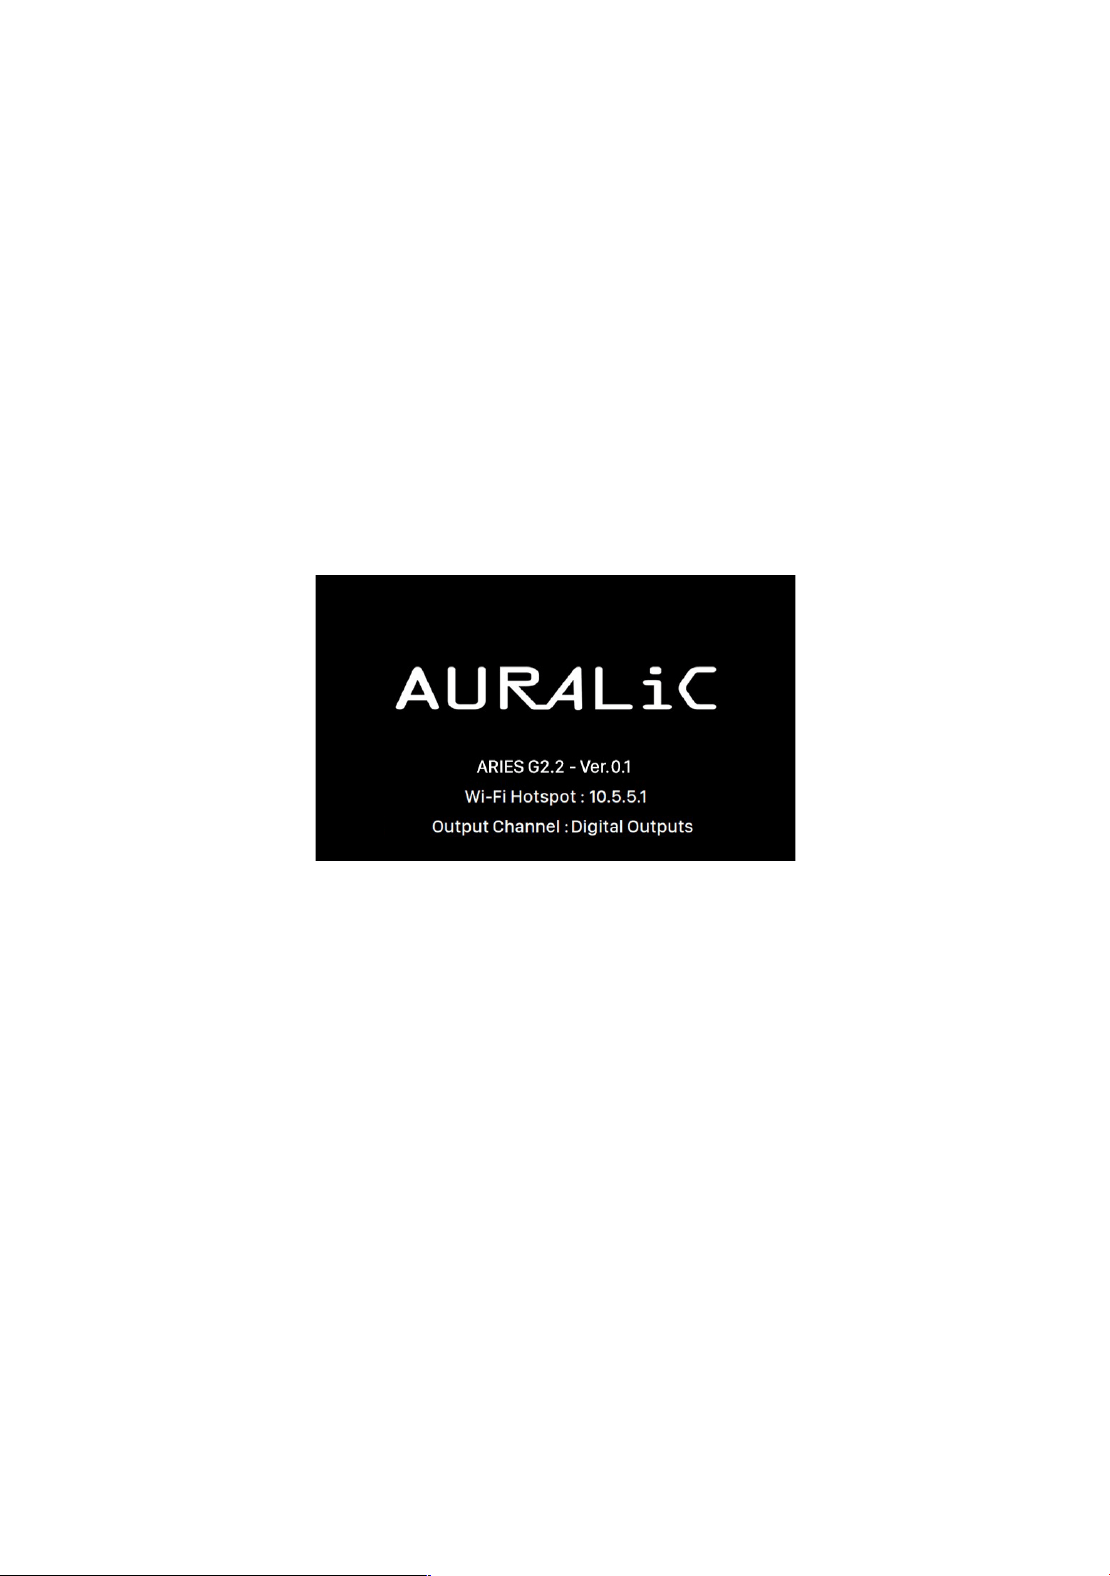
The ARIES G2.2’s front display should light up after a couple of seconds and you will see
an AURALiC logo on the display indicating the device is starting up. If this is a brand-new
device, you will need to select the device language. Once the device has fully started,
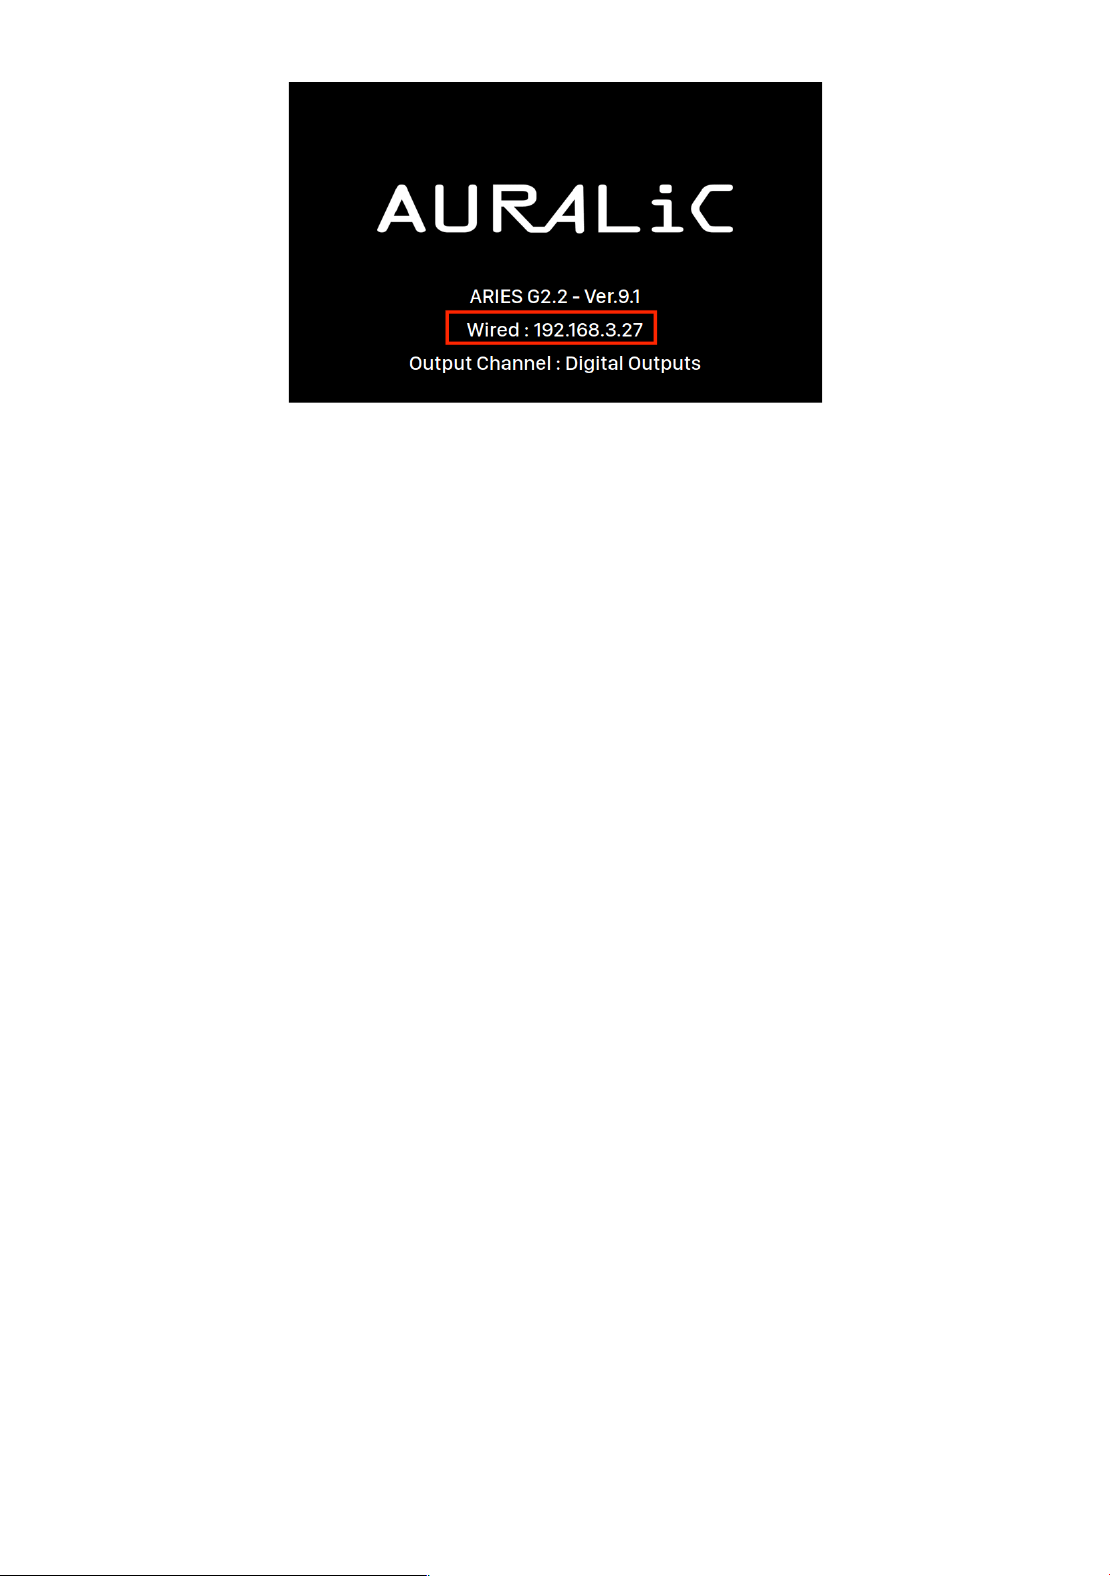
you will see the ‘Welcome’ screen, which displays basic information about your device:
Once you see the interface and verify that the second line displays ‘Wi-Fi Hotspot:
10.5.5.1’, you can proceed with joining an open WiFi network called ‘AURALiC-Lightning’
on any computer or mobile device.
Please note that your computer or mobile device might issue a warning stating that the
network is not password protected or lacks internet connectivity. This is perfectly normal
as the Wi-Fi hotspot is temporary and intended solely for the initial device setup process.
Once connected to ‘AURALiC-Lightning’, open a web browser, and enter ’10.5.5.1’ into
the address bar. The Lightning web control interface is now available:
19
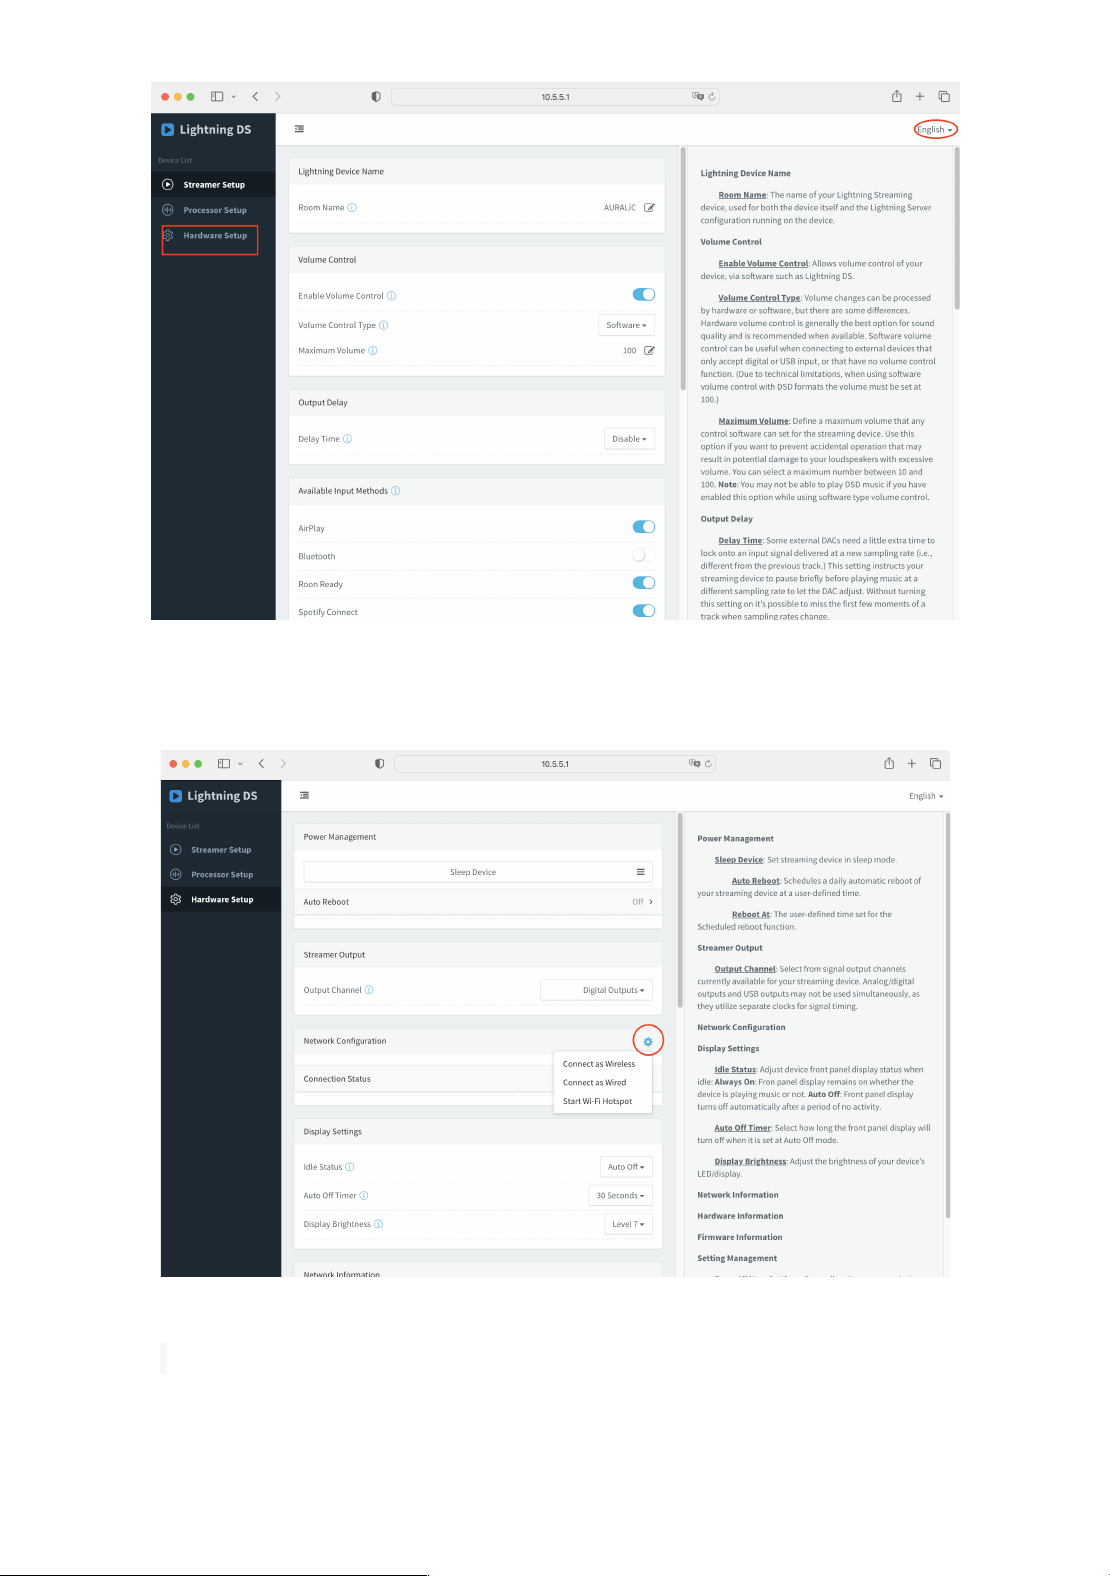
At the top right corner of the interface, change the language option by selecting the
desired language. On the left-hand side, click on ‘Hardware Setup’:
Locate the ‘Network Configuration’ group and click on the blue gear icon at the right
corner. From the options provided, select the desired connection type.
20
If you are using a wired connection, ensure that you have connected the network cable
before selecting ‘Connect as Wired’. If you are using a wireless connection, choose
‘Connect as Wireless’, and a popup window will appear within the web control interface.
In the popup window, select your Wi-Fi network, then click on ‘Next’ to join it. If your
network does not broadcast its name, choose the ‘Other…’ option to manually input the
network information.
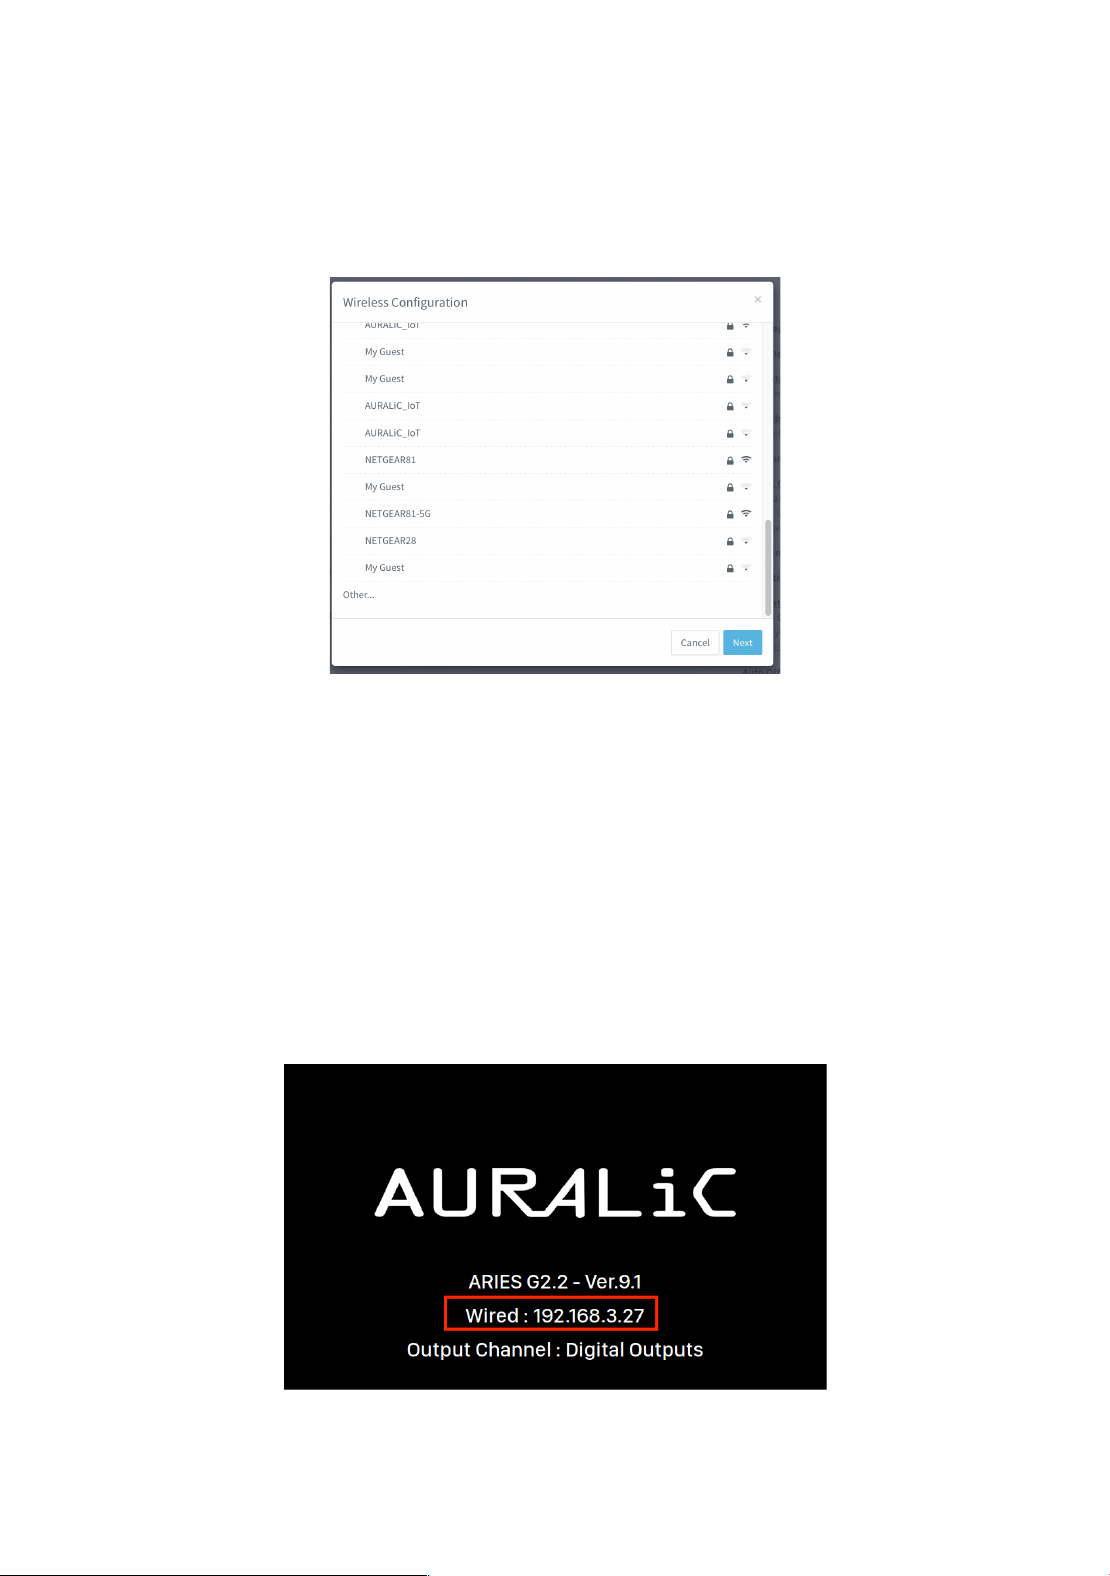
After entering the network information correctly, click the ‘Join’ button, and your ARIES
G2.2 will attempt to connect to the selected network. During this process, the device’s
front display will show a loading animation.
Once your ARIES G2.2 has finished attempting to join the selected network, the
‘Welcome’ screen will reappear. However, the second line of the display will no longer
show ‘Wi-Fi Hotspot: 10.5.5.1’. Instead, it will display the name of the Wi-Fi network
along with its corresponding IP address. If you have chosen a wired connection, it will
display ‘Wired’ along with the IP address. You have now successfully configured your
ARIES G2.2 to join your home network and the device is ready to use.

21
In the event that your ARIES G2.2 fails to connect to your selected network, it will revert
to the ‘Welcome’ screen. However, the second line will show ‘Wi-Fi Hotspot: 10.5.5.1’
again. This indicates that the device was unable to join the network and has
automatically returned to Wi-Fi hotspot mode.
Once you have successfully configured your ARIES G2.2 to join the network, you no
longer need to use the Lightning DS device setup guide for further configuration. In the
Lightning DS app, you can choose ‘Setup Lightning Device’ > ‘Add Existing Device’ at
start up screen. Your ARIES G2.2 should appear in the list of available devices. Simply
select it and start using the app.
Use Front Panel Control
You can use ARIES G2.2’s front panel control to join wired or wireless network. Connect
the power cord to your ARIES G2.2, switch on the main power by putting toggle switch
to the ‘I’ position, press the ‘Power’ button on the front panel to start up the device.
The ARIES G2.2’s front display should light up after a couple of seconds and you will see
an AURALiC logo on the display indicating the device is starting up. If this is a brand-new
device, you will need to select the device language. Once the device has fully started,
you will see the ‘Welcome’ screen, which displays basic information about your device:
Press ‘M’ button on the front panel to enter main menu, use ‘Up’ or ‘Down’ button to
select ‘System’ menu, then press the ‘Play’ button to enter system menu:
22
Use ‘Up’ or ‘Down’ button to select ‘Network’ menu, then press’ Play’ button to enter
network menu. Select ‘Connection Type’ and enter the menu. Choose the connection
type you prefer to use and go to the next step.
If you are using a wired connection, ensure that you have connected the network cable
before selecting ‘Join Network’. If you are using wireless connection, ARIES G2.2 will
scan and list networks that are available to join. If your network does not broadcast its
name, choose the ‘Other…’ option to manually input the network information.
After you have selected ‘Join Network’, ARIES G2.2 will attempt to connect to the
selected network. During this process, the device’s front display will show a loading
animation.
Once your ARIES G2.2 has finished attempting to join the selected network, the
‘Welcome’ screen will reappear. However, the second line of the display will no longer
show ‘Wi-Fi Hotspot: 10.5.5.1’. Instead, it will display the name of the WiFi network
along with its corresponding IP address. If you have chosen a wired connection, it will
display ‘Wired’ along with the IP address. You have now successfully configured your
ARIES G2.2 to join your home network and the device is ready to use.
23
In the event that your ARIES G2.2 fails to connect to your selected network, it will revert
to the ‘Welcome’ screen. However, the second line will show ‘Wi-Fi Hotspot: 10.5.5.1’
again. This indicates that the device was unable to join the network and has
automatically returned to Wi-Fi hotspot mode.
Once you have successfully configured your ARIES G2.2 to join the network, you no
longer need to use the Lightning DS device setup guide for further configuration. In the
Lightning DS app, you can choose ‘Setup Lightning Device’ > ‘Add Existing Device’ at
start up screen. Your ARIES G2.2 should appear in the list of available devices. Simply
select it and start using the app.
24
Setup Music Library and Streaming Service
After you have successfully configured your ARIES G2.2 to connect to your home
network, it’s time to bring your music to the system. However, if you exclusively use
Roon software or rely solely on TIDAL Connect, Spotify Connect, or AirPlay, you may skip
this chapter.
If you have music stored locally on a computer, NAS (Network Attached Storage), USB
drive or internal storage, you will need to set up a music library within Lightning DS. Your
music library can be any DLNA/UPnP media server present on your network. AURALiC
has developed its own integrated media server called Lightning Server, which is part of
the ARIES G2.2 operating system. However, if you prefer to use a third-party media
server, we recommend using Minimserver for the best compatibility.
If you use online streaming exclusively, you can skip the next two sections and jump to
‘Add Streaming Service in Lightning DS’ on page 26.
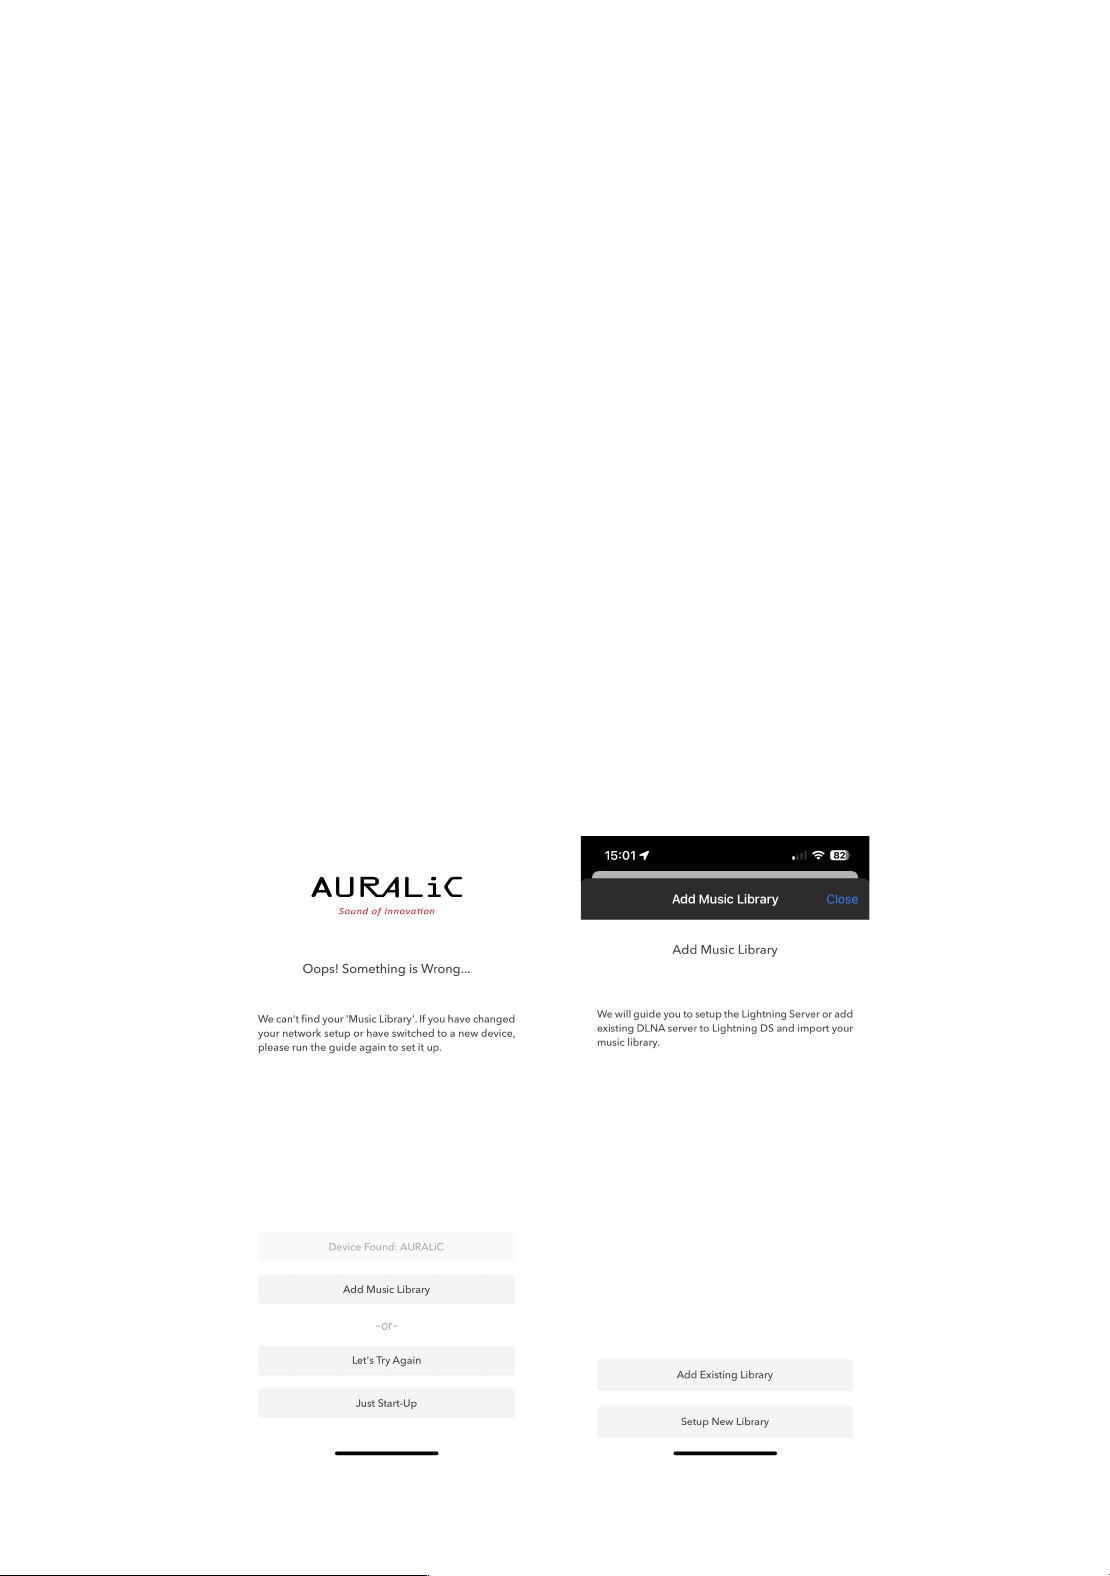
Setup Lightning Server
At Lightning DS start up screen, choose ‘Add Music Library’ option then select ‘Setup
New Library’.
25
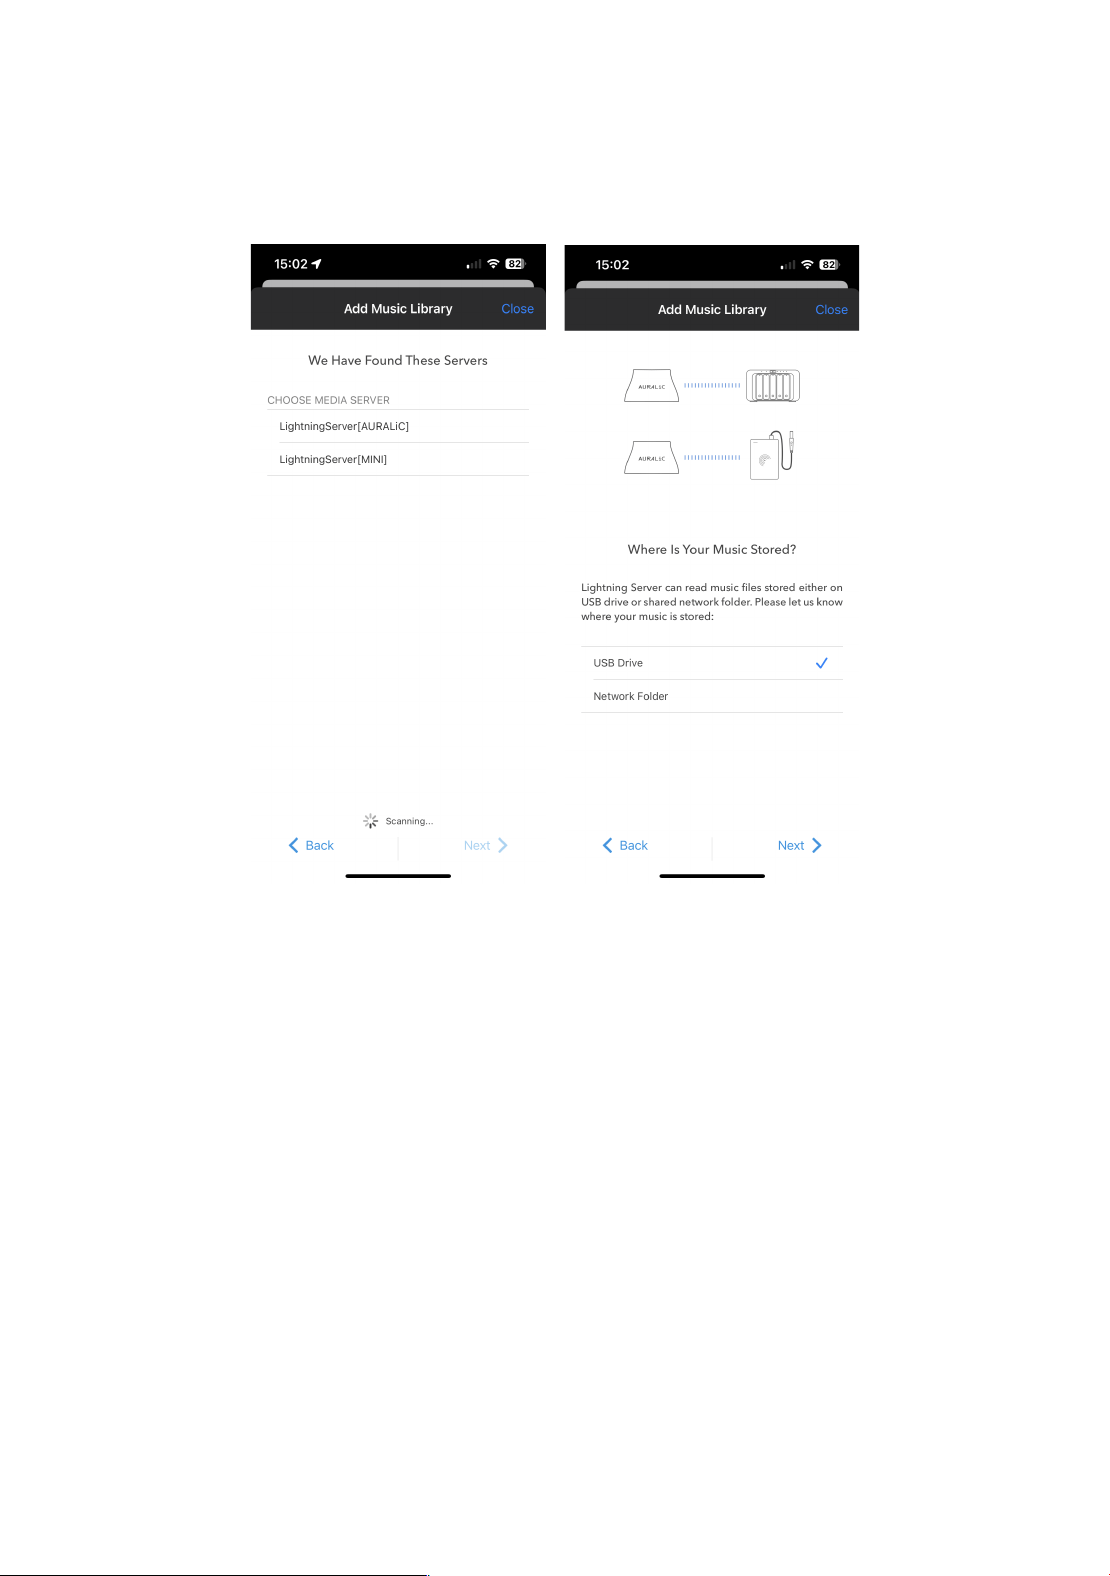
Lightning DS will scan and show all available UPnP/DLNA media servers in your network.
You may see several server options in the network but you will want to select the one
named ‘LightningServer[XXXXXX]’ (XXXXXX is your device S/N). Select the correct
Lightning Server then click Next.
Our setup guide will prompt you with questions and provide guidance to complete the
initial setup of Lightning Server. Please note that the setup guide only allows you to add
a single music library path to your Lightning Server. However, Lightning Server is capable
of supporting multiple music library paths. To access these additional options, you can
utilize our Lightning web control interface. For more information about the Lightning
web control interface, please refer to the ‘Lightning Web Control Interface’ section on
page 34.
Use Other UPnP/DLNA Media Server
If you already have a well-organized UPnP/DLNA media server, you can skip the Lightning
Server and use your own media server as the music library server for Lightning DS. You
can simply configure Lightning DS to connect to your existing media server and access
your music library directly. This allows you to continue using your preferred media server
while utilizing the features and capabilities of Lightning DS for playback and control.
26
At Lightning DS start up screen, choose ‘Add Music Library’ option then select ‘Add
Existing Library’.
Lightning DS will scan and show all available UPnP/DLNA media servers in your network.
Select the one that you are currently using then click ‘Next’. The setup guide will start
creating an index of this media server on your iOS device.
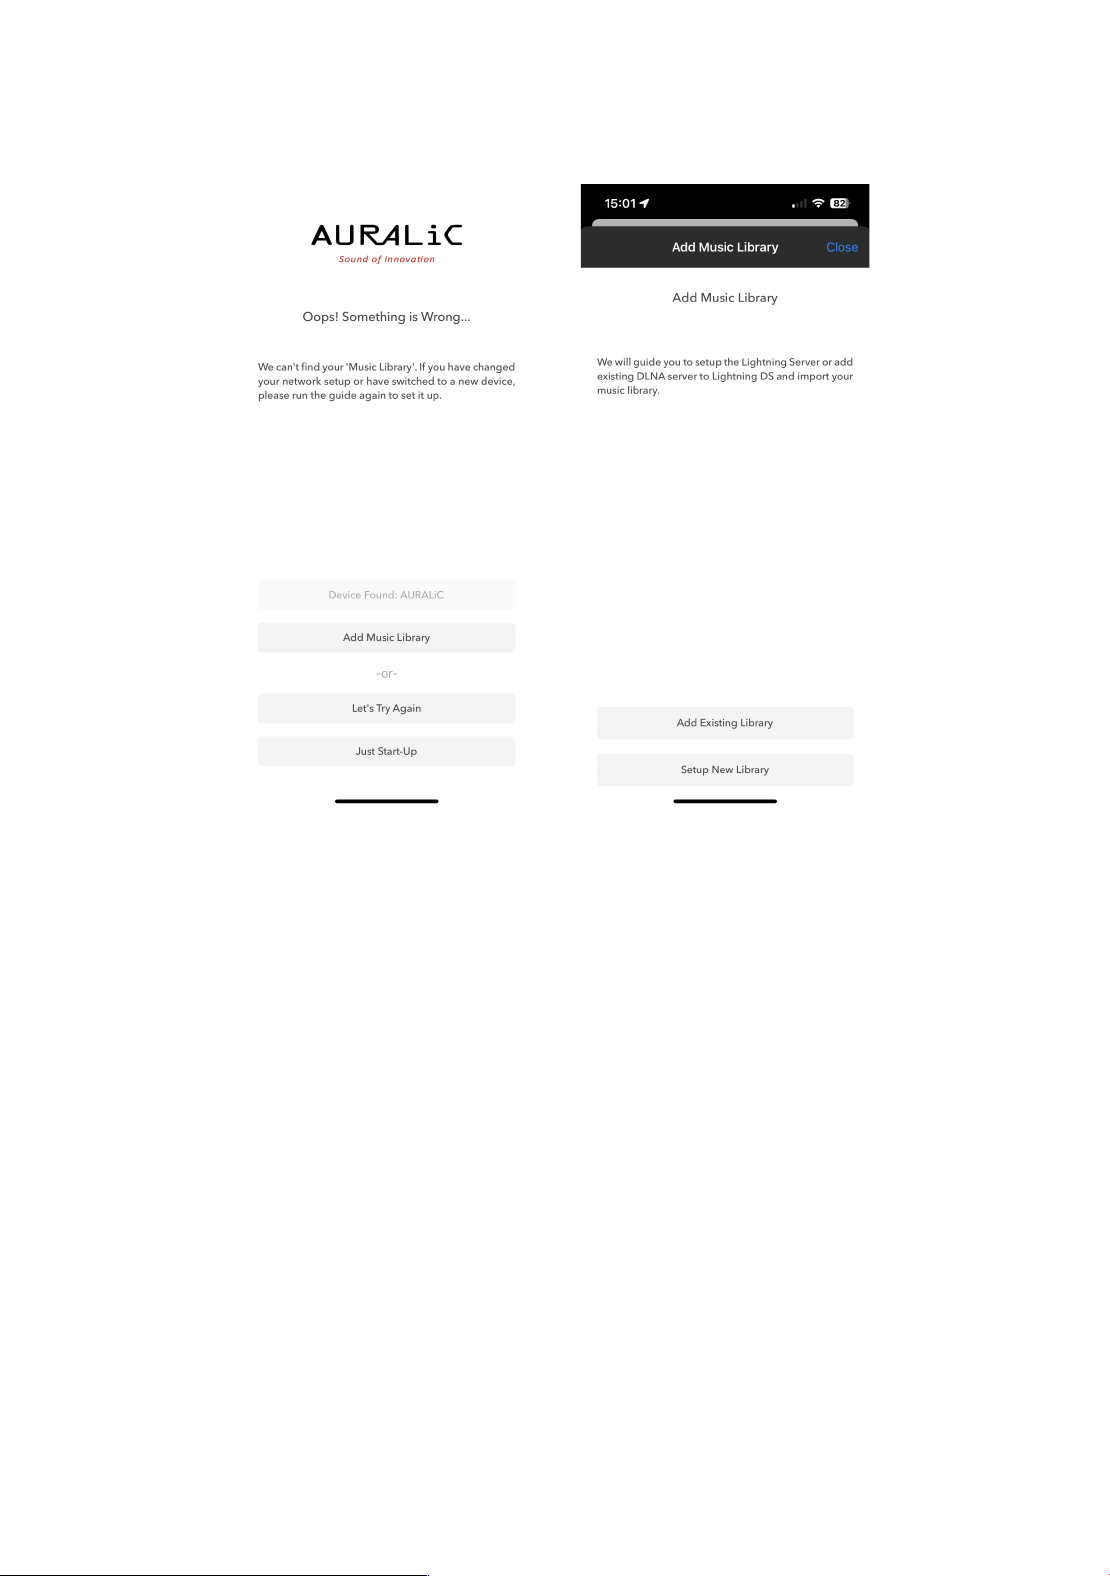
Add Streaming Service in Lightning DS
If you don’t have any locally stored music and intend to solely stream music online using
your ARIES G2.2, you can bypass the media server setup steps. Simply select either the
‘I Will Set Up Later’ or ‘Just Start-Up’ option on the Lightning DS startup screen. This will
allow you to proceed directly to using Lightning DS for online music streaming without
setting up a media server.
To log in your streaming service account, click on the blue navigation icon at the top left
of the screen. This will open the blue navigation side menu. Locate and click on the blue
gear icon at the bottom left corner of the menu. This will take you to the ‘Settings’ menu.
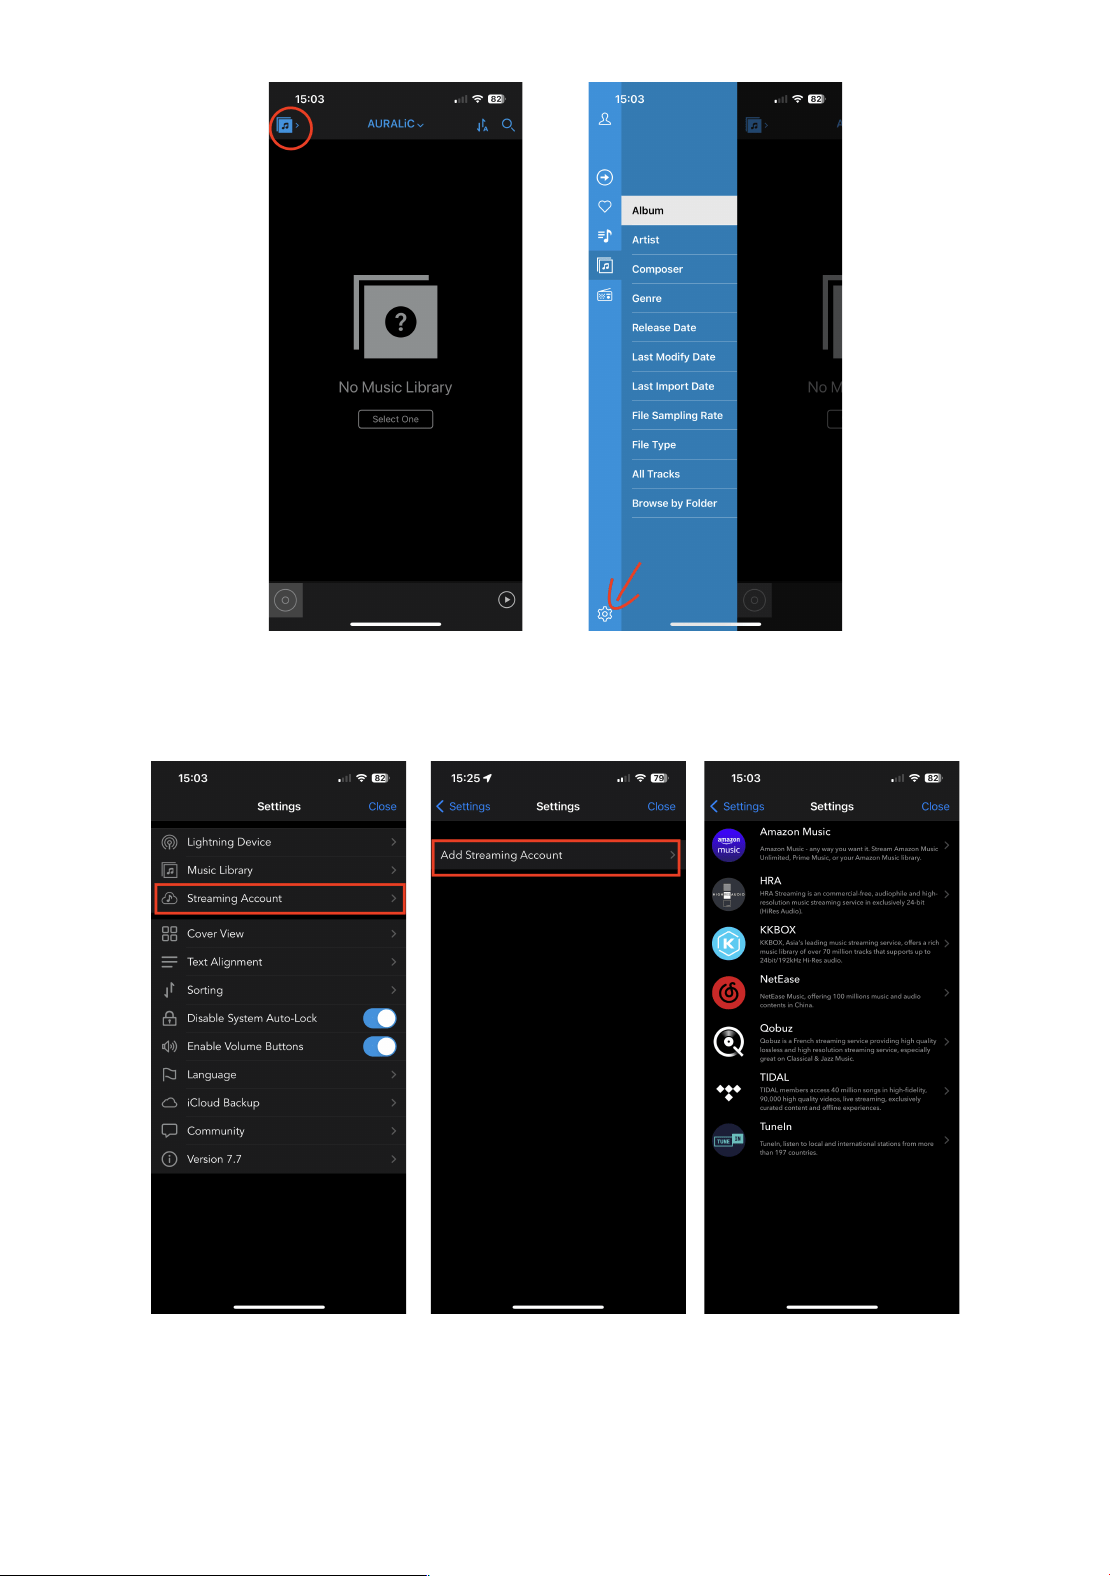
27
Select ‘Streaming Account’ option then click ‘Add Streaming Account’. The streaming
services that are currently being integrated inside Lightning DS will be listed here:
If you wish to stream a service that is not currently integrated within Lightning DS, you
have the option to use alternative software. For more information on how to do this,
please refer to the ‘Use with Other Software’ section on page 43 of the user manual.
28
Display and Operation
The front panel buttons, along with the 4” display, provide a convenient interface for
users to complete hardware-related setup tasks and view the current playback status
when the ARIES G2.2 is in use. However, for an optimal setup experience, we highly
recommend accessing and configuring all settings through the Lightning web control
interface. This web-based interface offers a more comprehensive and user-friendly way
to set up your ARIES G2.2, providing access to a wider range of options and features.
Please refer to page 34 for more information about Lightning web control interface.
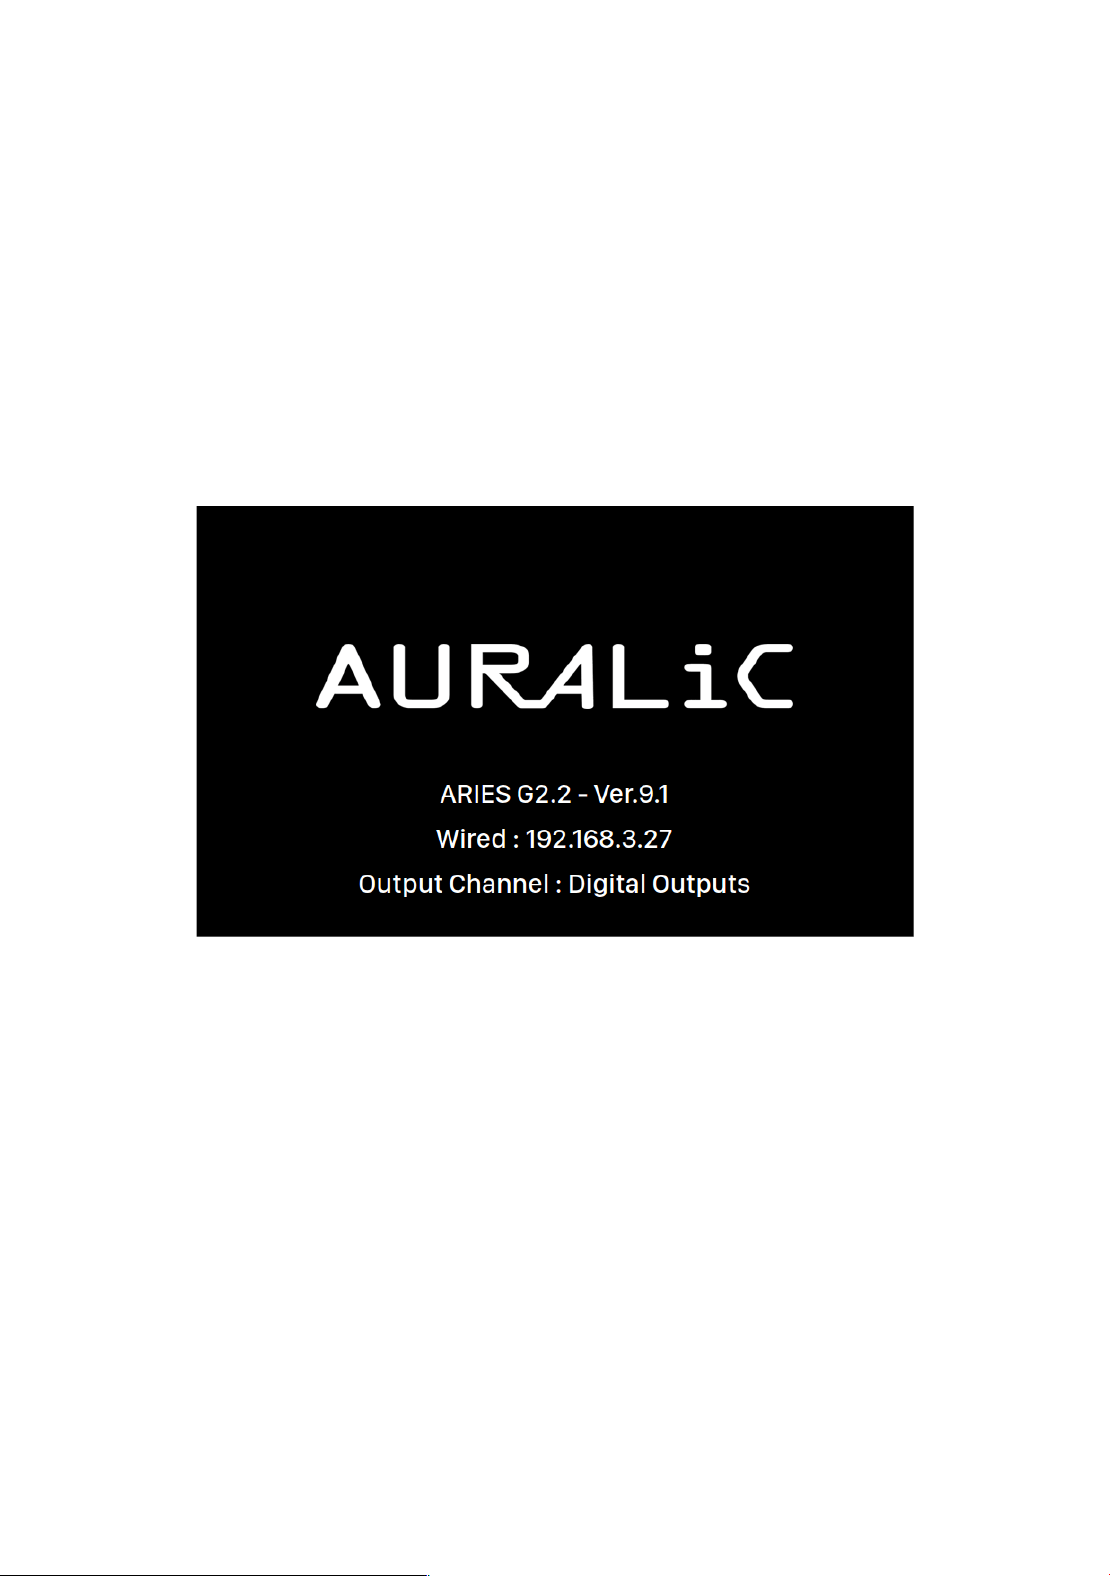
Welcome Screen
Upon startup, the ARIES G2.2 presents the welcome screen, which provides essential
information such as the device model, firmware version, current network connection
type, IP address, and the output channel in use. To access the Lightning web control
interface, simply type the IP address of your ARIES G2.2 into a web browser.
To exit the welcome screen and navigate to the main menu, you can press any front
panel button (excluding the power button).
If you have already selected a track to play using a control software, the ARIES G2.2 will
automatically transition to the ‘Playing’ screen, where you can view the current playback
information and control the playback functions.
Main Menu

29
The main menu serves as the root level menu for your ARIES G2.2, offering access to
eight different destinations. Here is an overview of each destination available from the
main menu:
1. ‘Playing’: This destination displays track information, playback status, playback
mode (shuffle, repeat), and volume control.
2. ‘Queue’: Here, you can view the current queue of tracks in the ARIES G2.2 and
select individual tracks for playback.
3. ‘Library’: Browse and play music from your library, and configure the built-in
Lightning Server on your ARIES G2.2.
4. ‘System’: Access general hardware-related settings, including network
information, output channel configuration, display language, and more.
5. ‘Streamer’: Configure settings specific to the streaming software on your ARIES
G2.2.
6. ‘Processor’: Adjust settings for the ARIES G2.2 processor. Note that if an external
processor, such as SIRIUS, is connected via Lightning Link, the ARIES G2.2
processor is disabled, and the options presented here apply to the external
processor.
7. ‘DAC’: View and modify settings for any Lightning Link-connected DAC, such as
VEGA G2.2 (if applicable).
8. ‘Master Clock’: Access settings for any Lightning Link-connected Master Clock,
such as the LEO GX.1 (if applicable).
To navigate the main menu, use the ‘Up’ and ‘Down’ buttons to highlight a destination,
and press the ‘Play’ button to select it. To return to the welcome screen, press the ‘M’
button.
30
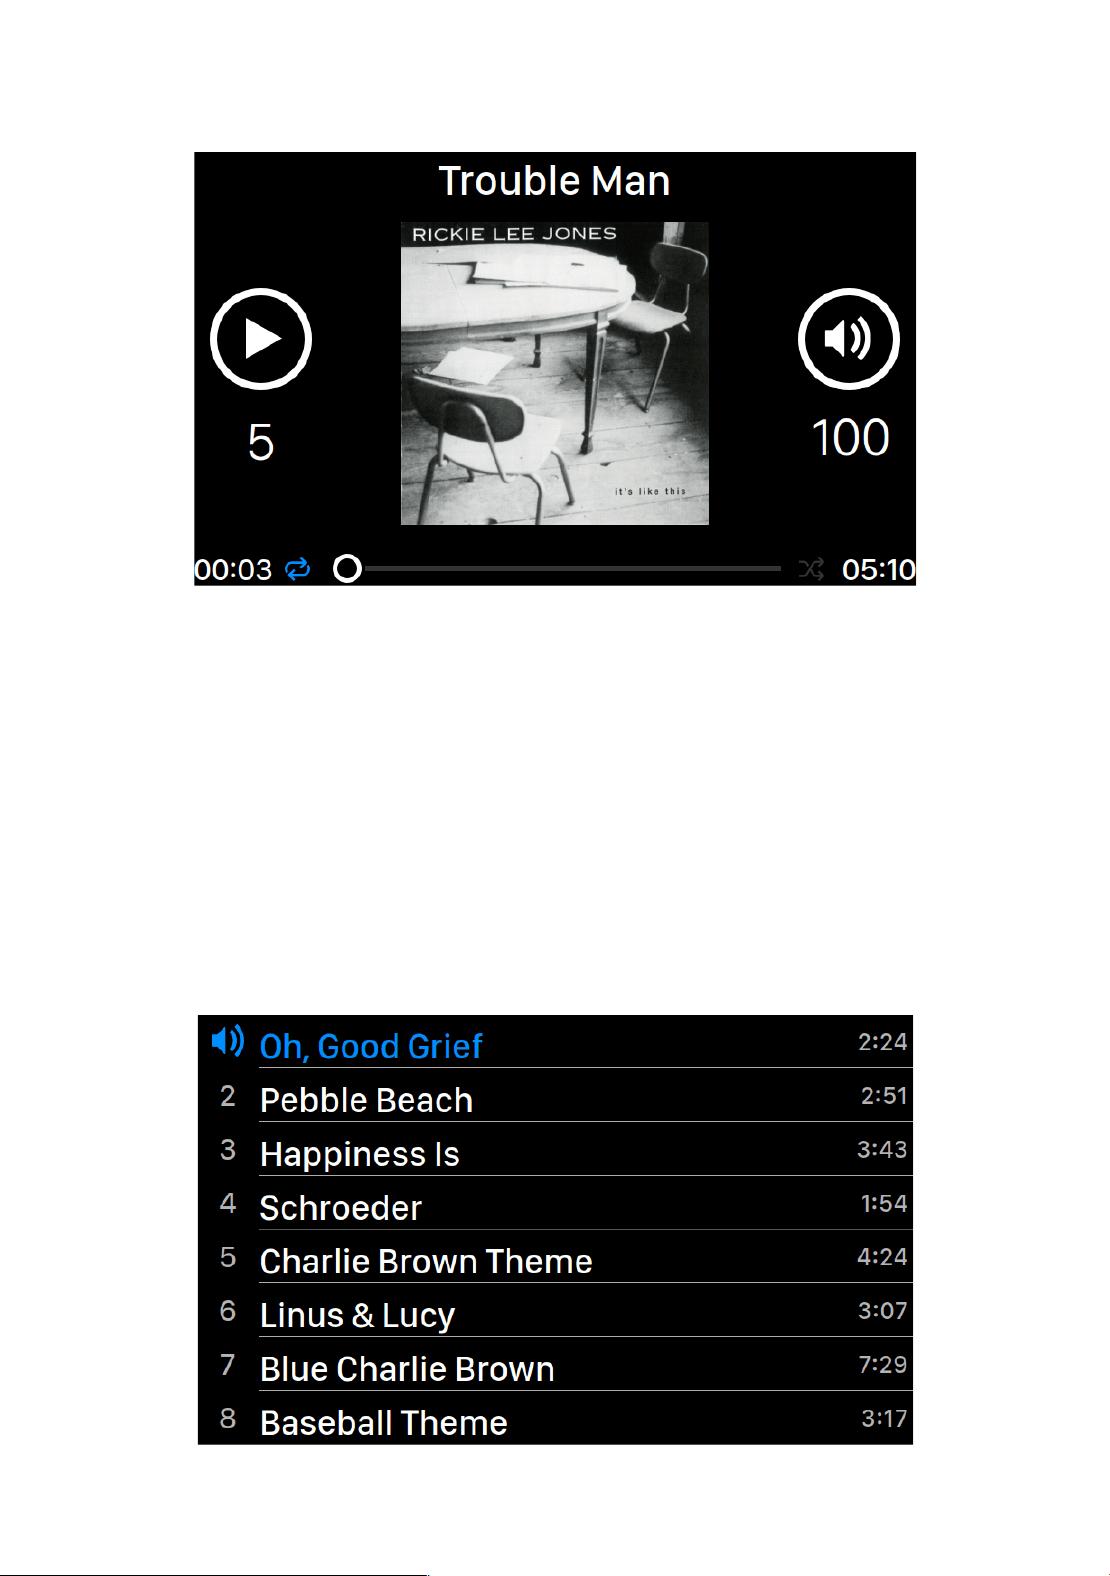
Playing
On the ‘Playing’ screen, you will find information related to the current playback,
including playback status, track progress, playback mode, volume control, and metadata
for the currently playing track. You can also utilize the front panel buttons for specific
functions:
1. ‘Play’ button: Press this button to play or pause the current track.
2. ‘M’ button: Use this button to return to the main menu from the ‘Playing’ screen.
3. ‘Up’ and ‘Down’ buttons: Adjust the volume by pressing the ‘Up’ button to
increase the volume and the ‘Down’ button to decrease the volume.
Queue
31
The ‘Queue’ menu displays the playback queue that is currently stored in the device’s
memory. You can interact with the ‘Queue’ menu using the following front panel
buttons:
1. ‘Up’ and ‘Down’ buttons: Use these buttons to navigate and highlight a specific
track in the queue.
2. ‘Play’ button: Press the ‘Play’ button to start playback of the selected track in
the queue.
3. ‘M’ button: This button allows you to return to the main menu.
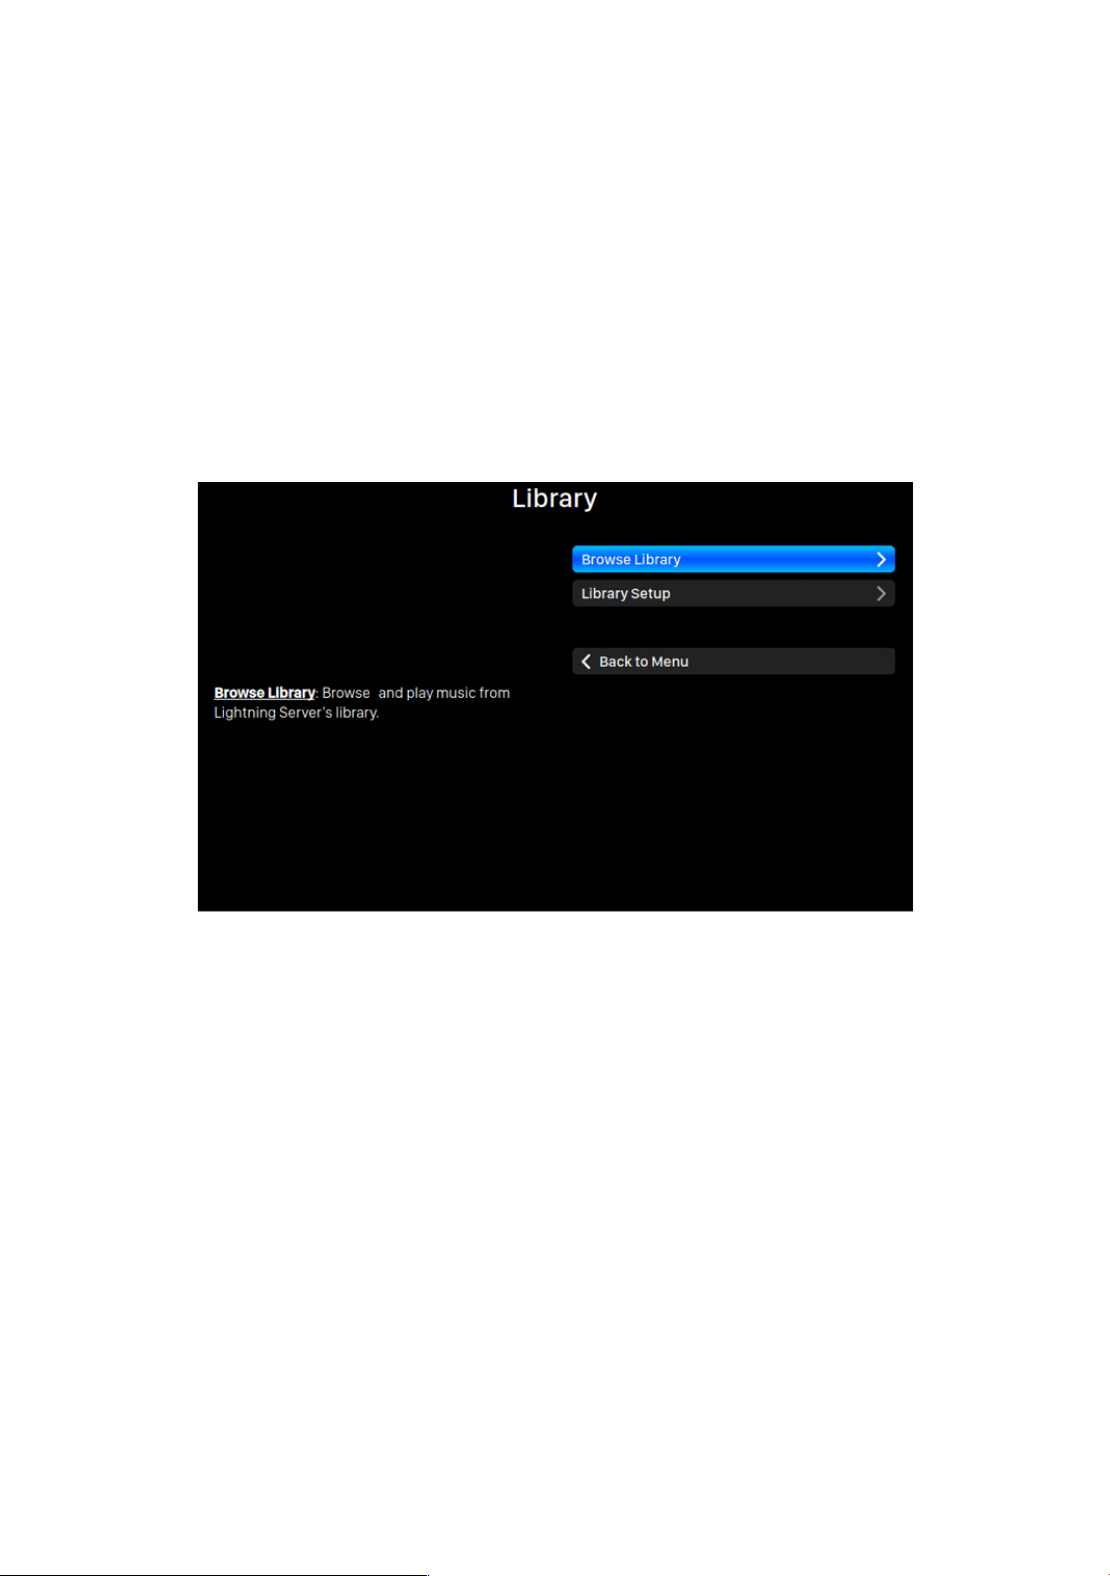
Library
The ‘Library’ menu on your ARIES G2.2 provides options to set up the Lightning Server
and browse the music library created by the server. When on the ‘Library’ menu, you
can utilize the following front panel buttons:
1. ‘Up’ and ‘Down’ buttons: Use these buttons to highlight different menu items
within the ‘Library’ menu.
2. ‘Play’ button: Press the ‘Play’ button to select the highlighted menu item.
3. ‘M’ button: This button allows you to exit to the previous level of setting menu.
You can press and hold the ‘M’ button and return to the main menu directly.
System

32
The ‘System’ menu in Lightning DS encompasses general hardware-related settings for
your ARIES G2.2. When navigating the ‘System’ menu, you can employ the following
front panel buttons:
1. ‘Up’ and ‘Down’ buttons: Use these buttons to highlight different menu items
within the ‘System’ menu.
2. ‘Play’ button: Press the ‘Play’ button to select the highlighted menu item.
3. ‘M’ button: This button allows you to exit to the previous level of setting menu.
You can press and hold the ‘M’ button and return to the main menu directly.
Streamer

33
The ‘Streamer’ menu contains all streaming and rendering related setup options. When
navigating the ‘System’ menu, you can employ the following front panel buttons:
1. ‘Up’ and ‘Down’ buttons: Use these buttons to highlight different menu items
within the ‘System’ menu.
2. ‘Play’ button: Press the ‘Play’ button to select the highlighted menu item.
3. ‘M’ button: This button allows you to exit to the previous level of setting menu.
You can press and hold the ‘M’ button and return to the main menu directly.
Processor
The ‘Processor’ menu displays all available DSP (Digital Signal Processing) plug-in
options. If you have connected an external processor, such as the SIRIUS, via Lightning
Link, the software processor inside ARIES G2.2 will be disabled, and the options shown
in the ‘Processor’ menu will apply to the external processor.
To navigate within the ‘Processor’ menu, you can use the following front panel buttons:
1. ‘Up’ and ‘Down’ buttons: Use these buttons to highlight different menu items
within the ‘Processor’ menu.
2. ‘Play’ button: Press the ‘Play’ button to select the highlighted menu item.
3. ‘M’ button: This button allows you to exit to the previous level of setting menu.
You can press and hold the ‘M’ button and return to the main menu directly.
DAC and Master Clock

34
The ‘DAC’ and ‘Master Clock’ menu will light up and accessible when a VEGA and LEO is
connecting to ARIES G2.2 via Lightning Link corresponding. You will be able to access to
the DAC and clock’s setting through these two menus.
To navigate within the ‘DAC’ and ‘Master Clock’ menu, you can use the following front
panel buttons:
1. ‘Up’ and ‘Down’ buttons: Use these buttons to highlight different menu items
within the ‘DAC’ and ‘Master Clock’ menu.
2. ‘Play’ button: Press the ‘Play’ button to select the highlighted menu item.
3. ‘M’ button: This button allows you to exit to the previous level of setting menu.
You can press and hold the ‘M’ button and return to the main menu directly.
While the front panel buttons provide access to the settings of your ARIES G2.2, it’s
worth noting that you can easily access and configure all the settings through the
Lightning web control interface. The web interface offers a more comprehensive and
user-friendly way to manage the Lightning Server and access your music library.
35
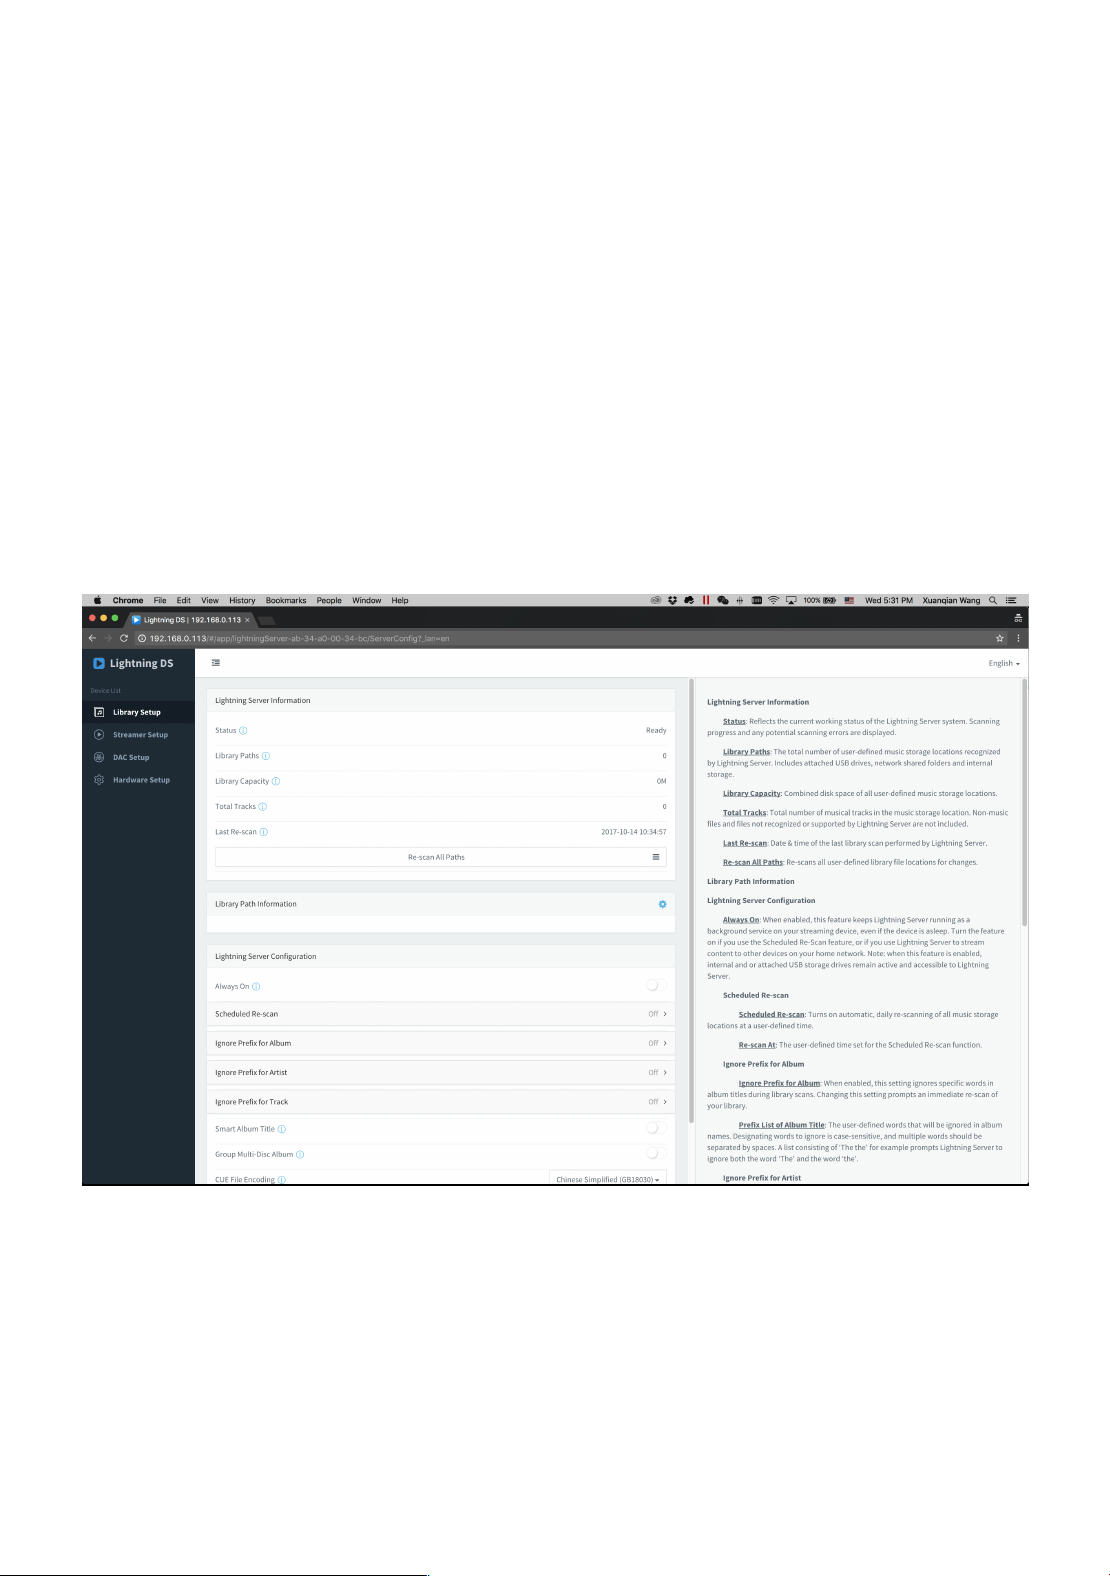
Lightning Web Control Interface
The Lightning web control interface provides a user-friendly way to access and configure
hardware settings for AURALiC streaming devices. You can access the web interface
using any laptop, tablet, or desktop computer with a compatible web browser. Follow
these steps to access the Lightning Web Interface:
1. On the welcome screen of your AURALiC streaming device, note the device’s IP
address displayed.
2. Open a compatible web browser such as Google Chrome or Safari on your laptop,
smartphone, or desktop computer.
3. Enter the IP address of your AURALiC streaming device, as shown on the welcome
screen, into the address bar of the web browser.
4. Press Enter or Go to load the Lightning Web Interface.
The Lightning web control interface consists of three sections:
1. Navigation menu on the left: This menu provides navigation options to access
different sections and settings within the interface. It allows you to easily switch
between different setup options and features.
2. Main setup options in the middle: The central section of the interface displays
the main setup options and configuration settings for your AURALiC streaming

36
device. This is where you can make adjustments and customize various aspects
of your device’s functionality, network settings, streaming options, and more.
3. Setup guide on the right: The right section of the interface provides a setup guide
or additional information to assist you in configuring your AURALiC streaming
device. It may offer step-by-step instructions, tips, and explanations for specific
settings or features.
With these three sections in the Lightning web control interface, you have easy access
to navigate through the different menus, configure the setup options, and refer to the
setup guide for assistance or additional information as needed.

37
Smart-IR Remote Control
Our Smart-IR feature is an intuitive way to eliminate the clutter of an additional remote
in your listening room. This easily programmable feature allows you to control the
operation of your AURALiC product with a remote that you already have. Our system is
basically the reverse of a learning remote. With Smart-IR, you choose a function on the
ARIES G2.2 you would like to access via the remote control, and then by pressing any
button on the remote, teach your ARIES G2.2 to respond to that specific IR code.
To explain this advanced technology, we have created a step-by-step video guide helping
you understand and use this feature. Please scan the QR Code below to view the video:
https://us.auralic.com/pages/auralic-smart-ir-feature
If you do not have a remote for your ARIES G2.2 and would like to use one, AURALiC
offers a generic remote that are compatible with ARIES G2.2. You can order this remote
by contacting your local AURALiC dealer, distributor, or reaching out to AURALiC directly.
38
Lightning DS
Lightning DS is an iOS-based software designed to provide a comprehensive and intuitive
user interface for controlling and managing AURALiC’s streaming devices, including
ARIES, VEGA and ALTAIR family products. With Lightning DS, users can access and
organize their digital music libraries, stream music from various sources, such as local
storage, online streaming services, or internet radio, and control playback on AURALiC
devices.
Lightning DS offers features like playlist and user collection management, search
functionality, and extensive metadata support, making it easy to navigate and find
desired music. The software also integrates with popular streaming services like Tidal,
Qobuz, Amazon Music Unlimited, enabling seamless access to their vast libraries.
Additionally, Lightning DS supports multi-room audio, allowing synchronized playback
across multiple AURALiC devices in different rooms.
Main Interface
The following introduction is based on the interface displayed on a tablet screen. The
interface may appear slightly different on a mobile device, but the essential elements
remain the same. When Lightning DS is launched, you will encounter the following
interface:
39
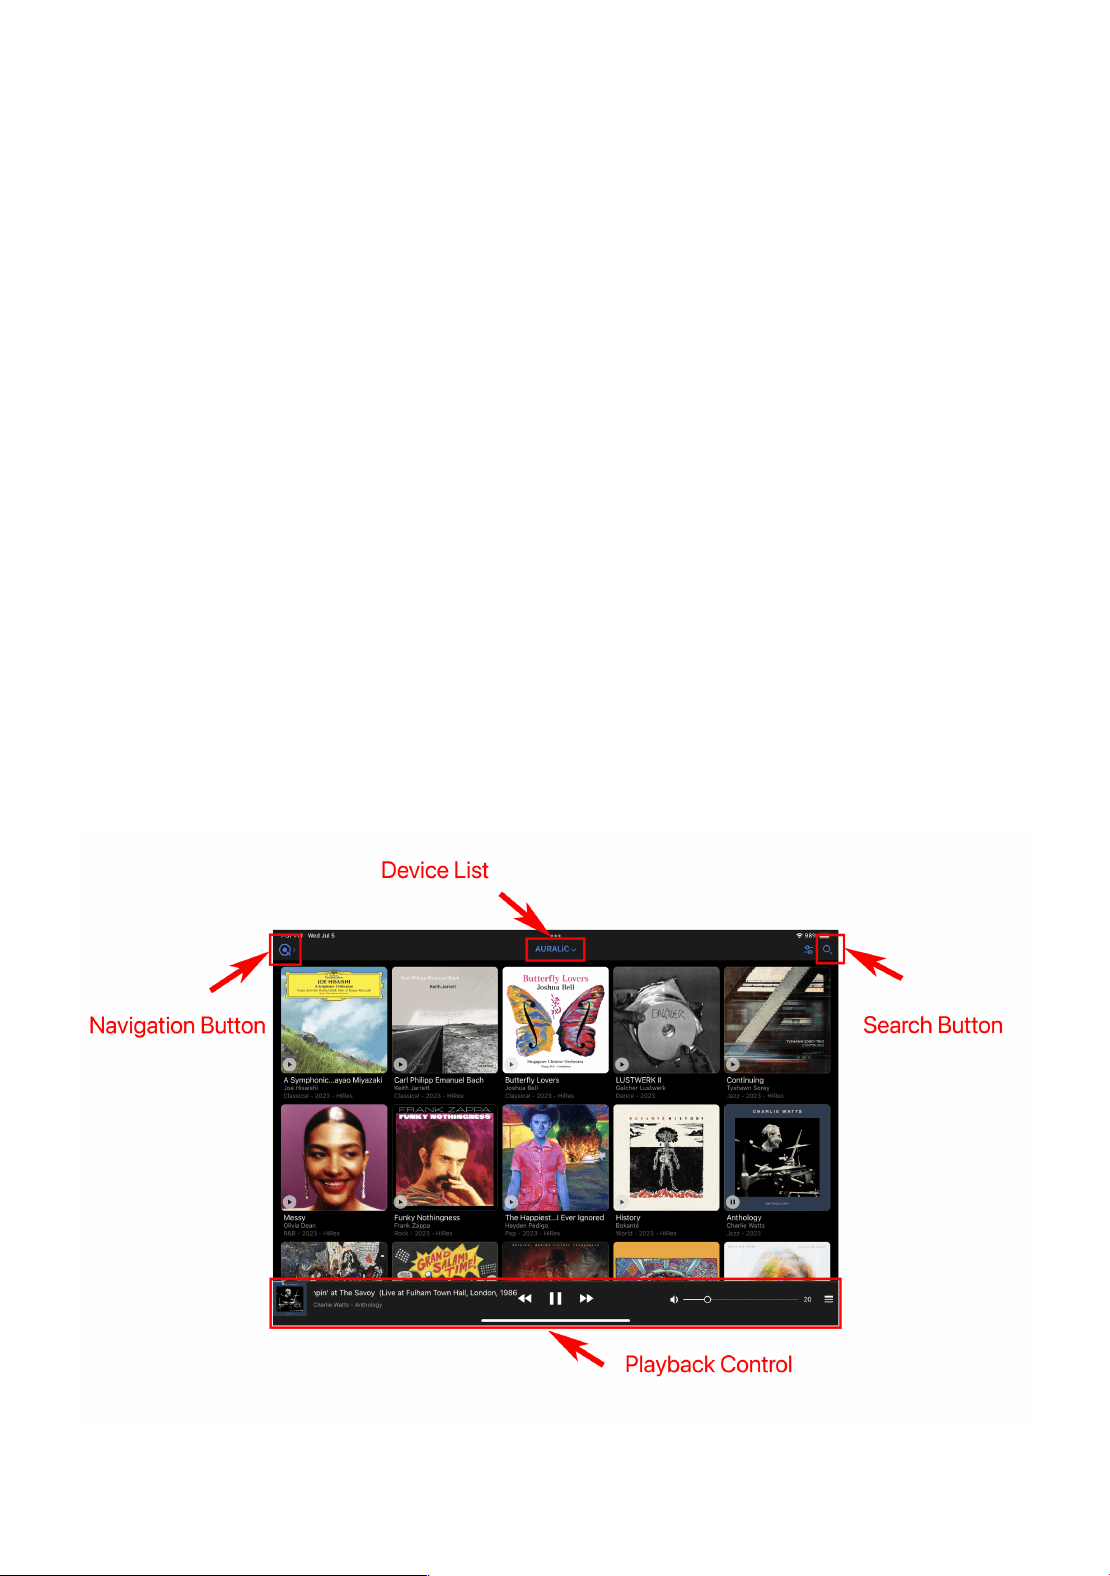
Aside from the obvious library content showing in the middle of the screen, the
Lightning DS interface includes several key elements. Here is a description of each
element:
• Device List: The currently selected streaming device name is displayed in the
middle of the top navigation bar. Clicking on the device name will open the
device list window, allowing you to select a different streaming device if
available.
• Navigation Button: At the main interface level, this button activates the side
menu. You can use the side menu to switch between different content
sections. When browsing your music library, the navigation button transforms
into a back button. Briefly pressing the back button will return you to the
previous interface, while holding the back button opens the side menu.
• Search Button: Clicking on the search button opens the search bar, where you
can search for music among your local library and online streaming sources.
This feature helps you quickly find specific tracks, albums, or artists.
• Playback Control: This section displays the current playing music. It includes
transport controls for previous track, play/pause, next track, and volume
control. Additionally, it shows the queue list, allowing you to manage the
playback order. Clicking anywhere in this section will open the full ‘Queue’
interface, providing a detailed view of the current playback queue.
Album Information
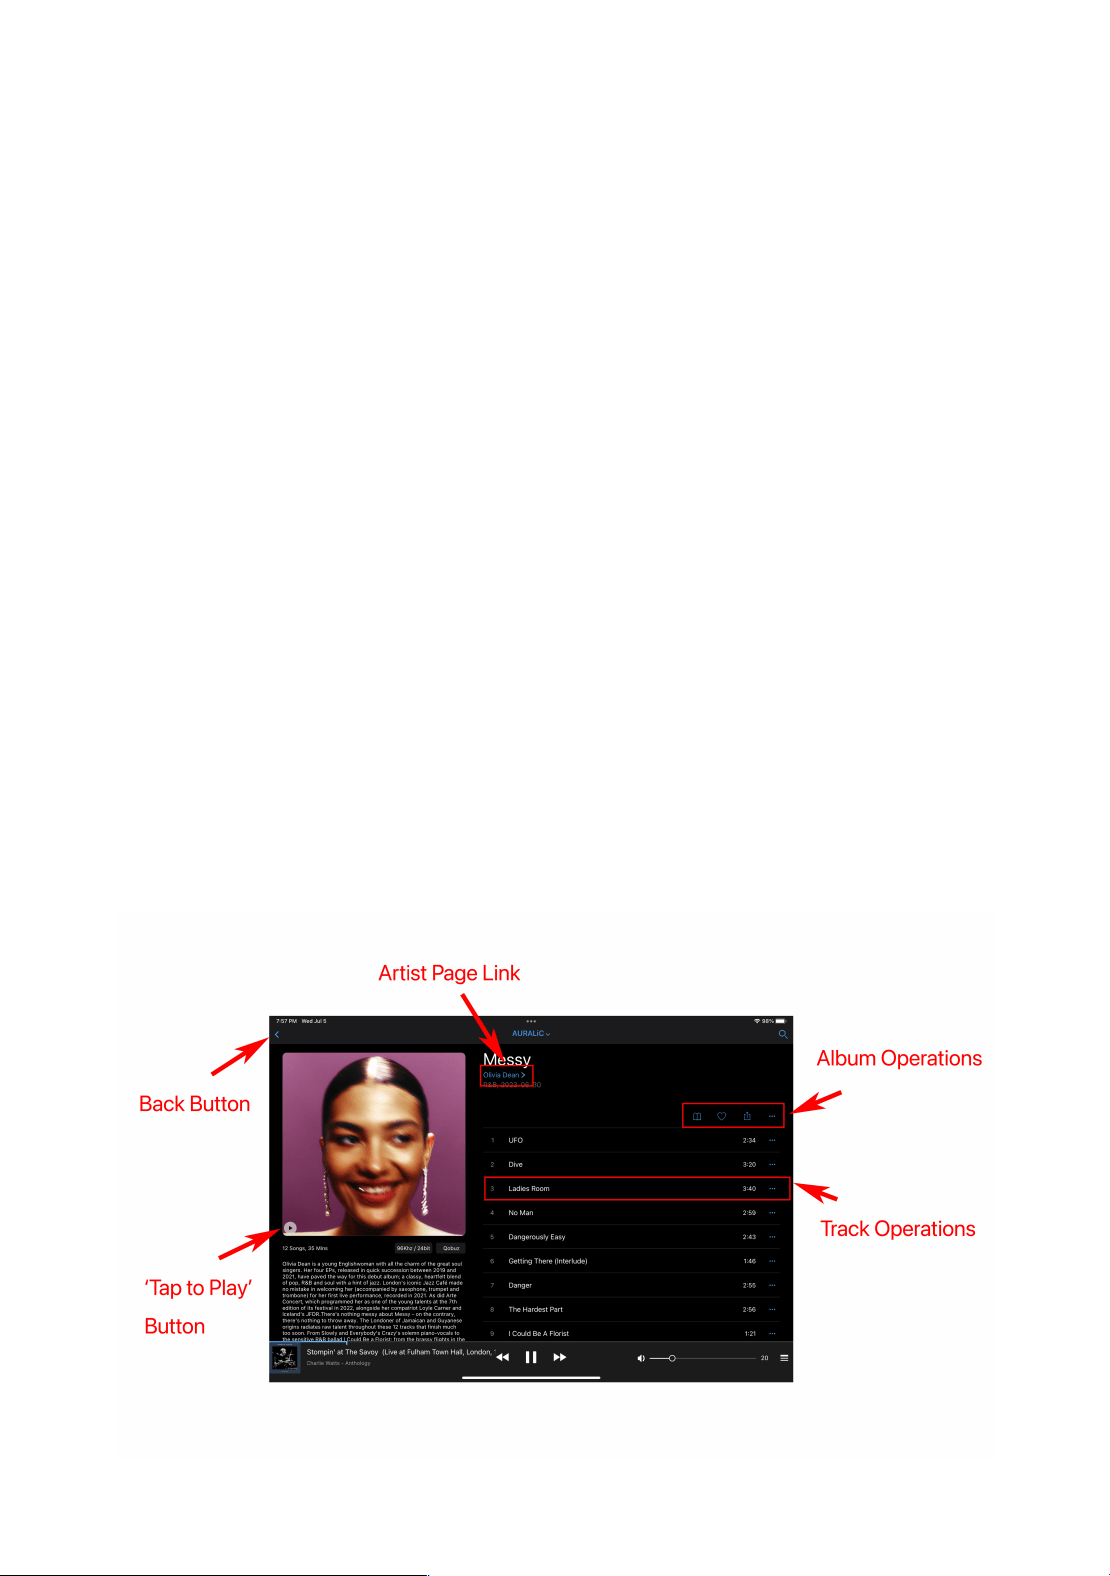
You can tap the small ‘Play’ bottom at the left bottom corner of the album cover to
instantly play selected album or tap the album cover to enter album information:
40
The Album Information interface provides comprehensive details about a specific album.
Here are the key elements to mention:
• Artist Page Link: If available, the artist name will be displayed in blue color,
indicating that an individual page about the artist is accessible. Clicking on
the artist name will redirect you to the artist page, where you can find more
information about the artist and their other works.
• Album Operations: This section contains four icons that allow you to perform
operations at the album level. For example, clicking the heart icon indicates
that you want to add the album to your collection or favorites.
• Track Operations: Each individual track within the album can be tapped to
perform specific operations. Tapping a track adds the entire album to your
device’s queue and starts playing the selected track. Additionally, tapping the
‘…’ icon provides access to additional track-related operations.
• Back Button: Tapping the back button briefly will take you back to the
previous interface, allowing you to navigate through your music library
seamlessly. Pressing and holding the back button opens the side menu,
providing quick access to various sections and settings within Lightning DS.
Playback Control
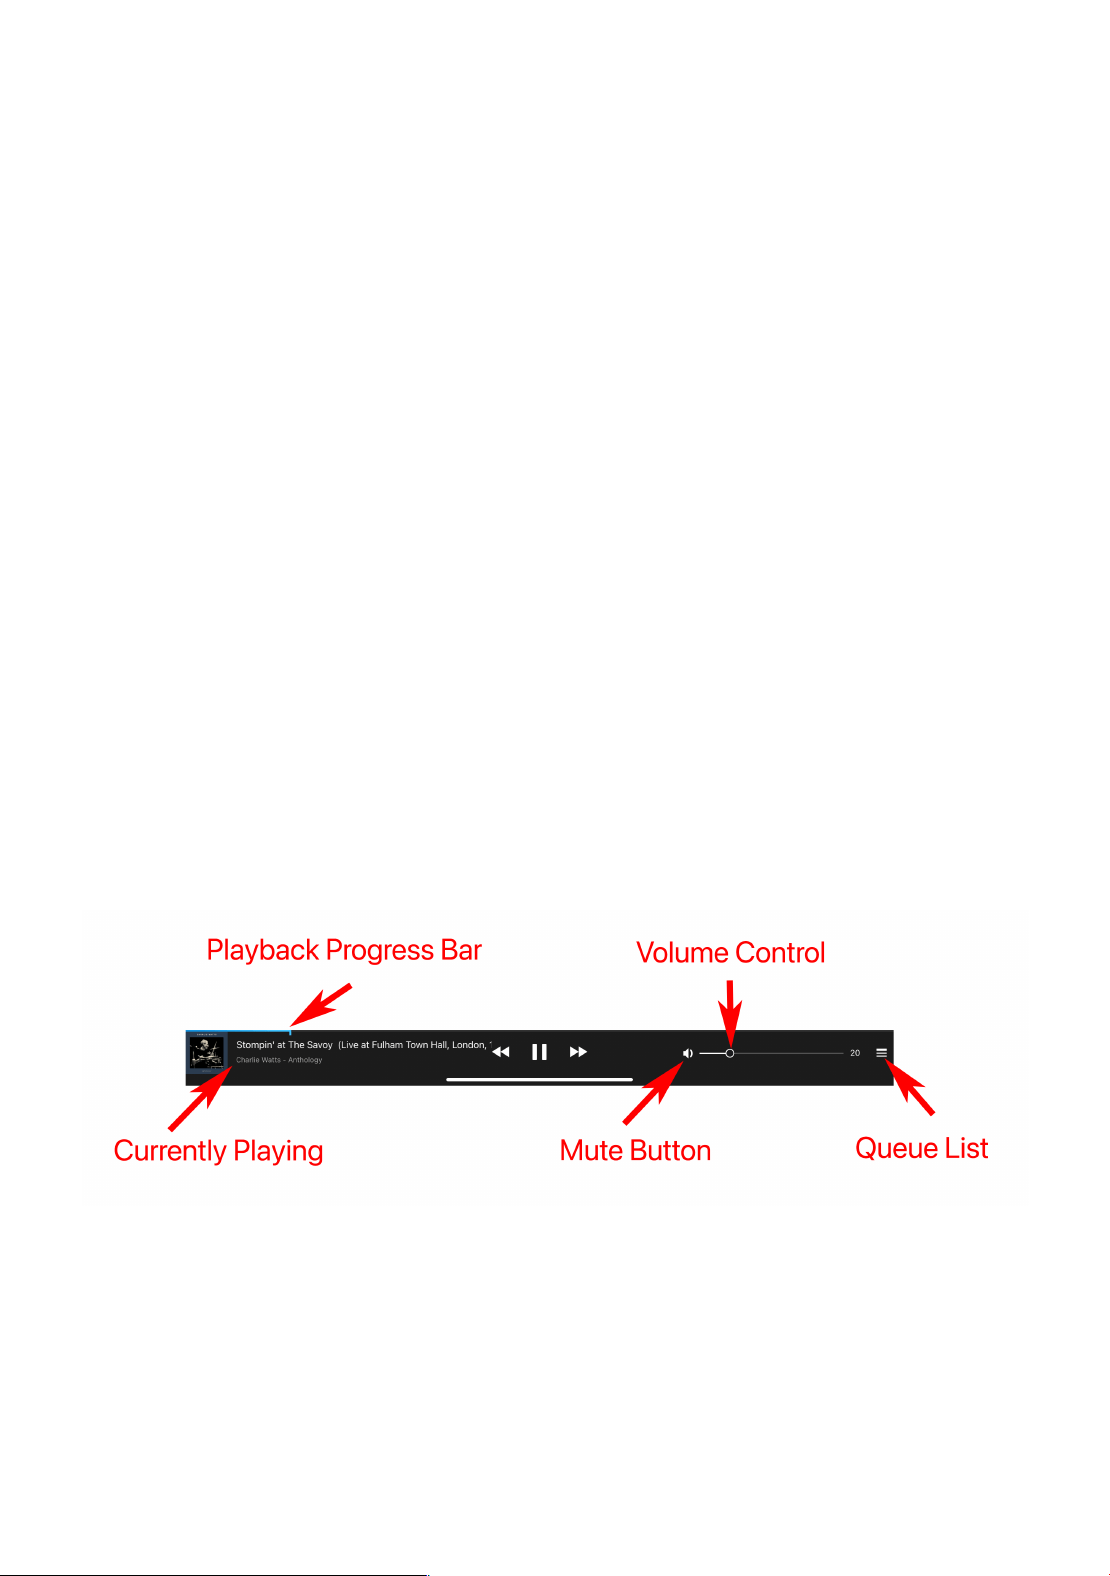
At the bottom of the main interface, you will find the playback control section, which
provides quick access to essential transport-related control functions. Here are the key
elements to mention:
• Previous, Play/Pause, Next Buttons: These three buttons in the middle of the
playback control section are the primary track control buttons. It’s worth
noting that if you click the previous button after the playback progress has
exceeded 5 seconds, Lightning DS will jump to the beginning of the current
track and play from there. If the playback progress is less than 5 seconds, it
will jump to the previous track in the device’s playback queue.
41
• Playback Progress Bar: The small blue line represents the approximate
percentage of the track currently being played. You can press and drag the
marker on the progress bar to seek to a specific position within the track.
• Currently Play: This area displays metadata information about the track that
is currently playing. You can tap on this area to open the ‘Queue’ interface
and get more details about the current playback.
• ‘Mute’ Button and Volume control: This area allows you to adjust the volume
level and quickly mute or unmute your device’s audio output.
• Queue List: Tapping this icon will open a small pop-up window that displays
the tracks currently stored in the device’s queue. This allows you to view and
manage the playback order, add or remove tracks, and make changes to the
queue as desired.
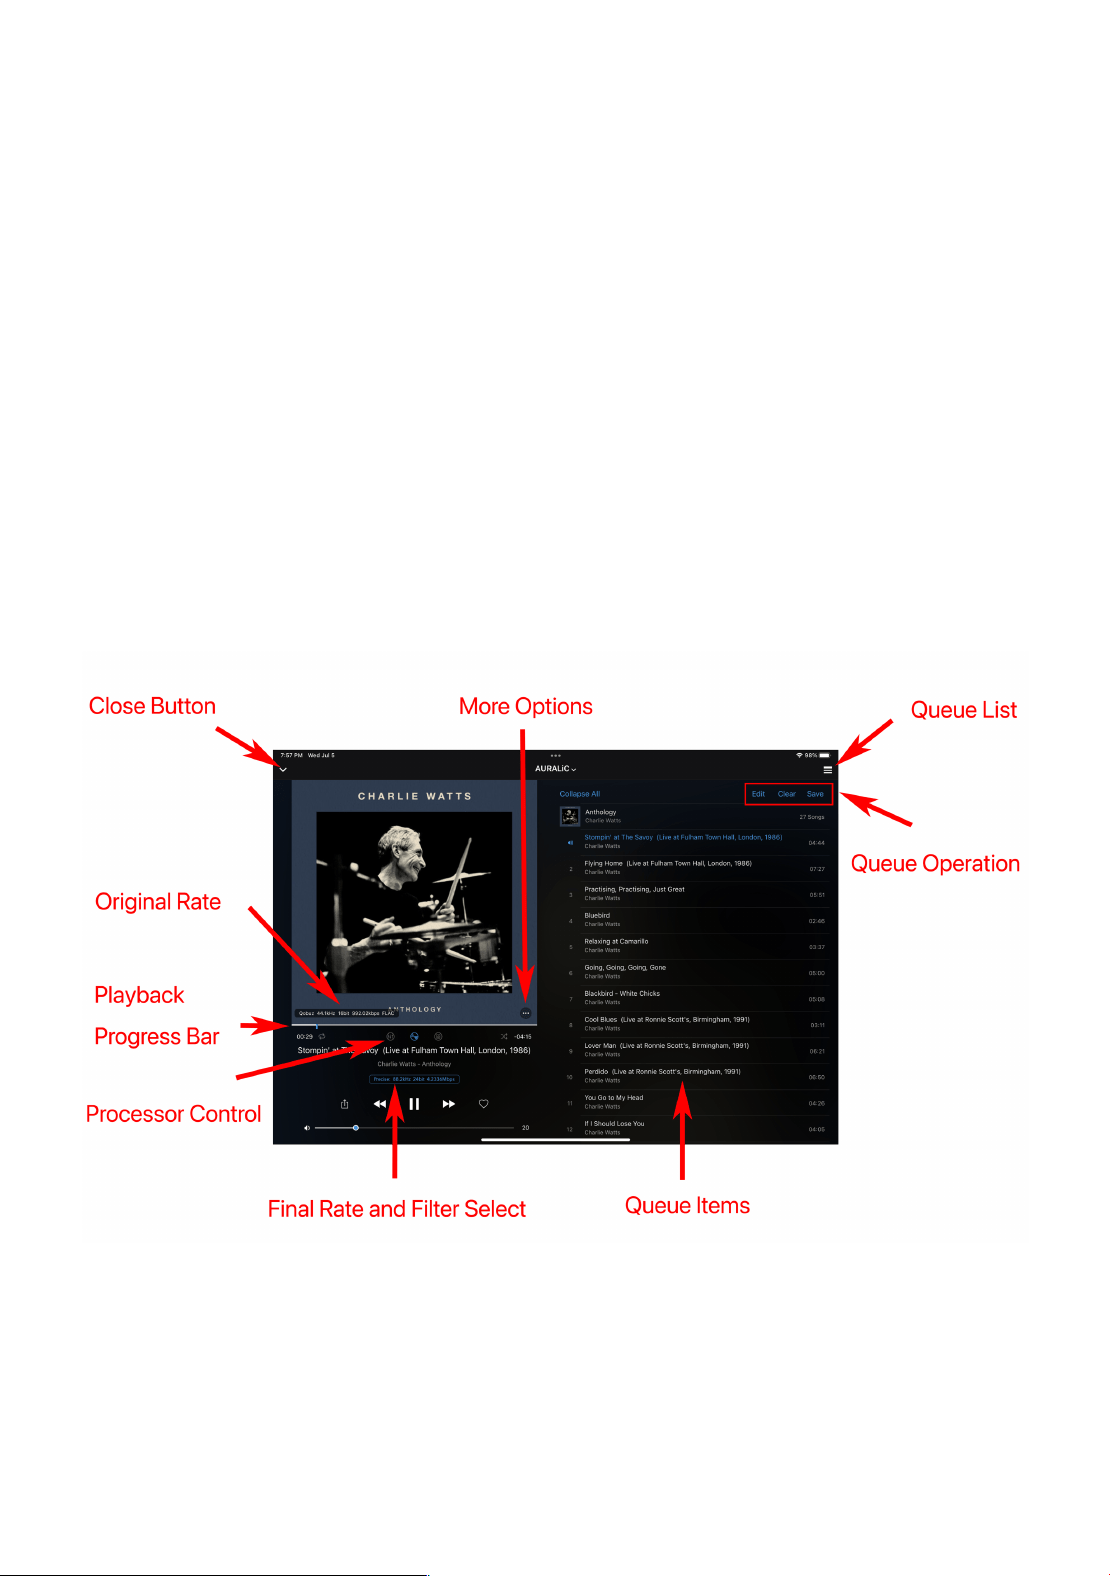
Queue Interface
In the queue interface, you have full control over playback-related operations and
access to some hardware control functions. Here are some key points to remember:
• Original Rate: The original rate section displays information about the source of
the music, including the sampling rate, bit depth, file bitrate, and format details.
This information is displayed briefly and can be accessed again by tapping the
album cover. It provides valuable insight into the quality and characteristics of
the music being played.
• More Options: Tapping the ‘…’ icon on the album cover opens a small pop-up
42
window that offers additional options. You can access more information about
the track, add it to your collection or a playlist, or jump to the album to which the
track belongs. This feature is particularly useful when streaming music from
online service providers.
• Processor Control: If available, individual processor function icons will be
displayed in this section. You can click on these icons to access their settings or
enable/disable the corresponding functions. This allows you to customize and
optimize the audio processing according to your preferences.
• Final Rate and Filter Select: The final output sampling rate, bit depth, and bitrate
are shown in this section. These values represent the data streaming directly to
the output circuit of the device, such as DAC. If this section is displayed in blue
color, it indicates the availability of a filter selection option. You can click on it to
view and change the filter settings, tailoring the audio output to your desired
characteristics.
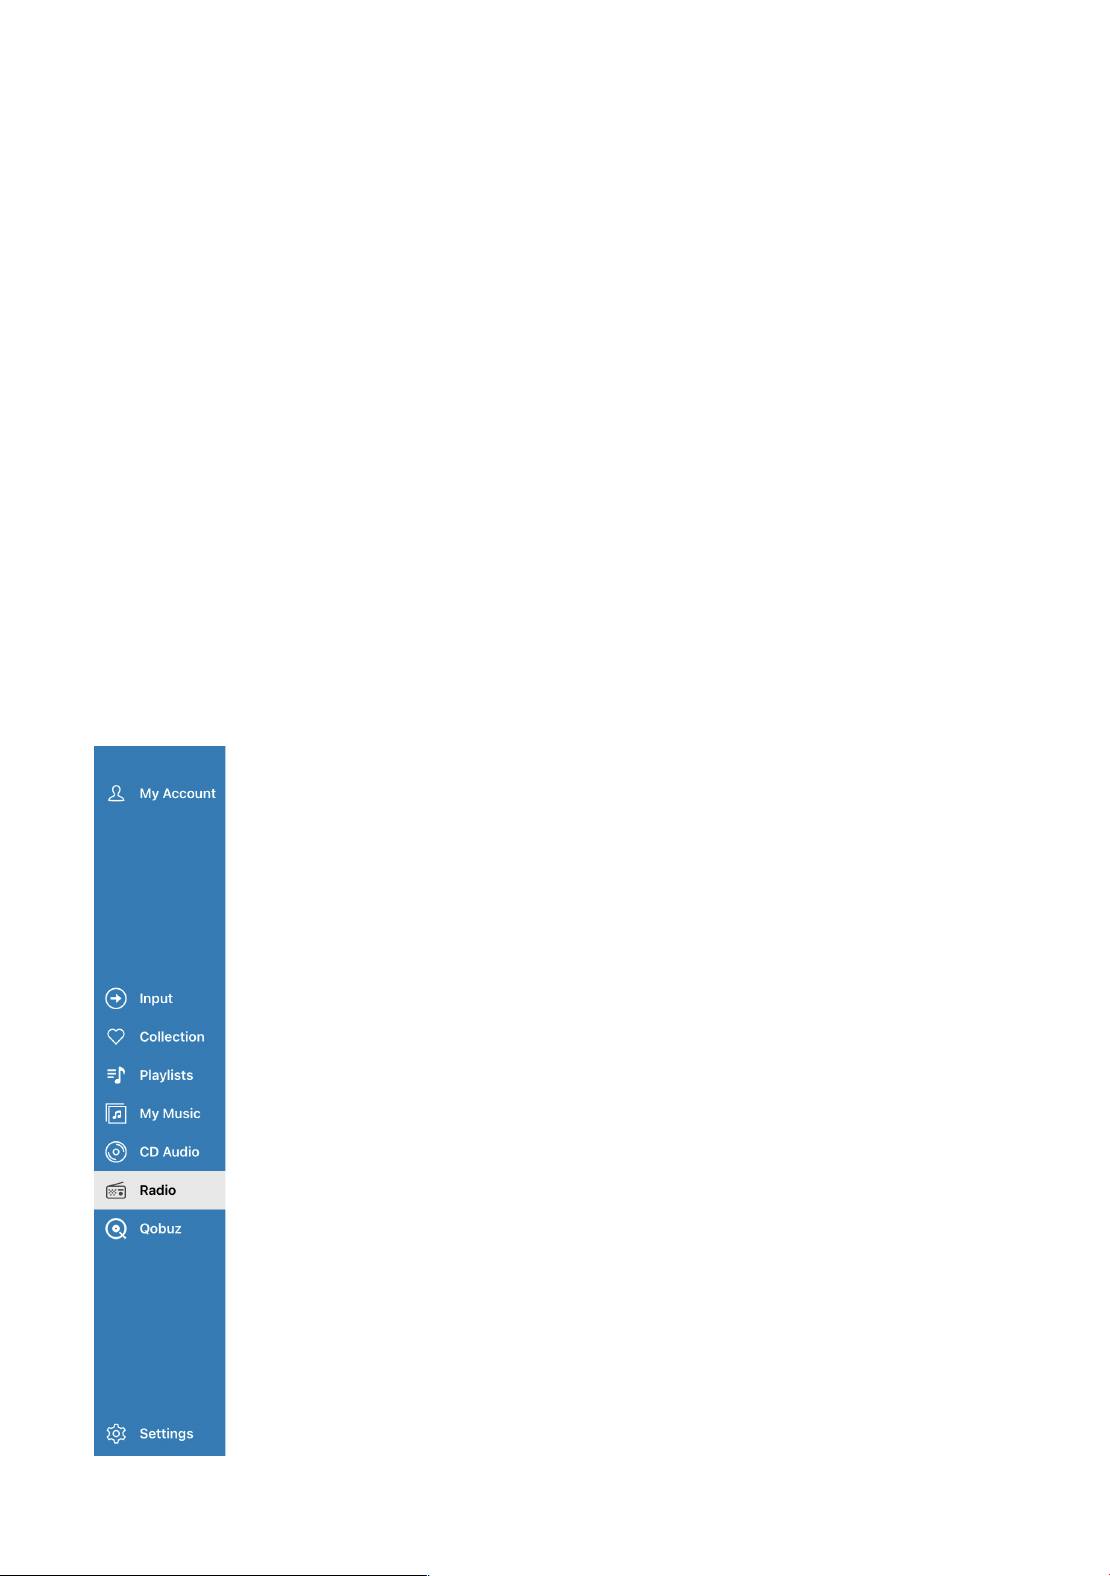
Side Menu
The side menu in Lightning DS provides convenient navigation and allows you to switch
between different features and sections of the app.
• My Account: This option allows you to register an AURALiC
account and manage the streaming devices you have
purchased. Refer to the ‘Device Activation and Deactivation’
section for detailed information.
• Input: The input menu enables you to switch between
different physical and virtual input channels of your device.
For virtual input channels like Lightning, Radio, AirPlay, and
others, the switching is automatic without the need for
manual operation.
• Collection and Playlist: This section contains your favorite
tracks and customized playlists that are stored on your specific
iOS device. If you want to transfer this data to different
devices, you can use the ‘iCloud Backup’ function in the
Settings menu.
• My Music: This option displays the music library stored locally
on your selected media server. You can browse and access
your music collection from this menu.
• CD Audio: If you have selected the current machine’s
Lightning Server as the music library and have a USB CD drive
connected to the back of your ARIES G2.2 with an audio CD
inside, this option will appear. You can use this menu to play
43
CD audio.
• Radio: This option allows you to access the internet radio
function. The internet radio service is provided by vTuner, and
you may also have the option to use TuneIn as a radio service
provider. To use TuneIn, you will need to register or log in
through the Streaming Account menu.
• Qobuz/TIDAL/etc: After successfully logging in to a streaming
account within Lightning DS, the individual service name (e.g.,
Qobuz, TIDAL) will appear under the side menu. You can
navigate and browse the library of the specific service
provider from this menu.
• Settings: Access to all Lightning DS and hardware related user
settings.
Useful Tip: To quickly activate the side menu in Lightning DS without having to click the
back button multiple times to navigate to the main level, you can simply press and hold
the back button. This action will immediately activate the side menu, allowing you to
access its options and navigate to different features or sections of the app. It’s a
convenient shortcut that saves you time and makes it easier to switch between different
parts of Lightning DS’s interface.
44
Use with Other Software
While Lightning DS is the recommended software for operating your ARIES G2.2, you
have several other options available for controlling and streaming with the device. Here
are some additional software and ecosystems that are compatible with the ARIES G2.2:
1. OpenHome Software: ARIES G2.2 is fully compatible with any control software
that supports the OpenHome protocol, such as BubbleUPnP, BubbleDS, and Linn
Kazoo. These applications allow you to control and stream music to your ARIES
G2.2 in Lightning mode as well.
2. Roon: ARIES G2.2 works as a Roon Ready endpoint, allowing you to integrate it
seamlessly with the Roon software ecosystem. This enables you to control and
stream music to your ARIES G2.2 directly from the Roon interface.
3. TIDAL Connect, Spotify Connect: The ARIES G2.2 supports TIDAL Connect, Spotify
Connect. With these features, you can easily stream music from TIDAL, Spotify,
or compatible devices directly to your ARIES G2.2 without the need for Lightning
DS.
4. AirPlay. ARIES G2.2 is fully compatible with Apple AirPlay 2 protocol. You can
stream music from services like Apple Music and Deezer by using the official
music software on your iOS device or Mac computer and sending the audio signal
to your ARIES G2.2 via an AirPlay connection.
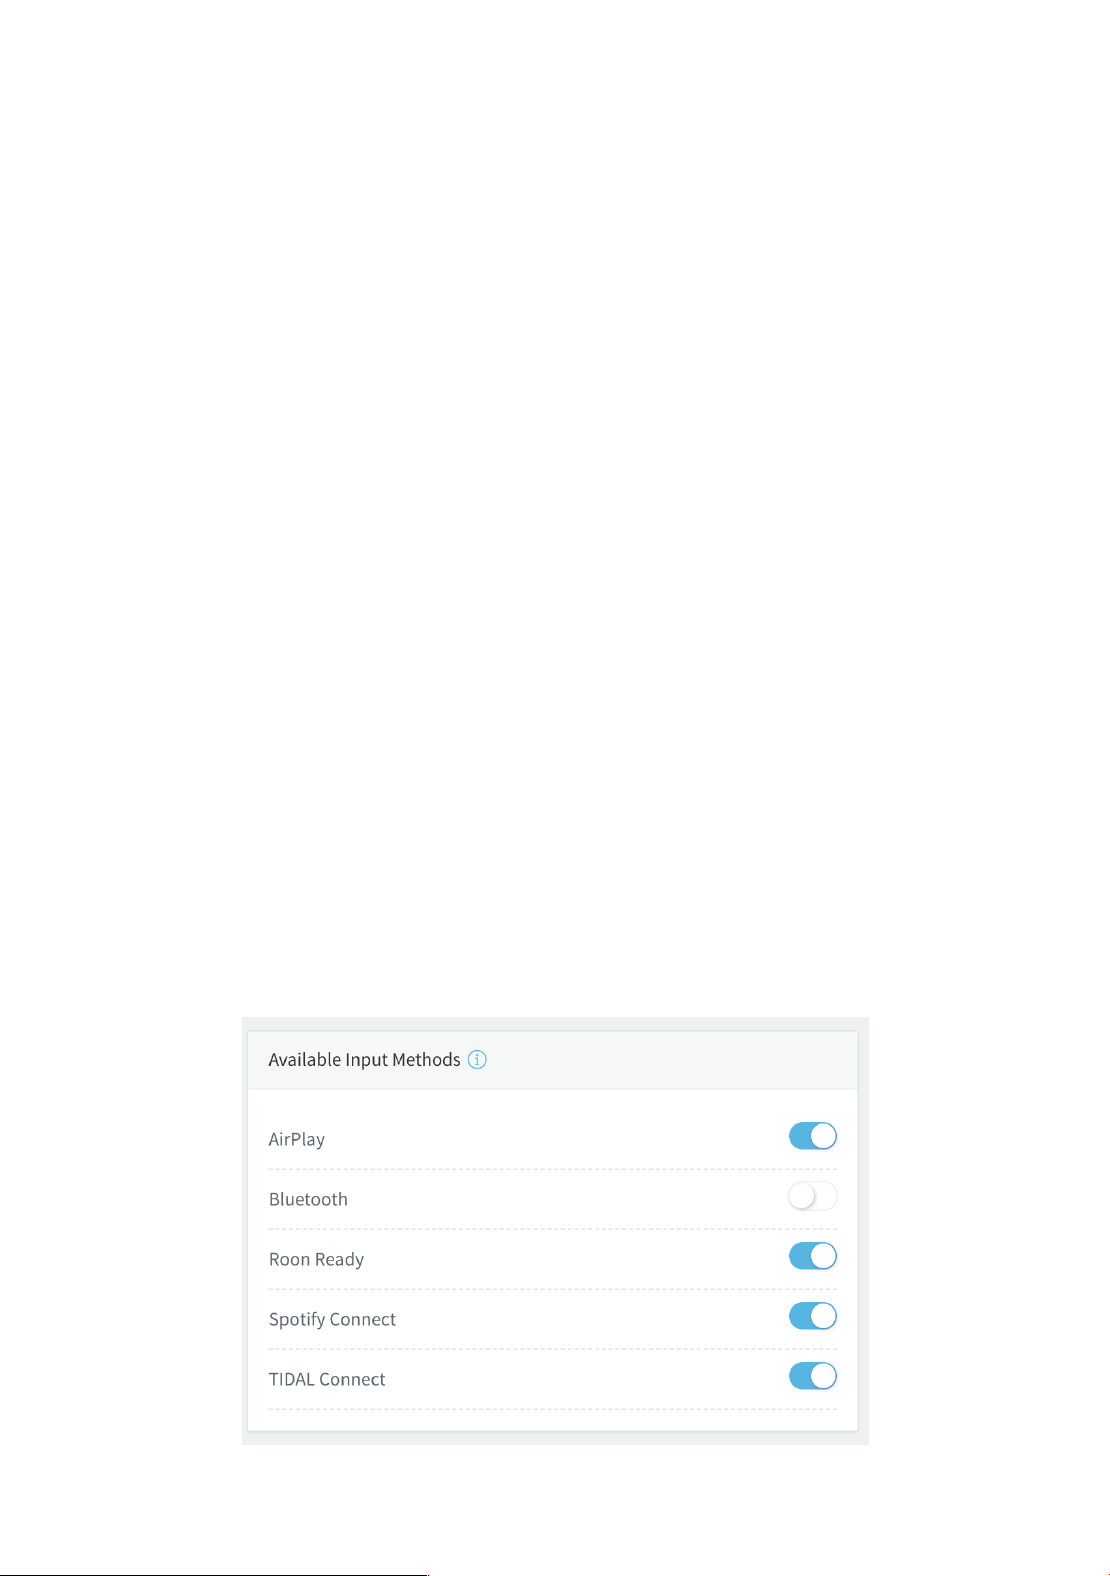
Although no additional setup or input switching is required for these functionalities,
please ensure that the corresponding option under ‘Available Input Methods’ is enabled
in your ARIES G2.2 settings if you intend to use any of these features. This allows
seamless integration and automatic connection with the respective software or
ecosystem you choose to utilize.

45
Device Activation and Deactivation
Activating your AURALiC product is a straightforward process that extends the basic
factory warranty and makes hardware logging available for troubleshooting. The
activation process is optional; forgoing it will not affect device function or performance.
Please scan the QR Code below to view our step-by-step video:
https://us.auralic.com/pages/activate-and-deactivate-your-auralic-streamer
If you have purchased a used product and it's still registered to the previous owner, you
have a couple of options. Your first step should be to contact the person you purchased
the unit from and ask them to deactivate it remotely. This can be done by the previous
owner using Lightning DS installed on any IOS device they may have.
Once they have started Lightning DS they can choose the option of “I Will Set Up Later”,
or “Just Start-Up” if the app was previously configured. The previous owner now needs
to log into their AURALiC account and deactivate the product. This process can also be
done without the unit connected.
If the previous owner refuses to help or cannot deactivate the unit, you should arrange
for a refund and return the unit immediately, as the device may not be authentic. If you
purchased your AURALiC product second-hand from a dealer, you should contact them
for help deactivating the unit. AURALiC will not directly deactivate a device upon request
by a new owner for legal reasons.

46
Cleaning
To maintain the cleanliness of the enclosure, it is recommended to follow these cleaning
instructions:
1. Use a soft, dry cloth: Regularly wipe the enclosure with a soft, dry cloth to
remove dust and smudges. This helps to keep the surface clean and free from
debris.
2. Dish soap and magic eraser: If the enclosure is heavily soiled or dirty, you can use
a mild dish soap along with white-colored 'magic eraser' sponges. Dampen the
sponge with water, apply a small amount of dish soap, and gently rub the surface
of the enclosure.
3. Dry with a microfiber cloth: Use a clean microfiber cloth that has been slightly
dampened with water to gently dry the surface. Microfiber cloths are gentle and
effective in absorbing moisture without leaving lint or scratches on the surface.
Remember to avoid using harsh chemicals, abrasive materials, or excessive moisture on
the enclosure, as these can potentially damage the finish or electronic components. By
following these cleaning guidelines, you can keep your ARIES G2.2 enclosure looking
clean and well-maintained.

47
Support & Contact
For support or service inquiries related to your ARIES G2.2, it is recommended to first
contact the dealer or distributor from whom you purchased the device. They have a
better understanding of your system and can provide personalized assistance.
If you have general questions about using your ARIES G2.2 or Lightning DS software,
there are two valuable online resources available:
• Community Forum: The AURALiC community forum is a friendly and experienced
online community where you can find discussions on a wide range of topics. It
welcomes new members and offers a wealth of knowledge and support. You can
access the forum at community.auralic.com.
• Knowledge Center: AURALiC's extensive knowledge center is another valuable
resource for information and assistance. It provides detailed guides, tutorials, and
troubleshooting tips. You can access the knowledge center at support.auralic.com.
If your ARIES G2.2 experiences any issues, it is important to contact your dealer or
AURALiC for assistance. Attempting to repair or service the device yourself or engaging
unauthorized personnel may void the warranty. To initiate a service request, an RMA
(Return Material Authorization) number must be issued by AURALiC. You can contact
your dealer or AURALiC for further information on the service process.
If your ARIES G2.2 is out of warranty and you possess the necessary skills to service the
device, AURALiC can provide you with the required information and service parts to
assist you.
For additional help or service requests related to your ARIES G2.2, you can contact
AURALiC's technical support department at [email protected].
When you contact our support department, please make sure to include the S/N of your
product and write your question in English.

48
Specifications
Streaming File Formats
Lossless: AIFF, ALAC, APE, DIFF, DSF, FLAC, OGG, WAV and WV
Lossy: AAC, MP3 and WMA
Sampling Rates
PCM: 44.1kHz to 384kHz in 16,24 and 32Bit*
DSD: DSD64 to DSD512**
Streaming Platform
AURALiC Tesla G3 with 64bit quad-core processor
4GB system memory, 16GB data storage
Streaming Inputs
• Network shared folder
• USB removable drive
• Optional Internal music storage***
• CD Audio playback and ripping
• UPnP/DLNA media server
• TIDAL, Qobuz, Amazon Music Unlimited, HRA, KKBOX
• vTuner and TuneIn Radio
• Spotify Connect, TIDAL Connect
• AirPlay, Bluetooth
• Roon Ready
Audio Outputs
AURALiC Lightning Link
Digital Outputs: AES/EBU, Coaxial, Toslink
USB Output: USB Host to compatible DAC ****
Network
Wired: Gigabit Ethernet
Wireless: 802.11b/g/n/ac Tri-Band Wi-Fi
Power Consumption
Standby: <0.5W
Sleep: <10W
Playback: 50W at max.
Dimensions - W x D x H
13.4 x 12.6 x 3.2 in. (34cm x 32cm x 9.6cm)
Weight
22.5 lbs. (10.2kg)
Product Finishing
Anodized aluminum case in matte black with copper EMI
shielding enclosure.
*352.8KS/s and 384KS/s and 32bit are supported through Lightning Link and USB Output only
** By 'DoP V1.1' or native DSD protocol
*** With internal NVME storage option
**** 'Compatible DAC' means a DAC not requiring a driver for Linux systems
All specifications are subject to change without notice.
49
AURALiC Product Registration Form
Owner Information
Your Name
Address
City
Zip Code
Country
Email
Telephone
Product Information
Product Name
Serial Number
Dealer Name
Purchase Date
Purchase Price