PANOPTIX
™
PS22-IF ICE FISHING KIT AND BUNDLE
INSTALLATION INSTRUCTIONS
Important Safety Information
WARNING
See the Important Safety and Product Information guide in the chartplotter or fishfinder product box for product
warnings and other important information.
To obtain best performance and to avoid product damage and potential injury, you must install this mount using
these instructions.
NOTE: Read all installation instructions before proceeding with the installation. If you experience difficulty
during the installation, go to support.garmin.com for more information.
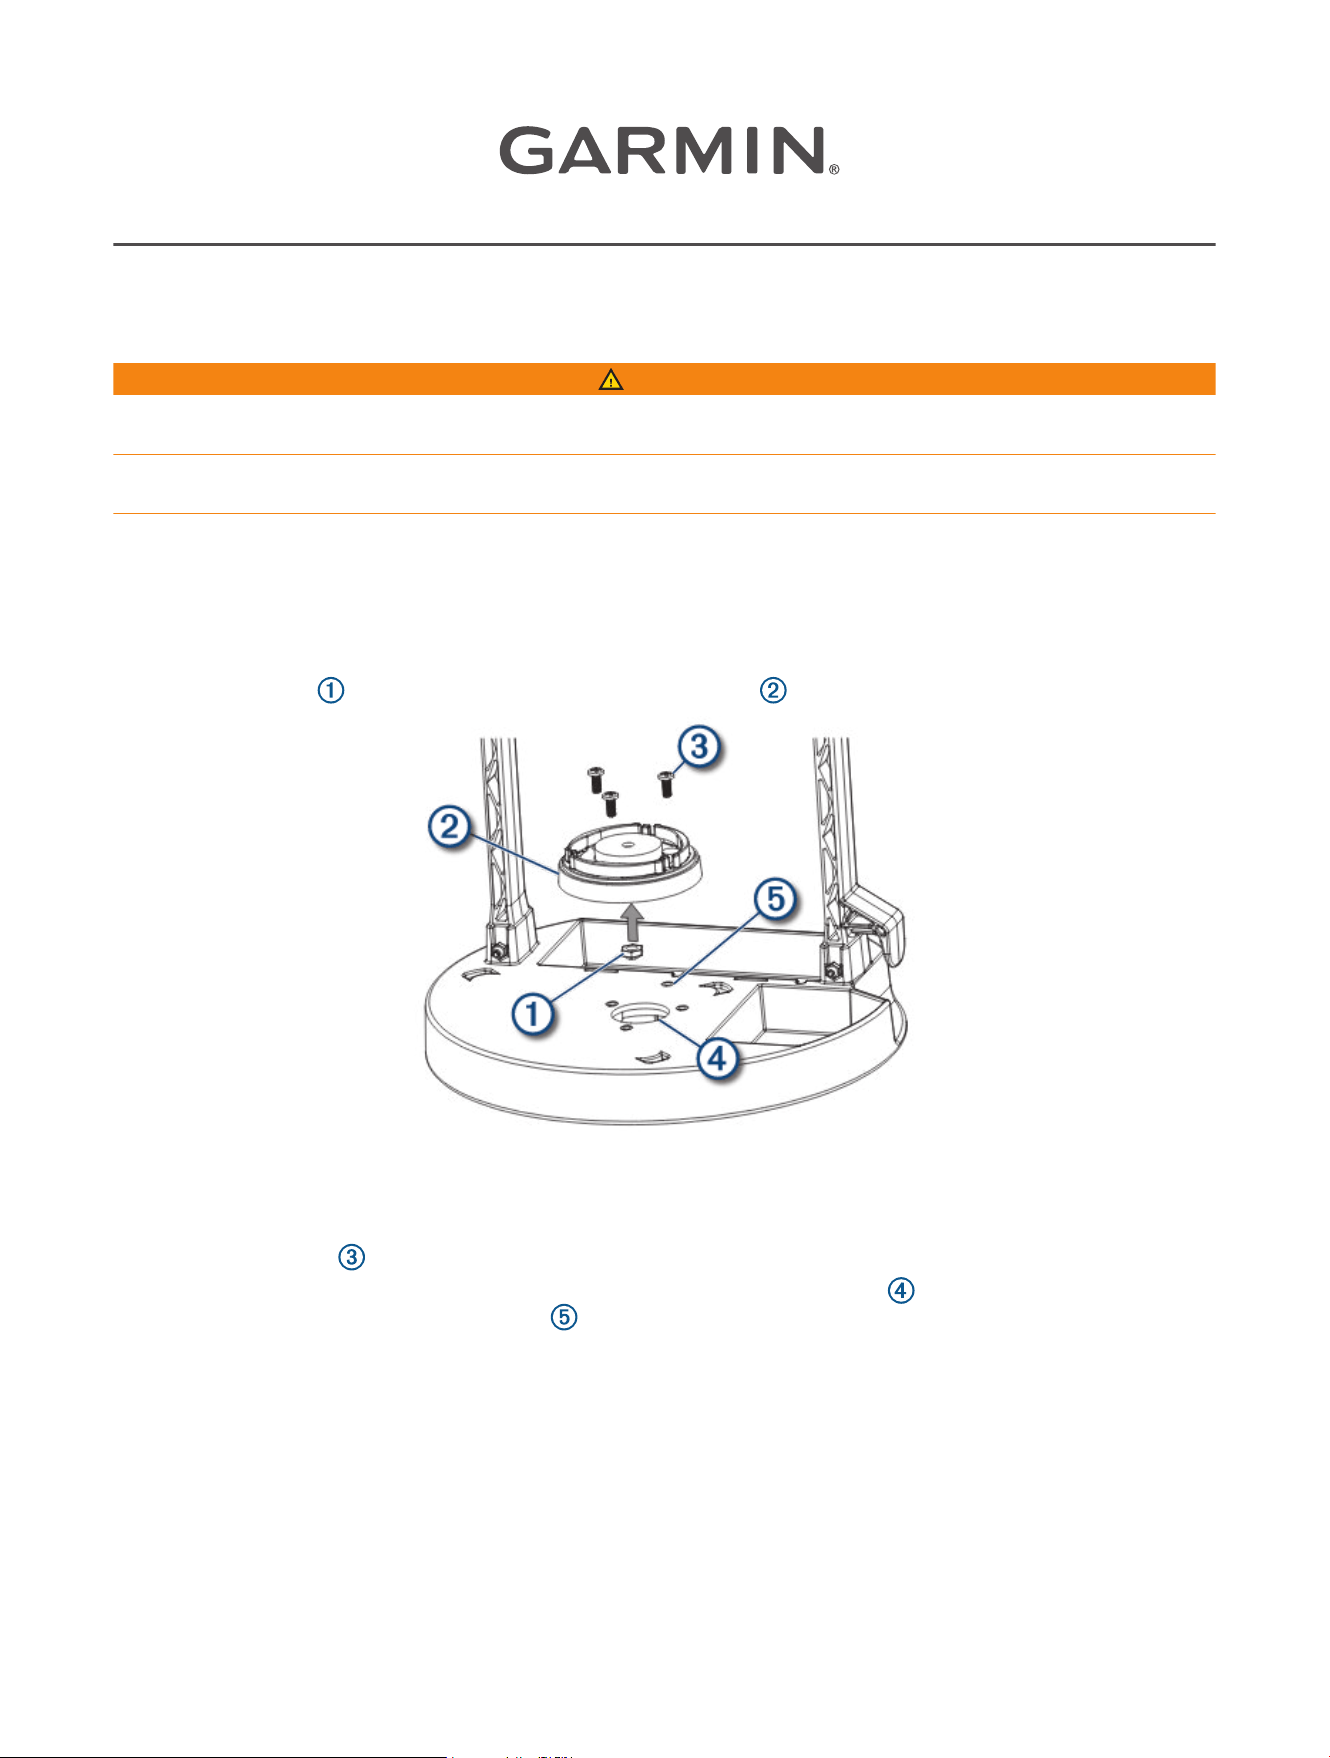
Assembling the Mount
The portable mount is preassembled in the ice fishing bundle. This step is only required for the ice fishing kit.
1 Press the M6 nut into the bottom of the swivel-mount base .
NOTE: If you purchased your chartplotter or fishfinder device separately, use the swivel-mount base and bail
mount bracket included with your device.
2 Place the swivel-mount base on the portable mount and fasten the swivel-mount base using the three
M4x10mm screws .
NOTE: For 4in. and 5in. devices, install the mount on the front hole pattern . For 6in. and 7in. devices,
install the mount on the rear hole pattern . The rear hole pattern allows more room in front of the device to
close the front zipper of the bag.
3 Place the bail-mount bracket on the swivel-mount base.
4 Install the M6x1mm screw through the bracket and base, and tighten to the preferred position.
5 Slide an included rubber washer onto each bail-mount knob, and screw the knobs into the sides of the
device.
NOTE: The rubber washers enable you to adjust the viewing angle without loosening the knobs.
GUID-181F18E5-ADB5-4E45-BFEA-01FF9B0E701D v3
August 2024

6 Place the device in the bail-mount bracket and tighten the bail-mount knobs.
7 If necessary, pull out enough slack from the power and transducer cables so the mount can fully tilt to the
preferred positions when the cables are connected.
Connecting the Cables
CAUTION
Ensure that you connect the correct spade connector to the correct battery terminal. Damage to the battery or
device, or bodily harm may occur if the device is improperly connected to the battery (not included).
1 Obtain an appropriate power cable and transducer cable to use with your chartplotter and transducer.
The all-in-one power and transducer cable (010-12676-40) works with 7 inch or larger ECHOMAP
™
chartplotters.
2 Connect the 4-pin power cable and transducer cable to the chartplotter.
3 Connect the transducer power leads to the gray bare wire connectors on the power cable.
4 Connect the 2-pin power cable to the sonar module.
5 Slide the red spade connector onto the positive (red) terminal on the battery.
6 Slide the black spade connector onto the negative (black) terminal on the battery.
Placing the Portable Mount in the Bag
After you have assembled the portable mount, you should place it in the bag, which makes it easier to carry and
protects it from the elements. The bag contains loops that allow you to tether the bag as needed.
1 Place the portable mount into the bag.
2 If necessary, wrap the excess power cable and transducer cables around the handle.
3 Close all of the zippers.
You can use the zipper at the back of the bag for quick access to charge the battery. You can store the wall
charger in the interior zippered pocket, and store the transducer in the exterior side pocket.
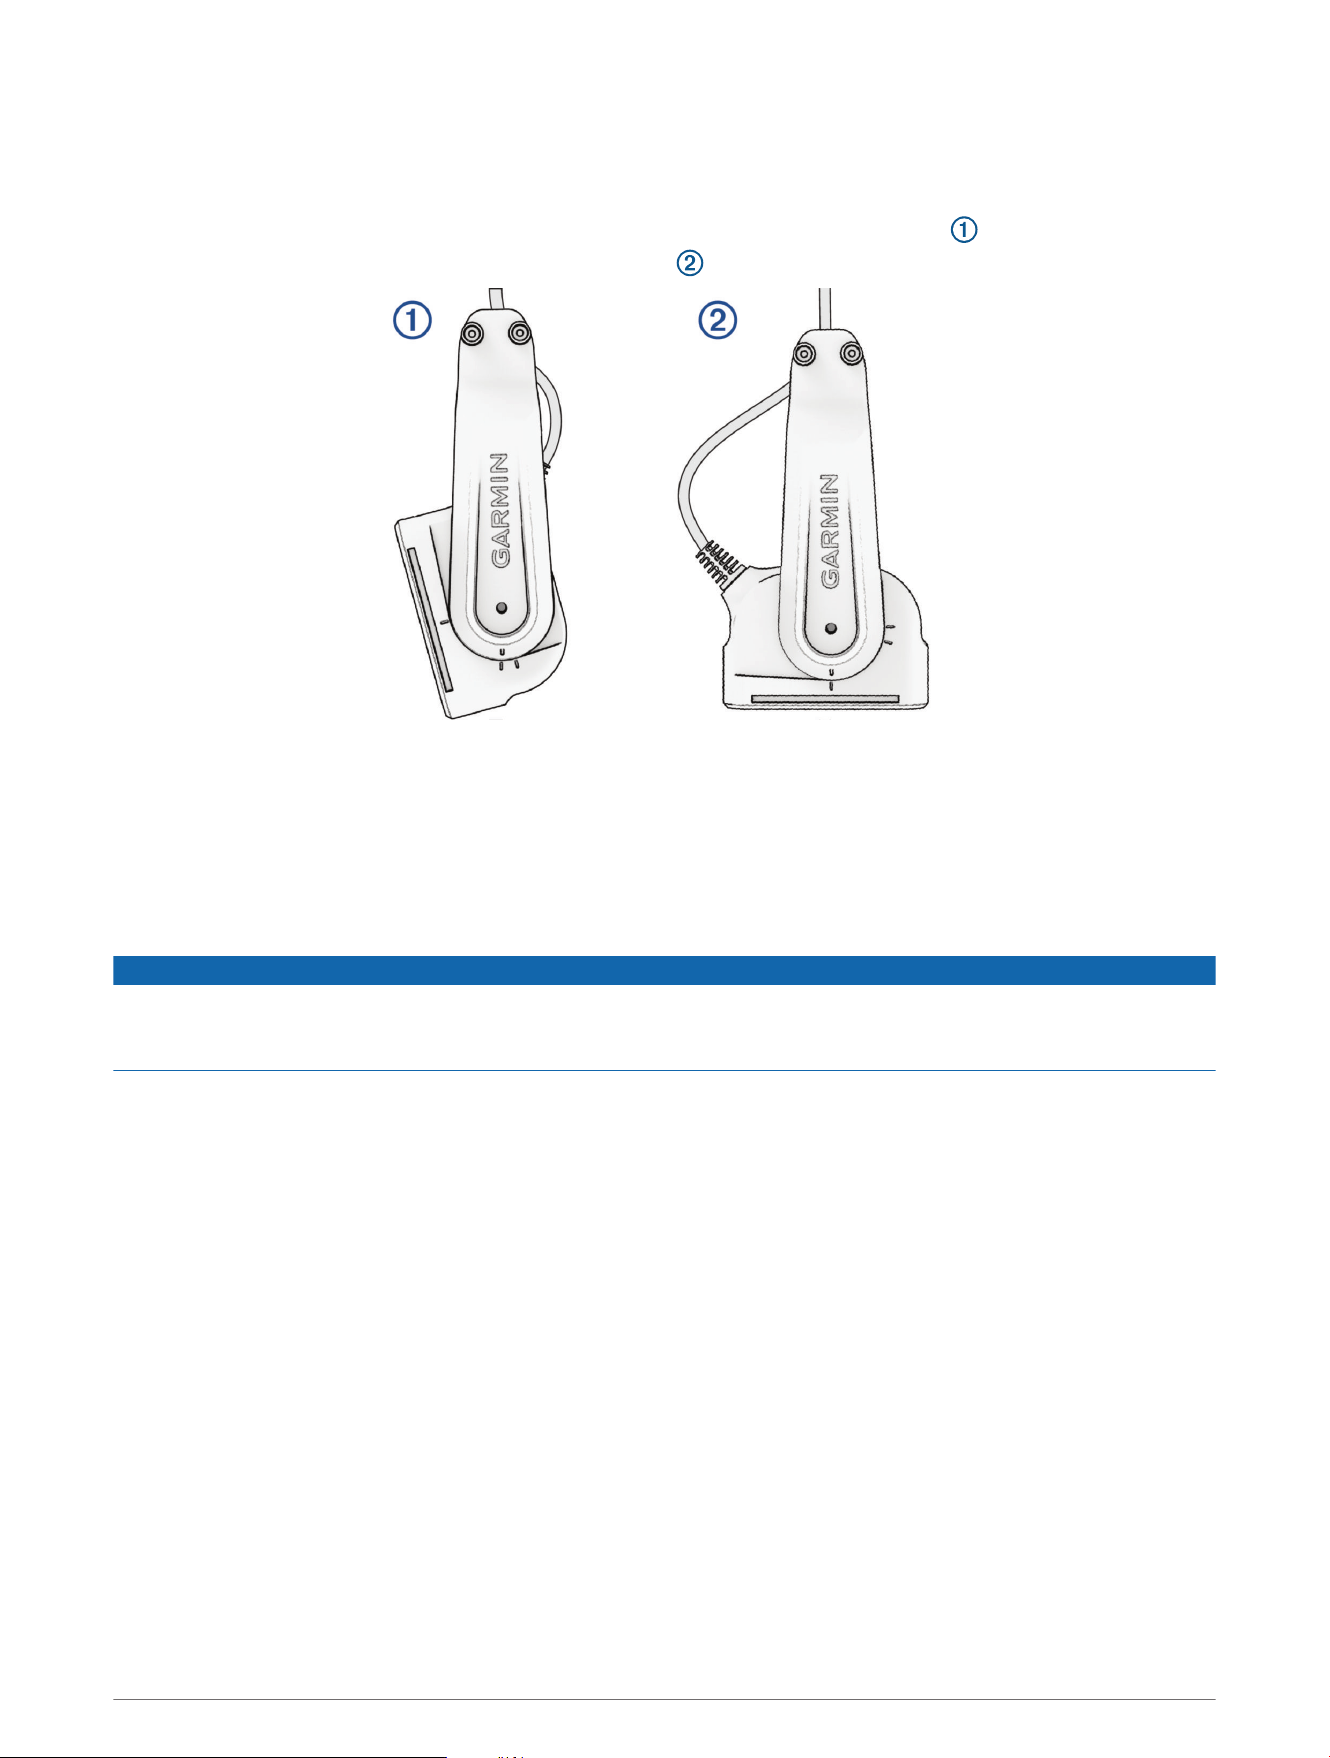
Panoptix Ice Fishing Mount Installation
Installing the Panoptix Ice Float Mount and Transducer
1 Slide the float over the cable between the transducer and the directional indicator.
2 Loosen the knob to adjust the depth and direction of the transducer, and -tighten the knob to lock the depth
and direction.
TIP: The top of the transducer must be below the bottom of the ice for best performance, and the arrow on
the knob should point in the same direction as the front of the transducer.
3 Position the transducer for the desired view.
4 With the transducer cable connected to the back of the device, drop the transducer into the water.
5 Rotate the cable to aim the transducer.
2
Adjusting the Transducer Angle
The transducer should be angled properly for optimal imagery in each mode.
1 With the transducer mounted, angle the transducer according to the mode you will use:
• For LiveVü Forward mode, angle the transducer forward and slightly downward .
• For LiveVü Down mode, angle the transducer down .
TIP: You may want to experiment to find the best angle for your sonar needs.
TIP: For LiveVü Forward mode, adjust the angle 1 or 2 clicks downward in shallow water (less than 4.6m/15
feet) and 2 or 3 clicks downward in deeper water (more than 4.6m/15 feet).
2 Tighten the knob or mounting bolt so the device does not move during use.
3 On the chartplotter, select Sonar, and select LiveVü Down or LiveVü Forward.
Effective Forward and Down Range
NOTICE
Water conditions and bottom conditions affect the depth and range performance of the transducer. You should
use caution and observe the water depth and range to prevent damage or loss of the device, especially when
your unit is operating in manual range or depth mode.
When operating in LiveVü Forward mode, the transducer has an effective forward range of between five and
eight times the depth of the water. For example, in 3m (10ft.) of water, the effective forward range is between
15 and 24m (between 50 and 80ft.). Water conditions and bottom conditions affect the actual range.
When operating in LiveVü Down mode, the fore/aft range is equal to the depth of the water. For example, in
10m (33ft.) water depth, the screen will display 5m (16ft.) fore and 5m (16ft.) aft of the transducer. Deeper
water provides a greater fore and aft range.
3
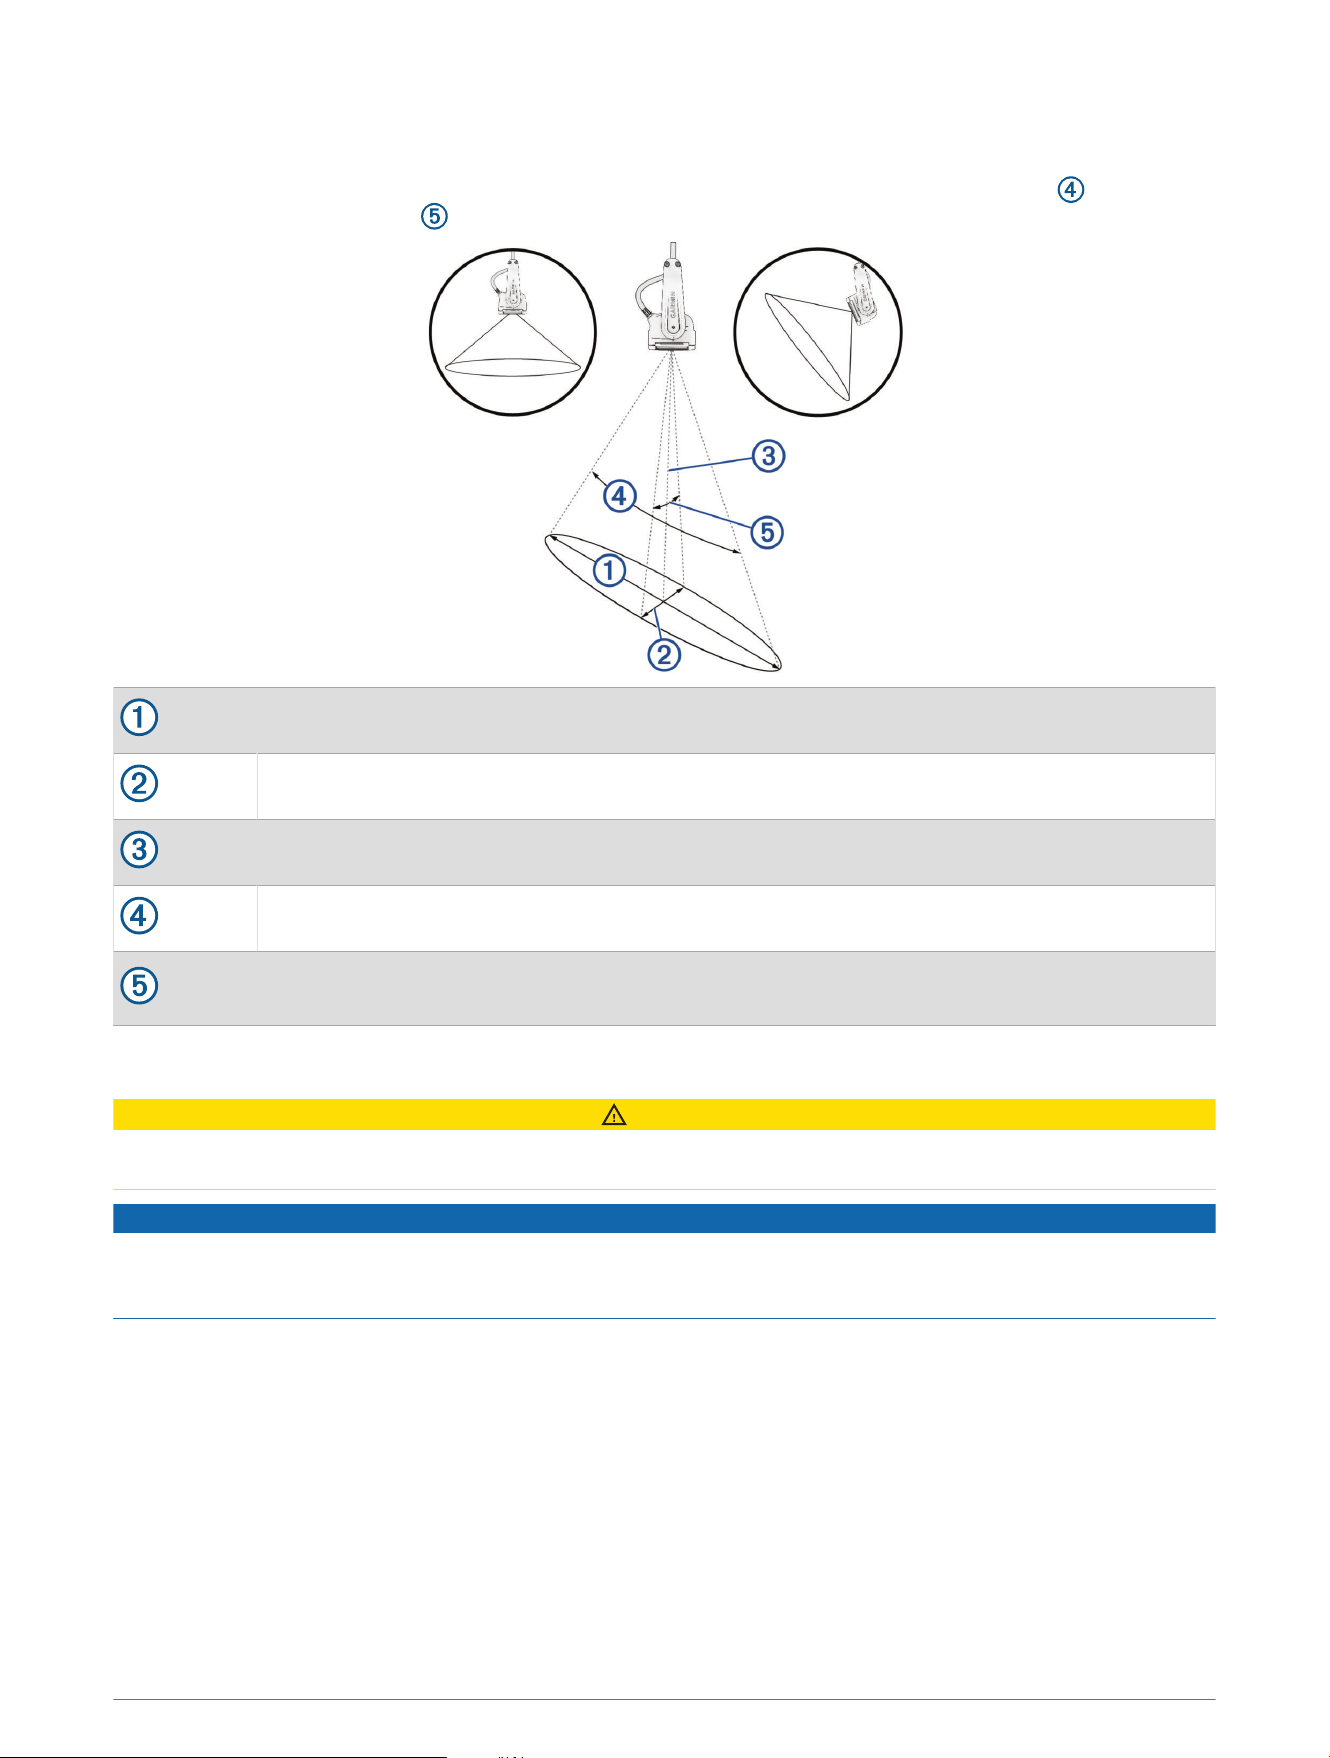
Beam width
When you point the transducer away from the bottom, the integrated stabilization system automatically aligns
the beam vertical to the bottom. Regardless of the transducer orientation, the length cone angle is always
120°, and the width cone angle is 12° with the lens installed and 57° without the lens installed.
Length of beam at the bottom
Width of beam at the bottom
Depth
120° cone angle
12° width cone angle with lens
57° width cone angle without lens
Cleaning the Transducer
CAUTION
To avoid possible transducer damage or personal injury, use care when cleaning the transducer, particularly
when attempting to remove severe fouling.
NOTICE
To prevent permanent damage to the surface of the transducer, do not use solvents such as mineral spirits,
acetone, Methyl Ethyl Ketone (MEK), or similar products when cleaning. Do not use a power sander or pressure
washer to clean the transducer.
Aquatic fouling accumulates quickly and can reduce your device's performance.
1 Remove the fouling with a soft cloth and mild detergent.
2 If the fouling is severe, use a non-metallic scouring pad or putty knife to remove growth.
3 Wipe the transducer dry.
4

Specifications
Ice Fishing Kit and Bundle Specifications
Physical size, assembled kit with transducer (L × W × H) 26.67 × 22.86 × 27.94cm (10.5 × 9 × 11in.)
Kit weight without transducer 3.27kg (7.2lb.)
Bundle weight without transducer 4.31kg (9.5lb.)
Panoptix PS22-IF Specifications
Dimensions (W x H x L) 66 x 228.6 x 101.6mm (2.6 x 9 x 4in.)
Transducer and cable weight 680g (1.5lb.)
Total weight (transducer, mount, and cable) 1150g (2.54lb.)
Max. continuous power usage 8W
Peak transmit power 48W
Operating voltage From 10 to 35Vdc
Operating temperature range
1
From -10 to 40°C (from 14 to 104°F)
Storage temperature range From -40 to 70°C (from -40 to 158°F)
Material ASA plastic
Maximum range
2
91.4m (300ft.)
Frequency 417kHz
Fuse rating 4.0A mini 32Vdc
© 2024 Garmin Ltd. or its subsidiaries
Garmin
®
and the Garmin logo are trademarks of Garmin Ltd. or its subsidiaries, registered in the USA and other countries. ECHOMAP
™
and Panoptix
™
are trademarks of
Garmin Ltd. or its subsidiaries. These trademarks may not be used without the express permission of Garmin.
1
When the transducer is used out of the water, the transducer monitors the internal temperature and suspends operation until the temperature returns to the
operating range.
2
Dependent upon transducer placement, water salinity, bottom type, and other water conditions.
5

© 2024 Garmin Ltd. or its subsidiaries
support.garmin.com

