
Technical Support and E-Warranty Certificate www.vevor.com/support
METAL EDGING USER MANUAL
We continue to be committed to provide you tools with competitive price.
"Save Half", "Half Price" or any other similar expressions used by us only represents an
estimate of savings you might benefit from buying certain tools with us compared to the major
top brands and does not necessarily mean to cover all categories of tools offered by us. You
are kindly reminded to verify carefully when you are placing an order with us if you are
actually saving half in comparison with the top major brands.

1
Model:JC40*6in 3pcs, JC40*8in 3pcs, JC40*6in 4pcs, JC40*8in 4pcs,
JC40*6in 6pcs, JC40*8in 6pcs, JC12*40in 4pcs
Have product questions? Need technical support? Please feel free to
contact us:
Technical Support and E-Warranty Certificate
www.vevor.com/support
NEED HELP? CONTACT US!
This is the original instruction, please read all manual instructions
carefully before operating. VEVOR reserves a clear interpretation of our
user manual. The appearance of the product shall be subject to the
product you received. Please forgive us that we won't inform you again if
there are any technology or software updates on our product.
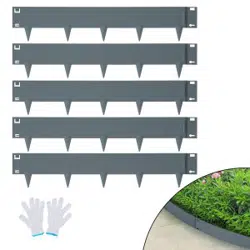
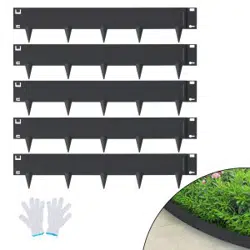
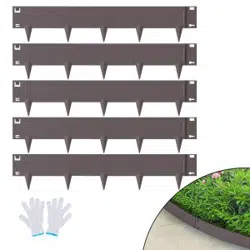
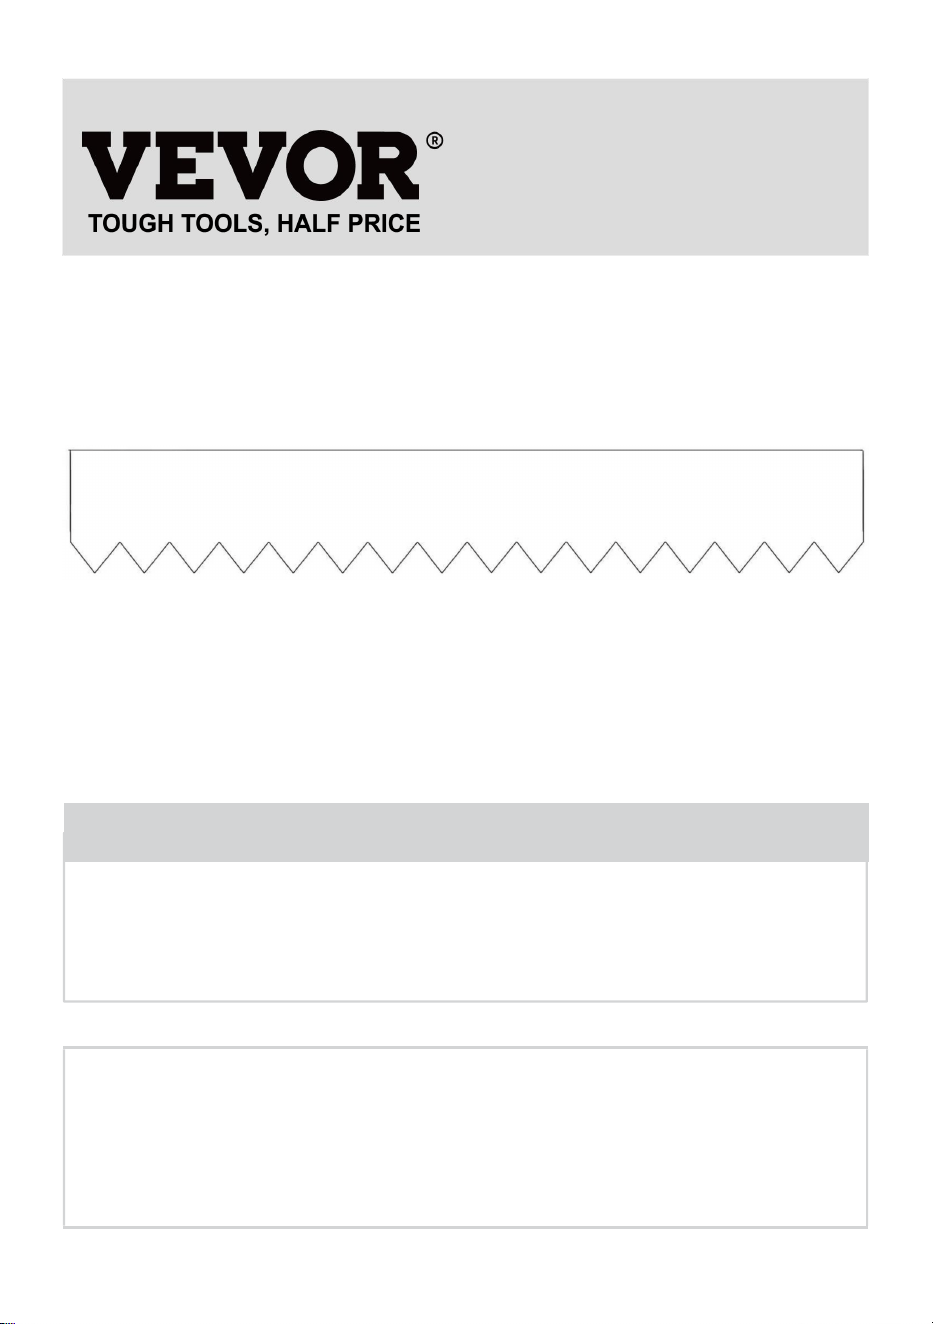
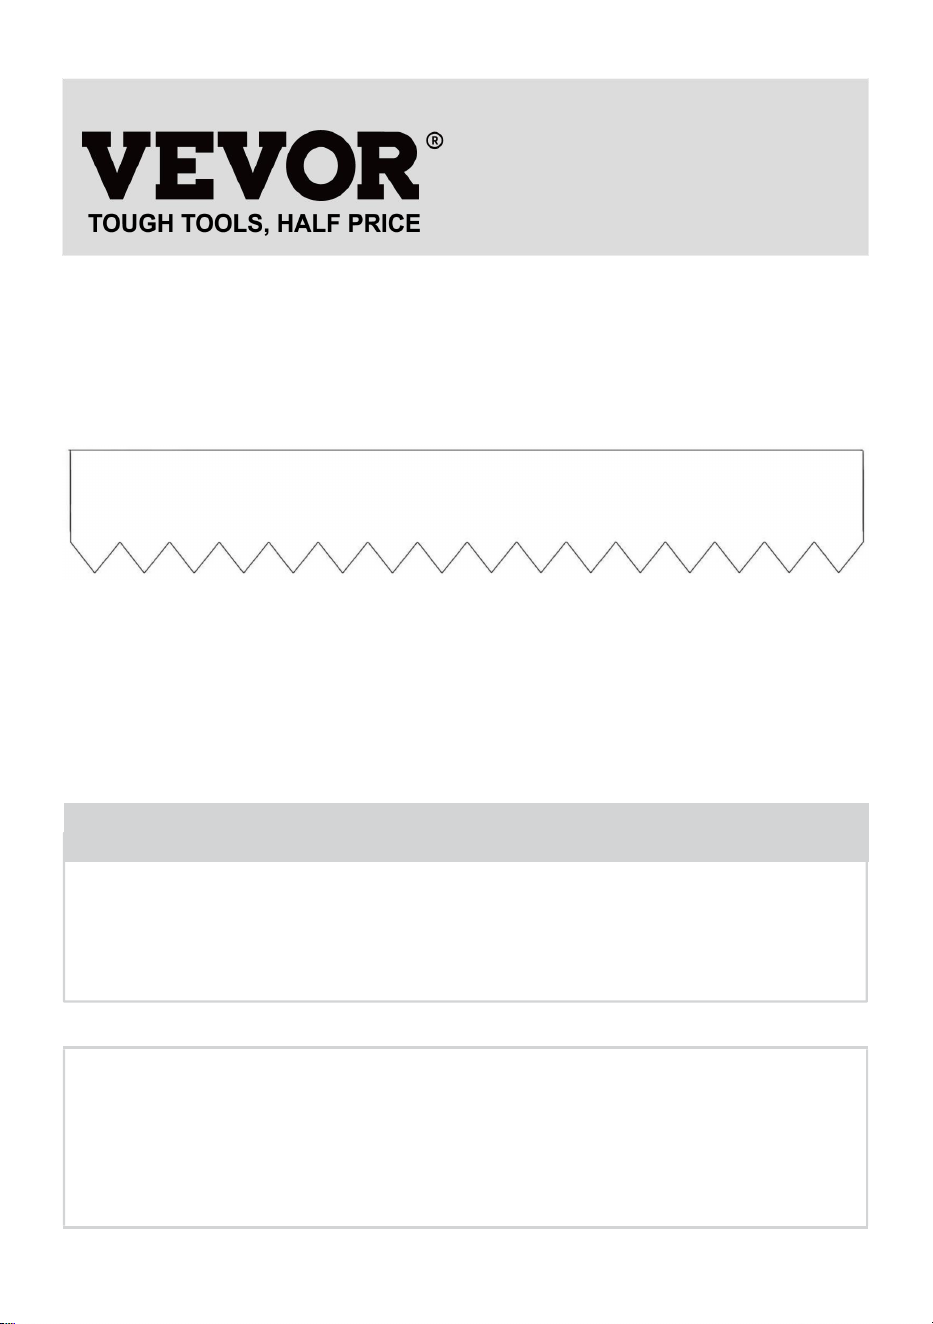
METAL EDGING

2
Safety & Warning
Read and understand this entire manual before assembling, installing,
operating, or servicing this product. Failure to follow these warnings and
instructions can cause death, personal injury or damage to valuable property.
Wear ANSI-approved safety goggles, heavy-duty work gloves and safety
shoes during assembly and installation of this product. Keep bystanders out
of the area during assembly
Do not assemble when tired or when under the influence of alcohol, drugs or
medication.
Use as intended only. TO PREVENT SERIOUS INJURY AND DEATH FROM
TIPPING: DO NOT SIT, STAND OR CLIMB ON THIS ITEM.
This product is not a toy. Do not allow children to play with or near this
item.
Before use, inspect the general condition of the product. Check for: broken,
cracked, or bent parts, loose or missing parts, and any condition that may
affect the proper function of the product.
Ensure only genuine parts are used for replacement & Repair.
SAVE THESE INSTRUCTIONS
3
SPECIFICATIONS
Model
JC40*6in 3pcs
Size of Single metal edge
40*6in
Color
Black
Model
JC40*8in 3pcs
Size of Single metal edge
40*8in
Color
Black
Model
JC40*6in 4pcs
Size of Single metal edge
40*6in
Color
Black
Model
JC40*8in 4pcs
Size of Single metal edge
40*6in
Color
Black
Model
JC40*6in 6pcs
Size of Single metal edge
40*6in
Color
Black
Model
JC40*8in 6pcs
Size of Single metal edge
40*8in
Color
Black
Model
JC12*40in 4pcs
Size of Single metal edge
40*12in
Color
Black
4
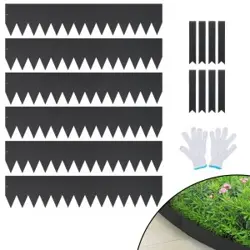
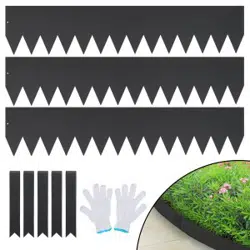
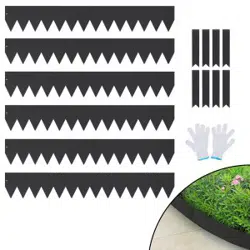
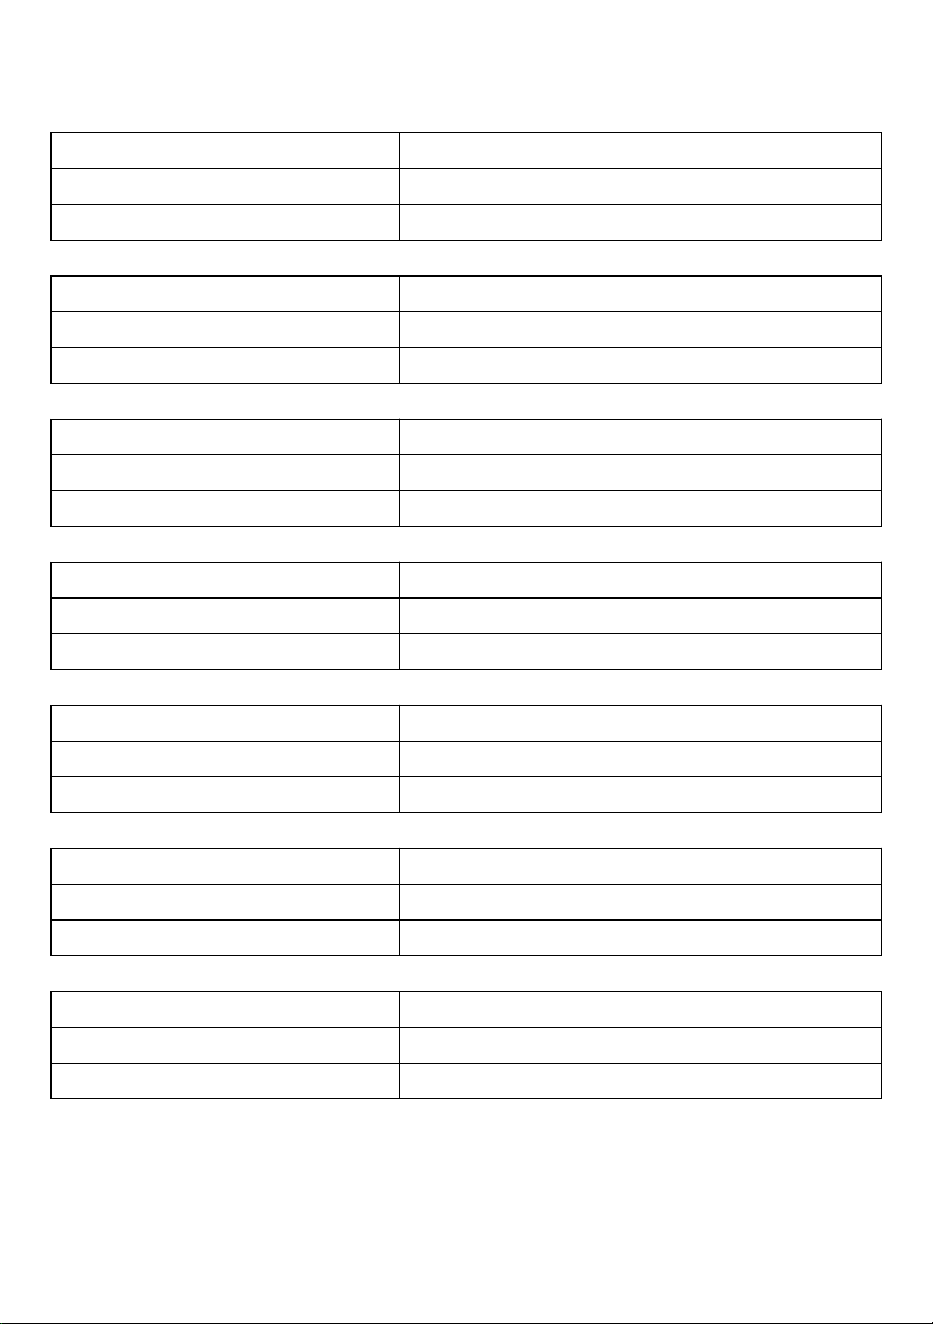
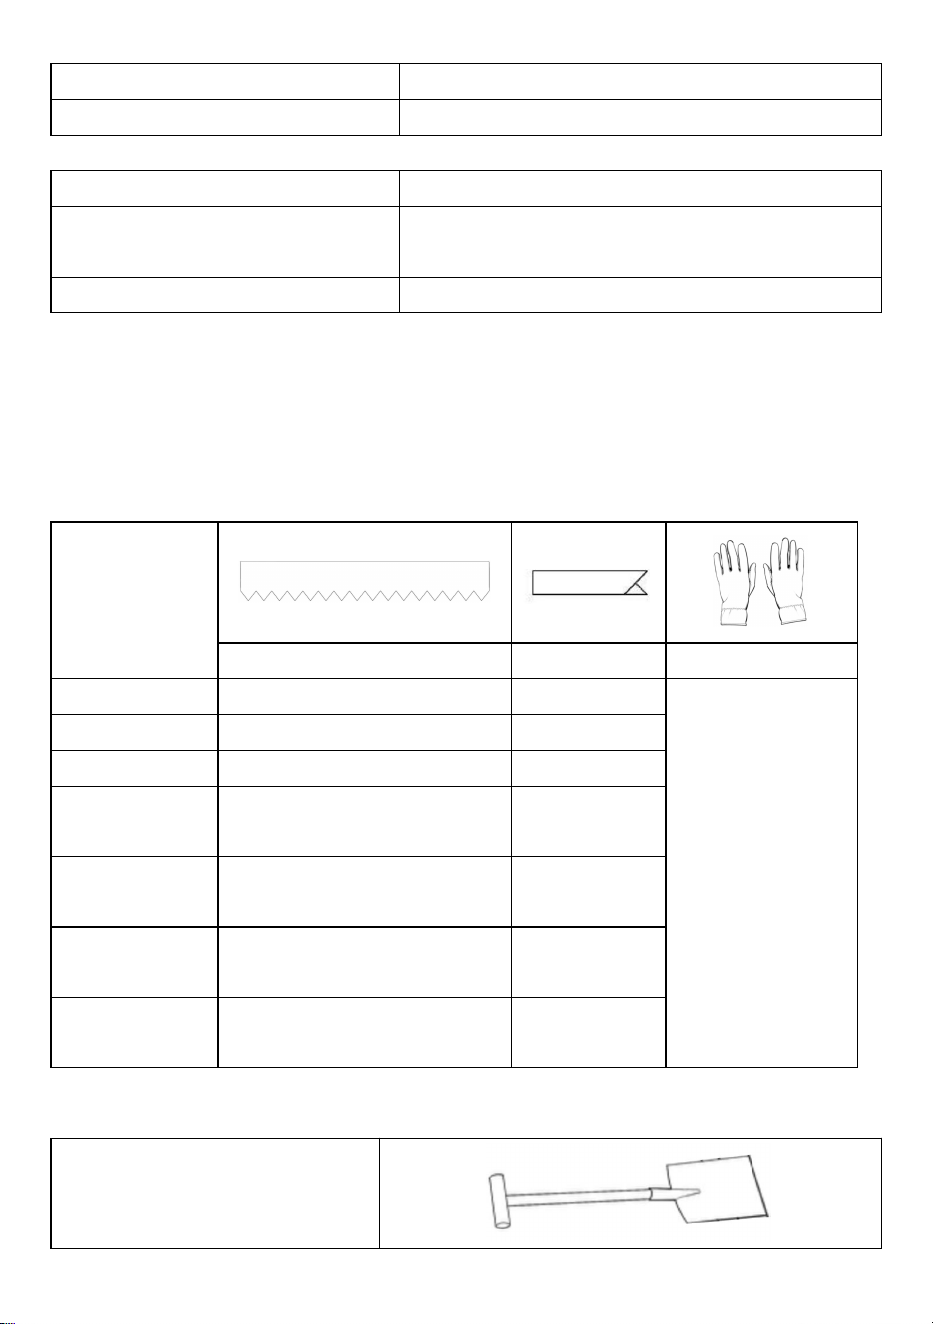
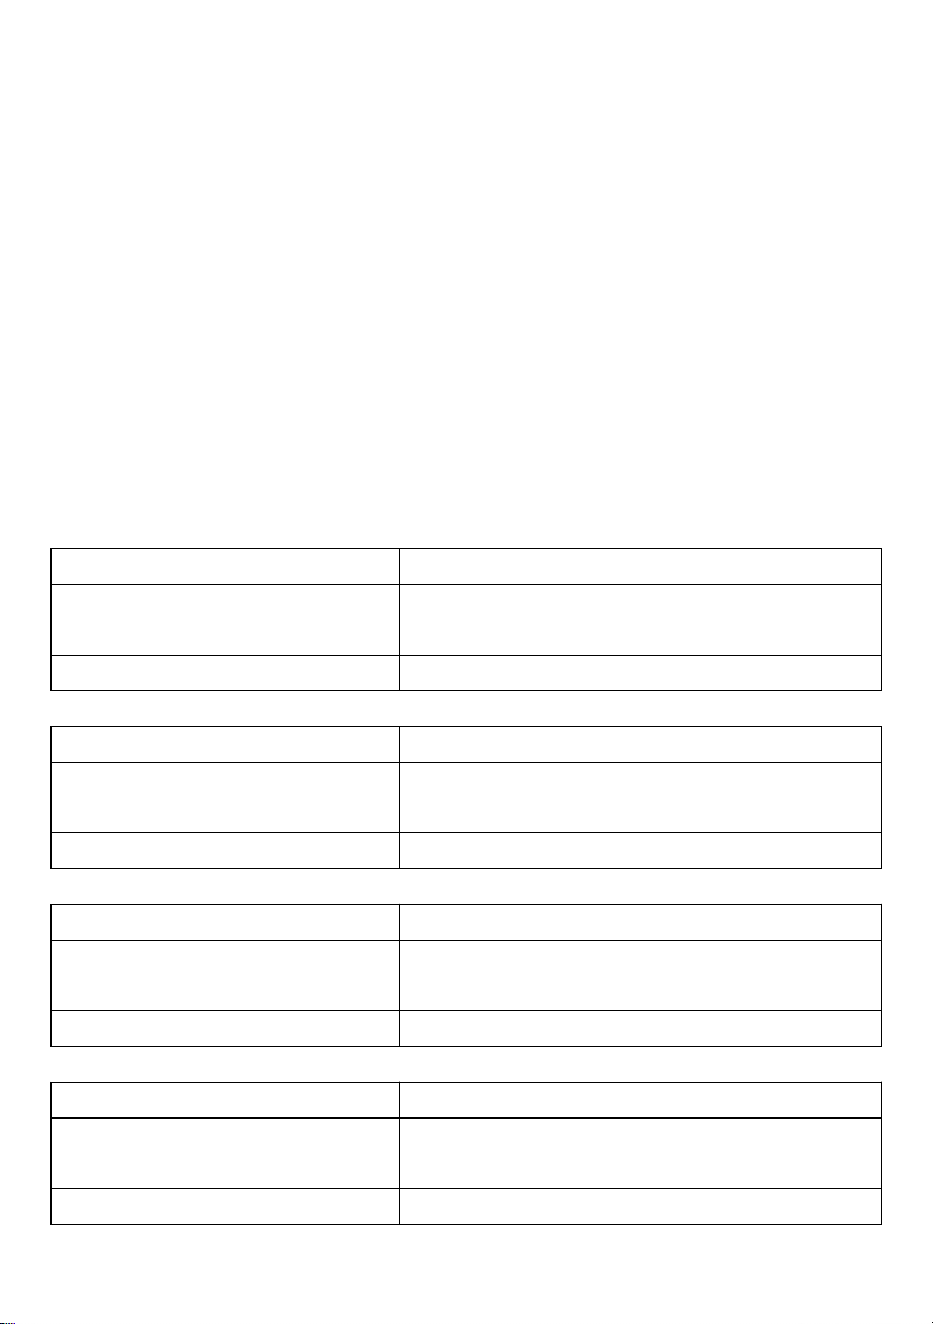
COMPONENTS
Model
Metal edge
Connector
Gloves
JC40*6 in 3pcs
x3
x5
X1
JC40*8in 3pcs
x3
x5
JC40*6in 4pcs
x4
x6
JC40*8in 4pcs
x4
x6
JC40*6in 6pcs
x6
x8
JC40*8in 6pcs
x6
x8
JC12*40in 4pcs
x4
x6
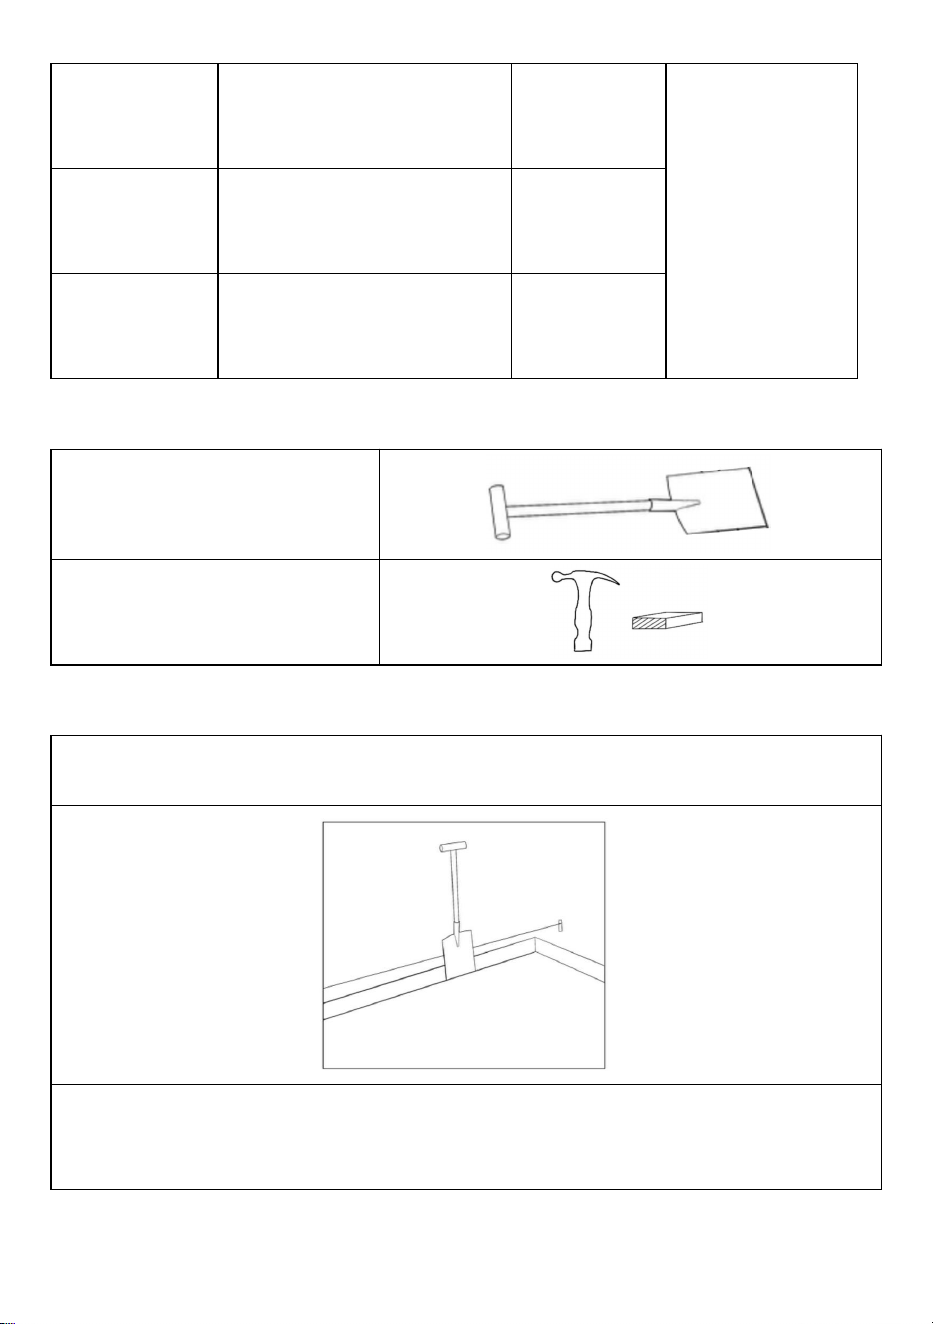
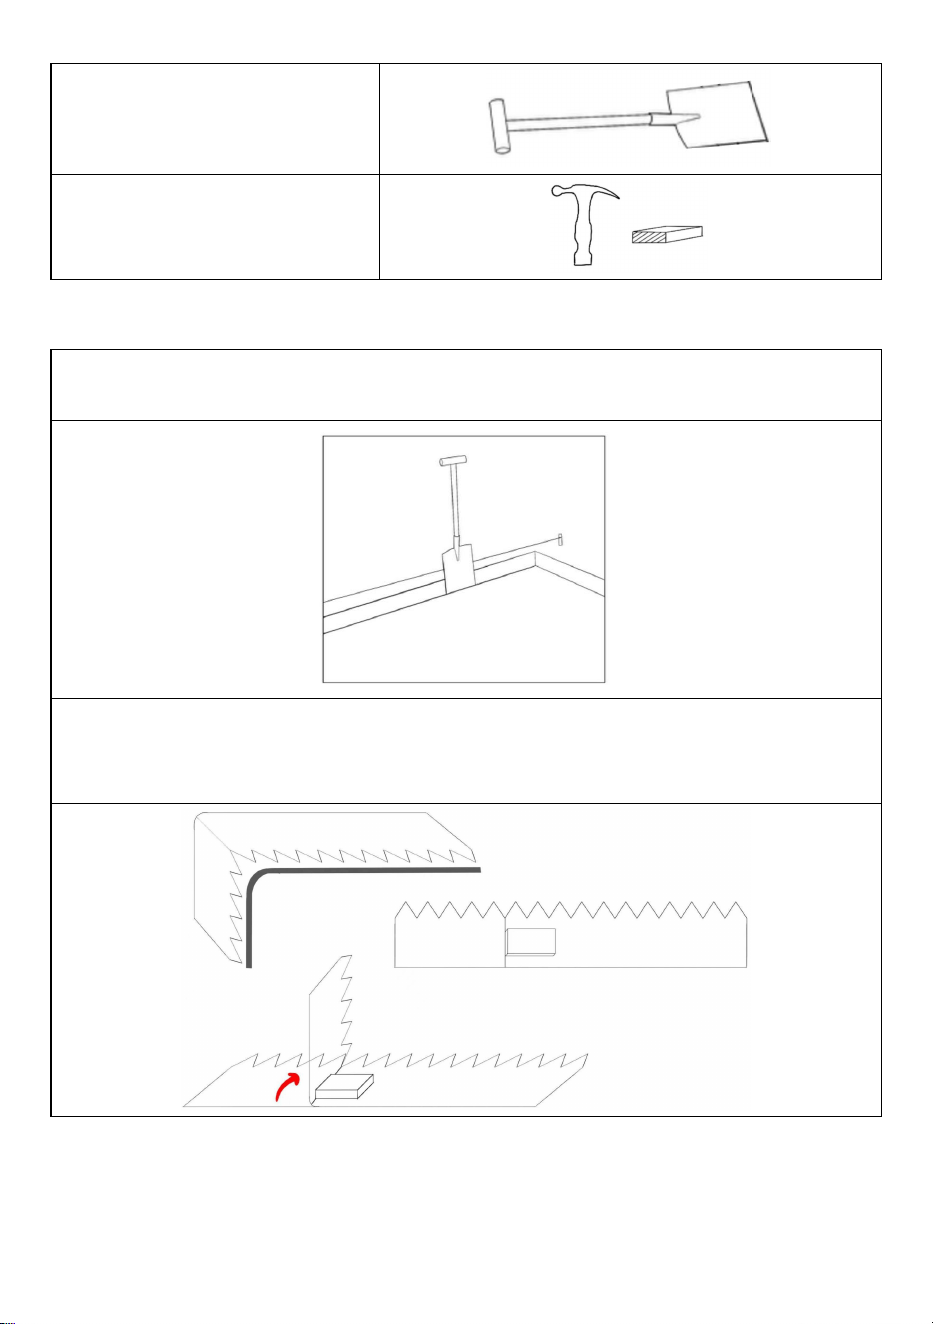
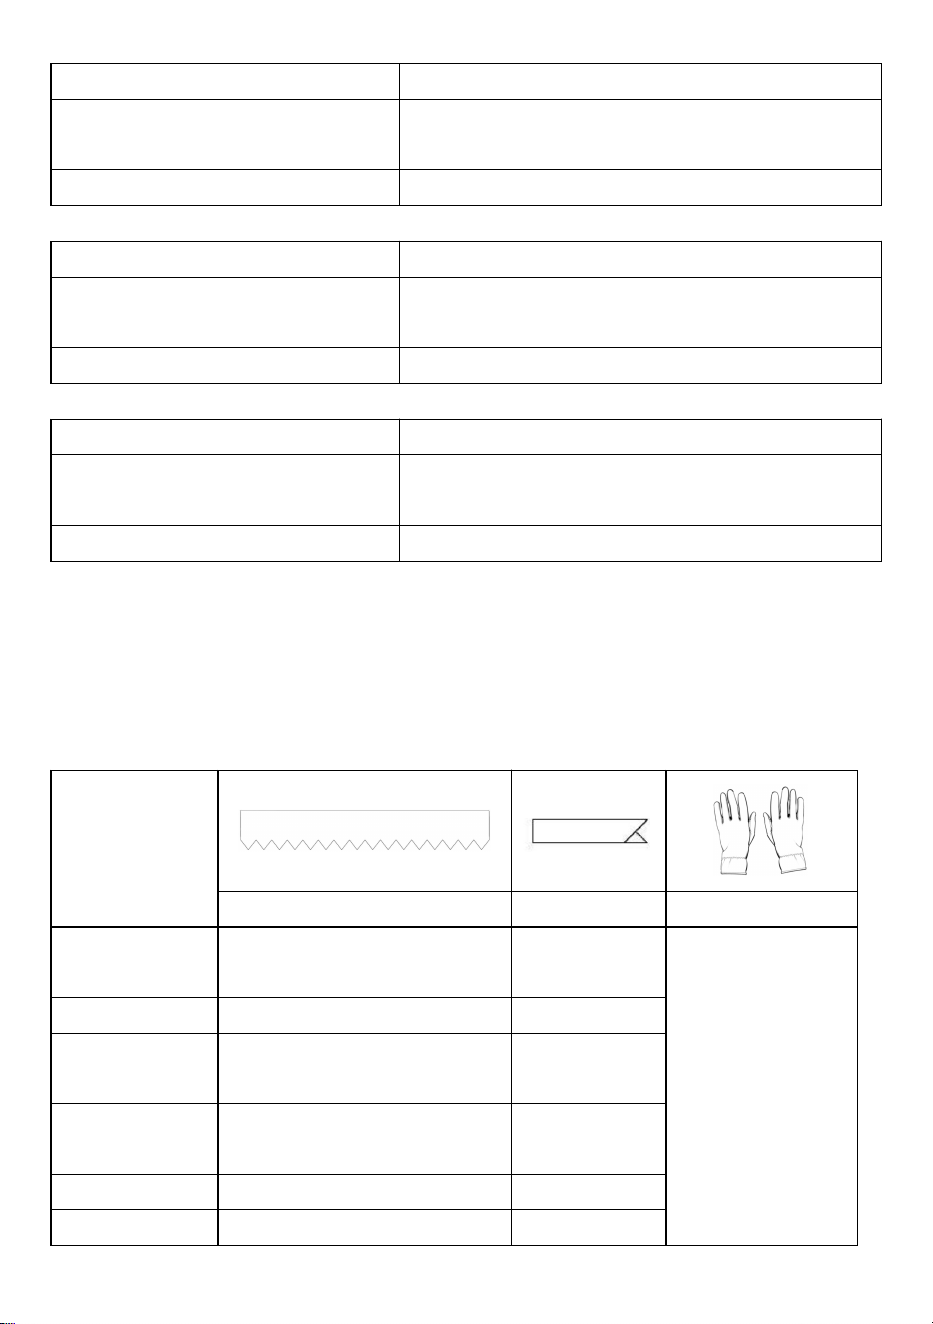
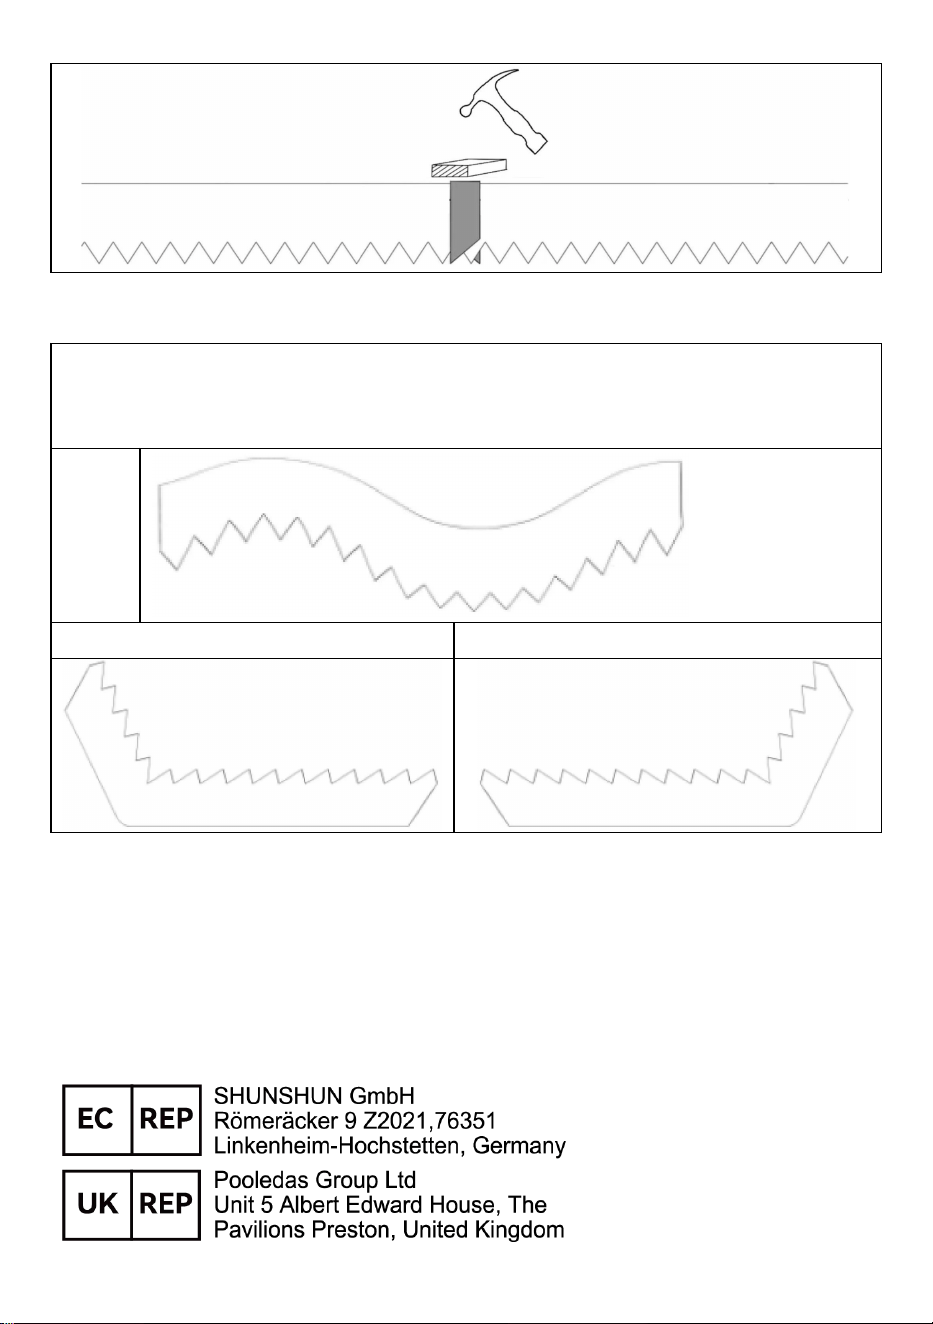
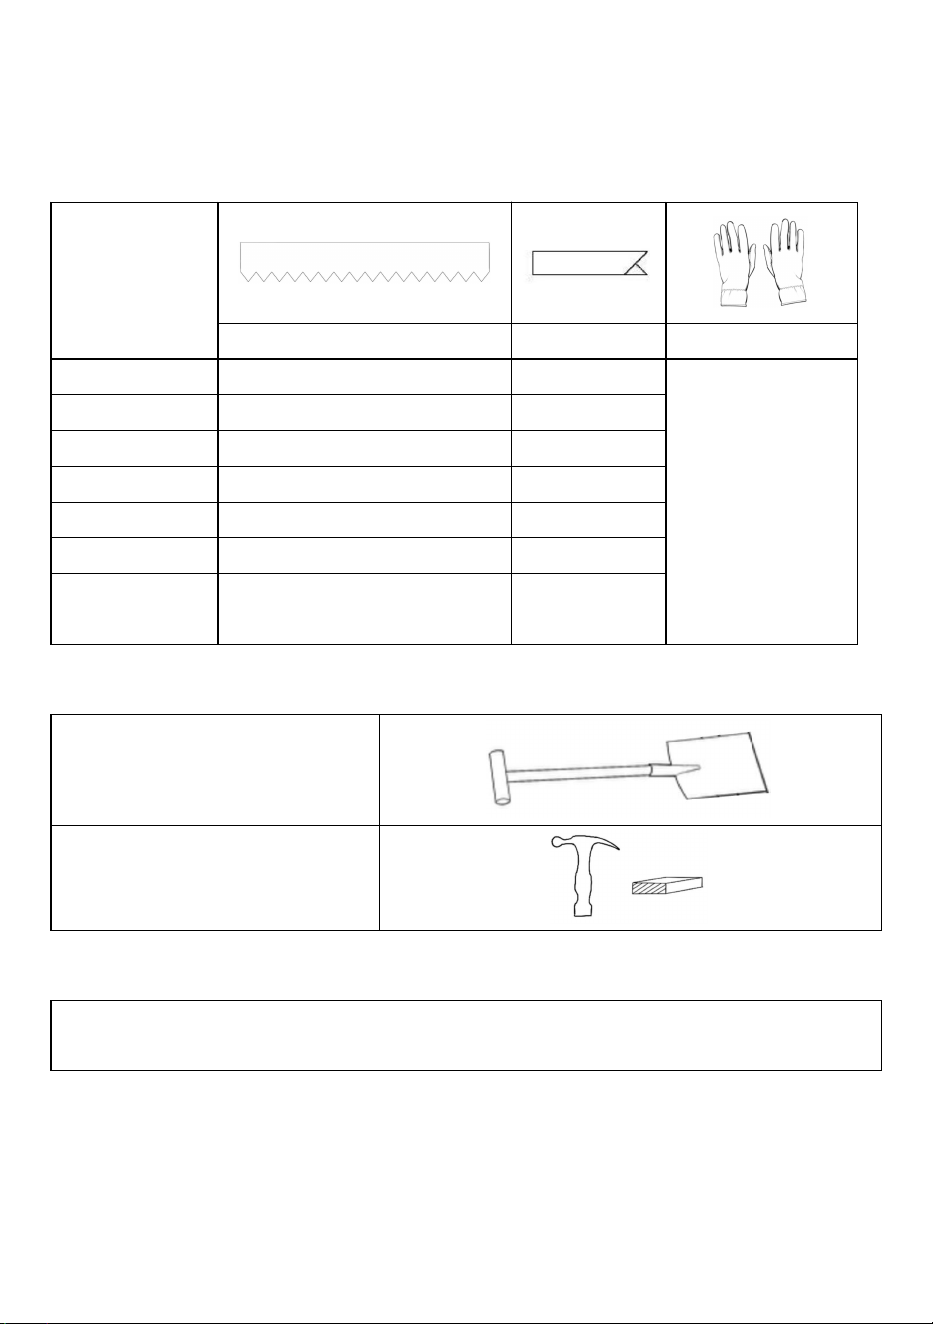
Required tools
1.Spade
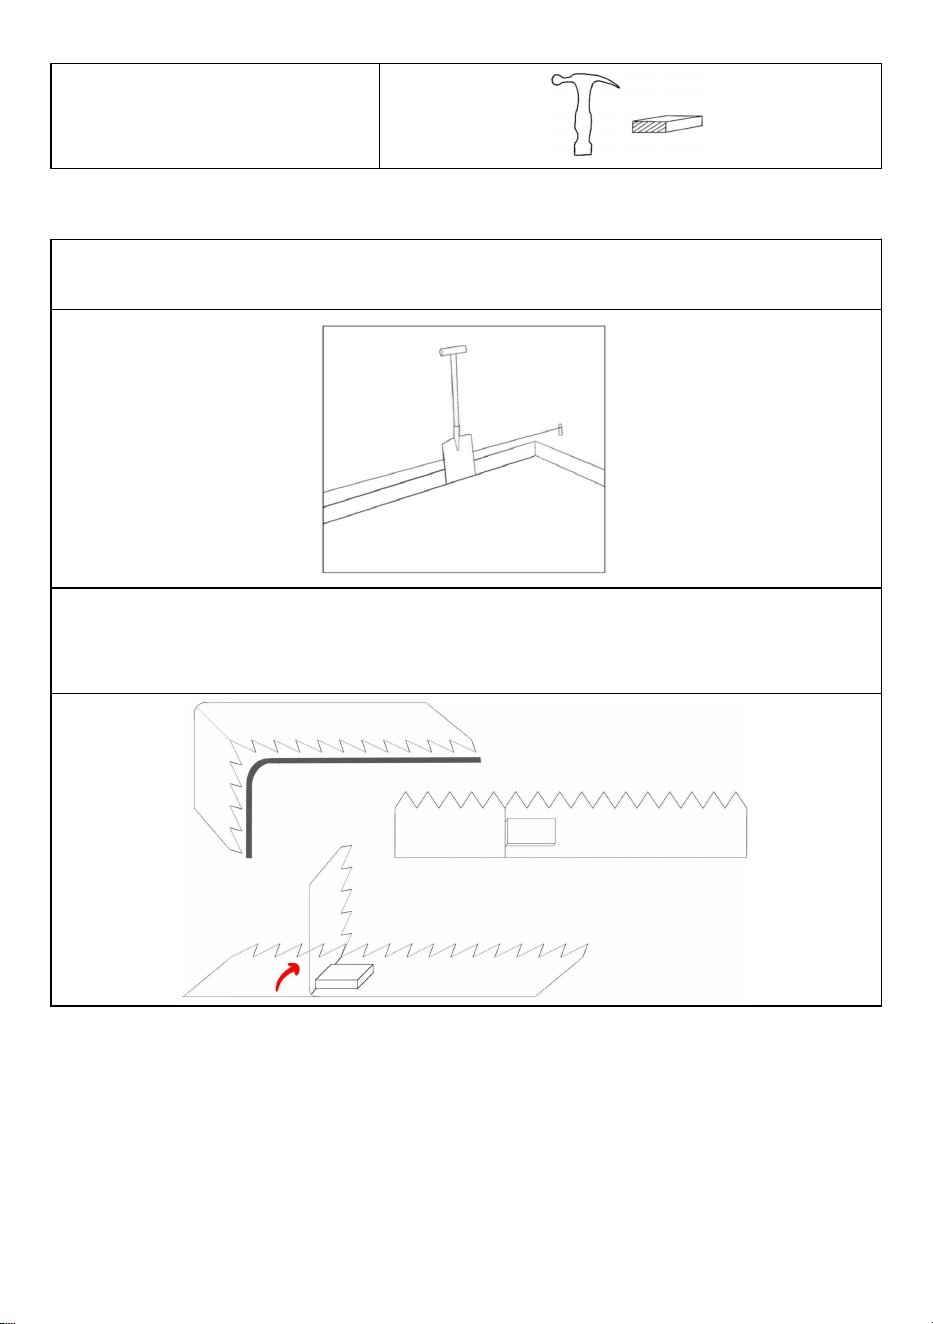
2.Hammer and a block of wood
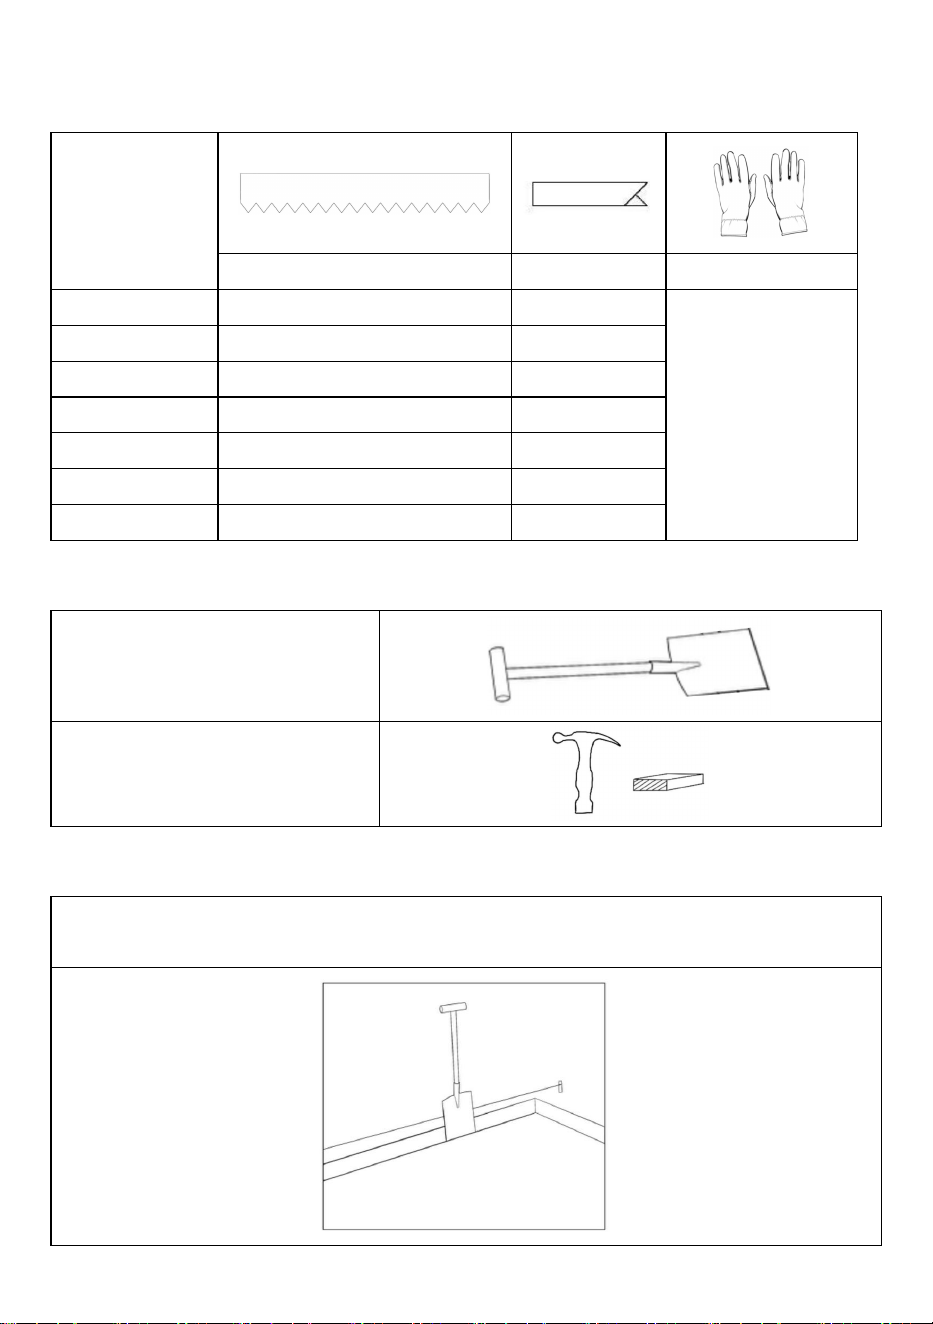
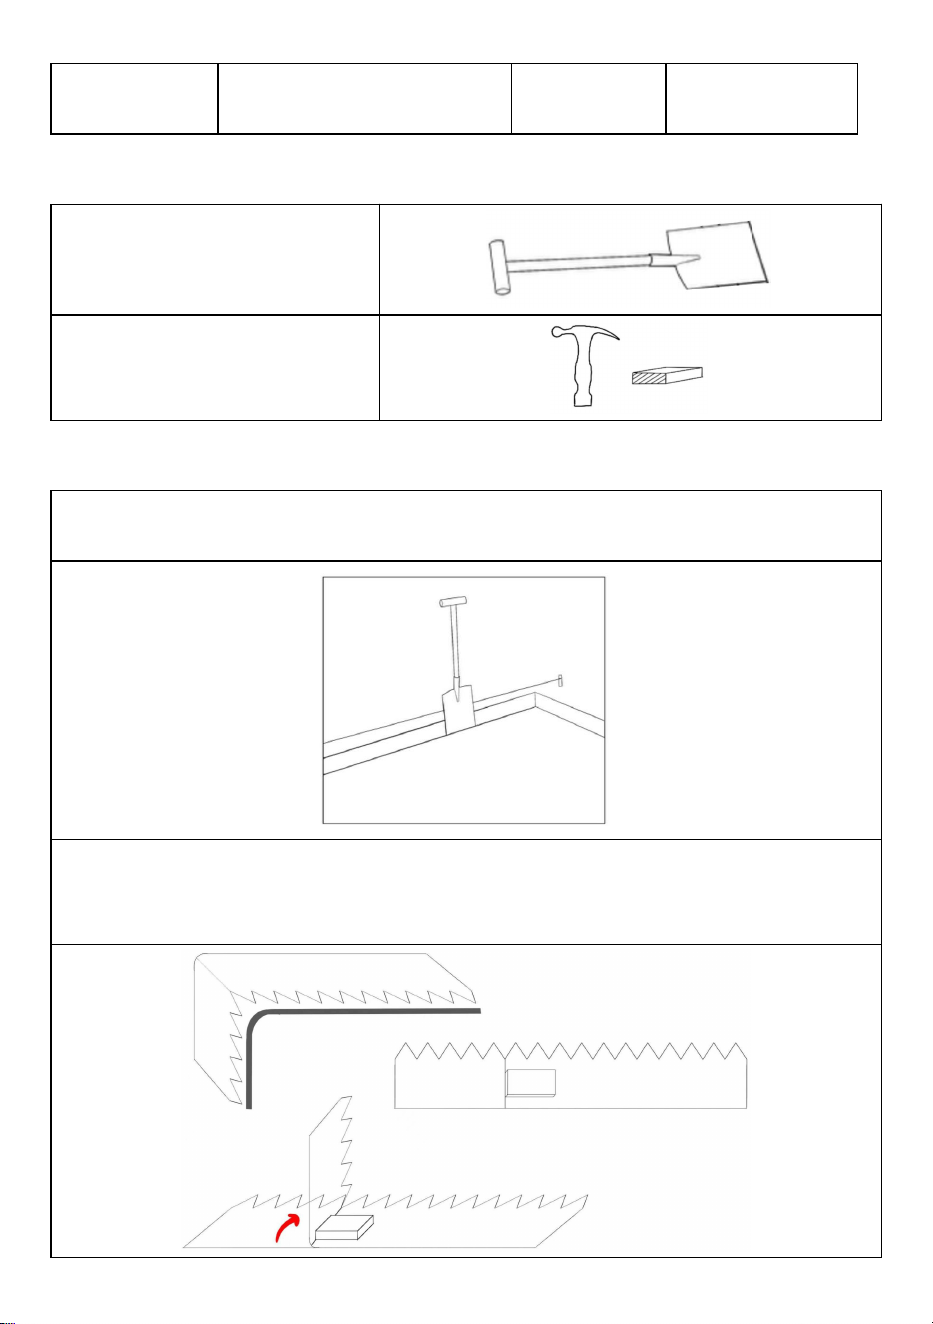
Assemble instructions
STEP 1 Prepare a line for the edging to follow and remove any obstructions. If ground is
stony,loosen with pickaxe.
5
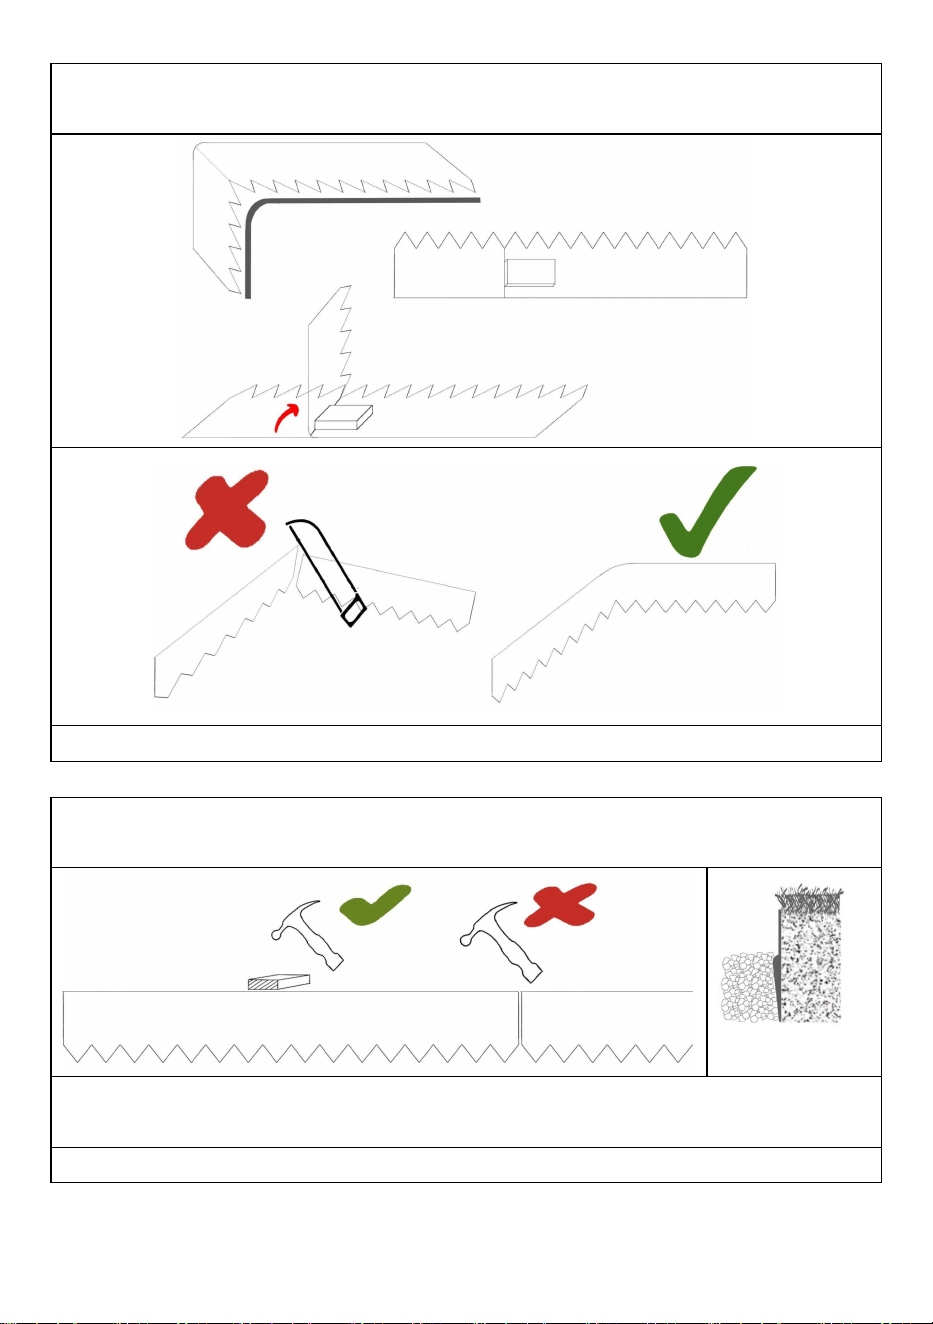
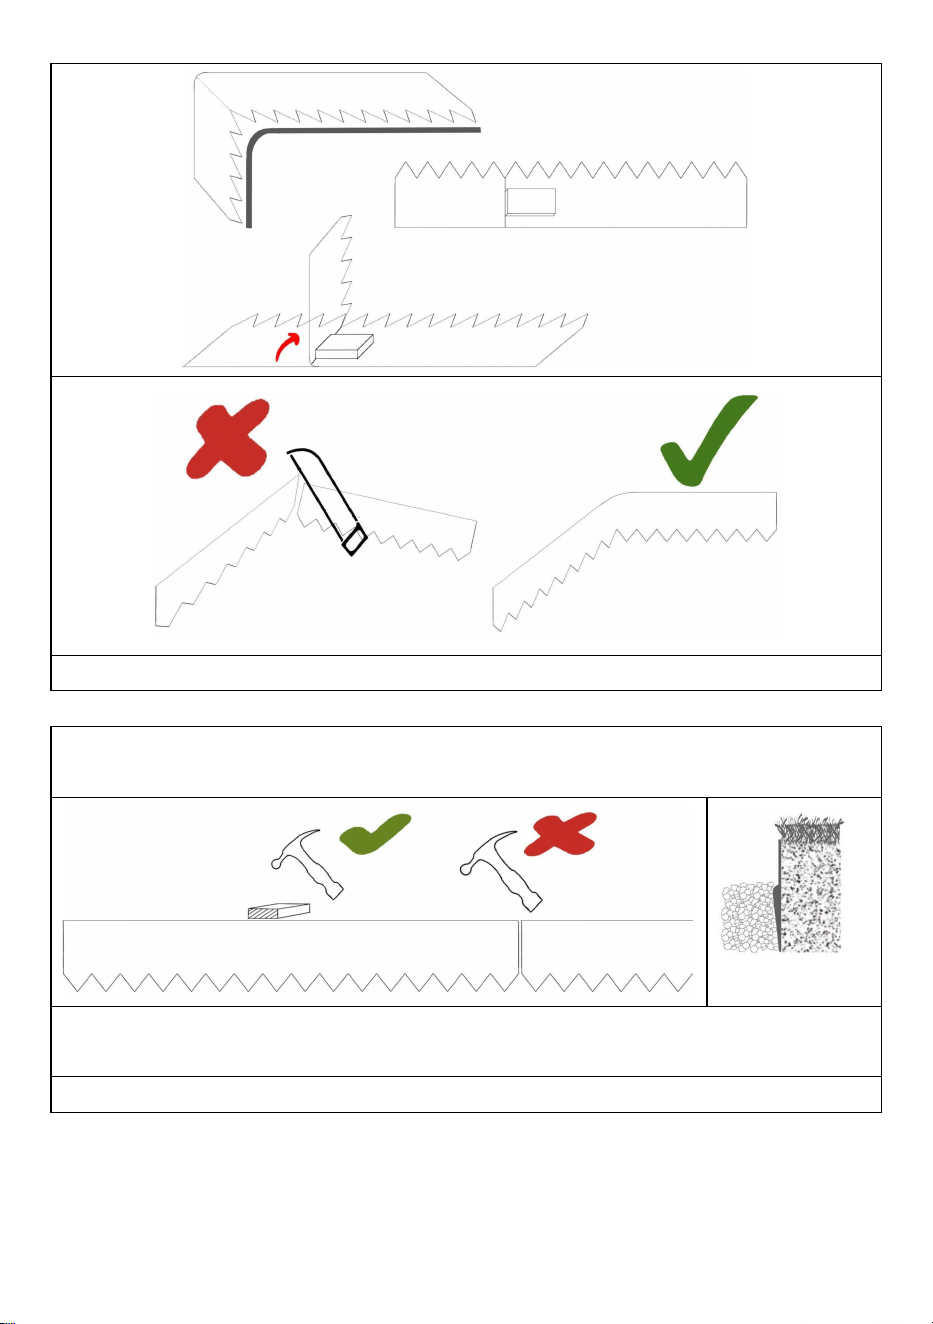
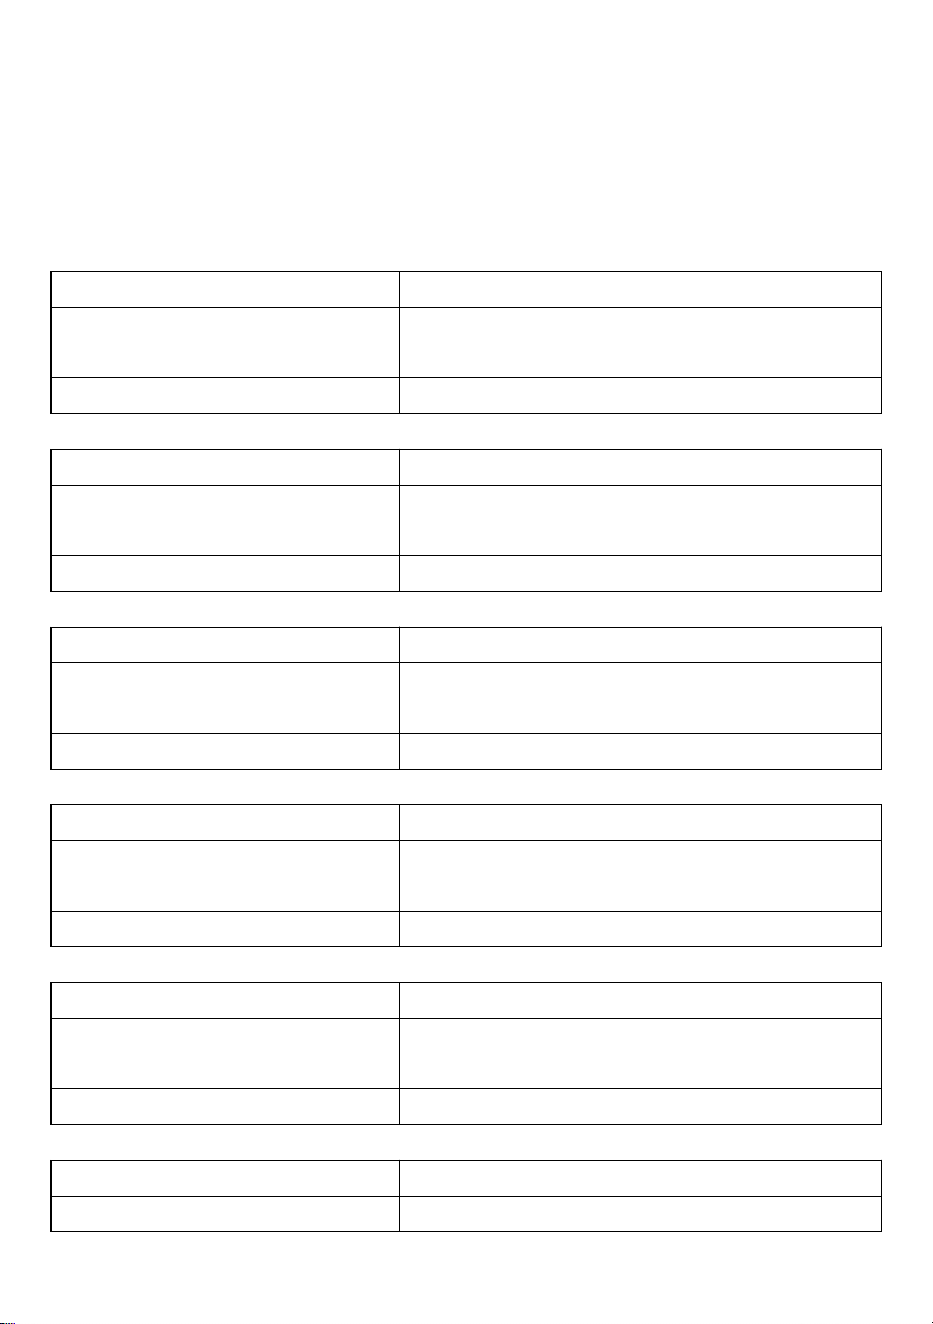
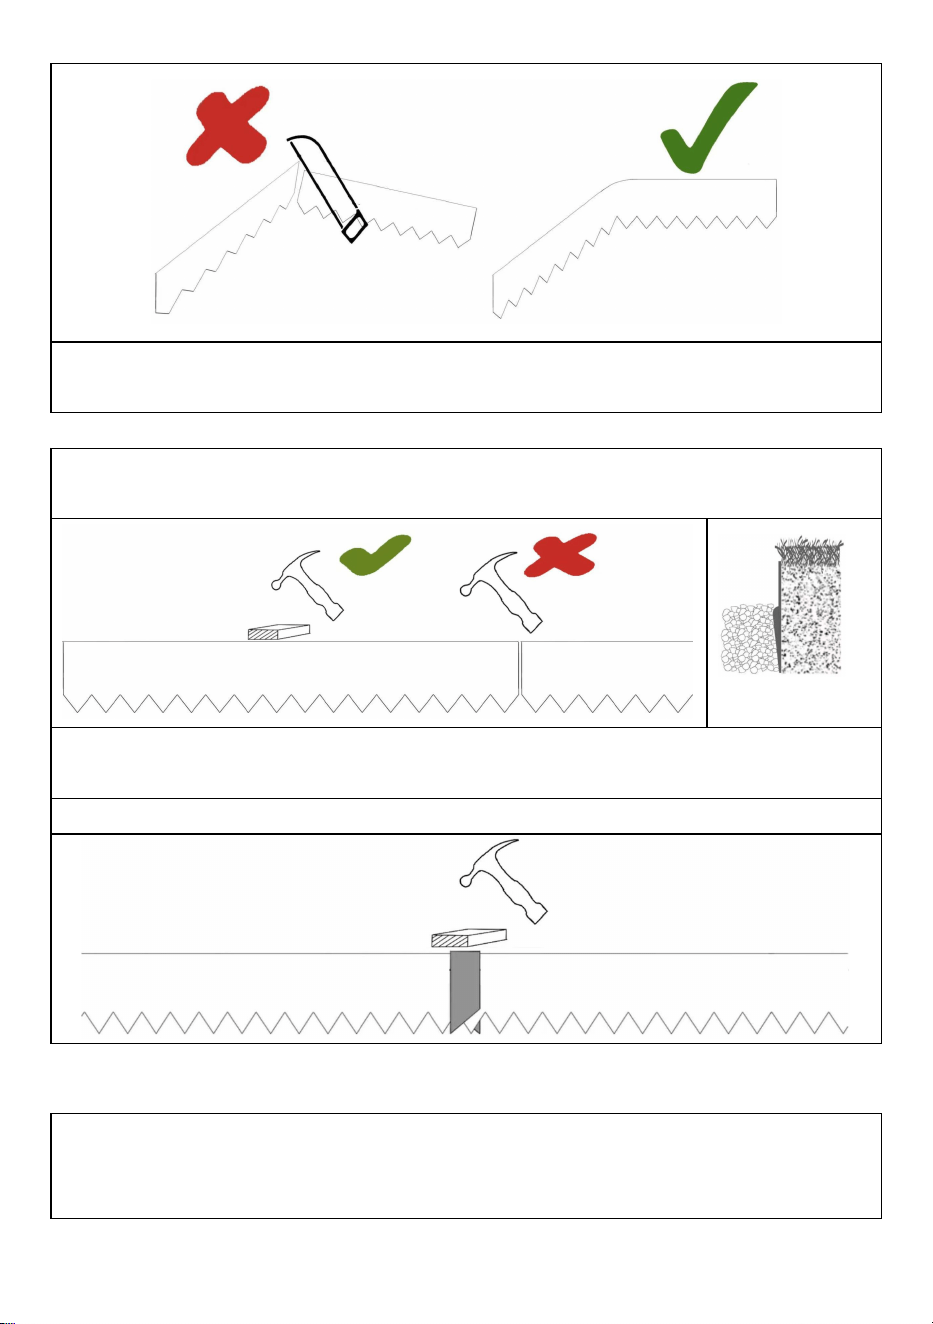
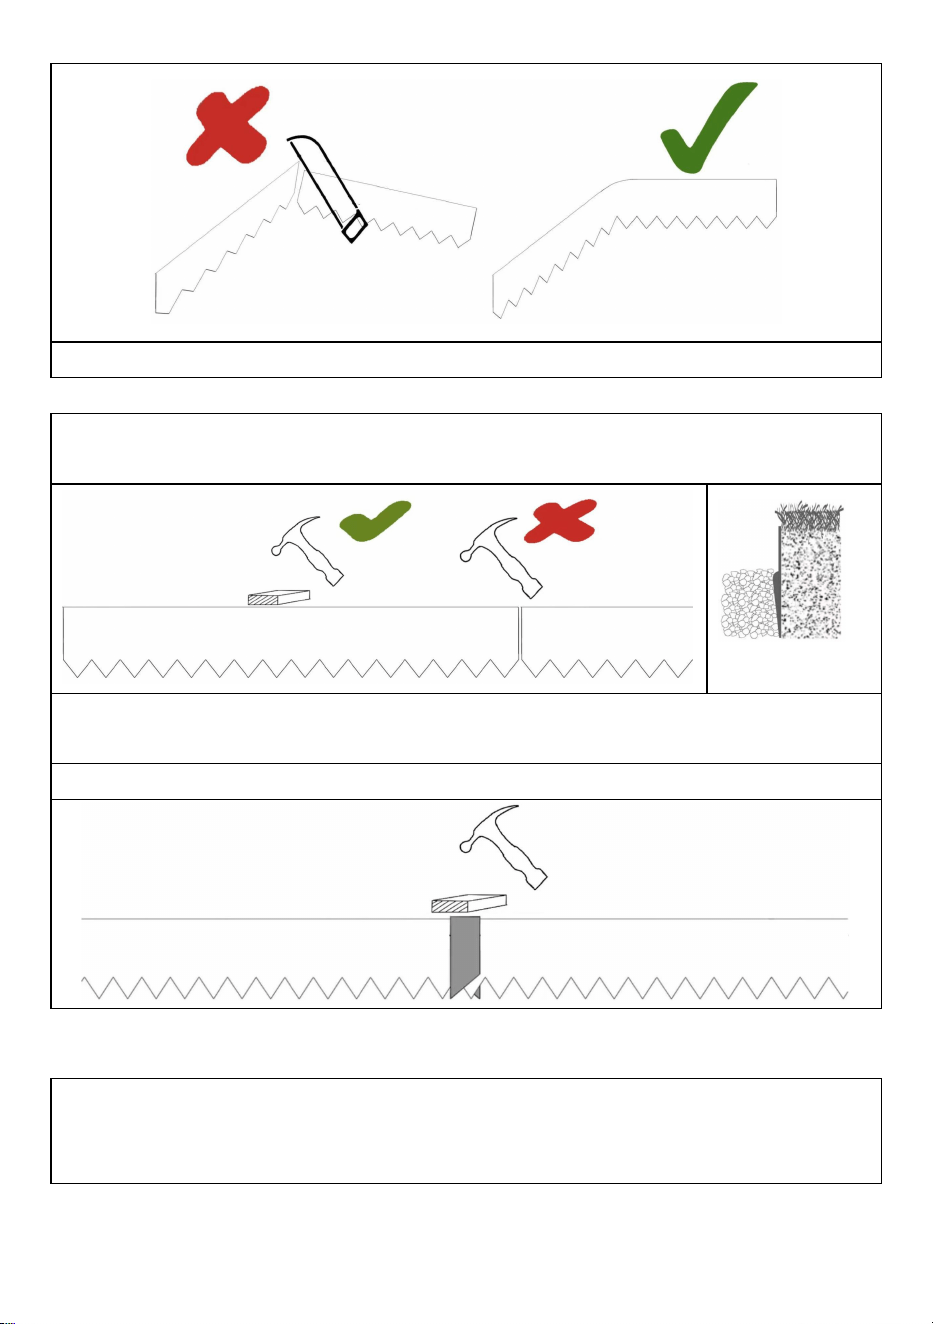
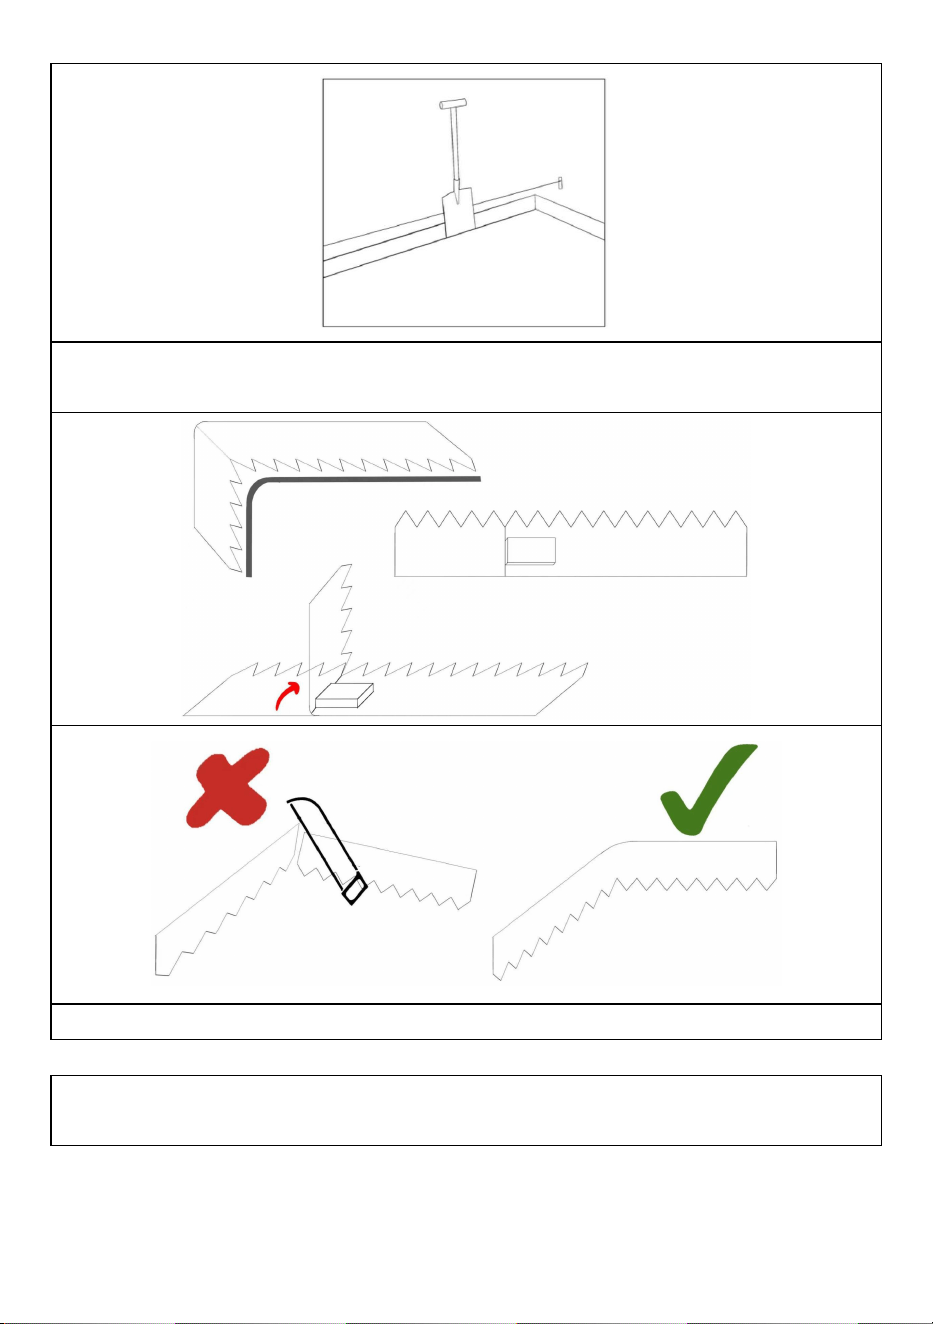
STEP 2 Bending instructions: A work bench, the edge of a table, a timber, or other
former is advised when bending the metal edge to required angle.
NOTE: Do not cut with anything as it can cause injury.
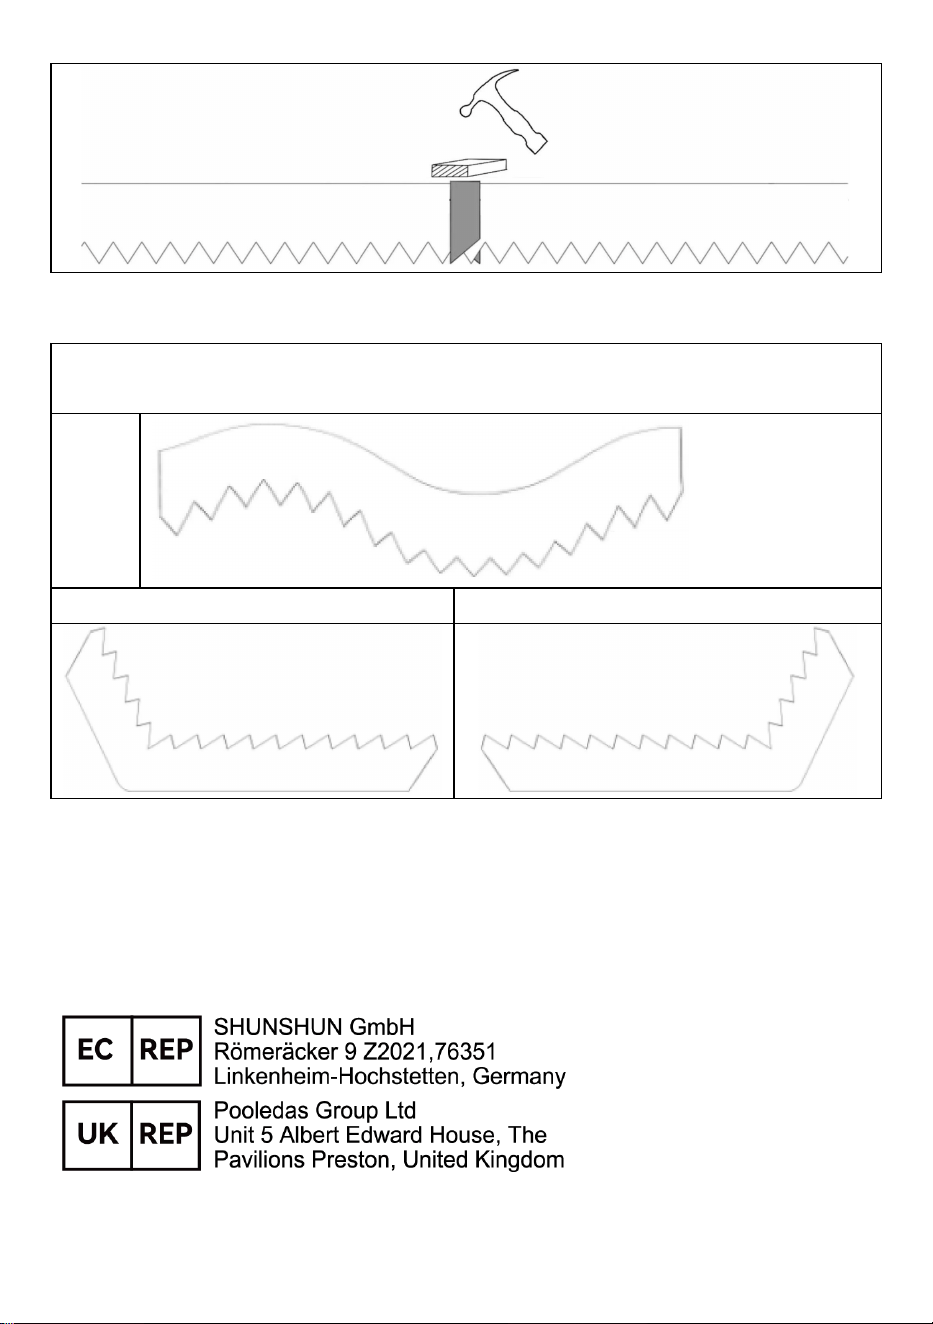
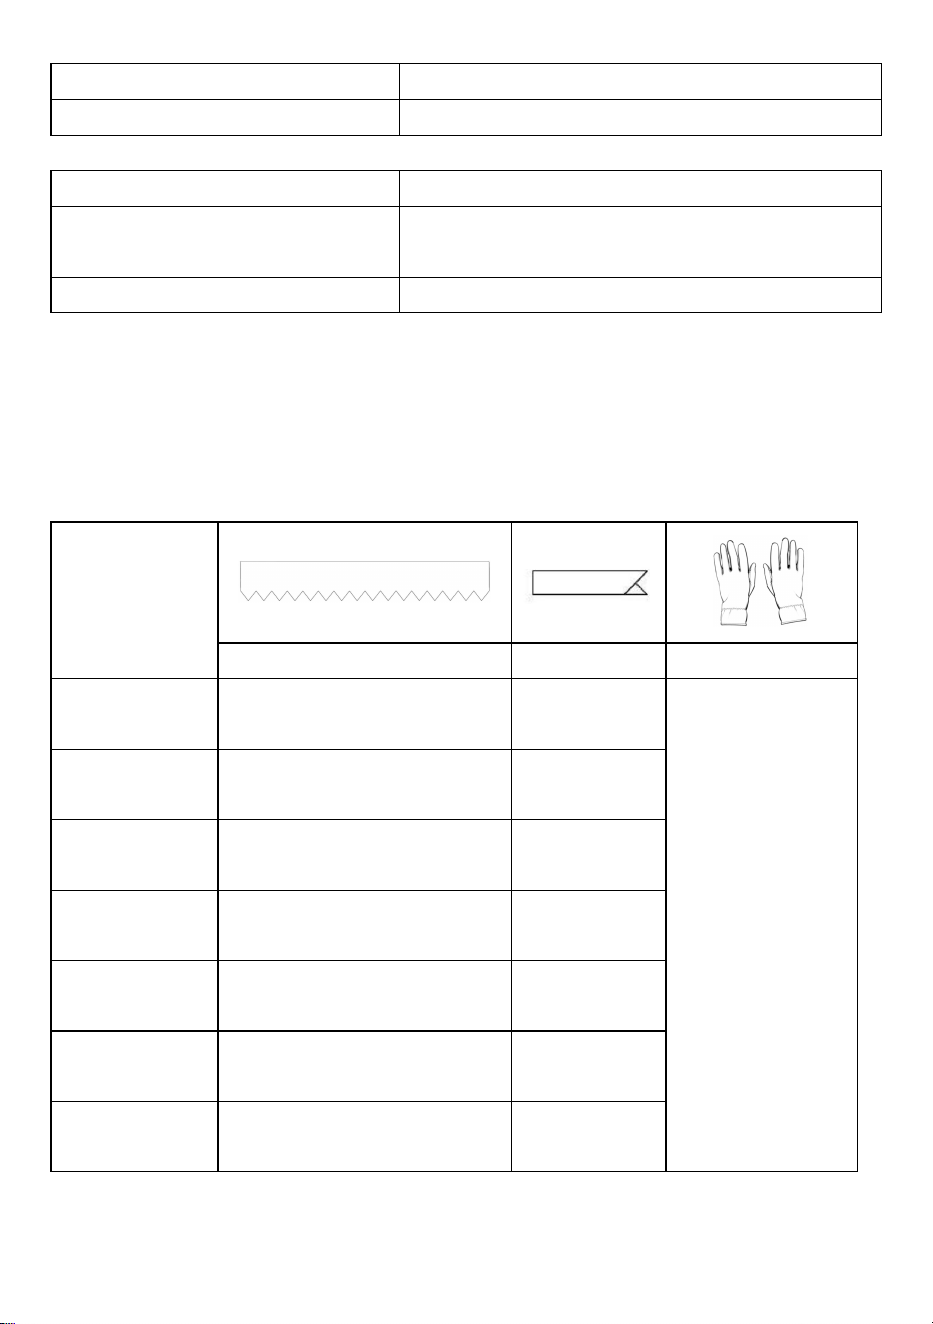
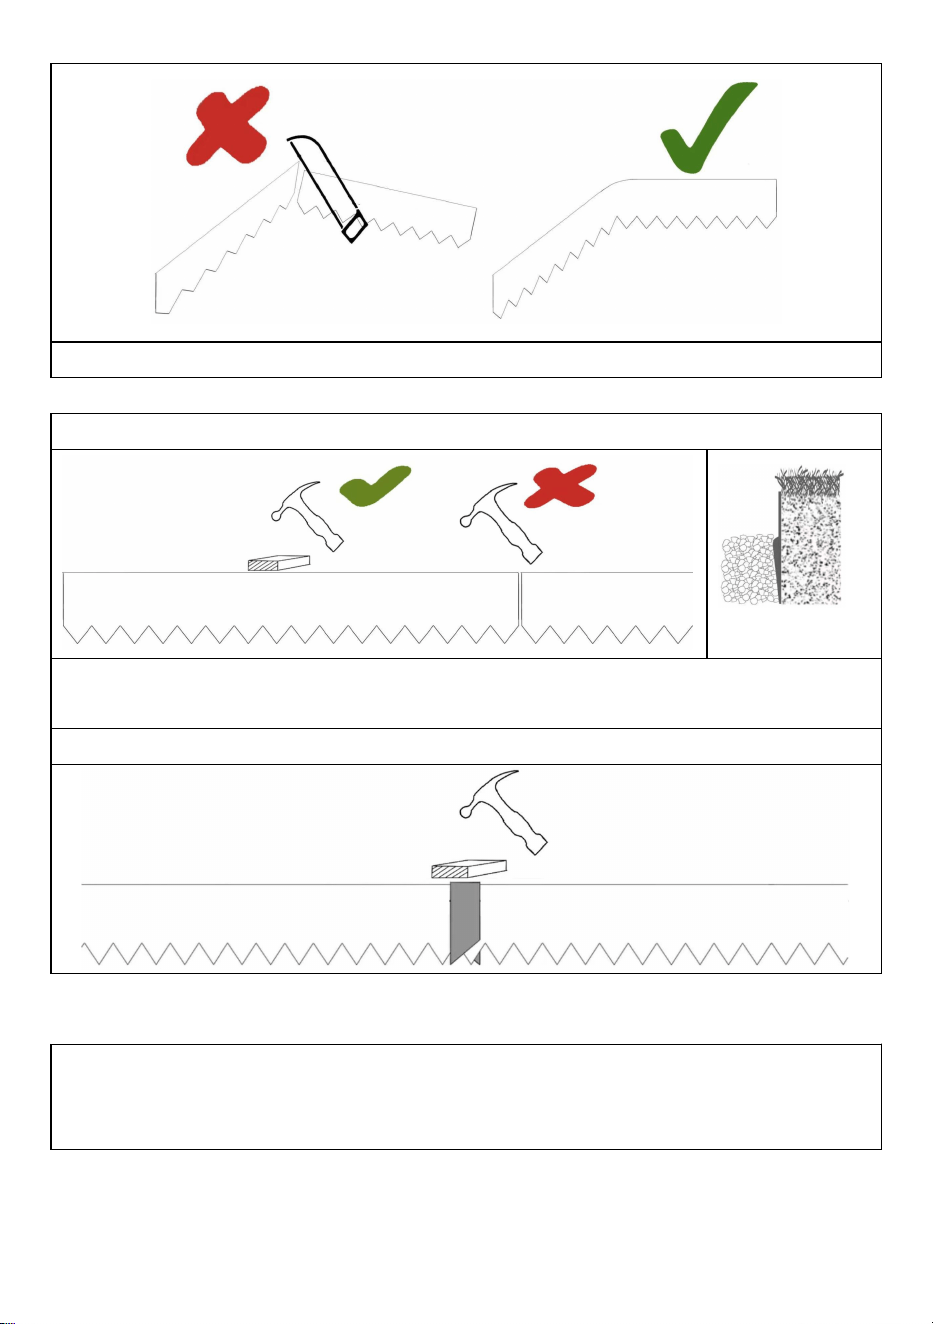
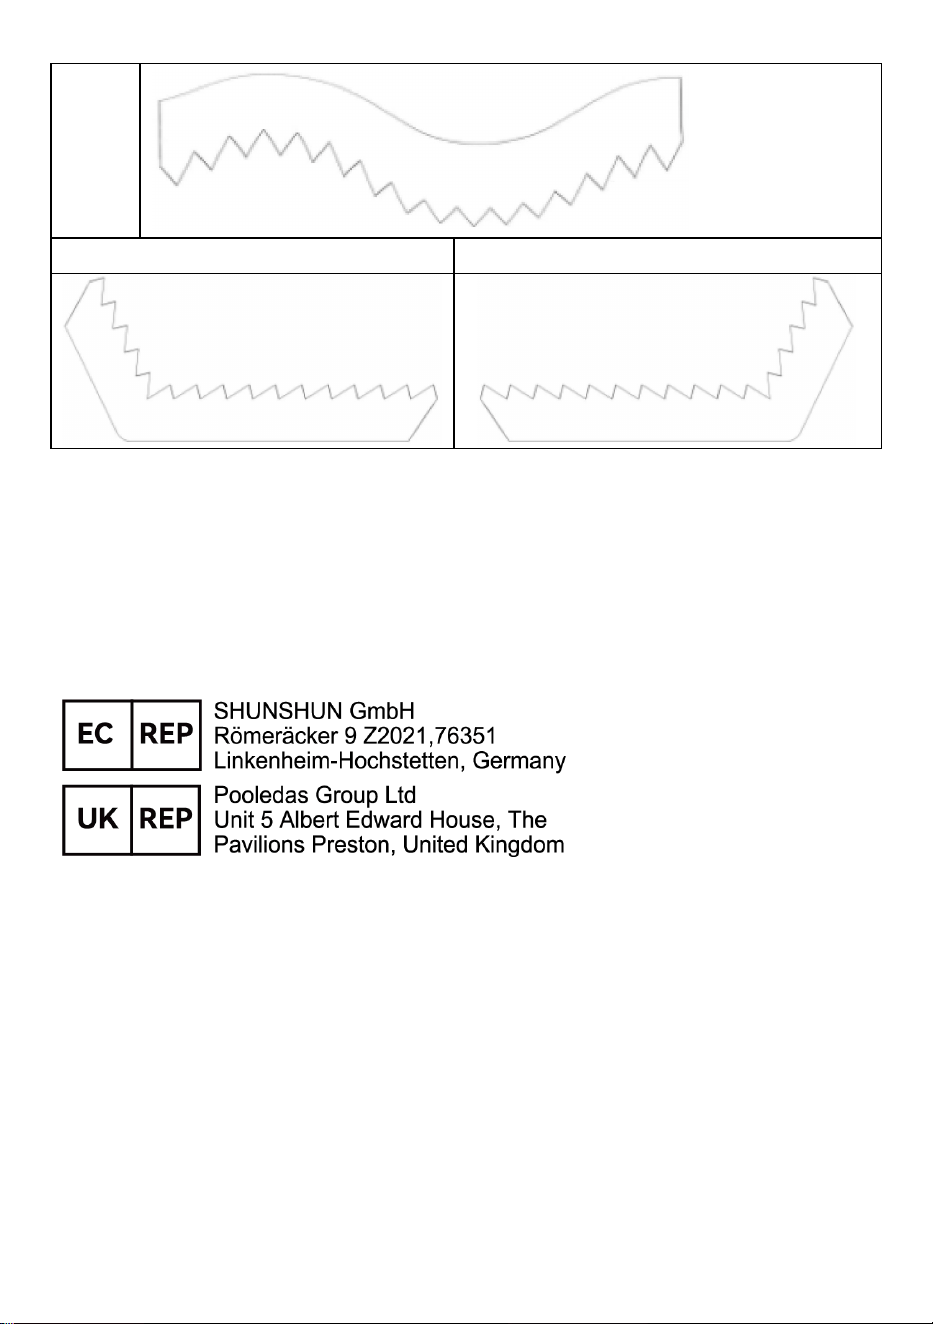
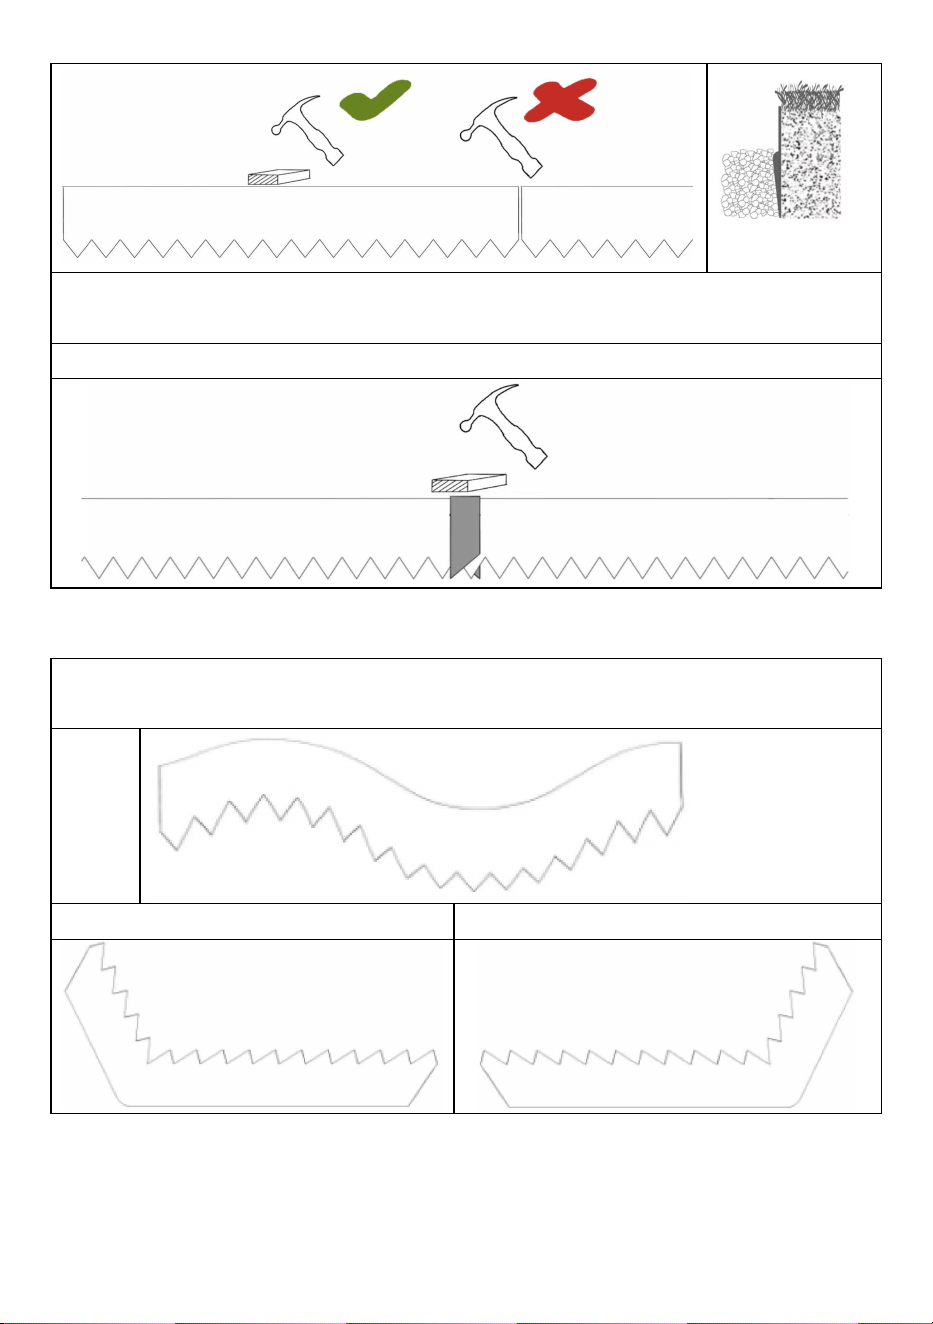
STEP:3 Insert the connected metal edges into the ground and secure it with a
hammer.
NOTE:Place a piece of wood over the metal edge when striking with a hammer to
avoid damaging the metal edge.
STEP:4 Insert a connector to fix the connection.
6
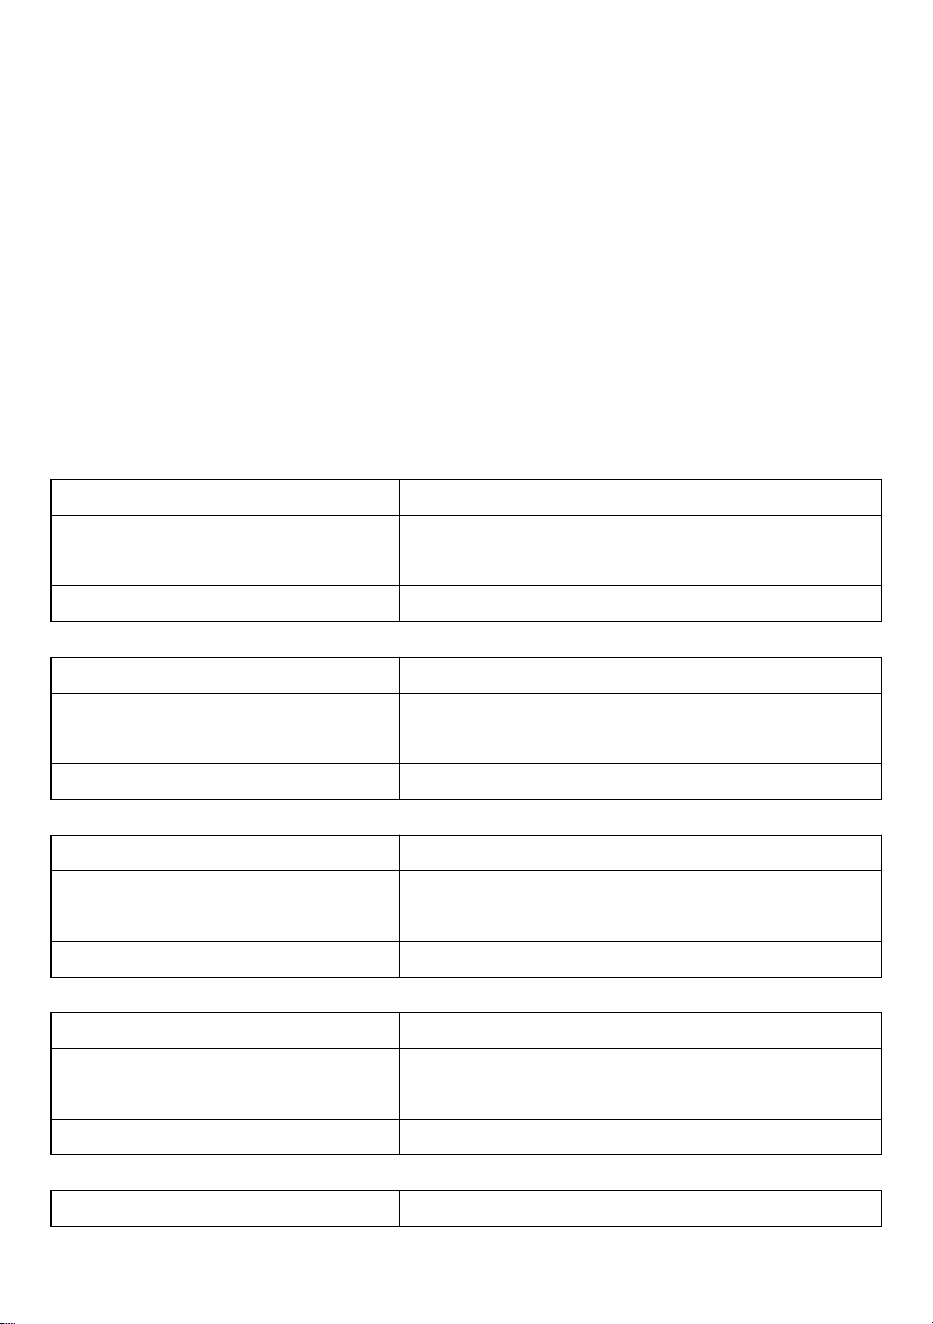
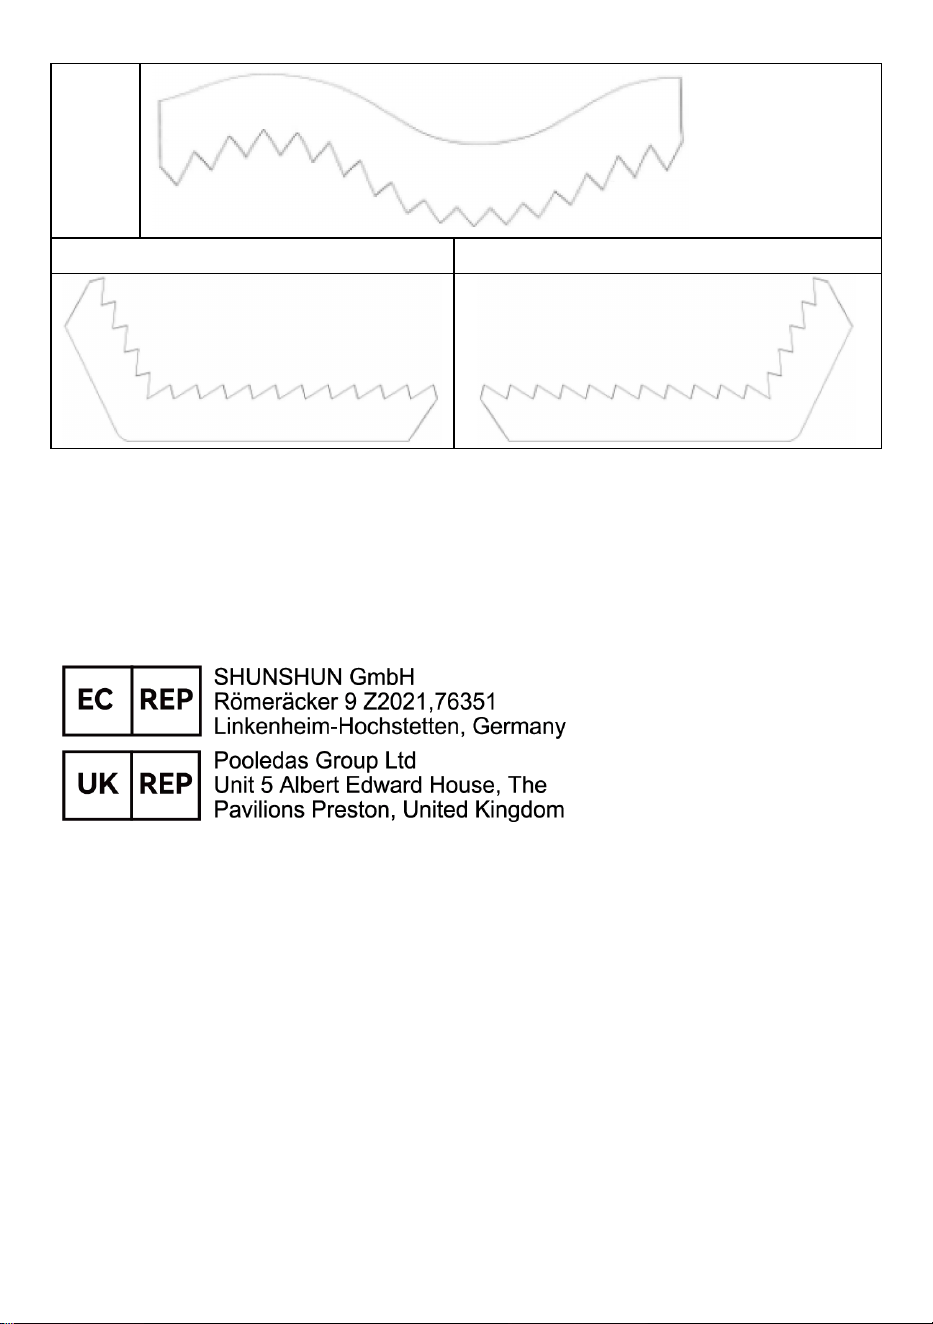
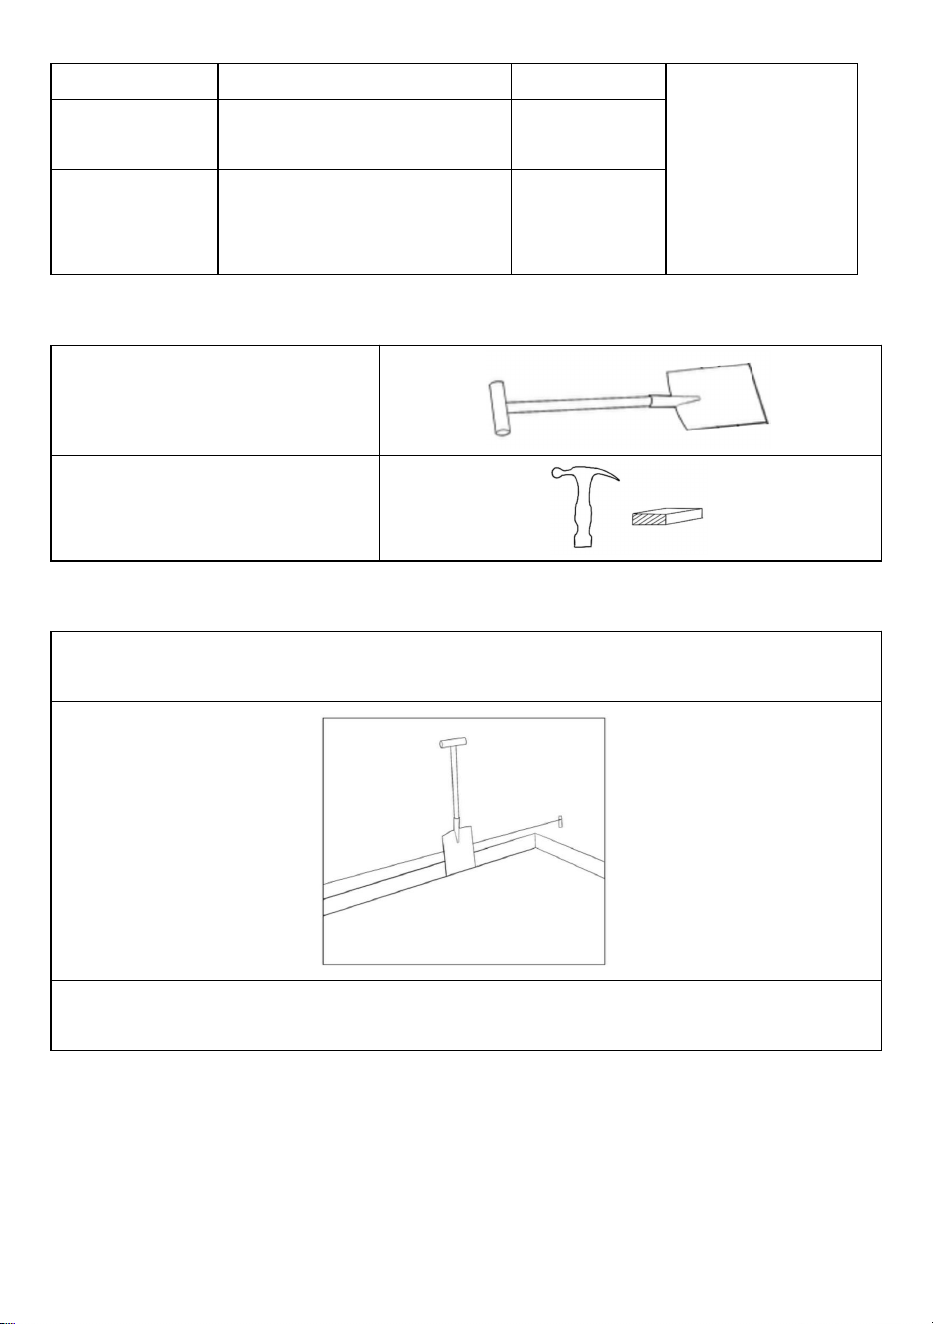
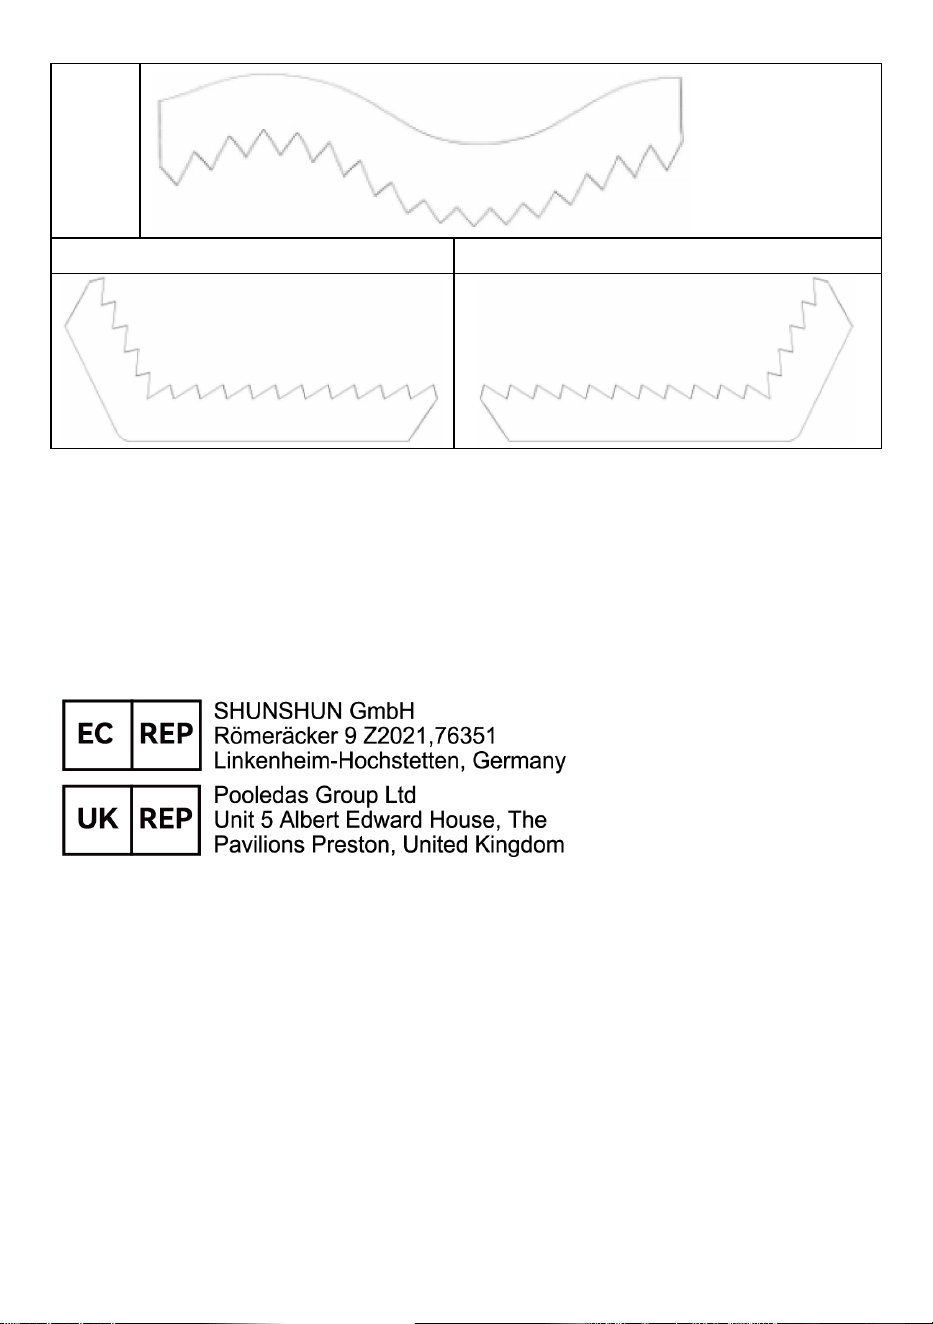
Supplementary statement:The metal barrier can be bent into the shape you
need according to your needs (Including but not limited to the following shapes).
①
②
③
Address: Baoshanqu Shuangchenglu 803long 11hao 1602A-1609shi Shanghai
Imported to AUS: SIHAO PTY LTD, 1 ROKEVA STREETEASTWOOD NSW 2122 Australia
Imported to USA: Sanven Technology Ltd.Suite 250, 9166 Anaheim Place, Rancho
Cucamonga, CA 91730
Made In China


Técnico Soporte y certificado de garantía electrónica www.vevor.com/support
BORDE METÁLICO MANUAL DE USUARIO
We continue to be committed to provide you tools with competitive price.
"Save Half", "Half Price" or any other similar expressions used by us only represents an
estimate of savings you might benefit from buying certain tools with us compared to the major
top brands and does not necessarily mean to cover all categories of tools offered by us. You
are kindly reminded to verify carefully when you are placing an order with us if you are
actually saving half in comparison with the top major brands.

1
Modelo: JC40*6 pulgadas 3 piezas , JC40* 8 pulgadas 3 piezas , JC40* 6
pulgadas 4 piezas , JC40* 8 pulgadas 4 piezas , JC40* 6 pulgadas 6 piezas ,
JC40* 8 pulgadas 6 piezas , JC12*40 pulgadas 4 piezas
Have product questions? Need technical support? Please feel free to
contact us:
Technical Support and E-Warranty Certificate
www.vevor.com/support
NEED HELP? CONTACT US!
METAL EDGING

2
This is the original instruction, please read all manual instructions
carefully before operating. VEVOR reserves a clear interpretation of our
user manual. The appearance of the product shall be subject to the
product you received. Please forgive us that we won't inform you again if
there are any technology or software updates on our product.
Advertencia de seguridad
Lea y comprenda este manual completo antes de ensamblar, instalar, operar
o dar servicio a este producto. El incumplimiento de estas advertencias e
instrucciones puede provocar la muerte, lesiones personales o daños a
bienes valiosos.
Utilice gafas de seguridad, guantes de trabajo resistentes y calzado de
seguridad aprobados por ANSI durante el montaje e instalación de este
producto. Mantenga a los transeúntes fuera del área durante el montaje.
No se reúna cuando esté cansado o bajo la influencia de alcohol, drogas o
medicamentos.
Úselo únicamente según lo previsto. PARA EVITAR LESIONES GRAVES O
LA MUERTE POR VUELCO: NO SE SIENTE, PARE NI SE SUBA SOBRE
ESTE ARTÍCULO.
Este producto no es un juguete. No permita que los niños jueguen con
este artículo o cerca de él.
Antes de su uso, inspeccionar el estado general del producto. Verifique:
piezas rotas, agrietadas o dobladas, piezas sueltas o faltantes y cualquier
condición que pueda afectar el funcionamiento adecuado del producto.
Asegúrese de que solo se utilicen piezas originales para el reemplazo y la
reparación.
3
GUARDA ESTAS INSTRUCCIONES
ESPECIFICACIONES
Modelo
JC40 * 6 pulgadas 3 piezas
Tamaño del borde metálico
único
40*6 pulgadas
Color
Negro
Modelo
JC40* 8 en 3 piezas
Tamaño del borde metálico
único
40*8 pulgadas
Color
Negro
Modelo
JC40*6 pulgadas 4 piezas
Tamaño del borde metálico
único
40*6 pulgadas
Color
Negro
Modelo
JC40* 8 en 4 piezas
Tamaño del borde metálico
único
40*6 pulgadas
Color
Negro
Modelo
JC40*6 pulgadas 6 piezas

4
Tamaño del borde metálico
único
40*6 pulgadas
Color
Negro
Modelo
JC40* 8 en 6 piezas
Tamaño del borde metálico
único
40*8 pulgadas
Color
Negro
Modelo
JC12 * 40 pulgadas 4 piezas
Tamaño del borde metálico
único
40*12 pulgadas
Color
Negro
COMPONENTES
Modelo
Borde metálico
Conector
Guantes
JC40*6 en 3
piezas
x3 _
x5 _
X1 _
JC40 * 8
pulgadas 3
piezas
x3
x5
JC40* 6 en 4
piezas
x4
x6
JC40*8
pulgadas 4
piezas
x4 _
x6 _
5
JC40*6
pulgadas 6
piezas
x6 _
x8 _
JC40*8
pulgadas 6
piezas
x6 _
x8 _
JC12*40
pulgadas 4
piezas
x4 _
x6 _
Herramientas necesarias
1. pala
2.Martillo y un bloque de madera.
Instrucciones de montaje
PASO 1 Prepare una línea para que la siga el borde y elimine cualquier obstrucción. Si el
terreno es pedregoso, afloje con un pico.
PASO 2 Instrucciones para doblar : Se recomienda utilizar un banco de trabajo, el
borde de una mesa, una madera u otro material para doblar el borde de metal al
ángulo requerido.
6
NOTA: No corte con nada ya que puede causar lesiones .
PASO:3 Inserte los bordes metálicos conectados en el suelo y asegúrelos con un
martillo.
NOTA: Coloque un trozo de madera sobre el borde metálico cuando golpee con
un martillo para evitar dañar el borde metálico.
PASO:4 Inserte un conector para fijar la conexión.

7
Declaración complementaria : La barrera metálica se puede doblar en la forma
que necesite según sus necesidades (incluidas, entre otras, las siguientes
formas).
①
②
③
Dirección: Baoshanqu Shuangchenglu 803long 11hao 1602A-1609shi Shanghai
Importado a AUS: SIHAO PTY LTD, 1 ROKEVA STREETEASTWOOD NSW 2122
Australia
Importado a EE. UU.: Sanven Technology Ltd.Suite 250, 9166 Anaheim Place, Rancho
Cucamonga, CA 91730

8
Hecho en china


Tecnico Supporto e certificato di garanzia elettronica www.vevor.com/support
BORDO IN METALLO MANUALE D'USO
We continue to be committed to provide you tools with competitive price.
"Save Half", "Half Price" or any other similar expressions used by us only represents an
estimate of savings you might benefit from buying certain tools with us compared to the major
top brands and does not necessarily mean to cover all categories of tools offered by us. You
are kindly reminded to verify carefully when you are placing an order with us if you are
actually saving half in comparison with the top major brands.

1
Modello: JC40*6in 3 pezzi , JC40* 8 in 3 pezzi , JC40*6in 4 pezzi , JC40* 8 in
4 pezzi , JC40*6in 6 pezzi , JC40* 8 in 6 pezzi , JC12*40in 4 pezzi
Have product questions? Need technical support? Please feel free to
contact us:
Technical Support and E-Warranty Certificate
www.vevor.com/support
NEED HELP? CONTACT US!
This is the original instruction, please read all manual instructions
carefully before operating. VEVOR reserves a clear interpretation of our
user manual. The appearance of the product shall be subject to the
product you received. Please forgive us that we won't inform you again if
there are any technology or software updates on our product.
METAL EDGING

2
Avvertenza di sicurezza
Leggere e comprendere l'intero manuale prima di assemblare, installare,
utilizzare o sottoporre a manutenzione questo prodotto. La mancata
osservanza di queste avvertenze e istruzioni può causare morte, lesioni
personali o danni a beni di valore.
Indossare occhiali di sicurezza approvati ANSI, guanti da lavoro pesanti e
scarpe di sicurezza durante il montaggio e l'installazione di questo prodotto.
Tenere gli astanti lontani dall'area durante il montaggio
Non montare in caso di stanchezza o sotto l'effetto di alcol, droghe o farmaci.
Utilizzare solo come previsto. PER EVITARE LESIONI GRAVI E MORTE
DOVUTE AL RIBALTAMENTO: NON SEDERSI, NON STARE IN PIEDI O
ARRAMPICARSI SU QUESTO OGGETTO.
Questo prodotto non è un giocattolo. Non permettere ai bambini di
giocare con o vicino a questo oggetto.
Prima dell'uso, ispezionare le condizioni generali del prodotto. Verificare la
presenza di: parti rotte, incrinate o piegate, parti allentate o mancanti e
qualsiasi condizione che possa influire sul corretto funzionamento del
prodotto.
Assicurarsi che per la sostituzione e la riparazione vengano utilizzate solo
parti originali.
CONSERVA QUESTE ISTRUZIONI
3
SPECIFICHE
Modello
JC40*6 pollici 3 pezzi
Dimensioni del bordo metallico
singolo
40*6 pollici
Colore
Nero
Modello
JC40* 8 pollici 3 pezzi
Dimensioni del bordo metallico
singolo
40*8 pollici
Colore
Nero
Modello
JC40*6 pollici 4 pz
Dimensioni del bordo metallico
singolo
40*6 pollici
Colore
Nero
Modello
JC40* 8 pollici 4 pz
Dimensioni del bordo metallico
singolo
40*6 pollici
Colore
Nero
Modello
JC40*6 pollici 6 pezzi
Dimensioni del bordo metallico
singolo
40*6 pollici
Colore
Nero
Modello
JC40* 8 pollici 6 pz
Dimensioni del bordo metallico
40*8 pollici
4
singolo
Colore
Nero
Modello
JC12*40 pollici 4 pezzi
Dimensioni del bordo metallico
singolo
40*12 pollici
Colore
Nero
COMPONENTI
Modello
Bordo in metallo
Connettore
Guanti
JC40*6 in 3
pezzi
x3 _
x5 _
X1 _
JC40*8 pollici 3
pezzi
x3
x5
JC40* 6 pollici 4
pezzi
x4
x6
JC40*8 pollici 4
pezzi
x4 _
x6 _
JC40*6 pollici 6
pezzi
x6 _
x8 _
JC40*8 pollici 6
pezzi
x6 _
x8 _
JC12*40 pollici
4 pezzi
x4 _
x6 _
Strumenti richiesti
5
1. Vanga
2.Martello e un blocco di legno
Istruzioni per il montaggio
FASE 1 Preparare una linea da seguire per il bordo e rimuovere eventuali ostruzioni. Se il
terreno è sassoso, allentare con il piccone.
FASE 2 Istruzioni per la piegatura : si consiglia di utilizzare un banco da lavoro, il
bordo di un tavolo, una tavola di legno o altro per piegare il bordo metallico
all'angolazione richiesta.

6
NOTA: non tagliare con oggetti poiché potrebbe causare lesioni .
PASSO:3 Inserisci i bordi metallici collegati nel terreno e fissali con un martello.
NOTA: posizionare un pezzo di legno sul bordo metallico quando si colpisce con
un martello per evitare di danneggiare il bordo metallico.
PASSO:4 Inserisci un connettore per fissare la connessione.
Dichiarazione supplementare : la barriera metallica può essere piegata nella
forma desiderata in base alle proprie esigenze (comprese ma non limitate alle
seguenti forme).

7
①
②
③
Indirizzo: Baoshanqu Shuangchenglu 803long 11hao 1602A-1609shi Shanghai
Importato in AUS: SIHAO PTY LTD, 1 ROKEVA STREETEASTWOOD NSW 2122
Australia
Importato negli Stati Uniti: Sanven Technology Ltd.Suite 250, 9166 Anaheim Place,
Rancho Cucamonga, CA 91730
Made in China


Techniczny Certyfikat wsparcia i e-gwarancji www.vevor.com/support
OBRZEŻE METALOWE INSTRUKCJA OBSŁUGI
We continue to be committed to provide you tools with competitive price.
"Save Half", "Half Price" or any other similar expressions used by us only represents an
estimate of savings you might benefit from buying certain tools with us compared to the major
top brands and does not necessarily mean to cover all categories of tools offered by us. You
are kindly reminded to verify carefully when you are placing an order with us if you are
actually saving half in comparison with the top major brands.
1
Model: JC40*6 cali 3 szt. , JC40* 8 cali 3 szt . , JC40*6 cali 4 szt. , JC40* 8
cali 4 szt. , JC40*6 cali 6 szt . , JC40* 8 cali 6 szt ., JC12*40in 4 szt.
Have product questions? Need technical support? Please feel free to
contact us:
Technical Support and E-Warranty Certificate
www.vevor.com/support
NEED HELP? CONTACT US!
This is the original instruction, please read all manual instructions
carefully before operating. VEVOR reserves a clear interpretation of our
user manual. The appearance of the product shall be subject to the
product you received. Please forgive us that we won't inform you again if
there are any technology or software updates on our product.
METAL EDGING

2
Bezpieczeństwo i ostrzeżenie
Przeczytaj i zrozum całą niniejszą instrukcję przed montażem, instalacją,
obsługą lub serwisowaniem tego produktu. Niezastosowanie się do tych
ostrzeżeń i instrukcji może spowodować śmierć, obrażenia ciała lub
uszkodzenie cennego mienia.
Podczas montażu i instalacji tego produktu należy nosić zatwierdzone przez
ANSI okulary ochronne, wytrzymałe rękawice robocze i obuwie ochronne.
Podczas montażu trzymaj osoby postronne z dala od obszaru
Nie należy montować, gdy jest się zmęczonym lub pod wpływem alkoholu,
narkotyków lub leków.
Używaj wyłącznie zgodnie z przeznaczeniem. ABY UNIKNĄĆ POWAŻNYCH
OBRAŻEŃ LUB ŚMIERCI W PRZYPADKU WYWROTU: NIE SIEDŹ, NIE
STÓJ ANI WSPIERAJ SIĘ NA TYM PRZEDMIOCIE.
Ten produkt nie jest zabawką. Nie pozwalaj dzieciom bawić się tym
przedmiotem lub w jego pobliżu.
Przed użyciem należy sprawdzić ogólny stan produktu. Sprawdź, czy nie ma
złamanych, pękniętych lub wygiętych części, luźnych lub brakujących części
oraz wszelkich stanów, które mogą mieć wpływ na prawidłowe
funkcjonowanie produktu.
Upewnij się, że do wymiany i naprawy używane są wyłącznie oryginalne
części.
ZACHOWAJ TE INSTRUKCJE

3
SPECYFIKACJE
Model
JC40*6 cali 3 szt
Rozmiar pojedynczej
metalowej krawędzi
40*6 cali
Kolor
Czarny
Model
JC40* 8 w 3szt
Rozmiar pojedynczej
metalowej krawędzi
40*8 cali
Kolor
Czarny
Model
JC40*6 cali 4 szt
Rozmiar pojedynczej
metalowej krawędzi
40*6 cali
Kolor
Czarny
Model
JC40* 8 w 4 szt
Rozmiar pojedynczej
metalowej krawędzi
40*6 cali
Kolor
Czarny
Model
JC40*6 cali 6 szt
Rozmiar pojedynczej
metalowej krawędzi
40*6 cali
Kolor
Czarny
Model
JC40* 8 w 6 szt
Rozmiar pojedynczej
40*8 cali
4
metalowej krawędzi
Kolor
Czarny
Model
JC12*40 cali 4szt
Rozmiar pojedynczej
metalowej krawędzi
40*12 cali
Kolor
Czarny
SKŁADNIKI
Model
Metalowa krawędź
Złącze
Rękawice
JC40*6 w 3szt
x 3
x 5
X 1
JC40*8 cali 3szt
x3
x5
JC40* 6 w 4szt
x4
x6
JC40*8 cali 4
szt
x 4
x 6
JC40*6 cali 6
szt
x 6
x 8
JC40*8 cali 6
szt
x 6
x 8
JC12*40 cali 4
szt
x 4
x 6
Wymagane narzędzia
1. Łopata
5
2.Młotek i klocek drewna
Instrukcje montażu
KROK 1 Przygotuj linię, po której będzie przebiegać obrzeże i usuń wszelkie przeszkody.
Jeśli ziemia jest kamienista, poluzuj ją kilofem.
KROK 2 Instrukcje dotyczące gięcia : Do zginania metalowej krawędzi pod
wymaganym kątem zaleca się stół warsztatowy, krawędź stołu, drewno lub inną
deskę.
6
UWAGA: Nie przecinaj niczym, ponieważ może to spowodować obrażenia .
KROK:3 Wbij połączone metalowe krawędzie w ziemię i zabezpiecz młotkiem.
UWAGA: Podczas uderzania młotkiem umieść kawałek drewna na metalowej
krawędzi, aby uniknąć uszkodzenia metalowej krawędzi.
KROK:4 Włóż złącze, aby naprawić połączenie.
Oświadczenie uzupełniające : Metalową barierę można wygiąć do wymaganego
kształtu, zgodnie z własnymi potrzebami (w tym między innymi następujące
kształty).
7
①
②
③
Adres: Baoshanqu Shuangchenglu 803long 11hao 1602A-1609shi Szanghaj
Import do AUS: SIHAO PTY LTD, 1 ROKEVA STREETEASTWOOD NSW 2122 Australia
Import do USA: Sanven Technology Ltd.Suite 250, 9166 Anaheim Place, Rancho
Cucamonga, CA 91730
Wyprodukowano w Chinach


Technisch Support- und E-Garantie-Zertifikat www.vevor.com/support
METALLKANTE BENUTZERHANDBUCH
We continue to be committed to provide you tools with competitive price.
"Save Half", "Half Price" or any other similar expressions used by us only represents an
estimate of savings you might benefit from buying certain tools with us compared to the major
top brands and does not necessarily mean to cover all categories of tools offered by us. You
are kindly reminded to verify carefully when you are placing an order with us if you are
actually saving half in comparison with the top major brands.

1
Modell: JC40*6 Zoll 3 Stück , JC40* 8 Zoll 3 Stück , JC40* 6 Zoll 4 Stück ,
JC40* 8 Zoll 4 Stück , JC40*6 Zoll 6 Stück , JC40* 8 Zoll 6 Stück , JC12*40
Zoll 4 Stück
Have product questions? Need technical support? Please feel free to
contact us:
Technical Support and E-Warranty Certificate
www.vevor.com/support
NEED HELP? CONTACT US!
METAL EDGING

2
This is the original instruction, please read all manual instructions
carefully before operating. VEVOR reserves a clear interpretation of our
user manual. The appearance of the product shall be subject to the
product you received. Please forgive us that we won't inform you again if
there are any technology or software updates on our product.
Sicherheitswarnung
Lesen und verstehen Sie dieses gesamte Handbuch, bevor Sie dieses
Produkt zusammenbauen, installieren, bedienen oder warten. Die
Nichtbeachtung dieser Warnungen und Anweisungen kann zum Tod, zu
Verletzungen oder zur Beschädigung wertvoller Gegenstände führen.
Tragen Sie bei der Montage und Installation dieses Produkts eine
ANSI-zugelassene Schutzbrille, strapazierfähige Arbeitshandschuhe und
Sicherheitsschuhe. Halten Sie Unbeteiligte während der Montage vom
Bereich fern
Nicht aufbauen, wenn Sie müde sind oder unter dem Einfluss von Alkohol,
Drogen oder Medikamenten stehen.
Nur bestimmungsgemäß verwenden. UM SCHWERE VERLETZUNGEN
UND TOD DURCH UMKIPPEN ZU VERMEIDEN: SITZEN, STEHEN ODER
KLETTERN SIE NICHT AUF DIESEM ARTIKEL.
Dieses Produkt ist kein Spielzeug. Erlauben Sie Kindern nicht, mit oder
in der Nähe dieses Artikels zu spielen.
Überprüfen Sie vor der Verwendung den allgemeinen Zustand des Produkts.
Prüfen Sie auf: gebrochene, rissige oder verbogene Teile, lose oder fehlende
Teile und jeden Zustand, der die ordnungsgemäße Funktion des Produkts
beeinträchtigen könnte.
3
Stellen Sie sicher, dass für den Austausch und die Reparatur nur Originalteile
verwendet werden.
ANLEITUNG AUFBEWAHREN
SPEZIFIKATIONEN
Modell
JC40*6in 3St
Größe der einzelnen
Metallkante
40 * 6 Zoll
Farbe
Schwarz
Modell
JC40* 8 Zoll 3 Stück
Größe der einzelnen
Metallkante
40 * 8 Zoll
Farbe
Schwarz
Modell
JC40*6in 4 Stk
Größe der einzelnen
Metallkante
40 * 6 Zoll
Farbe
Schwarz
Modell
JC40* 8 in 4 Stk
Größe der einzelnen
Metallkante
40 * 6 Zoll
Farbe
Schwarz
4
Modell
JC40*6in 6 Stk
Größe der einzelnen
Metallkante
40 * 6 Zoll
Farbe
Schwarz
Modell
JC40* 8 in 6 Stk
Größe der einzelnen
Metallkante
40 * 8 Zoll
Farbe
Schwarz
Modell
JC12*40in 4St
Größe der einzelnen
Metallkante
40 * 12 Zoll
Farbe
Schwarz
KOMPONENTEN
Modell
Metallkante
Verbinder
Handschuhe
JC40*6 in 3
Stück
x 3
x 5
X 1
JC40*8in 3St
x3
x5
JC40* 6 Zoll 4
Stück
x4
x6
JC40*8in 4
Stück
x 4
x 6
JC40*6in 6 Stk
x 6
x 8
JC40*8in 6 Stk
x 6
x 8
5
JC12*40in 4
Stück
x 4
x 6
Notwendige Werkzeuge
1. Spaten
2.Hammer und ein Holzblock
Montageanleitung
SCHRITT 1 Bereiten Sie eine Linie vor, der die Kante folgen soll, und entfernen Sie alle
Hindernisse. Wenn der Boden steinig ist, lockern Sie ihn mit einer Spitzhacke.
SCHRITT 2 Biegeanweisungen : Zum Biegen der Metallkante auf den
erforderlichen Winkel wird eine Werkbank, eine Tischkante, ein Holz oder eine
andere Unterlage empfohlen.
6
HINWEIS: Schneiden Sie nicht mit Gegenständen, da dies zu Verletzungen führen
kann .
SCHRITT:3 Stecken Sie die verbundenen Metallkanten in den Boden und
befestigen Sie sie mit einem Hammer.
HINWEIS: Legen Sie beim Schlagen mit einem Hammer ein Stück Holz über die
Metallkante, um eine Beschädigung der Metallkante zu vermeiden.
SCHRITT:4 Stecken Sie einen Stecker ein, um die Verbindung zu fixieren.
Ergänzende Erklärung : Die Metallbarriere kann je nach Bedarf in die
gewünschte Form gebogen werden (einschließlich, aber nicht beschränkt auf die
folgenden Formen).
7
①
②
③
Adresse: Baoshanqu Shuangchenglu 803long 11hao 1602A-1609shi Shanghai
Importiert nach AUS: SIHAO PTY LTD, 1 ROKEVA STREETEASTWOOD NSW 2122
Australien
In die USA importiert: Sanven Technology Ltd. Suite 250, 9166 Anaheim Place, Rancho
Cucamonga, CA 91730
In China hergestellt


Technique Assistance et certificat de garantie électronique
www.vevor.com/support
BORDURE EN MÉTAL MANUEL DE L'UTILISATEUR
We continue to be committed to provide you tools with competitive price.
"Save Half", "Half Price" or any other similar expressions used by us only represents an
estimate of savings you might benefit from buying certain tools with us compared to the major
top brands and does not necessarily mean to cover all categories of tools offered by us. You
are kindly reminded to verify carefully when you are placing an order with us if you are
actually saving half in comparison with the top major brands.

1
Modèle : JC40 * 6 pouces 3 pièces , JC40 * 8 pouces 3 pièces , JC40 * 6
pouces 4 pièces , JC40 * 8 pouces 4 pièces , JC40 * 6 pouces 6 pièces , JC40
* 8 pouces 6 pièces , JC12 * 40 pouces 4 pièces .
Have product questions? Need technical support? Please feel free to
contact us:
Technical Support and E-Warranty Certificate
www.vevor.com/support
NEED HELP? CONTACT US!
METAL EDGING

2
This is the original instruction, please read all manual instructions
carefully before operating. VEVOR reserves a clear interpretation of our
user manual. The appearance of the product shall be subject to the
product you received. Please forgive us that we won't inform you again if
there are any technology or software updates on our product.
Alerte de sécurité
Lisez et comprenez l'intégralité de ce manuel avant d'assembler, d'installer,
d'utiliser ou d'entretenir ce produit. Le non-respect de ces avertissements et
instructions peut entraîner la mort, des blessures ou des dommages à des
biens de valeur.
Portez des lunettes de sécurité approuvées par l'ANSI, des gants de travail
robustes et des chaussures de sécurité pendant l'assemblage et l'installation
de ce produit. Gardez les spectateurs hors de la zone pendant l'assemblage
Ne vous rassemblez pas lorsque vous êtes fatigué ou sous l’influence de
l’alcool, de drogues ou de médicaments.
Utiliser uniquement comme prévu. POUR ÉVITER DES BLESSURES
GRAVES ET LA MORT PAR BASCULEMENT : NE PAS VOUS ASSOYER,
NE VOUS TENIR OU GRIMER SUR CET ARTICLE.
Ce produit n'est pas un jouet. Ne laissez pas les enfants jouer avec ou à
proximité de cet article.
Avant utilisation, inspectez l’état général du produit. Vérifiez : les pièces
cassées, fissurées ou pliées, les pièces desserrées ou manquantes et toute
condition pouvant affecter le bon fonctionnement du produit.
Assurez-vous que seules des pièces d'origine sont utilisées pour le
remplacement et la réparation.

3
CONSERVEZ CES INSTRUCTIONS
CARACTÉRISTIQUES
Modèle
JC40 * 6 pouces 3 pièces
Taille du bord métallique
unique
40*6 pouces
Couleur
Noir
Modèle
JC40* 8 en 3 pièces
Taille du bord métallique
unique
40*8 pouces
Couleur
Noir
Modèle
JC40 * 6 pouces 4 pièces
Taille du bord métallique
unique
40*6 pouces
Couleur
Noir
Modèle
JC40* 8 en 4 pièces
Taille du bord métallique
unique
40*6 pouces
Couleur
Noir
Modèle
JC40 * 6 pouces 6 pièces

4
Taille du bord métallique
unique
40*6 pouces
Couleur
Noir
Modèle
JC40* 8 en 6 pièces
Taille du bord métallique
unique
40*8 pouces
Couleur
Noir
Modèle
JC12 * 40 pouces 4 pièces
Taille du bord métallique
unique
40*12 pouces
Couleur
Noir
COMPOSANTS
Modèle
Bordure en métal
Connecteur
Gants
JC40*6 en 3
pièces
x3 _
x5 _
X1 _
JC40 * 8
pouces 3
pièces
x3
x5
JC40* 6 en 4
pièces
x4
x6
JC40*8 pouces
4 pièces
x4 _
x6 _
JC40*6 pouces
x6 _
x8 _
5
6 pièces
JC40*8 pouces
6 pièces
x6 _
x8 _
JC12 * 40
pouces 4
pièces
x4 _
x6 _
Outils requis
1. Bêche
2. Un marteau et un bloc de bois
Instructions d'assemblage
ÉTAPE 1 Préparez une ligne que la bordure devra suivre et éliminez toute obstruction. Si le
sol est pierreux, desserrez avec une pioche.
ÉTAPE 2 Instructions de pliage : Un établi de travail, le bord d'une table, un bois ou
autre forme est conseillé pour plier le bord métallique à l'angle requis.

6
REMARQUE : Ne coupez rien car cela pourrait provoquer des blessures .
ÉTAPE : 3 Insérez les bords métalliques connectés dans le sol et fixez-les avec un
marteau.
REMARQUE : Placez un morceau de bois sur le bord métallique lorsque vous
frappez avec un marteau pour éviter d'endommager le bord métallique.
ÉTAPE : 4 Insérez un connecteur pour fixer la connexion.
7
Déclaration complémentaire : La barrière métallique peut être pliée dans la
forme dont vous avez besoin en fonction de vos besoins (y compris, mais sans s'y
limiter, les formes suivantes).
①
②
③
Adresse : Baoshanqu Shuangchenglu 803long 11hao 1602A-1609shi Shanghai
Importé en Australie : SIHAO PTY LTD, 1 ROKEVA STREETASTWOOD NSW 2122
Australie
Importé aux États-Unis : Sanven Technology Ltd.Suite 250, 9166 Anaheim Place, Rancho
Cucamonga, CA 91730

8
Fabriqué en Chine


Technisch Ondersteuning en e-garantiecertificaat www.vevor.com/support
METALEN RANDEN HANDLEIDING
We continue to be committed to provide you tools with competitive price.
"Save Half", "Half Price" or any other similar expressions used by us only represents an
estimate of savings you might benefit from buying certain tools with us compared to the major
top brands and does not necessarily mean to cover all categories of tools offered by us. You
are kindly reminded to verify carefully when you are placing an order with us if you are
actually saving half in comparison with the top major brands.

1
Model: JC40*6in 3 stuks , JC40* 8 in 3 stuks , JC40*6in 4 stuks , JC40* 8 in 4
stuks , JC40*6in 6 stuks , JC40* 8 in 6 stuks , JC12*40in 4 stuks
Have product questions? Need technical support? Please feel free to
contact us:
Technical Support and E-Warranty Certificate
www.vevor.com/support
NEED HELP? CONTACT US!
This is the original instruction, please read all manual instructions
carefully before operating. VEVOR reserves a clear interpretation of our
user manual. The appearance of the product shall be subject to the
product you received. Please forgive us that we won't inform you again if
there are any technology or software updates on our product.
METAL EDGING

2
Veiligheidswaarschuwing
Lees en begrijp deze gehele handleiding voordat u dit product monteert,
installeert, bedient of onderhoudt. Het niet opvolgen van deze
waarschuwingen en instructies kan de dood, persoonlijk letsel of schade aan
waardevolle eigendommen veroorzaken.
Draag een ANSI-goedgekeurde veiligheidsbril, stevige werkhandschoenen en
veiligheidsschoenen tijdens de montage en installatie van dit product. Houd
omstanders tijdens de montage uit de buurt
Niet monteren als u moe bent of onder invloed bent van alcohol, drugs of
medicijnen.
Alleen gebruiken zoals bedoeld. OM ERNSTIG LETSEL EN DE DOOD
DOOR KANTELEN TE VOORKOMEN: ZIT, STA OF KLIM NIET OP DIT
ITEM.
Dit product is geen speelgoed. Laat kinderen niet met of in de buurt van
dit artikel spelen.
Inspecteer vóór gebruik de algemene staat van het product. Controleer op:
gebroken, gebarsten of verbogen onderdelen, losse of ontbrekende
onderdelen en alle omstandigheden die de goede werking van het product
kunnen beïnvloeden.
Zorg ervoor dat alleen originele onderdelen worden gebruikt voor vervanging
en reparatie.
BEWAAR DEZE INSTRUCTIES

3
SPECIFICATIES
Model
JC40*6in 3 stuks
Grootte van enkele metalen
rand
40 * 6 inch
Kleur
Zwart
Model
JC40* 8 in 3 stuks
Grootte van enkele metalen
rand
40 * 8 inch
Kleur
Zwart
Model
JC40*6in 4 stuks
Grootte van enkele metalen
rand
40 * 6 inch
Kleur
Zwart
Model
JC40* 8 in 4 stuks
Grootte van enkele metalen
rand
40 * 6 inch
Kleur
Zwart
Model
JC40*6in 6 stuks
Grootte van enkele metalen
rand
40 * 6 inch
Kleur
Zwart
Model
JC40* 8 in 6 stuks
Grootte van enkele metalen
40 * 8 inch

4
rand
Kleur
Zwart
Model
JC12*40in 4 stuks
Grootte van enkele metalen
rand
40 * 12 inch
Kleur
Zwart
COMPONENTEN
Model
Metalen rand
Connector
Handschoenen
JC40*6 in 3
stuks
x 3
x 5
X 1
JC40*8in 3
stuks
x3
x5
JC40* 6 in 4
stuks
x4
x6
JC40*8in 4
stuks
x 4
x 6
JC40*6in 6
stuks
x 6
x 8
JC40*8in 6
stuks
x 6
x 8
JC12*40in 4
stuks
x 4
x 6
Benodigd gereedschap

5
1. Schoppen
2. Hamer en een blok hout
Instructies samenstellen
STAP 1 Bereid een lijn voor die de rand kan volgen en verwijder eventuele obstakels. Als de
grond steenachtig is, maak deze dan los met een houweel.
STAP 2 Buiginstructies : Een werkbank, de rand van een tafel, een stuk hout of iets
anders wordt geadviseerd bij het buigen van de metalen rand in de gewenste
hoek.
6
OPMERKING: Snijd nergens mee, omdat dit letsel kan veroorzaken .
STAP:3 Steek de aangesloten metalen randen in de grond en zet deze vast met
een hamer.
OPMERKING: Plaats een stuk hout over de metalen rand wanneer u met een
hamer slaat om beschadiging van de metalen rand te voorkomen.
STAP:4 Plaats een connector om de verbinding te bevestigen.
Aanvullende verklaring : De metalen barrière kan in de gewenste vorm worden
gebogen, afhankelijk van uw behoeften (inclusief maar niet beperkt tot de
volgende vormen).
7
①
②
③
Adres: Baoshanqu Shuangchenglu 803long 11hao 1602A-1609shi Shanghai
Geïmporteerd naar AUS: SIHAO PTY LTD, 1 ROKEVA STREETEASTWOOD NSW 2122
Australië
Geïmporteerd naar de VS: Sanven Technology Ltd.Suite 250, 9166 Anaheim Place,
Rancho Cucamonga, CA 91730
Gemaakt in China


Teknisk Support och e-garanticertifikat www.vevor.com/support
METALLKANT ANVÄNDARMANUAL
We continue to be committed to provide you tools with competitive price.
"Save Half", "Half Price" or any other similar expressions used by us only represents an
estimate of savings you might benefit from buying certain tools with us compared to the major
top brands and does not necessarily mean to cover all categories of tools offered by us. You
are kindly reminded to verify carefully when you are placing an order with us if you are
actually saving half in comparison with the top major brands.
1
Modell: JC40 *6in 3st , JC40* 8 i 3st , JC40 * 6in 4st , JC40* 8 i 4st , JC40*6in
6st , JC40* 8 i 6st , JC12* 40in 4st
Have product questions? Need technical support? Please feel free to
contact us:
Technical Support and E-Warranty Certificate
www.vevor.com/support
NEED HELP? CONTACT US!
This is the original instruction, please read all manual instructions
carefully before operating. VEVOR reserves a clear interpretation of our
user manual. The appearance of the product shall be subject to the
product you received. Please forgive us that we won't inform you again if
there are any technology or software updates on our product.
METAL EDGING

2
Säkerhet och varning
Läs och förstå hela denna manual innan du monterar, installerar, använder
eller servar denna produkt. Underlåtenhet att följa dessa varningar och
instruktioner kan orsaka dödsfall, personskada eller skada på värdefull
egendom.
Bär ANSI-godkända skyddsglasögon, kraftiga arbetshandskar och
skyddsskor under montering och installation av denna produkt. Håll åskådare
borta från området under monteringen
Sätt dig inte ihop när du är trött eller påverkad av alkohol, droger eller
mediciner.
Använd endast som avsett. FÖR ATT FÖRHINDRA ALLVARLIGA SKADA
OCH DÖDSFALL OM ATT VÄLTA: SIT, STÅ ELLER KLÄTTRA INTE PÅ
DETTA FÖREMÅL.
Denna produkt är inte en leksak. Låt inte barn leka med eller nära detta
föremål.
Inspektera produktens allmänna skick före användning. Kontrollera efter:
trasiga, spruckna eller böjda delar, lösa eller saknade delar och alla tillstånd
som kan påverka produktens korrekta funktion.
Se till att endast äkta delar används för utbyte och reparation.
SPARA DESSA INSTRUKTIONER
3
SPECIFIKATIONER
Modell
JC40*6in 3st
Storlek på Enkel metallkant
40*6 tum
Färg
Svart
Modell
JC40* 8 i 3 st
Storlek på Enkel metallkant
40*8 tum
Färg
Svart
Modell
JC40*6in 4 st
Storlek på Enkel metallkant
40*6 tum
Färg
Svart
Modell
JC40* 8 i 4 st
Storlek på Enkel metallkant
40*6 tum
Färg
Svart
Modell
JC40*6in 6 st
Storlek på Enkel metallkant
40*6 tum
Färg
Svart
Modell
JC40* 8 i 6 st
Storlek på Enkel metallkant
40*8 tum
Färg
Svart
Modell
JC12*40in 4st
Storlek på Enkel metallkant
40*12 tum
Färg
Svart
4
KOMPONENTER
Modell
Metallkant
Anslutning
Handskar
JC40*6 i 3 st
x 3
x 5
X 1
JC40*8in 3st
x3
x5
JC40* 6 i 4 st
x4
x6
JC40*8 tum 4 st
x 4
x 6
JC40*6tum 6 st
x 6
x 8
JC40*8 tum 6 st
x 6
x 8
JC12*40tum 4
st
x 4
x 6
Nödvändiga verktyg
1. Spader
2.Hammare och ett träblock
Monteringsanvisningar
STEG 1 Förbered en linje som kanterna ska följa och ta bort eventuella hinder. Om marken
är stenig, lossa med hacka.
5
STEG 2 Böjningsinstruktioner : En arbetsbänk, kanten på ett bord, en timmer eller
annan form rekommenderas när du böjer metallkanten till önskad vinkel.
OBS: Skär inte med något eftersom det kan orsaka skada .
STEG:3 Sätt in de anslutna metallkanterna i marken och fäst den med en
hammare.
6
OBS: Placera en träbit över metallkanten när du slår med en hammare för att
undvika att skada metallkanten.
STEG:4 Sätt i en kontakt för att fixa anslutningen.
Kompletterande uttalande : Metallbarriären kan böjas till den form du behöver
enligt dina behov (inklusive men inte begränsat till följande former).
①
②
③
Adress: Baoshanqu Shuangchenglu 803long 11hao 1602A-1609shi Shanghai

7
Importerad till AUS: SIHAO PTY LTD, 1 ROKEVA STREETEASTWOOD NSW 2122
Australien
Importerad till USA: Sanven Technology Ltd.Suite 250, 9166 Anaheim Place, Rancho
Cucamonga, CA 91730
Tillverkad i Kina