
www.klarstein.com
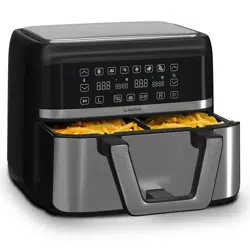
VITAFRY DUO
Heißluftfritteuse
Hot Air Fryer
Freidora de aire caliente
Friteuse à air chaud
Friggitrice ad aria calda
10045473


3
DE
Sehr geehrter Kunde,
wir gratulieren Ihnen zum Erwerb Ihres Gerätes. Lesen Sie
die folgenden Hinweise sorgfältig durch und befolgen Sie
diese, um möglichen Schäden vorzubeugen. Für Schäden,
die durch Missachtung der Hinweise und unsachgemäßen
Gebrauch entstehen, übernehmen wir keine Haftung.
Scannen Sie den folgenden QR-Code, um Zugriff auf die
aktuellste Bedienungsanleitung und weitere Informationen
rund um das Produkt zu erhalten.
INHALTSVERZEICHNIS
Allgemeine Sicherheitshinweise 4
Hinweise zum sicheren Gebrauch 5
Geräteübersicht 6
Vor dem ersten Gebrauch 6
Allgemeine Bedienung 7
Bedienfeld und Tastenfunktionen 8
Einstellungen und Gartabelle 11
Reinigung und Pege 13
Fehlerbehebung 14
Spezielle Entsorgungshinweise für Verbraucher in Deutschland 16
Hinweise zur Entsorgung 18
Hersteller & Importeur (UK) 18
TECHNISCHE DATEN
Artikelnummer 10045473
Stromversorgung 220-240 V ~ 50/60 Hz
Leistung 2 x 1425 W = 2850 W (max.)
Volumen der Körbe 2 x 3.8 L
Einstellbare Temperatur und Zeit
Fritteuse: 80-200 °C / 0-60 min
Trocknung: 40-80 °C / 1-24 h
English 19
Español 33
Français 47
Italiano 61

4
DE
ALLGEMEINE SICHERHEITSHINWEISE
• Lesen Sie sich alle Anweisungen genau durch.
• Berühren Sie keine heißen Oberächen.
• Zum Schutz vor Stromschlag tauchen Sie Kabel, Stecker oder die Basis niemals
in Wasser oder andere Flüssigkeiten.
VORSICHT
Verbrennungsgefahr! Dieses Elektrogerät enthält eine
Heizfunktion. Oberächen, auch andere als die Funktionsächen,
können hohe Temperaturen entwickeln. Da Temperaturen von
verschiedenen Personen unterschiedlich wahrgenommen werden,
ist dieses Gerät mit VORSICHT zu verwenden. Das Gerät darf nur
an den dafür vorgesehenen Griffen und Greiächen angefasst
werden, und es ist ein Hitzeschutz wie Handschuhe oder ähnliches
zu verwenden. Andere als die vorgesehenen Grifächen müssen
ausreichend Zeit zum Abkühlen erhalten, bevor sie berührt
werden.
• Ziehen Sie den Stecker aus der Steckdose, wenn Sie das Gerät nicht benutzen
und bevor Sie es reinigen. Lassen Sie das Gerät abkühlen, bevor Sie es an
• Teile abnehmen.
• Wenn das Netzkabel beschädigt ist, muss es durch den Hersteller, seinen
Kundendienst oder ähnlich qualizierte Personen ersetzt werden, um eine
Gefährdung zu vermeiden.
• Die Verwendung von Zubehörteilen, die nicht vom Hersteller des Geräts
empfohlen werden, kann Verletzungen verursachen.
• Verwenden Sie das Gerät nicht im Freien.
• Lassen Sie das Kabel nicht über Tischkanten oder Arbeitsächen hängen und
berühren Sie keine heißen Oberächen.
• Stellen Sie das Gerät nicht auf oder in die Nähe von heißen Gas- oder
Elektrobrennern oder in einen beheizten Ofen.
• Seien Sie äußerst vorsichtig, wenn Sie ein Gerät mit heißem Öl oder anderen
heißen Flüssigkeiten bewegen.
• Stecken Sie immer zuerst den Stecker in das Gerät und dann das Kabel in die
Steckdose. Wenn Sie das Gerät nicht mehr benutzen, schalten Sie es zuerst
aus, bevor Sie den Stecker aus der Steckdose ziehen.
• Verwenden Sie das Gerät nicht für andere als die vorgesehenen Zwecke.
• Dieses Gerät kann von Kindern ab 8 Jahren und darüber sowie von Personen
mit verringerten physischen, sensorischen oder geistigen Fähigkeiten oder
Mangel an Erfahrung und Wissen benutzt werden, wenn sie beaufsichtigt oder
bezüglich des sicheren Gebrauchs des Geräts unterwiesen wurden und die
daraus resultierenden Gefahren verstehen. Kinder dürfen nicht mit dem Gerät
spielen. Reinigung und Wartung durch den Benutzer dürfen nicht von Kindern
vorgenommen werden, es sei denn, sie sind älter als 8 Jahre und werden
beaufsichtigt.

5
DE
HINWEISE ZUM SICHEREN GEBRAUCH
• Legen Sie die zu frittierenden Zutaten immer in den Korb, damit sie nicht mit
den Heizelementen in Berührung kommen.
• Decken Sie Luftein- und Luftauslassöffnungen nicht ab, während das Gerät in
Betrieb ist.
• Füllen Sie kein Öl in die Pfanne, da dies eine Brandgefahr darstellen kann.
• während es in Betrieb ist.
VORSICHT
Verbrennungsgefahr! Die Temperatur der zugänglichen
Oberächen ist hoch, wenn das Gerät in Betrieb ist. Berühren Sie
niemals das Innere des Geräts.
• Stellen Sie das Gerät nicht an eine Wand oder an andere Geräte. Lassen Sie
auf der Rückseite und an den Seiten mindestens 10 cm und oberhalb des
Geräts 10 cm Freiraum.
• Stellen Sie keine Gegenstände auf das Gerät.
• Lassen Sie das Gerät nicht unbeaufsichtigt laufen.
VORSICHT
Verbrennungsgefahr! Beim Heißluftfrittieren wird heißer Dampf
durch die Luftaustrittsöffnungen freigesetzt. Halten Sie Ihre Hände
und Ihr Gesicht in einem sicheren Abstand zum Dampf und zu den
Luftaustrittsöffnungen. Achten Sie auch auf heißen Dampf und
Luft, wenn Sie die Pfanne aus dem Gerät entfernen.
• Ziehen Sie sofort den Netzstecker, wenn Sie dunklen Rauch aus dem Gerät
kommen sehen. Warten Sie, bis die Rauchentwicklung aufhört, bevor Sie den
Stecker aus dem Gerät entfernen.
• Achten Sie darauf, dass das Gerät auf einer horizontalen, ebenen und stabilen
Fläche steht.
• Dieses Gerät ist nur für den Gebrauch im Haushalt bestimmt. Es ist
nicht geeignet für den Gebrauch in Umgebungen wie Personalküchen,
Bauernhöfen, Motels und anderen Nichtwohnumgebungen. Es ist auch nicht
für die Verwendung durch Kunden in Hotels, Motels, Pensionen und anderen
Wohnumgebungen vorgesehen.
• Ziehen Sie immer den Netzstecker, wenn Sie das Gerät nicht benutzen.
• Das Gerät muss nach dem Gebrauch 30 Minuten abkühlen, um es sicher
handhaben oder reinigen zu können.
• Bewahren Sie das Gerät und sein Kabel außerhalb der Reichweite von Kindern
unter 8 Jahren auf.
• Das Gerät darf nicht mit einer externen Zeitschaltuhr oder einem separaten
Fernbedienungssystem betrieben werden.
6
DE
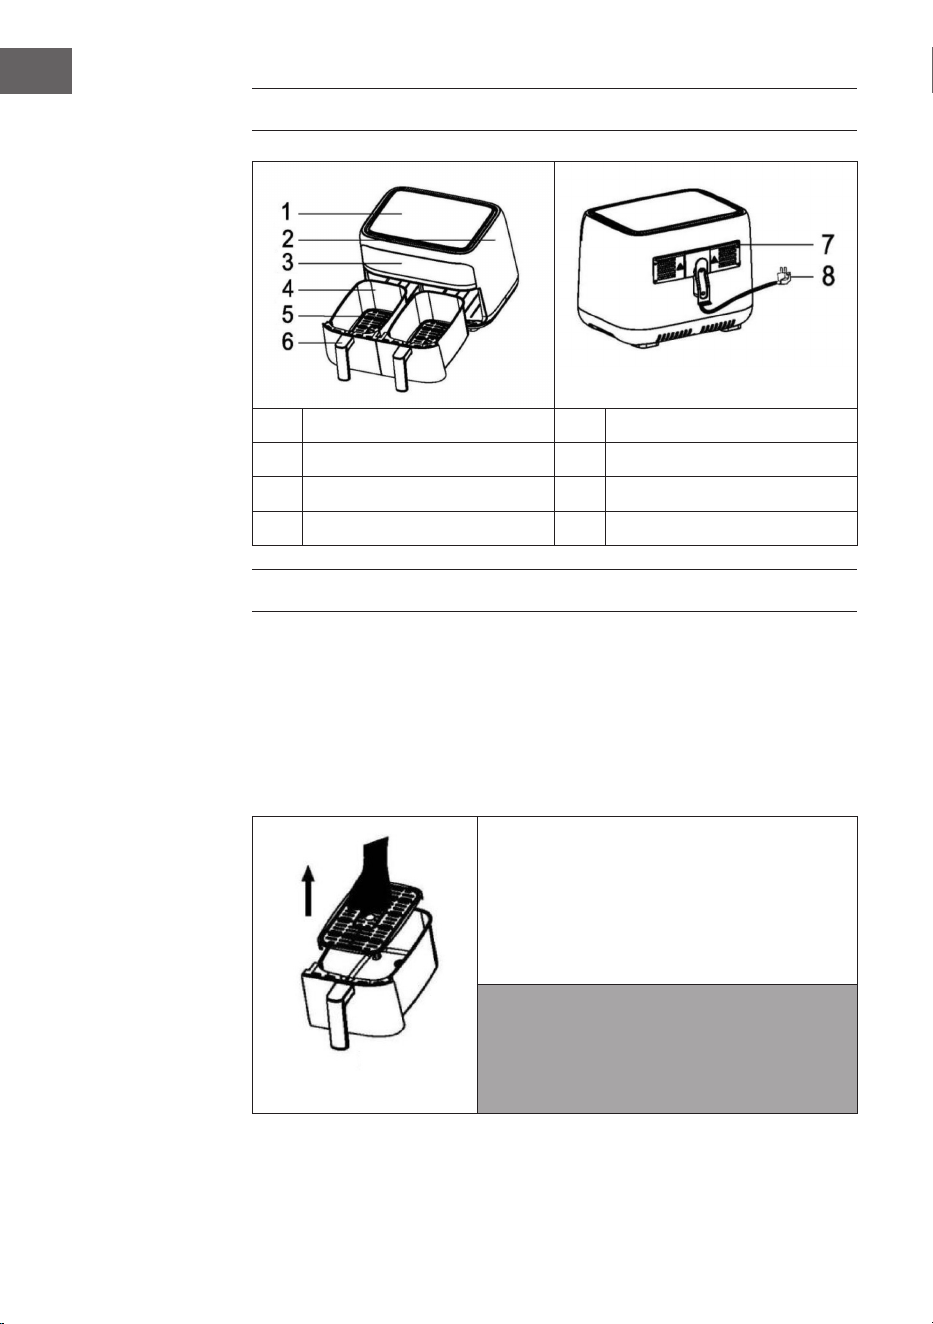
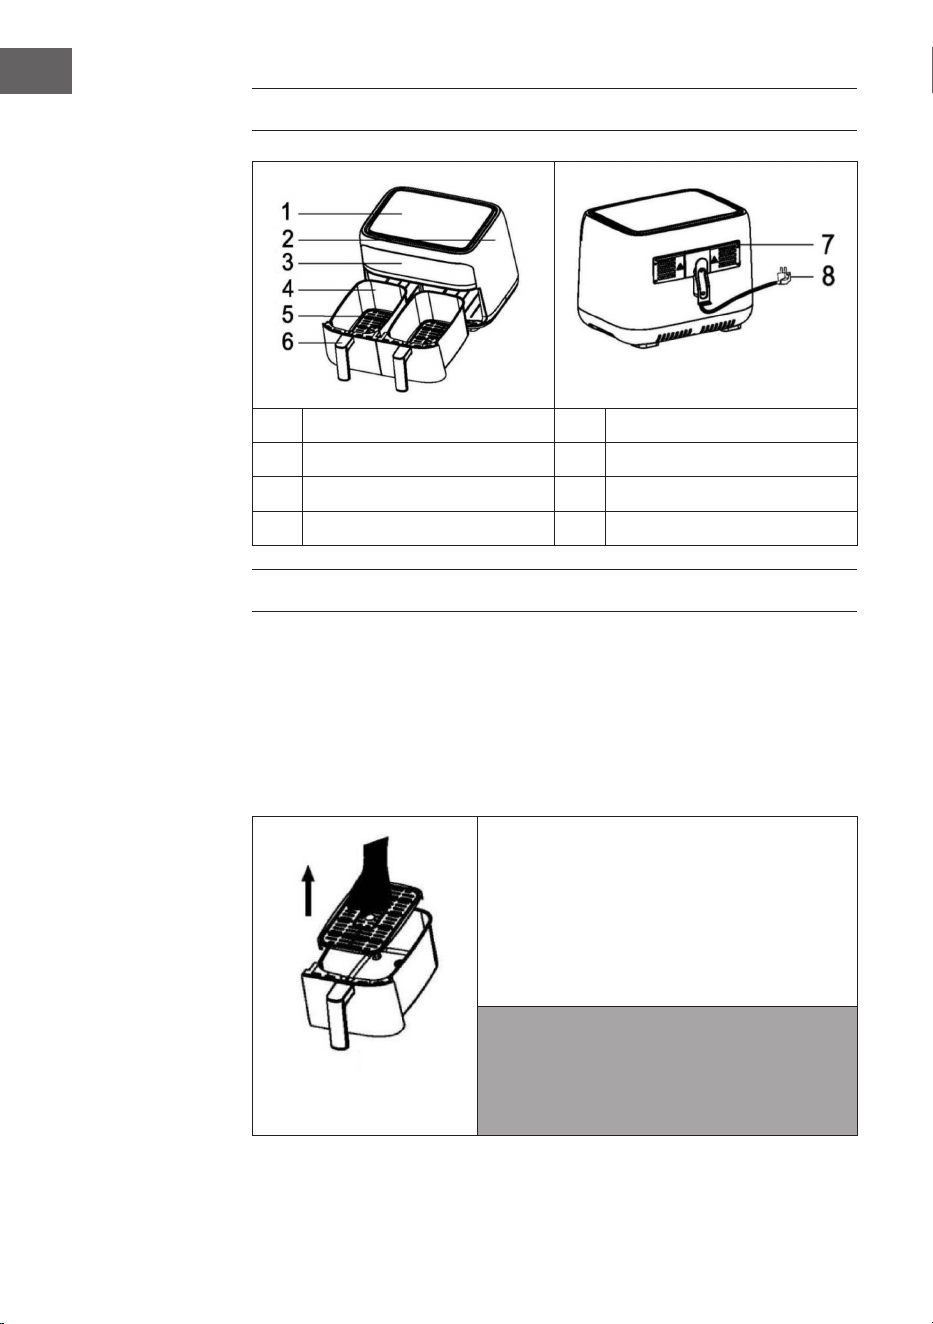
GERÄTEÜBERSICHT
1 Deckel 5 Gitter
2 Gehäuse 6 Griff
3 Bedienfeld 7 Luftauslassöffnungen
4 Frittierkorb 8 Netzkabel
VOR DEM ERSTEN GEBRAUCH
• Entfernen Sie alle Verpackungsmaterialien.
• Entfernen Sie alle Aufkleber oder Etiketten vom Gerät.
• Reinigen Sie den Korb und den Topf gründlich mit heißem Wasser, etwas
Spülmittel und einem nicht scheuernden Schwamm.
• Wischen Sie das Gerät innen und außen mit einem feuchten Tuch ab.
Gerät vorbereiten
1. Stellen Sie das Gerät auf eine stabile,
horizontale und ebene Fläche. Stellen Sie
das Gerät nicht auf eine hitzeempndliche
Unterlage.
2. Setzen Sie das Gitter in den Korb ein.
3. Ziehen Sie das Kabel aus dem Staufach an
der Unterseite des Geräts.
Hinweis: Dies ist eine ölfreie Fritteuse, die mit
Heißluft arbeitet. Füllen Sie den Korb nicht
mit Öl oder Frittierfett.
7
DE
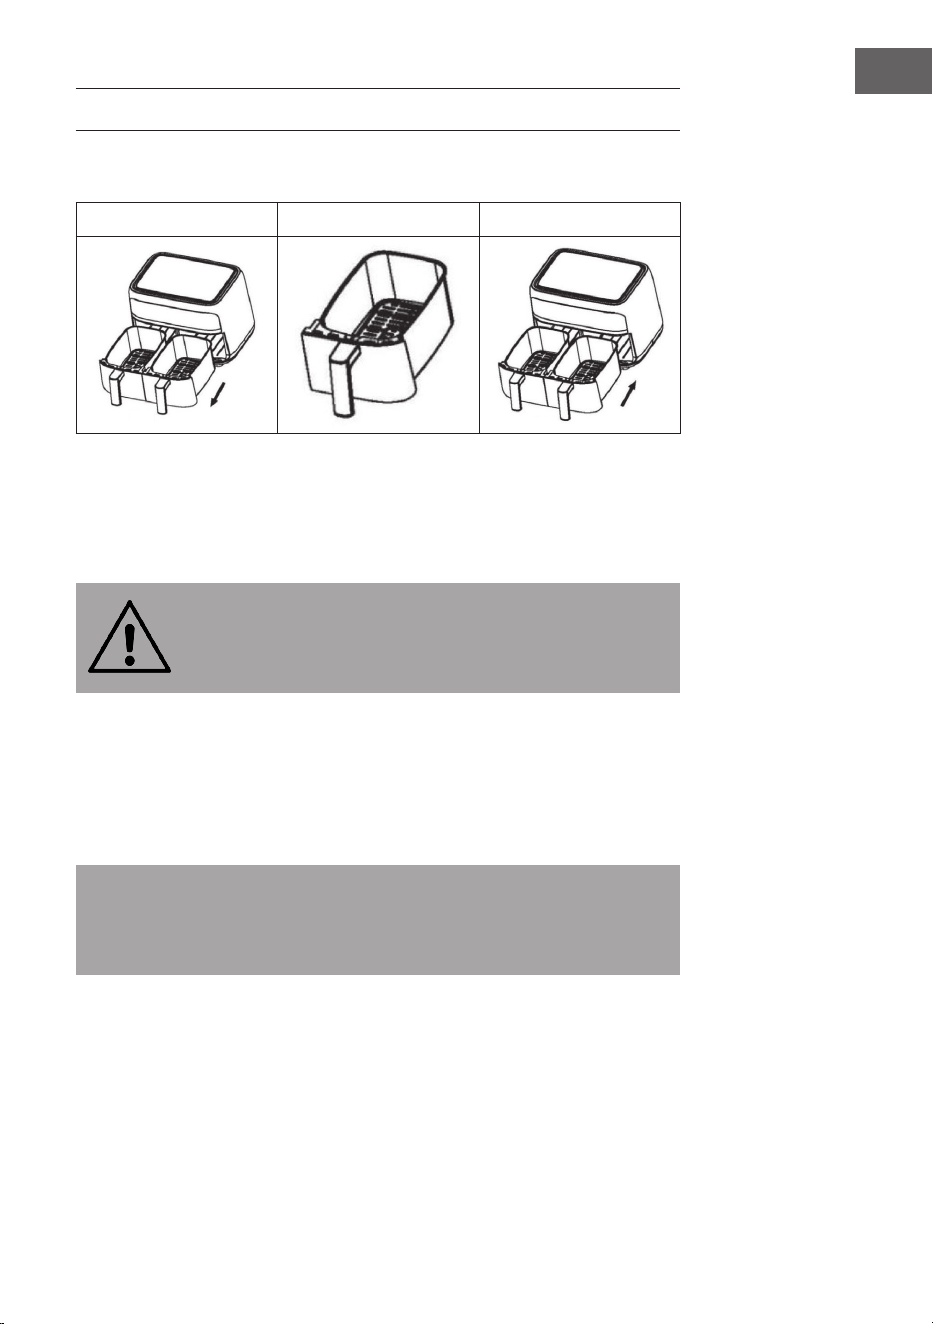
ALLGEMEINE BEDIENUNG
Heißluftfrittieren
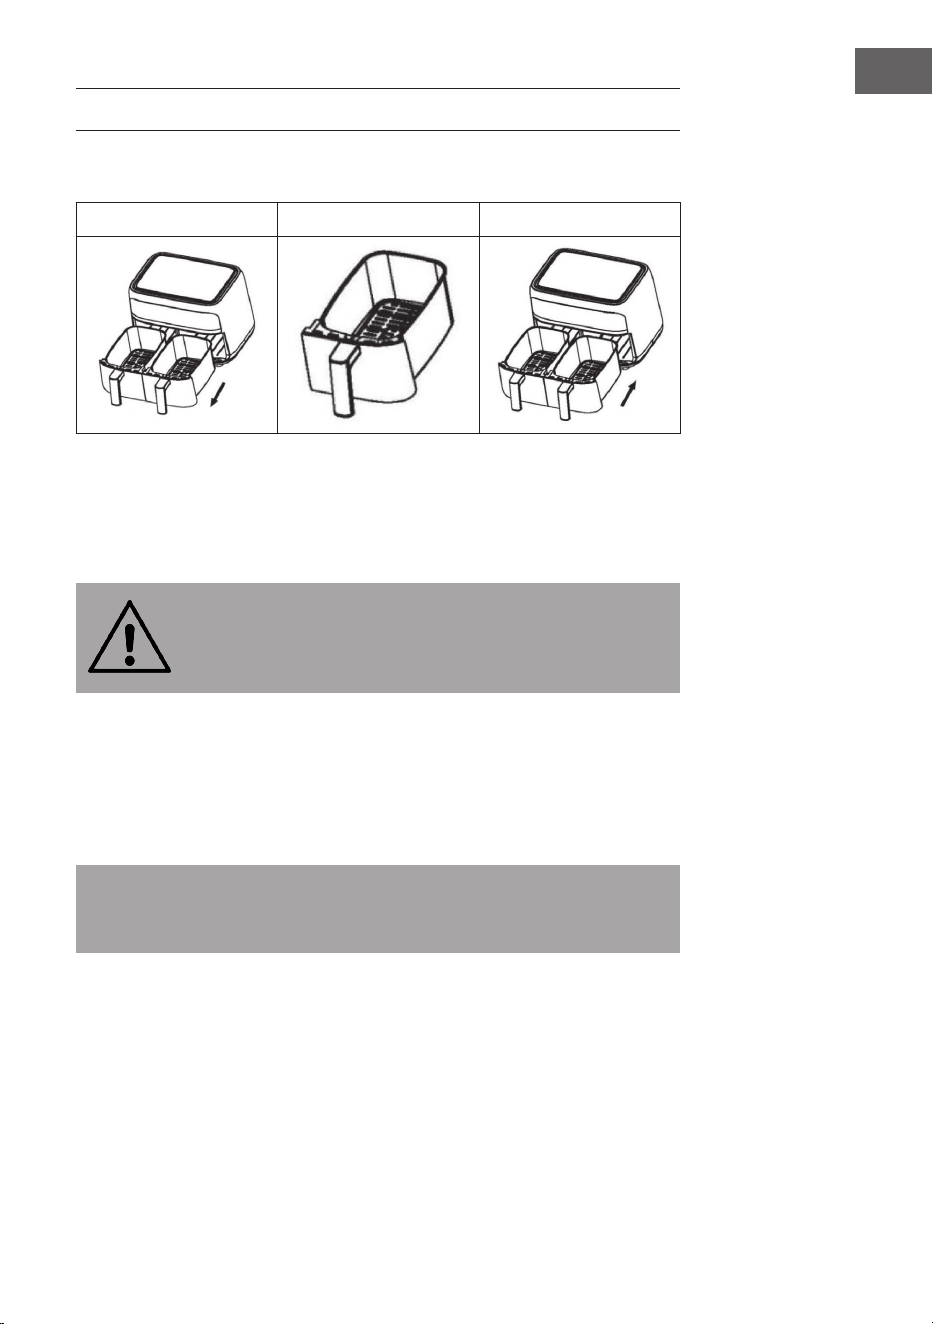
1 2 3
1. Stecken Sie den Stecker in die Steckdose.
2. Ziehen Sie die Körbe vorsichtig aus der Heißluftfritteuse (siehe Bild 1)
3. Geben Sie die Zutaten in den Korb (siehe Bild 2).
4. Schieben Sie die Körbe zurück in die Heißluftfritteuse (siehe Bild 3).
Orientieren Sie sich beim Hineinschieben an den Führungen im Gehäuse.
VORSICHT
Verbrennungsgefahr! Berühren Sie die Körbe während und einige
Zeit nach dem Gebrauch nicht, da sie sehr heiß werden. Fassen Sie
die Körbe nur am Griff an.
5. Bestimmen Sie die erforderliche Zubereitungszeit für die Zutat anhand der
Gartabelle (siehe Kapitel „Einstellungen und Gartabelle“)
6. Manche Zutaten müssen nach der Hälfte der Zubereitungszeit geschüttelt
werden (siehe Kapitel „Einstellungen und Gartabelle“). Um die Zutaten zu
schütteln, ziehen Sie den Korb am Griff aus dem Gerät und schütteln ihn.
Schieben Sie dann den Korb zurück in die Fritteuse.
Tipp: Wenn Sie den Timer auf die Hälfte der Zubereitungszeit einstellen, hören
Sie das Glockensignal des Timers, wenn Sie die Zutaten schütteln müssen.
Das bedeutet jedoch, dass Sie den Timer nach dem Schütteln wieder auf die
verbleibende Zubereitungszeit einstellen müssen.
7. Wenn Sie die Glocke des Timers hören, ist die eingestellte Zubereitungszeit
verstrichen. Nehmen Sie den Korb aus dem Gerät und stellen Sie ihn auf einen
Topfuntersetzer.
8. Prüfen Sie, ob die Zutaten gar sind. Wenn die Zutaten noch nicht gar sind,
schieben Sie den Korb wieder in das Gerät und stellen Sie den Timer auf einige
Minuten mehr ein.

8
DE
9. Um Zutaten (wie Pommes) zu entfernen, ziehen Sie den Korb aus der
Heißluftfritteuse, stellen Sie ihn auf einen Topfuntersetzer und entnehmen Sie
die Zutaten mit einer Zange.
Hinweis: Drehen Sie den Korb nicht auf den Kopf da sonst überschüssiges Öl,
das sich am Boden angesammelt hat, auf die Zutaten gelangt.
VORSICHT
Verbrennungsgefahr! Der Korb und die Zutaten sind nach dem
frittieren sehr heiß. Je nach Art der Zutaten in der Fritteuse kann
heißer Dampf aus dem Korb entweichen.
10. Wenn eine Portion Zutaten fertig ist, ist die Heißluftfritteuse sofort für die
Zubereitung einer weiteren Portion bereit.
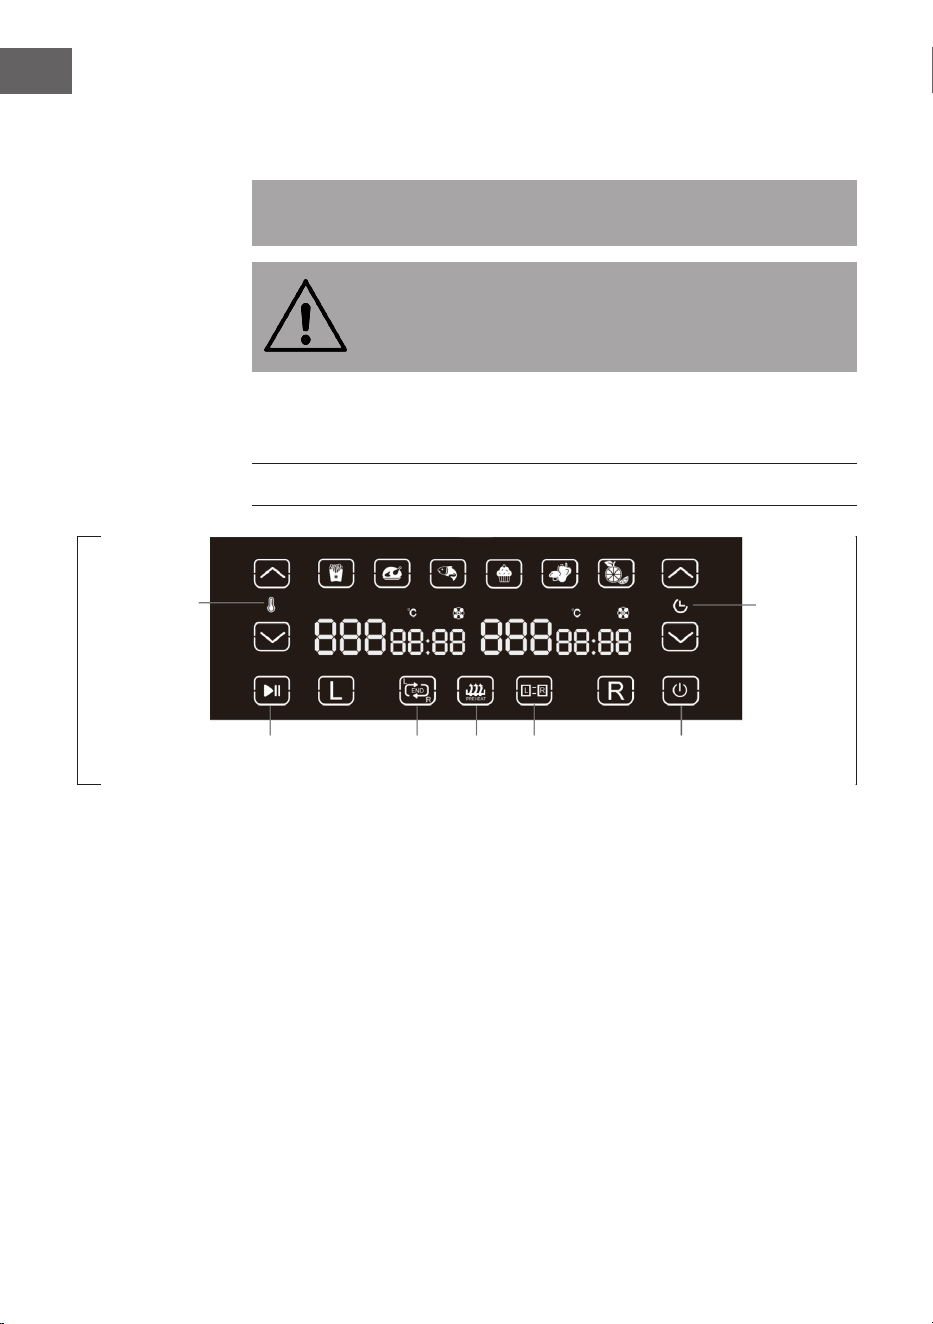
BEDIENFELD UND TASTENFUNKTIONEN
Allgemeine Funktionen
Sobald Sie den Stecker in die Steckdose stecken, leuchten alle Symbole für 1
Sekunde auf und erlöschen danach. Der Summer ist nun ebenfalls eingeschaltet
und die Taste POWER blinkt.
• Drücken Sie das auf die Taste POWER. Die Symbole L, R und L=R leuchten auf
und können ausgewählt werden.
• Wenn Sie L drücken, blinkt das Symbol L. Wenn Sie R drücken, blinkt das
Symbol R. Wenn Sie L=R drücken, blinkt das Symbol L=R und die sechs
voreingestellte Lebensmittelsymbole leuchten oben im Bedienfeld auf.
Temperatur
Timer
Start/Stop Sync
L=R
PowerPreheat

9
DE
Hinweis zum Lüfter-Symbol
Wenn sich der Lüfter an ist, leuchtet das Lüfter-Symbol durchgängig. Ist der Lüfter
aus, erlischt das Symbol. Nach dem Betrieb blinkt das Symbol, bis sie die Taste
START/PAUSE oder POWER drücken.
Funktion der Pfeiltasten und der Tasten L/R/L=R
• Drücken Sie auf der Timer-Seite und , um die Garzeit in 1-Minuten-
Schritten hoch oder runter zu stellen.
• Drücken auf der Temperatur-Seite und , um die Temperatur in
5 °C-Schritten hoch oder runter zu stellen. Bei der Einstellung der Maximal-
und Minimaltemperatur sind die Symbole und ausgeschaltet.
• Wenn Sie die Taste PREHEAT drücken, beträgt die voreingestellte Temperatur
200 °C und die voreingestellte Zeit 5 Minuten (nicht geeignet für die
Trocknung). Drücken Sie die Taste L, um den linken Korb vorzuheizen und die
Taste R, um den rechten Korb vorzuheizen. Wenn Sie L=R drücken, werden
beide Körbe zusammen vorgeheizt. Die maximale Vorheizzeit beträgt 15
Minuten.
• Nachdem Sie Zeit und Temperatur eingestellt haben, drücken Sie Taste START/
PAUSE, um die Fritteuse zu starten. Die ausgewählten Symbole leuchten, die
anderen sind ausgeschaltet.
Funktion der Tasten Start/Pause und Power
• Wenn sie im eingeschalteten Zustand auf die Taste POWER drücken, geht das
Gerät aus und der Summer ertönt.
• Wenn beide Körbe zusammen arbeiten und Sie die Taste START/PAUSE
drücken, ertönt der Summer und das Gerät hört auf zu arbeiten. Drücken Sie
erneut Taste START/PAUSE, um mit dem Frittieren fortzufahren.
• Wenn Sie einen der Körbe anhalten wollen, drücken Sie zuerst L oder R und
dann die Taste START/PAUSE.
• Wenn das Gerät in den Pausen-Modus geht, arbeitet es erst weiter, wenn Sie
erneut auf die Taste START/PAUSE drücken.
• Während das Gerät in Betrieb ist, können Timer und Temperatur angepasst
werden. Drücken Sie die Taste L oder R und stellen Sie Timer oder Temperatur
neu ein. Nach 5 Minuten fährt das Gerät mit dem Frittieren fort.
• Wenn das Gerät nicht arbeitet oder die eingestellte Zeit abgelaufen ist,
schaltet sich das Gerät nach 5 Minuten aus.
• Nach Beendigung des Garvorgangs ertönt der Summer 5 Mal und das Gerät
geht aus. Auf dem Bildschirm wird 5 Minuten lang [End] angezeigt und die
Taste POWER blinkt langsam.

10
DE
Sync-Function (nicht geeignet für die Trocknung)
• Drücken Sie zuerst die Taste L oder R und stellen Sie Zeit und Temperatur ein.
• Drücken Sie auf die Taste SYNC. Die Taste beginnt zu blinken.
• Drücken Sie START/PAUSE, um das Gerät zu starten. Der Korb mit der
längeren eingestellten Garzeit heizt sich zuerst auf, während auf dem anderen
Bildschirm [HOLD] angezeigt wird. Wenn die unterschiedliche Zeit abgelaufen
ist, arbeiten die beiden Körbe zusammen.
• Wenn im Sync-Modus die Garzeit eines Korbes nicht eingestellt ist, startet
das Gerät nicht. Das Symbol L oder R für den nicht eingestellten Korb blinkt.
Stellen Sie dann dort die Zeit und Temperatur ein oder beenden Sie die Sync-
Funktion.
Wenn das Gerät in Betrieb ist und Sie die längere Garzeit plötzlich kürzer oder
die kürzere Garzeit plötzlich länger einstellen, beginnt der HOLD-Korb zu
arbeiten und das Sync-Symbol erlischt.
Modus L=R
• Drücken Sie L oder R, und stellen Sie Zeit und Temperatur für einen der beiden
Körbe ein. Drücken Sie dann die Taste L=R, um die Einstellungen für die nicht
eingestellte Seite zu kopieren.
• Wenn Sie zuerst die Taste L=R drücken und dann die Einstellung von Zeit und
Temperatur vornehmen werden für beide Körbe die selben Werte eingestellt.
• Drücken Sie START/PAUSE und beide Körbe arbeiten synchron. Die beiden
Bildschirme zeigen die gleiche Temperatur und Zeit an.
• Wenn Sie die Tasten und drücken, während beide Körbe arbeiten,
werden die Werte für beide Körbe gleich angepasst. Nach dem Anpassen von
Zeit und Temperatur, läuft das Gerät weiter und die Taste L=R erlischt.
Korbentnahme-Modus
• Wenn im Modus Sync oder L=R einer der Körbe herausgenommen wird, hört
das Gerät auf zu arbeiten und der Bildschirm für den herausgenommenen
Korb zeigt [Out] an.
• Wenn der Korb innerhalb von 90 Sekunden wieder eingesetzt wird,
funktioniert das Gerät wie in der ursprünglichen Einstellung.
• Wenn der Korb nicht innerhalb von 90 Sekunden, sondern innerhalb
von 5 Minuten wieder eingesetzt werden kann, arbeitet der nicht
herausgenommene Korb weiter wie in der ursprünglichen Einstellung. Die
Seite ohne Korb wird nicht aufgeheizt. Die Tasten Sync oder L=R erlöschen in
diesem Fall.
• Wenn einer der Körbe oder beide Körbe nicht innerhalb von 5 Minuten wieder
eingesetzt werden, wird die Seite ohne Korb in den Standby-Modus versetzt.
Der nicht herausgezogene Korb funktioniert weiter.

11
DE
EINSTELLUNGEN UND GARTABELLE
Tipps
• Kleinere Zutaten benötigen in der Regel eine etwas kürzere Zubereitungszeit
als größere Zutaten.
• Eine größere Menge an Zutaten erfordert nur eine etwas längere
Zubereitungszeit, eine kleinere Menge an Zutaten erfordert nur eine etwas
kürzere Zubereitungszeit.
• Das Schütteln kleinerer Zutaten nach der Hälfte der Zubereitungszeit
optimiert das Endergebnis und kann dazu beitragen, dass die Zutaten nicht
ungleichmäßig gebraten werden.
• Geben Sie etwas Öl zu frischen Kartoffeln, um ein knuspriges Ergebnis zu
erzielen. Frittieren Sie Ihre Zutaten in der Heißluftfritteuse innerhalb weniger
Minuten, nachdem Sie das Öl hinzugefügt haben.
• Bereiten Sie keine extrem fettigen Zutaten wie Würstchen in der
Heißluftfritteuse zu.
• Snacks, die im Backofen zubereitet werden können, können auch in der
Heißluftfritteuse zubereitet werden.
• Die optimale Menge für die Zubereitung von knusprigen Pommes beträgt
500 Gramm.
• Verwenden Sie vorgefertigten Teig, um gefüllte Snacks schnell und einfach
zuzubereiten. Vorgefertigter Teig benötigt auch eine kürzere Zubereitungszeit
als selbst gemachter Teig.
• Legen Sie ein Backblech oder eine Auaufform in den Korb der
Heißluftfritteuse, wenn Sie einen Kuchen oder eine Quiche backen möchten
oder wenn Sie zerbrechliche oder gefüllte Zutaten frittieren möchten
• Sie können die Heißluftfritteuse auch zum Aufwärmen von Zutaten
verwenden. Stellen Sie dazu die Temperatur auf 150 °C und die Zeit auf bis zu
10 Minuten ein.

12
DE
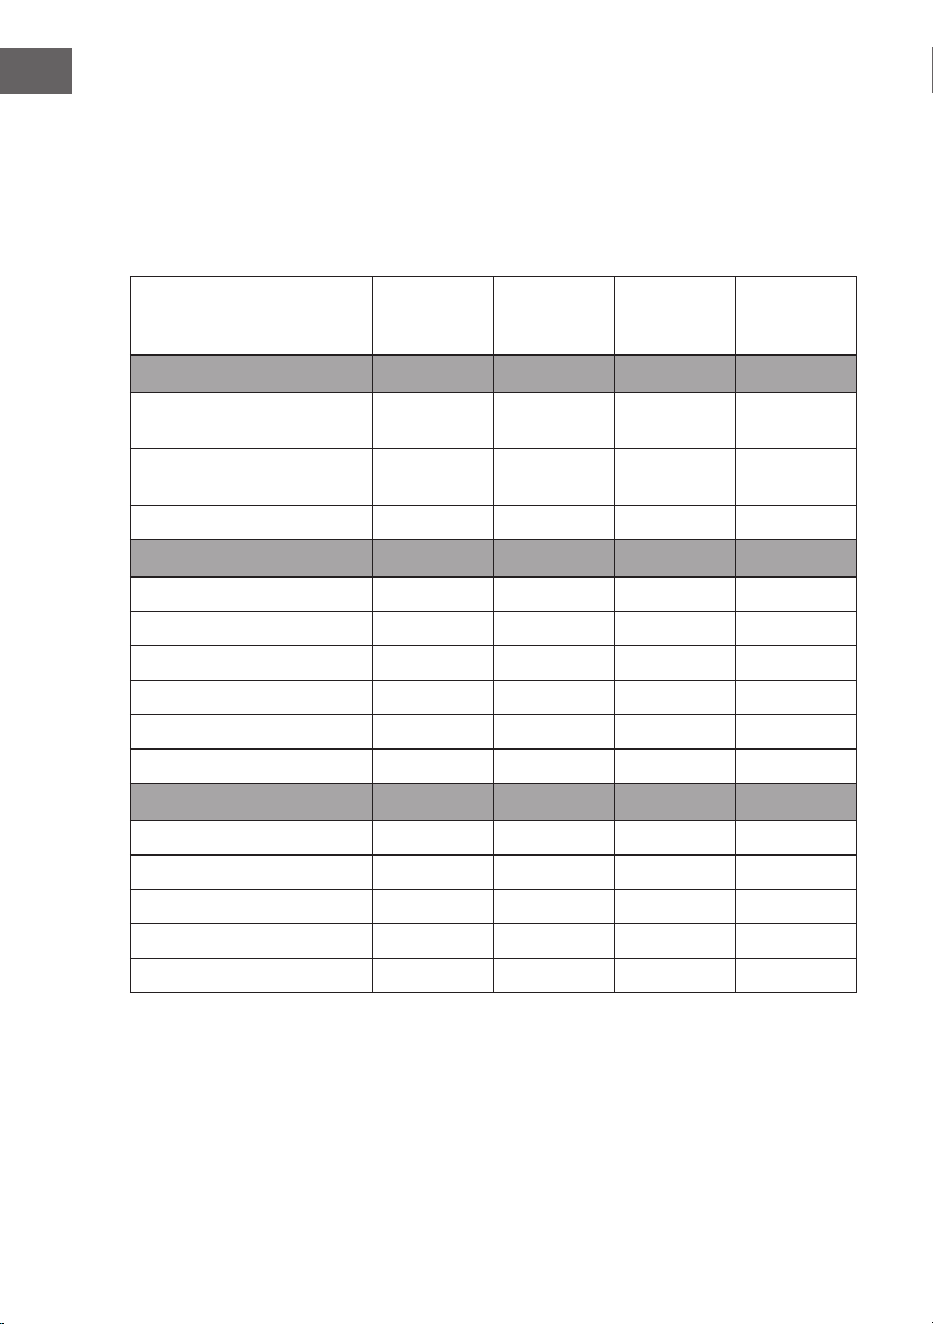
Gartabelle
Die nachstehende Tabelle hilft Ihnen bei der Auswahl der Grundeinstellungen
für die Zutaten. Beachten Sie, dass diese Einstellungen nur Richtwerte sind. Da
sich die Zutaten in Bezug auf Herkunft, Größe, Form und Marke unterscheiden,
können wir die beste Einstellung für Ihre Zutaten nicht garantieren. Addieren Sie 3
Minuten zur Zubereitungszeit, wenn Sie mit dem Frittieren beginnen, während die
Heißluftfritteuse noch kalt ist.
Menge
Min.-Max.
in g
Zeit in
Minuten
Temperatur
in °C
Schütteln
nach halber
Zeit
Kartoffeln und Pommes
Dünne Tiefkühlpommes 500-600 18-25 200 Ja
Tiefkühlpommes dick 500-600 20-25 200 Ja
Kartoffelgratin 600 20-25 200 Ja
Fleisch & Geügel
Steak 100-600 12-18 180 Nein
Schweinekoteletts 100-600 12-18 180 Nein
Hamburger 100-600 10-20 180 Nein
Wurst im Blätterteig 100-600 13-15 200 Nein
Hühnerkeulen 100-600 25-30 180 Nein
Hähnchenbrust 100-600 18-25 180 Nein
Snacks
Frühlingsrollen 100-600 8-10 200 Ja
Gefrorene Hähnchen-
Nuggets
100-600 8-12 180 Ja
Gefrorene Fischstäbchen 100-500 6-10 200 Nein
Gefrorene panierte Käse-
Snacks
100-500 8-10 180 Nein
Gefülltes Gemüse 100-500 12-20 160 Nein

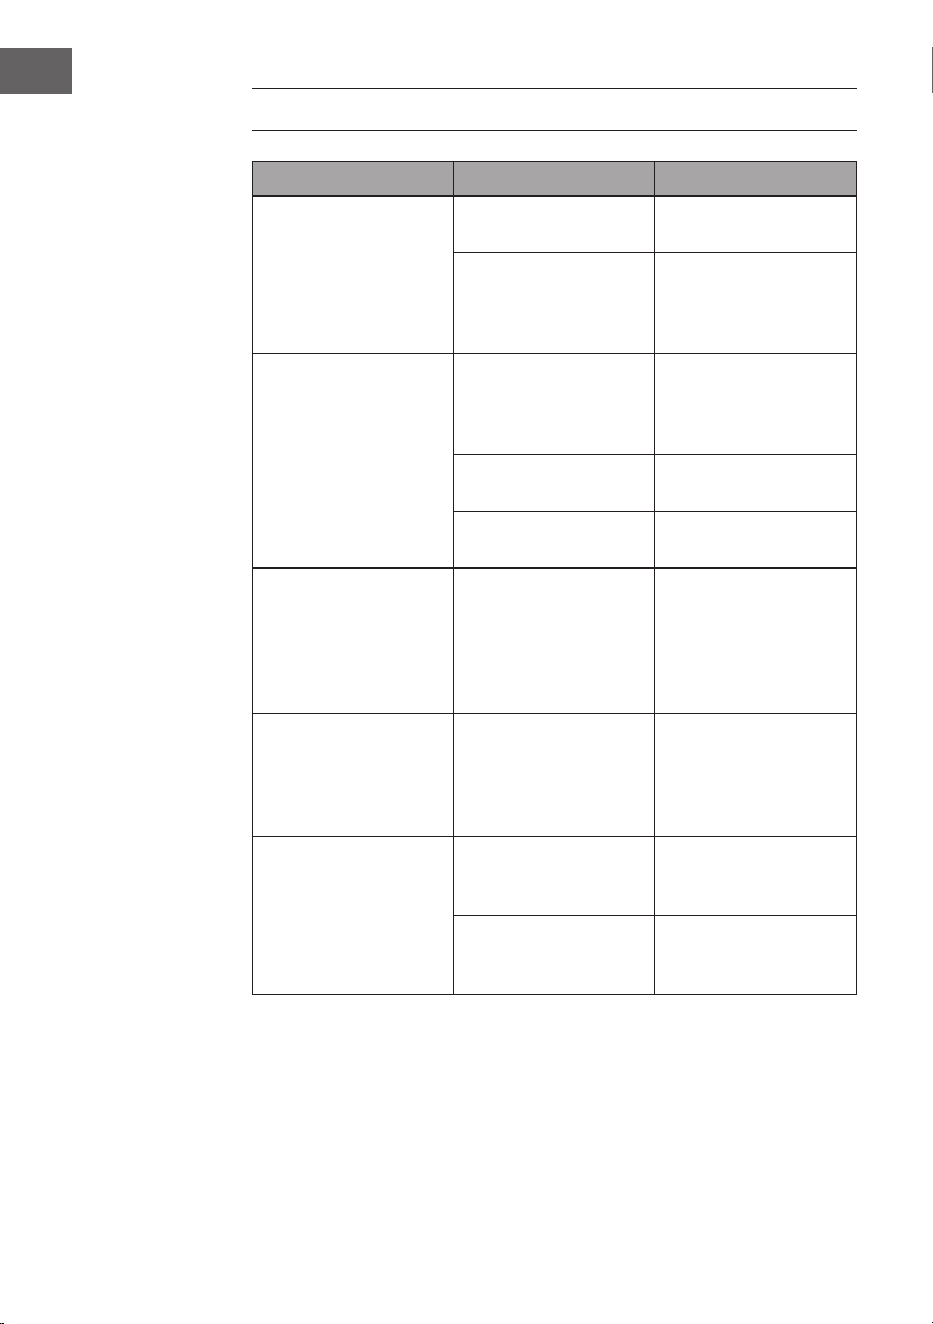
13
DE
Menge
Min.-Max.
in g
Zeit in
Minuten
Temperatur
in °C
Schütteln
nach halber
Zeit
Backwaren
Kuchen 500 8-15 180 Nein
Quiche 500 20-22 180 Nein
Muns 500 15-18 200 Nein
Süße Snacks 500 20 160 Nein
REINIGUNG UND PFLEGE
• Ziehen Sie den Stecker aus der Steckdose und lassen Sie das Gerät mindestens
30 Minuten lang abkühlen.
• Entfernen Sie das Zubehör.
• Reinigen Sie das Gerät nach jedem Gebrauch. Reinigen Sie das Zubehör und
die Innenseite des Gerätes nicht mit spitzen oder scharfen Küchenutensilien
oder Scheuermitteln, da diese die Beschichtung beschädigen.
• Wischen Sie die Außenseite des Gerätes mit einem feuchten Tuch ab.
• Reinigen Sie das Zubehör mit heißem Wasser, etwas Geschirrspülmittel und
einem nicht scheuernden Schwamm.
• Entfernen Sie hartnäckige Fettrückstände mit einer Entfettungsüssigkeit.
• Reinigen Sie das Innere des Gerätes mit einem nicht scheuernden Schwamm.
• Reinigen Sie das Heizelement mit einer Reinigungsbürste, um
Lebensmittelrückstände zu entfernen.
• Wenn Sie das Gerät länger nicht benutzen, reinigen Sie es, bevor Sie es
verstauen.
14
DE
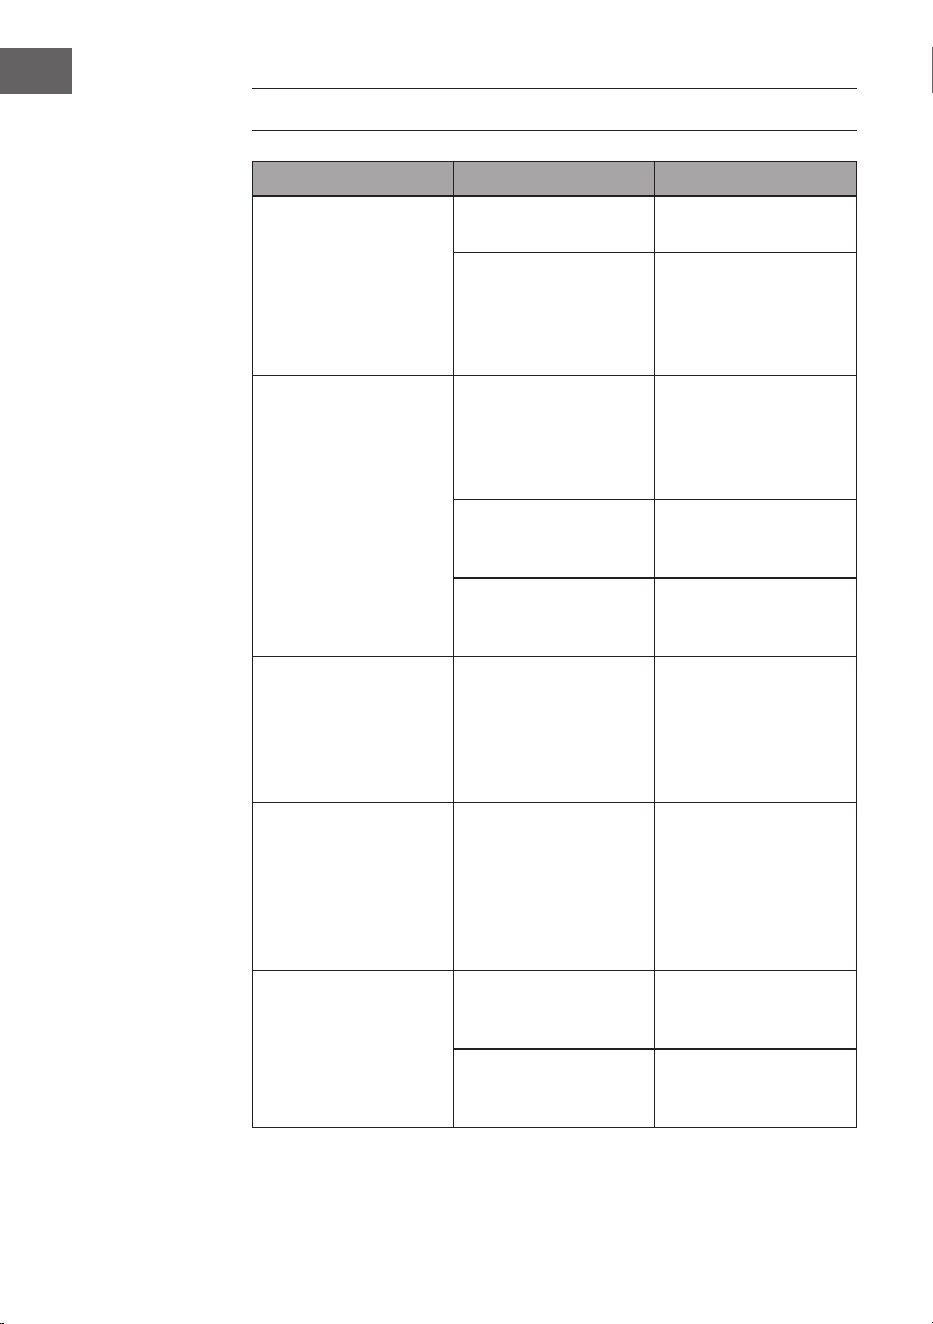
FEHLERBEHEBUNG
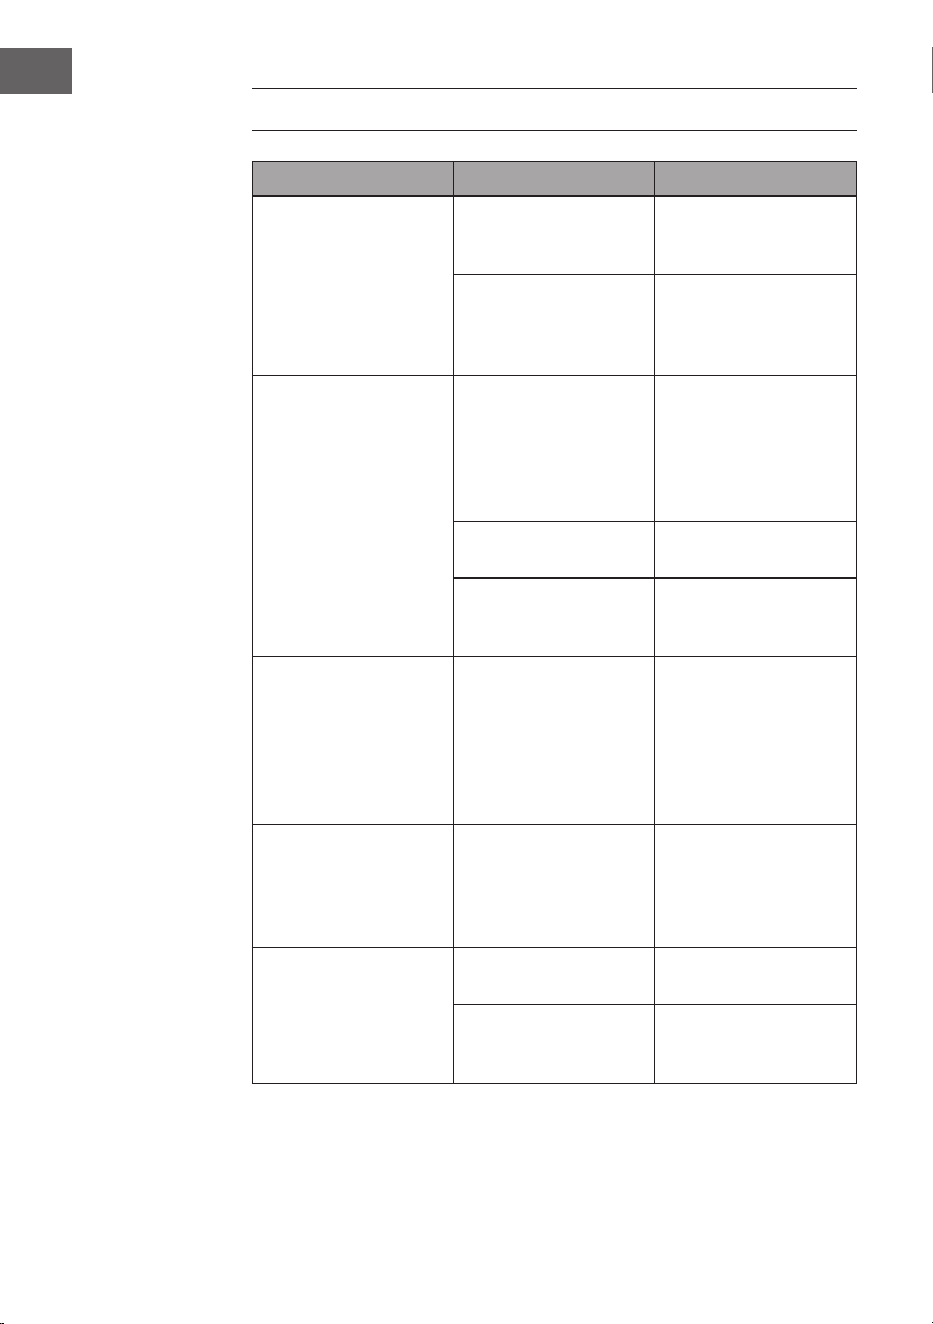
Problem Mögliche Ursache Lösungsansatz
Die Heißluftfritteuse
funktioniert nicht
Das Gerät ist nicht
eingesteckt.
Stecken Sie den Stecker
in die Steckdose.
Sie haben den Timer
nicht eingestellt.
Stellen Sie am Timer
die gewünschte
Zubereitungszeit ein
schalten Sie das Gerät
ein.
Die mit der
Heißluftfritteuse
frittierten Zutaten
werden nicht fertig.
Die Menge der Zutaten
im Korb ist zu groß.
Geben Sie kleinere
Portionen von Zutaten
in den Korb. Kleinere
Portionen werden
gleichmäßiger gebraten.
Die eingestellte
Temperatur ist zu
niedrig.
Stellen Sie eine höhere
Temperatur ein.
Die Zubereitungszeit ist
zu kurz.
Stellen Sie am Timer eine
längere zubereitungszeit
ein.
Die Zutaten werden
in der Fritteuse
ungleichmäßig frittiert.
Bestimmte Arten
von Zutaten müssen
nach der Hälfte der
Zubereitungszeit
geschüttelt werden.
Zutaten, die
übereinander oder quer
liegen (z. B. Pommes),
müssen nach der Hälfte
der Zubereitungszeit
geschüttelt werden.
Die frittierten Snacks
sind nicht knusprig,
wenn sie aus der
Fritteuse kommen.
Sie haben eine Art von
Snacks verwendet, die
für die Zubereitung in
einer herkömmlichen
Friteuse bestimmt sind.
Verwenden Sie Snacks
die für den Backofen
geeignet sind oder
bestreichen Sie die
Snacks leicht mit Öl,
um sie knuspriger zu
machen.
Ich kann die Pfanne
nicht richtig in das Gerät
schieben.
Es benden sich zu viele
Zutaten im Korb.
Füllen Sie den Korb nicht
über die MAX-Anzeige
hinaus.
Das Gitter ist nicht
richtig in der Pfanne
platziert.
Schieben Sie das Gitter
in den Korb hinunter, bis
Sie ein Klicken hören.
15
DE
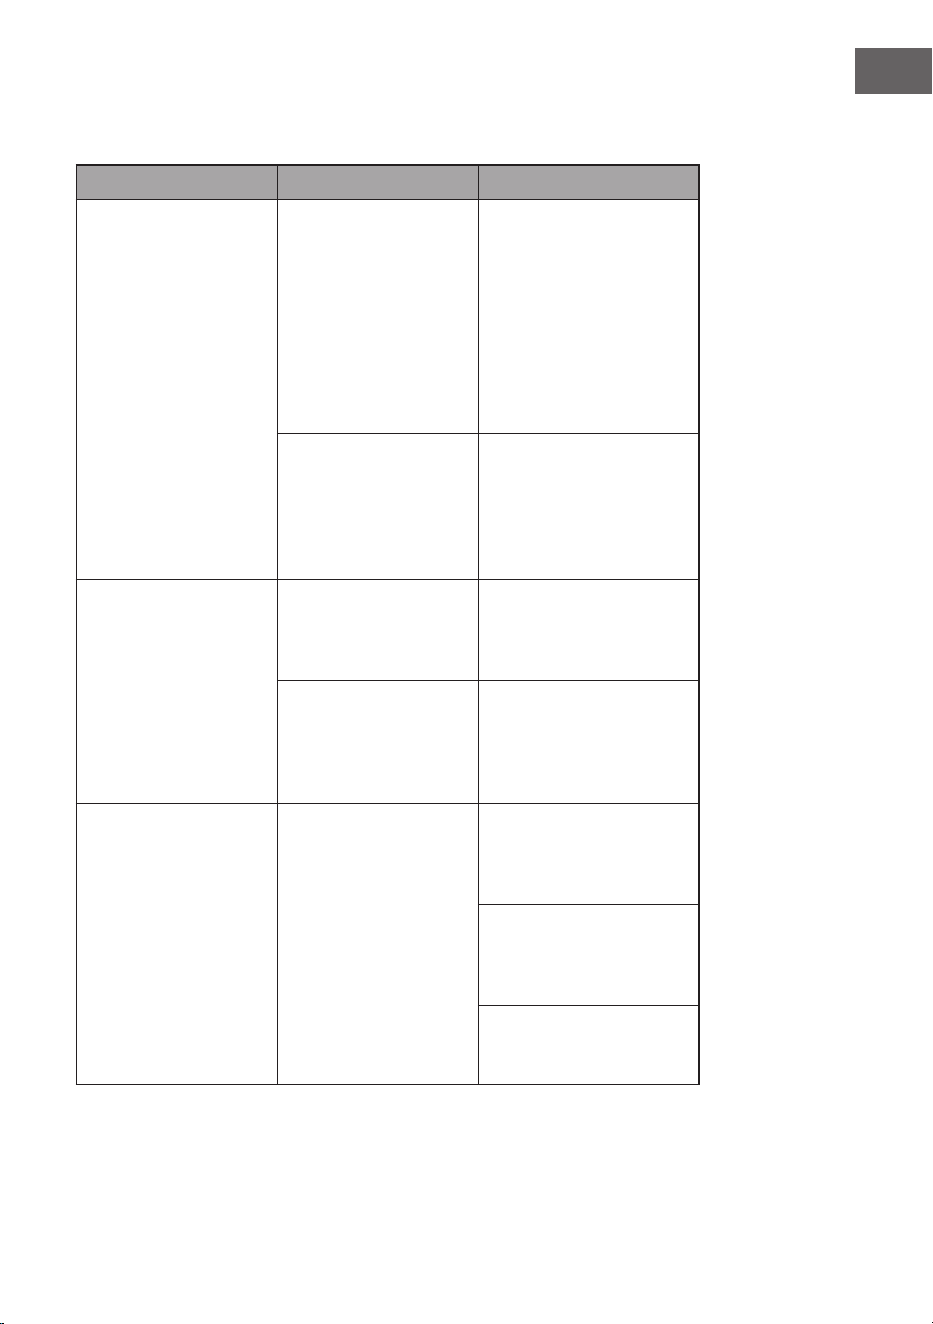
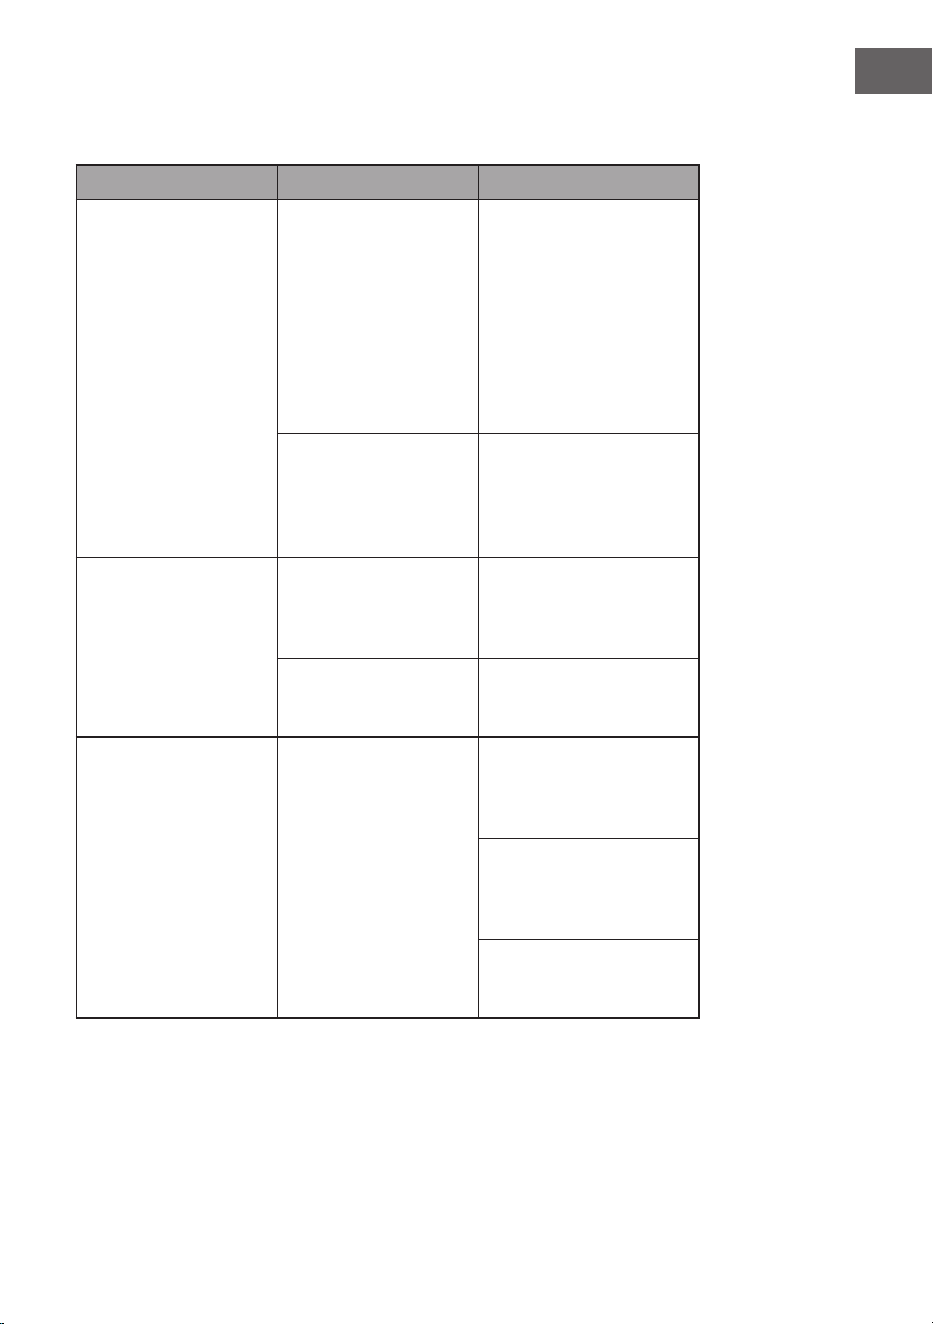
Problem Mögliche Ursache Lösungsansatz
Aus dem Gerät kommt
weißer Rauch.
Sie bereiten fettige
Zutaten zu.
Wenn Sie fettige Zutaten
in der Heißluftfritteuse
frittieren, tritt eine große
Menge Öl in den Korb aus.
Das Öl erzeugt weißen
Rauch, und der Korb kann
sich stärker als gewöhnlich
erhitzen. Dies hat keinen
Einuss auf das Gerät oder
das Endergebnis.
Der Korb enthält
noch Fettreste vom
vorherigen Gebrauch.
Weißer Rauch entsteht,
wenn sich das Fett im Korb
hoch erhitzt. Achten Sie
darauf, dass Sie den Korb
nach jedem Gebrauch
gründlich reinigen.
Frische Pommes werden
in der Heißluftfritteuse
ungleichmäßig frittiert.
Sie haben nicht die
richtige Kartoffelsorte
verwendet.
Verwenden Sie frische
Kartoffeln und achten
Sie darauf, dass sie beim
Frittieren fest bleiben.
Sie haben die
Kartoffelstäbchen vor
dem Frittieren nicht
richtig abgespült.
Spülen Sie die
Kartoffelstäbchen gut ab,
um die Stärke von der
Außenseite der Stäbchen
zu entfernen.
Frische Pommes frites
sind nicht knusprig,
wenn sie aus der
Fritteuse kommen.
Die Knusprigkeit der
Pommes frites hängt von
der Menge an Öl und
Wasser in den Pommes
frites ab.
Achten Sie darauf, dass
die Kartoffelstäbchen gut
abgetrocknet sind, bevor
Sie das Öl hinzufügen.
Schneiden Sie die
Kartoffelstäbchen kleiner,
um ein knusprigeres
Ergebnis zu erzielen.
Geben Sie etwas mehr Öl
hinzu, um ein knusprigeres
Ergebnis zu erzielen.

16
DE
SPEZIELLE ENTSORGUNGSHINWEISE FÜR
VERBRAUCHER IN DEUTSCHLAND
Entsorgen Sie Ihre Altgeräte fachgerecht. Dadurch wird gewährleistet, dass die
Altgeräte umweltgerecht verwertet und negative Auswirkungen auf die Umwelt
und menschliche Gesundheit vermieden werden. Bei der Entsorgung sind
folgende Regeln zu beachten:
• Jeder Verbraucher ist gesetzlich verpichtet, Elektro- und Elek-
tronikaltgeräte (Altgeräte) sowie Batterien und Akkus getrennt
vom Hausmüll zu entsorgen. Sie erkennen die entsprechenden
Altgeräte durch folgendes Symbol der durchgestrichenen
Mülltonne (WEEE-Symbol).
• Sie haben Altbatterien und Altakkumulatoren, die nicht vom Altgerät
umschlossen sind, sowie Lampen, die zerstörungsfrei aus dem Altgerät
entnommen werden können, vor der Abgabe an einer Entsorgungsstelle vom
Altgerät zerstörungsfrei zu trennen.
• Bestimmte Lampen und Leuchtmittel fallen ebenso unter das Elektro- und
Elektronikgesetz und sind dementsprechend wie Altgeräte zu behandeln.
Ausgenommen sind Glühbirnen und Halogenlampen. Entsorgen Sie
Glühbirnen und Halogenlampen bitte über den Hausmüll, sofern sie nicht das
WEEE-Symbol tragen.
• Jeder Verbraucher ist für das Löschen von personenbezogenen Daten auf dem
Elektro- bzw. Elektronikgerät selbst verantwortlich.
Rücknahmepicht der Vertreiber
Vertreiber mit einer Verkaufsäche für Elektro- und Elektronikgeräte von
mindestens 400 Quadratmetern sowie Vertreiber von Lebensmitteln mit einer
Gesamtverkaufsäche von mindestens 800 Quadratmetern, die mehrmals im
Kalenderjahr oder dauerhaft Elektro- und Elektronikgeräte anbieten und auf dem
Markt bereitstellen, sind verpichtet,
1. bei der Abgabe eines neuen Elektro- oder Elektronikgerätes an einen Endnutzer
ein Altgerät des Endnutzers der gleichen Geräteart, das im Wesentlichen die
gleichen Funktionen wie das neue Gerät erfüllt, am Ort der Abgabe oder in
unmittelbarer Nähe hierzu unentgeltlich zurückzunehmen und
2. auf Verlangen des Endnutzers Altgeräte, die in keiner äußeren Abmessung
größer als 25 Zentimeter sind, im Einzelhandelsgeschäft oder in unmittelbarer
Nähe hierzu unentgeltlich zurückzunehmen; die Rücknahme darf nicht an den
Kauf eines Elektro- oder Elektronikgerätes geknüpft werden und ist auf drei
Altgeräte pro Geräteart beschränkt.

17
DE
• Bei einem Vertrieb unter Verwendung von Fernkommunikationsmitteln
ist die unentgeltliche Abholung am Ort der Abgabe auf Elektro- und
Elektronikgeräte der Kategorien 1, 2 und 4 gemäß § 2 Abs. 1 ElektroG, nämlich
„Wärmeüberträger“, „Bildschirmgeräte“ (Oberäche von mehr als 100 cm²)
oder „Großgeräte“ (letztere mit mindestens einer äußeren Abmessung
über 50 Zentimeter) beschränkt. Für andere Elektro- und Elektronikgeräte
(Kategorien 3, 5 und 6) ist eine Rückgabemöglichkeit in zumutbarer
Entfernung zum jeweiligen Endnutzer zu gewährleisten.
• Altgeräte dürfen kostenlos auf dem lokalen Wertstoffhof oder in folgenden
Sammelstellen in Ihrer Nähe abgegeben werden: www.take-e-back.de
• Für Elektro- und Elektronikgeräte der Kategorien 1, 2 und 4 bieten wir auch die
Möglichkeit einer unentgeltlichen Abholung am Ort der Abgabe an. Beim Kauf
eines Neugeräts haben Sie die Möglichkeit, eine Altgerätabholung über die
Webseite auszuwählen.
• Batterien können überall dort kostenfrei zurückgegeben werden, wo sie
verkauft werden (z. B. Super-, Bau-, Drogeriemarkt). Auch Wertstoff- und
Recyclinghöfe nehmen Batterien zurück. Sie können Batterien auch per Post
an uns zurücksenden. Altbatterien in haushaltsüblichen Mengen können Sie
direkt bei uns von Montag bis Freitag zwischen 08:00 und 16:00 Uhr unter der
folgenden Adresse unentgeltlich zurückgeben:
Chal-Tec Fulllment GmbH
Norddeutschlandstr. 3
47475 Kamp-Lintfort
• Wichtig zu beachten ist, dass Lithiumbatterien aus Sicherheitsgründen vor der
Rückgabe gegen Kurzschluss gesichert werden müssen (z. B. durch Abkleben
der Pole).
• Finden sich unter der durchgestrichenen Mülltonne auf der Batterie zusätzlich
die Zeichen Cd, Hg oder Pb ist das ein Hinweis darauf, dass die Batterie
gefährliche Schadstoffe enthält. (»Cd« steht für Cadmium, »Pb« für Blei und
»Hg« für Quecksilber.)
Hinweis zur Abfallvermeidung
Indem Sie die Lebensdauer Ihrer Altgeräte verlängern, tragen Sie dazu bei,
Ressourcen ezient zu nutzen und zusätzlichen Müll zu vermeiden. Die
Lebensdauer Ihrer Altgeräte können Sie verlängern, indem Sie defekte Altgeräte
reparieren lassen. Wenn sich Ihr Altgerät in gutem Zustand bendet, könnten Sie
es spenden, verschenken oder verkaufen.
18
DE
HINWEISE ZUR ENTSORGUNG
Wenn es in Ihrem Land eine gesetzliche Regelung
zur Entsorgung von elektrischen und elektronischen
Geräten gibt, weist dieses Symbol auf dem Produkt oder
auf der Verpackung darauf hin, dass dieses Produkt
nicht im Hausmüll entsorgt werden darf. Stattdessen
muss es zu einer Sammelstelle für das Recycling von
elektrischen und elektronischen Geräten gebracht
werden. Durch regelkonforme Entsorgung schützen
Sie die Umwelt und die Gesundheit Ihrer Mitmenschen
vor negativen Konsequenzen. Informationen zum
Recycling und zur Entsorgung dieses Produkts,
erhalten Sie von Ihrer örtlichen Verwaltung oder Ihrem
Hausmüllentsorgungsdienst.
HERSTELLER & IMPORTEUR (UK)
Hersteller:
Chal-Tec GmbH, Wallstraße 16, 10179 Berlin, Deutschland.
Importeur für Großbritannien:
Berlin Brands Group UK Limited
PO Box 42
272 Kensington High Street
London, W8 6ND
United Kingdom

19
EN
Dear customer,
Congratulations on your purchase. Please read the
following instructions carefully and follow them to prevent
potential damage. We accept no liability for damage caused
by disregarding the instructions and improper use. Please
scan the QR code to access the latest operating instructions
and further information about the product.
CONTENTS
General Safety Instructions 20
Instructions for safe use 21
Device Overview 22
Before rst use 22
General operation 23
Control panel and button functions 24
Settings and cooking table 27
Cleaning and Care 29
Troubleshooting 30
Disposal considerations 32
Manufacturer & importer (UK) 32
TECHNICAL DATA
Article number 10045473
Power supply 220-240 V ~ 50/60 Hz
Power 2 x 1425 W = 2850 W (max.)
Volume of the baskets 2 x 3.8 L
Adjustable temperature and time
Fryer: 80-200 °C / 0-60 min
Dryer: 40-80 °C / 1-24 h
English
Español
Français
Italiano

20
EN
GENERAL SAFETY INSTRUCTIONS
• Read all safety instructions carefully.
• Do not touch the hot surfaces.
• To protect against electric shock, do not immerse cord, plug or base in water
or any other liquid.
CAUTION
Risk of burns! This electrical appliance contains a heating function.
Surfaces, even those other than the functional surfaces, can
develop high temperatures. Because temperature is perceived
differently by different people, use this device with caution. The
device may only be touched by the handles and gripping surfaces
provided for this purpose, and heat protection such as gloves or
similar must be used. Gripping surfaces other than those intended
must be allowed sucient time to cool before touching.
• Unplug the device when it is not in use and before cleaning. Let the device
cool down before
• removing any parts.
• If the power cord is damaged, it must be replaced by the manufacturer,
customer service or a similarly qualied person in order to avoid a hazard.
• The use of accessories not recommended by the manufacturer of the
appliance may cause injury.
• Do not use the device outdoors.
• Do not let cord hang over edges of tables or work surfaces, and do not touch
hot surfaces.
• Do not place the device on or near a hot gas or electric burner or in a heated
oven.
• Be extremely careful when moving the unit with hot oil or other hot liquids.
• Always insert the plug into the device rst and then the cable into the socket.
When you are no longer using the device, switch it off rst before you pull the
plug out of the socket.
• Do not use the device for purposes other than those intended.
• This device may be used by children aged 8 years and over and by persons
with reduced physical, sensory or mental abilities or lack of experience and
knowledge if they are supervised or have been instructed in the safe use of
the device and understand the resulting dangers. Children must not play
with the device. Cleaning and user maintenance may not be done by children
unless they are older than 8 years and are supervised.
21
EN
INSTRUCTIONS FOR SAFE USE
• Always place the ingredients to be fried in the basket so that they do not come
into contact with the heating elements.
• Do not cover air inlet and outlet openings while the device is in operation.
• Do not ll the pan with oil as this may pose a re hazard
• while it is in operation.
CAUTION
Burn risk! The temperature of the accessible surfaces is high when
the device is in operation. Never touch the inside of the device.
• Do not place the device against a wall or other devices. Leave at least 10 cm of
free space on the back and sides and 10 cm on top of the device.
• Do not place any objects on the appliance.
• Do not leave the device unattended while it is running.
CAUTION
Risk of burns! Hot air frying releases hot steam through the air
outlet openings. Keep your hands and face a safe distance from
the steam and air vents. Also, be careful of hot steam and air when
removing the pan from the device.
• Unplug the power cord immediately if you see dark smoke coming from the
unit. Wait until the smoke stops before removing the plug from the device.
• Make sure that the device is on a horizontal, level and stable surface.
• This device is intended for household use only. It is not suitable for use in
environments such as staff kitchens, farms, motels and other non-residential
environments. It is also not intended for use by customers in hotels, motels,
boarding houses and other residential environments.
• Always pull out the mains plug when you are not using the device.
• The device must cool down for 30 minutes after use before it can be handled
or cleaned safely.
• Keep the device and its cord out of the reach of children under 8 years old.
• The device must not be operated with an external timer or a separate remote
control system.

22
EN
DEVICE OVERVIEW
1 Cover 5 Grid
2 Housing 6 Handle
3 Control panel 7 Air outlet openings
4 Frying basket 8 Power cable
BEFORE FIRST USE
• Remove all packaging materials.
• Remove any stickers or labels from the device.
• Thoroughly clean the basket and pot with hot water, a little washing-up liquid
and a non-abrasive sponge.
• Wipe the device inside and out with a damp cloth.
Prepare device
1. Place the device on a stable, horizontal and
level surface. Do not place the device on a
heat-sensitive surface.
2. Insert the grate into the basket.
3. Pull the cable out of the storage
compartment on the bottom of the device.
Note: This is an oil-free fryer that uses hot air.
Do not ll the basket with oil or frying fat.
23
EN
GENERAL OPERATION
Hot air frying
1 2 3
1. Plug the power plug into the mains socket.
2. Carefully pull the baskets out of the hot air fryer (see image 1)
3. Put the ingredients in the basket (see image 2).
4. Slide the baskets back into the air fryer (see image 3). Use the guides in the
housing as a guide when pushing it in.
CAUTION
Risk of burns! Do not touch the baskets during and for some time
after use as they become very hot. Only hold the baskets by the
handle.
5. Determine the required preparation time for the ingredient using the cooking
table (see chapter "Settings and cooking table")
6. Some ingredients have to be shaken halfway through the preparation time
(see chapter "Settings and cooking table"). To shake the ingredients, pull the
basket out of the device by the handle and shake it. Then slide the basket back
into the fryer.
Tip: If you set the timer halfway through the preparation time, you will hear the
timer chime when you need to shake the ingredients. However, that means you
have to set the timer back to the remaining prep time after shaking.
7. When you hear the timer sound, the set cooking time has elapsed. Remove
the basket from the device and place it on a trivet.
8. Check if the ingredients are done. If the ingredients are not done yet, slide the
basket back into the device and set the timer for a few more minutes.

24
EN
9. To remove ingredients (like chips), pull the basket out of the air fryer, place it
on a trivet and use tongs to remove the ingredients.
Note: Do not turn the basket upside down or excess oil that has collected at the
bottom will spill onto the ingredients.
CAUTION
Risk of burns!The basket and the ingredients are very hot after
frying. Depending on the type of ingredients in the fryer, hot steam
may escape from the basket.
10. When a batch of ingredients is done, the air fryer is immediately ready to cook
another batch.
CONTROL PANEL AND BUTTON FUNCTIONS
General functions
As soon as you insert the plug into the socket, all symbols will light up for 1 second
and then go out. The buzzer is now also switched on and the POWER button
ashes.
• Press the POWER button. The L, R and L=R symbols light up and can be
selected.
• If you press L, the L symbol will ash. If you press R, the R symbol will ash. If
you press L=R, the L=R symbol will ash and the six preset food symbols will
light up at the top of the control panel.
Temperature
Timer
Start/Stop Sync
L=R
PowerPreheat

25
EN
Note on the fan symbol
When the fan is on, the fan icon will be solidly illuminated. If the fan is off, the
symbol goes out. After operation, the icon will ash until you press the START/
PAUSE or POWER button.
Function of the arrow buttons and the buttons L/R/L=R
• From the timer page, press and to increase or decrease the cooking
time in 1-minute increments.
• On the temperature page, press and to increase or decrease the
temperature in 5 °C increments. When setting the maximum and minimum
temperature, the symbols and are switched off.
• When you press the PREHEAT button, the preset temperature is 200 °C and
the preset time is 5 minutes (not suitable for drying). Press the L button to
preheat the left basket and the R button to preheat the right basket. If you
press L=R, both baskets will be preheated together. The maximum preheating
time is 15 minutes.
• After setting the time and temperature, press the START/PAUSE button to start
the fryer. The selected symbols are lit, the others are off.
Function of the Start/Pause and Power buttons
• If you press the POWER button when the device is on, it will turn off and the
buzzer will sound.
• When both baskets are working together and you press the START/PAUSE
button, the buzzer will sound and the machine will stop working. Press START/
PAUSE button again to continue cooking.
• If you want to pause one of the baskets, rst press L or R and then the START/
PAUSE button.
• If the device goes into pause mode, it will not continue to work until you press
the START/PAUSE button again.
• While the device is in operation, the timer and temperature can be adjusted.
Press the L or R button and reset the timer or temperature. After 5 minutes,
the device will continue frying.
• If the device is not in operation or the set time has expired, the device will turn
off after 5 minutes.
• When cooking is complete, the buzzer will beep 5 times and the appliance will
turn off. [End] is displayed on the screen for 5 minutes and the POWER button
ashes slowly.

26
EN
Sync function (not suitable for drying)
• First press the L or R button and set the time and temperature.
• Press the SYNC button. The button starts ashing.
• Press START/PAUSE to start the device. The basket with the longer set cooking
time will heat up rst while [HOLD] is displayed on the other screen. When the
different time is up, the two baskets will start working at the same time.
• In Sync mode, if the cooking time of a basket is not set, the device will not
start. The L or R symbol for the basket that is not set ashes. Then set the time
and temperature there or stop the Sync function.
When the device is in operation and you suddenly set the longer cooking time
shorter or the shorter cooking time suddenly longer, the HOLD basket will start
working and the Sync icon will go out.
L=R mode
• Press L or R and set the time and temperature for one of the two baskets.
Then press the L=R button to copy the settings for the side that has not been
set.
• If you rst press the L=R button and then set the time and temperature, the
same values are set for both baskets.
• Press START/PAUSE and both baskets will work in sync. The two screens show
the same temperature and time.
• If you press the and buttons while both baskets are in operation, the
values for both baskets will be adjusted equally. After adjusting the time and
temperature, the device continues to run and the L=R button goes out.
Basket removal mode
• In Sync or L=R mode, if one of the baskets is taken out, the machine will stop
working and the basket taken out screen will show [Out].
• If the basket is reinserted within 90 seconds, the device will function as in the
original setting.
• If the basket cannot be reinserted within 90 seconds but can be reinserted
within 5 minutes, the basket that has not been removed will continue to work
as in the original setting. The side without the basket is not heated. The Sync
or L=R buttons go out in this case.
• If one or both of the baskets are not reinserted within 5 minutes, the side
without a basket will go into standby mode. The basket that has not been
pulled out continues to function.

27
EN
SETTINGS AND COOKING TABLE
Tips
• Smaller ingredients usually require a slightly shorter preparation time than
larger ingredients.
• A larger amount of ingredients only requires a slightly longer preparation
time, a smaller amount of ingredients only requires a slightly shorter
preparation time.
• Shaking smaller ingredients halfway through the cooking time optimises the
end result and can help to ensure that the ingredients are not unevenly fried.
• Add some oil to fresh potatoes for a crispy result. Fry your ingredients in the
hot air fryer within a few minutes after adding the oil.
• Do not prepare extremely greasy ingredients such as sausages in the air fryer.
• Snacks that can be prepared in the oven can also be prepared in the hot air
fryer.
• The optimal amount for preparing crispy chips is 500 grams.
• Use pre-made dough to prepare lled snacks quickly and easily. Pre-made
dough also takes less preparation time than homemade dough.
• Place a baking sheet or casserole dish in the air fryer basket when you want to
bake a cake or quiche, or when you want to fry fragile or stuffed ingredients
• You can also use the hot air fryer to heat up food. To do this, set the
temperature to 150 °C and the time to up to 10 minutes.

28
EN
Cooking table
The table below will help you to choose the basic settings for the ingredients you
are using. Note that these settings are guidelines only. Because ingredients vary
in origin, size, shape and brand, we cannot guarantee the best setting for your
ingredients. Add 3 minutes to the prep time if you start frying while the air fryer is
still cold.
Quantity
Min.-Max.
in g
Time (in
minutes)
Temperature
in °C
Shake
halfway
through
Potatoes and chips
Thin frozen chips 500-600 18-25 200 Yes
Thick frozen chips 500-600 20-25 200 Yes
Potato gratin 600 20-25 200 Yes
Meat & poultry
Steak 100-600 12-18 180 No
Pork chops 100-600 12-18 180 No
Hamburger 100-600 10-20 180 No
Sausage in puff pastry 100-600 13-15 200 No
Chicken thighs 100-600 25-30 180 No
Chicken breast 100-600 18-25 180 No
Snacks
Spring rolls 100-600 8-10 200 Yes
Frozen chicken nuggets 100-600 8-12 180 Yes
Frozen sh ngers 100-500 6-10 200 No
Frozen breaded cheese
snacks
100-500 8-10 180 No
Stuffed vegetables 100-500 12-20 160 No

29
EN
Quantity
Min.-Max.
in g
Time (in
minutes)
Temperature
in °C
Shake
halfway
through
Baked goods
Cake 500 8-15 180 No
Quiche 500 20-22 180 No
Muns 500 15-18 200 No
Sweet snacks 500 20 160 No
CLEANING AND CARE
• Remove the plug from the socket and let the device cool down for at least 30
minutes.
• Remove the accessories.
• Clean the device after each use. Do not clean the accessories or the inside of
the device with pointed or sharp kitchen utensils or abrasives, as these will
damage the coating.
• Wipe the outside of the device with a damp cloth.
• Clean the accessories with hot water, a little washing-up liquid and a non-
abrasive sponge.
• Remove stubborn grease residues with a degreasing liquid.
• Clean the inside of the device with a non-abrasive sponge.
• Clean the heating element with a cleaning brush to remove any food residue.
• If the appliance will not be used for a considerable period of time, it should be
cleaned before it is stored away.
30
EN
TROUBLESHOOTING
Problem Possible cause Solution
The hot air fryer does
not work.
The device is not
plugged in.
Plug the power plug into
the mains socket.
You have not set the
timer.
Set the desired
preparation time on the
timer and switch on the
device.
The ingredients fried
with the air fryer are not
ready.
The quantity of
ingredients in the basket
is too large.
Place smaller portions
of ingredients in the
basket. Smaller portions
are fried more evenly.
The set temperature is
too low.
Set a higher
temperature.
The preparation time is
too short.
Set a longer preparation
time on the timer.
The ingredients are fried
unevenly in the deep
fryer.
Certain types of
ingredients need to be
shaken halfway through
the preparation time.
Ingredients that are
on top of each other
or across (e.g. chips)
must be shaken halfway
through the preparation
time.
The fried snacks are not
crispy when they come
out of the deep fryer.
You are using a type of
snack intended to be
cooked in a conventional
deep fryer.
Use snacks that are
suitable for the oven or
lightly brush the snacks
with oil to make them
crispier.
I cannot slide the pan
into the device properly.
There are too many
ingredients in the
basket.
Do not ll the basket
past the MAX indicator.
The grid is not placed
correctly in the pan.
Slide the grid down into
the basket until you hear
a click.

31
EN
Problem Possible cause Solution
White smoke is coming
out of the device.
You are preparing
greasy ingredients.
When you fry greasy
ingredients in the air fryer,
a large amount of oil will
leak into the basket. The oil
produces white smoke and
the basket may heat up
more than usual. This does
not affect the device or the
end result.
The basket still contains
grease residue from
previous use.
White smoke is produced
when the fat in the basket
heats up. Be sure to clean
the basket thoroughly after
each use.
Fresh chips are unevenly
fried in the hot air fryer.
You have not used the
right type of potato.
Use fresh potatoes and
make sure they stay rm
when deep-frying.
You have not rinsed the
potato sticks properly
before frying.
Rinse the potato sticks well
to remove the starch from
the outside of the sticks.
Fresh chips are not
crispy when they come
out of the fryer.
The crispness of the
chips depends on the
amount of oil and water
in the chips.
Be sure the potato sticks
are dry before adding the
oil.
Cut the potato sticks
smaller for a crispier result.
Add a little more oil for a
crispier result.

32
EN
DISPOSAL CONSIDERATIONS
If there is a legal regulation in your country regarding
the disposal of electrical and electronic equipment, this
symbol on the product or on the packaging indicates that
this product must not be disposed of with household
waste. Instead, it must be taken to a collection point
for the recycling of electrical and electronic equipment.
By disposing of this product in accordance with the
regulations, you protect the environment and the health
of those around you from negative consequences. For
information on recycling and disposal of this product,
contact your local government or household waste
disposal service.
MANUFACTURER & IMPORTER (UK)
Manufacturer:
Chal-Tec GmbH, Wallstrasse 16, 10179 Berlin, Germany.
Importer for Great Britain:
Berlin Brands Group UK Limited
PO Box 42
272 Kensington High Street
London, W8 6ND
United Kingdom

33
ES
Estimado cliente:
Le felicitamos por la adquisición de este producto. Lea
atentamente el siguiente manual y siga cuidadosamente las
instrucciones de uso con el n de evitar posibles daños. La
empresa no se responsabiliza de los daños ocasionados por
un uso indebido del producto o por haber desatendido las
indicaciones de seguridad. Escanee el siguiente código QR
para obtener acceso al manual de usuario más reciente y
otra información sobre el producto.
ÍNDICE
Instrucciones generales de seguridad 34
Indicaciones para un uso seguro 35
Vista general del aparato 36
Antes del primer uso 36
Puesta en funcionamiento 37
Panel de control y botones 38
Ajustes y tabla de cocción 41
Limpieza y cuidado 43
Detección y reparación de anomalías 44
Indicaciones sobre la retirada del aparato 46
Fabricante e importador (Reino Unido) 46
DATOS TÉCNICOS
Número de artículo 10045473
Suministro eléctrico 220-240 V ~ 50/60 Hz
Alimentación 2 x 1425 W = 2850 W (máx.)
Volumen de las cestas 2 x 3,8 L
Temperatura y tiempo ajustables
Freidora: 80-200 °C/0-60 min
Deshidratador: 40-80 °C/1-24 h

34
ES
INSTRUCCIONES GENERALES DE SEGURIDAD
• Lea atentamente todas las instrucciones de seguridad.
• No toque las supercies calientes.
• Para evitar las descargas eléctricas, no sumerja el cable, el enchufe ni la base
en agua ni en ningún otro líquido.
ATENCIÓN
¡Riesgo de quemaduras! Este aparato eléctrico contiene una
función de calentamiento. Las supercies, incluso las que no son
las funcionales, pueden alcanzar temperaturas altas. Dado que las
personas no perciben la misma temperatura por igual, use este
aparato con precaución. Agarre el aparato únicamente por las asas
y supercies de agarre previstas para ello, y use protección
térmica, como guantes o similar. Deje las supercies de agarre
distintas de las previstas enfriar el tiempo suciente antes de
tocarlas.
• Desenchufe el aparato cuando no lo utilice y antes de limpiarlo. Deje que el
aparato se enfríe
• antes de desmontar las partes.
• Si el cable de alimentación está dañado, deberá ser sustituido por el
fabricante, el servicio técnico o una persona con cualicación similar para
evitar situaciones de peligro.
• No utilice accesorios no recomendados por el fabricante del aparato, ya que
puede provocar lesiones.
• No use el aparato al aire libre.
• No deje el cable colgando del borde de la mesa o encimera y no toque las
supercies calientes.
• No coloque el aparato sobre o cerca de un quemador de gas o eléctrico
caliente o en un horno caliente.
• Tenga mucho cuidado al mover el aparato con aceite caliente u otros líquidos
calientes.
• Inserte siempre primero el enchufe en el aparato y después el cable, en la
toma de corriente. Si no va a usar el aparato, apáguelo y desenchúfelo de la
toma de corriente.
• No utilice el aparato para nes distintos de los previstos.
• Los niños mayores de 8 años y las personas con discapacidad física, sensorial
o psíquica, o con falta de experiencia y conocimientos pueden utilizar el
aparato si han sido previamente instruidos por su tutor o supervisor sobre
el funcionamiento del mismo y conocen las funciones, las indicaciones de
seguridad y los riesgos asociados. No permita que niños jueguen con el
aparato. Los niños mayores de 8 años solamente podrán limpiar el aparato si
se encuentran bajo supervisión.
35
ES
INDICACIONES PARA UN USO SEGURO
• Introduzca siempre los ingredientes que vaya a freír en la cesta de forma que
no entren en contacto con los elementos calefactores.
• No cubra las aberturas de entrada y salida de aire mientras el aparato esté en
funcionamiento.
• No llene la olla de aceite, ya que puede provocar incendio
• mientras esté en funcionamiento.
ATENCIÓN
¡Riesgo de quemaduras! La temperatura de las supercies
accesibles alcanza temperaturas elevadas cuando el aparato está
en funcionamiento. No toque nunca el interior del aparato.
• No coloque el aparato contra la pared u otros dispositivos. Deje al menos
10 cm de espacio libre en la parte trasera y los laterales y 10 cm en la parte
superior del aparato.
• No coloque ningún objeto sobre el aparato.
• No deje el aparato sin supervisión mientras esté en funcionamiento.
ATENCIÓN
¡Riesgo de quemaduras! La fritura con aire caliente libera vapor
caliente a través de las aberturas de salida de aire. Mantenga las
manos y la cara a una distancia segura de las salidas de vapor y
aire. Además, tenga cuidado con el vapor caliente y el aire al retirar
la olla del aparato.
• Desenchufe inmediatamente el cable de alimentación si empieza a salir humo
oscuro del aparato. Espere a que deje de salir humo antes de desenchufar el
aparato.
• Coloque el aparato sobre una supercie horizontal, nivelada y estable.
• Este aparato está destinado exclusivamente al uso doméstico. No es adecuado
para usarse en entornos como cocinas de personal, granjas, moteles y otros
entornos no residenciales. Tampoco está diseñado para ser utilizado por
clientes de hoteles, moteles, pensiones y otros entornos residenciales.
• Desconecte siempre el aparato de la toma de corriente si no lo utiliza.
• Si ha usado el aparato, deje que enfríe durante 30 minutos antes de proceder
a manipularlo o limpiarlo.
• Mantenga el aparato y el cable de alimentación fuera del alcance de los niños
menores de 8 años.
• No utilice el aparato con un temporizador externo o un sistema de control
remoto independiente.
36
ES
VISTA GENERAL DEL APARATO
1 Tapa 5 Rejilla
2 Carcasa 6 Asa
3 Panel de control 7 Aberturas de salida de aire
4 Cesta para freír 8 Cable de alimentación
ANTES DEL PRIMER USO
• Retire todo el material de embalaje.
• Retire cualquier pegatina o etiqueta en el aparato.
• Limpie a fondo la cesta y la olla con agua caliente, un poco de detergente
líquido y una esponja no abrasiva.
• Limpie el aparato por dentro y por fuera con un paño húmedo.
Preparación del aparato
1. Coloque el aparato sobre una supercie
estable, horizontal y nivelada. No coloque
el aparato sobre una supercie sensible al
calor.
2. Introduzca la rejilla en la cesta.
3. Saque el cable del compartimento de
almacenamiento situado en la parte inferior
del aparato.
Nota: Este aparato es una freidora sin aceite
que utiliza aire caliente. No llene la cesta con
aceite o grasa para freír.

37
ES
PUESTA EN FUNCIONAMIENTO
Freidora de aire caliente
1 2 3
1. Introduzca el cable de alimentación en la toma de corriente.
2. Retire con cuidado las cestas de la freidora de aire caliente (véase imagen 1).
3. Introduzca los ingredientes en las cestas (véase imagen 2).
4. Vuelva a introducir las cestas en la freidora de aire (véase imagen 3). Utilice las
guías de la carcasa para introducir más cómodamente las cestas.
ATENCIÓN
¡Riesgo de quemaduras! No toque las cestas durante y un tiempo
después de usar el aparato, ya que se calientan mucho. Sujete las
cestas únicamente por el asa.
5. Determine el tiempo de preparación necesario para los ingredientes
utilizando la tabla de cocción (véase sección «Ajustes y tabla de cocción»).
6. Algunos ingredientes deben sacudirse a mitad del tiempo de preparación
(véase sección «Ajustes y tabla de cocción»). Para sacudir los ingredientes,
saque la cesta del aparato por el asa y agítela. A continuación, vuelva a
introducir la cesta en la freidora.
Consejo: Si programa el temporizador a la mitad del tiempo de preparación,
oirá la señal sonora del temporizador cuando tenga que sacudir los
ingredientes. Sin embargo, eso signica que tiene que volver a programar el
temporizador para el tiempo de preparación restante después de sacudir.
7. Cuando oiga la señal del temporizador, habrá transcurrido el tiempo de
cocción programado. Retire la cesta del aparato y colóquela sobre un
salvamanteles.
8. Compruebe si los ingredientes se han cocido. Si los ingredientes aún no están
hechos, vuelva a introducir la cesta en el aparato y programe el temporizador
unos minutos más.
38
ES
9. Para retirar los ingredientes (como las patatas fritas), saque la cesta de la
freidora de aire, colóquela sobre un salvamanteles y utilice unas pinzas para
retirar los ingredientes.
Nota: No ponga la cesta boca abajo o el exceso de aceite que se haya
acumulado en el fondo se derramará sobre los ingredientes.
ATENCIÓN
¡Riesgo de quemaduras!La cesta y los ingredientes están muy
calientes después de freír. Dependiendo del tipo de ingredientes
que ha puesto en la freidora, puede salir vapor caliente de la cesta.
10. Cuando una tanda de ingredientes está hecha, la freidora de aire está
inmediatamente lista para cocinar otra tanda.
PANEL DE CONTROL Y BOTONES
Funciones generales
En cuanto inserte el cable de alimentación en la toma de corriente, todos los
símbolos se iluminarán durante 1 segundo y luego se apagarán. Ahora también se
enciende el pitido y el botón POWER parpadea.
• Pulse el botón POWER. Los símbolos L, R y L=R se encienden y pueden
seleccionarse.
• Si pulsa L, el símbolo L parpadeará. Si pulsa R, el símbolo R parpadeará.
Si pulsa L=R, el símbolo L=R parpadeará y los seis símbolos de alimentos
preajustados se iluminarán en la parte superior del panel de control.
Temperatura
Temporiza-
dor
Iniciar/detener Sincroni-
zación
L=R
Encender/apagarPrecalenta-
miento

39
ES
Nota sobre el icono de ventilador
Si el ventilador esté encendido, el icono de ventilador se ilumina de forma ja. Si
el ventilador está apagado, el icono se apaga. Tras el funcionamiento, el icono
parpadeará hasta que pulse el botón START/PAUSE o POWER.
Función de los botones de echa y de los botones L/R/L=R
• En la página del temporizador, pulse y para aumentar o disminuir el
tiempo de cocción en incrementos de 1 minuto.
• En la página de temperatura, pulse y para aumentar o disminuir la
temperatura en incrementos de 5 °C. Al ajustar la temperatura máxima y
mínima, los iconos y se apagan.
• Al pulsar el botón PREHEAT, la temperatura precongurada será de 200
°C y el tiempo precongurado, de 5 minutos (no apto para la función
«Deshidratación»). Pulse el botón L para precalentar la cesta izquierda y el
botón R para precalentar la cesta derecha. Si pulsa L=R, se precalentarán
ambas cestas. El tiempo máximo de precalentamiento es de 15 minutos.
• Después de programar el tiempo y la temperatura, pulse el botón START/
PAUSE para poner en marcha la freidora. Los iconos seleccionados se
encienden, los demás se apagan.
Función de los botones Start/Pause y Power
• Si pulsa el botón POWER cuando el aparato está encendido, se apagará y
sonará un pitido.
• Cuando las dos cestas estén funcionando a la vez y pulse el botón START/
PAUSE, sonará un pitido y el aparato dejará de funcionar. Pulse de nuevo el
botón START/PAUSE para continuar cocinando.
• Si desea poner en pausa una de las cestas, pulse primero L o R y después el
botón START/PAUSE.
• Si el aparato entra en modo pausa, no seguirá funcionando hasta que vuelva a
pulsar el botón START/PAUSE.
• Mientras el aparato está en funcionamiento, se puede ajustar el temporizador
y la temperatura. Pulse el botón L o R y congure el temporizador o la
temperatura. Después de 5 minutos, el aparato continuará friendo.
• Si el aparato no está en funcionamiento o el temporizador programado ha
nalizado, el aparato se apagará después de 5 minutos.
• Cuando nalice la cocción, el aparato emitirá 5 pitidos y se apagará. Aparecerá
[End] en la pantalla durante 5 minutos y el botón POWER parpadeará
lentamente.

40
ES
Función de sincronización (no apta para la función «Deshidratación»)
• Pulse el botón L o R y programe el temporizador o la temperatura.
• Pulse el botón POWER. El botón comienza a parpadear.
• Pulse START/PAUSE para poner el aparato en marcha. La cesta con el tiempo
de cocción programado más largo se calentará primero mientras se muestra
[HOLD] en la otra pantalla. Cuando haya transcurrido el tiempo diferente, las
dos cestas empezarán a funcionar al mismo tiempo.
• En el modo Sync, si el tiempo de cocción de una cesta no está programado,
el aparato no se pondrá en marcha. El icono L o R de la cesta que no está
programada parpadea. A continuación, programe el tiempo y la temperatura
o detenga la función Sync.
Si el aparato está en marcha y usted ajusta de repente el tiempo de cocción más
largo a más corto o el tiempo de cocción más corto a más largo, la cesta HOLD
comenzará a funcionar y el icono Sync se apagará.
Modo L=R
• Pulse L o R y programe el tiempo y la temperatura para una de las dos cestas.
A continuación, pulse el botón L=R para copiar los ajustes a la cesta que no se
ha programado.
• Si primero pulsa el botón L=R y luego programa la hora y la temperatura, se
ajustan los mismos valores para ambas cestas.
• Pulse START/PAUSE y ambas cestas se pondrán en marcha a la vez. Las dos
pantallas muestran la misma temperatura y hora.
• Si pulsa los botones y mientras ambas cestas están en marcha, los
valores de ambas cestas se ajustarán por igual. Después de programar el
tiempo y la temperatura, el aparato sigue funcionando y el botón L=R se
apaga.
Modo de extracción de la cesta
• En modo Sync o L=R, si se extrae una de las cestas, el aparato dejará de
funcionar y la pantalla de la cesta extraída mostrará [Out].
• Si se vuelve a introducir la cesta antes de que transcurran 90 segundos, el
aparato funcionará siguiendo los ajustes programados originalmente.
• Si la cesta no se introduce transcurridos los 90 segundos, pero sí antes de que
transcurran 5 minutos, la cesta que no se ha extraído seguirá funcionando
siguiendo los ajustes programados originalmente. La parte de la cesta
extraída no se calentará. Los botones Sync o L=R se apagan en este caso.
• Si una o ambas cestas no se vuelven a colocar en 5 minutos, el lado sin
cesta pasará al modo de espera. La cesta que no se ha extraído seguirá
funcionando.

41
ES
AJUSTES Y TABLA DE COCCIÓN
Consejos
• Los ingredientes más pequeños suelen requerir un tiempo de preparación
algo menor que los ingredientes más grandes.
• Una mayor cantidad de ingredientes requiere un tiempo de preparación
ligeramente mayor, mientras que una menor cantidad de ingredientes
requiere un tiempo de preparación ligeramente menor.
• Sacudir los ingredientes más pequeños a mitad del tiempo de cocción
optimiza el resultado nal y puede ayudar a que los ingredientes no se frían
de forma desigual.
• Añada un poco de aceite a las patatas frescas para obtener un resultado
crujiente. Fría los ingredientes en la freidora de aire caliente durante unos
minutos después de añadir el aceite.
• No prepare ingredientes muy grasientos, como salchichas, en la freidora de
aire.
• Los aperitivos que pueden prepararse en el horno también pueden
prepararse en la freidora de aire caliente.
• La cantidad óptima para preparar patatas fritas crujientes es de 500 gramos.
• Utilice masa precocinada para preparar aperitivos rellenos de forma rápida y
sencilla. La masa precocinada también requiere menos tiempo de preparación
que la masa casera.
• Coloque una bandeja para hornear o una cazuela en la cesta de la freidora
de aire cuando quiera hornear un pastel o una quiche, o cuando quiera freír
ingredientes frágiles o rellenos
• También puede utilizar la freidora de aire caliente para calentar alimentos.
Para ello, ajuste la temperatura a 150 °C y el tiempo hasta 10 minutos.
42
ES
Tabla de cocción
La siguiente tabla le ayudará a elegir los ajustes básicos para los ingredientes que
esté utilizando. Tenga en cuenta que estos ajustes son sólo orientativos. Dado que
los ingredientes varían en origen, tamaño, forma y marca, no podemos garantizar
el mejor ajuste para sus ingredientes. Añada 3 minutos al tiempo de preparación
si empieza a freír cuando la freidora de aire aún está fría.
Cantidad
Mín. - Máx.
en g
Tiempo (en
minutos)
Temperatura
en ºC
Sacudir a la
mitad
Patatas y patatas fritas
Patatas fritas nas
congeladas
500-600 18-25 200 Sí
Patatas fritas gruesas
congeladas
500-600 20-25 200 Sí
Patatas gratinadas 600 20-25 200 Sí
Carne y aves
Filete 100-600 12-18 180 No
Chuletas de cerdo 100-600 12-18 180 No
Hamburguesa 100-600 10-20 180 No
Hojaldres de salchicha 100-600 13-15 200 No
Muslos de pollo 100-600 25-30 180 No
Pechuga de pollo 100-600 18-25 180 No
Aperitivos
Rollito de primavera 100-600 8-10 200 Sí
Nuggets de pollo congelados 100-600 8-12 180 Sí
Barritas de pescado 100-500 6-10 200 No
Palitos de queso congelados 100-500 8-10 180 No
Verduras rellenas 100-500 12-20 160 No

43
ES
Cantidad
Mín. - Máx.
en g
Tiempo (en
minutos)
Temperatura
en ºC
Sacudir a la
mitad
Productos horneados
Pastel 500 8-15 180 No
Quiche 500 20-22 180 No
Magdalenas 500 15-18 200 No
Aperitivos dulces 500 20 160 No
LIMPIEZA Y CUIDADO
• Retire el enchufe de la toma de corriente y deje que el aparato se enfríe
durante al menos 30 minutos.
• Retire los accesorios.
• Limpie el aparato después de cada uso. No limpie los accesorios ni el interior
del aparato con utensilios de cocina puntiagudos o alados, ni con productos
abrasivos, ya que dañarían el revestimiento.
• Limpie el aparato por fuera con un paño húmedo.
• Limpie los accesorios con agua caliente, un poco de detergente líquido y una
esponja no abrasiva.
• Elimine los restos de grasa persistentes con un líquido desengrasante.
• Limpie el interior del aparato con una esponja no abrasiva.
• Limpie la resistencia con un cepillo de limpieza para eliminar cualquier resto
de comida.
• Si no va a utilizar el aparato durante un largo periodo de tiempo, límpielo
antes de guardarlo.
44
ES
DETECCIÓN Y REPARACIÓN DE ANOMALÍAS
Anomalía Posible causa Solución
La freidora de aire
caliente no funciona.
El aparato no está
enchufado.
Introduzca el cable de
alimentación en la toma
de corriente.
No ha programado el
temporizador.
Programe el tiempo de
preparación deseado
en el temporizador y
encienda el aparato.
Los ingredientes fritos
con la freidora de aire no
están bien cocidos.
La cantidad de
ingredientes en la cesta
es demasiado grande.
Introduzca porciones
más pequeñas de
ingredientes en la cesta.
Las porciones más
pequeñas se fríen más
uniformemente.
La temperatura ajustada
es demasiado baja.
Congure una
temperatura más alta.
El tiempo de preparación
es demasiado corto.
Programe un tiempo de
preparación más largo
en el temporizador.
Los ingredientes se fríen
de forma desigual en la
freidora.
Ciertos tipos de
ingredientes deben
sacudirse a mitad del
tiempo de preparación.
Los ingredientes que
están unos encima
de otros o cruzados
(por ejemplo, patatas
fritas) deben agitarse
a mitad del tiempo de
preparación.
Los aperitivos fritos no
están crujientes cuando
salen de la freidora.
Está utilizando un tipo
de aperitivo destinado
a ser cocinado en una
freidora convencional.
Utilice aperitivos aptos
para el horno o úntelos
ligeramente con aceite
para que queden más
crujientes.
No puedo introducir
correctamente la cesta
en el aparato.
Hay demasiados
ingredientes en la cesta.
No llene la cesta más allá
del indicador MAX.
La rejilla no está
colocada correctamente
en la cesta.
Deslice la rejilla hacia
abajo en la cesta hasta
que oiga un clic.
45
ES
Anomalía Posible causa Solución
Sale humo blanco del
aparato.
Está preparando
ingredientes grasientos.
Cuando fríe ingredientes
grasientos en la freidora
de aire, se derrama una
gran cantidad de aceite en
la cesta. El aceite produce
humo blanco y la cesta
puede calentarse más de
lo normal. Esto no afecta
al aparato ni al resultado
nal.
La cesta todavía
contiene restos de grasa
de un uso anterior.
Se produce humo blanco
cuando la grasa de la cesta
se calienta. Asegúrese
de limpiar bien la cestilla
después de cada uso.
Las patatas fritas frescas
se fríen de forma
desigual en la freidora
de aire caliente.
No ha utilizado el tipo de
patata adecuado.
Utilice patatas frescas
y asegúrese de que se
mantienen rmes al
freírlas.
No ha enjuagado bien
las patatas antes de
freírlas.
Enjuague bien las patatas
para eliminar la fécula del
exterior de las mismas.
Las patatas fritas no
están crujientes cuando
salen de la freidora.
El crujiente de las
patatas fritas depende
de la cantidad de aceite
y agua que contengan.
Asegúrese de que los
palitos de patata están
secos antes de añadir el
aceite.
Corte los palitos de patata
más pequeños para
obtener un resultado más
crujiente.
Añada un poco más de
aceite para obtener un
resultado más crujiente.

46
ES
INDICACIONES SOBRE LA RETIRADA DEL APARATO
Si en su país existe una normativa legal relativa a la
eliminación de aparatos eléctricos y electrónicos, este
símbolo en el producto o en el embalaje indica que este
producto no debe desecharse con la basura doméstica. En
su lugar, debe llevarse al punto de recolección apropiado
para el reciclaje de equipos eléctricos y electrónicos. Si se
asegura de que este producto se desecha correctamente,
ayudará a prevenir posibles consecuencias negativas
para el medio ambiente y la salud humana. Para obtener
información sobre el reciclaje y la eliminación de este
producto, póngase en contacto con la administración local
o con el servicio de eliminación de residuos domésticos.
FABRICANTE E IMPORTADOR (REINO UNIDO)
Fabricante:
Chal-Tec GmbH, Wallstraße 16, 10179 Berlín, Alemania.
Importador para Gran Bretaña:
Berlin Brands Group UK Limited
PO Box 42
272 Kensington High Street
London, W8 6ND
Reino Unido

47
FR
Cher client, chère cliente,
Félicitations pour l'achat de votre appareil. Lisez
attentivement les indications suivantes et suivez-les pour
éviter d'éventuels dommages. Nous ne saurions être tenus
pour responsables des dommages dus au non-respect des
consignes et à la mauvaise utilisation de l’appareil. Veuillez
scanner le code QR pour accéder aux dernières instructions
d'utilisation et pour obtenir de plus amples informations sur
le produit.
SOMMAIRE
Consignes générales de sécurité 48
Instructions pour une utilisation en toute sécurité 49
Aperçu de l‘appareil 50
Avant la première utilisation 50
Fonctionnement général 51
Panneau de commande et touches de fonctions 52
Réglages et tableau de cuisson 55
Nettoyage et entretien 57
Dépannage 58
Informations sur le recyclage 60
Fabricant et importateur (GB) 60
FICHE TECHNIQUE
Numéro d'article 10045473
Alimentation 220-240 V ~ 50/60 Hz
Alimentation 2 x 1425 W = 2850 W (max.)
Contenance des paniers 2 x 3,8 L
Température et durée réglables
Friteuse : : 80-200 °C / 0-60 min
Déshydrateur : 40-80 °C / 1-24 h

48
FR
CONSIGNES GÉNÉRALES DE SÉCURITÉ
• Lisez toutes les consignes de sécurité avec attention.
• Ne touchez pas les surfaces chaudes.
• Pour vous protéger contre les chocs électriques, ne plongez pas le cordon, la
che ou la base dans l'eau ou tout autre liquide.
ATTENTION
Risque de brûlures ! Cet appareil électrique contient une fonction
de chauffage. Les surfaces, même autres que les surfaces
fonctionnelles, peuvent développer des températures élevées. La
température étant ressentie différemment selon les personnes,
utilisez cet appareil avec prudence. Ne touchez l'appareil que par
les poignées et les surfaces de préhension prévues à cet effet, avec
une protection thermique telle que des gants ou similaire. Les
surfaces de préhension autres que celles prévues doivent avoir
susamment de temps pour refroidir avant de les toucher.
• Débranchez l'appareil lorsque vous ne l'utilisez pas et avant de le nettoyer.
Laissez refroidir l'appareil avant
• de retirer des éléments.
• Si le cordon d'alimentation est endommagé, il doit être remplacé par le
fabricant, le service clientèle ou une personne de qualication similaire pour
éviter tout danger.
• L'utilisation d'accessoires non recommandés par le fabricant de l'appareil
peut entraîner des blessures.
• N'utilisez pas l'appareil à l'extérieur.
• Ne laissez pas le cordon pendre sur les bords des tables ou des surfaces de
travail et ne touchez pas les surfaces chaudes.
• Ne placez pas l'appareil sur ou à proximité d'un brûleur à gaz ou électrique
chaud ou dans un four chauffé.
• Soyez extrêmement prudent lorsque vous déplacez l'appareil contenant de
l'huile ou d'autres liquides chauds.
• Insérez toujours d'abord la che dans l'appareil, puis le câble dans la prise.
Lorsque vous n'utilisez plus l'appareil, éteignez-le avant de débrancher la
che de la prise.
• N'utilisez pas l'appareil à des ns autres que celles prévues.
• Cet appareil peut être utilisé par des enfants de 8 ans et plus et par des
personnes dont les capacités physiques, sensorielles ou mentales sont
limitées et/ou dénuées d'expérience et de connaissances si elles ont été
formées à l'utilisation sûre de l'appareil par une personne responsable et si
elles comprennent les dangers encourus. Les enfants ne doivent pas jouer
avec l'appareil. Le nettoyage et l'entretien par l'utilisateur ne doivent pas être
effectués par des enfants, sauf s'ils sont âgés de plus de 8 ans et s'ils sont
sous surveillance.
49
FR
INSTRUCTIONS POUR UNE UTILISATION EN
TOUTE SÉCURITÉ
• Placez toujours les ingrédients à frire dans le panier an qu'ils n'entrent pas
en contact avec les éléments chauffants.
• Ne couvrez pas les ouvertures d'entrée et de sortie d'air lorsque l'appareil est
en marche.
• Ne remplissez pas la poêle avec de l'huile car cela peut présenter un risque
d'incendie
• pendant le fonctionnement.
ATTENTION
Risque de brûlure ! La température des surfaces accessibles est
élevée lorsque l'appareil est en fonctionnement. Ne touchez jamais
l'intérieur de l'appareil.
• Ne placez pas l'appareil contre un mur ou d'autres appareils. Laissez au
moins 10 cm d'espace libre à l'arrière et sur les côtés et 10 cm au-dessus de
l'appareil.
• Ne placez aucun objet sur l'appareil.
• Ne laissez pas l'appareil en marche sans surveillance.
ATTENTION
Risque de brûlures ! La friture à l'air chaud libère de la vapeur
chaude par les ouvertures de sortie d'air. Gardez vos mains et
votre visage à une distance de sécurité des ouvertures de sortie
d'air et de vapeur. Faites également attention à la vapeur chaude
et à l'air lorsque vous retirez la casserole de l'appareil.
• Débranchez immédiatement le cordon d'alimentation si de la fumée noire
s'échappe de l'appareil. Attendez que la fumée s'arrête avant de retirer la
che de l'appareil.
• Assurez-vous que l'appareil se trouve sur une surface horizontale, plane et
stable.
• Cet appareil est destiné à un usage domestique uniquement. Il ne convient
pas à une utilisation dans des environnements tels que les cuisines du
personnel, les fermes, les motels et autres environnements non résidentiels.
Il n'est pas non plus destiné à être utilisé par des clients dans des hôtels, des
motels, des pensions de famille et d'autres environnements résidentiels.
• Débranchez toujours la che secteur lorsque vous n'utilisez pas l'appareil.
• L'appareil doit refroidir pendant 30 minutes après utilisation avant de pouvoir
être manipulé ou nettoyé en toute sécurité.
• Gardez l'appareil et son cordon hors de portée des enfants de moins de 8 ans.
• L'appareil ne doit pas être utilisé avec une minuterie externe ou un système
de télécommande séparé.
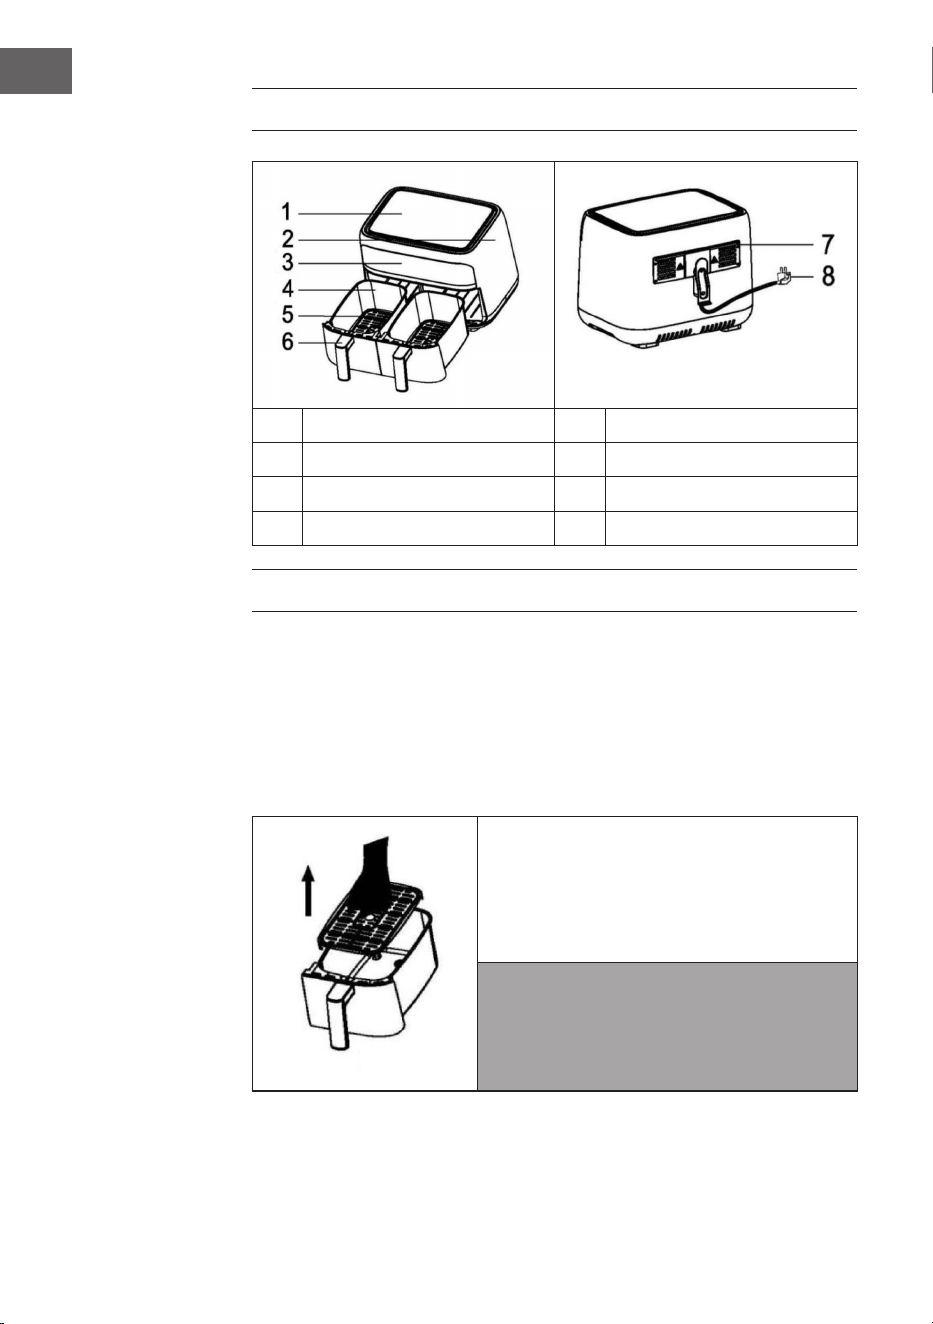
50
FR
APERÇU DE L'APPAREIL
1 Couvercle 5 Grille
2 Boîtier 6 Poignée
3 Panneau de commande 7 Ouvertures d'aération
4 Panier de friture 8 Câble d'alimentation
AVANT LA PREMIÈRE UTILISATION
• Retirez tous les matériaux d'emballage.
• Retirez tous les autocollants ou étiquettes de l'appareil.
• Nettoyez soigneusement le panier et la cuve avec de l'eau chaude, un peu de
liquide vaisselle et une éponge non abrasive.
• Essuyez l'intérieur et l'extérieur de l'appareil avec un chiffon humide.
Préparer l'appareil
1. Placez l'appareil sur une surface stable,
horizontale et plane. Ne placez pas l'appareil
sur une surface sensible à la chaleur.
2. Insérez la grille dans le panier.
3. Tirez le câble hors du compartiment de
rangement au bas de l'appareil.
Remarque : Il s'agit d'une friteuse sans huile
qui utilise de l'air chaud. Ne remplissez pas le
panier d'huile ou de graisse de friture.

51
FR
FONCTIONNEMENT GÉNÉRAL
Friture à l'ir chaud
1 2 3
1. Branchez la che d'alimentation dans la prise secteur.
2. Retirez délicatement les paniers de la friteuse à air chaud (voir image 1)
3. Mettez les ingrédients dans le panier (voir image 2).
4. Glissez les paniers dans la friteuse à air (voir image 3). Utilisez pour ce faire les
guides du boîtier.
ATTENTION
Risque de brûlures ! Ne touchez pas les paniers pendant et un
certain temps après l'utilisation car ils deviennent très chauds.
Tenez les paniers uniquement par la poignée.
5. Déterminez le temps de cuisson nécessaire pour l'ingrédient à l'aide du
tableau de cuisson (voir chapitre « Réglages et tableau de cuisson »)
6. Certains ingrédients doivent être remués à mi-cuisson (voir chapitre «
Réglages et tableau de cuisson »). Pour remuer les ingrédients, tirez le panier
hors de l'appareil par la poignée et secouez-le. Remettez ensuite le panier
dans la friteuse.
Astuce : Si vous réglez la minuterie à mi-cuisson, vous entendrez son carillon
lorsque vous devrez remuer les ingrédients. Cependant, cela signie que vous
devez régler la minuterie sur le temps de préparation restant après avoir
secoué.
7. Lorsque vous entendez l'alarme de la minuterie, le temps de cuisson réglé est
écoulé. Retirez le panier de l'appareil et placez-le sur un dessous de plat.
8. Vériez si les ingrédients sont cuits. Si les ingrédients ne sont pas encore cuits,
remettez le panier dans l'appareil et réglez la minuterie sur quelques minutes
supplémentaires.
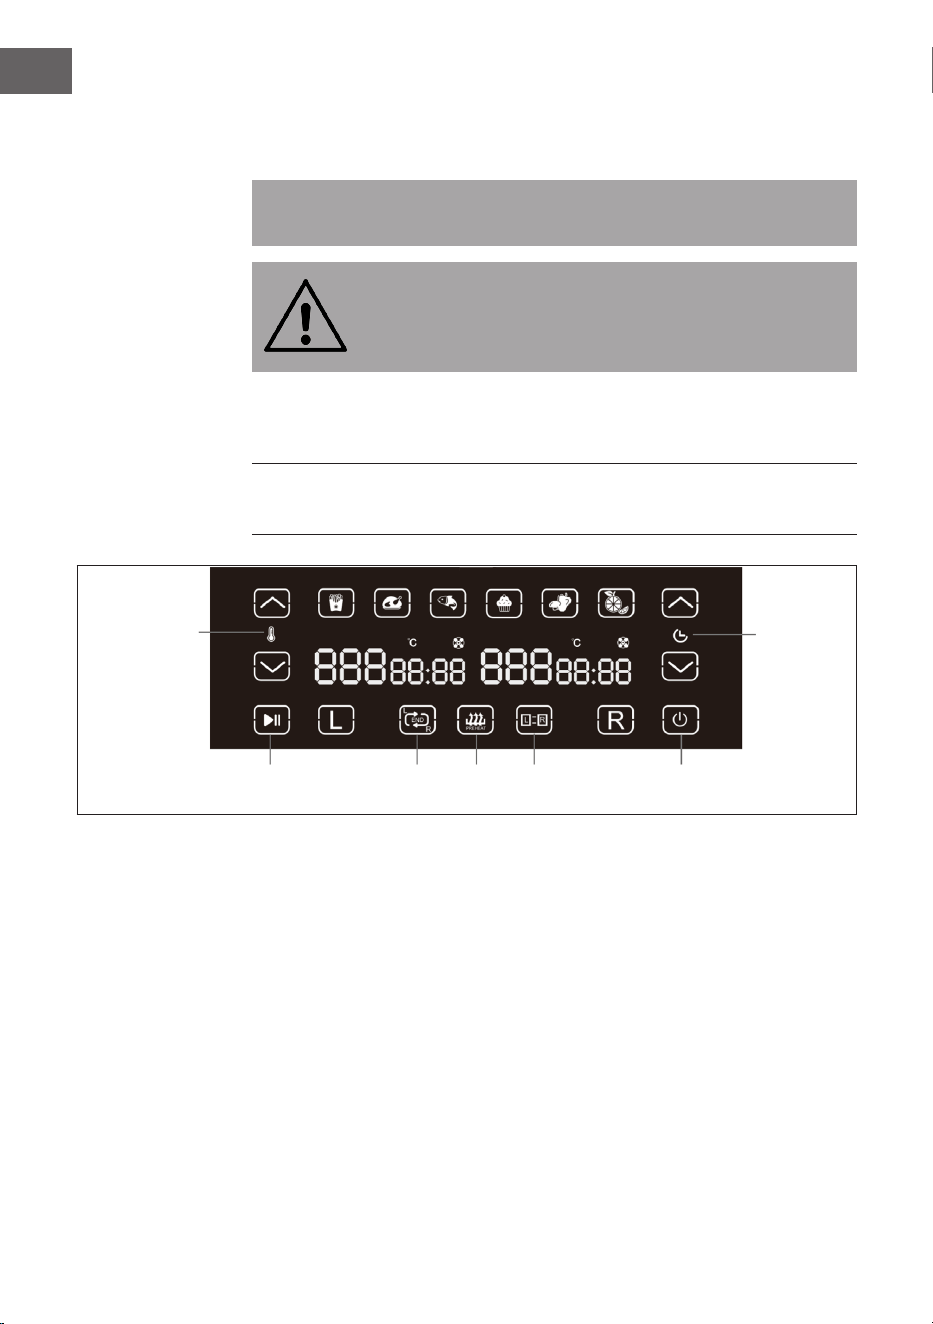
52
FR
9. Pour retirer les ingrédients (comme les frites), sortez le panier de la friteuse
à air, placez-le sur un dessous de plat et utilisez des pinces pour retirer les
ingrédients.
Remarque : Ne renversez pas le panier, pour ne pas renverser l'excès d'huile
accumulé au fond sur les ingrédients.
ATTENTION
Risque de brûlures !Le panier et les ingrédients sont très chauds
après la friture. Selon le type d'ingrédients dans la friteuse, de la
vapeur chaude peut s'échapper du panier.
10. Lorsqu'un lot d'ingrédients est prêt, la friteuse à air est immédiatement prête
à cuire un autre lot.
PANNEAU DE COMMANDE ET TOUCHES DE
FONCTIONS
Fonctions générales
Dès que vous insérez la che dans la prise, tous les symboles s'allument pendant 1
seconde puis s'éteignent. Le buzzer est maintenant également activé et le bouton
POWER clignote.
• Appuyez sur le bouton POWER. Les symboles L, R et L=R s'allument et peuvent
être sélectionnés.
• Si vous appuyez sur L, le symbole L clignote. Si vous appuyez sur R, le
symbole R clignote. Si vous appuyez sur L=R, le symbole L=R clignotera et
les six symboles d'aliments prédénis s'allumeront en haut du panneau de
commande.
Température
Minuterie
Start/Stop Sync
L=R
AlimentationPréchauf-
fage

53
FR
Remarque sur l’icône de ventilateur
Lorsque le ventilateur est allumé, son icône s'allume en continu. Si le ventilateur
est éteint, elle s'éteint. Après le fonctionnement, l'icône clignotera jusqu'à ce que
vous appuyiez sur le bouton START/PAUSE ou POWER.
Fonction des touches échées et des touches L/R/L=R
• Sur la page de la minuterie, appuyez sur et pour augmenter ou diminuer
le temps de cuisson par incréments de 1 minute.
• Sur la page de la température, appuyez sur et pour augmenter ou
diminuer la température par incréments de 5 °C. Lors du réglage de la
température maximale et minimale, les symboles et sont éteints.
• Lorsque vous appuyez sur le bouton PREHEAT, la température préréglée est
de 200 °C et la durée préréglée est de 5 minutes (ne convient pas pour la
déshydratation). Appuyez sur le bouton L pour préchauffer le panier gauche
et sur le bouton R pour préchauffer le panier droit. Si vous appuyez sur L=R,
les deux paniers seront préchauffés ensemble. Le temps de préchauffage
maximal est de 15 minutes.
• Après avoir réglé la durée et la température, appuyez sur le bouton START/
PAUSE pour démarrer la friteuse. Les symboles sélectionnés sont allumés, les
autres sont éteints.
Fonction des boutons Start/Pause et Alimentation
• Si vous appuyez sur le bouton POWER lorsque l'appareil est allumé, il
s'éteindra et la sonnerie retentira.
• Lorsque les deux paniers fonctionnent ensemble et que vous appuyez sur
le bouton START/PAUSE, le signal sonore retentit et la machine s'arrête de
fonctionner. Appuyez à nouveau sur le bouton START/PAUSE pour poursuivre
la cuisson.
• Pour mettre en pause l'un des paniers, appuyez d'abord sur L ou R, puis sur le
bouton START/PAUSE.
• Si l'appareil passe en mode pause, il cessera de fonctionner jusqu'à ce que
vous appuyiez à nouveau sur le bouton START/PAUSE.
• La minuterie et la température peuvent être réglables pendant le
fonctionnement de l'appareil. Appuyez sur le bouton L ou R et réinitialisez la
minuterie ou la température. Après 5 minutes, l'appareil continuera à frire.
• Si l'appareil n'est pas en marche ou si le temps réglé a expiré, l'appareil
s'éteindra après 5 minutes.
• Lorsque la cuisson est terminée, le buzzer émet 5 bips et l'appareil s'éteint.
[End] s'ache à l'écran pendant 5 minutes et le bouton POWER clignote
lentement.

54
FR
Fonction Sync (ne convient pas à la déshydratation)
• Appuyez sur le bouton L ou R et réglez la minuterie et la température.
• Appuyez sur le bouton POWER. Le bouton se met à clignoter.
• Appuyez sur START/PAUSE pour démarrer l'appareil. Le panier avec le temps
de cuisson le plus long chauffe en premier pendant que [HOLD] s'ache
sur l'autre écran. Lorsque le temps restant est le même, les deux paniers se
mettent à fonctionner en même temps.
• En mode Sync, si le temps de cuisson d'un panier n'est pas réglé, l'appareil ne
démarre pas. Le symbole L ou R du panier non réglé clignote. Ensuite, réglez-y
la durée et la température ou arrêtez la fonction Sync.
Lorsque l'appareil est en marche et que vous réduisez soudainement le
temps de cuisson le plus long ou rallongez le temps de cuisson le plus court
soudainement, le panier HOLD se met à fonctionner et l'icône Sync s'éteint.
Mode L=R
• Appuyez sur L ou R et réglez la durée et la température pour l'un des deux
paniers. Appuyez ensuite sur la touche L=R pour copier les paramètres du côté
qui n'a pas été déni.
• Si vous appuyez d'abord sur le bouton L=R, puis réglez la durée et la
température, les mêmes valeurs seront dénies pour les deux paniers.
• Appuyez sur START/PAUSE et les deux paniers fonctionneront en
synchronisation. Les deux écrans achent la même température et la même
durée.
• Si vous appuyez sur les boutons et pendant que les deux paniers
fonctionnent, les valeurs des deux paniers seront ajustées de la même
manière. Après avoir réglé la durée et la température, l'appareil continue de
fonctionner et la touche L=R s'éteint.
Mode de retrait du panier
• En mode Sync ou L=R, si l'un des paniers est sorti, la machine s'arrête de
fonctionner et l'écran de retrait du panier ache [Out].
• Si le panier est réinséré dans les 90 secondes, l'appareil fonctionne avec le
réglage d'origine.
• Si le panier ne peut pas être réinséré dans les 90 secondes mais dans les
5 minutes, le panier qui n'a pas été retiré continuera à fonctionner avec le
réglage d'origine. Le côté sans panier n'est pas chauffé. Les boutons Sync ou
L=R s'éteignent dans ce cas.
• Si l'un des paniers ou les deux ne sont pas réinsérés dans les 5 minutes,
le côté sans panier passe en mode veille. Le panier qui n'a pas été retiré
continue de fonctionner.

55
FR
RÉGLAGES ET TABLEAU DE CUISSON
Conseils
• Les ingrédients plus petits nécessitent généralement un temps de préparation
légèrement plus court que les ingrédients plus gros.
• Une plus grande quantité d'ingrédients ne nécessite qu'un temps de
préparation légèrement plus long, une plus petite quantité d'ingrédients ne
nécessite qu'un temps de préparation légèrement plus court.
• Secouer les ingrédients plus petits à mi-cuisson optimise le résultat nal et
peut aider à garantir que les ingrédients ne sont pas frits de manière inégale.
• Ajouter un peu d'huile aux pommes de terre fraîches pour un résultat
croustillant. Faites frire vos ingrédients dans la friteuse à air chaud quelques
minutes après avoir ajouté l'huile.
• Ne préparez pas d'ingrédients extrêmement gras tels que des saucisses dans
la friteuse à air.
• Les collations qui peuvent être préparées au four peuvent également être
préparées dans la friteuse à air chaud.
• La quantité optimale pour préparer des frites croustillantes est de 500
grammes.
• Utilisez de la pâte préfabriquée pour préparer rapidement et facilement des
collations fourrées. La pâte préfabriquée prend également moins de temps de
préparation que la pâte maison.
• Placez une plaque à pâtisserie ou une cocotte dans le panier de la friteuse à
air lorsque vous voulez faire cuire un gâteau ou une quiche, ou lorsque vous
voulez faire frire des ingrédients fragiles ou farcis
• Vous pouvez également utiliser la friteuse à air chaud pour réchauffer les
aliments. Pour ce faire, réglez la température sur 150 °C et la durée jusqu'à 10
minutes.

56
FR
Tableau de cuisson
Le tableau ci-dessous vous aidera à choisir les paramètres de base pour les
ingrédients que vous utilisez. Notez que ces paramètres ne sont que des
lignes directrices. Étant donné que l'origine, la taille, la forme et la marque des
ingrédients varient, nous ne pouvons pas garantir le meilleur réglage pour vos
ingrédients. Ajoutez 3 minutes au temps de préparation si vous commencez à frire
avec la friteuse à air encore froide.
Quantité
Min.-Max.
en g
Durée (en
minutes)
Température
en °C
Secouer à
mi-cuisson
Pommes de terre et frites
Frites nes surgelées 500-600 18-25 200 Oui
Frites surgelées épaisses 500-600 20-25 200 Oui
Gratin de pommes de terre 600 20-25 200 Oui
Viande & volaille
Steak 100-600 12-18 180 Non
Côtes de porc 100-600 12-18 180 Non
Hamburger 100-600 10-20 180 Non
Saucisse en pâte feuilletée 100-600 13-15 200 Non
Cuisses de poulet 100-600 25-30 180 Non
Blanc de poulet 100-600 18-25 180 Non
Snacks
Rouleaux de printemps 100-600 8-10 200 Oui
Nuggets de poulet surgelés 100-600 8-12 180 Oui
Bâtonnets de poisson
surgelés
100-500 6-10 200 Non
Snacks au fromage panés
surgelés
100-500 8-10 180 Non
Légumes farcis 100-500 12-20 160 Non

57
FR
Quantité
Min.-Max.
en g
Durée (en
minutes)
Température
en °C
Secouer à
mi-cuisson
Produits de boulangerie
Gâteau 500 8-15 180 Non
Quiche 500 20-22 180 Non
Muns 500 15-18 200 Non
Collations sucrées 500 20 160 Non
NETTOYAGE ET ENTRETIEN
• Retirez la che de la prise et laissez l'appareil refroidir pendant au moins 30
minutes.
• Retirez les accessoires.
• Nettoyez l'appareil après chaque utilisation. Ne nettoyez pas les accessoires
ou l'intérieur de l'appareil avec des ustensiles de cuisine pointus ou
tranchants ou des abrasifs, car ils endommageraient le revêtement.
• Essuyez l'intérieur et l'extérieur de l'appareil avec un chiffon humide.
• Nettoyez les accessoires avec de l'eau chaude, un peu de liquide vaisselle et
une éponge non abrasive.
• Enlevez les résidus de graisse tenaces avec un liquide dégraissant.
• Nettoyez l'intérieur de l'appareil avec une éponge non abrasive.
• Nettoyez l'élément chauffant avec une brosse de nettoyage pour enlever tout
résidu de nourriture.
• Si vous n'utilisez pas l'appareil pendant une longue période, nettoyez-le avant
de le ranger.
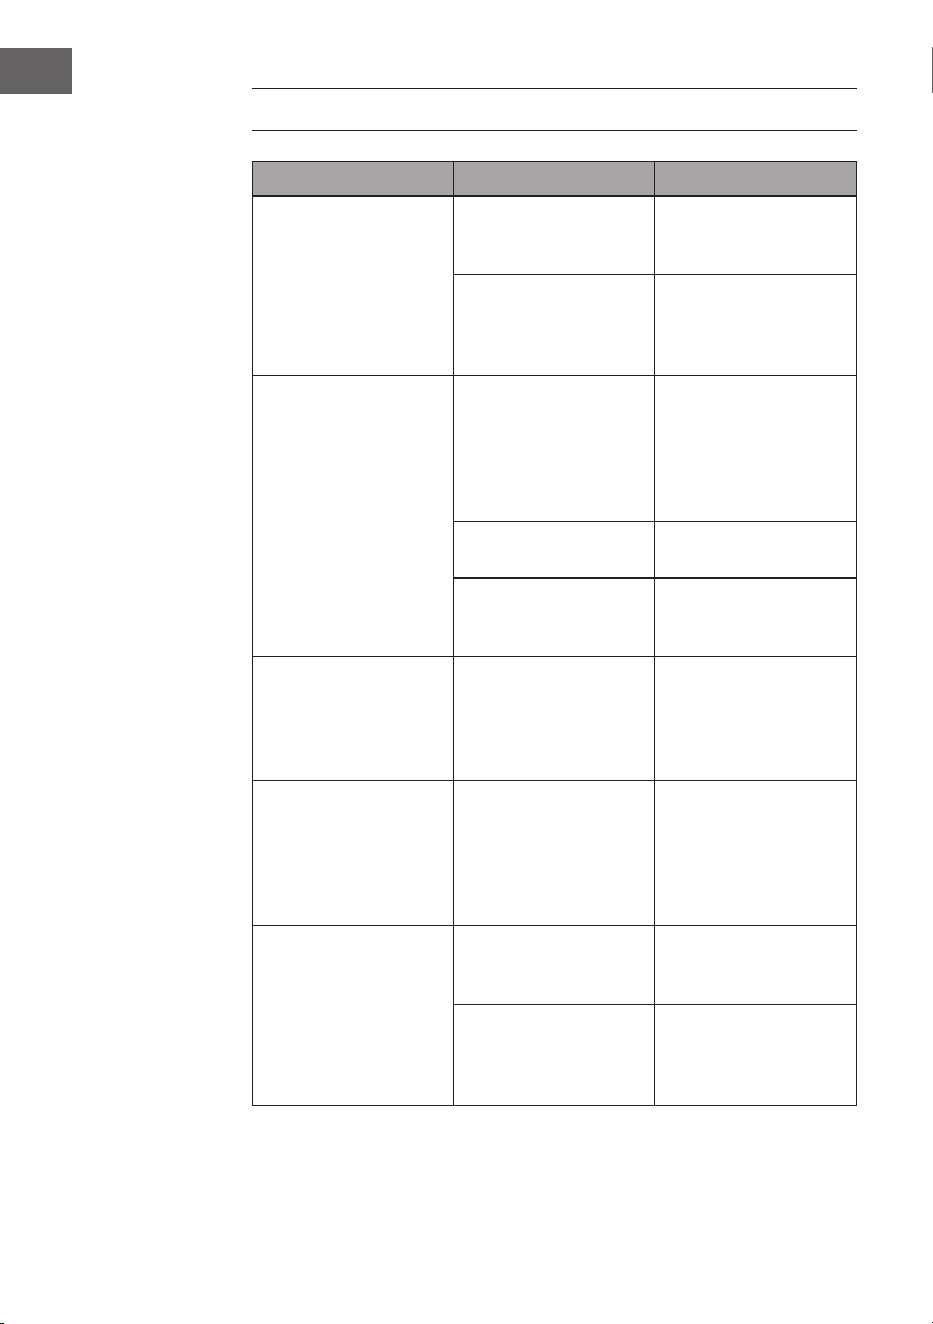
58
FR
DÉPANNAGE
Problème Cause possible Solution
La friteuse à air chaud
ne fonctionne pas.
L'appareil n'est pas
branché.
Branchez la che
d'alimentation dans la
prise secteur.
Vous n'avez pas réglé la
minuterie.
Réglez le temps de
préparation souhaité sur
la minuterie et allumez
l'appareil.
Les ingrédients frits avec
la friteuse à air ne sont
pas cuits.
La quantité d'ingrédients
dans le panier est trop
importante.
Placez de plus petites
quantités d'ingrédients
dans le panier. Les
petites portions
seront frites plus
uniformément.
La température réglée
est trop basse.
Réglez une température
plus élevée.
Le temps de cuisson est
trop court.
Réglez un temps de
cuisson plus long sur la
minuterie.
Les ingrédients sont frits
de manière inégale dans
la friteuse.
Certains types
d'ingrédients doivent
être secoués à mi-
cuisson.
Les ingrédients qui
se chevauchent (par
exemple les frites)
doivent être secoués à
mi-cuisson.
Les snacks frits ne sont
pas croustillants à la
sortie de la friteuse.
Vous utilisez un type
de snack destiné à
cuire dans une friteuse
conventionnelle.
Utilisez des snacks
à cuire au four ou
badigeonnez légèrement
les collations d'huile
pour les rendre plus
croustillants.
Je n'arrive pas à faire
glisser correctement la
cuve dans l'appareil.
Il y a trop d'ingrédients
dans le panier.
Ne remplissez pas
le panier au-delà de
l'indicateur MAX.
La grille n'est pas placée
correctement dans la
cuve.
Faites glisser la grille
vers le bas dans le
panier jusqu'à entendre
un clic.

59
FR
Problème Cause possible Solution
De la fumée blanche sort
de l'appareil.
Vous préparez des
ingrédients gras.
Lorsque vous faites frire
des ingrédients gras
dans la friteuse à air, une
grande quantité d'huile
s'écoule dans le panier.
L'huile dégage de la
fumée blanche et le panier
peut chauffer plus que
d'habitude. Cela n'affecte
pas l'appareil ou le résultat
nal.
Le panier contient
encore des résidus de
graisse d'une utilisation
précédente.
De la fumée blanche se
dégage lorsque la graisse
dans le panier chauffe.
Assurez-vous de bien
nettoyer le panier après
chaque utilisation.
Les frites fraîches sont
frites de manière inégale
dans la friteuse à air
chaud.
Vous n'avez pas utilisé
le bon type de pomme
de terre.
Utilisez des pommes de
terre fraîches et assurez-
vous qu'elles restent
fermes lors de la friture.
Vous n'avez pas bien
rincé les bâtonnets de
pommes de terre avant
de les faire frire.
Rincez bien les frites de
pommes de terre pour
enlever l'amidon.
Les frites fraîches ne
sont pas croustillantes.
Le croustillant des frites
dépend de la quantité
d'huile et d'eau dans les
frites.
Assurez-vous que les frites
sont sèches avant d'ajouter
l'huile.
Coupez des frites plus
petites pour un résultat
plus croustillant.
Ajoutez un peu d'huile
pour un résultat plus
croustillant.

60
FR
INFORMATIONS SUR LE RECYCLAGE
S'il existe une réglementation légale dans votre pays
concernant la mise au rebut des équipements électriques
et électroniques, ce symbole sur le produit ou sur
l'emballage indique que ce produit ne doit pas être
jeté avec les ordures ménagères. Au lieu de cela, il doit
être apporté à un point de collecte pour le recyclage
des équipements électriques et électroniques. En
vous en débarrassant dans les règles, vous protégez
l'environnement et la santé de vos semblables des
conséquences négatives. Pour plus d'informations sur le
recyclage et l'élimination de ce produit, veuillez contacter
votre autorité locale ou votre service de collecte des
déchets ménagers.
FABRICANT ET IMPORTATEUR (GB)
Fabricant :
Chal-Tec GmbH, Wallstraße 16, 10179 Berlin, Allemagne.
Importateur pour la Grande Bretagne :
Berlin Brands Group UK Limited
PO Box 42
272 Kensington High Street
London, W8 6ND
United Kingdom
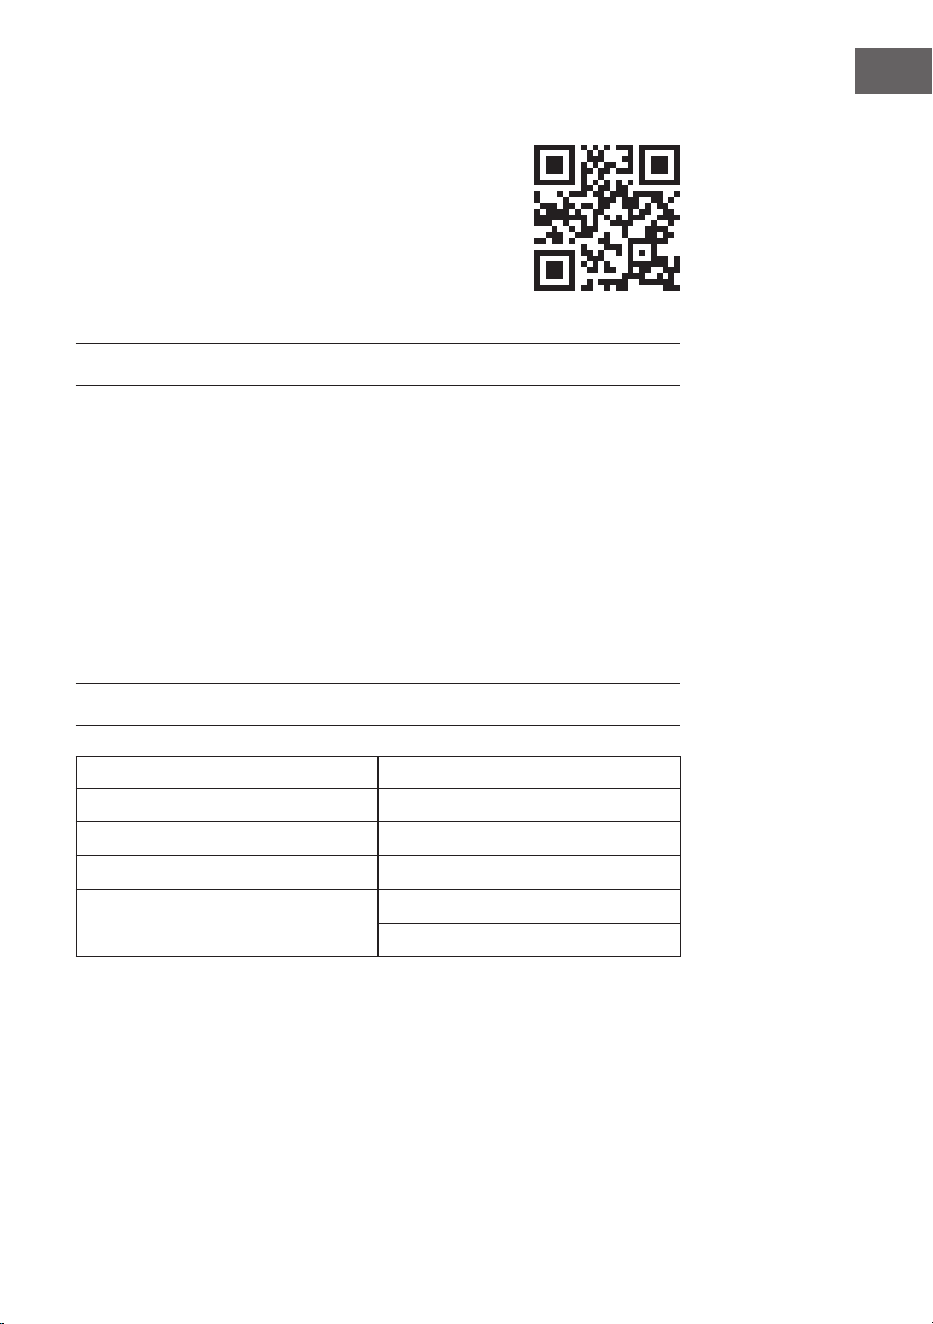
61
IT
Gentile cliente,
Congratulazioni per l'acquisto del dispositivo. La preghiamo
di leggere attentamente le seguenti istruzioni per l'uso e
di seguirle per evitare potenziali danni. Non ci assumiamo
alcuna responsabilità per danni scaturiti da una mancata
osservanza delle avvertenze di sicurezza o da un uso
improprio del dispositivo. Si prega di scansionare il codice
QR per accedere alle istruzioni per l'uso più recenti e per
ulteriori informazioni sul prodotto.
INDICE
Avvertenze di sicurezza generiche 62
Istruzioni per un utilizzo sicuro 63
Panoramica del dispositivo 64
Prima di procedere all‘uso 64
Utilizzo 65
Pannello di controllo e funzione dei tasti 66
Impostazioni e tabella per la cottura 69
Pulizia e manutenzione 71
Risoluzione dei problemi 72
Avviso di smaltimento 74
Produttore & importatore (UK) 74
DATI TECNICI
Numero articolo 10045473
Alimentazione 220-240 V ~ 50/60 Hz
Potenza 2 x 1425 W = 2850 W (max.)
Volume dei cestelli 2 x 3,8 L
Temperatura e durata regolabili
Friggitrice: 80-200 °C/0-60 minuti
Essiccatore: 40-80 °C/1-24 ore

62
IT
AVVERTENZE DI SICUREZZA GENERICHE
• Leggere attentamente tutte le avvertenze di sicurezza.
• Non toccare le superci bollenti.
• Per evitare scosse elettriche, non immergere il cavo, la spina e la base in acqua
o altri liquidi.
ATTENZIONE
Pericolo di ustioni! Questo dispositivo elettrico è dotato di una
funzione di riscaldamento. Le superci, anche quelle non
funzionali, possono raggiungere temperature elevate. Dato che la
temperatura è percepita in modo diverso da diverse persone,
utilizzare questo dispositivo con cautela. È possibile toccare il
dispositivo solo sulle impugnature e sulle apposite superci di
presa ed è necessario indossare guanti termoresistenti o similari.
Le superci di presa diverse da quelle appositamente progettate a
tal ne possono essere toccate solo quando il dispositivo si è
raffreddato a sucienza.
• Staccare la spina prima della pulizia e quando il dispositivo non viene
utilizzato. Lasciare raffreddare il dispositivo prima
• di rimuovere i componenti.
• Se il cavo di alimentazione è danneggiato, deve essere sostituito dal
produttore, dal servizio di assistenza ai clienti o da una persona con qualica
equivalente, in modo da evitare pericoli.
• L'uso di accessori non consigliati dal produttore del dispositivo può causare
lesioni.
• Non utilizzare il dispositivo all'aperto.
• Non lasciare che il cavo di alimentazione penzoli dal bordo di tavoli o piani di
lavoro ed evitare che entri in contatto con superci bollenti.
• Non posizionare il dispositivo sopra o vicino a fornelli elettrici o forni caldi.
• Prestare la massima attenzione quando si sposta il dispositivo con olio o altri
liquidi bollenti.
• Inserire sempre il connettore nel dispositivo prima di collegare la spina alla
presa elettrica. Quando il dispositivo non è più in utilizzo, spegnerlo prima di
staccare la spina dalla presa.
• Non utilizzare il dispositivo per scopi diversi da quelli previsti.
• Questo dispositivo può essere utilizzato da bambini a partire da 8 anni e da
persone con capacità siche, sensoriali o mentali limitate e con mancanza
di esperienza e conoscenza a condizione che siano supervisionati e abbiano
ricevuto istruzioni in merito a un uso sicuro del dispositivo, accertandosi del
fatto che siano stati compresi i rischi associati all'uso del dispositivo stesso.
I bambini non devono giocare con il dispositivo. Pulizia e manutenzione
possono essere realizzate da bambini di età superiore a 8 anni con la dovuta
supervisione.
63
IT
ISTRUZIONI PER UN UTILIZZO SICURO
• Posizionare sempre gli ingredienti da friggere nel cestello, in modo da evitare
il contatto con gli elementi riscaldanti.
• Non coprire le aperture di uscita e ingresso dell'aria quando il dispositivo è in
funzione.
• Non riempire il contenitore d'olio, altrimenti si corre il rischio d'incendi
• durante il funzionamento.
ATTENZIONE
Pericolo di ustioni! Quando il dispositivo è in funzione, la
temperatura delle superci accessibili è elevata. Non toccare
assolutamente il lato interno del dispositivo.
• Non posizionare il dispositivo contro una parete o altri dispositivi. Lasciare
almeno 10 cm di spazio sui lati, sul retro e sul lato superiore del dispositivo.
• Non poggiare oggetti sopra il dispositivo.
• Tenere sempre sotto controllo il dispositivo mentre è in funzione.
ATTENZIONE
Pericolo di ustioni! Quando si frigge con aria calda, dalle aperture
di uscita viene emesso vapore bollente. Tenere mani e viso a
distanza di sicurezza dalle aperture di uscita dell'aria e del vapore.
Fare attenzione all'aria bollente e al vapore anche quando si
rimuove il contenitore dal dispositivo.
• Scollegare immediatamente il cavo di alimentazione se esce fumo scuro dal
dispositivo. Attendere che il fumo scompaia prima di staccare la spina dal
dispositivo.
• Assicurarsi che il dispositivo si trovi su una supercie orizzontale, stabile e in
piano.
• Questo dispositivo è adatto solo all'uso domestico. Non è adatto all'utilizzo in
ambienti come cucine per il personale, agriturismi, motel e altri contesti non
residenziali. Non è adatto neanche all'uso da parte di clienti di hotel, motel,
pensioni e altri contesti residenziali di questo tipo.
• Quando non si utilizza il dispositivo, staccare sempre la spina di alimentazione
principale.
• Per spostare e pulire il dispositivo in sicurezza, attendere che si raffreddi per
30 minuti dopo l'uso.
• Tenere il dispositivo e il cavo di alimentazione fuori dalla portatati di bambini
di età inferiore a 8 anni.
• Non utilizzare il dispositivo con un timer esterno o un sistema di controllo a
distanza separato.

64
IT
PANORAMICA DEL DISPOSITIVO
1 Copertura 5 Griglia
2 Alloggiamento 6 Impugnatura
3 Pannello di controllo 7 Aperture di uscita dell'aria
4 Cestello per friggere 8 Cavo di alimentazione
PRIMA DI PROCEDERE ALL'USO
• Rimuovere tutti i materiali d'imballaggio.
• Rimuovere tutti gli adesivi e le etichette dal dispositivo.
• Pulire a fondo il cestello e il contenitore con acqua calda, un po' di detersivo
per piatti e una spugna non abrasiva.
• Passare un panno umido sui lati interno ed esterno del dispositivo.
Preparare il dispositivo
1. Posizionare il dispositivo su una supercie
stabile, orizzontale e in piano. Non
posizionare il dispositivo su una supercie
sensibile al calore.
2. Inserire la griglia nel cestello.
3. Tirare fuori il cavo dal vano sul fondo del
dispositivo.
Nota: questa friggitrice usa aria calda e non
ha bisogno d'olio. Non riempirla con olio o
altri grassi.
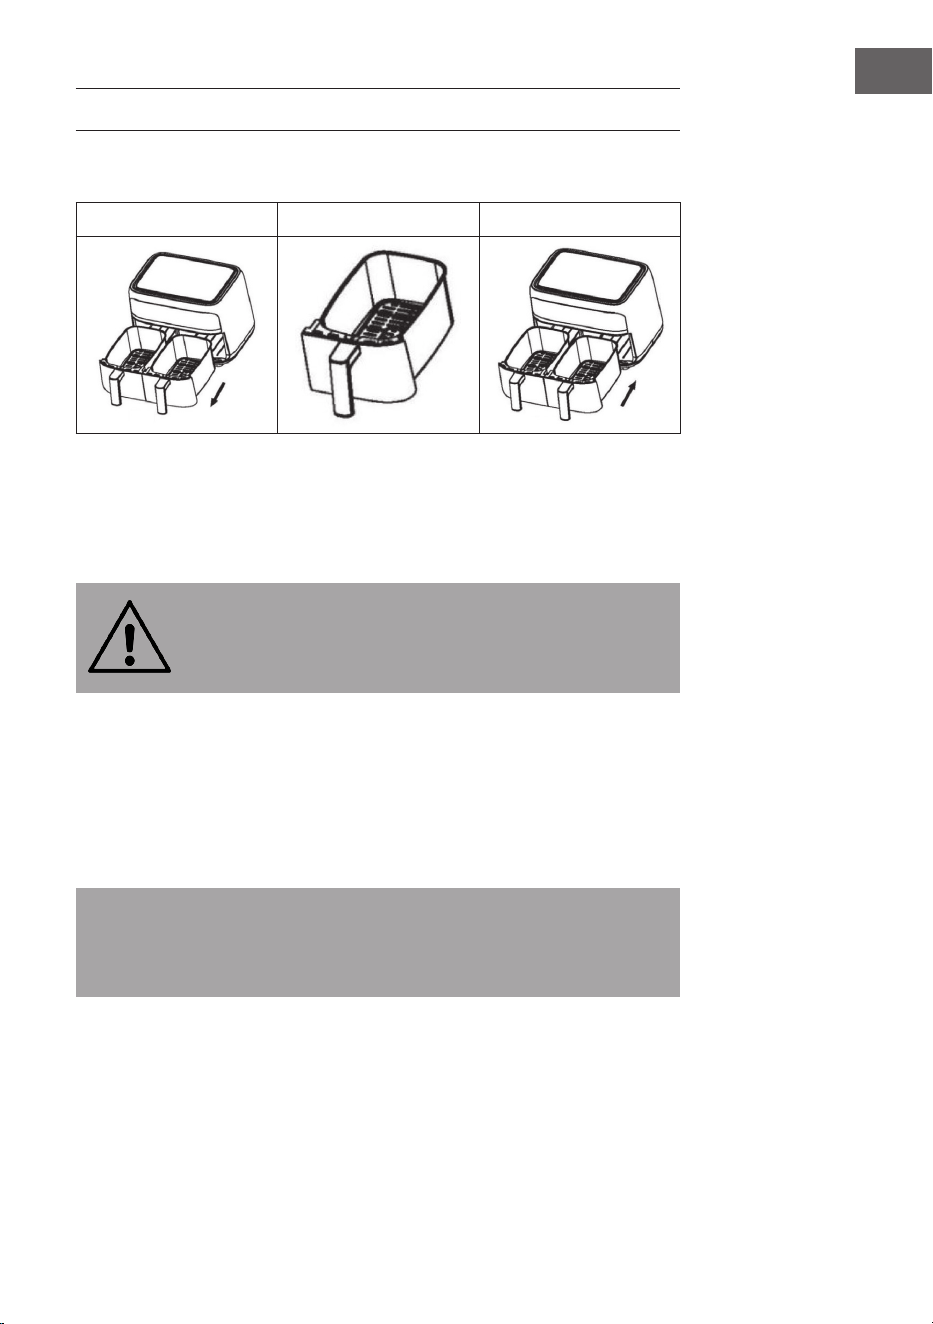
65
IT
UTILIZZO
Friggere con aria calda
1 2 3
1. Inserire la spina nella presa elettrica.
2. Tirare fuori con cura i cestelli dalla friggitrice ad aria (v. immagine 1).
3. Mettere gli ingredienti nel cestello (v. immagine 2).
4. Rimettere i cestelli nella friggitrice ad aria (v. immagine 3). Usare le guide
sull'alloggiamento quando si spinge il cestello all'interno.
ATTENZIONE
Pericolo di ustioni! Non toccare i cestelli durante l'uso e per un
certo periodo dopo l'uso, dato che diventano estremamente caldi.
Tenere i cestelli solo dall'apposita impugnatura.
5. Usare le indicazioni nella tabella per la cottura (v. capitolo "Impostazioni e
tabella per la cottura") per determinare la durata di preparazione necessaria
per gli ingredienti.
6. Alcuni ingredienti devono essere smossi a metà della durata di preparazione
(v. capitolo "Impostazioni e tabella per la cottura"). Per scuotere gli
ingredienti, tirare fuori il cestello dal dispositivo tenendolo dall'impugnatura e
agitarlo. Rimettere poi il cestello nella friggitrice.
Consiglio: se si imposta il timer alla metà della durata di preparazione
consigliata, si sentirà il segnale acustico quando bisogna scuotere gli
ingredienti. Questo signica però che sarà necessario impostare nuovamente la
durata di preparazione rimanente dopo aver agitato gli ingredienti.
7. Quando suona l'allarme del timer, la durata di cottura è terminata. Togliere il
cestello dal dispositivo e poggiarlo su un sottopentola.
8. Controllare se gli ingredienti sono cotti. Se gli ingredienti non sono ancora
cotti, rimettere il cestello nel dispositivo e aggiungere qualche minuto in più
al timer.
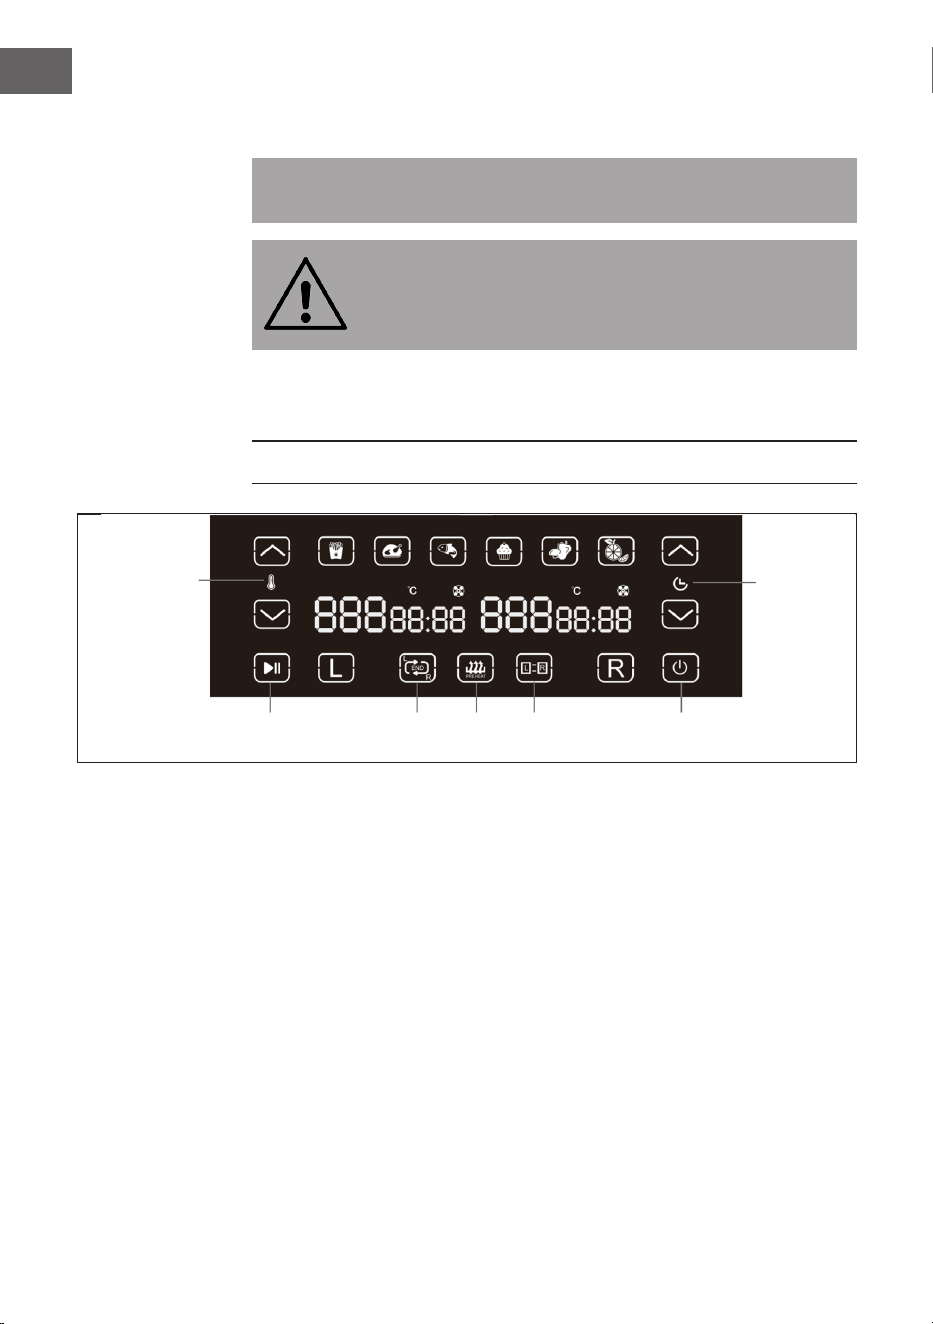
66
IT
9. Per rimuovere gli ingredienti (come le patatine), tirare fuori il cestello dalla
friggitrice ad aria, poggiarlo su un sottopentola e usare una pinza.
Nota: non rovesciare il cestello, altrimenti l'olio in eccesso accumulatosi sul
fondo verrà versato sugli ingredienti.
ATTENZIONE
Pericolo di ustioni!Dopo la cottura, gli ingredienti e il cestello sono
estremamente caldi. In base al tipo di ingredienti nella friggitrice,
potrebbe uscire vapore bollente dal cestello.
10. Quando la prima porzione di ingredienti è cotta, la friggitrice è
immediatamente pronta alla cottura di quella successiva.
PANNELLO DI CONTROLLO E FUNZIONE DEI TASTI
Funzioni generiche
Non appena si inserisce la spina nella presa elettrica, tutti i simboli si illuminano
per 1 secondo e poi si spengono. Viene attivato anche il segnale acustico e il tasto
POWER lampeggia.
• Premere il tasto POWER. I simboli L, R e L=R si accendono e possono essere
selezionati.
• Se si preme L, lampeggia il simbolo L. Se si preme R, lampeggia il simbolo R.
Se si preme L=R, lampeggia il simbolo L=R e si accendono i sei simboli per gli
alimenti predeniti sulla parte alta del pannello di controllo.
Temperatura
Timer
Start/Stop Sync
L=R
PowerPreheat

67
IT
Nota sul simbolo della ventola
Quando la ventola è accesa, il simbolo corrispondente resta acceso. Quando la
ventola è spenta, il simbolo si spegne. Dopo l'uso, il simbolo lampeggia no a
quando si preme START/PAUSA o POWER.
Funzione dei tasti freccia e dei tasti L/R/L=R
• Dalla schermata del timer, premere o per aumentare o diminuire la
durata di cottura in incrementi di 1 minuto.
• Sulla schermata della temperatura, premere o per aumentare o
diminuire la temperatura in incrementi di 5 °C. Quando si impostano la
temperatura massima e minima, i simboli e sono spenti.
• Se si preme PREHEAT, la temperatura predenita è 200 °C e la durata è 5
minuti (non adatte per essiccare). Premere L per preriscaldare il cestello
sinistro e R per preriscaldare quello destro. Se si preme L=R, entrambi i
cestelli verranno preriscaldati insieme. La durata massima per preriscaldare è
di 15 minuti.
• Dopo aver impostato durata e temperatura, premere START/PAUSA per
avviare la friggitrice. I simboli selezionati sono accesi mentre gli altri
rimangono spenti.
Funzione dei tasti Start/Pausa e Power
• Se si preme POWER a dispositivo acceso, la friggitrice si spegne e viene
emesso un segnale acustico.
• Quando entrambi i cestelli sono in funzione e si preme START/PAUSA, viene
emesso il segnale acustico e il dispositivo si arresta. Premere di nuovo START/
PAUSA per continuare con la cottura.
• Per mettere in pausa uno dei due cestelli, premere prima L o R e poi START/
PAUSA.
• Se il dispositivo è in pausa, la cottura non continuerà no a quando non si
preme di nuovo START/PAUSA.
• È possibile regolare timer e temperatura mentre il dispositivo è in funzione.
Premere L o R e regolare timer o temperatura. Dopo 5 minuti, il dispositivo
continuerà con la cottura.
• Se il dispositivo non è in funzione o è scaduto il tempo impostato, si spegne
dopo 5 minuti.
• Quando la cottura è terminata, viene emesso 5 volte il segnale acustico e il
dispositivo si spegne. Sul display viene mostrato [End] per 5 minuti e il tasto
POWER lampeggia lentamente.

68
IT
Funzione di sincronizzazione (non adatta all'essiccazione)
• Per prima cosa, premere L o R e regolare la durata e la temperatura.
• Premere il tasto SYNC. Il tasto inizia a lampeggiare.
• Premere START/PAUSA per avviare il dispositivo. Il cestello con la durata di
cottura maggiore si scalderà per primo e sullo schermo compare [HOLD].
Quando la differenza delle durate di cottura è terminata, i due cestelli
funzionano contemporaneamente.
• Se non viene impostata la durata di un cestello in modalità di sincronizzazione,
il dispositivo non si avvia. Il simbolo L o R per il cestello che non è impostato
lampeggia. A questo punto, impostare la durata e la temperatura o
interrompere la funzione di sincronizzazione.
Se il dispositivo è in funzione e si riduce la durata di cottura più lunga o si
aumenta la durata di cottura più corta, il cestello HOLD entra in funzione e il
simbolo SYNC si spegne.
Modalità L=R
• Premere L o R e impostare la durata e la temperatura per uno dei due cestelli.
Premere poi il tasto L=R per copiare gli stessi valori per il cestello che non è
stato impostato.
• Se si preme prima il tasto L=R e poi si imposta la durata e la temperatura,
verranno impostati gli stessi valori per entrambi i cestelli.
• Premere START/PAUSA ed entrambi i cestelli si avviano contemporaneamente.
I due schermi mostrano gli stessi valori per temperatura e durata.
• Se si premono i tasti e mentre entrambi i cestelli sono in funzione, i
valori per entrambi i cestelli verranno regolati allo stesso modo. Dopo aver
regolato la durata e la temperatura, il dispositivo resta in funzione e il tasto
L=R si spegne.
Modalità di rimozione del cestello
• Se viene rimosso uno dei cestelli in modalità di sincronizzazione o L=R, il
dispositivo smette di funzionare e lo schermo del cestello che è stato rimosso
mostra [Out].
• Se il cestello viene riposizionato entro 90 secondi, il dispositivo riprenderà il
funzionamento con le impostazioni originarie.
• Se il cestello non può essere riposizionato entro 90 secondi, ma entro 5 minuti,
il cestello che non è stato rimosso continuerà a funzionare con le impostazioni
originarie. Il lato senza cestello non viene riscaldato. In questo caso, il tasto
SYNC o L=R si spegne.
• Se uno o entrambi i cestelli non vengono riposizionati entro 5 minuti, il lato
senza cestello passa alla modalità standby. Il cestello che non è stato rimosso
continua a funzionare.

69
IT
IMPOSTAZIONI E TABELLA PER LA COTTURA
Consigli
• Gli ingredienti più piccoli richiedono tendenzialmente una durata di
preparazione più breve degli ingredienti più grandi.
• Una maggiore quantità di ingredienti richiede una durata di preparazione
leggermente più lunga e una quantità minore di ingredienti una durata
leggermente più breve.
• Agitando gli ingredienti a metà della preparazione è possibile ottimizzare il
risultato nale e ottenere una frittura più omogenea.
• Aggiungere un po' d'olio alle patate per ottenere un risultato croccante.
Iniziare la cottura degli ingredienti nella friggitrice ad aria entro qualche
minuto dall'aggiunta dell'olio.
• Non preparare ingredienti estremamente grassi nella friggitrice ad aria, come
ad esempio salsicce.
• Gli snack che possono essere preparati in forno sono adatti anche alla cottura
nella friggitrice ad aria.
• La quantità ideale per preparare patatine croccanti è 500 grammi.
• Usare impasti già pronti per preparare snack ripieni in modo rapido e
semplice. Gli impasti già pronti richiedono inoltre una preparazione più breve
degli impasti fatti in casa.
• Mettere una teglia o una casseruola nel cestello della friggitrice ad aria per
cuocere torte dolci o salate o per friggere ingredienti delicati o ripieni.
• La friggitrice ad aria può essere utilizzata anche per riscaldare gli alimenti. A
tal ne, impostare una temperatura di 150 °C e una durata di 10 minuti.
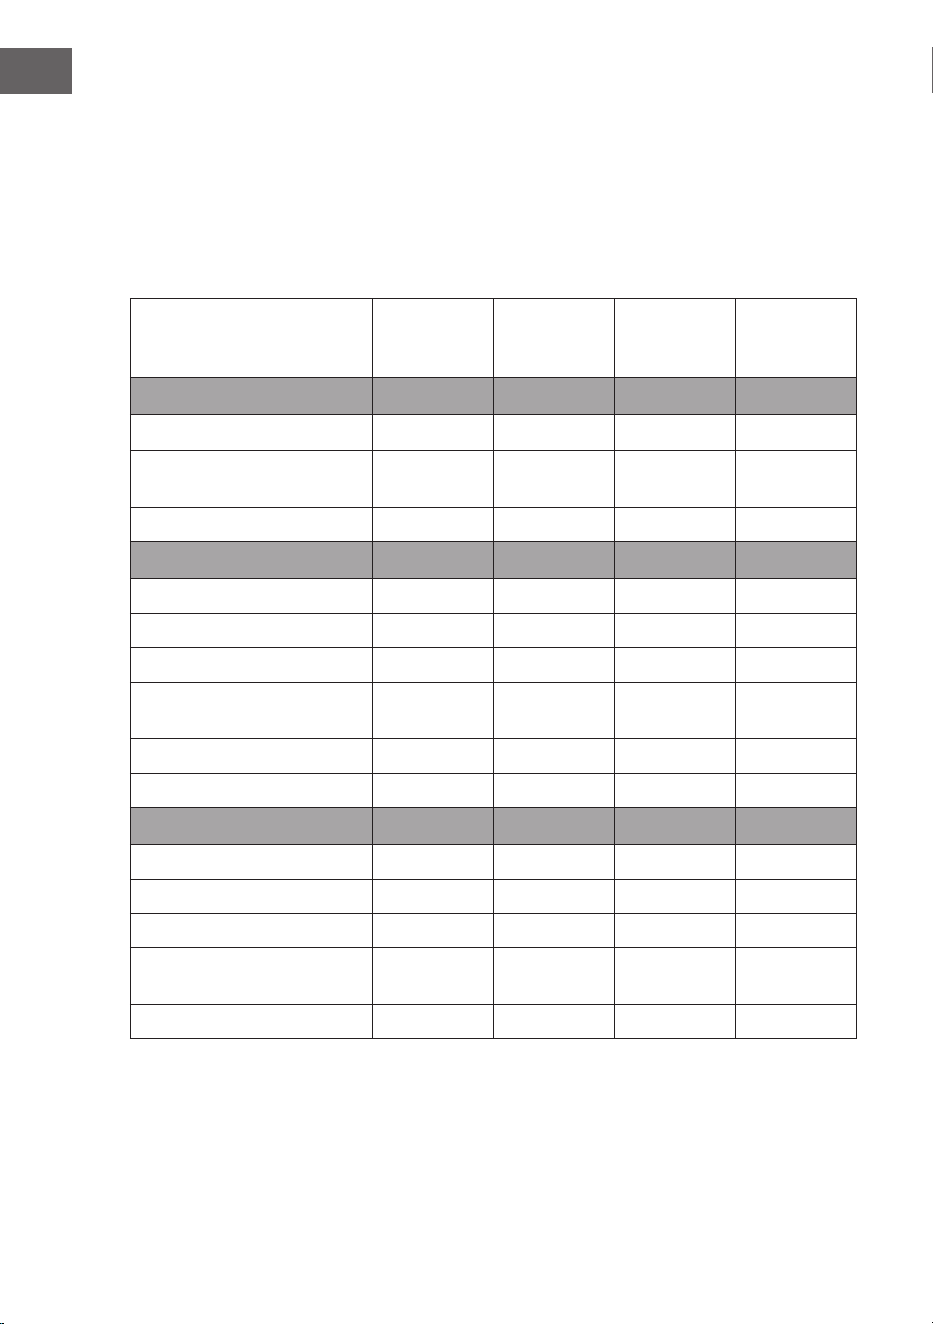
70
IT
Tabella per la cottura
La tabella seguente aiuta a selezionare le impostazioni di base per gli ingredienti
da cuocere. Nota: queste impostazioni servono solo come riferimento. Dato che gli
ingredienti si differenziano per origine, dimensioni, forma e marca, non possiamo
garantire le migliori impostazioni per gli ingredienti in questione. Se si inizia la
cottura quando la friggitrice ad aria è ancora fredda, aggiungere 3 minuti alla
durata di preparazione.
Quantità
Min.-Max.
in g
Durata (in
minuti)
Temperatura
in °C
Agitare a
metà cottura
Patate e patatine fritte
Patatine fritte sottili surgelate 500-600 18-25 200 Sì
Patatine fritte spesse
surgelate
500-600 20-25 200 Sì
Gratin di patate 600 20-25 200 Sì
Carne & pollame
Bistecca 100-600 12-18 180 No
Braciole di maiale 100-600 12-18 180 No
Hamburger 100-600 10-20 180 No
Salsicce avvolte nella pasta
sfoglia
100-600 13-15 200 No
Cosce di pollo 100-600 25-30 180 No
Petto di pollo 100-600 18-25 180 No
Snack
Involtini primavera 100-600 8-10 200 Sì
Crocchette di pollo surgelate 100-600 8-12 180 Sì
Bastoncini di pesce surgelati 100-500 6-10 200 No
Snack di formaggio impanato
surgelati
100-500 8-10 180 No
Verdure ripiene 100-500 12-20 160 No

71
IT
Quantità
Min.-Max.
in g
Durata (in
minuti)
Temperatura
in °C
Agitare a
metà cottura
Prodotti da forno
Torta 500 8-15 180 No
Torta salata 500 20-22 180 No
Mun 500 15-18 200 No
Snack dolci 500 20 160 No
PULIZIA E MANUTENZIONE
• Staccare la spina dalla presa elettrica e lasciare raffreddare il dispositivo per
almeno 30 minuti.
• Rimuovere gli accessori.
• Pulire il dispositivo dopo ogni utilizzo. Non pulire gli accessori o l'interno del
dispositivo con utensili da cucina alati o appuntiti o con prodotti abrasivi,
altrimenti si danneggia il rivestimento.
• Passare un panno umido sul lato esterno del dispositivo.
• Pulire gli accessori con acqua calda, un po' di detersivo per piatti e una
spugna non abrasiva.
• Rimuovere residui ostinati di grasso con un apposito liquido sgrassante.
• Pulire l'interno del dispositivo con una spugna non abrasiva.
• Pulire l'elemento riscaldante con una spazzola per rimuovere residui di
alimenti.
• Se il dispositivo non viene utilizzato per lunghi periodi di tempo, pulirlo prima
di metterlo via.
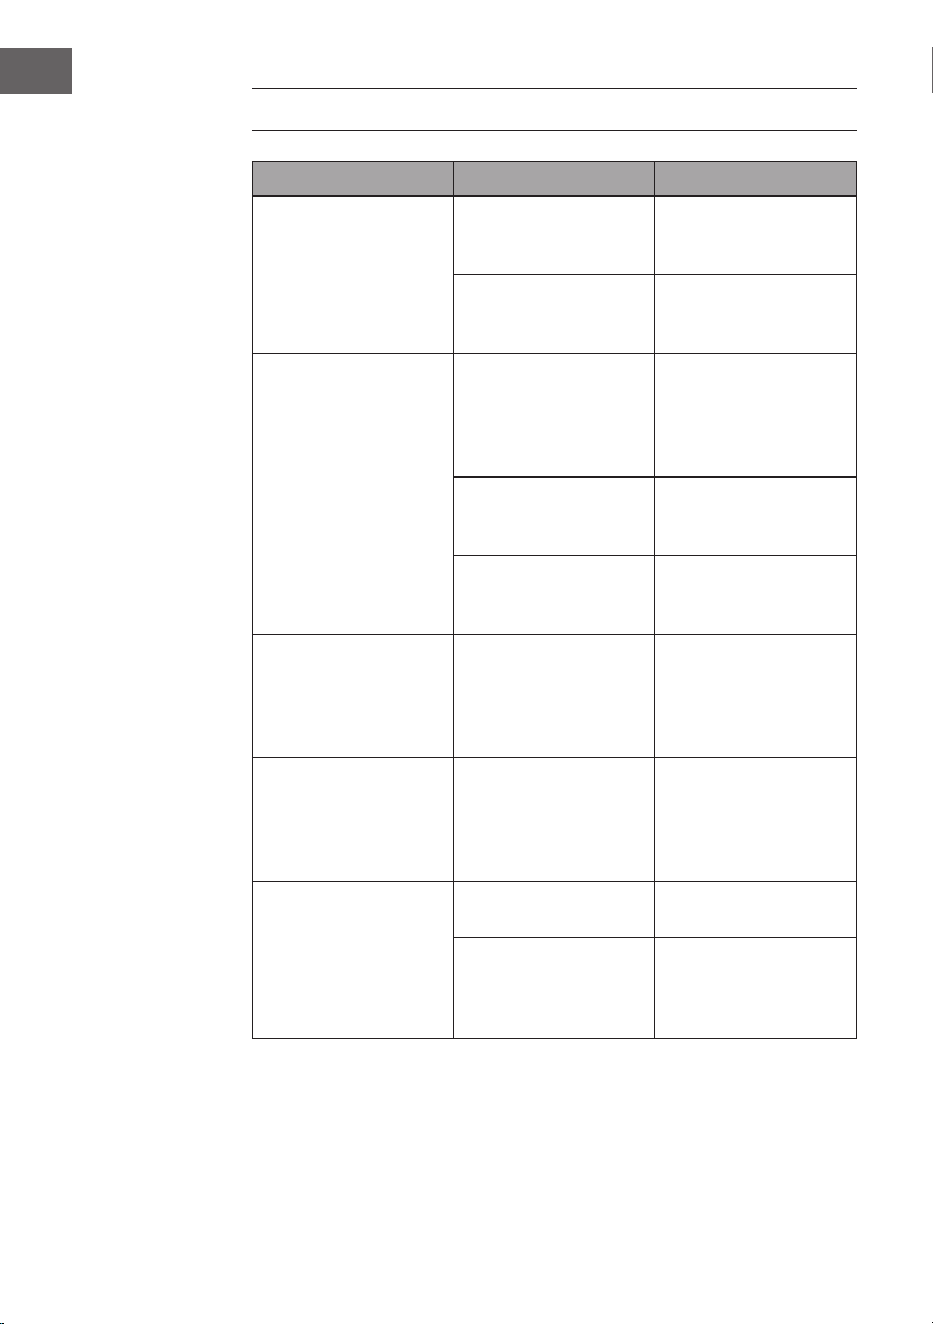
72
IT
RISOLUZIONE DEI PROBLEMI
Problema Possibile causa Soluzione
La friggitrice ad aria non
funziona.
Il dispositivo
non è collegato
all'alimentazione.
Inserire la spina nella
presa elettrica.
Il timer non è stato
impostato.
Impostare la durata
desiderata con il timer e
accendere il dispositivo.
Gli ingredienti cucinati
nella friggitrice ad aria
non sono pronti.
La quantità di ingredienti
nel cestello è eccessiva.
Ridurre la quantità di
ingredienti nel cestello.
Friggendo porzioni più
piccole si ottengono
risultati più omogenei.
La temperatura
impostata è troppo
bassa.
Aumentare la
temperatura.
La durata di
preparazione è troppo
breve.
Impostare una durata di
preparazione più lunga.
Gli ingredienti non sono
fritti in modo omogeneo.
Alcuni ingredienti
devono essere agitati a
metà cottura.
Gli ingredienti che sono
sovrapposti (ad es. le
patatine fritte) devono
essere agitati a metà
cottura.
Gli snack fritti non
sono croccanti quando
vengono tolti dalla
friggitrice ad aria.
Gli snack utilizzati
devono essere cucinati
in una friggitrice
tradizionale.
Utilizzare snack adatti
alla cottura in forno o
spennellarli con un po'
d'olio per renderli più
croccanti.
Non è possibile
posizionare il
contenitore
correttamente nel
dispositivo.
Ci sono troppi
ingredienti nel cestello.
Non riempire il cestello
oltre l'indicazione MAX.
La griglia non
è posizionata
correttamente nel
contenitore.
Inserire la griglia nel
cestello no a sentire
un clic.

73
IT
Problema Possibile causa Soluzione
Esce fumo bianco dal
dispositivo.
Si stanno cuocendo
ingredienti grassi.
Quando si cuociono
ingredienti grassi nella
friggitrice ad aria, una
grande quantità d'olio
nisce nel cestello. L'olio
produce fumo bianco e il
cestello potrebbe scaldarsi
più del solito. Questo non
inuisce sul dispositivo o
sul risultato nale.
Il cestello contiene
ancora residui di grasso
dall'utilizzo precedente.
Il fumo bianco si forma
quando il grasso nel
cestello si scalda.
Assicurarsi di pulire per
bene il cestello dopo ogni
uso.
Le patatine non sono
fritte omogeneamente.
Le patate utilizzate non
sono della tipologia
giusta.
Usare patate fresche
e assicurarsi che
mantengano una
consistenza soda quando
vengono fritte.
Le patatine non sono
state sciacquate a
dovere prima della
cottura.
Sciacquare per bene le
patatine, in modo da
eliminare l'amido sul lato
esterno.
Le patatine fritte non
sono croccanti quando
vengono tolte dalla
friggitrice ad aria.
La croccantezza dipende
dalla quantità d'olio e
acqua nelle patatine.
Assicurarsi che le patatine
siano asciutte prima di
aggiungere l'olio.
Tagliare le patatine di
dimensioni più piccole per
un risultato più croccante.
Aumentare la quantità
d'olio per un risultato più
croccante.

74
IT
AVVISO DI SMALTIMENTO
Se nel vostro paese sono vigenti regolamenti legislativi
sullo smaltimento di dispositivi elettrici ed elettronici,
questo simbolo sul prodotto o sull'imballaggio indica
che non è consentito smaltire questo prodotto nei riuti
casalinghi. Il dispositivo deve invece essere portato in un
centro di raccolta per il riciclaggio di dispositivi elettrici ed
elettronici. Lo smaltimento di questo prodotto conforme
ai regolamenti tutela l'ambiente e salvaguarda la salute
del prossimo da conseguenze negative. Informazioni sul
riciclaggio e sullo smaltimento di questo prodotto sono
disponibili presso l'amministrazione locale o il servizio di
smaltimento dei riuti.
PRODUTTORE & IMPORTATORE (UK)
Produttore:
Chal-Tec GmbH, Wallstrasse 16, 10179 Berlin, Germany.
Importatore per la Gran Bretagna:
Berlin Brands Group UK Limited
PO Box 42
272 Kensington High Street
London, W8 6ND
United Kingdom