
A
B
1
2
3
4
5
6
7
8
9
10
11
12
13
1
1
2
3
4
5
6 7 8
9
10
11
12
2
3
4
5 6
7 8
9
10
11 12
13
1
2
14
15 16
17
18
19 20
1
2
21
1
2
22
23
1
2
24
0 mm
25
26
27
Table of contents en
You can find additional information and explanations online.
Scan the QR code on the title page.
Table of contentsTable of contents
.......................................................... 8
1 Safety ............................................ 8
1.1 General information .................... 8
1.2 Intended use ................................ 8
1.3 Restriction on user group .......... 9
1.4 Safe transport .............................. 9
1.5 Safe installation ........................... 9
1.6 Safe use ...................................... 10
1.7 Damaged appliance ................. 12
2 Preventing material damage .... 13
3 Environmental protection and
saving energy ............................ 13
3.1 Disposing of packaging ........... 13
3.2 Saving energy ............................ 13
4 Installation and connection ...... 14
4.1 Scope of delivery ...................... 14
4.2 Criteria for the installation loc-
ation ............................................. 14
4.3 Installing the appliance ............ 15
4.4 Preparing the appliance for
the first time ............................... 15
4.5 Connecting the appliance to
the electricity supply ................. 15
5 Familiarising yourself with
your appliance ........................... 15
5.1 Appliance .................................... 15
5.2 Control panel ............................. 16
6 Features ..................................... 16
6.1 Shelf ............................................. 16
6.2 Snack container ........................ 16
6.3 Storage container ..................... 16
6.4 Fruit and vegetable container
with humidity control ................ 16
6.5 Butter and cheese compart-
ment ............................................. 17
6.6 Door tray ..................................... 17
6.7 Ice cube maker ......................... 17
6.8 Accessories ............................... 17
7 Basic operation ......................... 18
7.1 Switching on the appliance ..... 18
7.2 Operating tips ............................ 18
7.3 Switching off the appliance ..... 18
7.4 Setting the temperature ........... 18
8 Additional functions ................. 18
8.1 Super cooling ........................... 19
8.2 Super freezing ........................... 19
8.3 Holiday mode ............................ 19
8.4 Energy-saving mode ................. 19
8.5 Freshness mode ....................... 20
9 Alarm .......................................... 20
9.1 Door alarm ................................. 20
9.2 Temperature alarm ................... 20
10 HomeConnect ....................... 20
10.1 Setting up HomeConnect ..... 21
10.2 Switching on the connection
to the WLAN home network
(Wi-Fi) ........................................ 21
10.3 Switching off the connection
to the WLAN home network
(Wi-Fi) ........................................ 21
10.4 Installing updates for the
HomeConnectsoftware ........ 21
10.5 Resetting HomeConnect set-
tings ........................................... 21
10.6 Data protection ........................ 22
11 Refrigerator compartment ..... 22
11.1 Tips for storing food in the re-
frigerator compartment .......... 22
11.2 Chill zones in the refrigerator
compartment ........................... 22
12 Freezer compartment ............. 23
12.1 Freezing capacity .................... 23
7
en Safety
12.2 Fully utilising the freezer
compartment volume ............. 23
12.3 Tips for storing food in the
freezer compartment .............. 23
12.4 Tips for freezing fresh food ... 23
12.5 Shelf life of frozen food at
−18°C ...................................... 24
12.6 Defrosting methods for
frozen food ............................... 24
13 Defrosting ................................ 24
13.1 Defrosting in the refrigerator
compartment ........................... 24
13.2 Defrosting in the freezer com-
partment ................................... 24
14 Cleaning and servicing ........... 24
14.1 Preparing the appliance for
cleaning .................................... 24
14.2 Cleaning the appliance .......... 25
14.3 Removing the fittings ............. 25
14.4 Removing appliance com-
ponents ..................................... 26
15 Troubleshooting ...................... 27
15.1 Power failure ............................ 30
15.2 Conducting an appliance
self-test ..................................... 31
16 Storage and disposal .............. 31
16.1 Taking the appliance out of
operation .................................. 31
16.2 Disposing of old appliance ... 31
17 Customer Service ................... 32
17.1 Product number (E-Nr.), pro-
duction number (FD) and
consecutive numbering (Z-
Nr.) ............................................. 32
18 Technical data ......................... 32
18.1 Information regarding Free
and Open Source Software .. 32
19 Declaration of Conformity ...... 33
Safety 1 Safety
Observe the following safety instructions.
1.1 General information
¡ Read this instruction manual carefully.
¡ Keep the instruction manual and the product information safe
for future reference or for the next owner.
¡ Do not connect the appliance if it has been damaged in transit.
1.2 Intended use
Only use this appliance:
¡ for chilling and freezing food and for making ice cubes.
¡ in private households and in enclosed spaces in a domestic en-
vironment.
¡ Up to an altitude of 2000 m above sea level.
8

Safety en
1.3 Restriction on user group
This appliance may be used by children aged 8 or over and by
people who have reduced physical, sensory or mental abilities or
inadequate experience and/or knowledge, provided that they are
supervised or have been instructed on how to use the appliance
safely and have understood the resulting dangers.
Do not let children play with the appliance.
Cleaning and user maintenance must not be performed by chil-
dren unless they are being supervised.
1.4 Safe transport
WARNING‒Risk of injury!
The heavy weight of the appliance may result in injury when lifted.
Do not lift the appliance on your own.
1.5 Safe installation
WARNING‒Risk of electric shock!
Incorrect installation is dangerous.
Connect and operate the appliance only in accordance with the
specifications on the rating plate.
Connect the appliance to a power supply with alternating cur-
rent only via a properly installed socket with earthing.
The protective conductor system of the domestic electrical in-
stallation must be properly installed.
Never equip the appliance with an external switching device,
e.g. a timer or remote control.
When the appliance is installed, the mains plug of the power
cord must be freely accessible. If free access is not possible, an
isolating switch must be integrated into the permanent electrical
installation according to the installation regulations.
When installing the appliance, check that the power cable is not
trapped or damaged.
If the insulation of the power cord is damaged, this is dangerous.
Never let the power cord come into contact with heat sources.
9
en Safety
WARNING‒Risk of explosion!
If the appliance's ventilation openings are closed off, a leak in the
refrigeration circuit may result in a flammable mixture of gas and
air.
Keep ventilation openings in the appliance casing or in the in-
tegrated casing clear of obstruction.
WARNING‒Risk of fire!
It is dangerous to use an extended power cord and non-approved
adapters.
Do not use extension cables or multiple socket strips.
Only use adapters and power cords approved by the manufac-
turer.
If the power cord is too short and a longer one is not available,
please contact an electrician to have the domestic installation
adapted.
Portable multiple socket strips or portable power supply units may
overheat and cause a fire.
Do not place portable multiple socket strips or power supply
units on the back of the appliance.
1.6 Safe use
WARNING‒Risk of electric shock!
An ingress of moisture can cause an electric shock.
Only use the appliance in enclosed spaces.
Never expose the appliance to intense heat or humidity.
Do not use steam- or high-pressure cleaners to clean the appli-
ance.
WARNING‒Risk of suffocation!
Children may put packaging material over their heads or wrap
themselves up in it and suffocate.
Keep packaging material away from children.
Do not let children play with packaging material.
Children may breathe in or swallow small parts, causing them to
suffocate.
Keep small parts away from children.
Do not let children play with small parts.
10

Safety en
WARNING‒Risk of explosion!
If the cooling circuit is damaged, flammable refrigerant may es-
cape and explode.
To accelerate the defrosting process, do not use any other
mechanical devices or means other than those recommended
by the manufacturer.
If food is stuck to the freezer compartment, loosen it with a blunt
object such as the handle of a wooden spoon.
Products which contain flammable propellants and explosive sub-
stances may explode, e.g. spray cans.
Do not store products which contain flammable propellants (e.g.
spray cans) or explosive substances in the appliance.
WARNING‒Risk of fire!
Electrical devices within the appliance may cause a fire, e.g. heat-
ers or electric ice makers.
Do not operate electrical devices within the appliance.
WARNING‒Risk of injury!
Containers that contain carbonated drinks may burst.
Do not store containers that contain carbonated drinks in the
freezer compartment.
Injury to the eyes caused by escaping flammable refrigerant and
hazardous gases.
Do not damage the tubes of the refrigerant circuit or the insula-
tion.
The appliance may tip.
Do not stand or support yourself on the base, runners or doors.
WARNING‒Risk of burns!
Individual parts on the back of the appliance become hot during
operation.
Never touch these hot parts.
WARNING‒Risk of cold burns!
Contact with frozen food and cold surfaces may cause burns by
refrigeration.
Never put frozen food straight from the freezer compartment
into your mouth.
11

en Safety
Avoid prolonged contact of the skin with frozen food, ice and
surfaces in the freezer compartment.
CAUTION‒Risk of harm to health!
To prevent food from being contaminated, you must observe the
following instructions.
If the door is open for an extended period of time, this may lead
to a considerable temperature increase in the compartments of
the appliance.
Regularly clean the surfaces that may come into contact with
food and accessible drain systems.
Store raw meat and fish in suitable containers in the refrigerator
so that they do not touch or drip on other food.
If the fridge/freezer is empty for an extended period of time,
switch off the appliance, defrost it, clean it and leave the door
open to prevent the formation of mould.
Metal or metal-style parts in the appliance may contain aluminium.
If acidic food comes into contact with aluminium in the appliance,
aluminium foil ions may pass into the food.
Do not consume soiled food.
1.7 Damaged appliance
WARNING‒Risk of electric shock!
If the appliance or the power cord is damaged, this is dangerous.
Never operate a damaged appliance.
Never pull on the power cord to unplug the appliance. Always
unplug the appliance at the mains.
If the appliance or the power cord is damaged, immediately un-
plug the power cord or switch off the fuse in the fuse box.
Call customer service.
Page32
Improper repairs are dangerous.
Repairs to the appliance should only be carried out by trained
specialist staff.
Only use genuine spare parts when repairing the appliance.
If the power cord or the appliance power cable of this appliance
is damaged, it must be replaced with a special power cord or
special appliance power cable, which is available from the man-
ufacturer or its Customer Service.
12
Preventing material damage en
WARNING‒Risk of fire!
If the tubes are damaged, flammable refrigerant and harmful
gases may escape and ignite.
Keep naked flames and ignition sources away from the appli-
ance.
Ventilate the room.
Switch off the appliance.
Page18
Unplug the mains plug from the mains or switch off the circuit
breaker in the fuse box.
Call customer service.
Page32
Preventing material damage2 Preventing material
damage
ATTENTION
If not rolling freely, the appliance's
castors may damage the floor when
the appliance is moved.
Transport the appliance using a
sack truck.
Use floor protection when moving
the appliance, and do not move it
in a zigzag fashion.
Using the appliance, base, runners or
doors as a seat or climbing surface
may damage the appliance.
Do not stand or lean on the appli-
ance, base, runners or doors.
Contamination with oil or fat may
cause plastic parts and door seals to
become porous.
Keep plastic parts and door seals
free of oil and grease.
Metal or metal-style parts in the appli-
ance may contain aluminium. When
aluminium comes into contact with
acidic foods, it corrodes and discol-
ours.
Only store packaged food in the
appliance.
If you clean fittings and accessories
in the dishwasher, this may cause
them to become deformed or discol-
our.
Never clean fittings and accessory
in the dishwasher.
Environmental protection and saving energy3 Environmental protec-
tion and saving energy
3.1 Disposing of packaging
The packaging materials are environ-
mentally compatible and can be re-
cycled.
Sort the individual components by
type and dispose of them separ-
ately.
3.2 Saving energy
If you follow these instructions, your
appliance will use less power.
Selecting the installation location
Keep the appliance out of direct
sunlight.
Install the appliance as far away as
possible from heating elements,
cookers and other heat sources:
13
en Installation and connection
– Maintain a 30mm clearance to
electric or gas cookers.
– Maintain a 300mm clearance to
oil or solid-fuel cookers.
Make sure there is a small gap
between the side wall and the ap-
pliance.
Never cover or block the external
ventilation openings.
Saving energy during use
Note: The arrangement of the fittings
does not affect the energy consump-
tion of the appliance.
Open the appliance only briefly
and then close it carefully.
Never cover or block the interior
ventilation openings or the exterior
ventilation openings.
Transport purchased food in a
cool bag and place in the appli-
ance quickly.
Allow warm food and drinks to
cool down before storing them.
Thaw frozen food in the refrigerator
compartment to utilise the low tem-
perature of the food.
Always leave some space between
the food and to the back panel.
Installation and connection4 Installation and con-
nection
4.1 Scope of delivery
After unpacking all parts, check for
any transport damage and for com-
pleteness of delivery.
If you have any complaints, contact
your dealer or our after-sales service
Page32
.
The delivery consists of the following:
Free-standing appliance
Equipment and accessories
1
Installation instructions
User manual
Customer service directory
Warranty enclosure
2
Energy label
Information on energy consump-
tion and noises
Information about HomeConnect
4.2 Criteria for the installation
location
WARNING
Risk of explosion!
If the appliance is in a space that is
too small, a leak in the refrigeration
circuit may result in a flammable mix-
ture of gas and air.
Only install the appliance in a
space with a volume of at least
1m
3
per 8g refrigerant. The
volume of refrigerant is indicated
on the rating plate.
"Appliance", Fig.
1
/
Page15
The weight of the appliance ex works
may be up to 110kg depending on
the model.
The subfloor must be sufficiently
stable to bear the weight of the appli-
ance.
The surface must be level.
This refrigerator is intended for use at
ambient temperatures of 10°C to
43°C.
The appliance is fully functional within
the permitted room temperature.
If the appliance is operated at colder
room temperatures, the appliance will
1
Depending on the appliance specifications
2
Not in all countries
14

Familiarising yourself with your appliance en
not be damaged up to a room tem-
perature of 5°C.
Over-and-under and side-by-side
installation
If you want to install 2 refrigerating
appliances one over the other or side
by side, you must maintain a clear-
ance of at least 150mm between the
appliances. Selected appliances can
be installed without a minimum clear-
ance. Ask your dealer or kitchen
planner about this.
4.3 Installing the appliance
Install the appliance in accordance
with the enclosed installation in-
structions.
4.4 Preparing the appliance for
the first time
1.
Remove the informative material.
2.
Remove the protective foil and
transit bolts, e.g. remove the ad-
hesive strips and carton.
3.
Clean the appliance for the first
time.
Page25
4.5 Connecting the appliance
to the electricity supply
1.
Insert the appliance plug of the
power cord into the appliance.
2.
Insert the mains plug of the appli-
ance's power cable in a socket
nearby.
The connection data of the appli-
ance can be found on the rating
plate.
"Appliance", Fig.
1
/
Page15
3.
Check the mains plug is inserted
properly.
The appliance is now ready for
use.
Familiarising yourself with your appliance5 Familiarising yourself
with your appliance
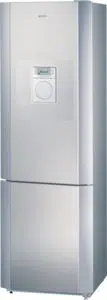
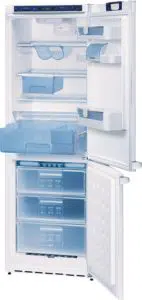
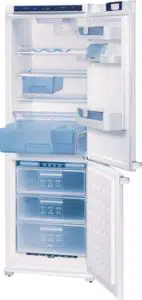
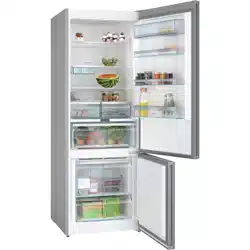
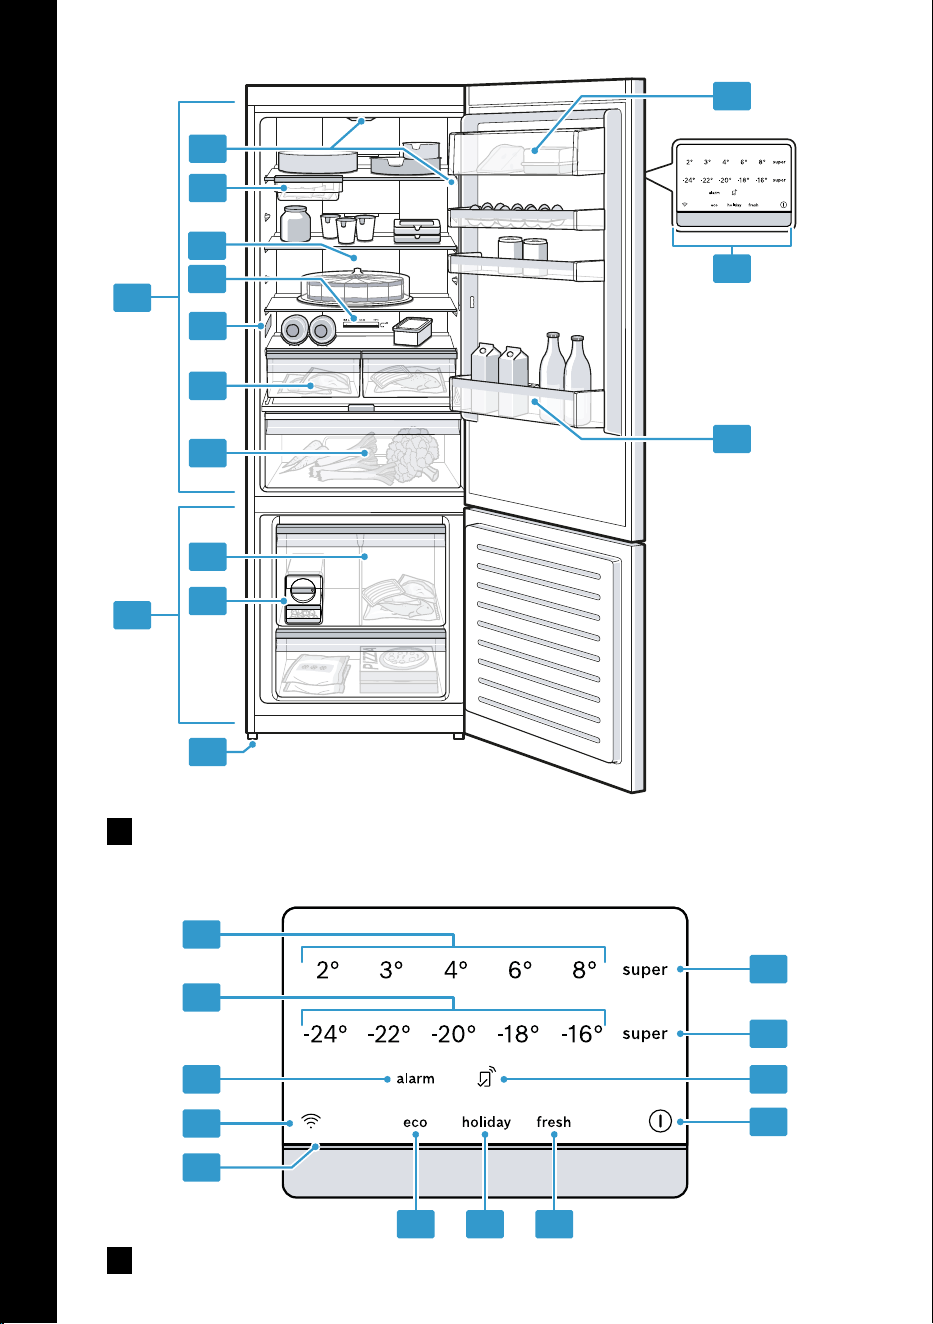
5.1 Appliance
You can find an overview of the parts
of your appliance here.
Fig.
1
Refrigerator compartment
Page22
Freezer compartment
Page23
Lighting
Snack container
Page16
1
Inner ventilation openings
Temperature controller (storage
container)
Page18
Rating plate
Page32
Storage container
Page16
Fruit and vegetable container
with humidity control
Page16
Frozen food container
Page26
Ice cube maker
Page17
Screw foot
Butter and cheese compartment
Page17
1
Control panel
Page16
Door tray for large bottles
Page17
1
Depending on the appliance specifications
15
en Features
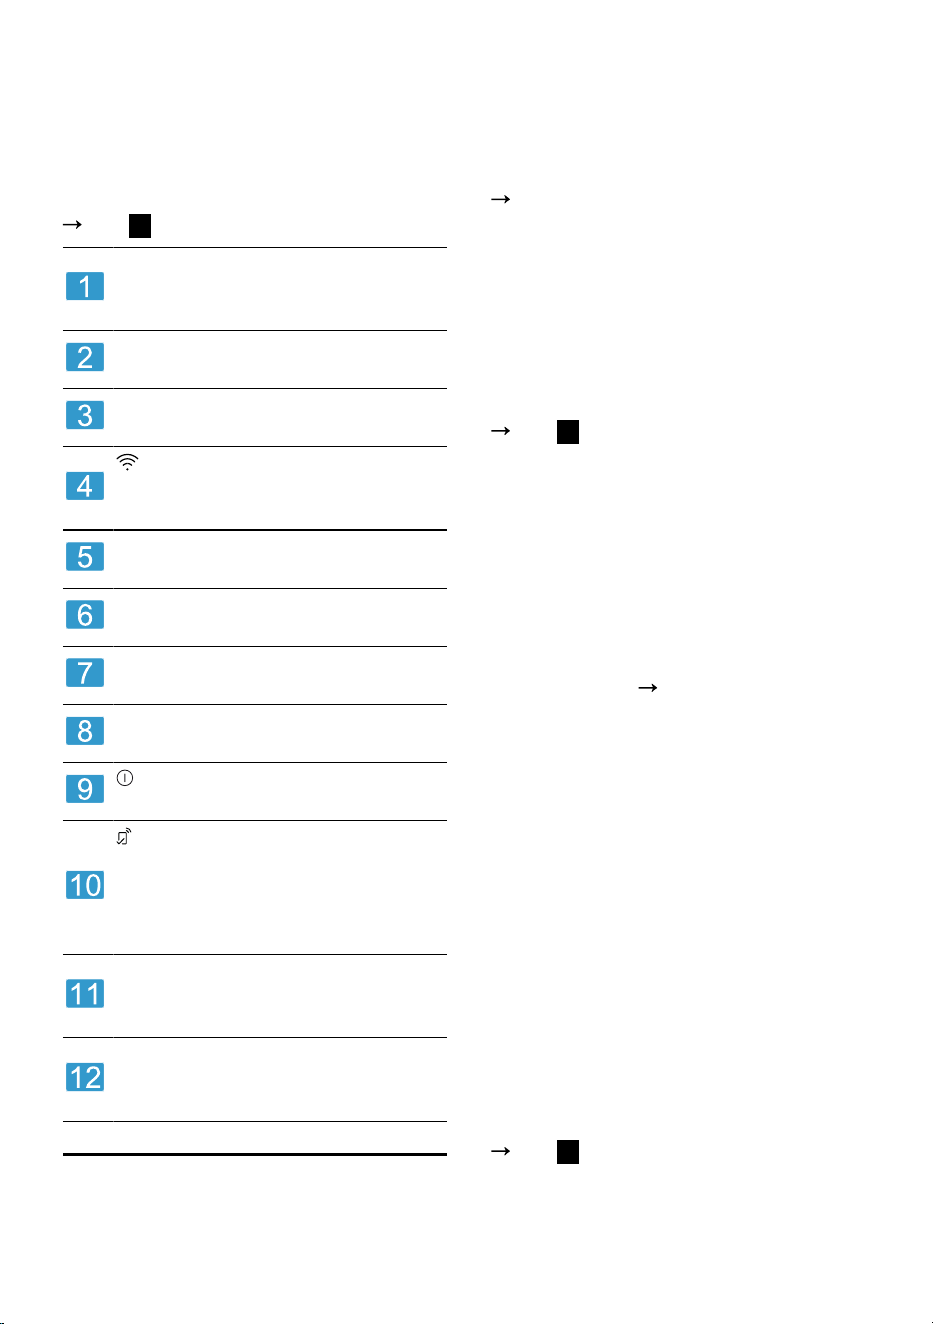
5.2 Control panel
You can use the control panel to con-
figure all functions of your appliance
and to obtain information about the
operating status.
Fig.
2
Displays the set temperature for
the refrigerator compartment
in°C.
Displays the set temperature for
the freezer compartment in °C.
alarm switches the warning sig-
nal off.
switches the connection to
the WLAN home network (Wi-Fi)
on or off.
The light bar provides visual
feedback.
eco switches energy-saving
mode on or off.
holiday switches holiday mode
on or off.
fresh switches freshness mode
on or off.
switches the appliance on or
off.
lights up if user-defined set-
tings have been set via the
HomeConnectapp. You can
find more information in the
HomeConnectapp.
super(Freezer compartment)
switches Super freezing on or
off.
super(Refrigerator compart-
ment) switches Super cooling
on or off.
Features6 Features
The features of your appliance de-
pend on the model.
6.1 Shelf
To vary the shelf as required, you
can remove the shelf and re-insert it
elsewhere.
"Removing the shelf", Page25
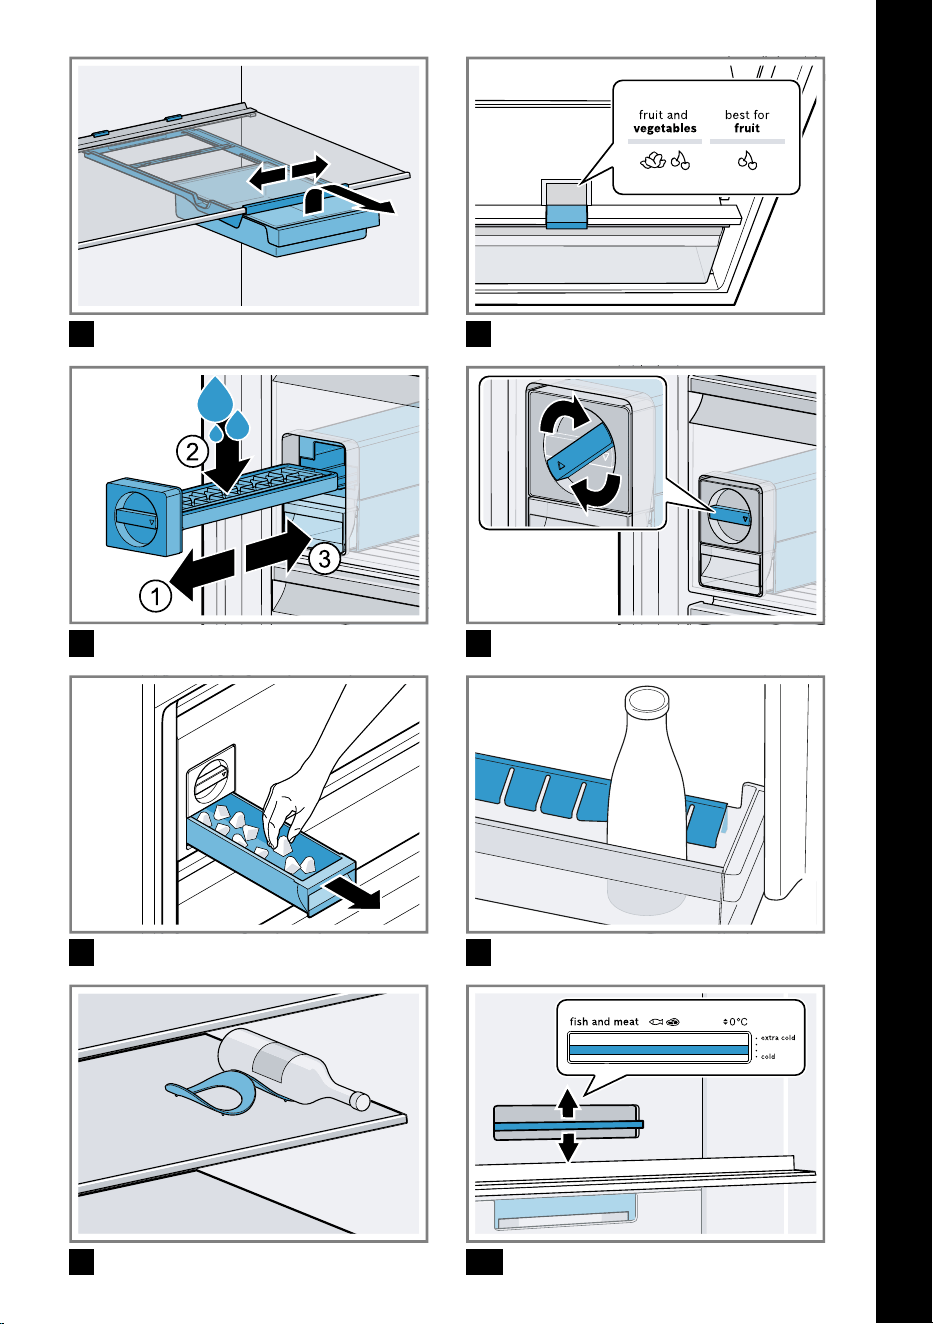
6.2 Snack container
Store packaged food or small snacks
in the snack container.
You can remove the snack container.
To do this, pull out and remove the
snack container. You can move the
holder for the snack container.
Fig.
3
6.3 Storage container
The temperatures in the storage con-
tainer are lower than in the refriger-
ator compartment. Temperatures be-
low 0°C may occur occasionally.
In order to reach temperatures close
to 0 °C in the storage container, set
the refrigerator compartment temper-
ature to 2 °C.
Page18
Use the lower temperatures in the
storage container to store highly per-
ishable food, e.g. fish, meat and
sausages.
6.4 Fruit and vegetable con-
tainer with humidity control
Store fresh fruit and vegetables loose
in the fruit and vegetable container.
Cover any chopped fruit and veget-
ables, or store in air-tight packaging.
You can adjust the humidity in the
fruit and vegetable container using
the humidity controller and a special
seal. This allows fresh fruit and veget-
ables to be stored for up to twice as
long as with conventional storage.
Fig.
4
The air humidity in the fruit and veget-
able container can be set according
to the type and amount of food to be
16
Features en
stored by pressing the humidity con-
troller:
Push in and engage for low humid-
ity when primarily storing fruit or
mixed items, or if the appliance is
very full.
Release for high humidity
when primarily storing vegetables
or when the appliance is not very
full.
Condensation may form in the fruit
and vegetable container depending
on the food and quantity stored.
Remove the condensation with a dry
cloth and adjust the air humidity to a
lower setting using the humidity con-
troller.
To ensure that the quality and aroma
are retained, store fruit and veget-
ables that are sensitive to cold out-
side of the appliance at temperatures
of approx. 8°C to 12°C, e.g. pine-
apple, bananas, citrus fruits, cucum-
bers, courgettes, peppers, tomatoes
and potatoes.
6.5 Butter and cheese com-
partment
Store butter and hard cheese in the
butter and cheese compartment.
6.6 Door tray
To adjust the door tray as required,
you can remove the door tray and re-
insert elsewhere.
"Removing door tray", Page25
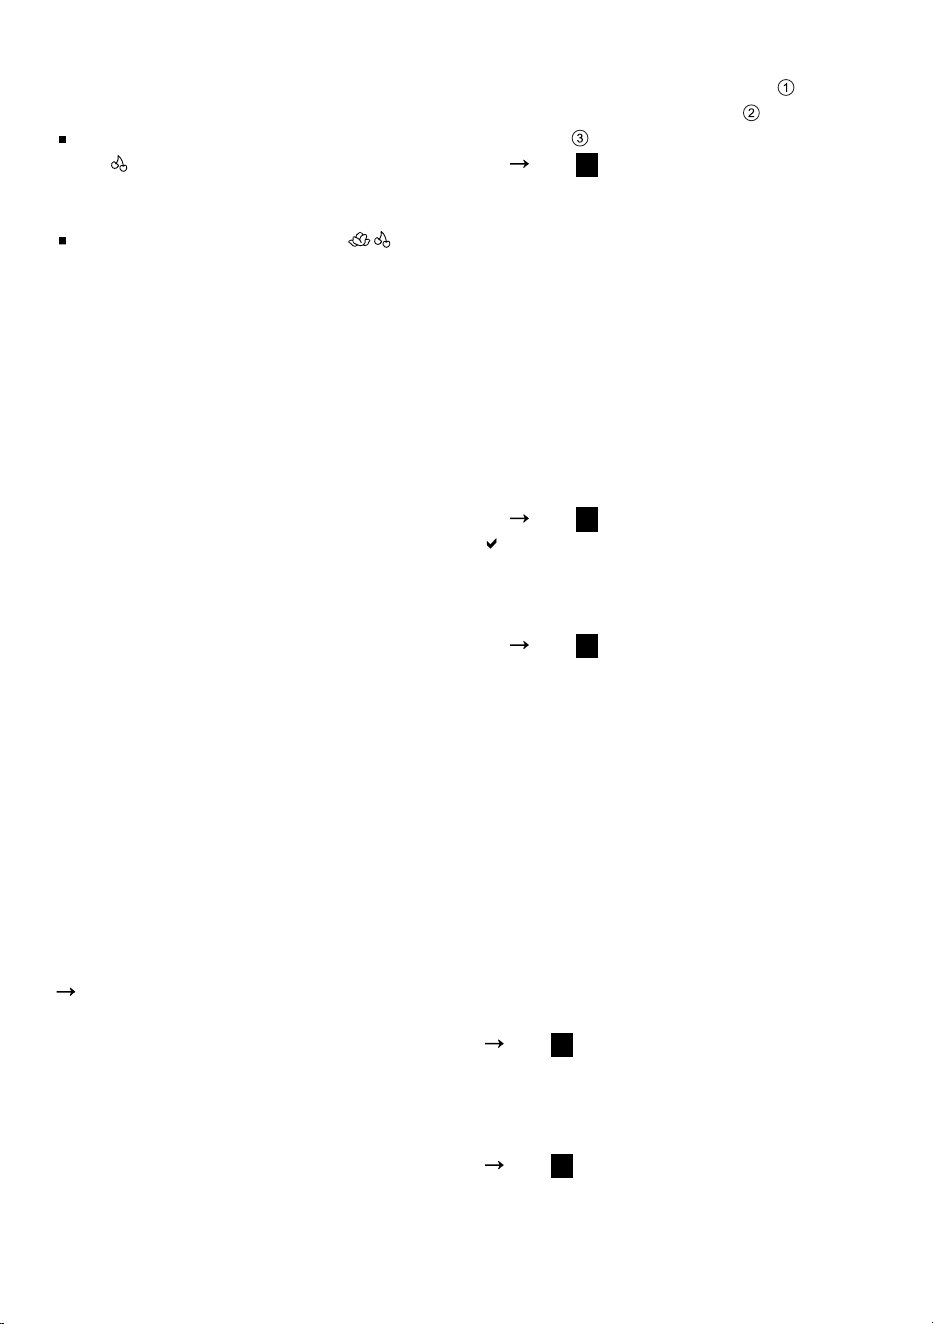
6.7 Ice cube maker
Use the ice cube maker to make ice
cubes out of drinking water.
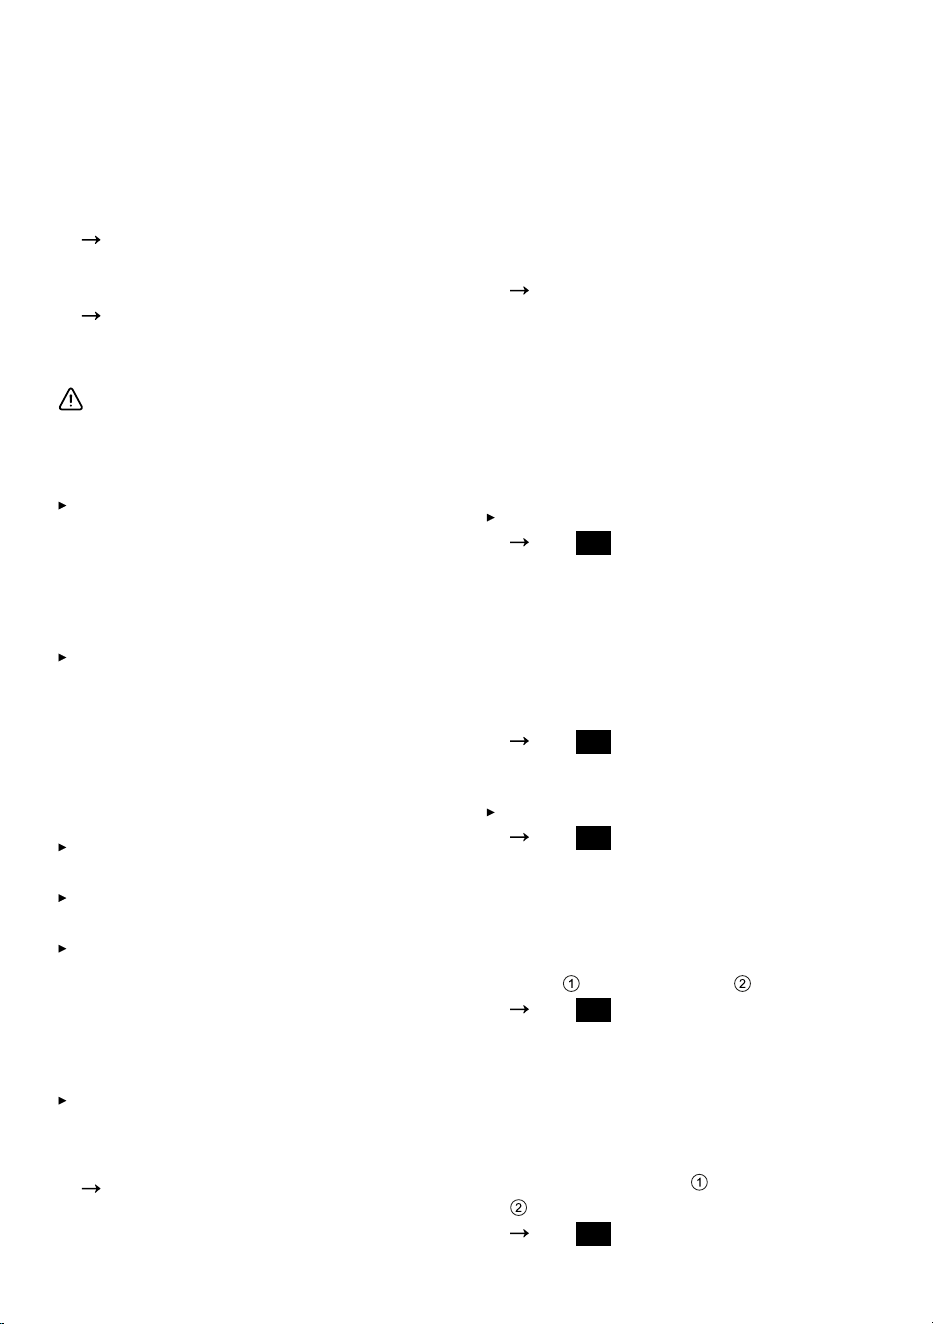
Making ice cubes
Use only drinking water tomake ice
cubes.
1.
Remove the ice cube tray , fill ¾
full with drinking water and re-
insert .
Fig.
5
Note: If it is filled with too much
drinking water, this may impair the
function of the ice cube maker.
The ice cubes cannot be removed
individually from the ice cube tray.
Too much drinking water was ad-
ded and isrunning into the ice
cube container, causing any ice
cubes tofreeze together.
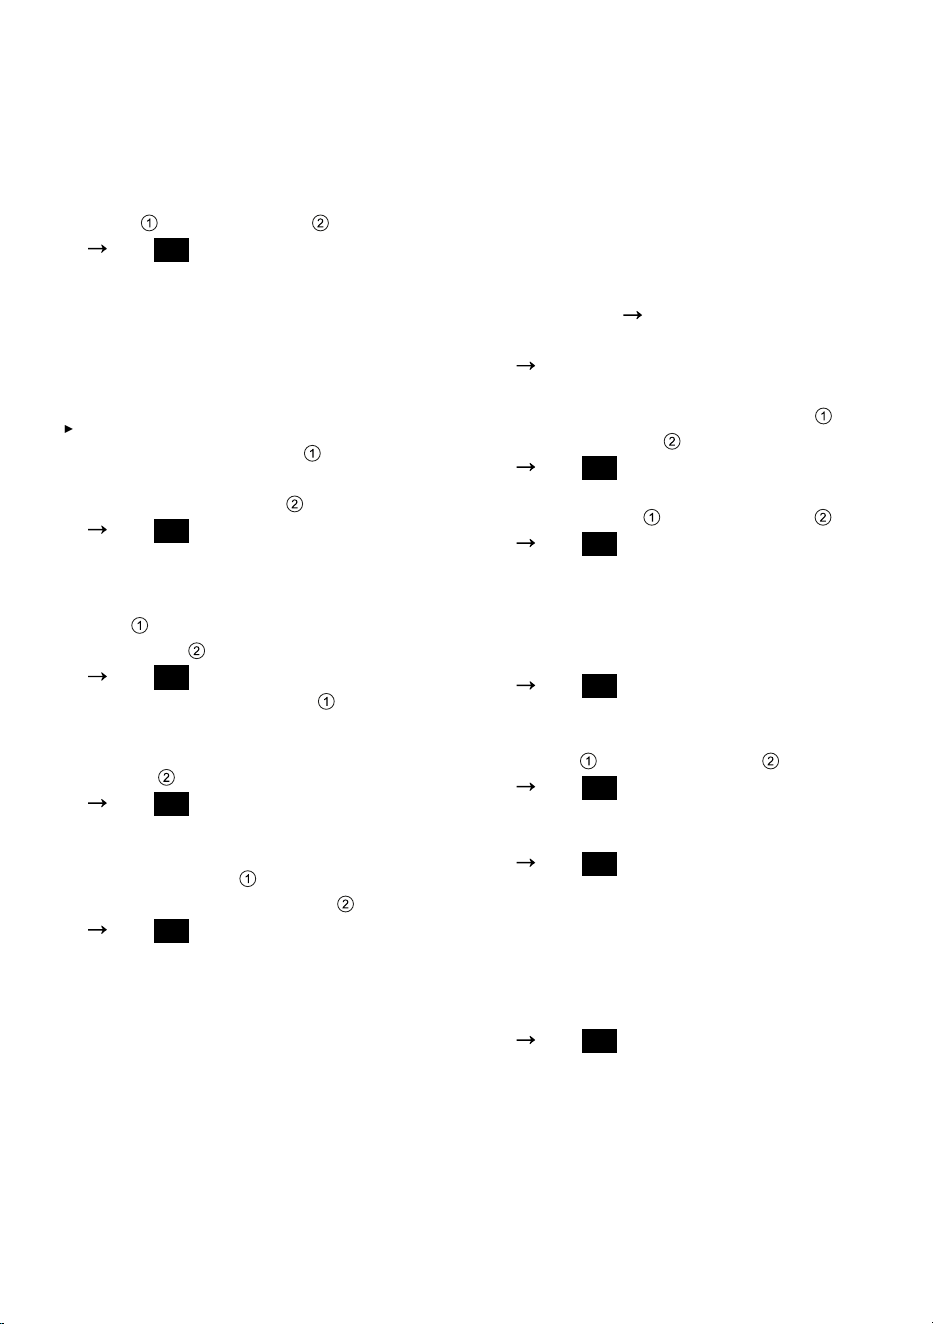
2.
When the ice cubes are frozen, ro-
tate the knob on the ice cube tray
several times in a clockwise direc-
tion and release it.
Fig.
6
The ice cubes will loosen and fall
into the ice cube container.
3.
Pull out the ice storage container
and remove the ice cubes.
Fig.
7
6.8 Accessories
Use original accessories. These have
been made especially for your appli-
ance.
The accessories for your appliance
depend on the model.
Egg tray
Store eggs safely on the egg tray.
Bottle holder
The bottle holder prevents bottles
from falling over when the appliance
door is opened and closed.
Fig.
8
Variable bottle shelf
Store bottles securely on the variable
bottle shelf.
Fig.
9
17
en Basic operation
Basic operation7 Basic operation
7.1 Switching on the appliance
1.
Electrically connect the appliance.
Page15
Note: If the appliance has been
previously switched off using the
control panel, press and hold for
threeseconds.
The appliance begins to cool.
A warning signal sounds and the
temperature display flashes be-
cause the freezer compartment is
still too warm.
2.
Switch off the warning tone using
alarm.
"alarm" goes out as soon as the
set temperature has been
reached.
3.
Set the required temperature.
Page18
7.2 Operating tips
Once you have switched on the
appliance, the set temperature is
only reached after several hours.
Do not put any food in the appli-
ance until the set temperature has
been reached.
The front panels of the housing are
temporarily heated slightly. This
prevents condensation in the area
of the door seal.
When closing the door, make sure
that the door is not blocked by
stored items.
When you close the door, a va-
cuum may be created. The door is
then difficult to open again. Wait a
moment until the vacuum is offset.
The temperature in the appliance
varies due to the following condi-
tions:
– How often the appliance is
opened
– Load capacity
– Temperature of newly stored
food
– Ambient temperature
– Direct sunlight
7.3 Switching off the appliance
Press and hold for 3seconds.
7.4 Setting the temperature
Setting the refrigerator compart-
ment temperature
Press the required temperature.
To reach the set temperature, slide
the temperature controller for the
storage container to a position that
is one third from the bottom.
Page18
The recommended temperature in
the refrigerator compartment is
4°C.
Setting the storage container tem-
perature
Select one of the options:
To reduce the temperature,
move the temperature controller
up towards "extra cold".
To increase the temperature,
move the temperature controller
down towards "cold".
Fig.
10
Setting the freezer compartment
temperature
Press the required temperature.
The recommended temperature in
the freezer compartment is
−18°C.
Additional functions8 Additional functions
Find out which additional functions
can be used for your appliance.
18
Additional functions en
8.1 Super cooling
With Super cooling, the refrigerator
compartment cools as cold as pos-
sible.
Switch on Super cooling before pla-
cing large quantities of food in the re-
frigerator compartment.
Note: When Super cooling is
switched on, increased noise may
occur.
Switching on Super cooling
Press super(Refrigerator compart-
ment).
"super"(Refrigerator compartment)
lights up.
Note: After approx. 6hours, the ap-
pliance switches to normal operation.
Switching off Super cooling
Press super(Refrigerator compart-
ment).
8.2 Super freezing
With Super freezing, the freezer com-
partment cools as cold as possible.
Switch on Super freezing four to
sixhours before placing food weigh-
ing 2kg or more into the freezer
compartment.
In order to utilise the freezer capacity,
use Super freezing.
"Prerequisites for freezing capa-
city", Page23
Note: When Super freezing is
switched on, increased noise may
occur.
Switching on Super freezing
Press super(Freezer compart-
ment).
"super"(Freezer compartment)
lights up.
Note: After approx. 54hours, the ap-
pliance switches to normal operation.
Switching off Super freezing
Press super(Freezer compart-
ment).
8.3 Holiday mode
If you are going to be away for a long
time, you can switch on energy-sav-
ing holiday mode on the appliance.
CAUTION
Risk of harm to health!
The refrigerator compartment heats
up while the holiday mode is
switched on. The increased temperat-
ure may cause bacteria to increase
and spoil the food.
When the holiday mode is
switched on, do not store any food
in the refrigerator compartment.
The appliance automatically sets the
temperatures.
Refrigerator com-
partment
14°C
Freezer compart-
ment
Temperature re-
mains unchanged
Switching on holiday mode
Press holiday.
"holiday" lights up.
Switching off holiday mode
Press holiday.
8.4 Energy-saving mode
You can set the appliance to save
energy with the energy-saving mode.
The appliance automatically sets the
temperatures.
Refrigerator com-
partment
8°C
Freezer compart-
ment
−16°C
19
en Alarm
Switching on energy-saving mode
Press eco.
"eco" lights up.
Switching off energy-saving mode
Press eco.
8.5 Freshness mode
In order to keep the food fresh for
longer, you can switch on the fresh-
ness mode on the appliance.
The appliance automatically sets the
temperatures.
Refrigerator com-
partment
2°C
Freezer compart-
ment
Temperature re-
mains unchanged
Switching freshness mode on
Press fresh.
"fresh" lights up.
Switching off freshness mode
Press fresh.
Alarm9 Alarm
9.1 Door alarm
If the appliance door is open for a
while, the door alarm switches on.
A warning tone sounds, "alarm"
flashes, the light bar flashes and the
temperature display for the affected
compartment flashes.
Switching off the door alarm
Close the appliance door or press
alarm.
The warning tone is switched off.
9.2 Temperature alarm
If the freezer compartment becomes
too warm, the temperature alarm is
switched on.
A warning tone sounds and the set
temperature (freezer compartment),
"alarm" and the light bar flash.
CAUTION
Risk of harm to health!
During the thawing process, bacteria
may multiply and spoil the frozen
food.
Do not refreeze food after it has
been defrosted or started to de-
frost.
Refreeze food only after cooking.
These items should no longer be
stored for the maximum storage
period.
The temperature alarm can be
switched on in the following cases:
The appliance is switched on.
Do not store any food until the ap-
pliance has reached the set tem-
perature.
Large quantities of fresh food are
being placed inside.
Switch on Super freezing before
placing large quantities of food in
the appliance.
The freezer compartment door is
open for too long.
Check whether the frozen food has
defrosted or thawed.
Switching off the temperature
alarm
Press alarm.
The warning tone is switched off.
HomeConnect 10 HomeConnect
This appliance is network-capable.
Connect your appliance to a mobile
device to control its functions via the
HomeConnect app.
The HomeConnect services are not
available in every country. The avail-
ability of the HomeConnect function
20
HomeConnect en
depends on the availability of the
HomeConnect services in your coun-
try. You can find information about
this at:
www.home-connect.com
.
To be able to use HomeConnect,
you must first set up the connection
to the WLAN home network (Wi-Fi
1
)
and to the HomeConnect app.
After switching on the appliance, wait
at least 2minutes until internal device
initialisation is complete. Only then
should you set up HomeConnect.
The HomeConnect app guides you
through the entire login process. Fol-
low the instructions, noting the in-
formation in the HomeConnect app.
Notes
Please note the safety precautions
in this instruction manual and
make sure that they are also ob-
served when operating the appli-
ance via the HomeConnect app.
"Safety", Page8
Operating the appliance on the ap-
pliance itself always takes priority.
During this time it is not possible
to operate the appliance using the
HomeConnect app.
10.1 Setting up HomeConnect
Requirement: The appliance is re-
ceiving signals from the WLAN home
network (Wi-Fi) at its installation loca-
tion.
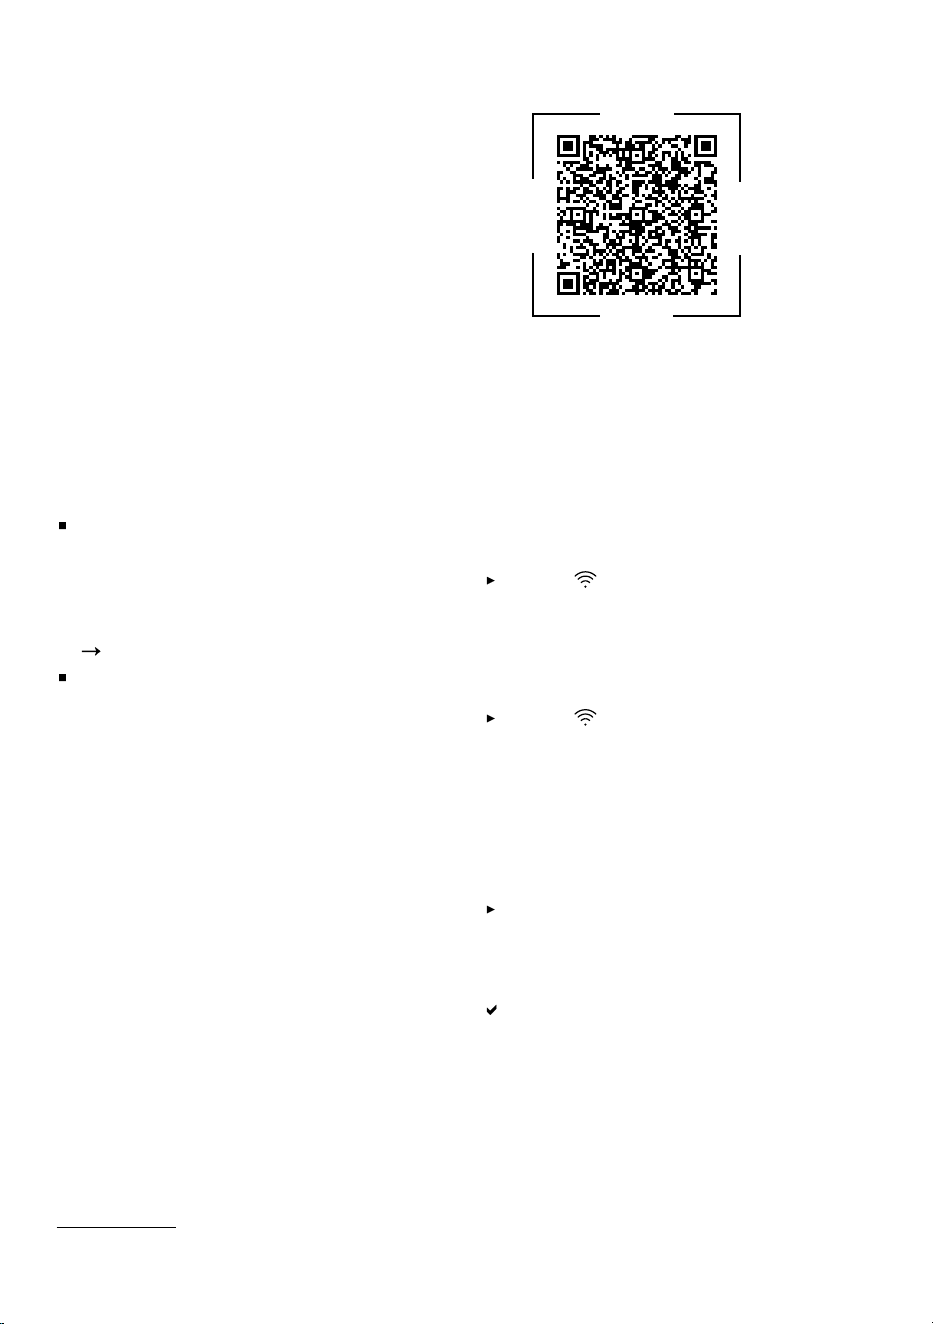
1.
Scan the following QR code.
RFSM0Z01
You can install the HomeConnect
app and connect your appliance
via the QR code.
2.
Follow the instructions in the
HomeConnect app.
10.2 Switching on the connec-
tion to the WLAN home
network (Wi-Fi)
Press .
10.3 Switching off the connec-
tion to the WLAN home
network (Wi-Fi)
Press .
10.4 Installing updates for the
HomeConnectsoftware
Note: If an update of the HomeCon-
nect software is available, a message
appears in the HomeConnect app.
To install the update for the
HomeConnect software, follow the
instructions in the HomeConnect
app.
The control panel is partially
locked during the installation.
10.5 Resetting HomeConnect
settings
If your appliance experiences con-
nection problems with the WLAN
1
Wi-Fi is a registered trademark of the Wi-Fi Alliance.
21

en Refrigerator compartment
home network (Wi-Fi) or your appli-
ance wants to log into a different
WLAN home network (Wi-Fi), you can
reset the HomeConnectsettings.
Press and hold for six seconds
until goes out.
The HomeConnect settings have
been reset.
10.6 Data protection
Please see the information on data
protection.
The first time your appliance is re-
gistered on a home network connec-
ted to the Internet, your appliance will
transmit the following types of data to
the HomeConnect server (initial re-
gistration):
Unique appliance identification
(consisting of appliance codes as
well as the MAC address of the in-
stalled Wi-Fi communication mod-
ule).
Security certificate of the Wi-Fi
communication module (to ensure
a secure data connection).
The current software and hardware
version of your appliance.
Status of any previous resetting to
factory settings.
This initial registration prepares the
HomeConnect functions for use and
is only required when you want to
use the HomeConnect functions for
the first time.
Note: Please note that the
HomeConnect functions can only be
utilised with the HomeConnect app.
Information on data protection can be
retrieved in the HomeConnect app.
Refrigerator compartment11 Refrigerator compart-
ment
You can keep meat, sausage, fish,
dairy products, eggs, prepared meals
and pastries in the refrigerator com-
partment.
The temperature can be set from
2°C to 8°C.
The refrigerator compartment can
also be used to store highly perish-
able foods in the short to medium
term. The lower the selected temper-
ature, the longer the food remains
fresh.
11.1 Tips for storing food in
the refrigerator compart-
ment
Only store food when fresh and
undamaged.
Store food covered or in air-tight
packaging.
To avoid impeding the circulation
of air and to prevent food from
freezing, do not place food in front
of the inner ventilation openings or
in direct contact with the back wall.
Allow hot food and drinks to cool
down first before placing in the ap-
pliance.
Observe the best-before date or
use-by date specified by the manu-
facturer.
11.2 Chill zones in the refriger-
ator compartment
The air circulation in the refrigerator
compartment creates different chill
zones.
Coldest zone
The coldest zone is in the storage
container.
22
Freezer compartment en
Tip: Store highly perishable food
such as fish, sausages and meat in
the coldest zone.
Warmest zone
The warmest zone is at the very top
of the door.
Tip: Store food that does not spoil
easily in the warmest zone, e.g. hard
cheese and butter. Cheese can then
continue to release its aroma and the
butter will still be easy to spread.
Freezer compartment12 Freezer compartment
You can store frozen food, freeze
food and make ice cubes in the
freezer compartment.
The temperature can be set from
−16°C to −24°C.
Long-term storage of food should be
at –18°C or lower.
The freezer compartment can be
used to store perishable food long-
term. The low temperatures slow
down or stop the spoilage.
12.1 Freezing capacity
The freezing capacity indicates the
quantity of food that can be frozen
right through to the centre within a
specific period of time.
Information on freezing capacity can
be found on the rating plate.
"Appliance", Fig.
1
/ Page15
Prerequisites for freezing capacity
1.
Approx. 24 hours before placing
fresh food in the appliance, switch
on Super freezing.
"Switching on Super freezing",
Page19
2.
Place food in the bottom frozen
food container first.
12.2 Fully utilising the freezer
compartment volume
Learn how to store the maximum
amount of frozen food in the freezer
compartment.
1.
Remove all fittings from the freezer
compartment.
Page25
2.
Store food directly on the shelves
and on the floor of the freezer
compartment.
12.3 Tips for storing food in
the freezer compartment
Store food in air-tight packaging.
Do not bring food which is to be
frozen into contact with frozen
food.
Place thefood over thewhole area
ofthefrozen food containers.
To ensure that the air can circulate
freely in the appliance, push the
frozen food containers in as far as
they will go.
12.4 Tips for freezing fresh
food
Freeze fresh and undamaged food
only.
Freeze food in portions.
Cooked food is more suitable than
food that can be eaten raw.
Vegetables: Wash, chop up and
blanch before freezing.
Fruit: Wash, pit and perhaps peel,
possibly add sugar or ascorbic
acid solution.
Food that is suitable for freezing in-
cludes baked items, fish and sea-
food, meat, game, poultry, eggs
without shells, cheese, butter and
quark, ready meals and leftovers.
Food that is unsuitable for freezing
includes lettuce, radishes, eggs in
shells, grapes, raw apples and
23
en Defrosting
pears, yoghurt, sour cream, crème
fraîche and mayonnaise.
Packing frozen food
If you select suitable packaging ma-
terial and the correct type of pack-
aging, you can determine the product
quality and prevent freezer burn.
1.
Place the food in the packaging.
2.
Squeeze out the air.
3.
Pack food airtight to prevent it
from losing flavour and drying out.
4.
Label the packaging with the con-
tents and the date of freezing.
12.5 Shelf life of frozen food at
−18°C
Food Storage time
Fish, sausages, pre-
pared meals and
baked goods
up to
6months
Poultry, meat up to
8months
Vegetables, fruit up to
12months
The imprinted freezer calendar indic-
ates the maximum storage duration
in months at a constant temperature
of –18°C.
12.6 Defrosting methods for
frozen food
CAUTION
Risk of harm to health!
During the thawing process, bacteria
may multiply and spoil the frozen
food.
Do not refreeze food after it has
been defrosted or started to de-
frost.
Refreeze food only after cooking.
These items should no longer be
stored for the maximum storage
period.
Defrost animal-based food, such
as fish, meat, cheese, quark, in the
refrigerator compartment.
Defrost bread at room temperat-
ure.
Prepare food for immediate con-
sumption in the microwave, in the
oven, or on the hob.
Defrosting13 Defrosting
13.1 Defrosting in the refriger-
ator compartment
The refrigerator compartment in your
appliance defrosts automatically.
13.2 Defrosting in the freezer
compartment
The fully automatic NoFrost system
ensures that the freezer compartment
remains frost-free. Defrosting is not
required.
Cleaning and servicing14 Cleaning and servi-
cing
To keep your appliance working effi-
ciently for a long time, it is important
to clean and maintain it carefully.
Customer Service must clean inac-
cessible points. Cleaning by cus-
tomer service can give rise to costs.
14.1 Preparing the appliance
for cleaning
1.
Switch off the appliance.
Page18
2.
Disconnect the appliance from the
power supply.
Unplug the appliance from the
mains or switch off the circuit
breaker in the fuse box.
24
Cleaning and servicing en
3.
Take out all of the food and store it
in a cool place.
Place ice packs (if available) onto
the food.
4.
Remove all fittings and accessor-
ies from the appliance.
Page25
5.
Remove the shelf above the fruit
and vegetable container.
Page26
14.2 Cleaning the appliance
WARNING
Risk of electric shock!
An ingress of moisture can cause an
electric shock.
Do not use steam- or high-pres-
sure cleaners to clean the appli-
ance.
Liquid in the lighting, controls or in-
ner ventilation openings can be dan-
gerous.
The rinsing water must not drip
into the lighting, controls or inner
ventilation openings.
ATTENTION
Unsuitable cleaning products may
damage the surfaces of the appli-
ance.
Do not use hard scouring pads or
cleaning sponges.
Do not use harsh or abrasive de-
tergents.
Do not use cleaning products with
a high alcohol content.
If you clean fittings and accessories
in the dishwasher, this may cause
them to become deformed or discol-
our.
Never clean fittings and accessory
in the dishwasher.
1.
Prepare the appliance for cleaning.
Page24
2.
Clean the appliance, the fittings,
the accessories and the door seals
with a dish cloth, lukewarm water
and a little pH-neutral washing-up
liquid.
3.
Dry thoroughly with a soft, dry
cloth.
4.
Insert the fittings and install the re-
movable appliance parts.
5.
Electrically connect the appliance.
Page15
6.
Putting the food into the appliance.
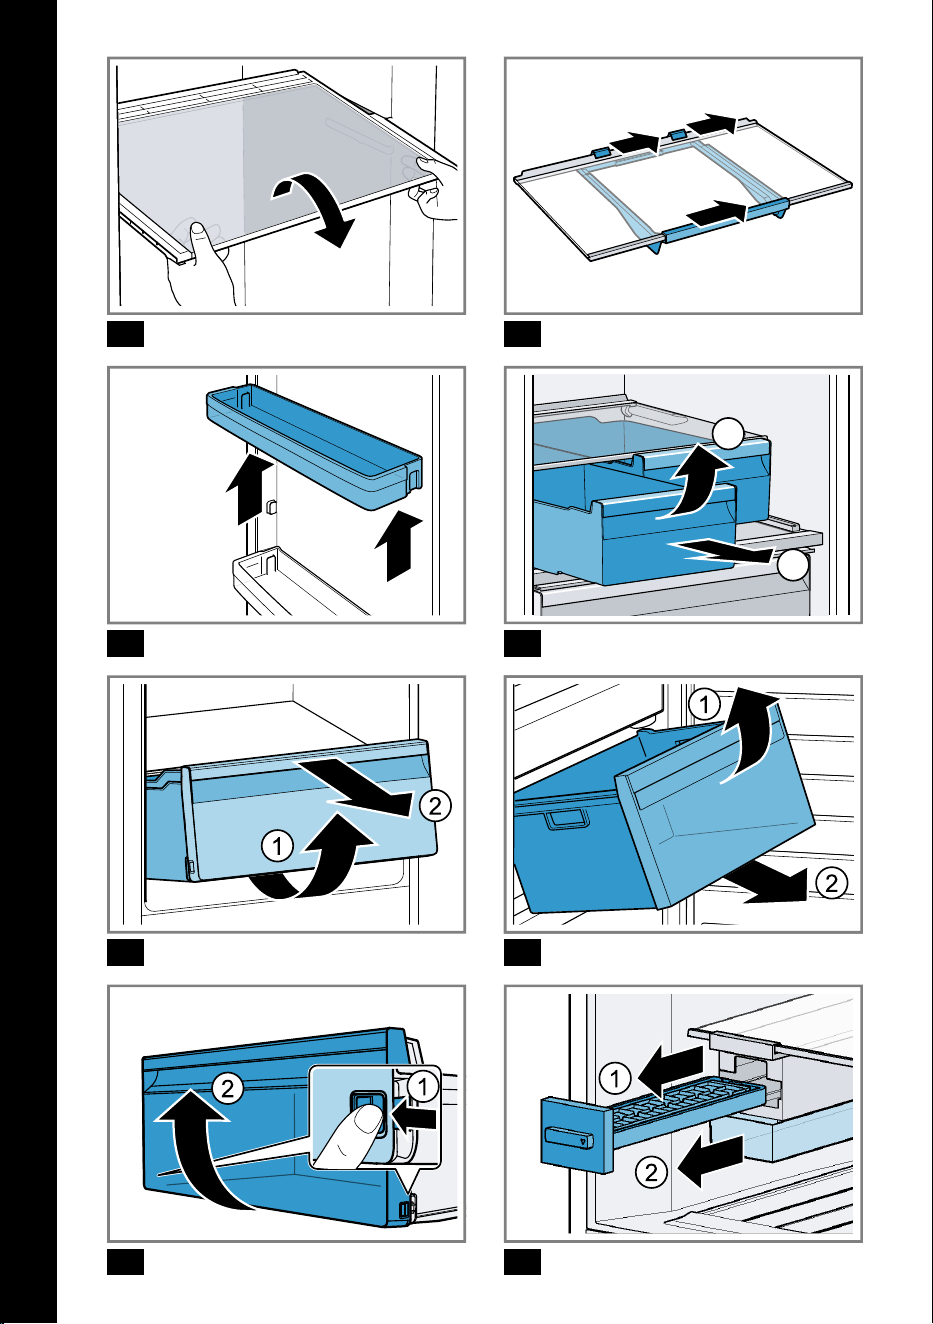
14.3 Removing the fittings
If you want to clean the fittings thor-
oughly, remove these from your ap-
pliance.
Removing the shelf
Pull out and remove the shelf.
Fig.
11
Removing the snack container
with holder
1.
Remove the snack container.
2.
Remove the shelf with the holder.
3.
Slide the holder sideways off the
shelf.
Fig.
12
Removing door tray
Lift the door tray and remove it.
Fig.
13
Removing the storage container
1.
Pull out the storage container as
far as it will go.
2.
Lift the storage container at the
front and remove it .
Fig.
14
Removing the fruit and vegetable
container
1.
Pull out the fruit and vegetable
container as far as it will go.
2.
Lift the fruit and vegetable con-
tainer at the front and remove it
.
Fig.
15
25
en Cleaning and servicing
Removing the frozen food con-
tainer
1.
Take out the frozen food container
as far as it will go.
2.
Lift the frozen food container at the
front and remove it .
Fig.
16
Removing the front of the con-
tainer
You can remove the front of the fruit
and vegetable container to facilitate
cleaning.
Press in the snap-in hooks on the
side of the container and re-
move the front from the container
in a turning motion .
Fig.
17
Removing the ice cube maker
1.
Remove and empty the ice cube
tray and the ice storage
container .
Fig.
18
2.
Press the push-button to release
the ice cube maker from the
holder and remove the ice cube
maker .
Fig.
19
3.
Lift the rear end of the holder and
lower it behind the freezer com-
partment shelf . Remove the
holder towards the front .
Fig.
20
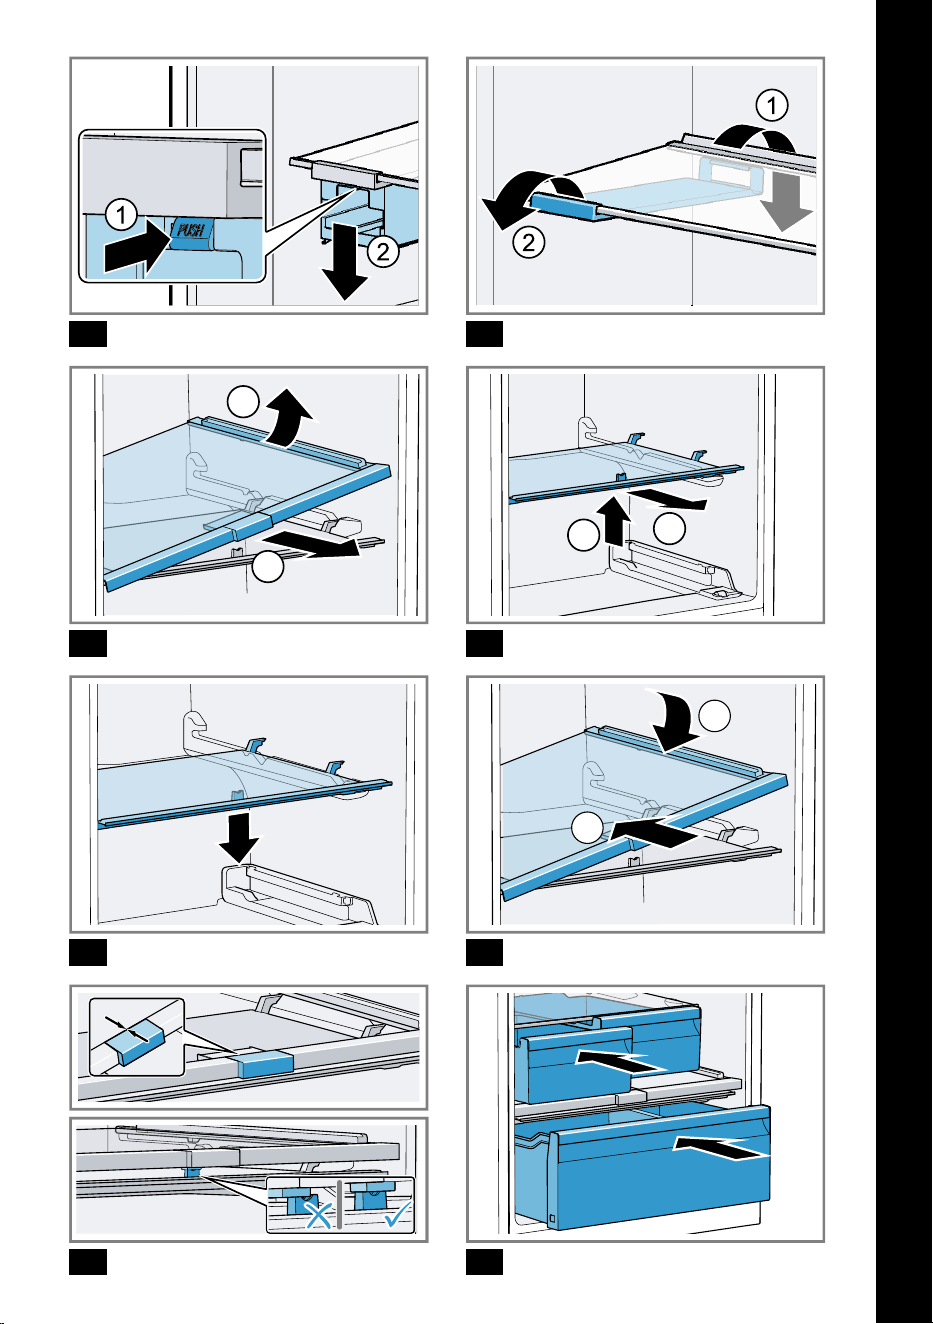
14.4 Removing appliance com-
ponents
If you want to clean your appliance
thoroughly, you can remove certain
components from your appliance.
Shelf above the fruit and veget-
able container
You can remove the cover of the fruit
and vegetable container in order to
clean it thoroughly.
Removing the shelf above the fruit
and vegetable container
1.
Remove the fruit and vegetable
container.
Page25
2.
Remove the storage container.
Page25
3.
Tilt the shelf above the fruit and ve-
getable container to the side
and remove it .
Fig.
21
4.
Lift the fruit and vegetable con-
tainer cover and remove it .
Fig.
22
Fitting the shelf above the fruit and
vegetable container
1.
Clip the fruit and vegetable con-
tainer cover in place.
Fig.
23
2.
Tilt the shelf above the fruit and ve-
getable container to one side to in-
sert it and then lower .
Fig.
24
3.
Move the humidity controller to the
front.
Fig.
25
Make sure that the fruit and veget-
able container cover sits in the
opening under the humidity con-
troller.
4.
Insert the storage containers and
the fruit and vegetable containers.
Fig.
26
26
Troubleshooting en
Troubleshooting15 Troubleshooting
You can rectify minor faults on your appliance yourself. Read the troubleshoot-
ing information before contacting after-sales service. This will avoid unneces-
sary costs.
WARNING
Risk of electric shock!
Improper repairs are dangerous.
Repairs to the appliance should only be carried out by trained specialist
staff.
Only use genuine spare parts when repairing the appliance.
If the power cord or the appliance power cable of this appliance is damaged,
it must be replaced with a special power cord or special appliance power
cable, which is available from the manufacturer or its Customer Service.
Fault Cause and troubleshooting
The appliance is not
cooling, the displays
and lighting are lit.
Showroom mode is switched on.
1.
Switch off the appliance.
Page18
2.
Wait 2minutes.
3.
Switch the appliance back on.
Page18
4.
Wait 1 minute and then press and hold super(Refri-
gerator compartment) until 4 audible signals have
sounded.
5.
After a short time, check whether your appliance is
cooling.
The LED lighting does
not work.
Different causes are possible.
Call customer service.
The customer service number can be found in the
enclosed customer service directory.
The refrigeration unit
is switching on more
frequently and for
longer.
The appliance has been opened frequently.
Do not open appliance door unnecessarily.
External ventilation openings are covered up.
Remove any obstructions from in front of the ex-
ternal ventilation openings.
Not a fault. Modern refrigeration machines switch on
more frequently and have different power levels to cool
more efficiently.
Remove any obstructions from in front of the ex-
ternal ventilation openings.
27
en Troubleshooting
Fault Cause and troubleshooting
The refrigeration unit
is switching on more
frequently and for
longer.
Install the appliance as far away as possible from
heating elements, cookers and other heat sources.
Avoid prolonged exposure of the appliance to direct
sunlight.
Only open the appliance door as briefly as neces-
sary.
Allow hot food and drinks to cool down first before
storing in the appliance.
A layer of frost forms
on the back wall of
the refrigerator com-
partment.
Not a fault. Modern refrigeration machines ensure a
more even temperature in the refrigerator compart-
ment. The back wall of the refrigerator compartment is
defrosted automatically at regular intervals.
Only open the appliance door as briefly as neces-
sary.
Pack the food airtight or cover it.
Allow hot food and drinks to cool down first before
storing in the appliance.
Always leave some space between the food and the
interior walls.
Side panels of the ap-
pliance are warm.
Not a fault. The side panels contain pipes which heat
up during the cooling process. Units touching the appli-
ance will not be damaged by the heat.
No action required.
HomeConnect is not
working properly.
Different causes are possible.
Go to
www.home-connect.com
.
A warning tone
sounds and the tem-
perature display (refri-
gerator compartment),
"alarm" and the light
bar flash.
The door alarm is
switched on.
The refrigerator compartment door is open.
Close the refrigerator compartment door.
28
Troubleshooting en
Fault Cause and troubleshooting
A warning tone
sounds and the tem-
perature display
(freezer compart-
ment), "alarm" and the
light bar flash.
The door alarm is
switched on.
The freezer compartment door is open.
Close the freezer compartment door.
A warning tone
sounds and the set
temperature (freezer
compartment), "alarm"
and the light bar flash.
The temperature
alarm is switched on.
Different causes are possible.
Press alarm.
The alarm is switched off.
External ventilation openings are covered up.
Remove any obstructions from in front of the ex-
ternal ventilation openings.
Larger quantities of fresh food have been put in.
Do not exceed the max. freezing capacity.
"Freezing capacity", Page23
The set temperature is
not reached.
Fully automatic de-
frosting no longer
works.
The freezer compartment door was open for a long
time. The evaporator (refrigeration unit) in the noFrost
system is heavily iced up.
Requirement: Store the frozen food well insulated in a
cool place.
1.
Switch off the appliance.
Page18
2.
Disconnect the appliance from the mains.
Unplug the appliance from the mains or switch off
the circuit breaker in the fuse box.
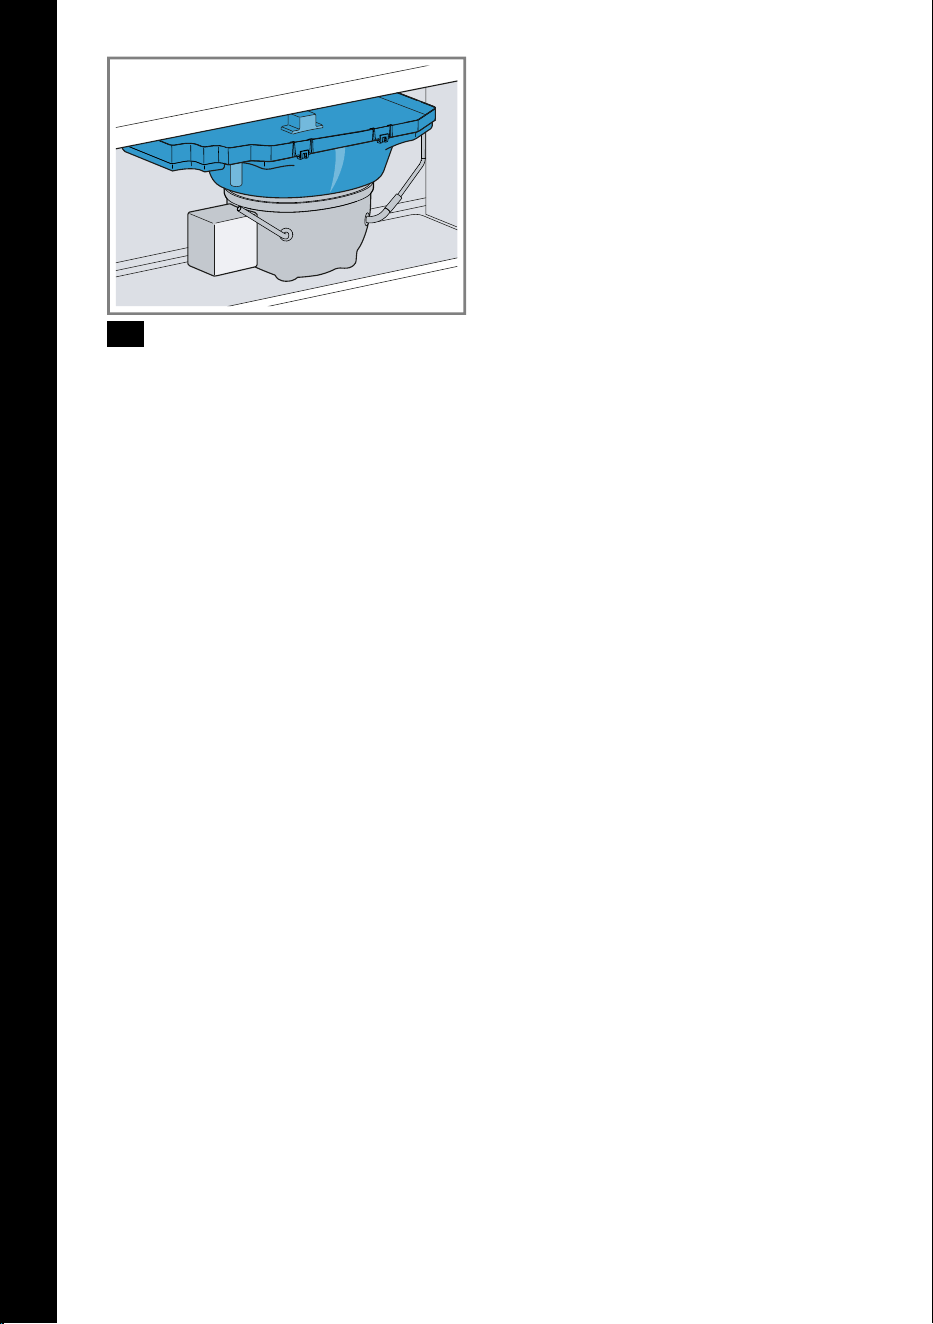
3.
Move the appliance away from the wall.
4.
Leave the appliance door open.
After approx. 20 minutes, the condensation starts to
run into the evaporation pan at the rear of the appli-
ance.
Fig.
27
5.
To prevent the evaporation pan from overflowing,
mop up the condensation water with a sponge.
The evaporator is defrosted if no more condensation
water runs into the evaporation pan.
6.
Clean the interior of the appliance.
Page25
7.
Switch the appliance back on.
Page18
29
en Troubleshooting
Fault Cause and troubleshooting
The temperature dif-
fers greatly from the
setting.
Different causes are possible.
1.
Switch off the appliance.
Page18
2.
Switch the appliance back on after fiveminutes.
Page18
If the temperature is too warm, check the temper-
ature again after a couple of hours.
If the temperature is too cold, check the temperat-
ure again on the following day.
Condensation accu-
mulates on the sur-
face of the appliance
and on the shelves in-
side.
The water contained in warm and humid air condenses
on the colder surfaces of the appliance.
1.
Wipe away the condensation water with a soft, dry
cloth.
2.
Open the appliance as briefly as possible.
3.
Ensure that the appliance is always closed properly.
The appliance hums,
bubbles, buzzes,
gargles, clicks or
crackles.
Not a fault. A motor is running, e.g. refrigerating unit,
fan. Refrigerant flows through the pipes. The motor,
switches or solenoid valves are switching on or off.
Automatic defrosting is running.
No action required.
The appliance makes
noises.
The appliance is not level.
Align the appliance using a spirit level and the screw
feet.
The appliance is not free-standing.
Observe the minimum clearances for the appliance.
Fittings wobble or stick.
Check the removable fittings and, if required, re-
place these.
Bottles or containers are touching.
Move the bottles or containers away from each
other.
Super freezing is switched on.
No action required.
15.1 Power failure
During a power failure, the temperat-
ure in the appliance rises; this re-
duces the storage time and the qual-
ity of the frozen food.
On the website for your appliance,
the technical data provides you with
the storage times for frozen food in
the event of a fault.
Notes
Open the appliance as little as
possible during a power failure
and do not place any other food in
the appliance.
Check the quality of the food im-
mediately after a power failure.
– Dispose of any frozen food that
has defrosted and is hotter than
5°C.
30

Storage and disposal en
– Cook or fry slightly thawed
frozen food, and then either con-
sume it or freeze it again.
15.2 Conducting an appliance
self-test
Your appliance has an appliance self-
test which displays faults that can be
eliminated by your customer service.
1.
Switch off the appliance.
Page18
2.
Disconnect the appliance from the
power supply.
Unplug the appliance from the
mains or switch off the circuit
breaker in the fuse box.
3.
Electrically reconnect the appli-
ance after 5minutes.
Page15
4.
One minute after connecting to the
power supply, press and hold su-
per(Refrigerator compartment) for
3 to 5seconds until a second aud-
ible signal sounds.
If, at the end of the appliance self-
test, 2 audible signals sound and
the temperature display indicates
the set temperature, the temperat-
ure sensors on your appliance are
OK. The appliance switches to nor-
mal operation.
If, at the end of the appliance self-
test, 5audible signals sound and
the temperature display LEDs light
up with a different brightness, in-
form customer service. The LEDs
provide customer service with in-
formation about this fault.
Storage and disposal16 Storage and disposal
16.1 Taking the appliance out
of operation
1.
Switch off the appliance.
Page18
2.
Disconnect the appliance from the
power supply.
Unplug the appliance from the
mains or switch off the circuit
breaker in the fuse box.
3.
Remove all of the food.
4.
Clean the appliance.
Page25
5.
To guarantee the ventilation inside
the appliance, leave the appliance
open.
16.2 Disposing of old appli-
ance
Valuable raw materials can be re-
used by recycling.
WARNING
Risk of harm to health!
Children can lock themselves in the
appliance, thereby putting their lives
at risk.
Leave shelves and containers in-
side the appliance to prevent chil-
dren from climbing in.
Keep children away from the re-
dundant appliance.
WARNING
Risk of fire!
If the tubes are damaged, flammable
refrigerant and harmful gases may
escape and ignite.
Do not damage the tubes of the re-
frigerant circuit or the insulation.
1.
Unplug the appliance from the
mains.
2.
Cut through the power cord.
3.
Dispose of the appliance in an en-
vironmentally friendly manner.
Information about current disposal
methods are available from your
specialist dealer or local authority.
31
en Customer Service
Customer Service17 Customer Service
Detailed information about the war-
ranty period and the warranty condi-
tions in your country is available via
the QR code on the enclosed docu-
ment on service contacts and war-
ranty conditions, from our customer
service or on our website.
If you contact Customer Service, you
will require the product number (E-
Nr.), the production number (FD) and
the consecutive numbering (Z-Nr.) of
your appliance.
You can find the contact details for
our customer service via the QR
code on the enclosed document on
service contacts and warranty condi-
tions or on our website.
17.1 Product number (E-Nr.),
production number (FD)
and consecutive number-
ing (Z-Nr.)
You can find the product number (E-
Nr.), the production number (FD) and
the consecutive numbering (Z-Nr.) on
the appliance's rating plate.
"Appliance", Fig.
1
/ Page15
Make a note of your appliance's de-
tails and the Customer Service tele-
phone number to find them again
quickly.
Technical data18 Technical data
Refrigerant, cubic capacity and fur-
ther technical specifications can be
found on the rating plate.
"Appliance", Fig.
1
/ Page15
18.1 Information regarding
Free and Open Source
Software
This product includes software com-
ponents that are licensed by the
copyright holders as free or open
source software.
The applicable licence information is
stored on your home appliance. You
can also access the applicable li-
cence information via your
HomeConnect app: "Profile -> Legal
information -> Licence Information".
1
You can download the licence in-
formation on the brand product web-
site. (Please search on the product
website for your appliance model
and additional documents). Alternat-
ively, you can request the relevant in-
formation from oss-
[email protected] or BSH Hausger-
äte GmbH, Carl-Wery-Str. 34, 81739
Munich, Germany.
The source code will be made avail-
able to you on request.
Please send your request to oss-
[email protected] or BSH Hausger-
äte GmbH, Carl-Wery-Str.34, 81739
Munich, Germany.
Subject: „OSSREQUEST“
The cost of performing your request
will be charged to you. This offer is
valid for three years from the date of
purchase or at least as long as we
offer support and spare parts for the
relevant appliance.
1
Depending on the appliance specifications
32
Declaration of Conformity en
Declaration of Conformity19 Declaration of Conformity
BSH Hausgeräte GmbH hereby declares that the appliance with Home Connect
functionality conforms to the essential requirements and other relevant provi-
sions of Directive 2014/53/EU.
A detailed RED Declaration of Conformity can be found online at
www.bosch-
home.com
among the additional documents on the product page for your ap-
pliance.
2.4 GHz band (2400–2483.5MHz): Max. 100mW
5-GHz band (5150–5350MHz + 5470–5725MHz): max. 130mW
BE BG CZ DK DE EE IE EL ES
FR HR IT CY LI LV LT LU HU
MT NL AT PL PT RO SI SK FI
SE NO CH TR IS UK (NI)
5GHz WLAN (Wi-Fi): For indoor use only.
AL BA MD ME MK RS UK UA
5GHz WLAN (Wi-Fi): For indoor use only.
33

id Daftar isi
Informasi dan penjelasan tambahan dapat ditemukan online.
Pindai kode QR di halaman judul.
Daftar isiDaftar isi
........................................................ 35
1 Keselamatan .............................. 35
1.1 Petunjuk umum ......................... 35
1.2 Penggunaan yang sesuai ........ 36
1.3 Pembatasan grup pengguna .. 36
1.4 Pengangkutan yang aman ...... 36
1.5 Pemasangan yang aman ........ 36
1.6 Penggunaan yang aman ......... 37
1.7 Alat yang rusak ......................... 39
2 Menghindari kerusakan pada
alat .............................................. 40
3 Perlindungan lingkungan dan
penghematan ............................. 41
3.1 Membuang kemasan ............... 41
3.2 Menghemat energi .................... 41
4 Memasang dan menyambung-
kan .............................................. 41
4.1 Lingkup pengiriman .................. 41
4.2 Kriteria lokasi pemasangan .... 42
4.3 Memasang alat .......................... 42
4.4 Mempersiapkan alat untuk
penggunaan pertama kali ....... 42
4.5 Menghubungkan alat dengan
listrik ............................................ 42
5 Pendahuluan .............................. 42
5.1 Perangkat ................................... 42
5.2 Panel kontrol .............................. 43
6 Perlengkapan ............................. 43
6.1 Rak .............................................. 44
6.2 Kontainer makanan ringan ...... 44
6.3 Wadah penyimpanan ............... 44
6.4 Kontainer buah dan sayuran
dengan pengontrol kelembap-
an ................................................. 44
6.5 Kompartemen untuk mentega
dan keju ...................................... 44
6.6 Rak pintu .................................... 44
6.7 Mesin es batu ............................ 45
6.8 Aksesori ...................................... 45
7 Pengoperasian dasar ................ 45
7.1 Menghidupkan alat ................... 45
7.2 Petunjuk pengoperasian .......... 45
7.3 Mematikan alat .......................... 46
7.4 Mengatur suhu .......................... 46
8 Fungsi tambahan ...................... 46
8.1 Super-dingin ............................. 46
8.2 Super-beku ................................. 46
8.3 Mode liburan .............................. 47
8.4 Mode hemat daya ..................... 47
8.5 Mode kesegaran ....................... 47
9 Alarm .......................................... 47
9.1 Alarm pintu ................................. 47
9.2 Alarm suhu ................................. 47
10 HomeConnect ....................... 48
10.1 Mengonfigurasi HomeCon-
nect ............................................ 48
10.2 Mengaktifkan koneksi ke ja-
ringan rumah WLAN (WiFi) ... 49
10.3 Menonaktifkan koneksi ke ja-
ringan rumah WLAN (WiFi) ... 49
10.4 Menginstal pembaruan pe-
rangkat lunak HomeConnec-
t .................................................. 49
10.5 Mereset pengaturan Ho-
meConnect ............................ 49
10.6 Perlindungan data .................. 49
11 Kompartemen pendingin ....... 50
11.1 Tips menyimpan bahan ma-
kanan di kompartemen pen-
dingin ........................................ 50
11.2 Zona-zona dingin dalam
kompartemen pendingin ....... 50
12 Kompartemen pembeku ......... 50
34
Keselamatan id
12.1 Kapasitas pembekuan ........... 50
12.2 Memanfaatkan sepenuhnya
volume kompartemen pem-
beku .......................................... 51
12.3 Tips menyimpan bahan ma-
kanan di dalam komparte-
men pembeku ......................... 51
12.4 Tips untuk membekukan ba-
han makanan segar ............... 51
12.5 Umur penyimpanan makanan
beku pada suhu−18°C .......... 52
12.6 Metode pencairan untuk ma-
kanan beku .............................. 52
13 Menghilangkan beku es .......... 52
13.1 Menghilangkan beku es pa-
da kompartemen pendi-
ngin ............................................ 52
13.2 Menghilangkan beku es pa-
da kompartemen pembeku .. 52
14 Pembersihan dan perawatan . 52
14.1 Menyiapkan alat untuk diber-
sihkan ........................................ 52
14.2 Membersihkan alat ................. 53
14.3 Melepaskan bagian peralat-
an ............................................... 53
14.4 Melepaskan komponen
alat ............................................. 54
15 Pemecahan masalah ............... 54
15.1 Mati listrik ................................. 58
15.2 Melakukan uji mandiri pada
alat ............................................. 58
16 Penyimpanan dan pembuang-
an .............................................. 59
16.1 Mematikan alat ........................ 59
16.2 Membuang alat yang sudah
tidak terpakai ........................... 59
17 Layanan pelanggan ................ 59
17.1 Nomor seri (E-Nr.), nomor
produksi (FD), dan nomor
barang (Z-Nr.) .......................... 60
18 Data teknis ............................... 60
18.1 Informasi tentang perangkat
lunak sumber terbuka dan
gratis ......................................... 60
19 Pernyataan kesesuaian .......... 61
Keselamatan 1 Keselamatan
Perhatikan petunjuk keselamatan berikut.
1.1 Petunjuk umum
¡ Baca dengan saksama petunjuk ini.
¡ Simpan petunjuk seperti informasi produk untuk penggunaan
berikutnya atau untuk pemilik berikutnya.
¡ Jangan menghubungkan alat yang mengalami kerusakan akibat
pengangkutan.
35
id Keselamatan
1.2 Penggunaan yang sesuai
Hanya gunakan alat:
¡ untuk mendinginkan dan membekukan bahan makanan serta
membuat es.
¡ dalam peralatan rumah tangga pribadi dan di ruang tertutup di
lingkungan rumah.
¡ hingga ketinggian 2000 m di atas permukaan laut.
1.3 Pembatasan grup pengguna
Alat ini dapat digunakan oleh anak-anak yang berusia mulai 8 ta-
hun dan oleh orang dengan keterbatasan fisik, sensorik, atau
mental, atau pengalaman dan/atau pengetahuan tidak mencu-
kupi, jika mereka diawasi atau dilatih terkait penggunaan alat
yang aman, sehingga memahami bahaya yang bisa terjadi.
Anak-anak tidak boleh bermain-main dengan alat.
Pembersihan dan perawatan pengguna tidak boleh dilakukan oleh
anak-anak tanpa pengawasan.
1.4 Pengangkutan yang aman
PERINGATAN‒Risiko cedera!
Besarnya berat alat dapat menyebabkan cedera ketika diangkat.
Jangan mengangkat alat seorang diri.
1.5 Pemasangan yang aman
PERINGATAN‒Risiko sengatan listrik!
Pemasangan yang tidak tepat dapat menimbulkan bahaya.
Peralatan hanya boleh disambungkan dan digunakan sesuai de-
ngan data-data yang tercantum pada label tipe peralatan.
Perangkat hanya boleh disambungkan dengan stopkontak sis-
tem grounding yang dipasang sesuai petunjuk ke pasokan lis-
trik dengan arus alternatif.
Sistem konduktor pelindung instalasi listrik rumah harus dipa-
sang sesuai petunjuk.
Jangan pernah menyuplai perangkat melalui alat sakelar ekster-
nal, misalnya, pewaktu atau pengendali jarak jauh.
Saat perangkat dipasang, steker listrik dari kabel sambungan
listrik harus dapat diakses secara leluasa, atau jika akses yang
36

Keselamatan id
leluasa tidak dimungkinkan, perangkat pemutus harus dipasang
di instalasi listrik yang terpasang secara permanen sesuai deng-
an peraturan pemasangan.
Pada saat menempatkan peralatan, pastikan bahwa kabel listrik
tidak terjepit atau rusak.
Isolasi kabel daya yang rusak akan membahayakan.
Jangan pernah mendekatkan kabel daya ke sumber panas.
PERINGATAN‒Risiko terjadi ledakan!
Jika lubang ventilasi alat tertutup, kebocoran pada sirkuit pendi-
ngin dapat menimbulkan campuran gas-udara yang mudah terba-
kar.
Jangan tutup lubang ventilasi pada housing perangkat atau pa-
da housing pemasangan.
PERINGATAN‒Risiko kebakaran!
Penggunaan kabel daya yang diperpanjang dan adaptor yang ti-
dak diizinkan akan membahayakan.
Jangan gunakan kabel ekstensi atau strip stopkontak ganda.
Hanya gunakan adaptor dan kabel daya yang disetujui oleh pro-
dusen.
Jika kabel sambungan listrik terlalu pendek dan kabel sam-
bungan listrik tidak tersedia lagi, hubungi teknisi listrik untuk
menyesuaikan pemasangan di rumah.
Strip stopkontak ganda portabel atau komponen jaringan dapat
menjadi sangat panas dan menyebabkan kebakaran.
Jangan letakkan strip stopkontak ganda portabel atau kompo-
nen jaringan di bagian belakang alat.
1.6 Penggunaan yang aman
PERINGATAN‒Risiko sengatan listrik!
Kelembapan yang masuk dapat menyebabkan sengatan listrik.
Hanya gunakan alat dalam ruang yang tertutup.
Jangan letakkan alat di tempat yg panas dan basah.
Jangan gunakan pembersih uap atau pembersih bertekanan
tinggi untuk membersihkan perangkat.
37
id Keselamatan
PERINGATAN‒Risiko kesulitan bernapas!
Anak-anak dapat menarik material kemasan ke atas kepala mere-
ka atau membungkus diri mereka dengan kemasan tersebut se-
hingga menyebabkan kesulitan bernapas.
Jauhkan material kemasan dari jangkauan anak-anak.
Jangan biarkan anak-anak bermain dengan material kemasan.
Anak-anak dapat menghirup atau menelan komponen kecil se-
hingga menyebabkan kesulitan bernapas.
Jauhkan komponen kecil dari jangkauan anak-anak.
Jangan biarkan anak-anak bermain dengan komponen kecil.
PERINGATAN‒Risiko terjadi ledakan!
Jika sirkuit pendingin rusak, cairan pendingin yang mudah terba-
kar dapat mengalir keluar dan meledak.
Jangan gunakan perangkat mekanis lain atau alat lain selain
yang direkomendasikan oleh produsen untuk mempercepat pro-
ses pencairan.
Angkat bahan makanan yang membeku dengan benda tum-
pul,misalnya gagang sendok kayu.
Produk dengan propelan yang mudah terbakar dan zat-zat pele-
dak dapat meledak,misalnya kaleng semprot aerosol.
Jangan menyimpan produk yang mengandung propelan yang
mudah terbakar atau zat-zat peledak di dalam alat.
PERINGATAN‒Risiko kebakaran!
Perangkat listrik di dalam alat dapat menyebabkan kebakaran,mi-
salnya alat pemanas atau pembuat es listrik.
Jangan mengoperasikan perangkat listrik di dalam alat.
PERINGATAN‒Risiko cedera!
Kontainer berisikan minuman berkarbonasi dapat pecah.
Jangan simpan kontainer berisikan minuman berkarbonasi di
dalam kompartemen pembeku.
Cedera pada mata akibat kebocoran cairan pendingin yang mu-
dah terbakar dan gas berbahaya.
Jangan merusak tabung sistem sirkulasi cairan pendingin dan
isolasi.
Perangkat dapat terguling.
Jangan menginjak atau bersandar pada alas tumpuan, laci, atau
pintu.
38

Keselamatan id
PERINGATAN‒Risiko luka bakar!
Setiap komponen di bagian belakang alat menjadi panas selama
pengoperasian.
Jangan pernah menyentuh komponen yang panas.
PERINGATAN‒Risiko radang dingin!
Bersentuhan dengan makanan beku dan permukaan yang dingin
dapat menyebabkan luka bakar karena kedinginan.
Jangan pernah memasukkan makanan beku langsung ke da-
lam mulut begitu makanan dikeluarkan dari kompartemen pen-
dingin.
Hindari menyentuh makanan beku, es, dan permukaan pada
kompartemen pembeku dalam waktu yang lama.
WASPADA‒Risiko bahaya bagi kesehatan!
Perhatikan petunjuk berikut untuk menghindari kontaminasi pada
bahan makanan.
Jika pintu dibuka untuk waktu yang lama, suhu di kompartemen
alat dapat meningkat secara signifikan.
Bersihkan permukaan yang dapat bersentuhan dengan bahan
makanan dan sistem pembuangan yang mudah diakses secara
berkala.
Simpan daging dan ikan mentah dalam wadah yang sesuai di
lemari pendingin agar tidak menyentuh atau menetes pada ba-
han makanan lainnya.
Jika perangkat pendingin/pembeku sudah lama dibiarkan ko-
song, matikan alat, cairkan, bersihkan, dan biarkan pintu terbu-
ka untuk mencegah pembentukan jamur.
Bagian dalam alat yang terbuat dari logam atau dengan tampilan
logam dapat mengandung aluminium. Jika bahan makanan asam
bersentuhan dengan aluminium, ion aluminium dapat berpindah
ke bahan makanan.
Jangan makan bahan makanan yang terkontaminasi.
1.7 Alat yang rusak
PERINGATAN‒Risiko sengatan listrik!
Alat yang rusak atau kabel daya yang rusak akan membahayak-
an.
Jangan pernah mengoperasikan alat yang rusak.
39
id Menghindari kerusakan pada alat
Untuk memutus sambungan listrik pada alat, jangan pernah me-
lepas pada kabel daya. Selalu lepas pada steker kabel daya.
Jika alat atau kabel daya rusak, segera cabut steker kabel daya
atau matikan sekring di kotak sekring.
Hubungi layanan pelanggan.
Halaman59
Perbaikan yang tidak tepat dapat berbahaya.
Hanya teknisi ahli yang boleh melakukan perbaikan pada alat.
Hanya komponen pengganti asli yang boleh digunakan untuk
perbaikan peralatan.
Jika kabel suplai listrik atau kabel koneksi alat rusak, kabel ter-
sebut harus diganti dengan kabel suplai listrik khusus atau ka-
bel koneksi alat khusus yang tersedia di produsen atau di la-
yanan pelanggan.
PERINGATAN‒Risiko kebakaran!
Jika pipa rusak, cairan pendingin yang mudah terbakar dan gas
berbahaya dapat keluardan terbakar.
Jauhkan api dan sumber api dari alat.
Alirkan udara di ruangan.
Matikan alat.
Halaman46
Lepaskan steker kabel daya atau matikan sekring di kotak
sekring.
Hubungi layanan pelanggan.
Halaman59
Menghindari kerusakan pada alat2 Menghindari kerusakan
pada alat
PERHATIAN
Memiringkan roda alat dapat meru-
sak lantai saat alat dipindahkan.
Angkut perangkat dengan troli ba-
rang.
Gunakan pelindung lantai saat me-
mindahkan perangkat dan jangan
bergerak secara zig-zag.
Menggunakan alat, alas tumpuan, la-
ci, atau pintu sebagai permukaan du-
duk atau alas untuk dinaiki dapat me-
rusak alat.
Dilarang menginjak atau bersandar
pada alat, alas tumpuan, laci, atau
pintu.
Bagian plastik dan gasket pintu da-
pat menjadi keropos akibat noda mi-
nyak atau lemak.
Jaga bagian plastik dan gasket
pintu bebas dari minyak dan le-
mak.
Bagian dalam alat yang terbuat dari
logam atau dengan tampilan logam
dapat mengandung aluminium. Jika
bersentuhan dengan bahan makanan
40
Perlindungan lingkungan dan penghematan id
yang mengandung asam, aluminium
akan berkarat dan berubah warna.
Hanya bahan makanan yang dike-
mas yang dapat disimpan di da-
lam alat.
Jika bagian peralatan dan aksesori
dibersihkan di dalam mesin pencuci
piring, keduanya dapat berubah ben-
tuk atau berubah warna.
Jangan pernah membersihkan ba-
gian peralatan dan aksesori di da-
lam mesin pencuci piring.
Perlindungan lingkungan dan penghematan3 Perlindungan lingkung-
an dan penghematan
3.1 Membuang kemasan
Material kemasannya ramah ling-
kungan dan dapat didaur ulang.
Buang setiap komponen secara
terpisah sesuai jenis materialnya.
3.2 Menghemat energi
Jika petunjuk ini diperhatikan, alat
akan menghabiskan lebih sedikit da-
ya.
Pilihan lokasi pemasangan
Lindungi alat dari paparan sinar
matahari langsung.
Pasang alat dengan jarak sejauh
mungkin dari radiator, kompor dan
sumber panas lainnya:
– Jaga jarak 30 mm ke kompor
listrik atau gas.
– Jaga jarak 300 mm dari kompor
minyak atau batubara.
Jaga sedikit jarak di samping din-
ding.
Jangan pernah menutupi atau
menghalangi lubang ventilasi eks-
ternal.
Menghemat energi saat penggu-
naan
Catatan: Penyusunan bagian peralat-
an tidak memengaruhi konsumsi da-
ya pada alat.
Hanya buka alat secara singkat
dan tutup dengan hati-hati.
Jangan pernah menutupi atau
menghalangi lubang ventilasi inter-
nal atau lubang ventilasi eksternal.
Pindahkan bahan makanan yang
dibeli ke dalam tas pendingin dan
segera simpan di dalam alat.
Biarkan bahan makanan dan mi-
numan hangat menjadi dingin se-
belum disimpan.
Untuk menggunakan suhu dingin
makanan beku, simpan makanan
beku di kompartemen pendingin
untuk menghilangkan beku es.
Selalu beri sedikit ruang di antara
bahan makanan dan dinding bela-
kang.
Memasang dan menyambungkan4 Memasang dan me-
nyambungkan
4.1 Lingkup pengiriman
Setelah membongkar, periksa semua
komponen dari kerusakan saat peng-
angkutan dan kelengkapan pengirim-
an.
Apabila ada keluhan, tanyakan kepa-
da dealer tempat Anda atau kepada
layanan pelanggan
Halaman59
kami.
Pengiriman terdiri atas:
Freestanding
Perlengkapan dan aksesori
1
Instruksi pemasangan
Petunjuk penggunaan
1
Tergantung perlengkapan peralatan
41
id Pendahuluan
Direktori layanan pelanggan
Lampiran garansi
1
Label energi
Informasi mengenai konsumsi da-
ya dan kebisingan
Informasi mengenai HomeCon-
nect
4.2 Kriteria lokasi pemasangan
PERINGATAN
Risiko terjadi ledakan!
Jika alat terletak di ruangan yang ter-
lalu kecil, udara dan gas yang mu-
dah terbakar dapat bercampur saat
terjadi kebocoran sirkuit pendinginan.
Hanya pasang alat di ruangan de-
ngan volume minimal 1m
3
per 8g
cairan pendingin. Jumlah cairan
pendingin ditunjukkan pada label
peringkat.
"Perangkat", Gbr.
1
/
Halaman43
Bergantung pada modelnya, berat
alat dari produsen dapat mencapai
110kg.
Untuk menopang berat alat, permu-
kaan harus cukup stabil.
Permukaan lantai harus rata.
Perangkat pendingin ini sesuai untuk
digunakan pada suhu sekitar mulai
10°C hingga 43°C.
Alat berfungsi penuh dalam suhu ru-
angan yang diperbolehkan.
Jika alat dioperasikan pada suhu ru-
angan yang lebih dingin, kerusakan
pada alat dapat dikecualikan hingga
pada suhu ruangan 5°C.
Pemasangan atas bawah dan ber-
dampingan
Jika 2 lemari pendingin ingin dipa-
sang secara atas bawah atau berse-
belahan, jarak antar alat setidaknya
harus sebesar 150mm. Alat yang di-
pilih dapat dipasang tanpa jarak mini-
mal. Tanyakan kepada toko penjual-
an khusus atau perencana dapur An-
da tentang hal ini.
4.3 Memasang alat
Pasang alat sesuai dengan petun-
juk pemasangan yang disertakan.
4.4 Mempersiapkan alat untuk
penggunaan pertama kali
1.
Keluarkan materi informasi.
2.
Lepaskan foil pelindung dan per-
lengkapan pengaman, misalnya
selotip dan karton.
3.
Bersihkan alat untuk pertama kali.
Halaman53
4.5 Menghubungkan alat deng-
an listrik
1.
Hubungkan steker alat pada kabel
daya ke alat.
2.
Hubungkan steker jaringan kabel
daya perangkat ke stop kontak di
dekat peralatan.
Data sambungan perangkat ter-
cantum pada pelat label.
"Perangkat", Gbr.
1
/
Halaman43
3.
Periksa steker jaringan apakah su-
dah terpasang kuat.
Perangkat siap untuk digunakan.
Pendahuluan5 Pendahuluan
5.1 Perangkat
Ikhtisar mengenai komponen alat da-
pat ditemukan di sini.
Gbr.
1
1
Tidak di semua negara
42
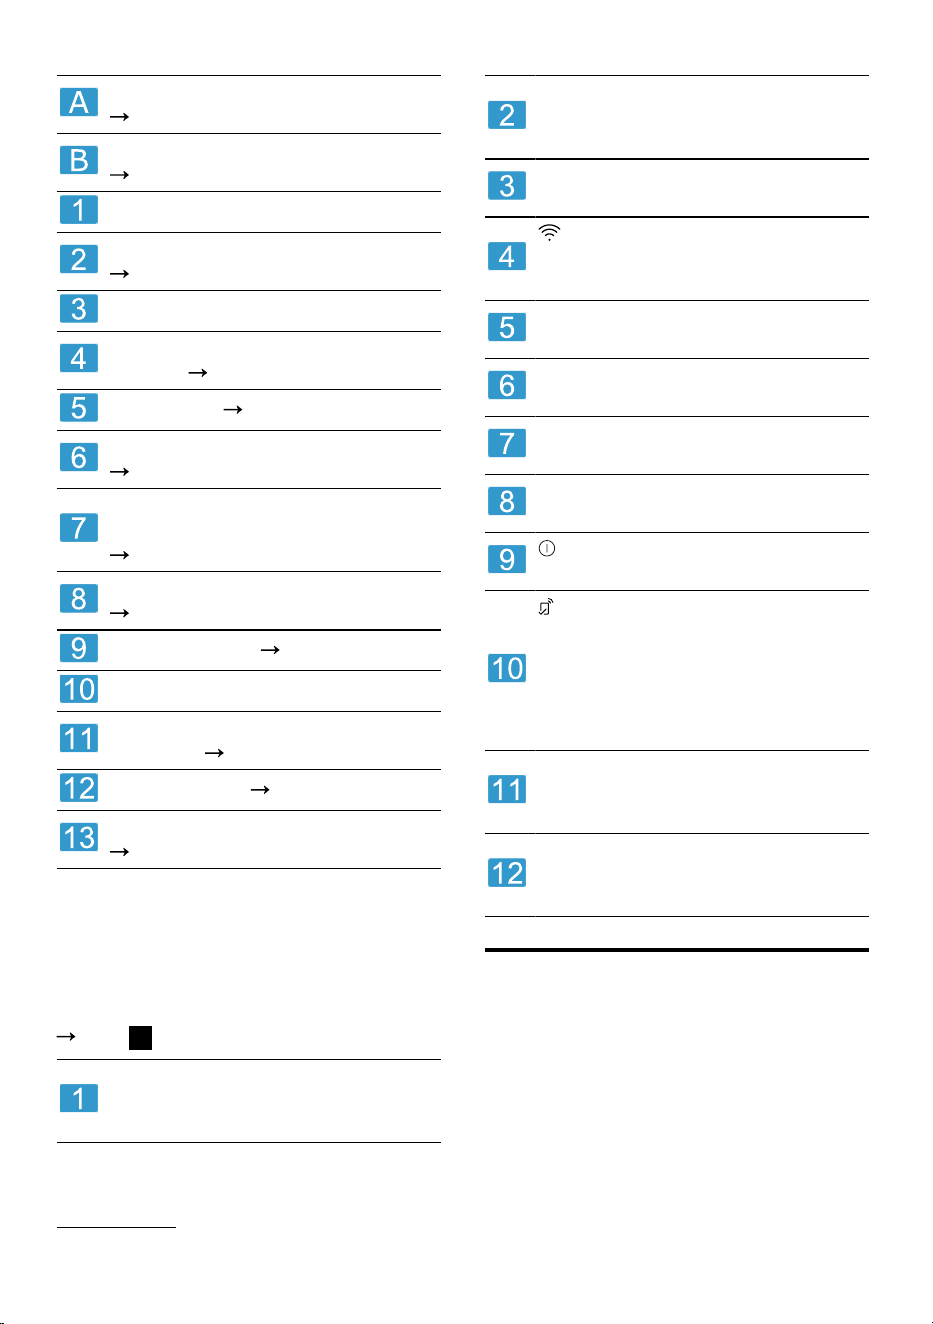
Perlengkapan id
Kompartemen pendingin
Halaman50
Kompartemen pembeku
Halaman50
Lampu
Kontainer makanan ringan
Halaman44
1
Lubang udara internal
Pengatur suhu (wadah penyim-
panan)
Halaman46
Pelat label
Halaman60
Wadah penyimpanan
Halaman44
Kontainer buah dan sayuran de-
ngan pengontrol kelembapan
Halaman44
Kontainer makanan beku
Halaman54
Mesin es batu
Halaman45
Dudukan sekrup
Kompartemen untuk mentega
dan keju
Halaman44
1
Panel kontrol
Halaman43
Rak pintu untuk botol besar
Halaman44
5.2 Panel kontrol
Panel kontrol dapat digunakan untuk
mengatur semua fungsi alat dan me-
nerima informasi tentang status
pengoperasian.
Gbr.
2
Menampilkan suhu komparte-
men pendingin yang diatur da-
lam°C.
Menampilkan suhu komparte-
men pembeku yang diatur da-
lam°C.
alarm mematikan nada peringat-
an.
mengaktifkan atau menonak-
tifkan koneksi ke jaringan ru-
mah WLAN (WiFi).
Lampu setrip memberikan feed-
back visual.
eco mengaktifkan atau menon-
aktifkan mode hemat daya.
holiday mengaktifkan atau me-
nonaktifkan mode liburan.
fresh mengaktifkan atau menon-
aktifkan mode kesegaran.
menghidupkan atau memati-
kan alat.
menyala ketika pengaturan
yang ditentukan pengguna telah
diatur melalui aplikasi Ho-
meConnect. Informasi lebih lan-
jut dapat ditemukan pada apli-
kasi HomeConnect.
super(Kompartemen pembeku)
menghidupkan atau mematikan
Super-beku.
super(Kompartemen pendingin)
menghidupkan atau mematikan
Super-dingin.
Perlengkapan6 Perlengkapan
Perlengkapan alat bergantung pada
model.
1
Tergantung perlengkapan peralatan
43
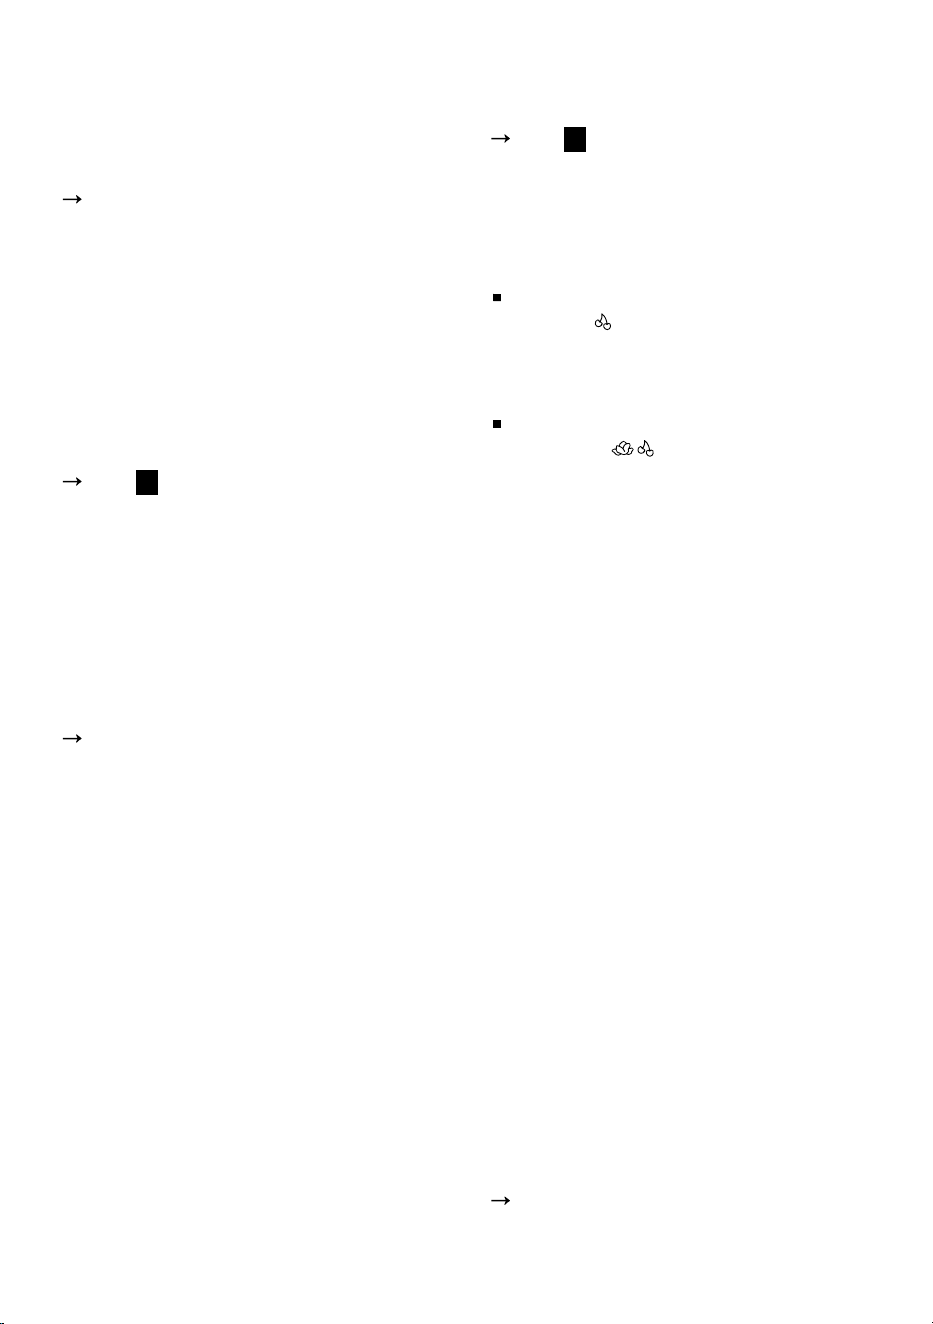
id Perlengkapan
6.1 Rak
Untuk memvariasikan rak sesuai ke-
butuhan, rak dapat dilepaskan dan
dipasang kembali ke posisi lainnya.
"Melepaskan rak", Halaman53
6.2 Kontainer makanan ringan
Simpan bahan makanan kemasan
atau makanan ringan berukuran kecil
di kontainer makanan ringan.
Kontainer makanan ringan dapat dile-
paskan. Untuk melakukannya, angkat
dan lepaskan kontainer makanan ri-
ngan. Dudukan kontainer makanan ri-
ngan dapat digeser.
Gbr.
3
6.3 Wadah penyimpanan
Suhu di wadah penyimpanan lebih
rendah dibandingkan suhu di kom-
partemen pendingin. Suhu di bawah
0°C dapat terjadi sewaktu-waktu.
Untuk mencapai suhu mendekati
0°C di wadah penyimpanan, atur su-
hu kompartemen pendingin ke 2°C.
Halaman46
Gunakan suhu yang lebih rendah di
wadah penyimpanan untuk menyim-
pan makanan yang tidak tahan lama,
misalnya ikan, daging, dan sosis.
6.4 Kontainer buah dan sayur-
an dengan pengontrol ke-
lembapan
Simpan buah dan sayuran segar tan-
pa kemasan dalam kontainer buah
dan sayuran.
Tutupi potongan buah dan sayuran
atau simpan dalam kemasan kedap
udara.
Melalui pengontrol kelembapan dan
penutupan khusus, kelembapan uda-
ra dapat disesuaikan dalam kontainer
sayuran dan buah. Dengan demikian,
buah dan sayuran segar dapat disim-
pan dua kali lebih lama daripada pe-
nyimpanan konvensional.
Gbr.
4
Atur kelembapan udara pada kontai-
ner buah dan sayur sesuai dengan
jenis dan jumlah makanan yang akan
disimpan dengan menekan tombol
pengatur kelembapan:
Penguncian untuk kelembapan
rendah saat menyimpan sebagi-
an besar buah, berbagai makanan
atau makanan dalam jumlah be-
sar.
Pembukaan kunci untuk kelembap-
an tinggi saat menyimpan ba-
nyak sayuran atau makanan dalam
jumlah sedikit.
Air kondensat dapat muncul di dalam
kontainer buah dan sayuran bergan-
tung pada jumlah dan produk yang
disimpan.
Bersihkan air kondensat dengan kain
kering dan atur kelembapan udara
rendah dengan pengontrol kelemba-
pan.
Untuk menjaga kualitas dan aroma,
simpan buah dan sayuran yang sen-
sitif terhadap suhu dingin di luar alat
pada suhu sekitar 8°C hingga 12°C,
misalnya nanas, pisang, buah jeruk,
mentimun, zukini, paprika, tomat dan
kentang.
6.5 Kompartemen untuk men-
tega dan keju
Simpan mentega dan keju keras di
kompartemen mentega dan keju.
6.6 Rak pintu
Untuk memvariasikan rak pintu sesu-
ai kebutuhan, rak pintu dapat dile-
paskan dan dipasang kembali di po-
sisi lainnya.
"Melepaskan rak pintu",
Halaman53
44

Pengoperasian dasar id
6.7 Mesin es batu
Gunakan mesin es batu untuk mem-
buat es batu dari air minum.
Membuat es batu
Hanya gunakan air minum untuk
membuat es batu.
1.
Lepaskan cetakan es batu dan
isi ¾ cetakan dengan air minum ,
lalu pasang kembali .
Gbr.
5
Catatan: Terlalu banyak air minum
dapat mengganggu fungsi mesin
es batu. Es batu tidak keluar satu
per satu dari cetakan es batu. Ter-
lalu banyak air minum yang masuk
ke kontainer es batu, es batu yang
sudah ada akan membeku bersa-
maan.
2.
Saat es batu telah membeku, putar
kenop pada cetakan es batu ke
kanan beberapa kali dan lepaskan.
Gbr.
6
Es batu akan keluar dan jatuh ke
dalam kontainer es batu.
3.
Lepaskan kontainer es batu dan
keluarkan es batu.
Gbr.
7
6.8 Aksesori
Gunakan aksesori asli. Aksesori ter-
sebut telah dirancang khusus untuk
alat ini.
Aksesori alat Anda tergantung pada
modelnya.
Rak telur
Simpan telur dengan aman pada rak
telur.
Penahan botol
Penahan botol mencegah botol ter-
balik saat pintu alat dibuka dan ditu-
tup.
Gbr.
8
Rak botol variabel
Simpan botol dengan aman di rak
botol variabel.
Gbr.
9
Pengoperasian dasar7 Pengoperasian dasar
7.1 Menghidupkan alat
1.
Sambungkan perangkat dengan
daya listrik.
Halaman42
Catatan: Jika alat sebelumnya di-
matikan melalui panel kontrol, te-
kan dan tahan selama 3 detik.
Alat mulai mendingin.
Nada peringatan berbunyi dan in-
dikator suhu berkedip karena kom-
partemen pembeku masih terlalu
panas.
2.
Matikan nada peringatan dengan
alarm.
"alarm" padam begitu suhu yang
diatur tercapai.
3.
Atur suhu yang diinginkan.
Halaman46
7.2 Petunjuk pengoperasian
Setelah alat dihidupkan, diperlukan
waktu hingga beberapa jam untuk
mencapai suhu yang diatur.
Jangan memasukkan bahan ma-
kanan apa pun sebelum suhu
yang diatur tercapai.
Sisi depan housing terkadang
akan sedikit panas. Hal ini bertuju-
an untuk menghindari pembentuk-
an air kondensasi pada area
gasket pintu.
Saat menutup pintu, pastikan pintu
tidak terhalang oleh makanan yang
disimpan.
Jika pintu ditutup, mungkin terda-
pat tekanan negatif. Pintu hampir
tidak dapat dibuka kembali. Tung-
gu beberapa saat hingga tekanan
negatif merata.
45
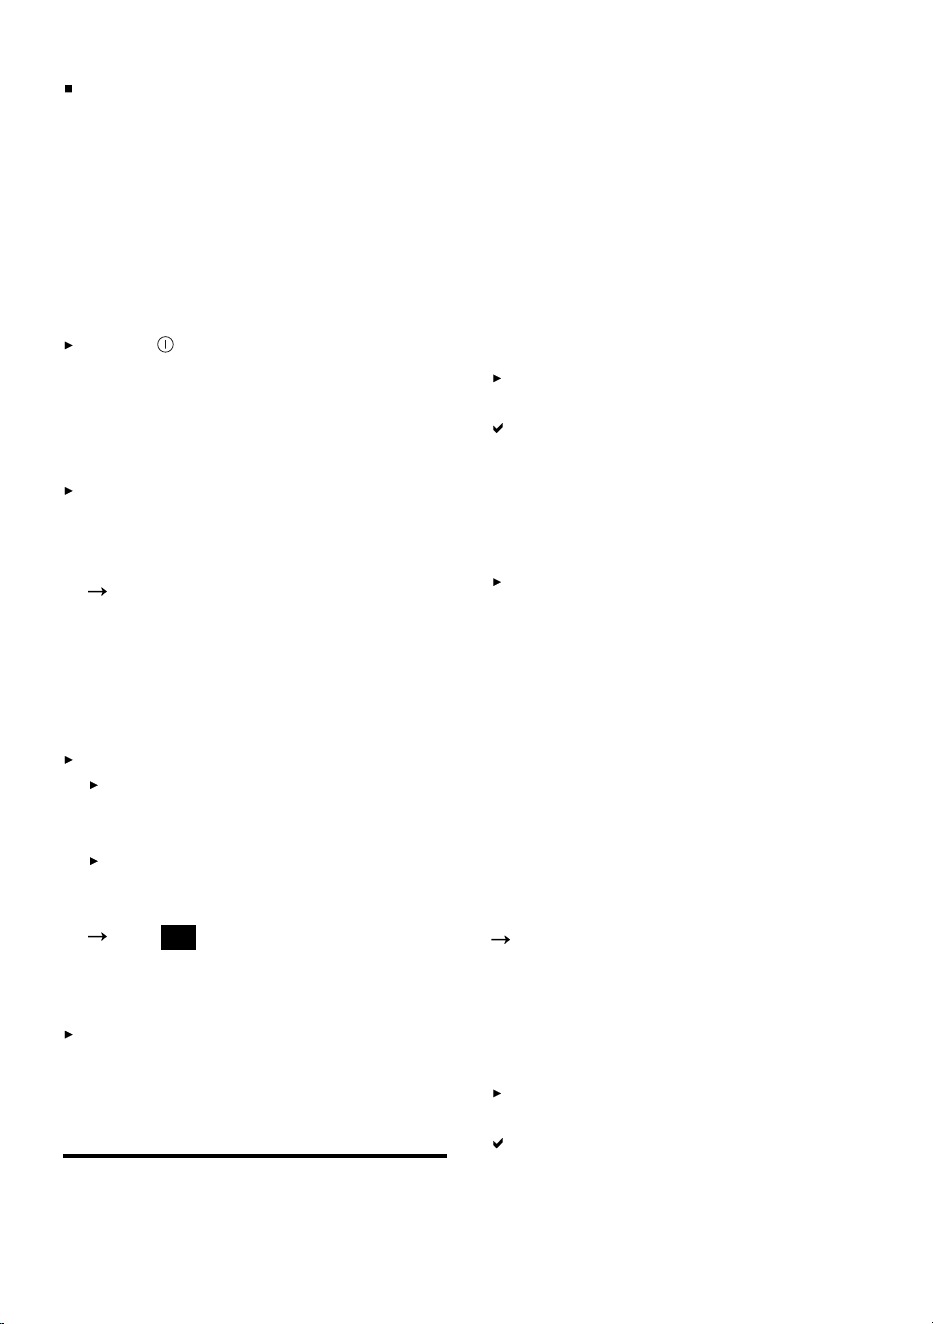
id Fungsi tambahan
Suhu di dalam alat bervariasi aki-
bat kondisi berikut:
– Frekuensi dibukanya alat
– Jumlah muatan
– Suhu makanan yang baru disim-
pan
– Suhu sekitar
– Sinar matahari langsung
7.3 Mematikan alat
Tekan dan tahan selama 3 detik.
7.4 Mengatur suhu
Mengatur suhu kompartemen
pendingin
Tekan suhu yang diinginkan.
Geser pengatur suhu kontainer pe-
nyimpanan ke posisi ⅓ dari bawah
untuk mencapai suhu yang diatur.
Halaman46
Suhu yang direkomendasikan pa-
da kompartemen pendingin sebe-
sar 4°C.
menyetel suhu kontainer penyim-
panan
Pilih salah satu opsi:
Untuk menurunkan suhu, geser
pengatur suhu ke atas ke arah
"extra cold".
Untuk menaikkan suhu, geser
pengatur suhu ke bawah ke
arah "cold".
Gbr.
10
Mengatur suhu kompartemen
pembeku
Tekan suhu yang diinginkan.
Suhu yang direkomendasikan pa-
da kompartemen pembeku sebe-
sar −18°C.
Fungsi tambahan8 Fungsi tambahan
Temukan fungsi tambahan yang da-
pat diatur yang dimiliki oleh alat.
8.1 Super-dingin
Pada Super-dingin, kompartemen
pendingin mendinginkan hingga sedi-
ngin mungkin.
Aktifkan Super-dingin sebelum me-
nyimpan bahan makanan dalam jum-
lah besar di kompartemen pendingin.
Catatan: Saat Super-dingin diaktif-
kan, kebisingan dapat meningkat.
Mengaktifkan Super-dingin
Tekan super(Kompartemen pendi-
ngin).
"super"(Kompartemen pendingin)
menyala.
Catatan: Setelah sekitar 6jam, alat
beralih ke mode normal.
Menonaktifkan Super-dingin
Tekan super(Kompartemen pendi-
ngin).
8.2 Super-beku
Saat Super-beku aktif, kompartemen
pembeku mendinginkan hingga sedi-
ngin mungkin.
Aktifkan Super-beku 4 hingga 6jam
sebelum memasukkan bahan makan-
an dengan berat mulai 2kg atau le-
bih ke dalam kompartemen pembe-
ku.
Gunakan Super-beku untuk meman-
faatkan kapasitas pembekuan.
"Persyaratan untuk kapasitas pem-
bekuan", Halaman51
Catatan: Saat Super-beku diaktifkan,
kebisingan dapat meningkat.
Mengaktifkan Super-beku
Tekan super(Kompartemen pem-
beku).
"super"(Kompartemen pembeku)
menyala.
Catatan: Setelah sekitar 54jam, alat
beralih ke mode normal.
46
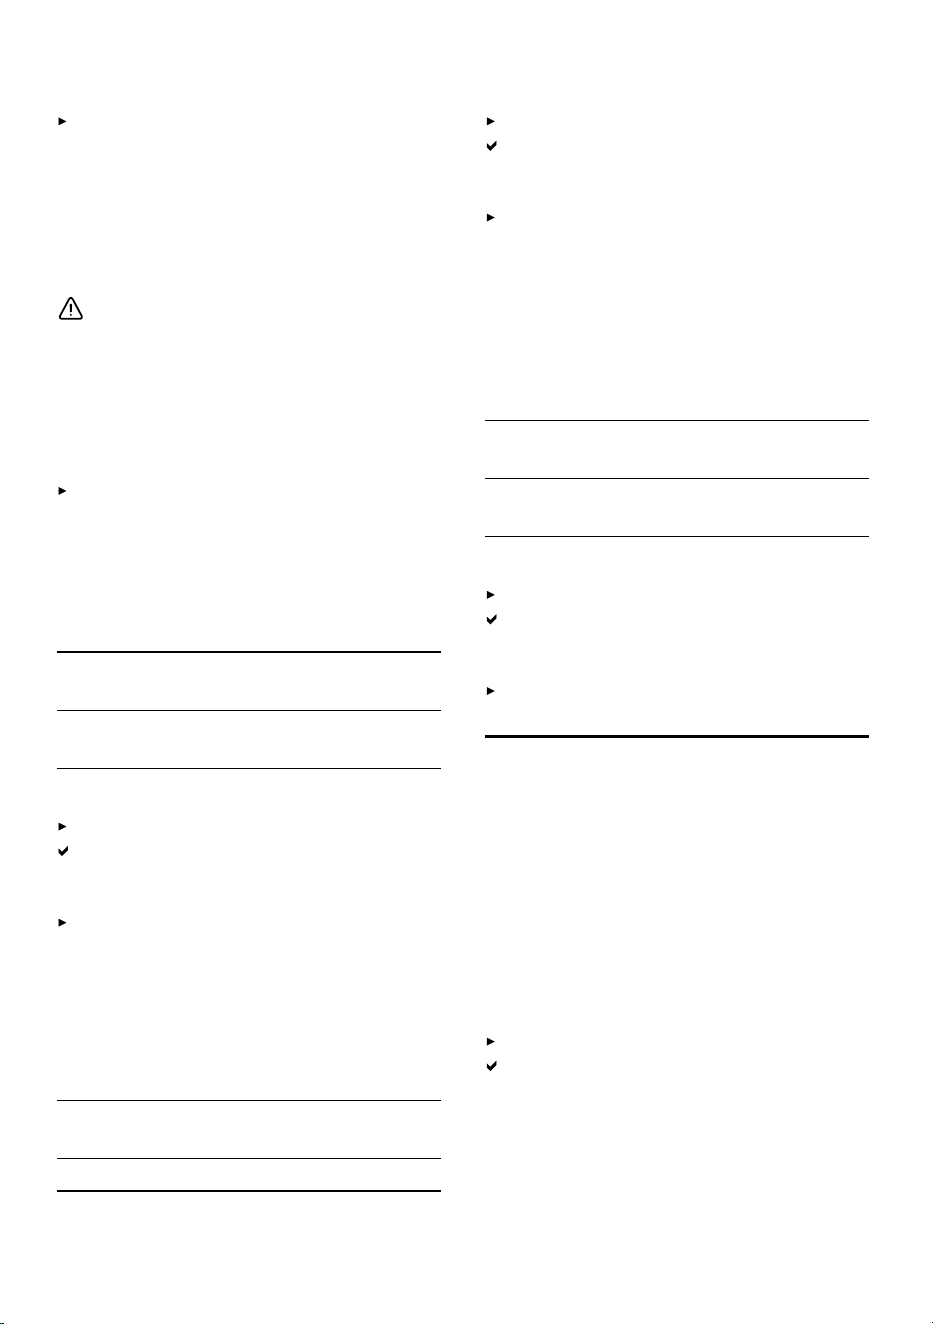
Alarm id
Menonaktifkan Super-beku
Tekan super(Kompartemen pem-
beku).
8.3 Mode liburan
Jika alat tidak digunakan dalam jang-
ka waktu lama, mode liburan hemat
daya dapat diaktifkan pada alat.
WASPADA
Risiko bahaya bagi kesehatan!
Kompartemen pendingin memanas
saat mode liburan diaktifkan. Pening-
katan suhu dapat menyebabkan bak-
teri tumbuh dan merusak bahan ma-
kanan.
Jangan menyimpan bahan makan-
an apa pun di kompartemen pen-
dingin ketika mode liburan diaktif-
kan.
Alat secara otomatis menyesuaikan
suhu.
Kompartemen
pendingin
14°C
Kompartemen
pembeku
Suhu tidak beru-
bah
Mengaktifkan mode liburan
Tekan holiday.
"holiday" menyala.
Menonaktifkan mode liburan
Tekan holiday.
8.4 Mode hemat daya
Dengan mode hemat daya, alat bera-
lih ke pengoperasian hemat energi.
Alat secara otomatis menyesuaikan
suhu.
Kompartemen
pendingin
8°C
Freezer −16°C
Mengaktifkan mode hemat daya
Tekan eco.
"eco" menyala.
Menonaktifkan mode hemat daya
Tekan eco.
8.5 Mode kesegaran
Mode kesegaran dapat diaktifkan pa-
da alat untuk menjaga kesegaran ba-
han makanan lebih lama.
Alat secara otomatis menyesuaikan
suhu.
Kompartemen
pendingin
2°C
Freezer Suhu tidak beru-
bah
Mengaktifkan mode kesegaran
Tekan fresh.
"fresh" menyala.
Menonaktifkan mode kesegaran
Tekan fresh.
Alarm9 Alarm
9.1 Alarm pintu
Jika pintu alat dibuka terlalu lama,
alarm pintu akan menyala.
Nada peringatan berbunyi, "alarm"
berkedip, lampu setrip berkedip dan
indikator suhu kompartemen terkait
berkedip.
Mematikan alarm pintu
Tutup pintu alat atau tekan alarm.
Nada peringatan dimatikan.
9.2 Alarm suhu
Jika kompartemen pembeku menjadi
terlalu hangat, alarm suhu akan me-
nyala otomatis.
47
id HomeConnect
Nada peringatan berbunyi, suhu yang
diatur (kompartemen pembeku),
"alarm" dan lampu setrip berkedip.
WASPADA
Risiko bahaya bagi kesehatan!
Saat makanan mencair, bakteri dapat
tumbuh dan makanan beku dapat
membusuk.
Jangan membekukan ulang ma-
kanan beku yang mencair atau te-
lah menjadi cair.
Bekukan ulang setelah makanan
dimasak atau dibakar.
Jangan gunakan lagi bahan ma-
kanan yang melewati periode pe-
nyimpanan maksimal.
Alarm suhu dapat diaktifkan pada si-
tuasi berikut:
Alat dioperasikan.
Jangan menyimpan bahan makan-
an hingga suhu yang diatur terca-
pai.
Sejumlah besar bahan makanan
segar dimasukkan.
Aktifkan Super-beku sebelum me-
nyimpan bahan makanan dalam
jumlah besar.
Pintu kompartemen pembeku ter-
buka terlalu lama.
Periksa apakah makanan beku
mencair atau telah menjadi cair.
Mematikan alarm suhu
Tekan alarm.
Nada peringatan dimatikan.
HomeConnect 10 HomeConnect
Alat ini kompatibel dengan jaringan.
Hubungkan alat Anda dengan pe-
rangkat seluler untuk menggunakan
fungsi pada aplikasi HomeConnect.
Layanan HomeConnect tidak terse-
dia di setiap negara. Ketersediaan
fungsi HomeConnect tergantung pa-
da ketersediaan layanan HomeCon-
nect di negara Anda. Untuk menda-
patkan informasi mengenai hal terse-
but, Anda dapat melihat di:
www.home-connect.com
.
Untuk dapat menggunakan Ho-
meConnect, arahkan koneksi ke ja-
ringan rumah WLAN (Wi-Fi
1
) dan ke
aplikasi HomeConnect.
Setelah alat dihidupkan, tunggu mini-
mal 2menit hingga inisialisasi alat in-
ternal selesai. Kemudian, arahkan
HomeConnect dahulu.
Aplikasi HomeConnect akan me-
mandu Anda melalui keseluruhan
proses pendaftaran. Ikuti petunjuknya
dan perhatikan panduan di aplikasi
HomeConnect.
Catatan
Perhatikan petunjuk keselamatan
dalam panduan pengguna ini dan
pastikan petunjuk tersebut juga di-
patuhi selama mengoperasikan pe-
rangkat melalui aplikasi Ho-
meConnect.
"Keselamatan", Halaman35
Pengoperasian langsung di peral-
atan selalu diprioritaskan. Dalam
jangka waktu ini, pengoperasian
melalui aplikasi HomeConnect ti-
dak dimungkinkan.
10.1 Mengonfigurasi Ho-
meConnect
Prasyarat: Alat memiliki sinyal pene-
rimaan ke jaringan rumah WLAN (Wi-
Fi) di lokasi pemasangan.
1
Wi-Fi adalah merek dagang terdaftar dari Wi-Fi Alliance.
48
HomeConnect id
1.
Pindai kode QR berikut.
RFSM0Z01
Kode QR dapat digunakan untuk
memasang aplikasi HomeConnect
dan menghubungkan alat.
2.
Ikuti petunjuk pada aplikasi Ho-
meConnect.
10.2 Mengaktifkan koneksi ke
jaringan rumah WLAN
(WiFi)
Tekan .
10.3 Menonaktifkan koneksi ke
jaringan rumah WLAN
(WiFi)
Tekan .
10.4 Menginstal pembaruan
perangkat lunak Ho-
meConnect
Catatan: Jika pembaruan perangkat
lunak HomeConnect telahtersedia,
sebuah pesan akan muncul pada ap-
likasi HomeConnect.
Untuk menginstal pembaruan pe-
rangkat lunak HomeConnect, ikuti
petunjuk pada aplikasi HomeCon-
nect.
Panel kontrol sebagian akan ter-
kunci selama instalasi.
10.5 Mereset pengaturan Ho-
meConnect
Jika perangkat mengalami gangguan
koneksi saat dihubungkan ke WLAN
jaringan rumah (Wi-Fi) atau jika pe-
rangkat ingin didaftarkan ke WLAN
jaringan rumah (Wi-Fi) yang berbeda,
atur ulang pengaturan HomeCon-
nect.
Tekan selama 6 detik hingga
padam.
Pengaturan HomeConnecttelah
direset.
10.6 Perlindungan data
Perhatikan petunjuk tentang perlin-
dungan data.
Dengan menghubungkan alat untuk
pertama kalinya ke jaringan rumah
yang terhubung dengan internet, alat
akan mengirimkan kategori data beri-
kut ke server HomeConnect (regis-
trasi awal):
Deteksi perangkat yang jelas (ter-
diri atas kunci perangkat seperti
alamat MAC modul komunikasi
Wi-Fi yang terinstal).
Sertifikat keamanan modul komuni-
kasi Wi-Fi (untuk proteksi sistem
informasi koneksi).
Versi perangkat lunak dan perang-
kat keras terbaru untuk alat rumah
tangga Anda.
Status pengaturan pabrik yang se-
belumnya.
Registrasi pertama ini akan memper-
siapkan penggunaan fitur HomeCon-
nect dan siap digunakan saat diperlu-
kan, ketika Anda ingin menggunakan
fitur HomeConnect tersebut untuk
pertama kali.
Catatan: Perlu diketahui, jika fitur Ho-
meConnect hanya dapat digunakan
ketika terhubung dengan aplikasi Ho-
meConnect. Informasi terkait perlin-
dungan data dapat diperoleh dari ap-
likasi HomeConnect.
49
id Kompartemen pendingin
Kompartemen pendingin11 Kompartemen pendi-
ngin
Daging, sosis, ikan, produk susu, te-
lur, makanan siap saji, dan produk
pastri dapat disimpan di komparte-
men pendingin.
Suhu dapat diatur dari 2°C hingga
8°C.
Melalui penyimpanan dingin, bahan
makanan yang mudah busuk juga
dapat disimpan dalam jangka pen-
dek atau menengah. Semakin rendah
suhu yang dipilih, semakin lama ba-
han makanan akan tetap segar.
11.1 Tips menyimpan bahan
makanan di kompartemen
pendingin
Hanya masukkan bahan makanan
yang segar dan tidak rusak.
Simpan bahan makanan dalam ke-
masan kedap udara atau tertutup.
Jangan letakkan makanan di de-
pan lubang ventilasi internal atau
bersentuhan langsung dengan din-
ding belakang agar tidak meng-
ganggu sirkulasi udara dan men-
cegah makanan membeku.
Biarkan hidangan dan minuman
hangat mendingin terlebih dahulu.
Perhatikan tanggal kedaluwarsa
produk atau tanggal penggunaan
yang ditentukan oleh produsen.
11.2 Zona-zona dingin dalam
kompartemen pendingin
Sirkulasi udara di kompartemen pen-
dingin menciptakan zona dingin yang
berbeda.
Zona terdingin
Zona terdingin berada di dalam wa-
dah penyimpanan.
Kiat: Simpan bahan makanan yang
mudah busuk di dalam zona terdi-
ngin,misalnya ikan, sosis dan da-
ging.
Zona terhangat
Zona terhangat yaitu pada pintu pa-
ling atas.
Kiat: Simpan bahan makanan yang
tidak lunak seperti keju keras dan
mentega di zona terhangat. Keju da-
pat tetap menyebarkan aromanya,
sedangkan mentega dapat tetap dio-
leskan.
Kompartemen pembeku12 Kompartemen pembe-
ku
Makanan beku dapat disimpan, ba-
han makanan dapat dibekukan, dan
es batu dapat dibuat di komparte-
men pembeku.
Suhu dapat diatur dari −16°C hingga
−24°C.
Penyimpanan bahan makanan jang-
ka panjang harus pada suhu −18°C
atau lebih rendah.
Penyimpanan pembeku memungkin-
kan Anda untuk menyimpan bahan
makanan yang mudah busuk untuk
waktu yang lama. Suhu rendah mem-
perlambat atau menghentikan proses
pembusukan.
12.1 Kapasitas pembekuan
Kapasitas pembekuan menunjukkan,
bahan makanan mana saja yang da-
pat dibekukan secara menyeluruh
hingga inti dalam waktu beberapa
jam.
Keterangan terkait kapasitas pembe-
kuan dapat ditemukan di pelat label.
"Perangkat", Gbr.
1
/
Halaman43
50

Kompartemen pembeku id
Persyaratan untuk kapasitas pem-
bekuan
1.
Aktifkan Super-beku sekitar 24 jam
sebelum memasukkan bahan ma-
kanan segar.
"Mengaktifkan Super-beku",
Halaman46
2.
Letakkan bahan makanan terlebih
dahulu di kontainer makanan beku
paling bawah.
12.2 Memanfaatkan sepenuh-
nya volume kompartemen
pembeku
Temukan cara memasukkan jumlah
maksimal makanan beku ke dalam
kompartemen pembeku.
1.
Lepaskan semua bagian peralatan
pada kompartemen pembeku.
Halaman53
2.
Simpan bahan makanan langsung
di rak dan lantai kompartemen
pembeku.
12.3 Tips menyimpan bahan
makanan di dalam kom-
partemen pembeku
Simpan bahan makanan dalam ke-
masan kedap udara.
Jauhkan bahan makanan yang
akan dibekukan dari bahan ma-
kanan yang sudah beku.
Simpan dan letakkan bahan ma-
kanan di area yang luas dalam
kontainer makanan beku.
Agar udara dapat bersirkulasi de-
ngan baik di dalam alat, dorong
kontainer makanan beku hingga
maksimal.
12.4 Tips untuk membekukan
bahan makanan segar
Hanya bekukan bahan makanan
segar dan belum rusak.
Bekukan bahan makanan dalam
porsi.
Bahan makanan siap saji lebih co-
cok daripada bahan makanan
mentah.
Cuci, potong dan rebus sayuran
sebelum dibekukan.
Cuci, buang biji dan kupas buah
sebelum dibekukan bila perlu,
mungkin tambahkan gula atau la-
rutan asam askorbat.
Bahan makanan yang cocok untuk
dibekukan adalah misalnya produk
pastri, ikan dan hidangan laut, da-
ging, daging rusa dan daging ung-
gas, telur yang telah dikupas, keju,
mentega, quark, makanan siap sa-
ji, dan sisa makanan.
Bahan makanan yang tidak cocok
untuk dibekukan misalnya selada,
lobak, telur tanpa dikupas, anggur,
apel dan pir mentah, yoghurt, krim
asam, crème fraîche, dan mayo-
nes.
Mengemas makanan beku
Bahan kemasan yang sesuai dan je-
nis kemasan yang tepat merupakan
faktor penting dalam menjaga kuali-
tas produk dan mencegah freezer
burn.
1.
Masukkan bahan makanan dalam
kemasan.
2.
Buang udara.
3.
Tutup kemasan kedap udara untuk
mencegah bahan makanan kehi-
langan rasanya atau menjadi ke-
ring.
4.
Labeli kemasan dengan keterang-
an isi dan tanggal pembekuan.
51
id Menghilangkan beku es
12.5 Umur penyimpanan ma-
kanan beku pada su-
hu−18°C
Bahan makanan Waktu pe-
nyimpanan
Ikan, sosis, makanan
siap saji, kue kering
hingga 6bu-
lan
Daging unggas, da-
ging
hingga 8bu-
lan
Sayuran, buah-buah-
an
hingga 12bu-
lan
Kalender pembekuan yang dicetak
mengindikasikan durasi penyimpan-
an maksimal dalam satuan bulan pa-
da suhu tetap –18 °C.
12.6 Metode pencairan untuk
makanan beku
WASPADA
Risiko bahaya bagi kesehatan!
Saat makanan mencair, bakteri dapat
tumbuh dan makanan beku dapat
membusuk.
Jangan membekukan ulang ma-
kanan beku yang mencair atau te-
lah menjadi cair.
Bekukan ulang setelah makanan
dimasak atau dibakar.
Jangan gunakan lagi bahan ma-
kanan yang melewati periode pe-
nyimpanan maksimal.
Mencairkan beku es pada bahan
makanan hewani di kompartemen
pendingin,misalnya ikan, daging,
keju dan quark.
Hilangkan beku es roti pada suhu
ruangan.
Masak bahan makanan yang ha-
rus segera dikonsumsi dalam mic-
rowave, oven, atau zona mema-
sak.
Menghilangkan beku es13 Menghilangkan beku
es
13.1 Menghilangkan beku es
pada kompartemen pendi-
ngin
Kompartemen pendingin pada pe-
rangkat akan mencairkan beku es
secara otomatis.
13.2 Menghilangkan beku es
pada kompartemen pem-
beku
Berkat sistem NoFrost yang benar-
benar otomatis, freezer tetap bebas
dari bunga es. Mencairkan beku es
tidak diperlukan.
Pembersihan dan perawatan14 Pembersihan dan pe-
rawatan
Agar alat Anda tetap baik dan ber-
fungsi normal, bersihkan dan rawat
secara menyeluruh.
Pembersihan area yang tidak dapat
diakses harus dilakukan oleh layanan
pelanggan. Pembersihan oleh layan-
an pelanggan dapat dikenakan biaya.
14.1 Menyiapkan alat untuk di-
bersihkan
1.
Matikan alat.
Halaman46
2.
Putus alat dari sambungan listrik.
Lepaskan steker kabel daya atau
matikan sekring di kotak sekring.
3.
Keluarkan semua bahan makanan
dan simpan di tempat yang dingin.
Jika tersedia, letakkan kemasan es
pada bahan makanan.
52

Pembersihan dan perawatan id
4.
Lepaskan semua bagian peralatan
dan komponen aksesori dari alat.
Halaman53
5.
Lepaskan rak di atas kontainer bu-
ah dan sayuran.
Halaman54
14.2 Membersihkan alat
PERINGATAN
Risiko sengatan listrik!
Kelembapan yang masuk dapat me-
nyebabkan sengatan listrik.
Jangan gunakan pembersih uap
atau pembersih bertekanan tinggi
untuk membersihkan perangkat.
Cairan di dalam lampu, elemen kon-
trol, atau lubang ventilasi internal da-
pat membahayakan.
Air bilasan tidak boleh masuk ke
dalam lampu, elemen kontrol, atau
lubang ventilasi internal.
PERHATIAN
Bahan pembersih yang tidak sesuai
dapat merusak permukaan alat.
Jangan menggunakan spons go-
sok yang keras atau spons cuci.
Jangan menggunakan bahan pem-
bersih yang keras atau abrasif.
Jangan menggunakan bahan pem-
bersih yang mengandung kadar al-
kohol tinggi.
Jika bagian peralatan dan aksesori
dibersihkan di dalam mesin pencuci
piring, keduanya dapat berubah ben-
tuk atau berubah warna.
Jangan pernah membersihkan ba-
gian peralatan dan aksesori di da-
lam mesin pencuci piring.
1.
Siapkan alat untuk dibersihkan.
Halaman52
2.
Bersihkan alat, bagian peralatan,
komponen aksesori, dan gasket
pintu dengan kain lap, air hangat,
dan sedikit bahan pembersih pH
netral.
3.
Lalu keringkan secara menyeluruh
dengan kain yang lembut dan ke-
ring.
4.
Masukkan bagian peralatan dan
pasang komponen alat yang dapat
dilepas.
5.
Sambungkan alat dengan listrik.
Halaman15
6.
Masukkan bahan makanan.
14.3 Melepaskan bagian peral-
atan
Jika bagian peralatan ingin dibersih-
kan secara menyeluruh, keluarkan
bagian peralatan dari alat.
Melepaskan rak
Keluarkan dan lepaskan rak.
Gbr.
11
Melepaskan kontainer makanan ri-
ngan dengan dudukan
1.
Lepaskan kontainer makanan ring-
an.
2.
Lepaskan rak dengan dudukan.
3.
Geser dudukan ke samping dari
rak.
Gbr.
12
Melepaskan rak pintu
Angkat dan lepaskan rak pintu.
Gbr.
13
Melepaskan wadah penyimpanan
1.
Keluarkan wadah penyimpanan se-
penuhnya.
2.
Angkat bagian depan wadah pe-
nyimpanan dan lepaskan .
Gbr.
14
Melepaskan kontainer buah dan
sayuran
1.
Keluarkan kontainer buah dan sa-
yuran hingga maksimal.
2.
Angkat bagian depan kontainer
buah dan sayur dan lepaskan .
Gbr.
15
53
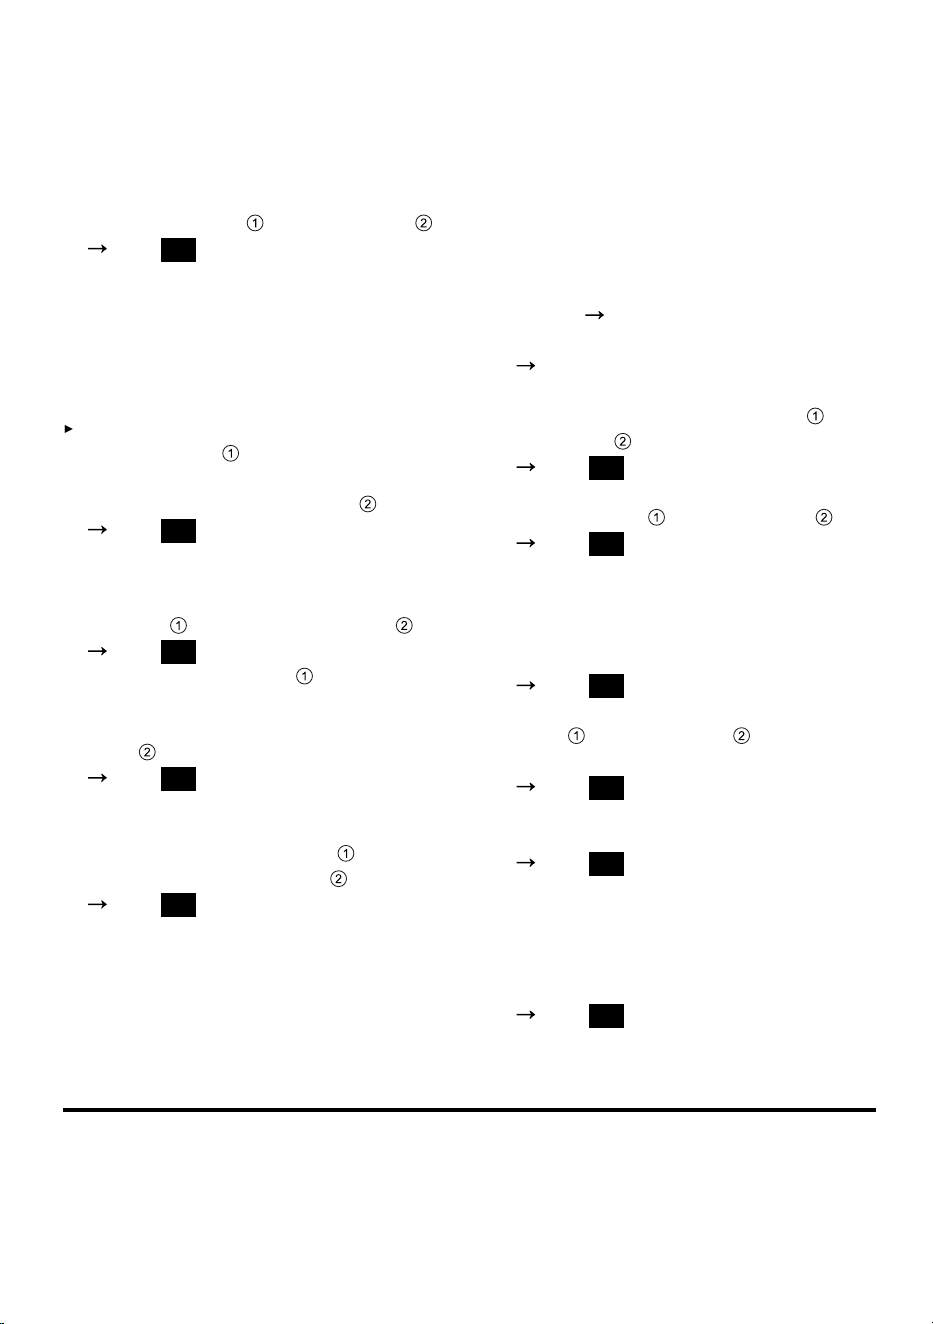
id Pemecahan masalah
Melepaskan kontainer makanan
beku
1.
Keluarkan kontainer makanan be-
ku hingga maksimal.
2.
Angkat bagian depan kontainer
makanan beku dan lepaskan .
Gbr.
16
Melepaskan bagian depan kontai-
ner
Bagian depan kontainer buah dan
sayuran dapat dilepas agar pember-
sihan lebih mudah dilakukan.
Tekan kait pengunci samping pa-
da kontainer dan lepaskan bagi-
an depan kontainer dari kontainer
dengan gerakan memutar .
Gbr.
17
Melepaskan mesin es batu
1.
Keluarkan dan kosongkan nampan
es batu dan wadah es batu .
Gbr.
18
2.
Tekan tombol tekan untuk mele-
paskan mesin es batu dari duduk-
annya dan melepaskan mesin es
batu .
Gbr.
19
3.
Angkat ujung belakang dudukan
dan turunkan ke belakang rak
kompartemen pembeku . Lepas-
kan dudukan ke depan .
Gbr.
20
14.4 Melepaskan komponen
alat
Jika alat ingin dibersihkan secara
menyeluruh, komponen alat tertentu
dapat dilepaskan dari alat.
Rak di atas kontainer buah dan
sayuran
Penutup kontainer buah dan sayuran
dapat dilepaskan untuk dibersihkan
secara menyeluruh.
Melepaskan rak di atas kontainer
buah dan sayuran
1.
Lepaskan kontainer buah dan sa-
yuran.
Halaman53
2.
Lepaskan kontainer penyimpanan.
Halaman53
3.
Miringkan rak di atas kontainer bu-
ah dan sayuran ke samping dan
lepaskan .
Gbr.
21
4.
Angkat penutup kontainer buah
dan sayuran dan lepaskan .
Gbr.
22
Memasang rak di atas kontainer bu-
ah dan sayuran
1.
Pasang penutup kontainer buah
dan sayuran.
Gbr.
23
2.
Pasang rak secara miring ke sam-
ping dan turunkan di atas
kontainer buah dan sayuran.
Gbr.
24
3.
Atur pengatur kelembapan ke po-
sisi depan.
Gbr.
25
Pastikan penutup kontainer buah
dan sayuran diletakkan di lubang
di bawah pengatur kelembapan.
4.
Pasang kontainer penyimpanan
dan kontainer buah dan sayuran.
Gbr.
26
Pemecahan masalah15 Pemecahan masalah
Gangguan kecil pada alat dapat Anda atasi sendiri. Gunakan informasi terkait
pemecahan masalah sebelum menghubungi layanan pelanggan. Dengan begi-
tu, Anda dapat menghindari biaya yang tidak perlu.
54
Pemecahan masalah id
PERINGATAN
Risiko sengatan listrik!
Perbaikan yang tidak tepat dapat berbahaya.
Hanya teknisi ahli yang boleh melakukan perbaikan pada alat.
Hanya komponen pengganti asli yang boleh digunakan untuk perbaikan per-
alatan.
Jika kabel suplai listrik atau kabel koneksi alat rusak, kabel tersebut harus
diganti dengan kabel suplai listrik khusus atau kabel koneksi alat khusus
yang tersedia di produsen atau di layanan pelanggan.
Kerusakan Penyebab dan pemecahan masalah
Alat tidak dalam kea-
daan dingin, indikator
dan lampu menyala.
Mode pajangan diaktifkan.
1.
Matikan alat.
Halaman46
2.
Tunggu selama 2menit.
3.
Hidupkan kembali alat.
Halaman45
4.
Tunggu selama 1 menit lalu tekan dan tahan su-
per(Kompartemen pendingin) hingga terdengar 4 si-
nyal akustik.
5.
Setelah beberapa saat, periksa apakah alat mendi-
ngin.
Lampu LED tidak ber-
fungsi.
Penyebab yang berbeda-beda dimungkinkan.
Hubungi layanan pelanggan.
Nomor layanan pelanggan dapat ditemukan di direk-
tori layanan pelanggan yang disertakan.
Mesin pendingin bero-
perasi lebih sering
dan lebih lama.
Alat sering dibuka.
Jangan membuka pintu alat bila tidak perlu.
Lubang ventilasi eksternal tertutup.
Singkirkan penghalang yang berada di depan lu-
bang ventilasi eksternal.
Tidak ada gangguan. Chiller modern lebih sering me-
nyala dan memiliki level daya berbeda untuk mendi-
nginkan secara lebih efisien.
Singkirkan penghalang yang berada di depan lu-
bang ventilasi eksternal.
Pasang alat dengan jarak sejauh mungkin dari radia-
tor, kompor, dan sumber panas lainnya. Hindari pa-
paran sinar matahari langsung dalam waktu lama
pada alat.
Hanya buka pintu alat secara singkat selama diper-
lukan.
55
id Pemecahan masalah
Kerusakan Penyebab dan pemecahan masalah
Mesin pendingin bero-
perasi lebih sering
dan lebih lama.
Biarkan hidangan dan minuman hangat menjadi di-
ngin sebelum disimpan.
Lapisan es terbentuk
di dinding belakang
kompartemen pendi-
ngin.
Tidak ada gangguan. Chiller modern memastikan suhu
yang lebih merata dalam kompartemen pendingin. Din-
ding belakang kompartemen pendingin otomatis dihi-
langkan beku esnya secara teratur.
Hanya buka pintu alat secara singkat selama diper-
lukan.
Kemas bahan makanan secara kedap udara atau tu-
tupi bahan makanan.
Biarkan hidangan dan minuman hangat menjadi di-
ngin sebelum disimpan.
Selalu beri sedikit ruang di antara bahan makanan
dan dinding dalam.
Dinding samping alat
hangat.
Tidak ada gangguan. Terdapat pipa di dinding sam-
ping yang akan memanas selama proses pendinginan.
Furnitur yang mengenai alat tidak akan rusak akibat
pemanasan tersebut.
Tidak diperlukan penanganan.
HomeConnectFitur ti-
dak berfungsi dengan
benar.
Penyebab yang berbeda-beda dimungkinkan.
Masuk ke
www.home-connect.com
.
Nada peringatan ber-
bunyi, indikator suhu
(kompartemen pendi-
ngin), "alarm" dan
lampu setrip berkedip.
Alarm pintu diaktifkan.
Pintu kompartemen pendingin terbuka.
Tutup pintu kompartemen pendingin.
Nada peringatan ber-
bunyi, indikator suhu
(kompartemen pem-
beku),"alarm" dan
lampu setrip berkedip.
Alarm pintu diaktifkan.
Pintu kompartemen pembeku terbuka.
Tutup pintu kompartemen pembeku.
56

Pemecahan masalah id
Kerusakan Penyebab dan pemecahan masalah
Nada peringatan ber-
bunyi, suhu yang dia-
tur (kompartemen
pembeku) dan "alarm"
serta lampu setrip ber-
kedip.
Alarm suhu diaktifkan.
Penyebab yang berbeda-beda dimungkinkan.
Tekan alarm.
Alarm dimatikan.
Lubang ventilasi eksternal tertutup.
Singkirkan penghalang yang berada di depan lu-
bang ventilasi eksternal.
Sejumlah besar bahan makanan segar dimasukkan.
Jangan melebihi kapasitas pembekuan.
"Kapasitas pembekuan", Halaman50
Suhu yang diatur tidak
tercapai.
Pencairan bunga es
yang sepenuhnya oto-
matis tidak lagi ber-
fungsi.
Pintu kontainer pembeku terbuka dalam waktu yang la-
ma. Terdapat banyak sekali bunga es pada evaporator
(generator pendingin) dalam sistem NoFrost.
Prasyarat: Makanan beku disimpan di tempat yang di-
ngin dan terisolasi dengan baik.
1.
Matikan alat.
Halaman46
2.
Putus sambungan listrik dari alat.
Lepaskan steker kabel daya atau matikan sekring di
kotak sekring.
3.
Jauhkan alat dari dinding.
4.
Biarkan pintu alat terbuka.
Setelah sekitar 20 menit, air kondensasi akan meng-
alir ke baki penguapan di bagian belakang alat.
Gbr.
27
5.
Serap air kondensasi dengan spons agar tidak me-
luap dari baki penguapan.
Bunga es pada evaporator akan dicairkan ketika ti-
dak ada lagi air kondensasi yang mengalir ke baki
penguapan.
6.
Bersihkan bagian dalam alat.
Halaman53
7.
Hidupkan kembali alat.
Halaman45
Suhu sangat berbeda
dari pengaturan.
Penyebab yang berbeda-beda dimungkinkan.
1.
Matikan alat.
Halaman46
2.
Hidupkan kembali alat setelah sekitar 5menit.
Halaman45
Jika suhu terlalu panas, periksa kembali suhu se-
telah beberapa jam.
Jika suhu terlalu dingin, periksa kembali suhu pa-
da hari berikutnya.
57
id Pemecahan masalah
Kerusakan Penyebab dan pemecahan masalah
Air kondensasi terben-
tuk di permukaan alat
dan rak pada alat.
Air yang terkandung dalam udara hangat dan lembap
akan berkondensasi pada permukaan alat yang lebih
dingin.
1.
Seka air kondensasi dengan kain lap yang lembut
dan kering.
2.
Buka alat sesingkat mungkin.
3.
Pastikan alat selalu ditutup dengan benar.
Perangkat berde-
ngung, menderu, me-
ngeluarkan bunyi de-
sis, bunyi klik, atau
bunyi retak.
Tidak ada gangguan. Mesin sedang beroperasi, misal-
nyaunit pendingin, ventilator. Cairan pendingin menga-
lir melalui pipa. Motor, sakelar, atau katup solenoid ak-
tif atau nonaktif. Pencairan es berlangsung otomatis.
Tidak diperlukan penanganan.
Alat mengeluarkan su-
ara bising.
Posisi perangkat tidak stabil.
Sejajarkan perangkat dengan bantuan waterpass
dan dudukan sekrup.
Perangkat harus ditopang.
Beri jarak minimal pada perangkat.
Bagian peralatan longgar atau macet.
Periksa bagian peralatan yang dapat dilepas dan
masukkan kembali bila perlu.
Botol-botol atau wadah saling bersentuhan.
Pisah botol atau wadah.
Super-beku diaktifkan.
Tidak diperlukan penanganan.
15.1 Mati listrik
Selama mati listrik, suhu di dalam
alat akan meningkat, hal itu dapat
mempersingkat waktu penyimpanan
dan mengurangi kualitas makanan
beku.
Waktu penyimpanan makanan beku
saat terjadi gangguan dapat ditemu-
kan pada data teknis di situs web ka-
mi untuk alat.
Catatan
Jangan terlalu sering membuka
alat dan memasukkan bahan ma-
kanan lain selama listrik mati.
Periksa kualitas bahan makanan
begitu listrik mati.
– Buang makanan beku yang te-
lah mencair dan lebih hangat
dari 5°C.
– Rebus atau bakar makanan be-
ku yang telah sedikit dicairkan
dan konsumsi atau bekukan
kembali.
15.2 Melakukan uji mandiri pa-
da alat
Alat memiliki uji mandiri pada pe-
rangkat yang menampilkan ganggu-
an yang dapat diperbaiki oleh layan-
an pelanggan Anda.
1.
Matikan alat.
Halaman46
58

Penyimpanan dan pembuangan id
2.
Putus perangkat dari sambungan
listrik.
Lepaskan steker kabel daya atau
matikan sekring di kotak sekring.
3.
Sambungkan kembali perangkat
dengan daya listrik setelah 5 me-
nit.
Halaman15
4.
Satu menit setelah sambungan lis-
trik, tekan dan tahan super(Kom-
partemen pendingin) selama 3
hingga 5 detik hingga sinyal akus-
tik kedua berbunyi.
Jika 2 sinyal akustik berbunyi sete-
lah uji mandiri pada alat berakhir
dan indikator suhu menampilkan
suhu yang diatur, sensor suhu alat
dalam keadaan baik. Perangkat
beroperasi dengan mode normal.
Hubungi layanan pelanggan, jika 5
sinyal akustik berbunyi setelah uji
mandiri alat berakhir dan LED indi-
kator suhu menyala dengan ting-
kat kecerahan yang berbeda. LED
memberikan informasi kepada la-
yanan pelanggan tentang ganggu-
an saat ini.
Penyimpanan dan pembuangan16 Penyimpanan dan
pembuangan
16.1 Mematikan alat
1.
Matikan alat.
Halaman46
2.
Putus alat dari sambungan listrik.
Lepaskan steker kabel daya atau
matikan sekring di kotak sekring.
3.
Keluarkan seluruh bahan makan-
an.
4.
Bersihkan alat.
Halaman53
5.
Biarkan alat terbuka untuk memas-
tikan sirkulasi udara pada bagian
dalam alat.
16.2 Membuang alat yang su-
dah tidak terpakai
Bahan baku yang berharga dapat di-
gunakan kembali melalui pembuang-
an yang ramah lingkungan.
PERINGATAN
Risiko bahaya bagi kesehatan!
Anak-anak dapat terjebak di dalam
alat dan dapat membahayakan kese-
lamatan mereka.
Untuk mencegah anak-anak me-
masuki alat, jangan keluarkan baki
dan wadah.
Jauhkan anak-anak dari alat yang
sudah tidak digunakan.
PERINGATAN
Risiko kebakaran!
Jika pipa rusak, cairan pendingin
yang mudah terbakar dan gas berba-
haya dapat keluar dan terbakar.
Jangan merusak tabung sistem sir-
kulasi cairan pendingin dan isolasi.
1.
Cabut steker listrik dari kabel da-
ya.
2.
Potong kabel daya.
3.
Singkirkan alat dengan cara yang
ramah lingkungan.
Informasi mengenai metode pem-
buangan teraktual dapat diperoleh
dari toko khusus, pemerintah dae-
rah atau pemerintah kota.
Layanan pelanggan17 Layanan pelanggan
Informasi terperinci tentang masa ga-
ransi dan ketentuan garansi di nega-
ra Anda dapat diperoleh melalui ko-
de QR pada dokumen kontak servis
dan ketentuan garansi terlampir dari
layanan pelanggan kami, dealer, atau
di situs web kami.
Saat Anda menghubungi layanan pe-
langgan, Anda memerlukan nomor
59
id Data teknis
seri (E-Nr.), nomor produksi (FD),
dan nomor barang (Z-Nr.) alat Anda.
Data kontak layanan pelanggan da-
pat diperoleh melalui kode QR pada
dokumen kontak servis dan ketentu-
an garansi terlampir atau di situs web
kami.
17.1 Nomor seri (E-Nr.), nomor
produksi (FD), dan nomor
barang (Z-Nr.)
Nomor seri (E-Nr.), nomor produksi
(FD), dan nomor barang (Z-Nr.) dapat
ditemukan di label tipe alat.
"Perangkat", Gbr.
1
/
Halaman43
Untuk kembali menemukan data alar
dan nomor telepon layanan pelang-
gan dengan cepat, Anda dapat men-
catat data-data tersebut.
Data teknis18 Data teknis
Cairan pendingin, kapasitas yang da-
pat digunakan, dan spesifikasi lain
berada pada pelat label.
"Perangkat", Gbr.
1
/
Halaman43
18.1 Informasi tentang perang-
kat lunak sumber terbuka
dan gratis
Produk ini berisi komponen perang-
kat lunak yang dilisensikan oleh pe-
milik hak cipta sebagai perangkat lu-
nak sumber terbuka atau gratis.
Informasi lisensi yang sesuai disim-
pan di perangkat rumah tangga An-
da. Akses ke informasi lisensi yang
sesuai juga dapat dilakukan melalui
aplikasi HomeConnect: "Profil -> In-
formasi resmi -> Informasi lisensi".
1
Informasi lisensi dapat diunduh di si-
tus web produk bermerek. (Silakan
cari di situs web produk sesuai mo-
del alat Anda dan dokumen lainnya.)
Sebagai alternatif, informasi yang se-
suai dapat diperoleh di ossrequ-
[email protected] atau BSH Hausgeräte
GmbH, Carl-Wery-Str. 34, D-81739
Munich.
Kode sumber akan disediakan sesu-
ai permintaan.
Silakan kirimkan permintaan Anda ke
[email protected] atau BSH Ha-
usgeräte GmbH, Carl-Wery-Str. 34,
D-81739 Munich.
Subjek: „OSSREQUEST“
Biaya untuk pemrosesan permintaan
Anda akan ditagihkan. Penawaran ini
berlaku tiga tahun sejak tanggal
pembelian atau minimal selama peri-
ode penawaran dukungan dan kom-
ponen pengganti untuk alat yang se-
suai.
1
Tergantung perlengkapan peralatan
60
Pernyataan kesesuaian id
Pernyataan kesesuaian19 Pernyataan kesesuaian
Dengan ini, BSH Hausgeräte GmbH menyatakan bahwa alat dengan fitur Home
Connect sesuai dengan persyaratan dasar dan ketentuan terkait lainnya dari
pedoman 2014/53/EU.
Pernyataan kesesuaian RED terperinci dapat ditemukan di internet di
www.bosch-home.com
pada halaman produk alat Anda sebagai dokumen tam-
bahan.
Gelombang 2,4 GHz (2400 – 2483,5MHz): maks. 100mW
Gelombang 5 GHz (5150 – 5350MHz + 5470 – 5725MHz): maks. 130mW
Rentang frekuensi yang berlaku untuk Indonesia adalah gelombang 5-GHz
(5150-5350MHz + 5735-5815MHz).
BE BG CZ DK DE EE IE EL ES
FR HR IT CY LI LV LT LU HU
MT NL AT PL PT RO SI SK FI
SE NO CH TR IS UK (NI)
WLAN 5 GHz (Wi-Fi): Hanya untuk penggunaan di dalam ruangan.
AL BA MD ME MK RS UK UA
WLAN 5 GHz (Wi-Fi): Hanya untuk penggunaan di dalam ruangan.
61

th สารบัญ
คุณสามารถดูข้อมูลเพิ่มเติมและคำอธิบายได้ทางออนไลน์ โดยสแกนรหัส QR Code ในหน้าแสดงชื่อผลิตภัณฑ์
สารบัญสารบัญ
............................................................................................. 63
1 ความปลอดภั................................................................ 63
1.1 หมายเหตุทั่วไ............................................................... 63
1.2 การใช้งานที่ตรงตามวัตถุประสงค................................... 63
1.3 การจำกัดกลุ่มผู้ใช........................................................... 63
1.4 การขนย้ายอย่างปลอดภั............................................... 64
1.5 การติดตั้งอย่างปลอดภั................................................. 64
1.6 การใช้งานอย่างปลอดภั................................................ 65
1.7 ตัวเครื่องที่ชำรุดเสียหา................................................. 66
2 การหลีกเลี่ยงความเสียหายต่อทรัพย์สิ.......................... 67
3 การรักษาสิ่งแวดล้อมและการประหยั............................ 67
3.1 กำจัดหีบห่อบรรจุทิ้....................................................... 67
3.2 ประหยัดพลังงา............................................................ 67
4 การติดตั้งและการเชื่อมต่ .............................................. 68
4.1 รายการอุปกรณ์ที่จัดส่................................................... 68
4.2 เกณฑ์สำหรับตำแหน่งการติดตั้..................................... 68
4.3 การประกอบเครื่อ......................................................... 68
4.4 การเตรียมเครื่องสำหรับการใช้งานครั้งแร.................... 68
4.5 การเชื่อมต่ออุปกรณ์ไฟฟ้ .............................................. 68
5 มาทำความรู้จักเกี่ยวกับอุปกรณ์กั................................. 69
5.1 ตัวเครื่อ......................................................................... 69
5.2 แผงควบคุ..................................................................... 69
6 อุปกรณ์ติดตั้.................................................................. 69
6.1 ชั้นวา............................................................................. 69
6.2 ช่องใส่ขนมขบเคี้ย......................................................... 69
6.3 ช่องเก็บขอ.................................................................... 70
6.4 ช่องแช่ผลไม้และผักพร้อมตัวควบคุมความชื้................ 70
6.5 ช่องเก็บเนยและชี......................................................... 70
6.6 ชั้นวางที่ประต................................................................. 70
6.7 เครื่องทำน้ำแข็งก้อ....................................................... 70
6.8 อุปกรณ์เสริ................................................................... 70
7 การใช้งานทั่วไ.............................................................. 71
7.1 การเปิดใช้งานเครื่อ....................................................... 71
7.2 คำแนะนำเกี่ยวกับการใช้งา.......................................... 71
7.3 การปิดใช้งานเครื่อ........................................................ 71
7.4 การปรับตั้งอุณหภูม ........................................................ 71
8 ฟังก์ชันเสริ ................................................................... 71
8.1 ฟังก์ชัน Super Cool .................................................... 71
8.2 ฟังก์ชัน Super Freeze .................................................. 72
8.3 โหมด Holida ............................................................... 72
8.4 โหมดประหยัดพลังงา................................................... 72
8.5 โหมด Fres ................................................................... 72
9 สัญญาณเตือ................................................................. 72
9.1 สัญญาณเตือนการเปิดประต........................................... 72
9.2 สัญญาณเตือนอุณหภูม.................................................... 73
10 HomeConnect ....................................................... 73
10.1 การปรับตั้ง HomeConnect ..................................... 73
10.2 การเปิดใช้งานการเชื่อมต่อไปยังเครือข่าย WLAN
ภายในบ้าน (Wi-Fi) ..................................................... 73
10.3 การปิดใช้งานการเชื่อมต่อไปยังเครือข่าย WLAN
ภายในบ้าน (Wi-Fi) ..................................................... 73
10.4 การติดตั้งการอัปเดตซอฟต์แวร์HomeConnect ...... 74
10.5 การรีเซ็ตการตั้งค่า HomeConnect ......................... 74
10.6 การคุ้มครองข้อมู....................................................... 74
11 ช่องแช่เย็................................................................... 74
11.1 เคล็ดลับเกี่ยวกับการจัดเก็บวัตถุดิบในช่องแช่เย็....... 74
11.2 โซนทำความเย็นในช่องแช่เย็..................................... 74
12 ช่องแช่แข็.................................................................. 74
12.1 ความจุในการแช่แข็ ................................................... 75
12.2 การใช้ปริมาณความจุช่องแช่แข็งอย่างเต็มพิกั........... 75
12.3 เคล็ดลับเกี่ยวกับการจัดเก็บวัตถุดิบในช่องแช่แข็....... 75
12.4 เคล็ดลับเกี่ยวกับการแช่แข็งวัตถุดิบส........................ 75
12.5 ความสามารถในการเก็บรักษาอาหารแช่แข็งที่
อุณหภูมิ −18 °......................................................... 75
12.6 วิธีการละลายน้ำแข็งอาหารแช่แข็ ............................. 75
62
ความปลอดภัย th
13 การละลายน้ำแข็........................................................ 76
13.1 การละลายน้ำแข็งในช่องแช่เย็.................................. 76
13.2 การละลายน้ำแข็งในช่องแช่แข็.................................. 76
14 การทำความสะอาดและการดูแลรักษ......................... 76
14.1 การเตรียมเครื่องสำหรับการทำความสะอา............... 76
14.2 การทำความสะอาดเครื่อ........................................... 76
14.3 การถอดชิ้นส่วนอุปกรณ์ติดตั้..................................... 76
14.4 การถอดชิ้นส่วนเครื่อ................................................. 77
15 การแก้ไขข้อขัดข้อ ..................................................... 77
15.1 ไฟดั........................................................................... 81
15.2 การดำเนินการทดสอบตัวเองของเครื่อ...................... 81
16 การเก็บรักษาและการกำจั......................................... 81
16.1 การปิดใช้งานเครื่อ..................................................... 81
16.2 กำจัดอุปกรณ์เก่......................................................... 81
17 ฝ่ายบริการลูกค้.......................................................... 81
17.1 หมายเลขผลิตภัณฑ์ (E-Nr.), หมายเลขการผลิต (FD)
และหมายเลขลำดับ (Z-Nr......................................... 82
18 ข้อมูลทางเทคนิ......................................................... 82
18.1 ข้อมูลเกี่ยวกับซอฟต์แวร์อิสระและ Open Source
Software .................................................................... 82
19 คำประกาศเกี่ยวกับความสอดคล้อ............................. 82
ความปลอดภัย 1 ความปลอดภัย
โปรดปฏิบัติตามคำแนะนำด้านความปลอดภัยต่อไปนี้
1.1 หมายเหตุทั่วไป
¡ โปรดอ่านคู่มือฉบับนี้อย่างละเอียด
¡ โปรดเก็บรักษาคู่มือและข้อมูลผลิตภัณฑ์สำหรับการใช้งานในภายหลังหรือผู้ใช้งานคนถัดไปไว้ให้ดี
¡ ห้ามเชื่อมต่อเครื่องหากเกิดความเสียหายระหว่างการขนส่ง
1.2 การใช้งานที่ตรงตามวัตถุประสงค์
โปรดใช้งานเครื่องเฉพาะในกรณีต่อไปนี้:
¡ ใช้ในการแช่เย็นและแช่แข็งอาหาร รวมถึงการทำน้ำแข็งก้อน
¡ ในครัวเรือนและในพื้นที่ปิดบริเวณรอบบ้าน
¡ ที่ความสูงไม่เกิน 2000 ม. เหนือระดับน้ำทะเล
1.3 การจำกัดกลุ่มผู้ใช้
เด็กที่มีอายุ 8 ปีขึ้นไปและบุคคลที่ด้อยความสามารถทางร่างกาย ประสาทสัมผัส หรือทางจิต และ/หรือผู้ขาด
ประสบการณ์และความรู้สามารถใช้งานเครื่องนี้ได้ ถ้ามีผู้คอยระวังดูแลหรือได้รับการชี้แจงวิธีใช้งานได้อย่างปลอดภัย
และเข้าใจถึงอันตรายที่จะเกิดขึ้นได้
ไม่อนุญาตให้เด็กเล่นกับอุปกรณ์เครื่องนี้
ห้ามเด็กทำความสะอาดและทำการบำรุงรักษาทั่วไปโดยไม่อยู่ภายใต้การดูแล
63
th ความปลอดภัย
1.4 การขนย้ายอย่างปลอดภัย
คำเตือน‒ระวังการบาดเจ็บ!
อุปกรณ์ที่มีน้ำหนักมากอาจจะทำให้ได้รับบาดเจ็บขณะที่ยกขึ้น
ห้ามยกอุปกรณ์ขึ้นเพียงลำพัง
1.5 การติดตั้งอย่างปลอดภัย
คำเตือน‒ระวังไฟดูด!
การติดตั้งอย่างไม่ถูกวิธีอาจก่อให้เกิดอันตราย
สามารถเชื่อมต่อและใช้เครื่องนี้ทำงานได้ตามข้อมูลอ้างอิงบนป้ายกำกับรุ่นเท่านั้น
ให้เชื่อมต่อเครื่องผ่านทางซ็อคเกตที่ติดตั้งตามข้อกำหนดซึ่งมีการต่อกราวด์กับแหล่งจ่ายไฟที่มีกระแสไฟฟ้าสลับ
ต้องมีการติดตั้งระบบป้องกันไฟฟ้าของระบบไฟฟ้าในบ้านอย่างถูกต้องตามข้อกำหนด
ห้ามใช้ไฟเครื่องผ่านอุปกรณ์สวิตช์ภายนอก เช่น ตัวจับเวลาหรือการควบคุมระยะไกล
หากติดตั้งอุปกรณ์แล้ว จะต้องเข้าถึงปลั๊กไฟและสายไฟได้ง่าย หรือหากไม่สามารถเข้าถึงได้อย่างอิสระ จะต้องติดตั้ง
อุปกรณ์ตัดการเชื่อมต่อในการติดตั้งระบบไฟฟ้าแบบถาวรตามข้อกำหนดการติดตั้ง
ในการติดตั้งอุปกรณ์ โปรดระมัดระวังว่าสายไฟต่อไม่ได้ถูกอัดจนติดขัดหรือได้รับความเสียหาย
ฉนวนหุ้มหรือสายไฟที่ชำรุดเสียหายเป็นอันตราย
ห้ามให้สายไฟสัมผัสกับแหล่งกำเนิดความร้อนเด็ดขาด
คำเตือน‒ระวังการระเบิด!
หากช่องระบายอากาศของเครื่องปิดอยู่ ส่วนผสมระหว่างแก๊สกับอากาศที่มีคุณสมบัติติดไฟอาจก่อตัวขึ้นในกรณีที่วงจร
ทำความเย็นมีรอยรั่ว
ห้ามปิดช่องระบายอากาศในตัวเรือนเครื่องหรือตัวเรือนการติดตั้ง
คำเตือน‒ระวังไฟไหม้!
การใช้สายเชื่อมต่อเพื่อขยายความยาวสายไฟและอะแดปเตอร์ที่ไม่ได้รับอนุญาตอาจก่อให้เกิดอันตราย
ห้ามใช้สายไฟต่อขยายหรือปลั๊กพ่วงแบบหลายช่อง
ใช้เฉพาะอะแดปเตอร์และสายเชื่อมต่อแหล่งจ่ายไฟที่ผู้ผลิตอนุญาตเท่านั้น
หากสายเชื่อมต่อแหล่งจ่ายไฟสั้นเกินไปและไม่มีสายเชื่อมต่อแหล่งจ่ายไฟเส้นที่ยาวกว่า โปรดติดต่อช่างไฟฟ้าเพื่อ
ปรับระบบติดตั้งภายในบ้านให้เหมาะสม
ปลั๊กต่อซ็อคเกตแบบหลายตัวหรือชิ้นส่วนจ่ายไฟแบบพกพาอาจมีความร้อนสูงเกินและก่อให้เกิดไฟลุกไหม้
ห้ามวางปลั๊กต่อซ็อคเกตแบบหลายตัวหรือชิ้นส่วนจ่ายไฟแบบพกพาไว้บริเวณด้านหลังตัวเครื่อง
64
ความปลอดภัย th
1.6 การใช้งานอย่างปลอดภัย
คำเตือน‒ระวังไฟดูด!
ความชื้นที่แทรกซึมเข้าไปอาจเป็นสาเหตุให้เกิดไฟฟ้าดูดได้
ใช้งานเครื่องในพื้นที่ปิดเท่านั้น
ห้ามปล่อยให้เครื่องอยู่ในบริเวณที่ต้องสัมผัสความร้อนและความชื้นสูง
ห้ามใช้เครื่องทำความสะอาดไอน้ำหรือเครื่องทำความสะอาดแรงดันสูงในการทำความสะอาดอุปกรณ์
คำเตือน‒ระวังการขาดอากาศหายใจ!
เด็กอาจจะดึงวัสดุหีบห่อมาสวมหัวหรือเอามาพันจนขาดอากาศหายใจได้
ห้ามทิ้งวัสดุหีบห่อไว้ใกล้เด็ก
ห้ามเด็กเล่นกับวัสดุหีบห่อ
เด็กอาจจะสูดหรือกลืนชิ้นส่วนขนาดเล็กเข้าไปจนขาดอากาศหายใจได้
ห้ามทิ้งชิ้นส่วนขนาดเล็กไว้ใกล้เด็ก
ห้ามเด็กเล่นกับชิ้นส่วนขนาดเล็ก
คำเตือน‒ระวังการระเบิด!
วงจรน้ำหล่อเย็นที่ชำรุดเสียหายอาจทำให้น้ำยาทำความเย็นที่มีคุณสมบัติติดไฟเกิดการรั่วไหลและระเบิด
ห้ามใช้อุปกรณ์เชิงกลอื่นหรือสารใดๆ นอกเหนือจากที่ผู้ผลิตแนะนำเพื่อเร่งกระบวนการละลายน้ำแข็ง
นำวัตถุดิบที่จับตัวเป็นน้ำแข็งออกโดยใช้วัตถุที่มีลักษณะทื่อ เช่น ไม้ตักน้ำผึ้ง
ผลิตภัณฑ์ที่มีสารขับดันที่มีคุณสมบัติติดไฟและสารไวไฟอาจเกิดการระเบิด เช่น กระป๋องสเปรย์
ห้ามจัดเก็บผลิตภัณฑ์ที่มีสารขับดันที่มีคุณสมบัติติดไฟและสารไวไฟไว้ในเครื่อง
คำเตือน‒ระวังไฟไหม้!
อุปกรณ์ไฟฟ้าภายในตัวเครื่องอาจก่อให้เกิดไฟลุกไหม้ เช่น อุปกรณ์ทำความร้อนหรือเครื่องทำไอศกรีมระบบไฟฟ้า
ห้ามใช้งานอุปกรณ์ไฟฟ้าภายในตัวเครื่อง
คำเตือน‒ระวังการบาดเจ็บ!
ภาชนะที่มีเครื่องดื่มอัดลมอาจระเบิดแตก
ห้ามจัดเก็บภาชนะที่มีเครื่องดื่มอัดลมในช่องแช่แข็ง
ระวังได้รับบาดเจ็บที่ดวงตาเนื่องจากการรั่วไหลของน้ำยาทำความเย็นที่มีคุณสมบัติติดไฟและแก๊สที่เป็นอันตราย
ห้ามให้ท่อสารทำความเย็นและท่อระบายชำรุดเสียหาย
ตัวเครื่องอาจพลิกล้ม
ห้ามเหยียบหรือลงน้ำหนักบนฐานวาง ชั้นเลื่อน หรือประตู
65
th ความปลอดภัย
คำเตือน‒ระวังเกิดบาดแผลจากความร้อน!
ชิ้นส่วนแต่ละชิ้นที่ด้านหลังตัวเครื่องจะร้อนขึ้นในระหว่างเครื่องทำงาน
ห้ามสัมผัสชิ้นส่วนที่มีความร้อนโดยเด็ดขาด
คำเตือน‒ระวังเกิดบาดแผลจากความเย็นจัด!
การสัมผัสกับอาหารแช่แข็งและพื้นผิวที่มีความเย็นอาจทำให้เกิดแผลไหม้เนื่องจากความเย็น
ห้ามนำอาหารแช่แข็งเข้าปากทันทีหลังจากนำออกจากช่องแช่แข็ง
หลีกเลี่ยงไม่ให้ผิวหนังสัมผัสกับอาหารแช่แข็ง น้ำแข็ง และพื้นผิวในช่องแช่แข็งเป็นเวลานาน
ข้อควรระวัง‒ระวังอันตรายต่อสุขภาพ!
โปรดปฏิบัติตามคำแนะนำต่อไปนี้เพื่อป้องกันไม่ให้วัตถุดิบเกิดการปนเปื้อน
หากเปิดประตูค้างไว้เป็นเวลานาน อุณหภูมิในช่องต่างๆ ของเครื่องอาจเพิ่มสูงขึ้นเป็นอย่างมาก
ทำความสะอาดพื้นผิวที่อาจสัมผัสกับวัตถุดิบและระบบระบายน้ำที่สามารถเข้าถึงได้เป็นประจำ
จัดเก็บเนื้อสัตว์และเนื้อปลาดิบในตู้เย็นโดยใช้ภาชนะที่เหมาะสมเพื่อไม่ให้สัมผัสกับวัตถุดิบอื่นๆ หรือมีน้ำจากเนื้อ
สัตว์ดังกล่าวหยดลงบนวัตถุดิบ
หากตู้แช่เย็น/ตู้แช่แข็งว่างเปล่าเป็นเวลานาน ให้ปิดใช้งานเครื่อง ละลายน้ำแข็ง ทำความสะอาด และเปิดประตูทิ้ง
ไว้เพื่อป้องกันการเกิดเชื้อรา
ชิ้นส่วนในตัวเครื่องที่ทำจากโลหะหรือมีลักษณะคล้ายโลหะอาจประกอบด้วยอะลูมิเนียม หากวัตถุดิบที่เป็นกรดสัมผัส
กับอะลูมิเนียม อะลูมิเนียมไอออนอาจปนเปื้อนเข้าไปในวัตถุดิบ
ห้ามบริโภควัตถุดิบที่มีการปนเปื้อน
1.7 ตัวเครื่องที่ชำรุดเสียหาย
คำเตือน‒ระวังไฟดูด!
เครื่องหรือสายไฟที่ชำรุดเสียหายเป็นอันตราย
ห้ามใช้งานเครื่องที่ชำรุดเสียหายโดยเด็ดขาด
ห้ามดึงสายไฟเพื่อหยุดการเชื่อมต่อเครื่องออกจากแหล่งจ่ายไฟโดยเด็ดขาด ให้ดึงที่ปลั๊กไฟของสายไฟทุกครั้ง
ถ้าเครื่องหรือสายไฟชำรุด ให้ดึงปลั๊กไฟของสายไฟต่อออกหรือปิดสวิตช์ฟิวส์ในกล่องฟิวส์ทันที
ติดต่อฝ่ายบริการลูกค้า
หน้า81
การซ่อมแซมอย่างไม่ถูกวิธีอาจก่อให้เกิดอันตรายได้
อนุญาตให้เฉพาะบุคลากรผู้เชี่ยวชาญที่ผ่านการอบรมดำเนินการซ่อมแซมเครื่องเท่านั้น
อนุญาตให้ใช้อะไหล่แท้สำหรับการซ่อมแซมเครื่องเท่านั้น
หากสายไฟหรือสายเชื่อมต่อเครื่องของเครื่องนี้ได้รับความเสียหาย จะต้องเปลี่ยนมาใช้สายไฟแบบพิเศษหรือสาย
เชื่อมต่อเครื่องแบบพิเศษ ซึ่งจำหน่ายโดยผู้ผลิตหรือฝ่ายบริการลูกค้า
66
การหลีกเลี่ยงความเสียหายต่อทรัพย์สิน th
คำเตือน‒ระวังไฟไหม้!
ในกรณีที่ท่อชำรุดเสียหาย น้ำยาทำความเย็นที่มีคุณสมบัติติดไฟและแก๊สอันตรายอาจรั่วไหลและเกิดการลุกไหม้
จัดวางเครื่องให้อยู่ห่างจากเปลวไฟและแหล่งกำเนิดไฟ
ระบายอากาศภายในห้อง
ปิดเครื่อง
หน้า71
ดึงปลั๊กไฟของสายเชื่อมต่อแหล่งจ่ายไฟหรือปิดใช้งานฟิวส์ในตู้ควบคุมระบบไฟฟ้า
โทรติดต่อฝ่ายบริการลูกค้า
หน้า81
การหลีกเลี่ยงความเสียหายต่อทรัพย์สิน2 การหลีกเลี่ยงความเสียหายต่อทรัพย์สิน
ข้อควรทราบ
ล้อเลื่อนเครื่องที่มีลักษณะเอียงอาจทำให้พื้นเกิดความเสียหายขณะ
เลื่อนตัวเครื่อง
ขนย้ายเครื่องโดยใช้รถเข็นสองล้อ
ใช้แผ่นป้องกันพื้นขณะเลื่อนตัวเครื่องและห้ามเคลื่อนไหวแบบ
สลับฟันปลา
การใช้ตัวเครื่อง ฐานวาง ชั้นเลื่อน หรือฝาเครื่องเป็นที่นั่งหรือที่ปีน
อาจทำให้เครื่องเกิดความเสียหายได้
ห้ามเหยียบหรือลงน้ำหนักบนตัวเครื่อง ฐานวาง ชั้นเลื่อน หรือ
ฝาเครื่อง
ชิ้นส่วนพลาสติกและซีลประตูอาจเป็นรูพรุนเนื่องจากเปื้อนน้ำมัน
หรือจาระบี
ดูแลไม่ให้ชิ้นส่วนพลาสติกและซีลประตูเปื้อนน้ำมันหรือจาระบี
ชิ้นส่วนในตัวเครื่องที่ทำจากโลหะหรือมีลักษณะคล้ายโลหะอาจ
ประกอบด้วยอะลูมิเนียม หากสัมผัสกับวัตถุดิบที่เป็นกรด
อะลูมิเนียมอาจเกิดการกร่อนและเปลี่ยนสีได้
ให้จัดวางวัตถุดิบในเครื่องโดยใส่บรรจุภัณฑ์ไว้เท่านั้น
การทำความสะอาดชิ้นส่วนอุปกรณ์ติดตั้งและอุปกรณ์เสริมในเครื่อง
ล้างจานอาจทำให้ชิ้นส่วนและอุปกรณ์ดังกล่าวเสียรูปหรือเกิดการ
เปลี่ยนสี
ห้ามทำความสะอาดชิ้นส่วนอุปกรณ์ติดตั้งและอุปกรณ์เสริมใน
เครื่องล้างจานโดยเด็ดขาด
การรักษาสิ่งแวดล้อมและการประหยัด3 การรักษาสิ่งแวดล้อมและการประหยัด
3.1 กำจัดหีบห่อบรรจุทิ้ง
วัสดุบรรจุภัณฑ์ทั้งหมดไม่เป็นอันตรายต่อสิ่งแวดล้อมและสามารถ
นำกลับมาใช้ใหม่ได้
โปรดกำจัดชิ้นส่วนประกอบแต่ละชิ้นแยกตามประเภท
3.2 ประหยัดพลังงาน
หากคุณดำเนินการตามคำแนะนำเหล่านี้ จะสามารถลดระดับการใช้
ไฟของอุปกรณ์นี้ลงได้
การเลือกตำแหน่งการติดตั้ง
ป้องกันไม่ให้เครื่องสัมผัสกับแสงแดดโดยตรง
จัดวางตัวเครื่องให้มีระยะห่างจากแผงทำความร้อน เตา และ
แหล่งทำความร้อนอื่นๆ ให้มากที่สุดเท่าที่เป็นไปได้:
– รักษาระยะห่างจากเตาไฟฟ้าหรือเตาแก๊ส 30 มม.
– รักษาระยะห่างจากเตาน้ำมันหรือเตาถ่าน 300 มม.
เว้นระยะห่างจากผนังด้านข้างเล็กน้อย
ห้ามปิดคลุมหรือปิดกั้นช่องระบายอากาศด้านนอกโดยเด็ดขาด
การประหยัดพลังงานขณะใช้งาน
หมายเหตุ: การจัดวางชิ้นส่วนอุปกรณ์ติดตั้งไม่ส่งผลต่ออัตราความ
สิ้นเปลืองพลังงานของเครื่อง
เปิดเครื่องเป็นระยะเวลาสั้นๆ เท่านั้นและปิดด้วยความ
ระมัดระวัง
ห้ามปิดคลุมหรือปิดกั้นช่องระบายอากาศด้านในหรือด้านนอก
โดยเด็ดขาด
67
th การติดตั้งและการเชื่อมต่อ
ขนย้ายวัตถุดิบที่ซื้อในกระเป๋าเก็บความเย็น แล้ววางลงในตัว
เครื่องอย่างรวดเร็ว
ปล่อยให้วัตถุดิบและเครื่องดื่มที่มีความร้อนเย็นตัวลงก่อนจัด
เก็บ
สำหรับการละลายน้ำแข็ง ให้วางอาหารแช่แข็งลงในช่องแช่เย็น
เพื่อใช้ประโยชน์จากความเย็นของอาหารแช่แข็ง
เว้นพื้นที่เล็กน้อยระหว่างวัตถุดิบแต่ละอย่าง รวมถึงเว้นพื้นที่
จากผนังด้านหลังเสมอ
การติดตั้งและการเชื่อมต่อ4 การติดตั้งและการเชื่อมต่อ
4.1 รายการอุปกรณ์ที่จัดส่ง
โปรดตรวจเช็คความเสียหายจากการขนย้ายของชิ้นส่วนทั้งหมด
และความครบถ้วนของอุปกรณ์ที่จัดส่งหลังนำออกจากบรรจุภัณฑ์
หากคุณมีปัญหาร้องเรียน กรุณาติดต่อผู้แทนจำหน่ายหรือติดต่อ
ฝ่ายบริการลูกค้า
หน้า81ของเรา
อุปกรณ์ที่จัดส่งประกอบด้วย:
ตัวเครื่องตั้งเดี่ยว
อุปกรณ์ติดตั้งและอุปกรณ์เสริม
1
คู่มือการประกอบ
คู่มือการใช้งาน
รายการศูนย์บริการลูกค้า
เอกสารการรับประกัน
2
ฉลากประหยัดพลังงาน
ข้อมูลเกี่ยวกับอัตราความสิ้นเปลืองพลังงานและเสียงรบกวน
ข้อมูลเกี่ยวกับ HomeConnect
4.2 เกณฑ์สำหรับตำแหน่งการติดตั้ง
คำเตือน
ระวังการระเบิด!
หากเครื่องตั้งอยู่ในห้องที่มีขนาดเล็กเกินไป ส่วนผสมระหว่างแก๊ส
กับอากาศที่มีคุณสมบัติติดไฟอาจก่อตัวขึ้นในกรณีที่วงจรทำความ
เย็นเกิดการรั่วไหล
ตั้งเครื่องในห้องที่มีปริมาตรอย่างน้อย 1 ตร.ม. ต่อน้ำยา
ทำความเย็น 8 กรัม โดยปริมาณน้ำยาทำความเย็นจะระบุอยู่
บนป้ายกำกับรุ่น
"ตัวเครื่อง", รูปที่ 1 / หน้า69
ตัวเครื่องจากโรงงานอาจมีน้ำหนักถึง 110 กก. ทั้งนี้ขึ้นอยู่กับ
แต่ละรุ่น
พื้นผิวต้องมีความแข็งแรงทนทานเพียงพอต่อการรับน้ำหนักตัว
เครื่อง
พื้นผิวต้องมีความเรียบ
ตู้แช่เย็นรุ่นนี้ออกแบบมาสำหรับการใช้งานที่อุณหภูมิโดยรอบตั้งแต่
10°C ถึง 43°C
เครื่องจะสามารถทำงานได้อย่างเต็มประสิทธิภาพภายใต้อุณหภูมิ
ห้องที่อนุญาต
สำหรับอุณหภูมิห้องที่เย็นกว่านี้ เครื่องจะใช้งานได้โดยไม่เกิดความ
ชำรุดเสียหายจนถึงอุณหภูมิห้อง 5°C
การติดตั้งแบบ Over-and-Under และ Side-by-Side
หากต้องการติดตั้งเครื่องทำความเย็น 2 เครื่องซ้อนทับกันหรือข้าง
กัน คุณจำเป็นต้องรักษาระยะห่างระหว่างตัวเครื่องอย่างน้อย
150มม. ทั้งนี้กับเครื่องบางเครื่อง คุณสามารถติดตั้งได้โดยไม่ต้อง
คำนึงถึงระยะห่างขั้นต่ำ โปรดสอบถามตัวแทนจำหน่ายที่มีความ
เชี่ยวชาญหรือนักออกแบบห้องครัว
4.3 การประกอบเครื่อง
ประกอบเครื่องตามคู่มือการประกอบที่แนบมาด้วย
4.4 การเตรียมเครื่องสำหรับการใช้งานครั้งแรก
1.
ศึกษาเอกสารข้อมูล
2.
นำฟิล์มป้องกันและตัวล็อคสำหรับการขนย้ายออก เช่น เทป
กาวและกล่องกระดาษ
3.
ทำความสะอาดเครื่องเป็นครั้งแรก
หน้า76
4.5 การเชื่อมต่ออุปกรณ์ไฟฟ้า
1.
เสียบปลั๊กสายเชื่อมต่อแหล่งจ่ายไฟของตัวเครื่องเข้ากับเครื่อง
2.
เสียบปลั๊กไฟของสายไฟอุปกรณ์เข้าในซ็อคเกตใกล้กับอุปกรณ์
ข้อมูลการเชื่อมต่ออุปกรณ์จะแสดงอยู่บนแผ่นป้ายข้อมูลกำกับ
"ตัวเครื่อง", รูปที่ 1 / หน้า69
3.
ตรวจสอบปลั๊กไฟว่าติดตั้งอยู่ในตำแหน่งอย่างแน่นหนา
อุปกรณ์พร้อมทำงานแล้ว
1
ขึ้นอยู่กับคุณสมบัติของอุปกรณ์
2
ไม่ใช่ในทุกประเทศ
68
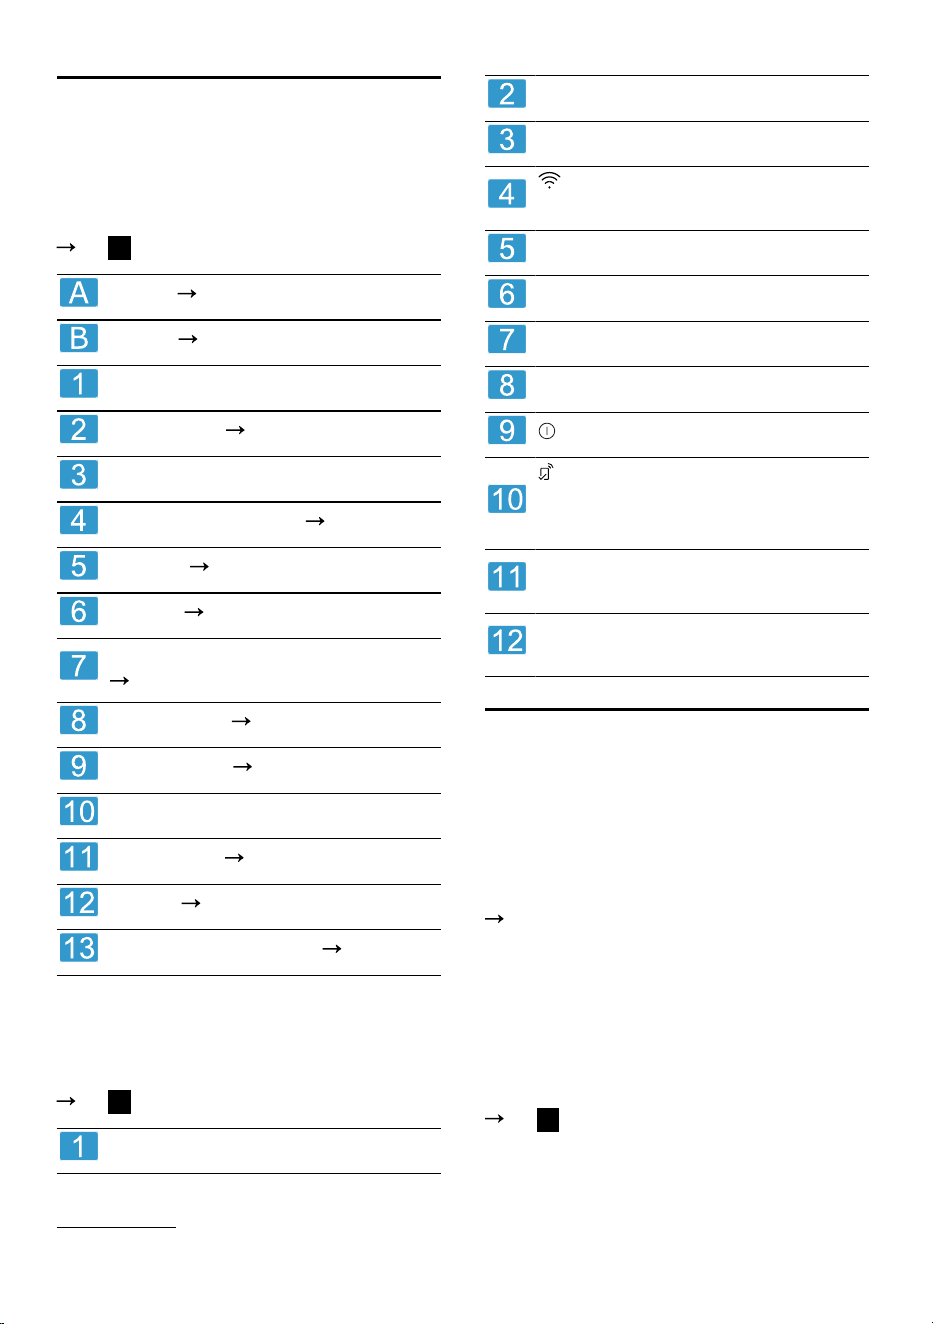
มาทำความรู้จักเกี่ยวกับอุปกรณ์กัน th
มาทำความรู้จักเกี่ยวกับอุปกรณ์กัน5 มาทำความรู้จักเกี่ยวกับอุปกรณ์กัน
5.1 ตัวเครื่อง
รายละเอียดภาพรวมเกี่ยวกับชิ้นส่วนประกอบต่าง ๆ ของอุปกรณ์
คุณอยู่ที่นี่
รูปที่ 1
ช่องแช่เย็น
หน้า74
ช่องแช่แข็ง
หน้า74
ไฟส่องสว่าง
ช่องใส่ขนมขบเคี้ยว
หน้า69
1
ช่องระบายอากาศด้านใน
ตัวควบคุมอุณหภูมิ (ช่องเก็บของ)
หน้า71
ป้ายกำกับรุ่น
หน้า82
ช่องเก็บของ
หน้า70
ช่องแช่ผลไม้และผักพร้อมตัวควบคุมความชื้น
หน้า70
ช่องใส่อาหารแช่แข็ง
หน้า77
เครื่องทำน้ำแข็งก้อน
หน้า70
ฐานสกรู
ช่องเก็บเนยและชีส
หน้า70
1
แผงควบคุม
หน้า69
ชั้นวางที่ประตูสำหรับขวดขนาดใหญ่
หน้า70
5.2 แผงควบคุม
คุณสามารถตั้งค่าฟังก์ชันทั้งหมดของอุปกรณ์และรับข้อมูลเกี่ยวกับ
สถานะการใช้งานได้ผ่านแผงควบคุม
รูปที่ 2
จะแสดงอุณหภูมิช่องแช่เย็นที่ปรับตั้งไว้ในหน่วย °C
จะแสดงอุณหภูมิช่องแช่แข็งที่ปรับตั้งไว้ในหน่วย °C
alarm จะปิดใช้งานเสียงเตือน
จะเปิดหรือปิดใช้งานการเชื่อมต่อกับเครือข่าย
WLAN ภายในบ้าน (Wi-Fi)
แถบไฟจะแสดงการตอบสนองทางภาพ
eco จะเปิดหรือปิดใช้งานโหมดประหยัดพลังงาน
holiday จะเปิดหรือปิดใช้งานโหมด Holiday
fresh จะเปิดหรือปิดใช้งานโหมด Fresh
จะเปิดหรือปิดการทำงานเครื่อง
จะติดสว่างเมื่อปรับการตั้งค่าที่กำหนดโดยผู้ใช้ผ่าน
แอป HomeConnect คุณสามารถดูข้อมูลเพิ่มเติมได้ใน
แอป HomeConnect
super(ช่องแช่แข็ง) จะเปิดหรือปิดใช้งาน ฟังก์ชัน Super
Freeze
super(ช่องแช่เย็น) จะเปิดหรือปิดใช้งาน ฟังก์ชัน Super
Cool
อุปกรณ์ติดตั้ง6 อุปกรณ์ติดตั้ง
อุปกรณ์ติดตั้งสำหรับตัวเครื่องจะขึ้นอยู่กับแต่ละรุ่น
6.1 ชั้นวาง
คุณสามารถถอดชั้นวางและใส่กลับเข้าในตำแหน่งอื่นเพื่อปรับ
เปลี่ยนชั้นวางได้ตามความต้องการ
"การถอดชั้นวาง", หน้า76
6.2 ช่องใส่ขนมขบเคี้ยว
คุณสามารถจัดเก็บวัตถุดิบที่อยู่ในบรรจุภัณฑ์หรือขนมขบเคี้ยวชิ้น
เล็กในช่องใส่ขนมขบเคี้ยวได้
คุณสามารถถอดช่องใส่ขนมขบเคี้ยว โดยยกช่องใส่ขนมขบเคี้ยวขึ้น
แล้วดึงออก รวมถึงสามารถเลื่อนตัวยึดช่องใส่ขนมขบเคี้ยวได้
รูปที่ 3
1
ขึ้นอยู่กับคุณสมบัติของอุปกรณ์
69

th อุปกรณ์ติดตั้ง
6.3 ช่องเก็บของ
ช่องเก็บของจะมีอุณหภูมิต่ำกว่าช่องแช่เย็น โดยอุณหภูมิอาจลดต่ำ
กว่า 0 °C ในบางครั้ง
ปรับตั้งอุณหภูมิช่องแช่เย็นให้อยู่ที่ 2 °C เพื่อให้ช่องเก็บของมี
อุณหภูมิใกล้เคียง 0 °C
หน้า71
ใช้ประโยชน์จากอุณหภูมิที่ต่ำกว่าในช่องเก็บของเพื่อจัดเก็บวัตถุดิบ
ที่เน่าเสียง่าย เช่น เนื้อปลา เนื้อสัตว์ และไส้กรอก
6.4 ช่องแช่ผลไม้และผักพร้อมตัวควบคุมความชื้น
จัดเก็บผลไม้และผักสดในช่องแช่ผลไม้และผักโดยนำออกจากบรรจุ
ภัณฑ์
จัดเก็บผลไม้และผักที่หั่นแล้วในภาชนะที่มีฝาครอบหรือบรรจุภัณฑ์
แบบปิดล็อคสุญญากาศ
คุณสามารถปรับความชื้นในอากาศภายในช่องแช่ผลไม้และผักได้
โดยใช้ตัวควบคุมความชื้นและซีลรูปแบบพิเศษ ดังนั้นจึงสามารถจัด
เก็บผลไม้และผักสดได้นานกว่าการจัดเก็บทั่วไปถึงสองเท่า
รูปที่ 4
ปรับตั้งความชื้นในอากาศภายในช่องแช่ผลไม้และผักตามประเภท
และปริมาณของวัตถุดิบที่ต้องการจัดเก็บโดยการกดตัวควบคุม
ความชื้น:
ล็อคสำหรับความชื้นในอากาศต่ำ เมื่อต้องการจัดเก็บผลไม้
เป็นส่วนใหญ่ จัดเก็บสิ่งของหลายชนิดรวมกัน หรือจัดเก็บ
สิ่งของในปริมาณมาก
ปลดล็อคสำหรับความชื้นในอากาศสูง เมื่อต้องการจัด
เก็บผักเป็นส่วนใหญ่หรือจัดเก็บสิ่งของในปริมาณน้อย
น้ำที่เกิดจากการควบแน่นอาจก่อตัวขึ้นในช่องแช่ผลไม้และผัก ทั้งนี้
ขึ้นอยู่กับปริมาณและสิ่งของที่นำมาจัดเก็บ
ใช้ผ้าแห้งเช็ดน้ำที่เกิดจากการควบแน่น แล้วปรับความชื้นในอากาศ
ให้อยู่ที่ระดับต่ำโดยใช้ตัวควบคุมความชื้น
หากต้องการรักษาคุณภาพและกลิ่นหอม ให้จัดเก็บผลไม้และผักที่ไว
ต่อความเย็นไว้นอกตัวเครื่องที่อุณหภูมิประมาณ 8 °C ถึง 12 °C
เช่น สับปะรด กล้วย ผลไม้รสเปรี้ยว แตงกวา ซูกินี ปาปริก้า มะเขือ
เทศ และมันฝรั่ง
6.5 ช่องเก็บเนยและชีส
จัดเก็บเนยและชีสแข็งในช่องเก็บเนยและชีส
6.6 ชั้นวางที่ประตู
คุณสามารถถอดชั้นวางที่ประตูและใส่กลับเข้าในตำแหน่งอื่นเพื่อ
ปรับเปลี่ยนชั้นวางที่ประตูได้ตามความต้องการ
"การถอดชั้นวางที่ประตู", หน้า76
6.7 เครื่องทำน้ำแข็งก้อน
คุณสามารถใช้เครื่องทำน้ำแข็งก้อนในการทำน้ำแข็งก้อนจากน้ำดื่ม
ได้
การทำน้ำแข็งก้อน
ใช้เฉพาะน้ำดื่มในการทำน้ำแข็งก้อนเท่านั้น
1.
ถอดถาดน้ำแข็งก้อน เติมน้ำดื่มให้อยู่ในระดับ ¾ แล้ว
ใส่กลับเข้าไปอีกครั้ง
รูปที่ 5
หมายเหตุ: หากเติมน้ำดื่มมากเกินไป การทำงานของเครื่องทำ
น้ำแข็งก้อนอาจได้รับผลกระทบ น้ำแข็งก้อนจะไม่หลุดออกจาก
ถาดน้ำแข็งเป็นก้อนๆ น้ำดื่มที่เติมไว้มากเกินไปจะไหลเข้าไปใน
ถาดรองน้ำแข็งก้อนและทำให้น้ำแข็งก้อนที่มีอยู่จับตัวเป็นก้อน
แข็ง
2.
เมื่อน้ำแข็งเป็นก้อนแล้ว ให้หมุนมือหมุนของถาดน้ำแข็งก้อนไป
ทางด้านขวาแล้วปล่อยหลายๆ ครั้ง
รูปที่ 6
น้ำแข็งก้อนจะหลุดและหล่นลงในถาดรองน้ำแข็งก้อน
3.
ดึงถาดรองน้ำแข็งก้อนออก แล้วนำน้ำแข็งก้อนออกมา
รูปที่ 7
6.8 อุปกรณ์เสริม
ใช้อุปกรณ์เสริมของแท้ ซึ่งได้รับการปรับให้เหมาะสมกับเครื่องของ
คุณ
อุปกรณ์เสริมขึ้นอยู่กับรุ่นอุปกรณ์ของคุณ
ชั้นวางไข่
จัดเก็บไข่บนชั้นวางไข่อย่างปลอดภัย
ตัวยึดขวด
ตัวยึดขวดช่วยป้องกันไม่ให้ขวดพลิกล้มขณะเปิดและปิดประตู
เครื่อง
รูปที่ 8
ชั้นวางขวดแบบปรับได้
คุณสามารถจัดเก็บขวดได้อย่างปลอดภัยไว้บนชั้นวางขวดแบบปรับ
ได้
รูปที่ 9
70
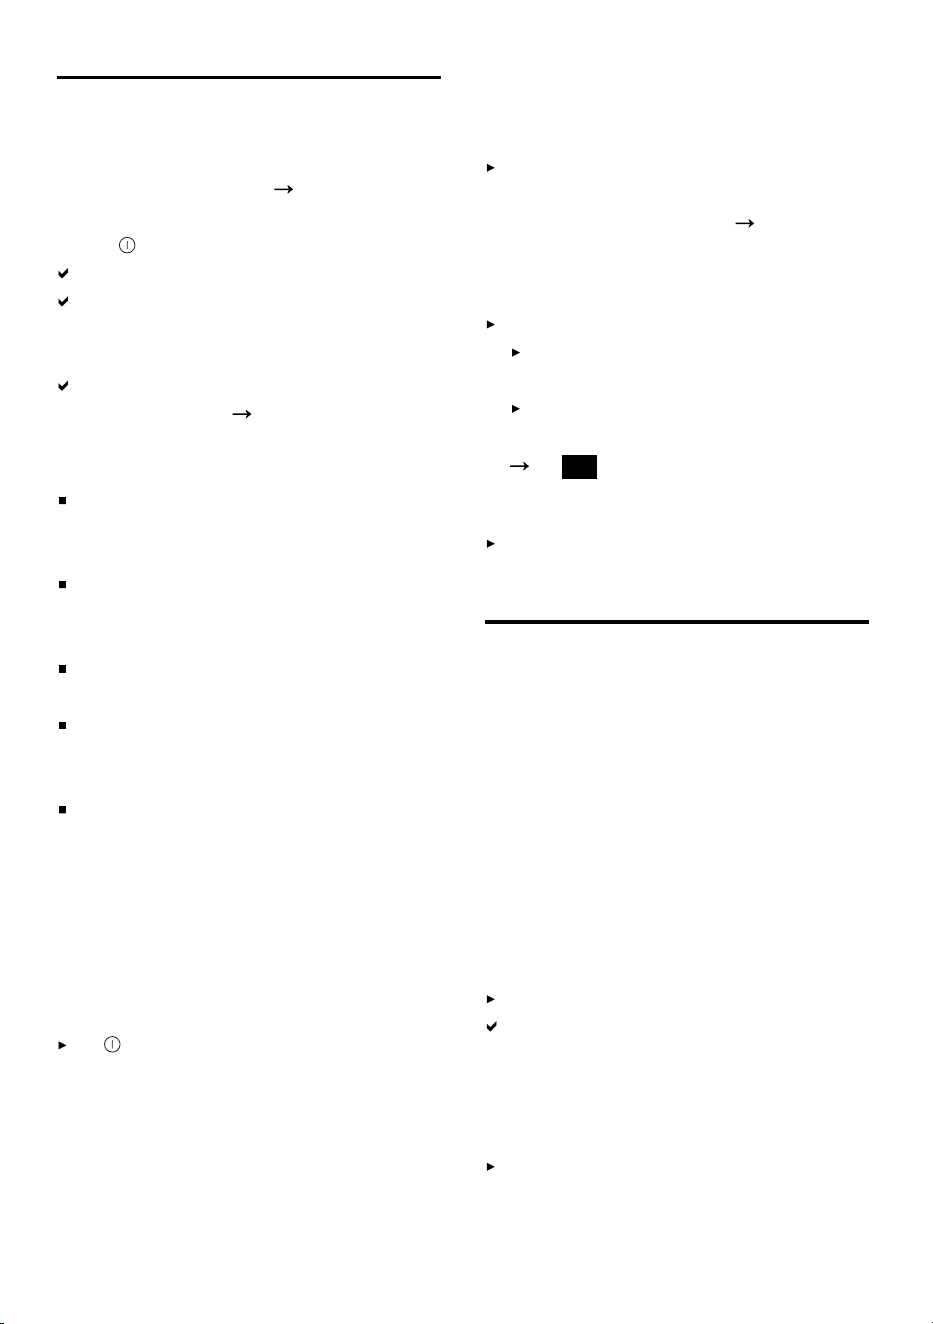
การใช้งานทั่วไป th
การใช้งานทั่วไป7 การใช้งานทั่วไป
7.1 การเปิดใช้งานเครื่อง
1.
เชื่อมต่อเครื่องเข้ากับระบบไฟฟ้า
หน้า68
หมายเหตุ: หากปิดใช้งานเครื่องผ่านแผงควบคุมไว้ก่อนหน้านี้
ให้กด ค้างไว้ 3วินาที
เครื่องจะเริ่มทำความเย็น
เสียงเตือนจะดังขึ้นและจอแสดงอุณหภูมิจะกะพริบเนื่องจาก
ช่องแช่แข็งยังคงอุ่นเกินไป
2.
ปิดใช้งานเสียงเตือนโดยกด alarm
"alarm" จะดับลงทันทีที่อุณหภูมิถึงระดับที่ปรับตั้งไว้
3.
ปรับตั้งอุณหภูมิที่ต้องการ
หน้า71
7.2 คำแนะนำเกี่ยวกับการใช้งาน
เมื่อเปิดใช้งาน เครื่องอาจใช้เวลาหลายชั่วโมงจนกว่าอุณหภูมิ
จะถึงระดับที่ปรับตั้งไว้
ห้ามวางวัตถุดิบก่อนอุณหภูมิถึงระดับที่ปรับตั้งไว้
ด้านหน้าของตัวเรือนจะได้รับการทำความร้อนเล็กน้อยในบาง
ช่วงเวลา ซึ่งช่วยป้องกันการเกิดไอน้ำควบแน่นบริเวณซีลฝา
เครื่อง
ตรวจสอบให้แน่ใจขณะปิดฝาตู้ว่าวัตถุดิบที่นำมาจัดเก็บไม่ได้
กีดขวางฝาตู้
การปิดประตูอาจทำให้เกิดความดันอากาศต่ำ ซึ่งทำให้เปิด
ประตูอีกครั้งได้ยาก โปรดรอสักครู่จนกว่าความดันอากาศต่ำจะ
ได้รับการชดเชย
อุณหภูมิในเครื่องอาจแตกต่างกันไปตามเงื่อนไขดังต่อไปนี้:
– ความถี่ในการเปิดฝาเครื่อง
– ปริมาณบรรจุ
– อุณหภูมิของวัตถุดิบสดที่นำมาจัดเก็บ
– อุณหภูมิโดยรอบ
– การสัมผัสกับแสงแดดโดยตรง
7.3 การปิดใช้งานเครื่อง
กด ค้างไว้ 3วินาที
7.4 การปรับตั้งอุณหภูมิ
การปรับตั้งอุณหภูมิช่องแช่เย็น
กดอุณหภูมิที่ต้องการ
เลื่อนตัวควบคุมอุณหภูมิของช่องเก็บไปยังตำแหน่ง ⅓ จากด้าน
ล่างเพื่อให้อุณหภูมิถึงระดับที่ปรับตั้งไว้
หน้า71
อุณหภูมิที่แนะนำสำหรับช่องแช่เย็นอยู่ที่ 4 °C
การปรับตั้งอุณหภูมิช่องเก็บของ
เลือกตัวเลือกใดตัวเลือกหนึ่งต่อไปนี้:
หากต้องการลดอุณหภูมิ ให้เลื่อนตัวควบคุมอุณหภูมิขึ้น
ด้านบนไปในทิศทาง "extra cold"
หากต้องการเพิ่มอุณหภูมิ ให้เลื่อนตัวควบคุมอุณหภูมิลง
ด้านล่างไปในทิศทาง "cold"
รูปที่ 10
การปรับตั้งอุณหภูมิช่องแช่แข็ง
กดอุณหภูมิที่ต้องการ
อุณหภูมิที่แนะนำสำหรับช่องแช่แข็งอยู่ที่ −18 °C
ฟังก์ชันเสริม8 ฟังก์ชันเสริม
โปรดศึกษาฟังก์ชันเสริมที่พร้อมใช้งานกับเครื่องของคุณ
8.1 ฟังก์ชัน Super Cool
เมื่อใช้งาน ฟังก์ชัน Super Cool ช่องแช่เย็นจะทำความเย็นระดับ
สูงสุด
โปรดเปิดใช้งาน ฟังก์ชัน Super Cool ก่อนจัดเก็บวัตถุดิบปริมาณ
มากในช่องแช่เย็น
หมายเหตุ: เมื่อเปิดใช้งาน ฟังก์ชัน Super Cool อาจมีเสียงรบกวน
ดังขึ้นหลายเสียง
การเปิดใช้งาน ฟังก์ชัน Super Cool
กด super(ช่องแช่เย็น)
"super"(ช่องแช่เย็น) จะติดสว่าง
หมายเหตุ: หลังจากเวลาผ่านไปประมาณ 6ชั่วโมง เครื่องจะสลับ
มาทำงานในโหมดปกติ
การปิดใช้งาน ฟังก์ชัน Super Cool
กด super(ช่องแช่เย็น)
71
th สัญญาณเตือน
8.2 ฟังก์ชัน Super Freeze
เมื่อใช้งาน ฟังก์ชัน Super Freeze ช่องแช่แข็งจะทำความเย็น
ระดับสูงสุด
เปิดใช้งาน ฟังก์ชัน Super Freeze เป็นเวลา 4 ถึง 6ชั่วโมงก่อน
จัดเก็บวัตถุดิบปริมาณตั้งแต่ 2กก. ขึ้นไปในช่องแช่แข็ง
ใช้ ฟังก์ชัน Super Freeze เพื่อให้สามารถใช้ประโยชน์จากความจุ
ในการแช่แข็งได้อย่างเต็มพิกัด
"เงื่อนไขสำหรับความจุในการแช่แข็ง", หน้า75
หมายเหตุ: เมื่อเปิดใช้งาน ฟังก์ชัน Super Freeze อาจมีเสียง
รบกวนดังขึ้นหลายเสียง
การเปิดใช้งาน ฟังก์ชัน Super Freeze
กด super(ช่องแช่แข็ง)
"super"(ช่องแช่แข็ง) จะติดสว่าง
หมายเหตุ: หลังจากเวลาผ่านไปประมาณ 54ชั่วโมง เครื่องจะสลับ
มาทำงานในโหมดปกติ
การปิดใช้งาน ฟังก์ชัน Super Freeze
กด super(ช่องแช่แข็ง)
8.3 โหมด Holiday
หากไม่อยู่บ้านเป็นระยะเวลานาน คุณสามารถเปิดใช้งานโหมด
Holiday ที่ช่วยประหยัดพลังงานบนตัวเครื่องได้
ข้อควรระวัง
ระวังอันตรายต่อสุขภาพ!
ในระหว่างที่โหมด Holiday เปิดใช้งานอยู่ ช่องแช่เย็นจะอุ่นขึ้น
อุณหภูมิที่สูงขึ้นอาจทำให้แบคทีเรียเพิ่มจำนวนขึ้นและวัตถุดิบอาจ
เน่าเสีย
ห้ามจัดเก็บวัตถุดิบในช่องแช่เย็นในขณะที่โหมด Holiday เปิด
ใช้งานอยู่
เครื่องจะปรับตั้งอุณหภูมิโดยอัตโนมัติ
ช่องแช่เย็น 14°C
ช่องแช่แข็ง อุณหภูมิไม่เปลี่ยนแปลง
การเปิดใช้งานโหมด Holiday
กด holiday
"holiday" จะติดสว่าง
การปิดใช้งานโหมด Holiday
กด holiday
8.4 โหมดประหยัดพลังงาน
คุณสามารถใช้โหมดประหยัดพลังงานเพื่อให้เครื่องทำงานแบบ
ประหยัดพลังงานได้
เครื่องจะปรับตั้งอุณหภูมิโดยอัตโนมัติ
ช่องแช่เย็น 8 °C
ช่องแช่แข็ง −16 °C
การเปิดใช้งานโหมดประหยัดพลังงาน
กด eco
"eco" จะติดสว่าง
การปิดใช้งานโหมดประหยัดพลังงาน
กด eco
8.5 โหมด Fresh
คุณสามารถเปิดใช้งานโหมด Fresh บนตัวเครื่องเพื่อให้วัตถุดิบคง
ความสดไว้ได้นานยิ่งขึ้น
เครื่องจะปรับตั้งอุณหภูมิโดยอัตโนมัติ
ช่องแช่เย็น 2°C
ช่องแช่แข็ง อุณหภูมิไม่มีการเปลี่ยนแปลง
การเปิดใช้งานโหมด Fresh
กด fresh
"fresh" จะติดสว่าง
การปิดใช้งานโหมด Fresh
กด fresh
สัญญาณเตือน9 สัญญาณเตือน
9.1 สัญญาณเตือนการเปิดประตู
หากเปิดประตูเครื่องค้างไว้นาน สัญญาณเตือนการเปิดประตูจะเปิด
ใช้งาน
เสียงเตือนจะดังขึ้น "alarm" จะกะพริบ แถบไฟจะกะพริบ และ
จอแสดงอุณหภูมิของช่องที่เกี่ยวข้องจะกะพริบ
การปิดใช้งานสัญญาณเตือนการเปิดประตู
ปิดประตูเครื่องหรือกด alarm
เสียงเตือนจะปิดใช้งาน
72
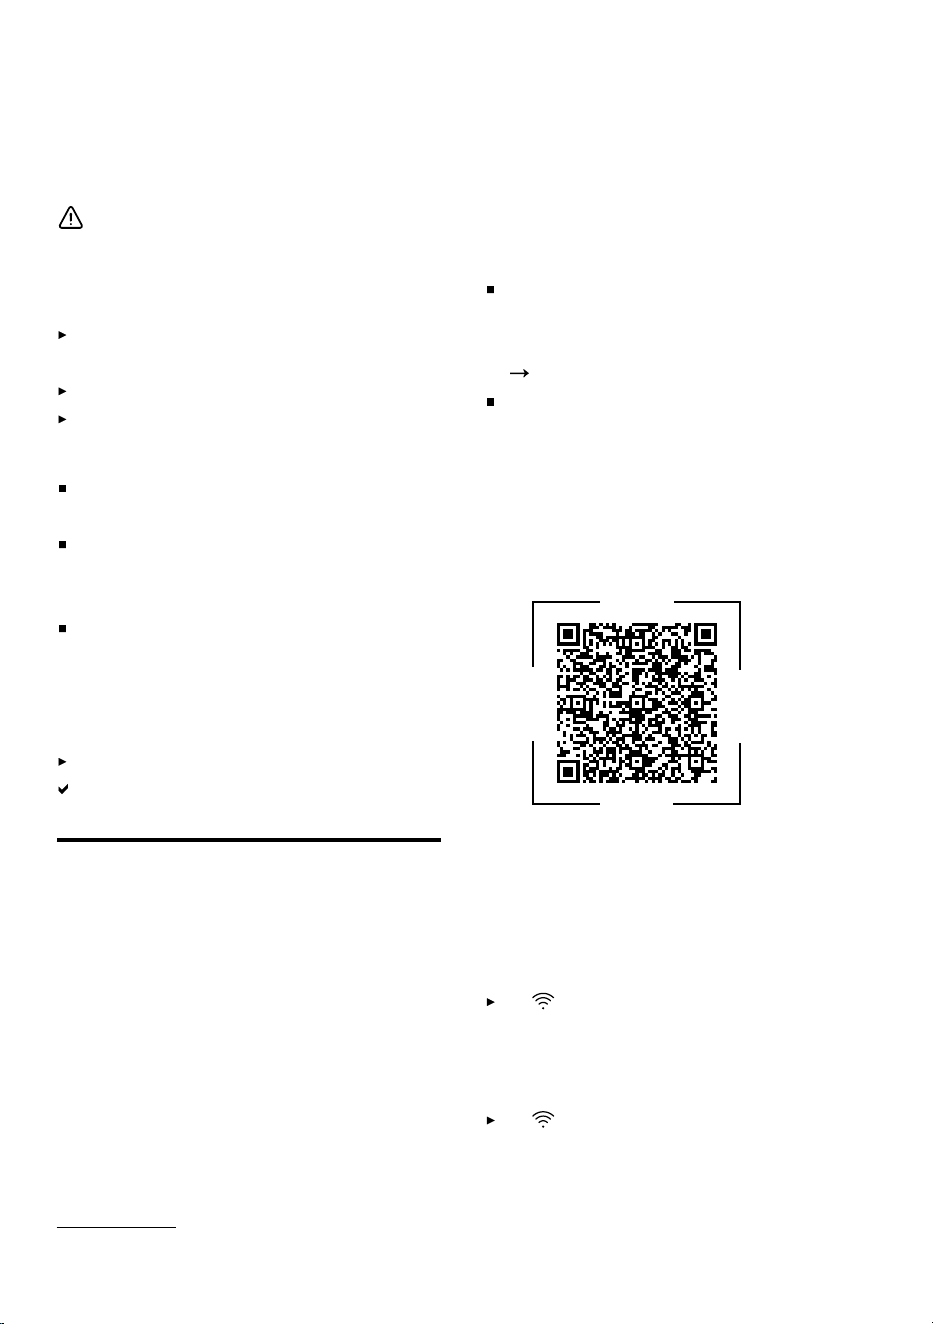
HomeConnect th
9.2 สัญญาณเตือนอุณหภูมิ
หากช่องแช่แข็งอุ่นเกินไป สัญญาณเตือนอุณหภูมิจะเปิดใช้งาน
เสียงเตือนจะดังขึ้น รวมถึงอุณหภูมิที่ปรับตั้งไว้ (ช่องแช่แข็ง)
"alarm" และแถบไฟจะกะพริบ
ข้อควรระวัง
ระวังอันตรายต่อสุขภาพ!
การละลายน้ำแข็งอาจทำให้แบคทีเรียเพิ่มจำนวนขึ้นและอาหารแช่
แข็งอาจเน่าเสีย
ห้ามแช่แข็งอาหารแช่แข็งที่เริ่มละลายหรือละลายน้ำแข็งแล้ว
อีกครั้ง
แช่แข็งอาหารอีกครั้งหลังจากปรุงสุกหรืออบแล้วเท่านั้น
ไม่ควรจัดเก็บอาหารตามระยะเวลาสูงสุดอีกต่อไป
สัญญาณเตือนอุณหภูมิอาจเปิดใช้งานในกรณีดังต่อไปนี้:
เมื่อเครื่องทำงาน
จัดเก็บวัตถุดิบต่อเมื่ออุณหภูมิถึงระดับที่ปรับตั้งไว้แล้วเท่านั้น
เมื่อจัดเก็บวัตถุดิบสดในปริมาณมาก
เปิดใช้งาน ฟังก์ชัน Super Freeze ก่อนจัดเก็บวัตถุดิบใน
ปริมาณมาก
เมื่อเปิดประตูช่องแช่แข็งนานเกินไป
ตรวจเช็คว่าอาหารแช่แข็งเริ่มละลายหรือละลายน้ำแข็งแล้ว
หรือไม่
การปิดใช้งานสัญญาณเตือนอุณหภูมิ
กด alarm
เสียงเตือนจะปิดใช้งาน
HomeConnect 10 HomeConnect
อุปกรณ์นี้สามารถเชื่อมโยงกับเครือข่ายได้ ต่ออุปกรณ์ของคุณเข้า
กับอุปกรณ์เคลื่อนที่เพื่อที่จะใช้งานฟังก์ชันต่าง ๆ ผ่านทางแอปพลิ
เคชั่น HomeConnect
บริการ HomeConnect พร้อมให้บริการในบางประเทศเท่านั้น
ความพร้อมใช้งานของฟังก์ชัน HomeConnect ขึ้นอยู่กับความ
พร้อมใช้งานของบริการ HomeConnect ในประเทศของคุณ ดู
ข้อมูลเพิ่มเติมได้ที่: www.home-connect.com
เพื่อที่จะสามารถใช้ HomeConnect ได้ ให้ติดตั้งการเชื่อมต่อเข้า
กับเครือข่ายไร้สายภายในบ้าน (Wi-Fi
1
) และเข้ากับแอปพลิเคชั่น
HomeConnect
หลังจากเปิดสวิตช์อุปกรณ์ ให้รออย่างน้อย 2 นาทีจนกว่าการเริ่ม
ต้นการทำงานภายในอุปกรณ์จะเสร็จสิ้น ทำการปรับตั้ง
HomeConnect ก่อน
แอป HomeConnect จะคอยแนะนำคุณตลอดขั้นตอนการลง
ทะเบียนทั้งหมด ปฏิบัติตามคำแนะนำและหมายเหตุต่างๆ ในแอป
HomeConnect
หมายเหตุ
โปรดปฏิบัติตามคำแนะนำด้านความปลอดภัยในคู่มือการใช้
งานฉบับนี้และให้แน่ใจว่าปฏิบัติตามคำแนะนำดังกล่าวเมื่อ
ควบคุมเครื่องผ่านแอป HomeConnect
"ความปลอดภัย", หน้า63
ให้ความสำคัญกับการใช้งานเครื่องก่อนเสมอ ขณะนี้ไม่สามารถ
ใช้งานผ่านแอปพลิเคชั่น HomeConnect ได้
10.1 การปรับตั้ง HomeConnect
ข้อกำหนด: เครื่องใช้ไฟฟ้าได้รับสัญญาณเครือข่าย WLAN ภายใน
บ้าน (Wi-Fi) จากตำแหน่งการติดตั้ง
1.
สแกนรหัส QR Code ต่อไปนี้
RFSM0Z01
คุณสามารถใช้รหัส QR Code เพื่อติดตั้งแอป
HomeConnect และเชื่อมต่ออุปกรณ์
2.
ปฏิบัติตามคำแนะนำของแอป HomeConnect
10.2 การเปิดใช้งานการเชื่อมต่อไปยังเครือข่าย WLAN
ภายในบ้าน (Wi-Fi)
กด
10.3 การปิดใช้งานการเชื่อมต่อไปยังเครือข่าย WLAN
ภายในบ้าน (Wi-Fi)
กด
1
Wi-Fi เป็นเครื่องหมายการค้าจดทะเบียนของ Wi-Fi Alliance
73
th ช่องแช่เย็น
10.4 การติดตั้งการอัปเดต
ซอฟต์แวร์HomeConnect
หมายเหตุ: หากมีการอัปเดตซอฟต์แวร์HomeConnect ที่พร้อม
ใช้งาน ข้อความแจ้งเตือนจะปรากฏในแอปHomeConnect
ปฏิบัติตามคำแนะนำในแอปHomeConnect เพื่อติดตั้งการ
อัปเดตซอฟต์แวร์HomeConnect
แผงควบคุมจะถูกล็อคบางส่วนในระหว่างติดตั้ง
10.5 การรีเซ็ตการตั้งค่า HomeConnect
หากเครื่องเกิดปัญหาในการเชื่อมต่อกับเครือข่าย WLAN ภายใน
บ้าน (Wi-Fi) หรือคุณต้องการลงทะเบียนเครื่องในเครือข่าย WLAN
อื่นภายในบ้าน (Wi-Fi) คุณสามารถรีเซ็ตการตั้งค่า
HomeConnect ได้
กด ค้างไว้ 6วินาทีจนกระทั่ง หายไป
การตั้งค่าHomeConnect จะถูกรีเซ็ต
10.6 การคุ้มครองข้อมูล
โปรดปฏิบัติตามคำแนะนำเกี่ยวกับการคุ้มครองข้อมูล
ในการเชื่อมต่อเครื่องเข้ากับเครือข่ายภายในบ้านที่เชื่อมต่อ
อินเทอร์เน็ตเป็นครั้งแรก เครื่องของคุณจะถ่ายโอนประเภทของ
ข้อมูลต่อไปนี้ไปยังเซิร์ฟเวอร์ HomeConnect (การลงทะเบียน
ครั้งแรก):
การระบุเครื่องที่ชัดเจน (ประกอบด้วยรหัสเครื่อง รวมถึงที่อยู่
MAC ของโมดูลการติดต่อสื่อสาร Wi-Fi ที่ติดตั้งไว้)
ใบรับรองความปลอดภัยของโมดูลการติดต่อสื่อสาร Wi-Fi
(เพื่อการป้องกันการเชื่อมต่อโดยเทคโนโลยีสารสนเทศ)
เวอร์ชันซอฟต์แวร์และเวอร์ชันฮาร์ดแวร์ล่าสุดของอุปกรณ์
เครื่องใช้ในบ้านของคุณ
สถานะการรีเซ็ตที่อาจเกิดขึ้นก่อนหน้านี้เป็นการตั้งค่าจาก
โรงงาน
การลงทะเบียนครั้งแรกนี้เป็นการเตรียมความพร้อมการใช้งาน
ฟังก์ชัน HomeConnect และจำเป็นต่อเมื่อคุณต้องการใช้งาน
ฟังก์ชัน HomeConnect เป็นครั้งแรกเท่านั้น
หมายเหตุ: โปรดทราบว่าฟังก์ชัน HomeConnect สามารถใช้งาน
ได้ต่อเมื่อเชื่อมต่อกับแอป HomeConnect เท่านั้น คุณสามารถ
เรียกดูข้อมูลเกี่ยวกับการคุ้มครองข้อมูลได้ในแอป
HomeConnect
ช่องแช่เย็น11 ช่องแช่เย็น
คุณสามารถจัดเก็บเนื้อสัตว์ ไส้กรอก เนื้อปลา ผลิตภัณฑ์ที่ทำจาก
นม ไข่ อาหารปรุงสำเร็จ และขนมปังอบในช่องแช่เย็นได้
อุณหภูมิสามารถปรับตั้งได้ระหว่าง 2 °C ถึง 8 °C
การจัดเก็บแบบแช่เย็นช่วยให้คุณสามารถจัดเก็บวัตถุดิบที่เน่าเสีย
ง่ายได้ในช่วงเวลาสั้นๆ จนถึงปานกลาง ยิ่งเลือกอุณหภูมิต่ำลง
วัตถุดิบก็จะคงความสดได้นานมากขึ้น
11.1 เคล็ดลับเกี่ยวกับการจัดเก็บวัตถุดิบในช่องแช่เย็น
จัดเก็บเฉพาะวัตถุดิบสดและไม่มีความเสียหายเท่านั้น
จัดเก็บวัตถุดิบในบรรจุภัณฑ์หรือภาชนะครอบแบบปิดล็อค
สุญญากาศ
ห้ามวางวัตถุดิบไว้หน้าช่องระบายอากาศด้านในหรือวางชิดผนัง
ด้านหลังโดยตรง ทั้งนี้เพื่อไม่ให้ประสิทธิภาพในการหมุนเวียน
อากาศลดลงและป้องกันไม่ให้วัตถุดิบถูกแช่แข็ง
ปล่อยให้อาหารและเครื่องดื่มที่มีความร้อนเย็นตัวลงก่อน
สังเกตวันที่ควรบริโภคหรือวันหมดอายุที่ผู้ผลิตกำหนดไว้
11.2 โซนทำความเย็นในช่องแช่เย็น
การหมุนเวียนอากาศภายในช่องแช่เย็นทำให้เกิดโซนทำความเย็นที่
แตกต่างกัน
โซนที่เย็นที่สุด
โซนที่เย็นที่สุดจะอยู่ในช่องเก็บของ
เคล็ดลับ: จัดเก็บวัตถุดิบที่เน่าเสียง่ายไว้ในโซนที่เย็นที่สุด เช่น เนื้อ
ปลา ไส้กรอก และเนื้อสัตว์
โซนที่อุ่นที่สุด
โซนที่อุ่นที่สุดจะอยู่ที่บริเวณประตูด้านบนสุด
เคล็ดลับ: จัดเก็บวัตถุดิบที่สามารถเก็บได้นานไว้ในโซนที่อุ่นที่สุด
เช่น ชีสแข็งและเนย วิธีนี้จะช่วยรักษากลิ่นของชีส รวมถึงช่วยให้
เนยยังคงสามารถนำไปทาได้
ช่องแช่แข็ง12 ช่องแช่แข็ง
คุณสามารถจัดเก็บอาหารแช่แข็ง แช่แข็งวัตถุดิบ และทำน้ำแข็ง
ก้อนในช่องแช่แข็งได้
อุณหภูมิสามารถปรับตั้งได้ระหว่าง −16 °C ถึง −24 °C
การจัดเก็บวัตถุดิบเป็นระยะเวลานานควรใช้อุณหภูมิที่ −18 °C
หรือต่ำกว่า
74
ช่องแช่แข็ง th
การจัดเก็บแบบแช่แข็งจะช่วยให้สามารถจัดเก็บวัตถุดิบที่เน่าเสียได้
เป็นระยะเวลานาน อุณหภูมิต่ำจะช่วยยืดระยะเวลาหรือหยุดการ
เน่าเสีย
12.1 ความจุในการแช่แข็ง
ความจุในการแช่แข็งจะระบุถึงปริมาณของวัตถุดิบต่อจำนวนชั่วโมง
ที่ใช้ในการแช่แข็งวัตถุดิบดังกล่าวจนถึงแกนใน
คุณสามารถดูข้อมูลเกี่ยวกับความจุในการแช่แข็งได้จากป้ายกำกับ
รุ่น
"ตัวเครื่อง", รูปที่ 1 / หน้า69
เงื่อนไขสำหรับความจุในการแช่แข็ง
1.
เปิดใช้งาน ฟังก์ชัน Super Freeze เป็นเวลาประมาณ 24
ชั่วโมงก่อนจัดเก็บวัตถุดิบสด
"การเปิดใช้งาน ฟังก์ชัน Super Freeze", หน้า72
2.
วางวัตถุดิบในช่องใส่อาหารแช่แข็งชั้นล่างสุดก่อน
12.2 การใช้ปริมาณความจุช่องแช่แข็งอย่างเต็มพิกัด
โปรดศึกษาวิธีการใส่อาหารแช่แข็งในช่องแช่แข็งให้ได้ปริมาณสูงสุด
1.
นำชิ้นส่วนอุปกรณ์ติดตั้งทั้งหมดในช่องแช่แข็งออก
หน้า76
2.
จัดเก็บวัตถุดิบบนชั้นวางและพื้นช่องแช่แข็งโดยตรง
12.3 เคล็ดลับเกี่ยวกับการจัดเก็บวัตถุดิบในช่องแช่แข็ง
จัดเก็บวัตถุดิบในบรรจุภัณฑ์แบบปิดล็อคสุญญากาศ
ห้ามไม่ให้วัตถุดิบที่ต้องการนำมาแช่แข็งสัมผัสกับวัตถุดิบที่แช่
แข็งอยู่
กระจายวัตถุดิบในช่องใส่อาหารแช่แข็งให้ทั่ว
เลื่อนช่องใส่อาหารแช่แข็งเข้าจนสุดเพื่อให้อากาศสามารถ
หมุนเวียนภายในเครื่องได้อย่างอิสระ
12.4 เคล็ดลับเกี่ยวกับการแช่แข็งวัตถุดิบสด
แช่แข็งเฉพาะวัตถุดิบที่สดและไม่มีตำหนิเท่านั้น
แช่แข็งวัตถุดิบโดยแบ่งขนาดสำหรับรับประทาน
วัตถุดิบปรุงสำเร็จเหมาะสมกว่าวัตถุดิบที่รับประทานแบบดิบได้
ล้างผัก หั่นให้เป็นชิ้นเล็กๆ และลวกก่อนแช่แข็ง
ล้าง แกะเมล็ด และปอกเปลือกผลไม้ก่อนแช่แข็ง รวมถึงเติม
น้ำตาลหรือสารละลายกรดแอสคอร์บิกหากจำเป็น
วัตถุดิบที่เหมาะสำหรับการแช่แข็ง ได้แก่ ขนมปังอบ เนื้อปลา
อาหารทะเล เนื้อสัตว์ เนื้อสัตว์ป่า และเนื้อสัตว์ปีก รวมถึงไข่
ไม่มีเปลือก ชีส เนย ควาร์ก อาหารสำเร็จรูป และเศษอาหาร
วัตถุดิบที่ไม่เหมาะสำหรับการแช่แข็ง ได้แก่ สลัดผักใบเขียว
แรดิช ไข่มีเปลือก องุ่น แอปเปิ้ลและลูกแพร์ดิบ โยเกิร์ต ครีม
เปรี้ยว ครีมสด และมายองเนส
การบรรจุอาหารแช่แข็ง
วัสดุบรรจุภัณฑ์และประเภทของบรรจุภัณฑ์ที่เหมาะสมจะช่วย
รักษาคุณภาพของผลิตภัณฑ์ได้เป็นอย่างมากและช่วยป้องกันความ
เสียหายจากการโดนความเย็นกัด
1.
วางวัตถุดิบลงในบรรจุภัณฑ์
2.
กดไล่อากาศออก
3.
ปิดล็อคบรรจุภัณฑ์แบบสุญญากาศเพื่อป้องกันไม่ให้วัตถุดิบสูญ
เสียรสชาติหรือแห้งเกินไป
4.
เขียนข้อมูลสิ่งที่บรรจุและวันที่แช่แข็งบนบรรจุภัณฑ์
12.5 ความสามารถในการเก็บรักษาอาหารแช่แข็งที่
อุณหภูมิ −18 °C
วัตถุดิบ ระยะเวลาการจัดเก็บ
เนื้อปลา ไส้กรอก อาหารปรุงสำเร็จ
และขนมปังอบ
ไม่เกิน 6 เดือน
เนื้อสัตว์ปีกและเนื้อสัตว์ ไม่เกิน 8 เดือน
ผักและผลไม้ ไม่เกิน 12 เดือน
ตารางระยะเวลาแช่แข็งที่จัดพิมพ์ไว้จะแสดงระยะเวลาจัดเก็บสูงสุด
ในรูปแบบเดือนเมื่อจัดเก็บในอุณหภูมิคงที่ -18°C
12.6 วิธีการละลายน้ำแข็งอาหารแช่แข็ง
ข้อควรระวัง
ระวังอันตรายต่อสุขภาพ!
การละลายน้ำแข็งอาจทำให้แบคทีเรียเพิ่มจำนวนขึ้นและอาหารแช่
แข็งอาจเน่าเสีย
ห้ามแช่แข็งอาหารแช่แข็งที่เริ่มละลายหรือละลายน้ำแข็งแล้ว
อีกครั้ง
แช่แข็งอาหารอีกครั้งหลังจากปรุงสุกหรืออบแล้วเท่านั้น
ไม่ควรจัดเก็บอาหารตามระยะเวลาสูงสุดอีกต่อไป
ละลายน้ำแข็งวัตถุดิบจากสัตว์ในช่องแช่เย็น เช่น เนื้อปลา เนื้อ
สัตว์ ชีส และควาร์ก
ละลายน้ำแข็งขนมปังในอุณหภูมิห้อง
นำวัตถุดิบสำหรับรับประทานทันทีมาประกอบอาหารใน
ไมโครเวฟ เตาอบ หรือบนเตา
75
th การละลายน้ำแข็ง
การละลายน้ำแข็ง13 การละลายน้ำแข็ง
13.1 การละลายน้ำแข็งในช่องแช่เย็น
ช่องแช่เย็นในเครื่องจะละลายน้ำแข็งโดยอัตโนมัติ
13.2 การละลายน้ำแข็งในช่องแช่แข็ง
ระบบ NoFrost แบบอัตโนมัติเต็มรูปแบบช่วยให้ช่องแช่แข็งไม่มีน้ำ
แข็งเกาะ ดังนั้นจึงไม่จำเป็นต้องละลายน้ำแข็ง
การทำความสะอาดและการดูแลรักษา14 การทำความสะอาดและการดูแลรักษา
ทำความสะอาดและดูแลรักษาเครื่องอย่างระมัดระวังเพื่อให้ยังคงใช้
งานเครื่องได้ยาวนาน
จะต้องให้ฝ่ายบริการลูกค้าดำเนินการทำความสะอาดในจุดที่เข้าไม่
ถึง การทำความสะอาดโดยฝ่ายบริการลูกค้าอาจมีค่าใช้จ่าย
14.1 การเตรียมเครื่องสำหรับการทำความสะอาด
1.
ปิดใช้งานเครื่อง
หน้า71
2.
ตัดการเชื่อมต่อเครื่องออกจากแหล่งจ่ายไฟ
ดึงปลั๊กไฟของสายเชื่อมต่อแหล่งจ่ายไฟหรือปิดใช้งานฟิวส์ในตู้
ควบคุมระบบไฟฟ้า
3.
นำวัตถุดิบทั้งหมดออก แล้ววางไว้ในบริเวณที่มีความเย็น
วางน้ำแข็งเทียมลงบนวัตถุดิบ (ถ้ามี)
4.
นำชิ้นส่วนอุปกรณ์ติดตั้งและชิ้นส่วนอุปกรณ์เสริมทั้งหมดออก
จากเครื่อง
หน้า76
5.
ถอดชั้นวางเหนือช่องแช่ผลไม้และผัก
หน้า77
14.2 การทำความสะอาดเครื่อง
คำเตือน
ระวังไฟดูด!
ความชื้นที่แทรกซึมเข้าไปอาจเป็นสาเหตุให้เกิดไฟฟ้าดูดได้
ห้ามใช้เครื่องทำความสะอาดไอน้ำหรือเครื่องทำความสะอาด
แรงดันสูงในการทำความสะอาดอุปกรณ์
ของเหลวในไฟส่องสว่าง ในส่วนควบคุม หรือในช่องระบายอากาศ
ด้านในอาจเป็นอันตรายได้
น้ำที่ใช้ล้างต้องไม่ไหลเข้าไปในไฟส่องสว่าง ในส่วนควบคุม
หรือในช่องระบายอากาศด้านใน
ข้อควรทราบ
สารทำความสะอาดที่ไม่เหมาะสมอาจจะทำให้พื้นผิวของอุปกรณ์
เสียหายได้
อย่าใช้ใยขัดหรือฟองน้ำที่แข็ง
อย่าใช้สารทำความสะอาดที่แรงหรือขูดขีด
อย่าใช้สารทำความสะอาดที่มีแอลกอฮอลเข้มข้น
การทำความสะอาดชิ้นส่วนอุปกรณ์ติดตั้งและอุปกรณ์เสริมในเครื่อง
ล้างจานอาจทำให้ชิ้นส่วนและอุปกรณ์ดังกล่าวเสียรูปหรือเกิดการ
เปลี่ยนสี
ห้ามทำความสะอาดชิ้นส่วนอุปกรณ์ติดตั้งและอุปกรณ์เสริมใน
เครื่องล้างจานโดยเด็ดขาด
1.
เตรียมเครื่องสำหรับการทำความสะอาด
หน้า76
2.
ทำความสะอาดเครื่อง ชิ้นส่วนอุปกรณ์ติดตั้ง ชิ้นส่วนอุปกรณ์
เสริม และซีลประตูโดยใช้ผ้าเช็ด น้ำอุ่น และน้ำยาล้างจานที่มี
ค่า pH เป็นกลางในปริมาณเล็กน้อย
3.
ใช้ผ้าแห้งเนื้อนุ่มเช็ดให้แห้งสนิท
4.
ใส่ชิ้นส่วนอุปกรณ์ติดตั้ง แล้วติดตั้งชิ้นส่วนเครื่องที่สามารถถอด
ออกได้
5.
เชื่อมต่อเครื่องเข้ากับระบบไฟฟ้า
หน้า15
6.
วางวัตถุดิบ
14.3 การถอดชิ้นส่วนอุปกรณ์ติดตั้ง
หากต้องการทำความสะอาดชิ้นส่วนอุปกรณ์ติดตั้งอย่างทั่วถึง ให้นำ
ชิ้นส่วนดังกล่าวออกจากเครื่อง
การถอดชั้นวาง
ดึงชั้นวาง แล้วถอดออก
รูปที่ 11
การถอดช่องใส่ขนมขบเคี้ยวพร้อมกับตัวยึด
1.
ถอดช่องใส่ขนมขบเคี้ยว
2.
ถอดชั้นวางพร้อมกับตัวยึด
3.
เลื่อนตัวยึดออกจากชั้นวางไปทางด้านข้าง
รูปที่ 12
การถอดชั้นวางที่ประตู
ยกชั้นวางที่ประตูขึ้น แล้วถอดออก
รูปที่ 13
76
การแก้ไขข้อขัดข้อง th
การถอดช่องเก็บของ
1.
ดึงช่องเก็บของออกจนสุด
2.
ยกช่องเก็บของขึ้นบริเวณด้านหน้า แล้วถอดออก
รูปที่ 14
การถอดช่องแช่ผลไม้และผัก
1.
ดึงช่องแช่ผลไม้และผักออกจนสุด
2.
ยกช่องแช่ผลไม้และผักขึ้นบริเวณด้านหน้า แล้วถอดออก
รูปที่ 15
การถอดช่องใส่อาหารแช่แข็ง
1.
ดึงช่องใส่อาหารแช่แข็งออกจนสุด
2.
ยกช่องใส่อาหารแช่แข็งขึ้นบริเวณด้านหน้า แล้วถอดออก
รูปที่ 16
การถอดส่วนหน้าของช่องแช่
คุณสามารถถอดส่วนหน้าของช่องแช่ผลไม้และผักเพื่อให้ทำความ
สะอาดได้ดียิ่งขึ้น
ดันตะขอคล้องด้านข้างของช่องแช่เข้าไป แล้วถอดส่วนหน้า
ออกจากช่องแช่โดยการหมุน
รูปที่ 17
การถอดเครื่องทำน้ำแข็งก้อน
1.
ถอดถาดทำน้ำแข็งก้อน และถาดรองน้ำแข็งก้อน แล้ว
ระบายน้ำแข็งออกให้หมด
รูปที่ 18
2.
กดปุ่ม Push เพื่อปลดเครื่องทำน้ำแข็งก้อนออกจากตัวยึด
แล้วถอดเครื่องทำน้ำแข็งก้อนออก
รูปที่ 19
3.
ยกปลายด้านหลังของตัวยึดขึ้น แล้วลดระดับลงด้านหลังชั้นวาง
ช่องแช่แข็ง ถอดตัวยึดออกมาด้านหน้า
รูปที่ 20
14.4 การถอดชิ้นส่วนเครื่อง
หากต้องการทำความสะอาดตัวเครื่องอย่างทั่วถึง คุณสามารถถอด
ชิ้นส่วนเครื่องบางชิ้นออกจากตัวเครื่องได้
ชั้นวางเหนือช่องแช่ผลไม้และผัก
คุณสามารถถอดฝาครอบช่องแช่ผลไม้และผักเพื่อให้ทำความสะอาด
ได้อย่างหมดจด
การถอดชั้นวางเหนือช่องแช่ผลไม้และผัก
1.
ถอดช่องแช่ผลไม้และผัก
หน้า77
2.
ถอดช่องเก็บของ
หน้า77
3.
พลิกชั้นวางเหนือช่องแช่ผลไม้และผักไปทางด้านข้าง แล้ว
ถอดออก
รูปที่ 21
4.
ยกฝาครอบช่องแช่ผลไม้และผักขึ้น แล้วถอดออก
รูปที่ 22
การติดตั้งชั้นวางเหนือช่องแช่ผลไม้และผัก
1.
แขวนฝาครอบช่องแช่ผลไม้และผัก
รูปที่ 23
2.
ใส่ชั้นวางเหนือช่องแช่ผลไม้และผักโดยพลิกไปทางด้านข้าง
แล้วลดระดับลง
รูปที่ 24
3.
ปรับตัวควบคุมความชื้นให้อยู่ในตำแหน่งด้านหน้า
รูปที่ 25
โดยตรวจสอบให้แน่ใจว่าฝาครอบช่องแช่ผลไม้และผักเกี่ยว
เข้าไปในช่องเปิดใต้ตัวควบคุมความชื้น
4.
ใส่ช่องเก็บของ รวมถึงช่องแช่ผลไม้และผัก
รูปที่ 26
การแก้ไขข้อขัดข้อง15 การแก้ไขข้อขัดข้อง
คุณสามารถแก้ไขข้อขัดข้องเล็ก ๆ น้อย ๆ ที่ตัวอุปกรณ์ได้ด้วยตัวเอง ใช้ข้อมูลเกี่ยวกับการแก้ไขข้อขัดข้องก่อนที่จะติดตั้งฝ่ายบริการลูกค้า ด้วย
การนี้ คุณสามารถหลีกเลี่ยงค่าใช้จ่ายที่ไม่จำเป็น
77
th การแก้ไขข้อขัดข้อง
คำเตือน
ระวังไฟดูด!
การซ่อมแซมอย่างไม่ถูกวิธีอาจก่อให้เกิดอันตรายได้
อนุญาตให้เฉพาะบุคลากรผู้เชี่ยวชาญที่ผ่านการอบรมดำเนินการซ่อมแซมเครื่องเท่านั้น
อนุญาตให้ใช้อะไหล่แท้สำหรับการซ่อมแซมเครื่องเท่านั้น
หากสายไฟหรือสายเชื่อมต่อเครื่องของเครื่องนี้ได้รับความเสียหาย จะต้องเปลี่ยนมาใช้สายไฟแบบพิเศษหรือสายเชื่อมต่อเครื่องแบบพิเศษ
ซึ่งจำหน่ายโดยผู้ผลิตหรือฝ่ายบริการลูกค้า
ความผิดปกติ สาเหตุและวิธีแก้ปัญหา
เครื่องไม่ทำความเย็น รวมถึงการแสดง
ผลและไฟติดสว่าง
โหมดสาธิตเปิดใช้งานอยู่
1.
ปิดใช้งานเครื่อง
หน้า71
2.
รอเป็นเวลา 2นาที
3.
เปิดใช้งานเครื่องอีกครั้ง
หน้า71
4.
รอเป็นเวลา 1นาที จากนั้นให้กด super(ช่องแช่เย็น) ค้างไว้จนกระทั่งสัญญาณเสียงดังขึ้น 4
ครั้ง
5.
ตรวจเช็คว่าเครื่องเย็นลงแล้วหรือไม่หลังจากเวลาผ่านไปสักครู่
ไฟส่องสว่าง LED ไม่ทำงาน สาเหตุแตกต่างกันที่เป็นไปได้
โทรติดต่อฝ่ายบริการลูกค้า
คุณสามารถดูหมายเลขติดต่อฝ่ายบริการลูกค้าได้จากรายการศูนย์บริการลูกค้าที่แนบมาด้วย
เครื่องทำความเย็นเปิดใช้งานบ่อยขึ้น
และนานขึ้น
เครื่องถูกเปิดบ่อยครั้ง
ห้ามเปิดประตูเครื่องโดยไม่จำเป็น
ช่องระบายอากาศด้านนอกถูกปิดคลุม
กำจัดสิ่งกีดขวางหน้าช่องระบายอากาศด้านนอก
ไม่มีความผิดปกติ เครื่องทำความเย็นรุ่นใหม่จะเปิดใช้งานบ่อยขึ้นและมีระดับกำลังที่แตกต่างกัน
เพื่อช่วยให้สามารถแช่เย็นได้อย่างมีประสิทธิภาพ
กำจัดสิ่งกีดขวางหน้าช่องระบายอากาศด้านนอก
โปรดติดตั้งเครื่องให้เว้นระยะห่างจากแผงทำความร้อน เตา และแหล่งความร้อนอื่นๆ ให้มาก
ที่สุดเท่าที่เป็นไปได้ หลีกเลี่ยงไม่ให้เครื่องสัมผัสกับแสงแดดโดยตรงเป็นเวลานาน
เปิดฝาเครื่องเป็นระยะเวลาสั้นๆ เท่าที่จำเป็น
ปล่อยให้อาหารและเครื่องดื่มที่อุ่นเย็นตัวลงก่อนจัดเก็บ
ชั้นน้ำแข็งก่อตัวขึ้นบริเวณผนังด้านหลัง
ของช่องแช่เย็น
ไม่มีความผิดปกติ เครื่องทำความเย็นรุ่นใหม่ช่วยให้อุณหภูมิในช่องแช่เย็นคงที่ ผนังด้านหลังของ
ช่องแช่เย็นจะถูกละลายน้ำแข็งโดยอัตโนมัติอย่างสม่ำเสมอ
เปิดฝาเครื่องเป็นระยะเวลาสั้นๆ เท่าที่จำเป็น
78
การแก้ไขข้อขัดข้อง th
ความผิดปกติ สาเหตุและวิธีแก้ปัญหา
ชั้นน้ำแข็งก่อตัวขึ้นบริเวณผนังด้านหลัง
ของช่องแช่เย็น
คุณสามารถบรรจุวัตถุดิบไว้ในหีบห่อที่เป็นสุญญากาศและปิดคลุมวัตถุดิบไว้ได้
ปล่อยให้อาหารและเครื่องดื่มที่อุ่นเย็นตัวลงก่อนจัดเก็บ
ควรเว้นพื้นที่เล็กน้อยระหว่างวัตถุดิบแต่ละอย่าง รวมถึงเว้นพื้นที่จากผนังด้านในไว้เสมอ
ผนังด้านข้างของเครื่องร้อน ไม่มีความผิดปกติ ผนังด้านข้างได้รับการเดินท่อซึ่งจะร้อนขึ้นในระหว่างกระบวนการทำความเย็น
ทั้งนี้เฟอร์นิเจอร์ที่สัมผัสกับเครื่องจะไม่ได้รับความเสียหายจากความร้อน
ไม่จำเป็นต้องดำเนินการใด ๆ
HomeConnect ไม่ทำงานตาม
มาตรฐาน
สาเหตุแตกต่างกันที่เป็นไปได้
ไปที่ www.home-connect.com
เสียงเตือนดังขึ้น รวมถึงจอแสดง
อุณหภูมิ (ช่องแช่เย็น) "alarm" และ
แถบไฟกะพริบ
สัญญาณเตือนการเปิดประตูเปิดใช้งาน
อยู่
ฝาช่องแช่เย็นเปิดอยู่
ปิดฝาช่องแช่เย็น
เสียงเตือนดังขึ้น รวมถึงจอแสดง
อุณหภูมิ (ช่องแช่แข็ง) "alarm" และ
แถบไฟกะพริบ
สัญญาณเตือนการเปิดประตูเปิดใช้งาน
อยู่
ฝาช่องแช่แข็งเปิดอยู่
ปิดฝาช่องแช่แข็ง
เสียงเตือนดังขึ้น รวมถึงอุณหภูมิที่ปรับ
ตั้งไว้ (ช่องแช่แข็ง) "alarm" และแถบไฟ
กะพริบ
สัญญาณเตือนอุณหภูมิเปิดใช้งานอยู่
สาเหตุแตกต่างกันที่เป็นไปได้
กด alarm
สัญญาณเตือนจะปิดใช้งาน
ช่องระบายอากาศด้านนอกถูกปิดคลุม
กำจัดสิ่งกีดขวางหน้าช่องระบายอากาศด้านนอก
จัดเก็บวัตถุดิบสดในปริมาณมาก
ห้ามจัดเก็บเกินความจุในการแช่แข็ง
"ความจุในการแช่แข็ง", หน้า75
อุณหภูมิไม่ถึงระดับที่ปรับตั้งไว้
การละลายน้ำแข็งโดยอัตโนมัติเต็มรูป
แบบไม่ทำงานอีกต่อไป
เปิดฝาช่องแช่แข็งไว้นานเกินไป คอยล์เย็น (เครื่องทำความเย็น) ในระบบ NoFrost มีน้ำแข็งเกาะ
อยู่มาก
ข้อกำ�หนด: อาหารแช่แข็งได้รับการหุ้มเป็นอย่างดีและจัดเก็บไว้ใน
บริเวณที่มีความเย็น
79
th การแก้ไขข้อขัดข้อง
ความผิดปกติ สาเหตุและวิธีแก้ปัญหา
อุณหภูมิไม่ถึงระดับที่ปรับตั้งไว้
การละลายน้ำแข็งโดยอัตโนมัติเต็มรูป
แบบไม่ทำงานอีกต่อไป
1.
ปิดใช้งานเครื่อง
หน้า71
2.
ยกเลิกการเชื่อมต่อเครื่องกับแหล่งจ่ายไฟ
ดึงปลั๊กไฟของสายเชื่อมต่อแหล่งจ่ายไฟหรือปิดใช้งานฟิวส์ในตู้ควบคุมระบบไฟฟ้า
3.
ดันเครื่องให้ออกห่างจากผนัง
4.
เปิดฝาเครื่องทิ้งไว้
หลังจากเวลาผ่านไป 20นาที น้ำที่เกิดจากการควบแน่นจะเริ่มหยดลงในถาดรองน้ำหยด
บริเวณด้านหลังตัวเครื่อง
รูปที่ 27
5.
เพื่อหลีกเลี่ยงไม่ให้น้ำล้นออกจากถาดรองน้ำหยด ให้ซับน้ำที่เกิดจากการควบแน่นโดยใช้
ฟองน้ำ
คอยล์เย็นจะละลายน้ำแข็งเสร็จเมื่อไม่มีน้ำที่เกิดจากการควบแน่นในถาดรองน้ำหยดอีก
6.
ทำความสะอาดพื้นที่ด้านในตัวเครื่อง
หน้า76K
7.
เปิดใช้งานเครื่องอีกครั้ง
หน้า71
อุณหภูมิคลาดเคลื่อนไปจากการปรับตั้ง
เป็นอย่างมาก
สาเหตุแตกต่างกันที่เป็นไปได้
1.
ปิดใช้งานเครื่อง
หน้า71
2.
เปิดใช้งานเครื่องอีกครั้งหลังจากเวลาผ่านไปประมาณ 5นาที
หน้า71
หากอุณหภูมิอุ่นเกินไป ให้ตรวจเช็คอุณหภูมิอีกครั้งหลังจากเวลาผ่านไป 2-3 ชั่วโมง
หากอุณหภูมิเย็นเกินไป ให้ตรวจเช็คอุณหภูมิอีกครั้งในวันถัดไป
มีน้ำที่เกิดจากการควบแน่นเกาะอยู่บน
พื้นผิวตัวเครื่องและบนชั้นวางในเครื่อง
น้ำที่เป็นส่วนประกอบในอากาศร้อนชื้นจะควบแน่นบริเวณพื้นผิวตัวเครื่องที่มีความเย็น
1.
เช็ดทำความสะอาดน้ำที่เกิดจากการควบแน่นโดยใช้ผ้านุ่มและแห้ง
2.
เปิดเครื่องเป็นระยะเวลาสั้นที่สุดเท่าที่ทำได้
3.
ตรวจสอบให้แน่ใจว่าปิดเครื่องอย่างถูกต้องเสมอ
ตัวเครื่องมีเสียงหึ่งๆ เสียงแตกฟอง เสียง
หวือ เสียงปุดๆ เสียงคลิก หรือเสียงแตก
กะเทาะ
ไม่มีความผิดปกติ มอเตอร์ทำงาน เช่น เครื่องทำความเย็นและพัดลม น้ำยาทำความเย็นไหลผ่านท่อ
มอเตอร์ สวิตช์ หรือโซลินอยด์วาล์วเปิดหรือปิดใช้งาน การละลายน้ำแข็งทำงานอัตโนมัติ
ไม่จำเป็นต้องดำเนินการใด ๆ
ตัวเครื่องส่งเสียงรบกวน ตัวเครื่องวางไม่เสมอกัน
จัดวางเครื่องโดยใช้เครื่องมือวัดระดับน้ำและสกรูขาตั้ง
ตัวเครื่องไม่สามารถติดตั้งแบบแยกเดี่ยวได้
รักษาระยะห่างขั้นต่ำของตัวเครื่อง
ชิ้นส่วนอุปกรณ์ติดตั้งขยับหรือติดขัด
ตรวจเช็คชิ้นส่วนอุปกรณ์ติดตั้งแบบถอดออกได้ แล้วใส่เข้าไปใหม่ในบางกรณี
ขวดหรือภาชนะสัมผัสกัน
แยกขวดหรือภาชนะออกจากกัน
ฟังก์ชัน Super Freeze เปิดใช้งานอยู่
ไม่จำเป็นต้องดำเนินการใด ๆ
80
การเก็บรักษาและการกำจัด th
15.1 ไฟดับ
ในกรณีที่ไฟดับ อุณหภูมิในตัวเครื่องจะเพิ่มสูงขึ้นซึ่งส่งผลให้ระยะ
เวลาในการจัดเก็บสั้นลงและคุณภาพของอาหารแช่แข็งลดลง
คุณสามารถดูข้อมูลทางเทคนิคเกี่ยวกับระยะเวลาในการจัดเก็บ
อาหารแช่แข็งในกรณีที่เกิดความขัดข้องได้จากเว็บไซต์ของเรา
สำหรับเครื่องของคุณ
หมายเหตุ
เปิดเครื่องให้น้อยที่สุดเท่าที่เป็นไปได้ขณะไฟดับและไม่จัดเก็บ
วัตถุดิบเพิ่มเติม
ตรวจสอบคุณภาพของวัตถุดิบทันทีหลังจากไฟดับ
– กำจัดอาหารแช่แข็งที่ละลายและมีอุณหภูมิอุ่นกว่า 5 °C
– นำอาหารแช่แข็งที่ละลายเล็กน้อยไปปรุงสุกหรืออบ แล้ว
รับประทานหรือแช่แข็งอีกครั้ง
15.2 การดำเนินการทดสอบตัวเองของเครื่อง
เครื่องมาพร้อมการทดสอบตัวเองที่จะแสดงความขัดข้องซึ่งฝ่าย
บริการลูกค้าสามารถแก้ไขให้คุณได้
1.
ปิดใช้งานเครื่อง
หน้า71
2.
ตัดการเชื่อมต่อเครื่องออกจากแหล่งจ่ายไฟ
ดึงปลั๊กไฟของสายเชื่อมต่อแหล่งจ่ายไฟหรือปิดใช้งานฟิวส์ในตู้
ควบคุมระบบไฟฟ้า
3.
เชื่อมต่อเครื่องเข้ากับระบบไฟฟ้าอีกครั้งหลังจากเวลาผ่านไป 5
นาที
หน้า15
4.
เมื่อเวลาผ่านไป 1 นาทีหลังจากเชื่อมต่อระบบไฟฟ้า ให้กด
super(ช่องแช่เย็น) ค้างไว้เป็นเวลา 3 ถึง 5วินาทีจนกระทั่ง
สัญญาณเสียงดังขึ้นเป็นครั้งที่สอง
หากมีสัญญาณเสียงดังขึ้น 2 ครั้งหลังจากสิ้นสุดการทดสอบตัว
เองของเครื่อง และจอแสดงอุณหภูมิแสดงอุณหภูมิที่ปรับตั้งไว้
แสดงว่าเซ็นเซอร์วัดอุณหภูมิของเครื่องเป็นปกติ เครื่องจะสลับ
ไปทำงานในโหมดปกติิ
หากสัญญาณเสียงดังขึ้น 5ครั้งหลังจากสิ้นสุดการทดสอบตัว
เองของเครื่องและไฟ LED ของจอแสดงอุณหภูมิติดสว่างด้วย
ความสว่างในระดับที่แตกต่างกัน ให้ติดต่อฝ่ายบริการลูกค้า ไฟ
LED เหล่านี้จะบอกให้ฝ่ายบริการลูกค้าทราบถึงข้อมูลเกี่ยวกับ
ความขัดข้องที่เกิดขึ้น
การเก็บรักษาและการกำจัด16 การเก็บรักษาและการกำจัด
16.1 การปิดใช้งานเครื่อง
1.
ปิดใช้งานเครื่อง
หน้า71
2.
ตัดการเชื่อมต่อเครื่องออกจากแหล่งจ่ายไฟ
ดึงปลั๊กไฟของสายเชื่อมต่อแหล่งจ่ายไฟหรือปิดใช้งานฟิวส์ในตู้
ควบคุมระบบไฟฟ้า
3.
นำวัตถุดิบทั้งหมดออก
4.
ทำความสะอาดเครื่อง
หน้า76
5.
เปิดตัวเครื่องทิ้งไว้เพื่อให้สามารถระบายอากาศภายในเครื่องได้
16.2 กำจัดอุปกรณ์เก่า
สามารถนำวัตถุดิบที่มีมูลค่ากลับมาใช้ซ้ำได้อีกครั้งด้วยการกำจัด
ตามข้อบังคับที่สอดคล้องกับการรักษาสิ่งแวดล้อม
คำเตือน
ระวังอันตรายต่อสุขภาพ!
เด็กอาจเข้าไปติดอยู่ในเครื่องและเป็นอันตรายถึงชีวิต
เพื่อป้องกันไม่ให้เด็กปีนป่ายอุปกรณ์ ห้ามดึงช่องลิ้นชักและช่อง
เก็บออกจากอุปกรณ์
ป้องกันให้เด็กอยู่ห่างจากอุปกรณ์ที่ไม่ใช้งานแล้ว
คำเตือน
ระวังไฟไหม้!
หากท่อชำรุดเสียหายอาจทำให้สารทำความเย็นที่ติดไฟได้และก๊าซ
อันตรายรั่วไหลออกมาและลุกเป็นไฟได้
ห้ามให้ท่อสารทำความเย็นและท่อระบายชำรุดเสียหาย
1.
ดึงปลั๊กไฟของสายไฟออก
2.
ดึงสายไฟแยกออก
3.
กำจัดเครื่องทิ้งด้วยวิธีที่เป็นมิตรต่อสิ่งแวดล้อม
โปรดสอบถามข้อมูลการกำจัดขยะปัจจุบันจากผู้จัดจำหน่าย
ของคุณหรือจากเทศบาล
ฝ่ายบริการลูกค้า17 ฝ่ายบริการลูกค้า
คุณสามารถขอรับข้อมูลรายละเอียดเกี่ยวกับระยะเวลาการรับ
ประกันและเงื่อนไขการรับประกันในประเทศของคุณได้โดยการ
สแกนรหัส QR Code บนเอกสารสำหรับการติดต่อศูนย์บริการและ
เงื่อนไขการรับประกันที่แนบมาพร้อมกัน จากฝ่ายบริการลูกค้า จาก
ตัวแทนจำหน่าย หรือบนเว็บไซต์ของเรา
เมื่อคุณติดต่อฝ่ายบริการลูกค้า คุณจำเป็นต้องแจ้งหมายเลข
ผลิตภัณฑ์ (E-Nr.), หมายเลขการผลิต (FD) และหมายเลขลำดับ
(Z-Nr.) ของเครื่องคุณ
คุณสามารถดูข้อมูลติดต่อฝ่ายบริการลูกค้าได้โดยการสแกนรหัส
QR Code บนเอกสารสำหรับการติดต่อศูนย์บริการและเงื่อนไขการ
รับประกันที่แนบมาพร้อมกันหรือบนเว็บไซต์ของเรา
81
th ข้อมูลทางเทคนิค
17.1 หมายเลขผลิตภัณฑ์ (E-Nr.), หมายเลขการผลิต
(FD) และหมายเลขลำดับ (Z-Nr.)
คุณสามารถดูหมายเลขผลิตภัณฑ์ (E-Nr.), หมายเลขการผลิต (FD)
และหมายเลขลำดับ (Z-Nr.) ได้บนป้ายกำกับรุ่นของเครื่อง
"ตัวเครื่อง", รูปที่ 1 / หน้า69
คุณสามารถจดบันทึกข้อมูลไว้เพื่อที่จะหาเจอข้อมูลอุปกรณ์ของคุณ
และหมายเลขโทรศัพท์ของฝ่ายบริการลูกค้าได้อย่างรวดเร็วอีกครั้ง
ข้อมูลทางเทคนิค18 ข้อมูลทางเทคนิค
คุณสามารถดูข้อมูลเกี่ยวกับน้ำยาทำความเย็น ความจุในการใช้งาน
และข้อมูลทางเทคนิคเพิ่มเติมได้จากป้ายกำกับรุ่น
"ตัวเครื่อง", รูปที่ 1 / หน้า69
18.1 ข้อมูลเกี่ยวกับซอฟต์แวร์อิสระและ Open
Source Software
ผลิตภัณฑ์นี้มีส่วนประกอบของซอฟต์แวร์ที่ได้รับอนุญาตจากผู้ถือ
ลิขสิทธิ์ว่าเป็นซอฟต์แวร์อิสระหรือ Open Source Software
ข้อมูลลิขสิทธิ์ที่เกี่ยวข้องจะถูกบันทึกไว้ในเครื่องใช้ภายในครัวเรือน
นอกจากนี้ยังสามารถเข้าถึงข้อมูลลิขสิทธิ์ผ่านแอปพลิเคชั่น
HomeConnect ได้โดย: "โปรไฟล์ -> ข้อมูลทางกฎหมาย ->
ข้อมูลสิทธิ์การใช้งาน"
1
คุณสามารถดาวน์โหลดข้อมูลลิขสิทธิ์ได้จาก
เว็บไซต์สินค้า (โปรดค้นหารุ่นของอุปกรณ์และเอกสารเพิ่มเติมบน
เว็บไซต์สินค้า) หรือคุณสามารถขอรับข้อมูลที่เกี่ยวข้องได้จาก
[email protected] หรือจาก BSH Hausgeräte GmbH,
Carl-Wery-Str. 34, D-81739 München
เราจะให้รหัสต้นทางตามคำขอ
โปรดส่งคำขอของคุณมาที่ [email protected] หรือ BSH
Hausgeräte GmbH, Carl-Wery-Str. 34, D-81739 München
หัวข้อ: „OSSREQUEST“
ค่าใช้จ่ายในการดำเนินงานตามคำขอของคุณจะระบุไว้ในใบเรียก
เก็บเงิน ข้อเสนอนี้มีอายุสามปีนับจากวันที่ซื้อหรืออย่างน้อยสำหรับ
ระยะเวลาที่เราเสนอการสนับสนุนและอะไหล่สำหรับอุปกรณ์ที่
เกี่ยวข้อง
คำประกาศเกี่ยวกับความสอดคล้อง19 คำประกาศเกี่ยวกับความสอดคล้อง
BSH Hausgeräte GmbH ขอประกาศไว้ ณ ที่นี้ว่าเครื่องใช้ไฟฟ้าที่มีฟังก์ชัน Home Connect สอดคล้องกับข้อกำหนดพื้นฐานและเงื่อนไขที่
เกี่ยวข้องอื่นๆ ตามข้อกำหนด 2014/53/EU
คุณสามารถดูคำประกาศเรื่องความสอดคล้องแบบละเอียด RED ได้ที่เว็บไซต์ www.bosch-home.com ที่หน้าผลิตภัณฑ์เครื่องใช้ไฟฟ้าของ
คุณในส่วนเอกสารเพิ่มเติม
การรับรองความสอดคล้อง "BSH Hausgeräte GmbH ขอรับรองว่าเครื่องใช้ไฟฟ้าที่มาพร้อมฟังก์ชั่น HomeConnect นี้มีความสอดคล้อง
ตามข้อกำหนดของ กสทช"
ย่านความถี่ 2.4 GHz (2,400–2,483.5 MHz): สูงสุด 100 เมกะวัตต์
ย่านความถี่ 5 GHz (5150–5350MHz + 5470–5725MHz): สูงสุด 130mW
BE BG CZ DK DE EE IE EL ES
FR HR IT CY LI LV LT LU HU
MT NL AT PL PT RO SI SK FI
SE NO CH TR IS UK (NI)
WLAN 5 GHz (Wi-Fi): เฉพาะสำหรับการใช้งานภายในอาคารเท่านั้น
1
ขึ้นอยู่กับคุณสมบัติของอุปกรณ์
82

คำประกาศเกี่ยวกับความสอดคล้อง th
AL BA MD ME MK RS UK UA
WLAN 5 GHz (Wi-Fi): เฉพาะสำหรับการใช้งานภายในอาคารเท่านั้น
83
ko 목차
추가 정보 및 설명은 온라인에서 확인할 수 있습니다. 제목 페이지에
있는 QR 코드를 스캔하세요.
목차목차
........................................................ 85
1 안전.......................................... 85
1.1 일반 지 .................................... 85
1.2 올바른 사용............................. 85
1.3 사용자 그룹의 제 ................... 85
1.4 안전한 운 ................................ 86
1.5 안전한 설 ................................ 86
1.6 안전한 사 ................................ 87
1.7 제품 손 .................................... 89
2 물적 손상의 방 ......................... 89
3 환경 보호 및 비용 절 ................ 90
3.1 포장 폐 .................................... 90
3.2 에너지 절 ................................ 90
4 설치 및 연 ................................ 90
4.1 공급사...................................... 90
4.2 설치 장소의 판단 기.............. 91
4.3 제품 설 .................................... 91
4.4 최초 사용 전 제품 준............. 91
4.5 장치의 전기 연 ....................... 91
5 제품 알아보.............................. 91
5.1 제품 소 .................................... 91
5.2 제어 패 .................................... 92
6 구성.......................................... 92
6.1 선.............................................. 92
6.2 스낵.......................................... 92
6.3 수납.......................................... 92
6.4 습도 조절기가 있는 과일 야채
.................................................. 93
6.5 버터 치즈 ................................ 93
6.6 문선.......................................... 93
6.7 아이스 메이............................. 93
6.8 부속.......................................... 93
7 기본 조작 및 취급 ........................ 94
7.1 제품 켜 .................................... 94
7.2 작동 지 .................................... 94
7.3 제품 끄 .................................... 94
7.4 온도 설 .................................... 94
8 보조 기..................................... 94
8.1 슈퍼 냉각 ................................... 94
8.2 슈퍼 냉동 .................................... 95
8.3 휴가 모 .................................... 95
8.4 에너지 절약 모 ....................... 95
8.5 신선 모 .................................... 95
9 알............................................. 96
9.1 도어 알 .................................... 96
9.2 온도 알 .................................... 96
10 HomeConnect ....................... 96
10.1 HomeConnect 설............... 97
10.2 WLAN 홈 네트워크(Wi-Fi) 연
결 켜...................................... 97
10.3 WLAN 홈 네트워크(Wi-Fi) 연
결 끄...................................... 97
10.4 HomeConnect소프트웨어 업
데이트 설 .............................. 97
10.5 HomeConnect 설정 리...... 97
10.6 개인정보보............................ 97
11 냉장 ....................................... 97
11.1 냉장실에서의 식품 보관 .... 98
11.2 냉장실 내의 냉각 구............ 98
12 냉동 ....................................... 98
12.1 냉동 성 .................................. 98
12.2 냉동실 용량을 최대한으로 사
............................................... 98
12.3 냉동실에서의 식품 보관 .... 98
12.4 신선 식품 냉동 .................... 98
12.5 −18°C에서의 냉동 식품 보관
기 ........................................... 99
12.6 냉동 식품의 해동 방............ 99
13 성에 제................................... 99
13.1 냉장실 내의 성에 제............ 99
13.2 냉동실에서의 성에 제 ......... 99
84
안전성 ko
14 세척 및 관 .............................. 99
14.1 세척 전 준............................. 99
14.2 제품 청 ............................... 100
14.3 구성품 탈 ........................... 100
14.4 장치 부품 탈...................... 101
15 문제 해 ................................. 101
15.1 정 ........................................ 105
15.2 제품 자가 테스트 실......... 105
16 보관 및 폐 ............................ 105
16.1 제품의 작동 중.................. 105
16.2 폐제품 폐 ........................... 105
17 고객 서비 ............................. 106
17.1 제품 번호(E-Nr.), 제조 번호
(FD)와 순차 번호(Z-Nr.) ....... 106
18 기술 제................................. 106
18.1 프리소프트웨어 및 오픈 소스
소프트웨어 관련 정.......... 106
19 적합성 선 ............................. 107
안전성 1 안전성
다음과 같은 안전지침에 유의하십시오.
1.1 일반 지침
¡ 본 매뉴얼을 주의 깊게 읽으십시오.
¡ 나중에 사용하거나 다음 소유자에게 전달할 수 있게 설명서와 제
품 정보를 보관하십시오.
¡ 운반 시 손상이 발생된 경우라면 제품을 연결시키지 마십시오.
1.2 올바른 사용법
다음의 조건 하에서만 제품을 사용하십시오:
¡ 식료품의 냉장 및 냉동과 제빙 용도.
¡ 개인 가정 및 가정 주변의 닫힌 공간에서.
¡ 해발 고도 기준 2,000 m 이하에서만 사용해야 합니다.
1.3 사용자 그룹의 제한
이 제품은 8세부터 사용할 수 있습니다. 신체적, 감각적 또는 정신적
능력이 제한되었거나 경험 및/또는 지식이 부족한 사람은 다른 사람
의 감독하에 또는 안전한 사용법에 대한 교육을 받고 사용과 관련한
위험을 숙지한 경우에 한해 제품을 사용할 수 있습니다.
어린이가 장치를 가지고 놀게 해서는 안 됩니다.
감독없이 어린이가 장치의 청소 및 사용자 유지보수를 수행해서는
안됩니다.
85
ko 안전성
1.4 안전한 운반
경고‒부상 위험!
장치의 무게가 무겁기 때문에 부상을 입을 수 있습니다.
장치를 혼자 들어올리지 마십시오.
1.5 안전한 설치
경고‒감전 위험!
부적절한 설치는 위험을 유발합니다.
반드시 사용설명서에 따라 제품을 연결하고 작동하십시오.
반드시 규정대로 설치되고 접지된 콘센트를 통해 교류 전원에 제
품을 연결하십시오.
가정 전기 설비의 누전차단장치가 규정에 따라 설치되어 있어야
합니다.
절대 외부 스위칭 장치로 제품에 전원을 공급하지 마십시오(예: 타
이머 또는 리모컨).
제품이 빌트인으로 설치된 경우 전원선의 전원 플러그에 자유롭게
접근할 수 있어야 하며, 자유롭게 접근할 수 없는 경우에는 고정
설치된 전기 설비에 설치 규정에 따라 차단 장치를 설치해야 합니
다.
장치를 배치할 때 전원선이 끼이거나 손상되지 않도록 유의하십시
오.
전원선의 절연이 손상되면 위험합니다.
전원선을 뜨거운 열원과 접촉시키지 마십시오.
경고‒폭발 위험!
제품 환기구가 닫혀 있는 경우 냉매 순환에 문제가 생기거나, 가연성
가스가 공기 중에 누출될 수 있습니다.
제품의 하우징 또는 빌트인 하우징에 있는 환기구는 닫지 말아 주
십시오.
경고‒화재 위험!
전원선을 임의 연장하거나, 허용되지 않은 어댑터를 사용하는 것은
위험합니다.
연장 케이블이나 멀티 소켓 스트립을 사용하지 마십시오.
제조사에서 허가한 어댑터와 전원선만 사용하십시오.
전원선이 너무 짧거나 긴 전원선을 사용할 수 없는 경우 전기 기술
자에게 문의하여 주택 설치를 조정하십시오.
86

안전성 ko
이동식 멀티탭 또는 전원장치가 과열되어 화재가 발생할 수 있습니
다.
이동식 멀티탭 또는 전원장치를 제품의 뒷면에 위치시키지 마십시
오.
1.6 안전한 사용
경고‒감전 위험!
습기가 침투하게 되면 감전을 일으킬 수 있습니다.
제품은 반드시 실내공간에서만 사용하십시오.
제품이 고온이나 높은 습기에 절대로 노출되게 하지 마십시오.
장치를 청소할 때 스팀 청소기나 고압 청소기를 사용하지 마십시
오.
경고‒질식 위험!
어린이가 포장재를 머리에 뒤집어 쓰거나 그 안에 감겨 질식할 수 있
습니다.
포장재에 어린이가 접근하지 못하게 하십시오.
아이들이 포장재로 장난을 치지 않도록 하십시오.
어린이가 소형 부품을 흡입하거나 삼키고, 질식할 수 있습니다.
소형 부품에 어린이가 접근하지 못하게 하십시오.
어린이가 소형 부품을 가지고 놀지 못하게 하십시오.
경고‒폭발 위험!
냉매 회로가 손상되면, 가연성 냉매가 유출되어 폭발할 수 있습니다.
성에 제거를 빨리할 목적으로 다른 기계 장치를 사용하거나, 제조
사가 명시하지 않은 다른 수단을 취하는 것은 금지됩니다.
꽁꽁 언 식료품은 끝이 뭉툭한 물체로 떼어 내십시오(예: 나무 젖
가락).
가연성 가스 및 폭발성 소재를 함유한 제품은 폭발 위험이 있습니다
(예: 스프레이통).
가연성 가스 및 폭발성 소재를 함유한 제품을 절대로 제품 안에 보
관하지 마십시오.
경고‒화재 위험!
제품에 들어 있는 전기 장치는 화재를 유발할 수 있습니다(예: 열풍
기 또는 전기 제빙기 등).
제품에 들어 있는 전기 장치를 임의로 사용하지 마십시오.
87
ko 안전성
경고‒부상 위험!
탄산 음료가 들어 있는 용기는 터질 수 있습니다.
탄산 음료가 들어 있는 통을 냉동실에서 보관하지 마십시오.
가연성 냉매나 유해 가스가 누출되면 눈을 다칠 수 있습니다.
냉매 회로의 파이프와 절연재를 손상시키지 마십시오.
제품이 기울어질 수 있습니다.
바닥판, 보관 서랍 및 문 등을 절대로 밟거나 그 위에 기대지 마십
시오.
경고‒화상 위험!
제품 뒷면의 일부 부품은 작동 시 고온이 됩니다.
절대로 뜨거운 부분에 접촉하지 마십시오.
경고‒동상 위험!
냉동된 물체 및 차가운 표면에 닿게 되면, 냉동 화상을 입을 수 있습
니다.
냉동실에서 꺼낸 냉동된 물체를 절대로 입에 바로 집어 넣지 마십
시오.
냉동된 물체나 얼음 및 냉동실 표면에 피부가 오래 닿게 하지 마십
시오.
주의‒건강 위험!
식료품의 오염을 막기 위해서 다음과 같은 지침을 준수하십시오.
냉장고 문을 오래 열어 놓게 되면, 냉장실의 온도가 급격히 상승할
수 있습니다.
식료품 및 배수 장치와 접촉될 수 있는 제품 면은 정기적으로 청소
하십시오.
생고기나 생선은 적합한 용기에 담아 냉장실에 보관해야 하며, 다
른 음식물과 접촉되거나, 고기 또는 생선 물이 떨어지지 않게 하십
시오.
냉장고 및 냉동고를 장시간 빈 상태로 놔둘 때에는 제품 전원을 끈
후 물기를 완전히 제거하고 청소해 놓음으로써 곰팡이 발생을 방
지할 수 있습니다.
제품 내의 금속 부분이나 금속처럼 보이는 부분에는 알루미늄이 함
유되어 있을 수 있습니다. 산성이 포함된 식품이 이러한 알루미늄과
닿게 되면, 알루미늄 이온이 식품에 침투할 수 있습니다.
오염된 식품을 절대로 섭취하지 마십시오.
88
물적 손상의 방지 ko
1.7 제품 손상
경고‒감전 위험!
손상된 제품이나 손상된 전원선은 위험합니다.
손상된 제품은 절대로 사용하지 마십시오.
제품 전원을 분리할 때 절대 전원선을 당기지 마십시오. 항상 전원
선의 전원 플러그를 당기십시오.
제품 또는 전원선이 손상된 경우 즉시 전원선의 전원 플러그를 뽑
거나 퓨즈 박스의 퓨즈를 차단하십시오.
고객 서비스센터에 연락하십시오.
페이지106
부적절한 수리는 위험합니다.
해당 교육을 받은 전문 기술자만 제품을 수리할 수 있습니다.
제품 수리 시 순정 예비 부품만 사용해야 합니다.
이 장치의 전원선 또는 장치 전원선이 손상되면, 제조업체 또는 고
객 서비스에서 제공하는 특수한 전원선 또는 특수한 장치 전원선
으로 교체해야 합니다.
경고‒화재 위험!
파이프 손상 시 가연성 냉매와 유해 가스가 유출되어 불이 붙을 수
있습니다.
제품이 화염 또는 발화원으로부터 멀리 떨어져 있게 하십시오.
환기를 하십시오.
제품을 끄십시오.
페이지94
전원선의 전원 플러그를 뽑거나, 퓨즈 박스의 퓨즈를 차단하십시
오.
고객 서비스센터에 연락하십시오.
페이지106
물적 손상의 방지2 물적 손상의 방지
참고
바퀴를 기울여서 움직이면, 제품을 이
동할 때 바닥이 손상될 수 있습니다.
제품 운반 시에는 손수레를 사용하
십시오.
제품을 이동시킬 때는 바닥 보호 조
치를 취하고, 제품을 지그재그로 움
직이지 마십시오.
제품 본체, 바닥판, 보관 서랍 또는 도
어를 앉거나 딛고 올라서는 용도로 사
용할 경우 제품이 손상될 수 있습니다.
제품 본체, 바닥판, 보관 서랍 또는
도어를 밟거나 그 위에 기대지 마십
시오.
오일이나 기름 성분이 묻게 되면, 제품
의 플라스틱 부분과 도어 씰링 부분에
기공이 발생할 수 있습니다.
플라스틱 부분과 도어 씰링 부분에
는 오일이나 기름이 묻지 않게 하십
시오.
89
ko 환경 보호 및 비용 절감
제품에서 금속 부분 또는 금속처럼 보
이는 부분에는 알루미늄이 포함되어
있을 수 있습니다. 산성 식품과 접촉하
면 알루미늄이 부식되어 변색됩니다.
식료품은 반드시 포장된 상태로 보
관하십시오.
구성품 및 부속품을 식기 세척기로 세
척하면, 변형이나 변색이 일어날 수 있
습니다.
구성품 및 부속품을 절대로 식기 세
척기로 세척하지 마십시오.
환경 보호 및 비용 절감3 환경 보호 및 비용 절감
3.1 포장 폐기
포장재는 환경 친화적인 소재로 되어
있으며 재활용이 가능합니다.
각 부위를 종류별로 분리하여 폐기
하십시오.
3.2 에너지 절감
이 지침을 따르면 장치의 전력 소비가
절감됩니다.
설치 장소의 선택
제품에 직사광선이 닿지 않도록 보
호하십시오.
제품을 히터, 레인지 및 기타 열원으
로부터 가능한 멀리 떨어진 곳에 설
치하십시오:
– 가스레인지 또는 전기레인지와는
30mm의 간격을 유지하십시오.
– 기름 및 숯을 사용하는 조리기구
와는 300mm의 간격을 유지하십
시오.
벽 옆을 약간 띄어 놓으십시오.
절대로 통풍구를 덮거나 막지 마십
시오.
사용 시 에너지 절약
참고: 각 부속품의 배치는 제품의 전력
소비에 영향을 미치지 않습니다.
제품은 잠깐 동안만 열도록 하고, 조
심스럽게 닫아야 합니다.
절대로 내부 통풍구 또는 외부 통풍
구를 덮거나 막지 마십시오.
구입한 식료품은 보냉백에 담아 옮
긴 후 냉장고에 신속히 넣으십시오.
뜨거운 식품 및 음료는 냉장고에 넣
기 전 충분히 식혀야 합니다.
냉동된 식품의 냉기를 활용하고자
할 때는 이를 냉장실에 넣어 해동하
면 좋습니다.
식료품 및 보관되는 뒷쪽면 사이에
항상 약간의 공간을 띄워 놓으십시
오.
설치 및 연결4 설치 및 연결
4.1 공급사양
제품 포장을 푼 후에는 각 부품이 손상
없이 안전하게 배송되었는지 확인하고,
빠진 부품이 없는지 체크합니다.
불만 사항이 있는 경우, 장치를 구입한
대리점 혹은 본사의 고객 서비스
페
이지106
에 문의하십시오.
배송되는 품목 구성:
독립형 제품
구성품 및 부속품
1
조립 설명서
사용 설명서
고객 서비스센터 목차
보증서
2
에너지 라벨
전력 소비량 및 소음 관련 정보
다음 관련 정보: HomeConnect
1
장치 사양별
2
일부 국가에서는 제공되지 않음
90
제품 알아보기 ko
4.2 설치 장소의 판단 기준
경고
폭발 위험!
제품의 설치 공간이 너무 협소할 경우
냉매 회로 누설 시 가연성 가스 혼합물
이 발생할 수 있습니다.
제품의 설치 공간은 냉매 8g 당
1m
3
면적이 보장되어야 합니다. 냉
매량은 형식판에 기재되어 있습니
다.
"제품 소개", 그림
1
/ 페이
지91
제품 무게는 각 모델에 따라 최대
110kg에 달할 수 있습니다.
제품의 무게를 지탱할 수 있도록 바닥
면이 충분한 지지력을 갖추고 있어야
합니다.
반드시 지면이 평평해야 합니다.
이 제품은 주변 온도가 10 °C ~ 43 °C
사이일 때 사용하도록 규정되었습니다.
제품은 허용 실내 온도 범위 내에서 완
벽하게 작동합니다.
하지만 제품을 더 낮은 실내 온도에서
사용하더라도 5°C까지는 손상 염려가
없습니다.
상하식 및 양립식 설치
2개의 냉장 장치를 위아래 방향 또는
양옆 방향으로 설치하고자 하는 경우
각 장치 사이의 간격은 최소 150mm
에 달해야 합니다. 선택된 제품의 경우
최소 간격 없이도 설치가 가능합니다.
이에 관한 사항은 전문 딜러 또는 키친
플래너에게 문의하십시오.
4.3 제품 설치
동봉된 설치 설명서에 따라 제품을
설치합니다.
4.4 최초 사용 전 제품 준비
1.
해당 정보를 참고합니다.
2.
보호 필름 및 운반 안전장치를 제거
합니다(예: 접착 테이프 및 상자).
3.
제품의 초기 청소를 실시합니다.
페이지100
4.5 장치의 전기 연결
1.
제품에서 전원선 플러그를 꽂으십시
오.
2.
장치 전원선의 전원 플러그를 장치
인근의 전원 소켓에 꽂으십시오.
제품의 연결 관련 정보는 형식판을
참고하십시오.
"제품 소개", 그림
1
/ 페이
지91
3.
전원 플러그가 잘 꽂혀 있는지 확인
하십시오.
이제 장치는 작동 준비가 완료된 상
태입니다.
제품 알아보기5 제품 알아보기
5.1 제품 소개
여기에서 기기의 구성 요소에 대한 개
요를 볼 수 있습니다.
그림
1
냉장실
페이지97
냉동실
페이지98
조명
스낵통
페이지92
1
내부 통풍구
온도 조절기(수납통)
페이
지94
명판
페이지106
수납통
페이지92
습도 조절기가 있는 과일 야채실
페이지93
냉동 수납칸
페이지100
1
장치 사양별
91
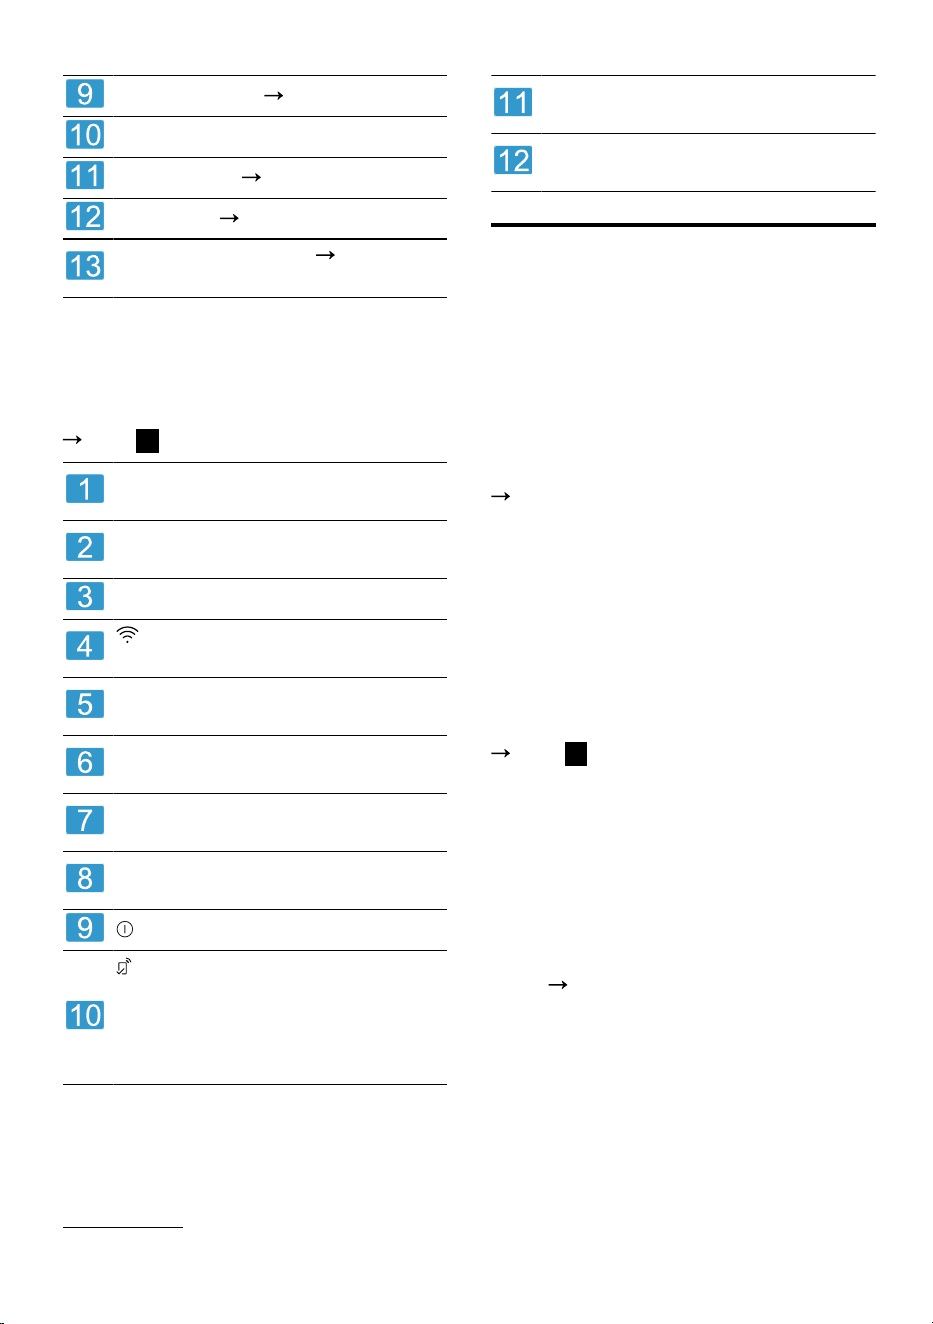
ko 구성품
아이스 메이커
페이지93
나사 베이스
버터 치즈칸
페이지93
1
제어 패널
페이지92
대형 병꽂이 문선반
페이
지93
5.2 제어 패널
제어 패널을 이용하여 장치의 모든 기
능을 설정하고 작동 상태에 대한 정보
를 얻을 수 있습니다.
그림
2
냉장실 설정 온도를 °C 단위로
보여줍니다.
냉동실 설정 온도를 °C 단위로
보여줍니다.
alarm 경고음을 끕니다.
와이파이(Wi-Fi) 홈 네트워크에
연결하거나 연결을 해제합니다.
라이트 스트립은 제품의 피드백
을 시각적으로 알려줍니다.
eco 에너지 절약 모드를 켜거나
끄게 됩니다.
holiday 휴가 모드를 켜거나 끄게
됩니다.
fresh 신선 모드를 켜거나 끄게
됩니다.
제품을 켜거나 끕니다.
의 경우 HomeConnect앱을 통
해서 사용자 지정 설정이 진행되
었을 때 불이 켜집니다. 자세한
정보는 HomeConnect앱을 확인
하십시오.
super(냉동실) 이는 슈퍼 냉동
을/를 켜거나 끄게 됩니다.
super(냉장실) 이는 슈퍼 냉각
을/를 켜거나 끄게 됩니다.
구성품6 구성품
제품에 적용된 사양은 각 모델 별로 다
릅니다.
6.1 선반
선반의 경우 필요에 따라 다양하게 변
용할 수 있습니다. 이를 위해 선반을 빼
낸 후 다른 위치에 다시 끼울 수 있습
니다.
"선반 빼내기", 페이지100
6.2 스낵통
스낵통에는 포장을 벗기지 않은 식료
품 및 작은 스낵 등을 보관할 수 있습
니다.
스낵통은 빼낼 수 있습니다. 스낵통을
살짝 들어 올린 후 빼내십시오. 스낵통
의 고정 장치는 밀 수 있게 되어 있습
니다.
그림
3
6.3 수납통
수납통 내부 온도는 냉장실 온도보다
더 낮게 설정되어 있습니다. 온도가
0°C 이하로 내려가는 경우도 있습니
다.
수납통 내부 온도를 0°C에 가깝게 하
려면, 냉장실 온도를 2°C로 설정하십
시오.
페이지94
상하기 쉬운 식품을 보관하기에는 저
온의 수납통이 적합합니다(예: 생선, 육
류 및 소세지 등).
1
장치 사양별
92

구성품 ko
6.4 습도 조절기가 있는 과일 야채
실
신선한 과일 및 야채를 포장을 벗긴 상
태로 과일 야채실에 보관할 수 있습니
다.
썰어 놓은 과일 및 야채는 덮어 놓거나,
밀폐 처리해서 보관합니다.
습도 조절기와 특수 실링을 사용하여
과일 야채실의 습도를 조절할 수 있습
니다. 이를 통해 신선한 과일과 채소를
기본의 보관 방식보다 두 배이상 오래
보관할 수 있습니다.
그림
4
보관되는 식품의 종류 및 수량에 적합
하도록 과일 야채실의 습도를 습도 조
절기를 눌러서 설정해 주십시오:
잠금 상태로 하면, 저습도 설정이
되므로, 이는 과일을 주로 보관하거
나, 여러 음식물의 보관 또는 보관양
이 많은 경우에 적합합니다.
잠금 풀림 상태로 하면, 고습도
설정이 되므로, 야채를 주로 보관하
거나, 양이 적을 때 적합합니다.
보관하는 양 및 식품 종류에 따라서는
과일 야채실 내부에 응축수가 맺힐 수
있습니다.
응축수를 마른 천으로 닦아 내고, 습도
조절기를 사용해서 습도를 저습도로
설정하십시오.
식품의 품질 및 향미를 보존하기 위해
서는 냉기에 민감한 일부 과일 및 야채
를 약 8°C ~ 12°C 사이의 실온 보관
하도록 권장합니다(예: 파인애플, 바나
나, 레몬류, 오이, 호박, 파프리카, 토마
토 및 감자 등).
6.5 버터 치즈칸
버터 및 경성 치즈는 버터 치즈칸에 보
관하십시오.
6.6 문선반
문선반은 필요에 따라 다양하게 변용
할 수 있으며, 이를 위해서는 문선반을
빼낸 다음 원하는 다른 위치에 끼우면
됩니다.
"문선반 탈거", 페이지100
6.7 아이스 메이커
아이스 메이커를 사용하면, 물로 얼음
을 간편하게 만들 수 있습니다.
제빙
각얼음을 만들 때는 식수만 사용하십
시오.
1.
얼음통 트레이를 꺼내어 , ¾ 정도
를 식수로 채운 후 다시 넣으십시
오 .
그림
5
참고: 식수를 너무 많이 채우게 되
면, 아이스 메이커의 기능에 장애가
생길 수 있습니다. 각얼음이 얼음용
트레이에서 하나씩 분리되지 않습니
다. 식수를 너무 많이 채우면 물이
얼음 보관용기로 들어가서 각얼음이
하나로 얼어붙습니다.
2.
각얼음이 다 얼면, 얼음용 트레이 손
잡이를 여러 번 오른쪽으로 돌렸다
가 손을 떼십시오.
그림
6
각얼음이 분리되어 얼음 보관용기
안으로 떨어집니다.
3.
얼음 보관용기를 꺼내어 각얼음을
빼내십시오.
그림
7
6.8 부속품
정품 부속품을 사용하십시오. 이는 본
제품에 최적화되어 있습니다.
장치의 부속품은 모델별로 상이합니다.
계란 트레이
계란은 계란 트레이에 안전하게 보관
하십시오.
병 홀더(고정대)
병 홀더(고정대)는 제품 문을 열고 닫
을 때 병이 넘어지는 것을 방지합니다.
그림
8
93
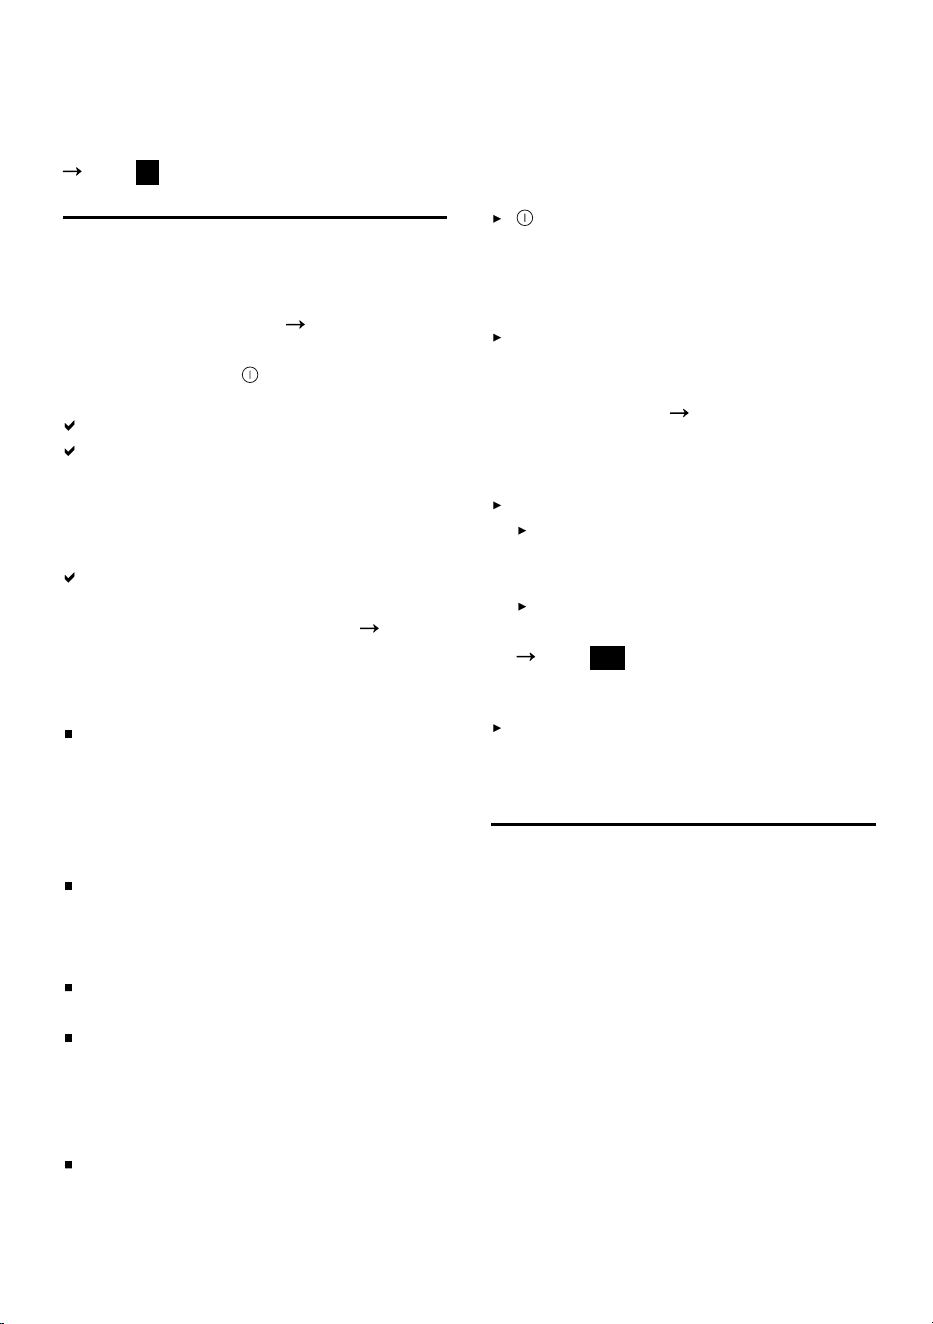
ko 기본 조작 및 취급
가변식 병꽂이
음료병은 가변식 병꽂이에 안전하게
보관하십시오.
그림
9
기본 조작 및 취급7 기본 조작 및 취급
7.1 제품 켜기
1.
전원을 연결합니다.
페이지91
참고: 제어 패널을 통해 제품을 꺼
놓았다면, 일단 기능을 3초간 누
른 상태로 유지합니다.
제품 냉각이 시작됩니다.
냉동실 온도가 아직 충분히 내려가
지 않았기 때문에 경고음이 울리고,
온도 표시가 깜박입니다.
2.
alarm을/를 누르면 경고음이 꺼집니
다.
설정된 온도로 맞춰지면, "alarm"이/
가 꺼집니다.
3.
원하는 온도로 설정합니다.
페이
지94
7.2 작동 지침
제품을 켰더라도 원하는 설정 온도
에 도달하기까지는 몇 시간이 걸릴
수 있습니다.
설정 온도까지 냉각되지 않은 상태
에서 식품을 미리 집어 넣지 마십시
오.
하우징의 전면이 일시적으로 약간
가열됩니다. 이는 도어 씰링 부분에
응결이 발생하지 않게 하는 역할을
합니다.
문을 닫을 때는 보관된 음식으로 인
해 문이 막히지 않도록 주의합니다.
도어를 닫으면 내부는 진공 상태로
될 수 있습니다. 이로 인해 도어를
열기가 쉽지 않을 수 있습니다. 진공
상태가 어느 정도 상쇄될 때까지 잠
시 기다립니다.
제품의 온도는 다음과 같은 조건에
따라서 달라집니다.
– 제품을 여는 횟수
– 하중 용량
– 갓 보관된 식품의 온도
– 주변 온도
– 직사광선
7.3 제품 끄기
을/를 3초간 누르십시오.
7.4 온도 설정
냉장실 온도 설정
원하는 온도를 누르십시오.
설정 온도에 도달되게 하려면, 수납
통의 온도 조절기를 아래쪽 ⅓ 지점
까지 미십시오.
페이지94
냉장실의 권장 온도는 4°C입니다.
수납통 온도 설정
옵션 선택:
온도를 줄이려면, 온도 조절기를
위쪽 "extra cold" 방향으로 미십
시오.
온도를 올리려면, 온도 조절기를
아래쪽 "cold" 방향으로 미십시오.
그림
10
냉동실 온도 설정
원하는 온도를 누르십시오.
냉동실의 권장 온도는 −18°C입니
다.
보조 기능8 보조 기능
귀하의 제품에서 사용 가능한 보조 기
능에는 어떤 것이 있는지 알아 보십시
오.
8.1 슈퍼 냉각
슈퍼 냉각에서는 냉장실이 최대 수준
으로 냉각됩니다.
많은 양의 음식을 냉장실에 넣기 전에
슈퍼 냉각 기능을 켜십시오.
참고: 슈퍼 냉각 기능이 켜진 상태에서
는 소음이 더 커질 수 있습니다.
94
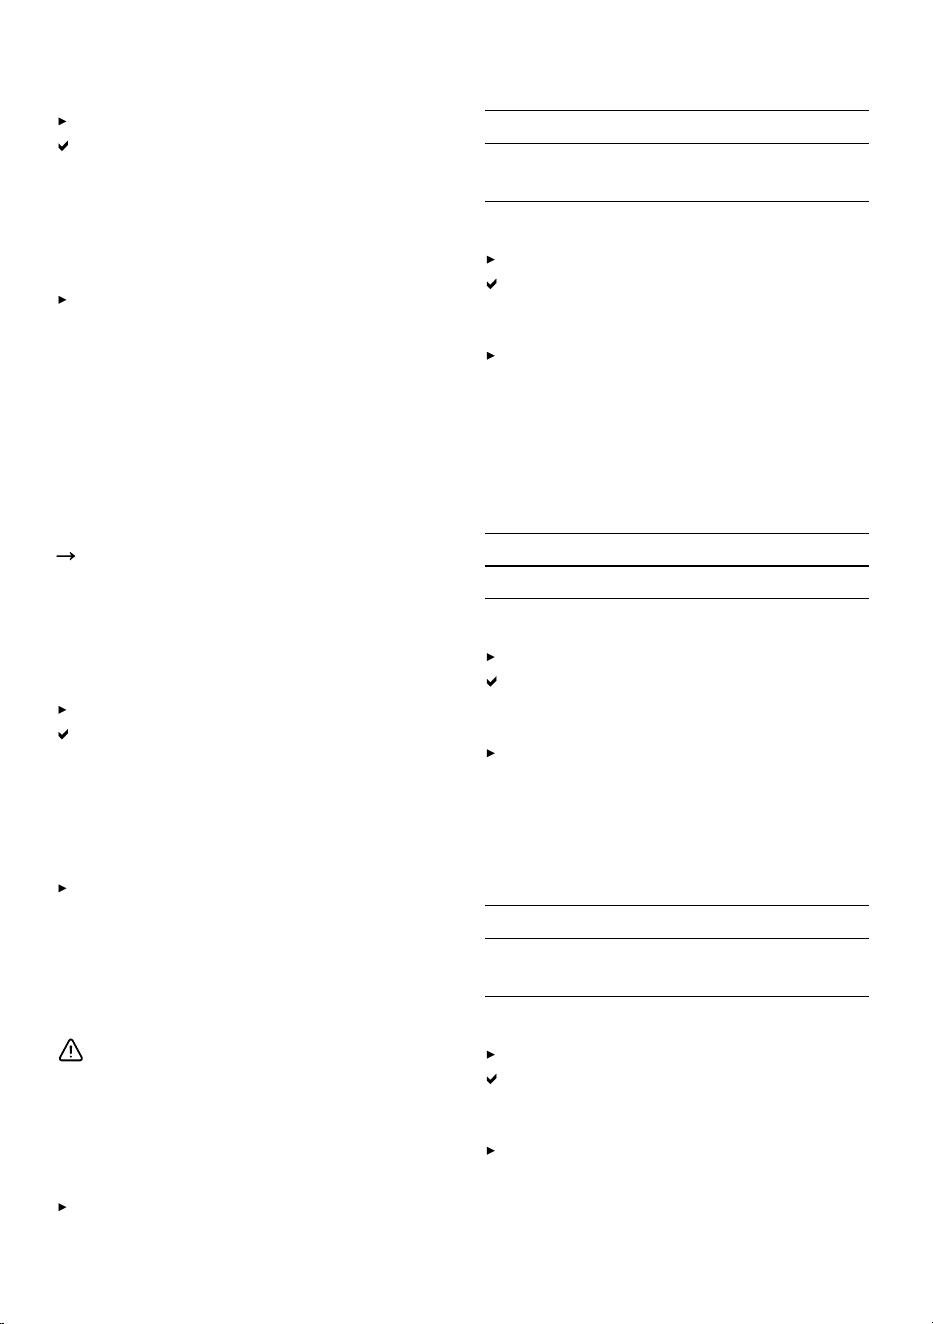
보조 기능 ko
슈퍼 냉각 켜기
super(냉장실)을/를 누릅니다.
"super"(냉장실)에 불이 들어옵니
다.
참고: 약 6시간 후 제품은 다시 일반 모
드로 복귀됩니다.
슈퍼 냉각 끄기
super(냉장실)을/를 누릅니다.
8.2 슈퍼 냉동
슈퍼 냉동에서는 냉동실이 가능한 최
대로 냉각됩니다.
2kg 이상되는 음식을 냉동실 칸에 넣
기 전 미리 슈퍼 냉동 기능을 4시간 ~
6시간 동안 켜 놓으십시오.
냉동 성능을 최대한으로 사용하려면,
슈퍼 냉동 기능을 사용하십시오.
"냉동 성능을 위한 전제조건", 페이
지98
참고: 슈퍼 냉동 기능이 켜진 상태에서
는 소음이 더 커질 수 있습니다.
슈퍼 냉동 켜기
super(냉동실)을/를 누릅니다.
"super"(냉동실)에 불이 들어옵니
다.
참고: 약 54시간 후 제품은 다시 일반
모드로 복귀됩니다.
슈퍼 냉동 끄기
super(냉동실)을/를 누릅니다.
8.3 휴가 모드
장기간 집을 비우는 경우 에너지를 절
약할 수 있는 휴가 모드를 사용할 수
있습니다.
주의
건강 위험!
휴가 모드가 켜져 있는 동안에는 냉장
실 온도가 높아집니다. 냉장고 온도가
높아지기 때문에 세균 번식의 우려가
있고, 음식물이 상할 수 있습니다.
휴가 모드를 켜 놓을 때는 냉장실에
음식물을 보관하지 마십시오.
온도는 자동으로 설정됩니다.
냉장실 14°C
냉동실 온도 변경되지 않
음
휴가 모드 켜기
holiday 을 누릅니다.
"holiday"에 불이 들어옵니다.
휴가 모드 끄기
holiday을/를 누릅니다.
8.4 에너지 절약 모드
에너지 절약 모드를 사용하면, 제품 작
동이 에너지 절약에 적합하게 전환됩
니다.
온도는 자동으로 설정됩니다.
냉장실 8°C
냉동실 −16°C
에너지 절약 모드 켜기
eco 을 누릅니다.
"eco"에 불이 들어옵니다.
에너지 절약 모드 끄기
eco 을 누릅니다.
8.5 신선 모드
식료품을 장기간 신선하게 보존하려면,
제품에서 신선 모드를 켜십시오.
온도는 자동으로 설정됩니다.
냉장실 2°C
냉동실 온도 변경되지 않
음
신선 모드 켜기
fresh 을 누릅니다.
"fresh"에 불이 들어옵니다.
신선 모드 끄기
fresh 을 누릅니다.
95
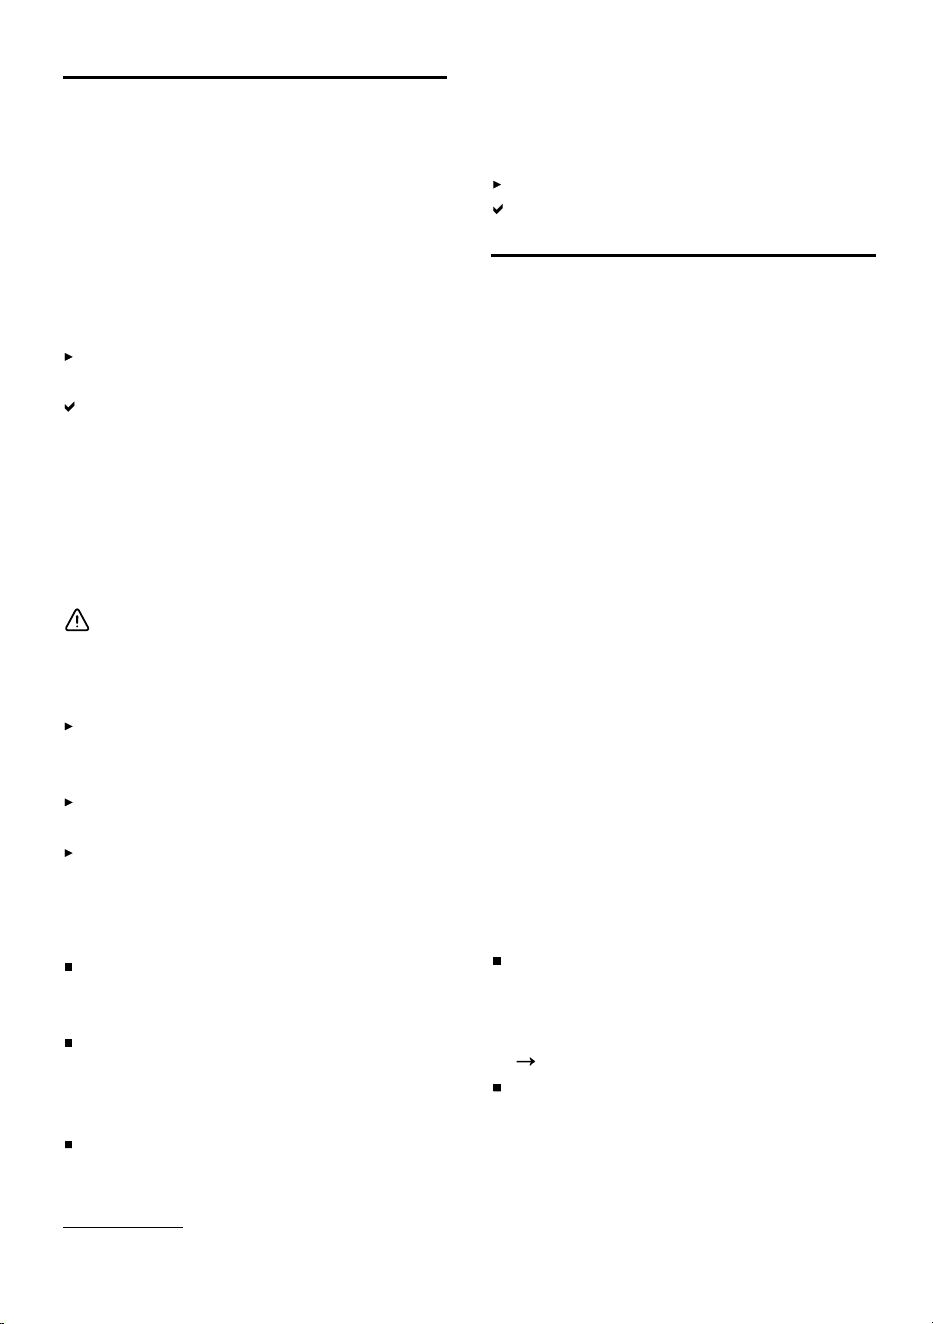
ko 알람
알람9 알람
9.1 도어 알람
냉장고 문이 오래 열려 있다면, 도어 알
람이 켜집니다.
경고음이 울리고, "alarm" 및 라이트 스
트립이 깜박이며, 해당 냉장실의 온도
표시 또한 깜박입니다.
도어 알람 끄기
냉장고 문을 닫거나 alarm을/를 누
르십시오.
경고음이 꺼진 상태입니다.
9.2 온도 알람
냉동실의 온도가 너무 상승하면, 온도
알람이 켜집니다.
경고음이 울리고, 설정 온도(냉동실),
"alarm" 및 라이트 스트립이 깜박입니
다.
주의
건강 위험!
해동 시에는 세균이 증식하며, 냉동 식
품이 상할 수 있습니다.
일단 해동이 시작되었거나 완전히
해동된 냉동 식품은 다시 얼리지 마
십시오.
일단 끓이거나 구운 후 다시 얼리십
시오.
이때는 원래의 최대 보관 기간을 더
이상 보장할 수 없습니다.
다음과 같은 경우 온도 알람이 켜질 수
있습니다:
제품 가동이 시작되는 경우입니다.
설정된 온도에 충분히 도달된 후 음
식을 넣으십시오.
신선한 음식을 대량으로 넣는 경우
입니다.
음식을 대량으로 넣기 전 슈퍼 냉동
기능을 켜십시오.
냉동실 문을 너무 오랫동안 열어 놓
은 경우입니다.
냉동물의 해동이 시작되었는지 혹은
완전히 해동되었는지 확인합니다.
온도 알람 끄기
alarm을/를 누릅니다.
경고음이 꺼진 상태입니다.
HomeConnect 10 HomeConnect
이 장치는 인터넷에 연결할 수 있습니
다. 장치를 휴대 기기에 연결하여
HomeConnect 앱을 통해 기능을 제어
합니다.
HomeConnect 서비스는 일부 국가에
서는 제공되지 않습니다.
HomeConnect 기능의 사용 가능 여부
는 귀하의 국가에서 HomeConnect 서
비스 사용 가능 여부에 따라 달라집니
다. 이에 대한 정보는 다음에서 확인할
수 있습니다:
www.home-
connect.com
.
HomeConnect을 사용하려면 먼저
WLAN-홈 네트워크(Wi-Fi
1
)와
HomeConnect 앱 연결을 설정해야 합
니다.
장치를 켠 후 내부 장치 초기화가 완료
될 때까지 최소 2분 정도 기다리십시
오. 그 후 HomeConnect 설정을 시작
하십시오.
이 HomeConnect 앱은 전체 로그인
과정을 안내합니다. HomeConnect 앱
의 지침을 따르고 안내 사항을 준수하
십시오.
참고
사용 설명서의 안전 지침에 유의하
고, HomeConnect 앱으로 제품을
조작하는 경우에도 이 지침을 준수
해야 합니다.
"안전성", 페이지85
제품에서 수행하는 조작이 항상 우
선합니다. 이때는 HomeConnect 앱
으로 제품을 조작할 수 없습니다.
1
Wi-Fi는 Wi-Fi Alliance의 등록 상표입니다.
96
냉장실 ko
10.1 HomeConnect 설치
필수 조건: 제품이 설치 장소에서
WLAN 홈 네트워크(Wi-Fi) 신호를 수신
할 수 있습니다.
1.
다음과 같은 QR 코드를 스캔합니다.
RFSM0Z01
QR 코드를 통해서 HomeConnect
앱을 설치하고 제품을 연결할 수 있
습니다.
2.
HomeConnect 앱의 설명 내용을 따
르십시오.
10.2 WLAN 홈 네트워크(Wi-Fi)
연결 켜기
을 누릅니다.
10.3 WLAN 홈 네트워크(Wi-Fi)
연결 끄기
을 누릅니다.
10.4 HomeConnect소프트웨어
업데이트 설치
참고: HomeConnect소프트웨어 업데
이트가 사용 가능하다면,
HomeConnect앱에서는 알림 메시지
가 나타납니다.
HomeConnect소프트웨어 업데이
트를 설치하려면, HomeConnect앱
에 나타난 지침을 따르십시오.
설치가 진행되는 동안에는 제어 패
널의 일부가 차단 상태로 됩니다.
10.5 HomeConnect 설정 리셋
WLAN 홈 네트워크 (Wi-Fi)와의 연결
문제가 발생하거나, 다른 WLAN 홈 네
트워크 (Wi-Fi)에 로그인하고자 한다면,
HomeConnect설정을 리셋해야 합니
다.
을/를 6초간 누르고 있으면, 이/
가 사라집니다.
HomeConnect설정이 리셋되었습
니다.
10.6 개인정보보호
개인정보 보호 지침에 유의하십시오.
인터넷에 연결된 홈 네트워크에 장치
를 최초로 연결하면, 장치는 다음과 같
은 범주의 데이터를 HomeConnect 서
버로 보냅니다(최초 등록):
고유 장치 ID(장치 키와 내장 Wi-Fi
통신 모듈의 MAC 주소로 구성됨).
Wi-Fi 통신 모듈의 보안 인증서(연결
관련 정보기술적 보호 용도).
해당 가전 제품의 현재 소프트웨어
버전 및 하드웨어 버전.
초기 설정 상태로 앞서 복원한 경우
에 있어 해당 상태.
이 최초 등록은 HomeConnect 기능의
사용을 준비하고, HomeConnect 기능
을 처음 사용하려는 시점에서 필요합
니다.
참고: HomeConnect 기능의 경우 반
드시 HomeConnect 앱과 함께 사용해
야 함에 유의하십시오. 개인정보 보호
관련 정보는 HomeConnect 앱에서 불
러올 수 있습니다.
냉장실11 냉장실
냉장실에는 고기, 소세지, 생선, 유제
품, 계란, 조리된 음식, 베이커리류를
보관할 수 있습니다.
온도는 2°C부터 8°C까지로 설정 가
능합니다.
쉽게 상하기 쉬운 음식물 또한 냉장실
에서 중단기로 보관할 수 있습니다. 온
도를 낮게 유지할수록 음식물 저장 가
능 기간도 늘어납니다.
97
ko 냉동실
11.1 냉장실에서의 식품 보관 팁
신선하고 상하지 않은 식품 만을 보
관하십시오.
식품을 밀폐 포장하거나 뚜껑을 덮
어서 보관하십시오.
냉장고 내부의 공기 순환을 약화시
키지 않고, 식품이 어는 것을 방지하
려면, 음식물을 내부 환풍구 바로 앞
에 놓지 말고, 냉장고 뒷벽에 음식이
직접 닿지 않게 해야 합니다.
뜨거운 음식과 음료는 우선 충분히
식히십시오.
제조사에서 명시한 최장 보존 날짜
또는 유통기한에 유의하십시오.
11.2 냉장실 내의 냉각 구역
냉장고 내부에는 공기 순환으로 인해
각기 다른 냉각 구역이 존재합니다.
온도가 가장 낮은 구역
온도가 가장 낮은 곳은 수납통 내부입
니다.
유용 정보: 가장 온도가 낮은 구역에는
상하기 쉬운 식료품을 저장하십시오
(예: 생선, 소세지, 고기).
온도가 가장 높은 구역
온도가 가장 높은 구역은 도어의 최상
단 영역입니다.
유용 정보: 치즈 및 버터와 같이 온도에
민감하지 않은 식품을 이 구역에 저장
하십시오. 치즈의 풍미는 계속 유지되
며, 버터도 바르기 좋은 상태로 유지됩
니다.
냉동실12 냉동실
냉동실 칸에서는 냉동 식품을 보관하
거나, 일반 음식을 얼릴 수 있으며, 제
빙도 가능합니다.
온도는 −16°C부터 −24°C까지로 설
정 가능합니다.
식품의 장기 보관 시에는 온도를
−18°C 이하로 유지해야 합니다.
상하기 쉬운 음식도 냉동시키면 장기
보관할 수 있습니다. 저온으로 인해 식
품의 변질이 늦춰지거나 멈춥니다.
12.1 냉동 성능
냉동 성능이란 어느 정도의 식품량을
몇 시간 내에 완전히 얼릴 수 있는 가
를 알려주는 지표입니다.
냉동 성능은 형식판에서 확인할 수 있
습니다.
"제품 소개", 그림
1
/ 페이지91
냉동 성능을 위한 전제조건
1.
신선 식품을 보관하기 약 24시간 전
에 슈퍼 냉동 기능을 켜십시오.
"슈퍼 냉동 켜기", 페이지95
2.
식료품은 우선 맨 아래쪽 냉동 수납
칸에 넣으십시오.
12.2 냉동실 용량을 최대한으로
사용
냉동실 칸에 냉동 식품을 최대량으로
수납하기 위한 방법을 주지하십시오.
1.
냉동실 칸의 모든 구성품을 빼내십
시오.
페이지100
2.
식품을 수납칸 및 냉동실 바닥에 보
관하십시오.
12.3 냉동실에서의 식품 보관 팁
식품을 밀폐 포장된 상태로 보관하
십시오.
아직 얼리지 않은 식품을 이미 얼려
진 상태의 식품과 섞지 마십시오.
식품을 냉동 수납칸에 넓게 펴서 분
배하십시오.
냉동실 내의 공기 순환이 원활하게
유지되지 위해서는 냉동 수납칸을
끝까지 밀어 넣으십시오.
12.4 신선 식품 냉동 팁
이상 없는 신선 식품만 냉동시키십
시오.
식품을 한 끼 분량씩 나누어 얼리십
시오.
98
성에 제거 ko
냉동을 위해서는 조리된 식품이 생
으로 먹는 식품보다 더 적합합니다.
야채는 냉동시키기 전에 세척한 후
잘게 썰어서 데쳐 놓으십시오.
과일은 냉동시키기 전에 세척한 후
씨를 제거하고, 필요 시에는 껍질을
벗긴 후 설탕이나 아스코르빈산을
뿌려 놓으십시오.
냉동시키기에 적합한 식품으로는 예
컨대 베이킹류, 생선 및 해산물, 육
류, 가금류, 껍질을 벗긴 계란, 치즈,
버터, 인스턴트 및 먹다 남은 음식
등이 있습니다.
냉동시키기에 적합하지 않은 식품은
예컨대 샐러드류, 래디쉬, 껍질이 있
는 계란, 포도, 사과, 배, 요구르트,
크림 및 마요네즈 등입니다.
냉동 식품 포장
적합한 포장 재료를 사용해서 적합한
방식으로 포장을 하게 되면, 식품 품질
을 그대로 유지할 수 있으며, 변색이 방
지됩니다.
1.
식품을 포장재 안에 넣으십시오.
2.
공기를 눌러서 빼내십시오.
3.
식품이 맛을 잃거나 마르지 않도록
공기가 통하지 않게 밀봉하십시오.
4.
포장지에 내용물 및 냉동 날짜를 기
입하십시오.
12.5 −18°C에서의 냉동 식품 보
관 기간
식품 보관 기간
생선, 소세지, 조리된
요리, 베이킹류
최장 6개월
가금류, 육류 최장 8개월
야채, 과일 최장 12개월
각인된 냉동 달력은 온도가 –18°C로
일정하게 유지될 수 있을 때의 최대 보
관 기간을 개월 수로 표시한 것입니다.
12.6 냉동 식품의 해동 방법
주의
건강 위험!
해동 시에는 세균이 증식하며, 냉동 식
품이 상할 수 있습니다.
일단 해동이 시작되었거나 완전히
해동된 냉동 식품은 다시 얼리지 마
십시오.
일단 끓이거나 구운 후 다시 얼리십
시오.
이때는 원래의 최대 보관 기간을 더
이상 보장할 수 없습니다.
육가공 식품은 냉장실에서 해동하십
시오(예: 생선, 육류, 치즈 등).
빵 종류는 실온에서 해동합니다.
냉동된 식품을 곧바로 섭취하려면,
전자레인지, 오븐 또는 쿡탑 등을 사
용하십시오.
성에 제거13 성에 제거
13.1 냉장실 내의 성에 제거
냉장실의 성에는 자동으로 제거됩니다.
13.2 냉동실에서의 성에 제거
냉동실의 경우 자동 성에 제거 시스템
이 작동되므로 성에 없는 상태로 유지
됩니다. 별도의 성에 제거는 필요하지
않습니다.
세척 및 관리14 세척 및 관리
제품이 오랫동안 잘 작동하도록 유지
하려면 세심하게 청소하고 관리해야
합니다.
접근이 어려운 부위는 고객 서비스를
통해 청소해야 합니다. 고객 서비스를
통해 청소하면 비용이 발생할 수 있습
니다.
14.1 세척 전 준비
1.
제품을 끄십시오.
페이지94
99
ko 세척 및 관리
2.
제품을 전원으로부터 분리시킵니다.
전원선의 전원 플러그를 뽑거나, 퓨
즈 박스의 퓨즈를 차단하십시오.
3.
모든 식품을 꺼내서 차가운 장소에
보관하십시오.
아이스팩이 있다면 이를 식품 위에
올려 놓으십시오.
4.
모든 구성품 및 부속품을 빼내십시
오.
페이지100
5.
과일 야채실 위의 선반을 탈거합니
다.
페이지101
14.2 제품 청소
경고
감전 위험!
습기가 침투하게 되면 감전을 일으킬
수 있습니다.
장치를 청소할 때 스팀 청소기나 고
압 청소기를 사용하지 마십시오.
조명, 조작 장치 또는 내부 환기구 등에
물기가 있으면, 위험할 수 있습니다.
물이 절대로 조명이나 조작 장치 또
는 내부 환기구 등에 닿지 않게 해야
합니다.
참고
부적절한 세제는 장치의 표면을 손상
시킬 수 있습니다.
단단한 연마 패드나 세척용 스펀지
를 사용하지 마십시오.
날카롭거나 마모시키는 세척 도구를
사용하지 마십시오.
강력한 알코올성 세제를 사용하지
마십시오.
구성품 및 부속품을 식기 세척기로 세
척하면, 변형이나 변색이 일어날 수 있
습니다.
구성품 및 부속품을 절대로 식기 세
척기로 세척하지 마십시오.
1.
제품 청소를 준비합니다.
페이
지99
2.
제품과 구성품, 부속품 및 도어 씰링
등은 미지근한 물과 중성 세제를 사
용해서 수세미로 닦으십시오.
3.
그 후 부드러운 마른 천으로 물기를
완전히 닦아 줍니다.
4.
구성품을 장착하고, 탈거식 장치 부
품도 원래대로 설치합니다.
5.
전원을 연결합니다.
페이지15
6.
식품을 집어 넣습니다.
14.3 구성품 탈거
구성품을 철저하게 세척하기 원한다면,
이를 제품으로부터 빼내십시오.
선반 빼내기
선반을 당겨 빼내어 제거합니다.
그림
11
스낵통을 고정 장치와 함께 제거
1.
스낵통을 빼내십시오.
2.
고정 장치와 더불어 선반을 빼내십
시오.
3.
선반으로부터 고정 장치를 옆쪽으로
미십시오.
그림
12
문선반 탈거
문선반은 들어 올려서 빼내십시오.
그림
13
수납통 빼내기
1.
수납통이 멈출 때까지 끄집어 내십
시오.
2.
수납통 앞을 들어 올린 후 빼내십
시오 .
그림
14
과일 야채실 탈거
1.
과일 야채실을 멈춤 위치까지 당겨
빼냅니다.
2.
과일 야채실 앞쪽을 들어 올린 후
이를 빼내십시오 .
그림
15
냉동 수납칸 탈거
1.
냉동 수납칸을 끝까지 당겨 빼내십
시오.
2.
냉동 수납칸 앞쪽을 들어 올린 후
빼내십시오 .
그림
16
100
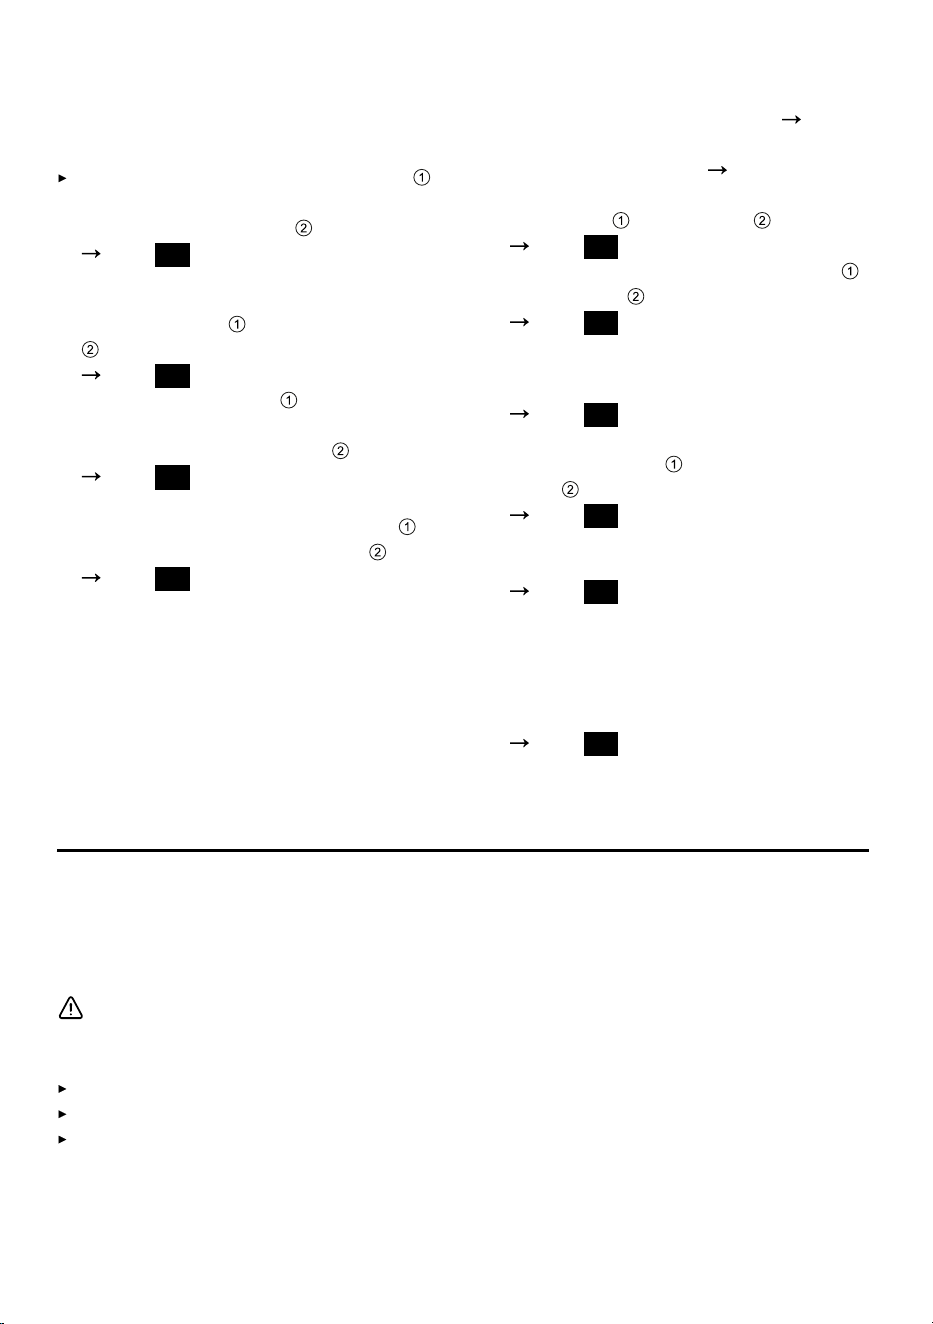
문제 해결 ko
통의 전면부 빼내기
과일 야채실의 통 전면부는 완벽한 세
척을 위해 빼낼 수 있게 되어 있습니다.
통의 옆쪽에 있는 후크를 누른 후
통의 전면부를 돌리면서 이를 통으
로부터 분리시킵니다 .
그림
17
아이스 메이커 꺼내기
1.
얼음 저장용기 및 얼음 수납칸을
빼내서 비우십시오.
그림
18
2.
푸시 버튼을 누르면 , 아이스 메이
커를 홀더에서 분리시켜 아이스 메
이커를 빼낼 수 있습니다 .
그림
19
3.
홀더의 뒤쪽 끝부분을 들어 올리고
냉동실 트레이 뒤에서 내립니다 .
홀더를 앞쪽으로 빼내십시오 .
그림
20
14.4 장치 부품 탈거
제품을 철저하게 세척하기 원한다면,
제품으로부터 특정 장치들을 빼내십시
오.
과일 야채실 위의 선반
과일 야채실 커버를 철저하게 세척하
기 원한다면, 이를 탈거할 수 있습니다.
과일 야채실 위의 선반 탈거
1.
과일 야채실을 빼내십시오.
페이
지100
2.
수납통을 빼냅니다.
페이지100
3.
과일 야채실 위의 선반을 옆쪽으로
기울인 후 빼내십시오 .
그림
21
4.
과일 야채실 커버를 들어 올린 후
빼내십시오 .
그림
22
과일 야채실 위의 선반 설치
1.
과일 야채실 커버를 걸어 놓습니다.
그림
23
2.
과일 야채실 위의 선반을 옆으로 기
울여서 끼운 후 아래쪽으로 내립
니다 .
그림
24
3.
습도 조절기가 앞쪽 위치로 가게 하
십시오.
그림
25
과일 야채실 커버의 경우 개구부에
서 습도 조절기 아래쪽에 위치해야
함을 유념하십시오.
4.
수납통 및 과일 야채실을 삽입합니
다.
그림
26
문제 해결15 문제 해결
제품에 발생한 사소한 문제는 사용자가 스스로 해결할 수 있습니다. 고객 서비스에
문의하기 전에 문제 해결 정보를 이용하십시오. 그러면 불필요한 비용이 소모되지
않습니다.
경고
감전 위험!
부적절한 수리는 위험합니다.
해당 교육을 받은 전문 기술자만 제품을 수리할 수 있습니다.
제품 수리 시 순정 예비 부품만 사용해야 합니다.
이 장치의 전원선 또는 장치 전원선이 손상되면, 제조업체 또는 고객 서비스에
서 제공하는 특수한 전원선 또는 특수한 장치 전원선으로 교체해야 합니다.
101
ko 문제 해결
결함 원인 및 해결
냉각이 되지 않으며, 화
면 표시 및 조명에 불이
들어 옵니다.
전시 모드가 켜진 상태입니다.
1.
제품을 끄십시오.
페이지94
2.
2분간 기다리십시오.
3.
제품을 다시 켜십시오.
페이지94
4.
1분간 기다렸다가 super(냉장실)을/를 누른 상태로
유지하면, 4번의 신호음이 울립니다.
5.
잠시 후 제품이 충분히 냉각되었는지 확인하십시오.
LED 조명이 작동하지
않습니다.
다양한 원인에 의해 발생할 수 있음.
고객 서비스센터로 연락하십시오.
고객 서비스센터 번호는 동봉된 서비스센터 연락처를
확인하십시오.
냉각기가 자주 켜지고
오래 켜져 있습니다.
냉장고를 자주 열었습니다.
필요하지 않은 경우에는 냉장고 문을 열지 마십시오.
외부 환기 그릴이 가려져 있습니다.
외부 환기구 앞에 있는 장애물을 치우십시오.
오류가 아닙니다. 최신 냉장 기기는 더 빈번하게 전원이
켜지고, 다양한 전력 레벨을 갖춰 더욱 효율적으로 냉각
합니다.
외부 환기구 앞에 있는 장애물을 치우십시오.
제품을 히터, 레인지 및 기타 열원으로부터 가능한 멀
리 떨어진 곳에 설치합니다. 제품을 직사광선에 장시간
노출시키지 마십시오.
제품 도어는 꼭 필요한 경우에만 짧은 시간 동안만 여
십시오.
뜨거운 음식과 음료는 식힌 후에 보관합니다.
냉장고 뒷벽에 성에 층
이 형성됩니다.
오류가 아닙니다. 최신 냉장 기기는 냉장실 내부의 온도
를 더 균일하게 유지합니다. 냉장고 뒷벽은 정기적으로
자동으로 성에가 제거됩니다.
제품 도어는 꼭 필요한 경우에만 짧은 시간 동안만 여
십시오.
음식은 밀폐된 곳에 포장하거나 덮어두십시오.
뜨거운 음식과 음료는 식힌 후에 보관합니다.
음식 및 내부 벽 사이에 항상 약간의 공간을 두십시오.
102
문제 해결 ko
결함 원인 및 해결
제품의 측면벽이 아직
차가워지지 않았습니
다.
오류가 아닙니다. 측면벽 안쪽에 있는 파이프는 냉각 과
정이 진행되는 동안 뜨거워집니다. 제품과 접촉하는 가구
는 열로 손상되지 않습니다.
조치할 필요없음.
HomeConnect홈 커넥
트가 올바르게 작동하
지 않음.
다양한 원인에 의해 발생할 수 있음.
www.home-connect.com
기능을 불러오십시오.
경고음이 울리고, 온도
표시(냉장실), "alarm"
및 라이트 스트립이 깜
박입니다.
도어 알람이 켜진 상태
입니다.
냉장실 문이 열려 있습니다.
냉장실 문을 닫으십시오.
경고음이 울리고, 온도
표시(냉동실) "alarm"
및 라이트 스트립이 깜
박입니다.
도어 알람이 켜진 상태
입니다.
냉동실 문이 열려 있습니다.
냉동실 문을 닫으십시오.
경고음이 울리고, 설정
온도(냉동실), "alarm"
및 라이트 스트립이 깜
박입니다.
온도 알람이 켜진 상태
입니다.
다양한 원인에 의해 발생할 수 있음.
alarm을/를 누르십시오.
알람이 꺼집니다.
외부 환기 그릴이 가려져 있습니다.
외부 환기구 앞에 있는 장애물을 치우십시오.
많은 양의 음식물이 수납되었습니다.
냉동 용량을 초과하지 마십시오.
"냉동 성능", 페이지98
설정 온도에 도달되지
않습니다.
완전 자동 제상 기능이
더 이상 작동되지 않습
니다.
냉동실 문이 장시간 열려 있었습니다. NoFrost 시스템의
증발기(냉각기)에 성에가 심하게 끼어 있습니다.
필수 조건: 냉동된 음식들을 차가운 장소에 따로 잘 보관
해 놓으십시오.
103
ko 문제 해결
결함 원인 및 해결
설정 온도에 도달되지
않습니다.
완전 자동 제상 기능이
더 이상 작동되지 않습
니다.
1.
제품을 끄십시오.
페이지94
2.
제품을 전원에서 분리하십시오.
전원선의 플러그를 뽑거나, 퓨즈박스의 퓨즈를 끄십시
오.
3.
제품을 벽으로부터 떨어 뜨립니다.
4.
제품 도어를 열어 두십시오.
약 20분이 지나면, 장치 뒷면의 증발 팬에 녹은 물이
고이기 시작합니다.
그림
27
5.
증발 팬이 넘치지 않도록 녹은 물을 스펀지를 사용하여
흡수시키십시오.
증발 팬에 더 이상 녹은 물이 고이지 않으면, 증발기의
제상이 완료된 것입니다.
6.
제품 내부를 청소해 주십시오.
페이지100
7.
제품을 다시 켜십시오.
페이지94
온도가 설정된 것과 차
이가 많이 납니다.
다양한 원인에 의해 발생할 수 있음.
1.
제품을 끄십시오.
페이지94
2.
약 5분 후 제품을 다시 켜십시오.
페이지94
온도가 너무 높다면, 몇 시간이 경과한 후 온도를 다
시 측정해 보십시오.
온도가 너무 낮다면, 그 다음날 온도를 다시 측정해
보십시오.
장치 표면 및 장치 선반
에 응축수가 형성됩니
다.
따뜻하고 습한 공기 중에 있는 수분이 제품의 차가운 표
면에서 응축됩니다.
1.
부드러운 마른 천으로 맺힌 물방울을 닦아내십시오.
2.
제품은 되도록이면 잠깐 동안만 여십시오.
3.
장치가 항상 올바르게 닫혀 있게 하십시오.
제품에서 윙윙거리거나
딸깍거리는 소리 등 소
음이 발생합니다.
오류가 아닙니다. 모터가 작동 중입니다(예: 냉각기, 환풍
기 등). 냉매가 관을 통해 흐르고 있습니다. 모터, 스위치
또는 솔레노이드 밸브 등이 켜지거나 꺼집니다. 자동 제
상 기능이 작동 중입니다.
조치할 필요없음.
제품에서 소음이 발생
합니다.
제품의 수평이 맞지 않습니다.
수준기 및 나사 베이스를 사용해서 제품 수평을 맞추십
시오.
본 제품은 독립형이 아닙니다.
제품에 필요한 최소 간격을 준수하십시오.
구성품이 흔들리거나 걸려 있습니다.
탈착이 가능한 구성품을 점검하고, 필요한 경우 이를
다시 장착해 보십시오.
병이나 그릇이 서로 부딪힙니다.
병이나 그릇을 서로 떨어뜨려 놓습니다.
104
보관 및 폐기 ko
결함 원인 및 해결
제품에서 소음이 발생
합니다.
슈퍼 냉동 기능이 켜진 상태입니다.
조치할 필요없음.
15.1 정전
정전이 발생하면, 제품 내부의 온도가
높아지므로, 냉동된 음식물의 보존기간
이 더 짧아질 수 있고, 쉽게 상할 수 있
습니다.
본사 웹사이트에서는 해당 제품에서
오류 발생 시 냉동 식품의 보존 기간에
관한 기술적 사항을 확인할 수 있습니
다.
참고
정전이 발생하면 되도록 제품을 여
닫지 말고, 다른 음식물을 추가로 넣
지 마십시오.
정전이 발생한 후에는 음식물의 상
태를 즉시 확인하십시오.
– 냉동 식품이 해동되었고, 5°C 이
상이라면 즉시 폐기하십시오.
– 약간만 해동된 경우라면 음식을
일단 익혀서 바로 섭취하든지 다
시 얼리십시오.
15.2 제품 자가 테스트 실시
본 제품에는 자가 테스트 기능이 있으
므로, 오류가 있을 시 내용이 표시됩니
다. 이러한 오류는 고객 서비스센터에
서 해결할 수 있습니다.
1.
제품을 끄십시오.
페이지94
2.
제품 전원을 분리하십시오.
전원선의 전원 플러그를 뽑거나, 퓨
즈 박스의 퓨즈를 차단하십시오.
3.
5분 후에 제품 전원을 다시 연결하
세요.
페이지15
4.
전기 연결을 마치고 일 분이 지나면,
super(냉장실)을/를 3초 ~ 5초 정
도 누른 상태로 유지합니다. 그러면
두 번째 신호음이 울립니다.
셀프 테스트 종료 후 신호음이 2회
울리고, 온도 표시에서 설정 온도가
다시 표시된다면, 제품의 온도 센서
는 정상입니다. 제품은 일반 모드로
전환됩니다.
제품의 자가 테스트 종료 후 신호음
이 5번 울리고, 온도 표시 LED가 서
로 다른 밝기로 켜진다면, 고객 서비
스센터로 연락하십시오. LED를 보
면 고객 서비스센터 측에서 현존하
는 문제점을 알 수 있습니다.
보관 및 폐기16 보관 및 폐기
16.1 제품의 작동 중지
1.
제품을 끄십시오.
페이지94
2.
제품을 전원으로부터 분리시킵니다.
전원선의 전원 플러그를 뽑거나, 퓨
즈 박스의 퓨즈를 차단하십시오.
3.
모든 음식물을 꺼내십시오.
4.
제품을 청소합니다.
페이지100
5.
제품 내부의 환기를 위해 제품 문을
열어 놓으십시오.
16.2 폐제품 폐기
환경 친화적인 폐기를 통해 소중한 자
원을 재활용할 수 있습니다.
경고
건강 위험!
어린이가 장치 안에 갇히거나 목숨을
잃을 위험에 처할 수 있습니다.
아이들이 장치 안으로 들어가는 것
을 방해하도록, 선반이나 용기를 장
치에서 빼내지 마십시오.
105
ko 고객 서비스
폐제품에 어린이가 접근하지 못하도
록 하십시오.
경고
화재 위험!
파이프 손상 시 가연성 냉매와 유해 가
스가 유출되어 불이 붙을 수 있습니다.
냉매 회로의 파이프와 절연재를 손
상시키지 마십시오.
1.
전원선의 전원 플러그를 빼내십시
오.
2.
전원선을 절단하십시오.
3.
제품을 환경 규정에 따라 폐기하십
시오.
현행 폐기 방법에 대한 정보는 대리
점과 관할 관청에서 얻을 수 있습니
다.
고객 서비스17 고객 서비스
귀하가 거주하는 국가에서의 보증 기
간 및 보증 조건에 대한 자세한 정보는
서비스 연락처 및 보증 조건에 관한 동
봉 문서에 있는 QR 코드를 통해 확인
가능하며, 당사 고객 서비스, 담당 딜러
또는 웹사이트에서도 확인할 수 있습
니다.
고객 서비스에 문의할 때는 제품의 제
품 번호(E-Nr.), 제조 번호(FD)와 일련
번호(Z-Nr.)가 필요합니다.
고객 서비스 연락처 정보는 서비스 연
락처 및 보증 조건에 관한 동봉 문서에
있는 QR 코드를 통해서나 당사 웹사이
트에서 확인할 수 있습니다.
17.1 제품 번호(E-Nr.), 제조 번호
(FD)와 순차 번호(Z-Nr.)
제품 번호(E-Nr.), 제조 번호(FD)와 순
차 번호(Z-Nr.)는 제품 명판에서 확인할
수 있습니다.
"제품 소개", 그림
1
/ 페이지91
필요할 때 장치 정보와 고객 서비스 전
화 번호를 빠르게 다시 찾아내기 위해
해당 정보를 기록하십시오.
기술 제원18 기술 제원
냉매, 내부 용량 및 기타 기술 정보는
형식판을 참고하십시오.
"제품 소개", 그림
1
/ 페이지91
18.1 프리소프트웨어 및 오픈 소
스 소프트웨어 관련 정보
이 제품에는 저작권 소유자로부터 무
료 또는 오픈 소스 소프트웨어로 사용
이 허가 된 소프트웨어 구성요소가 포
함되어 있습니다.
해당 라이선스 정보는 가전 제품에 저
장되어 있습니다. 해당 라이선스 정보
는 HomeConnect 앱의 "프로필 -> 법
적 고지 -> 라이선스 정보"에서 확인할
수 있습니다.
1
브랜드 제품 웹사이트에
서 라이선스 정보를 다운로드할 수 있
습니다. (제품 웹사이트에서 해당 제품
모델과 기타 문서를 검색하십시오.) 아
니면 [email protected] 또는
BSH Hausgeräte GmbH, Carl-Wery-
Str. 34, D-81739 München에 해당 정
보를 요청할 수도 있습니다.
소스 코드는 요청 시 제공됩니다.
[email protected] 또는 BSH
Hausgeräte GmbH, Carl-Wery-Str. 34,
D-81739 München으로 요청을 보내십
시오.
제목: „OSSREQUEST“
요청 처리 비용이 청구됩니다. 이 서비
스는 구입일로부터 3년 또는 적어도 당
사가 해당 제품에 대해 지원과 예비 부
품을 제공하는 기간 동안 유효합니다.
1
장치 사양별
106
적합성 선언 ko
적합성 선언19 적합성 선언
BSH Hausgeräte GmbH는 Home Connect 기능을 갖춘 본 제품이 지침
2014/53/EU의 기본 요구사항 및 기타 관련 규정에 부합함을 증명합니다.
상세한 RED 적합성에 관한 설명은 인터넷
www.bosch-home.com
의 제품 페이지
에 있는 추가 문서에서 확인할 수 있습니다.
2.4GHz 대역(2400–2483.5MHz): 최대 100mW
5GHz 대역(5150–5350MHz + 5470–5725MHz): 최대 130mW
BE BG CZ DK DE EE IE EL ES
FR HR IT CY LI LV LT LU HU
MT NL AT PL PT RO SI SK FI
SE NO CH TR IS UK(NI)
5GHz WLAN(Wi-Fi): 실내 전용.
AL BA MD ME MK RS UK UA
5GHz WLAN(Wi-Fi): 실내 전용.
107

Thank you for buying a
Bosch Home Appliance!
Register your new device on MyBosch now and profit directly from:
• Expert tips & tricks for your appliance
• Warranty extension options
• Discounts for accessories & spare-parts
• Digital manual and all appliance data at hand
• Easy access to Bosch Home Appliances Service
Free and easy registration – also on mobile phones:
www.bosch-home.com/welcome
Looking for help?
You'll find it here.
Expert advice for your Bosch home appliances, help with problems
or a repair from Bosch experts.
Find out everything about the many ways Bosch can support you:
www.bosch-home.com/service
Contact data of all countries are listed in the attached service
directory.
BSH Hausgeräte GmbH
Carl-Wery-Straße 34
81739 München, GERMANY
www.bosch-home.com
A Bosch Company
IMPORTIR:
PT. BSH HOME APPLIANCES
ARKADIA GREEN PARK TOWER G LAN-
TAI 7,
JL. TB SIMATUPANG KAV.88 KEBAGU-
SAN, PASAR MINGGU
KOTA ADM. JAKARTA SELATAN DKI JA-
KARTA 12520
*8001263908*
8001263908 (050630)
en, id, th, ko