
Technical Support and E-Warranty Certificate
www.vevor.com/support
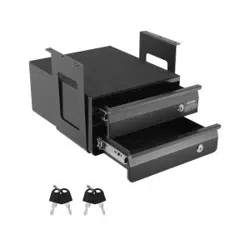
Under Desk Drawer
MODEL: CT-1 / CT-2 / CT-3
We continue to be committed to provide you tools with competitive price.
"Save Half", "Half Price" or any other similar expressions used by us only
represents an estimate of savings you might benefit from buying certain tools
with us compared to the major top brands and does not necessarily mean to cover
all categories of tools offered by us. You are kindly reminded to verify carefully
when you are placing an order with us if you are actually Saving
Half in comparison with the top major brands.
- 1 -
MODEL: CT-1 / CT-2 / CT-3
NEED HELP? CONTACT US!
Have product questions? Need technical support? Please feel free to
contact us:
Technical Support and E-Warranty Certificate
www.vevor.com/support
This is the original instruction, please read all manual instructions
carefully before operating. VEVOR reserves a clear interpretation of our
user manual. The appearance of the product shall be subject to the
product you received. Please forgive us that we won't inform you again if
there are any technology or software updates on our product.
Under Desk Drawer
CT-1
CT-2
CT-3

- 2 -
SAFETY INSTRUCTIONS
Warning - To reduce the risk of injury, user must read instructions
manual carefully.
Warning- Be sure to wear gloves when using this product.
1.1 Please make sure to read and understand all instructions before
assembling and installing this product.
1.2 Make sure to use the correct tools and fixings for installation and
avoid using unsuitable substitutes.
1.3 Please be careful when installing to avoid pinching hands or other
body parts.
1.4 Do not store items in the drawer that exceed the recommended load
to avoid injury or damage due to the drawer falling off.
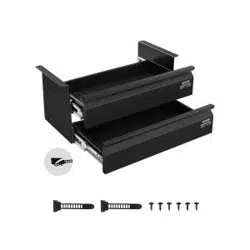
Product Description
Under desk drawers are a type of drawer used for storing and organizing
tools, parts, or other items, usually installed beneath a workbench. They
help keep the work area neat and orderly, allowing users to conveniently
access the tools or items they need at any time.
Under desk drawers can be widely used in workshops, laboratories, homes,
garages, offices, and various other places, making it convenient to store
and retrieve all kinds of necessary tools or items.
Product Parameter
Model
drawer
layers
Total
drawer
length
Inner
drawer
length
With
dividers
With
lock
Hub
Stainless
steel rails
liner
CT-1
1
13inch
12inch
×
×
2pcs
√
1
CT-2
1
13inch
12.6inch
√
√
×
√
1
CT-3
2
13inch
12.6inch
√
√
×
√
2

- 3 -
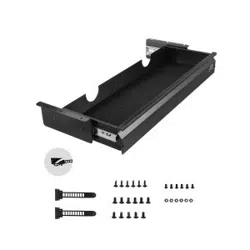
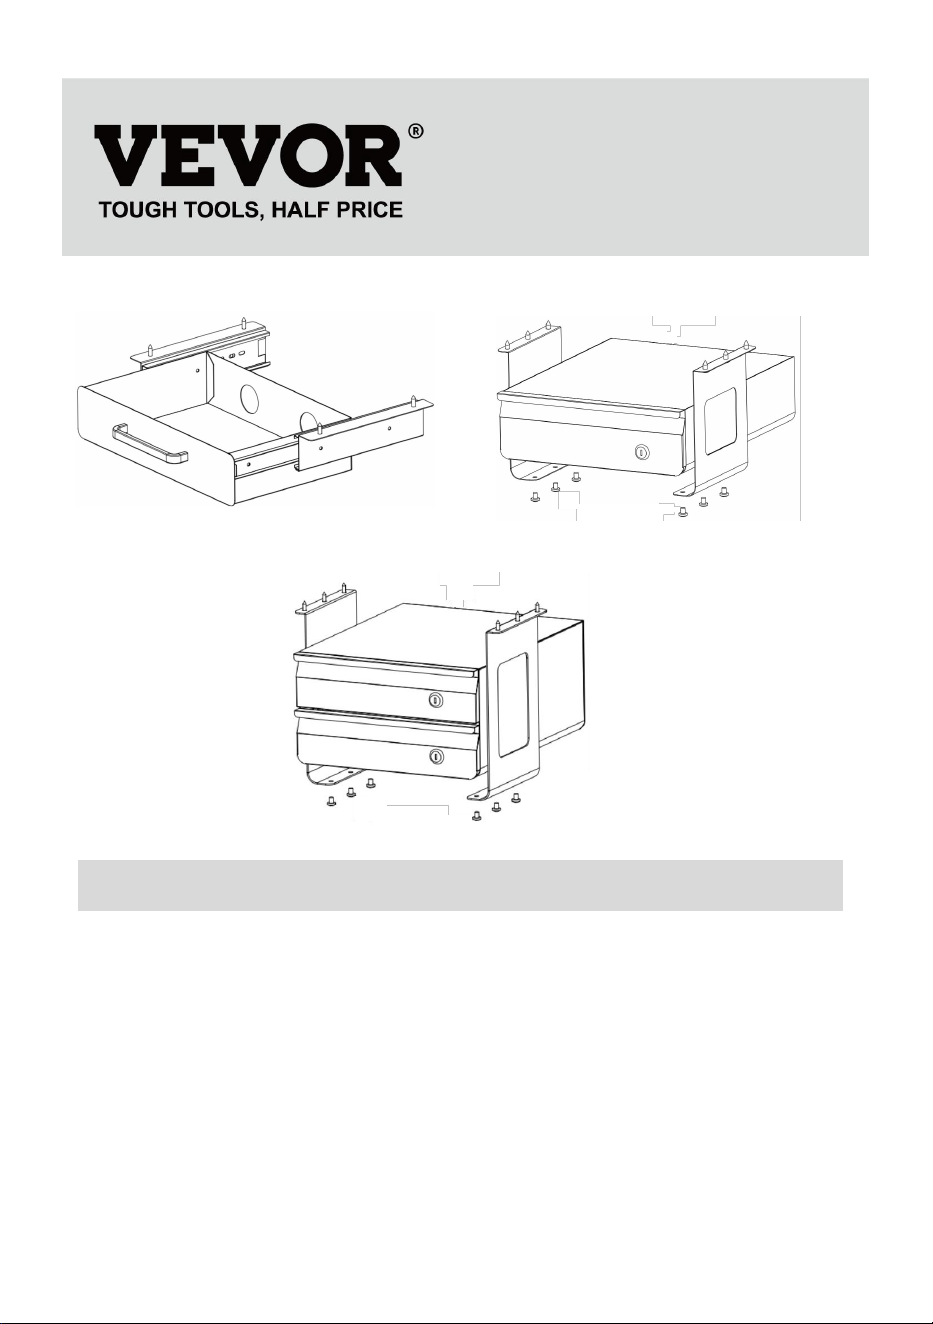
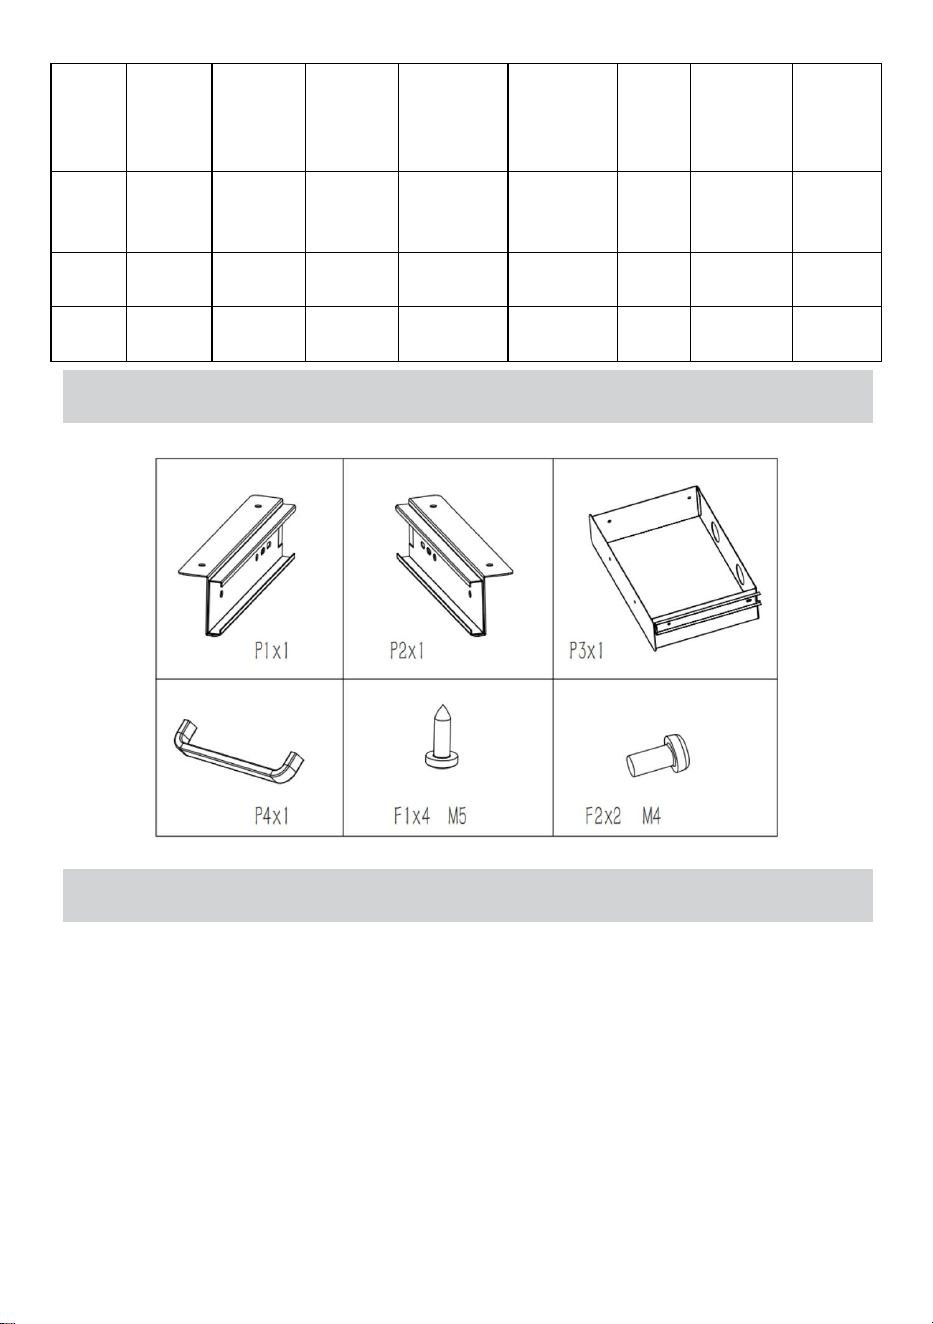
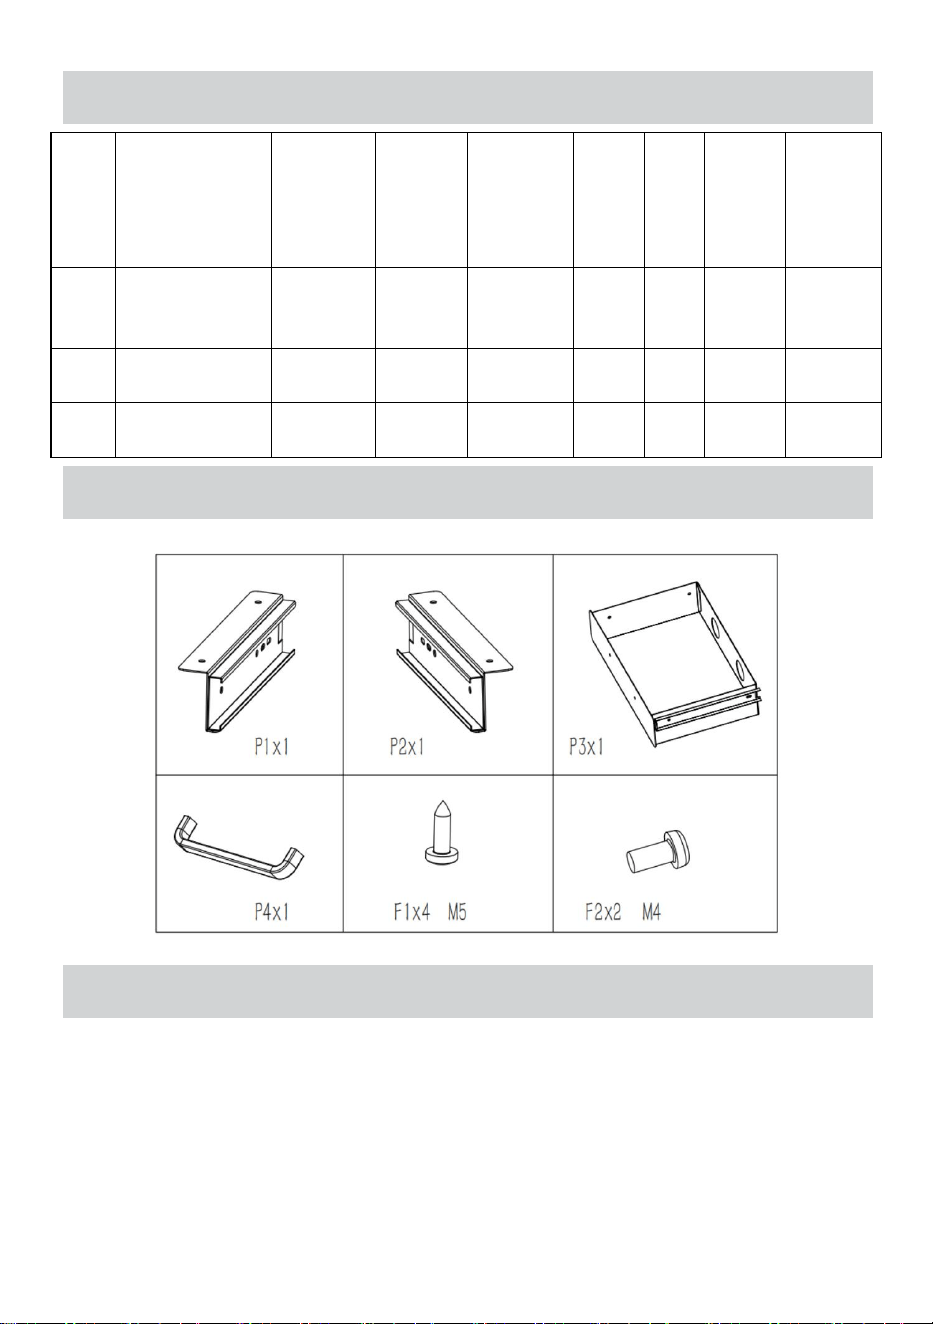
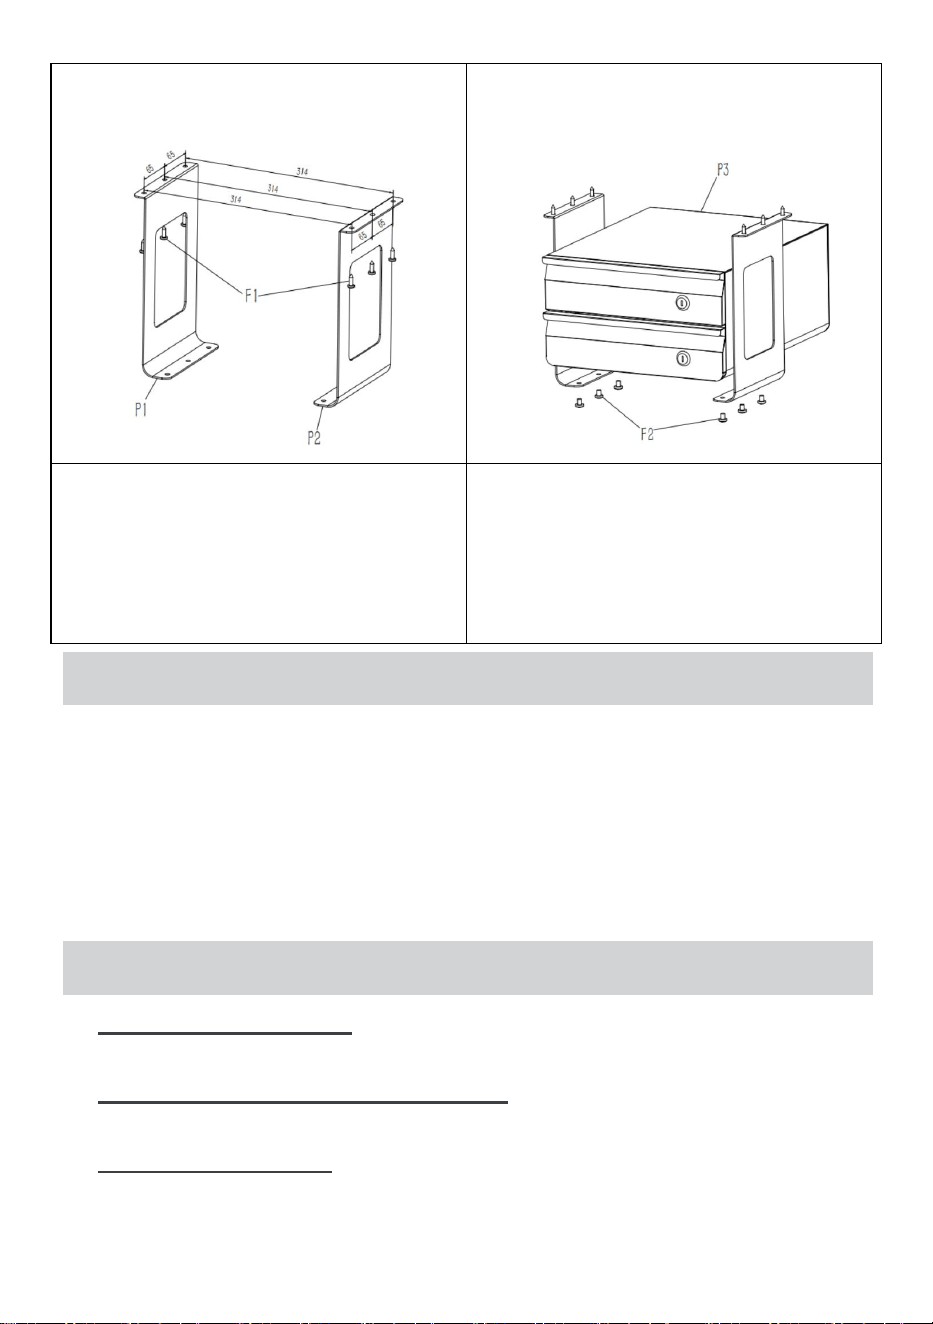
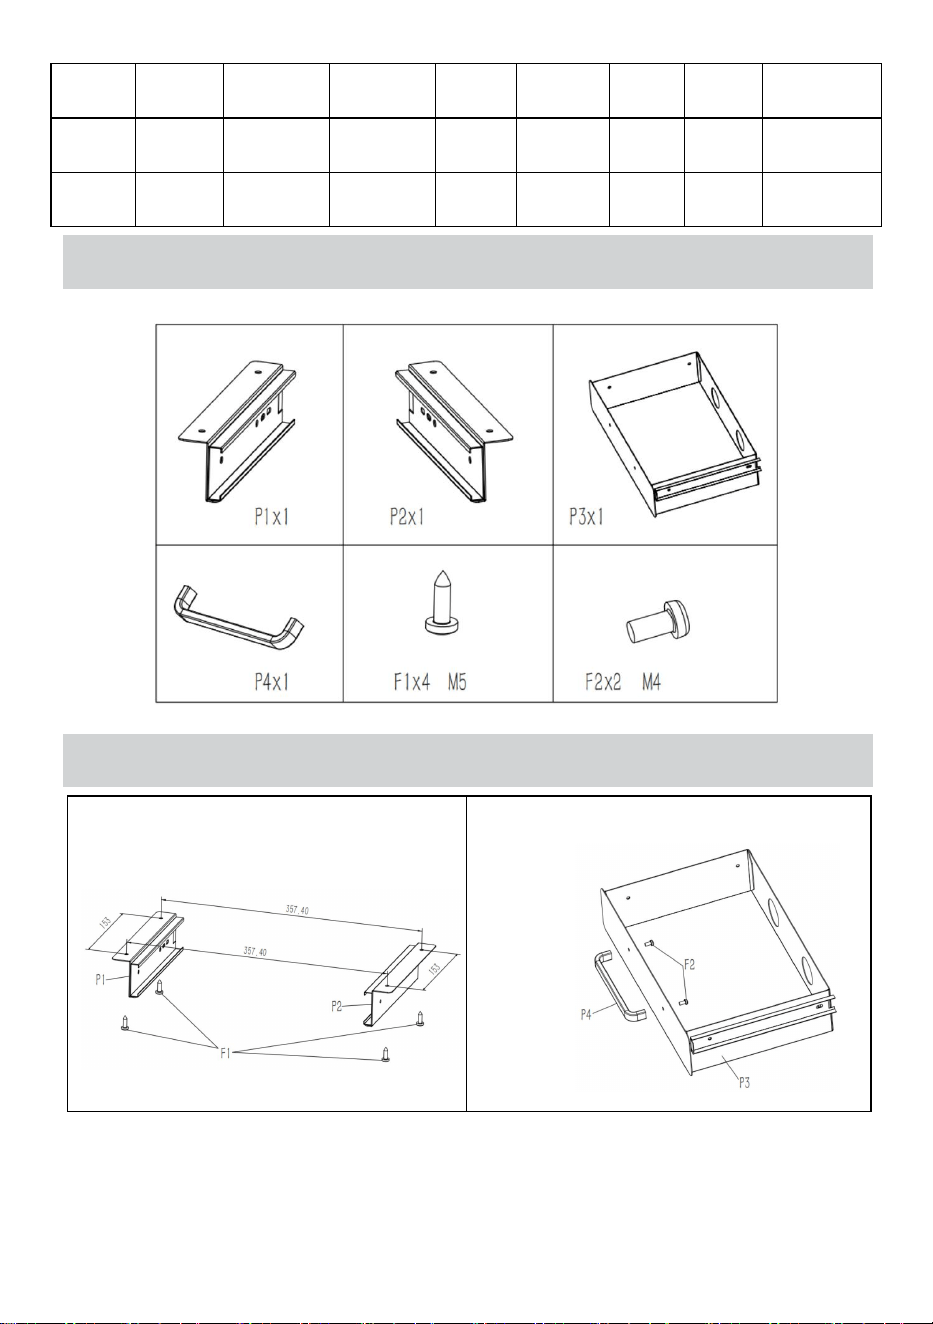
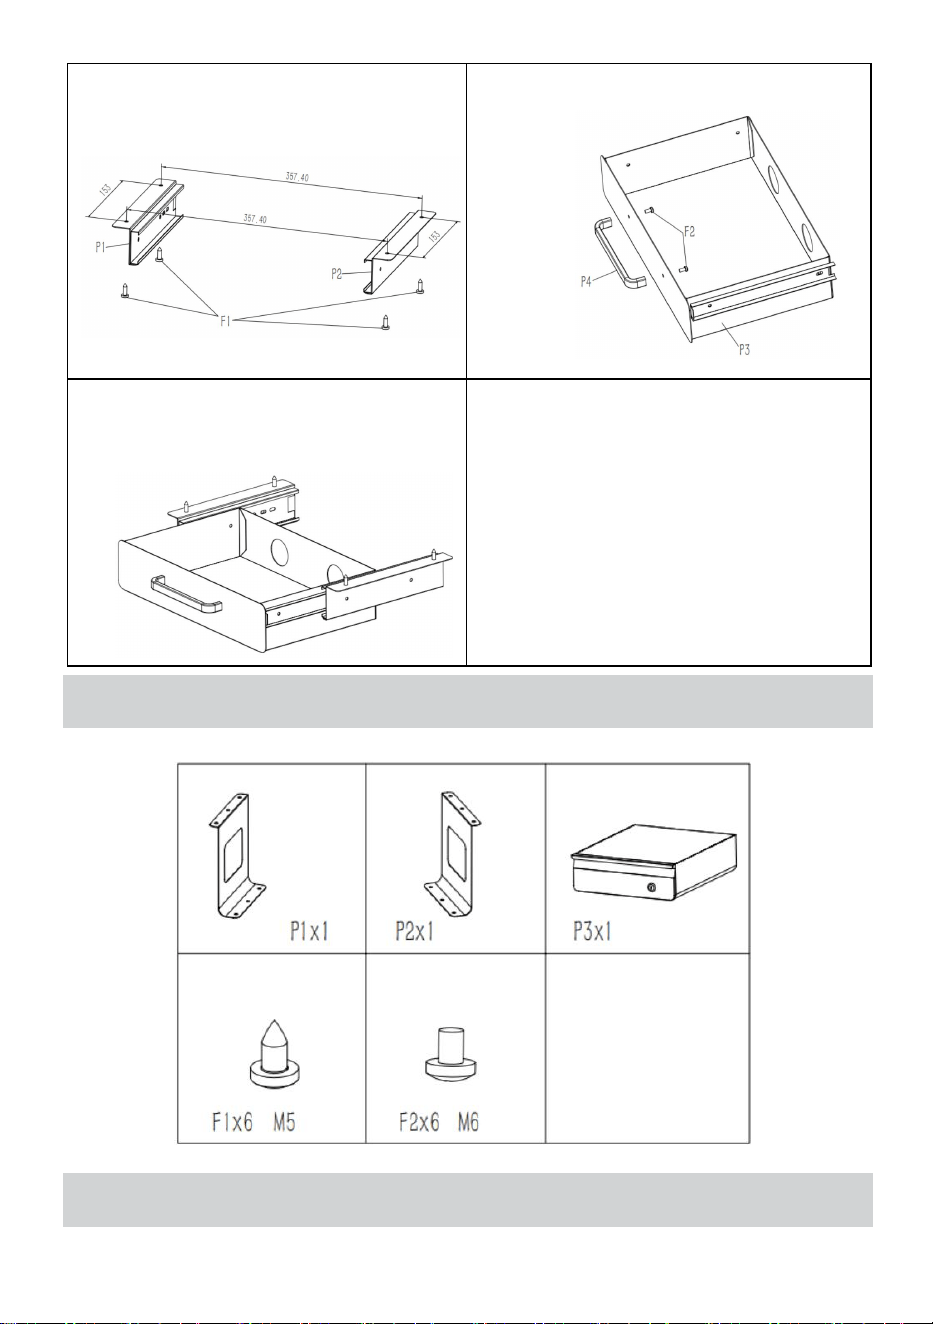
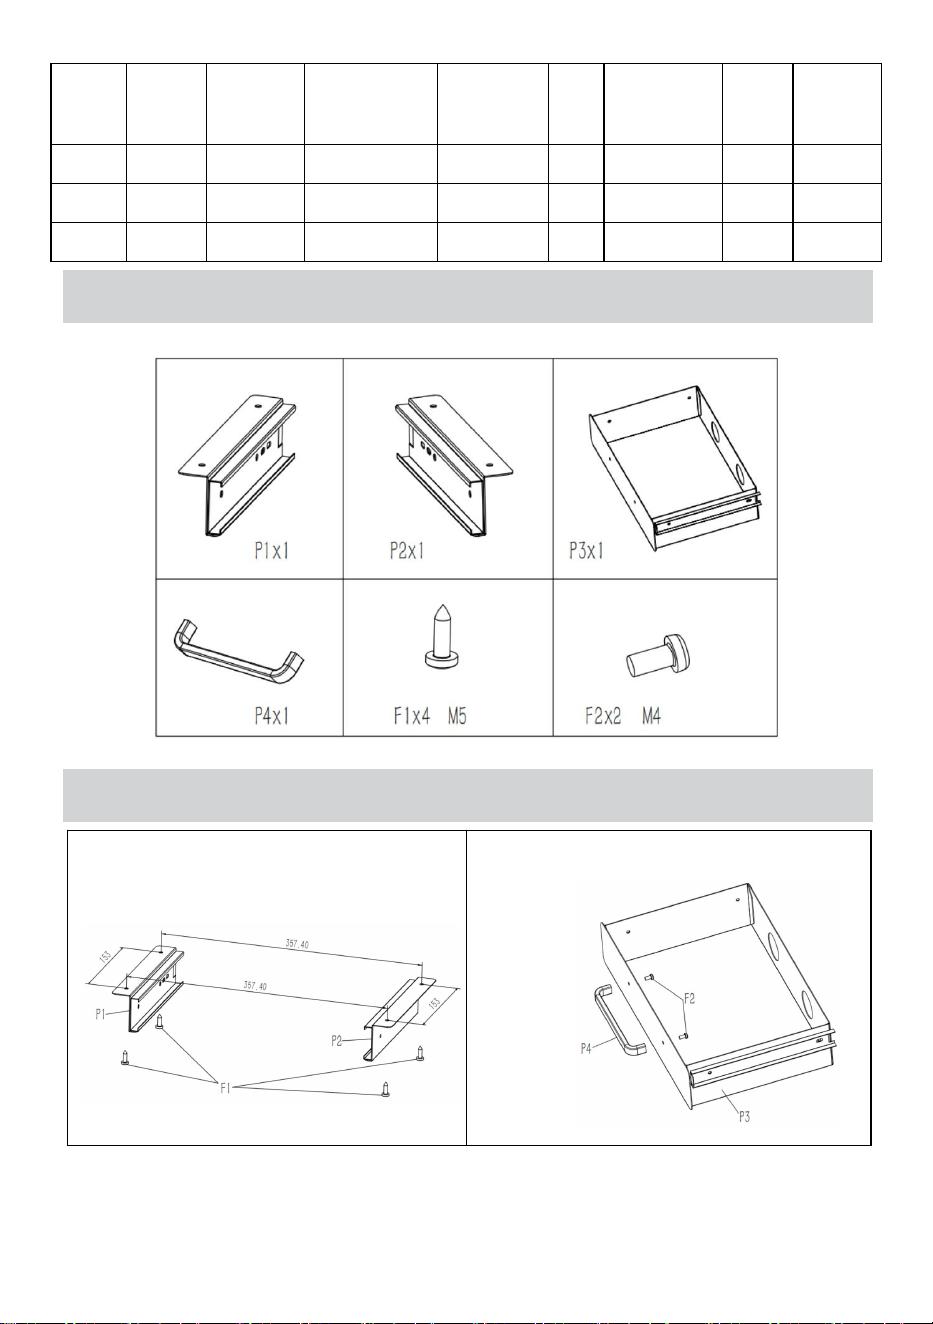
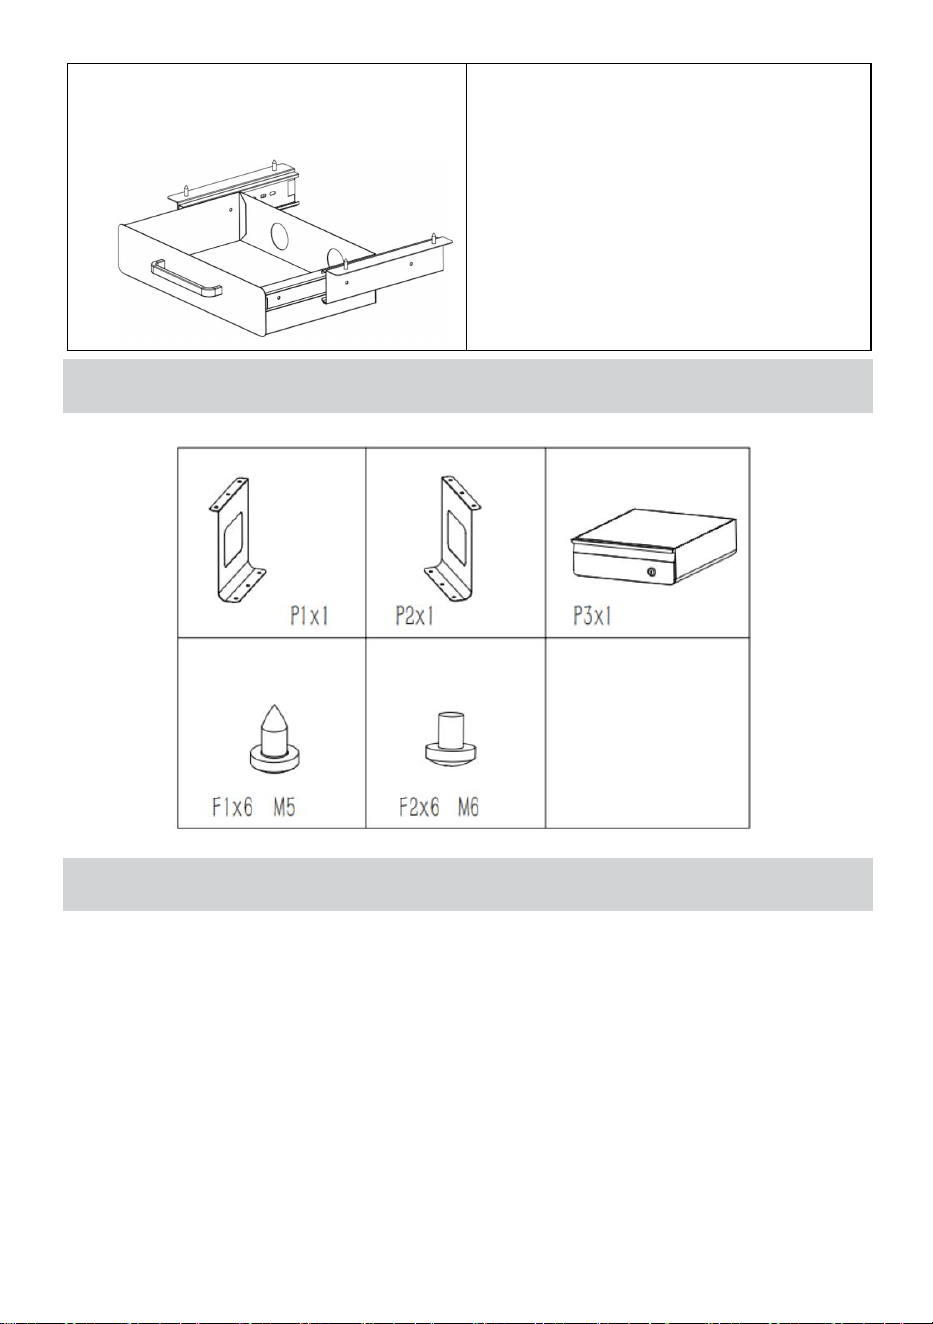
Part List - CT-1
INSTALLATION INSTRUCTIONS - CT-1
Step 1 : Assemble P1 and P2
using screw F1
Step2:Assemble P4 and P3 using
screw F2
Step 3: Assemble the component
from Step1 and Step2
Step4: Assemble the product under
desk. Finished
- 4 -
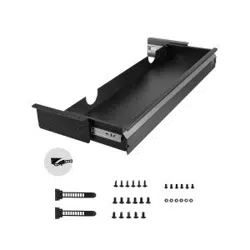
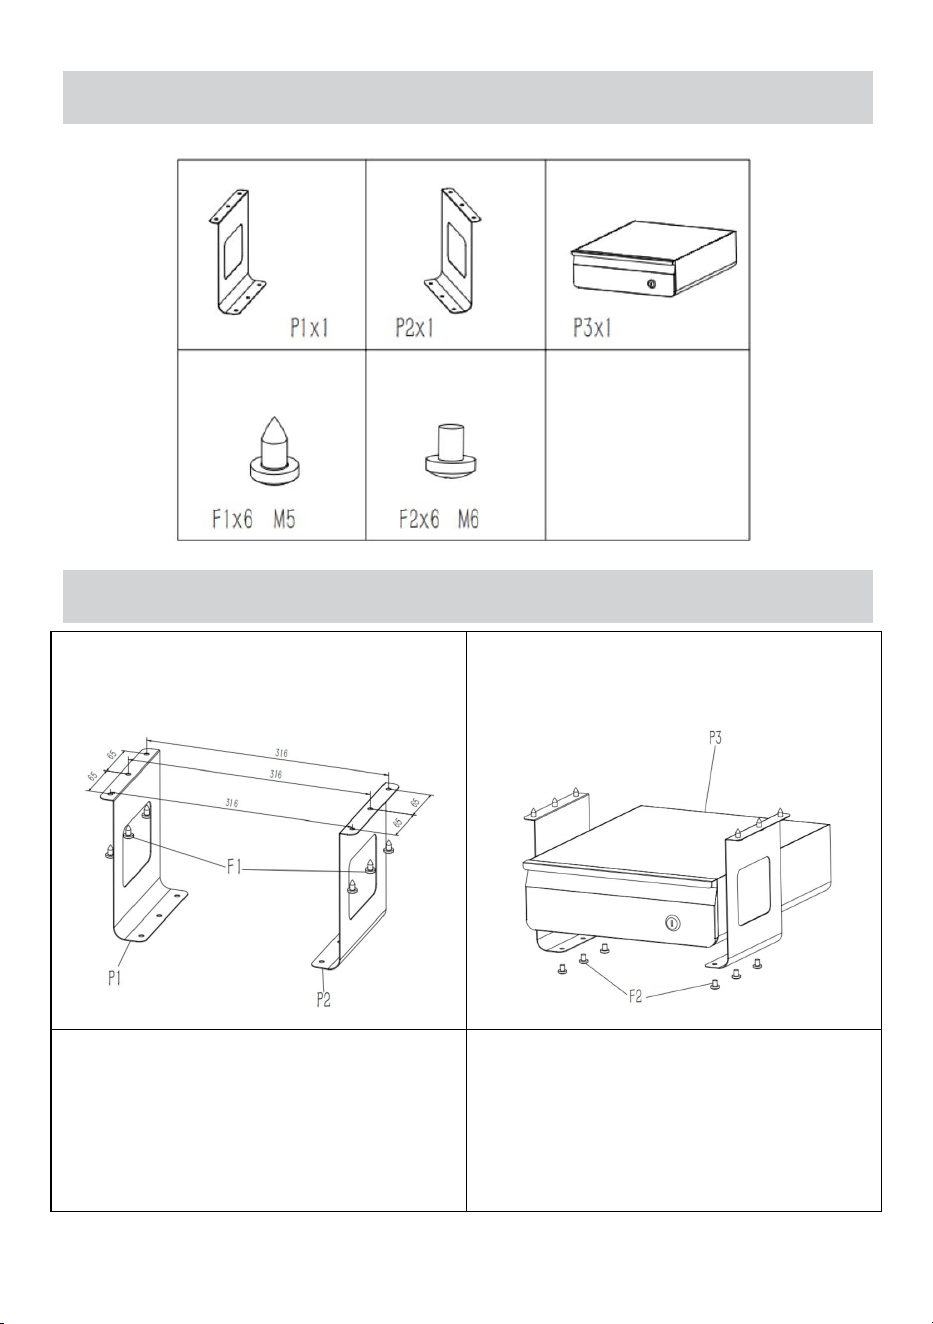
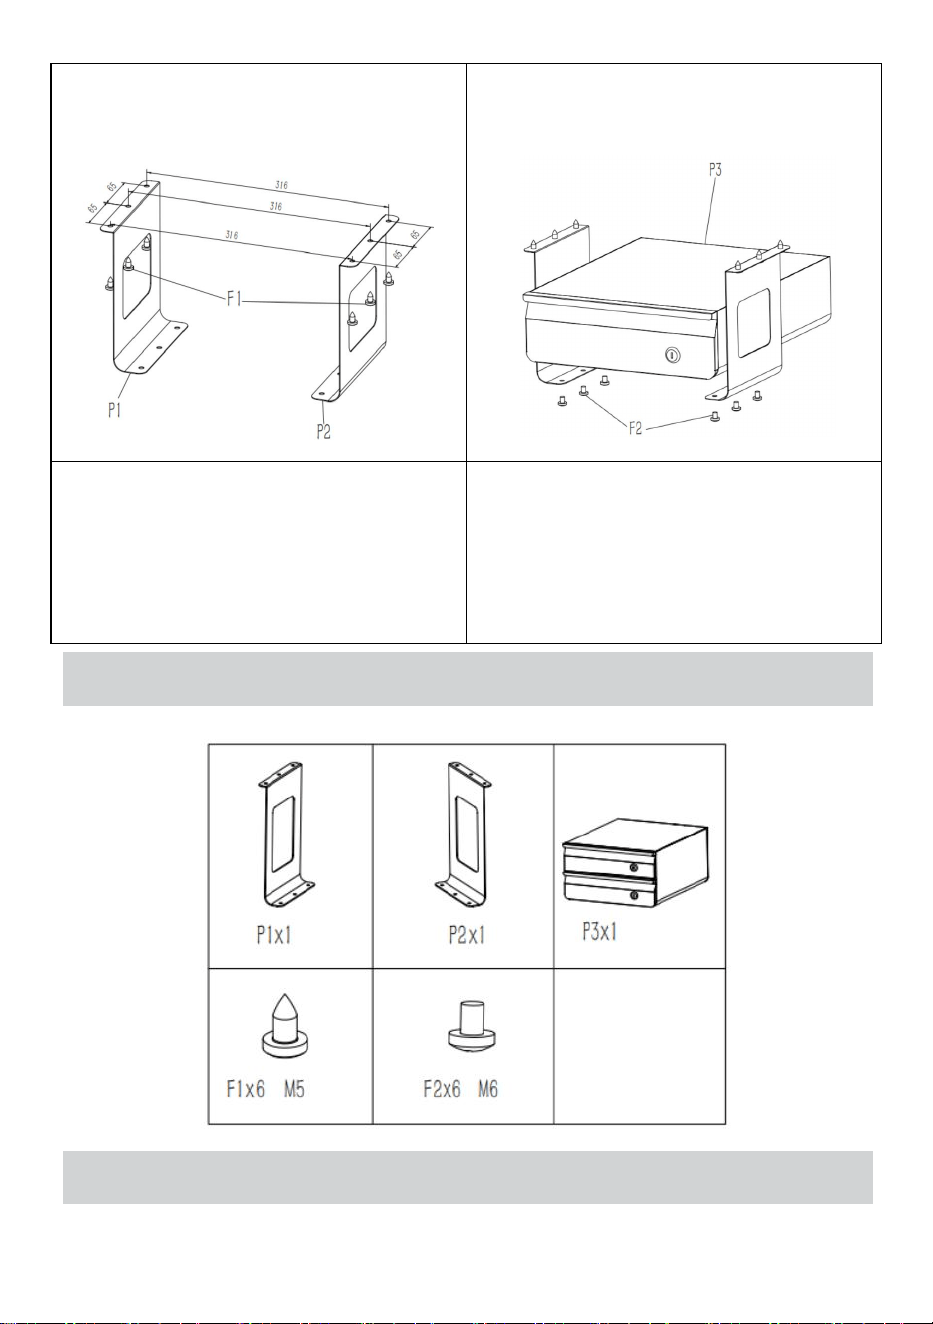
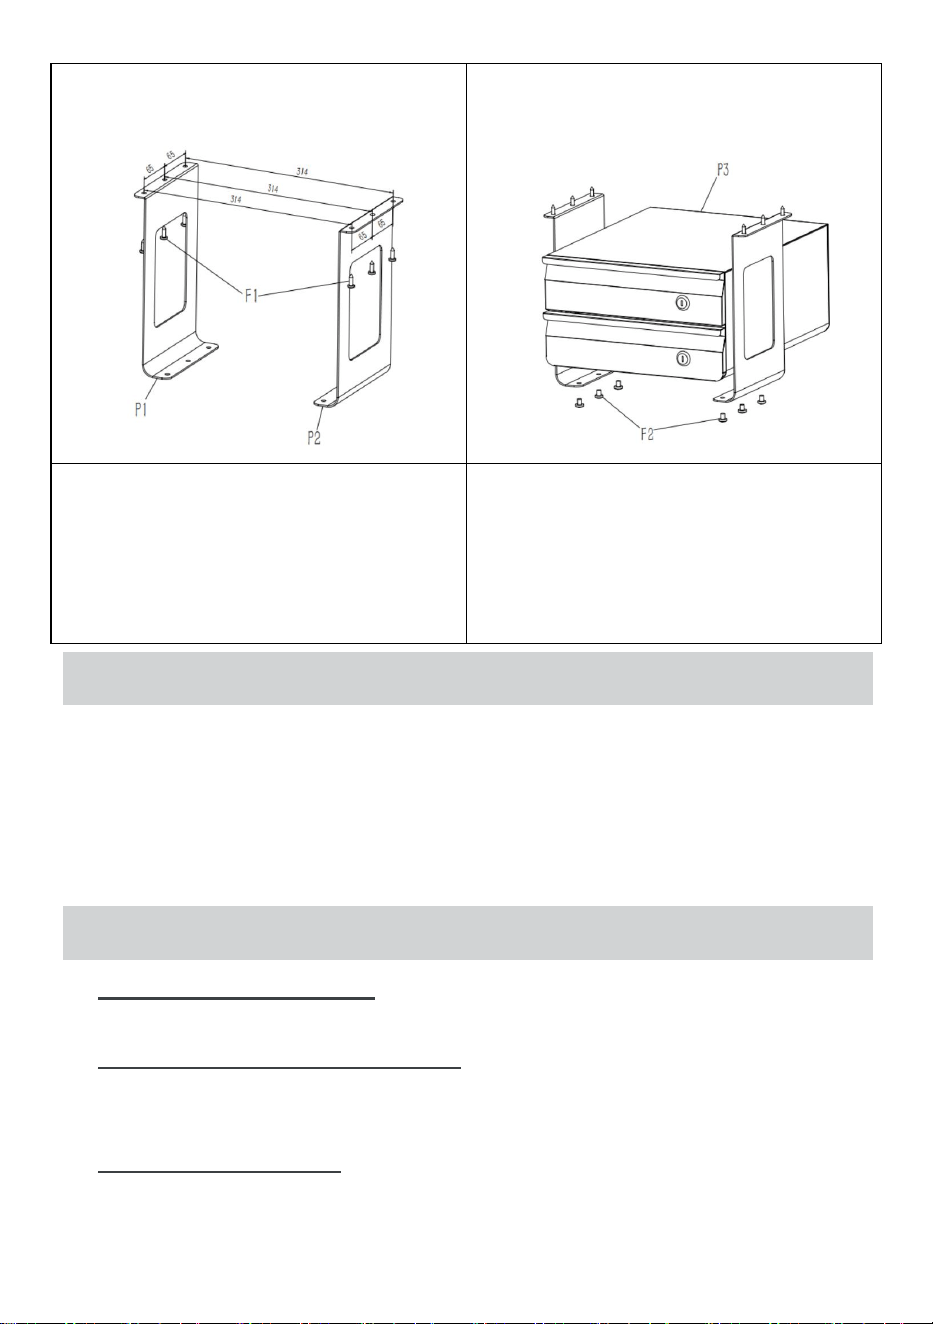
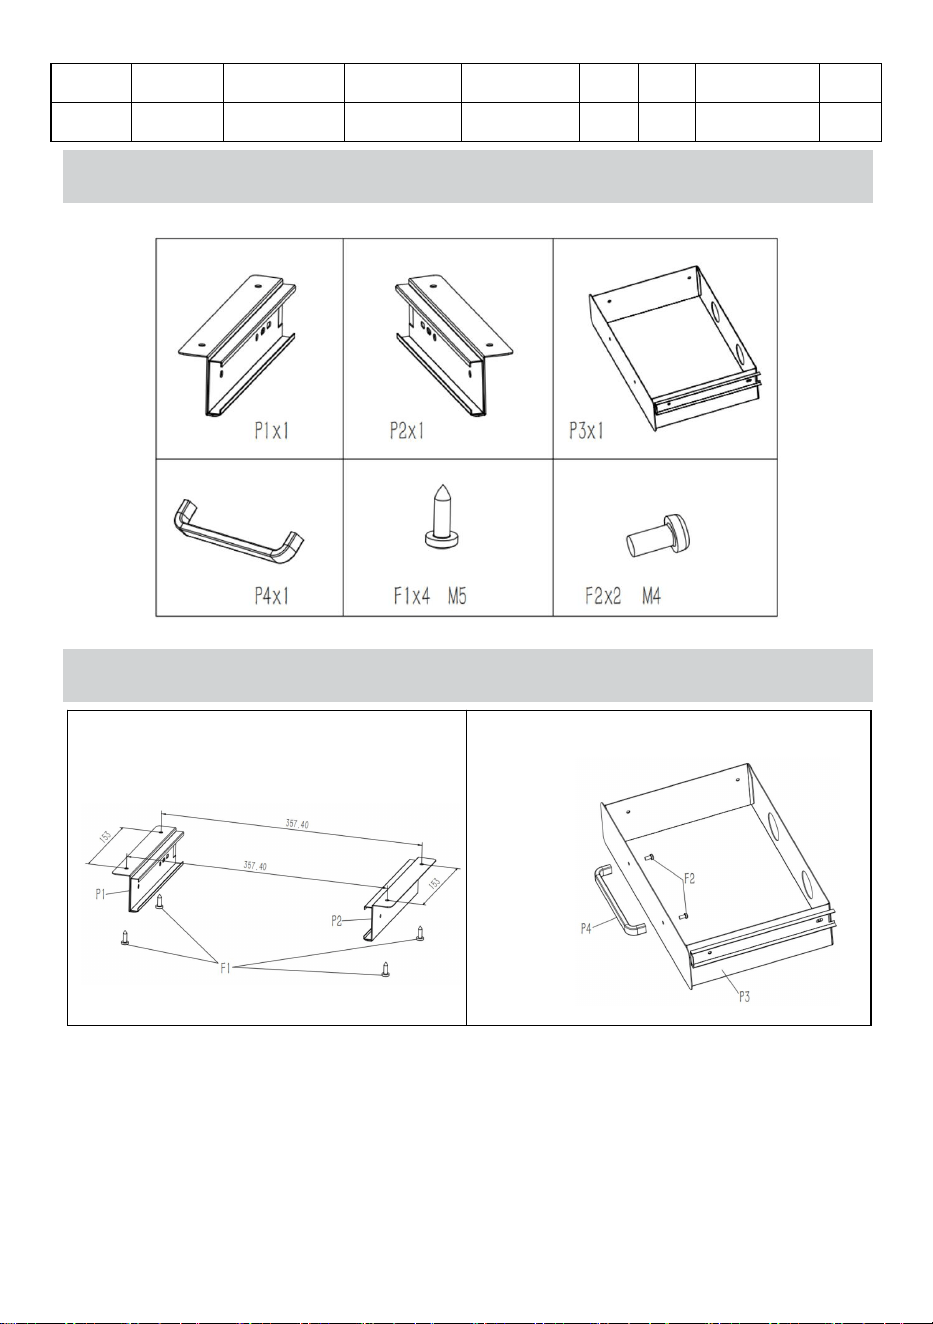
Part List - CT-2
INSTALLATION INSTRUCTIONS - CT-2
Step 1 : Assemble P1 and P2
using screw F1
Step2:Assemble P3 with the
component from Step 1 using screw
F2.
Step3: Assemble the product under
desk.
Finished
- 5 -
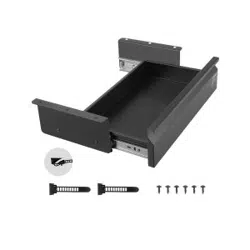
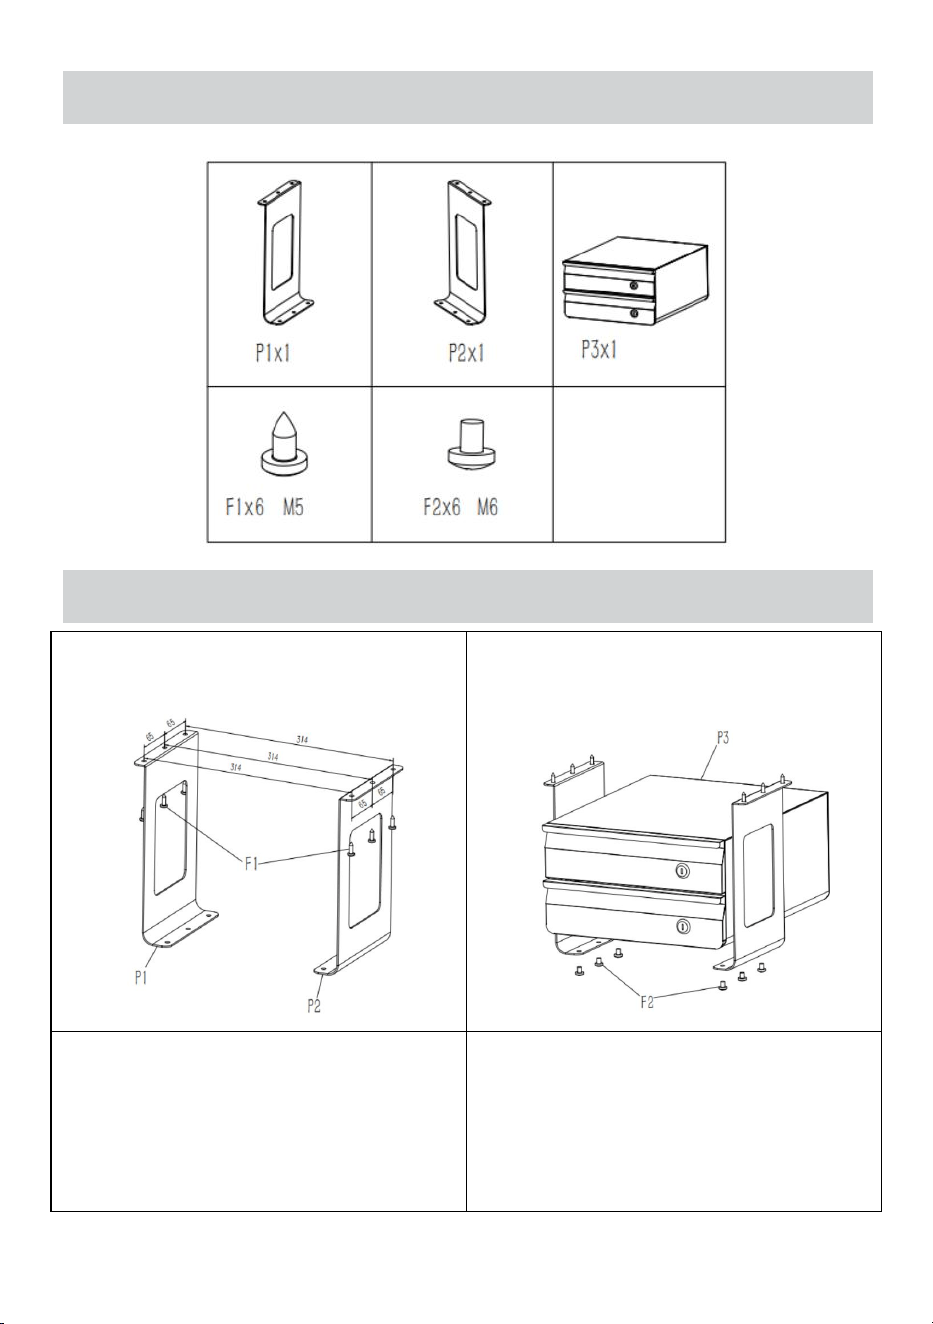
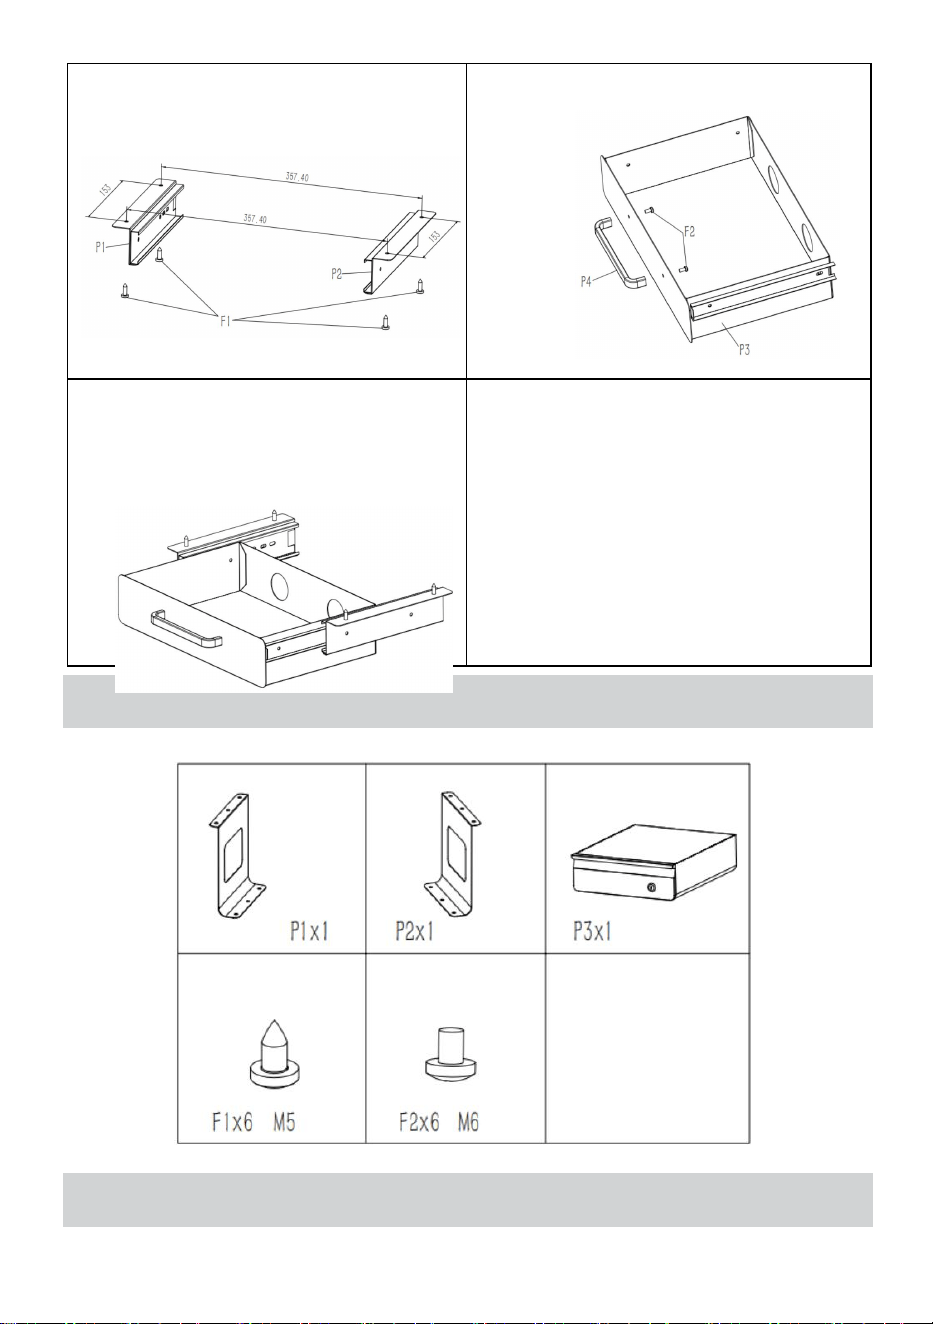
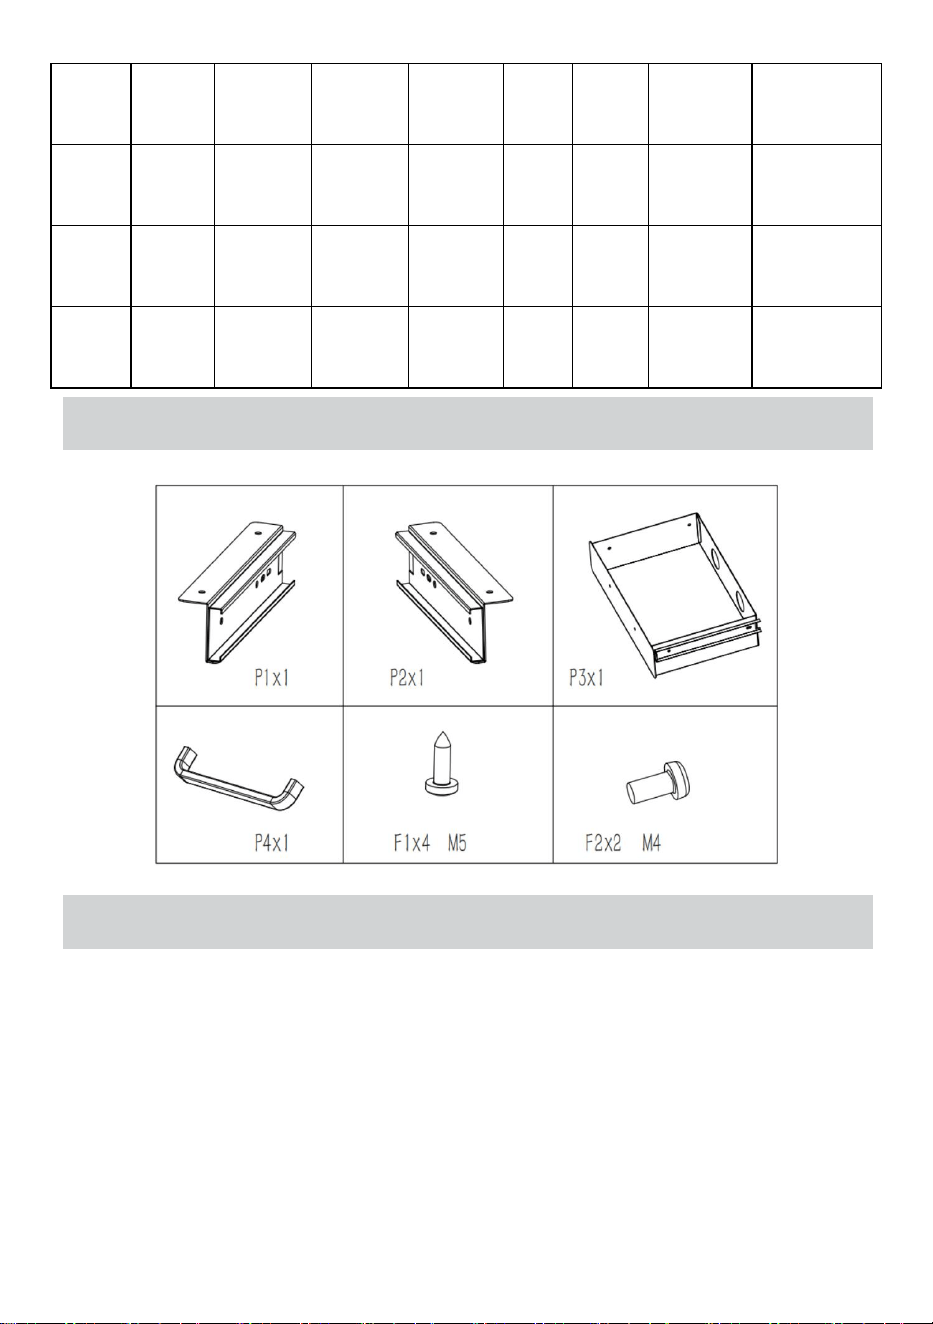
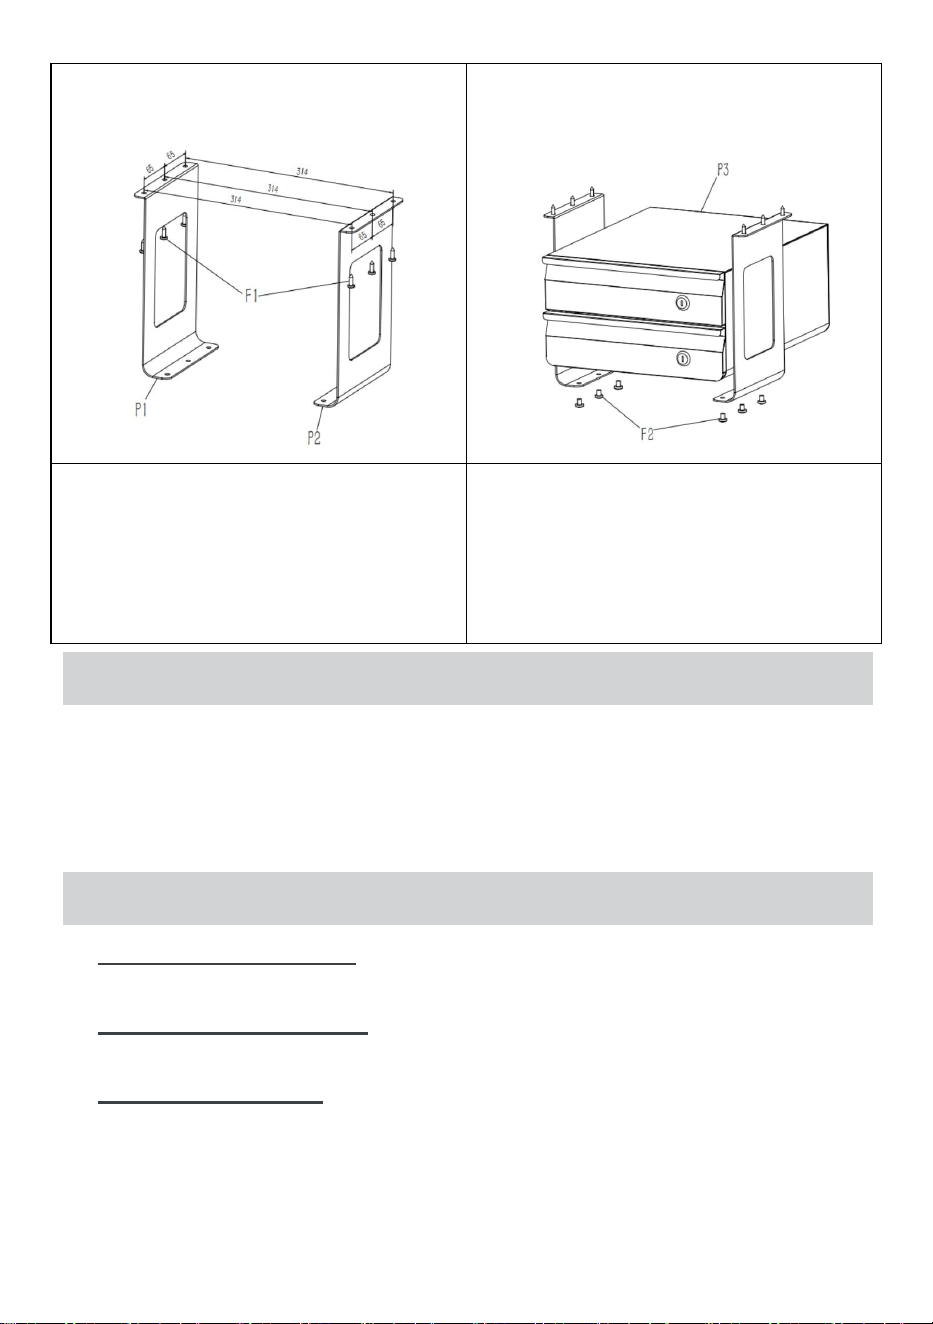
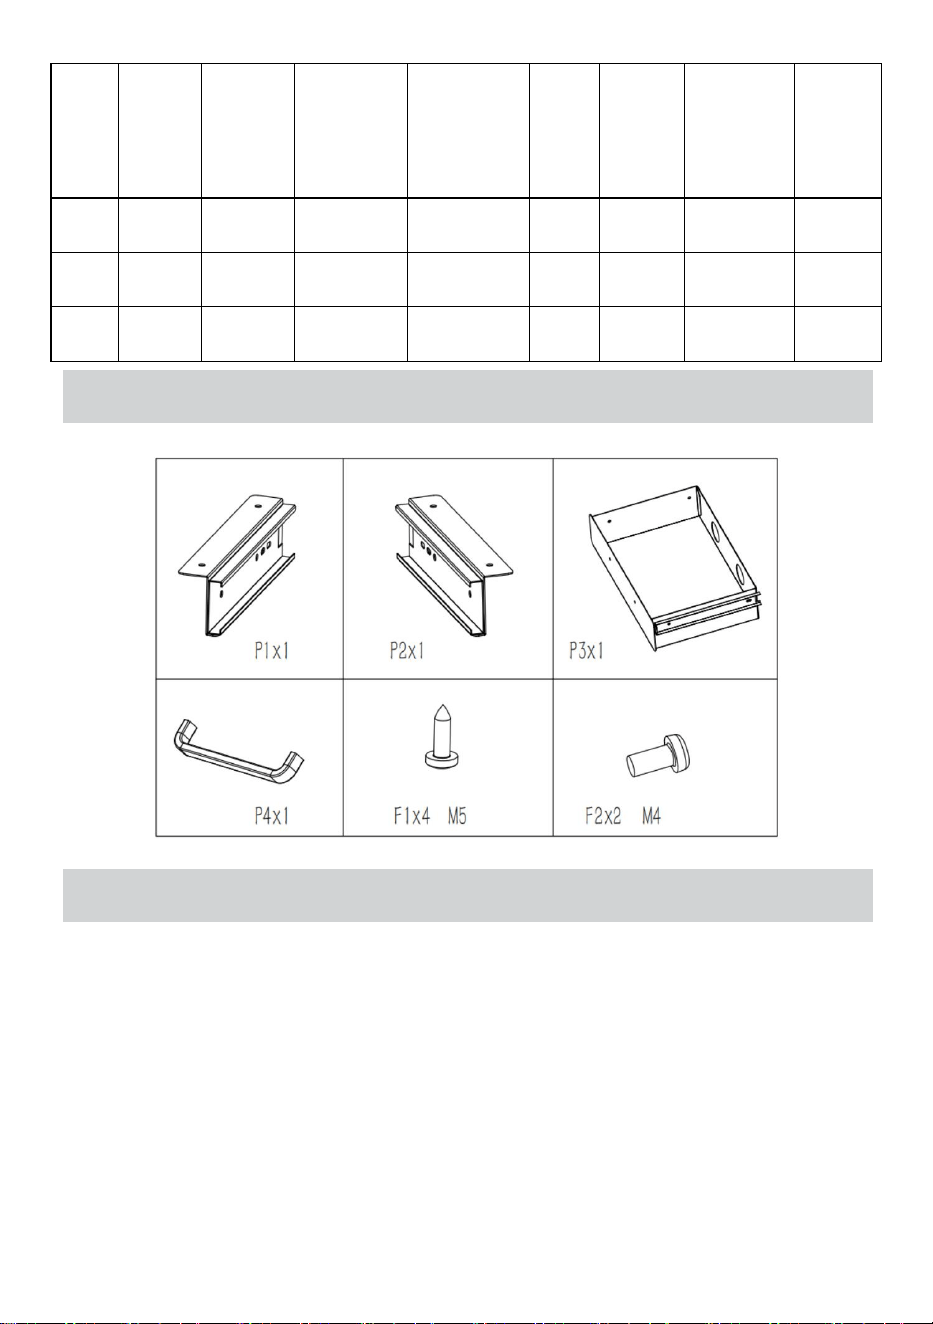
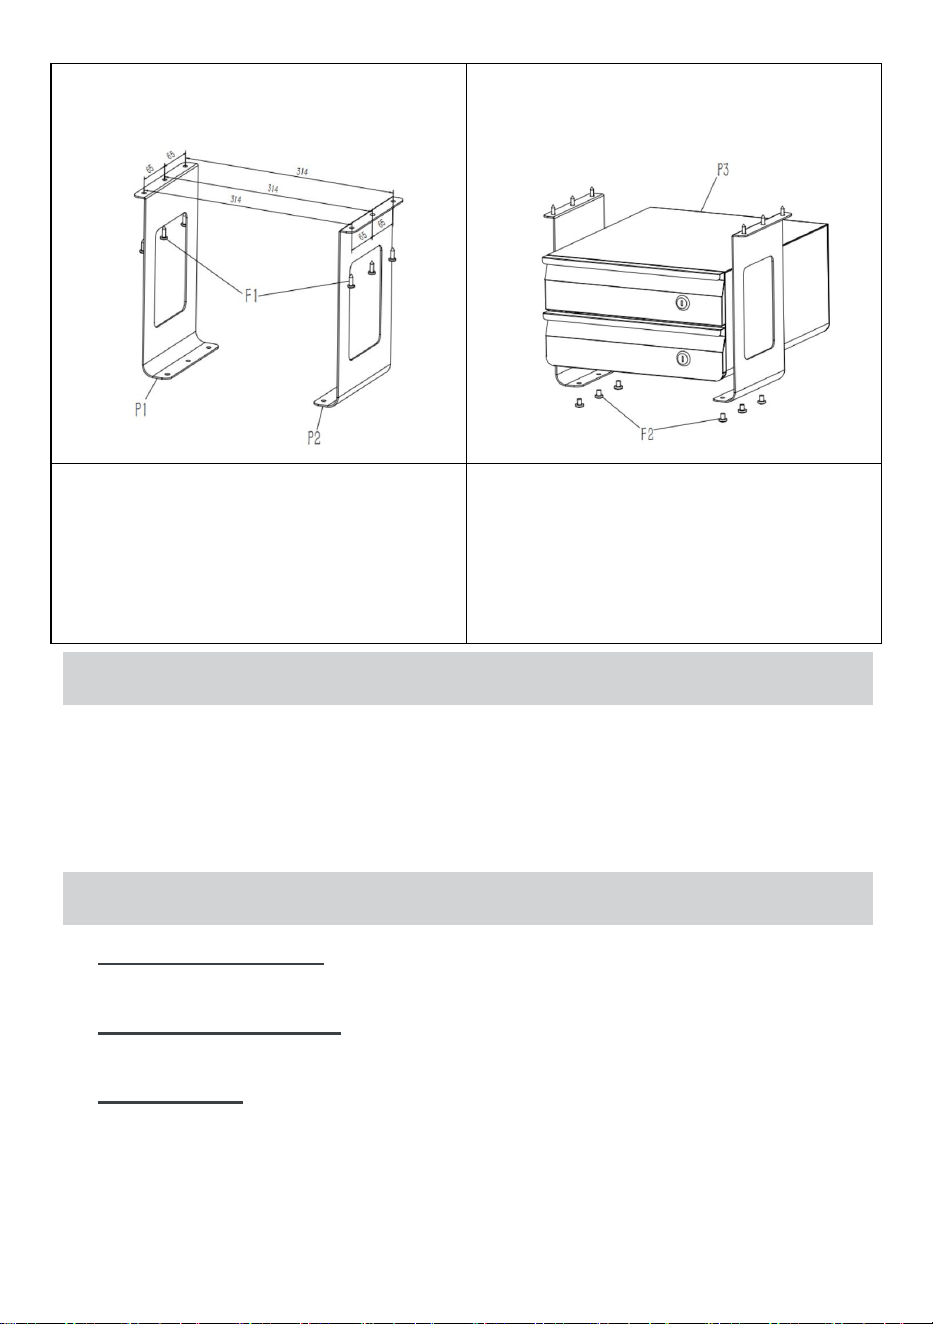
Part List - CT-3
INSTALLATION INSTRUCTIONS - CT-3
Step 1 : Assemble P1 and P2
using screw F1
Step2:Assemble P3 with the
component from Step 1 using screw
F2.
Step3: Assemble the product under
desk.
Finished

- 6 -
PRECAUTIONS FOR USE
1.Gently pull the handle to open or close the drawer smoothly.
2.Avoid pulling the drawer violently to prevent damage to the slide rail or
derailment of the drawer.
TROUBLESHOOTING INSTRUCTIONS
1. Drawer is not stable: Check if the slide rail is installed correctly and the
bolts are tight.
2. Drawer is difficult to pull: Check if there is foreign matter or damage on
the slide rail, clean the slide rail or replace it if necessary.
3. Drawer is loose: Retighten all fixing bolts.
MAINTENANCE
1. Check all drawer fastenings regularly to ensure they are securely
fastened.
2. Avoid using corrosive or abrasive cleaning agents

- 7 -
Manufacturer: Shanghaimuxinmuyeyouxiangongsi
Address: Shuangchenglu 803nong11hao1602A-1609shi, baoshanqu,
shanghai 200000 CN.
Imported to AUS: SIHAO PTY LTD. 1 ROKEVA STREETEASTWOOD NSW
2122 Australia
Imported to USA: Sanven Technology Ltd. Suite 250, 9166 Anaheim Place,
Rancho Cucamonga, CA 91730
REP
EC
E-CrossStu GmbH
Mainzer Landstr.69, 60329 Frankfurt am Main.
REP
UK
YH CONSULTING LIMITED.
C/O YH Consulting Limited Office 147, Centurion House,
London Road, Staines-upon-Thames, Surrey, TW18 4AX
Technical Support and E-Warranty Certificate
www.vevor.com/support

- 8 -
Technique Certificat d'assistance et de garantie électronique
www.vevor.com/support
Tiroir sous le bureau
MODÈLE : CT-1 / CT-2 / CT-3
Nous continuons à nous engager à vous fournir des outils à des prix compétitifs.
« Économisez la moitié », « Moitié prix » ou toute autre expression similaire utilisée par
nous uniquement
représente une estimation des économies dont vous pourriez bénéficier en achetant
certains outils
avec nous par rapport aux grandes marques et ne signifie pas nécessairement couverture
toutes les catégories d'outils que nous proposons. Nous vous rappelons de bien vouloir
vérifier soigneusement
lorsque vous passez une commande chez nous si vous êtes réellement Économie
Moitié par rapport aux plus grandes marques.

- 9 -

- 1 -
MODÈLE : CT-1 / CT-2 / CT-3
BESOIN D'AIDE? CONTACTEZ-NOUS!
Vous avez des questions sur les produits ? Vous avez besoin d'une
assistance technique ? N'hésitez pas à nous contacter :
Assistance technique et certificat de garantie électronique
www.vevor.com/support
Il s'agit de la notice d'utilisation d'origine. Veuillez lire attentivement toutes
les instructions du manuel avant de l'utiliser. VEVOR se réserve le droit
d'interpréter clairement notre manuel d'utilisation. L'apparence du produit
dépend du produit que vous avez reçu. Veuillez nous excuser, nous ne
vous informerons plus en cas de mise à jour technologique ou logicielle
Under Desk Drawer
CT-1
CT-2
CT-3

- 2 -
de notre produit.
SAFETY INSTRUCTIONS
Avertissement - Pour réduire le risque de blessure, l'utilisateur doit
lire attentivement le manuel d'instructions.
Avertissement – Assurez-vous de porter des gants lorsque vous
utilisez ce produit.
1.1 Assurez-vous de lire et de comprendre toutes les instructions avant
d'assembler et d'installer ce produit.
1.2 Assurez-vous d’utiliser les outils et les fixations appropriés pour
l’installation et évitez d’utiliser des substituts inadaptés.
1.3 Soyez prudent lors de l'installation pour éviter de pincer les mains
ou d'autres parties du corps.
1.4 Ne stockez pas d’articles dans le tiroir qui dépassent la charge
recommandée afin d’éviter des blessures ou des dommages dus à la chute
du tiroir.
Product Description
Les tiroirs sous le bureau sont un type de tiroir utilisé pour ranger et
organiser des outils, des pièces ou d'autres articles, généralement installés
sous un établi. Ils aident à garder la zone de travail propre et ordonnée,
permettant aux utilisateurs d'accéder facilement aux outils ou aux articles
dont ils ont besoin à tout moment.
Les tiroirs sous le bureau peuvent être largement utilisés dans les ateliers,
les laboratoires, les maisons, les garages, les bureaux et divers autres
endroits, ce qui permet de stocker et de récupérer facilement toutes sortes
d'outils ou d'articles nécessaires.
Product Parameter
Modèl
couch
Longue
Longue
Avec des
Avec
Moye
Rails en
doublu
- 3 -
e
es de
tiroirs
ur
totale
du tiroir
ur du
tiroir
intérieu
r
séparateu
rs
verrouilla
ge
u
acier
inoxydab
le
re
CT-1
1
13
pouces
12
pouces
×
×
2
pièce
s
√
1
CT-2
1
13
pouces
12,6
pouces
√
√
×
√
1
CT-3
2
13
pouces
12,6
pouces
√
√
×
√
2
Part List - CT-1
INSTALLATION INSTRUCTIONS - CT-1

- 4 -
Étape 1 : Assembler P1 et P2 à
l'aide de la vis F1
Étape 2 : Assemblez P4 et P3 à
l'aide de la vis F2
Étape 3 : Assemblez les
composants des étapes 1 et 2
Étape 4 : Assemblez le produit
sous le bureau. Terminé
Part List - CT-2
INSTALLATION INSTRUCTIONS - CT-2
- 5 -
Étape 1 : Assembler P1 et P2 à
l'aide de la vis F1
Étape 2 : Assemblez P3 avec le
composant de l’étape 1 à l’aide de
la vis F2.
Étape 3 : Assemblez le produit sous
le bureau.
Fini
Part List - CT-3
INSTALLATION INSTRUCTIONS - CT-3

- 6 -
Étape 1 : Assembler P1 et P2 à
l'aide de la vis F1
Étape 2 : Assemblez P3 avec le
composant de l’étape 1 à l’aide de
la vis F2.
Étape 3 : Assemblez le produit sous
le bureau.
Fini
PRECAUTIONS FOR USE
1. Tirez doucement sur la poignée pour ouvrir ou fermer le tiroir en
douceur.
2. Évitez de tirer violemment sur le tiroir pour éviter d'endommager le rail
coulissant ou de faire dérailler le tiroir.
TROUBLESHOOTING INSTRUCTIONS
4. Le tiroir n'est pas stable : vérifiez si le rail coulissant est correctement
installé et si les boulons sont serrés.
5. Le tiroir est difficile à tirer : vérifiez s'il y a des corps étrangers ou des
dommages sur le rail coulissant, nettoyez le rail coulissant ou remplacez-le si
nécessaire.
6. Le tiroir est desserré : Resserrez tous les boulons de fixation.

- 7 -
MAINTENANCE
1. Vérifiez régulièrement toutes les fixations des tiroirs pour vous assurer
qu'elles sont solidement fixées.
3. Évitez d'utiliser des produits de nettoyage corrosifs ou abrasifs

- 8 -
Fabricant : Shanghaimuxinmuyeyouxiangongsi
Adresse : Shuangchenglu 803nong11hao1602A-1609shi, baoshanqu,
Shanghai 200000 CN.
Importé en Australie : SIHAO PTY LTD. 1 ROKEVA STREETEASTWOOD
NSW 2122 Australie
Importé aux États-Unis : Sanven Technology Ltd. Suite 250, 9166 Anaheim
Place, Rancho Cucamonga, CA 91730
REP
EC
E-CrossStu GmbH
Mainzer Landstr.69, 60329 Frankfurt am Main.
REP
UK
YH CONSULTING LIMITED.
C/O YH Consulting Limited Office 147, Centurion House,
London Road, Staines-upon-Thames, Surrey, TW18 4AX
Technique Certificat d'assistance et de garantie électronique
www.vevor.com/support

- 9 -
Technisch Support und E-Garantie-Zertifikat
www.vevor.com/support
Schublade unter dem Schreibtisch
MODELL: CT-1 / CT-2 / CT-3
Wir sind weiterhin bestrebt, Ihnen Werkzeuge zu wettbewerbsfähigen Preisen anzubieten.
"Sparen Sie die Hälfte", "Halber Preis" oder andere ähnliche Ausdrücke, die wir nur
verwenden
stellt eine Schätzung der Einsparungen dar, die Sie durch den Kauf bestimmter Werkzeuge
erzielen können
mit uns im Vergleich zu den großen Top-Marken und bedeutet nicht unbedingt, Abdeckung
alle von uns angebotenen Werkzeugkategorien. Wir möchten Sie bitten, zu überprüfen
sorgfältig
wenn Sie bei uns eine Bestellung aufgeben, wenn Sie tatsächlich Speichern
Hälfte im Vergleich mit den Top-Großmarken.

- 10 -

- 1 -
MODELL: CT-1 / CT-2 / CT-3
Brauchen Sie Hilfe? Kontaktieren Sie uns!
Sie haben Fragen zu unseren Produkten? Sie benötigen technischen
Support? Dann kontaktieren Sie uns gerne:
Technischer Support und E-Garantie-Zertifikat
www.vevor.com/support
Dies ist die Originalanleitung. Bitte lesen Sie alle Anweisungen sorgfältig
durch, bevor Sie das Gerät in Betrieb nehmen. VEVOR behält sich eine
klare Auslegung unserer Bedienungsanleitung vor. Das Erscheinungsbild
des Produkts richtet sich nach dem Produkt, das Sie erhalten haben. Bitte
verzeihen Sie uns, dass wir Sie nicht erneut informieren, wenn es
Under Desk Drawer
CT-1
CT-2
CT-3

- 2 -
Technologie- oder Software-Updates für unser Produkt gibt .
SAFETY INSTRUCTIONS
Warnung – Um das Verletzungsrisiko zu verringern, muss der
Benutzer die Bedienungsanleitung sorgfältig lesen.
Achtung: Tragen Sie bei der Verwendung dieses Produkts
unbedingt Handschuhe.
1.1 Bitte lesen und verstehen Sie alle Anweisungen, bevor Sie dieses
Produkt zusammenbauen und installieren.
1.2 Stellen Sie sicher, dass Sie für die Installation die richtigen
Werkzeuge und Befestigungen verwenden und vermeiden Sie die
Verwendung ungeeigneter Ersatzmaterialien.
1.3 Bitte seien Sie bei der Installation vorsichtig, um ein Einklemmen der
Hände oder anderer Körperteile zu vermeiden.
1.4 Bewahren Sie in der Schublade keine Gegenstände auf, die die
empfohlene Belastung überschreiten, um Verletzungen oder Schäden
durch Herunterfallen der Schublade zu vermeiden.
Product Description
Untertischschubladen sind Schubladen, die zur Aufbewahrung und
Organisation von Werkzeugen, Teilen oder anderen Gegenständen
verwendet werden und normalerweise unter einer Werkbank angebracht
sind. Sie helfen dabei, den Arbeitsbereich sauber und ordentlich zu halten,
und ermöglichen Benutzern jederzeit bequemen Zugriff auf die benötigten
Werkzeuge oder Gegenstände.
Schubladen unter dem Schreibtisch können vielseitig in Werkstätten,
Laboren, Wohnungen, Garagen, Büros und an vielen anderen Orten
eingesetzt werden und ermöglichen die bequeme Aufbewahrung und
Bereitstellung aller Arten von notwendigen Werkzeugen oder
Gegenständen.
- 3 -
Product Parameter
Mod
ell
Schubladensch
ichten
Gesamtlä
nge der
Schublad
e
Innenlä
nge der
Schubl
ade
Mit
Trennwä
nden
Mit
sperr
en
Nab
e
Schie
nen
aus
Edelst
ahl
Innensc
huh
CT-
1
1
13 Zoll
12 Zoll
×
×
2
Stü
ck
√
1
CT-
2
1
13 Zoll
12,6
Zoll
√
√
×
√
1
CT-
3
2
13 Zoll
12,6
Zoll
√
√
×
√
2
Part List - CT-1
INSTALLATION INSTRUCTIONS - CT-1
- 4 -
Schritt 1: P1 und P2 mit Schraube
F1 zusammenbauen
Schritt 2: P4 und P3 mit Schraube
F2 zusammenbauen
Schritt 3: Zusammenbau der
Komponenten aus Schritt 1 und
Schritt 2
Schritt 4: Montieren Sie das
Produkt unter dem Schreibtisch.
Fertig
Part List - CT-2
INSTALLATION INSTRUCTIONS - CT-2

- 5 -
Schritt 1: P1 und P2 mit Schraube
F1 zusammenbauen
Schritt 2: Montieren Sie P3 mit der
Komponente aus Schritt 1 mithilfe
der Schraube F2.
Schritt 3: Montieren Sie das Produkt
unter dem Schreibtisch.
Fertig
Part List - CT-3
INSTALLATION INSTRUCTIONS - CT-3
- 6 -
Schritt 1: P1 und P2 mit Schraube
F1 zusammenbauen
Schritt 2: Montieren Sie P3 mit der
Komponente aus Schritt 1 mithilfe
der Schraube F2.
Schritt 3: Montieren Sie das Produkt
unter dem Schreibtisch.
Fertig
PRECAUTIONS FOR USE
1. Ziehen Sie leicht am Griff, um die Schublade sanft zu öffnen oder zu
schließen.
2. Vermeiden Sie heftiges Ziehen an der Schublade, um eine
Beschädigung der Gleitschiene oder ein Entgleisen der Schublade zu
verhindern.
TROUBLESHOOTING INSTRUCTIONS
7. Schublade ist instabil: Überprüfen Sie, ob die Gleitschiene richtig
installiert ist und die Schrauben fest angezogen sind.
8. Schublade lässt sich schwer ziehen: Gleitschiene auf Fremdkörper oder
Beschädigungen prüfen, Gleitschiene reinigen oder ggf. austauschen.
9. Schublade ist locker: Ziehen Sie alle Befestigungsschrauben wieder fest.

- 7 -
MAINTENANCE
1. Überprüfen Sie regelmäßig alle Schubladenverschlüsse auf ihren festen
Sitz.
4. Vermeiden Sie die Verwendung von ätzenden oder scheuernden
Reinigungsmitteln

- 8 -
Hersteller: Shanghaimuxinmuyeyouxiangongsi
Adresse: Shuangchenglu 803nong11hao1602A-1609shi, baoshanqu,
Shanghai 200000 CN.
Nach AUS importiert: SIHAO PTY LTD. 1 ROKEVA STREETEASTWOOD
NSW 2122 Australien
Importiert in die USA: Sanven Technology Ltd. Suite 250, 9166 Anaheim
Place, Rancho Cucamonga, CA 91730
REP
EC
E-CrossStu GmbH
Mainzer Landstr.69, 60329 Frankfurt am Main.
REP
UK
YH CONSULTING LIMITED.
C/O YH Consulting Limited Office 147, Centurion House,
London Road, Staines-upon-Thames, Surrey, TW18 4AX
Technisch Support und E-Garantie-Zertifikat
www.vevor.com/support

- 9 -
Tecnico Supporto e certificato di garanzia elettronica
www.vevor.com/support
Cassetto sotto la scrivania
MODELLO: CT-1 / CT-2 / CT-3
Continuiamo a impegnarci per fornirvi strumenti a prezzi competitivi.
"Risparmia la metà", "Metà prezzo" o altre espressioni simili utilizzate solo da noi
rappresenta una stima dei risparmi che potresti ottenere acquistando determinati strumenti
con noi rispetto ai grandi marchi top e non significa necessariamente copertina
tutte le categorie di strumenti da noi offerti. Ti ricordiamo cortesemente di verificare
accuratamente
quando effettui un ordine con noi se sei effettivamente Risparmio
Metà rispetto ai marchi più importanti.

- 1 -
MODELLO: CT-1 / CT-2 / CT-3
HAI BISOGNO DI AIUTO? CONTATTACI!
Hai domande sui prodotti? Hai bisogno di supporto tecnico? Non
esitare a contattarci:
Supporto tecnico e certificato di garanzia elettronica
www.vevor.com/support
Questa è l'istruzione originale, si prega di leggere attentamente tutte le
istruzioni del manuale prima di utilizzare. VEVOR si riserva una chiara
interpretazione del nostro manuale utente. L'aspetto del prodotto sarà
soggetto al prodotto ricevuto. Vi preghiamo di perdonarci se non vi
informeremo di nuovo se ci sono aggiornamenti tecnologici o software sul
Under Desk Drawer
CT-1
CT-2
CT-3

- 2 -
nostro prodotto.
SAFETY INSTRUCTIONS
Attenzione - Per ridurre il rischio di lesioni, l'utente deve leggere
attentamente il manuale di istruzioni.
Attenzione: assicurarsi di indossare guanti quando si utilizza questo
prodotto.
1.1 Assicurarsi di leggere e comprendere tutte le istruzioni prima di
montare e installare questo prodotto.
1.2 Assicurarsi di utilizzare gli strumenti e i fissaggi corretti per
l'installazione ed evitare di utilizzare sostituti non idonei.
1.3 Durante l'installazione, prestare attenzione a non pizzicare le mani o
altre parti del corpo.
1.4 Non riporre nel cassetto oggetti che superino il carico consigliato per
evitare lesioni o danni dovuti alla caduta del cassetto.
Product Description
I cassetti sotto la scrivania sono un tipo di cassetto utilizzato per riporre e
organizzare utensili, parti o altri oggetti, solitamente installati sotto un
banco da lavoro. Aiutano a mantenere l'area di lavoro pulita e ordinata,
consentendo agli utenti di accedere comodamente agli utensili o agli
oggetti di cui hanno bisogno in qualsiasi momento.
I cassetti sottoscrivania possono essere ampiamente utilizzati in officine,
laboratori, case, garage, uffici e molti altri luoghi, rendendo comodo riporre
e recuperare tutti i tipi di utensili o oggetti necessari.
Product Parameter
Modell
o
strati
del
cassett
o
Lunghezz
a totale
del
cassetto
Lunghezz
a
cassetto
interno
Con
diviso
ri
Con
serratur
a
Centr
o
Rotai
e in
acciai
o inox
rivestimen
to
- 3 -
CT-1
1
13 pollici
12 pollici
×
×
2
pezzi
√
1
CT-2
1
13 pollici
12,6
pollici
√
√
×
√
1
CT-3
2
13 pollici
12,6
pollici
√
√
×
√
2
Part List - CT-1
INSTALLATION INSTRUCTIONS - CT-1
Fase 1: assemblare P1 e P2
utilizzando la vite F1
Fase 2: assemblare P4 e P3
utilizzando la vite F2

- 4 -
Fase 3: assemblare il componente
dal passaggio 1 e dal passaggio 2
Fase 4: assemblare il prodotto
sotto la scrivania. Finito
Part List - CT-2
INSTALLATION INSTRUCTIONS - CT-2

- 5 -
Fase 1: assemblare P1 e P2
utilizzando la vite F1
Fase 2: assemblare P3 con il
componente della fase 1 utilizzando
la vite F2.
Fase 3: Montare il prodotto sotto la
scrivania.
Finito
Part List - CT-3
INSTALLATION INSTRUCTIONS - CT-3
- 6 -
Fase 1: assemblare P1 e P2
utilizzando la vite F1
Fase 2: assemblare P3 con il
componente della fase 1 utilizzando
la vite F2.
Fase 3: Montare il prodotto sotto la
scrivania.
Finito
PRECAUTIONS FOR USE
1. Tirare delicatamente la maniglia per aprire o chiudere delicatamente il
cassetto.
2. Evitare di tirare il cassetto con violenza per evitare di danneggiare la
guida di scorrimento o di far deragliare il cassetto.
TROUBLESHOOTING INSTRUCTIONS
10.Il cassetto non è stabile: controllare che la guida di scorrimento sia
installata correttamente e che i bulloni siano serrati.
11. Il cassetto è difficile da estrarre: controllare che la guida di scorrimento
non sia danneggiata o non vi siano corpi estranei; pulire la guida di
scorrimento o sostituirla se necessario.
12.Il cassetto è allentato: Serrare nuovamente tutti i bulloni di fissaggio.

- 7 -
MAINTENANCE
1. Controllare regolarmente tutti i dispositivi di fissaggio dei cassetti per
assicurarsi che siano ben fissati.
5. Evitare l'uso di detergenti corrosivi o abrasivi

- 8 -
Produttore: Shanghaimuxinmuyeyouxiangongsi
Indirizzo: Shuangchenglu 803nong11hao1602A-1609shi, baoshanqu,
shanghai 200000 CN.
Importato in AUS: SIHAO PTY LTD. 1 ROKEVA STREETEASTWOOD NSW
2122 Australia
Importato negli USA: Sanven Technology Ltd. Suite 250, 9166 Anaheim
Place, Rancho Cucamonga, CA 91730
REP
EC
E-CrossStu GmbH
Mainzer Landstr.69, 60329 Frankfurt am Main.
REP
UK
YH CONSULTING LIMITED.
C/O YH Consulting Limited Office 147, Centurion House,
London Road, Staines-upon-Thames, Surrey, TW18 4AX
Tecnico Supporto e certificato di garanzia elettronica
www.vevor.com/support

- 9 -
Técnico Certificado de soporte y garantía electrónica
www.vevor.com/support
Cajón debajo del escritorio
MODELO: CT-1 / CT-2 / CT-3
Seguimos comprometidos a brindarle herramientas a precios competitivos.
"Ahorra la mitad", "mitad de precio" o cualquier otra expresión similar utilizada únicamente
por nosotros
Representa una estimación de los ahorros que podría obtener al comprar ciertas
herramientas.
con nosotros en comparación con las principales marcas líderes y no significa
necesariamente cubrir
Todas las categorías de herramientas que ofrecemos. Le recordamos que debe verificar
con cuidado
Cuando realiza un pedido con nosotros, si realmente está Ahorro
Medio en comparación con las principales marcas líderes.

- 10 -

- 1 -
MODELO: CT-1 / CT-2 / CT-3
¿NECESITA AYUDA? ¡CONTÁCTENOS!
¿Tiene preguntas sobre el producto? ¿Necesita asistencia técnica? No
dude en ponerse en contacto con nosotros:
Soporte técnico y certificado de garantía electrónica
www.vevor.com/support
Estas son las instrucciones originales, lea atentamente todas las
instrucciones del manual antes de utilizar el producto. VEVOR se reserva
una interpretación clara de nuestro manual de usuario. La apariencia del
producto estará sujeta al producto que recibió. Perdónenos por no
informarle nuevamente si hay actualizaciones de tecnología o software
Under Desk Drawer
CT-1
CT-2
CT-3

- 2 -
en nuestro producto.
SAFETY INSTRUCTIONS
Advertencia: Para reducir el riesgo de lesiones, el usuario debe leer
atentamente el manual de instrucciones.
Advertencia: Asegúrese de usar guantes al utilizar este producto.
1.1 Asegúrese de leer y comprender todas las instrucciones antes de
ensamblar e instalar este producto.
1.2 Asegúrese de utilizar las herramientas y fijaciones correctas para la
instalación y evite utilizar sustitutos inadecuados.
1.3 Tenga cuidado durante la instalación para evitar pillarse las manos u
otras partes del cuerpo.
1.4 No guarde en el cajón artículos que excedan la carga recomendada
para evitar lesiones o daños debido a la caída del cajón.
Product Description
Los cajones debajo del escritorio son un tipo de cajón que se utiliza para
almacenar y organizar herramientas, piezas u otros elementos,
generalmente instalados debajo de un banco de trabajo. Ayudan a
mantener el área de trabajo ordenada y limpia, lo que permite a los
usuarios acceder cómodamente a las herramientas o elementos que
necesitan en cualquier momento.
Los cajones debajo del escritorio se pueden usar ampliamente en talleres,
laboratorios, hogares, garajes, oficinas y varios otros lugares, lo que hace
que sea conveniente almacenar y recuperar todo tipo de herramientas o
artículos necesarios.
Product Parameter
Model
capas
Longitu
Longitu
Con
Con
Centr
Rieles de
transatlánti
- 3 -
o
de
cajone
s
d total
del
cajón
d del
cajón
interior
divisore
s
cerra
r
o
acero
inoxidabl
e
co
TC-1
1
13
pulgada
s
12
pulgada
s
×
×
2
pieza
s
√
1
TC-2
1
13
pulgada
s
12,6
pulgada
s
√
√
×
√
1
CT-3
2
13
pulgada
s
12,6
pulgada
s
√
√
×
√
2
Part List - CT-1
INSTALLATION INSTRUCTIONS - CT-1
- 4 -
Paso 1: Ensamble P1 y P2 usando
el tornillo F1
Paso 2: Ensamble P4 y P3 usando
el tornillo F2
Paso 3: Ensamble el componente
del Paso 1 y el Paso 2
Paso 4: Ensamble el producto
debajo del escritorio. Listo.
Part List - CT-2
INSTALLATION INSTRUCTIONS - CT-2

- 5 -
Paso 1: Ensamble P1 y P2 usando
el tornillo F1
Paso 2: Ensamble P3 con el
componente del Paso 1 usando el
tornillo F2.
Paso 3: Ensamble el producto
debajo del escritorio.
Finalizado
Part List - CT-3
INSTALLATION INSTRUCTIONS - CT-3
- 6 -
Paso 1: Ensamble P1 y P2 usando
el tornillo F1
Paso 2: Ensamble P3 con el
componente del Paso 1 usando el
tornillo F2.
Paso 3: Ensamble el producto
debajo del escritorio.
Finalizado
PRECAUTIONS FOR USE
1. Tire suavemente de la manija para abrir o cerrar el cajón con suavidad.
2. Evite tirar violentamente del cajón para evitar dañar el riel deslizante o
descarrilar el cajón.
TROUBLESHOOTING INSTRUCTIONS
13.El cajón no es estable: Verifique que el riel deslizante esté instalado
correctamente y que los pernos estén apretados.
14.Es difícil sacar el cajón: verifique si hay cuerpos extraños o daños en el
riel deslizante, limpie el riel deslizante o reemplácelo si es necesario.
15.El cajón está suelto: Vuelva a apretar todos los pernos de fijación.

- 7 -
MAINTENANCE
1. Revise periódicamente todos los cierres de los cajones para asegurarse
de que estén bien fijados.
6. Evite utilizar agentes de limpieza corrosivos o abrasivos.

- 8 -
Fabricante: Shanghaimuxinmuyeyouxiangongsi
Dirección: Shuangchenglu 803nong11hao1602A-1609shi, baoshanqu,
shanghai 200000 CN.
Importado a AUS: SIHAO PTY LTD. 1 ROKEVA STREETEASTWOOD NSW
2122 Australia
Importado a EE. UU.: Sanven Technology Ltd. Suite 250, 9166 Anaheim
Place, Rancho Cucamonga, CA 91730
REP
EC
E-CrossStu GmbH
Mainzer Landstr.69, 60329 Frankfurt am Main.
REP
UK
YH CONSULTING LIMITED.
C/O YH Consulting Limited Office 147, Centurion House,
London Road, Staines-upon-Thames, Surrey, TW18 4AX
Técnico Certificado de soporte y garantía electrónica
www.vevor.com/support

- 9 -
Techniczny Wsparcie i certyfikat e-gwarancji
www.vevor.com/support
Szuflada pod biurkiem
MODELE: CT-1 / CT-2 / CT-3
Nadal staramy się oferować Państwu narzędzia w konkurencyjnych cenach.
„Oszczędź połowę”, „Połowa ceny” lub jakiekolwiek inne podobne wyrażenia używane
wyłącznie przez nas
przedstawia szacunkowe oszczędności, jakie możesz uzyskać kupując określone
narzędzia
z nami w porównaniu do głównych, najlepszych marek i niekoniecznie oznacza to okładka
wszystkie kategorie narzędzi oferowanych przez nas. Przypominamy o sprawdzeniu
ostrożnie
gdy składasz u nas zamówienie, jeśli faktycznie Oszczędność
Połowa w porównaniu z wiodącymi markami.

- 10 -

- 1 -
MODELE: CT-1 / CT-2 / CT-3
POTRZEBUJESZ POMOCY? SKONTAKTUJ SIĘ Z NAMI!
Masz pytania dotyczące produktu? Potrzebujesz wsparcia
technicznego? Skontaktuj się z nami:
Wsparcie techniczne i certyfikat e-gwarancji
www.vevor.com/support
To jest oryginalna instrukcja, przed użyciem należy uważnie przeczytać
wszystkie instrukcje. VEVOR zastrzega sobie jasną interpretację naszej
instrukcji obsługi. Wygląd produktu będzie zależał od produktu, który
otrzymałeś. Prosimy o wybaczenie, że nie poinformujemy Cię ponownie,
jeśli w naszym produkcie pojawią się jakiekolwiek aktualizacje
Under Desk Drawer
CT-1
CT-2
CT-3

- 2 -
technologiczne lub oprogramowania.
SAFETY INSTRUCTIONS
Ostrzeżenie - Aby zminimalizować ryzyko obrażeń, użytkownik
powinien uważnie przeczytać instrukcję obsługi.
Ostrzeżenie: Podczas stosowania tego produktu należy nosić
rękawiczki.
1.1 Przed montażem i instalacją tego produktu należy dokładnie
przeczytać i zrozumieć wszystkie instrukcje.
1.2 Należy upewnić się, że do montażu używane są właściwe narzędzia
i elementy mocujące oraz unikać stosowania nieodpowiednich
zamienników.
1.3 Zachowaj ostrożność podczas montażu, aby nie przytrzasnąć dłoni
lub innych części ciała.
1.4 Nie przechowuj w szufladzie przedmiotów o ładowności
przekraczającej zalecane, aby uniknąć obrażeń ciała lub uszkodzeń
spowodowanych wypadnięciem szuflady.
Product Description
Szuflady pod biurkiem to rodzaj szuflady używanej do przechowywania i
organizowania narzędzi, części lub innych przedmiotów, zwykle
instalowanych pod stołem roboczym. Pomagają utrzymać porządek i ład w
miejscu pracy, umożliwiając użytkownikom wygodny dostęp do
potrzebnych narzędzi lub przedmiotów w dowolnym momencie.
Szuflady pod biurkiem znajdują szerokie zastosowanie w warsztatach,
laboratoriach, domach, garażach, biurach i wielu innych miejscach,
umożliwiając wygodne przechowywanie i wyszukiwanie wszelkiego
rodzaju niezbędnych narzędzi lub przedmiotów.
Product Parameter
- 3 -
Mod
el
warst
wy
szufla
d
Całkowi
ta
długość
szuflad
y
Długość
wewnętrz
nej
szuflady
Z
przegródka
mi
Z
zame
k
Centru
m
Szyny ze
stali
nierdzew
nej
liniowi
ec
CT-
1
1
13 cali
12 cali
×
×
2 szt.
√
1
CT-
2
1
13 cali
12,6 cala
√
√
×
√
1
CT-
3
2
13 cali
12,6 cala
√
√
×
√
2
Part List - CT-1
INSTALLATION INSTRUCTIONS - CT-1

- 4 -
Krok 1: Złóż P1 i P2 za pomocą
śruby F1
Krok 2: Złóż P4 i P3 za pomocą
śruby F2
Krok 3: Złóż komponent z kroku 1 i
kroku 2
Krok 4: Złóż produkt pod biurkiem.
Gotowe
Part List - CT-2
INSTALLATION INSTRUCTIONS - CT-2

- 5 -
Krok 1: Złóż P1 i P2 za pomocą
śruby F1
Krok 2: Złóż P3 z komponentem z
kroku 1 za pomocą śruby F2.
Krok 3: Złóż produkt pod biurkiem.
Gotowy
Part List - CT-3
INSTALLATION INSTRUCTIONS - CT-3

- 6 -
Krok 1: Złóż P1 i P2 za pomocą
śruby F1
Krok 2: Złóż P3 z komponentem z
kroku 1 za pomocą śruby F2.
Krok 3: Złóż produkt pod biurkiem.
Gotowy
PRECAUTIONS FOR USE
1. Delikatnie pociągnij za uchwyt, aby płynnie otworzyć lub zamknąć
szufladę.
2. Unikaj gwałtownego ciągnięcia szuflady, aby zapobiec uszkodzeniu
prowadnicy lub wypadnięciu szuflady.
TROUBLESHOOTING INSTRUCTIONS
16.Szuflada nie jest stabilna: Sprawdź, czy szyna ślizgowa jest
zamontowana prawidłowo i czy śruby są dobrze dokręcone.
17.Szuflada trudno się wysuwa: Sprawdź, czy na szynie ślizgowej nie ma
ciał obcych lub uszkodzeń, wyczyść szynę ślizgową lub, w razie konieczności,
wymień ją.
18.Szuflada jest luźna: Dokręć wszystkie śruby mocujące.

- 7 -
MAINTENANCE
1. Regularnie sprawdzaj wszystkie zapięcia szuflad, aby mieć pewność, że
są solidnie zamocowane.
7. Unikaj stosowania żrących lub ściernych środków czyszczących.

- 8 -
Producent: Shanghaimuxinmuyeyouxiangongsi
Adres: Shuangchenglu 803nong11hao1602A-1609shi, baoshanqu, szanghaj
200000 CN.
Importowane do AUS: SIHAO PTY LTD. 1 ROKEVA STREETEASTWOOD
NSW 2122 Australia
Importowane do USA: Sanven Technology Ltd. Suite 250, 9166 Anaheim
Place, Rancho Cucamonga, CA 91730
REP
EC
E-CrossStu GmbH
Mainzer Landstr.69, 60329 Frankfurt am Main.
REP
UK
YH CONSULTING LIMITED.
C/O YH Consulting Limited Office 147, Centurion House,
London Road, Staines-upon-Thames, Surrey, TW18 4AX
Techniczny Wsparcie i certyfikat e-gwarancji
www.vevor.com/support

- 9 -
Technisch Ondersteuning en E-garantiecertificaat
www.vevor.com/support
Onder bureau lade
MODEL: CT-1 / CT-2 / CT-3
Wij streven er voortdurend naar om u gereedschappen tegen concurrerende prijzen te
leveren.
"Bespaar de helft", "halve prijs" of andere soortgelijke uitdrukkingen die alleen door ons
worden gebruikt
geeft een schatting van de besparingen die u kunt behalen door bepaalde gereedschappen
te kopen
bij ons vergeleken met de grote topmerken en betekent niet per se dat omslag
alle categorieën van tools die wij aanbieden. U wordt vriendelijk verzocht om te verifiëren
voorzichtig
wanneer u een bestelling bij ons plaatst, als u daadwerkelijk Besparing
Half in vergelijking met de grote topmerken.

- 10 -

- 1 -
MODEL: CT-1 / CT-2 / CT-3
HULP NODIG? NEEM CONTACT MET ONS OP!
Heeft u vragen over het product? Heeft u technische ondersteuning
nodig? Neem dan gerust contact met ons op:
Technische ondersteuning en e-garantiecertificaat
www.vevor.com/support
Dit is de originele instructie, lees alle handleidingen zorgvuldig door
voordat u het product gebruikt. VEVOR behoudt zich een duidelijke
interpretatie van onze gebruikershandleiding voor. Het uiterlijk van het
product is afhankelijk van het product dat u hebt ontvangen. Vergeef ons
dat we u niet opnieuw zullen informeren als er technologie- of
Under Desk Drawer
CT-1
CT-2
CT-3

- 2 -
software-updates voor ons product zijn .
SAFETY INSTRUCTIONS
Waarschuwing - Om het risico op letsel te verkleinen, dient de
gebruiker de gebruiksaanwijzing zorgvuldig te lezen.
Waarschuwing: draag handschoenen wanneer u dit product
gebruikt.
1.1 Zorg ervoor dat u alle instructies leest en begrijpt voordat u dit
product monteert en installeert.
1.2 Zorg ervoor dat u de juiste gereedschappen en
bevestigingsmiddelen gebruikt voor de installatie en vermijd het gebruik
van ongeschikte vervangende middelen.
1.3 Wees voorzichtig bij de installatie, zodat uw handen of andere
lichaamsdelen niet bekneld raken.
1.4 Bewaar geen voorwerpen in de lade die de aanbevolen belasting
overschrijden, om letsel of schade te voorkomen doordat de lade eraf valt.
Product Description
Onder bureauladen zijn een type lade dat wordt gebruikt voor het
opbergen en organiseren van gereedschap, onderdelen of andere items,
meestal geïnstalleerd onder een werkbank. Ze helpen om het werkgebied
netjes en ordelijk te houden, zodat gebruikers op elk gewenst moment
gemakkelijk toegang hebben tot de gereedschappen of items die ze nodig
hebben.
Laden onder bureaus kunnen op veel plaatsen worden gebruikt in
werkplaatsen, laboratoria, woningen, garages, kantoren en op allerlei
andere plekken. Ze maken het gemakkelijk om allerlei benodigde
gereedschappen of artikelen op te bergen en eruit te halen.
Product Parameter
- 3 -
Model
lade
lagen
Totale
lade
lengte
Lengte
binnenlade
Met
verdelers
Met
slot
Middelpunt
RVS
rails
voering
CT-1
1
13 inch
12 inch
×
×
2 stuks
√
1
CT-2
1
13 inch
12,6 inch
√
√
×
√
1
CT-3
2
13 inch
12,6 inch
√
√
×
√
2
Part List - CT-1
INSTALLATION INSTRUCTIONS - CT-1
Stap 1: Monteer P1 en P2 met
behulp van schroef F1
Stap 2: Monteer P4 en P3 met
behulp van schroef F2
- 4 -
Stap 3: Monteer het onderdeel uit
stap 1 en stap 2
Stap 4: Monteer het product onder
het bureau. Afgerond
Part List - CT-2
INSTALLATION INSTRUCTIONS - CT-2

- 5 -
Stap 1: Monteer P1 en P2 met
behulp van schroef F1
Stap 2: Monteer P3 met het
onderdeel uit stap 1 en gebruik
hiervoor schroef F2.
Stap 3: Monteer het product onder
het bureau.
Afgerond
Part List - CT-3
INSTALLATION INSTRUCTIONS - CT-3

- 6 -
Stap 1: Monteer P1 en P2 met
behulp van schroef F1
Stap 2: Monteer P3 met het
onderdeel uit stap 1 en gebruik
hiervoor schroef F2.
Stap 3: Monteer het product onder
het bureau.
Afgerond
PRECAUTIONS FOR USE
1. Trek voorzichtig aan de hendel om de lade soepel te openen of te
sluiten.
2. Trek niet te hard aan de lade om schade aan de geleiders of ontsporing
van de lade te voorkomen.
TROUBLESHOOTING INSTRUCTIONS
19.Lade is niet stabiel: Controleer of de geleiders correct zijn gemonteerd en
of de bouten goed vastzitten.
20.De lade gaat moeilijk open: Controleer of er vreemde voorwerpen of
beschadigingen op de geleiders zitten, reinig de geleiders of vervang ze indien
nodig.
21.Lade zit los: Draai alle bevestigingsbouten weer vast.

- 7 -
MAINTENANCE
1. Controleer regelmatig of alle ladebevestigingen goed vastzitten.
8. Vermijd het gebruik van bijtende of schurende schoonmaakmiddelen

- 8 -
Fabrikant: Shanghaimuxinmuyeyouxiangongsi
Adres: Shuangchenglu 803nong11hao1602A-1609shi, baoshanqu, shanghai
200000 CN.
Geïmporteerd naar AUS: SIHAO PTY LTD. 1 ROKEVA
STREETEASTWOOD NSW 2122 Australië
Geïmporteerd naar de VS: Sanven Technology Ltd. Suite 250, 9166 Anaheim
Place, Rancho Cucamonga, CA 91730
REP
EC
E-CrossStu GmbH
Mainzer Landstr.69, 60329 Frankfurt am Main.
REP
UK
YH CONSULTING LIMITED.
C/O YH Consulting Limited Office 147, Centurion House,
London Road, Staines-upon-Thames, Surrey, TW18 4AX
Technisch Ondersteuning en E-garantiecertificaat
www.vevor.com/support

- 9 -
Teknisk Support och e-garanticertifikat
www.vevor.com/support
Under skrivbordslådan
MODELL: CT-1 / CT-2 / CT-3
Vi fortsätter att vara engagerade i att ge dig verktyg till konkurrenskraftiga priser.
"Spara hälften", "Halva priset" eller andra liknande uttryck som endast används av oss
representerar en uppskattning av besparingar du kan dra nytta av att köpa vissa verktyg
med oss jämfört med de stora toppmärkena och betyder inte nödvändigtvis att täcka
alla kategorier av verktyg som erbjuds av oss. Du påminns vänligen om att verifiera
försiktigt
när du gör en beställning hos oss om du faktiskt gör det Sparande
Halv i jämförelse med de främsta varumärkena.

- 1 -
MODELL: CT-1 / CT-2 / CT-3
BEHÖVER HJÄLP? KONTAKTA OSS!
Har du produktfrågor? Behöver du teknisk support? Kontakta oss
gärna:
Teknisk support och e-garanticertifikat
www.vevor.com/support
Detta är den ursprungliga instruktionen, läs alla instruktioner noggrant
innan du använder den. VEVOR reserverar sig för en tydlig tolkning av vår
användarmanual. Utseendet på produkten är beroende av den produkt du
fått. Ursäkta oss att vi inte kommer att informera dig igen om det finns
någon teknik eller mjukvaruuppdateringar på vår produkt.
Under Desk Drawer
CT-1
CT-2
CT-3

- 2 -
SAFETY INSTRUCTIONS
Varning - För att minska risken för skada måste användaren läsa
bruksanvisningen noggrant.
Varning- Var noga med att bära handskar när du använder denna
produkt.
1.1 Se till att läsa och förstå alla instruktioner innan du monterar och
installerar denna produkt.
1.2 Se till att använda rätt verktyg och fästen för installationen och
undvik att använda olämpliga ersättningsprodukter.
1.3 Var försiktig vid installationen för att undvika att klämma händer eller
andra kroppsdelar.
1.4 Förvara inte föremål i lådan som överstiger den rekommenderade
belastningen för att undvika skador eller skador på grund av att lådan faller
av.
Product Description
Under skrivbordslådor är en typ av lådor som används för att lagra och
organisera verktyg, delar eller andra föremål, vanligtvis installerade under
en arbetsbänk. De hjälper till att hålla arbetsområdet snyggt och ordnat,
vilket gör att användarna enkelt kan komma åt de verktyg eller föremål de
behöver när som helst.
Under skrivbordslådor kan användas i stor utsträckning i verkstäder,
laboratorier, hem, garage, kontor och olika andra platser, vilket gör det
bekvämt att lagra och hämta alla typer av nödvändiga verktyg eller
föremål.
Product Parameter
Modell
lådlager
Total
lådlängd
Inre
lådlängd
Med
avdelare
Med
låsa
Nav
Rostfria
skenor
liner
CT-1
1
13 tum
12 tum
×
×
2 st
√
1
- 3 -
CT-2
1
13 tum
12,6 tum
√
√
×
√
1
CT-3
2
13 tum
12,6 tum
√
√
×
√
2
Part List - CT-1
INSTALLATION INSTRUCTIONS - CT-1
Steg 1: Montera P1 och P2 med
skruv F1
Steg 2: Montera P4 och P3 med
skruv F2

- 4 -
Steg 3: Montera komponenten
från steg 1 och steg 2
Steg 4: Montera produkten under
skrivbordet. Färdig
Part List - CT-2
INSTALLATION INSTRUCTIONS - CT-2

- 5 -
Steg 1: Montera P1 och P2 med
skruv F1
Steg 2: Montera P3 med
komponenten från steg 1 med skruv
F2.
Steg 3: Montera produkten under
skrivbordet.
Färdig
Part List - CT-3
INSTALLATION INSTRUCTIONS - CT-3
- 6 -
Steg 1: Montera P1 och P2 med
skruv F1
Steg 2: Montera P3 med
komponenten från steg 1 med skruv
F2.
Steg 3: Montera produkten under
skrivbordet.
Färdig
PRECAUTIONS FOR USE
1. Dra försiktigt i handtaget för att öppna eller stänga lådan smidigt.
2. Undvik att dra i lådan våldsamt för att förhindra skador på glidskenan
eller urspårning av lådan.
TROUBLESHOOTING INSTRUCTIONS
22.Lådan är inte stabil: Kontrollera om glidskenan är korrekt installerad och
bultarna är åtdragna.
23.Lådan är svår att dra: Kontrollera om det finns främmande föremål eller
skador på glidlisten, rengör glidlisten eller byt ut den vid behov.
24.Lådan är lös: Dra åt alla fästbultar igen.

- 7 -
MAINTENANCE
1. Kontrollera alla lådfästen regelbundet för att säkerställa att de sitter
ordentligt fast.
9. Undvik att använda frätande eller slipande rengöringsmedel

Tillverkare: Shanghaimuxinmuyeyouxiangongsi
Adress: Shuangchenglu 803nong11hao1602A-1609shi, baoshanqu,
shanghai 200000 CN.
Importerad till AUS: SIHAO PTY LTD. 1 ROKEVA STREETEASTWOOD
NSW 2122 Australien
Importerad till USA: Sanven Technology Ltd. Suite 250, 9166 Anaheim Place,
Rancho Cucamonga, CA 91730
REP
EC
E-CrossStu GmbH
Mainzer Landstr.69, 60329 Frankfurt am Main.
REP
UK
YH CONSULTING LIMITED.
C/O YH Consulting Limited Office 147, Centurion House,
London Road, Staines-upon-Thames, Surrey, TW18 4AX
Teknisk Support och e-garanticertifikat
www.vevor.com/support