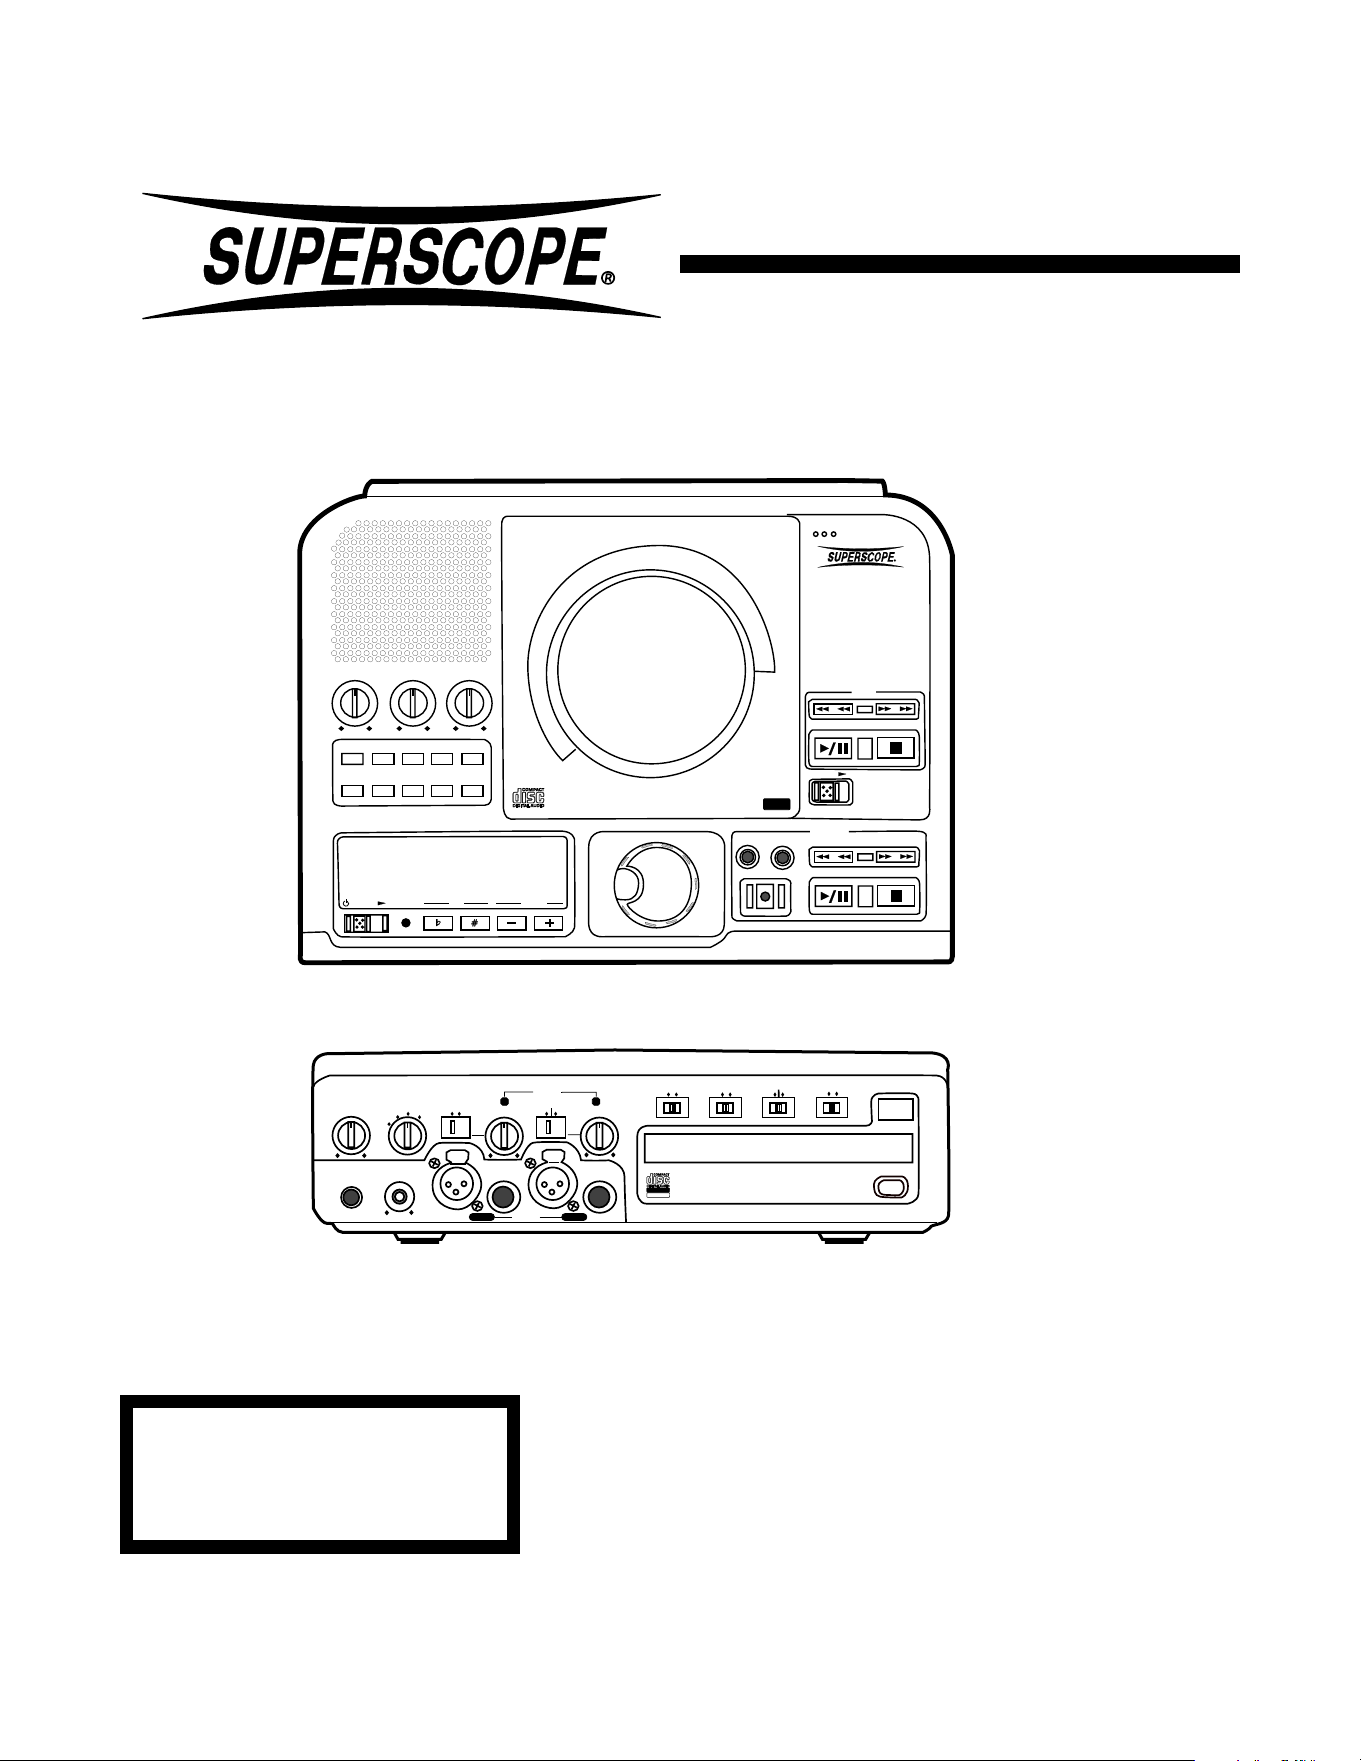
CD Recording System
PSD300
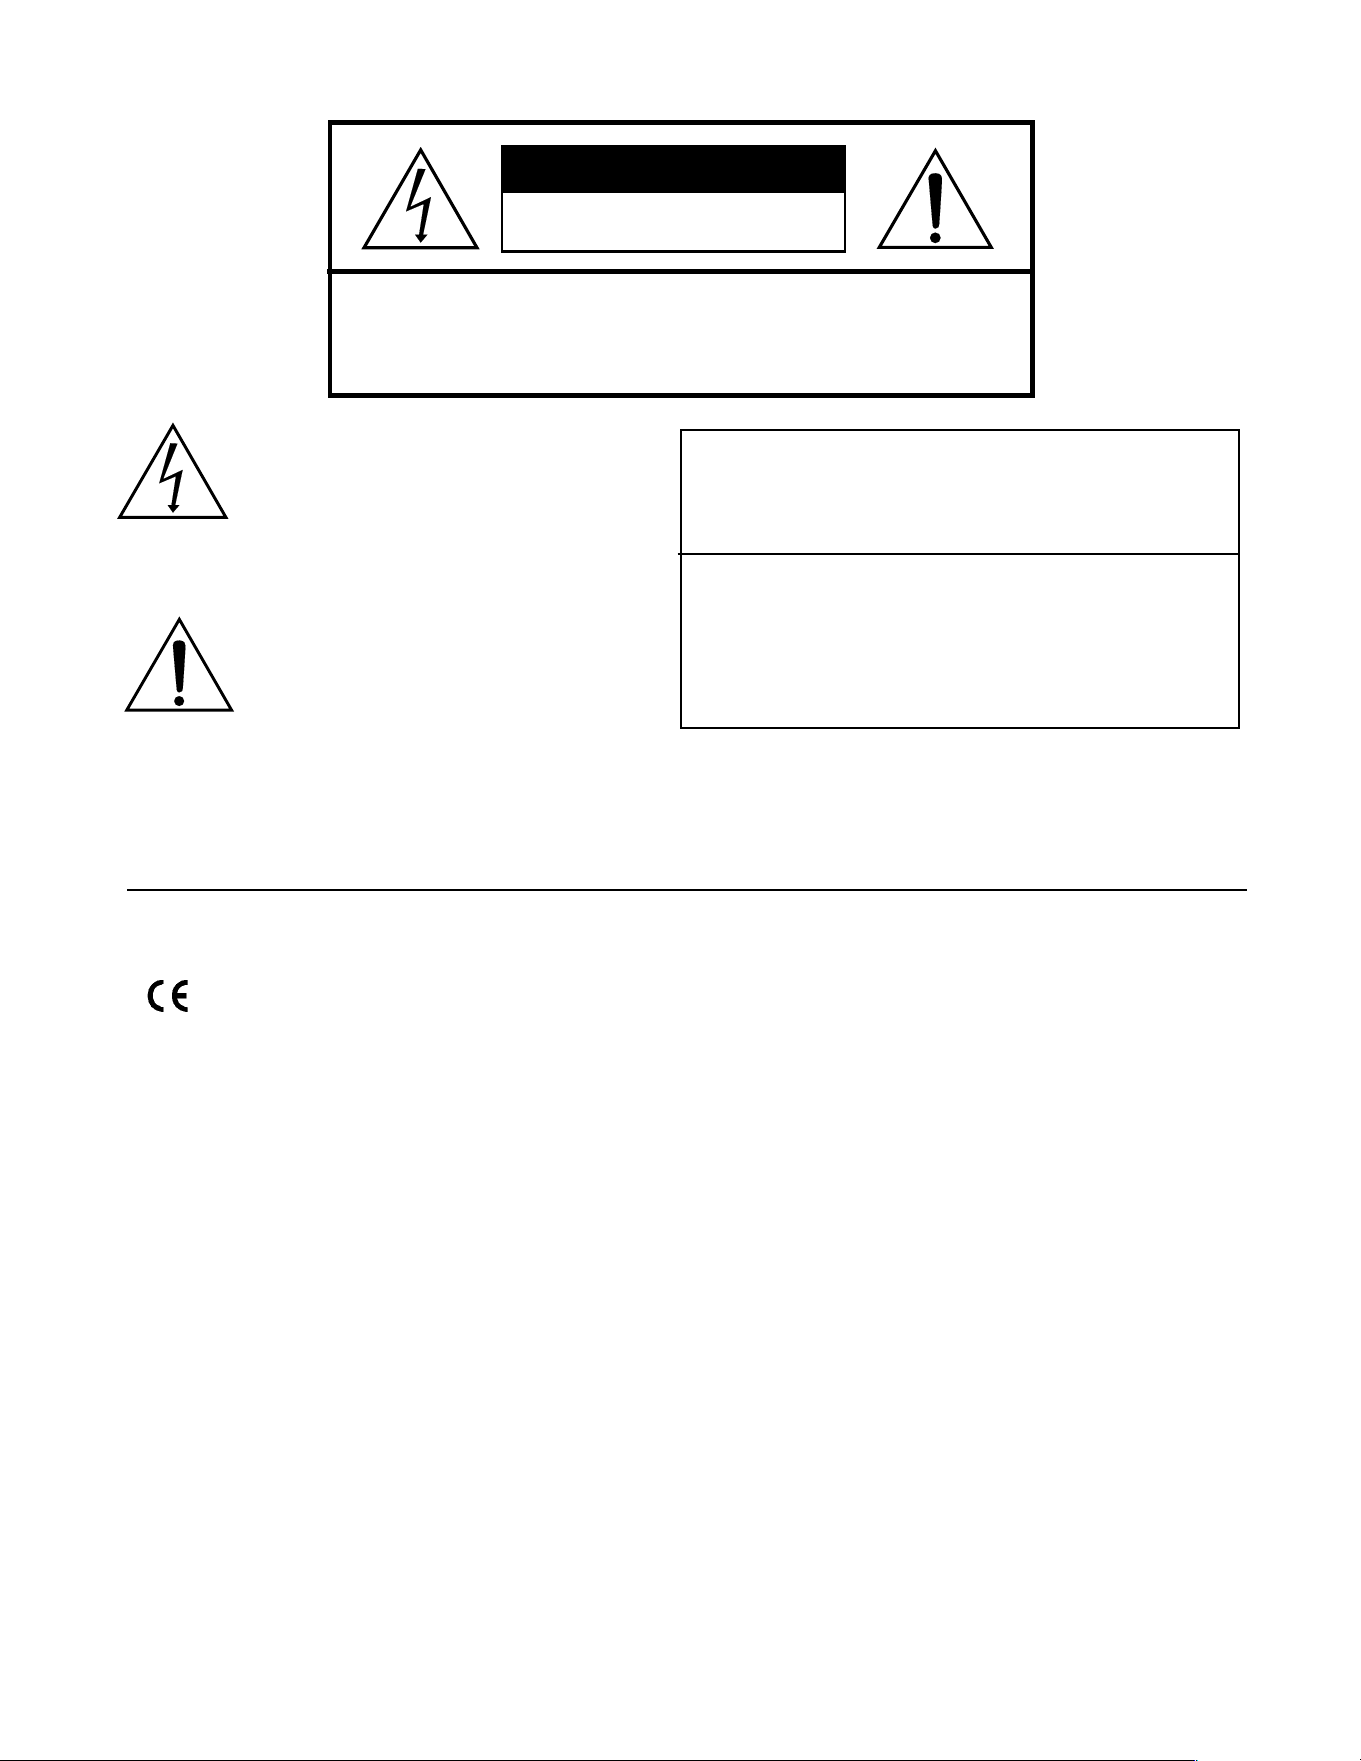
CLASS 1 LASER PRODUCT
LUOKAN 1 LASERLAITE
KALSS 1 LASERAPPARAT
© 2002, Superscope Technologies
Owners Manual
PUSH
BASS
MID
TREBLE
TEXT VR PROG REPEAT
MENU/STORE
DISP SINGLE
A-B
CANCEL/DELETE
REC MODE
CD-RW PLAYBACK
CD RECORDING SYSTEM PSD300
MIC
PLAY
OPEN
REC/PLAY
ERASE FINALIZE
REC
SELECT
PUSH ENTER
POWER KEY TEMPOSTANDBY
PHONE/SPEAKER
LEVEL
PHONE SELECTOR
MIC/LINE
CD
LINE OUT AUX
PHONES
LINE OUT
ReWritable
Recordable
CD PLAY / RECORD
OPEN/CLOSE
MIX
SPLIT
MIC
STEREO
ONOFF
ALC
DIGITAL
ANALOG
INPUT
ONOFF
SPEAKER
MIC
LINE
INT
LINE
MIC
MIC/LINE
L
PUSH
R
MIC/LINE RIGHT
PUSH
LEFT
- 2 -
RISK OF ELECTRIC SHOCK
DO NOT OPEN
CAUTION
CAUTION: TO REDUCE THE RISK OF ELECTRIC SHOCK,
DO NOT REMOVE COVER (OR BACK)
NO USER-SERVICEABLE PARTS INSIDE
REFER SERVICING TO QUALIFIED SERVICE PERSONNEL
The lightning flash with arrowhead symbol,
within an equilateral triangle, is intended to
alert the user to the presence of uninsulated
"dangerous voltage" within the product's
enclosure that may be of sufficient
magnitude to constitute a risk of electric
shock to persons.
The exclamation point within an equilateral
triangle is intended to alert the user to the
presence of important operating and
maintenance (servicing) instructions in the
literature accompanying the appliance.
WARNING
TO REDUCE THE RISK OF FIRE OR ELECTRIC SHOCK,
DO NOT
EXPOSE THIS APPLIANCE TO RAIN OR MOISTURE.
LASER SAFETY
This unit employs lasers. Only a qualified service person
should remove the cover or attempt to service this device,
due to possible eye injury.
CAUTION
USE OF CONTROLS OR ADJUSTMENTS OR
PERFORMANCE OF PROCEDURE OTHER THAN
THOSE SPECIFIED HEREIN MAY RESULT IN
HAZARDOUS RADIATION EXPOSURE.
CE marking (only EU version)
This product is in conformity with the EMC directive
and low-voltage directive.
Equipment mains working system
This product complies with household power and safety
requirements in your area.
IMPORTANT: (For U.K. only)
This apparatus is fitted with an approved moulded 13 Amp
plug. To change a fuse in this type of plug proceed as follows:
1 Remove fuse cover and fuse.
2 Fix new fuse which should be a BS1362 5A, A.S.T.A.
or BSI approved type.
3 Refit the fuse cover.
If the fitted plug is not suitable for your socket outlets, it
should be cut off and an appropriate plug fitted in its place.
If the mains plug contains a fuse, this should have a value
of 5A. If a plug without a fuse is used, the fuse at the distri-
bution board should not be greater than 5A.
Note:
The severed plug must be destroyed to avoid pos-
sible shock hazard should it be inserted into a 13A socket
elsewhere.
HOW TO CONNECT A PLUG
The wires in this mains lead are coloured in accordance with
the following core:
GREEN
−and−YELLOW−"EARTH" ("E")
BLUE
−"NEUTRAL" ("N")
BROWN
−"LIVE" ("L")
As the colours of the wires in the mains lead of this apparatus
may not correspond with the coloured markings identifying
the terminals in your plug, proceed as follows:
1 The wire which is coloured green-and-yellow must be
connected to the terminal in the plug which is marked
with the letter "E" or by the earth symbol or coloured
green or green-and-yellow.
2 The wire which is coloured blue must be connected to
the terminal which is marked with the letter "N" or
coloured BLACK.
3 The wire which is coloured brown must be connected to
the terminal which is marked with the letter "L" or
coloured RED.
Before replacing the plug cover, make certain that the cord
grip is clamped over the sheath of the lead -- not simply
over the three wires.

- 3 -
SAFETY INSTRUCTIONS
READ BEFORE OPERATING EQUIPMENT
This product was designed and manufactured to meet
strict quality and safety standards. There are, however
some installation and operation precautions which you
should be particularly aware of.
1. Read Instructions – All the safety and operating
instructions should be read before the appliance is
operated.
2. Retain Instructions – The safety and operating
instructions should be retained for future reference.
3. Heed Warnings – All warnings on the appliance and in
the operating instructions should be adhered to.
4. Follow Instructions – All operating and use instructions
should be followed.
5. Water and Moisture – The appliance should not be
used near water – for example, near a bathtub,
washbowl, kitchen sink, laundry tub, in a wet base-
ment, or near a swimming pool, etc. Do not handle
with wet hands.
6. Heat – The appliance should be situated away from
heat sources such as radiators, heat registers, stoves,
or other appliances (including amplifiers) that produce
heat or open flames.
7. Cleaning – The appliance should be cleaned only as
recommended by the manufacturer.
8. Power sources – The appliance should be connected
to a power source only of the type described in the
operating instructions or as marked on the appliance.
9. Ground or Polarization – Do not defeat the grounding
or polarization of the appli-
ance, plug or cord.
10. Power Cord – Route power
and other cords so they are
not likely to be walked on or
pinched by items placed on or
against them. Pay particular attention to cords at
plugs, and receptacles.
11. Non-use Periods – The power cord of the appliance should
be unplugged from the outlet when left unused for a long
period of time.
12. Object and Liquid Entry – Care should be taken so that
objects do not fall and liquids are not spilled into the
enclosure through openings. Do not cover this appliance
with any cloths, newspapers, curtains, etc.
13. Damage Requiring Service – The appliance should be
serviced by qualified service personnel when:
A. The power-supply cord or the plug has been
damaged; or
B. Objects have fallen, or liquid has spilled into the
appliance; or
C. The appliance has been exposed to rain; or
D. The appliance does not appear to operate normally
or exhibits a marked change in performance; or
E. The appliance has been dropped, or the enclosure
damaged.
14. Servicing – The user should not attempt to service the
appliance beyond that described in the operating
instructions. All other servicing should be referred to
qualified service personnel.
AC polarized plug
and receptacle
This Class B digital apparatus meets all
requirements of the Canadian Interference
Causing Equipment Regulations.
Cet appareil numérique de la Class B respecte
toutes les exigences du Réglement sur le
matérier brouilleur du Canada.
NOTE:
This equipment has been tested and found to comply with
the limits for a Class B digital device, pursuant to Part 15 of
the FCC Rules. These limits are designed to provide
reasonable protection against harmful interference in a
residential installation. This equipment generates, uses and
can radiate radio frequency energy and, if not installed and
used in accordance with the instructions, may cause harmful
interference to radio communications. However, there is no
guarantee that interference will not occur in a particular
installation. If this equipment does cause harmful
interference to radio or television reception, which can be
determined by turning the equipment off and on, the user is
encouraged to try to correct the interference by one or more
of the following measures:
– Re-orient or relocate the receiving antenna.
– Increase the separation between the equipment and
receiver.
– Connect the equipment into an outlet on a circuit
different from that to which the receiver is connected.
– Consult the dealer or an experienced radio/TV
technician for help.
NOTE: Changes or modifications may cause this unit
to fail to comply with Part 15 of the FCC Rules and may
void the user's authority to operate the equipment.

Table of Contents
- 4 -
Topic page
Warnings ..............................................................2
Safety Instructions ................................................3
Table of Contents .................................................4
Introduction .......................................................... 5
Drive terminology .................................................5
Package contents .................................................6
Remote batteries ..................................................6
Connections (basic) .............................................. 6
Controls, Display (top)
1 Speaker grill ...................................................7
2 CD drive ................................................................ 7
3 MIC (microphone) ..........................................7
4 Model number ................................................7
5 Tone controls .................................................7
6 Control buttons
1 TEXT button...............................................7
2 VR button ...................................................7
3 PROG button .............................................7
4 REPEAT button ..........................................7
5 MENU/STORE button ................................8
REC menu table.........................................8
6 DISP button ...............................................9
7 REC MODE button ....................................9
8 SINGLE button.........................................10
9 A-B button ................................................10
10 CANCEL/DELETE button ........................10
7 PLAY controls ..............................................11
1 Fast backward search button ...................11
2 Fast forward search button ......................11
3 Play/Pause button ....................................11
4 Stop button ..............................................11
8 Open switch .................................................11
9 Standby POWER switch ..............................11
10 STANDBY light.............................................11
Control of tempo and pitch ................................11
11 KEY controls ................................................11
12 TEMPO controls ..........................................12
TUNING ...................................................12
13 Display .........................................................12
1 TOC .........................................................12
2 Record Indicator ......................................12
3 Pause Indicator .........................................12
4 Play Indicator ............................................12
5 PROG Indicator ........................................12
6 REPEAT Indicator .....................................12
7 DIGITAL Indicator .....................................13
8 Level meter ...............................................13
9 CD Indicator..............................................13
10 TEXT Indicator..........................................13
11 A-B Indicator .............................................13
12 TOTAL TRACK Indicator ...........................13
13 AUTO Indicator .........................................13
14 SYNC Indicator .........................................13
Topic page
14 Alphanumeric display ................................13
14 SELECT control ........................................13
15 REC/PLAY controls...................................13
1 ERASE button light ..................................14
2 FINALIZE button light ..............................14
3 REC button light.......................................14
4 CDR drive PLAY controls (see page 11)...14
Controls, Connections (front)
1 PHONE/SPEAKER LEVEL control ...........14
2 PHONE SELECTOR.................................14
3 MIC/LINE/INT controls and input jacks .....14
1 Left XLR or 1/4" input jack ........................15
2 Right XLR or 1/4" input jack......................15
3 Left LINE MIC switch ................................15
4 Left level control........................................15
5 Right LINE MIC INT switch .......................15
6 Right level control .....................................15
4 INPUT ANALOG/DIGITAL switch .............15
5 ALC OFF/ON switch .................................16
6 MIC SPLIT/STEREO/MIX switch..............16
7 SPEAKER OFF/ON switch .......................16
8 OPEN/CLOSE switch ...............................16
9 PHONES jack ...........................................16
10 LINE OUT level control .............................16
11 CDR drive (disc tray) .................................16
12 Remote control sensor..............................16
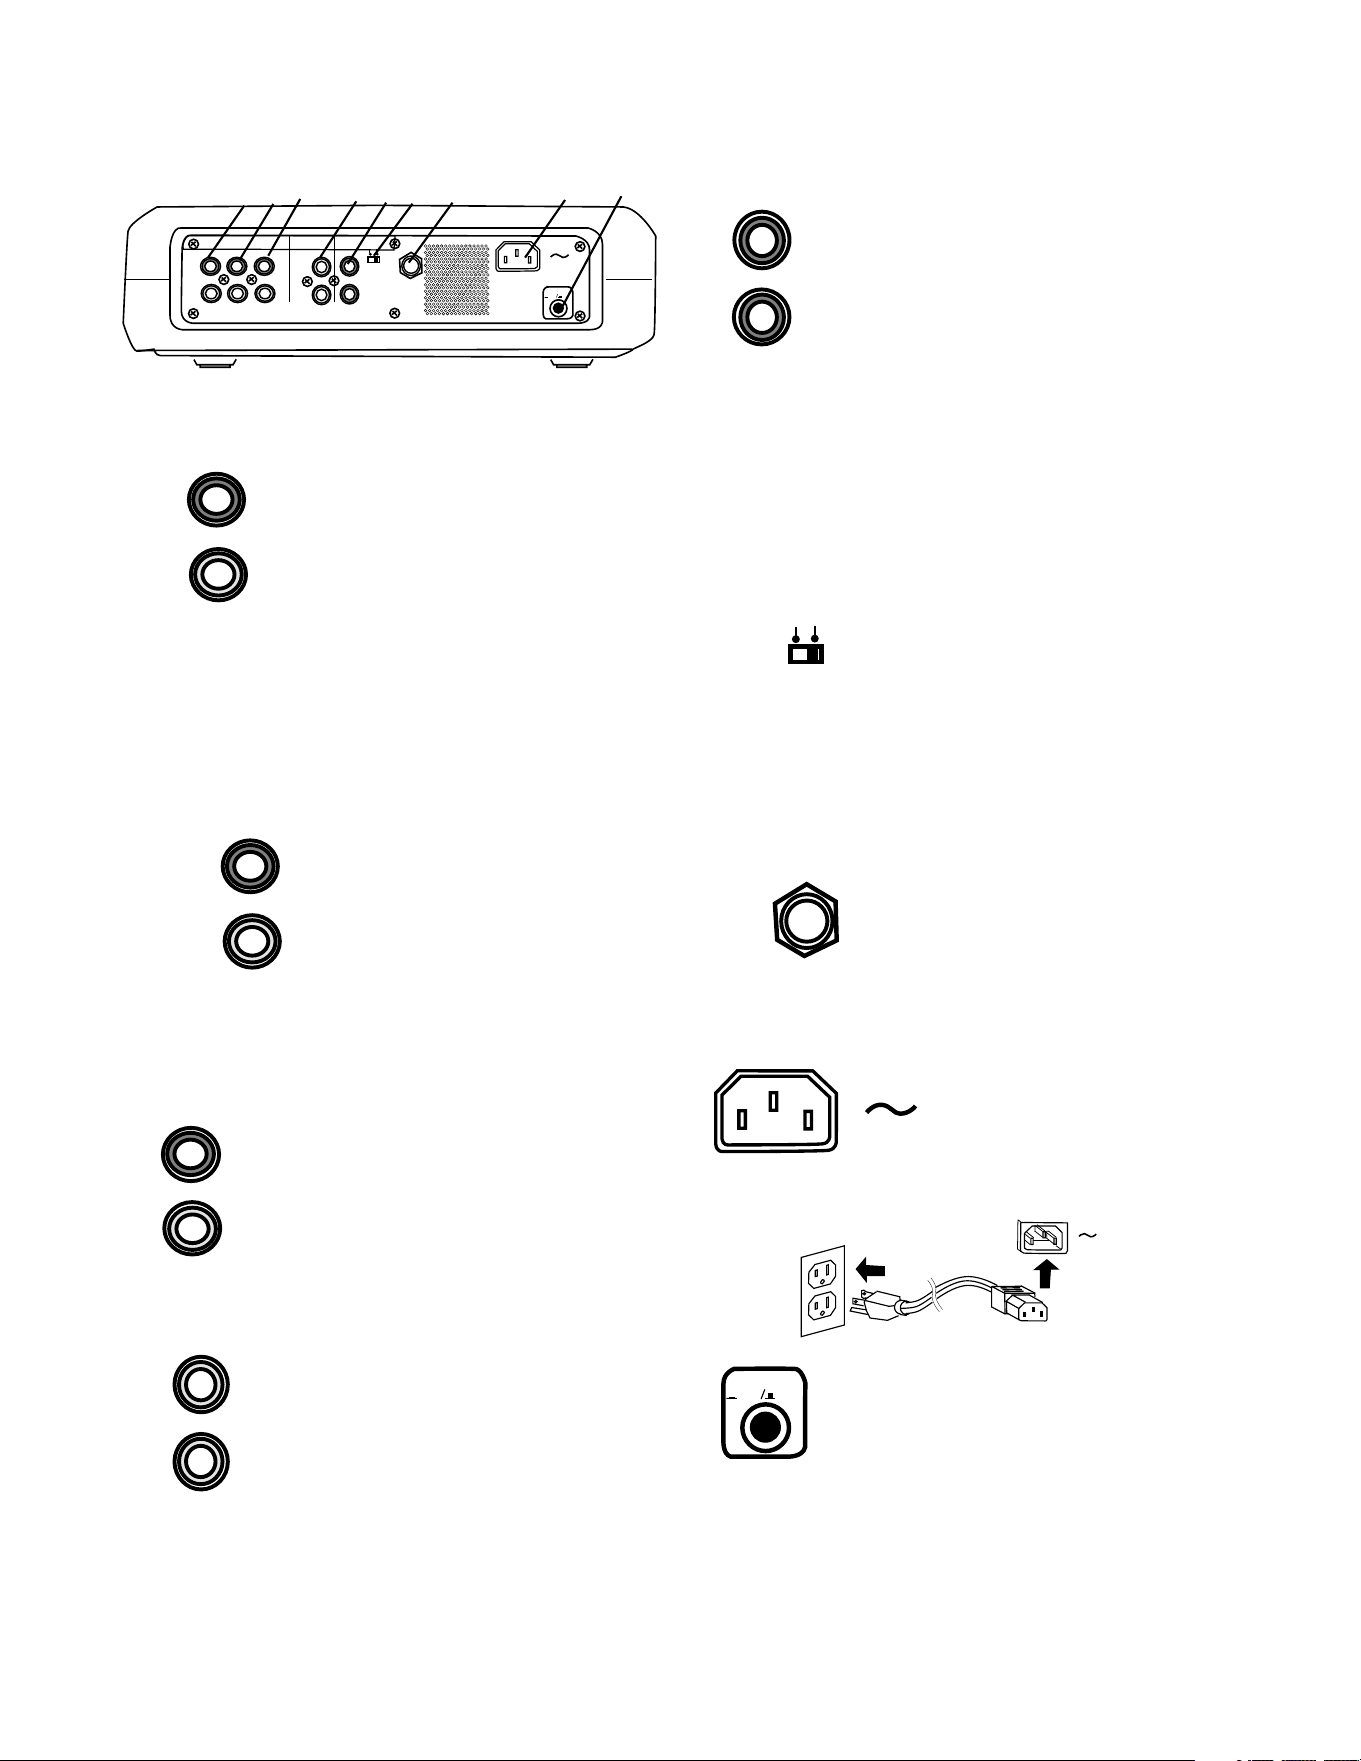
Controls, Connections (rear)
1 MIX OUT jacks .........................................17
2 LINE OUT jacks ........................................17
3 AUX IN jacks.............................................17
4 DIGITAL IN and OUT jacks.......................17
5 REMOTE RC-5 IN and OUT jacks............17
6 REMOTE EXT. INT. switch........................17
7 FOOT PEDAL jack....................................17
8 Power plug ................................................17
9 Power switch .............................................17
How to Play
How to Play a CD (basics) ...........................18
How to Pause...............................................18
How to Stop .................................................18
How to switch between drives ......................18
How to display time ......................................18
How to select tracks.....................................19
How to Search .............................................19
How to play a Single Track ...........................19
How to cue to music (cue to audio)..............20
How to adjust the cue point..........................20
How to use Voice Reduction ........................21
How to enter CHANGER MODE..................21
How to program tracks .................................21
How to erase a programed track ..............22
How to clear a program............................22
(table of contents continues)
- 5 -
Table of Contents continued
Introduction
PUSH
BASS
MID
TREBLE
TEXT
VR
PROG
REPEAT
MENU/STORE
DISP
SINGLE
A-B
CANCEL/DELETE
REC MODE
CD-RW PLAYBACK
CD RECORDING SYSTEM PSD300
MIC
PLAY
OPEN
REC/PLAY
ERASE FINALIZE
REC
SELECT
PUSH ENTER
POWER
KEY
TEMPO
STANDBY
PHONE/SPEAKER
LEVEL
PHONE SELECTOR
MIC/LINE
CD
LINE OUT AUX
PHONES
LINE OUT
ReWritable
Recordable
CD PLAY / RECORD
OPEN/CLOSE
MIX
SPLIT
MIC
STEREO
ONOFF
ALC
DIGITAL
ANALOG
INPUT
ONOFF
SPEAKER
MIC
LINE
INT
LINE
MIC
MIC/LINE
L
PUSH
R
MIC/LINE RIGHT
PUSH
LEFT
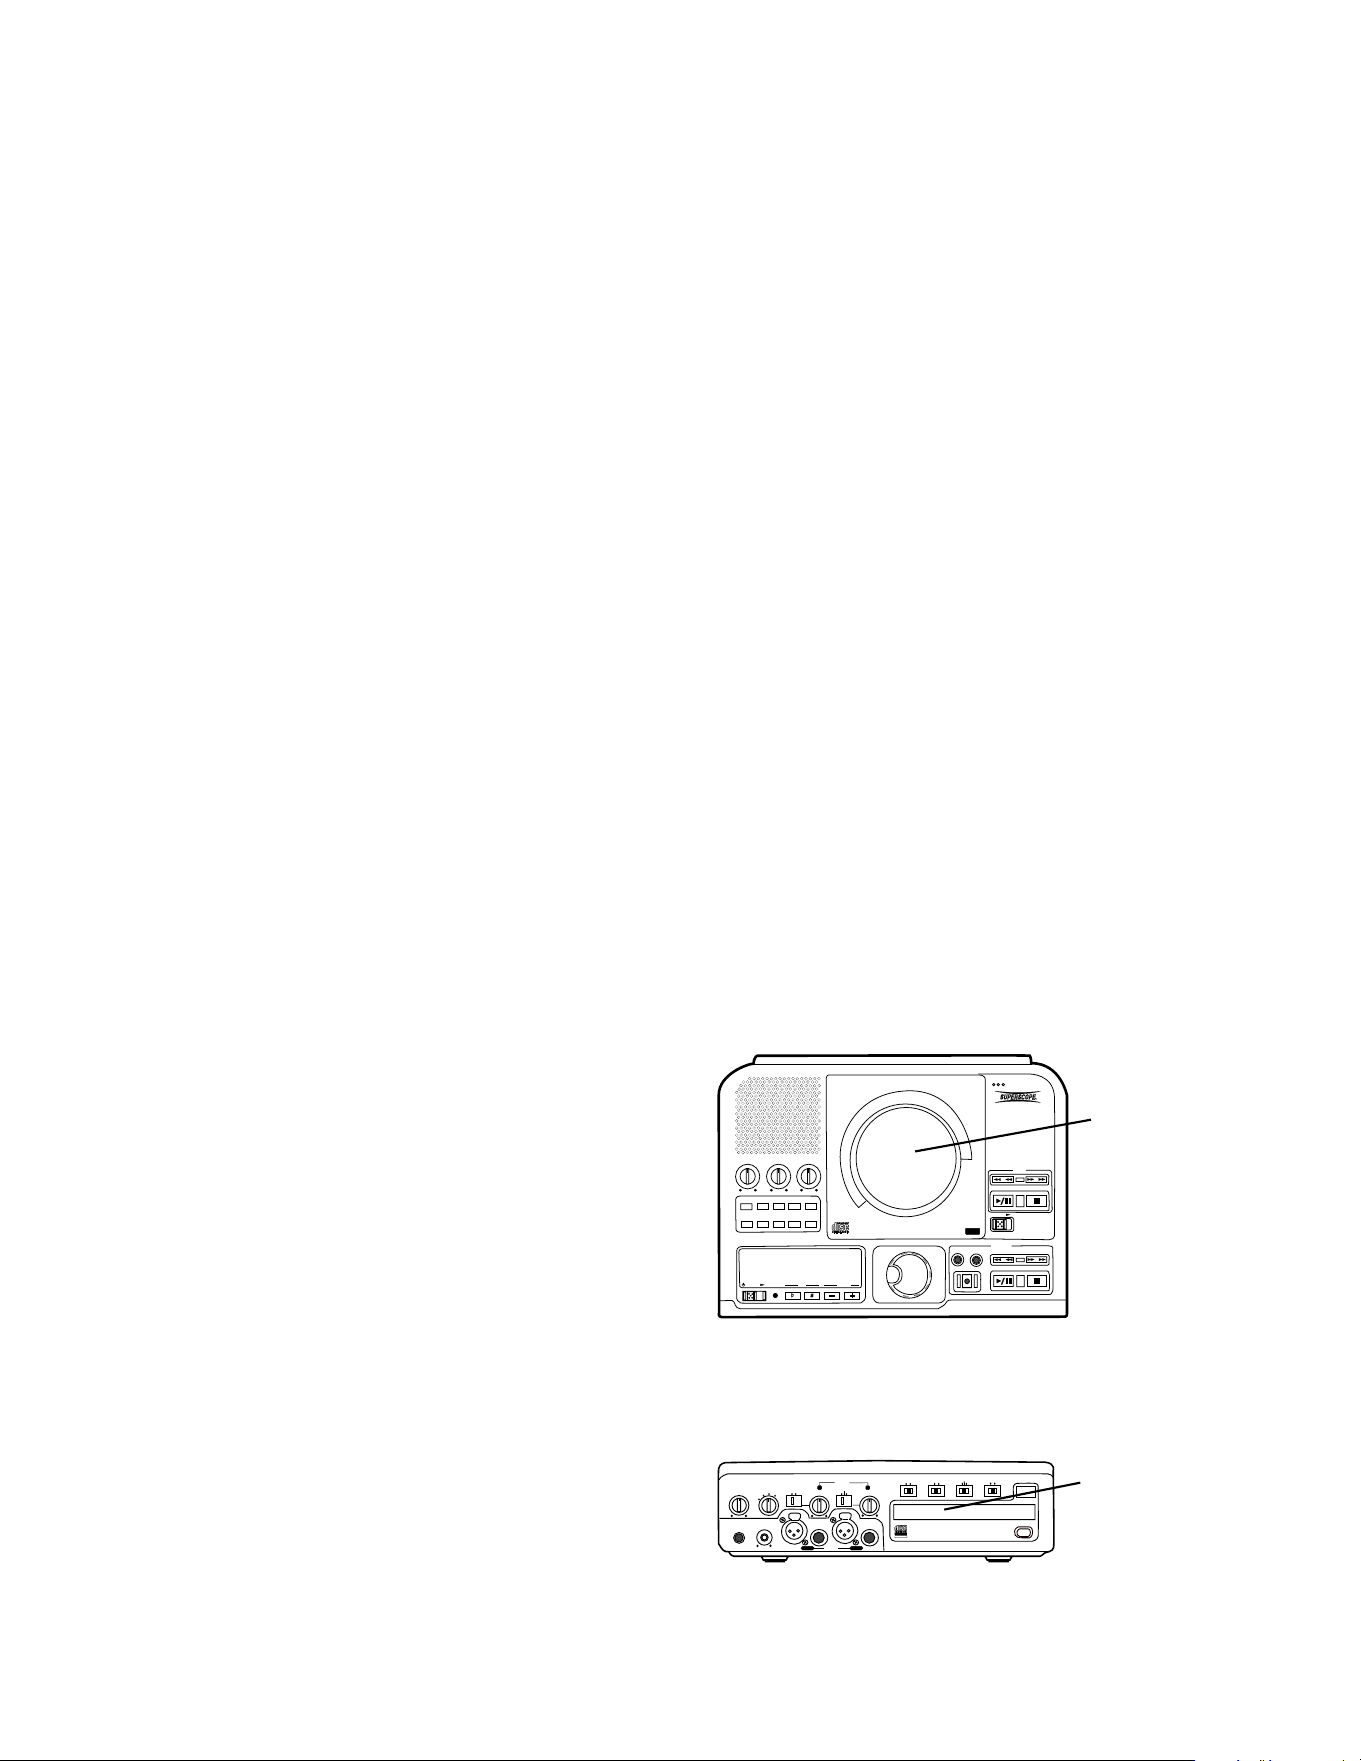
CD drive
CDR drive
The front, tray loading drive is for recording and
playback and is referred to as the CDR drive.
The PSD300 CD recording system is a CD player with
a built-in CD recorder. It includes features designed
for a music teacher, professional musician, vocalist, or
studio.
For musical practice you can:
• select A-B (point to point) repeat playback
• adjust KEY and TEMPO (adjust the musical pitch
and/or speed of any CD)
For CD recording you can:
• record on CD-R or CD-RW discs
• record any of the playing options (listed below)
For CD playing you can:
• auto cue (start at the beginning of the audio and
adjust the auto cue point)
• use voice reduction (reduce the volume of the
voice track on a CD)
• add (mix in) your own microphone or instrument
input.
• connect to an amplifier/speaker system
• connect to an external CD recorder
• connect an additional CD player (or other line
input) to the PSD300 and mix that input
Drive terminology:
In this manual the top loading drive is for playback
only and is referred to as the CD drive.
Topic page
How to program tracks for recording ........22
How to Record
How to record your voice or instrument
(basics) ........................................................23
SCMS ..........................................................24
How to copy an existing CD (basics) ...........24
Select record mode
REC with CD............................................25
RECORD .................................................25
COPY + LISTEN......................................25
COPY 2X .................................................25
COPY 2X+FINAL .....................................25
CONV HALFSPEED ................................25
SYNC RECORD ......................................25
SYNC RECORD +FINAL .........................25
Recording tips ..........................................25
Record Adjustments
AUTO TRACK and AUTO STOP defaults ...26
AUTO TRACK ..............................................26
How to turn AUTO TRACK ON or OFF ....26
AUTO STOP ................................................27
How to turn AUTO STOP ON or OFF ......27
How to adjust the MIC EQUALIZER ............27
REC LEVEL .................................................27
How to adjust SPLIT BALANCE ..................28
How to adjust REC BALANCE .....................28
How to select filters......................................29
How to erase
How to erase the last track ..........................30
How to erase the entire disc ........................30
How to finalize ...............................................30
How to Finalize a CD-R or CD-RW disc.......31
How to Unfinalize a CD-RW disc .................31
About the Remote ............................................32
Track Skip forward button ...............................33
Track Skip backward button............................33
AMS button (Automatic Search) .....................33
TR INC (Track Increment) ..............................33
About CD discs ................................................34
Which discs to use .........................................34
Disc cleaning ..................................................34
CD text...............................................................35
CD text during playback ...............................35
Recording CD text........................................35
How to view CD text.....................................36
How to erase CD text ...................................37
RC-5 remote control codes ...........................37
Troubleshooting ............................................38
Maintenance ...................................................38
Specifications ................................................39
Warranty .........................................................40
- 6 -
Package contents
PUSH
BASS
MID
TREBLE
TEXT VR PROG REPEAT
MENU/STORE
DISP SINGLE
A-B
CANCEL/DELETE
REC MODE
CD-RW PLAYBACK
CD RECORDING SYSTEM PSD300
MIC
PLAY
OPEN
REC/PLAY
ERASE FINALIZE
REC
SELECT
PUSH ENTER
POWER KEY TEMPOSTANDBY
1
ABC
2
DEF
3
GHI
PROG
4
JKL
5
MNO
6
PQR TEXT
7
STU
8
VW
9
XYZ SINGLE
DISPLAY
0
SPACE
TEMPO RESET
VR
CDR CD
REPEAT CAN/DEL ENTER MEN/STO
A B
TR INC
REC
REMOTE CONTROL
RC300PSD
AMS
#
KEY
TEMPO
PSD300 unit
Infrared remote control
Power cord
Audio cable
AA batteries (2)
Remote batteries
Press and lift at arrow to open the remote control
battery compartment.
Install two AA batteries.
Replace compartment cover.
Connections (basic)
POWER
ON OFF
MIX LINE AUX DIGITAL
REMOTE
RC-5 EXT. INT.
FOOT
PEDAL
IN
OUT
IN
OUT
R
L
R
L
INOUT
OUT
1 4
2
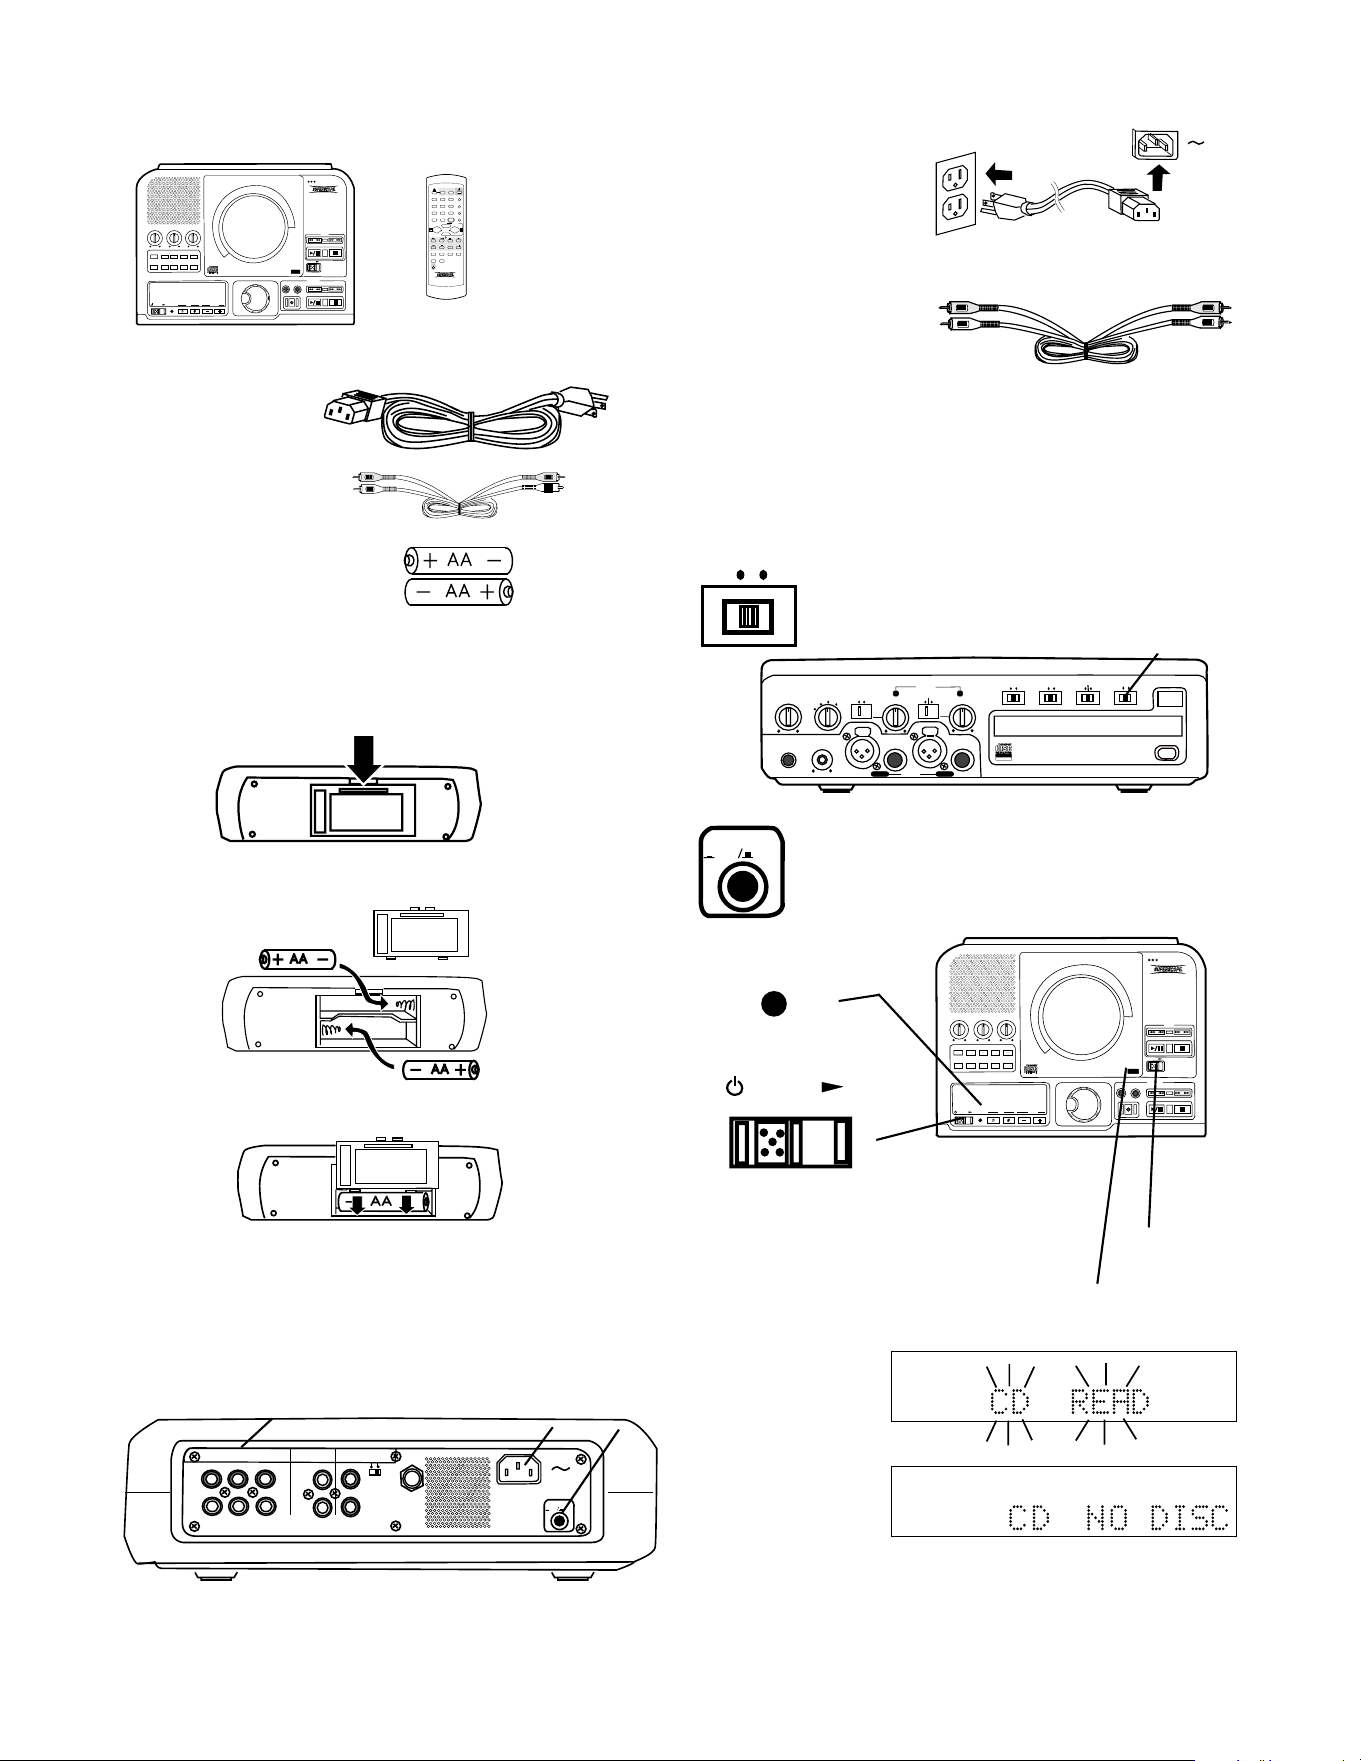
Install on a table or other flat, stable, surface.
1 Plug in to 110
VAC power
2 Connect your amplifier and speaker system
(optional)
Connect the
supplied Right and
Left RCA audio
cable to LINE OUT and then connect to the input of an
amplifier, receiver or other external unit, typically CD
input.
3 Speaker: switch the internal speaker OFF and
ONOFF
SPEAKER
PHONE/SPEAKER
LEVEL
PHONE SELECTOR
MIC/LINE
CD
LINE OUT AUX
PHONES
LINE OUT
ReWritable
Recordable
CD PLAY / RECORD
OPEN/CLOSE
MIX
SPLIT
MIC
STEREO
ONOFF
ALC
DIGITAL
ANALOG
INPUT
ONOFF
SPEAKER
MIC
LINE
INT
LINE
MIC
MIC/LINE
L
PUSH
R
MIC/LINE RIGHT
PUSH
LEFT
3
POWER
ON OFF
4 POWER Push the POWER OFF/ON
button so it is ON (in position).
PUSH
BASS
MID
TREBLE
TEXT VR PROG REPEAT
MENU/STORE
DISP SINGLE
A-B
CANCEL/DELETE
REC MODE
CD-RW PLAYBACK
CD RECORDING SYSTEM PSD300
MIC
PLAY
OPEN
REC/PLAY
ERASE FINALIZE
REC
SELECT
PUSH ENTER
POWER KEY TEMPOSTANDBY
STANDBY
POWER
a
b
The STANDBY light a will be lit.
Slide the POWER switch b to the right.
The STANDBY light will go out.
5
6
R
L
dB-50 -30 -22 -16 -12 -8 -4 0
CD READ will
flash on the
display.
R
L
dB-50 -30 -22 -16 -12 -8 -4 0
Then the
display will
read CD NO
DISC.
turn your amplifier on. If an external
amplifier system is unavailable switch
the internal speaker ON.
When disposing of used batteries, please comply
with governmental and environmental regulations.
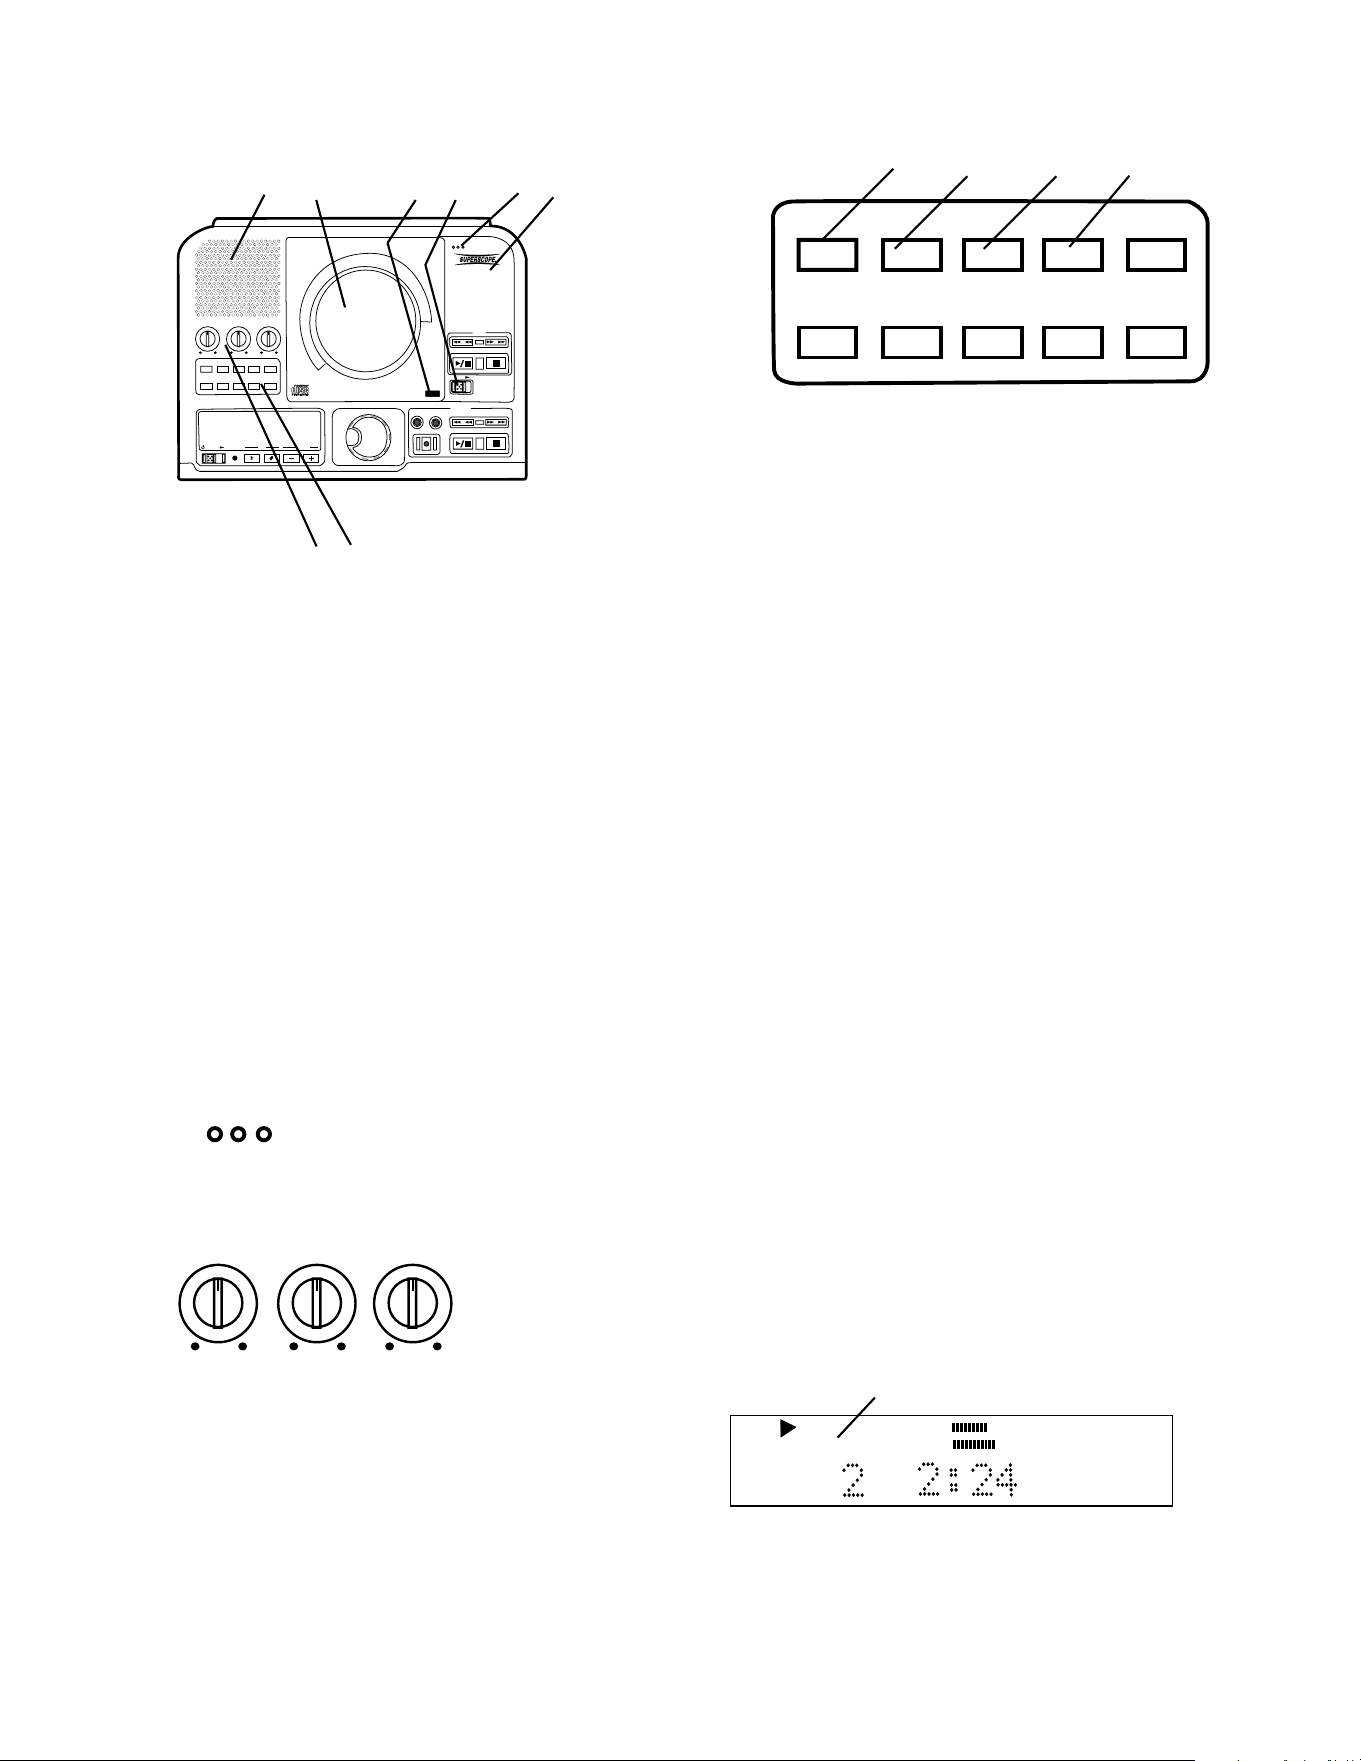
Controls, Display (top)
1 Speaker grill
The built in full range speaker allows listening
to a CD without having to connect to other
equipment for amplification.
- 7 -
2 CD drive
The top loading drive is for playback only. The
PSD300 can playback CD, CD-R and CD-RW
discs.
A disc being played can be heard over the built in
speaker, can be recorded on the CDR drive, or
output to an external amplification system or
recording device via LINE OUT or DIGITAL out
connections.
The CD drive is opened by the OPEN slide switch
(a), and closed by pushing on the corner marked
PUSH (b).
MIC (microphone)
Built in microphone.
MIC
4 PSD300 Model number
BASS
MID
TREBLE
Tone controls
Turning a knob
controls the level of
the corresponding
frequency range of
PUSH
BASS
MID
TREBLE
TEXT VR PROG REPEAT MENU/STORE
DISP SINGLE
A-B CANCEL/DELETE
REC MODE
CD-RW PLAYBACK
CD RECORDING SYSTEM PSD300
MIC
PLAY
OPEN
REC/PLAY
ERASE FINALIZE
REC
SELECT
PUSH ENTER
POWER KEY TEMPOSTANDBY
1 2 b a 3 4
5 6
3
5
the CD being played in CD drive. Level adjustments
apply to the internal speaker, headphone jack and
LINE OUT output. Turn clockwise to boost the fre-
quency and counterclockwise to attenuate it. Level
adjustments do not apply to MIX OUT.
TREBLE High frequencies (6 kHz)
MID Middle frequencies (2 kHz)
BASS Low frequencies (150 Hz)
TEXT VR PROG REPEAT
MENU/STORE
DISP SINGLE
A-B
CANCEL/DELETE
REC MODE
1 2 3 4
6 Control buttons
1 TEXT button
Activates scrolling text in the display.
When a CD with text is first read the text is
automatically displayed and scrolls across.
2 VR button (voice reduction)
Push and release to activate voice reduction, a
special processor that reduces the volume of the
vocal track on a CD.
VR ON is displayed momentarily when voice
reduction is switched on.
Push and release the VR button again to turn
voice reduction off.
VR OFF is displayed momentarily.
Voice reduction is useful for vocal performers
who want to add their own voice through a
microphone for playback or recording. The
amount of voice reduction varies with the method
of mastering used in the original recording.
3 PROG button (program)
Push and release to enter programming mode.
Programming lets you select tracks for playback
in the CD drive only. Up to 30 tracks can be
selected in any order you desire. See How to
program tracks for a full discussion of this
feature.
4 REPEAT button
There are two repeat modes, entire CD and track.
Entire CD: while playing a CD in either drive push
and release once to repeat the entire CD.
REPEAT
TRACK
CD
a
a REPEAT is lit and steady in the display.
- 8 -
Controls, Display (top) continued
PUSH
BASS
MID
TREBLE
TEXT VR PROG REPEAT MENU/STORE
DISP SINGLE
A-B CANCEL/DELETE
REC MODE
CD-RW PLAYBACK
CD RECORDING SYSTEM PSD300
MIC
PLAY
OPEN
REC/PLAY
ERASE FINALIZE
REC
SELECT
PUSH ENTER
POWER KEY TEMPOSTANDBY
TEXT VR PROG REPEAT
MENU/STORE
DISP SINGLE
A-B
CANCEL/DELETE
REC MODE
6 a
4 5
Track: push and release REPEAT twice to repeat
only the track being played.
REPEAT
TRACK
CD
1
b
4 REPEAT button continued
6 Control buttons continued
Menu selections are available depending on which drive (CD or CDR) is selected, if the CD is stopped or in
Play/Pause, and if REC is selected. The table below shows which menu selection is available under which
conditions. The table also lists which page of this manual contains instructions for that menu item.
Menu Item CD/CDR CD/CDR CDR Page
Stop Play/Pause REC/REC Pause
AUTO TRACK ........................................................................... X ........................ 27
AUTO STOP ............................................................................. X ........................ 28
REC BALANCE ........................................................................ X ........................ 29
TEXT EDIT ...................... X ................................................................................. 35
TEXT ERASE .................. X ................................................................................. 37
TEXT VIEW ..................... X ................................................................................. 36
MIC EQUALIZER............. X ........................X ......................... X ........................ 27
SPLIT BALANCE ............. X ........................X ......................... X ........................ 29
CHANGER MODE........... X ................................................................................. 22
FILTER SELECT ............. X ........................X ......................... X ........................ 30
Notes:
1. AUTO TRACK, AUTO STOP, REC BALANCE only operate in REC MODE.
2. TEXT EDIT, TEXT ERASE only apply to unfinalized discs in the CDR drive.
3. CHANGER MODE is only selectable in Stop.
5 MENU/STORE button
Push and release to enter Menu mode.
b REPEAT 1 is lit and steady in the display.
Push and release a third time to exit REPEAT.
Menu selections and changes are made using the
SELECT control (a). Turn the SELECT control to scroll
through the options. Push and release the SELECT
control to select the option. Push and release the
MENU/STORE button to store changes and exit Menu
mode.
- 9 -
Controls, Display (top) continued
PUSH
BASS
MID
TREBLE
TEXT VR PROG REPEAT
MENU/STORE
DISP SINGLE
A-B
CANCEL/DELETE
REC MODE
CD-RW PLAYBACK
CD RECORDING SYSTEM PSD300
MIC
PLAY
OPEN
REC/PLAY
ERASE FINALIZE
REC
SELECT
PUSH ENTER
POWER KEY TEMPOSTANDBY
6
TEXT VR PROG REPEAT
MENU/STORE
DISP SINGLE
A-B
CANCEL/DELETE
REC MODE
6 7
6 Control buttons continued
6 DISP button (display)
While playing a CD in either drive push and
release once to display the remaining play time
for the track.
CD
TRACK
a
b
a Only TRACK is lit and steady.
b The countdown time is for the track being played.
Push DISP and release a second time and the
remaining play time for the entire CD is displayed.
CD
TOTAL TRACK
c
d
c TOTAL TRACK is lit and steady.
d The countdown time is for the entire CD.
Push DISP and release again to return to the
default display showing elapsed track time.
7 REC MODE button
With a CD-R or CD-RW disc in the CDR drive,
push and release to enter recording mode. Turn
the SELECT control to select the recording mode.
Then push and release the SELECT control to
choose that mode.
Note: When recording from a CD in the CD drive
when tracks are programmed the recording follows
the program, if not the entire disc is recorded.
The 8 recording modes are:
REC with CD
This mode allows you to record along with a CD.
You can add your voice or instrument via the MIC/
LINE jacks, INT microphone, or AUX input. Moni-
tor the recording process using the headphone
jack, internal speaker, or LINE OUT.
RECORD
If no CD is present in the CD drive this is the first
REC mode that appears in the REC mode menu.
You can record using the INT mic, MIC/LINE
inputs and/or AUX inputs or DIGITAL input.
COPY + LISTEN
This mode is used to digitally copy a CD in real-
time while listening to it. This is an internal
recording function that allows no inputs from
outside sources.
COPY 2X
Digitally copy individual or programmed tracks or
an entire disc. This is an internal recording
function that allows no inputs from outside
sources.
COPY 2X +FINAL
This is the quickest way to digitally copy individual
programmed tracks or an entire disc. This is an
internal recording function that allows no inputs
from outside sources.
CONV HALFSPEED
This will record individual or programmed tracks at
half speed. The converted recording will play one
octave lower which provides a powerful new tool
for difficult music transcription.
SYNC RECORD
This REC mode is used to automatically engage
the recording process from an outside digital or
analog source including DAT, minidisk, cassette
tape or LP for example.
SYNC RECORD+FINAL
Use this REC mode to automatically start the
recording process from an outside digital or analog
source including DAT, minidisk, cassette tape or
LP for example.
- 10 -
When the track is finished the PSD300 will
automatically pause, cued to music, at the
beginning of the next track.
9 A-B button
While a CD is playing push and release to start
point A to point B repeat play.
Point A (starting point) is set when the A-B button
is pushed and released. The next push and
release of the A-B button sets point B (ending
point). Play repeats between A and B. Example
display:
Controls, Display (top) continued
PUSH
BASS
MID
TREBLE
TEXT VR PROG REPEAT
MENU/STORE
DISP SINGLE
A-B
CANCEL/DELETE
REC MODE
CD-RW PLAYBACK
CD RECORDING SYSTEM PSD300
MIC
PLAY
OPEN
REC/PLAY
ERASE FINALIZE
REC
SELECT
PUSH ENTER
POWER KEY TEMPOSTANDBY
CD TEXT
TRACK
CD TEXT
TRACK
REPEAT
A-B
R
L
dB-50 -30 -22 -16 -12 -8 -4 0
During A-B repeat push and release the A-B
button. Point B becomes the new A point and the
next push and release of the A-B button sets a
new B point.
OR
During A-B repeat push and hold the A-B button
for one second to keep the A point. Push and
release the A-B button to set a new B point.
To exit A-B repeat press the REPEAT button, play
continues, or the Stop button, play ends.
10 CANCEL/DELETE button
Push and release to delete tracks from a program,
to delete text when entering CD text, or return to a
higher level in the Menu.
6
6 Control buttons continued
TEXT VR PROG REPEAT
MENU/STORE
DISP SINGLE
A-B
CANCEL/DELETE
REC MODE
8 9 10
8 SINGLE button
Push and release to toggle Single Track Play on
or off.
While in Single Track Play, when a track is
selected with the SELECT control, the track does
not automatically start playing but is paused and
cued up at the beginning of the audio (example
display follows), and the Play pause button
flashes.
CD TEXT
TRACK
CD TEXT
TRACK
While playing in Single Track Play the Play (a)
and TRACK (b) displays are flashing, and the time
counter (c) is counting up indicating elapsed time
(example display below).
a b c
PLAY
- 11 -
Controls, Display (top) continued
PUSH
BASS
MID
TREBLE
TEXT VR PROG REPEAT
MENU/STORE
DISP SINGLE
A-B
CANCEL/DELETE
REC MODE
CD-RW PLAYBACK
CD RECORDING SYSTEM PSD300
MIC
PLAY
OPEN
REC/PLAY
ERASE FINALIZE
REC
SELECT
PUSH ENTER
POWER KEY TEMPOSTANDBY
7a
7b
1 2
3 4
9 10 11 12 8
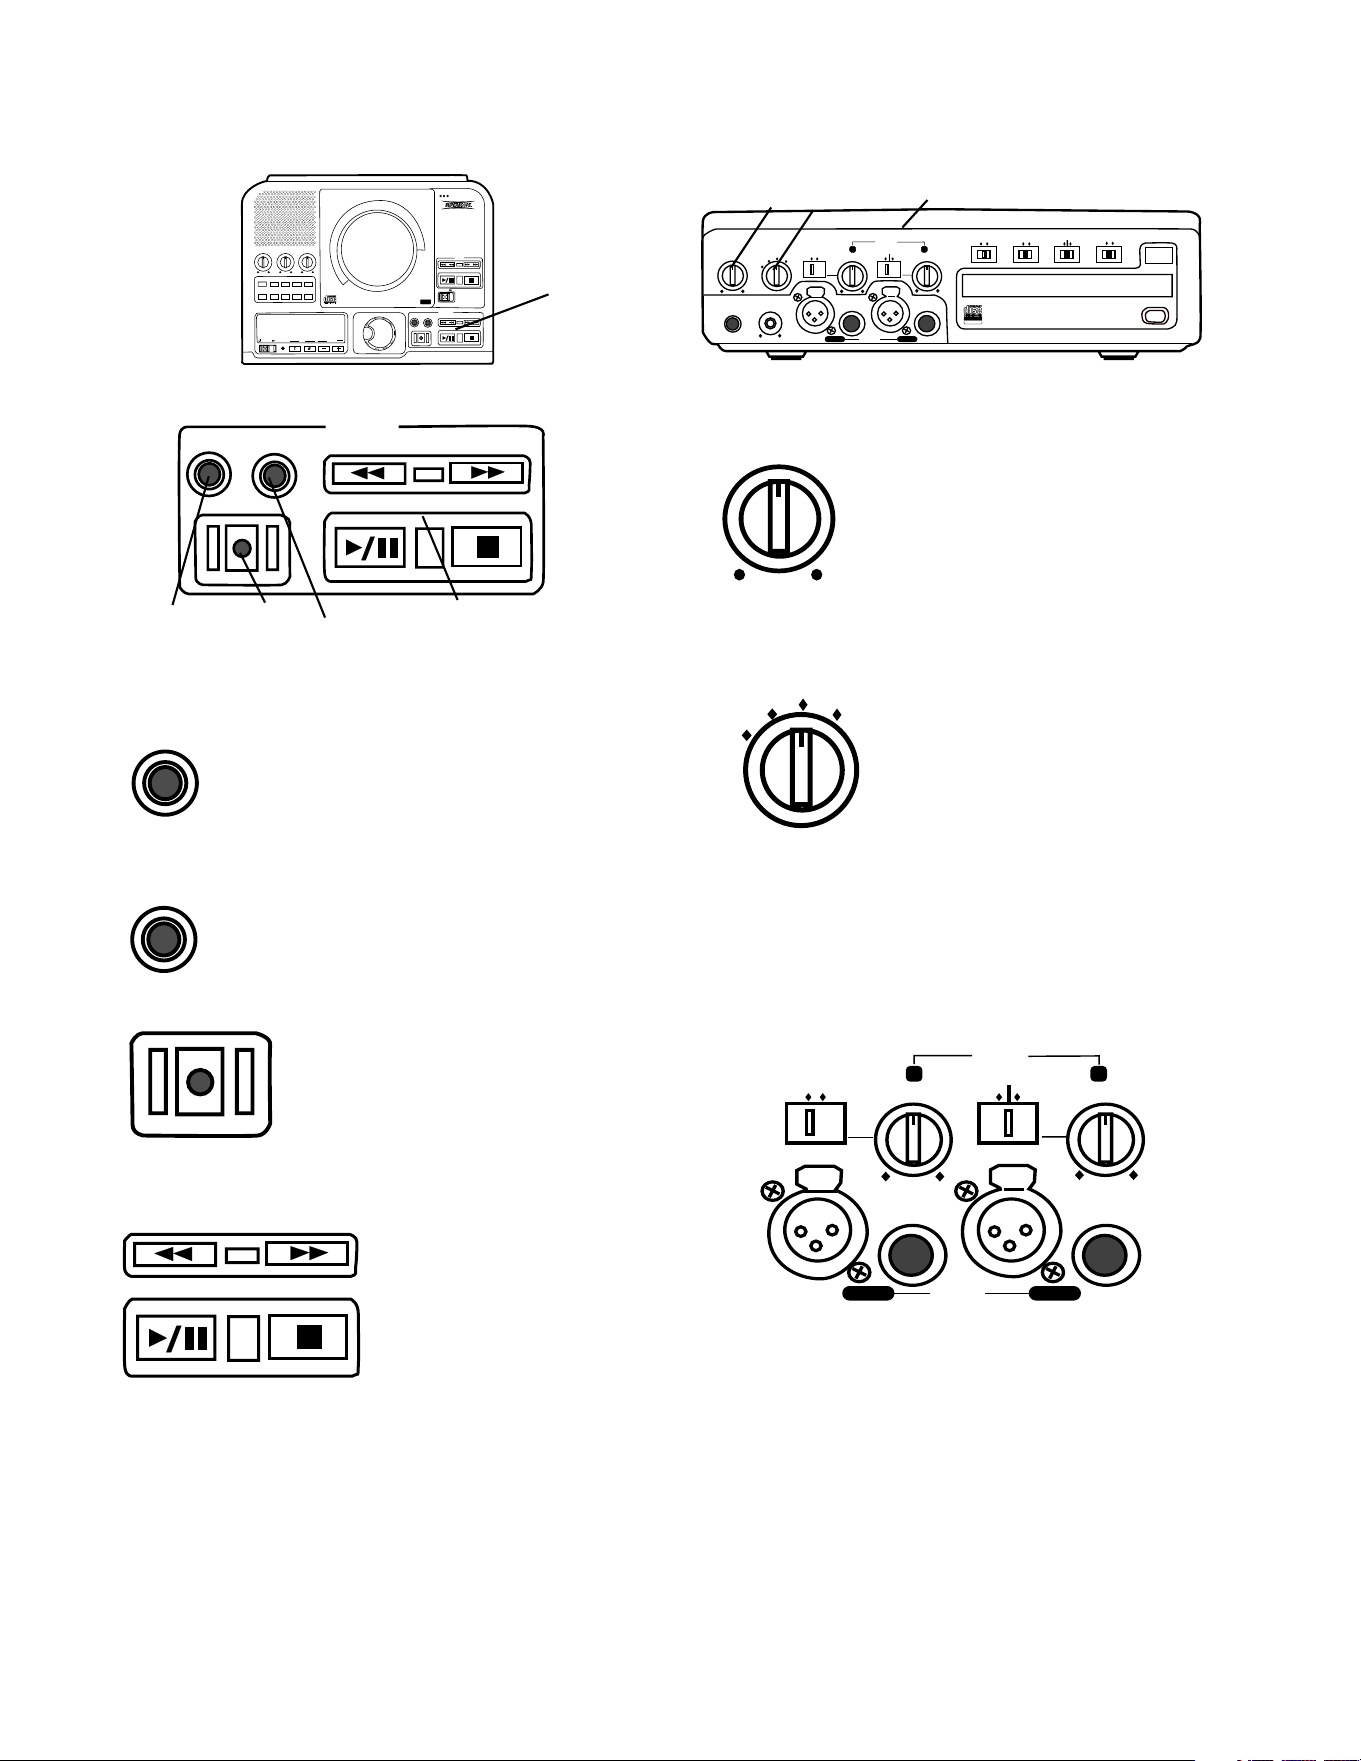
7 Play controls
Play controls 7a control playback of a disc in the
CD drive. Another set of play controls 7b control
playback of a disc in the CDR drive.
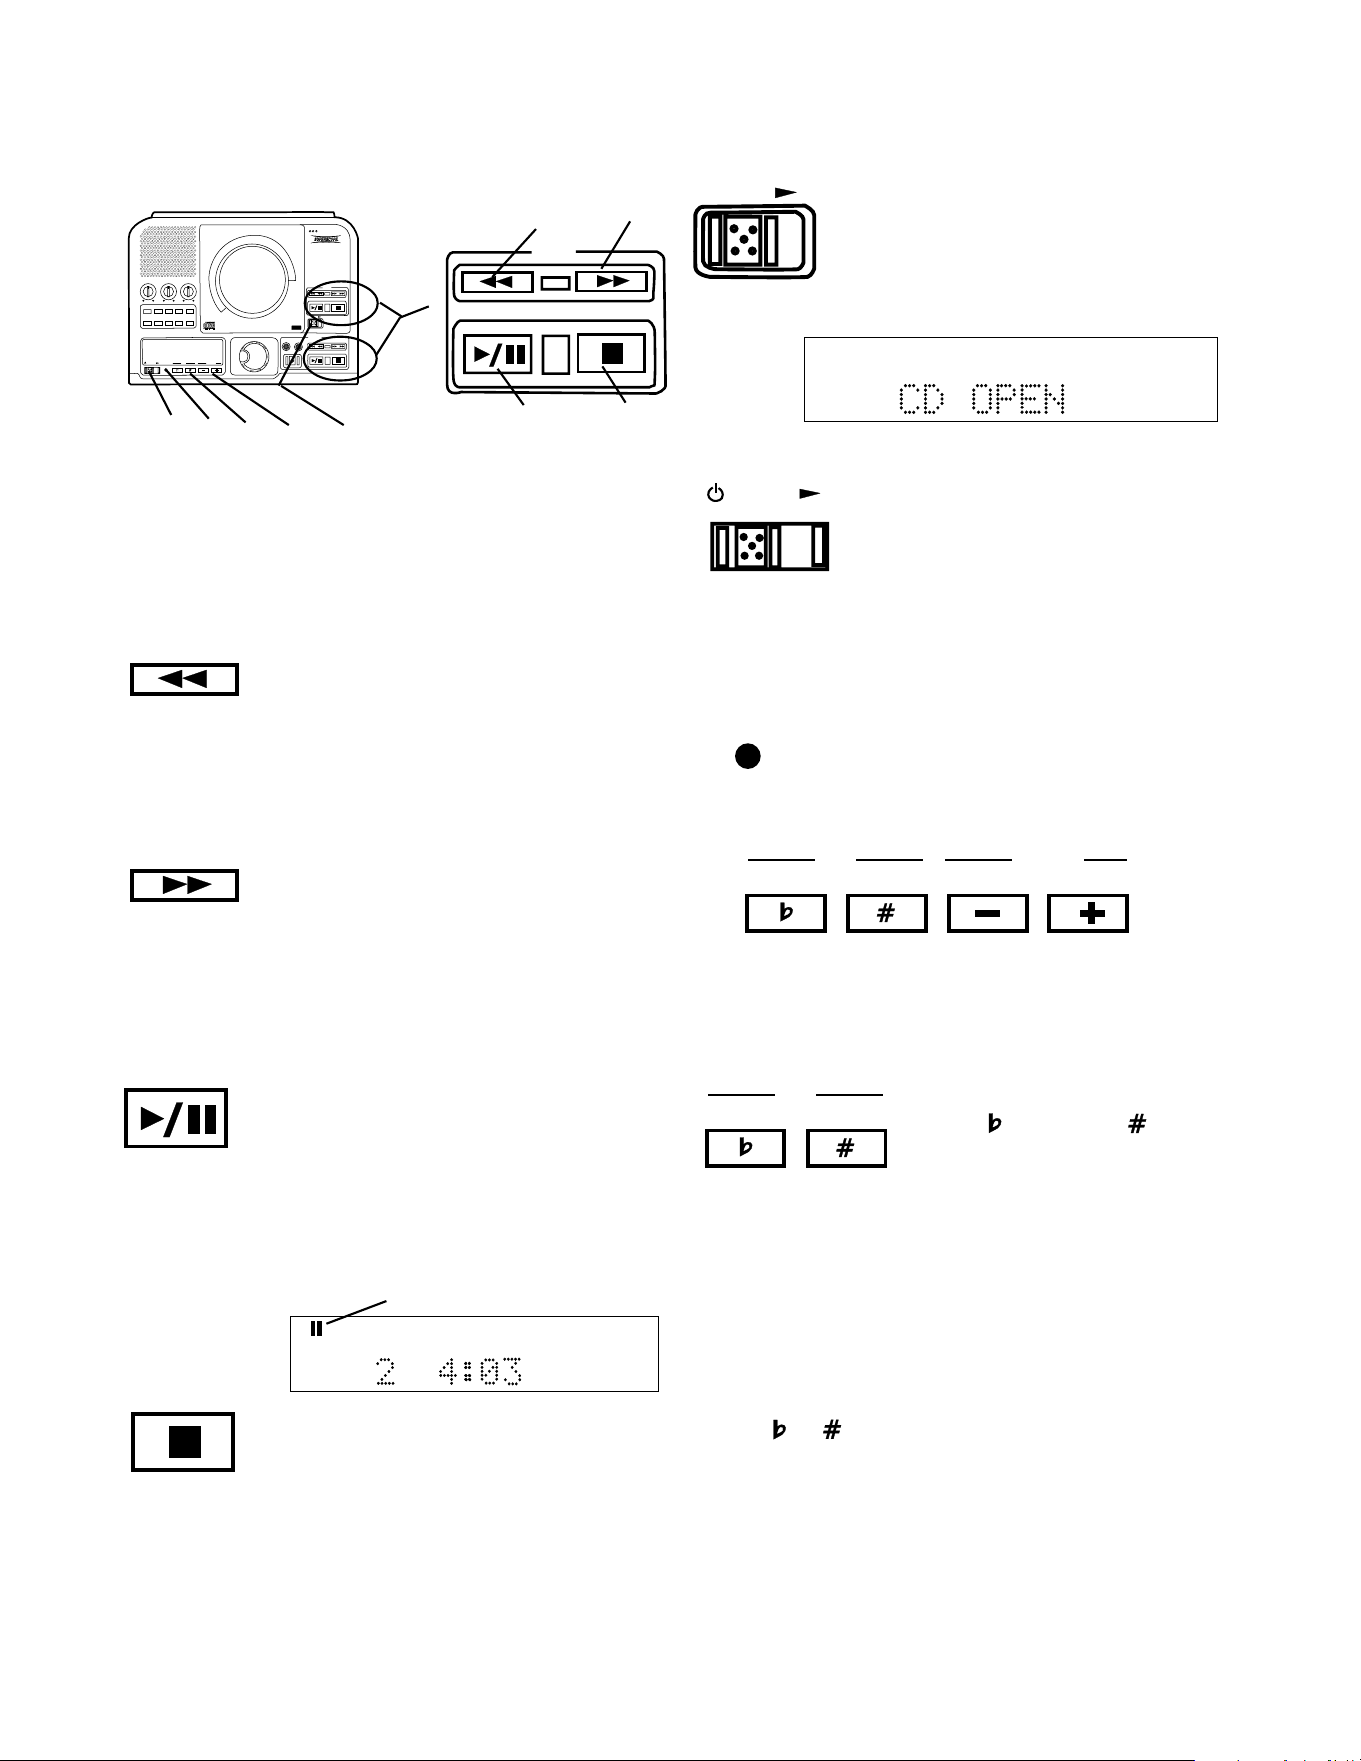
1 Fast backward search button
Push and hold during playback to search
backward. While searching samples of audio are
played to help you find the point you are searching
for. Returns to playing forward when the button is
released.
2 Fast forward search button
Push and hold during playback to search forward.
While searching samples of audio are played to
help you find the point you are searching for.
Returns to playing forward when the button is
released.
3 Play/Pause button
Push and release to start play of a stopped or
paused disc. Push and release during play to
pause. Button lit during play, flashing during
pause.
CD TEXT
TRACK
R
L
dB-50 -30 -22 -16 -12 -8 -4 0
paused symbol
Example
display during
pause.
4 Stop button
Push and release to stop play of a playing or
paused disc. When a disc is not playing or
paused, push and release to clear a program.
Button lit when drive is selected and stopped.
8 OPEN switch
Slide the OPEN switch to the right
to open the CD drive. A CD playing
automatically stops. CD OPEN is
displayed.
OPEN
POWER
9 Standby POWER switch
Slide the Standby POWER switch
to the right to turn power on or off.
POWER button on rear of unit
must be ON (the red STANDBY
STANDBY
10 STANDBY light
STANDBY light (red) is lit when power
is switched off by the Standby
POWER switch on the unit or remote.
KEY TEMPO
11, 12 Control of KEY and TEMPO
The PSD300 allows control of key (musical pitch) and
tempo (CD playback speed). The CD drive must be
selected to allow control of KEY and TEMPO.
KEY
11 KEY controls
Press to lower or to raise
the key (musical pitch).
KEY control can change the CD
sound by up to plus or minus
one octave.
The KEY control system works on the following
musical principles:
100 cents = 1 half step
2 half steps = 1 whole step
12 half steps = 1 octave
Press or once to start KEY control. Then press
once to change the key by a 12.5 cents increment.
The display shows the increment rounded to 0.13
cents. Press and hold to quickly decrease or increase
the key. Press both buttons at the same time to return
to 0.00 position.
light must be lit).
- 12 -
Controls, Display (top) continued
PUSH
BASS
MID
TREBLE
TEXT VR PROG REPEAT
MENU/STORE
DISP SINGLE
A-B
CANCEL/DELETE
REC MODE
CD-RW PLAYBACK
CD RECORDING SYSTEM PSD300
MIC
PLAY
OPEN
REC/PLAY
ERASE FINALIZE
REC
SELECT
PUSH ENTER
POWER KEY TEMPOSTANDBY
11 12 13
11 KEY controls continued
Notes
• If the or the buttons are pressed while
another display (such as CD-TEXT) is shown, the
current position of the KEY control is shown first.
Once one of the or buttons are pressed a
second time the KEY changes.
• Once the key has been adjusted by pressing
either the or button, it is possible to also
adjust the tempo (CD playback speed). For a key
adjustment in a range of ±5.00 half steps, the
tempo can also be adjusted -33% to +50%.
• Pressing the STOP button during
stop mode will reset the KEY to
0.00 position
12 Tempo
controls
TEMPO
TEMPO can be changed in increments of 1% up to
+50% and -33%.
A "+" button increases the speed in steps of 1%.
A "-" button decreases the speed insteps of 1%.
Holding down either a "+" or a "-" button for more than
1 second causes the tempo adjustment to change
rapidly. Pressing both the "+" and "-" buttons at the
same time returns the TEMPO to 0% (normal speed).
TUNING Once the Tempo has been adjusted by
pressing either the - or + button, it is possible to also
fine tune (TUNING) the key (musical pitch).
Press to lower or to
raise the key (musical pitch).
TUNING
lets you tune the
CD output to a musical
instrument (CD drive only).
KEY
Useful when practicing an instrument because it lets
you adjust the music practice source to your instru-
ment.
The button raises the tuning in 0.1% increments
and is displayed as a whole number with a + sign. For
example, to raise the tuning of the CD by 1.5% the
display should show "+15".
The button lowers the tuning in 0.1% increments
and is displayed as a whole number with a - sign. For
example, to lower the tuning by 0.8% the display
should read "-8".
TOC
information is held in memory. The table of contents
includes the total number of tracks, playback time and
other CD text if provided. Flashes during recording.
1 TOC
Lit when TOC (disc table of contents)
3 Pause indicator
Lit when recording or playback has been
paused.
2 Record indicator
Lit when recording.
5 PROG indicator
Lit during programming mode (selecting
track playback sequence).
PROG
6 REPEAT indicator
Lit during a repeat operation.
When the 1 indicator is also lit only the
currently playing track is repeated.
REPEAT
4 Play indicator
Lit during recording or playback.
13 Display
R
L
dB-50 -30 -22 -16 -12 -8 -4 0OVER
1 A B TOTAL TRACK
REPEAT AUTO SYNC
PROGRANDOM DIGITAL
STANDBY
CD-RW
CD TEXT
TOC
1 2 3 4 5 6
REPEAT
1
PUSH
BASS
MID
TREBLE
TEXT VR PROG REPEAT MENU/STORE
DISP SINGLE
A-B CANCEL/DELETE
REC MODE
CD-RW PLAYBACK
CD RECORDING SYSTEM PSD300
MIC
PLAY
OPEN
REC/PLAY
ERASE FINALIZE
REC
SELECT
PUSH ENTER
POWER KEY TEMPOSTANDBY
- 13 -
Controls, Display (top) continued
DIGITAL
7 DIGITAL indicator
Lit during digital playback or recording.
Not lit during analog playback or record-
ing.
R
L
dB-50 -30 -22 -16 -12 -8 -4 0OVER
8 Level meter
Displays the level of the Left and Right channels of
audio from the music source. During CD playback this
is the audio level of either the CD drive or the CDR
drive. During recording this is the audio level of all
music sources feeding the CDR drive.
CD
CD-RW
10 TEXT indicator
TEXT is displayed when the CD being
9 CD indicator
Displays CD, CD-R, or CD-RW telling
you the type of disc that is in the selected
drive.
TEXT
played includes CD TEXT information. Or when TEXT
mode is selected to enter CD TEXT information onto a
CD you are recording.
A-B
11 A-B indicator
A- is lit after pushing the A-B button once
indicating that the beginning of audio segment to be
repeated has been selected. REPEAT is also lit. A-B
is lit after pushing the A-B button a second time. The
audio segment from A to B is repeated indefinitely.
13
14
R
L
dB-50 -30 -22 -16 -12 -8 -4 0OVER
1 A B TOTAL TRACK
REPEAT AUTO SYNC
PROGRANDOM DIGITAL
STANDBY
CD-RW
CD TEXT
TOC
9
10 11 12 13 14 15
13 Display continued
SYNC
14 SYNC indicator
Lit when the SYNC RECORD mode is
on.
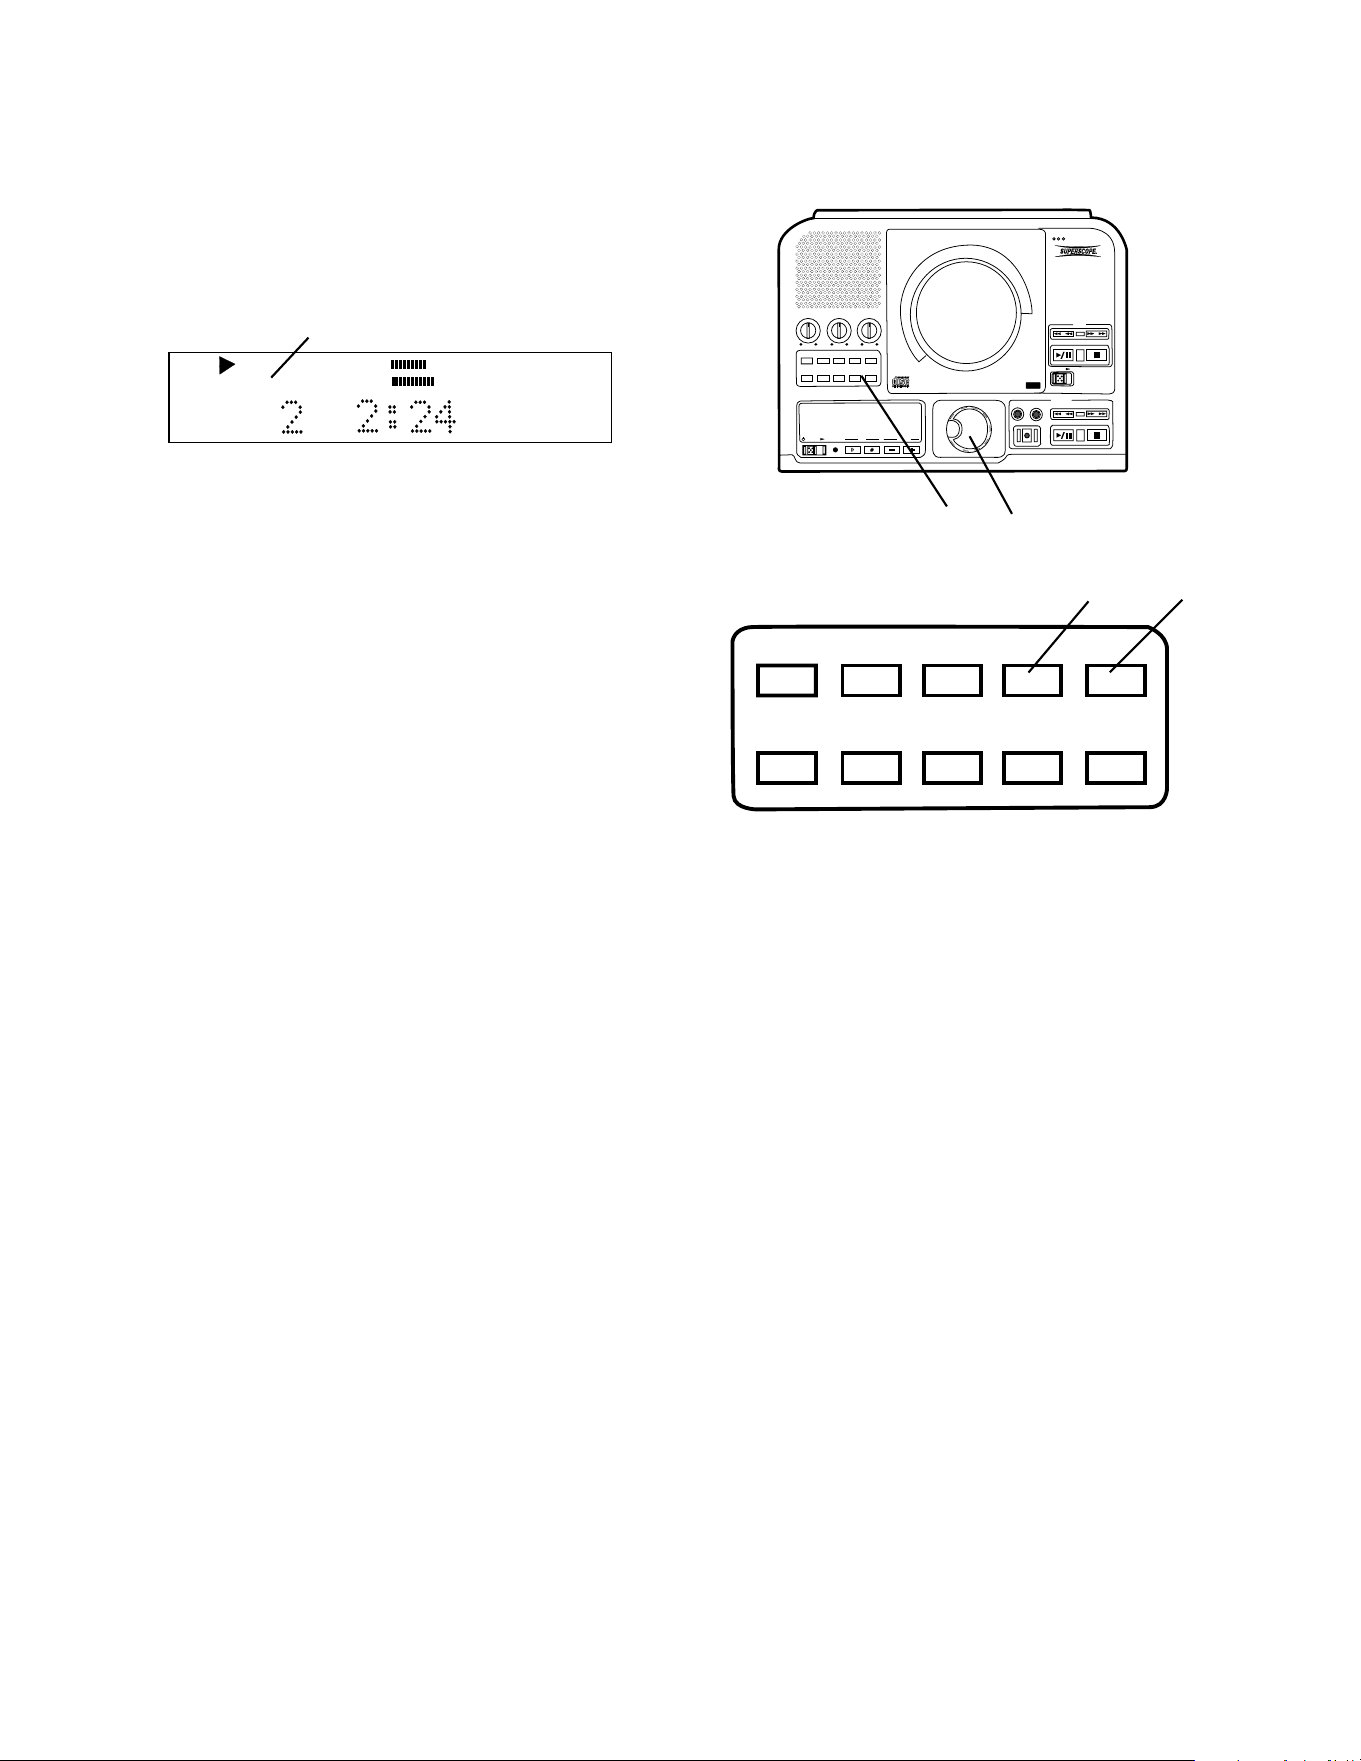
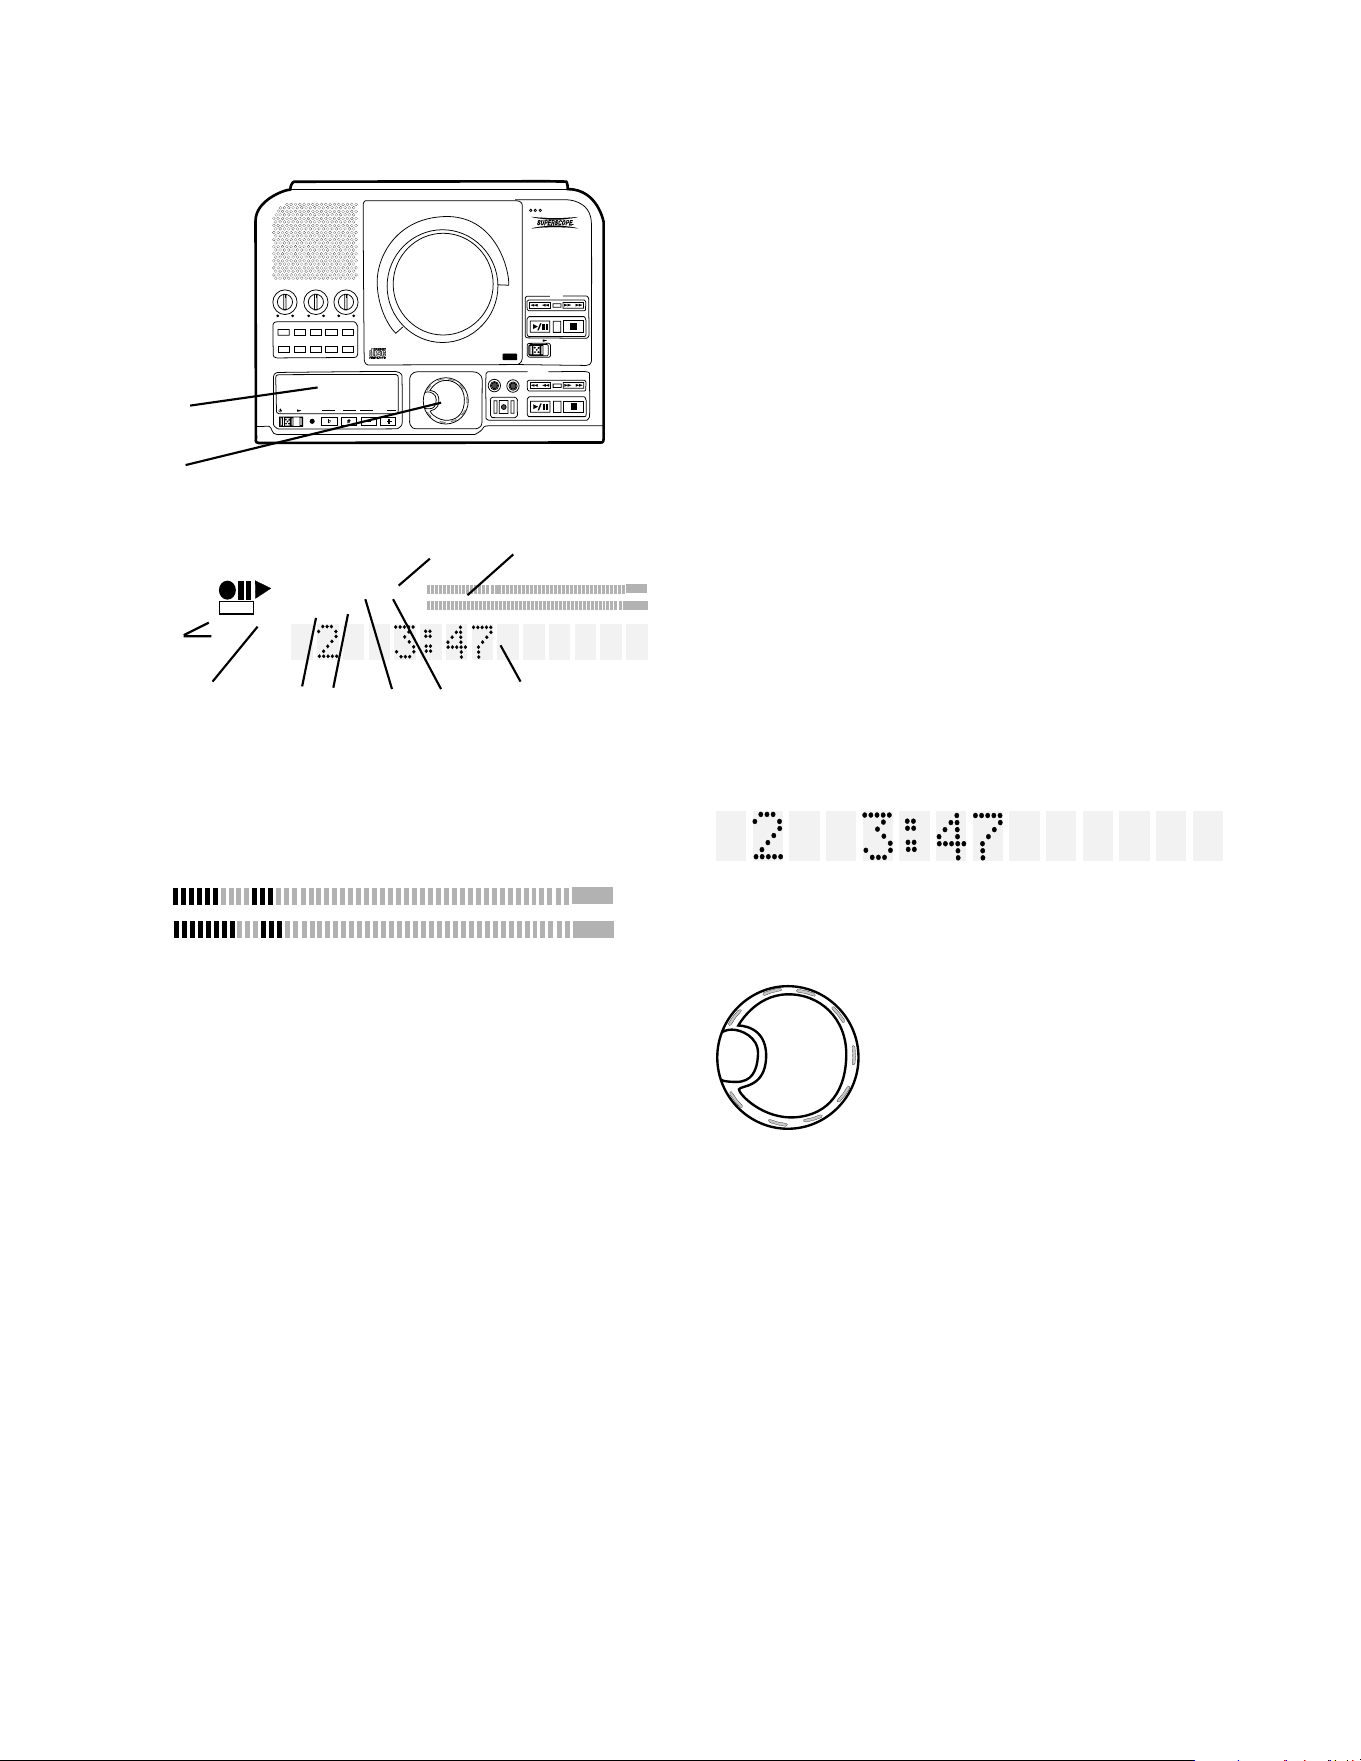
15 Alphanumeric display
Information, instructions and error messages can be
displayed. The example shown indicates track 2 is
being played and it is three minutes and forty seven
seconds to the end of track 2.
SELECT
PUSH / ENTER
14 SELECT control
This is the "master" control for
the PSD300. Push and
release to switch control
between the CD drive and the
CDR drive.
For most operations you turn
to select, then push and
release to confirm and enter your selection.
• In PROG mode turn to select track, then push and
release to program the track.
• In Play mode turn to select the track.
• When recording, selects recording level.
• In MENU mode turn to scroll through menu selec-
tions.
7 8
TOTAL TRACK is lit when the display information (time
to end) applies to the whole CD rather than the track
being played.
TOTAL TRACK
12 TOTAL TRACK indicator
TRACK is lit when the display information (time to end)
applies to the track being played rather than the whole
CD.
AUTO
13 AUTO indicator
Lit when tracks are automatically being
determined (by digital subcode or audio sensing).
PUSH
BASS
MID
TREBLE
TEXT VR PROG REPEAT
MENU/STORE
DISP SINGLE
A-B
CANCEL/DELETE
REC MODE
CD-RW PLAYBACK
CD RECORDING SYSTEM PSD300
MIC
PLAY
OPEN
REC/PLAY
ERASE FINALIZE
REC
SELECT
PUSH ENTER
POWER KEY TEMPOSTANDBY
Controls, Display (top) continued
- 14 -
15
15 REC/PLAY controls
1 ERASE button light
Push and release to enter ERASE
mode. See How to erase.
ERASE
FINALIZE
2 FINALIZE button light
Push and release to enter FINALIZE
mode. See How to finalize.
REC/PLAY
ERASE FINALIZE
REC
1 2 3 4
REC
3 REC (record) button light
When flashing and prompted by the
display to PUSH REC KEY, push and
release to start recording. See How
to Record for recording modes.
Also used when finalizing.
4 PLAY controls
CDR drive controls
work the same as the
play controls for the
CD drive. See PLAY
controls.
Controls, Connections (front)
PHONE/SPEAKER
LEVEL
PHONE SELECTOR
MIC/LINE
CD
LINE OUT AUX
PHONES
LINE OUT
ReWritable
Recordable
CD PLAY / RECORD
OPEN/CLOSE
MIX
SPLIT
MIC
STEREO
ONOFF
ALC
DIGITAL
ANALOG
INPUT
ONOFF
SPEAKER
MIC
LINE
INT
LINE
MIC
MIC/LINE
L
PUSH
R
MIC/LINE RIGHT
PUSH
LEFT
1 2 3
PHONE/SPEAKER
LEVEL
1 PHONE/SPEAKER LEVEL
control
Turn to adjust the level (volume) of
the built-in speaker and head-
phones plugged into the PHONE
jack. (To listen to headphones
only turn the SPEAKER OFF/ON
switch to OFF.)
PHONE SELECTOR
MIC/LINE
CD
LINE OUT AUX
2 PHONE SELECTOR
Turn to select the audio input to
the PHONE jack and internal
Speaker.
CD – CD drive.
LINE OUT – Audio available at
the LINE OUT output jacks.
MIC/LINE – Audio being input via the MIC/LINE/INT
input jacks.
AUX – Audio being input to the AUX IN jack.
MIC
LINE
INT
LINE
MIC
MIC/LINE
L
PUSH
R
MIC/LINE RIGHT
PUSH
LEFT
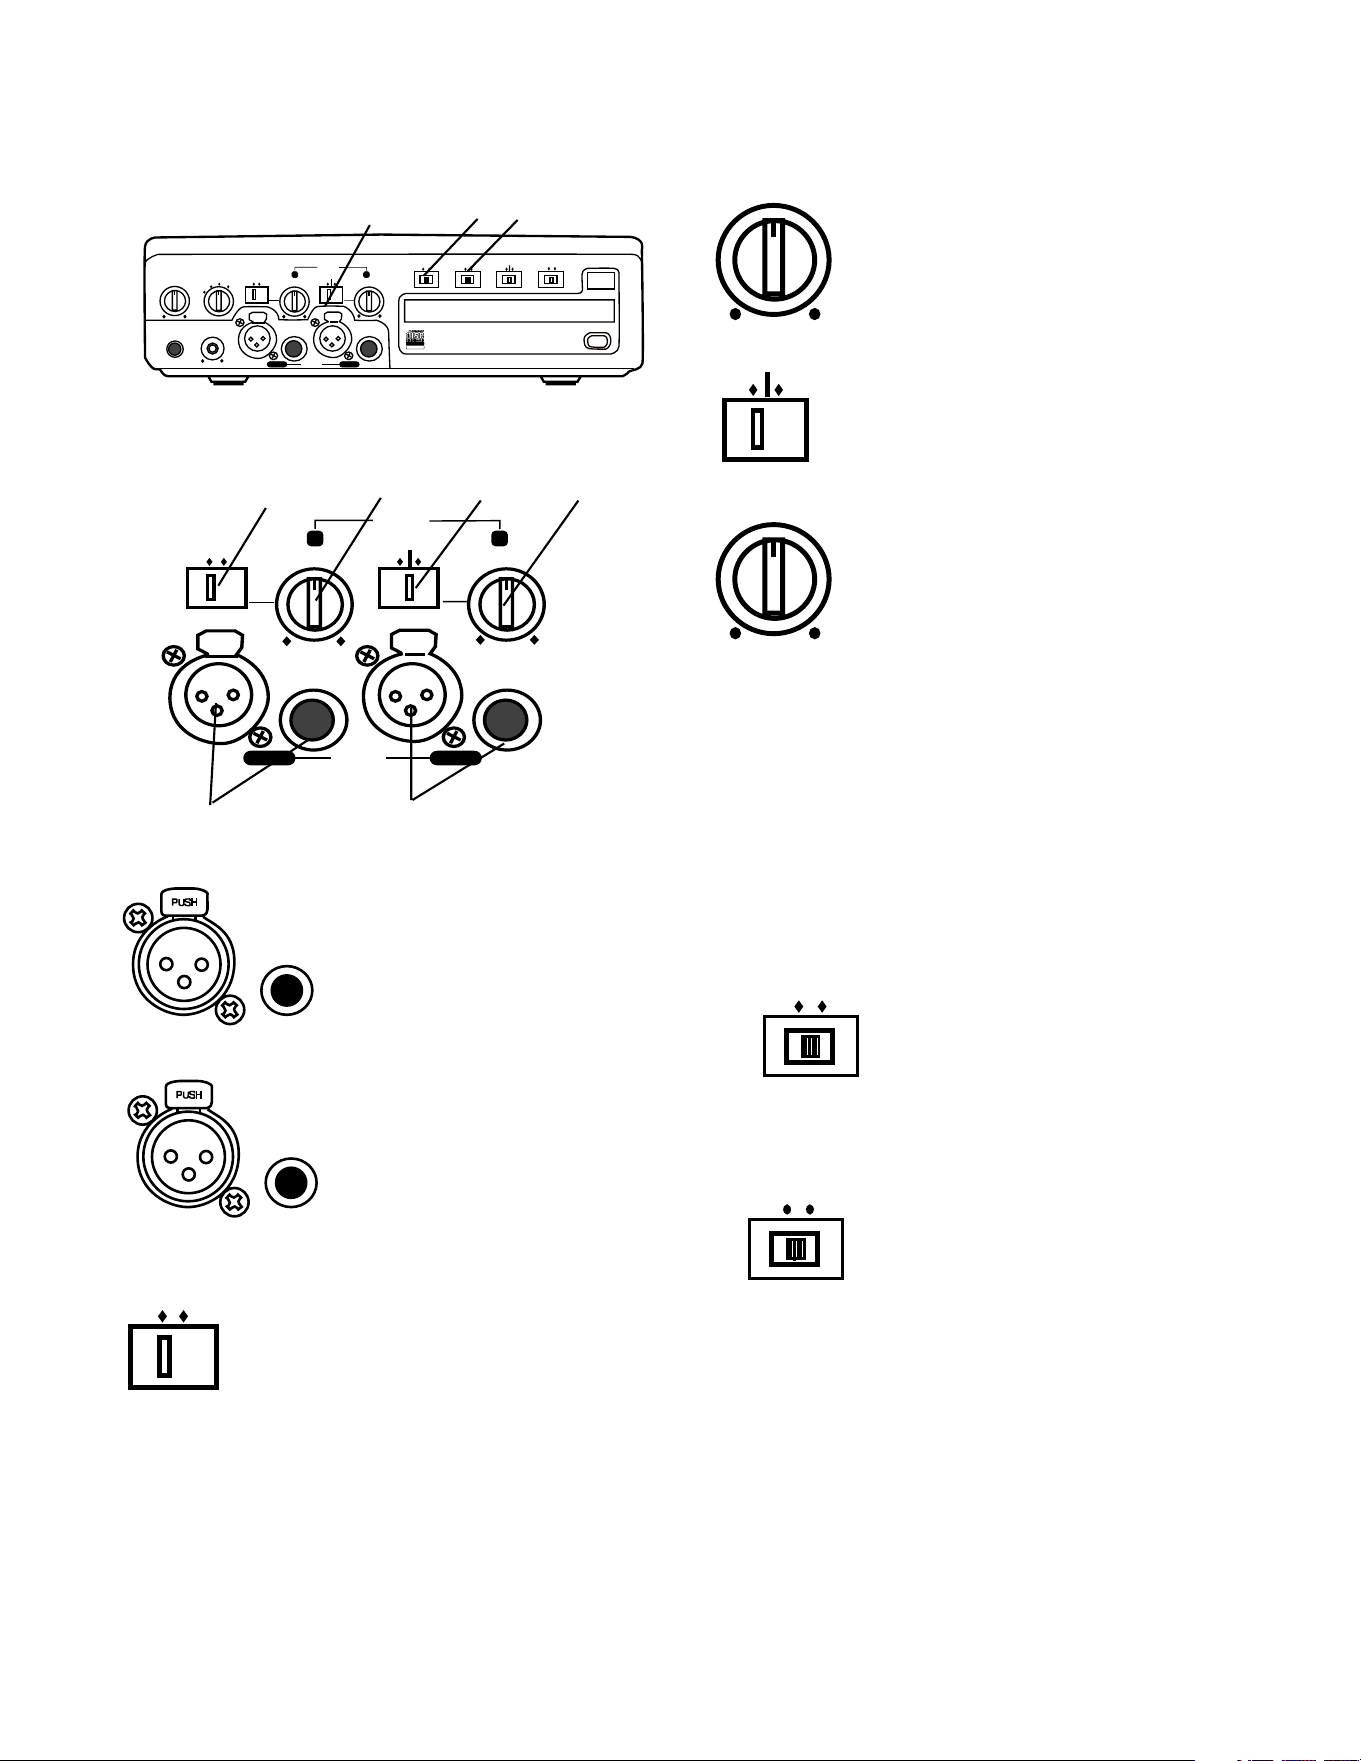
3 MIC/LINE/INT controls and input jacks
Left and right microphones or instruments via phone
jacks or via XLR connectors are input here. LINE/MIC
switches on each input channel permit, for example,
input of an instrument on the left channel (LINE) and a
mic level input on the right channel (MIC).
- 15 -
Controls, Connections (front) con-
tinued
PHONE/SPEAKER
LEVEL
PHONE SELECTOR
MIC/LINE
CD
LINE OUT AUX
PHONES
LINE OUT
ReWritable
Recordable
CD PLAY / RECORD
OPEN/CLOSE
MIX
SPLIT
MIC
STEREO
ONOFF
ALC
DIGITAL
ANALOG
INPUT
ONOFF
SPEAKER
MIC
LINE
INT
LINE
MIC
MIC/LINE
L
PUSH
R
MIC/LINE RIGHT
PUSH
LEFT
3 4 5
3
MIC/LINE/INT controls and input jacks contin-
ued
MIC
LINE
INT
LINE
MIC
MIC/LINE
L
PUSH
R
MIC/LINE RIGHT
PUSH
LEFT
3 4 5 6
1 2
1 Left XLR or 1/4" input
jack
Plug in an instrument or
other line level audio device
here to provide audio to the
left stereo channel.
4 Left level control
Turn to adjust the level of the left input.
INT
LINE
MIC
5 Right LINE MIC INT switch
Switch to LINE for a line level input or to
MIC for a microphone level input.
Switch to INT for the internal micro-
phone.
6 Right level control
Turn to adjust the level of the right
input.
Note: When internal mic is selected both the Left level
control and the Right level control are active. To
record the internal microphone to both the left and
right channels adjust both Left and Right level controls.
Note: To avoid feedback, turn the internal SPEAKER
OFF/ON switch OFF or reduce the PHONE/SPEAKER
LEVEL control, and reduce the LINE OUT level control
if connected to an external amplifier.
DIGITAL
ANALOG
INPUT
the DIGITAL IN jack on the rear of PSD300.
4 INPUT ANALOG/DIGITAL
switch
Select between analog or digital
external input. Connect digital
output of the source machine to
ONOFF
ALC
ON – Limits any input signal greater than -12 dB. Left
and right MIC/LINE (or INT MIC) level controls should
be set to maximum.
OFF – Set level using left and right MIC/LINE (or INT
MIC) level controls. Levels in excess of 0 dB may be
recorded and may result in distorted recordings.
5 ALC OFF/ON switch
Record level limiter for analog
input during recording.
2 Right XLR or 1/4" input
jack
Plug in an instrument or other
line level audio device here to
provide audio to the right
stereo channel.
MIC
LINE
3 Left LINE MIC switch
Switch to LINE for a line level input or to
MIC for a microphone level input.
Note: To mix two microphones from the front inputs
with a stereo line input, use the AUX input on the rear
for the stereo line input.
- 16 -
Controls, Connections (front) con-
tinued
PHONE/SPEAKER
LEVEL
PHONE SELECTOR
MIC/LINE
CD
LINE OUT AUX
PHONES
LINE OUT
ReWritable
Recordable
CD PLAY / RECORD
OPEN/CLOSE
MIX
SPLIT
MIC
STEREO
ONOFF
ALC
DIGITAL
ANALOG
INPUT
ONOFF
SPEAKER
MIC
LINE
INT
LINE
MIC
MIC/LINE
L
PUSH
R
MIC/LINE RIGHT
PUSH
LEFT
9 10 11 12
6 7 8
6 MIC/LINE SPLIT/STEREO/MIX
switch
Determines how the signal from
the CD drive and the signals from
the MIC/LINE (or INT MIC) inputs
are recorded.
MIX
SPLIT
MIC/LINE
STEREO
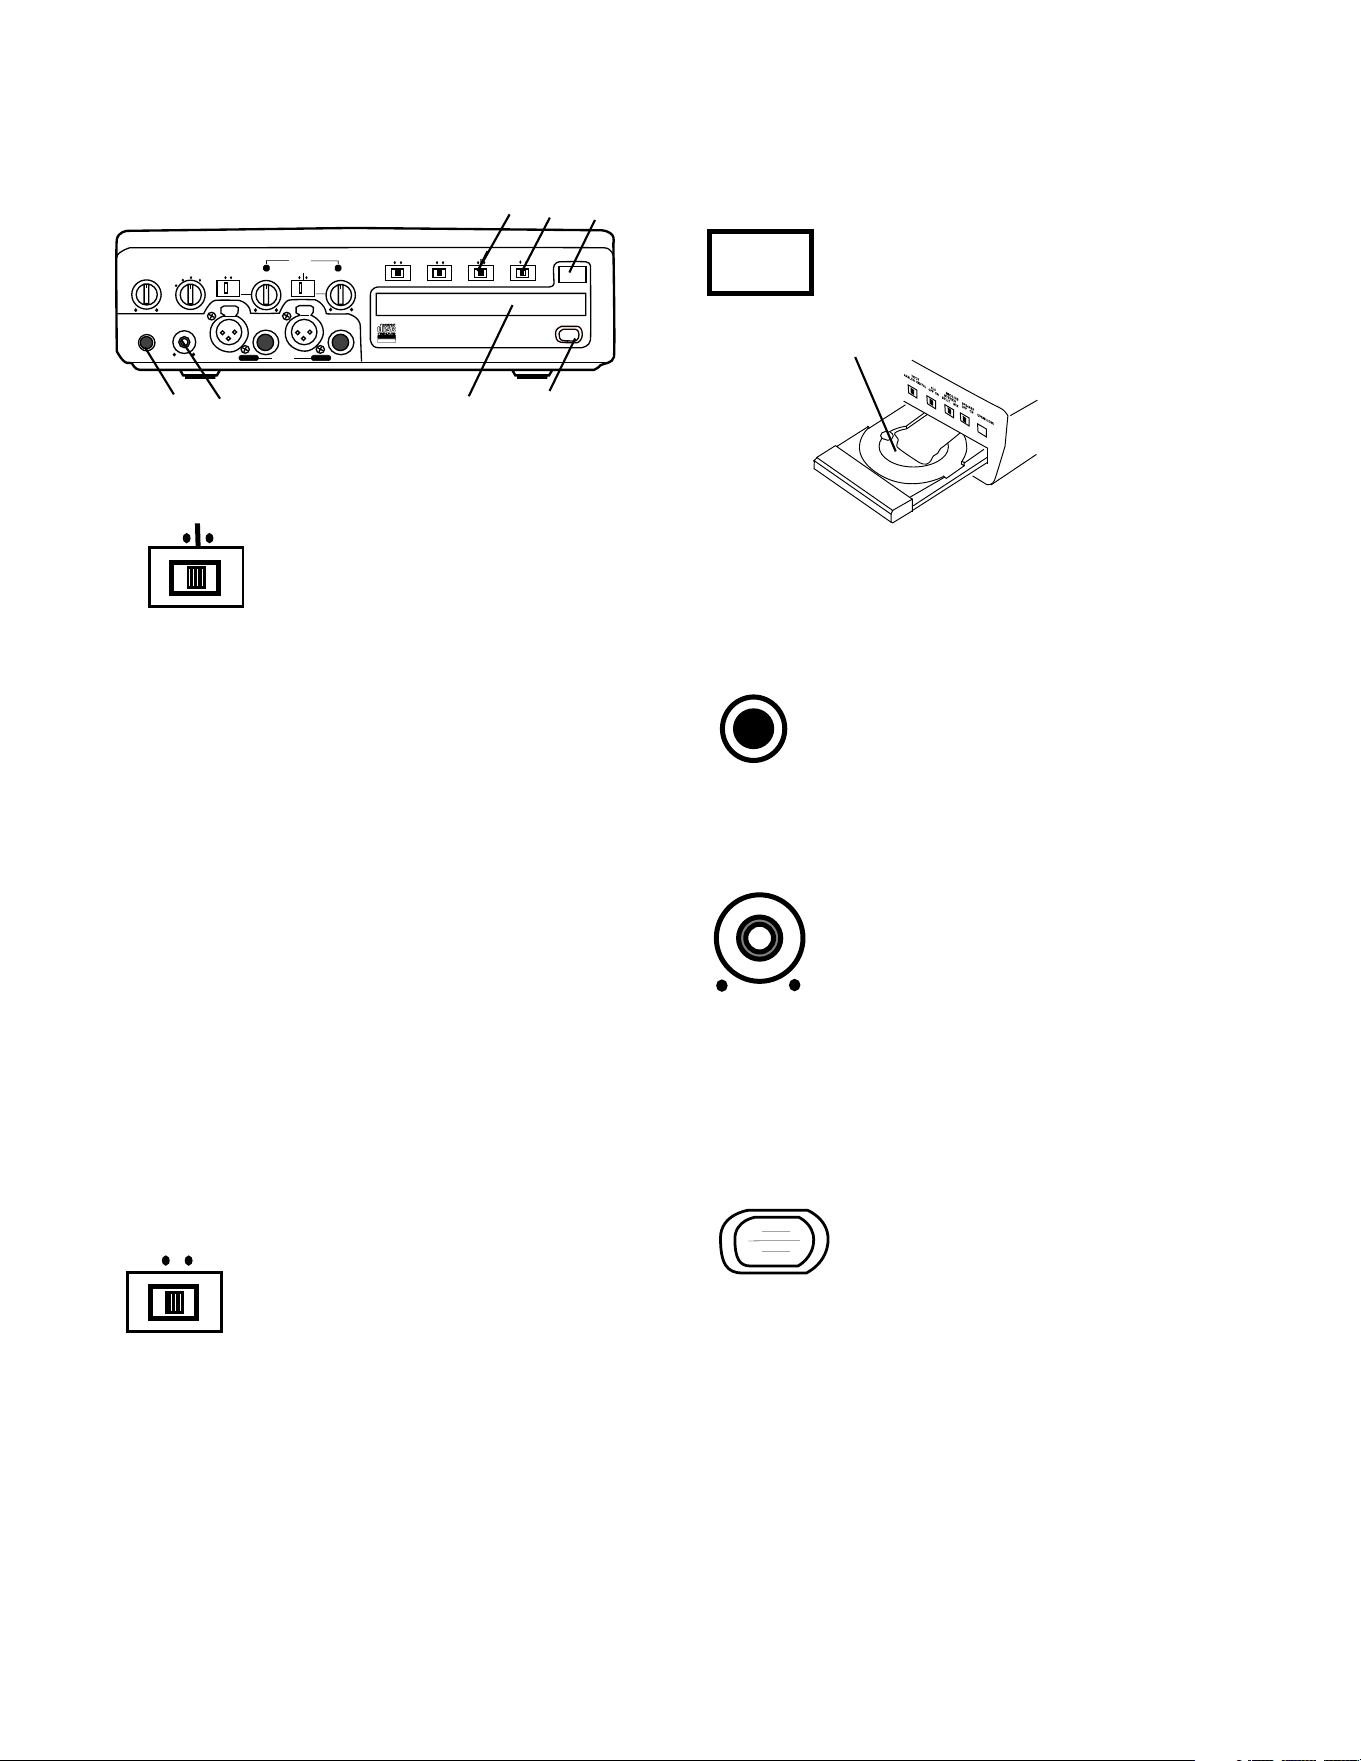
OPEN/CLOSE
8 OPEN/CLOSE switch
Push and release to OPEN the
CDR drive.
To CLOSE the CDR drive, push and release the
OPEN/CLOSE switch.
CDR drive open
PHONES
9 PHONES jack
Plug stereo headphones in here.
Adjust headphone volume with the
PHONES/SPEAKER LEVEL control.
10 LINE OUT level control
Turn to adjust the level of the output to
the LINE OUT jacks.
LINE OUT
11 CDR drive (disc tray)
In this manual this drive is referred to as the CDR drive.
The CDR drive is used for recording and can record
CD-R and CD-RW discs. The CDR drive can also
playback CD, CD-R and CD-RW disks
12 Remote control sensor
Sensor for the supplied wireless
remote control.
Note: Set the REMOTE EXT. INT.
switch on the back to INT. to enable
the wireless remote control.
7 SPEAKER OFF/ON switch
Turns the built-in speaker OFF or
ON.
ONOFF
SPEAKER
SPLIT – Left and right signals from the CD drive are
sent to the left channel of the recording. Left and right
signals from MIC/LINE (or INT MIC) are sent to the
right channel of the recording. Left and right signals
from the AUX inputs are sent to the left and right
channels of the recording.
STEREO – Left and right signals from the CD drive
are sent to the left and right channels of the recording.
Left and right signals from the MIC/LINE (or INT MIC)
and/or AUX inputs are sent to the left and right chan-
nels of the recording.
MIX – Left and right signals from the CD drive and the
AUX inputs are sent to the left and right channels of
the recording. MIC/LINE (or INT MIC) inputs are sent
to both channels of the recording.
Note: When internal mic is selected both the Left level
control and the Right level control are active. To
record the internal microphone to both left and right
channels adjust both Left and Right level controls.
POWER
ON OFF
MIX LINE AUX DIGITAL
REMOTE
RC-5 EXT. INT.
FOOT
PEDAL
IN
OUT
IN
OUT
R
L
R
L
INOUT
OUT
- 17 -
Controls, Connections (rear)
1 MIX OUT jacks
Plug Right and Left RCA audio
cables in here to connect to the
input of an amplifier or other
external unit. Use for recording
onto an external recorder.
Output from the CD drive and MIC/
LINE (or INT MIC) and/or AUX
MIX
R
L
OUT
jacks are output as line level output to an external
recorder or amplifier. The signal is output before going
to the CDR drive, so it is available for monitoring or
recording even if the CDR drive is stopped. This signal
cannot be equalized by the PSD300 tone controls.
1 2 3 4 5 6 7 8 9
MIX LINE AUX
R
L
OUT
2 LINE OUT jacks
Plug Right and Left RCA
audio cables in here to
connect to the input of an
amplifier or other external
unit. When the CDR drive
is not recording the LINE
OUT jacks output the MIX
out signal. This signal can be equalized by the
PDS300 tone controls.
AUX
R
L
IN
3 AUX IN jacks
Plug Right and Left RCA audio
cables in here to connect to the
output of an external unit.
Use for recording onto the CDR
drive from an external audio
source such as a cassette deck.
DIGITAL
IN
OUT
4 DIGITAL IN and OUT jacks
Plug RCA coaxial cables in here to
connect to the input and/or output
of an external digital unit.
Use IN for recording onto the CDR
drive from an external digital audio
source.
Use OUT for going to an external
digital device.
5 REMOTE RC-5 IN and OUT
jacks
Plug RCA audio cables in here to
connect to the input and output of
an RC-5 remote control system.
The RC-5 control code list is on
page 38.
REMOTE
RC-5
IN
OUT
Notes:
• For more information on the RC-5 system and
details regarding its operation please contact
Superscope Technologies.
• When an RC-5 remote control system is not used
the REMOTE EXT. INT. switch should be at INT.
REMOTE
EXT. INT.
6 REMOTE EXT. INT. switch
Switch to EXT. (external) when an
external RC-5 remote control
system is used.
Notes:
• Switch to INT. (internal) to enable the supplied IR
(infrared) remote.
• A list of the RC-5 remote control codes is on the
page 38.
7 FOOT PEDAL jack
An optional foot pedal can provide
Play/Pause control for the CD
drive and the CDR drive.
Foot pedal (FT200) is available
from Superscope Technologies
Inc.
FOOT
PEDAL
POWER
ON OFF
9 Power switch
Push and release to turn power ON (in
position). Push and release to turn
power OFF (out position).
Normally, to retain memory, leave this switch at ON
and turn power on and off with the Standby POWER
slide switch on the top of the unit.
8 Power plug
Plug one end of the
supplied power cord in
here and the other into a
110 VAC outlet.
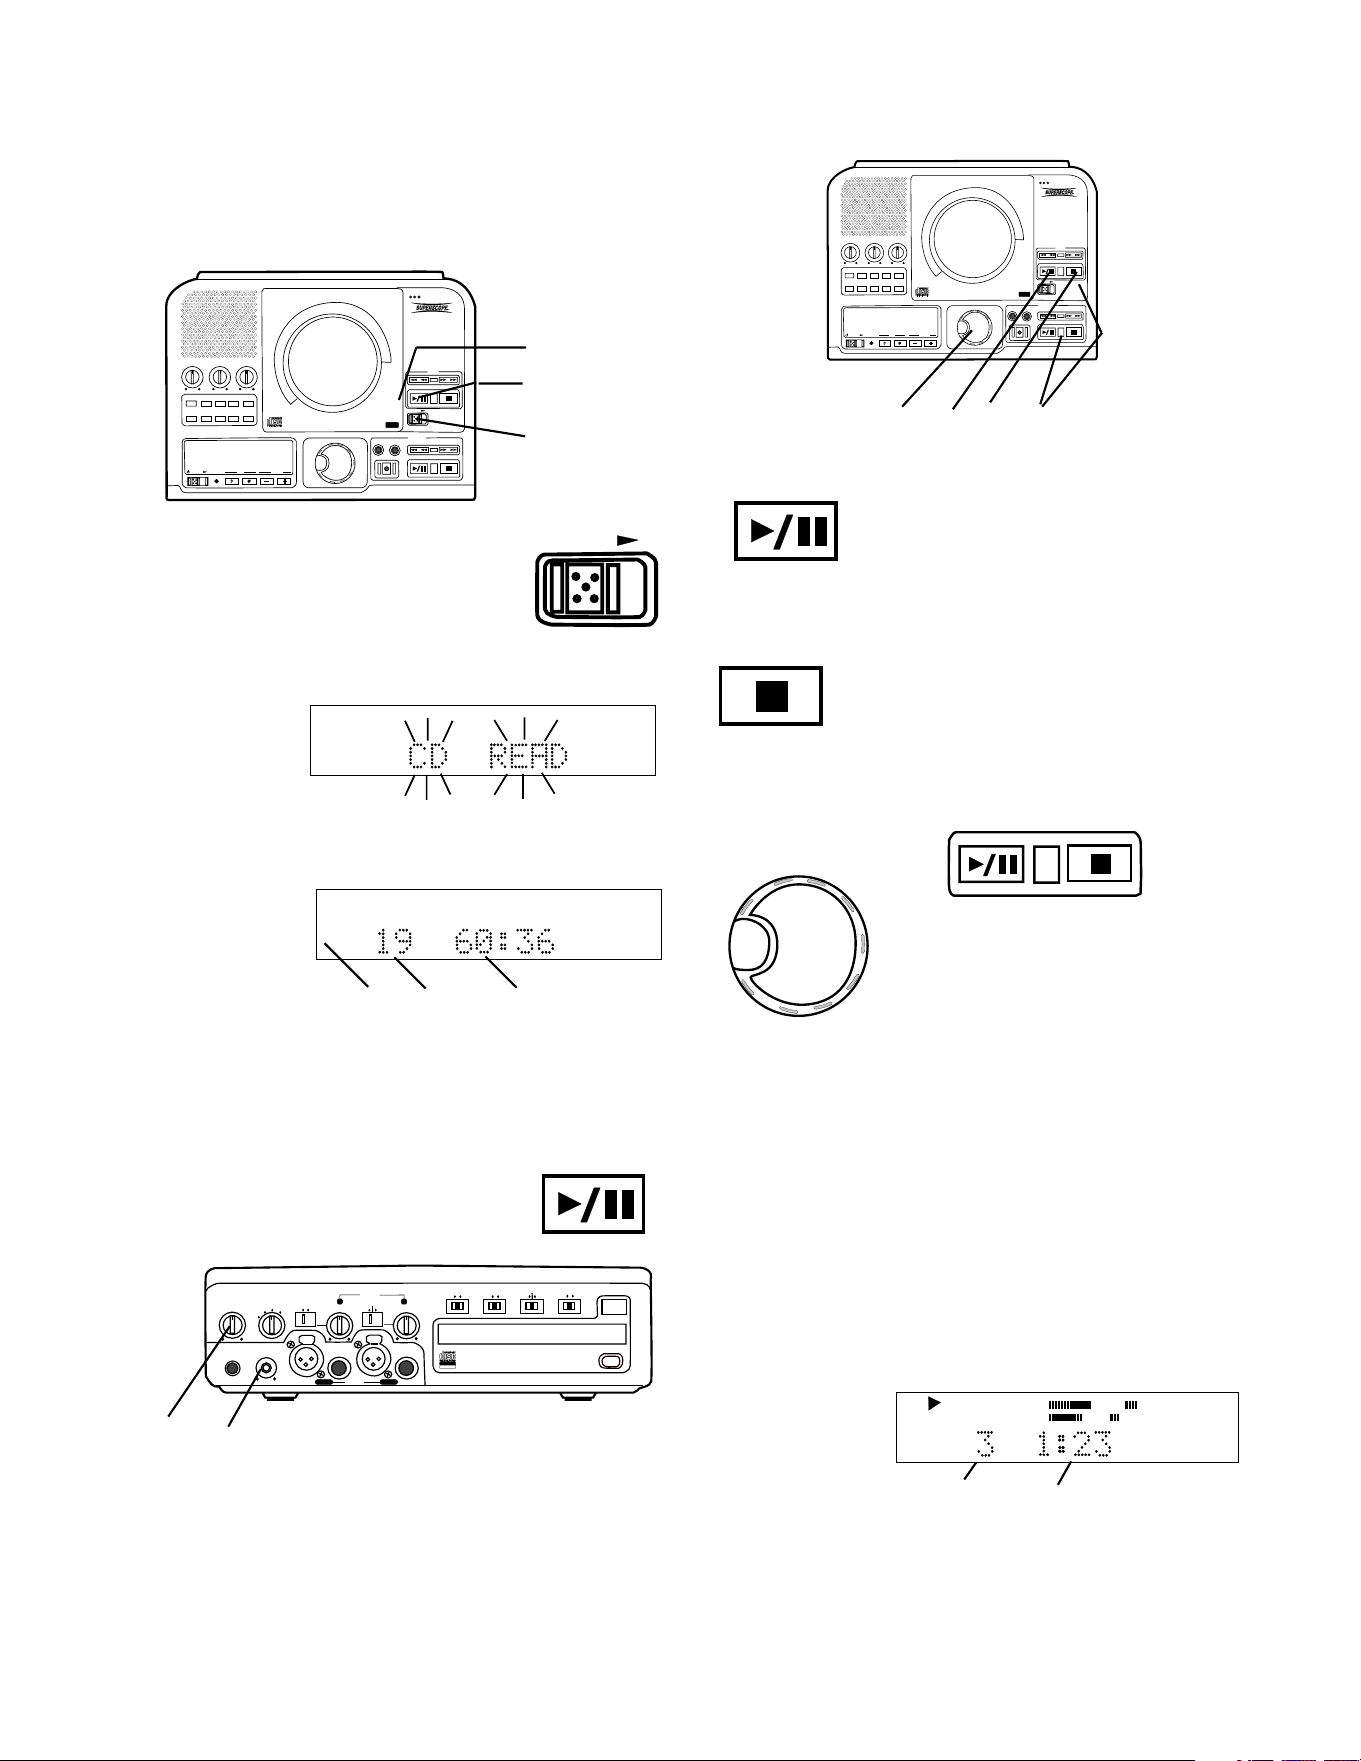
- 18 -
How to Play
How to Play a CD (basics)
Push and release the Play/Pause
button (1) to Pause. When paused,
push and release to continue play from
the same point.
Push and release the Stop button (2) to
Stop. When Play/Pause is pushed,
play starts from the beginning of the
disc.
How to play
SELECT
PUSH / ENTER
3a
If both the CD drive and the
CDR drive have CDs in-
serted and ready for play
you can switch between the
drives during play, stop or
pause by pushing and
3b
How to display time
There are three modes of time display:
A Elapsed track time
B Total remaining disc time
C Remaining track time
A Elapsed track time
The default time display shows the elapsed time on
the track being played.
Example
display.
CD
TRACK
R
L
dB-50 -30 -22 -16 -12 -8 -4 0
a b
That track 3 (a) has been playing for 1 minute and 23
seconds (b).
How to Pause
How to Stop
How to switch between drives
PUSH
BASS
MID
TREBLE
TEXT VR PROG REPEAT
MENU/STORE
DISP SINGLE
A-B
CANCEL/DELETE
REC MODE
CD-RW PLAYBACK
CD RECORDING SYSTEM PSD300
MIC
PLAY
OPEN
REC/PLAY
ERASE FINALIZE
REC
SELECT
PUSH ENTER
POWER KEY TEMPOSTANDBY
3
4
2
2 Slide the OPEN switch to open the
CD drive.
OPEN
3 Insert your CD and push at PUSH to close the CD
drive.
CD READ will
flash on the
display.
R
L
dB-50 -30 -22 -16 -12 -8 -4 0
If CD text is available the CD title/artist will scroll
across the display.
Then the display
will show disc
information
(example shown).
TOTAL TRACK
CD
R
L
dB-50 -30 -22 -16 -12 -8 -4 0
CD
a b c
a The type of disc (CD, CD-R or CD-RW) is shown.
b The number of tracks on the disc.
c The total playing time of the disc.
4 Play Push the Play/Pause button to
begin play. The CD will play to the end
and stop.
PHONE/SPEAKER
LEVEL
PHONE SELECTOR
MIC/LINE
CD
LINE OUT AUX
PHONES
LINE OUT
ReWritable
Recordable
CD PLAY / RECORD
OPEN/CLOSE
MIX
SPLIT
MIC
STEREO
ONOFF
ALC
DIGITAL
ANALOG
INPUT
ONOFF
SPEAKER
MIC
LINE
INT
LINE
MIC
MIC/LINE
L
PUSH
R
MIC/LINE RIGHT
PUSH
LEFT
d e
Adjust internal speaker or headphone volume with the
PHONE/SPEAKER level control d.
Adjust the LINE OUT level with the control e and your
amplifier's volume controls if using an external ampli-
fier.
1 Connect and turn on the PSD300, see Connections
(basic) on page 6.
releasing the SELECT control (3a) or the Play/Pause
or Stop buttons (3b).
PUSH
BASS
MID
TREBLE
TEXT VR PROG REPEAT
MENU/STORE
DISP SINGLE
A-B
CANCEL/DELETE
REC MODE
CD-RW PLAYBACK
CD RECORDING SYSTEM PSD300
MIC
PLAY
OPEN
REC/PLAY
ERASE FINALIZE
REC
SELECT
PUSH ENTER
POWER KEY TEMPOSTANDBY
3a 1 2 3b
- 19 -
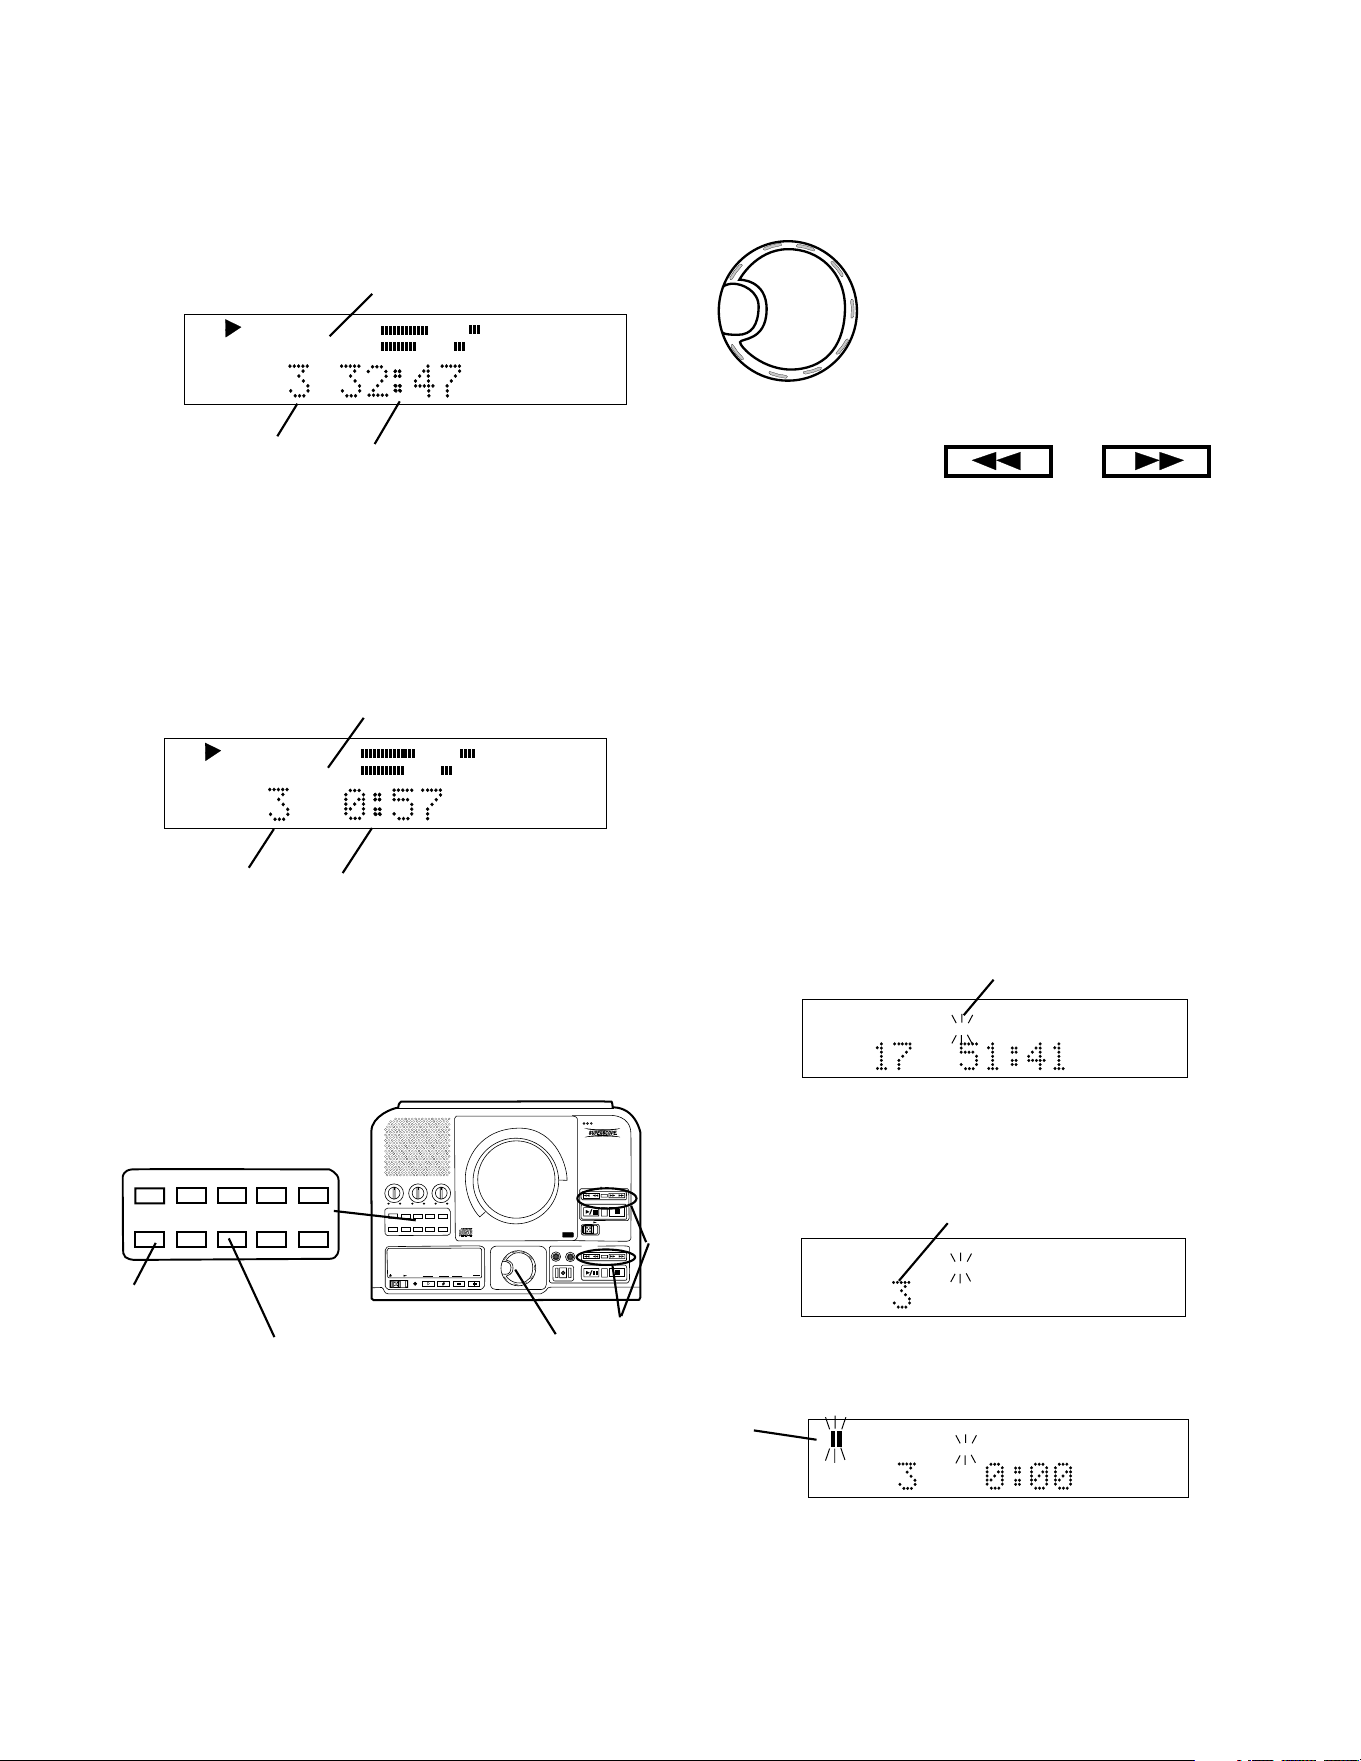
How to play continued
How to select tracks
You can select tracks during Stop, Play or Pause.
Turn the SELECT control (5) to
choose the track. During play wait
about a second or push and
release the SELECT control to
switch to the beginning of that
track. During Stop or Pause push
Play/Pause to begin playing the
selected track.
SELECT
PUSH / ENTER
How to Search
While playing (CD or CDR drive) push and hold a Fast
backward search or Fast forward search button (6).
Samples of audio are played while searching back-
ward or forward. After a couple of seconds of holding
the search speeds up.
For more accurate positioning on the CD drive push
and release the Fast backward or Fast forward search
button during Pause. Each push and release is
approximately one half second of audio.
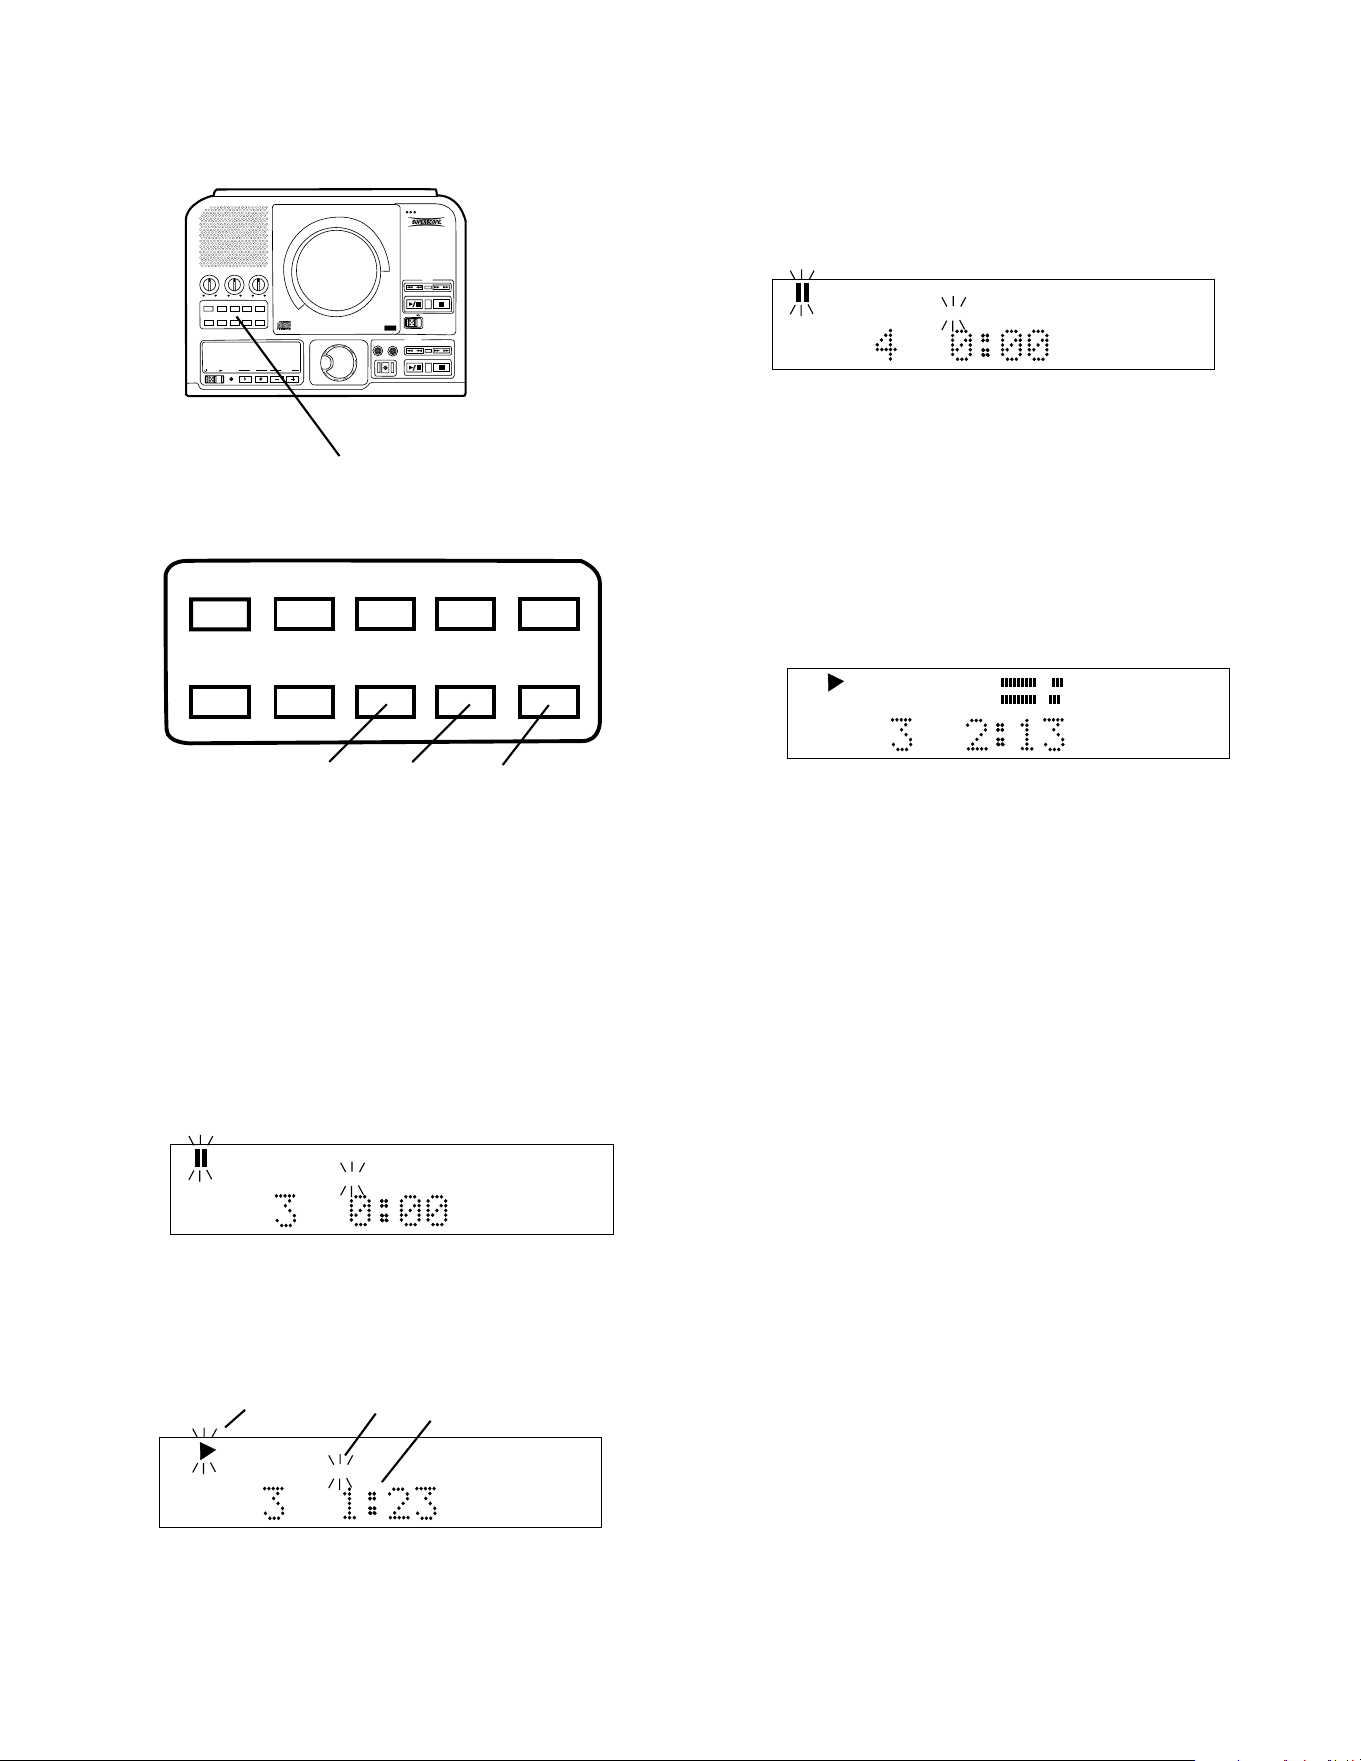
While stopped push and release the SINGLE button
(7).
How to play a Single Track
CD TEXT
R
L
dB-50 -30 -22 -16 -12 -8 -4 0
TOTAL TRACK
b
Example display shows TRACK 3 selected (b).
Push and release Play/Pause.
CD TEXT
R
L
dB-50 -30 -22 -16 -12 -8 -4 0
TRACK
c
The selected track will be cued to music and paused.
Paused symbol flashing (c).
CD TEXT
R
L
dB-50 -30 -22 -16 -12 -8 -4 0
TOTAL TRACK
a
Example display shows TRACK flashing (a).
Turn the SELECT control to choose the track you wish
to play.
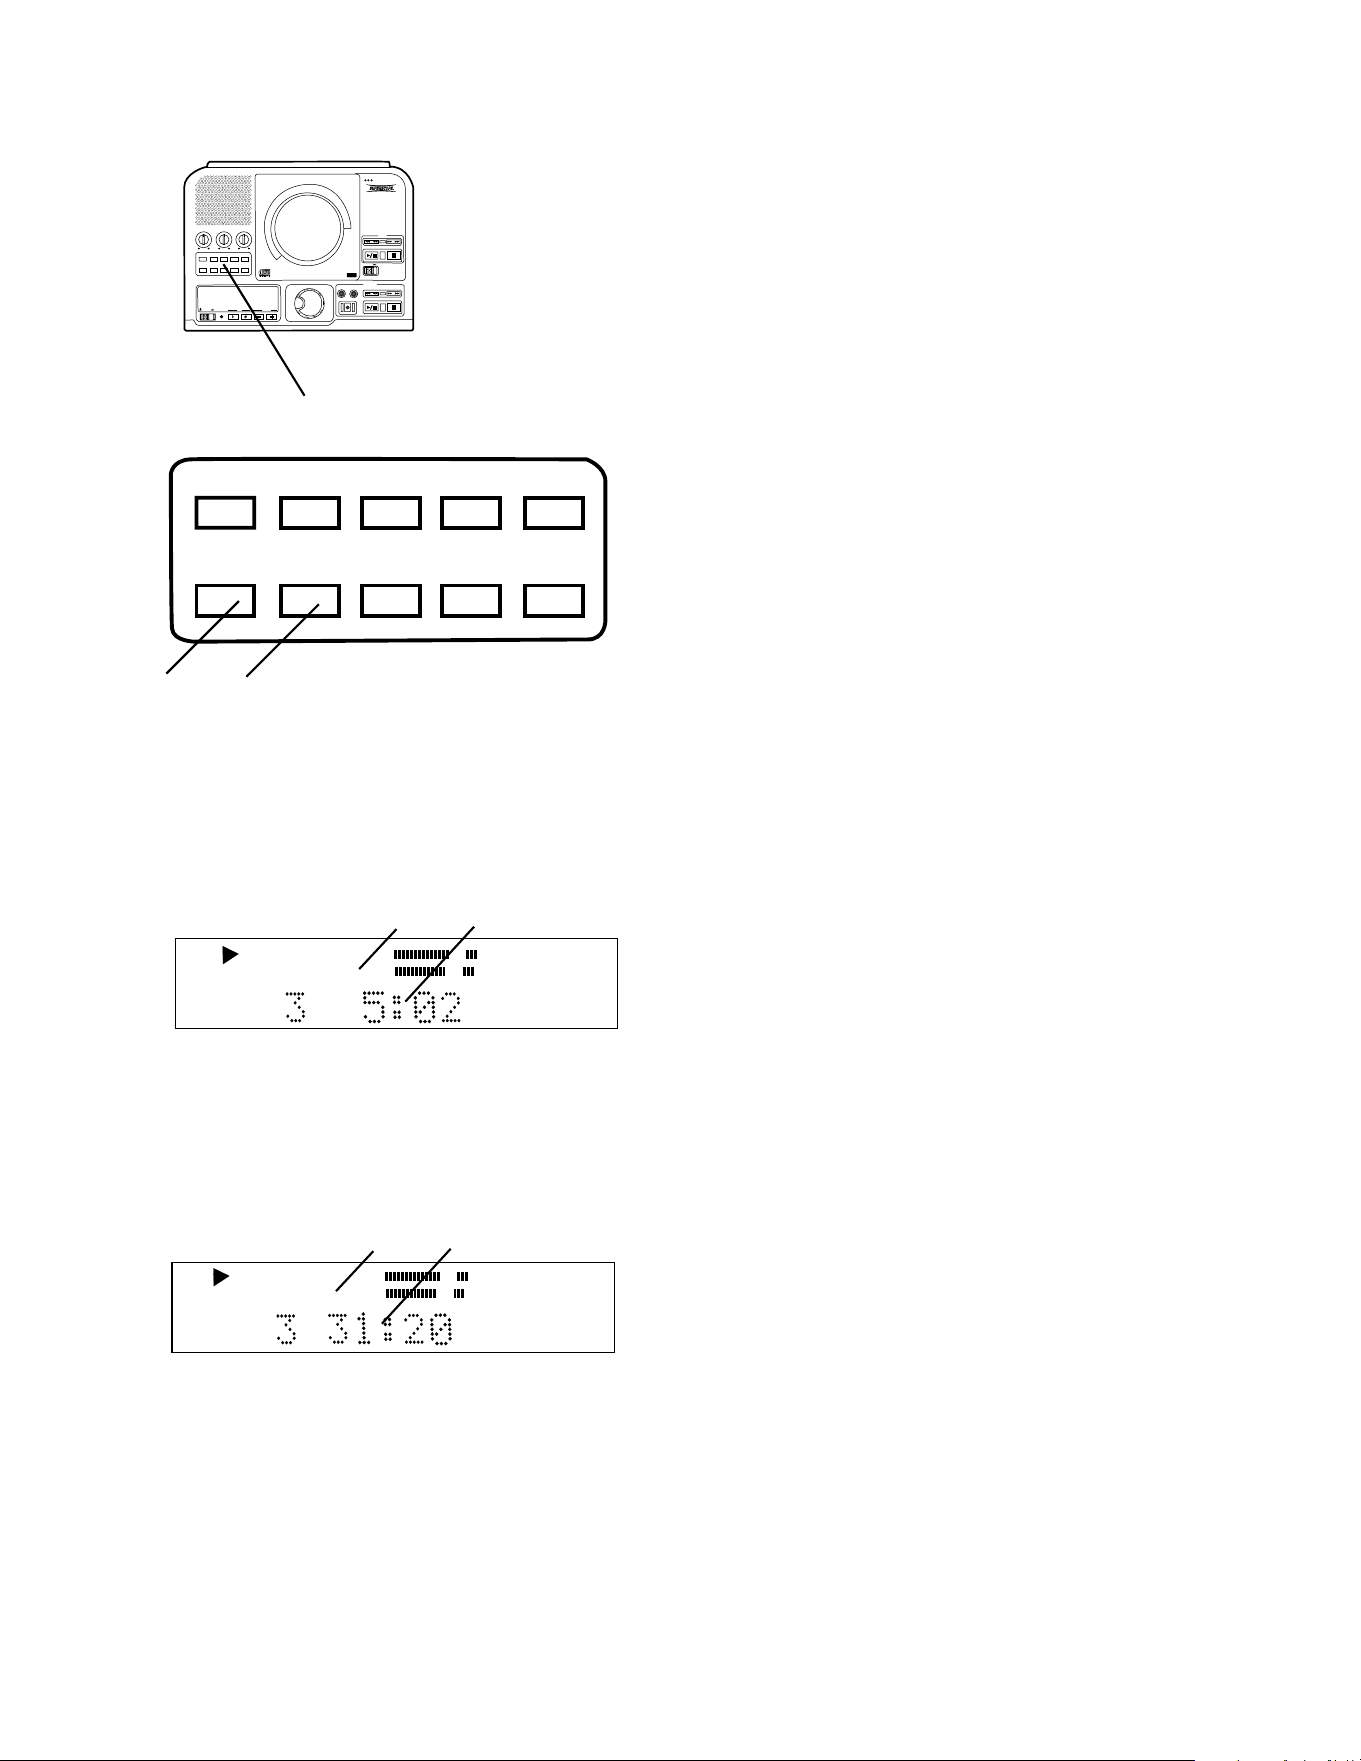
B Total remaining disc time
Push and release DISP (4) once. The display shows
the total time remaining on the disc counting down.
CD
R
L
dB-50 -30 -22 -16 -12 -8 -4 0
TOTAL TRACK
a c
b
The example display indicates that track 3 (a) is
playing, and total track (total disc) (b) has 32 minutes
and 47 seconds to play (c).
Push and release DISP (4) another time. The display
shows the time remaining on the track counting down.
C Remaining track time
CD
TRACK
R
L
dB-50 -30 -22 -16 -12 -8 -4 0
b c
a
The example display indicates that track time is
displayed (a) track 3 is playing (b) and has 0 minutes
and 57 seconds of remaining play time (c).
Push and release DISP (4) a third time. The display
returns to the track time counting up.
TEXT VR PROG REPEAT MENU/STORE
DISP SINGLE
A-B CANCEL/DELETE
REC MODE
PUSH
BASS
MID
TREBLE
TEXT VR PROG REPEAT
MENU/STORE
DISP SINGLE
A-B
CANCEL/DELETE
REC MODE
CD-RW PLAYBACK
CD RECORDING SYSTEM PSD300
MIC
PLAY
OPEN
REC/PLAY
ERASE FINALIZE
REC
SELECT
PUSH ENTER
POWER KEY TEMPOSTANDBY
4
5 6
7
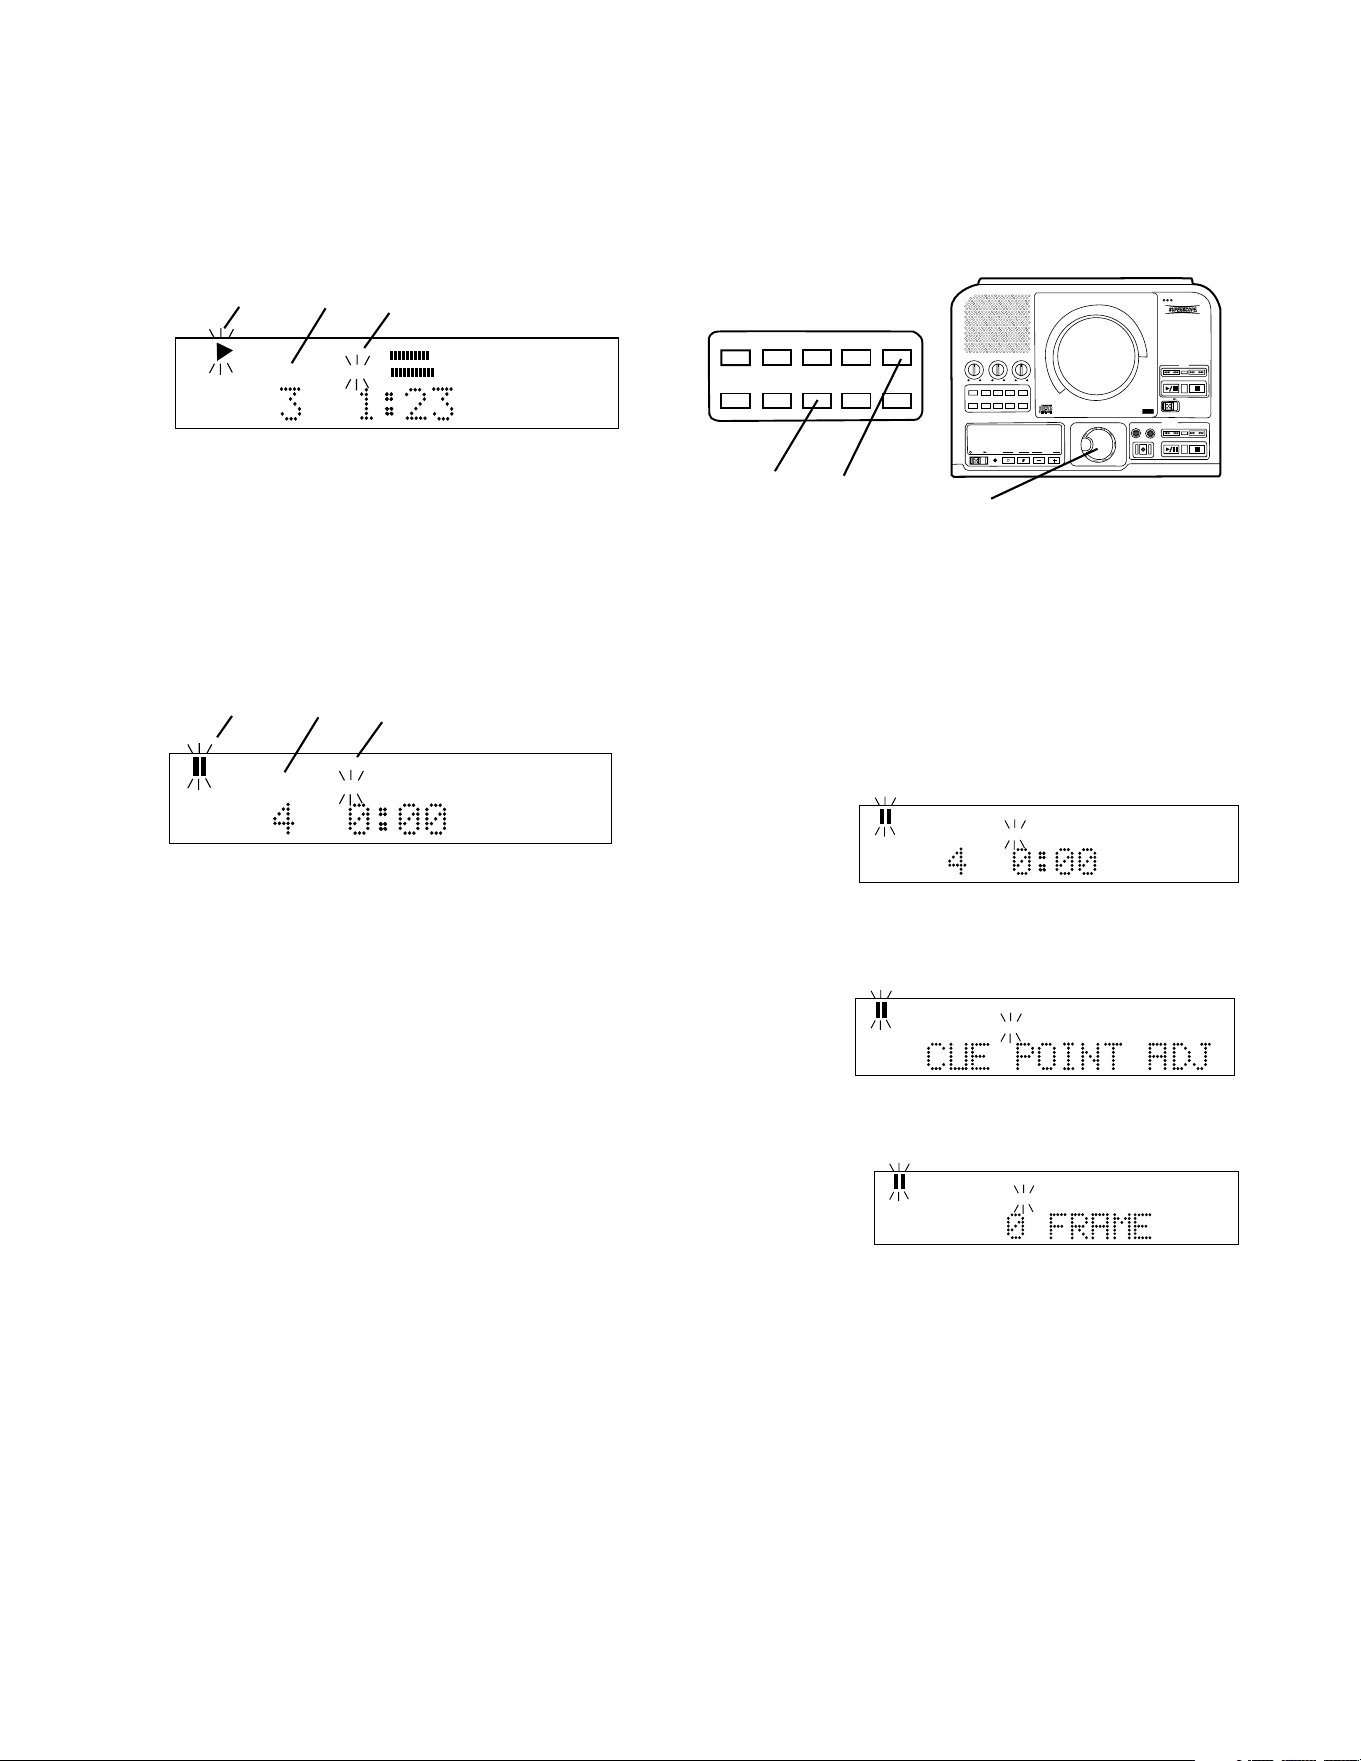
- 20 -
How to play continued
Push and release Play/Pause.
CD TEXT
TRACK
R
L
dB-50 -30 -22 -16 -12 -8 -4 0
a b c
Example display:
a Play symbol flashing indicates track is playing.
b Example track #3 is playing
c Flashing "TRACK" indicates single track play.
When the track is completed the PSD300 remains in
Single track, paused at the beginning of the next track
and cued to music.
CD TEXT
TRACK
R
L
dB-50 -30 -22 -16 -12 -8 -4 0
a b c
Example display:
a Paused symbol flashing indicates track is paused.
b Example track #4 is cued.
c Flashing "TRACK" indicates single track play.
Push SINGLE to exit Single Track.
How to cue to music (cue to audio)
Normally there is some silence from beginning of a
track (track ID position) to the beginning of the music
(audio). Cue to music skips the silence so you can
directly switch to audio from Play/Pause mode.
In Single Track the PSD300 automatically turns cue to
music on. Push SINGLE to enter cue to music.
PUSH
BASS
MID
TREBLE
TEXT VR PROG REPEAT MENU/STORE
DISP SINGLE
A-B CANCEL/DELETE
REC MODE
CD-RW PLAYBACK
CD RECORDING SYSTEM PSD300
MIC
PLAY
OPEN
REC/PLAY
ERASE FINALIZE
REC
SELECT
PUSH ENTER
POWER KEY TEMPOSTANDBY
TEXT VR PROG REPEAT
MENU/STORE
DISP SINGLE
A-B
CANCEL/DELETE
REC MODE
3 Push and release MENU/STORE. The display
switches to CUE POINT ADJUST.
CD TEXT
TRACK
R
L
dB-50 -30 -22 -16 -12 -8 -4 0
4 Push and release the SELECT control. The
display shows O FRAME.
CD TEXT
TRACK
R
L
dB-50 -30 -22 -16 -12 -8 -4 0
Depending on the specific track, the FRAME
adjustment can be from 75 to -75 (75 frames = 1
second).
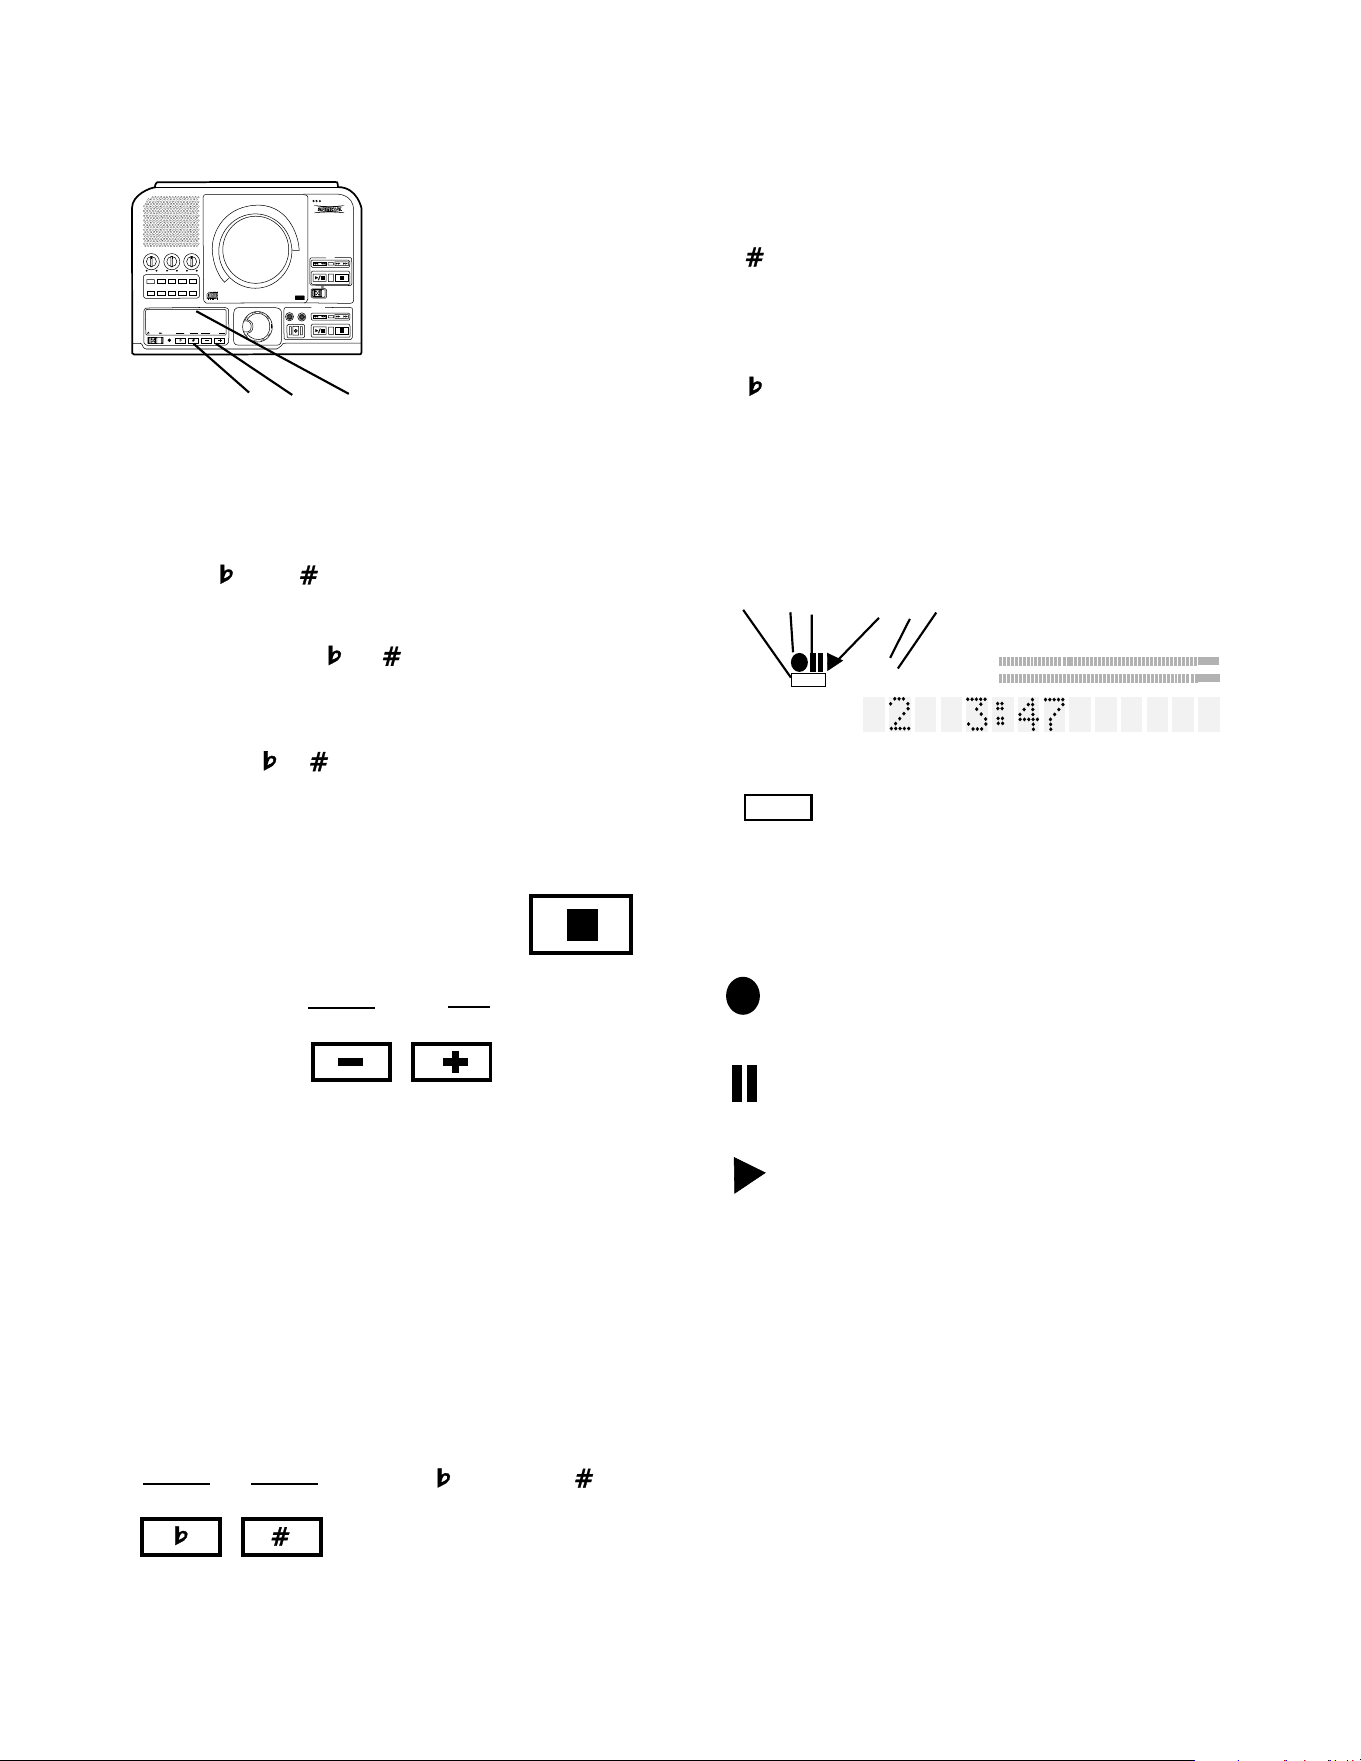
How to adjust the cue point
2, 4
1 3, 5
The cue point (start point of audio) is detected by the
PSD300 as volume exceeding a threshold of audio.
To adjust
1 With your CD in the CD drive, at Pause, and with
SINGLE track selected.
2 Turn the SELECT control to choose the track and
push and release the SELECT control to confirm.
CD TEXT
TRACK
Example
display.
Turn the SELECT control to change the audio start
position. Then push and release the SELECT
control to store the adjustment.
5 Push and release MENU/STORE to exit.

- 21 -
How to play continued
PUSH
BASS
MID
TREBLE
TEXT VR PROG REPEAT
MENU/STORE
DISP SINGLE
A-B
CANCEL/DELETE
REC MODE
CD-RW PLAYBACK
CD RECORDING SYSTEM PSD300
MIC
PLAY
OPEN
REC/PLAY
ERASE FINALIZE
REC
SELECT
PUSH ENTER
POWER KEY TEMPOSTANDBY
TEXT VR PROG REPEAT
MENU/STORE
DISP SINGLE
A-B
CANCEL/DELETE
REC MODE
PUSH
BASS
MID
TREBLE
TEXT VR PROG REPEAT
MENU/STORE
DISP SINGLE
A-B
CANCEL/DELETE
REC MODE
CD-RW PLAYBACK
CD RECORDING SYSTEM PSD300
MIC
PLAY
OPEN
REC/PLAY
ERASE FINALIZE
REC
SELECT
PUSH ENTER
POWER KEY TEMPOSTANDBY
TEXT VR PROG REPEAT MENU/STORE
DISP SINGLE
A-B CANCEL/DELETE
REC MODE
2
3
TOTAL TRACK
CD-R
R
L
dB-50 -30 -22 -16 -12 -8 -4 0
CD
Example
display.
Push and release the SELECT control.
CHANGER ON or OFF is displayed.
Turn the SELECT control to switch between ON
and OFF. Push and release the SELECT control
to make selection.
1 With the PSD300 in stop mode (stop lit on either
the CD or the CDR drive.
2 Push and release MENU/STORE.
3 Turn the SELECT control so CHANGER MODE is
displayed.
PUSH
BASS
MID
TREBLE
TEXT VR PROG REPEAT
MENU/STORE
DISP SINGLE
A-B
CANCEL/DELETE
REC MODE
CD-RW PLAYBACK
CD RECORDING SYSTEM PSD300
MIC
PLAY
OPEN
REC/PLAY
ERASE FINALIZE
REC
SELECT
PUSH ENTER
POWER KEY TEMPOSTANDBY
1 With a CD in the CD drive and with playback
stopped, push and release the PROG button to
enter programming. This display appears:
PROG
TOTAL TRACK
a b
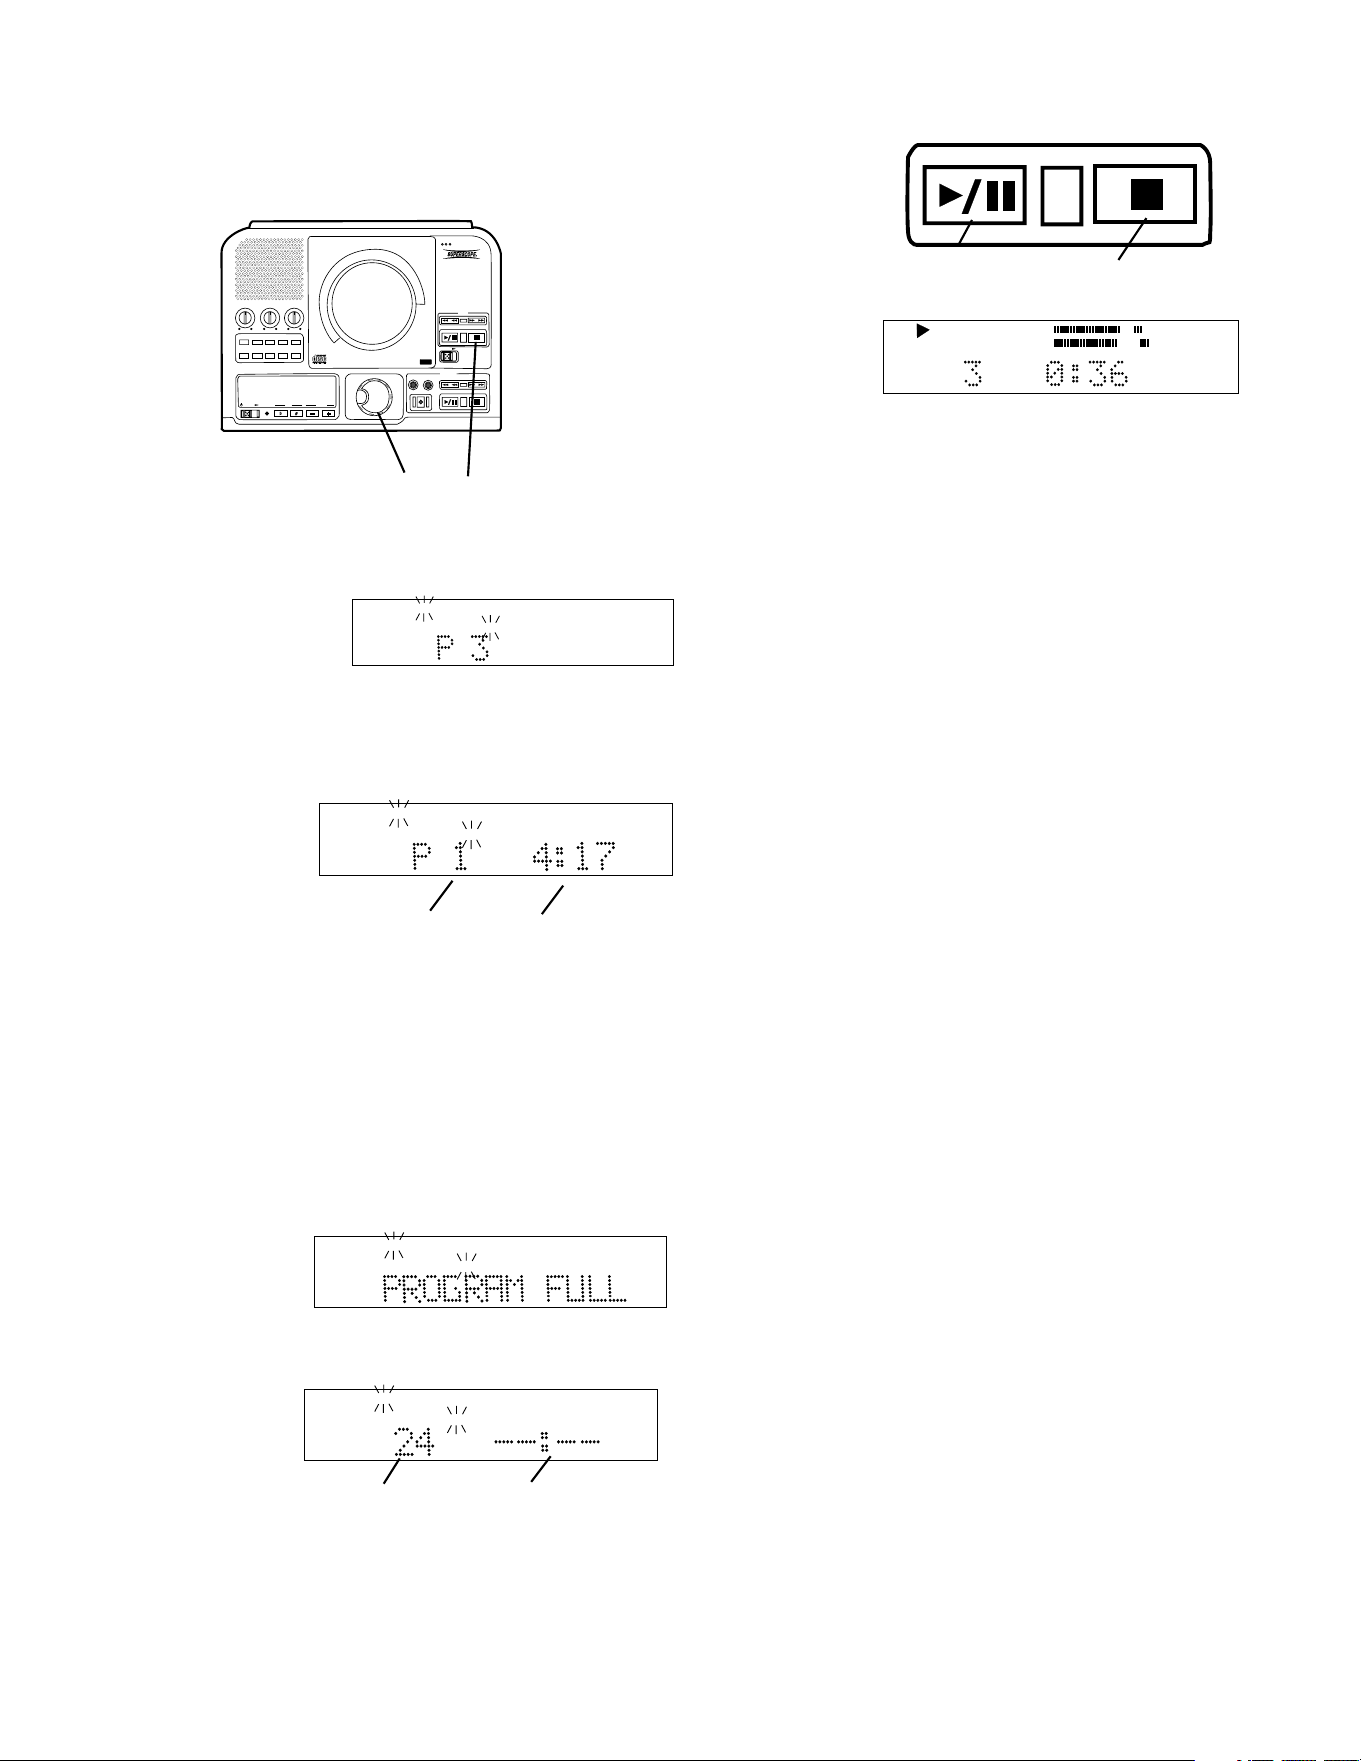
c d e
a PROG is lit and flashing.
b TOTAL TRACK is lit with TRACK flashing.
c P indicates "Programmed tracks".
d The number of tracks programmed is displayed.
e The total playing time programmed is displayed.
How to Program Tracks
Programming lets you select tracks for playback (CD
drive only). Up to 30 tracks can be selected in any
order you desire.
TOTAL TRACK
CD-R
R
L
dB-50 -30 -22 -16 -12 -8 -4 0
CD
1
1
How to use Voice Reduction
Voice reduction is an electronic filter that reduces the
relative volume of the audio that during the production
process of the commercial CD was mixed in the
center channel (between right and left channels).
Normally the lead vocal of a CD is mixed to the center
channel.
While playing or paused (CD drive only) push and
release VR. A single push and release displays the
status of Voice Reduction.
Example
display.
CD
TRACK
R
L
dB-50 -30 -22 -16 -12 -8 -4 0
A second push and release of VR switches the status
of voice reduction. When voice reduction is ON VR is
displayed during play.
TOTAL TRACK
CD
R
L
dB-50 -30 -22 -16 -12 -8 -4 0
CD
Example
display.
How to enter CHANGER MODE
CHANGER MODE is a continuously playing mode that
automatically switches between drives. In CHANGER
MODE when the CD drive finishes playing the CDR
drive automatically starts playing, and when the CDR
drive finishes playing the CD drive automatically starts
playing. The tracks on the CD drive can be pro-
grammed for CHANGER MODE.
You have to manually push Pause or Stop to stop play.
- 22 -
How to play continued
How to Program Tracks continued
PUSH
BASS
MID
TREBLE
TEXT VR PROG REPEAT
MENU/STORE
DISP SINGLE
A-B
CANCEL/DELETE
REC MODE
CD-RW PLAYBACK
CD RECORDING SYSTEM PSD300
MIC
PLAY
OPEN
REC/PLAY
ERASE FINALIZE
REC
SELECT
PUSH ENTER
POWER KEY TEMPOSTANDBY
2 Turn the SELECT control to display the track
desired.
Example display
shows track 3
selected.
PROG
TOTAL TRACK
Push and release the SELECT control to enter the
selected track, or wait 1.5 seconds and the track is
automatically entered.
The
display
changes
to:
PROG
TOTAL TRACK
a b
a 1 track is programmed. (In the example track 3 is
the first track to be programmed.)
b The total playing time programmed in the example
is 4 minutes and 17 seconds.
Repeat step 2 to program tracks in the order you
desire. Up to 30 tracks can be programmed.
When you try to program a 31st track, this display
appears:
PROG
TOTAL TRACK
If the total time programmed exceeds 99 minutes
and 59 seconds the display changes to:
PROG
TOTAL TRACK
a b
a Number of tracks programmed (example).
b Total time given as dashes.
a b
3
Push Play/
Pause (a) to
play the pro-
gram.
TOTAL TRACK
CD
R
L
dB-50 -30 -22 -16 -12 -8 -4 0
CD
PROG
Example
display
shown.
a Push Play/Pause to pause, push again to resume
play from that point in the program.
b Push Stop to stop. Push Play/Pause to resume
play from the beginning of the program.
1 In Stop mode push and release PROG to enter
Program mode.
2 Turn the SELECT control to select the track to be
erased.
3 Push and release CANCEL/DELETE to erase the
track.
How to erase a programmed track
How to clear a program
Push Stop b twice to clear the program and exit
program mode.
How to program tracks for recording
2 3
Pause, Stop: While playing the program:
1 Follow steps 1 and 2 of How to program tracks
(above). You can check your program by playing
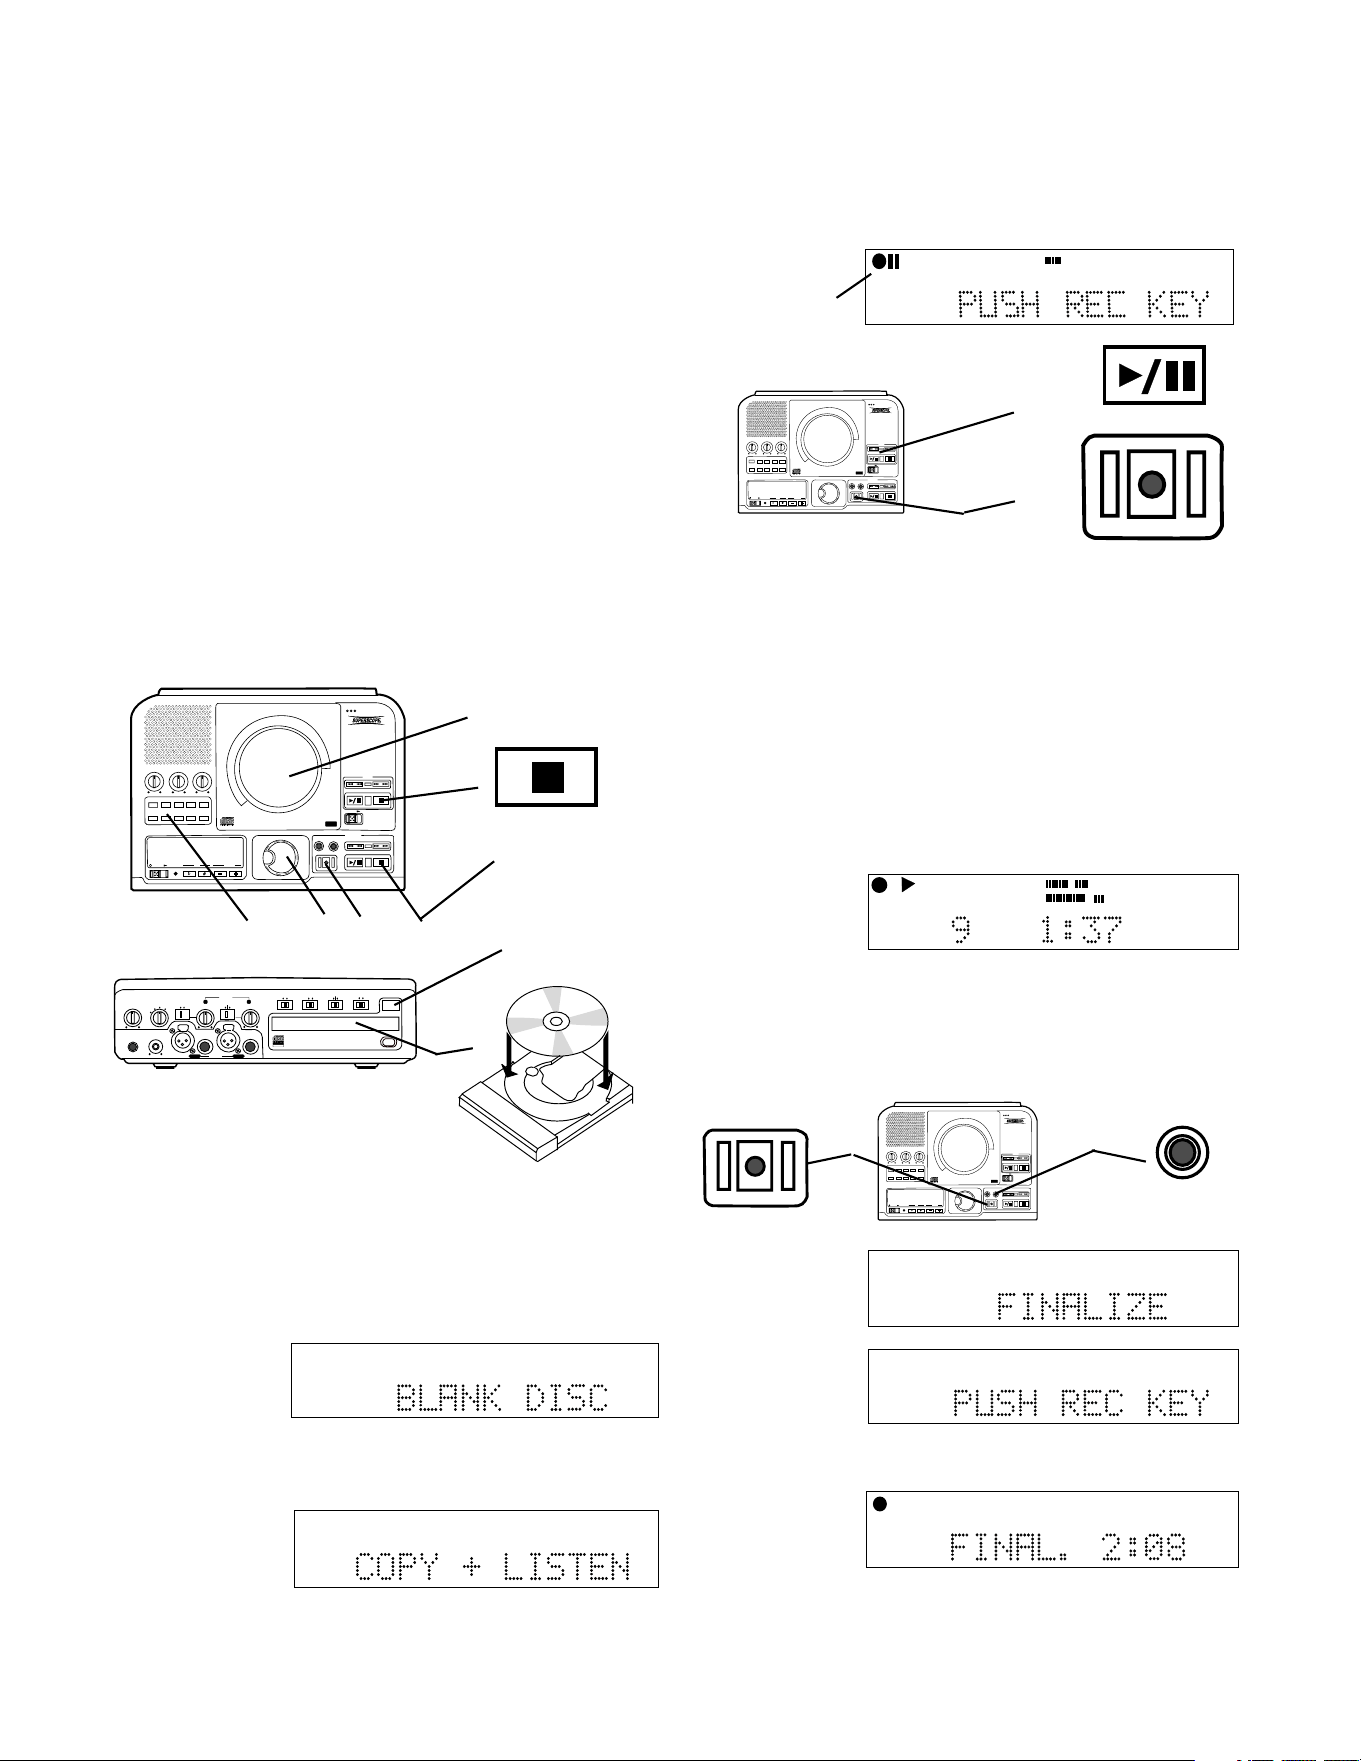
and/or pausing it. With your program at stop:
2 Insert a blank recordable CD or CD with space for
recording in the CDR drive.
3 Select the CDR drive by pressing the Stop button
on the CDR drive.
4 Push and release REC MODE. REC with CD,
COPY+ LISTEN, COPY 2X, or COPY 2X+FINAL
are suggested recording modes.
5 You will most likely want AUTO TRACK and AUTO
STOP ON so your programmed tracks are auto-
matically included. Push and release MENU/
STORE to check or change those menu settings.
See AUTO TRACK and AUTO STOP for full
instructions.
- 23 -
How to record your voice or instrument
(basics)
How to Record
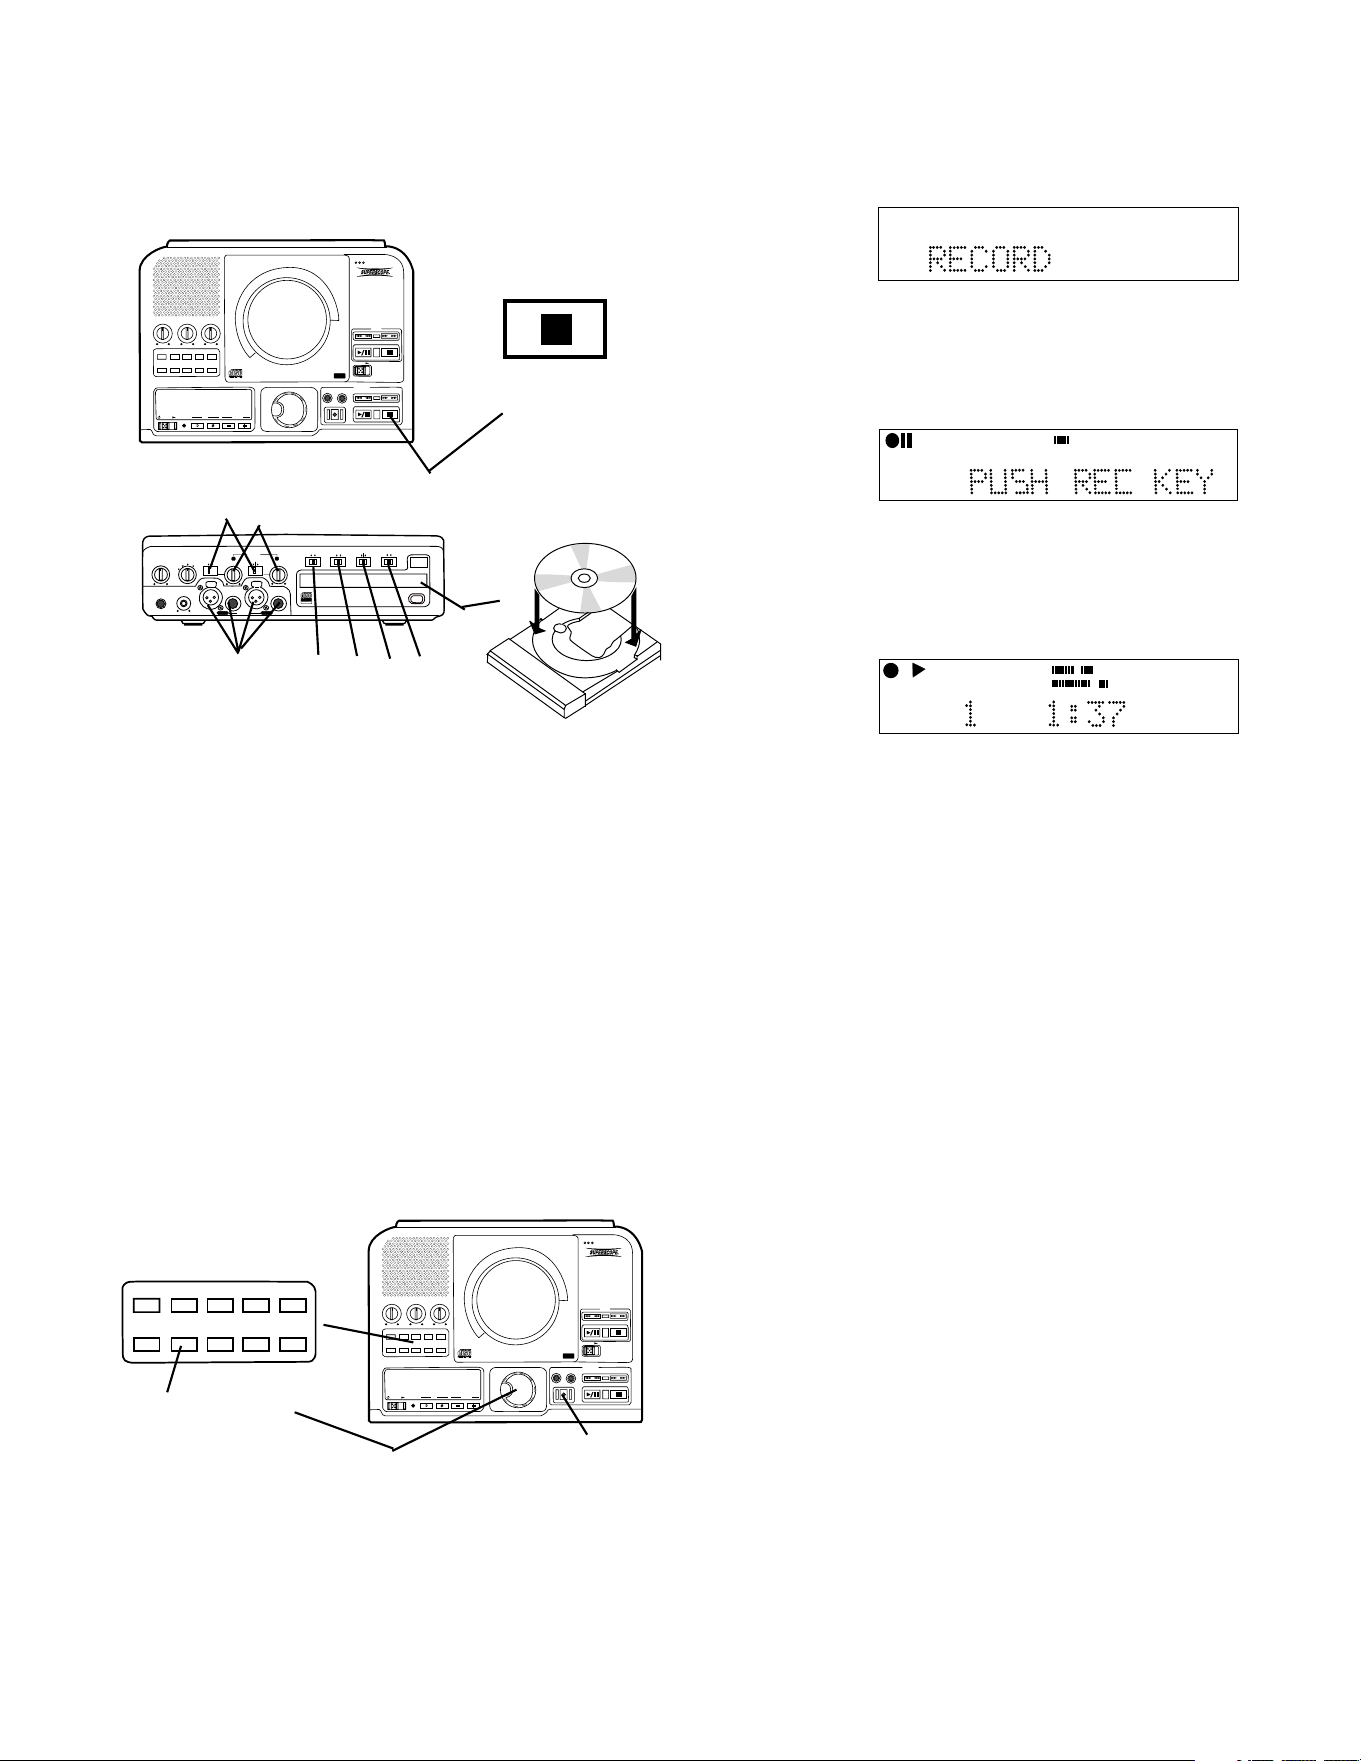
10 Turn the SELECT control so RECORD is dis-
played.
Then push and release the SELECT control to
accept the RECORD recording mode.
The display changes to:
TOTAL TRACK
CD-RW
R
L
dB-50 -30 -22 -16 -12 -8 -4 0
AUTO SYNC
CD-RW
TRACK
dB-50 -30 -22 -16 -12 -8 -4 0OVER
R
L
The REC button (11) is lit and flashing.
11 Push and release REC to begin recording.
Example
display while
recording.
Push and release Stop or Play/Pause to stop
recording and to set the end of your recording
track and the beginning of the next track.
To play your new recording on other CD players your
disc must first be finalized. See How to finalize.
TRACK
CD
R
L
dB-50 -30 -22 -16 -12 -8 -4 0
CD-RW
PHONE/SPEAKER
LEVEL
PHONE SELECTOR
MIC/LINE
CD
LINE OUT AUX
PHONES
LINE OUT
ReWritable
Recordable
CD PLAY / RECORD
OPEN/CLOSE
MIX
SPLIT
MIC
STEREO
ONOFF
ALC
DIGITAL
ANALOG
INPUT
ONOFF
SPEAKER
MIC
LINE
INT
LINE
MIC
MIC/LINE
L
PUSH
R
MIC/LINE RIGHT
PUSH
LEFT
1
1 Insert a blank disc, or a recordable disc with space
for additional recording in the CDR drive.
2 With the CDR drive at Stop.
3 Connect your microphone(s) or instrument(s) to
the MIC/LINE jacks on the front of the PSD300.
3 7 6 8 9
4 5
4
Set the LINE MIC switches for microphone input
(MIC) or for instrument input (LINE).
5 Turn the L and R level controls all the way up
(clockwise).
6 We suggest switching ALC (record level limiter)
ON.
7 Set the INPUT switch to analog.
8 Set the MIC/LINE switch to STEREO so the left
input is recorded on the left channel and the right
input on the right channel.
PUSH
BASS
MID
TREBLE
TEXT VR PROG REPEAT MENU/STORE
DISP SINGLE
A-B CANCEL/DELETE
REC MODE
CD-RW PLAYBACK
CD RECORDING SYSTEM PSD300
MIC
PLAY
OPEN
REC/PLAY
ERASE FINALIZE
REC
SELECT
PUSH ENTER
POWER KEY TEMPOSTANDBY
TEXT VR PROG REPEAT
MENU/STORE
DISP SINGLE
A-B
CANCEL/DELETE
REC MODE
10
9
11
9 Push and release REC MODE.
PUSH
BASS
MID
TREBLE
TEXT VR PROG REPEAT
MENU/STORE
DISP SINGLE
A-B
CANCEL/DELETE
REC MODE
CD-RW PLAYBACK
CD RECORDING SYSTEM PSD300
MIC
PLAY
OPEN
REC/PLAY
ERASE FINALIZE
REC
SELECT
PUSH ENTER
POWER KEY TEMPOSTANDBY
Stop button lit
2
PUSH
BASS
MID
TREBLE
TEXT VR PROG REPEAT
MENU/STORE
DISP SINGLE
A-B
CANCEL/DELETE
REC MODE
CD-RW PLAYBACK
CD RECORDING SYSTEM PSD300
MIC
PLAY
OPEN
REC/PLAY
ERASE FINALIZE
REC
SELECT
PUSH ENTER
POWER KEY TEMPOSTANDBY
How to Record
minutes and automatically stops.
Finalizing
counts down
for about 2
TOTAL TRACK
CD-R
R
L
dB-50 -30 -22 -16 -12 -8 -4 0
CD-RW
7 Push and release the REC button.
TOTAL TRACK
CD-R
R
L
dB-50 -30 -22 -16 -12 -8 -4 0
CD-RW
FINALIZE
REC
6
7
FINALIZE is
displayed for a
couple of
seconds.
Then PUSH
REC KEY is
displayed.
TOTAL TRACK
CD-R
R
L
dB-50 -30 -22 -16 -12 -8 -4 0
CD-RW
6 To finalize push and release the FINALIZE button.
The entire CD will be recorded and recording will
automatically stop when completed. This REC mode
does not automatically finalize the recorded disc.
TOTAL TRACK
CD
R
L
dB-50 -30 -22 -16 -12 -8 -4 0
CD
DIGITAL
AUTO SYNC
5 Push and release the REC button
The CD will play at normal speed and you can listen
while recording on the built-in speaker or on an
amplifier/speaker system connected to the LINE OUT
jacks.
a The red rec indicator and the pause indicator in
the display are lit.
b The Play/Pause button for the CD drive is lit and
flashing.
c The red REC button is lit and flashing.
PUSH
BASS
MID
TREBLE
TEXT VR PROG REPEAT
MENU/STORE
DISP SINGLE
A-B
CANCEL/DELETE
REC MODE
CD-RW PLAYBACK
CD RECORDING SYSTEM PSD300
MIC
PLAY
OPEN
REC/PLAY
ERASE FINALIZE
REC
SELECT
PUSH ENTER
POWER KEY TEMPOSTANDBY
b
c
SCMS (Serial Copy Management System)
The SCMS copy management system is designed to
prevent consumer recorders from making unlimited
digital copies of a digital source. Most consumer CD
recorders will not make a digital copy when SCMS is
present in the digital source, while a professional CD
recorder (PSD300) will act differently.
If the digital source being recorded on the PSD300
contains no SCMS information then the copy will also
not include SCMS. If the digital source material being
recorded on the PSD300 contains SCMS information
then the copy will also include SCMS.
The SCMS copy management system does not apply
to analog source material.
PUSH
BASS
MID
TREBLE
TEXT VR PROG REPEAT
MENU/STORE
DISP SINGLE
A-B
CANCEL/DELETE
REC MODE
CD-RW PLAYBACK
CD RECORDING SYSTEM PSD300
MIC
PLAY
OPEN
REC/PLAY
ERASE FINALIZE
REC
SELECT
PUSH ENTER
POWER KEY TEMPOSTANDBY
1
Stop button lit
4 5 6 3
PHONE/SPEAKER
LEVEL
PHONE SELECTOR
MIC/LINE
CD
LINE OUT AUX
PHONES
LINE OUT
ReWritable
Recordable
CD PLAY / RECORD
OPEN/CLOSE
MIX
SPLIT
MIC
STEREO
ONOFF
ALC
DIGITAL
ANALOG
INPUT
ONOFF
SPEAKER
MIC
LINE
INT
LINE
MIC
MIC/LINE
L
PUSH
R
MIC/LINE RIGHT
PUSH
LEFT
2b
2a, 2c
- 24 -
2 Insert a blank CD-R or CD-
RW disc in the CDR drive.
a Push OPEN/CLOSE to open the disc tray.
b Add the blank disc.
c Push OPEN/CLOSE to close.
3 Push and release the CDR drive Stop button to
activate the drive. After reading the disc BLANK DISC
is displayed.
TOTAL TRACK
CD-RW
R
L
dB-50 -30 -22 -16 -12 -8 -4 0
Example
display.
Example
display.
TOTAL TRACK
CD-R
R
L
dB-50 -30 -22 -16 -12 -8 -4 0
How to copy an existing CD (basics)
OBSERVE REGULATIONS REGARDING COPYRIGHT INFRINGEMENT.
4 Push and release REC MODE. Turn the SELECT
control so COPY + LISTEN is displayed.
Push and release the SELECT control to accept the
COPY + LISTEN recording mode choice.
AUTO SYNC
CD-RW
TRACK
dB-50 -30 -22 -16 -12 -8 -4 0OVER
R
L
Example
display.
a
REC
Example
display
during
recording.
1 Insert a CD in the CD drive.

- 25 -
How to Record continued
Select record mode
The record mode (REC mode) sets the PSD300 to
expect and accept certain inputs, outputs, and other
conditions such as the settings of AUTO TRACK and
AUTO STOP, and the easy availability of some adjust-
ments such as REC LEVEL.
The following descriptions will help you select the REC
mode that suits your needs.
REC with CD
This mode allows you to record along with a CD.
You can add your voice or instrument via the MIC/
LINE jacks, INT microphone, or AUX input. Moni-
tor the recording process using the headphone
jack, internal speaker, or LINE OUT.
CD recordings must be finalized in order to play
back on other CD drives.
RECORD
If no CD is present in the CD drive this is the first
REC mode that appears in the REC mode menu.
You can record using the INT mic, MIC/LINE
inputs and/or AUX inputs or DIGITAL input.
This mode can be used to record live meetings,
conferences, concerts, seminars, and also for
mastering in the project studio.
CD recordings must first be finalized in order to
play back on other CD drives.
COPY + LISTEN
This mode is used to digitally copy a CD in real-
time while listening to it. This is an internal
recording function that allows no inputs from
outside sources.
A 74-minute CD will take 74 minutes to copy and
then must be finalized in order to play in other CD
drives.
COPY 2X
Digitally copy individual or programmed tracks or
an entire disc. This is an internal recording
function that allows no inputs from outside
sources.
A 74-minute CD will take approximately 37 min-
utes to copy and then must be finalized in order to
play in other CD drives.
COPY 2X +FINAL
This is the quickest way to digitally copy individual
programmed tracks or an entire disc. This is an
internal recording function that allows no inputs
from outside sources.
A 74-minute CD will take approximately 37
minutes to copy and will automatically be finalized
at the end of the recording session. The finaliza-
tion takes approximately 2 minutes.
CONV HALFSPEED
This will record individual or programmed tracks
at half speed. The converted recording will play
one octave lower which provides a powerful new
tool for difficult music transcription.
Because this is a tool and not a production
process consider using a CD-RW disc that can
later be erased. The disc must be finalized in
order to be play on other CD drives.
SYNC RECORD
This REC mode is used to automatically engage
the recording process from an outside digital or
analog source including DAT, minidisk, cassette
tape or LP for example.
The disc must be finalized in order to play on
other CD drives.
SYNC RECORD+FINAL
Use this REC mode to automatically start the
recording process from an outside digital or
analog source including DAT, minidisk, cassette
tape or LP for example.
The disc will automatically be finalized at the end
of the recording session. The finalization takes
approximately 2 minutes.
Recording tips
• Be sure to set the input, mix, and speaker
switches to the appropriate setting prior to
entering a record mode.
• Consider using a CD-RW (re-writable) disc. Then
only the tracks that you like can be duplicated to
a CD-R (write once) disc using the COPY 2X
REC mode.
• To record MONO (one microphone or instrument
to both channels of the CD recorder) switch the
MIC/LINE SPLIT/STEREO/MIX switch to MIX.
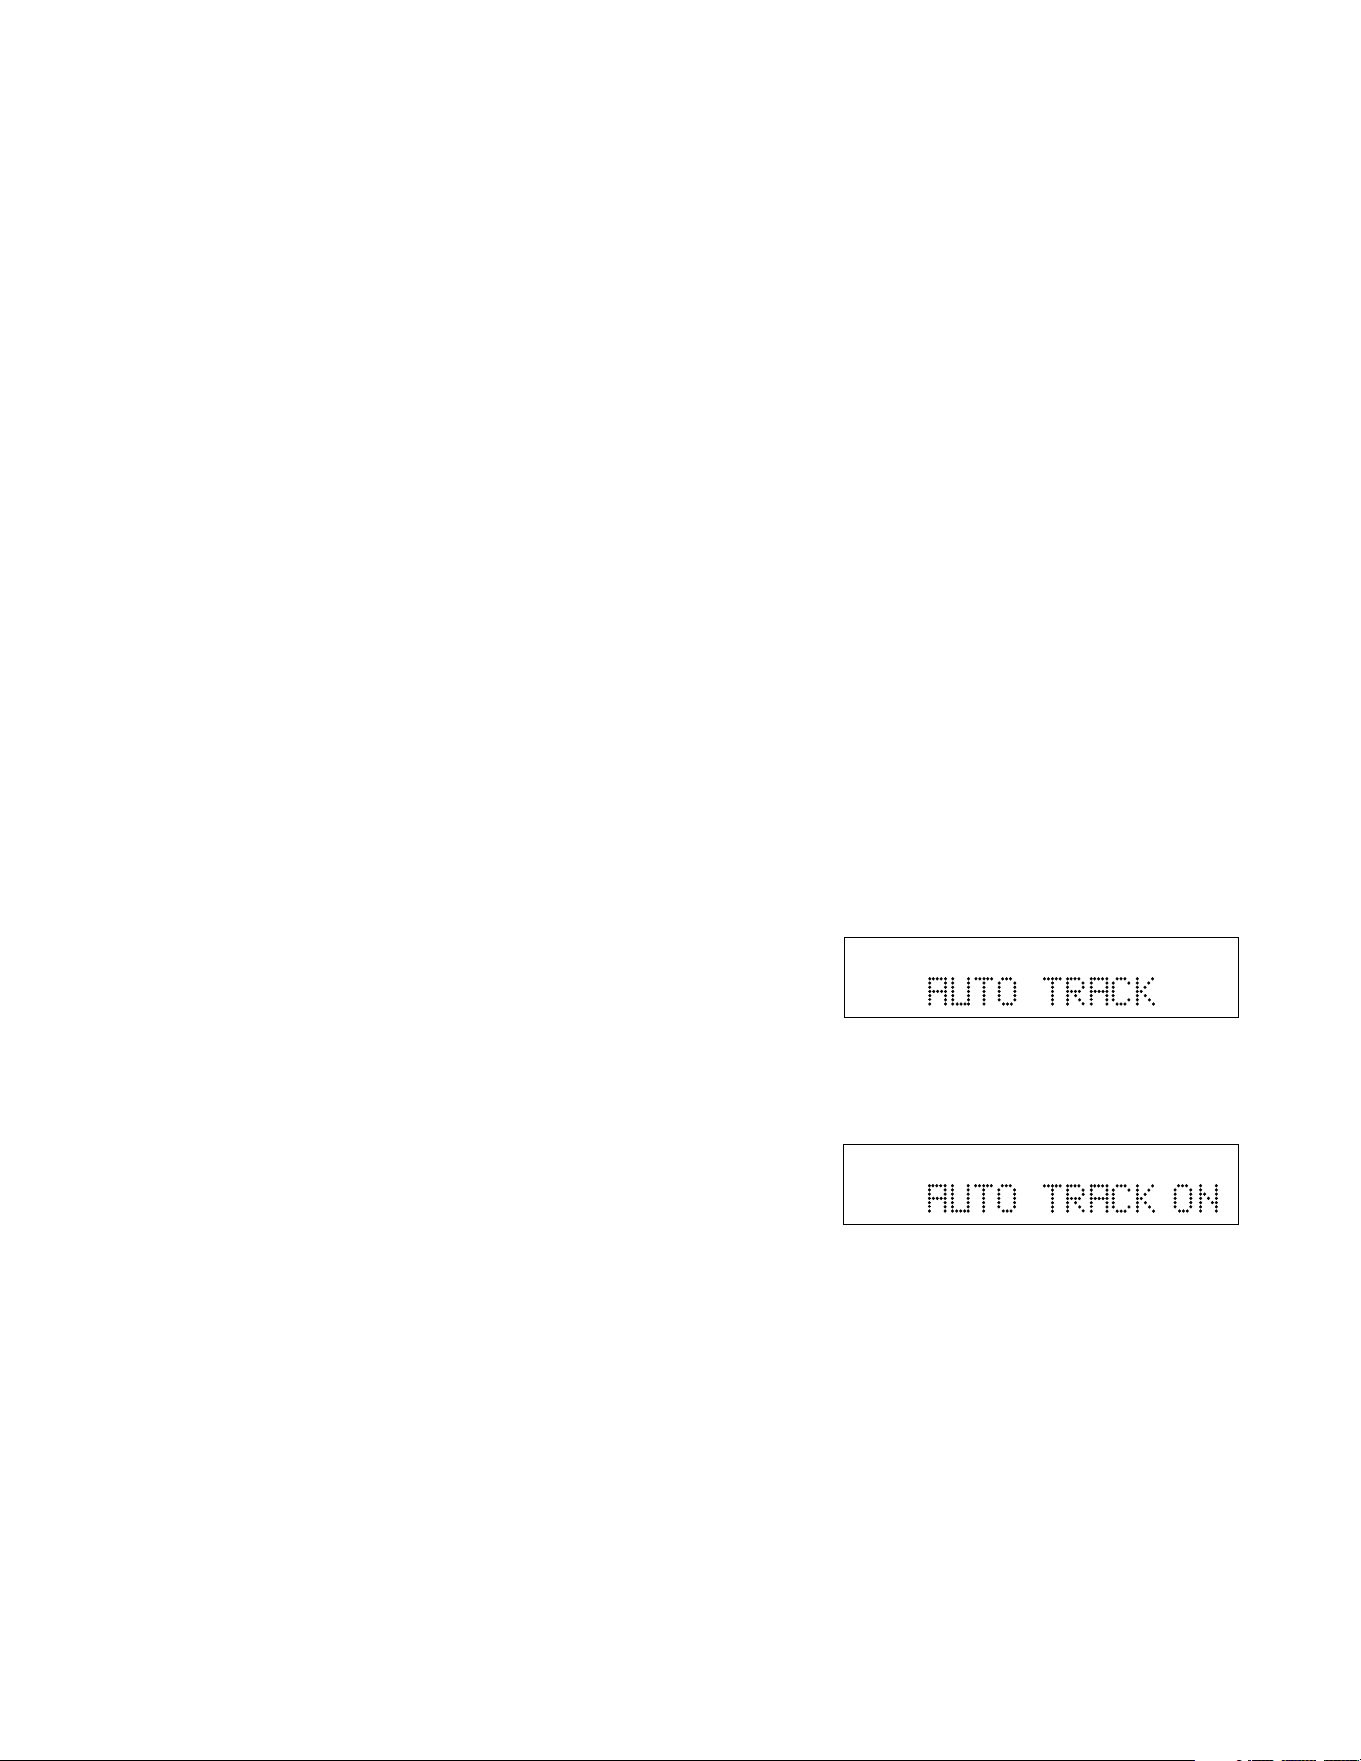
- 26 -
How to Record continued
Recording tips continued:
• In order to avoid feedback during analog recording
with any microphone, switch the SPEAKER to
OFF or lower the level of the PHONE/SPEAKER
LEVEL control. Lower the LINE OUT level control
if you are connected to an external amplifier.
• Note the default conditions of AUTO TRACK and
AUTO STOP outlined in this manual (see AUTO
TRACK). Each recording mode has a default
setup of these functions that can be altered to fit
the conditions of your specific application.
• You can use the supplied infrared remote control
to write your own track ID's during the recording
process by pushing the TR INC button.
• When the remaining record time on the CD-R or
CD-RW becomes 5 minutes, the message DISC
END will be displayed, and then the display will
indicate the remaining time both in minutes and
seconds as well as graphically.
• When DISC FULL is displayed there is no more
available recording time on the disc in the CDR
drive.
• When DOES NOT FIT is displayed the amount of
information you have selected to copy from the CD
drive will not fit on the recording time available on
the disc in the CDR drive.
AUTO TRACK
When recording with AUTO TRACK ON the PSD300
will automatically increment tracks.
If AUTO TRACK is ON and the source of recording is a
digital source that has tracks, such as a CD in the CD
drive or a source input via the DIGITAL IN jack (CD/
MD), those tracks will be included in your recording.
This source data is usually found only in an SPDIF
format digital connection.
If AUTO TRACK is ON and the source is digital
(without track data) or analog, the PSD300 will use a
silence gap to mark a track. When the source audio
signal drops below -80dB for digital, or -40dB for
analog, for 3 seconds or more and then rises to above
those levels, the PSD300 will mark a new track and
continue recording.
You can manually introduce a new track when AUTO
TRACK is ON or OFF by pushing TR INC on the
remote.
Record adjustments
AUTO TRACK and AUTO STOP defaults
The default settings for AUTO TRACK and AUTO
STOP depend on the REC mode.
REC AUTO AUTO
mode TRACK STOP
REC with CD ......................... OFF ................. OFF
RECORD ............................... OFF ................. OFF
COPY+ LISTEN ..................... ON .................. OFF
COPY 2X ................................ ON .................. OFF
COPY 2X +FINAL .................. ON .................. OFF
CONV HALFSPEED............... ON .................. OFF
SYNC RECORD .................... OFF ................. OFF
SYNC RECORD+FINAL........ OFF ................. OFF
How to turn AUTO TRACK ON or OFF
1 With the PSD300 in one of the REC modes.
2 Push and release MENU/STORE.
3 Turn the SELECT control so AUTO TRACK is
displayed.
TOTAL TRACK
CD-R
R
L
dB-50 -30 -22 -16 -12 -8 -4 0
CD
4 Push and release the SELECT control to select
the AUTO TRACK menu item. The current status
of AUTO TRACK ON or OFF is displayed.
Example
shows
AUTO
TRACK
ON.
5 Push and release the SELECT control to select
the displayed state of AUTO TRACK, or turn the
SELECT control to select the other state and then
push and release the SELECT control.
6 The display returns to AUTO TRACK.
TOTAL TRACK
CD-R
R
L
dB-50 -30 -22 -16 -12 -8 -4 0
CD
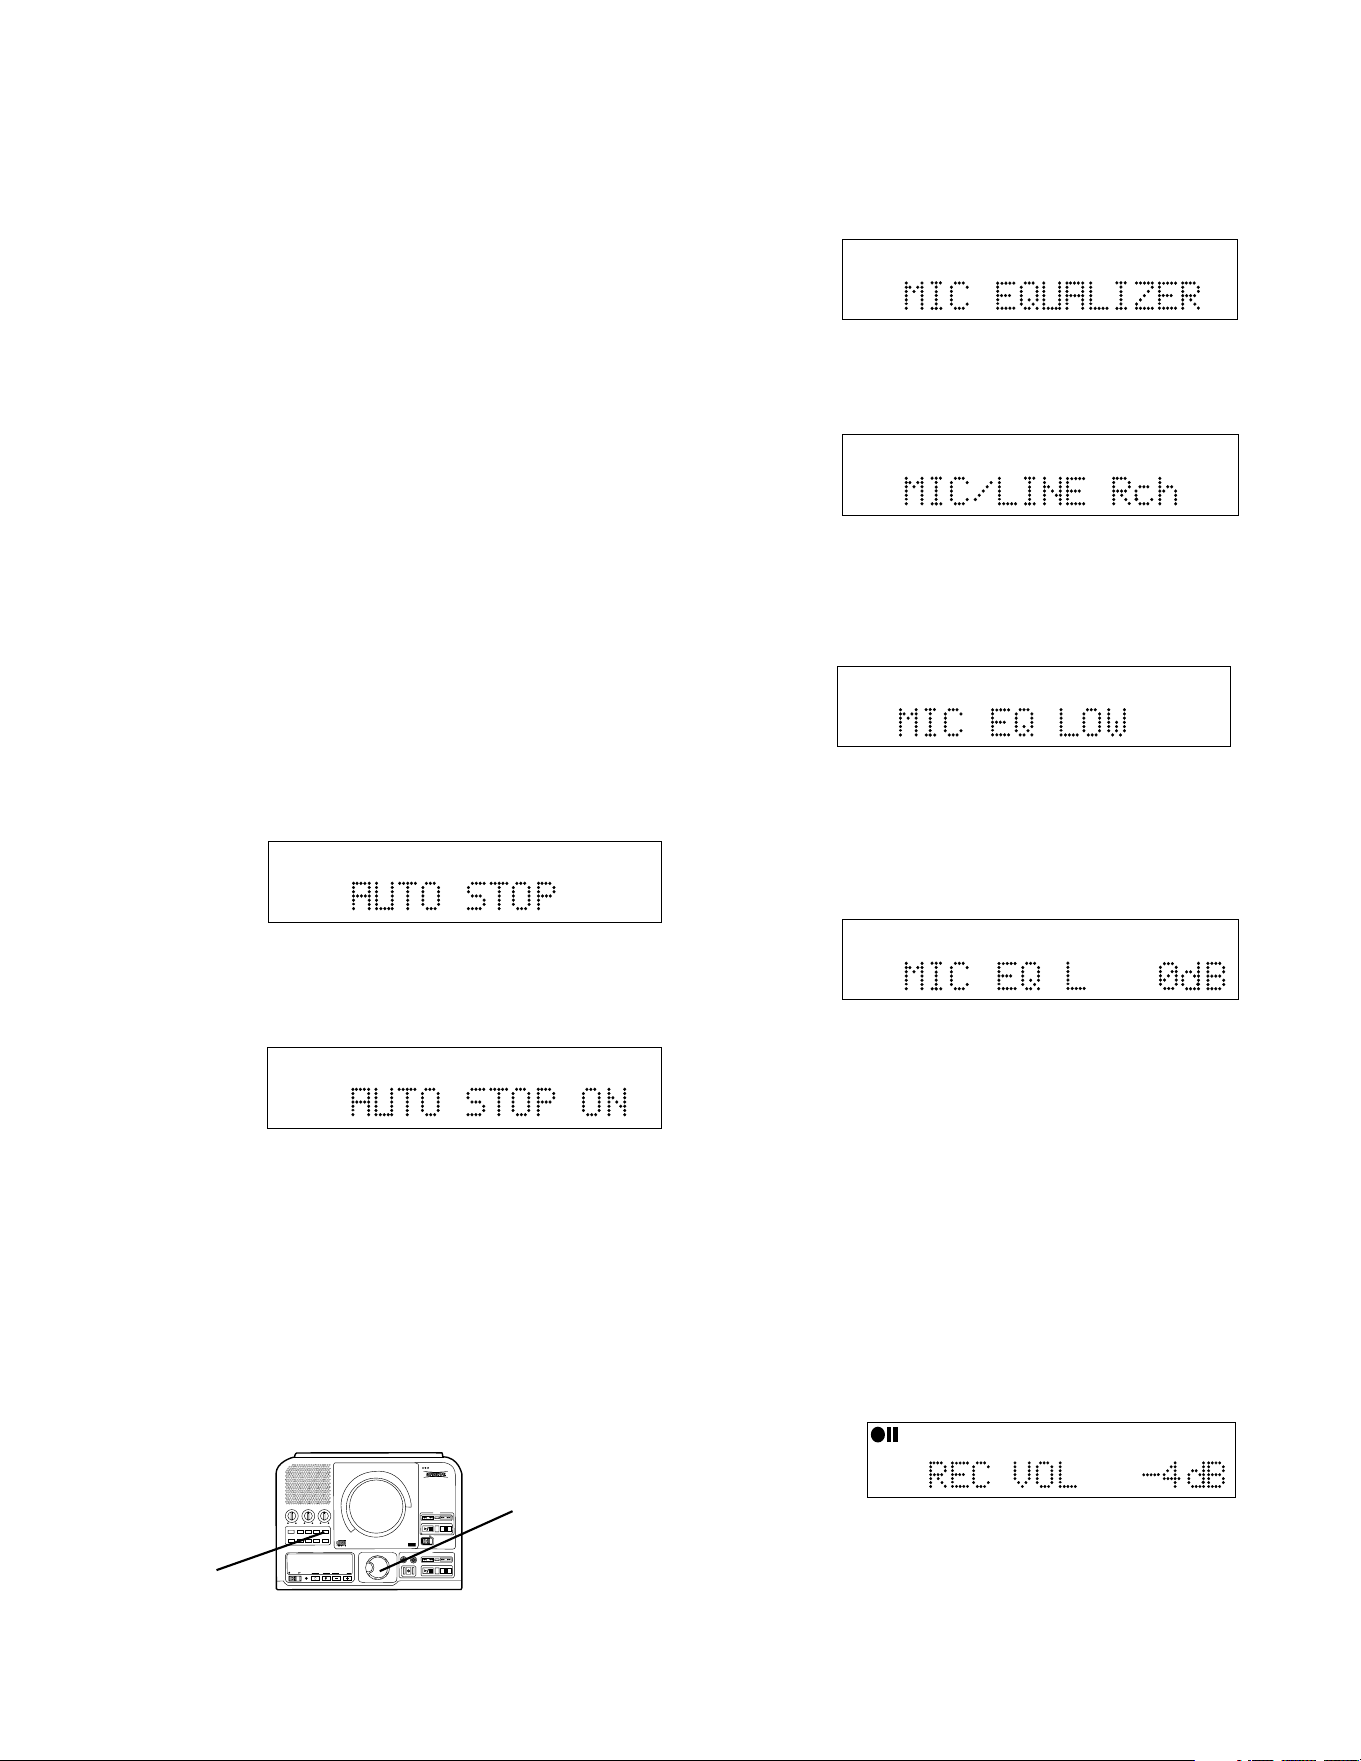
- 27 -
How to Record continued
AUTO STOP
When recording with AUTO STOP ON the PSD300 will
automatically stop after a period of silence. The
silence will be recorded onto the last track of the
recording session.
When recording with AUTO STOP ON from an analog
source, the recording will stop after recording 20
seconds of silence (a signal lower than -40dB). When
recording with AUTO STOP ON from a digital source
(without track and stop data), the recording will stop
after recording 4 seconds of silence (a signal lower
than -80dB).
When recording in COPY + LISTEN, COPY 2X, or
CONV HALFSPEED modes the recording will stop
after detecting the stop data from the disc in the CD
drive.
1 Push and release MENU/STORE.
2 Turn the SELECT control so MIC EQUALIZER is
displayed.
a Push and release the SELECT control. MIC/LINE
Rch is displayed.
TOTAL TRACK
CD-R
R
L
dB-50 -30 -22 -16 -12 -8 -4 0
CD-RW
b Push and release the SELECT control to confirm
the right channel or turn the SELECT control to
select the left channel. Then push and release
the SELECT control to confirm.
TOTAL TRACK
CD-R
R
L
dB-50 -30 -22 -16 -12 -8 -4 0
CD-RW
c Push and release the SELECT control to confirm
adjusting the low frequencies or turn the SELECT
control to select adjusting the high frequencies.
Then push and release the SELECT control to
confirm.
TOTAL TRACK
CD-R
R
L
dB-50 -30 -22 -16 -12 -8 -4 0
CD-RW
d Turn the SELECT control to change the decibel
level from -10 to +10 dB. Then push and release
the SELECT control to enter the value and return
to MIC EQUALIZER.
Repeat steps a, b, c and d to change the values
for the other channel and High or Low.
When done push and release MENU/STORE to exit.
Example
display.
Example
display.
CD-R
R
L
dB-50 -30 -22 -16 -12 -8 -4 0
CD-R
AUTO SYNC
TRACK
REC LEVEL
In all recording modes, when at record Pause,
(REC button flashing) you can adjust the final
record level by turning the SELECT control.
How to turn AUTO STOP ON or OFF
1 With the PSD300 in one of the REC modes
2 Push and release MENU/STORE.
3 Check or turn the SELECT control so AUTO STOP
is displayed.
TOTAL TRACK
CD-R
R
L
dB-50 -30 -22 -16 -12 -8 -4 0
CD
4 Push and release the SELECT control to select
the AUTO STOP menu item. The current status of
AUTO STOP ON or OFF is displayed.
TOTAL TRACK
CD-R
R
L
dB-50 -30 -22 -16 -12 -8 -4 0
CD
Example
shows
AUTO
STOP ON.
5 Push and release the SELECT control to select
the displayed state of AUTO STOP, or turn the
SELECT control to select the other state and then
push and release the SELECT control.
6 The display returns to AUTO STOP.
How to adjust the MIC EQUALIZER
With the PSD300 in Stop, Play/Pause, REC or
REC Pause mode.
PUSH
BASS
MID
TREBLE
TEXT VR PROG REPEAT
MENU/STORE
DISP SINGLE
A-B
CANCEL/DELETE
REC MODE
CD-RW PLAYBACK
CD RECORDING SYSTEM PSD300
MIC
PLAY
OPEN
REC/PLAY
ERASE FINALIZE
REC
SELECT
PUSH ENTER
POWER KEY TEMPOSTANDBY
1
2
TOTAL TRACK
CD-R
R
L
dB-50 -30 -22 -16 -12 -8 -4 0
CD-RW
When ALC is set to ON, the REC LEVEL is not
available in certain REC modes.
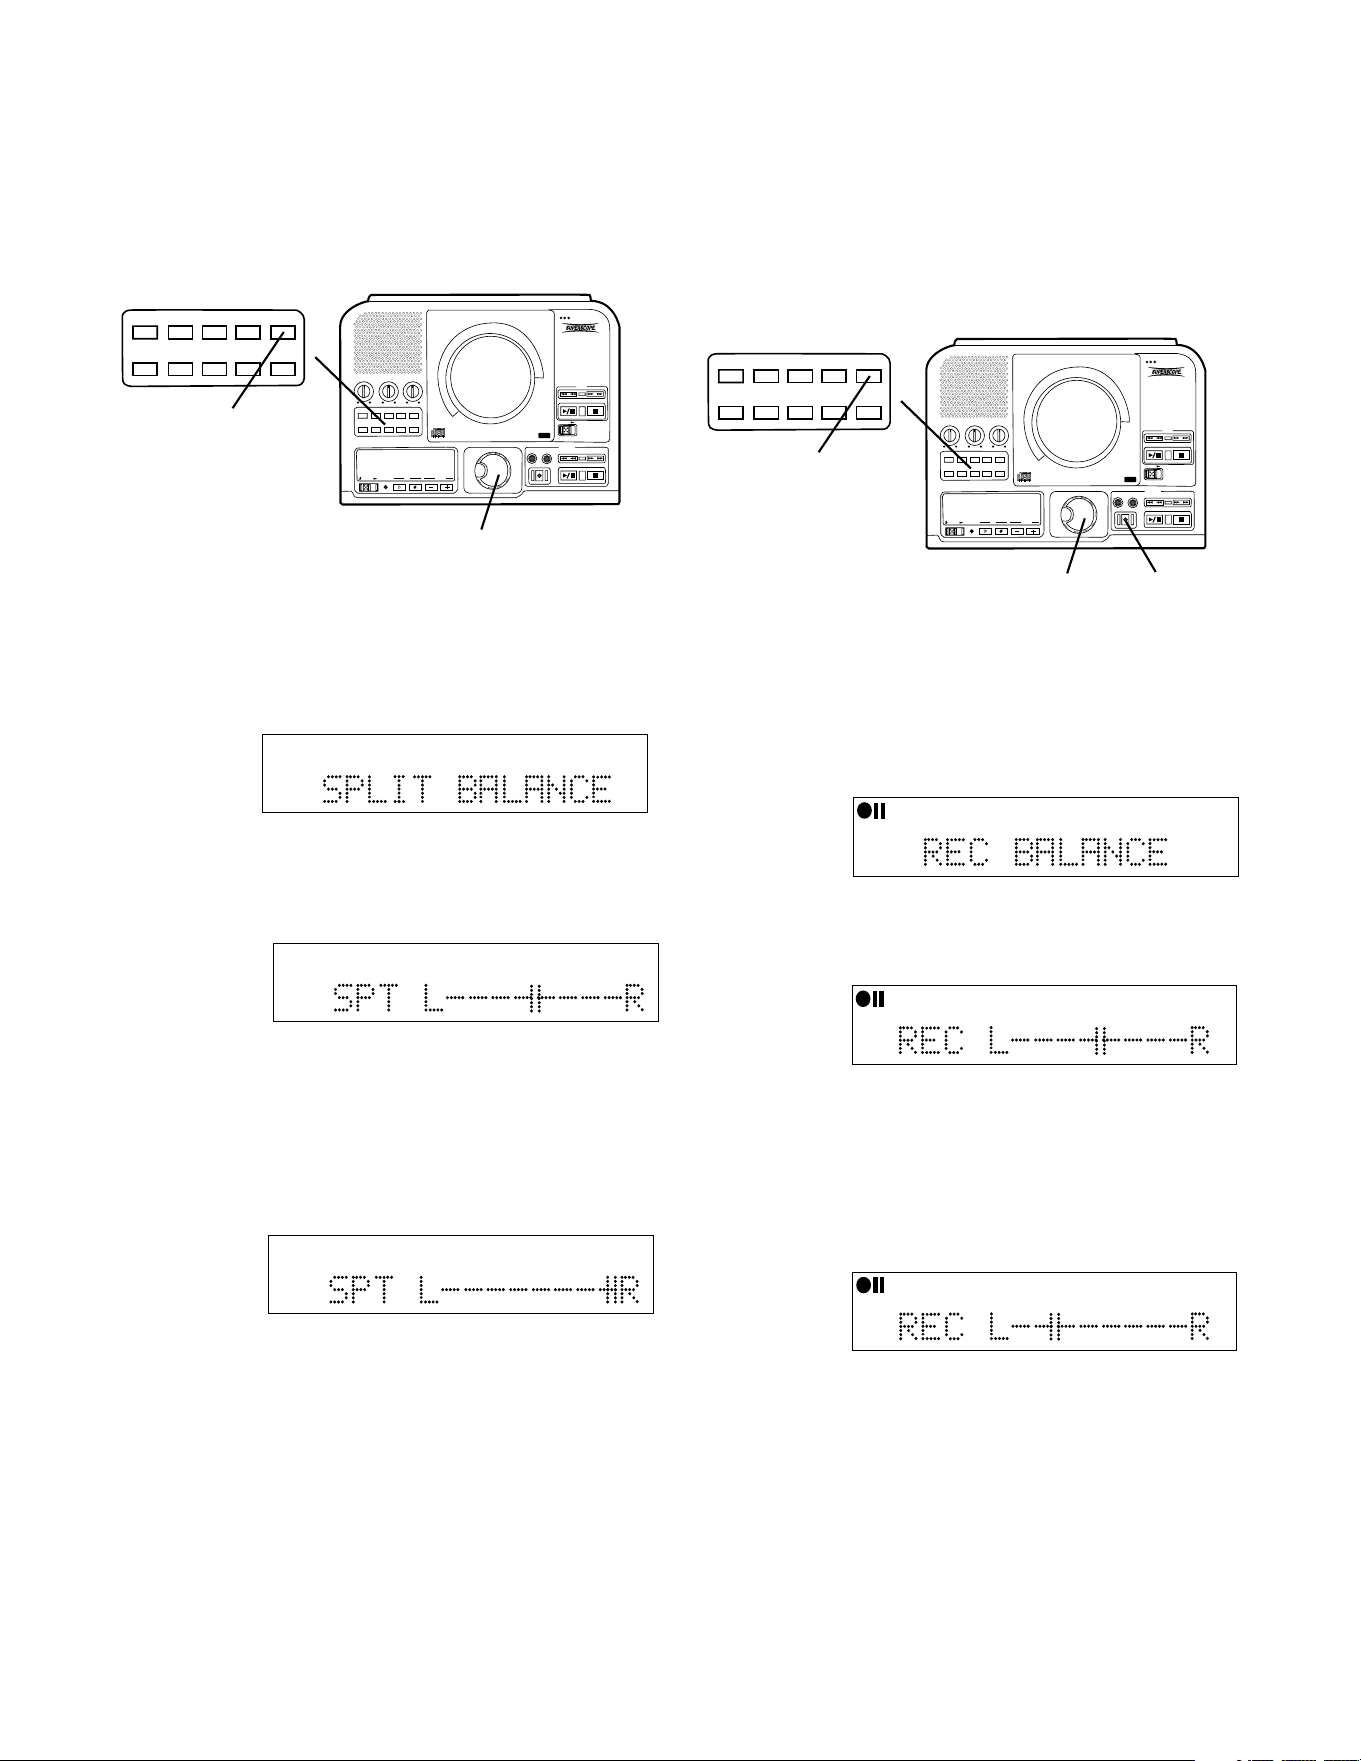
- 28 -
Record adjustments continued
a Push and release the SELECT control. The
current balance setting is displayed
How to adjust SPLIT BALANCE
The SPLIT BALANCE menu item lets you adjust the
right left stereo balance from the CD drive.
PUSH
BASS
MID
TREBLE
TEXT VR PROG REPEAT
MENU/STORE
DISP SINGLE
A-B
CANCEL/DELETE
REC MODE
CD-RW PLAYBACK
CD RECORDING SYSTEM PSD300
MIC
PLAY
OPEN
REC/PLAY
ERASE FINALIZE
REC
SELECT
PUSH ENTER
POWER KEY TEMPOSTANDBY
TEXT VR PROG REPEAT MENU/STORE
DISP SINGLE
A-B CANCEL/DELETE
REC MODE
1
3
TOTAL TRACK
CD-R
R
L
dB-50 -30 -22 -16 -12 -8 -4 0
CD-RW
TOTAL TRACK
CD-R
R
L
dB-50 -30 -22 -16 -12 -8 -4 0
CD-RW
Example
display
shows
balance to
the Right.
c Push and release the SELECT control to confirm
your balance adjustment. The SPLIT BALANCE
display returns.
d Push and release MENU/STORE to exit Menu
mode.
b Turn the SELECT control clockwise to adjust
balance to the Right and counter clockwise to
adjust balance to the Left.
How to adjust REC BALANCE
The REC BALANCE menu item lets you adjust the
right left stereo balance for recording on the CDR drive.
You can adjust REC BALANCE during a recording
session by pausing the recording session.
With the PSD300 in Stop, Play/Pause, REC or
REC Pause mode,
1 Push and release MENU/STORE.
2 Turn the SELECT control so SPLIT BALANCE is
displayed.
TOTAL TRACK
CD-R
R
L
dB-50 -30 -22 -16 -12 -8 -4 0
CD-RW
Example
display
shows mid
point of
balance.
PUSH
BASS
MID
TREBLE
TEXT VR PROG REPEAT
MENU/STORE
DISP SINGLE
A-B
CANCEL/DELETE
REC MODE
CD-RW PLAYBACK
CD RECORDING SYSTEM PSD300
MIC
PLAY
OPEN
REC/PLAY
ERASE FINALIZE
REC
SELECT
PUSH ENTER
POWER KEY TEMPOSTANDBY
TEXT VR PROG REPEAT MENU/STORE
DISP SINGLE
A-B CANCEL/DELETE
REC MODE
1
2
3
1 With the PSD300 in REC mode (recording mode
selected and REC button lit and flashing).
2 Push and release MENU/STORE.
3 Turn the SELECT control so REC BALANCE is
displayed.
CD-R
R
L
dB-50 -30 -22 -16 -12 -8 -4 0
CD-R
AUTO SYNC
TRACK
a Push and release the SELECT control. The
current balance setting is displayed
Example
display
shows mid
point of
balance.
b Turn the SELECT control clockwise to adjust
balance to the Right and counter clockwise to
adjust balance to the Left.
CD-R
R
L
dB-50 -30 -22 -16 -12 -8 -4 0
CD-R
AUTO SYNC
TRACK
CD-R
R
L
dB-50 -30 -22 -16 -12 -8 -4 0
CD-R
AUTO SYNC
TRACK
Example
display
shows
balance
partially to
the Left.
c Push and release the SELECT control to confirm
your balance adjustment. The REC BALANCE
display returns.
d Push and release MENU/STORE to exit Menu
mode.
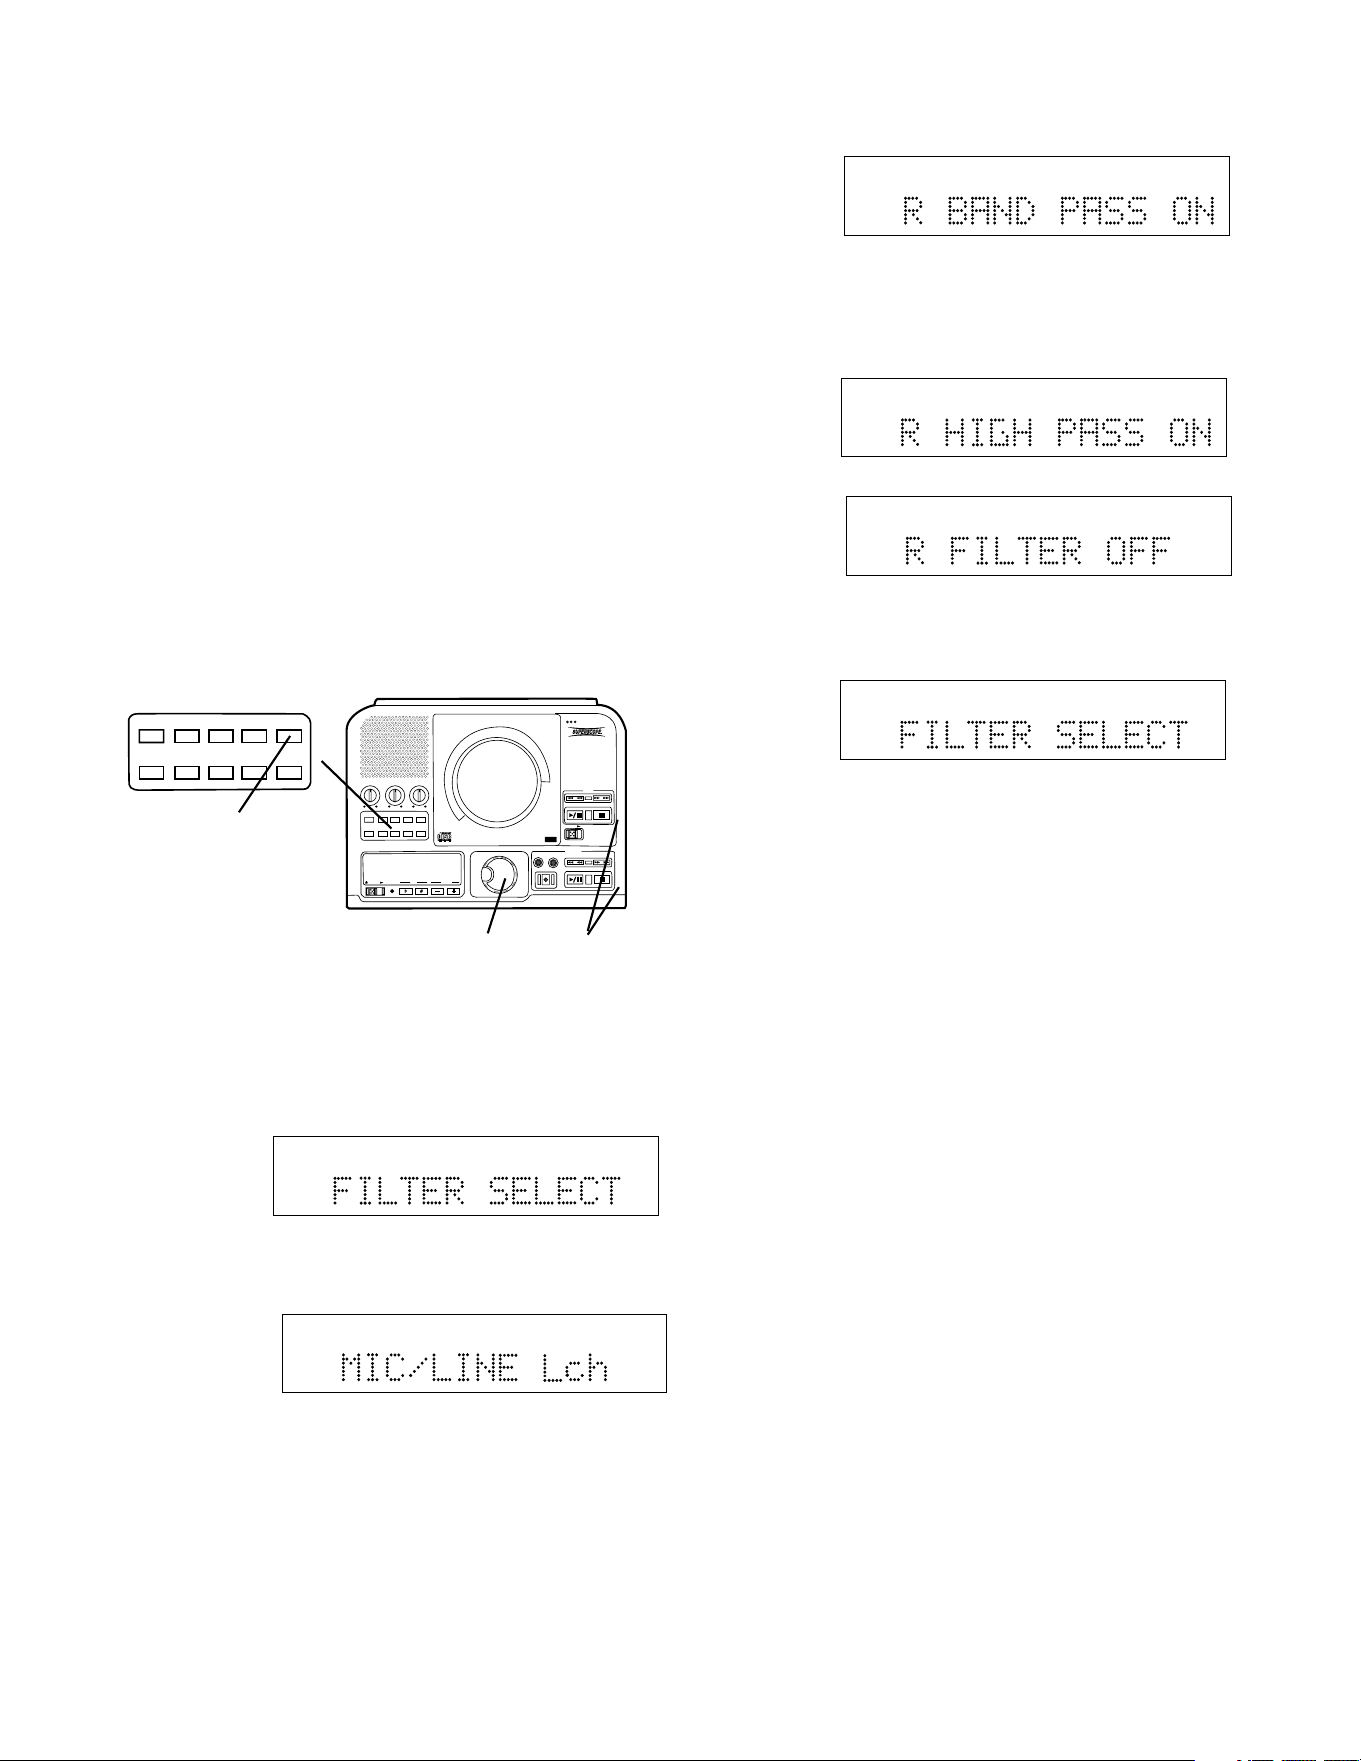
- 29 -
Record adjustments continued
The FILTER SELECT menu item lets you turn high
pass or band pass filters on the right or left MIC/LINE
inputs on or off.
How to select filters (FILTER SELECT)
F
ILTER SPECIFICATIONS
Frequency BAND PASS BAND PASS HIGH PASS
OFF ON ON
20Hz 0dB -48dB -48dB
50Hz 0dB -24dB -24dB
100Hz 0dB -6dB -12dB
250Hz 0dB 0dB 0dB
500Hz 0dB 0dB 0dB
1kHz 0dB 0dB 0dB
5kHz 0dB 0dB 0dB
10kHz 0dB -6dB 0dB
15kHz 0dB -12dB 0dB
20kHz 0dB -24dB 0dB
PUSH
BASS
MID
TREBLE
TEXT VR PROG REPEAT
MENU/STORE
DISP SINGLE
A-B
CANCEL/DELETE
REC MODE
CD-RW PLAYBACK
CD RECORDING SYSTEM PSD300
MIC
PLAY
OPEN
REC/PLAY
ERASE FINALIZE
REC
SELECT
PUSH ENTER
POWER KEY TEMPOSTANDBY
TEXT VR PROG REPEAT MENU/STORE
DISP SINGLE
A-B CANCEL/DELETE
REC MODE
1
2
3
1 With the PSD300 in Stop, Play/Pause, REC or
REC Pause mode,
2 Push and release MENU/STORE.
3 Turn the SELECT control so FILTER SELECT is
displayed.
TOTAL TRACK
R
L
dB-50 -30 -22 -16 -12 -8 -4 0
CD
a Push and release the SELECT control. MIC/LINE
Lch or MIC/LINE Rch is displayed
TOTAL TRACK
R
L
dB-50 -30 -22 -16 -12 -8 -4 0
CD
Example
display.
b Turn the SELECT control to switch between Lch
(left channel) and Rch (right channel). Push and
release the SELECT control to confirm your
selection. The display switches to one of three
filter choices (BAND PASS ON, HIGH PASS ON,
or FILTER OFF).
TOTAL TRACK
R
L
dB-50 -30 -22 -16 -12 -8 -4 0
CD
Example
display.
c Push and release the SELECT control to confirm
the displayed filter selection or turn the SELECT
control to switch to the other choices.
TOTAL TRACK
R
L
dB-50 -30 -22 -16 -12 -8 -4 0
CD
TOTAL TRACK
R
L
dB-50 -30 -22 -16 -12 -8 -4 0
CD
d When you have confirmed your selection the
display returns to FILTER SELECT.
TOTAL TRACK
R
L
dB-50 -30 -22 -16 -12 -8 -4 0
CD
When done making filter selections push and
release MENU/STORE (2) to exit Menu mode.
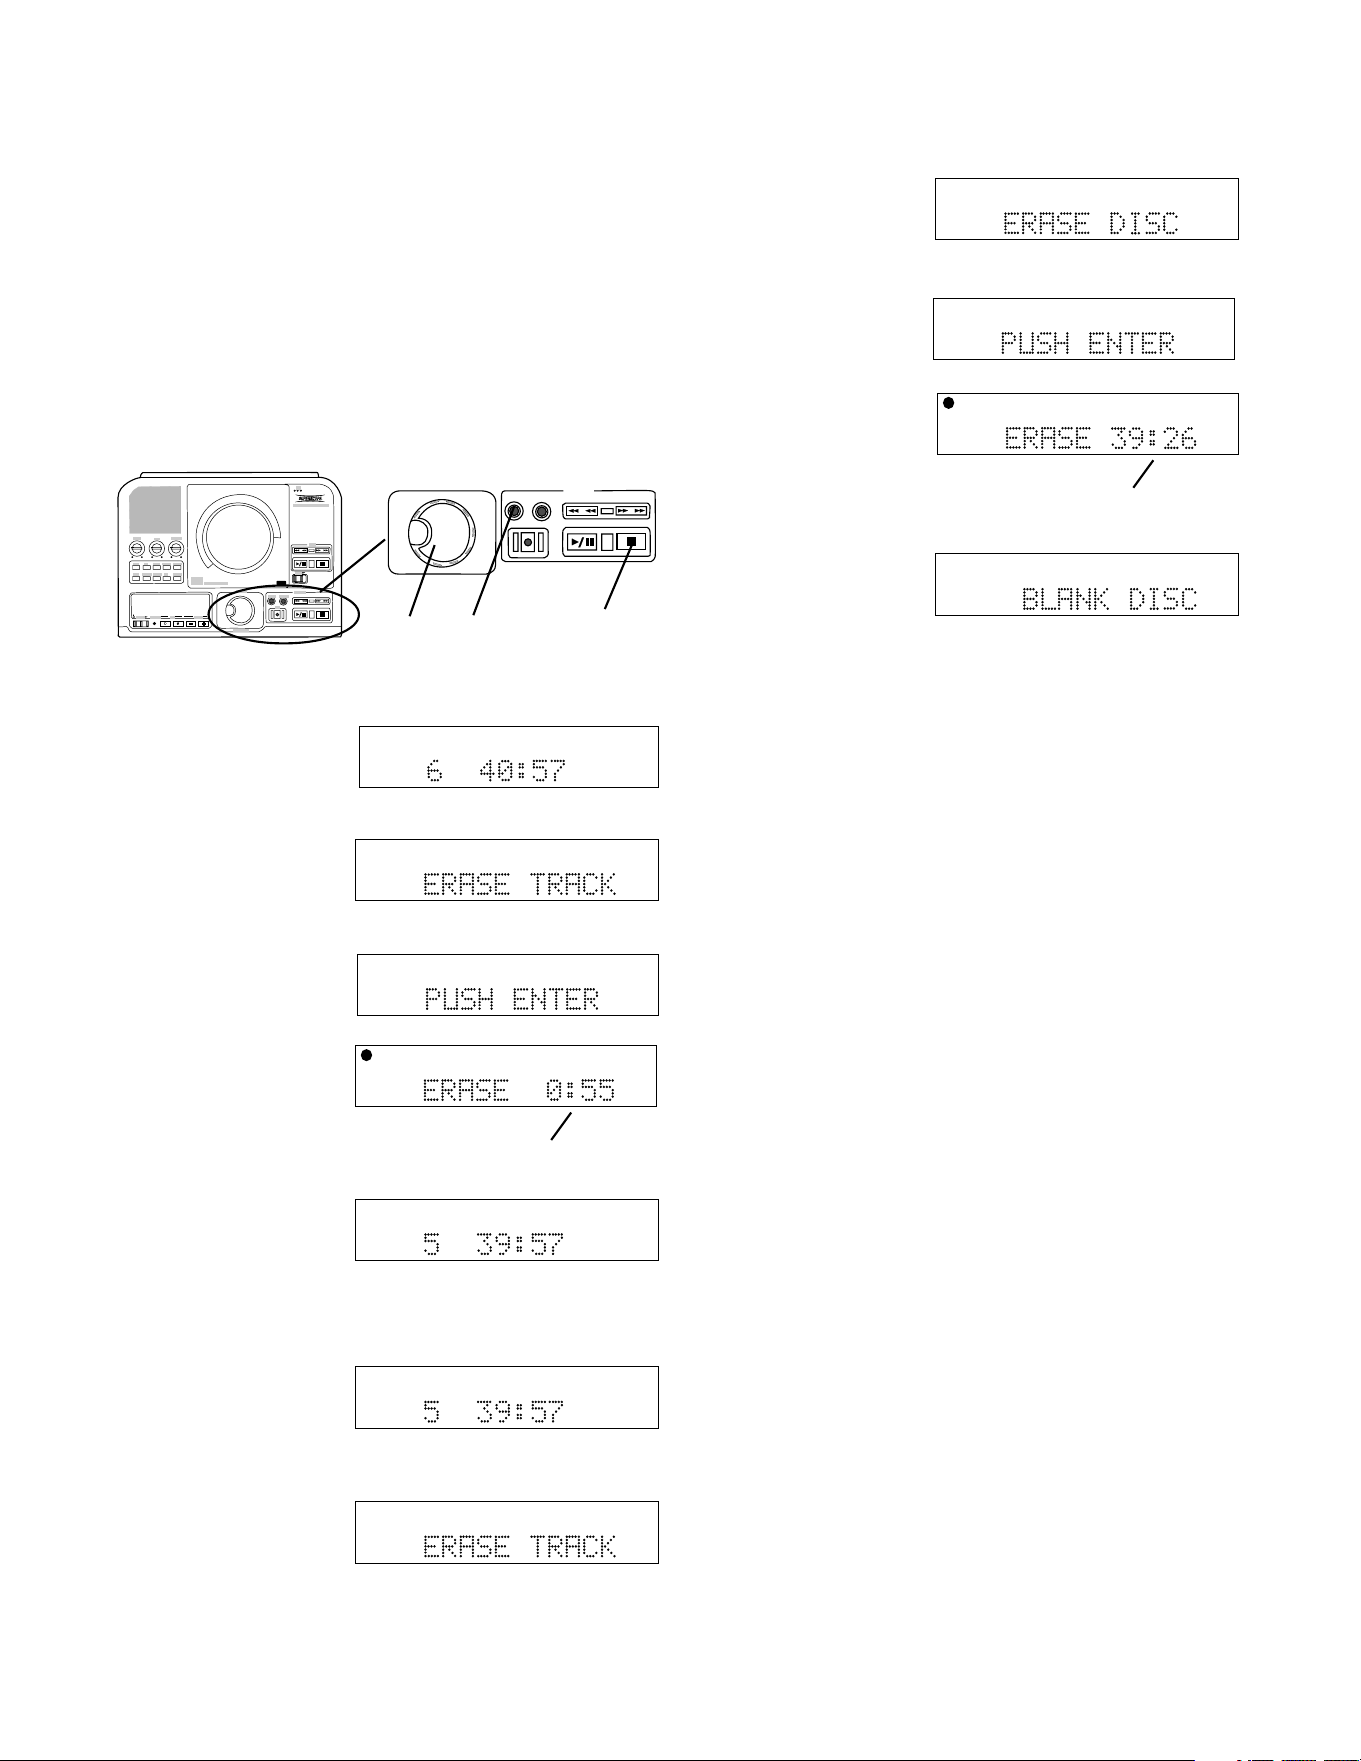
How to Erase
You can only erase CD-RW discs.
You can erase one or more tracks from the end of the
CR-RW disc, or you can erase the entire disc. If
finalized, erasing a track or the disc automatically
unfinalizes the disc.
Push and release ERASE
• Once to select erasing the last track of the disc,
• Twice in succession to erase the entire disc,
• Three times in succession to unfinalize.
REC/PLAY
ERASE FINALIZE
REC
SELECT
PUSH ENTER
3 2 1
How to Erase the last track
TOTAL TRACK
CD-R
R
L
dB-50 -30 -22 -16 -12 -8 -4 0
CD-RW
their total playing time (example shown).
2 Push ERASE.
ERASE TRACK is
displayed for about 3
seconds.
TOTAL TRACK
CD-R
R
L
dB-50 -30 -22 -16 -12 -8 -4 0
CD-RW
TOTAL TRACK
CD-R
R
L
dB-50 -30 -22 -16 -12 -8 -4 0
CD-RW
3 Push the SELECT
PUSH/ENTER control.
The timer (a) counts
down as the track is
erased.
When done the
display shows the
remaining number of
TOTAL TRACK
CD-R
R
L
dB-50 -30 -22 -16 -12 -8 -4 0
CD-RW
a
Then PUSH ENTER
is displayed.
TOTAL TRACK
CD-R
R
L
dB-50 -30 -22 -16 -12 -8 -4 0
CD-RW
tracks and their total playing time (example shown).
1 Push Stop. The
display shows the
number of tracks and
TOTAL TRACK
CD-R
R
L
dB-50 -30 -22 -16 -12 -8 -4 0
CD-RW
1 Push Stop. The
display shows the
number of tracks and
their total playing time (example shown).
TOTAL TRACK
CD-R
R
L
dB-50 -30 -22 -16 -12 -8 -4 0
CD-RW
How to Erase the entire disc
2 Push ERASE twice.
After the first push
ERASE TRACK is
displayed.
- 30 -
TOTAL TRACK
CD-R
R
L
dB-50 -30 -22 -16 -12 -8 -4 0
CD-RW
TOTAL TRACK
CD-R
R
L
dB-50 -30 -22 -16 -12 -8 -4 0
CD-RW
Then PUSH ENTER
is displayed.
TOTAL TRACK
CD-R
R
L
dB-50 -30 -22 -16 -12 -8 -4 0
CD-RW
a
3 Push the SELECT
PUSH/ENTER control.
The timer (a) counts
down as the disc is
erased.
When done the
display shows BLANK
DISC.
TOTAL TRACK
CD-RW
R
L
dB-50 -30 -22 -16 -12 -8 -4 0
After the second push
ERASE DISC is
displayed for about
three seconds.
How to Finalize
Finalizing is writing the TOC (table of contents) on a
disc so a CD player can recognize the number of
tracks, the total time for each track, and their location
on the disc. A recorded disc must be finalized to
playback on a standard CD player. Once finalized a
CD-R disc can be played on CD players that support
CD-R playback. CD-RW discs can only be played on
CD players that support CD-RW playback. Consult
your CD player owner's manual to confirm supported
formats.
Finalizing is necessary to:
• be able to play a recorded CD-R or CD-RW disc on
a CD player including the PSD300 CD drive
• prevent further recording on a disc
• avoid erasing tracks on a CD-RW disc
• record text information onto a disc you record
Notes:
• A finalized CD-R disc can never be recorded onto
again.
• A finalized CD-RW disc can be unfinalized for more
recording.
• The PSD300 can play back unfinalized CD-R or
CD-RW discs in the CDR drive.
• Several recording modes automatically finalize:
COPY 2X+FINAL, and SYNC RECORD+FINAL.
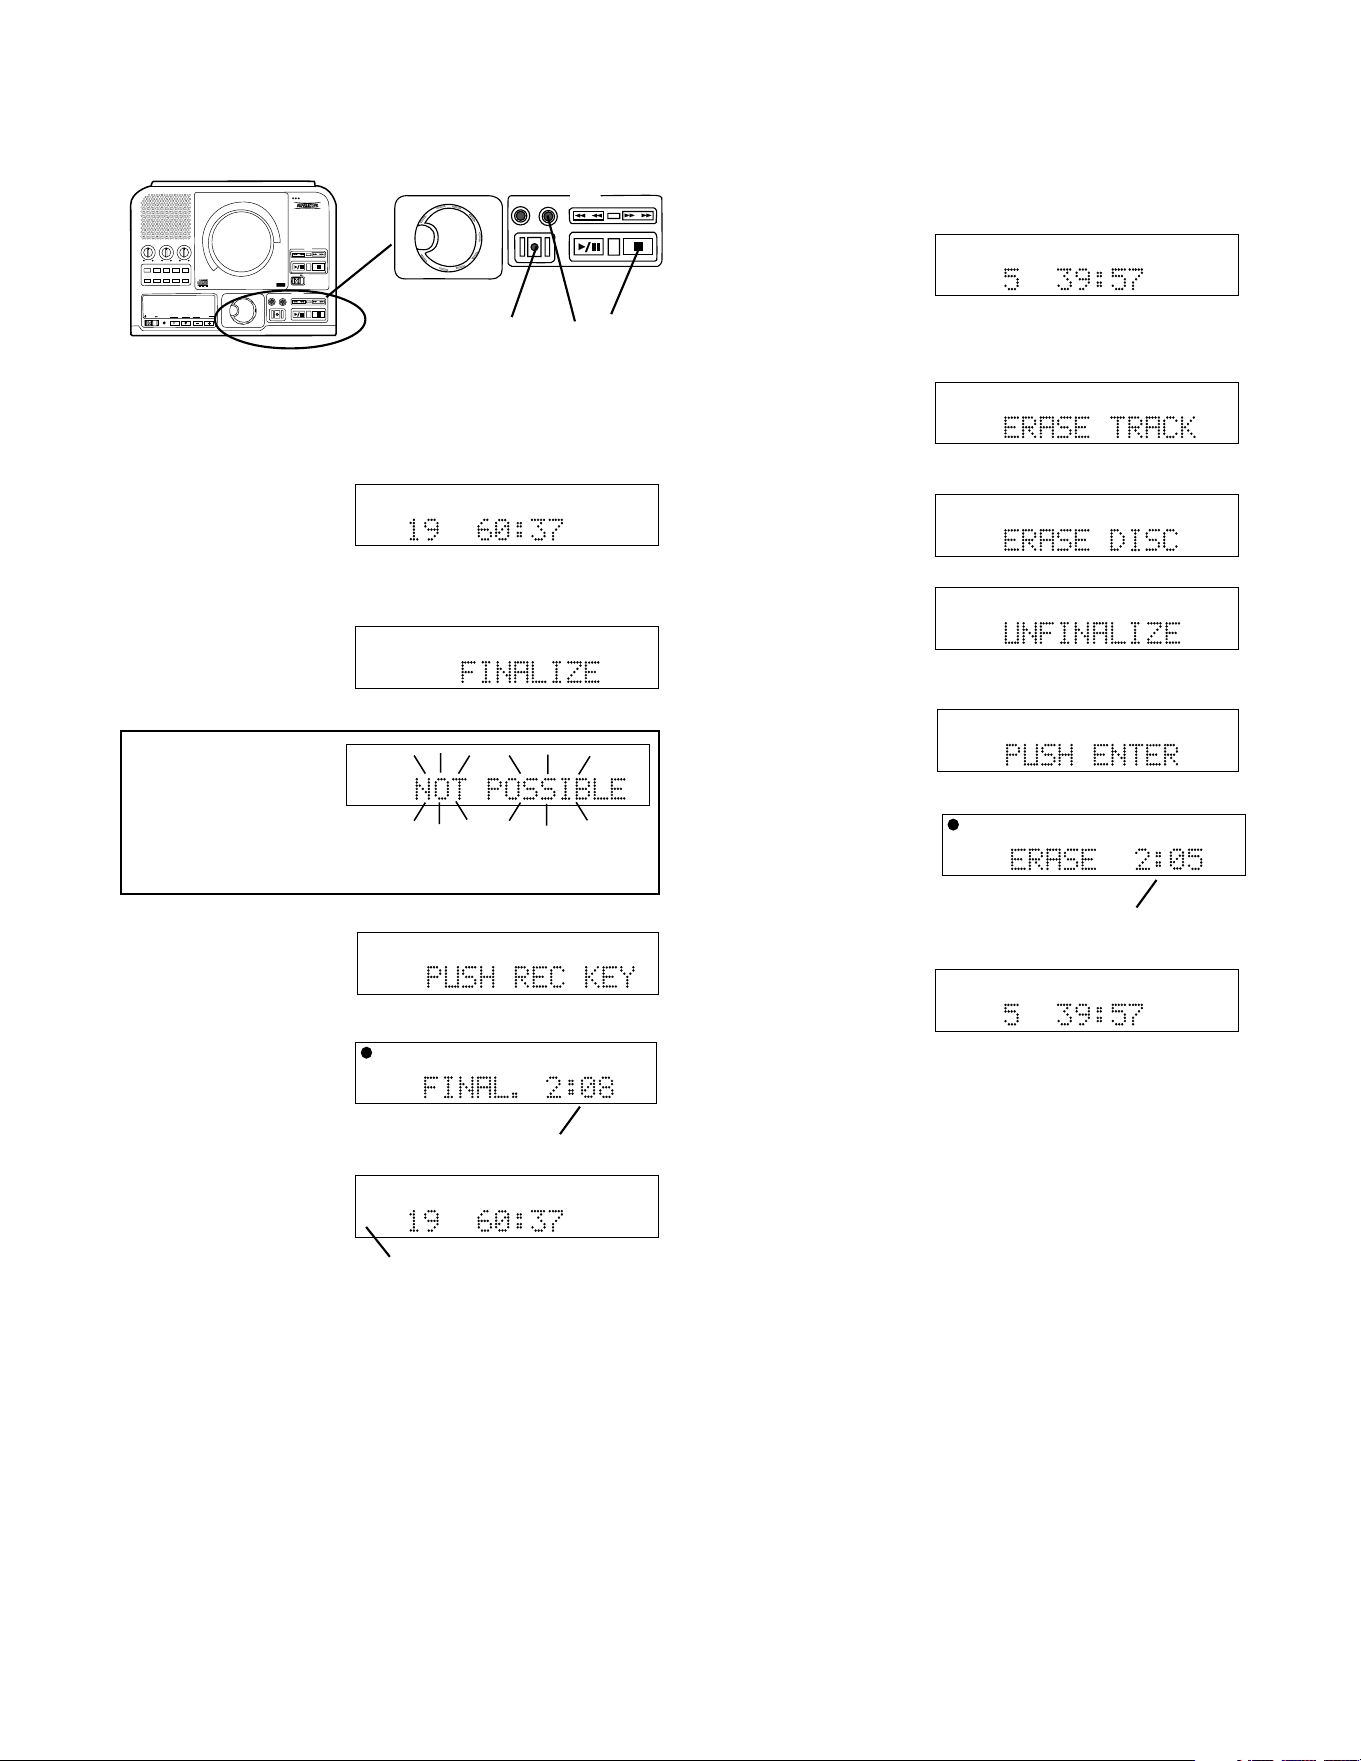
- 31 -
How to Finalize continued
PUSH
BASS
MID
TREBLE
TEXT VR PROG REPEAT
MENU/STORE
DISP SINGLE
A-B
CANCEL/DELETE
REC MODE
CD-RW PLAYBACK
CD RECORDING SYSTEM PSD300
MIC
PLAY
OPEN
REC/PLAY
ERASE FINALIZE
REC
SELECT
PUSH ENTER
POWER KEY TEMPOSTANDBY
REC/PLAY
ERASE FINALIZE
REC
SELECT
PUSH ENTER
How to Finalize a CD-R or CD-RW disc:
TOTAL TRACK
CD-R
R
L
dB-50 -30 -22 -16 -12 -8 -4 0
CD-RW
3 2 1
1 Push Stop on the CDR drive.
The display shows
the number of tracks
and their total playing
time (example
shown).
2 Push FINALIZE.
FINALIZE is displayed
for about 3 seconds.
TOTAL TRACK
CD-R
R
L
dB-50 -30 -22 -16 -12 -8 -4 0
CD-RW
finalized, NOT POSSIBLE flashes twice, then the
previous display returns.
Note:
If the disc is blank or
has already been
TOTAL TRACK
CD-R
R
L
dB-50 -30 -22 -16 -12 -8 -4 0
CD-RW
TOTAL TRACK
CD-R
R
L
dB-50 -30 -22 -16 -12 -8 -4 0
CD-RW
Then PUSH REC KEY
is displayed.
a
TOTAL TRACK
CD-R
R
L
dB-50 -30 -22 -16 -12 -8 -4 0
CD-RW
TOTAL TRACK
CD
R
L
dB-50 -30 -22 -16 -12 -8 -4 0
CD
b
CD-RW or CD-R changes to CD (b).
3 Push the REC
button. The timer (a)
counts down as the
track is erased.
When done the
display shows the
number of tracks and
their total playing time
(example shown).
How to Unfinalize a CD-RW disc
TOTAL TRACK
CD-R
R
L
dB-50 -30 -22 -16 -12 -8 -4 0
CD-RW
1 Push Stop on the
CDR drive. The
display shows the
number of tracks and their total playing time (example
shown).
TOTAL TRACK
CD-R
R
L
dB-50 -30 -22 -16 -12 -8 -4 0
CD-RW
2 Push ERASE three
times. After the first
push ERASE TRACK
is displayed.
TOTAL TRACK
CD-R
R
L
dB-50 -30 -22 -16 -12 -8 -4 0
CD-RW
After the second push
ERASE DISC is
displayed.
TOTAL TRACK
CD-R
R
L
dB-50 -30 -22 -16 -12 -8 -4 0
CD-RW
TOTAL TRACK
CD-R
R
L
dB-50 -30 -22 -16 -12 -8 -4 0
CD-RW
3 Push the SELECT
PUSH/ENTER control.
The timer (a) counts
down as the finalizing
is erased.
When done the
display shows the
number of tracks and
their total playing time (example shown).
The disc has been unfinalized but not erased.
TOTAL TRACK
CD-R
R
L
dB-50 -30 -22 -16 -12 -8 -4 0
CD-RW
TOTAL TRACK
CD-R
R
L
dB-50 -30 -22 -16 -12 -8 -4 0
CD-RW
a
After the third push
UNFINALIZE is
displayed for about
three seconds.
Then PUSH ENTER
is displayed.
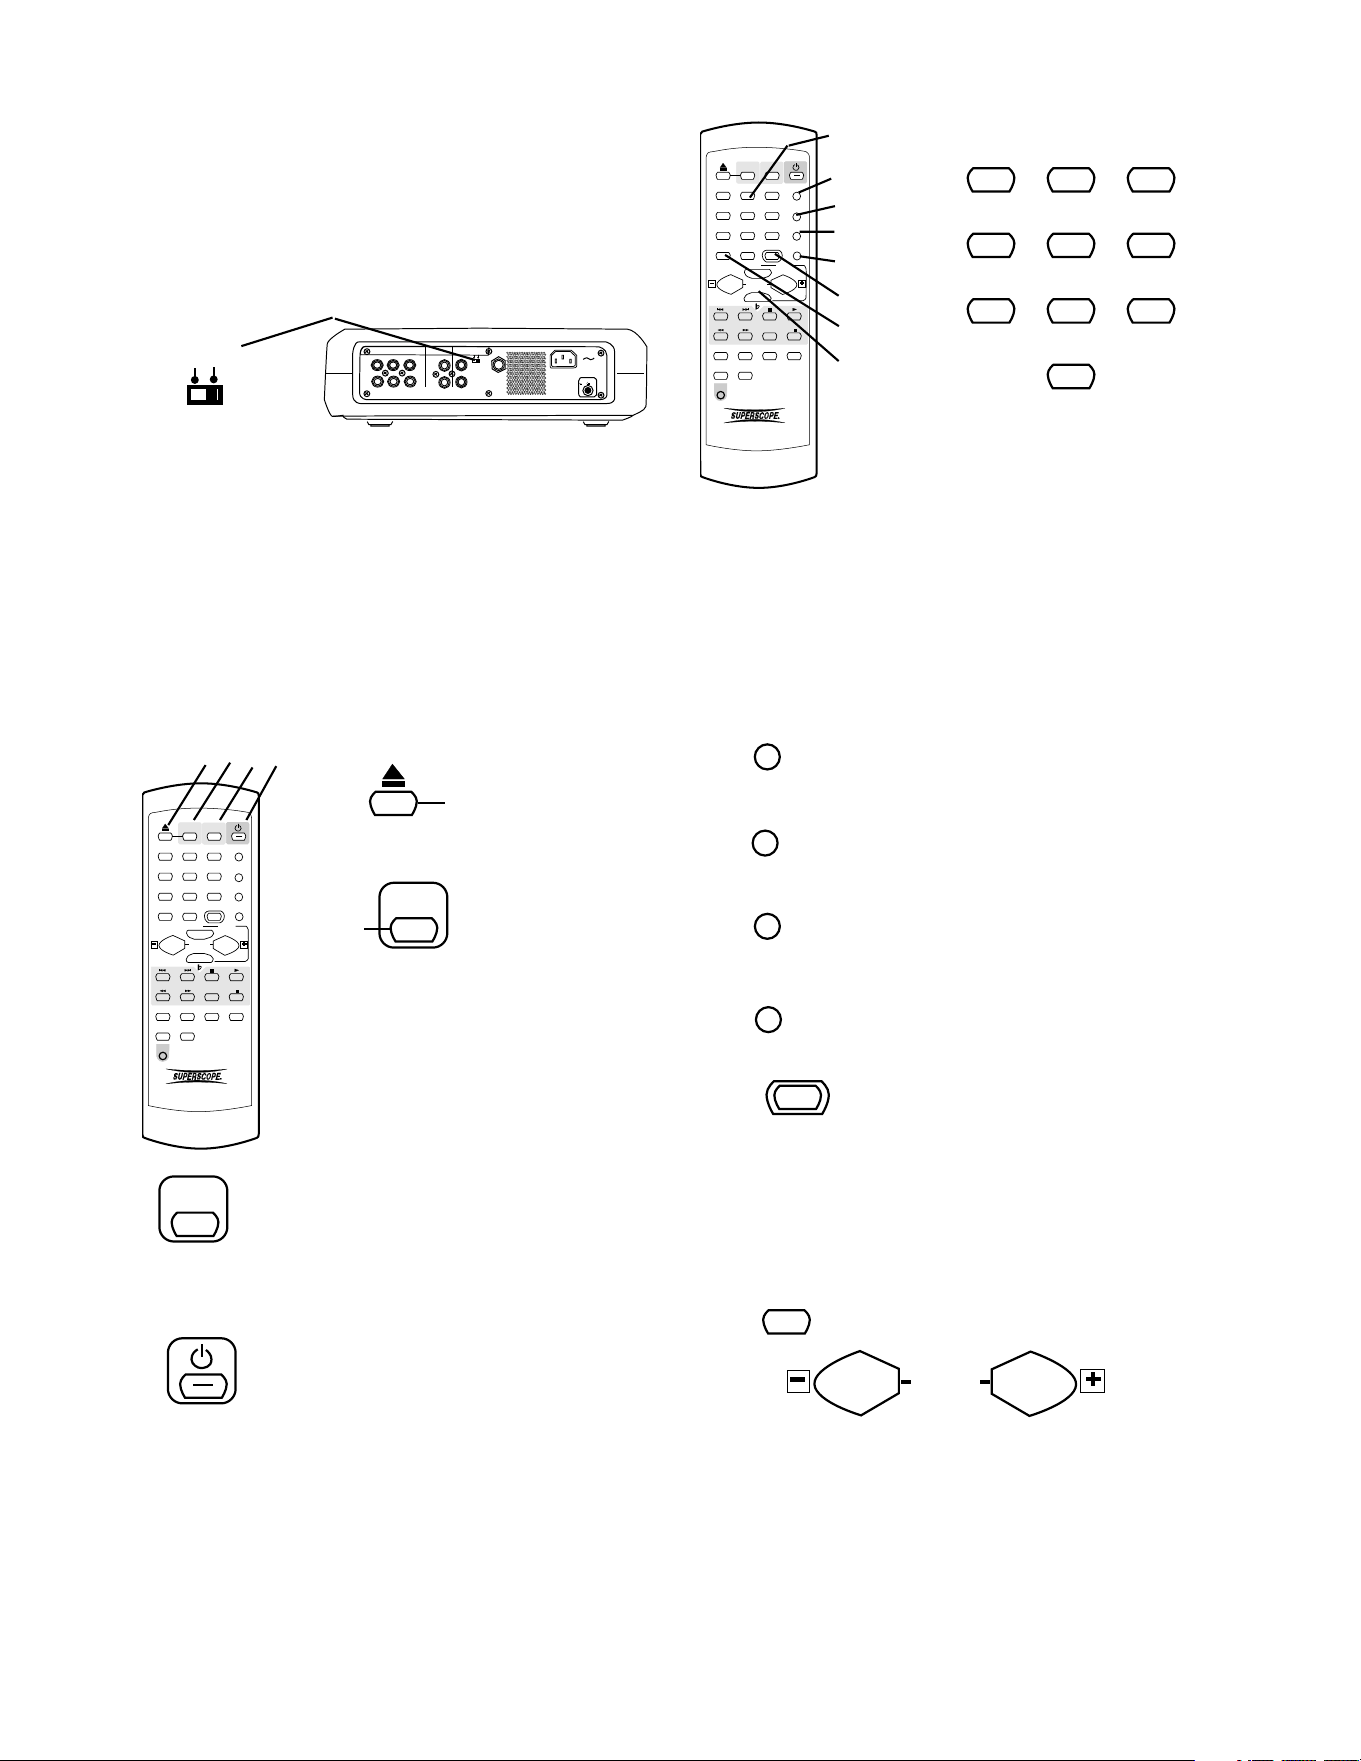
About the Remote
- 32 -
POWER
ON OFF
MIX LINE AUX DIGITAL
REMOTE
RC-5 EXT. INT.
FOOT
PEDAL
IN
OUT
IN
OUT
R
L
R
L
INOUT
OUT
REMOTE
EXT. INT.
The REMOTE EXT. INT. switch on the back of the
PSD300 must be at INT. for the infrared remote to
work.
Most of the controls on the remote work identically to
the control on the unit. The page number describing
identical functioning unit controls is given below.
Further instruction is supplied for controls that are on
the remote only or that function differently from con-
trols on the unit.
1
ABC
2
DEF
3
GHI
PROG
4
JKL
5
MNO
6
PQR TEXT
7
STU
8
VW
9
XYZ SINGLE
DISPLAY
0
SPACE
TEMPO RESET
VR
CDR CD
REPEAT CAN/DEL ENTER MEN/STO
A B
TR INC
REC
REMOTE CONTROL
RC300PSD
AMS
#
KEY
TEMPO
1 2 3 4
= OPEN/CLOSE
switch for the CDR
drive.
See page ............................... 16.
1
2
CDR
CDR select button.
Push to select the
CDR drive.
When selected buttons on this
remote such as Play, Pause,
Stop, and Search work on the
CDR drive rather than CD play-
back.
CD
When selected buttons on this remote such as Play,
Pause, Stop, and Search work on the CD drive rather
than the CDR drive.
CD select button. Push to select the CD
drive.
3
4
= Standby POWER switch.
See page ..................................... 11.
1
ABC
2
DEF
3
GHI
PROG
4
JKL
5
MNO
6
PQR TEXT
7
STU
8
VW
9
XYZ SINGLE
DISPLAY
0
SPACE
TEMPO RESET
VR
CDR CD
REPEAT CAN/DEL ENTER MEN/STO
A B
TR INC
REC
REMOTE CONTROL
RC300PSD
AMS
#
KEY
TEMPO
5
6
7
8
9
10
11
12
1
ABC
2
DEF
3
GHI
4
JKL
5
MNO
6
PQR
7
STU
8
VW
9
XYZ
0
SPACE
5
In Play and Program modes push and release a
number button to select the track. Then push ENTER
on the unit or remote to enter the selection.
When entering CD TEXT push a number button once
to select the first of the three letters, twice for the
second and three times for the third. Push ENTER on
the remote or unit to enter the selected number.
6
= PROG button. See page ............... 7.
7
= TEXT button. See page ................. 7.
8
= SINGLE button. See page ........... 10.
PROG
TEXT
SINGLE
VR
9
TEMPO RESET button
On the PSD300 resetting the Tempo
to 0% (normal speed) is done by
10
TEMPO RESET
pressing both Tempo controls at the same time. The
TEMPO RESET button is the same as pushing both
Tempo controls at the same time.
See page ............................................................... 12.
= DISP button. See page.................. 9.
11
DISPLAY
12
TEMPO
= Tempo controls except for TEMPO RESET above.
See page ............................................................. 12.
Alphanumeric keypad
Performs some of the functions of
the SELECT control.
= VR button. See page ..................... 7.
The supplied infrared remote control permits most
functions of the PSD300 to be controlled remotely.
See Remote batteries for installing or changing remote
batteries.
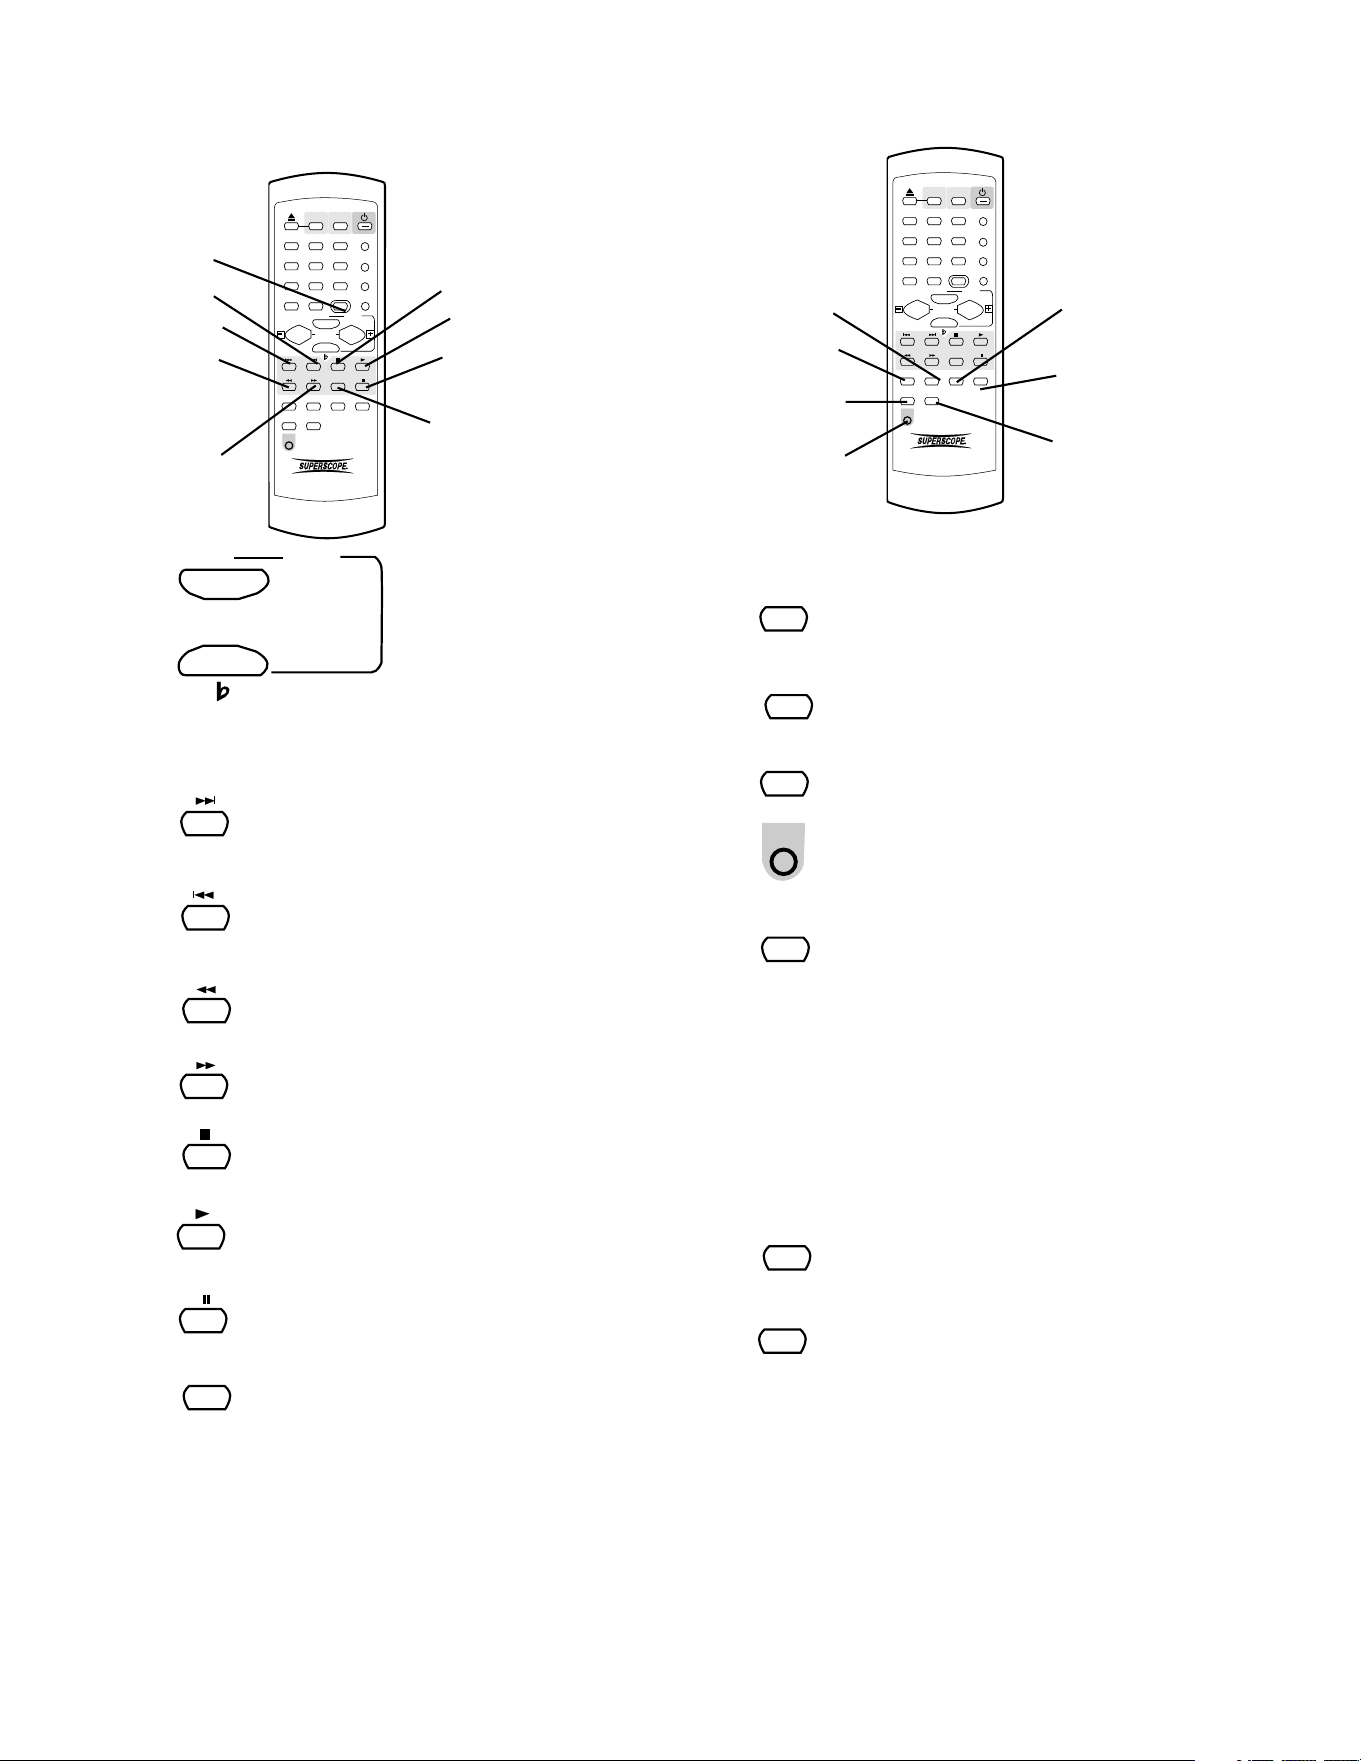
- 33 -
About the Remote continued
1
ABC
2
DEF
3
GHI
PROG
4
JKL
5
MNO
6
PQR TEXT
7
STU
8
VW
9
XYZ SINGLE
DISPLAY
0
SPACE
TEMPO RESET
VR
CDR CD
REPEAT CAN/DEL ENTER MEN/STO
A B
TR INC
REC
REMOTE CONTROL
RC300PSD
AMS
#
KEY
TEMPO
13
14
15
16
17
18
19
20
21
13
#
KEY
= KEY controls.
See page ............... 11.
14
Track Skip forward button.
Push and release during Play or Pause
to skip forward to the next track.
15
Track Skip backward button.
Push and release during Play or Pause
to skip backward to the previous track.
16
= Fast backward search button.
See page ......................................... 11.
= Fast forward search button.
See page ......................................... 11.
17
18
= Stop button.
See page ......................................... 11.
= Play of Play/Pause button.
See page ......................................... 11.
19
= Pause of Play/Pause button.
See page ......................................... 11.
20
AMS (Automatic Search) button.
Remote only. Push and release to play
the first 10 seconds of each track. AMS
21
AMS
1
ABC
2
DEF
3
GHI
PROG
4
JKL
5
MNO
6
PQR TEXT
7
STU
8
VW
9
XYZ SINGLE
DISPLAY
0
SPACE
TEMPO RESET
VR
CDR CD
REPEAT CAN/DEL ENTER MEN/STO
A B
TR INC
REC
REMOTE CONTROL
RC300PSD
AMS
#
KEY
TEMPO
22
23
24
25
26
27
28
22
CAN/DEL
= CANCEL DELETE button.
See page ......................................... 10.
23
REPEAT
= REPEAT button.
See page ........................................... 7.
24
= A-B button.
See page ......................................... 10.
A B
25
= REC button.
See page ......................................... 14.
REC
26
ENTER button.
is displayed in the time display while searching. Push
Pause to pause the automatic search. Push Play to
switch from AMS to Play. Automatically stops at the
end of the disc. Push AMS to exit automatic search.
Performs some of the functions of the
SELECT control.
• In Play and Program modes push number button
to select the track. Then push ENTER to enter
the selection.
• Selects settings in MENU mode.
• Programs track numbers.
• Enters a letter during finalizing text entry.
• When entering CD TEXT push ENTER to enter
the selected character.
ENTER
27
MEN/STO
= MENU/STORE button.
See page ........................................... 8.
28
TR INC button. Remote only.
During recording push and release to
manually increment a new track. It is
recommended to set AUTO TRACK to
OFF.
TR INC
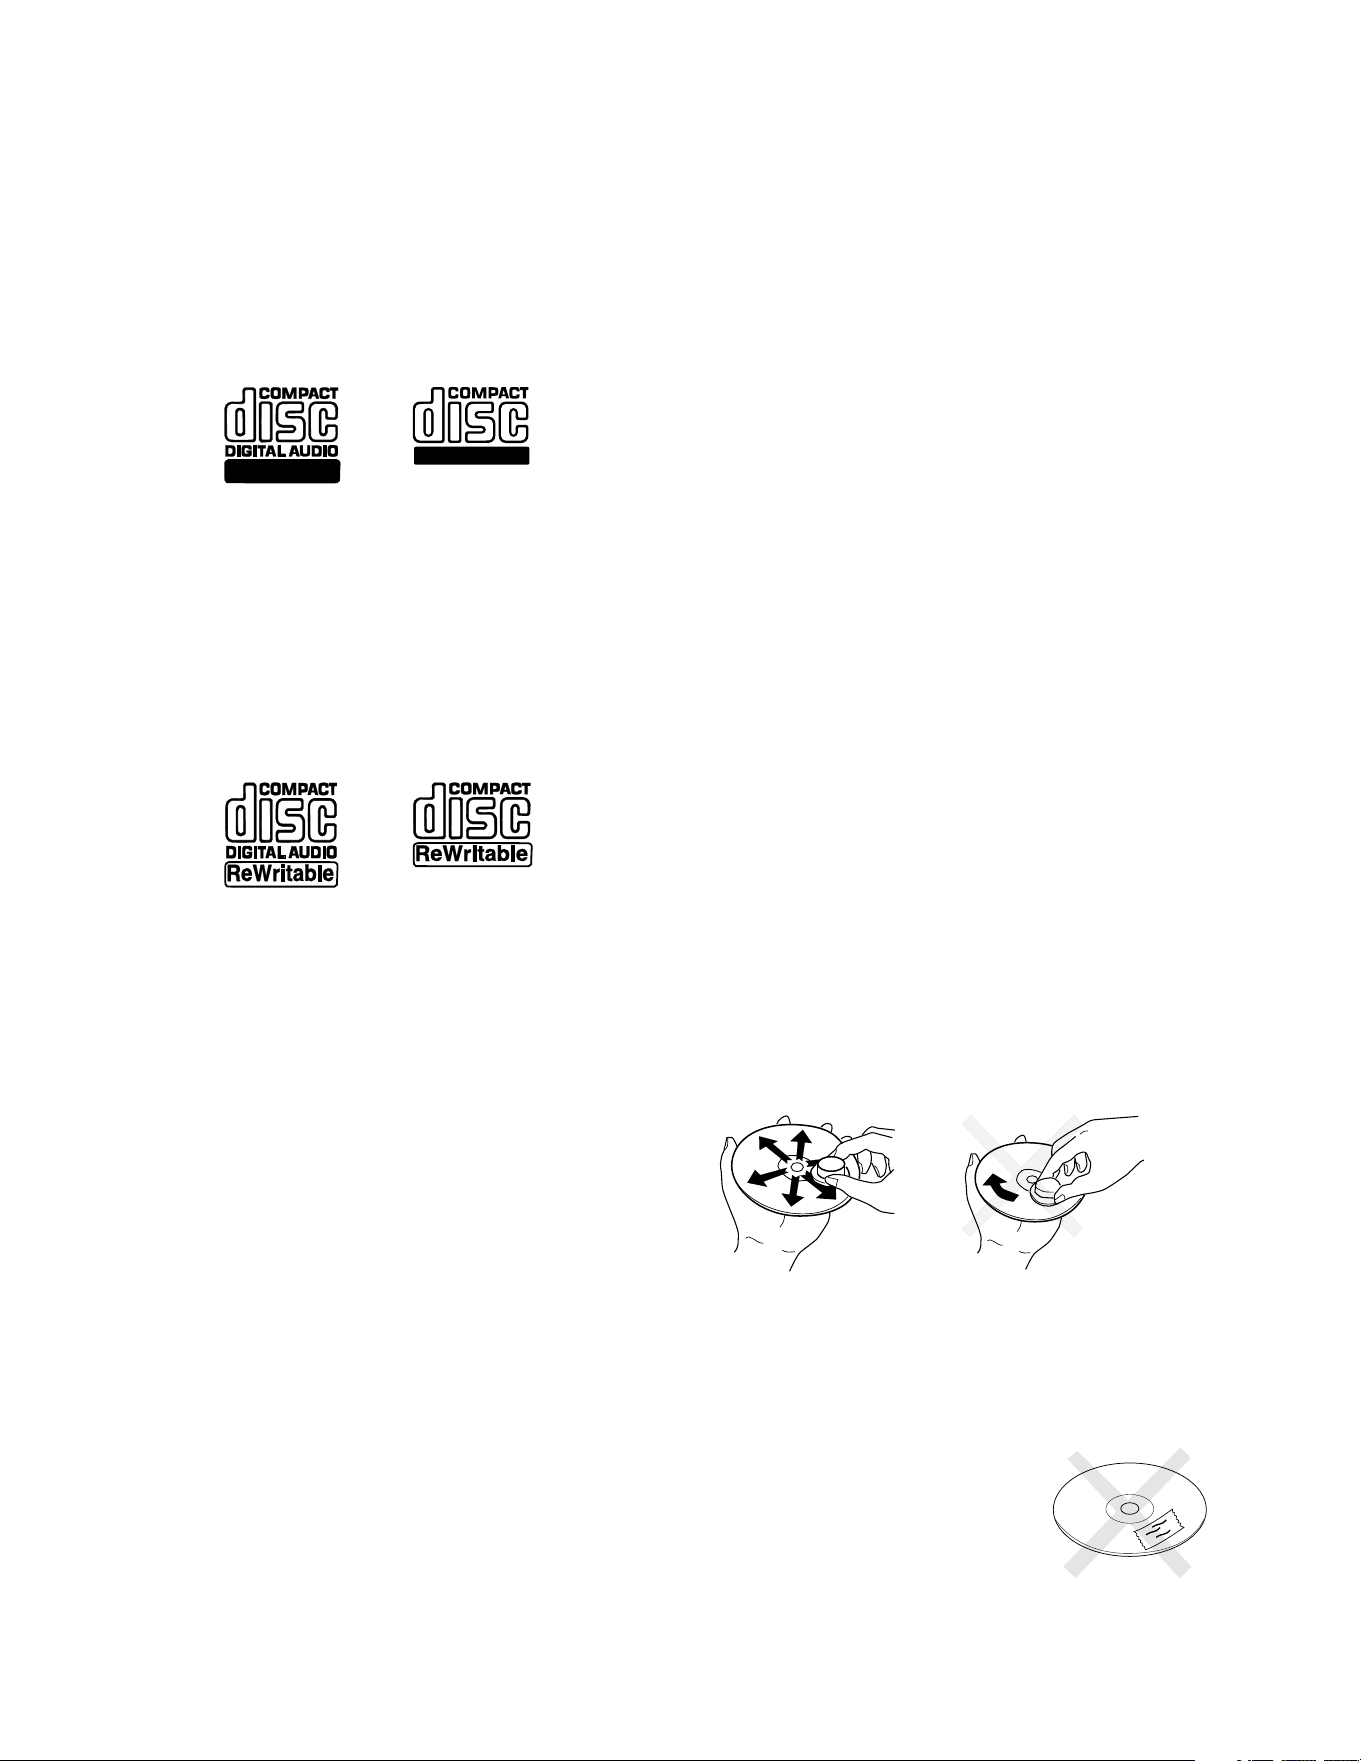
- 34 -
About CD discs
The PSD300 can play CD, CD-R, or CD-RW discs and
can record on CD-R or CD-RW discs:
CD-R (record once)
CD-R discs are only able to be recorded onto a
single time but will playback in most CD players.
CD-R discs can be recognized by the following
logos:
Recordable
Recordable
CD-RW (multiple recording)
CD-RW discs are able to be recorded onto many
times but will only playback in CD players offering
CD-RW compatibility. Products that offer CD-RW
compatibility are available from Marantz, Marantz
Professional, and Superscope. Please contact your
dealer for more information on these products.
CD-RW discs can be recognized by the following
logos:
Notes:
• Most DVD players cannot playback CD-R discs
and some cannot playback CD-RW discs because
of laser power differences.
• Some CD players may be able to playback
finalized CD-RW discs.
• Some CD players can not play finalized CD-R
discs because of the low reflectivity of such discs.
Which discs to use:
The PSD300 is able to record onto any 1X or 2X
compatible CD-R and CD-RW disc, including discs for
Consumer use and Professional (computer) discs.
The PSD300 records according to the Orange Book
specification. Every CDR disc sold should be accord-
ing to the Orange Book specification and therefore
compatible with the PSD300.
In practice however, the quality of the recording
depends on the match between the disc used and the
writing strategy of the recorder. At 1X speed (stand
alone audio) the match between disc and recorder is
important. Higher recording speeds are less critical in
terms of recording quality.
Consumer CD Recorders can only record on CDR
Audio discs and those discs are optimized for single
speed automatically. Professional CD Recorders can
use both Audio and Data discs. When using Data
discs, one should take care to use discs with a good
single speed compatibility.
Recording Capacity:
Discs with higher capacity than 74 minutes (80 min-
utes) are out of the Orange Book standard and may
perform below your expectations.
Compact disc care
The glossy side is the record side of the disc, and
matted (dull) side is the label side.
Handle discs carefully so as not to damage or scratch
the record side.
Avoid placing discs in the following locations:
• In direct sunlight or near a source of heat such as
a heater.
• In a place that is damp or dirty.
• In a place which could be exposed to rain, such as
near a window.
Disc cleaning
Always keep the disc surface clean. Up to six billion
data units are recorded on the record side of the disc.
When cleaning the disc surface always be sure to use
a special compact disc cleaner and wipe as shown
below.
Do not wipe in
circumferential
direction.
Wipe in a radial
direction.
• Do not use record cleaner, it will adversely affect
the disc surface.
• Store discs in their disc cases.
• Do not attach a piece of
paper or sticker to the label
side of the disc. When a
disc has a piece of plastic
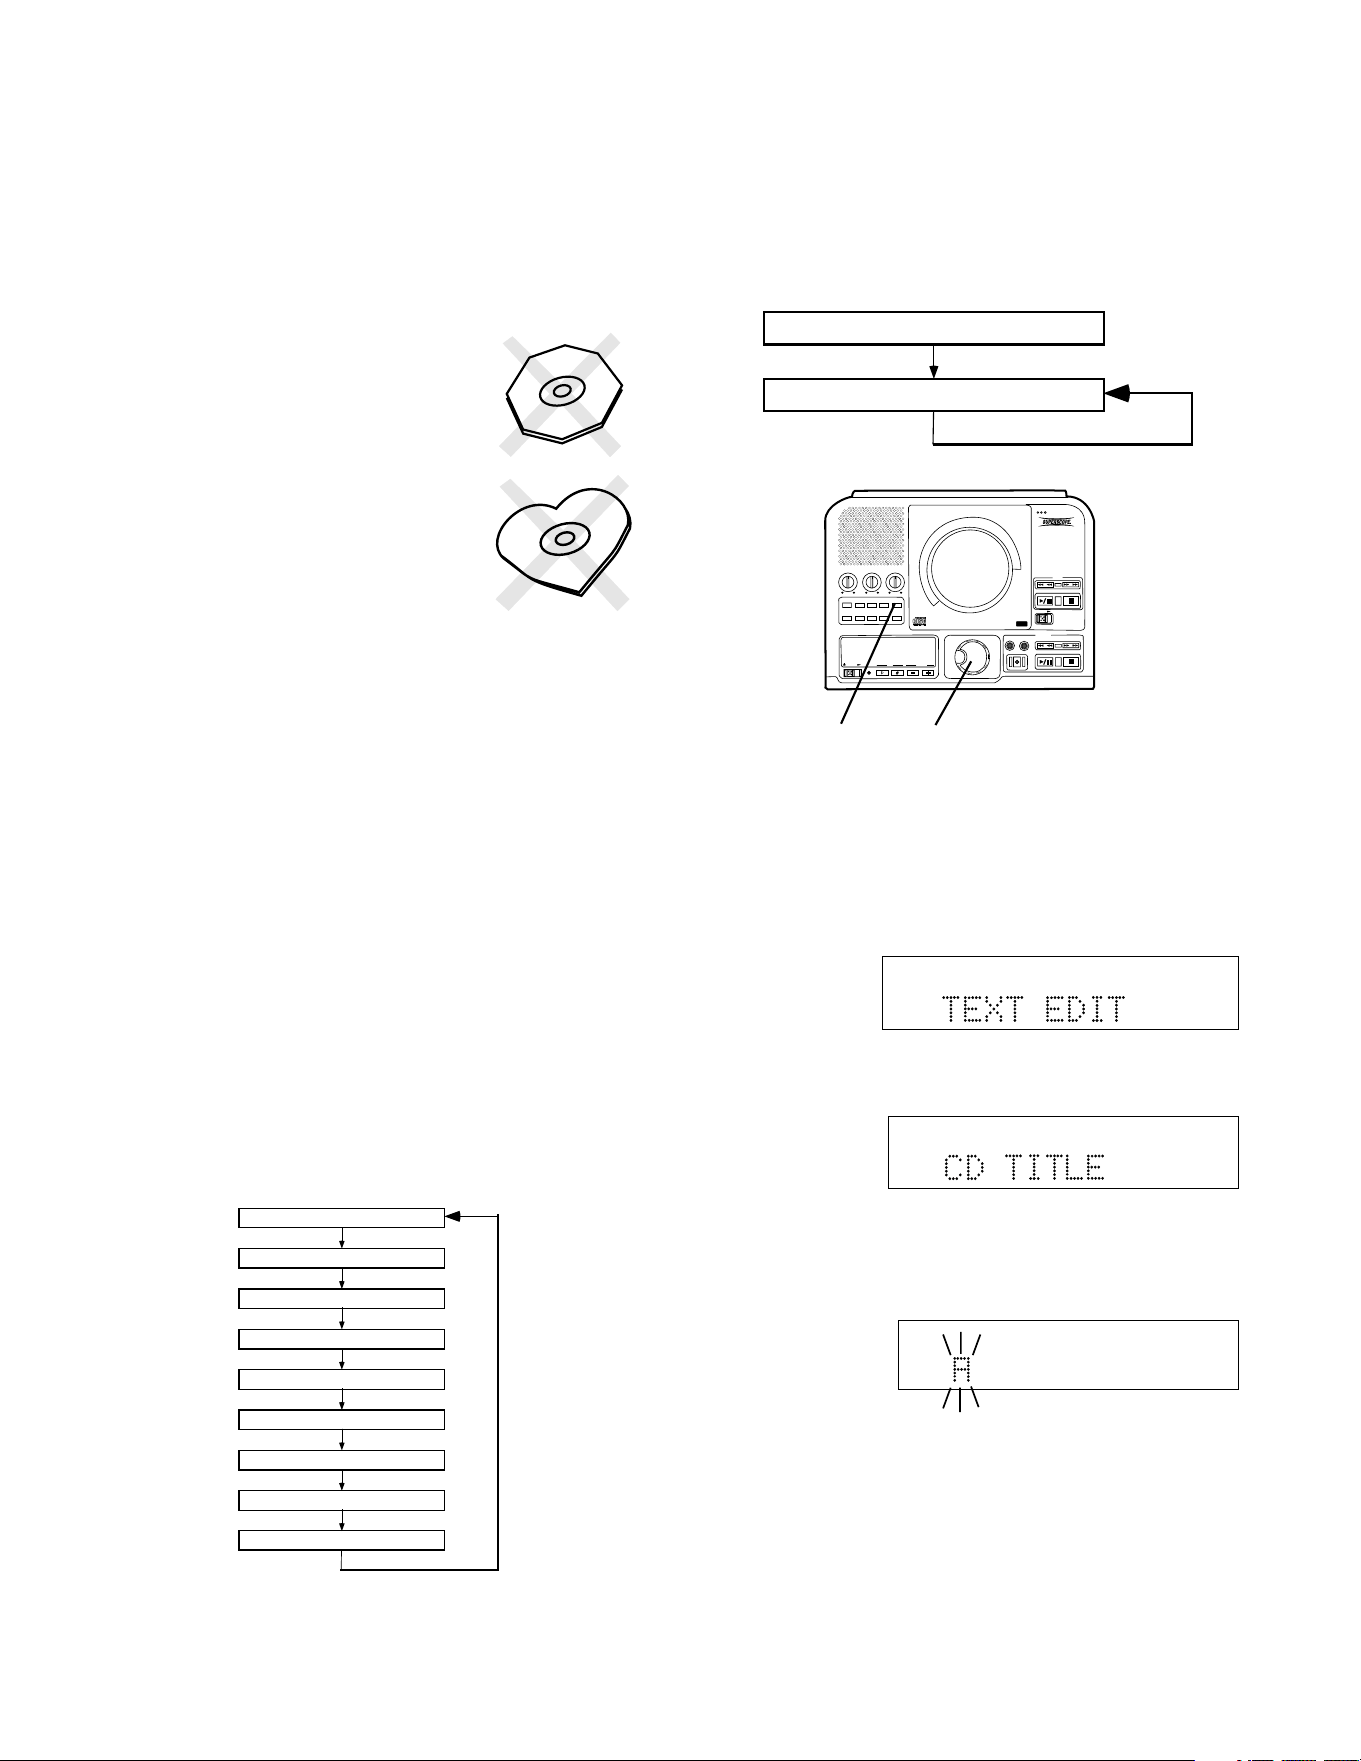
tape or rental CD label with paste protruding from
the edge or when a disc has a trace of such as
sticky object, do not attempt to play the disc. The
disc may be impossible to take out, or another
malfunction may result.
• Write only on the printed side of a CD-R or CD-
- 35 -
RW disc, and only with a soft
felt-tipped pen.
• Do not attempt to record a
disc with a special shape.
• Do not attempt to play a disc
with a special shape such as
an octagonal or heart shaped
disc. Equipment malfunction
may result.
CD text
CD text, when present, provides text information such
as the CD title, artist, track titles, and track artists.
The PSD300 can record text information on an
unfinalized CD-R or CD-RW that you record.
CD text during playback
When a disc is inserted in the CD drive or CDR drive
the PSD300 automatically detects if a disc has text
information and automatically displays the CD title.
The PSD300 can display 14 characters, if the text
information is longer than that the text automatically
scrolls from right to left.
Play
The following information, if available, is displayed
every time the TEXT button is pushed and released
while the PSD300 is playing. During Stop the track
information is unavailable.
CD Title
Track Title
Track Artist
Track Songwriter
Track Composer
Track Arranger
Track Message
CD ID
CD Genre
Recording CD text
Before finalalization of a CD you can enter text
information. Only the CD title and track titles can be
entered.
CD Title
Title of each track
PUSH
BASS
MID
TREBLE
TEXT VR PROG REPEAT
MENU/STORE
DISP SINGLE
A-B
CANCEL/DELETE
REC MODE
CD-RW PLAYBACK
CD RECORDING SYSTEM PSD300
MIC
PLAY
OPEN
REC/PLAY
ERASE FINALIZE
REC
SELECT
PUSH ENTER
POWER KEY TEMPOSTANDBY
1
2
With your unfinalized disc in the CDR drive and
stopped
1 push and release Menu/Store.
2 Turn the SELECT control so TEXT EDIT is
displayed.
Push and release the SELECT control to select.
CD TITLE is displayed.
(Turn the SELECT control to select editing track
titles.) Push and release the SELECT control to
select editing the CD TITLE or the Track title. The
first character of the title is flashing.
Turn the SELECT control to select the character.
Or from the remote with CDR selected, push and
release alphanumeric keys to select the character.
TOTAL TRACK
CD-R
R
L
dB-50 -30 -22 -16 -12 -8 -4 0
CD-RW
TOTAL TRACK
CD-R
R
L
dB-50 -30 -22 -16 -12 -8 -4 0
CD-RW
TOTAL TRACK
CD-R
R
L
dB-50 -30 -22 -16 -12 -8 -4 0
CD-RW

- 36 -
Recording CD text continued
The SELECT control presents the following
characters in order:
The _ after the 9 is displayed as a space.
Consider using the infrared remote control to enter
CD text. All the numbers, the space, and all upper
and lower case characters are available from the
remote alphanumeric keypad.
TOTAL TRACK
CD-R
R
L
dB-50 -30 -22 -16 -12 -8 -4 0
CD-RW
After the final character is entered, push and
release MENU/STORE.
Note: All CD text entries are in short term memory
until the CD is finalized. You can play, pause and
stop, but if you turn off power, or open the CDR
drive your editing will be lost.
When the correct character is flashing, push and
release the SELECT control or push ENTER on
the remote.
TOTAL TRACK
CD-R
R
L
dB-50 -30 -22 -16 -12 -8 -4 0
CD-RW
In this example M was entered. The entered
character is repeated and flashing.
Continue selecting characters and entering them.
Up to 23 characters.
The Fast backward search button and Fast
forward search button both work as the cursor
during text editing. Push and release to move the
editing position one character.
PUSH
BASS
MID
TREBLE
TEXT VR PROG REPEAT
MENU/STORE
DISP SINGLE
A-B
CANCEL/DELETE
REC MODE
CD-RW PLAYBACK
CD RECORDING SYSTEM PSD300
MIC
PLAY
OPEN
REC/PLAY
ERASE FINALIZE
REC
SELECT
PUSH ENTER
POWER KEY TEMPOSTANDBY
MENU/STORE
How to view CD text
PUSH
BASS
MID
TREBLE
TEXT VR PROG REPEAT
MENU/STORE
DISP SINGLE
A-B
CANCEL/DELETE
REC MODE
CD-RW PLAYBACK
CD RECORDING SYSTEM PSD300
MIC
PLAY
OPEN
REC/PLAY
ERASE FINALIZE
REC
SELECT
PUSH ENTER
POWER KEY TEMPOSTANDBY
MENU/STORE
The TEXT VIEW menu item lets you review the CD
text that has been entered before a disc is finalized.
With your disk in the CDR drive and stopped
1 Push and release MENU/STORE.
2 Turn the SELECT control so TEXT VIEW is
displayed.
TOTAL TRACK
CD-R
R
L
dB-50 -30 -22 -16 -12 -8 -4 0
CD-RW
3 Push and release the SELECT control to confirm
the selection.
TOTAL TRACK
CD-R
R
L
dB-50 -30 -22 -16 -12 -8 -4 0
CD-RW
Example
display
4 Push and release the SELECT control to review
how the album title scrolls by when displayed, or,
5 Turn the SELECT control to switch to reviewing
track text.
TOTAL TRACK
CD-R
R
L
dB-50 -30 -22 -16 -12 -8 -4 0
CD-RW
Example
display
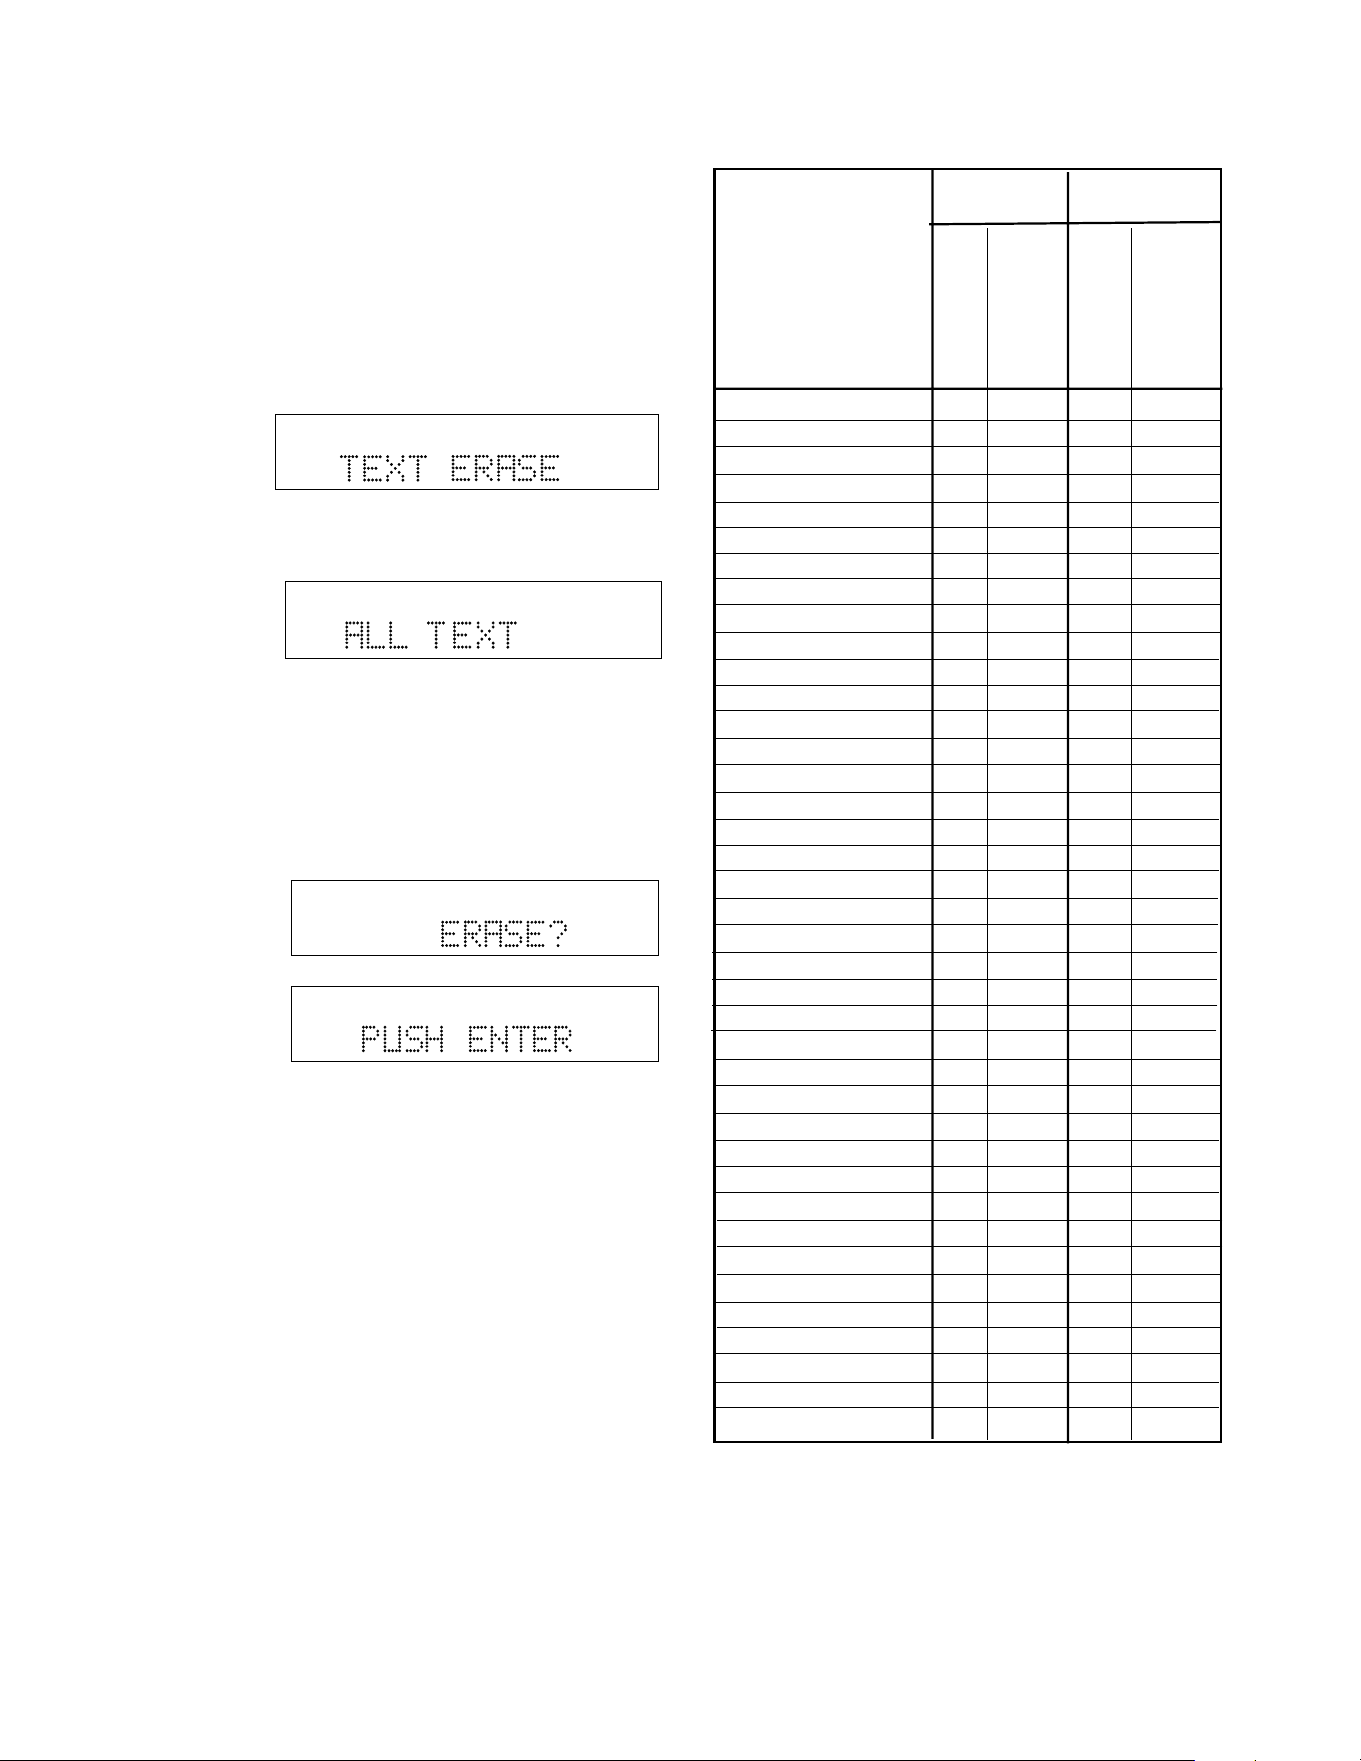
- 37 -
How to erase CD text
The TEXT ERASE menu item lets you delete CD text
that has been entered.
With your unfinalized disk in the CDR drive and
stopped
1 Push and release MENU/STORE.
2 Turn the SELECT control so TEXT ERASE is
displayed.
TOTAL TRACK
CD-R
R
L
dB-50 -30 -22 -16 -12 -8 -4 0
CD-RW
3 Push and release the SELECT control to confirm
the selection. ALL TEXT is displayed.
TOTAL TRACK
CD-R
R
L
dB-50 -30 -22 -16 -12 -8 -4 0
CD-RW
When ALL TEXT is displayed, turn the SELECT
control to select erasing only the CD title or a track
title.
4 Push and release the SELECT control to confirm
the selection. ERASE? is displayed briefly, then
PUSH ENTER is displayed.
TOTAL TRACK
CD-R
R
L
dB-50 -30 -22 -16 -12 -8 -4 0
CD-RW
TOTAL TRACK
CD-R
R
L
dB-50 -30 -22 -16 -12 -8 -4 0
CD-RW
Push and release the SELECT control to erase the
selected text.
0 _ Space 20 00 26 00
1 ABCabc 20 01 26 01
2 DEFdef 20 02 26 02
3 GHIghi 20 03 26 03
4 JKLjkl 20 04 26 04
5 MNOmno 20 05 26 05
6 PQRpqr 20 06 26 06
7 STUstu 20 07 26 07
8 VWvw 20 08 26 08
9 XYZxyz 20 09 26 09
PLAY 20 53 26 53
STOP 20 54 26 54
PAUSE 20 48 26 48
NEXT 20 32 26 32
PREVIOUS 20 33 26 33
FF 20 52 26 52
REW 20 50 26 50
PROGRAM 20 36 - -
CANCEL/DELETE 20 49 26 49
DISPLAY 20 11 26 11
TEMPO + 20 38 - -
TEMPO - 20 39 - -
KEY + 20 68 - -
KEY - 20 69 - -
AMS (intro scan) 20 43 - -
TEMPO RESET 20 37 - -
REC - - 26 55
OPEN/CLOSE 26 45 26 45
STANDBY 20 12 26 12
TEXT 20 15 26 15
ENTER 20 87 26 87
MENU/STORE 20 82 26 82
REPEAT 20 29 26 29
A - B 20 59 - -
CD 20 63 - -
CD-R - - 26 63
TR.INCR - - 26 114
SINGLE 20 59-11 - -
VR voice reduction 20 67 - -
CD code CD-R code
System (dec)
System (dec)
Command (dec)
Command (dec)
Function
RC-5 remote control codes

- 38 -
Troubleshooting
Warning!
Under no circumstances should you try to
repair the unit yourself. That will cause a
safety hazard and void the warranty.
No Power
• Check that the Power switch on the back of the
PSD300 is in the in ON position.
• If the STANDBY light is lit, slide the POWER
switch to the right.
• Check that the power cord is plugged in correctly.
• Switch the Power switch on the back of the unit
OFF and then back ON.
No sound
• Check audio connections.
• Check position of level control (LINE OUT for
attached amplifier speaker system, PHONE/
SPEAKER LEVEL for internal speaker or head-
phones).
Amplified sound is distorted
• Check that LINE OUT is not connected to a Phono
input.
• Check that the disc is not defective (try another
disc.)
Play will not start
• Check that the disc is inserted correctly.
• Check that the disc is not defective (try another
disc.)
• Check that the disc is finalized (CD drive only).
Remote control does not work
• Check that the REMOTE EXT./INT. switch is at
INT.
• Select the right source (CD or CDR).
• Point the infrared remote at the remote sensor.
• Check/replace batteries.
Recording is distorted
• Check/lower recording level.
• Check for a defective disc by trying another disc.
Will not record
• Check/clean the disc.
• Check that the disc is recordable.
• Check that the right input source is selected.
• Check that the disc is not defective. Clean the
disc or try another disc.
Maintenance
• Clean the PSD300 with a soft, slightly dampened
lint-free cloth. Do not use any cleaning agents as
they may have a corrosive effect.
• Do not expose the PSD300, batteries or CDs to
humidity, rain, sand or excessive heat (caused by
heating equipment or direct sunlight).
• The lenses may cloud over when the PSD300 is
suddenly moved from cold to warm surroundings.
It is not possible to play a CD then. Leave the
PSD300 in a warm environment until the moisture
evaporates.
• Always keep the tray closed to avoid dust on the
lens.
Disc problems
Display message Description
DATA/DISC ERROR...............Disc is not an audio CD.
DISC ERROR ........................Corrupt or out of specifications disc.
OPC ERROR .........................Optimum Power Calibration (OPC) failure. Disc problem, use new disc.
REC ERROR ......................... Recording interrupted as a result of transport failure due to shock or a bad
sector of the recordable disc.

Specifications
General
System ......................................................................................... Compact Disc Digital Audio (CD-DA)
Number of channels ..................................................................... 2 (stereo)
Applicable discs ............................................................................ CD, CD-R, CD-RW
Power requirement ....................................................................... AC 120V 60 Hz, 21W
Dimensions (maximum)
Width ............................................................................... 11 inches (279 mm)
Height .............................................................................. 4 inches (102 mm)
Depth ............................................................................... 9 inches (229 mm)
Weight ............................................................................. 7 pounds (3.2 Kg)
Audio
ADC ........................................................................................ 24 Bit Resolution 64x oversampling
DAC ........................................................................................ 16 Bit Resolution 8x oversampling
Overall frequency response .......................................................... 20 Hz - 20 kHz
CD-R drive output
Playback S/N ................................................................................ 85 dB
Playback Dynamic Range ............................................................ 85 dB
Playback Total Harmonic Distortion .............................................. 0.05%
Output Voltage/Impedance (Line Output) ..................................... 1.0 V/2K
CD drive output
Playback S/N ................................................................................ 75 dB
Playback Dynamic Range ............................................................ 75 dB
Playback Total Harmonic Distortion .............................................. 0.1%
Output Voltage .............................................................................. 1.0V/2K
MIC/LINE analog input
LINE level
S/N ........................................................................................ 80 dB
THD ....................................................................................... 0.05%
Input Sensitivity/Impedance ................................................... 500 mV/2K
MIC level
S/N ........................................................................................ 60 dB
THD ....................................................................................... 0.2%
Input Sensitivity/Impedance ................................................... 1.2 mV/2K
AUX analog input
S/N ........................................................................................ 75 dB
THD ....................................................................................... 0.05%
Input Sensitivity/Impedance ................................................... 800 mV/23K
Digital Input
Sample rate ........................................................................... 11 kHz ~ 58 kHz
Digital Output
Output Level/Impedance ........................................................ 0.5 Vp-p/75 ohm
Headphone Output (10% THD)
Level/Impedance .................................................................... 70 mW/32 ohm
Speaker Output (10% THD)
Level/Impedance .................................................................... 1.7 W/8 ohm
- 39 -

WARRANTY
One Year Limited Warranty:
Your Superscope PSD300 is warranted against manufacturer defects in material and workmanship for one year
parts and labor.
Non-transferable warranty:
This warranty may be enforced only by the original purchaser.
The following are not covered under warranty:
1.Damage, deterioration, malfunction or failure to meet performance specifications resulting from:
• accident, acts of nature, misuse, abuse, neglect or unauthorized product modification.
• improper installation, removal or maintenance, or failure to follow supplied instructions.
• repair or attempted repair by a non-Superscope authorized agent.
• any shipment (claims must be presented to the carrier).
• any cause other than a defect of manufacturing.
2.Cleaning, check-ups with no fault found.
3.Any product on which the serial number has be defaced, modified or removed.
4.Accessories, including but not limited to, cables and adaptors.
5.Product purchased outside of the United States, its possessions or territories.
The following are covered under warranty:
All labor and material expenses for items covered by the warranty.
To obtain service:
1.If your unit needs service contact Superscope at (630) 820-4800. A service representative will advise you of
how to obtain service. Please do not return the unit directly to Superscope Technologies, unless specified by
our service representative.
2.You must pay any shipping charges if it is necessary to ship the product for service. If the necessary repairs
are covered by the warranty, we will pay return shipping charges to your location anywhere in the United
States.
3.Whenever warranty service is required, you must present the original dated sales receipt, or other proof of
purchase.
Limitation of implied warranties
All implied warranties, including warranties of merchantability and fitness for a particular purpose, are limited in
duration to the length of this warranty.
Exclusion of damages
Liability for any defective product is limited to repair or replacement of the product at Superscope's option.
Superscope shall not be liable for damage to other products caused by any defects in Superscope products,
damages based on inconvenience or loss of use of the product, or any other damages, whether incidental,
consequential, or otherwise.
Some States do not allow limitations on how long an implied warranty lasts and/or do not allow the exclusion or
limitation of incidental or consequential damages, so the above limitations and exclusions may not apply to you.
How State law relates to the warranty
This warranty gives you specific legal rights, and you may have other rights which may vary from State to State.
This warranty is enforceable only in the United States and its possessions or territories.
Superscope Technologies, Inc.
1508 BataviaAve. Telephone (630) 232-8900
Geneva, Illinois 60134 Fax: (630) 232-8905
Internet: www.superscopetechnologies.com