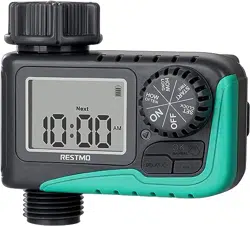
ONE-TOUCH DIGITAL
WATER TIMER
•Timer for Micro-irrigation by tap
• Multifunction button CLICK
• Inlet threaded for tap 1” F and reduction of 3/4” F
• Output threaded 3/4” M
• Powered by 3 AAA 1.5V Alkaline Batteries not included)
• ABS case
• Battery compartment with O-Ring
• Diaphragm solenoid valve
• Working water pressure: 0.5 bar to 5.0 bar
• Flow rate: 5 L/MIN to 35 L/MIN
WARNINGS
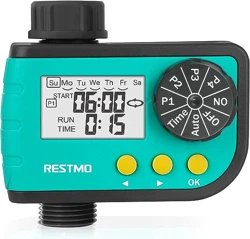
SET START TIME
START IRRIGATION
SUBSEQUENT PROGRAMMING
CLEAR SETTING
TECHNICAL DATA
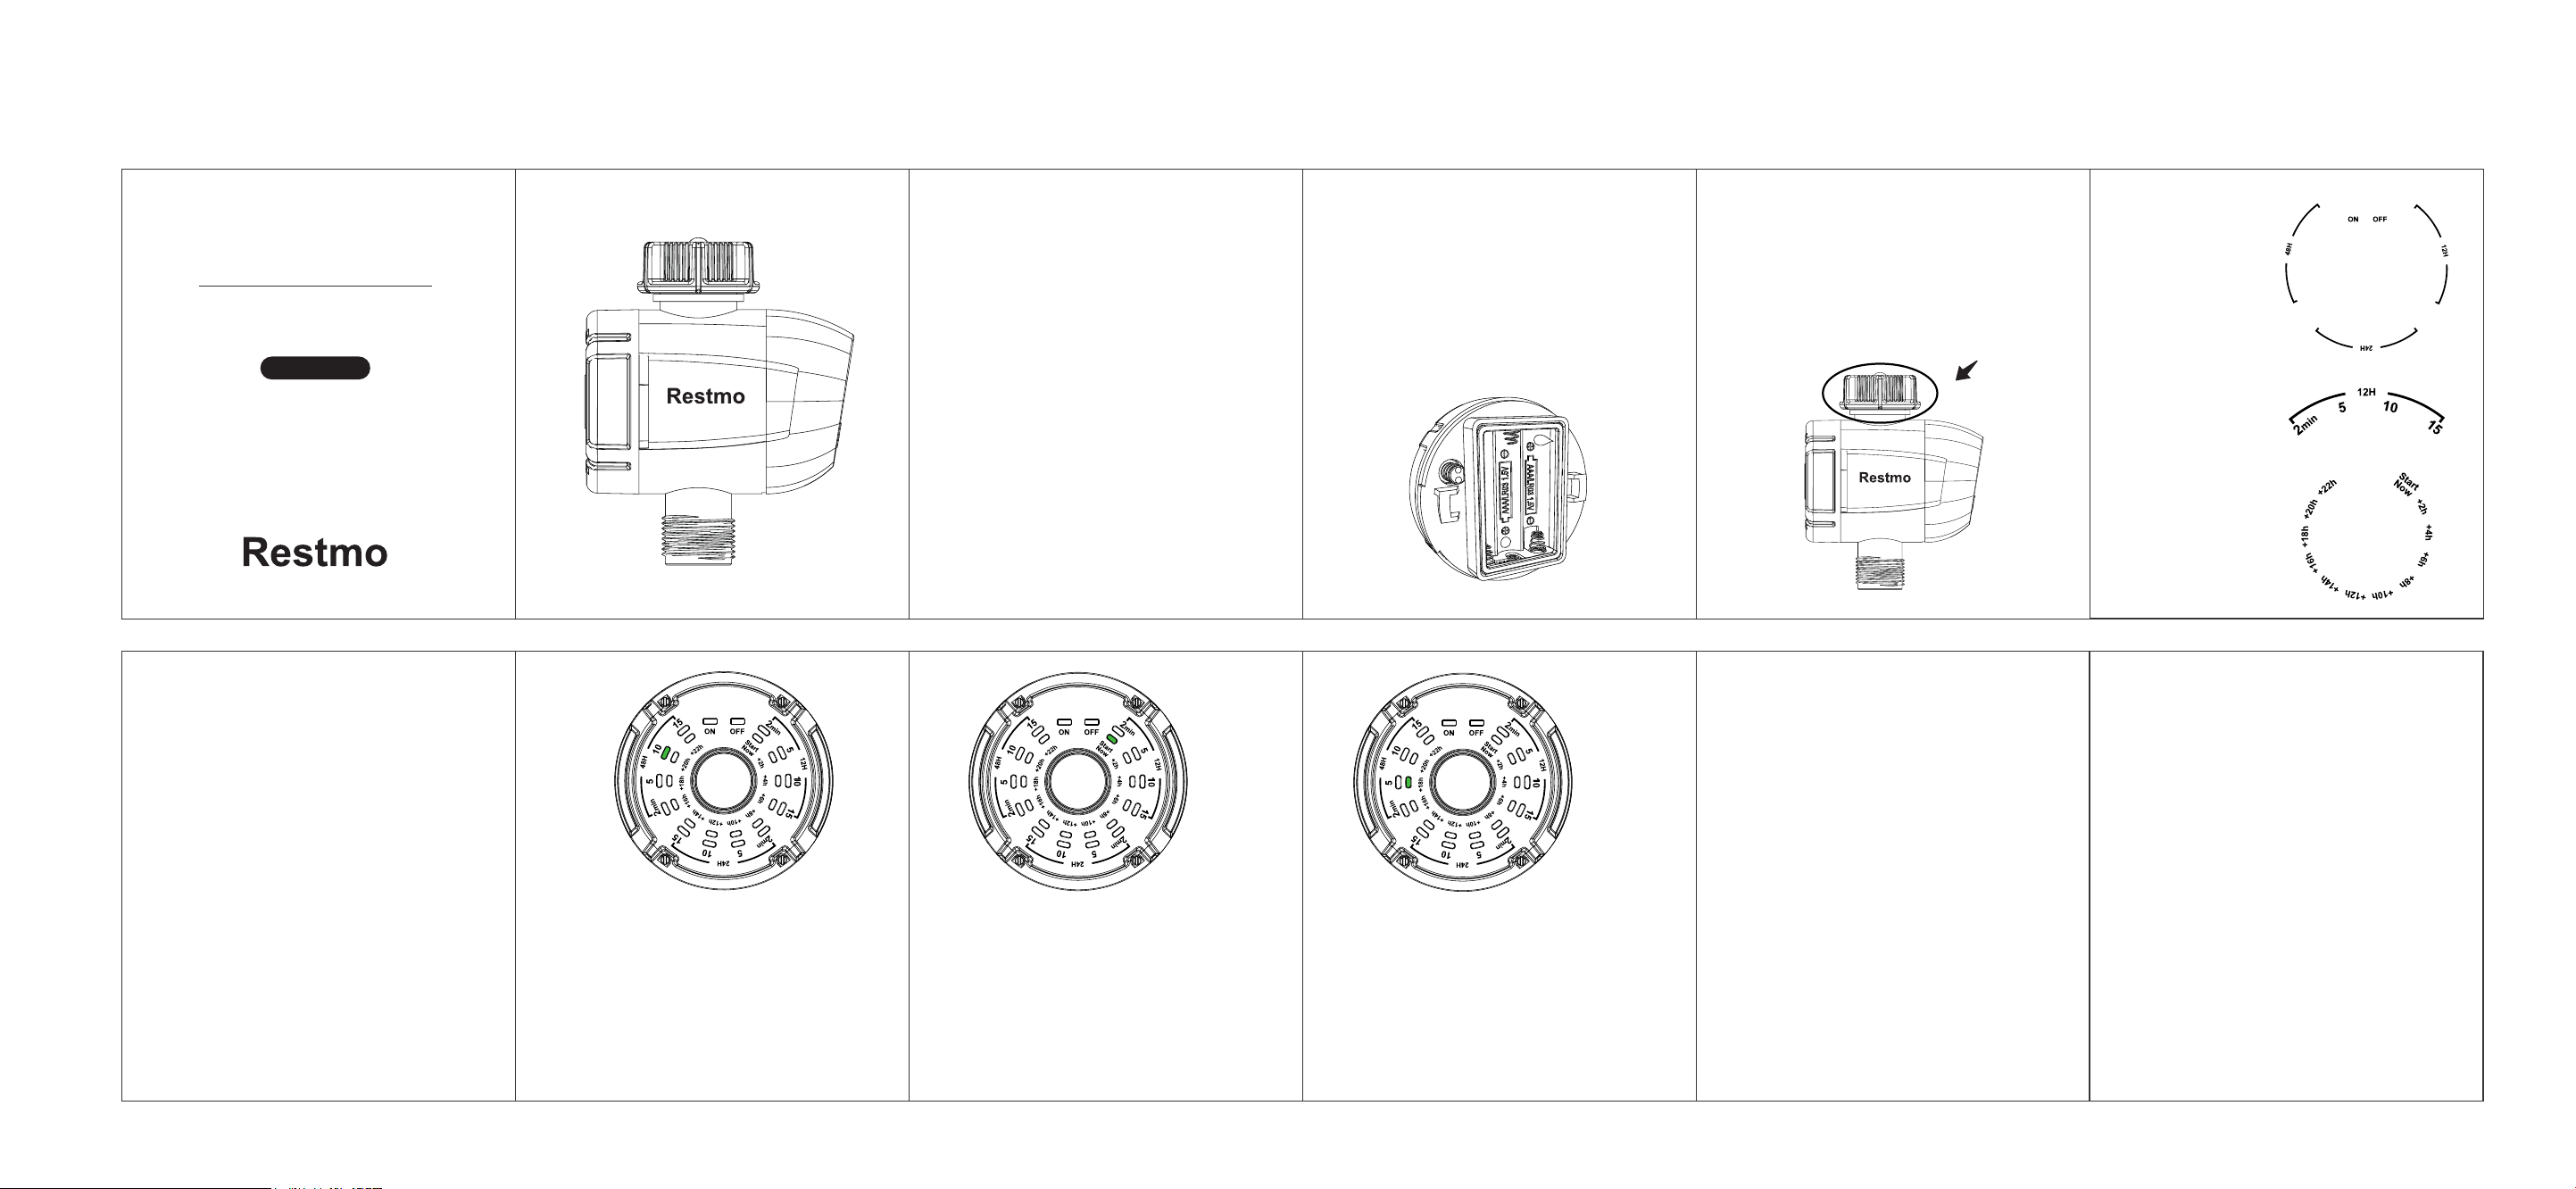
BATTERY INSTALLATION
TIMER INSTALLATION
FIRST PROGRAMMING
SET IRRIGATION FREQUENCY
AND IRRIGATION PERIODS
IRRIGATION FREQUENCY:
• Install the batteries before connect the timer to the tap, because
installing the batteries the timer will close the solenoid valve.
• Low Battery: when the battery will reach the safety level, it will
automatically turn off and the red LED (OFF) will begin flashing.
• Use only cold water
• Do not expose timer to frost
• Remove and store the timer in a dry place during the winter.
• Replace all batteries at the same time and reset the parameters.
Warning: install the batteries before connect our device at the tap,
because installing the batteries, the timer will close the solenoid
valve.
• Unscrew the front cover, remove the cap of the battery
compartment positioned on the back side of the cover, being
sure that the battery compartment is clean.
• Install the batteries into the battery compartment.
(Warning: at the right pole of batteries as shown into the battery
compartment.)
Screw the unit to the tap through the upper ring, with thread of
3/4" female.
• Every 12 hours;
• Every 24 hours;
• Every 48 hours
• 2 minutes per time;
• 5 minutes per time;
• 10 minutes per time;
• 15 minutes per time;
IRRIGATION PERIODS
(EACH IRRIGATION FREQUENCY):
Close the battery compartment with the cover (making sure that
its seal is perfectly fits into the compartment) and replace the
front cover, making ensure correct position of the cable to avoid
compromising their integrity and functionality of the unit control.
After power-on, all LED lights turn on for 1 second and then go
out. After the light is off, follow-up operation can be carried out.
•
USER MANUAL
O-HT-1-BU
IRRIGATION DELAY TIME:
START NOW;
+2 hours;
+4 hours;
+6 hours;
+8 hours;
+10 hours;
+12 hours;
+14 hours;
+16 hours;
+18 hours;
+20 hours;
+22 hours;
Press the CLICK button, the ON green LED lights up, and
quickly switch to the OFF, the red light lights up for 4 seconds
No operation for 4 seconds, the controller goes to sleep model.
If press CLICK button again within 4 seconds, the red light starts
to flash at the OFF position, means that the watering schedule
program is ready for setting.
Continue to press the button, move the light to 2min position,
change to blue light, set the parameters of Irrigation frequency
and Irrigation periods
Press the CLICK button repeatedly ,the blue LED lights start
moving clockwise, until reaches the favourite duration and
frequency
For example, the following figure shows 10 minutes of irrigation
every 48 hours
Once finish setting the watering schedule, waiting for 4 seconds,
The LED lights switch to the position of the inner ring (Green LED
light) for setting start time and stay at START NOW position to
flash for 4 seconds.
If there is no any operation within this 4 seconds, the device will
start irrigation immediately according to watering schedule
program.
(Tip: if press the CLICK button again when blue LED light flashing,
the blue LED will keep moving for changing water schedule)
For example, the following figure shows START NOW
When the green LED flashed, press the CLICK button
repeatedly, the green LED light start moving clockwise to set the
delay of the irrigation start time.
Once finish setting the delay time, waiting for 4 seconds, the LED
light will light off, the device will be into sleep mode and count
down for irrigation,Irrigation delay light and the LED light (ON)
flash every 4 seconds during irrigation.
(Tip: if press the CLICK button again when the green LED light
flashing, the green LED will keep moving for changing delay time
For example, the following figure shows that irrigation begins
after 18 hours.
Once reaching the watering schedule, the device will automatically
start irrigation.
At this time, the green LED light (ON position) will turn on for 4
seconds which means irrigation is started, then the frequency light
and the ON position light will flash every 3 seconds, that mean the
device is under watering, until finishing the watering schedule.
• During irrigation, if press the CLICK button once, the LED lights
will run one circle, stop at the working position, and light up for 4
seconds, then keep flash every 4 seconds until finishing the
watering schedule.
• Within 4 seconds of light up, press the CLICK button again,then
the irrigation will stop, the valve will close immediately,
meanwhile the frequency light (blue LED light) starts to flash, it
means that new program can be re-setting.
• During irrigation, if press and hold the CLICK button for 3
seconds, the indicator light will switch to the OFF position and
stops irrigation compulsively, but the program setting parameters
are remained, and the device waits for the next irrigation
frequency.
When the user has completed the first setup, and the device does
not work right now (Sleep mode, no LED lights on):
Press the CLICK button once can wake up the LED light and
check the program(Checking Mode):
• Within 3 seconds of lights up,if the user presses the CLICK
button, the blue LED lights will start to flicker, re-enter the
irrigation program settings, and continue to press the CLICK
button can change the program.
• No matter at sleep mode or checking mode, press CLICK button
for 3 seconds, the Indicator light will switch to the ON position
and manually start irrigation, but the program setting parameters
is remained.The default time of manually irrigation is 25
minutes,and Irrigation will be closed automatically after 25
minutes, waiting for the next irrigation frequency which set by the
last time
Moving the blue light by pressing the operation key until it moves to
the red OFF light. After the red light flashes 4 times, the LED lights
are all on and the data are restored to the factory setting.
• The LED lights run one circle and stop at the position which
user set.
• The blue LED light indicates how long and how often of irrigation.
• The green LED light indicates the delay of working time, the
green LED may move according the rest of the delay time.
• When in checking Mode, the LED light will turn on for 3 seconds,
after that, the LED light will back to sleep mode.
Restmo provide one-year worry-free warranty. For any warranty claims
within one year from the original order date, please email your order ID
to Restmo Support and we will respond within 24 hours.
Restmo Support Email: [email protected]
WARRANTY