
Technical Support and E-Warranty Certificate www.vevor.com/support
YURT TENT USER MANUAL
We continue to be committed to provide you tools with competitive price.
"Save Half", "Half Price" or any other similar expressions used by us only represents an
estimate of savings you might benefit from buying certain tools with us compared to the major
top brands and does not necessarily mean to cover all categories of tools offered by us. You
are kindly reminded to verify carefully when you are placing an order with us if you are
actually saving half in comparison with the top major brands.
1
Model: ZJTM1184
Have product questions? Need technical support? Please feel free to
contact us:
Technical Support and E-Warranty Certificate
www.vevor.com/support
NEED HELP? CONTACT US!
This is the original instruction, please read all manual instructions
carefully before operating. VEVOR reserves a clear interpretation of our
user manual. The appearance of the product shall be subject to the
product you received. Please forgive us that we won't inform you again if
there are any technology or software updates on our product.
YURT TENT

2
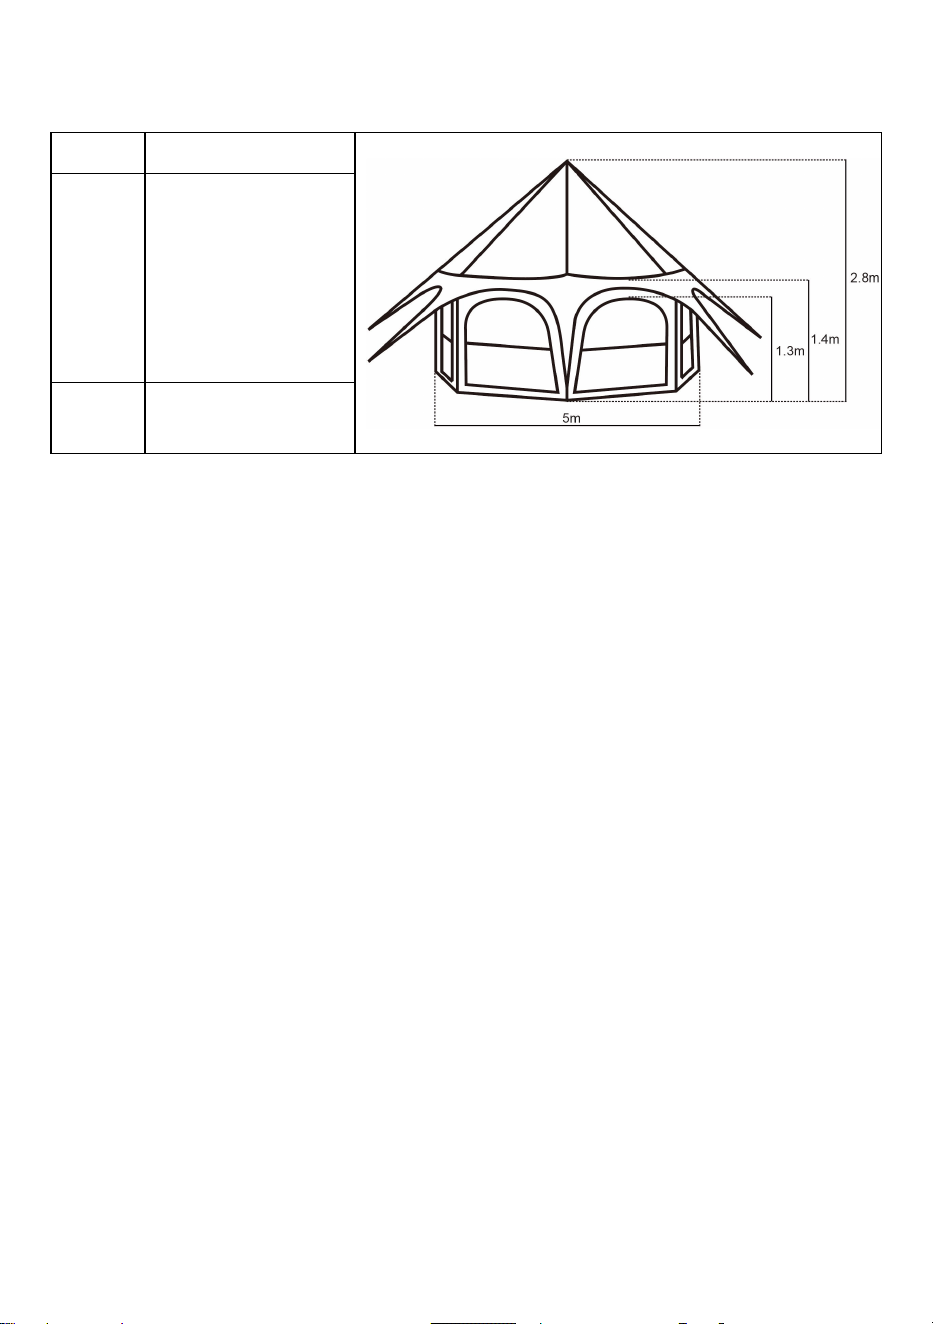
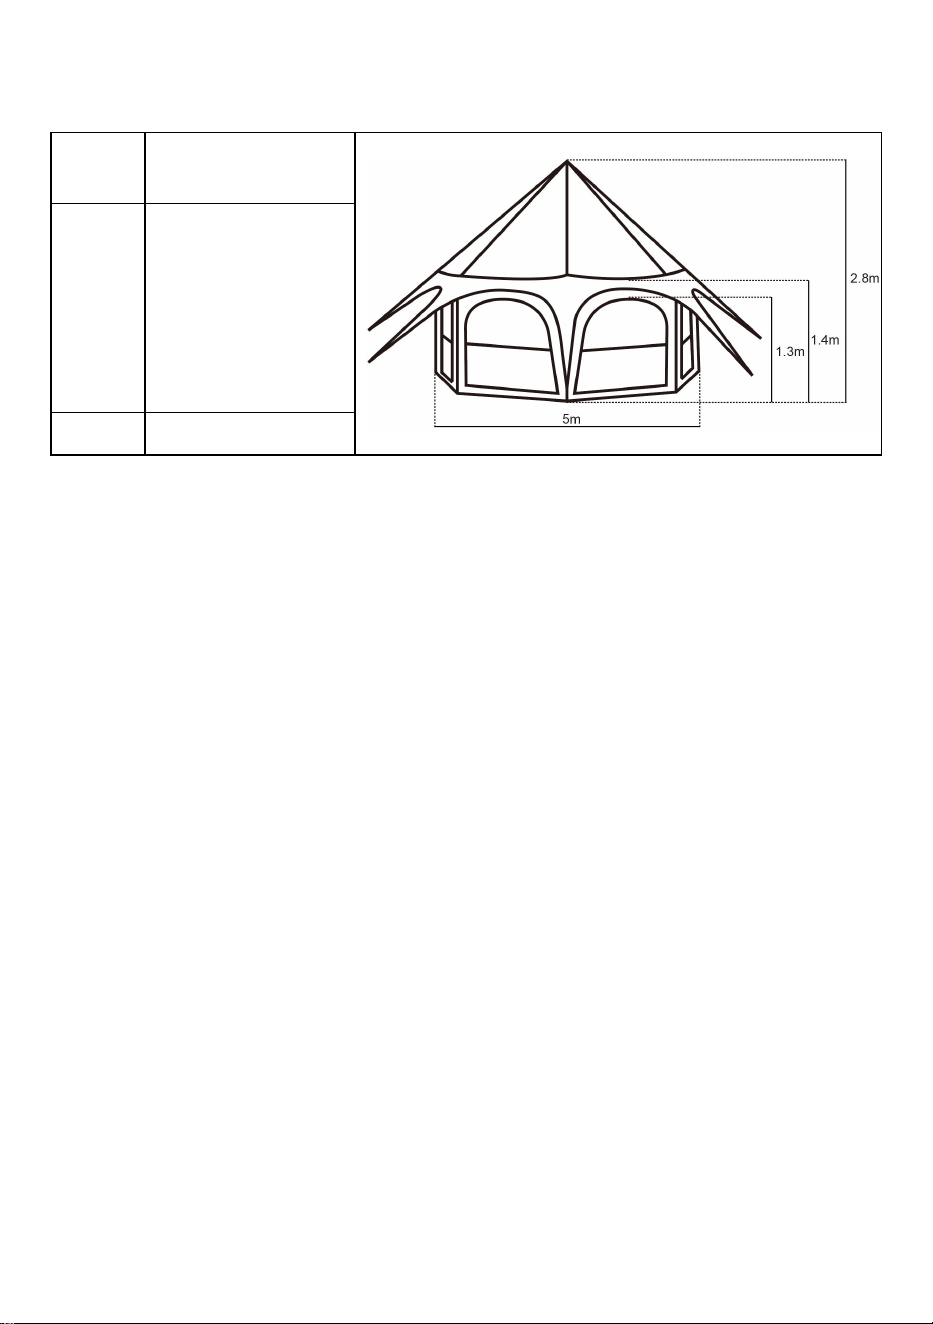
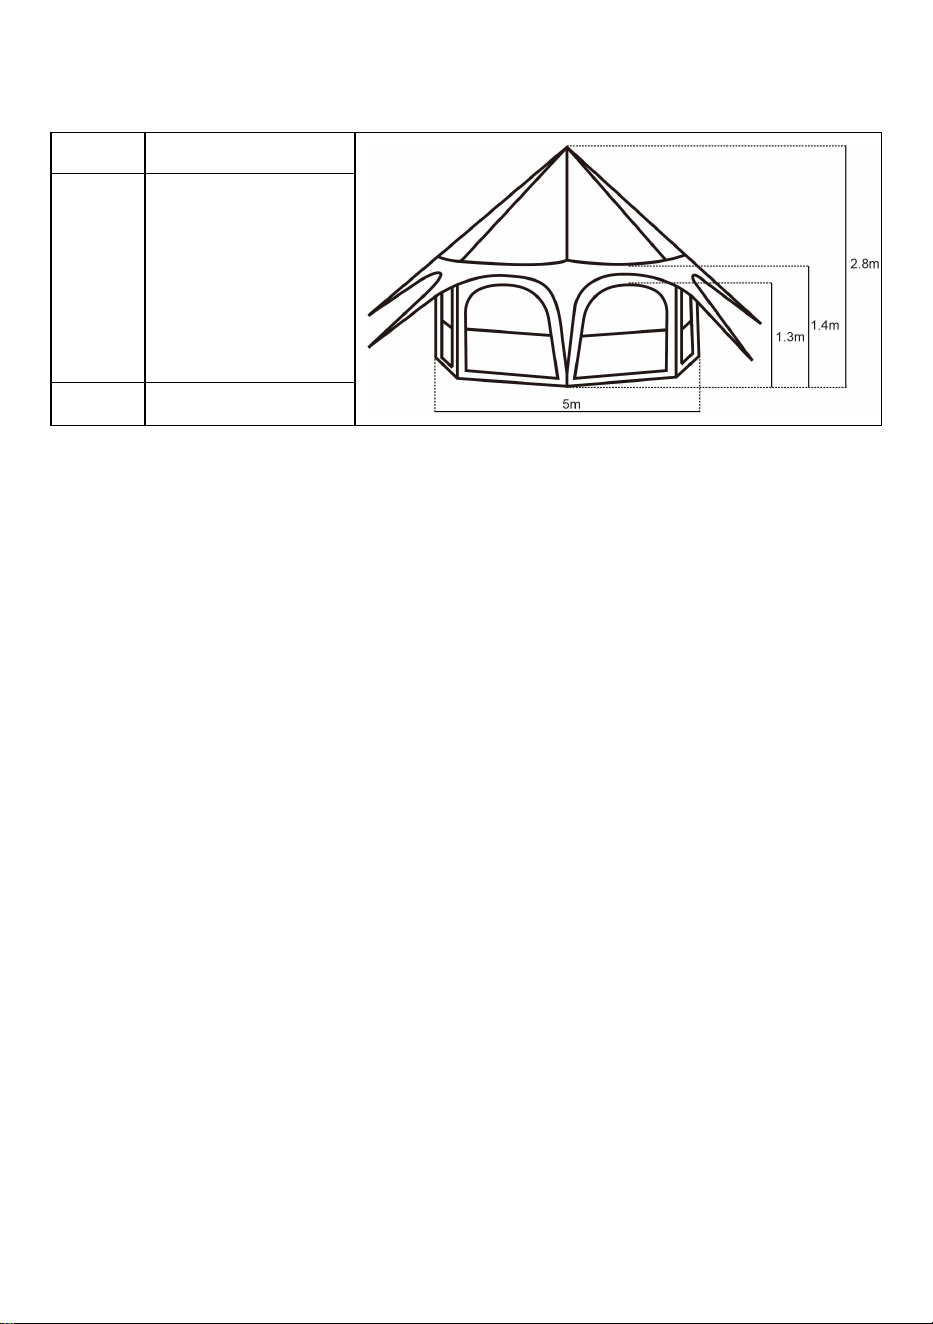
SPECIFICATIONS
Model
ZJTM1184
Product
Size
Diameter: 5m
Height: 2.8m
Height of Door: 1.3m
Height of fence:1.4m
Color
Beige
! CAUTIONS
1. Please refer to parts list to check items you received carefully, do not discard any of the
packaging until you have checked that you have all the parts & hardware! Don't hesitate to
contact us if you missed parts, have broken parts or have any other installation problems.
2. Select a level site clear of rocks, branches, and other hard or sharp objects to install
your tent and be sure that no underground utilities are present. Do not set up your tent
under trees or tall buildings to avoid potential safety hazards caused by falling objects.
3. The tent is manufactured for use as a temporary structure and does not meet structural
code, the installer is responsible for anticipating weather severity for the proper time of
installation.
4. As the tent needs to be fixed at any time during the building process, enlist at least one
person to assist you when it is time to assemble the tent.
5. The warnings, cautions, and instructions discussed in this instruction manual cannot
cover all possible conditions. We will not be responsible for any damage caused by human
factors. If there is any problem during the use of the product, please contact us in time.
! WARNING
1. Keep away from children, the elderly and other people to prevent personal injury
caused by falling metal frames during installation.
2. Keep all flame and heat sources away from this tent fabric to avoid the tent burning by
accidental contact.

3
! CARE INSTRUCTION
1. Clean debris and Keep the canvas dry when storing the tent, store the metal frame and
canvas separately in the carry bag to prevent mildew or damage.
2. Use normal detergent and water for cleaning if the tent is dirty.
! PRECAUTIONS
The following precautions should be taken when you go outdoors:
1. Be certain that your tent is properly ventilated (especially if you decide to ignore the first
warning and use a heater in your tent). Carbon monoxide is real, and can cause serious
damage such as death.Vents and screens are built into the tent body.
2. Be sure to anchor your tent properly—this is not a free-standing tent—follow these
instructions for proper staking practices and ensure that all guy lines & pegs are securely
fixed.
3. Be certain that children are supervised in and around the tent at all times.
4. Do not use candles, matches or open flames of any kind in or near a tent.
5. It is better to not cook inside a tent, but if you are, do not leave cooking unattended.
Make sure grills, cooking appliances and similar must not be placed nearer than 1 meter to
tent canvas. There should be no use of open fires or glowing charcoal inside tents or near
tent canvas - fire can spread very quickly. There should be no use of open fires or glowing
charcoal inside tents or near tent canvas as there is a significant risk from the buildup of
Carbon Monoxide (CO), particularly in a confined space inside the tent. All flexible tubes
and couplings to the gas burner should be checked for leakage and that it is in good order.
6. Build campfires downwind and several meters away from a tent and be sure to fully
extinguish campfires before leaving a campsite or before retiring for the night.
7. Exercise extreme caution when using fuel-powered lanterns or heaters inside a tent and
use battery-operated lanterns whenever possible. Do not refuel lamps, heaters or stoves
inside a tent. Extinguish or turn off all lanterns before going to sleep.
8. Do not smoke in a tent or store flammable liquids inside a tent. Installation of log
burners or heating equipment at your own risk.
9.
SAVE THESE INSTRUCTIONS
4
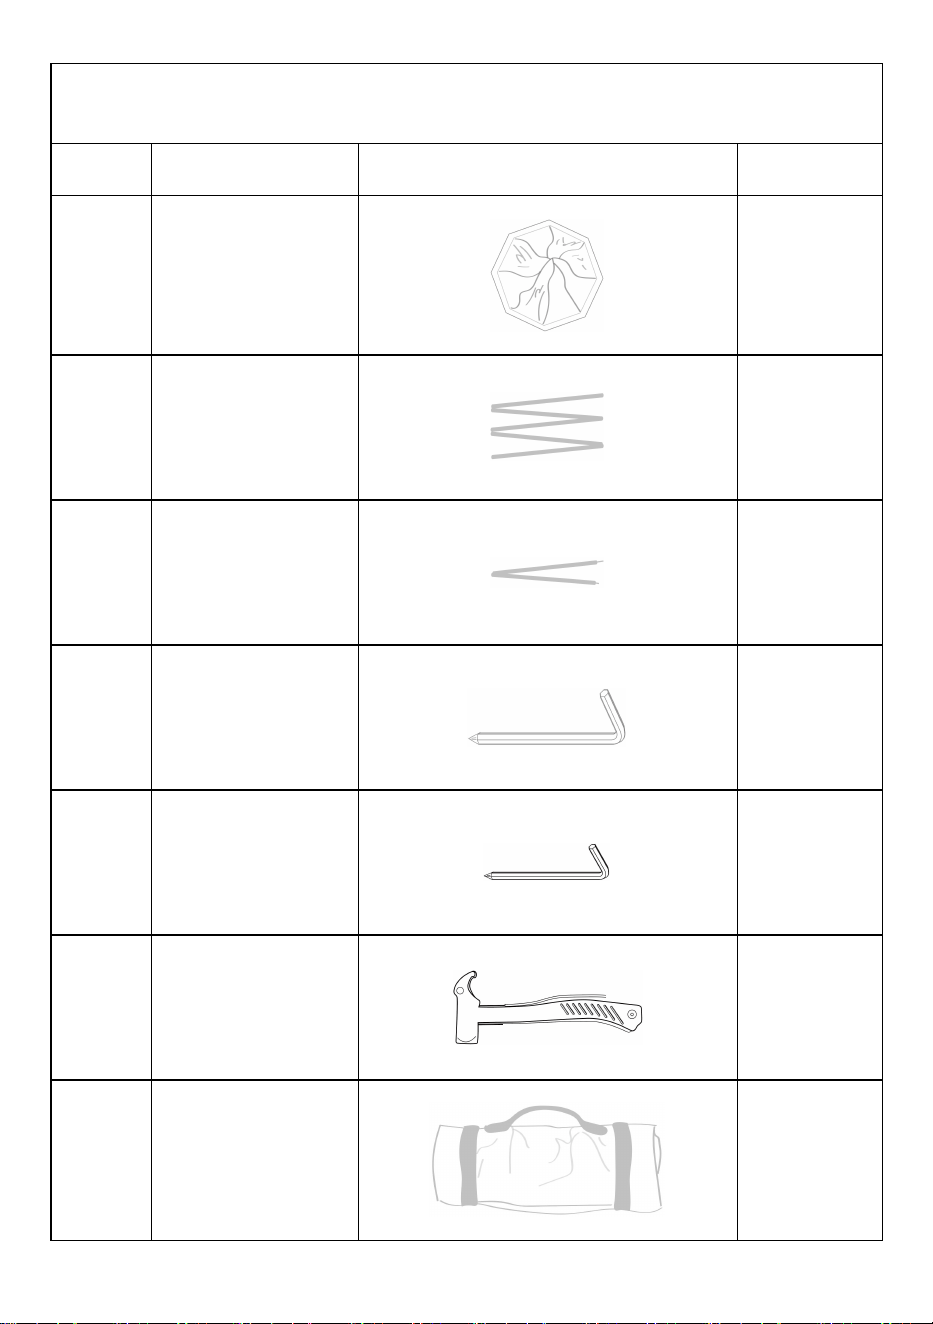
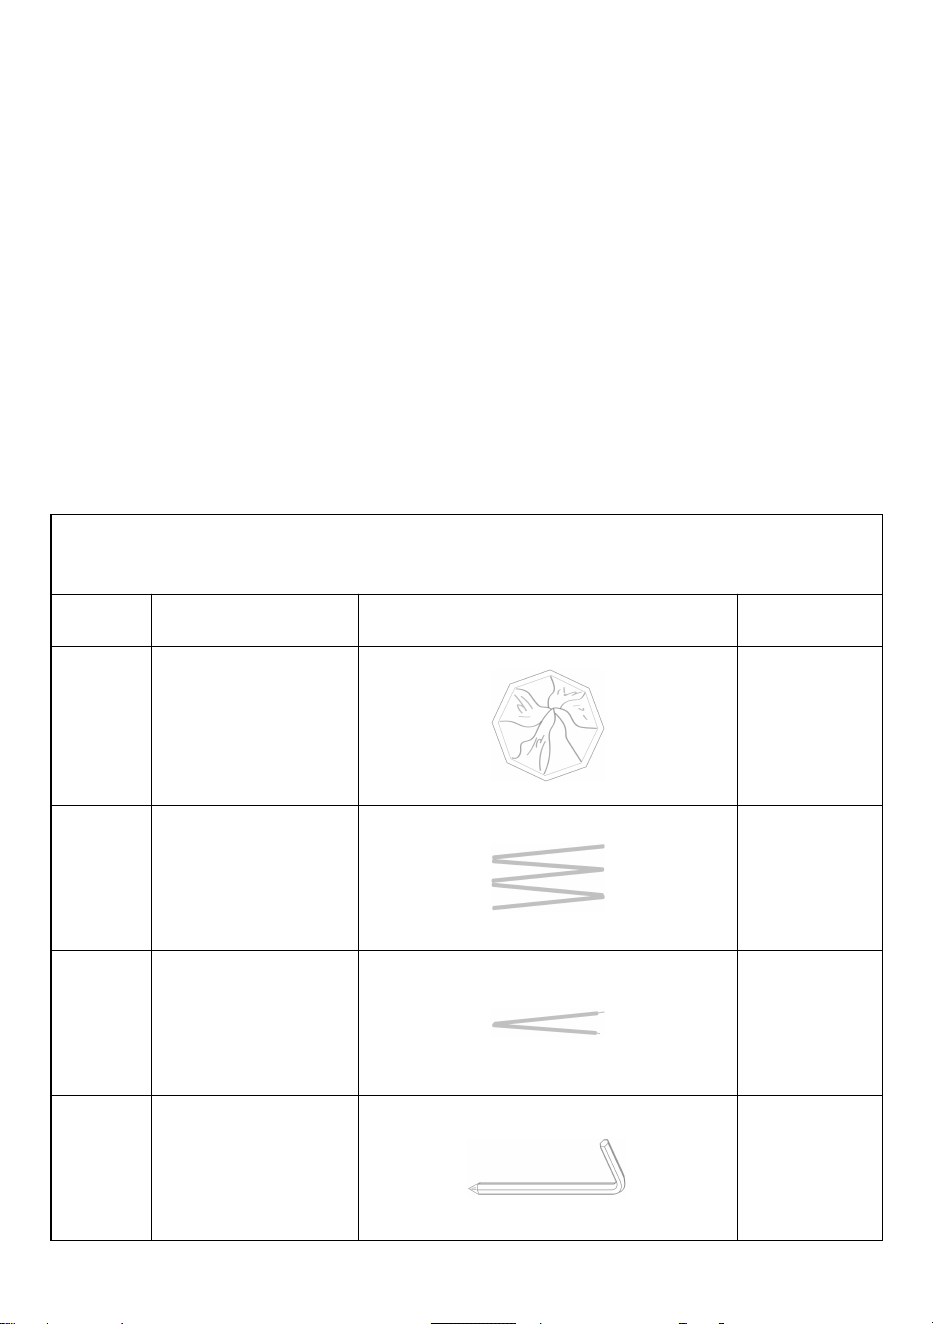
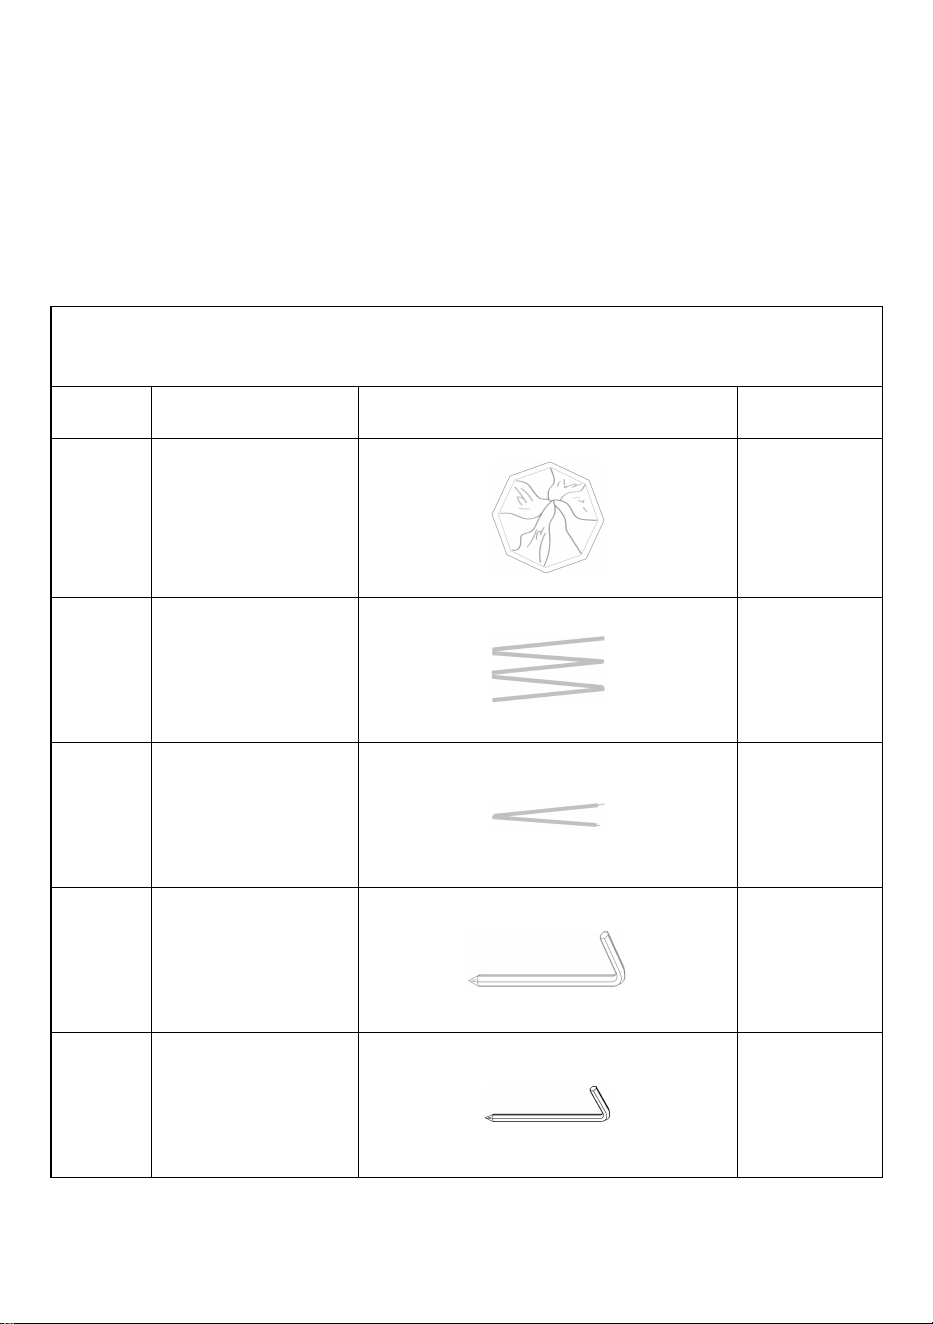
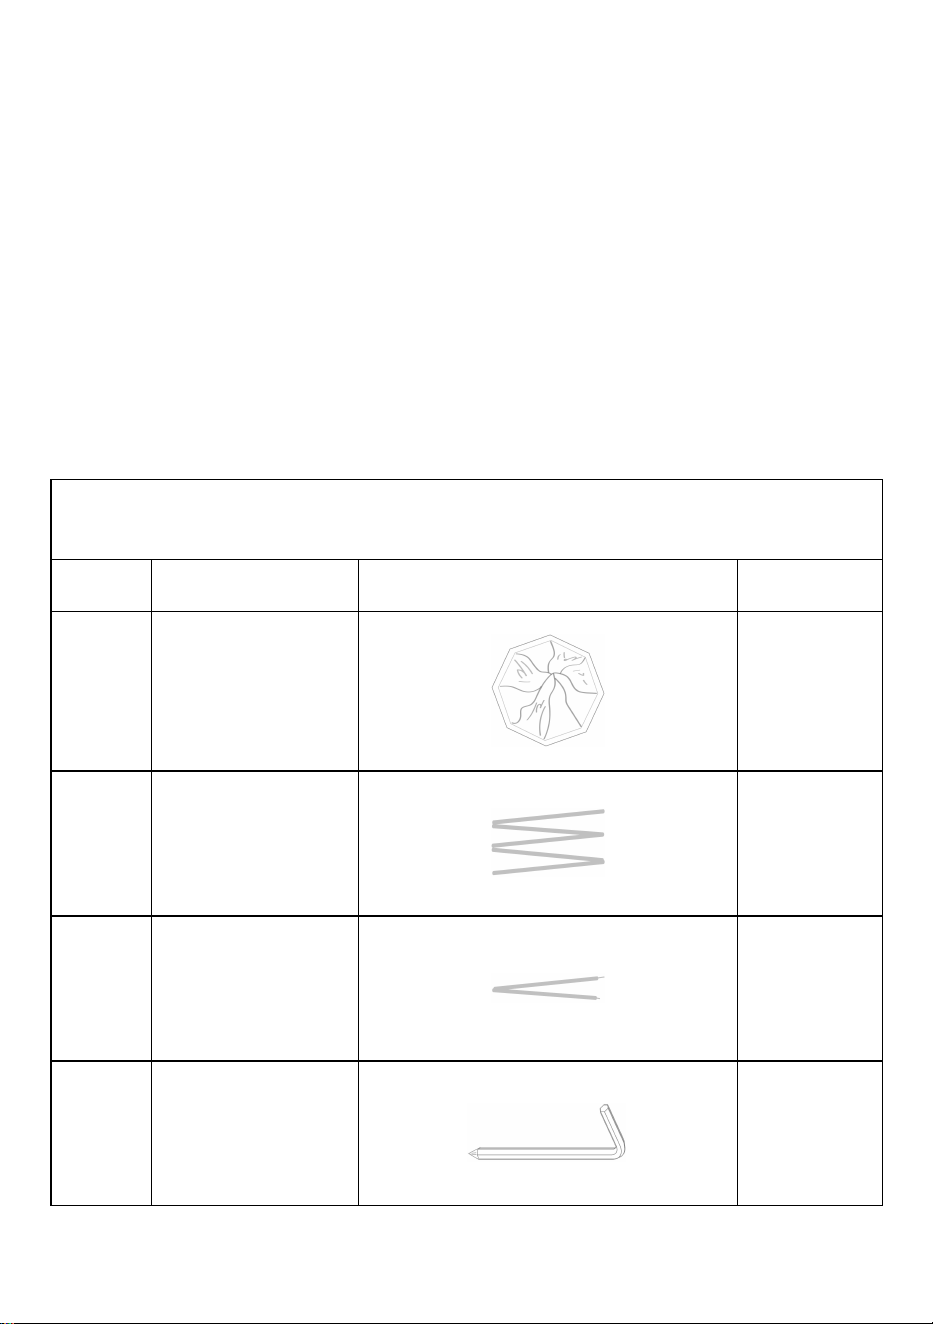
PARTS LIST
NO.
NAME
DRAWING
QTY
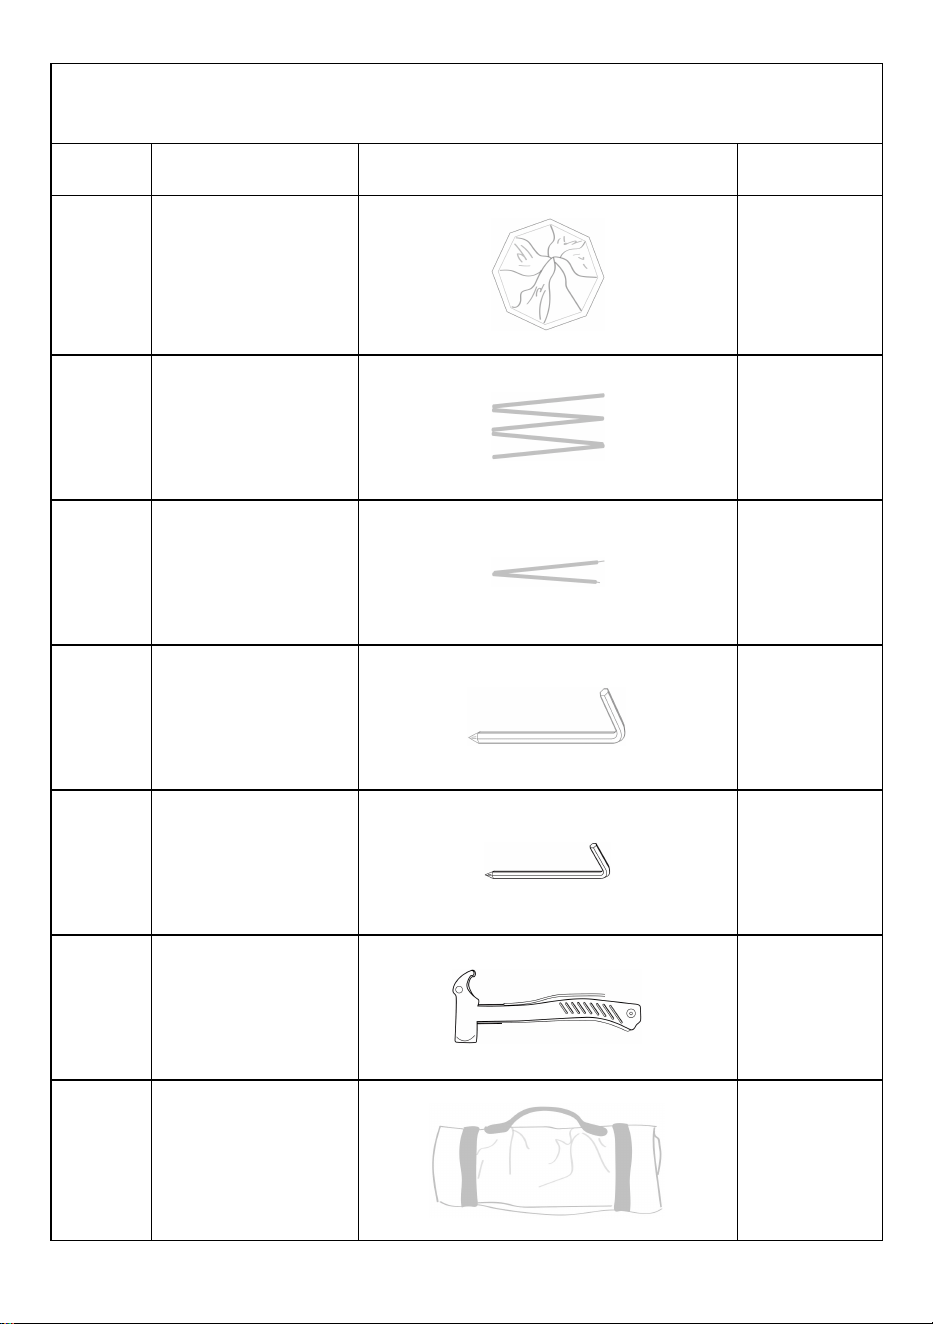
1
Circus tent
1
2
Center pole
1
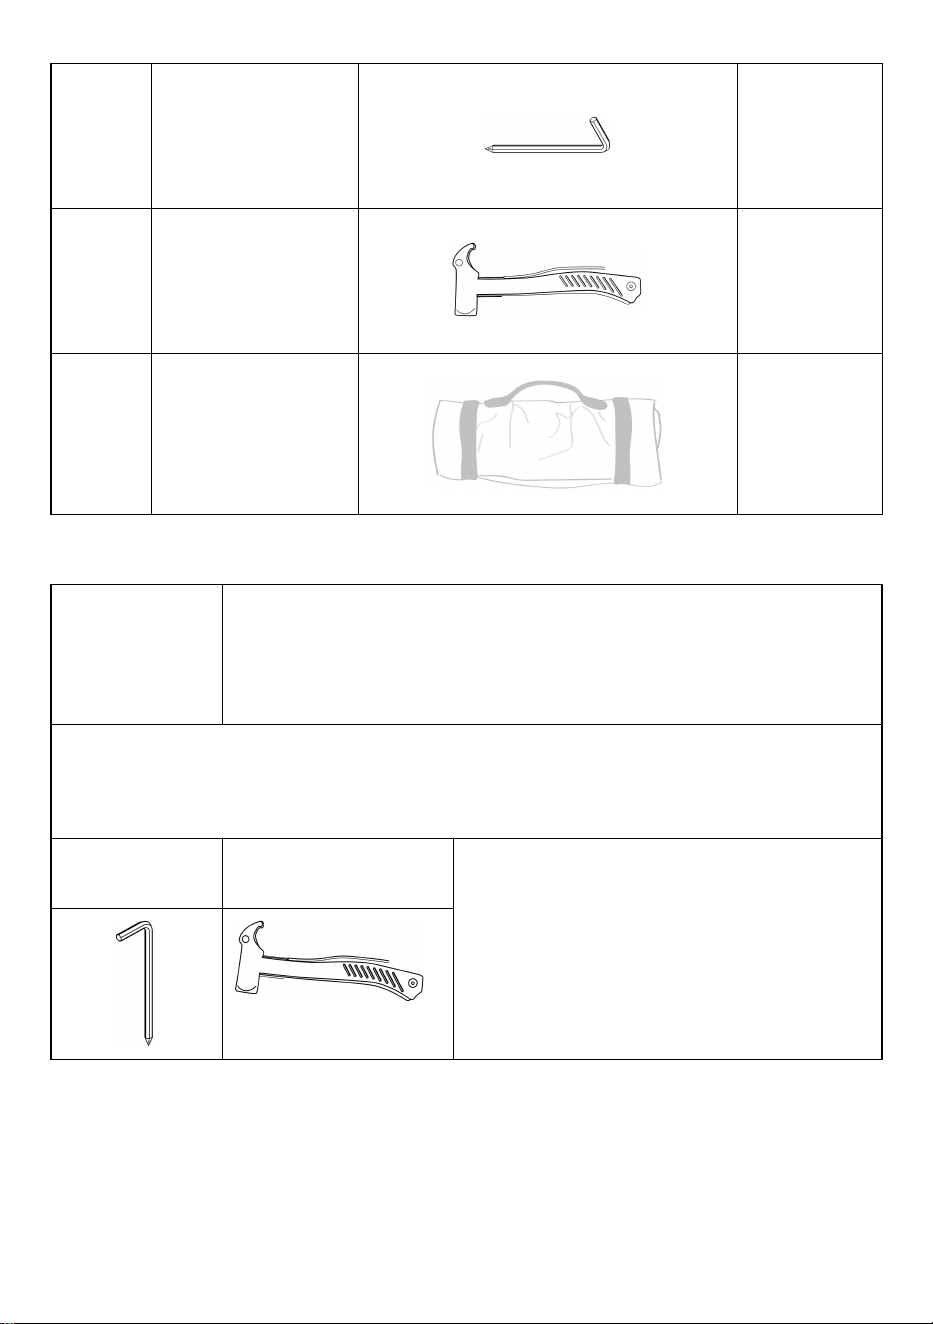
3
Side pole
8
4
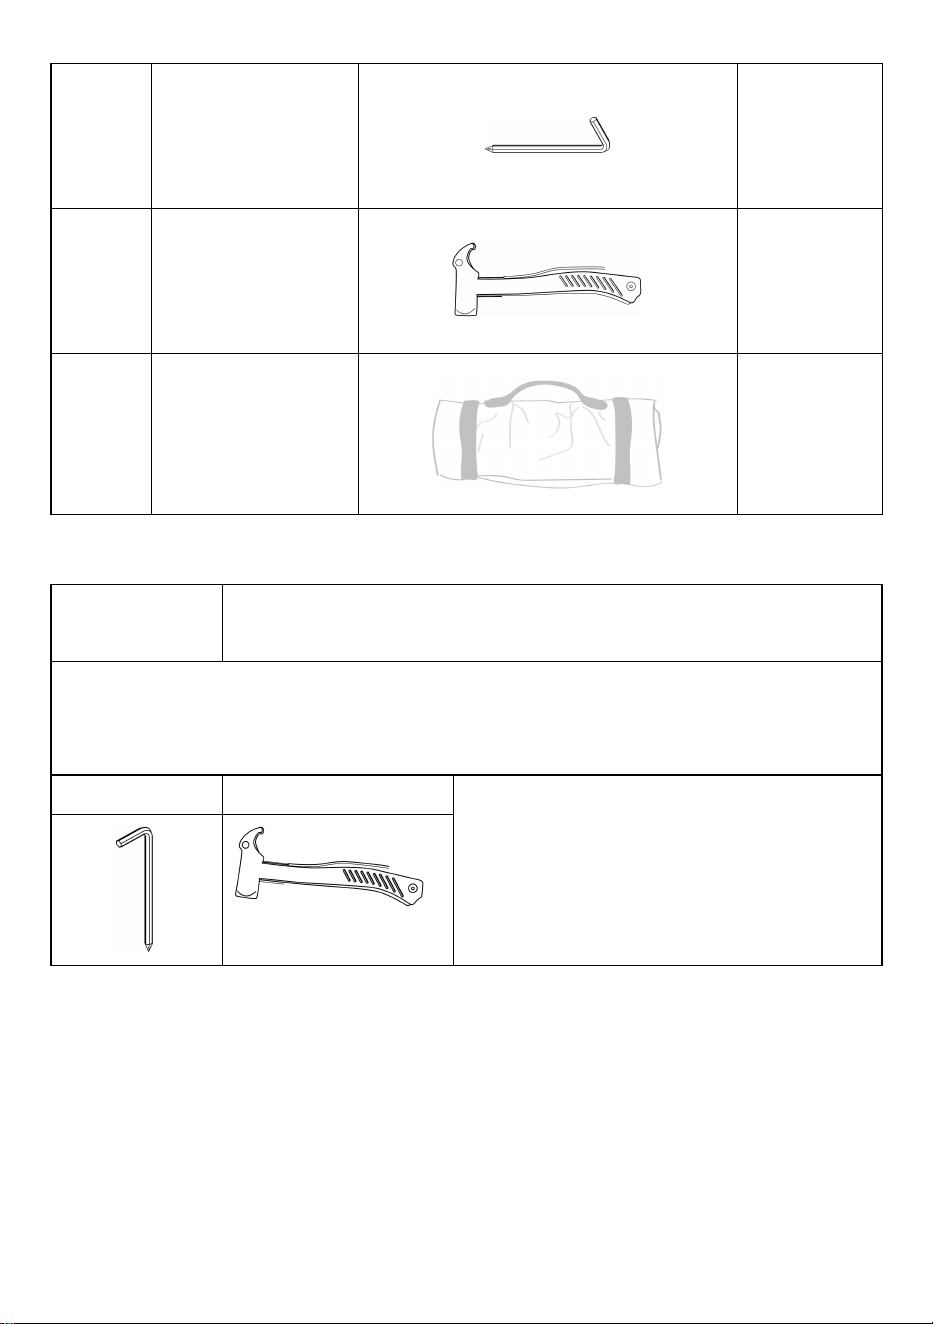
Large stake
8
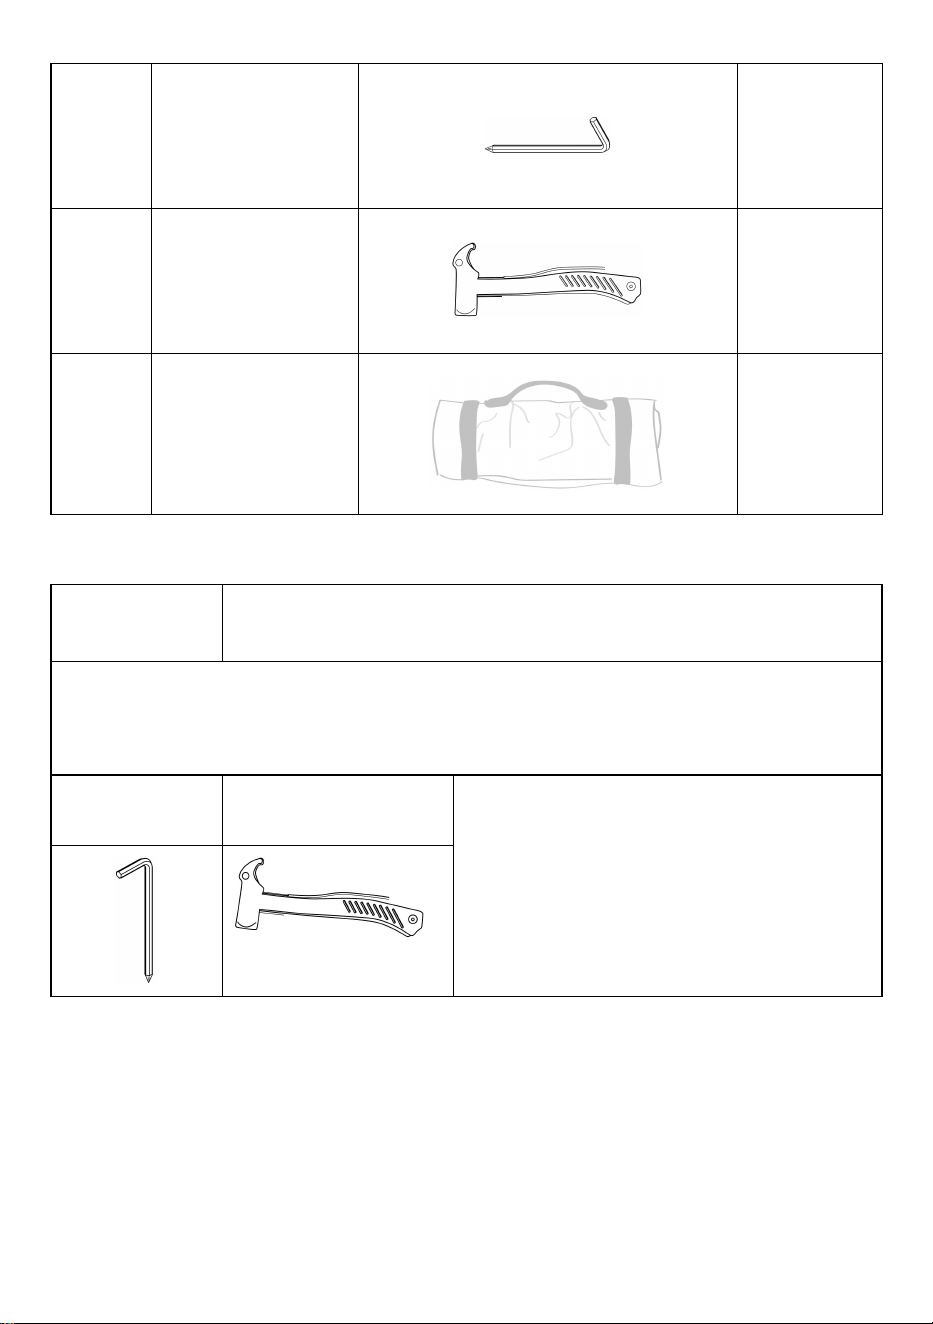
5
Small stake
8
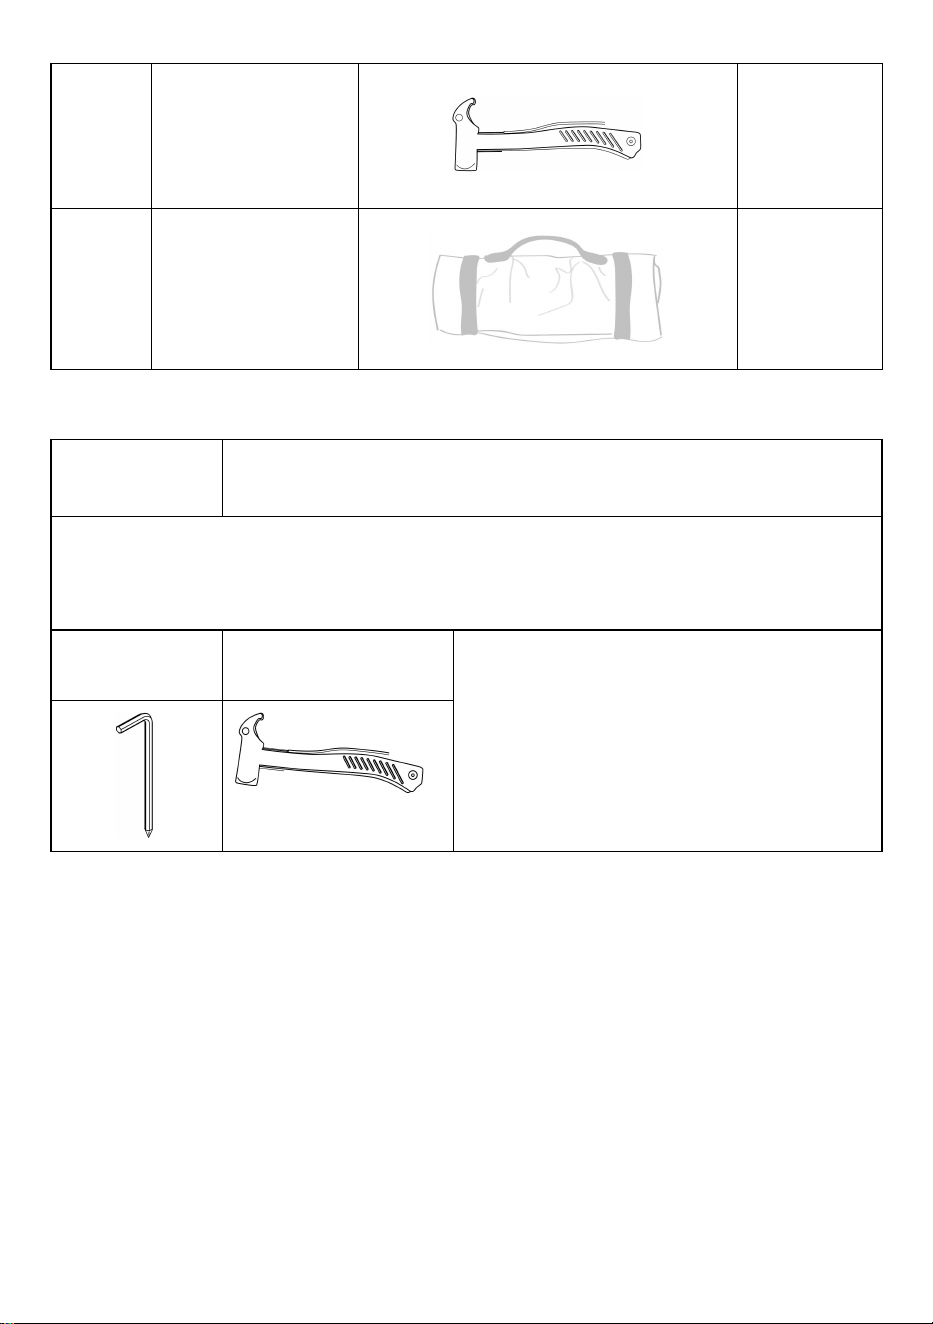
6
Hammer
1
7
Stake bag
1

5
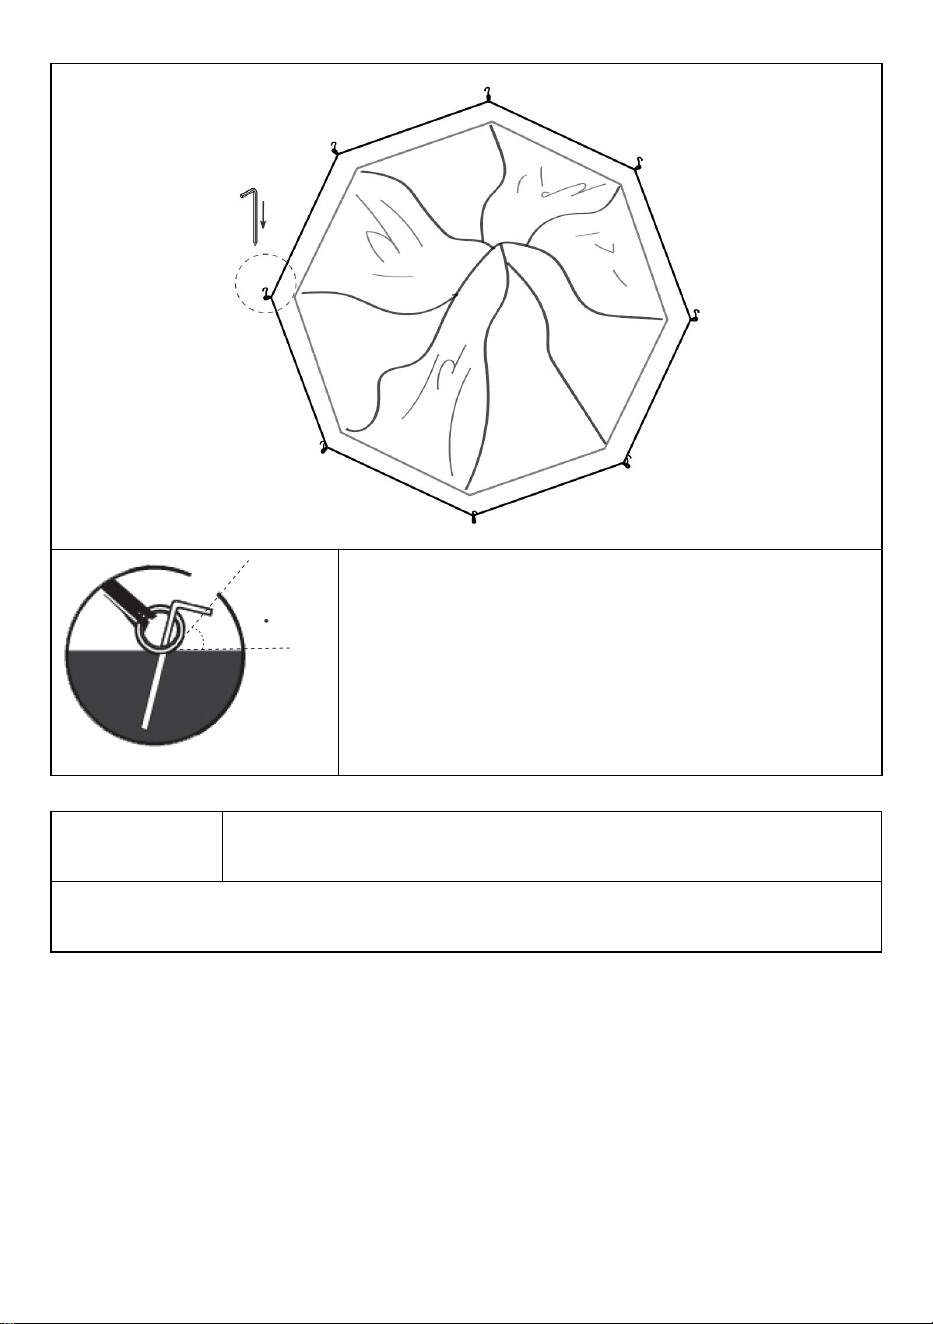
ASSEMBLY INSTRUCTION
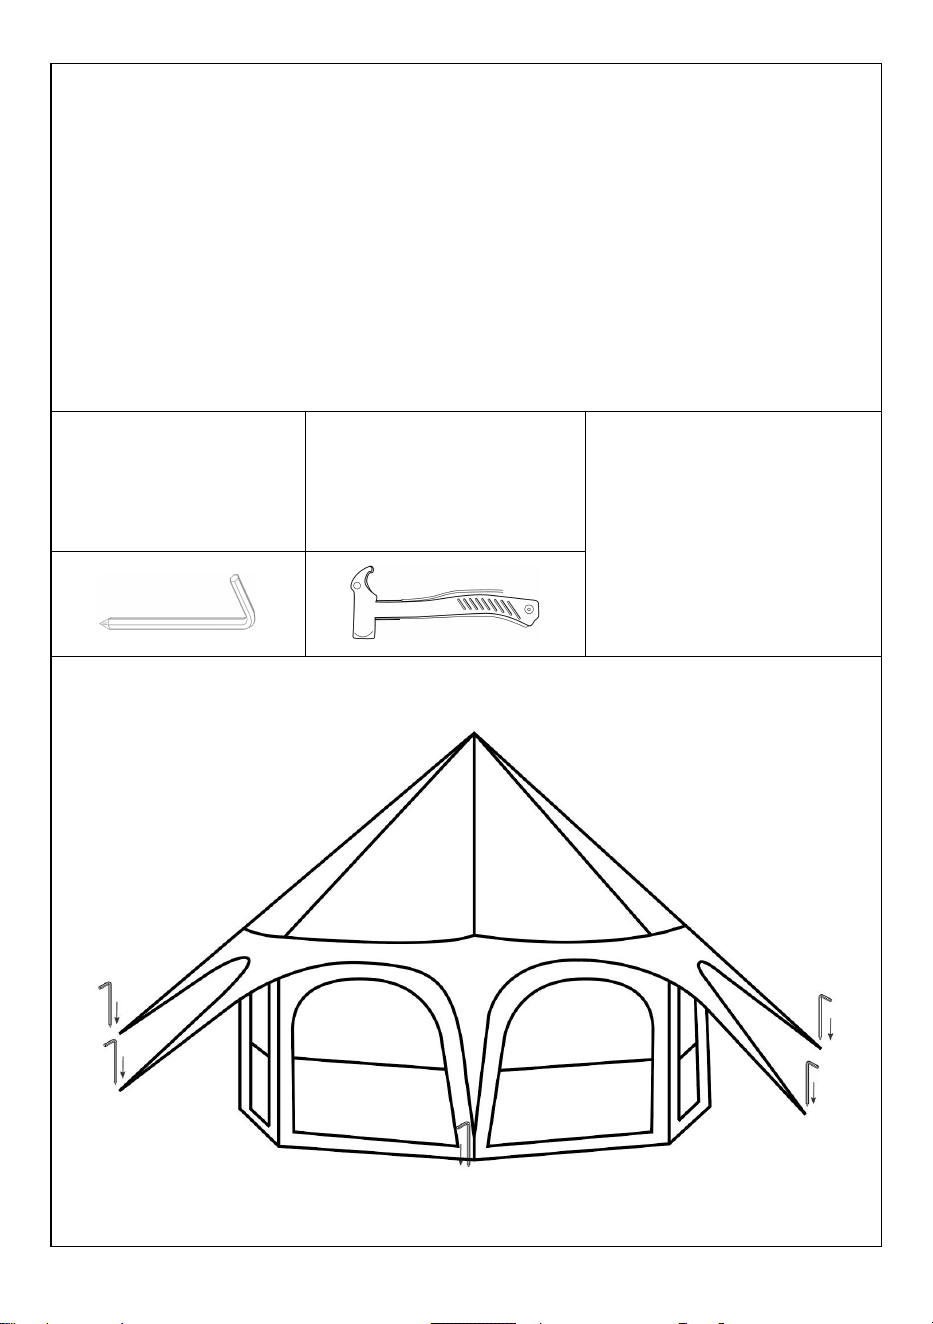
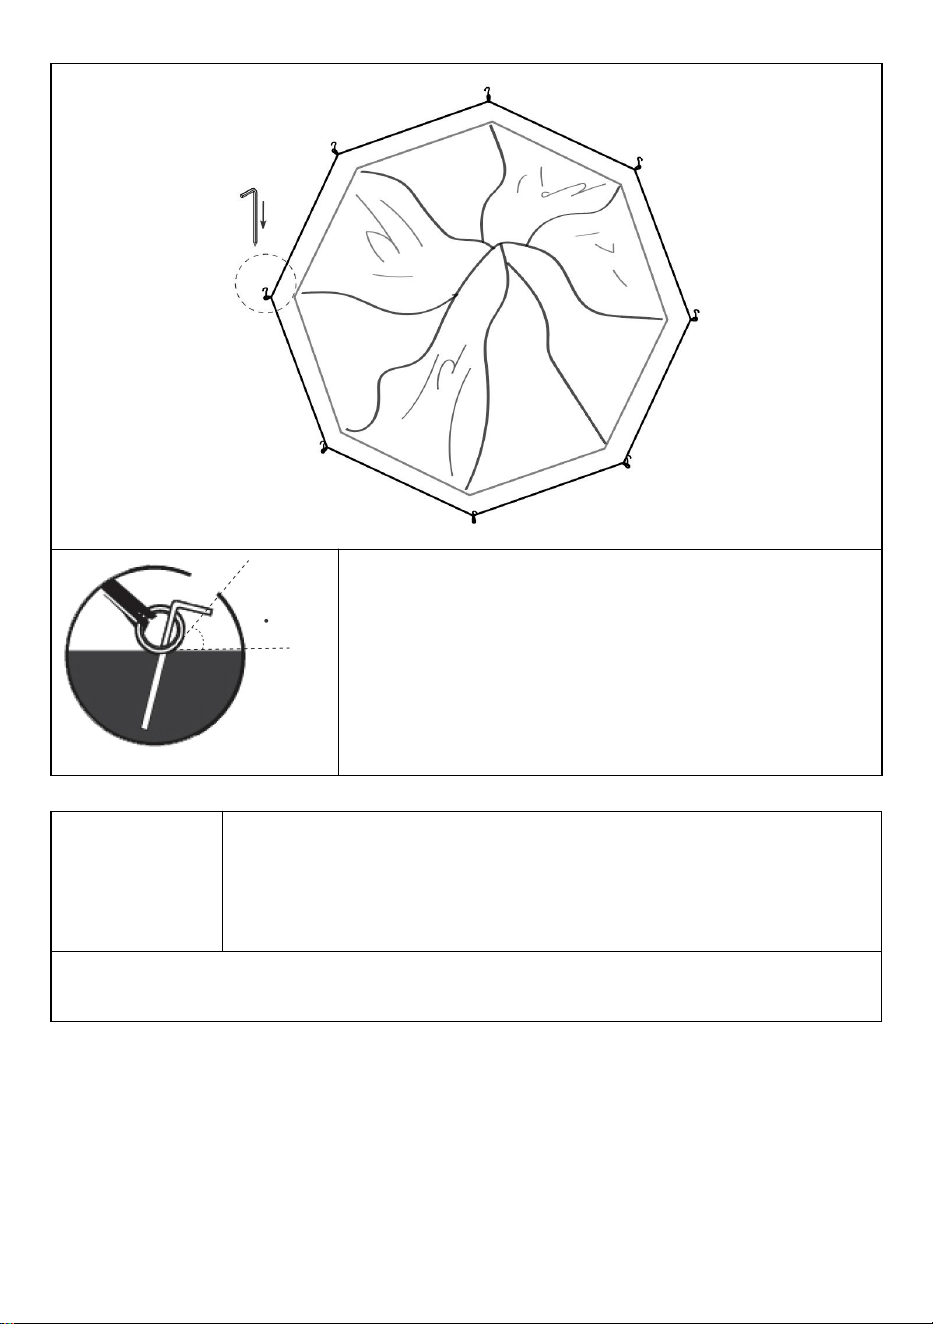
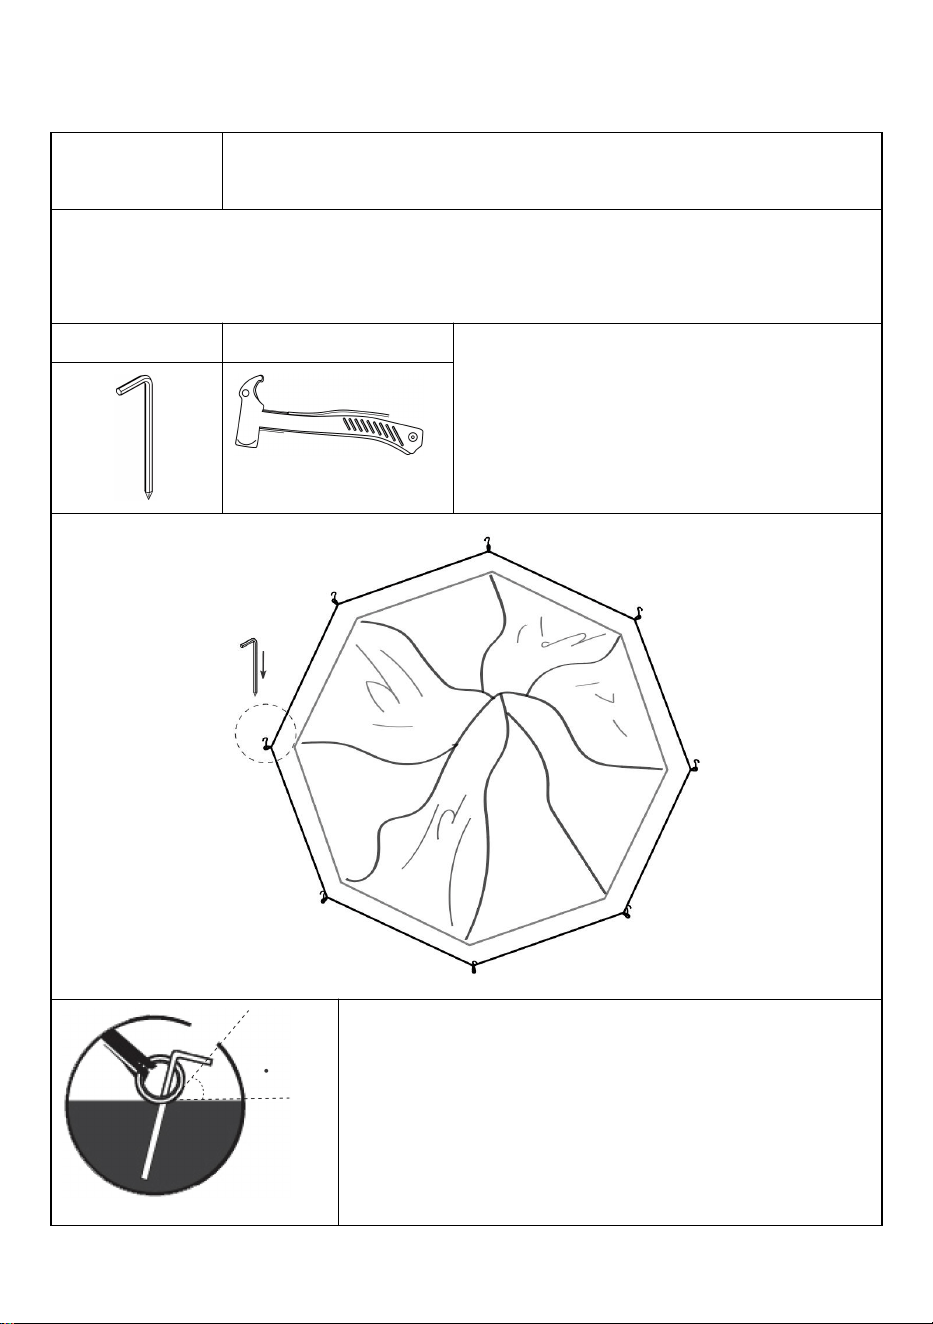
STEP 1
Fix the tent body
● Lay your tent onto the ground, keep the floor taut with partner. Stake down 8
tent corners with the small stake.
Small stake
Hammer
! NOTE:
Please don't stake down too much
at this step for later adjustment.
The stake maintain an angle of 45°-60° with
the ground, so the angle of bearing
capacity is the largest.
6
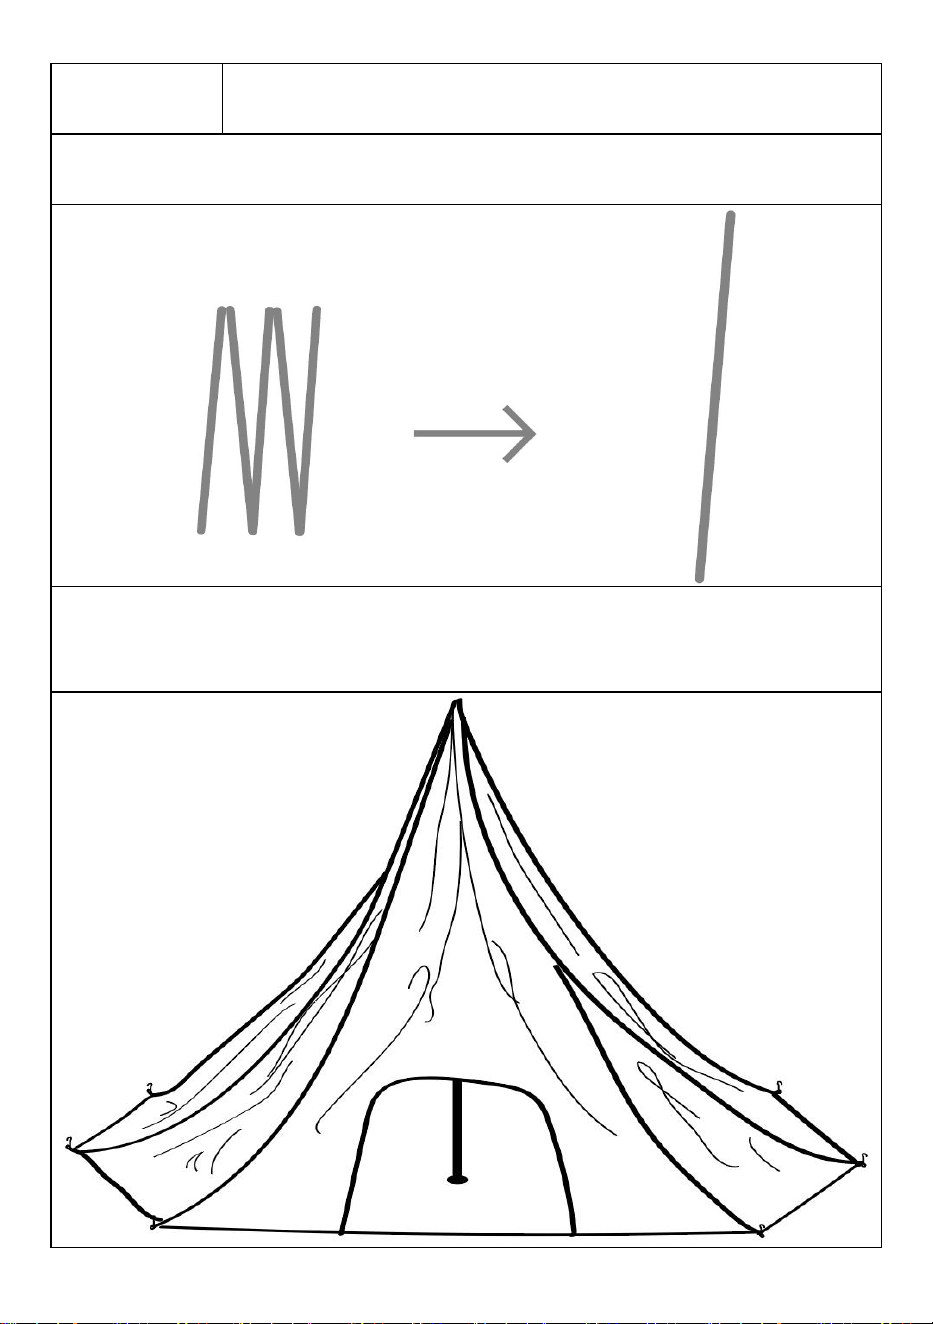
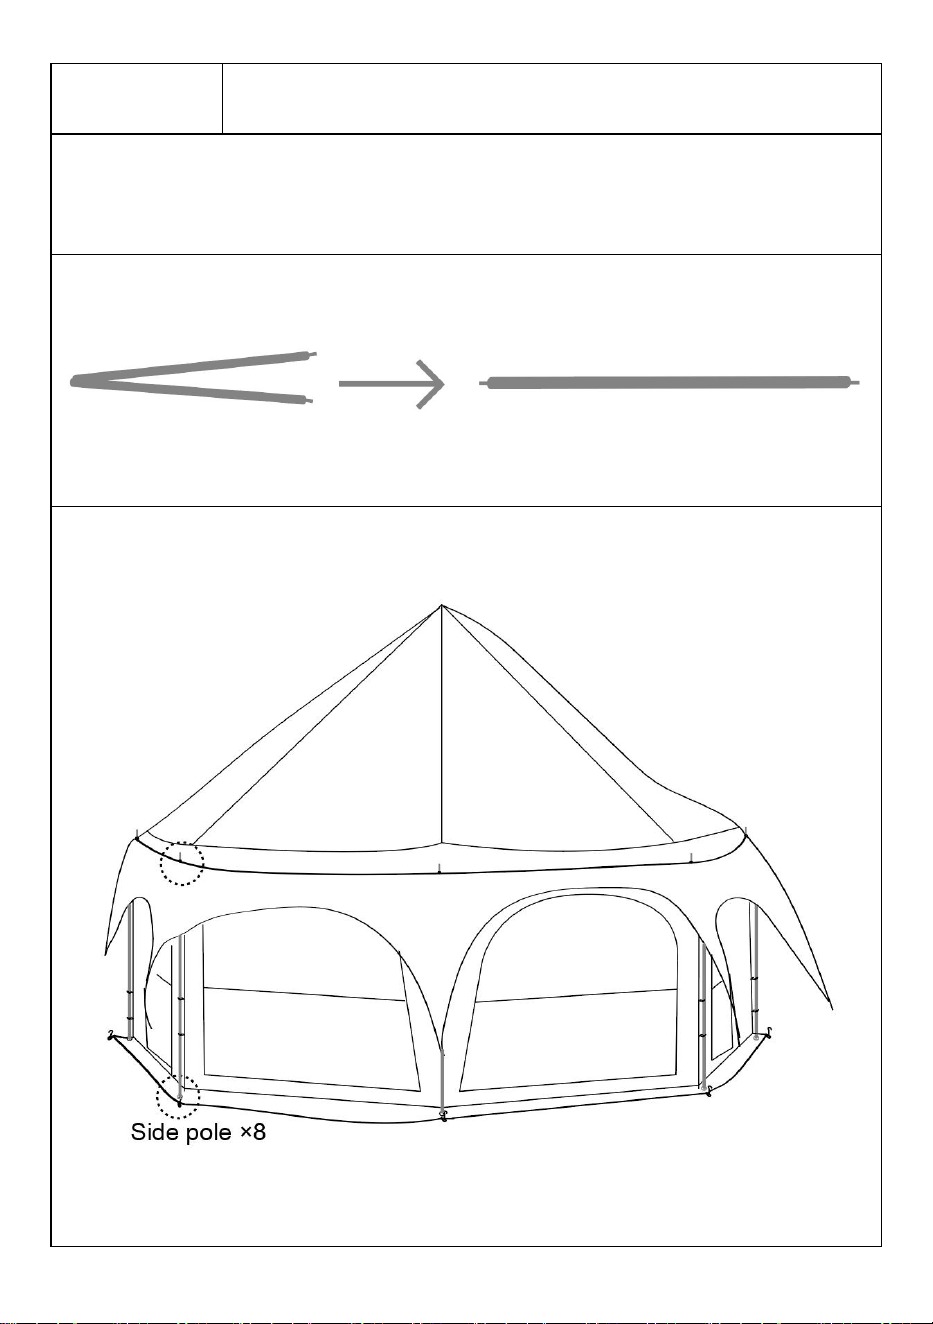
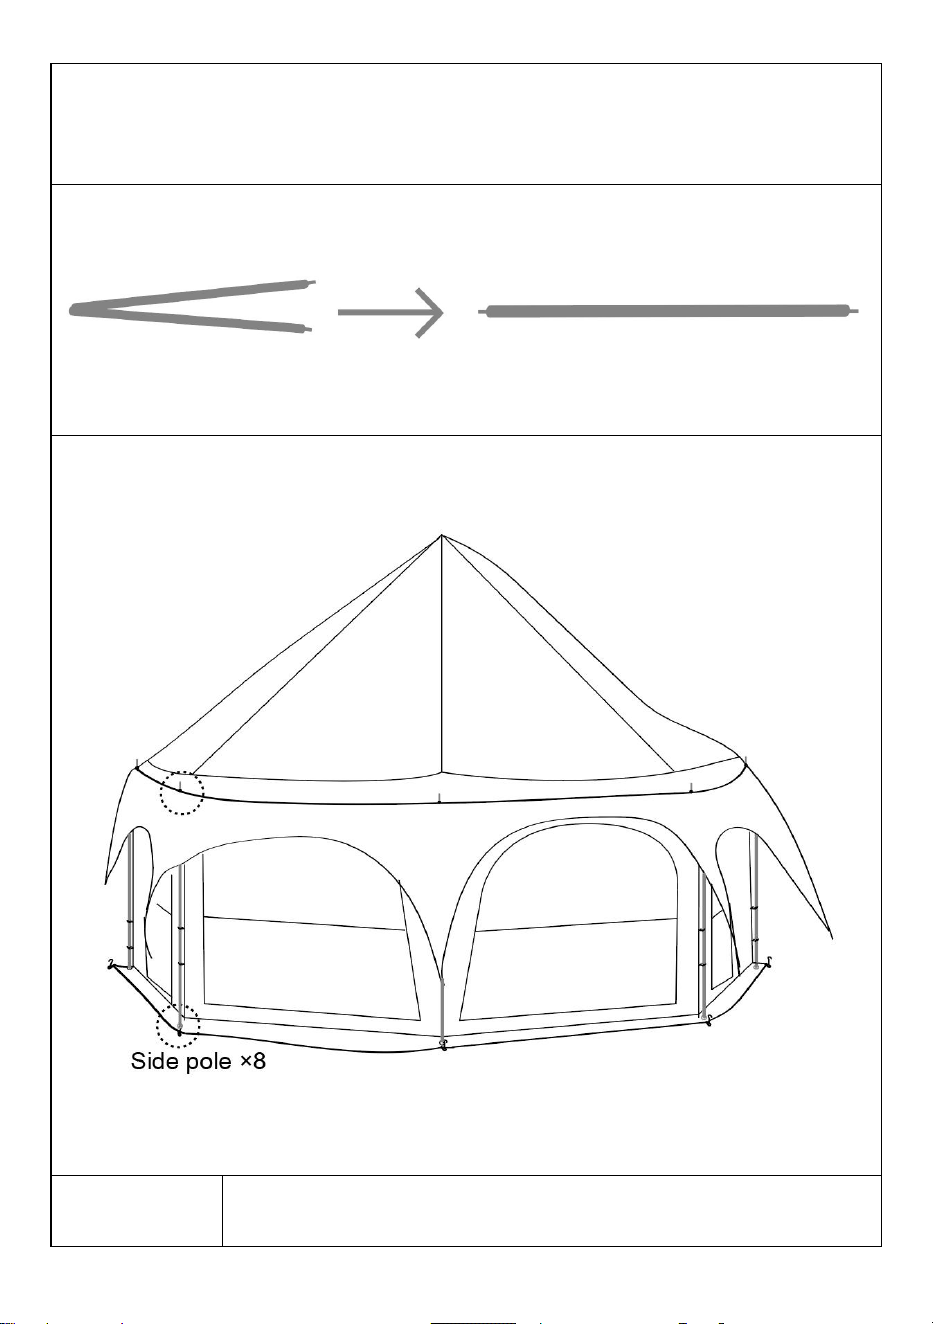
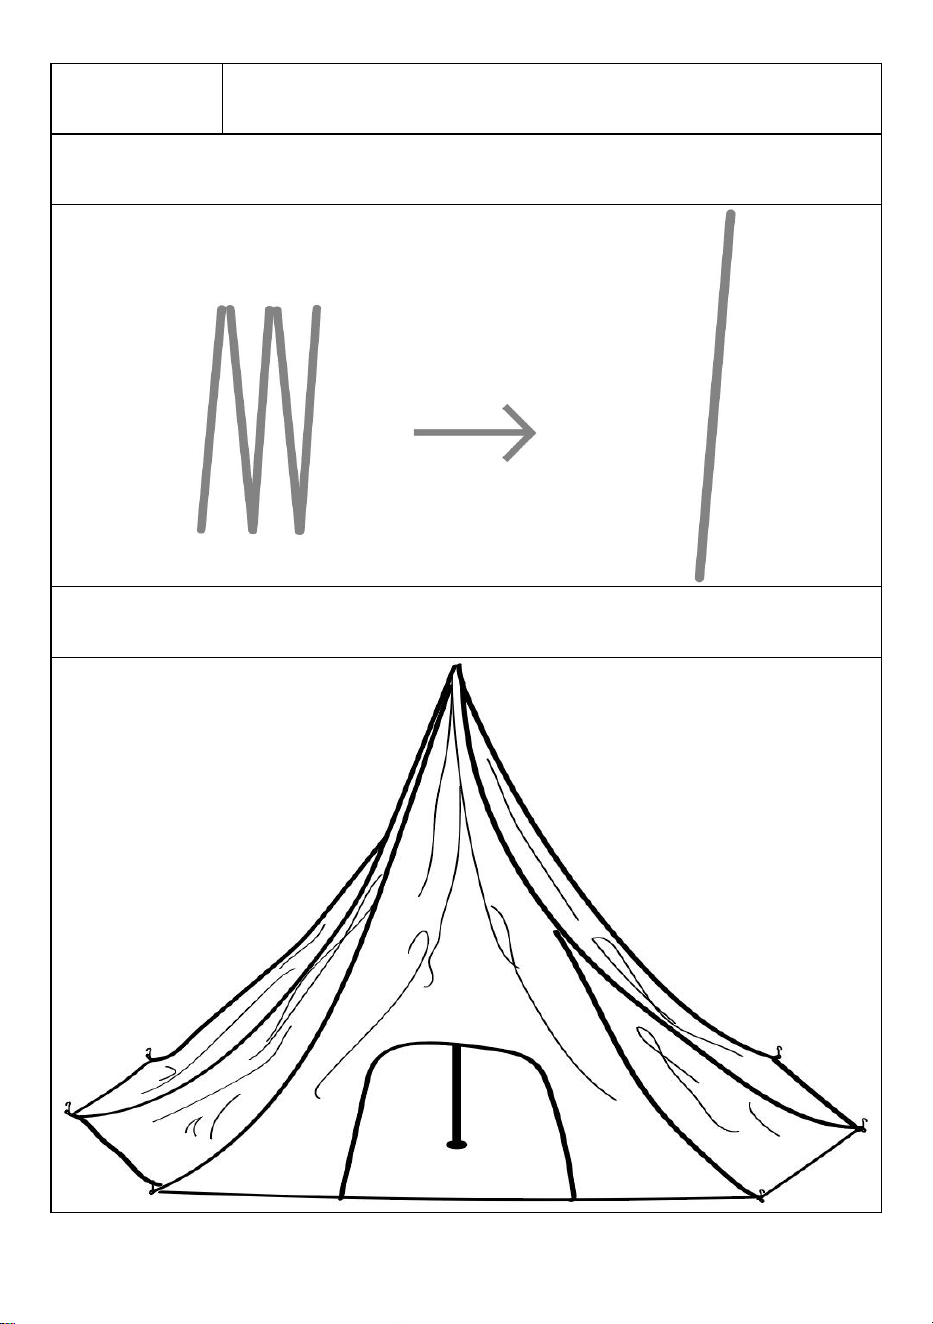
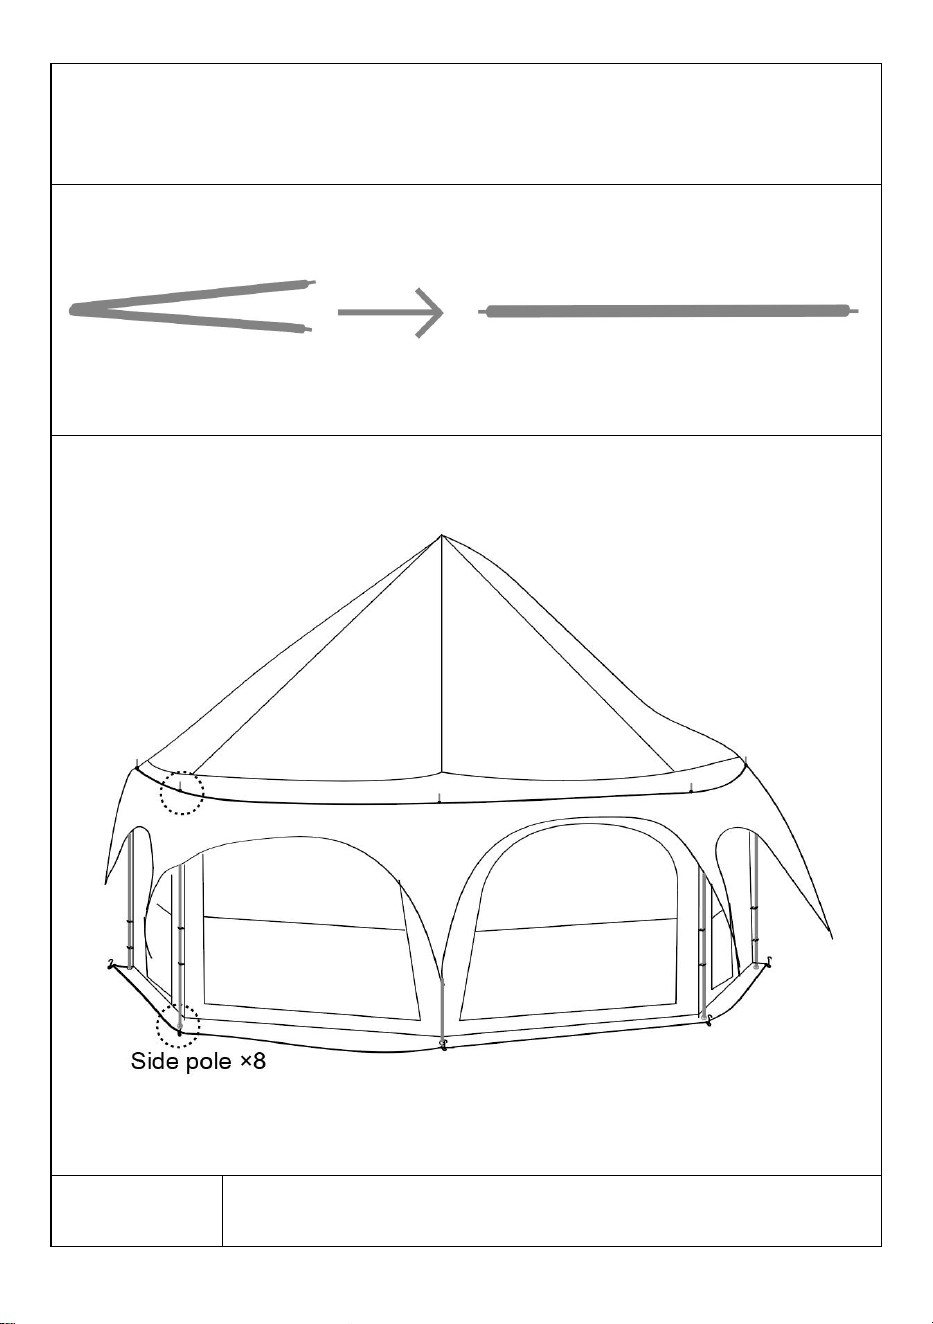
STEP 2
Prop up the tent
● Assemble the center pole through the built-in metal buckle.
● One person put centre pole on the middle point of floor for propping up the
tent.
7
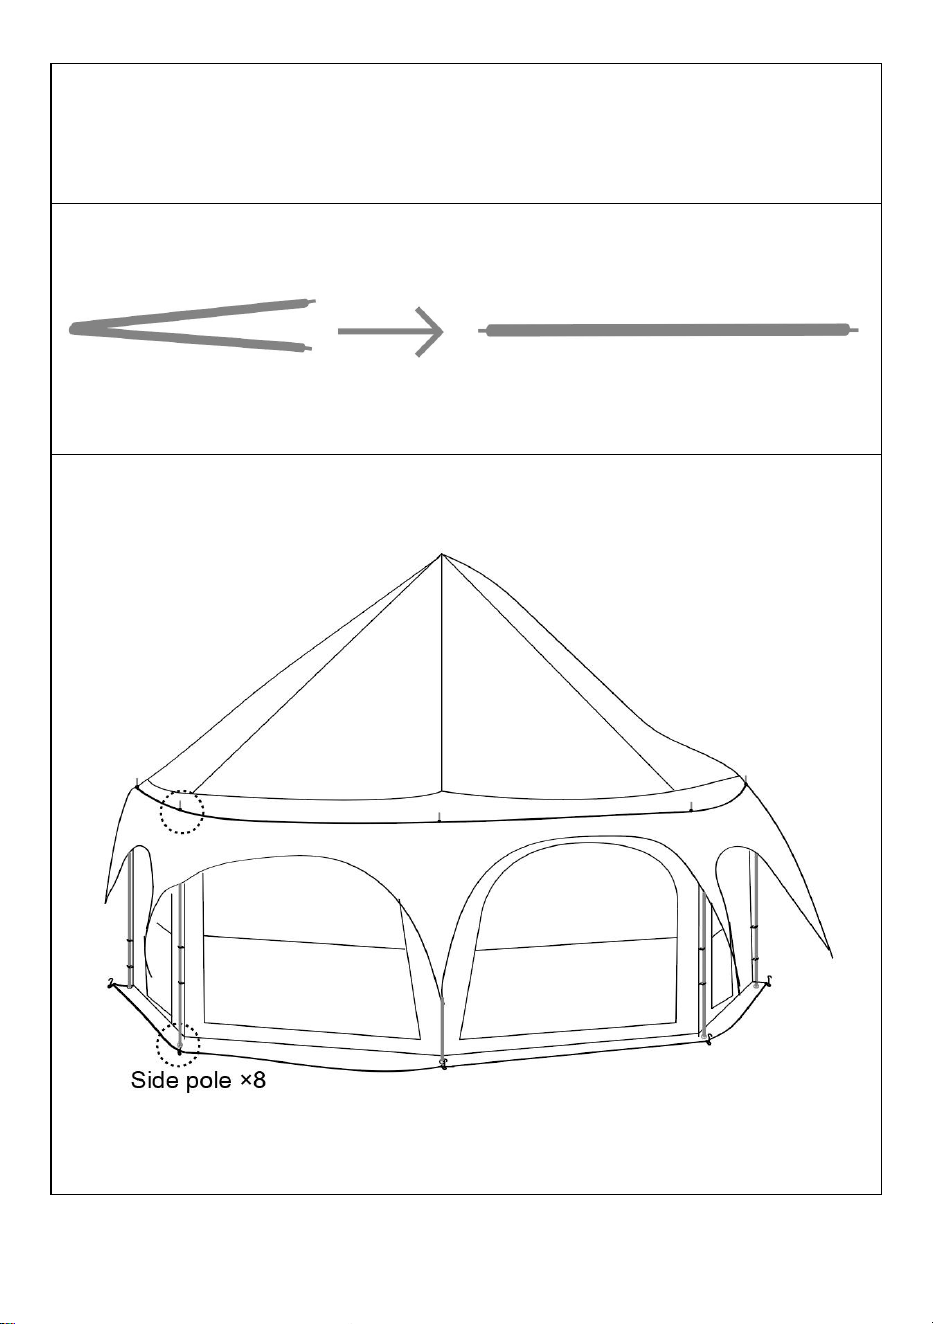
STEP 3
Install door pole
● Assemble the side poles and support the side wall with them. Fasten the
plastic buckle to the side poles for better fixation.
8
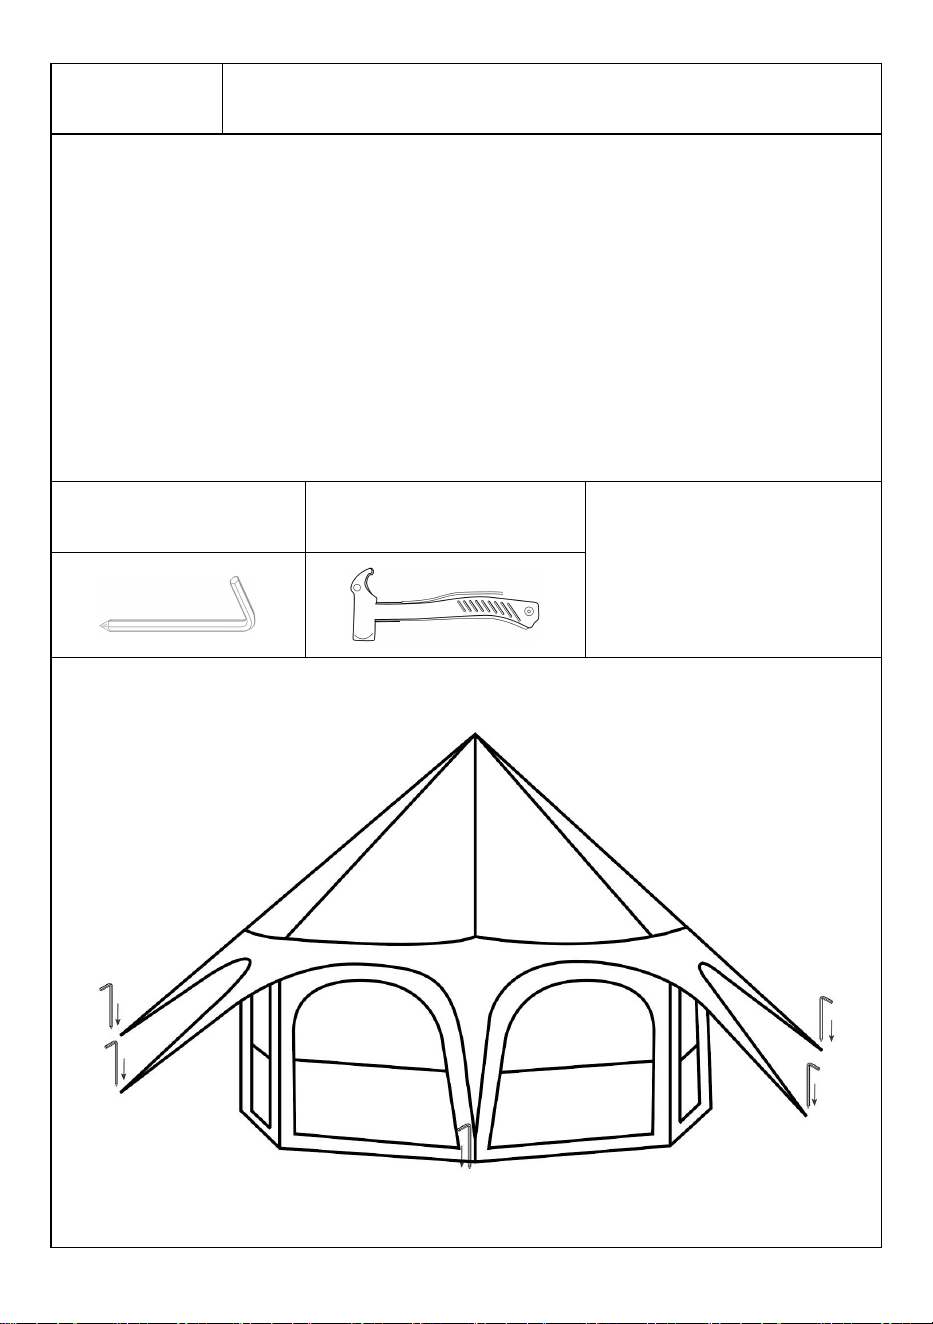
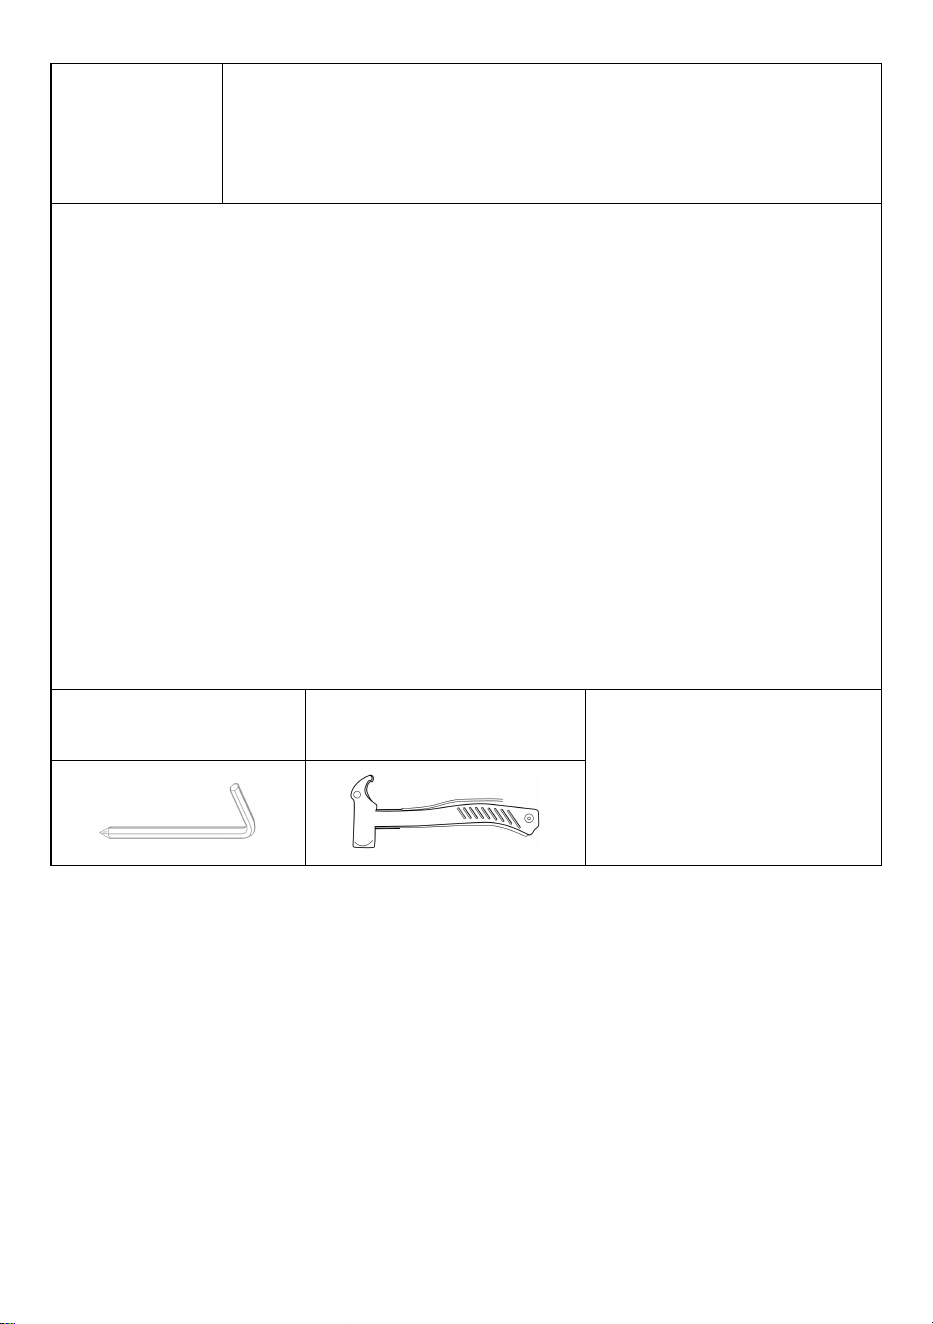
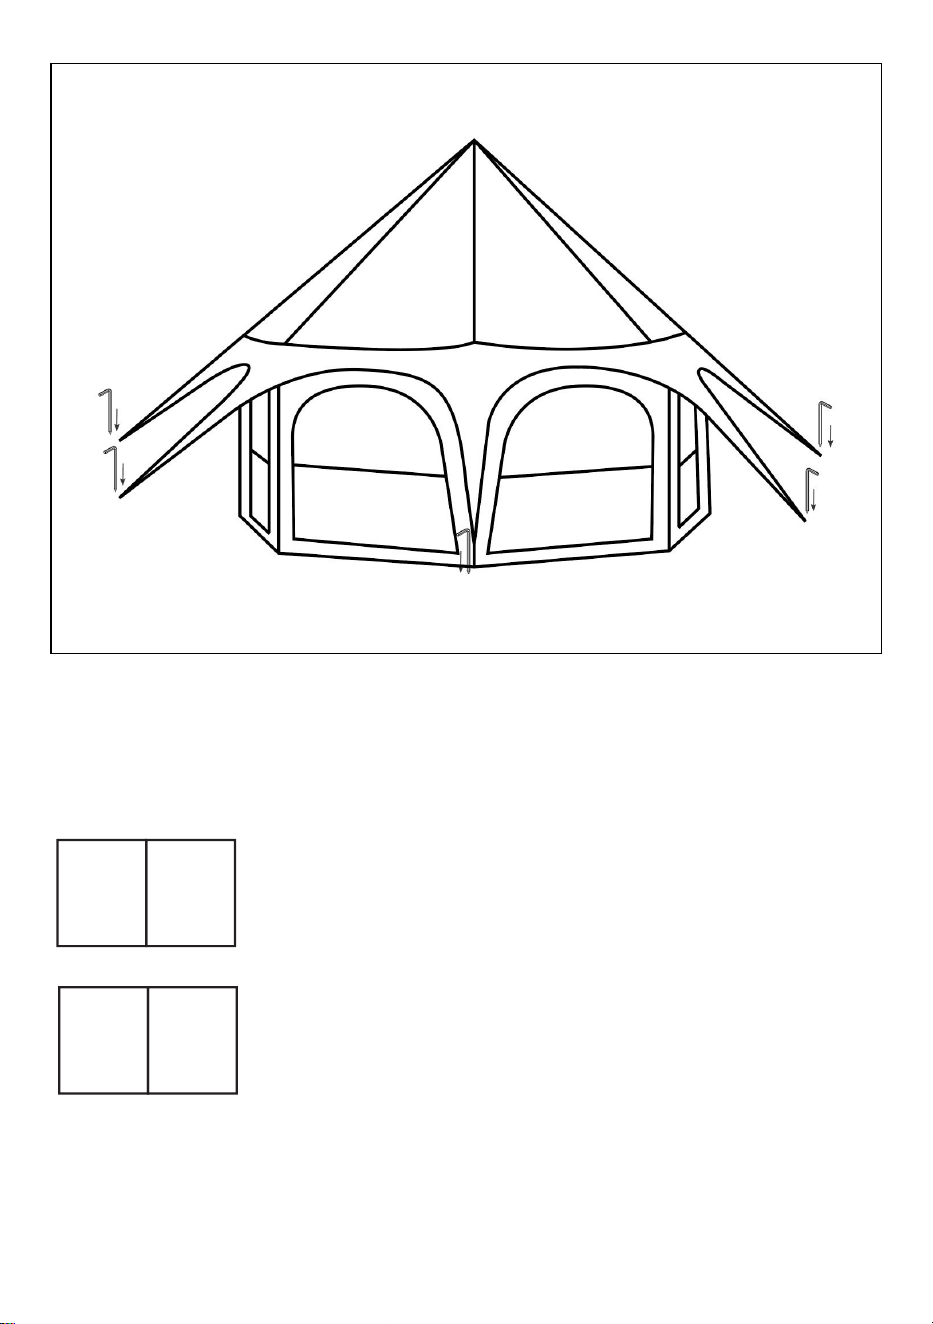
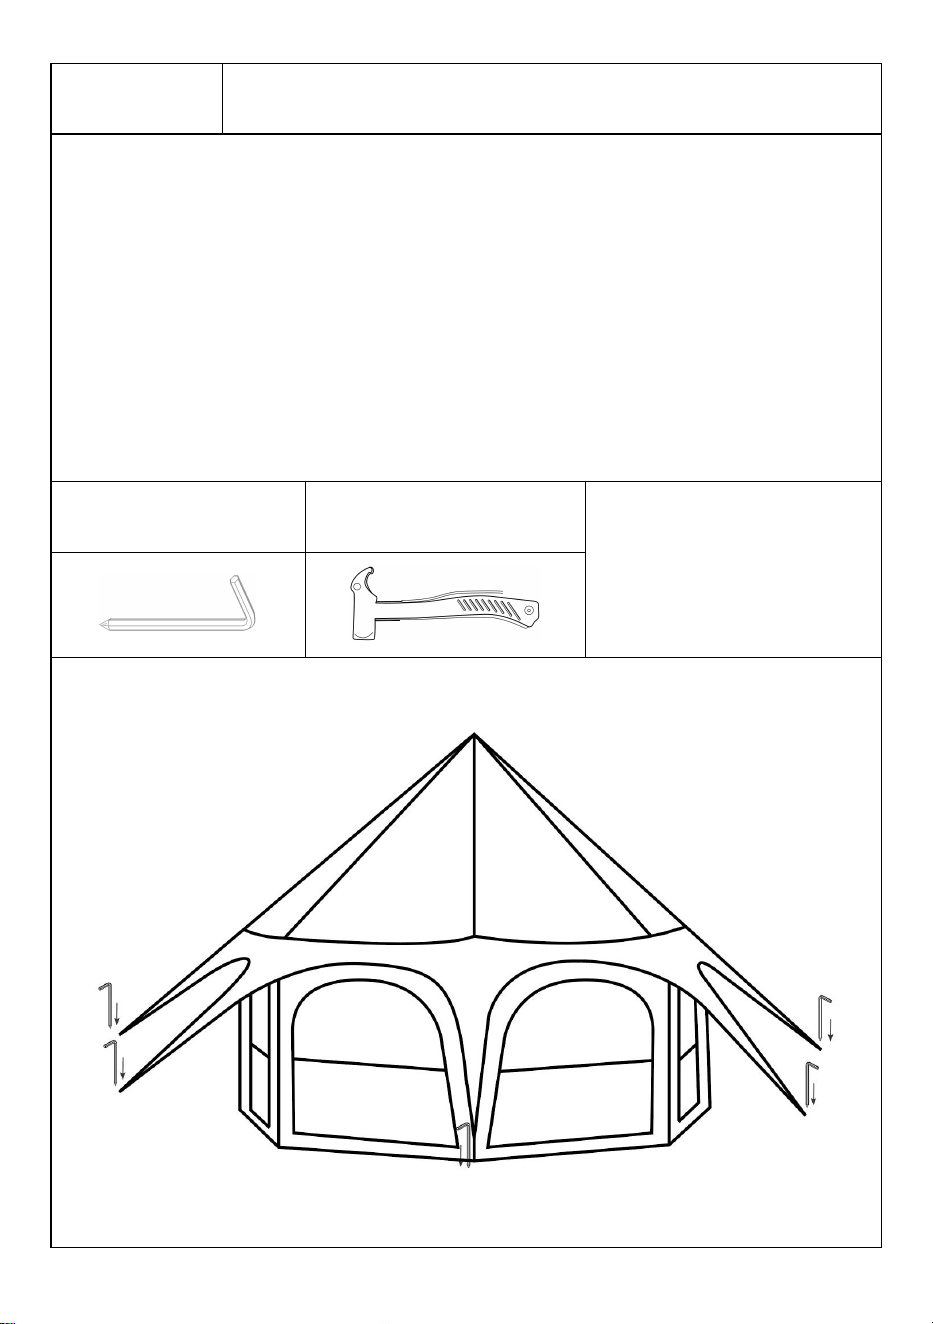
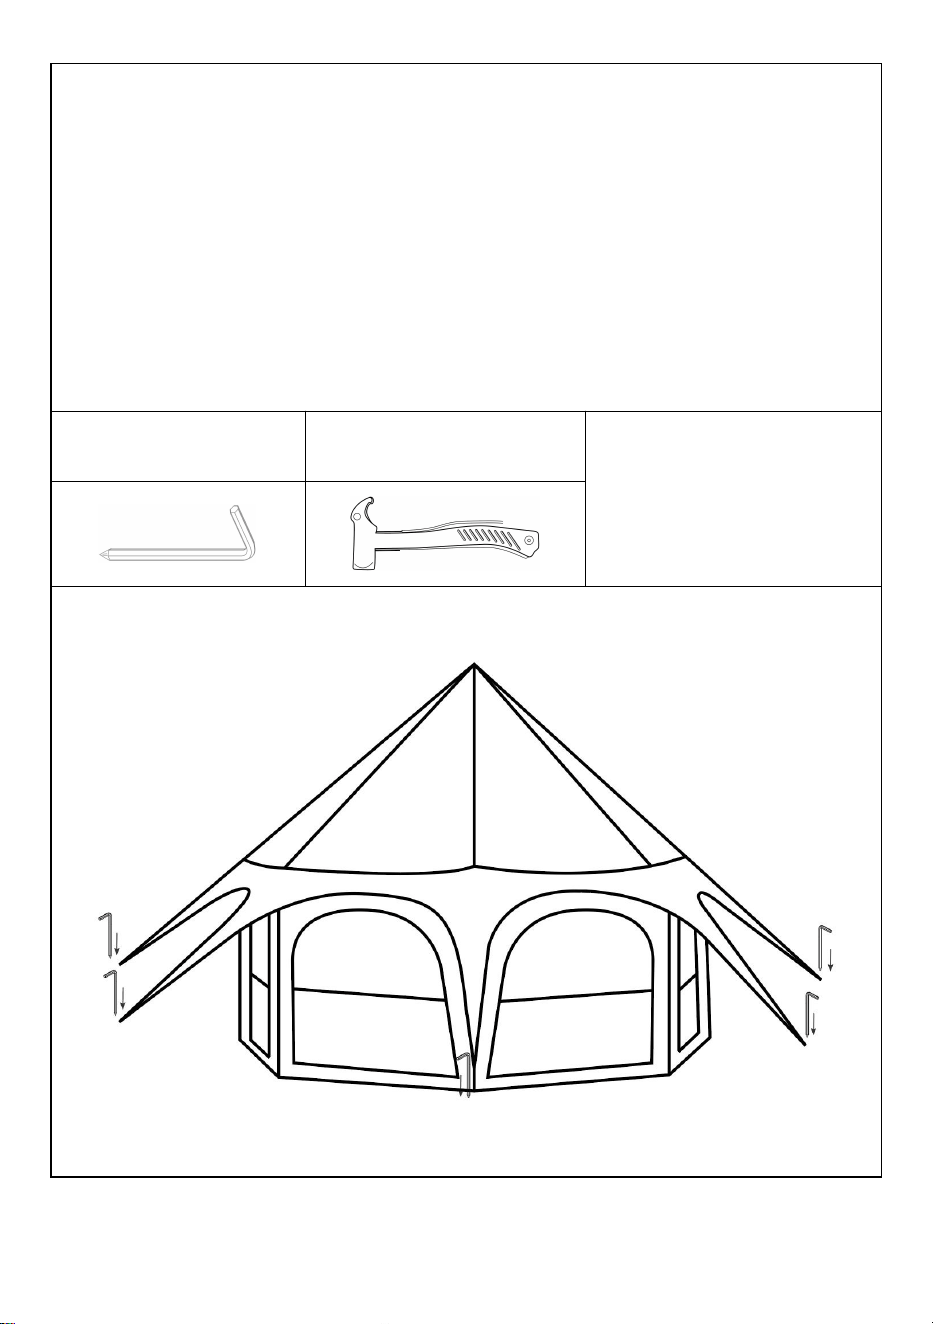
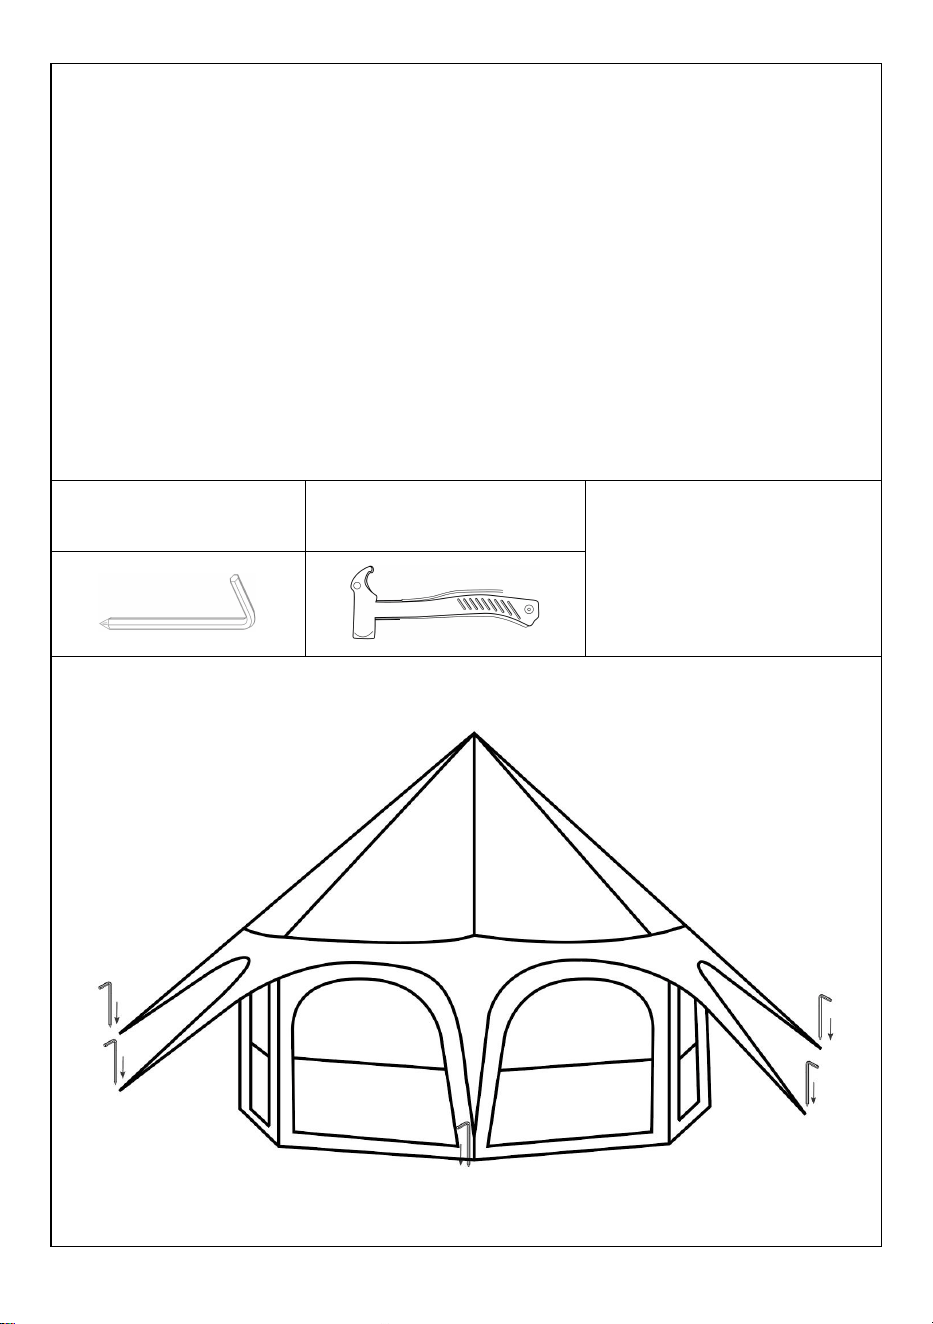
STEP 4
Finish the tent assembly
● Fix the one-piece webbing wind rope with large stakes and tighten the
adjustable buckle.
●Recommend pulling out guy ropes along the direction of every seam
on the tent roof to get the perfect visual effect and stability. (Make
adjustments to the tent stakes after this step, if needed.)
Large stake
Hammer

9
Manufacturer: Shanghaimuxinmuyeyouxiangongsi
Address: Shuangchenglu 803nong11hao1602A-1609shi, baoshanqu, shanghai 200000 CN.
EC REP: E-CrossStu GmbH.
Mainzer Landstr.69, 60329 Frankfurt am Main.
UK REP: YH CONSULTING LIMITED.
C/O YH Consulting Limited Office 147, Centurion House, London Road, Staines-upon-
Thames, Surrey, TW18 4AX
Imported to AUS: SIHAO PTY LTD.
1 ROKEVA STREETEASTWOOD NSW 2122 Australia
Imported to USA: Sanven Technology Ltd.
Suite 250, 9166 Anaheim Place, Rancho Cucamonga, CA 91730


Technique Assistance et certificat de garantie électronique
www.vevor.com/support
TENTE YOURTE MANUEL DE L'UTILISATEUR
We continue to be committed to provide you tools with competitive price.
"Save Half", "Half Price" or any other similar expressions used by us only represents an
estimate of savings you might benefit from buying certain tools with us compared to the major
top brands and does not necessarily mean to cover all categories of tools offered by us. You
are kindly reminded to verify carefully when you are placing an order with us if you are
actually saving half in comparison with the top major brands.

1
Modèle : ZJTM1184
Have product questions? Need technical support? Please feel free to
contact us:
Technical Support and E-Warranty Certificate
www.vevor.com/support
NEED HELP? CONTACT US!
This is the original instruction, please read all manual instructions
carefully before operating. VEVOR reserves a clear interpretation of our
user manual. The appearance of the product shall be subject to the
product you received. Please forgive us that we won't inform you again if
there are any technology or software updates on our product.
YURT TENT
2
CARACTÉRISTIQUES
Modèle
ZJTM1184
Taille
du
produit
D iamètre : 5m
Hauteur : 2,8m
Hauteur de la porte :
1,3m
Hauteur de
clôture :1,4m
Couleu
r
Beige
! PRÉCAUTIONS
6. Veuillez vous référer à la liste des pièces pour vérifier soigneusement les articles que
vous avez reçus. Ne jetez aucun emballage avant d'avoir vérifié que vous disposez de
toutes les pièces et du matériel ! N'hésitez pas à nous contacter si vous manquez des
pièces, si vous avez des pièces cassées ou si vous avez tout autre problème d'installation.
7. Sélectionnez un site plat, exempt de roches, de branches et d'autres objets durs ou
pointus pour installer votre tente et assurez-vous qu'aucun service souterrain n'est présent.
N'installez pas votre tente sous des arbres ou des bâtiments de grande hauteur pour éviter
les risques potentiels de sécurité causés par la chute d'objets.
8. La tente est fabriquée pour être utilisée comme structure temporaire et ne respecte pas
le code de la structure. L'installateur est responsable d'anticiper les intempéries pour le
moment approprié de l'installation.
9. Comme la tente doit être réparée à tout moment pendant le processus de construction,
inscrivez-vous à au moins une personne pour vous aider au moment de monter la tente.
10. Les avertissements, mises en garde et instructions abordés dans ce manuel
d'instructions ne peuvent pas couvrir toutes les conditions possibles. Nous ne serons pas
responsables de tout dommage causé par des facteurs humains. S'il y a un problème lors
de l'utilisation de Le produit, veuillez nous contacter à temps.
! AVERTISSEMENT

3
3. Tenir à l'écart des enfants, des personnes âgées et d'autres personnes pour éviter les
blessures causées par la chute des cadres métalliques lors de l'installation.
4. Gardez toutes les sources de flammes et de chaleur éloignées de ce tissu de tente pour
éviter que la tente ne brûle par contact accidentel.
! INSTRUCTION DE SOINS
3. Nettoyez les débris et gardez la toile au sec lors du stockage de la tente, rangez le cadre
métallique et la toile séparément dans le sac de transport pour éviter la moisissure ou les
dommages.
4. Utilisez un détergent normal et de l'eau pour le nettoyage si la tente est sale.
! PRÉCAUTIONS
Les précautions suivantes doivent être prises lorsque vous sortez à l’extérieur :
10. Assurez-vous que votre tente est bien ventilée (surtout si vous décidez d'ignorer le
premier avertissement et d'utiliser un chauffage dans votre tente). Le monoxyde de carbone
est réel et peut causer de graves dommages, voire la mort. Des bouches d'aération et des
écrans sont intégrés au corps de la tente.
11. Assurez-vous d'ancrer correctement votre tente (il ne s'agit pas d'une tente
autoportante), suivez ces instructions pour connaître les bonnes pratiques de jalonnement
et assurez-vous que tous les haubans et piquets sont solidement fixés.
12. Assurez-vous que les enfants sont surveillés à tout moment dans et autour de la tente.
13. N'utilisez pas de bougies, d'allumettes ou de flammes nues de toute sorte dans ou à
proximité d'une tente.
14. Il est préférable de ne pas cuisiner à l’intérieur d’une tente, mais si c’est le cas, ne
laissez pas cuisiner sans surveillance. Assurez-vous que les grils, appareils de cuisson et
similaires ne doivent pas être placés à moins de 1 mètre de la toile de la tente. Il ne faut pas
utiliser de feux ouverts ou de charbon de bois incandescent à l'intérieur des tentes ou à
proximité de la toile de la tente - le feu peut se propager très rapidement. Il ne faut pas
utiliser de feux ouverts ou de charbon de bois incandescent à l'intérieur des tentes ou à
proximité de la toile de tente car il existe un risque important d'accumulation de monoxyde
de carbone (CO), en particulier dans un espace confiné à l'intérieur de la tente. Tous les
tubes flexibles et raccords du brûleur à gaz doivent être vérifiés pour détecter toute fuite et
s'assurer qu'ils sont en bon état.
4
15. Allumez des feux de camp sous le vent et à plusieurs mètres d’une tente et
assurez-vous d’éteindre complètement les feux de camp avant de quitter un camping ou
avant de vous retirer pour la nuit.
16. Faites preuve d'une extrême prudence lorsque vous utilisez des lanternes ou des
radiateurs à combustible à l'intérieur d'une tente et utilisez des lanternes à piles autant que
possible. Ne faites pas le plein de lampes, de radiateurs ou de poêles à l’intérieur d’une
tente. Éteignez ou éteignez toutes les lanternes avant de vous coucher.
17. Ne fumez pas dans une tente et ne stockez pas de liquides inflammables à l’intérieur
d’une tente. Installation de poêles à bois ou d'équipements de chauffage à vos propres
risques.
18.
CONSERVEZ CES INSTRUCTIONS
LES PIÈCES LISTE
NON.
NOM
DESSIN
QTÉ
1
Chapiteau de
cirque
1
2
Poteau central
1
3
Poteau latéral
8
4
Un enjeu important
8

5
5
Petit enjeu
8
6
Marteau
1
7
Sac à piquets
1
INSTRUCTIONS DE MONTAGE
ÉTAPE 1
Réparer le corps de la tente
● Posez votre tente au sol, gardez le sol tendu avec votre partenaire. Fixez 8
coins de tente avec le petit piquet.
Petit enjeu
Marteau
! NOTE:
Veuillez ne pas trop miser à cette
étape pour un ajustement
ultérieur.

6
Le piquet maintient un angle de 45°-60°
avec le sol, donc l'angle d'appui
la capacité est la plus grande.
ÉTAPE 2
Soutenir la tente
● Assemblez le poteau central à travers la boucle métallique intégrée.

7
● Une personne a placé le poteau central au milieu du sol pour soutenir la
tente.
ÉTAPE 3
Installer le poteau de porte
8
● Assemblez les poteaux latéraux et soutenez la paroi latérale avec eux.
Fixez la boucle en plastique aux poteaux latéraux pour une meilleure fixation.
ÉTAPE 4
Terminer l'assemblage de la tente
9
● Fixez la corde à vent en sangle monobloc avec de gros piquets et serrez la
boucle réglable.
●Il est recommandé de retirer les haubans dans le sens de chaque couture.
sur le toit de la tente pour obtenir un effet visuel et une stabilité parfaits.
(Ajustez les piquets de la tente après cette étape, si nécessaire.)
Un enjeu
important
Marteau
10
Adresse : Baoshanqu Shuangchenglu 803long 11hao 1602A-1609shi Shanghai
Importé en Australie : SIHAO PTY LTD . 1 ROKEVA STREETASTWOOD NSW 2122
Australie
Importé aux États-Unis : Sanven Technology Ltd.Suite 250, 9166 Anaheim Place, Rancho
Cucamonga, CA 91730
Fabriqué en Chine
REP
EC
SHUNSHUN GmbH
Römeräcker 9 Z2021,76351
Linkenheim-Hochstetten,Germany
REP
UK
Pooledas Group Ltd
Unit 5 Albert Edward House, The Pavilions
Preston, United Kingdom


Technisch Support- und E-Garantie-Zertifikat www.vevor.com/support
JURTENZELT BENUTZERHANDBUCH
We continue to be committed to provide you tools with competitive price.
"Save Half", "Half Price" or any other similar expressions used by us only represents an
estimate of savings you might benefit from buying certain tools with us compared to the major
top brands and does not necessarily mean to cover all categories of tools offered by us. You
are kindly reminded to verify carefully when you are placing an order with us if you are
actually saving half in comparison with the top major brands.
1
Modell: ZJTM1184
Have product questions? Need technical support? Please feel free to
contact us:
Technical Support and E-Warranty Certificate
www.vevor.com/support
NEED HELP? CONTACT US!
This is the original instruction, please read all manual instructions
carefully before operating. VEVOR reserves a clear interpretation of our
user manual. The appearance of the product shall be subject to the
product you received. Please forgive us that we won't inform you again if
there are any technology or software updates on our product.
YURT TENT

2
SPEZIFIKATIONEN
Modell
ZJTM1184
Produkt
größe
Durchmesser : 5 m
Höhe : 2,8 m
Höhe der Tür : 1,3 m
Zaunhöhe : 1,4 m
Farbe
Beige
! VORSICHTSHINWEISE
11. Bitte sehen Sie sich die Teileliste an, um die Artikel, die Sie erhalten haben, sorgfältig
zu überprüfen. Werfen Sie keine Verpackung weg, bis Sie überprüft haben, dass Sie alle
Teile und Hardware haben! Zögern Sie nicht, uns zu kontaktieren, wenn Sie benötigte Teile
vermissen, defekte Teile haben oder andere Installationsprobleme haben.
12. Wählen Sie für die Aufstellung Ihres Zeltes einen ebenen Standort frei von Steinen,
Ästen und anderen harten oder scharfen Gegenständen und stellen Sie sicher, dass keine
unterirdischen Versorgungsleitungen vorhanden sind. Bauen Sie Ihr Zelt nicht unter
Bäumen oder hohen Gebäuden auf, um mögliche Sicherheitsrisiken durch herabfallende
Gegenstände zu vermeiden.
13. Das Zelt wurde für den Einsatz als temporäre Struktur hergestellt und entspricht nicht
den Bauvorschriften. Der Installateur ist dafür verantwortlich, die Witterungsbedingungen
zum richtigen Zeitpunkt der Installation vorherzusehen.
14. Da das Zelt während des Bauprozesses jederzeit repariert werden muss, melden Sie
sich bei an mindestens eine Person, die Ihnen beim Aufbau des Zeltes behilflich ist.
15. Die in dieser Bedienungsanleitung beschriebenen Warnungen, Vorsichtsmaßnahmen
und Anweisungen können nicht alle möglichen Bedingungen abdecken. Wir übernehmen
keine Haftung für Schäden, die durch menschliche Faktoren verursacht werden. Wenn
während der Verwendung ein Problem auftritt das Produkt, kontaktieren Sie uns bitte
rechtzeitig.
! WARNUNG

3
5. Von Kindern, älteren Menschen und anderen Personen fernhalten, um Verletzungen
durch herabfallende Metallrahmen während der Installation zu vermeiden.
6. Halten Sie alle Flammen- und Wärmequellen von diesem Zeltstoff fern um zu
verhindern, dass das Zelt durch versehentlichen Kontakt verbrennt.
! PFLEGEANLEITUNG
5. Reinigen Sie Schmutz und halten Sie die Plane trocken, wenn Sie das Zelt lagern.
Bewahren Sie den Metallrahmen und die Plane getrennt in der Tragetasche auf, um
Schimmel oder Beschädigungen zu vermeiden.
6. Wenn das Zelt verschmutzt ist, verwenden Sie zum Reinigen normales Reinigungsmittel
und Wasser.
! VORSICHTSMASSNAHMEN
Wenn Sie ins Freie gehen, sollten Sie folgende Vorsichtsmaßnahmen treffen:
19. Stellen Sie sicher, dass Ihr Zelt ausreichend belüftet ist (insbesondere, wenn Sie die
erste Warnung ignorieren und eine Heizung in Ihrem Zelt verwenden). Kohlenmonoxid ist
real und kann schwere Schäden wie den Tod verursachen. In den Zeltkörper sind
Lüftungsschlitze und Fliegengitter eingebaut.
20. Achten Sie darauf, Ihr Zelt richtig zu verankern – es handelt sich nicht um ein
freistehendes Zelt – befolgen Sie diese Anweisungen für die richtige Absteckung und
stellen Sie sicher, dass alle Abspannleinen und Heringe sicher befestigt sind.
21. Stellen Sie sicher, dass Kinder im und um das Zelt jederzeit beaufsichtigt werden.
22. Benutzen Sie keine Kerzen, Streichhölzer oder offene Flammen jeglicher Art in oder in
der Nähe eines Zeltes.
23. Es ist besser, nicht in einem Zelt zu kochen, aber wenn ja, lassen Sie das Kochen nicht
unbeaufsichtigt. Stellen Sie sicher, dass Grills, Kochgeräte und Ähnliches nicht näher als 1
Meter an der Zeltplane angebracht werden dürfen. In Zelten oder in der Nähe von
Zeltplanen sollte kein offenes Feuer oder glühende Holzkohle verwendet werden – Feuer
kann sich sehr schnell ausbreiten. In Zelten oder in der Nähe von Zeltplanen sollte kein
offenes Feuer oder glühende Holzkohle verwendet werden, da ein erhebliches Risiko durch
die Bildung von Kohlenmonoxid (CO) besteht, insbesondere in engen Räumen im Zelt. Alle
flexiblen Schläuche und Kupplungen zum Gasbrenner sollten auf Dichtheit und
einwandfreien Zustand überprüft werden.

4
24. Machen Sie Lagerfeuer windabwärts und mehrere Meter von einem Zelt entfernt und
löschen Sie die Lagerfeuer unbedingt vollständig, bevor Sie einen Campingplatz verlassen
oder sich für die Nacht zurückziehen.
25. Seien Sie äußerst vorsichtig, wenn Sie brennstoffbetriebene Laternen oder Heizgeräte
in einem Zelt verwenden, und verwenden Sie nach Möglichkeit batteriebetriebene Laternen.
Betanken Sie keine Lampen, Heizgeräte oder Öfen im Zelt. Löschen Sie alle Laternen oder
schalten Sie sie aus, bevor Sie schlafen gehen.
26. Rauchen Sie nicht in einem Zelt und lagern Sie keine brennbaren Flüssigkeiten in
einem Zelt. Die Installation von Holzbrennern oder Heizgeräten erfolgt auf eigene Gefahr.
27.
ANLEITUNG AUFBEWAHREN
TEILE AUFFÜHREN
NEIN.
NAME
ZEICHNUNG
MENGE
1
Zirkuszelt
1
2
Mittelstange
1
3
Seitenstange
8
4
Großer Einsatz
8
5
5
Kleiner Einsatz
8
6
Hammer
1
7
Pfahltasche
1
BAUANLEITUNG
SCHRITT
1
Befestigen Sie den Zeltkörper
● Stellen Sie Ihr Zelt auf den Boden und halten Sie den Boden zusammen mit
Ihrem Partner fest. Mit dem kleinen Pflock 8 Zeltecken abstecken.
Kleiner
Einsatz
Hammer
! NOTIZ:
Bitte stecken Sie bei diesem
Schritt nicht zu viel ab, um später
Anpassungen vornehmen zu
können.
6
Der Pfahl bildet einen Winkel von 45°-60°
zum Boden, also den Peilwinkel
Die Kapazität ist am größten.
SCHRITT
2
Stützen Sie das Zelt ab
● Befestigen Sie die Mittelstange mithilfe der integrierten Metallschnalle.

7
● Eine Person stellt die Mittelstange auf die Mitte des Bodens, um das Zelt
abzustützen.
SCHRITT
3
Türstange montieren
8
● Montieren Sie die Seitenstangen und stützen Sie damit die Seitenwand ab.
Befestigen Sie die Kunststoffschnalle zur besseren Fixierung an den
Seitenstangen.
9
SCHRITT
4
Beenden Sie den Zeltaufbau
● Befestigen Sie das einteilige Windseil mit großen Heringen und ziehen Sie
die verstellbare Schnalle fest.
●Wir empfehlen, die Abspannleinen entlang jeder Nahtrichtung
herauszuziehen
auf dem Zeltdach, um die perfekte optische Wirkung und Stabilität zu
erzielen. (Nehmen Sie nach diesem Schritt ggf. Anpassungen an den
Zeltpfählen vor.)
Großer Einsatz
Hammer

10
Adresse: Baoshanqu Shuangchenglu 803long 11hao 1602A-1609shi Shanghai
Importiert nach AUS: SIHAO PTY LTD . 1 ROKEVA STREETEASTWOOD NSW 2122
Australien
In die USA importiert: Sanven Technology Ltd. Suite 250, 9166 Anaheim Place, Rancho
Cucamonga, CA 91730
In China hergestellt
REP
EC
SHUNSHUN GmbH
Römeräcker 9 Z2021,76351
Linkenheim-Hochstetten,Germany
REP
UK
Pooledas Group Ltd
Unit 5 Albert Edward House, The Pavilions
Preston, United Kingdom


Tecnico Supporto e certificato di garanzia elettronica www.vevor.com/support
TENDA YURTA MANUALE D'USO
We continue to be committed to provide you tools with competitive price.
"Save Half", "Half Price" or any other similar expressions used by us only represents an
estimate of savings you might benefit from buying certain tools with us compared to the major
top brands and does not necessarily mean to cover all categories of tools offered by us. You
are kindly reminded to verify carefully when you are placing an order with us if you are
actually saving half in comparison with the top major brands.

1
Modello: ZJTM1184
Have product questions? Need technical support? Please feel free to
contact us:
Technical Support and E-Warranty Certificate
www.vevor.com/support
NEED HELP? CONTACT US!
This is the original instruction, please read all manual instructions
carefully before operating. VEVOR reserves a clear interpretation of our
user manual. The appearance of the product shall be subject to the
product you received. Please forgive us that we won't inform you again if
there are any technology or software updates on our product.
YURT TENT
2
SPECIFICHE
Modell
o
ZJTM1184
Taglia
del
prodott
o
Diametro : 5 m
Altezza : 2,8 m
Altezza della porta :
1,3 m
Altezza della
recinzione : 1,4 m
Colore
Beige
! ATTENZIONE
16. Si prega di fare riferimento all'elenco delle parti per controllare attentamente gli articoli
ricevuti, non gettare l'imballaggio finché non si è verificato di avere tutte le parti e l'hardware!
Non esitare a contattarci se hai perso parti , hai parti rotte o hai altri problemi di
installazione.
17. Seleziona un sito pianeggiante privo di rocce, rami e altri oggetti duri o appuntiti per
installare la tenda e assicurati che non siano presenti servizi sotterranei. Non montare la
tenda sotto alberi o edifici alti per evitare potenziali rischi per la sicurezza causati dalla
caduta di oggetti.
18. La tenda è prodotta per essere utilizzata come struttura temporanea e non soddisfa il
codice strutturale, l'installatore è responsabile di prevedere la gravità delle condizioni
atmosferiche per il momento corretto dell'installazione.
19. Poiché la tenda deve essere riparata in qualsiasi momento durante il processo di
costruzione, iscriviti a almeno una persona che ti assista quando è il momento di montare la
tenda.
20. Le avvertenze, le precauzioni e le istruzioni descritte nel presente manuale di istruzioni
non possono coprire tutte le condizioni possibili. Non saremo responsabili per eventuali
danni causati da fattori umani. Se c'è qualche problema durante l'uso di il prodotto, vi
preghiamo di contattarci in tempo.
! AVVERTIMENTO

3
7. Tenere lontano dalla portata dei bambini, degli anziani e di altre persone per evitare
lesioni personali causate dalla caduta dei telai metallici durante l'installazione.
8. Tenere tutte le fiamme e le fonti di calore lontane dal tessuto della tenda per evitare che
la tenda bruci per contatto accidentale.
! ISTRUZIONI PER LA CURA
7. Pulisci i detriti e mantieni la tela asciutta quando riponi la tenda, riponi il telaio metallico e
la tela separatamente nella borsa per il trasporto per evitare muffe o danni.
8. Utilizzare detersivo normale e acqua per pulire se la tenda è sporca.
! PRECAUZIONI
Quando si esce all'aperto è necessario adottare le seguenti precauzioni:
28. Assicurati che la tua tenda sia adeguatamente ventilata (soprattutto se decidi di
ignorare il primo avvertimento e utilizzare un riscaldatore nella tenda). Il monossido di
carbonio è reale e può causare danni gravi, fino alla morte. Prese d'aria e schermi sono
integrati nel corpo della tenda.
29. Assicurati di ancorare correttamente la tenda (non si tratta di una tenda indipendente),
segui queste istruzioni per pratiche di picchettamento corrette e assicurati che tutti i tiranti e
i picchetti siano fissati saldamente.
30. Assicurarsi che i bambini siano sempre sorvegliati dentro e intorno alla tenda.
31. Non utilizzare candele, fiammiferi o fiamme libere di alcun tipo all'interno o in prossimità
della tenda.
32. È meglio non cucinare all'interno di una tenda, ma se lo fai, non lasciare la cucina
incustodita. Assicurarsi che griglie, apparecchi di cottura e simili non siano posizionati a
meno di 1 metro dal telo della tenda. Non si dovrebbero usare fuochi aperti o carbone
ardente all'interno delle tende o vicino al telo della tenda: il fuoco può diffondersi molto
rapidamente. Non si dovrebbero utilizzare fuochi aperti o carbone ardente all'interno delle
tende o vicino al telo della tenda poiché esiste un rischio significativo di accumulo di
monossido di carbonio (CO), in particolare in uno spazio ristretto all'interno della tenda.
Tutti i tubi flessibili e i raccordi del bruciatore a gas devono essere controllati per eventuali
perdite e che siano in buone condizioni.
33. Costruisci fuochi da campo sottovento e a diversi metri di distanza da una tenda e
assicurati di spegnere completamente i fuochi da campo prima di lasciare il campeggio o
prima di ritirarti per la notte.
4
34. Prestare estrema attenzione quando si utilizzano lanterne o stufe alimentate a
carburante all'interno di una tenda e utilizzare lanterne a batteria quando possibile. Non
rifornire di carburante lampade, riscaldatori o fornelli all'interno di una tenda. Spegni o
spegni tutte le lanterne prima di andare a dormire.
35. Non fumare in una tenda né conservare liquidi infiammabili all'interno della tenda.
L'installazione di bruciatori a legna o apparecchi di riscaldamento avviene a proprio rischio
e pericolo.
36.
CONSERVA QUESTE ISTRUZIONI
PARTI ELENCO
NO.
NOME
DISEGNO
QUANTITÀ
1
Tenda da circo
1
2
Polo centrale
1
3
Polo laterale
8
4
Grande posta in
gioco
8

5
5
Piccola posta in
gioco
8
6
Martello
1
7
Borsa con pali
1
ISTRUZIONI DI ASSEMBLAGGIO
PASSO 1
Fissare il corpo della tenda
● Appoggia la tenda a terra, mantieni il pavimento teso con il partner. Fissa 8
angoli della tenda con il picchetto piccolo.
Piccola
posta in
gioco
Martello
! NOTA:
Si prega di non puntare troppo in
questo passaggio per eventuali
aggiustamenti successivi.

6
Il picchetto mantiene un angolo di 45°-60°
con il terreno, quindi l'angolo di appoggio
la capacità è la più grande.
PASSO 2
Sostieni la tenda
● Montare il palo centrale attraverso la fibbia metallica incorporata.

7
● Una persona posiziona il palo centrale al centro del pavimento per
sostenere la tenda.
PASSO 3
Installare il palo della porta

8
● Assemblare i pali laterali e con essi sostenere la parete laterale. Fissare la
fibbia in plastica ai pali laterali per un migliore fissaggio.
PASSO 4
Termina il montaggio della tenda

9
● Fissare la fune antivento in tessuto monopezzo con picchetti grandi e
stringere la fibbia regolabile.
●Si consiglia di estrarre i tiranti lungo la direzione di ogni cucitura
sul tetto della tenda per ottenere l'effetto visivo e la stabilità perfetti. (Se
necessario, apporta modifiche ai picchetti della tenda dopo questo
passaggio.)
Grande posta
in gioco
Martello
10
Indirizzo: Baoshanqu Shuangchenglu 803long 11hao 1602A-1609shi Shanghai
Importato in AUS: SIHAO PTY LTD . 1 ROKEVA STREETEASTWOOD NSW 2122
Australia
Importato negli Stati Uniti: Sanven Technology Ltd.Suite 250, 9166 Anaheim Place,
Rancho Cucamonga, CA 91730
Made in China
REP
EC
SHUNSHUN GmbH
Römeräcker 9 Z2021,76351
Linkenheim-Hochstetten,Germany
REP
UK
Pooledas Group Ltd
Unit 5 Albert Edward House, The Pavilions
Preston, United Kingdom


Técnico Soporte y certificado de garantía electrónica www.vevor.com/support
TIENDA YURTA MANUAL DE USUARIO
We continue to be committed to provide you tools with competitive price.
"Save Half", "Half Price" or any other similar expressions used by us only represents an
estimate of savings you might benefit from buying certain tools with us compared to the major
top brands and does not necessarily mean to cover all categories of tools offered by us. You
are kindly reminded to verify carefully when you are placing an order with us if you are
actually saving half in comparison with the top major brands.

1
Modelo: ZJTM1184
Have product questions? Need technical support? Please feel free to
contact us:
Technical Support and E-Warranty Certificate
www.vevor.com/support
NEED HELP? CONTACT US!
This is the original instruction, please read all manual instructions
carefully before operating. VEVOR reserves a clear interpretation of our
user manual. The appearance of the product shall be subject to the
product you received. Please forgive us that we won't inform you again if
there are any technology or software updates on our product.
YURT TENT

2
ESPECIFICACIONES
Modelo
ZJTM1184
Tamañ
o del
product
o
Diámetro : 5m _
Altura : 2,8 m
Altura de la puerta :
1,3 m
Altura de la valla :
1,4 m
Color
Beige
! PRECAUCIONES
21. Consulte la lista de piezas para verificar cuidadosamente los artículos que recibió. ¡No
deseche ningún paquete hasta que haya verificado que tiene todas las piezas y el
hardware! No dude en contactarnos si le faltan piezas , tiene piezas rotas o tiene algún otro
problema de instalación.
22. Seleccione un sitio nivelado, libre de rocas, ramas y otros objetos duros o afilados para
instalar su tienda y asegúrese de que no haya servicios subterráneos. No instale su tienda
de campaña debajo de árboles o edificios altos para evitar posibles riesgos de seguridad
causados por la caída de objetos.
23. La carpa está fabricada para usarse como estructura temporal y no cumple con el
código estructural; el instalador es responsable de anticipar la severidad del clima para el
momento adecuado de instalación.
24. Como la tienda necesita ser reparada en cualquier momento durante el proceso de
construcción, regístrese en Al menos una persona que le ayude cuando llegue el momento
de montar la tienda.
25. Las advertencias, precauciones e instrucciones analizadas en este manual de
instrucciones no pueden cubrir todas las condiciones posibles. No seremos responsables
de ningún daño causado por factores humanos. Si hay algún problema durante el uso de El
producto, contáctanos a tiempo.
! ADVERTENCIA

3
9. Manténgalo alejado de niños, ancianos y otras personas para evitar lesiones
personales causadas por la caída de marcos metálicos durante la instalación.
10. Mantenga todas las llamas y fuentes de calor alejadas de la tela de esta tienda. para
evitar que la tienda se queme por contacto accidental.
! INSTRUCCIÓN DE CUIDADO
9. Limpie los escombros y mantenga la lona seca cuando guarde la tienda, guarde el
marco de metal y la lona por separado en la bolsa de transporte para evitar moho o daños.
10. Utilice detergente normal y agua para limpiar si la tienda está sucia.
! PRECAUCIONES
Se deben tomar las siguientes precauciones al salir al aire libre:
37. Asegúrese de que su tienda esté adecuadamente ventilada (especialmente si decide
ignorar la primera advertencia y usar un calentador en su tienda). El monóxido de carbono
es real y puede causar daños graves, como la muerte. Las rejillas de ventilación y las
pantallas están integradas en el cuerpo de la tienda.
38. Asegúrese de anclar su tienda de campaña correctamente (esta no es una tienda de
campaña independiente); siga estas instrucciones para conocer las prácticas de replanteo
adecuadas y asegúrese de que todos los vientos y clavijas estén bien fijados.
39. Asegúrese de que los niños estén supervisados dentro y alrededor de la tienda en todo
momento.
40. No utilice velas, fósforos ni llamas abiertas de ningún tipo dentro o cerca de una tienda
de campaña.
41. Es mejor no cocinar dentro de una tienda de campaña, pero si lo hace, no deje la
comida desatendida. Asegúrese de que las parrillas, aparatos de cocina y similares no se
coloquen a menos de 1 metro de la lona de la tienda. No se deben utilizar fogatas ni carbón
incandescente dentro de las tiendas o cerca de las lonas de las mismas; el fuego puede
propagarse muy rápidamente. No se deben utilizar fogatas ni carbón incandescente dentro
de las tiendas de campaña o cerca de las lonas de las mismas, ya que existe un riesgo
significativo de acumulación de monóxido de carbono (CO), particularmente en un espacio
confinado dentro de la tienda. Se deben revisar todos los tubos flexibles y acoplamientos
del quemador de gas para detectar fugas y que estén en buen estado.
4
42. Encienda fogatas a favor del viento y a varios metros de distancia de una tienda de
campaña y asegúrese de apagarlas por completo antes de abandonar el campamento o
antes de retirarse a pasar la noche.
43. Tenga mucho cuidado al usar linternas o calentadores que funcionan con combustible
dentro de una tienda de campaña y use linternas que funcionen con baterías siempre que
sea posible. No reposte lámparas, calentadores o estufas dentro de una tienda de
campaña. Apague o apague todas las linternas antes de ir a dormir.
44. No fume en una tienda de campaña ni almacene líquidos inflamables dentro de una
tienda de campaña. La instalación de estufas de leña o equipos de calefacción corre por su
cuenta y riesgo.
45.
GUARDA ESTAS INSTRUCCIONES
PARTES LISTA
NO.
NOMBRE
DIBUJO
CANTIDAD
1
Tienda de circo
1
2
poste central
1
3
poste lateral
8
4
Gran apuesta
8
5
5
pequeña apuesta
8
6
Martillo
1
7
bolsa de estaca
1
INSTRUCCIONES DE ENSAMBLAJE
PASO 1
Arreglar el cuerpo de la tienda
● Coloque su tienda en el suelo, mantenga el piso tenso con su compañero.
Sujeta 8 esquinas de la tienda con la estaca pequeña.
pequeña
apuesta
Martillo
! NOTA:
Por favor, no apueste demasiado
en este paso para realizar ajustes
posteriores.

6
La estaca mantiene un ángulo de 45°-60°
con el suelo, por lo que el ángulo de apoyo
La capacidad es la más grande.
PASO 2
Levanta la tienda
● Ensamble el poste central a través de la hebilla metálica incorporada.

7
● Una persona colocó el poste central en el punto medio del piso para
apuntalar la tienda.
PASO 3
Instalar poste de puerta

8
● Monte los postes laterales y apoye la pared lateral con ellos. Fije la hebilla
de plástico a los postes laterales para una mejor fijación.
ETAPA 4
Terminar el montaje de la tienda.

9
● Fije la cuerda de viento de una sola pieza con estacas grandes y apriete la
hebilla ajustable.
●Se recomienda sacar los tensores en la dirección de cada costura.
en el techo de la tienda para conseguir el efecto visual y la estabilidad
perfectos. (Haga ajustes a las estacas de la tienda después de este paso, si es
necesario).
Gran apuesta
Martillo
10
Dirección: Baoshanqu Shuangchenglu 803long 11hao 1602A-1609shi Shanghai
Importado a AUS: SIHAO PTY LTD . 1 ROKEVA STREET ASTWOOD NSW 2122 Australia
Importado a EE. UU.: Sanven Technology Ltd.Suite 250, 9166 Anaheim Place, Rancho
Cucamonga, CA 91730
Hecho en china
REP
EC
SHUNSHUN GmbH
Römeräcker 9 Z2021,76351
Linkenheim-Hochstetten,Germany
REP
UK
Pooledas Group Ltd
Unit 5 Albert Edward House, The Pavilions
Preston, United Kingdom


Teknisk Support och e-garanticertifikat www.vevor.com/support
JURT TÄLT ANVÄNDARMANUAL
We continue to be committed to provide you tools with competitive price.
"Save Half", "Half Price" or any other similar expressions used by us only represents an
estimate of savings you might benefit from buying certain tools with us compared to the major
top brands and does not necessarily mean to cover all categories of tools offered by us. You
are kindly reminded to verify carefully when you are placing an order with us if you are
actually saving half in comparison with the top major brands.

1
Modell: ZJTM1184
Have product questions? Need technical support? Please feel free to
contact us:
Technical Support and E-Warranty Certificate
www.vevor.com/support
NEED HELP? CONTACT US!
This is the original instruction, please read all manual instructions
carefully before operating. VEVOR reserves a clear interpretation of our
user manual. The appearance of the product shall be subject to the
product you received. Please forgive us that we won't inform you again if
there are any technology or software updates on our product.
YURT TENT

2
SPECIFIKATIONER
Modell
ZJTM1184
Produkt
storlek
Diameter : 5m _
Höjd : 2,8m
Dörrhöjd : 1,3m
Stängslets höjd :
1,4m
Färg
Beige
! FÖRSIKTIGHET
26. Se reservdelslistan för att kontrollera artiklar du fått noggrant, kassera inte något av
förpackningen förrän du har kontrollerat att du har alla delar och hårdvara! Tveka inte att
kontakta oss om du saknar delar , har trasiga delar eller har andra installationsproblem.
27. Välj en plan plats fri från stenar, grenar och andra hårda eller vassa föremål för att
installera ditt tält och se till att inga underjordiska verktyg finns. Sätt inte upp ditt tält under
träd eller höga byggnader för att undvika potentiella säkerhetsrisker orsakade av fallande
föremål.
28. Tältet är tillverkat för användning som en tillfällig struktur och uppfyller inte
konstruktionskoden, installatören är ansvarig för att förutse vädrets svårighetsgrad för rätt
tidpunkt för installation.
29. Eftersom tältet behöver fixas när som helst under byggprocessen, mönstra kl minst en
person som hjälper dig när det är dags att montera tältet.
30. De varningar, varningar och instruktioner som diskuteras i denna bruksanvisning kan
inte täcka alla möjliga förhållanden. Vi ansvarar inte för eventuella skador orsakade av
mänskliga faktorer. Om det finns något problem under användningen av produkten,
vänligen kontakta oss i tid.
! VARNING
11. Håll borta från barn, äldre och andra människor för att förhindra personskador orsakade
av fallande metallramar under installationen.

3
12. Håll alla lågor och värmekällor borta från detta tälttyg för att undvika att tältet brinner vid
oavsiktlig kontakt.
! SKÖTSELINSTRUKTION
11. Rengör skräp och håll duken torr när du förvarar tältet, förvara metallramen och duken
separat i väskan för att förhindra mögel eller skador.
12. Använd vanligt rengöringsmedel och vatten för rengöring om tältet är smutsigt.
! FÖRSIKTIGHETSÅTGÄRDER
Följande försiktighetsåtgärder bör vidtas när du går utomhus:
46. Se till att ditt tält är ordentligt ventilerat (särskilt om du bestämmer dig för att ignorera
den första varningen och använda en värmare i ditt tält). Kolmonoxid är äkta och kan orsaka
allvarliga skador såsom dödsfall. Ventilationer och skärmar är inbyggda i tältkroppen.
47. Var noga med att förankra ditt tält ordentligt – det här är inte ett fristående tält – följ
dessa instruktioner för korrekt stakning och se till att alla linor och pinnar är säkert fastsatta.
48. Se till att barn är under uppsikt i och runt tältet hela tiden.
49. Använd inte ljus, tändstickor eller öppna lågor av något slag i eller nära ett tält.
50. Det är bättre att inte laga mat i ett tält, men om du är det, lämna inte matlagningen utan
uppsikt. Se till att grillar, matlagningsapparater och liknande inte får placeras närmare än 1
meter från tältduken. Det bör inte användas av öppen eld eller glödande kol inuti tält eller
nära tältduk - eld kan spridas mycket snabbt. Det bör inte användas av öppen eld eller
glödande kol inuti tält eller nära tältduk eftersom det finns en betydande risk från ansamling
av kolmonoxid (CO), särskilt i ett begränsat utrymme inuti tältet. Alla flexibla slangar och
kopplingar till gasbrännaren bör kontrolleras för läckage och att de är i gott skick.
51. Bygg lägereldar i vinden och flera meter bort från ett tält och se till att släcka lägereldar
helt innan du lämnar en campingplats eller innan du går i pension för natten.
52. Iaktta extrem försiktighet när du använder bränsledrivna lyktor eller värmare inuti ett tält
och använd batteridrivna lyktor när det är möjligt. Tanka inte lampor, värmare eller spisar i
ett tält. Släck eller stäng av alla lyktor innan du går och lägger dig.
53. Rök inte i ett tält och förvara inte brandfarliga vätskor i ett tält. Installation av
vedbrännare eller värmeutrustning på egen risk.
54.
SPARA DESSA INSTRUKTIONER
4
DELAR LISTA
NEJ.
NAMN
TECKNING
ANTAL
1
Cirkustält
1
2
Mittstång
1
3
Sidostolpe
8
4
Stor insats
8
5
Liten insats
8
6
Hammare
1
7
Insatspåse
1
5
MONTERINGSANVISNING
STEG 1
Fixa tältkroppen
● Lägg ditt tält på marken, håll golvet spänt med din partner. Sätt ner 8
tälthörn med den lilla pålen.
Liten insats
Hammare
! NOTERA:
Vänligen satsa inte för mycket i
detta steg för senare justering.
Staven bibehåller en vinkel på 45°-60° med
marken, så bäringsvinkeln
kapaciteten är störst.
6
STEG 2
Stå upp tältet
● Montera mittstången genom det inbyggda metallspännet.
● En person satte mittstången på mitten av golvet för att stötta upp tältet.

7
STEG 3
Montera dörrstolpen
● Montera sidostolparna och stöd sidoväggen med dem. Fäst plastspännet på
sidostolparna för bättre fixering.
8
STEG 4
Avsluta monteringen av tältet
● Fäst lindningsrepet i ett stycke med stora pålar och dra åt det justerbara
spännet.
●Rekommendera att dra ut stavar i riktningen för varje söm
på tälttaket för att få den perfekta visuella effekten och stabiliteten. (Gör
justeringar av tältpålarna efter detta steg, om det behövs.)
Stor insats
Hammare

9
Adress: Baoshanqu Shuangchenglu 803long 11hao 1602A-1609shi Shanghai
Importerad till AUS: SIHAO PTY LTD . 1 ROKEVA STREETEASTWOOD NSW 2122
Australien
Importerad till USA: Sanven Technology Ltd.Suite 250, 9166 Anaheim Place, Rancho
Cucamonga, CA 91730
Tillverkad i Kina
REP
EC
SHUNSHUN GmbH
Römeräcker 9 Z2021,76351
Linkenheim-Hochstetten,Germany
REP
UK
Pooledas Group Ltd
Unit 5 Albert Edward House, The Pavilions
Preston, United Kingdom


Techniczny Certyfikat wsparcia i e-gwarancji www.vevor.com/support
JURTA NAMIOT INSTRUKCJA OBSŁUGI
We continue to be committed to provide you tools with competitive price.
"Save Half", "Half Price" or any other similar expressions used by us only represents an
estimate of savings you might benefit from buying certain tools with us compared to the major
top brands and does not necessarily mean to cover all categories of tools offered by us. You
are kindly reminded to verify carefully when you are placing an order with us if you are
actually saving half in comparison with the top major brands.

1
Model: ZJTM1184
Have product questions? Need technical support? Please feel free to
contact us:
Technical Support and E-Warranty Certificate
www.vevor.com/support
NEED HELP? CONTACT US!
This is the original instruction, please read all manual instructions
carefully before operating. VEVOR reserves a clear interpretation of our
user manual. The appearance of the product shall be subject to the
product you received. Please forgive us that we won't inform you again if
there are any technology or software updates on our product.
YURT TENT
2
SPECYFIKACJE
Model
ZJTM1184
Rozmia
r
produkt
u
Średnica : 5m _
Wysokość : 2,8 m
Wysokość drzwi :
1,3 m
Wysokość
ogrodzenia : 1,4m
Kolor
Beżowy
! OSTRZEŻENIA
31. Proszę zapoznać się z listą części, aby dokładnie sprawdzić otrzymane elementy. Nie
wyrzucaj żadnego opakowania, dopóki nie sprawdzisz, czy masz wszystkie części i sprzęt!
Nie wahaj się z nami skontaktować, jeśli brakuje Ci części , masz uszkodzone części lub
masz inne problemy z instalacją.
32. Wybierz równe miejsce, wolne od kamieni, gałęzi i innych twardych lub ostrych
przedmiotów, aby zainstalować namiot i upewnij się, że nie ma tam żadnych podziemnych
instalacji. Nie ustawiaj namiotu pod drzewami lub wysokimi budynkami, aby uniknąć
potencjalnych zagrożeń bezpieczeństwa spowodowanych przez spadające przedmioty.
33. Namiot został wyprodukowany do użytku jako konstrukcja tymczasowa i nie spełnia
norm konstrukcyjnych. Instalator jest odpowiedzialny za przewidzenie trudnych warunków
pogodowych w odpowiednim czasie montażu.
34. Ponieważ namiot wymaga naprawy na każdym etapie budowy, zapisz się pod adresem
przynajmniej jedną osobę, która pomoże Ci, gdy nadejdzie czas montażu namiotu.
35. Ostrzeżenia, przestrogi i instrukcje omówione w niniejszej instrukcji obsługi nie
obejmują wszystkich możliwych warunków. Nie ponosimy odpowiedzialności za szkody
spowodowane czynnikiem ludzkim. Jeśli wystąpią jakiekolwiek problemy podczas
użytkowania produkt, skontaktuj się z nami na czas.
! OSTRZEŻENIE
13. Trzymaj z dala od dzieci, osób starszych i innych osób, aby zapobiec obrażeniom ciała
spowodowanym przez spadające metalowe ramy podczas instalacji.

3
14. Trzymaj wszelkie źródła płomieni i ciepła z dala od materiału namiotu aby uniknąć
spalenia namiotu w wyniku przypadkowego kontaktu.
! INSTRUKCJA OPIEKI
13. Wyczyść gruz i utrzymuj suche płótno podczas przechowywania namiotu. Metalową
ramę i płótno przechowuj oddzielnie w torbie transportowej, aby zapobiec pleśni lub
uszkodzeniom.
14. Jeśli namiot jest brudny, do czyszczenia użyj zwykłego detergentu i wody.
! ŚRODKI OSTROŻNOŚCI
Wychodząc na zewnątrz należy zachować następujące środki ostrożności:
55. Upewnij się, że Twój namiot jest odpowiednio wentylowany (szczególnie jeśli
zdecydujesz się zignorować pierwsze ostrzeżenie i użyć w namiocie grzejnika). Tlenek
węgla istnieje naprawdę i może spowodować poważne szkody, w tym śmierć. W korpusie
namiotu wbudowane są otwory wentylacyjne i ekrany.
56. Pamiętaj o prawidłowym zakotwiczeniu namiotu – nie jest to namiot wolnostojący –
postępuj zgodnie z poniższymi instrukcjami dotyczącymi właściwych praktyk tyczenia i
upewnij się, że wszystkie linki i kołki są bezpiecznie zamocowane.
57. Upewnij się, że dzieci w namiocie i wokół niego są przez cały czas nadzorowane.
58. Nie używaj świec, zapałek ani żadnego otwartego ognia w namiocie lub w jego pobliżu.
59. Lepiej nie gotować w namiocie, ale jeśli tak jest, nie zostawiaj gotowania bez nadzoru.
Upewnij się, że grille, urządzenia kuchenne i podobne nie mogą być umieszczane bliżej niż
1 metr od płótna namiotu. Nie należy używać otwartego ognia ani rozżarzonego węgla
drzewnego wewnątrz namiotów lub w pobliżu poszycia namiotu – ogień może
rozprzestrzeniać się bardzo szybko. Nie należy używać otwartego ognia ani rozżarzonego
węgla drzewnego wewnątrz namiotów lub w pobliżu poszycia namiotu, ponieważ istnieje
znaczne ryzyko gromadzenia się tlenku węgla (CO), szczególnie w ograniczonej
przestrzeni wewnątrz namiotu. Wszystkie elastyczne przewody i złącza palnika gazowego
należy sprawdzić pod kątem wycieków i stanu technicznego.
60. Rozpalaj ogniska z wiatrem, kilka metrów od namiotu i pamiętaj o całkowitym ugaszeniu
ognisk przed opuszczeniem kempingu lub przed udaniem się na noc.
61. Zachowaj szczególną ostrożność podczas korzystania z latarni lub grzejników
zasilanych paliwem wewnątrz namiotu i, jeśli to możliwe, używaj latarni na baterie. Nie
4
tankuj lamp, grzejników ani pieców wewnątrz namiotu. Przed pójściem spać zgaś lub
wyłącz wszystkie latarnie.
62. Nie pal w namiocie i nie przechowuj w nim łatwopalnych płynów. Montaż palników na
drewno lub urządzeń grzewczych odbywa się na własne ryzyko.
63.
ZACHOWAJ TE INSTRUKCJE
CZĘŚCI LISTA
NIE.
NAZWA
RYSUNEK
ILOŚĆ
1
Namiot cyrkowy
1
2
Słup środkowy
1
3
Słup boczny
8
4
Duża stawka
8
5
Mała stawka
8
5
6
Młotek
1
7
Torba na stawki
1
INSTRUKCJA MONTAŻU
KROK 1
Napraw korpus namiotu
● Połóż namiot na ziemi, utrzymuj podłogę napiętą razem z partnerem. Za
pomocą małego kołka zamocuj 8 rogów namiotu.
Mała
stawka
Młotek
! NOTATKA:
Na tym etapie nie należy zbyt
mocno stawiać w celu późniejszej
regulacji.

6
Palka utrzymuje z podłożem kąt 45°-60°, a
więc kąt podparcia
pojemność jest największa.
KROK 2
Podeprzyj namiot
● Zamontuj słupek środkowy poprzez wbudowaną metalową klamrę.

7
● Jedna osoba umieściła słupek środkowy na środkowym punkcie podłogi w
celu podparcia namiotu.
KROK 3
Zamontuj słupek drzwi
8
● Zamontuj słupki boczne i podeprzyj nimi ścianę boczną. Przymocuj
plastikową klamrę do bocznych słupków, aby zapewnić lepsze zamocowanie.
KROK 4
Zakończ montaż namiotu
9
● Zamocuj jednoczęściową linę wiatrową za pomocą dużych kołków i
zaciśnij regulowaną klamrę.
●Zalecamy przeciąganie odciągów wzdłuż kierunku każdego szwu
na dachu namiotu, aby uzyskać doskonały efekt wizualny i stabilność. (W
razie potrzeby po tym kroku dostosuj paliki namiotu.)
Duża stawka
Młotek
Adres: Baoshanqu Shuangchenglu 803long 11hao 1602A-1609shi Szanghaj
Import do AUS: SIHAO PTY LTD . 1 ROKEVA STREETEASTWOOD NSW 2122 Australia
10
Import do USA: Sanven Technology Ltd.Suite 250, 9166 Anaheim Place, Rancho
Cucamonga, CA 91730
Wyprodukowano w Chinach
REP
EC
SHUNSHUN GmbH
Römeräcker 9 Z2021,76351
Linkenheim-Hochstetten,Germany
REP
UK
Pooledas Group Ltd
Unit 5 Albert Edward House, The Pavilions
Preston, United Kingdom


Technisch Ondersteuning en e-garantiecertificaat www.vevor.com/support
YURT-TENT HANDLEIDING
We continue to be committed to provide you tools with competitive price.
"Save Half", "Half Price" or any other similar expressions used by us only represents an
estimate of savings you might benefit from buying certain tools with us compared to the major
top brands and does not necessarily mean to cover all categories of tools offered by us. You
are kindly reminded to verify carefully when you are placing an order with us if you are
actually saving half in comparison with the top major brands.

1
Model: ZJTM1184
Have product questions? Need technical support? Please feel free to
contact us:
Technical Support and E-Warranty Certificate
www.vevor.com/support
NEED HELP? CONTACT US!
This is the original instruction, please read all manual instructions
carefully before operating. VEVOR reserves a clear interpretation of our
user manual. The appearance of the product shall be subject to the
product you received. Please forgive us that we won't inform you again if
there are any technology or software updates on our product.
YURT TENT

2
SPECIFICATIES
Model
ZJTM1184
Product
grootte
Diameter : 5m _
Hoogte : 2,8 m
Hoogte deur : 1,3 m
Hoogte hek : 1,4m
Kleur
Beige
! WAARSCHUWINGEN
36. Raadpleeg de onderdelenlijst om de items die u heeft ontvangen zorgvuldig te
controleren. Gooi de verpakking niet weg totdat u hebt gecontroleerd of u over alle
onderdelen en hardware beschikt! Aarzel niet om contact met ons op te nemen als u
onderdelen mist , kapotte onderdelen heeft of andere installatieproblemen heeft.
37. Kies een vlakke plek uit, vrij van rotsen, takken en andere harde of scherpe voorwerpen
om uw tent te installeren en zorg ervoor dat er geen ondergrondse voorzieningen aanwezig
zijn. Zet uw tent niet op onder bomen of hoge gebouwen om mogelijke veiligheidsrisico's
veroorzaakt door vallende voorwerpen te voorkomen.
38. De tent is vervaardigd voor gebruik als tijdelijke structuur en voldoet niet aan de
structurele voorschriften. De installateur is verantwoordelijk voor het anticiperen op de
weersomstandigheden voor het juiste tijdstip van installatie.
39. Omdat de tent op elk moment tijdens het bouwproces gerepareerd moet worden, kunt u
zich aanmelden bij minimaal één persoon om u te helpen wanneer het tijd is om de tent op
te zetten.
40. De waarschuwingen, waarschuwingen en instructies die in deze handleiding worden
besproken, kunnen niet alle mogelijke omstandigheden dekken. Wij zijn niet
verantwoordelijk voor schade veroorzaakt door menselijke factoren. Als er een probleem is
tijdens het gebruik van het product, neem dan tijdig contact met ons op.
! WAARSCHUWING

3
15. Houd het apparaat uit de buurt van kinderen, ouderen en andere mensen om
persoonlijk letsel veroorzaakt door vallende metalen frames tijdens de installatie te
voorkomen.
16. Houd alle vlammen en warmtebronnen uit de buurt van dit tentdoek om te voorkomen
dat de tent door onbedoeld contact verbrandt.
! ZORGINSTRUCTIE
15. Reinig vuil en houd het canvas droog wanneer u de tent opbergt. Bewaar het metalen
frame en het canvas afzonderlijk in de draagtas om schimmel of schade te voorkomen.
16. Gebruik normaal schoonmaakmiddel en water om de tent schoon te maken als deze
vuil is.
! VOORZORGSMAATREGELEN
Als u naar buiten gaat, moeten de volgende voorzorgsmaatregelen worden genomen:
64. Zorg ervoor dat uw tent goed geventileerd is (vooral als u besluit de eerste
waarschuwing te negeren en een verwarming in uw tent te gebruiken). Koolmonoxide is
reëel en kan ernstige schade veroorzaken, zoals de dood. Ventilatieopeningen en
schermen zijn in de tentbehuizing ingebouwd.
65. Zorg ervoor dat u uw tent goed verankert – dit is geen vrijstaande tent – volg deze
instructies voor de juiste uitzetpraktijken en zorg ervoor dat alle scheerlijnen en haringen
stevig vastzitten.
66. Zorg ervoor dat kinderen te allen tijde onder toezicht staan in en rond de tent.
67. Gebruik geen kaarsen, lucifers of open vuur van welke aard dan ook in of nabij een tent.
68. Het is beter om niet in een tent te koken, maar als dat wel het geval is, laat het koken
dan niet onbeheerd achter. Zorg ervoor dat grills, kooktoestellen en dergelijke niet dichter
dan 1 meter bij het tentdoek worden geplaatst. Er mag geen gebruik worden gemaakt van
open vuur of gloeiende houtskool in tenten of in de buurt van tentdoek - vuur kan zich zeer
snel verspreiden. Er mag geen gebruik worden gemaakt van open vuur of gloeiende
houtskool in tenten of in de buurt van tentdoek, aangezien er een aanzienlijk risico bestaat
door de ophoping van koolmonoxide (CO), vooral in een besloten ruimte in de tent. Alle
flexibele slangen en koppelingen naar de gasbrander moeten worden gecontroleerd op
lekkage en in goede staat zijn.
4
69. Bouw kampvuren met de wind mee en op enkele meters afstand van een tent en zorg
ervoor dat u de kampvuren volledig dooft voordat u een camping verlaat of voordat u zich
terugtrekt voor de nacht.
70. Wees uiterst voorzichtig bij het gebruik van lantaarns of verwarmingstoestellen op
brandstof in een tent en gebruik waar mogelijk lantaarns die op batterijen werken. Vul geen
lampen, kachels of kachels bij in een tent. Doof of schakel alle lantaarns uit voordat u gaat
slapen.
71. Rook niet in een tent en bewaar geen brandbare vloeistoffen in een tent. Installatie van
houtkachels of verwarmingsapparatuur is op eigen risico.
72.
BEWAAR DEZE INSTRUCTIES
ONDERDELEN LIJST
NEE.
NAAM
TEKENING
AANTAL
1
Circustent
1
2
Middelste paal
1
3
Zijpaal
8
4
Grote inzet
8
5
5
Kleine inzet
8
6
Hamer
1
7
Staak tas
1
MONTAGE-INSTRUCTIES
STAP 1
Bevestig het tentlichaam
● Zet je tent op de grond, houd samen met je partner de vloer strak. Zet 8
tenthoeken vast met de kleine paal.
Kleine inzet
Hamer
! OPMERKING:
Zet bij deze stap niet teveel in op
latere aanpassingen.
6
De paal behoudt een hoek van 45°-60° met
de grond, dus de steunhoek
capaciteit is het grootst.
STAP 2
Zet de tent op
● Monteer de middenpaal door de ingebouwde metalen gesp.

7
● Eén persoon plaatste de middenpaal op het middelste punt van de vloer om
de tent te ondersteunen.
STAP 3
Deurpaal installeren

8
● Monteer de zijpalen en ondersteun daarmee de zijwand. Bevestig de plastic
gesp aan de zijpalen voor een betere bevestiging.
STAP 4
Voltooi de montage van de tent
9
● Bevestig het uit één stuk bestaande windtouw met grote stokken en draai
de verstelbare gesp vast.
●Wij adviseren om de scheerlijnen langs de richting van elke naad uit te
trekken
op het tentdak voor een perfect visueel effect en stabiliteit. (Maak na deze
stap indien nodig aanpassingen aan de tentharingen.)
Grote inzet
Hamer
10
Adres: Baoshanqu Shuangchenglu 803long 11hao 1602A-1609shi Shanghai
Geïmporteerd naar AUS: SIHAO PTY LTD . 1 ROKEVA STREETEASTWOOD NSW 2122
Australië
Geïmporteerd naar de VS: Sanven Technology Ltd.Suite 250, 9166 Anaheim Place,
Rancho Cucamonga, CA 91730
Gemaakt in China
REP
EC
SHUNSHUN GmbH
Römeräcker 9 Z2021,76351
Linkenheim-Hochstetten,Germany
REP
UK
Pooledas Group Ltd
Unit 5 Albert Edward House, The Pavilions
Preston, United Kingdom


