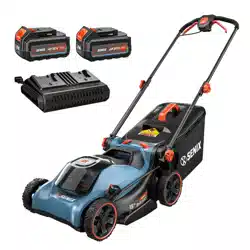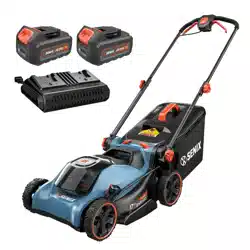

EnglishV 1,1SENIXTOOLS.COM
CORDLESS PUSH LAWN
MOWER
• SAFETY
• ASSEMBLY
• OPERATION
• MAINTENANCE
• WARRANTY
CAUTION: Before using this tool, please read this manual completely,
and follow all operating safety measures.
YAT USA INC. 10506 Bryton Corporate Center Dr, #500 Huntersville, NC 28078
For customer support, please call 1-800-261-3981 or email us at [email protected]
Instruction Manual
Model: LPPX2-M4
LPPX2-M5
EN - 2
SENIXTOOLS.COM
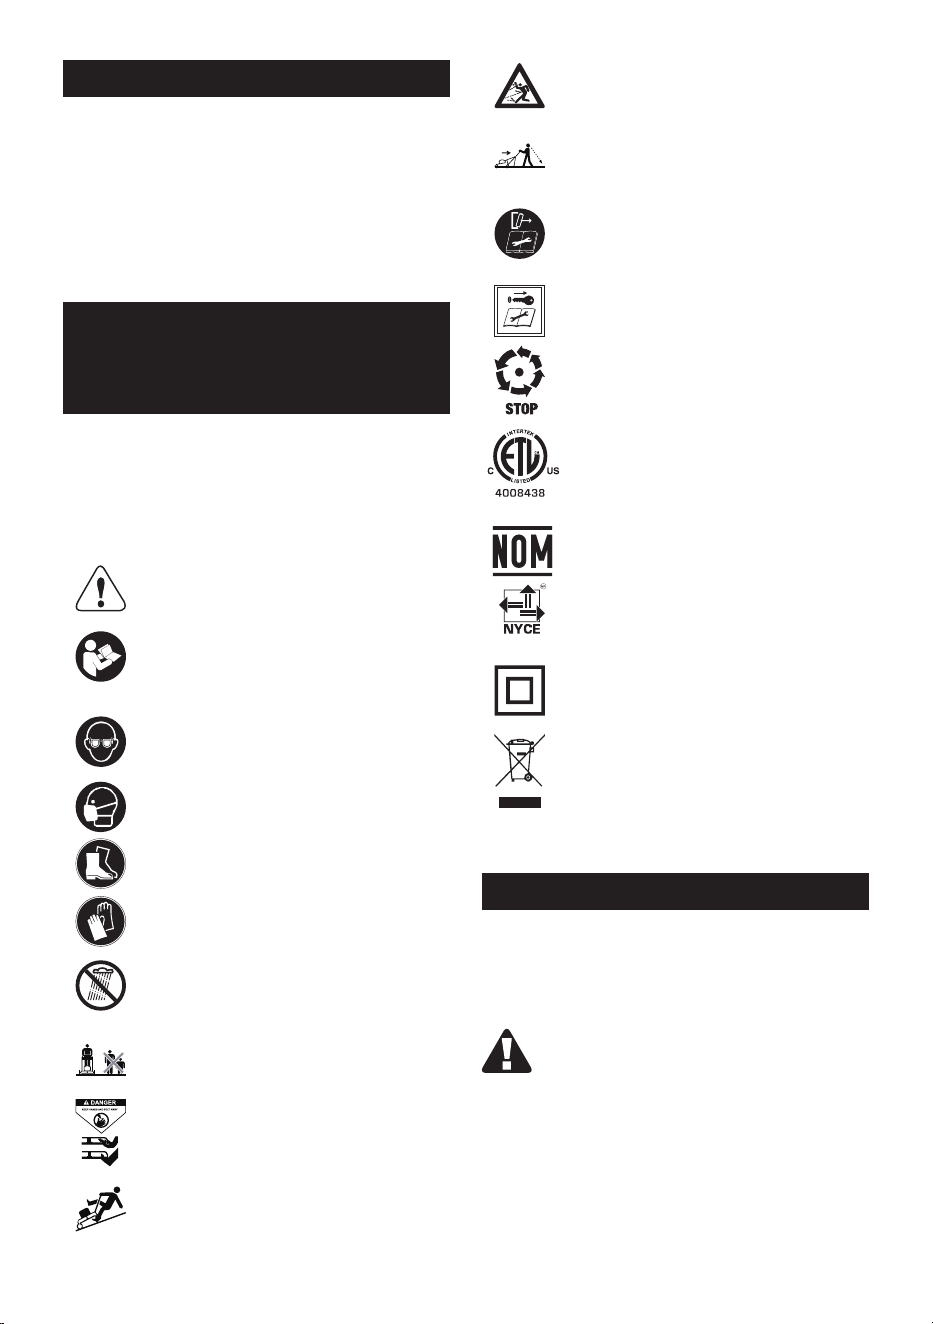
SAFETY &
INTERNATIONAL
SYMBOLS
Explanation of Safety & international symbols
describes safety and international symbols
and pictographs that may appear on this
product. Read the operator’s manual for
complete safety, assembly, operating and
maintenance and repair information.
Caution / Warning.
WARNING - To reduce the risk of
injury, user must read instruction
manual.
Wear eye protection.
Wear a dust mask.
Wear safety footwear.
Wear protective gloves.
Do not expose the product to rain or
wet conditions.
Keep bystanders and children a
safe distance away.
DANGER! Rotating blades. Keep
hands and feet away.
Slip on slope hazard – Use extra
caution when mowing on slopes to
prevent slip and fall accidents.
Thrown objects and rotating blade
can cause severe injury.
Look behind when backing up with
the lawn mower.
WARNING – Disconnect battery
before maintenance.
WARNING – Remove the disabling
device before maintenance.
Blades continue to rotate after
machine is switched off.
Complies with ETL standards.
Mexican Certification Mark.
Class II equipment (Charger)
Power tools that are no longer
usable and defective or used
battery packs/batteries, must be
collected separately and disposed
of in an environmentally correct
manner.
SAFETY INSTRUCTIONS
ORIGINAL INSTRUCTIONS
LAWNMOWER SAFETY
WARNINGS
WARNING!
Read all safety warnings, instructions,
illustrations and specications provided
with this lawnmower.
Failure to follow all
instructions listed below may result in electric
shock, re and/or serious injury.
Save all warnings and instructions for future
reference.
TABLE OF CONTENTS
SAFETY & INTERNATIONAL SYMBOLS ..............2
SAFETY INSTRUCTIONS .........................................2
KNOW YOUR UNIT .....................................................6
SPECIFICATIONS* ..................................................... 7
ASSEMBLY ...................................................................8
OPERATION ................................................................10
MAINTENANCE .........................................................14
TROUBLESHOOTING .............................................. 18
WARRANTY ...............................................................20

3 - EN
SENIXTOOLS.COM
1) Work Area Safety
a. To avoid bystander contact with the
moving blade or a thrown object injury,
keep the area of operation clear of
all bystanders, particularly small
children. Stop the lawnmower and any
attachment(s) if anyone enters the area.
Contact with the moving blade or thrown
objects may result in serious personal
injury or death.
b. Only operate the lawnmower in daylight or
good artificial light. Low light or dark areas
are more prone to accidents.
c. Do not operate lawnmowers in explosive
atmospheres, such as in the presence
of flammable liquids, gases or dust.
Lawnmowers create sparks which may
ignite the dust or fumes.
d. Do not use the lawnmower in bad weather
conditions, especially when there is a risk
of lightning.
This decreases the risk of
being struck by lightning.
e. Thoroughly inspect the area where the
lawnmower is to be used and remove all
stones, sticks, wires, bones, and other
foreign objects.
Thrown objects can cause
personal injury.
2) Electrical Safety
a. Do not expose the lawnmower to rain or
wet conditions.
3) Personal Safety
a. Use personal protective equipment.
Always wear eye protection. Protective
equipment will reduce personal injuries.
b. Dress properly. Do not wear loose clothing
or jewellery. Keep your hair and clothing
away from moving parts.
Loose clothes,
jewellery or long hair can be caught in
moving parts.
c. While operating the lawnmower, always
wear long trousers.
Exposed skin
increases the likelihood of injury from
thrown objects.
d. While operating the lawnmower, always
wear non-slip and protective footwear. Do
not operate the lawnmower when barefoot
or wearing open sandals.
This reduces the
chance of injury to the feet from contact
with the moving blade.
e. Prevent unintentional starting. Ensure
the switch is in the off-position before
connecting to power source and/or
batteries, picking up or carrying the
lawnmower. Carrying a lawnmower with
your finger on the switch or energising a
lawnmower that has the switch on invites
accidents.
f. Remove any adjusting key or wrench
before turning the lawnmower on. A
wrench or a key left attached to a rotating
part of the lawnmower may result in
personal injury.
g. Don’t Overreach –Keep proper footing and
balance at all times. This enables better
control of the lawnmower in unexpected
situations.
h. Stay alert, watch what you are doing and
use common sense when operating a
lawnmower. Do not use a lawnmower while
you are tired or under the influence of
drugs, alcohol or medication. A moment
of inattention while operating a lawnmower
may result in serious personal injury.
i. Do not let familiarity gained from frequent
use of lawnmower allow you to become
complacent and ignore lawnmower safety
principles. A careless action can cause
severe injury within a fraction of a second.
j. To avoid operator blade contact or a
thrown object injury, stay in the operator
zone behind the lawnmower handles.
Blade contact or thrown objects may result
in serious personal injury.
k. Do not touch blades and other hazardous
moving parts while they are still in motion.
This reduces the risk of injury from moving
parts.
l. Use of rubber gloves and footwear is
recommended when working outdoors.
m. Use Safety Glasses – Always use face or
dust mask if operation is dusty.
n. Keep proper footing and balance at all
times. This enables better control of the
lawnmower in unexpected situations.
4) Lawnmower Use And Care
a. Use the lawnmower and accessories
in accordance with these instructions,
taking into account the working conditions
and the work to be performed. Use of the
lawnmower for operations different from
those intended may result in a hazardous
situation.
b. Before using the lawnmower, always
visually inspect to see that the blade(s)
and the blade(s) assembly are properly
secured and not worn or damaged. Loose,
worn, or damaged parts may increase the
risk of injury.
c. Keep guards and other safety devices in

EN - 4
SENIXTOOLS.COM
place, properly mounted, and in working
order. A guard or other safety device that
is loose, damaged, or is not functioning
correctly may result in personal injury.
d. Keep all cooling air inlets clear of debris.
Blocked air inlets and debris may result in
overheating or risk of fire.
e. Do not use the lawnmower if the switch
does not turn it on and off. Any lawnmower
that cannot be controlled with the switch is
dangerous and must be repaired.
f. Do not force the lawnmower. Use the
correct lawnmower for your application.
The correct lawnmower will do the job
better and safer at the rate for which it was
designed.
g. Be aware of the mower and attachment
discharge direction and do not point
the mower discharge at anyone. Thrown
objects can cause personal injury.
h. Use extreme caution when reversing
or pulling the lawnmower towards you.
Always be aware of your surroundings.
This reduces the risk of tripping during
operation.
i. Operate the disabling device and/or
remove all battery packs, if removable,
from the lawnmower before making any
adjustments, changing accessories, or
storing the lawnmower. Such preventive
safety measures reduce the risk of starting
the lawnmower accidentally.
j. Keep handles and grasping surfaces
dry, clean and free from oil and grease.
Slippery handles and grasping surfaces do
not allow for safe handling and control of
the lawnmower in unexpected situations.
k. Check the grass bag frequently for wear or
deterioration. A worn or damaged grass bag
may increase the risk of personal injury.
l. Before removing the grass bag, turn off
the motor and wait until the blade(s)
comes to a complete stop. The cutting
blade(s) continues to rotate after the
blade control is released. Never place any
part of the body in the blade(s) area until
you are certain the motor is off and the
blade(s) has stopped rotating. Contact
with the moving cutting blade(s) may result
in serious personal injury.
m. Before unclogging the chute, turn off the
motor, wait until the blade(s) comes to
a complete stop, operate the disabling
device and/or remove all batteries, if
removable. The cutting blade(s) continues
to rotate after the blade control is
released. Never place any part of the body
in the blade(s) area until you are certain
the motor is off and the blade(s) has
stopped rotating. Contact with the moving
cutting blade(s) may result in serious
personal injury.
n. Before cleaning or inspecting the
lawnmower, turn off the motor, wait
until the blade(s) comes to a complete
stop, operate the disabling device and/
or remove all batteries, if removable.
Accidental contact with the moving blade
and moving parts may result in personal
injury.
o. Maintain the lawnmower and accessories.
Check for misalignment or binding of
moving parts, breakage of parts and
any other condition that may affect the
lawnmower’s operation. If damaged, have
the lawnmower repaired before use. Many
accidents are caused by poorly maintained
lawnmowers.
p. Store idle lawnmowers out of the reach
of children and do not allow persons
unfamiliar with the lawnmower or these
instructions to operate the lawnmower.
Lawnmowers are dangerous in the hands of
untrained users.
q. Do not operate the lawnmower in wet
grass. Walk, never run. This reduces the
risk of slipping and falling which may result
in personal injury.
r. Do not operate the lawnmower on
excessively steep slopes. This reduces the
risk of loss of control, slipping and falling
which may result in personal injury.
s. When working on slopes, always be sure of
your footing, always work across the face
of slopes, never up or down and exercise
extreme caution when changing direction.
This reduces the risk of loss of control,
slipping and falling which may result in
personal injury.
5) Battery Lawnmower Use And Care
a. Use lawnmowers only with specifically
designated battery packs.
Use of any
other battery packs may create a risk of
injury and fire.
b. Recharge only with the charger specified
by the manufacturer. A charger that is
suitable for one type of battery pack(s) may
create a risk of fire when used with another
battery pack(s).
c. Follow all charging instructions and do not
charge the battery pack(s) or lawnmower

5 - EN
SENIXTOOLS.COM
outside the temperature range specified in
the instructions. Charging improperly or at
temperatures outside the specified range
may damage the battery and increase the
risk of fire.
d. Do not use a battery pack or lawnmower
that is damaged or modified. Damaged
or modified batteries may exhibit
unpredictable behaviour resulting in fire,
explosion or risk of injury.
e. Do not expose a battery pack(s)
or lawnmower to fire or excessive
temperature. Exposure to fire or
temperature above 212°F (100°C) may
cause an explosion.
f. Under abusive conditions, liquid may
be ejected from the battery(ies); avoid
contact. If contact accidentally occurs,
flush with water. If liquid contacts eyes,
additionally seek medical help. Liquid
ejected from the battery(ies) may cause
irritation or burns.
g. When battery packs are not in use, keep
them away from other metal objects, like
paper clips, coins, keys, nails, screws or
other small metal objects that can make a
connection from one terminal to another.
Shorting the battery terminals together
may cause burns or a fire.
WARNING!
Use only SENIX X2 batteries (B40X2, B50X2,
and B80X2) and chargers (CHX2, CHQX2,
CHQX2-M and CHDX2-M).
6) Service
a. Have your lawnmower serviced by a
qualified repair person using only identical
replacement parts.
This will ensure that
the safety of the lawnmower is maintained.
Use of parts which do not meet the original
equipment specifications may lead to
improper performance and compromise
safety.
b. Never service damaged battery packs.
Service of battery packs should only
be performed by the manufacturer or
authorized service providers.
LAWNMOWER SAFETY
WARNINGS
a. Do not use the lawnmower in bad
weather conditions.
b. especially when there is a risk of
lightning. This decreases the risk of being
struck by lightning.
c. Thoroughly inspect the area for wildlife
where the lawnmower is to be used.
Wildlife may be injured by the lawnmower
during operation.
d. Thoroughly inspect the area where the
lawnmower is to be used and remove all
stones, sticks, wires, bones, and other
foreign objects. Thrown objects can cause
personal injury.
e. Before using the lawnmower, always
visually inspect to see that the blade
and the blade assembly are not worn or
damaged. Worn or damaged parts increase
the risk of injury.
f. Check the grass catcher frequently for
wear or deterioration. A worn or damaged
grass catcher may increase the risk of
personal injury.
g. Keep guards in place. Guards must be in
working order and be properly mounted.
A guard that is loose, damaged, or is not
functioning correctly may result in personal
injury.
h. Keep all cooling air inlets clear of
debris. Blocked air inlets and debris may
result in overheating or risk of fire.
i. While operating the lawnmower, always
wear non-slip and protective footwear.
Do not operate the lawnmower when
barefoot or wearing open sandals. This
reduces the chance of injury to the feet
from contact with the moving blade.
j. While operating the lawnmower,
always wear long trousers. Exposed
skin increases the likelihood of injury from
thrown objects.
k. Do not operate the lawnmower in wet
grass. Walk, never run. This reduces the
risk of slipping and falling which may result
in personal injury.
l. Do not operate the lawnmower on
excessively steep slopes. This reduces
the risk of loss of control, slipping and falling
which may result in personal injury.
m. When working on slopes, always be sure
of your footing, always work across
the face of slopes, never up or down
and exercise extreme caution when
changing direction. This reduces the risk
of loss of control, slipping and falling which
may result in personal injury.
n. Use extreme caution when reversing
or pulling the lawnmower towards you.
Always be aware of your surroundings.

EN - 6
SENIXTOOLS.COM
This reduces the risk of tripping during
operation.
o. Do not touch blades and other
hazardous moving parts while they are
still in motion. This reduces the risk of
injury from moving parts.
p. When clearing jammed material or
cleaning the lawnmower, make sure all
power switches are off and the battery
has been removed. Unexpected operation
of the lawnmower may result in serious
personal injury.
q. Use Right Appliance – Do not use lawn
mower for any job except that for which it
is intended.
r. Maintain Lawn Mower With Care – Keep
cutting edges sharp and clean for best and
safest performance. Follow instructions
for lubricating and changing accessories.
s. Keep blades sharp.
t. Keep hands and feet away from cutting
area.
u. Objects struck by the lawn mower blade
can cause severe injuries to persons. The
lawn should always be carefully examined
and cleared of all objects prior to each
mowing.
v. If lawn mower strikes a foreign object,
follow these steps:
I) Stop lawn mower. Release the switch.
II) Unplug power cord.
III) Inspect for damage.
IV) Repair any damage before restarting
and operating the lawn mower.
V) Use identical replacement blades only.
SAVE THESE
INSTRUCTIONS
INTENDED USE
This lawn mower is only intended for cutting
grass in domestic use. Do not use it for other
purpose.
7 - EN
SENIXTOOLS.COM
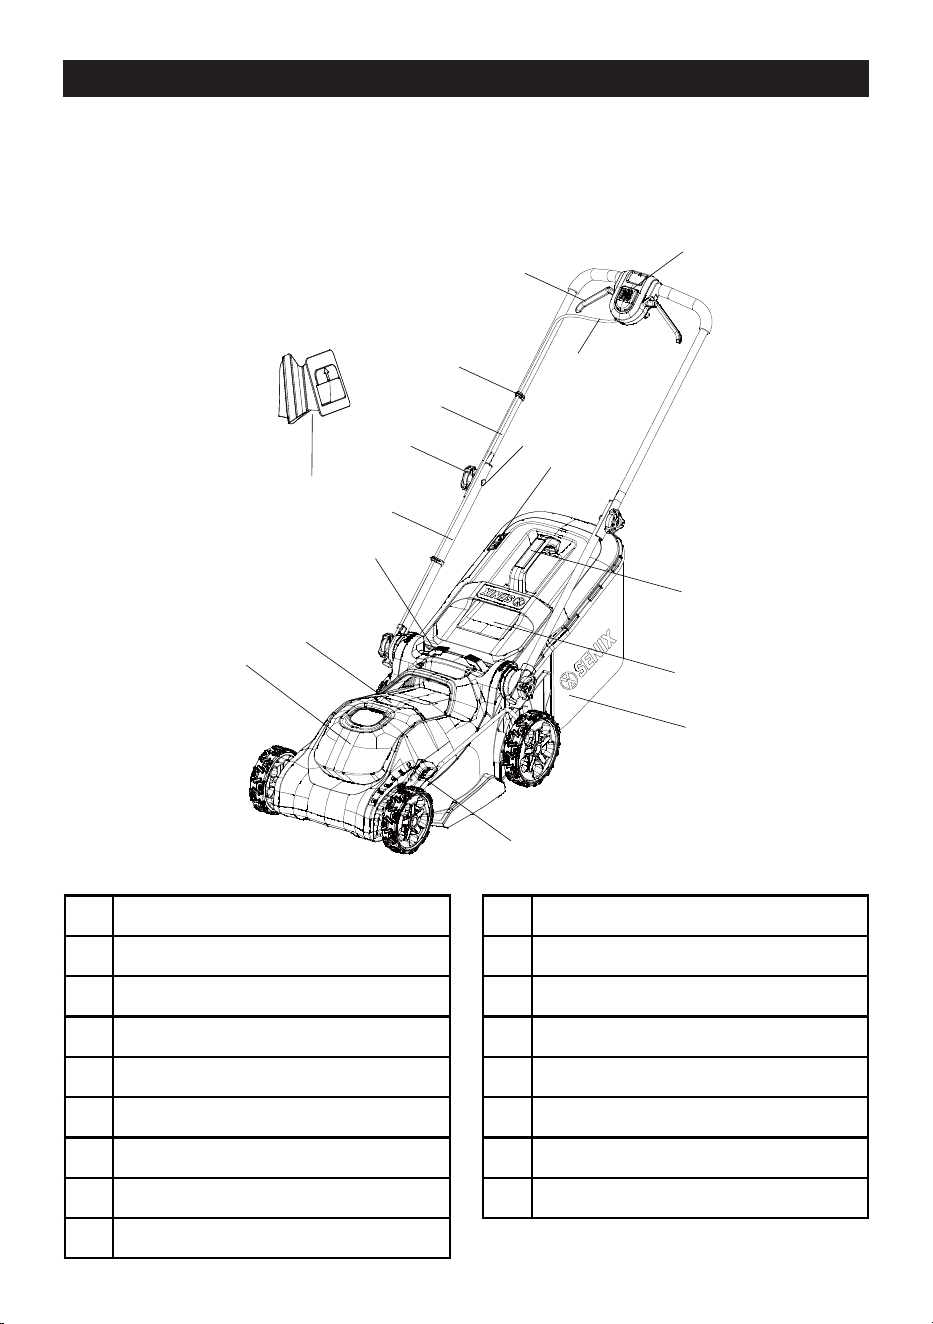
KNOW YOUR UNIT
APPLICATIONS
Model: LPPX2-M4 and LPPX2-M5
As a cordless lawn mower:
Cutting grass in domestic use.
1
2
3
4
5
6
7
8
9
11
12
13
15
16
14
17
10
1 Safety Button
2 Switch Trigger
3 Power Cord
4 Cord Clip
5 Upper Handle
6 Handle Knob
7 Bolt
8 Lower Handle Bar
9 Quick-adjust Lever
10 Battery Level Indicator / ECO Button
11 Battery Compartment Cover
12 Cutting-height Adjustment Lever
13 Grass Bag Assembly
14 Discharge Chute Door
15 Grass Bag Handle
16 Grass Bag Volume Indicator
17 Mulching Insert

EN - 8
SENIXTOOLS.COM
SPECIFICATIONS*
Model LPPX2-M4 LPPX2-M5
Input Voltage 36 V (40 V Max*)
Motor Power Output 800 W
No-Load Speed 3200 RPM / 2900 RPM (ECO)
Cutting Capacity 15" 17"
Mowing Functions 2-in-1 function: Mulching, Bagging
Height Adjustment 6 Positions
Minimum Cut Height 1"
Maximum Cut Height 3"
Wheel Size (Front/Rear) 6.3" / 7" 7" / 8.6"
Drive Type Push
Grass Collection Bag 1.3 Bushels 1.4 Bushels
Maximum Working Time
Up to 45 min
(4.0Ah Battery)
Up to 45 min
(5.0Ah Battery)
Maximum Area Coverage 1/4 Acre
Weight (Tool Only) 31.9 lb 35.3 lb
*40 V Max battery, maximum initial battery voltage (measured without a workload) is 40 V. The
nominal voltage is 36 V.
9 - EN
SENIXTOOLS.COM
ASSEMBLY
1. Unpack all parts and lay them on a flat,
stable surface:
2. Remove all packing materials and shipping
devices, if applicable.
3. The scope of delivery varies depending on
the country and purchased variant.
Model of LPPX2-M4 and LPPX2-M5
• Lawn mower x1
• Upper handle x1
• Mulching insert x1
• Grass bag assembly x1
• Grass bag handle x1
• Handle knob x2
• Bolt x2
• Cord clip x2
• Instruction manual x1
4. If you find that parts are missing or show
damage do not use the product but
contact your dealer. Using an incomplete
or damaged product represents a hazard
to people and property.
5. Ensure that you have all the accessories
and tools needed for assembly and
operation. This also includes suitable
personal protective equipment.
WARNING!
Wear protective gloves for this
assembly work and always lay the
product on a flat and stable surface
while assembling. Follow the
assembly instructions step-by-step
and use the pictures provided as a
visual guide to easily assemble the
product! Do not insert the battery
pack before the power tool is
completely assembled or adjusted!
WARNING!
To prevent accidental starting that could
cause serious personal injury, always remove
the battery pack from the machine when
assembling parts.
WARNING!
Do not attempt to modify this tool or create
accessories not recommended for use
with this mower. Any such alteration or
modication is misuse and could result in a
hazardous condition leading to serious injury.
INSTALLING THE UPPER
HANDLE
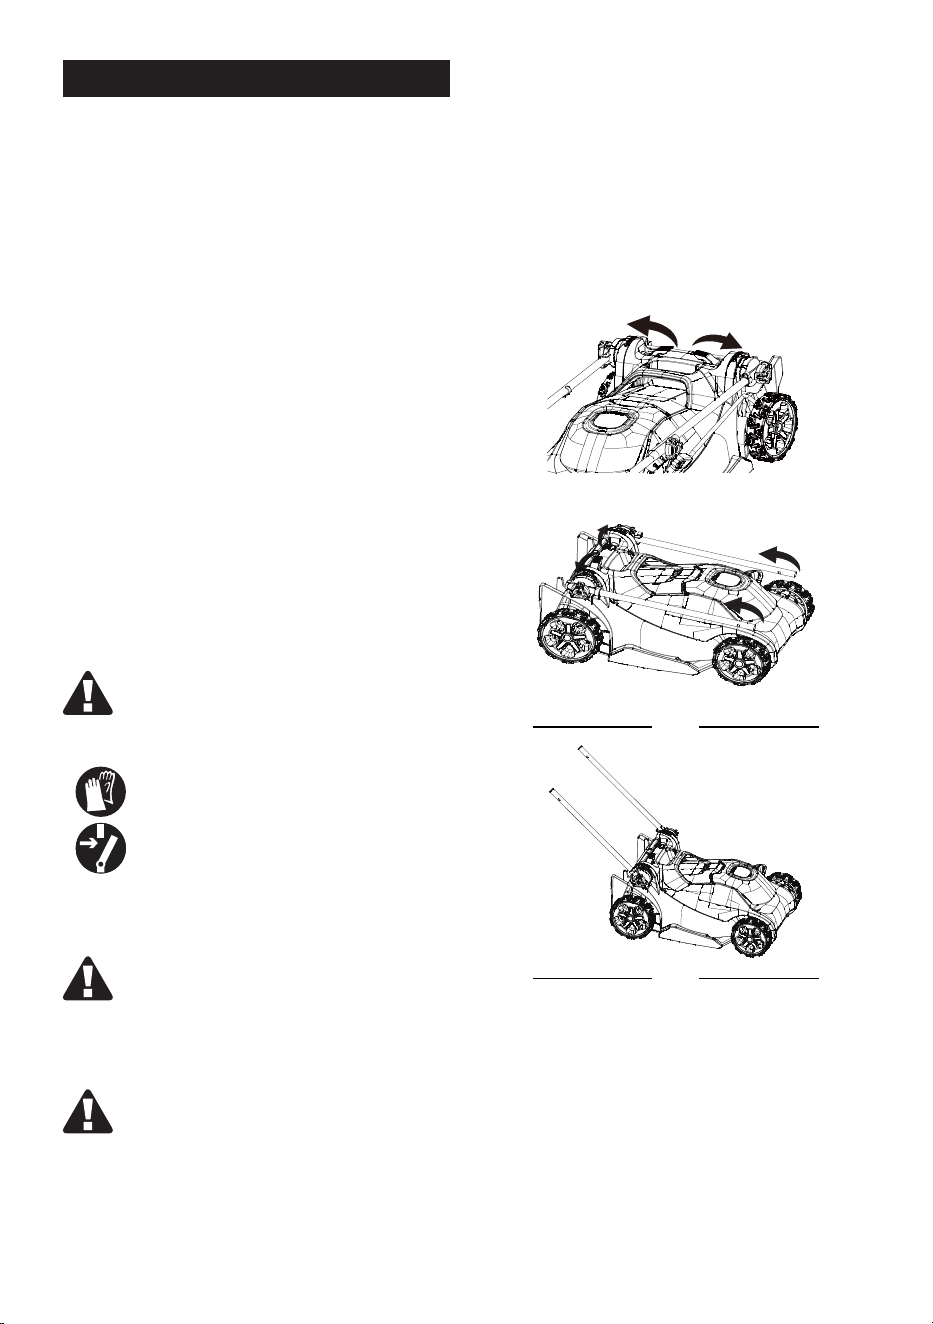
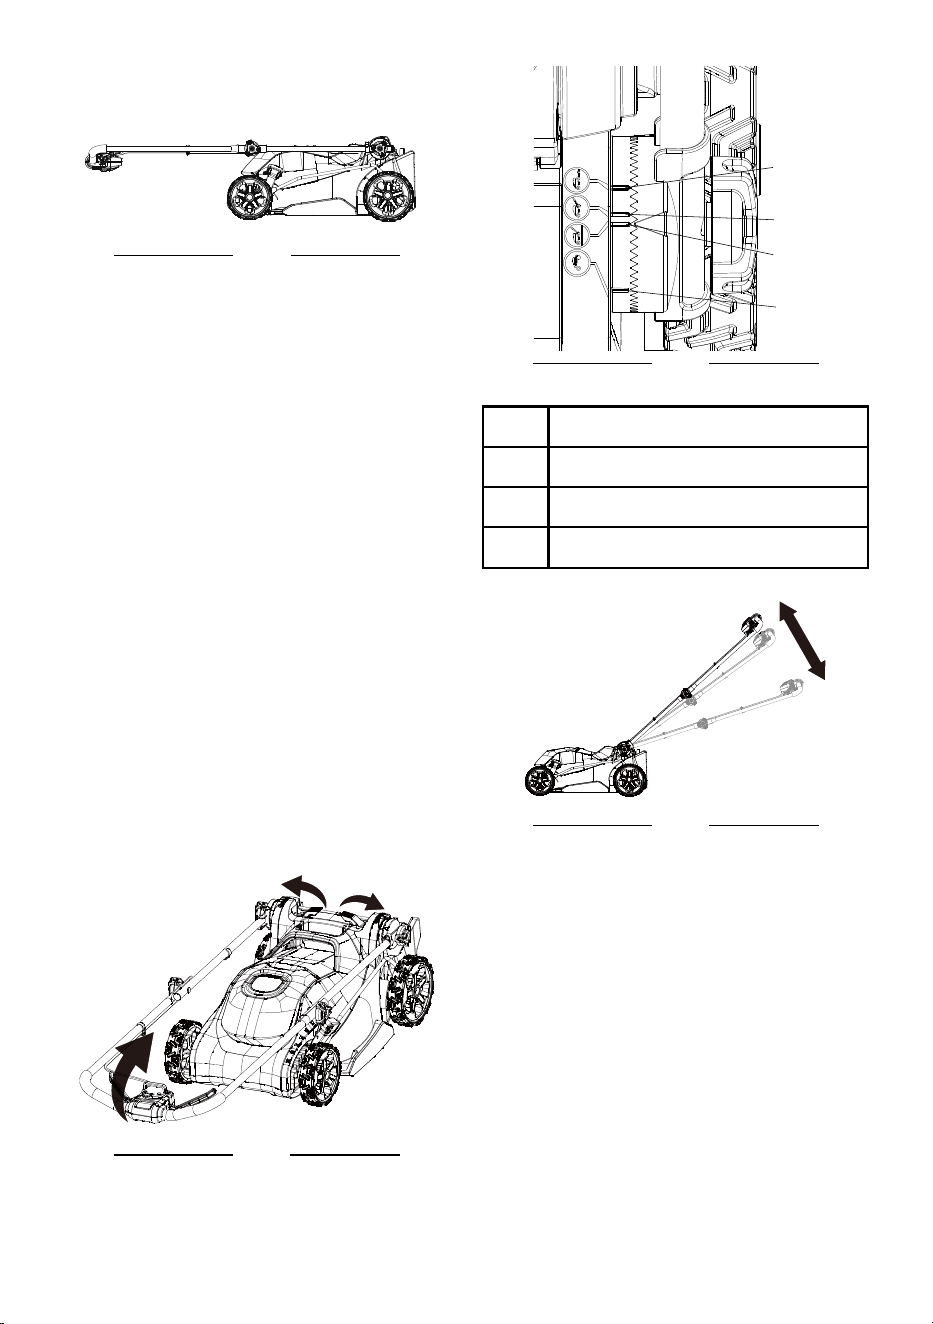
6. Pull the quick-adjust levers up to loosen
the lower handle bars and release bars
from the Locked Storage Position. Begin to
lift the handle bars from its folded position.
Gently pivot the bars backward until them
are secured in one of the three operating
positions and then close the two quick-
adjust levers.
Fig. 1
Fig. 2
7. Secure the connection of the upper handle
assembly to the lower handle bars using
2 knobs and 2 bolts and tighten them on
each side.
EN - 10
SENIXTOOLS.COM
Fig. 3
8. Secure the cord to the machine by using
two cord clips.
Fig. 4
ASSEMBLING THE GRASS
BAG ASSEMBLY
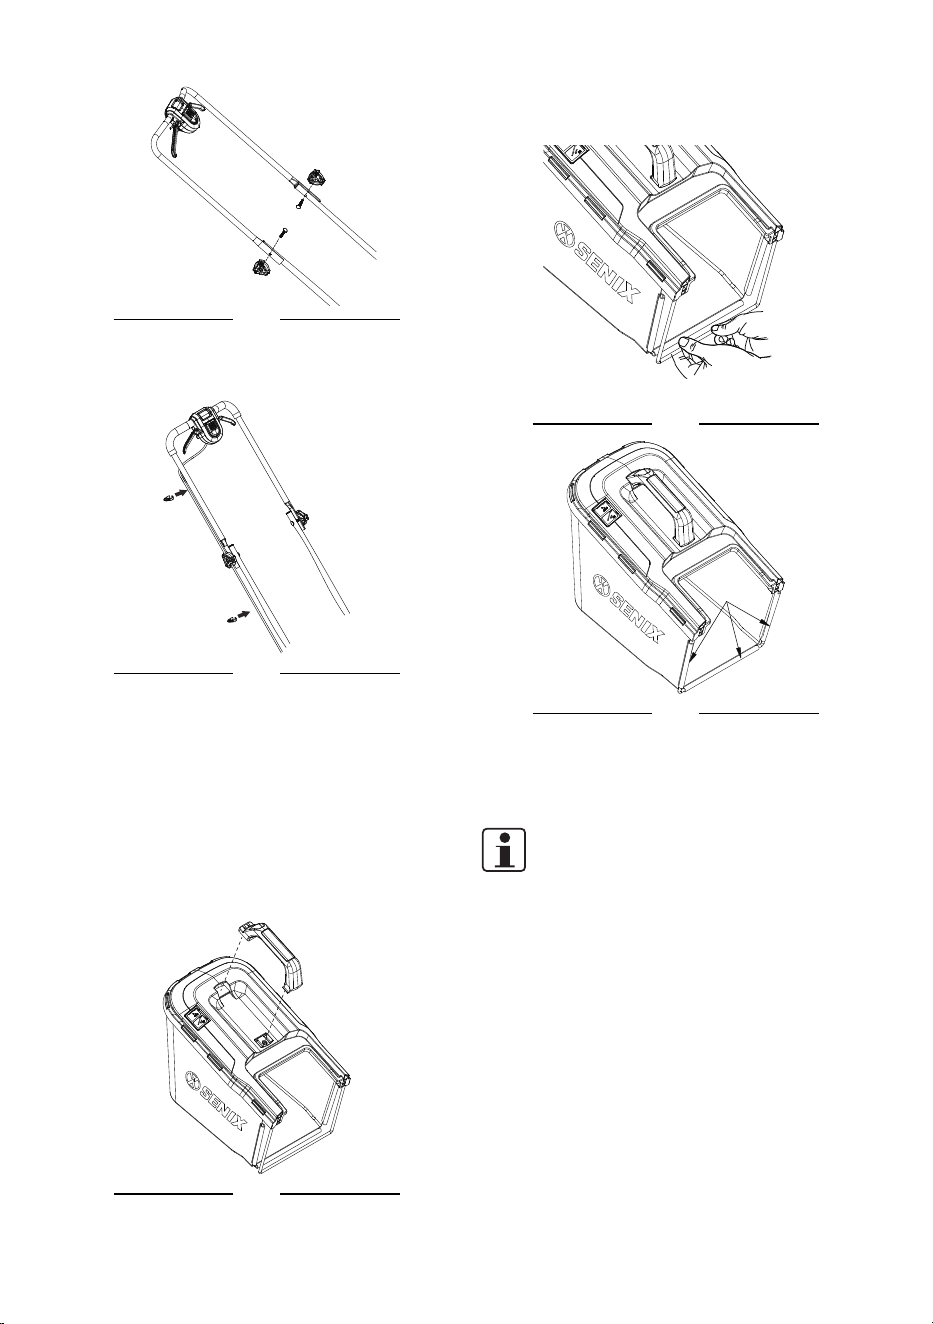
1. Check the grass bag before assembling, to
make sure that there is no damage.
2. Push the grass bag handle into the
openings on the grass bag. Check that
the handle is securely and correctly
positioned.
Fig. 5
3. Slide the grass bag onto the frame. To
completely assemble grass bag, assemble
the two side and the bottom clips to the
frame.
Fig. 6
Fig. 7
INSTALLING/REMOVING
THE GRASS BAG
NOTE:
Remove the mulching insert before attaching
the grass bag on the mower.
1. Lift the discharge chute door with
one hand while holding the grass bag
assembly by its handle with the other
hand. Insert the side frames into the slots
on the back of the machine and hook
the grass bag assembly on the mower.
Release the discharge door so that it rests
on the grass bag.
11 - EN
SENIXTOOLS.COM
Fig. 8
2. To remove the grass bag, lift the discharge
chute door on the mower. Lift the grass
bag up and off of the mower. Release the
discharge door.
WARNING!
When using the grass bag, never operate the
mower unless the grass bag is rmly seated
on the mower and the discharge door rests
rmly against the top of the grass bag.
WARNING!
To reduce the risk of injury, frequently inspect
the bag assembly and replace the bag if there
are any signs of wear or deterioration. Use
only grass bags manufactured for this mower.
INSTALLING/REMOVING
THE MULCHING INSERT
1. Lift the discharge chute door. Grasp
the handle of the mulching insert and
fully insert it into the mower, so that it is
securely seated. Release the discharge
door and make sure it rests firmly against
the mulching insert.
Fig. 9
2. To remove the mulching insert, lift the
discharge chute door, grasp the handle of
the mulching insert, and pull it out. Release
the discharge door.
NOTE:
The mulching insert must be removed in order
to install and use the grass bag and must be
re-installed when the grass bag is removed.
OPERATION
WARNING!
The safe use of this product requires an
understanding of the information on the ma-
chine and in this operator’s manual, as well as
knowledge of the project you are attempting.
Before use of this product, familiarize yourself
with all operating features and safety rules.
INSTALLING/REMOVING
THE BATTERY PACK
WARNING!
If any parts are broken or missing, do not
attempt to attach the battery packs to the
mower or operate the mower until the broken
or missing parts are replaced. Failure to do so
could result in serious injury.
WARNING!
Charge the battery packs before first use.
1. Raise the battery compartment cover by
lifting the front of the cover.
2. Align the grooves in the battery packs with
the raised ribs in the battery compartment
and then insert the battery packs into the
compartment until you hear a "click".
Fig. 10
3. To detach the battery packs, depress the
battery-release buttons to release the
battery packs, and then lift them out of the
compartment.
4. Close the battery compartment cover.
EN - 12
SENIXTOOLS.COM
NOTE:
If necessary, refer to the manuals for the char-
ger and battery pack for more details about
how to charge the battery pack and other
information.
STARTING/STOPPING THE
LAWN MOWER
Before operating, make sure the handle is
locked into position and the battery packs are
attached to the machine securely.
NOTE:
This mower requires (2) battery packs to start.
If only one battery is inserted, the mower will
not start.
WARNING!
The operation of any lawn mower can result
in foreign objects being thrown into your
or others’ eyes, which can damage eyes
severely. Always wear safety glasses while
operating the mower or while performing
any adjustments or repairs on the mower.
NOTE:
The blade will continue to rotate for a few sec-
onds after the mower is turned off. Allow the
motor/blade to stop rotating before starting
it again.
To start:
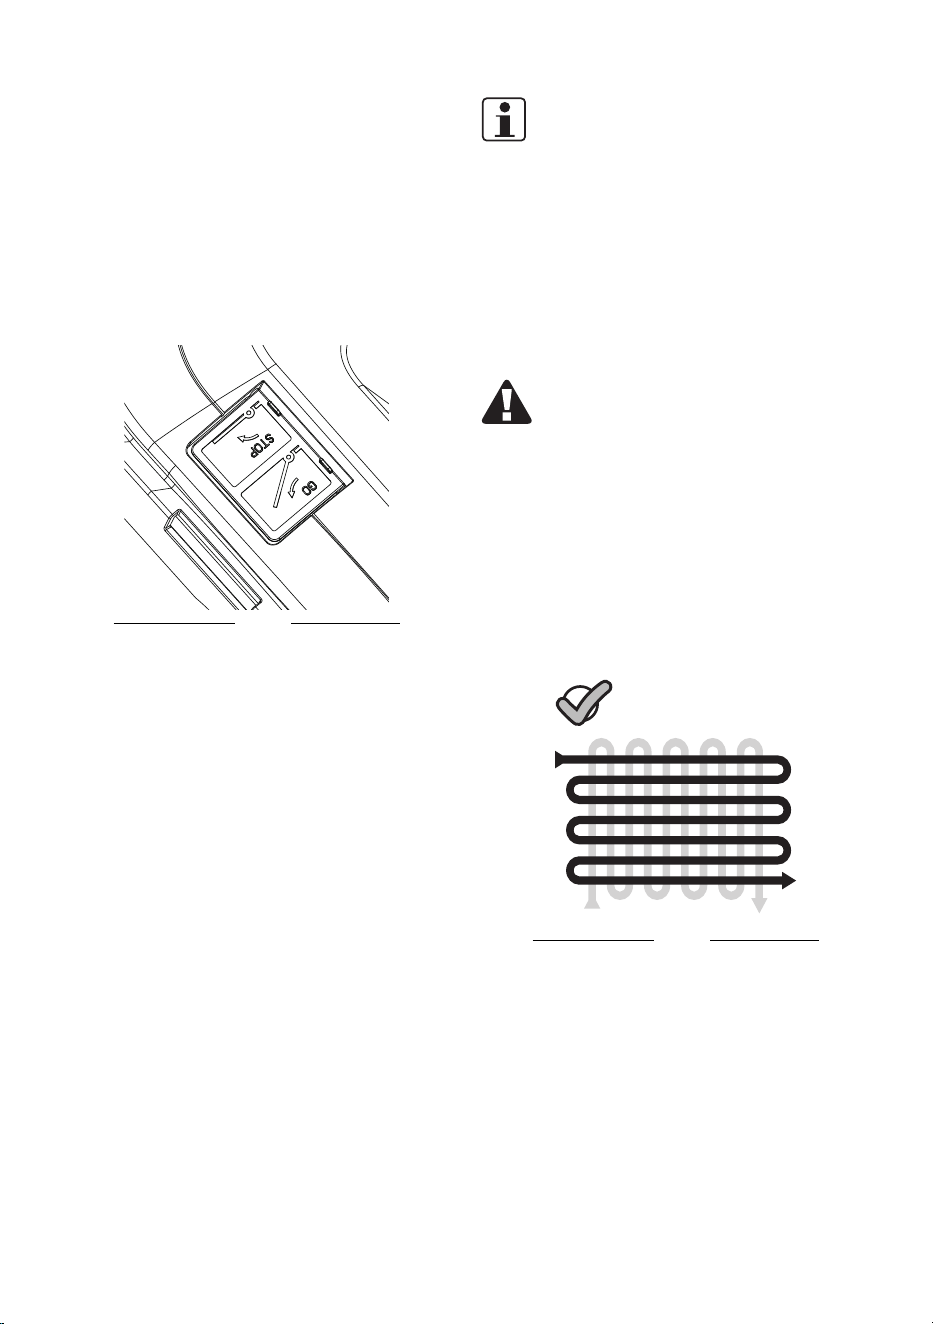
Press the safety button and pull the switch
trigger upward to meet the handle and grasp
it. Release the safety button and begin oper-
ation.
Fig. 11
To stop:
Fully release the switch trigger to stop it.
CUTTING-HEIGHT
ADJUSTMENT
WARNING!
Do not at any time make any adjustment to the
lawn mower without rst stopping the motor,
removing the battery packs, and waiting until
the blade has stopped rotating.
WARNING!
Keep your feet away from the deck when
adjusting its height.
The mower can be set to 6 cutting heights
between 1" (25 mm) and 3" (76 mm). Choose
the proper cutting height according to the
type and condition of the grass to be cut.
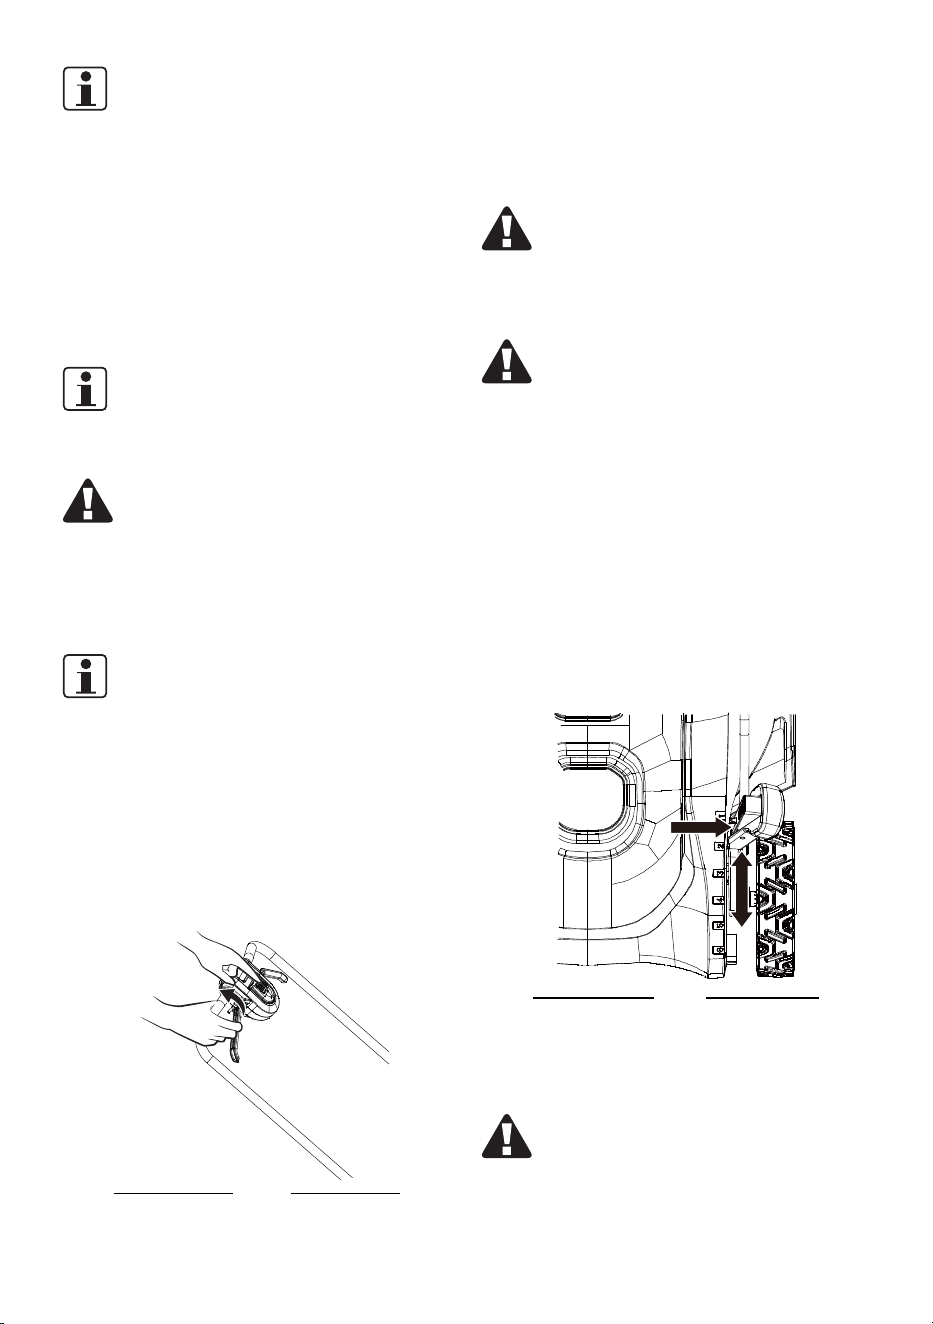
1. Hold the cutting-height adjustment lever
and press the adjustment trigger on the
lever with your thumb.
2. Move the cutting-height adjustment lever
forward or backward to adjust the cutting
height.
3. Once arriving at the desired cutting-height
position, release the adjustment trigger.
①
②
Fig. 12
ADJUSTING THE FOLDED
HANDLE
WARNING!
Do not attempt to start the mower until the
handle has been locked at position.
13 - EN
SENIXTOOLS.COM
1. LOCKED STORAGE POSITION: Your mower
can be stored with the handle in the
compact, locked position.
Fig. 13
2. UPPER OPERATING POSITION: Pull the
quick-adjust levers up to loosen the
handle and release the handle from the
Locked Storage Position. Begin to lift the
handle from its folded position. Gently
pivot the handle backward until the handle
is secured in the Upper Operating Position
and then close the two quick-adjust levers.
Taller users may prefer this position.
3. MIDDLE OPERATING POSITION: Pull the
quick-adjust levers up to loosen the
handle and release the handle from the
Upper Operating Position. Begin to lower
the handle and gently pivot the handle
downward until the handle is secured in
the Middle Operating Position and then
close the two quick-adjust levers.
4. LOWER OPERATING POSITION: Pull the
quick-adjust levers up to loosen the
handle and release the handle from the
Middle Operating Position. Begin to lower
the handle and gently pivot the handle
downward until the handle is secured in
the Lower Operating Position and then
close the two quick-adjust levers. This
position is suitable for mower to cut grass
in a slope.
Fig. 14
A
B
C
D
Fig. 15
A Locked storage position
B Upper operating position
C Middle operating position
D Lower operating position
Fig. 16
ECO MODE
This mower has two power setting: full power
and ECO mode. ECO mode will increase
runtime by slowing the blade down when
full power isn’t needed. Press the ECO mode
button to activate this setting. The ECO light
will illuminate. Press the ECO button again to
return to full power.
BATTERY CHARGE LEVEL
INDICATOR
This mower has LEDs to show battery charge
level while using the mower, without taking out
the batteries to check.
EN - 14
SENIXTOOLS.COM
GRASS BAG VOLUME
INDICATOR
1. If the grass bag is empty or is not
completely full with grass, the grass
indicator flap will remain open due to the
flow of air or will flutter open and close as
the grass accumulates in the bag.
2. When the grass bag reaches its maximum
capacity, the grass indicator flap will
remain closed due to the restricted air
flow. This shows that it is time to empty
the bag.
Fig. 17
MOWER OVERLOAD
PROTECTION
To prevent overload conditions, do not try to
remove too much grass at one time. Please
raise the cut height. Your mower has built-in
overload circuit protection. When the mower
is overloaded, the motor will stop. Remove the
battery pack from the mower. Check to see
if grass has collected beneath the deck and
clear it if necessary, then install the battery
and restart the mower.
MOWER OVERHEAT
PROTECTION
This lawn mower has a overheat protection
function. When the temperature of PCB is too
high during operation, the lawn mower will be
shut down automatically. Wait it to cool down
and then restart the product.
MOWING TIPS
NOTE:
A sharp blade will greatly enhance the
performance of the mower, especially when
cutting tall grass. Make sure to check the
sharpness of the blade before mowing.
Verify that the lawn is free of stones, sticks,
wires, and other objects which could damage
the lawn mower or motor. Such objects could
be accidentally thrown by the mower in any
direction and could cause serious personal
injury to the operator and to others.
WARNING!
If you strike a foreign object, stop the motor
and remove the battery. Thoroughly inspect
the mower for any damage, and repair the
damage before restarting and operating the
mower. Excessive vibration of the mower
during operation is an indication of damage.
The unit should be promptly inspected and
repaired.
• For best results, do not mow in circles.
Travel back and forth across the lawn.
Fig. 18
• When cutting thick grass, reduce your
walking speed in order to allow for a more
effective cut and a proper discharge of the
clippings.
• To maintain a healthy lawn, cut o only
one-third or less of the total length of the
grass.
15 - EN
SENIXTOOLS.COM
MULCHING TIPS
WARNING!
Inspect the area where the mower is to be
used and remove all stones, sticks, wire and
other debris that might be thrown by the
rotating blade.
• Release the switch trigger to turn off the
mower blade rotation when crossing any
graveled areas; stones can be thrown by a
rotating blade.
• Set the mower to the highest cutting
height when mowing on uneven ground or
in tall growth.
• For effective mulching, do not cut wet
grass; it tends to stick to the underside of
the deck, preventing the proper mulching
of grass clippings. The best time to mow
grass is in the late afternoon, when the
grass is dry and the newly cut area will not
be exposed to direct sunlight.
• For the best mulching performance,
set the cutting height to remove
approximately one third of the grass blade
length, ideally no more than 1 1/2" at one
time. If the grass is overgrown, it may
be necessary to increase the cut height
to make it easier to mow and to prevent
overloading the motor. Slow your cutting
pace in tall or thick grass conditions. For
mulching extremely thick or tall grass, it is
advisable to first cut at a high cut-height
setting, and then re-cut to the final cut
height. Otherwise, make narrower cuts and
mow slowly. ALWAYS MAKE SURE THAT
THE BLADE IS SHARP.
MAINTENANCE
WARNING!
Always switch the product o, remove the
battery pack and let the product cool down
before performing cleaning and maintenance
work!
WARNING!
Only perform cleaning and maintenance work
according to these instructions! All further
works must be performed by a qualied
specialist! And only use specied spare parts
for replacement.
WARNING!
When servicing, use only identical
replacement parts. Use of any other parts may
create a hazard or cause product damage. To
ensure safety and reliability, all repairs should
be performed by a qualied service technician.
REPLACING THE BLADE
WARNING!
Always protect your hands by wearing heavy
gloves or wrapping the cutting edges with
rags or other materials when performing any
maintenance on the mower blade. Always
remove the battery pack when servicing or
transporting the mower.
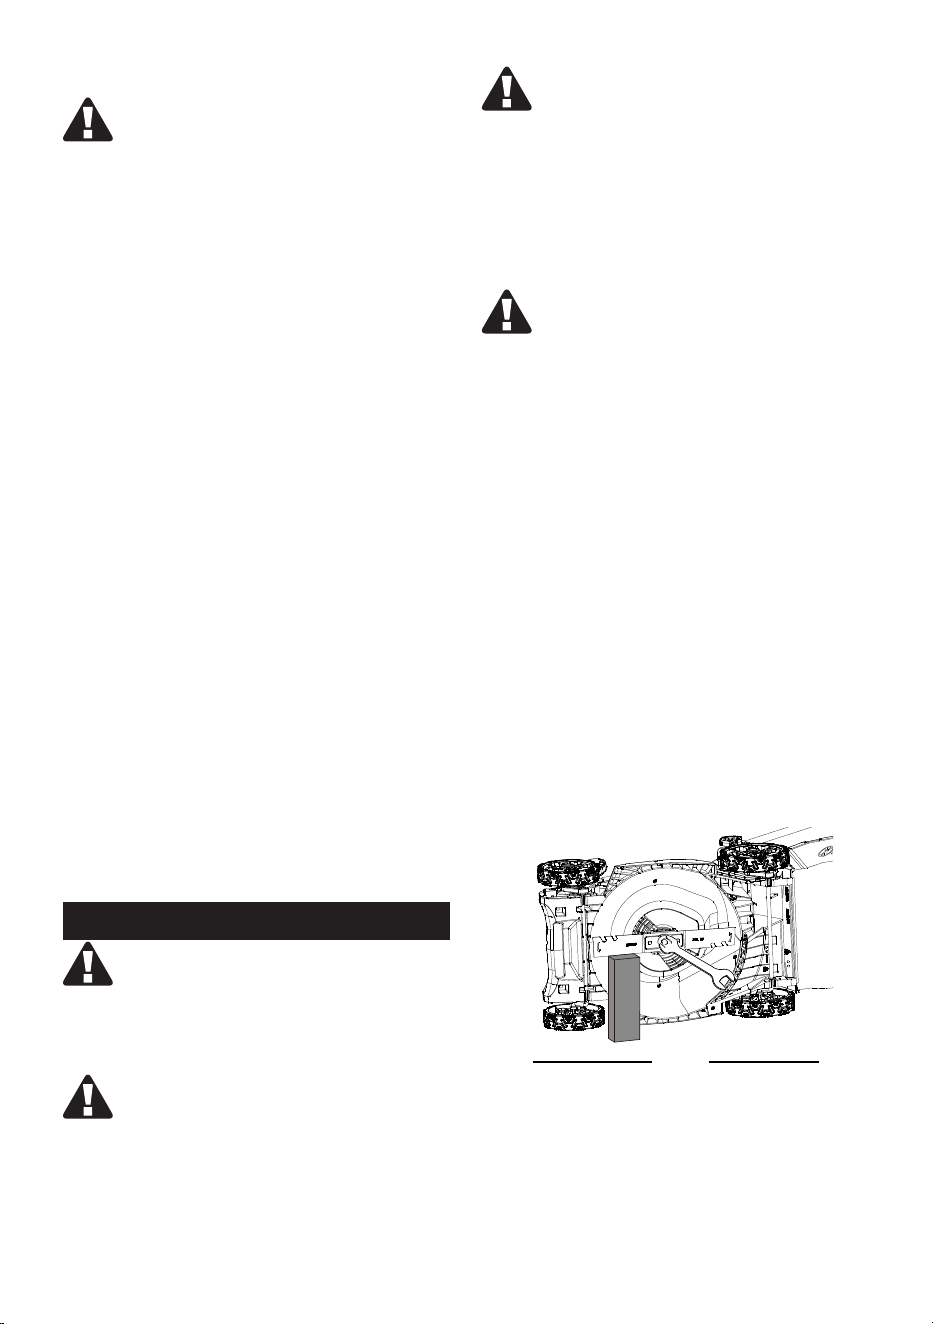
To remove the blade:
1. Switch off the product and remove the
battery packs from the mower.
2. Turn the mower on its side to expose the
underside of the blade housing.
3. Wedge a block of wood between the blade
and mower deck to prevent the blade from
turning.
4. Use a wrench (impact wrench is
recommended) to turn the blade bolt
counterclockwise to loosen and remove
the bolt.
5. Remove the bolt, the washer and the blade
in turn. If the retaining bracket is worn or
damaged, replace the bracket with a new
one.
Fig. 19

EN - 16
SENIXTOOLS.COM
Fig. 20
To install the blade:
1. Wear protective gloves.
2. Replace the old blade with a new one and
put the new blade on the retaining bracket.
3. Wedge a block of wood between the blade
and mower deck to prevent the blade from
turning.
4. Put the washer on the blade and insert
the bolt into the hole in the blade. Use
a suitable wrench (impact wrench is
recommended) to turn the blade bolt
clockwise to tighten the bolt.
SHARPENING THE BLADE
WARNING!
Always protect your hands by wearing heavy
gloves or wrapping the cutting edges with
rags or other materials when performing any
maintenance on the mower blade. Always
remove the battery pack when servicing or
transporting the mower.
WARNING!
A worn, cracked, or damaged blade can break
and pieces of the damaged blade can become
dangerous projectiles. Thrown objects can
cause serious injury. Inspect the blade
regularly and do not operate the mower with a
worn or damaged blade.
NOTE:
Keep the blade sharp for best mower
performance. A dull blade does not cut grass
cleanly or mulch properly.
To remove the blade, follow the “REPLACING
THE BLADE” section in this manual.
A dull blade can be sharpened, but a blade
that is excessively worn, bent, cracked, or
otherwise damaged must be replaced. A worn
or damaged blade can break, causing blade
pieces to be thrown from the mower.
Sharpening frequency:
Sharpening the blade twice during a mowing
season is usually sucient under normal
circumstances. Sand causes the blade to
dull quickly; if your lawn has sandy soil, more
frequent sharpening may be required.
When sharpening the blade:
• Make sure that the blade remains
balanced.
• Sharpen the blade at the original cutting
angle.
• Sharpen the cutting edges on both ends
of the blade, removing an equal amount of
material from each end.
TO SHARPEN A BLADE IN A
VISE
1. Remove the blade from the mower (please
see the “REPLACING THE BLADE” section).
2. Secure the blade in a vise.
3. Wear proper eye protection and gloves
and be careful not to cut yourself.
4. Carefully file the cutting edges of the blade
with a fine tooth file or sharpening stone,
maintaining the original cutting edge
angle.
5. To check the blade balance: clamp a nail
or a screw driver with a round shank
in the horizontal position. Position the
blade so that the nail or round shank
of the screwdriver supports the blade
through its center hole. Balance the blade
horizontally. If either end of the blade
rotates downward, remove some metal
from the heavy or lower end until the blade
is balanced. It is balanced when neither
end drops.
6. Replace the blade on the mower and
tighten it securely (please see the
“REPLACING THE BLADE” section).

17 - EN
SENIXTOOLS.COM
Fig. 21
Fig. 22
WARNING!
An unbalanced blade may cause excessive
vibration. It may also cause damage to the
mower and could break, causing personal
injury.
LIFETIME LUBRICATION
Lubrication is not necessary and may damage
the product. The lawn mower is lubricated for
lifetime use at the factory before shipment.
CLEANING
• Switch the product off, pull out the battery
packs from the product.
• Always keep the lawn mower clean and
free of grass, dirt, or other debris.
• Keep the handles dry, clean, and free of oil
and grease.
• Use a small brush to clean the outside of
the product. Do not use strong detergents.
Household cleaners that contain aromatic
oils such as pine and lemon, and solvents
such as kerosene, can damage plastic.
Wipe off any moisture with a soft cloth.
• After each cutting session, remove
accumulated grass clippings and debris
using either a dry cloth or hand brush.
• Inspect the product before and after each
use for worn and damaged parts. Do not
operate it if you find worn and damaged
parts.
NOTE:
If the cutting blade is blocked by foreign
objects during the operating, stop the product,
wait for the cutting blade stops entirely,
remove the foreign objects and clean the
cutting blade.
STORAGE
• Remove the battery packs from the mower
and store it at room temperature in a dry
location.
• Clean the mower as described above.
• Inspect the blade and replace it or sharpen
it if required.
• Store the mower in a dry, clean location.
Do not store it next to corrosive materials,
such as fertilizer or rock salt.
• Store the mower in a covered and en-
closed space that is cool and dry and out
of the reach of pets and children.
• Do not cover the lawn mower with a solid
plastic sheet. Plastic coverings trap mois-
ture around the mower, which causes rust
and corrosion.
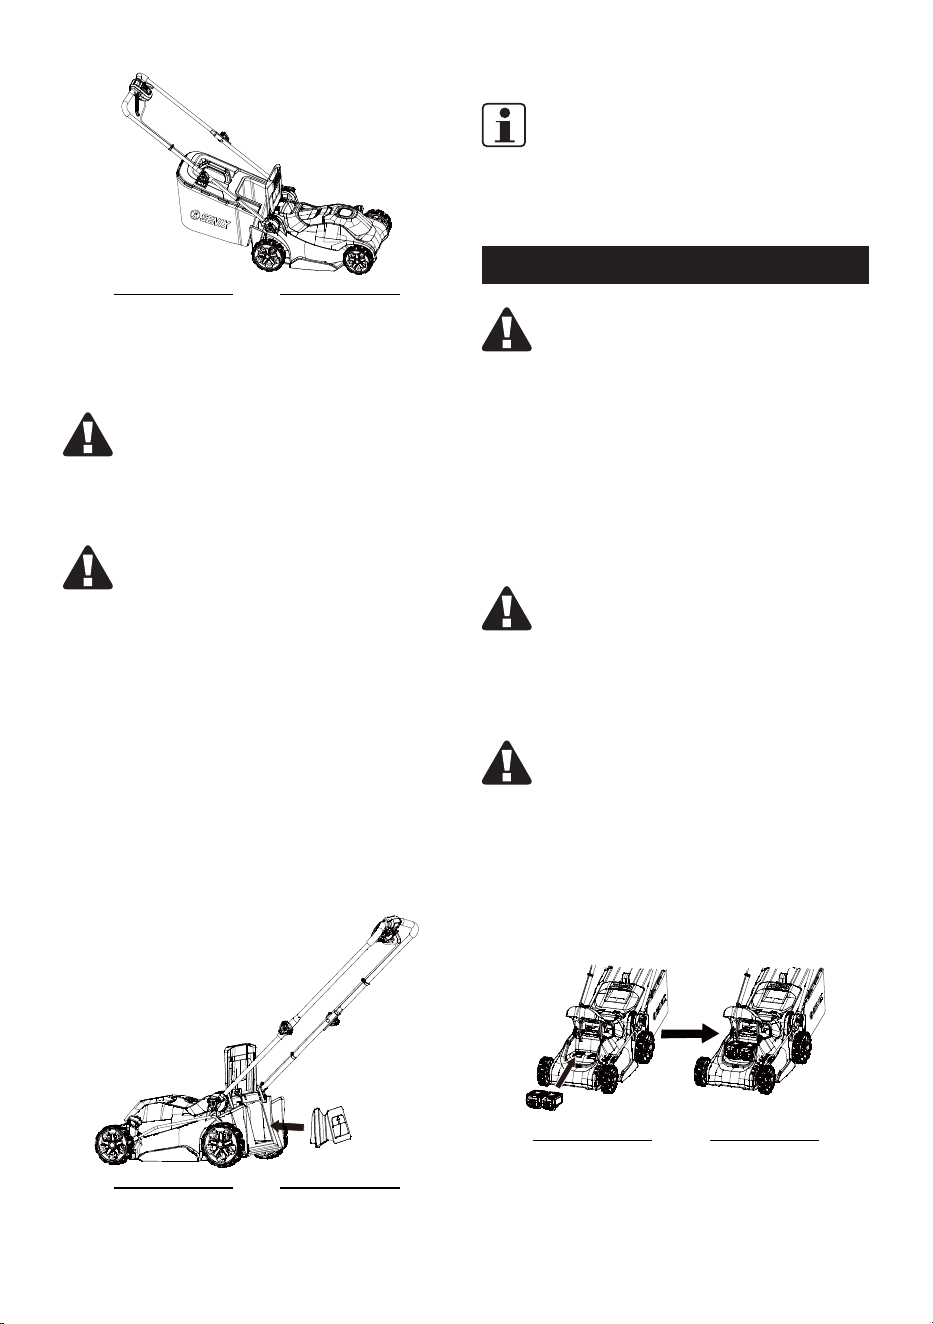
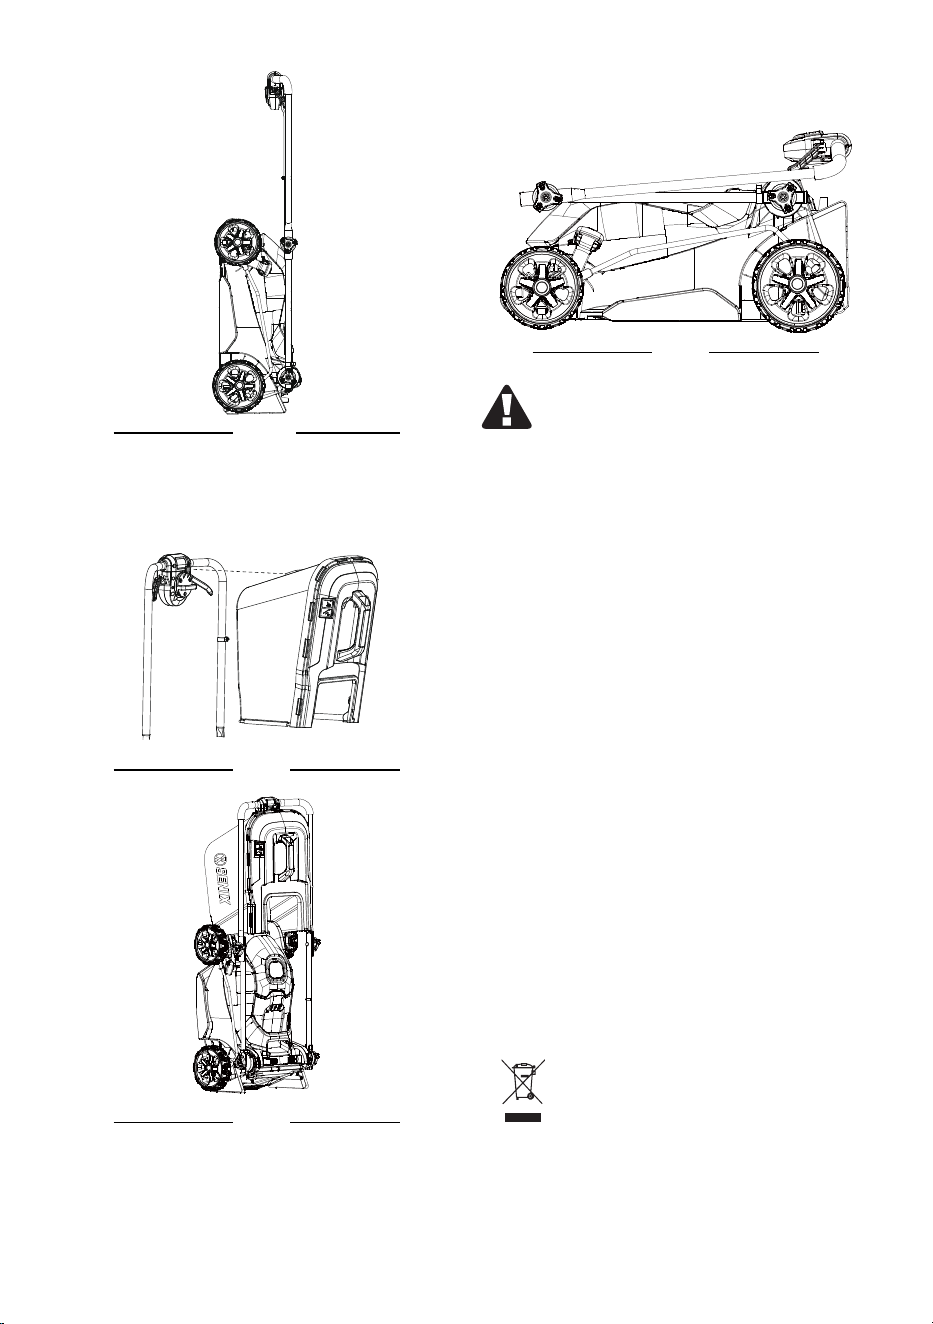
The handle can be folded away completely
for storage:
1. Remove the grass bag/mulching insert.
2. Refer to the “CUTTING-HEIGHT ADJUST-
MENT” section to move the cutting-height
adjustment lever to the lowest position.
3. Pull the quick-adjust levers up to loosen
the handle and completely fold away the
handle.
4. Store the mower upright or at.
Fig. 23
EN - 18
SENIXTOOLS.COM
Fig. 24
5. It’s recommended to store the mower with
the grass bag hooked on the mower and
the mulching insert installed in the mower.
Fig. 25
Fig. 26
6. To save space, you can choose to fold
down the upper handle while storing the
mower.
Fig. 27
WARNING!
If the mower to tips over from the upright
position, mower damage or personal injury
may result. Always keep the mower stable
and out of the reach of children when it is in
the upright position. If possible, lay it at for
storage.
TRANSPORTATION
• Clean the product as described above.
• Make sure the handle is folded away
completely.
• Always carry the product by its handle.
• Protect the product from any heavy im-
pact or strong vibrations which may occur
during transportation in vehicles.
• Secure the product to prevent it from slip-
ping or falling over, damage or injury.
DISPOSAL
Waste product should not be disposed of
with household waste. Please recycle where
facilities exist. Check with your local authority
or retailer for recycling advice. Users should
clean up dust generated during operation to
protect environment.
Electrical products should not be
discarded with household products.
Used electrical products must be
collected separately and disposed
of at collection points provided for
this purpose. Talk with your local
authorities or dealer for advice on
recycling.

19 - EN
SENIXTOOLS.COM
TROUBLESHOOTING
Suspected malfunctions are often due to causes that the users can x themselves. Therefore,
check the product using this section. In most cases the problem can be solved quickly.
PROBLEM POSSIBLE CAUSE SOLUTION
The mower fails to
start.
The battery packs are depleted. Charge the battery packs.
The battery packs are not
mounted in place in the battery
compartment..
Reattach the battery packs to
the mower; press it until you
hear a click.
The battery packs or mower
circuitry is too hot.
Allow the battery packs or
mower to cool down.
The mower deck is clogged with
grass and debris.
Clean the mower deck and
make certain that the blade has
freedom of movement.
The mower cuts
unevenly.
The blade is dull. Sharpen or replace the blade.
The grass-cutting height is not set
properly.
Move the deck height to a
higher setting.
The blade is assembled incorrectly.
Clean the mower deck and
make certain that the blade has
freedom of movement.
Unsatisfactory
result.
Damaged or worn blade. Replace with a new one.
Short running time
of the mower with
included battery.
Grass conditions and cutting
height setting will greatly aect
the battery run time. The claimed
run time is based on a light load
condition.
Raise the blade height and slow
your pace to reduce the cutting
load.
The mower does
not mulch properly
Wet grass clippings are sticking to
the underside of the deck.
Wait until the grass dries
before mowing.
The mower is set to cut too much
grass at once.
Raise the deck to a higher
cutting-height setting.

EN - 20
SENIXTOOLS.COM
The mower stops
while mowing
The battery packs are depleted. Charge the battery packs.
Mower is in overload condition.
Raise the cutting height or slow
down the mowing.
Mower deck is clogged with grass
and debris.
Unclog the mower deck. Raise
the cutting height and/or cut a
narrower swath.
The battery packs or mower
circuitry is too hot.
Allow the battery packs or
mower to cool down.
There is excessive
vibration
The cutting blade is loose. Tighten the blade bolt.
The cutting blade set is
unbalanced.
Balance the blade set following
the "SHARPENING THE BLADE".
The cutting blade is bent. Replace the blade.
The motor shaft is bent. Contact the service center.
The mower is set to cut too much
grass at once.
Raise the deck to a higher
cutting-height setting.

EnglishV 1,1SENIXTOOLS.COM
WARRANTY
SENIX TOOLS LIMITED WARRANTY
FOR FIVE YEARS from the date of original purchase this product is warranted against defects in material or
workmanship. WITH PROOF OF ORIGINAL PURCHASE a defective product will receive free repair. If the product
cannot be repaired it will be replaced free of charge.
For details to obtain warranty coverage, visit senixtools.com, email senix.support@yatusa.com
or call 1-800-261-3981.
• This warranty does not cover repairs necessary due to product accident or abuse, or failure to operate or
maintain the product according to all supplied instructions.
• This warranty does not cover an included battery pack or charger, which offer three-year, replacement-only
coverage. See battery pack or charger instruction manuals for complete warranty details.
• This warranty does not cover expendable items that can wear out from normal use within the warranty
period, including but not limited to drill bits, cutting blades and trimmer spool or line.
• This warranty does not apply to damage resulting from repairs to the product made or attempted by other
than SENIX authorized agents.
• This warranty does not cover the cost of mailing or transporting the power tool to receive warranty
coverage.
• The warranty is void if the product has been used for commercial, professional, or rental service purposes.
• The warranty applies to the original retail purchaser and is not transferable.
• Proof of purchase is required to obtain warranty coverage.
THIS WARRANTY IS GIVEN IN LIEU OF ALL OTHERS, INCLUDING THE IMPLIED WARRANTY OF MERCHANTABILITY
AND FITNESS FOR A PARTICULAR PURPOSE, AND EXCLUDES ALL INCIDENTAL OR CONSEQUENTIAL DAMAGE.
Some states do not allow limitations on how long an implied warranty lasts or the exclusion or limitation of incidental
or consequential damages, so these limitations may not apply to you. This warranty gives you specic legal rights
and you may have other rights which vary in certain states or provinces.
NOTE: Battery pack warranty voided if the battery pack is tampered with in any way. SENIX is not responsible for
any injury caused by tampering and may prosecute warranty fraud to the fullest extent permitted by law.
60-DAY MONEY-BACK GUARANTEE. If for any reason within 60 days from the date of original purchase you are
not completely satised with the performance of this SENIX product, you can return it with the original sales receipt
for a full refund.
Latin America: This warranty does not apply to products sold in Latin America. For products sold in Latin America,
see the country-specic warranty information contained in the packaging, call the retailer from which it was
purchased, or visit the website for warranty information.
Free warning label replacement: If your warning labels become illegible or are missing, call 1-800-261-3981 for a
free replacement.
REGISTER ONLINE - www.senixtools.com/pages/product-registration
Thank you for your purchase! Register your product now for:
Warranty Service: Registering your product will help you obtain more ecient warranty service in case of a problem
with your product.
Conrmation of Ownership: In case of an insurance loss, such as re, ood, or theft, your ownership registration
will serve as proof of purchase.
For your safety: Registering your product will allow us to contact you in the unlikely event a safety notication is
required under the Federal Consumer Safety Act.
YAT USA INC. 10506 Bryton Corporate Center Dr, #500 Huntersville, NC 28078
For customer support, please call 1-800-261-3981 or email us at senix.support@yatusa.com
WARRANTY