
ENGLISH | 1
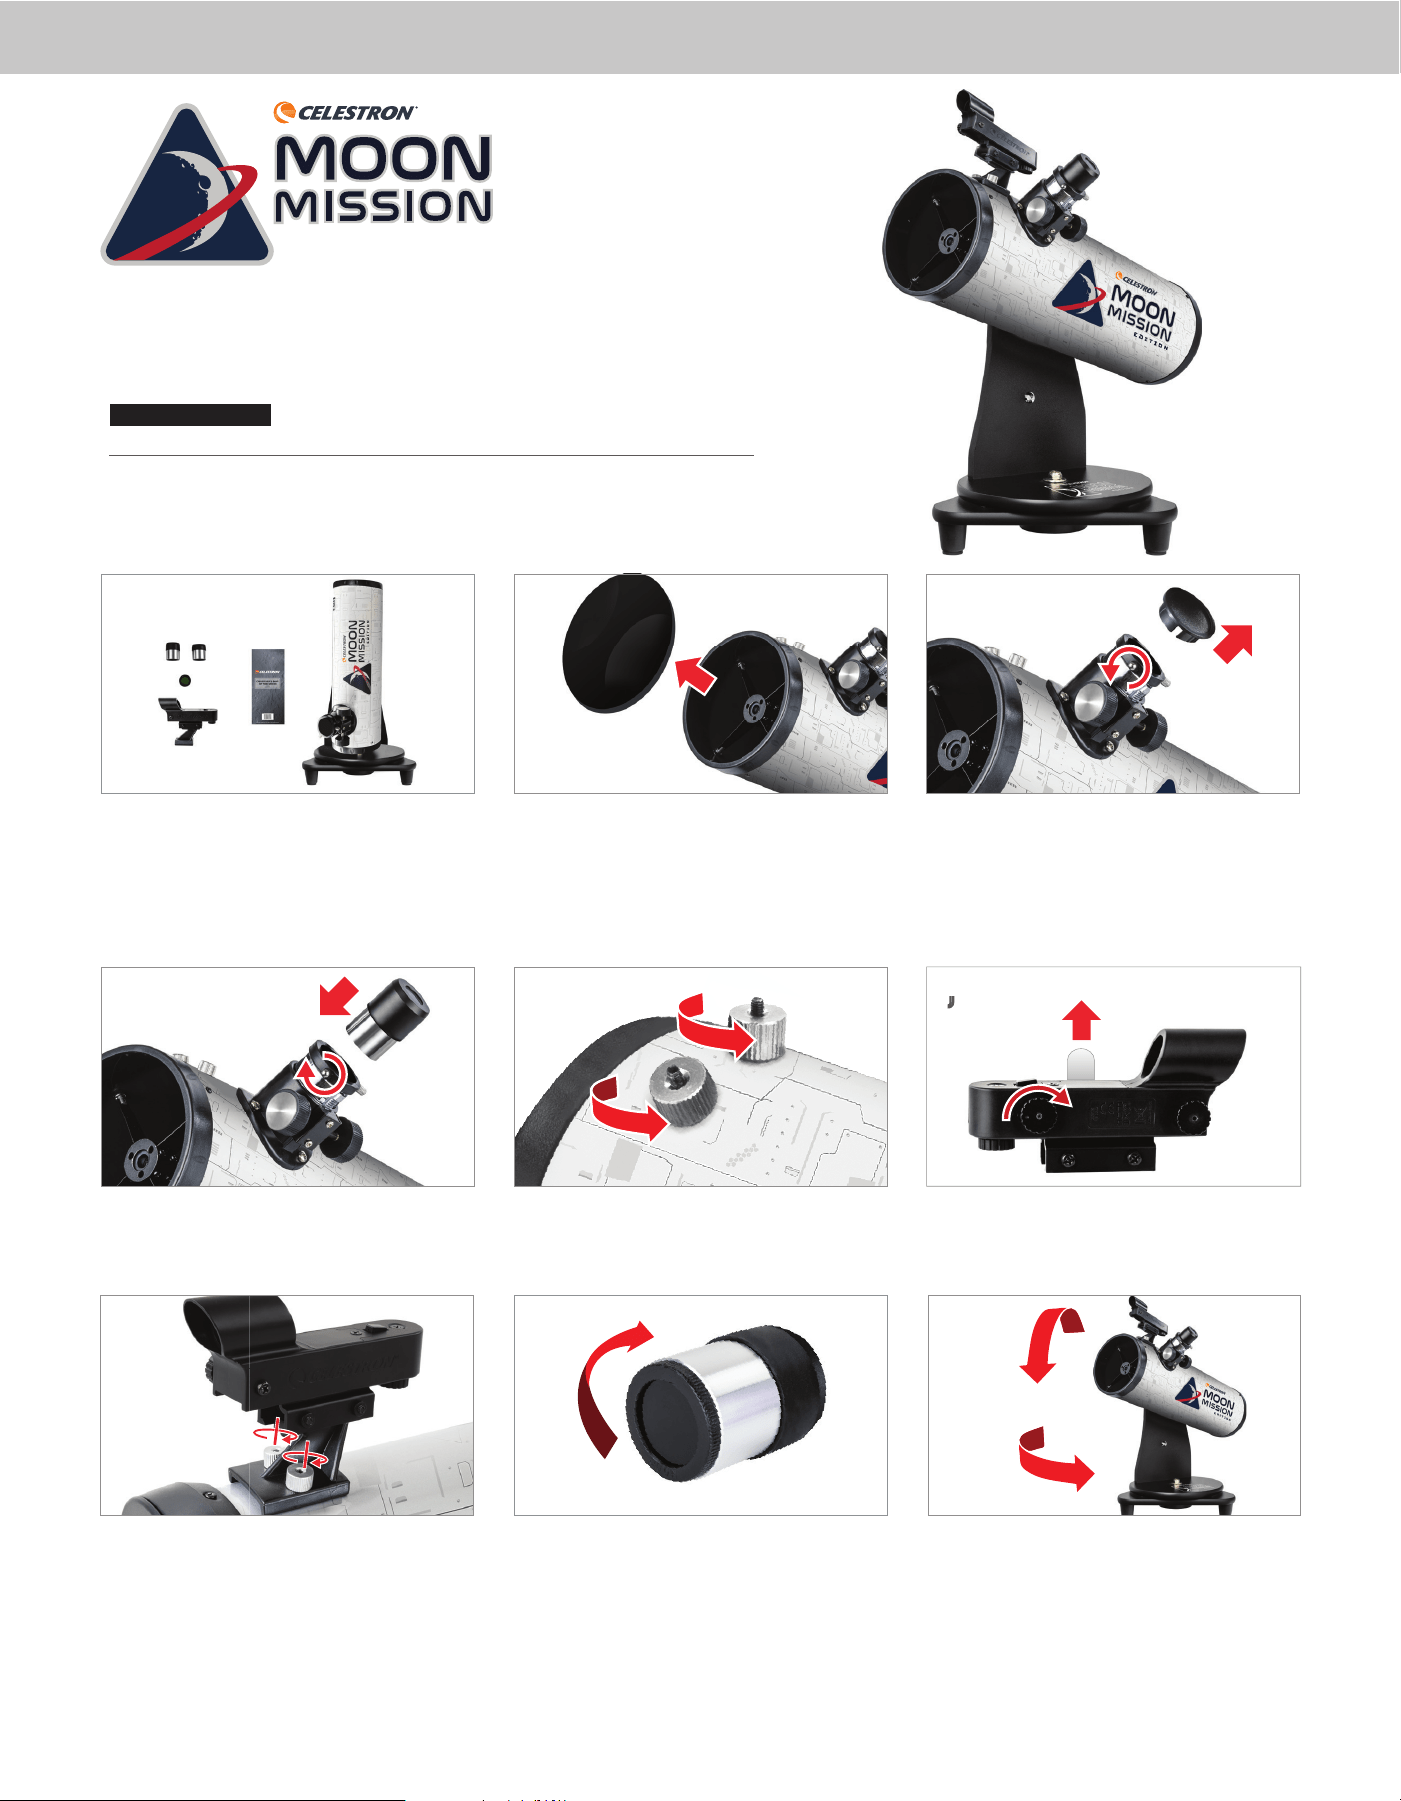
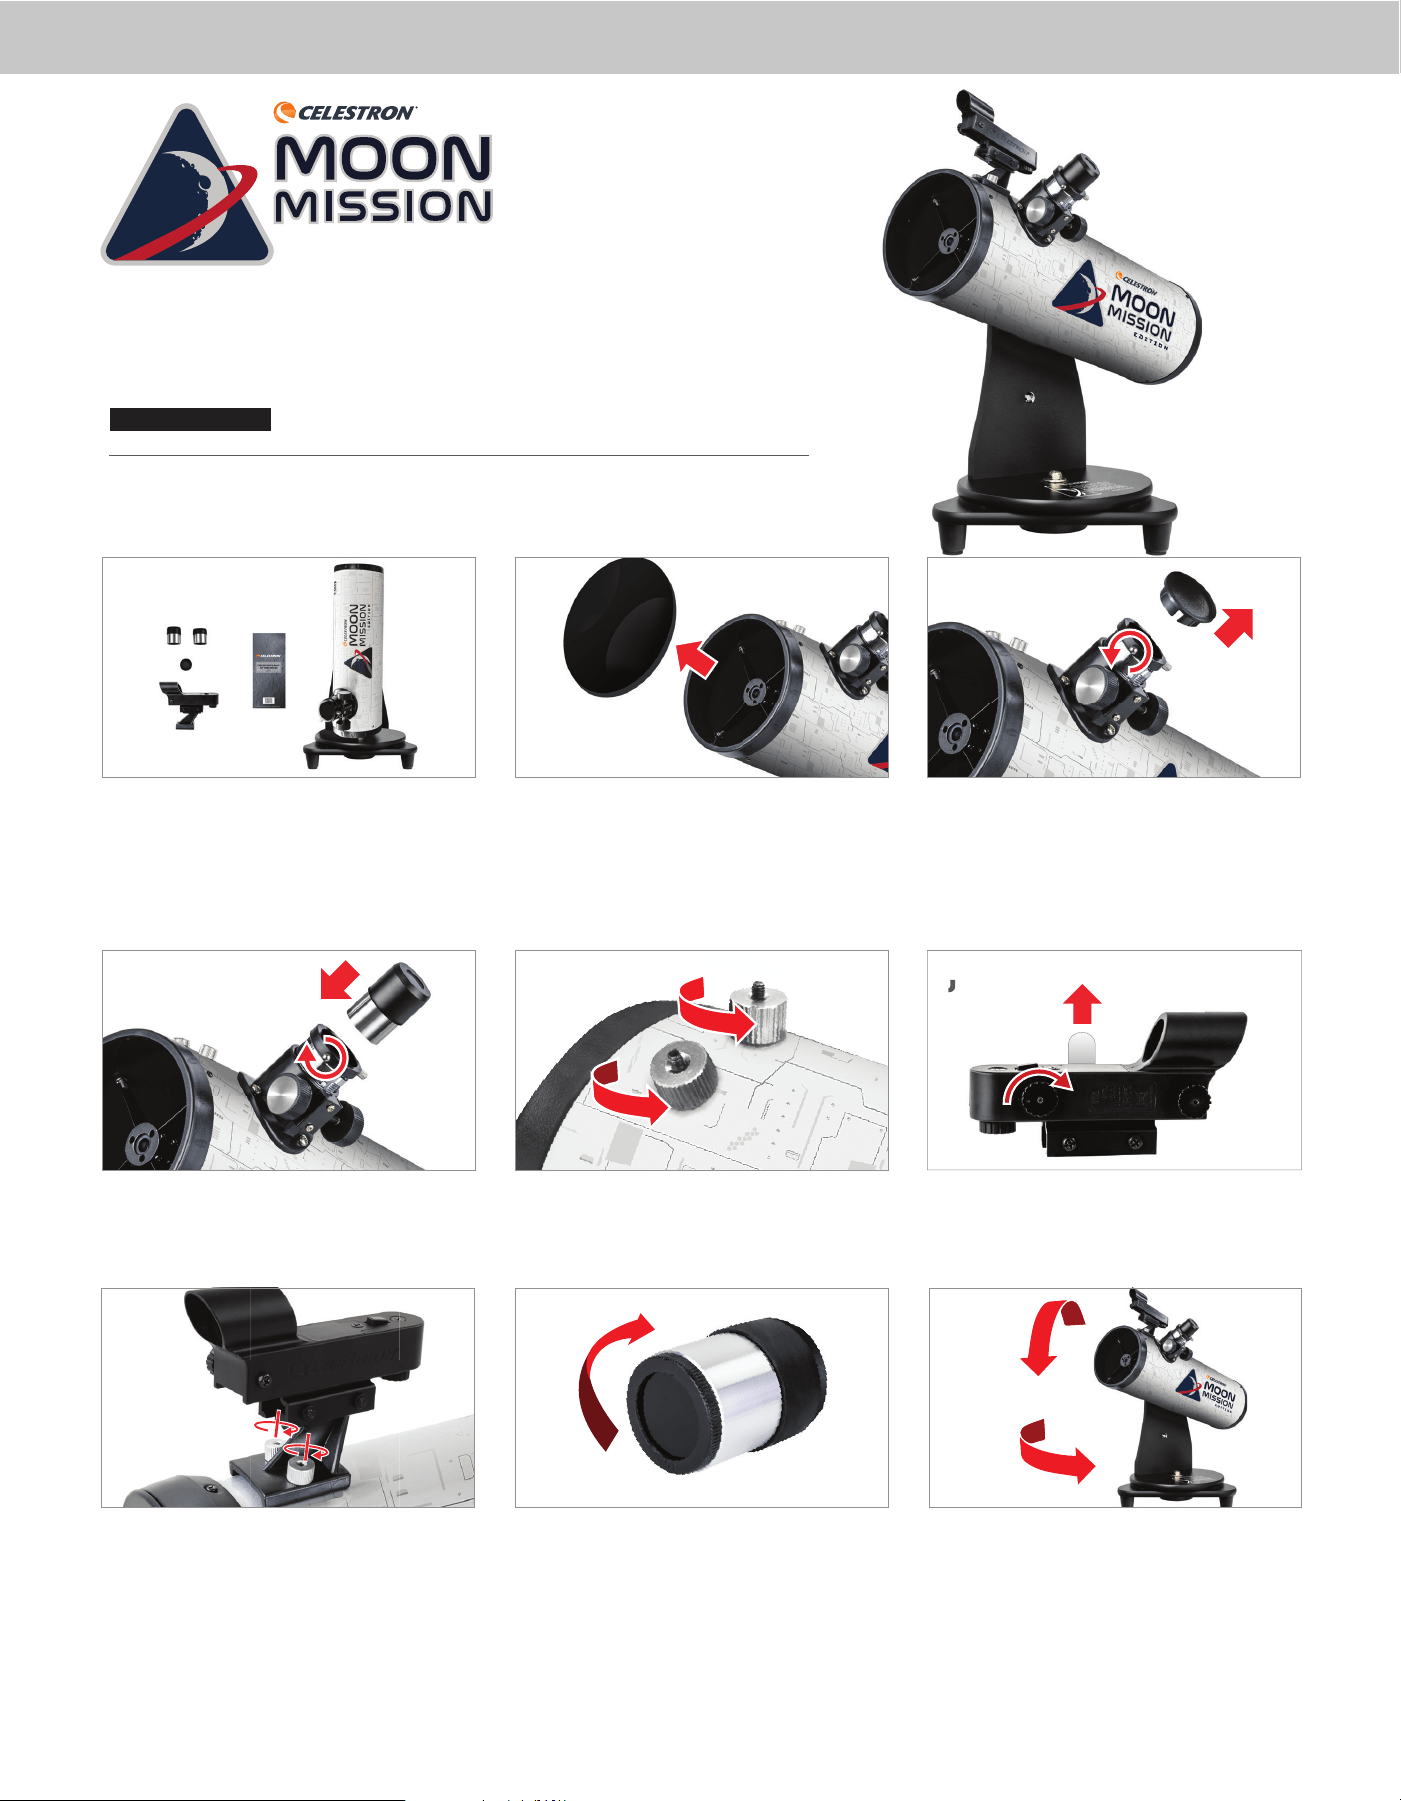
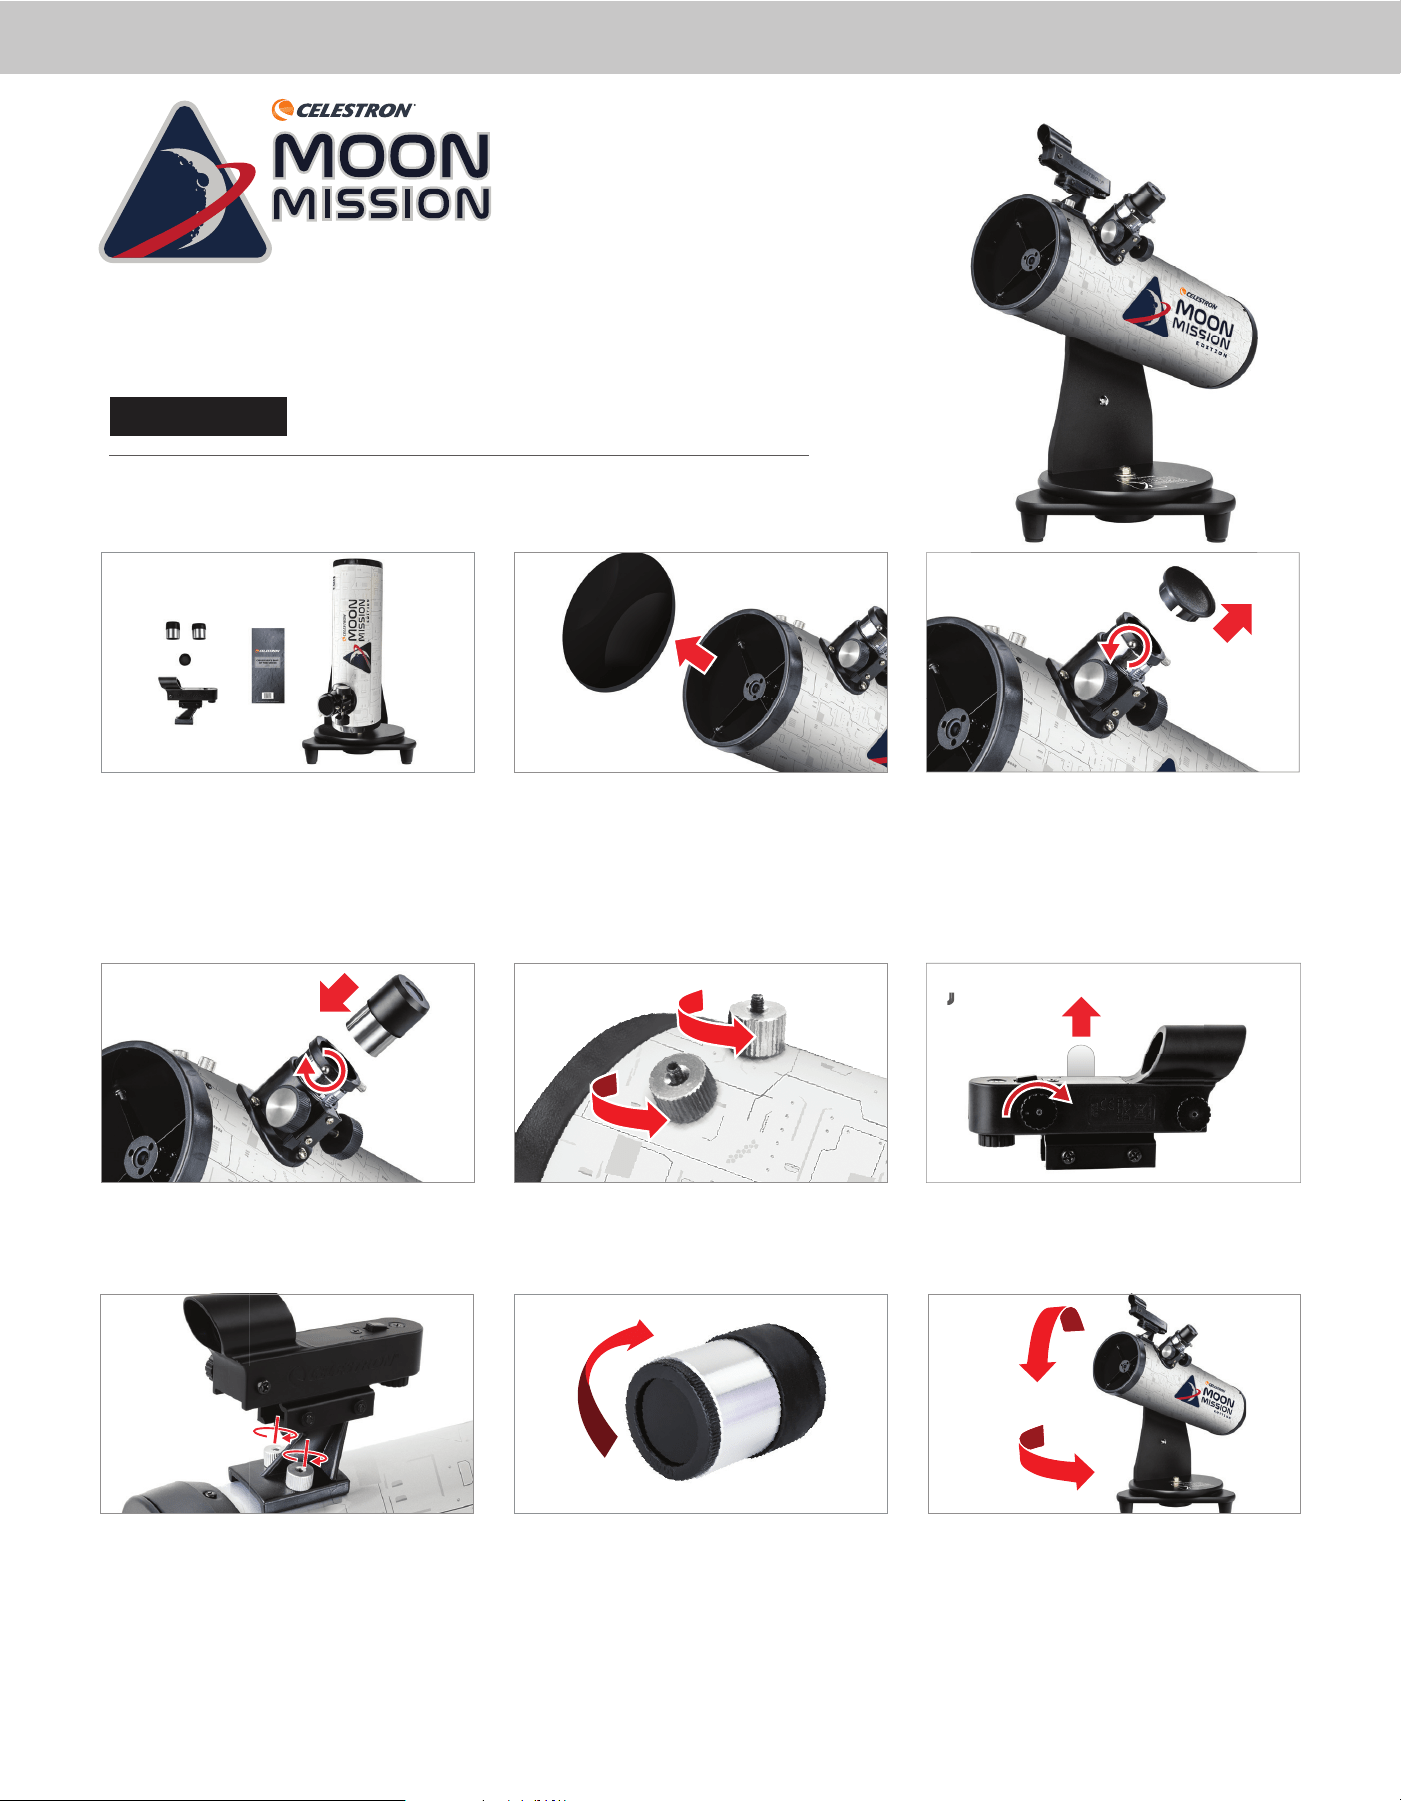
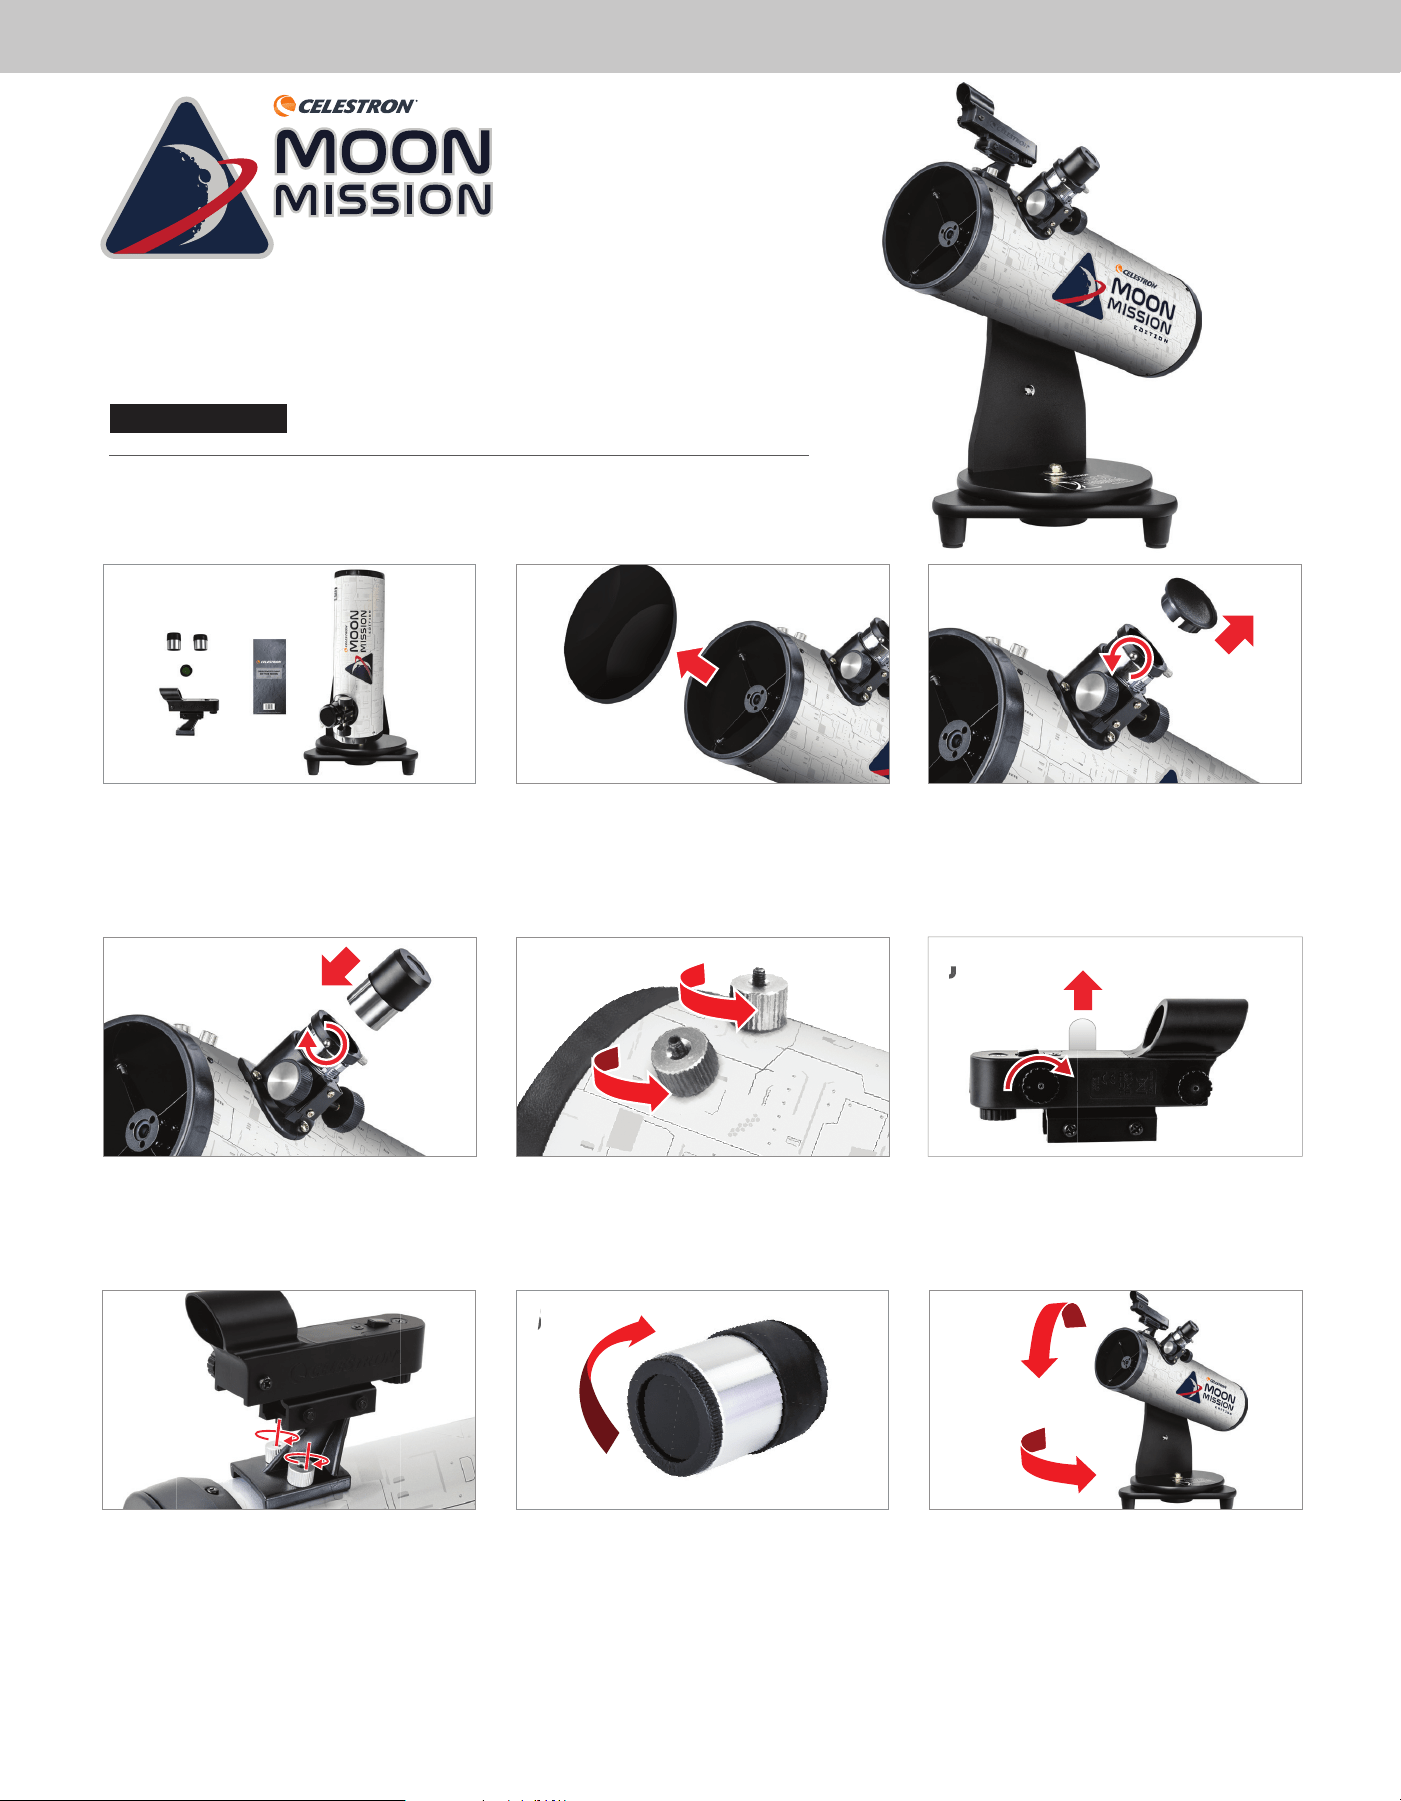
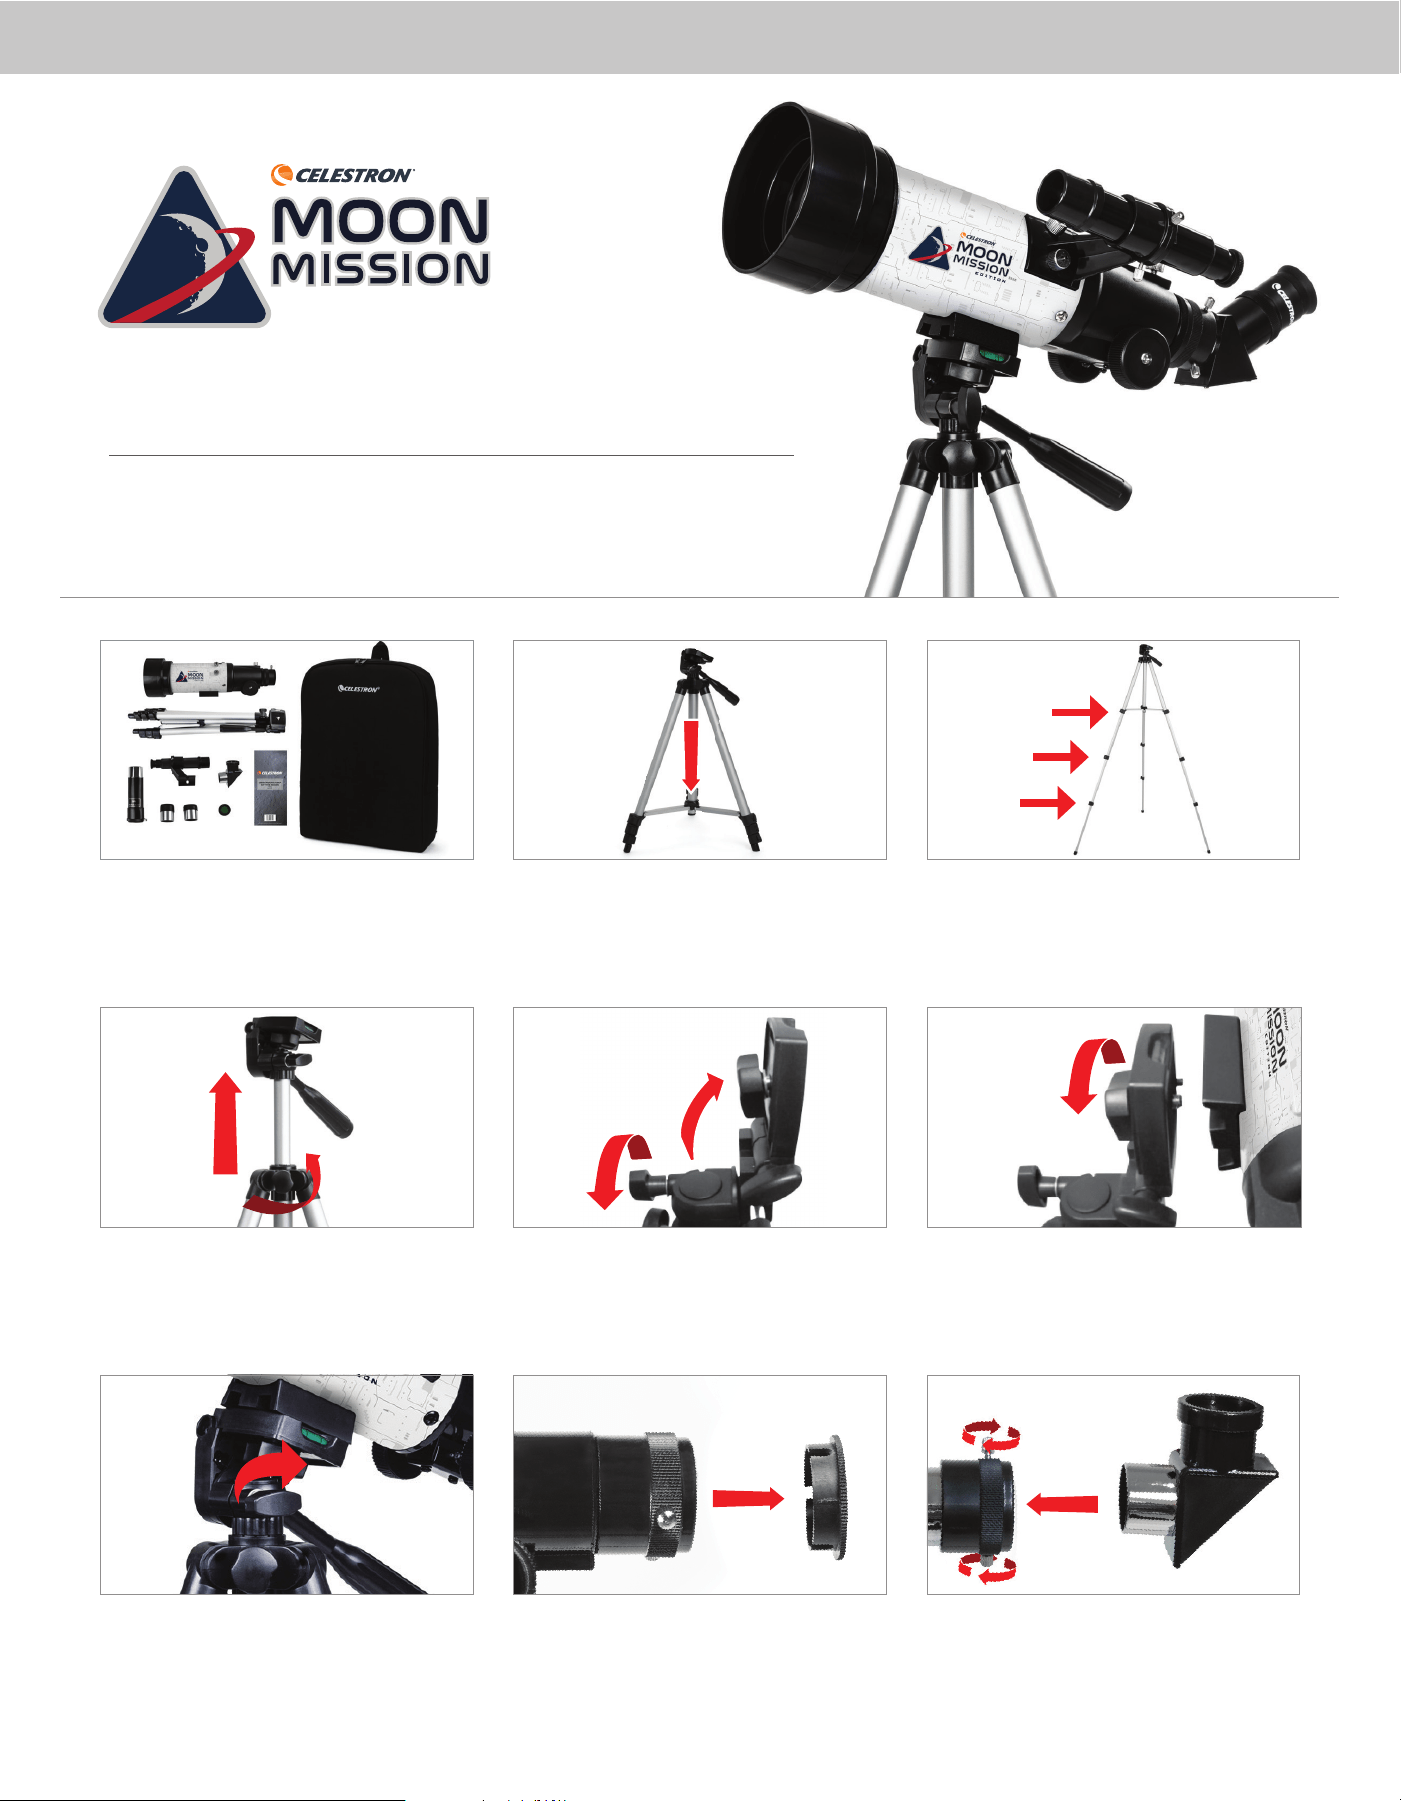
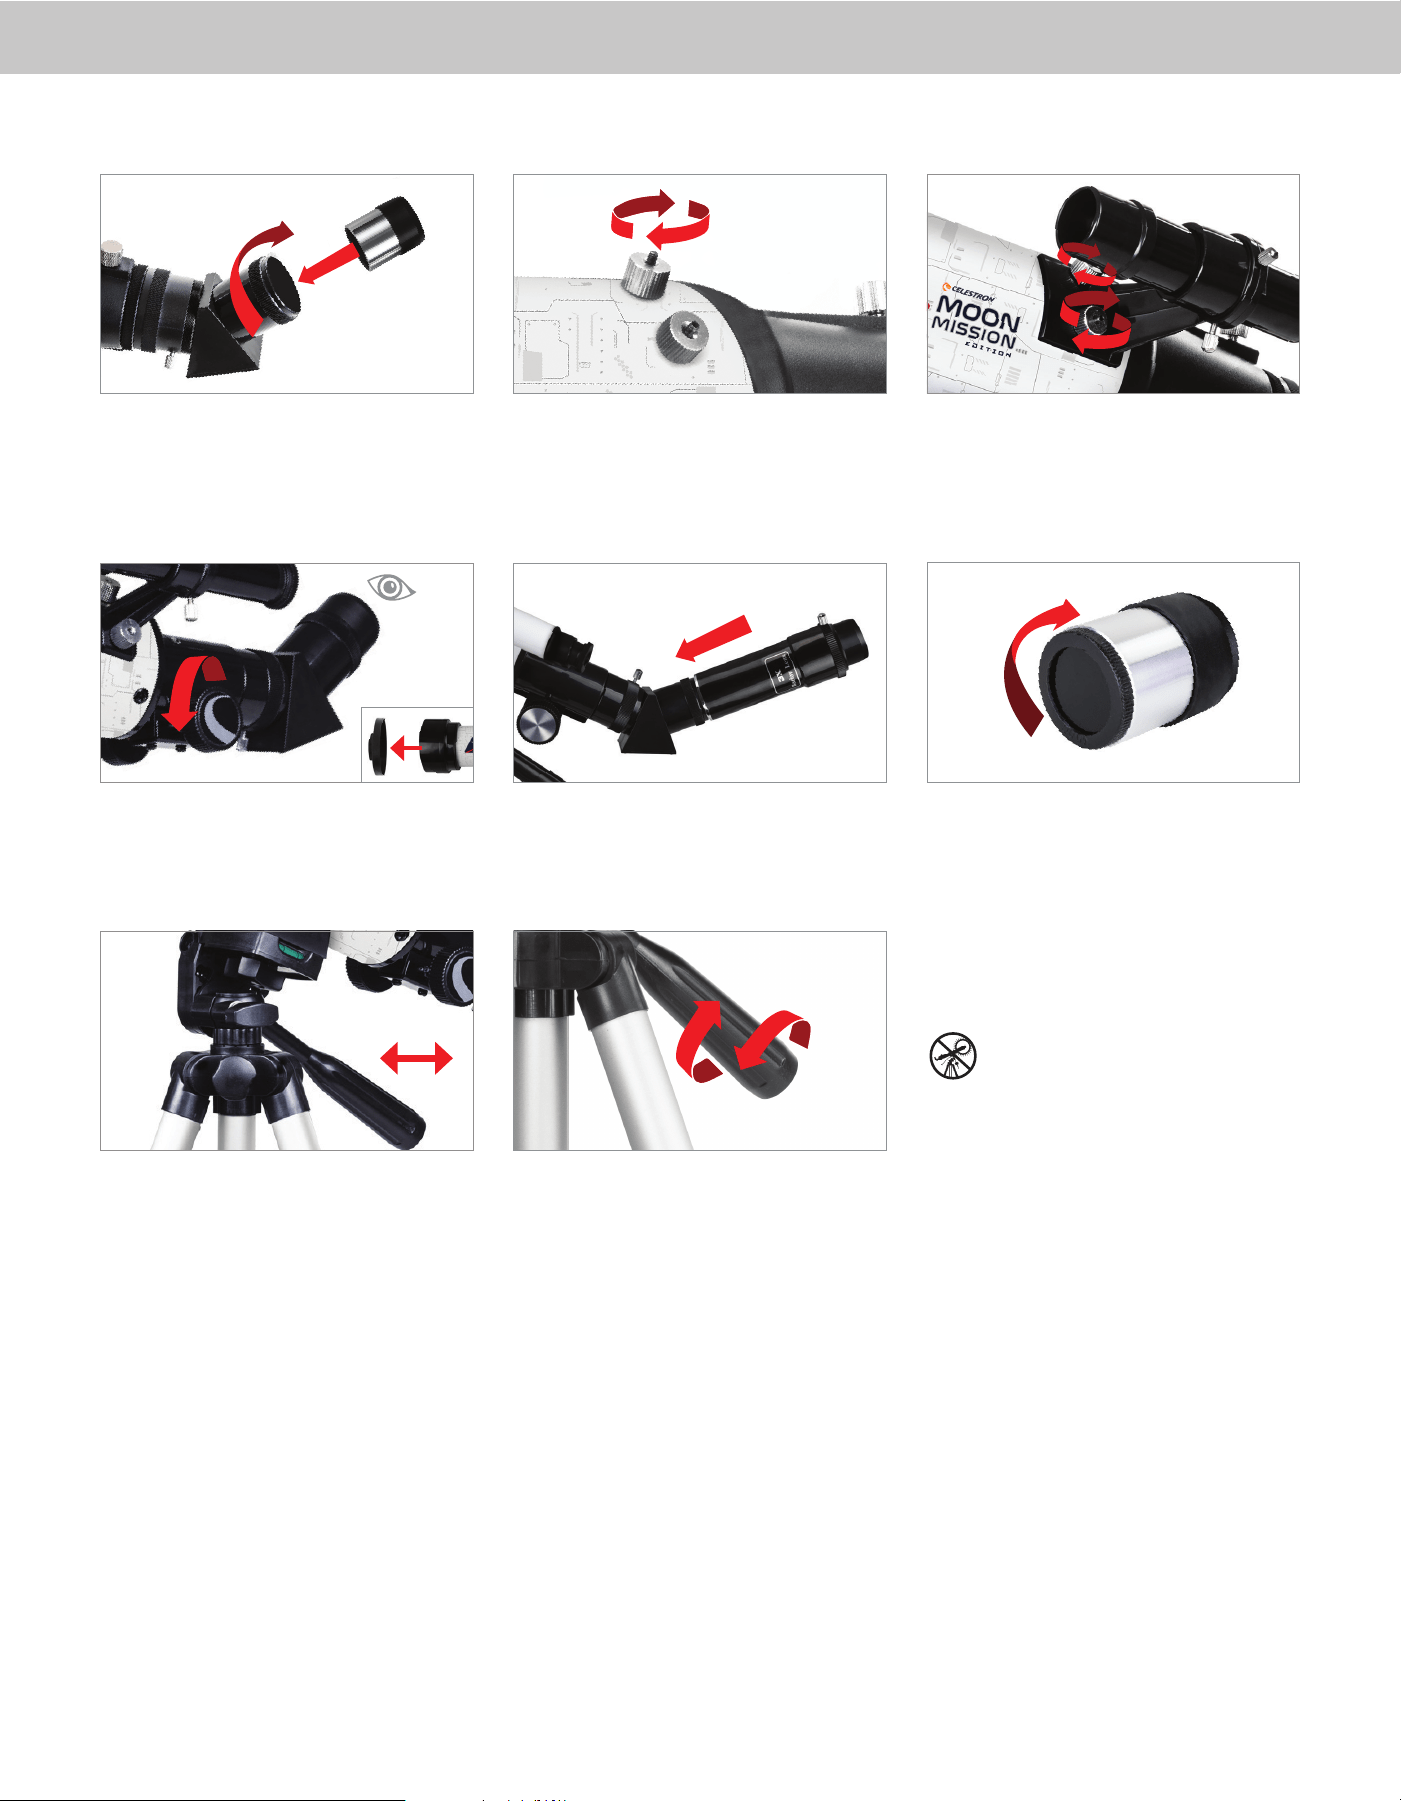
Your telescope is ready to use right out of the box. It ships
with two eyepieces: one 20mm (20x magnifi cation) and
one 8mm (50x magnifi cation). Inside the box, you’ll also
fi nd a StarPointer
TM
red dot fi nderscope, a Moon fi lter, and
a Moon map.
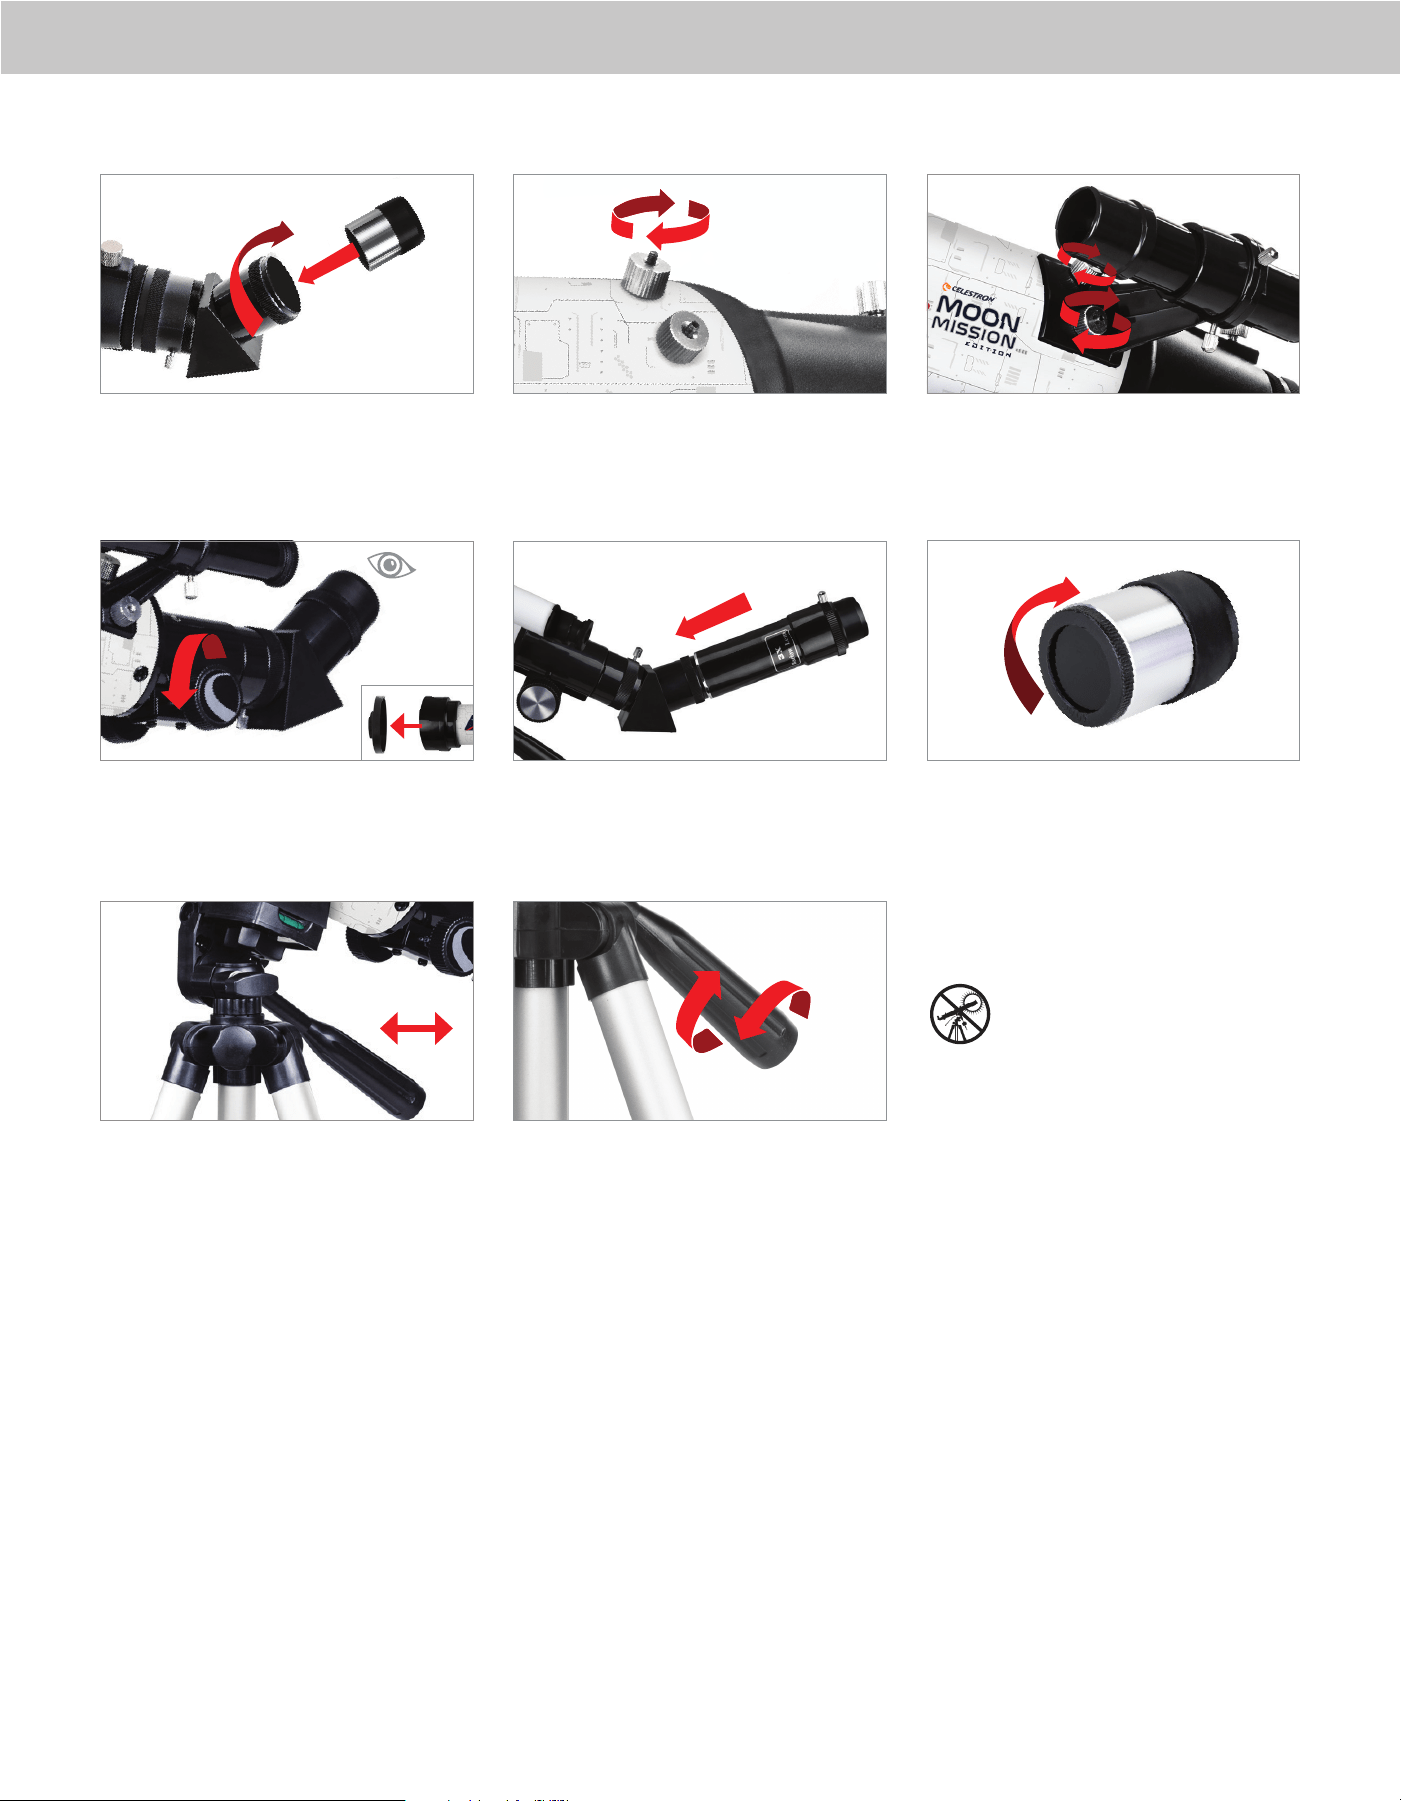
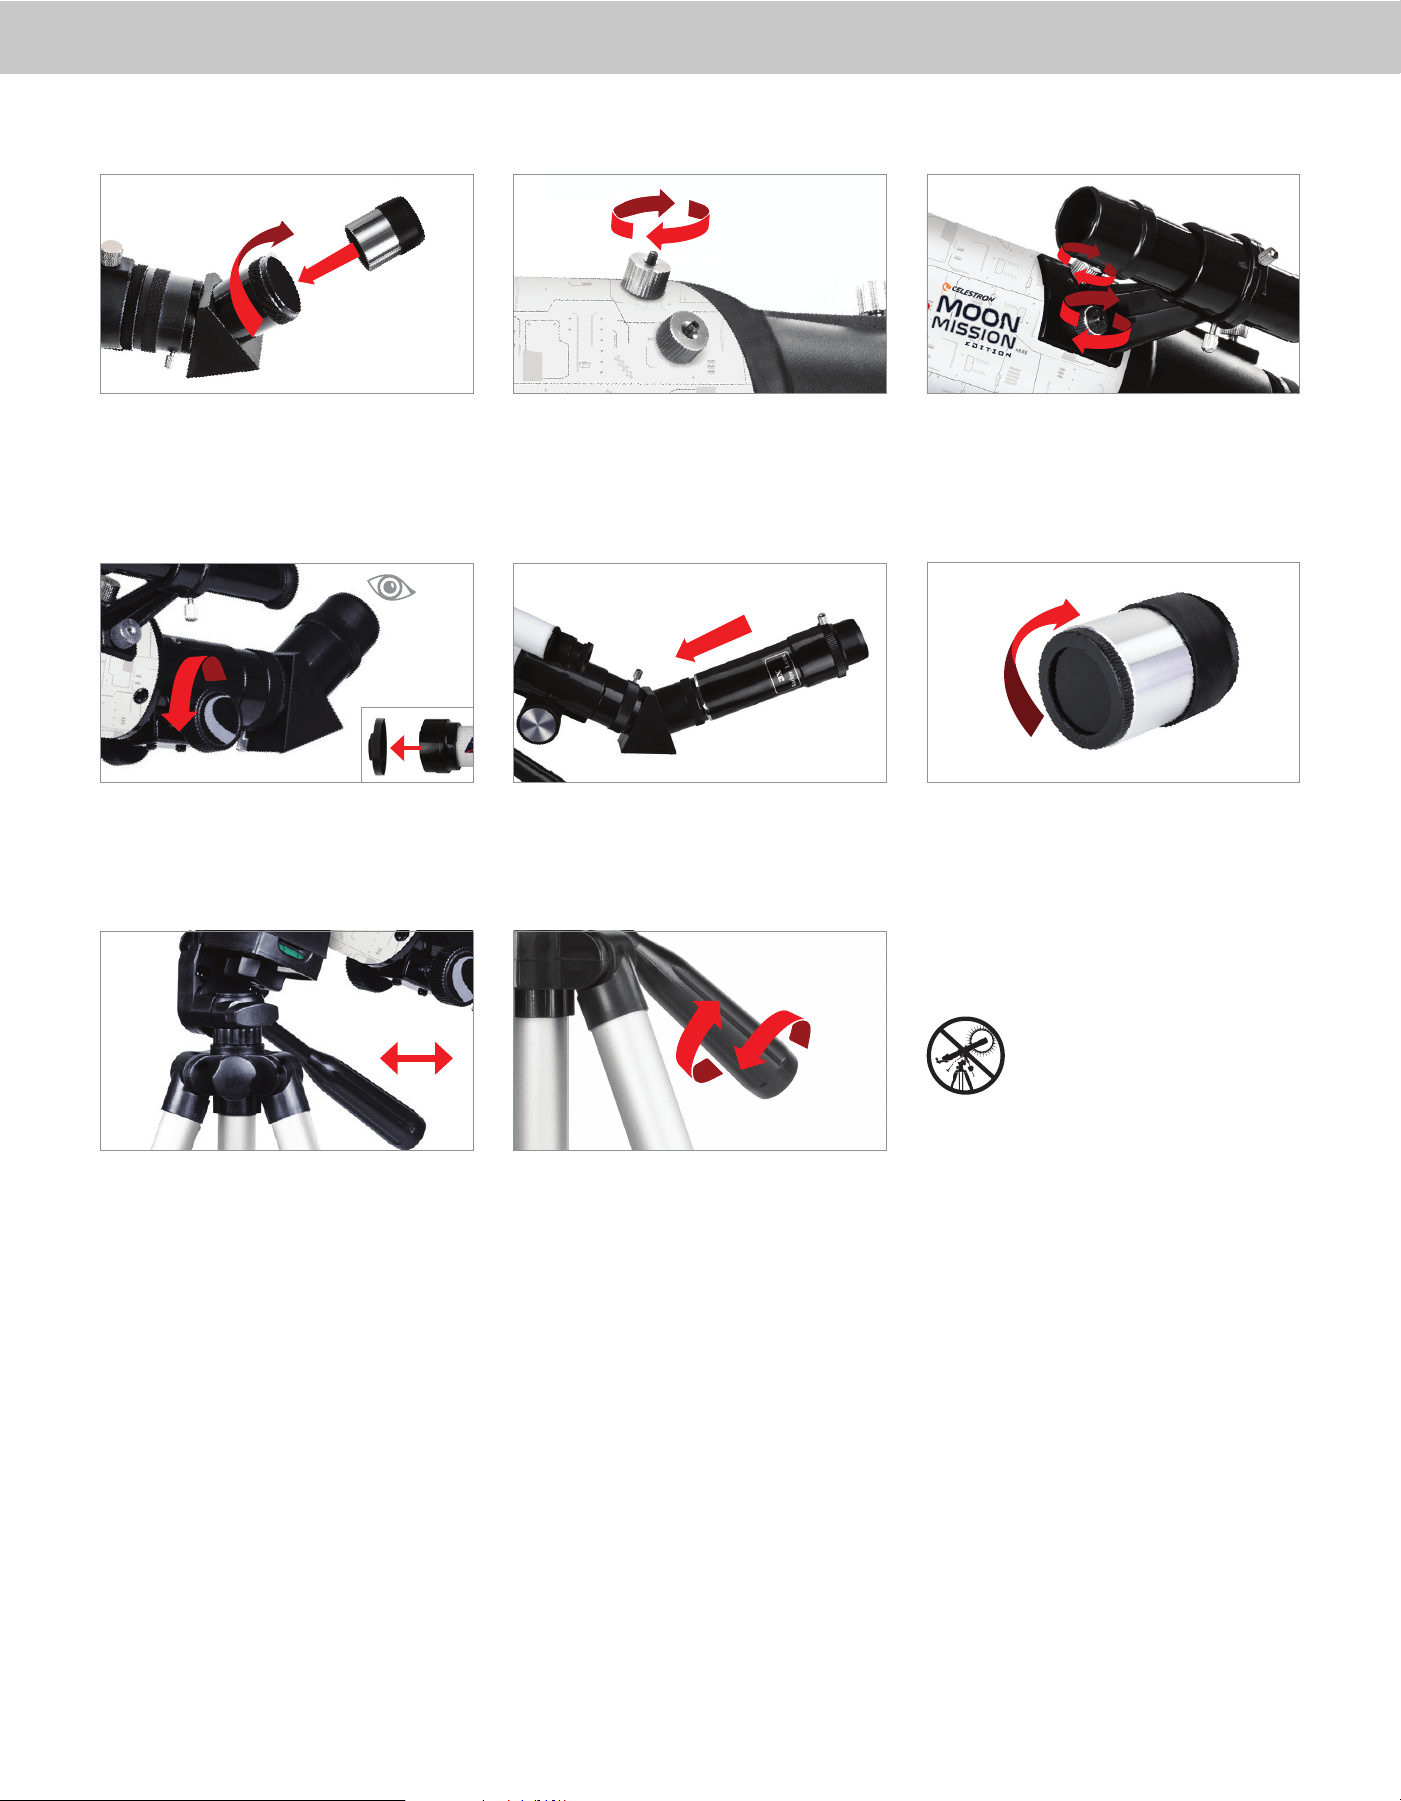
Once the eyepiece is seated correctly, tighten the
thumbscrews to secure it in place.
Place the fi nderscope over the threaded posts on the
optical tube and secure the fi nderscope in place by
tightening the knurled nuts from step 5.
Setting up the telescope is a breeze. First, remove the lens
cap from your optical tube.
Remove the knurled nuts on the threaded posts near
the focuser. Set them in a safe place to be used in a
later step.
To use the Moon fi lter, thread it onto the bottom of
the eyepiece and before inserting the eyepiece into the
eyepiece tube.
Next, remove the eyepiece cap and insert the 20mm
eyepiece into the eyepiece tube. If necessary, back the
thumbscrews out, so the threads are not impeding the
insertion of the eyepiece.
Remove the plastic tab from the fi nderscope battery
compartment, and turn the power knob to the “ON”
position.
The Moon Mission Tabletop 100 telescope is a “push-
to” telescope, that comes assembled on a simple alt-az
mount. “Alt” is short for altitude (vertical adjustment)
and “Az” is short for azimuth (horizontal adjustment).
Moving the scope to capture a target is simple. Just
apply pressure in the direction you want to go.
Item #22018
ENGLISH
Quick Setup Guide
TABLETOP DOBSONIAN
TELESCOPE
100
mm
22 3311
5544 6
6
6
9977
88
2 | ENGLISH
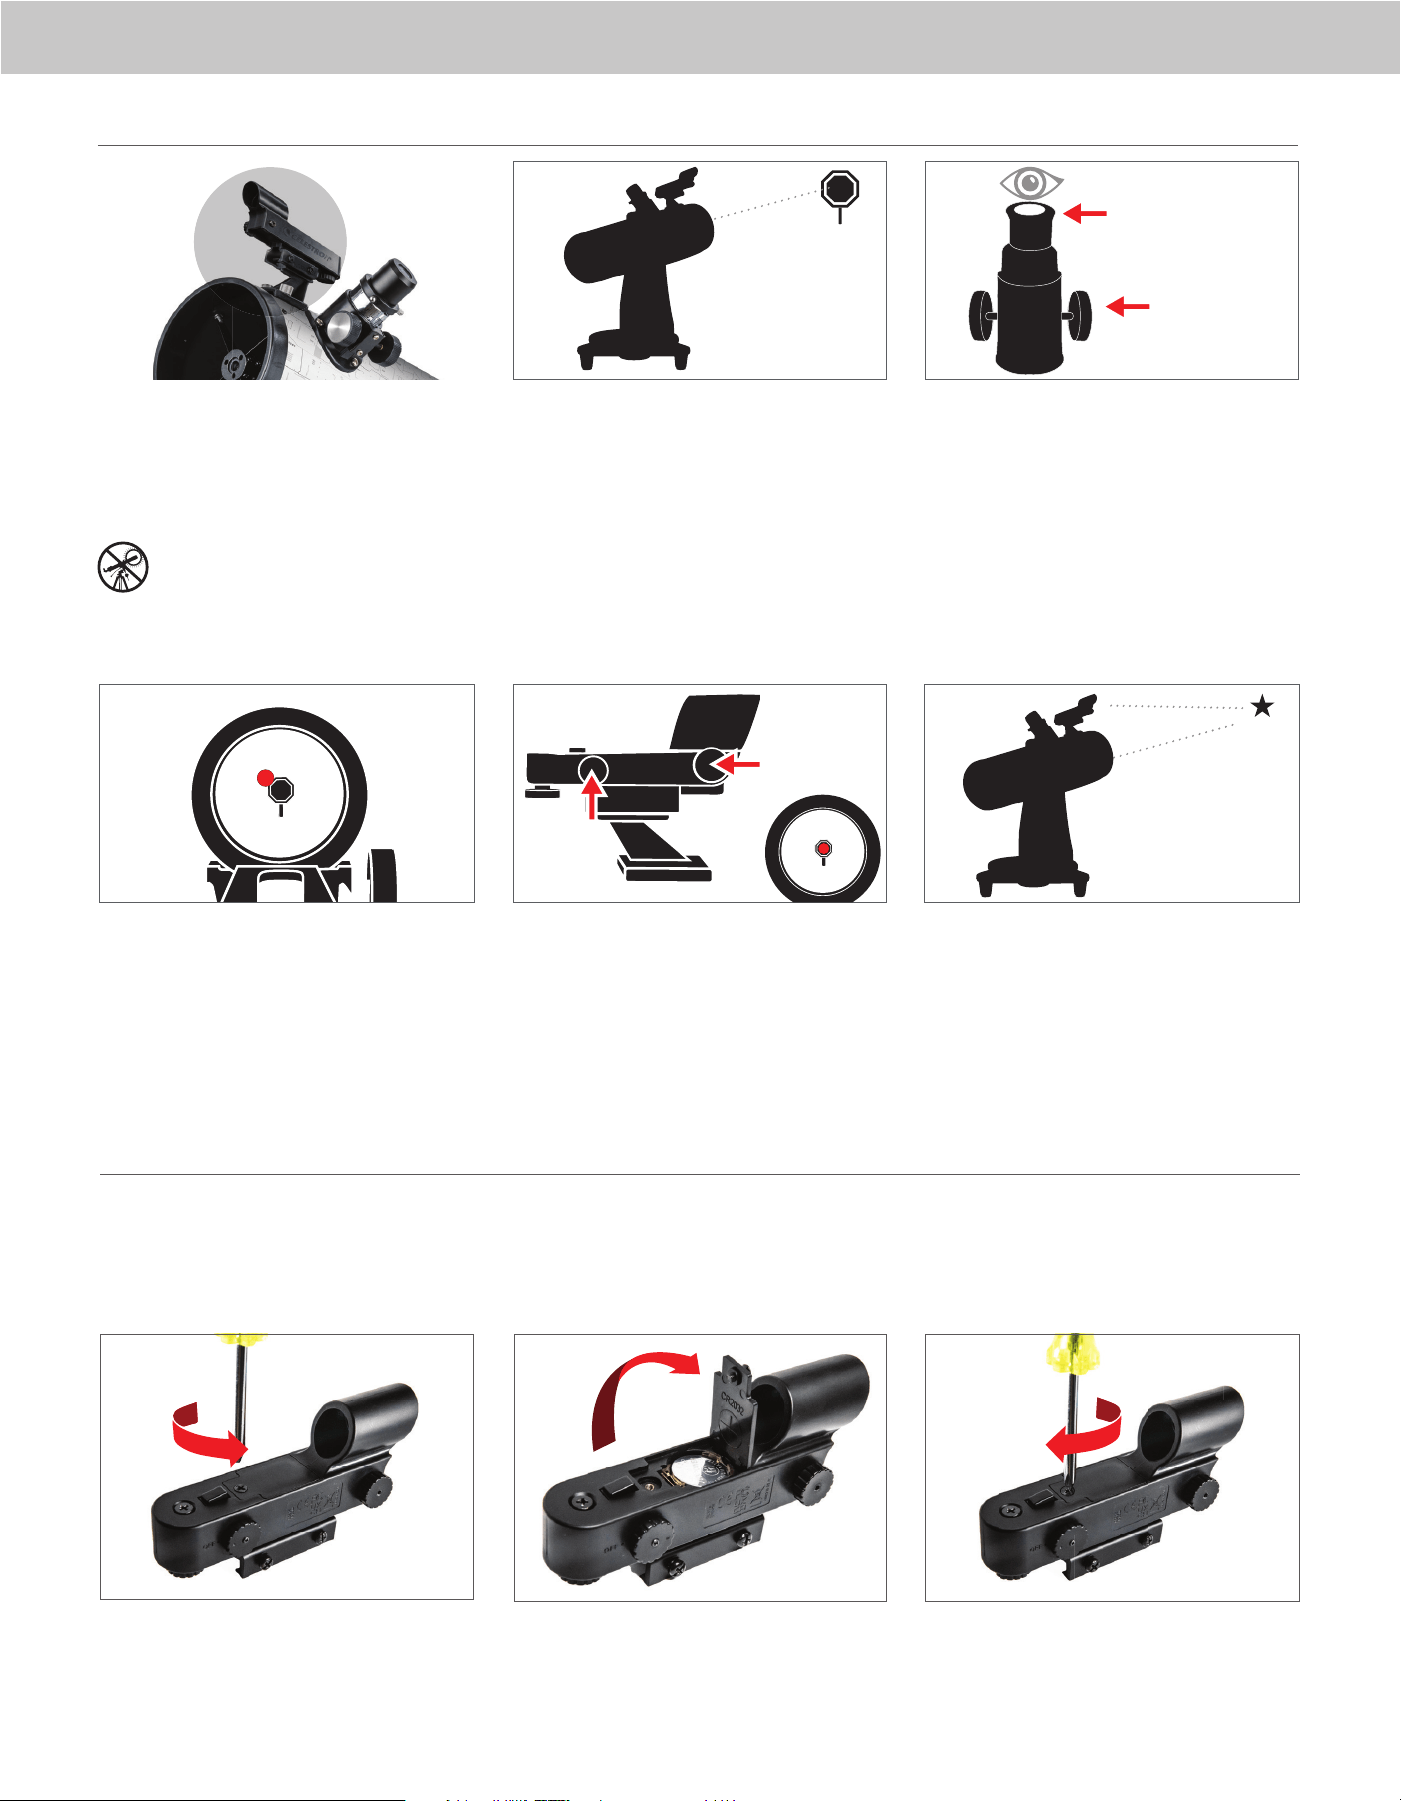
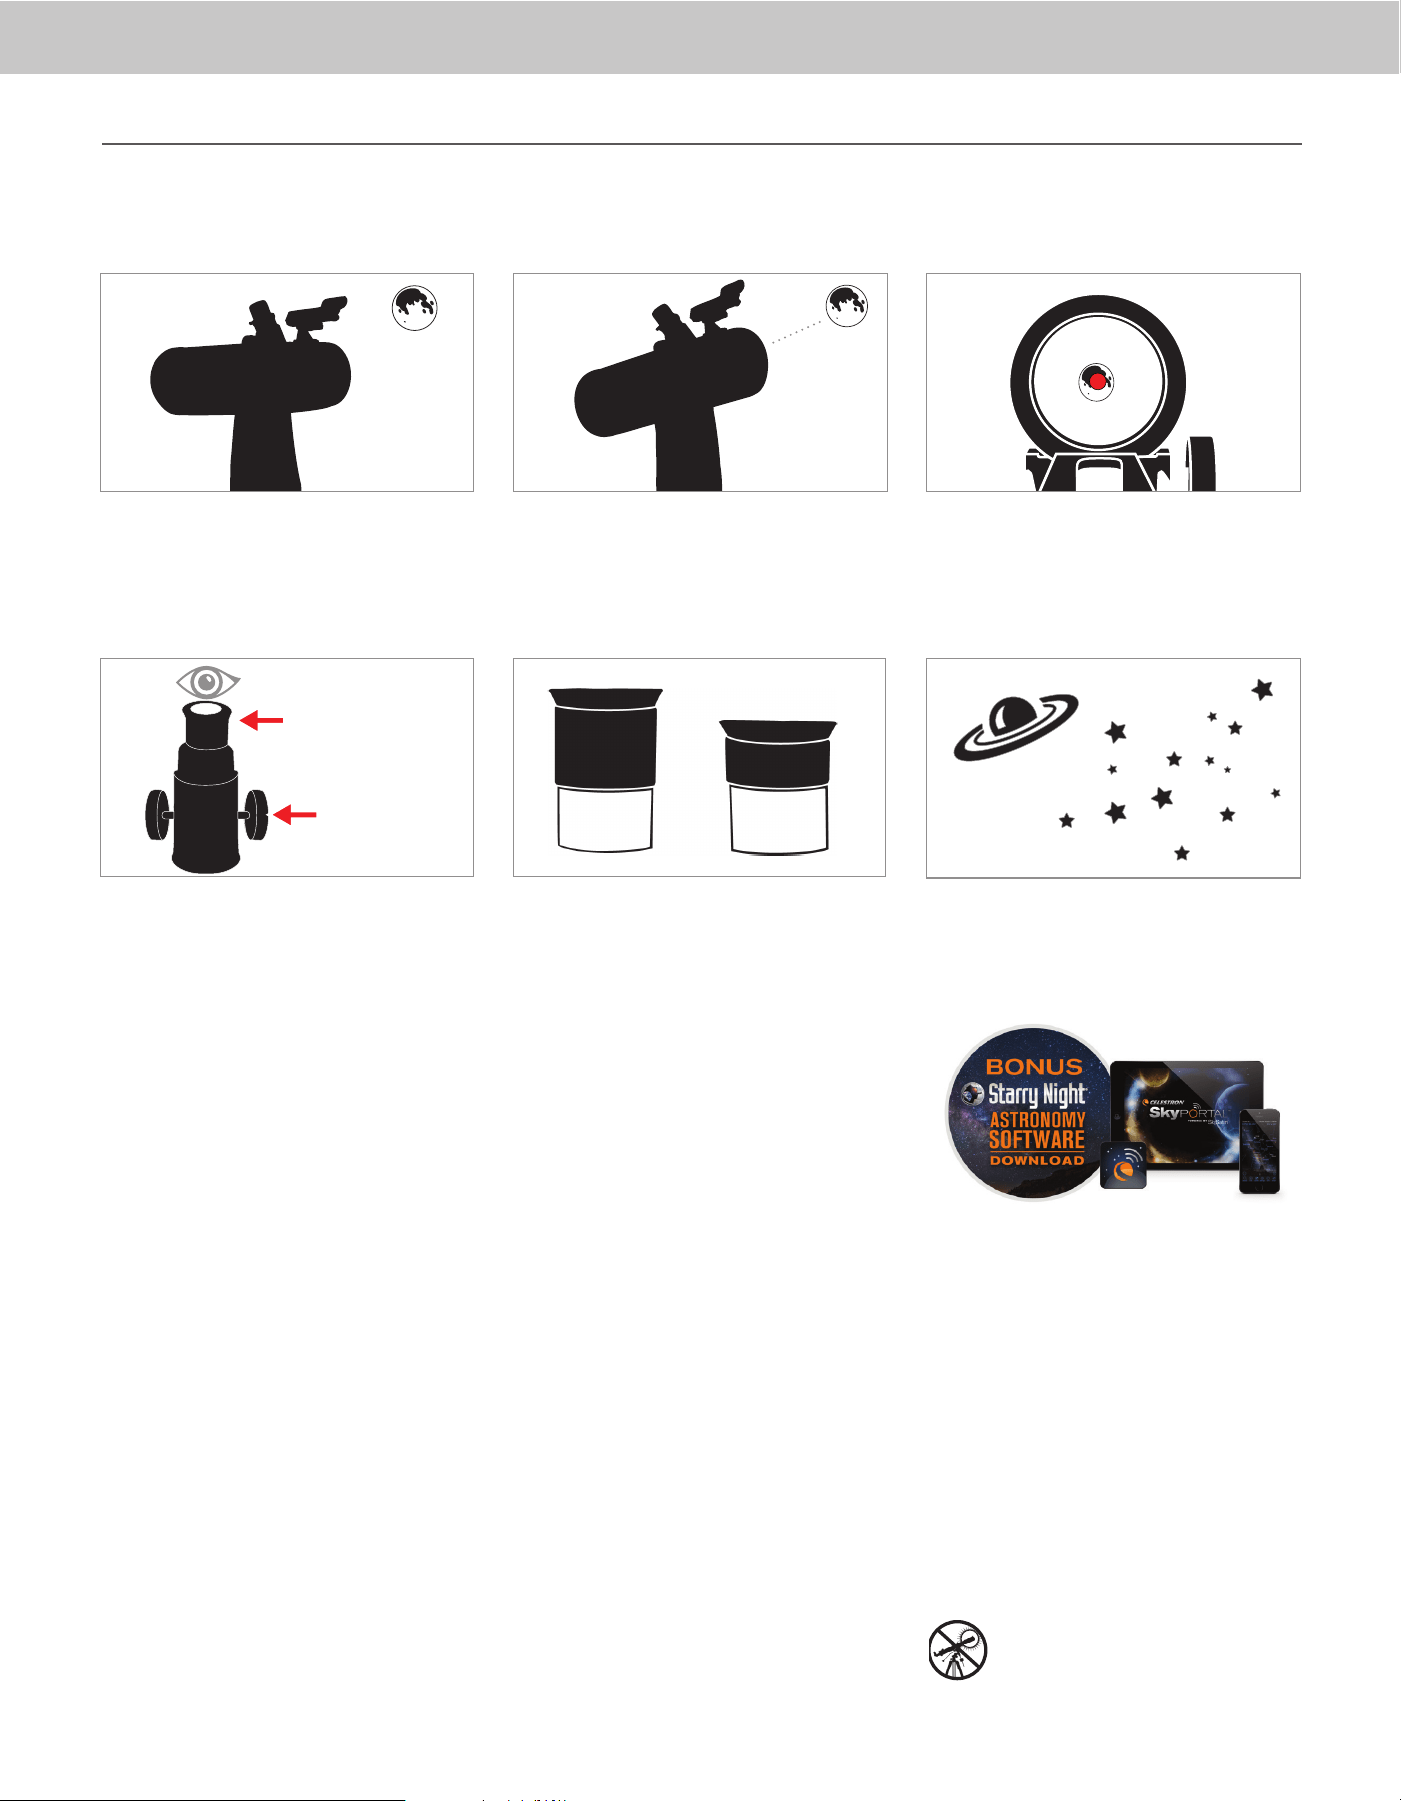
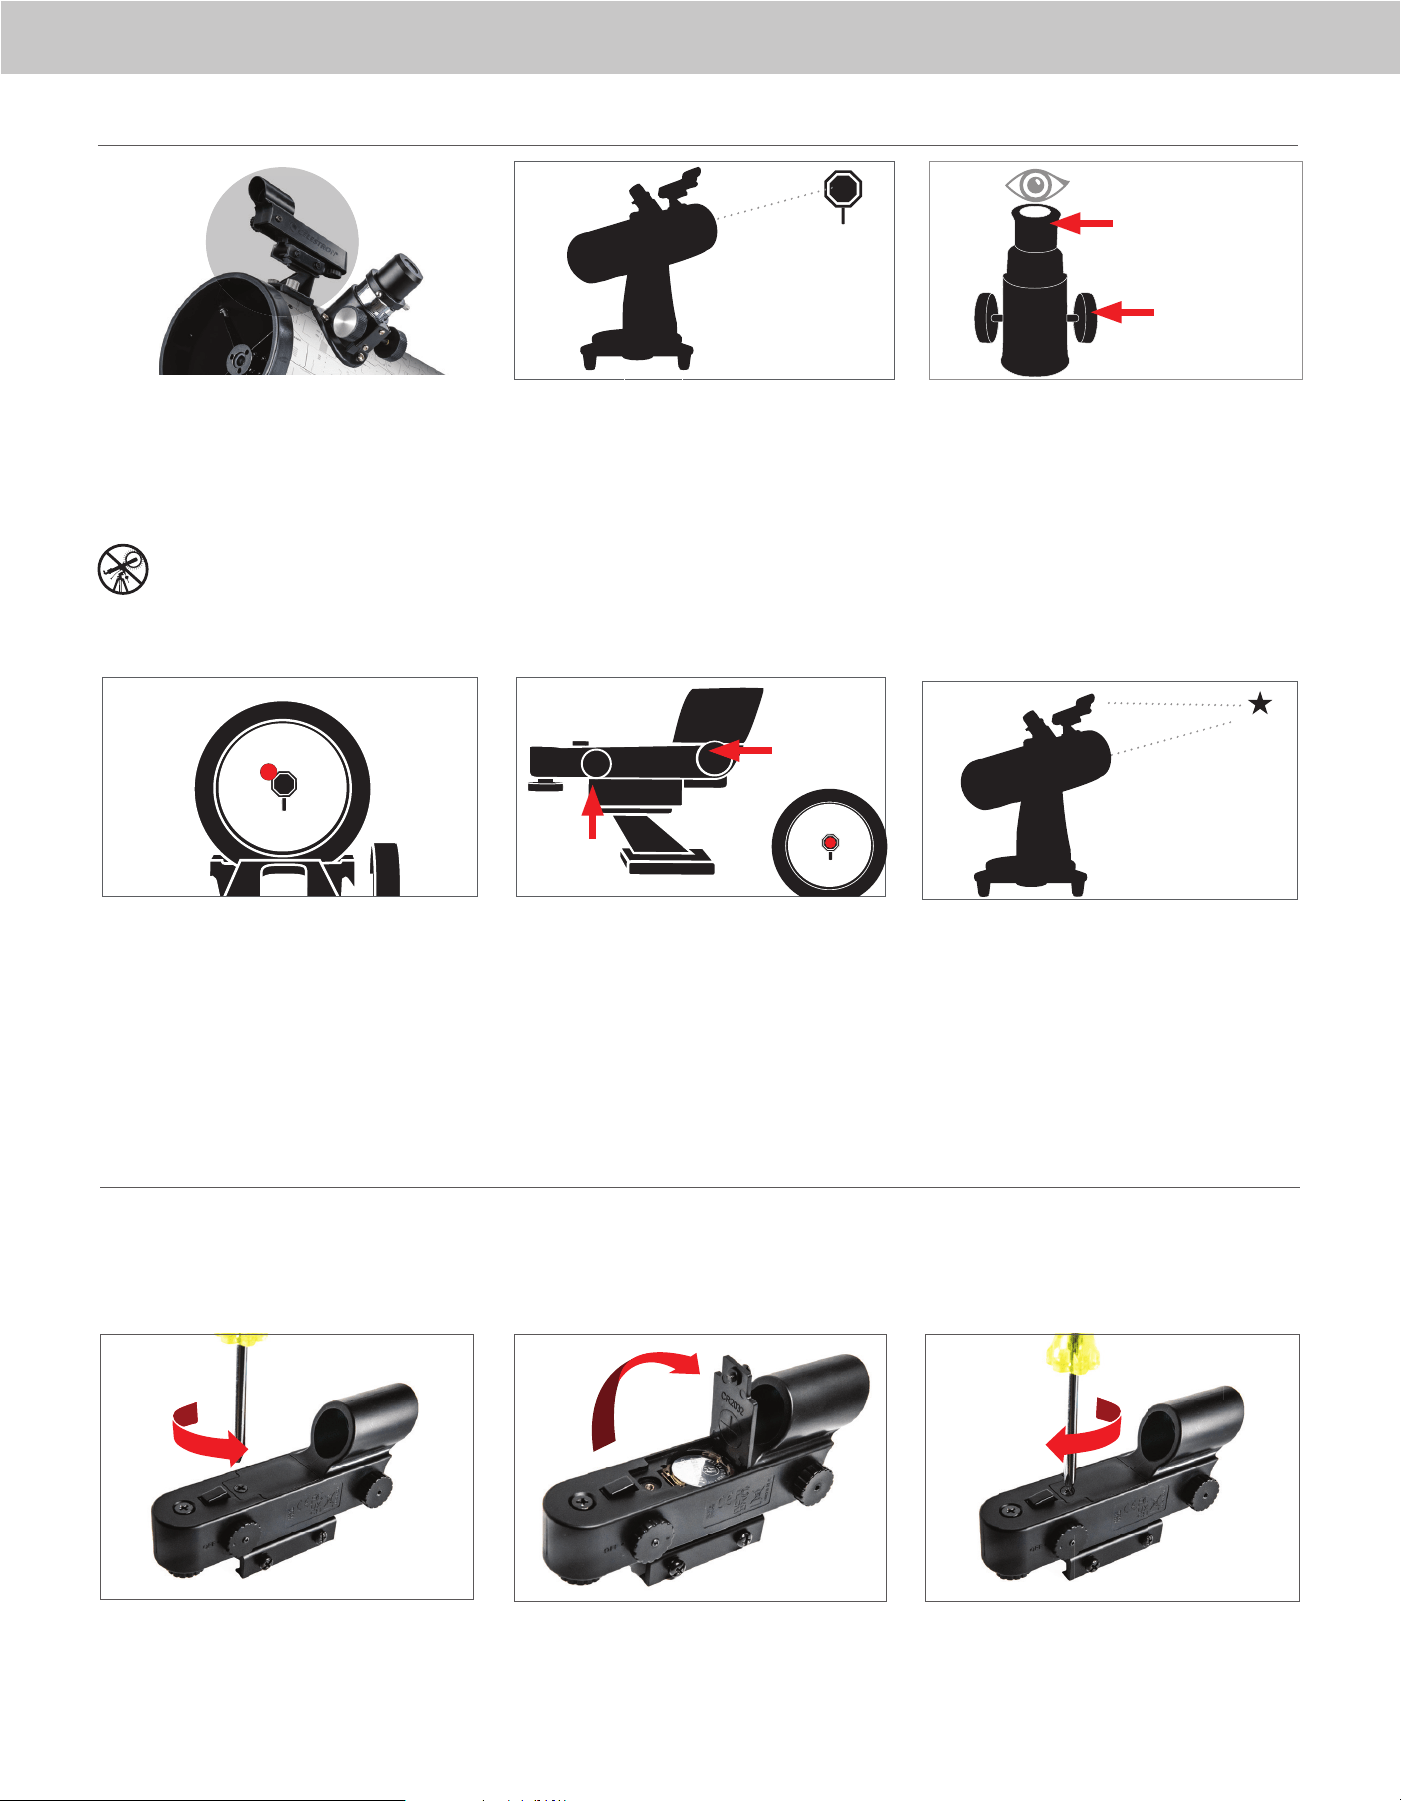
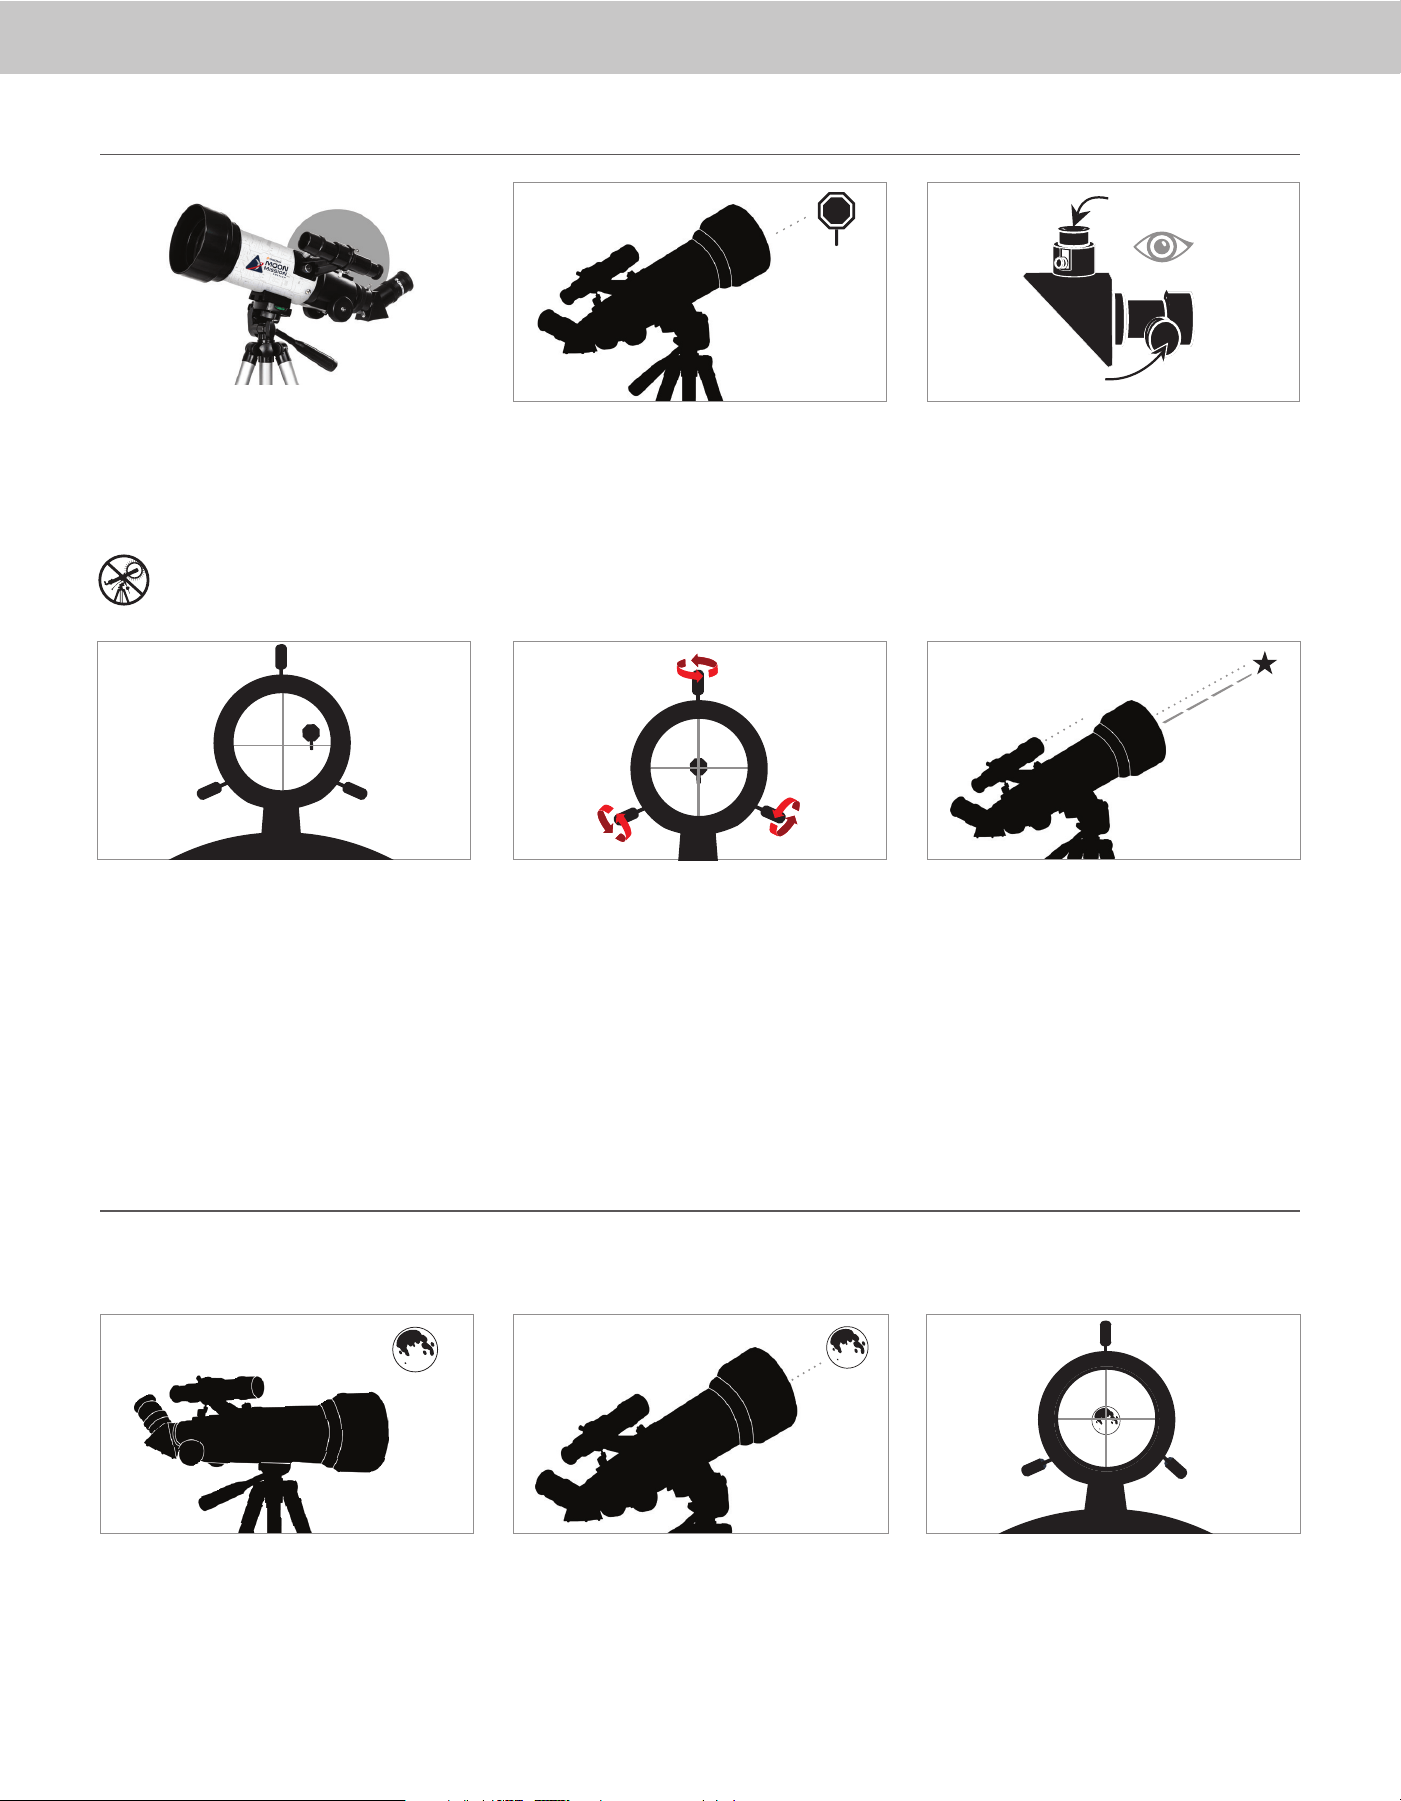
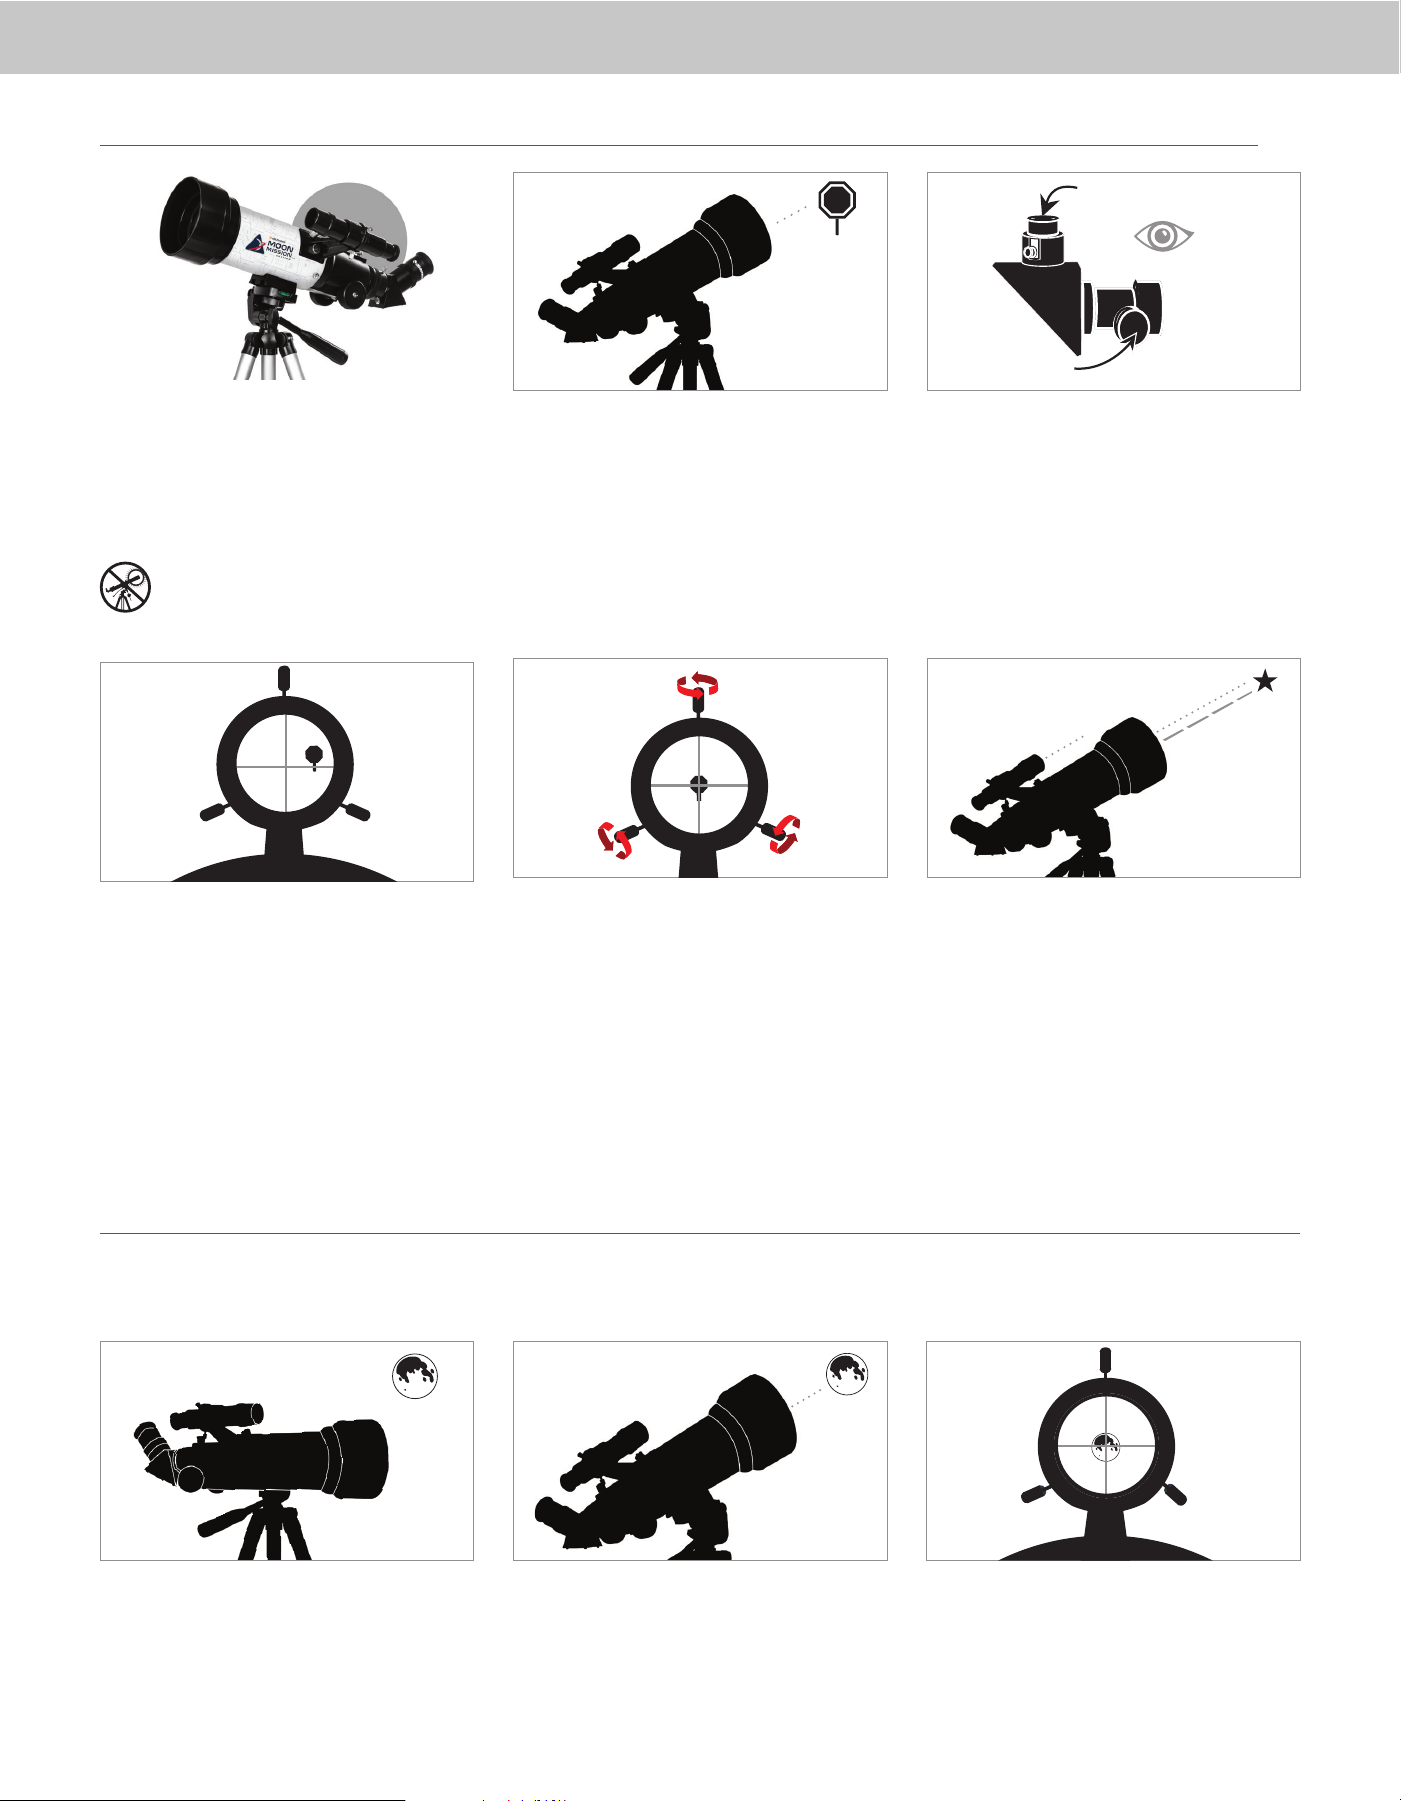
CENTER THE TARGET
IN THE EYEPIECE
Look through the telescope using your lower powered
eyepiece. Move the telescope until the object you
chose lies in the center of the view. If the image is
blurry, gently turn the focus knobs on either side of the
telescope until it comes into sharp focus.
NOTE: The image in your telescope may appear
inverted. This is perfectly normal in astronomical
telescopes.
LOOK THROUGH FINDERSCOPE
Once the object is centered in your 20mm eyepiece,
look through the fi nderscope and locate the red dot.
33
ADJUST THE FINDERSCOPE
Without moving the telescope, use the two
adjustment knobs to move the fi nder around until
the red dot appears over the same object you are
observing in the telescope’s 20mm eyepiece.
YOUR FINDERSCOPE IS
NOW ALIGNED!
It should not require realignment unless it is bumped
or dropped.
44
The fi nder is one of the most important parts of your
telescope. It helps you locate objects and center them
in the eyepiece. The fi rst time you assemble your
telescope, you need to align the fi nder to the telescope’s
main optics. It’s best to do this during the day*.
* SOLAR WARNING! Never attempt to view
the Sun through any telescope without a
proper solar fi lter!
CHOOSE A TARGET
Take the telescope outside during the day and fi nd an
easily recognizable object, such as a streetlight, car
license plate or sign. The object should be as far away
as possible, but at least a quarter mile away.
22
11
55
ALIGNING THE RED DOT FINDERSCOPE
20mm Eyepiece
Focus Knobs
adjustment knob
(side-to-side)
adjustment knob
(up-and-down)
ACCESSING THE FINDERSCOPE BATTERY
The StarPointer fi nderscope uses a long-life 3V lithium battery (#CR2032), which is located on the StarPointer’s top surface. If you plan on not using your telescope for an extended
period, we recommend removing the battery for storage. To remove or replace the battery, follow these instructions:
NOTE: You will need a small Philips-head screwdriver to replace the StarPointer fi nderscope’s battery
22
3311
Using a Phillips-head screwdriver, loosen the battery
cover screw and fl ip the cover open.
If you are replacing the battery, install the new one with
the (+) terminal facing outward.
Place the cover back onto the fi nderscope and retighten
the screw with the Phillips-head screwdriver.
ENGLISH | 3
For more information on this product or to
download the instruction manual, please visit its
product page on celestron.com
SOLAR WARNING: Never attempt to view the
Sun through any telescope without a proper solar
fi lter.
NEED ASSISTANCE?
Contact Celestron Technical Support
celestron.com/pages/technical-support
07-24
ASTRONOMY MOBILE APP & DESKTOP SOFTWARE
Your purchase includes Starry Night Celestron Software
for PC and Mac, plus our SkyPortal Powered by
SkySafari
TM
planetarium app for iOS and Android.
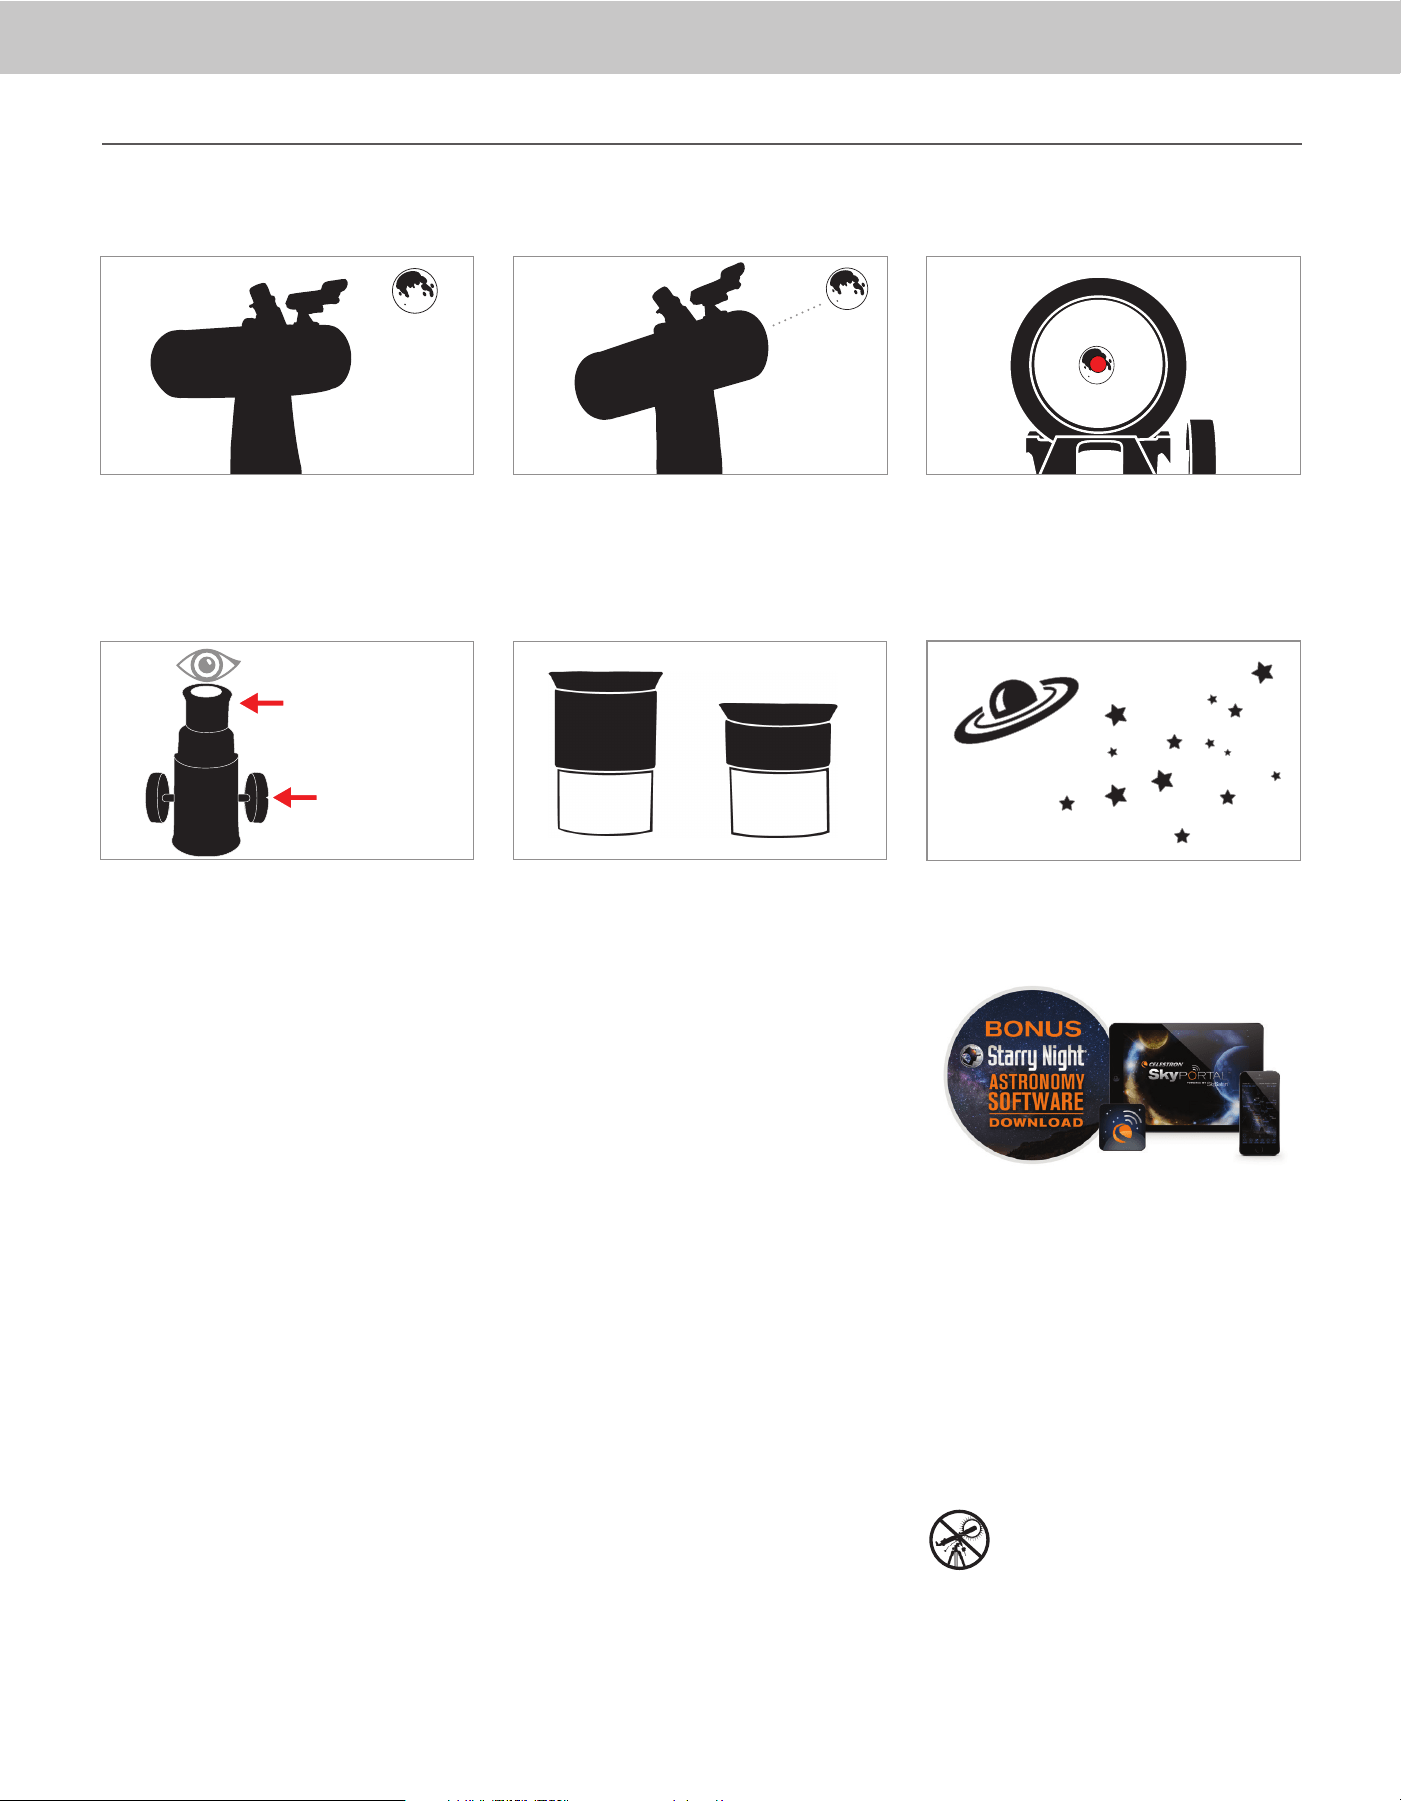
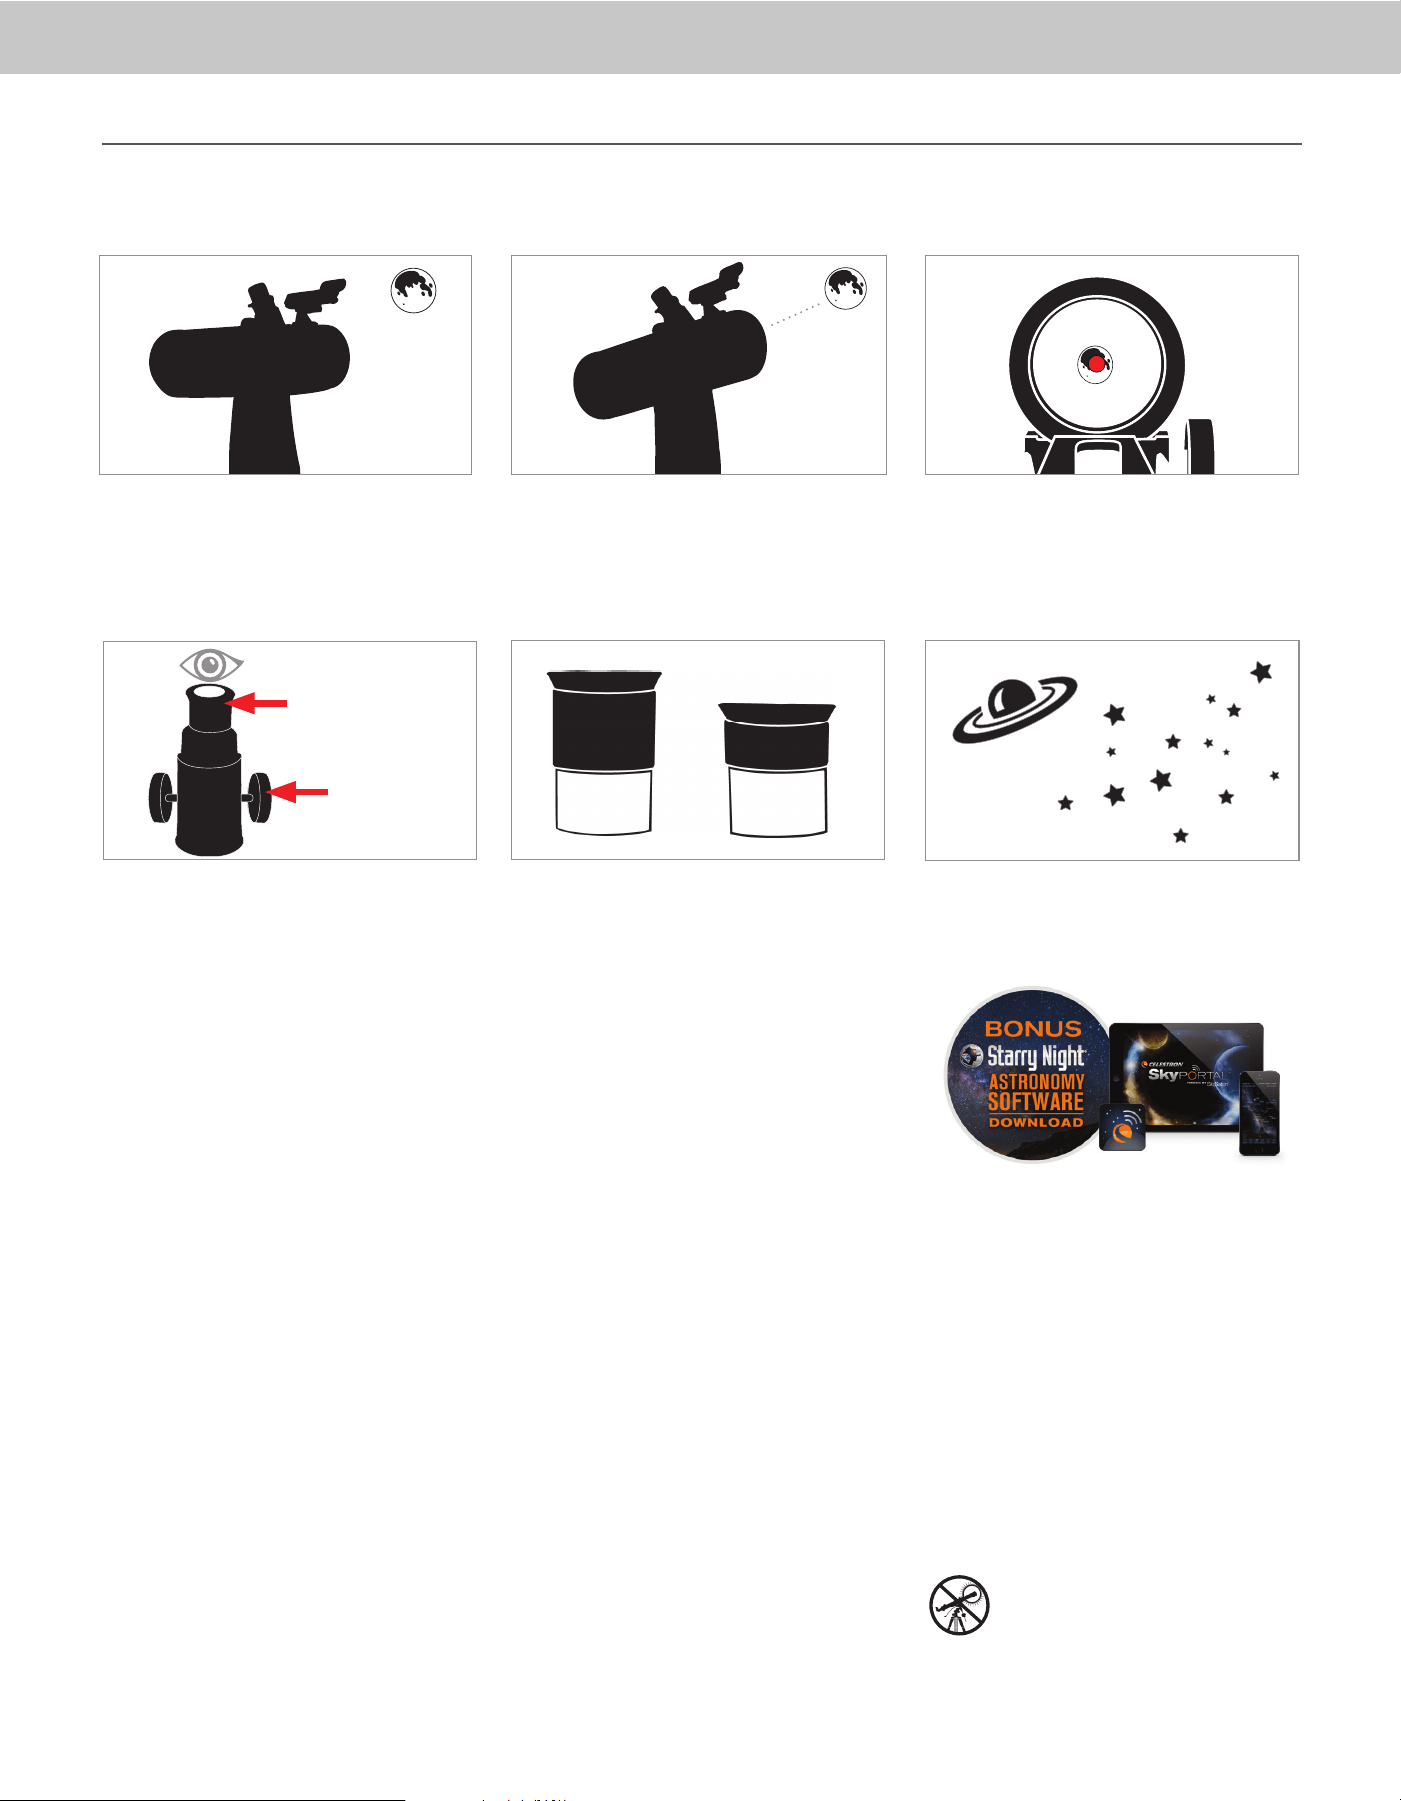
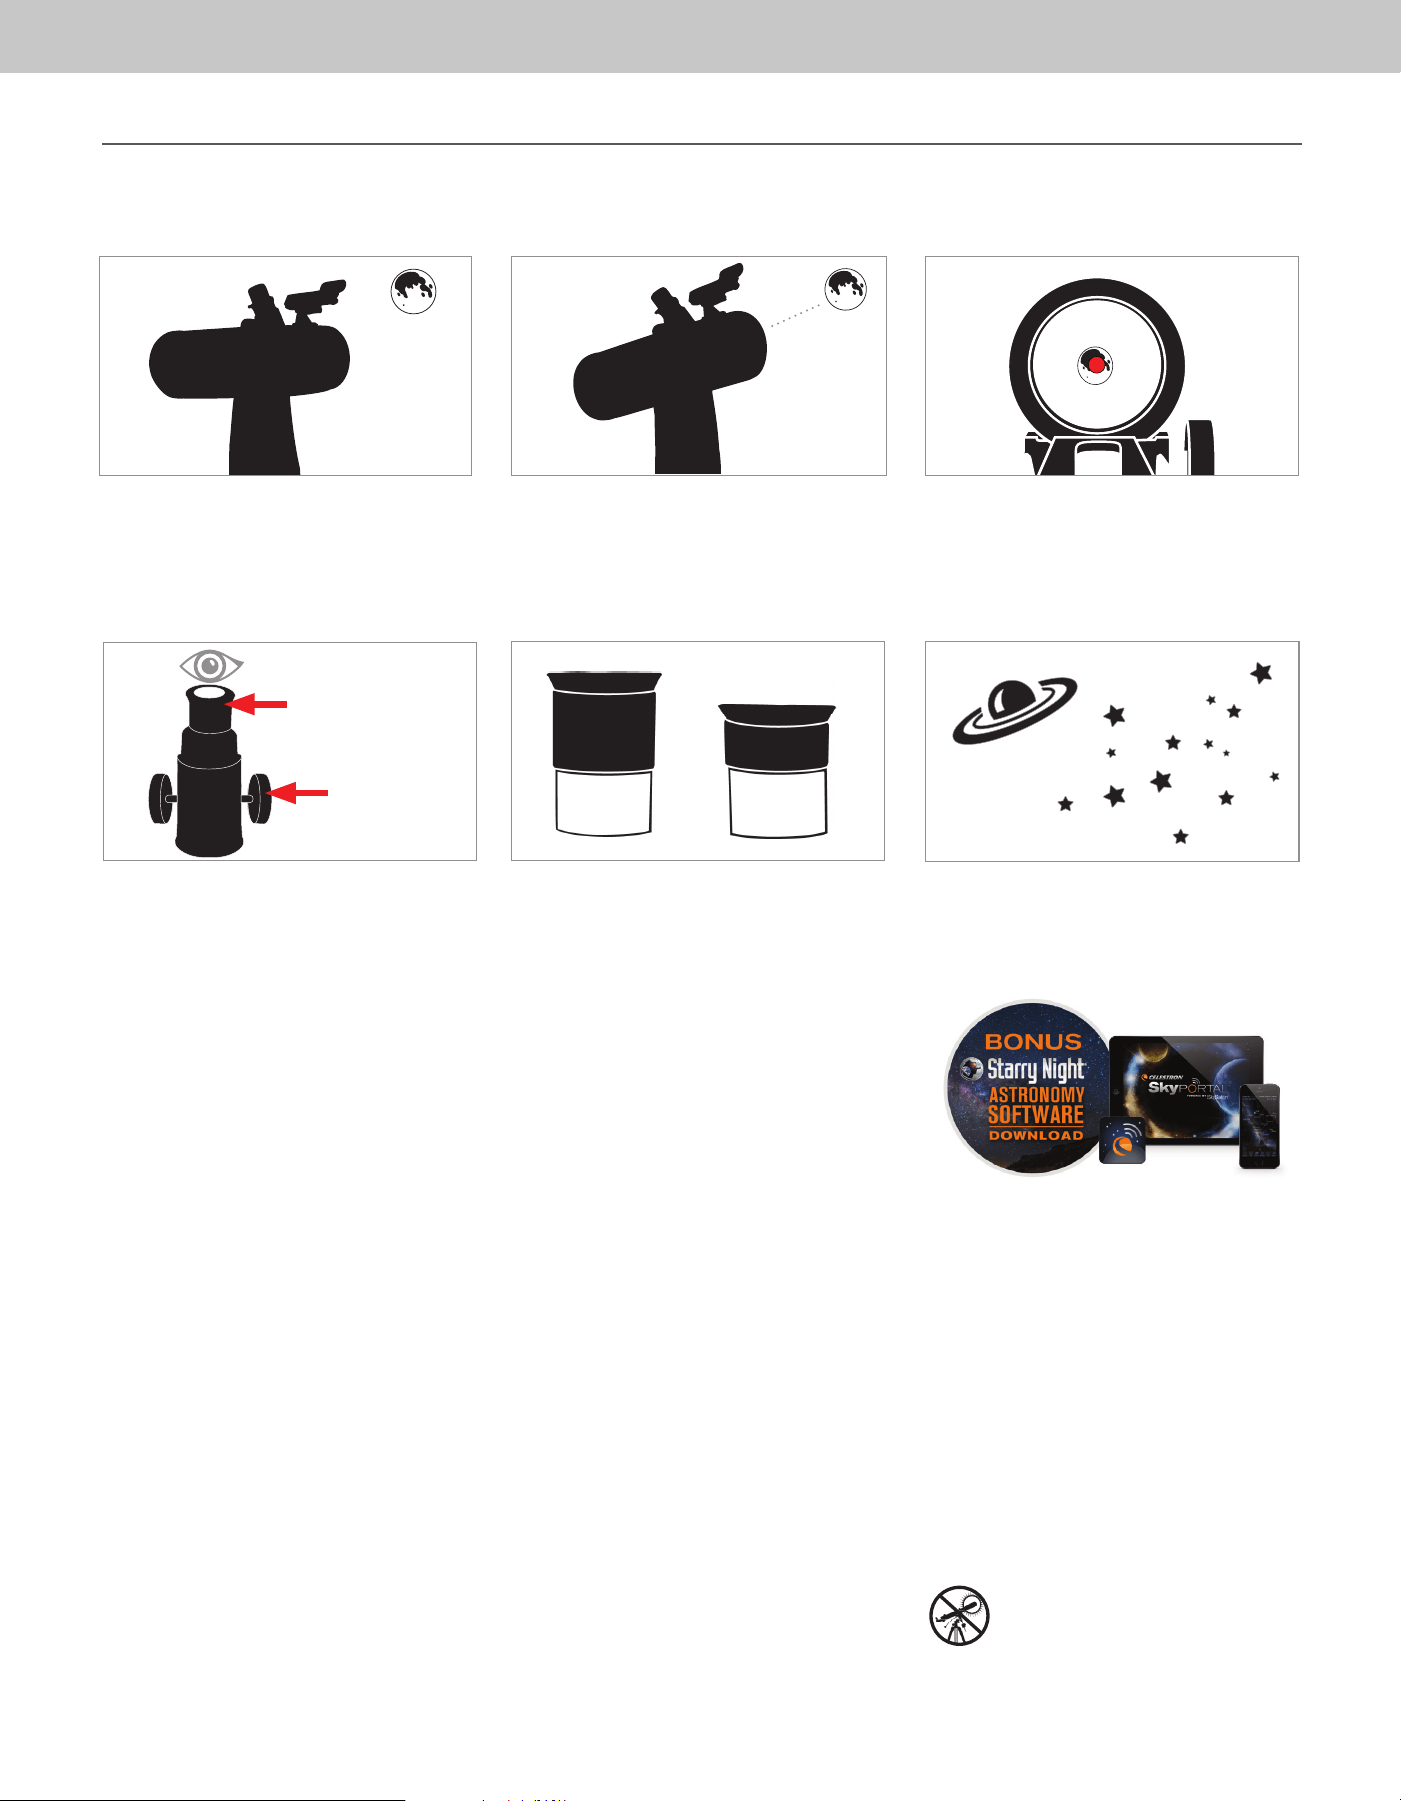
With the Moon visible in the sky, set up your telescope
with the 20mm eyepiece installed.
Look through the telescope’s 20mm eyepiece. Gently
turn the focus knobs to adjust the sharpness of
the image.
You can view many other celestial objects, such as
planets, star clusters and nebulae using this same
technique if you know where to fi nd them in the
night sky.
The best and easiest target for you to try to view fi rst is the Moon. Try observing the Moon at different points in its phase cycle. The best time to view the Moon is from two days after
a New Moon up to a few days before a Full Moon. During this period, you will be able to see the most detail in the craters and lunar mountain ranges.
To get a closer view of the Moon, loosen the
thumbscrews on the focuser and remove the 20mm
eyepiece. Replace it with your 8mm eyepiece and
tighten the thumbscrews to secure it in place. The 8mm
eyepiece will give you signifi cantly more magnifi cation,
making the Moon appear much larger.
NOTE: You may need to adjust the focus knobs when
you change eyepieces to make sure you are
getting the sharpest image possible.
Move the telescope so that it is roughly pointing
toward the Moon.
Look through the fi nderscope and locate the red dot.
Continue moving the telescope until the red dot
appears over the Moon.
11
66
33
CONGRATULATIONS!
YOU HAVE NOW OBSERVED YOUR
FIRST CELESTIAL OBJECT!
22
44
55
8mm
20mm
20mm Eyepiece
Focus Knobs
YOUR FIRST NIGHT OUT - THE MOON
4 | ENGLISH
SOLAR WARNING: Never attempt to view the sun through any telescope.
SAFETY INSTRUCTIONS
• There is a risk of explosion if the battery is replaced with an
incorrect type.
• The included battery is not rechargeable.
• Only use the battery as originally intended to avoid a short
circuit. Connecting the conductive material directly to the
battery’s positive and negative sides will cause a short
circuit.
• Do not use a damaged battery.
• Do not store the battery in an extremely cold or hot
environment. Doing so can reduce battery life.
• Remove batteries if drained or if product is to be left unused
for a long time.
• When replacing the battery, refer to the instruction manual
and ensure the positive and negative sides are oriented
correctly.
• Do not put the battery in fi re.
• Dispose of the battery according to local regulations.
NEED ASSISTANCE? Contact Celestron Technical Support
celestron.com/pages/technical-support
Product design and specifi cations are subject to change without prior notifi cation.
This product is designed and intended for use by those 14 years of age and older
©2024 Celestron. Celestron and Symbol are trademarks of Celestron, LLC.
All rights reserved. • Celestron.com
US: Celestron, 2835 Columbia Street, Torrance, CA 90503 USA
UK: Celestron Global Ltd., Unit 2 Transigo, Gables Way, Thatcham RG19 4JZ, United Kingdom
www.celestron.com/pages/warranty
FCC NOTICE: This device complies with Part 15 of the FCC Rules.
Operation is subject to the following two conditions: (1) This device may not
cause harmful interference, and (2) this device must accept any interference
received, including interference that may cause undesired operation.
BONUS SOFTWARE
Your purchase includes software for your computer. You don’t need to download this software to use your telescope, but it can enhance
your experience.
MINIMUM SYSTEM REQUIREMENTS
Windows:
• Windows 7 or higher
• 500MHz or higher processor
• 128 MB RAM
• 850 MB hard disk space
• 32 MB OpenGL-capable graphics card
• Monitor with 1024x768 pixel resolution (recommended)
Mac:
• Universal binary (PPC/Intel-compatible)
• OS X 10.4 or higher (10.5 or higher for Elementary)
• G3 450 MHz or higher processor
• 128 MB RAM
• 850 MB hard disk space
• 32 MB OpenGL-capable graphics card
• Monitor with 1024x768 pixel resolution (recommended)
Celestron Starry Night Astronomy Software
Celestron Starry Night, the premier astronomy software on the market, takes you on a guided tour of our Solar System’s past, present, and
future. It can help you learn about the night sky and plan your next observing session. Use Starry Night to model exactly how the night sky
will appear from your backyard, a neighboring town, or anywhere on Earth.
Made in China | 07-24
FRANÇAIS | 1
Une fois l'oculaire correctement installé, serrez les vis à
oreilles pour le fi xer.
Placez le chercheur sur les tiges fi letées du tube optique
et fi xez-le en place en serrant les écrous moletés de
l'étape5.
L'installation du télescope est un jeu d'enfant. Tout
d'abord, retirez le capuchon de l'objectif de votre tube
optique.
Pour utiliser le fi ltre lunaire, vissez-le sur le bas de
l'oculaire et avant d'insérer l'oculaire dans le tube
oculaire.
Ensuite, retirez le capuchon de l'oculaire et insérez
l'oculaire de 20 mm dans le tube de l'oculaire. Si
nécessaire, dévissez les vis à oreilles pour que les
fi letages ne gênent pas l'insertion de l'oculaire.
Retirez la languette en plastique du compartiment à
piles du chercheur et tournez le bouton d'alimentation
sur la position "ON".
Le télescope Moon Mission Tabletop 100 est un téles-
cope "push-to", qui est livré assemblé sur une simple
monture alt-az. "Alt" est l'abréviation d'altitude (réglage
vertical) et "Az" est l'abréviation d'azimut (réglage ho-
rizontal). Déplacer la lunette pour capturer une cible
est simple. Appliquez simplement une pression dans la
direction souhaitée.
Article #22018
FRANÇAIS
Guide de confi guration rapide
DE DOBSON DE TABLE
TÉLESCOPE
100
mm
Votre télescope est prêt à l'emploi dès sa sortie de la
boîte. Il est livré avec deux oculaires: un de 20 mm
(grossissement de 20x) et un de 8mm (grossissement
de 50x). Dans la boîte, vous trouverez également un
chercheur à point rouge StarPointer
TM
, un fi ltre lunaire
et une carte lunaire.
22 3311
5544 6
6
6
9977
Retirez les écrous moletés des tiges fi letées près du
dispositif de mise au point. Placez-les dans un endroit
sûr pour les utiliser ultérieurement.

2 | FRANÇAIS
Oculaire de 20mm
Molettes de mise
au point
CENTRER LA CIBLE
DANS L'OCULAIRE
Regardez dans le télescope en utilisant votre oculaire
basse puissance. Déplacez le télescope jusqu'à que
l'objet choisi se trouve au centre du champ de vision.
Si l’image est fl oue, faites doucement tourner l'une ou
l'autre molette de mise au point jusqu’à ce que l’image
soit nette.
REMARQUE: L'image dans votre télescope apparaîtra
probablement inversée. Cela est parfaitement normal
pour un télescope astronomique.
REGARDEZ DANS LE CHERCHEUR
Une fois l’objet centré dans votre oculaire de 20mm,
regardez dans le chercheur et localisez le viseur.
AJUSTER LE CHERCHEUR
Sans déplacer le télescope, utilisez les deux molettes
d’ajustement pour déplacer le chercheur jusqu’à que le
point rouge s’aligne sur l’objet observé dans l’oculaire de
20mm du télescope.
VOTRE CHERCHEUR EST
MAINTENANT ALIGNÉ !
Il n'aura pas besoin d'être aligné de nouveau tant qu'il
n'aura pas subi un choc ou qu'il sera tombé.
44
Le chercheur est l'un des composants les plus importants
de votre télescope. Il vous aide à localiser des objets et à
les centrer dans votre oculaire. La première fois que vous
assemblez votre télescope, vous devez aligner le chercheur
avec le système optique principal du télescope. Il est plus
facile d'effectuer cette opération pendant la journée*.
* AVERTISSEMENT SUR LE SOLEIL! N’essayez
jamais d’observer le soleil à l’aide d’un
télescope sans utiliser un fi ltre solaire adéquat!
CHOISIR UNE CIBLE
Installez le télescope à l’extérieur en journée, et repérez
un objet aisément reconnaissable, comme un feu
de signalisation, une plaque d’immatriculation ou un
panneau. L’objet doit se situer aussi loin que possible,
mais à au moins un quart de mile de vous.
22
11
33
ALIGNEMENT DU CHERCHEUR À POINT ROUGE STARPOINTER
Molette de réglage
(Côte à côte)
Molette de réglage
(Haut et bas)
ACCÈS À LA PILE DU CHERCHEUR
Le chercheur StarPointer utilise une pile au lithium 3V longue durée (#CR2032), qui est située sur la surface supérieure du StarPointer. Si vous prévoyez de ne pas utiliser votre
télescope pendant une période prolongée, nous vous recommandons de retirer la batterie. Si vous devez retirer ou remplacer la pile, suivez ces instructions:
REMARQUE: Vous aurez besoin d'un petit tournevis cruciforme pour remplacer la pile du chercheur StarPointer
À l'aide d'un tournevis cruciforme, desserrez la vis du
couvercle de la batterie et ouvrez le couvercle.
Si vous remplacez la pile, installez la nouvelle en orientant
le pôle (+) vers l'extérieur.
Remettez le couvercle sur le chercheur et resserrez la
vis avec le tournevis cruciforme.
55
22
3311
FRANÇAIS | 3
Pour obtenir plus d'informations sur ce produit
ou télécharger le mode d’emploi, veuillez visiter
la page correspondante du produit sur celestron.
com
AVERTISSEMENT SUR LE SOLEIL: N’essayez jamais
d’observer le soleil à l’aide d’un télescope
sans utiliser un fi ltre solaire adéquat.
APPLI MOBILE ET LOGICIEL D’ORDINATEUR
D’ASTRONOMIE
Votre achat comprend le logiciel Starry Night de
Celestron pour PC et Mac, ainsi que notre application
de planétarium SkyPortal rendu possible par SkySafari
TM
pour iOS et Android.
Lorsque la Lune est visible dans le ciel, installez votre
télescope avec l'oculaire de 20mm.
Regardez dans l'oculaire de 20mm dans le télescope.
Faites doucement tourner la molette de mise au point
pour ajuster la netteté de l’image.
Vous pouvez voir un grand nombre d'objets célestes,
comme des planètes, des amas d'étoiles et des
nébuleuses en utilisant la même technique, si vous savez
comment les trouver dans le ciel nocturne.
Pour obtenir une meilleure vue de la Lune, desserrez les
vis de fi xation du système de mise au point et retirez
l'oculaire de 20mm. Replacez-le par l'oculaire de 8mm
et serrez les vis de fi xation pour le fi xer. L'oculaire de
8 mm permettra un grossissement notablement plus
important, faisant apparaître la Lune en bien plus grand.
NOTE: Il pourrait être nécessaire de faire tourner
les molettes de mise au point après le
changement des oculaires, pour garantir
que l’image la plus nette possible est obtenue.
Déplacez le télescope de manière qu'il pointe plus ou
moins vers la Lune.
Regardez dans le chercheur et localisez le point rouge.
Continuez à orienter le télescope jusqu'à ce que que le
point rouge soit superposé sur la Lune.
FÉLICITATIONS !
VOUS AVEZ MAINTENANT
OBSERVÉ VOTRE PREMIER OBJET
CÉLESTE!
VOTRE PREMIÈRE NUIT D’OBSERVATION - LA LUNE
11
66
3322
44
55
8mm
20mm
Oculaire de 20mm
Molettes de mise
au point
La meilleure cible, qui est également la plus aisée, est la Lune. Essayez d'observer la Lune à différents moments de ses phases. Le meilleur moment pour observer la Lune est deux
jours après la nouvelle Lune et quelques jours avant la pleine Lune. Pendant cette période, vous pourrez distinguer la plus grande quantité de détails dans les cratères et les chaînes
de montagnes lunaires.

4 | FRANÇAIS
AVERTISSEMENT SUR LE SOLEIL: N’essayez jamais d’observer le soleil l’aide d’un
télescope, quel que soit son type.
INSTRUCTIONS DE SÉCURITÉ
• Risque d’explosion si la pile est remplacée par un type
incorrect.
• La pile incluse n’est pas rechargeable.
• N’utilisez la pile que de la manière prévue pour éviter les
court-circuits. Si un matériau conducteur met directement
en contact les pôles positifs et négatifs d’une pile, cela crée
un court-circuit.
• N’utilisez pas une pile endommagée.
• Ne stockez pas la pile dans un lieu extrêmement froid ou
chaud. Ceci pourrait réduire sa durée de vie.
• Retirez les piles si elles sont vides, ou si vous ne prévoyez
pas d'utiliser l'appareil pendant une durée prolongée.
• Avant de remplacer la pile, consultez le mode d'emploi et
faites attention au sens positif et négatif de la pile.
• Ne jetez pas la pile au feu.
• Jetez la pile dans le respect de la réglementation
BESOIN D'ASSISTANCE? Contactez le support technique de Celestron
celestron.com/pages/technical-support
Le design et les spécifi cations du produit sont sujettes à modifi cation sans préavis. Ce produit
est conçu et prévu pour être utilisé par des personnes âgées de 14 ans et plus
©2024 Celestron. Celestron et le Symbol sont des marques déposées de Celestron, LLC. • Tous
droits réservés • Celestron.com
US: Celestron.com • 2835 Columbia Street, Torrance, CA 90503 USA
UK: Celestron Global Ltd., Unit 2 Transigo, Gables Way, Thatcham RG19 4JZ, Royaume-Uni
www.celestron.com/pages/warranty
Déclaration de la FCC Cet appareil respecte la section 15 des règles de
la FCC. Son utilisation est sujette aux deux conditions suivantes: (1) Cet
appareil ne doit pas causer d'interférences nuisibles et (2) cet appareil doit
accepter toutes les interférences reçues, y compris celles pouvant entraîner
un fonctionnement indésirable.
LOGICIEL BONUS
Votre achat inclus un logiciel pour votre ordinateur. Vous n'avez pas besoin de télécharger ce logiciel pour utiliser votre télescope; il est
capable d'améliorer votre expérience.
CONFIGURATION MINIMALE REQUISE
Windows:
• Windows 7 ou version ultérieure
• Processeur de 500 MHz ou plus
• 128 Mo de mémoire vive
• 850 Mo d’espace sur le disque dur
• Carte graphique compatible OpenGL de 32 Mo
• Moniteur d’une résolution de 1024x768 pixels (recommandé)
Mac:
• Binaire universel (compatible PC/Intel)
• OS X 10,4 ou version ultérieure (10,5 ou version ultérieure pour la version
Elementary)
• Processeur G3 450 MHz ou plus
• 128 Mo de mémoire vive
• 850 Mo d’espace sur le disque dur
• Carte graphique compatible OpenGL de 32 Mo
• Moniteur d’une résolution de 1024x768 pixels (recommandé)
Logiciel d'astronomie Celestron Starry Night
Celestron Starry Night, le logiciel d'astronomie leader sur le marché, vous emmène dans une visite guidée du passé, du présent et du futur
de notre système solaire. Cela peut vous aider à en savoir plus sur le ciel nocturne et à planifi er votre prochaine session d'observation.
Utilisez Starry Night pour modéliser exactement comment le ciel nocturne apparaîtra depuis votre jardin, une ville voisine ou n'importe où
sur Terre.
Fabriqué en Chine | 07- 24
DEUTSCH | 1
Ihr Teleskop ist sofort nach dem Auspacken einsatzbereit.
Es wird mit zwei Okularen geliefert: einem 20 mm
Okular (20-fache Vergrößerung) und einem 8mm Okular
(50-fache Vergrößerung). In der Box fi nden Sie außerdem
ein StarPointerTM-Sucherfernrohr mit Leuchtpunkt, einen
Mondfi lter und eine Mondkarte.
Sobald das Okular richtig sitzt, ziehen Sie die
Flügelschrauben fest, um es zu fi xieren.
Setzen Sie das Sucherfernrohr über den Gewindestiften
am optischen Tubus und fi xieren das Sucherfernrohr,
indem Sie die Rändelmuttern aus Schritt 5 festziehen.
Das Einrichten des Teleskops ist ein Kinderspiel.
Entfernen Sie zuerst die Linsenkappe vom optischen
Tubus.
Entfernen Sie die Rändelmuttern an den Gewindestiften
in der Nähe des Fokussierers. Bewahren Sie sie an
einem sicheren Ort auf, um sie in einem späteren Schritt
zu verwenden.
Um den Mondfi lter zu verwenden, schrauben Sie ihn auf
die Unterseite des Okulars, bevor Sie das Okular in das
Okularrohr einsetzen.
Entfernen Sie als Nächstes die Okularkappe und setzen
Sie das 20mm Okular in das Okularrohr ein. Wenn nö-
tig, drehen Sie die Flügelschrauben heraus, damit die
Gewinde das Einsetzen des Okulars nicht behindern.
Entfernen Sie die Kunststoffl asche vom Batteriefach des
Sucherfernrohrs und drehen Sie den Einschaltknopf auf
die Position „ON“.
Das Moon Mission Tabletop 100-Teleskop ist ein „Push-
to“-Teleskop, das auf einer einfachen Alt-Az-Montierung
montiert geliefert wird. „Alt“ ist die Abkürzung für Höhe
(vertikale Einstellung) und „Az“ ist die Abkürzung für
Azimut (horizontale Einstellung). Das Bewegen des
Teleskops zum Erfassen eines Ziels ist ganz einfach.
Üben Sie einfach Druck in die gewünschte Richtung aus.
Artikelnr. 22018
DEUTSCH
Kurzanleitung zur Einrichtung
DOBSON TELESKOP MIT
TISCH-MONTIERUNG
100
mm
22 3311
5544 6
6
6
9977
88

2 | DEUTSCH
ZENTRIEREN SIE DAS ZIEL IM
OKULAR
Schauen Sie mit dem unteren Okular durch das Teleskop.
Schwenken Sie das Teleskop, bis das ausgewählte
Objekt im Zentrum des Sichtfelds liegt. Ist das Bild
unscharf, drehen Sie langsam an den Fokussierknöpfen,
bis das Bild scharf wird.
HINWEIS: Das Bild in Ihrem Teleskop erscheint
möglicherweise spiegelverkehrt. Dies ist bei einem
astronomischen Teleskop völlig normal.
DURCH DAS SUCHERFERNROHR
SCHAUEN
Wenn das Objekt in Ihrem 20 mm Okular zentriert ist,
schauen Sie durch das Sucherfernrohr und suchen den
roten Leuchtpunkt.
SUCHERFERNROHR AUSRICHTEN
Ohne das Teleskop zu bewegen, verwenden Sie die beiden
Einstellknöpfe, um den Sucher zu bewegen, bis er über
demselben Objekt erscheint, das Sie im 20mm Okular
des Teleskops beobachten.
IHR SUCHERFERNROHR IST
JETZT AUSGERICHTET!
Es sollte keine Neuausrichtung erforderlich sein, es sei
denn, es wird angestoßen oder fallen gelassen.
Das Sucherfernrohr ist eines der wichtigsten Teile Ihres
Teleskops. Es hilft Ihnen, Objekte zu suchen und im
Okular zu zentrieren. Wenn Sie Ihr Teleskop zum ersten
Mal zusammenbauen, müssen Sie das Sucherfernrohr
auf die Hauptoptik des Teleskops ausrichten. Dies tun
Sie am besten tagsüber*.
* SONNENSTRAHLEN-WARNHINWEIS!
Versuchen Sie niemals, ohne einen geeigneten
Sonnenfi lter die Sonne durch ein Teleskop zu
beobachten!
WÄHLEN SIE EIN ZIEL
Nehmen Sie das Teleskop tagsüber mit nach draußen
und suchen ein leicht erkennbares Objekt wie eine
Straßenlaterne, ein Nummernschild oder ein Schild. Das
Objekt sollte 400 Meter oder weiter entfernt sein.
LEUCHTPUNKT-SUCHERFERNROHR AUSRICHTEN
Einstellknopf
(von Seite zu
Seite)
Einstellknopf
(auf und ab)
AUF DIE BATTERIE DES SUCHERFERNROHRS ZUGREIFEN
Das StarPointer-Sucherfernrohr verwendet eine langlebige 3 V Lithiumbatterie (#CR2032), die sich auf der Oberseite des StarPointer befi ndet. Wenn Sie Ihr Teleskop über einen
längeren Zeitraum nicht verwenden möchten, empfehlen wir Ihnen, die Batterie zur Lagerung herauszunehmen. Um die Batterie zu entfernen oder auszutauschen, befolgen Sie diese
Anweisungen:
HINWEIS: Zum Ersetzen der Batterie des StarPointer-Sucherfernrohrs benötigen Sie einen kleinen Kreuzschlitzschraubendreher
22
3311
Lösen Sie mit einem Kreuzschlitzschraubendreher
die Schraube der Batterieabdeckung und klappen die
Abdeckung auf.
Wenn Sie die Batterie austauschen, legen Sie die neue
Batterie so ein, dass der (+)-Anschluss nach außen zeigt.
Setzen Sie die Abdeckung wieder auf das
Sucherfernrohr und ziehen die Schraube mit dem
Kreuzschlitzschraubendreher wieder fest.
44
22
11
33
20-mm-Okular
Fokussierknöpfe
55

DEUTSCH | 3
Weitere Informationen zu diesem Produkt oder die
Bedienungsanleitung zum Herunterladen fi nden
Sie auf der Produktseite auf celestron.com.
SONNENSTRAHLEN-WARNHINWEIS:
Versuchen Sie niemals, ohne einen geeigneten
Sonnenfi lter die Sonne durch ein Teleskop zu
beobachten.
ASTRONOMIE MOBILE APP & PC-SOFTWARE
Ihr Kauf umfasst die Starry Night Celestron-Software für
PC und Mac sowie unsere Planetariums-App SkyPortal
Powered by SkySafari
TM
für iOS und Android.
Wenn der Mond im Himmel sichtbar ist, richten Sie Ihr
Teleskop mit dem installierten 20 mm Okular aus.
Schauen Sie jetzt durch das 20 mm Okular des
Teleskops. Drehen Sie die Fokussierknöpfe vorsichtig,
um die Bildschärfe einzustellen.
Sie können viele andere Himmelsobjekte wie Planeten,
Sternhaufen und Nebel mit derselben Technik
beobachten, wenn Sie wissen, wo sie am Nachthimmel
zu fi nden sind.
Das beste und einfachste Ziel, das Sie zuerst beobachten können, ist der Mond. Versuchen Sie, den Mond an verschiedenen Punkten in seinem Phasenzyklus zu beobachten. Die beste
Zeit, um den Mond zu beobachten, ist zwei Tage nach Neumond bis ein paar Tage vor Vollmond. Innerhalb dieses Zeitfensters zeigen sich Krater und Mondgebirge am detailreichsten.
Um den Mond näher zu betrachten, lösen Sie die
Stellschrauben am Fokussierer und nehmen das 20
mm Okular heraus. Ersetzen Sie es durch Ihr 8 mm
Okular und ziehen dann die Stellschrauben fest, um
es zu sichern. Mit dem 8 mm Okular erhalten Sie eine
deutlich höhere Vergrößerung, sodass der Mond viel
größer erscheint.
HINWEIS: Möglicherweise müssen Sie die
Fokusknöpfe anpassen, wenn Sie das
Okular wechseln, um sicherzustellen, dass
Sie ein möglichst scharfes Bild erhalten.
Schwenken Sie das Teleskop so, dass es ungefähr auf
den Mond zeigt.
Schauen Sie durch das Sucherfernrohr und suchen das
den roten leuchtpunkt. Bewegen Sie das Teleskop so
lange, bis das den roten leuchtpunkt über dem Mond
erscheint.
HERZLICHEN
GLÜCKWUNSCH!
SIE HABEN GERADE IHR
ERSTES HIMMELSOBJEKT
BEOBACHTET!
IHRE ERSTE NACHT DRAUSSEN -DER MOND
44
20-mm-Okular
Fokussierknöpfe
11
66
3322
55
8mm
20mm
den roten Leuchtpunkt
4 | DEUTSCH
WARNUNG BEI SONNENBEOBACHTUNG: Versuchen Sie niemals, die
Sonne durch ein Teleskop zu betrachten.
SICHERHEITSHINWEISE
• Es besteht eine Explosionsgefahr, wenn die Batterie durch
einen falschen Batterietyp ersetzt wird.
• Die mitgelieferte Batterie ist nicht wiederaufl adbar.
• Verwenden Sie die Batterie nur wie ursprünglich
vorgesehen, um einen Kurzschluss zu vermeiden. Das
direkte Anschließen des leitenden Materials an die
positiven und negativen Seiten der Batterie führt zu einem
Kurzschluss.
• Verwenden Sie keine beschädigte Batterie.
• Lagern Sie die Batterie nicht in einer extrem kalten oder
heißen Umgebung. Dies kann die Batterielebensdauer
verringern.
• Nehmen Sie die Batterien heraus, wenn sie leer sind oder
das Produkt längere Zeit nicht benutzt wird.
• Beachten Sie beim Ersetzen der Batterie die
Bedienungsanleitung und sorgen Sie dafür, dass die
positiven und negativen Pole richtig ausgerichtet sind.
• Werfen Sie die Batterie nicht ins Feuer.
• Entsorgen Sie die Batterie gemäß den örtlichen
Vorschriften.
BENÖTIGEN SIE UNTERSTÜTZUNG? Wenden Sie sich an die technische Unterstützung von Celestron unter
celestron.com/pages/technical-support
Produktdesign und technische Daten können ohne vorherige Ankündigung geändert werden.
Dieses Produkt ist für Personen ab 14 Jahren konzipiert und vorgesehen.
©2024 Celestron. Celestron und Symbol sind Warenzeichen von Celestron, LLC. Alle Rechte
vorbehalten. Celestron.com
USA: Celestron, 2835 Columbia Street, Torrance, CA 90503 USA
UK: Celestron Global Ltd., Einheit 2 Transigo, Gables Way, Thatcham RG19 4JZ, Vereinigtes
Königreich
celestron.com/pages/warranty
FCC-HINWEIS: Dieses Gerät entspricht Teil 15 der FCC-Bestimmungen.
Der Betrieb unterliegt den folgenden beiden Bedingungen: (1) Dieses Gerät
darf keine schädlichen Störungen erzeugen und (2) dieses Gerät muss
Störungen von außen akzeptieren, dazu gehören solche Störungen, die
einen unerwünschten Betrieb verursachen.
BONUS SOFTWARE
Ihr Kauf beinhaltet Software für Ihren Computer. Sie müssen diese Software nicht herunterladen, um Ihr Teleskop zu verwenden, aber
sie kann Ihr Erlebnis verbessern.
MINDESTANFORDERUNGEN AN DAS GERÄT:
Windows:
• Windows 7 oder höher
• Prozessor mit 500 MHz oder mehr
• 128 MB RAM
• 850 MB Festplattenspeicher
• 32 MB OpenGL-fähige Grafi kkarte
• Monitor mit einer Aufl ösung von 1024 x 768 Pixeln(empfohlen)
Mac:
• Universal Binary (PPC/Intel-kompatibel)
• OS X 10.4 oder höher (10.5 oder höher für Elementary)
• G3 Prozessor mit 450 MHz oder mehr
• 128 MB RAM
• 850 MB Festplattenspeicher
• 32 MB OpenGL-fähige Grafi kkarte
• Monitor mit einer Aufl ösung von 1024 x 768 Pixeln (empfohlen)
Celestron Sternennacht-Astronomiesoftware
Celestron Starry Night, die führende Astronomiesoftware auf dem Markt, nimmt Sie mit auf eine geführte Tour durch die Vergangenheit,
Gegenwart und Zukunft unseres Sonnensystems. Sie kann Ihnen dabei helfen, mehr über den Nachthimmel zu erfahren und Ihre
nächste Beobachtungssitzung zu planen. Sie kann Ihnen dabei helfen, mehr über den Nachthimmel zu erfahren und Ihre nächste
Beobachtungssitzung zu planen.
Hergestellt in China | 07-24
ITALIANO | 1
Il telescopio è pronto all’uso appena rimosso dalla confe-
zione. Viene consegnato con due oculari: uno da 20 mm
(ingrandimento 20x) e uno da 8 mm (ingrandimento
50x). All’interno della confezione è inoltre presente il
cercatore con mirino StarPointerTM, un fi ltro lunare e
una mappa della Luna.
Una volta sistemato correttamente l’oculare, serrare le
viti di blocco per fi ssarlo in posizione.
Sistemare il cercatore sulle aste fi lettate del tubo ottico
e fi ssare il cercatore in posizione serrando i dadi zigrinati
del punto 5.
Confi gurare il telescopio è facilissimo. Innanzitutto,
rimuovere il tappo dal tubo ottico.
Rimuovere i dadi zigrinati dalle aste fi lettate vicino al
focheggiatore. Sistemarle in un luogo sicuro per poterle
utilizzare successivamente.
Per utilizzare il fi ltro lunare, avvitarlo alla base
dell'oculare, prima di inserire l’oculare nell’apposito
tubo.
Quindi, rimuovere il tappo dell’oculare e inserire l’oculare
da 20 mm nell’apposito tubo. Se necessario, estrarre le
viti di blocco, in modo che la fi lettatura non impedisca
l’inserimento dell’oculare.
Rimuovere la linguetta di plastica dal vano batteria del
cercatore, quindi ruotare la manopola di alimentazione
sulla posizione “ON”.
Il telescopio da tavolo Moon Mission 100 è un telescopio
con puntamento passivo che viene consegnato montato
su una semplice montatura alt-az. “Alt” è l’abbreviazione
di altitudine (regolazione verticale) e “Az” è l’abbrevia-
zione di azimut (regolazione orizzontale). Spostare il
telescopio verso un obiettivo è semplice. È suffi ciente
applicare pressione nella direzione desiderata.
Articolo n. 22018
ITALIANO
Guida rapida
TELESCOPIO
DA TAVOLO DOBSON
100
mm
22 3311
5544 6
6
6
9977
88
2 | ITALIANO
44
22
11
33
Oculare 20mm
Manopole di
messa a fuoco
CENTRARE L'OGGETTO
NELL'OCULARE
Guardare attraverso il telescopio utilizzando l'oculare
con minore ingrandimento. Muovere il telescopio fi no a
quando l'oggetto prescelto si trova al centro del campo
visivo. Se l'immagine è sfocata, ruotare con delicatezza
le manopole di messa a fuoco a lato del telescopio fi no a
quando l'immagine non è nitida.
NOTA: L'immagine del telescopio potrebbe apparire
capovolta. Ciò è perfettamente normale per i telescopi
astronomici.
OSSERVARE ATTRAVERSO IL
CERCATORE
Una volta che l'oggetto è centrato nell'oculare da 20
mm, guardare attraverso il cercatore e localizzare il
punto rosso.
REGOLARE IL CERCATORE
Senza spostare il telescopio,, utilizzare le due manopole
di regolazione per spostare il cercatore fi no a quandoil
punto rosso.appare sullo stesso oggetto che si sta
osservando nell'oculare da 20 mm del telescopio.
IL CERCATORE È ORA ALLINEATO!
Non occorre effettuare un nuovo allineamento salvo
colpi o cadute.
Il cercatore è uno dei componenti più importanti del
telescopio. Aiuta a localizzare gli oggetti e a centrarli
nell'oculare. Al primo assemblaggio del telescopio è
necessario allineare il cercatore con le ottiche principali
del telescopio. È preferibile eseguire questa operazione
durante il giorno*.
* AVVERTENZA SOLARE! Non tentare mai di
osservare il Sole attraverso un telescopio
senza un fi ltro solare adeguato!
SCEGLIERE UN OGGETTO DA
OSSERVARE
Portare il telescopio all'esterno durante il giorno e
individuare un oggetto facilmente riconoscibile, come ad
esempio un semaforo, la targa di un'auto o un cartello.
L'oggetto dovrebbe trovarsi il più lontano possibile,
minimo a 400 metri.
ALLINEAMENTO DEL CERCATORE CON MIRINO
Manopola
di rego-
lazione (laterale)
Manopola di
regolazione
(su e giù)
ACCESSO ALLA BATTERIA DEL CERCATORE
Il cercatore StarPointer utilizza una batteria al litio di lunga durata da 3 V (n. CR2032), che si trova nella parte superiore dello StarPointer. Se si pensa di non utilizzare il telescopio
per un periodo prolungato, si consiglia di rimuovere la batteria prima di conservarlo. Per rimuovere o sostituire la batteria, seguire le istruzioni riportate sotto.
NOTA: è necessario un piccolo cacciavite a croce per sostituire la batteria del cercatore StarPointer
22
3311
Utilizzando un cacciavite a croce, allentare il coperchio
della batteria e aprirlo.
In caso di sostituzione della batteria, installare la batteria
nuova con la faccia (+) rivolta verso l’esterno.
Sistemare nuovamente il coperchio sul cercatore e
serrare nuovamente la vite con il cacciavite a croce.
55
ITALIANO | 3
Per maggiori informazioni sul prodotto o per
scaricare il manuale di istruzioni, visitare la
pagina relativa al prodotto su celestron.com
AVVERTENZA SOLARE: Non tentare mai
di osservare il Sole attraverso un telescopio
senza un fi ltro solare adeguato.
APP DI ASTRONOMIA PER DISPOSITIVI MOBILI E
SOFTWARE PER PC
Nell’acquisto è incluso il software per PC e Mac Starry
Night Celestron, più la nostra app planetario SkyPortal
Powered by SkySafari
TM
per iOS e Android.
Quando la Luna è visibile in cielo predisporre il telescopio
con installato l'oculare da 20 mm.
Osservare attraverso l'oculare da 20 mm del telescopio.
Ruotare delicatamente le manopole di messa a fuoco
per regolare la nitidezza dell'immagine.
È possibile osservare altri corpi celesti, come pianeti,
ammassi solari e nebulose, utilizzando questa tecnica se
si conosce la loro posizione nel cielo notturno.
L'oggetto migliore e più facile da osservare per primo è la Luna. Provare a osservare la Luna in diversi momenti delle sue fasi. Il momento migliore per osservare la Luna è a partire
da due giorni dopo la Luna nuova fi no a un paio di giorni prima della Luna piena. Durante questo periodo crateri e catene montuose sono osservabili nel dettaglio.
Per avere una visione più ravvicinata della Luna, allentare
le viti di blocco sul focheggiatore e rimuovere l'oculare da
20 mm. Sostituirlo con l'oculare da 8 mm e serrare le
viti di blocco per fi ssarlo in posizione. L'oculare da 8 mm
consente un ingrandimento signifi cativamente maggiore,
facendo apparire la Luna molto più grande.
NOTA: Per assicurare la maggiore nitidezza possibile,
quando si sostituisce l'oculare, potrebbe essere
necessario regolare le manopole di messa a fuoco.
Spostare il telescopio in modo che punti
approssimativamente verso la Luna.
Osservare attraverso il cercatore e localizzare il punto
rosso.. Continuare a muovere il telescopio fi no a quando
il punto rosso appare sulla Luna.
CONGRATULAZIONI!
HAI APPENA OSSERVATO IL TUO PRIMO
CORPO CELESTE!
LA PRIMA NOTTE DI OSSERVAZIONE - LA LUNA
44
Oculare 20mm
Manopole di
messa a fuoco
11
66
3322
55
8mm
20mm

4 | ITALIANO
AVVERTENZA SOLARE: Non tentare mai di osservare il Sole attraverso il telescopio.
ISTRUZIONI DI SICUREZZA
• Rischio di esplosione se la batteria è sostituita con un tipo
di batteria non corretto.
• La batteria in dotazione non è ricaricabile.
• Utilizzare la batteria esclusivamente come previsto
originariamente per evitare un corto circuito. Quando il
materiale conduttivo è in contatto diretto con il polo positivo
e negativo della batteria si ha un corto circuito.
• Non usare una batteria danneggiata.
• Non conservare la batteria in un ambiente eccessivamente
freddo o caldo. Ciò può ridurre la durata della batteria.
• Rimuovere le batterie se scariche o se il prodotto viene
lasciato inutilizzato per un periodo prolungato.
• Quando si sostituisce la batteria, consultare il manuale di
istruzioni e assicurarsi che i poli positivo e negativo siano
orientati correttamente.
• Non gettare la batteria nelle fi amme.
• Smaltire la batteria in conformità ai regolamenti locali.
BISOGNO DI AIUTO? Contattare il supporto tecnico Celestron
celestron.com/pages/technical-support
Il design del prodotto e le specifi che sono soggetti a modifi che senza previa notifi ca. Questo
prodotto è progettato per essere utilizzato da persone di età pari o superiore ai 14 anni
©2024 Celestron. Celetron e Symbol sono marchi di Celestron, LLC. • Tutti i diritti riservati. •
Celestron.com
Stati Uniti: Celestron, 2835 Columbia Street, Torrance, CA 90503 Stati Uniti
Regno Unito: Celestron Global Ltd., Unit 2 Transigo, Gables Way, Thatcham RG18 4JZ Regno
Unito
celestron.com/pages/warranty
NOTA FCC: Il presente dispositivo è conforme alla Parte 15 delle Norme FCC.
L'utilizzo è soggetto alle seguenti due condizioni: (1) Il presente dispositivo
non deve causare interferenze dannose, e (2) il presente dispositivo deve
accettare qualsiasi interferenza ricevuta, comprese interferenze che
potrebbero causare un funzionamento indesiderato.
SOFTWARE IN OMAGGIO
Nell’acquisto è incluso un software per il computer. Non occorre scaricare il software per utilizzare il telescopio, ma può migliorarne
l’esperienza generale.
REQUISITI MINIMI DI SISTEMA
Windows:
• Windows 7 o superiore
• Processore 500 MHz o superiore
• 128 MB RAM
• 850 MB spazio su disco rigido
• Scheda video da 32 MB che supporta OpenGL
• Monitor con risoluzione 1024x768 pixel (consigliato)
Mac:
• Universal binary (compatibile PPC/Intel)
• OS X 10.4 o superiore (10.5 o superiore per Elementary)
• Processore G3 450 MHz o superiore
• 128 MB RAM
• 850 MB spazio su disco rigido
• Scheda video da 32 MB che supporta OpenGL
• Monitor con risoluzione 1024x768 pixel (consigliato)
Software di astronomia Celestron Starry Night
Celestron Starry Night, software di astronomia premier nel mercato, conduce l’utente in un viaggio nel sistema solare passato, presente
e futuro. Fornisce informazioni sulla volta stellata e aiuta a pianifi care le successive sessioni di osservazione. Utilizzare Starry Night per
creare un modello esatto del cielo notturno osservato dal proprio cortile, da una città vicina o da un qualsiasi punto sulla Terra.
Prodotto in Cina | 07-24
ESPAÑOL | 1
Su telescopio está listo para el uso inmediatamente al
sacarlo de la caja. Se entrega con dos oculares, uno de
20mm (aumento 20x) y uno de 8mm (aumento 50x). En
la caja también encontrará un localizador de punto rojo
StarPointer™, un fi ltro lunar y un mapa lunar.
Cuando el ocular esté correctamente asentado, apriete
los tornillos manuales para asegurarlo en posición.
Coloque el localizador sobre los postes estriados del
tubo óptico y asegúrelo en posición apretando las roscas
estriadas del paso 5.
Instalar el telescopio es muy sencillo. Retire primero la
tapa de la lente del tubo óptico.
Saque las roscas estriadas de los postes estriados cerca
del enfoque. Guárdelas en un lugar seguro para usarlas
más adelante.
Para usar el fi ltro lunar, enrósquelo en la parte inferior
del ocular antes de introducir el ocular en el tubo.
A continuación, retire la tapa del ocular e inserte el
ocular de 20mm en el tubo. Si es necesario, haga
retroceder los tornillos manuales de forma que no
impidan la inserción del ocular.
Saque la tira de plástico del compartimiento de batería
del localizar y ponga el mando de encendido en
posición "ENCENDIDO".
El telescopio de sobremesa Moon Mission 100 es un
telescopio de "empuje" que viene montado sobre un
soporte alt-az sencillo. "Alt" es la abreviatura de alti-
tud (ajuste vertical) y "Az" es la abreviatura de azimut
(ajuste horizontal). Es sencillo mover el telescopio para
capturar un objeto. Solo tiene que aplicar presión en la
dirección en la que desee ir.
Producto # 22018
ESPAÑOL
Guía de instalación rápida
DOBSONIANO DE SOBREMESA
TELESCOPIO
100
mm
22 3311
5544 6
6
6
9977 8
8
8

2 | ESPAÑOL
CENTRAR EL OBJETO
EN EL OCULAR
Mire por el telescopio usando el ocular con menor
potencia. Mueva el telescopio hasta que el objeto elegido
quede en el centro del campo de visión. Si la imagen se
ve borrosa, gire suavemente los mandos de enfoque a
cada lado del telescopio hasta que quede defi nida.
NOTA: La imagen del telescopio puede aparecer
invertida. Es normal en telescopios astronómicos.
MIRAR POR EL LOCALIZADOR
Cuando el objeto esté centrado en el ocular de 20mm,
mire por el localizador y localice el punto rojo.
AJUSTAR EL LOCALIZADOR
Sin mover el telescopio, use los dos mandos de ajuste para
mover el localizador hasta que el punto rojo aparezca
sobre el objeto que está observando en el ocular de
20mm del telescopio.
SU LOCALIZADOR ESTÁ
ALINEADO.
No debería necesitar realineado a menos que reciba
golpes o caiga.
El localizador es una de las piezas más importantes de
su telescopio. Le ayuda a localizar objetos y centrarlos
en el ocular. La primera vez que monte el telescopio,
deberá alinear el localizador con la óptica principal del
telescopio. Es preferible hacerlo de día.*
* ¡AVISO SOLAR! ¡No intente nunca observar el
sol por un telescopio sin un fi ltro solar
adecuado!
ELEGIR UN OBJETO
Saque el telescopio de día y localice un objeto fácilmente
reconocible, como una farola, una matrícula de coche,
o una señal. El objeto debe estar lo más lejos posible, al
menos a 400 m.
ALINEAR EL LOCALIZADOR DE PUNTO ROJO
mando de ajuste
(lado a lado)
mando de ajuste
(arriba y abajo)
ACCEDER A LA BATERÍA DEL LOCALIZADOR
El localizador StarPointer usa una batería de litio de 3V de larga duración (#CR2032), situada en la superfi cie superior del StarPointer. Si no va a usar su telescopio durante un tiempo
prolongado, recomendamos retirar la batería para guardarlo. Para retirar o sustituir la batería, siga estas instrucciones:
NOTA: Necesitará un destornillador de cabezal Phillips pequeño para sustituir la batería del localizador StarPointer
22
3311
Usando un destornillador con cabezal Phillips, afl oje el
tornillo de la cubierta de la batería y abra la tapa.
Si está sustituyendo la batería, instale la nueva con el
terminal (+) hacia fuera.
Vuelva a colocar la tapa en el localizador y apriete el
tornillo con el destornillador de cabezal Phillips.
44
22
11
33
Ocular de 20mm
Mandos de enfoque
55
ESPAÑOL | 3
Para obtener más información de este producto
o descargar el manual de instrucciones, visite la
página del producto en celestron.com
AVISO SOLAR: No intente nunca
observar el Sol por un telescopio sin un
fi ltro solar adecuado.
APP PARA MÓVIL Y SOFTWARE DE ESCRITORIO
ASTRONÓMICO
Su compra incluye el software de Celestron Starry Night
para PC y Mac, además de nuestra app de planetario
SkyPortal Powered by SkySafari™ para iOS y Android.
Con la Luna visible en el fi rmamento, instale el telescopio
con el ocular de 20mm instalado.
Mire por el ocular de 20mm del telescopio. Gire
suavemente los mandos de enfoque para ajustar la
defi nición de la imagen.
Puede observar muchos más objetos celestes, como
planetas, clústeres estelares y nebulosas usando
esta misma técnica si sabe dónde encontrarlos en el
fi rmamento.
El mejor y más sencillo objetivo que puede probar a observar primero es la Luna. Pruebe a observar la Luna en distintos puntos de sus fases. El mejor momento para observar la Luna
es desde dos días después de Luna nueva hasta unos días antes de Luna llena. Durante este periodo podrá ver el máximo detalle de los cráteres y riscos lunares.
Para obtener una vista más cercana de la Luna, afl oje
los tornillos del enfoque y saque el ocular de 20mm.
Cámbielo por el ocular de 8mm y apriete los tornillos
manuales para asegurarlo en posición. El ocular de 8mm
le ofrecerá notablemente más aumento, haciendo que la
Luna se muestre mucho más grande.
NOTA: Puede tener que ajustar los mandos de enfoque
cuando cambie oculares, para asegurarse de
obtener la imagen más defi nida posible.
Mueva el telescopio de forma que apunte
aproximadamente a la Luna.
Mire por el localizador y localice el punto rojo.. Siga
moviendo el telescopio hasta que el punto rojo se
muestre sobre la Luna.
¡FELICIDADES!
¡HA OBSERVADO SU
PRIMER OBJETO CELESTE!
SU PRIMERA NOCHE FUERA - LA LUNA
44
11
66
3322
55
8mm
20mm
Ocular de 20mm
Mandos de enfoque
4 | ESPAÑOL
AVISO SOLAR: No intente nunca observar el Sol con ningún telescopio.
INSTRUCCIONES DE SEGURIDAD
• Riesgo de explosión si se sustituye la batería por un tipo
incorrecto.
• La batería incluida no es recargable.
• Use la batería exclusivamente del modo originalmente
pretendido para evitar un cortocircuito. Cuando el material
conductor se conecte directamente al positivo y negativo
de la batería causará un cortocircuito.
• No use una batería dañada.
• No guarde la batería en un entorno extremadamente frío
o cálido. Hacerlo puede reducir la duración de la batería.
• Retire las baterías si están agotadas o si el producto no va
a usarse durante un tiempo prolongado.
• Cuando cambie la batería, consulte el manual de
instrucciones y asegúrese de que los lados positivo y
negativo estén correctamente orientados.
• No ponga las baterías en el fuego.
• Deseche la batería según la normativa local.
¿NECESITA AYUDA? Contacte con el soporte técnico de Celestron
celestron.com/pages/technical-support
El diseño y las especifi caciones del producto están sujetos a cambios sin notifi cación previa.
Este producto ha sido diseñado y está pensado para ser usado por personas de 14 años o más
de edad.
©2024 Celestron. Celestron y su símbolo son marcas comerciales de Celestron, LLC. • Todos
los derechos reservados. • Celestron.com
EE.UU.: Celestron, 2835 Columbia Street, Torrance, CA 90503 EE.UU.
GB: Celestron Global Ltd., Unit 2 Transigo, Gables Way, Thatcham RG19 4JZ, Reino Unido
www.celestron.com/pages/warranty
NOTIFICACIÓN FCC: Este dispositivo cumple con el apartado 15 de las
normas FCC. Su uso está sujeto a las dos condiciones siguientes: (1) este
dispositivo no puede causar interferencias nocivas, y (2) este dispositivo
debe admitir cualquier interferencia recibida, incluidas las interferencias que
puedan causar un funcionamiento indeseado.
SOFTWARE COMPLEMENTARIO
Su adquisición incluye software para su ordenador. No necesita descargar este software para usar su telescopio, pero puede mejorar
su experiencia.
REQUISITOS MÍNIMOS DEL SISTEMA
Windows:
• Windows 7 o superior
• Procesador de 500MHz o superior
• 128 MB RAM
• Espacio en el disco duro de 850 MB
• Tarjeta gráfi ca de 32 MB con capacidad de OpenGL
• Monitor con resolución de 1024x768 píxeles (recomendado)
Mac:
• Binario universal (PPC/compatible con Intel)
• OS X 10.4 o superior (10.5 o superior para Elementary)
• Procesador G3 450 MHz o superior
• 128 MB RAM
• Espacio en el disco duro de 850 MB
• Tarjeta gráfi ca de 32 MB con capacidad de OpenGL
• Monitor con resolución de 1024x768 píxeles (recomendado)
Software de astronomía Celestron Starry Night
Celestron Starry Night, el principal software de astronomía del mercado, le lleva en una visita guiada del pasado, presente y futuro de
nuestro sistema solar. Puede ayudarle a aprender sobre el fi rmamento nocturno y a planifi car su siguiente sesión de observación. Use
Starry Night para modelar con exactitud el aspecto del fi rmamento nocturno desde su patio trasero, una ciudad cercana, o cualquier lugar
de la Tierra.
Fabricado en China | 07-24

ENGLISH | 1
Unpack your telescope and verify that all parts are present. Your Moon
Mission Travel Scope 70 includes: a 70mm telescope tube, a tripod
and mount head, two eyepieces, a 3x Barlow lens, a finderscope, an
erect image diagonal, a Moon filter, and a Moon map.
To extend the tripod’s central column, loosen the collar on the mount
by turning the locking knob counterclockwise, lift up the tripod head
until it is at the desired height, and turn the locking knob clockwise
to secure.
Rotate the mounting platform so it is horizontal and tighten the knob
to secure it.
To set up the tripod, spread the legs outward until they are fully
extended and push down on the center leg brace.
Loosen the knob on the side of the tripod head mounting platform and
rotate the platform 90 degrees so it is standing vertically.
Remove the cap from the focuser end of the telescope tube and make
sure the two thumbscrews do not protrude into the opening.
Extend the legs of the tripod by unlocking the three tripod lock levers
on each leg. Pull each leg section all the way out and push the lever on
each lock downward to secure it in place.
Match the 1/4”-20 threaded bolt in the mounting platform to the
threaded 1/4”-20 hole on the bottom of the telescope tube and thread
the two together by turning the upper mount knob clockwise. This
should be tight, but be sure to not over-tighten.
Locate the erect image diagonal and remove the plastic covers. Insert
the barrel of the diagonal into the focuser and secure it in place by
tightening the thumbscrews.
2 3
1
8 9
4
5
77
6
ITEM #22008
ENGLISH
Quick Setup Guide
Travel Scope 70Travel Scope 70
2 | ENGLISH
10
Insert the barrel of the 20mm eyepiece into the diagonal and tighten
the thumbscrew.
Remove the lens cap from the front of the telescope. To observe, look
through the eyepiece as shown. Focus the image by turning the knobs
below the focuser.
To move the scope right and left, hold a tripod leg with one hand
while the other hand uses the panning handle to move the scope.
The azimuth locking screw can be loosened or tightened to adjust the
tension to your preference.
Remove the knurled nuts on the threaded posts at the focuser end of
the telescope tube.
For additional magnification, you can use the included 3x Barlow lens.
Place the Barlow lens between the diagonal and the eyepiece.
To move the scope up and down, rotate the entire pan handle
counterclockwise and use the handle to point the scope in the
direction you want to view. Rotate the pan handle clockwise to
lock it in place.
Locate the finderscope and remove the plastic caps on the front and
back lens. Orient the finderscope so that the larger lens is facing
towards the front of the tube as shown. Place the finderscope over the
posts on the tube and replace the knurled nuts to secure it in place.
To use the Moon filter, remove the eyepiece from the diagonal or
Barlow lens. Thread the filter onto the bottom of the eyepiece and
re-insert the eyepiece into the diagonal or Barlow.
For more information on this product or to
download the instruction manual, please visit its
product page on celestron.com
SOLAR WARNING: Never attempt to view the Sun
through any telescope without a proper solar filter.
NEED ASSISTANCE?
Contact Celestron Technical Support
celestron.com/pages/technical-support
11-24
1313
14
15
1717
16
12
11
ENGLISH | 3
CENTER THE TARGET
IN THE EYEPIECE
Look through the telescope using your lower powered
eyepiece. Move the telescope until the object you chose lies
in the center of the view. If the image is blurry, gently turn
the focus knobs until it comes into sharp focus.
LOOK THROUGH FINDERSCOPE
Once the object is centered in your 20mm eyepiece, look
through the finderscope and locate the crosshair reticle.
3
ADJUST THE FINDERSCOPE
Without moving the telescope, use the three finger knobs
on the finderscope bracket to move the finder around in the
bracket until the crosshair appears over the same object you
are observing in the telescope’s 20mm eyepiece.
TIP: Try adjusting one screw at a time. Loosen one screw
by half a turn and tighten another by the same amount
to ensure the finderscope is securely held in place.
YOUR FINDERSCOPE IS
NOW ALIGNED!
You won’t need to realign the finderscope unless it is bumped
or dropped, or you remove it from the main telescope optics.
4
The finder is one of the most important parts of your telescope.
It helps you locate objects and center them in the eyepiece.
The first time you assemble your telescope, you need to align
the finder to the telescope’s main optics. It’s best to do this
during the day*.
* SOLAR WARNING! Never attempt to view the Sun
through any telescope without a proper solar filter!
CHOOSE A TARGET
Take your fully assembled telescope outside during
the day and find an easily recognizable object, such
as a streetlight, car license plate, or sign. The object
should be as far away as possible, but at least a quarter
mile away.
2
Low Power Eyepiece
Focus Knobs
1
5
ALIGNING THE FINDERSCOPE
The best and easiest target for you to try to view first is the Moon. Try observing the Moon at different points in its phase cycle. Although you can observe the Moon any night it is visible, the best
time to view it is from two days after a New Moon up to a few days before a Full Moon. During this period, you will be able to see the most detail in the craters and lunar mountain ranges.
YOUR FIRST NIGHT OUT - THE MOON
With the Moon visible in the sky, set up your telescope with the
20mm eyepiece installed.
Move the telescope so that it is roughly pointing toward
the Moon.
Look through the finderscope and locate the crosshair reticle.
Continue moving the telescope until the crosshair appears
over the Moon.
1 32
4 | ENGLISH
Look through the telescope’s 20mm eyepiece. Gently turn
the focus knobs to adjust the sharpness of the image.
You can view many other celestial objects, such as planets, star
clusters and nebulae using this same technique.
To get a closer view of the Moon, loosen the thumbscrews on
the focuser and remove the 20mm eyepiece. Replace it with
your 10mm eyepiece and tighten the thumbscrews to secure
it in place. The 10mm eyepiece will give you signifi cantly more
magnifi cation, making the Moon appear much larger.
NOTE: You may need to adjust the focus knobs when you
change eyepieces to make sure you are getting the
sharpest image possible.
6
CONGRATULATIONS!
YOU HAVE NOW OBSERVED YOUR
FIRST CELESTIAL OBJECT!
Low Power Eyepiece
Focus Knobs
4
5
10mm
20mm
BONUS SOFTWARE
Your purchase includes software for your computer. You don’t need to download this software to use your telescope, but it can enhance
your experience.
MINIMUM SYSTEM REQUIREMENTS
Windows:
• Windows 7 or higher
• 500MHz or higher processor
• 128 MB RAM
• 850 MB hard disk space
• 32 MB OpenGL-capable graphics card
• Monitor with 1024x768 pixel resolution (recommended)
Mac:
• Universal binary (PPC/Intel-compatible)
• OS X 10.4 or higher (10.5 or higher for Elementary)
• G3 450 MHz or higher processor
• 128 MB RAM
• 850 MB hard disk space
• 32 MB OpenGL-capable graphics card
• Monitor with 1024x768 pixel resolution (recommended)
Celestron Starry Night Astronomy Software
Celestron Starry Night, the premier astronomy software on the market, takes you on a guided tour of our Solar System’s past, present, and
future. It can help you learn about the night sky and plan your next observing session. Use Starry Night to model exactly how the night sky
will appear from your backyard, a nearby dark-sky site, or anywhere on Earth.
NEED ASSISTANCE? Contact Celestron Technical Support
celestron.com/pages/technical-support
Product design and specifi cations are subject to change without prior notifi cation.
This product is designed and intended for use by those 14 years of age and older.
©2024 Celestron. Celestron and Symbol are trademarks of Celestron, LLC.
All rights reserved. • Celestron.com
US: Celestron, 2835 Columbia Street, Torrance, CA 90503 USA
UK: Celestron Global Ltd., Unit 2 Transigo, Gables Way, Thatcham RG19 4JZ, United Kingdom
Made in China | 11-24
celestron.com/pages/warranty
SOLAR WARNING: Never attempt to view the sun through any telescope.

FRANÇAIS | 5
2 3
1
8 9
4
5
77
6
Guide de Configuration Rapide
Lunette de voyage 70Lunette de voyage 70
FRANÇAIS
Déballez votre télescope, et vérifiez que toutes les pièces sont
présentes. Votre Lunette de voyage Moon Mission 60 comprend: un
tube télescopique de 70mm, un trépied et une tête de monture, deux
oculaires, une lentille de Barlow 3x, un chercheur, une diagonale
d'image, un filtre lunaire et une carte de la Lune.
Pour allonger la colonne centrale du trépied, faites desserrez le collier
de la monture en faisant tourner la molette de verrouillage dans le
sens antihoraire, soulevez la tête du trépied jusqu’à ce qu’elle soit à
la hauteur désirée et tournez le bouton de verrouillage dans le sens
horaire pour la fixer.
Faites pivoter la plateforme de montage de façon qu'elle soit à
l'horizontale et serrez le bouton pour la fixer solidement.
Pour installer le trépied, écartez les pieds vers l'extérieur jusqu'à ce
qu'ils soient entièrement dépliés et poussez l’entretoise centrale vers
le bas.
Desserrez le bouton sur le côté de la plateforme de monture de la
tête de trépied et faites-la pivoter de 90 degrés pour qu'elle soit à
la verticale.
Retirez le capuchon de l'extrémité du système de mise au point
du tube du télescope et assurez-vous que les deux vis à oreilles ne
dépassent pas dans l'ouverture.
Déployez les pieds du trépied en déverrouillant les trois leviers de
verrouillage de chacun. Tirez chaque section de pied complètement
vers l'extérieur et poussez le levier de chaque verrou vers le bas pour
le fixer en place.
Faites correspondre le boulon fileté de 1/4”-20 de la plate-forme
de monture au trou fileté de 1/4”-20 sur le dessous du tube du
télescope et vissez-les ensemble en faisant tourner la molette du
dessus de la monture dans le sens horaire. Cette molette doit être
serrée, mais pas escessivement.
Trouvez le renvoi coudé dans la boîte et retirez les capuchons de
plastique. Insérez le barillet de la diagonale dans la porte-oculaire et
fixez-la en place en serrant les vis à main.
ARTICLE #22008
6 | FRANÇAIS
10
1313
14
15
1717
16
11
Insérez le barillet de l’oculaire de 20mm dans la diagonale d’image
et serrez la vis à main.
Retirez le capuchon de la lentille de l'avant du télescope. Pour
observer, regardez dans l'oculaire comme montré ci-dessus. Faites le
point sur l'image en faisant tourner les molettes sous le système de
mise au point.
Pour déplacer le télescope vers la droite et vers la gauche, tenez un
trépied d'une main et de l'autre main, utilisez la poignée panoramique
pour déplacer le télescope. La vis de verrouillage d’azimut peut être
desserrée ou serrée pour régler la tension selon vos préférences.
Retirez les écrous striés des tiges filetées de l'extrémité du tube du
télescope comportant le système de mise au point.
Pour obtenir un plus grand grossissement, vous pouvez utiliser la
lentille de Barlow x3 incluse. Placez la lentille de Barlow entre la dia-
gonale et l'oculaire.
Pour déplacer le télescope vers le haut ou vers le bas, tournez la
poignée dans le sens contraire des aiguilles d'une montre et utilisez
la poignée pour orienter le télescope dans la direction vers laquelle
vous voulez observer. Tournez la poignée dans le sens horaire pour la
verrouiller en place.
Repérez le chercheur et retirez les capuchons de plastique des lentilles
avant et arrière. Orientez le chercheur de façon à ce que l'objectif
plus grand soit orienté vers l'avant du tube, comme illustré. Placez le
chercheur sur les tiges du tube et remplacez les écrous moletés pour
le fixer en place.
Pour utiliser le filtre lunaire, retirez l'oculaire de la lentille de la diago-
nale ou de la lentille de Barlow. Vissez le filtre sur le fond de l'oculaire
et réinsérez l'oculaire dans la diagonale ou la lentille Barlow.
Pour obtenir plus d'informations sur ce produit ou
télécharger le mode d’emploi, veuillez visiter la
page correspondante du produit sur celestron.com
AVERTISSEMENT SUR LE SOLEIL:
N’essayez jamais d’observer le soleil à l’aide
d’un télescope sans utiliser un filtre solaire
adéquat.
BESOIN D'ASSISTANCE?
Contactez le support technique de Celestron
celestron.com/pages/technical-support
11-24
12
FRANÇAIS | 7
2
1
5
3
Le chercheur est l'un des composants les plus importants
de votre télescope. Il vous aide à localiser des objets et à
les centrer dans votre oculaire. La première fois que vous
assemblez votre télescope, vous devez aligner le chercheur
avec le système optique principal du télescope. Il est plus
facile d'effectuer cette opération pendant la journée*.
* AVERTISSEMENT SUR LE SOLEIL! N’essayez
jamais d’observer le soleil à l’aide d’un télescope
sans utiliser un filtre solaire adéquat!
Oculaire basse puissance
Molettes de
mise au point
CENTRER LA CIBLE
DANS L'OCULAIRE
Regardez dans le télescope en utilisant votre oculaire basse
puissance. Déplacez le télescope jusqu'à que l'objet choisi se
trouve au centre du champ de vision. Si l’image est floue, faites
doucement tourner la molette de mise au point jusqu’à ce que
l’image soit nette.
REGARDEZ DANS LE CHERCHEUR
Une fois l'objet centré dans votre oculaire de 20mm,
regardez dans le chercheur et localisez le réticule du viseur.
CHOISIR UNE CIBLE
Installez le télescope à l’extérieur en journée, et repérez un
objet aisément reconnaissable, comme un feu de signalisation,
une plaque d’immatriculation ou un panneau. L’objet doit se
situer aussi loin que possible, mais à au moins un quart de
mile de vous.
AJUSTER LE CHERCHEUR
Sans déplacer le télescope, utilisez les deux molettes
d’ajustement pour déplacer le chercheur jusqu’à que le point
rouge s’aligne sur l’objet observé dans l’oculaire de 20mm
du télescope.
CONSEIL: Essayez autant que possible de ne faire tourner
qu'une vis à la fois. Desserrez une vis d'un demi
tour, et faites-en tourner une autre d'autant
pour garantir que le chercheur ne risque pas de
tomber.
VOTRE CHERCHEUR EST
MAINTENANT ALIGNÉ !
Il ne sera plus nécessaire d’effectuer l’alignement de nouveau
à moins qu’il subisse un choc ou une chute, ou que vous le
retiriez du système optique du télescope.
4
ALIGNER LE CHERCHEUR
VOTRE PREMIÈRE NUIT D’OBSERVATION - LA LUNE
La meilleure cible, qui est également la plus aisée, est la Lune. Essayez d’observer la Lune à différents moments de ses phases. Bien que vous puissiez observer la Lune tant qu’elle est visible dans le
ciel, le meilleur moment pour la voir deux jours après une nouvelle lune jusqu’à quelques jours avant une pleine lune. Pendant cette période, vous pourrez distinguer la plus grande quantité de détails
dans les cratères et les chaînes de montagnes lunaires.
1 32
Lorsque la Lune est visible dans le ciel, installez votre télescope
avec l'oculaire de 20mm.
Déplacez le télescope de manière qu'il pointe plus ou moins
vers la Lune.
Regardez dans le chercheur et localisez le réticule du viseur.
Continuez à orienter le télescope jusqu'à ce que le viseur soit
superposé sur la Lune.
8 | FRANÇAIS
65
20mm
Regardez dans l'oculaire de 20mm dans le télescope. Faites
tourner doucement la molette de mise au point pour ajuster le
netteté de l'image.
Vous pouvez observer un grand nombre d’autres objets
célestes, comme les planètes, les amas d’étoiles et les
nébuleuses en utilisant cette même techniques.
Pour obtenir une meilleure vue de la Lune, desserrez les vis
de fi xation du système de mise au point et retirez l'oculaire
de 20mm. Replacez-le par l'oculaire de 10mm et serrez les
vis de fi xation pour le fi xer. L'oculaire de 10mm permettra un
grossissement notablement plus important, faisant apparaître
la Lune en bien plus grand.
NOTE: Il pourrait être nécessaire de faire tourner les molettes
de mise au point après le changement des oculaires,
pour garantir que l’image la plus nette possible est
obtenue.
FÉLICITATIONS !
VOUS AVEZ MAINTENANT
OBSERVÉ VOTRE PREMIER OBJET CÉLESTE!
Oculaire basse puissance
Molettes de
mise au point
4
10mm
BESOIN D'ASSISTANCE? Contactez le support technique de Celestron
celestron.com/pages/technical-support
Le design et les spécifi cations du produit sont sujettes à modifi cation sans préavis. Ce produit est conçu et prévu pour être utilisé par
des personnes âgées de 14 ans et plus
©2024 Celestron. Celestron et le Symbol sont des marques déposées de Celestron, LLC. • Tous droits réservés • Celestron.com
US: Celestron.com • 2835 Columbia Street, Torrance, CA 90503 USA
UK: Celestron Global Ltd., Unit 2 Transigo, Gables Way, Thatcham RG19 4JZ, Royaume-Uni
Fabriqué en Chine | 11-24
celestron.com/pages/warranty
Windows:
• Windows 7 ou version ultérieure
• Processeur de 500 MHz ou plus
• 128 Mo de mémoire vive
• 850 Mo d’espace sur le disque dur
• Carte graphique compatible OpenGL de 32 Mo
• Moniteur d’une résolution de 1024x768 pixels (recommandé)
CONFIGURATION MINIMALE REQUISE
Mac:
• Binaire universel (compatible PC/Intel)
• OS X 10,4 ou version ultérieure (10,5 ou version ultérieure pour la
version Elementary)
• Processeur G3 450 MHz ou plus
• 128 Mo de mémoire vive
• 850 Mo d’espace sur le disque dur
• Carte graphique compatible OpenGL de 32 Mo
• Moniteur d’une résolution de 1024x768 pixels (recommandé)
LOGICIEL BONUS
Votre achat inclus un logiciel pour votre ordinateur. Vous n'avez pas besoin de télécharger ce logiciel pour utiliser votre télescope; il est capable d'améliorer votre expérience.
Logiciel d'astronomie Celestron Starry Night
Celestron Starry Night, le logiciel d’astronomie leader sur le marché, vous emmène dans une visite guidée du passé, du présent et du futur de notre système solaire. Cela peut vous aider à en savoir plus sur
le ciel nocturne et à planifi er votre prochaine session d’observation. Utilisez Starry Night pour modéliser exactement comment le ciel nocturne apparaîtra depuis votre jardin, une ville voisine ou n’importe
où sur Terre.
AVERTISSEMENT SUR LE SOLEIL: N’essayez jamais d’observer le soleil l’aide d’un
télescope, quel que soit son type.
DEUTSCH | 9
2 31
8 9
4
5
77
6
ARTIKEL NR. 22008
DEUTSCH
Kurzanleitung zur Einrichtung
Travel Scope 70Travel Scope 70
Packen Sie Ihr Teleskop aus und überprüfen die Vollständigkeit aller
Teile. Zu Ihrem Moon Mission Travel Scope 70 gehört: ein 70-mm-
Tubus, ein Stativ mit Montierungskopf, zwei Okulare, eine 3-fach
Barlowlinse, ein Sucherfernrohr, einen Diagonalspiegel, einen
Mondfilter und eine Mondkarte.
Um die Mittelsäule des Stativs auszuziehen, lösen Sie den Ring an der
Montierung, indem Sie den Feststellknopf gegen den Uhrzeigersinn
drehen und den Stativkopf anheben, bis er die gewünschte Höhe
erreicht hat, drehen Sie dann den Feststellknopf im Uhrzeigersinn, um
ihn festzuziehen.
Drehen Sie die Montierung, bis sie waagerecht ist und ziehen den
Knopf fest, um sie zu sichern.
Um das Stativ aufzustellen, spreizen Sie die Beine nach außen, bis sie
vollständig ausgezogen sind, drücken Sie dann die mittlere Beinstrebe
nach unten.
Lösen Sie den Knopf seitlich der Plattform an der Montierung am Sta-
tivkopf und drehen die Plattform um 90 Grad, sodass sie vertikal steht.
Entfernen Sie die Kappe an einem Ende des Okularauszugs am Tubus
und vergewissern Sie sich, dass die beiden Stellschrauben nicht in die
Öffnung ragen.
Entriegeln Sie die drei Hebelverschlüsse an jedem Bein des Stativs,
um die Stativbeine auszuziehen. Ziehen Sie jeden Beinabschnitt ganz
heraus und drücken Sie den Hebel an jeder Verriegelung nach unten,
um das Bein zu sichern.
Setzen Sie den 1/4-Zoll-20-Gewindebolzen in der Montageplattform
in das 1/4-Zoll-20-Gewindeloch an der Unterseite des Tubus ein und
schrauben beides zusammen, indem Sie den oberen Knopf der Mon-
tierung im Uhrzeigersinn drehen. Dies sollte festgezogen sein, aber
nicht zu fest anziehen.
Nehmen Sie den Diagonalspiegel und entfernen die
Kunststoffabdeckungen. Setzen Sie den Zylinder des Diagonalspiegels
in den Okularauszug ein und ziehen ihn mit den Stellschrauben fest.
10 | DEUTSCH
10
1313
14
15
1717
16
11
Setzen Sie den Zylinder des 20-mm-Okulars in den Diagonalspiegel ein
und ziehen ihn mit der Stellschraube fest.
Nehmen Sie den Objektivdeckel vorne am Teleskop ab. Schauen Sie
zum Beobachten wie gezeigt durch das Okular. Stellen Sie das Bild
scharf, indem Sie an den Knöpfen unterhalb des Okularauszugs dre-
hen.
Um das Teleskop nach rechts und links zu bewegen, halten Sie mit
einer Hand ein Stativbein fest, während Sie mit der anderen Hand den
Schwenkgriff nehmen, um das Teleskop zu bewegen. Die Azimut-
Stellschraube kann gelöst oder festgezogen werden, um die Spannung
nach Belieben anzupassen.
Entfernen Sie die Rändelmuttern von den Gewindestangen am
Fokussiererende des Tubus.
Für eine zusätzliche Vergrößerung können Sie die mitgelieferte 3-fach
Barlowlinse verwenden. Setzen Sie die Barlowlinse zwischen dem Dia-
gonalspiegel und dem Okular ein.
Um das Zielfernrohr nach oben und unten zu bewegen, drehen Sie den
gesamten Schwenkgriff gegen den Uhrzeigersinn und stellen mit dem
Griff das Teleskop in die gewünschte Blickrichtung. Drehen Sie den
Schwenkgriff im Uhrzeigersinn, um ihn zu arretieren.
Nehmen Sie das Sucherfernrohr und entfernen die Kunststoffkappen
an beiden Seiten der Linse. Richten Sie das Sucherfernrohr so aus,
dass die größere Linse wie gezeigt zur Vorderseite des Tubus zeigt.
Setzen Sie das Sucherfernrohr über die Gewindestangen am Tubus
und ziehen es mit den Rändelmuttern fest.
Zur Verwendung des Mondfilters, entfernen Sie das Okular vom Diago-
nalspiegel oder von der Barlowlinse. Schrauben Sie den Filter auf die
Unterseite des Okulars und setzen das Okular wieder in den Diagonal-
spiegel oder die Barlowlinse ein.
Weitere Informationen zu diesem Produkt oder die
Bedienungsanleitung zum Herunterladen finden
Sie auf der Produktseite auf celestron.com.
SONNENSTRAHLEN-WARNHINWEIS: Versuchen
Sie niemals, ohne einen geeigneten Sonnenfilter die
Sonne durch ein Teleskop zu beobachten.
BRAUCHEN SIE UNTERSTÜTZUNG?
Wenden Sie sich an die technische Unterstützung von
Celestron unter celestron.com/pages/technical-support
11-24
12
DEUTSCH | 11
2
1
53
Das Sucherfernrohr ist eines der wichtigsten Teile Ihres
Teleskops. Es hilft Ihnen, Objekte zu suchen und im Okular
zu zentrieren. Wenn Sie Ihr Teleskop zum ersten Mal
zusammenbauen, müssen Sie das Sucherfernrohr auf die
Hauptoptik des Teleskops ausrichten. Dies tun Sie am besten
tagsüber*.
* SONNENSTRAHLEN-WARNHINWEIS! Versuchen
Sie niemals, ohne einen geeigneten Sonnenfilter
die Sonne durch ein Teleskop zu beobachten!
ZENTRIEREN SIE DAS ZIEL IM
OKULAR
Schauen Sie mit dem unteren Okular durch das Teleskop.
Schwenken Sie das Teleskop, bis das ausgewählte Objekt im
Zentrum des Sichtfelds liegt. Ist das Bild unscharf, drehen Sie
langsam am Fokussierknopf, bis das Bild scharf gestellt ist.
DURCH DAS SUCHERFERNROHR
SCHAUEN
Wenn das Objekt in Ihrem 20-mm-Okular zentriert ist, schauen Sie
durch das Sucherfernrohr und suchen das Fadenkreuz.
SUCHERFERNROHR EINSTELLEN
Ohne das Teleskop zu bewegen, bewegen Sie den
Sucher mit den drei Fingerknöpfen an der Halterung des
Sucherfernrohrs, bis das Fadenkreuz über demselben Objekt
erscheint, das Sie im 20-mm-Okular des Teleskops beobachten.
TIPP: Versuchen Sie, ein Knopf nach dem anderen
einzustellen. Lösen Sie eine Schraube mit einer
halben Umdrehung, und ziehen Sie sie auch mit einer
halben Umdrehung fest, um sicherzustellen, dass das
Sucherfernrohr sicher festgehalten wird.
IHR SUCHERFERNROHR IST
JETZT AUSGERICHTET!
Es ist keine Neuausrichtung erforderlich, es sei denn, es wird
einem Stoß ausgesetzt oder es fällt um.
WÄHLEN SIE EIN ZIEL
Nehmen Sie das Teleskop tagsüber mit nach draußen und
suchen ein leicht erkennbares Objekt wie eine Straßenlaterne,
ein Nummernschild oder ein Schild. Das Objekt sollte so weit
wie möglich entfernt sein, mindestens 400 Meter entfernt.
Okular mit geringer
Vergrößerungsleistung
Fokussierknöpfe
4
AUSRICHTUNG DES SUCHERFERNROHRS
IHRE ERSTE NACHT DRAUSSEN -DER MOND
Das beste und einfachste Ziel, das Sie zuerst beobachten können, ist der Mond. Versuchen Sie, den Mond an verschiedenen Punkten in seinem Phasenzyklus zu beobachten. Obwohl Sie den Mond in jeder Nacht beobachten
können, in der er sichtbar ist, ist die beste Zeit dafür zwei Tage nach Neumond bis einige Tage vor Vollmond. Innerhalb dieses Zeitfensters zeigen sich Krater und Mondgebirge am detailreichsten.
1 32
Wenn der Mond im Himmel sichtbar ist, richten Sie Ihr Teleskop
mit dem installierten 20-mm-Okular aus.
Schwenken Sie das Teleskop so, dass es ungefähr auf den
Mond zeigt.
Schauen Sie durch das Sucherfernrohr und suchen das
Fadenkreuz. Bewegen Sie das Teleskop so lange, bis das
Fadenkreuz über dem Mond erscheint.
12 | DEUTSCH
4
65
20mm
Schauen Sie jetzt durch das 20-mm-Okular des Teleskops.
Drehen Sie die Fokussierknöpfe langsam, um das Bild
scharfzustellen.
Sie können viele andere Himmelsobjekte wie Planeten,
Sternhaufen und Nebel mit derselben Technik beobachten,
wenn Sie wissen, wo sie am Nachthimmel zu fi nden sind.
Um den Mond näher zu betrachten, lösen Sie die Stellschrauben
am Fokussierer und nehmen das 20-mm-Okular heraus.
Ersetzen Sie es durch Ihr 10-mm-Okular und ziehen dann die
Stellschrauben fest, um es zu sichern. Mit dem 10-mm-Okular
erhalten Sie eine deutlich höhere Vergrößerung, sodass der
Mond viel größer erscheint.
HINWEIS:
Möglicherweise müssen Sie die Fokusknöpfe anpassen, wenn
Sie das Okular wechseln, um sicherzustellen, dass Sie ein
möglichst scharfes Bild erhalten.
HERZLICHEN GLÜCKWUNSCH!
SIE HABEN GERADE IHR
ERSTES HIMMELSOBJEKT BEOBACHTET!
Okular mit geringer
Vergrößerungsleistung
Fokussierknöpfe
10mm
BENÖTIGEN SIE UNTERSTÜTZUNG? Wenden Sie sich an die technische Unterstützung von Celestron unter
celestron.com/pages/technical-support
Produktdesign und technische Daten können ohne vorherige Ankündigung geändert werden. Dieses Produkt ist für Personen ab 14
Jahren konzipiert und vorgesehen.
©2024 Celestron. Celestron und Symbol sind Warenzeichen von Celestron, LLC. Alle Rechte vorbehalten. Celestron.com
USA: Celestron, 2835 Columbia Street, Torrance, CA 90503 USA
UK: Celestron Global Ltd., Einheit 2 Transigo, Gables Way, Thatcham RG19 4JZ, Vereinigtes Königreich
Hergestellt in China | 11-24
celestron.com/pages/warranty
Windows:
• Windows 7 oder höher
• Prozessor mit 500 MHz oder mehr
• 128 MB RAM
• 850 MB Festplattenspeicher
• 32 MB OpenGL-fähige Grafi kkarte
• Monitor mit einer Aufl ösung von 1024 x 768 Pixeln(empfohlen)
BONUS SOFTWARE
Ihr Kauf beinhaltet Software für Ihren Computer. Sie müssen diese Software nicht herunterladen, um Ihr Teleskop zu verwenden, aber sie kann Ihr Erlebnis verbessern.
MINDESTANFORDERUNGEN AN DAS GERÄT:
Mac:
• Universal Binary (PPC/Intel-kompatibel)
• OS X 10.4 oder höher (10.5 oder höher für Elementary)
• G3 Prozessor mit 450 MHz oder mehr
• 128 MB RAM
• 850 MB Festplattenspeicher
• 32 MB OpenGL-fähige Grafi kkarte
• Monitor mit einer Aufl ösung von 1024 x 768 Pixeln (empfohlen)
Celestron Sternennacht-Astronomiesoftware
Celestron Starry Night, die führende Astronomiesoftware auf dem Markt, nimmt Sie mit auf eine geführte Tour durch die Vergangenheit, Gegenwart und Zukunft unseres Sonnensystems. Sie kann Ihnen dabei
helfen, mehr über den Nachthimmel zu erfahren und Ihre nächste Beobachtungssitzung zu planen. Verwenden Sie Starry Night, um mehr über den Nachthimmel von Ihrem Garten, einem nahe gelegenen Standort
mit dunklem Himmel oder von jedem anderen Ort der Erde aus aussehen wird.
WARNUNG BEI SONNENBEOBACHTUNG: Versuchen Sie
niemals, die Sonne durch ein Teleskop zu betrachten.

ITALIANO | 13
2 31
8 9
4
5
77
6
ARTICOLO N. 22008
ITALIANO
Guida rapida
Travel Scope 70Travel Scope 70
Disimballare il telescopio e verificare che siano presenti tutti i
componenti. Il Moon Mission Travel Scope 70 comprende: un tubo
telescopico da 70 mm, un treppiedi e una testa di montaggio, due
oculari, una lente di Barlow 3x, un cercatore, un diagonale a immagine
eretta, un filtro lunare e una mappa della Luna.
Per estendere il montante centrale del treppiedi, allentare il collare
dell'attacco ruotando la manopola di blocco in senso antiorario,
sollevare la testa del treppiedi fino all'altezza desiderata e ruotare la
manopola di blocco in senso orario per assicurare.
Ruotare la piattaforma di montaggio in modo che sia orizzontale e
stringere la manopola per assicurarla.
Per impostare il treppiedi, allargare le gambe verso l'esterno fino a
quando non sono completamente estese e premere verso il basso il
braccio della gamba centrale.
Allentare la manopola sul lato della piattaforma di montaggio della
testa del treppiedi e ruotare la piattaforma di 90° in modo che
stia verticalmente.
Rimuovere il cappuccio dall'estremità del focalizzatore del tubo
telescopico e assicurarsi che le due viti non fuoriescano nell'apertura.
Estendere le gambe del treppiedi sbloccando le tre leve di blocco del
treppiedi su ogni gamba. Estrarre ogni sezione della gamba per tutta
la sua lunghezza e premere la leva di ogni blocco verso il basso per
assicurarla in posizione.
Far corrispondere il perno filettato da 1/4"-20 della piattaforma
di montaggio con il foro filettato da 1/4"-20 sul fondo del tubo
del telescopio e avvitare i due elementi ruotando la manopola di
montaggio superiore in senso orario. Il serraggio deve essere stretto,
ma non eccessivo.
Individuare il diagonale raddrizzatore di immagini e rimuovere i
coperchi in plastica. Inserire il cilindro della diagonale nel focalizzatore
e assicurarlo in posizione stringendo le viti a testa zigrinata.
celestron.com/pages/warranty

14 | ITALIANO
10
1313
14
15
1717
16
11
Inserire il cilindro dell'oculare da 20 mm nella diagonale e stringere la
vite a testa zigrinata.
Rimuovere il tappo della lente dalla parte anteriore del telescopio.
Per osservare, guardare attraverso l'oculare come mostrato. Mettere
a fuoco l'immagine ruotando le manopole al di sotto del focheggiatore.
Per muovere il telescopio a sinistra e destra, mantenere una gamba
del treppiedi con una mano mentre con l'altra si usare la manopola di
panoramica per spostare il telescopio. La vite di blocco dell'azimut
può essere allentata o serrata per regolare la tensione secondo le
proprie preferenze.
Rimuovere i dadi zigrinati dai perni filettati sull'estremità del focheg-
giatore del tubo del telescopio.
Per ulteriore ingrandimento, è possibile usare l'obiettivo Barlow 3x
incluso. Porre l'obiettivo Barlow tra la diagonale e l'oculare.
Per spostare il telescopio in alto e in basso, ruotare completamente la
manopola di panoramica in senso antiorario e usare la manopola per
puntare il telescopio nella direzione desiderata. Ruotare la manopola
panoramica in senso orario per bloccarla in posizione.
Individuare il cercatore e rimuovere i tappi di plastica sull'obiettivo
anteriore e posteriore. Orientare il cercatore in modo che l'obiettivo
più grande sia rivolto verso la parte anteriore del tubo come mostrato.
Porre il cercatore sui punti del tubo e riposizionare i dadi zigrinati per
assicurarli in posizione.
Per usare il filtro Luna, rimuovere l'oculare dalla diagonale o dall'obiet-
tivo Barlow. Avvitare il filtro sulla parte bassa dell'oculare e re-inserire
l'oculare nella diagonale o Barlow.
Per maggiori informazioni su questo prodotto o
per scaricare il manuale di istruzioni, visitare la
sua pagina prodotto su celestron.com
AVVERTENZA SOLARE: Non cercare mai
di guardare il Sole attraverso un qualsiasi
telescopio senza un filtro solare idoneo.
BISOGNO DI AIUTO?
Contattare l'Assistenza Tecnica Celestron
celestron.com/pages/technical-support
11-24
12
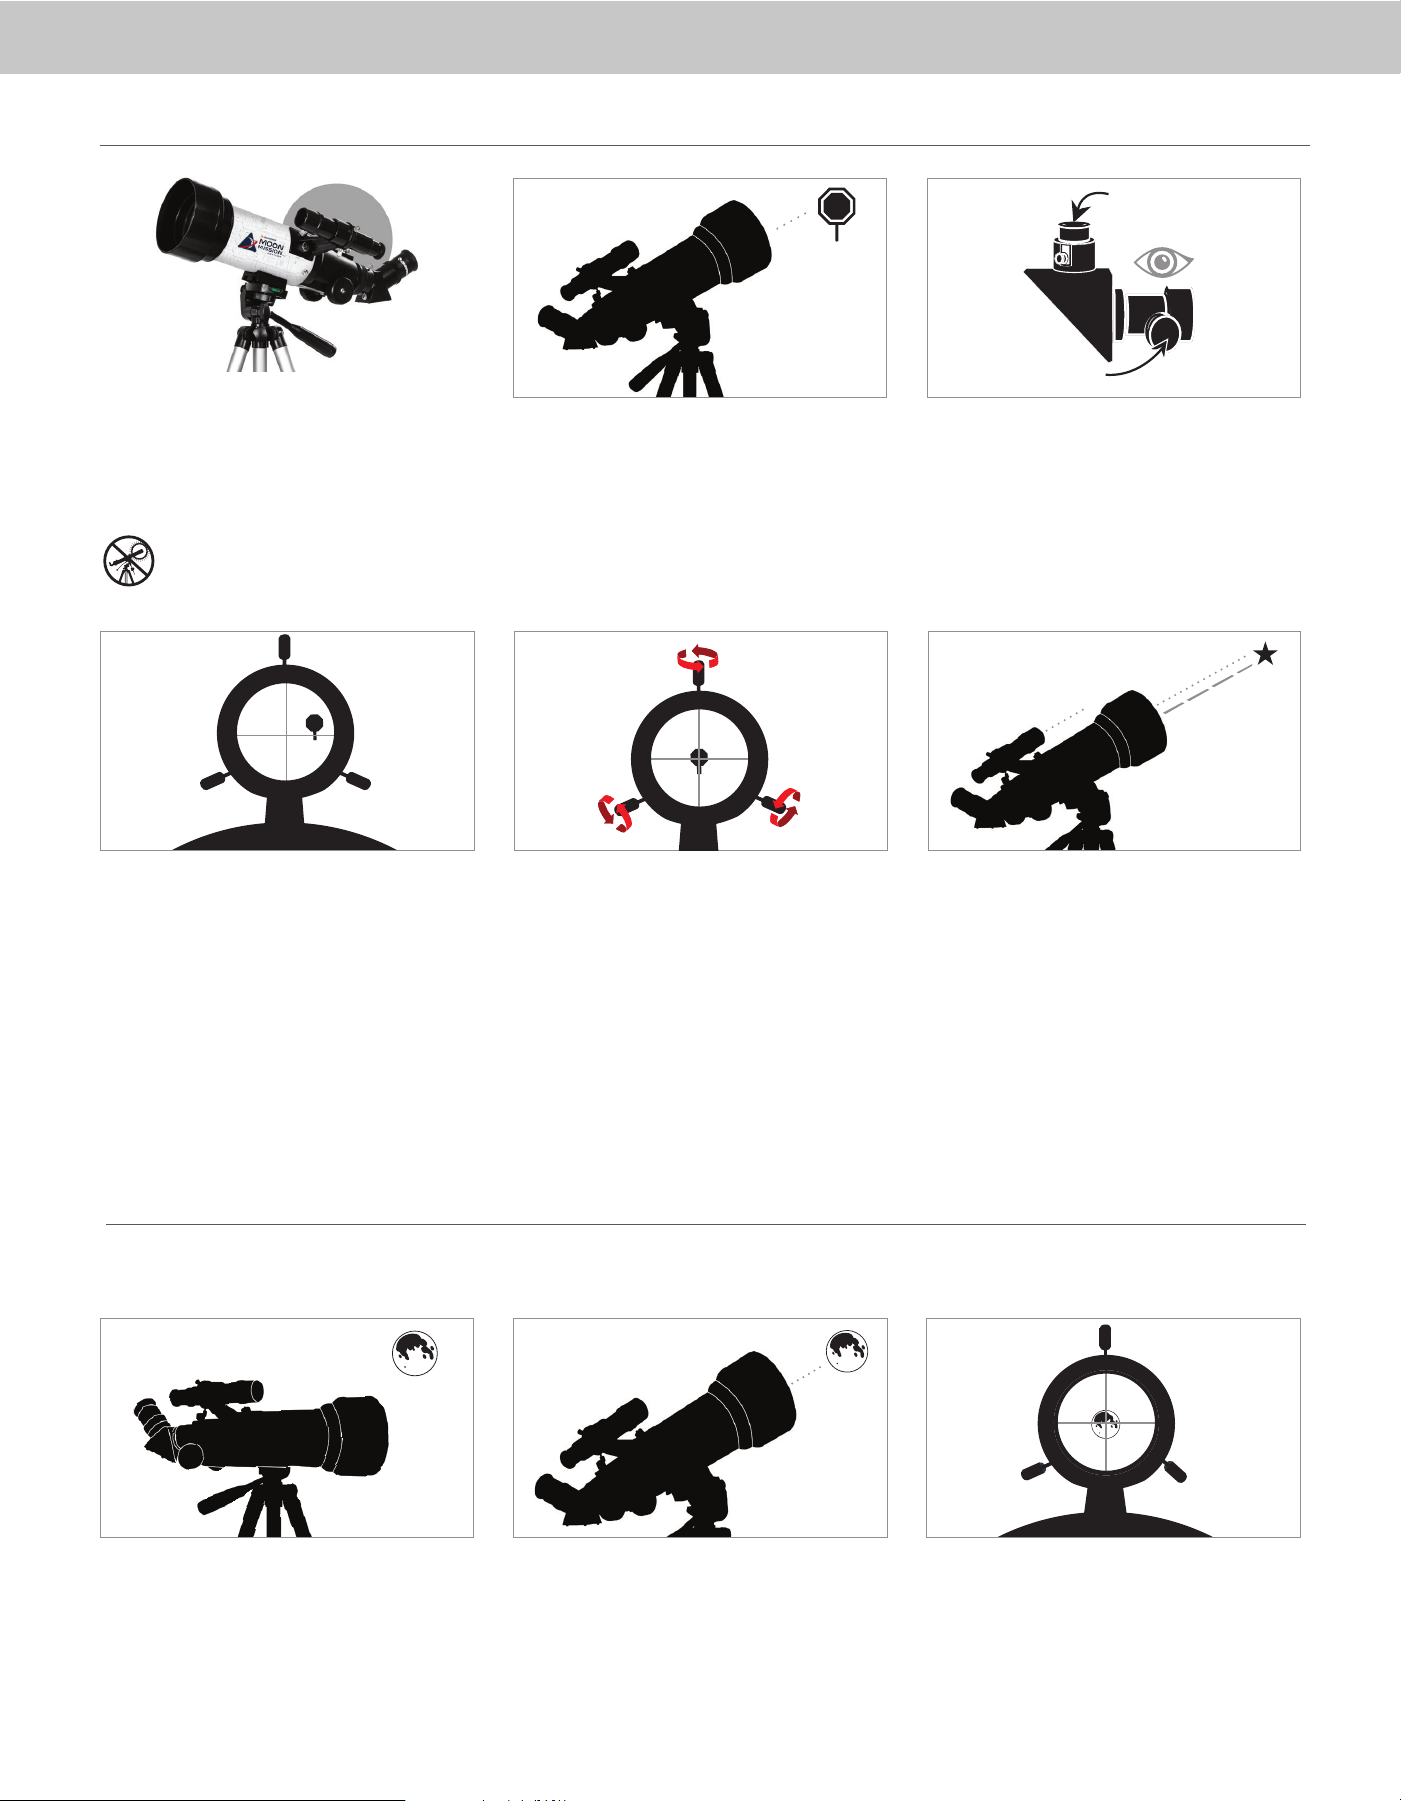
ITALIANO | 15
3
2
1
5
Il cercatore è uno dei componenti più importanti del telescopio.
Aiuta a localizzare gli oggetti e a centrarli nell'oculare. Al primo
assemblaggio del telescopio è necessario allineare il cercatore
con le ottiche principali del telescopio. È preferibile eseguire
questa operazione durante il giorno*.
* AVVERTENZA SOLARE! Non tentare mai di
osservare il Sole attraverso un telescopio senza un
filtro solare adeguato!
CENTRARE L'OGGETTO
NELL'OCULARE
Guardare attraverso il telescopio utilizzando l'oculare con
minore ingrandimento. Muovere il telescopio fino a quando
l'oggetto prescelto si trova al centro del campo visivo. Se
l'immagine è sfocata, ruotare con delicatezza le manopole di
messa a fuoco fino a quando l'immagine non è nitida.
GUARDARE ATTRAVERSO IL
CERCATORE
Una volta centrato l'oggetto nell'oculare da 20 mm, guardare
attraverso il cercatore e individuare il reticolo del mirino.
SCEGLIERE UN OGGETTO DA
OSSERVARE
Portate il telescopio all'esterno durante il giorno e trovate un
oggetto facilmente riconoscibile, come un lampione, una targa
o un cartello. L'oggetto deve essere il più lontano possibile, ma
almeno a un quarto di miglio di distanza.
Oculare basso indice
di ingrandimento
Manopole della
messa a fuoco
4
REGOLARE IL CERCATORE
Senza muovere il telescopio, usare le tre manopole sulla
staffa del cercatore per spostarlo intorno alla staffa fino a
quando non appare il mirino sullo stesso oggetto che si sta
osservando nell'oculare da 20 mm del telescopio.
Suggerimento:
Provare a regolare una vite alla volta. Allentare una vite di
mezzo giro, quindi serrare un'altra dello stesso tanto per
garantire che il cercatore sia fissato saldamente in posizione.
IL CERCATORE È ORA ALLINEATO!
Non occorre effettuare un nuovo allineamento salvo colpi o
cadute.
ALLINEAMENTO DEL CERCATORE
L’oggetto migliore e più facile da osservare per primo è la Luna. Provare a osservare la Luna in diversi momenti delle sue fasi. Sebbene la Luna sia osservabile ogni qualvolta è visibile nel cielo notturno, il periodo migliore per
osservarla è a partire dal terzo giorno di Luna nuova e fino a qualche giorno prima della Luna piena. Durante questo periodo crateri e catene montuose sono osservabili nel dettaglio.
LA PRIMA NOTTE DI OSSERVAZIONE - LA LUNA
1 32
Quando la Luna è visibile nel cielo, impostare il proprio
telescopio con l'oculare da 20 mm installato.
Spostare il telescopio in modo che punti approssimativamente
verso la Luna.
Osservare attraverso il cercatore e localizzare il reticolo.
Continuare a muovere il telescopio fino a quando il reticolo
appare sulla Luna.
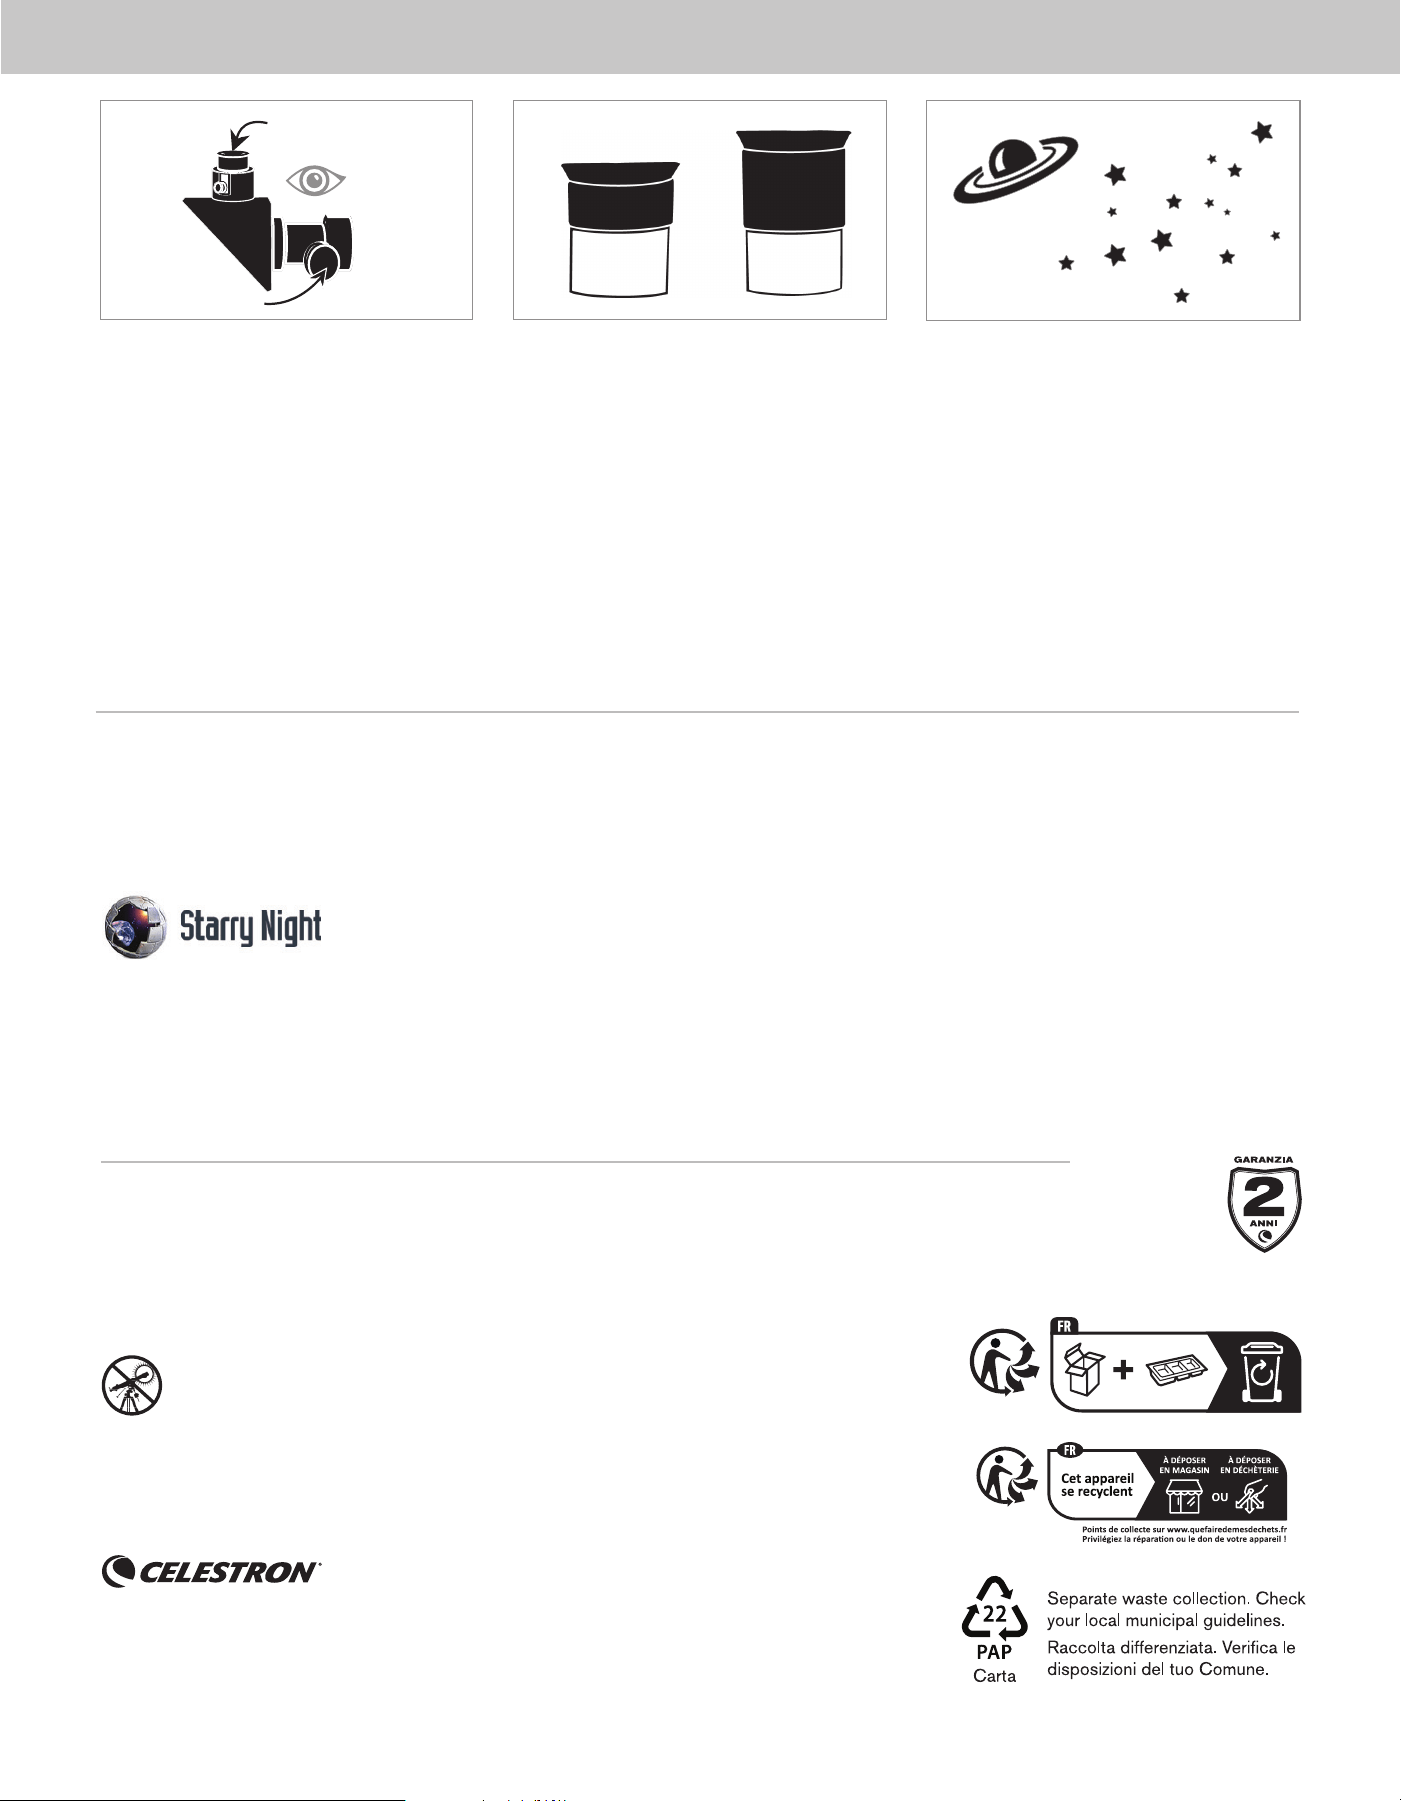
16 | ITALIANO
65
20mm
Guardare attraverso l'oculare da 20 mm del telescopio.
Ruotare con cura le manopole di messa a fuoco per regolare la
nitidezza dell'immagine.
Utilizzando questa stessa tecnica è possibile osservare molti
altri oggetti celesti, come ad esempio pianeti, ammassi stellari
e nebulose.
Per ottenere una vista più ravvicinata della Luna, allentare la
vite a testa zigrinata del focalizzatore e rimuovere l'oculare da
20 mm. Sostituirlo con l'oculare da 10 mm e stringere le viti a
testa zigrinata per fi ssarlo in posizione. L'oculare da 10 mm
offre un ingrandimento signifi cativamente maggiore, facendo
apparire la Luna molto più grande.
NOTA: può essere necessario regolare le manopole di
messa a fuoco quando si cambiano gli oculari, quindi
assicurarsi di avere l'immagine più nitida possibile.
CONGRATULAZIONI!
HAI APPENA OSSERVATO IL TUO PRIMO
CORPO CELESTE!
4
Oculare basso indice
di ingrandimento
Manopole della
messa a fuoco
10mm
BISOGNO DI AIUTO? Contattare il supporto tecnico Celestron
celestron.com/pages/technical-support
Il design del prodotto e le specifi che sono soggetti a modifi che senza previa notifi ca. Questo prodotto è progettato per essere utilizzato da
persone di età pari o superiore ai 14 anni
©2024 Celestron. Celetron e Symbol sono marchi di Celestron, LLC. • Tutti i diritti riservati. • Celestron.com
Stati Uniti: Celestron, 2835 Columbia Street, Torrance, CA 90503 Stati Uniti
Regno Unito: Celestron Global Ltd., Unit 2 Transigo, Gables Way, Thatcham RG18 4JZ Regno Unito
Prodotto in Cina | 11-24
celestron.com/pages/warranty
Windows:
• Windows 7 o superiore
• Processore 500 MHz o superiore
• 128 MB RAM
• 850 MB spazio su disco rigido
• Scheda video da 32 MB che supporta OpenGL
• Monitor con risoluzione 1024x768 pixel (consigliato)
SOFTWARE IN OMAGGIO
Nell’acquisto è incluso un software per il computer. Non occorre scaricare il software per utilizzare il telescopio, ma può migliorarne l’esperienza generale.
REQUISITI MINIMI DI SISTEMA
Mac:
• Universal binary (compatibile PPC/Intel)
• OS X 10.4 o superiore (10.5 o superiore per Elementary)
• Processore G3 450 MHz o superiore
• 128 MB RAM
• 850 MB spazio su disco rigido
• Scheda video da 32 MB che supporta OpenGL
• Monitor con risoluzione 1024x768 pixel (consigliato)
Software di astronomia Celestron Starry Night
Celestron Starry Night, software di astronomia premier nel mercato, conduce l’utente in un viaggio nel sistema solare passato, presente e futuro. Fornisce informazioni sulla volta stellata e aiuta a pianifi care le
successive sessioni di osservazione. Utilizzare Starry Night per creare un modello esatto del cielo notturno osservato dal proprio cortile, da un luogo vicino immerso nel buio o da un qualsiasi punto sulla Terra.
AVVERTENZA SOLARE: Non tentare mai di osservare il Sole
attraverso il telescopio.
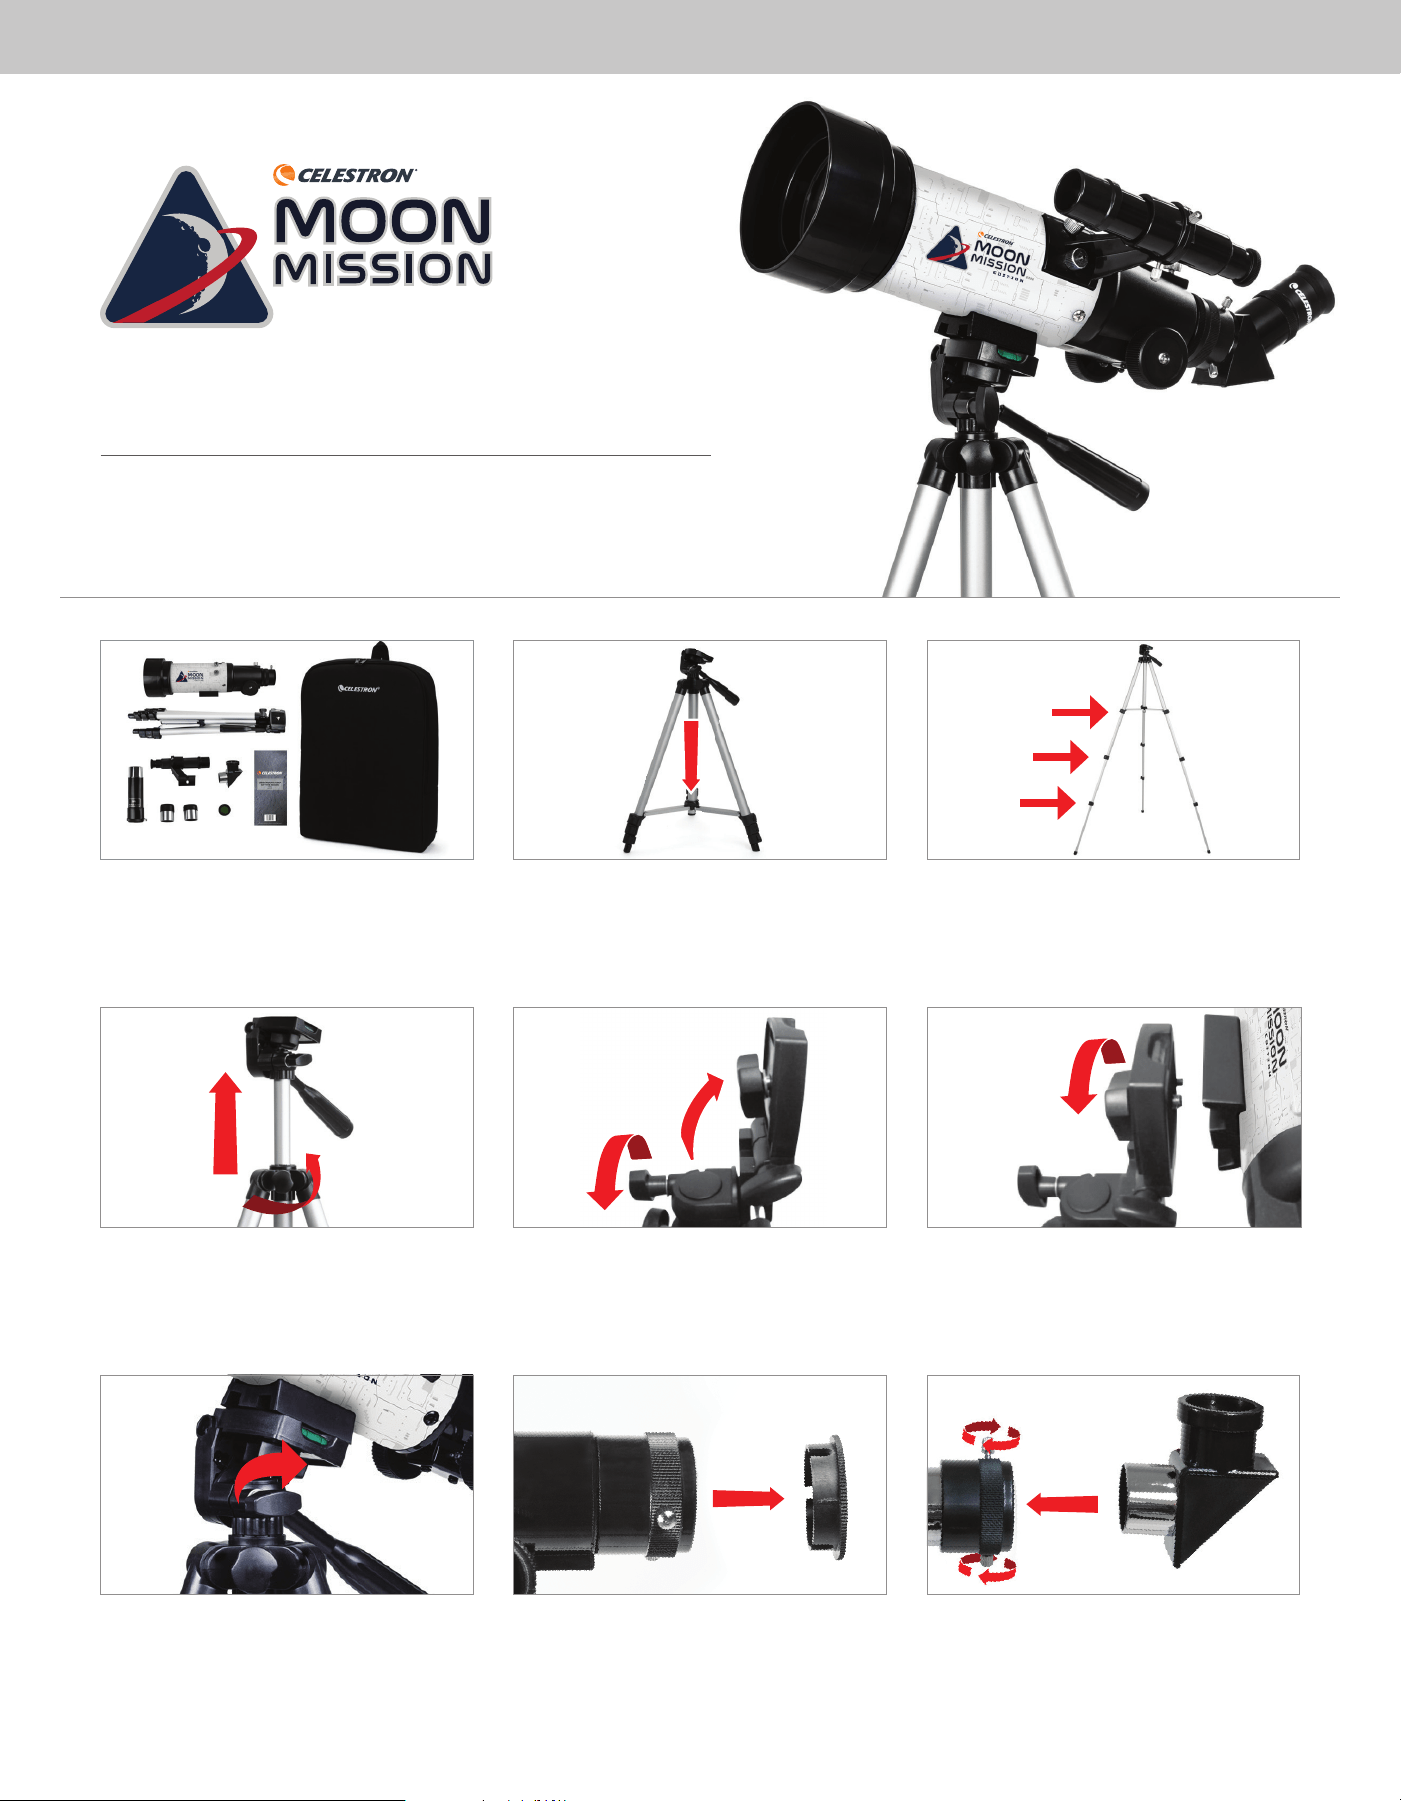
ESPAÑOL | 17
2 3
1
8 9
4
5
77
6
PRODUCTO # 22008
ESPAÑOL
Guía de instalación rápida
Travel Scope 70Travel Scope 70
Desembale el telescopio y compruebe que estén presentes todas las
piezas. Su Moon Mission Travel Scope 70 incluye: un tubo de telescopio
de 70mm, un trípode y cabezal de montaje, dos oculares, una lente
Barlow 3x, un localizador, una diagonal de imagen recta, un filtro lunar,
y un mapa lunar.
Para extender la columna central del trípode, afloje la fijación girando
en sentido contrario a las agujas del reloj el mando de bloqueo, levante
en cabezal del trípode hasta que esté a la altura deseada y gire el
mando de bloqueo en sentido de las agujas del reloj para asegurarlo.
Gire la plataforma de montaje de forma que quede horizontal y apriete
el mando para asegurarlo.
Para instalar el trípode, separe las patas hacia fuera hasta que estén
totalmente extendidas y empuje el soporte de las patas central.
Afloje el mando del lateral de la plataforma de montaje del cabezal del
trípode y gire la plataforma 90 grados de forma que quede vertical.
Saque la tapa del extremo del enfoque del tubo del telescopio y
asegúrese de que los dos tornillos manuales no sobresalgan por la
apertura.
Extienda las patas del trípode desbloqueando las tres palancas de
bloqueo de cada pata. Tire de cada sección de pata por completo
y presione la palanca de cada bloqueo hacia abajo para asegurarla
en posición.
Haga coincidir el perno estriado de 1/4"-20 en la plataforma de
montaje con el agujero estriado de 1/4"-20 de la parte inferior del
tubo del telescopio y enrósquelos juntos girando el mando del soporte
superior en sentido de las agujas del reloj. Debería estar apretado, pero
asegúrese de no apretarlo en exceso.
Localice la diagonal de imagen recta y saque las tapas de plástico.
Introduzca el cañón de la diagonal en el enfoque y asegúrelo en
posición apretando los tornillos manuales.
celestron.com/pages/warranty
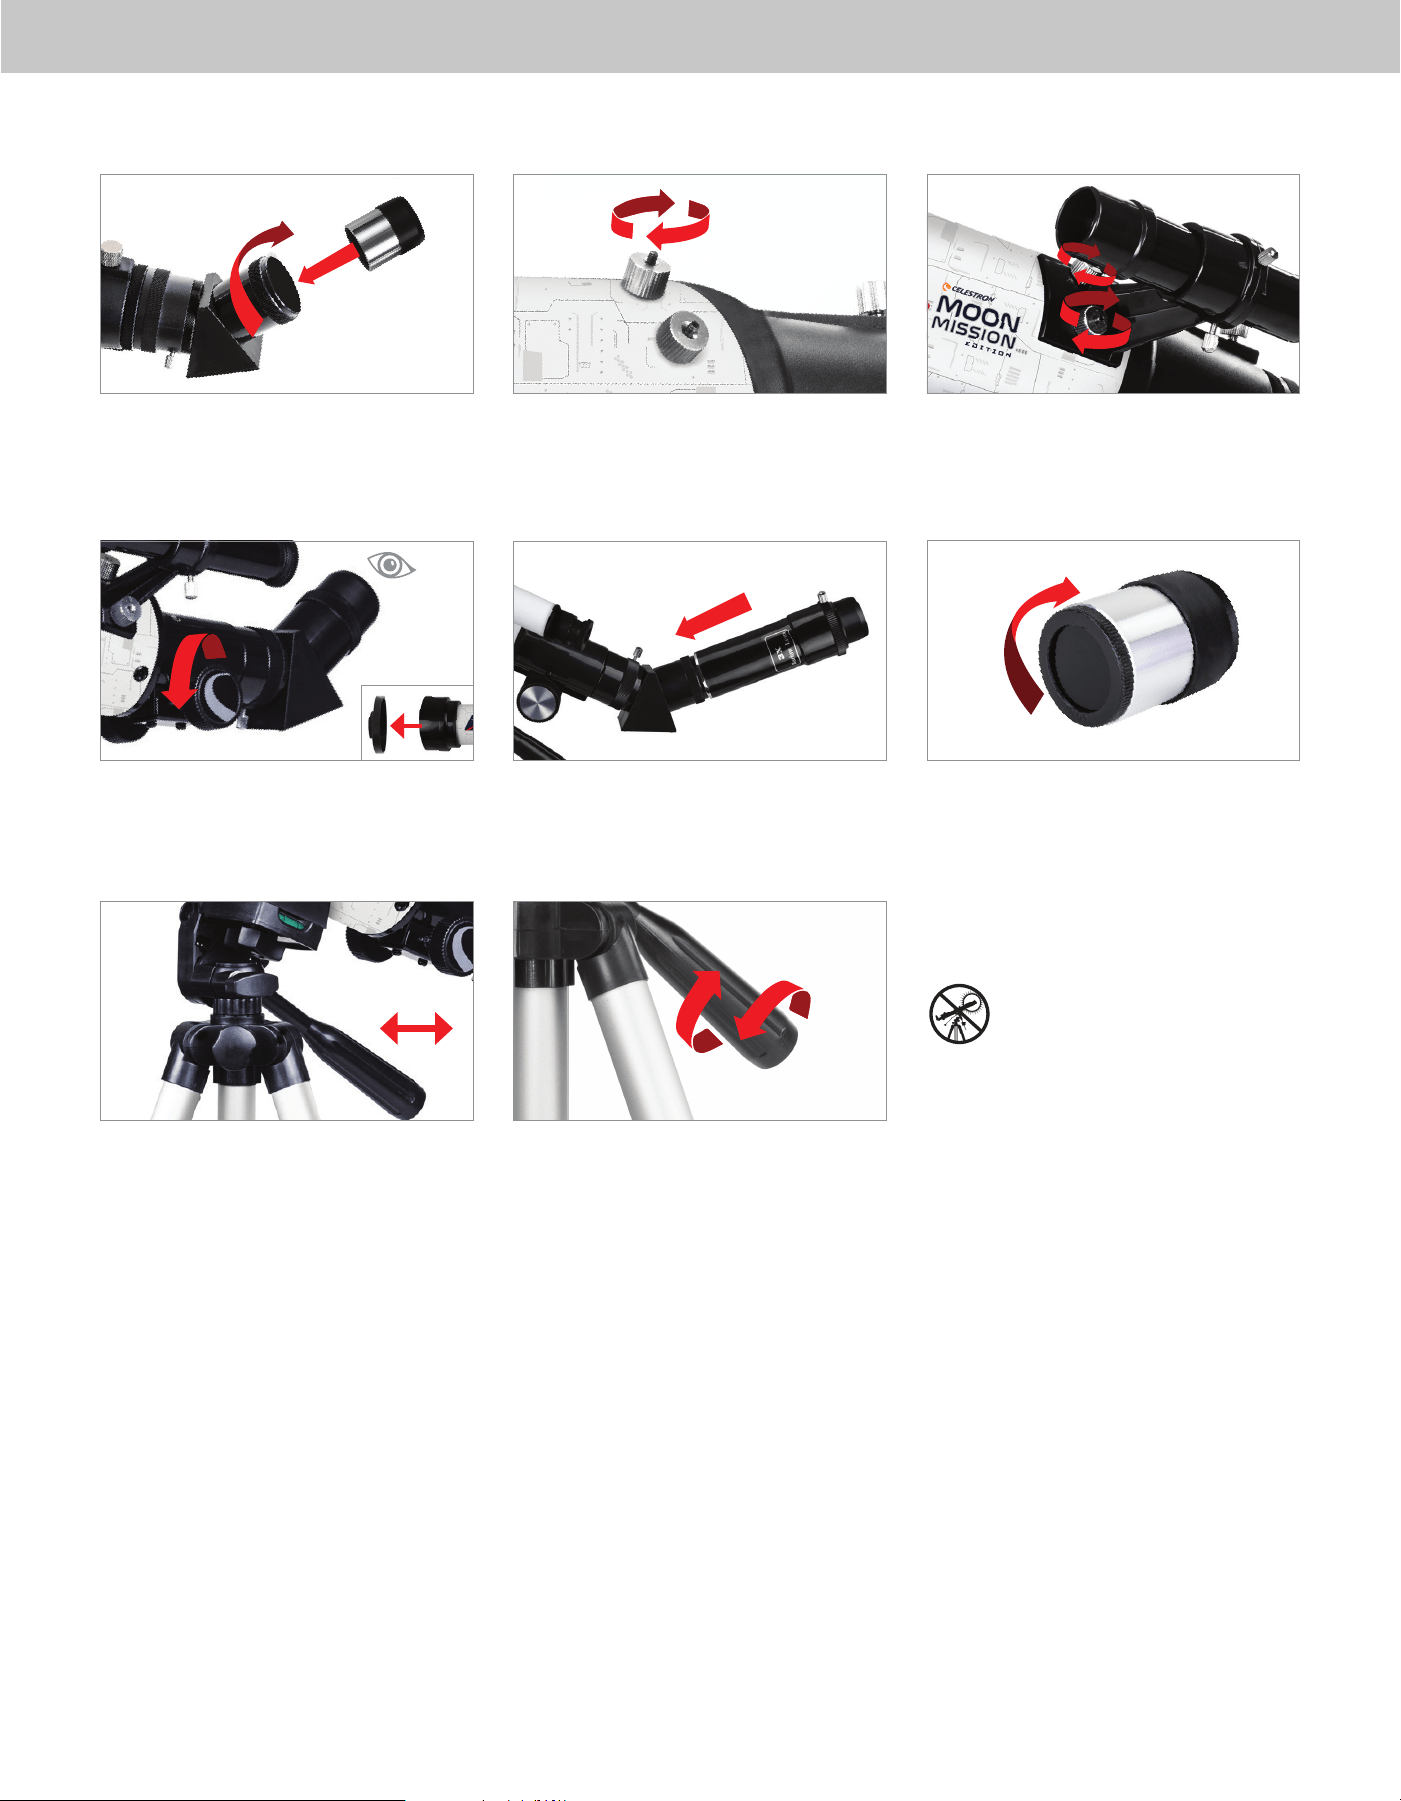
18 | ESPAÑOL
10
1313
14
15
1717
16
11
Introduzca el cañón del ocular de 20mm en la diagonal y apriete el
tornillo manual.
Saque la tapa de la lente de la parte anterior del telescopio. Para
observar, mire por el ocular del modo indicado. Enfoque la imagen
girando los mandos bajo el enfoque.
Para mover el telescopio a izquierda y derecha, sujete una pata del
trípode con la mano izquierda y use el mango de desplazamiento con
la otra mano para moverlo. El tornillo de bloqueo de azimut puede
aflojarse o apretarse para ajustar la tensiòn como desee.
Saque las roscas estriadas de los postes estriados del extremo del
enfoque del tubo telescópico.
Para un aumento adicional puede usar la lente Barlow 3x incluida.
Ponga la lente Barlow entre la diagonal y el ocular.
Para mover arriba y abajo el telescopio, gire el mango de
desplazamiento en sentido contrario a las agujas del reloj y úselo
para apuntar el telescopio en la dirección que desee observar. Gire
el mango de desplazamiento en sentido de las agujas del reloj para
bloquearlo en posición.
Localice el localizador y saque las tapas de plástico en la parte anterior
y posterior de las lentes. Oriente el localizador de forma que la lente
más grande esté orientada a la parte anterior del tubo del modo
indicado. Ponga el localizador sobre los postes del tubo y coloque las
roscas estriadas para asegurarlo en posición.
Para usar el filtro lunar, saque el ocular de la diagonal o la lente
Barlow. Enrosque el filtro en la parte inferior del ocular y vuelva a
introducir el ocular en la diagonal o la lente Barlow.
Para obtener más información de este producto
o descargar el manual de instrucciones, visite la
página del producto en celestron.com
AVISO SOLAR: No intente nunca observar el Sol
por un telescopio sin un filtro solar adecuado.
¿NECESITA AYUDA?
Contacte con el soporte técnico de Celestron
celestron.com/pages/technical-support
11-24
12
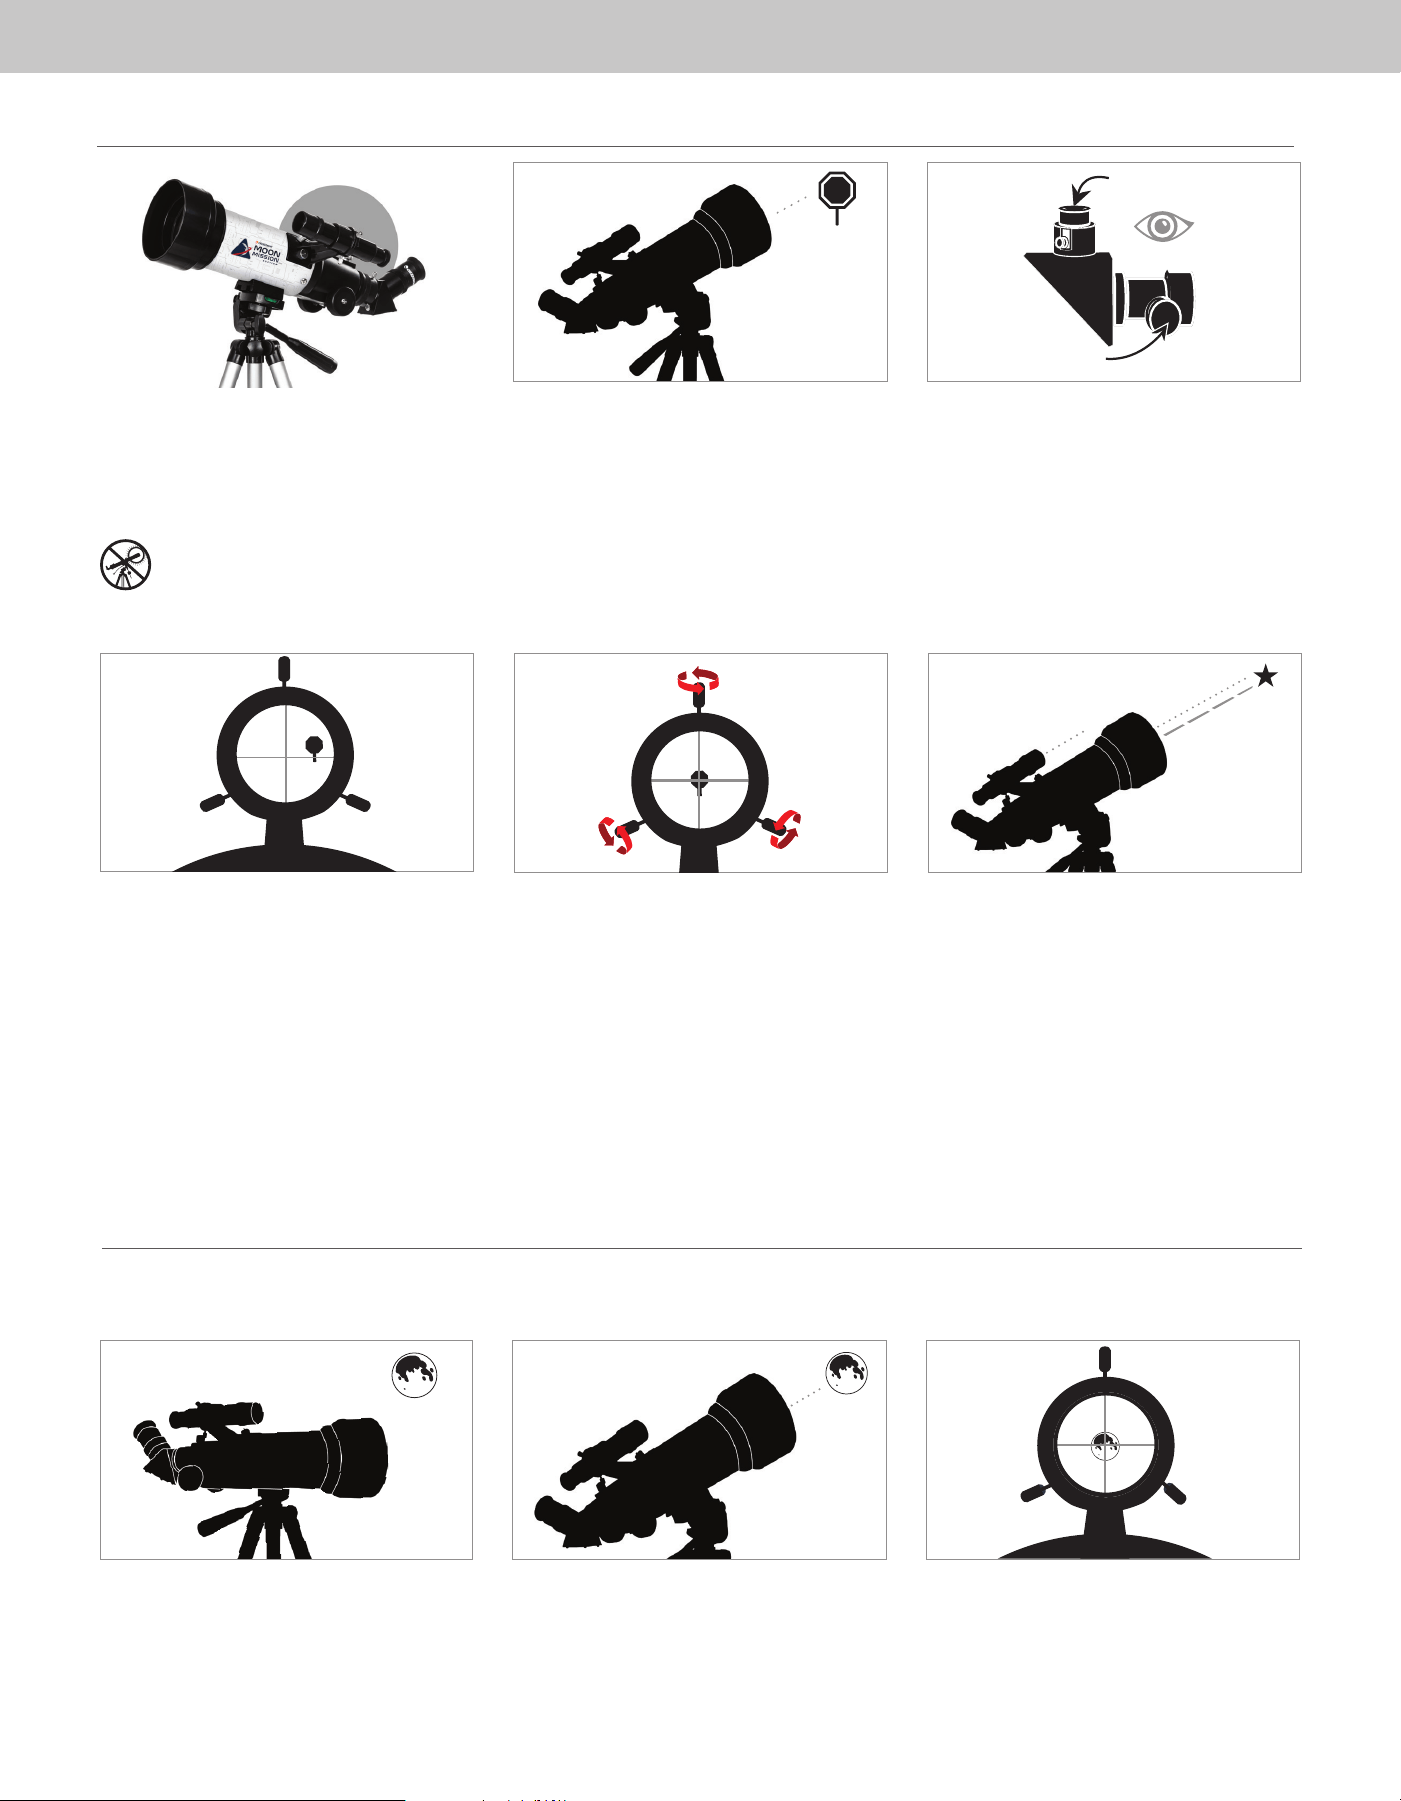
ESPAÑOL | 19
3
4
2
Low Power Eyepiece
Focus Knobs
1
5
El localizador es una de las piezas más importantes de su
telescopio. Le ayuda a localizar objetos y centrarlos en el
ocular. La primera vez que monte el telescopio, deberá
alinear el localizador con la óptica principal del telescopio. Es
preferible hacerlo de día*.
* ¡AVISO SOLAR! ¡No intente nunca observar el sol
por un telescopio sin un filtro solar adecuado!
CENTRAR EL OBJETO
EN EL OCULAR
Mire por el telescopio usando el ocular con menor potencia.
Mueva el telescopio hasta que el objeto elegido quede en
el centro del campo de visión. Si la imagen está borrosa,
gire suavemente los mandos de enfoque hasta que quede
enfocada.
MIRAR POR EL LOCALIZADOR
Cuando el objeto esté centrado en el ocular de 20mm, mire
por el localizador y localice el punto de mira.
AJUSTAR EL LOCALIZADOR
Sin mover el telescopio, use los tres tornillos manuales que
rodean el soporte del localizador para moverlo en el soporte
hasta que el punto de mira aparezca sobre el objeto que está
observando en el ocular de 20mm del telescopio.
RECOMENDACIÓN:
Pruebe ajustando un tornillo cada vez. Afloje el tornillo media
vuelta y apriete otro el mismo recorrido para garantizar que el
localizador se mantenga con seguridad en posición.
SU LOCALIZADOR ESTÁ ALINEADO.
No debería realinarse a menos que reciba golpes o caiga.
ELEGIR UN OBJETO
Saque el telescopio de día y localice un objeto fácilmente
reconocible, como una farola, una matrícula de coche o una
señal. El objeto debe estar lo más lejos posible, al menos a
400 m.
ALINEAR EL LOCALIZADOR
El mejor y más sencillo objetivo que puede probar a observar primero es la Luna. Pruebe a observer la Luna en distintos puntos de sus fases. Aunque puede observar la Luna cualquier noche que esté visible, el mejor
momento para observarla es a partir de dos días después de Luna nueva hasta algunos días antes de Luna llena. Durante este periodo podrá ver el máximo detalle de los cráteres y riscos lunares.
SU PRIMERA NOCHE FUERA - LA LUNA
1 32
Con la Luna visible en el firmamento, instale el telescopio con
el ocular de 20mm instalado.
Mueva el telescopio de forma que apunte aproximadamente
a la Luna.
Mire por el localizador y localice la retícula. Siga moviendo
el telescopio hasta que la retícula se muestre sobre la Luna.
20 | ESPAÑOL
65
20mm
4
Oculare basso indice
di ingrandimento
Manopole della
messa a fuoco
Mire por el ocular de 20mm del telescopio. Gire suavemente
los mandos de enfoque para ajustar la defi nición de la imagen.
Puede observar muchos otros objetos celestes, como planetas,
cúmulos estelares y nebulosas usando esta misma técnica.
Para obtener una vista más cercana de la Luna, afl oje los
tornillos del enfoque y saque el ocular de 20mm. Cámbielo
por el ocular de 10mm y apriete los tornillos manuales
para asegurarlo en posición. El ocular de 10mm le ofrecerá
notablemente más aumento, haciendo que la Luna se muestre
mucho más grande.
NOTA: Puede tener que ajustar los mandos de enfoque
cuando cambie oculares, para asegurarse de obtener
la imagen más defi nida posible.
FELICIDADES!
HA OBSERVADO SU
PRIMER OBJETO CELESTE.
10mm
¿NECESITA AYUDA? Contacte con el soporte técnico de Celestron
celestron.com/pages/technical-support
El diseño y las especifi caciones del producto están sujetos a cambios sin notifi cación previa. Este producto ha sido diseñado y está
pensado para ser usado por personas de 14 años o más de edad.
©2024 Celestron. Celestron y su símbolo son marcas comerciales de Celestron, LLC. • Todos los derechos reservados.
• Celestron.com
EE.UU.: Celestron, 2835 Columbia Street, Torrance, CA 90503 EE.UU.
GB: Celestron Global Ltd., Unit 2 Transigo, Gables Way, Thatcham RG19 4JZ, Reino Unido
Fabricado en China | 11-24
celestron.com/pages/warranty
Windows:
• Windows 7 o superior
• Procesador de 500MHz o superior
• 128 MB RAM
• Espacio en el disco duro de 850 MB
• Tarjeta gráfi ca de 32 MB con capacidad de OpenGL
• Monitor con resolución de 1024x768 píxeles (recomendado)
SOFTWARE COMPLEMENTARIO
Su adquisición incluye software para su ordenador. No necesita descargar este software para usar su telescopio, pero puede mejorar su experiencia.
REQUISITOS MÍNIMOS DEL SISTEMA
Mac:
• Binario universal (PPC/compatible con Intel)
• OS X 10.4 o superior (10.5 o superior para Elementary)
• Procesador G3 450 MHz o superior
• 128 MB RAM
• Espacio en el disco duro de 850 MB
• Tarjeta gráfi ca de 32 MB con capacidad de OpenGL
• Monitor con resolución de 1024x768 píxeles (recomendado)
Software de astronomía Celestron Starry Night
Celestron Starry Night, el principal software de astronomía del mercado, le lleva en una visita guiada del pasado, presente y futuro de nuestro sistema solar. Puede ayudarle a aprender sobre el fi rmamento
nocturno y a planifi car su siguiente sesión de observación. Use Starry Night para modelar con exactitud el aspecto del fi rmamento nocturno desde su patio trasero, una ubicación con fi rmamento oscuro cercana,
o cualquier lugar de la Tierra.
AVISO SOLAR: No intente nunca observar el Sol con ningún telescopio.
ENGLISH | 1
Unpack your telescope and verify that all parts are present. Your Moon
Mission Travel Scope 60 includes: a 60mm telescope tube, a tripod
and mount head, two eyepieces, a 3x Barlow lens, a finderscope, an
erect image diagonal, a Moon filter, and a Moon map.
To extend the tripod’s central column, loosen the collar on the mount
by turning the locking knob counterclockwise, lift up the tripod head
until it is at the desired height, and turn the locking knob clockwise
to secure.
Rotate the mounting platform so it is horizontal and tighten the knob
to secure it.
To set up the tripod, spread the legs outward until they are fully ex-
tended and push down on the center leg brace.
Loosen the knob on the side of the tripod head mounting platform and
rotate the platform 90 degrees so it is standing vertically.
Remove the cap from the focuser end of the telescope tube and make
sure the two thumbscrews do not protrude into the opening.
Extend the legs of the tripod by unlocking the three tripod lock levers
on each leg. Pull each leg section all the way out and push the lever
on each lock downward to secure it in place.
Match the 1/4”-20 threaded bolt in the mounting platform to the
threaded 1/4”-20 hole on the bottom of the telescope tube and thread
the two together by turning the upper mount knob clockwise. This
should be tight, but be sure to not over-tighten.
Locate the erect image diagonal and remove the plastic covers. Insert
the barrel of the diagonal into the focuser and secure it in place by
tightening the thumbscrews.
1 2 31
8 9
4 5
77
6
EDITION
ITEM #99902
ENGLISH
Quick Setup Guide
Travel Scope 60Travel Scope 60
2 | ENGLISH
10
Insert the barrel of the 20mm eyepiece into the diagonal and tighten
the thumbscrew.
Remove the lens cap from the front of the telescope. To observe, look
through the eyepiece as shown. Focus the image by turning the knobs
below the focuser.
To move the scope right and left, hold a tripod leg with one hand
while the other hand uses the panning handle to move the scope.
The azimuth locking screw can be loosened or tightened to adjust the
tension to your preference.
Remove the knurled nuts on the threaded posts at the focuser end of
the telescope tube.
For additional magnification, you can use the included 3x Barlow lens.
Place the Barlow lens between the diagonal and the eyepiece.
To move the scope up and down, rotate the entire pan handle
counterclockwise and use the handle to point the scope in the
direction you want to view. Rotate the pan handle clockwise to
lock it in place.
Locate the finderscope and remove the plastic caps on the front and
back lens. Orient the finderscope so that the larger lens is facing
towards the front of the tube as shown. Place the finderscope over the
posts on the tube and replace the knurled nuts to secure it in place.
To use the Moon filter, remove the eyepiece from the diagonal or
Barlow lens. Thread the filter onto the bottom of the eyepiece and
re-insert the eyepiece into the diagonal or Barlow.
For more information on this product or to download
the instruction manual, please visit its product page
on celestron.com
SOLAR WARNING: Never attempt to view the Sun
through any telescope without a proper solar filter.
NEED ASSISTANCE?
Contact Celestron Technical Support
celestron.com/pages/technical-support
04-24
13 1414 15
1716
12
11
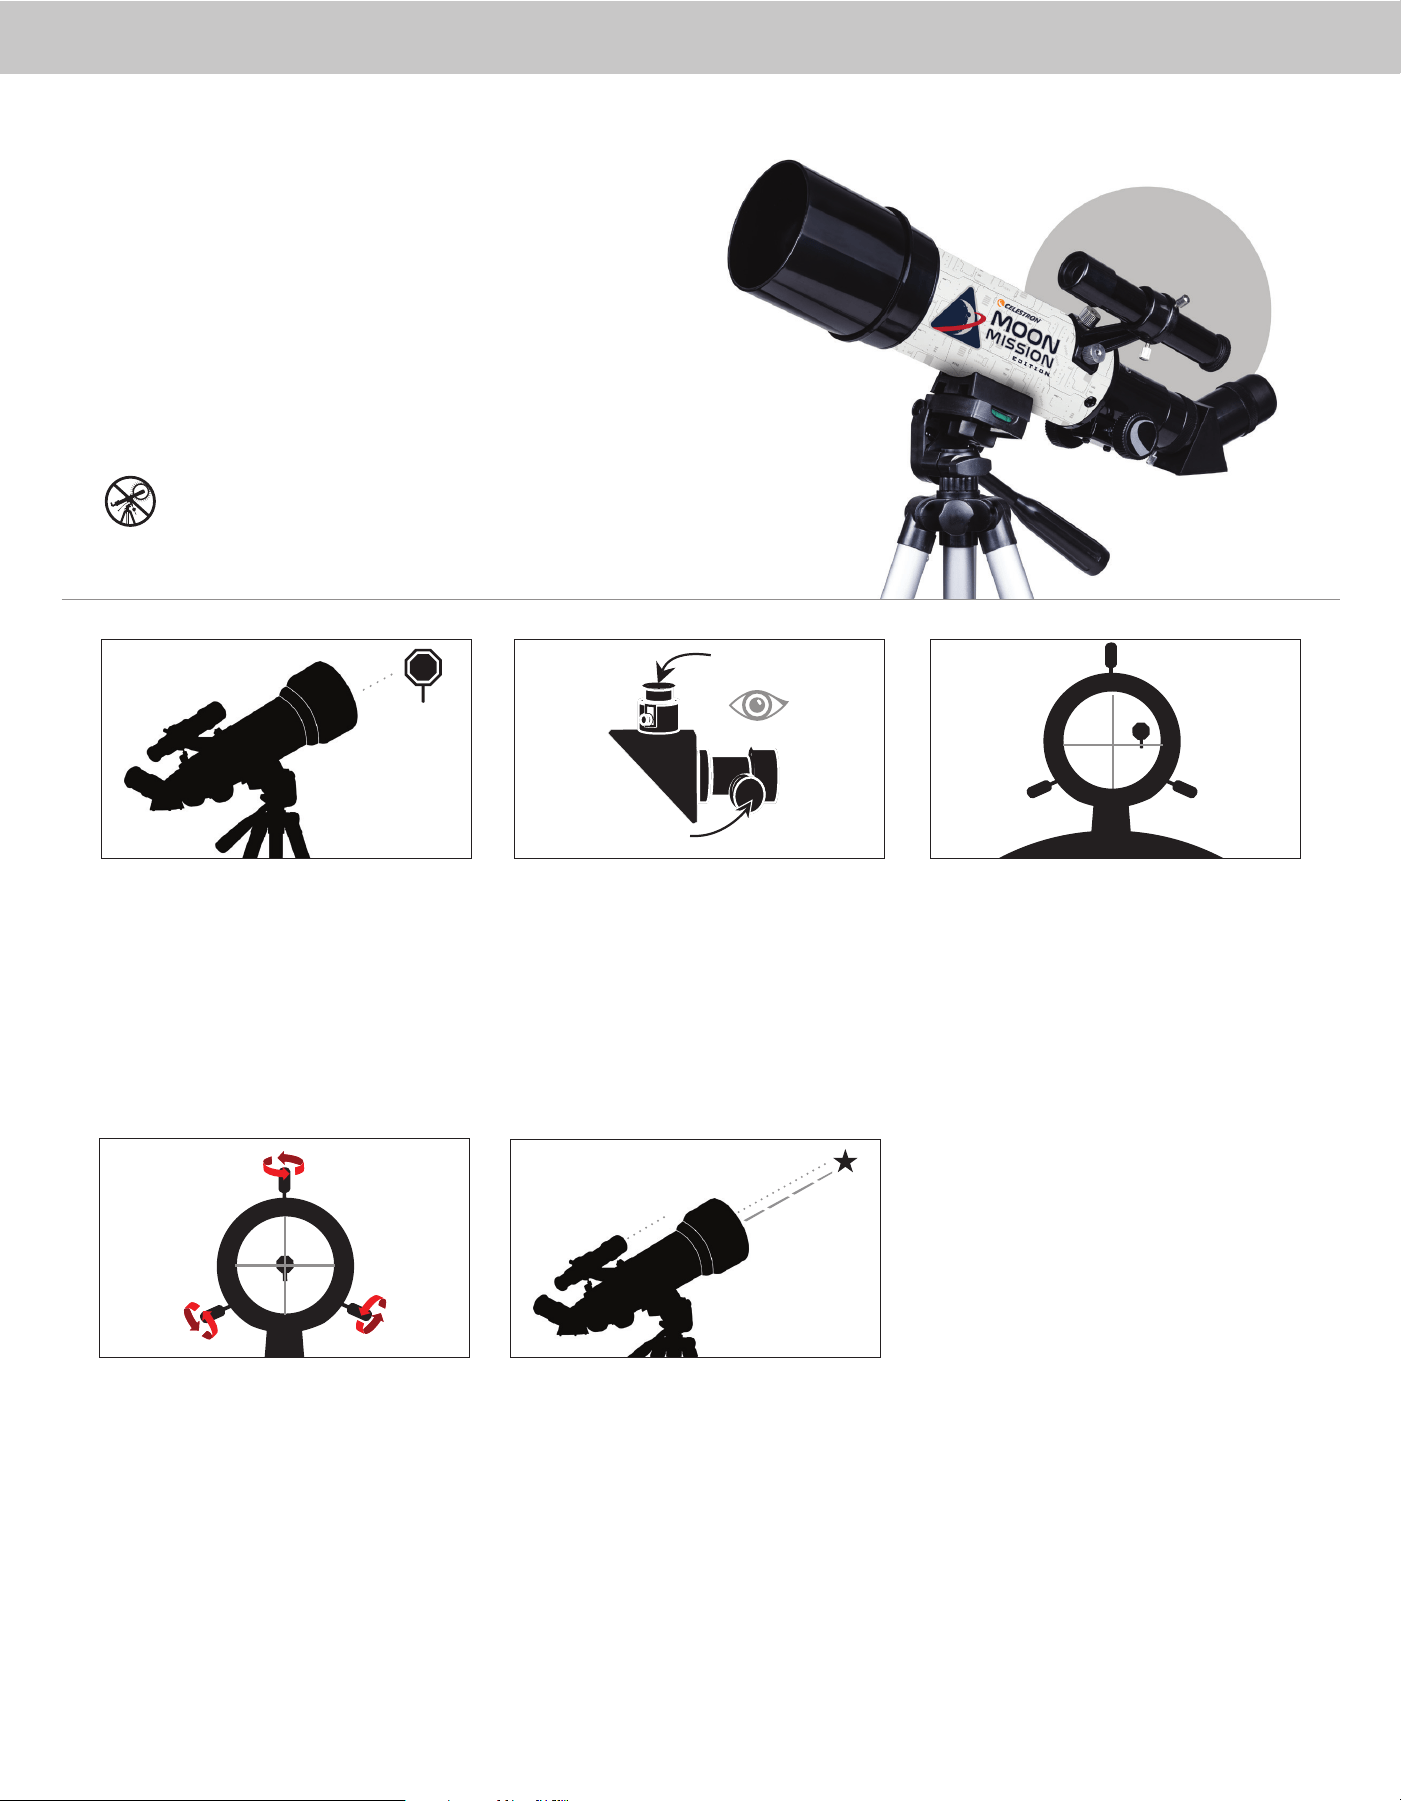
ENGLISH | 3
CENTER THE TARGET
IN THE EYEPIECE
Look through the telescope using your lower powered
eyepiece. Move the telescope until the object you
chose lies in the center of the view. If the image is
blurry, gently turn the focus knobs until it comes into
sharp focus.
LOOK THROUGH FINDERSCOPE
Once the object is centered in your 20mm eyepiece, look
through the finderscope and locate the crosshair reticle.
3
ADJUST THE FINDERSCOPE
Without moving the telescope, use the three finger
knobs on the finderscope bracket to move the finder
around in the bracket until the crosshair appears over
the same object you are observing in the telescope’s
20mm eyepiece.
TIP: Try adjusting one screw at a time. Loosen
one screw by half a turn and tighten
another by the same amount to ensure the
finderscope is securely held in place.
YOUR FINDERSCOPE IS
NOW ALIGNED!
It should not require realignment unless it is bumped
or dropped.
4
The finder is one of the most important parts of your telescope. It helps you
locate objects and center them in the eyepiece. The first time you assemble your
telescope, you need to align the finder to the telescope’s main optics. It’s best to
do this during the day*.
* SOLAR WARNING! Never attempt to view the Sun through any telescope
without a proper solar filter
!
ALIGNING THE
FINDERSCOPE
CHOOSE A TARGET
Take the telescope outside during the day and find an
easily recognizable object like a streetlight, license
plate or sign. The object should be as far away as
possible, but at least a quarter mile away.
2
Low Power Eyepiece
Focus Knobs
1
5
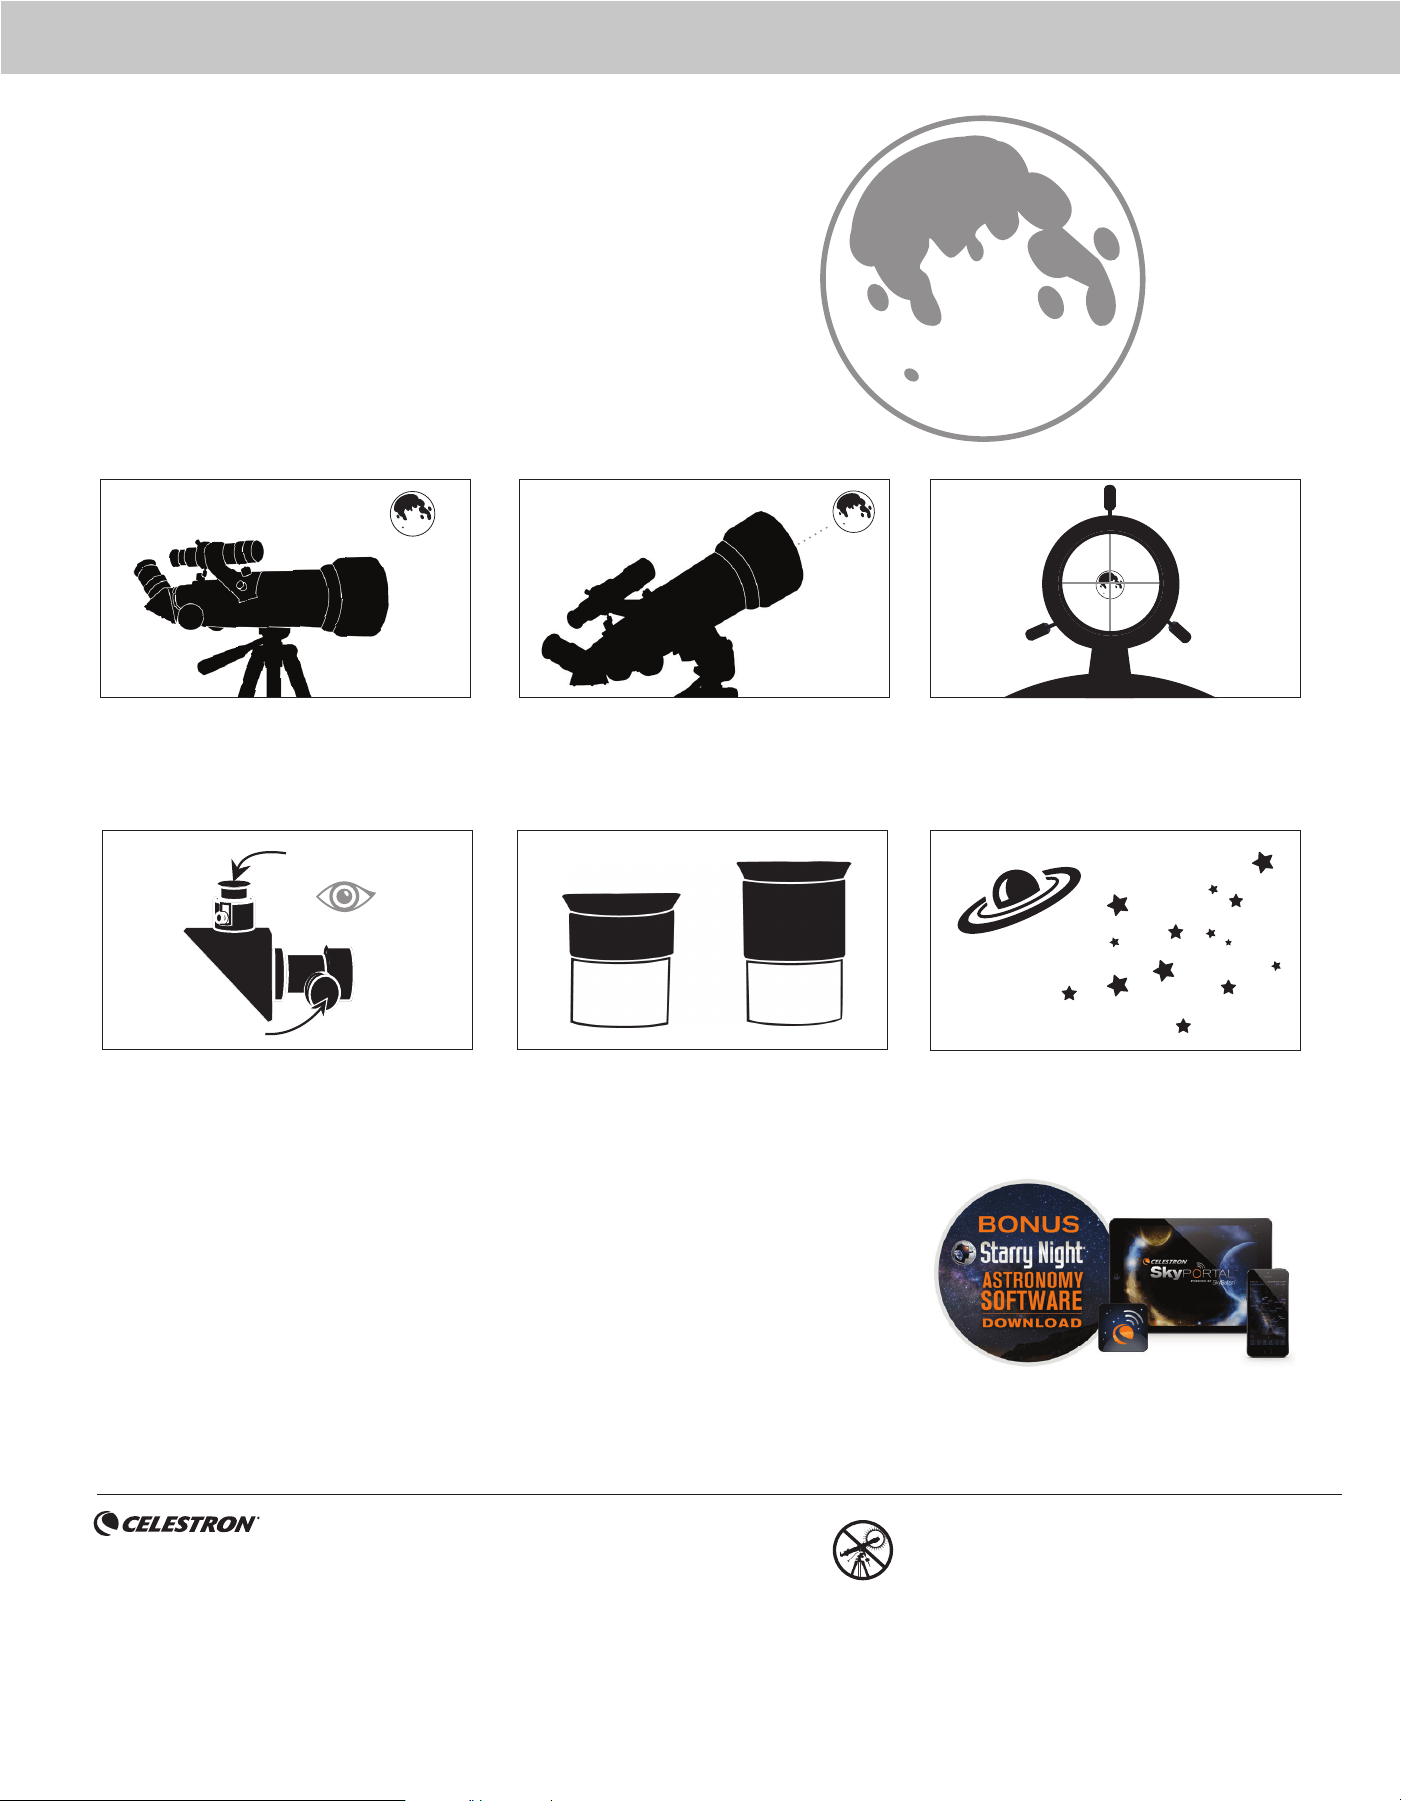
4 | ENGLISH
ASTRONOMY MOBILE APP & DESKTOP SOFTWARE
Your purchase includes Starry Night Celestron
Software for PC and Mac, plus our SkyPortal Powered
by SkySafari
TM
planetarium app for iOS and Android.
With the Moon visible in the sky, set up your telescope
with the 20mm eyepiece installed.
Look through the telescope’s 20mm eyepiece. Gently
turn the focus knobs to adjust the sharpness of the
image.
You can view many other celestial objects, such as
planets, star clusters and nebulae using this same
technique if you know where to fi nd them in the
night sky.
The best and easiest target for you to try to view fi rst is the Moon. Try
observing the Moon at different points in its phase cycle. The best time
to view the Moon is from two days after a New Moon up to a few days
before a Full Moon. During this period, you will be able to see the most
detail in the craters and lunar mountain ranges.
YOUR FIRST NIGHT OUT
THE MOON
To get a closer view of the Moon, loosen the
thumbscrews on the focuser and remove the 20mm
eyepiece. Replace it with your 8mm eyepiece and
tighten the thumbscrews to secure it in place. The
8mm eyepiece will give you signifi cantly more
magnifi cation, making the Moon appear much larger.
NOTE: You may need to adjust the focus knobs when
you change eyepieces to make sure you are
getting the sharpest image possible.
Move the telescope so that it is roughly pointing
toward the Moon.
Look through the fi nderscope and locate the crosshair
reticle. Continue moving the telescope until the
crosshair appears over the Moon.
1
6
3
CONGRATULATIONS!
YOU HAVE NOW OBSERVED YOUR
FIRST CELESTIAL OBJECT!
2
Low Power Eyepiece
Focus Knobs
4 55
8mm
20mm
©2024 Celestron. • Celestron and Symbol are trademarks of Celestron, LLC.
All rights reserved. • Celestron.com
2835 Columbia Street, Torrance, CA 90503 USA
This product is designed and intended for use by those 14 years of age and older.
(Products or instructions may change without notice or obligation.)
Printed in China • 04-24
NEED ASSISTANCE?
Contact Celestron Technical Support
celestron.com/pages/technical-support
SOLAR WARNING: Never attempt to view the Sun through any telescope
without a proper solar fi lter.

