

1
for those who appreciate quality, reliability & performance
Congratulations
Congratulations
Dear Kirby Customer,
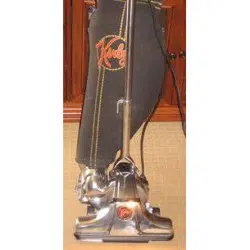
Congratulations on the purchase of The Ultimate G series™.
You now own a superior, complete home maintenance
system designed to help make your home and furnishings
look better and last longer. Most importantly, repeated use
of your Kirby
®
Ultimate G will give you the type of clean
in-home environment you want and deserve.
This use and care manual is designed to help you get the
most out of your new Kirby Ultimate G and enjoy its
numerous benefits and features. The Kirby video will give
you step-by-step instructions on your machine’s operation.
Your local distributor is available should you have any
further questions.
Kirby, the hallmark of innovation and quality for over 85
years, sells through the in-home sales method in over 60
countries. We, at Kirby, want you to know that every
customer is important to us and that we sincerely
appreciate your business.
Please enjoy your Ultimate G to its fullest!
This manual is written for use with the Kirby Model The Ultimate G series.
For assistance, contact your local authorized distributor
The Kirby Company, 1920 West 114th Street, Cleveland, Ohio 44102, U.S.A.
Parts and Supplies (1-800-437-7170), [email protected]
Consumer Relations (1-800-494-8586), [email protected]
www.kirby.com
Kirby, Micron Magic, Split Second, Split Second 2, Scuttle, Odorific, TechDrive, Miracle Waxer, and Mini Em-Tor are registered
trademarks of The Scott Fetzer Company.
The Ultimate G series is a trademark of The Scott Fetzer Company.

2
The Kirby Company
Important Safety Instructions
Important Safety Instructions
The Ultimate G series™ Model G7D is Listed and Certified by Underwriters Laboratories Inc. and
Canadian Standards Association as a double insulated appliance. The Model 293001 and 295001
Carpet Shampoo System, Model 293101 and 295101 Floor Care System, Model 293501 Zippbrush™
and Model 293201 Turbo Accessory System™ are also Listed and Certified as Optional Accessories
for use with this Kirby
®
model. Outside North America, Kirby products are approved by national test
authorities as appropriate.
WHEN USING AN ELECTRICAL APPLIANCE, BASIC PRECAUTIONS
SHOULD ALWAYS BE FOLLOWED.
BE FAMILIAR WITH ALL THE IMPORTANT SAFETY INSTRUCTIONS
BEFORE USING YOUR KIRBY.
WARNING - To reduce the risk of fire, electric shock or injury:
• Donotleaveapplianceunattendedwhenrunningorpluggedin.Unplugfromoutletwhen
not in use and before servicing.
• Donotuseoutdoors.UseonlyondrysurfacesorwiththeKirbyCarpetShampooSystem.
• Donotallowtobeusedasatoy.Closeattentionisnecessarywhenusedbyornearchildren.
Do not let children use the cleaner unattended.
• Useonlyasdescribedinthismanual.Useonlymanufacturer’srecommendedattachments.
• Donotusewithdamagedcordorplug.Ifapplianceisnotworkingasitshould,hasbeen
dropped, damaged, left outdoors or dropped into water, return it to a factory authorized
distributor or service center.
• Donotpullorcarrybycord,usecordasahandle,closedoorsoncord,orpullcordaround
sharp edges or corners. Do not run appliance over cord. Keep cord away from heated surfaces.
• Donotunplugbypullingoncord.Tounplug,grasptheplug,notthecord.
• Donothandleplugorappliancewithwethands.
• Donotputanyobjectintoopenings.Donotusewithanyopeningblocked;keepopenings
free of dust, lint, hair and anything that may reduce airflow.
• Keephair,looseclothing,fingersandallpartsofbodyawayfromopeningsandmovingparts.
• Donotpickupanythingthatisburning,smolderingorsmoking,suchascigarettes,matches,
glowing particles or hot ashes.
• Donotpickupcombustiblematerials.
• Donotusewithoutdustbagand/orfiltersinplace.
• TurnKirbyOFFbeforeunpluggingthecord.
• Useextracarewhencleaningonstairs.
• Donotusetopickupflammableorcombustibleliquids,suchasgasolineoruseinconfined
areas where flammable or combustible vapors are present.
• WhenusingtheCarpetShampooSystem,donotuseflammableorcombustibleliquidsto
clean carpet or floor.
• WhenusingtheFloorCareSystem,useonlygenuineKirbycleaningproductsorcommercially
available floor cleaners or waxes intended for machine operation.
• Unplugthecordfromthewalloutletandletthemotorcometoacompletestopbefore
attempting any cleaning, service or changing accessories.
• ThisapplianceisprovidedwithDoubleInsulation.Itmustbeservicedbyafactoryauthorized
distributor or service center using genuine Kirby parts to maintain safety and to protect your
warranty. See page 51.
• KeepallKirbychemicalsoutofthereachofchildren.Thesechemicalsmaycauseirritation
or discomfort if swallowed or placed in the eyes.
• DonotuseflammableorcombustiblefluidinthePortableSprayer.
• DonotusepesticidesorchemicalproductsinthePortableSprayerthatmayaffectordamage
the human respiratory system, eyes or skin.
• Toavoidirritationordamagetoeyesorears,keepthemassagecupandallotheraccessories
a safe distance away.
• Alwaysusesafetyglasseswhenturbosanding.
SAVE THESE INSTRUCTIONS
FOR HOUSEHOLD USE ONLY

3
for those who appreciate quality, reliability & performance
Table of Contents
Table of Contents
Important Safety Instructions 2
About this Manual 4
Kirby
®
Micron Magic
®
HEPA Filtration 5
Part 1 — Getting Started 6
Moving Your Ultimate G/HandleTiltLatch/Toe-TouchControl
™
7
PowerNozzleHeightAdjustment/TechDrive
®
Power Assist 8
Installing/ChangingDisposableFilterBags 9
BagSupportStrap/MiniEm-Tor
®
10
TheBeltLifter 10
Part 2 — Upright & Portable Cleaner 12
The Upright Cleaner 13
The Upright as a Straight Suction Cleaner 14
The Portable Cleaner 15
Part 3—Canister Cleaner & Attachments 17
ConvertingtoaCanisterCleaner/InstallingtheAttachmentHose 18
ExtensionTubes/SurfaceNozzle 19
DusterBrush/UpholsteryNozzle 20
CreviceTool/Wall&CeilingBrush 20
MassageCup/SuctionControlGrip 21
Using Your Ultimate GasaBlower 21
The Portable Sprayer 24
The Portable Shampooer 26
Part 4 — Optional Accessories 29
The Carpet Shampoo System 30
The Miracle Waxer
®
36
TheFloorCareSystem-FloorBuffer 38
The Floor Care System - Carpet Fluffer 40
The Turbo Accessory System
™
41
The Zippbrush
™
43
Part 5 — Operating/Maintenance Tips 45
ChangingthePowerNozzleBelt 46
AdjustingtheBrushRollHeight 48
LightBulbReplacement 49
Miscellaneous Parts Replacement 50
QuestionsandAnswers/Troubleshooting 51
Other Fine Kirby Cleaning Products 56
Index 58
Expanded Illustration of Ultimate G and Filtration System - Inside back cover.
IfyouhaveanyquestionsregardingyourpurchaseortheoperationofyourKirbyHomeCare
System, please contact your local authorized distributorship:
___________________________________________________
___________________________________________________
___________________________________________________
OR
You may contact The Kirby Company’s Consumer Relations Department by:
e-mail [email protected]
telephone 1-800-494-8586
fax 216-529-6146
mail Consumer Relations
1920 West 114th Street
Cleveland, Ohio 44102
Our business hours are 8:00 a.m. to 5:00 p.m. Eastern Time, U.S.A. Monday through Friday.

4
The Kirby Company
About This Manual
About This Manual
Using this Owner's Manual
This Owner’s Manual was designed to be easy to read and follow. It has been organized
in sections based on the various ways you may use your new Kirby
®
Ultimate G. Within
each section, simple step-by-step illustrations will help you easily visualize the steps required
to properly operate your new Ultimate G and its many attachments and optional accessories.
Please note: The rear cover of this Owner’s Manual includes a fold-out illustration that points
out the location of various parts of your new Ultimate G. Simply fold this flap out and refer
to the illustrations and corresponding (#) as you read this manual.
In addition to the Table of Contents on page 3, you will also find an Index on page 58 that
will refer you to the information you require.
We at Kirby sincerely hope this Owner’s Manual will help you obtain years of satisfactory
world-class performance from The Ultimate G series
™
by Kirby.

5
for those who appreciate quality, reliability & performance
Youboughtthebest;youexpectthebest.That’swhyKirbydevelopedtheMicronMagic
HEPA(HighEfficiencyParticleArrest)FiltrationSystemfeaturingthelatestincleanair
technology without sacrificing Kirby’s tremendous airflow.
* Captures and retains 99.97% of household dust, pollen, dust mites and other particles
down to 0.3 microns.
* Captures and retains 99.5% of other particles down to 0.1 microns.
So, what does this mean?
Improved Indoor Air Quality!
These improvements are a part of the Kirby Company’s pursuit to respond to our customers’
needs.TheKirbyMicronMagicHEPAFiltrationSystemdemonstratesthequalityyouexpect
and the performance you deserve.
ReordergenuineKirbyMicronMagicHEPAfilterbagsfromyourlocalauthorized
Kirby Distributor.
Kirby
®
For those who appreciate Quality, Reliability and Performance
™

6
The Kirby Company
Getting Started
Getting Started
PART ONE
This section outlines general information you will need as
you begin using your new Kirby
®
Ultimate G. It includes
information on:
Moving and Carrying Your Ultimate G
Using the Handle Tilt Latch
The Toe-Touch Control
™
Proper Power Nozzle Height
Using TechDrive
®
Power Assist
Installing/Changing Disposable Filter Bags
Emptying the Mini Em-Tor
®
Understanding the Belt Lifter
Please read this section (as well as all other sections) carefully
before using your new Ultimate G.
7
for those who appreciate quality, reliability & performance
Getting Started
Getting Started
Moving/Carrying Your Ultimate G/Handle Tilt Latch
and Toe-Touch Control
™
MOVING YOUR ULTIMATE G
Your Ultimate G is equipped with TechDrive
®
Power Assist.
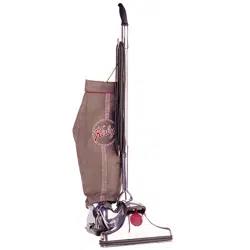
In order to push your Ultimate G with the motor OFF,
TechDrive Pedal
o
11 must be turned OFF (disengaged).
Turn TechDrive OFF by pushing down on the gray “N” side
(marked“N”forNeutral)oftheTechDrivePowerAssistN/D
Pedal. (See page 8 for additional information.)
CARRYING YOUR ULTIMATE G
NOTE: The Carrying Grip
o
18 is designed for convenience in
carrying your Ultimate G. ❏
HANDLETILTLATCH
TheHandleTiltLatch
o
10 serves two purposes:
To allow you to lift the front of the Ultimate G over door
thresholds or throw rugs. To do so, move the Tilt Latch
Levertowardsthebag.Bydoingthis,thehandlewillonly
lower part way to the 45° position. This allows you to push
down on the locked handle and lift the front of the Ultimate G.
➤
To allow you to store your Ultimate G in a vertical
position or carry it.
To do this, lower the handle to a horizontal position
near the floor. While pushing the handle down, move the Tilt
Latch Lever away from the bag to lock the handle down. You
can now stand the Ultimate G up onto its bumper and lean it
against a wall for storage.
This vertical position may also be useful in carrying the
Ultimate G. To lift the Ultimate G, use the Carrying
Grip
o
18 . ❏
THETOE-TOUCHCONTROL
The Toe-Touch Control
o
8 ,
o
9 , located over the front wheel,
raises and lowers the front of your Ultimate G.
StepdownontheToe-TouchControlBottomPedal
o
9 to
raise the front (see page 13). ➤
1
2
CAUTION:
NeverunlocktheHandleTiltLatchwithoutholdingontothehandle.
The handle is spring-loaded and could fly up when unlatched.
!
8
The Kirby Company
Getting Started
Getting Started
Power Nozzle Height Adjustment and TechDrive
®
Power Assist
Then, each time you press on the Toe-Touch Control
™
Upper
Pedal
o
8 , you will lower the front one notch.
The number of bars showing above the Toe-Touch Control
provide an indication of height. ❏
POWERNOZZLEHEIGHTADJUSTMENT
When using the Power Nozzle
o
25 , it is important to adjust
the height properly. Start by pressing the Toe-Touch Control
BottomPedal
o
9 all the way down, raising the front of your
Ultimate G all the way up.
Then, with your Ultimate G ON, press the Toe-Touch Control
Upper Pedal
o
8 , one notch at a time, until you hear a change in
the tone of the motor. This means your Ultimate G has sealed to
the carpet. Press the Toe-Touch Control Upper Pedal one more
time and your Power Nozzle will be at the proper operating height.
NOTE: When finished vacuuming, press the Toe-Touch Control
BottomPedalallthewaydowntomoveyourUltimate G. ❏
TECHDRIVE
Your new Ultimate G is equipped with TechDrive Power
Assist. This innovative power assist feature eliminates most of
the effort required to move your Ultimate G back and forth. ❏
TURNINGTECHDRIVEON(DRIVE)
To engage TechDrive and put the Ultimate G in the Power
Assist mode, push down the yellow “D” side (marked “D” for
Drive)oftheTechDriveN/DPedal
o
12 located just below the
Power Switch.
o
13
You may use your Ultimate G without TechDrive Power Assist
if desired. Simply put TechDrive in Neutral. ❏
IMPORTANT:
To avoid possible damage to soft tiles or marking of waxed and
finished non-carpeted floors, disengage the TechDrive.
!
TURNINGTECHDRIVEOFF(NEUTRAL)
To move your Ultimate G with the motor OFF or to vacuum
without Power Assist, TechDrive must be put in Neutral.
To place TechDrive in Neutral, push down the gray “N” side
(marked“N”forNeutral)oftheTechDrivePowerAssistN/D
Pedal
o
11 . ❏
9
for those who appreciate quality, reliability & performance
CAUTION:
BeforechangingtheDisposableFilterBag,unplugthepowercord
from the wall outlet and be sure that the motor and fan have stopped.
!
Getting Started
Getting Started
Installing/Changing Disposable Filter Bags
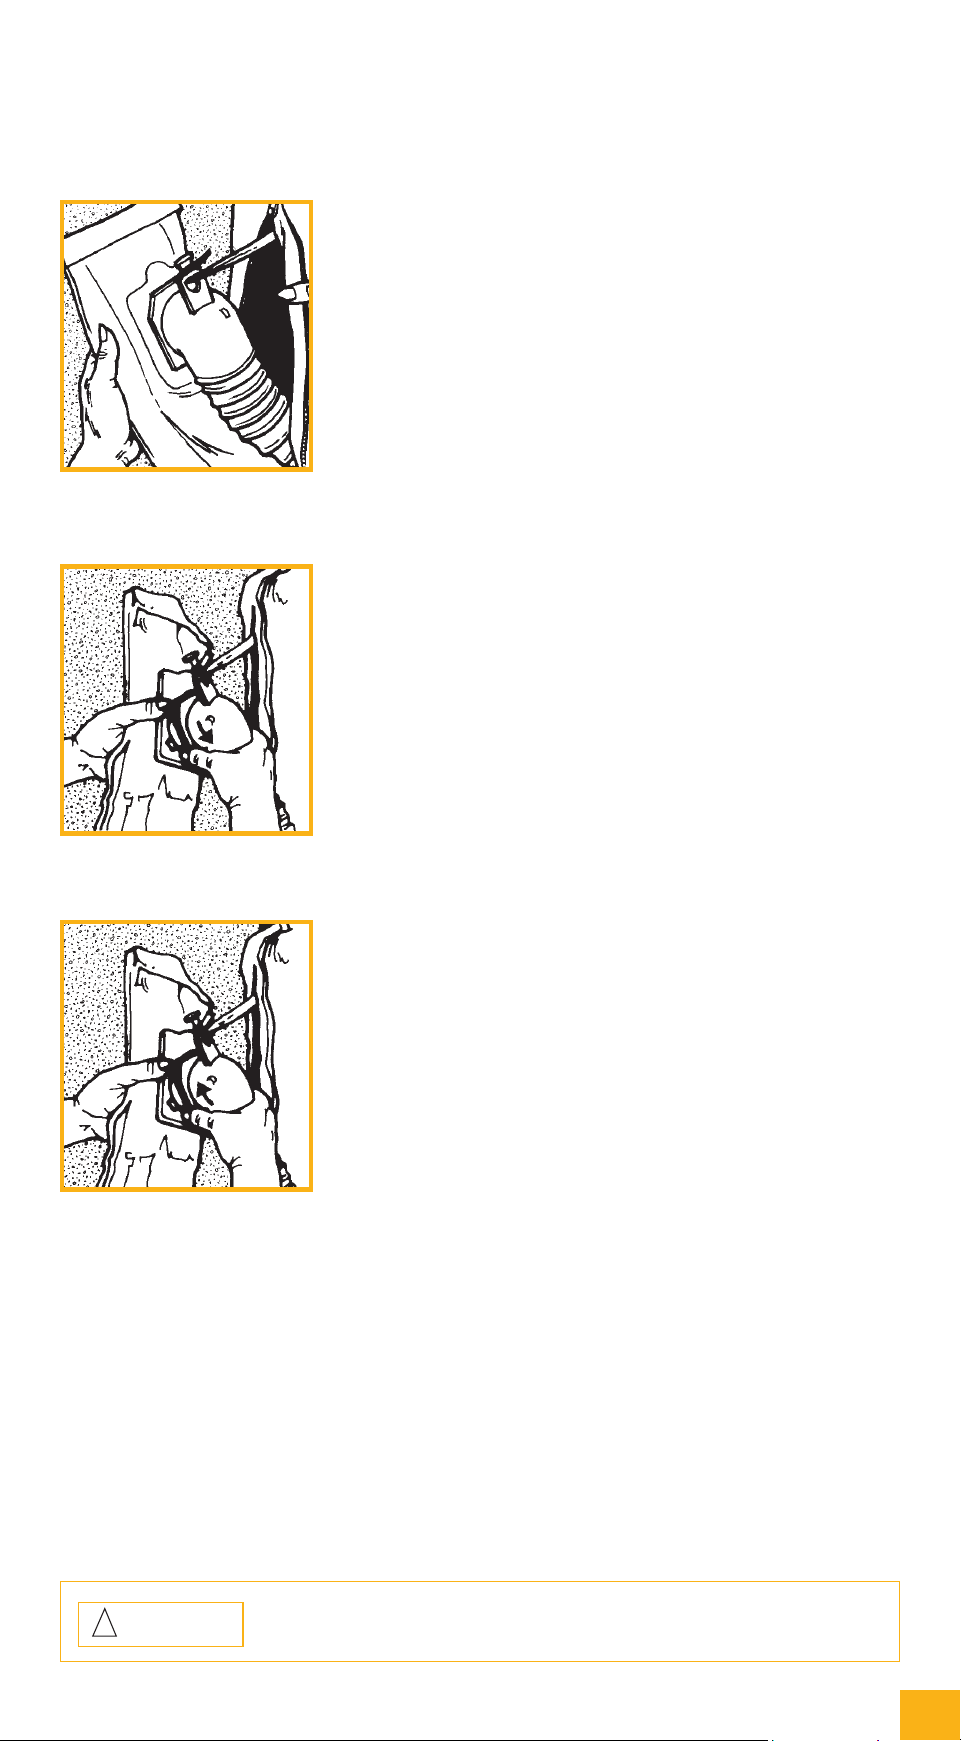
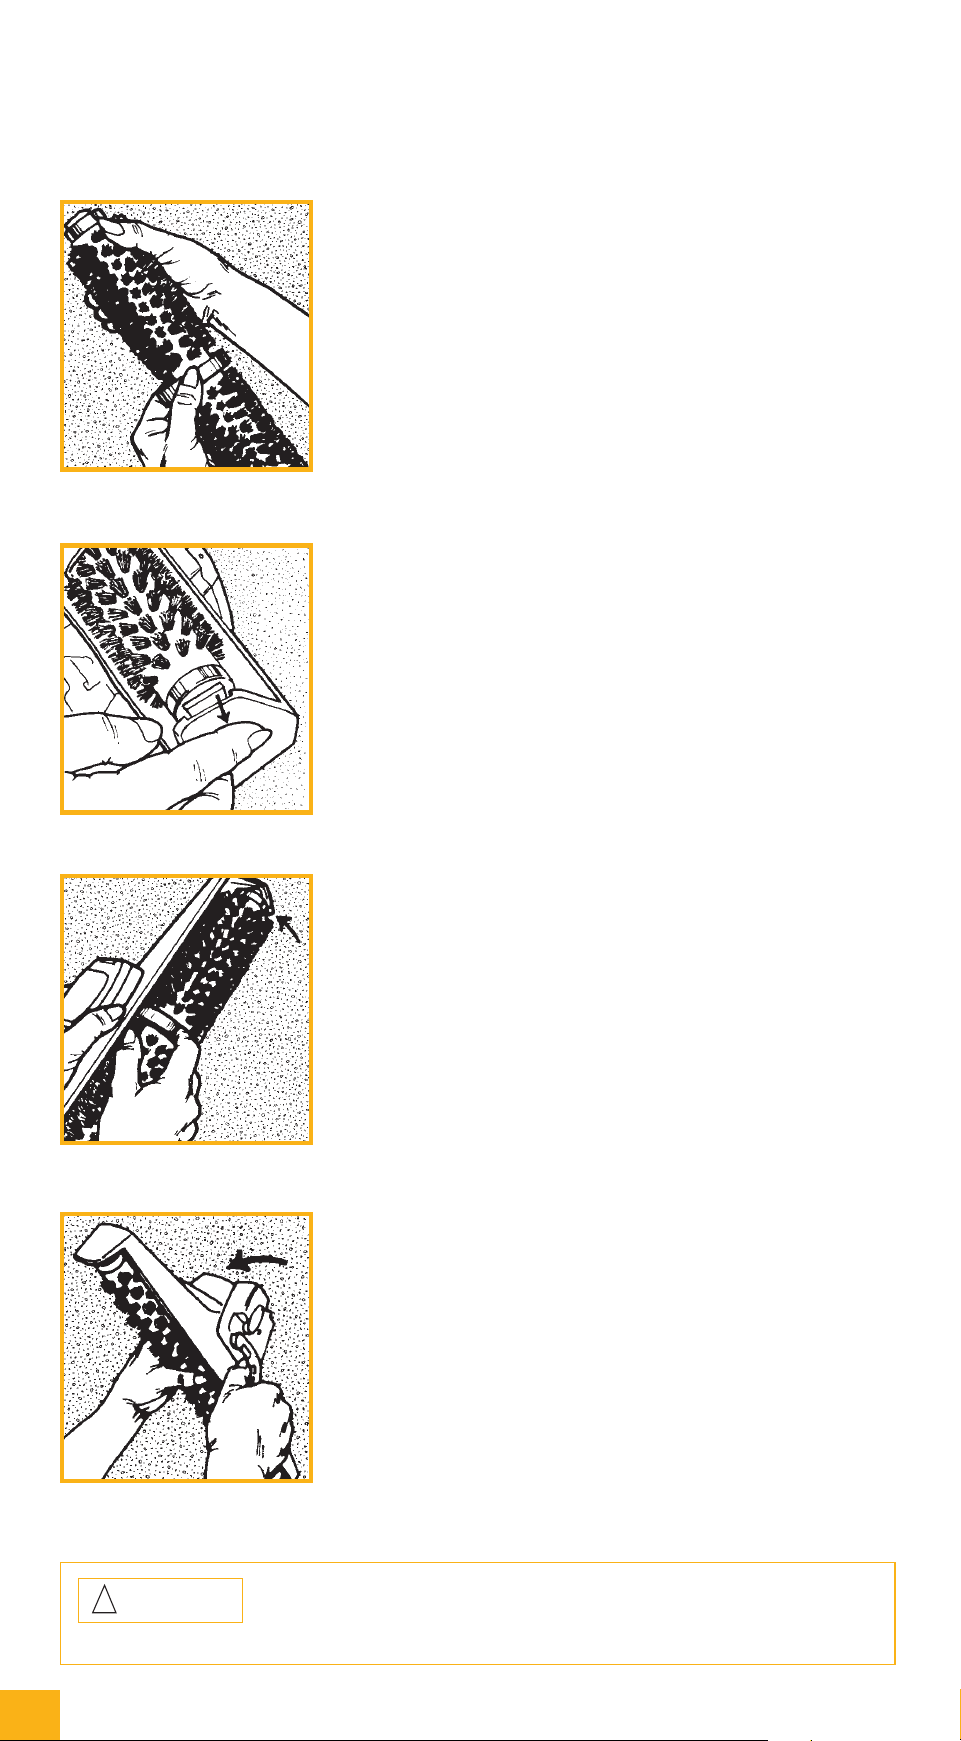
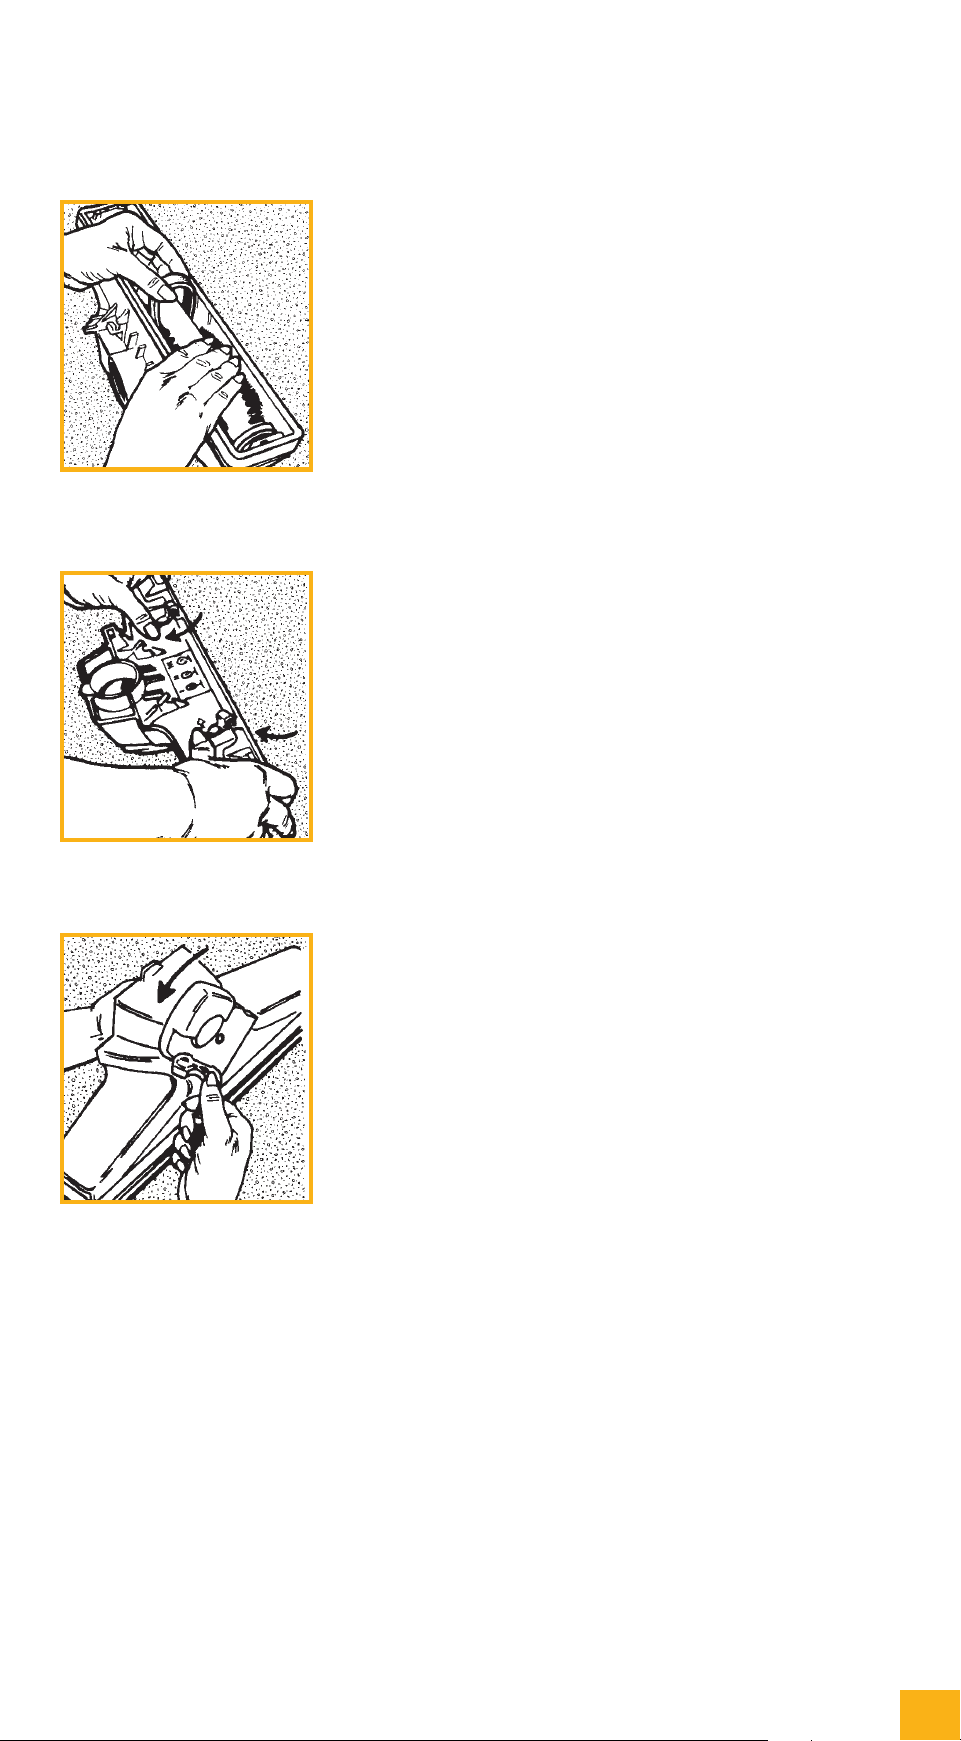
INSTALLING/CHANGINGDISPOSABLE
FILTERBAGS
ADisposableFilterBagmustbeinstalledbeforeyoubegin
vacuuming.
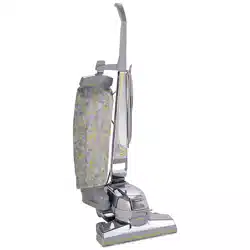
ToinstallanewDisposableFilterBag,unziptheOuter
PermanentBag
o
1andpullouttheDisposableFilterBag
along with the Top Adaptor
o
5 . ➤
Whennecessary,removetheusedDisposableFilterBag.
NOTE:AlwaysreplacetheDisposableFilterBagwhen
dirt reaches the “FULL” line on the bag. Failure to do
so will affect performance.
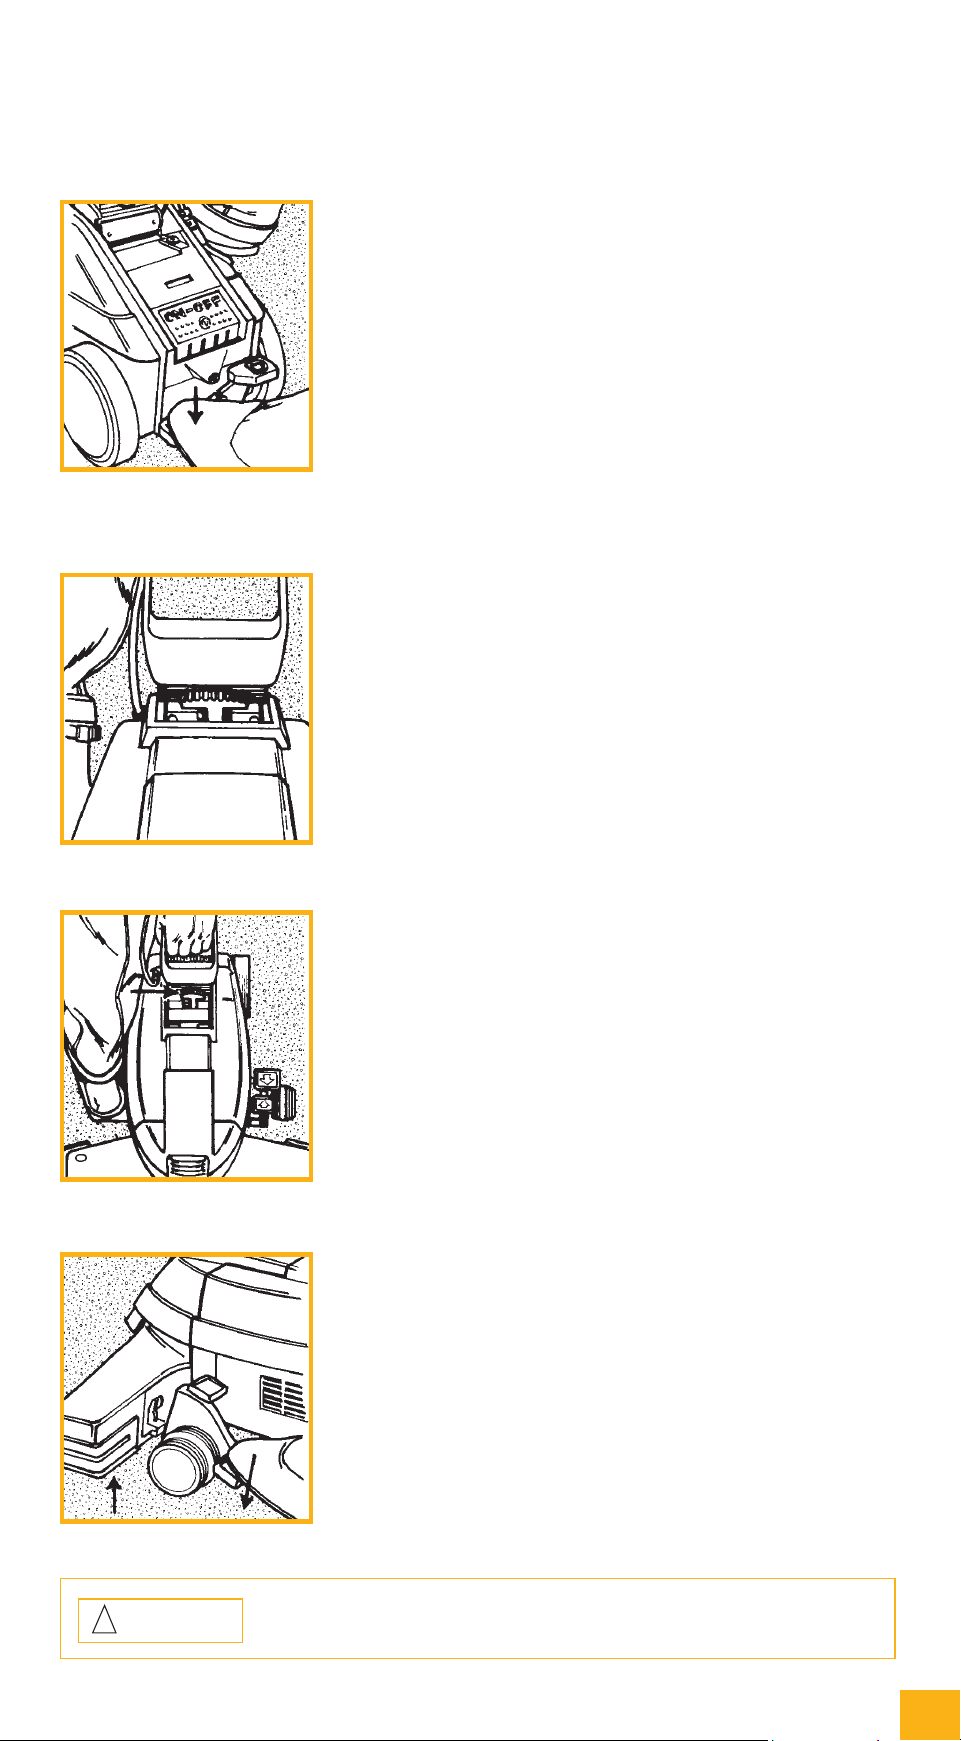
FromtherearoftheDisposableBag,graspthecardboardface-
plate.HoldingtheTopAdaptorsteady,rotatethecardboard
faceplate to the left (counter-clockwise). When the lock tabs
on the Top Adaptor align with the slots in the cardboard face-
plate, gently pull the bag off. ➤
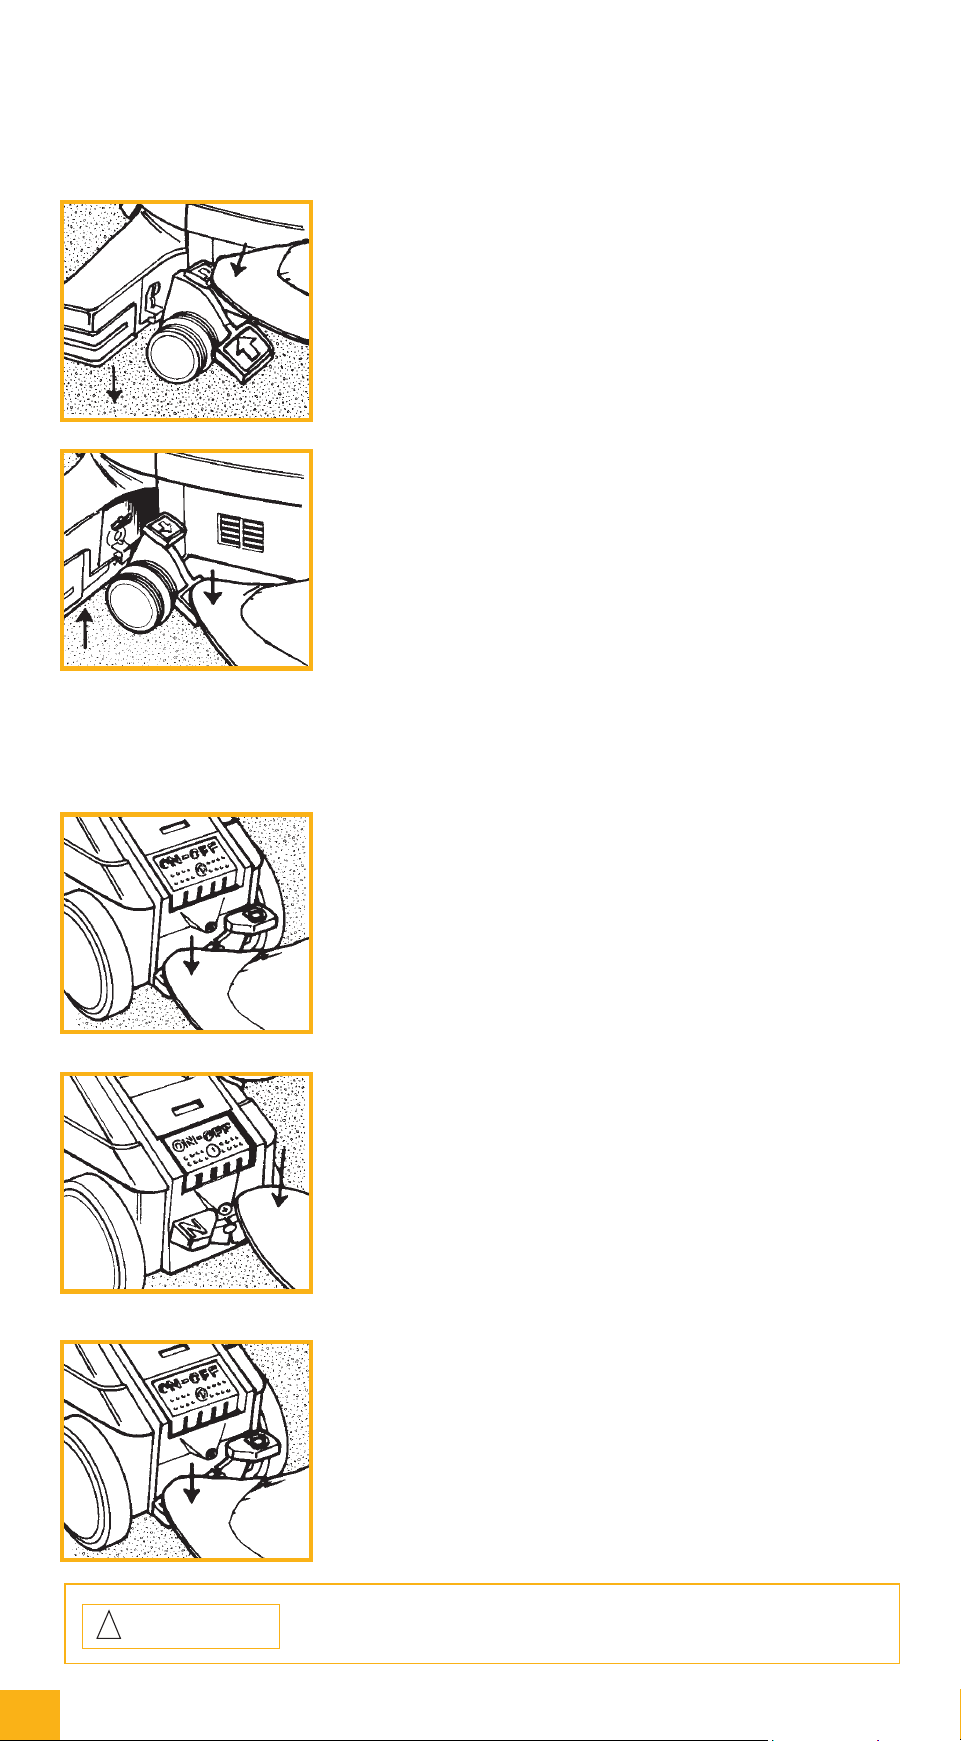
ToinstallanewDisposableFilterBag,graspthecard-
board faceplate from the rear of the Disposable Filter
bag. Align the slots in the cardboard faceplate on the
DisposableFilterBagwiththelocktabsontheTop
Adaptor. Then push the Top Adaptor into the bag opening.
HoldingtheTopAdaptorsteady,rotatethecardboardfaceplate
totheright(clockwise)tosecuretheDisposableFilterBag.
NOTE: To avoid air leaks, make sure the cardboard faceplate is
securely positioned up against the flat portion of the Top
Adaptor. ➤
1
2
3
10
The Kirby Company
CAUTION:
Do not pick up heavy objects, such as coins, screws, rocks or similar
objects. This may damage the fan.
!
Getting Started
Getting Started
Bag Support Strap/Mini Em-Tor
®
and Belt Lifter
BAGSUPPORTSTRAP
ChecktomakesuretheBagSupportStrap
o
4 is con-
nected to the Top Adaptor
o
5.TheBagSupportStrap
provides the support required for proper operation of
theDisposableFilterBag.
If it is not connected, thread the strap through the small hole
of the Top Adaptor. Then place the hole in the strap over the
stud on the Top Adaptor.
Finally, insert the adaptor and new filter bag into the Outer
PermanentBag
o
1 and close the zipper completely for
maximum performance.
NOTE: In order for the Filtration System to perform effectively,
use only Kirby
®
Micron Magic
®
HEPAFiltrationBags.Ifthe
outside bag is torn or damaged, please replace immediately. ❏
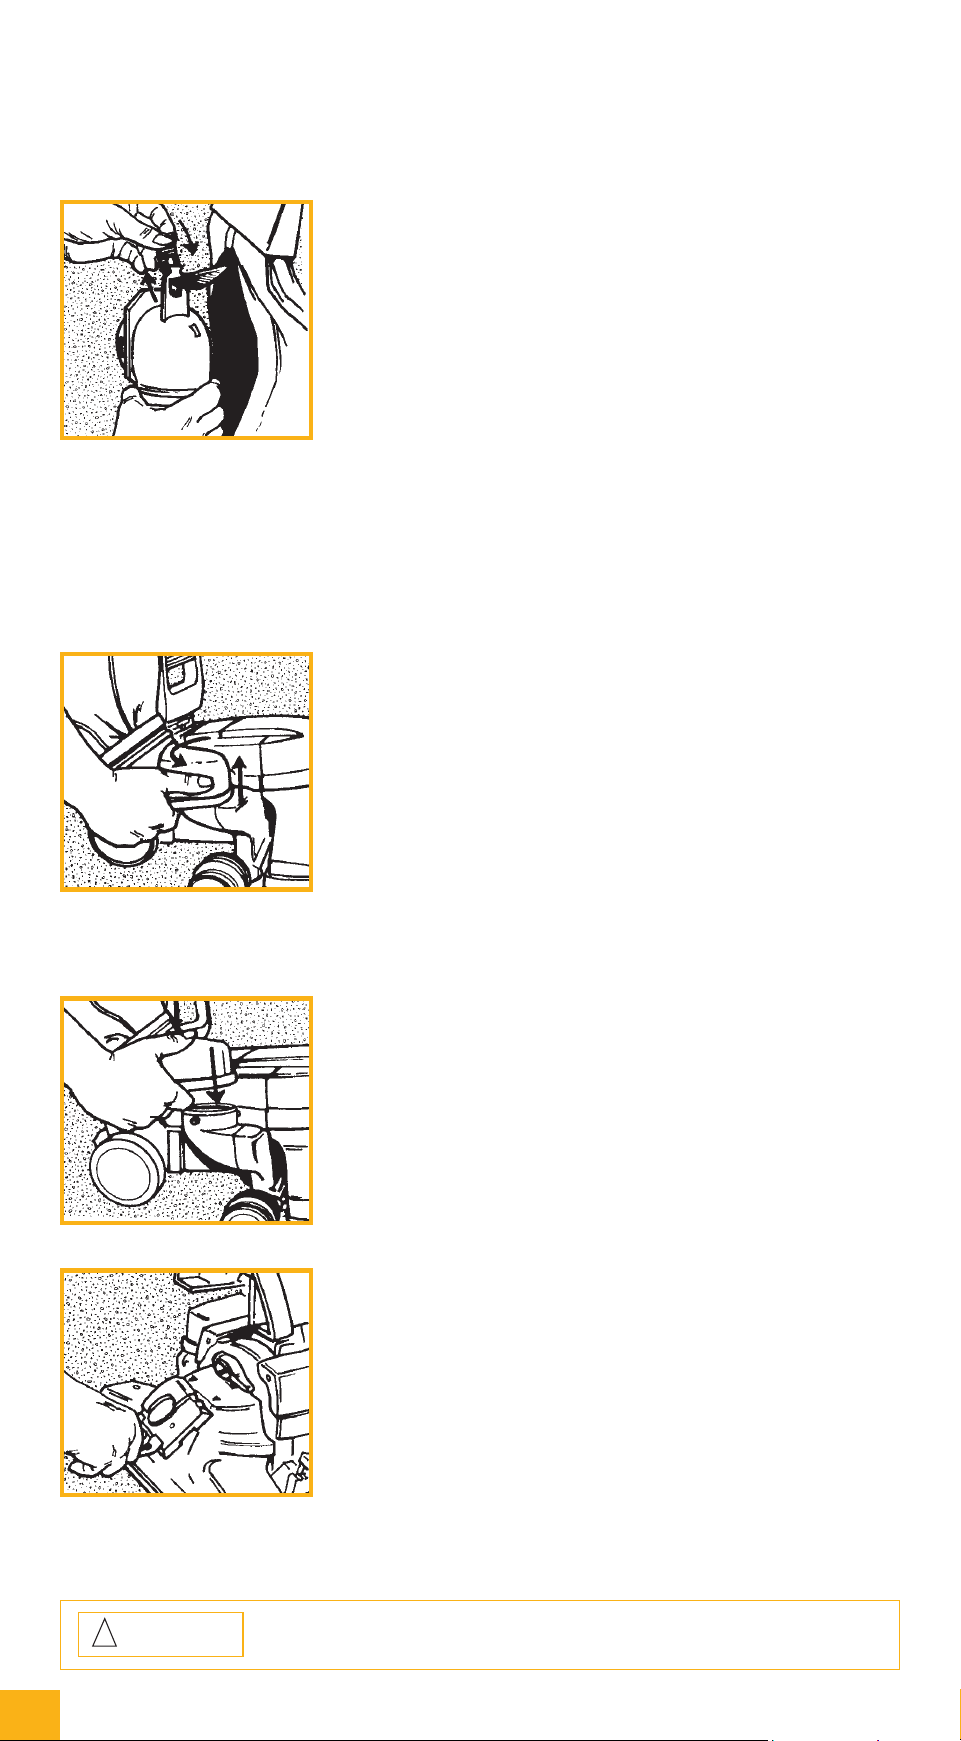
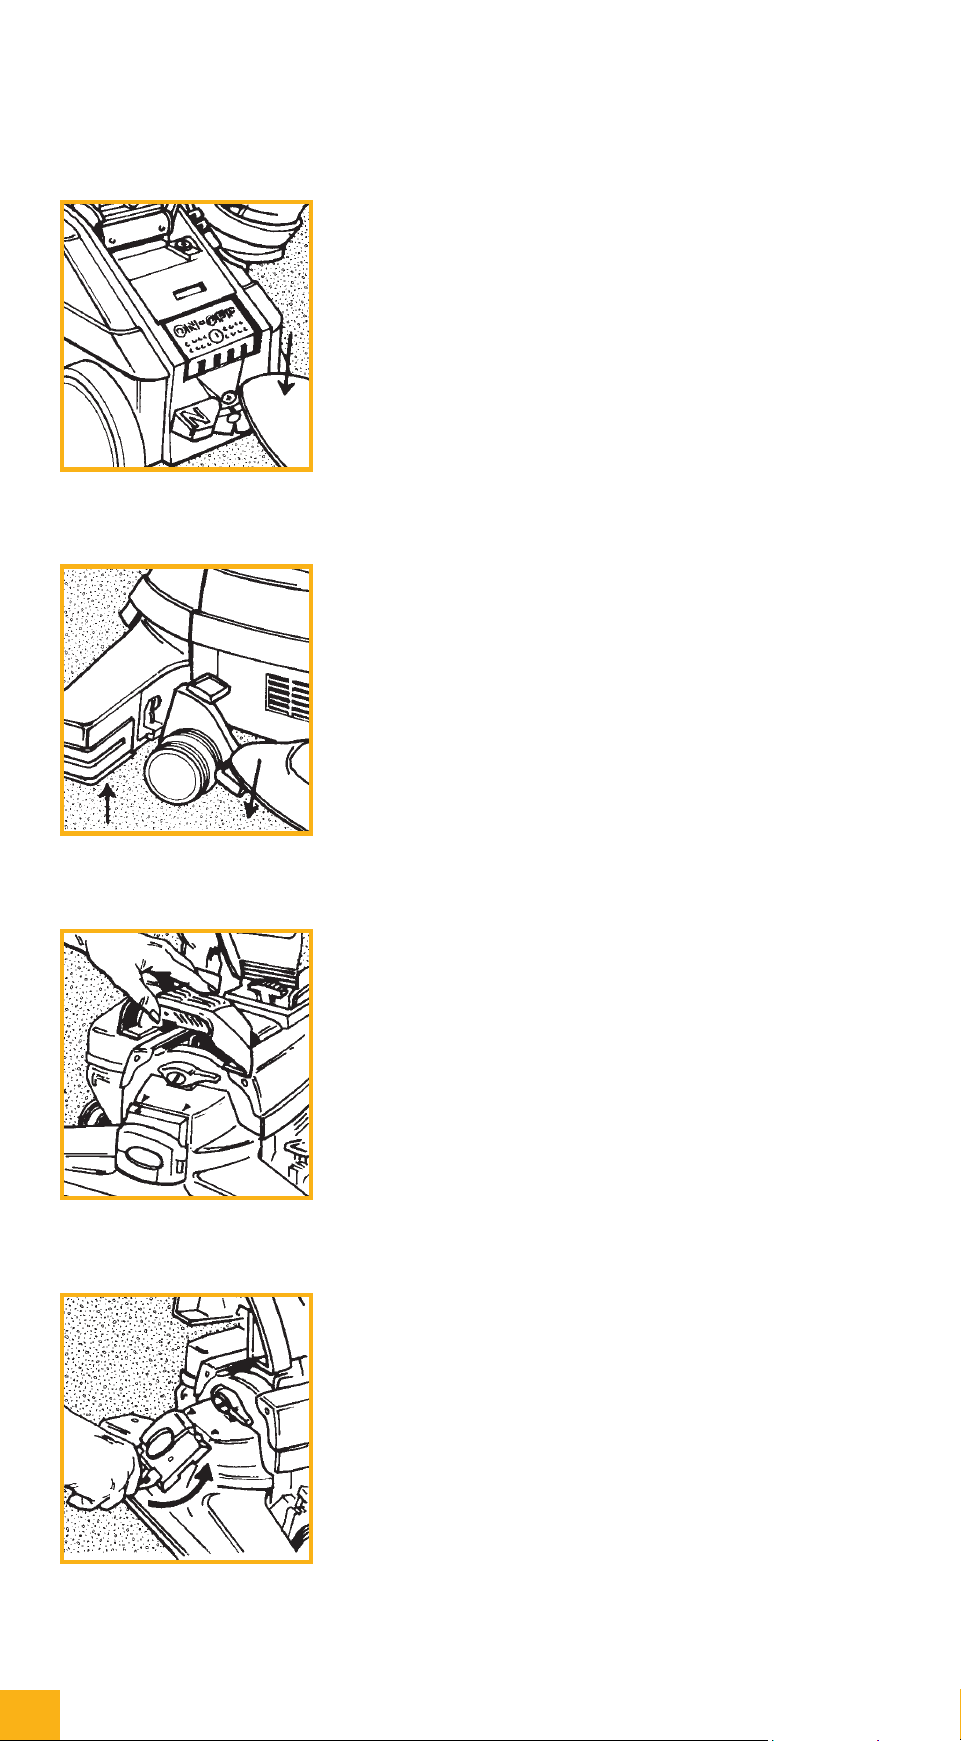
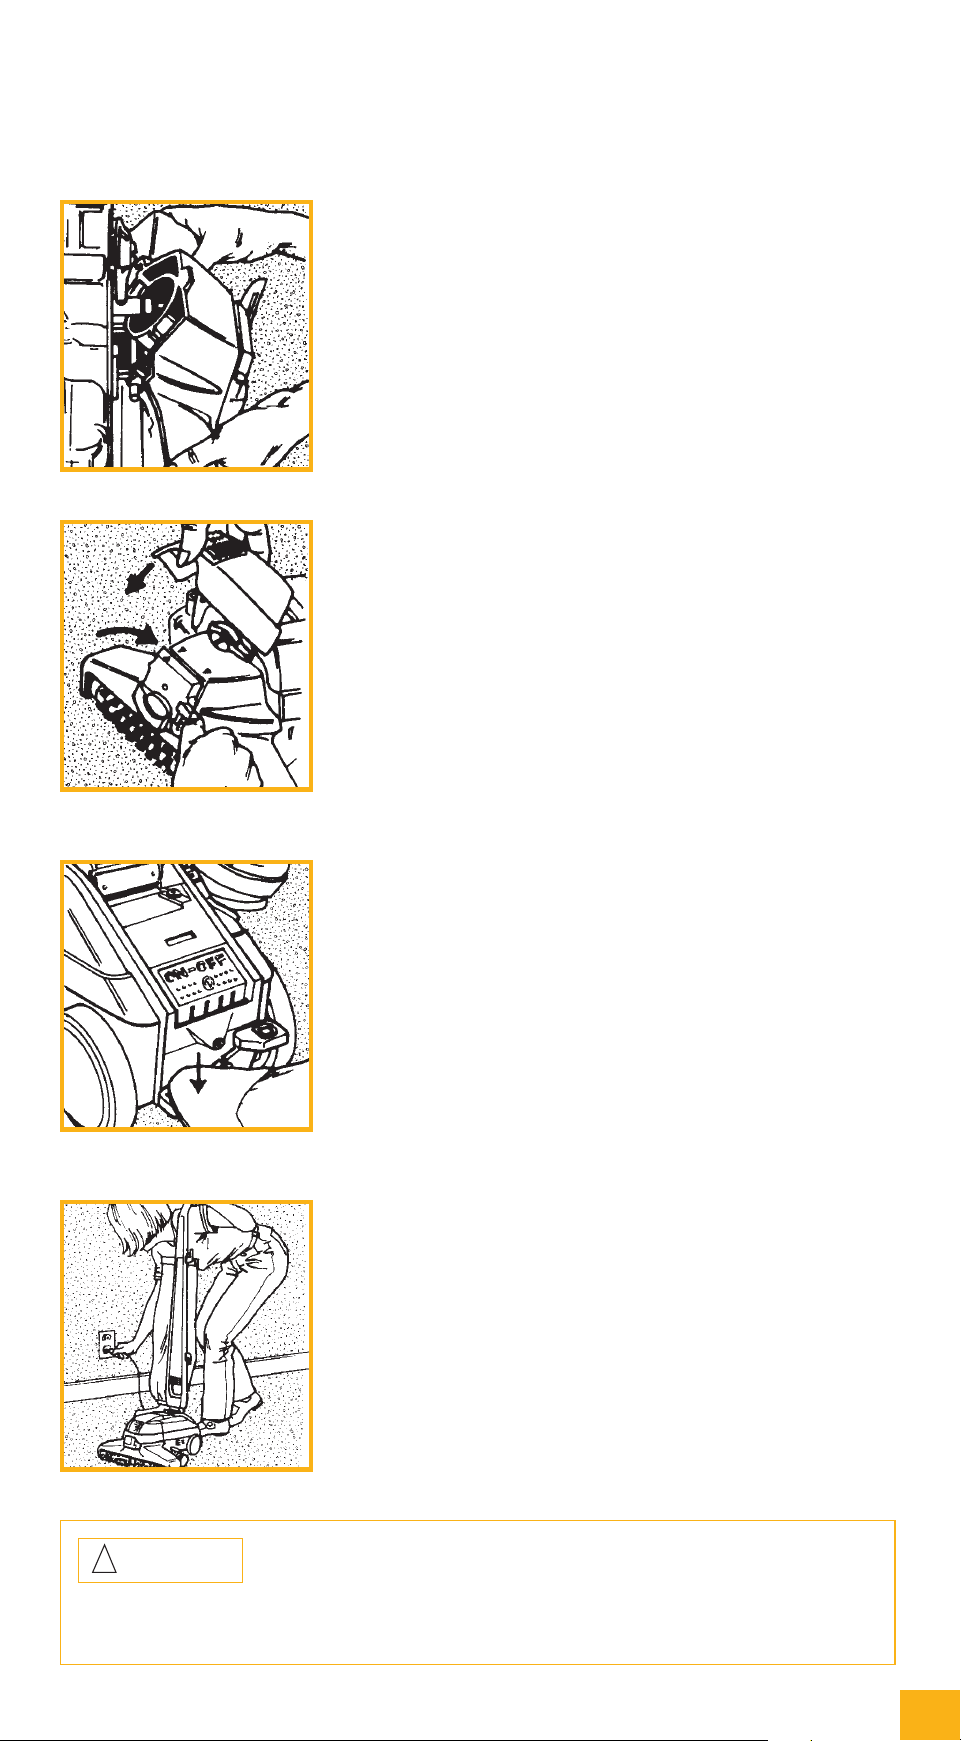
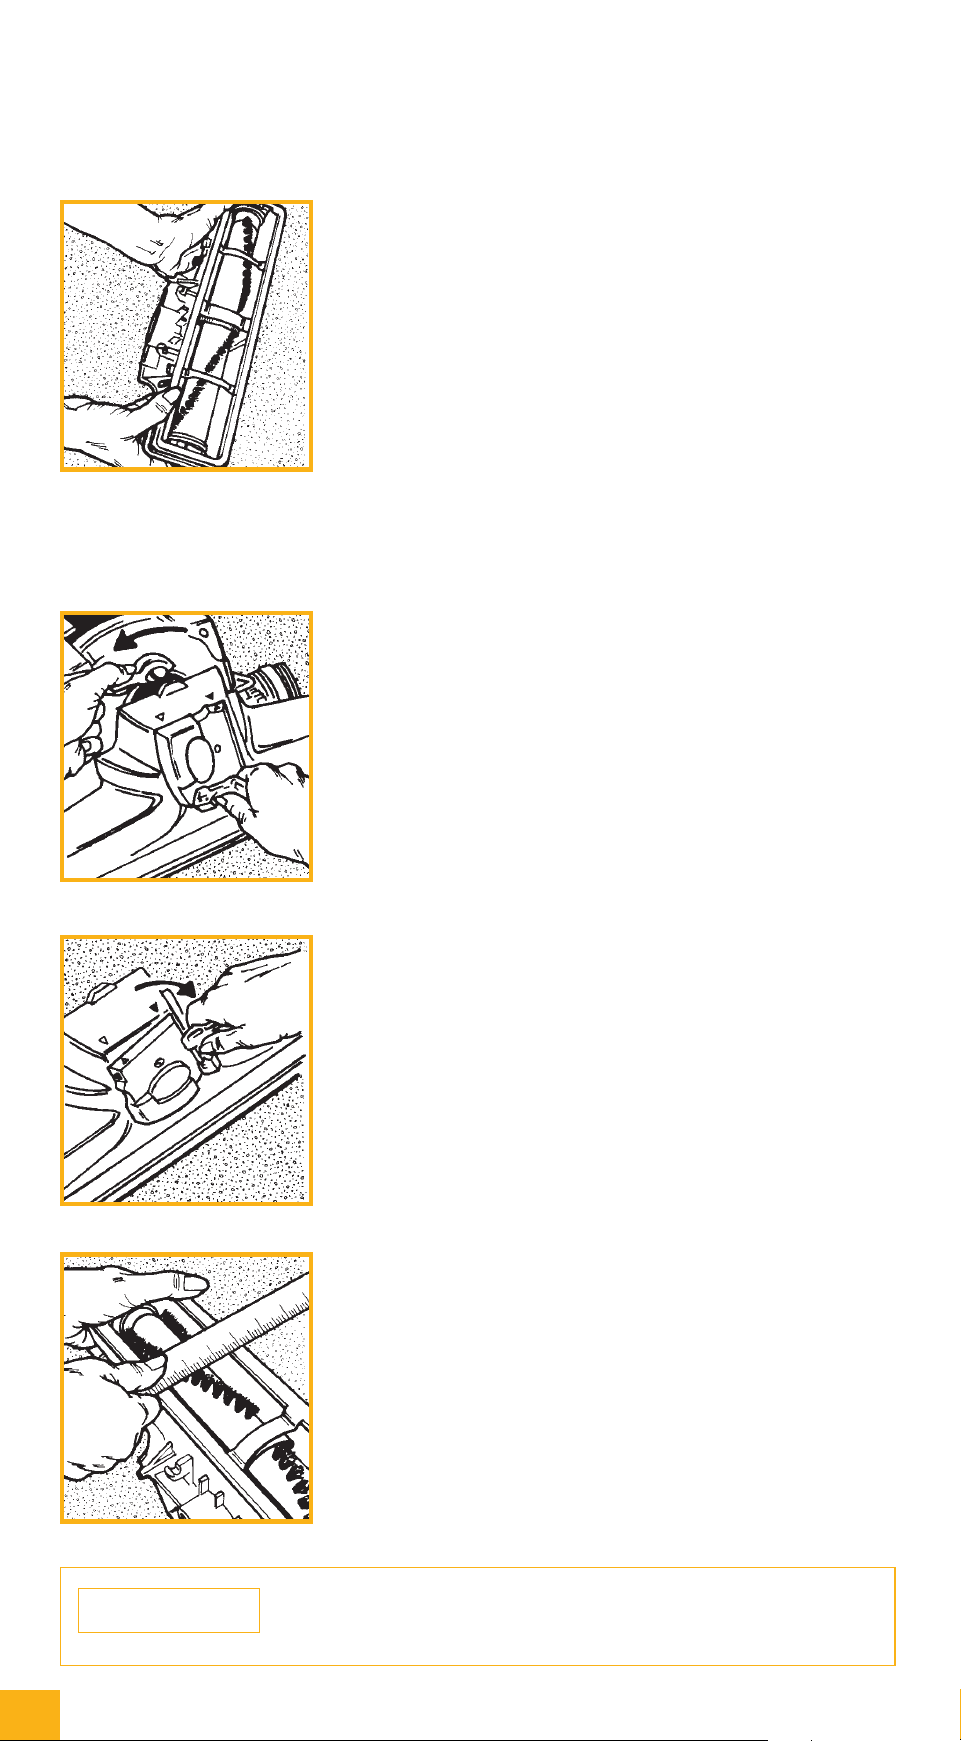
EMPTYINGTHEMINIEM-TOR
The Mini Em-Tor
o
6 is designed to collect large, heavy particles
which can be emptied by removing the Mini Em-Tor.
To remove, grasp the Mini Em-Tor in the handhold
provided and rotate it away from the body of the
Ultimate G as far as it will go, then lift it off.
ThetopofthebagisreleasedfromthehandlebypressingtheBag
ReleaseButton
o
16 . After removing the Mini Em-Tor and the
entireBagAssembly,positionthefrontopeningoftheMini
Em-Tor over a newspaper and shake it to remove the particles. ➤
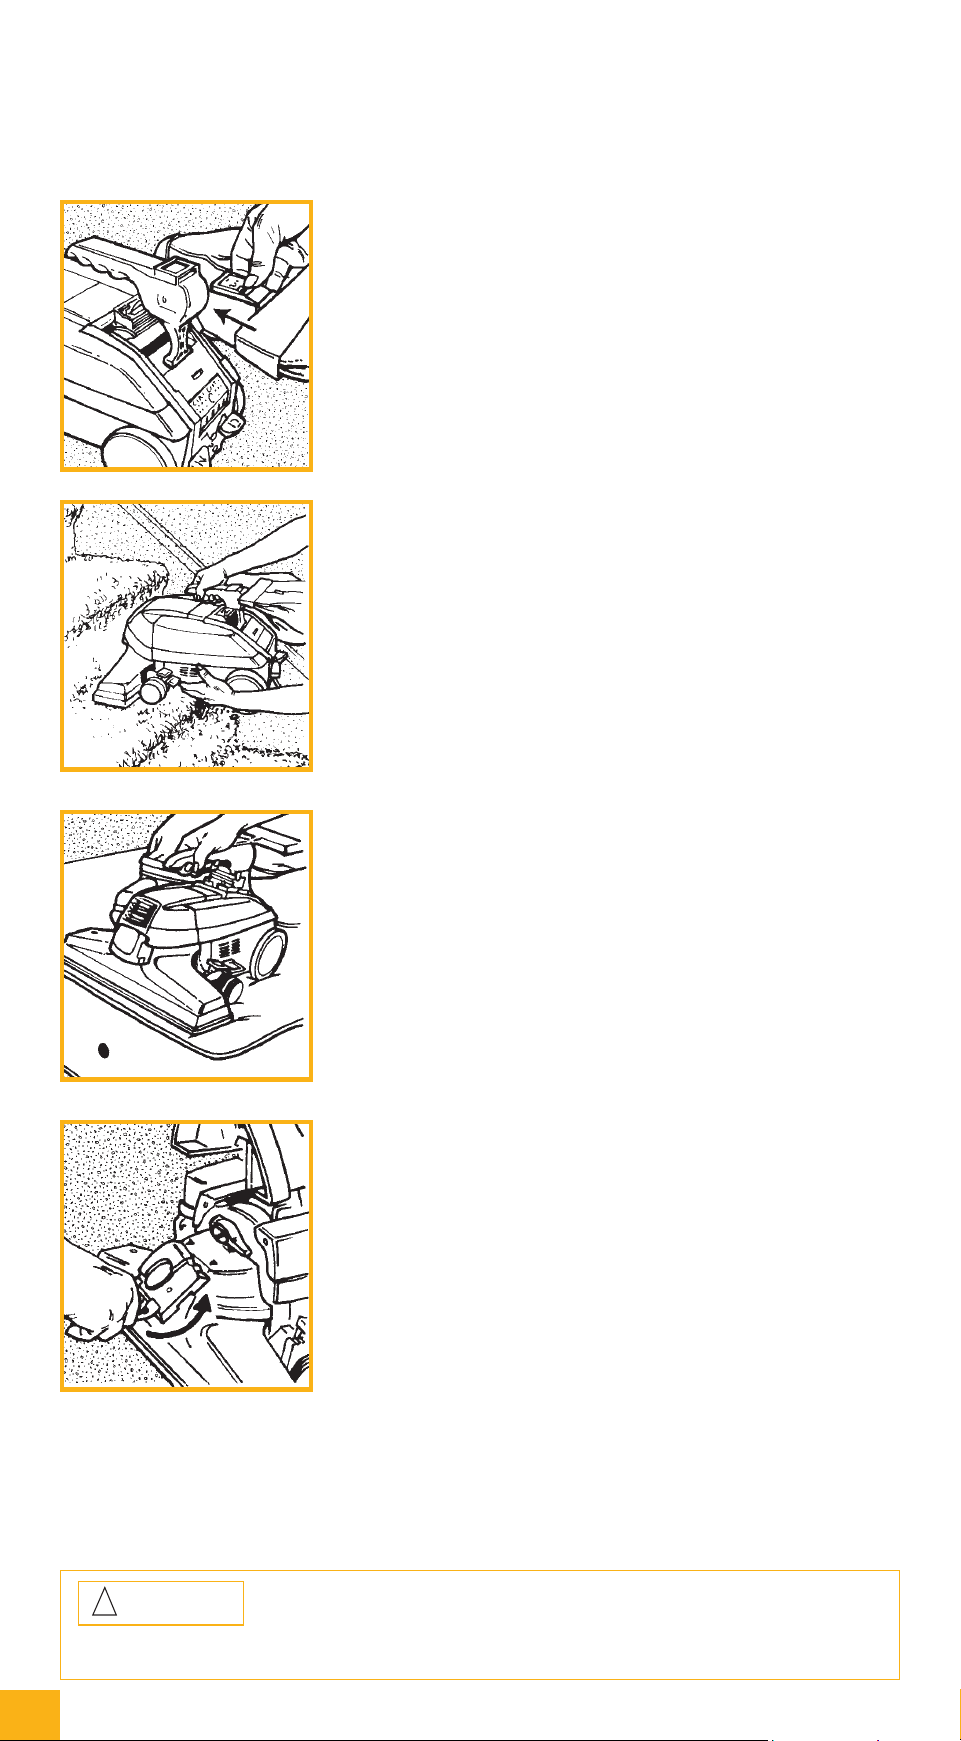
ToreplacetheMiniEm-Tor,re-attachtheentireBag
AssemblybyinsertingtheBagLatchTab
o
2 at the top of
thebagintotheslotundertheBagReleaseButton
o
16 .
Finally, line up the raised indicator arrow of the Mini Em-Tor
with the indicator arrow on the Air Exhaust Port
o
19 . Rotate the
Mini Em-Tor towards the Ultimate G and lock it in place.
NOTE: The Mini Em-Tor must be securely locked in place
or the Ultimate G will not operate. ❏
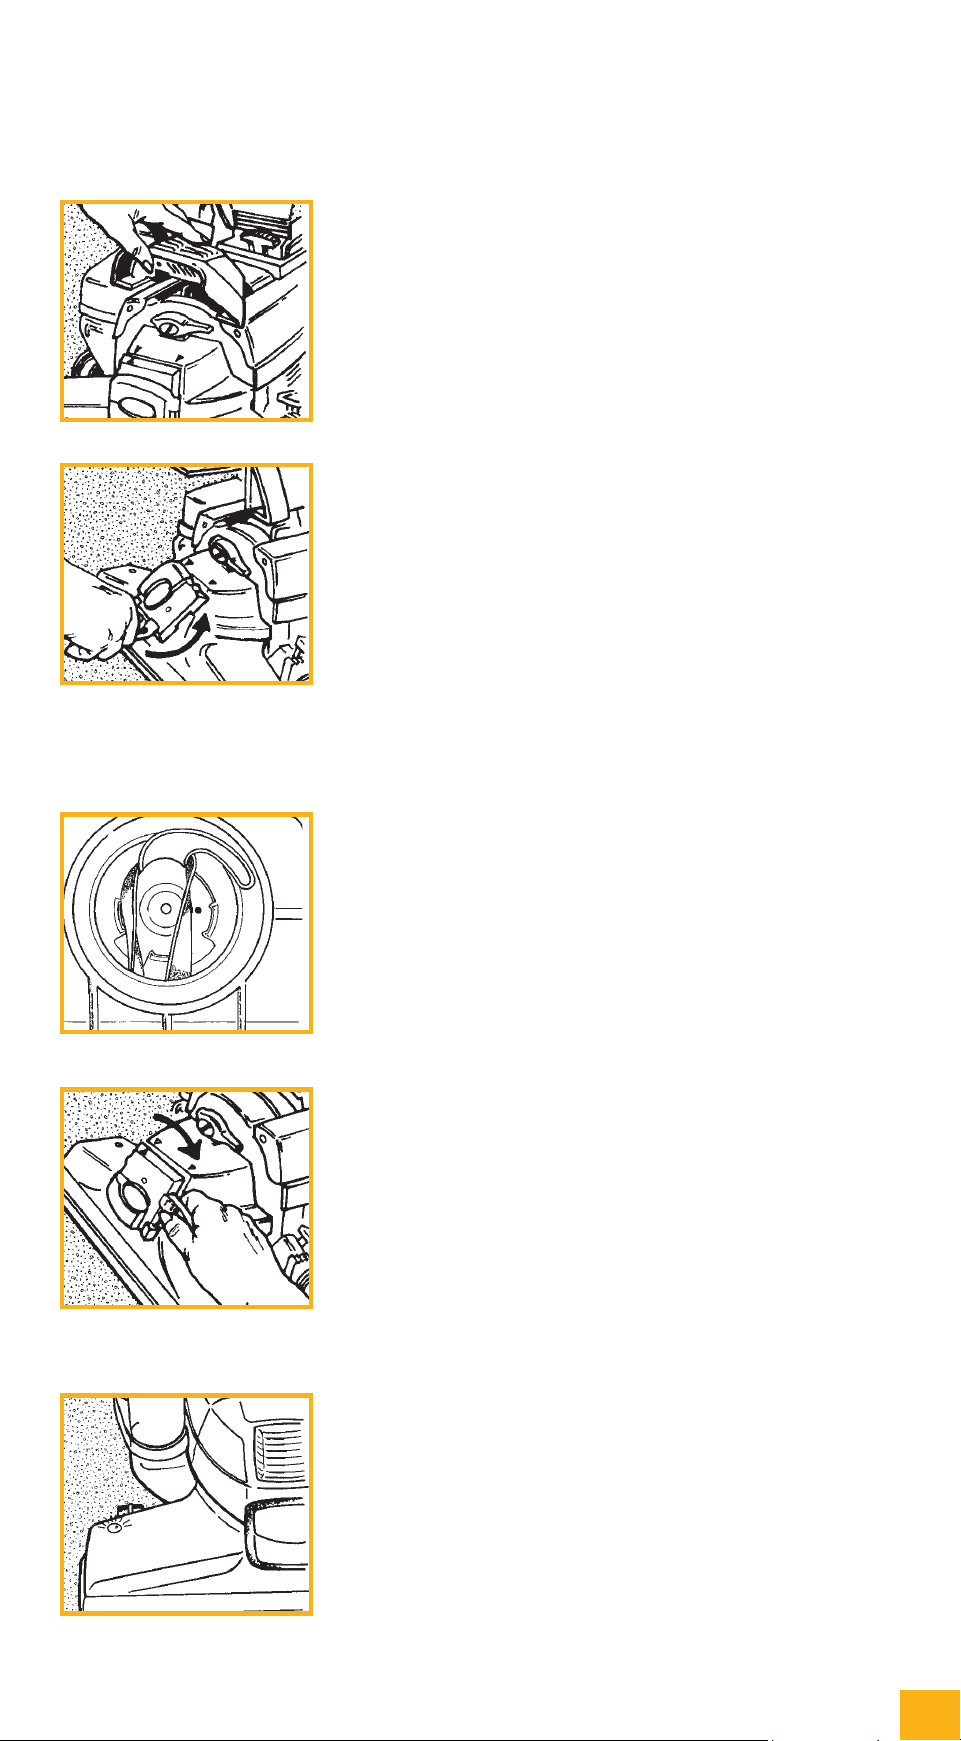
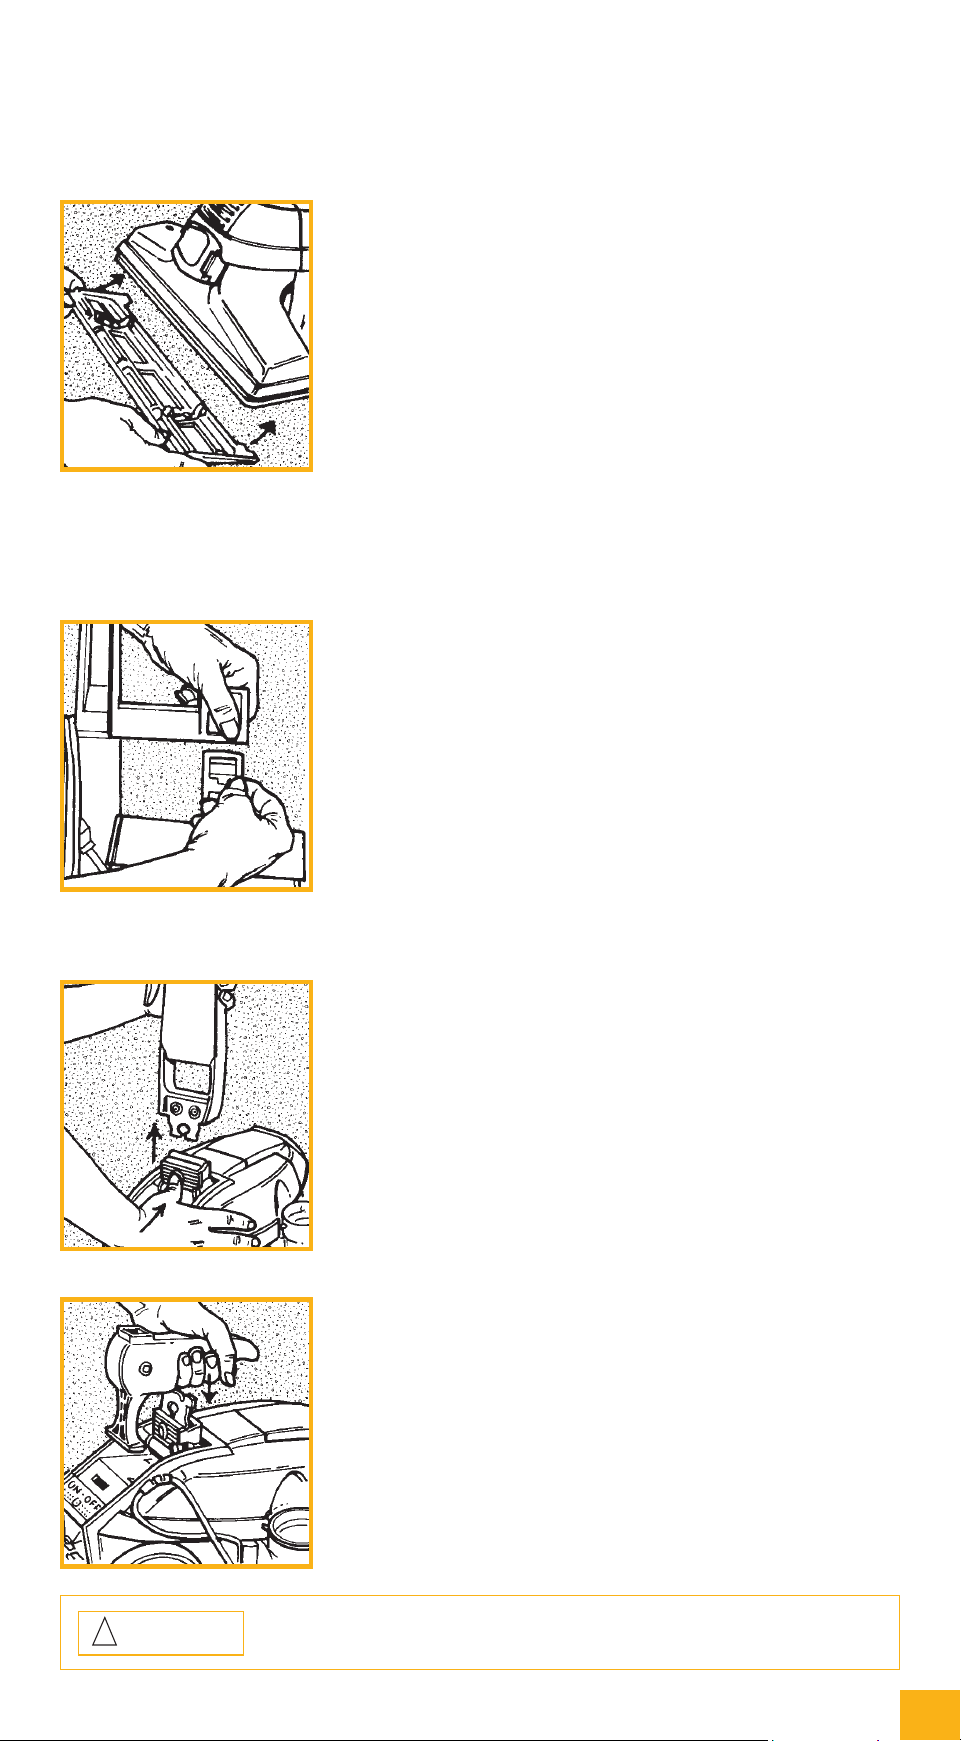
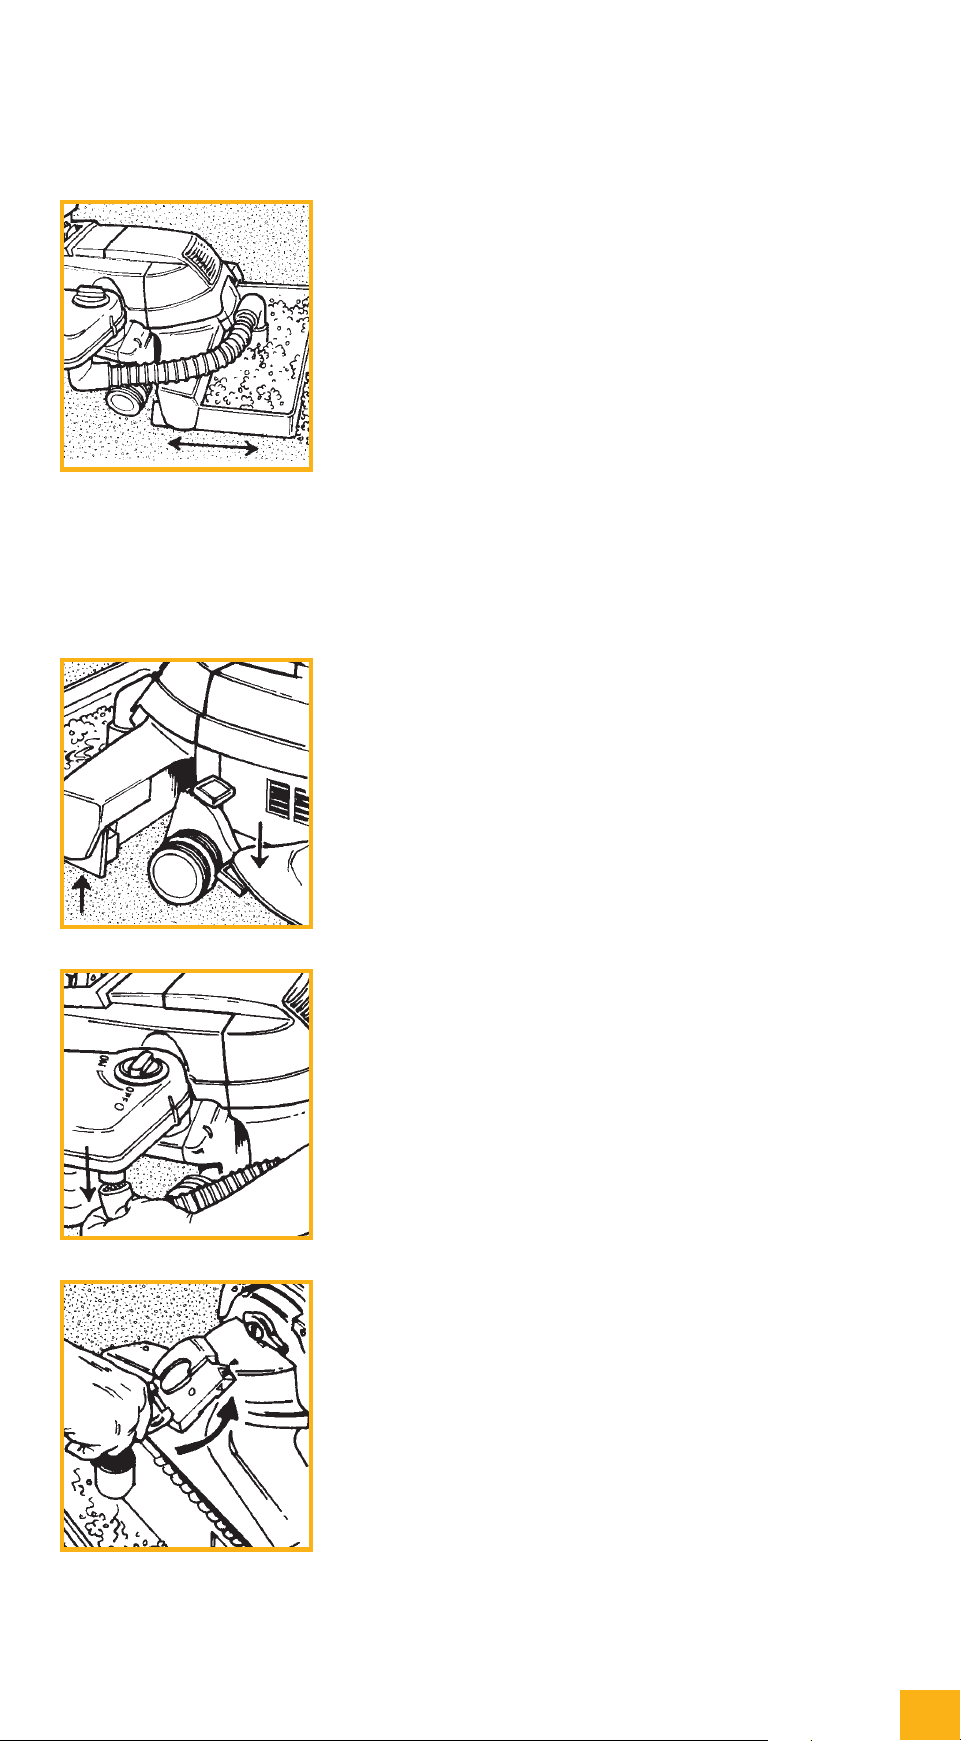
USINGTHEBELTLIFTER
TheBeltLifter
o
20 on your Ultimate G is used for two purposes:
l) ToengageordisengagetheBrushRoll.WhentheBrushRoll
is disengaged, the Ultimate G can be used as a straight suction
cleaner(page14),and;
2) To allow removal of the Power Nozzle when converting
your Ultimate G for use with various attachments and
optional accessories.
To avoid damaging the belt, turn the Ultimate G OFF before
usingtheBeltLifter.➤
4
1
2
11
for those who appreciate quality, reliability & performance
USINGTHEBELTLIFTER(cont)
TousetheBeltLifter,youmustfirstraisetheHeadlight
Hood
o
21 . ➤
FlipouttheL-shapedhandleontheBeltLifter
o
20 . Use
ittoturntheBeltLifterfullytotheleft(counter-clock-
wise) until it stops and the red arrows line up. This
stretches the belt and lifts it off the motor shaft. Return the
L-shapedhandleontheBeltLiftertoitsclosedposition.
If you are using your Ultimate G as a straight suction cleaner,
simplylowertheHeadlightHood.TheBrushRollisnow
disengaged and will not rotate when the power switch is
turned ON. ➤
The belt will be stretched to the top of the nozzle as shown.
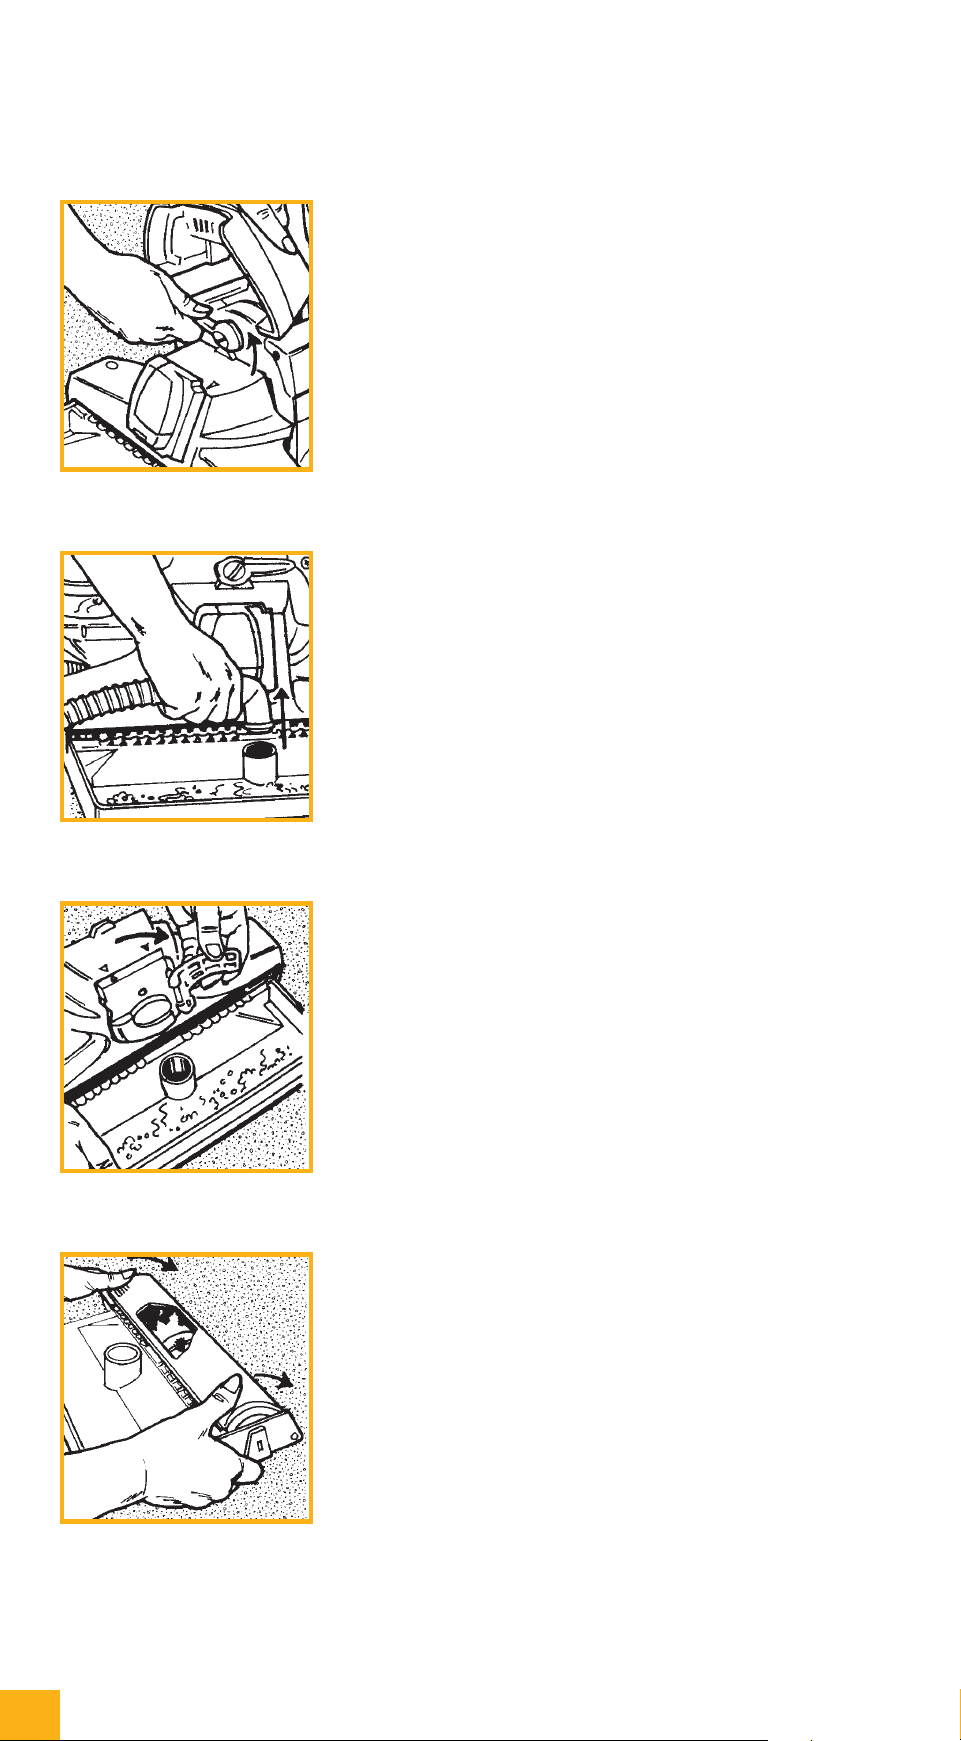
Tore-engagethebeltsotheBrushRollrotates,simply
raisetheHeadlightHoodandusetheL-shapedhandleto
turntheBeltLifterfullytotheright(clockwise)untilthe
greenarrowslineup.ThenlowertheHeadlightHood.
TheBrushRollwillnowrotatewhenthePowerSwitchis
turned ON.
NOTE: The belt should not be stretched when stored for an
extended period. Make sure the green arrows line up for
storage. ❏
Your Ultimate G
isequippedwithaBrushRoll
Performance Indicator Light
o
7 , located on the top
right side of the Power Nozzle. The purpose of this
lightistoshowiftheBrushRollisrotatingproperly.
IftheBrushRollIndicatorLightflashesintermittentlyor
doesnotcomeonwhenusingthePowerNozzle,theBrush
RollBeltmaynotbeworkingproperly.EithertheBeltisnot
engaged or may need to be replaced.
ToreplacetheBrushRollBelt,alsocalledthePowerNozzle
Belt,seePage46.
Getting Started
Getting Started
The Belt Lifter (continued)
1
2
3
4
5

Upright&PortableCleaner
Upright&PortableCleaner
PART TWO
Your Kirby
®
Ultimate G is an extremely versatile home
maintenance system. In this section, we will discuss
the following:
Using your Ultimate G as an
Upright Cleaner
Using your Upright as a Straight
Suction Cleaner
Cleaning Hard-Surface Floors
Using your Ultimate G as a
Portable Cleaner
Cleaning Mattresses and Carpeted Stairs
This section provides the information you need to use your
Ultimate G for a wide variety of jobs.
12
The Kirby Company
Upright&PortableCleaner
Upright&PortableCleaner
The Upright Cleaner
13
for those who appreciate quality, reliability & performance
THEUPRIGHTCLEANER
Beforeyoubeginvacuuming,it’simportanttohavethePower
Nozzle
o
25 adjusted to the proper height setting. This gives you
the most efficient cleaning action. Lowering the Power Nozzle
too far prevents proper cleaning and shortens belt life.
The proper height setting can be achieved by doing
the following: ➤
BeforeyouturntheUltimate G ON, raise the Power
Nozzle by stepping on the Toe Touch Control
TM
BottomPedal
o
9 all the way down (see page 8 for
additional details). ➤
Turn the Ultimate G ON by pressing the Power Switch
o
13 . ➤
Press the Toe-Touch Control
Upper Pedal
o
8 , one
notch at a time, until you hear a change in the tone of
the motor. This means your Ultimate G has sealed to
the carpet. Press the Toe-Touch Control Upper Pedal one
more time and your Power Nozzle will be at the proper
operating height. ➤
1
2
3
14
The Kirby Company
Upright&PortableCleaner
Upright&PortableCleaner
The Upright Cleaner/Straight Suction Upright Cleaner
If power assist is desired, engage TechDrive
®
by push-
ing down the yellow “D” side (marked “D” for Drive) of
theTechDrivePowerAssistN/DPedal
o
12 located just
below the Power Switch
o
13 . ➤
To turn your Ultimate G OFF, press the Toe-Touch
Control
™
BottomPedal
o
9 all the way down until noz-
zle is fully raised.
Disengage TechDrive by stepping on the gray “N” side
(marked“N”forNeutral)oftheTechDrivePowerAssistN/D
Pedal
o
11 .
Turn the Ultimate G OFF by pressing the Power Switch
o
13
and then unplugging. ❏
STRAIGHTSUCTIONCLEANER
Straight Suction Cleaning allows you to vacuum hard floors,
throwrugsanddelicatecarpetswithoutuseoftheBrushRoll.
NOTE: When using Straight Suction Cleaning without the
HardFloorPad,eitheroncarpetsorbarefloors,lowerthe
nozzle as close as possible to the floor without scraping it.
With the Ultimate GturnedOFF,raisetheHeadlight
Hood
o
21 . ➤
FlipouttheL-shapedhandleontheBeltLifter
o
20 .
UseittoturntheBeltLifterallthewaytotheleft
(counter-clockwise) until the red arrows line up (see
page10).ReturntheL-shapedhandleontheBeltLifterto
its closed position.
ThenlowertheHeadlightHood.
TheBrushRollisnowdisengagedandyourUltimate G will
operate as a Straight Suction Cleaner. ❏
5
4
1
2
15
for those who appreciate quality, reliability & performance
Upright&PortableCleaner
Upright&PortableCleaner
The Hard Floor Pad and The Portable Cleaner
THEHARDFLOORPAD
ByattachingtheoptionalHardFloorPadtoyourUltimate
G, you may dust bare floors. While the Ultimate G is turned
OFF, raise the Power Nozzle
o
25 as far as it will go by press-
ing the Toe-Touch Control
™
BottomPedal
o
9 . Attach the
HardFloorPadontothenozzleopeningusingthespring
clips on the plate. Then lower the Power Nozzle by pressing
the Toe-Touch Control Upper Pedal
o
8 one notch at a time
until the bristles touch the floor.
NOTE:TheHardFloorPadshouldonlybeusedwhenthe
Ultimate G is in the Straight Suction Cleaner mode. When
usingtheHardFloorPad,lowerthenozzleuntilthebristles
touch the bare floor. ❏
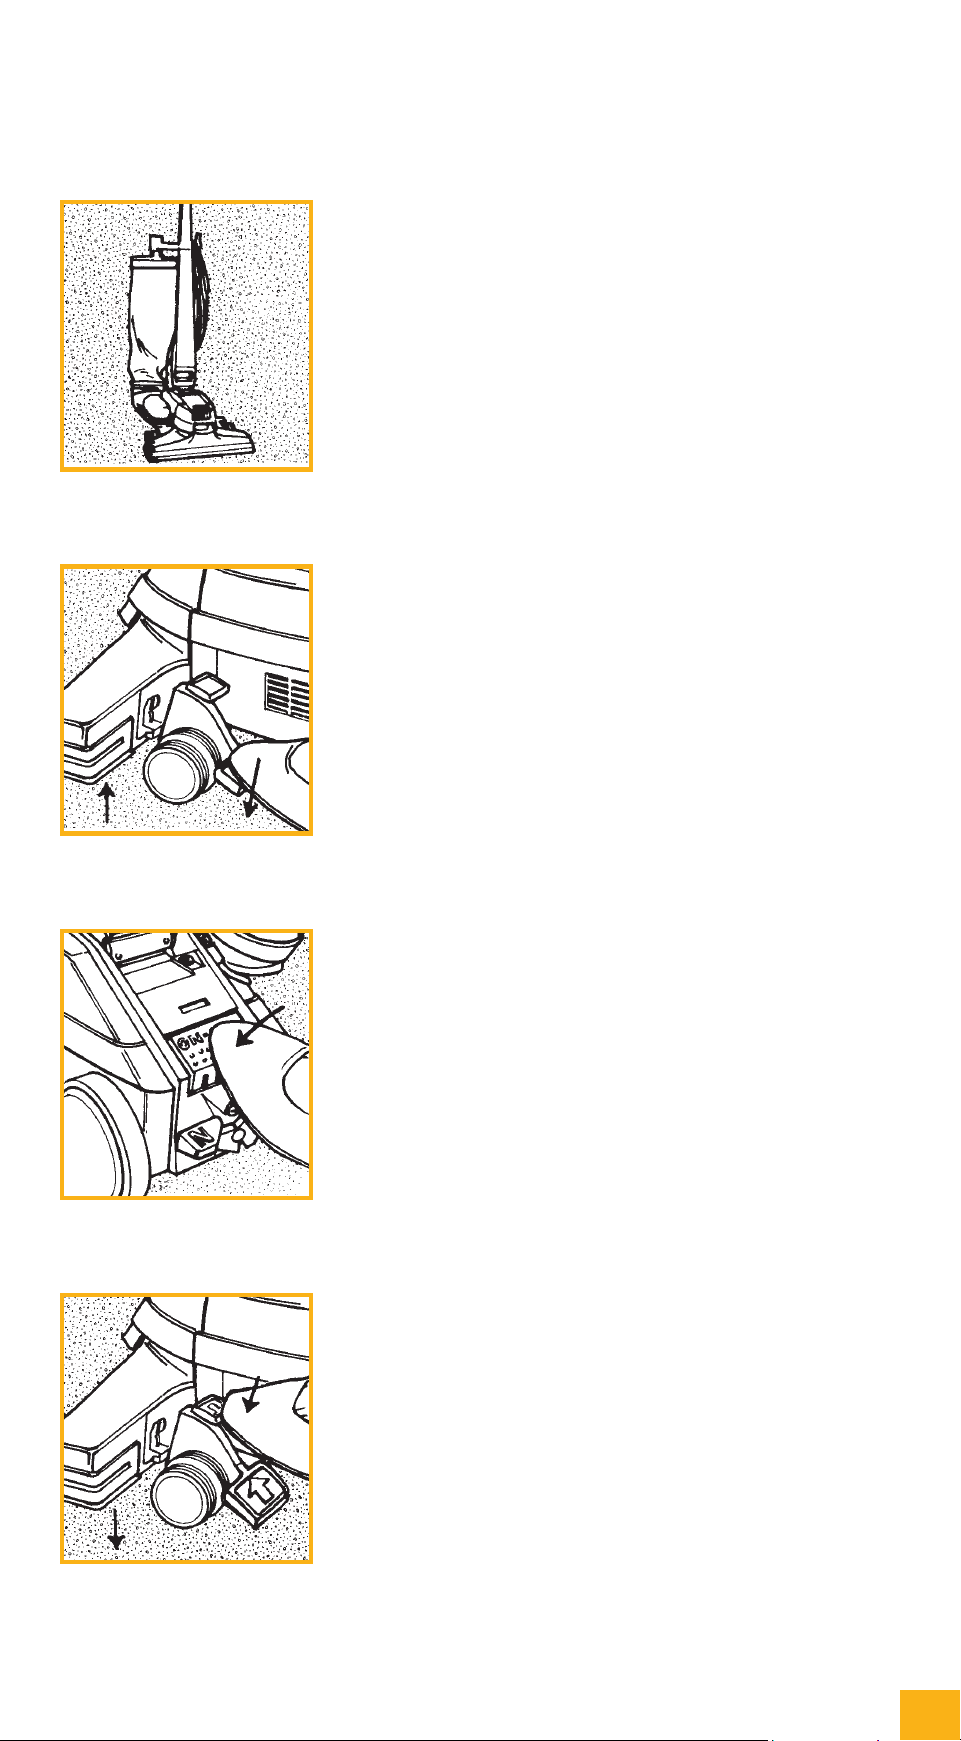
PORTABLECLEANERSET-UP
BesidesbeingaremarkableUprightCleaner,theUltimate G
can easily be converted into a portable cleaner for mattresses
and carpeted stairs.
To convert your Ultimate G to a Portable Cleaner,
make sure the Ultimate G is turned OFF, unplugged,
and the TechDrive
®
is disengaged.
ThenreleasetheOuterPermanentBagTopfromtheBag
Support
o
16bypressingtheBagReleaseButton
o
16 and sliding
the bag top off. ➤
Remove the cord from the handle. With the Upright
Handle
o
17intheverticalposition,pushtheHandle
ReleaseButton
o
14 , located at the base of the handle,
andpullthehandlestraightupandoutoftheslot.(Bag
not shown for clarity.) ➤
InsertthePortableHandle
o
15 into the slot where the
UprightHandlewasconnected.PushthePortable
Handleintotheslotuntilitsnapsintoplace.➤
1
2
3
CAUTION:
BeforeinstallingtheHardFloorPad,turnunitOFF,unplugthepowercord
from the wall outlet and be sure the motor and nozzle brush have stopped.
!
16
The Kirby Company
Upright&PortableCleaner
Upright&PortableCleaner
The Portable Cleaner
PORTABLECLEANERSET-UP(cont)
BendtheFiltrationBagAssembly
o
1 in half and insert
theBagLatchTab
o
2 into the slot on the Portable
Handleuntilitsnapsintoplace.
You are now ready for portable power cleaning. ❏
NOTE:
Do not use portable mode on upholstered furniture.
CARPETED STAIRS
Place your Ultimate G on one of the carpeted steps, while
supporting the rear of the Ultimate G.
RollthecleanerbackandforthsothattheBrushRoll
agitates the carpeting and loosens the dirt. ❏
MATTRESS CLEANING
Cleaning mattress surfaces is done the same as carpeted
stairs. To begin, set the Ultimate GHandPortableonthe
mattress.WiththeBrushRollengaged,turntheUltimate G
ON and lower the power nozzle to its lowest setting. Engage
TechDrive
®
and begin to vacuum. ❏
DELICATE MATTRESS CLEANING
Cleaning soft or delicate mattress surfaces is done the same as
regular mattress surfaces, except that you may want to disen-
gagetheBrushRoll.(Ifyourmattresshastuftedbuttonson
thesurface,theBrushRollcouldpullthemloose.)
Forstraightsuctioncleaning,raisetheHeadlightHood
o
21
andflipouttheL-shapedhandleontheBeltLifter
o
20 . Use it
toturntheBeltLifterallthewaytotheleft(counter-clock-
wise)untiltheredarrowslineup.ThiswillstoptheBrush
Roll from turning.
ReturntheL-shapedhandleontheBeltLiftertoitsclosed
positionandlowertheHeadlightHood.UsetheToe-Touch
Control
™
to adjust the Power Nozzle to its lowest setting. ❏
4
CAUTION:
To reduce risk of injury in the portable mode, keep hair and loose clothing
away from the
Ultimate G
while in operation.
Also make sure TechDrive is in the neutral position whan vacuuming stairs.
!

17
for those who appreciate quality, reliability & performance
CanisterCleaner&Attachments
CanisterCleaner&Attachments
PART THREE
Your Kirby
®
Ultimate G comes with a wide variety of
attachments for added versatility. In this section, we will dis-
cuss the following:
Removing the Power Nozzle to Convert
to a Canister Cleaner
Using Extension Tubes
Using the Surface Nozzle, Duster Brush,
Upholstery Nozzle, Crevice Tool, Wall &
Ceiling Brush and the Massage Cup
Using the Suction Control Grip
Using your Ultimate G as a Blower Unit
Using the Portable Sprayer and the
Portable Shampooer
This section will add even greater value to your Ultimate G
by providing information you need to use attachments for a
wide variety of jobs.
18
The Kirby Company
LocktheAttachmentHoseConnectorinplaceby
turning the Accessory Lock
o
22 all the way to the
right (clockwise). (Accessory Lock will clamp the
AttachmentHosetotheUltimate G.)
WiththeAttachmentHoseinplace,theUltimate G will
automatically adjust to high speed for hose operation.
NOTE: If the Ultimate G will not run when the Power
Switch is ON, see page 51. ❏
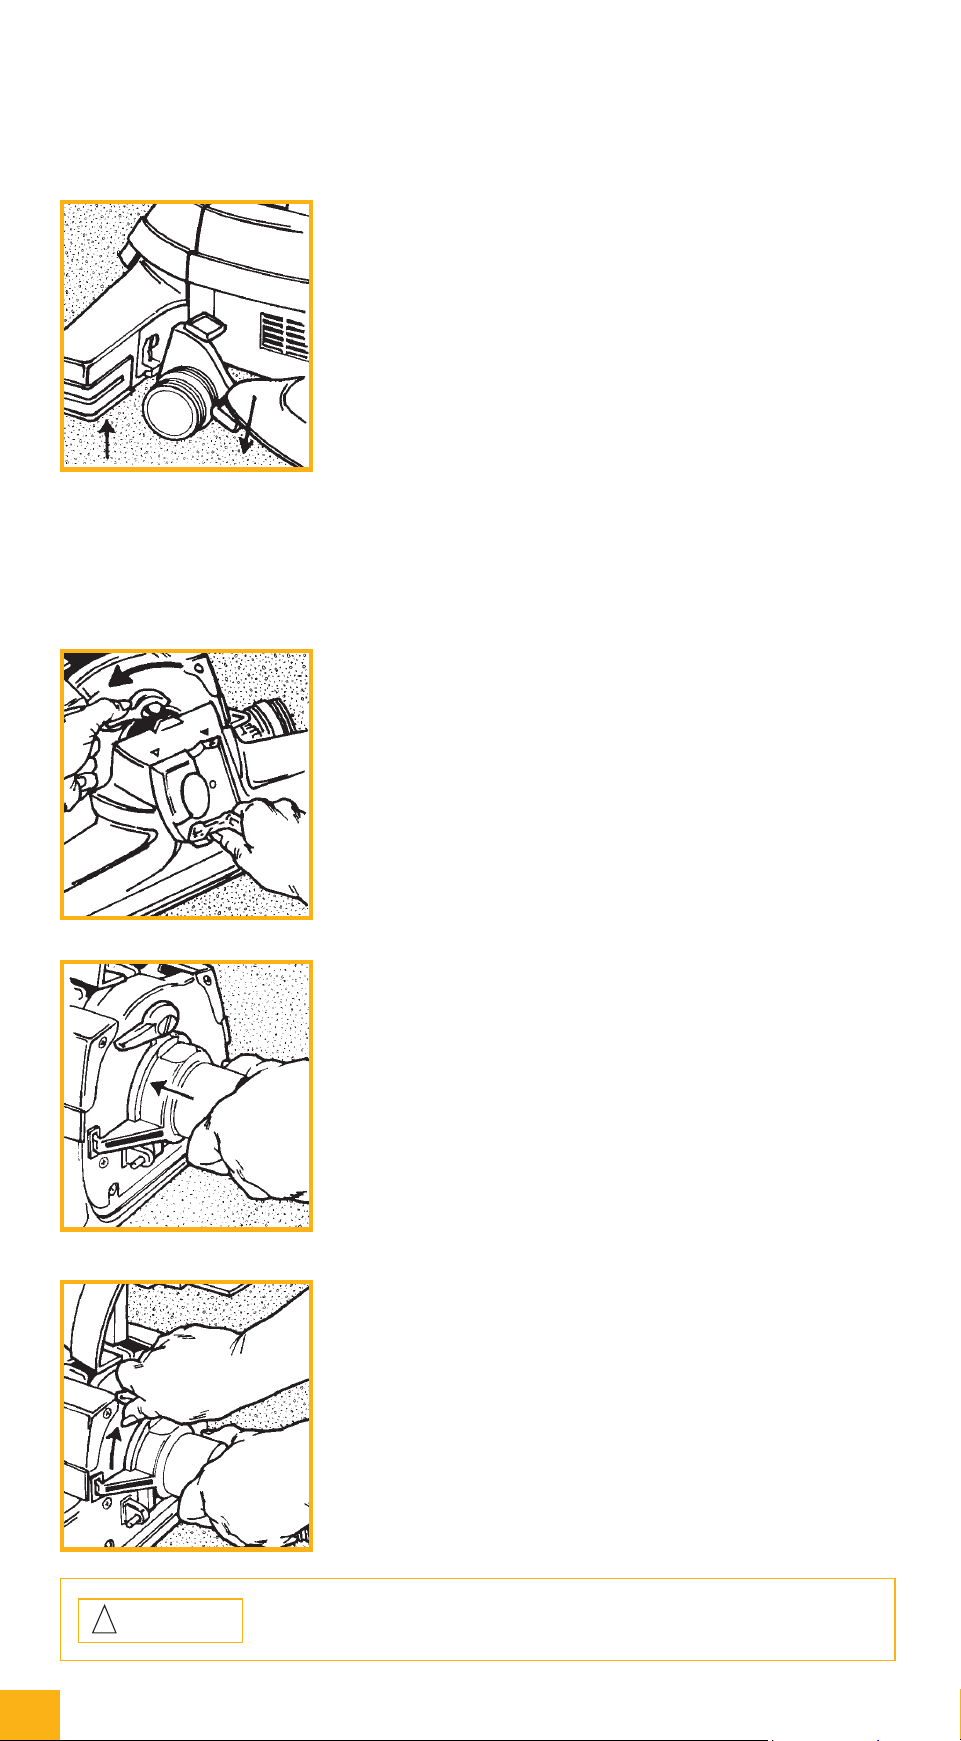
CONVERTINGTOACANISTERCLEANER/
INSTALLINGTHEATTACHMENTHOSE
When using different cleaning attachments, the Attachment
Hoseisconnectedtothefrontofthecleanerinplaceofthe
Power Nozzle
o
25 .
NOTE:WhenconnectingtheAttachmentHose,youmay
choosebetweentheUprightHandle
o
17 or the Portable
Handle
o
15 .ToinstallthePortableHandle,seepage15.
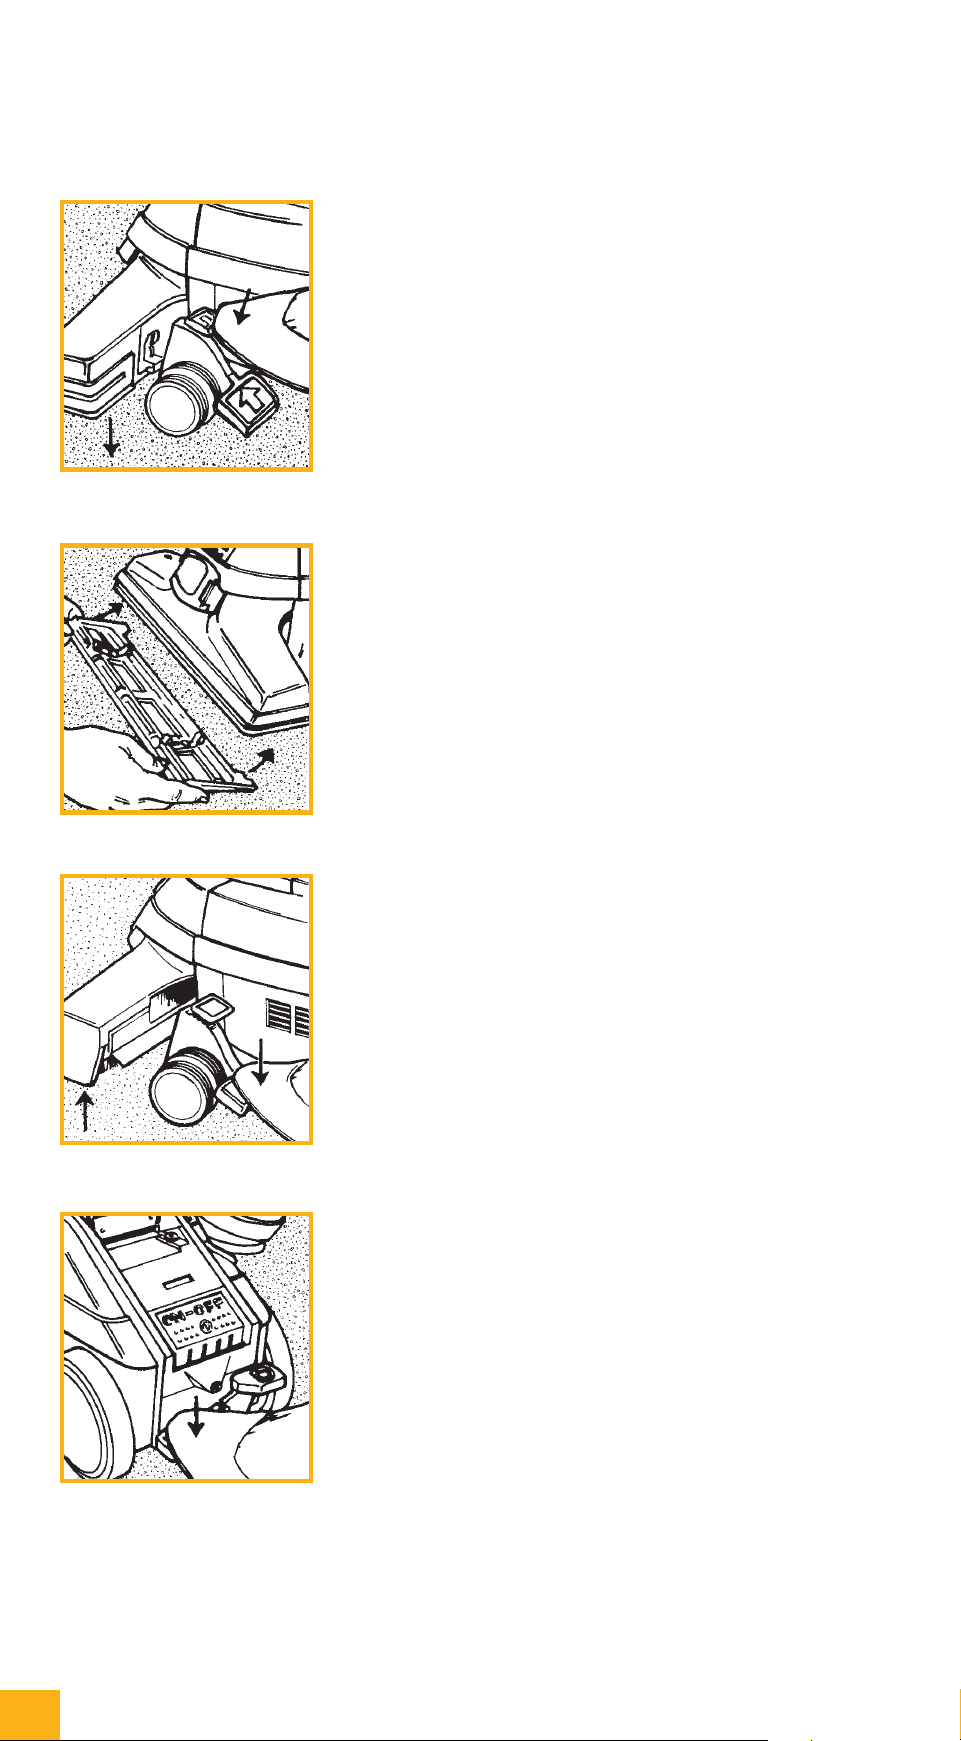
ToinstalltheAttachmentHose,youmustfirstconvert
to a Canister by removing the Power Nozzle. To do so,
press the Toe-Touch Control
™
BottomPedal
o
9 all the
way down until nozzle is fully raised. Disengage
TechDrive
®
by stepping on the gray “N” side (marked “N” for
Neutral)oftheTechDrivePowerAssistN/DPedal
o
11 . Turn the
Ultimate G OFF by pressing the Power Switch
o
13 and then
unplugging. ➤
RaisetheHeadlightHood
o
21 and flip out the L-shaped
handleontheBeltLifter
o
20.UseittoturntheBelt
Lifter all the way to the left (counter-clockwise) until
the red arrows line up.
Unlock the Power Nozzle by turning the Accessory Lock
o
22 all the way to the left (counter-clockwise). The Power
Nozzle should tip forward when it is released. Lift the
nozzle away from the Ultimate G and off. ➤
AttheconnectorendoftheAttachmentHose,youwill
noticetwohook-shapedlugs.Hookthelugsoverthe
endsoftheAttachingBar
o
24 , then push the opening of
the hose up against the Ultimate G.
1
2
4
5
3
CAUTION:
In normal operation, friction between the belt and the metal motor
shaft may cause the metal motor shaft to become hot to the touch.
!
CanisterCleaner&Attachments
CanisterCleaner&Attachments
Converting to a Canister Cleaner/Installing the Attachment Hose
19
for those who appreciate quality, reliability & performance
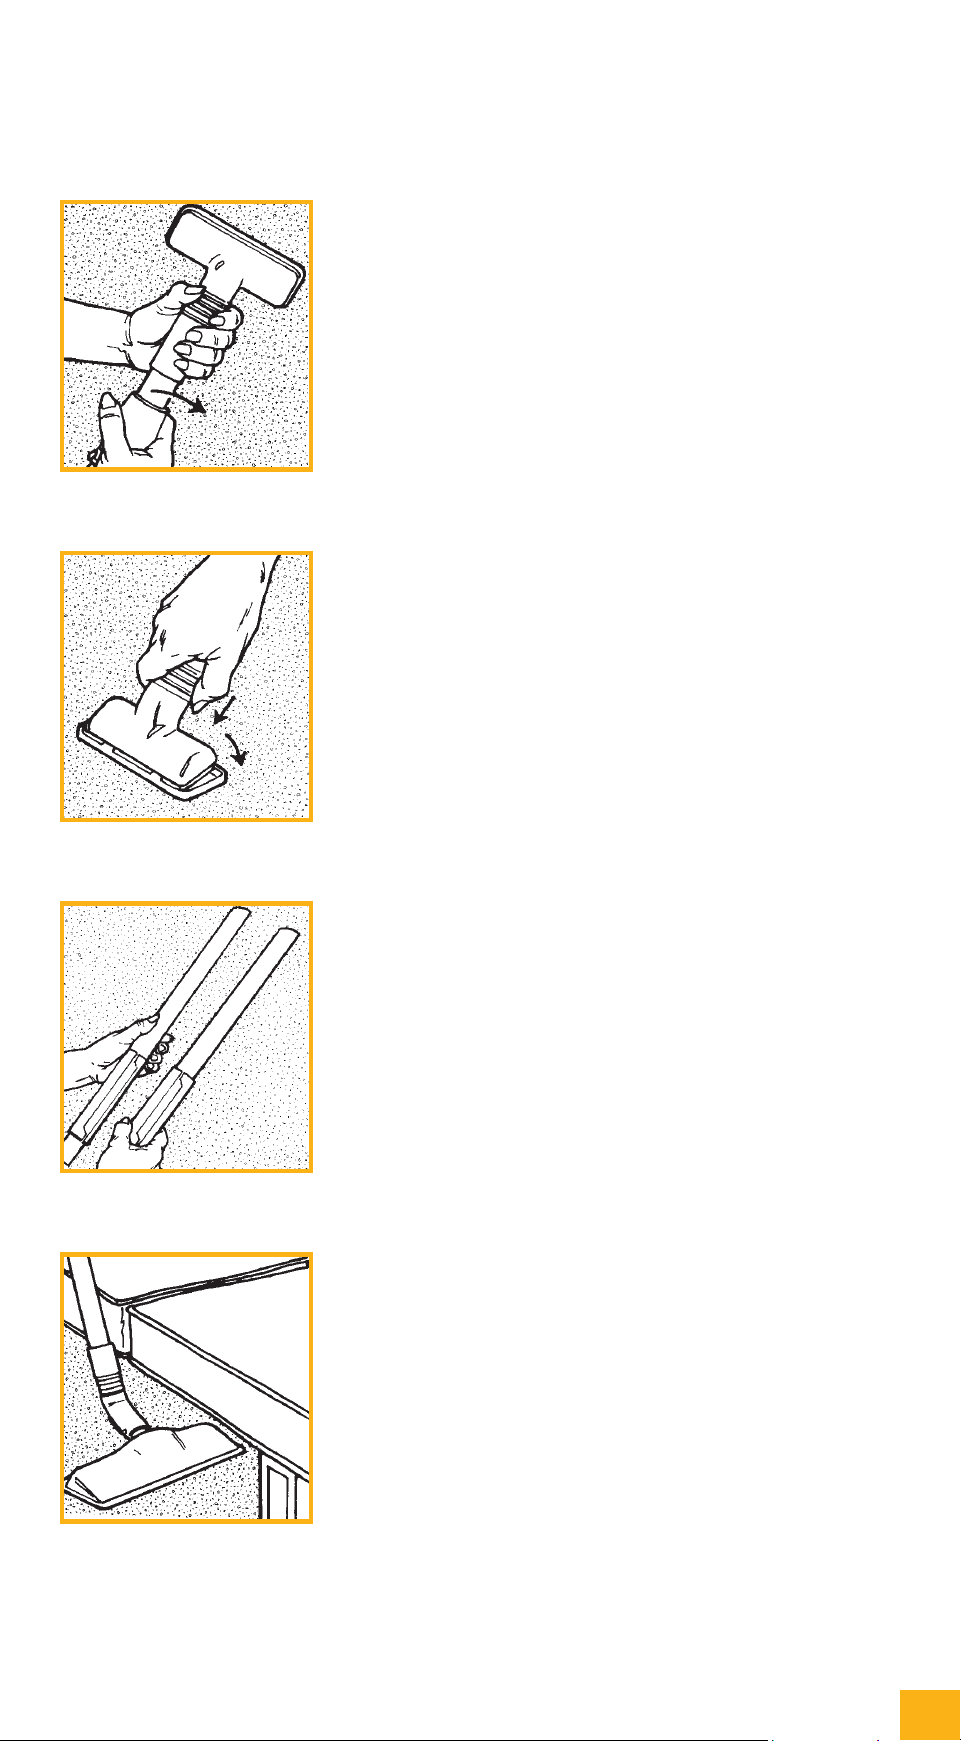
INSTALLINGATTACHMENTSONTHE
ATTACHMENTHOSE
To attach tools to the hose, push lightly while twisting the
smaller end of the hose into the tool. ❏
ATTACHINGTHESUCTIONRELIEF
UPHOLSTERYPANEL
To attach the suction relief faceplate for drapes and delicate
upholstery, insert the lip on the front edge of the upholstery
tool under the two tabs on the front of the suction relief
faceplate as shown.
Push down the rear of the upholstery tool as shown to snap
the suction relief faceplate into place.
To remove the suction relief faceplate, reverse the
above procedure. ❏
EXTENSIONTUBES
One or two Extension Tubes can be attached to the end of
the hose to extend your reach and efficiently use various
attachments. ❏
SURFACE NOZZLE
The Surface Nozzle may be used on bare floors or for sur-
face cleaning carpets and under low furniture.
Rubber wheels on the nozzle allow it to glide silently on the
surface of hard floors without scratching and vacuum with
maximum power. ❏
CanisterCleaner&Attachments
CanisterCleaner&Attachments
Installing/Using the Attachments
20
The Kirby Company
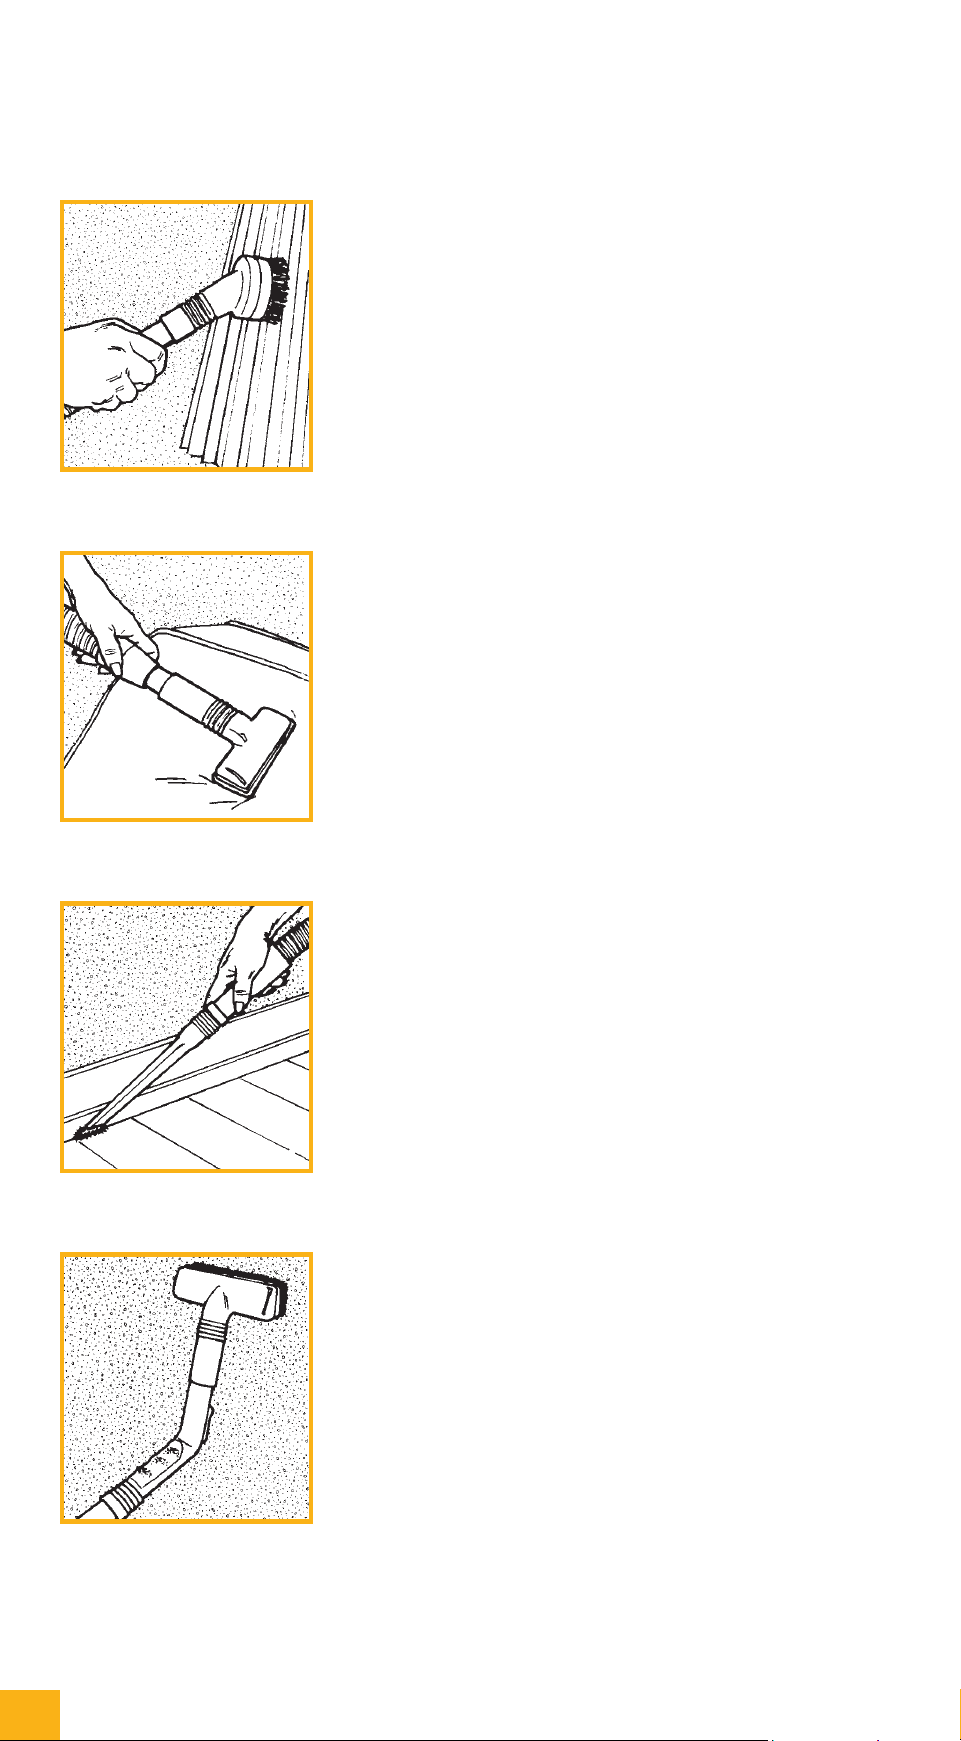
DUSTERBRUSH
TheDusterBrushmaybeconnectedtotheAttachment
HoseortheExtensionTubestoremovedustfromany
surface, including contoured or irregular surfaces. ❏
UPHOLSTERYNOZZLE
The Upholstery Nozzle is used for cleaning upholstered fur-
niture, carpeted steps, clothing and inside of cars. ❏
CREVICETOOLWITHREMOVABLEBRUSH
Without the removable brush, the Crevice Tool can be used
for cleaning cracks, crevices, corners, grooves and narrow
openings.
Install the removable brush in the end of the Crevice Tool to
remove dirt from corners, button tufts, between radiator coils
and sliding window tracks. ❏
WALL&CEILINGBRUSH
To vacuum walls, ceilings, drapes and other surfaces, attach
theWall&CeilingBrushtotheSuctionControlGrip(shown
on page 21). Then attach the Suction Control Grip to the
Extension Tube(s) as shown. In addition to providing suction
relief, the Suction Control Grip provides the proper angle to
comfortably vacuum walls and ceilings.
Tip: To vacuum the top of door frames or ledges, or books on
abookshelf,rotatetheWall&CeilingBrush180°.
NOTE: You may also wish to use the Suction Control Grip
as shown on page 21. ❏
CanisterCleaner&Attachments
CanisterCleaner&Attachments
Using the Attachments
21
for those who appreciate quality, reliability & performance
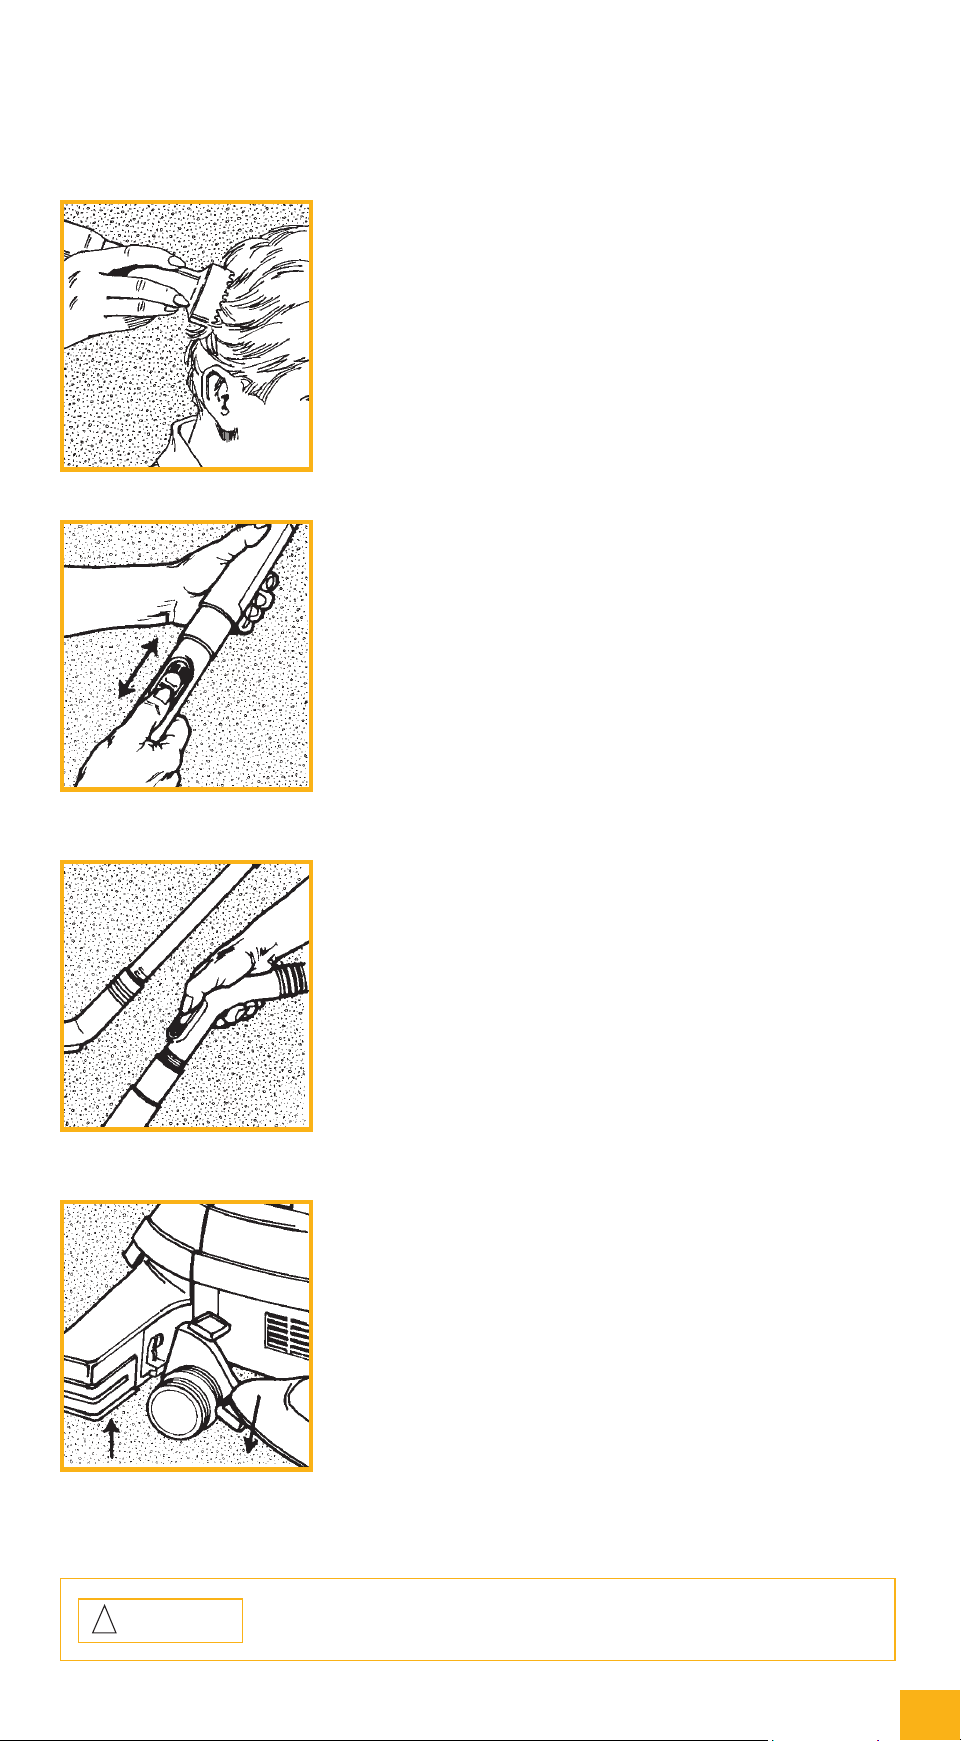
CAUTION:
To avoid irritation or damage to eyes or ears, keep the massage cup
and all other accessories a safe distance away.
!
MASSAGE CUP
UsedwiththeAttachmentHose,theMassageCupprovides
an invigorating skin or scalp massage. It can also be used to
clean the floors of cars. ❏
CONTROLLINGAIRFLOWWITHTHE
SUCTION CONTROL GRIP
Sometimes when using the attachments, vacuuming drapes or
delicate lamp shades, for example, you might wish to control
the amount of suction.
The Suction Control Grip features a valve to control the
amount of suction. Slide the control back and forth until the
desired level of suction is reached.
The Suction Control Grip can be used with or without the
Extension Tubes. ❏
SUCTION CONTROL GRIP PLACEMENT
The Suction Control Grip may be used at the end of the
Extension Tubes for reaching up or at the beginning of the
Extension Tubes for reaching down. ❏
BLOWERSET-UP
Your Ultimate G can also be used as a blower. To do so, you
must first remove the Power Nozzle
o
25 .
NOTE: When using your Ultimate G as a blower, you may
choosebetweentheUprightHandle
o
17 or the Portable
Handle
o
15 .ToinstallthePortableHandle,seepage15.
Turn the power OFF, place the TechDrive
®
Power
Assist in Neutral (see page 8 for details), unplug
the Ultimate G from the wall outlet and press the
Toe-Touch Control
™
BottomPedal
o
9 all the way down
until nozzle is fully raised. ➤
CanisterCleaner&Attachments
CanisterCleaner&Attachments
Using the Attachments/Using Your Ultimate G as a Blower
1
22
The Kirby Company
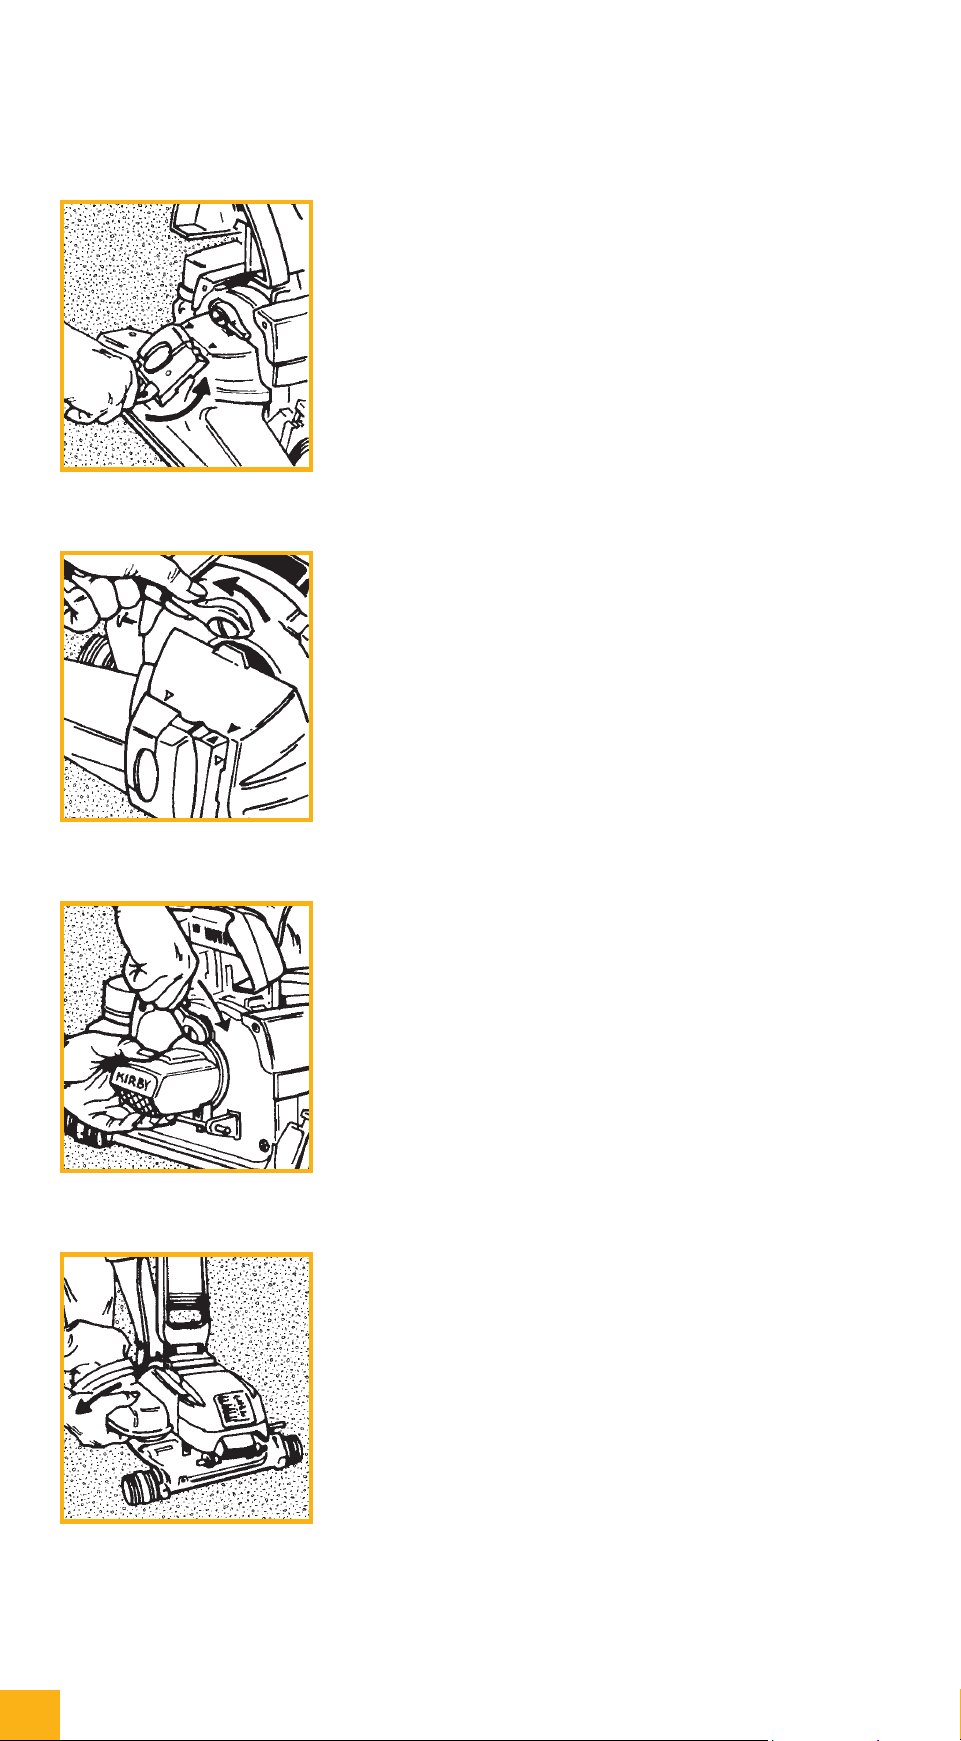
BLOWERSET-UP(cont)
RaisetheHeadlightHood
o
21 and flip out the L-shaped
handleontheBeltLifter
o
20.UseittoturntheBelt
Lifter all the way to the left (counter-clockwise) until
the red arrows line up. ➤
Unlock the Power Nozzle
o
25 by turning the Accessory
Lock
o
22 all the way to the left (counter-clockwise). The
Power Nozzle should tip forward when it is released.
Lift nozzle away from the Ultimate G and off. ➤
When using the blower attachments, the Air Intake
Guard must be attached to the front of the Ultimate G.
FastentheAirIntakeGuardontotheAttachingBar
o
24
thesamewayyouwouldtheAttachmentHose.Thenlockit
on by turning the Accessory Lock
o
22 all the way to the right
(clockwise). ➤
ToremovetheentireBagAssembly,grasptheMini
Em-Tor
®
o
6 in the hand-hold provided and rotate it out
and away from the Ultimate G as far as it will go. Then
lift it off.
(ToreplacetheBagAssemblyafteruseasablower,seepage10.)
ReleasetheOuterPermanentBagTopfromtheBagSupport
o
16bypressingtheBagReleaseButton
o
16 and sliding the
bag top down. (See page 15 for details.) ➤
CanisterCleaner&Attachments
CanisterCleaner&Attachments
Using your Ultimate G as a Blower (continued)
2
3
4
5
23
for those who appreciate quality, reliability & performance
BLOWERSET-UP(cont)
PlacethelargeendoftheAttachmentHoseovertheAir
Exhaust Port
o
19 . Line up the Indicator Arrow on the
HoseEndwiththeIndicatorArrowontheAirExhaust
PortandtwisttheHoseConnectortotheright(clockwise)to
lock it in place.
If the Ultimate G will not operate, see page 51, question 2,
items 4 and 5. ❏
USING YOUR ULTIMATE GASABLOWER
Your Ultimate G may now be used as a blower.
ByattachingtheInflator/DeflatorTooltotheAttachment
Hose,youcaninflatetoys,airmattressesoranyother
low-pressure inflatable item up to 1 p.s.i. (pounds per
square inch of air pressure). ➤
Todeflateitems,connecttheAttachmentHosetothefrontof
the Ultimate G (see page 18 for details) and connect the
Inflator/DeflatorTooltotheAttachmentHose.Thenconnect
theBagAssemblytotheAirExhaustPort(seepage10).
You may now use your Ultimate G to deflate items.
NOTE: You can also use this set-up to clean tight areas such
ascomputerkeyboardsandaudio/videoequipment.❏
CanisterCleaner&Attachments
CanisterCleaner&Attachments
Using your Ultimate G as a Blower (continued)
6
24
The Kirby Company
THEPORTABLESPRAYER
ThePortableSprayerisusedonlyintheBlowerMode.Itis
an excellent tool to apply many different types of water-based
liquids to any type of surface. The spray can be adjusted
ranging from very fine to coarse.
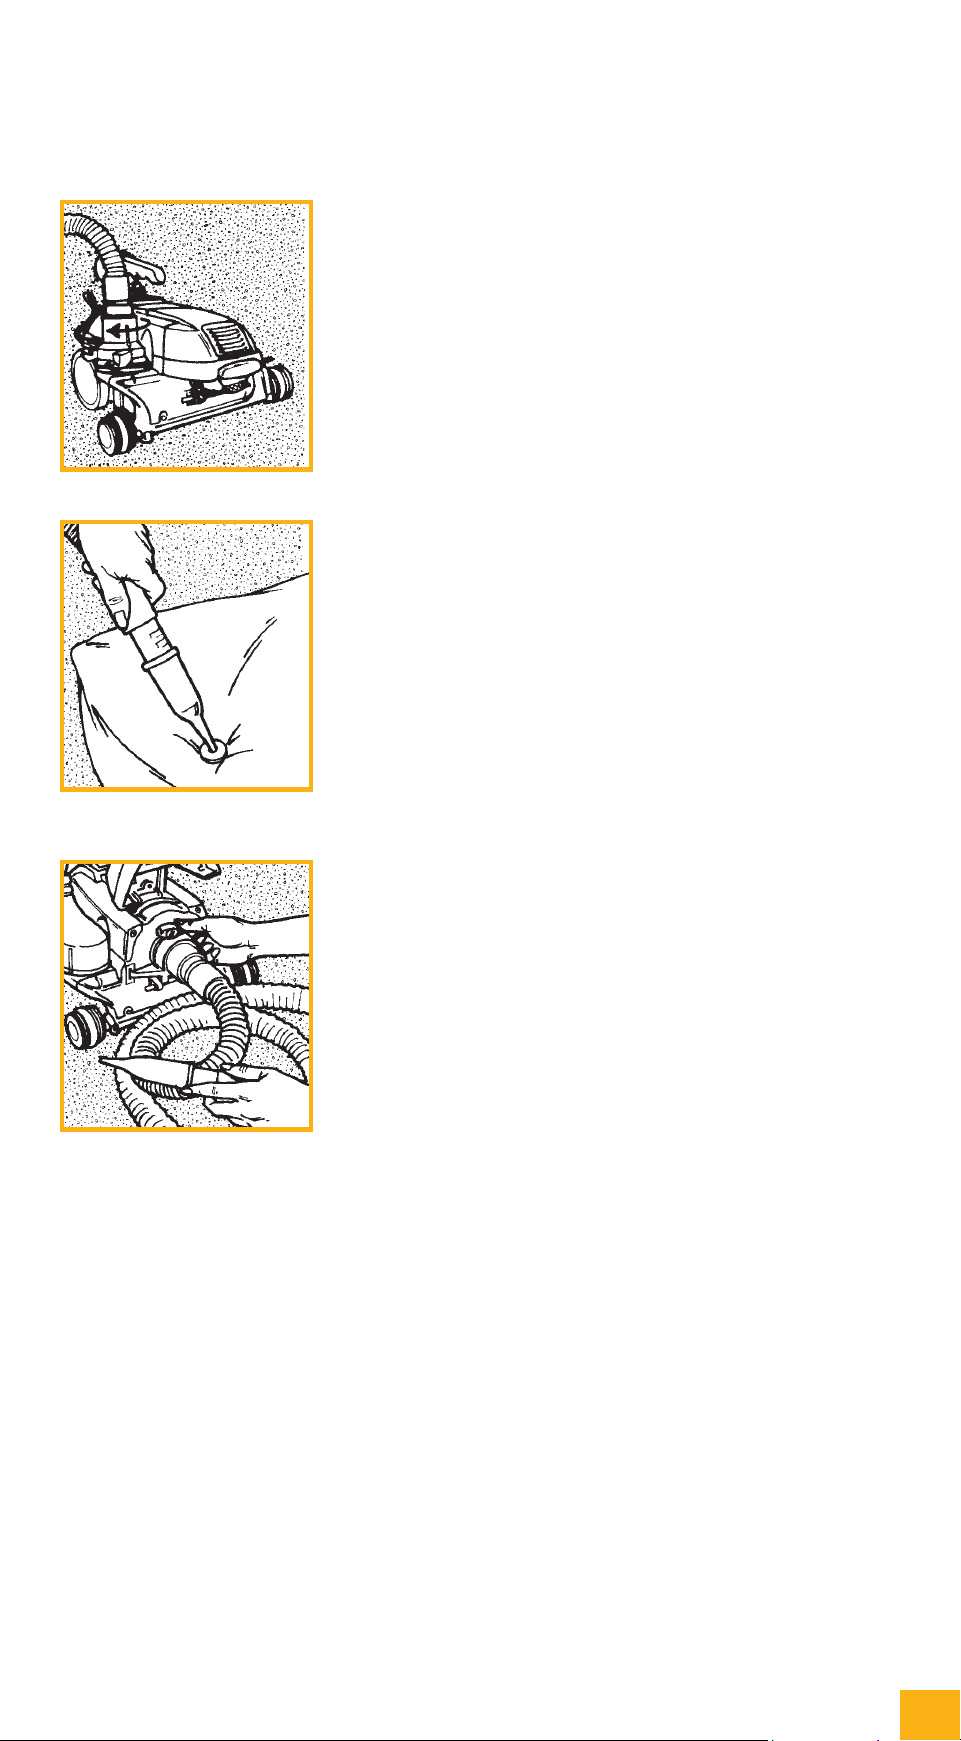
PORTABLESPRAYERSET-UP
UnscrewthejarfromthePortableSprayerandfill3/4
fullwithnon-flammableliquid.Beforereinstallingthe
jar, make sure the portable sprayer dip tube is attached
to the spray gun body. ➤
Screw the jar tightly on the Portable Sprayer and attach
thePortableSprayertotheendoftheAttachmentHose
intheBlowerMode(seepage21).
Make certain your Ultimate GissetupasaBlowerUnit.
TheAttachmentHoseshouldbeconnectedtotheAirExhaust
Port
o
19 . ❏
USINGTHEPORTABLESPRAYER
HoldingthePortableSprayerhorizontally,aimit
toward a sheet of newspaper. Turn the Ultimate G ON
and squeeze the Portable Sprayer trigger, spraying your
non-flammable solution onto the newspaper to check
spray pattern.
NOTE: If the Portable Sprayer must be tilted during usage,
less solution should be used in the jar. This will help avoid
large droplets in the spray. ➤
WARNING:
Never use oil or solvent base paint of any kind in the Portable Sprayer. The
motor is open to the spray and could ignite flammable and volatile solvents.
!
CanisterCleaner&Attachments
CanisterCleaner&Attachments
The Portable Sprayer (Blower Mode Only)
1
2
1
25
for those who appreciate quality, reliability & performance
WARNING:
Never clean the Portable Sprayer with flammable cleaning fluids.
The motor is open to the spray and could ignite the spray.
!
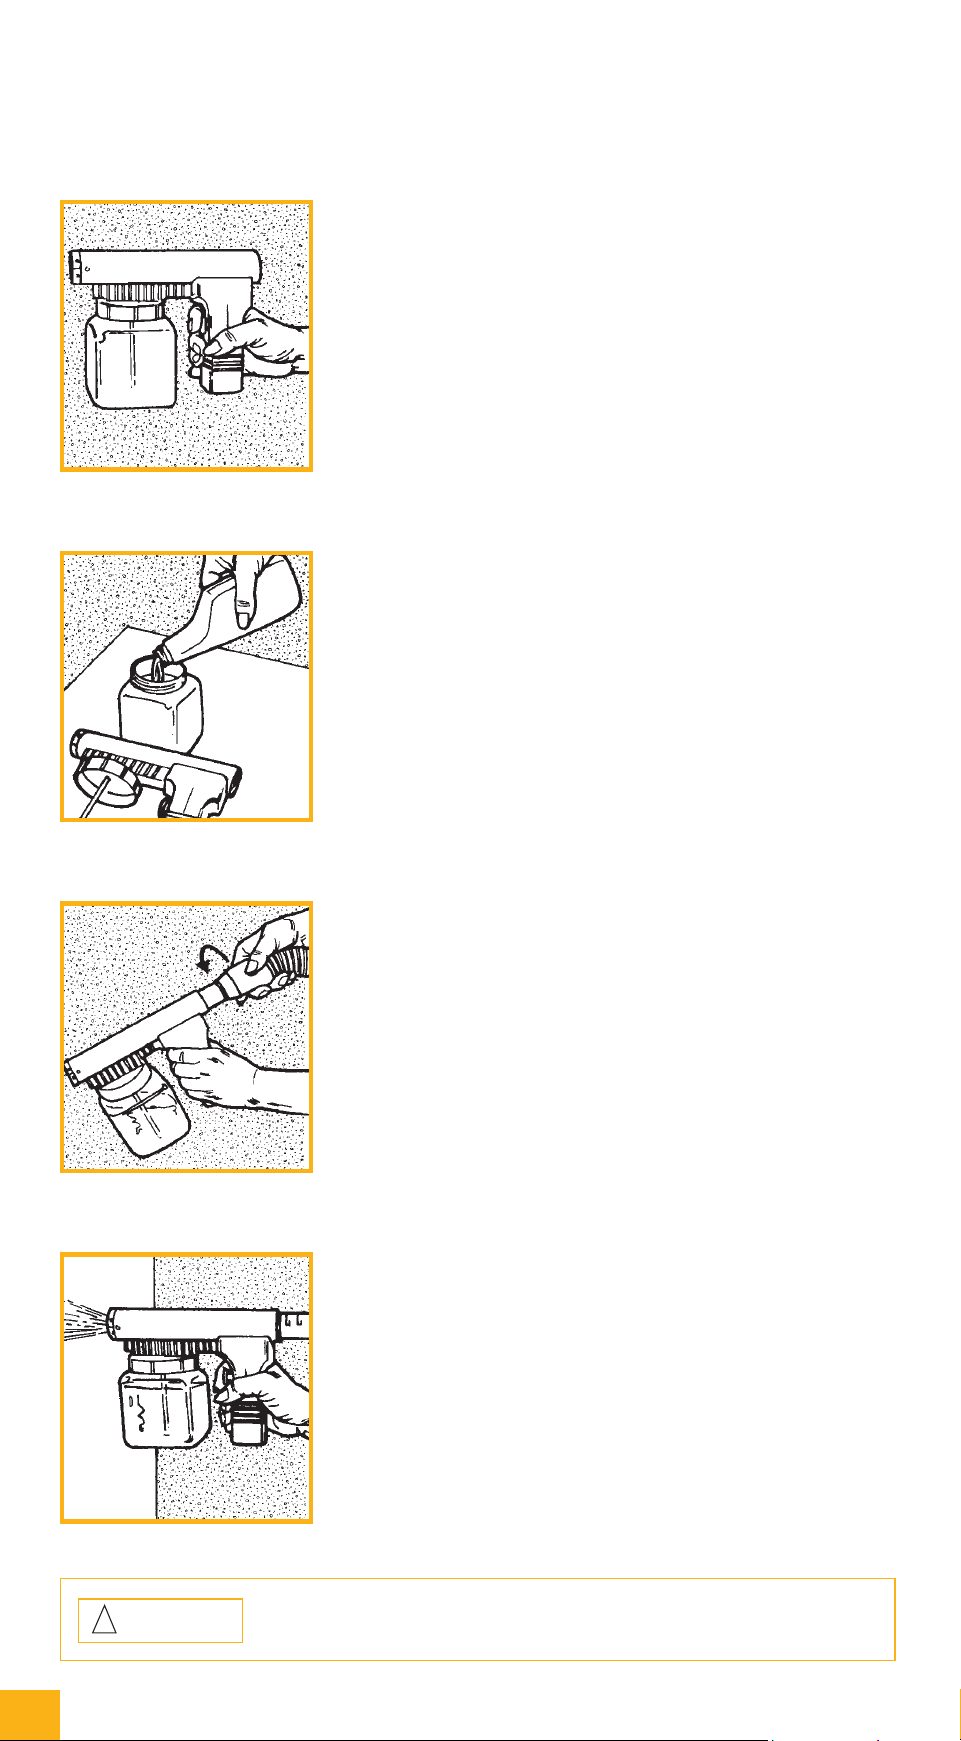
USINGTHEPORTABLESPRAYER(cont)
With the nozzle pointed away from you, adjust the
spray by turning the Spray Adjustment Control on the
trigger of the Portable Sprayer. ➤
Use slow, sweeping motions to spray the desired
area with solution. Always squeeze the trigger fully
to permit maximum flow. This will give you the best
spray control. ❏
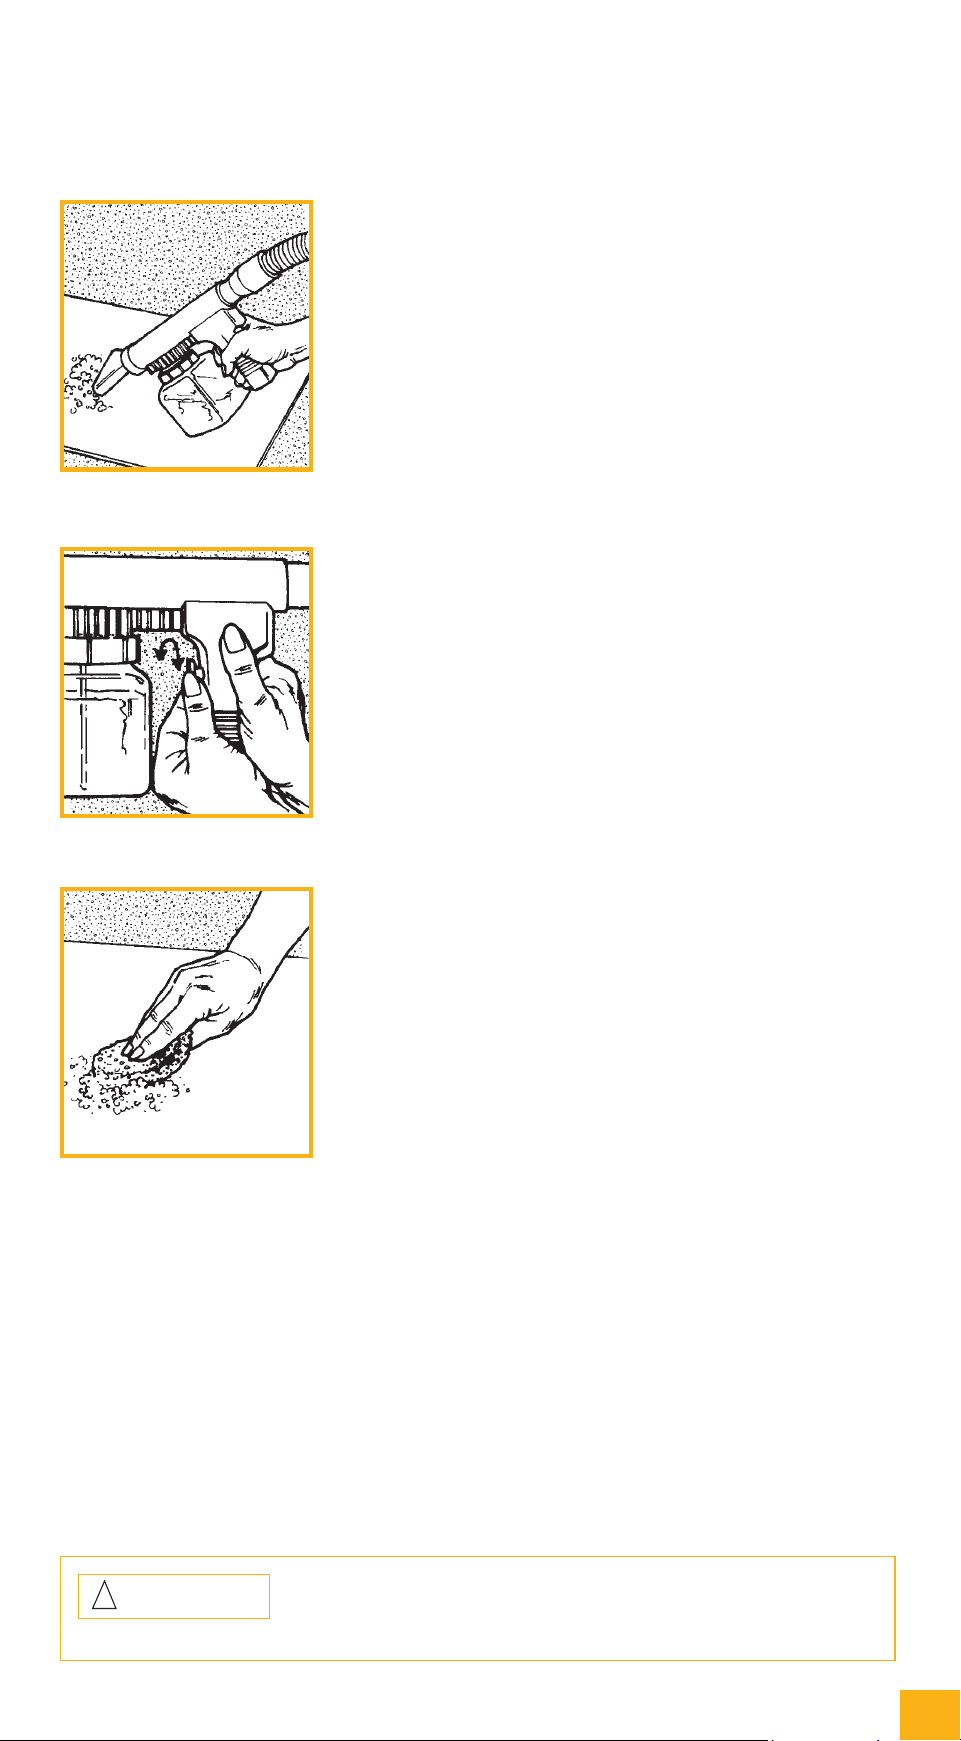
CLEANINGTHEPORTABLESPRAYER
Immediately after use, empty the Portable Sprayer jar
and wash with warm soapy water. ➤
The Portable Sprayer dip tube should also be removed
and washed. (Make sure to reinstall it after cleaning.) ➤
CanisterCleaner&Attachments
CanisterCleaner&Attachments
The Portable Sprayer
2
2
3
1
26
The Kirby Company
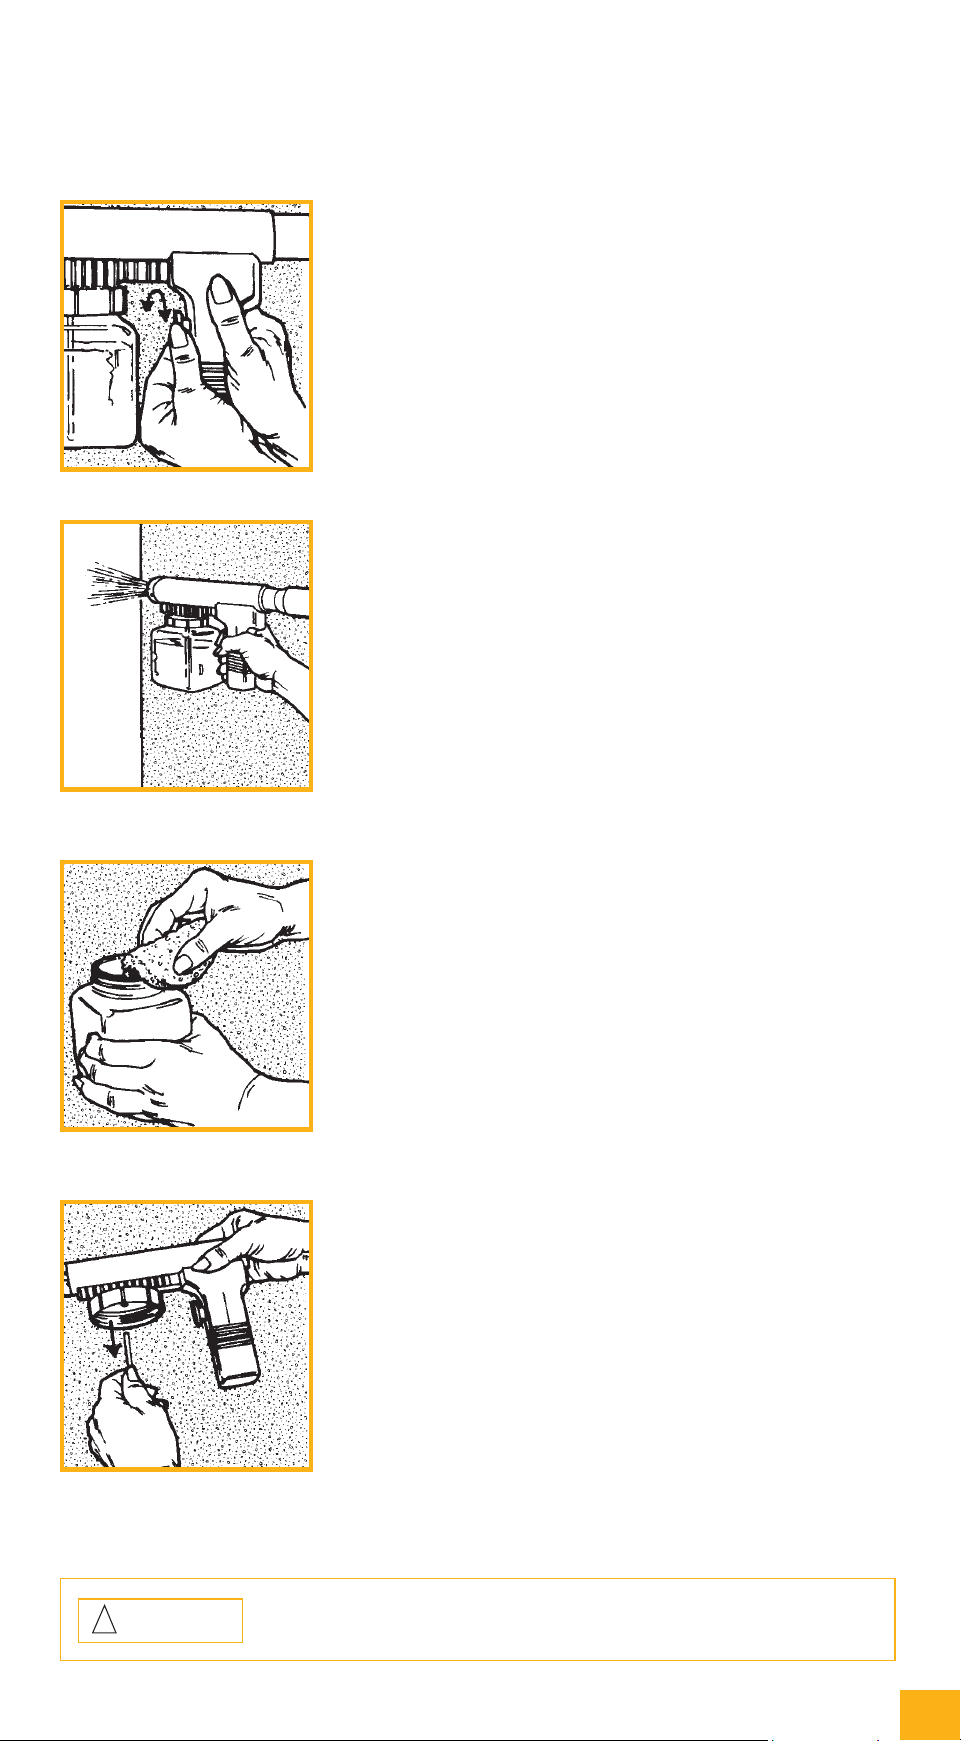
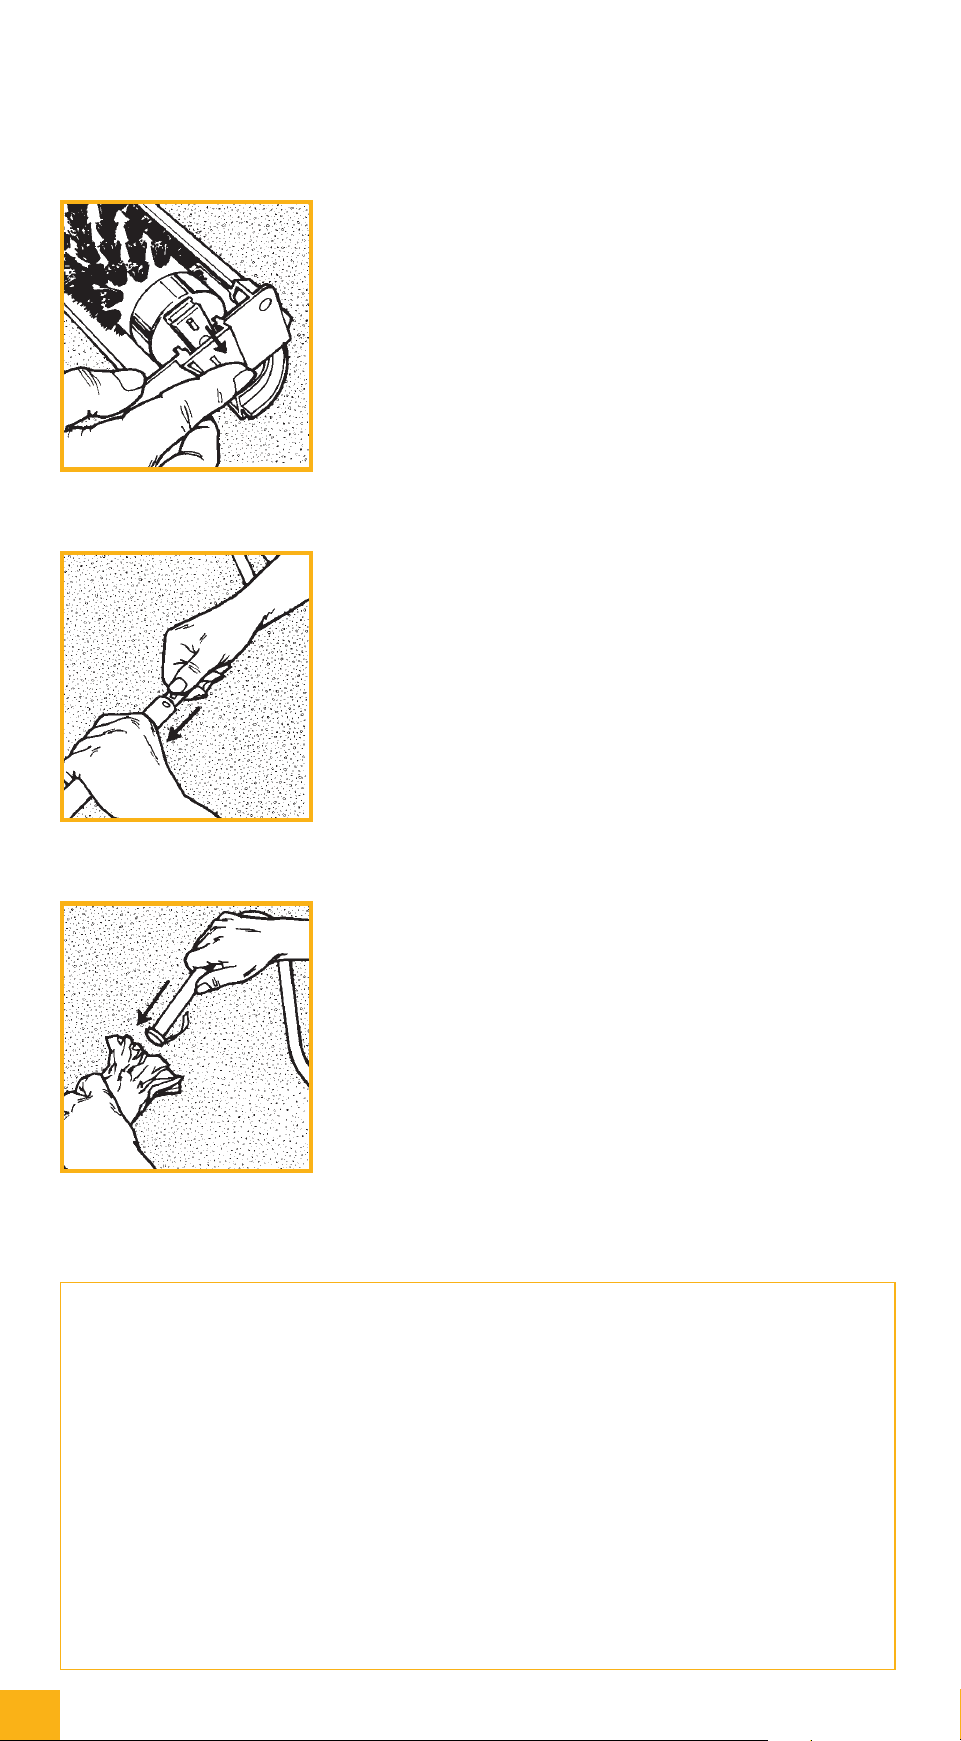
CLEANINGTHEPORTABLESPRAYER(cont)
The spray opening on the front of the Sprayer also
pulls out so that the inside of the Sprayer and the noz-
zle jet can be cleaned.
To remove the nozzle jet, press on the two latches on the
front of the nozzle jet and pull it out. (The latches must be
aligned with the holes on the front of the Sprayer when
returning the nozzle jet to the front of the Sprayer.)
Then, fill the jar with water. Spray water until the spray
becomes clear. Reassemble the Sprayer after cleaning so
none of the parts will be lost. ❏
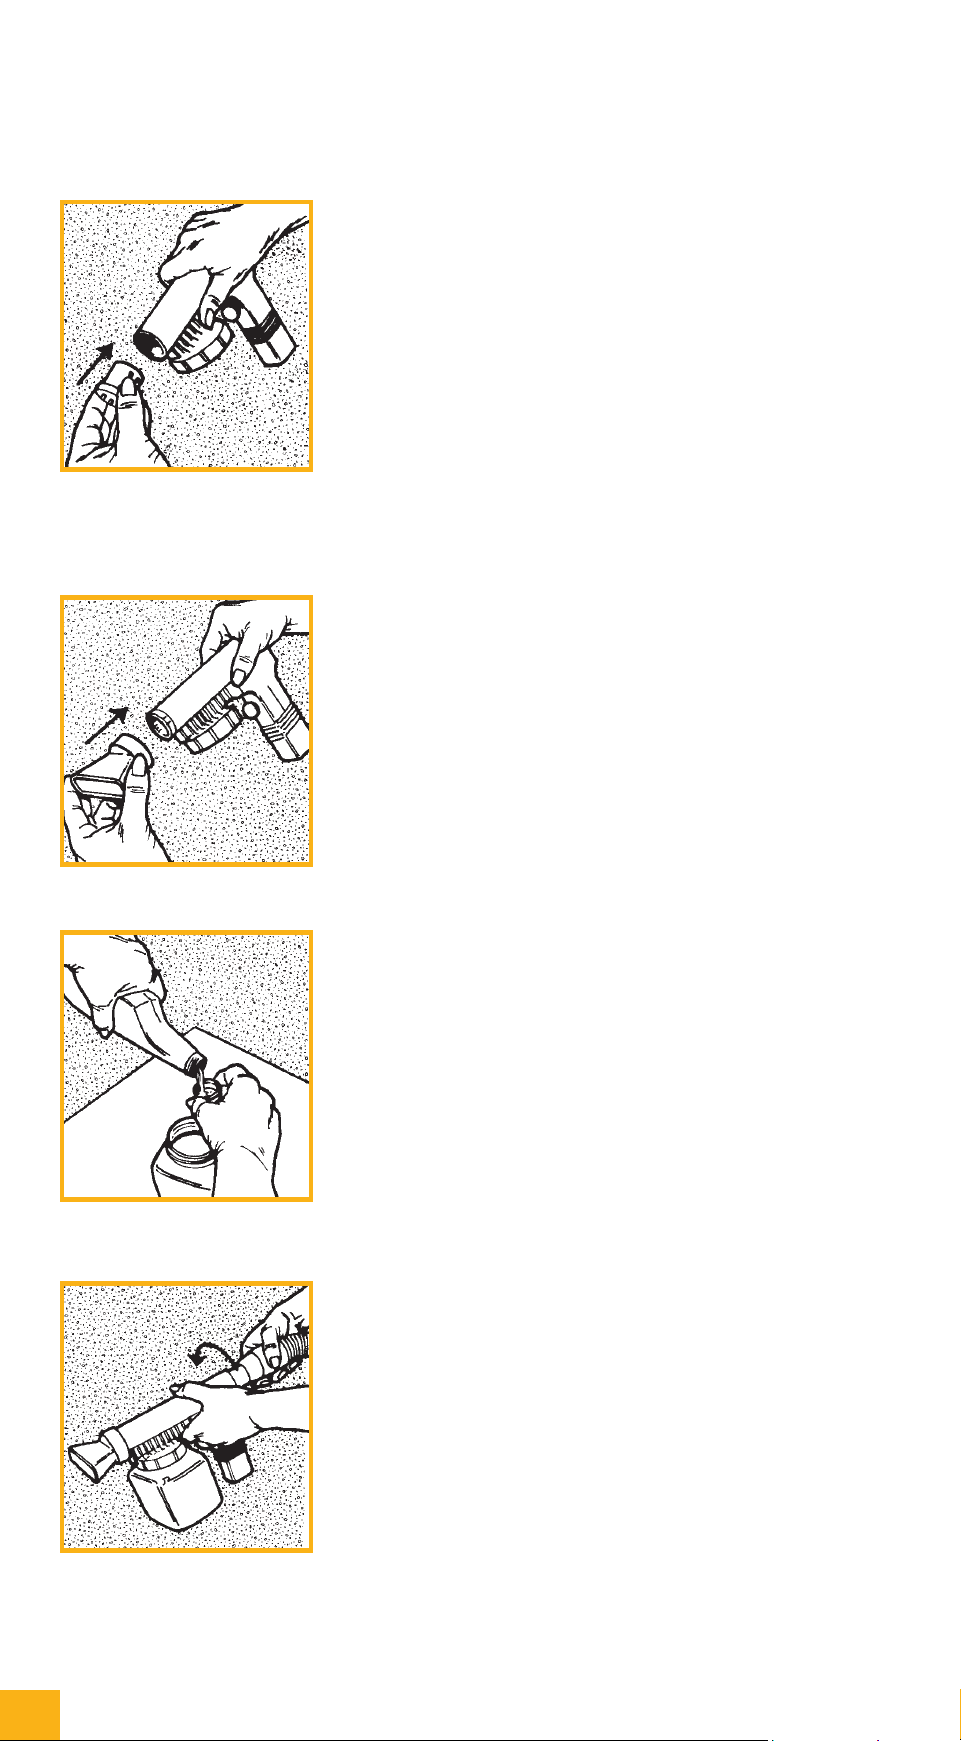
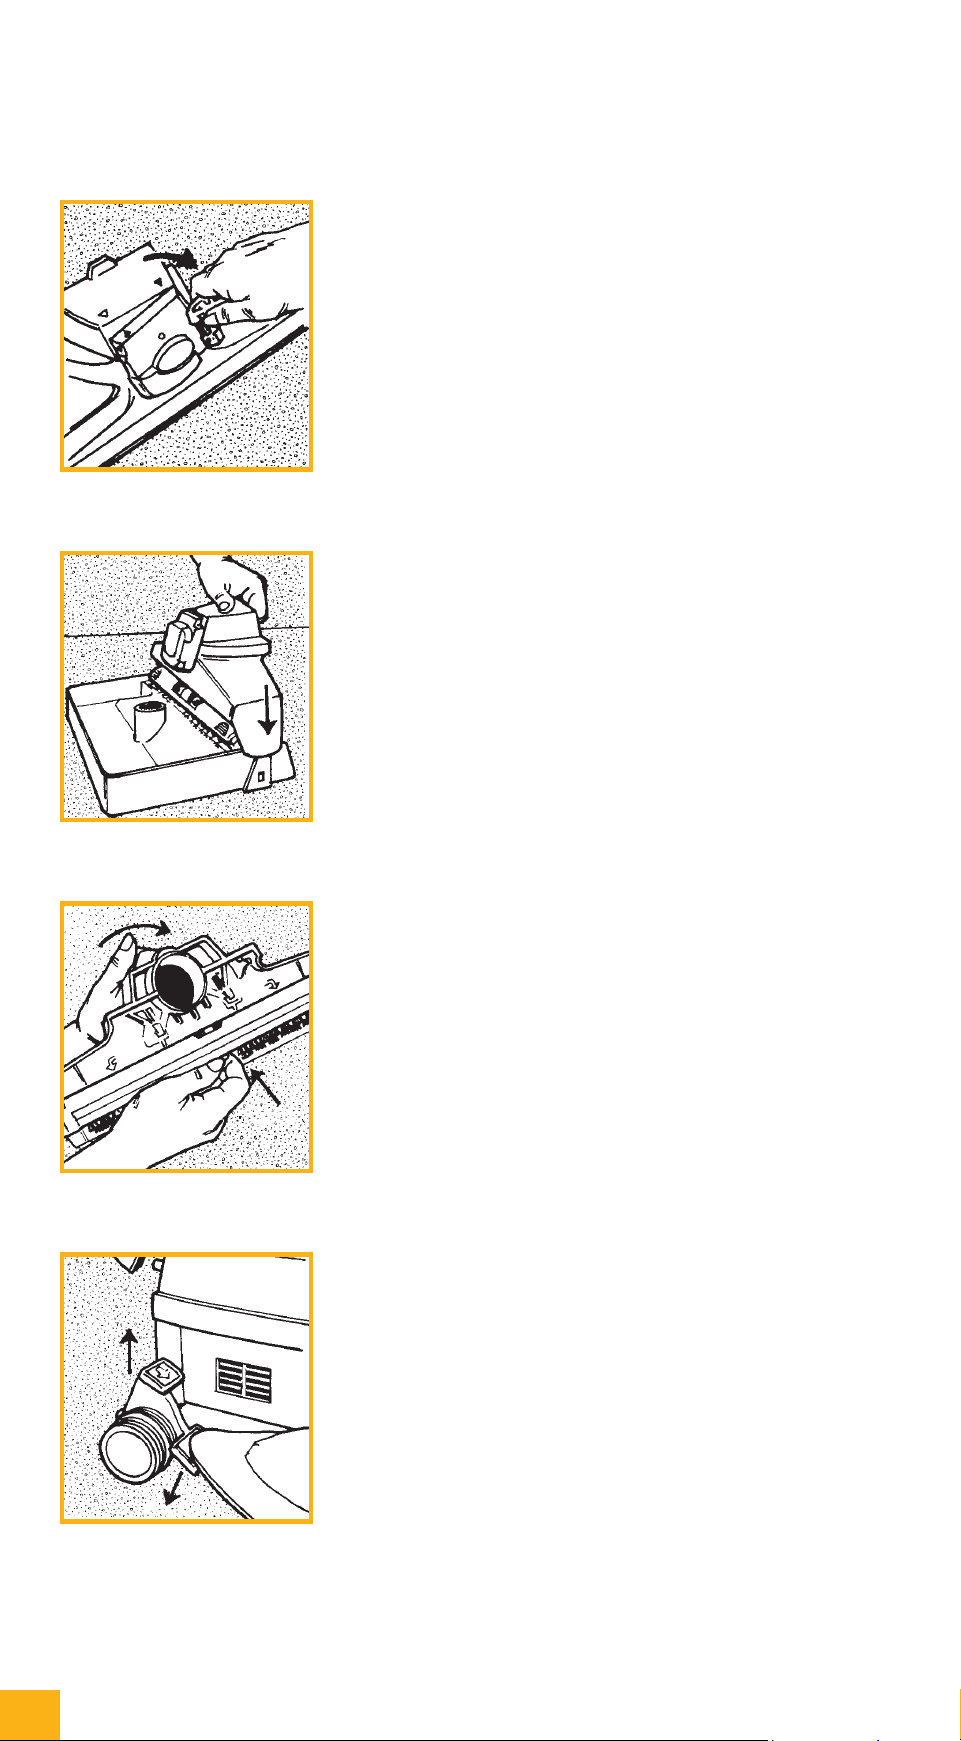
PORTABLESHAMPOOERSET-UP
ThePortableShampooerisusedintheBlowerModeonly
(see page 21 for details). It is designed for fast and easy
cleaning of carpeted stairways and areas that are difficult to
reach with the Carpet Shampoo System.
To set up the Portable Shampooer, attach the Portable
Shampooer cap to the end of the Portable Sprayer. ➤
Remove the jar from the Portable Sprayer and fill the
jarabout3/4fullwithKirby
®
Carpet Shampoo mix-
ture (Mix according to the instructions on the bottle.)
USEONLYKIRBYCARPETSHAMPOOforbestresults.
➤
Screw the jar tightly on the Portable Sprayer, then
attachtheSprayertotheAttachmentHose.
(Make certain your Ultimate GissetupasaBlower
Unit.TheAttachmentHoseshouldbeconnectedtotheAir
Exhaust Port
o
19 - see page 21.) ❏
CanisterCleaner&Attachments
CanisterCleaner&Attachments
The Portable Sprayer (continued)/The Portable Shampooer
1
3
2
3
27
for those who appreciate quality, reliability & performance
IMPORTANT:
The Portable Shampooer is not recommended for use on upholstery
or fabrics such as silk, brocade and velvet. If in doubt, try a test patch.
Let the test patch dry and then check it before you shampoo further.
!
USINGTHEPORTABLESHAMPOOER
Beforeshampooing,vacuumsurfacethoroughly.
To make suds, turn the Ultimate G ON and pull the
trigger of the Portable Sprayer. A stream of suds will
come out of the cap.
The suds can be sprayed directly onto the surface being
cleaned or on a plain paper bag or in a bowl and then applied
to the surface being cleaned. ➤
Adjust the Portable Sprayer for proper suds volume by
turning the Spray Adjustment Control located on the
trigger. ➤
Work suds into the surface with a soft clean, white
brush or sponge until they disappear. Allow the surface
to dry completely.
Then vacuum with the appropriate cleaning tool. This will
remove the dry residue which contains grime and loosened
dirt. ❏
CanisterCleaner&Attachments
CanisterCleaner&Attachments
The Portable Shampooer
1
2
3

28
The Kirby Company

Optional Accessories
Optional Accessories
PART FOUR
Optional Kirby
®
Accessories greatly enhance the usefulness
of your new Ultimate G. In this section, we will discuss
the following:
Using the Carpet Shampoo System
Using the Floor Care System
Using the Turbo Accessory System
™
Using the Zippbrush
™
This section will provide the information you need to take
advantage of your Kirby Optional Accessories.
29
for those who appreciate quality, reliability & performance
30
The Kirby Company
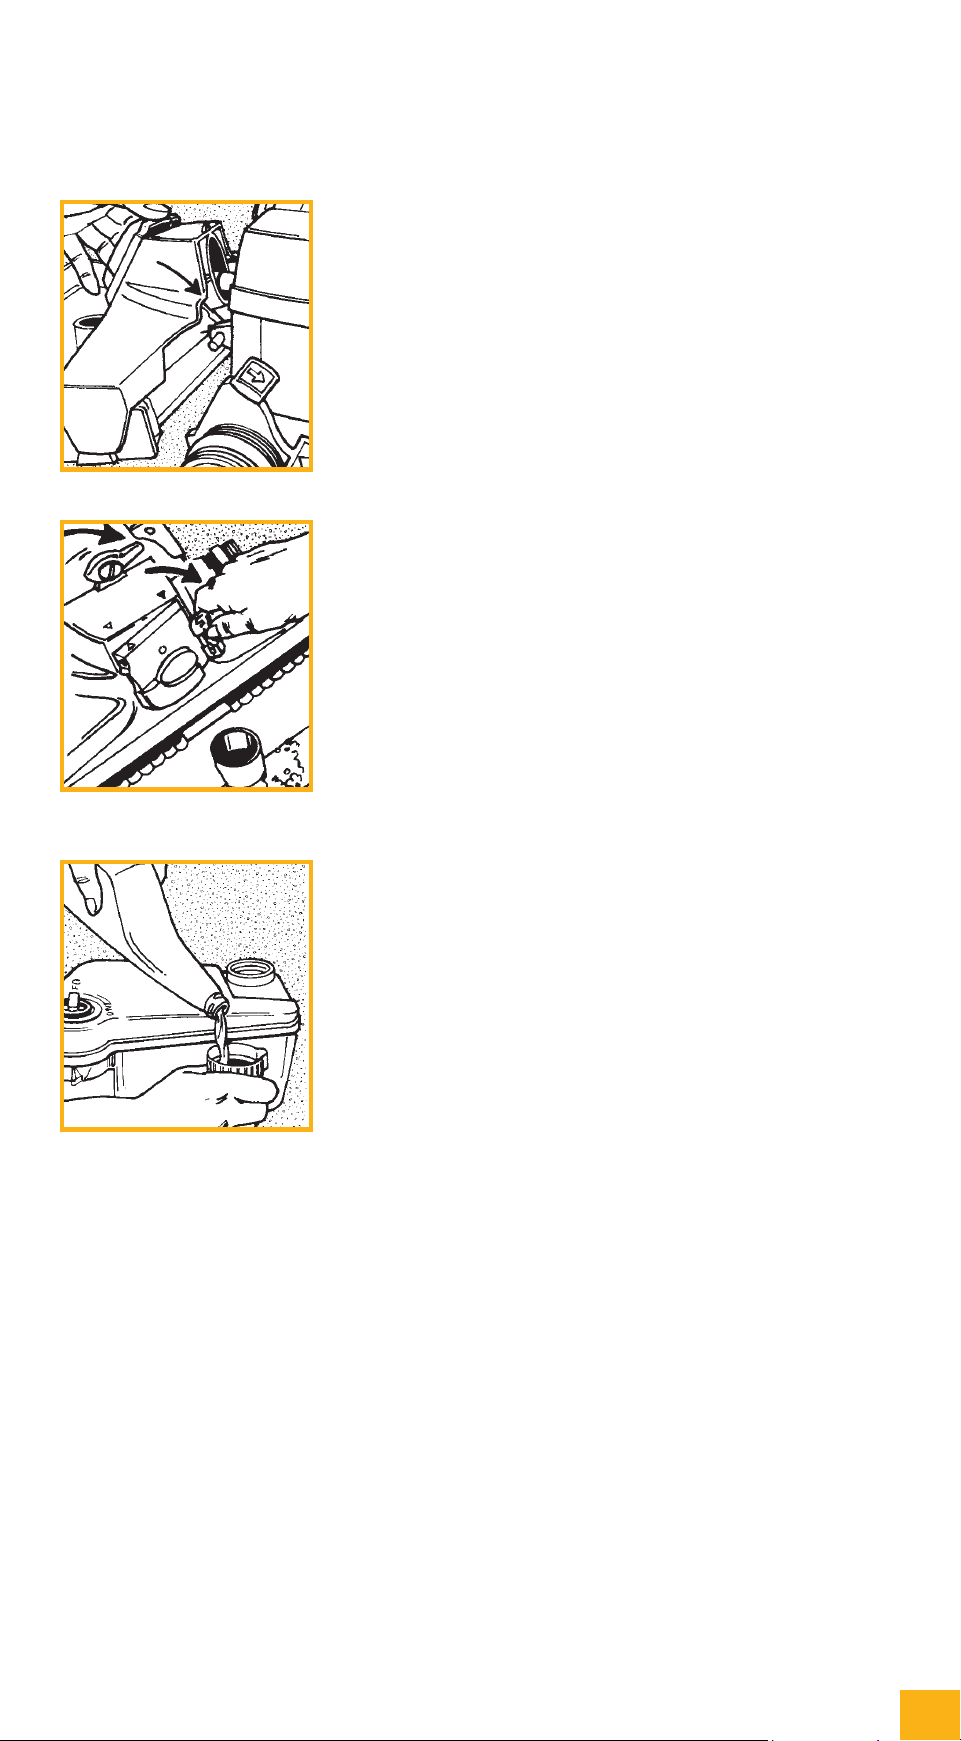
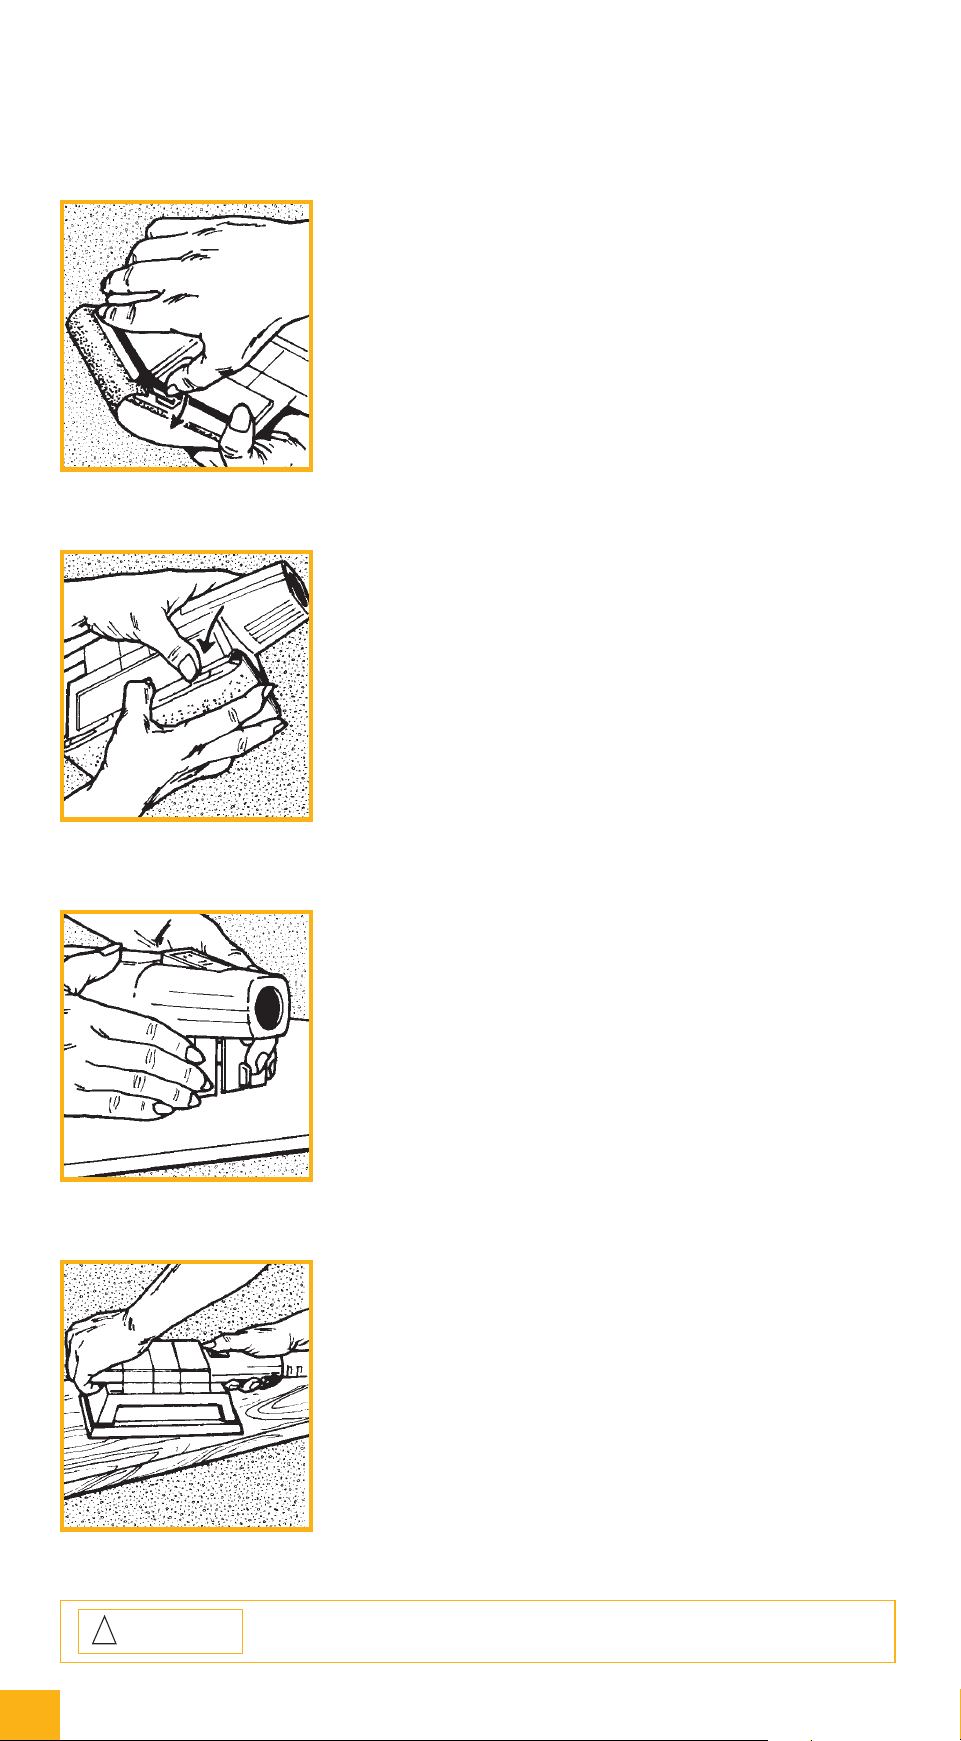
CARPETSHAMPOOSYSTEMSET-UP
Vacuum thoroughly before shampooing for maximum clean-
ing.Then,removetheOuterPermanentBag
o
1 and the
Power Nozzle
o
25 to prepare for shampooing.
ByusingtheL-shapedhandle,turntheCarpet
ShampooSystemNozzleBeltLiftertotheright(clock-
wise) until the green arrows line up. ➤
Slide the slots on the side of the Carpet Shampoo
System Nozzle over the outer shoulders of the Carpet
Shampoo System Tray. ➤
While pushing up on the belt with your finger, use
theL-shapedhandleontheBeltLiftertoturnitleft
(counter-clockwise looking at it from the front) until
theredarrowslineup.(TheBeltLifterHookwillcatchand
stretch the belt.) ➤
Press the Toe-Touch Control
TM
BottomPedal
o
9 all
the way down to raise the front of the Ultimate G. ➤
Optional Accessories
Optional Accessories
The Carpet Shampoo System
2
1
3
4
31
for those who appreciate quality, reliability & performance
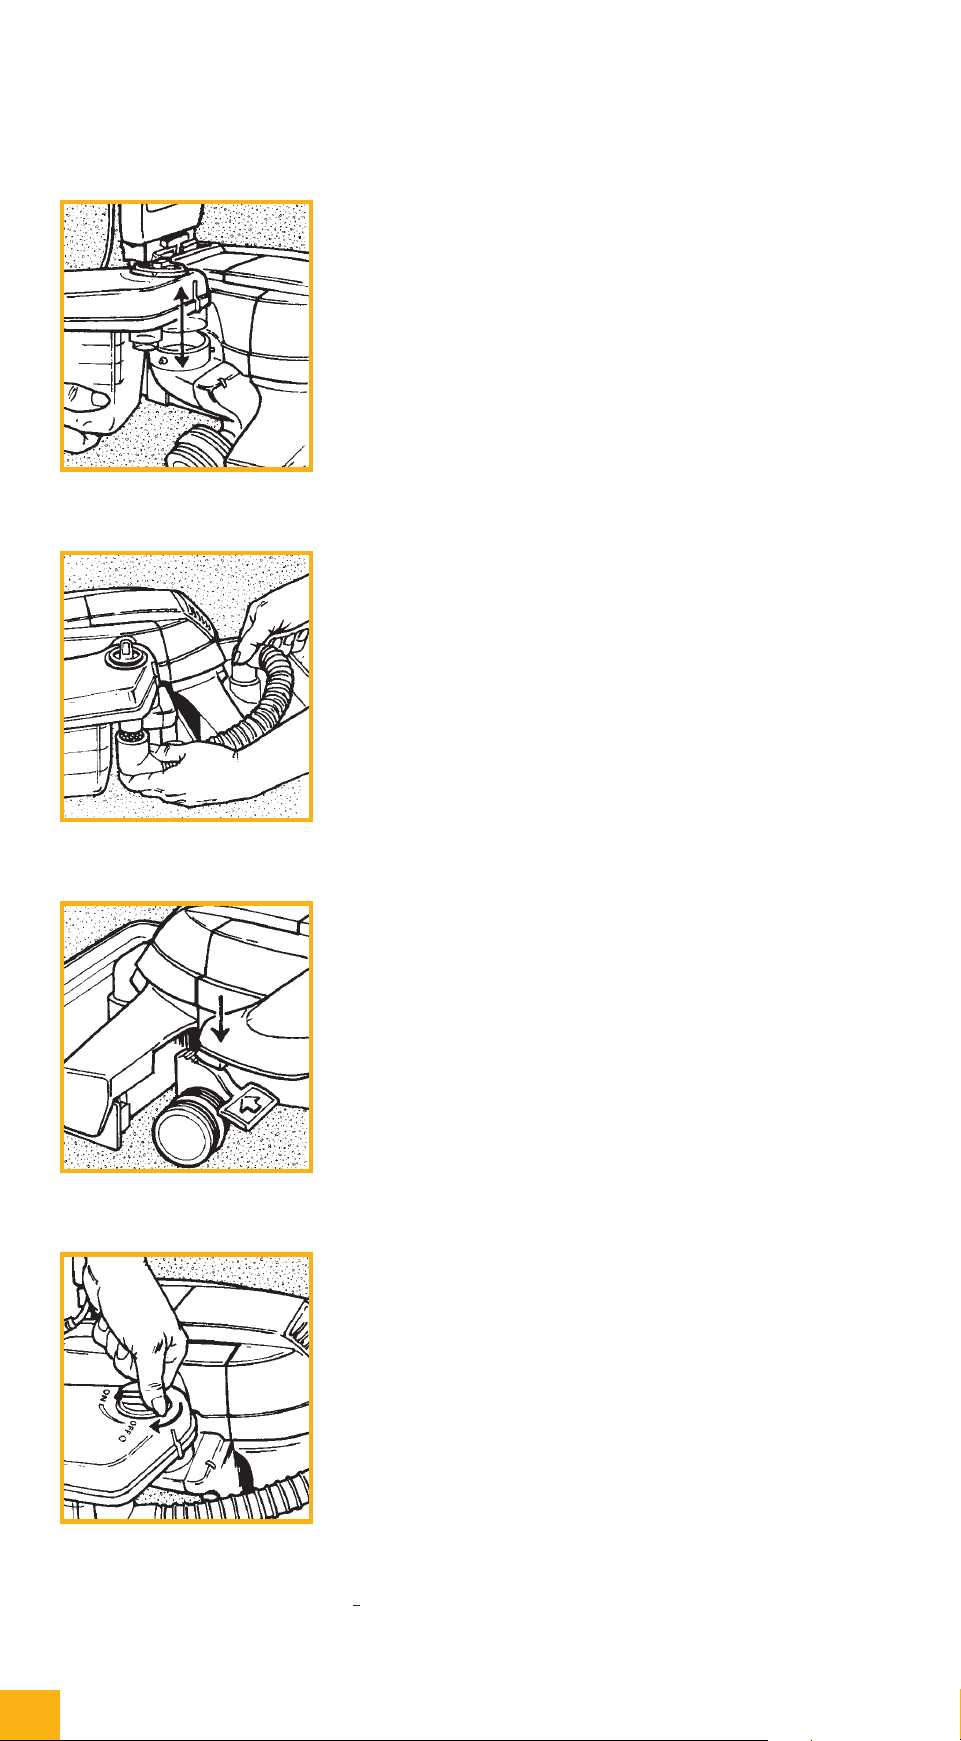
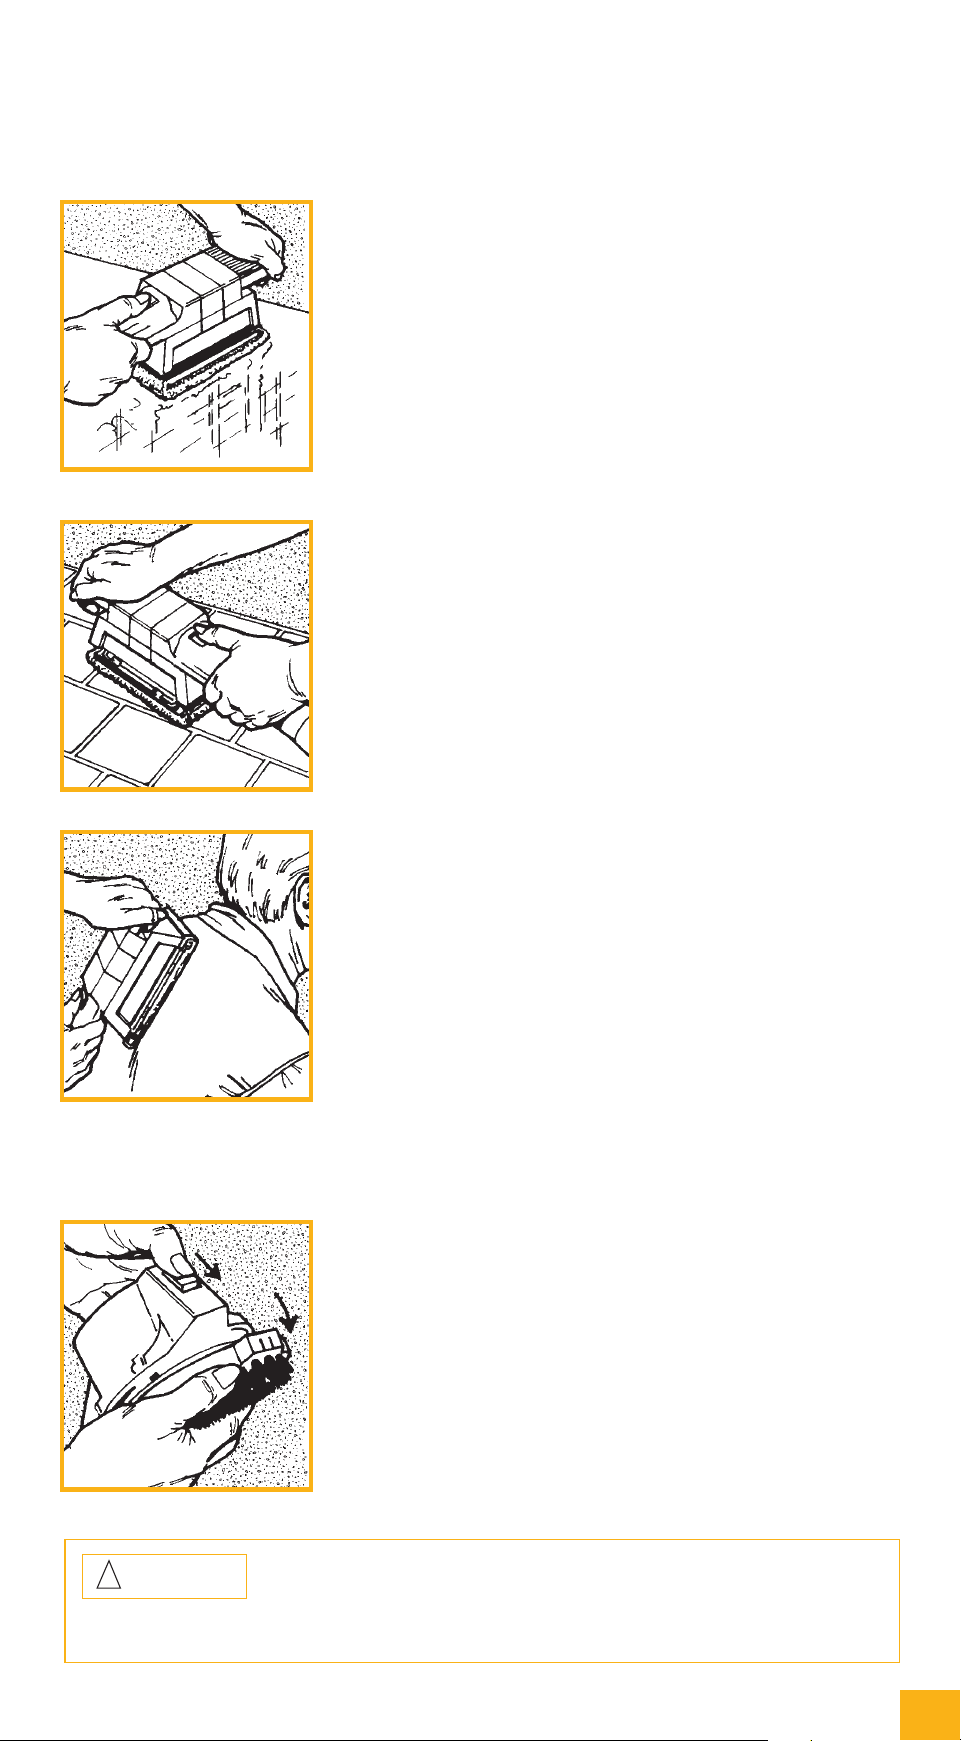
CARPETSHAMPOOSYSTEMSET-UP(cont)
WhileslidingtheCarpetShampooSystemNozzle/
Tray Assembly toward the Ultimate G and over the
Motor Shaft
o
23 , connect the hooks on the bottom rear
ofthenozzletotheAttachingBar
o
24 . ➤
Push the nozzle up against the Ultimate G and turn the
Accessory Lock
o
22 to the right (clockwise) to lock the
nozzle in place. To engage the belt, use the L-shaped
handleontheBeltLiftertoturnitallthewaytothe
right (clockwise) until the green arrows line up. Then lower
theHeadlightHood
o
21 . ➤
The Shampoo Tank is removable and should be filled or
emptied at your sink.
NOTE: The Shampoo Tank is removed and re-attached in the
same way as the Mini Em-Tor
®
(see page 10 for details).
Unscrew the large cup from the top of the Shampoo
Tank and turn the Suds Control Valve fully to the left
(counter-clockwise) to OFF.
HoldingtheShampooTanklevel,fillittothefulllinewith
warm water (not hot).
Using the large cup from the top of the tank, pour three cup-
fuls of Kirby
®
Carpet Shampoo into the Shampoo Tank. Do
not use more, as over-foaming will result.
NOTE: One tankful of solution will clean about a 10x12 foot
carpet (3x3.5m). Larger carpets will require refilling the
Shampoo Tank.
Replace the large cup into the opening on top of the
Shampoo Tank. ➤
Optional Accessories
Optional Accessories
The Carpet Shampoo System
5
6
7
32
The Kirby Company
Taking care to avoid spilling liquid on the Ultimate G
or the floor, place the opening in the bottom front of
the Shampoo Tank over the Air Exhaust Port
o
19 on the
Ultimate G. Angle the Shampoo Tank outward from the
Ultimate G until the arrows line up. Next, slide the Shampoo
Tank down over the locking pins on the Air Exhaust Port.
Rotate the Shampoo Tank toward the Ultimate G (clockwise)
to lock it in place. ➤
Push the round elbow into the hole in the tray until it
snaps into place. Firmly insert the other end over the
fitting at the bottom front of the Shampoo Tank. ❏
USINGTHECARPETSHAMPOOSYSTEM
To set the nozzle to the proper height, step on the Toe-
Touch Control
™
Upper Pedal
o
8 as often as necessary
to lower the nozzle to its lowest position. ➤
NOTE: Forcing the brushroll into the surface of the carpet
decreases its ability to thoroughly clean the carpet and could
damage the belt and brushroll.
Turn the Suds Control Valve all the way to the right
(clockwise) to the ON position. Turn the Ultimate G
ON and engage TechDrive
®
Power Assist (see page 8
for details). Suds flow will begin immediately.
Control the amount of suds by turning the Suds Control
Valve left (counter-clockwise) for decreased suds flow and
right (clockwise) for increased suds flow. Turning the valve
all the way to the left (counter-clockwise) to the OFF posi-
tion will stop the flow of suds completely.
Stopping the flow of suds allows you to thoroughly brush all
the suds into the carpet before applying more suds. This also
lets you spot scrub badly soiled areas. ➤
Optional Accessories
Optional Accessories
The Carpet Shampoo System (continued)
9
8
1
2
Optional Accessories
33
for those who appreciate quality, reliability & performance
Optional Accessories
USINGTHECARPETSHAMPOOSYSTEM(cont)
As you move the Ultimate G back and forth, foam will be
released and the brush will work it into the carpet.
NOTE: Suds should be dispensed the full width of the tray
when the Ultimate G is pulled backward. If not, pull back
more slowly or check and clean the Shampoo Tank Filter,
if necessary (see page 35).
After suds have been on the carpet at least five minutes, pick
up the foam by turning the Shampoo Tank to the OFF posi-
tion. With the Ultimate G at its lowest height level, move the
Shampooer over the foam until the foam is picked up. Some
moisture will accumulate in the front of the tray. Once the
carpet is thoroughly dry, vacuum with the Kirby
®
Upright
(see page 13). ❏
CLEANINGTHECARPETSHAMPOOSYSTEM
Push the Toe-Touch Control
™
BottomPedal
o
9 all the
way down to raise the nozzle and tray, then turn the
Ultimate G OFF and unplug it. ➤
Turn the Suds Control Valve fully to the left (counter-
clockwise) to the OFF position .
PulltheSmallFlexibleHosefromtheShampooTank
and the tray. ➤
RaisetheHeadlightHood
o
21 . Release the belt by
turningtheBeltLiftertotheleft(counter-clockwise)
until the red arrows line up. ➤
The Carpet Shampoo System (continued)
3
1
2
34
The Kirby Company
CLEANINGTHECARPETSHAMPOOSYSTEM
(cont)
Turn the Accessory Lock
o
22 to the left (counter-
clockwise).TheCarpetShampooSystemNozzle/Tray
Assembly will tip forward.
LifttheNozzle/TrayAssemblyofftheUltimate G and carry
it to the sink. ➤
Remove the hose from the tray and rinse. ➤
ByusingtheL-shapedhandle,turntheBeltLifterto
the right (clockwise) until the green arrows line up.
Pull the tray and nozzle apart. Rinse tray. ➤
To clean the brush, push the thumb pads located at each end
of the plastic shield and rotate the shield up and away from
the brush.
Disconnect the shield by gently pulling out the ends of the
trayjustbehindtheBrushRoll.
PushtheBrushRolldownoutofthetraybysimultane-
ously pushing on both ends of the brush with both
thumbs.
Rinse all areas of the shield tray and brush, and remove any
lint from brush tufts.
ShakeexcesswaterfromtheBrushRollbybrushinghand
over the bristles and then drying with a towel. ➤
Optional Accessories
Optional Accessories
The Carpet Shampoo System (continued)
5
4
6
7

35
for those who appreciate quality, reliability & performance
Optional Accessories
Optional Accessories
CLEANINGTHECARPETSHAMPOOSYSTEM
(cont)
To remove the Shampoo Tank from the Air Exhaust
Port
o
19 , rotate it away from the Ultimate G as far as it
will go, then lift it upwards. ➤
Remove and clean the Suds Screen Cap, Cup and
Sponge Filter.
Rinse out the Shampoo Tank with cold water and
replace the Screen Cap, Cup and Sponge Filter.
NOTE: The belt should not be stretched for extended periods.
Make sure the green arrows on the nozzle line up for storage.
(Remember to align the red arrows before replacing the nozzle
on the Ultimate G
-seeBeltLiftersectiononpage10.)❏
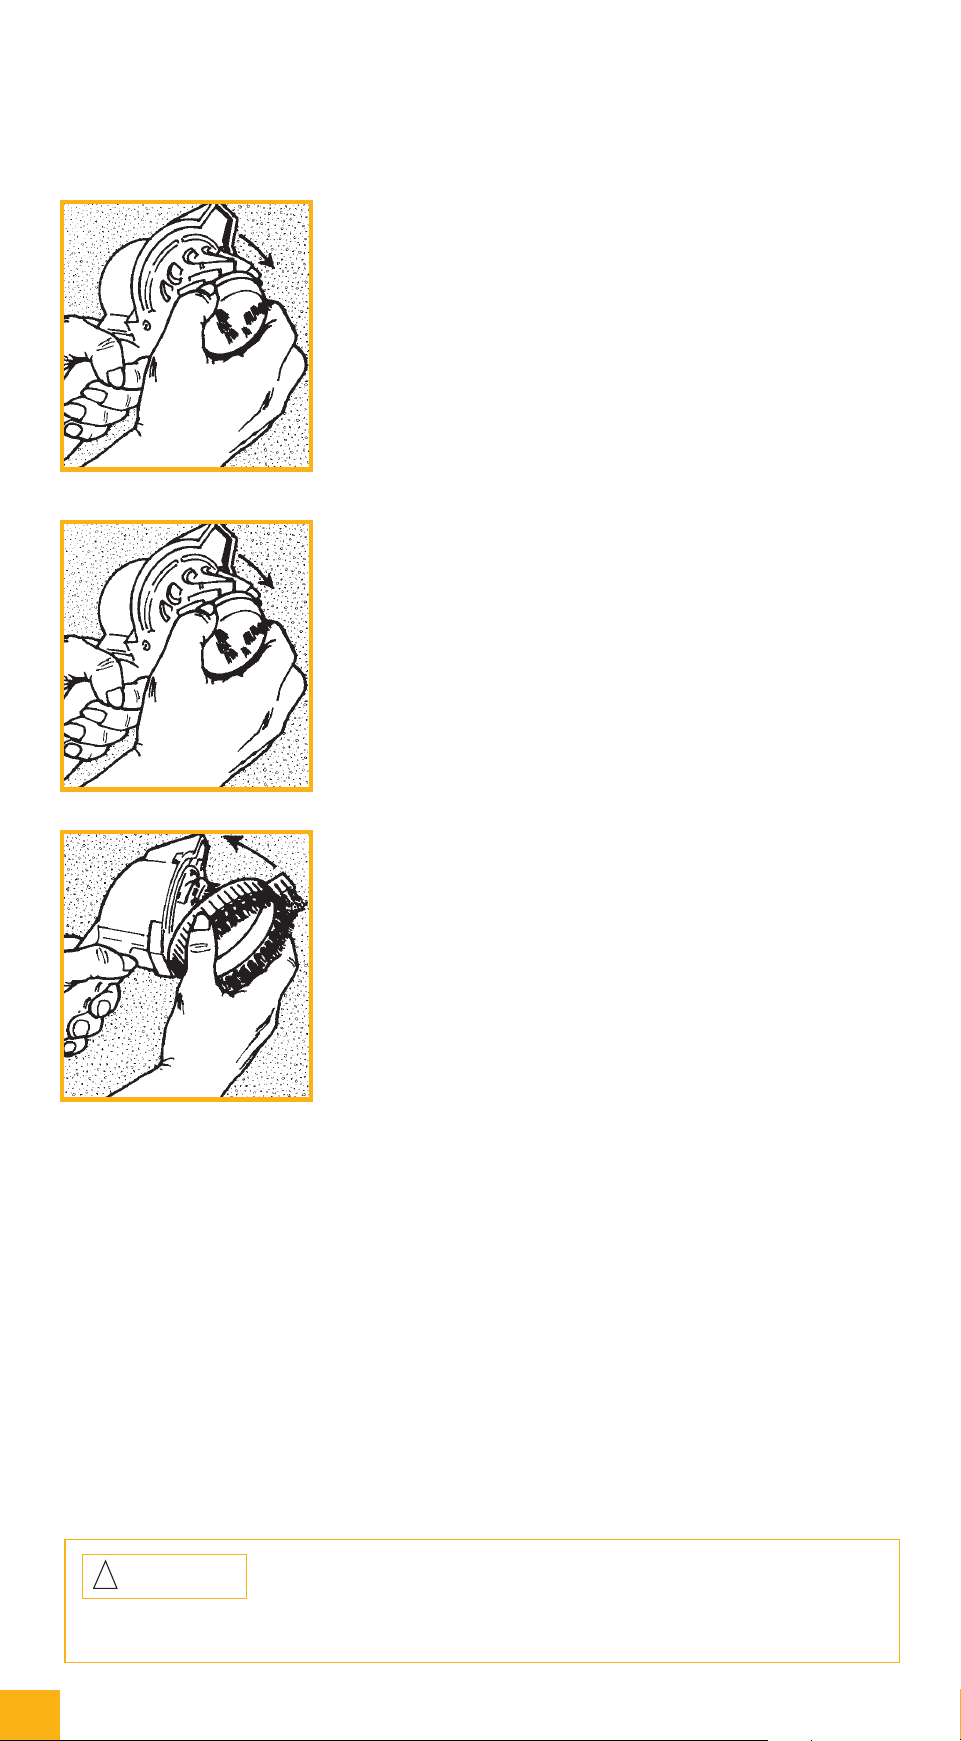
REPLACINGAWORNCARPETSHAMPOO
SYSTEMNOZZLEBELT
ToreplacetheCarpetShampooSystemNozzleBelt,
push the thumb pads located at each end of the shield
and rotate the shield up and away from the brush. ➤
Push down carefully on the ends of the brush with
your thumbs. The brush will snap out and the belt
can be replaced.
Becertainthebeltisplacedinthecenterofthebrush.
NOTE: Use only approved Kirby
®
belts. ➤
The Carpet Shampoo System (continued)
2
9
8
1
36
The Kirby Company
REPLACINGAWORNCARPETSHAMPOO
SYSTEMNOZZLEBELT(cont)
Align the metal ends of the brush with the slots on the
tray and push the brush in until it snaps into place. The
brush will only fit the tray the correct way.
NOTE: The belt should not be stretched when stored for an
extended period. Make sure the green arrows line up for
storage(seepage10fordiscussionoftheBeltLifter).❏
USINGTHEKIRBY
®
MIRACLE WAXER
To assemble the roller waxer applicator, attach the top
half of the roller waxer handle to the bottom half (if not
already done). Adjust the upper half until the spring-
loaded pin in the lower half is seated in the hole near the bot-
tom of the upper half. ➤
With the wax roller bag facing the hooked end of the
long roller handle, push the wax roller over the connector
on the bottom of the handle until secure. ➤
Optional Accessories
Optional Accessories
The Carpet Shampoo System (continued)/The Floor Care
System-Miracle Waxer
®
1
3
2
KIRBYMIRACLEWAXDIRECTIONS
ForHardwood,Vinyl,CorkandLinoleumFloors:
1. Clean surface thoroughly.
2.AttachKirbyFloorCareSystemBufferNozzleand
Brushaccordingtotheinstructionsonpage38,
under‘‘FloorBufferSet-Up.”
3. For best results, apply a very thin coat of Kirby
Miracle Wax using the roller applicator. It is not
necessary to completely cover the floor with wax at
this time, as the wax will be spread in the next step.
4. Using the Toe-Touch Control
™
Upper Pedal to
lower the nozzle all the way down, spread the
wax evenly over the entire floor
using the Kirby Floor Care System
BufferBrush.
5. Let dry 5 minutes.
6. When dry, buff with the Kirby Floor Care System
BufferBrush.
NOTE: For very worn areas, two coats may be
re quired. In this case, multiple thin coats will
provide better results than one thick coat.
For Marble Floors:
Apply a thin coat and spread as in the directions in
#4.However,buffimmediately,avoidingany
drying time.
Once you have completed the steps above, the floor
may be rebuffed, any time it becomes necessary, using
theFloorCareSystemBufferBrush.Applyadditional
wax ONLY when rebuffing does not produce
acceptable results.
IMPORTANT:
Do not use Kirby Miracle Wax on rubber
or asphalt tile. ❏
37
for those who appreciate quality, reliability & performance
Optional Accessories
Optional Accessories
USINGTHEKIRBY
®
MIRACLE WAXER
(cont)
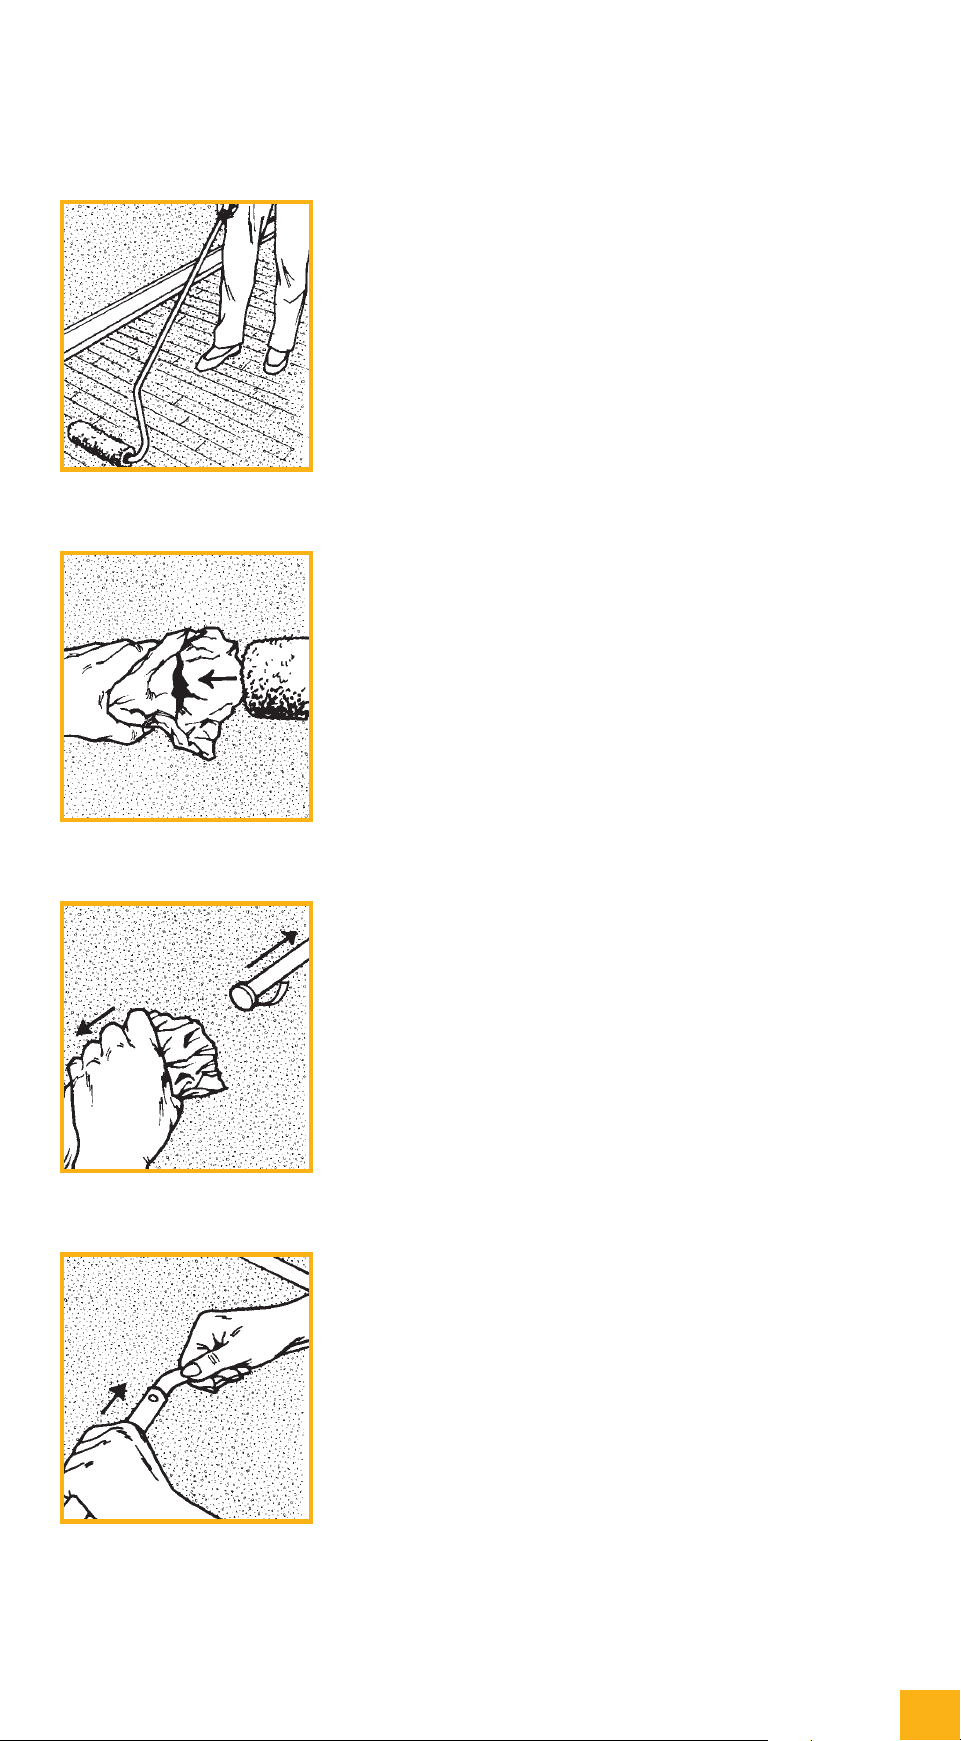
Pull the roller bag off the wax roller and save the packing
bag.Beginwaxingaccordingtothedirectionsinboxon
previous page. ➤
To remove the wax roller from the long handle, hold
the original wax roller packing bag with the open end
facing the roller. Push the wax roller into the packing
bag as far as it will go. Avoid touching the wax with your
hand. ➤
Grasp both the packing bag and roller firmly and pull
them off the long roller waxer handle. To do this, push
the roller away from the handle grip toward the bar to
compress the retaining spring. This will allow you to slide the
roller over the end cap. Seal bag tightly to prevent premature
drying. Store in the provided packing tube and put in a safe
place away from children and pets until next use. ➤
If desired, prepare the long waxer roller handle for stor-
age by depressing the spring-loaded pin on the lower
portion of the handle while pushing the upper portion
toward the hooked end.
IMPORTANT: Seal used roller in original packing bag and
tube after each use to prevent the wax from drying out. ❏
The Floor Care System-Miracle Waxer
®
(continued)
6
4
3
5
38
The Kirby Company
FLOORBUFFERSET-UP
Your Ultimate G can be used as an effective floor buffer for
wood or tile floors.
TousetheFloorBuffer,youmustfirstinserttheBuffer
BrushintotheFloorBufferNozzle.
NOTE: Use only approved Kirby
®
belts.
CenterthebeltoftheBufferBrushinthemiddlearea
between the tufts of the brush. ➤
TurntheBufferNozzleoverandslidetheendsofthe
Brushintotheslotsateachendofthenozzle.The
BufferBrushwillonlyfitthecorrectway.➤
PushthebeltupagainsttheBrushRollwithyourfinger.➤
While holding the belt in place, use the L-shaped han-
dleontheBeltLiftertoturnitleft(counter-clockwise)
untiltheredarrowslineup.TheBeltLifterhookwill
catch the belt and stretch it upward into the nozzle. ➤
1
2
3
4
Optional Accessories
Optional Accessories
The Floor Care System-Floor Buffer
CAUTION:
To avoid loss of control, do not stand unit on end for polishing. For
Kirby units with TechDrive
®
, the TechDrive must be in the neutral
position during polishing.
!
39
for those who appreciate quality, reliability & performance
CAUTION:
ToavoidlosingcontroloftheBufferwhenbrushisonthefloorsurface,
hold on to the handle before plugging the power cord into the wall outlet
and before turning the power switch ON. To avoid possible damage to
soft tiles or marking of waxed and finished non-carpeted floors,
disengage the TechDrive.
!
FLOORBUFFERSET-UP(cont)
Place the hooks located on the rear of the nozzle over the
AttachingBar
o
24 and push the nozzle up against the
Ultimate G.
Turn the Accessory Lock
o
22 all the way to the right
(clockwise) to lock the nozzle in place. ➤
ToengagethedrivebeltandBufferBrush,usethe
L-shapedhandletoturntheBeltLifterallthewayto
the right (clockwise) until the green arrows line up.
LowertheHeadlightCap
o
21 . ➤
DO NOT USE TechDrive
®
Power Assist with the
FloorBuffer.
Place TechDrive Power Assist in Neutral by stepping
on the gray “N” side (“N” for Neutral) of the TechDrive
PowerAssistN/DPedal
o
11 . ➤
USINGTHEFLOORBUFFER
BecausetheunitmovesforwardwhentheFloorBuffer
Brushtouchesthefloor,makesuretheBufferNozzleis
on its highest setting. Press the Toe-Touch Control
TM
BottomPedal
o
9 allthewaydowntoraisetheBufferNozzle
all the way up.
While holding onto the unit’s handle, turn the Ultimate G
ON. ➤
8
5
6
7
Optional Accessories
Optional Accessories
The Floor Care System-Floor Buffer (continued)
40
The Kirby Company
USINGTHEFLOORBUFFER(cont)
Press the Toe-Touch Control
™
Upper Pedal
o
8 to lower
the brush one notch at a time. Lower the brush as far as
the Toe-Touch Control will allow.
WiththeBufferrunning,movetheUltimate G over the floor
as though you were cleaning a carpet, using slow, steady
strokes.
NOTE: The belt should not be stretched when stored for an
extended period. Make sure the green arrows line up for stor-
age(seepage10fordiscussionoftheBeltLifter).❏
HARDFLOORPAD
Seepage15forset-upanduseoftheHardFloorPad.❏
USINGTHECARPETFLUFFER
Your Kirby
®
FloorBuffercanalsobeusedasaCarpet
Fluffer to reset the nap on a matted-down carpet.
Beforefluffingthecarpet,raisethenozzlealltheway
upbypushingtheToe-TouchControlBottomPedal
o
9
all the way down.
Place the cleaner on the carpet to be fluffed. ➤
Plug in the Power Cord. Disengage the TechDrive
®
Power Assist by pressing on the gray “N” side of the
TechDrivePowerAssistN/DPedal
o
11 .
Holdingontothehandlefirmly,startthecleanerbypressing
the ON switch. ➤
9
1
2
Optional Accessories
Optional Accessories
The Floor Care System-Floor Buffer (continued)/The Floor Care
System-Carpet Fluffer
41
for those who appreciate quality, reliability & performance
CAUTION:
Besurenometalobjects,suchastacks,nails,etc.,arestickingupfrom
the surface. They can damage the sandpaper and the Turbo Accessory.
They may also cause sparks, which could ignite dust. Replace the
disposable bag after extended sanding because the dust is fine and will
plug the bag pores.
!
USINGTHECARPETFLUFFER(cont)
Lower the Carpet Fluffer Nozzle one notch at a time
by pushing the Toe-Touch Control
™
Upper Pedal
o
8 . The instant the brush contacts the carpet, stop
lowering the brush. ➤
Then engage TechDrive
®
by pressing down on the yel-
low“D”sideofthe“N/D”Pedal.Youarenowreadyto
fluff the carpet by pushing the cleaner back and forth
over the carpet.
NOTE: •Loweringthebrushtoofaroncableyarntype
carpets may cause the carpet to fuzz. Do not fluff
delicate carpets.
• Thebeltshouldnotbestretchedwhenstoredforan
extended period. Make sure the green arrows line
up for storage (see page 10 for discussion of the
BeltLifter).❏
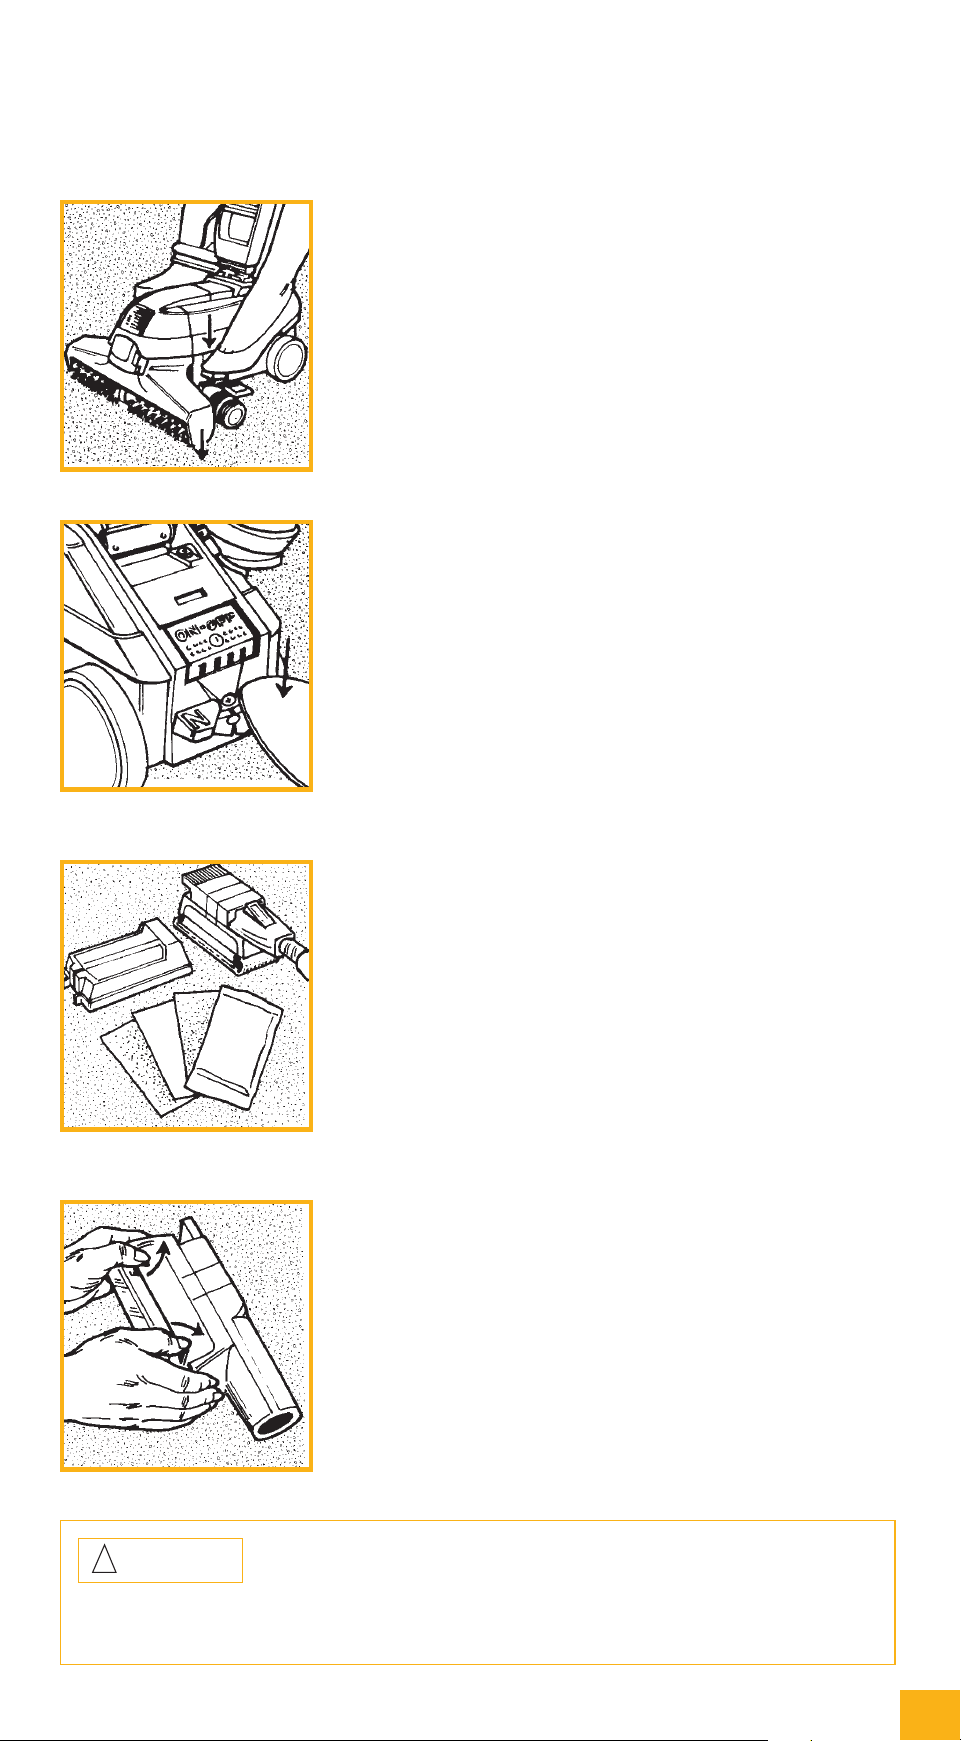
TURBOACCESSORYSET-UP
The Turbo Accessory System can be used for a wide variety
of household jobs. It’s a sander, a buffing unit, a scouring
unit and a massage unit.
TURBO-SANDING
To set up the Turbo Accessory System as a sander,
unsnap the Sander Dust Shroud at the rear of the tool
and lift off. ➤
Rotate the clamp levers on the side of the Turbo
Accessory upwards to open the clamps. ➤
2
3
4
1
Optional Accessories
Optional Accessories
The Floor Care System-Carpet Fluffer (continued)/
The Turbo Accessory System
™
42
The Kirby Company
TURBO-SANDINGSET-UP(cont)
Select the correct grade of sandpaper needed for the
job. Use fine paper for a smooth finish and coarse
paper to clear rough surfaces or remove paint.
Slide the sheet into the front clamp and lock the clamp lever.
NOTE: Three grades of sandpaper come with the Sander.
Eachpieceisastandard1/3sheet.➤
Tightly wrap the paper around the bottom of the Turbo
Accessory and tuck the end into the rear clamp. Lock
the rear clamp. ➤
With the Turbo Accessory on a level surface, wrap the
Sander Dust Shroud around the Sander with the open-
ing to the rear and snap it closed. ➤
InserttheAttachmentHoseintotheendoftheTurbo
Accessory.
Grip the Sander at the front and rear and turn the
Ultimate G ON. Then press the ON button on the top of
the Sander.
While applying light pressure, move it over the surface slowly.
Allow the Sander to do the work. Don’t force it or lean heavily
on it. The tool works best at high speed. ❏
3
5
4
6
Optional Accessories
Optional Accessories
The Turbo Accessory System
™
(continued)
CAUTION:
Always wear safety glasses when turbo sanding.
!
43
for those who appreciate quality, reliability & performance
TURBOPOLISHING
Attach the synthetic lamb’s wool pad using the same
procedure as attaching sandpaper (see page 42). The Turbo
Accessory now becomes a polisher. Use it for polishing hard
waxed surfaces, such as table tops, paneling, large flat
surfaces and cars.
The Dust Shroud is not used when polishing. ❏
TURBOSCOURING
Attach the webbed nylon scouring pad using the same
procedure as attaching sandpaper (see page 42). The Turbo
Accessory now becomes a scouring tool. Use it for scouring
hard surfaces such as ceramic tile, etc. (Do not use on
painted surfaces.)
The Dust Shroud is not used when using the scouring pad. ❏
ORBITALMASSAGEUNIT
The Turbo Accessory Massage Unit is intended for use where
massage is desired or medically recommended.
To use as an Orbital Massage Unit, attach the soft vinyl pad to
the Turbo Accessory using the same procedure as attaching
sandpaper (see page 42).
The Suction Control Grip can be used to decrease the vibration
of the Massager. Thus, a variable speed Massager. The Suction
Control Grip also enables a person to massage their own back.
The Dust Shroud is not used when using the Turbo Accessory
as a massage unit. ❏
USINGTHEZIPPBRUSH
WhenattachedtotheAttachmentHose,theZippbrushcanbe
used for a wide variety of cleaning surfaces, including uphol-
stery, carpeted steps and automotive interiors.
For optimum results, do not press down heavily on the
Zippbrush. Allow the brush to rotate at maximum speed by
gently moving it side to side on the surface being cleaned.
Optional Accessories
Optional Accessories
The Turbo Accessory System
™
(continued)/The Zippbrush
™
CAUTION:
Do not use the Orbital Massager on swollen or inflamed areas, legs with
varicose veins, areas where there are skin eruptions, unexplained calf pains
or anesthetic skin areas unless first approved by your doctor. Children must
be supervised when using the massager.
!
44
The Kirby Company
CLEANINGTHEZIPPBRUSH
To clean the Zippbrush, press the button on the front
of the brush to release the outer brush ring.
When pressing the release button, avoid placing
pressure on the outer ring brush. ➤
LiftthecenterBrush/AirTurbineoutofthetooland
remove any particles or lint from the brush and turbine.
Also remove any particles left in the tool cavity. ➤
PlacetheBrush/AirTurbinebackinthetoolandturnit
untilthetabsdropintotheslots.Hookthetabonthe
rear of the ring brush into the small opening of the tool
and snap it back into place. ❏
Optional Accessories
Optional Accessories
The Zippbrush
™
(continued)
CAUTION:
While using the Zippbrush, do not insert fingers into the revolving brush
area or push the release button while the brush is in motion. Keep brush
flat against the surface being cleaned as the brush can throw particles
outward. Do not use on delicate fabrics.
1
2
3
!

45
for those who appreciate quality, reliability & performance
Operating/MaintenanceTips
Operating/MaintenanceTips
PART FIVE
Your Kirby
®
Ultimate G is a highly sophisticated home
maintenance system. As with most modern appliances, it
requires a modest degree of routine maintenance to keep it
operating efficiently. This section of the Owner’s Manual
presents tips on operating and maintaining your Ultimate G.
In this section, we will discuss the following:
Changing the Power Nozzle Belt
Adjusting the Brush Roll for Optimum
Performance
Light Bulb Replacement
Miscellaneous Parts Replacement
Helpful Answers to Questions/
Troubleshooting
This section will provide the information you need to keep
your Ultimate G operating at peak efficiency.
46
The Kirby Company
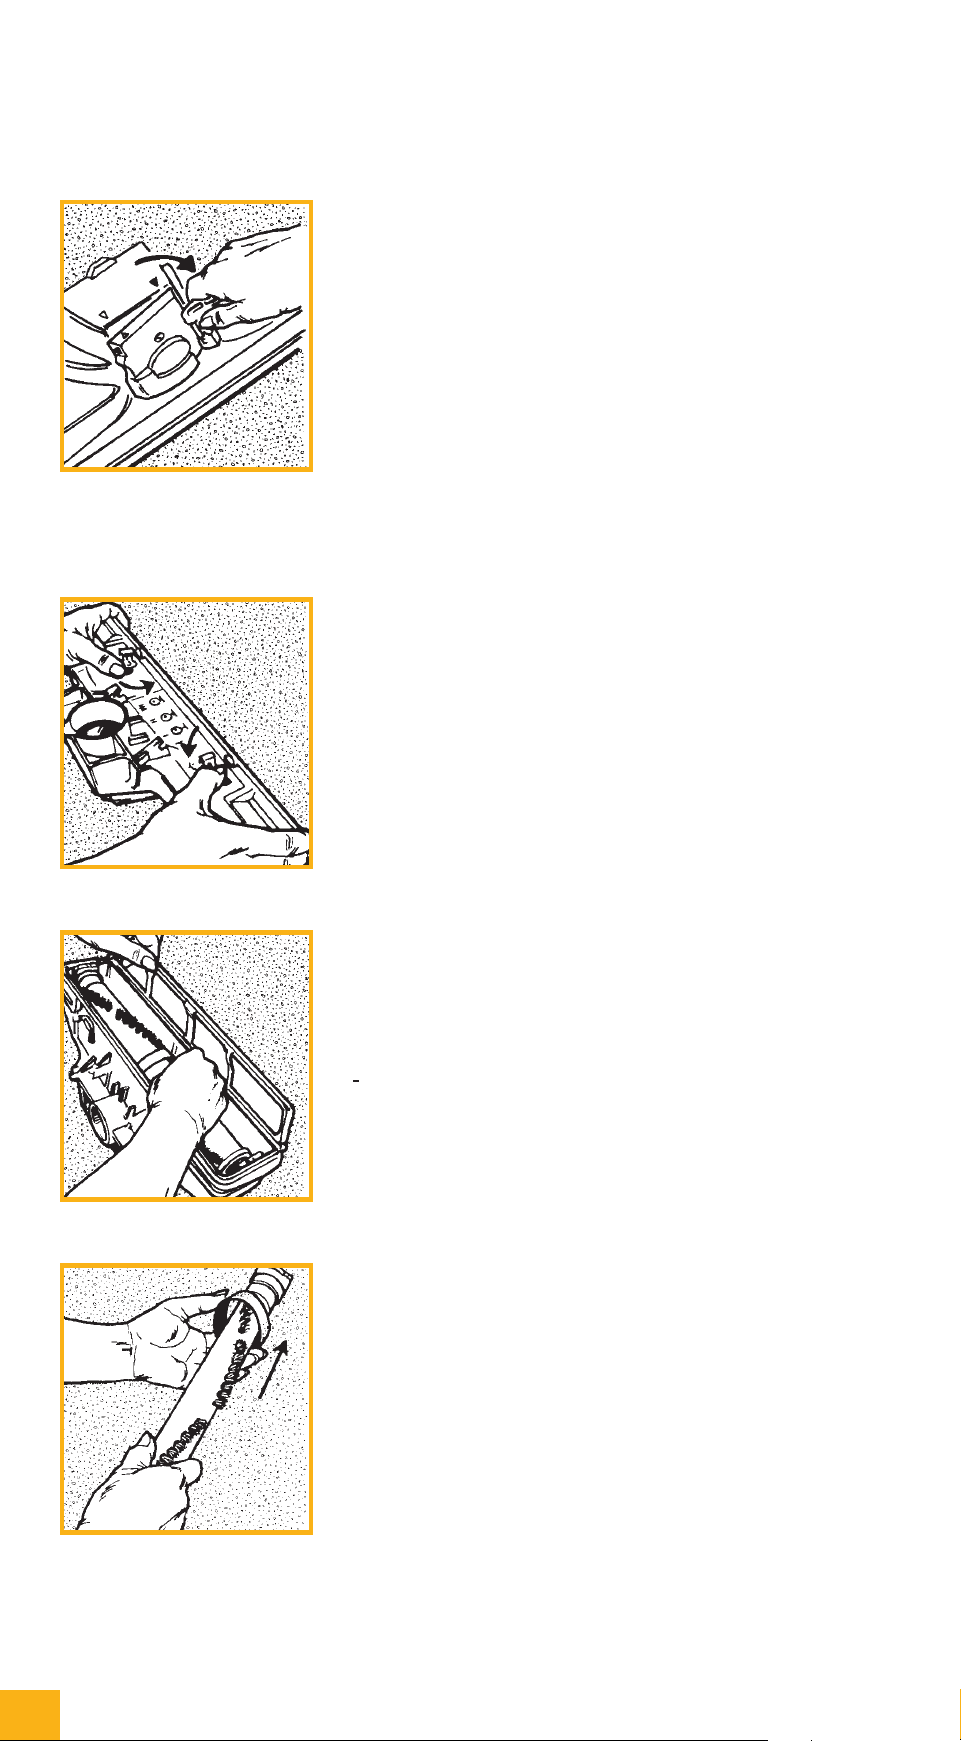
CHANGINGTHEPOWERNOZZLEBELT
Afterextendeduse,thePowerNozzleBeltonyourUltimate G
may become stretched and worn causing the belt to slip.(See
page11-BrushRollPerformanceIndicatorLight.)Ifthis
condition exists, simply replace the old belt with a new one.
NOTE: Use only approved Kirby
®
belts.
To change the belt, remove the nozzle from the
Ultimate G as on page 18. Then release the belt tension
byusingtheL-shapedhandleontheBeltLifter
o
20 to turn it
all the way to the right (clockwise) until the green arrows
line up. ➤
Unlock the Rug Plate
o
26 by unhooking the two latches
on the rear of the nozzle. ➤
Pull on the rear edge of the Rug Plate to remove from
the nozzle.
NotetheBrushRollBristleHeightAdjustmentsetting
(1, 2, or 3).
LiftouttheBeltandBrushRoll.➤
Slide off the old belt and replace with a new one. ➤
Operating/MaintenanceTips
Operating/MaintenanceTips
Changing The Power Nozzle Belt
2
1
3
4
47
for those who appreciate quality, reliability & performance
Operating/MaintenanceTips
Operating/MaintenanceTips
CHANGINGTHEPOWERNOZZLEBELT(cont)
MakesuretheBrushRollBristleHeightAdjustment
setting (1, 2, or 3) is the same as when the brush was
removed.Seepage48fordiscussionoftheBrushRoll
BristleHeightAdjustment(1,2,or3).Placethebelt
andBrushRollbackintothenozzle.OneoftheplasticBrush
Rollendsislargerthantheother,thustheBrushRollwill
only fit in the nozzle one way.
ThencenterthebeltontheBrush.➤
Replace the Rug Plate
o
26 by placing it on the front of
the bumper first and then pulling it over the bumper on
rear of Power Nozzle
o
25 . Secure the Rug Plate using
the two latches that hold it in place. ➤
UsingtheL-shapedhandleontheBeltLifter
o
20 , turn it
to the left (counter-clockwise) until the red arrows line
up. This will stretch the belt in preparation for return-
ing the nozzle to the Ultimate G.
Now you are ready to re-attach the Power Nozzle and
re-engage the belt (see page 11 for details). ❏
Changing The Power Nozzle Belt
6
5
7
48
The Kirby Company
ADJUSTINGTHEBRUSHROLLHEIGHT
TheBrushRollbristleswearawayafterlongperiodsofuse.
This reduces cleaning efficiency.
However,theendsoftheBrushRollareadjustable,soyoucan
extend the bristles, allowing the brush to work like new again.
TheBrushRollonanewUltimate G has three settings: one
notch, two notches and three notches. The greater the number
of notches, the farther the bristles are extended. Use the one
notch (1) setting for delicate carpeting such as berber. Use the
two-notch (2) and three-notch (3) settings to extend the bristles
to compensate for bristle wear. ➤
Remove the Power Nozzle
o
25 from the Ultimate G as
on page 18. ➤
Release the belt tension by using the L-shaped handle
ontheBeltLifter
o
20 to turn it all the way to the right
(clockwise) until the green arrows line up.
Unlock the two latches on the rear of the Power Nozzle to
remove the Rug Plate
o
26 .
Then lift the brush out of the nozzle. ➤
RotatetheplasticBrushRollendstothe1,2or3-notch
settings as desired. The greater the number of notches,
the farther the bristles are extended.
Whenviewedfromthetop,rotatetheplasticBrushRollends
to the side with the appropriate number of notches visible.
MakesurebothplasticBrushRollendsaresettothesame
number of notches. ➤
Operating/MaintenanceTips
Operating/MaintenanceTips
Brush Roll Bristle Height Adjustment
1
2
3
SERVICE TIP:
KeeptheentireBrushRollandbelttrackclearoflint,string,
hairandotherfibers.ThiswillallowtheBrushRolltoperform
to its fullest potential.

49
for those who appreciate quality, reliability & performance
Operating/MaintenanceTips
Operating/MaintenanceTips
ADJUSTINGTHEBRUSHROLLHEIGHT(cont)
Place the brush back into the nozzle making sure both
plasticBrushRollendsaresettothesamenumberof
notches (1, 2, or 3).
Replace the Rug Plate
o
26 by placing it on the front of the
bumper first and then pulling it over the bumper on rear of
Power Nozzle
o
25 . Secure the Rug Plate using the two latches
that hold it in place.
UsingtheL-shapedhandle,hookthebeltontotheBeltLifter
o
20 andturntheBeltLiftertotheleft(counter-clockwise)
until the red arrows line up. This will stretch the belt in prep-
aration for returning the nozzle to the Ultimate G. ❏
LIGHTBULBREPLACEMENT
IfthelightbulbinyourHeadlightAssemblyburnsout,
you may wish to contact your authorized Kirby
®
Distributor.
If you prefer to install a new light bulb yourself, use the
following procedure:
Turn off and unplug your Ultimate G. Raise the
HeadlightHood
o
21 . On the underside of the hood,
locate the horizontal slot in the center just above the
arrow. Insert a flat screwdriver in the slot and push until the
plastic lens loosens. Pop the lens off. ➤
LowertheHeadlightHood.Withyourforefingerand
thumb, gently wiggle the light bulb until it loosens.
Gently pull it out of the socket. Gently push a new
bulb into the opening. ➤
Beforeyoure-attachthelens,lookatthetwotabson
therearofthelens.Bothshouldfaceup.Insertthelens
into the lens opening and gently fit into place. ❏
Brush Roll Bristle Height Adjustment/Light Bulb Replacement
3
1
4
2

50
The Kirby Company
WHEELWEAR/REPLACEMENT
Kirby
®
wheels are made with a pliable tread that is designed
to prevent carpet wear and prevent damage to non-carpeted
floors. After extended periods of use, the tread on the wheels
will wear out and the wheels will need to be replaced.
Check wheel tread occasionally to determine if the wheels
need to be replaced. The tread material is darker in color than
the plastic wheel itself. If any of the lighter plastic wheel is
showing through the tread, the wheels need to be replaced.
The wheels are not user-replaceable. Contact your nearest
authorized Kirby Service Center for prompt, courteous wheel
replacement. ❏
CORD REPLACEMENT
If the electrical cord connecting the Ultimate G to the outlet
becomescutorfrayedovertime,DONOTUSETHEUNIT.
Contact your authorized Kirby Service Center immediately
for replacement.
Avoid damage to your cord by being careful not to run over
it with your Ultimate G. Also, unplug your unit by grasping
the plug at the end of the cord rather than pulling on the cord
itself. ❏
Operating/MaintenanceTips
Operating/MaintenanceTips
Miscellaneous Parts Replacement

51
for those who appreciate quality, reliability & performance
Operating/MaintenanceTips
Operating/MaintenanceTips
Q
WHAT IS A DOUBLE-INSULATED MACHINE? (Servicing of double-insulated appliances)
A In a double-insulated appliance, two systems of insulation are provided instead of ground-
ing. No grounding means is necessary on a double-insulated appliance, nor should a means
for grounding be added to the appliance. A double-insulated appliance is marked with the
words“DOUBLE-INSULATED”(U.S.A.andCanada).Thesymbol(squarewithina
square) may also be marked on the appliance.
Servicing a double-insulated appliance requires extreme care and knowledge of the system
and should be done only by qualified service personnel.
Replacement parts for this double-insulated Kirby
®
model must be genuine Kirby parts for
maintenance of safety and protection of warranty.
Q WHAT SHOULD I DO IF THE MOTOR DOES NOT RUN WHEN I TURN
THE ULTIMATE G
ON?
A Many service calls are unnecessary. Checking a few simple things can save a lot of cost,
time and trouble. Whenever your Ultimate G does not perform properly, make these checks
first before calling authorized service personnel.
IFTHEMOTORDOESNOTRUNWHENTHEMOTORON-OFFSWITCHISPUSHED:
1. Make sure the Power Cord is plugged into an outlet and that the outlet has power.
(Check for a blown fuse, tripped circuit breaker or power company trouble.)
2. Make sure the cord plug is fully inserted into the Ultimate G.
3. Look for breaks in the Power Cord insulation. If the cord is damaged, get a new one.
DO NOT ATTEMPT TO REPAIR IT. Use only a genuine Kirby Power Cord. Do not use
standard extension cords.
4. Make sure that an attachment or accessory is properly mounted on the front of the
Power Plant. The Ultimate G will not run without the Power Nozzle
o
25,HoseCoupling,
AirIntakeGuardorAccessoryBrushNozzleinplace.
5. The Ultimate GwillnotoperatewithouteitheraFiltrationBagAssembly/MiniEm-Tor
®
o
6 ,
AttachmentHoseorCarpetShampooTankproperlyinstalledontheAirExhaustPort
o
19 .
6. TheFiltrationBagAssembly/MiniEm-Tor,AttachmentHoseorCarpetShampooTank
must “click” firmly into place for the Ultimate G to operate. If the fitting is too tight and
you have difficulty installing the above, apply a small drop of water to the gasket to reduce
friction and ease installation.
Q WHAT SHOULD I DO IF THE ULTIMATE G
DOES NOT PICK UP LINT OR DIRT
ON THE CARPET?
A l.ChecktoseeiftheBrushRollisturning,whentheUltimate G is running.
2.IftheBrushRollisnotturningfreely,thebeltisslipping,brokenornotonthemotorpulley
o
23 .
3. If the belt is not on the pulley
o
23 , remove the nozzle and follow the instructions on pages 10
and 46. See page 48 for bristle extension.
4. If the belt is in good condition and the brush is running, check for bristle wear and replace
BrushRoll,ifnecessary.
To check for wear, turn the Power Nozzle
o
25 over and place a ruler against the Metal Rug
Plate(26).Ifthebristlesarebeloworjusttouchingtheruler,theBrushRollshouldbe
adjusted. See page 48 for details.
5. Make sure that the nozzle height is adjusted to place the brush in contact with the carpet.
Use the Toe-Touch Control
™
to adjust as appropriate. See page 7.
6. Check the bag to see if it is full.
7. Check the fill tube
o
5 for clogging.
8. Make sure the nozzle is not set too low. Raise the Toe-Touch Control one or two notches.
Questions and Answers/Troubleshooting

52
The Kirby Company
Operating/MaintenanceTips
Operating/MaintenanceTips
Questions and Answers/Troubleshooting
Q I SMELL BURNING RUBBER WHEN I USE MY ULTIMATE G WHAT SHOULD I DO?
A 1.ChecktoseeiftheBrushRollisturningwhentheUltimate G is running. If not, then the
BrushRollmaybestalledduetothreadsaroundtheends.RemoveBrushRollandmake
sure it rotates freely at both ends. See page 46.
2. The belt may not be fully engaged (or disengaged). Make sure the green arrows or red
arrowsontheBeltLifter
o
20 match up fully.
3.
Thenozzlemaybeadjustedtooclosetothecarpet.StartbypressingtheToe-TouchControl™Bottom
Pedal
o
9 all the way down, raising the front of your Ultimate G all the way up. Then,with your
Ultimate G ON, press the Toe-Touch Control Upper Pedal
o
8 , one notch at a time, until you hear a
change in the tone of the motor. This means your Ultimate G has sealed to the carpet. Press the Toe-
Touch Control Upper Pedal one more time and your power nozzle will be at the proper operating height.
4. If a slipping belt has deposited a black residue on the Motor Shaft
o
23 , remove it gently
using steel wool or sandpaper and replace the belt.
Q HOW DO I VACUUM MY MATTRESS?
A l. Remove all bedding, including mattress cover, from the mattress.
2. Convert your upright Ultimate G to a Portable Cleaner. See “Portable Cleaning” on page 15.
3. Place Portable Cleaner on the mattress.
4. Disengage TechDrive
®
by pressing the gray “N” side (marked “N” for Neutral) of the
N/DPedal
o
11 .
5. Plug in your Ultimate G and turn it ON.
NOTE: On delicate mattress surfaces, you may want to convert to straight suction by
disengagingtheBrushRoll.Seepage16.(Ifyourmattresshastuftedbuttonsonthe
surface,avoidcontactwiththerevolvingBrushRoll.)
6. Lower the Power Nozzle by pressing the Toe-Touch Control Upper Pedal
o
8 until it is
all the way down.
7. WithyourhandonthePortableHandle
o
15 , engage TechDrive by pressing the yellow
“D”side(marked“D”forDrive)oftheN/DPedal
o
12 .
8. Beginvacuuming.
Q HOW DO I VACUUM MY CARPETED STAIRS?
A There are several different ways. You can use:
•thePortableCleaner
•theZippbrush
™
•ortheUpholsteryNozzle
To vacuum the carpeted stairs in the portable cleaning mode (with the Power Nozzle
o
25 attached):
1. Convert your upright Ultimate G to a Portable Cleaner. See “Portable Cleaning” on page 15.
2. Disengage TechDrive
by pressing the gray “N” side (marked “N” for Neutral) of
theN/DPedal
o
11 .
3. Plug in your Ultimate G.
4. Place Portable Cleaner on a carpeted step.
5. Turn your Ultimate G ON.
6. Starting with the Power Nozzle
o
25 on the highest setting, lower the Power Nozzle by
pressing the Toe-Touch Control Upper Pedal
o
8 one notch at a time until you hear a
change in the motor’s tone. Now, drop it one more notch.
7. Grip the handle with one hand and begin vacuuming. If necessary, hold your free hand
under the rear of the power plant for balance.
IMPORTANT: Always exercise caution when vacuuming stairways.

53
for those who appreciate quality, reliability & performance
Operating/MaintenanceTips
Operating/MaintenanceTips
Q HOW DO I VACUUM MY UPHOLSTERED FURNITURE?
A 1.Convert to a canister. See page 18. (Do not use Power Nozzle
o
25 on furniture.)
2. UsetheAttachmentHosewithorwithoutthefollowingattachments:
•theUpholsteryNozzle.
•theCreviceToolwiththebrushremoved.(Useinbetweenseatcushionsandincrevices.)
•theoptionalZippbrush™.
The optional Zippbrush uses rotating brushes to agitate fibers and remove imbedded dirt and
pet hair from the fabric. When using the Zippbrush, move it slowly from side to side across
surface. Do not apply heavy pressure as it will slow the brush action. (If the brush becomes
jammed and stops turning, simply rotate the inner rotating brush clockwise to free it up and let
go. It should then resume turning.)
To clean hard-to-reach upholstery buttons, use narrow tip of the Zippbrush, located on the side
opposite the hose, to work the dirt loose. (For additional information on the use and mainte-
nance of the optional Zippbrush, see the Zippbrush section on page 43).
Q HOW DO I CLEAN MY WALLS AND CEILING?
A 1. Convert to a canister. See page 18.
2.AttachoneortwoExtensionTubestotheAttachmentHosebyinsertingthehoseintothe
Extension Tube opening and twisting to lock in place.
3. Attach the Suction Control Grip onto the end of the Extension Tube.
4. AttachtheWall&CeilingBrushtotheendoftheSuctionControlGrip.TheSuction
Control Grip not only allows you to regulate airflow, it also allows you to adjust the Wall
&CeilingBrushtotheproperanglesformantles,windowledges,wallsandceilings.
Q HOW DO I CLEAN MY CAR?
A Your Ultimate G comes equipped with a range of tools to help you clean your car. In addition,
you may also use the optional Zippbrush for vacuuming automobile upholstery, carpeting, floor
mats and trunks. (See Zippbrush section on page 43 for Zippbrush use and maintenance
information.)
1. Convert to a canister. See page 18.
2. YoucanusetheendoftheAttachmentHoseforstraightsuctionorattachanyoneof
a variety of tools.
3. We suggest using the Upholstery Nozzle (or optional Zippbrush) to clean the seats, areas
under the seats and the trunk.
4. Use the Crevice Tool (with or without the small Crevice Tool brush end) for small,
hard-to-reach areas, such as the area between the windshield and dash and the area
between the seats.
5. UsetheDusterBrushtocleantheinstrumentpanel.
6. Use the Massage Cup to pick up gravel and heavy particles on floor mats and carpeting.
Questions and Answers/Troubleshooting

54
The Kirby Company
Q HOW DO I CLEAN OTHER HOME FURNISHINGS?
A Books and Bookcases:
1. Convert to a canister. See page 18.
2. AttachtheDusterBrushtotheendoftheAttachmentHoseand“dust”thebooksandbookcase.
3. OtheroptionsincludeusinganExtensionTubewiththeDusterBrushortheWall&
CeilingBrushtodustthebookcasetop.
Lampshades and Pictures:
1. Convert to a canister. See page 18.
2. AttachtheDusterBrushtotheSuctionControlGrip.ThenconnectthegriptotheAttachment
Hose.TesttheairflowbyregulatingtheSuctionControlValveontheSuctionControlGrip
before you dust your lampshades. Dust glass-covered artwork and picture frames.
Stereos and Computers:
1. Convert to a canister. See page 18.
2. AttachtheDusterBrushtotheSuctionControlGrip.Thenconnectthegriptothe
AttachmentHose.Testtheair-flowbyregulatingtheSuctionControlValveontheSuction
Control Grip before you dust your home electronics.
3. ConnecttheInflator/DeflatortooltotheendoftheAttachmentHosetodustbetweenthe
keys on a computer key board, faceplates on electronic gear and other hard-to-reach
small spaces.
Wicker Furniture and Baskets:
1. Convert to a canister. See page 18.
2.AttachtheDusterBrushtotheendoftheAttachmentHose.YourDusterBrushworkswell
between cracks and crevices on wicker and other irregular surfaces.
Drapes and Blinds:
1. Convert to a canister. See page 18.
2. Fordrapes,attachoneortwoExtensionTubestotheAttachmentHose.Connectthe
Suction Control Grip to the Extension Tube and then connect the Upholstery Nozzle (with
the faceplate attached). Test the air-flow by regulating the Suction Control Valve on the
Suction Control Grip before you dust your drapes and blinds.
The Suction Control Valve on the Suction Control Grip regulates airflow and prevents you
from pulling the drapes off the curtain rods.
Forblinds,followasimilarprocedureusingtheDusterBrushinsteadoftheUpholstery
Nozzle. If using the Suction Control Grip, make sure to completely close the Suction Control
Valve to maintain maximum airflow.
Q WHAT SHOULD I DO IF MY BAG SMELLS?
A Change it. Replace the bag when the dirt reaches the fill line. Do not overfill. Once the bag
is changed, roll your Ultimate G to an open area, put it in Neutral and turn it ON. Let it run in
Neutral for five minutes with the clean bag installed.
Make sure the Power Nozzle
o
25 is raised to its highest level by pressing the Toe-Touch
Control
TM
BottomPedal
o
9allthewaydown.DisengagetheBrushRollbyflippingoutthe
L-shapedhandleontheBeltLifter
o
20.UseittoturntheBeltLifterallthewaytotheleft
(counter-clockwise).
1. You may also purchase Odorific
®
II, an odorizer that leaves your room smelling clean and
fresh.PlaceafewdropsonacottonballandtossitintheOuterPermanentBag.Foralist
of other fine Kirby
®
products, see page 56 and 57.
Operating/MaintenanceTips
Operating/MaintenanceTips
Questions and Answers/Troubleshooting

55
for those who appreciate quality, reliability & performance
Your local authorized distributorship is available to answer any questions
regarding your purchase or the operation of your Kirby
®
HomeCareSystem.
The Kirby Company also has Consumer Relations Specialists available to
answeranyquestionsyoumayhaveabouttheKirbyHomeCareSystemor
provide you with the name of your nearest Kirby distributor.
You can contact Consumer Relations by:
e-mail [email protected]
telephone 1-800-494-8586
fax 216-529-6146
mail Consumer Relations
1920 West 114
th
Street
Cleveland, Ohio 44102
Our office hours are 8:00 a.m. to 5:00 p.m. Eastern Time, U.S.A.
Monday through Friday.
Consumer Relations
Consumer Relations
Got a Question? Need Assistance?

56
The Kirby Company
Kirby
®
HomeCareProducts
Kirby
®
HomeCareProducts
From Your Factory Authorized Distributors and Service Centers
CARPET SHAMPOO PRODUCT FAMILY
Carpet Shampoo
Highlyeffectiveproductfordeep-cleaningcarpetsandrugs.Carpet-safeandnon-toxic.
ContainsKIRBYGUARD,auniqueanti-resoilingingredient.Availablein12-oz.,32-oz.
and one gallon sizes.
Multi-Purpose Spot Remover
Ready-to-useformulaforeverydaystains.Justsprayonstainandblotwithaclean,white
cloth.Greatforusepriortoshampooing;noneedtoblot!Availablein12-oz.and22-oz.sizes.
Pre-Treatment for Heavy Traffic Areas
Highlyeffectiveformulagivesyoua“headstart”onshampooing.Justsprayonheavily-soiled
walkways, entryways and traffic patterns a few minutes prior to shampooing. Available in
12-oz. and 22-oz. sizes.
Carpet Cleaning Kit
The perfect partner for your carpet! Everything you need to deep-clean your carpets in three
easy-to-use products. One quart of Carpet Shampoo and one 12-oz. bottle each of Spot
Remover and Pre-Treatment. All three products yield best results when used in combination.
STAIN REMOVER PRODUCT FAMILY
Stairway Cleaner
Effectiveonheavily-soiledcarpetedstairsandotherhard-to-reachplaces.Justsprayandblotto
remove the toughest stains. Great for auto and home floor mats! Available in 12- and 22-oz. sizes.
Pet Stain & Odor Carpet Cleaner
Attacks nasty pet stains and odors with natural enzymes. Active ingredients get right to the
core of carpet’s fibers, ensuring that lingering odors are eliminated and that pets won’t return
to the same spot. 22-oz. spray bottle.
Grease & Oil Stain Carpet Cleaner
Penetrates and removes the toughest stains with a solvent ingredient... auto grease, garage and
cookingoilsandmore.Justsprayandblot.22-oz.spraybottle.
Food Stain Carpet Cleaner
Specially formulated cleaner with natural enzyems that work to break the chemical bonds of
tough food stains, grape juice, red wine, chocolate, ketchup and more. 22-oz. spray bottle.

57
for those who appreciate quality, reliability & performance
Kirby
®
HomeCareProducts
Kirby
®
HomeCareProducts
From Your Factory Authorized Distributors and Service Centers
HARD SURFACE PRODUCT FAMILY
Scuttle
®
Glass & Surface Cleaner
AtraditionalKirbyfavorite;greatforhardsurfacessuchasfloors,walls,countertops,
appliances as well as windows, mirrors and more. Dries to a streak-free shine. 22-oz. spray bottle.
Scuttle
2
Antibacterial Kitchen & Bath Cleaner
Cleans, deodorizes and disinfects. Kills bacteria, mold and mildew. One product is all you
need for your entire kitchen and bathroom. 22-oz. spray bottle.
Citrus Scuttle
Heavy-dutycleanerforalltypesofindoorandoutdoorsurfaces.Dissolvesgum,lipstick,
blood, crayon, grease and oil, tape, tar or anything you thought you couldn’t remove. 22-oz.
spray bottle.
HOME FRAGRANCE PRODUCT FAMILY
HomeFresh Room and Carpet Freshener
Leavescarpetsandroomssmellingpleasantlyfreshwhileeliminatingodors.Justsprinkleon
carpets and vacuum after a few minutes. Available in 5 fresh fragrances: Original Citrus,
Lemon, Pine, Springfresh and Cinnamon. 16-oz. bottle
Odorific
®
II
All-purpose liquid deodorizer. Great for areas with foul odors like trash cans and damp corners.
A few drops is all you need. Also, a few drops are great for deodorizing your Kirby’s outer cloth
bag. Fresh fragrance lingers for many hours.
OTHER FINE KIRBY PRODUCTS AND SUPPLIES
Disposable Filter Bags
Use only Genuine Kirby Bags for maximum efficiency and filtration. Available in convenient
three-, six- and nine-packs.
Replacement Belts
Maintain peak efficiency. For use with Power Nozzle, Carpet Shampoo Nozzle and Floor
BufferNozzle.
Miracle Waxer
®
Keep your hard surface floors looking great. Features an easy-to-use rolling applicator and
carnauba wax cartridge. Your Kirby’s buffer brush does the rest!
Split Second
®
This cordless portable hand vacuum can be used where cord-type cleaners cannot reach.
Comes complete with handy re-charging unit so it’s always ready for use.
Split Second 2
®
The twelve-volt automotive version of the popular Split Second portable hand vacuum plugs
into a standard cigarette lighter. Perfect for cars, boats, campers and recreational vehicles.
Contact Your Factory Authorized Location for these and other Kirby Home Care Products.

58
The Kirby Company
Index
Index
A
About this Manual ............4
Accessories
................29
Accessory Lock
.............18
Air Intake Guard
............22
AttachingBar...............18
Attachments
................19
AttachmentHose.........18
Crevice Tool ............20
DusterBrush ............20
Extension Tubes .........19
Inflator/Deflator
.........23
Massage Cup ............21
Suction Control Grip ......21
Upholstery Nozzle........20
Wall&CeilingBrush .....20
B
Bag
Assembly-removal ...... 10
BagReleaseButton .......15
BagSupportStrap ....... 10
ChangingBags .......... 9
DisposableFilterBags .... 9
OuterPermanentBag .... 10
Top Adaptor............. 9
Belts
ChangingBelts ..........46
ReplacementBelts........57
BeltLifter................. 10
Blower
set-up ..................21
using ..................23
BrushRoll
adjusting for
optimum performance .....48
height adjustment ........48
indicator light ........... 11
C
Canister Cleaner.............17
Carpet Fluffer
...............40
Carpet Shampoo System
......30
BeltLifter ..............30
cleaning ................33
replacing the belt .........35
set-up ..................30
Suds Control Valve .......32
tray....................30
using ..................32
Carrying your machine
........7
Cleaning products
...........56
Crevice Tool
................20
D
DisposableFilterBags .......9,57
DusterBrush ...............20
E
Extension Tubes ............. 19
F
FloorBuffer . . . . . . . . . . . . . . . . 38
Belt
...................38
set-up ..................38
using ..................39
G
Getting Started ...............6
H
Handle
AttachingPortableHandle . 15
HandleTiltLatch.......... 7
HandleReleaseButton ....15
removingUprightHandle ..15
HardFloorPad..............15
I
Inflator/DeflatorTool.........23
K
Kirby
®
Carpet Shampoo ....31,56
M
Maintenance tips ............45
Massage Cup
...............21
Mattress cleaning
............16
Mini Em-Tor
®
-emptying
..... 10
Moving your machine
......... 7
O
Operating Tips ..............45
Optional Accessories
.........29
Owner’s Manual-using
.........4
P
Portable Cleaner.............15
PortableHandle .............15
Portable Shampooer
set-up ..................26
using ..................27
Portable Sprayer
adjusting spray ..........25
cleaning ................25
Dip Tube ...............25
Jar
..................24,25
reassemble ..............26
set-up ..................24
spray opening ...........26
using ..................24
Power Nozzle
changing the belt .........46
disengagingBrushRoll ....14
height setting ............ 8
lowering................ 8
raising ................. 8
removal ................18
Rug Plate ...............46
BrushRoll ..............46
Power Switch
...............13
Q
Questions&Answers.........51
R
ReplacementBelts ........... 57
S
Safety Instructions ........... 2
Straight Suction Cleaning
.....14
Suction Control Grip
.........21
Surface Nozzle
..............19
T
Table of Contents ............ 3
TechDrive
®
description .............. 8
ON/OFFPedal........... 8
Turning off ............. 8
Turning on.............. 8
Tilt Latch
.................. 7
Toe-Touch Control
TM
........ 7
Turbo Accessory System
TM
...41
clamp levers ............41
Dust Shroud.............42
massage ................43
polishing ...............43
rear clamp ..............42
sanding ................42
scouring ................43
set-up ..................41
U
Upholstery Nozzle ...........20
Upright Cleaner
.............13
UprightHandle-removing .....15
Z
Zippbrush
TM
Turbine ................44
cleaning ................44
OuterBrushRing ........43
using ..................43
The wires in the main lead are coloured in accordance with the following code:
Blue
...............................NeutralBrown...............................Live
As the colours of the wires in the mains lead of this appliance may not correspond with the coloured marking identifying the
terminals in your plug, proceed as follows:
WARNING: DO NOT connect either wire to the terminal marked “E” or with the earth symbol. No wire is connected to
this terminal. The wire which is coloured Blue must be connected to the terminal which is marked with the letter N or
colouredblack.ThewirewhichiscolouredBrownmustbeconnectedtotheterminalwhichismarked withtheletterLor
colouredred.IfaU.K.:13A(BS1363)plugisused,fita5Afuse.Foranyothertypeplug,protectwitha5Afuseorfusewire
in the adaptor or distribution board. If the plug does not fit the sockets in the user’s house, it should be cut off and safely dis-
posed of and the correct plug fitted.
The Ultimate G series
™
ModelG7EisapprovedbytheBritishElectrotechnicalApprovalsBoard(BEAB).
Warning: There is a shock hazard if a plug that has been cut from the
supply cord is inserted in a 13A socket outlet. Any
replacement fuse in the plug must be an ASTA approved
BS13625AfuseintheU.K.
Warning: If the fuse cover is removable, never use the plug with the
fuse cover removed.
The following information need only apply when changing plugs on Ultimate G’s that are used in the
U.K., Australia, South Africa and New Zealand.
IMPORTANT
Ifsupplycordisdamagedandneedstobereplaced,thereplacementpartnumberis:890801-Australia/NewZealand;
890901-ContinentalEurope;890701-SouthAfrica;890601-UnitedKingdom;192001-U.S.A.;
P/N 260001 Rev. B - U.S., Canada and U.K. Printed in U.S.A. ©2002 The Scott Fetzer Company

59
for those who appreciate quality, reliability & performance
CE DECLARATION OF CONFORMITY
We declare under our sole responsibility that, where applicable,
the Model G7E vacuum cleaner is in conformity with the
following standards or standardized documents.
EN 55 014, EN 60 555, EN 60 335-1 and EN 60 335-2-2
inaccordancewiththeregulations73/23/EEC,93/68/EEC
CE 95
KIRBY
®
1920 West 114
th
Street
Cleveland,OH44102
U.S.A.
Made under one or more of the following patents and design registrations,
other patents and design registrations pending.
United States
4514199
4573235
4692754
4728942
4733532
4877432
4905343
4947512
5007133
5014387
5047597
5057131
5064455
5086536
5092915
5115537
5187832
5285550
5308288
5335740
5573369
5713810
5784750
5792224
D392779
D396902
Canada
1271006
2016600
2036739
Australia
582715
610422
616833
633948
640711
661597
Austria
0233933
Belgium
0233933
Benelux
0233933
Denmark
Dansk
Mønsterregistering
Nr. Mr 0679 1991
France
0233933
Germany
Geschütztes Muster
M9002507.5
P3650439.4-08
68916013.5
Italy
0233933
Japan
1997813
2011083
Luxembourg
0233933
Mexico
175879
Netherlands
0233933
New Zealand
236192
Norway
169940
175085
South Africa
S.A.PatentNo.90/5400
S.A.PatentNo.93/5427
South Korea
75716
081950
Sweden
0233933
Switzerland
0233933
United Kingdom
U.K. Patent 0233933
U.K. Patent 0399031
U.K. Patent 2229651
U.K. Reg. 2005900

60
The Kirby Company
Accessories and Attachments
Accessories and Attachments
NOTE: View inside rear cover.
No. Part Recommended Uses
27 Carpet Shampoo System Shampoo your carpet.
28 Floor Care System Floor buffer for wood or tile floors. Carpet fluffer to
reset the nap on a matted-down carpet.
29 HardFloorPad Dustbarefloors.
30 Kaddy Storage of accessories.
31 Portable Sprayer Attach onto attachment hose with unit in blower mode
only to apply water-based, non-flammable liquids.
32 PortableHandle Totransformunitfromuprighttoportablepositionby
removing upright handle and inserting portable handle.
Aids in cleaning of carpeted stairs and mattress cleaning.
33 Portable Shampooer Cap Attach onto portable sprayer with unit in blower mode
to apply Kirby
®
Carpet Shampoo for spot cleaning.
34 MassageCup Skin/scalpmassageandtocleanthefloorsofcars.
35 Inflator/DeflatorTool Withunitinblowermode,usetoinflatetoys,air
mattresses or other low-pressure inflatable items up to
1 p.s.i. With unit in canister mode, use to deflate objects.
36 DusterBrush Withorwithoutextensiontubesoncontouredor
irregular surfaces.
37 Upholstery Nozzle Upholstered furniture, carpeted stairs, clothing and
vehicle interiors.
38 Suction Relief Drapes and delicate upholstery.
Upholstery Panel
39 WallandCeilingBrush Walls,ceilings,drapesandothersurfaces.
40 Suction Control Grip
Use when needing to control amount of suction such as
drapes and delicate lampshades. Use with or without
extension tubes.
41 Extension Tubes Extend reach and use with other tools.
42 AttachmentHose Convertfromuprighttocanisterorblowermode.
43 ReplacementBelt Emergencybackupsupply.
44
Crevice Tool with Without brush, use on cracks, crevices, corners, grooves
RemovableBrush andnarrowopenings.Withbrushuseoncorners,button
tufts, between radiator coils and sliding window tracks.
45 Surface Nozzle
Barefloors,surfacecleaningcarpetsandunderlowfurniture.
46 Air Intake Guard Place on front of unit to convert unit into a blower.
47 Zippbrush
™
Upholstery,carpetedstairs&automotiveinteriors.
48 Turbo Accessory System
™
Sander,Buffer,Scouring,Massaging.
49 Miracle Waxer
®
ForHardwood,Vinyl,CorkandLinoleumfloors.
Apply with roller waxer applicator.
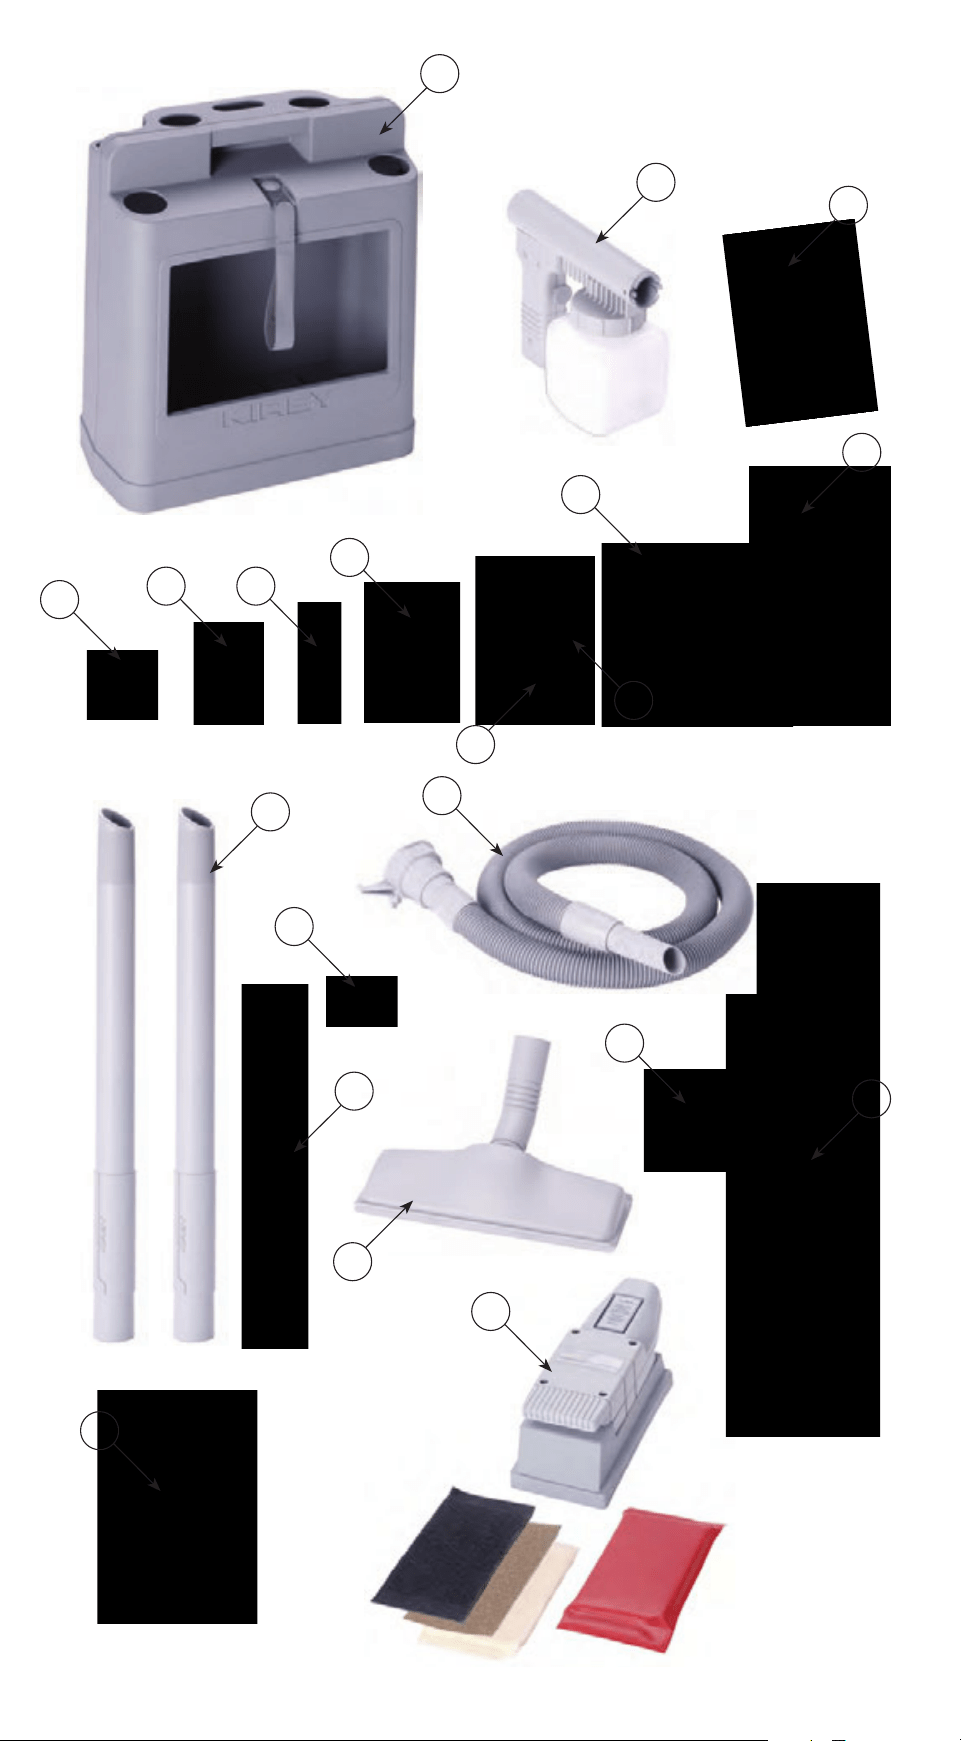
31
40
49
41
44
32
30
33
43
47
48
46
45
42
34 35
36
37
38
39
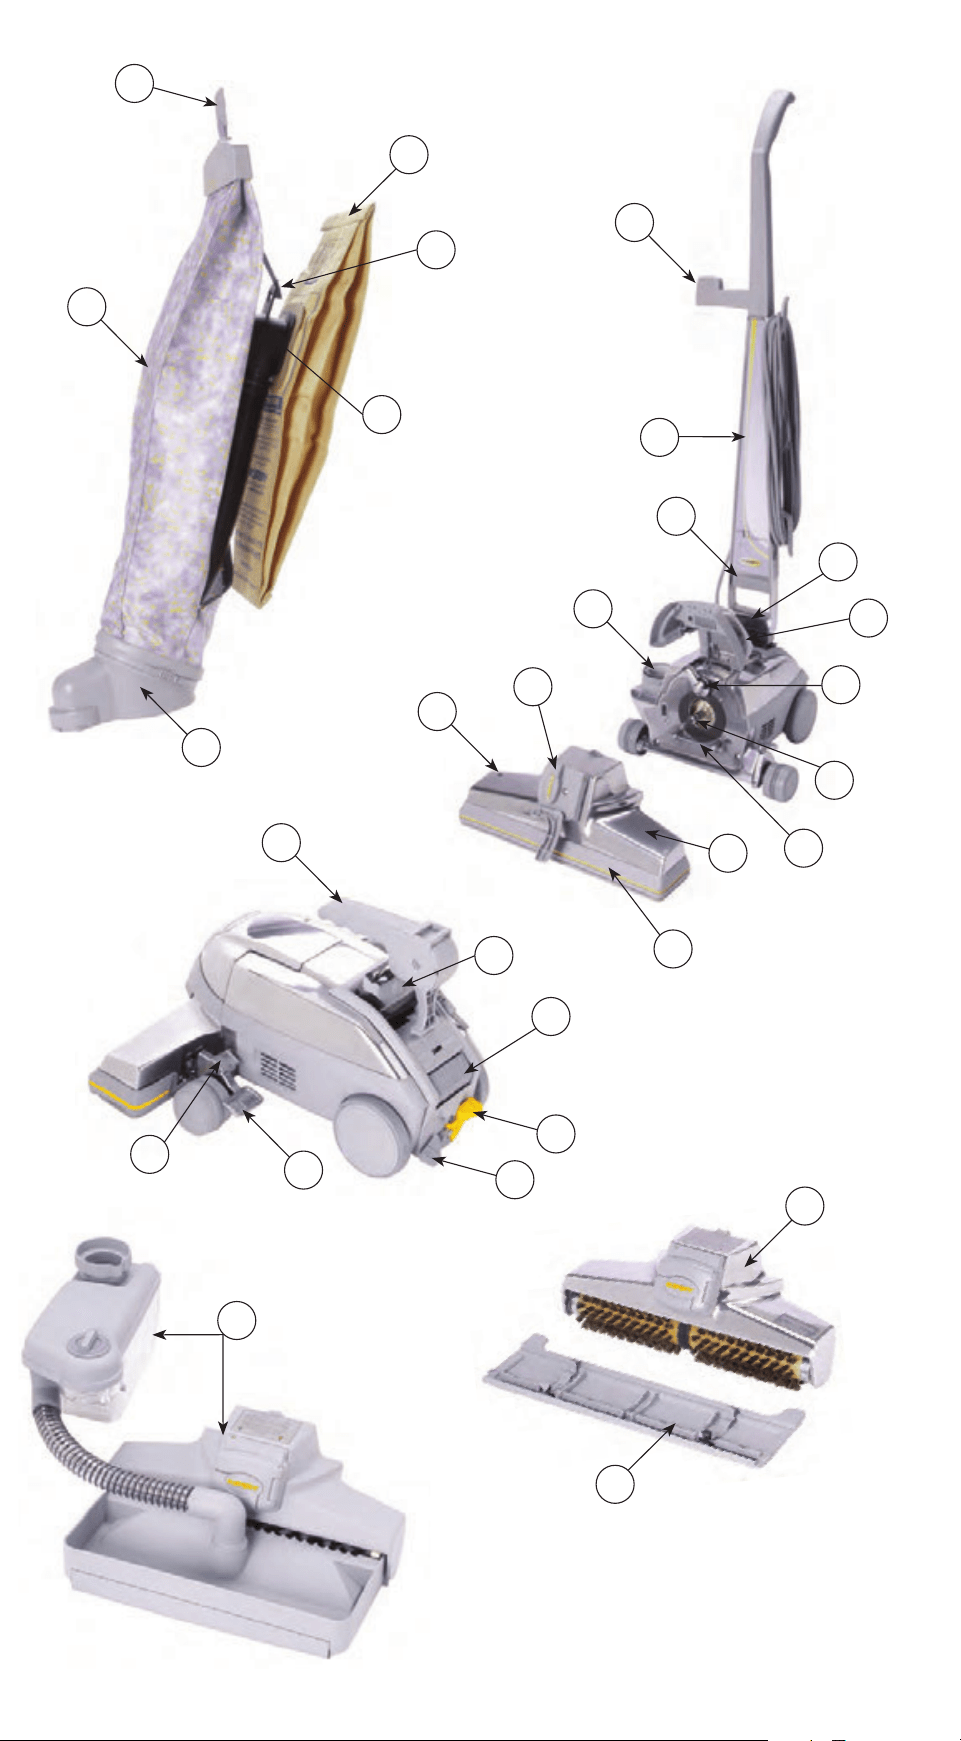
27
28
2
12
25
11
4
8
5
3
1
16
19
18
17
21
22
7
20
15
14
13
10
26
6
24
23
9
29

F
or those who a
pp
reciat
e
Q
uality, Reliability & Performanc
e
For assistance, contact your local Authorized Distributor.
Kirby
®
, a division of The Scott Fetzer Co., 1920 West 114
th
Street, Cleveland, OH 44102,
U.S.A.
www.kirby.com