
COYOTE OUTDOOR LIVING, INC.
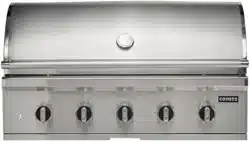
SL-Series
FOR OUTDOOR USE ONLY
IMPORTANT: Read all instructions and warnings carefully before using this product.
Like any outdoor grill, using this product involves potential risks from high
temperatures and exposure to smoke and fumes. Please exercise caution and
common sense to ensure safe operation.
• For the Installer or Assembler: Leave this manual with the grill for the consumer's future
reference.
• For the Consumer: Retain this manual for future reference as it contains essential warnings and
instructions.
Coyote Stainless Steel Gas Grill
Use & Care Manual
Conforms to ANSI STD Z21.58
Certified to CSA STD 1.6 Outdoor Cooking Gas Appliances
CSA/ANSI Z21.58:22
·
CSA1.6:22 0utdoor Cooking Gas Appliances
C3CL36
C3C34
C3CL42
C3SL36
C3SL42
C3SL30
4004477

V 1.0
1
Welcome & Congratulations!
Congratulations on purchasing a Coyote Outdoor Living Gas Grill. You have chosen a high-quality,
innovative, and stylish product from a company dedicated to enhancing your outdoor cooking
experience. We are thrilled to welcome you to the Coyote family!
Get Started
• Register Your Grill: Please register your grill at www.CoyoteOutdoor.com. Registration
ensures you receive updates and personalized support for your grill.
• Need Assistance: If you have any questions, please call our Customer Support Team at 855-
520-1559. We are here to help.
Read, Save, and Follow the Instructions
For optimal performance and longevity of your grill:
• Carefully read this manual to understand how to install, operate, and maintain your grill.
• Always obey all warnings and instructions outlined in this manual.
This manual provides specific operating instructions for your gas grill model. While it covers most
scenarios, applying common sense and exercising caution when installing, using, or maintaining your
appliance is essential.
Need a Replacement Manual?
1. Download a replacement at www.CoyoteOutdoor.com
2. Contact Customer Support at 855-520-1559 for assistance.
Thank you for choosing Coyote Outdoor Living. We are confident you will enjoy cooking with your new
gas grill for years!
Welcome to the Coyote family!
V 1.0
2
Contents
Important Warnings and Safety Instructions ......................................................................................... 3
Limited Warranty ................................................................................................................................... 5
Grill Models ............................................................................................................................................ 7
Locating the Grill .................................................................................................................................... 8
Gas Requirements ................................................................................................................................ 11
Liquid Propane (LP) Gas Guidelines ................................................................................................. 11
Natural Gas (NG) Guidelines ............................................................................................................ 14
Operating the Grill ............................................................................................................................... 17
Care and Maintenance ......................................................................................................................... 23
Troubleshooting your Grill ................................................................................................................... 25
Parts Listing .......................................................................................................................................... 27
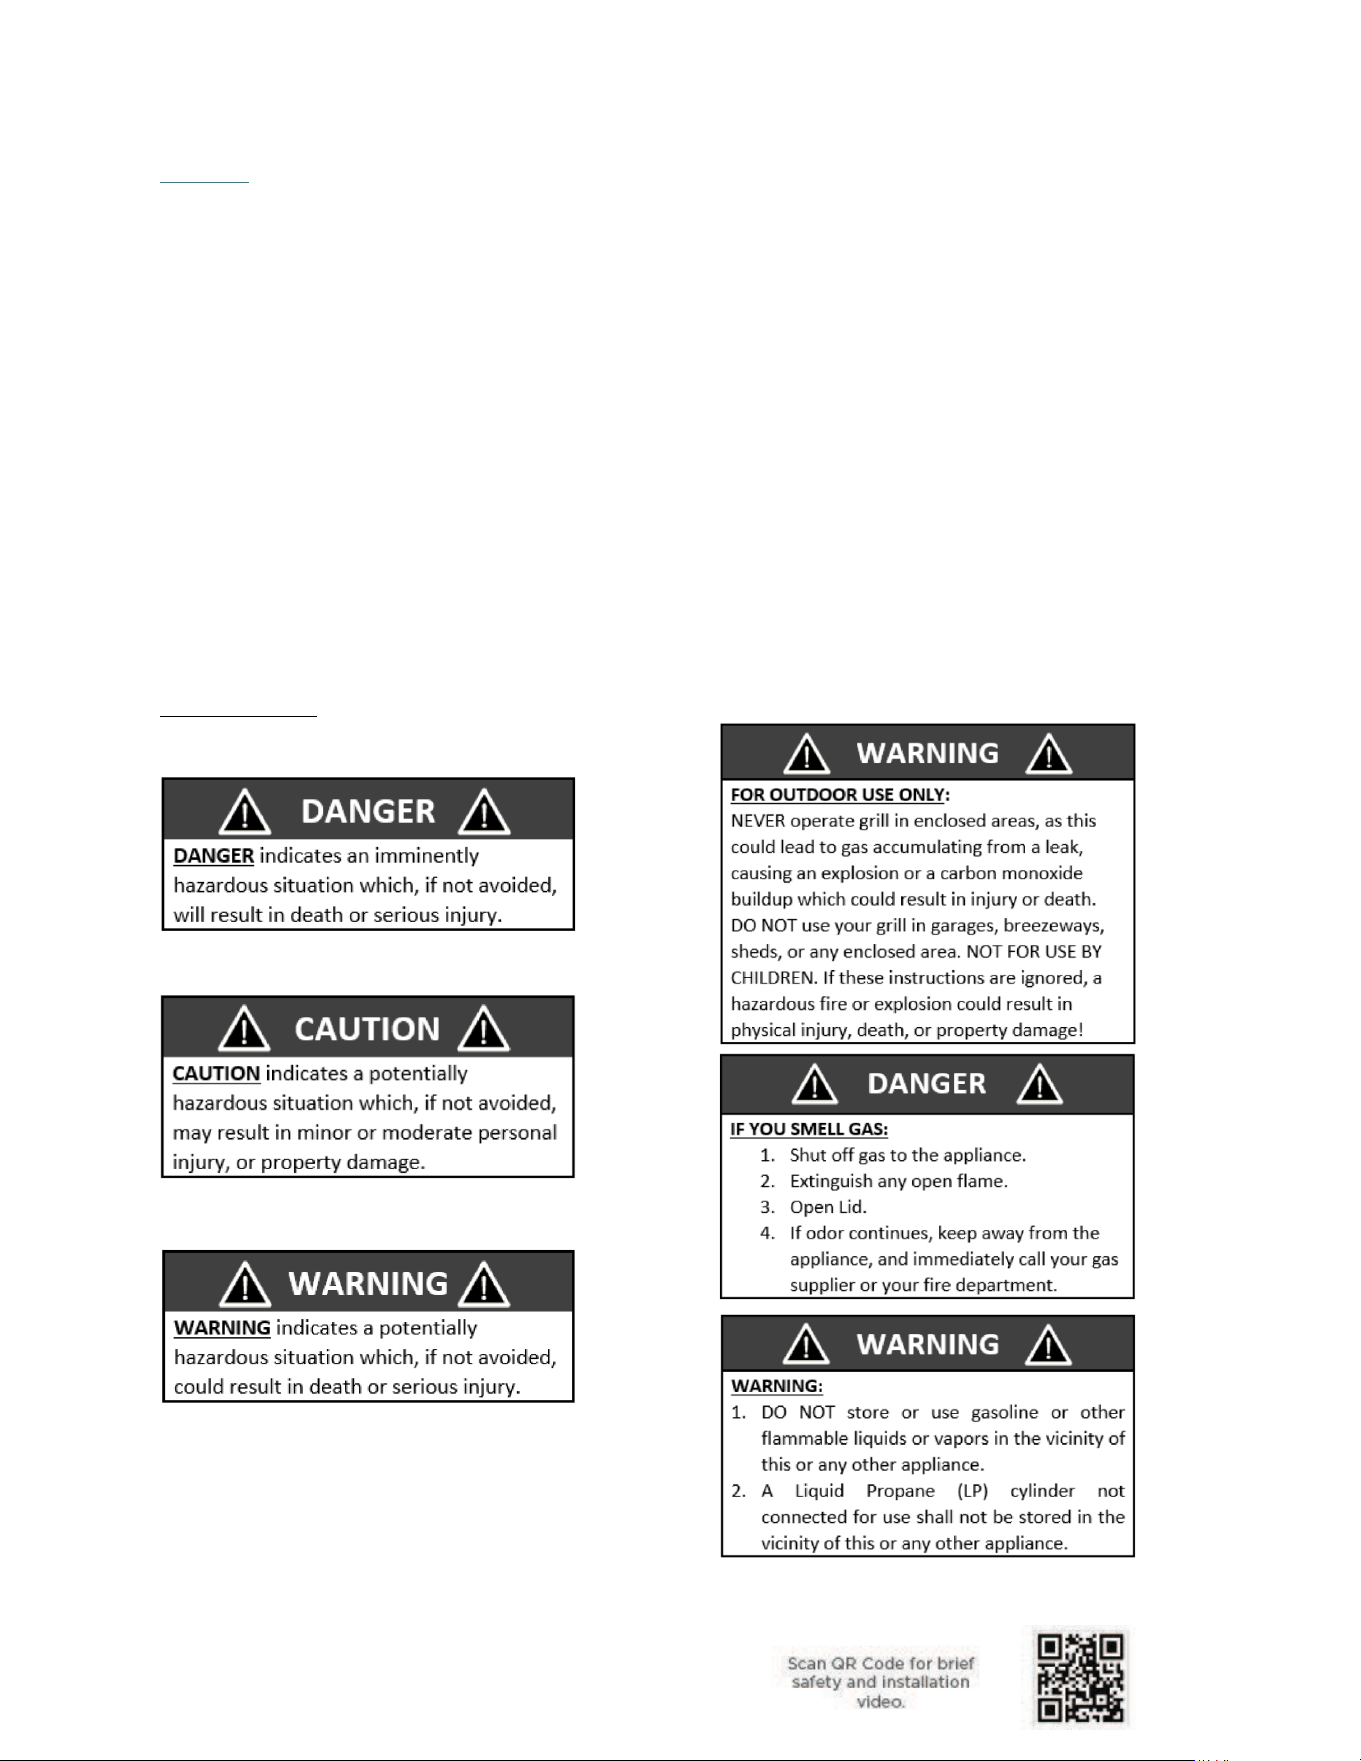
Safety Symbols
V 1.0
3
General Safety Instructions for Coyote Grills
Intended Use
• Coyote grills are designed exclusively for outdoor use and must not be used indoors or in
enclosed spaces such as garages, sheds, or breezeways.
• These grills are intended for residential use by the original purchaser (homeowner) and are
unsuitable for commercial applications.
• Do not install the grill on recreational vehicles, portable trailers, boats, or any other moving
installation.
Fire and Explosion Prevention
• Ventilation and Combustion: Use the grill only in open areas with good ventilation to prevent
toxic fume buildup, fire, or explosion. Never obstruct airflow or ventilation.
• Keep Area Clear: Maintain a clean area around the grill, free from flammable liquids and
materials such as cleaning fluids, gasoline, or lighter fluid.
• Wind Conditions: Avoid using the grill in windy conditions. Use a windbreak if it is in a windy
area (e.g., oceanfront or mountaintop). Adhere to clearance guidelines.
• Gas Compatibility: Never use natural gas in a grill designed for liquid propane or vice versa.
• Drip Tray Usage: Always grill with the drip tray properly in place to prevent grease fires or
explosions.
Burn and Injury Prevention
• Supervision: Never leave the grill unattended while in use.
• Child and Pet Safety: Keep children and pets away from the grill, especially when it is hot.
• Burn Hazards:
o Avoid leaning over an open grill, as heat and steam can cause burns.
o Wear appropriate clothing (avoid loose or flammable fabrics) and use heat-resistant
gloves when handling hot surfaces.
o Open the grill hood slowly to allow heat and steam to escape.
• Grease Fires: Never attempt to extinguish a grease fire with water.
• Use an ABC fire extinguisher to put out flames.
• Handling Grease: Allow grease to cool before handling or disposing.
• Regularly clean the drip tray to prevent grease buildup.
Gas and Leak Safety
1. Leak Testing: Only use the grill once a leak test has been completed.
2. Gas Connections: Turn off the LP cylinder valve and control knobs when the grill is not in use.
3. Keep gas supply lines as short as possible and correctly connect them.
4. Gas Cylinder Storage: Never store a spare gas cylinder under or near the grill.
1. Ensure gas cylinders are stored upright and away from heat sources or enclosed areas.
5. Unregulated Gas Lines: Never connect an unregulated gas line to the grill, as it can cause
excessive heat, fire, or damage.
Important Warnings and Safety Instructions
Improper installation, adjustment, alteration, service, maintenance or
use can cause injury or property damage. Read the installation, operating and maintenance
instructions thoroughly before installation or servicing of this equipment.
V 1.0
4
Operation and Maintenance
• Use Only Approved Accessories.
• Do not use lighter fluid or other accelerants in a gas grill.
• Electrical Safety: Keep electrical cords away from water and hot surfaces.
• Use only a Ground Fault Interrupter (GFI)-protected circuit for outdoor cooking appliances.
• Moving the Grill: Never move it while it is hot or in use.
• Container Safety: Never heat unopened glass or metal containers on the grill, as pressure
buildup may cause the container to burst.
• Regular Maintenance: Inspect the grill regularly for grease buildup, leaks, or signs of wear.
• Only a qualified technician should perform repairs or replacements.
Emergency Procedures
• Burner Outages: If a burner goes out, turn all control knobs to the OFF position, fully open the
hood, and let the grill air out before attempting to relight.
• Fire Precautions: Always have an ABC fire extinguisher nearby and accessible when using the
grill.
Additional Guidelines
• Alcohol and Drug Use: Never operate the grill under the influence of drugs or alcohol.
• Clearance Requirements: Adhere to clearance guidelines specified in the user manual to
ensure proper ventilation and safe operation.
• Proper Shutoff: Turn off the LP cylinder tank valve and ensure all control knobs are in the OFF
position after use.
Key Reminders
• Keep the grill in a well-ventilated outdoor area, free of combustible materials.
• Never leave the grill unattended while cooking.
• Follow all maintenance and safety guidelines to ensure safe and optimal operation.
DO NOT RELY JUST ON THIS SAFETY SECTION. USE CAUTION AND COMMON SENSE AT ALL TIMES.
PLEASE READ THE REST OF THIS MANUAL CAREFULLY FOR OTHER IMPORTANT SAFETY WARNINGS.
CALIFORNIA PROPOSITION 65 - WARNING: This product can expose you to Carbon Monoxide, which is on the
list of substances known by the state of California to cause cancer, birth defects or reproductive harm. For
more information go to: www.p65warnings.ca.gov. California law requires businesses to warn customers of
potential exposure to such substances. To minimize exposure to these substances, always operate this unit
according to the Use and Care Manual, ensuring you provide good ventilation when cooking with gas.
V 1.0
5
Coyote Outdoor Living, Inc. Limited Warranty
General Terms
To the maximum extent permitted by law, this Limited Warranty and the remedies outlined herein are
exclusive and supersede all other warranties, whether oral or written, express or implied. Coyote
Outdoor Living, Inc. expressly disclaims any implied warranties, including but not limited to warranties
of merchantability and fitness for a particular purpose.
This warranty is provided to the original purchaser at the original delivery site with proof of purchase and
applies only to residential use. The warranty covers defects in workmanship and materials under regular
residential use for the specified periods outlined below. It is non-transferable and does not apply to any
grill used in a commercial setting. Surface corrosion, scratches, discoloration, and other cosmetic
issues arising from regular use are explicitly excluded.
Warranty Coverage Periods
Lifetime (no rust or burn-through)
• Cooking Grids
• Heat Control Grids
• Stainless Steel Frame/Housing
• Stainless Steel Burners
One Year
• Ignition Systems/Valves
• Electric/Plastic Components
Coyote's Obligations
Coyote Outdoor Living, Inc. will repair or replace defective components at its discretion during the
warranty period. Replacement or repair is the exclusive remedy under this warranty. Liability under this
warranty is limited to the cost of the replacement part or repair. Labor and labor-related charges are
not covered, and customers are responsible for shipping and handling fees for replacement parts.
Exclusions
This Limited Warranty does not cover:
Normal wear and tear or damage caused by:
• Misuse, negligent use, or abuse of the product.
• Improper fuel/gas supply.
• Failure to follow operating instructions.
• Alterations by anyone other than a factory-authorized technician.
Cosmetic issues, including but not limited to:
• Scratches, dents, corrosion, or discoloration due to weather, heat, abrasive cleaners,
chemical exposure, or pool and spa chemicals.
• Paint loss, surface rust, or stainless-steel discoloration are considered normal wear and
tear.
• External factors include damage from accidents, vandalism, flashback or grease fires, and
improper installation, maintenance, or service.
Limited Warranty

V 1.0
6
• Severe weather events (hail, hurricanes, tornadoes, earthquakes, etc.), terrorism, Acts of
God, or exposure to atmospheric chemicals.
• Inconveniences or damages: Personal injury, property damage, or any incidental or
consequential damage arising from improper use or product failure.
Warranty Claim Procedure
If you require service or replacement parts for your Coyote Grill, follow these steps:
• Contact the Warranty Service Center: Phone: 855-520-1559
• Email: support@coyoteoutdoor.com
• Website: www.coyoteoutdoor.com (Warranty claims can be submitted online.)
• Provided With Required Information:
• Model number.
• Serial number.
• Proof of purchase.
Coyote Outdoor may require defective parts to be returned for examination. Customers are responsible
for prepaying shipping charges. If the part is deemed defective, Coyote Outdoor will approve the claim
and issue replacement parts at no charge. Shipping and handling costs for replacement parts remain the
customer's responsibility.
Important Notes
• Exclusion of Extended Warranty: Warranty periods are not extended by any repair or
replacement.
• Customer Responsibility: The customer is responsible for the proper maintenance and
operation of the grill, as outlined in the product manual.
• Non-Covered Issues: Damages from misuse, improper cleaning, and exposure to harsh
environmental conditions are not covered.
Limitation of Liability
To the maximum extent permitted by law, Coyote Outdoor Living, Inc. shall not be liable for:
• Incidental or consequential damages.
• Costs of inconvenience, personal injury, or property damage resulting from improper use or
product failure.
This Limited Warranty constitutes the sole and exclusive warranty provided by Coyote Outdoor Living,
Inc.; no other warranties, express or implied, will apply.
V 1.0
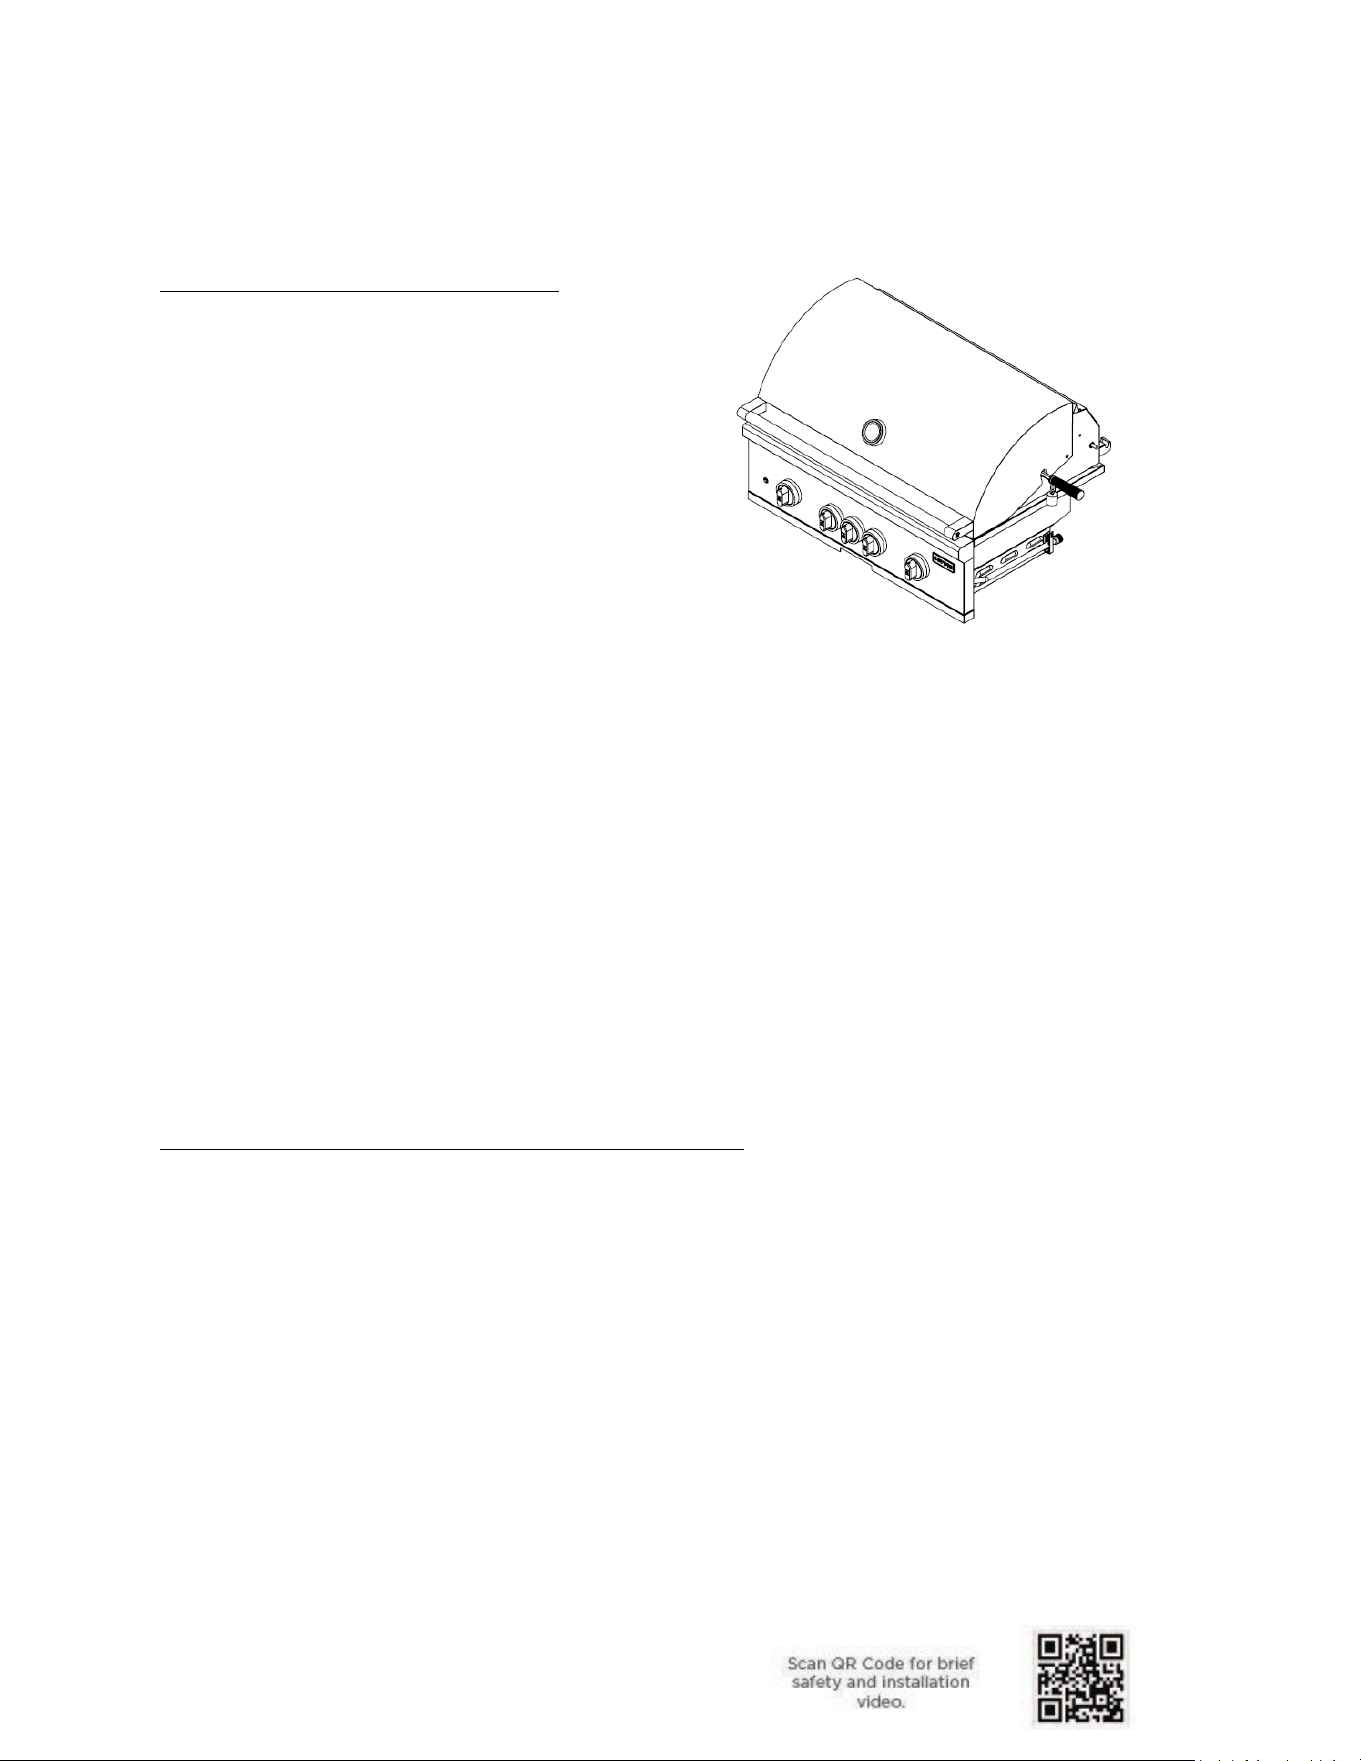
7
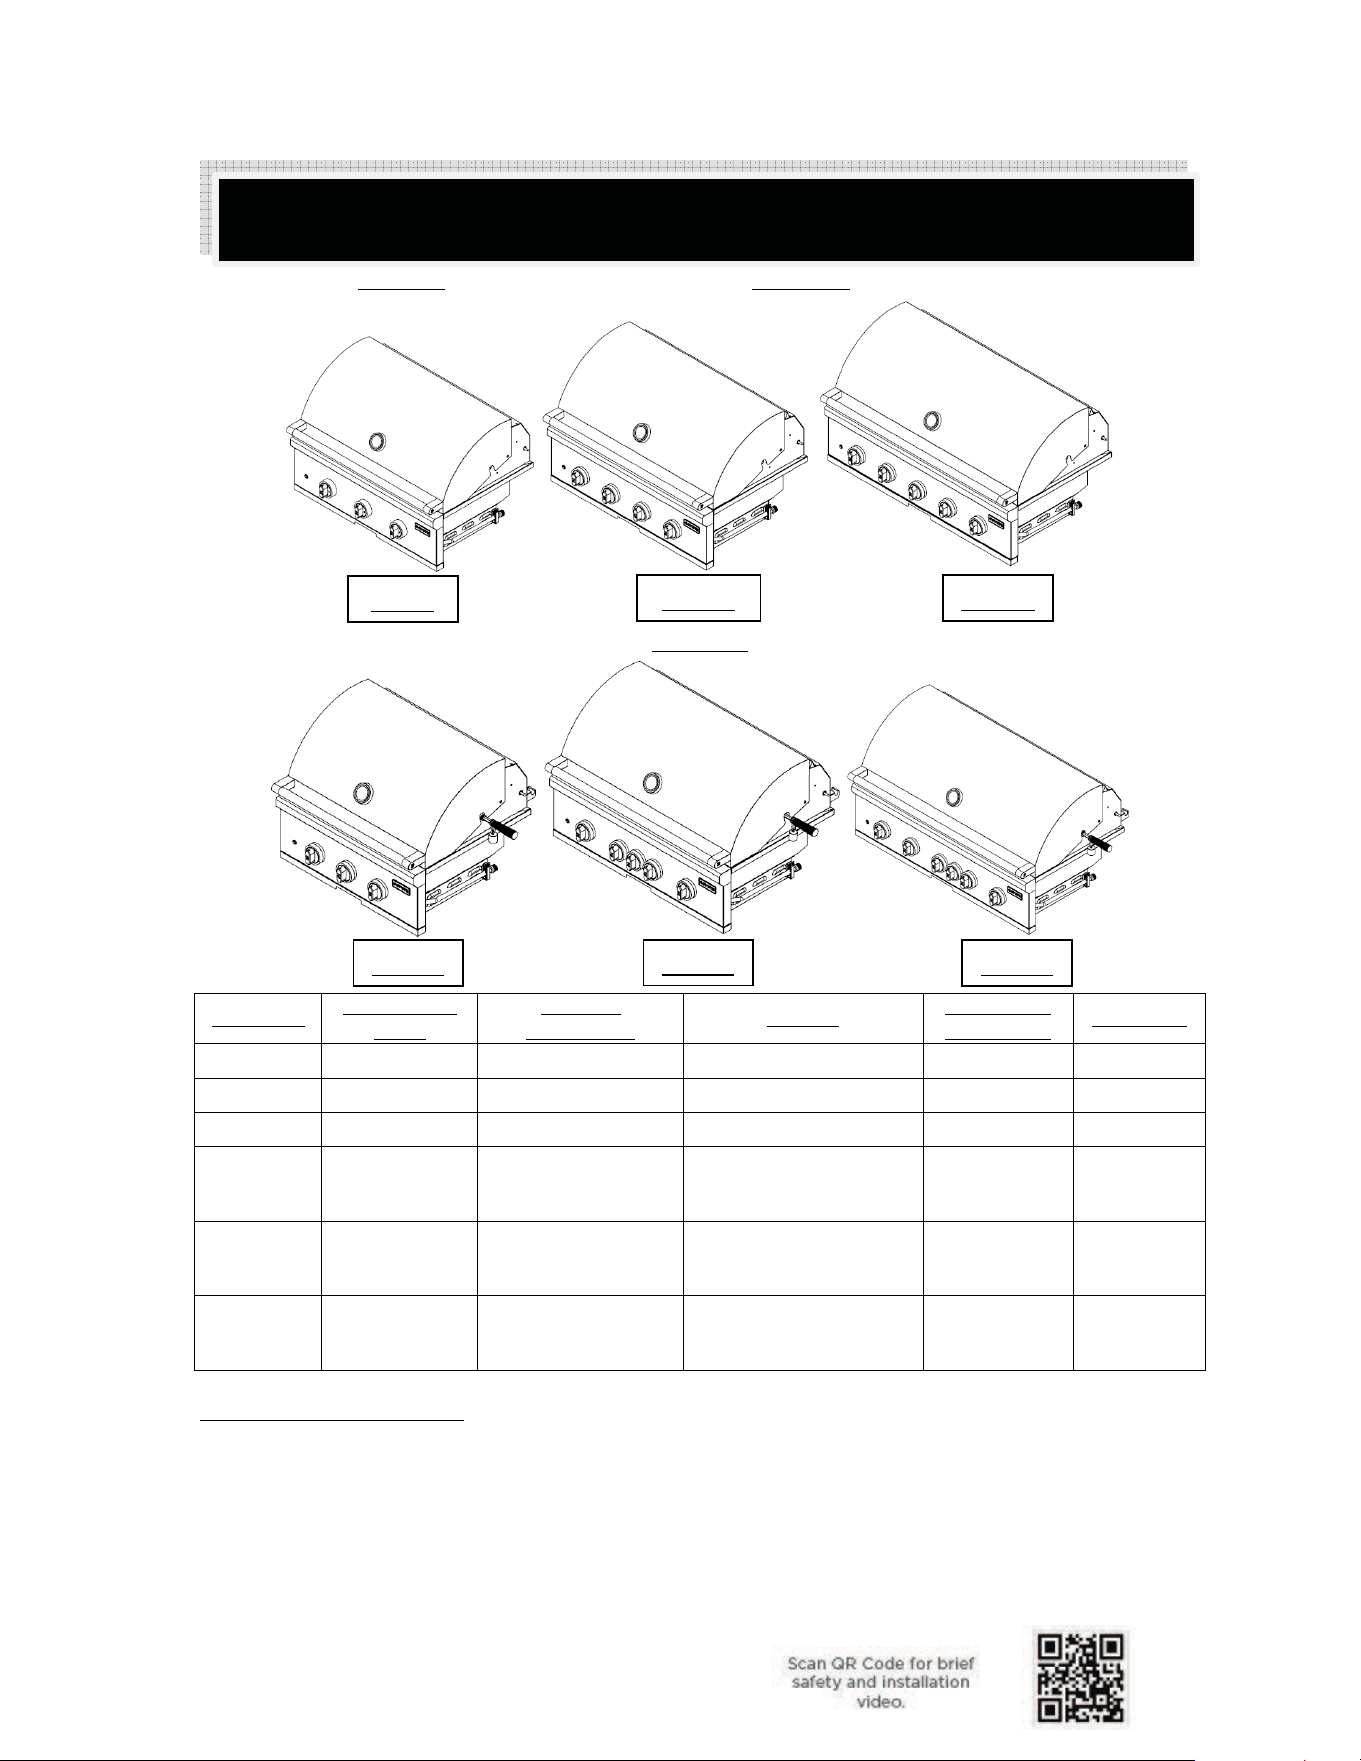
C-Series CL-Series
SL-Series
Model No.
Product Size
(Inch)
BTU/HR*
(Main/Back)
Burners
Convertible
Sear Burner
Knob Light
C3C34 34" 45,000 / None 3 I-Burners No No
C3CL36 36" 60,000 / None 4 Infinity Burners Yes White
C3CL42 42" 75,000 / None 5 Infinity Burners Yes White
C3SL30 30" 30,000 / 15,000
1 Infinity Burner
1 Sear Burner
1 Rear Burners
Yes
Gradient
Orange
C3SL36 36" 60,000 / 15,000
3 Infinity Burners,
1 Sear Burner, and
1 Rear Burner
Yes
Gradient
Orange
C3SL42 42" 75,000 / 15,000
4 Infinity Burners,
1 Sear Burner, and
1 Rear Burner
Yes
Gradient
Orange
Infinity Burner BTU Output
• Each Infinity Burner is designed to produce up to 20,000 BTUs of heat output.
• The grill is optimized for fuel efficiency and cooking performance so that the actual BTU
output may vary based on operating conditions and settings.
If you have questions about BTU output or performance, please call Coyote Customer Support at 855-
520-1559 for detailed information.
Grill Models
C3CL36
C3C34
C3CL42
C3SL36
C3SL42
C3SL30
V 1.0
8
Installation and Safety Guidelines for Coyote Grills
Pre-Installation Recommendations
• Record Product Information: Before installing a built-in grill, copy the product details, including
the model number, serial number, and fuel type (e.g., natural gas or LP). Store this information
in a safe place for future reference.
• Locate Gas Shut-Off: If the grill is installed by a professional, ensure they show you the location
of the gas supply shut-off valve. The valve must be readily and easily accessible.
• Check for Gas Leaks: If you smell gas, check for leaks using a soap and water solution. Never
inspect leaks with an open flame.
Notice: Professional installation of your Coyote Grill is highly recommended. These instructions provide
the necessary measurements for constructing a masonry structure to house your outdoor gas grill.
Location Requirements
• Outdoor Use Only: Always install the grill in a well-ventilated outdoor area. If placing the grill
in an enclosed space such as a garage, shed, or breezeway, ensure it is equipped with a properly
approved ventilation system.
• Smoke Ventilation: Choose a location where smoke can disperse quickly to avoid inhalation of
potentially harmful fumes.
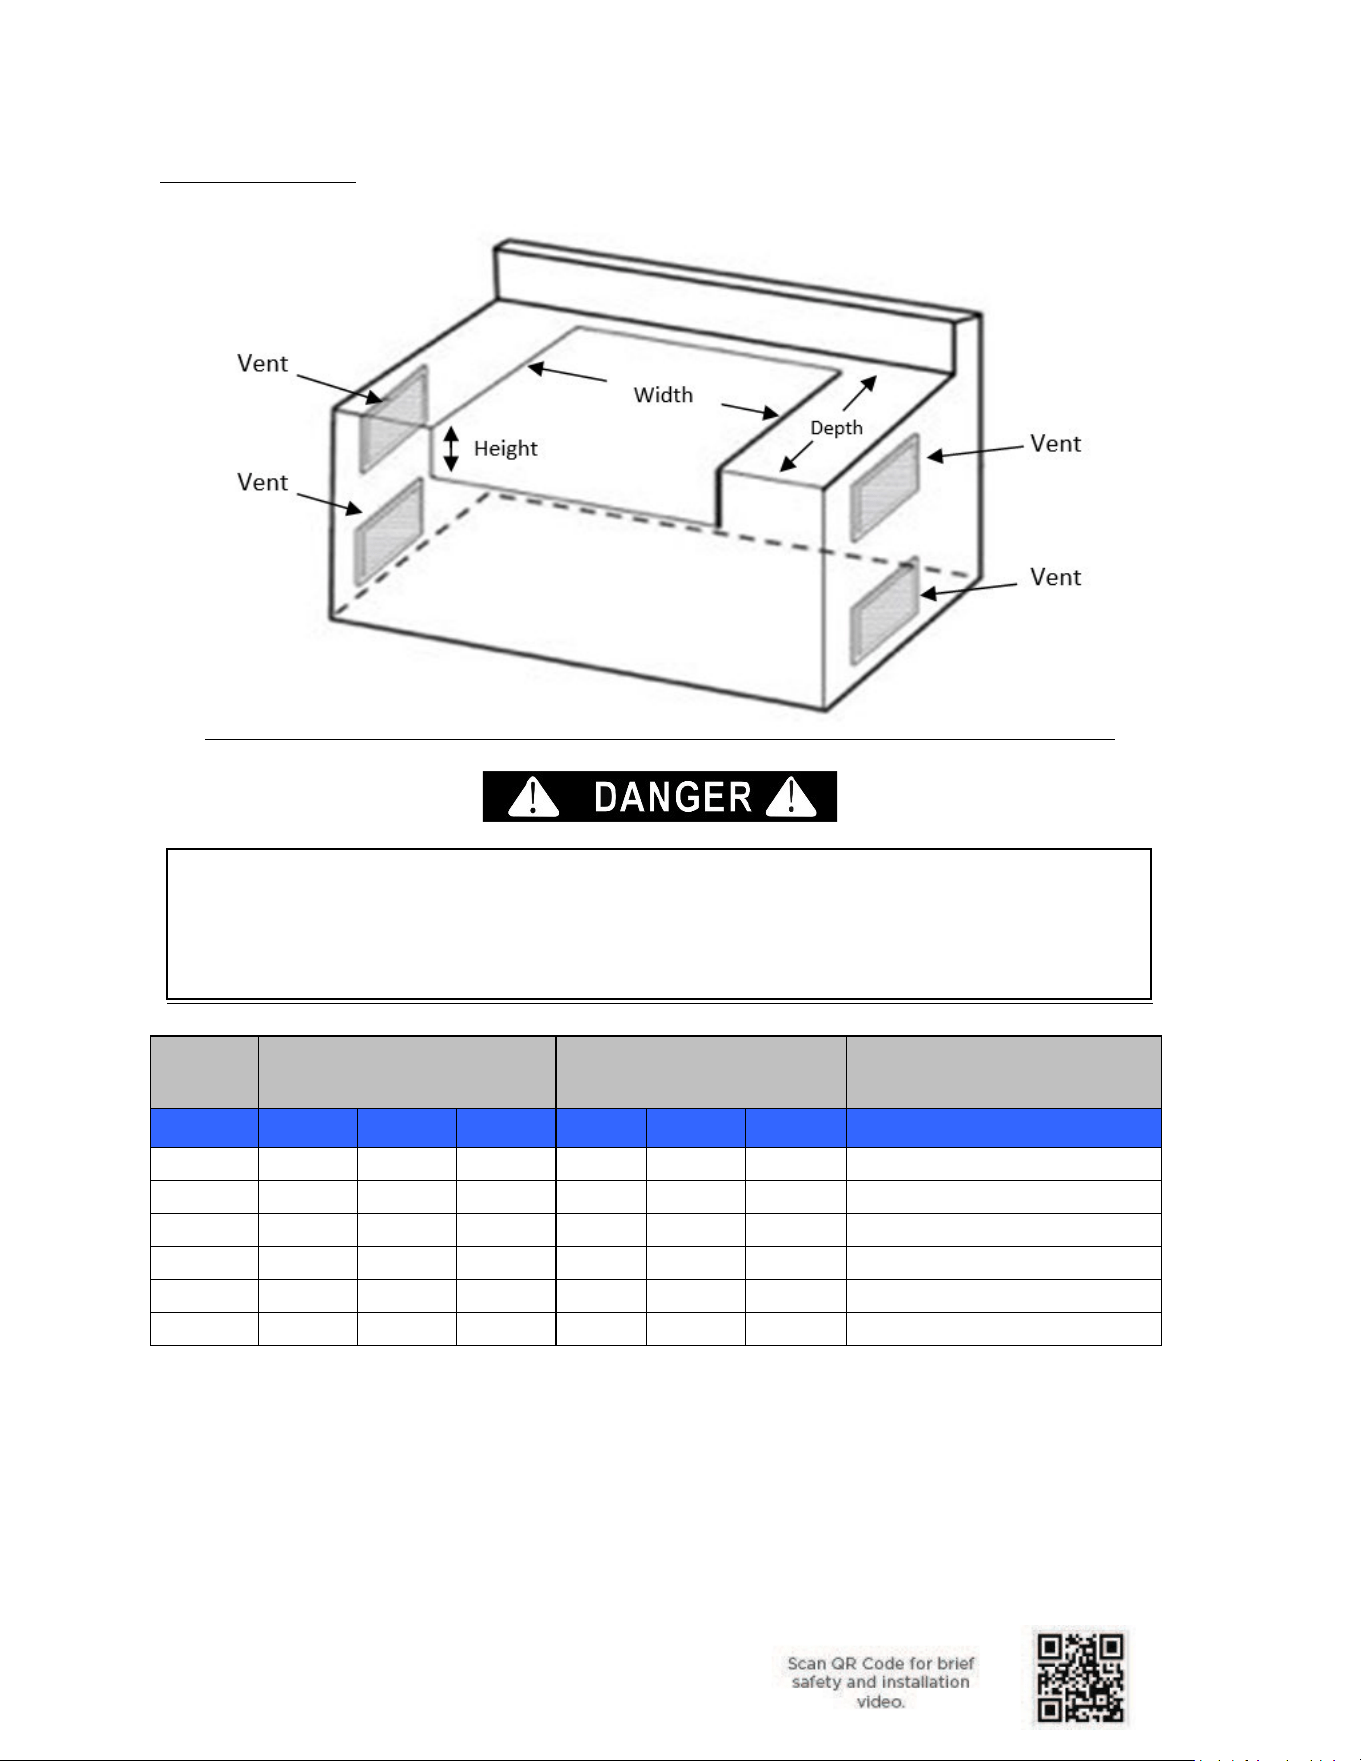
Ventilation Requirements
Proper ventilation allows heat and gas to escape, ensuring safe and efficient operation. Failure to meet
ventilation requirements will void the Coyote warranty and pose a risk of injury or death.
1. Ventilation for Built-in Islands:
• Islands must have at least two vents (optimally four) per cabinet containing gas
connections.
• Each vent must be at least 20 sq. inches in size and open to outside air.
• Propane grills: Place vents at or below the height of the tank valve, as propane is
heavier than air.
• Natural gas grills: Place vents at or above the gas connection height, as natural gas
is lighter than air.
2. Wind Considerations:
• Select a location that accounts for typical wind conditions to prevent heat buildup
inside the grill or island.
• Wind can block exhaust and trap heat, causing control panels and knobs to overheat
and potentially damage components like ignition systems or rubber gaskets.
3. Optional Wind Guards:
• Coyote Wind Guards can help divert wind over the grill, reducing overheating risks.
However, they are not guaranteed to solve ventilation issues in high-wind conditions.
These can be purchased from authorized dealers.
Locating the Grill
Check
your local building codes for the proper method of installation. In the absence of local codes, this unit
should
be installed in accordance with the National Fuel Gas Code No. Z223.1-1998 USA or CAN/CGA-8 149.1/.2
Natural
Gas/Propane Code (Canada) latest edition or the National E l ectrical Code ANSI/NFPA No. 70 or the
Canadian Electrical Code CSA C22.1, 1990 or latest version.

V 1.0
9
Clearance Requirements
1. From Non-Combustible Materials:
• If a wall or partition behind the grill blocks ventilation, we recommend maintaining a
minimum clearance of 7 inches from the back of the grill.
• A 2-inch minimum clearance behind the grill will allow the hood to open fully.
• Allow 6 inches of clearance on each grill side for the motor and spit handle to be used
in a rotisserie.
2. From Combustible Materials:
• Maintain at least 24 inches of clearance from combustible materials below the
countertop.
• Maintain at least 15 inches of clearance from combustible materials behind the grill
above the countertop.
• Never locate the grill under combustible structures unless an approved ventilation
hood is installed:
• The hood must be UL-certified, designed for outdoor Use, and installed per the
manufacturer’s specifications.
• It should be installed at least 30 inches above the cooking surface and be 6
inches wider than the grill frame (3 inches on each side).
3. Insulated Jackets:
• If the grill is within 24 inches of combustible materials below the countertop, an
appropriate Coyote insulated jacket must be used. Failure to use an insulated jacket
voids the warranty and compromises safety.
Built-in Installation
1. Masonry Installation:
• A built-in grill can be installed into masonry enclosures without a bottom deck to
support the grill. The weight of the grill body is supported by the countertop within the
cutout opening.
• Do not enclose the grill and block the ventilation around the grill's body.
• Ensure the countertop is flat and level relative to the floor.
• Install two or more vents, each at least 20 sq. inches in size, for proper ventilation:
• Propane grills: Position vents at or below tank valve height.
• Natural gas grills: Position vents at or above the gas connection.
2. LP Tank Storage:
• Store LP tanks in a separate, ventilated compartment with bottom vents for proper
airflow.
High-Elevation Use
• Coyote Grills are optimized for operation at 0-2000 feet above sea level elevations.
• Performance remains stable between 2000-4000 feet, though more gas combusts due to
reduced oxygen levels.
• Cooking times above 4000 feet may increase due to air/fuel mixture changes. For questions
regarding high-elevation installation, contact Coyote Customer Support for guidance.
Key Safety Notes
• Proper ventilation is critical for safety and performance.
• Always adhere to clearance guidelines to prevent overheating and ensure warranty validity.
• Use Coyote-approved insulated jackets and ventilation hoods for combustible materials or high-
risk areas.
V 1.0
10
Cutout Dimensions
Model
Cutout Dimensions
(Inches)
Overall Dimensions
(Inches)
Electrical Outlets Needed
(110V)
Grills Height Width Depth Height Width Depth Lights / Rotisserie
C3C34
10 1/4"
31"
20 1/2"
23”
34"
25 1/2”
Qty 1
C3CL36
10 1/4"
32 1/2"
20 1/2"
23”
35 1/2"
25 1/2”
Qty 1
C3CL42
10 1/4"
39 1/2"
20 1/2"
23”
42"
25 1/2”
Qty 1
C3SL30
10 1/4"
27”
20 1/2"
23”
30”
25 1/2”
Qty 2
C3SL36 10 1/4" 32 1/2" 20 1/2" 23” 35 1/2" 25 1/2” Qty 2
C3SL42 10 1/4" 39 1/2" 20 1/2" 23” 42" 25 1/2” Qty 2
Cabinets with any gas supply or connection are required to have a minimum of two vents,
with four vents being the optimal configuration. Each vent must be at least 20 square
inches in size and provide direct access to outside or fresh air. To ensure proper airflow
and ventilation, it is recommended to place two vents on each side of the cabinet.
V 1.0
11
Never attach an unregulated gas line to the appliance. Connection to
an unregulated gas line can cause excessive heat or fire and the risk of
property damage, bodily injury, or death.
Critical Safety Warnings
1. Do Not Use Unregulated Gas Lines:
Never attach an unregulated gas line to the grill. This can result in excessive heat or fire, which
can cause property damage, injury, or death.
2. Control Knobs:
Always ensure the grill control knobs are in the OFF position before connecting the grill to a gas
source.
Gas Connection Instructions
1. Verify Gas Type: Confirm whether the grill is designed for natural gas (NG) or liquid propane
(LP). Do not connect an LP grill to a natural gas supply or vice versa.
• Check the appliance rating label for compatibility with the gas supply.
2. Gas Supply Regulations: The installation must comply with local codes or, in their absence,
adhere to the following:
• National Fuel Gas Code (ANSI Z223.1/NFPA 54)
• Natural Gas and Propane Installation Code (CSA B149.1)
• Propane Storage and Handling Code (CSA B149.2)
• Use approved pipe sealants resistant to LP gas, but never use pipe sealants on flare
fittings.
3. Pre-Operation Check:
• Gas valves are preset at the factory for natural gas or propane. Contact your dealer to
convert your grill to a different gas type.
• Always check the rating plate to confirm the gas supply matches the grill's
manufacturing specifications.
Liquid Propane (LP) Gas Guidelines
• Key Characteristics of Propane:
• Propane is flammable, explosive under pressure, heavier than air, and can pool in low
areas.
• Propane is odorless in its natural state; an odorant is added for safety.
Gas Requirements
Note: Coyote strongly recommends that a qualified service technician perform
the initial installation and all conversions or modifications to the gas supply.
V 1.0
12
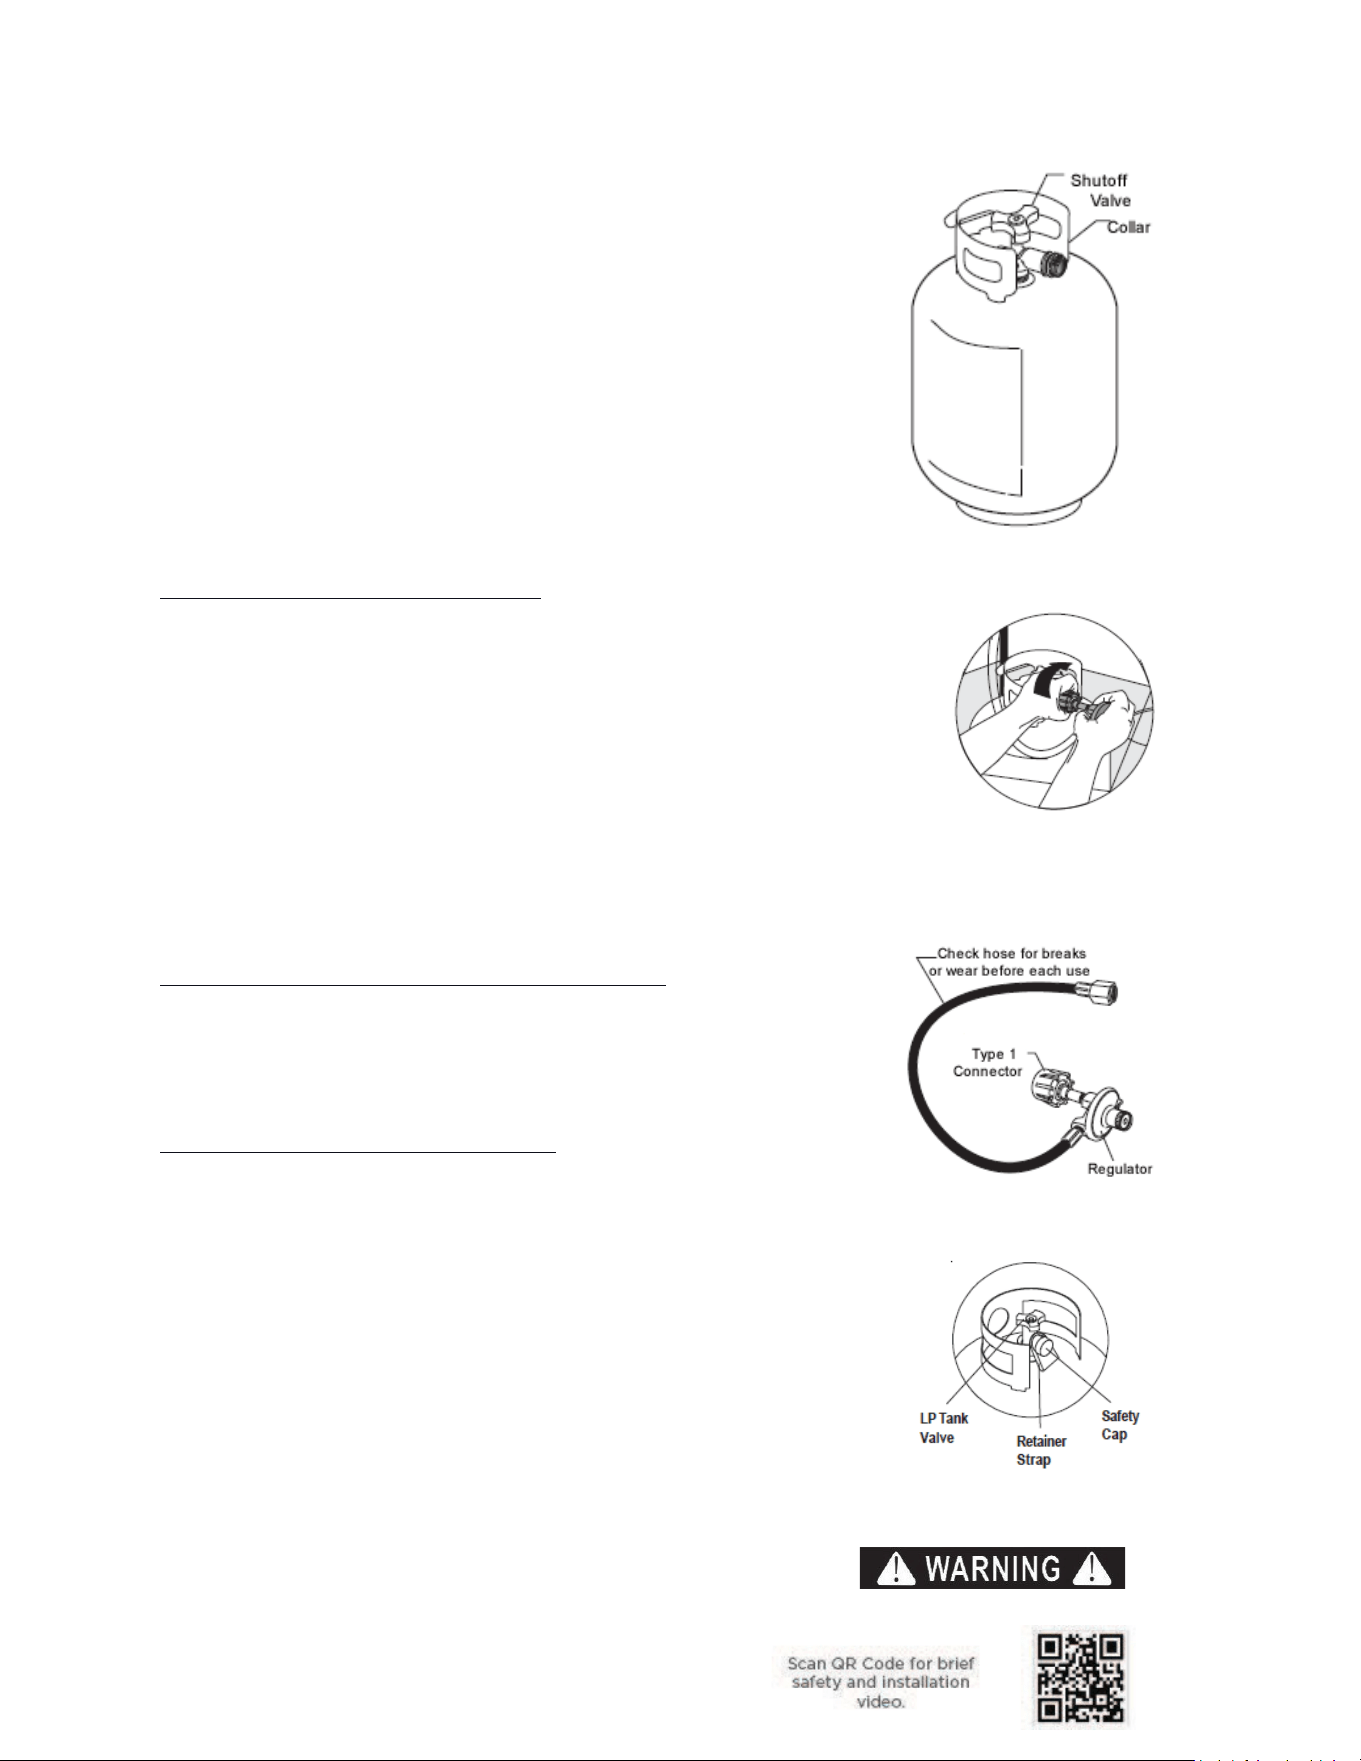
Safety Precautions:
• Never use a propane cylinder that is damaged, dented, or
rusted.
• Always store the LP cylinder upright, securely fastened,
and away from excessive heat.
• Do not store LP cylinders indoors or near gas-burning
appliances.
• Cylinder Specifications:
• Use only cylinders 12 inches in diameter and 18 inches
high, with a maximum capacity of 20 lbs. of propane
(80% full).
• Ensure cylinders comply with DOT or CSA B339
standards and include overfilling prevention devices.
LP (Propane) Gas Connection Process
1. Ensure the tank valve is in the OFF position.
2. Confirm all burner control knobs are in the OFF position.
3. Connect the regulator to the tank valve:
• Insert the regulator inlet into the valve and turn the nut clockwise
until tight.
• Avoid over-tightening.
4. Purge Air from the System:
• Turn the main tank valve on and the burner control valves to HIGH
for 20 seconds to purge air before lighting.
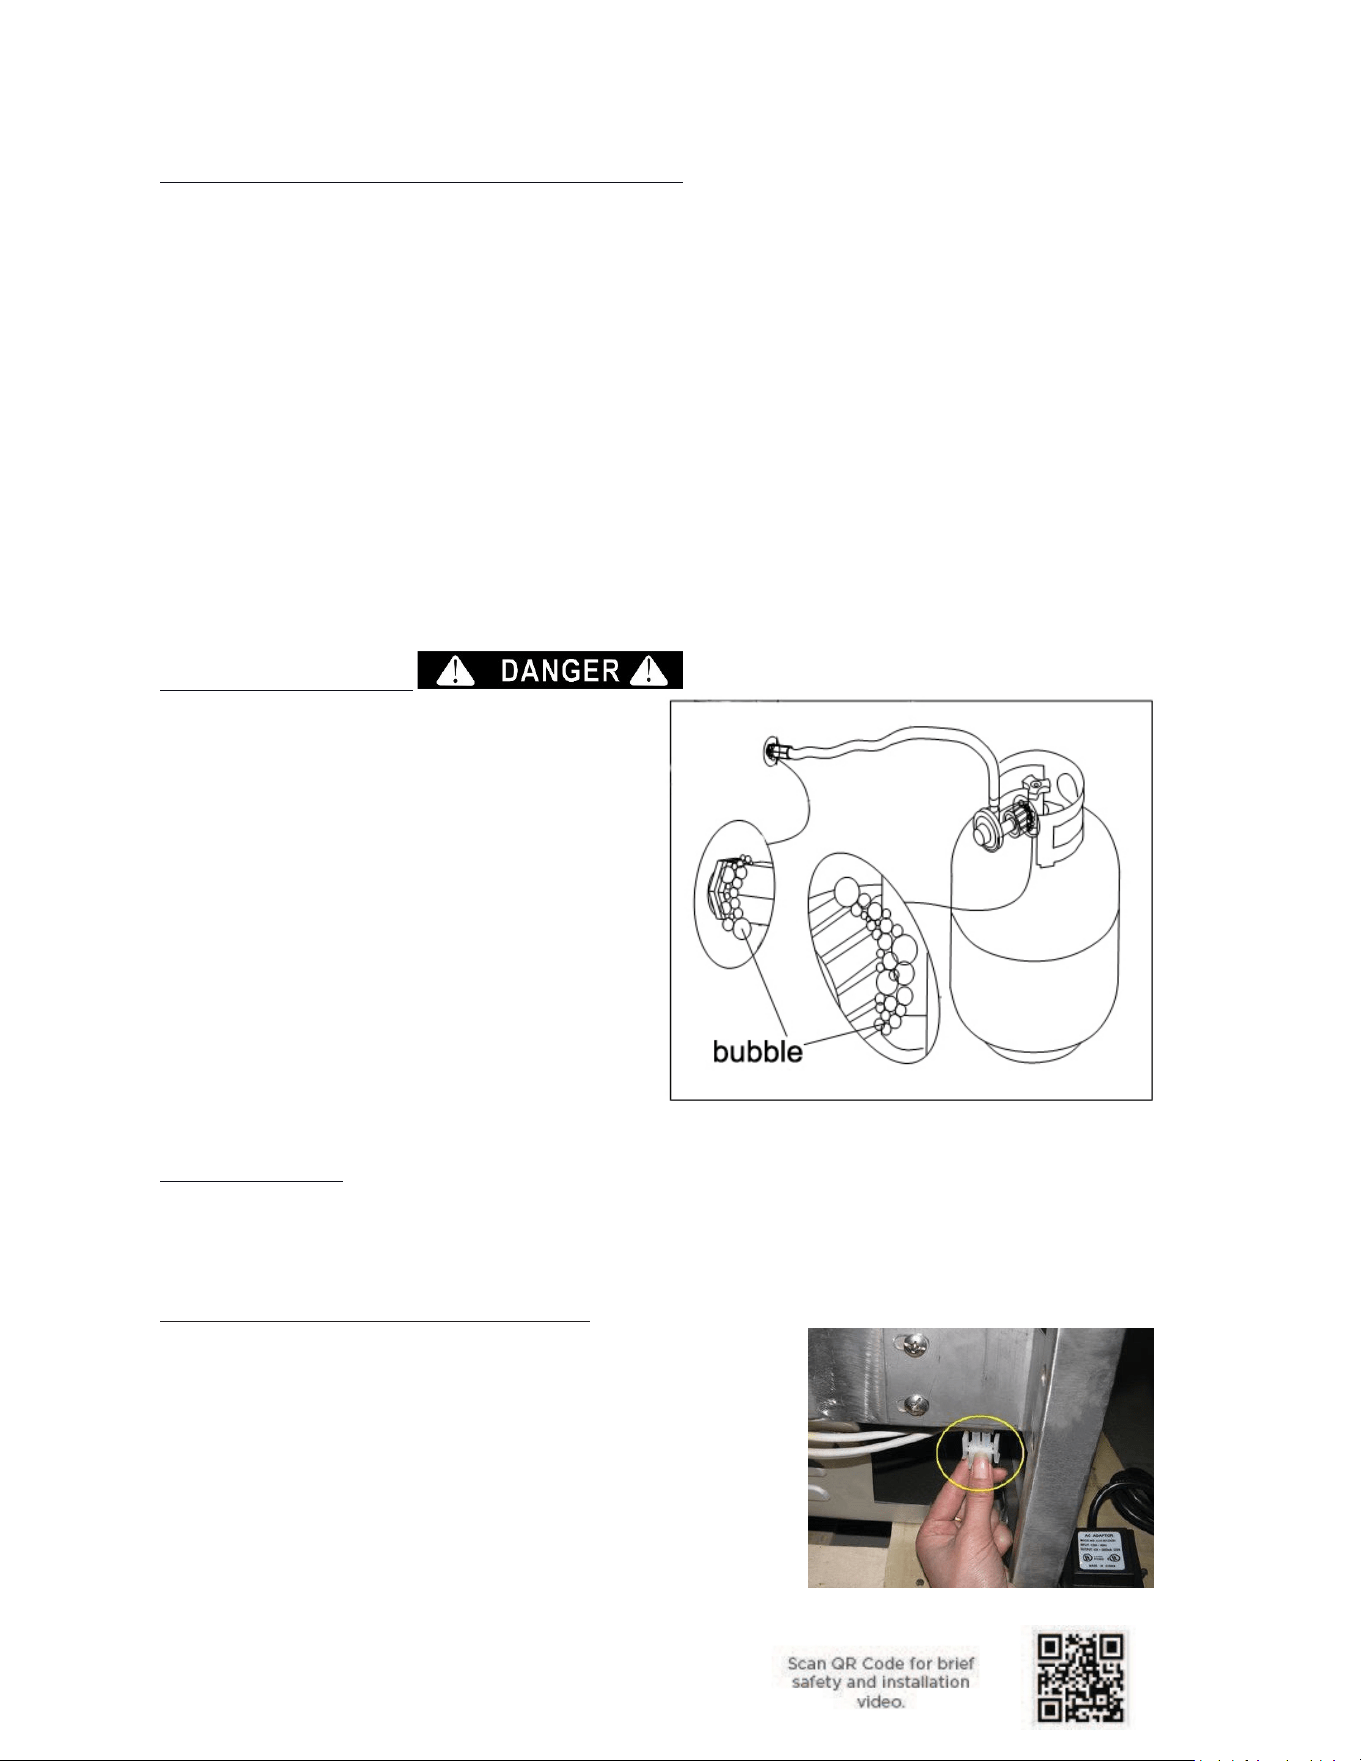
5. Leak test all connections:
• Use a soapy water solution to check for leaks. Tighten any connections if bubbles appear.
• Do not use thread sealant on the brass LP flare fittings.
Key Features of the LP Hose and Regulator System
• It prevents gas flow until a positive connection is made.
• Includes a thermal element that shuts off gas during a fire.
• Features a flow-limiting device to restrict gas flow in case of a
leak.
Propane Cylinder Handling and Storage
1. Disconnection:
• Turn off all control knobs and the tank valve.
• Detach the regulator by turning the coupling nut counterclockwise.
• Install the safety cap onto the LP tank valve.
2. Storage:
• Never store LP tanks in enclosed spaces or vehicles.
• Keep tanks upright and away from areas where children
play.
3. Filling and Transporting:
• Use licensed LP dealers and ensure tanks are filled to no
more than 80% capacity.
• Always assess new or exchanged tanks for leaks before
connecting to the grill.
Important: Always leak-test the hose and regulator before using the grill.
V 1.0
13
Large-Capacity Propane Systems
If connecting to a large propane tank (e.g., a home's central propane system):
1. Use an in-line LP regulator purchased from an authorized dealer or plumbing supply company.
2. Ensure compliance with all state, county, and federal codes.
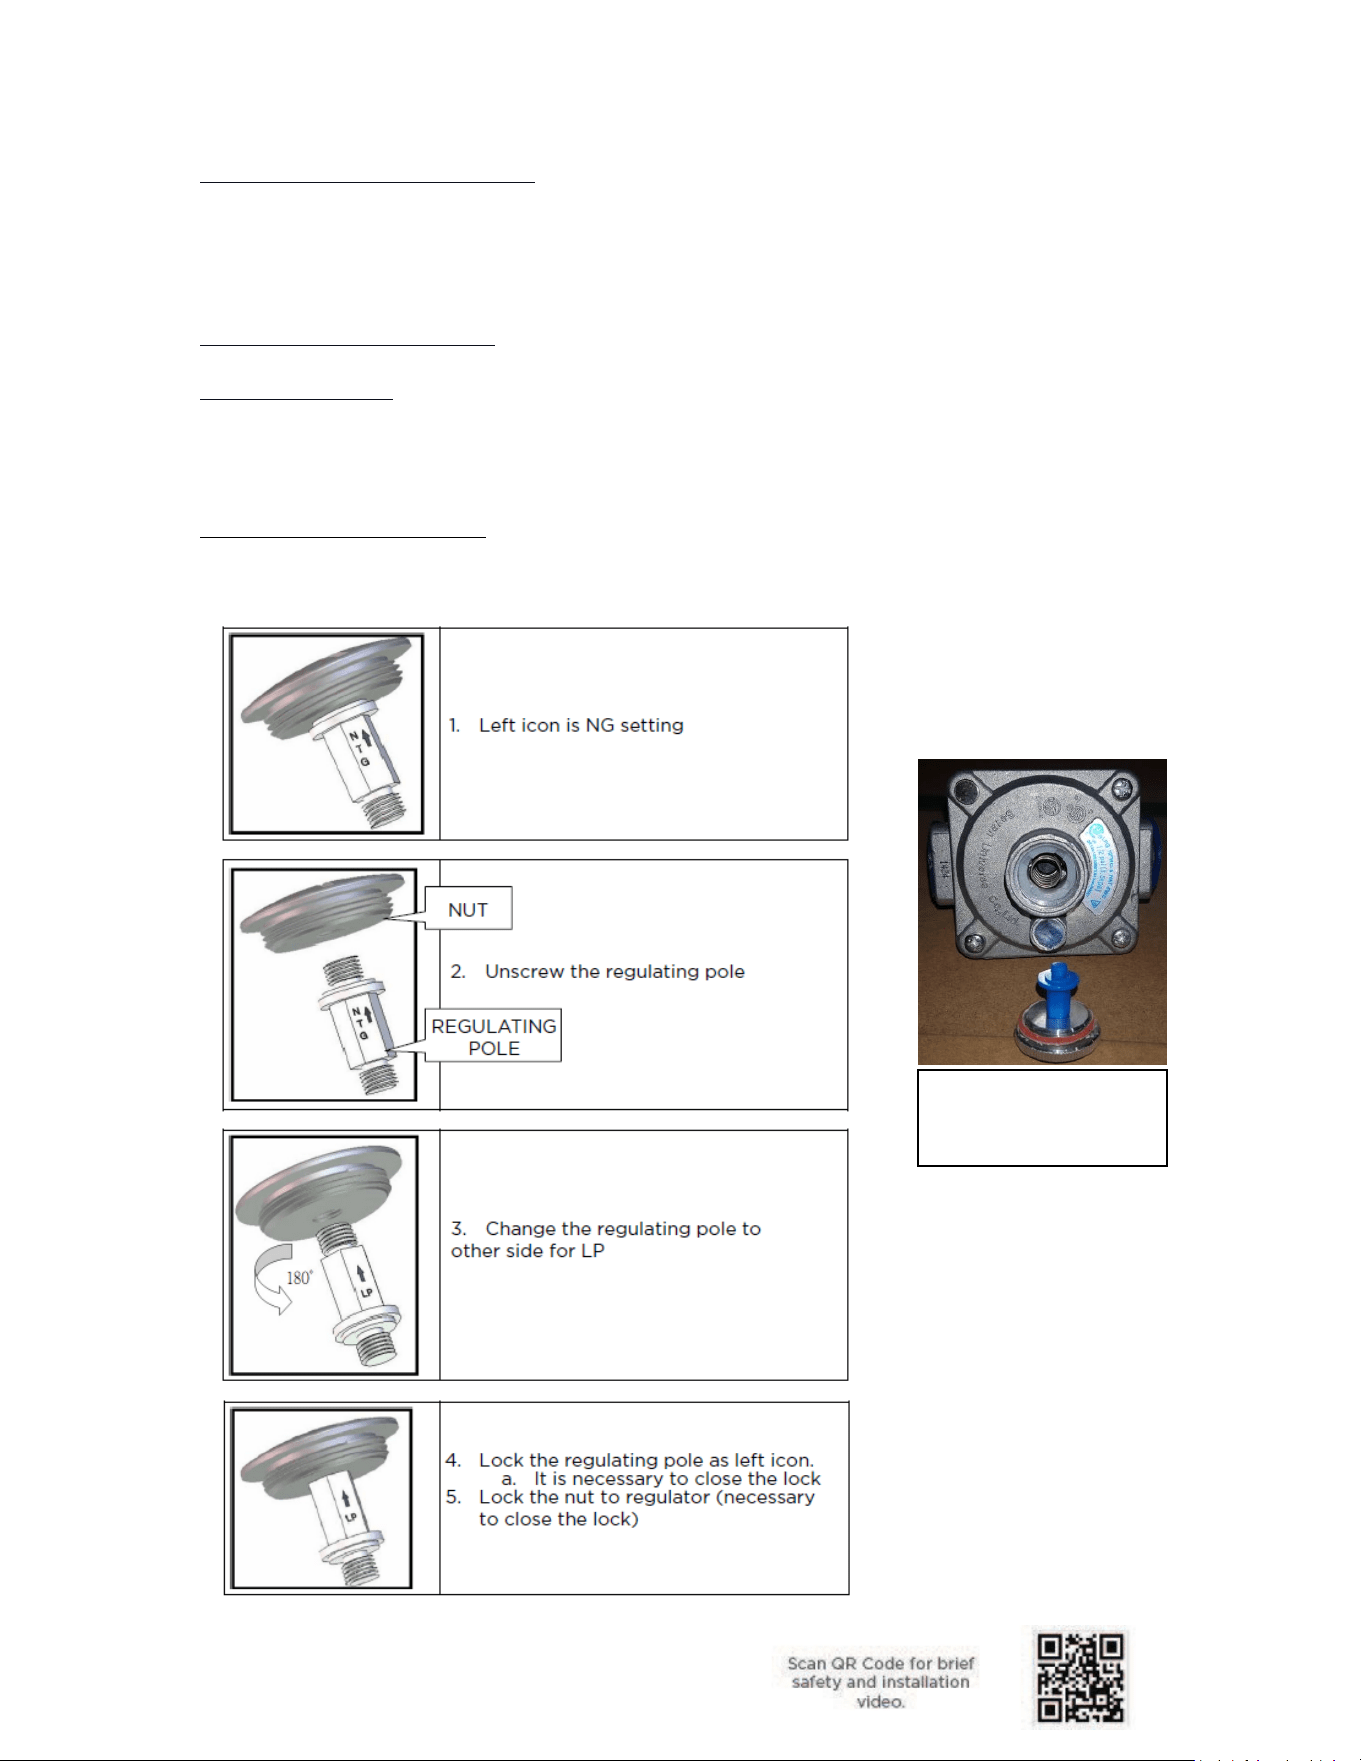
In-Line Convertible Regulator
Model # CINLNREG
Coyote sells a separate inline regulator for whole-home propane systems. This regulator can be used for
Natural Gas (NG) or Propane (LP). It comes pre-set for Natural Gas, and you must convert it to Propane
by performing the steps below.
CINLNREG Output Pressure:
• Propane (LP): 10" WC (water column)
• Natural Gas (NG): 4" WC (water column)
Image of the
regulating pole set to
LP.
V 1.0
14
Natural Gas Supply and Connection Guidelines
Natural Gas (NG) Guidelines
• Key Characteristics of Natural Gas:
• Natural gas is flammable, lighter than air, and can dissipate quickly in open spaces.
• Natural gas is odorless in its natural state; an odorant is added for safety to help detect
leaks.
• Safety Precautions:
• Ensure all natural gas connections are correctly installed and regularly inspected for
leaks or damage.
• Never store or use natural gas appliances in confined or poorly ventilated spaces.
• Always follow local codes and regulations when handling or installing natural gas
systems.
Professional Installation
Important: All natural gas connections must be performed by a licensed contractor or a representative
from the local gas company.
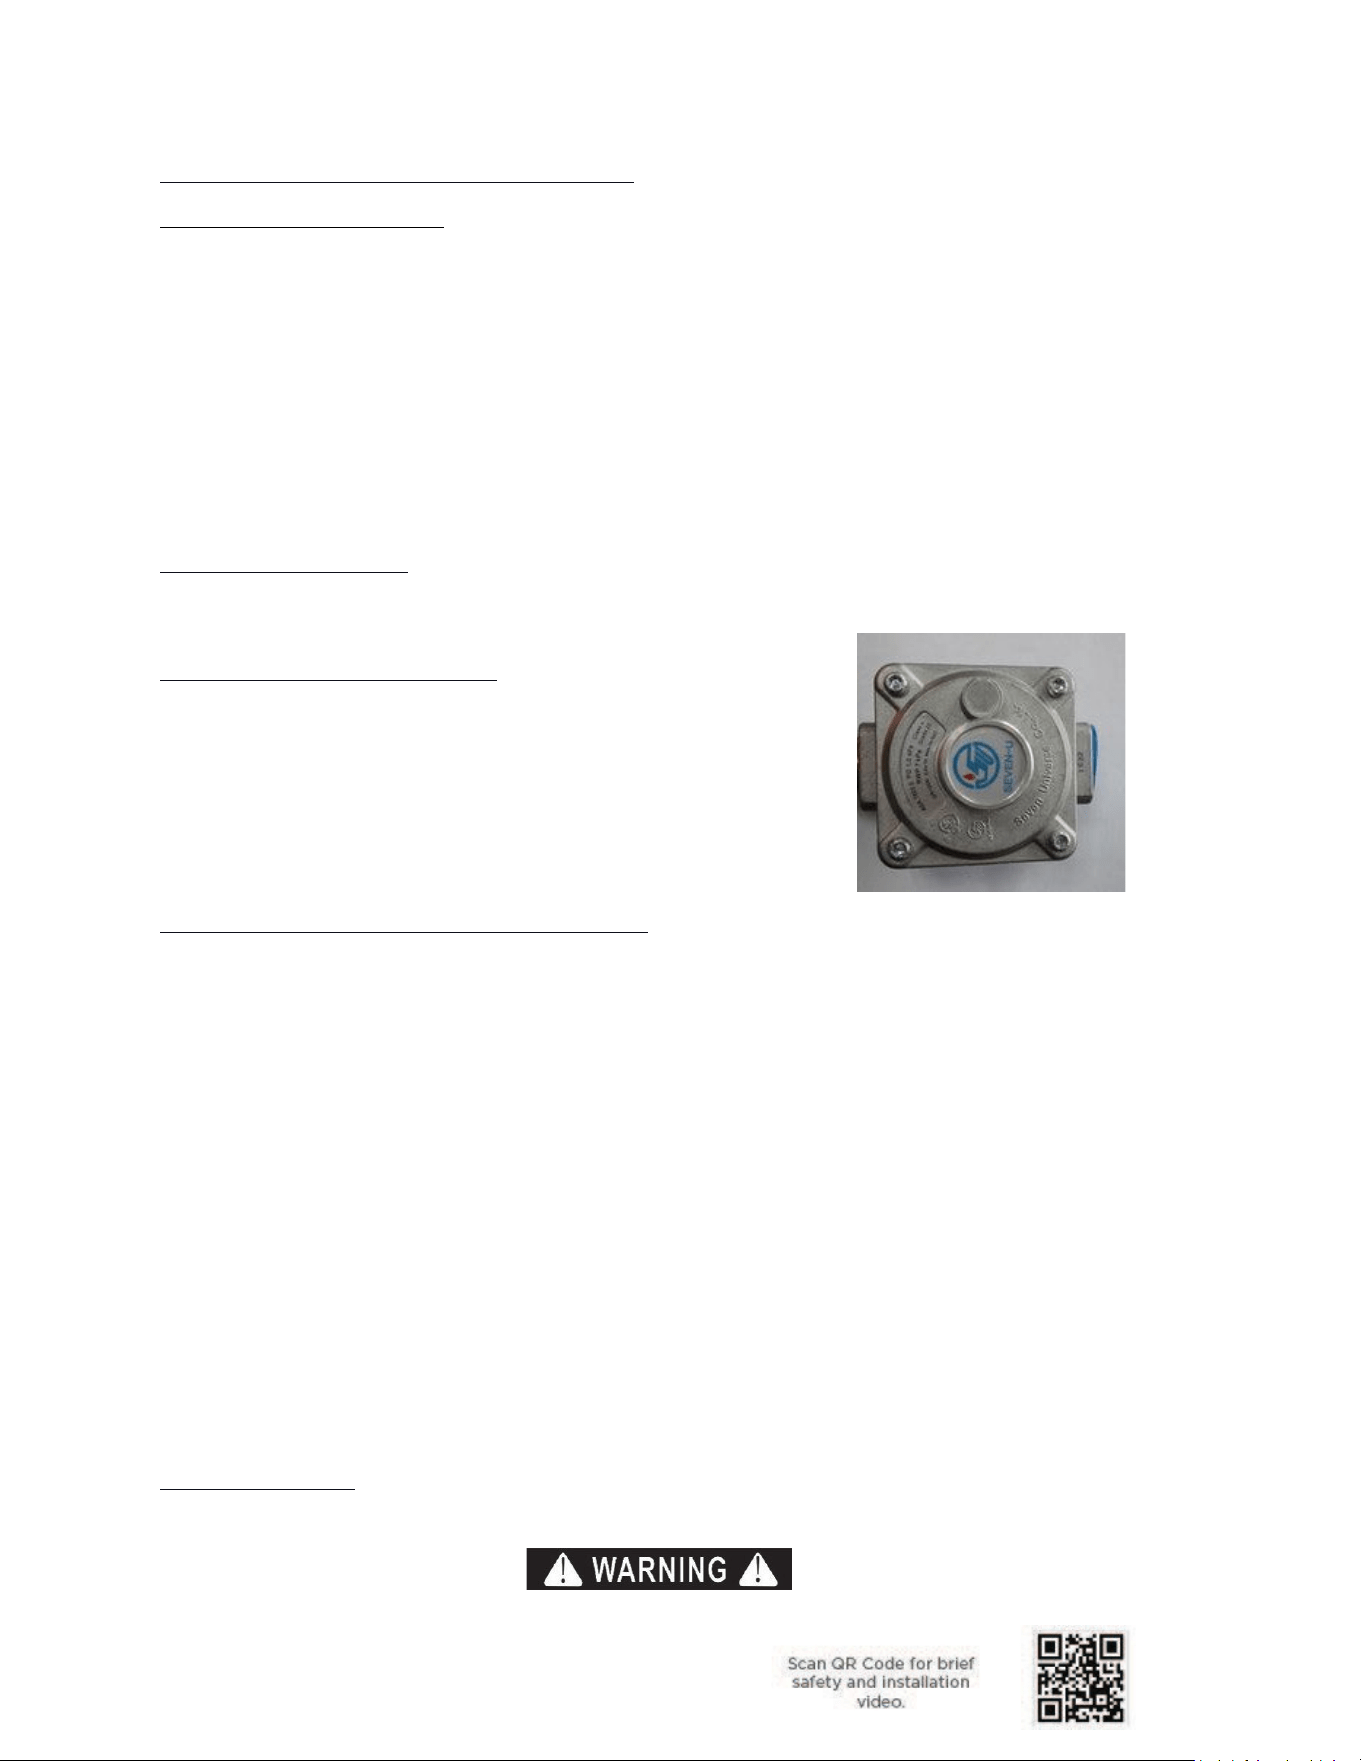
Natural Gas Regulator Guidelines
• Model: GR120
• Gas Pressure: 4" (101.6mm)
• Maximum Working Pressure: 1/2 Psig
• Leak Testing: Always leak-test the regulator before use. Do
not operate the grill without performing this test.
• The regulator should be installed directly to the back of the
grill or after the shutoff valve.
Natural Gas Supply and Connection Instructions
1. Prepare the Grill:
• Ensure all burner valves are in the "OFF" position.
2. Install Regulator and Shut-Off Valve:
• All NG grills require a regulator and shut-off valve on the supply line.
3. Seal Pipe Threads:
• Use gas-rated, outdoor-rated thread sealant on all pipe threads. Flare ends do not require or
use sealant.
4. Attach Regulator:
• Your Coyote NG grill includes a ½" regulator:
• The regulator has a directional arrow showing the correct gas flow direction (arrow pointing
toward the grill).
• Attach a connection hose (not included) to the "in" side of the regulator, which is ½" MIP.
5. Connect the Hose:
• Use **½" stainless steel corrugated hoses** for durability.
• Ensure the hose length and capacity are suitable for your application.
• Connect the other end of the hose to the shut-off valve.
6. Leak Testing:
• Test all connections with the soap and water solution as described above.
Liability Disclaimer
Coyote is not responsible for the selection, performance, or workmanship of contractors or installers
who connect the natural gas supply to the grill.
V 1.0
15
Gas Conversion Guidelines
Gas Conversions: Natural Gas (NG) and Propane (LP)
Coyote grills are designed to be convertible between liquid propane (LP) and natural gas (NG). To ensure
proper and safe conversion:
1. Use the Correct Conversion Kit:
o Obtain the appropriate Coyote conversion kit, available through your dealer or Coyote's
Customer Support Department.
o Using non-Coyote kits or orifices will void your grill’s warranty.
2. Hire a Professional:
o Gas appliance conversions should be performed by a Licensed Plumber or Certified
Installer.
3. Orifice Changes:
o Every burner on the grill requires a specific orifice for the desired gas type. Do not forget
to replace orifices with rotisserie or sear burners, if applicable.
4. Valve Change:
o For burners with safety valves, the valve must be replaced for conversion.
Steps to Convert Main and Sear Burners
Preparation:
1. Pull the grill out of the island or cart.
2. Remove the drip pan and the cooking grates.
Disassembly:
3. Unscrew the bolt connecting the manifold pipe to the grill body (located at the back of the grill).
4. Remove the 4 bolts holding the faceplate to the body (front edge where the cooking grates sit).
5. Unscrew the 2 bolts (on each side), attaching the manifold and faceplate assembly to the grill
body.
6. Disconnect all wires and flex lines from the valves and igniter assembly, noting their original
locations.
7. Slide the entire control panel and valve assembly from the grill body.
Orifice Replacement:
8. Flip the control panel onto its side to access the valves.
9. Using a wrench, remove the orifice at the end of the valve and install the new gas-specific orifice.
10. (CL & SL Models Only):
Main Burner
o Remove the main burner knobs and unscrew the horizontal screws.
o Replace the safety valve controlling the thermocouple. This valve must be entirely
changed; the orifice alone cannot be replaced.
o Remove the base bracket holding the center valve to the manifold pipe and remove the
valve.
o Install the new safety valve for the correct gas type, reversing the removal steps.
Rear Burner
o Remove the rear burner knob and unscrew the top and bottom screws.
o Replace the safety valve controlling the thermocouple. This valve must be entirely
changed; the orifice alone cannot be replaced.
o Remove the base bracket holding the center valve to the manifold pipe and remove the
valve.
o Install the new safety valve for the correct gas type, reversing the removal steps.
Reassembly:
11. Reassemble the control panel and grill in reverse order.
12. Test all connections with a soapy water solution to ensure no leaks.
V 1.0
16
Steps to Convert the Rear Burner (Rotisserie) Orifice
Preparation:
1. Take off the small back panel covering the rotisserie burner orifice:
Orifice Replacement:
3. Locate the gas line, brass elbow, and orifice behind the panel.
4. Use a wrench to remove the existing orifice and install the new gas-specific orifice.
Reassembly:
6. Reassemble the panel and rotisserie assembly in reverse order.
7. Test the rear burner to ensure proper ignition and burning.
Final Testing and Safety
• After reassembling the grill, perform a leak test using a soapy water solution on all connections.
• Check each burner, including the rear and sear, for proper ignition and flame performance.
Following these steps and ensuring proper installation, you can safely convert your Coyote grill between
propane and natural gas while maintaining its performance and warranty. For additional assistance,
contact Coyote Customer Support.
Leak Testing Instructions
Leak testing is mandatory before using the grill.
1. Do not smoke or use open flames during
the test.
2. Mix a solution of equal parts mild
detergent or liquid soap and water.
3. Turn all grill control knobs to OFF.
4. Open the LP tank valve completely.
• If you hear a rushing sound, shut
the gas off immediately.
5. Apply the soapy solution to all connection
points.
• If bubbles form, there is a leak.
Tighten connections and repeat
the test.
6. If leaks persist, contact Coyote
Customer Support at 855-520-1559.
Final Safety Notes
• Never connect the grill to an unregulated gas supply.
• Always ensure the gas supply matches the grill's design type.
• Contact Coyote Customer Support at 855-520-1559 with any questions or concerns.
Instruction for Connecting the Transformer
Your grill's electrical transformer will connect on the left side
(looking at it from the front) and operate the hood lights inside
your grill, along with the LED knob lights on the CL and SL models.
• Insert the white male plug into the white female socket on
the left side of your grill, and then plug the transformer
into a standard 110v outlet.
• If you have any questions or concerns, please consult, or
use a qualified electrician.
V 1.0
17
GENERAL RULES
NEVER leave the grill unattended while cooking!
• Ensure the grill has been leak-tested and is placed in a location with adequate ventilation and
proper clearance.
• Verify that each burner tube is correctly positioned over its corresponding valve orifice.
• Follow the manual’s instructions to ignite the grill burners safely.
• Adjust the heat settings to reach your desired cooking temperature.
• After cooking, allow the grill to cool, wipe away splatters or grease, and clean the drip tray.
• NEVER cover the grill while hot, which may pose a fire hazard.
First-Time Use: Burning Off Manufacturing Residue
Before cooking for the first time, operate your grill at the "HIGH" setting with the hood closed for no more than
5 minutes. This will remove any residual odors or debris from the manufacturing and shipping process. After
this step, your grill is ready for cooking!
Understanding Your Grill's Valves, Burners
Your grill has valves that control gas flow to each burner, and the CL and SL series have safety valves
equipped with thermocouples on the main burners and rear burners, a safety feature to prevent gas flow if
the flame goes out. These components, located behind the control knobs, are essential for setting your
desired temperature, managing fuel consumption, and ensuring safe operation.
• Important Reminder: If a control knob is left on while the burner is unlit, gas can leak through the
valve. Always double-check that all knobs are in the "OFF" position after using the grill to prevent
dangerous gas leaks. Proper use and care of the valves and thermocouples are critical for safe
grilling.
Operating the Grill
•
Failure to open the barbecue lid before igniting the burners or to wait at least 5
minutes for gas to dissipate if the barbecue fails to light can lead to an explosive flare-
up, posing a serious risk of severe injury or death.
•
NEVER use the grill if you detect a gas odor.
•
NEVER stand with your head, body, or arms over the grill when igniting it.
•
ALWAYS inspect the gas hose before use. Replace it immediately if there are signs of excessive
wear, abrasion, or cuts. Use only the replacement hose assembly specified by the
manufacturer.
•
ALWAYS keep the area around the barbecue free from flammable materials such as gasoline,
yard debris, or wood.
•
ALWAYS check that the airflow through the vent space beneath the grill is unobstructed to
ensure safe operation.
V 1.0
18
Lighting a grill burner with a safety valve equipped with a thermocouple involves a slightly different
process than lighting standard burners. The thermocouple is a safety feature attached to the valve,
ensuring the gas flow stops if the flame goes out.
Using the Grill's Built-In Ignition System
1. Select the Burner to Ignite:
• Locate the knob corresponding to the
burner you wish to light.
• Depress and rotate the knob
counterclockwise to the "High"
position. As you turn the knob, you will
feel resistance as the spring inside the
valve builds energy for the igniter.
• Once you hear a "click," the igniter has
sparked to light the burner.
2. Mind the Knob Rotation Speed:
• Turn the knob steadily—not too fast or
too slow:
• Too fast: The gas may not reach the burner in time to meet the spark.
• Too slow: Excess gas can build up, potentially causing a large flash when it
ignites.
3. Hold the Knob to Heat the Thermocouple: (CL & SL Series Only)
• Once the burner ignites, continue pressing the knob in the "High" position for 6-10
seconds.
• Pressing the knob allows the thermocouple to heat up and keep the gas valve open.
• If the flame goes out when you release the knob, the thermocouple may not be
sufficiently heated. Repeat the process.
4. If the Burner Fails to Ignite:
• Try lighting the burner again immediately, being cautious of gas buildup.
• If the burner does not light after three attempts, turn the knob to the "Off" position,
open the grill canopy, and let the gas clear for at least 5 minutes before trying again.
5. Persistent Ignition Issues:
• If the burner still does not ignite or stays lit, the thermocouple may need adjustment or
cleaning. Contact Coyote Customer Support for further assistance.
Steps to Light the Rear Infrared (IR) Burner (SL Series Only)
1. Press and Hold the Rear Burner Knob:
• Depress the knob and hold it for 6 to 10 seconds to allow gas to flow into the burner.
2. Partially Rotate the Knob:
• While holding the knob, turn it about ¼ of the way and hold this position for another 3
seconds.
3. Ignite the Burner:
• With the knob still depressed, continue turning it to the "High" position while sparking
the igniter.
• Once the burner ignites, keep the knob pressed for an additional 6 to 10 seconds to
allow the thermocouple to heat up and stabilize the flame.
4. If the Rear IR Burner Fails to Ignite:
• Turn the knob to the "Off" position and let the gas clear for 5 minutes before trying
again.
• If the ignition fails, shut off the gas supply and contact Coyote Customer Support for
assistance.
V 1.0
19
Key Safety Notes
• Ventilation: Always operate the grill in a well-ventilated area and keep the canopy open during
ignition.
• Gas Buildup: Be cautious of gas buildup. If ignition fails repeatedly, allow time for the gas to
dissipate before retrying.
• Safety Valve Maintenance: Keep the valve and thermocouple clean and properly aligned with
the burner. If the burner struggles to stay lit, the thermocouple attached to the valve may need to
be replaced.
• Professional Assistance: For persistent issues, do not attempt repairs yourself. Contact your
local technician or Coyote Customer Support for help.
Key Safety and Maintenance Notes
1. Gas Leaks:
• Always be vigilant for gas odor (natural gas or propane). Gas leaks are a serious safety
concern.
• If you suspect a leak, immediately shut off the gas supply and inspect the grill.
• When preparing to light the burners, never stand with your head directly over the grill to
prevent possible bodily injury.
2. Thermocouple Maintenance:
• Keep the thermocouples clean and properly aligned with the burners.
3. Burner Cleaning:
• Regularly clean your burners and check the air adjustment screw (Air Venturi) to ensure
proper gas flow and combustion.
• Refer to your manual's Care and Maintenance section for detailed cleaning instructions.
4. Food Safety:
• Always practice safe food handling and use a meat thermometer to ensure proper cooking
temperatures.
Sear Burner Changeout Instructions
The main burners on CL and SL Series grills can be replaced with sear burners.
• Maximum of 2 sear burners: Only two sear burners can be safely installed in any size grill.
Follow these steps carefully:
1. Remove the Existing Burner:
• Access the back of the grill and locate the pin securing the burner.
• Remove the pin and carefully lift the burner out of the grill.
2. Detach the Thermocouple Bracket:
• Locate the thermocouple bracket near the grill burner.
• Use a Phillips head screwdriver to remove the screw securing the bracket. Set the
bracket aside for future use.
3. Slide Out the Thermocouple:
• Gently slide the thermocouple forward out of the bracket.
• Be cautious not to bend or damage the brass line.
4. Reattach the Thermocouple:
• Slide the thermocouple into the bracket on the sear burner.
• Clip it securely in place.
5. Install the Sear Burner:
• Position the replacement burner and secure it using the same pin.
6. Test the Burner:
• Ignite the burner following the standard lighting procedure.

V 1.0
20
Important Safety Note:
• If the burner being replaced fails to ignite, or you detect the smell of the gas, immediately turn
off the gas supply.
• Double-check the installation for proper alignment.
• Perform a leak test before attempting to ignite the burner again.
• If the tip of the thermocouple gets damaged, it must be replaced.
Removable Heat Zone Dividers
CL and SL Series grills have removable heat zone dividers designed to provide maximum versatility and
control over your cooking. These dividers allow you to create separate temperature zones for different
cooking methods on the grill.
Using Heat Zone Dividers:
1. Ensure the grill is turned off and completely cool.
2. Open the grill lid and remove the cooking grates.
3. Locate the designated slots or guides for the dividers between the burners.
4. Insert the heat zone dividers into the slots, ensuring they are seated securely.
5. To remove the dividers, allow the grill to cool completely before handling the dividers.
6. Remove the cooking grates to access the dividers.
7. Lift the dividers straight out of their slots for cleaning or to allow heat to flow freely across the
grill.
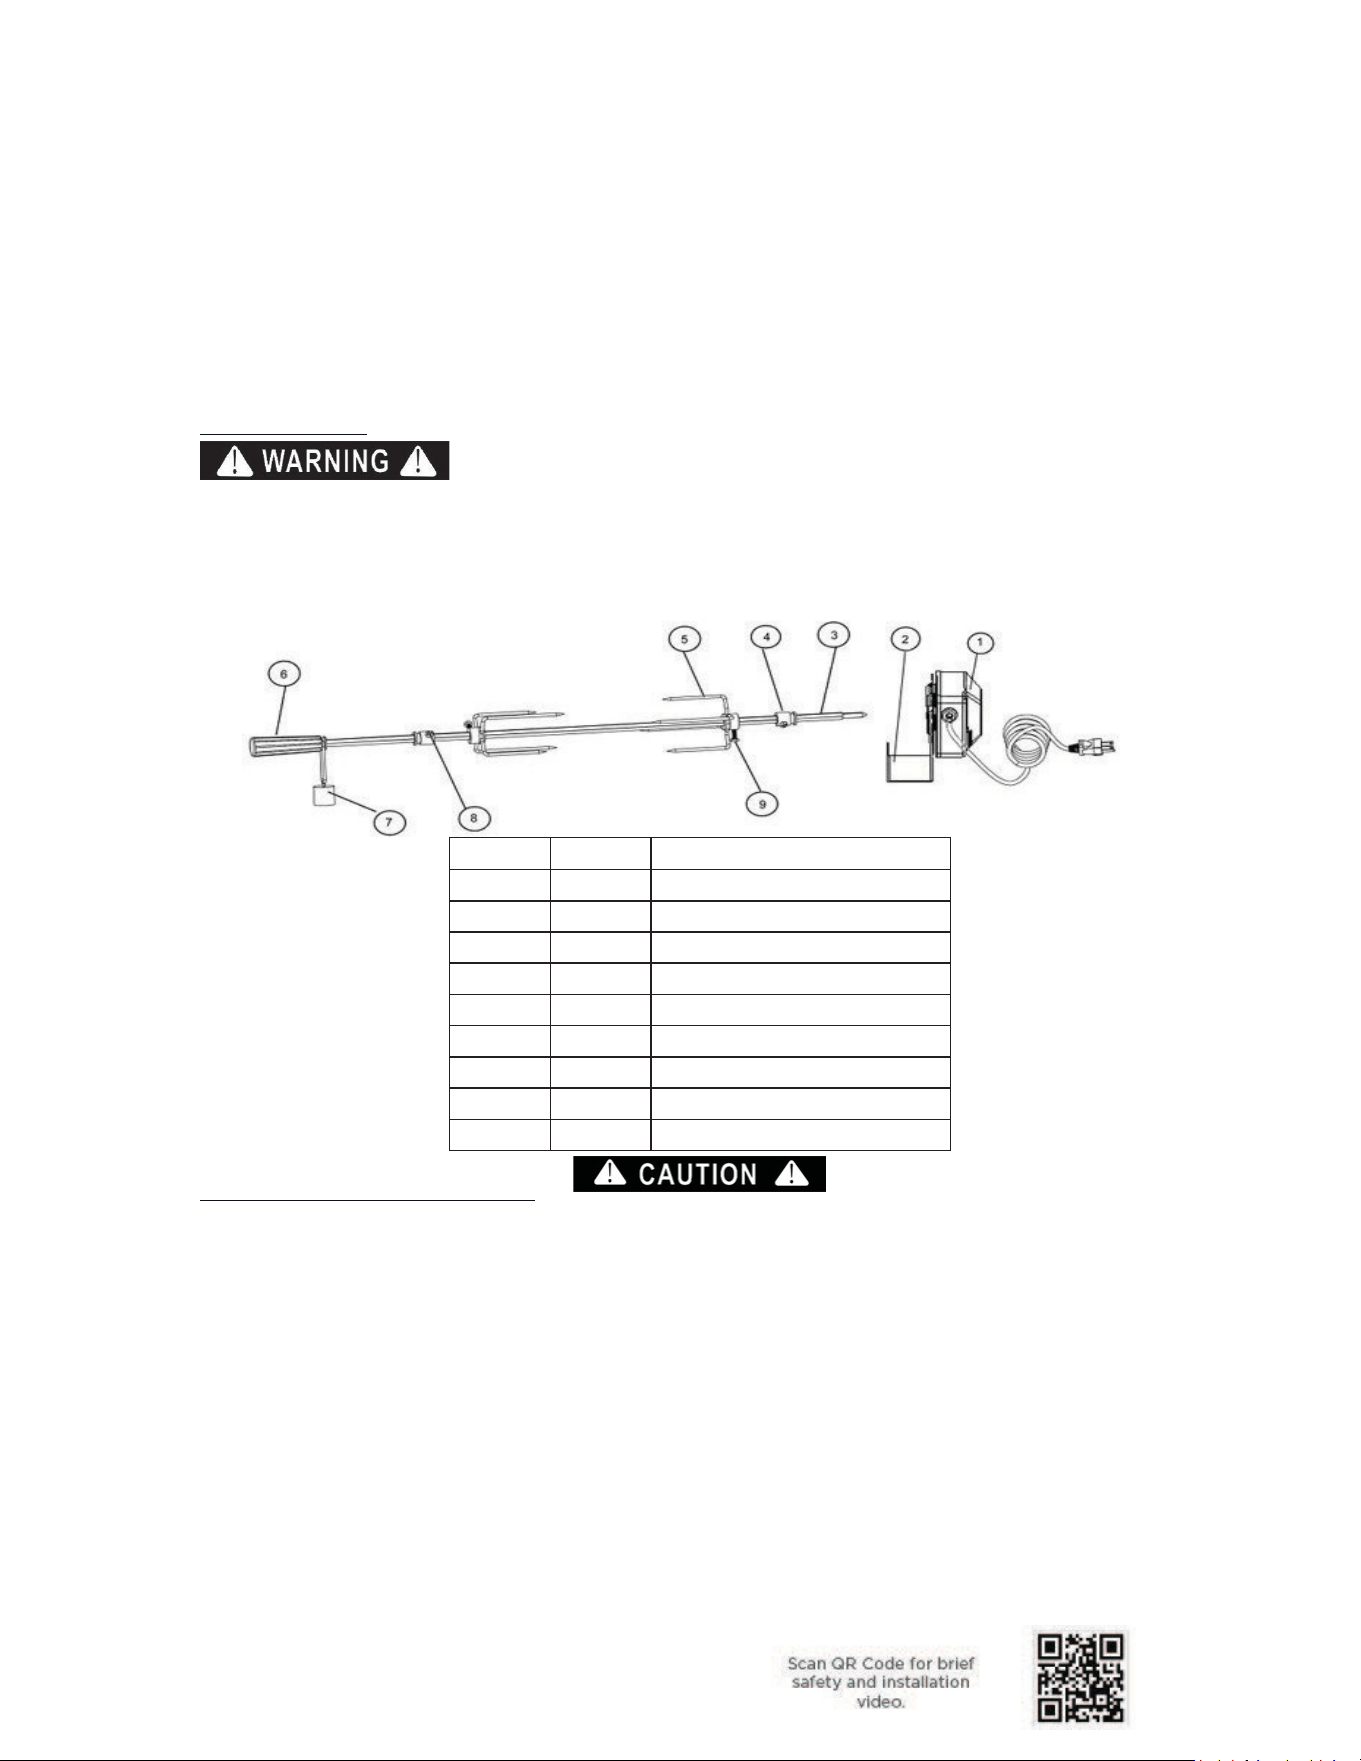
Rotisserie Assembly Instructions
Rotisserie cooking is ideal for large cuts of meat and poultry. It offers even cooking and self-basting to
ensure moist and juicy results. This method, favored by professional chefs, sears in natural juices and
nutrients, typically requiring 1½ to 4½ hours, depending on the meat type and size.
Balancing the meat evenly on the spit rod for optimal results and to avoid straining the motor is crucial.
Follow these detailed steps to assemble and operate your rotisserie:
1. Attach the Motor Bracket Assembly: Secure the Motor Bracket Assembly to either side of the
barbecue frame using the two provided screws and nuts.
2. Install the Rotisserie Motor: Slide it onto the Motor Bracket Assembly, ensuring it is securely
seated.
3. Assemble the Spit Rod Components: Attach the following components to the Spit Rod in
order:
• Key Washer
• Counterbalance (adjust as needed to balance the meat during operation)
• Handle (attach securely for safe handling)
4. Prepare the Prong Forks:
• Slide one Prong Fork onto the Spit Rod with the prongs facing away from the handle.
• Secure the meat or poultry on the Spit Rod with the second Prong Fork.
• Tighten the thumbscrews on both Prong Forks to hold the food firmly in place.
5. Position the Spit Rod Assembly:
• Insert the sharp end of the Spit Rod into the motor.
• Rest the other end of the Spit Rod onto the grill's supports on either side.
6. Secure Loose Portions of Meat:
• Use the butcher's string to tie loose food portions for uniform rotation.
• Caution: Do not use nylon or plastic string; it will melt and ruin the food.
7. Check All Connections: Ensure all bolts, screws, and thumbscrews are tightened securely.
8. Prepare for Drippings: Place a drip pan beneath the meat to catch drippings and prevent
excessive buildup on the grates.
V 1.0
21
• If the food is too large to accommodate a pan on the grates:
• Remove the grates and place the pan directly on the heat control grids.
• The distance between the Spit Rod and the hood should match the distance
between the Spit Rod and the heat control grids.
9. Align and Close the Hood:
• Carefully close the hood, ensuring the Rotisserie Rod is aligned between the hood
openings.
• Adjust the Motor Bracket and Shaft Mounting Bracket if necessary.
Operation Notes
• Drip Management: Always use a drip pan to simplify cleanup and prevent excessive grease
buildup.
• Warming Rack: Remove the warming rack before operating the rotisserie burner.
• Main Burners: Do not operate the main burners while using the rotisserie burner to avoid
uneven cooking or flare-ups.
No.
Qty
Description
1
1
110V Motor
2
1
Motor Bracket
3
1
Spit Rod
4
2
Shaft Collar
5
2
4-Prong Fork
6
1
Handle
7
1
Counterbalance
8
2
Screw
9
2
Hexagonal Head Screw
Electrical Grounding Instructions
1. Rotisserie Motor Grounding:
• The rotisserie motor has a three-prong grounding plug to protect against electric
shock.
• Insert the plug directly into a properly grounded three-prong receptacle.
• Do not cut or remove the grounding prong from the plug, compromising safety.
2. Grounding Compliance:
• The rotisserie motor must be grounded per local codes.
• In the absence of local codes, follow the National Electrical Code (ANSI/NFPA 70-
1990) or the Canadian Electrical Code (CSA C22.1).
3. Extension Cord Warning:
• Do not use an extension cord to supply power to the grill. This can result in fire,
electrical shock, or personal injury.
• Never install a neutral or ground circuit fuse, which creates an electrical shock hazard.
• Avoid grounding the appliance to a gas or hot water pipe.
V 1.0
22
How to Turn On the Lights on Your Grill
Overview of Light Features
1. C Series:
• Equipped with interior lights only.
2. CL Series:
• Features interior lights and knob lights.
3. SL Series:
• Includes interior lights, gradient knob lights, and a projection light.
• The knob lights transition from dark to bright orange as you adjust the grill to higher
heat settings.
• A Coyote logo projection light is displayed in front of the grill.
Steps to Turn on the Lights
1. Locate the light button on the left side of the control panel.
2. Press the button to turn on all lights:
• For the C Series, the interior lights will illuminate.
• For the CL Series, both the interior and knob lights will turn on.
• For the SL Series, the interior lights, gradient knob lights, and projection light will
activate.
3. To turn off all lights, press the button again.
• The lights on all series are designed to operate in an all-on or all-off mode.
Note
• The SL Series gradient knob lights adjust automatically to match the grill’s heat settings as the
knob is turned.
Preparing Food for the Grill
Safe food handling and preparation practices are essential to prevent foodborne illnesses.
Always follow these guidelines:
1. Cooking and Preparation:
• Cook foods thoroughly to kill bacteria, especially if previously thawed or exposed to
warm conditions.
• Keep uncooked foods refrigerated until ready to grill.
• Marinate meat in the refrigerator and discard excess marinade—never reuse it.
2. Preventing Cross-Contamination:
• Use separate plates and utensils for raw and cooked food.
• Never place cooked food on a plate that previously held raw food.
• Wash all plates, utensils, and surfaces that have encountered raw food before reusing.
3. Food Hygiene:
• Wash vegetables, seafood, and poultry thoroughly before cooking.
• Store leftovers in the refrigerator within 2 hours of cooking.

V 1.0
23
Comprehensive Grill Maintenance and Care Instructions
Drip Tray Maintenance
• Cleaning: The drip tray below the grill should be cleaned periodically to prevent debris and
grease buildup.
• Cooling: Allow the drip tray to cool completely before cleaning it.
• Weather Precautions: Do not leave the grill uncovered during inclement weather. Rainwater
can be collected inside the grill, cart, or drip tray.
• If the drip tray is left uncleaned and uncovered, water mixed with grease may overflow,
damaging the grill cart.
• Recommendation: Clean and store the drip tray after every use.
Cooking Grates
• Post-Cooking Cleaning: Use a barbecue mitt and a damp cloth immediately after cooking while
the grates are still warm. Exercise caution, as the grates will be extremely hot.
• For Cooled Grates, Remove the cooled grates from the grill and clean them with a mild
detergent for easier debris removal.
Heat Control Grids
• Periodic Cleaning: Occasionally clean the heat control grids with warm, soapy water.
• Use a wire brush to remove stubborn, burned-on residue after the grids have cooled.
• Ensure grids are thoroughly dried before reinstalling them into the grill.
Burner Care
Main Burners:
1. Ensure gas control knobs are in the "OFF" position and the fuel source is disconnected.
2. Allow burners to cool completely before cleaning.
3. Remove the burners by unscrewing the nuts, holding them in place, and then carefully lifting
them away from the gas valve orifice.
4. Brush the outer surfaces with a wire brush and clean clogged ports with a stiff wire or paper clip.
5. Inspect for damage (cracks or holes). Replace it if necessary.
6. Reinstall the burners, ensuring the gas valve orifices align with the burner tubes. Check the
spark electrode position.
Sear Burners:
1. Remove large food debris from the burner surface.
2. Turn the burner to high heat and allow it to burn off excess grease. Monitor for flare-ups.
3. After burning off debris, the burner is ready for use.
4. Tip: Run the burner a few minutes after cooking to simplify cleanup and avoid reheating the grill
later.
Stainless Steel Care and Maintenance
• Cleaning Process:
1. Allow the grill to cool completely before cleaning.
2. Wash off dirt and debris with warm water. For tough spots, use a third-party degreaser.
3. Rinse and dry with a clean towel to prevent water spots or discoloration.
Care and Maintenance
V 1.0
24
4. Apply a third-party stainless-steel polish to protect the exterior (do not use it on cooking
grates or heat control grids). Follow the Polish manufacturer's instructions.
5. If discoloration or rust occurs, clean it as above and use polish to restore the surface.
• Environmental Factors to Consider:
• Avoid exposure to mortar, pool chemicals, hard water, salt air, dust, rust particles, and
organic matter. If not promptly cleaned, these can cause surface discoloration or
corrosion.
• Do not leave cleaning solutions or sprays containing salt, acid, or alkaline substances
on the grill.
Changing the Light Bulbs
1. Remove the screw holding the bulb lens.
2. Grip the bulb edges (not the top or bottom) and pull straight out to avoid breakage.
3. Use a clean cloth to handle the new halogen bulb to ensure longevity.
4. Please insert the new bulb and gently press it into place.
5. Wipe off any fingerprints or grease before reinstalling the lens cover.
6. Test the lights by pressing the switch.
Annual Grill Housing Cleaning
1. Allow the grill to cool completely and disconnect the gas supply.
2. Remove cooking grids, heat control grids, and burners for cleaning.
3. Wash the warming rack with mild detergent and warm water.
4. Cover gas valve orifices with aluminum foil to prevent debris entry.
5. Brush the grill's interior with a stiff wire brush and wash with soapy water.
6. Remove the foil, check orifices for obstructions, and test the electrode spark.
7. Reinstall all components and reconnect the gas supply. Check burner flames for proper
operation.
Important: Do not line the grill bottom with foil, sand, or absorbent substances, as these can block
grease flow and cause a grease fire.
Maintenance Guidelines
1. Keep the grill area clear of combustible materials and flammable substances.
2. Ensure proper airflow for combustion and ventilation.
3. Check the burner flames regularly—they should be blue and stable, with no yellow tips or
excessive noise. Address issues promptly.
4. Clean the appliance and special surfaces with recommended cleaning agents.
5. Inspect and clean burners for insect nests or blockages to prevent fires beneath the grill.
Avoiding Rust and Scratches
• Rust Prevention: Use a Coyote Grill cover for protection against contaminants.
• Keep the grill covered during masonry work or near splashing pool chemicals.
• Scratch Removal: Use a third-party scratch repair kit to resurface stainless steel, following
product instructions carefully.
By following these detailed maintenance and care guidelines, your grill will remain in excellent condition,
providing safe and enjoyable cooking experiences for years.

V 1.0
25
General Troubleshooting Guide
Inspect your burners at least once a year or immediately if any of the following conditions occur:
• You smell gas.
• Burner flames appear primarily yellow.
• The grill does not reach the proper cooking temperature.
• Burners produce a snapping or popping noise.
• The grill heats unevenly.
When to Check for Spiders/Insects
Spiders and insects can obstruct the burner venturi, causing operational issues. Inspect the burners
once a year or immediately after experiencing any of the following:
1. The smell of gas combined with yellow flames.
2. The grill does not heat to the expected temperature.
3. The grill heats unevenly.
4. Burners make popping noises.
Troubleshooting Guide
If the grill is not functioning correctly, use the information below for guidance.
Safety First: If you cannot resolve the issue, contact Coyote Customer Support at 855-520-1559.
The grill will not ignite.
• Ensure the gas supply is turned on.
• If using LP gas, verify there is fuel in the tank. Check the gas level.
• Confirm that at least one burner is turned on, allowing up to 5 seconds of gas flow to ignite.
• Check if the igniter is working. You should hear a snapping sound.
• Check for a spark at the electrodes if there is a snapping sound. (Remove cooking grates and
heat control grids to inspect.)
• Ensure the electrode gap is 1/8" to 1/4" between the electrode and contact point.
• Inspect for loose wire connections to the igniter or electrodes.
• Clear any debris blocking the electrodes.
• If the igniter still does not work, try lighting the grill manually with a lighter.
Flare-ups
• Check for excess grease or food debris on heat control grids and cooking grates.
• Ensure the drip tray is clean (do not line it with aluminum foil).
• Avoid placing the grill directly in the path of wind.
• Note: Some flare-ups are normal when cooking greasy foods.
Yellow flames
• Check burner air inlets for obstructions, such as debris or insect nests.
• Ensure the grill is not in an overly windy location.
If the flame blows out on a low setting or uneven heat
• Inspect the venturi tubes for spider webs or insect nests and clean them thoroughly.
• Preheat the grill on high for 5 minutes before cooking.
• Ensure the venturi tubes are correctly aligned over the orifices.
Troubleshooting your Grill
V 1.0
26
• Relocate the grill to a less windy area, especially in cold or windy weather.
• Check for sufficient fuel. Confirm that the cylinder valve is open and that the cylinder contains
fuel.
Low heat on the "HIGH" setting
• Inspect the fuel hose for kinks or bends.
• Clear dust or debris from the grill area.
• Verify gas supply and pressure.
• Clean the burner and orifice if the issue affects only one burner.
The grill is too hot.
• Excess grease buildup may cause grease fires.
• Replace damaged or faulty regulators with factory-authorized parts.
• Lower the cooking temperature setting.
Flame behind the control panel or knobs.
• IMMEDIATELY shut off the cylinder valve and let the grill cool.
• Inspect venturi tubes for obstructions and clean them.
• Tighten loose connections with a wrench and replace any damaged parts. Perform a leak test
before reusing the grill.
• Realign the venturi tubes over the orifices.
• If you cannot find the issue, contact Customer Support.
Fire at any connection
• IMMEDIATELY shut off the cylinder valve and let the grill cool.
• Tighten connections with a wrench and replace damaged parts. Perform a leak test before using
the grill.
• If unresolved, contact Customer Support.
Important Notes
• For safety, always inspect burners for blockages or misalignment after extended periods of non-
use.
• Always err on the side of caution when dealing with potential gas leaks or malfunctioning
equipment.
• Contact Customer Support: Call 855-520-1559 for expert assistance with unresolved issues.
Controlling Flare-Ups
Flare-ups are a natural part of grilling meat and contribute to the unique flavor of gas grilling. However,
excessive flare-ups caused by grease buildup can overcook food and create safety risks.
Follow these tips to minimize and control flare-ups:
1. Minimizing Flare-Ups:
• Trim excess fat from meat before cooking.
• Cook fatty meats like chicken or pork on low heat or indirectly.
• Ensure the grill is on level ground, allowing grease to drain properly through the
evacuation hole.
2. Managing Flare-Ups:
• If a grease fire occurs, close the hood and turn off the burners. Wait for the grease to
burn out.
• Use caution when reopening the hood, as flare-ups may occur suddenly.
Never pour water on flames, which can cause splattering and severe burns.
V 1.0
27
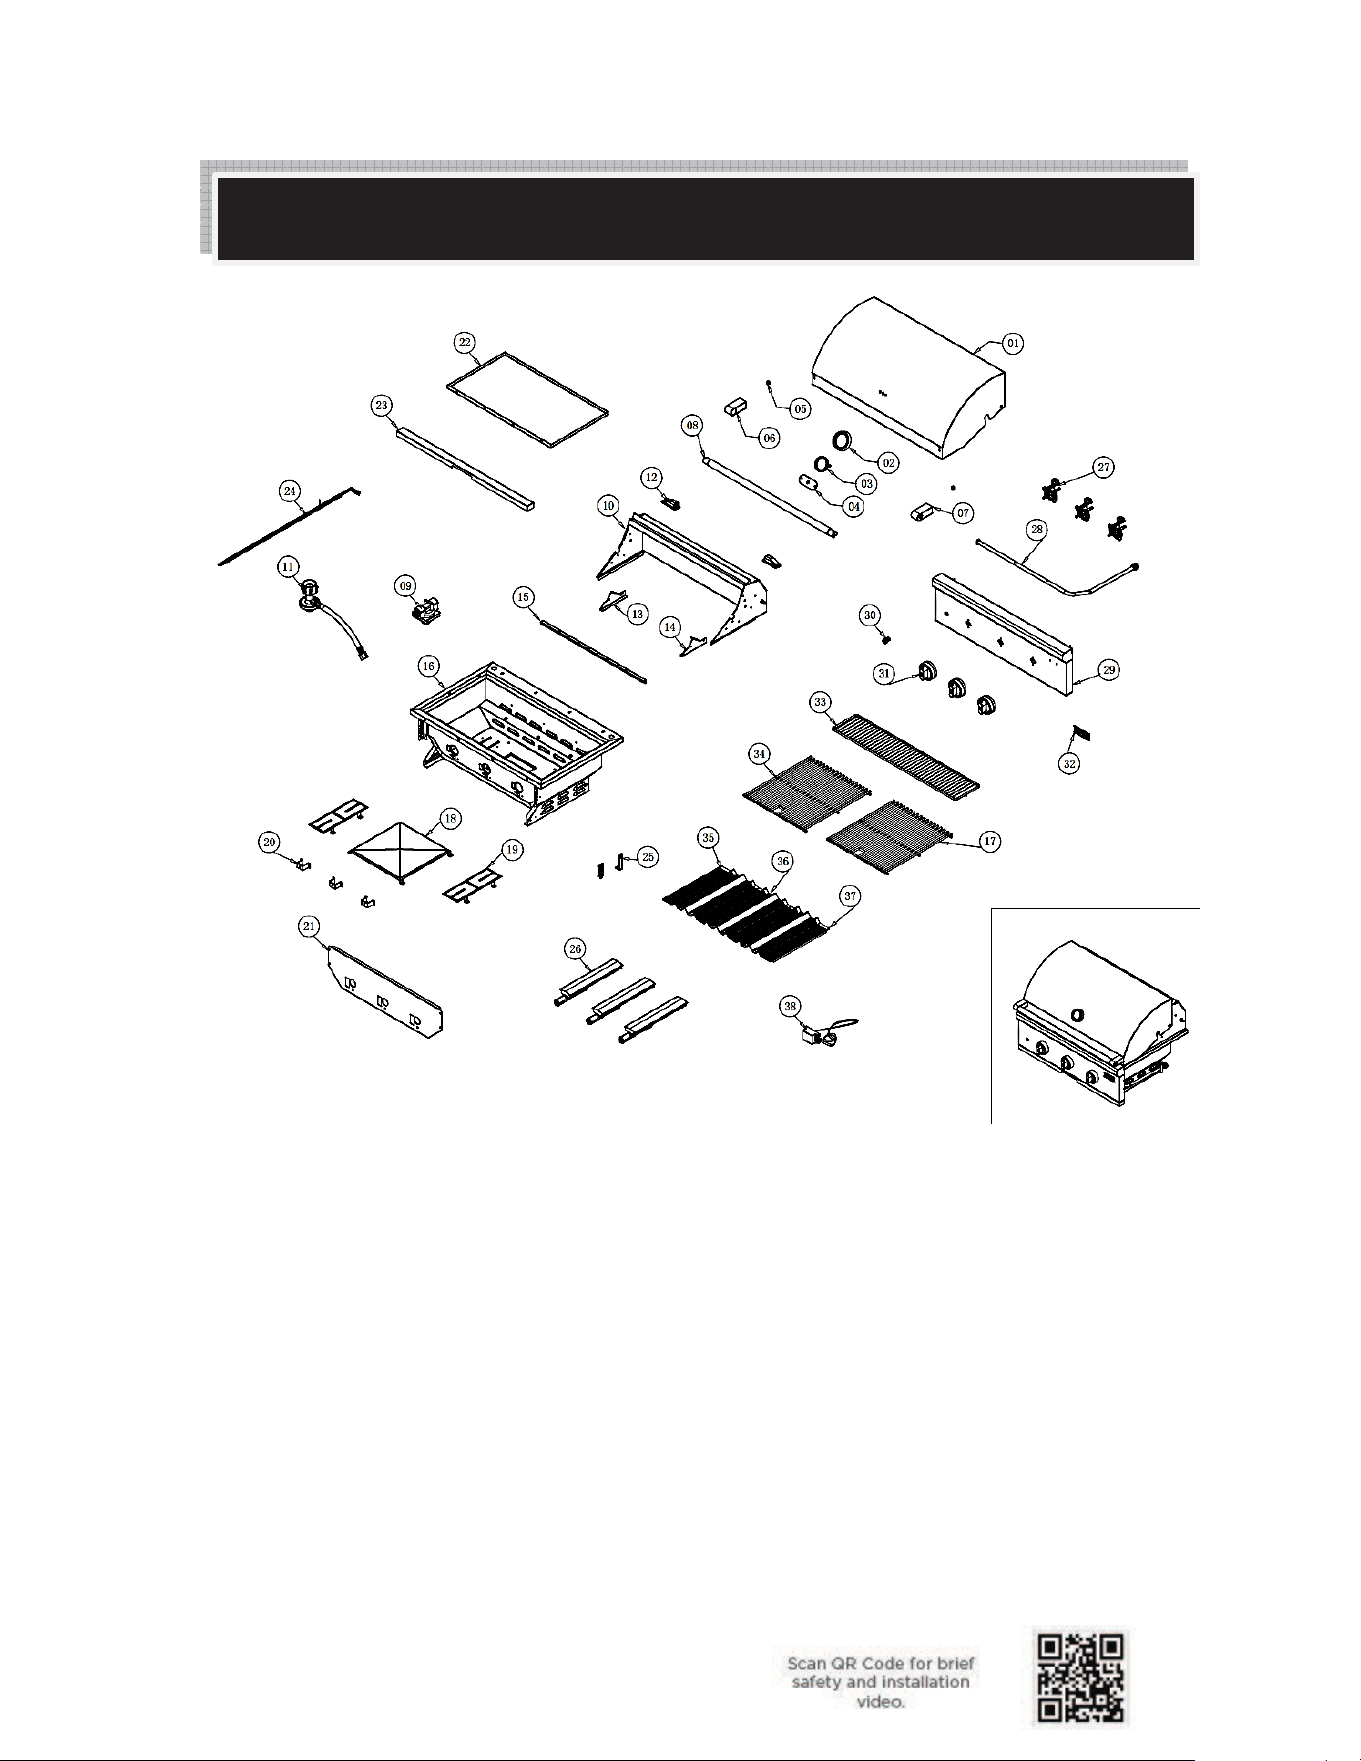
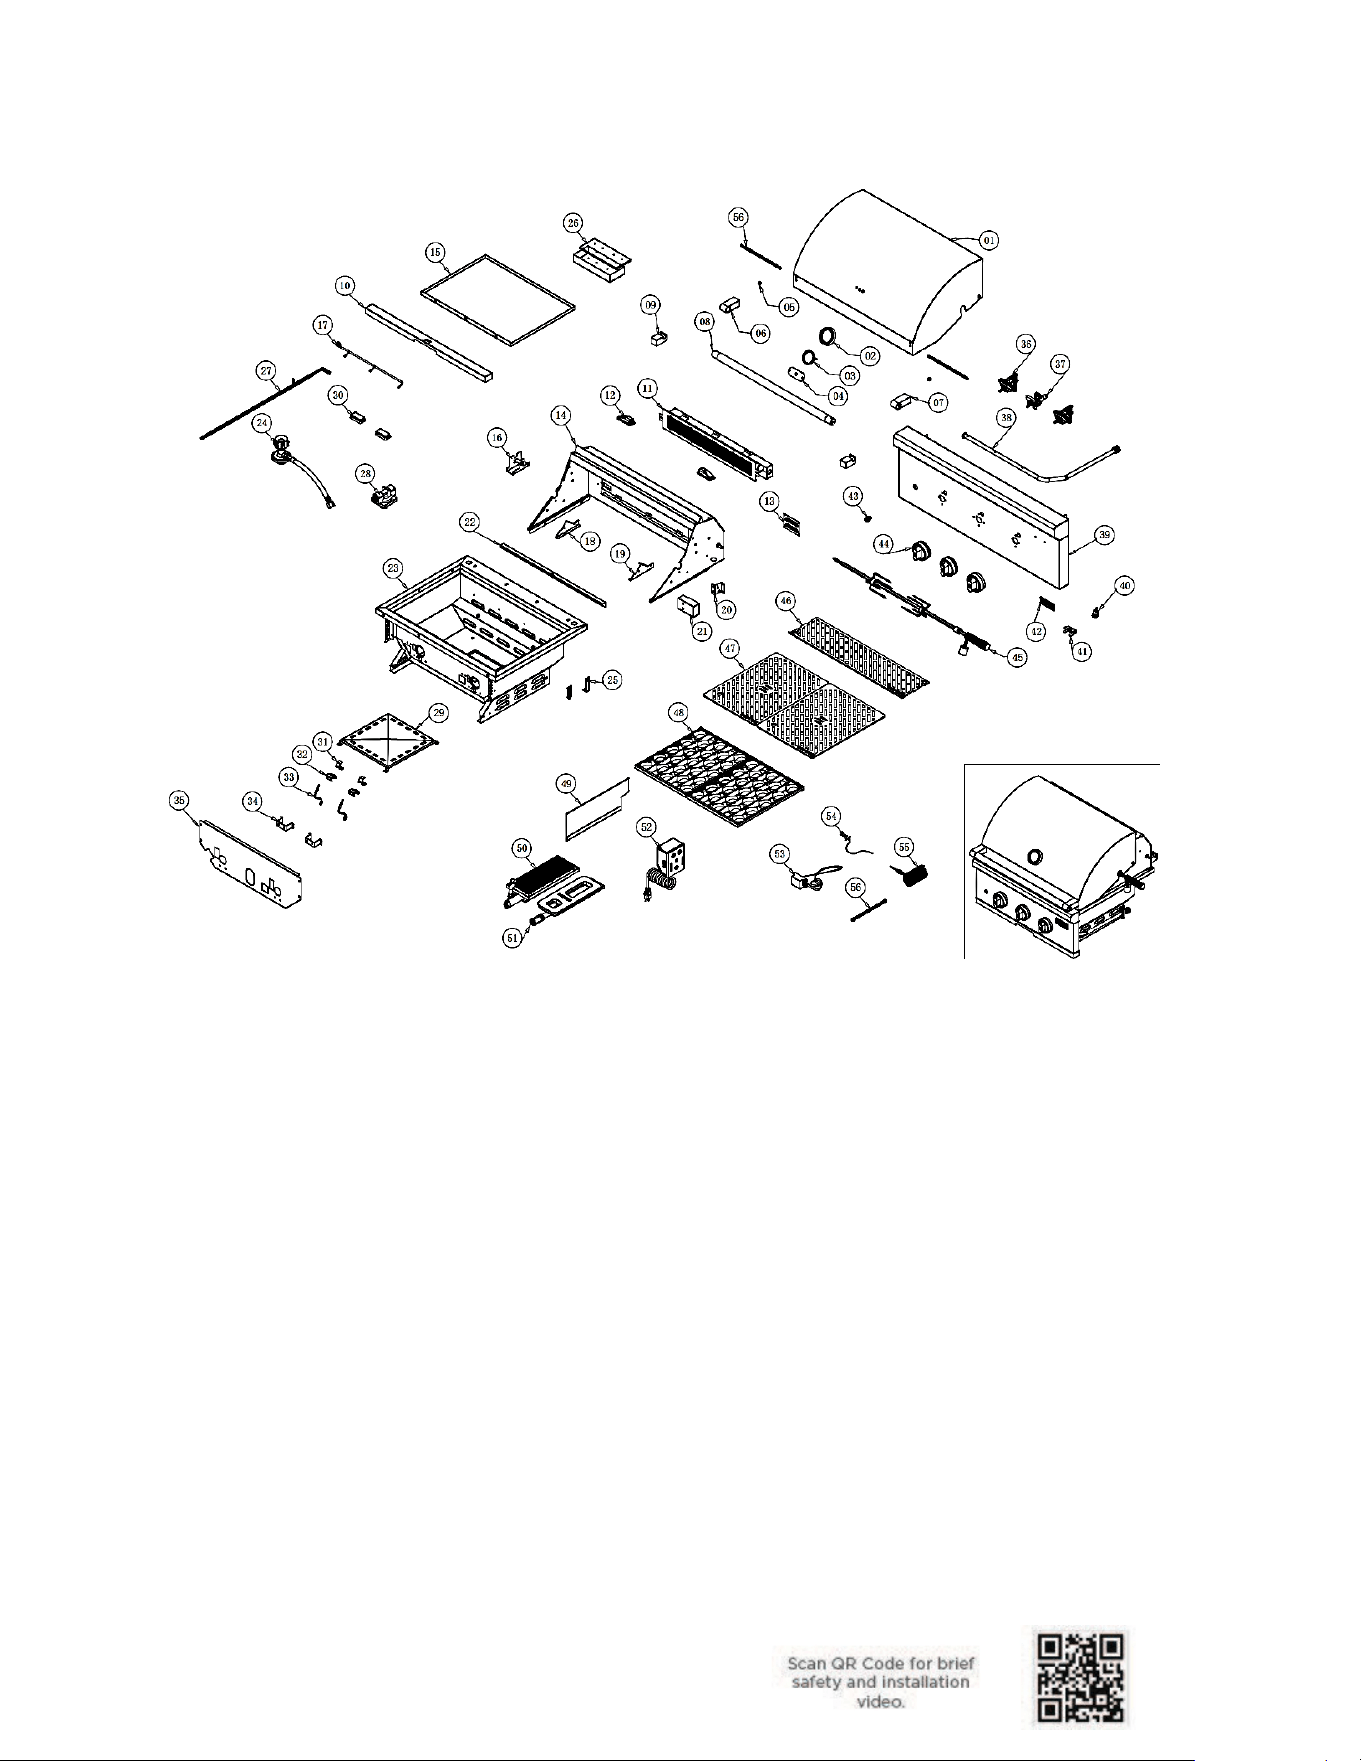
C3C34
Parts Listing
V 1.0
28
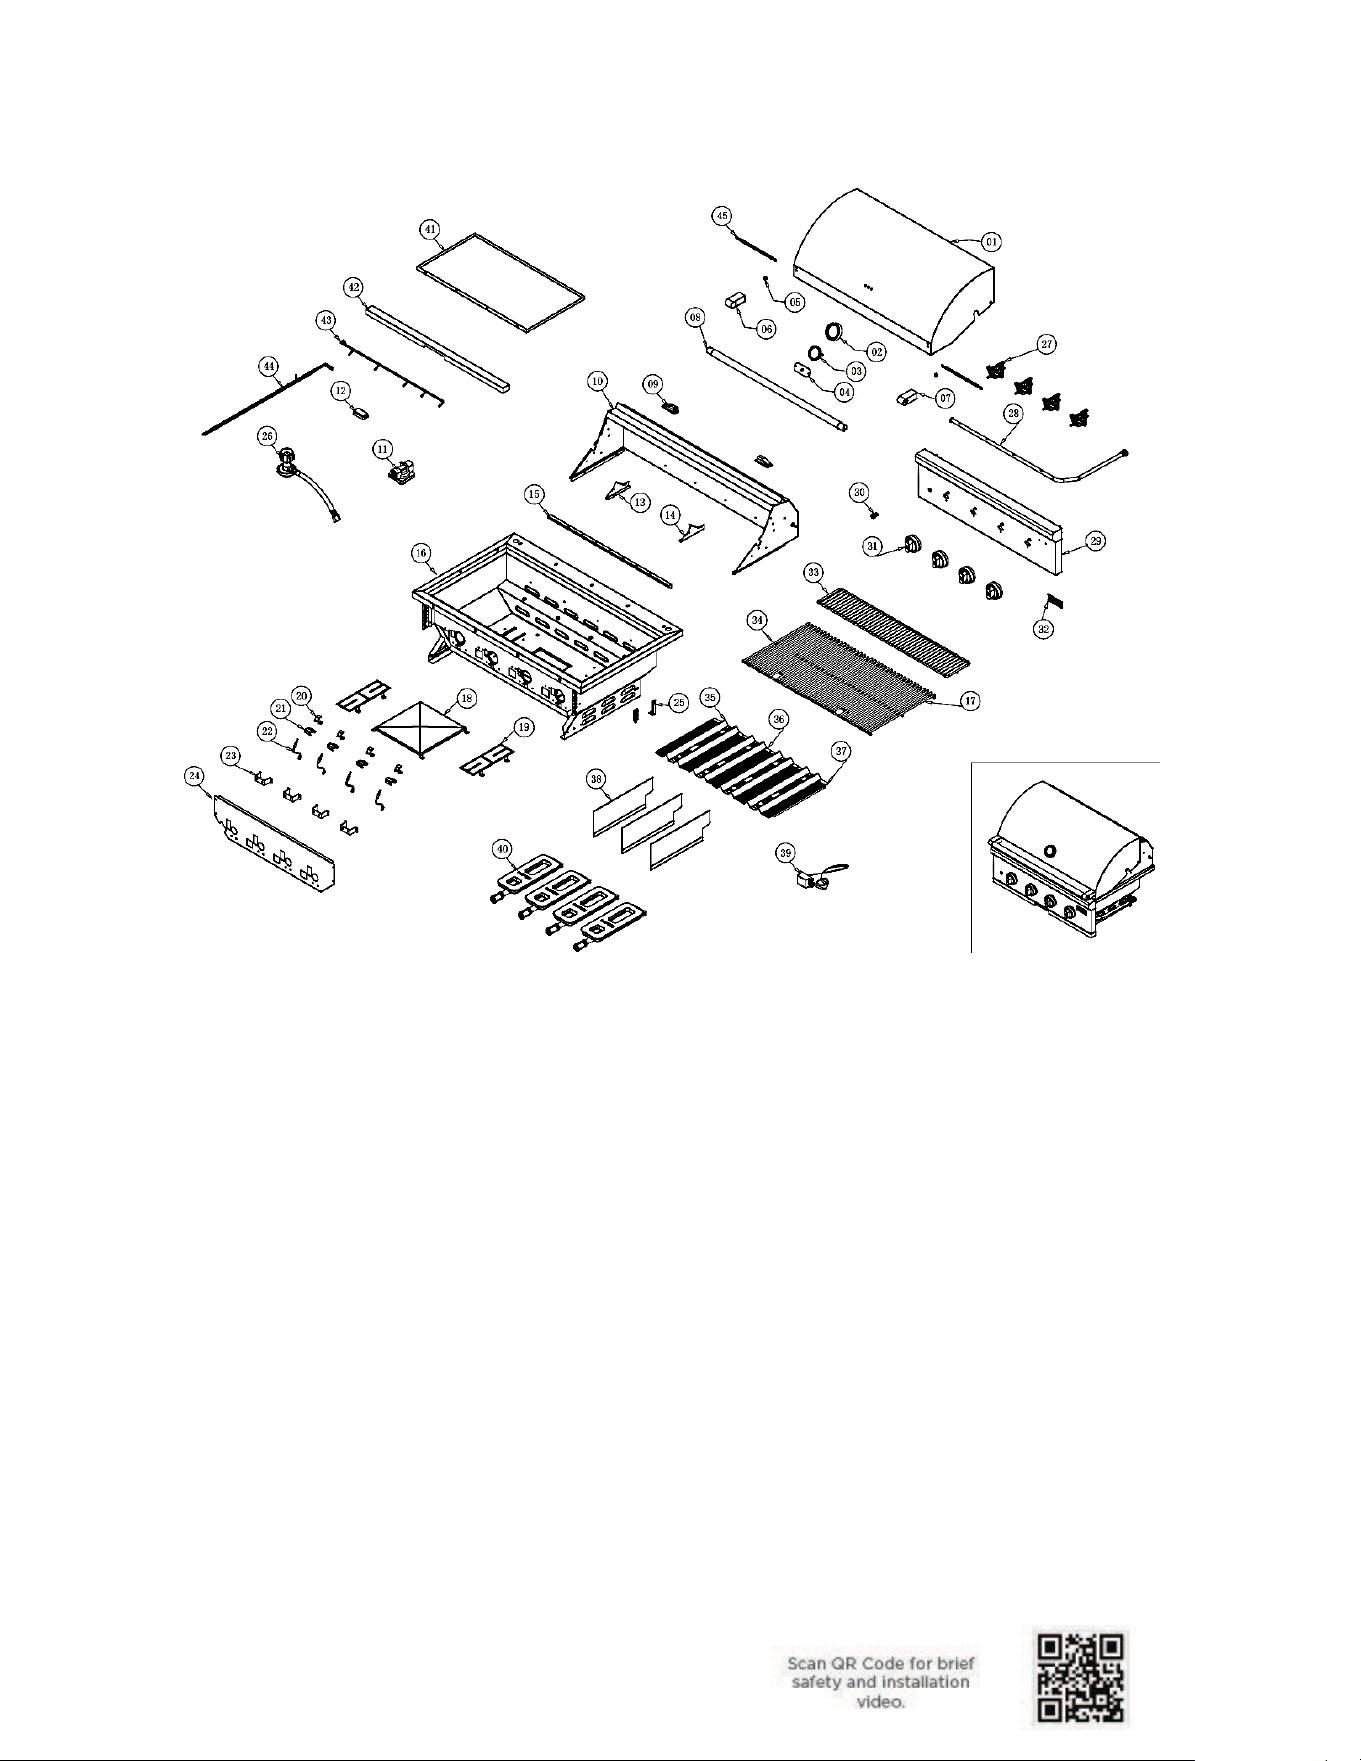
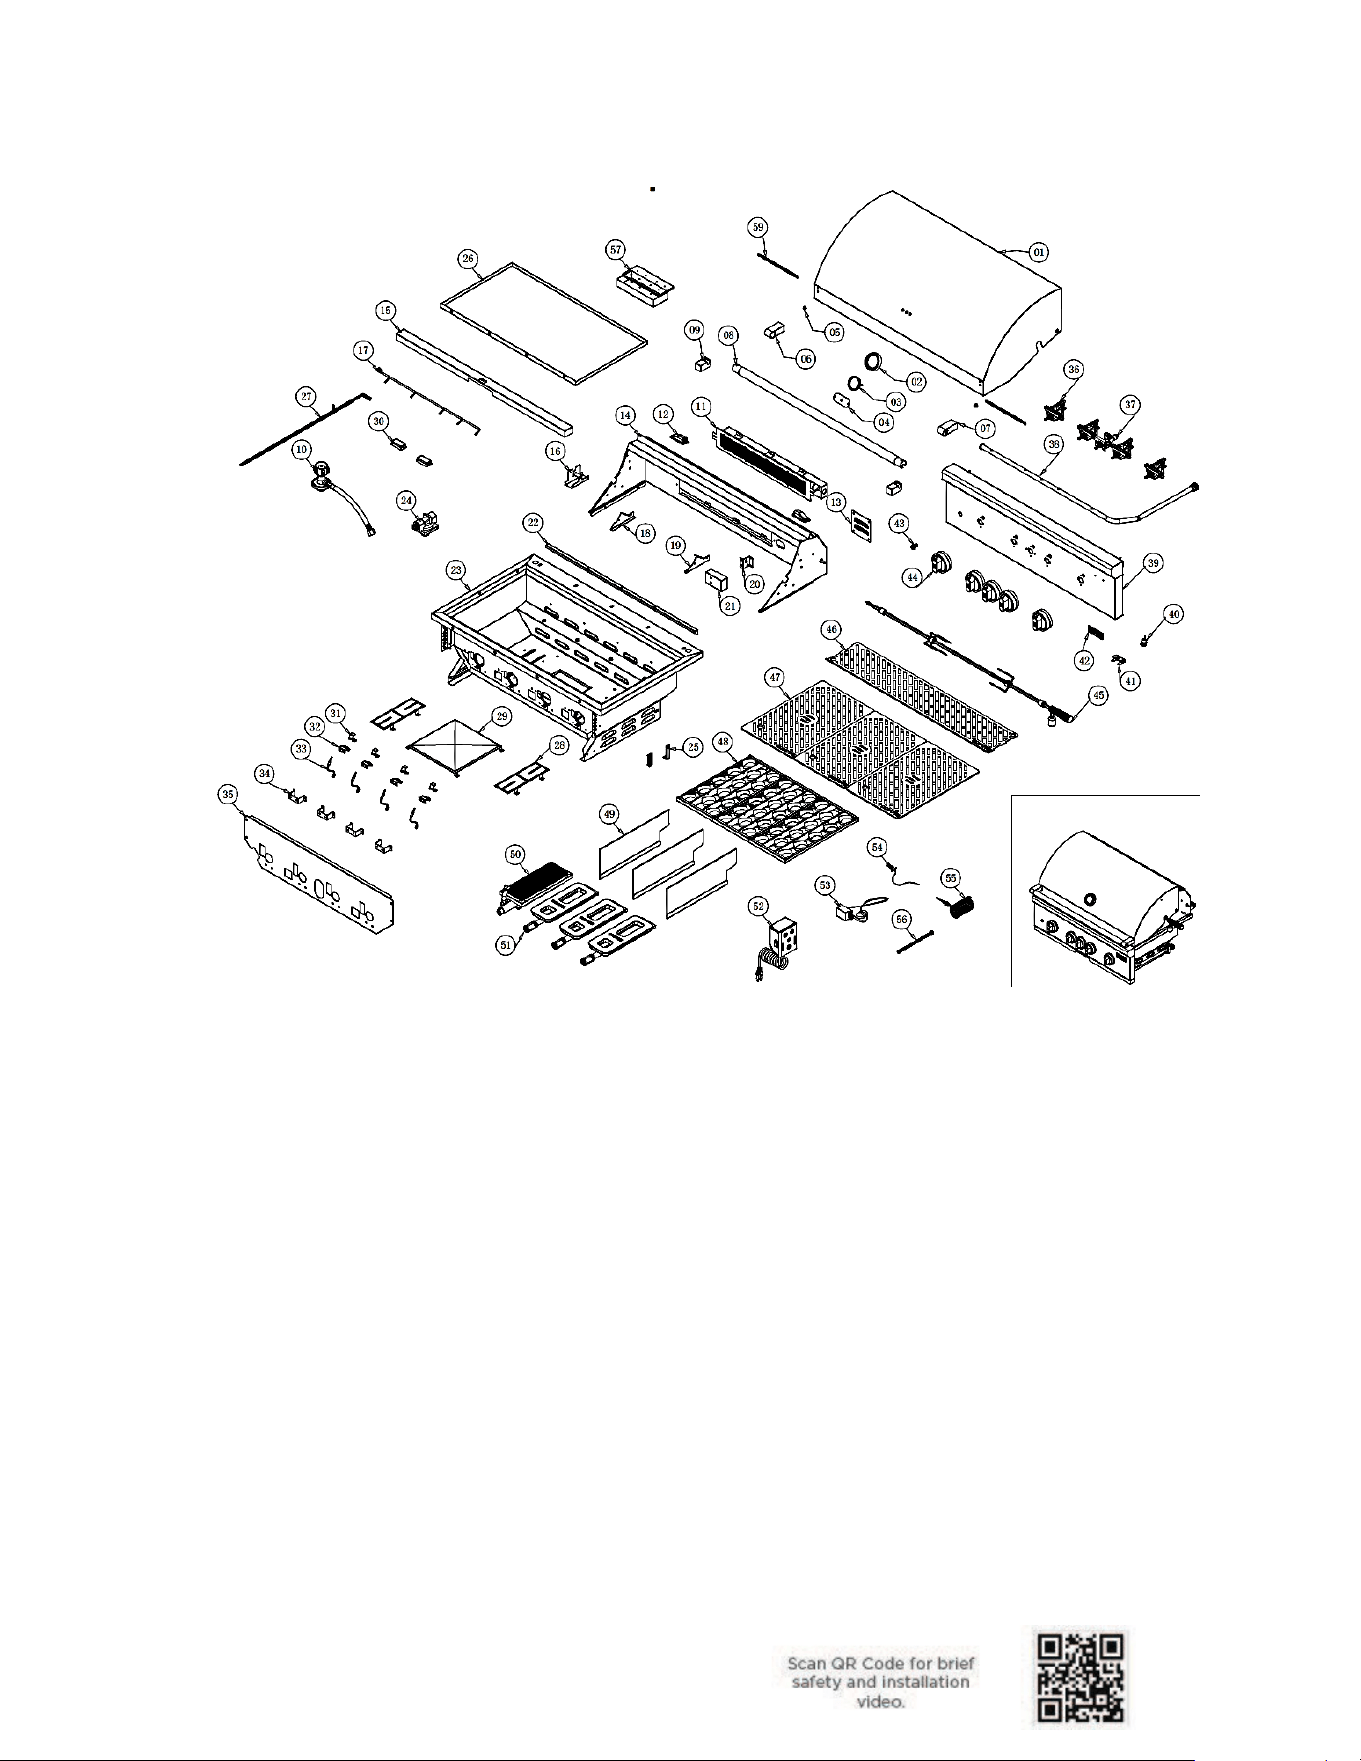
C3CL36
V 1.0
29
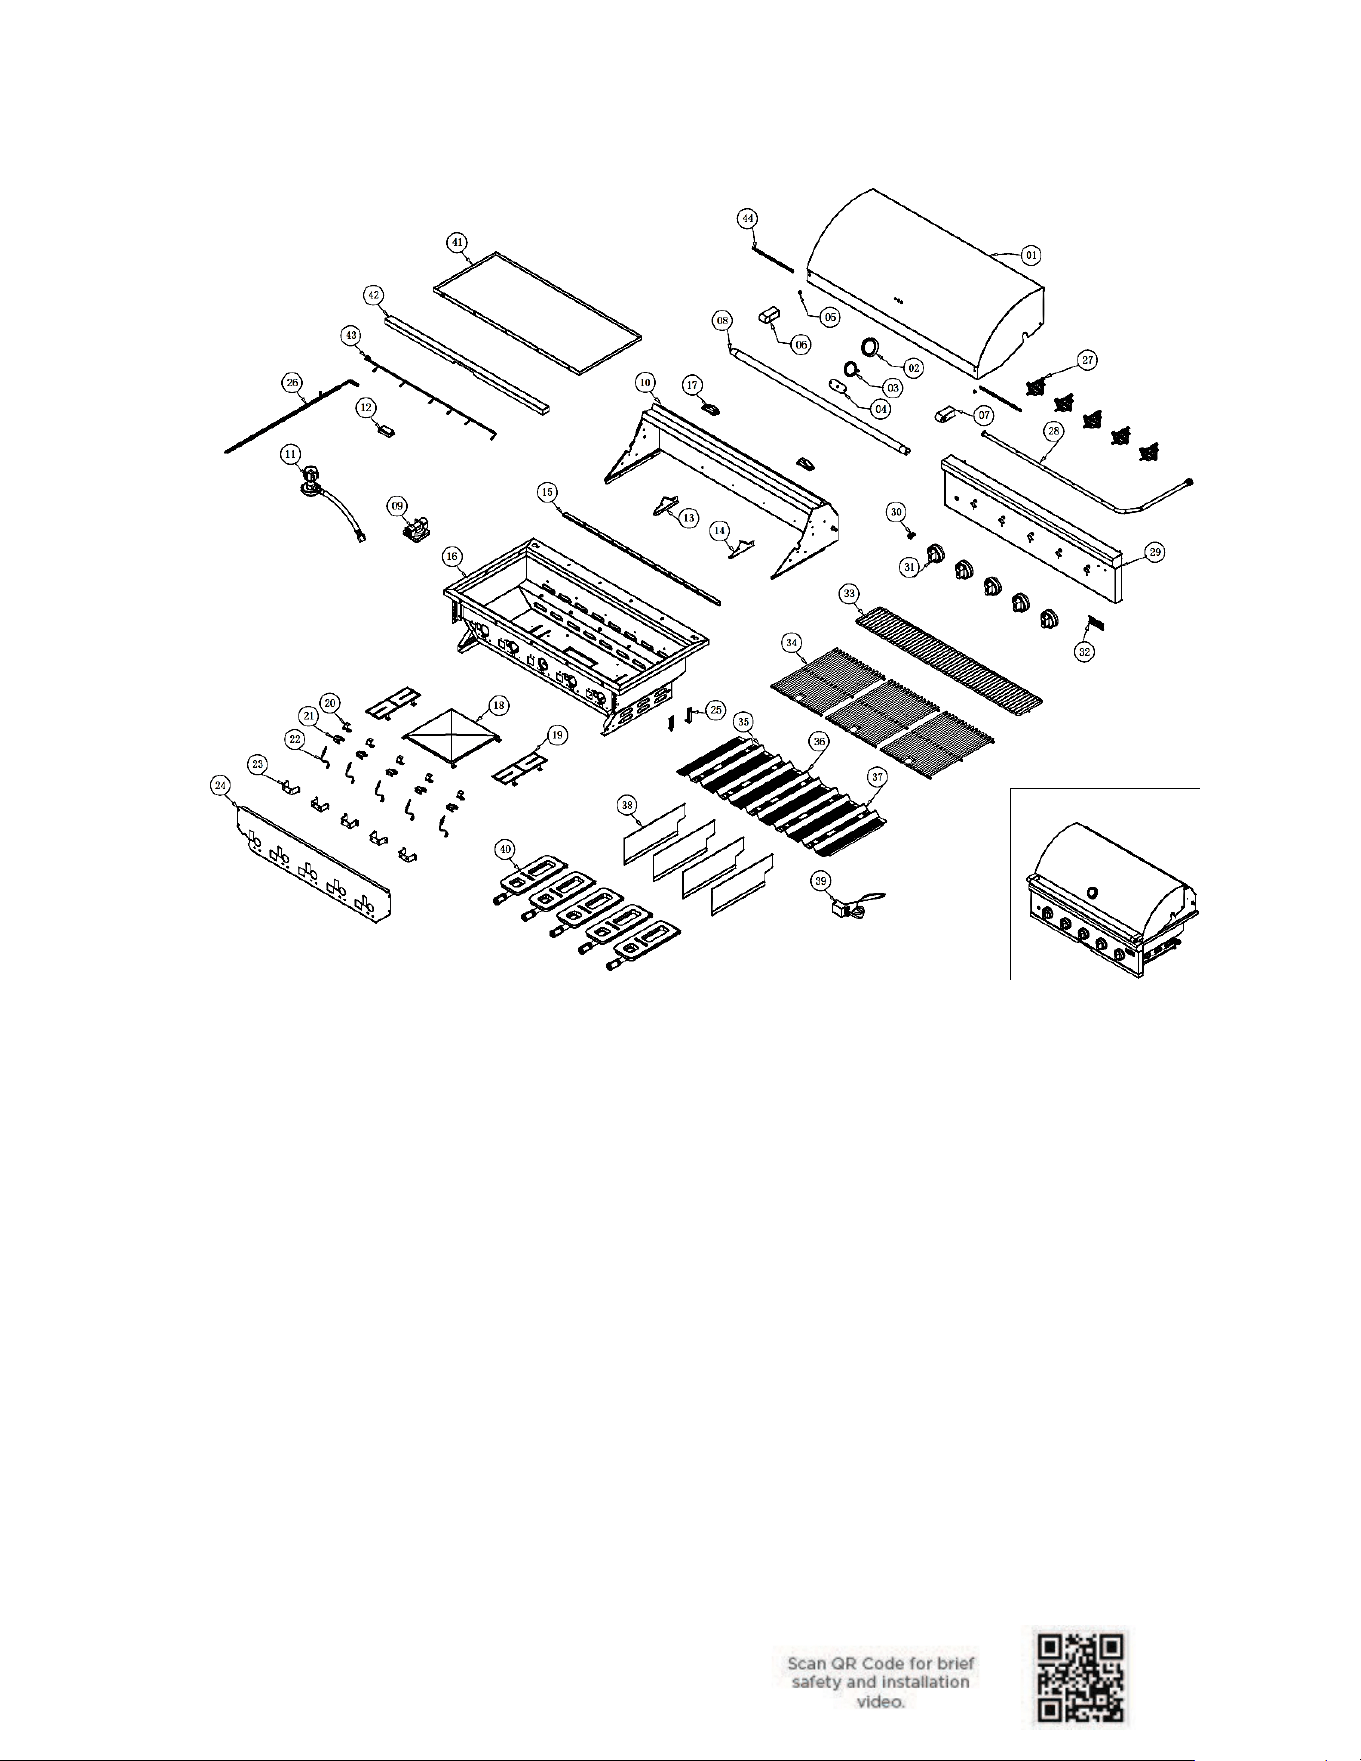
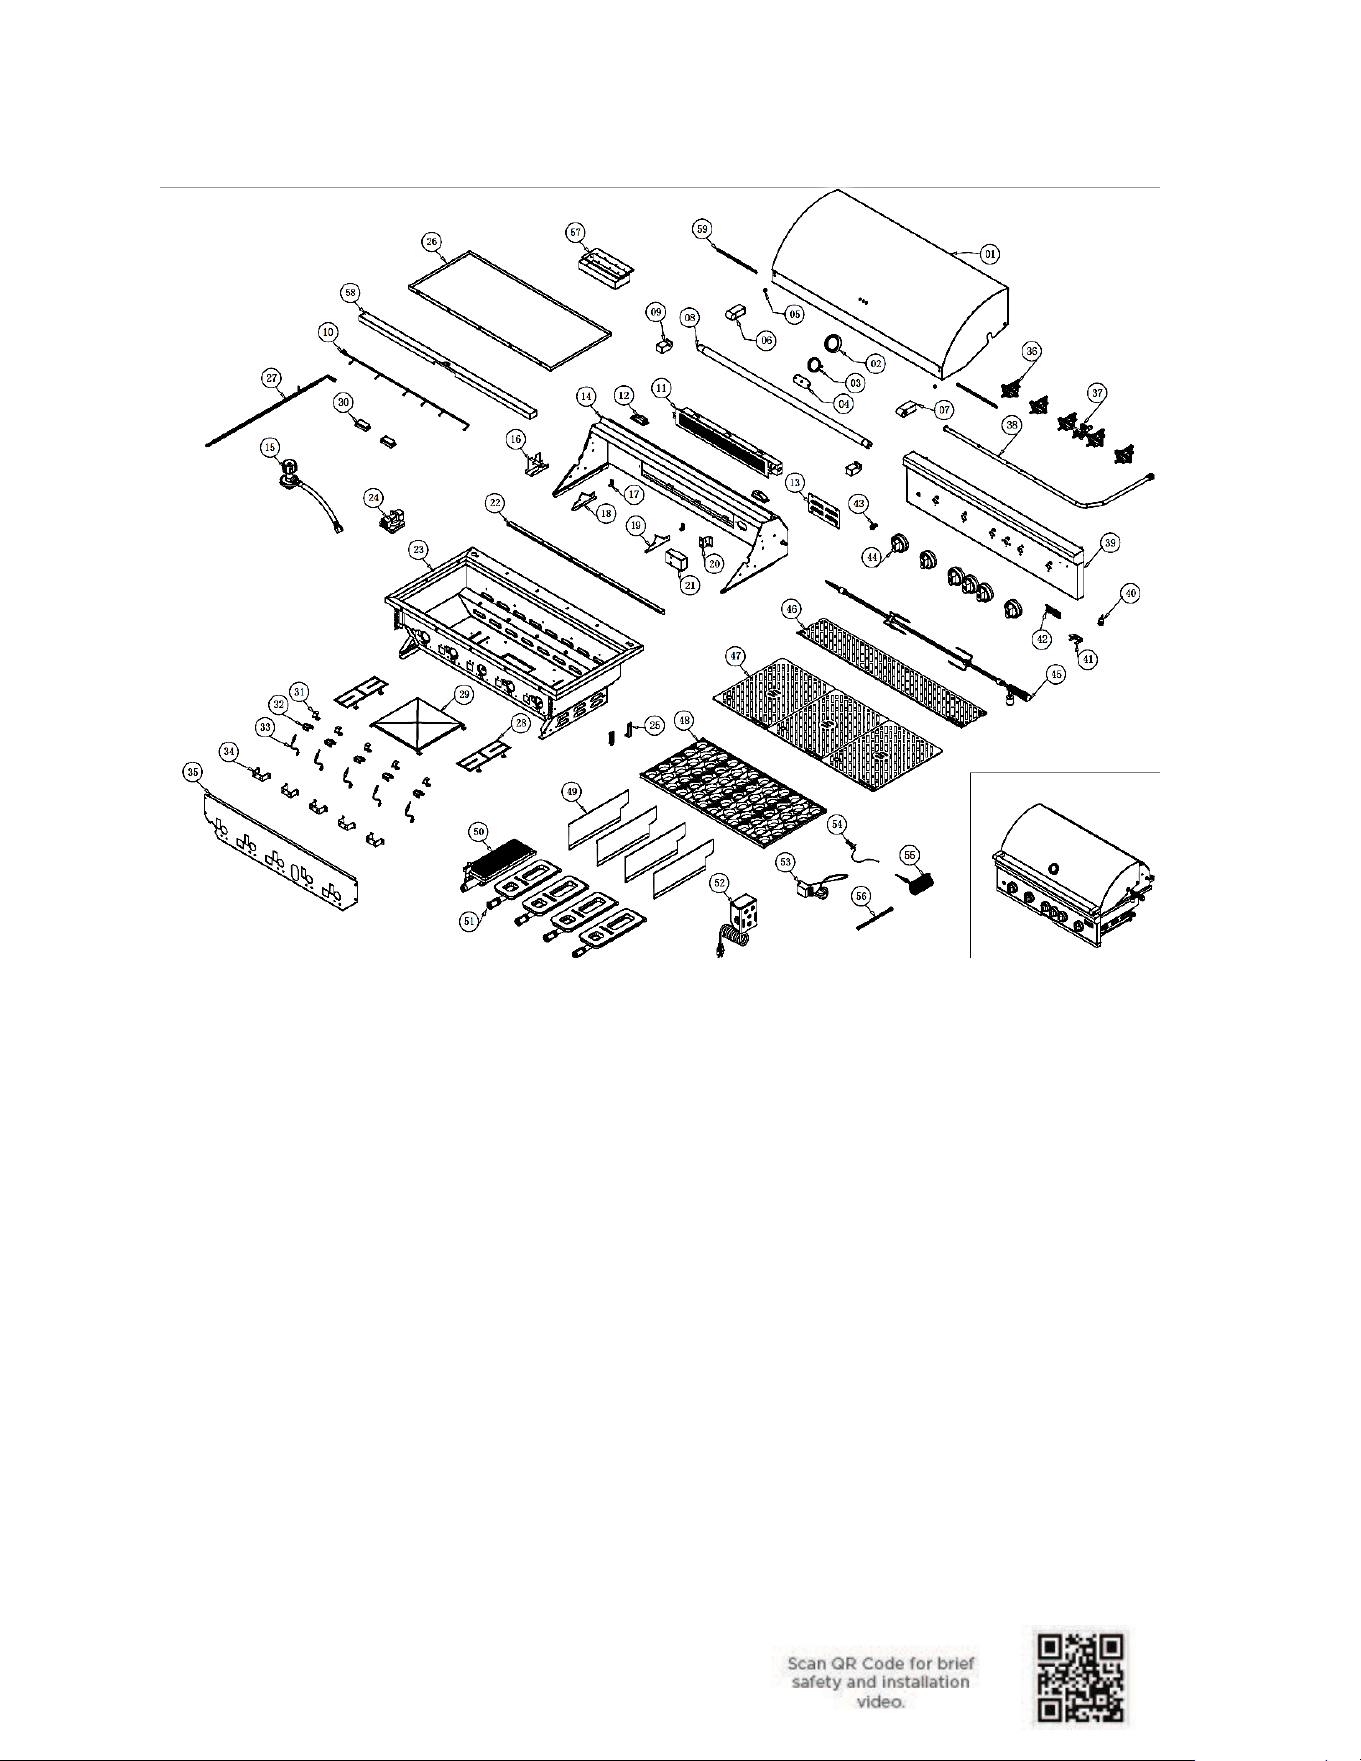
C3CL42
V 1.0
30
C3SL30
V 1.0
31
C3SL36
V 1.0
32
C3SL42
