
Technical Support and E-Warranty Certificate www.vevor.com/support
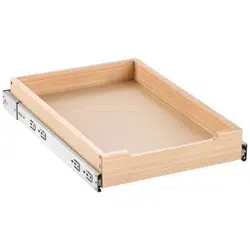
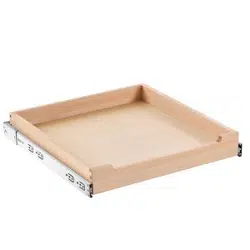
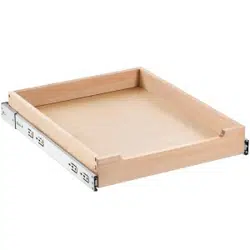
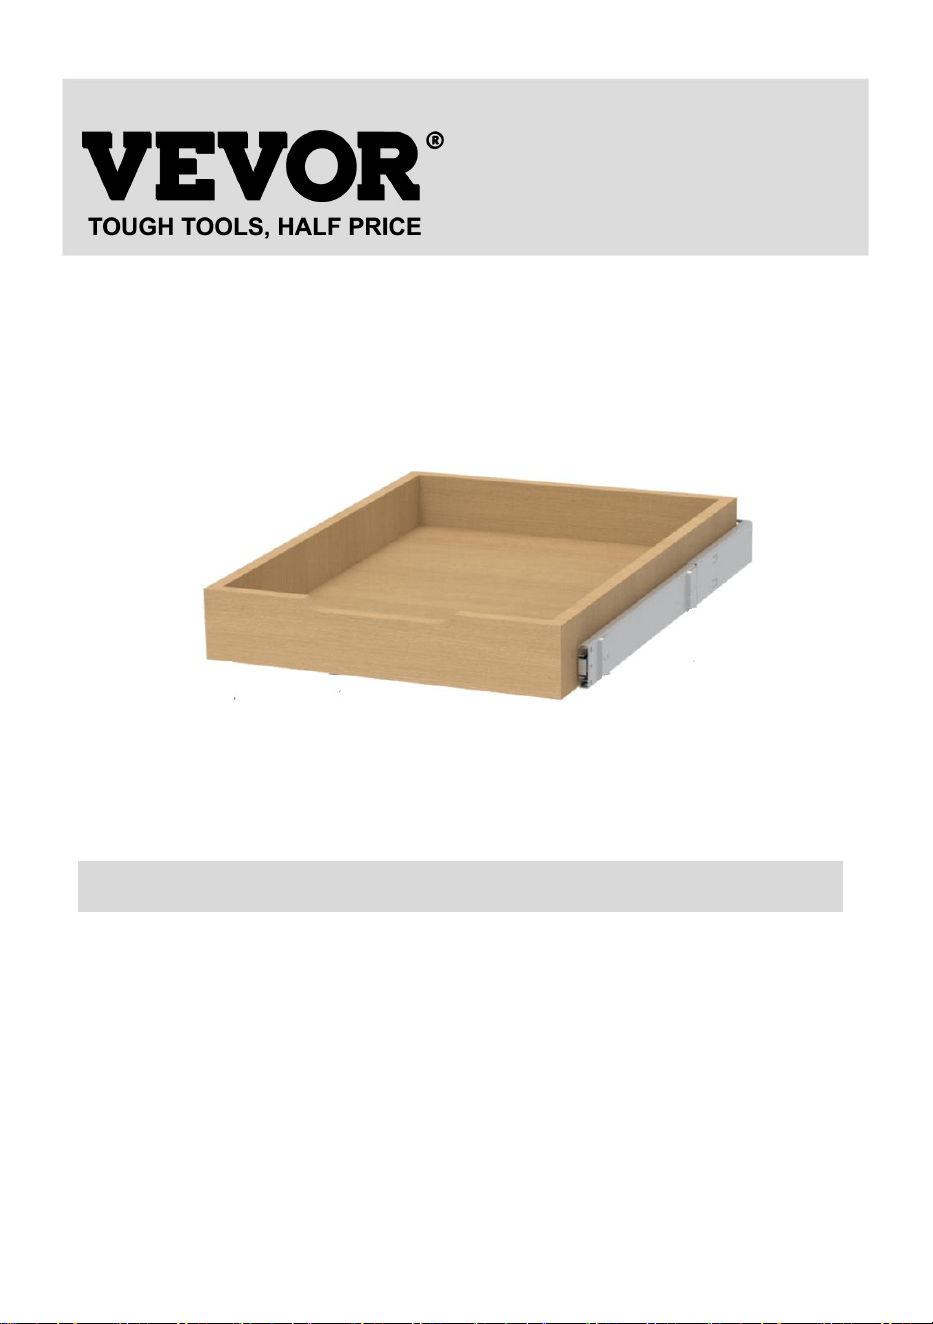
PULL-OUT DRAWER RACK
We continue to be committed to provide you tools with competitive price.
"Save Half", "Half Price" or any other similar expressions used by us only
represents an estimate of savings you might benefit from buying certain tools
with us compared to the major top brands and does not necessarily mean to cover
all categories of tools offered by us. You are kindly reminded to verify carefully
when you are placing an order with us if you are actually Saving
Half in comparison with the top major brands.

1
Thanks for purchasing one of our products, please read carefully the assembly
instructions before the installation.
Model:
SKU-1;SKU-2;SKU-3
NEED HELP? CONTACT US!
Have product questions? Need technical support? Please feel free to
contact us:
Technical Support and E-Warranty Certificate
www.vevor.com/support
This is the original instruction, please read all manual instructions
carefully before operating. VEVOR reserves a clear interpretation of our
user manual. The appearance of the product shall be subject to the
product you received. Please forgive us that we won't inform you again if
there are any technology or software updates on our product.
Pull-out drawer
rack Organizer
2
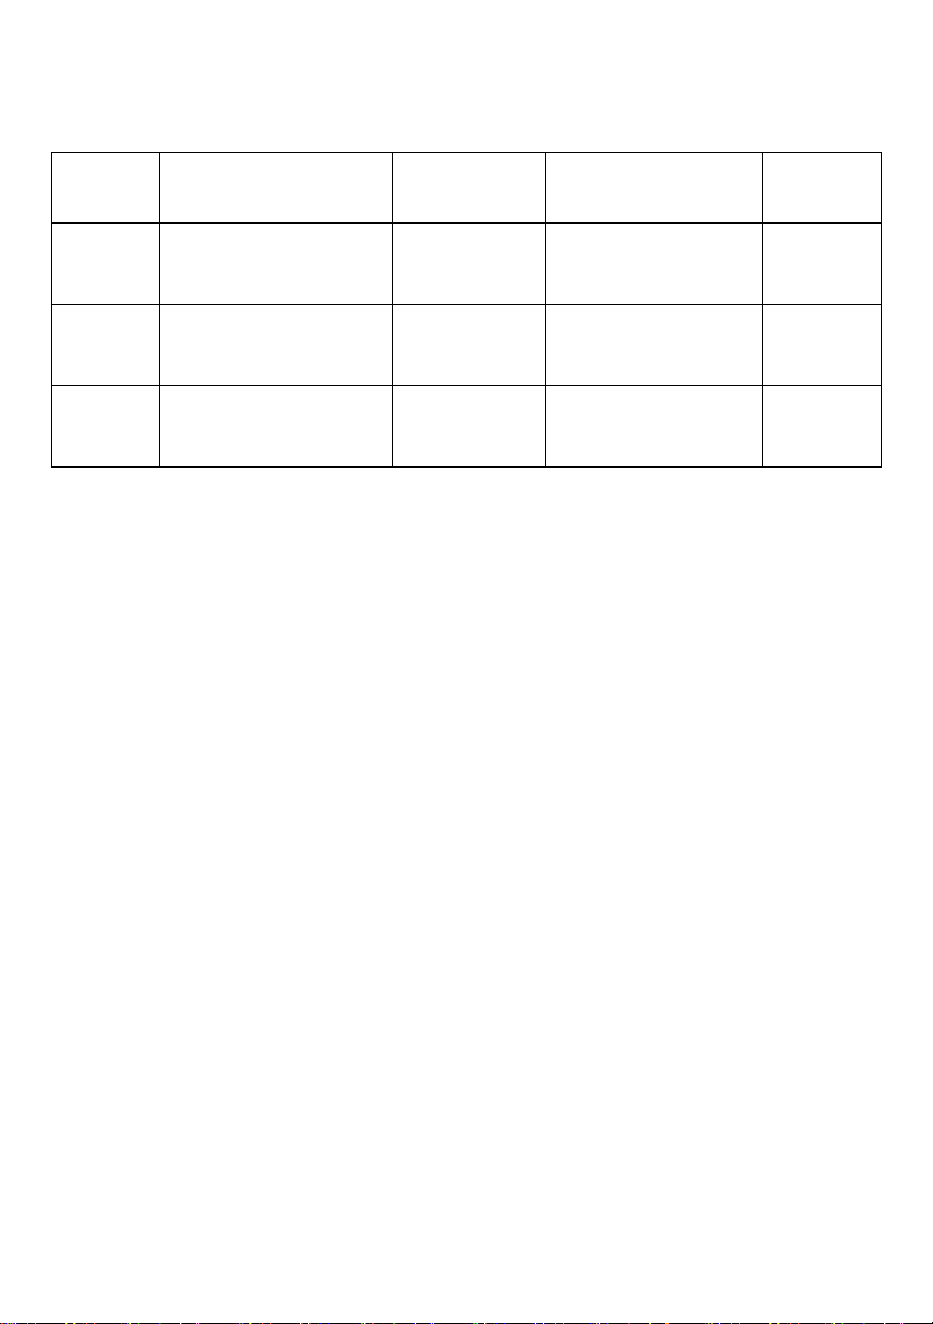
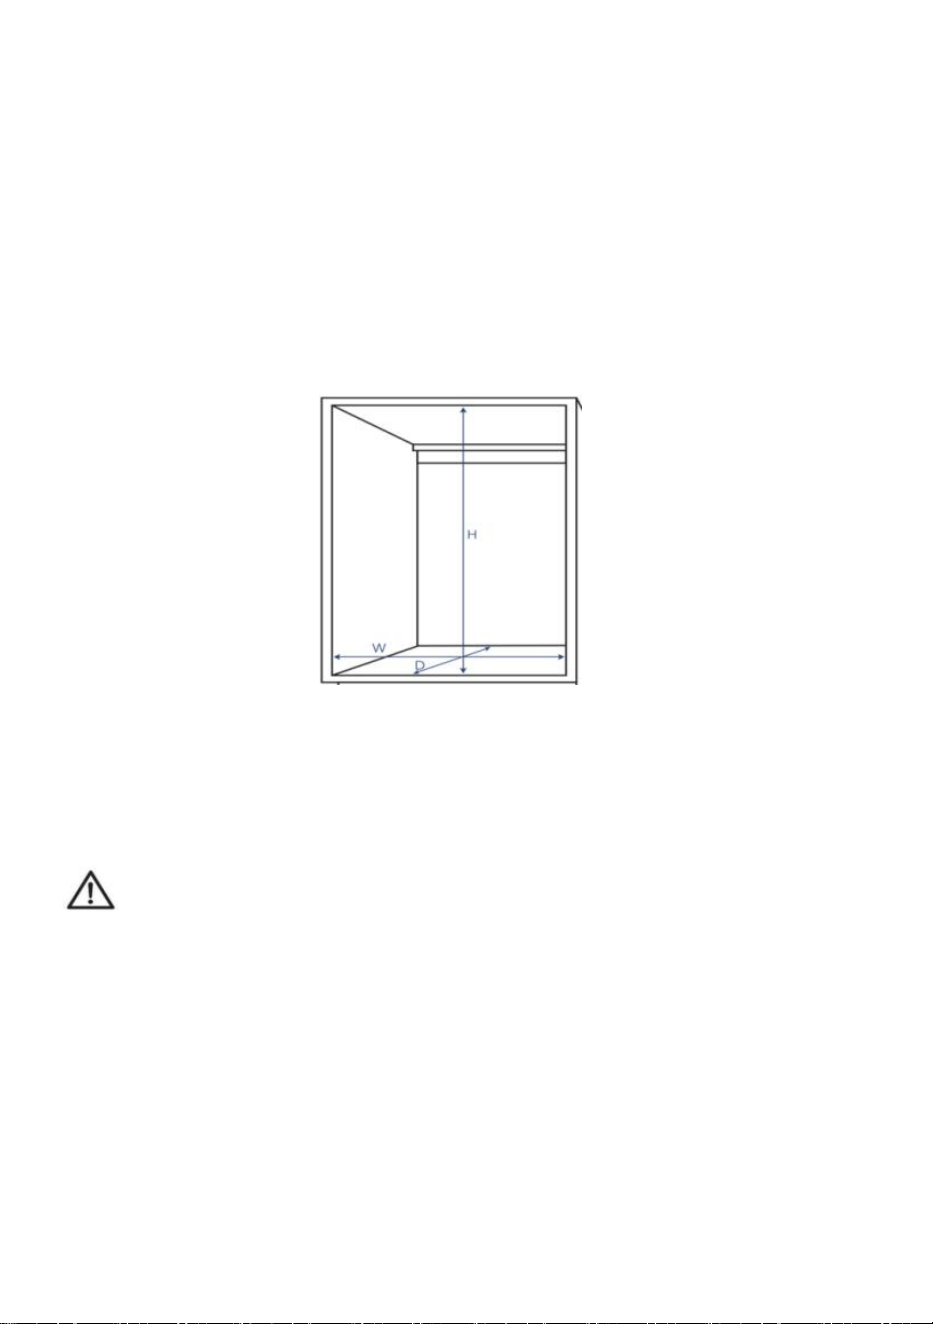
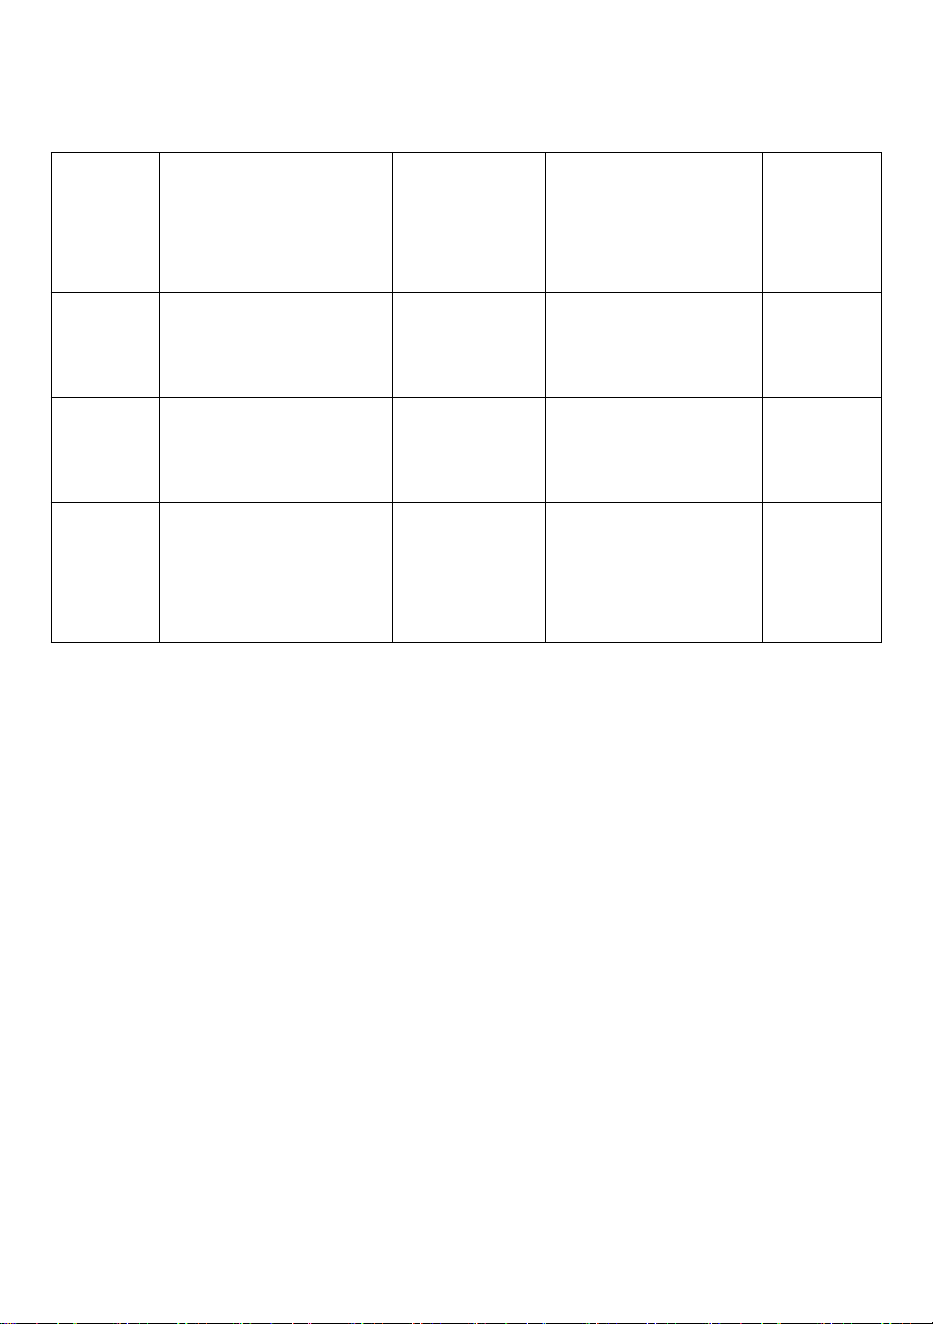
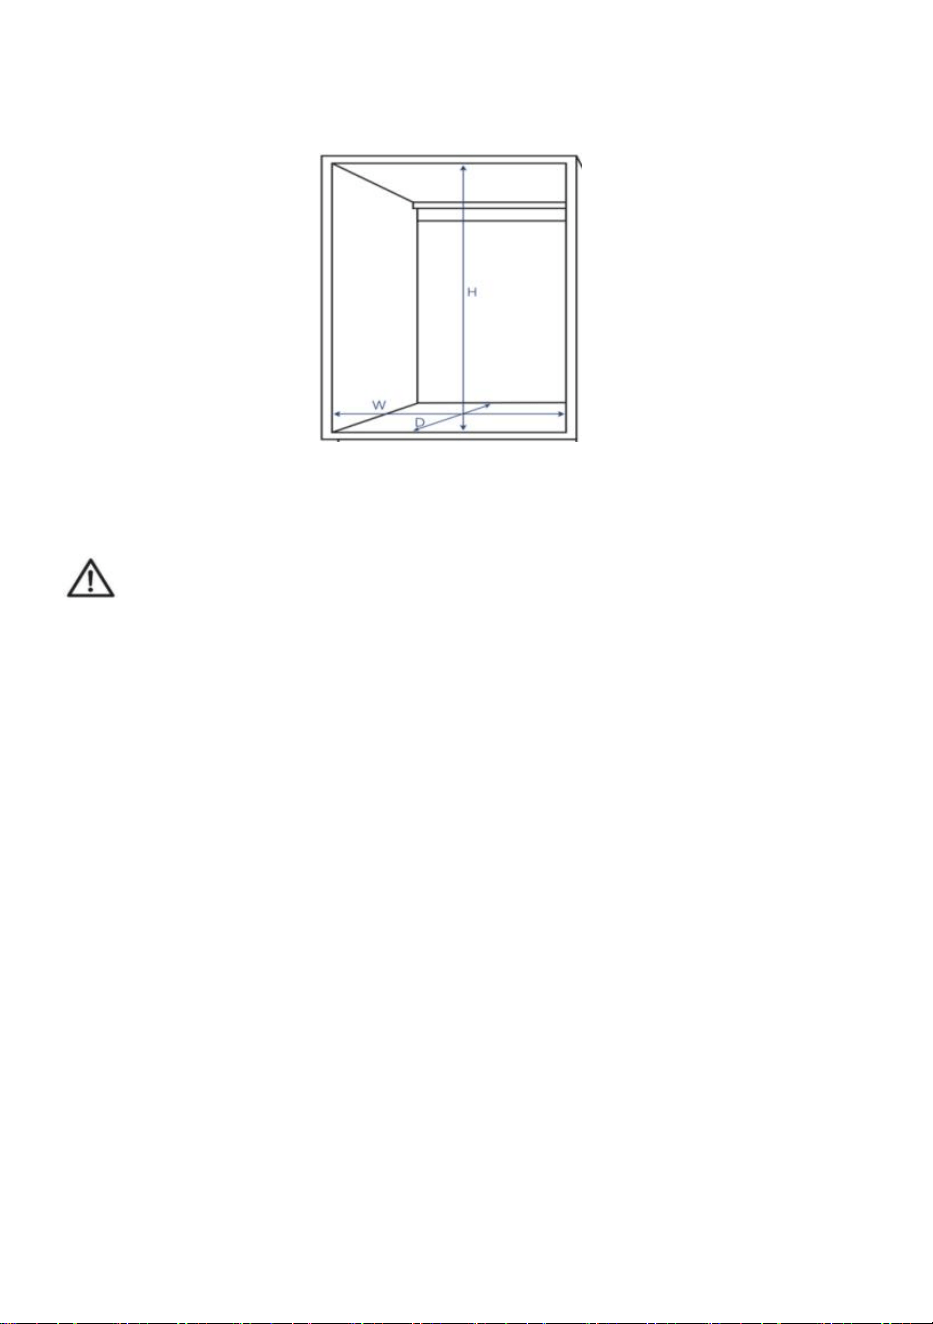
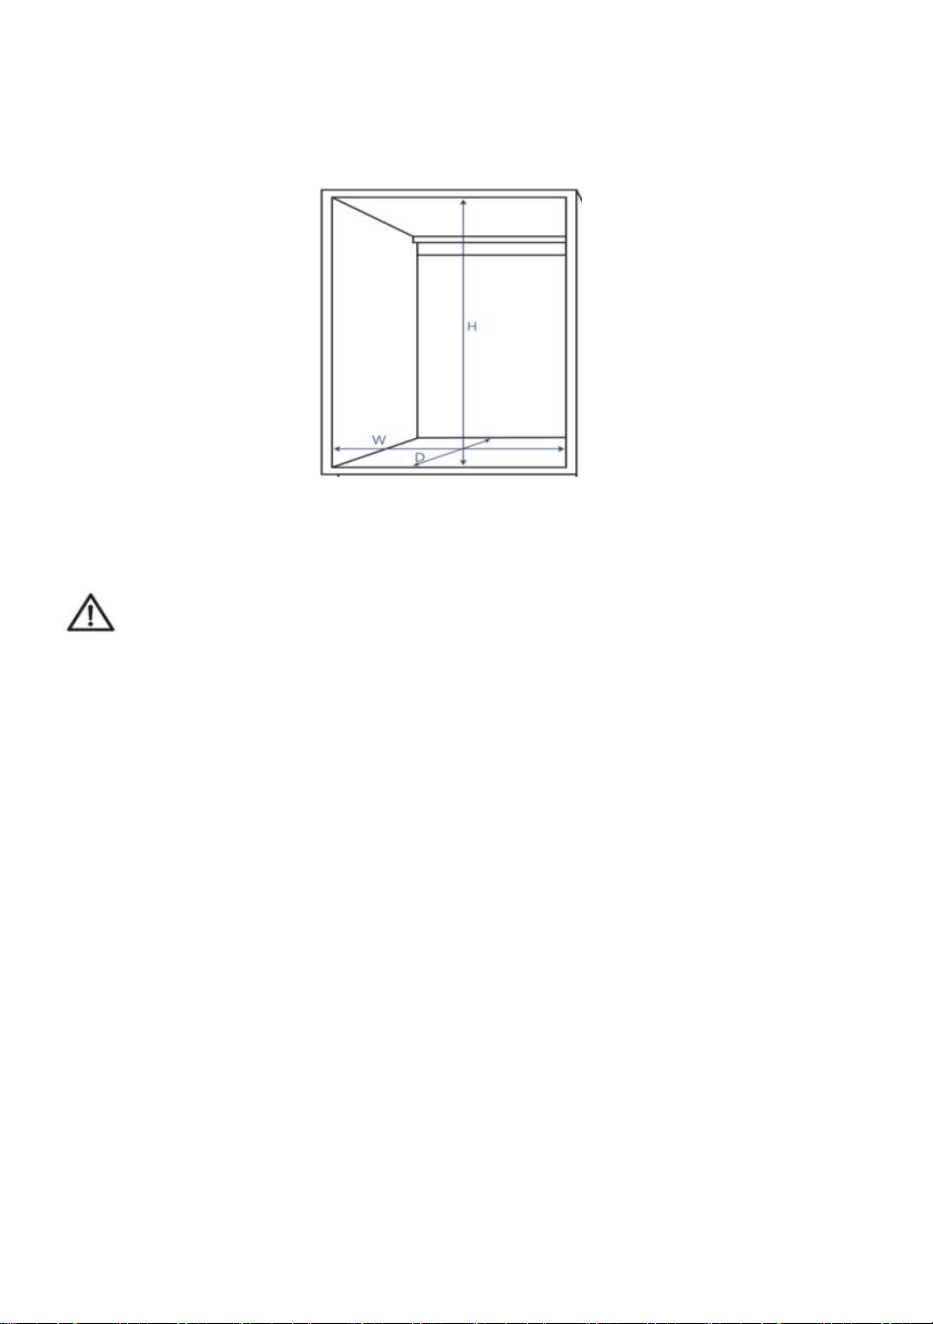
PRODUCT PARAMETERS
ASSEMBLY PRECAUTIONS
1. Assemble needs to follow these instructions. Incorrect assembly can be
a hazard.
2. Wear safety goggles and heavy-duty work gloves during assembly.
3. Do not assemble when tired or when under the influence of alcohol,
drugs or medication.
4. Weight capacity and other product capabilities apply to a properly and
completely assembled product only.
5. Keep the assembly area clean and well-lit.
6. Keep bystanders out of the area during assembly.
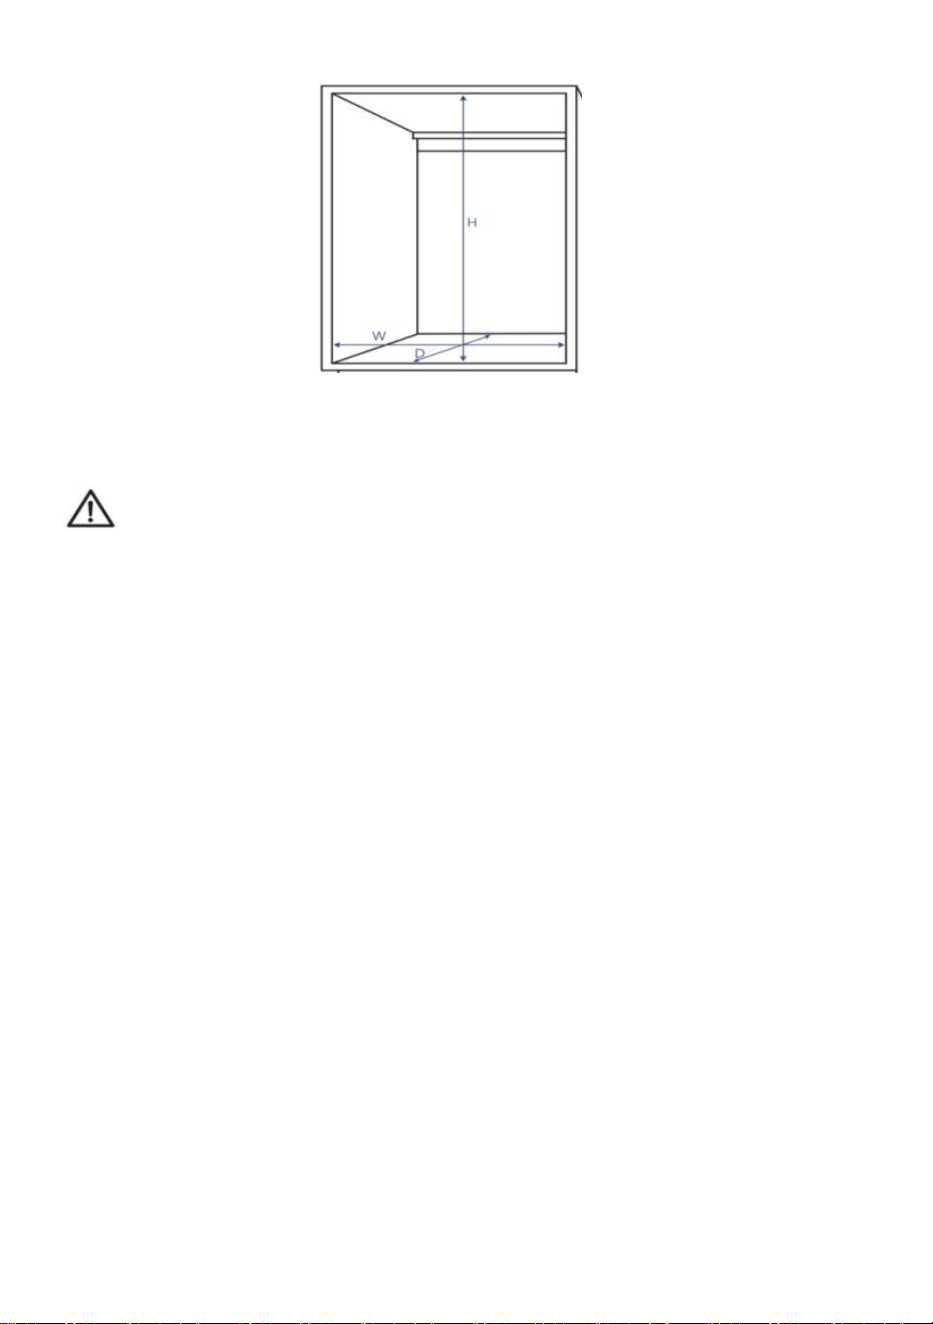
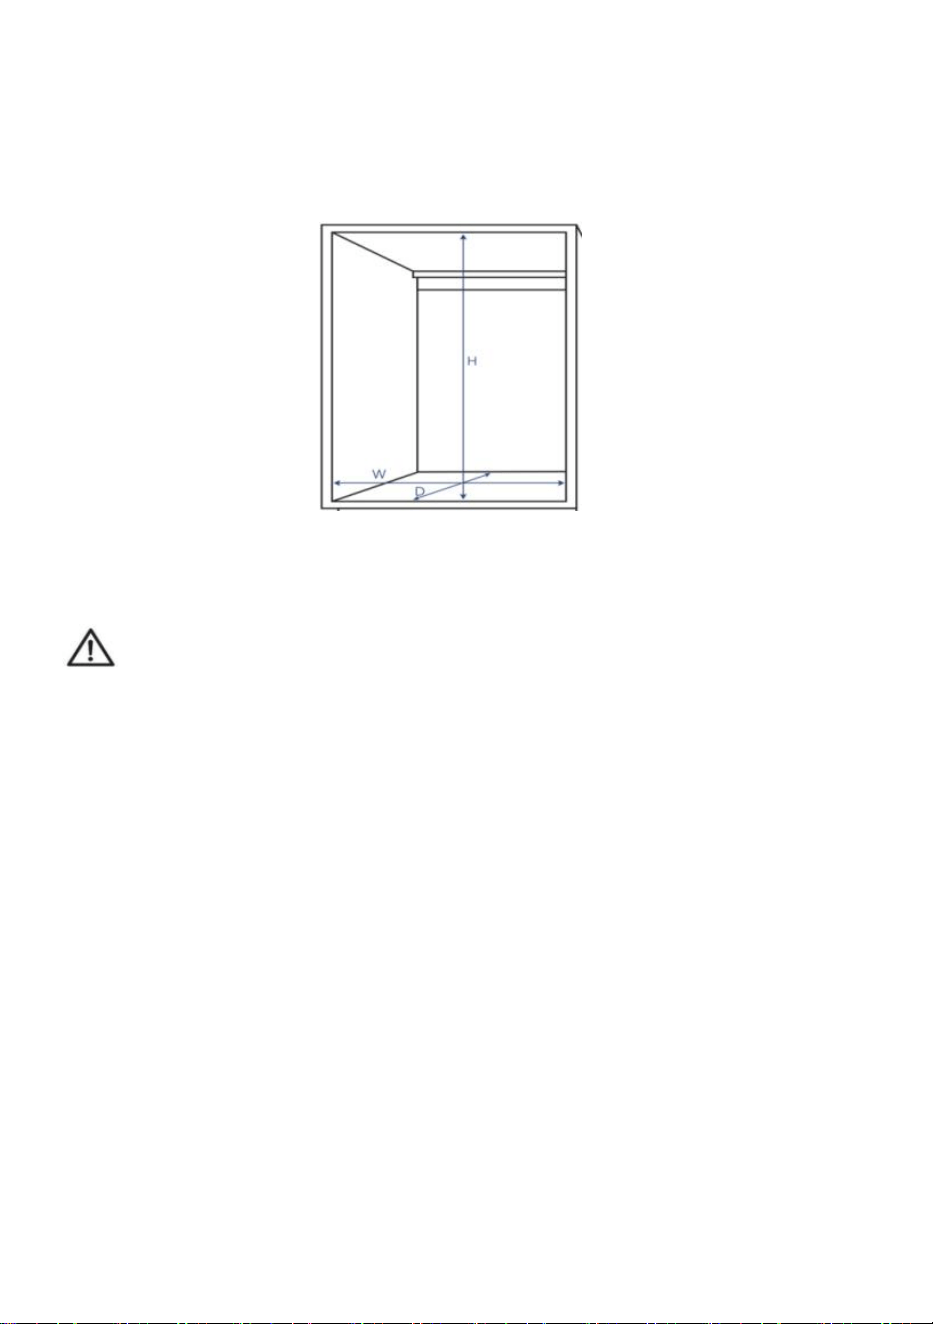
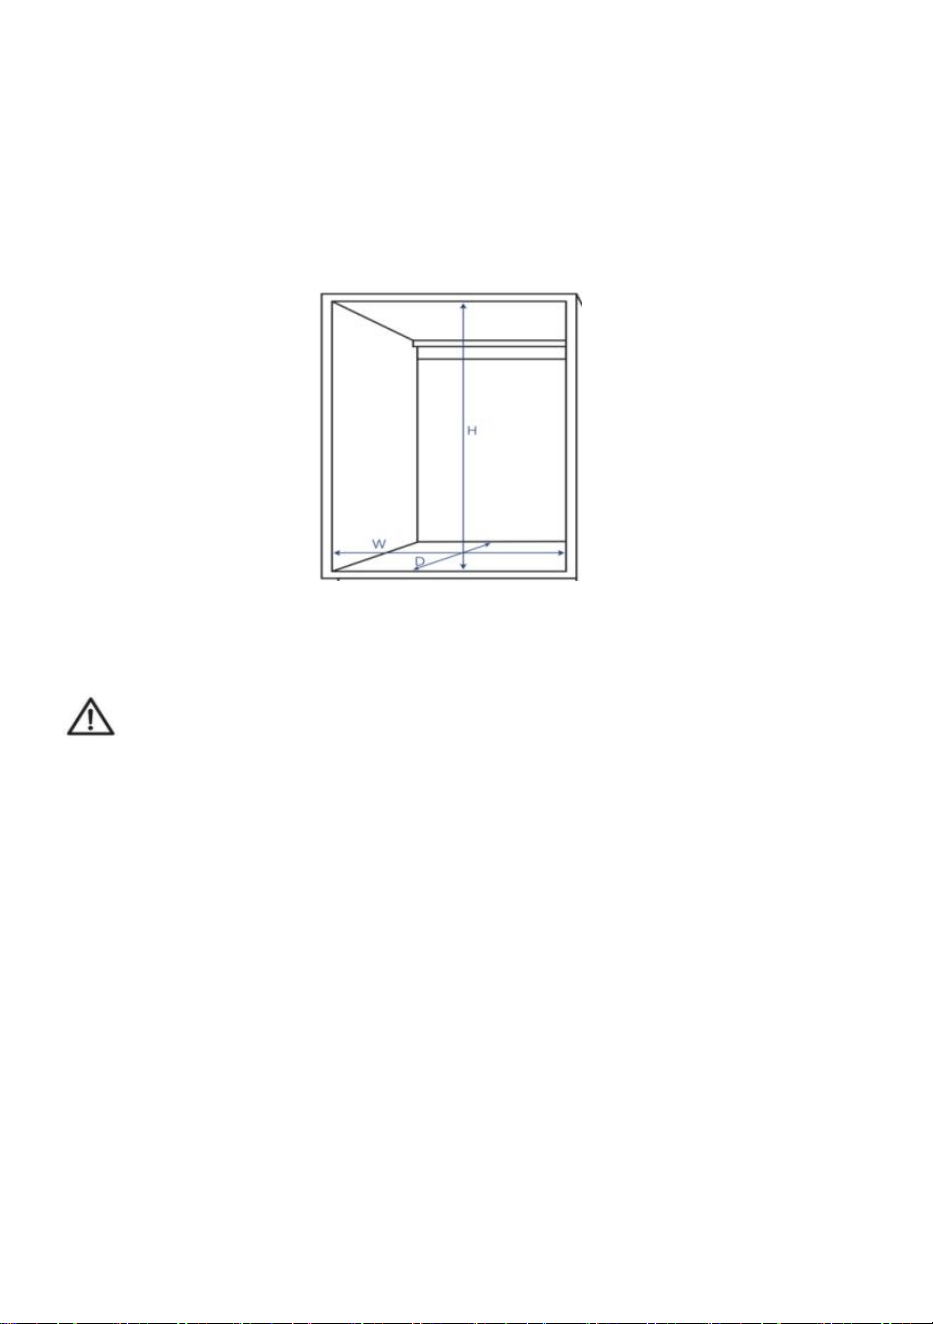
7. Check the installation size of the corresponding model of the
product, and select the cabinet consistent with or close to the
installation size for installation.
Model
Product Size
(W*D*H)
Loading
Capacity
Installation size
W*D*H (mm)
Number
of layers
SKU-1
15" x 21.7" x 3"
(382x550x76mm)
60 lbs(Max)
≥382 x ≥600
x≥150
1
SKU-2
18"x 21.7" x 3"
(458x550x76mm)
60 lbs(Max)
≥458 x ≥600 x≥
150
1
SKU-3
21"x 21.7" x 3"
(534x550x76mm)
60 lbs(Max)
≥534 x ≥600 x
≥150
1
3
USE PRECAUTIONS
WARNING: TO PREVENT SERIOUS INJURY AND DEATH FROM
TIPPING:
1. This product is not a toy. Do not allow children to play with or approach
this item.
2. Use as intended only. Do not sit or stand on the product.
3. Inspect before every use. Do not use it if parts are loose or damaged.
4. Use on Kitchen cabinet only and Do not use it alone on the ground .
5. Do not exceed the listed weight capacity. Tighten all knobs securely
before applying load. Be aware of dynamic loading! The sudden load
movement may briefly create an excess load, causing product failure.
4
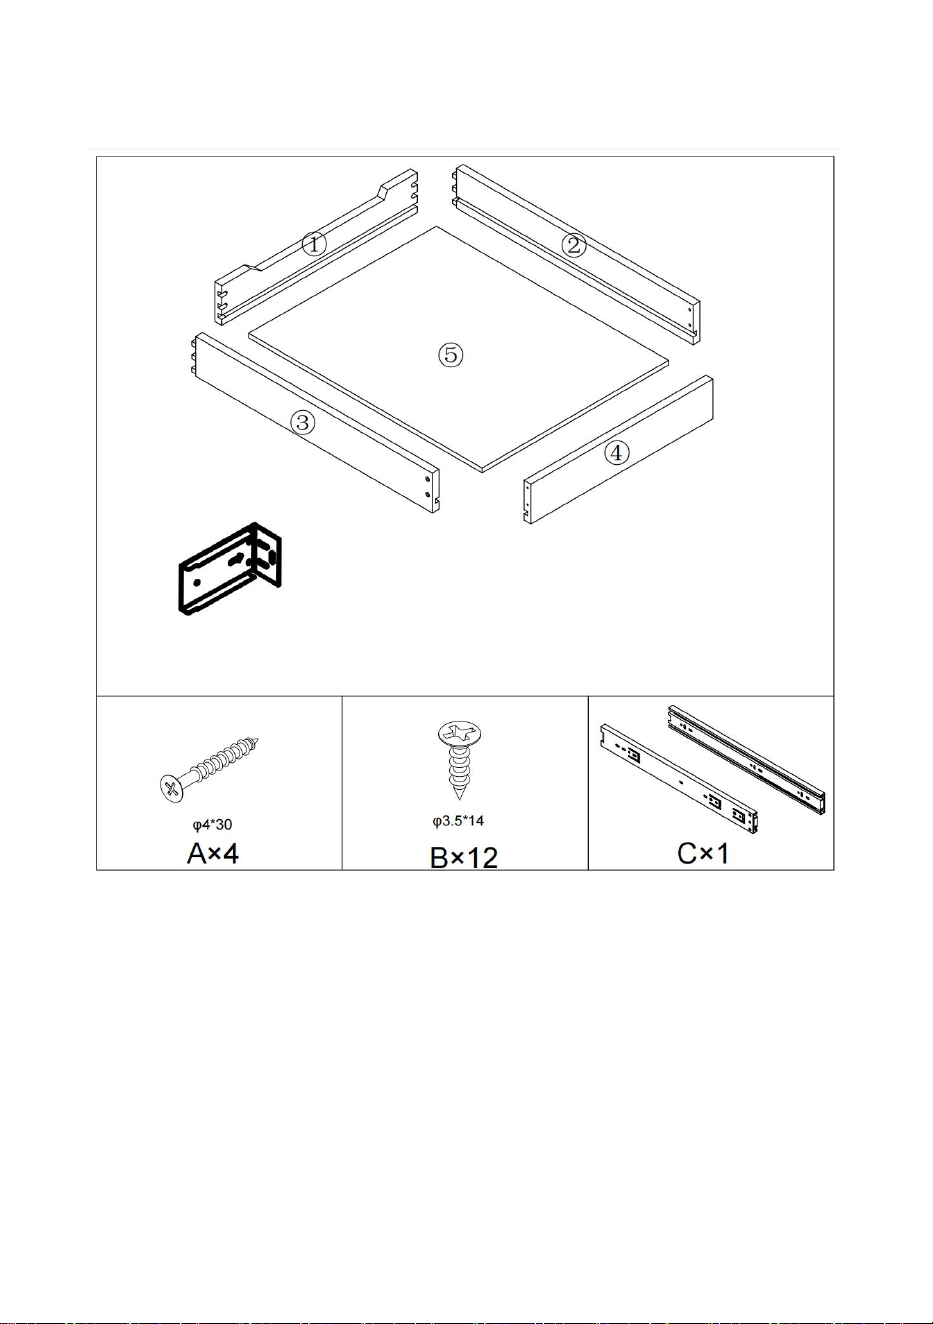
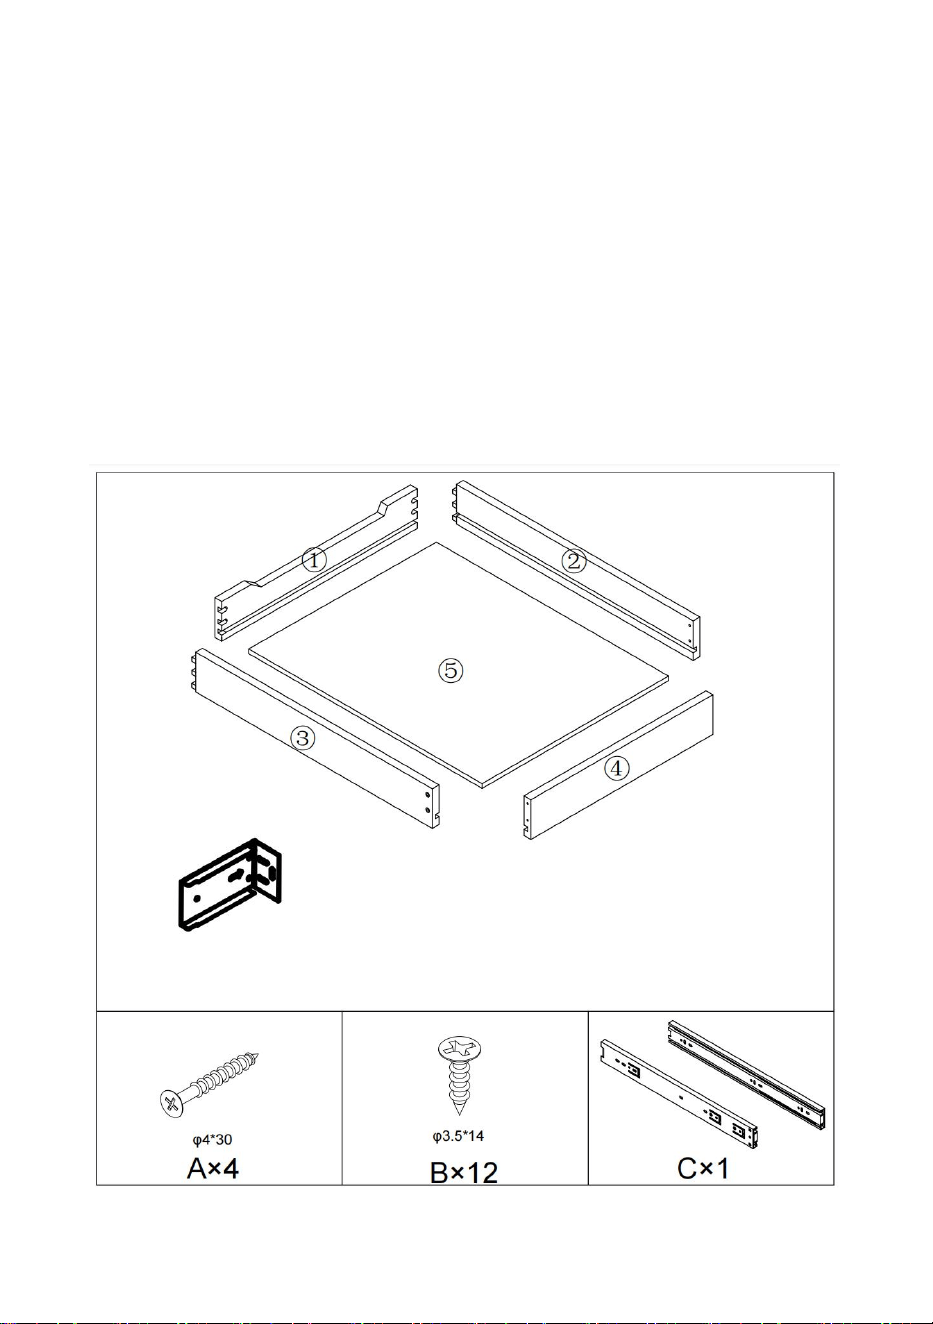
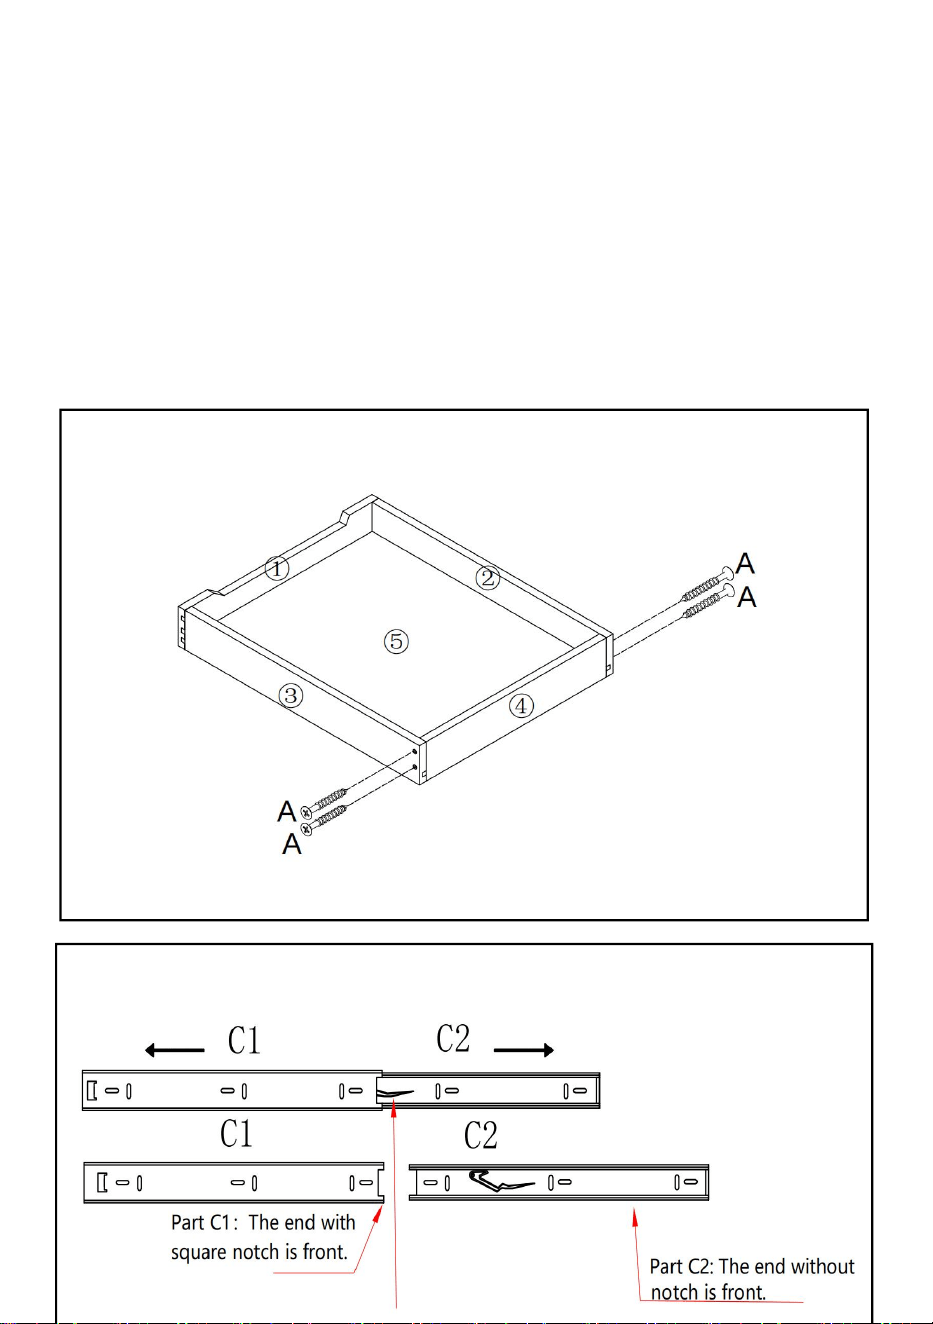
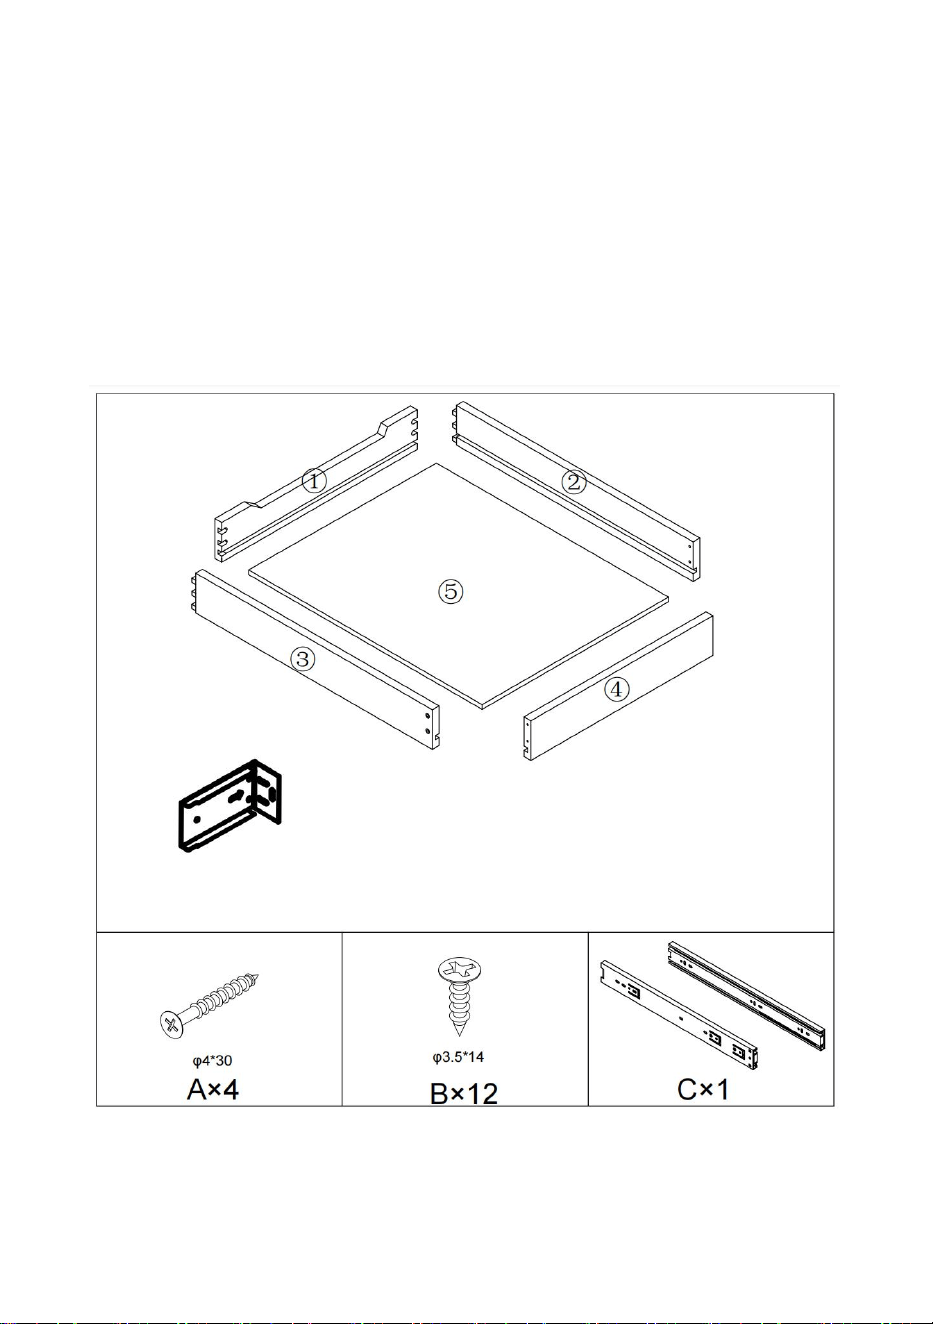
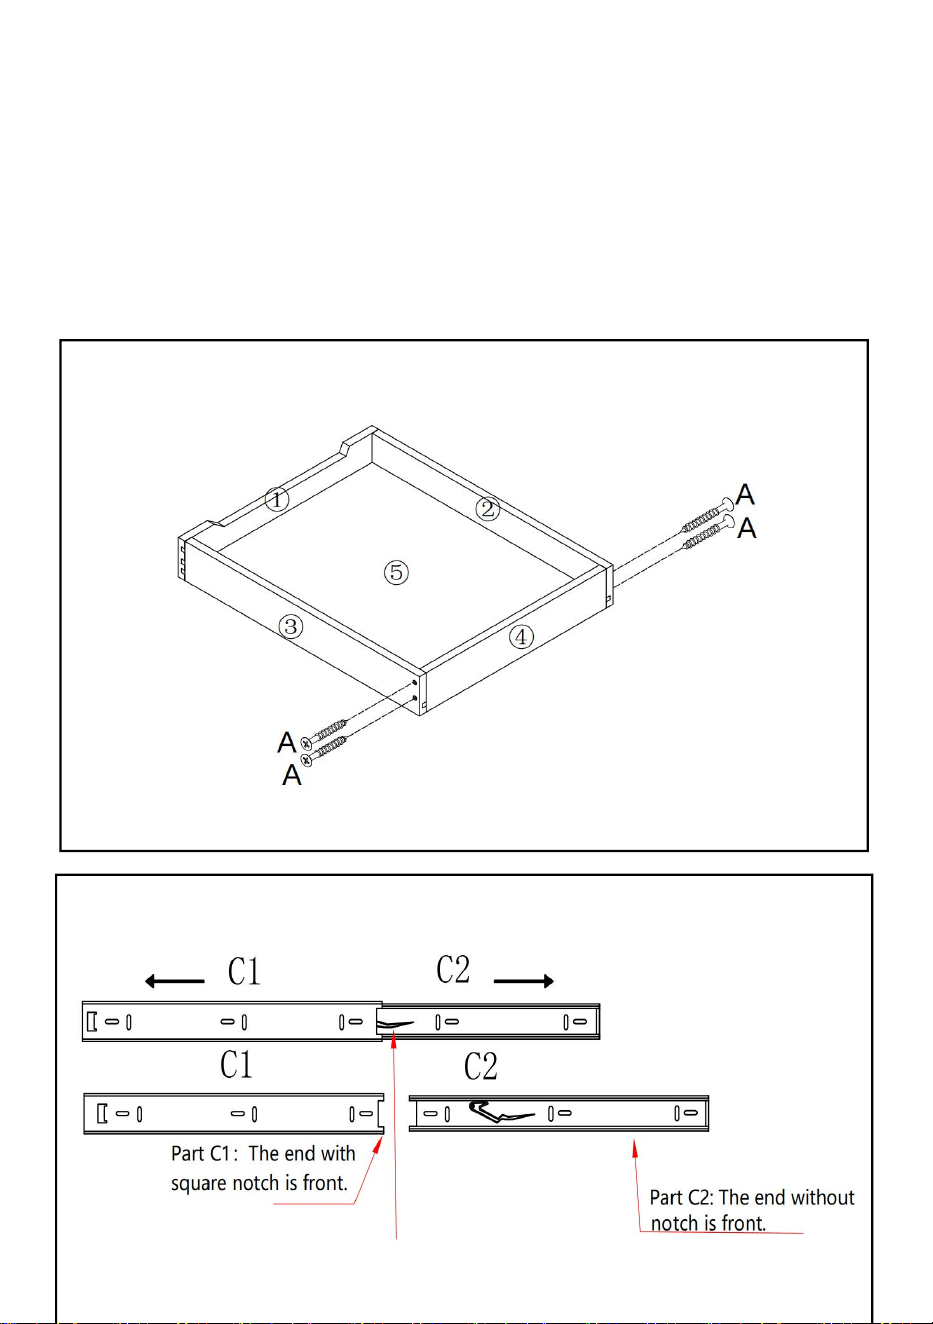
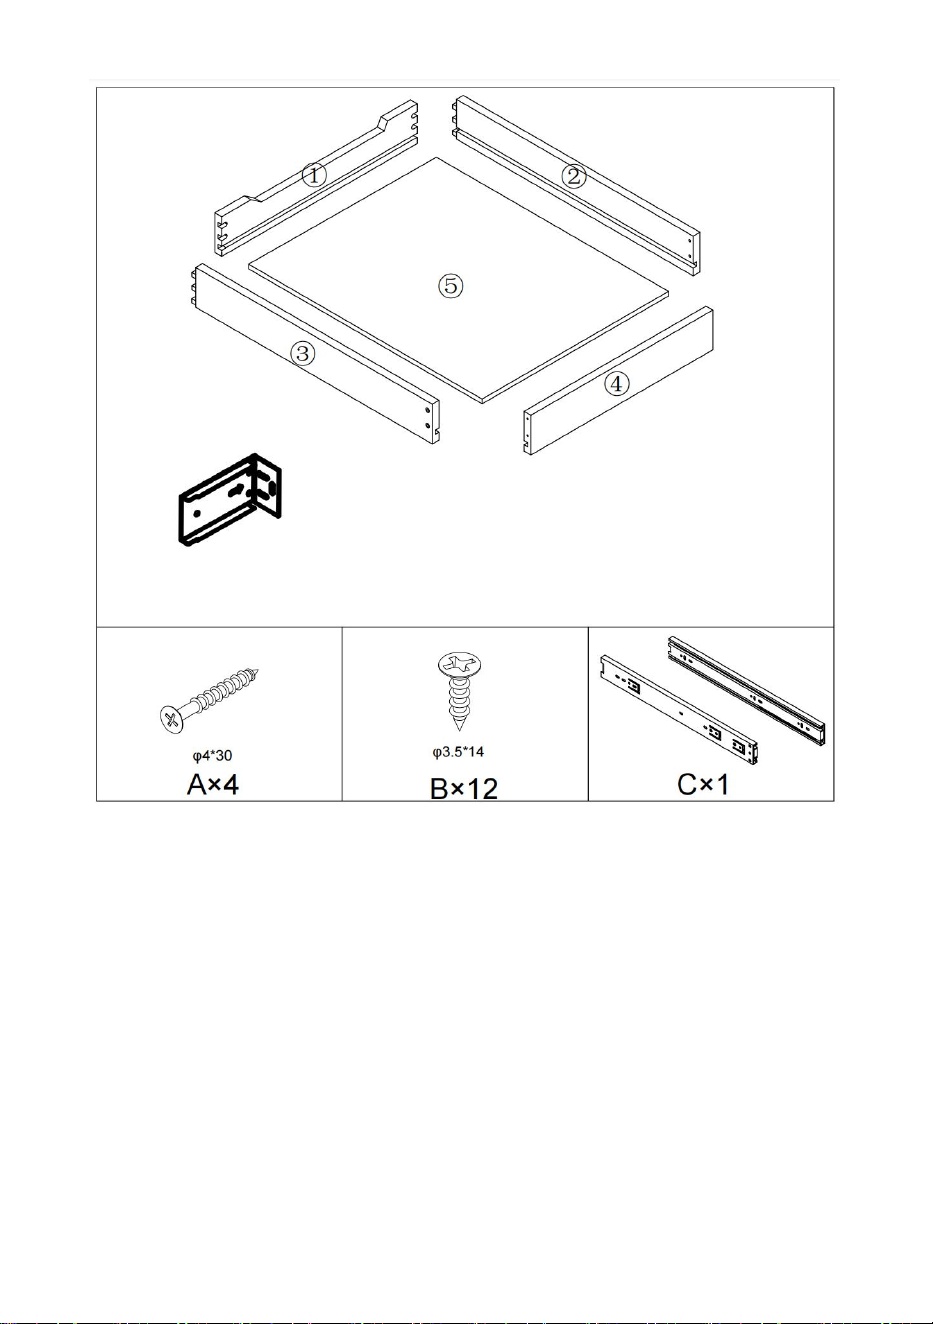
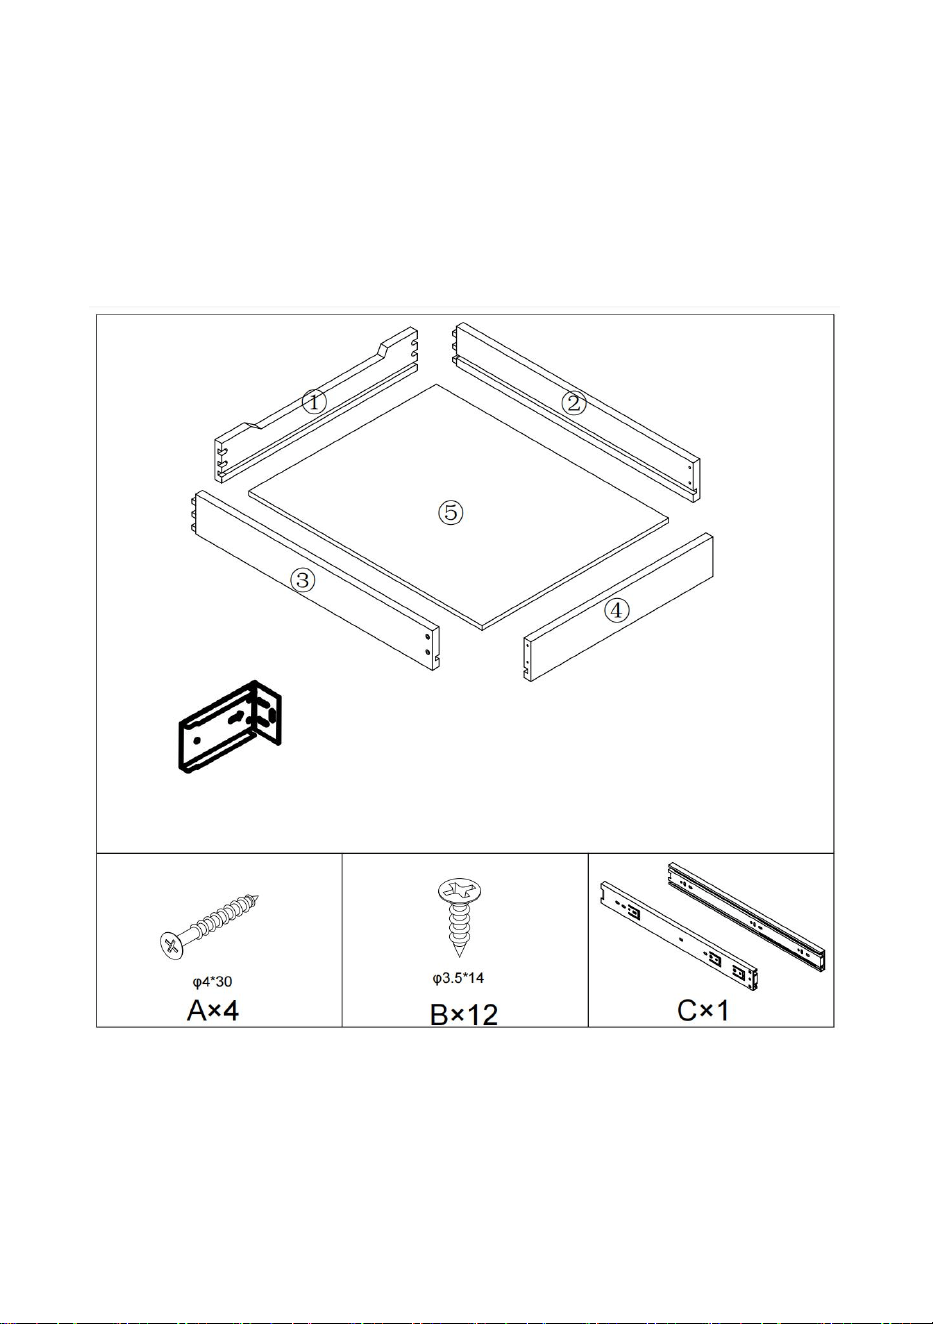
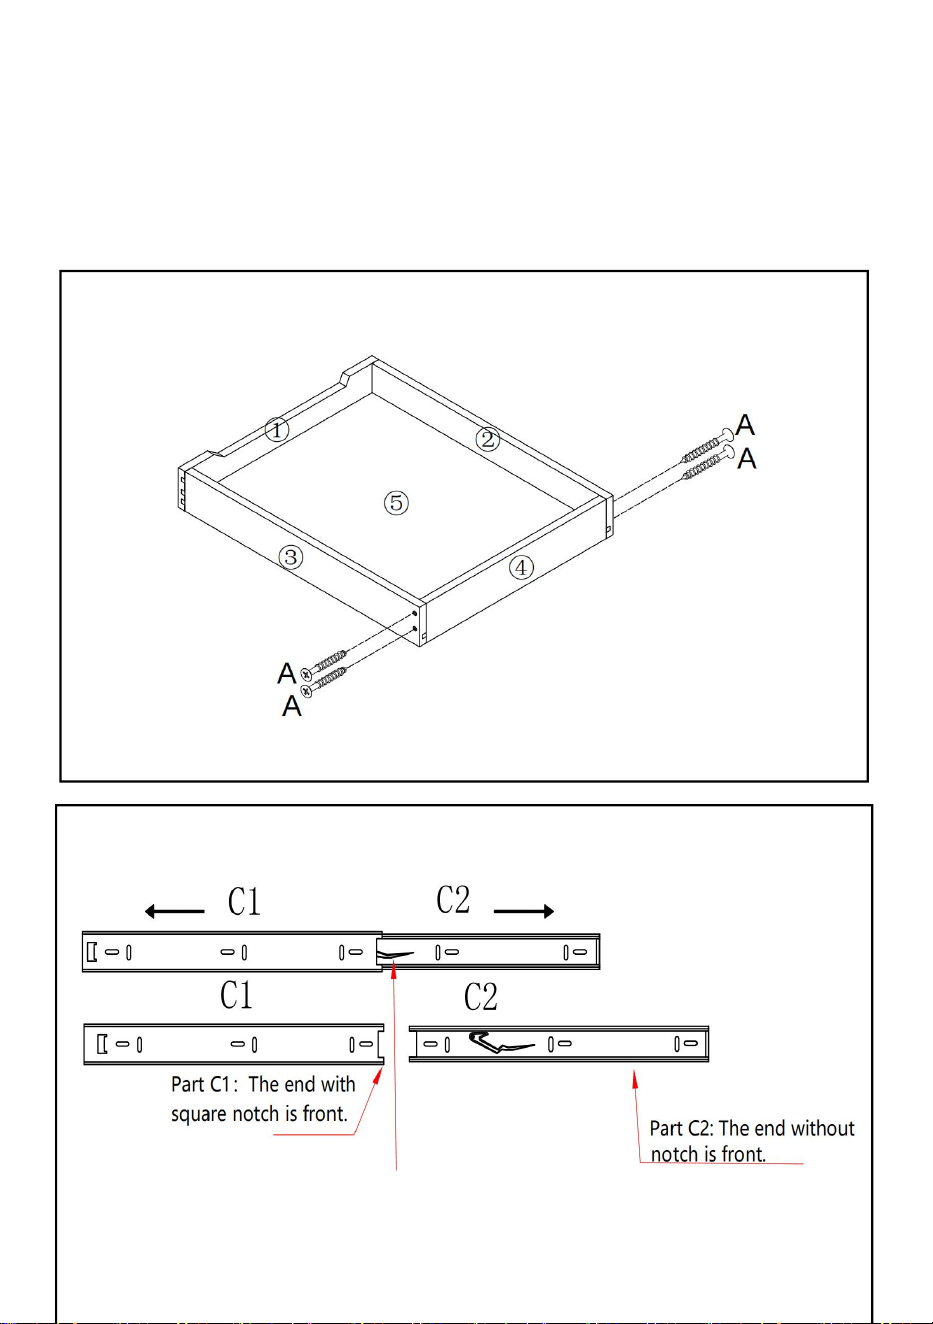
PARTS LIST
Dx2
5
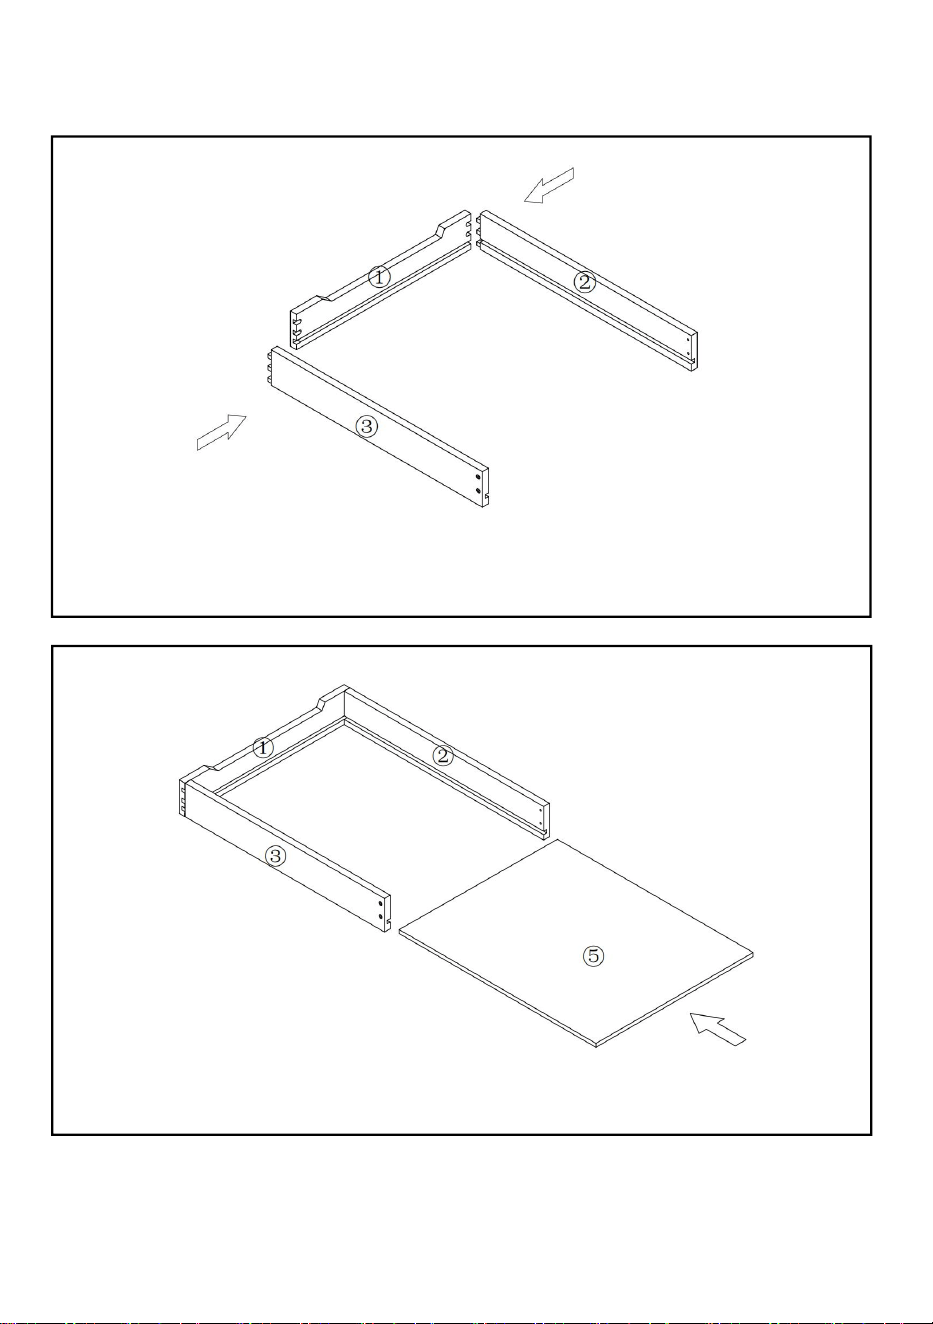
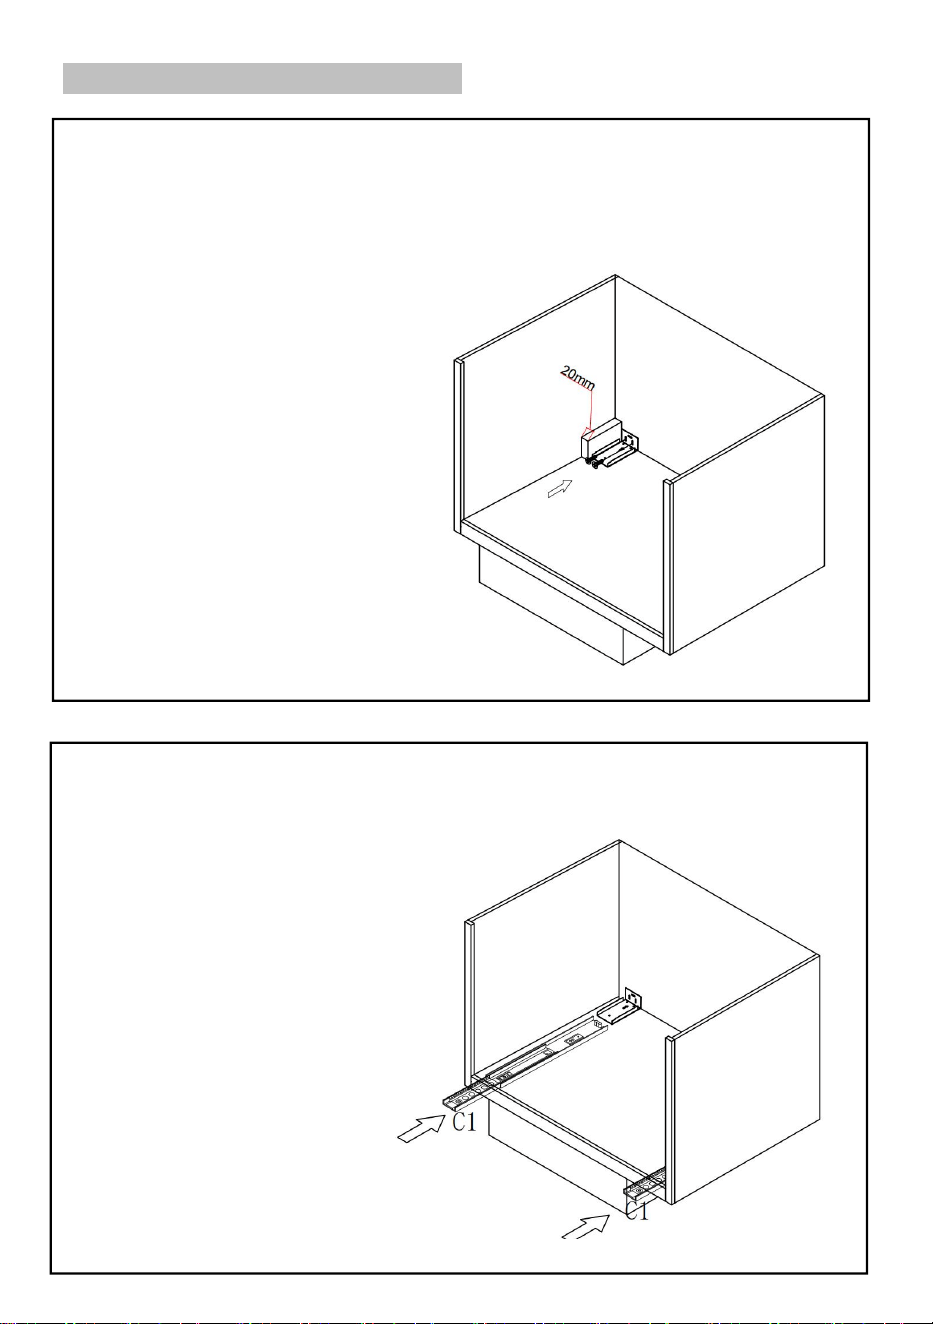
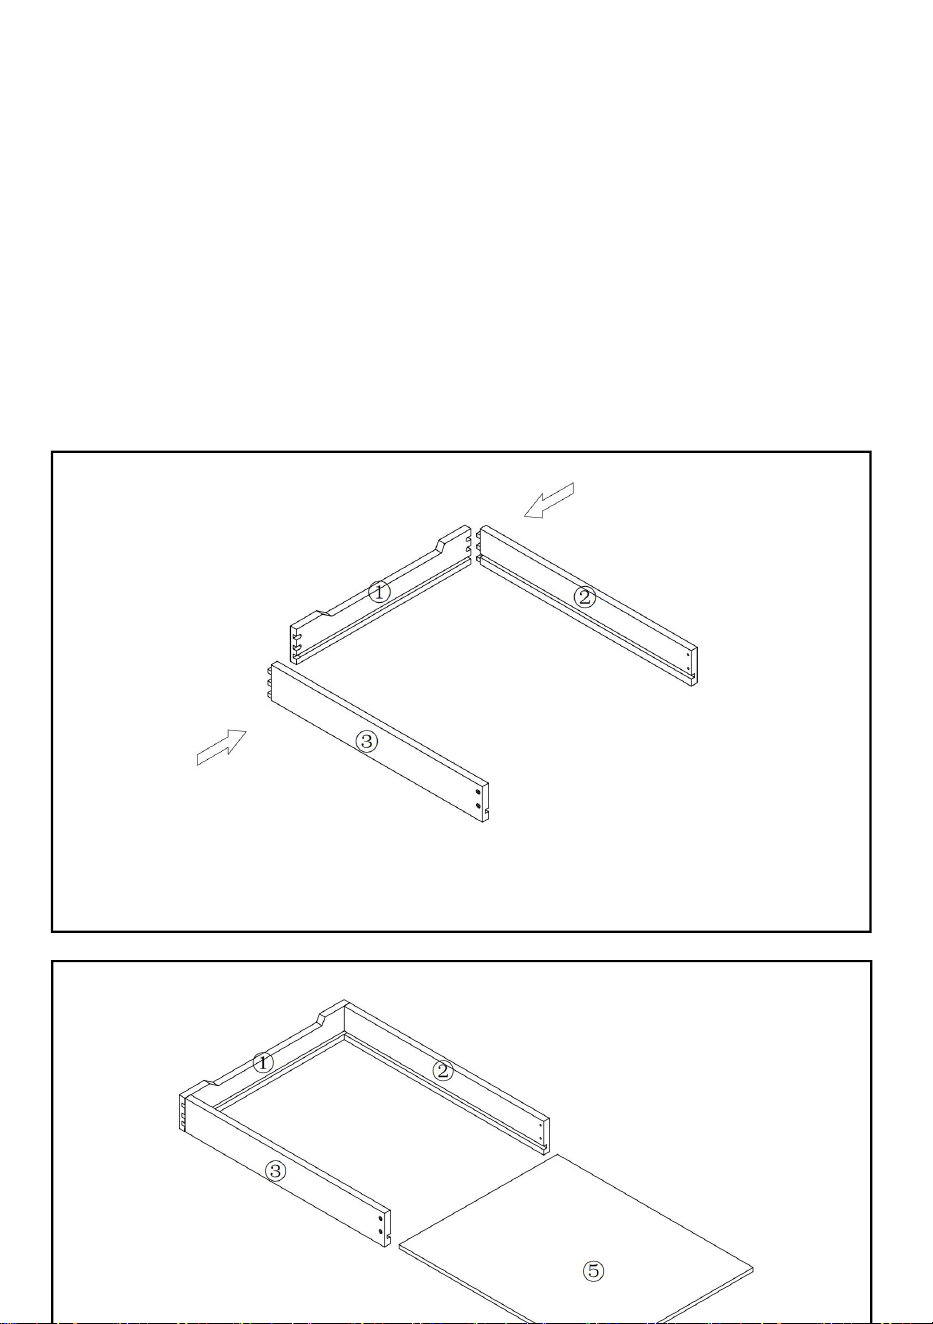
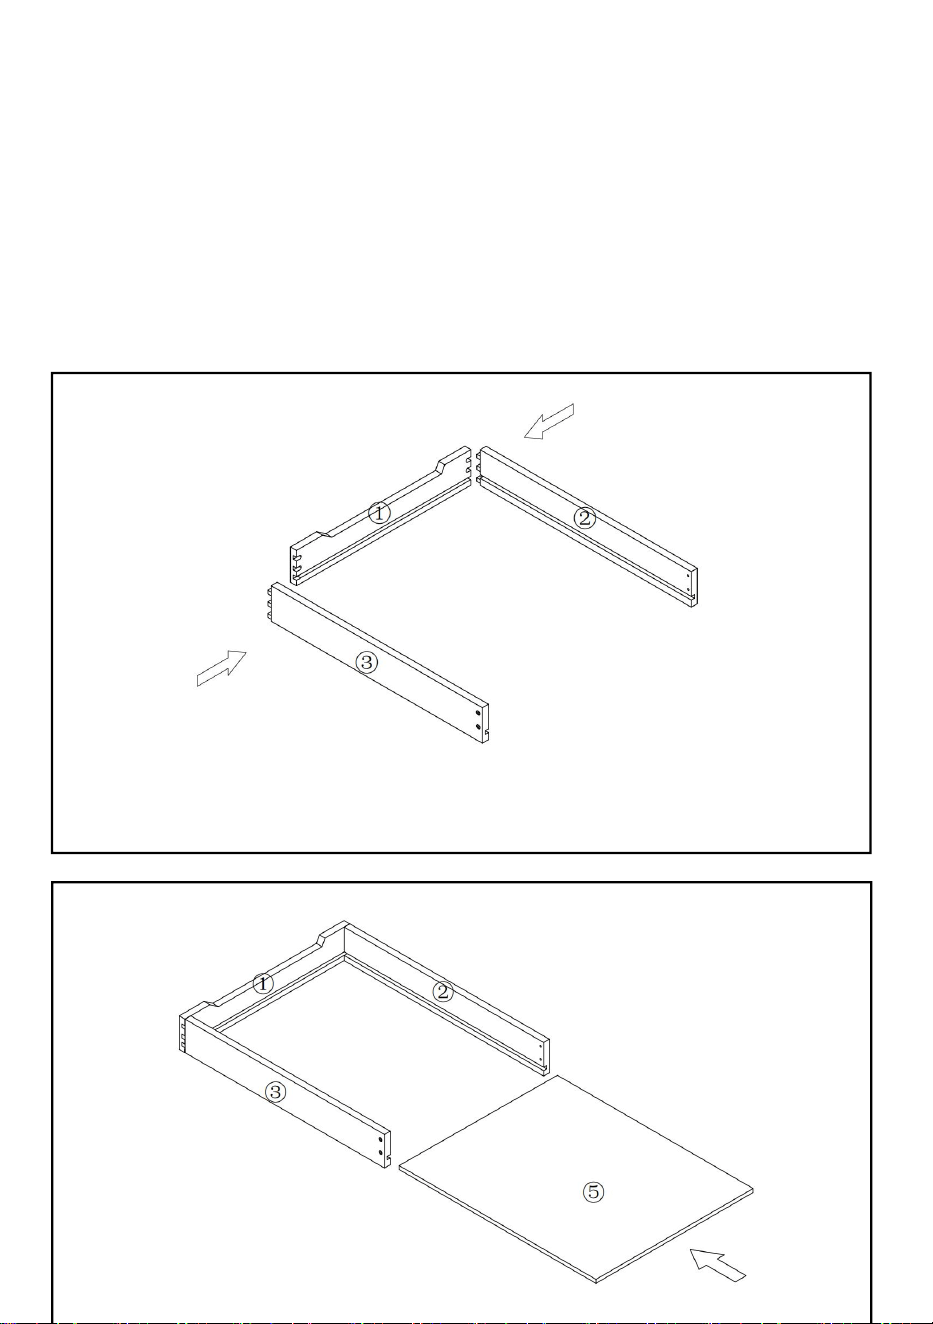
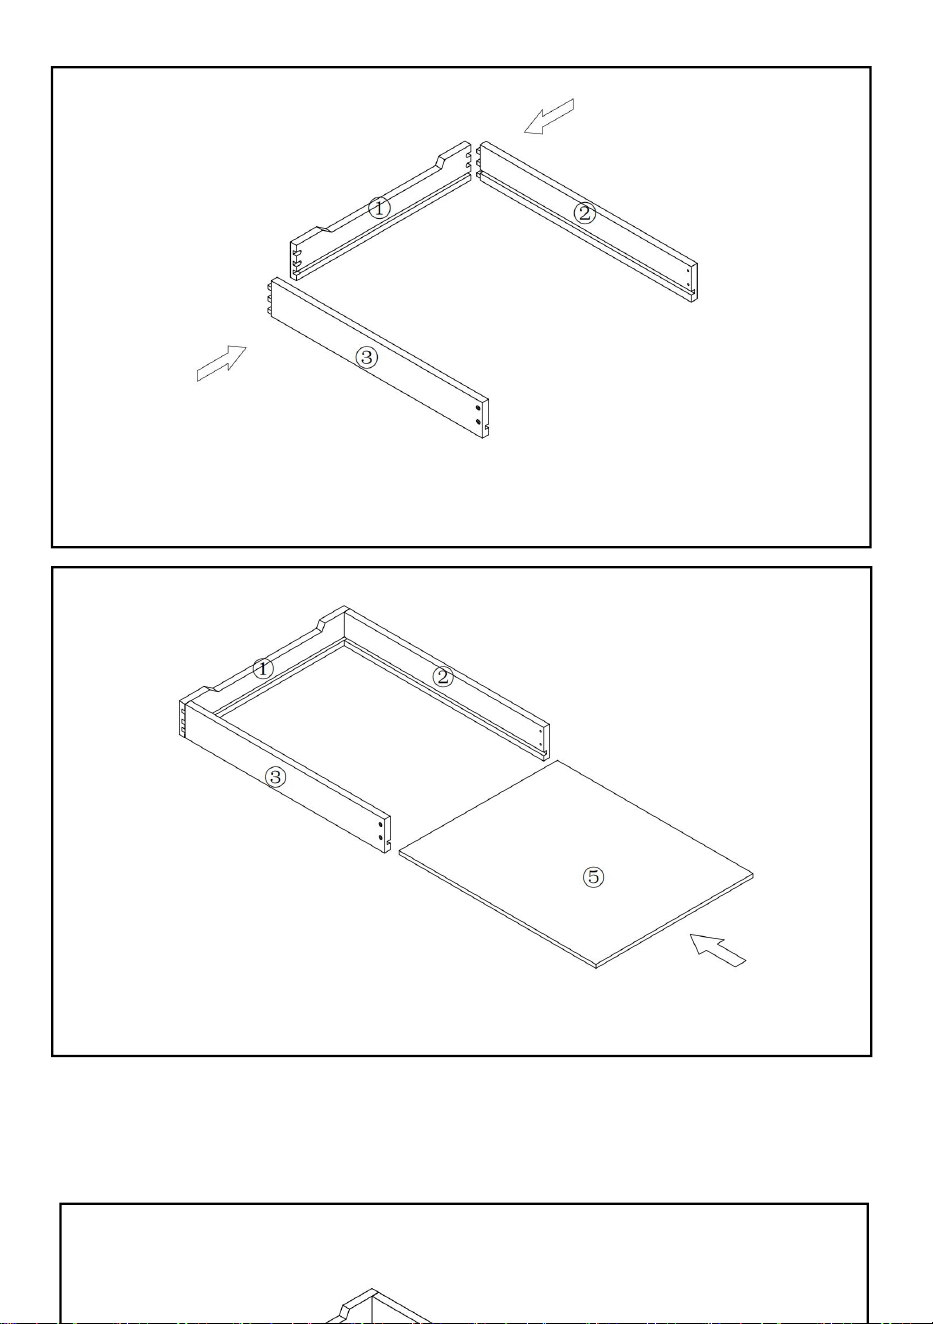
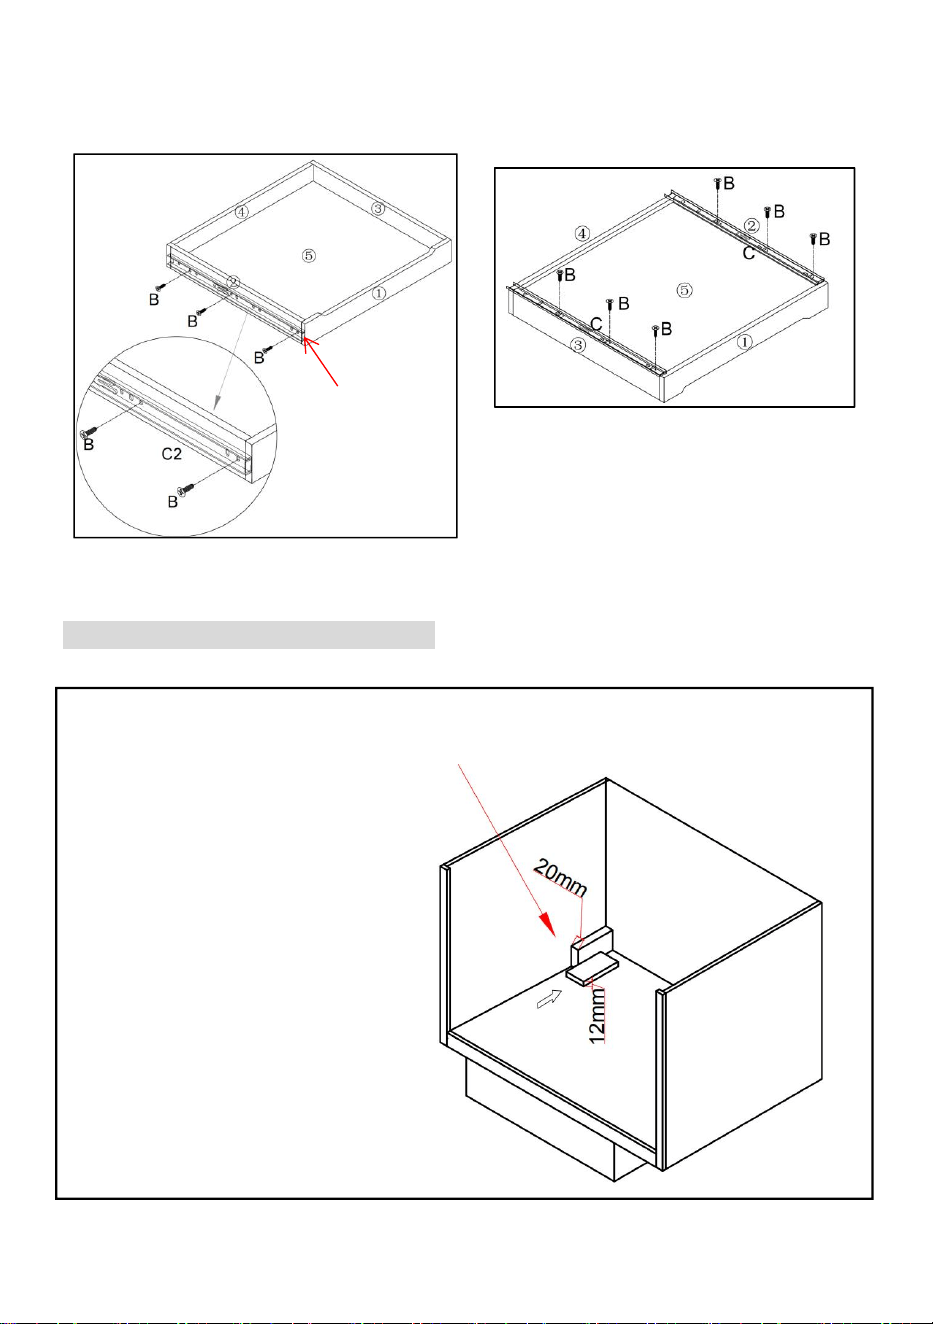
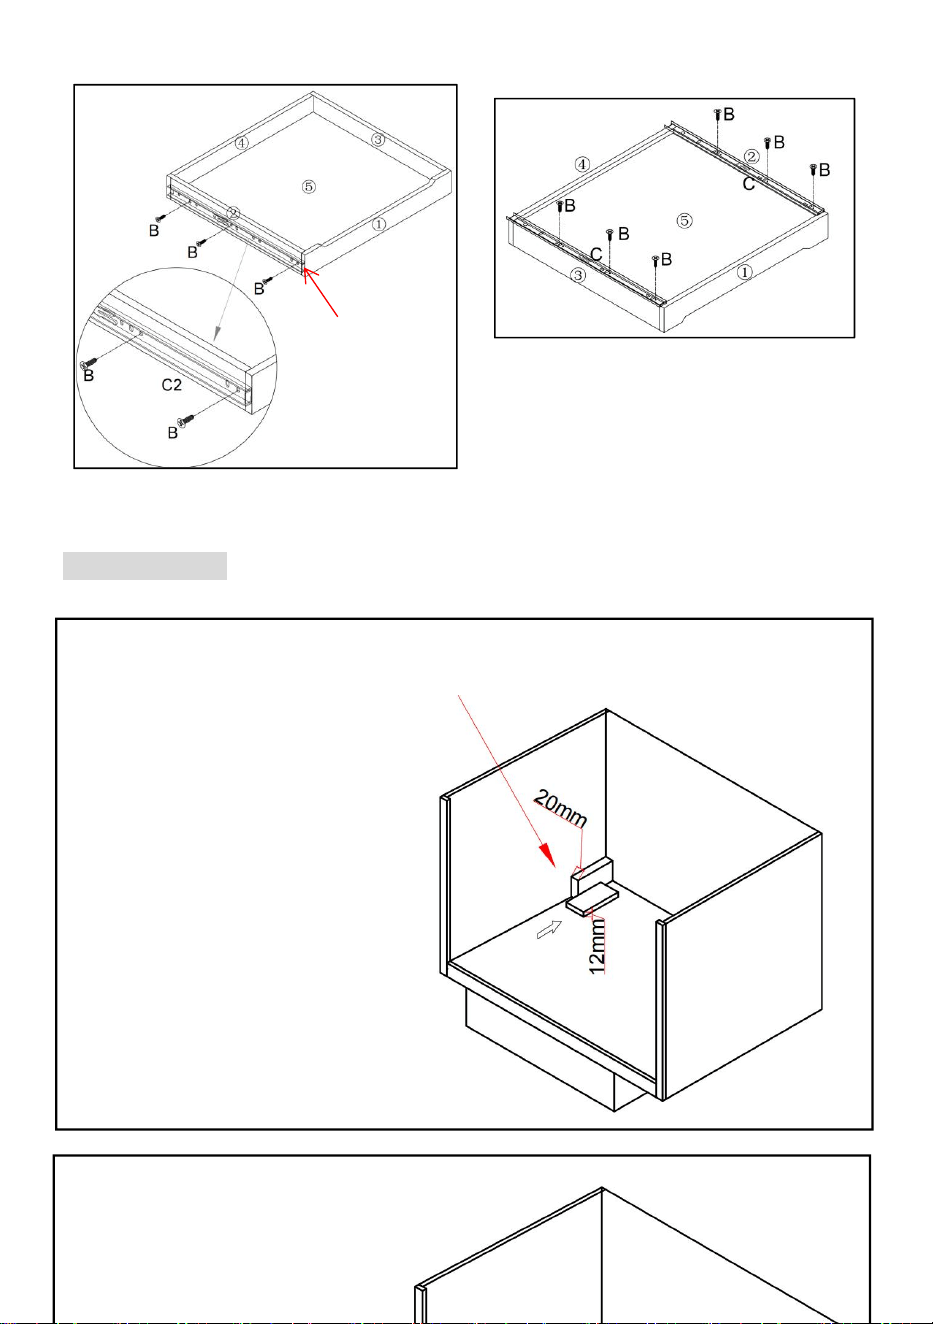
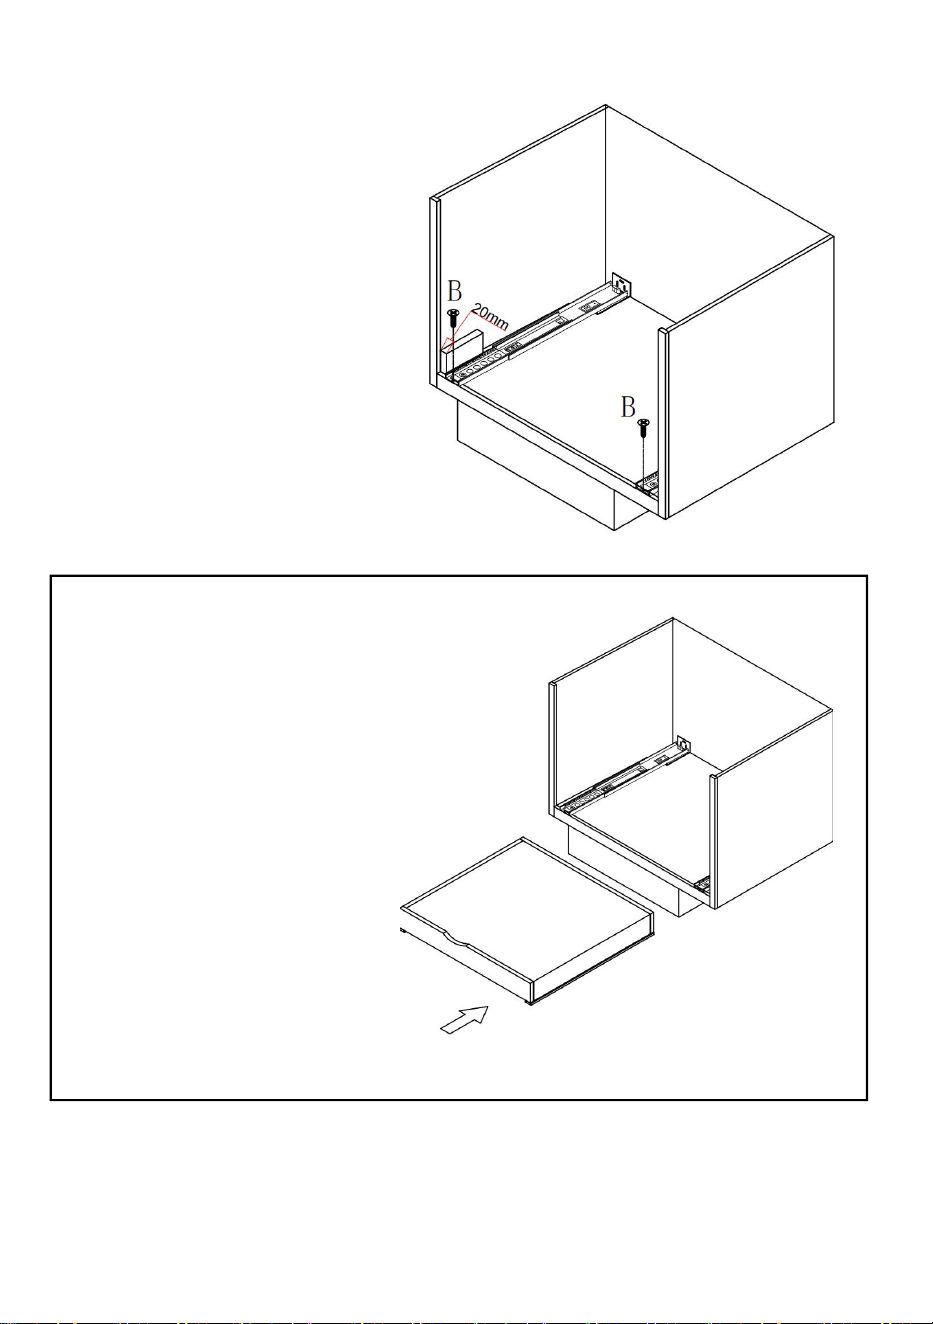
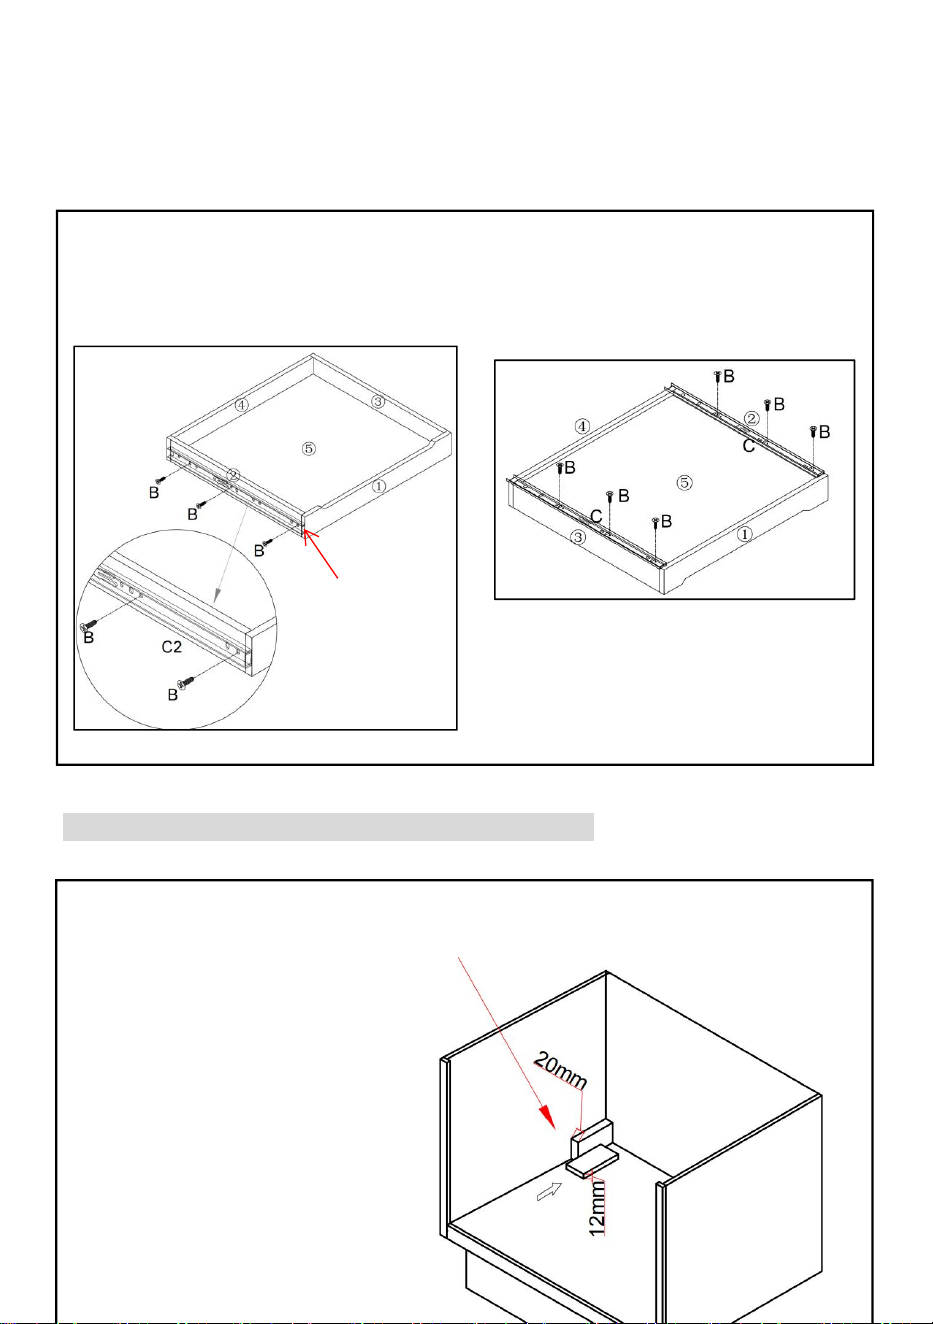
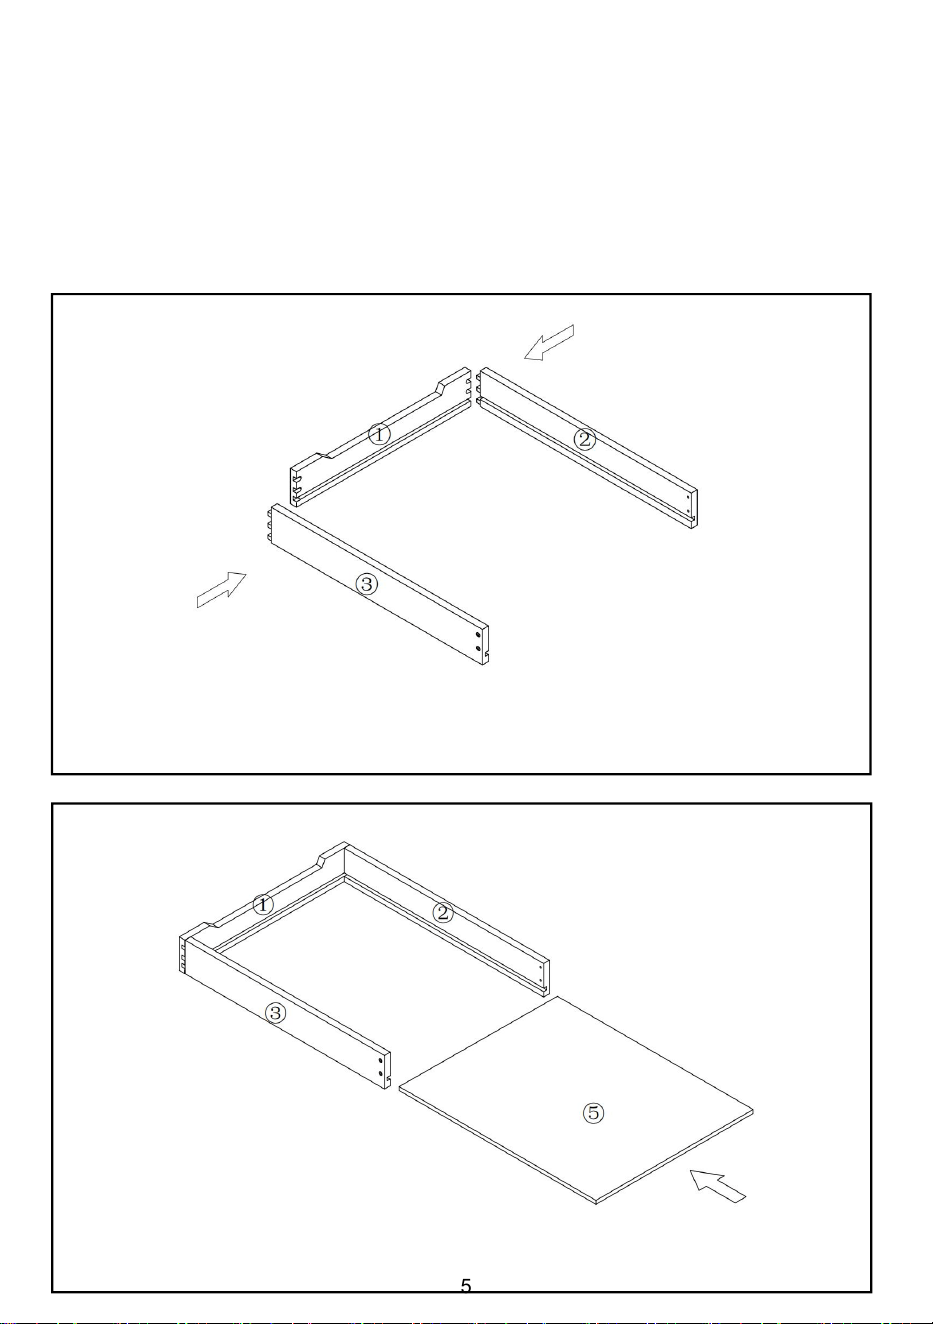
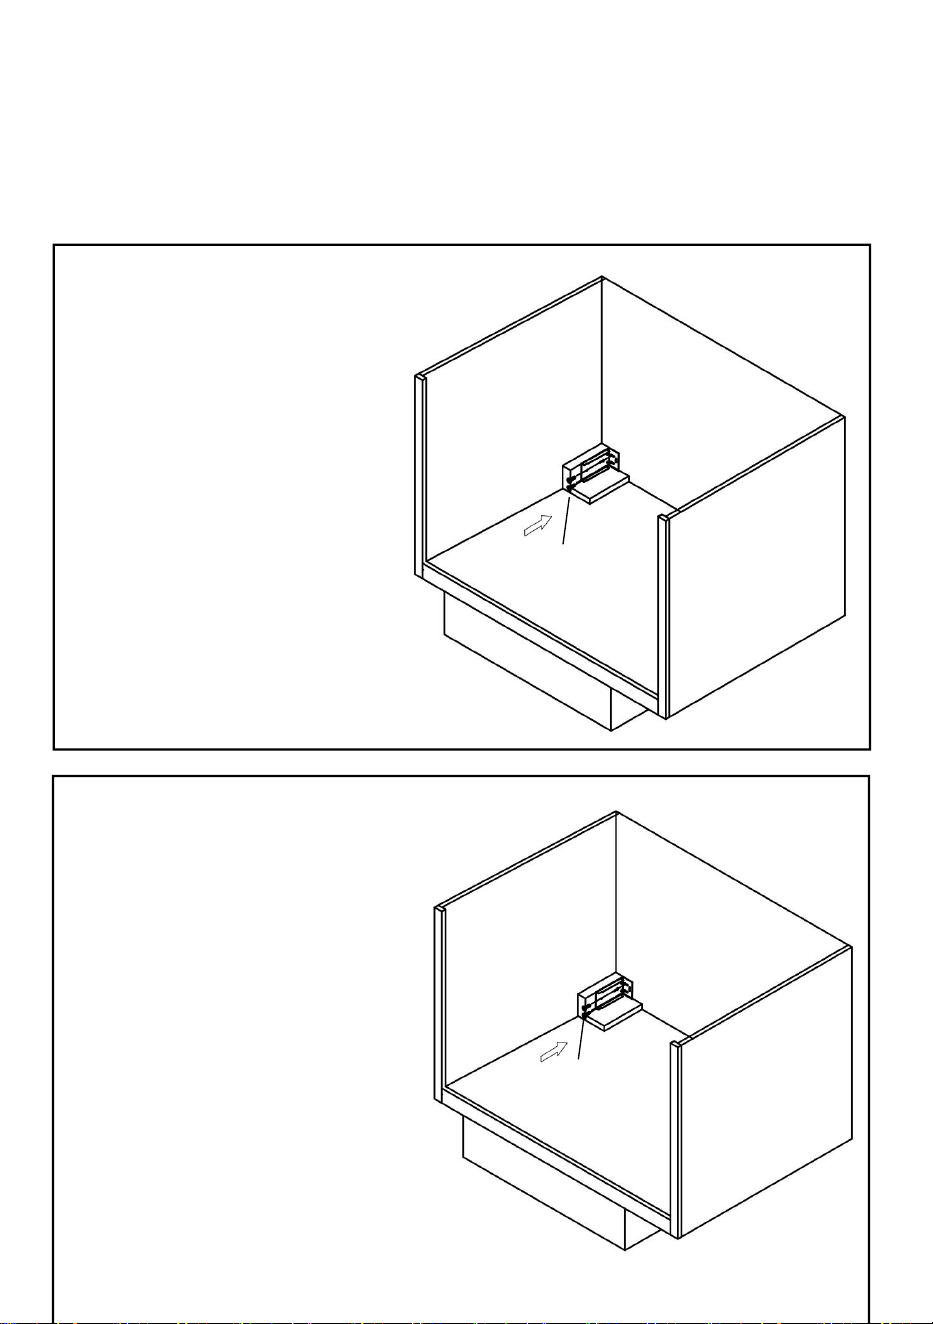
ASSEMBLY STEPS
Step1:
Step2:
6
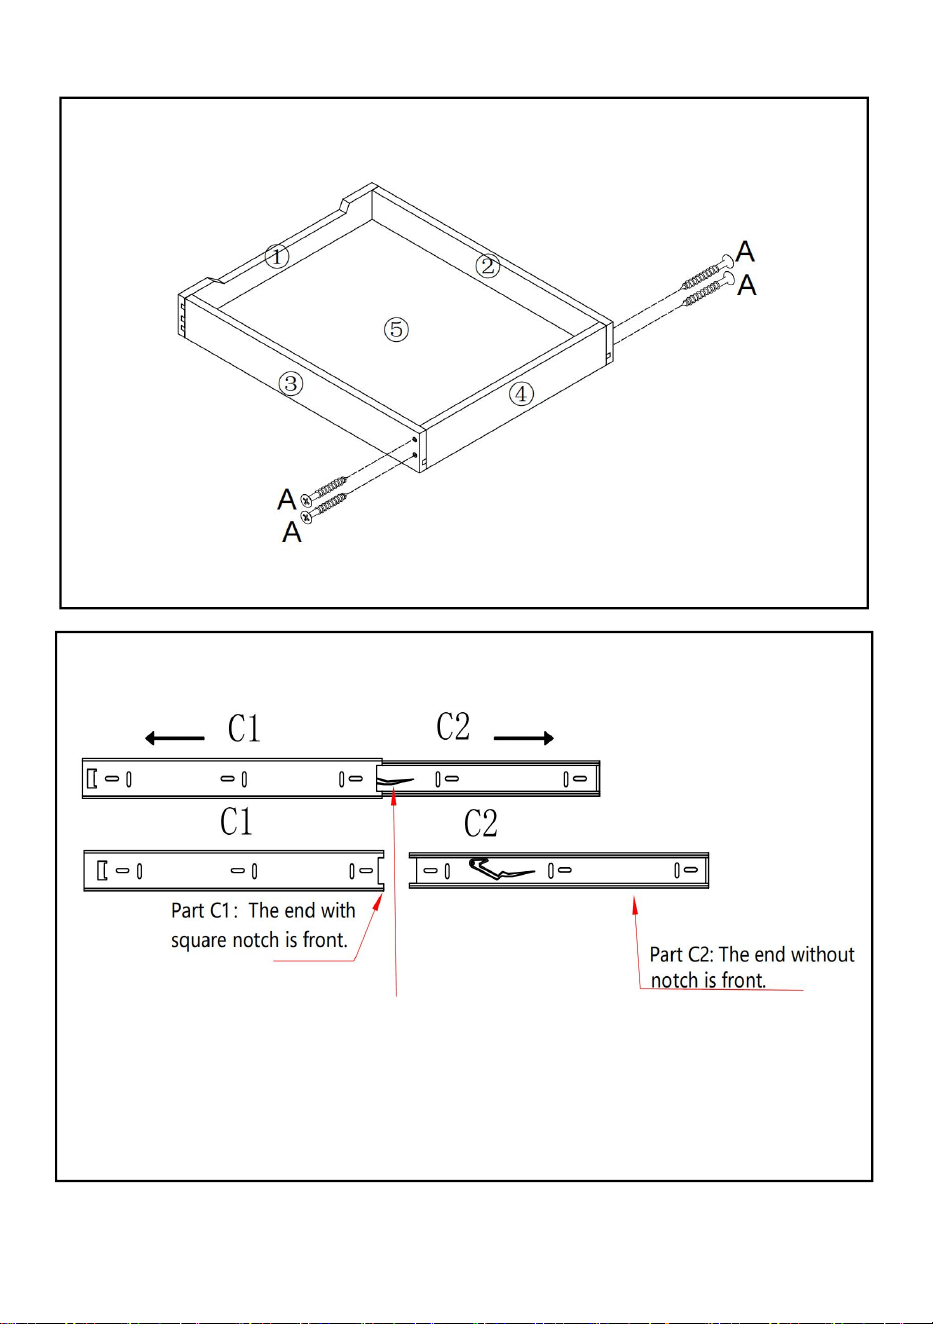
Step3:
Step4:
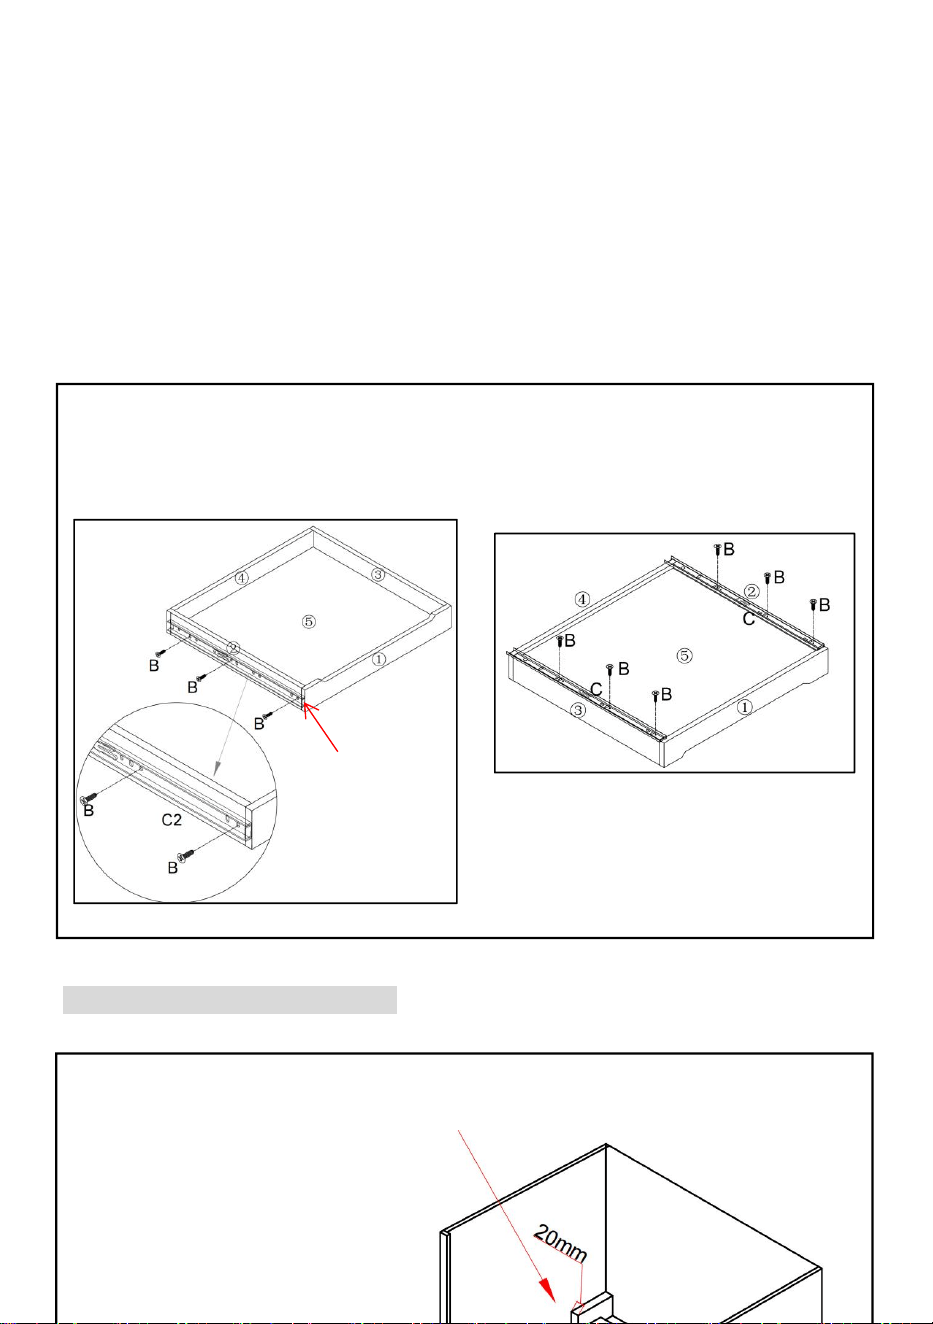
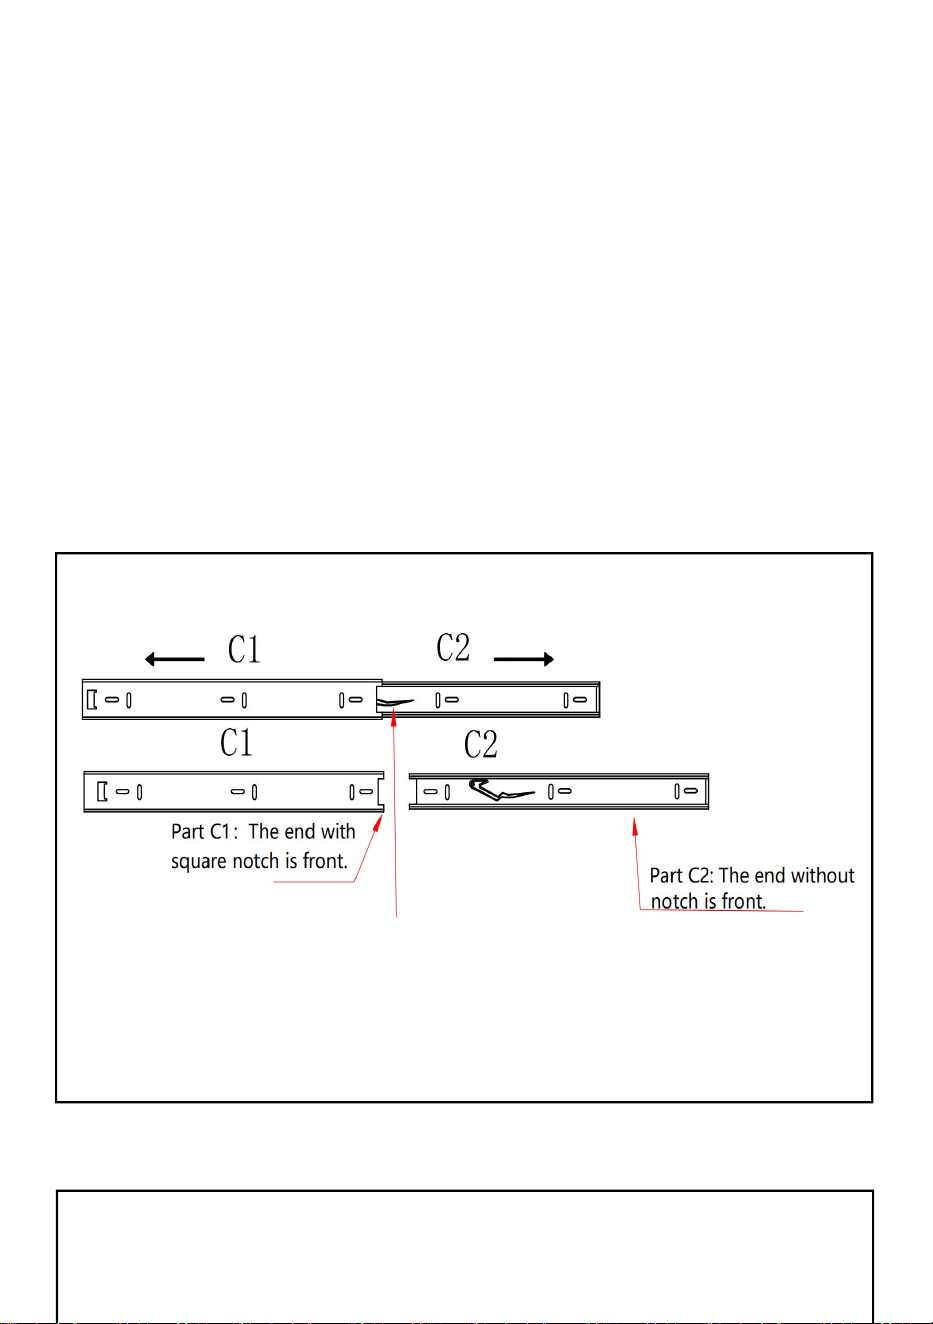
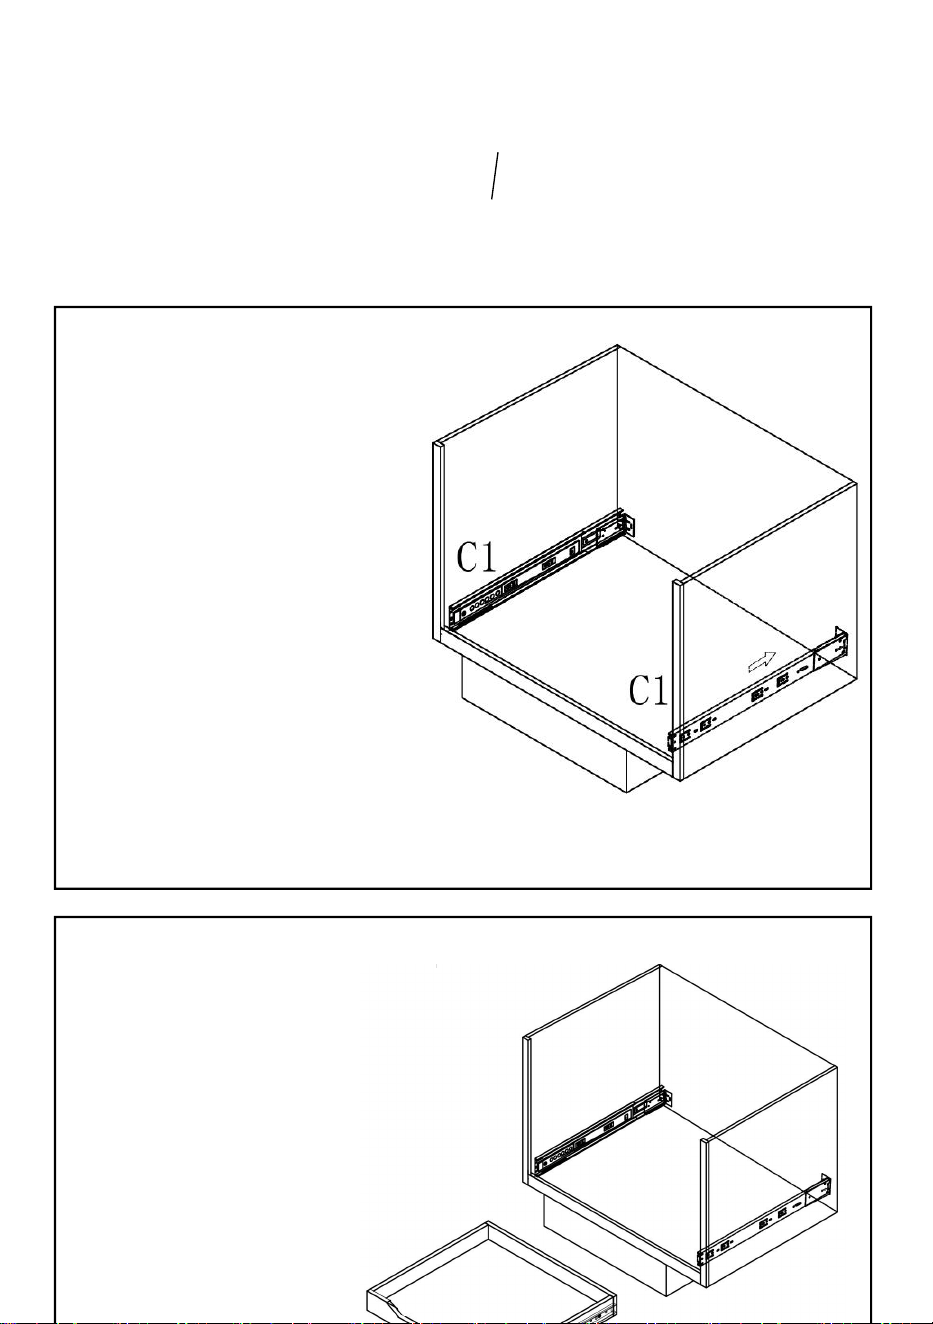
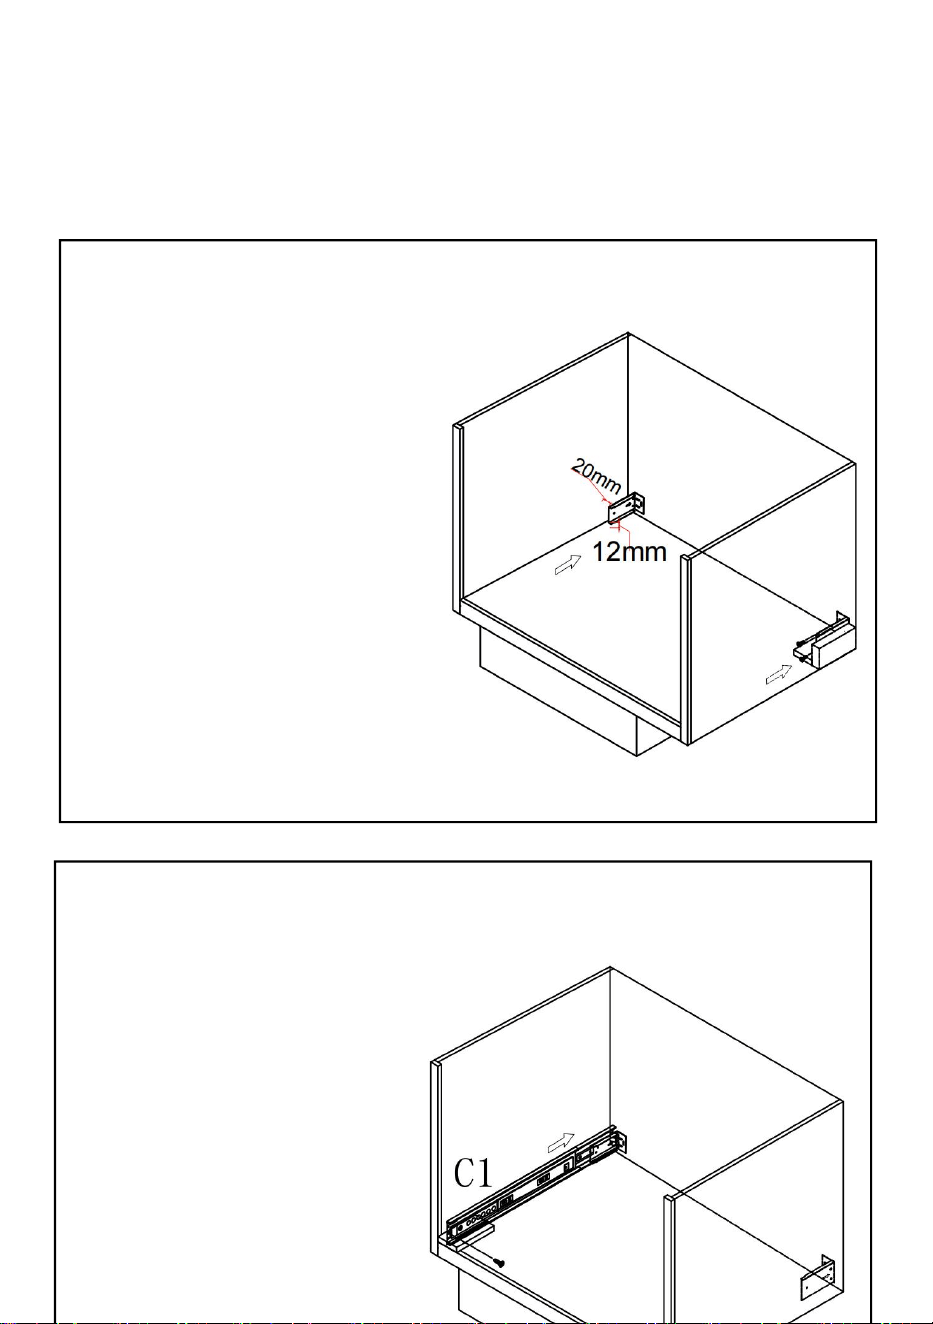
Press to release and take the slides apart as PartC1 & PartC2
7
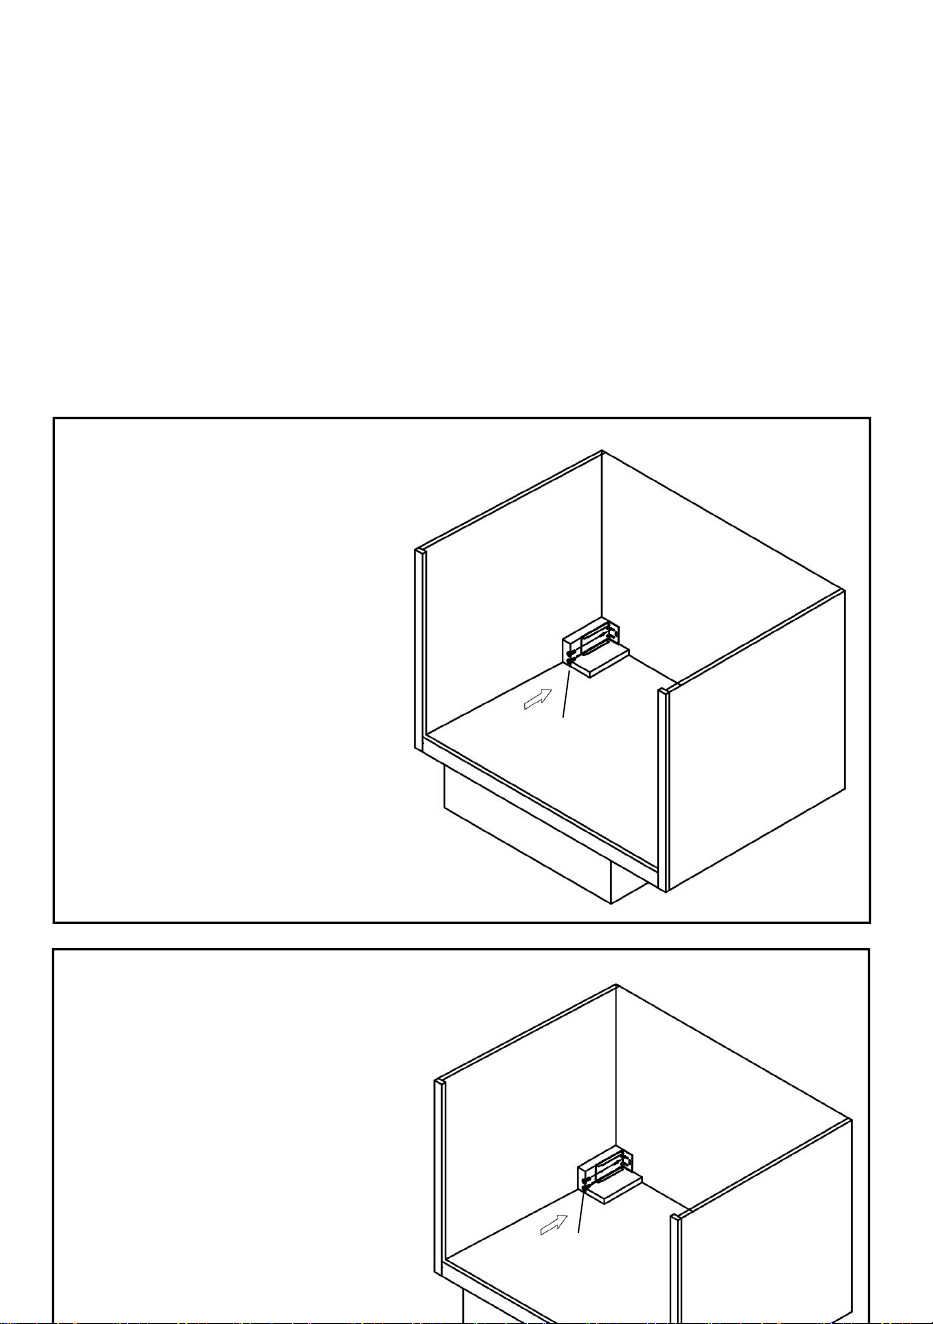
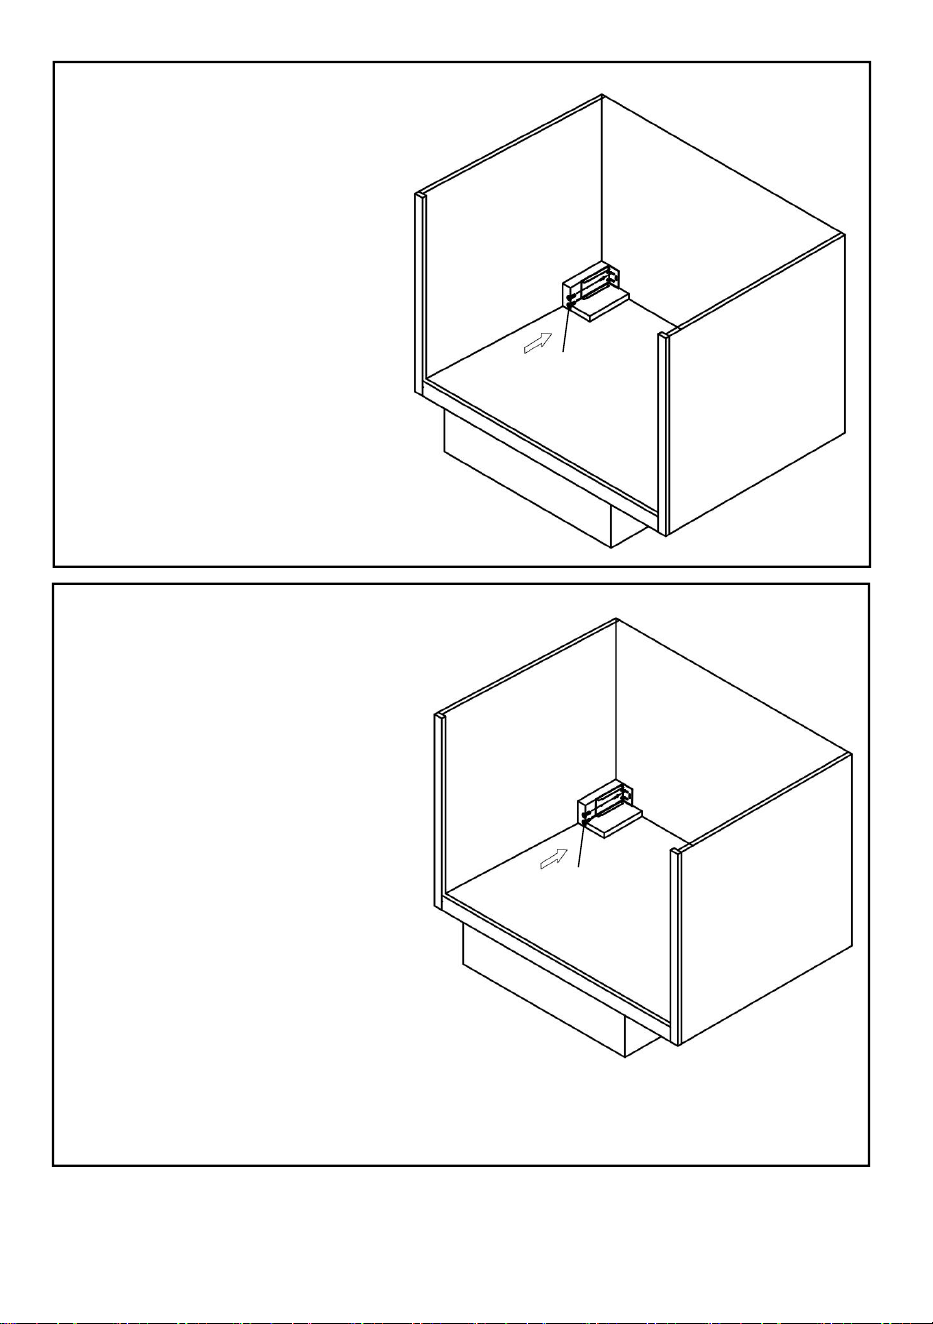
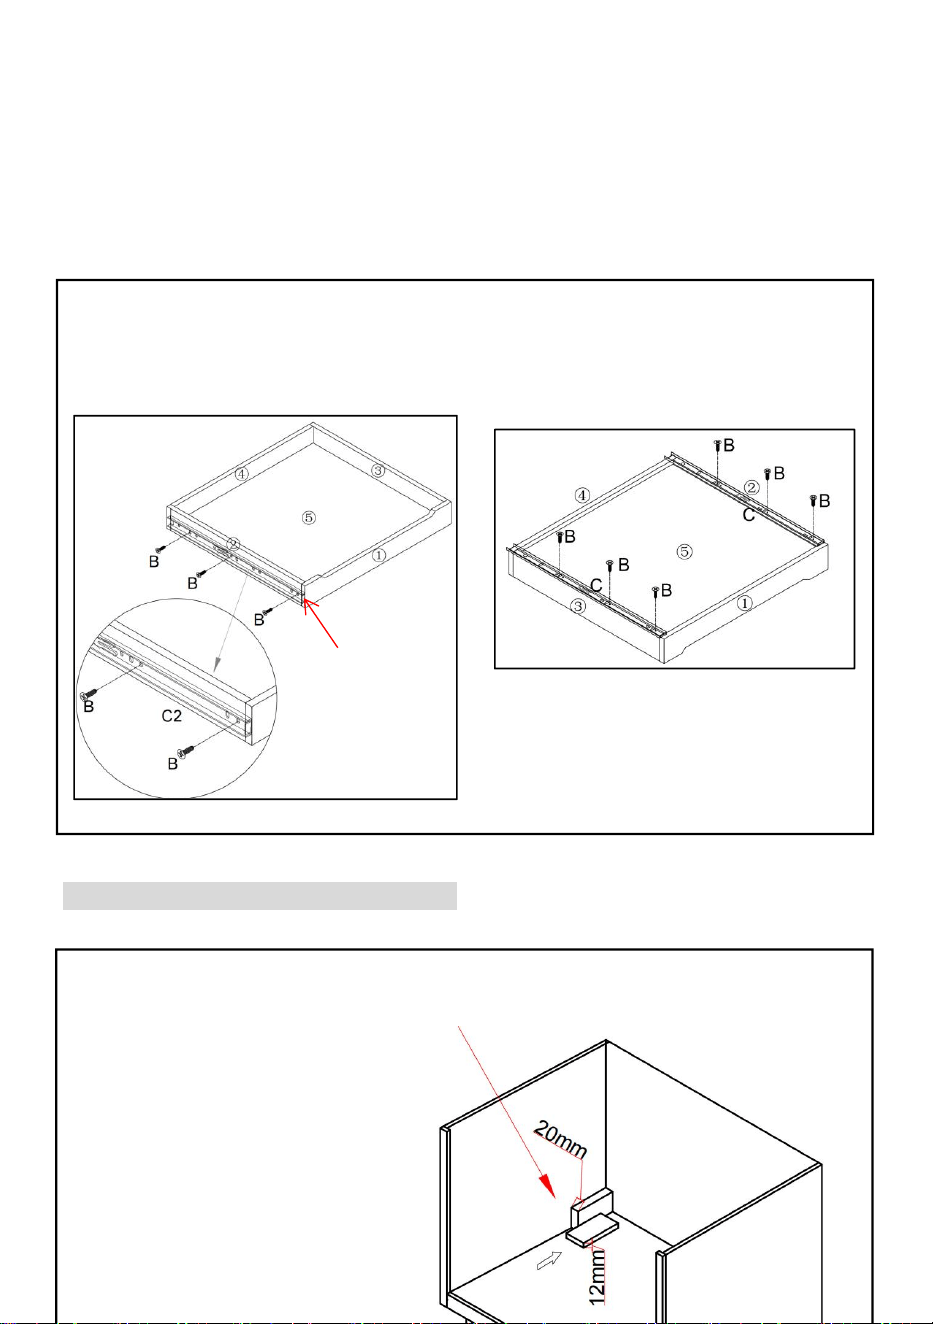
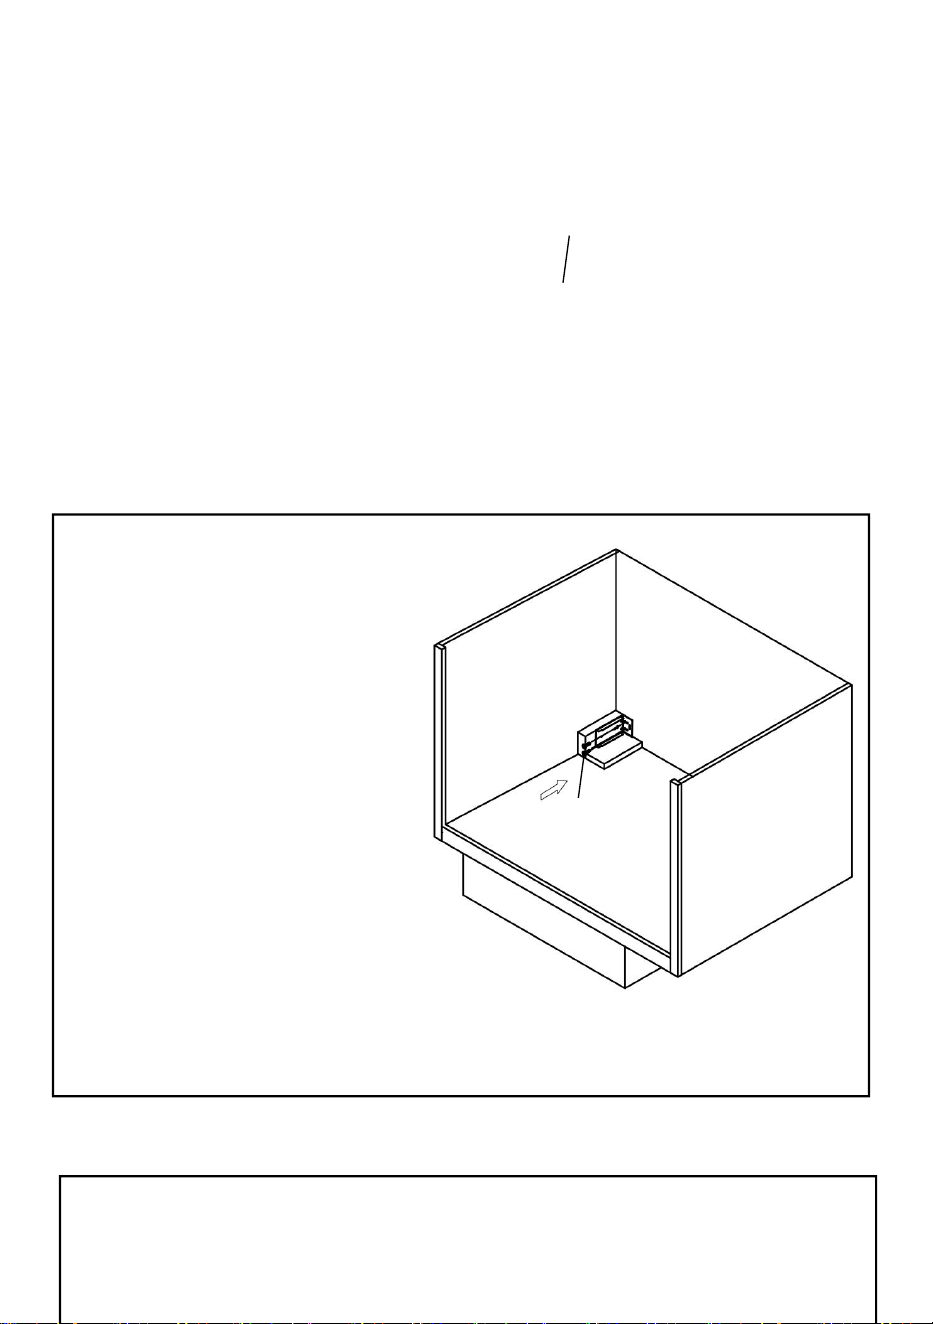
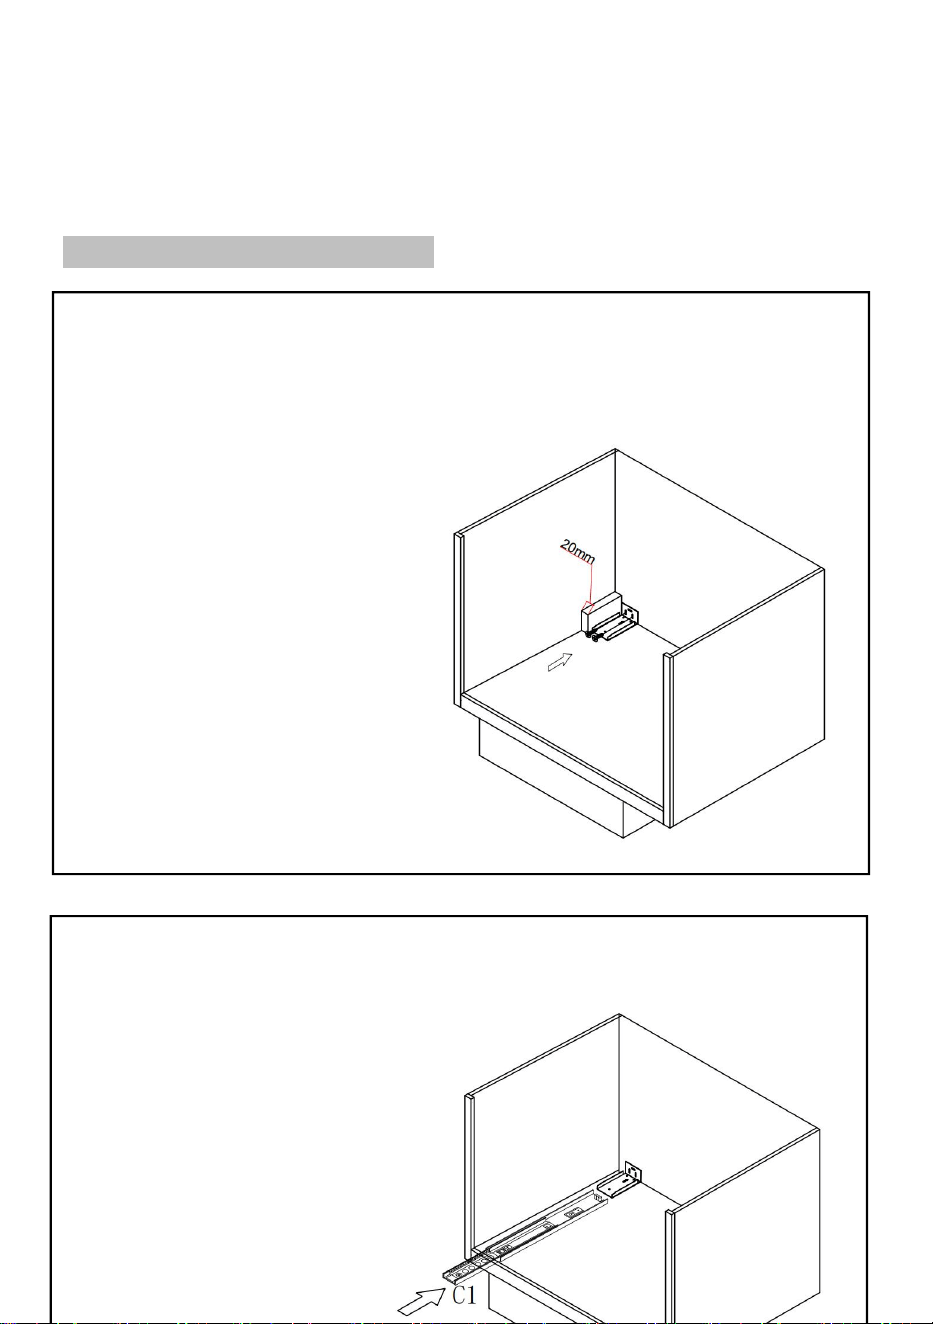
Step5:
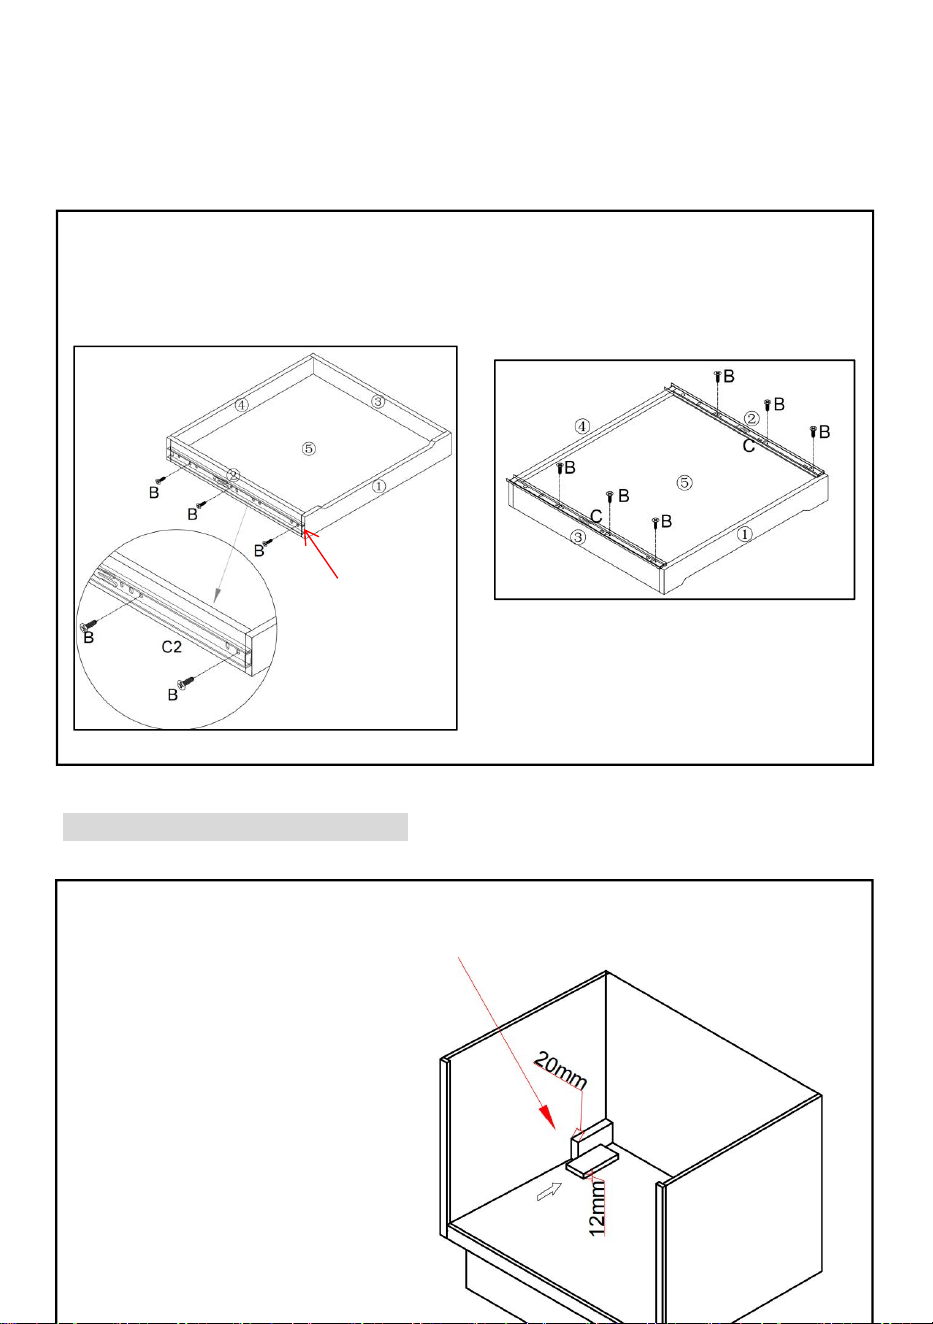
Install it by side mounting
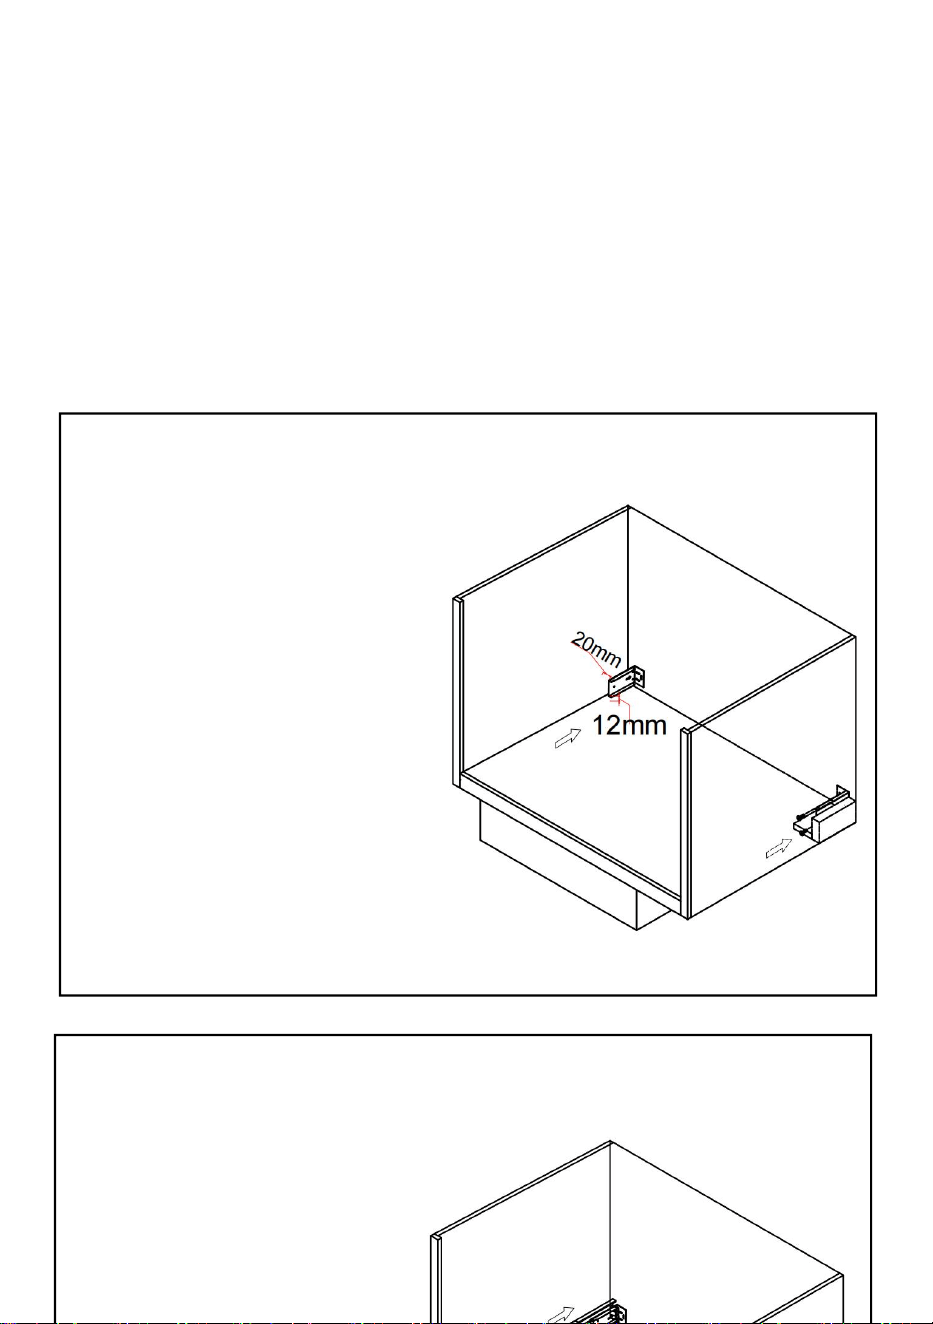
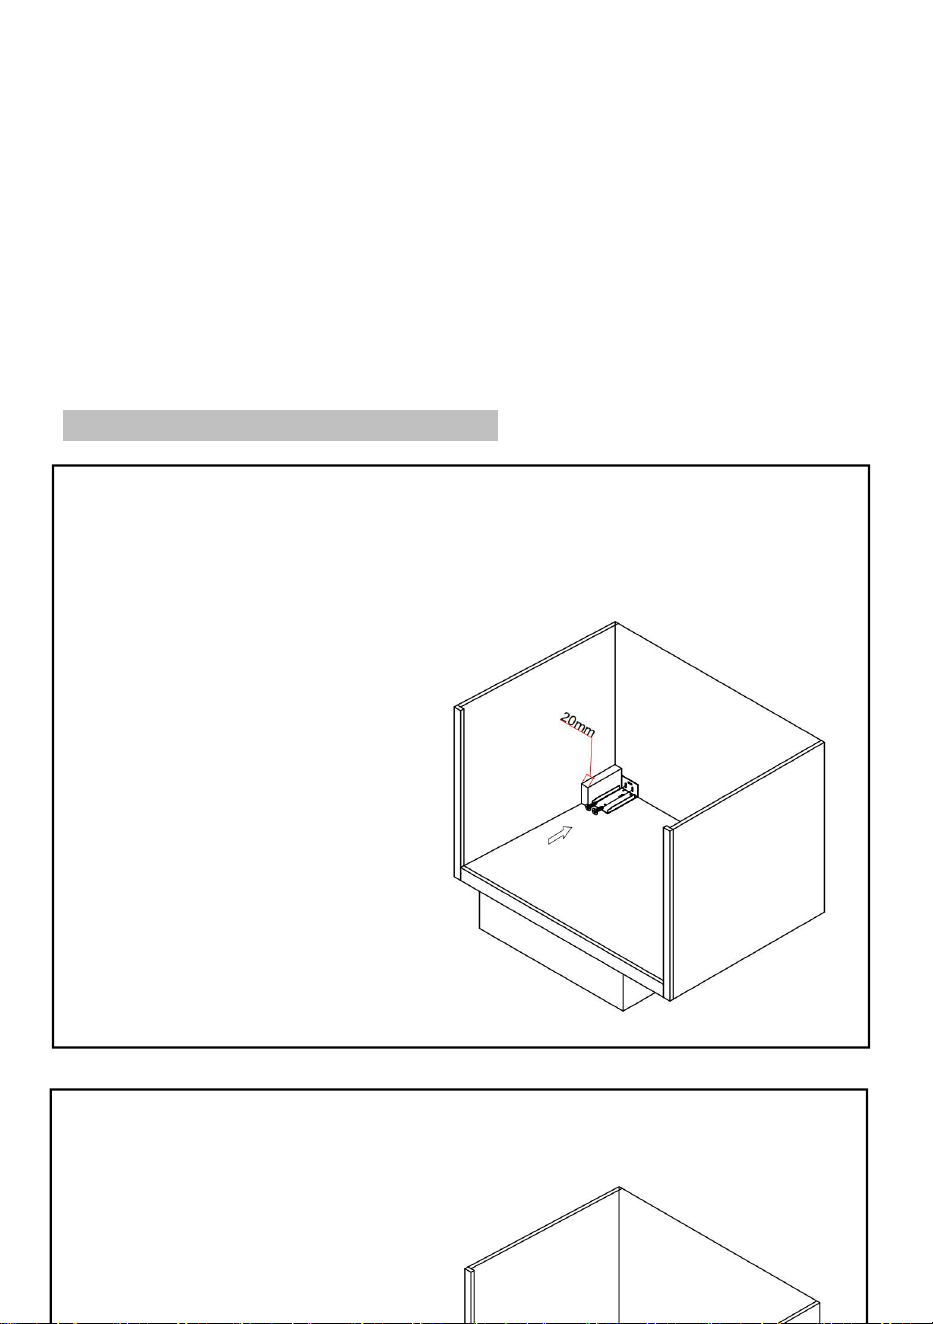
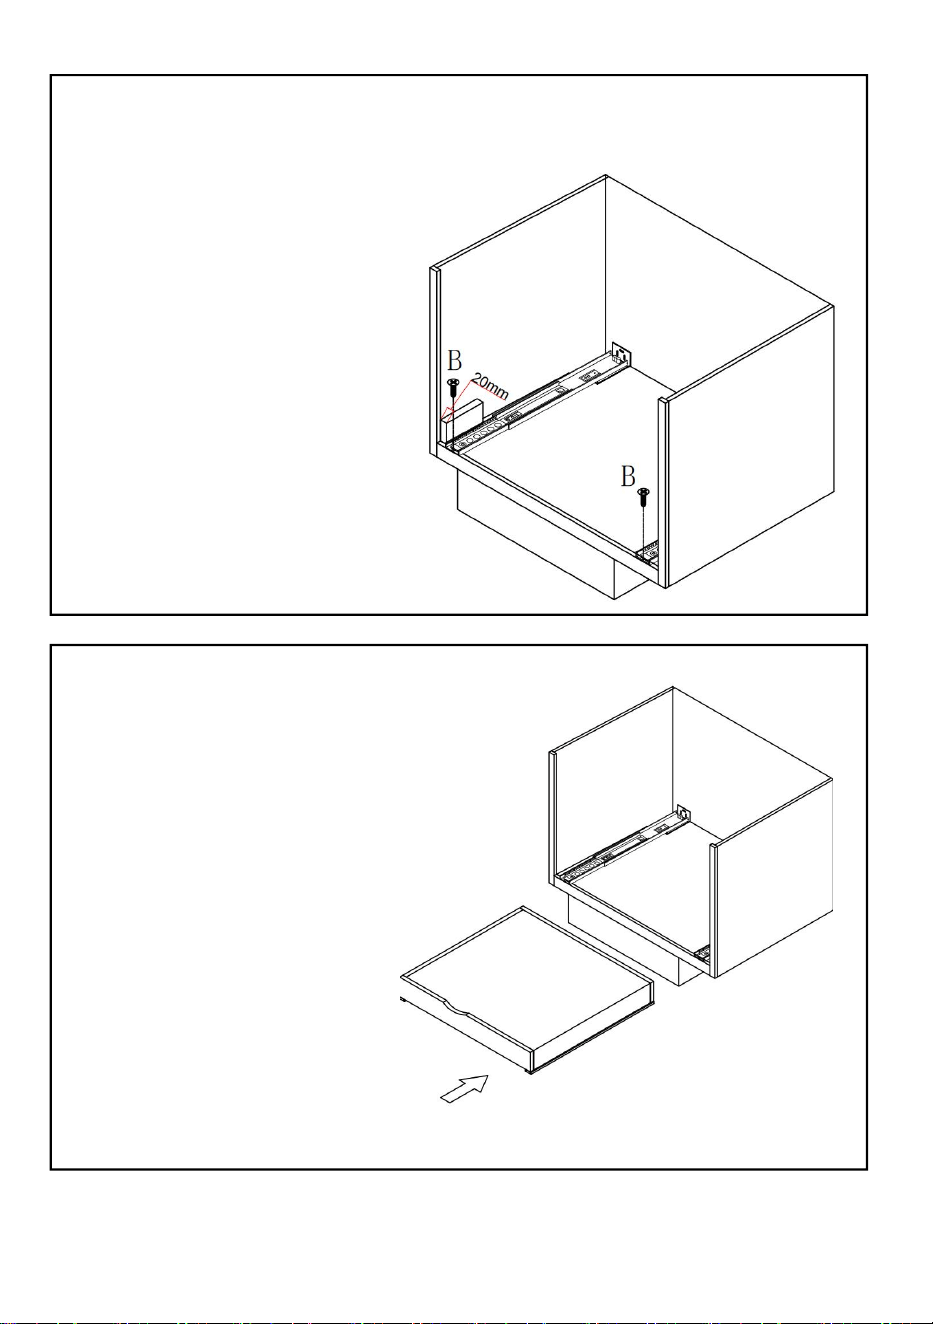
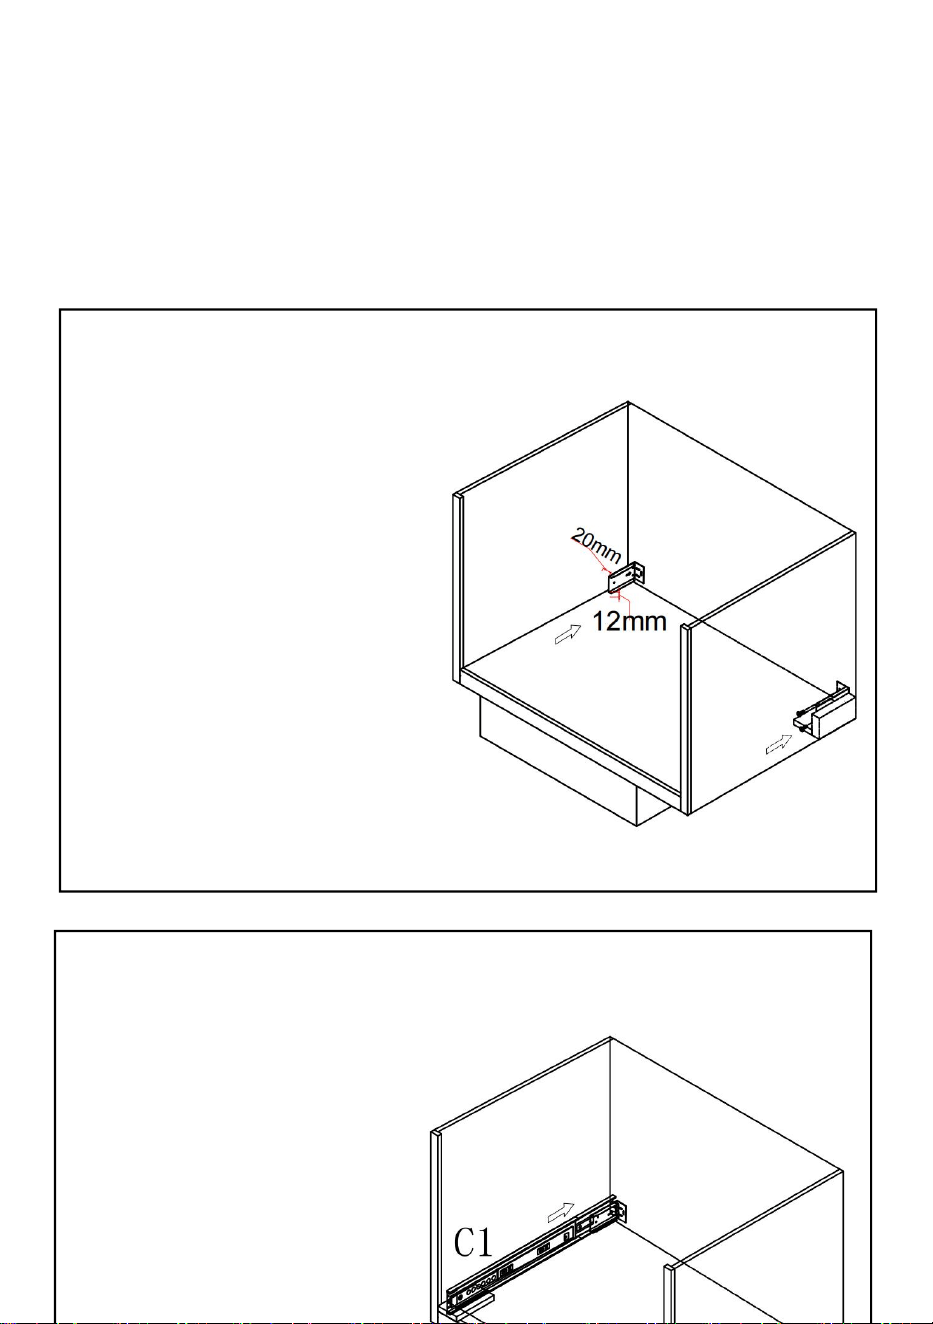
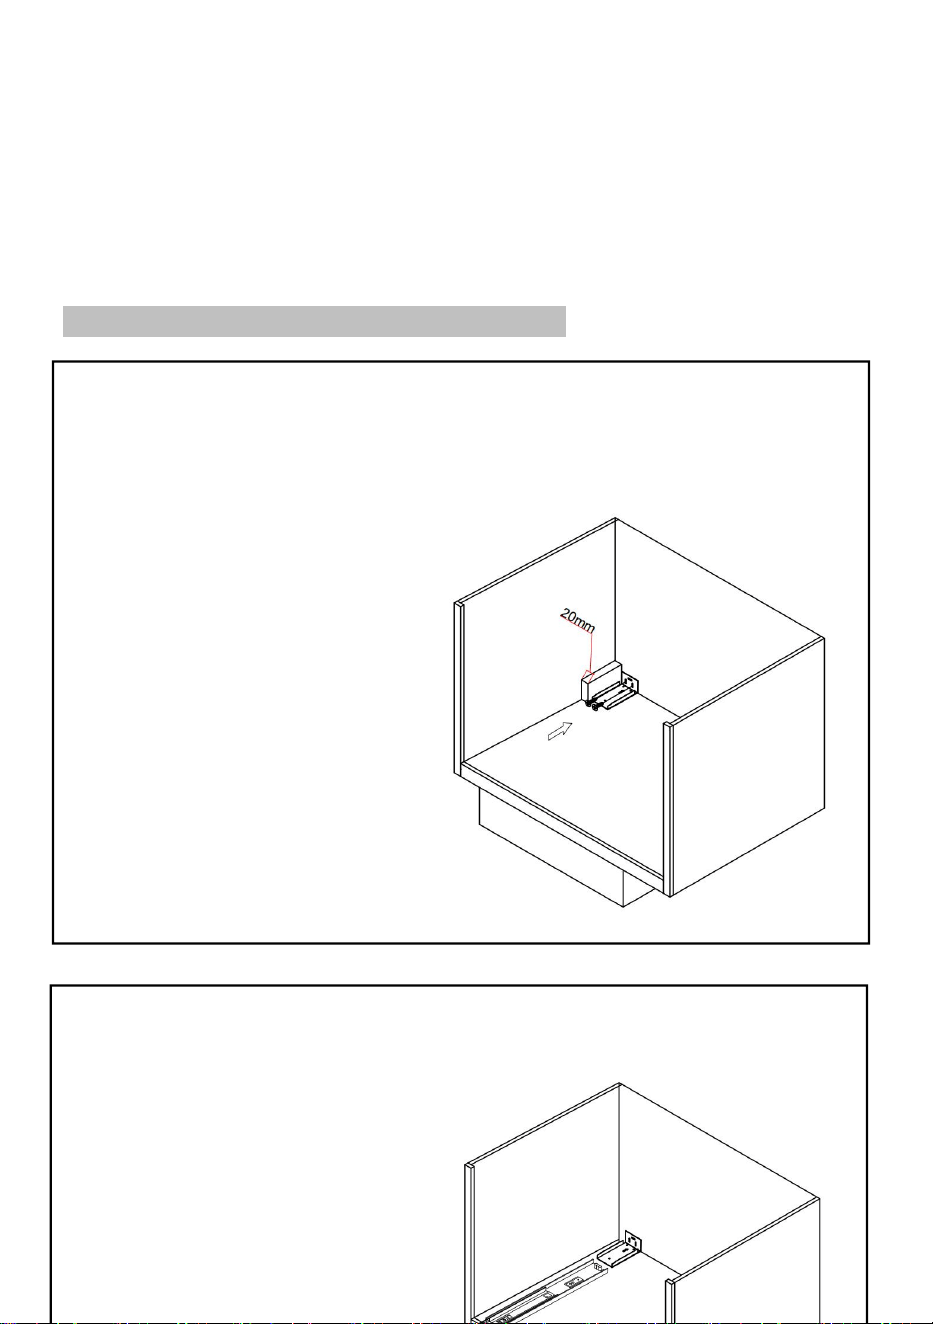
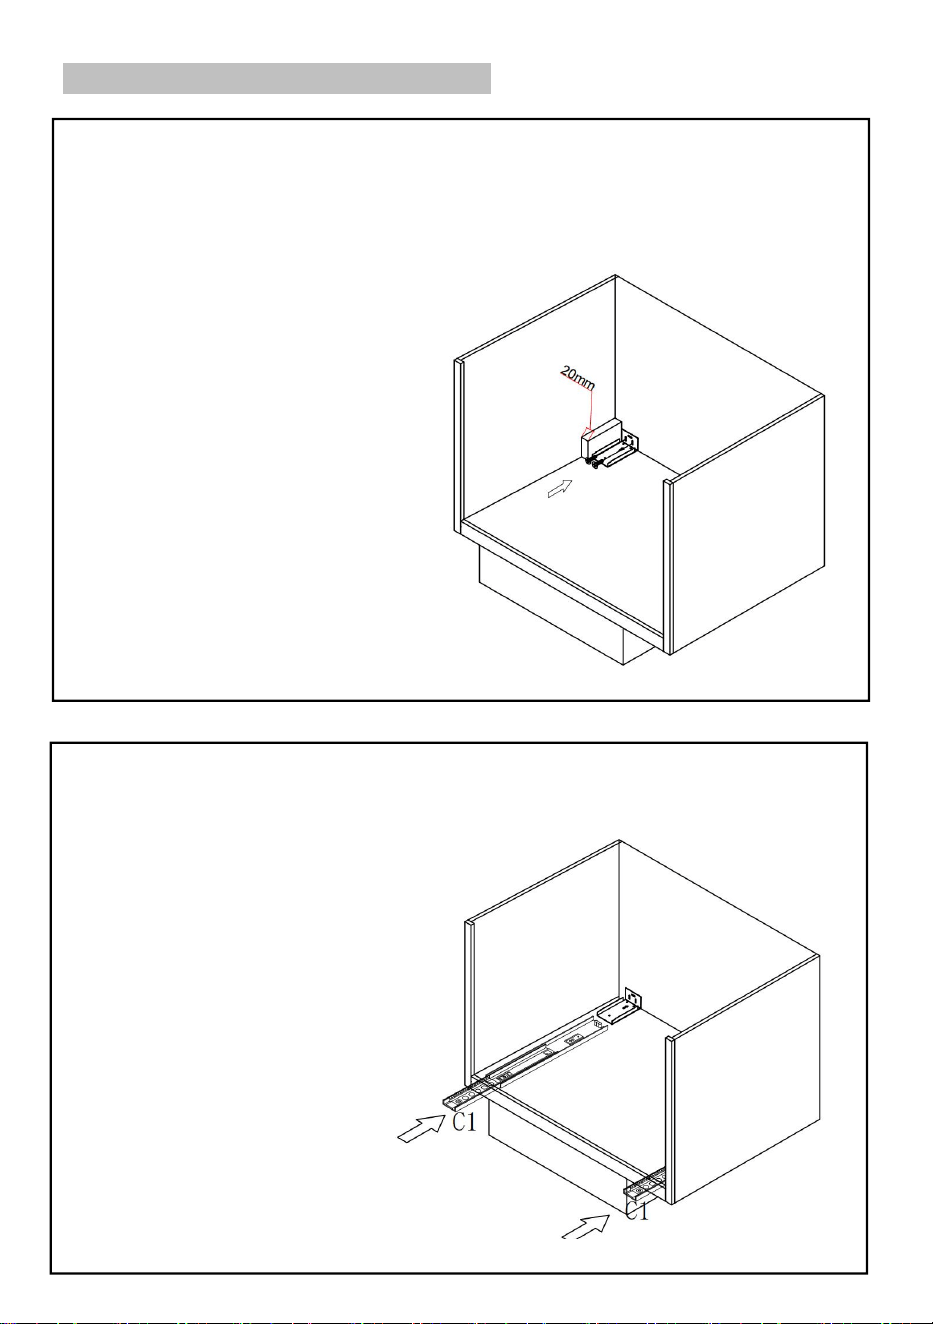
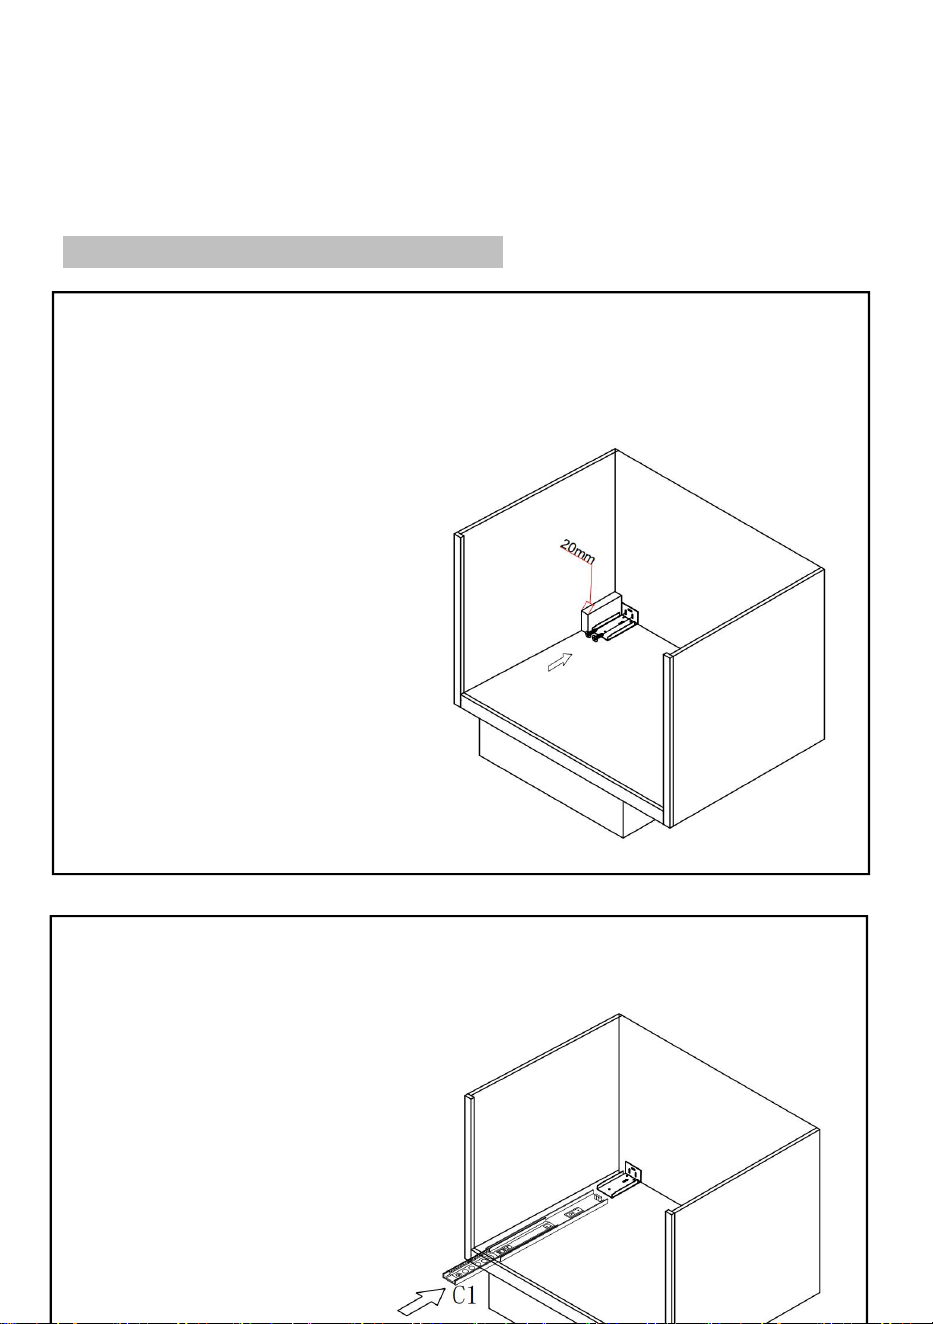
Step1:
As shown, a 20 mm Spacer is temporarily placed to
make the left clearance to be 20 mm;a12 mm Spacer
is temporarily placed to make the bottom clearance to
be 12mm.
Part C2: The
end without
notch is front.
Two rail mounting methods
Side mount
Bottom mounting
or

8
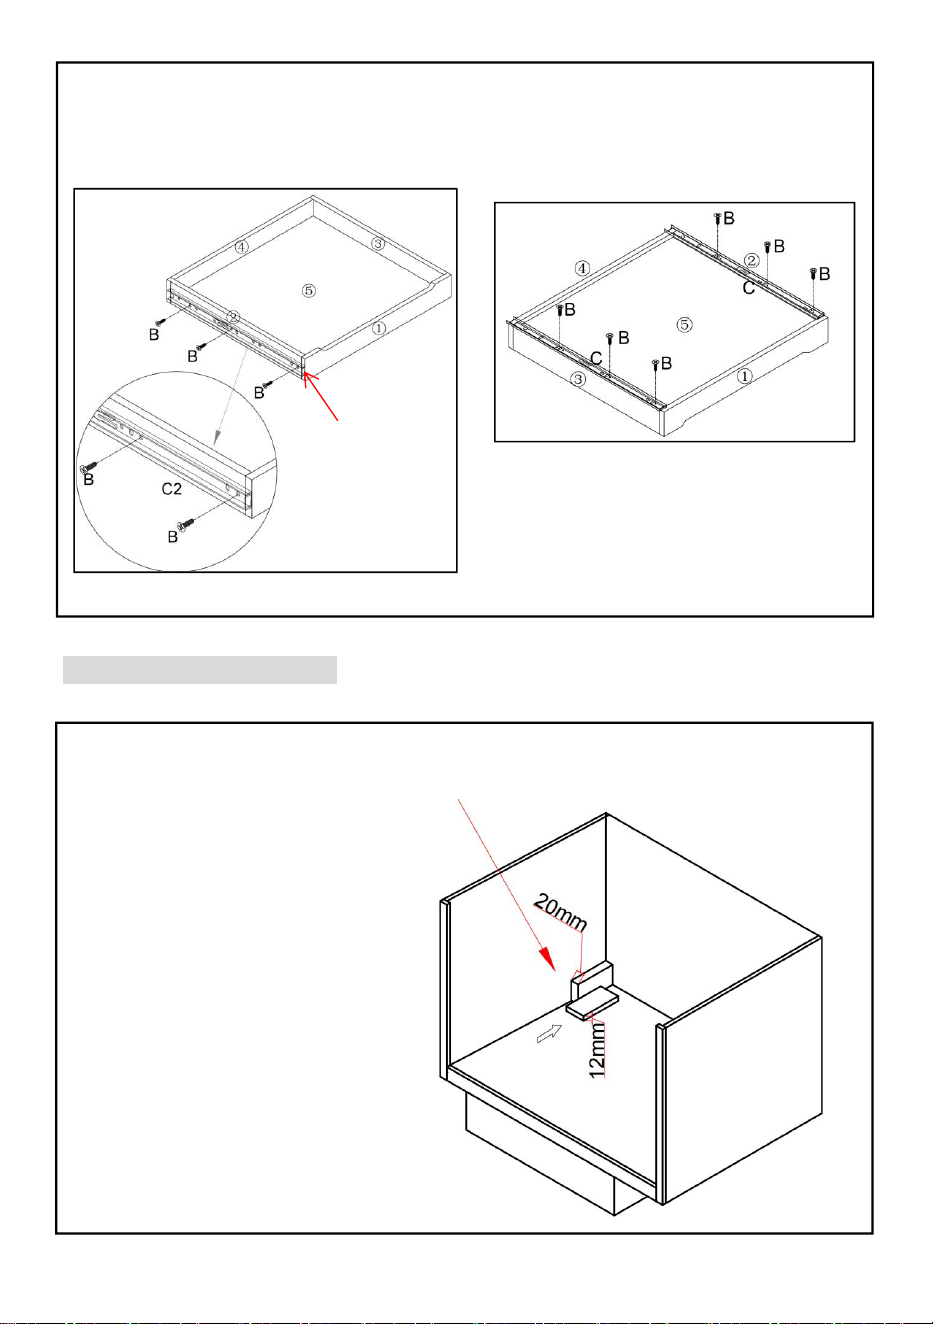
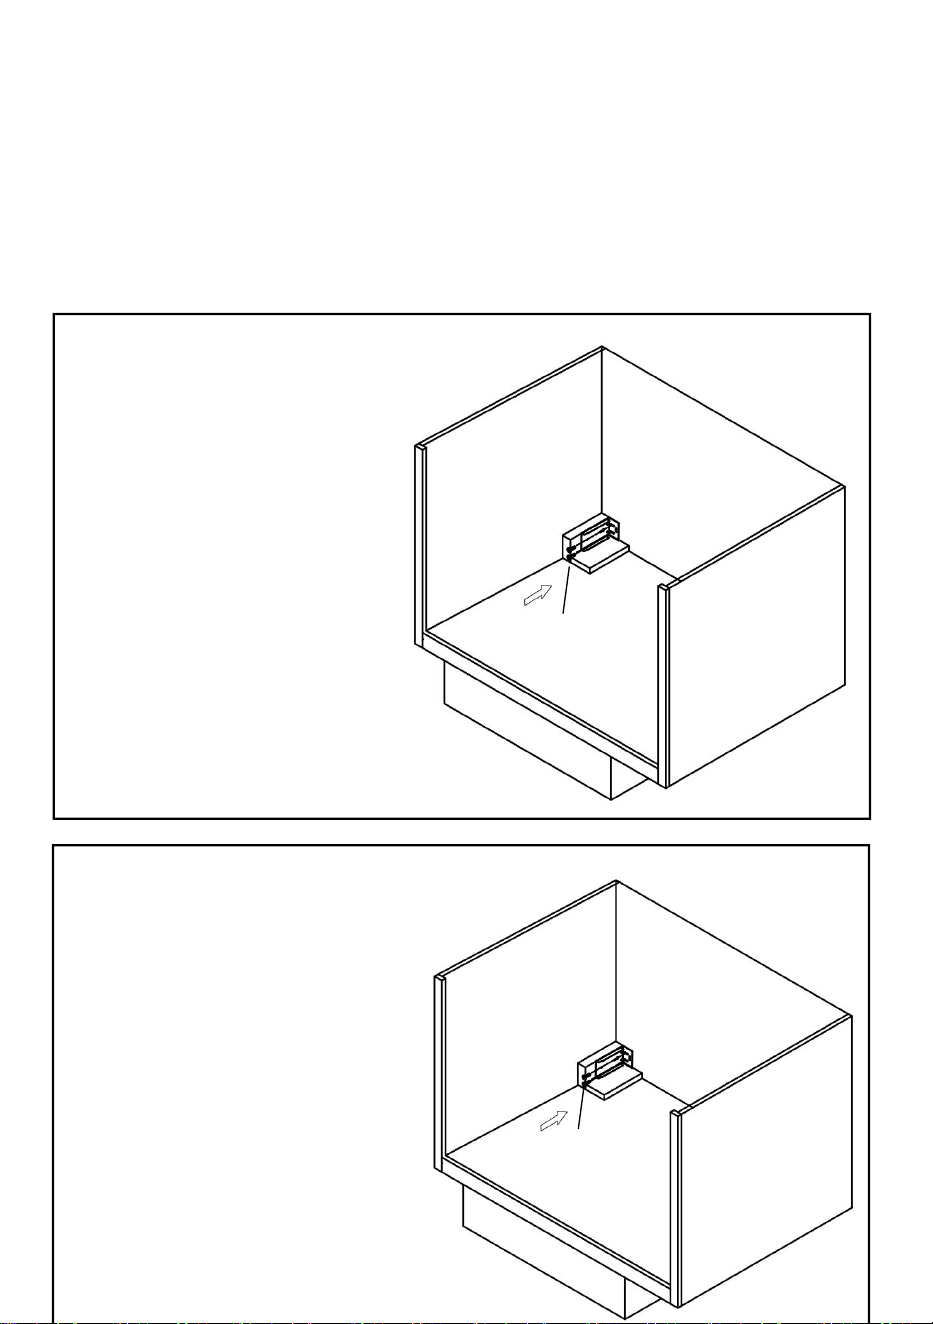
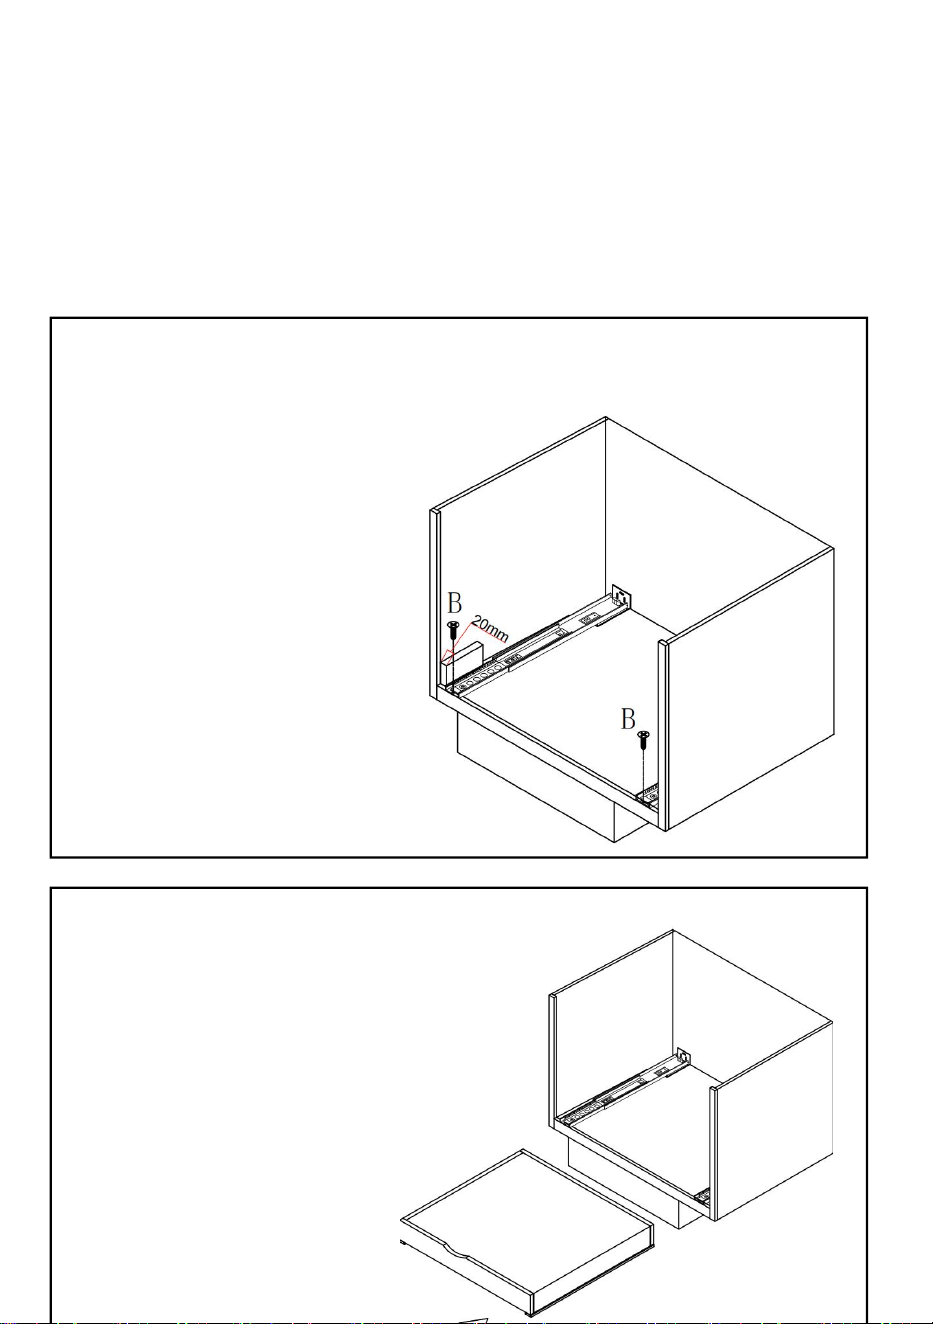
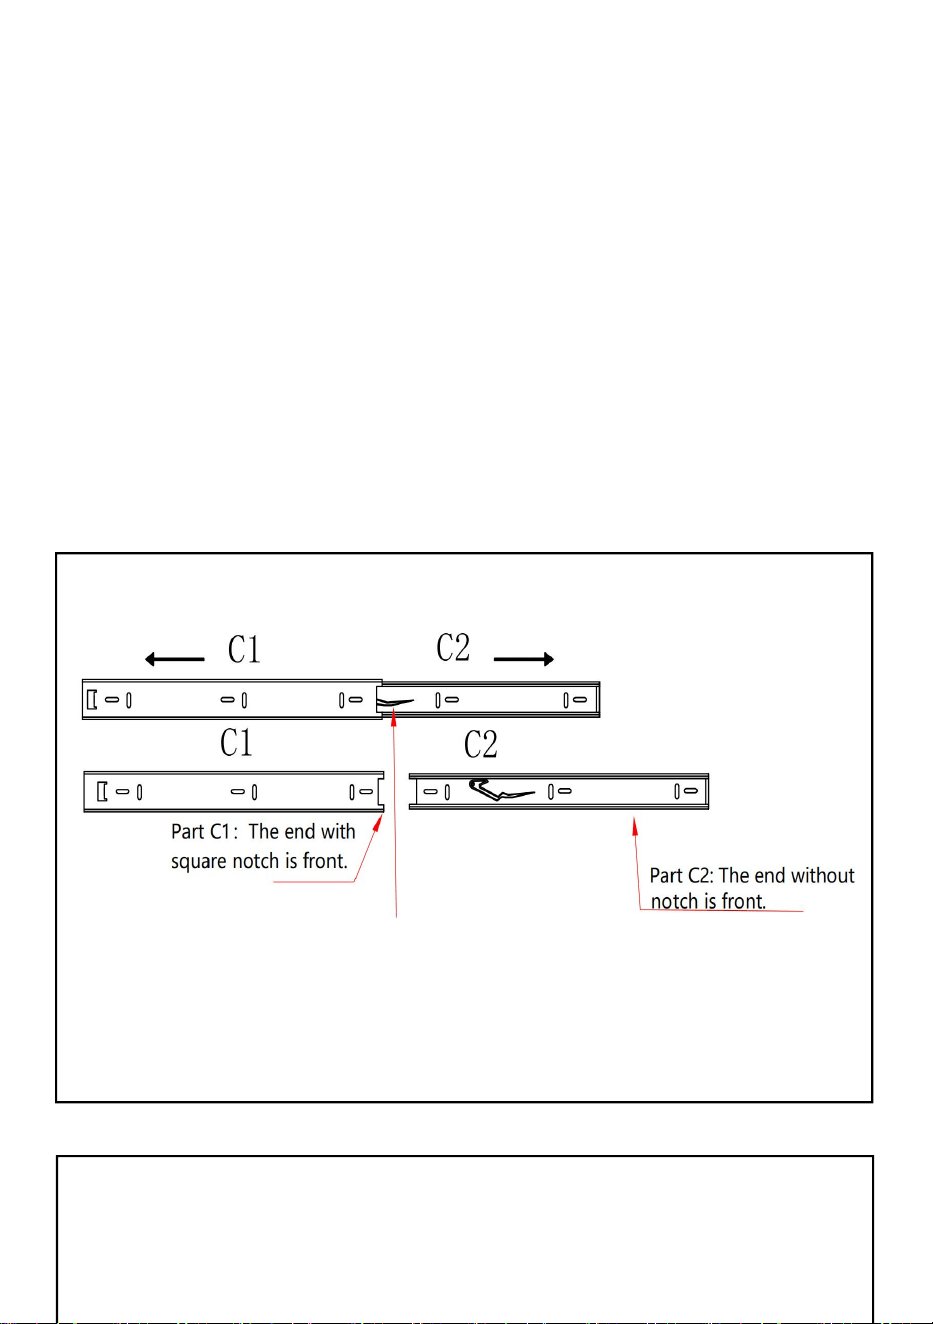
Step2:
Step3:
Place the bracket on the
Spacers (as shown) and fix
it to the back board by 2
screws, then take out the
Spacers and the required
clearances are achieved.
D
B
Place the 12 mm Spacer
underneath
Part D as shown, then tighten
the screw to fix Part D to the
left board.
D
B
9
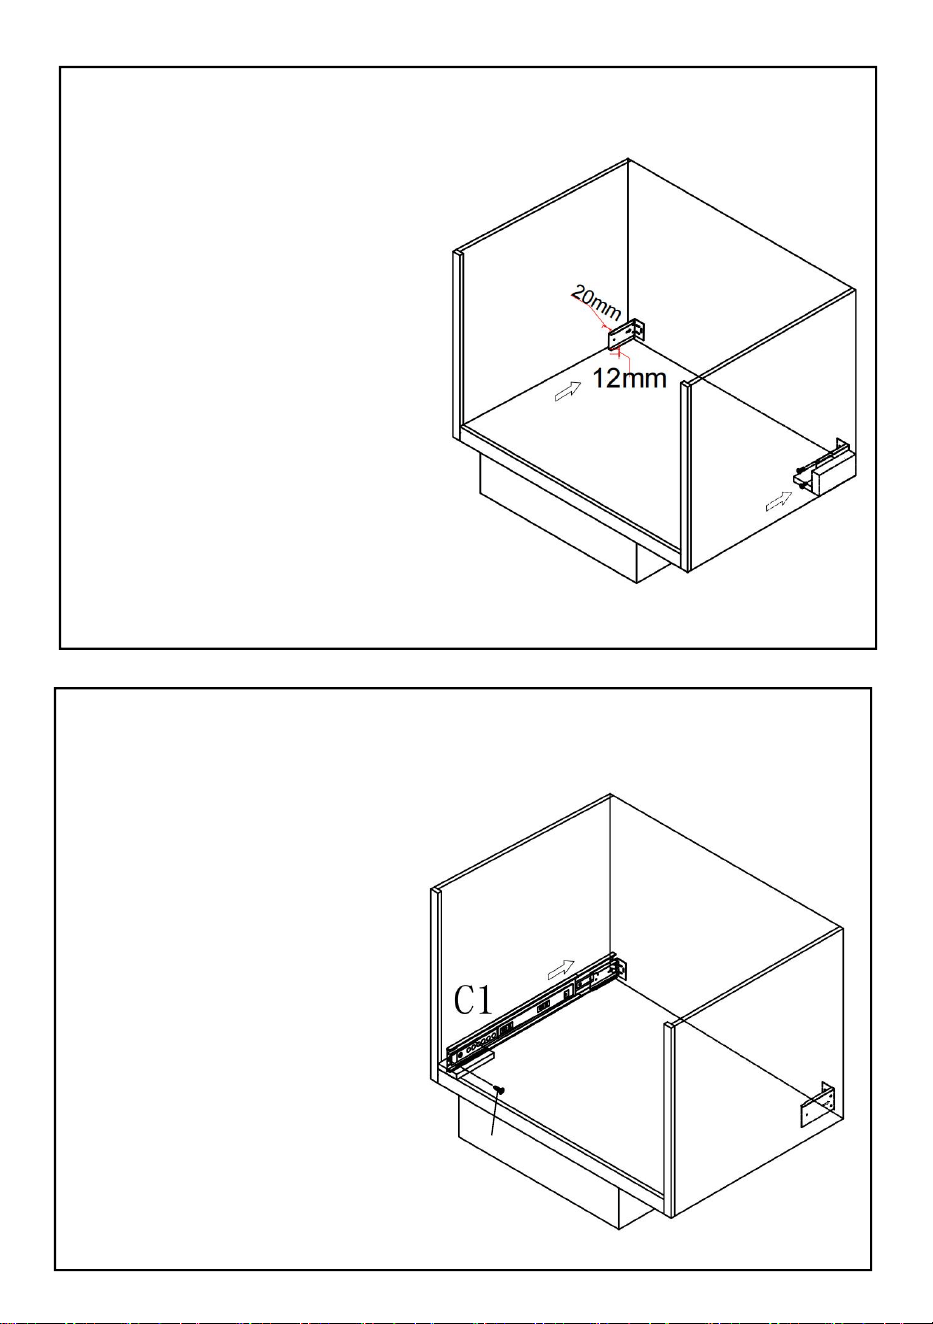
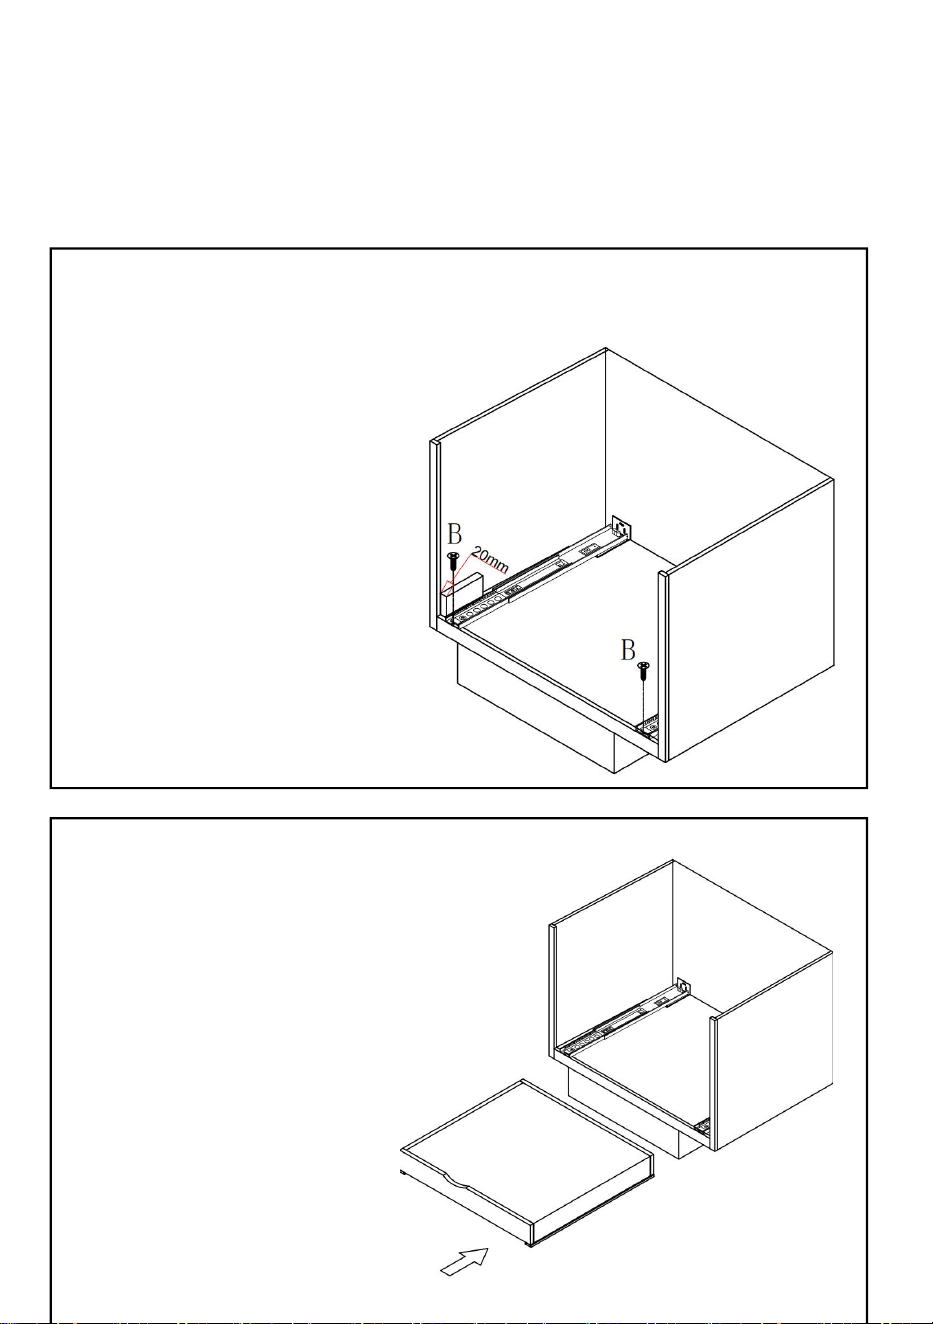
Step4:
Step5:
Place the Spacers as shown
to the right side; please
distinguish the different
thickness of the Spacers.
Install the bracket the same
way as of the left side.
Place the 12 mm Spacer
underneath
Part C1 as shown, then
tighten the screw to fix Part
C1 to the left board.
B

10
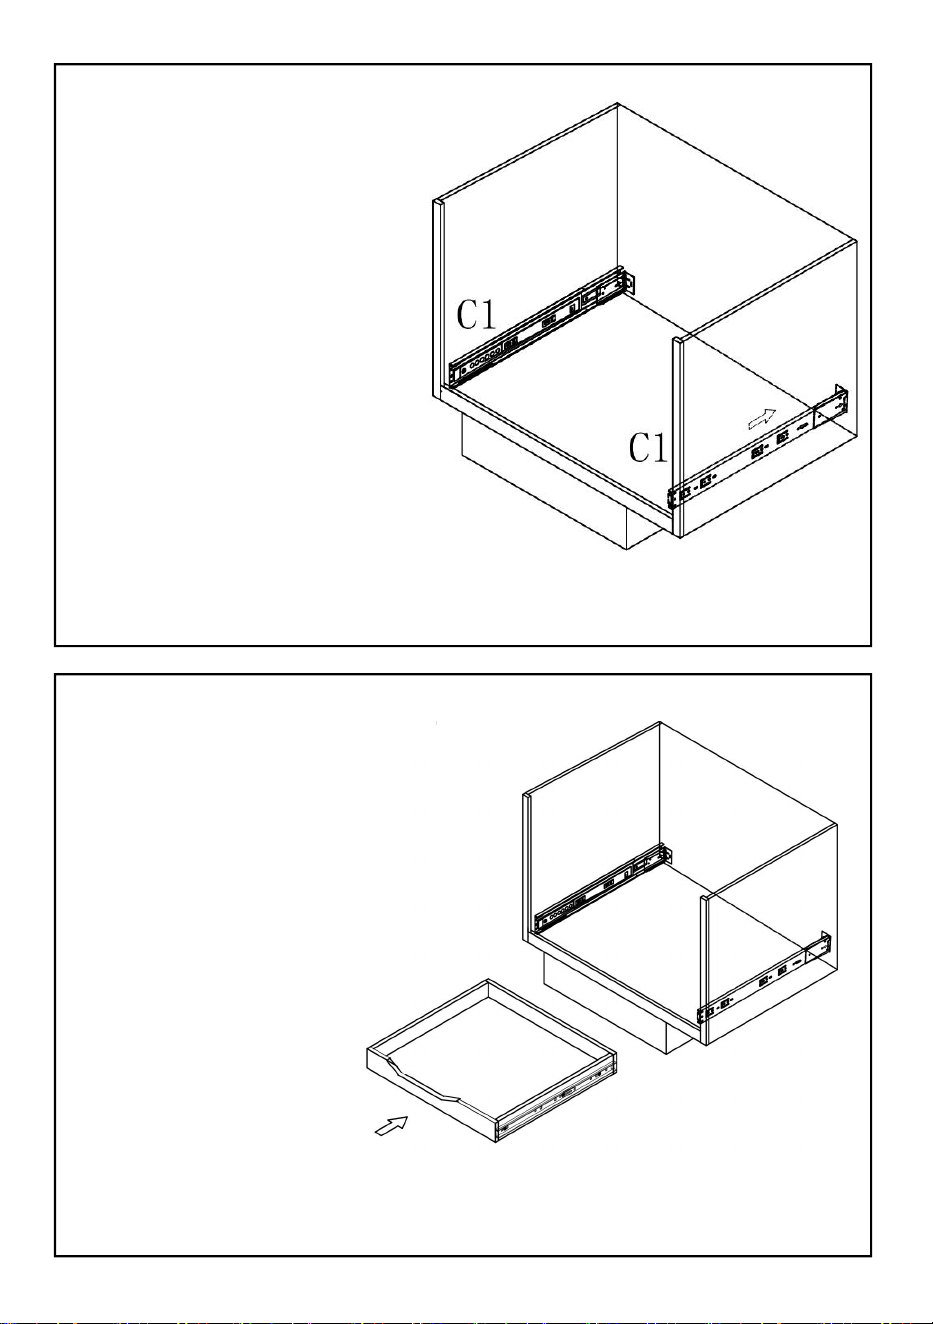
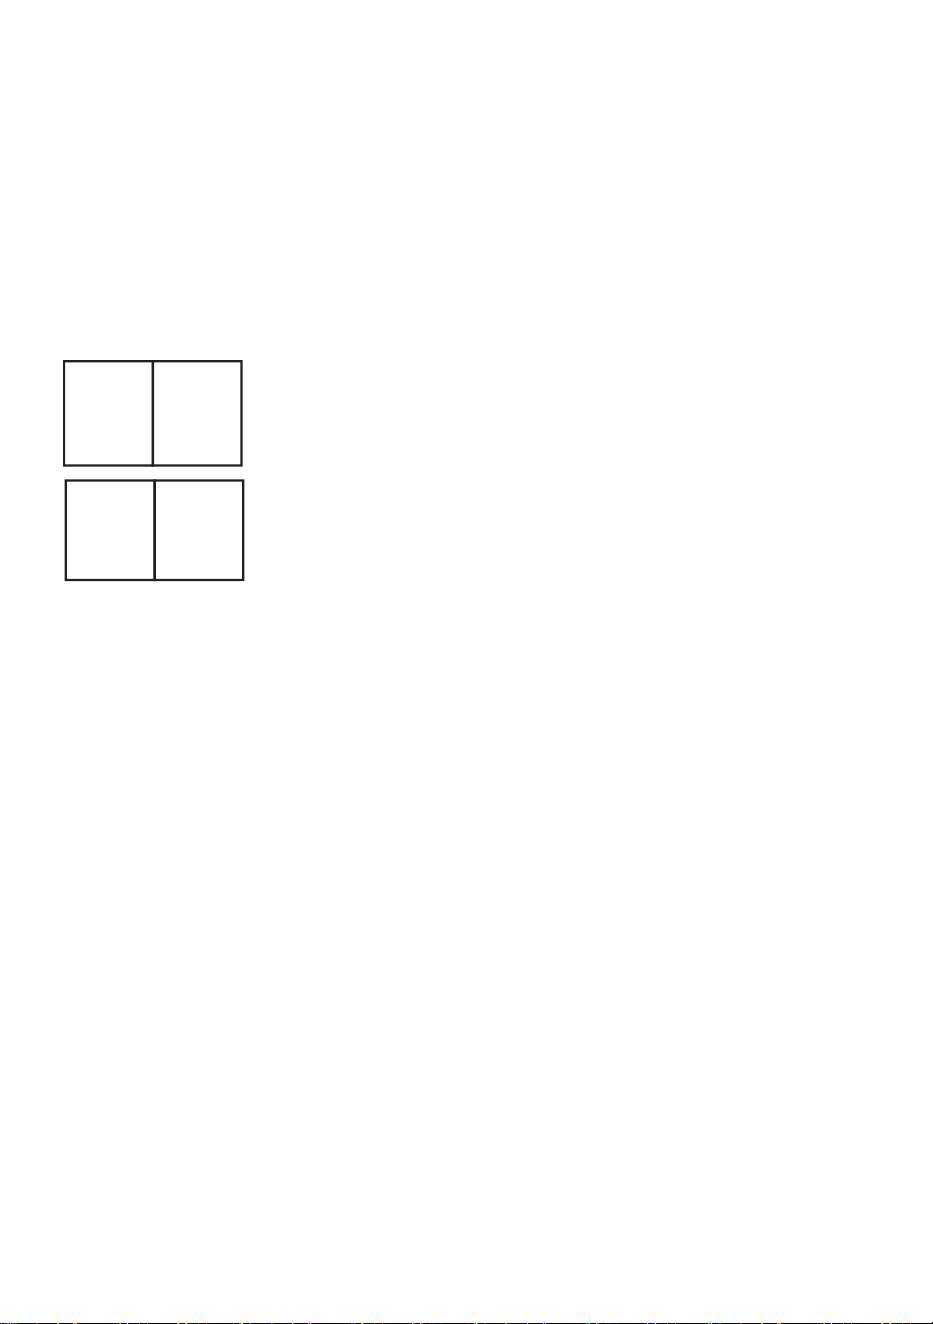
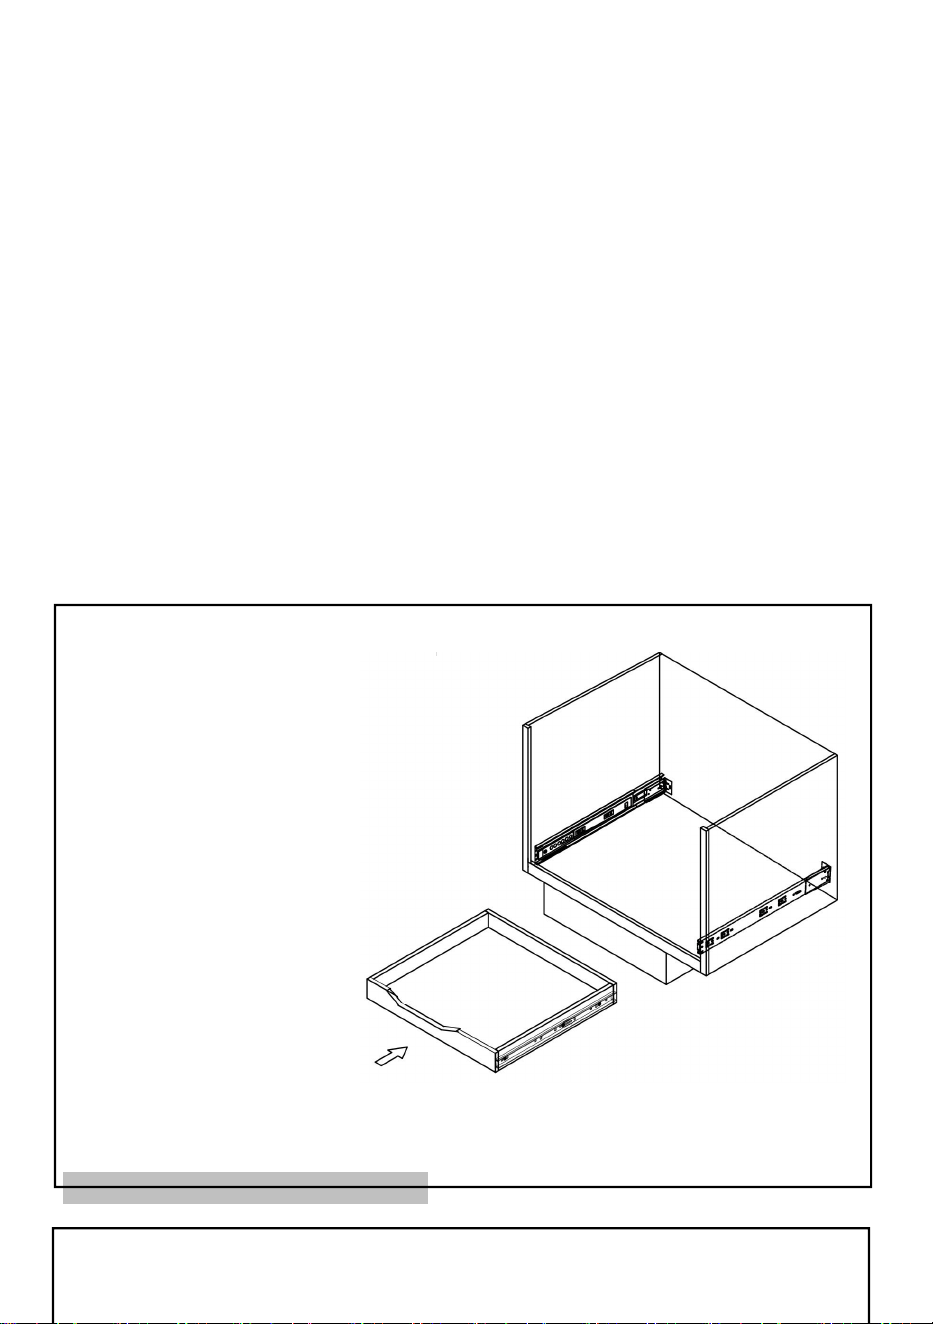
Step6:
Step7:
The same way as in Step 5,
fix another
Part C1 to the right board by
a screw.
Insert the drawer.
11
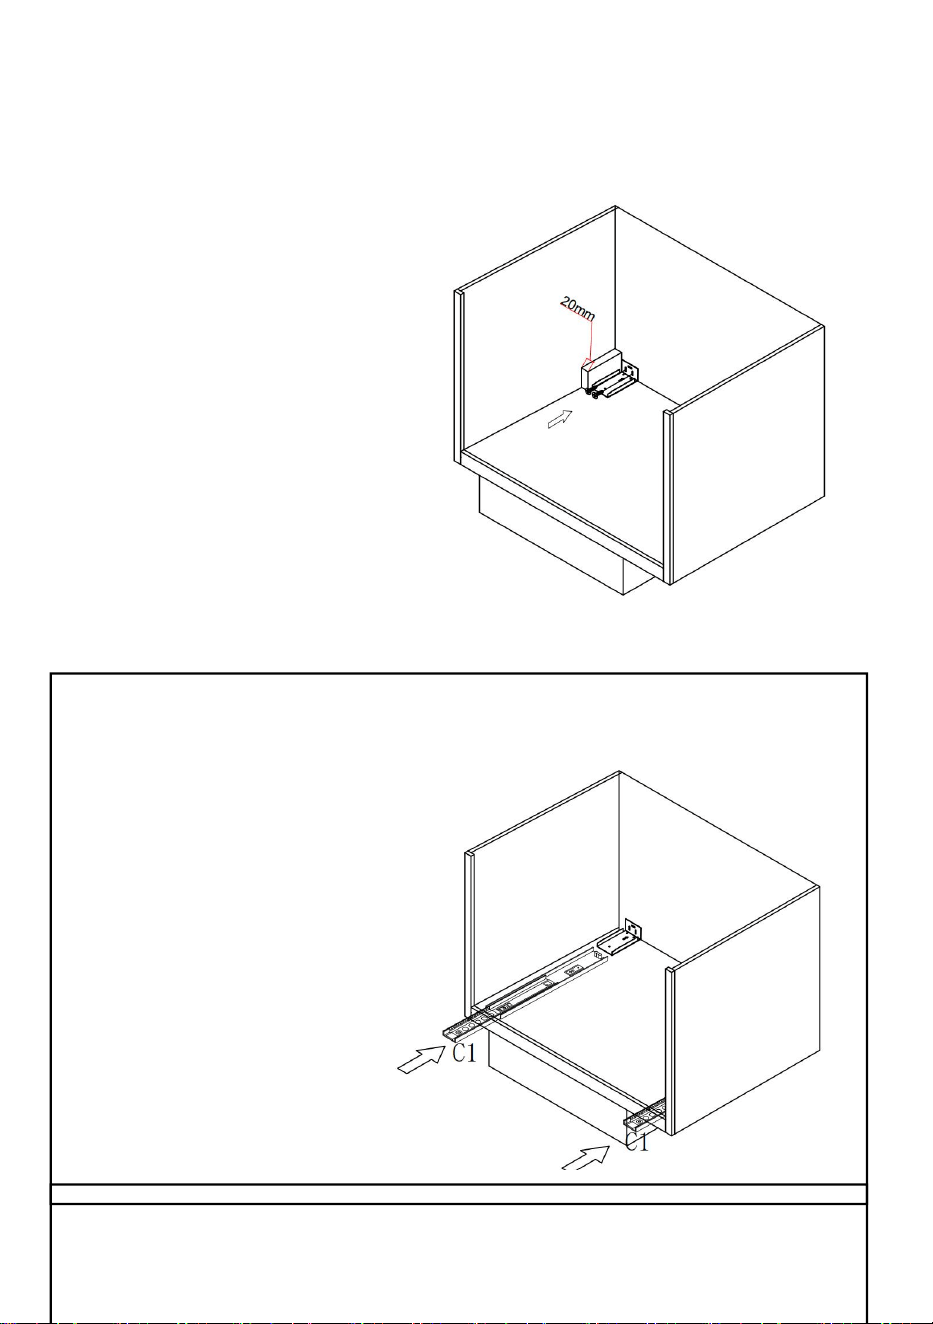
Installation in bottom mounting mode
Step1:
Step2:
As shown, temporarily place a 20 mm
Spacer next to the left side and rear
side, then fix the Bracket to the
back board by screws.
Insert Part C1 to the fixed Bracket as shown.

12
Step3:
Step4:
As shown, temporarily place a 20 mm
Spacer next to the left side, then fix
Part C1 by screws
Insert the drawer

13
Cleaning
-For cleaning, wipe the surface with a damp (not wet) cloth or wipe dry with
a clean lint free cotton cloth.

1
Manufacturer: Shanghaimuxinmuyeyouxiangongsi
Address: Shuangchenglu 803nong11hao1602A-1609shi, baoshanqu,
shanghai 200000 CN.
Imported to AUS: SIHAO PTY LTD. 1 ROKEVA STREETEASTWOOD
NSW 2122 Australia
Imported to USA: Sanven Technology Ltd. Suite 250, 9166 Anaheim
Place, Rancho Cucamonga, CA 91730
REP
UK
YH CONSULTING LIMITED. C/O YH Consulting
Limited Office 147, Centurion House, London
Road, Staines-upon-Thames, Surrey, TW18 4AX
REP
EC
E-CrossStu GmbH
Mainzer Landstr.69,
60329 Frankfurt am Main.


3
Technique Certificat d'assistance et de garantie électronique
www.vevor.com/support
ÉTAGÈRE À TIROIRS COULISSANTS
Nous continuons à nous engager à vous fournir des outils à des prix compétitifs.
« Économisez la moitié », « Moitié prix » ou toute autre expression similaire utilisée par
nous uniquement
représente une estimation des économies dont vous pourriez bénéficier en achetant
certains outils
avec nous par rapport aux grandes marques et ne signifie pas nécessairement couverture
toutes les catégories d'outils que nous proposons. Nous vous rappelons de bien vouloir
vérifier soigneusement
lorsque vous passez une commande chez nous si vous êtes réellement Économie
Moitié par rapport aux plus grandes marques.

4

1
Merci d'avoir acheté l'un de nos produits, veuillez lire attentivement les instructions
de montage avant l'installation .
Modèle: SKU-1 ; SKU-2 ; SKU-3
BESOIN D'AIDE? CONTACTEZ-NOUS!
Vous avez des questions sur nos produits ? Vous avez besoin
d'assistance technique ? N'hésitez pas à nous contacter :
Assistance technique et certificat de garantie électronique
www.vevor.com/support
Il s'agit de la notice d'utilisation d'origine. Veuillez lire attentivement toutes
les instructions du manuel avant de l'utiliser. VEVOR se réserve le droit
d'interpréter clairement notre manuel d'utilisation. L'apparence du produit
dépend du produit que vous avez reçu. Veuillez nous excuser, nous ne
vous informerons plus en cas de mise à jour technologique ou logicielle
de notre produit.
Pull-out drawer
rack Organizer
2
PARAMÈTRES DU PRODUIT
PRÉCAUTIONS D'ASSEMBLAGE
1. L'assemblage doit être effectué conformément aux instructions
ci-dessous. Un assemblage incorrect peut être dangereux.
2. Portez des lunettes de sécurité et des gants de travail résistants
pendant l’assemblage.
3. Ne montez pas lorsque vous êtes fatigué ou sous l'influence de l'alcool,
de drogues ou de médicaments.
4. La capacité de poids et les autres capacités du produit s'appliquent
uniquement à un produit correctement et complètement assemblé.
5. Gardez la zone de montage propre et bien éclairée.
6. Gardez les spectateurs hors de la zone pendant le montage.
7. Vérifiez la taille d'installation du modèle correspondant du produit
et sélectionnez l'armoire compatible ou proche de la taille
d'installation pour l'installation.
Modèle
Taille du produit (L
x P x H)
Capacité
de
chargemen
t
Taille
d'installation
L*P*H (mm)
Nombre
de
couches
SKU-1
15" x 21,7" x 3"
(382x550x76mm)
60 livres
(max.)
≥ 382 x ≥ 600 x ≥
150
1
SKU-2
18"x 21,7" x 3"
(458x550x76mm)
60 livres
(max.)
≥ 458 x ≥ 600 x ≥
150
1
SKU-3
21" x 21,7" x 3"
(534x550x76mm)
60 livres
(max.)
≥ 534 x ≥ 600 x ≥
150
1
3
PRÉCAUTIONS D'EMPLOI
AVERTISSEMENT: POUR ÉVITER LES BLESSURES GRAVES ET
LA MORT RÉSULTANT DU BASCULEMENT :
1. Ce produit n'est pas un jouet. Ne laissez pas les enfants jouer avec ou
s'en approcher.
2. Utiliser uniquement comme prévu. Ne pas s'asseoir ni se tenir debout
sur le produit.
3. Inspectez l'appareil avant chaque utilisation. Ne l'utilisez pas si des
pièces sont desserrées ou endommagées.
4. Utiliser uniquement sur les armoires de cuisine et ne pas l'utiliser seul
sur le sol.
5. Ne dépassez pas la capacité de charge indiquée. Serrez fermement
tous les boutons avant d'appliquer la charge. Soyez attentif à la charge
dynamique ! Le mouvement soudain de la charge peut brièvement créer
une charge excessive, provoquant une défaillance du produit.
4
LISTE DES PIÈCES
Dx2
5
ÉTAPES D'ASSEMBLAGE
Étape 1 :
Étape 2 :
6
Étape 3 :
Étape 4 :
7
Appuyez pour libérer et démonter les diapositives en tant que partie C1 et
partie C2
Étape 5 :
Installez-le par montage latéral
Étape 1 :
As shown, a 20 mm Spacer is temporarily placed to
make the left clearance to be 20 mm;a12 mm Spacer
is temporarily placed to make the bottom clearance to
be 12mm.
Part C2: The
end without
notch is front.
Two rail mounting methods
Side mount
Bottom mounting
or
8
Étape 2 :
Étape 3 :
Place the bracket on the
Spacers (as shown) and fix
it to the back board by 2
screws, then take out the
Spacers and the required
clearances are achieved.
D
B
Place the 12 mm Spacer
underneath
Part D as shown, then tighten
the screw to fix Part D to the
left board.
D
B
9
Étape 4 :
Étape 5 :
Place the Spacers as shown
to the right side; please
distinguish the different
thickness of the Spacers.
Install the bracket the same
way as of the left side.
Place the 12 mm Spacer
underneath
Part C1 as shown, then
tighten the screw to fix Part
C1 to the left board.
10
Étape 6 :
Étape 7 :
The same way as in Step 5,
fix another
Part C1 to the right board by
a screw.
B
Insert the drawer.
11
Installation en mode montage par le bas
Étape 1 :
Étape 2 :
As shown, temporarily place a 20 mm
Spacer next to the left side and rear
side, then fix the Bracket to the
back board by screws.
Insert Part C1 to the fixed Bracket as shown.

12
Étape 3 :
Étape 4 :
As shown, temporarily place a 20 mm
Spacer next to the left side, then fix
Part C1 by screws
Insert the drawer

13
Nettoyage
-Pour le nettoyage, essuyez la surface avec un chiffon humide (pas mouillé)
ou essuyez avec un chiffon en coton propre non pelucheux.

14

1
Fabricant : Shanghaimuxinmuyeyouxiangongsi
Adresse : Shuangchenglu 803nong11hao1602A-1609shi, baoshanqu,
Shanghai 200 000 CN.
Importé en Australie : SIHAO PTY LTD. 1 ROKEVA
STREETEASTWOOD
NSW 2122 Australie
Importé aux États-Unis : Sanven Technology Ltd. Suite 250, 9166
Anaheim
Lieu, Rancho Cucamonga, CA 91730
REP
UK
YH CONSULTING LIMITED. C/O YH Consulting
Limited Office 147, Centurion House, London
Road, Staines-upon-Thames, Surrey, TW18 4AX
REP
EC
E-CrossStu GmbH
Mainzer Landstr.69,
60329 Frankfurt am Main.

2


4
Technisch Support und E-Garantie-Zertifikat www.vevor.com/support
AUSZIEHBARES SCHUBLADENREGAL
Wir sind weiterhin bestrebt, Ihnen Werkzeuge zu wettbewerbsfähigen Preisen anzubieten.
"Sparen Sie die Hälfte", "Halber Preis" oder andere ähnliche Ausdrücke, die wir nur
verwenden
stellt eine Schätzung der Einsparungen dar, die Sie durch den Kauf bestimmter Werkzeuge
erzielen können
mit uns im Vergleich zu den großen Top-Marken und bedeutet nicht unbedingt, Abdeckung
alle von uns angebotenen Werkzeugkategorien. Wir möchten Sie bitten, zu überprüfen
sorgfältig
wenn Sie bei uns eine Bestellung aufgeben, wenn Sie tatsächlich Speichern
Hälfte im Vergleich mit den Top-Großmarken.

5

1
Vielen Dank für den Kauf eines unserer Produkte. Bitte lesen Sie die
Montageanleitung vor der Installation sorgfältig durch .
Modell: Artikelnummer-1 ; Artikelnummer-2; Artikelnummer-3
Brauchen Sie Hilfe? Kontaktieren Sie uns!
Sie haben Fragen zu unseren Produkten? Sie benötigen technischen
Support? Dann kontaktieren Sie uns gerne:
Technischer Support und E-Garantie-Zertifikat
www.vevor.com/support
Dies ist die Originalanleitung. Bitte lesen Sie alle Anweisungen sorgfältig
durch, bevor Sie das Gerät in Betrieb nehmen. VEVOR behält sich eine
klare Auslegung unserer Bedienungsanleitung vor. Das Erscheinungsbild
des Produkts richtet sich nach dem Produkt, das Sie erhalten haben. Bitte
verzeihen Sie uns, dass wir Sie nicht erneut informieren, wenn es
Technologie- oder Software-Updates für unser Produkt gibt .
Pull-out drawer
rack Organizer
2
PRODUKTPARAMETER
VORSICHTSMASSNAHMEN BEI DER
MONTAGE
1. Beim Zusammenbau müssen diese Anweisungen befolgt werden. Ein
falscher Zusammenbau kann gefährlich sein.
2. Tragen Sie während der Montage eine Schutzbrille und strapazierfähige
Arbeitshandschuhe.
3. Nicht montieren, wenn Sie müde sind oder unter dem Einfluss von
Alkohol, Drogen oder Medikamenten stehen.
4. Gewichtskapazität und andere Produkteigenschaften gelten nur für ein
ordnungsgemäß und vollständig montiertes Produkt.
5. Halten Sie den Versammlungsbereich sauber und gut beleuchtet.
6. Halten Sie während der Montage unbeteiligte Zuschauer vom Bereich
fern.
Modell
Produktgröße (B x
T x H)
Ladekapazi
tät
Baugröße
B*T*H (mm)
Anzahl
der
Schichte
n
Artikel
numm
er-1
15" x 21,7" x 3"
(382 x 550 x 76
mm)
60 Pfund
(max.)
≥382 x ≥600
x≥150
1
Artikel
numm
er-2
18" x 21,7" x 3"
(458 x 550 x 76
mm)
60 Pfund
(max.)
≥458 x ≥600 x≥
150
1
Artikel
numm
er-3
21" x 21,7" x 3"
(534 x 550 x 76
mm)
60 Pfund
(max.)
≥534 x ≥600 x
≥150
1
3
7. Überprüfen Sie die Einbaugröße des entsprechenden
Produktmodells und wählen Sie für die Installation einen Schrank aus,
der der Einbaugröße entspricht oder nahe daran liegt.
VORSICHTSMASSNAHMEN BEIM
GEBRAUCH
WARNUNG: UM SCHWERE VERLETZUNGEN UND TOD DURCH
KIPPEN ZU VERMEIDEN:
1. Dieses Produkt ist kein Spielzeug. Erlauben Sie Kindern nicht, mit
diesem Produkt zu spielen oder sich ihm zu nähern.
2. Nur bestimmungsgemäß verwenden. Nicht auf dem Produkt sitzen oder
stehen.
3. Vor jedem Gebrauch überprüfen. Nicht verwenden, wenn Teile lose oder
beschädigt sind.
4. Nur auf Küchenschränken verwenden und nicht allein auf dem Boden
verwenden.

4
5. Überschreiten Sie nicht die angegebene Gewichtskapazität. Ziehen Sie
alle Knöpfe fest an, bevor Sie eine Last aufbringen. Achten Sie auf
dynamische Belastung! Die plötzliche Lastbewegung kann kurzzeitig eine
Überlastung erzeugen und zu einem Produktausfall führen.
TEILELISTE

5
MONTAGEANLEITUNG
Dx2

6
Schritt 1:
Schritt 2:
Schritt 3:
7
Schritt 4:
Drücken Sie, um die Folien zu lösen und sie in PartC1 und PartC2 zu
zerlegen.
Schritt 5:
Two rail mounting methods

8
Installieren Sie es durch seitliche Montage
Schritt 1:
As shown, a 20 mm Spacer is temporarily placed to
make the left clearance to be 20 mm;a12 mm Spacer
is temporarily placed to make the bottom clearance to
be 12mm.
Part C2: The
end without
notch is front.
Side mount
Bottom mounting
or
9
Schritt 2:
Schritt 3:
Place the bracket on the
Spacers (as shown) and fix
it to the back board by 2
screws, then take out the
Spacers and the required
clearances are achieved.
D
B
Place the 12 mm Spacer
underneath
Part D as shown, then tighten
the screw to fix Part D to the
left board.
D
B

10
Schritt 4:
Schritt 5:
Place the Spacers as shown
to the right side; please
distinguish the different
thickness of the Spacers.
Install the bracket the same
way as of the left side.
Place the 12 mm Spacer
underneath
Part C1 as shown, then
tighten the screw to fix Part
C1 to the left board.
B
11
Schritt 6:
Schritt 7:
The same way as in Step 5,
fix another
Part C1 to the right board by
a screw.
Insert the drawer.

12
Installation im Bodenmontagemodus
Schritt 1:
Schritt 2:
As shown, temporarily place a 20 mm
Spacer next to the left side and rear
side, then fix the Bracket to the
back board by screws.
Insert Part C1 to the fixed Bracket as shown.
13
Schritt 3:
Schritt 4:
As shown, temporarily place a 20 mm
Spacer next to the left side, then fix
Part C1 by screws
Insert the drawer

14
Reinigung
- Wischen Sie die Oberfläche zum Reinigen mit einem feuchten (nicht
nassen) Tuch ab oder reiben Sie sie mit einem sauberen, fusselfreien
Baumwolltuch trocken.

15
1
Hersteller: Shanghaimuxinmuyeyouxiangongsi
Adresse: Shuangchenglu 803nong11hao1602A-1609shi, baoshanqu,
Shanghai, 200.000 CN.
Nach AUS importiert: SIHAO PTY LTD. 1 ROKEVA
STREETEASTWOOD
NSW 2122 Australien
Importiert in die USA: Sanven Technology Ltd. Suite 250, 9166 Anaheim
Ort, Rancho Cucamonga, CA 91730
REP
UK
YH CONSULTING LIMITED. C/O YH Consulting
Limited Office 147, Centurion House, London
Road, Staines-upon-Thames, Surrey, TW18 4AX
REP
EC
E-CrossStu GmbH
Mainzer Landstr.69,
60329 Frankfurt am Main.

2
Technisch Support und E-Garantie-Zertifikat


4
Tecnico Supporto e certificato di garanzia elettronica www.vevor.com/support
PORTAOGGETTI ESTRAIBILE PER
CASSETTO
Continuiamo a impegnarci per fornirvi strumenti a prezzi competitivi.
"Risparmia la metà", "Metà prezzo" o altre espressioni simili utilizzate solo da noi
rappresenta una stima dei risparmi che potresti ottenere acquistando determinati strumenti
con noi rispetto ai principali marchi top e non significa necessariamente copertina
tutte le categorie di strumenti da noi offerti. Ti ricordiamo cortesemente di verificare
accuratamente
quando effettui un ordine con noi se sei effettivamente Risparmio
Metà rispetto ai marchi più importanti.

5

1
Grazie per aver acquistato uno dei nostri prodotti. Vi preghiamo di leggere
attentamente le istruzioni di montaggio prima dell'installazione .
Modello: Codice articolo-1 ; Codice articolo-2; Codice articolo-3
HAI BISOGNO DI AIUTO? CONTATTACI!
Hai domande sui prodotti? Hai bisogno di supporto tecnico? Non
esitare a contattarci:
Supporto tecnico e certificato di garanzia elettronica
www.vevor.com/support
Questa è l'istruzione originale, si prega di leggere attentamente tutte le
istruzioni del manuale prima di utilizzare. VEVOR si riserva una chiara
interpretazione del nostro manuale utente. L'aspetto del prodotto sarà
soggetto al prodotto ricevuto. Vi preghiamo di perdonarci se non vi
informeremo di nuovo se ci sono aggiornamenti tecnologici o software sul
nostro prodotto.
Pull-out drawer
rack Organizer
2
PARAMETRI DEL PRODOTTO
PRECAUZIONI DI MONTAGGIO
1. Il montaggio deve seguire queste istruzioni. Un montaggio non corretto
può essere pericoloso.
2. Durante il montaggio, indossare occhiali protettivi e guanti da lavoro
resistenti.
3. Non riunirsi quando si è stanchi o sotto l'effetto di alcol, droghe o
farmaci.
4. La capacità di peso e le altre caratteristiche del prodotto si applicano
solo a un prodotto correttamente e completamente assemblato.
5. Mantenere l'area di assemblaggio pulita e ben illuminata.
6. Tenere gli astanti fuori dall'area durante l'assemblea.
7. Controllare le dimensioni di installazione del modello
corrispondente del prodotto e selezionare un mobile coerente o
simile alle dimensioni di installazione.
Modell
o
Dimensioni del
prodotto (L*P*A)
Capacità di
carico
Dimensioni
dell'installazione
L*P*A (mm)
Numero
di strati
Codice
articol
o-1
Dimensioni: 15" x
21,7" x 3"
(382x550x76mm)
60 libbre
(massimo)
≥382 x ≥600 x
≥150
1
Codice
articol
o-2
18"x 21,7"x 3"
(458x550x76mm)
60 libbre
(massimo)
≥458 x ≥600 x ≥
150
1
Codice
articol
o-3
21"x 21,7" x 3"
(534x550x76mm)
60 libbre
(massimo)
≥534 x ≥600 x
≥150
1

3
PRECAUZIONI D'USO
AVVERTIMENTO: PER PREVENIRE LESIONI GRAVI E MORTALI
DOVUTE AL RIBALTAMENTO:
1. Questo prodotto non è un giocattolo. Non permettere ai bambini di
giocare con questo articolo o di avvicinarsi ad esso.
2. Utilizzare solo come previsto. Non sedersi o stare in piedi sul prodotto.
3. Ispezionare prima di ogni utilizzo. Non utilizzarlo se le parti sono
allentate o danneggiate.
4. Utilizzare solo sui mobili della cucina e non utilizzarlo da solo sul
pavimento.
5. Non superare la capacità di peso indicata. Serrare saldamente tutte le
manopole prima di applicare il carico. Fare attenzione al carico dinamico! Il
movimento improvviso del carico può creare brevemente un carico
eccessivo, causando il guasto del prodotto.
4
ELENCO DELLE PARTI
Dx2
5
FASI DI MONTAGGIO
Fase 1:
Fase 2:
6
Fase 3:
Fase 4:
7
Premere per rilasciare e smontare le diapositive come Parte C1 e Parte C2
Fase 5:
Installarlo tramite montaggio laterale
Fase 1:
As shown, a 20 mm Spacer is temporarily placed to
make the left clearance to be 20 mm;a12 mm Spacer
is temporarily placed to make the bottom clearance to
be 12mm.
Part C2: The
end without
notch is front.
Two rail mounting methods
Side mount
Bottom mounting
or
8
Fase 2:
Fase 3:
Place the bracket on the
Spacers (as shown) and fix
it to the back board by 2
screws, then take out the
Spacers and the required
clearances are achieved.
D
B
Place the 12 mm Spacer
underneath
Part D as shown, then tighten
the screw to fix Part D to the
left board.
D
B
9
Fase 4:
Fase 5:
Place the Spacers as shown
to the right side; please
distinguish the different
thickness of the Spacers.
Install the bracket the same
way as of the left side.
Place the 12 mm Spacer
underneath
Part C1 as shown, then
tighten the screw to fix Part
C1 to the left board.
10
Fase 6:
Fase 7:
The same way as in Step 5,
fix another
Part C1 to the right board by
a screw.
B
Insert the drawer.
11
Installazione in modalità di montaggio inferiore
Fase 1:
Fase 2:
As shown, temporarily place a 20 mm
Spacer next to the left side and rear
side, then fix the Bracket to the
back board by screws.
Insert Part C1 to the fixed Bracket as shown.
12
Fase 3:
Fase 4:
As shown, temporarily place a 20 mm
Spacer next to the left side, then fix
Part C1 by screws
Insert the drawer

13
Pulizia
- Per la pulizia, passare la superficie con un panno umido (non bagnato)
oppure asciugarla con un panno di cotone pulito e privo di pelucchi.

14

1
Produttore: Shanghaimuxinmuyeyouxiangongsi
Indirizzo: Shuangchenglu 803nong11hao1602A-1609shi, baoshanqu,
shanghai 200000 CN.
Importato in AUS: SIHAO PTY LTD. 1 ROKEVA STREETEASTWOOD
Nuovo Galles del Sud 2122 Australia
Importato negli USA: Sanven Technology Ltd. Suite 250, 9166 Anaheim
Luogo, Rancho Cucamonga, CA 91730
REP
UK
YH CONSULTING LIMITED. C/O YH Consulting
Limited Office 147, Centurion House, London
Road, Staines-upon-Thames, Surrey, TW18 4AX
REP
EC
E-CrossStu GmbH
Mainzer Landstr.69,
60329 Frankfurt am Main.


3
Técnico Soporte y certificado de garantía electrónica www.vevor.com/support
ESTANTE PARA CAJONES EXTRAÍBLE
Seguimos comprometidos a brindarle herramientas a precios competitivos.
"Ahorra la mitad", "mitad de precio" o cualquier otra expresión similar utilizada únicamente
por nosotros
Representa una estimación de los ahorros que podría obtener al comprar ciertas
herramientas.
con nosotros en comparación con las principales marcas líderes y no significa
necesariamente cubrir
Todas las categorías de herramientas que ofrecemos. Le recordamos que debe verificar
con cuidado
Cuando realiza un pedido con nosotros, si realmente está Ahorro
Medio en comparación con las principales marcas líderes.

4
1
Gracias por adquirir uno de nuestros productos, lea atentamente las instrucciones
de montaje antes de la instalación .
Modelo: Código 1 ; Código 2; Código 3
¿NECESITA AYUDA? ¡CONTÁCTENOS!
¿Tiene preguntas sobre el producto? ¿Necesita asistencia técnica? No
dude en ponerse en contacto con nosotros:
Soporte técnico y certificado de garantía electrónica
www.vevor.com/support
Estas son las instrucciones originales, lea atentamente todas las
instrucciones del manual antes de utilizar el producto. VEVOR se reserva
una interpretación clara de nuestro manual de usuario. La apariencia del
producto estará sujeta al producto que recibió. Perdónenos por no
informarle nuevamente si hay actualizaciones de tecnología o software
en nuestro producto.
Pull-out drawer
rack Organizer
2
PARÁMETROS DEL PRODUCTO
PRECAUCIONES DE MONTAJE
1. Para el montaje, siga estas instrucciones. Un montaje incorrecto puede
suponer un riesgo.
2. Use gafas de seguridad y guantes de trabajo resistentes durante el
montaje.
3. No se reúna cuando esté cansado o bajo la influencia del alcohol,
drogas o medicamentos.
4. La capacidad de peso y otras capacidades del producto se aplican
únicamente a un producto ensamblado de forma correcta y completa.
5. Mantenga el área de reunión limpia y bien iluminada.
6. Mantenga a los transeúntes fuera del área durante el montaje.
7. Verifique el tamaño de instalación del modelo correspondiente del
producto y seleccione el gabinete que coincida o se acerque al
tamaño de instalación para la instalación.
Modelo
Tamaño del
producto (An. x Pr.
x Al.)
Capacidad
de carga
Tamaño de la
instalación
Ancho*Profundid
ad*Alto (mm)
Número
de
capas
Código
1
15" x 21,7" x 3"
(382 x 550 x 76
mm)
60 libras
(máximo)
≥382 x ≥600 x
≥150
1
Código
2
18" x 21,7" x 3"
(458 x 550 x 76
mm)
60 libras
(máximo)
≥458 x ≥600 x
≥150
1
Código
de
artícul
o-3
21" x 21,7" x 3"
(534 x 550 x 76
mm)
60 libras
(máximo)
≥534 x ≥600 x
≥150
1
3
PRECAUCIONES DE USO
ADVERTENCIA: PARA EVITAR LESIONES GRAVES Y LA
MUERTE POR VUELCO:
1. Este producto no es un juguete. No permita que los niños jueguen con
este artículo ni se acerquen a él.
2. Utilícelo únicamente para el fin previsto. No se siente ni se pare sobre el
producto.
3. Inspeccione el producto antes de cada uso. No lo utilice si hay piezas
sueltas o dañadas.
4. Úselo únicamente en gabinetes de cocina y no lo utilice solo en el suelo.
5. No exceda la capacidad de peso indicada. Apriete bien todas las perillas
antes de aplicar la carga. ¡Tenga cuidado con la carga dinámica! El
movimiento repentino de la carga puede crear brevemente un exceso de
carga, lo que provocará una falla del producto.

4
LISTA DE PIEZAS
5
PASOS DE MONTAJE
Dx2
6
Paso 1:
Paso 2:
Paso 3:

7
Paso 4:
Presione para liberar y desmontar las diapositivas como Parte C1 y Parte
C2
Paso 5:
Two rail mounting methods
8
Instálelo mediante montaje lateral.
Paso 1:
As shown, a 20 mm Spacer is temporarily placed to
make the left clearance to be 20 mm;a12 mm Spacer
is temporarily placed to make the bottom clearance to
be 12mm.
Part C2: The
end without
notch is front.
Side mount
Bottom mounting
or

9
Paso 2:
Paso 3:
Place the bracket on the
Spacers (as shown) and fix
it to the back board by 2
screws, then take out the
Spacers and the required
clearances are achieved.
D
B
Place the 12 mm Spacer
underneath
Part D as shown, then tighten
the screw to fix Part D to the
left board.
D
B

10
Paso 4:
Paso 5:
Place the Spacers as shown
to the right side; please
distinguish the different
thickness of the Spacers.
Install the bracket the same
way as of the left side.
Place the 12 mm Spacer
underneath
Part C1 as shown, then
tighten the screw to fix Part
C1 to the left board.
B

11
Paso 6:
Paso 7:
The same way as in Step 5,
fix another
Part C1 to the right board by
a screw.
Insert the drawer.
12
Instalación en modo de montaje inferior
Paso 1:
Paso 2:
As shown, temporarily place a 20 mm
Spacer next to the left side and rear
side, then fix the Bracket to the
back board by screws.
Insert Part C1 to the fixed Bracket as shown.

13
Paso 3:
Paso 4:
As shown, temporarily place a 20 mm
Spacer next to the left side, then fix
Part C1 by screws
Insert the drawer

14
Limpieza
-Para limpiar, limpie la superficie con un paño húmedo (no mojado) o
seque con un paño de algodón limpio y sin pelusa.

1
Fabricante: Shanghaimuxinmuyeyouxiangongsi
Dirección: Shuangchenglu 803nong11hao1602A-1609shi, baoshanqu,
Shangai 200000 CN.
Importado a Australia: SIHAO PTY LTD. 1 ROKEVA
STREETEASTWOOD
Nueva Gales del Sur 2122 Australia
Importado a EE. UU.: Sanven Technology Ltd. Suite 250, 9166 Anaheim
Lugar, Rancho Cucamonga, CA 91730
REP
UK
YH CONSULTING LIMITED. C/O YH Consulting
Limited Office 147, Centurion House, London
Road, Staines-upon-Thames, Surrey, TW18 4AX
REP
EC
E-CrossStu GmbH
Mainzer Landstr.69,
60329 Frankfurt am Main.

2
Técnico Certificado de soporte y garantía electrónica


4
Techniczny Wsparcie i certyfikat gwarancji elektronicznej www.vevor.com/support
WYSUWANA SZUFLADA
Nadal staramy się oferować Państwu narzędzia w konkurencyjnych cenach.
„Oszczędź połowę”, „Połowa ceny” lub jakiekolwiek inne podobne wyrażenia używane
wyłącznie przez nas
przedstawia szacunkowe oszczędności, jakie możesz uzyskać kupując określone
narzędzia
z nami w porównaniu do głównych, najlepszych marek i niekoniecznie oznacza to okładka
wszystkie kategorie narzędzi oferowanych przez nas. Przypominamy o sprawdzeniu
ostrożnie
gdy składasz u nas zamówienie, jeśli faktycznie Oszczędność
Połowa w porównaniu z wiodącymi markami.

5

1
Dziękujemy za zakup jednego z naszych produktów. Przed instalacją prosimy o
dokładne zapoznanie się z instrukcją montażu .
Model: SKU-1 ; SKU-2; SKU-3
POTRZEBUJESZ POMOCY? SKONTAKTUJ SIĘ Z NAMI!
Masz pytania dotyczące produktu? Potrzebujesz wsparcia
technicznego? Skontaktuj się z nami:
Wsparcie techniczne i certyfikat e-gwarancji
www.vevor.com/support
To jest oryginalna instrukcja, przed użyciem należy uważnie przeczytać
wszystkie instrukcje. VEVOR zastrzega sobie jasną interpretację naszej
instrukcji obsługi. Wygląd produktu będzie zależał od produktu, który
otrzymałeś. Prosimy o wybaczenie, że nie poinformujemy Cię ponownie,
jeśli w naszym produkcie pojawią się jakiekolwiek aktualizacje
technologiczne lub oprogramowania.
Pull-out drawer
rack Organizer

2
PARAMETRY PRODUKTU
ŚRODKI OSTROŻNOŚCI PODCZAS
MONTAŻU
1. Montaż musi być zgodny z poniższymi instrukcjami. Nieprawidłowy
montaż może być niebezpieczny.
2. Podczas montażu należy nosić okulary ochronne i solidne rękawice
robocze.
3. Nie przychodź na spotkania, jeśli jesteś zmęczony lub pod wpływem
alkoholu, narkotyków lub leków.
4. Podane parametry dotyczące nośności i innych parametrów produktu
odnoszą się wyłącznie do produktu prawidłowo i kompletnie
zmontowanego.
5. Utrzymuj miejsce zgromadzenia w czystości i zapewnij dobre
oświetlenie.
6. Podczas montażu nie dopuszczaj osób postronnych na teren montażu.
7. Sprawdź rozmiar montażowy odpowiedniego modelu produktu i
wybierz szafkę o rozmiarze zgodnym lub zbliżonym do rozmiaru
montażowego.
Model
Wymiary produktu
(szer.*gł.*wys.)
Ładowność
Rozmiar instalacji
Szer.*Gł.*Wys.
(mm)
Liczba
warstw
SKU-1
15" x 21,7" x 3"
(382x550x76mm)
60 funtów
(maks.)
≥382 x ≥600 x
≥150
1
SKU-2
18"x 21,7"x 3"
(458x550x76mm)
60 funtów
(maks.)
≥458 x ≥600 x
≥150
1
SKU-3
21"x 21,7"x 3"
(534x550x76mm)
60 funtów
(maks.)
≥534 x ≥600 x
≥150
1

3
ŚRODKI OSTROŻNOŚCI
OSTRZEŻENIE: ABY ZAPOBIEC POWAŻNYM OBRAŻENIOM I
ŚMIERCI SPOWODOWANEJ PRZEWRÓCENIEM:
1. Ten produkt nie jest zabawką. Nie pozwalaj dzieciom bawić się tym
przedmiotem ani zbliżać się do niego.
2. Używać wyłącznie zgodnie z przeznaczeniem. Nie siadać ani nie stawać
na produkcie.
3. Przed każdym użyciem sprawdź. Nie używaj, jeśli części są luźne lub
uszkodzone.
4. Stosować wyłącznie na szafkach kuchennych, nie ustawiać go
bezpośrednio na podłodze.
5. Nie przekraczaj podanego udźwigu. Przed zastosowaniem obciążenia
dokręć mocno wszystkie pokrętła. Uważaj na obciążenie dynamiczne!
Nagły ruch obciążenia może na krótko spowodować nadmierne obciążenie,
powodując awarię produktu.

4
LISTA CZĘŚCI

5
KROKI MONTAŻU
Dx2

6
Krok 1:
Krok 2:
Krok 3:
7
Krok 4:
Naciśnij, aby zwolnić i rozdzielić slajdy jako część C1 i część C2
Krok 5:
Two rail mounting methods
or
8
Montaż boczny
Krok 1:
Krok 2:
As shown, a 20 mm Spacer is temporarily placed to
make the left clearance to be 20 mm;a12 mm Spacer
is temporarily placed to make the bottom clearance to
be 12mm.
Part C2: The
end without
notch is front.
Place the bracket on the
Spacers (as shown) and fix
it to the back board by 2
Side mount
Bottom mounting
9
Krok 3:
Krok 4:
D
B
Place the 12 mm Spacer
underneath
Part D as shown, then tighten
the screw to fix Part D to the
left board.
D
B
Place the Spacers as shown
to the right side; please
distinguish the different

10
Krok 5:
Krok 6:
Place the 12 mm Spacer
underneath
Part C1 as shown, then
tighten the screw to fix Part
C1 to the left board.
The same way as in Step 5,
fix another
Part C1 to the right board by
B
11
Krok 7:
Montaż w trybie montażu dolnego
Insert the drawer.
12
Krok 1:
Krok 2:
Krok 3:
As shown, temporarily place a 20 mm
Spacer next to the left side and rear
side, then fix the Bracket to the
back board by screws.
Insert Part C1 to the fixed Bracket as shown.
As shown, temporarily place a 20 mm
Spacer next to the left side, then fix
Part C1 by screws
13
Krok 4:
Czyszczenie
Insert the drawer

14
- Do czyszczenia należy przetrzeć powierzchnię wilgotną (nie mokrą)
szmatką lub wytrzeć do sucha czystą, bawełnianą szmatką, która nie
pozostawia włókien.

1
Producent: Shanghaimuxinmuyeyouxiangongsi
Adres: Shuangchenglu 803nong11hao1602A-1609shi, baoshanqu,
Szanghaj 200000 CN.
Importowane do AUS: SIHAO PTY LTD. 1 ROKEVA
STREETEASTWOOD
NSW 2122 Australia
Importowane do USA: Sanven Technology Ltd. Suite 250, 9166 Anaheim
Miejsce, Rancho Cucamonga, CA 91730
REP
UK
YH CONSULTING LIMITED. C/O YH Consulting
Limited Office 147, Centurion House, London
Road, Staines-upon-Thames, Surrey, TW18 4AX
REP
EC
E-CrossStu GmbH
Mainzer Landstr.69,
60329 Frankfurt am Main.

2
Techniczny Wsparcie i certyfikat e-gwarancji


4
Technisch Ondersteuning en E-garantiecertificaat www.vevor.com/support
UITSCHUIFBARE LADEKAST
Wij streven er voortdurend naar om u gereedschappen tegen concurrerende prijzen te
leveren.
"Bespaar de helft", "halve prijs" of andere soortgelijke uitdrukkingen die alleen door ons
worden gebruikt
geeft een schatting van de besparingen die u kunt behalen door bepaalde gereedschappen
te kopen
bij ons vergeleken met de grote topmerken en betekent niet per se dat omslag
alle categorieën van tools die wij aanbieden. U wordt vriendelijk verzocht om te verifiëren
voorzichtig
wanneer u een bestelling bij ons plaatst, als u daadwerkelijk Besparing
Half in vergelijking met de grote topmerken.

5

1
Hartelijk dank voor uw aankoop van een van onze producten. Lees de
montage-instructies zorgvuldig door voordat u met de installatie begint .
Model:
SKU-1 ;SKU-2;SKU-3
HULP NODIG? NEEM CONTACT MET ONS OP!
Heeft u vragen over het product? Heeft u technische ondersteuning
nodig? Neem dan gerust contact met ons op:
Technische ondersteuning en e-garantiecertificaat
www.vevor.com/support
Dit is de originele instructie, lees alle handleidingen zorgvuldig door
voordat u het product gebruikt. VEVOR behoudt zich een duidelijke
interpretatie van onze gebruikershandleiding voor. Het uiterlijk van het
product is afhankelijk van het product dat u hebt ontvangen. Vergeef ons
dat we u niet opnieuw zullen informeren als er technologie- of
software-updates voor ons product zijn .
Pull-out drawer
rack Organizer

2
PRODUCTPARAMETERS
MONTAGEVOORZORGSMAATREGELEN
1. Assembleer volgens deze instructies. Onjuiste montage kan gevaarlijk
zijn.
2. Draag tijdens de montage een veiligheidsbril en stevige
werkhandschoenen.
3. Kom niet bijeen als u moe bent of onder invloed van alcohol, drugs of
medicijnen.
4. Het draagvermogen en andere producteigenschappen gelden alleen
voor een correct en volledig gemonteerd product.
5. Zorg ervoor dat de verzamelplaats schoon en goed verlicht is.
6. Houd omstanders uit de buurt tijdens de montage.
7. Controleer de installatiemaat van het overeenkomstige model van
het product en selecteer de kast die overeenkomt met of dicht bij de
installatiemaat voor de installatie ligt.
Model
Productafmetingen
(B*D*H)
Laadvermo
gen
Installatiegrootte
Breedte*Diepte*H
(mm)
Aantal
lagen
SKU-1
15" x 21,7" x 3"
(382x550x76mm)
60 lbs
(maximaal)
≥382x≥600x≥150
1
SKU-2
18" x 21,7" x 3"
(458x550x76mm)
60 lbs
(maximaal)
≥458 x ≥600 x ≥
150
1
SKU-3
21" x 21,7" x 3"
(534x550x76mm)
60 lbs
(maximaal)
≥534x≥600x≥150
1
3
GEBRUIK VOORZORGSMAATREGELEN
WAARSCHUWING: OM ERNSTIG LETSEL EN DE DOOD DOOR
KANTELEN TE VOORKOMEN:
1. Dit product is geen speelgoed. Laat kinderen niet met dit item spelen of
in de buurt ervan komen.
2. Gebruik alleen zoals bedoeld. Ga niet op het product zitten of staan.
3. Inspecteer voor elk gebruik. Gebruik het niet als onderdelen los of
beschadigd zijn.
4. Gebruik het alleen op keukenkastjes en gebruik het niet alleen op de
grond.
5. Overschrijd de vermelde gewichtscapaciteit niet. Draai alle knoppen
stevig vast voordat u de belasting aanbrengt. Wees u bewust van
dynamische belasting! De plotselinge belastingbeweging kan kortstondig
een overmatige belasting creëren, waardoor het product defect raakt.
4
ONDERDELENLIJST
Dx2

5
MONTAGESTAPPEN
Stap 1:
Stap 2:

6
Stap 3:
Stap 4:
Druk om de dia's los te maken en uit elkaar te halen als PartC1 en PartC2
7
Stap 5:
Installeer het door het aan de zijkant te monteren
Stap 1:
As shown, a 20 mm Spacer is temporarily placed to
make the left clearance to be 20 mm;a12 mm Spacer
is temporarily placed to make the bottom clearance to
be 12mm.
Part C2: The
end without
notch is front.
Two rail mounting methods
Side mount
Bottom mounting
or

8
Stap 2:
Stap 3:
Place the bracket on the
Spacers (as shown) and fix
it to the back board by 2
screws, then take out the
Spacers and the required
clearances are achieved.
D
B
Place the 12 mm Spacer
underneath
Part D as shown, then tighten
the screw to fix Part D to the
left board.
D
B
9
Stap 4:
Stap 5:
Place the Spacers as shown
to the right side; please
distinguish the different
thickness of the Spacers.
Install the bracket the same
way as of the left side.
Place the 12 mm Spacer
underneath
Part C1 as shown, then
tighten the screw to fix Part
C1 to the left board.

10
Stap 6:
Stap 7:
The same way as in Step 5,
fix another
Part C1 to the right board by
a screw.
B
Insert the drawer.
11
Installatie in de onderste montagemodus
Stap 1:
Stap 2:
As shown, temporarily place a 20 mm
Spacer next to the left side and rear
side, then fix the Bracket to the
back board by screws.
Insert Part C1 to the fixed Bracket as shown.
12
Stap 3:
Stap 4:
As shown, temporarily place a 20 mm
Spacer next to the left side, then fix
Part C1 by screws
Insert the drawer

13
Schoonmaak
- Voor het reinigen veegt u het oppervlak af met een vochtige (geen natte)
doek of droogt u het af met een schone, pluisvrije katoenen doek.

14
1
Fabrikant: Shanghaimuxinmuyeyouxiangongsi
Adres: Shuangchenglu 803nong11hao1602A-1609shi, baoshanqu,
Sjanghai 200000 CN.
Geïmporteerd naar AUS: SIHAO PTY LTD. 1 ROKEVA
STREETEASTWOOD
NSW 2122 Australië
Geïmporteerd naar de VS: Sanven Technology Ltd. Suite 250, 9166
Anaheim
Plaats, Rancho Cucamonga, CA 91730
REP
UK
YH CONSULTING LIMITED. C/O YH Consulting
Limited Office 147, Centurion House, London
Road, Staines-upon-Thames, Surrey, TW18 4AX
REP
EC
E-CrossStu GmbH
Mainzer Landstr.69,
60329 Frankfurt am Main.

2


4
Teknisk Support och e-garanticertifikat www.vevor.com/support
UTDRAGBART LÅDSTÄLL
Vi fortsätter att vara engagerade i att ge dig verktyg till konkurrenskraftiga priser.
"Spara hälften", "Halva priset" eller andra liknande uttryck som endast används av oss
representerar en uppskattning av besparingar du kan dra nytta av att köpa vissa verktyg
med oss jämfört med de stora toppmärkena och betyder inte nödvändigtvis att täcka
alla kategorier av verktyg som erbjuds av oss. Du påminns vänligen om att verifiera
försiktigt
när du gör en beställning hos oss om du faktiskt gör det Sparande
Halv i jämförelse med de främsta varumärkena.

5

1
Tack för att du köpte en av våra produkter, läs noggrant igenom
monteringsanvisningen innan installationen .
Modell:
SKU-1 ;SKU-2;SKU-3
BEHÖVER HJÄLP? KONTAKTA OSS!
Har du produktfrågor? Behöver du teknisk support? Kontakta oss
gärna:
Teknisk support och e-garanticertifikat
www.vevor.com/support
Detta är den ursprungliga instruktionen, läs alla instruktioner noggrant
innan du använder den. VEVOR reserverar sig för en tydlig tolkning av vår
användarmanual. Utseendet på produkten är beroende av den produkt du
fått. Ursäkta oss att vi inte kommer att informera dig igen om det finns
någon teknik eller mjukvaruuppdateringar på vår produkt.
Pull-out drawer
rack Organizer

2
PRODUKTPARAMETRAR
FÖRSIKTIGHETSÅTGÄRDER FÖR
MONTERING
1. Montering måste följa dessa instruktioner. Felaktig montering kan vara
en fara.
2. Använd skyddsglasögon och kraftiga arbetshandskar vid montering.
3. Sätt dig inte ihop när du är trött eller påverkad av alkohol, droger eller
mediciner.
4. Viktkapacitet och andra produktegenskaper gäller endast en korrekt och
färdigmonterad produkt.
5. Håll monteringsområdet rent och väl upplyst.
6. Håll åskådare borta från området under monteringen.
7. Kontrollera installationsstorleken för motsvarande modell av
produkten och välj det skåp som överensstämmer med eller ligger
nära installationsstorleken för installation.
Modell
Produktstorlek
(W*D*H)
Lastkapacit
et
Installationsstorle
k
B*D*H (mm)
Antal
lager
SKU-1
15" x 21,7" x 3"
(382x550x76mm)
60 lbs
(max)
≥382 x ≥600
x≥150
1
SKU-2
18" x 21,7" x 3"
(458x550x76mm)
60 lbs
(max)
≥458 x ≥600 x≥
150
1
SKU-3
21" x 21,7" x 3"
(534x550x76mm)
60 lbs
(max)
≥534 x ≥600 x
≥150
1
3
ANVÄND FÖRSIKTIGHETSÅTGÄRDER
VARNING: FÖR ATT FÖRHINDRA ALLVARLIGA SKADA OCH
DÖDSFALL VID VÄLLNING:
1. Denna produkt är inte en leksak. Låt inte barn leka med eller närma sig
detta föremål.
2. Använd endast på avsett sätt. Sitt eller stå inte på produkten.
3. Inspektera före varje användning. Använd den inte om delar är lösa eller
skadade.
4. Använd endast på köksskåp och använd den inte ensam på marken.
5. Överskrid inte den angivna viktkapaciteten. Dra åt alla knoppar
ordentligt innan du applicerar belastning. Var uppmärksam på dynamisk
laddning! Den plötsliga laströrelsen kan kortvarigt skapa en överbelastning,
vilket kan orsaka produktfel.

4
DELLISTA
Dx2
5
MONTERINGSSEG
Steg 1:
Steg 2:
6
Steg 3:
Steg 4:
Tryck för att släppa och ta isär objektglasen som PartC1 & PartC2
7
Steg 5:
Installera den vid sidomontering
Steg 1:
As shown, a 20 mm Spacer is temporarily placed to
make the left clearance to be 20 mm;a12 mm Spacer
is temporarily placed to make the bottom clearance to
be 12mm.
Part C2: The
end without
notch is front.
Two rail mounting methods
Side mount
Bottom mounting
or
8
Steg 2:
Steg 3:
Place the bracket on the
Spacers (as shown) and fix
it to the back board by 2
screws, then take out the
Spacers and the required
clearances are achieved.
D
B
Place the 12 mm Spacer
underneath
Part D as shown, then tighten
the screw to fix Part D to the
left board.
D
B

9
Steg 4:
Steg 5:
Place the Spacers as shown
to the right side; please
distinguish the different
thickness of the Spacers.
Install the bracket the same
way as of the left side.
Place the 12 mm Spacer
underneath
Part C1 as shown, then
tighten the screw to fix Part
C1 to the left board.

10
Steg 6:
Steg 7:
The same way as in Step 5,
fix another
Part C1 to the right board by
a screw.
B
Insert the drawer.
11
Installation i bottenmonteringsläge
Steg 1:
Steg 2:
As shown, temporarily place a 20 mm
Spacer next to the left side and rear
side, then fix the Bracket to the
back board by screws.
Insert Part C1 to the fixed Bracket as shown.

12
Steg 3:
Steg 4:
As shown, temporarily place a 20 mm
Spacer next to the left side, then fix
Part C1 by screws
Insert the drawer

13
Rengöring
-För rengöring, torka av ytan med en fuktig (inte våt) trasa eller torka av
med en ren luddfri bomullstrasa.

14
Tillverkare: Shanghaimuxinmuyeyouxiangongsi
Adress: Shuangchenglu 803nong11hao1602A-1609shi, baoshanqu,
shanghai 200 000 CN.
Importerad till AUS: SIHAO PTY LTD. 1 ROKEVA STREETEASTWOOD
NSW 2122 Australien
Importerad till USA: Sanven Technology Ltd. Suite 250, 9166 Anaheim
Place, Rancho Cucamonga, CA 91730
REP
UK
YH CONSULTING LIMITED. C/O YH Consulting
Limited Office 147, Centurion House, London
Road, Staines-upon-Thames, Surrey, TW18 4AX
REP
EC
E-CrossStu GmbH
Mainzer Landstr.69,
60329 Frankfurt am Main.