you are here: welcome
HP Pro Scanner
how do I...?
the problem is...
alphabetical index
welcome to the HP Scanner
This help system will present all you need to know to use your
HP Scanner.
Information is organized in three major categories; use the navigation
block on the left side of each topic to select one.
See "Getting Started" for instructions on setting up your system before
making your first copy.
See also "how do I optimize for color accuracy" for instructions on
ensuring the best color quality in your copies.
Getting Started
Contains the steps necessary for setting up the system before
making your first copy. Includes instructions for printer setup,
preliminary maintenance and media profile creation.
getting
started with your HP Scanner...
how do I...?
...helps you carry out procedures, like loading media, making copies,
or maintaining your scanner.
...how do I...?
the problem is...
...helps you solve problems that may occur while copying/scanning.
...the problem is...
There is also an alphabetical index, accessible from the navigation block,
to help you find topics quickly.
You can also refer to the Quick Reference Guide that came with your
scanner for basic routine procedures.
For user information on your HP large format printer refer to the
documentation that came with the printer.

you are here: welcome how do I...?
HP Pro Scanner
how do I...?
the problem is...
alphabetical index
how do I... ? (some step-by-step procedures)
How do I make copies?
(quick copying, selecting templates, input/output size, scaling, select
media profile, quality, batch, save a duplicate...)
How do I scan to file?
(general steps, original templates, input size, resize, scaling,
resolution, quality, batch, scan to folder, scan to email, multipage
files ...)
How do I print from files?
(print from files, set up and maintain a print list, delete files from
computer...)
How do I manage files on the system?
(browse files, move files, rename files, delete files, copy files)
How do I use copy options and tools?
(previewing, copy number, layout, alignment, print queue, margins,
rotate, page order, output destination...)
How do I customize my copy tools?
(creating original templates, size presets, creating media profiles...)
How do I maintain/recover/update my system?
(maintenance, calibration, replacing parts, recovery, software
update, shut down, see scanner status, create debugging files
(troubleshooting) ...
How do I set up the system?
(scanner setup options, preferences, interface options, accounting,
network connect, printer install, date and time, language...)
How do I scan/copy thick media?
(copy/scan thick media, change insertion slot height)
how do I make copies?
Select a topic...
...make copies
...select an original
template

...set the input size
...set the output size
...select a media profile
...set
the copy quality
...optimize for color accuracy
...set a scale factor
...set
the printer media width
...copy
whole batches of originals
...collate
copies
...how
do I save (to file) a duplicate of my copy?
how do I scan to file?
Select a topic...
...scan
to a file
...select
an original template
...set
scan resolution
...set scan
quality settings
...set
the original's size (input size)
...use
the Resize option to determine output size
...set
the output size
...set
a scale factor
...scan
to and access a network folder
...scan
to an FTP server

...scan-to-file whole batches of originals
...save (to file) a duplicate of my copy
...manage
image files on my system
...scan to email .,,
...set for automatic naming of files.,,
...scan multiple pages into a single file.,,
how do I print from files?
Select a topic...
...print
from files
... set
print from file quality
...set
up a print list
...maintain
the print list
how do manage files on the system?
Select a topic...
...manage
image files on my system
...access a network folder...
...browse, preview and select
files in the file management dialog
...Copy
image files...
...Move
image files...
...Delete
image files...
...Rename
image files...

...create a new file folder...
...Add
image files to the print list...
how do I use copy options and tools?
Select a topic...
...use the previewing tools
...set the number of copies
...print on multiple printers
...use nesting
...use paneling
...set paneling and tiling options and assemble panels
...automatically align the image
...view
the print queue
...set the output margins
...select crop to roll
... clip contents by printer's margins
...input in portrait
and output in landscape?
...rotate the output 90 dregrees?
...set page order?
...set copy mode?
...set output destination?
...set folding options?
how do I customize my copy tools?

Select a topic...
...define
an original template
...make type of original settings
...create
a custom scale size
...create
a custom paper size preset (Input size and Output size)
...create
a media profile
how do I maintain/recover/update my system?
Select a topic...
...maintenance procedures
...view scanner messages
... replace
scanner parts
...replace
glass plate- HP SD Pro
...replace
glass plate - HP HD Pro
...replace
the white background platen - HP HD Pro
...replace
the scanner lamp - HP HD Pro
...replace
glass plate - HP HD Pro 2
...replace
the white background platen - HP HD Pro 2
...set the scanner sleep timers
...recover
the system or update the software
...shut down the system
...view information about the scanner
...create and retrieve data files for support/debugging

...print help pages
how do I set up the system?
Select a topic...
...set preferences
...set
user interface options
...set
paper load - Auto or Manual
...set
media offset
...set
extended thickness correction settings
...change
the default Administrator password
...connect to a network
...make
network settings
...access shared files from another
computer
...automatic power up/down
...use
accounting
...create/delete/disable an
account
...select/activate an existing
account
...change the interface
language
...install
printer and printer drivers
...set
date and time
...enable storage of network connections
how do I copy and scan thick media?

you are here: welcome how do I...? maintenance procedures
HP Pro Scanner
how do I...?
the problem is...
alphabetical index
how do I... maintenance procedures
Maintenance procedures should all be performed in a single
maintenance session, starting with Cleaning the scan area and ending
with Camera alignment and calibration.
It is recommended to perform the scanner maintenance procedures at
least once per month.
cleaning the scan area
1. Turn the scanner power off and disconnect the scanner power
cable.
2. Open the scanner cover.
Press the two release buttons to disengage the locks and open
the lid. The release buttons are found near the insertion slot on
each side of the scanning area lid, or at the back of the lid
depending on the scanner model.
The scanning area is now exposed for cleaning.
3. Gently wipe the glass plate
Clean the glass with a lint-free cloth and a mild, streak-free,
glass cleaner.
Caution: do not use abrasives, acetone, benzene, or fluids that
contain these chemicals. Do not spray liquids directly onto the
scanner's glass plate or anywhere else in the scanner.
Caution: the lifespan of the glass plate depends on the paper types
that pass across it. Abrasive papers such as mylar may cause
premature deterioration, in which case the replacement of the plate
is the customer's responsibility.
4. Dry the glass completely using a separate clean, dry lint-free
cloth like the one provided with the maintenance kit.
5. Clean the white background platen/white rollers

On scanners with white pressure-platen - white background
platen (white metal area) is fixed in the scanning area lid. Hold
the lid open as you clean. Warning - do not attempt to remove
the white background platen for cleaning it. Removing the
white background platen is only necessary when replacing
it.
On scanners with white pressure rollers - the white rollers are at
the bottom between the transport rollers.
Wipe the white platen/rollers with a lint-free cloth and a mild,
streak-free, glass cleaner. Apply the cleaner to the cloth and
first and then wipe the white area.
6. Clean the upper and lower transport rollers and surrounding
area.
Wipe the rollers with a lint-free cloth and a mild, streak-free,
glass cleaner.
Caution: do not use abrasives, acetone, benzene or fluids that
contain these chemicals.
7. Dry the white background platen, transport rollers and
surrounding area fully using a separate clean, dry lint-free
cloth.
8. Clean also the scanner feed surface so dirt and dust are not
dragged into the scan area with the original.
9. Close the scanner cover. The locks will reengage.
You can now calibrate the scanner.
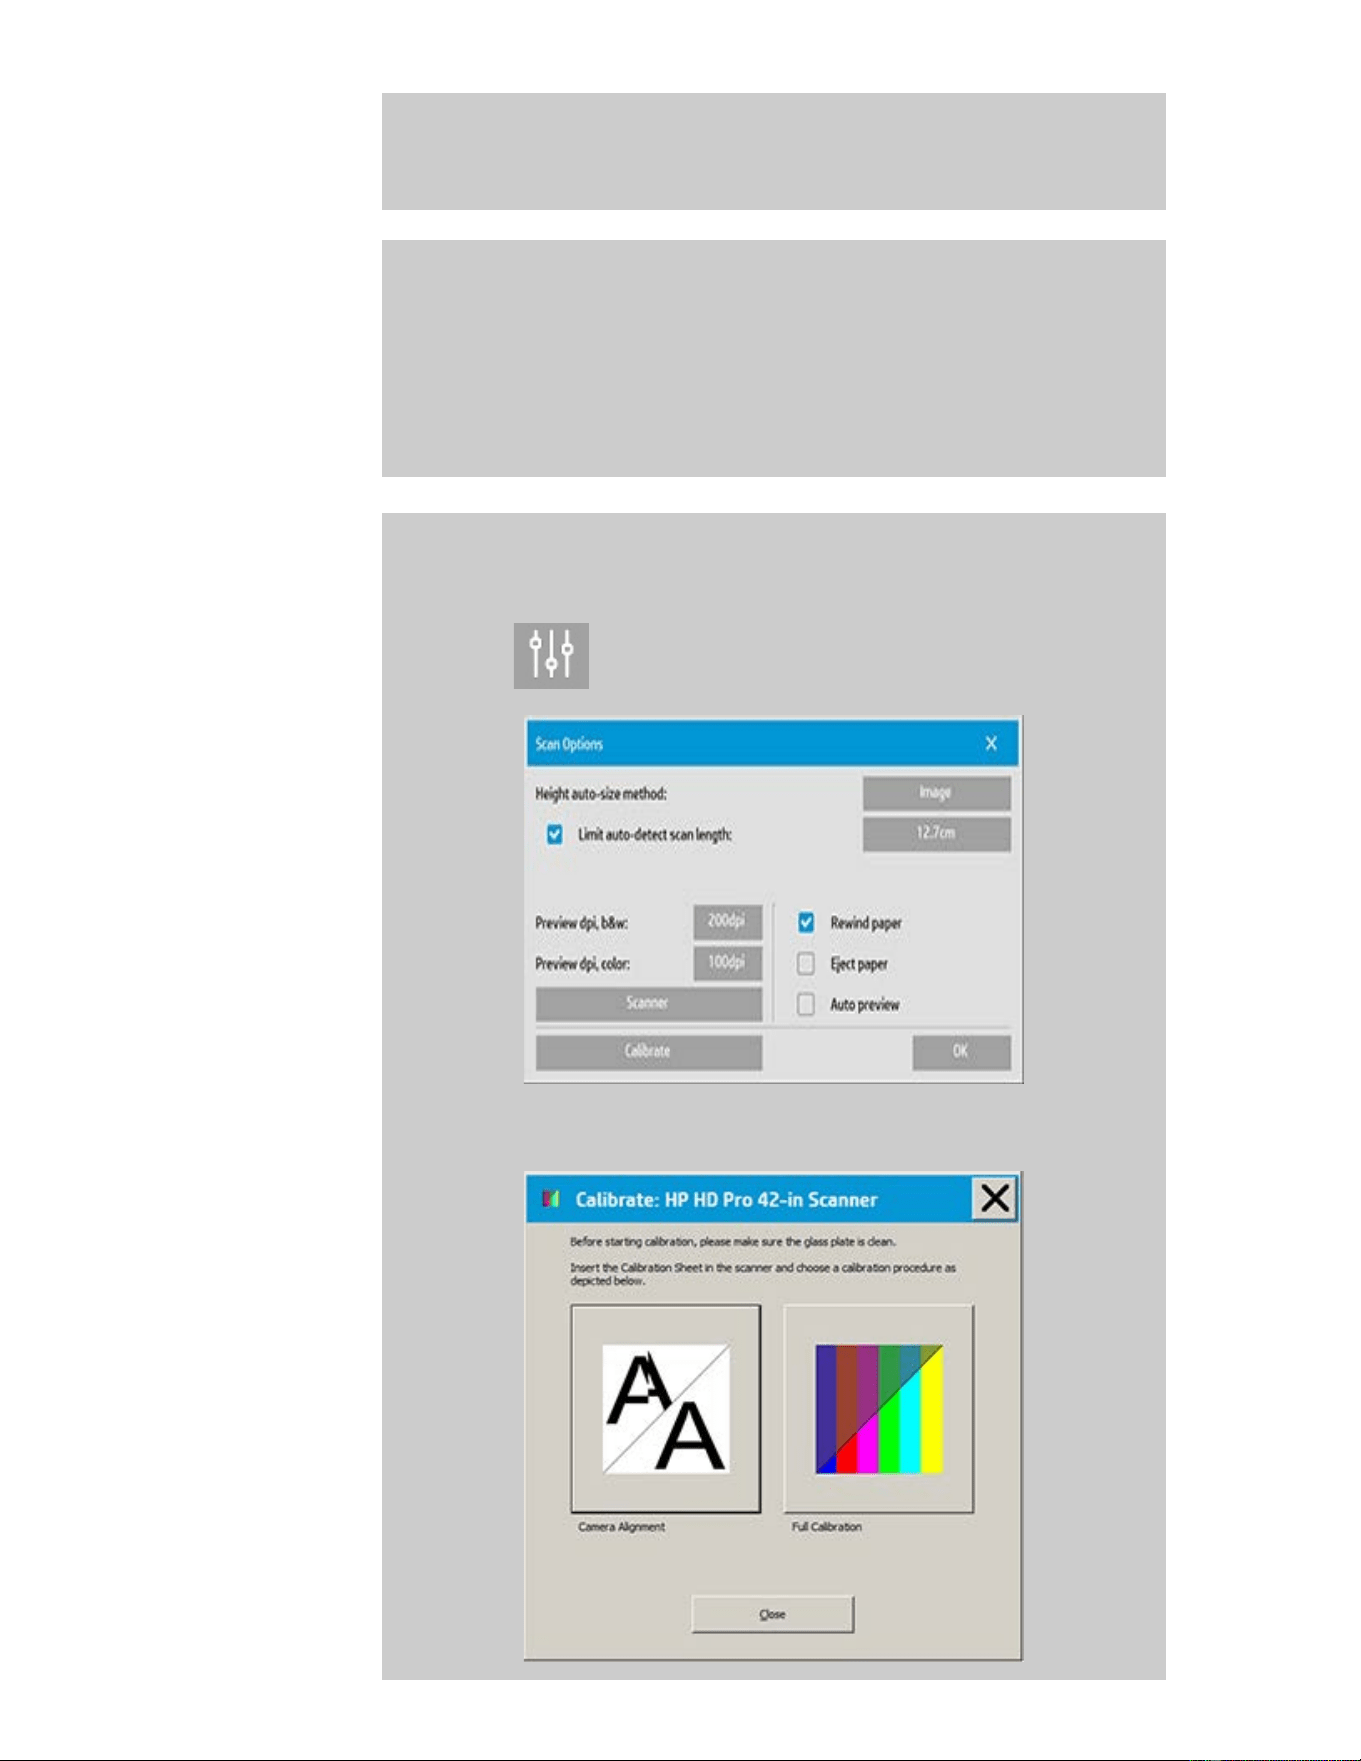
camera calibration (including camera alignment)
Before you calibrate, make sure that you have cleaned the scan area.
An unclean scanning area will give you imprecise calibration results.
Camera calibration is a fully automatic process that you only need to
activate through the wizard and then leave to run on its own.
1. Connect the scanner power cable.
2. Power ON the scanner.
3. The scanner should be warm - apply only for the HP HD Pro
Scanner.
Make sure that the scanner has been turned on for at least one hour
prior to calibration. Slight light intensity changes and camera shifting
can occur just after turning the scanner on and the warm-up time
will ensure that light conditions and camera heights have stabilized.
4. Select the Setup tab.
5. Press and select Scanning
6. Press the Calibrate button to start the Calibration wizard.

Select either Camera Alignment or Full Calibration.
Camera Alignment will align horizontal capture for correct
image stitching.
Full Calibration will perform Camera Alignment, B&W
Calibration, and Color calibration in the same session.
7. Insert the Calibration Sheet that came with your system.
Align the sheet's midpoint arrow with the scanner's midpoint arrow
and feed the sheet into the scanner.
8. When calibration is completed, remove the Calibration Sheet
from the scanner and return it to its protective cover or tube.
Store the calibration sheet in a dry place and out of direct light.
printing instructions legal information
© Copyright 2012, 2015 HP Development Company, L.P
you are here: welcome how do I...? make copies
HP Pro Scanner
how do I...?
the problem is...
alphabetical index
how do I make copies?
Follow the instructions below for making copies. In many cases, the
basic options will already be set and you won't have to change them.
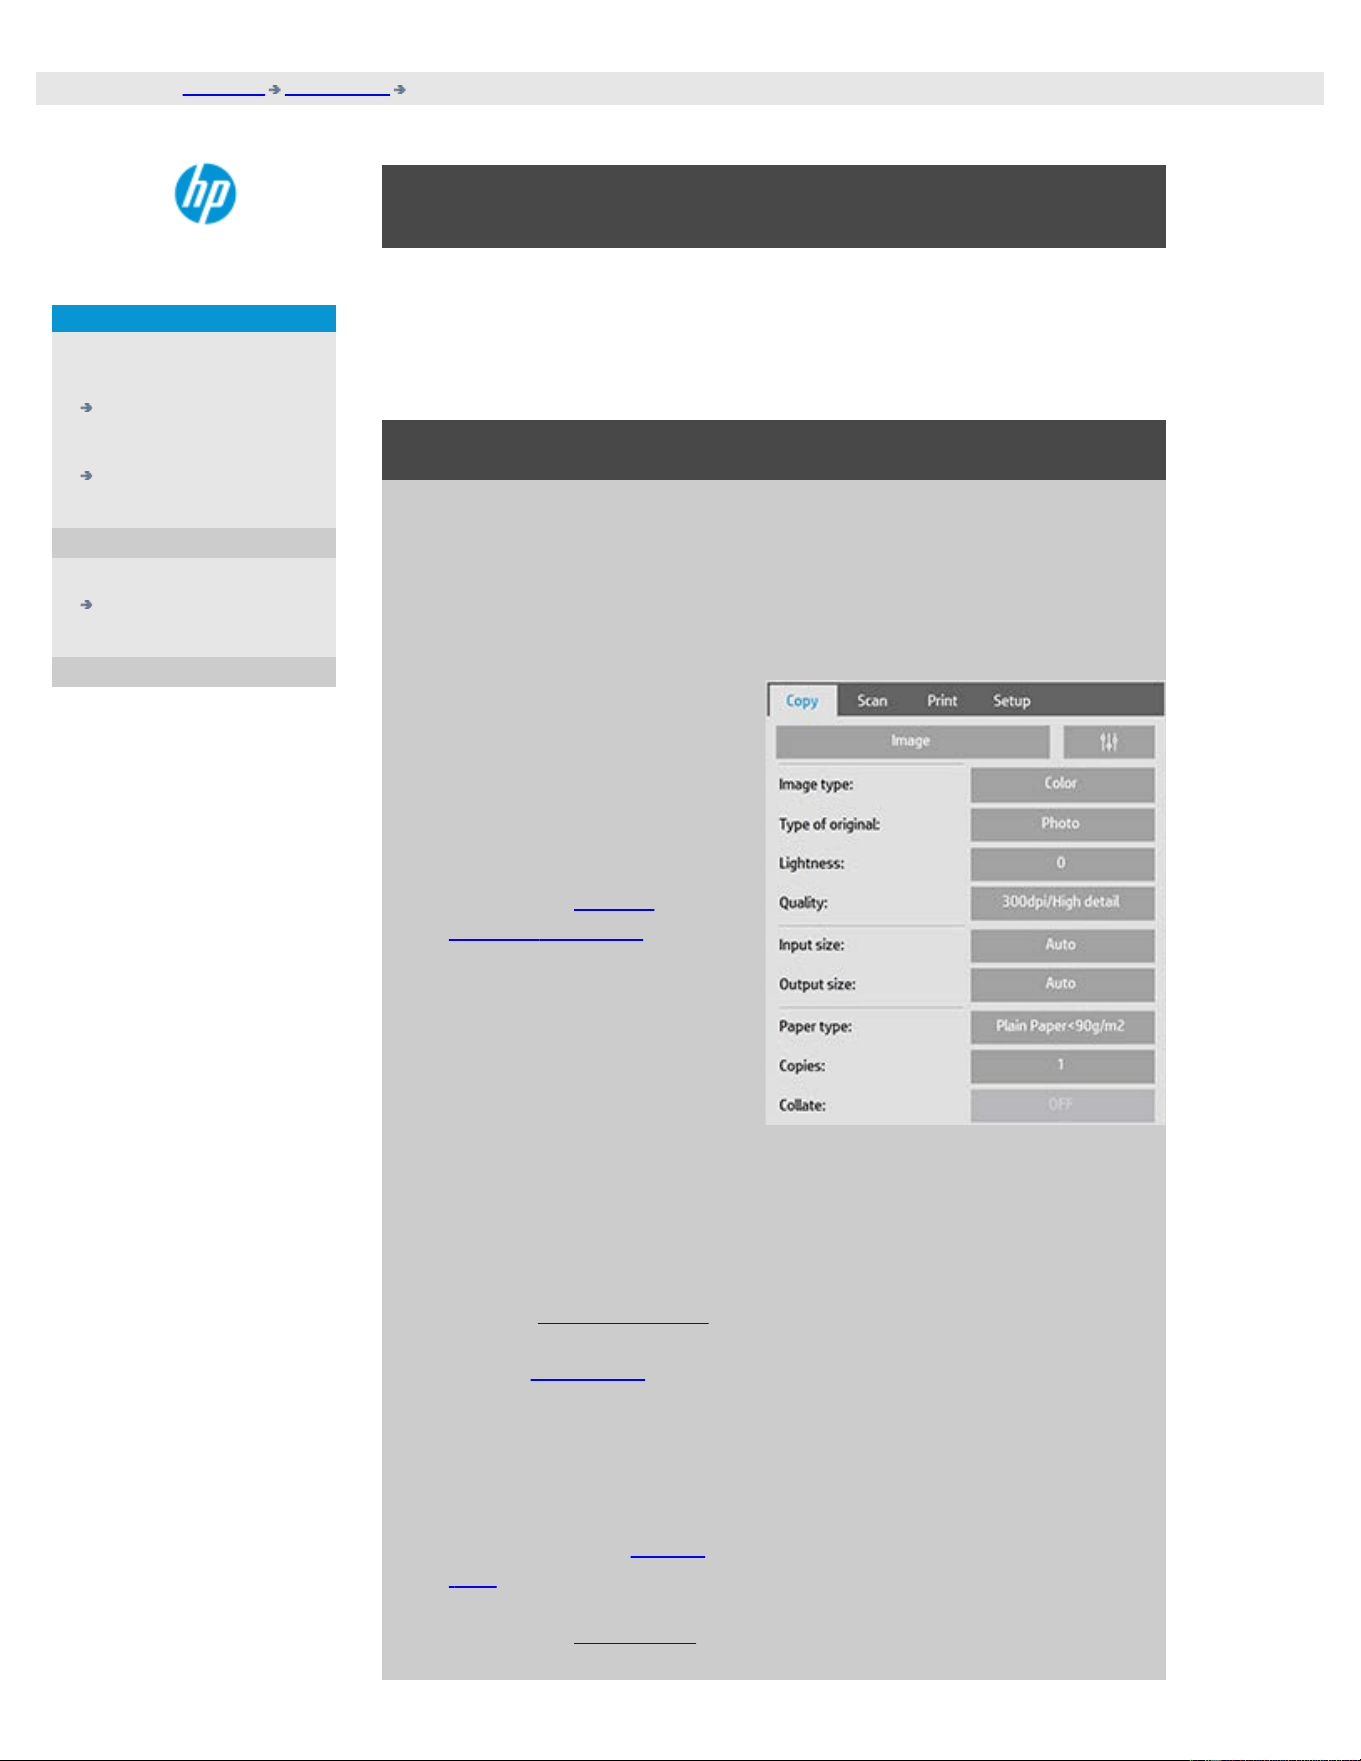
to make copies...
1. Load the original - Place the document with the intended top
edge forward in the scanner insertion slot.
2. Slide the document gently into the insertion slot until you feel it
pulled into the start position.
3. In the Copy tab, select
Color or B&W (black and
white) copying — this
determines the Type of
original.
4. Select your Type of
original template.
5. Set the Lightness level of
your copy. You can
change this value to
make the copy lighter
(positive value) or darker
(negative value) and
compensate for dull or
faded originals.
6. You can set copy quality
through the Quality
button. See instructions.
7. Set the Input size. Usually
this will be equal to the
size of your original. You
can let the scanner detect
the document's size.
8. Set the intended Output
size of your copy.
9. Select your Paper type.
10. If Copies is set more than
one then Collate will be
possible to set.
For making one-to-one copies, this will be the size of your original.
You can also use Scale to determine the copy's size.
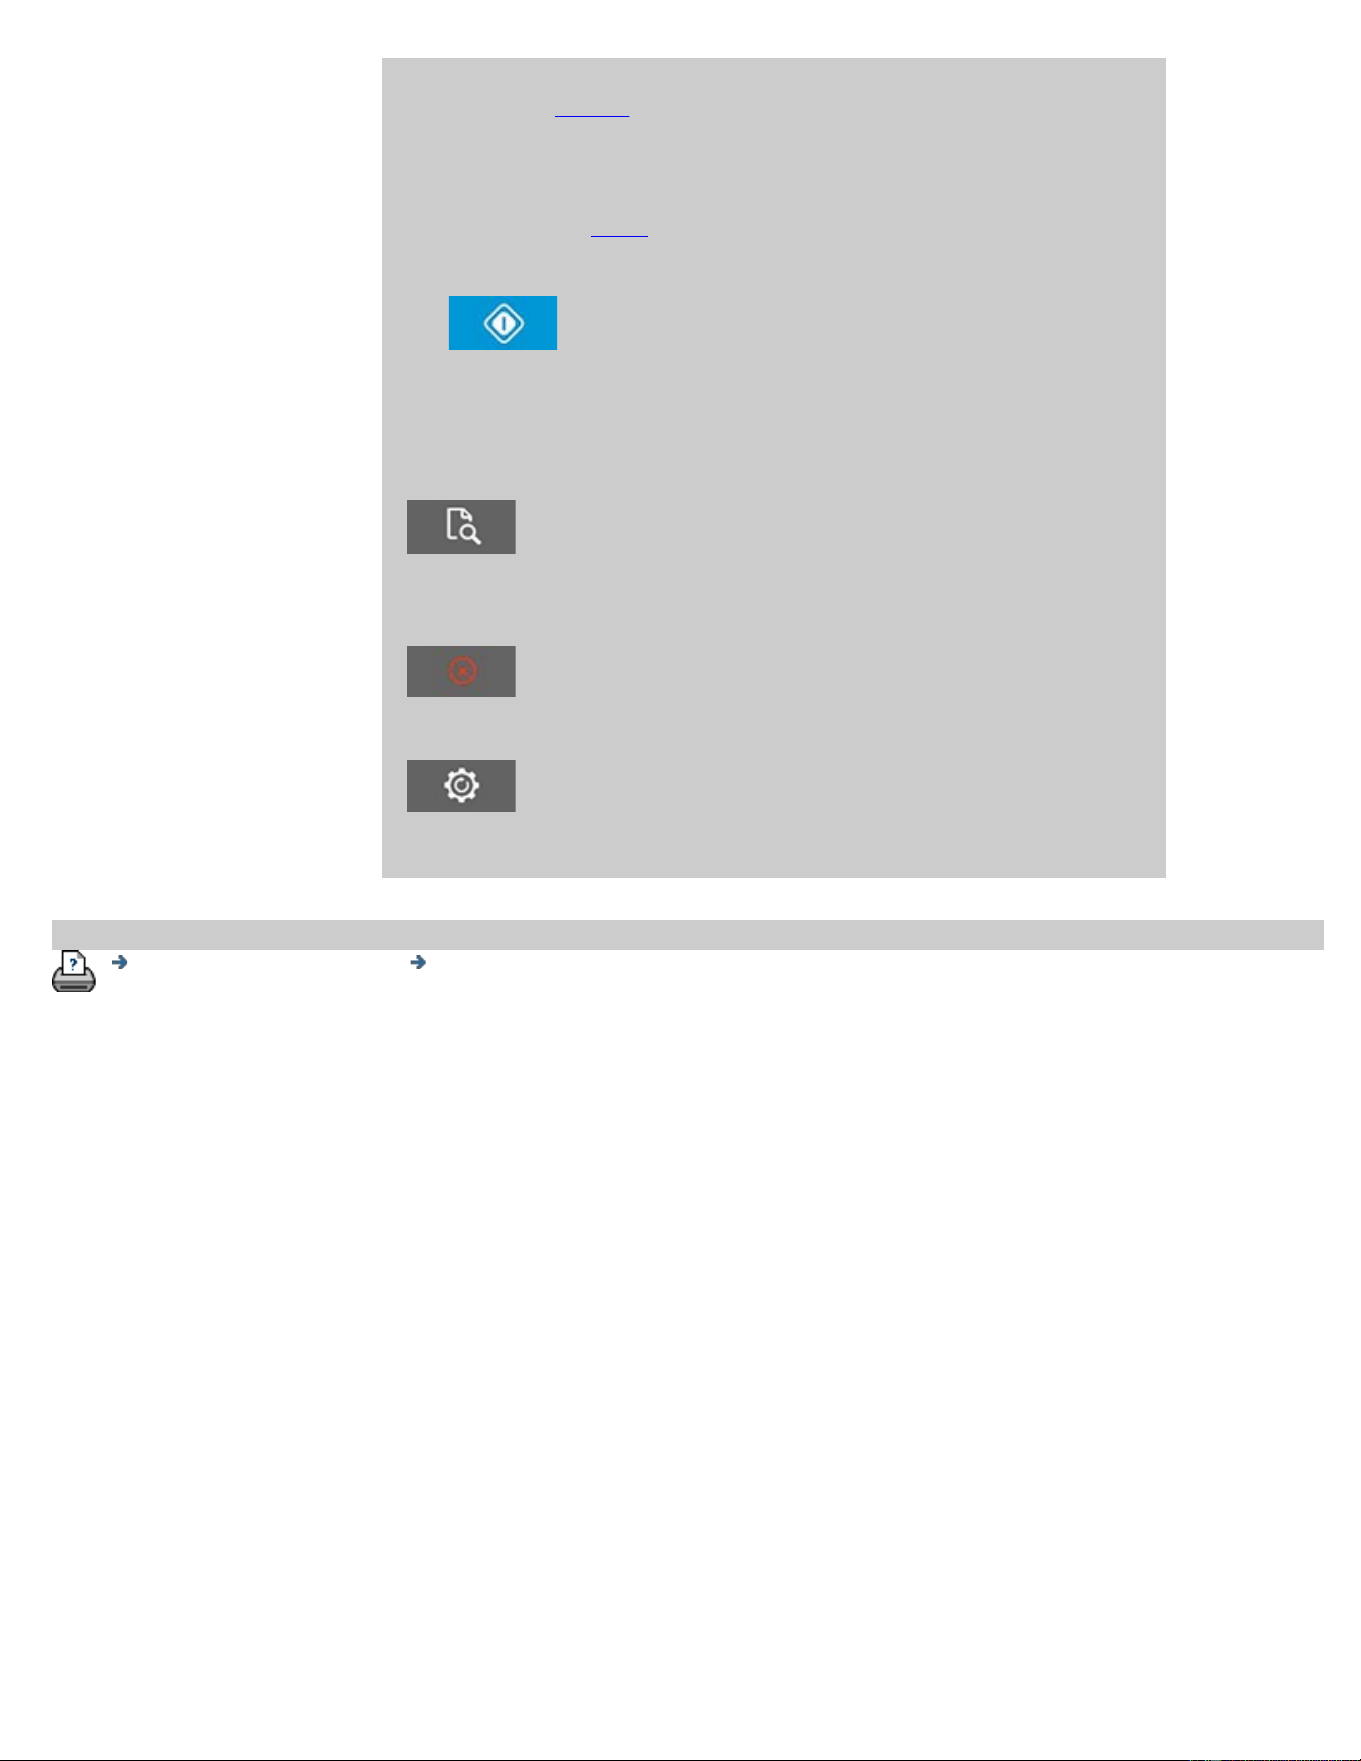
11. Press the Copy button.
You can preview the image before printing. The preview will give you
a "What You See Is What You Get" (WYSIWYG) picture of your copy.
Press the Preview button to load a preview of your copy.
You can use the Stop button if you need to cancel/abort as running
copy process. You can also use it to cancel a preview of an image file
while it is being loaded.
Press the Reset button to clear your own settings and reset the
application to all of the scanner software's default values.
printing instructions legal information
© Copyright 2012, 2015 HP Development Company, L.P
you are here: welcome how do I...? change the insertion slot height (thick media scanning)
HP Pro Scanner
how do I...?
the problem is...
alphabetical index
how do I change the insertion slot height (thick media
scanning)?
NOTE: Adjustment for thickness, and the following instructions apply only
with the scanners, HP HD Pro Scanner and HP HD Pro 2 Scanner
You may need to scan documents and drawings printed or pasted on
thick media such as cardboard, foamboards, gatorboards etc. To do so,
you will need to fit the insertion slot to the thickness of your original.
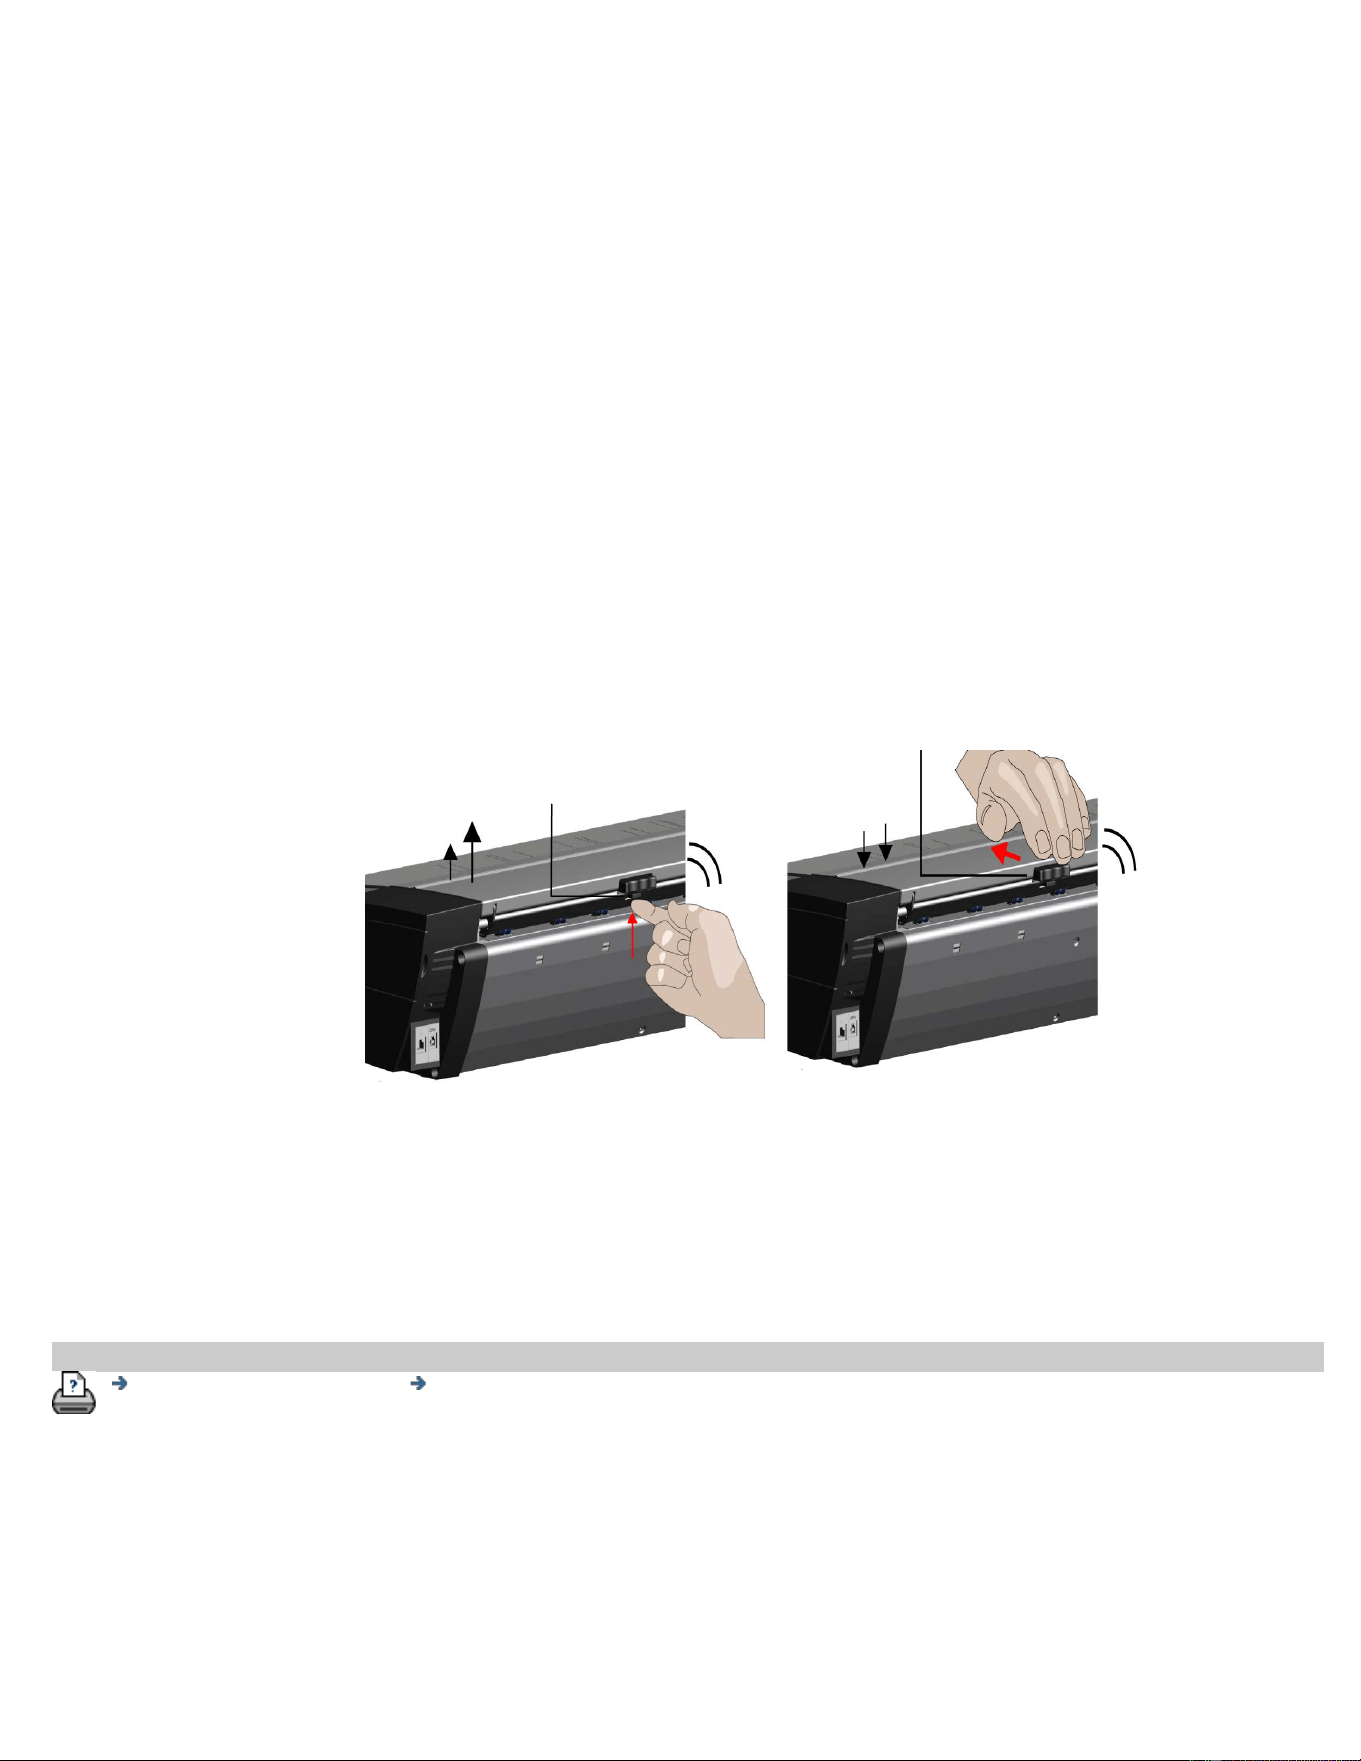
HP HD Pro Scanner:
If your scanner supports Automatic Thickness Adjustment Control (ATAC)
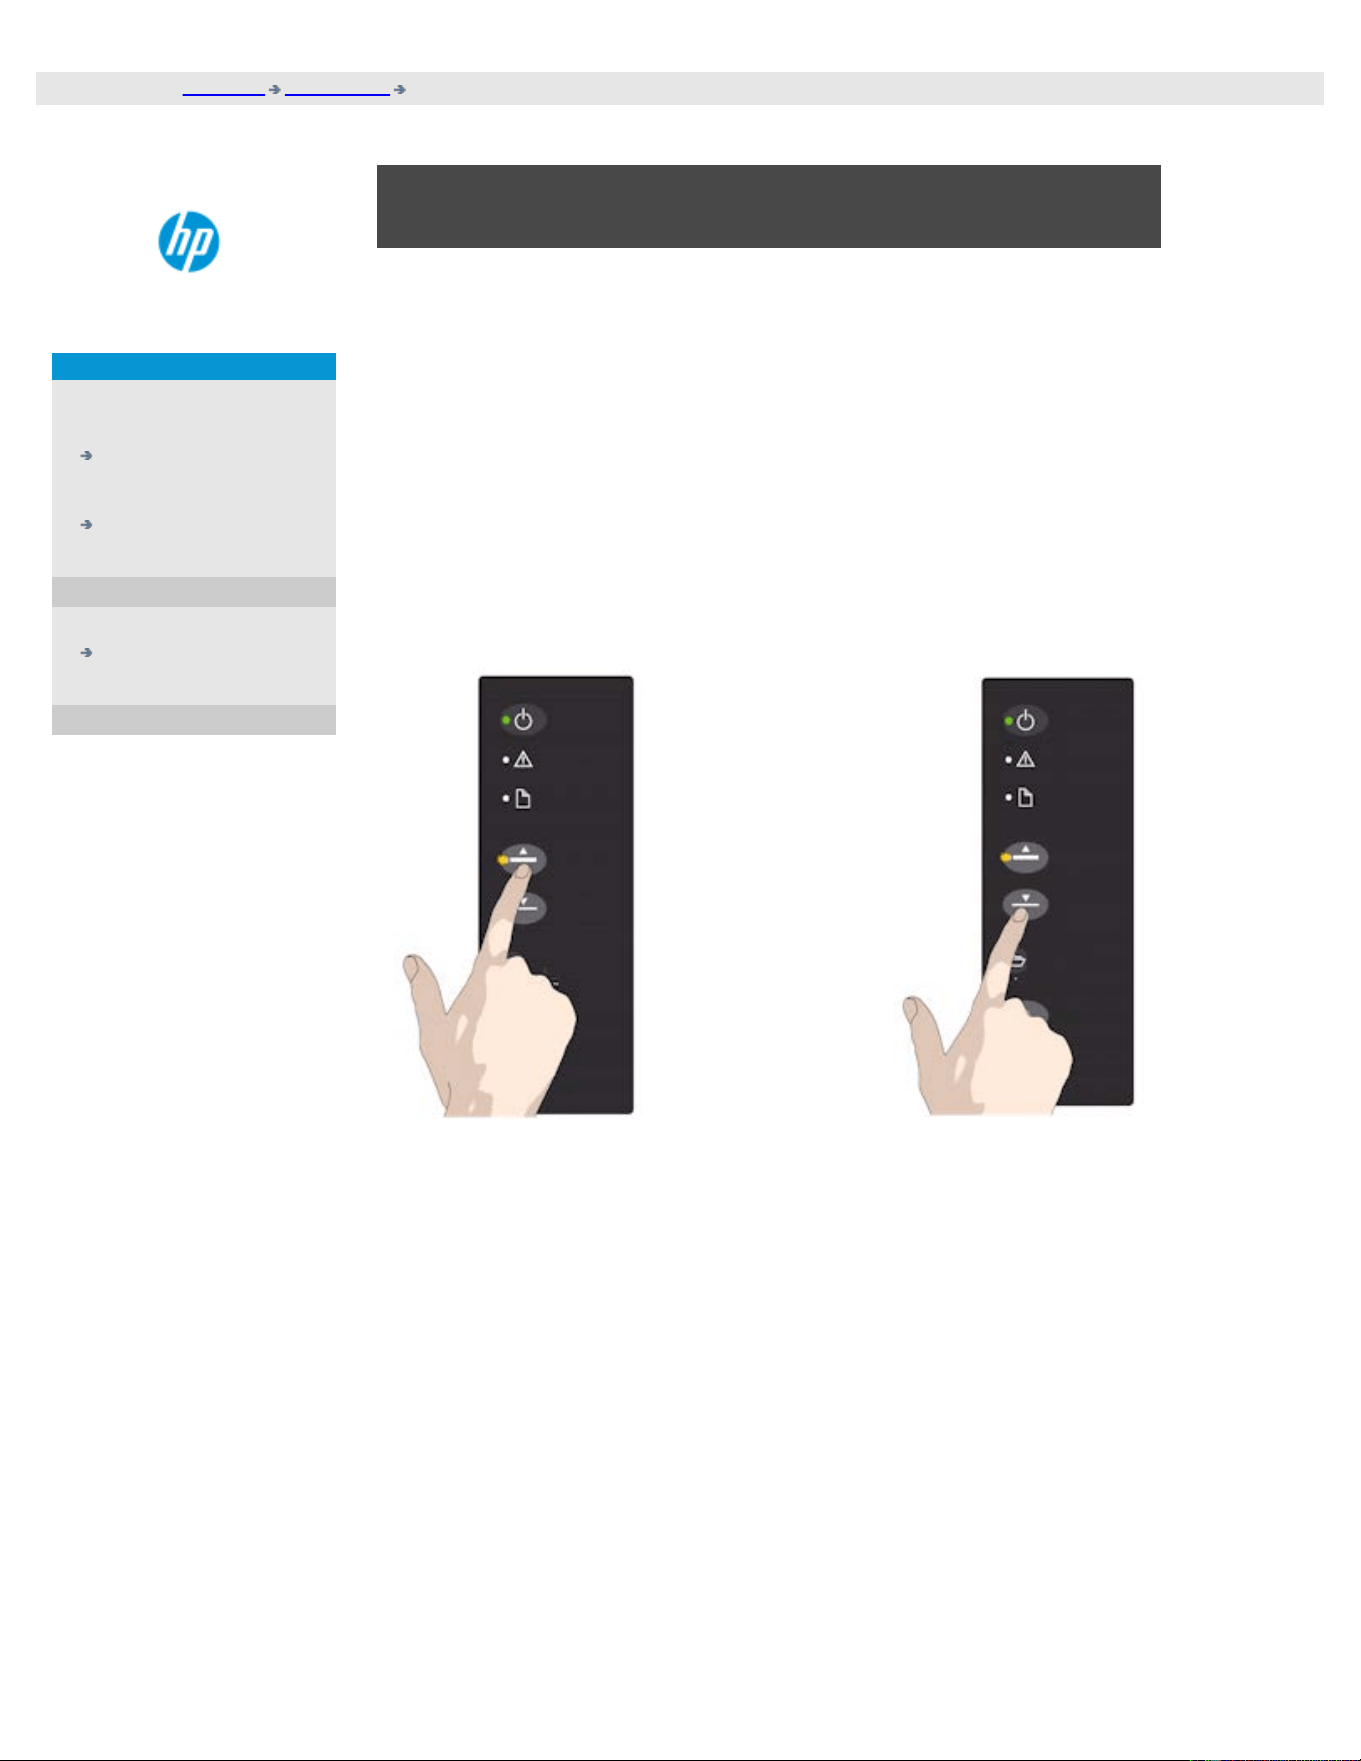
its panel will have Up and Down keys as illustrated below.
1. Press the ATAC Up-key
to raise the pressure
platen
2. Press the ATAC Down-key to
lower the pressure platen and
match to the thick original
You use the keys to raise and lower the pressure-platen and thus can
change the insertion slot size (pressure-platen height) on your scanner in
the range from 2mm to 15 mm (up to 0.6”). Originals up to 2mm thick
should be scanned with the pressure all the way down (normal position).
Thicker originals will require you use the ATAC functionality.
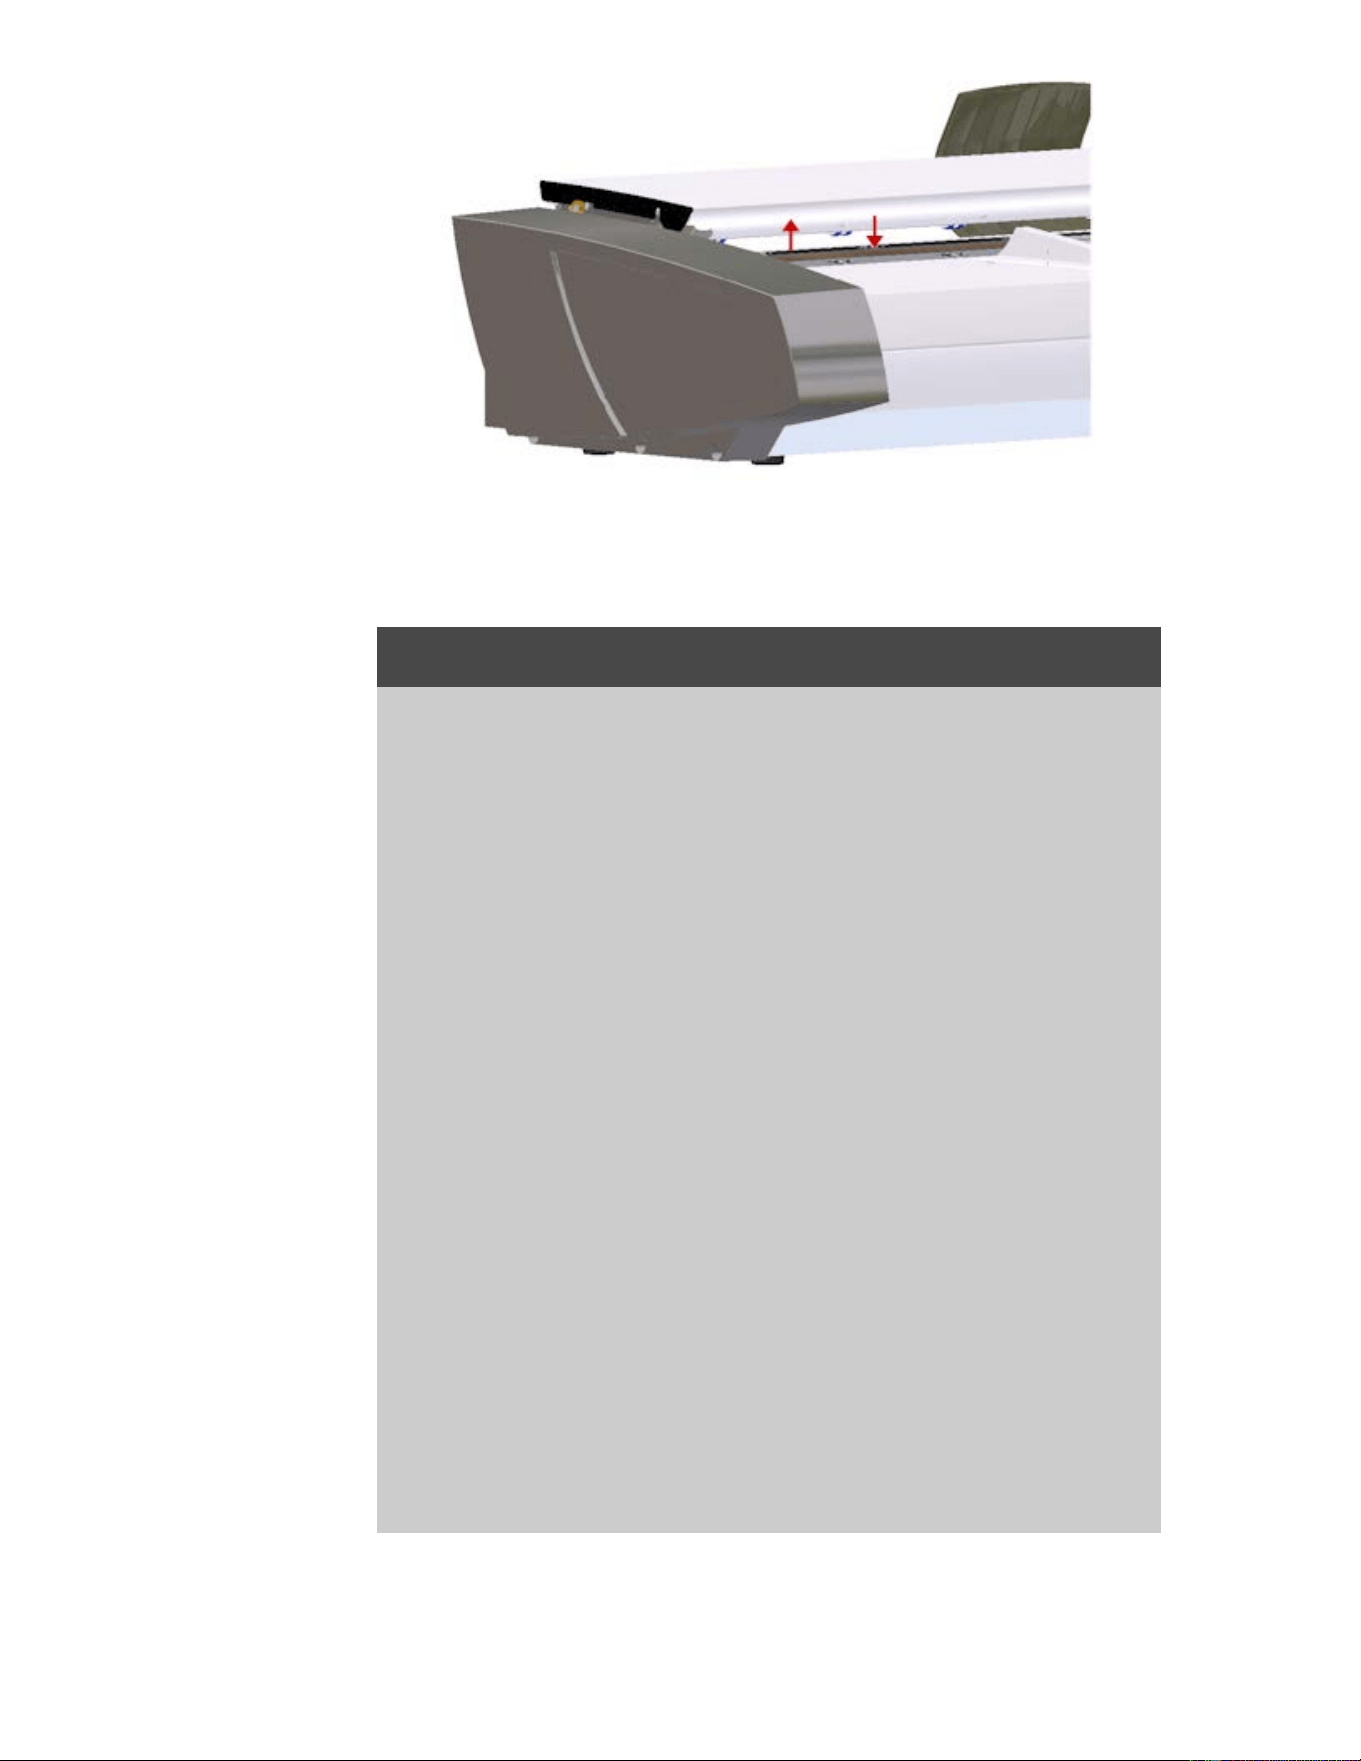
When the insertion slot height is not in the Normal position, the following
warning is displayed below the preview window on your touch screen:
Paper Guide in Extended Position
to adjust the insertion slot for thick media...
1. Press and hold down the ATAC Up-key on your operator’s
panel to raise the pressure platen and enlarge the insertion
slot until there is room to insert the thick original.
2. The ATAC Indicator blinks yellow indicating the scanner is in
ATAC mode.
3. Insert the thick original evenly for a straight scan path.
4. Press and hold the ATAC Down-Key to lower the pressure-
platen until the pressure-platen rests on the original and stops
on its own.
5. The ATAC indicator will stop blinking and remain yellow when
the pressure-platen is positioned correctly and is ready for
thick media scanning.
6. When finished scanning, and you have ejected the thick
original, press and hold the ATAC Down-Key to return the
pressure-platen to its normal position. The ATAC indicator LED
will turn off.
HP HD Pro 2 Scanner:
To scan thick medias the height of the insertion slot should be increased
by activating the Optimized Thick Media Adjustment (OTAC).
Raising OTAC
•Removeallofthepaperreturnguidesbyliftingthemoff.Place them
away from the scanner
•Liftthesmallleverunderneaththelargerbuttononthebackofthe
scanner lid nearest the keypad. The lid will lift to its maximum position
and increase the size of the insertion slot to 16mm. The yellow led on the
keypad will light.
•Insertthethickoriginalcenterjustifiedintothefrontofthescanner
keeping the leading edge square until it is under both lines of rollers
Lowering OTAC
From the fully raised position, the OTAC needs to be lowered down on to
the thick media before scanning can be started.
•Pulltheuppermostofthetwobuttonsonthebackofthescannerlid
nearest the keypad inwards, and then release it. This moves the OTAC
down in steps of 1-2mm. Continue pressing the button in and releasing it
until it no longer clicks. OTAC will determine the correct pressure required
for the thick media automatically.
1. Lift the small lever underneath
the larger button on the back of
the scanner lid nearest the
keypad.
2. Pull the uppermost of the two
buttons on the back of the
scanner lid nearest the keypad
inwards, and then release it.
printing instructions legal information
© Copyright 2012, 2015 HP Development Company, L.P
you are here: welcome how do I...? copy/scan thick media
HP Pro Scanner
how do I...?
the problem is...
alphabetical index
how do I copy/scan thick media?
Follow the guidelines below for problem free scanning of thick media.
First you must adjust the insertion slot height to accommodate your
thick media. See:
...how do I change the insertion slot height?
NOTE: Adjustment for thickness, and the following instructions apply
only with the scanners, HP HD Pro Scanner and HP HD Pro 2
Scanner.
Scanning thick media will require enlarging the insertion slot and this can
affect the scanner's automatic control of border lines between the
cameras, called Stitching. Instructions for compensating for this follow
below.
to copy thick media..
1. Change the insertion slot height to fit the original as described
in ...how
do I change the insertion slot height?.
2. Make a test scan.
Bulky thick media need to be supported with both hands both into
and out of the scanner.
Stitching errors will be easiest to see on an image with one or more
clear diagonal lines.
Normally, only stiff media will affect stitching. Flexible media will
usually be stitched correctly regardless of thickness.
If the lines seem uneven, do the following:
3. Select the Setup tab.
4. Select > Scanning.
5. Select the Scanner button.
6. Select the Extended Thickness button.
7. Check the box labeled Use extended thickness paper handling.
8. Change the value for each of the scanner's cameras —
normally, only positive values should be used.
9. Make test scans and readjust the values until you are satisfied
that the lines are stitched correctly.
10. Click OK to accept your settings.
11. Repeat the above steps until you are satisfied with the results.
printing instructions legal information
© Copyright 2012, 2015 HP Development Company, L.P
you are here: welcome how do I...? select an original template
HP Pro Scanner
how do I...?
the problem is...
alphabetical index
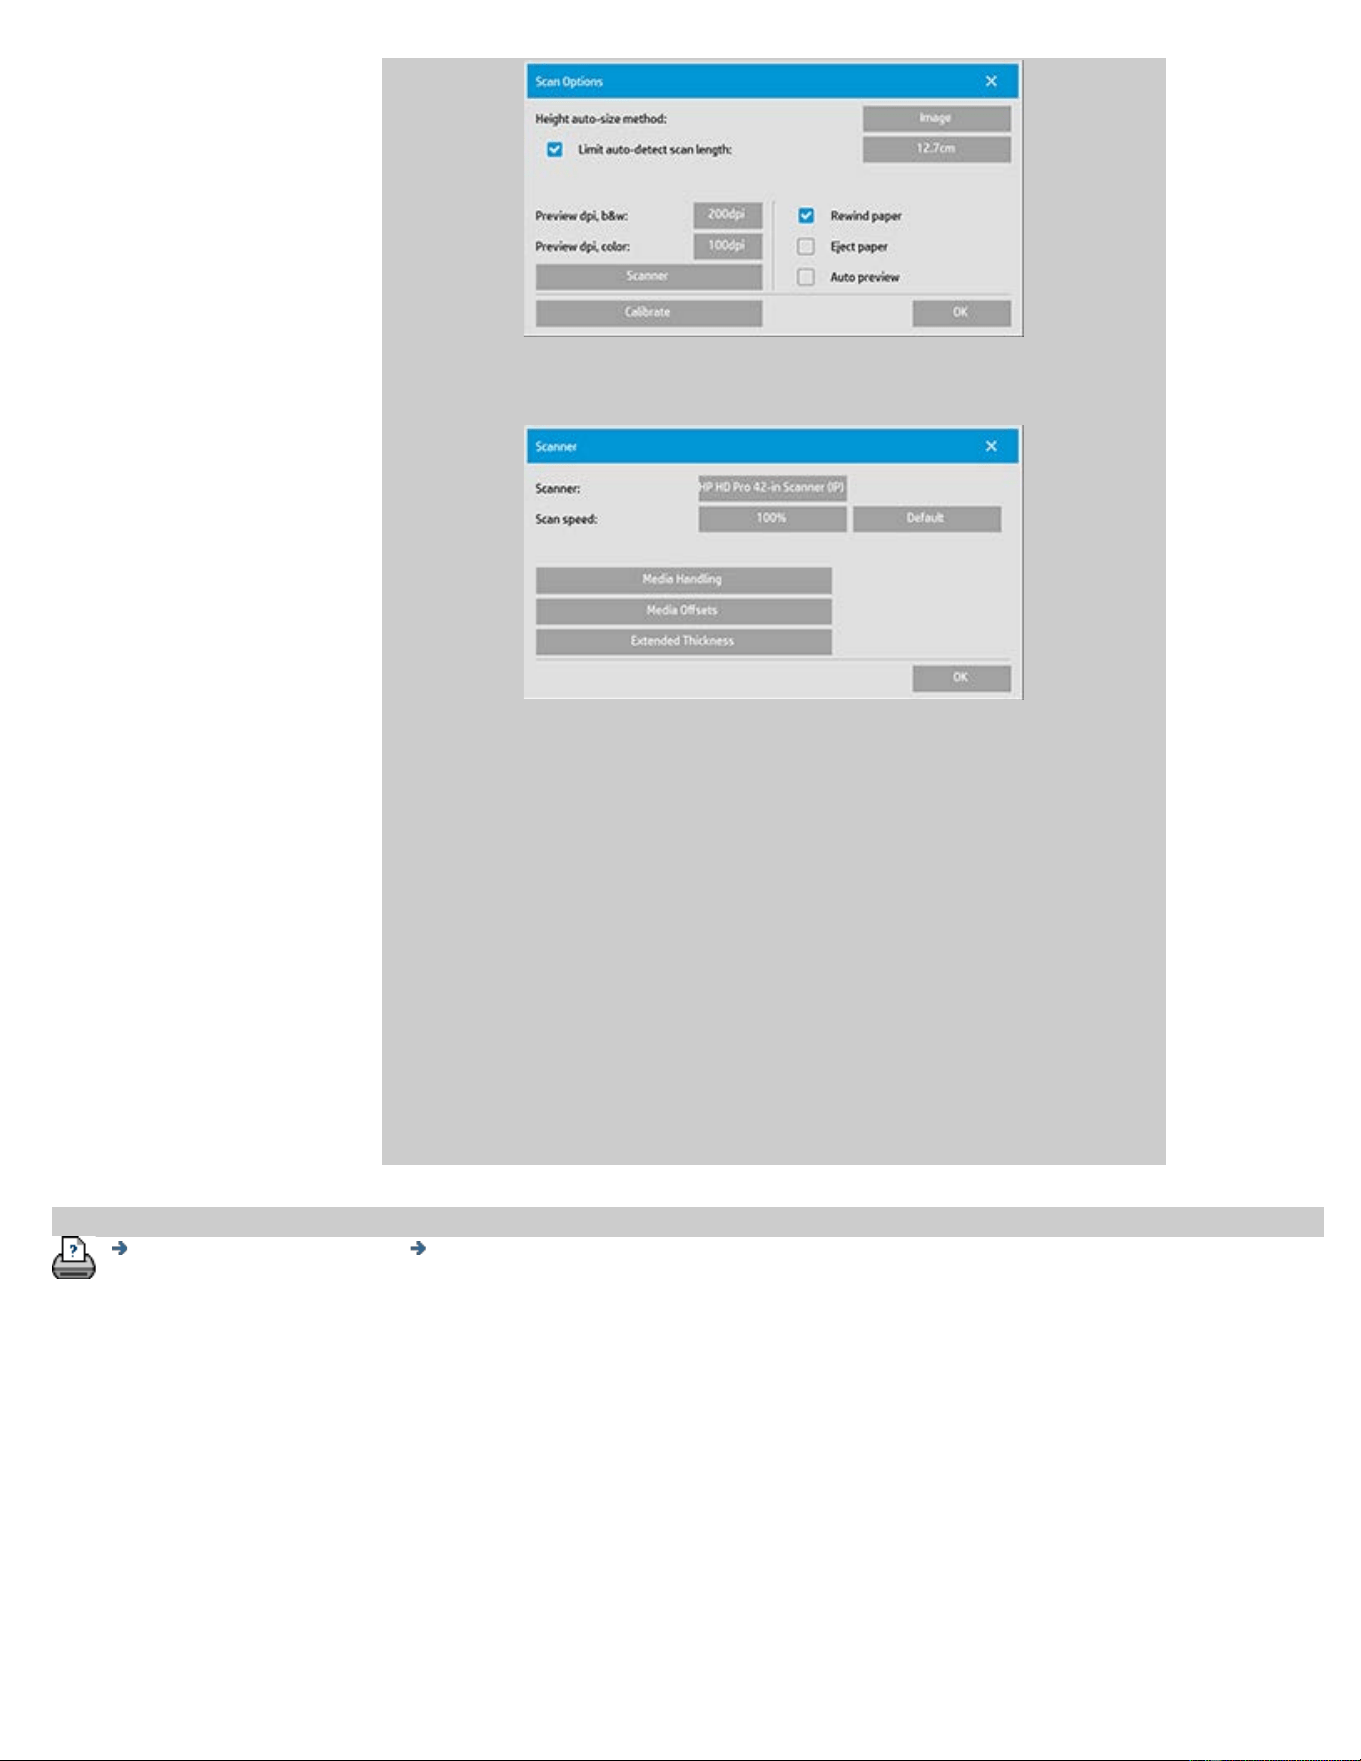
how do I select an original template?
The Type of Original template defines the original you wish to input. Type
of Original templates are used for both copy and scan-to-file jobs (Copy
tab and Scan tab).
to select a type of original template...
1. Select B&W/Grayscale or
Color. Your selection will
determine the Type of
Original templates
displayed in the next
steps.
2. Press the Type of original
button.
3. Select from the list a Type
of Original template that
best describes your
current input. The Type of
Original templates
displayed depend on if
you selected Color or
B&W in step 1.
See also:
...to define an original template...
...how do I make type of original template settings
printing instructions legal information
© Copyright 2012, 2015 HP Development Company, L.P
you are here: welcome how do I...? define an original template
HP Pro Scanner
how do I...?
the problem is...
alphabetical index
how do I define an original template?
Adjustments to a Type of Original template's settings will normally be
discarded when you close the program. You can however choose to save
them as a new custom Type of Original template. Type of original
templates apply for both copying (Copy Tab) and scan to file (Scan tab).
to define an original template...
1. Press the Copy tab or the Scan tab.
2. Set the copy mode to Color or B&W.
3. Press the Type of original
button to open the Type
of original (template)
menu.
4. Use the Tool button to
open the Type of original
Setup dialog.
If a preview of the copy is currently loaded, the Type of original Setup
dialog will start up with the Image Filter Preview and split screen for
on-line assessment of your change's effects.

5. After having made your settings and ensuring that they work
well with the current original, press the New button.
For information on template settings, see:
...how do I make original template settings?
The top preview panel illustrates changes to the image after modifying
your template settings.
6. Enter the name for your new template. Select a name that
represents the type of copy job you are working with, such as
"Fruit Photos".
7. Press the Save button to create the new Type of Original
template.
Your new Type of Original template will be added to the list of those
already available. You can start with one of the predefined Type of
Original presets that is closest to your original, save it under a new
name and then change it to fit your specific needs. Use the preview
to test your settings.
If you have changed your settings for the current Type of Original
template pressing the OK button will accept the values but they will
only be used for the current copy job. The next time you call up the
template, it will have regained its old settings.
8. Press the Save button when you are finished.
9. Press OK to confirm.
See also:
... how to select a type of original
template
...how do I make original template settings
printing instructions legal information
© Copyright 2012, 2015 HP Development Company, L.P
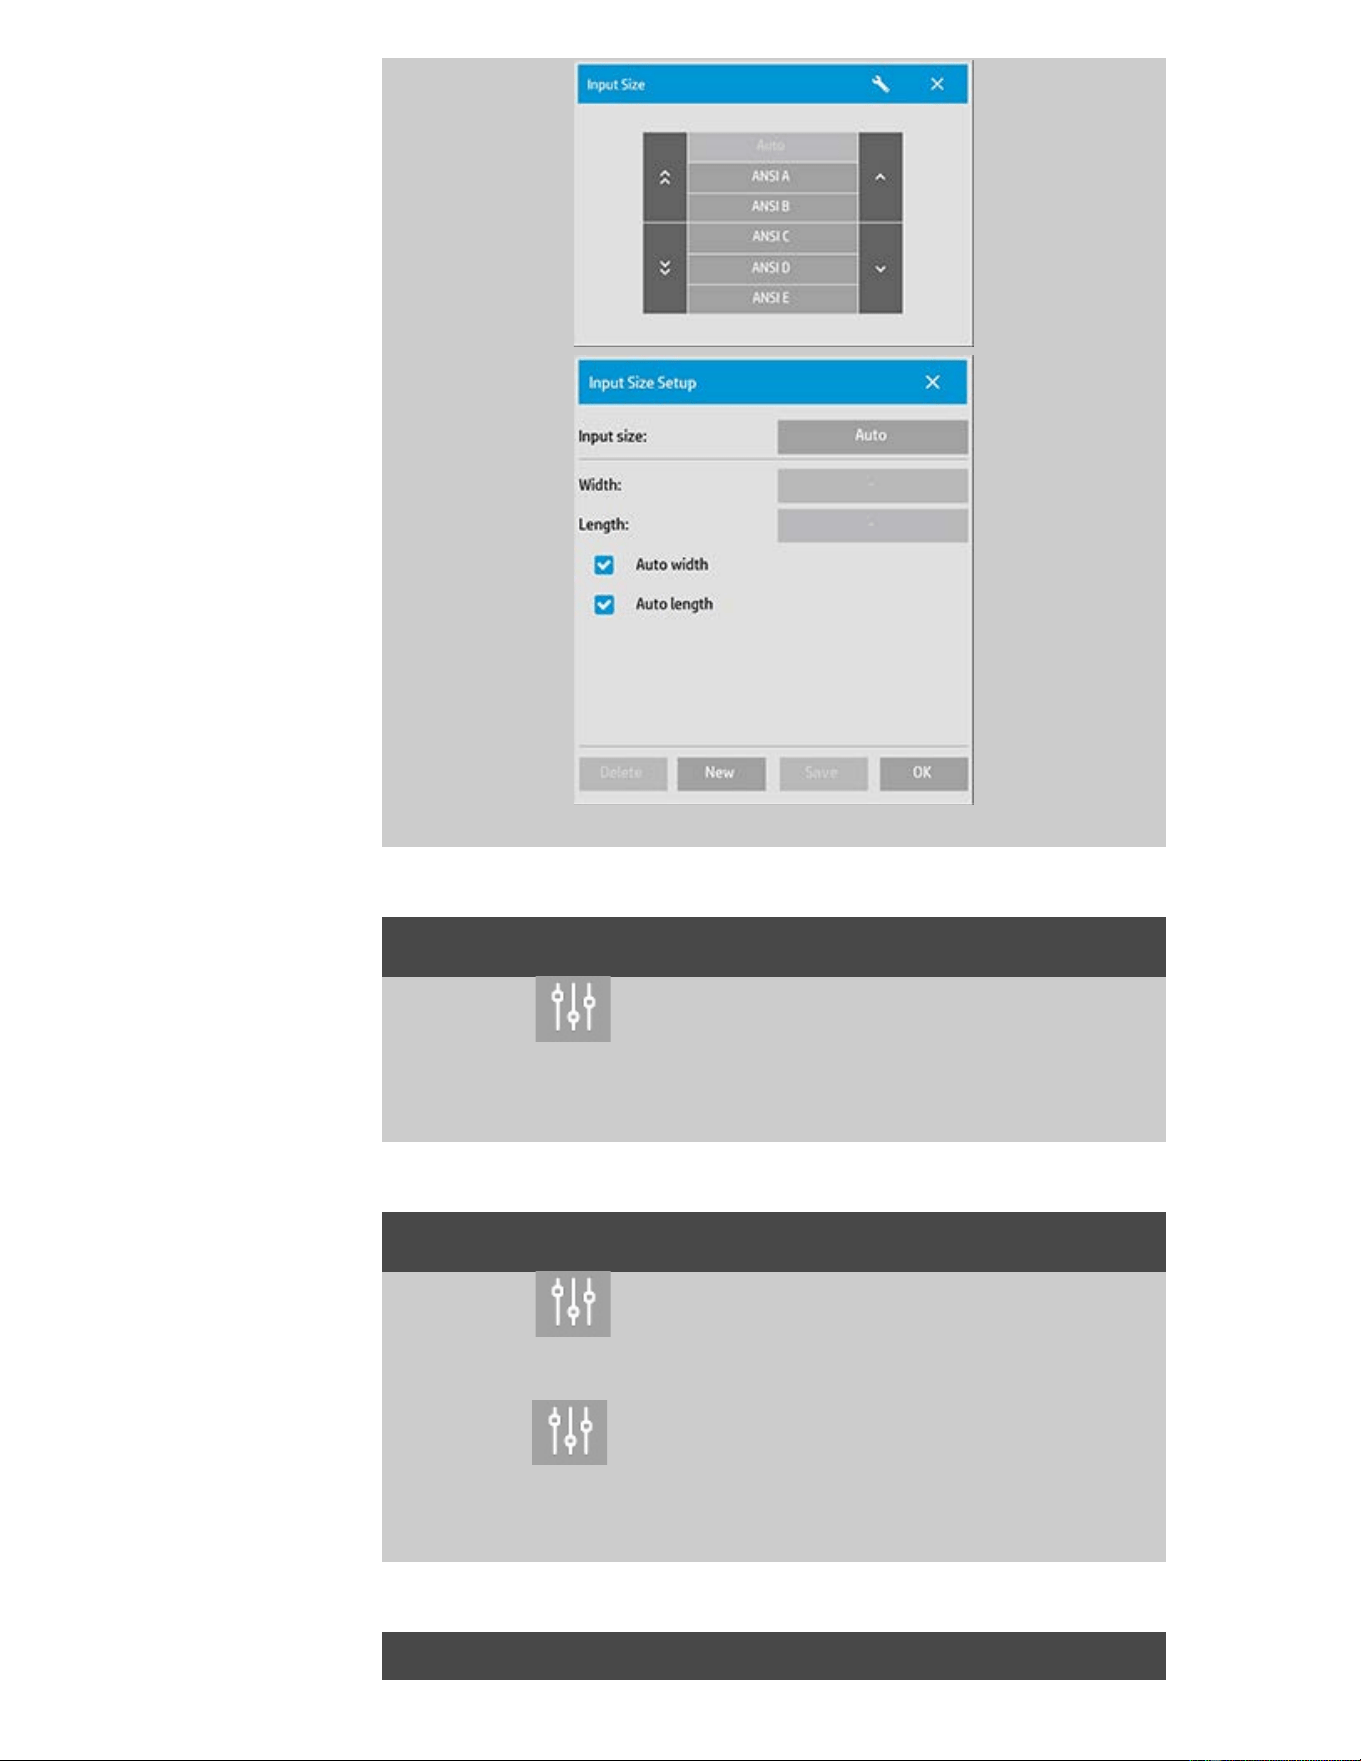
you are here: welcome how do I...? set the input size
HP Pro Scanner
how do I...?
the problem is...
alphabetical index
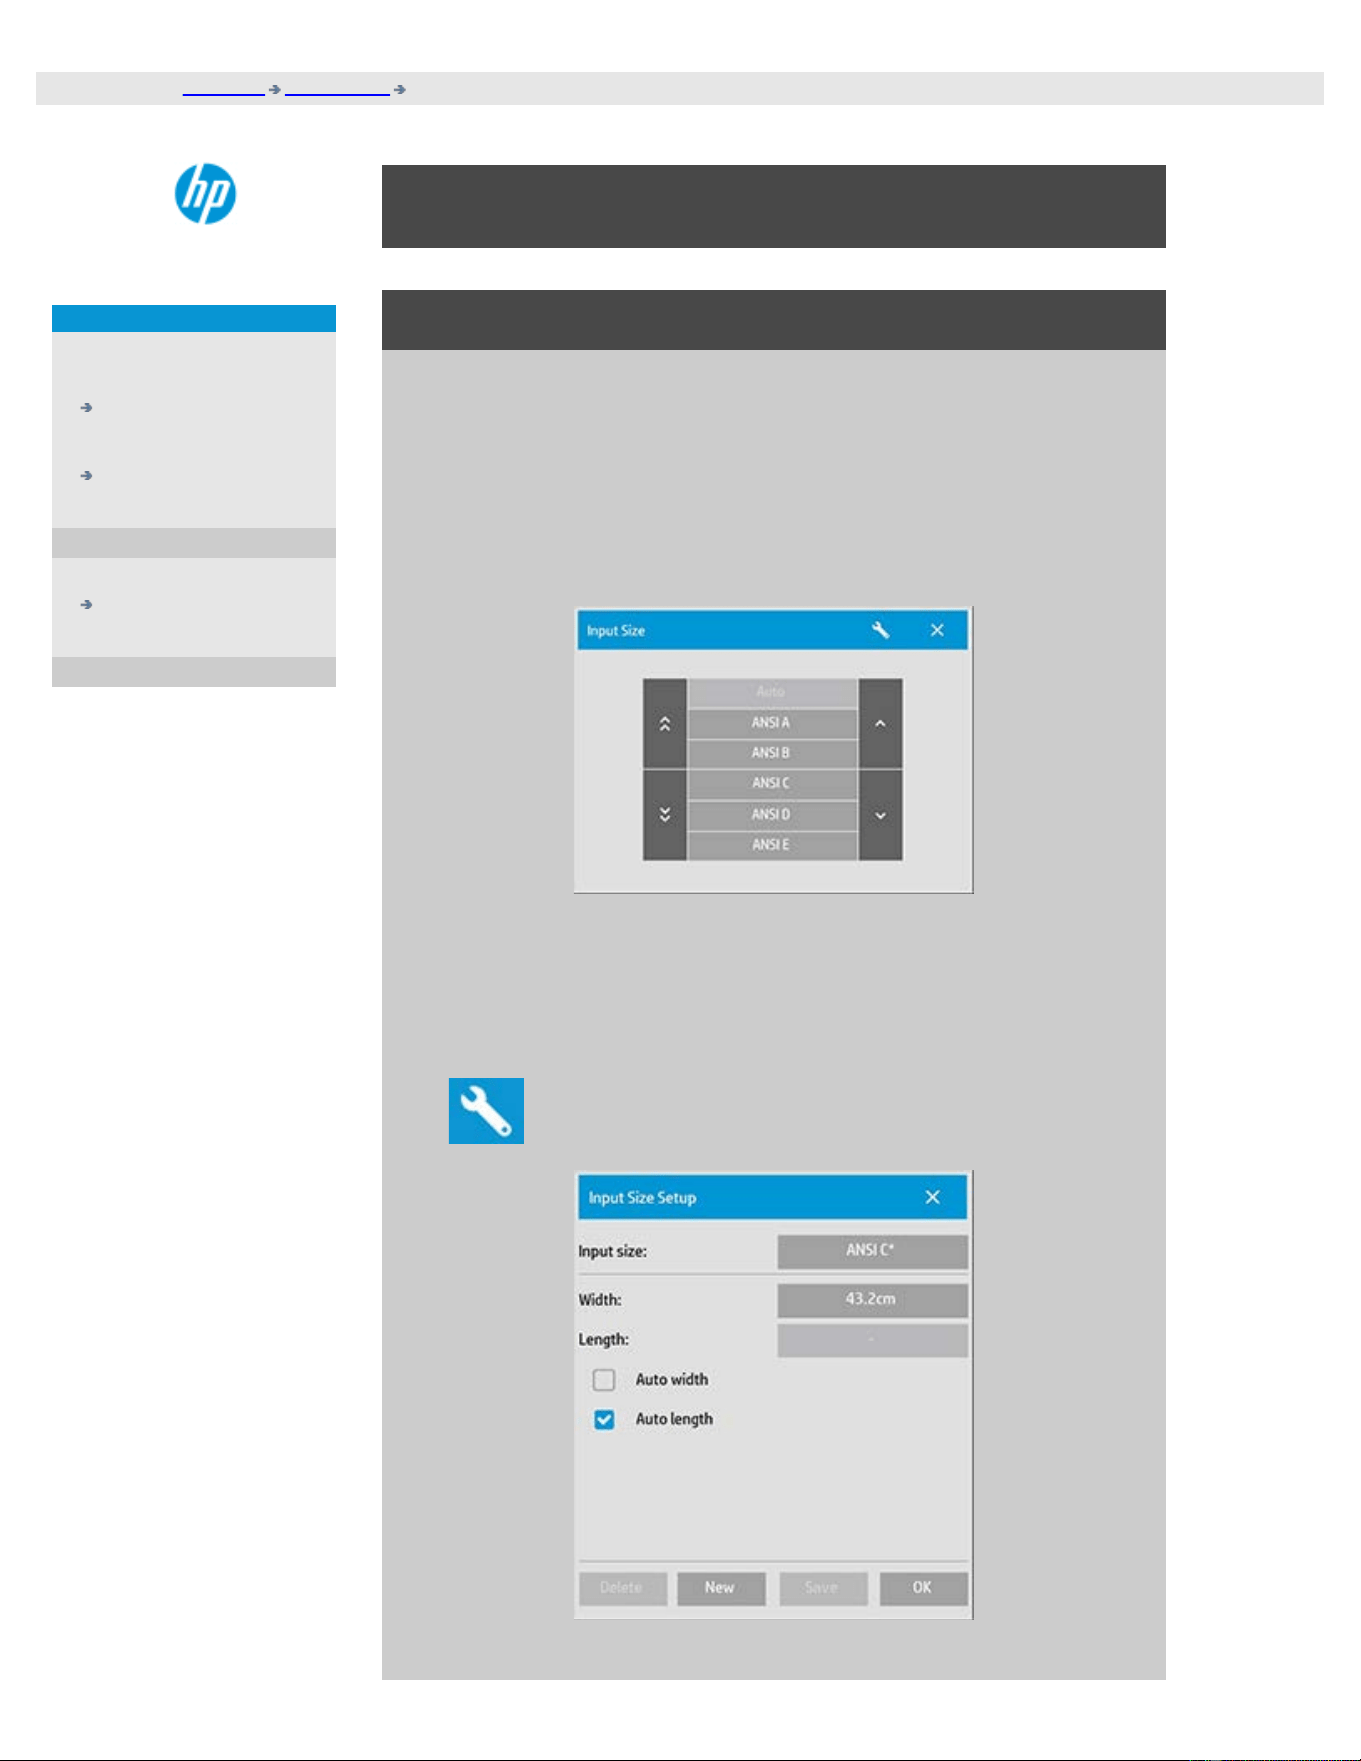
how do I set the input size?
to select the input size...
1. Press the Copy tab if performing a copy job or Scan tab if
performing a scan-to-file job.
2. Press the Input size button (Copy tab) or Size button (Scan tab)
to open the input size menu.
You can use Auto size detection for input size, standard sizes or
custom size presets. Press the dialog's Input size button to display
the list of available sizes.
3. Select an input size or use the Tool button to open the Input
size setup dialog.

4. To set the input size you can:
Specify the width and length. The original's width can be read
off the ruler at the scanner's insertion slot.
Select Auto Width and/or Auto Length to let the scanner detect
the physical input width and/or length of the inserted
document.
Press the dialog's Input size button to display the list of
available sizes.
Both Auto Width and Auto Length can be applied for total input size
detection. Automatic size detection works through a prescan of the
original and copying thus requires more time than with manual size
settings.
5. Press OK to return to the main (Copy or Scan) settings.
You can also save your settings i a new Size Preset. See how do I
create a custom paper size.
You can also use a scale factor to determine the output size. See:
...how do I set a scaling factor
See also:
...how do I set the output size?
printing instructions legal information
© Copyright 2012, 2015 HP Development Company, L.P
you are here: welcome how do I...? set the output size
HP Pro Scanner
how do I...?
the problem is...
alphabetical index
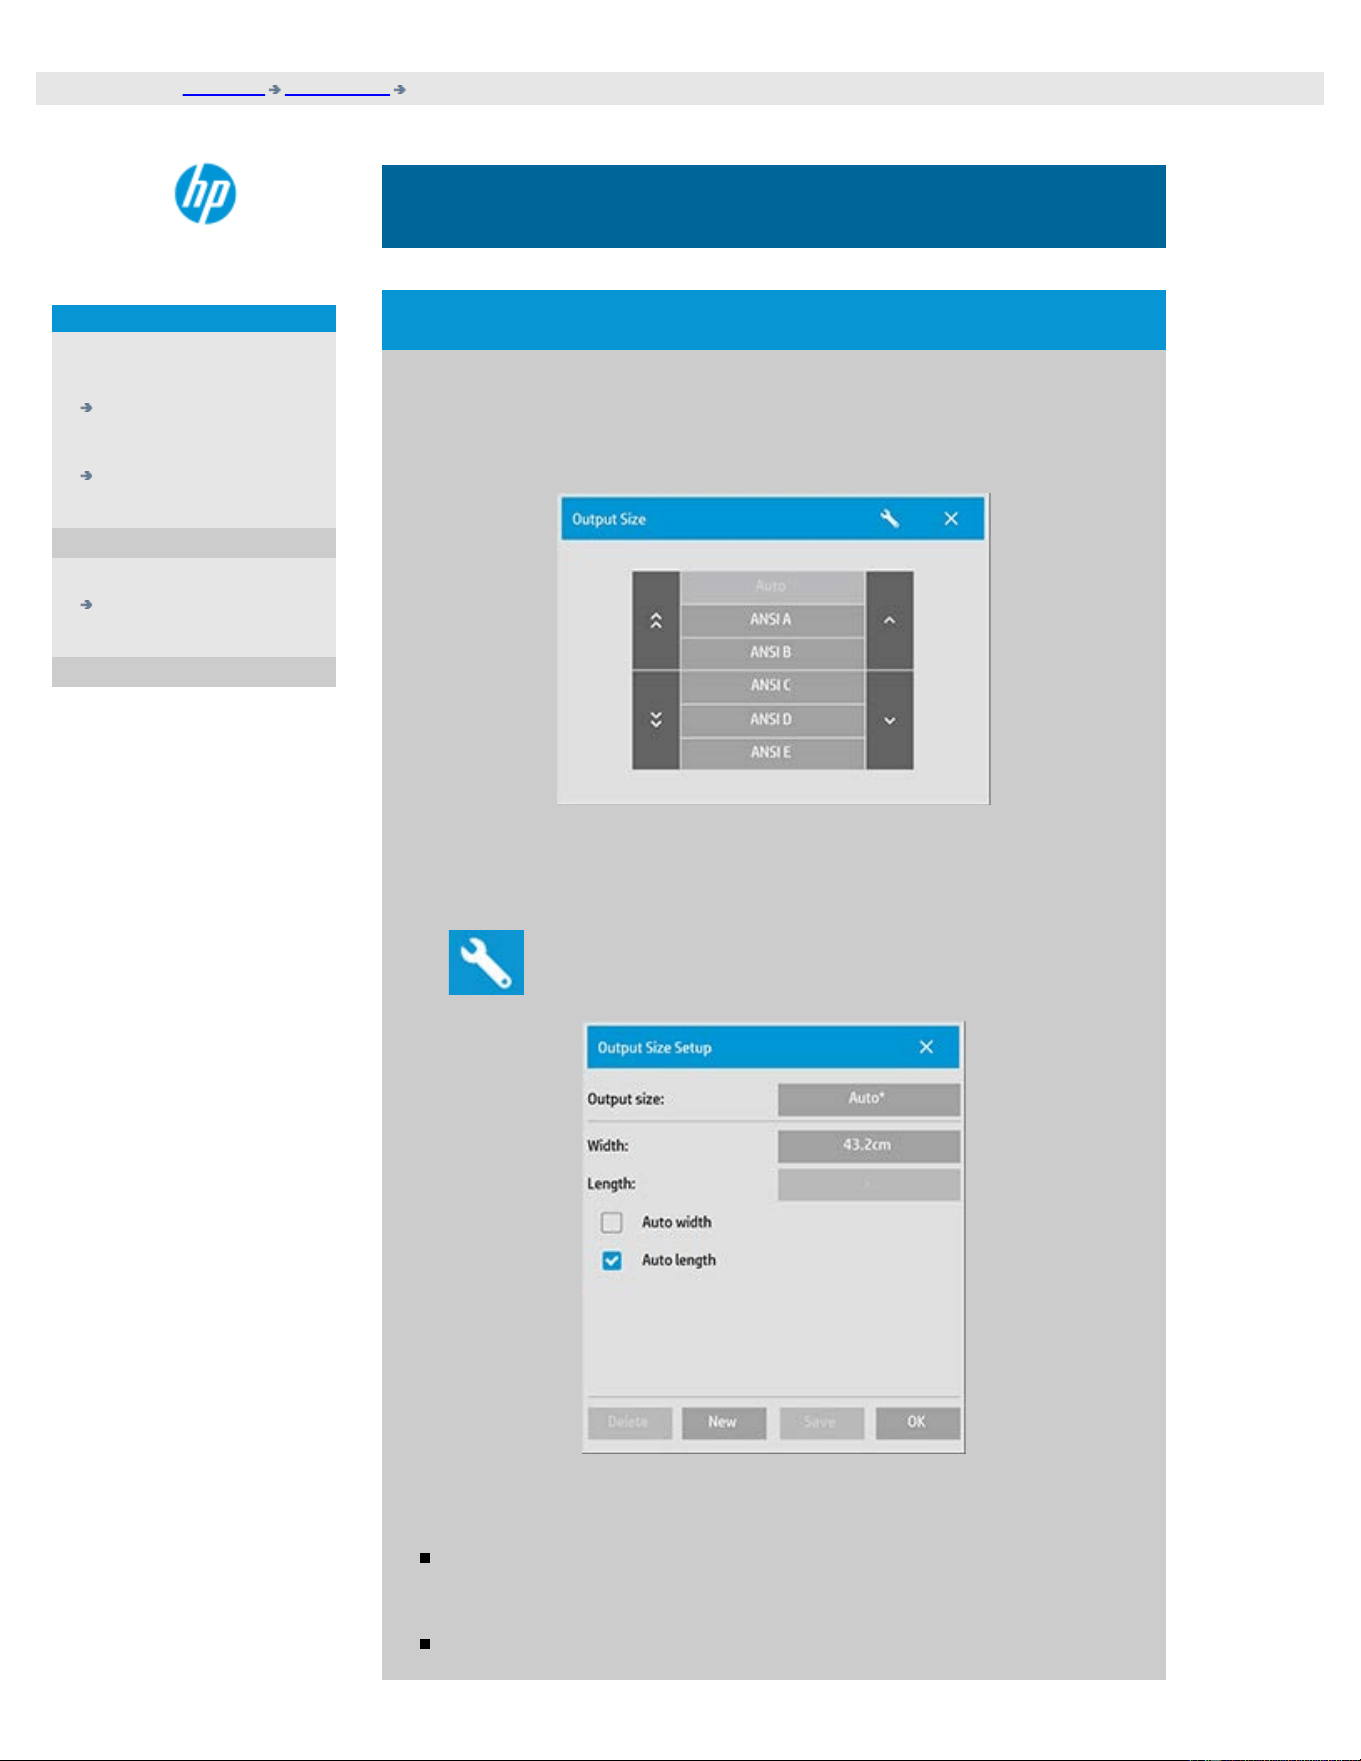
how do I set the output size?
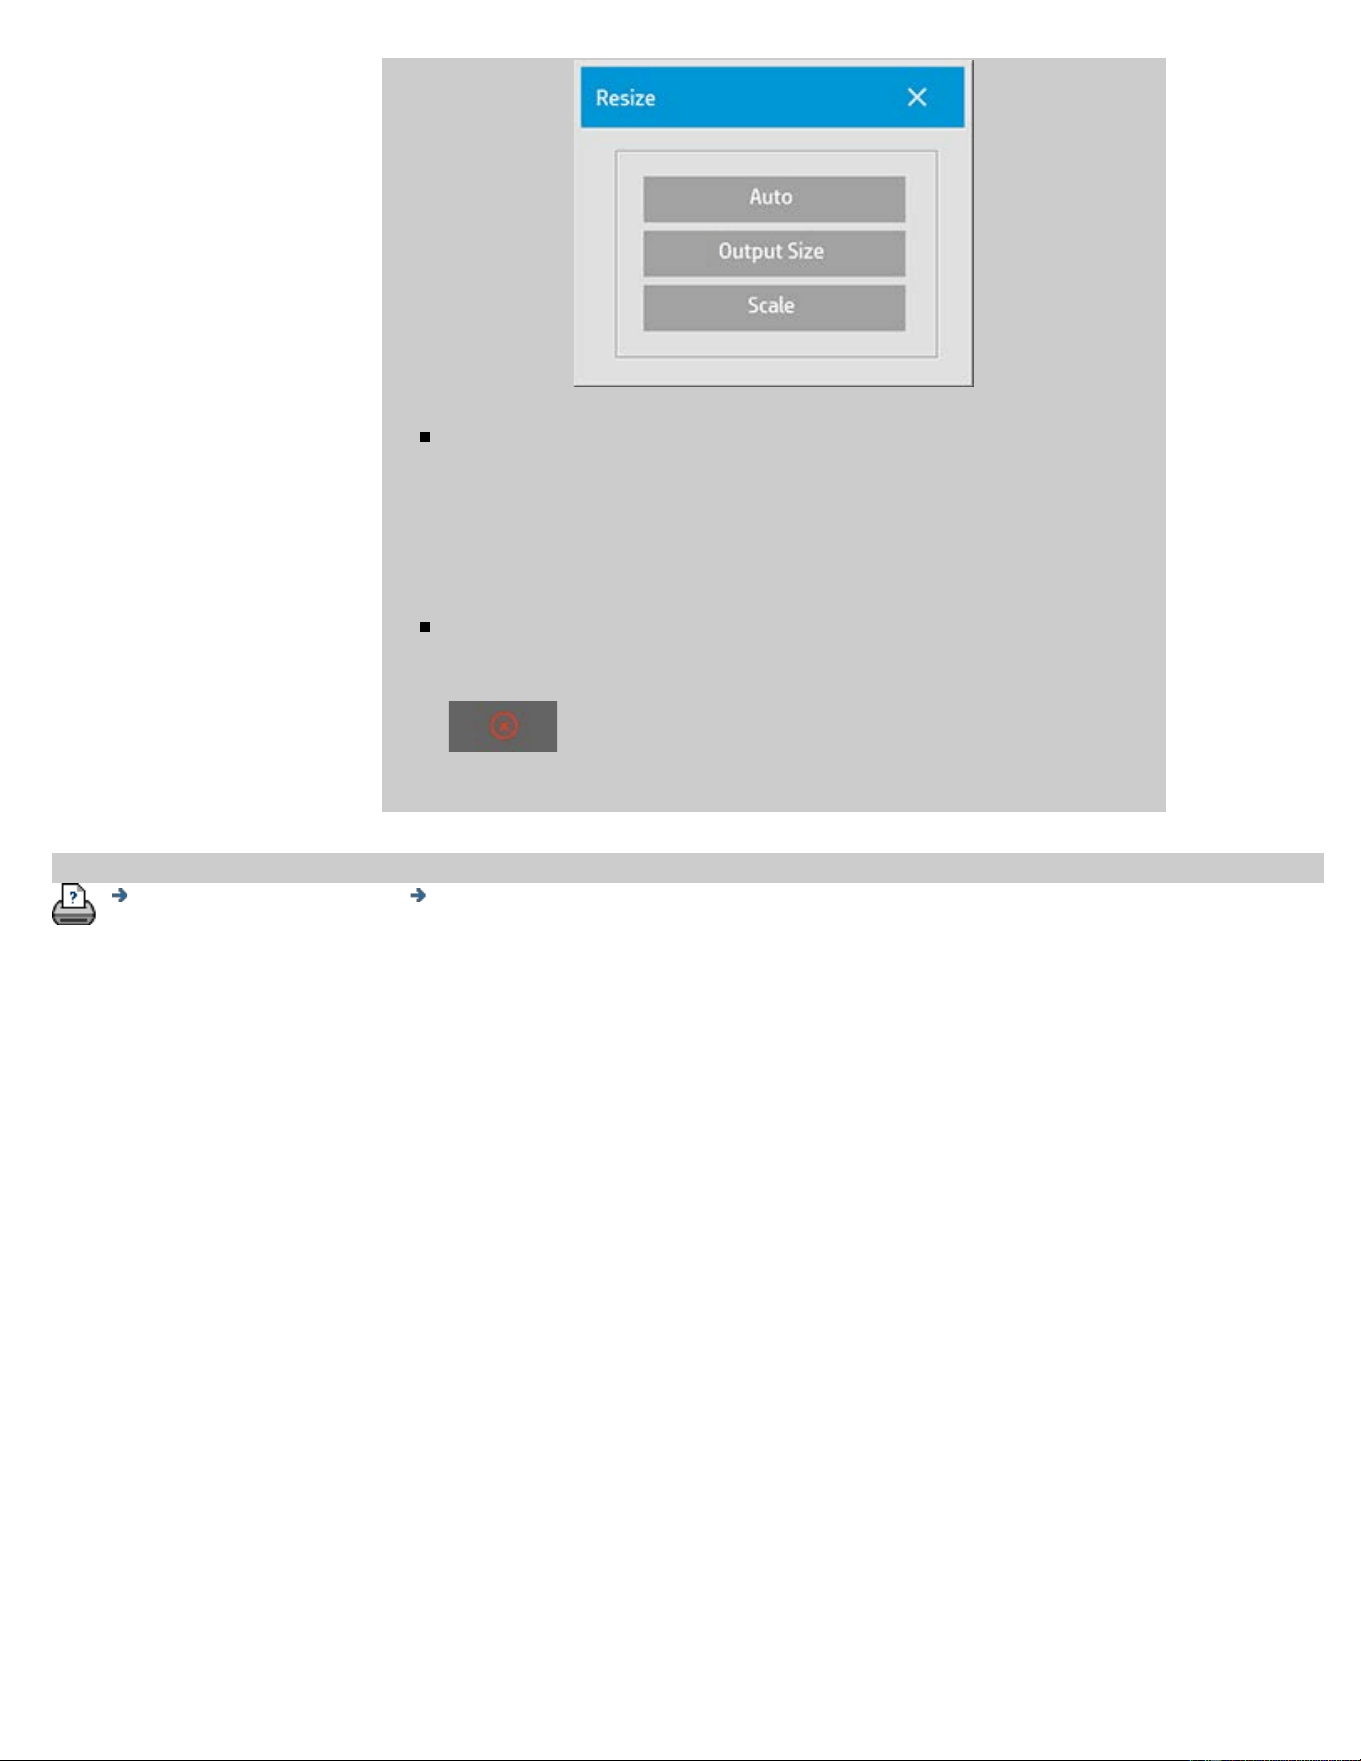
to select the output size...
1. If in the Copy tab - Press Output size->Output Size to open the
Output size menu. If in the Scan tab, press Resize->Size.
You can use Auto size, standard sizes or custom size presets.
2. Select an output size or use the Tool button to open the Output
size setup dialog.
3. To set the output size you can:
Select Auto if you want the program to take the input size and
use it also as the output size for creating a 1:1 copy.
Select standard sizes from the list as your output size.

You can create custom sizes and save them as presets. You can
specify the Output size by setting the Width and Length. Press
the tool button to open the Output size setup dialog.
4. Press OK to return to the Copy tab.
You can also use a scale factor to determine the output size. See:
...setting a scale factor
See also:
...how do I set the input size?
printing instructions legal information
© Copyright 2012, 2015 HP Development Company, L.P

you are here: welcome how do I...? scale copies
HP Pro Scanner
how do I...?
the problem is...
alphabetical index
how do I set a scale factor?
to scale copies or images with scan-to-file ...
1. After making your input setting: If in the Copy tab press Output size
-> Scale. If in the Scan tab, press Resize -> Scale. These actions
will display the list of standard or customized scaling factors
predefined in your system.
2. Select the Scale value that fits your intentions. A Scale factor of
100% makes a 1:1 duplicate. Below 100% reduces the image
and above 100% magnifies it.
3. If you need to define a new scale factor: select the Tool button
to open the Scale setup dialog. Here you can manually set a
scale factor with the Value button.
4. To save a new scale factor by adding it to the list of predefined
scale factors - Press the New button to give the new scale
factor a name and the Value button to enter its value. Press the
Save button to add it to the list.
TIP: Make a fast miniature version of your big copy by setting the Scale
factor to 25%.
printing instructions legal information
© Copyright 2012, 2015 HP Development Company, L.P
you are here: welcome how do I...? set the number of copies
HP Pro Scanner
how do I...?
the problem is...
alphabetical index
how do I set the number of copies?
to set the number of copies...
Wide-format copy jobs can be time-consuming. This option allows
you to leave the system working overnight or frees you to take care
of other tasks.
1. Press the button labeled Copies in the Copy tab if you want to
make more than one copy of the loaded original.
2. Enter the number of copies in the edit field.
printing instructions legal information
© Copyright 2012, 2015 HP Development Company, L.P
you are here: welcome how do I...? use the previewing tools
HP Pro Scanner
how do I...?
the problem is...
alphabetical index
how do I use the previewing tools?
The Preview button loads a fresh preview of the copy each time it is
selected.
The image always uses the last settings made and the effects of the
settings will be visible in the new preview. This feature allows you to
fine-tune your settings as you watch them take effect before
committing the copy to print.
how to...
...display the whole image...
...zoom in on a specific area...
...zoom out from a selected area...
...set one-to-one pixel viewing...
...resize the paper frame...
...move the image...
...position the paper frame...
...align the image...
to display the whole image...
You can use the Zoom All tool to view large format originals
in the preview window. No matter what zooming level you
start from, the Zoom All tool resizes the image so that it
exactly fits in the preview window.
to zoom in on a specific area...
Use the Zoom In tool when you need to view details for
making enhancement settings and for aligning. Zooming
takes place immediately with the zoom axis in the center of
the preview window. This means you may need to move the
image to center on a specific area before zooming. This is
done with the Move Image tool (see below). If you need to
enlarge the image further, then continue to press the Zoom
In button until you get the required level of detail in the view.
to zoom out from a selected area...
The Zoom Out tool decreases the image size in the preview
window. If you need to decrease the image further, then
continue to press the Zoom Out button until you get the
required field of view.
one-to-one pixel viewing...
Use the 1:1 tool to view the image with one scanned pixel
shown as one screen pixel. Note that the actual copy/scan
may show additional details as the preview is a low-
resolution view. The preview resolution can be set through
Setup Tab > > Scanning. Instructions..
to resize the paper frame...
The resize paper frame tool lets you resize the
paper frame interactively in the preview window.
When activated, the Resize Paper Frame Tool
partitions the areas around the paper frame into
sections. When a section is touched, the closest
frame side or corner is resized to the new
position. You can also drag the edges to resize
the frame.
to move the image...
There are two ways to use the move image tool:
Dragging: Dragging anywhere in the image window.
Imagine you are gripping hold of the image and
dragging it around inside the window.
Centering: Touch a point on the screen and that point
will then be centered in the preview window. The
image shifts so that the point you selected
becomes repositioned in the center of the screen.
This method is especially useful when zooming in
on image details. It lets you pick out important
spots and center on them before zooming in.

to position the paper frame...
There are three ways to use the position paper frame tool:
Dragging: Dragging anywhere on the screen. Imagine
you are gripping hold of the frame and dragging it
around over the image.
Centering: Touch a point on the screen and that point
becomes the new center for the paper frame. The
frame shifts so that it positions itself with the
point you selected directly in its center. This
method is especially useful when you are making
spot test strips for outputting on the printer. It
lets you continuously and rapidly reposition the
frame on important areas that you want tested.
Dragging the edges: This will resize the paper frame
and is an alternative to the Resize Paper Frame
tool.
to align the image...
The original may have been inserted slightly off balance and appears
crooked in the preview window. Correcting this does not mean you
have to reload the original and start again.
Use the perfectly aligned sides of the paper frame as references
when realigning.
Press the Align Left tool to tilt the image left.
Press the Align Right tool to tilt the image right.
printing instructions legal information
© Copyright 2012, 2015 HP Development Company, L.P
you are here: welcome how do I...? setup preferences
HP Pro Scanner
how do I...?
the problem is...
alphabetical index
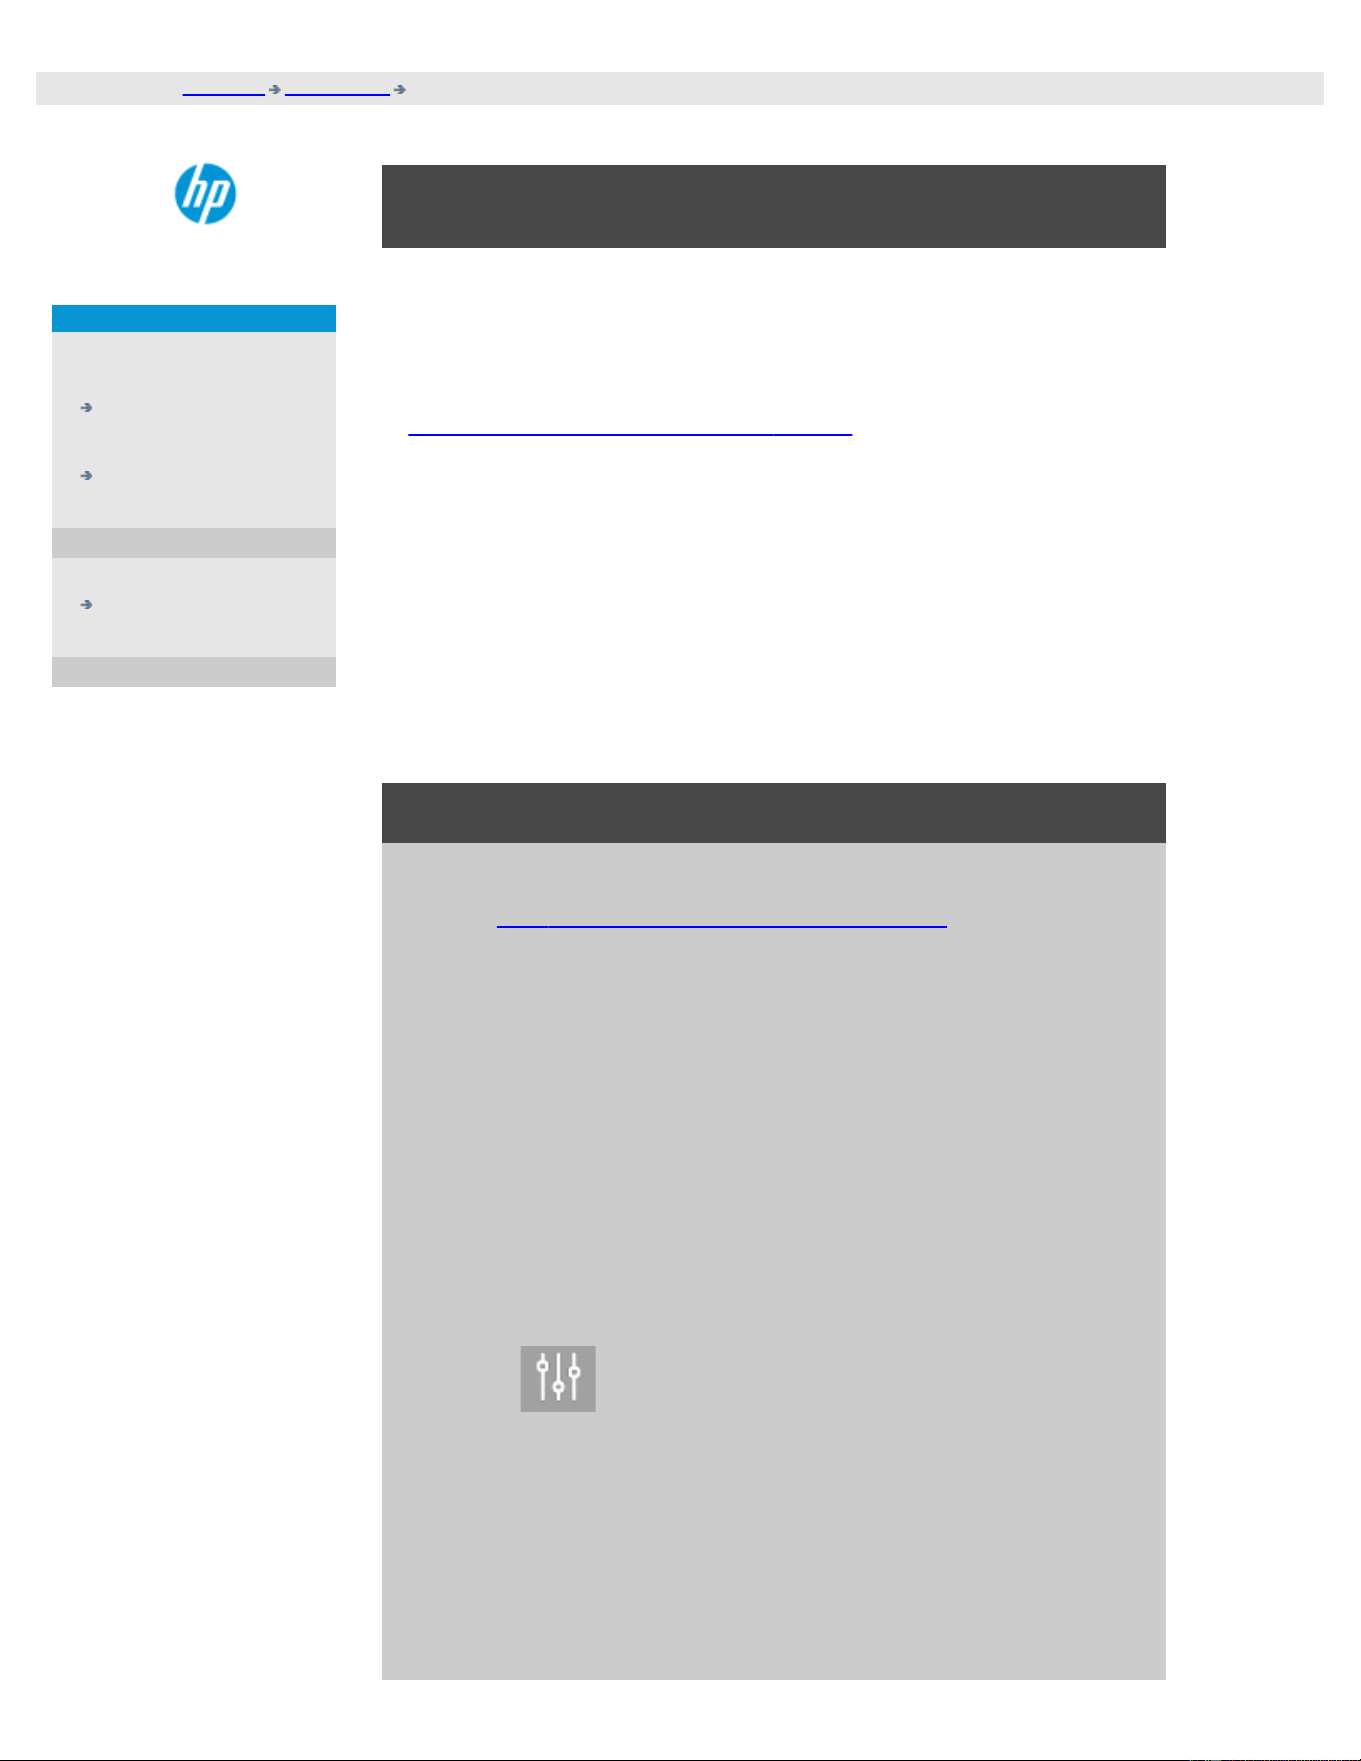
how do I set preferences?
scan and user interface options
1. Press the Setup tab.
2. Press > Scanning for setting scanner related options.
Press
> General for setting user interface options.
printing instructions legal information
© Copyright 2012, 2015 HP Development Company, L.P

you are here: welcome how do I...? scan to a file
HP Pro Scanner
how do I...?
the problem is...
alphabetical index
how do I scan to a file?
to scan to a file...
1. Place the document
with the intended
top edge forward
in the scanner
insertion slot.
2. Select the Scan tab.
Here you can set
various
characteristics of
the scan. These are
described in the
following steps.
Output settings such as
margins, layout, and
media profile can be
made later when you
print the file.
3. Select Color or B&W scanning.
4. Select the type of original template that best describes your
original. See also how do I make original template settings for
details on making additional special settings.
5. Set Lightness. The default Lightness value is set to zero which
works well with most documents. You can change this value to
make the copy lighter (positive value) or darker (negative
value) and compensate for dull or faded originals.
6. Set Scan Resolution. This is where you determine image
quality. You can set a custom dpi value, auto (program
determined based on the type of original), descreen (scanner's
optical resolution) or turbo mode. .
7. Use the Size and Resize options to determine the dimensions
of your scanned image. You can use Size: "Auto" and Resize:
None to keep the original's size. See ...how do I set the input
size and help on using the Resize option.
8. Set a destination folder or Scan-to-email as your File
destination.

9. Set the filename. The filename can be composed of entered
text and one or more automatic naming elements. A default
filename is set by the program. To change the default name,
press the File Name button and enter a new name.
Automatic file naming elements - To enter an element,
position your screen cursor in the name field and press the
element insert button. You can use the following automatic file
naming elements:
Counter <###>- increasing number series. Press the Insert
Counter button to add a counter to the file name. You can add
"#" chracters in the brackets. The number of “#” characters
defines the minimum number of digits that will be used. The
system will always examine the destination folder and start
numbering after the latest file name to avoid overwriting any
files already there. The system will add digits if necessary.
Example: if you enter as a file name: dogimage<###> the
system, for each scan, will create files dogimage001,
dogimage002… dogimage999… dogimage1000… and so on.
You can also enter an exact counter number to begin saving
files with a specific name - resuming the series from that point
forward.
Example: if you enter as a file name: dogimage<015> the
system, will begin to create files dogimage015, dogimage016,
dogimage017… and so on.
Date <DATE>- The current date string in yyyymmdd format.
Press the Insert Date button to add the current date to the file
name.
Time <TIME> - The current time string in hhmmss format. Press
the Insert Time button to add the current time to the file name.
An example of the next expected file name will be displayed
under the file name edit field so you can control your file name
settings.
Automatic file naming can be used with single file scanning but
is especially useful with batch scanning.
10. To modify the output file format, press File Format. Various
options are available for each format.
11. To modify the Folder group, press the File destination button.
In the Change Folder dialog you can:
use the arrows to select the folder on your disk.
use the folder up button (marked "..") to move up a level.
create a new folder in the current folder with the New Folder
button.
press a folder name to move your search to that folder's level.
Network destinations: Per default, the browse dialogs will display
only local drives and folders. You can however add network locations
to the system. Once added, you can use a network location and
underlying folders as destinations for scan-to-file jobs. Read the
help "how do I scan to and access a network folder?" for instructions.
Click OK in the Change Folder dialog when you have selected the
destination folder for your file.
Shared Files: Files to be shared across the network should be placed
in the D:\images folder. Once a file is saved in this folder it can be
accessed throughout the network, from any computer running any
operating system; see how do I access shared files.
12. Press the Scan to file button to start the scan-to-file process
and save the image.
printing instructions legal information
© Copyright 2012, 2015 HP Development Company, L.P
you are here: welcome how do I...? print from files
HP Pro Scanner
how do I...?
the problem is...
alphabetical index
how do I print from files?
Printing your files is set up and controlled through a convenient Print
List.
to print from files
1. Press the Print tab.
The Print list displays the files
currently selected for printing.
If the list is empty or it needs
changing, then you will have to
select files and build your list.
See:
...how do I set up a print
list?
2. Press to make quality settings (print from file). See how
do I set output quality.
3. Check or change your current Setup tab settings. The current
Setup tab settings such as Margins, Layout, Printer and Media
Profile will apply to the whole print job.
4. Press the Print button to send the listed files to the printer.
The scanner software's Print from File functionality is designed
specifically for printing files created with the scanner software's Scan
tab and is not recommended for outputting files from other sources.
printing instructions legal information
© Copyright 2012, 2015 HP Development Company, L.P
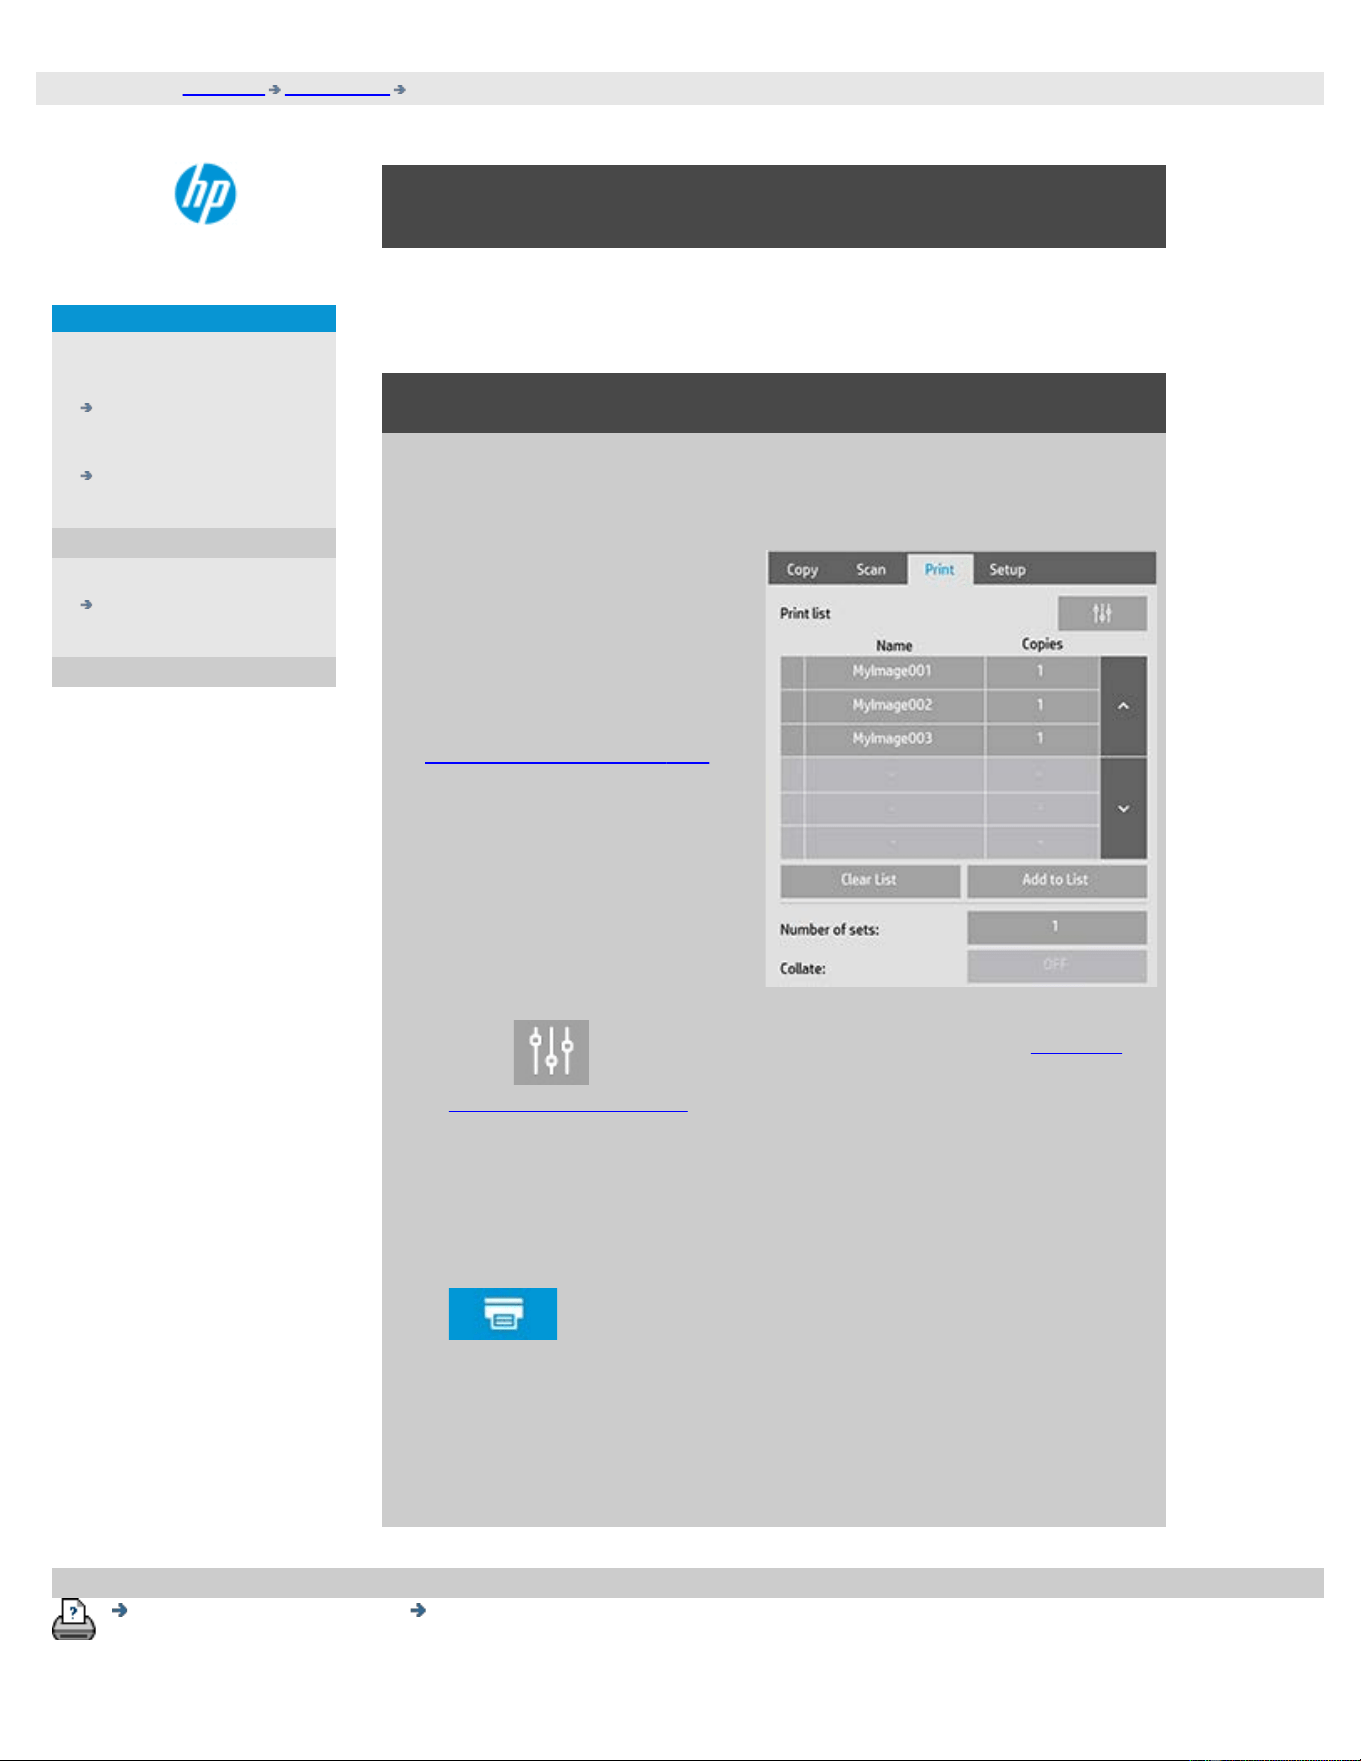
you are here: welcome how do I...? set up a print list
HP Pro Scanner
how do I...?
the problem is...
alphabetical index
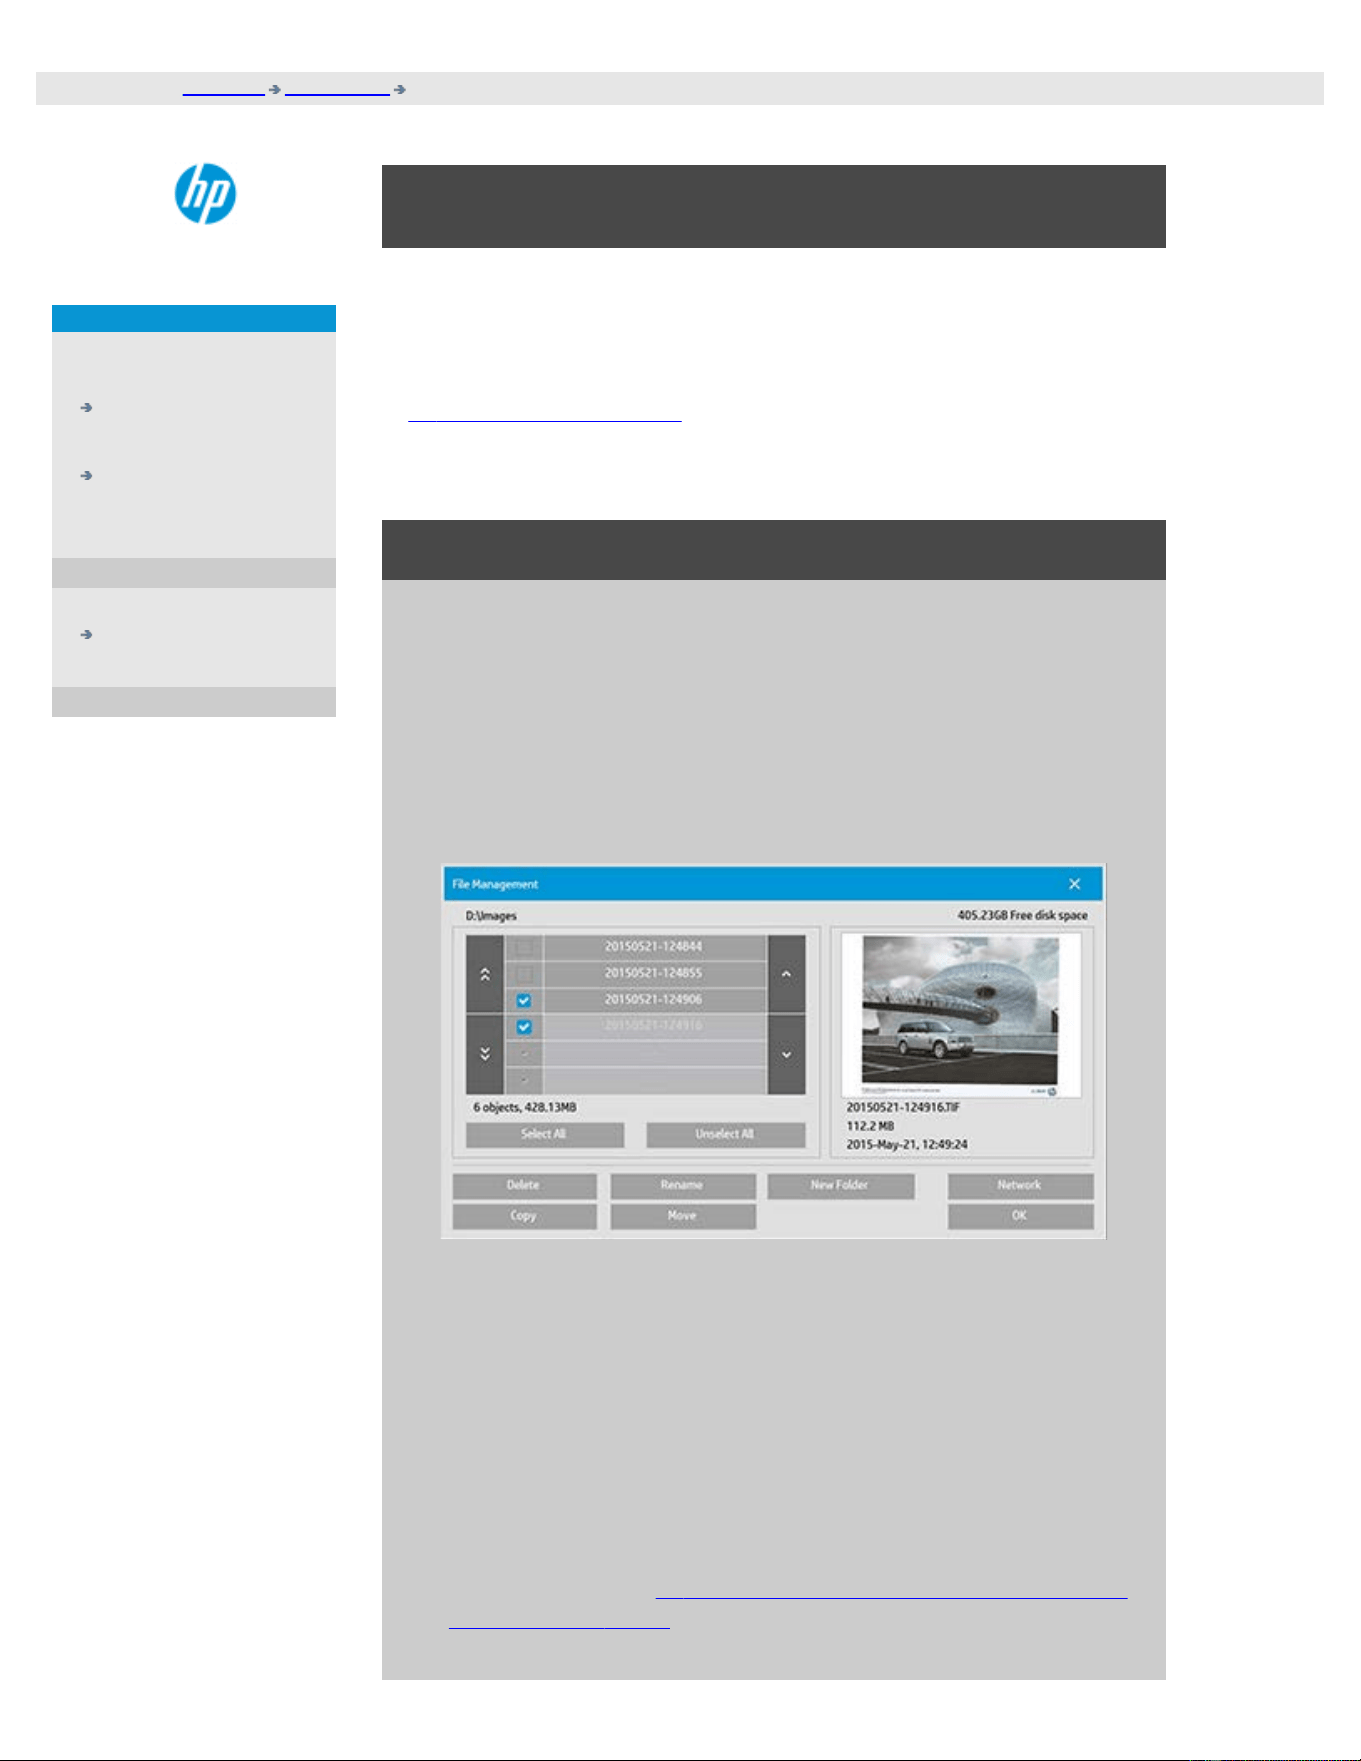
how do I set up a print list?
File Printing is set up and controlled through a Print List that is accessible
through the Print tab. This help section presents instructions for setting
up your list and deleting files from your disk. See also:
...to maintain the print list... for instructions on applying settings to
individual files on the list.
setting up the print list
1. Press the Print tab.
2. You can use the Clear List button to start afresh with an empty
list.
3. Press the Add to List button to reach the system File
Management dialog shown below:
Only a folder's image files will be shown.
4. You select files for addition to the print list by checking the box
to the left of the file name.
NOTE: Only printable file formats can be accessed through "Add
to List" (no DWF or external PDF).
5. Use "Select All" and "Unselect All" for multiple selections of files
in the current folder.
6. See the help under to browse, preview and select files in the file
management dialog for more instructions on selecting files.

7. You can also move, copy rename or delete files while you are
creating your list. See the help under how do I manage image
files on my system for more instructions
8. NOTE: If an inactivity timeout is applied to a network connection
then additional logon information could be required.
See more in: How does the Inactivity timeout for a network
connection work?
9. Click the OK button to add the checked files to the print list and
return to the Print tab. In the Print tab you can see the print list
with the files inserted.
You can always go back and add more files from other folders with
the Add to List button.
printing instructions legal information
© Copyright 2012, 2015 HP Development Company, L.P
you are here: welcome how do I...? maintain the print list
HP Pro Scanner
how do I...?
the problem is...
alphabetical index
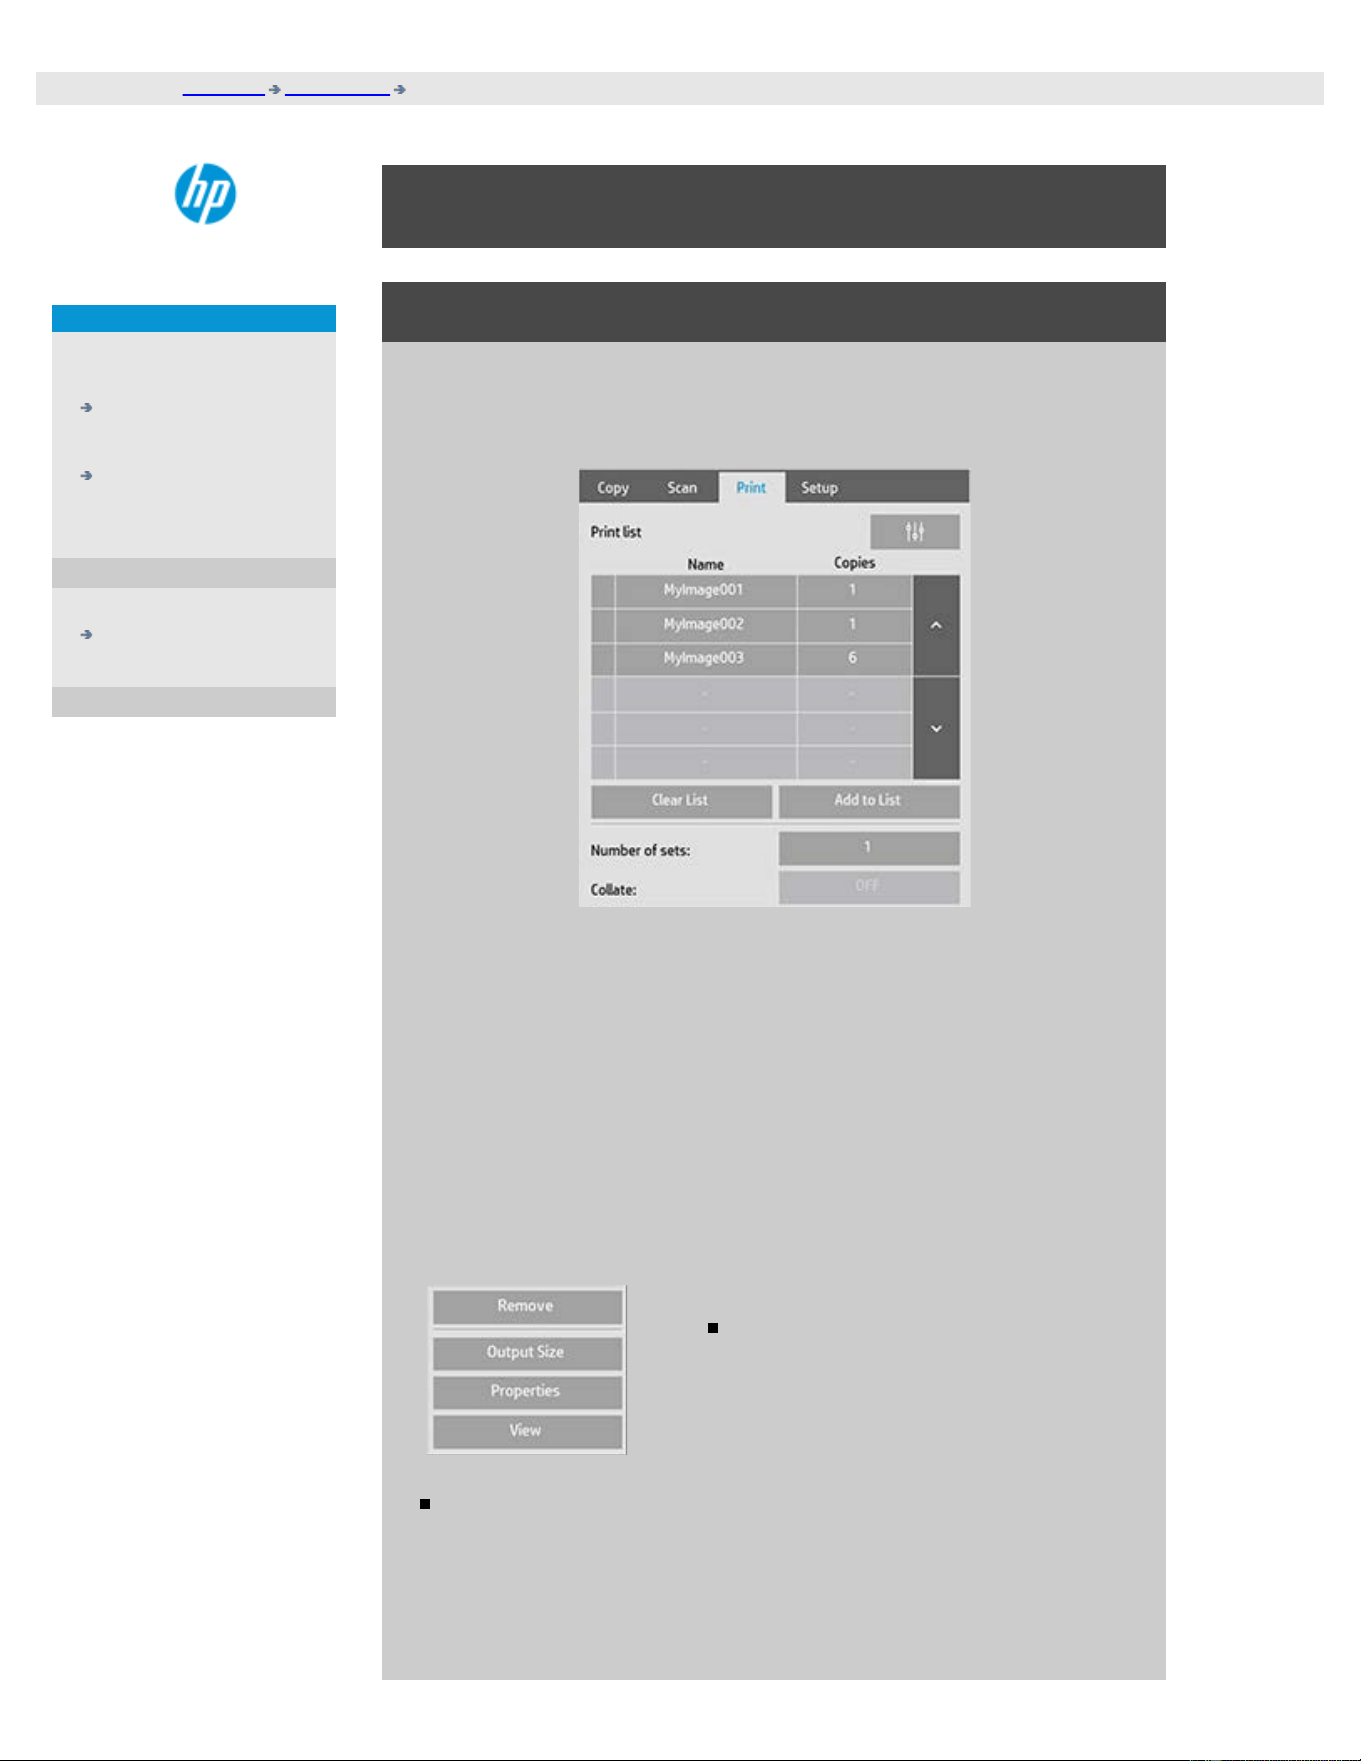
how do I maintain the print list?
to maintain the print list...
In the Print tab dialog, you can make settings that apply to the files in
your list and the whole print job before committing the job to
printing.
1. Set the number of copies for an individual file by pressing the
Copies button to the right of the file name.
2. Set the number of times you want your whole list printed with
the Number of sets button.
3. Set Collate ON if you have several number of sets to be printed
as collated sets.
4. Select (press) a file name in the list to change the file's settings.
The following context menu appears.
Remove: removes the selected file
from the list (not from your disk).
Output Size: selecting this option takes you to a dialog similar to
the Input Size, Output Size and Scale button group found on
the Copy Tab. The file's Input size is retrieved from information
in your file and you have the option to rescale the original size
in the output copy. Use Output size or Scale to resize the copy.
Properties: displays the file's properties —full path with name,
size, type and creation date. You can change the order of the
file in the print list by pressing the dialog's Move up and Move
down buttons. Check the Delete after print option if you want
the scanner software to delete the file from your disk
automatically.
View: sends a preview of the file to the preview window.
Previewing can be canceled midway by pressing the Stop
button.
printing instructions legal information
© Copyright 2012, 2015 HP Development Company, L.P
you are here: welcome how do I...? create/delete/disable an account
HP Pro Scanner
how do I...?
the problem is...
alphabetical index
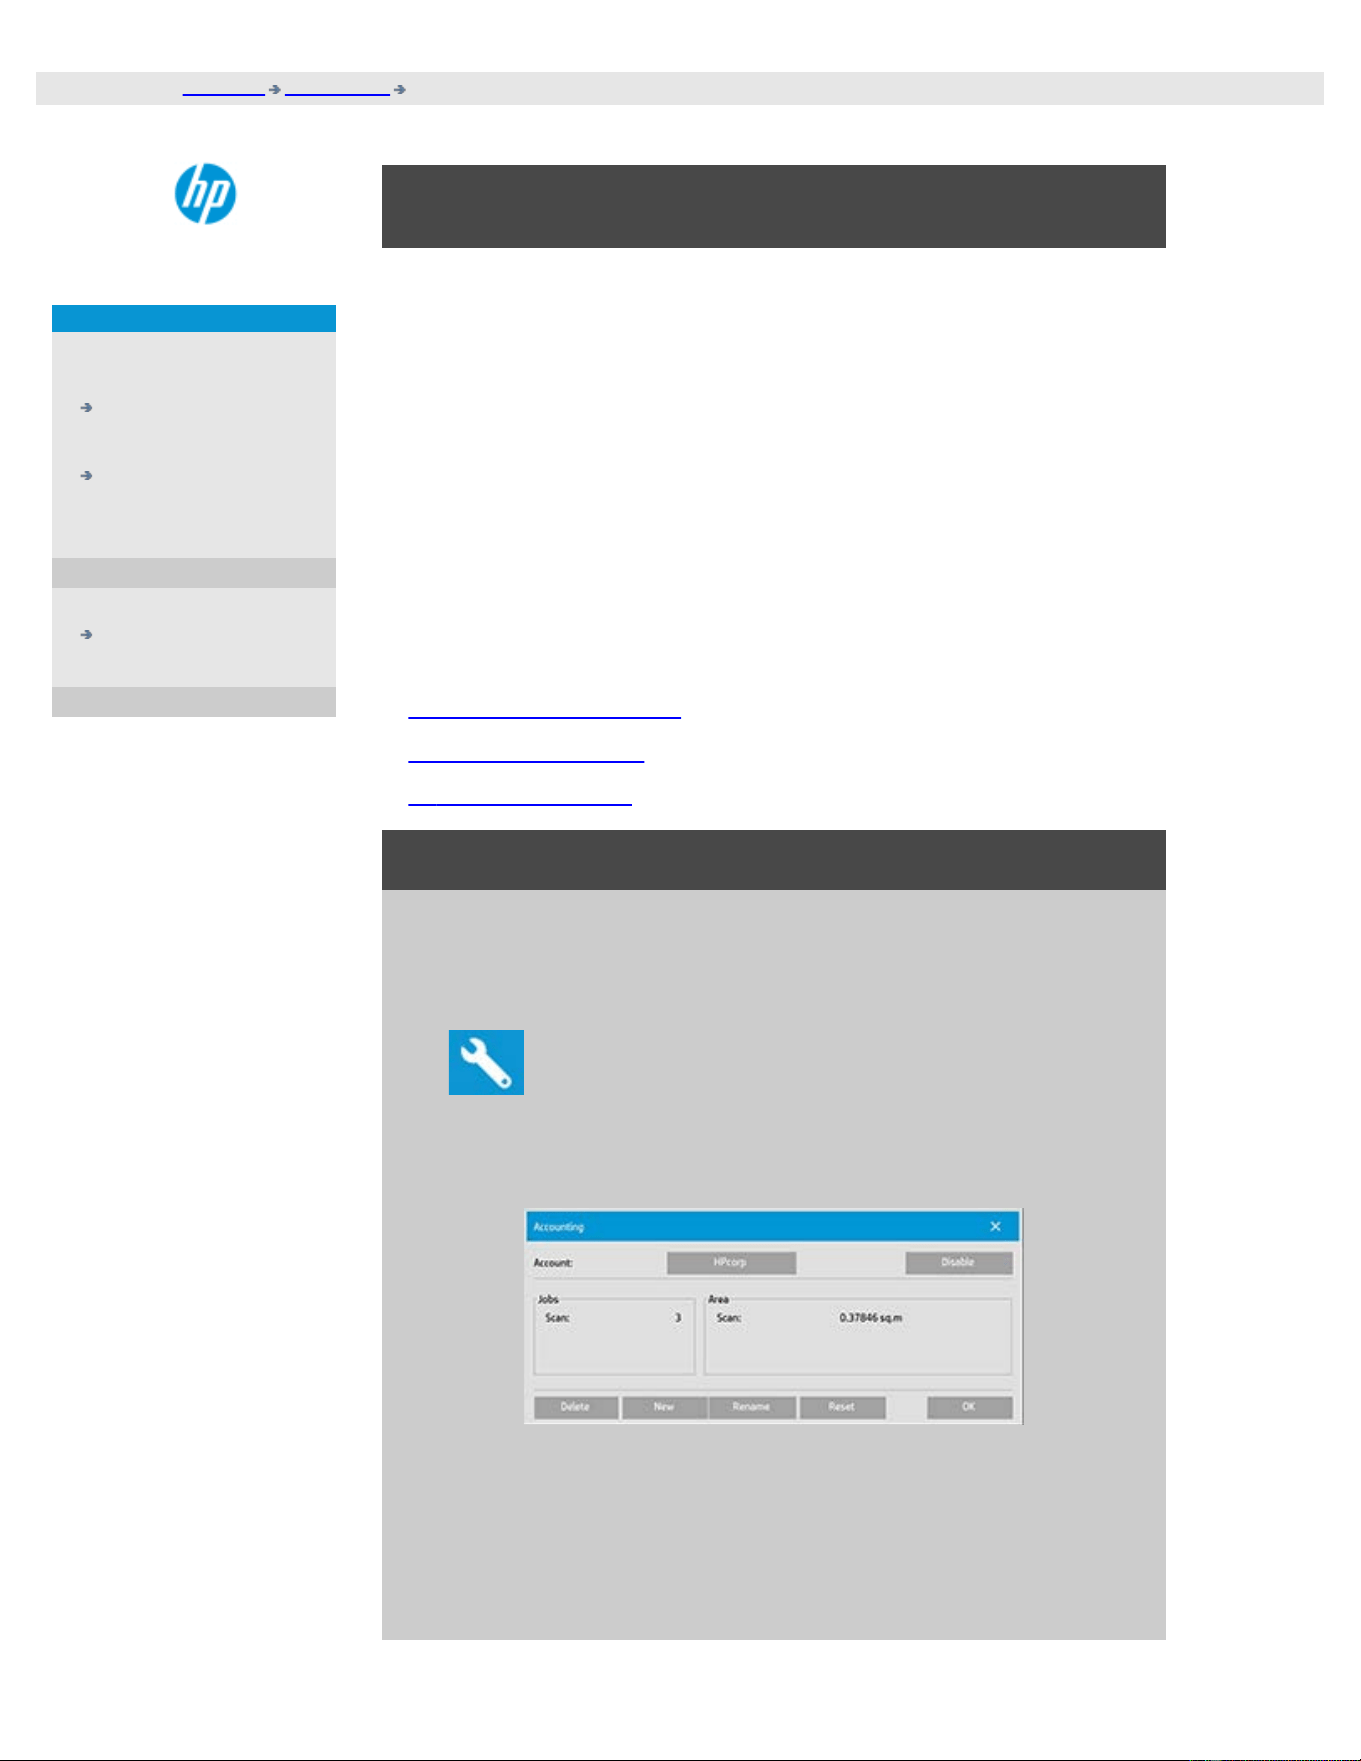
how do I create/delete/disable an account?
The Accounting feature helps keep track of your Copy activities. Only one
account (besides the Total account) can be active at a time. You can view
the scanning activity information for your account in the account dialog.
The account name will follow a copy job to the printer and you can then
reference the account's name to view the account-print-information on
the printer or network print server (if supported on printer model – see
the printer’s documentation).
NOTE: If the Administrator password has been setup and activated, you
will be prompted to enter it before being able to rename, reset, create
and delete accounts.
Select a topic...
...to create a new account...
...to delete an account...
...to reset an account...
to create a new account...
1. Press the Setup tab.
2. Press the Account button. Press the Tool button
.
3. In the Accounting dialog, press the New button. Enter the
administrator password if prompted.
4. Enter and accept a name for your new account.
The new account will automatically become the currently active
account. Every time you press the Copy button, or the Scan to file
button the Account dialog list opens for you to select an account.
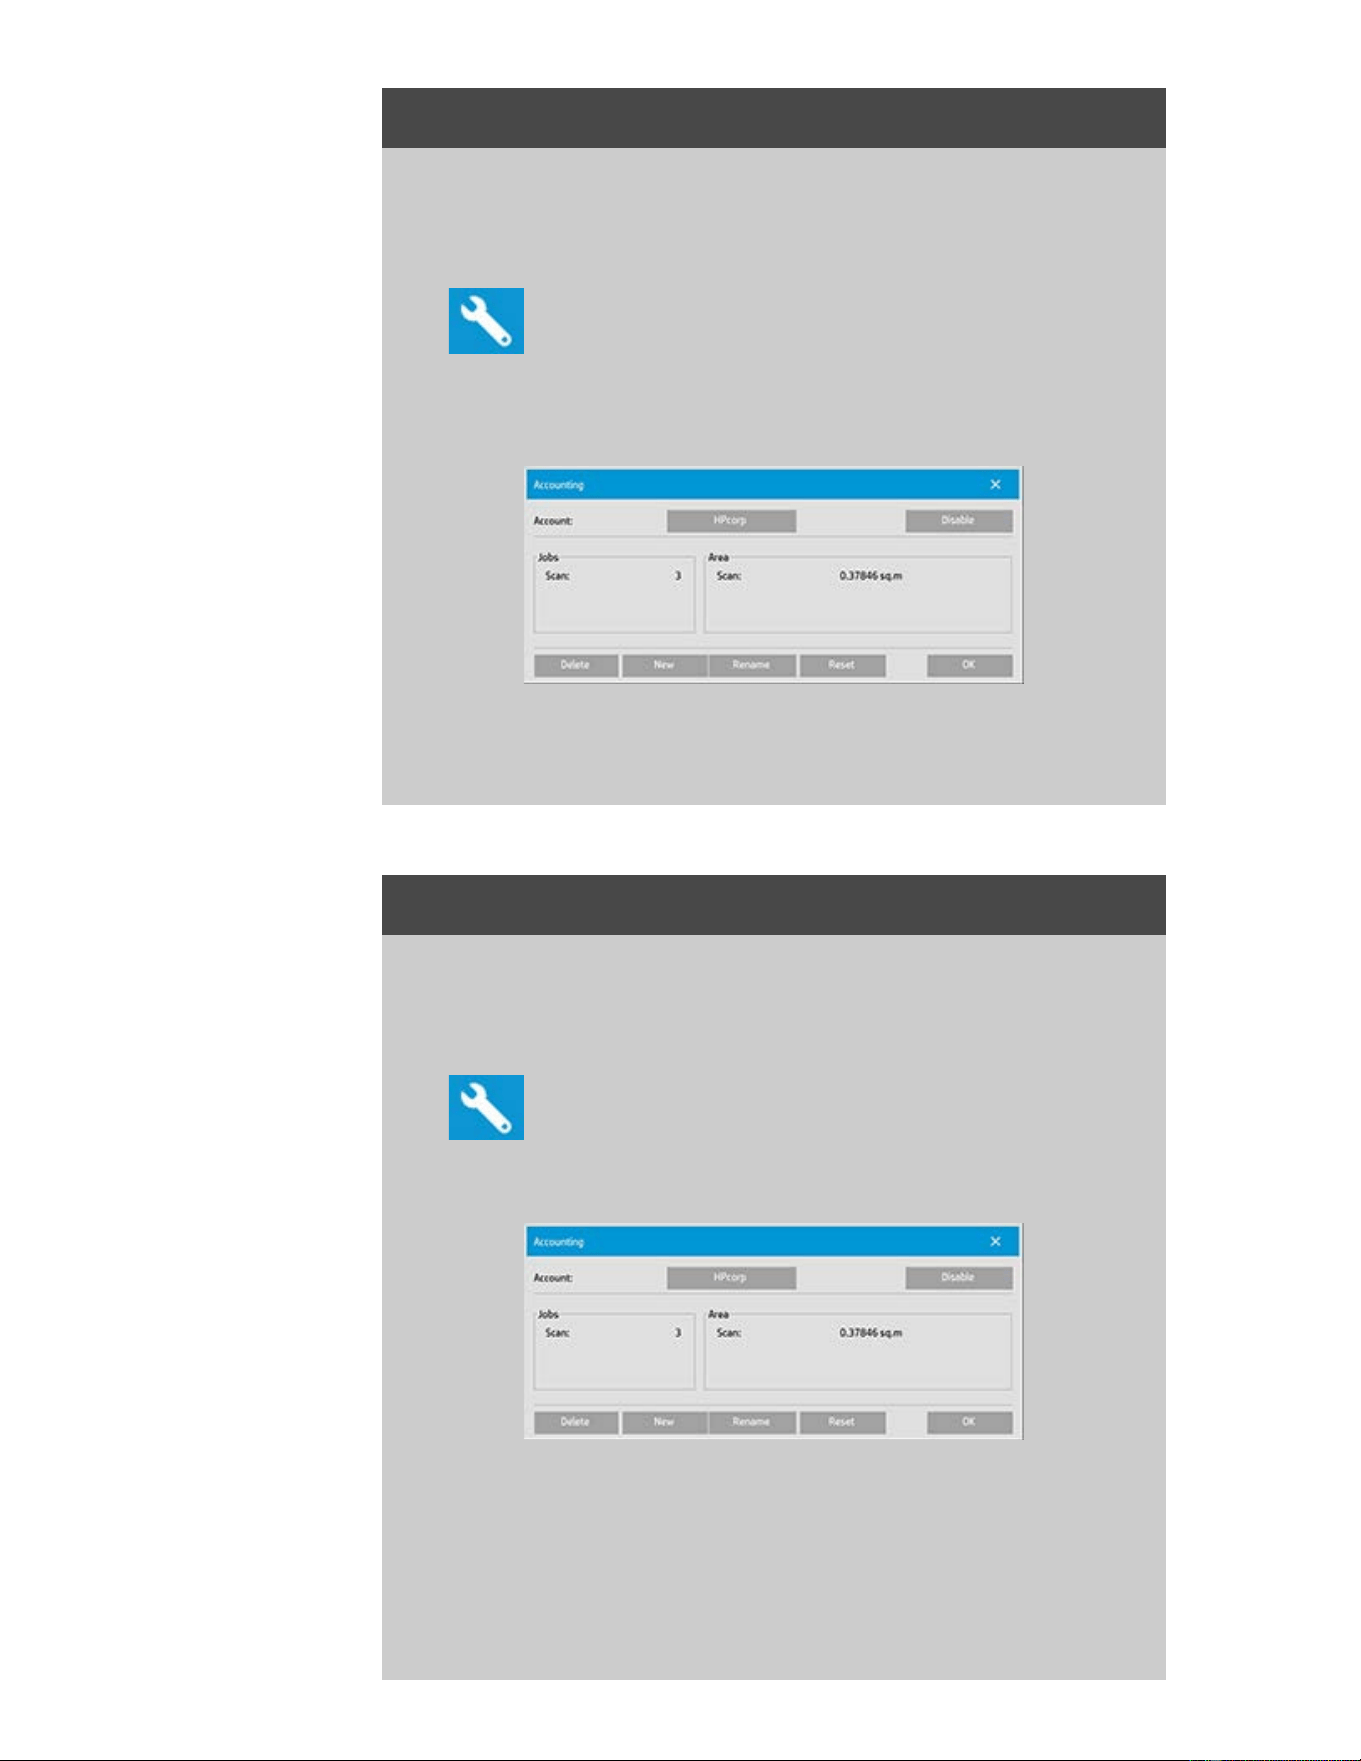
to delete an account...
1. Press the Setup tab.
2. Press the Account button. Press the Tool button.
3. In the Accounting dialog, press the Delete button. Enter the
administrator password if prompted.
4. Confirm deletion by pressing OK.
to reset an account...
1. Press the Setup tab.
2. Press the Account button. Press the Tool button.
3. Select the account name you want to reset.
4. Select the Reset button. Enter the administrator password if
prompted. .
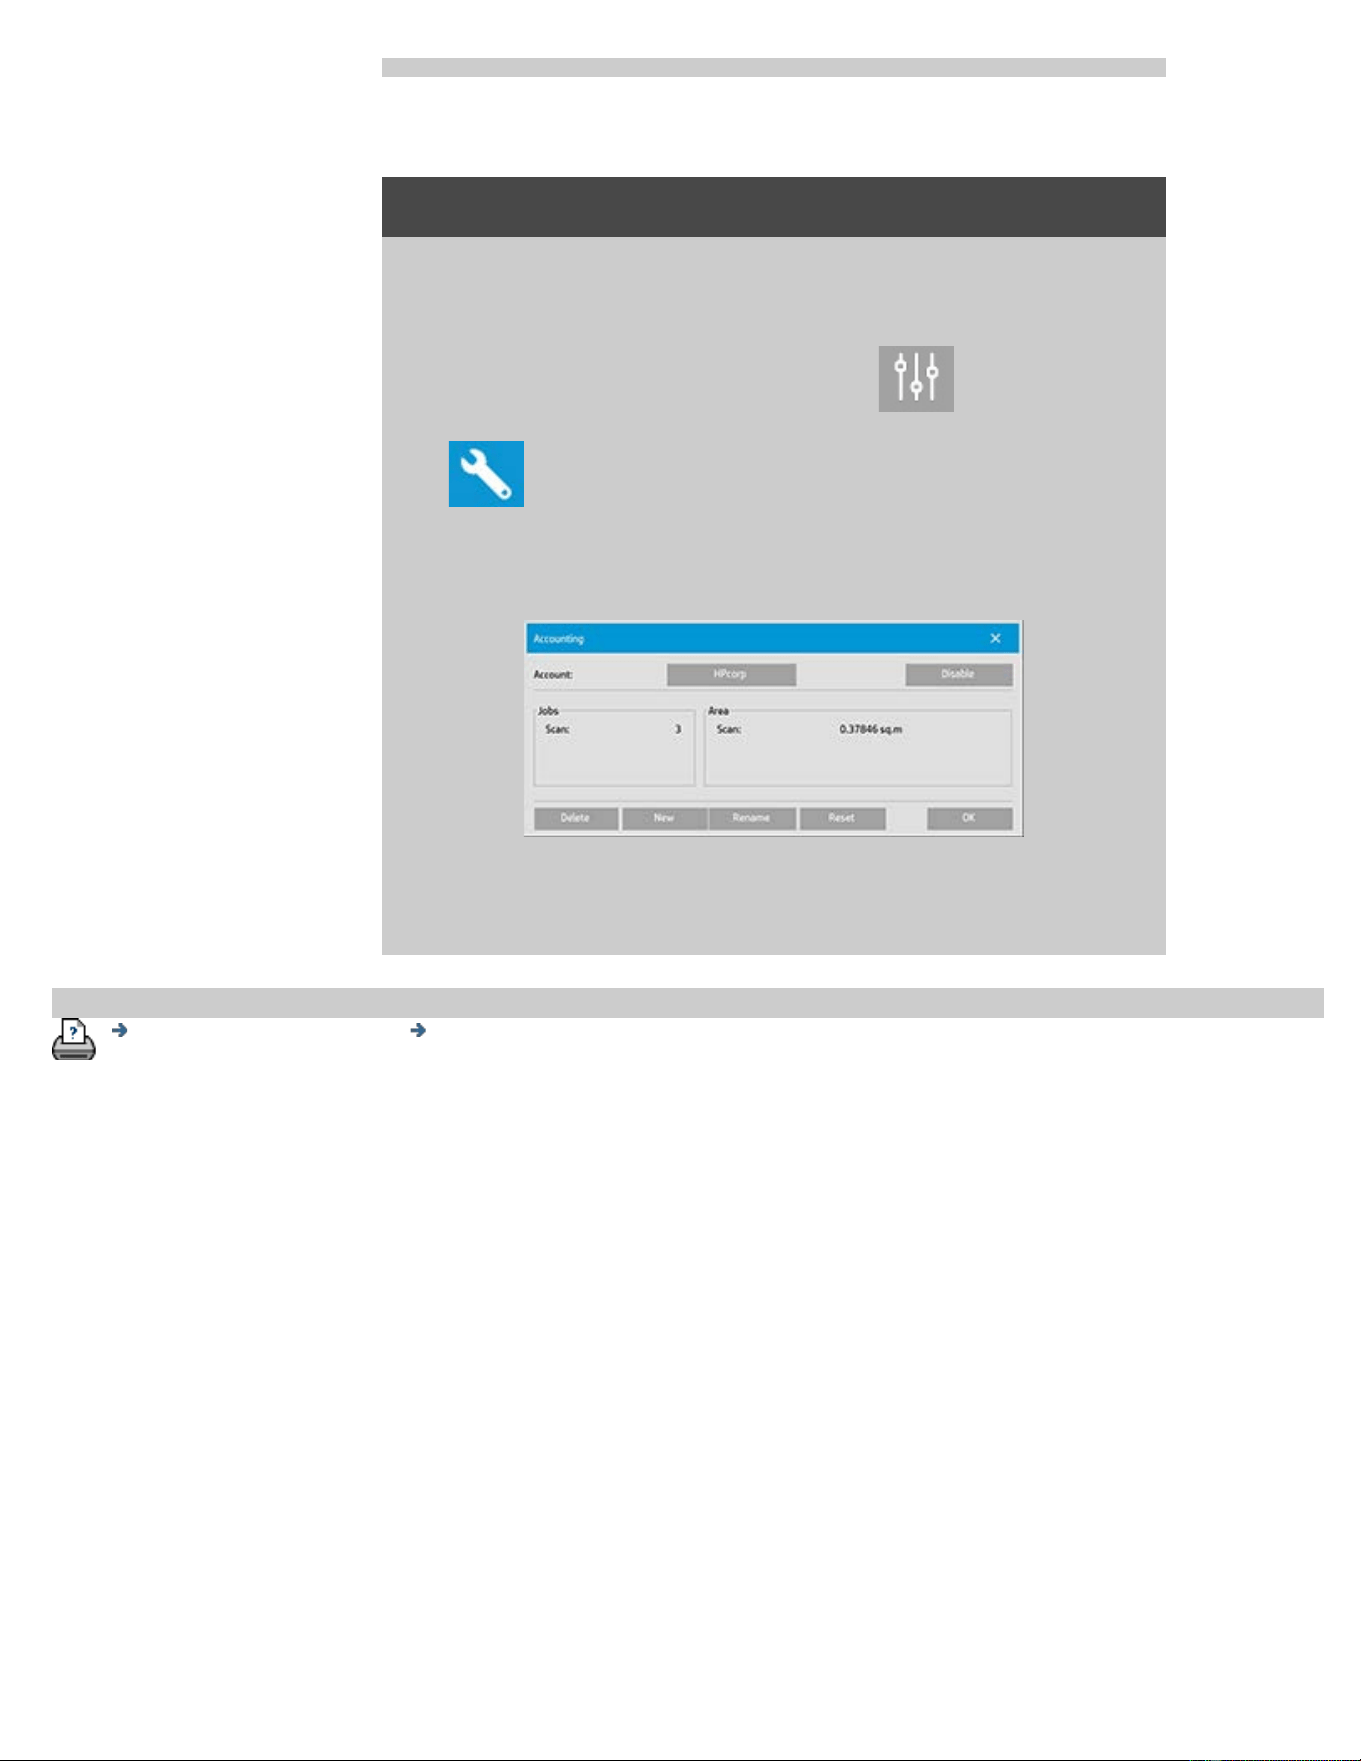
to rename an account...
1. Press the Setup tab.
2. Press the Account button. If Setup tab > > General > Use
quick select lists is selected, then press the Tool button.
3. In the Accounting dialog, press the Rename button. Enter the
administrator password if prompted.
4. Enter the new name for the account and press OK.
printing instructions legal information
© Copyright 2012, 2015 HP Development Company, L.P
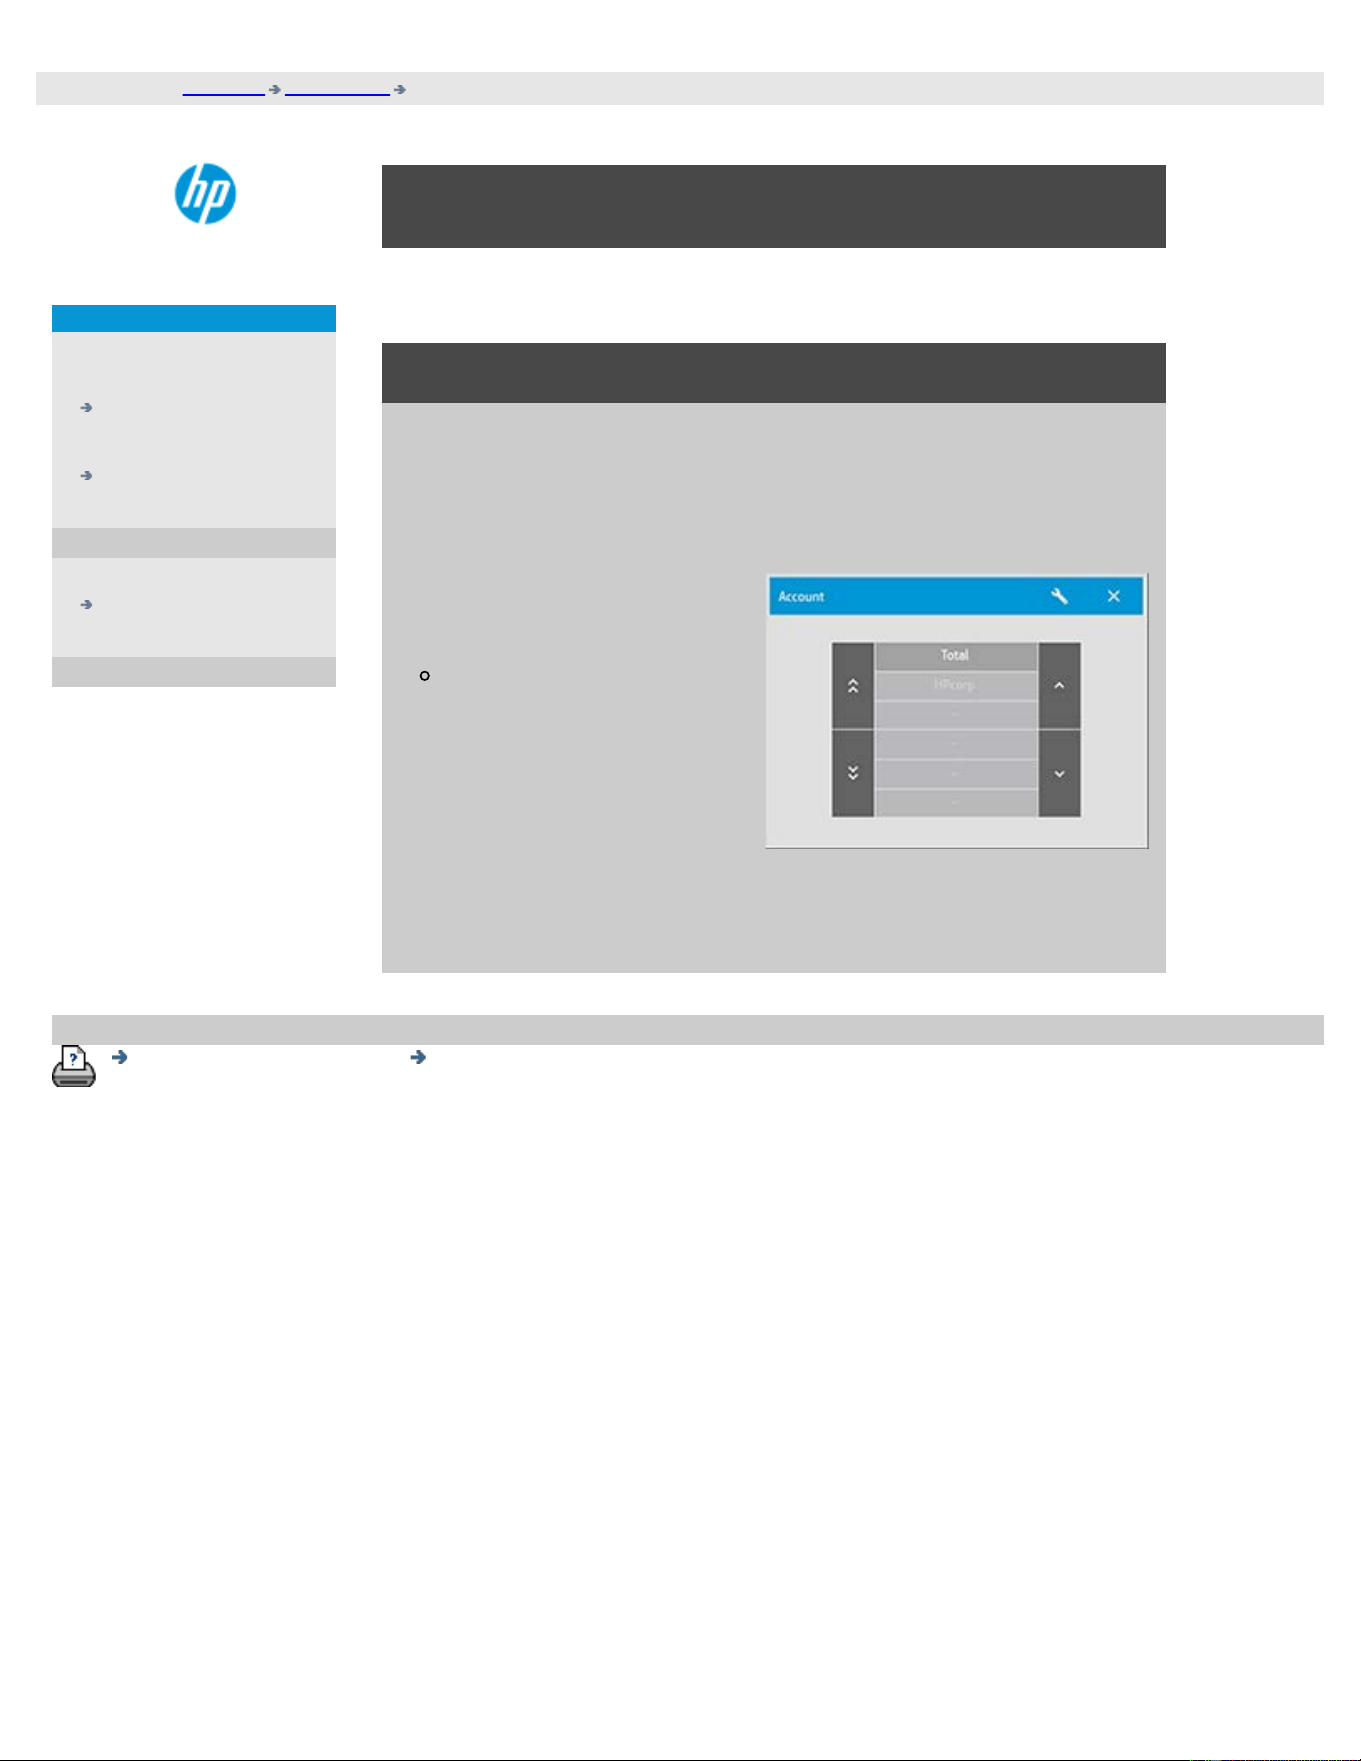
you are here: welcome how do I...? select/activate an existing account
HP Pro Scanner
how do I...?
the problem is...
alphabetical index
how do I select/activate an existing account?
Only one account (besides the Total account) can be active at a time.
to activate/select an existing account...
1. Press the Setup tab.
2. Press the Account button.
A list of existing accounts
appears.
Use the arrows to scroll
through the list and
press on an account
name to select it.
Every time you press the Copy button or the Scan to file button - the
Account dialog list opens for you to select an account.
printing instructions legal information
© Copyright 2012, 2015 HP Development Company, L.P
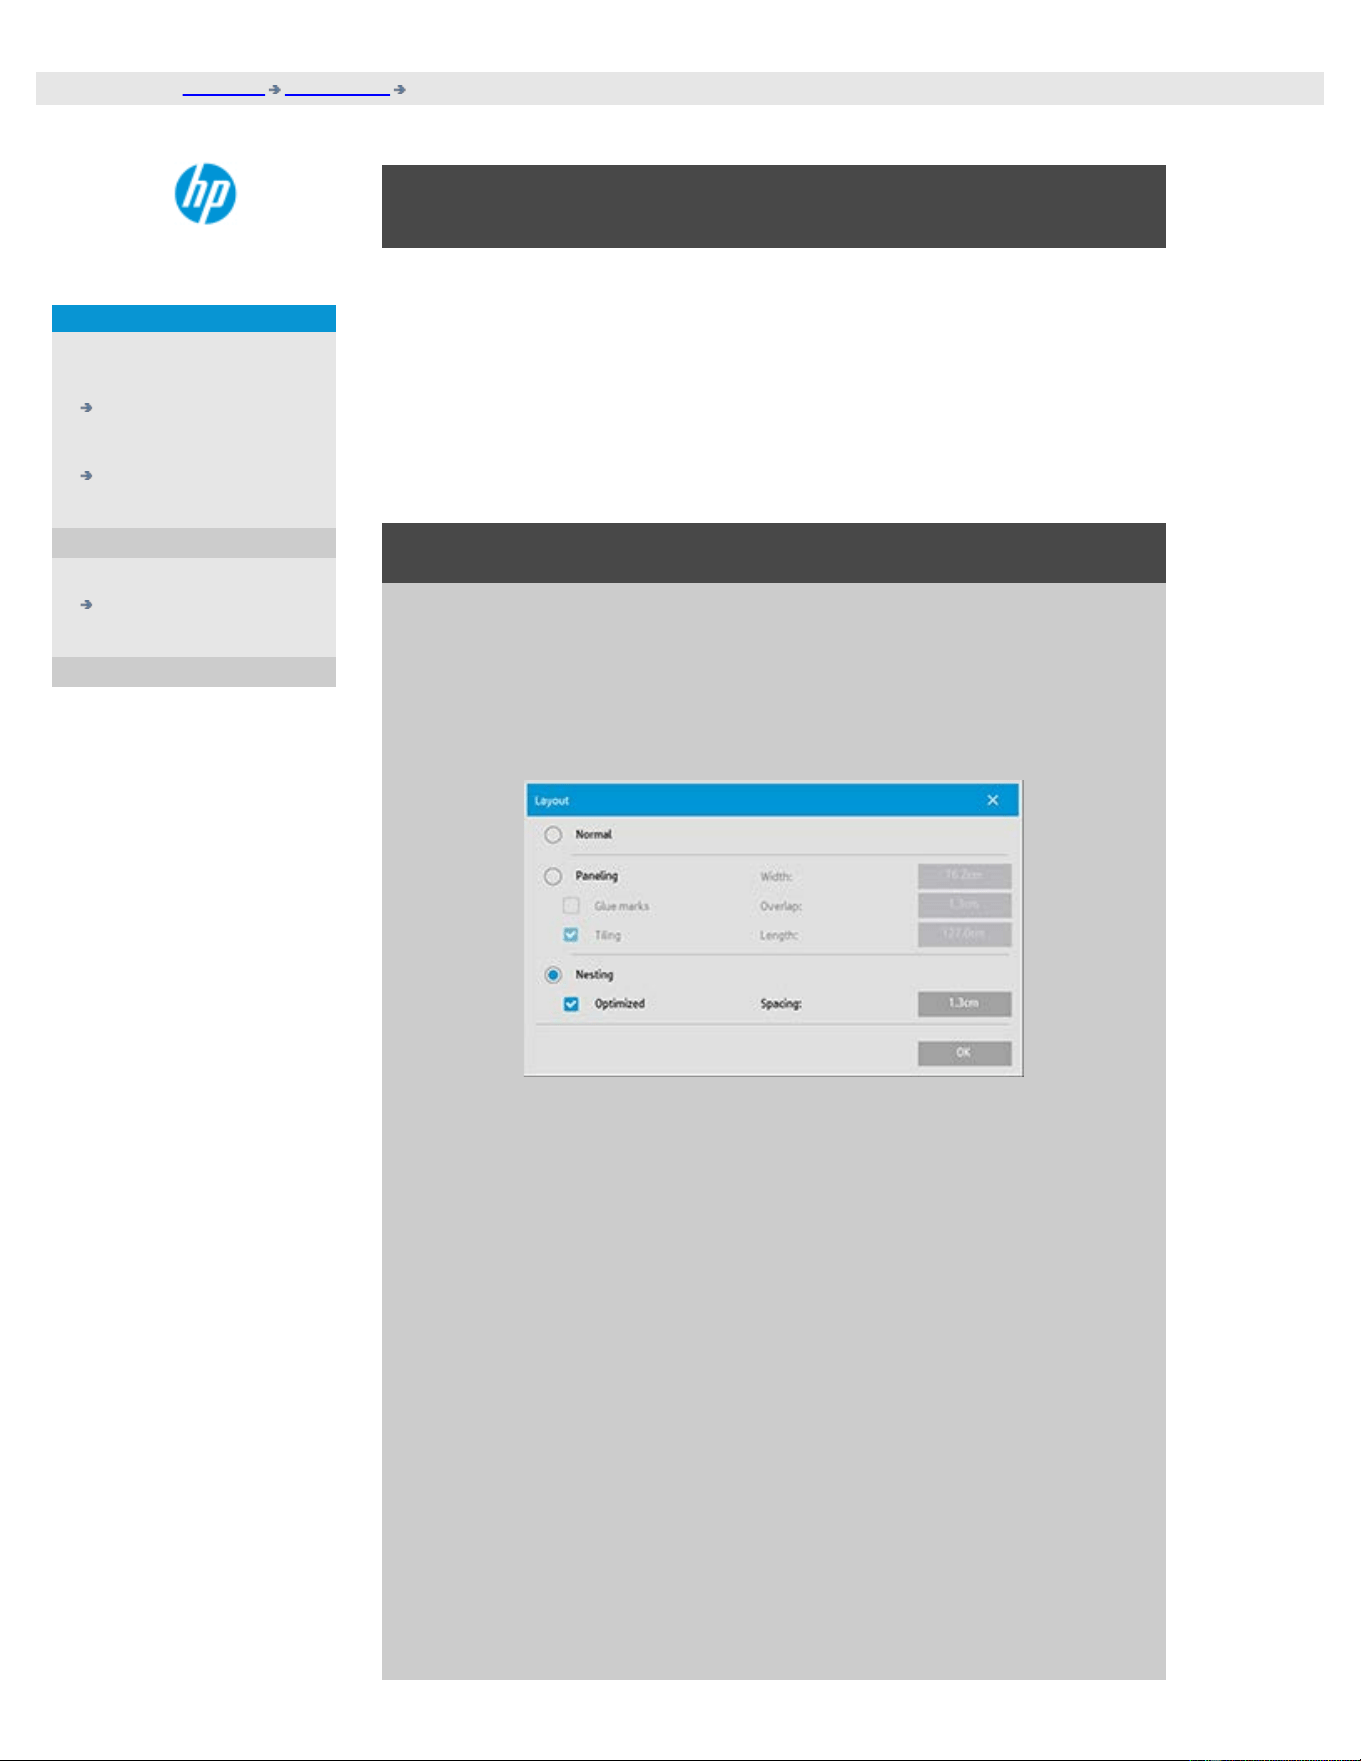
you are here: welcome how do I...? use nesting
HP Pro Scanner
how do I...?
the problem is...
alphabetical index
how do I use nesting?
With Nesting you can fit multiple copies side by side using the
roll/sheet width optimally and economically. Nesting is perfect for
printing multiple copies, collated copies and file print lists when at
least some of the copies can be fitted side by side in the output.
Nesting is also useful for creating large-thumbnail collages for
presenting overviews of whole sets of images.
to use nesting...
1. Select the Setup tab.
2. Select the Layout button.
3. Select the Nesting option.
4. Make your nesting settings.
Optimized: your scanner software will find the best solution for
Nesting with the least paper waste.
Without Optimized the copies are placed side by side in the
order of input. Omitting Optimized can sometimes give a result
that is easier to cut because the copies are simply lined up one
after the other. The price is wasted paper. Selecting Optimized
will always give a more economical result.
Spacing: determines the minimum of empty space between
each nested image.
5. Make your Copy tab and Setup tab settings (such as Type of
original, Margins, Media profile) as with normal copies, or else
select the files for copying from your print list.

For nesting to have a purpose, you will have chosen one of the
multiple copy output functions:
Copy tab: copies set to more than 1 copy.
Printing multiple files/sets from the Print tab.
6. Press the Copy button (Print button when printing from file) to
output your Nested copies.
When printing multiple sets, nesting is performed within each set but
not between the sets. Each new set will be started on a new strip and
thereafter nested individually.
printing instructions legal information
© Copyright 2012, 2015 HP Development Company, L.P
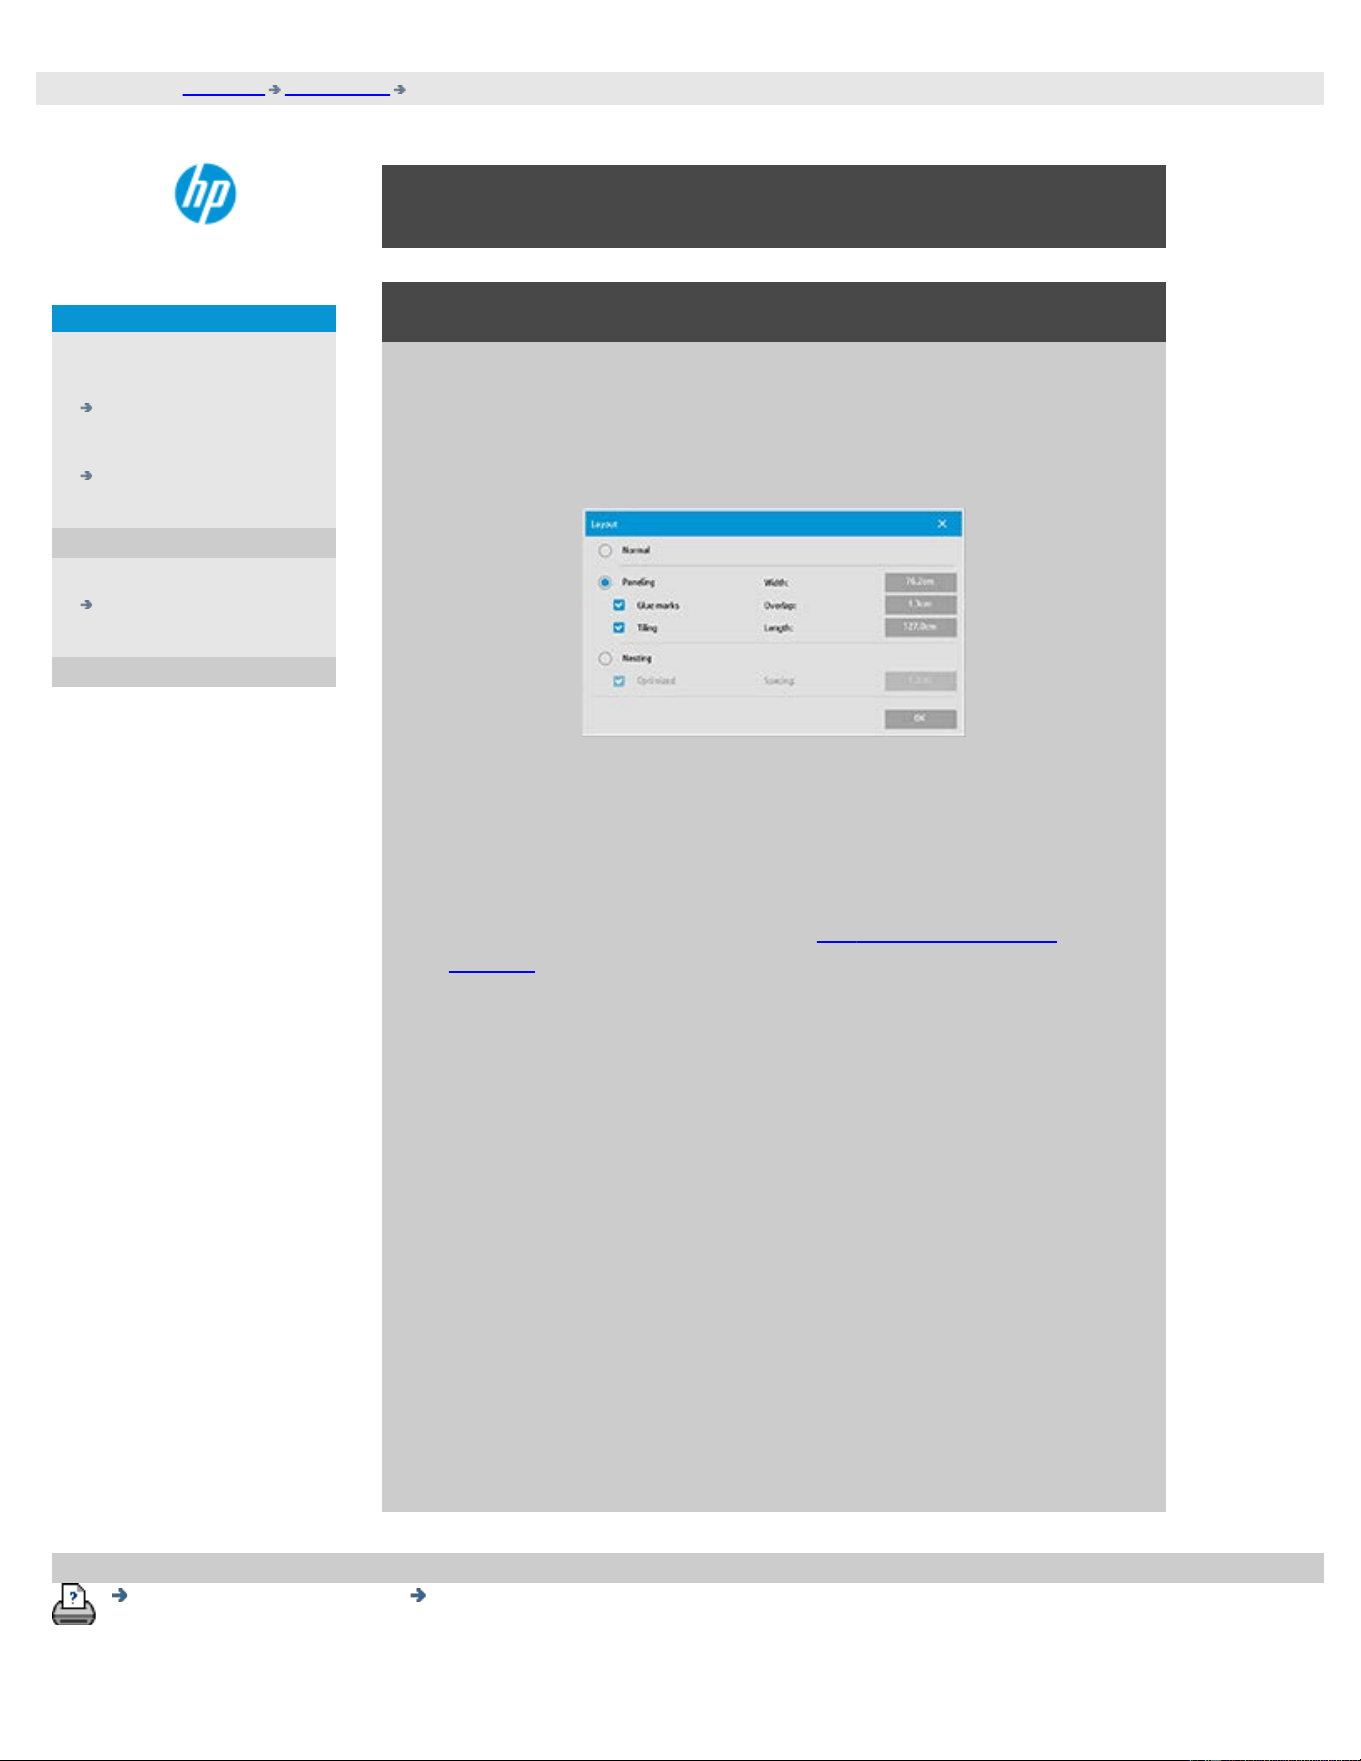
you are here: welcome how do I...? use paneling
HP Pro Scanner
how do I...?
the problem is...
alphabetical index
how do I use paneling?
to use paneling..
1. Select the Setup tab.
2. Select the Layout button to reach the Layout dialog.
3. Select the Paneling option.
4. Make your paneling settings. Select the tiling option when you
want to determine the length of each section and assemble
multiple short sections vertically instead of connecting long
whole image length sections. See tell me about paneling
options for instructions on all the settings.
5. Set your large Output size in the Copy tab. Your Output size
value is set to the size you want for the end result: that is, the
size of the total image after the panels are assembled.
6. Make your Copy tab and Setup tab settings (such as Type of
original, Input/Output Size, Margins, Number of copies, Media
profile) as with normal copies.
7. Press the Copy button (Print button when printing from file) to
output your panels.
NOTE: Your Margins setting in the Setup tab will apply for the whole
image after you connect the panels and not for each individual panel.
Paneling can be used with both Scan-to-print copying and with Print-
from-file copying through the Print tab.
printing instructions legal information
© Copyright 2012, 2015 HP Development Company, L.P
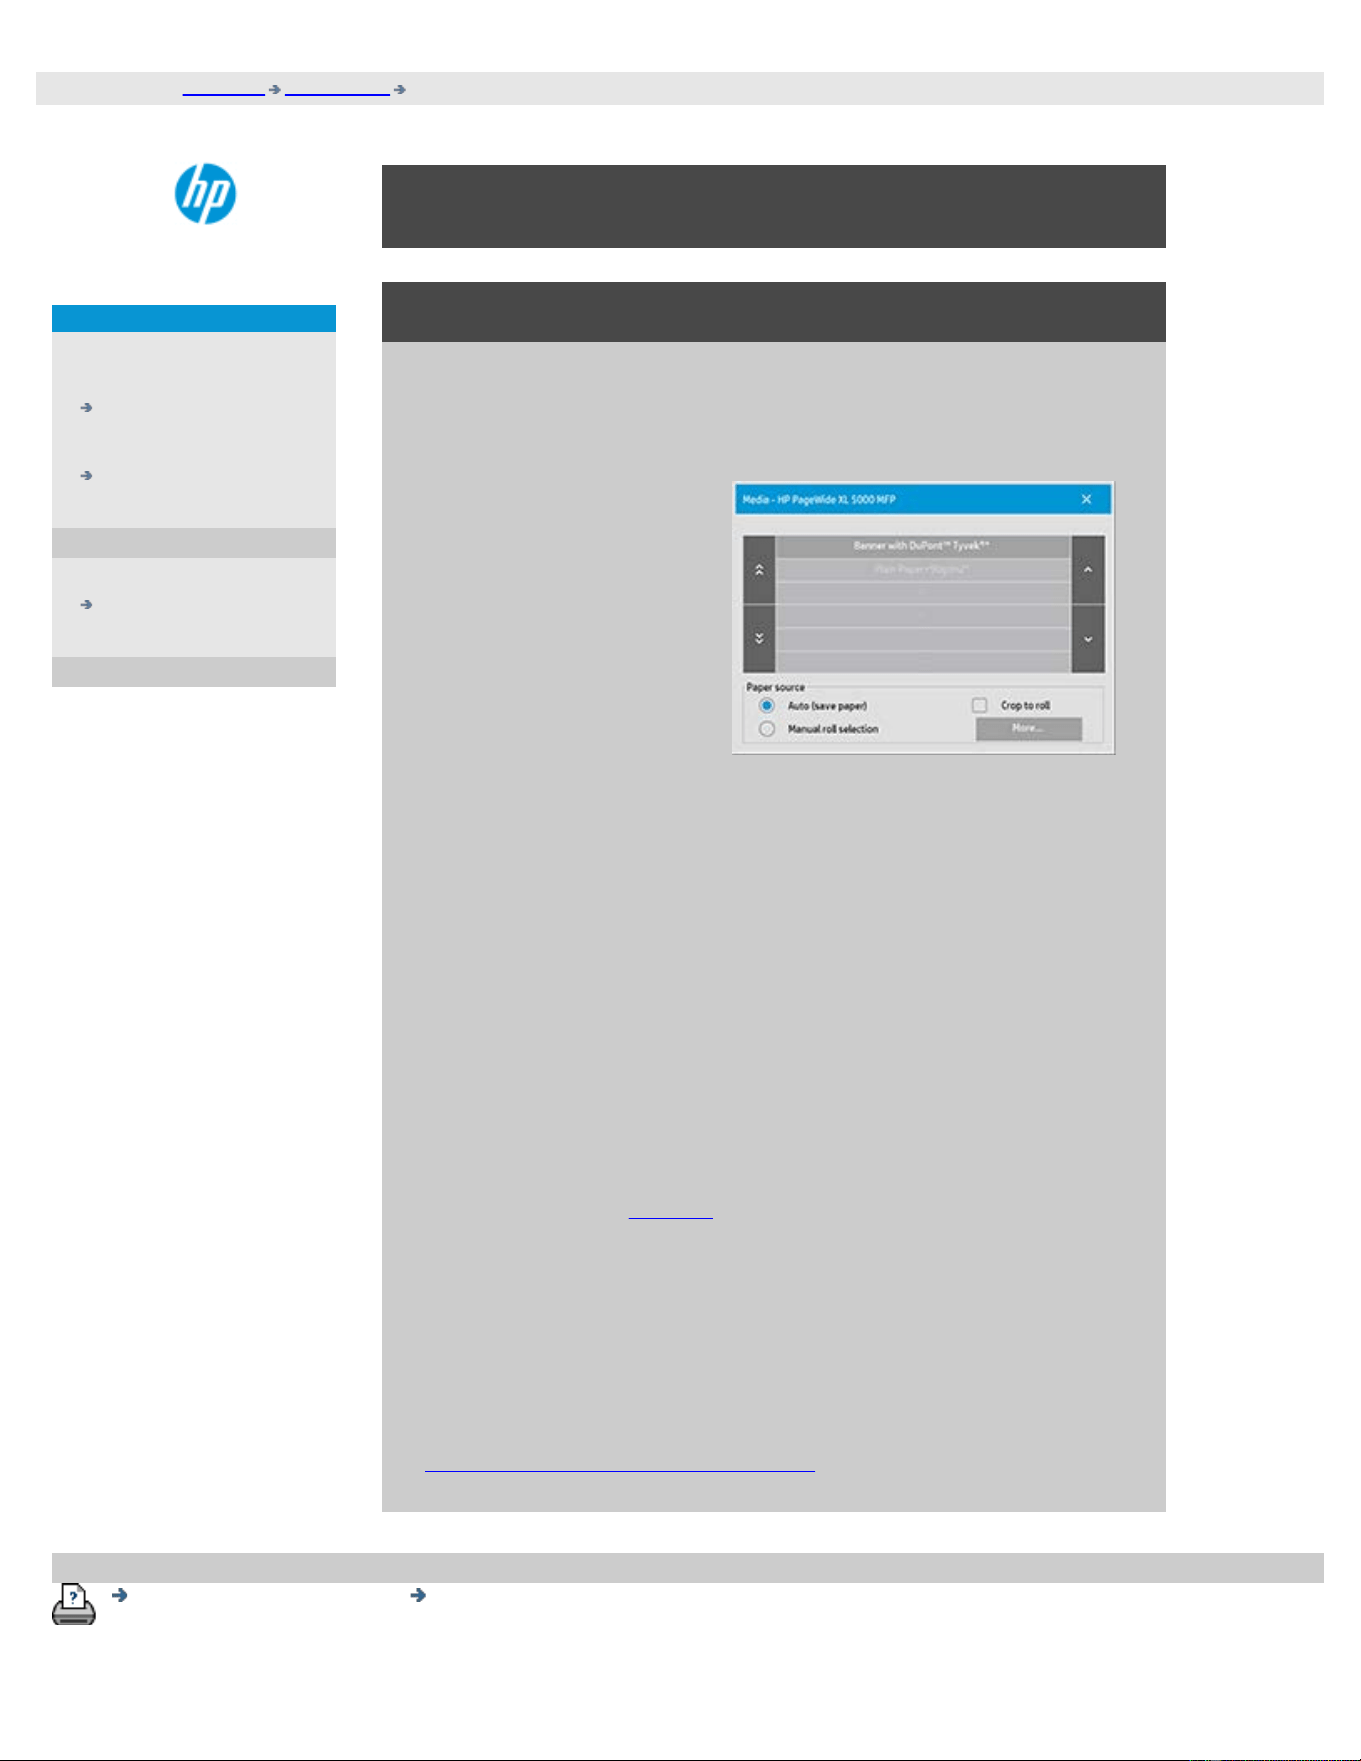
you are here: welcome how do I...? select a media profile
HP Pro Scanner
how do I...?
the problem is...
alphabetical index
how do I select a media profile?
to select a media profile...
1. Select the Copy Tab or the Setup tab.
2. Select the Paper type
or Media profile
button.
3. Select the media
profile from the list.
Profiles with a "*" are
currently loaded in the
printer.
4. By default the paper
source selection is set
to "Auto (save paper)"
which means that the
paper type will
determine the roll
selected automatic by
the printer. To force
the copy to a fixed roll
select "Manual roll
selection"
NOTE: "Crop to roll" can be enabled to secure that the correct media
roll is selected. See Margins for more information.
NOTE: For multi-roll printers, you can choose more than one profile
when there are different types of media loaded in the printer. To
learn more about multi-roll management, please see the User Guide
for the printer.
NOTE: Some printers will only display media profiles for loaded or
previously loaded media.
See also:
...how do I create a new media profile?
printing instructions legal information
© Copyright 2012, 2015 HP Development Company, L.P
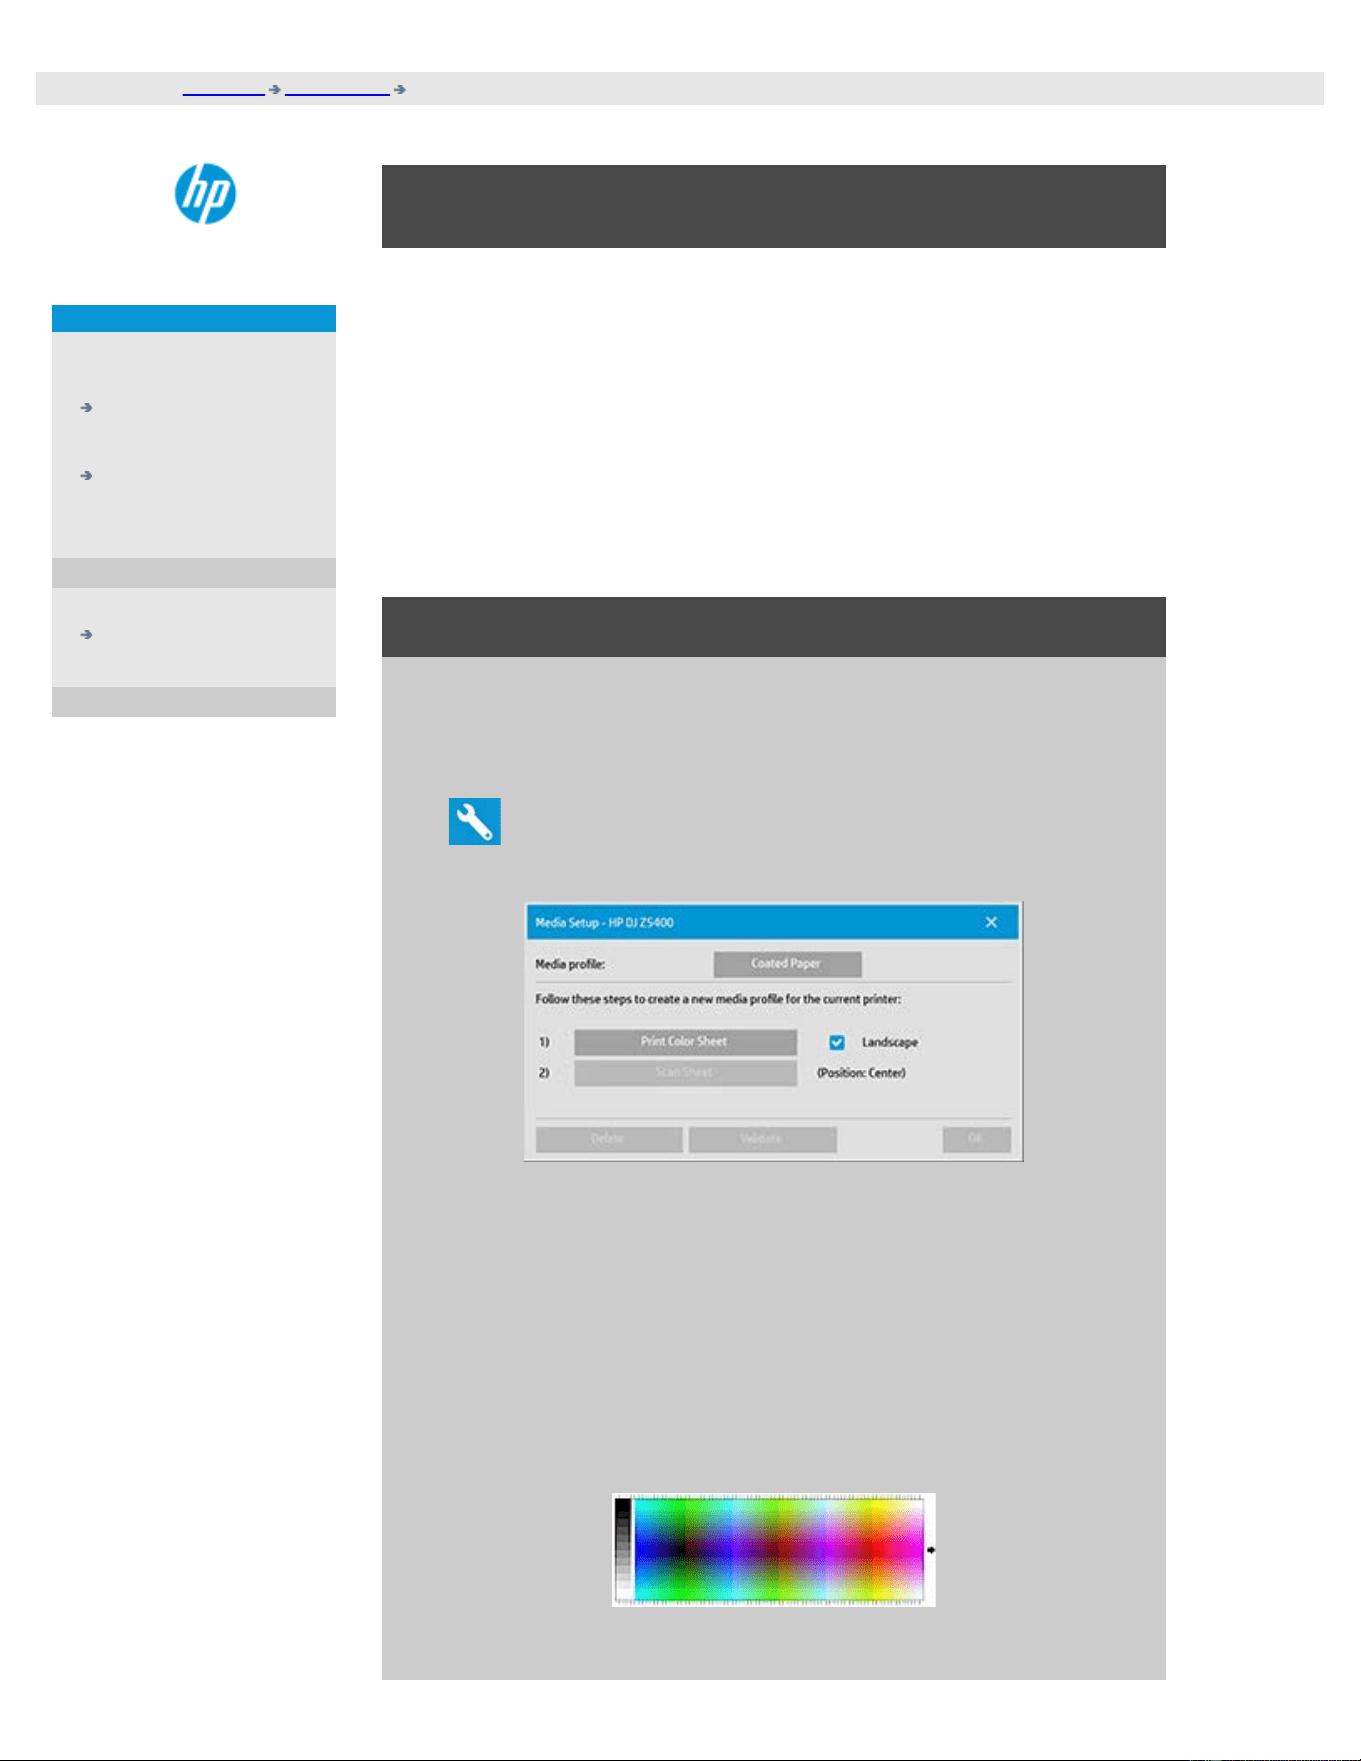
you are here: welcome how do I...? create a media profile
HP Pro Scanner
how do I...?
the problem is...
alphabetical index
how do I create a media profile?
Before starting the following procedure, make sure that you have color-
calibrated the scanner, and make sure that the media profile you intend
to create is not already in the media profile list.
NOTE: With some printers you can only create media profiles for media
actually loaded in the printer. These standard media types will be
detected by the system and their names will appear in the list of media
profiles. You can then select one of these and create a media profile for
it as described below. Naming and renaming of media profiles is not
possible with these printers.
to create a new media profile...
1. Press the Setup tab.
2. Press the Media Profile button and then the Tool button.
(Alternative path: Printer > Tool button > Media Profile)
NOTE: With some printers a Calibrate RIP option will be available in
the dialog as the first step. Press the button and follow the on-
screen instructions to use the function.
3. Press the Print Color Sheet button to print a color patch
reference sheet.
(NOTE: Some printers will output a special test sheet just
before the color sheet. You do not need to use the test sheet -
only the color sheet. The color sheet looks like the image
below:)
4. Load the color sheet into the scanner, aligning the sheet’s

arrow with the scanner’s center arrow mark.
5. Press the Name and Scan Sheet button to assign a name to
your new media profile. NOTE: Some printers work with
standard media profile names that comply with standard
media types and you cannot select your own name - the Name
and Scan Sheet button is non-existent with these printers
installed.
6. Press the Enter key to accept the new name and initiate a
scanning of the color sheet.
The media profile will then be active and entered in the list of
available media profiles.
You can use the Delete button to delete media profiles. Only user
created profiles can be deleted.
You can use the Rename button to rename media profiles if needed.
NOTE: Some printers work with standard media profile names that
comply with standard media types. On these printers, the Rename
button is not available in the dialog.
You can use the Validate button to check that the media profile is
valid for your combination of scanner and printer.
printing instructions legal information
© Copyright 2012, 2015 HP Development Company, L.P
you are here: welcome the problem is...
HP Pro Scanner
how do I...?
the problem is...
alphabetical index
solving problems
The problem is with the scanner
(Error indicator is flashing, warning and error messages)
The problem is a software system error
(copy software, system, online help, error codes)
The problem is with printing and with what is printed
the problem is with the scanner
Select a topic...
... the Error indicator light is
flashing
...I get a scanner warning message
the problem is a software system error
Select a topic...
...no scanner found
...printing error message
...system failure
...wrong interface language
the problem is with printing and with what is printed
Select a topic...
...image
is not printed - job held in queue
...image is cropped
...white space with nesting

you are here: welcome the problem is... diagnostics light flashing
HP Pro Scanner
how do I...?
the problem is...
alphabetical index
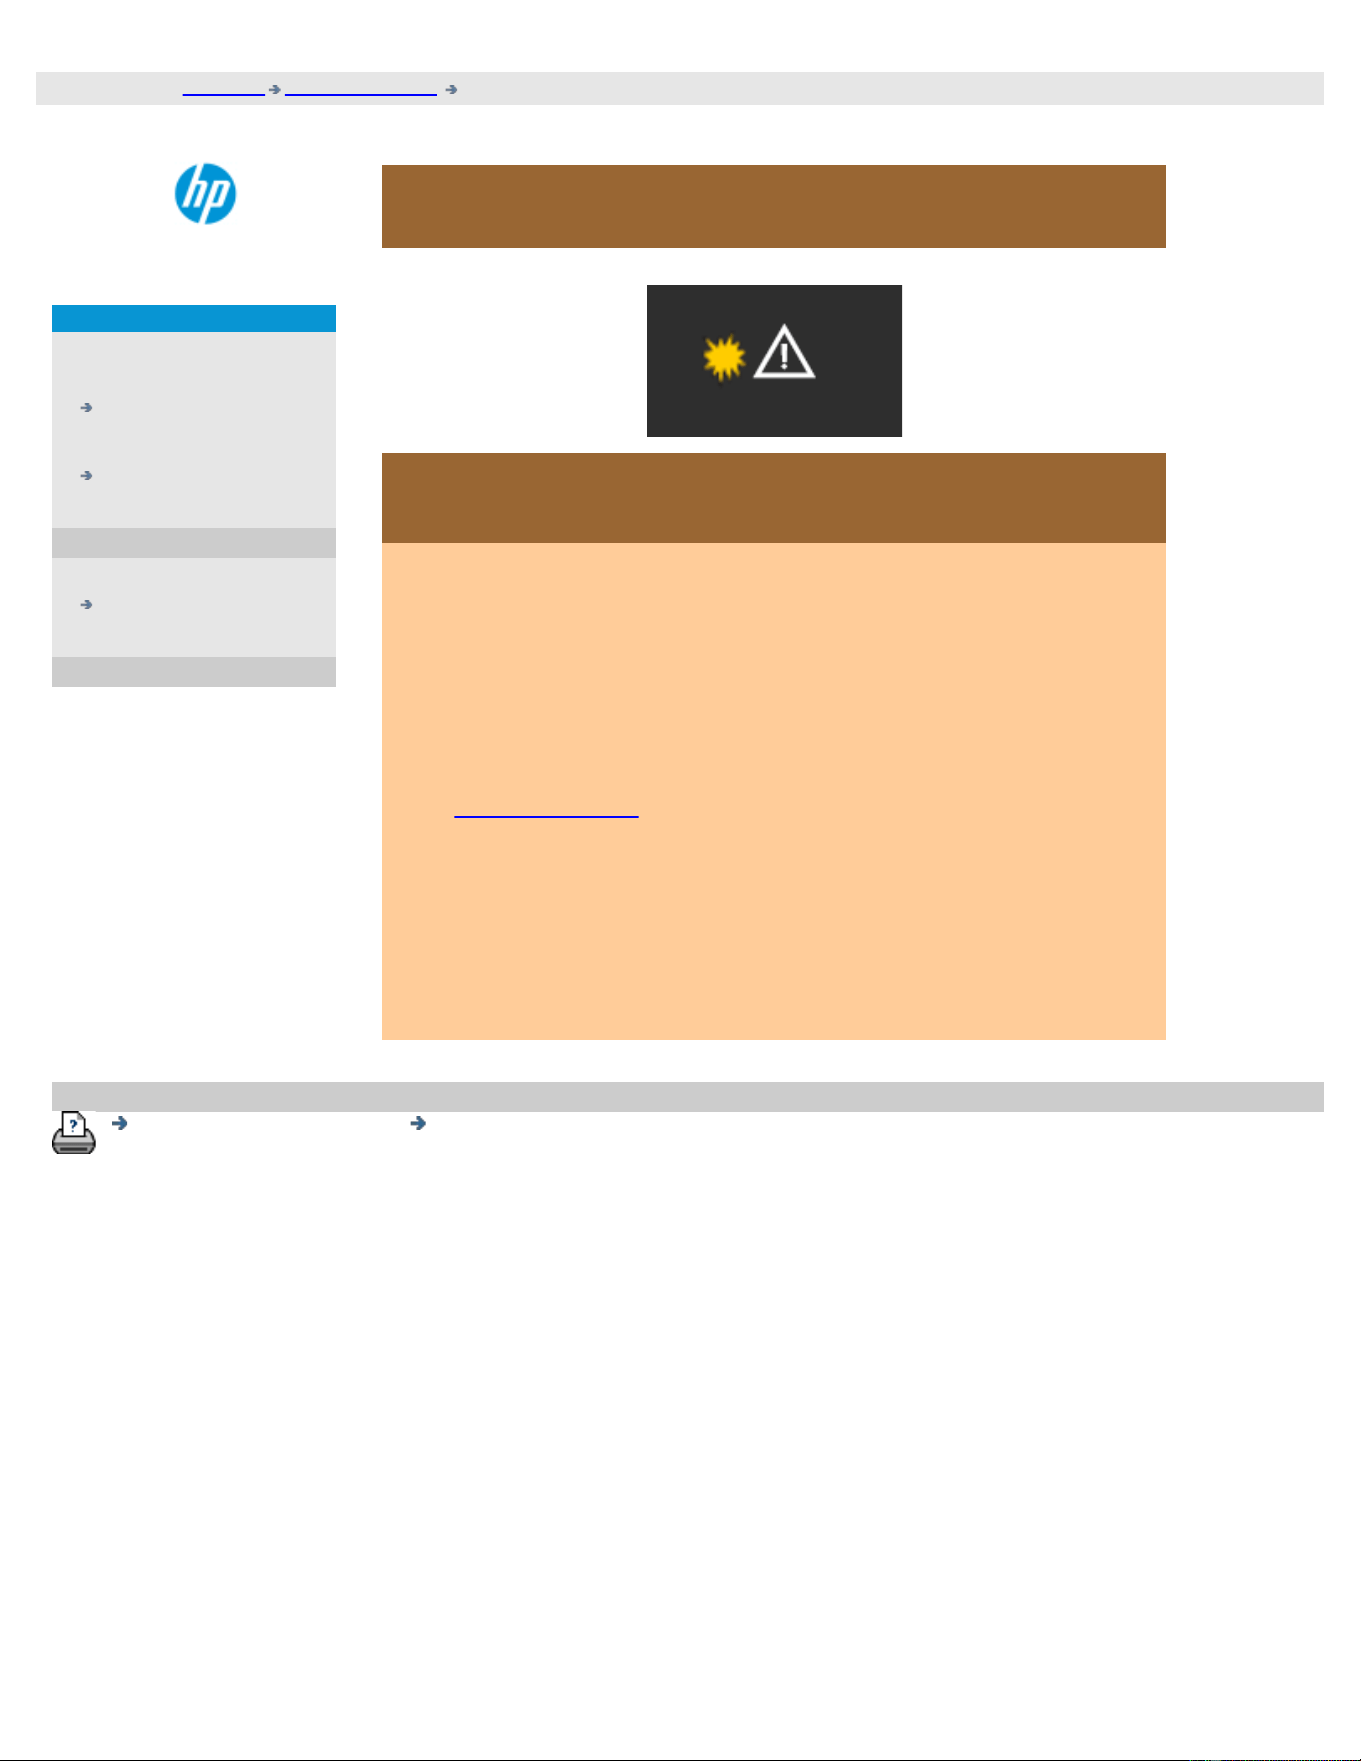
the problem is the error indicator is flashing
The scanner panel's Error Indicator will flash when the scanner
detects and error
1. The actual cause of the error will often be reported through a
message on your screen.
2. If not, open WIDEsystem (through the setup tab - system) and
select the Status tab to view information about the error.
3. Follow the error remedy instructions provided on your screen.
4. See also error remedy instruction in this help system under
solving problems
In some cases you may need technical assistance. See the
documentation that came with your equipment for service
information.
printing instructions legal information
© Copyright 2012, 2015 HP Development Company, L.P
you are here: welcome the problem is... no scanner found
HP Pro Scanner
how do I...?
the problem is...
alphabetical index
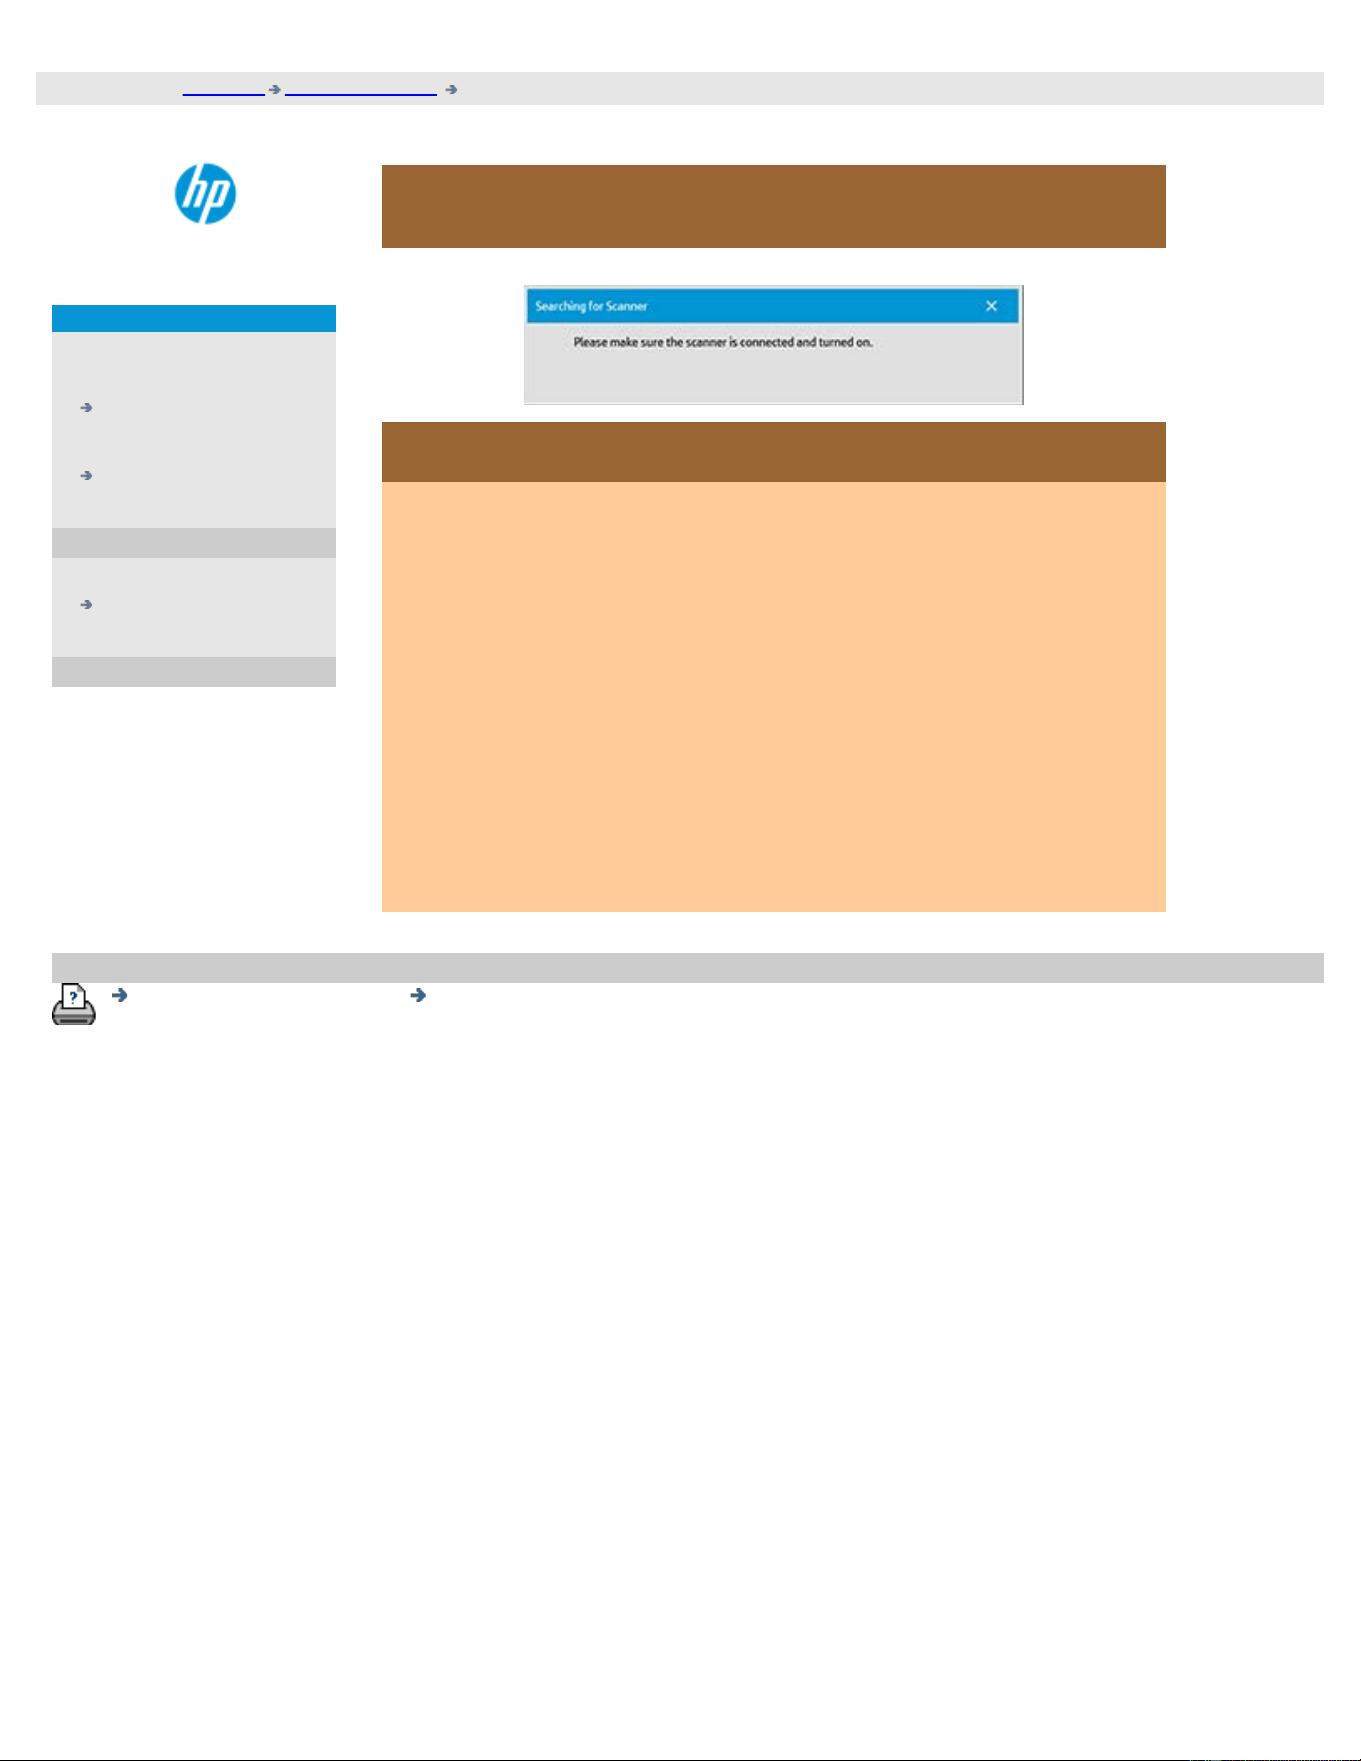
the problem is no scanner was found
if no scanner was found...
1. Check that the scanner power is ON.
2. Check that the ethernet or USB3 cable between the scanner and
the panel pc screen is inserted correctly.
3. In some cases, loss of communication to the scanner can be
resolved by removing and reinserting the ethernet or USB3
cable.
4. Press the Rescan button.
printing instructions legal information
© Copyright 2012, 2015 HP Development Company, L.P
you are here: welcome the problem is... the image is cropped
HP Pro Scanner
how do I...?
the problem is...
alphabetical index
the problem is the image is cropped
if your image is cropped...
If your image is cropped and no error message was displayed check
one or both of the following possibilities:
Make sure that you have set the correct media width for your
printer device in the copy system software.
...how do I set the printer media width? and your printer’s
documentation for instructions.
You may have set Margins in the Setup Tab -> Margins dialog. The
system will crop the image with the size of the margins defined.
Set these to zero if you do not want cropping and use the option
“Outer Margins to add margins to the output without cropping.
Note that "outer margins" will be added to the set output size
and thus expand the end result.
See: ...how do I set the Output margins? for instructions.
printing instructions legal information
© Copyright 2012, 2015 HP Development Company, L.P
you are here: welcome the problem is... system error
HP Pro Scanner
how do I...?
the problem is...
alphabetical index
the problem is a system failure
if your system does not work...
When you power ON your touch screen and your scanner system
does not start, you will need to recover your system using the
System Recovery procedure. See:
...how do I recover the system?
printing instructions legal information
© Copyright 2012, 2015 HP Development Company, L.P

you are here: welcome the problem is... printing error message
HP Pro Scanner
how do I...?
the problem is...
alphabetical index
the problem is a printing error message
if you see a printing error message...
The printer cannot be detected.
1. Select the setup tab and check that the printer is displayed next
to the printer button.
2. Check that the printer is powered on.
3. Check that the printer is connected to the network or directly to
the panel PC (ethernet). See ...how do I install the printer and
printer drivers... for more details.
4. Check that the printer job is not held up in the queue. If so,
remedy the cause. See ...image not printed...job held in queue...
for more details.
printing instructions legal information
© Copyright 2012, 2015 HP Development Company, L.P
Template Application - Copy
Photo Use with original photographs and posters.
CAD-Copy Use with original CAD drawings with a high level of detail.
Brochure-
Copy
Use with original documents containing both graphics,
posters and text.
Map-Copy
Use with original maps and graphics with a high level of
detail.
Template Application - Scan
Photo Use with original photographs and posters.
CAD-Scan Use with original CAD drawings with a high level of detail.
Brochure-
Scan
Use with original documents containing both graphics,
posters and text.
Map-Scan
Use with original maps and graphics with a high level of
detail.
you are here: welcome how do I... make original template settings
HP Pro Scanner
how do I...?
the problem is...
alphabetical index
How do I make type of original templates settings?
The capture or scanning Method with relevant image enhancement
settings are grouped together in a 'Type of original' template to give
best results with the kind of input document to which it refers. Your
selection of Color or B&W copy or scan-to-file determines which
enhancement adjustments are relevant to the template.
For most assignments, the HP Scanner software contains standard Type
of original templates with optimal default settings. For example, a
brochure is typically a mix of photos and text while maps are line-
oriented.
For a description of the templates available select...
...templates for color copying/scanning
...templates for black and white copying/scanning
To make small adjustments to a standard Type of original template or to
define one of your own, see:
...how do I define an original template?
templates for color copying/scanning
templates for black and white copying/scanning
Template Application
Photo Use with original photographic images that contain
many shades of gray.
Map
Use with original maps and graphics with a high level of
detail.
CAD
Grayscale
Use with original CAD drawings with a high level of
detail.
CAD B&W Use with original CAD line drawings with a high level of
detail.
Blueprint
B&W
Use with originals printed with blueprint paper to
contrast heavily between black and white.
Blueprint
Grayscale
Use with blueprint original copies and dark blueprint.
Sepia Use with sepia originals.
Ammonia/old
blueprint
Use with old originals printed with light blueprint paper
and irregular background shades.
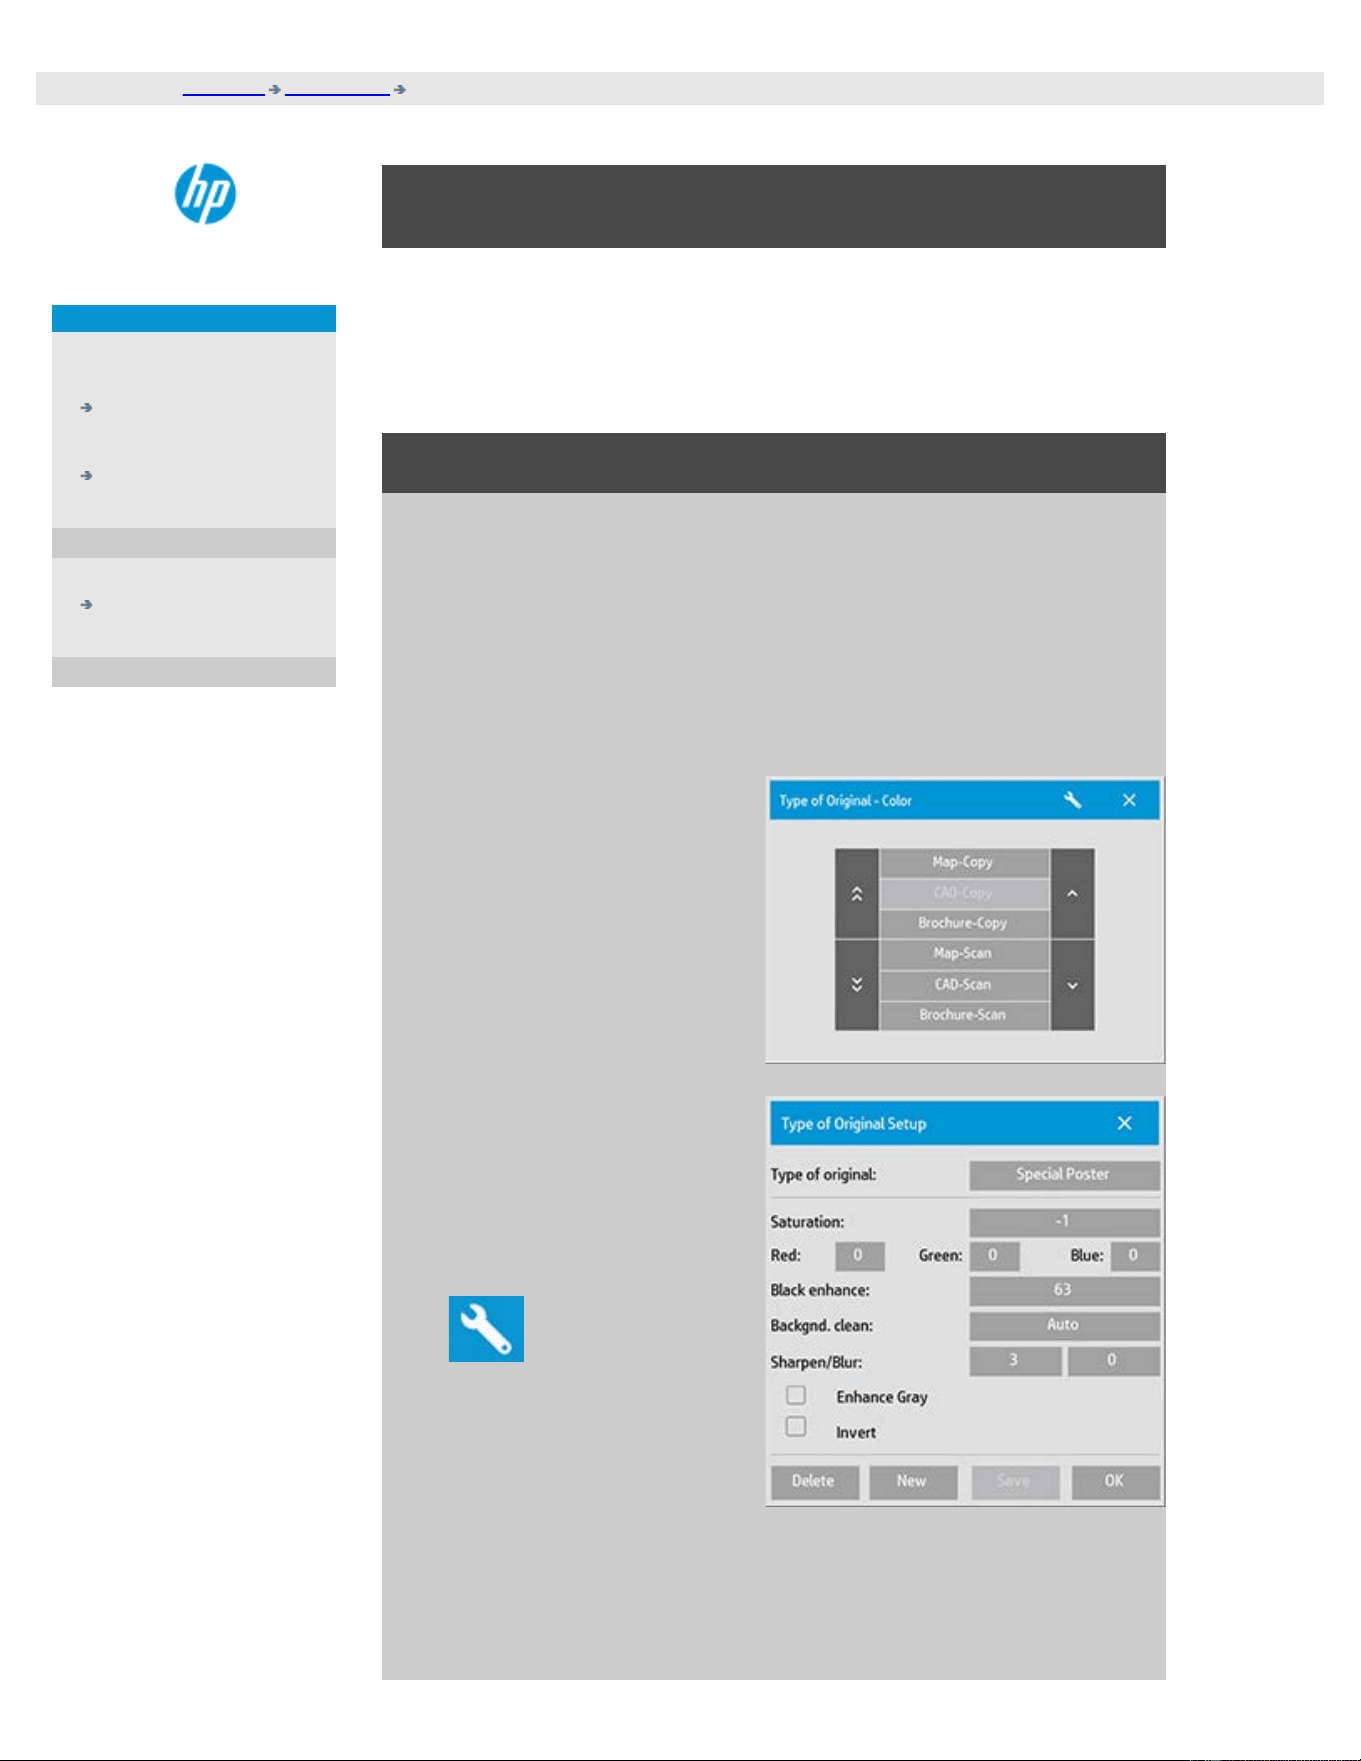
About original template settings
Method
The Method applies to the way the scanner captures and digitizes the
image. The default Method settings for the built-in Type of original
templates are optimal in relation to the kind of original in question
and you shouldn't have to change them. Methods are only applied
with BW copying.
The best method for your selected type of original is named on the
Method button. You can change the method however this is not
normally recommended. To change the method you press the
button and the following options become available:
Graytone: Creates good reproductions of complicated B/W images.
B&W Threshold: For drawings and line art. Uses thresholds to
determine whether a pixel is black or white.
Adaptive: For low contrast and difficult drawings. Clears up and
intensifies low contrast drawings like Sepias, Blueprints, etc.
Saturation
Saturation indicates the intensity of a hue, or in other words the
strength of a color. A high saturation makes a color's hue more
intense than the same color with a low saturation value. A positive
value increases saturation and a negative value decreases
saturation.
Red, green, and blue

You can adjust your copy's color balance during image capture
through separate controls for each of the three color-channels Red,
Green, and Blue. Adding and subtracting an amount of a color affects
the whole color balance. Often it's best to keep the three channels
on the same levels. Experiment with the different effects through
previewing.
Select negative values to reduce the total content of the color and
select positive values to increase the total content of the color.
Black enhance and background clean
The BLACK ENHANCE option is used to change dark graytone colors
to true black.
By increasing the BLACK ENHANCE value, you can get the text to be
copied in real black and it will therefore appear clearer.
For example, if you are copying a brochure with a mixture of text and
pictures, the text will often be digitized to a color that we may see as
black but really is a dark graytone. When the printer digests this
graytone data, it will print the original's text with a halftone pattern,
meaning scattered dots instead of solid black.
If the printed or scanned image shows some white lines on black
filled areas, you can correct them using BLACK ENHANCE.
Use the black enhance option with caution, because it can change
other dark colors (not only grays) into black, making small dark
spots appear in the picture.
Background clean is used if you have an original with a background
that is not completely white. If you want your background to appear
as pure white then you can increase the background clean value. As
with black enhance, background clean should be used with caution,
as it can also affect some of the other light colors.
Both black enhance and background clean function as "cutoff" values
in which pixels under or over a certain value are affected by the
setting. You define cutting points on a scale of low to high lightness
measured in values from 0 to 255. The default value of both options
is zero (no effect).
Example:
You have copied an original and want to improve it by making the
text blacker and the background whiter:
Adjust the BLACK ENHANCE value upwards from its default of
zero (to 25, for example) and thus make pixels with low
lightness values go to black.
Adjust the background clean value upwards from its default of
zero (to 25, for example) and thus make the pixels at high
lightness levels go to white.
You can give your copy sharper lines with the Sharpen option. The
Sharpen feature identifies edges in the image and intensifies them.
Sharpen/Blur

The Blur feature blends colors and thus removes unwanted "noise"
during image capture. Many images are created with dithering, which
is used for representing different colors in the original, and this
dithering often creates unnecessary "noise" in the image. Blurring
smoothes out unwanted transitions between colors. With Black and
White copying the Blur feature smoothes out gray dither by
removing unwanted sharp transitions between excessive shades of
gray.
Don't think of blurring as the opposite of sharpening. Sharpening
works on the image's edges only while blurring looks at whole color
or graytone areas and smoothes them out.
TIP: Using Sharpen together with the Blur feature can often enhance
image quality by first blurring away noise in the image and then
sharpening the result.
Enhance Gray
Enhance Gray is available with color type of original setup. Press the
More button to access the setting. Check the Enhance Gray option to
reduce the saturation of colors on copies or prints made from low
saturated color originals.
This setting will make graytones more neutral.
Invert
This setting inverts the colors in an image. Use this command, for
example, to make a positive black-and-white image negative.
Optimize for drawing
Optimize for drawing is available with both color and B&W type of
original setup. For color type of original setup - press the More
button to access the setting.
Setting this option is recommended when copying text and drawings.
It will tell the printer to output optimally in relation to clear and sharp
edges. It is not advisable to activate this setting with pictures as
visible bands can be created on the output.
Max detail
Max detail is available with both color and B&W type of original setup.
For color type of original setup - press the More button to access the
setting.
Set Max detail for enhancing detailed graphics. Activating Max detail
is recommended for originals with many small details such as maps
and certain CAD drawings. It is not recommended with pictures as
the setting will have a negative effect on color matching and
graytone output.

Black Ink Only
Black Ink Only is available with B&W type of original setup. Black ink
only is used for creating true and neutral graytone output. Creating
graytones with black ink only will create printouts that are less
sensitive to current lighting conditions when viewing the results.
Note that setting Black ink Only can create output that is more grainy
than normal graytone output where color ink is also used.
NOTE: The availability of these options depend on the printer
model.
printing instructions legal information
© Copyright 2012, 2015 HP Development Company, L.P
you are here: welcome how do I... make custom quicksets
HP Pro Scanner
how do I...?
the problem is...
alphabetical index
How do I make custom quicksets?
The capture or scanning Method with relevant image enhancement
settings are grouped together in a Quickset template to give best
results with the kind of input document to which it refers.
For most assignments, the HP Scanner software contains standard
Quickset templates with optimal default settings.
To make adjustments to a standard Quickset template or to define one
of your own, see:
...how do I define a custom quickset?
Quickset templates
Template Application
Grayscale
lines
Grayscale CAD drawings with a high level of detail.
Color lines Color CAD drawings with a high level of detail.
Mixed
content
Drawings with a mix of graphics, posters and text.
Image Photographs.
Blueprint When doing blueprint original copies.
Translucent When doing translucent or natural tracing paper original
copies.
printing instructions legal information
© Copyright 2012, 2015 HP Development Company, L.P

you are here: welcome how do I ... set the user interface options
HP Pro Scanner
how do I...?
the problem is...
alphabetical index
How do I set the user interface options
User interface options
Press Setup tab > > General to reach the Options dialog shown
below.
Setting ...
...units of measure
...paper lists show
...color balance
...use quick select lists
...print settings
...enable reprint
...paper series
units of measure
Setup tab > > General > Units of measure
With this option you can select millimeters, centimeters, or inches as
your units of measurement.
color balance

Setup tab > > General > Color balance
This option tells your scanner software whether to display color
values in Cyan, Magenta, and Yellow (CMY) or Red, Green, and Blue
(RGB) when setting Type of Original options.
paper lists show
Setup tab >
> General > Paper lists show
This option tells the scanner software whether to display paper sizes
(dimensions) or paper titles (such as E-0, A3) where possible.
use quick select lists
Setup tab >
> General > Use quick select lists
This option determines the behavior of your interface in relation to
making settings for Type of original, Input size, Output size, Scale,
Printer, Accounting, and Scanner. This option is set by default. The
default dialog order is that you first access an east-to-use list dialog
and from there you can choose a specific Setup dialog by pressing
the tool button
With Quick select lists un-selected, you reverse the above order: your
interface first presents the specific Setup dialog and you must from
there choose to view the List dialog with current predefined and
standard values for the options.
Leave this option selected if you primarily use the scanner software
with standard and customized pre definined option values. Make the
option empty if you primarily need to make specific adjustments and
settings for your different copy jobs and usually bypass the lists with
predefined values.
You can see below the Input size button behavior with and without
the Quick select lists option selected: Quick select lists ON (first) and
OFF (second). The Tool button on the Input Size dialog will activate
the Input Size Setup dialog, and the Input size button in the Input
Size Setup dialog will activate the Input Size dialog.
print settings
Setup tab > > General > Print settings
Checking this option tells the scanner software to print out an
overview of all your settings together with the copy.
enable reprint
Setup tab >
> General > Enable reprint
In the Copy Settings dialog box is a Reprint button, which can be
enabled or disabled here. If the Enable reprint option is selected, the
Copy tab >
> Reprint option button will reprint the last image
printed. This is useful if you suddenly realize that you need more
copies than you initially requested.
paper series

Setup tab > > General > Paper series
You can determine which types of size presets you want to appear in
the size presets list (size option dialogs) when you set the Input Size
or Output Size. Pressing the Paper series option displays a list of
paper series' (ANSI, ARCH.....) and you select (mark) all the paper
series' you want included in your size option dialogs. Be sure to
select the "Custom" series if you want to have your own custom
made size presets displayed in the size dialogs along with the
standard sizes.
printing instructions legal information
© Copyright 2012, 2015 HP Development Company, L.P
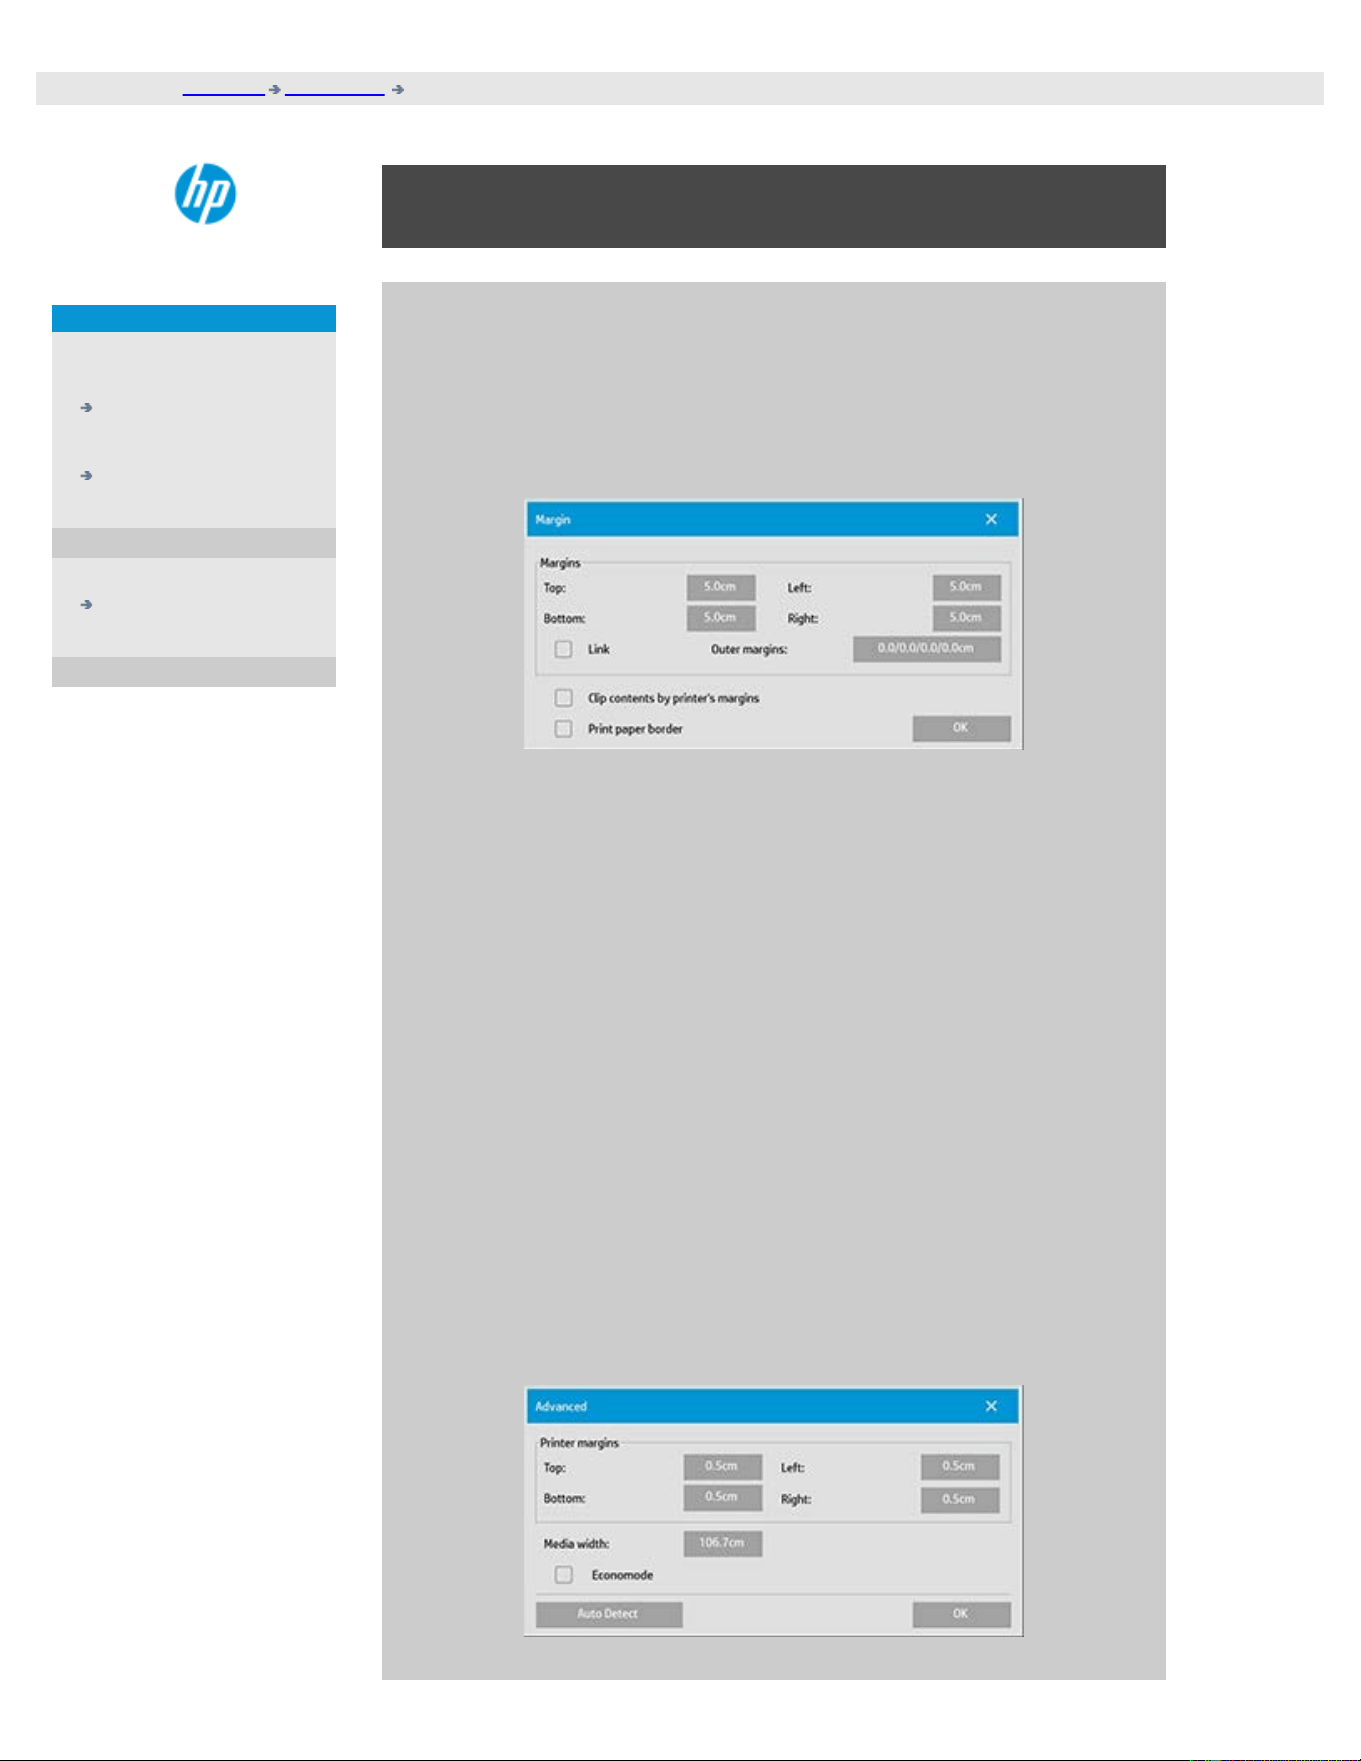
you are here: welcome how do I ... clip contents by printer margins
HP Pro Scanner
how do I...?
the problem is...
alphabetical index
Use the
"Clip contents by printer's margins" option
The Margins we set in the Setup tab dialog are the copy's "output
margins". But the printer itself also creates margins. The size of your
printer's margins depends on the printer model and cannot be
changed. You should consider the printer's margins as your
minimum margins, an unprintable area, and they will be in your
output whether you want them to or not.
Setup > Margins dialog:
The "Clip contents by printer's margins" option (Setup tab > Margins)
lets you compensate for these uncontrollable margins. Selecting the
option lets you economize paper usage by keeping unneeded margin
space down to a minimum.
Selecting the option will tell the application to deduct the printer's
enforced margins from your output Margins so the total margins are
as you specified for the copy.
For duplicating originals without margins, you would not want output
Margins either and thus the option should be deselected.
To use the option:
Enter your printer's margin values as specified in your printer
documentation through the Setup tab > Printer > Tool button >
Advanced button (dialog shown below).
On some printers: You can use the Auto Detect button to prevent
manual setting of printer margins and the values are set from the
printer device.

Guidelines on using the "Clip contents by printer's margins"
option:
If you select "Clip contents by printer's margins":
1. You will also have selected a minimum output Margin at least
equal to the printer's margins. The program will automatically
update the values in the Setup tab's Margin values to reflect
this. If you set output margins to zero or lower than the
printer's, then the printer's margins are used and updated as
the output Margins.
2. If the output Margins you set are higher than the printer's, then
the printer's margins are deducted from the output margins
meaning the scanner software only adds on the margins that
the printer is missing. This means that your total margin,
measured from the paper's physical edges, will be as you
specified in the Setup tab - Margins option.
3. The cropping effect on the original is always determined by the
value displayed on the Setup tab's Margin button whether it
was automatically calculated or not. The actual cropping effect
will be as displayed in your WYSIWYG preview.
If you do not select "Clip contents by printer's margins":
1. The output margins you set will be added to the printer's and
applied as if measuring inwards from the paper's physical
edges.
2. Only the specified Output margins will crop the copy as
displayed in your preview.
You would typically want to use precise margins when copying on
standard format sized sheets manually fed into the printer. When
you print on paper rolls, you will often have to cut out the copy
anyway.
Some examples:
If you are copying an original photo without margins then set your
output margins to zero and uncheck the "Clip contents by printer's
margins" option. Print the copy on a roll or a sheet larger than the
specified output size to get the whole image because the printer's
enforced margins will offset your copy.
Let's say you are printing a D-size poster, you want a margin of 1.5"
on the copy and your printer margins are 0.5". You are duplicating
the poster on a D-size sheet. Here you could select the Clip contents
by printer's margins option. You can then set your output Margins to
1.5" and you will also get only a 1.5" margin from the paper's
physical edges. Using the Clip contents by printer's margins option
saves paper for jobs when margins and slight cropping are
acceptable.

you are here: welcome how do I .. set paneling and tiling options and assemble
HP Pro Scanner
how do I...?
the problem is...
alphabetical index
how do I set paneling and tiling options and assemble
panels
Paneling enables you to create huge enlargements. With Paneling you
print wide format sections of your image as "panels" and then glue the
panels together to reconstruct the image. In effect, the Paneling option
creates a virtual printer with unlimited width capabilities. The HP
Scanner software makes Paneling easy by supplying precisely placed
cutting lines and guiding glue marks on the panel edges, so you can
connect your panels with near-invisible seams.
Tiling is also paneling — but gives you the option to make your panel
sections by dividing the image both horizontally and vertically.
See:
...options
...assembling the panels
options
1. Width: for setting the width of the panels.
The width includes the Overlap area. The panel width can at most be
as wide as the printer's printable area. For maximum sized panels,
set the panel width to the same value you set as the printer's Media
Width (through the Setup tab > Printer > Unprintable area) minus the
printer's left/right unprintable areas.
This value should correspond with the documented printable area for
your printer. The scanner software will calculate the size of the last
panel. When calculating special panel widths, for example for
dividing the image into equally wide panels, you must remember to
add extra space for panel overlap (see the example below).
2. Overlap: determines the width of the overlap areas — that is,
the edges that contain equal image data on two adjacent
panels.
Large, heavy panels will need wider overlap and gluing areas than
smaller panels.
3. Glue Marks: small gray arrows are printed on the panel's edges
to help guide you when you connect the panels.
The glue marks will hardly be distinguishable in your large copy. The
arrows vary in size: the larger the Overlap width, the larger the
arrows printed. Maximum arrow size is 1" high.
4. Tiling: allows you to determine the length of your panels. Select
the Tiling option when you want to determine the length of
each section and assemble multiple short sections vertically

instead of connecting long whole image length sections.
Your sections will be connected both horizontally and vertically. Tiling
is useful for single sheet printing but can also be used if you want to
make small sections on rolls. With tiling turned off, the panel is
output continuously on the printer from the image's top to its
bottom. Each panel becomes as long as the image itself and the
panels only have to be connected at the sides.
5. Length: set the length of your tiles if tiling is used.
assembling the panels
The strips or tiles representing sections of a whole image need to be
connected. Unless you have a huge table, it would be best to arrange
your sections on the floor in their correct order.
If you selected the Glue Marks option, the scanner software will have
made your job easier by printing the following guide-markings on
the panels:
1. The Cut line: a line will be printed on the left side of panels that
are to be joined with their left neighbor — that is, every panel
but the first (leftmost) panel in a row.
Use a sharp knife, scissors or other cutting device to cut on the right
edge of the line (to remove the line itself). The cutting line will be
placed in the middle of the overlap area so slight irregular cuts can
be tolerated since cutout image data will be picked up in the overlap
area of the neighboring panel.
2. Glue mark arrows: after cutting the edges at the cut line, bring
your panels together by overlapping with rightmost panel on
top of the panel on its left.
The second panel in a row overlaps the first panel, the third overlaps
the second and so on. Use the glue mark arrows to fit and glue the
panels together with perfect seams (see the illustration below).
You assemble the panels by bringing the arrows printed on the
overlapping panel down on top of the arrows printed on the
underlying panel.
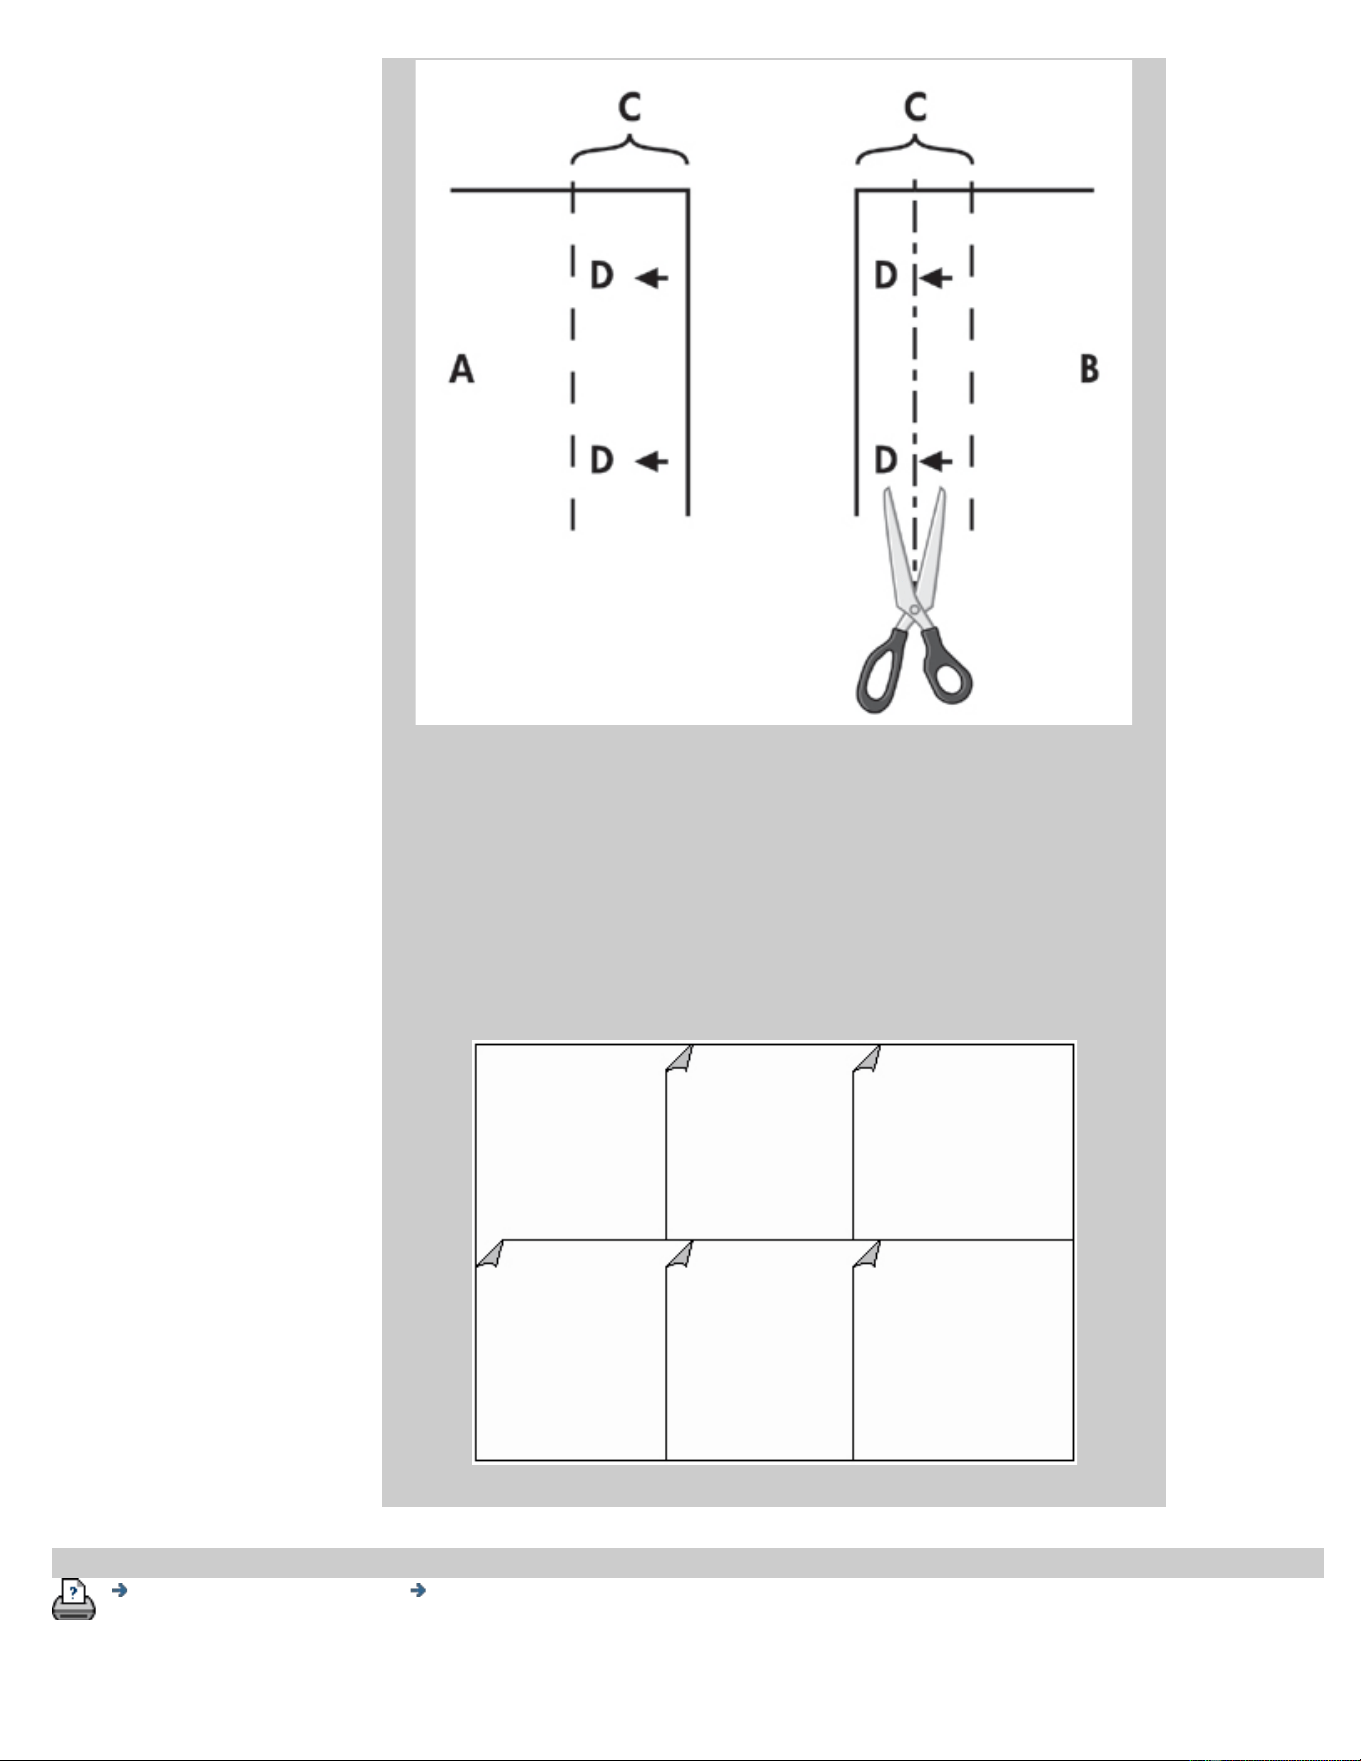
If the Tiling option is selected, cut lines and glue marks (D) will be
printed, both for horizontal connection (as illustrated above) and for
vertical connection.
Bring your panels together by overlapping the edges with each
rightmost panel (B) on top of the panel on its left (A). The second
panel in a row overlaps the first panel; the third overlaps the second
and so on as illustrated below. Vertical connection (tiling only) is
performed with the first row at the lowest level and then each
following row overlaps the bottom edges of the tiles in the row
before it.
printing instructions legal information
© Copyright 2012, 2015 HP Development Company, L.P
you are here: welcome how do I ... use accounting
HP Pro Scanner
how do I...?
the problem is...
alphabetical index
How do I use accounting?
The Accounting feature helps keep track of your copy activities. It can be
used to record your copy expenses and for billing your customers.
Accounting records information on your systems scans, prints, copies
and paper usage. Accounting information is stored in a simple format so
it can be loaded into spreadsheets and databases.
Read information about:
...active account
...total account
...accounting criteria
...accounting log files
active account
The active account name is displayed on the Account button in the
Setup tab. If a new Account has been created, every time you press
the Copy button
or the Scan to file button the
Account dialog list opens for you to select an account. Only one
account (besides the Total account) can be active at a time. See:
...how do I
create/delete/disable an account?
total account
The built-in Total account runs constantly in the background. Its
purpose is to record all your system's activities. Activities registered
on a current active account will automatically be recorded in the
Total account as well. The Total account cannot be deleted, reset or
disabled.
accounting criteria
The activities that update an account are: Copy, Collate Copy, Scan to
File, Print from File. The accounting system records the number of
times the system scans, prints and copies (straight-through scan
and print). Scan to File updates only the scan fields, Print from File
only the print fields, while Copy and Collate Copy update both. The
number of square feet or square meters for scanning and printing
activities are calculated from the Input size and Output size settings.
The calculations for paper usage in square feet incorporate the full
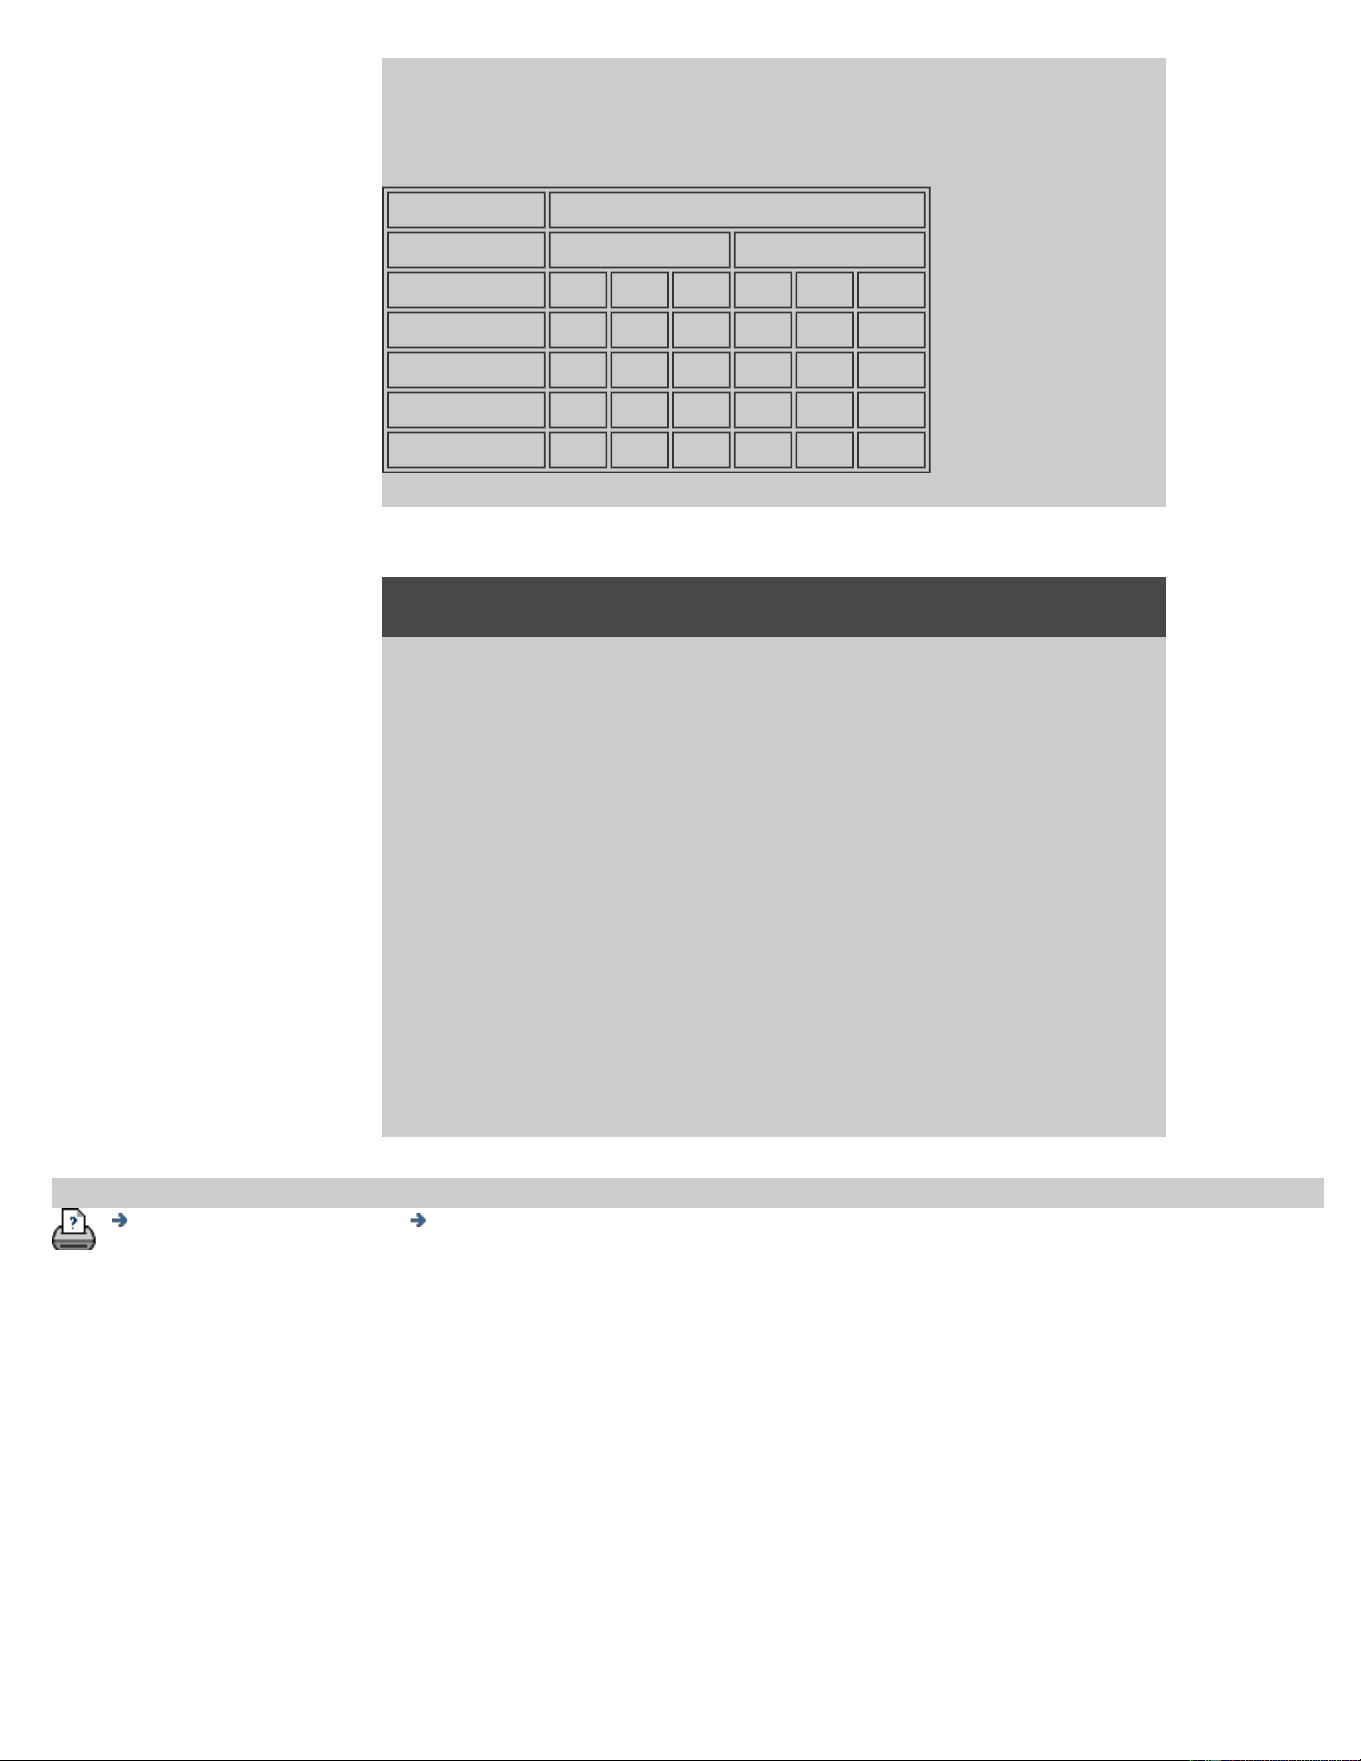
printer Media Width as set in the Setup tab > Printer Tool button >
Printer Margins dialog.
The following table shows how your scanner software actions update
the Accounting fields:
Action Account Fields
Jobs Area
Scan Print Copy Scan Print Paper
Copy No No Yes Yes Yes Yes
Collate Copy Yes Yes No Yes Yes Yes
Scan to File Yes No No Yes No No
Print from File No Yes No No Yes Yes
accounting log files
Your scanner software creates special log files for direct integration
into your invoicing and bookkeeping systems. Accounting data is
organized in files for easy loading into spreadsheets and/or
databases.
Accounting data files are stored in the scanner software Accounting
file folder. There is one file for each account you create. The files are
named: <account name>.csv. These (.csv) files can be viewed raw
with standard text editors like MS Notepad and they can be loaded
into popular spreadsheet and database applications.
The files contain lines of comma-separated fields. Each line
represents a single action and a line's fields contain values recorded
during the action. The actions that trigger the creation of a new line
are: Copy, Collate Copy, Scan to File, Print from File.
printing instructions legal information
© Copyright 2012, 2015 HP Development Company, L.P
you are here: welcome the problem is... white space with nesting
HP Pro Scanner
how do I...?
the problem is...
alphabetical index
the problem is white space with nesting
if there is too much white space with nesting...
If there is space for another image on your media when using
nesting, then make sure you have set the printer media width in your
copy system software. See:
...how do I set the printer media width?
printing instructions legal information
© Copyright 2012, 2015 HP Development Company, L.P
you are here: welcome alphabetical index
HP Pro Scanner
how do I...?
the problem is...
alphabetical index
alphabetical index
A
- B - C - D - E - F - G - H - I - J - K - L - M - N - O - P - Q -
R
- S - T - U - V- W - X - Y - Z
A
accessing shared files
accounting
about - using
creating new
deleting
log files
select/activate
total and active account, about
adaptive - method
Administrator password - enable/disable
auto-alignment - copy and scan-to-file
auto-detect scan length- limit
auto input size
auto landscape - input portrait and output landscape
auto output size
auto preview - scanner options
automatic file naming
B
B/W templates
background clean - type of original option
back-ups during scanning - scan speed
Batch copy and batch scan-to-file
black ink only - print from file settings
black ink only - type of original - copy and scan to file
black and white Threshold - method
blur - type of original option
C
calibrate rip option
calibration - scanner
Clip contents by printer's margins
CMY color balance
collate - copy sets

color accuracy - optimize
connect to a network
copies - making
copies - set how many
copies - sets (collate)
copy mode
copy - thick media
copy quality
crop to roll
cropped image - problem
D
Debugging files - Troubleshooting
delete files - from system
descreen
Destination - scan to file
duplicate copy (in a file)
E
eject paper - scanner options
Email - scan to
enable reprint
enhance gray - type of original option
exit button
Extended thickness - stitching offsets
F
File duplicate option
File Management
files - scan to file ...
how to scan to file...
batch scan-to-file
quality settings
delete files from hard disk
files shared - access to...
Folder button (at bottom of screen)
folding options
FTP/WebDAV
G
getting started - setup instructions
glass plate - replace on HP HD Pro Scanner
glass plate - replace on HP HD Pro 2 Scanner
glass plate - replace on HP SD Pro Scanner
graytone - method

H
HP
http://hp.com/go/hpproscanner
I
image cropped - problem
image overview - zoom viewing
ink printer original - copy quality
ink printer original - print
input size
install printer and printer drivers
interface language - how to change
interface options
insertion slot - raise for thick media
invert - type of original option
J
K
L
lamp unit - replace on HP HD Pro Scanner
landscape (auto) - input portrait and output landscape
language of interface - change
length
input size
output size
lightness - type of original option
limit auto detect scan length - scanner options
Link (margins, outer margins)
lists - print
setting up print list
to maintain the print list
delete files from the hard disk
remove files from the print list
M
maintenance
procedures
replace scanner parts HP HD Pro scanner
replace scanner parts HP HD Pro 2 scanner
replace glass plate HP SD Pro Scanner
margins
Margins - setting

Outer margins
Clip contents by printer margins
max detail - type of original option
max detail - print from file settings
media in printer, media profile
media profile selection
media profile creation
media handling
media size
paper series
width, printer
media offset
menu shortcuts - quick select lists
message - about scanner
viewing
warning
method - type of original option
mirror the image - copying and scan-to-file
move image tool
multiple printers
multipage scan to file
N
name and scan sheet button - during media profile creation
nesting
how
white space - problem
network
connecting system to a
settings
Set up scan network destination and folder access
Set up FTP connections for scanning
no scanner found message
number of copies
O
one to one pixel view
optical resolution (descreen)
optimize for drawing - type of original option
optimize for drawing - print from file settings
optimize - color accuracy
original - type of ... template
settings
defining
selecting
templates color
templates B&W

output destination
output margins - setting
outer margins - setting
output quality
output size
setting
printer media width
P
page order
paneling
setting options and assembling
using
paper frame
paper lists show
paper loading
how to set load preferences -media handling
paper series
paper size preset - create custom
password
administrator
network - FTP/WebDAV
position paper frame tool
power up/down timer
preferences - for scanner and user interface
preview
resolution - scan options
tools
print color sheet
print from file
how to...
lists - setting up
Print to File for debugging
print list
select all option
maintaining print lists
number of copies option- in list
setup the print list
print settings - print out an overview
Printer
driver and installation
margins
media width
printer - queue
viewing the queue
job held in queue
printing error

printing from files
printing from file - quality
Print Paper Border
Q
quality settings
copy quality
scan to file quality
print from file - quality
queue - printer
viewing the queue
job held in queue
quick select lists
quicksets
R
recover system
red, green, blue - type of original option
replace - scanner parts
glass plate - HP HD Pro Scanner
glass plate - HP HD Pro 2 Scanner
glass plate - HP SD Pro Scanner
white background - HP HD Pro Scanner
white background - HP HD Pro 2 Scanner
lamp unit
reprint, using and enabling
reset button
resize paper frame tool
resolution - scan to file
resolution - preview dpi
rewind paper - scanner options
rotate the output 90 degrees
S
saturation - type of original option
scale -setting
scale - create custom
SCANdump
scan - thick media
how to...
scan to file
how to...
batch scan-to-file
quality settings
multiple pages into a single file

scanner device
options and preferences
scanner maintenance
performing
replace scanner parts
scanner messages
scanner parts - replacing
glass plate - HP HD Pro Scanner
glass plate - HP HD Pro 2 Scanner
glass plate - HP SD Pro Scanner
white background - HP HD Pro Scanner
white background - HP HD Pro 2 Scanner
lamp unit
scanner software
changing language
scanner speed - scanner options
scan tab
setup security
administrator password
store network connections
disable USB storage
setup scanner
about scanner options and preferences
about user interface options
auto preview
eject paper
height auto-detect method
language
limit auto-detect scan length
preview dpi
printer media width
rewind paper
scan speed
units of measurement
user interface options
sharpen - type of original option
shared files - access
shortcuts, menu
show paper size in lists
shut down system
size
output size - set
input size - set
paper size preset - create custom
solving problems
stop button
system recovery
synchronous printing (multiple printers)

T
templates color
templates B&W
thick media
copying and scanning thick media
insertion slot height
extended thickness setting
tiling
time zone - setting
timer - power up and power down
Troubleshooting
turbo resolution - scan, copy quality
type of original templates
setting options
definition and creation of...
selection of...
templates color
templates B&W
U
units of measure
Update software
use quick select lists
V
W
warning message
welcome page - to help system
white background - replace for HP HD Pro Scanner
white background - replace for HP HD Pro 2 Scanner
white space with nesting
WIDEsystem
about
width
input size
output size
printer media
X
Y

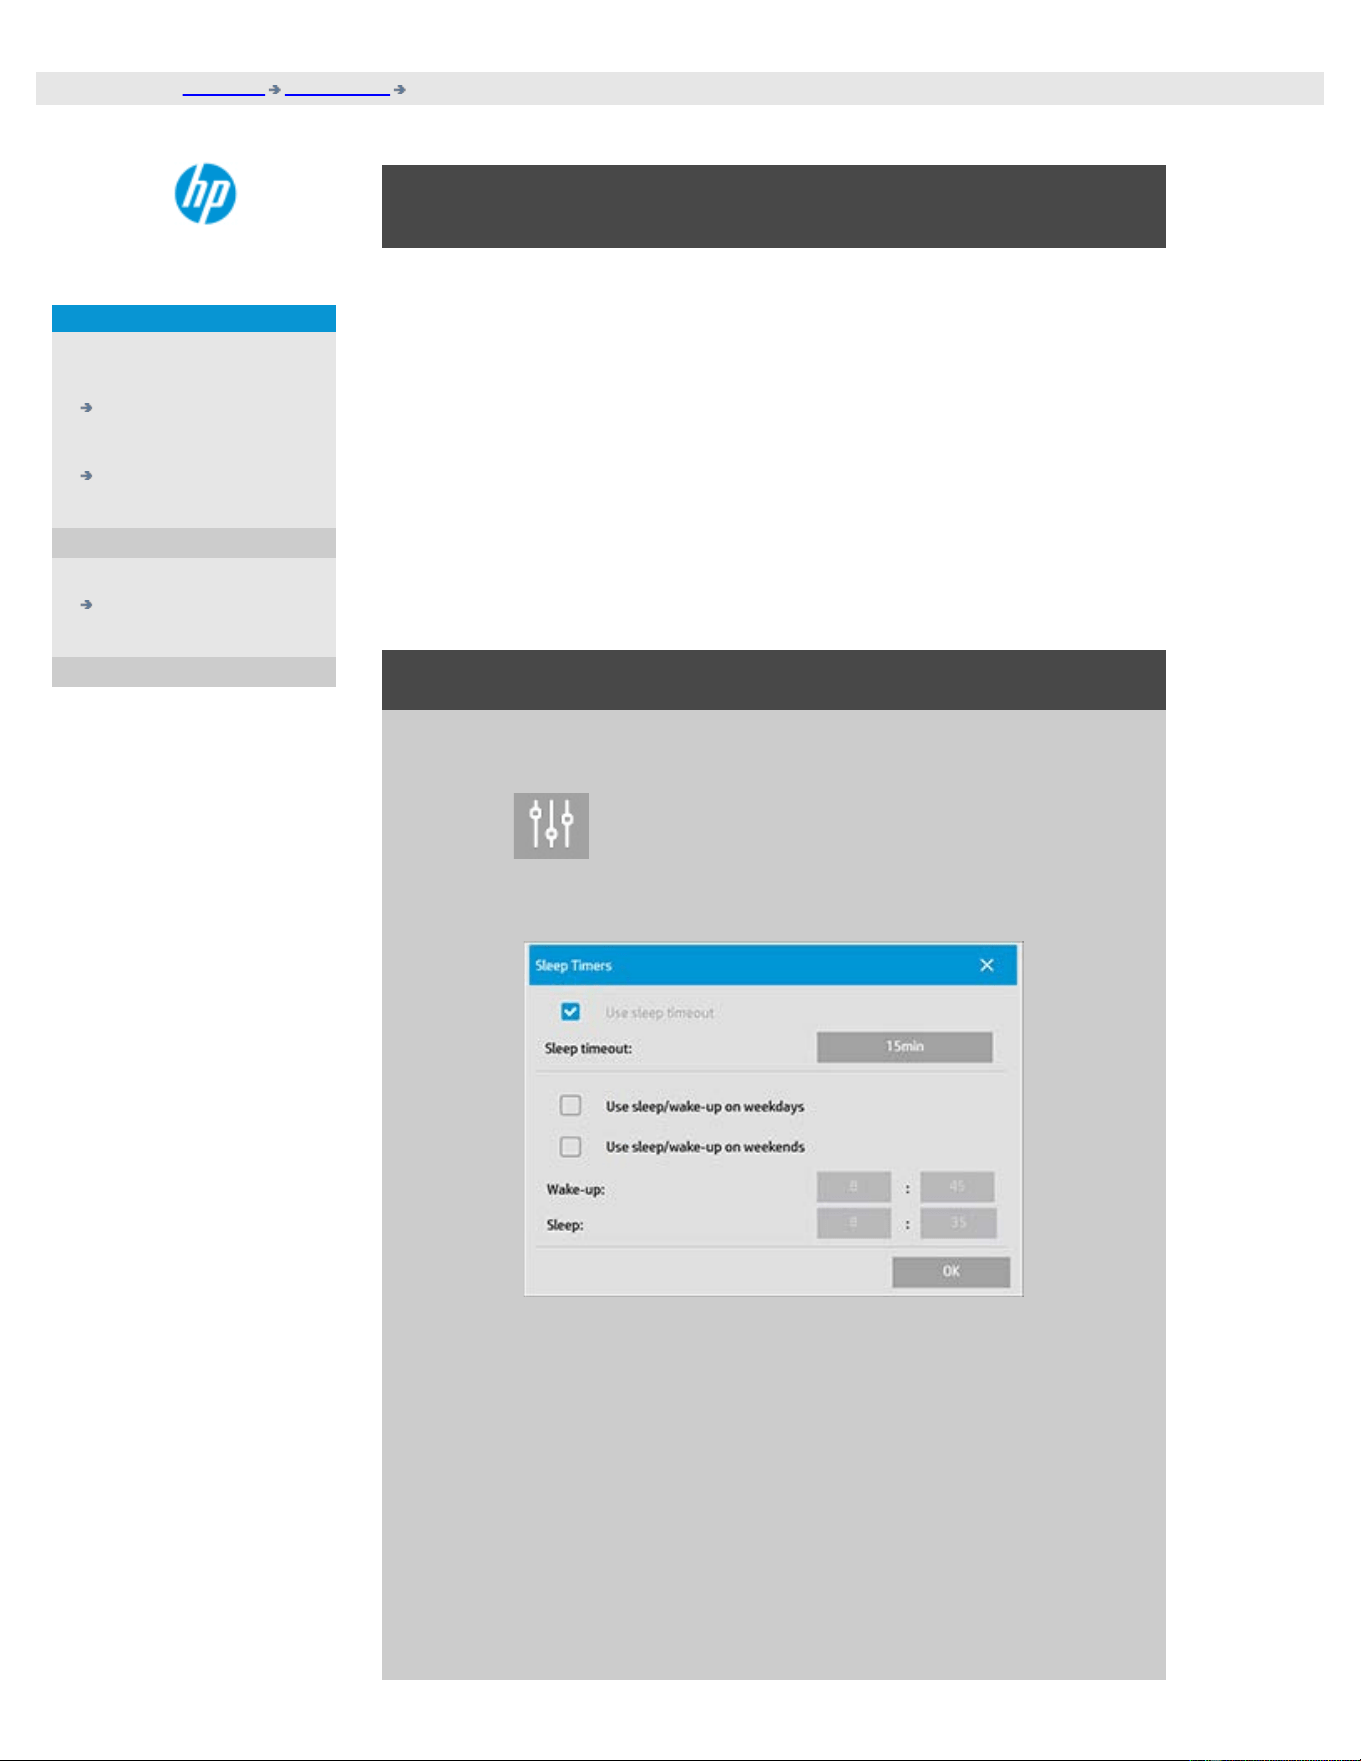
you are here: welcome how do I...? scanner sleep timer
HP Pro Scanner
how do I...?
the problem is...
alphabetical index
how do I set the scanner sleep timers?
NOTE: The availability of the sleep timer feature depends on your
scanner model.
For the HP HD Pro Scanner then the automatic power up/down saves
energy and will lengthen the life span for your scanner lamp. Typically,
you would set the scanner to power down sometime after work hours
and power up before you arrive in the morning so your system is ready
for use.
Note that The following applies when the power up/down timer is set:
If a scan is being done when power off time is reached, automatic power
off is delayed by 15 minutes.
to set the scanner system power up/down timer...
1. Press the Setup tab
2. Press
> System > Advanced
3. Press the Sleep Timers button
4. Use sleep timeout - this option cannot be disabled due to the
Energy Star 3.0 compliance.
5. Sleep timeout - The value can be set between 1 and 60 minutes.
Default value is 15 minutes
6. The 2 options: Use Sleep/wakup on weekdays and Use
Sleep/wakup on weekends allow you to define the days you
wish the scanner to go into sleep or wake modes. For example,
you may only want to have the scanner power up and off
during work days i.e., week days.

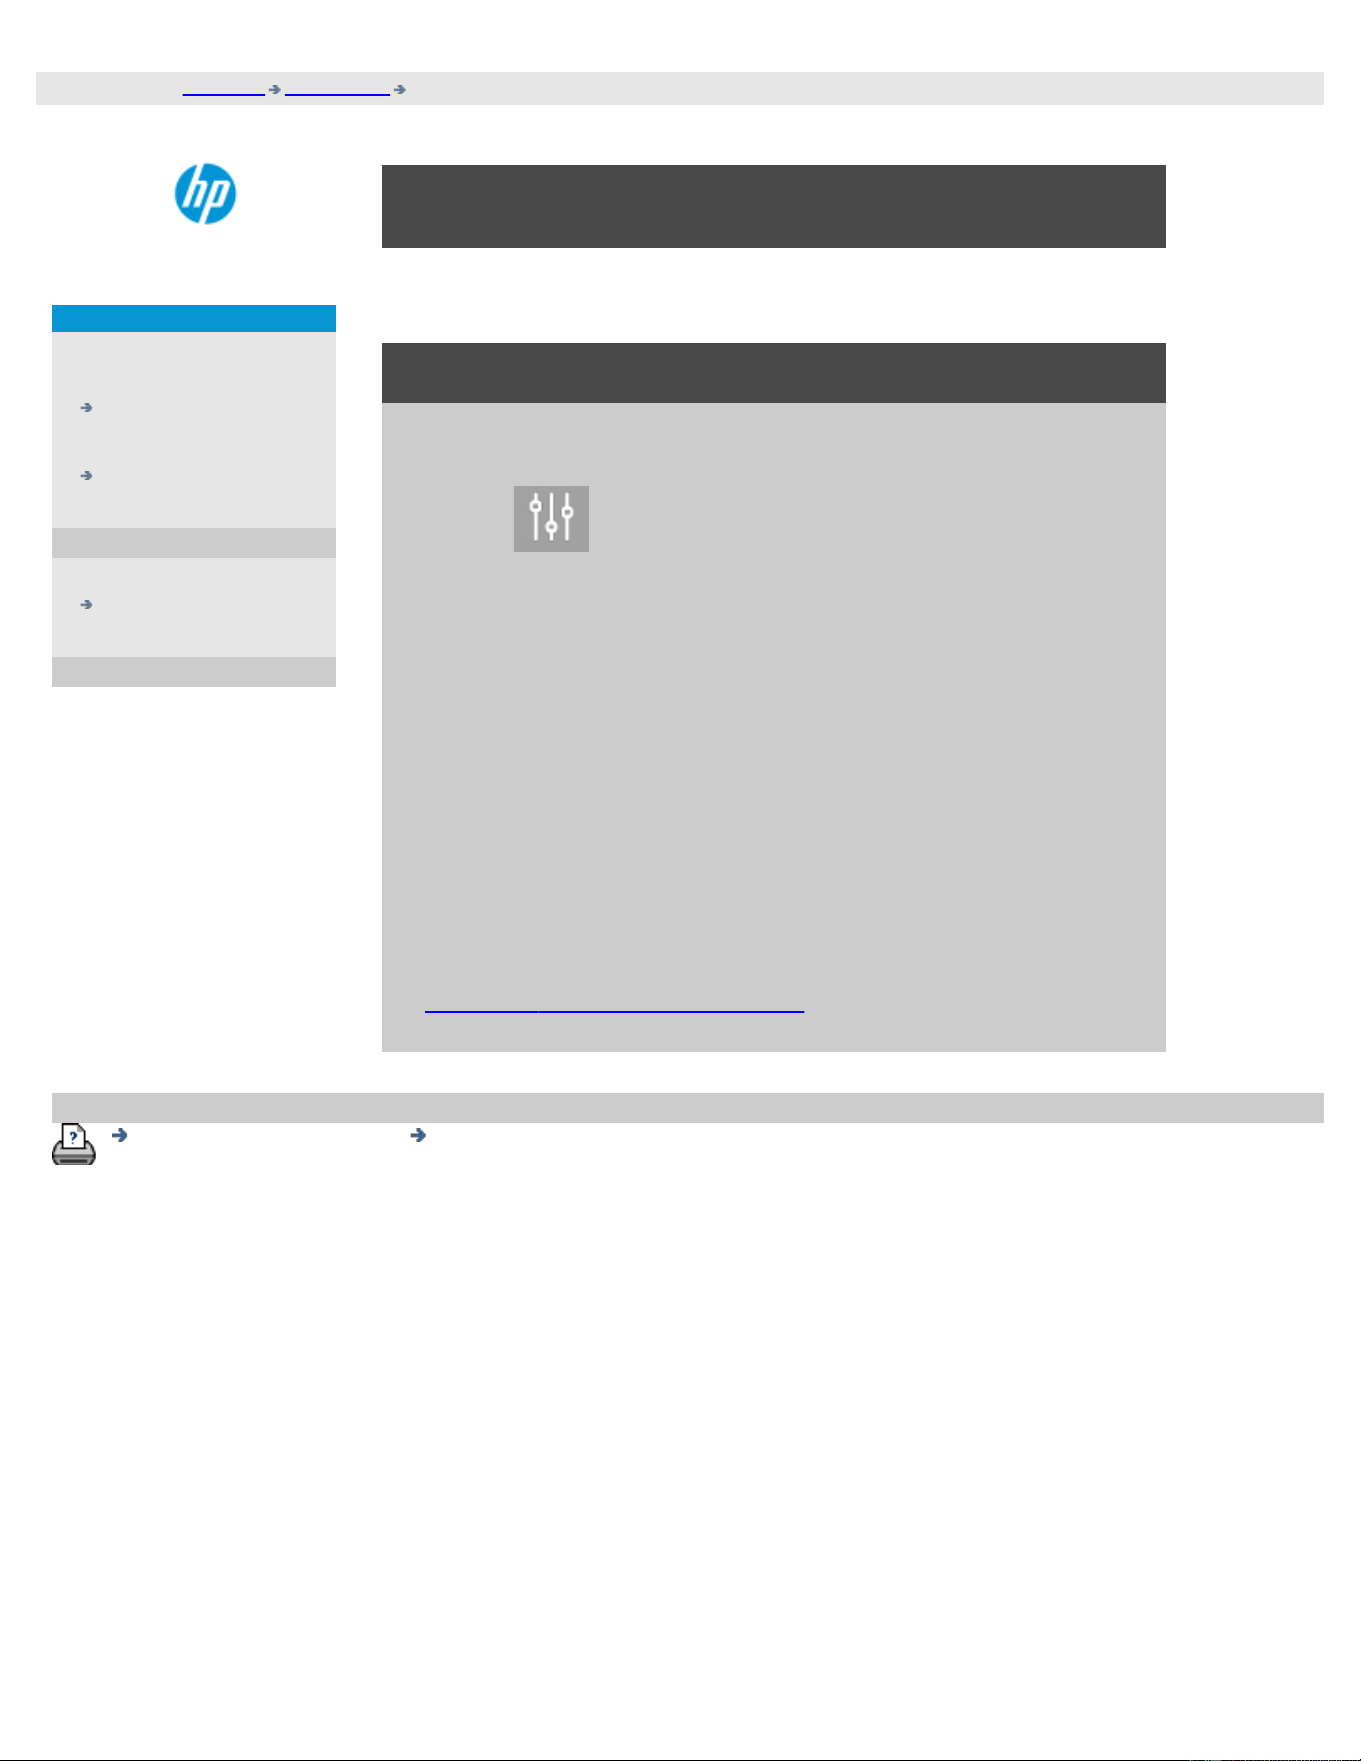
you are here: welcome how do I...? recover the system or update software
HP Pro Scanner
how do I...?
the problem is...
alphabetical index
how do I update the software or recover the system ?
to update the software or recover your system...
1. Press the Setup tab
2. Press
> System > Advanced
3. Press the Update Software button
4. Confirm that you wish to enter the Software Update and
Recovery mode to proceed.
5. The system will shut down and restart automatically in recovery
mode - and present your options.
5. Follow the instructions on your screen.
6. After updating the software/ system recovery you must run
Calibration. See:
...how do I...
maintenance procedures
printing instructions legal information
© Copyright 2012, 2015 HP Development Company, L.P
you are here: welcome how do I...? set the printer media width
HP Pro Scanner
how do I...?
the problem is...
alphabetical index
how do I set the printer media width?
Your work may involve printing on different media widths. For
example, with some jobs you will print on 36" wide media rol and for
other jobs, you will change to a 24" media roll.
Whatever the case, the program needs to know the width of the
media currently loaded on the printer.
The steps involved for setting the media width in the program
depend on your printer model. Newer printer models will support
automatic detection of the media width while older models may
require manual setting. See your printer's documentation for
determining its automatic media width detection capabilities.
Regardless of your printer model, it is recomended to view and
control your printer media width settings before commiting a large
and costly printing job. The printer media width setting can be
viewed in the Setup tab>Printer>Tool button> Advanced dialog. From
here you can also change the Media width setting when you change
the printer media roll to one of a different width.
The instructions in this topic describe:
1. Viewing and accessing the printer media width settings
2. Setting the printer media width on printers WITH support for
automatic media width detection - at startup and after
changing the paper roll.
3. Setting the printer media width on printers WITHOUT support
for automatic media width detection, at start up and manually
after changing the paper roll.
to view/access the printer media width settings ...
1. Select the setup tab.
2. Select the Printer button and then the Tool button
.
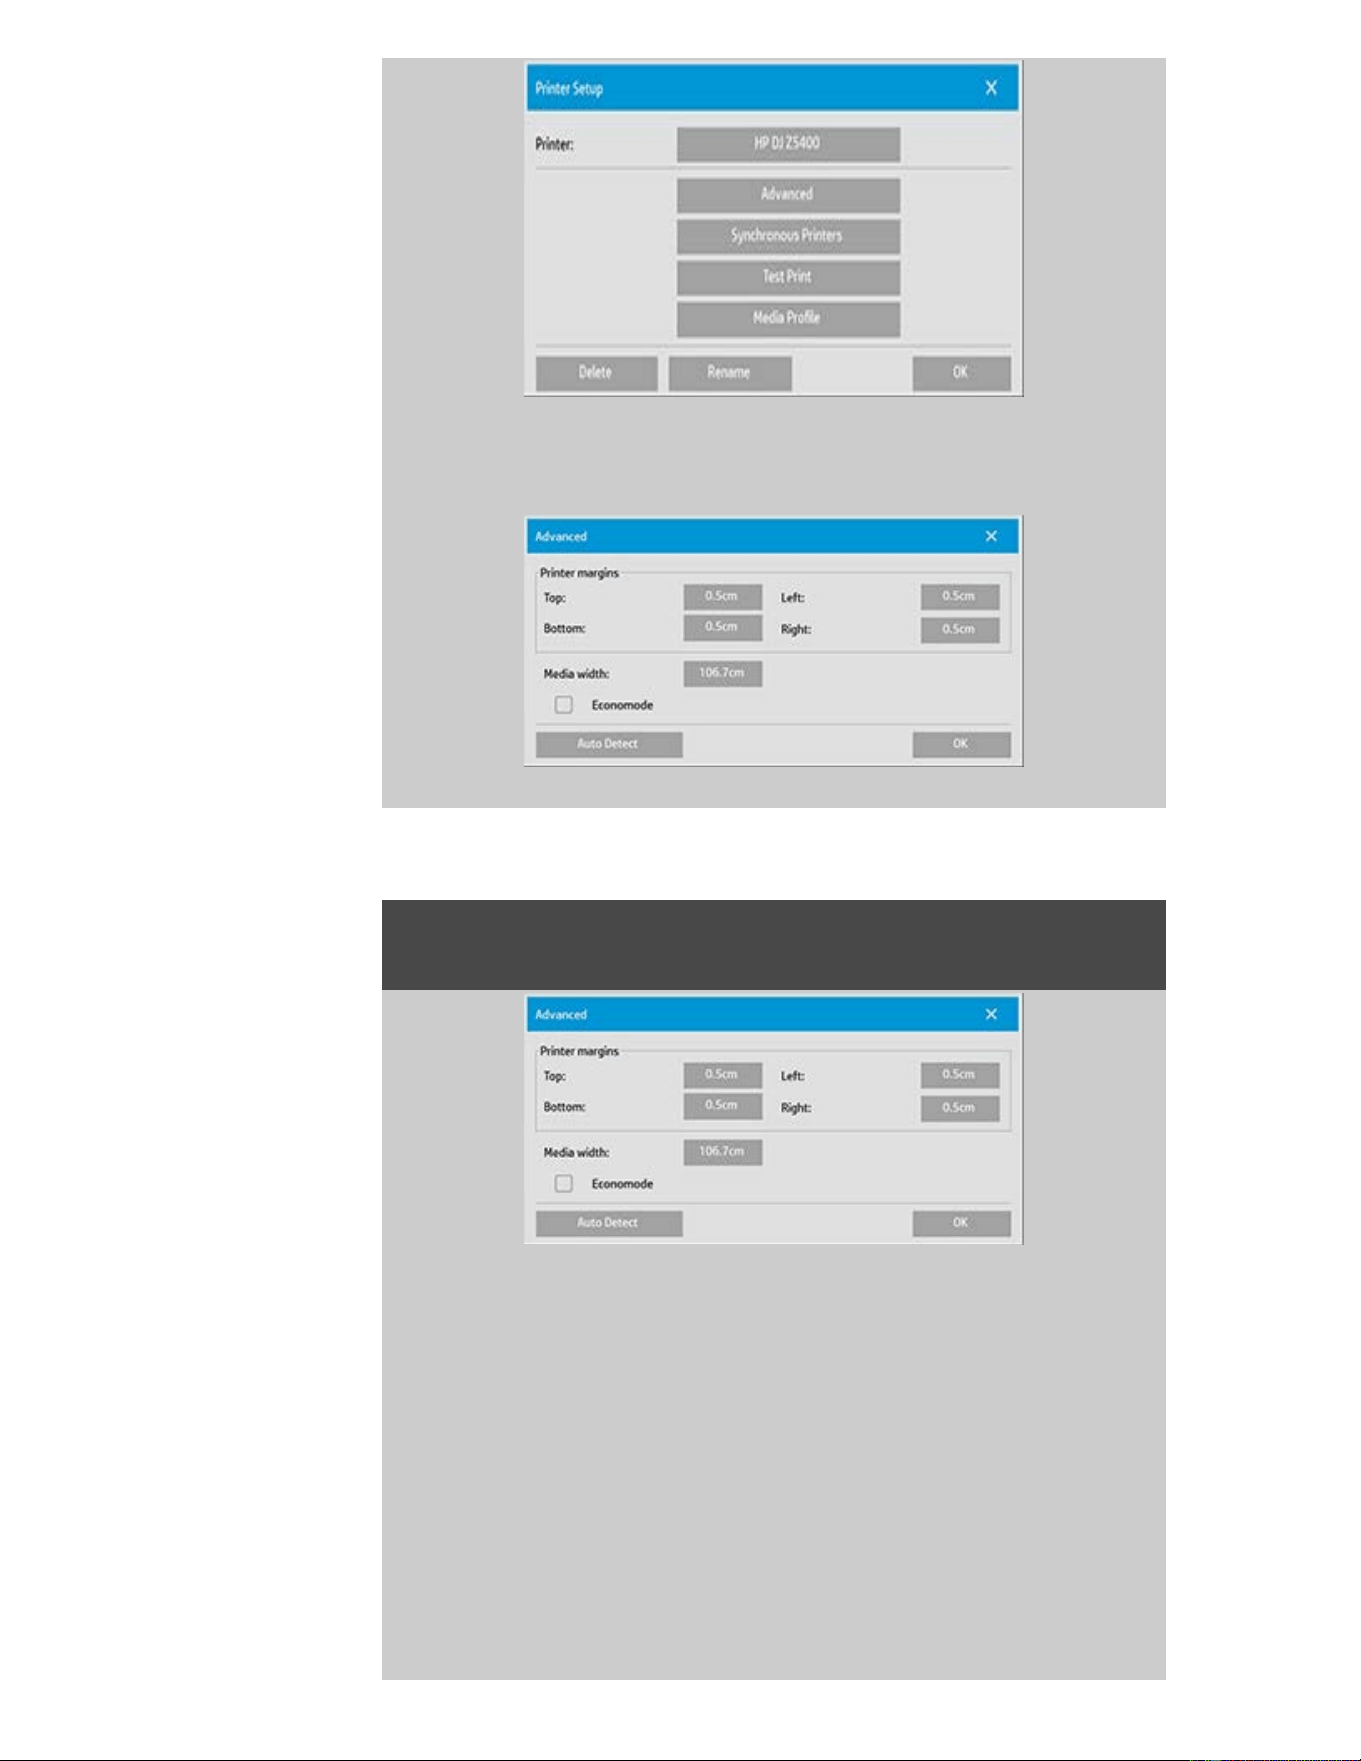
3. Select the Advanced button. The current Media width setting
(value) is displayed on the Media width button.
Setting the paper media width on printers WITH support for
automatic media width detection...
1. At start up - The program will automatically detect the width of
the roll currently loaded on the printer. The value will be
displayed in the Media width button in the Setup
tab>Printer>Tool button>Advanced dialog.
2. If you change the paper roll to one of another width - After
changing the roll, access the Setup tab>Printer>Tool
button>Advanced dialog. Press the Auto detect button to
retreive the new media width value from the printer. The new
value will be displayed in the Media width button.
3. Select OK to finish.
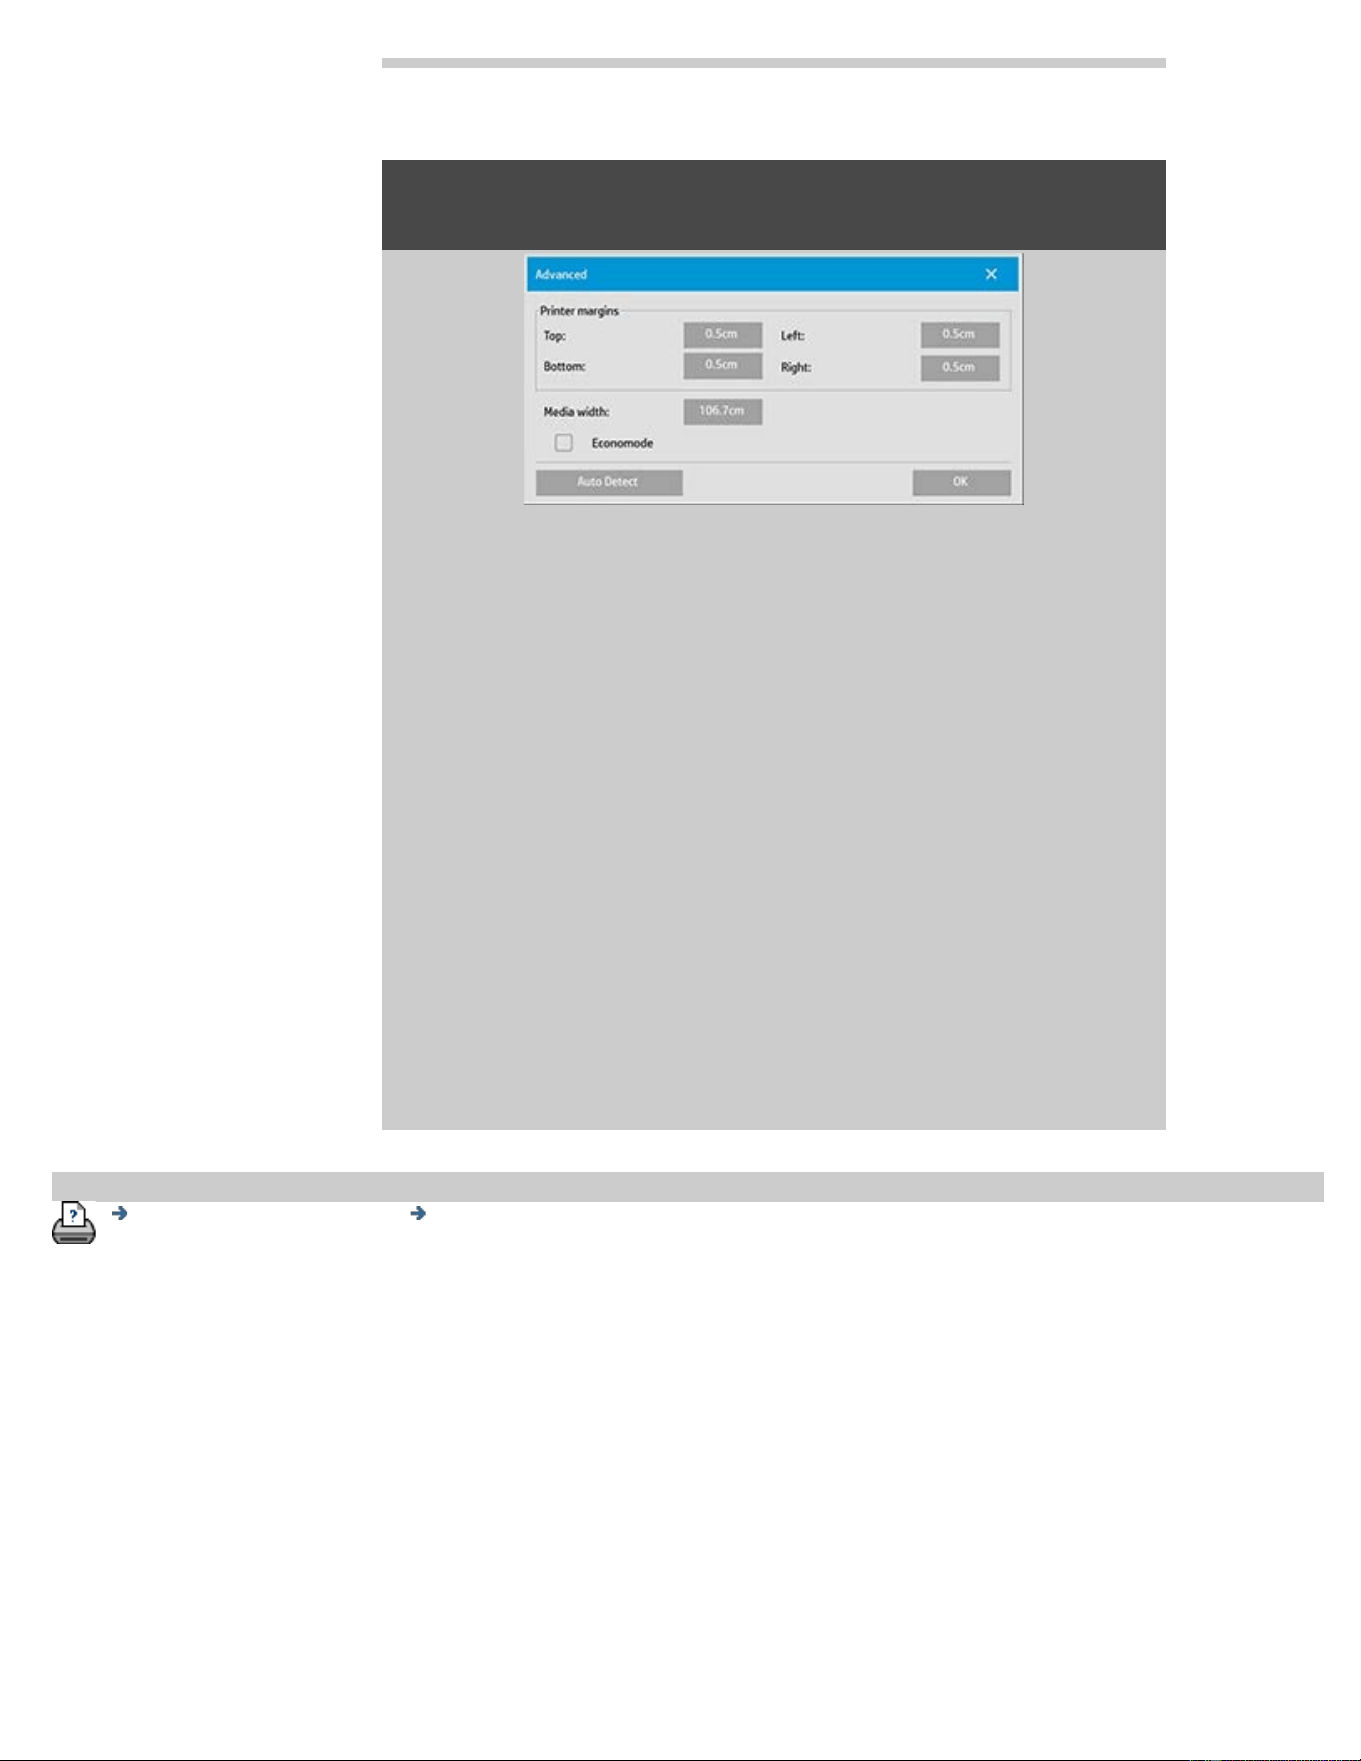
Setting the paper media width on printers WITHOUT support for
automatic media width detection...
1. At start up - The program will set the media width value stored
with the printer driver. This is normally the maximum output
width of the printer. If you are using a roll smaller than the
maximum width of the printer, you will need to change the
width manually. Access the Setup tab>Printer>Tool
button>Advanced dialog. Press the Media width button to enter
a new value with the on-screen keyboard and press the
keyboard's Enter key to confirm. The media width value will be
displayed in the Media width button.
2. If you change the paper roll to one of another width - You need
to change the width value manually. Access the Setup
tab>Printer>Tool button>Advanced dialog. Press the Media
width button to enter a new value with the on-screen keyboard
and press the keyboard's Enter key to confirm. The media
width value will be displayed in the Media width button.
3. Select OK to finish.
printing instructions legal information
© Copyright 2012, 2015 HP Development Company, L.P

you are here: welcome how do I...? change the interface language
HP Pro Scanner
how do I...?
the problem is...
alphabetical index
how do I change the interface language?
to change the interface language...
If the Administrator password has been setup and activated, you will
be prompted to enter it before being able to change the system
interface language.
1. Press Setup Tab >
2. Select System
3. Press the Advanced button.
4. Enter the Administrator password if prompted by the system.
5. Press the Change Language button.
6. Select the language from those available.
7. The system will reboot to apply the new language.
printing instructions legal information
© Copyright 2012, 2015 HP Development Company, L.P
you are here: welcome legal information
HP Pro Scanner
how do I...?
the problem is...
alphabetical index
legal notices
Notice
Trademarks
notice
The information contained in this document is subject to change
without notice.
HP makes no warranty of any kind with regard to this material,
including, but not limited to, the implied warranties of
merchantability and fitness for a particular purpose.
HP shall not be liable for errors contained herein or for incidental or
consequential damages in connection with the furnishing,
performance, or use of this material.
No part of this document may be photocopied, printed, or translated
to another language without the prior written consent of HP.
trademarks
HP, the HP logo, Designjet, PageWide and Jetdirect are trademarks of
HP.
Any other trademarks referenced herein are the properties of their
respective owners.
© Copyright 2015 HP Development Company, L.P.
Large Format Division
Camí de Can Graells 1-21 · 08174
Sant Cugat del Vallès
Barcelona · Spain
printing instructions legal information
© Copyright 2012, 2015 HP Development Company, L.P
you are here: welcome how do I printing my help pages
HP Scanner
how do I...?
the problem is...
alphabetical index
How do I print help pages
to print your help pages...
The default printer on your scanner system is your large-format
printer. We advise you to use the HP Pro Scanner Documentation CD
if you want to print any help pages. The contents are identical to
your online help and will open in your browser.
printing instructions legal information
© Copyright 2012, 2015 HP Development Company, L.P
you are here: welcome how do I ... view information about the scanner
HP Pro Scanner
how do I...?
the problem is...
alphabetical index
How do I view information about the scanner
WIDEsystem
WIDEsystem is an application designed to monitor and control the
functionality of your scanner and contains the drivers required by
your system.
To reach WIDEsystem Setup tab > > System > WIDEsystem
The programs main features are:
System Status
View the scanner system's status, called the Scanner Mode,
by exiting your scanner system and on the Active
Desktop, selecting the WIDEsystem scanner icon on the
system tray. Status messages include remaining warm-
up time, interface connection errors, and an indication that
the scanner is ready for scanning.
View useful Error messages that relate to the current
Scanner Mode.
View the load status of the original (media) to be scanned.
Scanner Information
View information on the scanner system's firmware and
hardware revisions. The information helps you keep track
of your upgrades and is useful for support purposes.
Initiate a scan of the connected HP Scanner.
printing instructions legal information
© Copyright 2012, 2015 HP Development Company, L.P
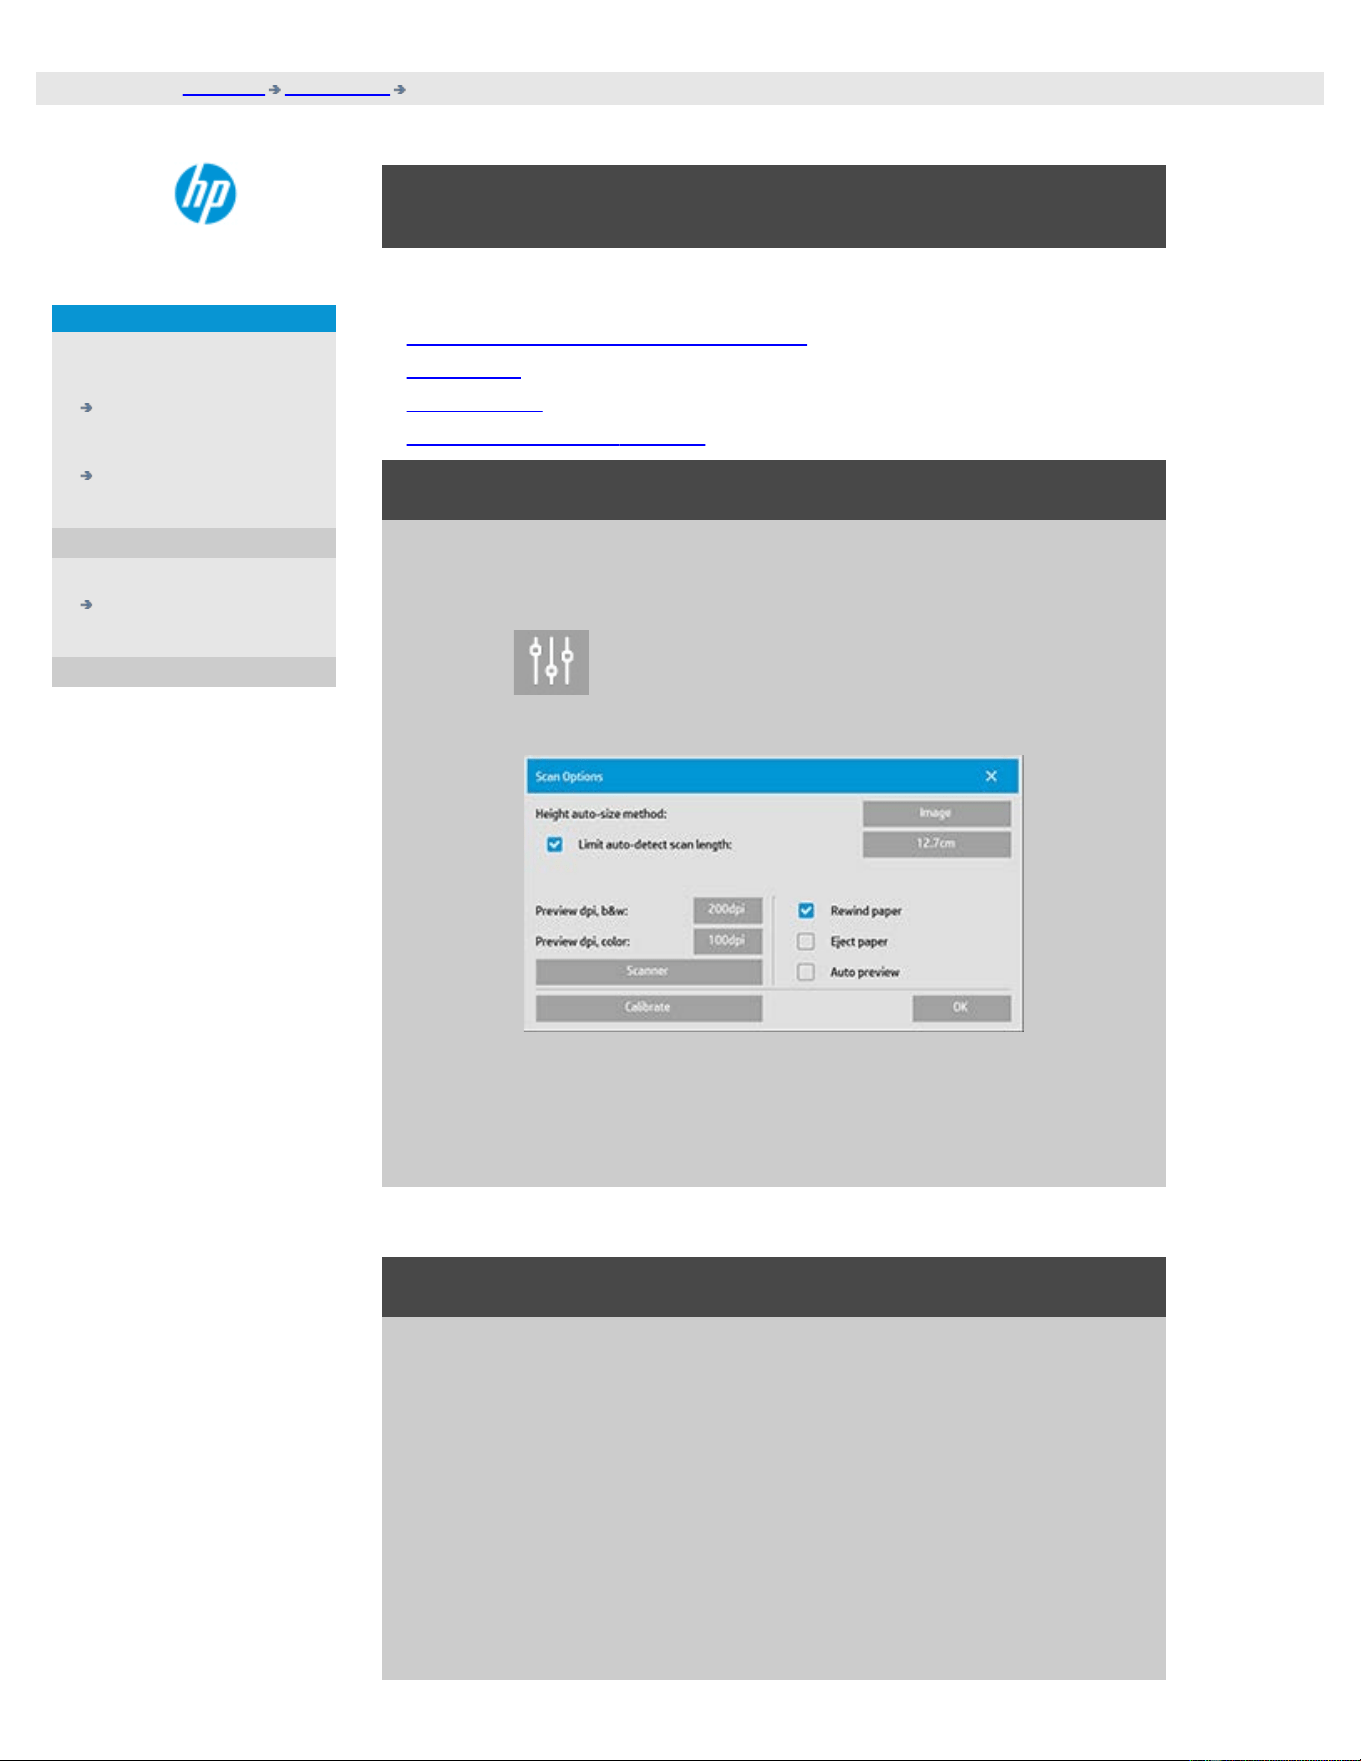
you are here: welcome how do I...? define special scanner setup options
HP Pro Scanner
how do I...?
the problem is...
alphabetical index
how do I define special scanner setup options?
Select a topic...
...to access the scanner setup options...
...paper load
...media offset
...extended thickness settings
to access the special scanner setup options...
1. Press the Setup tab.
2. Press
3. Press the Scanning button.
4. Press the Scanner button.
Media Handling
Select the Media Handling button
1. Select Automatic load or leave unselected for manual loading.
2. Set the Load delay factor for automatic paper loading to give
you time to position the original correctly.
3. Soft handling - set this to help correct paper jam errors while
scanning. Note that scanning speed is reduced.
4. Fast Load - For extra fast feeding of originals - used for batch
scanning.

media offset
Select the Media Offsets button
1. To get very high accuracy, modify the vertical precision from
zero to a value between -1% and 1%.
Positive settings mean that the distance between scan lines will be
increased, and negative settings mean that the distance between
scan lines will be decreased.
When you exit the Scanner Setup dialog, the modified value is stored
in non-volatile memory in the scanner and can only be changed by
re-doing the setup.
1. Paper offset -/ Top, Side, Bottom
The Paper Offset values determine the position of the scan
area. You can use the option to adjust the capture area's
position. This is done by moving the area to the right and down.
Top media offset: Move the area up or down. Perhaps there are
details close to the top edge that you want included or excluded
in the scan.
Bottom media offset : Move the scan area bottom marker up or
down. Perhaps there are details close to the bottom edge that
you want included or excluded in the scan or you wish to fine-
adjust the scanner's calculation of size length.
Side media offset: Move the area to the left to include/exclude
details close to the original's left edge.
extended thickness (stitching offsets)
Stitching is the scanner's automatic control of boundaries between
the cameras and creation of correct overlap of image data. Stitching
errors can happen when the original is not evenly pressed down on
the scanner's glass plate . The most common case involving stitching
errors is when scanning stiff thick originals with the pressure platen
raised for thick-original scanning .
NOTE: The extended thickness settings apply only with the HP HD
Pro Scanner
Normally, only stiff media will affect stitching. A flexible media will
usually be stitched correctly regardless of its thickness.

This option will let you adjust the normal stitching parameters to
accomodate thick media scanning if needed.
Select the Extended Thickness button
1. If the lines seem uneven, check the box labeled Enable
extended thickness handling.
2. Change the value for each of the scanner's camera pairs.
Normally, only positive values should be used.
3. Make test scans and readjust the values until you are satisfied
that the lines are stitched correctly.
4. Click OK to accept your settings.
printing instructions legal information
© Copyright 2012, 2015 HP Development Company, L.P
you are here: welcome how do I...? shut down the system
HP Pro Scanner
how do I...?
the problem is...
alphabetical index
how do I shut down my system?
to shut down your system...
1. Press the Exit button
.
2. Confirm that you wish to shut down the system.
3. Power OFF the scanner.
printing instructions legal information
© Copyright 2012, 2015 HP Development Company, L.P

you are here: welcome the problem is... wrong interface language
HP Pro Scanner
how do I...?
the problem is...
alphabetical index
the problem is with the interface language
if the user interface is not in the correct language...
When you installed your scanner system, the wrong language was
installed in the final step.
You need to change the interface language. See:
...how do I change the scanner system interface language?
printing instructions legal information
© Copyright 2012, 2015 HP Development Company, L.P
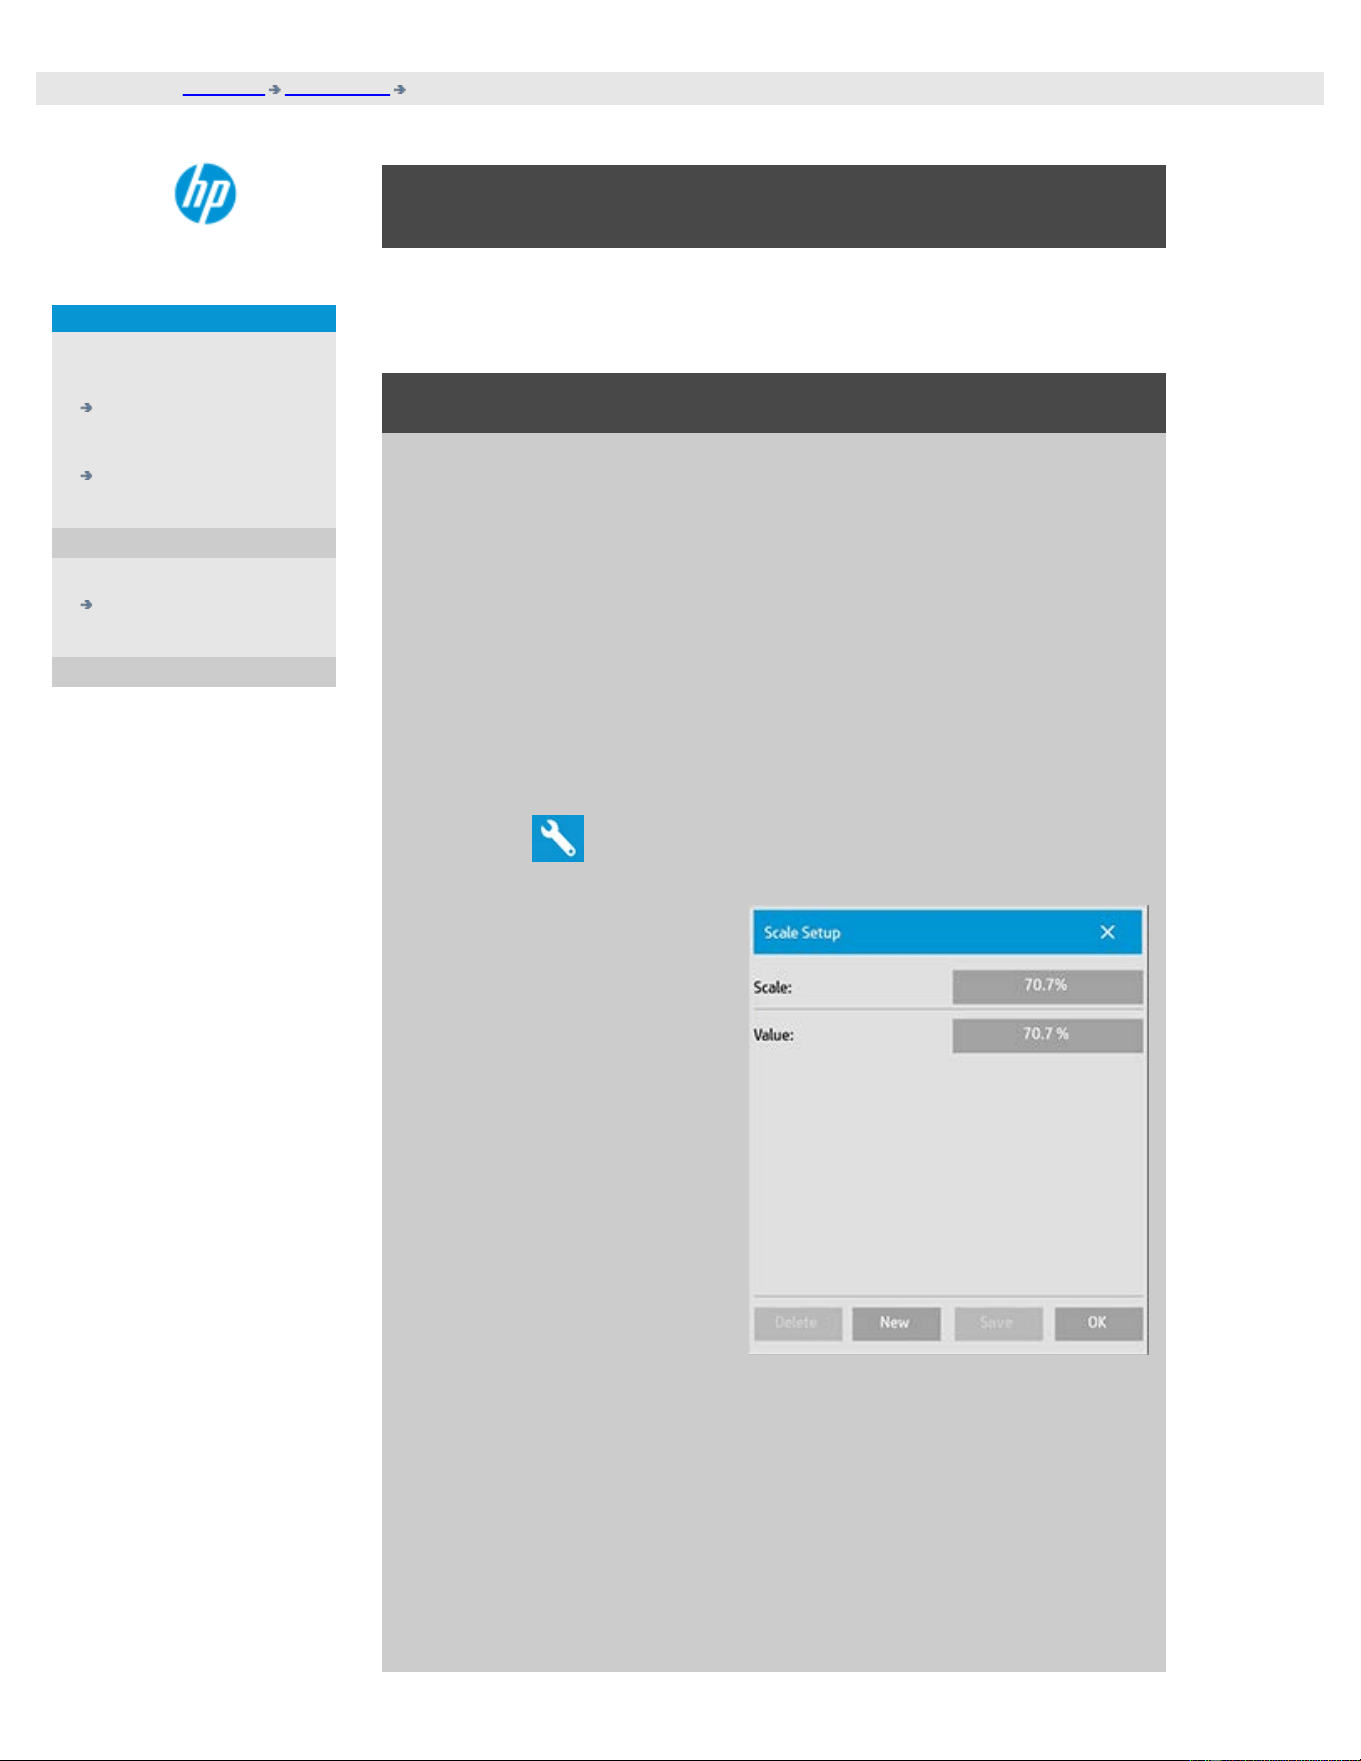
you are here: welcome how do I...? create a custom scale size
HP Pro Scanner
how do I...?
the problem is...
alphabetical index
how do I create a custom scale size?
You can set a custom scale size value from the copy tab and from the
scan tab.
to create a custom scale size...
1. Press the Copy tab ->Output size if you are performing a Copy
job
or...
Press the Scan tab ->Resize if you are performing a Scan to file
job.
2. Press the Scale button
and then the Tool
button
.
3. In the Scale Setup
dialog, press the New
button.
4. Enter a name for your new scale. Using the scale value itself as
the name is recommended (i.e., "72%").
5. Press the Value button and set the scale value.
6. Press the Save button and then OK to confirm.
Your new scale will join the standard scales in the Scale presets list.

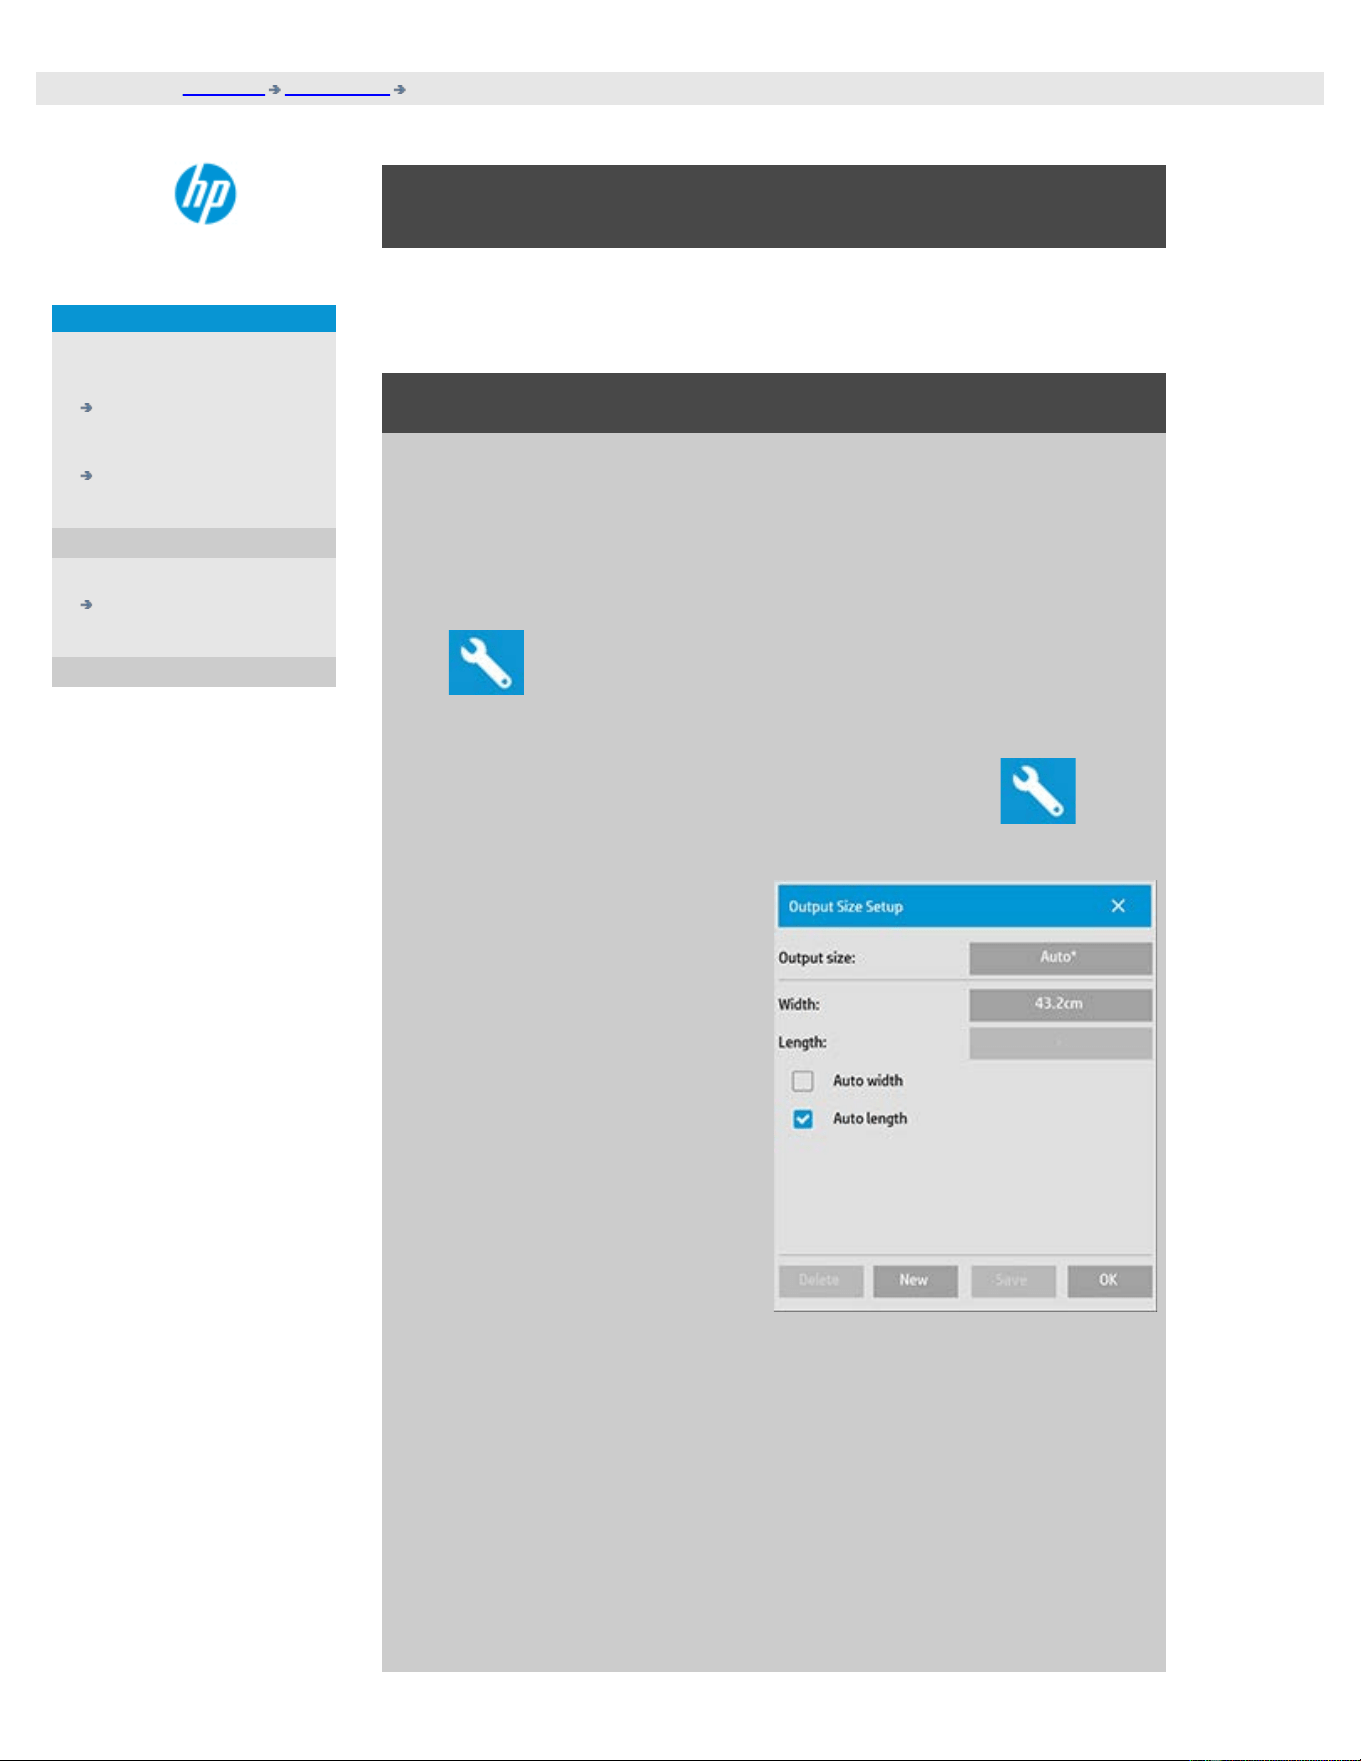
you are here: welcome how do I...? create a custom paper size
HP Pro Scanner
how do I...?
the problem is...
alphabetical index
how do I create a custom paper Size preset (Input size
and Output size)?
The following instructions apply for creating either a custom Input Size -
paper size preset or a custom Output Size - paper size preset.
to create a custom input or output size...
1. Press the Copy tab or Scan Tab.
2. Press the Input Size option and then the Tool button.
3. The Output size dialog is reached through the Output size ->
Output Size, if in the Copy tab, and through the Resize -> Size
option, if in the Scan tab, and then the Tool button.
3. In the Size Setup dialog,
press the New button.
4. Enter a name for your new size. The name could describe a
certain group of copies or the size itself i.e., "23x50".
5. Press the Width and length buttons and set the values. The
Auto options can also be used.
6. Press the Save button and then OK to confirm.
Your new size preset will join the standard sizes in the Size presets
lists.

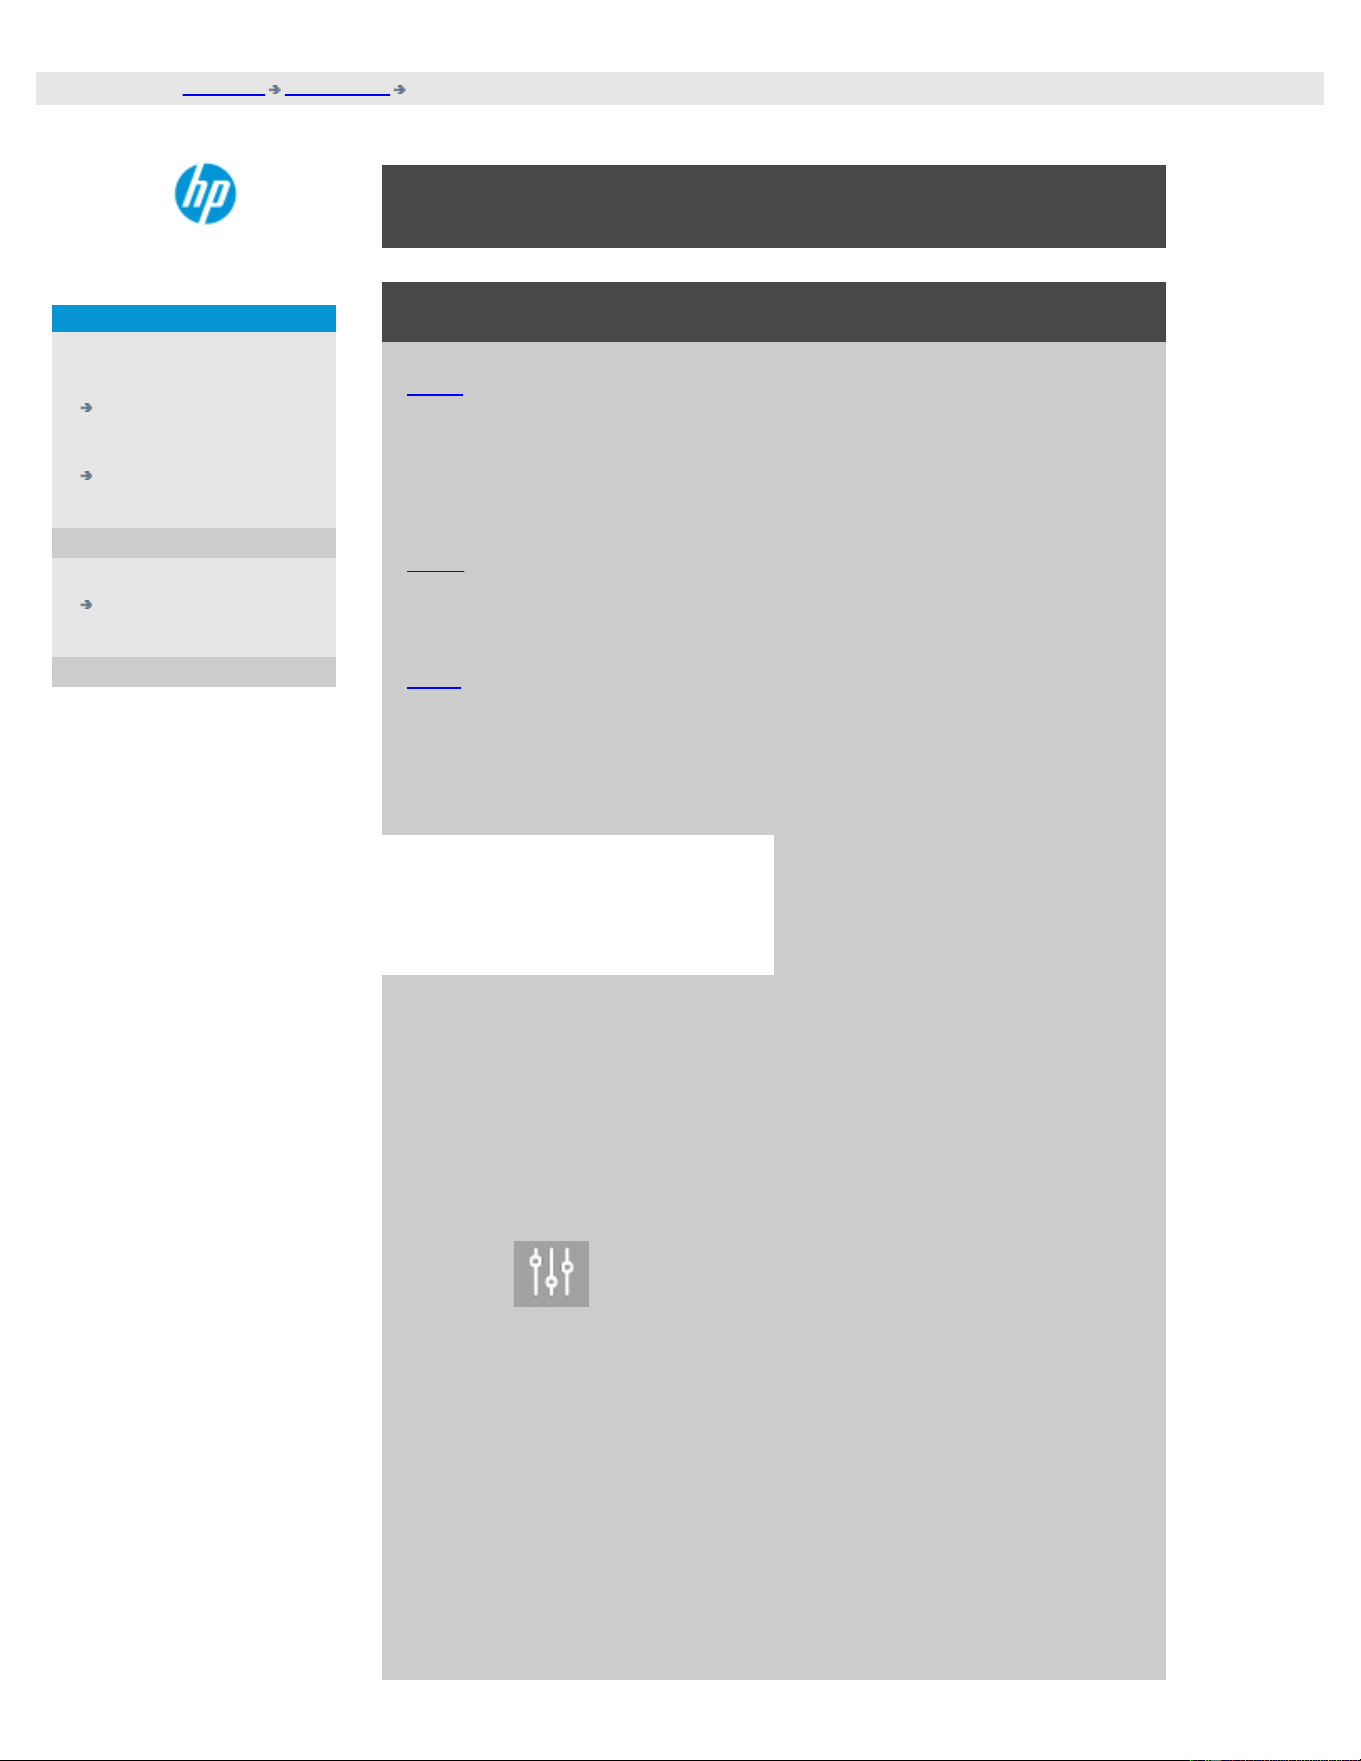
you are here: welcome how do I...? set the output quality
HP Pro Scanner
how do I...?
the problem is...
alphabetical index
how do I set the output quality?
Qualit settings for - Copy, Print, Scan
Copy: Quality setting from the
copy tab includes both scan and
basic print quality options. Both
Scan and Print Quality settings
are used with the process.
Print: Print from file - special
print quality settings can be
made from the print tab.
Scan: scan to file - scan quality
(resolution) settings can be
made from the scan tab.
Copy quality
With copying, you can set both
scan (input) and print (output)
quality values.
1. Press the Copy tab
2. Press
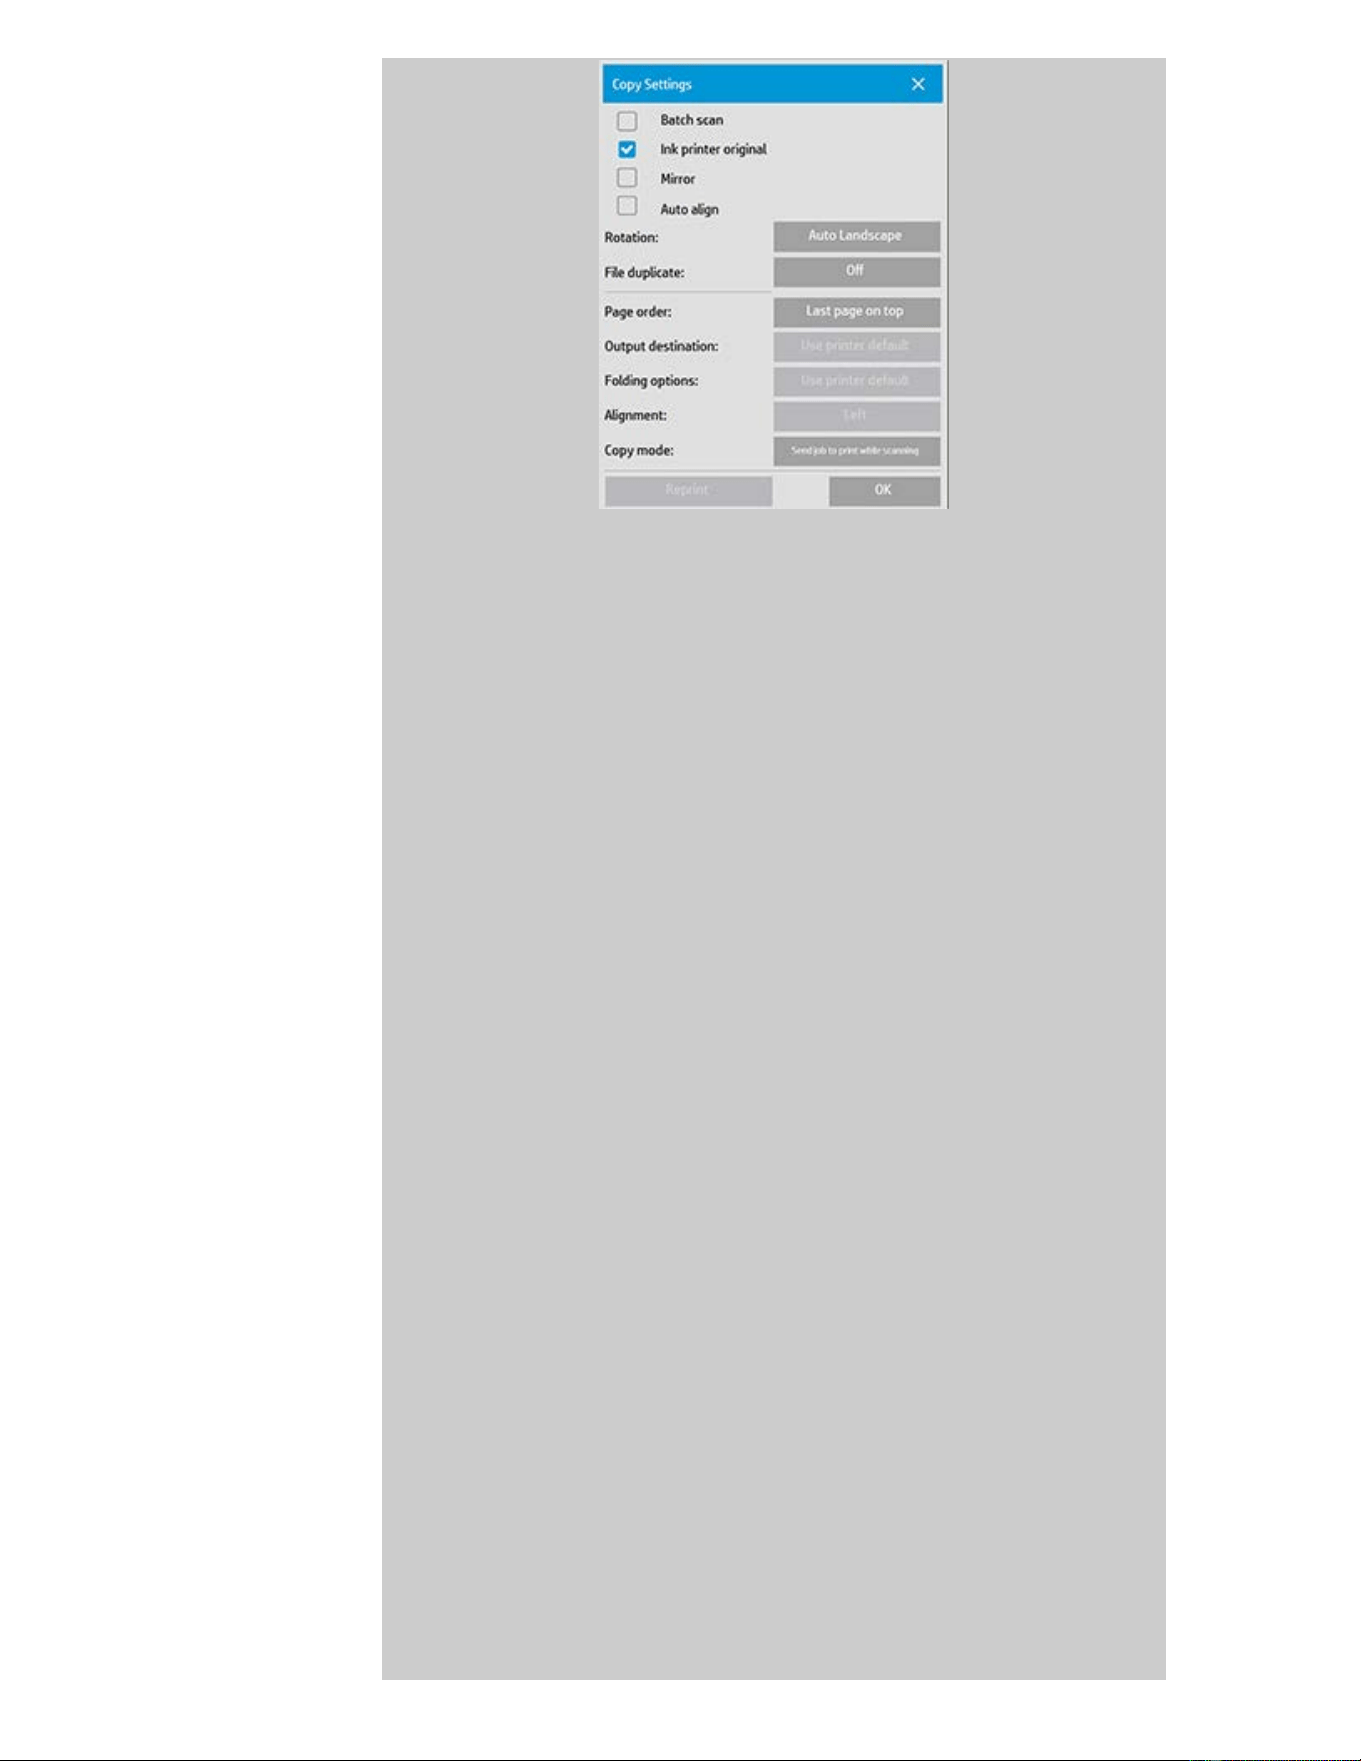
Ink Printer Original: will improve the result of your copy or print if
the original to be scanned has been printed with an inkjet
printer. Press OK button to apply.
3. Press the Copy tab > Quality button.
Define a new quality based on both print and scan quality as
described below.
Scan Quality
For the scanner you set scan resolution in dpi (dots per
inch).
Descreen tells the scanner to scan with the
scanner’s optical resolution and relay the
data to the software without interpolation.
Optimal conversion to the set dpi or quality is
then performed by the software. Gives
superior results with raster originals.
Scanning speed is reduced.
Turbo: You set the Scan resolution value and
then select Turbo. This will basically double
the scanning speed but with a reduction on
image quality. Turbo resolution processing
involves speeding up the paper’s movement,
reduction of captured scan data in the scan
direction and resampling to create the image
resolution as set in Scan Resolution options.
Turbo mode has no effect for resolutions
below 300 dpi.
Print Quality

You select Fast, Normal or Best settings.
Press OK button to apply.
NOTE: For HP PageWide printers the quality settings are defined as
Lines/fast, Uniform areas and High detail.
Print quality
With printing from an existing
file in the print tab, you set print
(output) quality options.
1. Press the Print tab.
2. Press
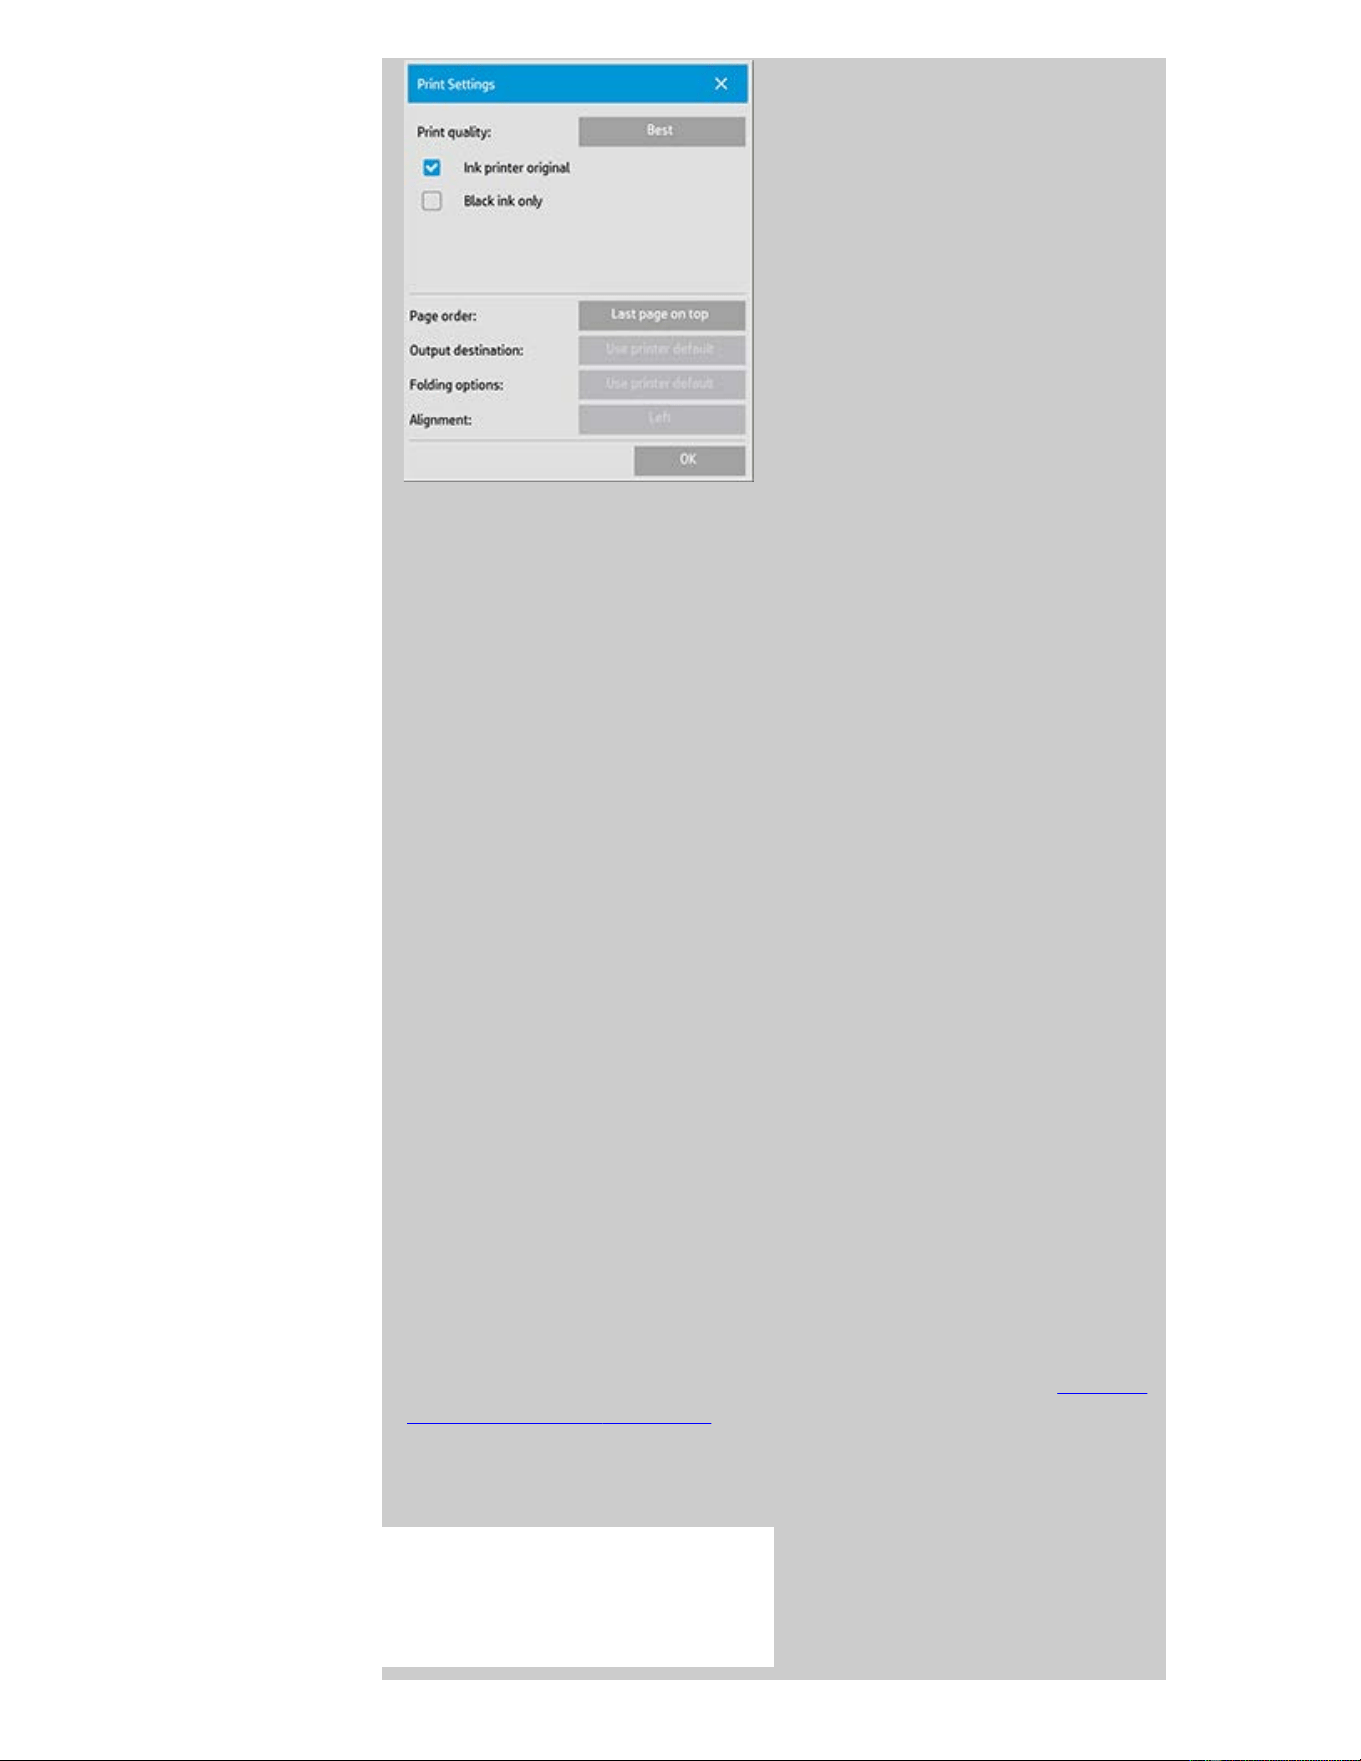
Press the Print Quality button to choose a fast, normal or
best output quality setting.
Ink Printer Original: to improve the result of your copy or
print if the original that was scanned to create the file had
been printed with an inkjet printer.
Black Ink Only: This option will only affect printed output
from graytone image files. For creating true and neutral
graytone output. Creating graytones with black ink only
will create printouts that are less sensitive to current
lighting conditions when viewing the results. Note that
setting Black ink Only can create output that is more
grainy than normal graytone output where color ink is
also used.
Optimize for drawing: Recommended with text and
drawings. Tells the printer to output optimally in relation
to clear and sharp edges. Not advisable to use with
pictures as visible bands can be created on the output.
Max detail: For enhancing detailed graphics. Recommended
for originals with many small details such as maps and
certain CAD drawings. Not recommended with pictures as
the setting will have a negative effect on color matching
and graytone output.
Press OK button to apply.
NOTE: The availability of of these options depend on the printer
model.
NOTE: Some of these special print quality options can also be defined
within a type of original template through the copy tab. See: how do I
define an original template? for more information.
NOTE: For HP PageWide printers the quality settings are defined as
Lines/fast, Uniform areas and High detail.
Scan quality
With scan-to-file in the Scan tab, you set scan (input) quality
factors.
1. Press the Scan Tab.
2. Press the Scan Resolution button.
Scan Quality
Scan Resolution - You set a scan resolution value in dpi (dots
per inch).
Uncheck Auto to set your own dpi value.
Descreen tells the scanner to scan with the scanner’s optical
resolution and relay the data to the software without
interpolation. Optimal conversion to the set dpi or quality
is then performed by the software. Gives superior results
with raster originals. Scanning speed is reduced.
Turbo: You set the Scan resolution value and then select
Turbo. This will basically double the scanning speed but
with a reduction on image quality. Turbo resolution
processing involves speeding up the paper’s movement,
reduction of captured scan data in the scan direction and
resampling to create the image resolution as set in Scan
Resolution options. Turbo mode has no effect for
resolutions below 300 dpi.
Press OK button to apply.

you are here: welcome how do I...? installing printer and printer drivers
HP Pro Scanner
how do I...?
the problem is...
alphabetical index
how do I install the printer and printer drivers?
Network connection through the LAN ...
1. Make sure the printer you wish to use is configured and setup
on the LAN to be recognized by other devices.
2. Connect your panel PC to the LAN.
3. Select the Setup Tab
4. Select
> System.
5. Select "Install Printer Driver". This opens the printer installer
wizard. Follow the installation instructions that appear on your
screen.
printing instructions legal information
© Copyright 2012, 2015 HP Development Company, L.P

you are here: welcome how do I...? connect to a network
HP Pro Scanner
how do I...?
the problem is...
alphabetical index
how do I connect to a network?
to connect your scanner to a network...
These actions will make your system recognizable to others on the
network.
NOTE: If the Administrator password has been setup and activated,
you will be prompted for it before being able to make the network
settings.
1. Connect the RJ45 network cable to the Ethernet port at the
back of your touch screen.
2. Check your Network settings.
3. Files to be shared across the network should be placed in the
D:\images folder. Once a file is saved to this folder, it can be
accessed throughout the network, from any computer running
any operating system; see how do I access shared files.
You will probably want to connect your printer to the same network.
See your printer's documentation for further information.
printing instructions legal information
© Copyright 2012, 2015 HP Development Company, L.P

you are here: welcome how do I...? make network settings
HP Pro Scanner
how do I...?
the problem is...
alphabetical index
how do I make network settings?
These actions will make your system recognizable to others on the
network.
NOTE: If the Administrator password has been setup and activated, you
will be prompted for it before being able to make the network settings.
to make your system's network settings...
1. Select the Setup Tab.
2. Select
> System.
3. Select the Advanced button.
4. Enter the Administrator password if prompted by the system.
5. Press the Network Settings button.
6. Select the DHCP option if you know that your network has a
DHCP server. This will let the system find the network
connection information automatically.
7. Select the Manually option for manual connection. Obtain the IP
address, and other relevant network connection information
from your system administrator.
8. Click OK for each setting.
9. You can protect your system's shared folders from unwelcome
network access by applying a login and password under the
FTP and WebDAV option area. Click the Login and Password
buttons to enter strings and apply them.
Note that the string "@scanner" is always appended to the
entered login name.
Pressing the Reset button will remove login/password
protection for FTP/WebDAV access and thereby bring the
system back to its default mode (unprotected access to the
system's shared folders).

you are here: welcome how do I...? change default administrator password
HP Pro Scanner
how do I...?
the problem is...
alphabetical index
how do I change the default Administrator Password?
The Administrator password can be used to protect the setting of system
specific options such as interface language, network parameters,
accounting i.e., key adminstrative settings. Your system comes with a
default Administrator password - "hpinvent" (all low-case letters).
If the default Administrator password is equal to "hpinvent" i.e.,
never changed or has been reset to its original value, password
protection will not be applied to the key administrative settings and they
will remain open for editing by all users.
If the default Administrator password is changed to something
different than the default password "hpinvent", , the system's key
administrative settings will be protected and users will be promted for
the new password before they can enter the options for changing them.
If there are many who share the system, it is recommended that the
default password is changed by the system's adminstrator when the
system is setup the first time.
to change the default Administrator password...
1. Select the Setup Tab.
2. Select
> System.
3. Select the Advanced button.
4. Select the Security Setup button.
5. Press the Set/Change Password button.
6. Enter the new Administrator password.
7. You will be asked to confirm the new Administrator password.
8. Click OK when finished. The new Administrator password is
effective immediately.
8. You can turn off protection again by resetting the Adminstrator
password to the default password "hpinvent".

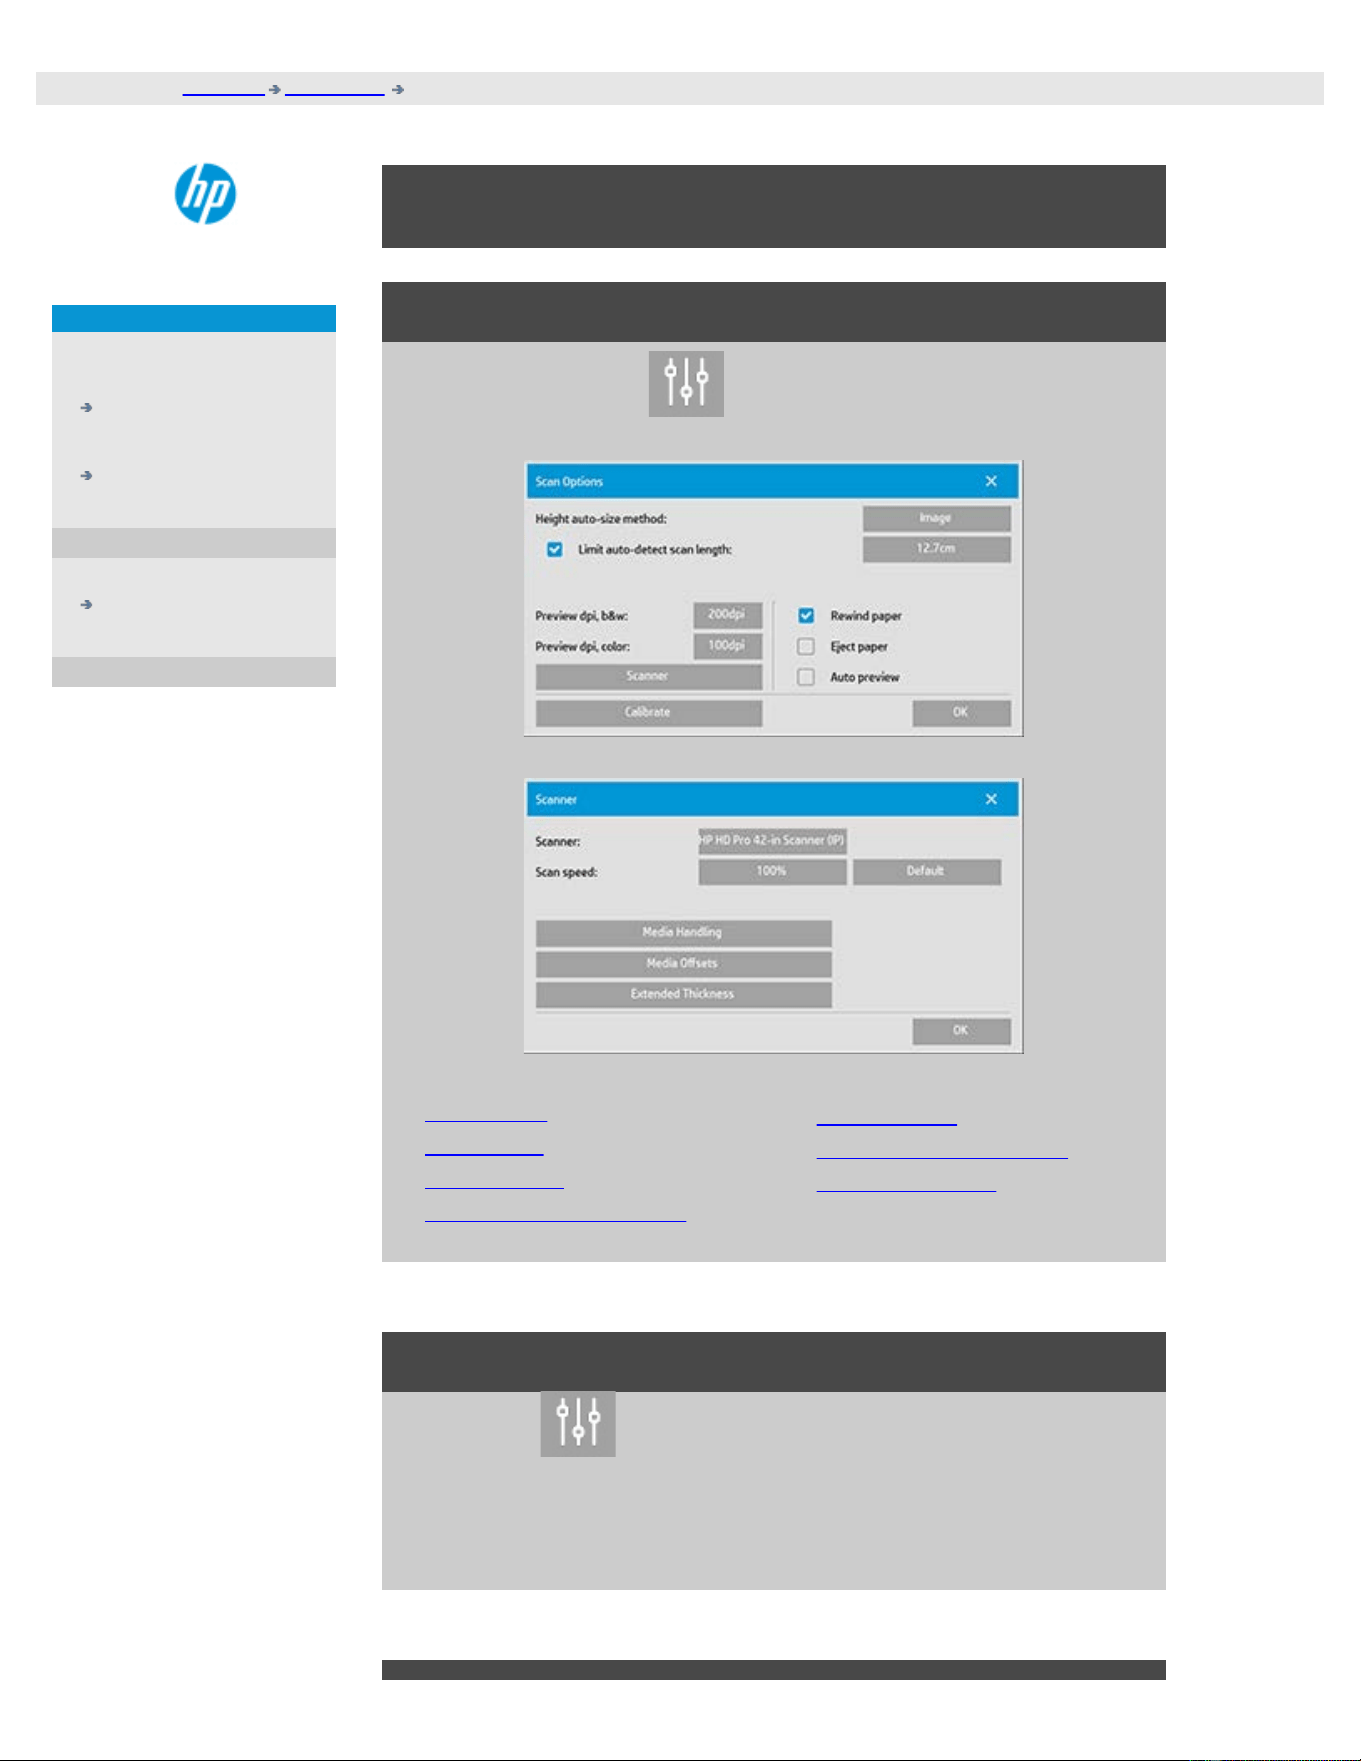
you are here: welcome how do I ... set scan scan options and preferences
HP Pro Scanner
how do I...?
the problem is...
alphabetical index
How do I set scan options and preferences
scan options
Press the Setup Tab > > Scanning to reach the Scan Options
dialog.
Tell me about the options...
...preview dpi
...eject paper
...auto preview
...scan speed - fix backups
...rewind paper
...hight auto-size method
...limit auto-detect
preview dpi
Setup Tab > > Scanning > Preview dpi
Determine the image resolution (between 50 and 300 dpi) for on
screen previewing. Lower resolutions give faster previewing.

eject paper
Setup Tab > > Scanning > Eject paper
Use this option to make the scanner eject the paper automatically
after each scan.
auto preview
Setup Tab >
> Scanning > Auto preview
Use this option to automatically run a preview of the output as soon
as an original is loaded in the scanner.
scan speed - fixing backups
Setup Tab >
> Scanning > Scan speed
Sometimes, the performance of your workstation will cause the
scanner to make repeated "back-ups" during scanning in order to
ensure correct and continuous processing of scanned data. Back-ups
can be avoided by reducing the maximum scanning speed thus
refitting the scanner's performance to that of your workstation. The
Default button can be used to restore the default scan speed value.
rewind paper
Setup Tab >
> Scanning > Rewind paper
After scanning, your original will normally be found hanging at the
back of the scanner. If the scanner is placed close to a wall, it may be
difficult to access the original in order to remove it from the scanner.
However, if the Rewind Paper option is selected, the original will be
rewound back to its starting position after scanning. In this case, it
can be ejected and removed from the front of the scanner.
height auto-size method

Setup Tab > > Scanning > Height auto-size method
There are two methods the scanner software can use to detect the
height (length) of the image: Paper detects the end of the paper by
mechanical means, while Image performs a prescan of the image
and uses software to work out the length of the prescanned image.
The Paper method is quicker because it doesn't require a prescan;
but the Image method may be more accurate (if the paper is longer
than the image).
limit auto-detect scan length
Setup Tab >
> Scanning > Limit auto-detect scan length
This option is provided so that you can set a maximum to the auto-
detected length of an image.
printing instructions legal information
© Copyright 2012, 2015 HP Development Company, L.P
you are here: welcome how do I...? use multiple printers
HP Pro Scanner
how do I...?
the problem is...
alphabetical index
how do I print on multiple printers?
If you are using the Copy tab or the Print tab to print sets or multiple
copies, you can save time by printing on more than one printer at the
same time.
Each copy or set will be printed on a single printer, but the printer will
automatically allocate different copies or sets to different printers in
order to print the whole job as quickly as possible.
Example 1: You have defined 3 synchronous printers and wish to print 3
different large format files that are in your print list, you can send the
print job and the system will allocate a synchronous printer for each file
so they can be output simultaneously.
Example 2: You have defined only 2 synchronous printers and are
printing a set of four posters three times, each of the four posters will
be printed twice on one printer (total: eight posters) and once on the
other printer (total: four posters).
to use multiple printers...
1. Select the Setup tab.
2. Select the Printer button.
3. Select the Tool button and then the Synchronous Printers
button.
4. The main printer will always be your first printer. You can then
select one or two additional printers (maximum 3 printers) for
synchronous output together with the "Main" printer. Press the
synchronous 1, 2 buttons to add printers.
NOTE: Synchronous printers must be of the same model as your main
printer.
NOTE: All printers must already be specified using Setup Tab >

you are here: welcome how do I...? access shared files from another computer
HP Pro Scanner
how do I...?
the problem is...
alphabetical index
how do I access shared files from another computer?
The following instructions explain how to access the shared files folder
on your HP Scanner system from other computers on the same
network.
To access shared files you will need to know:
The IP address of your HP Scanner system.
The system administrator may have applied protection for shared file
access. If this is the case you will also need:
2. the Login and password for FTP/WebDAV access.
You can download files from the shared folder simply by entering the IP
address into a Web browser's address field. You will be prompted for the
FTP/WebDAV access login and password if protection was applied by
your system administrator.
For setting up general access from a computer on the network:
1. You need to make settings on the computer that you wish to use
to accesss the shared files folder on your HP Scanner system.
The computer must be on the same network as your HP Scanner
system.
2. Open the computer's folder sharing options dialog.
- On Windows: Map Network Drives - Connect to a website....
option.
- On Mac: Connect to server dialog
3. Follow the instructions on your screen. When prompted, enter the
URL of the shared files folder on your HP Scanner system, which
is http://scanner_ip/images, where scanner_ip is the IP address
of the scanner system (see below about how to obtain the IP
adress).
4. Save your settings on the network computer.
To optain the IP address information directly from the system:
NOTE: If an Administrator password has been setup and activated, you
will be prompted for it before being able to enter the "Advanced" dialog

to view the IP address information directly from the system as described
below.
Contact your system's administrator for the IP address information If
you are prompted for the administrative password and do not know it.
1. Select the Setup Tab
2. Select > System > Advanced button
3. Enter the administrative password if prompted.
4. Press the Network Settings button to view the IP address
information
Administrators - See "How do I make network settings
" for details on
how to protect the system from network access by setting a login and
password
NOTE: You can also access shared files through FTP protocol. For this
you will need the same information as stated above - i.e., the IP address
of your HP Scanner system and the login and password for
FTP/WebDAV access if protection was applied. You will also need a FTP
client program.
printing instructions legal information
© Copyright 2012, 2015 HP Development Company, L.P
you are here: welcome the problem is... scanner message
HP Pro Scanner
how do I...?
the problem is...
alphabetical index
the problem is I get a system warning message
if you get a system message
1. The message will tell you how to proceed.
2. Follow the instructions in the "how do I...?" topics related to the
message:
How do I change replaceable scanner parts.
How do I run Calibrate
See also:
How do I view system messages
printing instructions legal information
© Copyright 2012, 2015 HP Development Company, L.P
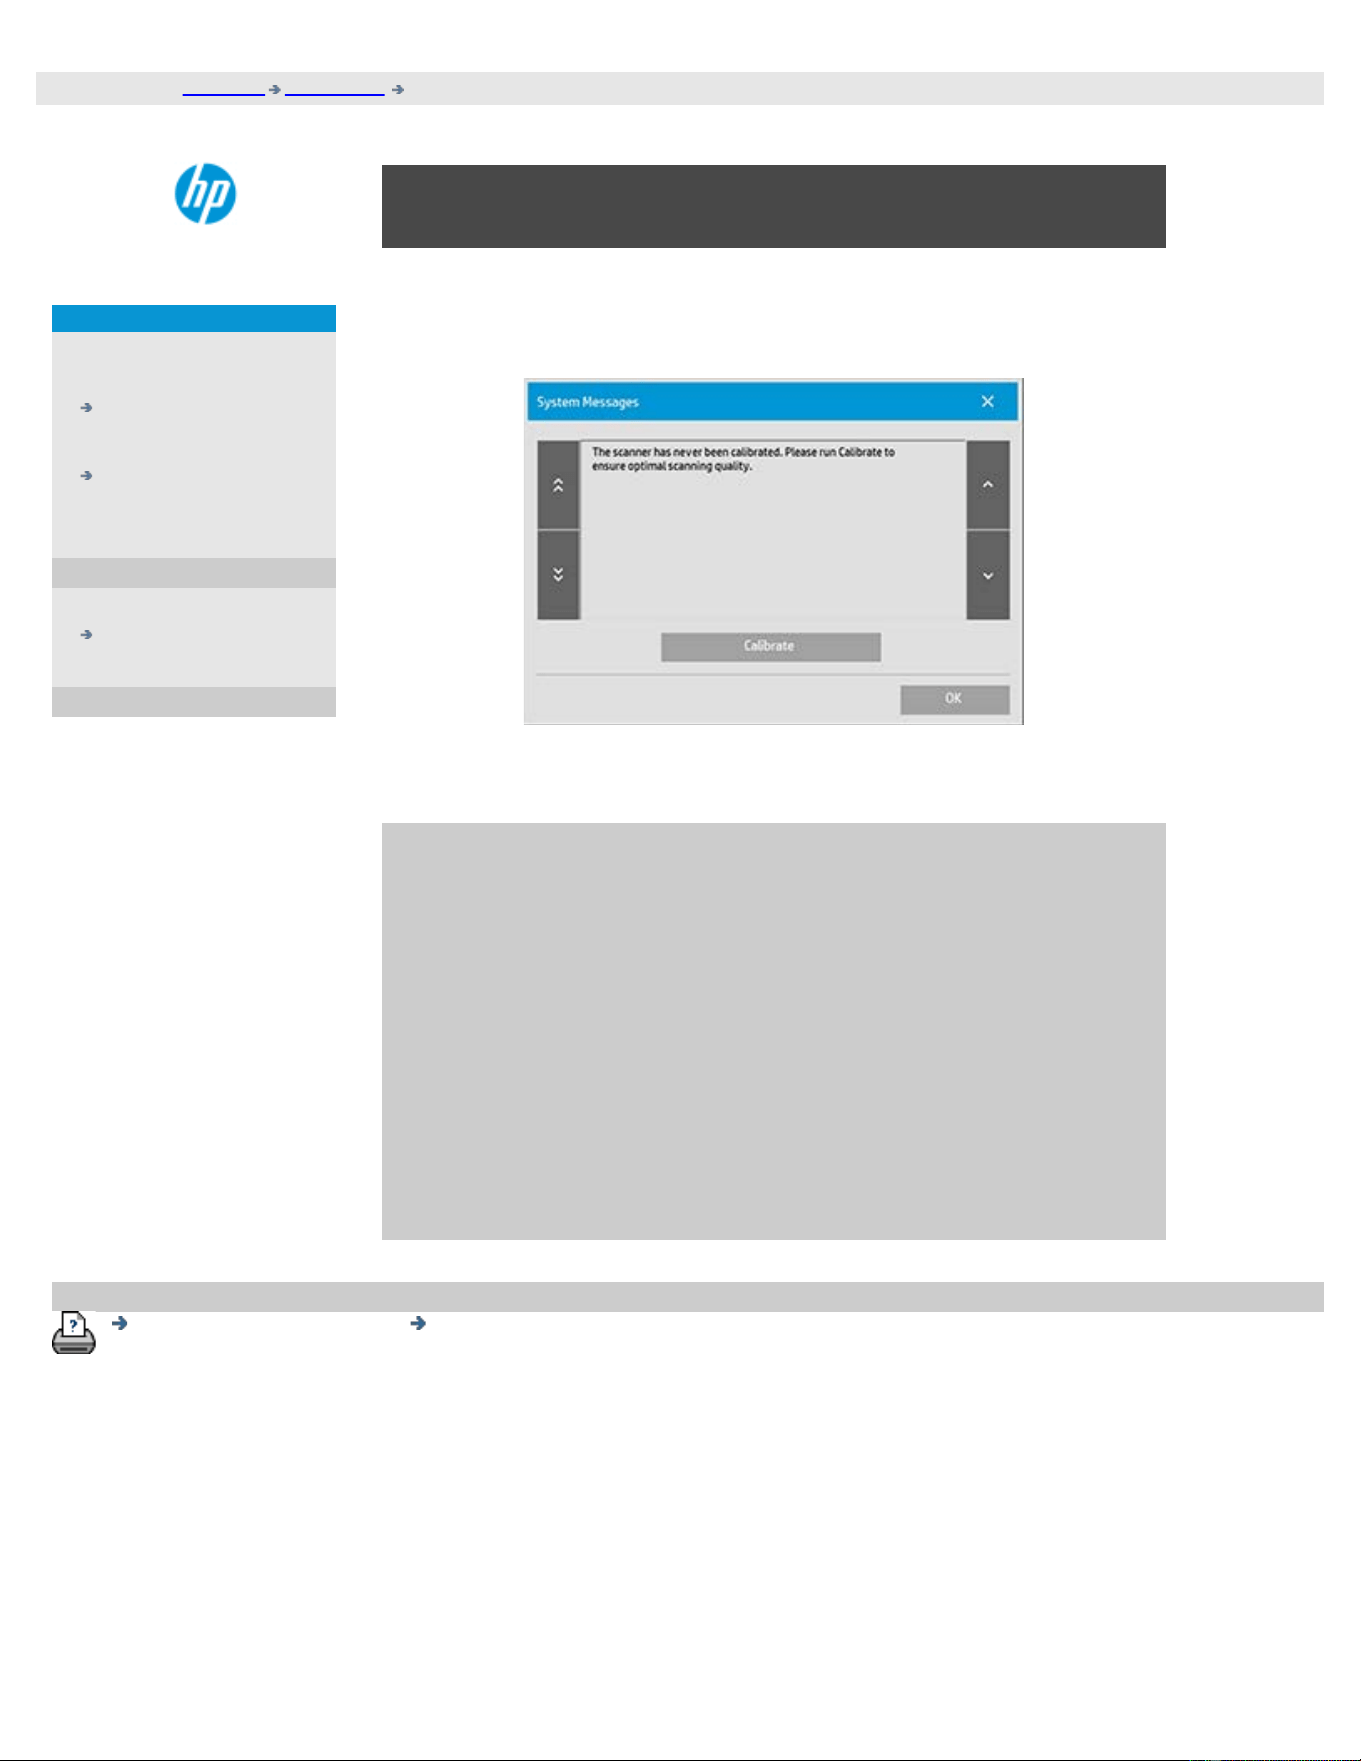
you are here: welcome how do I ... Scanner Messages
HP Pro Scanner
how do I...?
the problem is...
alphabetical index
How do I ... view system messages
This dialog shows messages about the scanner or printer and contains
the function for starting the Calibrate program.
System messages will appear automatically on your screen one time
only. After that, they can be can be recalled by pressing the red
"System Messages (press here)" text on the status bar (screen's
lower left).
A system message will tell you how to proceed in order to resolve the
problem it is reporting on.
Calibrate Button:
Most scanner problems can be resolved by running Calibrate.
Press this button to start the camera alignment or full
calibration process.
printing instructions legal information
© Copyright 2012, 2015 HP Development Company, L.P
you are here: welcome how do I...? replace scanner parts - HP HD Pro Scanner
HP Pro Scanner
how do I...?
the problem is...
alphabetical index
how do I replace scanner parts? - HP HD Pro Scanner
The following instructions apply for the scanner model HP HD Pro
Scanner only (see your documentation to identify the scanner model on
your sysem).
On the HP HD Pro scanner, you can replace various scanner parts that are
liable to wear down over long-term use.
Changing these parts will renew your scanner and ensure optimal results.
Before replacing parts, you should clean the scan area as described under
scanner maintenance to see if any errors or image defects then
disappear.
Select a topic:
Replacing the glass plate
Replacing the white background platen
Replacing the scanner lamp
Replacing the glass plate
Small scratches on the glass plate can reduce scanning quality.
Replacement with a new glass plate can be recommended by the
program. Before replacing the white background platen, you should
try to clean glass plate to see if errors or image defects then
disappear.
To replace the glass plate:
1. Turn the scanner power off and disconnect the power plug.
Push down on the lid release buttons to open the scanner lid
and expose the glass plate.
2. Pull back the glass plate levers
a. Locate the glass plate levers - on each side of the glassplate
there is a small lever with a round lever-knob on its inner-end.
b. Place a finger on both of the round lever knobs on each side
of the scanner
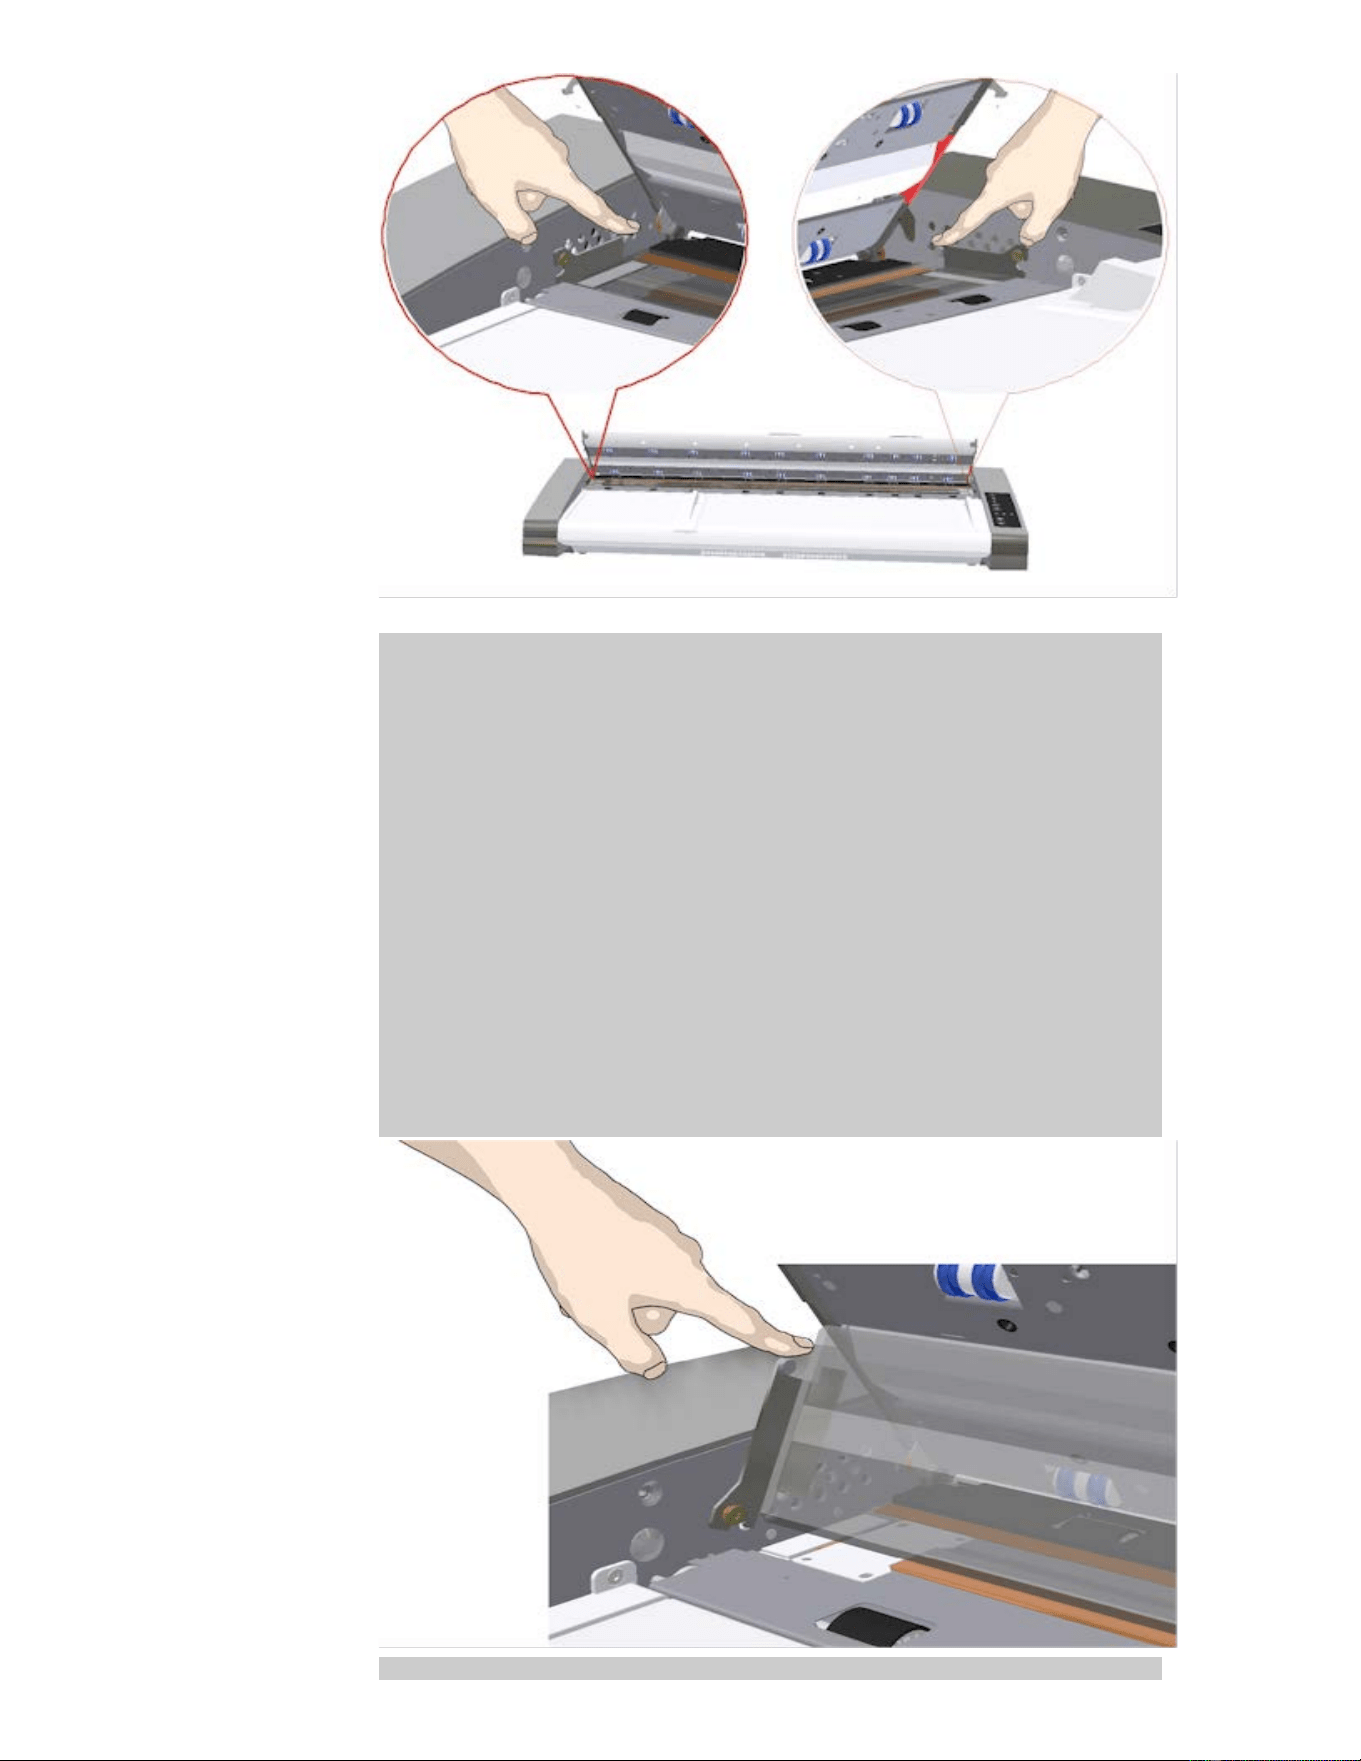
3. Tilt the glass plate back
At the end of each glass plate lever there is a small hook that
rests on a round pin. The hook holds the glass plate in place on
the scanner's chassis while also letting you un-attach the glass
plate from the scanner. You start by tilting the glass plate
upwards on the round pin's axis.
a. With both arms, pull simultaneously on the left and right
levers to tilt the glass-plate towards your body on the round
pin's axis.
b. Tilt the glass plate back on the hooks until it is completely
free of its resting place on the scan area bed and you can
access the glass pate edges.
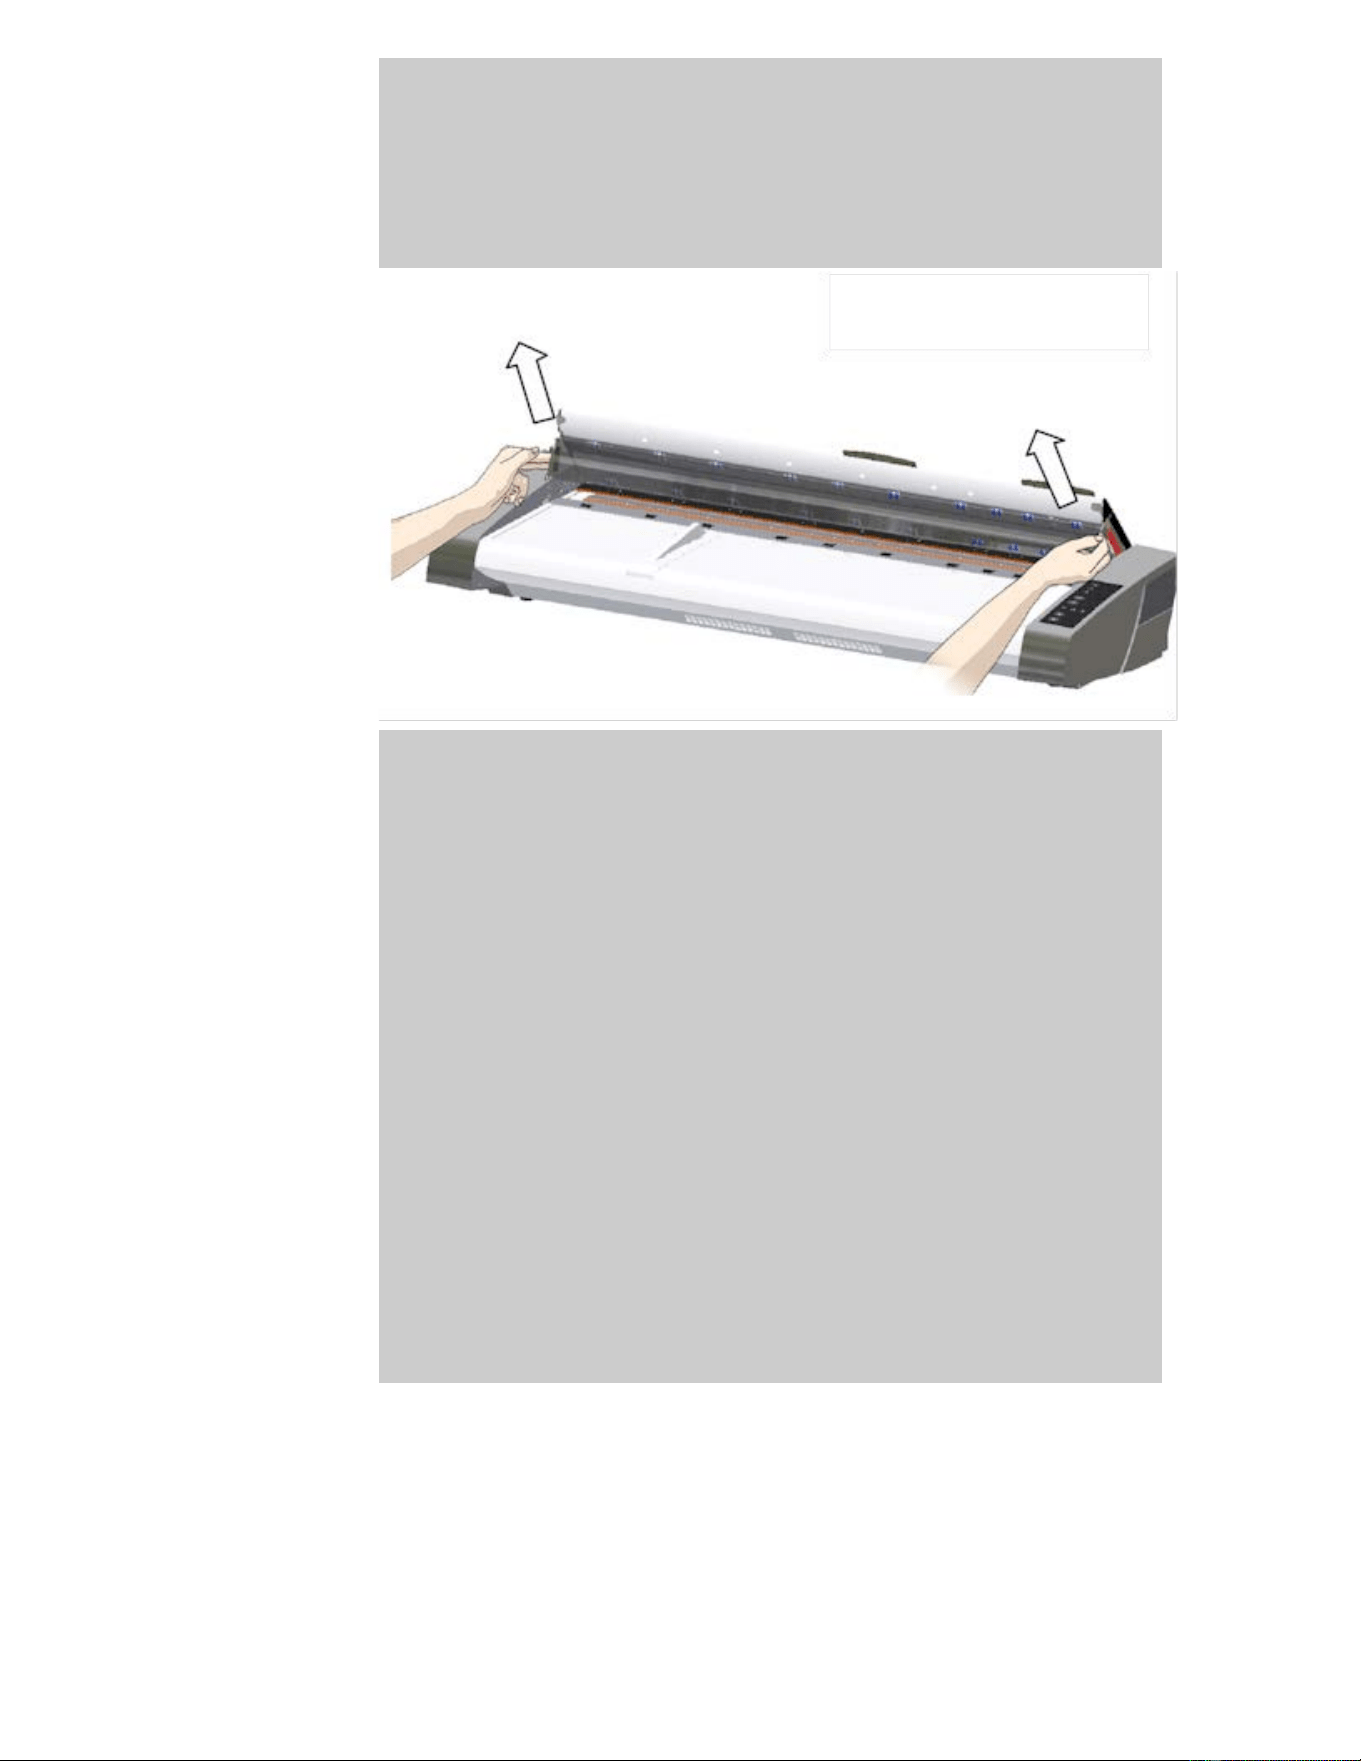
4. Lift the glass plate from the scanner bed
a. Tilt and lift the glass back until the hooks become free of
their pins.
b. Lift the glass plate from the scanner..
5. Insert a new glass plate
Reverse the above operations to reinsert a new glass-plate –
Carefully set the new glass plate down into the scan area.
a. Fit the new glass-plate's lever hooks on to the round pins on
each side
of the scanner.
b. While supporting the glass-plate with fingers on the lever
handles, carefully ease the glass-plate down backwards (away
from your body) so it falls into place.
c. Close the scan area lid.
NOTE: It is recommended to clean the new glass-plate after
inserting it in the scanner and before scanning.
NOTE: It is recommended to recalibrate after changing the
glass-plate..
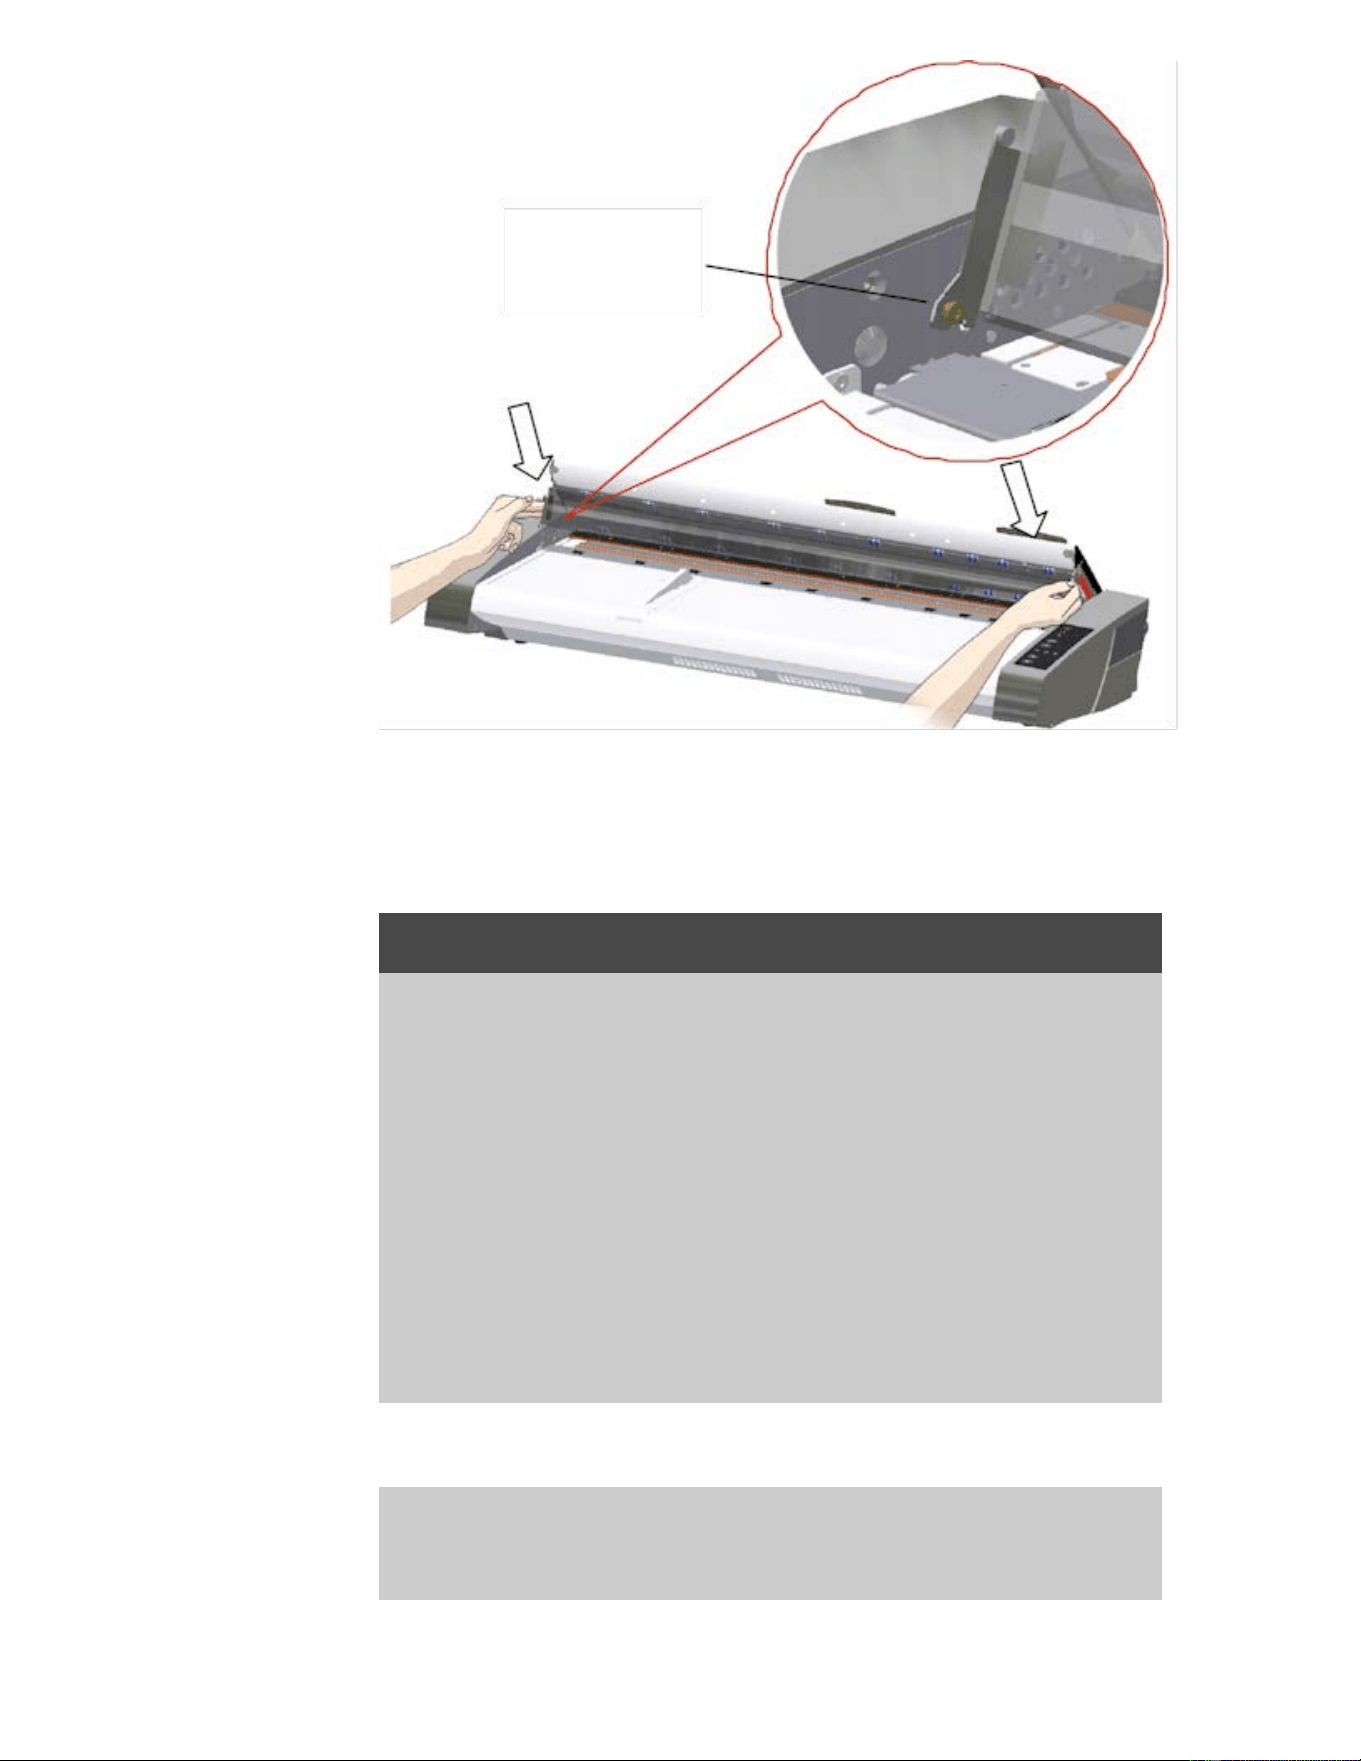
Replacing the white background platen
A white background platen can become worn and discolored after
long periods of use and in such cases replacement with a fresh white
background platen is recommended. Before replacing the white
background platen, you should try to clean it to see if errors or
image defects then disappear.
To replace the white background platen:
1. Turn the scanner power off and disconnect the power plug.
Push down on the lid release buttons to open the scanner lid.
2. On the lid’s right edge, you will find a red strip. Remove the red
strip to expose the edge of the white background platen.
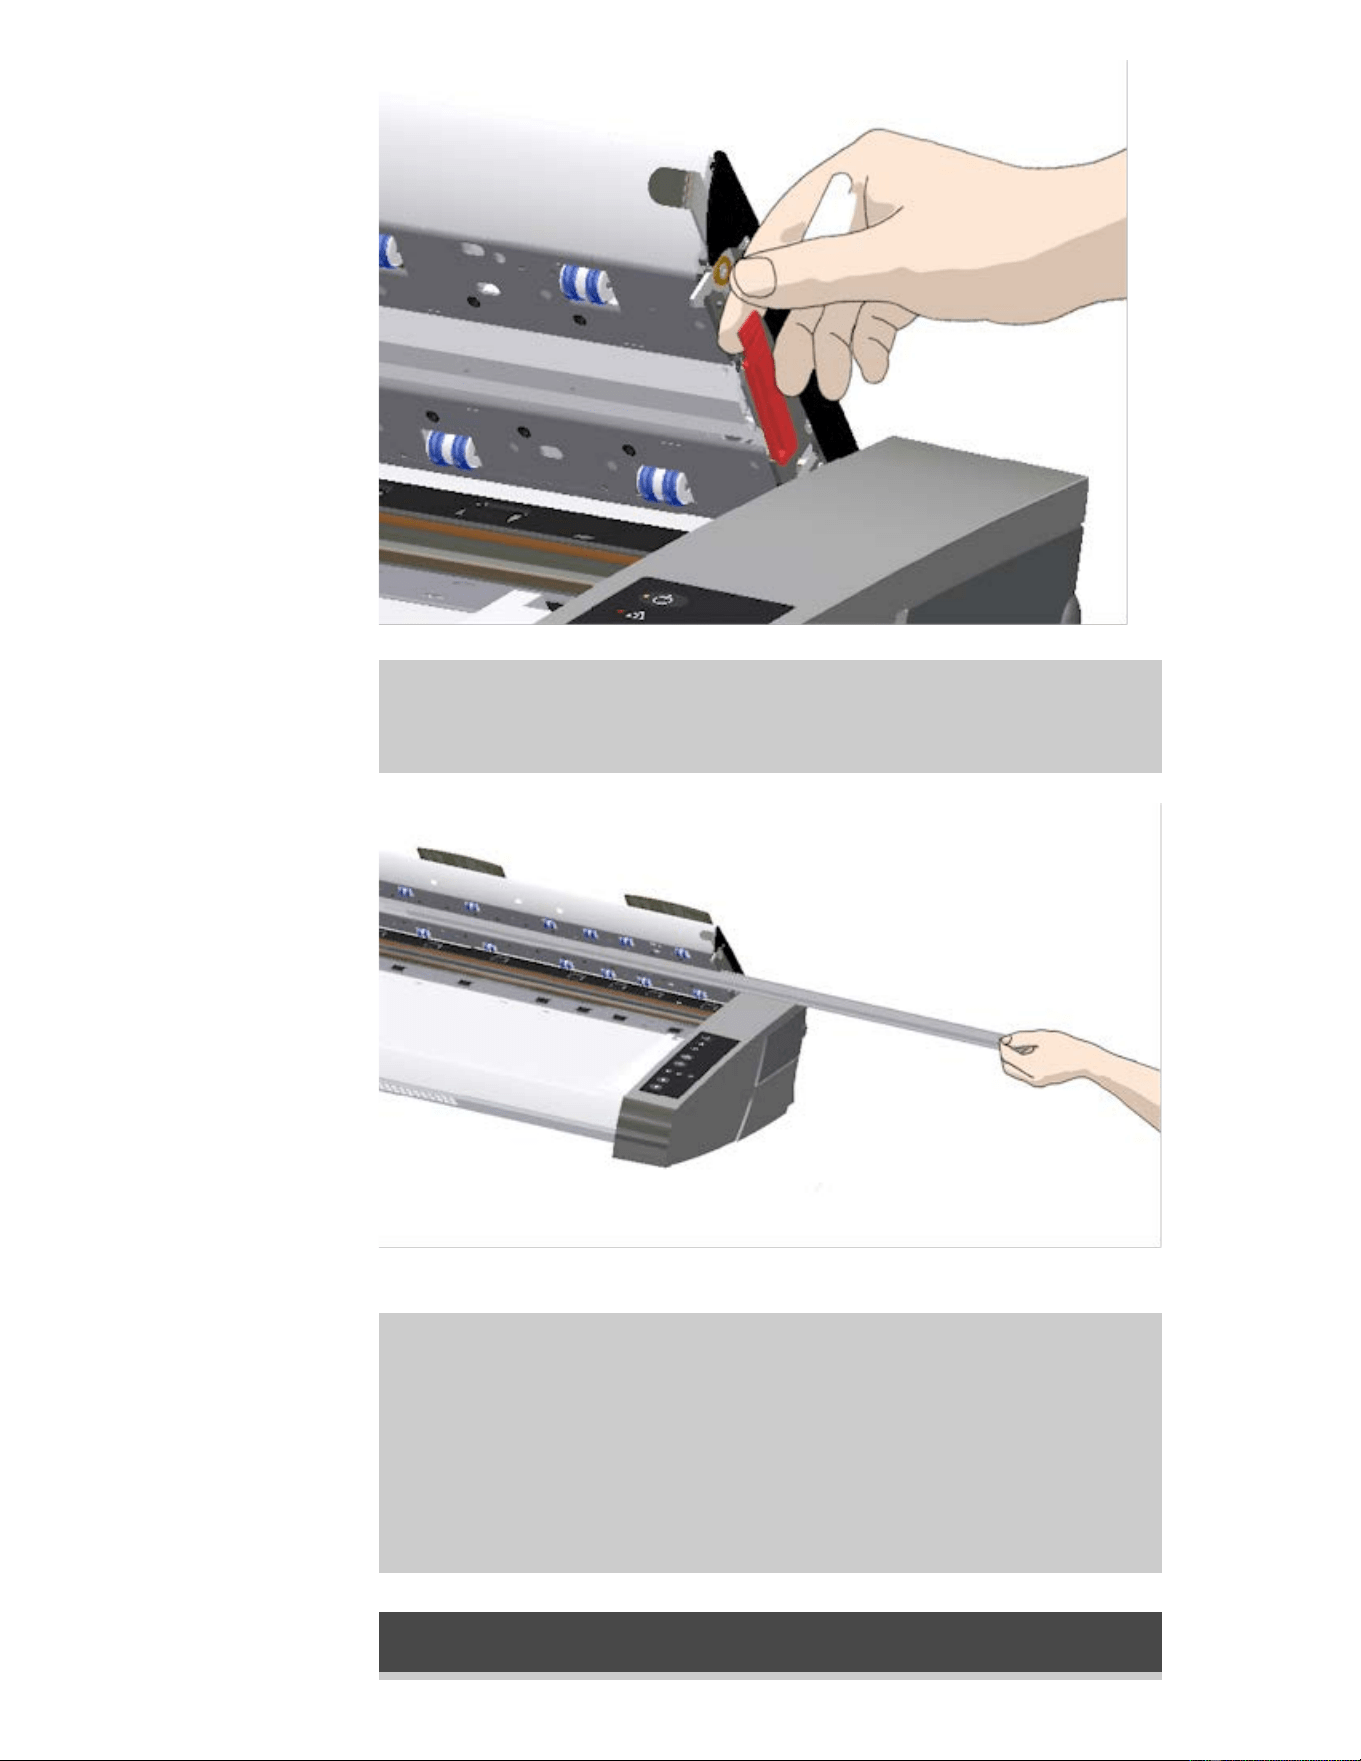
5. Grip the edge of the white background platen with your fingers
and pull to slide it out of the scanner.
6. Slide in the new white background platen.
7. Reattach the red strip.
8. Close the scanning area lid so the locking mechanism
reengages.
Replacing the scanner lamp unit
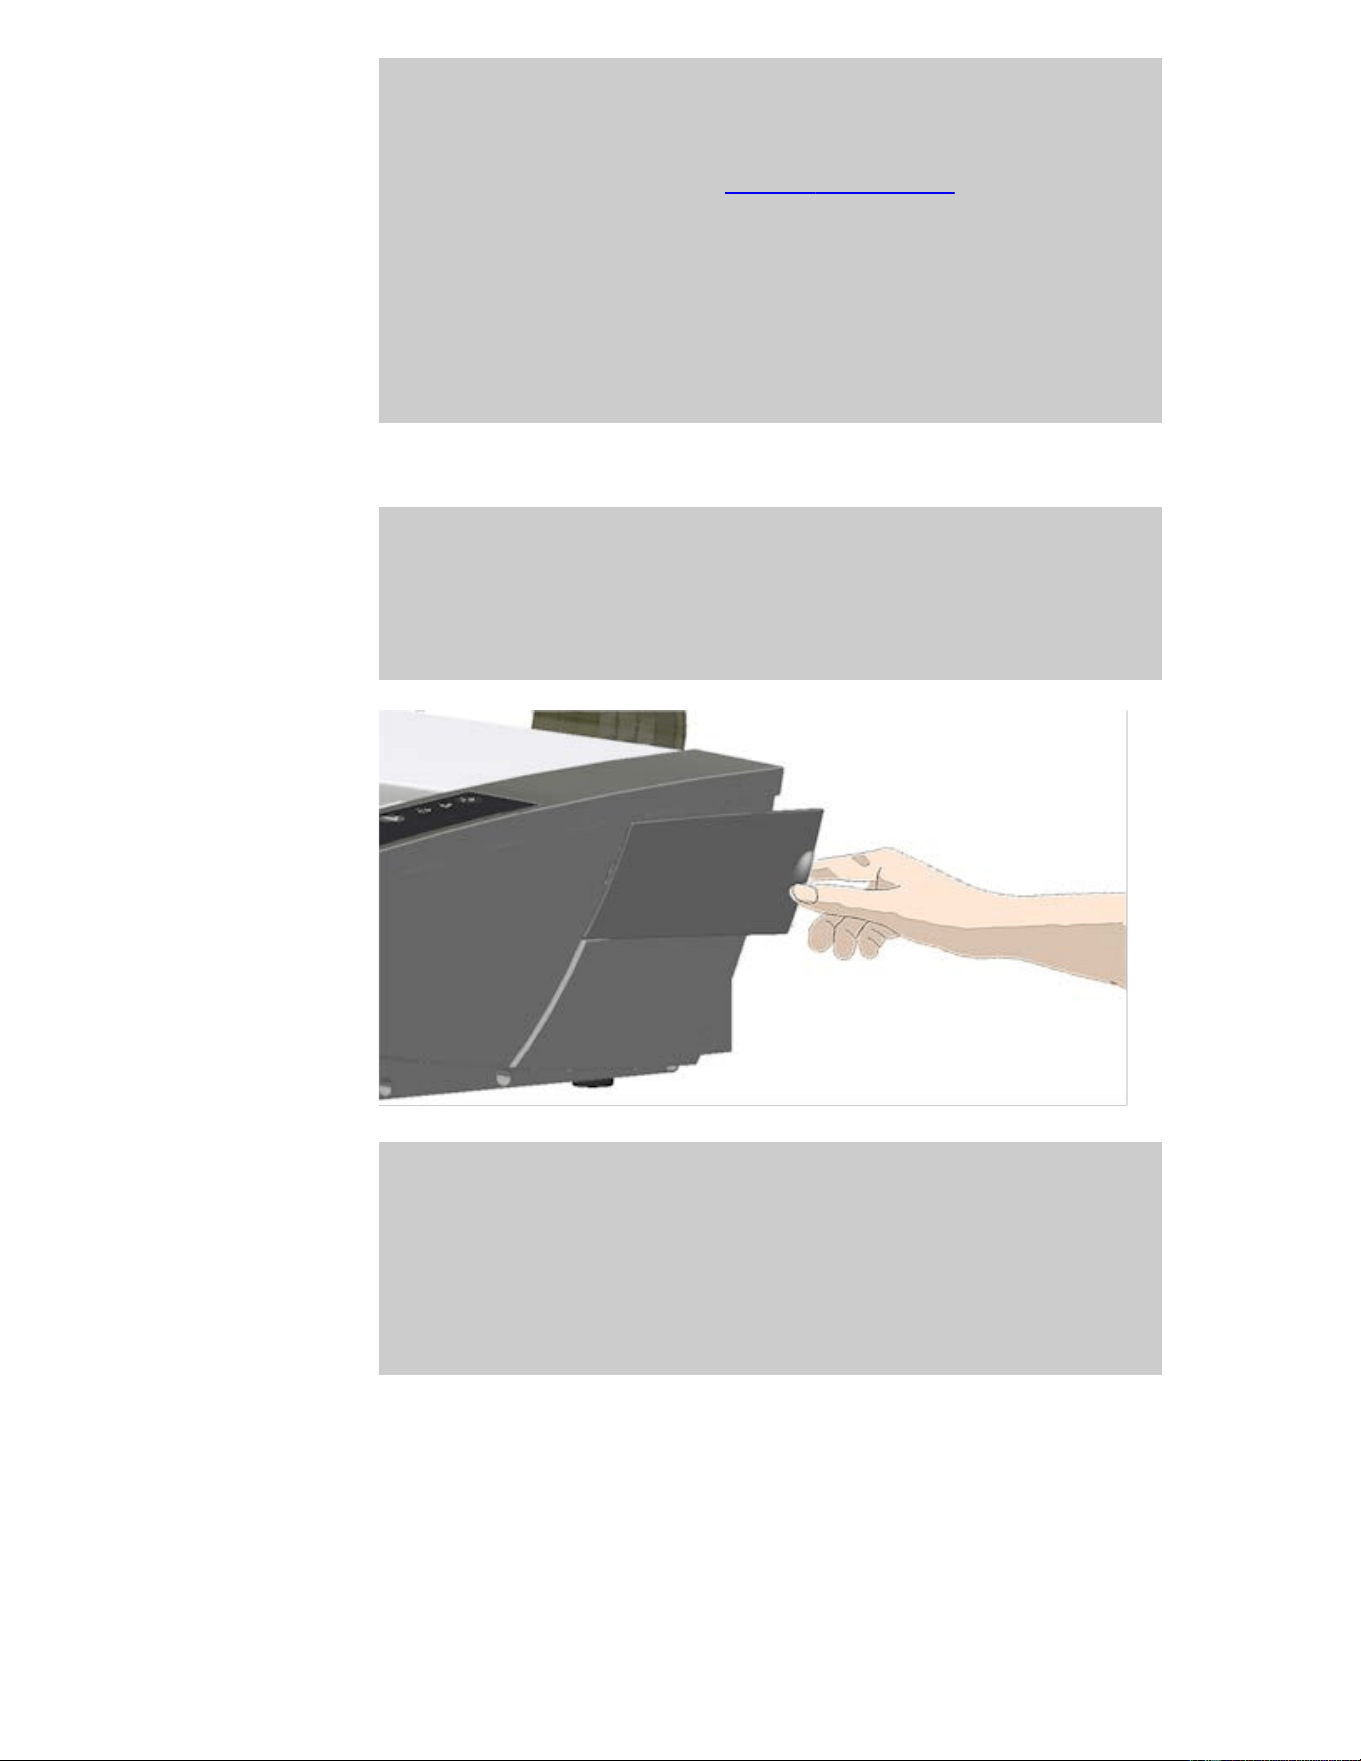
Lamp effectiveness will gradually weaken over time. Replacement of
the lamp-unit (lamp, reflector, power connectors) is recommended
after long term use. Before replacing the lamp, you should clean the
scan area as described under scanner maintenance to see if any
errors or image defects then disappear.
To replace the lamp unit:
1. Turn the scanner power off and disconnect the power plug.
2. The lamp cover is at the right edge of the scanner. Place a
finger in the gap and gently pull back to free the lid. Pull the
cover sideways and off its hinges to detatch it. The edge of the
lamp unit will now be accessable.
3. You must replace the whole lamp-unit. A lamp-unit consists of
a lamp mounted in a reflector brace and fixed power
connectors.
At the visable edge of the lamp unit there is a handle. Grasp the
handle with your fingers and carefully pull the unit out of the
scanner.
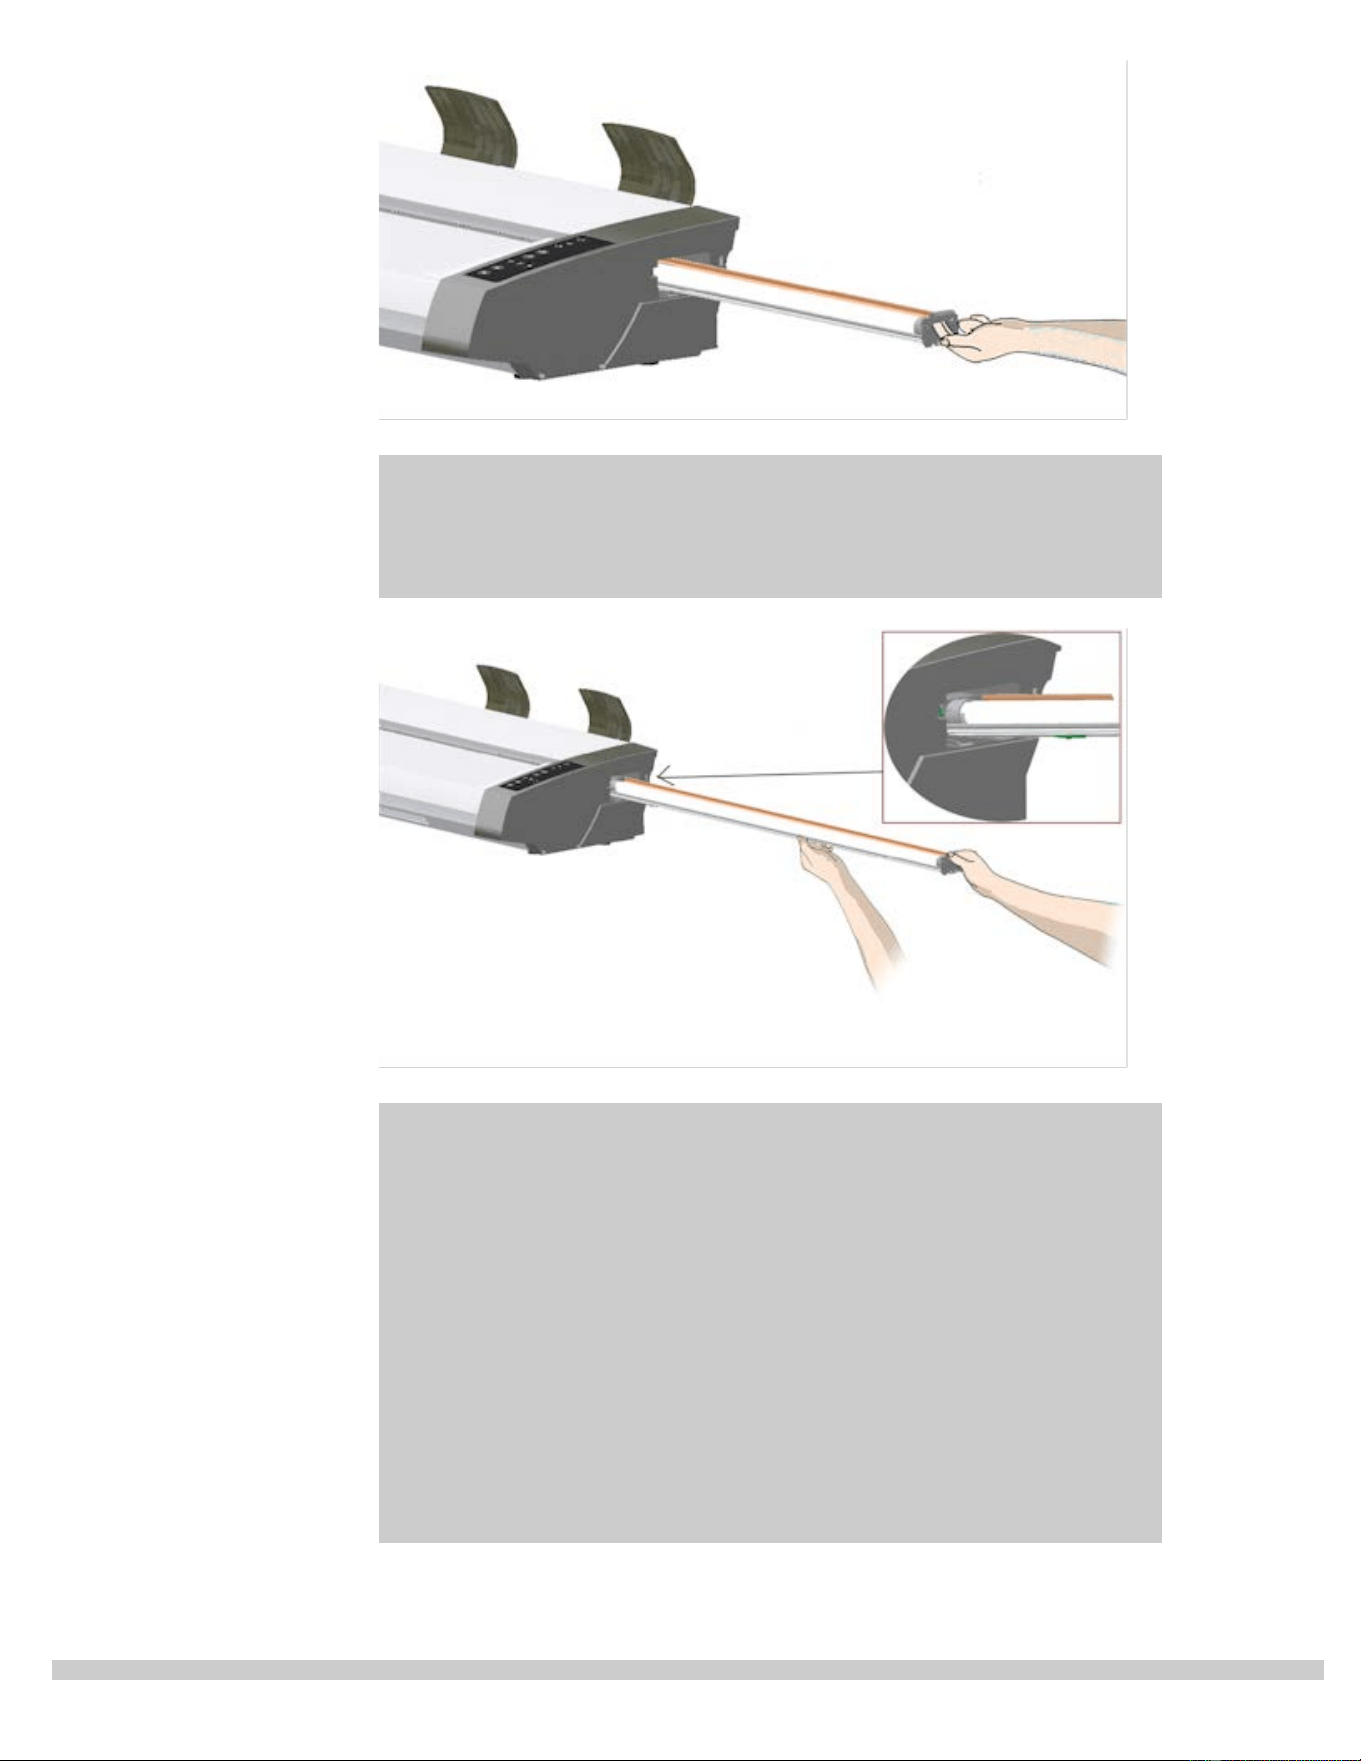
4. Reinsert the new lamp-unit by resting the power-connector
side on the slider and carefully push the lamp-unit into the
scanner.
5. Insert the lamp-unit all the way so the internal power
connections engage with the connections on the lamp-unit.
6. Replace the lamp cover on the scanner - fit the covers left siade
tab with the corresponding notche on the scanner and snap the
cover shut. The cover must always be closed before turning
scanner power ON.
7. Test the replacement by turning power and scanner on to see if
the lamp lights.
8. NOTE: Remember to reset the lamp replacement flag in
WIDEsystem.


you are here: welcome how do I...? replace glass - HP SD Pro Scanner
HP Pro Scanner
how do I...?
the problem is...
alphabetical index
how do I replace the glass plate? - HP SD Pro Scanner
The following instructions apply for scanner model HP SD Pro
Scanner only (see your documentation to identify the scanner model on
your sysem.
Small scratches on the glass plate can reduce scanning quality.
Replacement with a new glass plate can be recommended by the
program.
You can replace the glass on your HP SD Pro Scanner.
Replacing the glass plate
1. Power off and open the lid
Turn the scanner power off and disconnect the power plug.
Open the scanner lid by pushing the 2 backside lid release
buttons towards the middle of the scanner
2. Identify the latch release buttons
The illustration below shows the scanner from above with its
lid open. The illustration indicates the key parts and buttons
you need to recognize when replacing a worn glass plate.
The glass plate is held and locked in place with 2 small white-
colored latches. Each latch can be released from the glass plate
by pressing down on its corresponding latch release button
(see iluustration below). Each latch release button is placed in a
square hole just under the latch it releases.
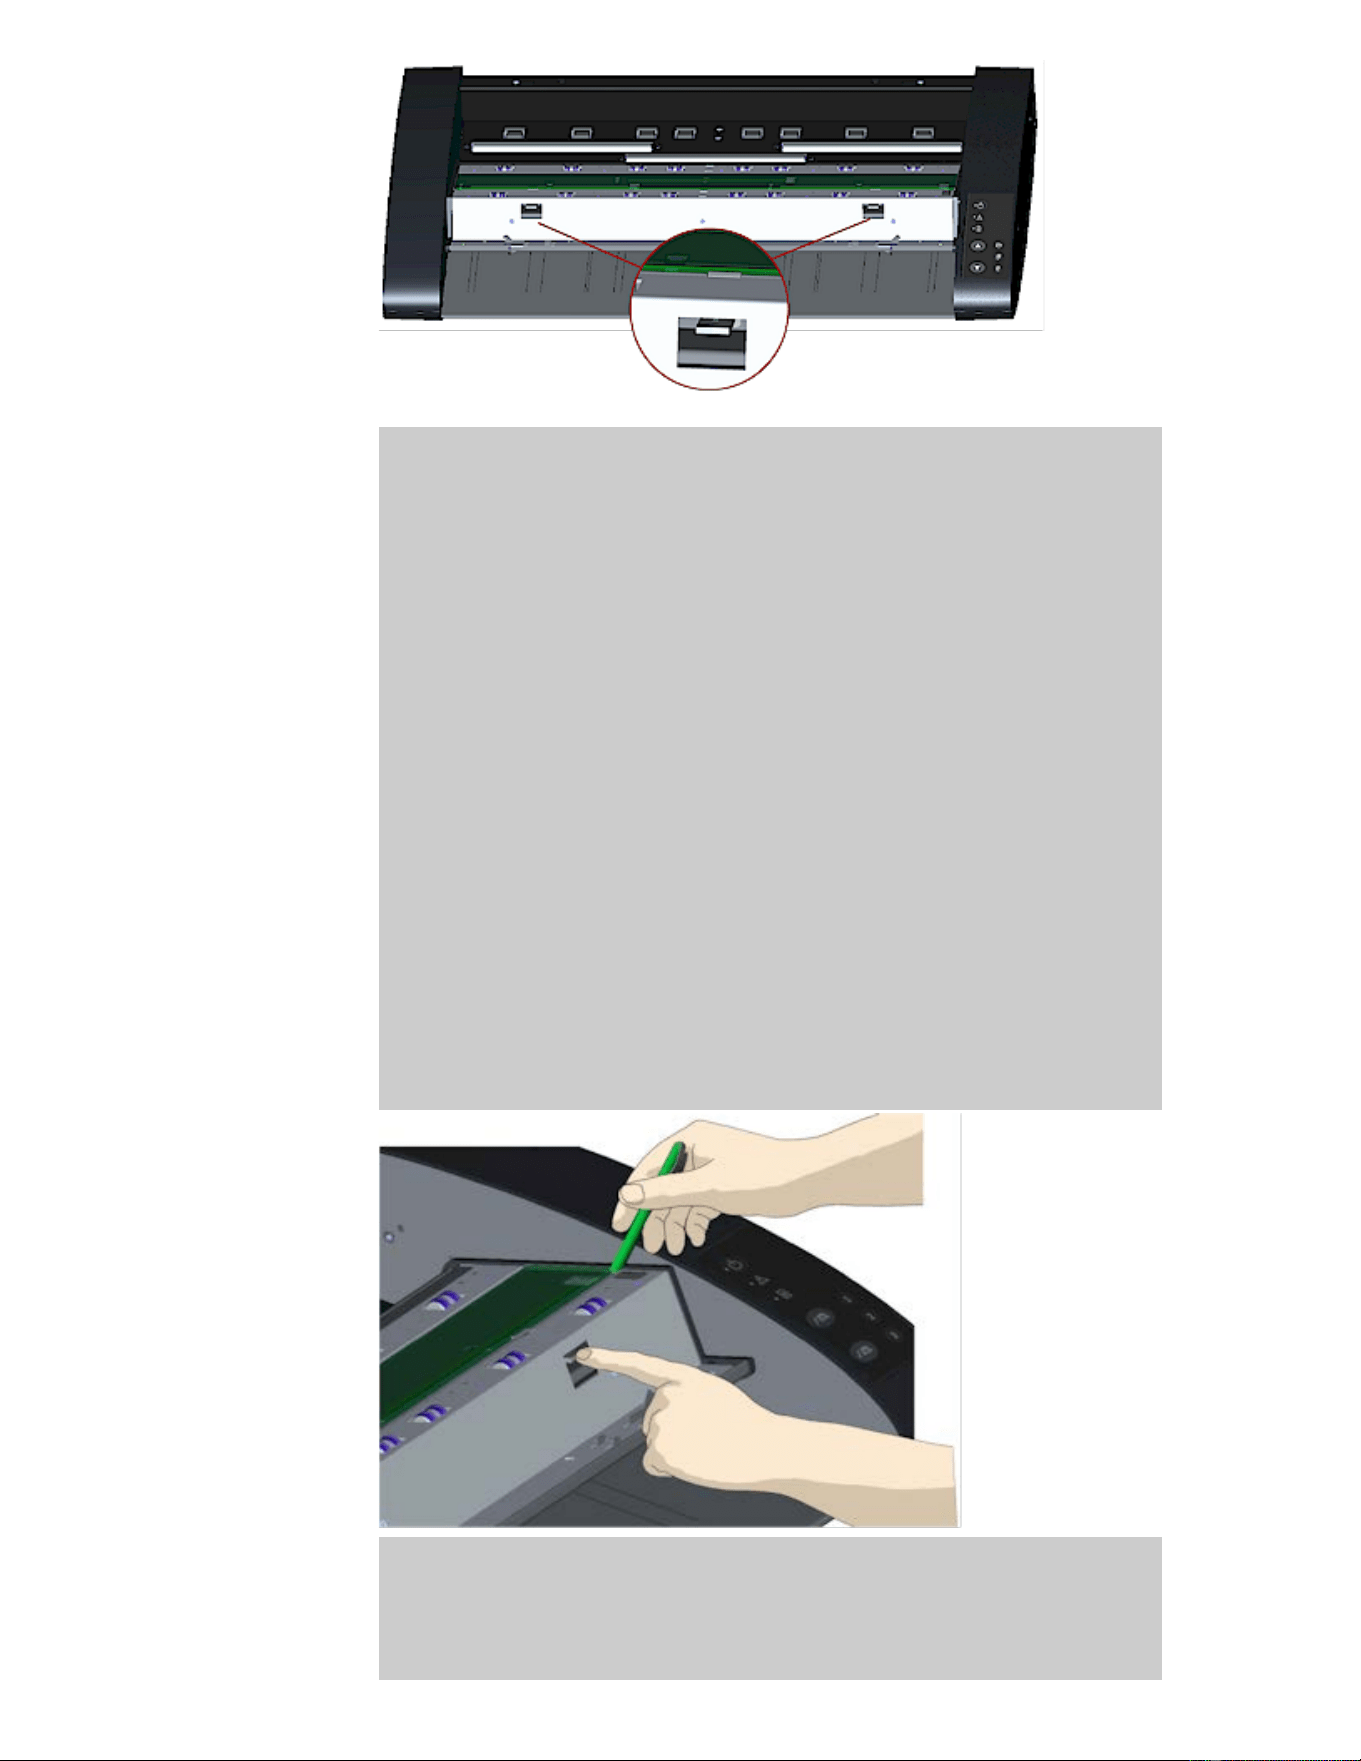
3. Detatching the glass plate – free the 1st latch
Stand at the front of the scanner. You start at the scanner’s
right side. See the illustration below.
a. Detaching the first (rightmost) latch requires a sharp, flat
tool such as a pen or a small screwdriver.
NOTE: Detaching the remaining latch will not require use of a
tool.
b. Locate the arrow label at the scanner’s right side.
c. Position the tool just under the glass plate edge where the
arrow label indicates. At the same time; press down on the
latch release button in the first (rightmost) square hole.
d. Carefully, use the tool to flip the edge of the glass upwards
until it comes above and free of the white latch that held it
down.
e. Release the latch release button.
4. Detaching the glass plate – free the 2nd latch
After freeing the first latch in the previous step, freeing the 2nd
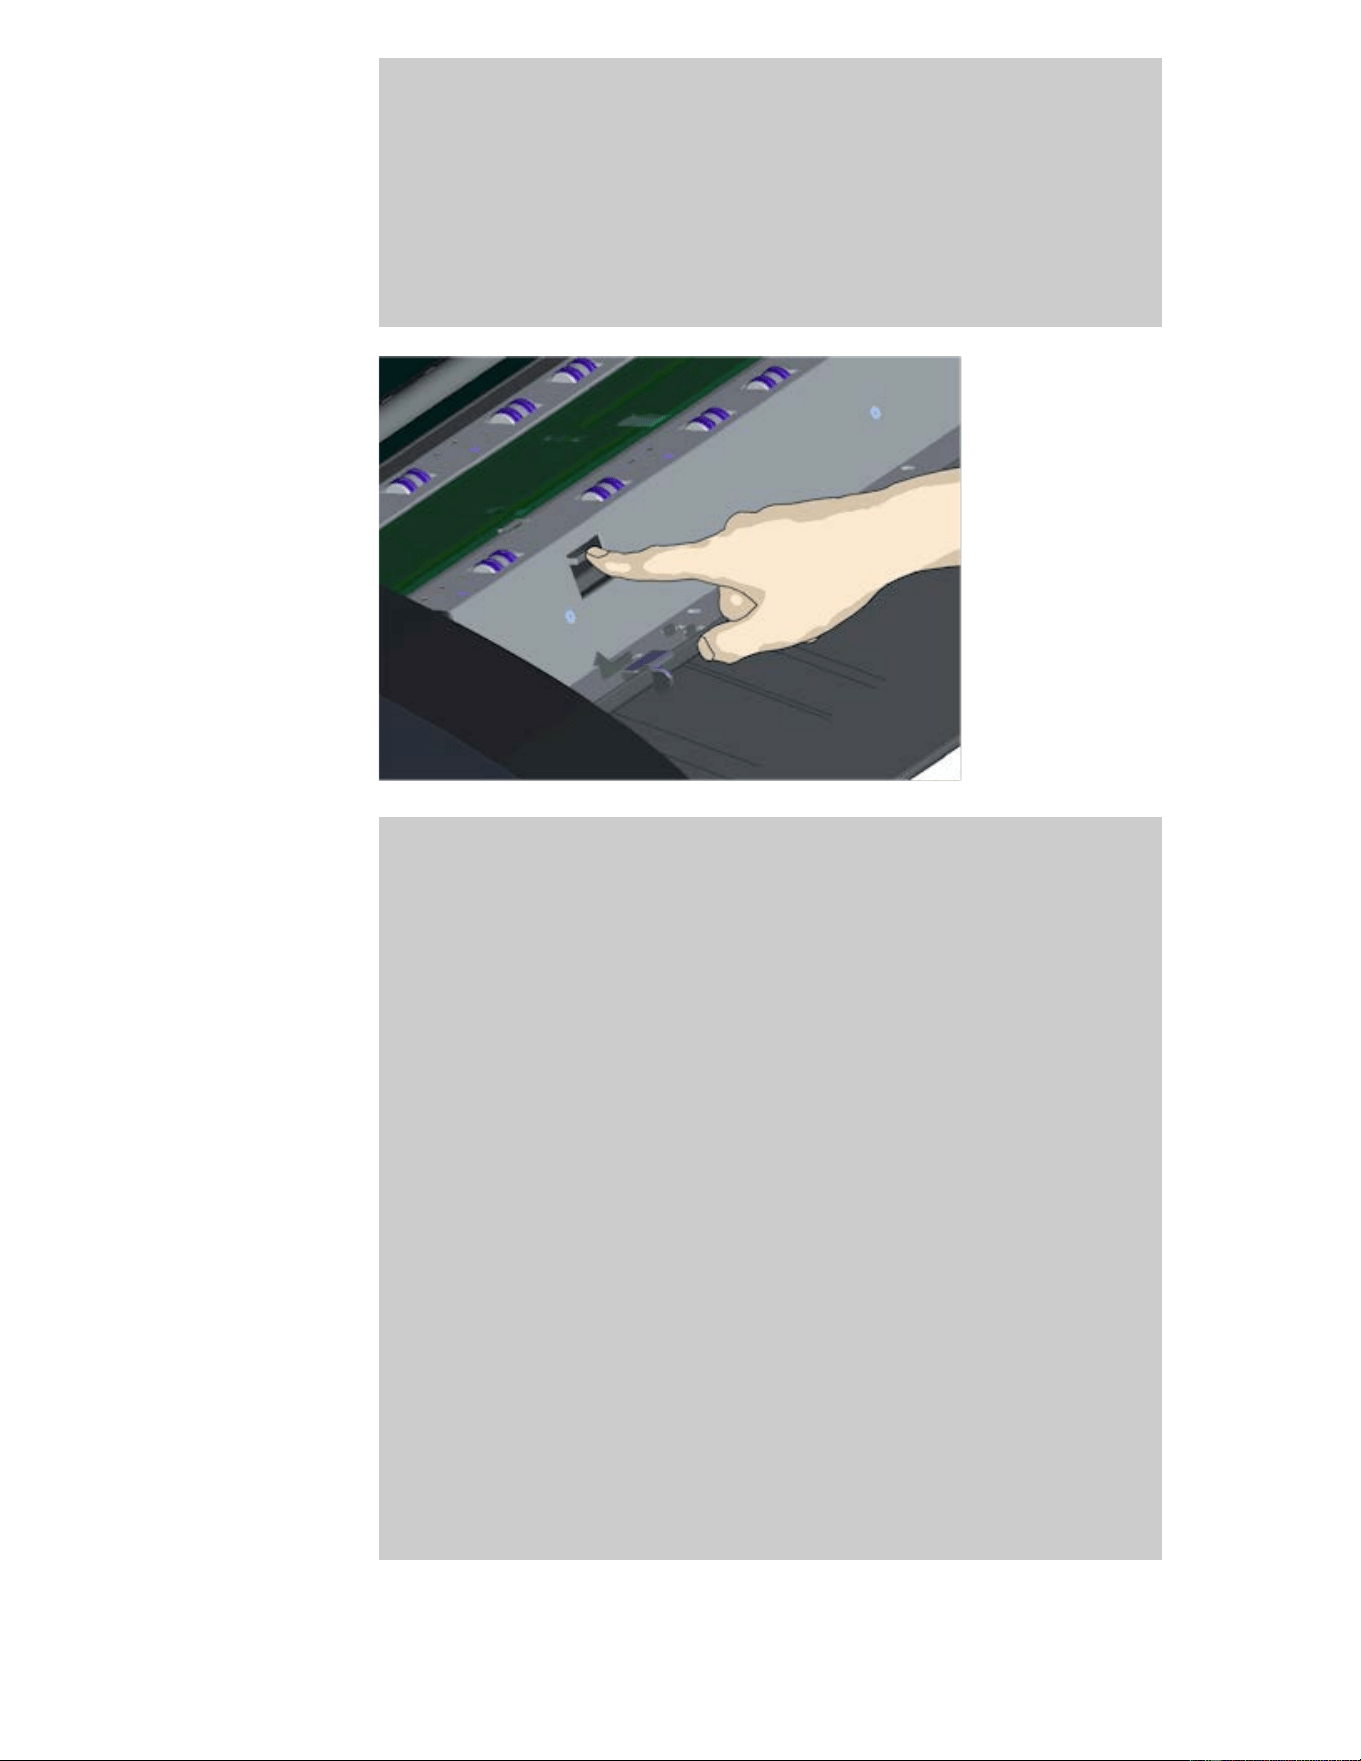
latch is easy. See the illustration below.
a. Press down on the latch release button in the 2nd square
hole.
b. The 2nd latch will release its grip and the glass will pop up
over the latch.
5. Detaching the glass plate – Tip the glass plate edge
upwards
After releasing the latches, the glass plate is now free for
removal.
a. Stand at the front side of the scanner.
b. Insert you thumbs under the glass plate edge around the
middle area as shown in the illustration on the right.
NOTE: If you can’t get your thumbs under the glass - use the
sharp, flat tool from step 5 to tip the glass high enough to get a
thumb underneath.
c. Tip the glass back and up so its two ends are free.
d. Move your hands, one at a time, to each end of the glass.
e. Apply light pressure with each hand as you lift the glass out
of the scanner.

6. Insert a new glass plate – lower a new glass plate into the
scanner
a. Pick up the new glass plate in the same manner as you
removed the old one - with two hands holding the glass on
each end so you avoid touching the glass surface.
NOTE: Take special care to avoid touching the glass plate’s
bottom surface which normally will not be cleaned during
maintenance.
b. Stand at the front of the scanner as you hold the glass. Make
sure you hold the glass for insertion with the correct surface
facing down. Note the direction of the facetted edges that
indicate which is the bottom surface of the glass. See the
illustration of the glass plate’s profile below. 1.=Top surface,
2.= Bottom surface
c. Hold the glass so that the bottom side surface faces your
body as indicated in the glass plate’s profile view below.
d. Lower the new glass plate into the scanner at an angle, as
shown in the glass plate’s profile view below, so that the
glass’s lower edge meets the scanner’s bottom position
groove.
CAUTION: The glass plate is long and thin and thus fragile. Take
care not to break it.
The glass plate will rest in the scanner’s lid between the
bottom and top position grooves. Locate the glass plate’s
bottom position groove in the lid. This is the groove furthest
from your body when you stand at the scanner’s front.
f. Place the lower edge of the glass plate so it rests in the glass
plate’s bottom position groove.
g. Carefully tilt the upper edge (the edge closest to your body)
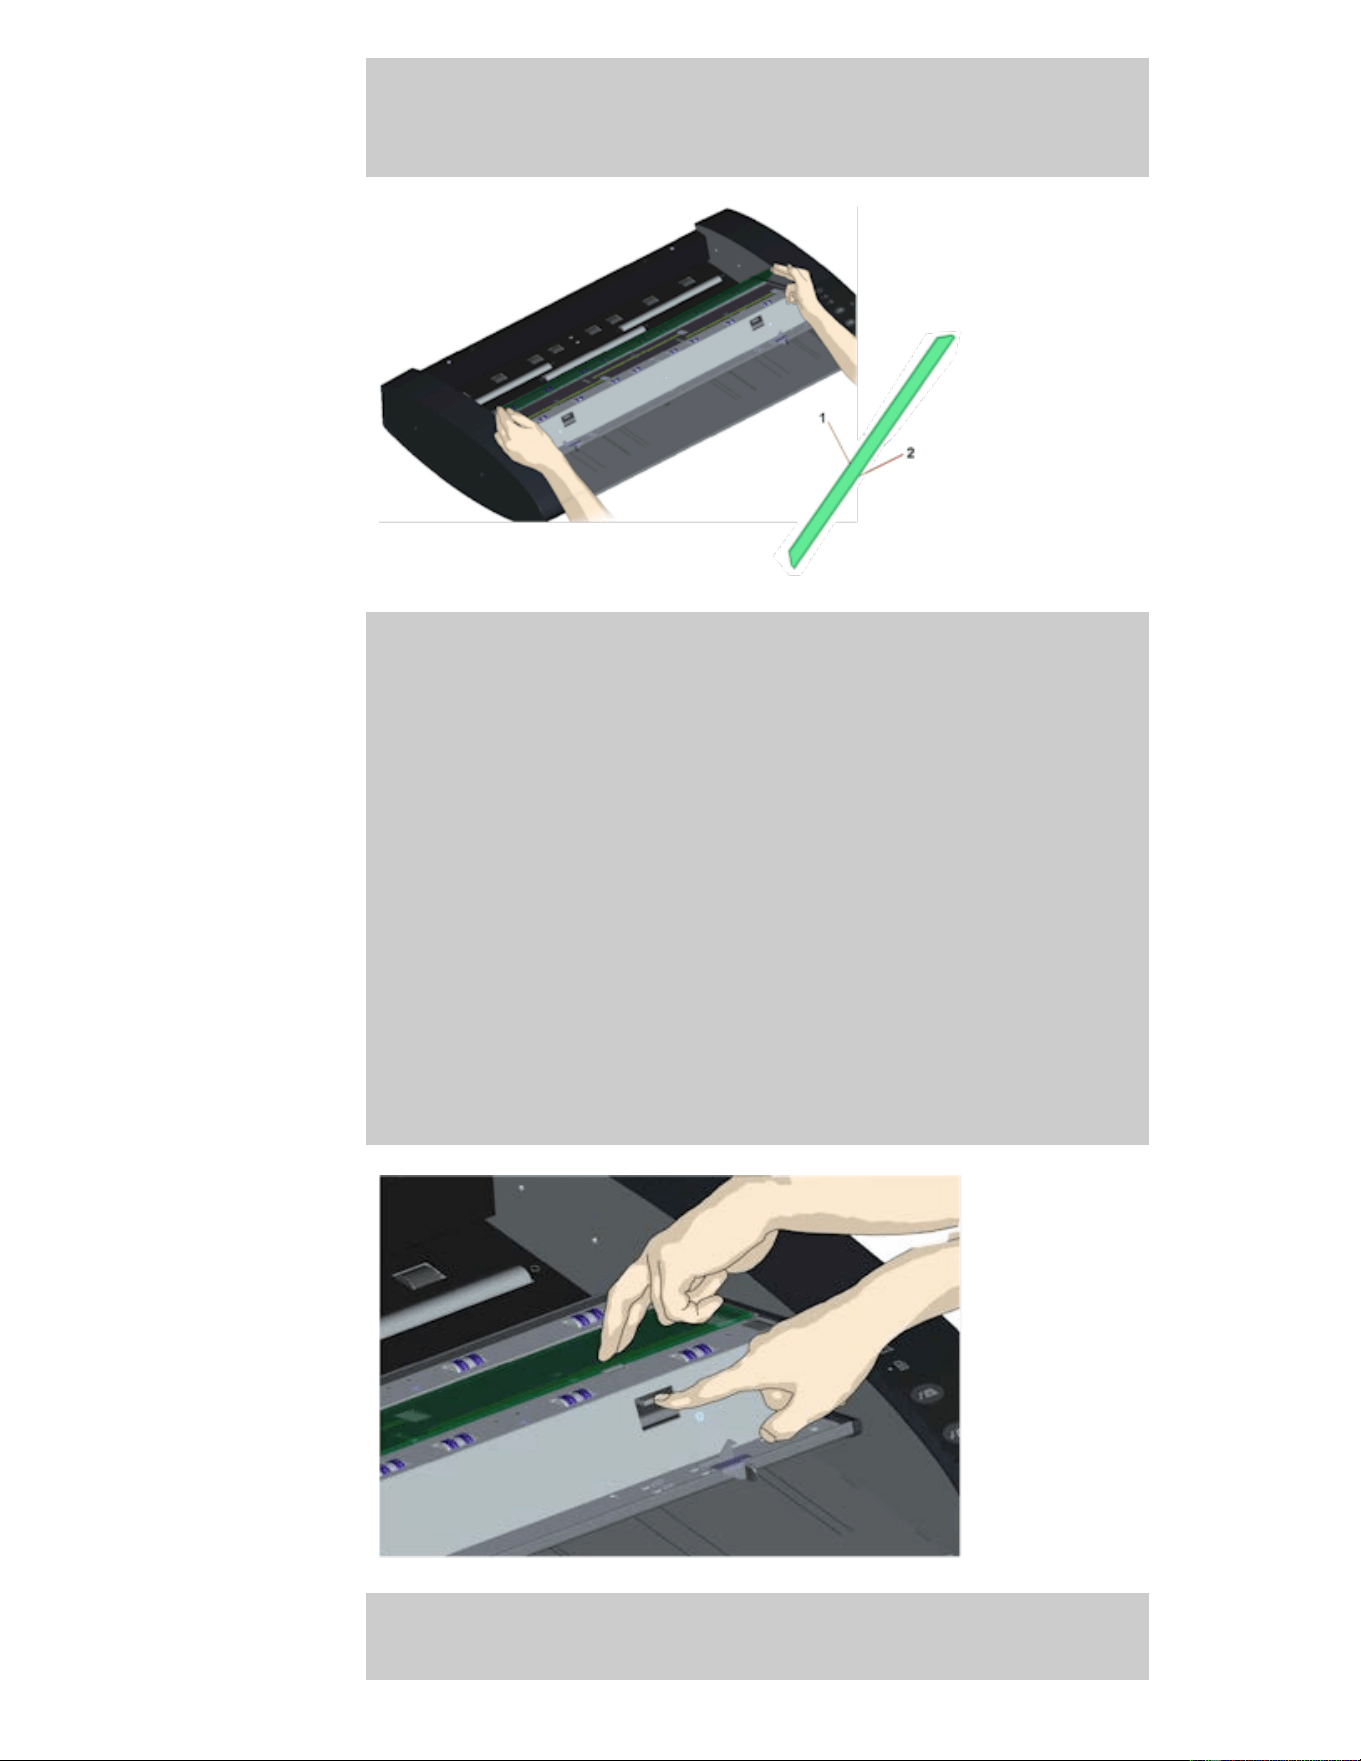
down until the glass plate rests in the scanner lid between the
2 grooves (top/bottom position grooves).
7. Lock the new glass plate in place
The glass needs to be locked in place with the two latches. At
this point, the latches are under the glass plate and they need
to be brought above so they grip the glass plate’s edge.
a. Start at the right side.
b. Press down on the first (rightmost) latch release button.
c. With your other hand, press down on the glass plate near the
latch so the glass plate’s edge snaps down under the latch.
d. Repeat the process with the other latch.
f. Ensure that both latches are gripping the glass plate’s edges.
8. Clean the new glass plate
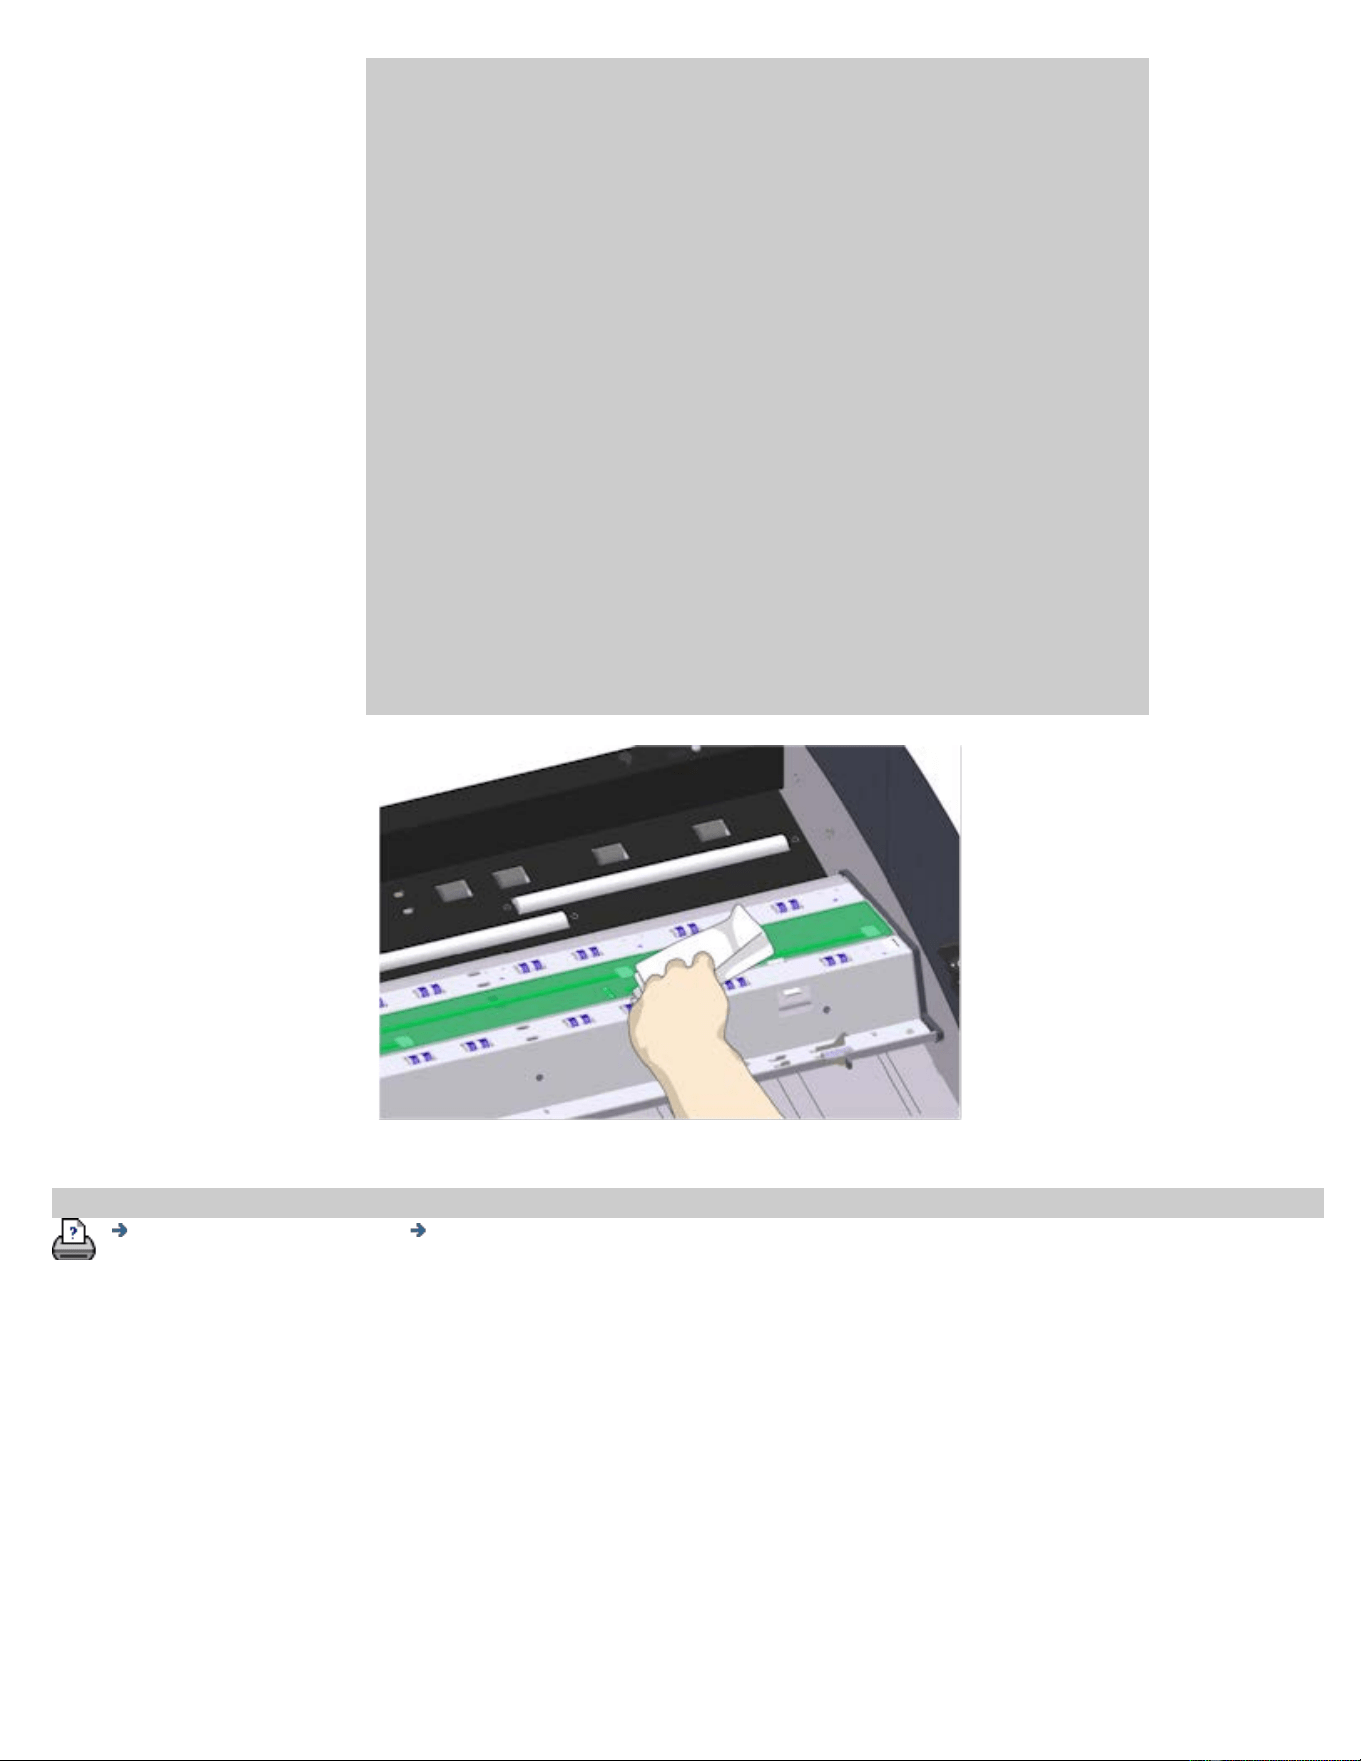
Make sure you use 2 fresh and clean lint-free cloths for
cleaning your new glass plate.
a. Spray/apply a mild, streak-free, glass cleaner onto a lint-free
cloth.
b. Gently wipe the glass clean. Look for fingerprints and
smudges that may have been applied to the glass during
replacement.
c. Dry the glass completely using the other clean, dry lint-free
cloth.
d. Make sure that fluids to not get under the glass and that you
leave the area dry.
CAUTION: Do not spray/apply cleaner fluids directly on the
glass plate or anywhere else in the scan area.
e. When done, close the lid gently until you hear the lid locks
click.
printing instructions legal information
© Copyright 2012, 2015 HP Development Company, L.P
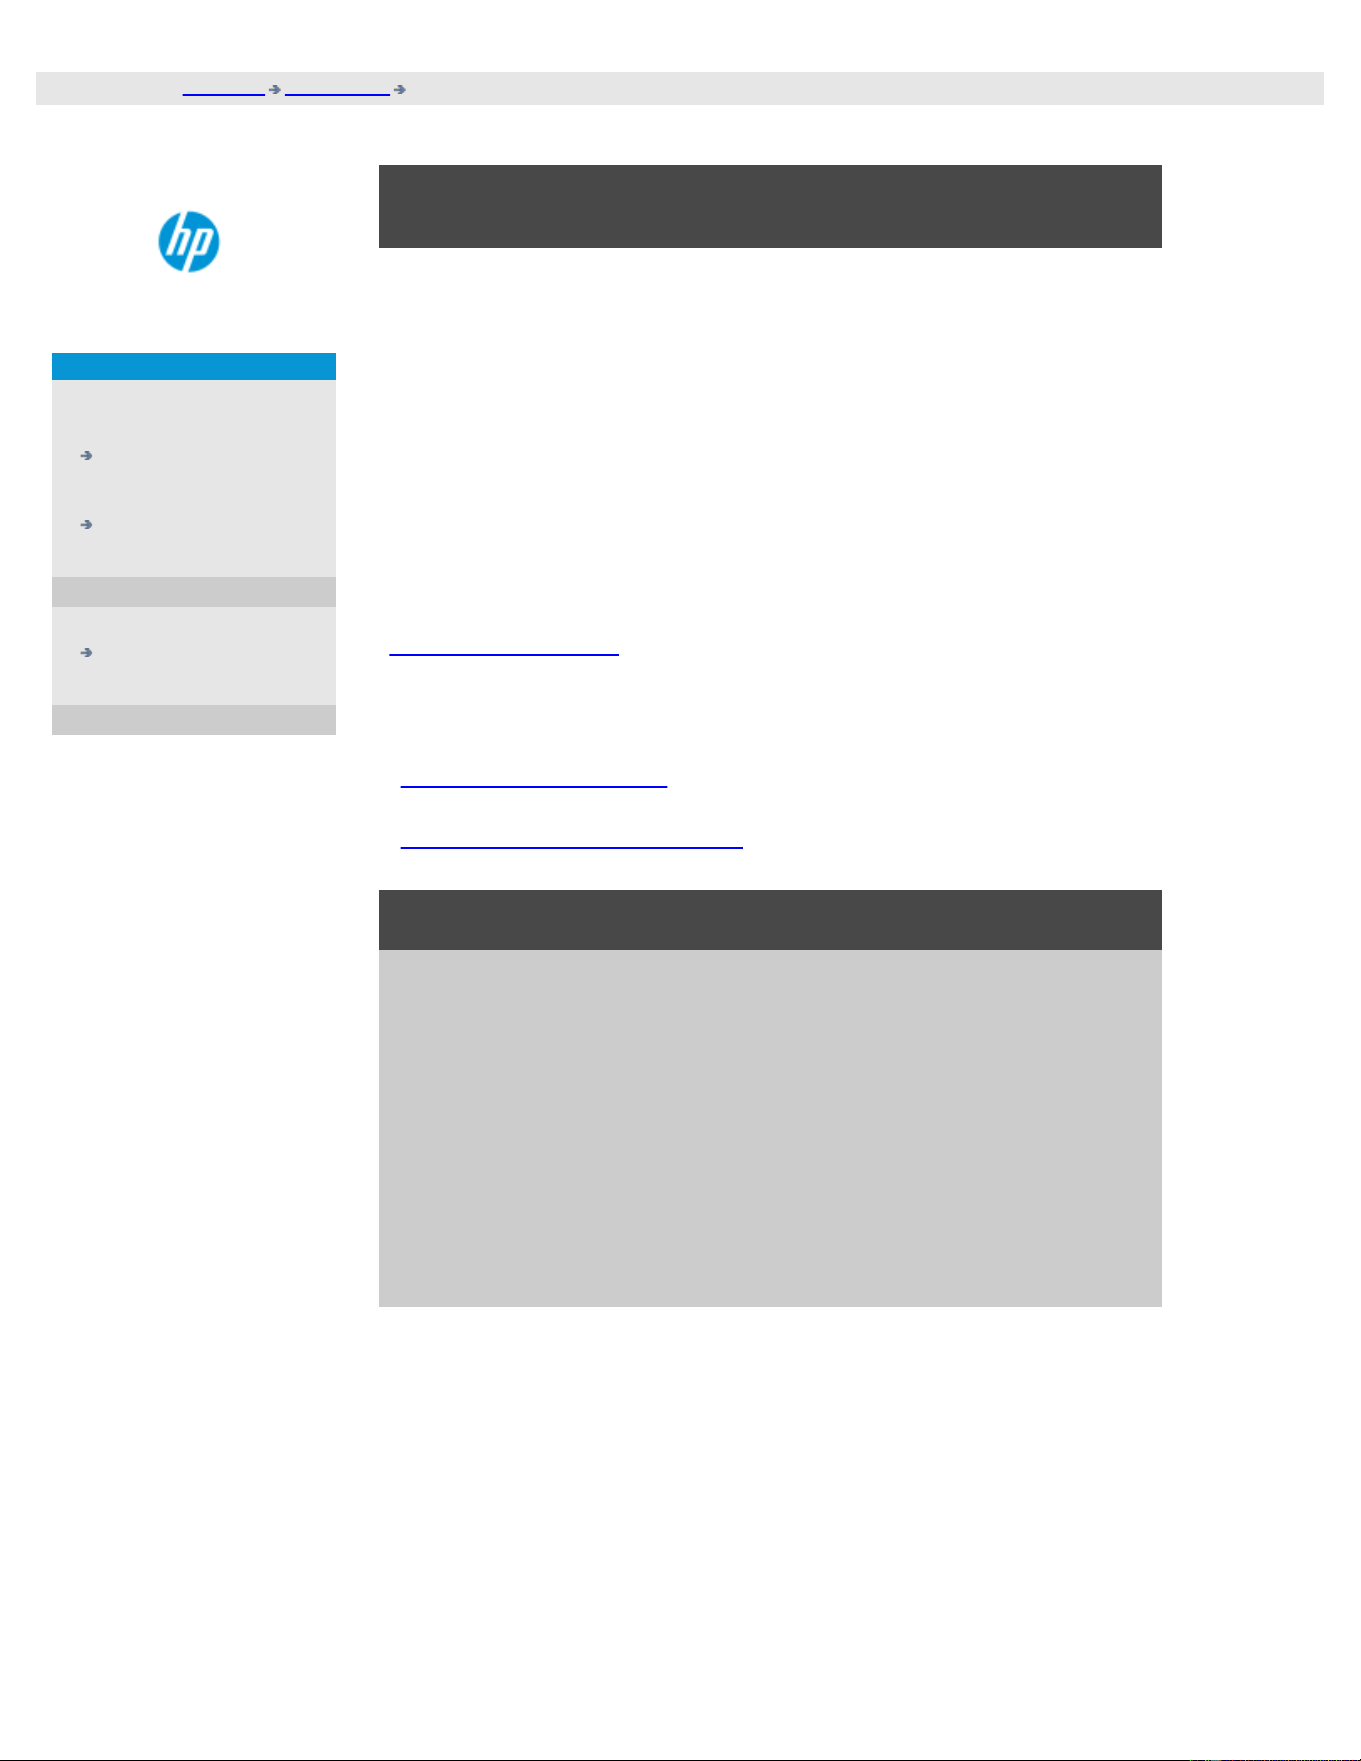
you are here: welcome how do I...? replace scanner parts - HP HD Pro 2 Scanner
HP Pro Scanner
how do I...?
the problem is...
alphabetical index
how do I replace scanner parts? - HP HD Pro 2 Scanner
The following instructions apply for the scanner model HP HD Pro 2
Scanner only (see your documentation to identify the scanner model on
your sysem).
On the HP HD Pro 2 scanner, you can replace various scanner parts that
are liable to wear down over long-term use.
Changing these parts will renew your scanner and ensure optimal results.
Before replacing parts, you should clean the scan area as described under
scanner maintenance to see if any errors or image defects then
disappear.
Select a topic:
Replacing the glass plate
Replacing the white background
Replacing the glass plate
Small scratches on the glass plate can reduce scanning quality.
Replacement with a new glass plate can be recommended by the
program. Before replacing the glass plate, you should try to clean it to
see if errors or image defects then disappear.
To replace the glass plate:
1. Turn the scanner power off and disconnect the power plug.
Push the lid release levers upward to open the scanner lid.
Push the lid up and backwards to expose the glass plate.
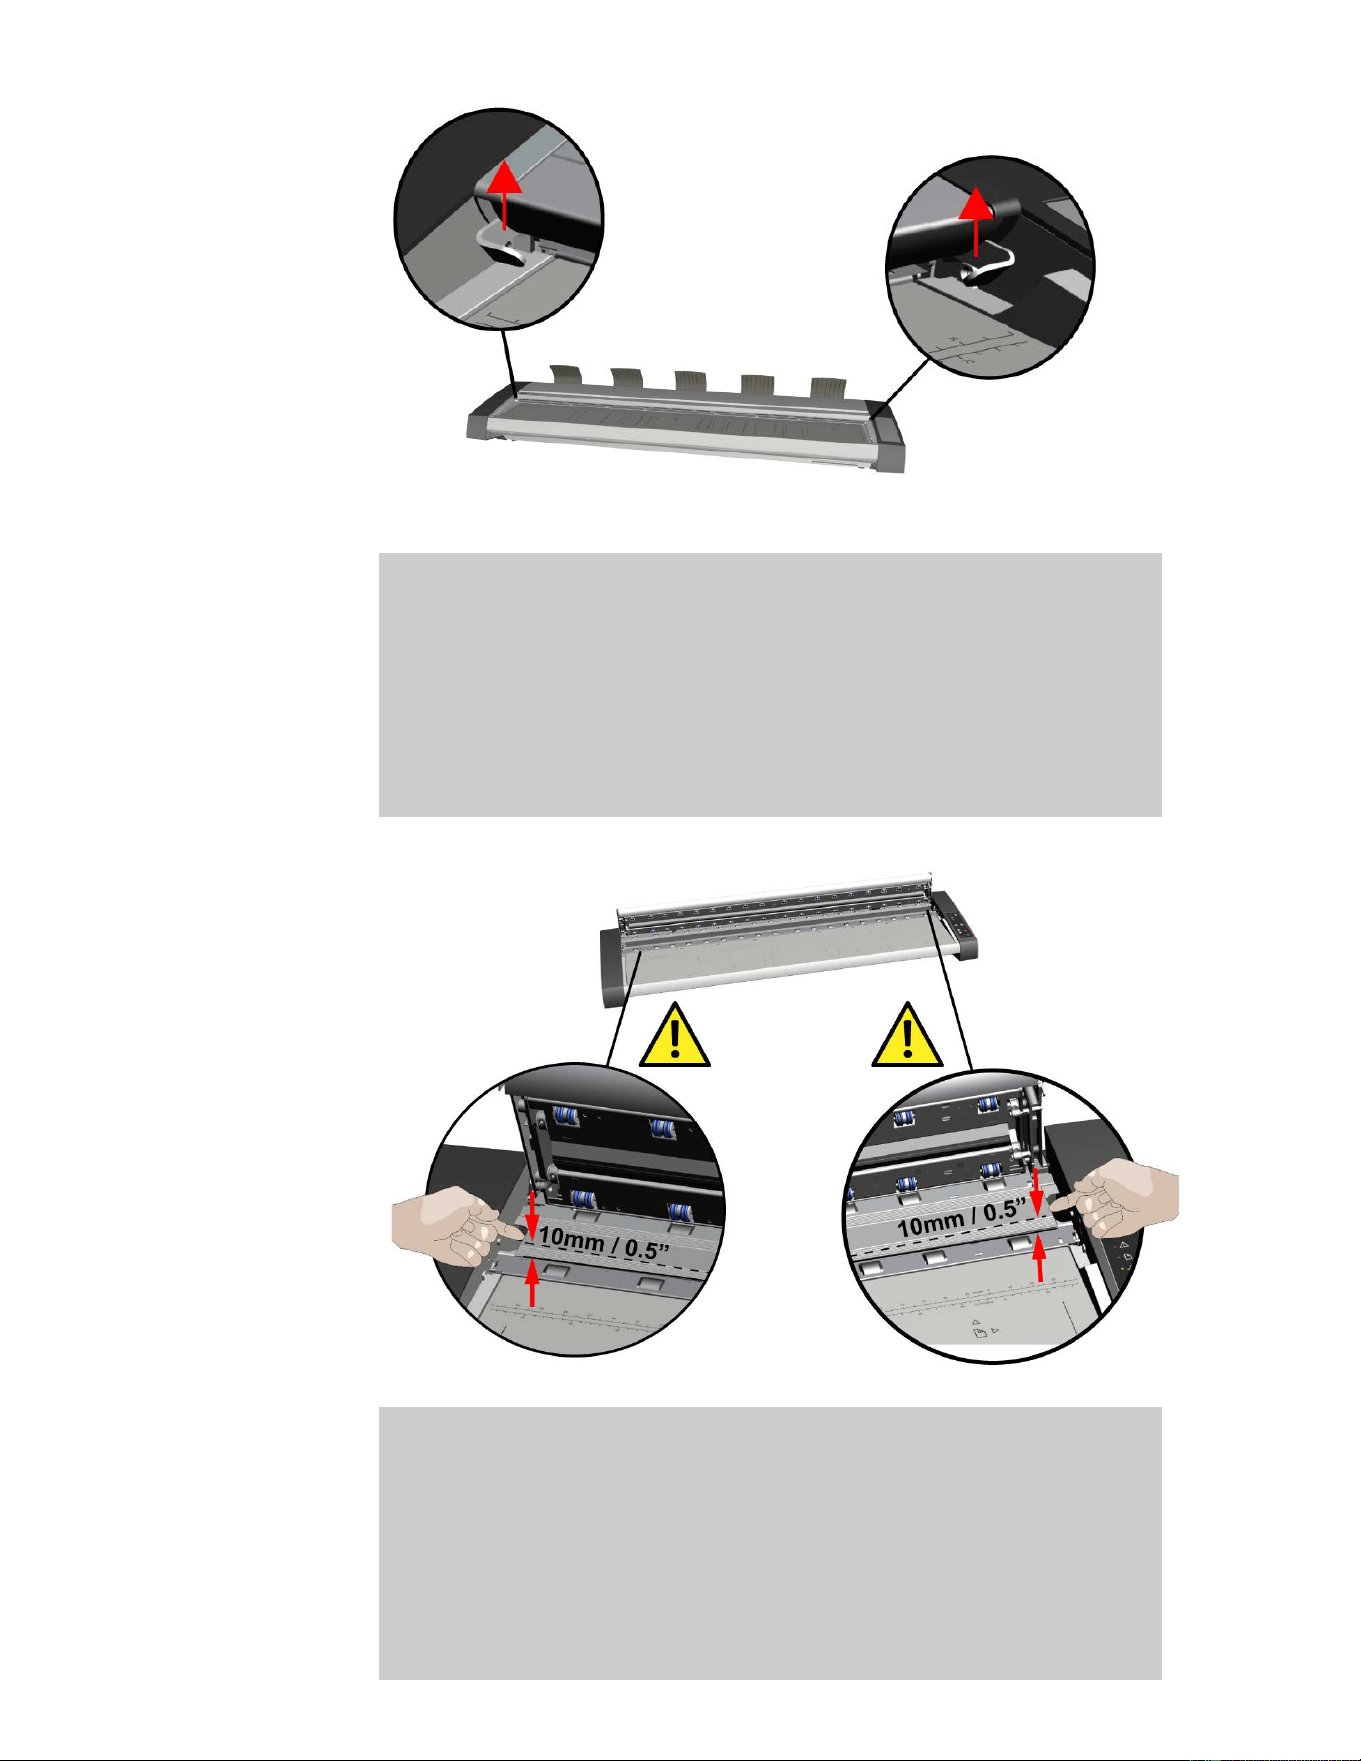
2. Remove the glass plate
a. Place an index finger under each end of the glass then
starting at one end apply moderate upwards pressure to begin
separating it from the scanner body.
b. Lift each end of the glass no more than 10mm / 0.5”.
3. Handling of the glass plate
a. Move your fingers to the 1/3 and 2/3 points BEFORE LIFTING
the scanner glass away from the scanner.
b. Always lift the glass plate at the 1/3, 2/3 points as shown.
c. Remove the glass plate.
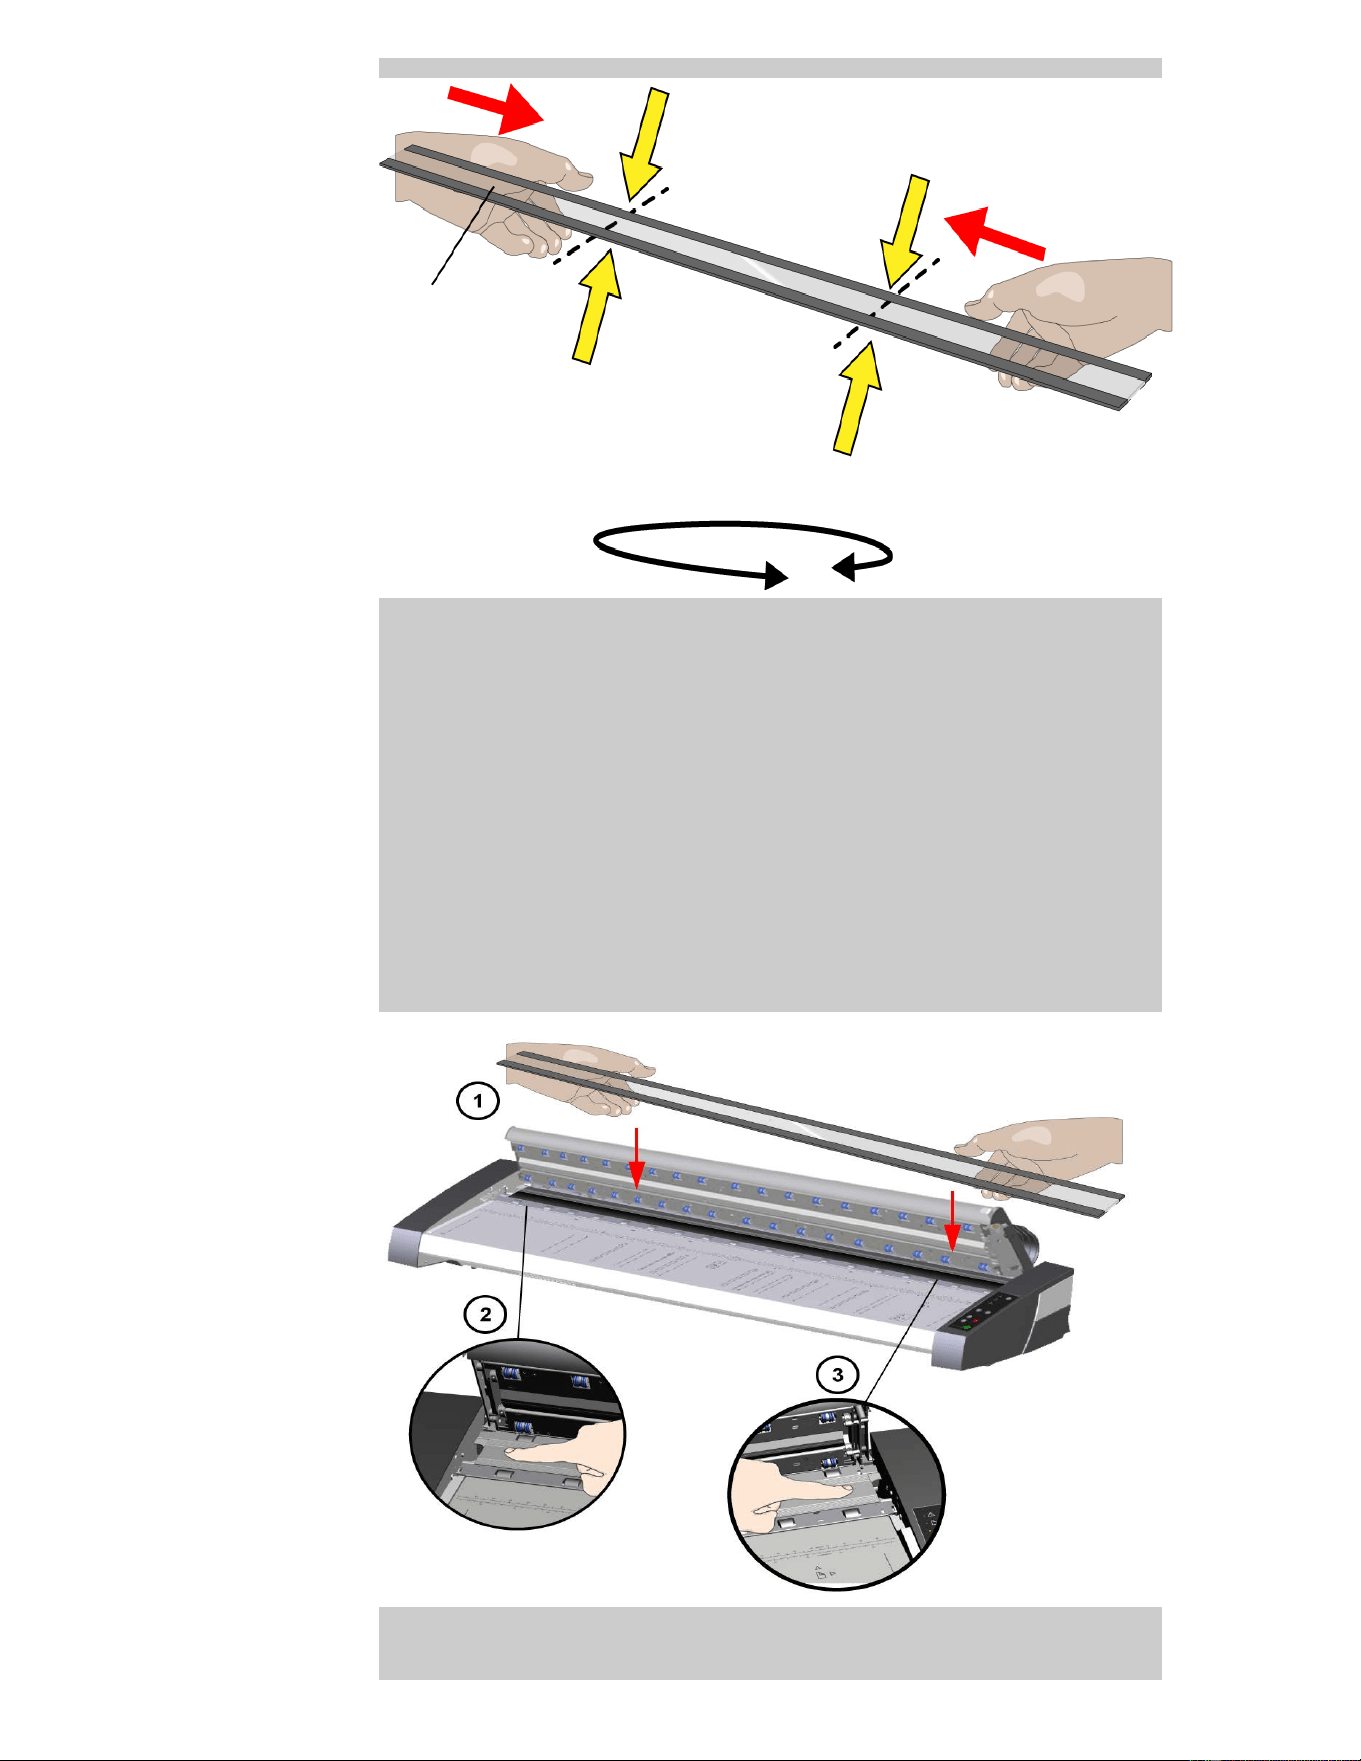
4. Insert a new glass plate
a. Check that the flat magnetic surfaces inside the scanner are
clean and free from dirt or dust.
b. Carefully bring the new scanner glass near to the open scan
area.
c. Using both hands support the glass by the fingertips then
carefully lower it into position taking care to locate each end
plate (up-side of glass) onto its four corresponding location
points inside the scanner body.
5. Complete the glass plate replacement
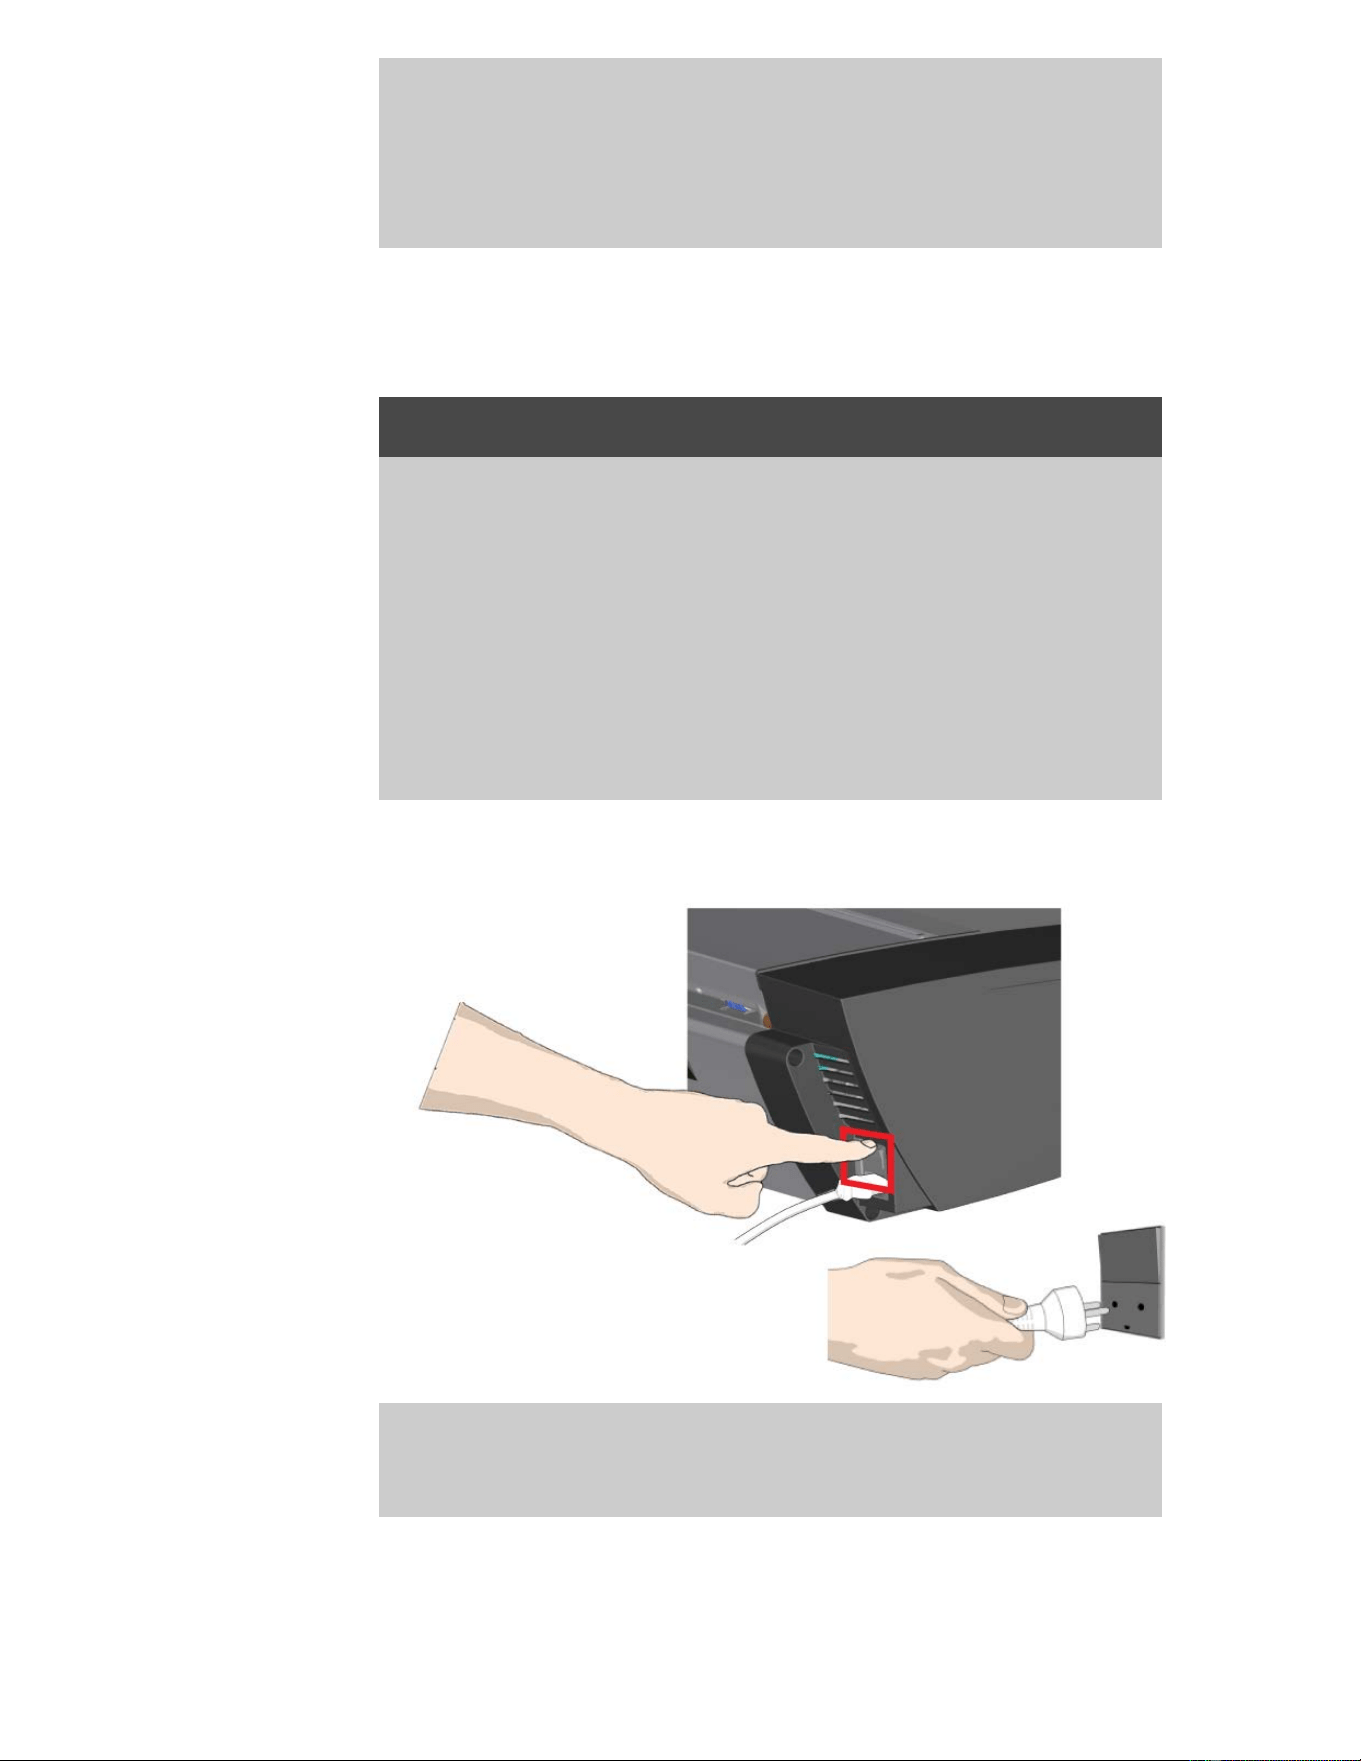
Recalibration is recommended after changing the scanner
glass.
NOTE: It is recommended to clean the new glass plate after
inserting it in the scanner and before scanning.
Replacing the white background
The white background can become worn and discolored after long
periods of use and in such cases replacement with a fresh white
background is recommended. Before replacing the white
background, you should try to clean it to see if errors or image
defects then disappear.
To replace the white background:
1. Turn the scanner power off and disconnect the power plug.
2. Push the lid release levers upward to open the scanner lid. Push
the lid up and backwards to expose the white background.
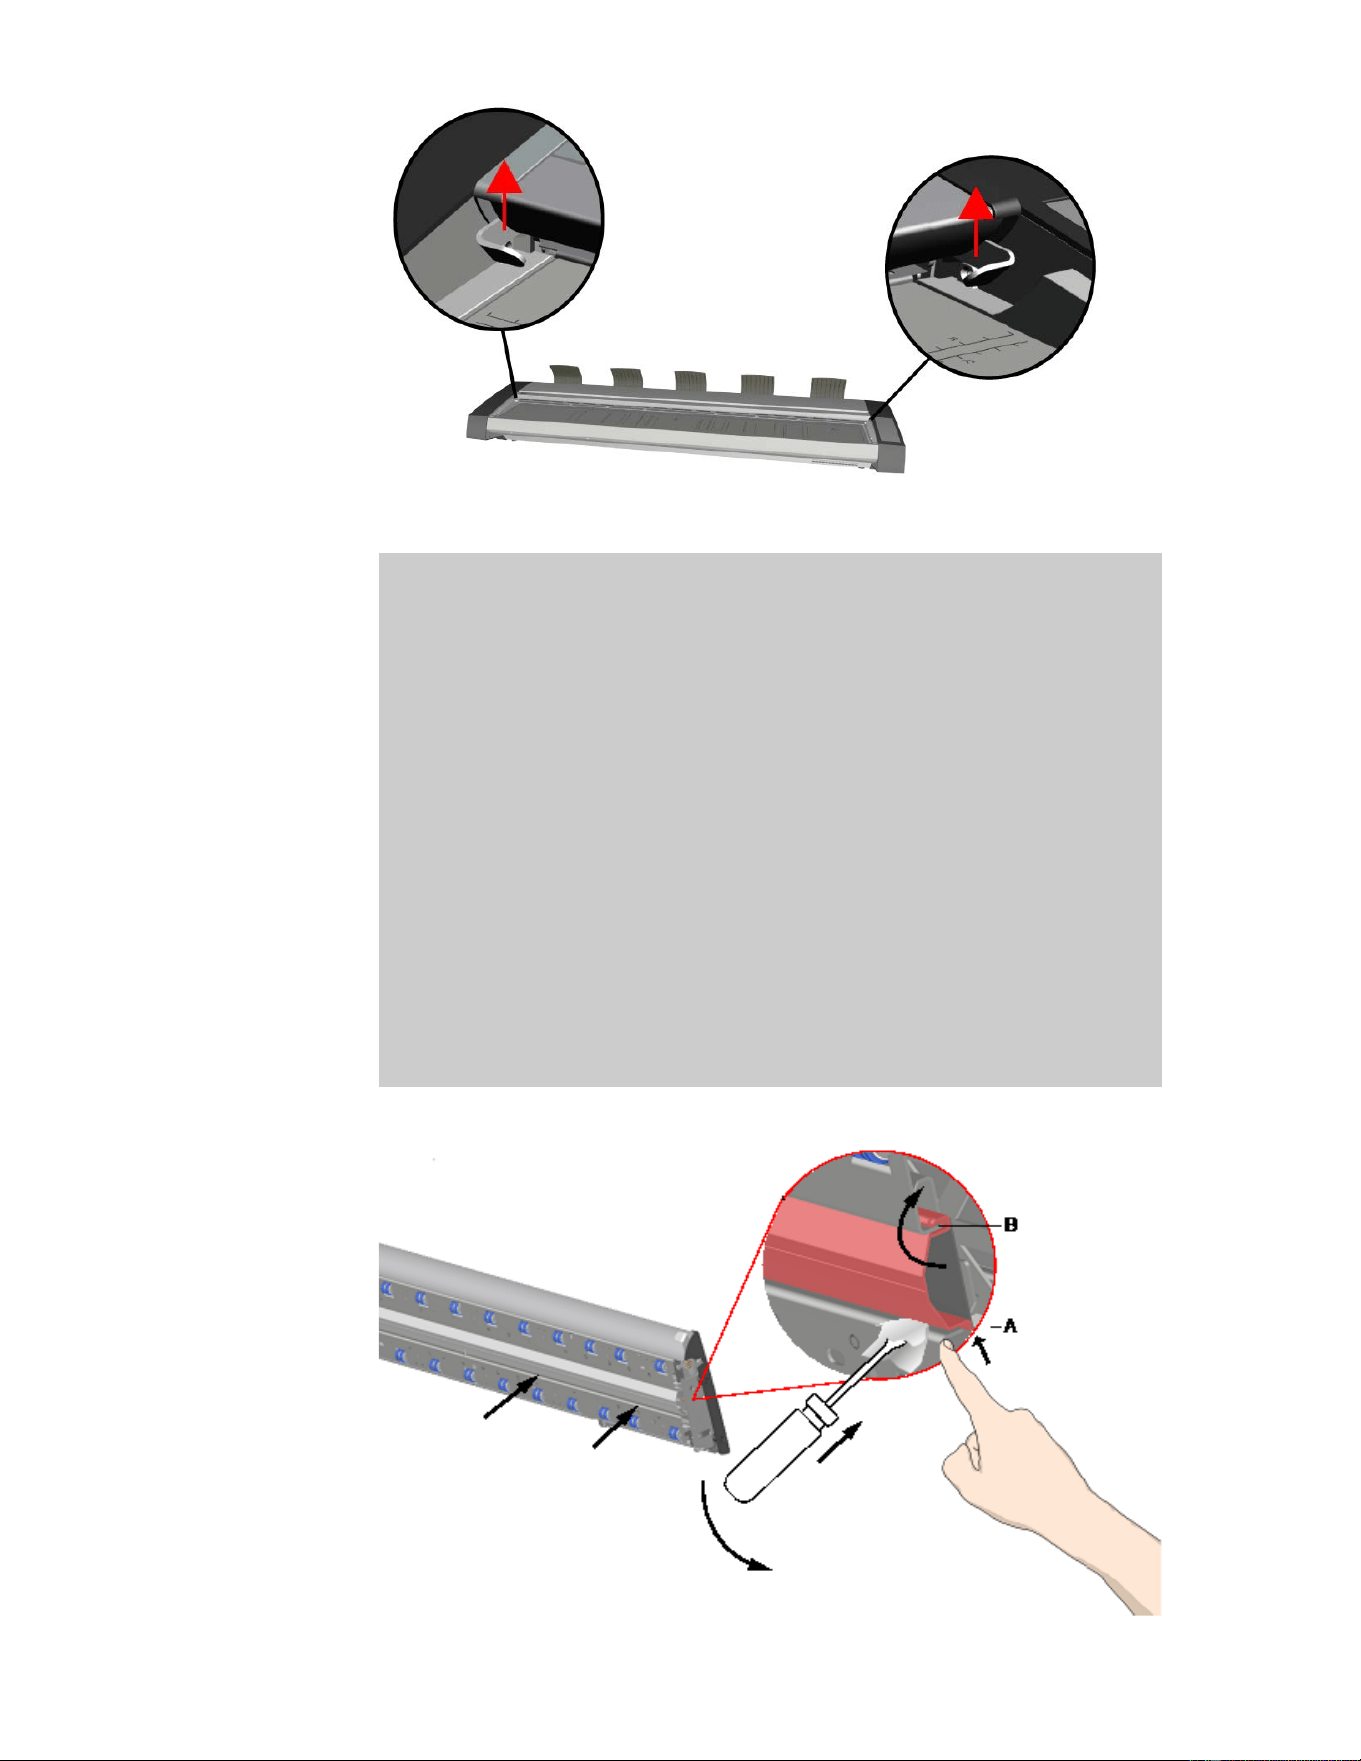
5. Remove the white background
a. Use a flat-bladed screwdriver tip wrapped in a soft cloth or
similar and gently push it into the gap between the metal and
the white background at one end.
b. With a gentle levering action, compress the side edge of the
plastic background to release it over the lower edge - A. Work
the tool along the edge towards the opposite end until it is
completely released.
c. Remove the white background free by lifting it up and
rotating it - B.
NOTE: Do not use excessive force on the background or pull it
from the lid before enough has been released using the tool.
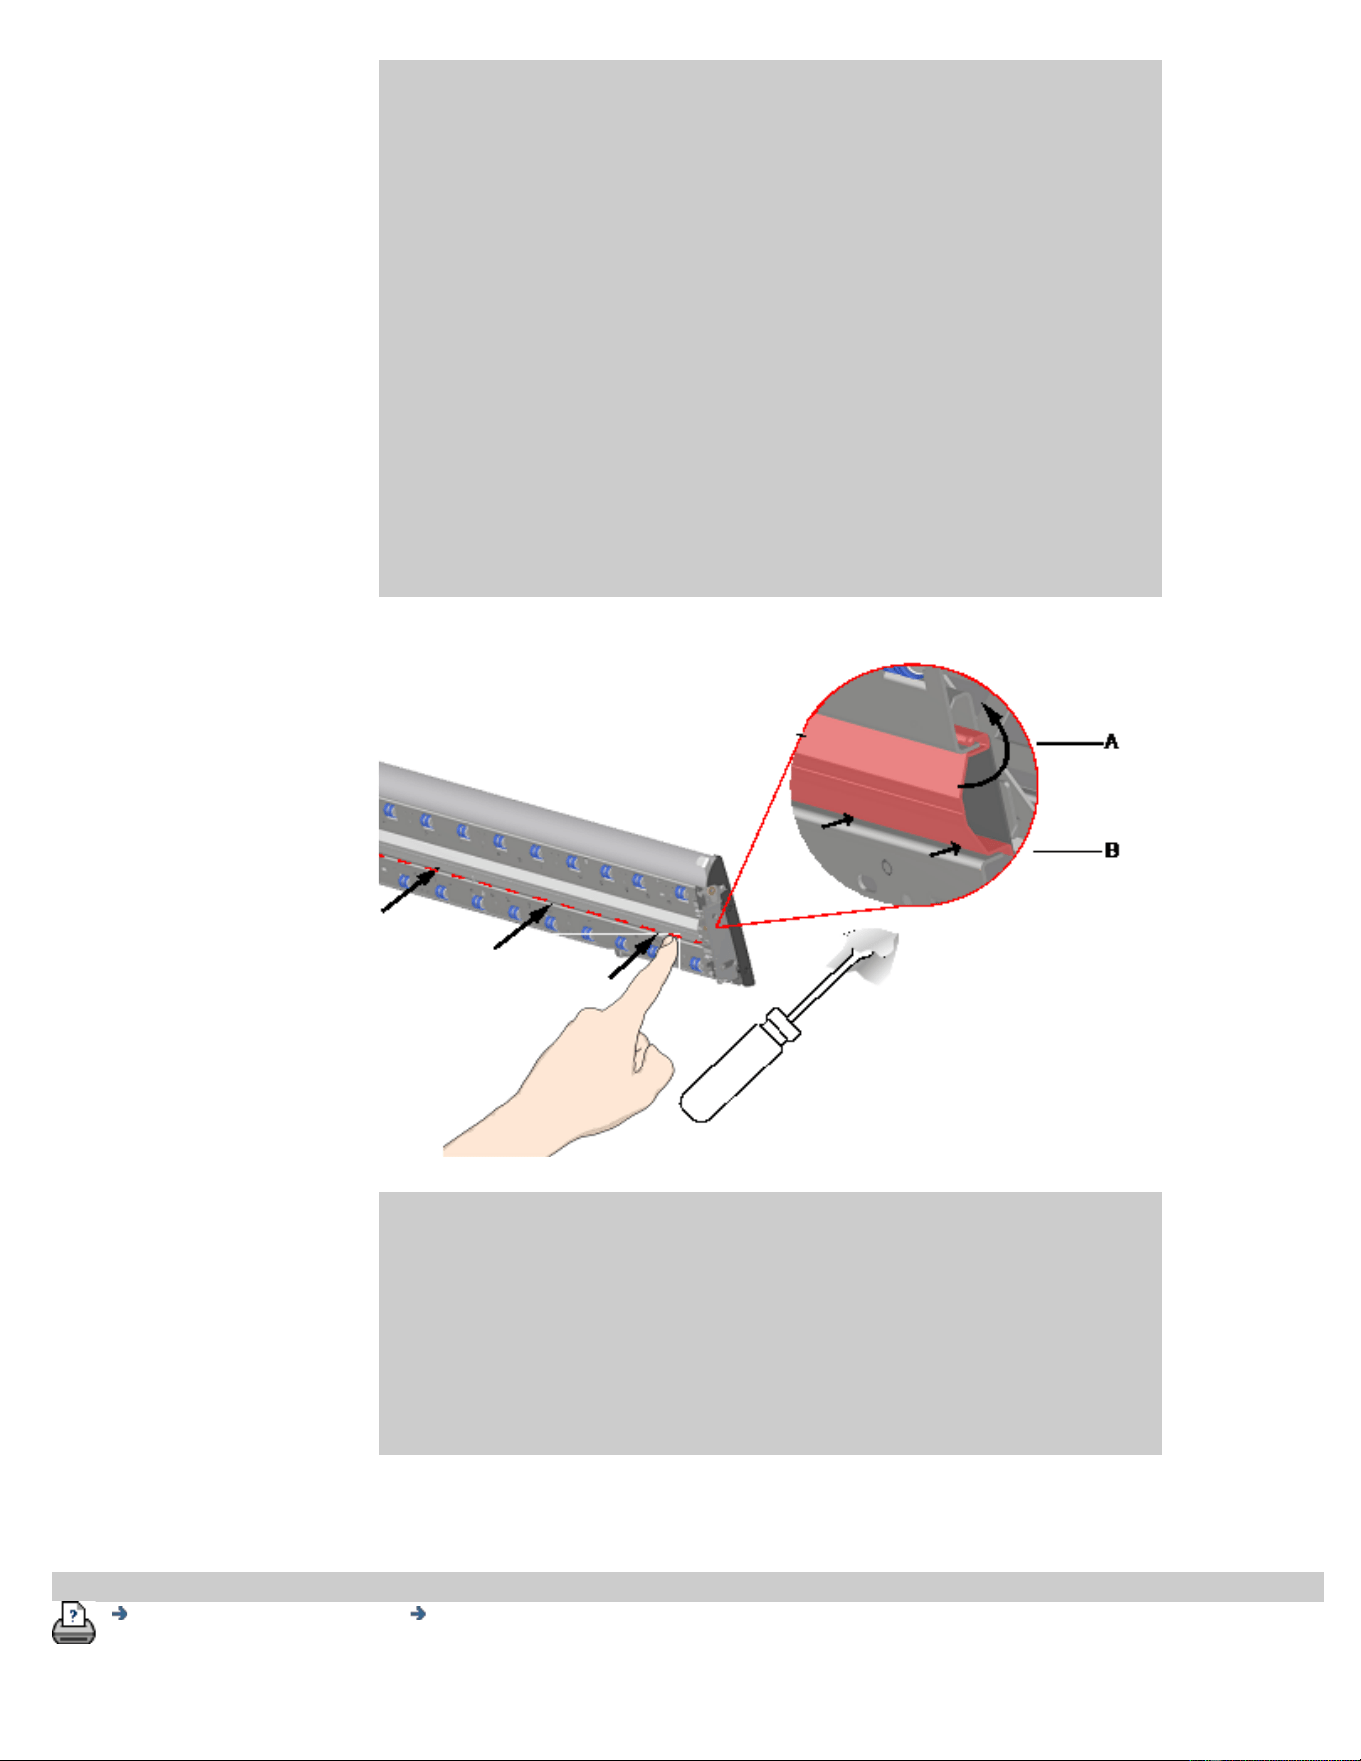
6. Install the new white background
Make sure the new white background is clean and free from
dust.
Hook the top edge of the white background into the lid along
its entire length - B. Now using your fingers or the soft tool
gently push the lower edge into the lid so that it hooks under
the inside - A.
Work from one end along the length of the part until all of the
white background is snapped into the lid.
NOTE: Check free movement. A properly inserted white
background will move freely in and out of the scanner lid under
fingertip pressure.
5. Complete the white background replacement
Recalibration is recommended after changing the white
background.
NOTE: It is recommended to clean the new white background
after inserting it in the scanner and before scanning.
printing instructions legal information
© Copyright 2012, 2015 HP Development Company, L.P
you are here: welcome how do I...? set system date and time
HP Pro Scanner
how do I...?
the problem is...
alphabetical index
how do I set system date and time?
The date and time can be set so they will be known by the program.
Setting the date and time is relevant for accounting.
setting the date and time
1. Press the Setup tab.
2. Press
> System
3. Press the Set Time and Date button
4. Start with the Time Zone setting. Press the Time zone button
and select the time zone for your area.
5. For convenience, you can select automatic daylight savings time
adjustment.
6. With the local time zone selected, set the current date and time.
Press each value button to make a setting. You will need your
keyboard to set values.
printing instructions legal information
© Copyright 2012, 2015 HP Development Company, L.P
you are here: welcome how do I...? view print queue
HP Pro Scanner
how do I...?
the problem is...
alphabetical index
how do I view the print queue?
With some printers, your system will have a Print Queue button at
the bottom of the main screen.
Press the button to view the current printers job queue.
to view the print queue
Press the Print queue button at the bottom of the screen.
The print queue list dialog lets you manage any jobs still waiting to be
output. You can move through the list and Delete unwanted jobs.
The print queue dialog's Properties section contains a window for
previewing the job you select in the queue list and additional
information.
Note : This function is not available with all printer models.
printing instructions legal information
© Copyright 2012, 2015 HP Development Company, L.P
you are here: welcome how do I...? scan to and access a network folder
HP Pro Scanner
how do I...?
the problem is...
alphabetical index
how do I scan to and access a network folder?
Per default, your system’s folder browse dialogs will display only
local drives and folders. This topic explains how you can add network
locations to the system. Once added, you can use a network location
and underlying folders as destinations for scan-to-file (Scan tab)
jobs and access them with the file manager (folder button).
To add/store/remove a network connection
1. Your system must be connected to the network.
2. Press the folder button to open the file manager dialog.
3. Press the "Network" button.
4. Press the Add Network Connection button to open the dialog
shown below. Contact your network administrator if you need
information about one or more of the dialogs settings as
described in the next steps.
5. Network Folder – enter the full path name to the location on the
network. This can be a server name, an IP address or any name
that is recognized by the network and identifies a valid
connection/location.
6. User name – the login user name for the network server/
machine. If your your machine is on a network Domain, then
you need to write the combination:
<domain name>\<user> in the field. Example:
"MAINOFFICE\John".

7. Password - the login password for the network server/
machine.
8. Label – this is what your HP Scanner system will display in its
browse dialogs. Enter a name that will help you identify the
network destination.
9. Inactivity timeout – This feature enables you to set an individual
timeout value (in minutes) for your network connections, for
added security.
NOTE: "If timeout value is set to 0 (Infinite) then the network
connection will never time out. See more in: How does the
Inactivity timeout for a network connection work?
10. Reconnect at logon – If this is left unchecked, your network
connection definition will automatically be deleted when you
shut down the panel PC. Select this option to tell the system to
store the connection and activate it every time you start up the
system.
NOTE: "Reconnect at logon" is a user feature. The option will
only be visible if it is enabled by the system's administrator.
See more in: How do I enable storing of network connections?
11. HP SmartStream – Select this option to identify the added
network location as an HP SmartStream hot-folder.
NOTE: The same network location needs to be added as a hot
folder in HP SmartStream preferences.
NOTE: You can add as many network connections as you need.
However, system will not allow 2 or more network connections on
the same server with different users. Example:
If user "John" has created the network connection:
"\\server1\colorphotos"
Then user "Judy" (or other users) cannot create the network
connection:
"\\server1\pdffiles"
...the system will reject the action.
Removing network connections:
Manual removal: You remove network connections through the
Folder button > Network > "Remove Network/FTP
Connection".
Automatic removal: If a network connection definition is not stored

(see above) it will be deleted automatically when you shut down
the panel PC.
Stored connections must be removed manually. You may for
example wish to remove a stored network connection that fails at
system startup because the server status or permissions have
changed.
To scan to the network folder
1. Complete the steps above under “To add a network
connection”.
2. Select the Scan tab and make your settings as with any scan-
to-file job.
3. Press the "File destination" button.
4. Press the path up (“..”) button until it disappears meaning you
reached the list’s topmost level which is the list of accessible
drives.
5. Navigate the list until you see your network location i.e. the
Label you entered in step 8 under "to add a network
connection" above.
6. Select the network location.
7. Once connected, you can navigate to a folder under the network
location to select it as the destination.
8. Press OK when you have highlighted the destination folder you
want to use.
To access files on the network folder
1. Complete the steps above under “To add a network
connection”.
2. Press the folder button to open the file manager dialog.
3. Press the path up (“..”) button until it disappears meaning you
reached the list’s topmost level which is the list of accessible
drives.
4. Navigate the list until you see your network location i.e. the
Label you entered in step 8 under "to add a network
connection" above.
5. Select the network location
6. Navigate to the folder under the network location you wish to
access.
7. Press OK when you have highlighted the file you want to open.
How does the Inactivity timeout for a network connection work?
1. When a network connection is added then it is possible to
specify an inactivity timeout for security reasons.
If timeout value is set to 0 (Infinite) then the network
connection will never time out.
See more in: To add/store/remove a network connection
2. The Network Logon dialog below will be displayed if inactivity
period is reached and access to a network connection is
attempted.
3. In the Network Logon dialog you will be able to change User
name, Password or Inactivity timeout value.
NOTE: Password is mandatory and should always be entered to

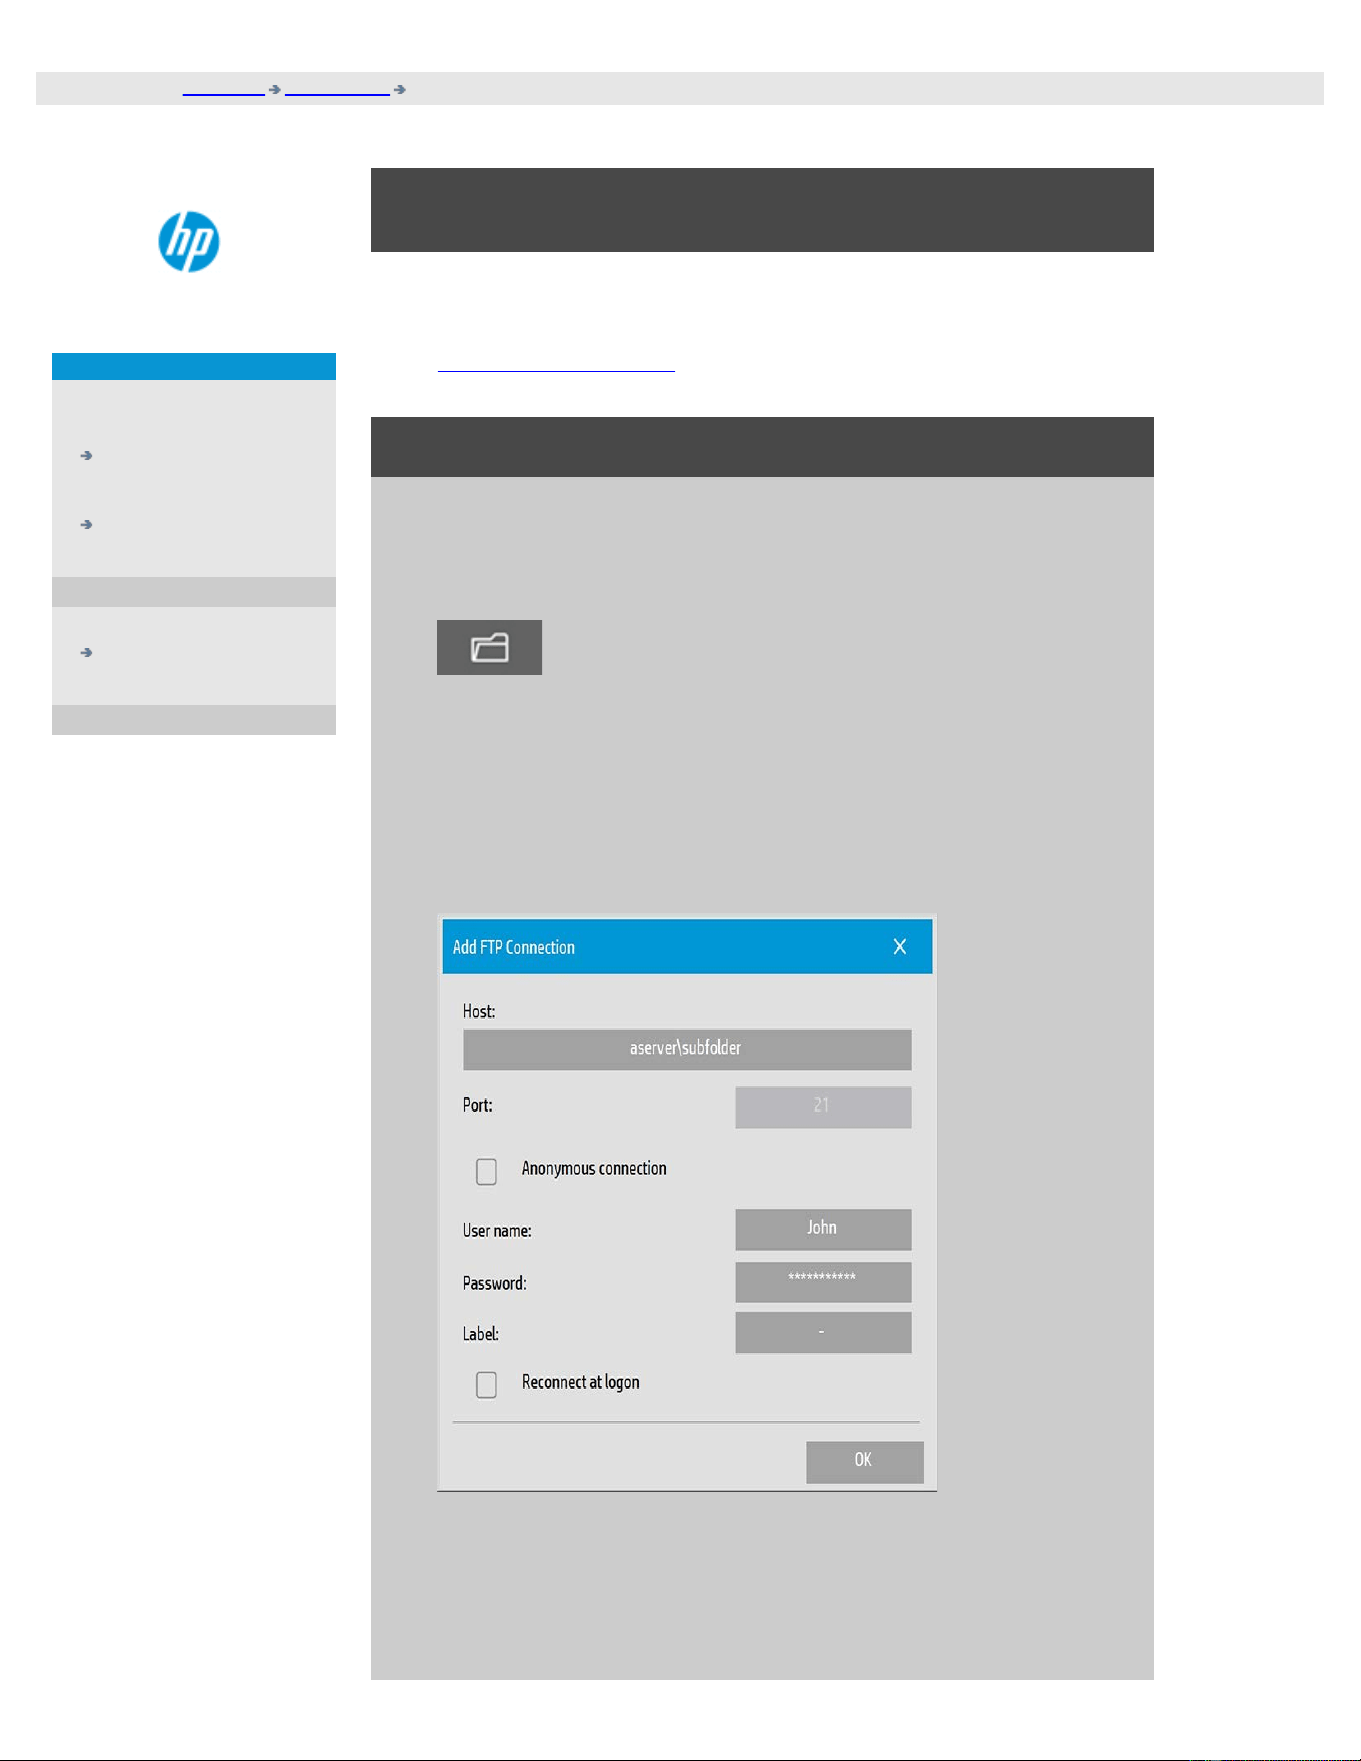
you are here: welcome how do I...? scan to an FTP server
HP Pro Scanner
how do I...?
the problem is...
alphabetical index
how do I scan to an FTP server?
Per default, your system’s folder browse dialogs will display only
local drives and folders. This topic explains how you can scan to an
FTP server on the network. Once added, you can use this destination
for scan-to-file (Scan tab) jobs.
To add/remove an FTP connection
1. Your system must be connected to the network.
2. Press the folder button to open the file manager dialog.
3. Press the "Network" button.
4. Press the Add FTP Connection button to open the dialog shown
below. Contact your network administrator if you need
information about one or more of the dialogs settings as
described in the next steps.
5. Host – enter the full path name to the location on the FTP
server, including the subfolder.
6. User name – the login user name for the FTP server.
Example: "John".

7. Password - the login password for the FTP server.
8. Label – this is what your HP Scanner system will display in its
browse dialogs. Enter a name that will help you identify the
FTP destination.
Remove FTP connections : You remove FTP connections through
the Folder button > Network > "Remove Network/FTP
Connection".
To scan to the FTP server
1. Complete the steps above under “To add an FTP connection”.
2. Select the Scan tab and make your settings as with any scan-
to-file job.
3. Press the "File destination" button.
4. Press the path up (“..”) button until it disappears meaning you
reached the list’s topmost level which is the list of accessible
drives.
5. Navigate the list until you see your FTP location i.e. the Label
you entered in step 8 under "to add an FTP connection" above.
6. Select the FTP destination.
7. Press OK when you have highlighted the destination folder you
want to use.
NOTE: All scans will be saved directly in the FTP server (or subfolder)
you have specified while creating the FTP connection.
You cannot perform file management tasks on the FTP connections
(deleting files, creating subfolders, etc.).
printing instructions legal information
© Copyright 2012, 2015 HP Development Company, L.P
you are here: getting started
< To the help welcome page
HP Pro Scanner
how do I...?
the problem is...
alphabetical index
Getting Started with your HP Scanner
Congratulations on choosing the HP Scanner.
This help page will guide you through the necessary final steps to get
your system running.
After completing these steps, you can use this help system to find
answers to any questions about operation.
Getting Started involves the following steps:
1. Install your
printer and printer drivers.
2. Run Calibrate.
3. Create a Media Profile.
About viewing instructions in the help system: You do not need to
print this page. While viewing a help topic, you can press the HIDE button
to close the help window, freeing the whole screen for carrying out the
Getting Started instructions. The system will remember your last help
topic and it will reappear on your screen when you press the ? button
once again.
After completing these steps, you can use this help system to find
answers to any questions on operation. Go to the help welcome page
for information about using this help system.
step 1: install your printer and printer drivers
Your HP Scanner system must recognize the printer before the
scanner, software and printer can operate together.
Your printer must be connected through the LAN and the right
driver is selected and installed during setup.
Follow the link below for instructions on setting up your printer
and printer drivers.

1. Install your printer and printer drivers.
step 2: run Calibrate
Preliminary Calibrate will ensure correct and reliable performance
from the start. After shipping, unpacking and setting up your
scanner, it must be cleaned and calibrated before using it the first
time. After that, scanner maintenance on a regular basis will ensure
stabile and reliable results with every job.
1. View the full instructions for Calibrate - cleaning and calibration.
step 3: create a media profile for your printer
A Media Profile is the unit that stores the data for matching scanner
and printer colors on a given media. You must create a Media Profile
for each media type you use with the specific color printer.
Your new media profile(s) will be used for color copying. Before you
start a copy job, you will select the media profile that corresponds
with the media in your printer. By this action you are harmonizing
scanner, printer and media factors for achieving matching colors
between the original and its copy.
1. ...how do I... create a new media profile for my printer and
media?
Congratulations! You have now setup your HP Scanner system and are
ready to make your first high quality copies.
printing instructions legal information
© Copyright 2012, 2015 HP Development Company, L.P
you are here: welcome how do I...? use the Resize option to determine output size
HP Pro Scanner
how do I...?
the problem is...
alphabetical index
how do I use the Resize option to determine output
size?
to select the output size...
1. Press the Scan tab.
2. Press the Resize size button.
You can select one of the following options:
None - No resizing. The output size will be equal to the input
size.
Size - Opens the Output Size dialog. Here you can set a custom
size, a standard size. Instructions.
Scale - Opens the Scale dialog in which you can determine a
scale factor. Instructions
See also:
...how do I set the input size?
printing instructions legal information
© Copyright 2012, 2015 HP Development Company, L.P
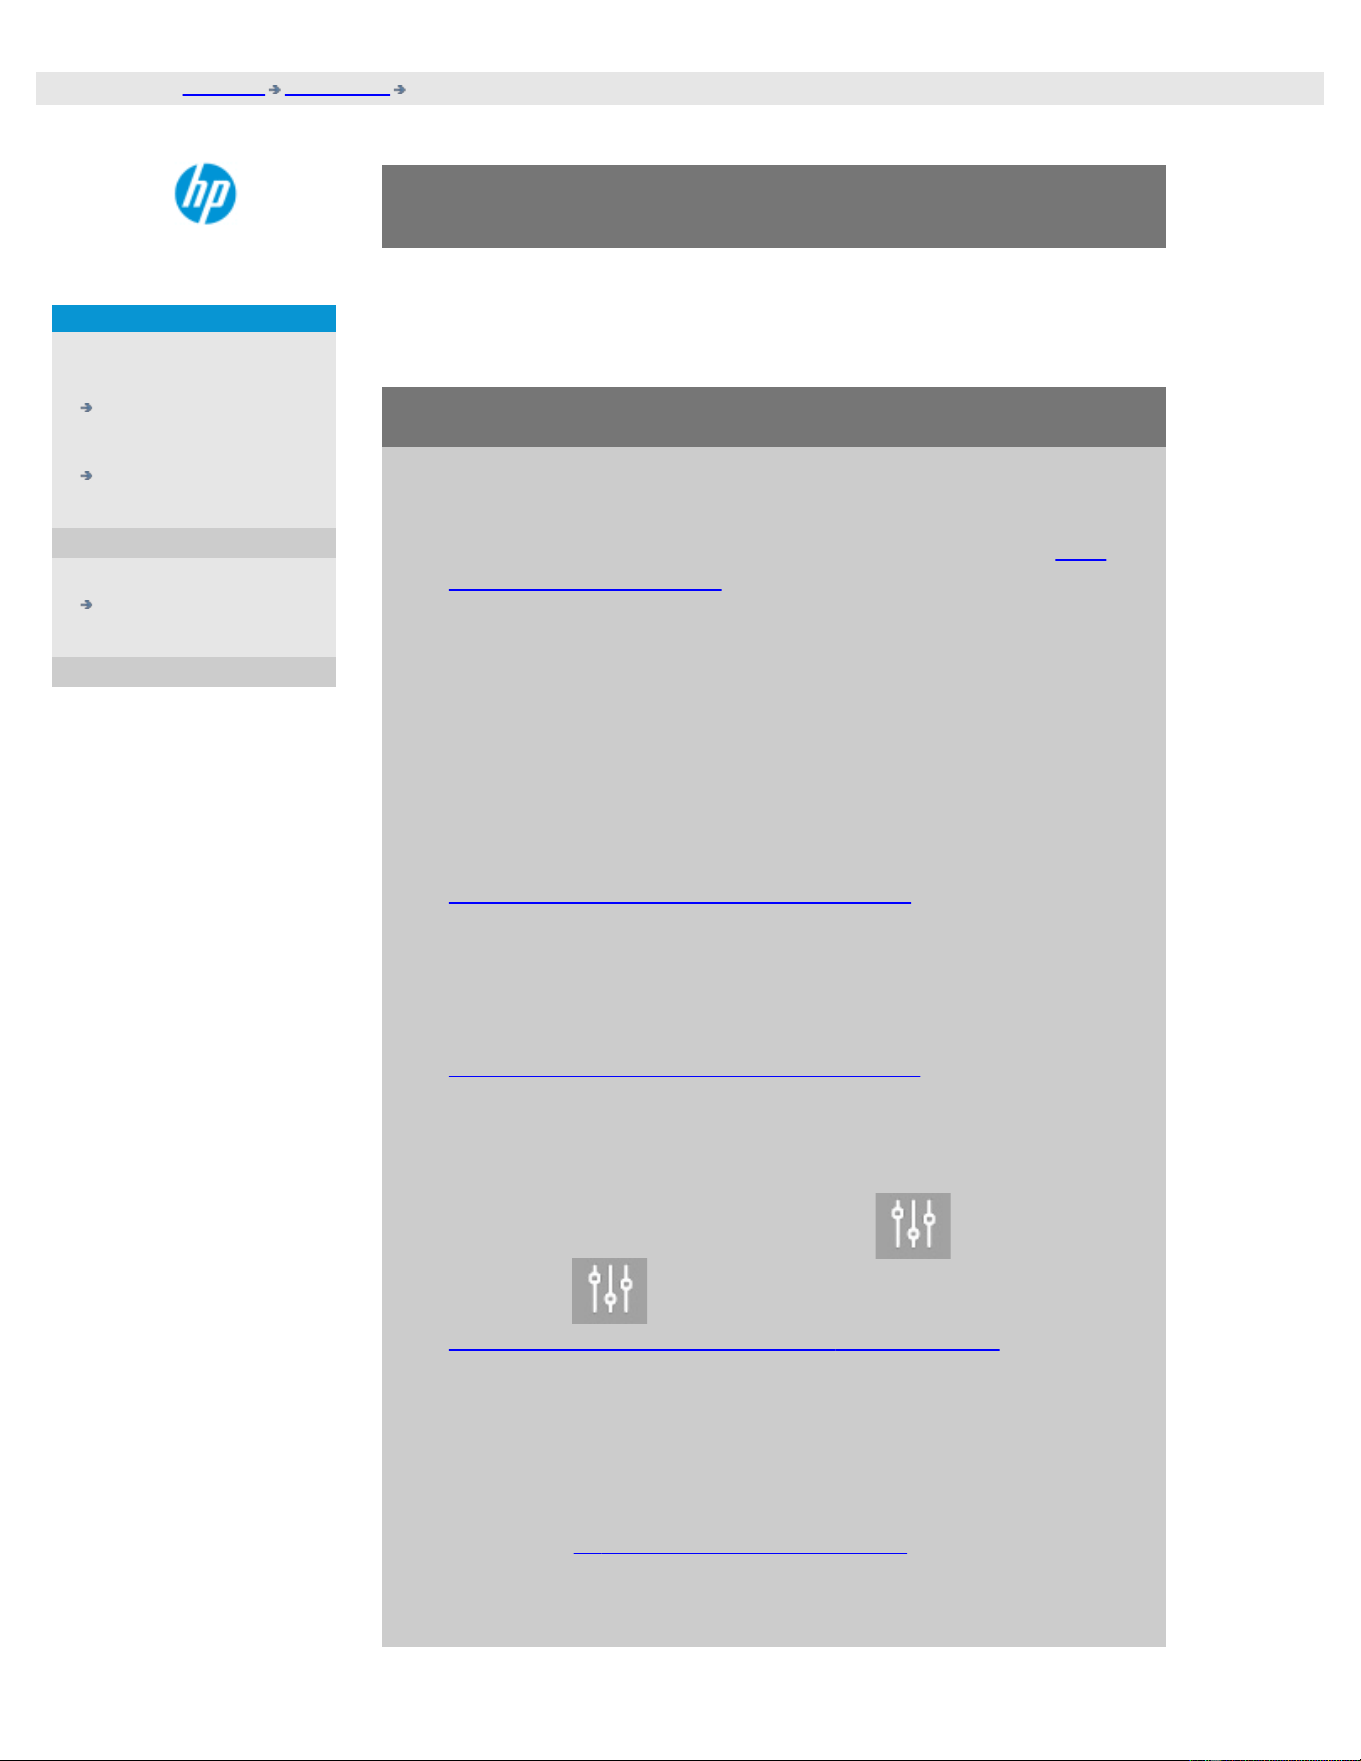
you are here: welcome how do I...? optimize color accuracy
HP Pro Scanner
how do I...?
the problem is...
alphabetical index
how do I optimize color accuracy?
Follow the guidelines below to ensure color accuracy.
guidelines..
1. Make sure your scanner's glass plate and white background
platen/white rollers are clean and you have recently performed
scanner maintenance including cleaning and calibration. View
the Calibrate Instructions.
2. Make sure your scanner has warmed up for at least one hour
before copying - apply only for the HP HD Pro Scanner.
3. Do you have a media profile for the specific media type that is in
the printer? If not, you will need to create a new media profile.
View the media profile creation instructions
.
4. Have you selected for the job the media profile that was created
for the specific media in the printer? If not you have to select it
through the Copy tab>Media Profile.
View the media profile selection instructions.
5. Are you copying an original that was printed with this system or
on another inkjet printer? If yes, than you must select the "Ink
Printer Original" option in the Copy tab> dialog or the
Print tab >
dialog.
View instructions for making output
quality settings.
6. Are you copying a color map and some of the colors in the copy
appear as gray? Make sure the "Enhance Gray" option under the
type of original template is not selected. Copy tab>Type of
original>Tool button>More>Enhance Gray
See also: ...to define an original template...

you are here: welcome the problem is... job held in queue
HP Pro Scanner
how do I...?
the problem is...
alphabetical index
the problem is that the image is not printed - job held
in queue
If your printer does not start printing the image, the job may be held
up in the print queue. With some printers you can view the printer
queue to see if that is the case. To do so, press the Print queue
button at the bottom of the screen.
There can be a number of reasons why the printer is holding the job
and not printing. Check and fix any of the causes listed below:
if your job is held in the queue
1. The printer may hold the job if the media profile selected is not
correct in relation to the media in the printer. If you find that
the media profile setting is incorrect - see: ...how do I select a
media profile.
If you find that a media profile for the printer's current media
does not exist in your system - See... how do I create a new
media profile.
2. The printer may hold the job if the output size width defined for
the job is wider than the actual media roll width loaded in the
printer. If this is the case - change the roll or the output size
width.
printing instructions legal information
© Copyright 2012, 2015 HP Development Company, L.P
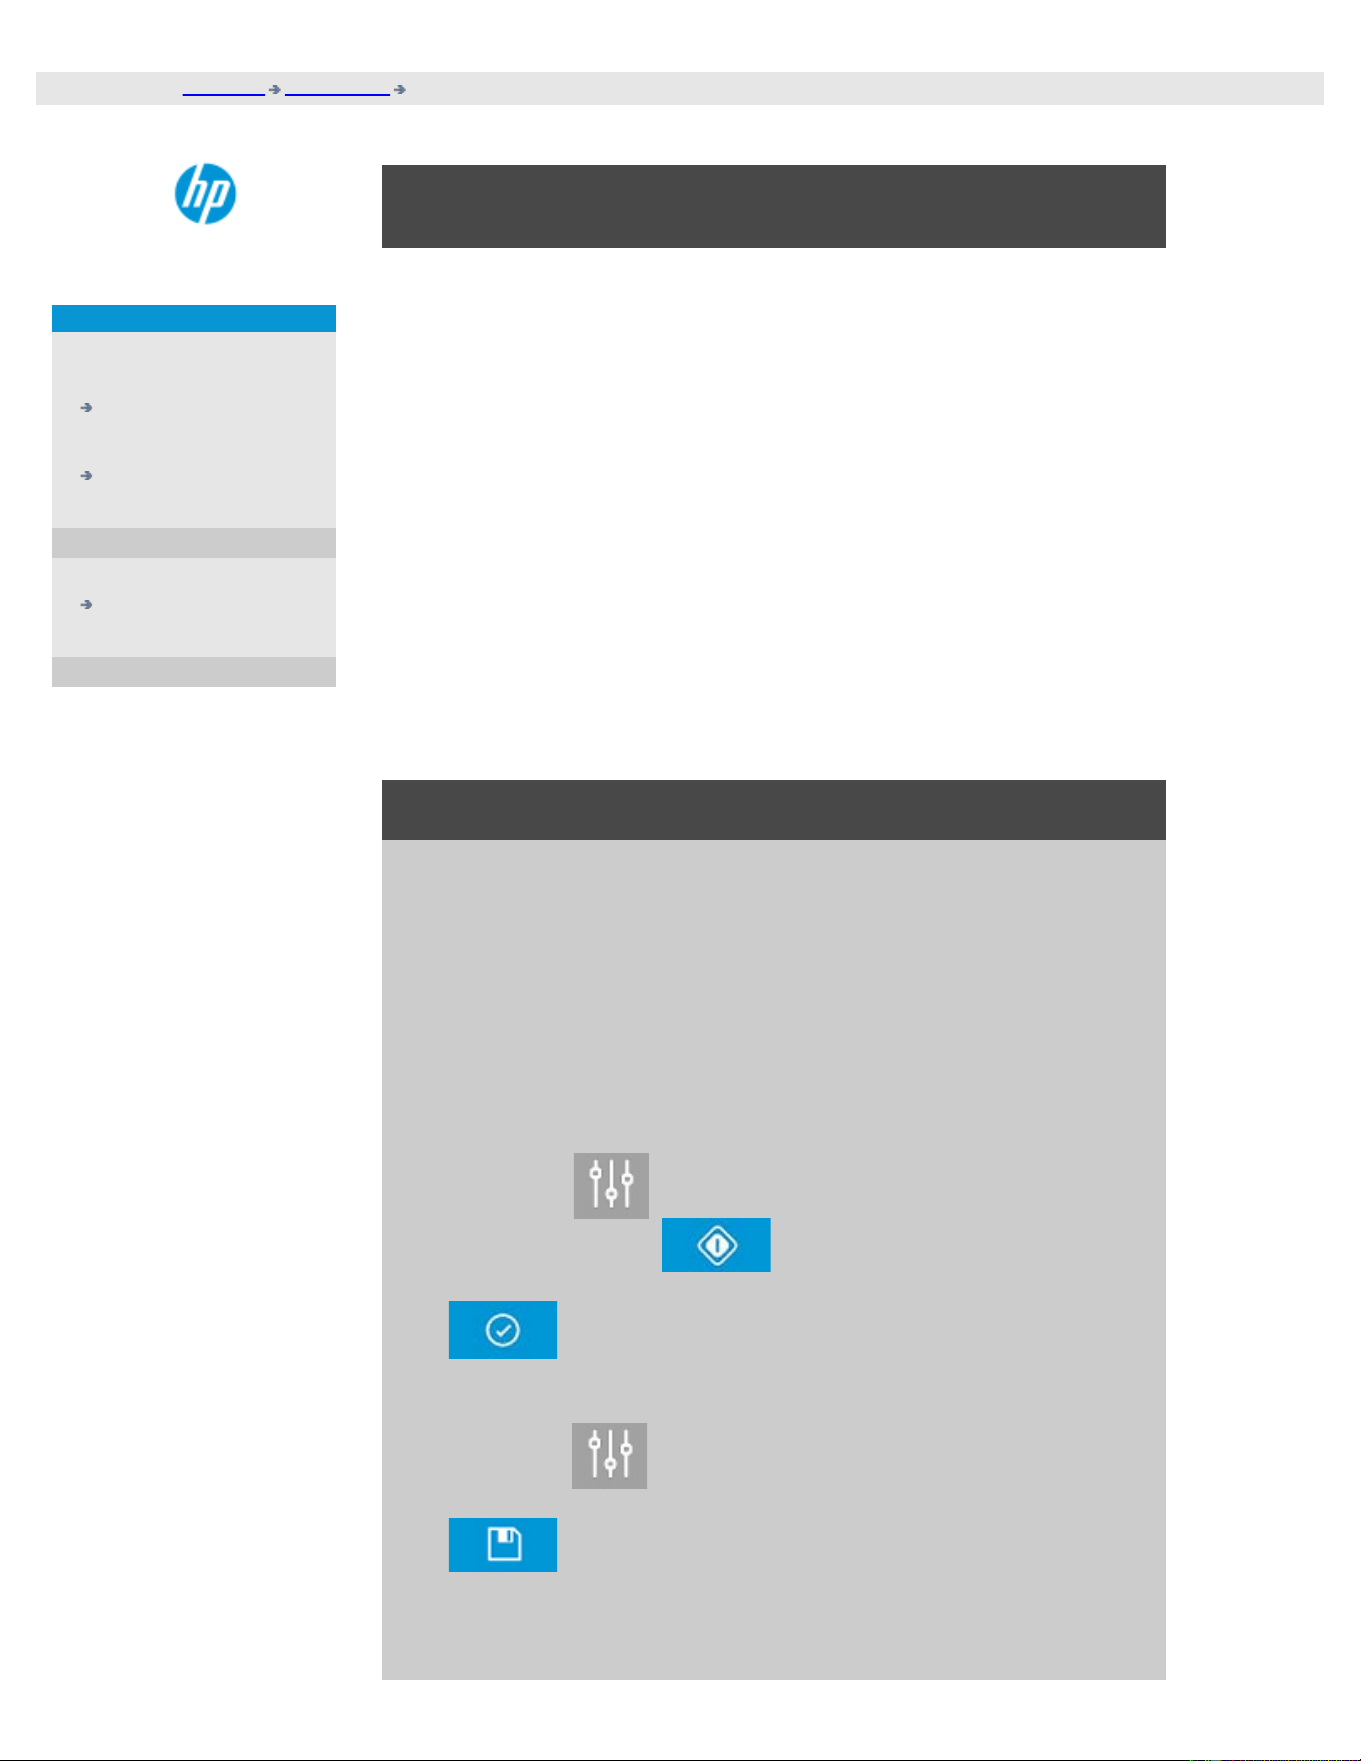
you are here: welcome how do I...? batch copying and batch scan-to-file
HP Pro Scanner
how do I...?
the problem is...
alphabetical index
how do I batch copy and batch scan to file?
Batch copying and scanning involves processing a large number of
originals in one session without readjusting parameters or repeated
clicks on the Copy or Scan button.
With batch scanning, you can stand at the scanner and just load originals
until you are finished. Batch scanning is useful with groups of
documents that require equal settings.
You can perform batch scan to printer (Copy) or batch scan to file. Batch
scanning with copying, i.e., direct scan to print is optimally used with fast
printing documents such as B&W drawings.
NOTE: For HP PageWide printers the Batch scanning feature is by default
enabled.
...how do I perform batch copying or scan-to-file
1. Prepare the originals you wished scanned with equal settings.
2. Load a representative original into the scanner.
3. Set up your parameters as with single-document scanning. For
copying this is in the Copy tab and for scan-to-file in the Scan
tab.
4. If you are copying, select:
Copy tab >
> Batch Scan and press OK. Press the copy
button when ready
NOTE: For the HP PageWide printers press the copy button
For Scan-to-file select:
Scan tab > > Batch Scan and press OK. Press the scan-
to-file button when ready.
5. The program will now run in Batch scan mode. You can feed
originals and they will be saved or printed right away.
6. You can interrupt the batch scan mode by pressing the stop
button.
This means you can feed an original without its being scanned
and saved right away. You resume Batch scanning the next
time you press the copy or scan-to-file button.
7. The scanner remains in Batch scan mode until you cancel the
Batch scan option through the settings button
TIP: You can set the scanner to eject the document on completion of
each scan and thus clear the way for feeding the next document.
Set this option through the Setup Tab > >Scanning > Eject
paper
TIP: With batch scan to file - You can use automatic file naming. You
define automatic file naming when you make your scan to file
settings in the Scan Tab – File name field. See the help topic how do I
scan to a file? for more details.
printing instructions legal information
© Copyright 2012, 2015 HP Development Company, L.P
you are here: welcome how do I...? automatically align the image
HP Pro Scanner
how do I...?
the problem is...
alphabetical index
how do I automatically align the image?
For best scanning results, the paper should be correctly orientated
during insertion into the scanner so that it feeds on a straight path.
However, slight deviations can occur when inserting large documents.
These can be fixed electronically during scanning with the Auto
Alignment option selected.
With Auto alignment selected, the application aligns the image during
scanning based on features in the original image.
Auto Alignment can be applied with both Copying (from the Copy tab)
and with Scan-to-file (from the Scan tab).
...how do auto align with copying or with scan-to-file
1. Insert the original into the scanner as evenly as possible.
2. Make all your settings for the job in the Copy tab or the Scan
tab.
3. If you are copying, select:
Copy tab >
> Auto align and press OK. Then press the
copy button when ready.
For Scan-to-file select:
Scan tab > > Auto align and press OK. Then press the
scan-to-file button when ready.
Disable the alignment option
The alignment will be reset when the "Auto align" is un-selected.
The alignment angle (both auto and manual) will be set to zero (no
alignment).
printing instructions legal information
© Copyright 2012, 2015 HP Development Company, L.P
you are here: welcome how do I...? mirror the image
HP Pro Scanner
how do I...?
the problem is...
alphabetical index
how do I mirror the image?
By selecting the Mirror option before pressing the copy or scan button,
you can Mirror the image during scanning.
You can apply the Mirror option with both Copying (from the Copy tab)
and with Scan-to-file (from the Scan tab).
...how do I mirror the image with copying and with scan-to-file
1. Insert the original into the scanner.
2. Make all your settings for the job in the Copy tab or the Scan
tab.
3. If you are copying, select:
Copy tab >
> Mirror and press OK. Then press the copy
button when ready.
For Scan-to-file select:
Scan tab > > Mirror and press OK. Then press the scan-
to-file button when ready.
printing instructions legal information
© Copyright 2012, 2015 HP Development Company, L.P
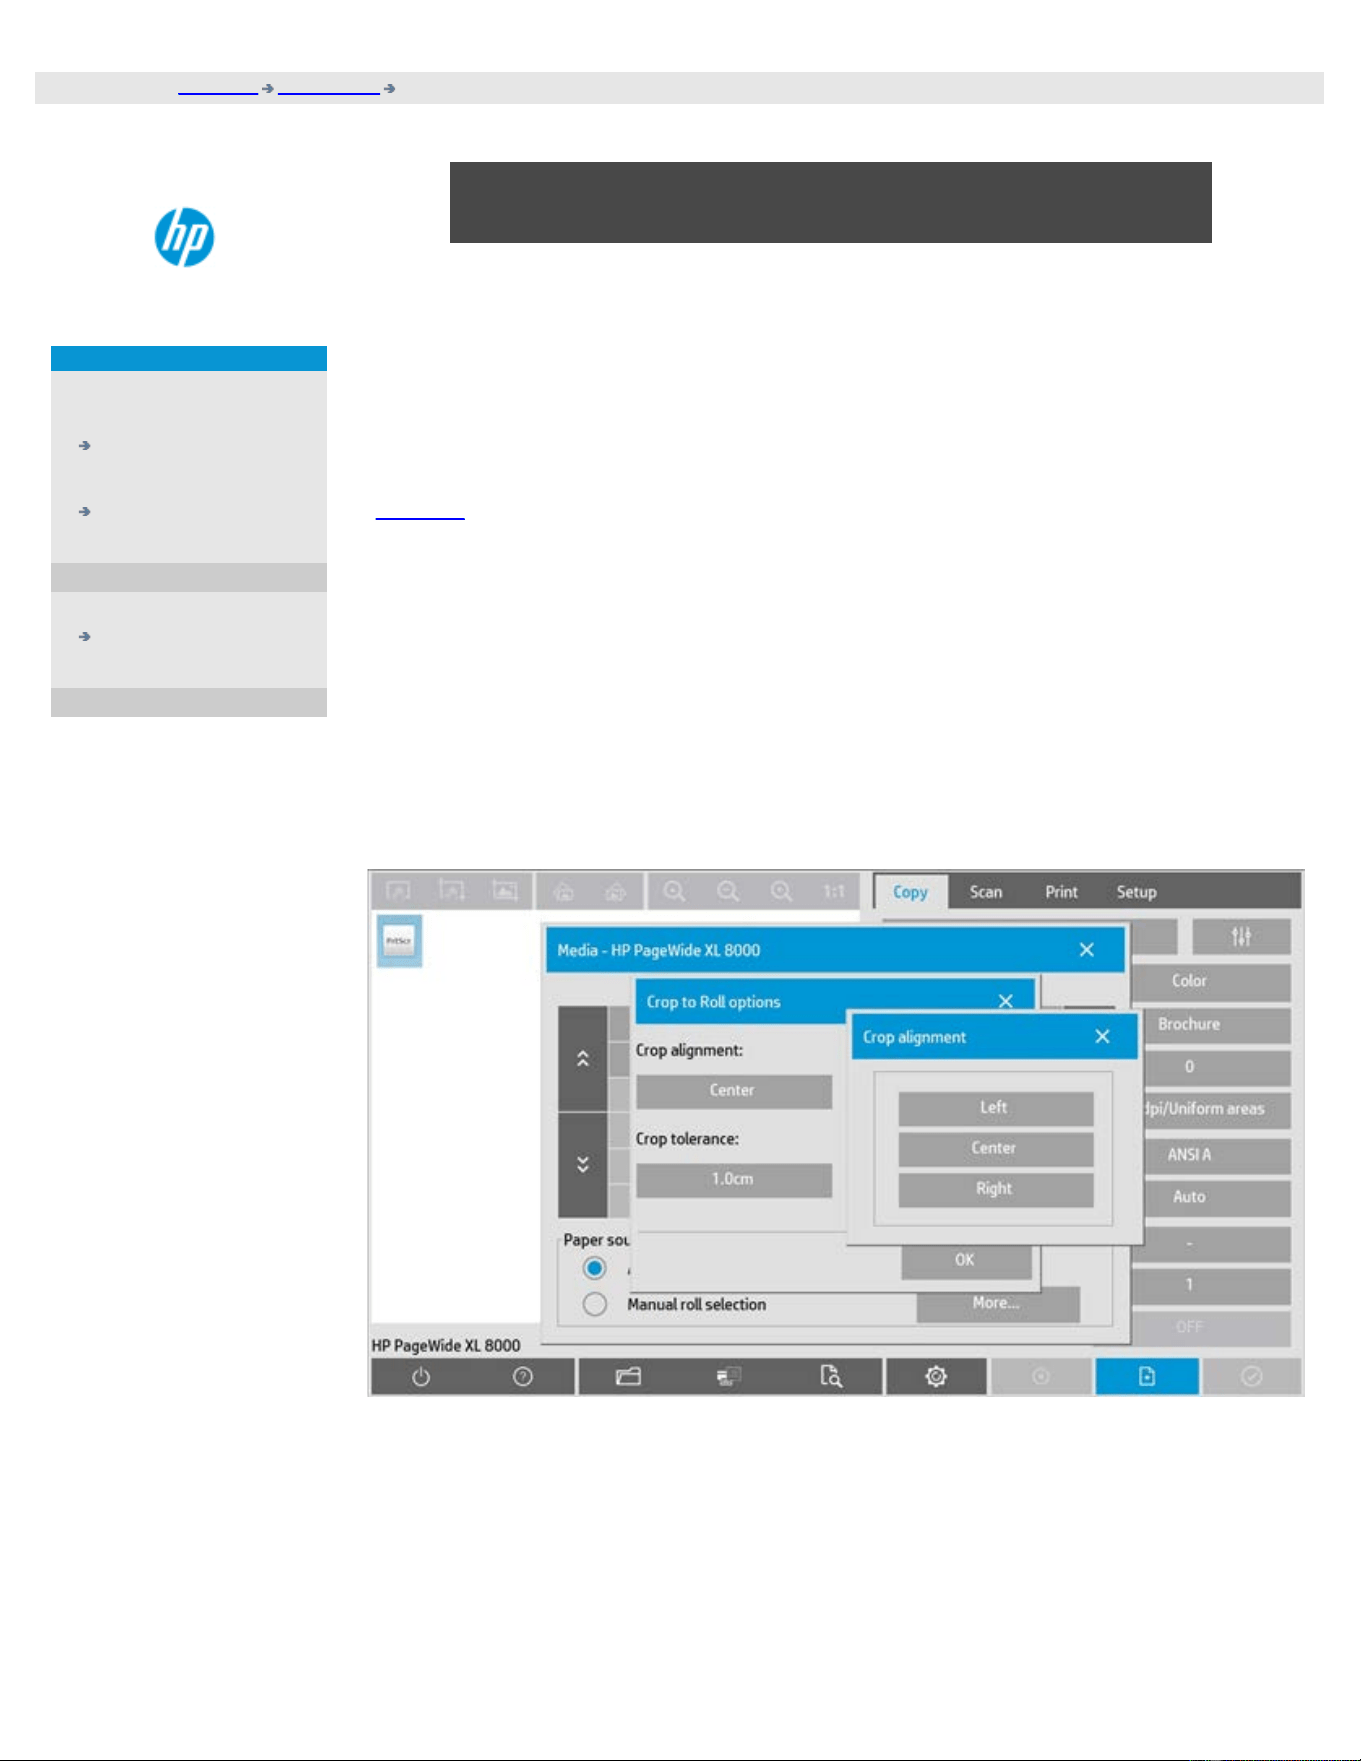
you are here: welcome how do I...? Set Output Margins
HP Pro Scanner
how do I...?
the problem is...
alphabetical index
how do I set the output margins?
You can set regular "Margins" and additional "Outer margins".
For both types you can define values for top, bottom, left, right.
NOTE: Margins are irrelevant for scan-to-file jobs. All margin values will automatically be
set to zero when working from the Scan tab.
"Margins
" are created within the selected scan area and thus replace edges of the image
itself with white border of the breadth defined by the "Margins" values. ("cropping" the
image).
The "Margins" values are deducted from the set Output size and thus the intended final
copy size is retained.
When Auto (save paper) in “Paper type” is selected, it is possible to enable the “Crop to
roll” feature which allows to crop the input image width to the destination roller width
within the given tolerance.
Image cropping for this feature can be performed Left, Center and Right Justified and the
tolerance within which the system has to carry out the cropping. Outside the tolerance
the image will not be cropped.
With scaling, the actual margin values are applied to the printed result while the margin's
cropping effect (breadth of cropping edges) on the scan area is adjusted according to the
relation between the input size and output size (scaling value).
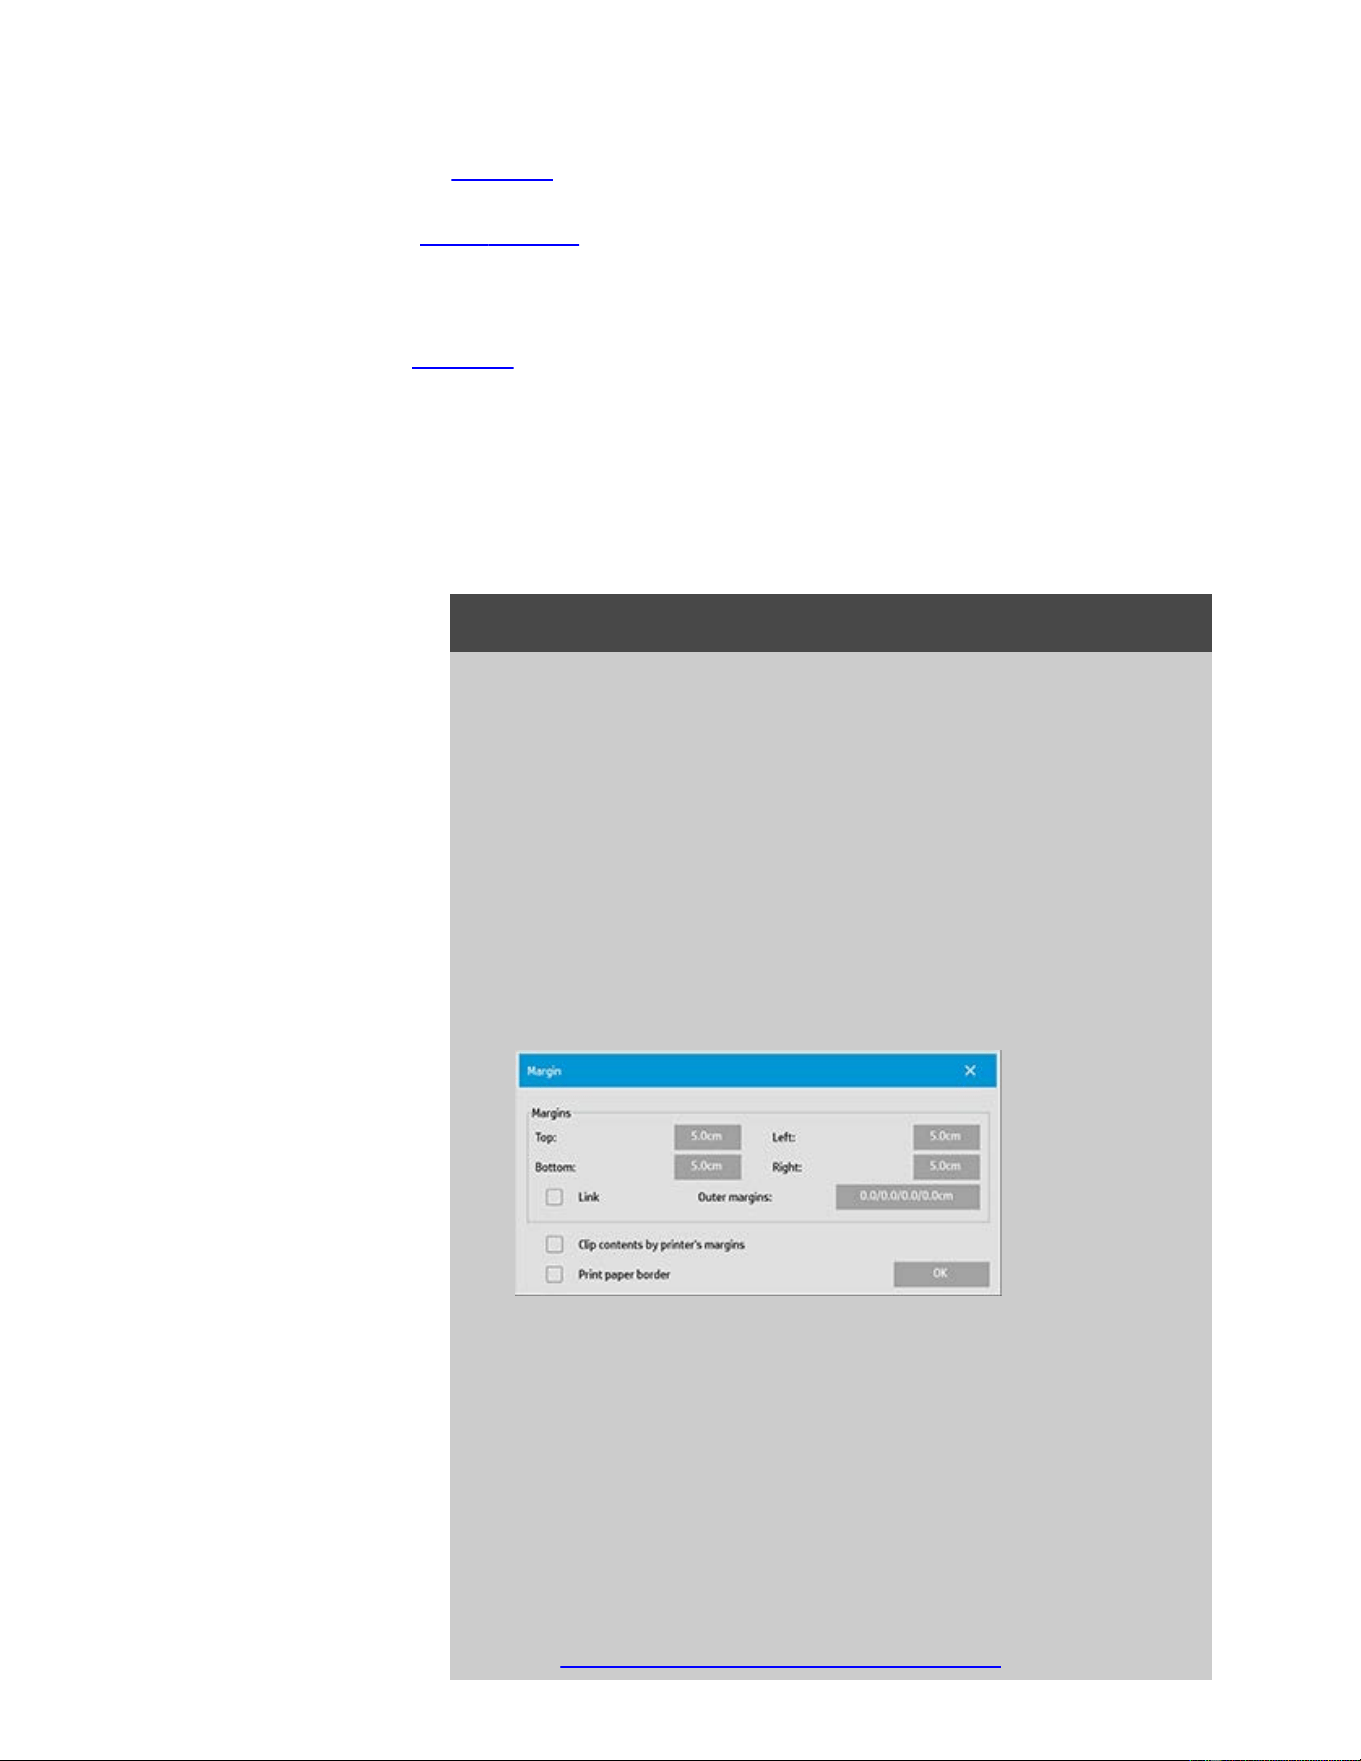
Without scaling (1:1 copying), the actual margin values are applied to the printed result
and are equal to the breadth of the edges that crop the scan area.
See the examples
for clarification.
The "Outer
margins" option lets you add additional margins to the scan area, thus adding
white border to the edges of the copy while leaving the scan area intact. The final copy
size is thus extended in relation to the set output size.
The examples
describe actual cases when applying margins and outer margins.
You can use "Margins" together with "Outer margins" to crop off unwanted edges. You can
also crop off existing low quality (discolored, unsharp) margins and add new or additional
white margins to the end result.
...how do I set margins?
"Margins" are for applying white border to the edges of the copy. The
Margins replace edges of the image itself (scan area) with white
border.
1. Select the Setup tab.
2. In the Setup dialog, press the Margins button. The Margins
dialog is displayed:
3. Set the Top, Bottom, Left and Right margins in the Margins
dialog.
4. Use the "Link" option if you want equal margins all around the
image. With the Link option checked, you only have to enter the
margin value in one of the four fields.
5. Most printers cannot start printing at the very edges of the
paper and thus enforce a margin on your output. You can
choose to account for this enforced margin by enabling the
"Clip contents by printer's margins" option. Read more about
the "Clip contents by printer's
margins" option.
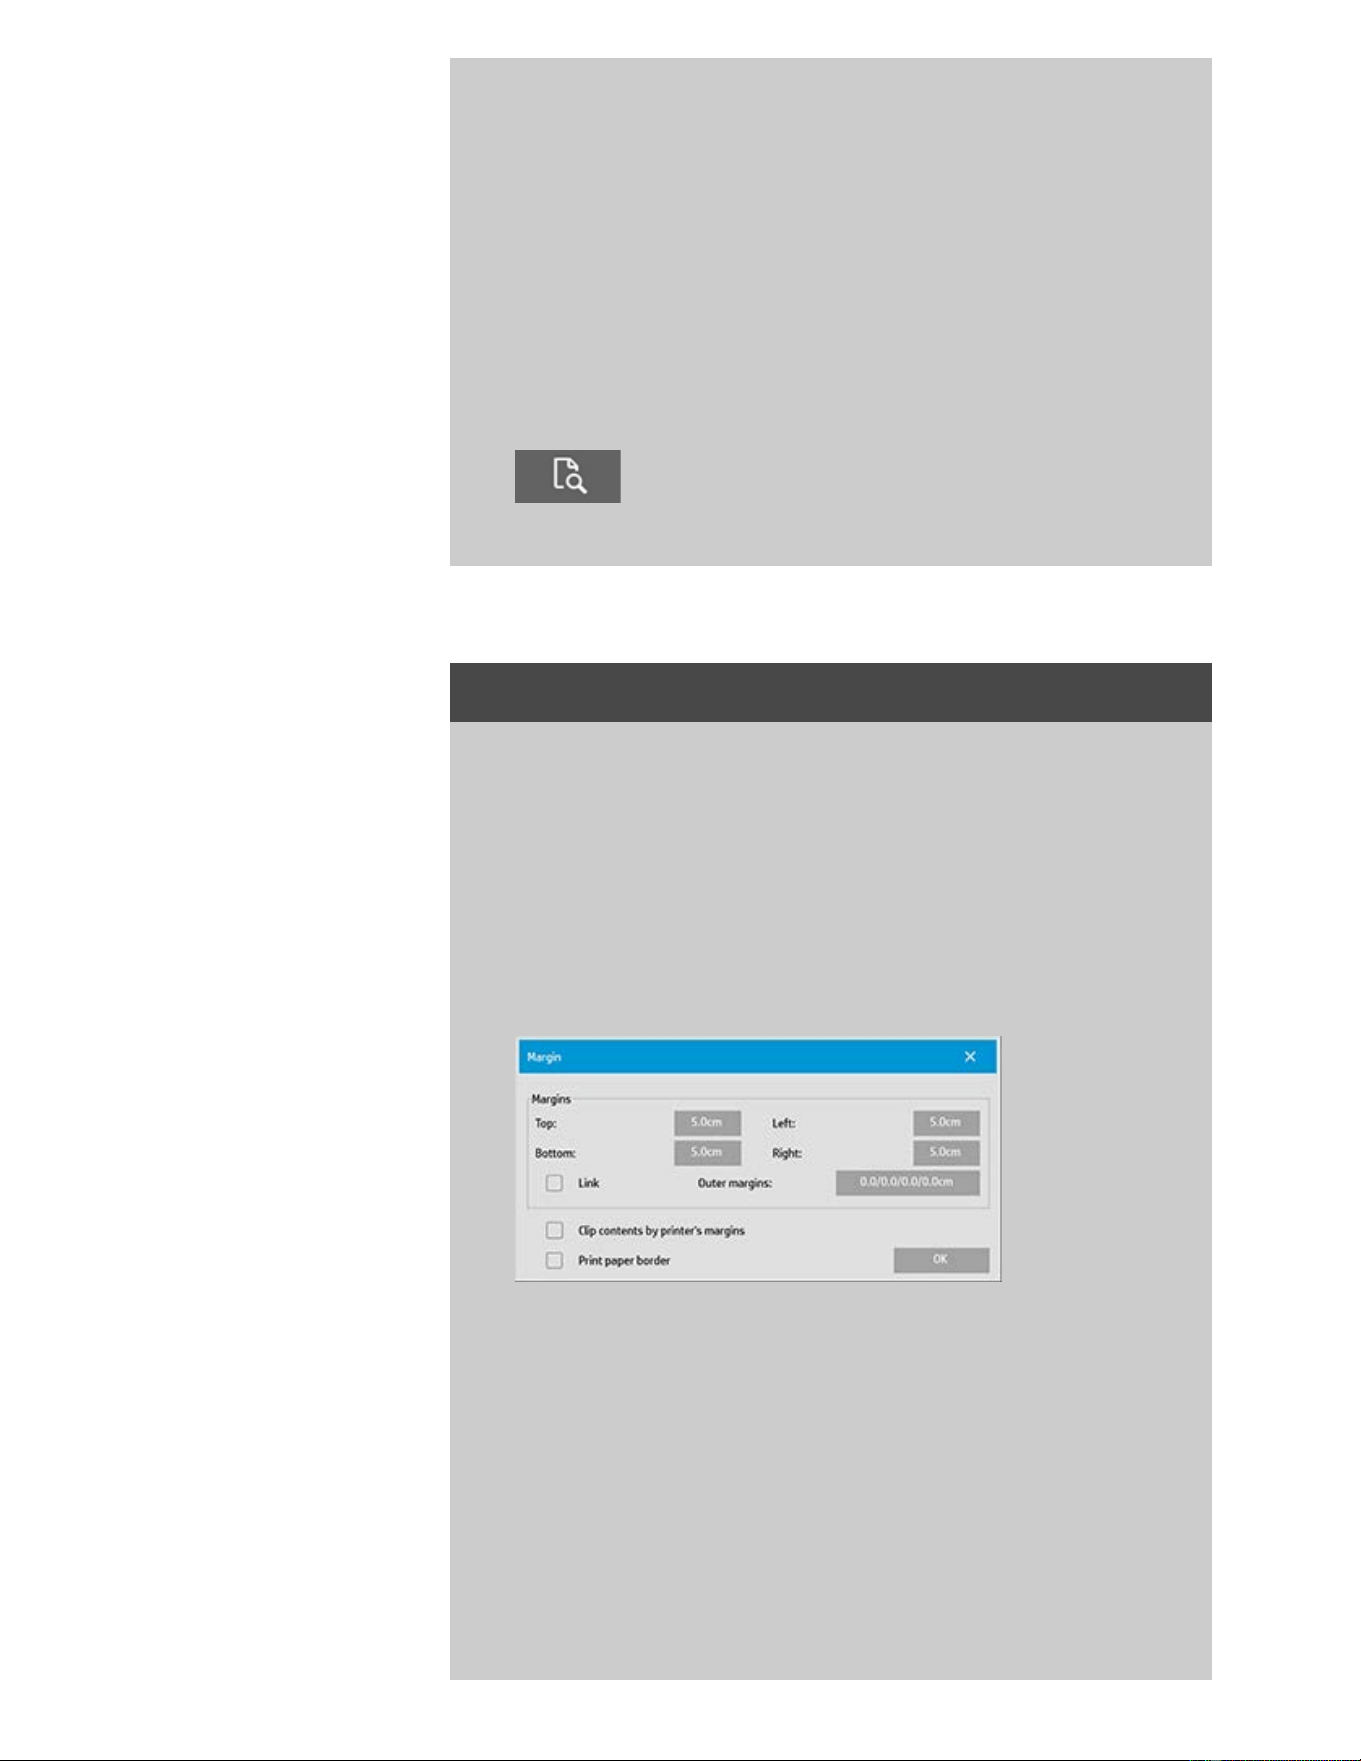
6. Check the Print Paper Border option to get a thin black line
around the output size boundaries. With wide format printing
on large printer rolls, this option will give you a clear cutting
line so you end with precisely the output size you defined.
7. The breadth of the Paper Frame displayed in the Preview
Window will reflect your margin settings in relation to the
Output size while also accounting for the Input size (scan area)
so you can see precisely how they will crop the input image.
Press the Preview button to load a preview with visible Margins
defined by your settings. If you set Margins to zero, then a thin
frame will still outline your current capture area in the Preview
Window.
...how do I use Outer margins?
"Outer Margins" are for adding white border to the edges of the copy
while leaving the scan area intact.
1. Select the Setup tab.
2. In the Setup dialog, press the Margins button. The Margins
dialog is displayed:
3. Press the Outer Margins button.
4. Set the Top, Bottom, Left and Right margins in the Outer Margin
dialog.
5. Use the "Link" option if you want equal Outer margins all around
the image. With the Link option checked, you only have to enter
the Outer margin value in one of the four fields.
6. Most printers cannot start printing at the very edges of the
paper and thus enforce a margin on your output. You can
choose to account for this enforced margin by enabling the

Margin dialog's "Clip contents by printer's margins" option.
Read more about the "Clip contents
by printer's margins"
option.
7. Check the Print Paper Border option to get a thin black line
around the new output size boundaries. With wide format
printing on large printer rolls, this option will give you a clear
cutting line so you end with precisely the output size you
defined.
...Examples of using Margins and Outer Margins
Example1:
The Input size is: 10x10".
The Output size is 10x10" (no scaling)
Margins are set at: 1" at all edges.
Outer Margins are set at 0" at all edges.
Result: Total size 10x10", Scanned area 8x8", 1" white border at all
edges.
Explanation: The margin of 1" is deducted from the scan area at all
edges (all around) creating the 8x8" scan area. The total size is equal
to the output size (and input size as there is no scaling) because
white space border through the "Margins" setting is deducted from
the output size and none is added on.
Example2:
The Input size is: 10x10".
The Output size is 10x10" (no scaling)
Margins are set at: 0" at all edges.
Outer Margins are set at 1" at all edges.
Result: Total size 12x12", Scanned area 10x10", 1" white border at
all edges.
Explanation: Margin is set to 0" so nothing is is deducted from the
scan area and the 10x10" scan area remains intact. The total size is
12x12" because the Outer margin is set to 1" and thus 1" of white
space border is added to the output size at all edges (all around).
Example3:
The Input size is: 10x10".
The Output size is 10x10" (no scaling)
Margins are set at 1" at all edges.
Outer Margins are set at 1" at all edges.
Result: Total size 12x12", Scanned area 8x8", 2" white border at all
edges.
Explanation: The margin of 1" is deducted from the scan area at all
edges creating the 8x8" scan area. The outer margin of 1" is added
to this white space giving a total of 2" white border. The added
"Outer margin" (and only the outer margin) of 1" expands the total

output size by 1" around all the edges totaling to the 12x12" output
result.
Example4:
The Input size is: 10x10".
The Output size is 20x20" (2 x scaling)
Margins are set at 1" at all edges.
Outer Margins are set at 1" at all edges.
Result: Total size 22x22", Scanned area 9x9", 2" white border at all
edges.
Explanation: Example 4 shows margin value application on the scan
area (input) with scaling, i.e., when the output size is larger than the
input size. As with the previous examples, the margin's value of 1" is
still deducted from the output size and this 1" white space plus 1"
outer margin will be output on the printer totaling to a 2" wide white
border. However, because of scaling, the 1" margin that should be
taken within the scan area during input is automatically reduced
relatively (in this case by half since its a 1:2 relation) so that only 1/2"
is deducted from the scan area at all edges during input. In this way,
cropping of the scan area is logically adjusted to fit the Margin that
was defined for the enlarged end result and match normal
intentions.
printing instructions legal information
© Copyright 2012, 2015 HP Development Company, L.P
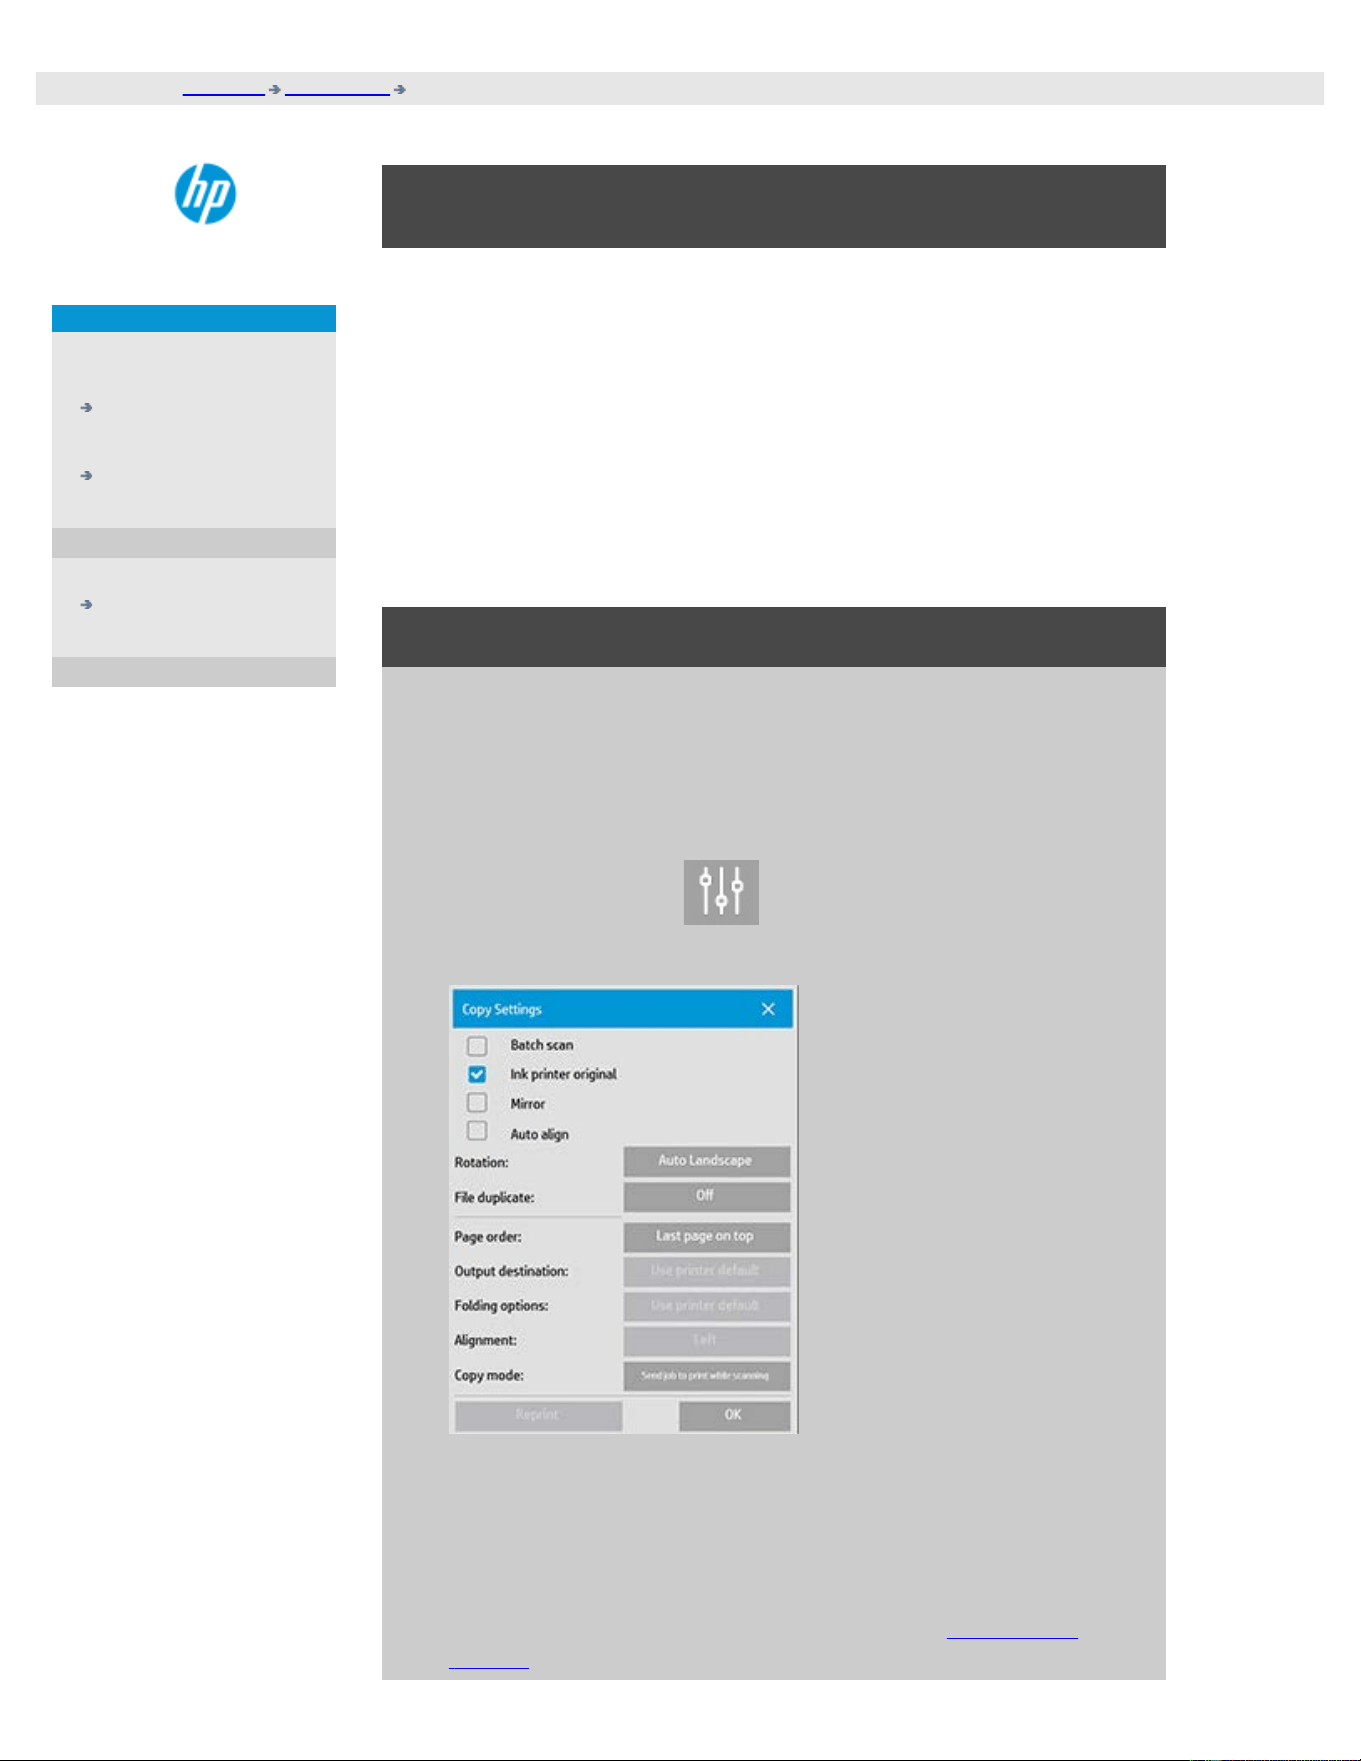
you are here: welcome how do I...? Set Auto Landscape
HP Pro Scanner
how do I...?
the problem is...
alphabetical index
how do I input in portrait and output in landscape?
The "Auto Landscape" option is useful when you want your copy output
in landscape but inputting the original in landscape with the scanner is
not possible because the scanner is too narrow and you can only insert
the original with portrait (short edge forward) orientation.
NOTE: The process of rotating the image is time and resource
consuming. Therefore, use this option only when you cannot insert the
original in landscape.
...how do I set Auto Landscape?
1. Select the Copy tab.
2. In the Copy tab, press
and the following dialog is
displayed:
3. Press the Rotation button and select "Auto Landscape"
Press OK to save and exit
4. When Auto landscape is active it rotates the output 90 degrees.
This happens only when copying originals that are longer than
max scan width, but shorter than the printer's media width
setting. I.e. if you have a printer that prints wider than your
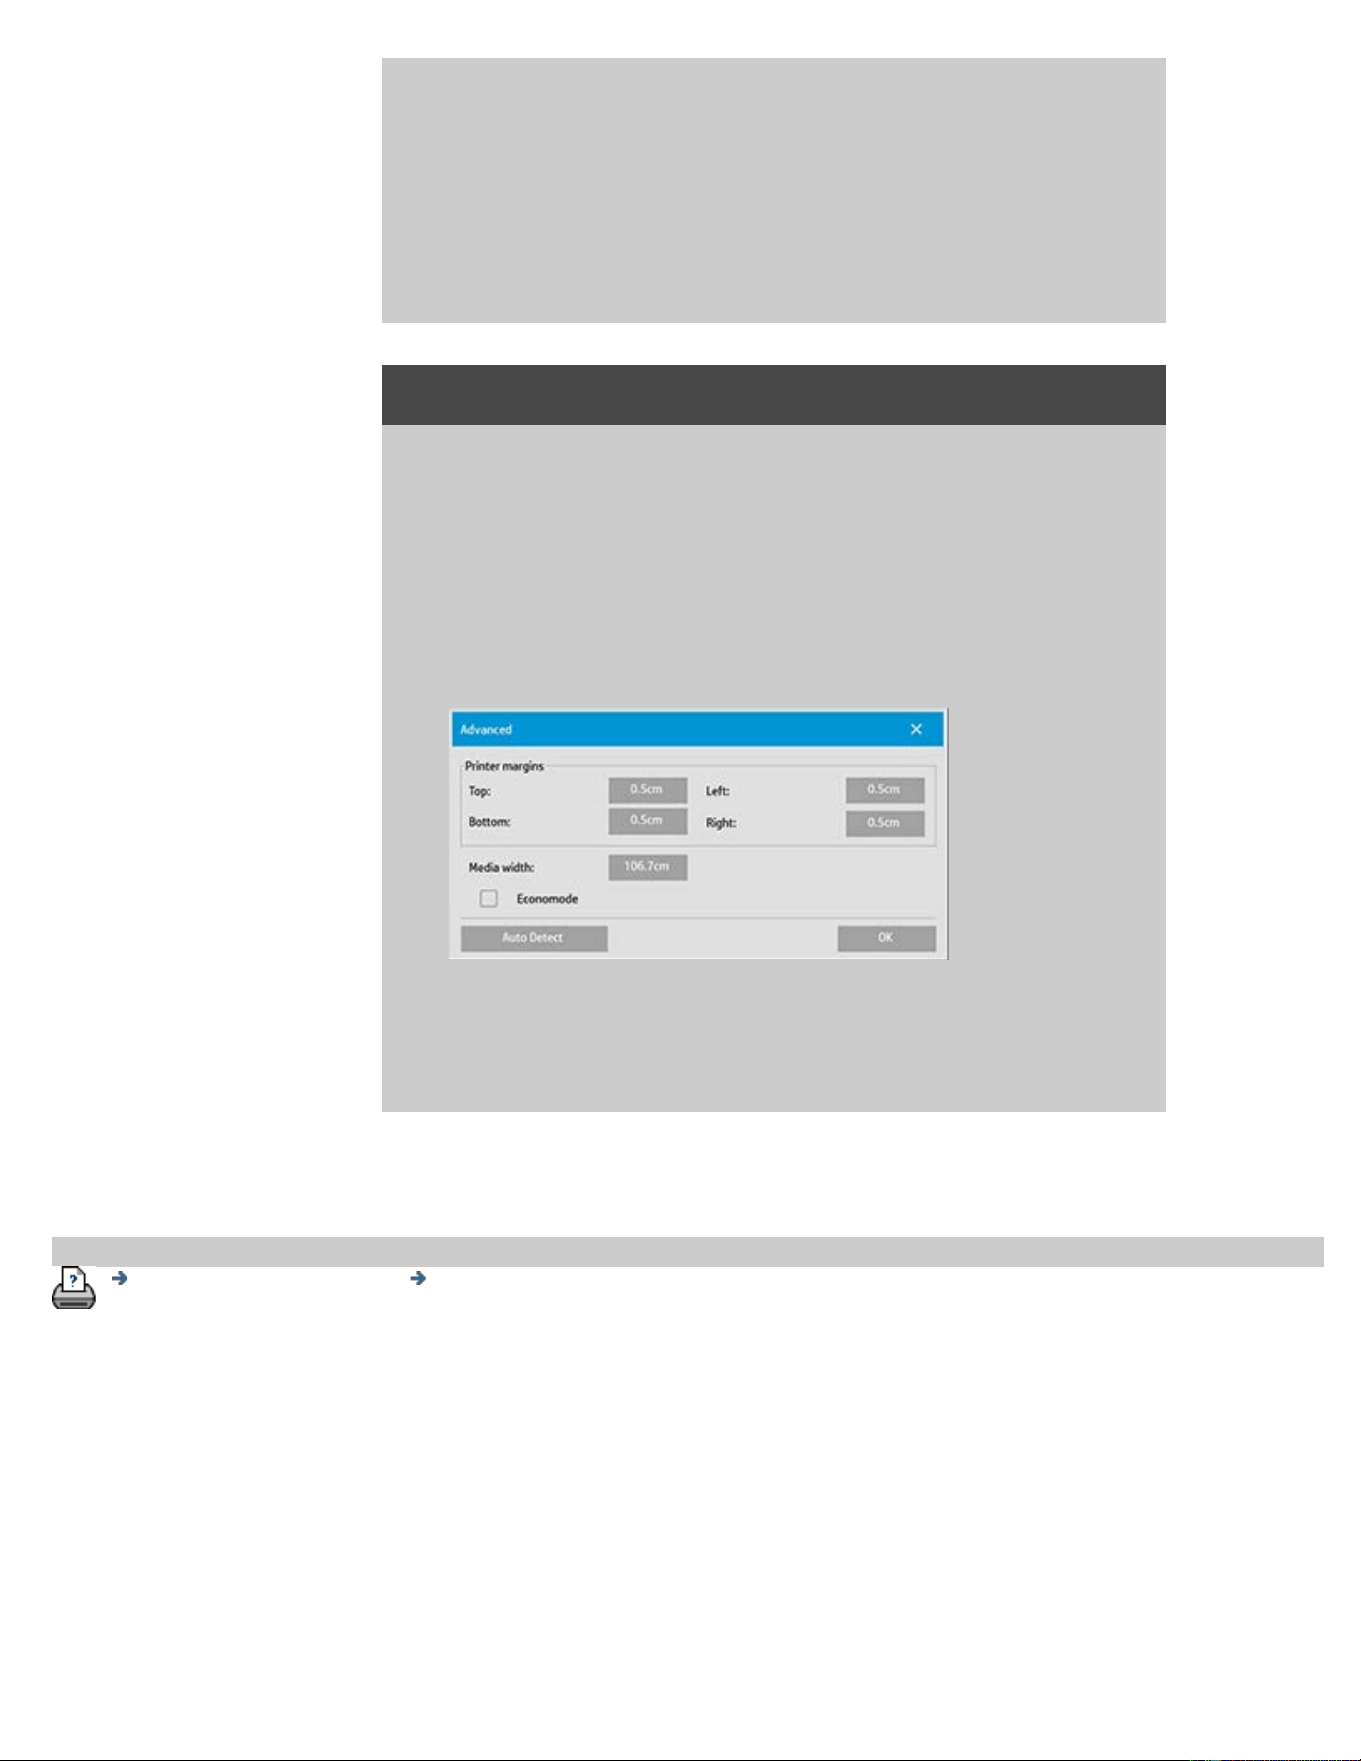
scanner can scan, you can still use the full print width when this
setting is enabled.
5. The setting has no effect in situations where the printer (media
width) is equal or narrower than the scanner. In these
situations the user can manually control copy orientation when
loading the scanner as printer output orientation will equal
loading orientation.
...how do I set printer margins?
1. Select the Setup tab.
2. In the Setup tab, press the Printer button, the Tool button and
then the Advanced button. The following dialog is displayed:
3. Select and set the margins for the printer.
Press OK to save and exit
printing instructions legal information
© Copyright 2012, 2015 HP Development Company, L.P
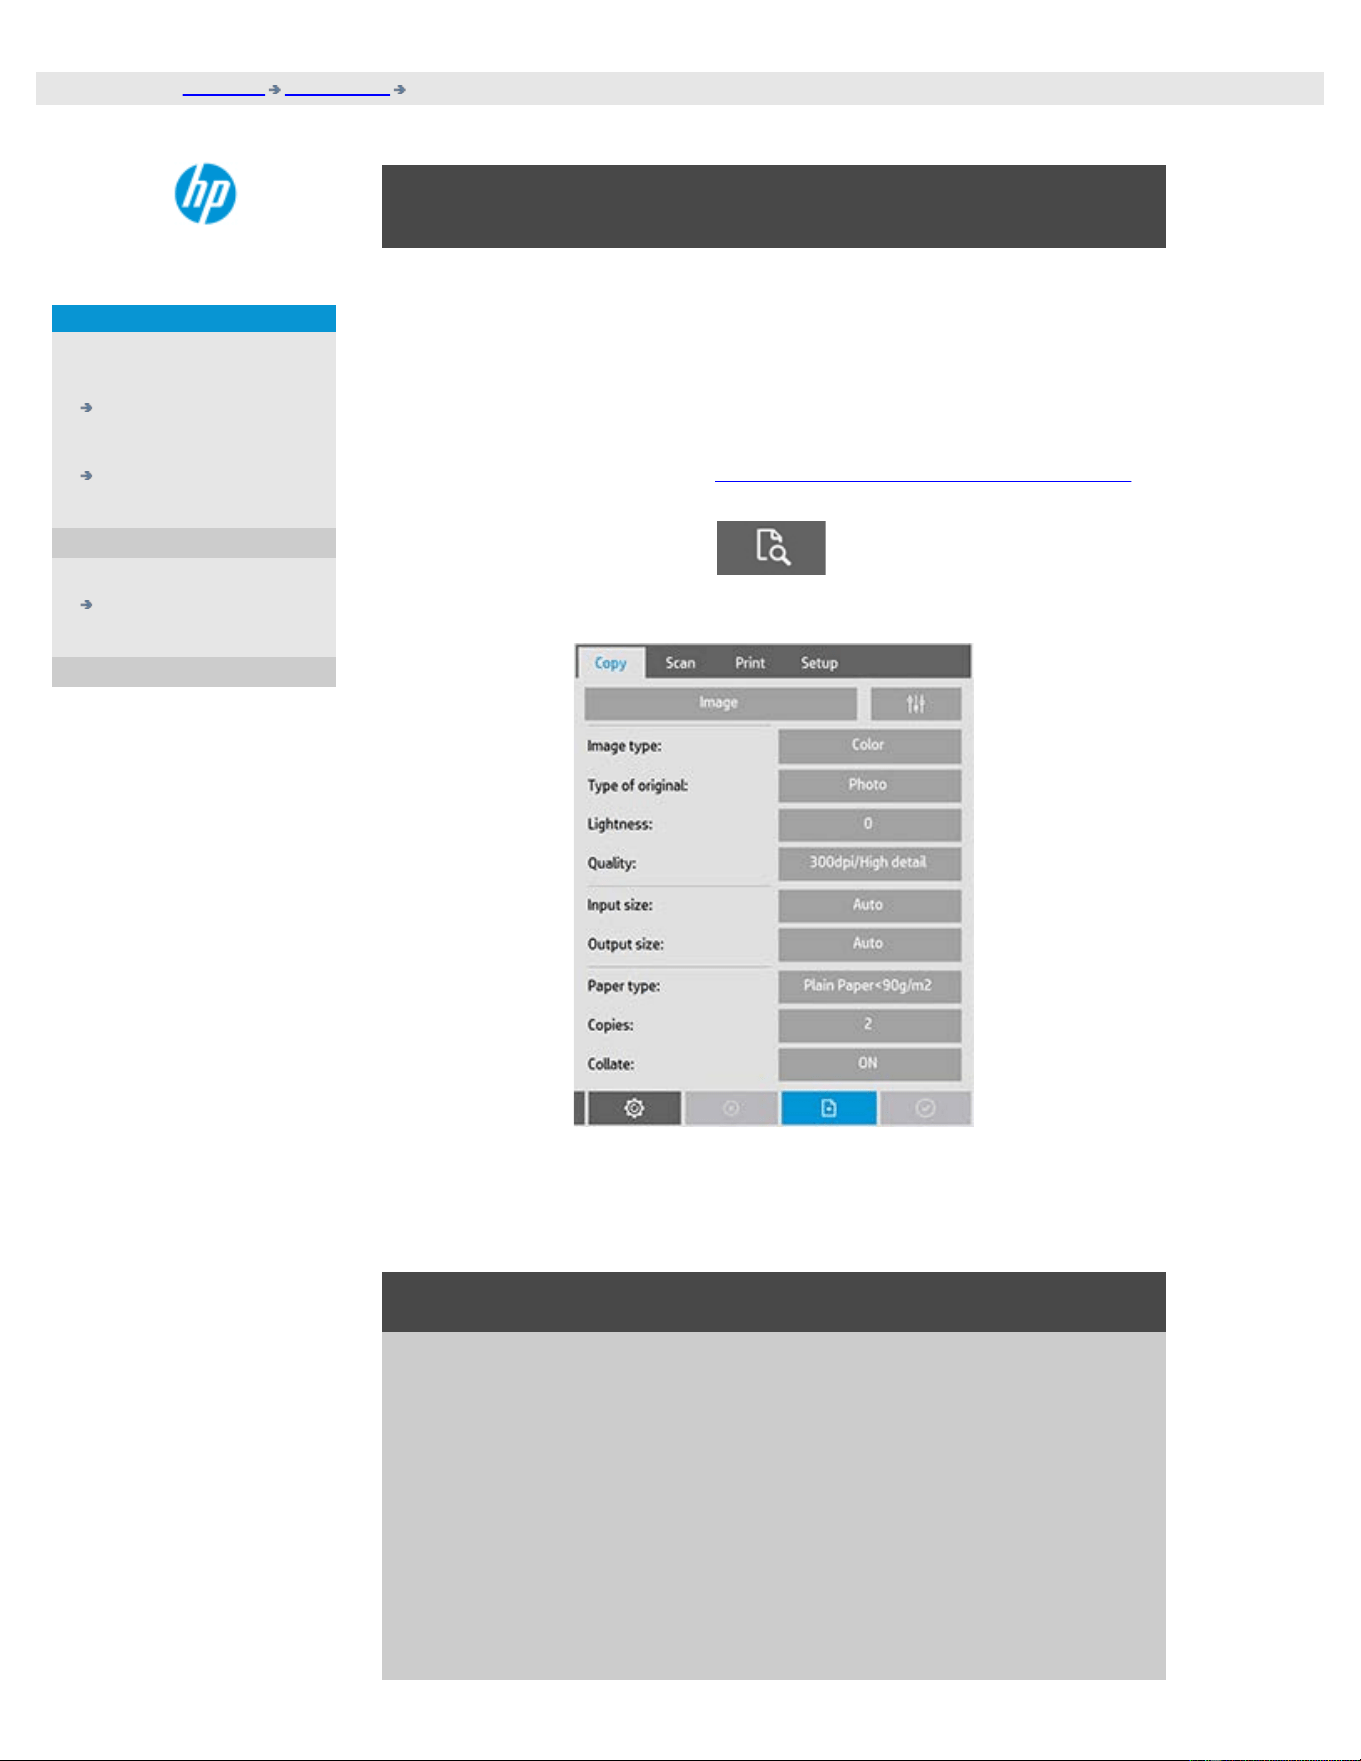
you are here: welcome how do I...? collate copies
HP Pro Scanner
how do I...?
the problem is...
alphabetical index
how do I collate copies?
The Collate function allows you to group your copies into sets, and then
output a selected number of these sets on your printer. All the
previewing and enhancement options available for single document
copying are also available when using Collate.
For the HP PageWide printer models the collate functionallity will work
differently. See how to create collated sets for HP PageWide printers.
NOTE: The previewing options will not be available if Batch
scan is enabled.
NOTE: The Collate option will only be possible if the number of sets
(Copies) are more than one.
to collate copy - create copy sets
1. Insert the first document of your set into the scanner.
2. Press the Copy tab.
3. Make your copy settings in the Copy tab dialog.
If you wish, you can press the Preview button and make on-
screen adjustments and tests.
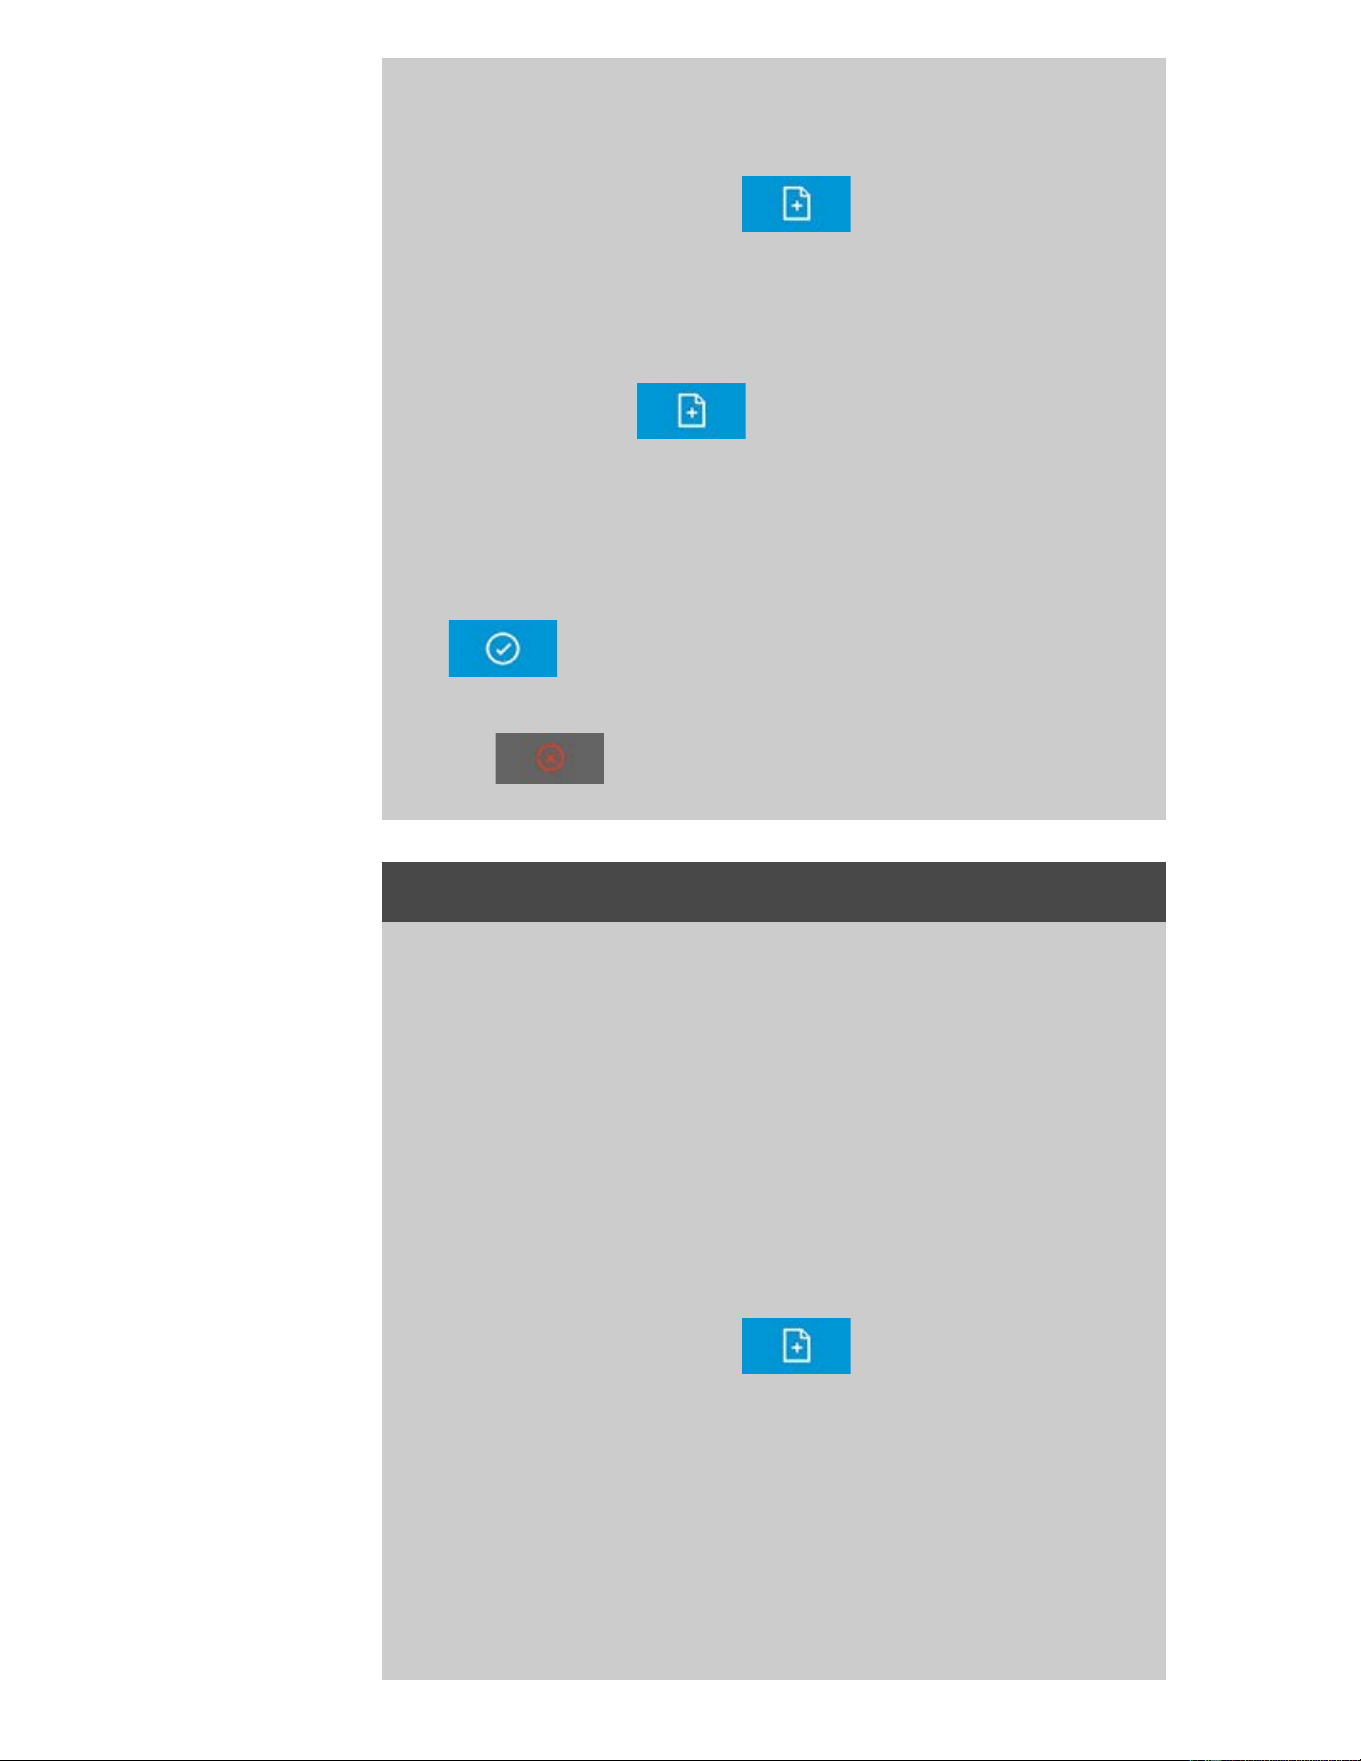
4. Set the number of sets by pressing the Copies button.
The number of copies indicates how many sets, each
containing all the input originals, will be output on your printer.
5. Press the add page button.
The original will then be input (captured) as with single-sheet
copying, but it will be put on standby inside your system
instead of going to the printer.
6. Continue inserting originals that belong to the set and press the
add page button for each one until all the originals
that are part of the set have been scanned.
You can adjust each copy in the set just as you can with single
document copying.
7. Press the Finish button to activate the whole copy job.
You can cancel the Collate session at any time by pressing the cancel
button.
to create collated sets on HP PageWide printers
1. Insert the first document of your set into the scanner.
2. Press the Copy tab.
3. Make your copy settings in the Copy tab dialog.
4. Set the number of sets by pressing the Copies button.
The number of copies indicates how many sets, each
containing all the input originals, will be output on your printer.
5. Press the add page button.
The original will then be input (captured) as with single-sheet
copying, but it will be put on standby inside your system until
the next original is scanned and then it will be send to the
printer.
6. Continue inserting originals that belong to the set until all the
originals that are part of the set have been scanned.
You can adjust each page in the set just as you can with single
document copying.

NOTE: Batch scan is enabled by default for the HP PageWide
printers.
7. Press the Finish button to activate the whole copy job.
You can cancel the Collate session at any time by pressing the cancel
button.
Pressing cancel will give you an option to delete last page added or
to delete the entire Multipage session.
printing instructions legal information
© Copyright 2012, 2015 HP Development Company, L.P
you are here: welcome how do I...? manage image files on my system
HP Pro Scanner
how do I...?
the problem is...
alphabetical index
how do I manage image files on my system?
Your system's harddisk can at any time contain image files that you will
need to access and manage.
The source of these files can be:
- image files saved on the system through the Scan tab.
- image files imported from or on another computer on the network
- image files saved on an an external drive (USB)
Actions you may wish to perform on these files can be:
- Add to List: Add files to the print list from the Print Tab. NOTE that
Move/Delete/Rename of files through the file management dialog will
not remove them in the print list and will make them unprintable.
- Delete files from your harddisk/system or accessible locations.
- Copy or move files between folders on the system.
- Rename files or create new folders.
All these actions take place through the File Management dialog.
The following files types can be accessed in the File Management dialog:
- Jpeg, Jpeg 2000, Tiff, Cal, PDF*.
* see notes under "to browse, preview and select files..." and under "to
add files to the print tab's print list"
to open the file management dialog
There are two ways to reach the file management dialog:
1. Press the Folder button at the bottom of the screen.
2. Press the Add to List button in the Print Tab dialog.
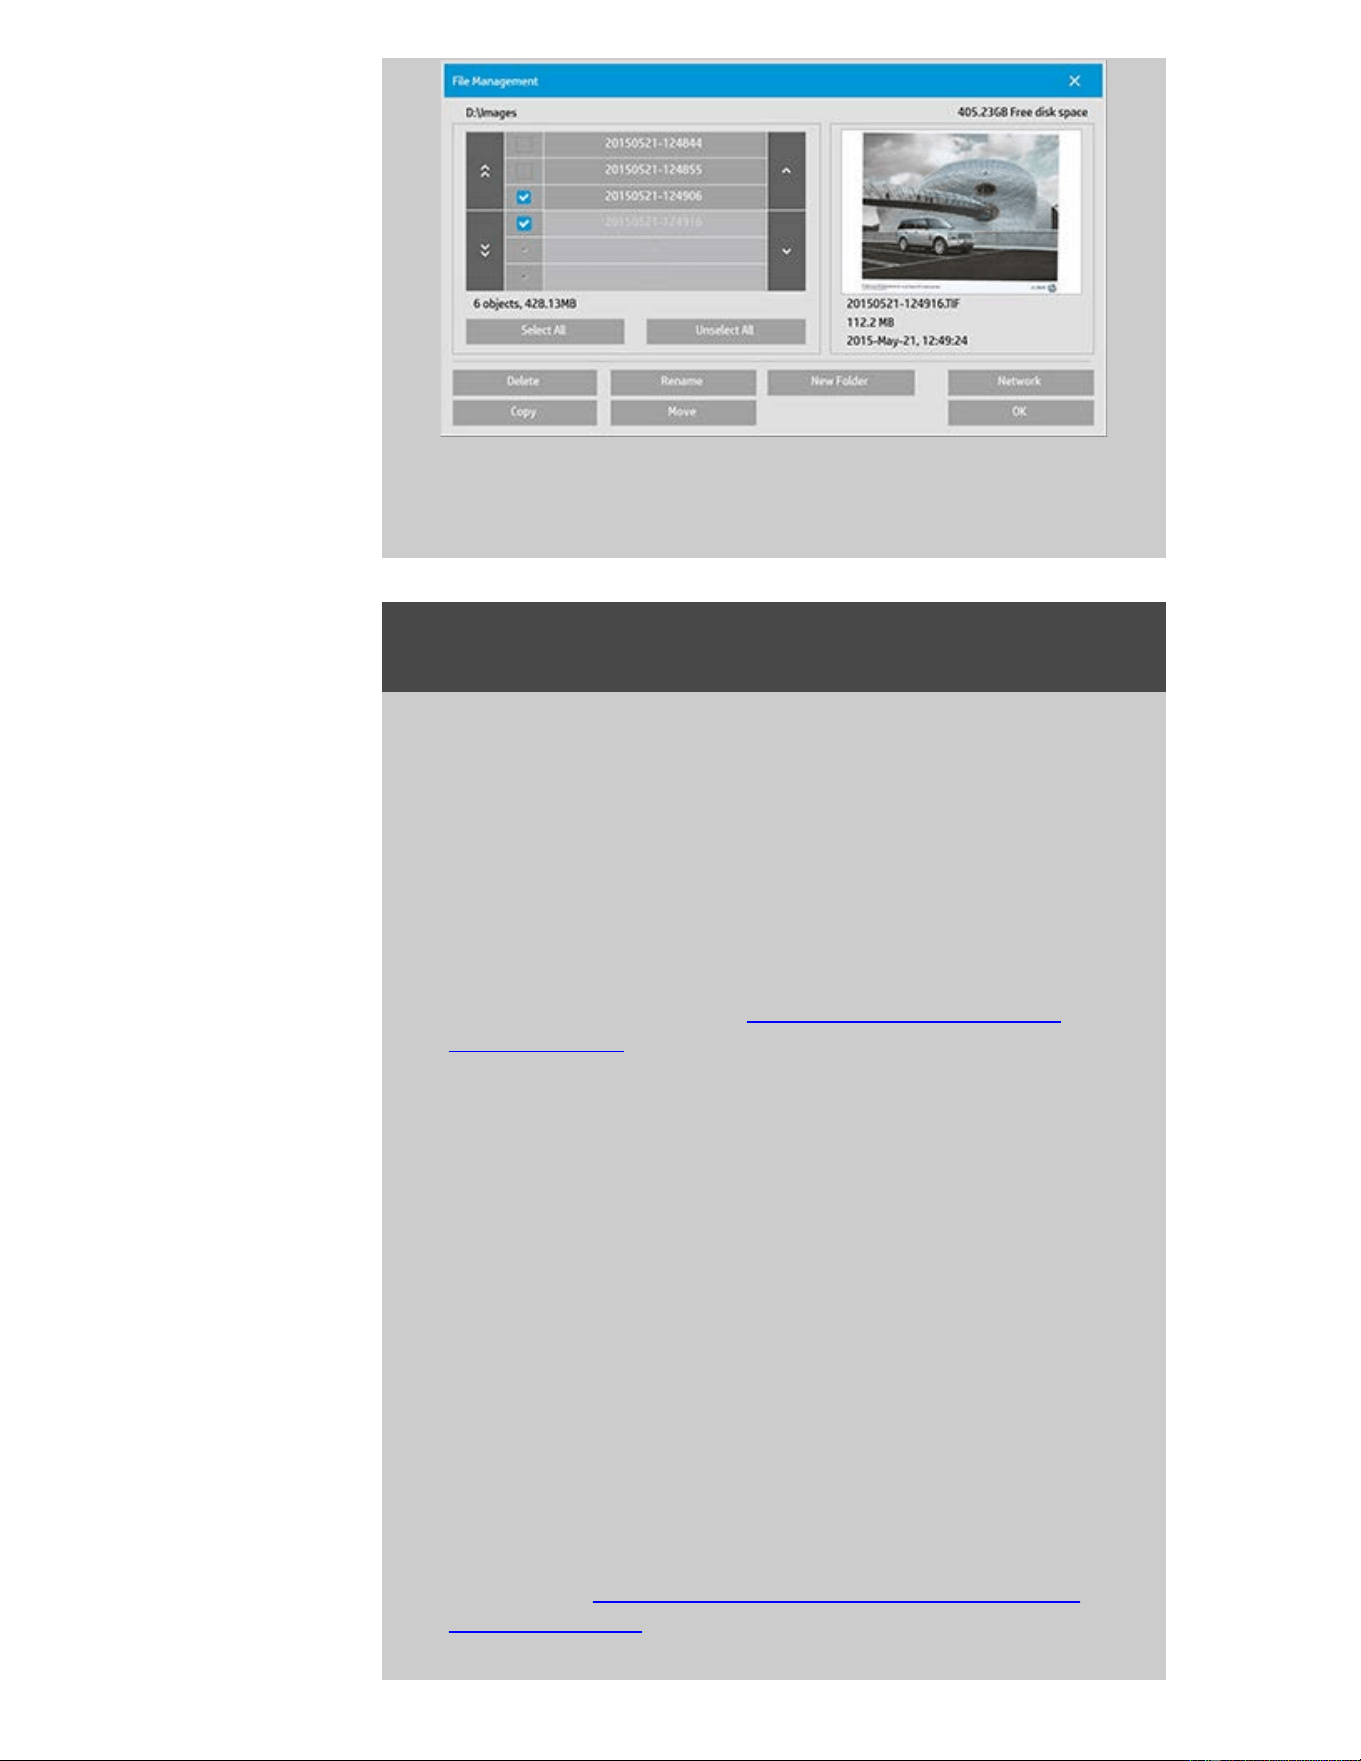
to browse, preview and select files in the file management
dialog
1. The folder up button (marked "..") will move you up a level.
Local folders: You can browse to folders on all drives open to
the system, including external drives. The C-drive is not open to
the system as this is reserved for system files only.
Network folders: Per default, the dialog will display only local
drives and folders. You can however add network locations to
the system. Read the help "how do I scan to and access a
network folder?" for instructions.”
2. Clicking on a folder name will move you onto its level.
3. Select files for an action by checking the box to the left of the
file name.
4. "Select All" will check the boxes to the left of the all the file
names in the current folder being viewed.
5. "Unselect All" will empty the boxes to the left of the all the file
names in the current folder being viewed.
6. Click on an image to get a preview and information on the
image (name,type,dimensions,file size,creation date.
7. NOTE: If inactivity timeout is applied to a network connection
then additional logon information could be required to perform
the file management operations.
See more in: How does the Inactivity timeout for a network
connection work?

NOTE: Imported 3rd party PDF files may not be able to preview in the
system.
to add files to the Print tab's print list
1. Press the Print tab.
2. You can use the Clear List button to start afresh with an empty
list.
3. Press the Add to List button to reach the File Management
dialog.
4. You select files for addition to the print list by checking the box
to the left of the file name.
NOTE: Imported 3rd party PDF files may not be accessed
through "Add to List".
5. Use "Select All" and "Unselect All" for multiple selections of files
in the current folder.
5. See the instructions under to
browse, preview and select files in
the file management dialog above for more instructions on
selecting files.
6. See the other instructions on this page regarding file
management if you wish to move, copy rename or delete files.
7. Click the OK button to add the checked files to the print list and
return to the Print tab. In the Print tab you can see the print list
with the files inserted.
NOTE about files in the print list (Print tab): if a file in the print list is
moved/deleted/renamed through the file management dialog, the
file will still be shown in the print list but it can not be printed.
to delete files from your system
From time to time, you will need to delete scanned files from your
accessible folders in order to ensure space for new files. There are
two ways to do this:
1. Browse to and select the files you want to delete by checking
the box to the left of a file name - See the instructions under to
browse, preview and select files in the file management dialog
above for more instructions on selecting files.

2. Press the Delete button and confirm.
NOTE about files in the print list (Print tab): if a file in the print list is
moved/deleted/renamed through the file management dialog, the
file will still be shown in the print list but it can not be printed.
to Rename files on your system
1. Browse to and select the files you want to rename by checking
the box to the left of a file name - See the instructions under to
browse, preview and select files in the file management dialog
above for more instructions on selecting files.
2. Press the Rename button. An edit box with the current file
name entered will appear. Edit the name and select OK when
done.
3. You can select more than one file at a time. When you select
multiple files and then press the Rename button, you will be
able to enter a name for each file in turn.
NOTE about files in the print list (Print tab): if a file in the print list is
moved/deleted/renamed through the file management dialog, the
file will still be shown in the print list but it can not be printed.
to Create a new folder on your system
1. Browse to and select the directory/folder in which you wish to
create the new folder - See the instructions under to browse,
preview and select files in the file management dialog above
for more instructions on browsing the file system.
2. Press the New Folder button.
3. Enter a name for your new folder in the edit dialog and press
OK.
4. The new folder will be insterted as a subfolder to the current
directory.

to copy files to other folders on your system
1. Browse to and select the files you want to copy by checking the
box to the left of a file name - See the instructions under to
browse, preview and select files in the file management dialog
above for more instructions on selecting files. You can make
multiple selections if you intend to copy all the files to the
same destination folder.
2. Press the Copy button.
3. The Destination folder dialog will appear. Browse to the
destination folder or create a new folder on the system.
4. Press OK to copy the files into the destination folder.
to move files to other folders on your system
1. Browse to and select the files you want to move by checking
the box to the left of a file name - See the instructions under to
browse, preview and select files in the file management dialog
above for more instructions on selecting files. You can make
multiple selections if you intend to move all the files to the
same destination folder.
2. Press the Move button.
4. Press OK to move the files into the destination folder.
NOTE about files in the print list (Print tab): if a file in the print list is
moved/deleted/renamed through the file management dialog, the
file will still be shown in the print list but it can not be printed.
printing instructions legal information
© Copyright 2012, 2015 HP Development Company, L.P
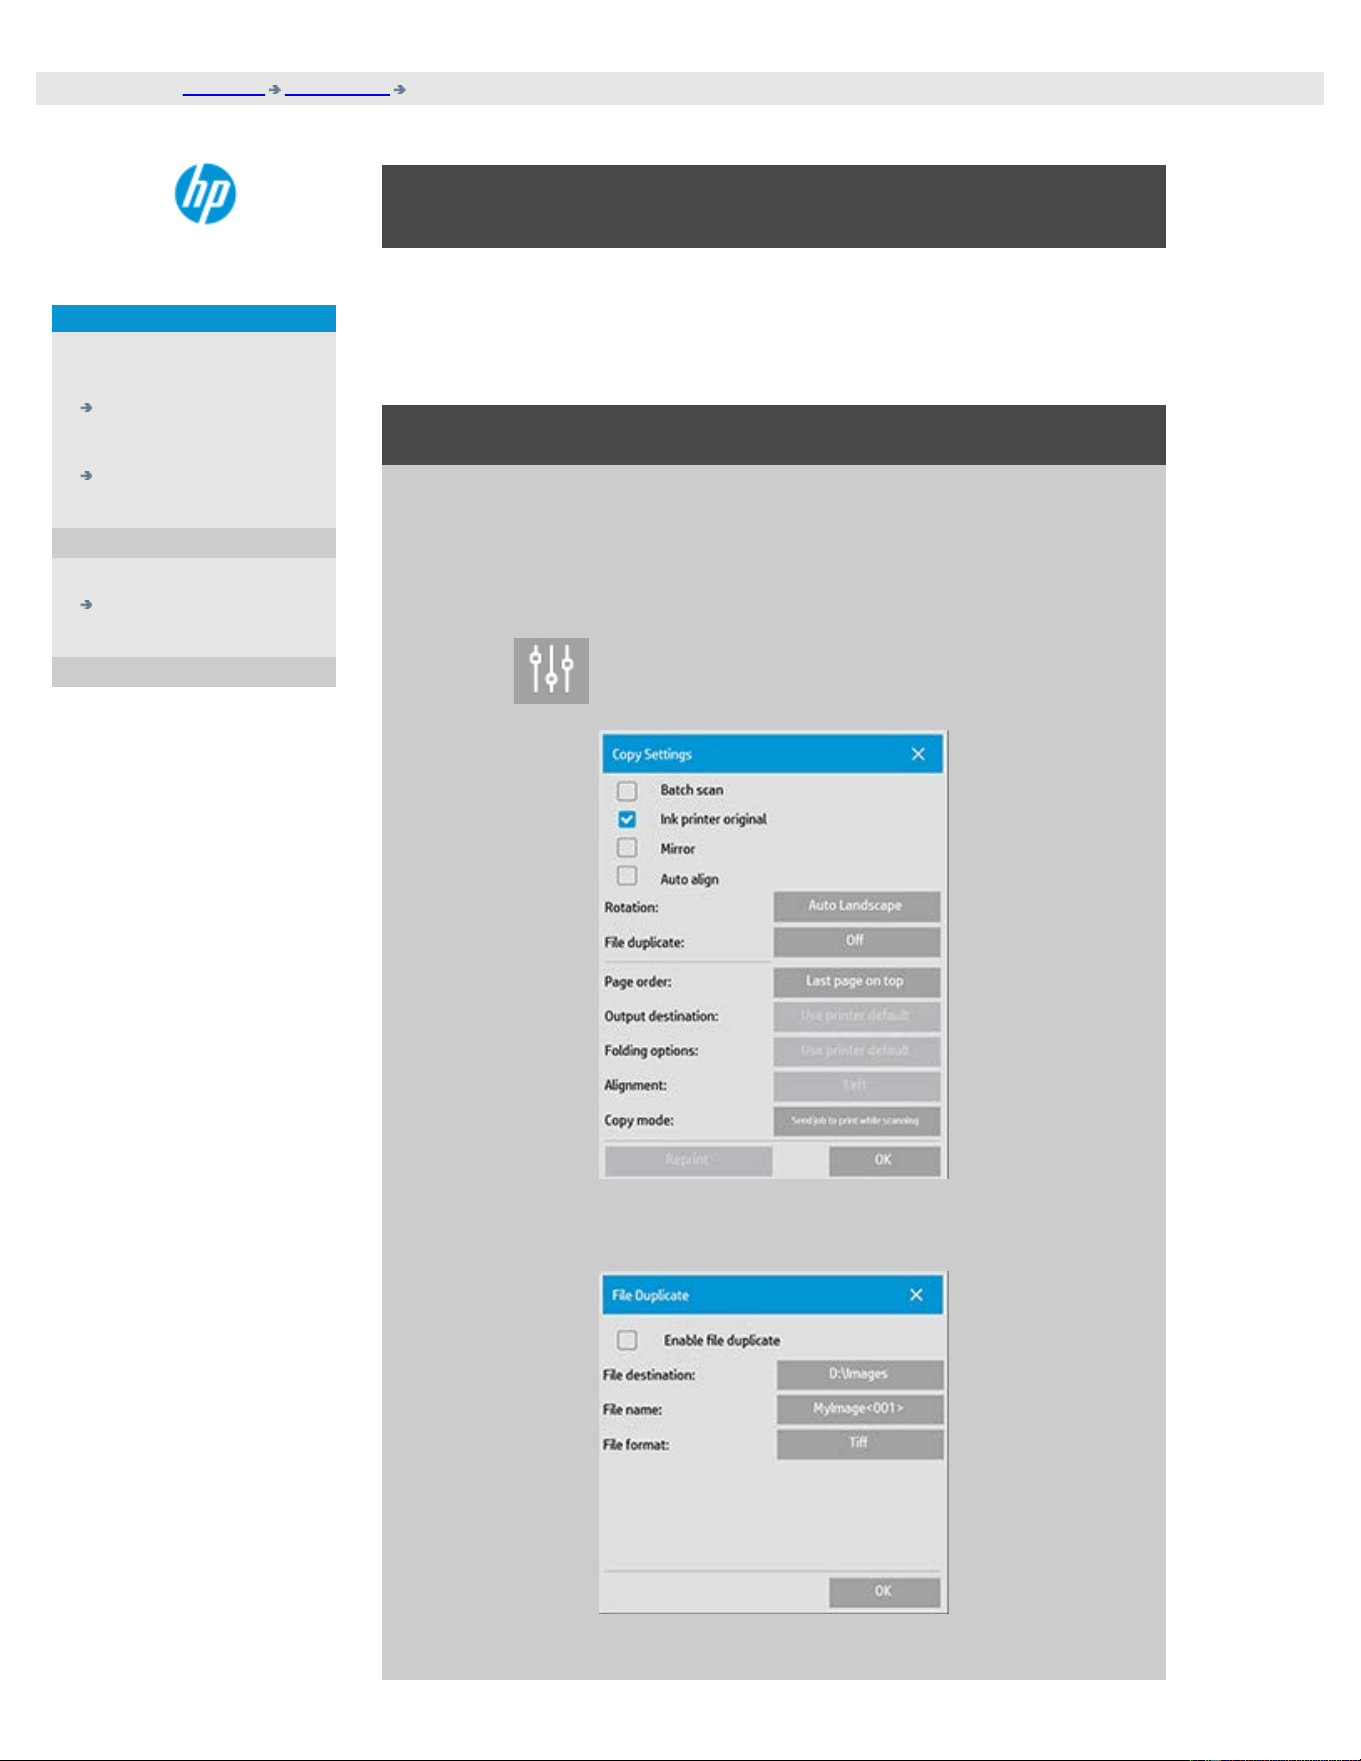
you are here: welcome how do I...? save (to file) a duplicate of my copy
HP Pro Scanner
how do I...?
the problem is...
alphabetical index
how do I save (to file) a duplicate of my copy?
You can tell the system to save duplicates of your copies. While this
option is enabled, each time you click the Copy button to start a
scan-to-print process, a file containing the same scanned image will
be saved on your system.
to save a duplicate of your copy in a file...
1. Press the Copy tab
2. Press
3. Press the File duplicate button.
4. Check the "Enable file

duplicate" option.
5. Press the File
destination button if
you want to change
the place the image
file will be saved.
6. Press the File name
button if you want to
specifically name the
image file or avoid
overwriting existing
files. The field
contains automatic
naming parameters
(counter, date, time...)
for dynamic creation
of new files. You can
read more on using
automatic file naming
parameters here.
7. Press the File format
button if you want
your duplicate in
another format.
8. Uncheck the "Enable
file duplicate" option
when you want to turn
the action off.
printing instructions legal information
© Copyright 2012, 2015 HP Development Company, L.P
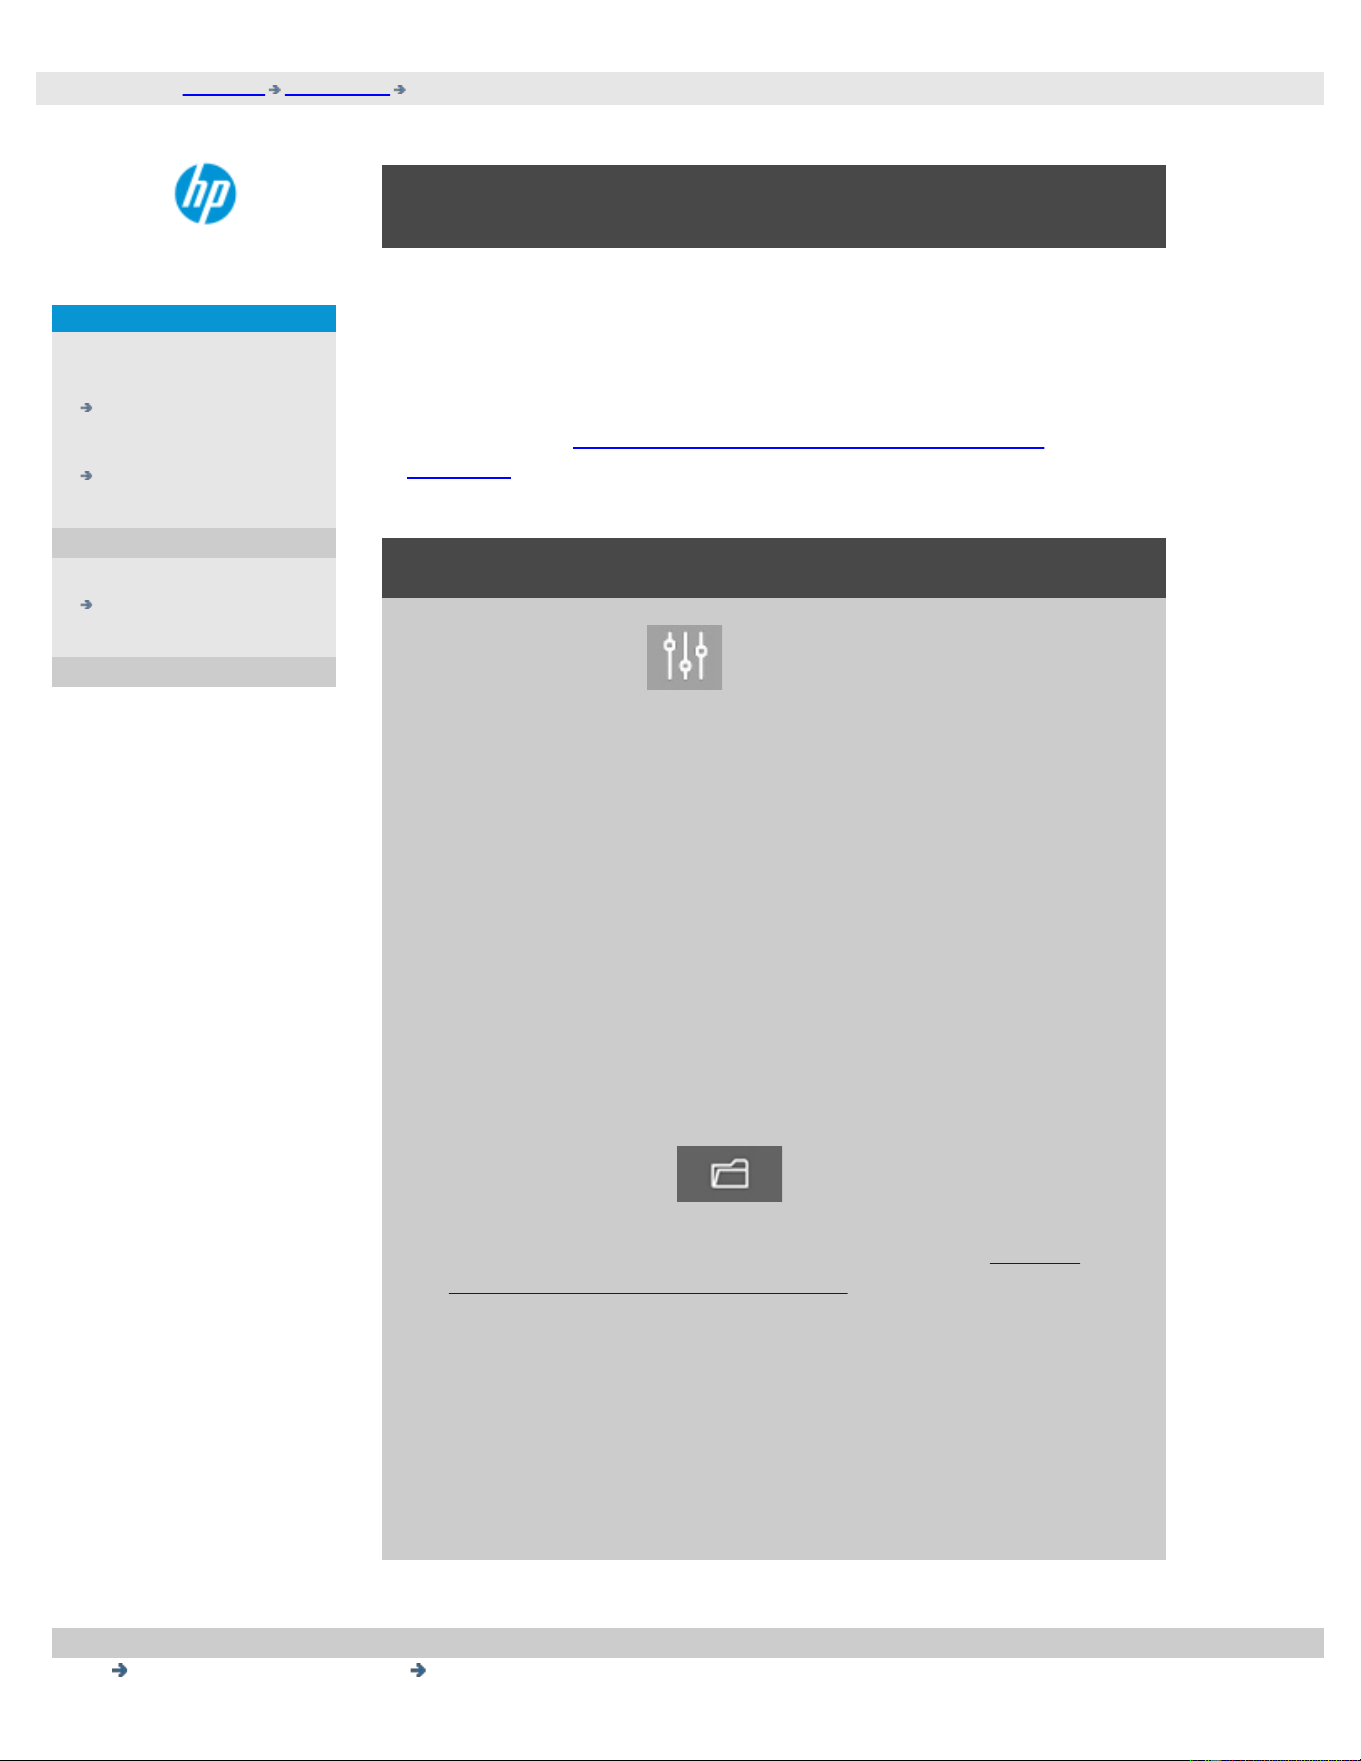
you are here: welcome how do I...? enable storage of network connections
HP Pro Scanner
how do I...?
the problem is...
alphabetical index
how do I enable storage of network connections?
The system can be setup so users can store network connection
definitions (username/password pairs) so that these are
reestablished every time the system is restarted.
Enabling users to store network connections is an adminstrator
function. If the Administrator password has been setup and
activated, you will be prompted to enter it before you can apply this
function.
to enable storage of network connections ...
1. Press Setup Tab >
2. Select System
3. Press the Advanced button.
4. Enter the Administrator password if prompted by the system.
5. Press the Security Setup button.
6. Press the Store Network Connections button.
7. Select the "Store network connection" option box and press OK.
8. With the "Store network connection" option box selected, the
system will then make visible (otherwise hidden) a "Reconnect
at logon" option on the dialog. To access the option:
Select Folder button > Network > Add Network
Connections. The dialog and the "Reconnect at logon" option
with network connections is described in the topic how do I
scan to and access a network folder?.
9. Stored connections that fail (for example due to changes on the
network) can be removed manually through the Folder button -
> Network -> "Remove Network Connection".
NOTE: Storing usernames and passwords on the system can pose
security risks.

you are here: welcome how do I...? create data files for support and debugging
HP Pro Scanner
how do I...?
the problem is...
alphabetical index
how do I create and retrieve data files for support and
debugging?
Your system contains functions for creating data files that can be
helpful for debugging errors. In a typical case, these files can be
created by users who then send them to their support service for
debugging.
To access the varrious dubugging file creation options:
Setup tab > > System > Advanced > Troubleshooting
SCANdump: You can create data files for debugging problems with
the scanner device through the SCANdump option.
Print to File: You can help debuggng of print output problems by
redirecting your print output data to a file with the Print to File
option.
Print Screen: You can also save the image of your screen for
conveying the user inteferface settings or error messages by using
the Print Screen button.
Export Log Files: For retrieving the data files for support and
debugging. After using the options above, the debugging output
files will reside in a protected area and must be exported in order for
you to access them. Press the Export Log Files button to export the
files to your D:\Images folder or USB drive.
to create scanner a data file (scandump) ...
1. Press Setup Tab >
> System > Advanced
2. Enter the Administrator password if prompted by the system.
3. Press the Troubleshooting button.
4. Press the SCANdump button. This starts the SCANdump
program.
5. The SCANdump program creates a data file scandump.con that
contains light profile data, error logs and statistics about the
scanner's activity.
6. Press the Export Log Files button to export the files to your
D:\Images folder or to a USB drive.

7. If you choose to export to the D:\Images folder and need to
move the files to another computer for processing/sending:
The panel PC's D:\Images folder can be accessed from other
computers through its IP. See "how do I access shared files
from another computer" for instructions.
to create a print output data file ...
1. Press Setup Tab > > System > Advanced
2. Enter the Administrator password if prompted by the system.
3. Press the Troubleshooting button.
4. Press the Print to File button. This tells the program to send
printer data to a file rather than to the printer the when you
print.
5. Printer data is saved to the file D:\Images\print.prn.
6. You may need to move the file print.prn to another computer
for processing/sending: The panel PC's D:\Images folder can be
accessed from other computers through its IP. See "how do I
access shared files from another computer" for instructions.
to create a screen image file ...
1. Press Setup Tab >
> System > Advanced
2. Enter the Administrator password if prompted by the system.
3. Press the Troubleshooting button.
4. Press the Print Screen button.
5. You can activate a PrnScn button on the upper corner of you
screen, to make continious scren snapshots.
6. Screen images are saved to the folder D:\Images\
7. You may need to move the files to another computer for
processing/sending: The panel PC's D:\Images folder can be
accessed from other computers through its IP. See "how do I

you are here: welcome how do I...? scan to email
HP Pro Scanner
how do I...?
the problem is...
alphabetical index
how do I scan to email?
When scanning to file (File tab), you can tell the system to create your
scan as an attachment in an email (scan-to-email).
Before using the scan to email functionality, you must setup your
outgoing email information in the system.
To scan to email
1. Select the Scan tab .
2. Make your scan settings.
3. Select the File destination button
4. Select the Email option.
5. Fill in the destination email address, the Subject line and your
message to the email recipient.
6. Press OK to apply.
To set up outgoing email
To enable use of scan-to-email, you need to setup your outgoing email
account.
1. Press the Setup tab .
2. Select > System > Advanced.
3. Press the Email Setup button.
4. Enter your email account information.
5. Press the Test button to verify your settings.
NOTE: Contact your system adminstrator if in doubt about one of
more of the settings.
printing instructions legal information
© Copyright 2012, 2015 HP Development Company, L.P
you are here: welcome how do I...? multipage PDF or TIFF
HP Pro Scanner
how do I...?
the problem is...
alphabetical index
how do I scan multiple pages into a single file ?
The Multipage Scan function allows you to combine 2 or more scans into
a single PDF or TIFF file. All the image settings, previewing and
enhancement options that are available for single document scanning
are also available when using Multipage.
You must set the scan file's Format to PDF or TIFF Multipage in order to
enable Multipage Scan.
To combine multiple pages into a single PDF or TIFF file
1. Insert the first document of your set into the scanner.
2. Press the Scan tab.
3. Make your Scan settings in the Scan tab dialog and set your
destination folder.
4. Press the File name button to set the file name.
5. Press the File Format button and select PDF Multipage or
TIFF Multipage as the file format.
6. Press the add page button
The original will then be input (captured) as with single-sheet
scanning, but it will be put on standby inside your system
instead of being saved to the file and desitnation folder.
7. Continue inserting originals that belong to the set and press the
add page button for each one until all the originals
that are part of the multipage file have been scanned.
You can adjust settings before each scan in the multipage file
just as you can with single document scanning.
7. Press the Save scan button to save the job.
NOTE: You can press the cancel button at any time during
the Multipage session.
Pressing cancel will give you an option to delete last page added or
to delete the entire Multipage session.

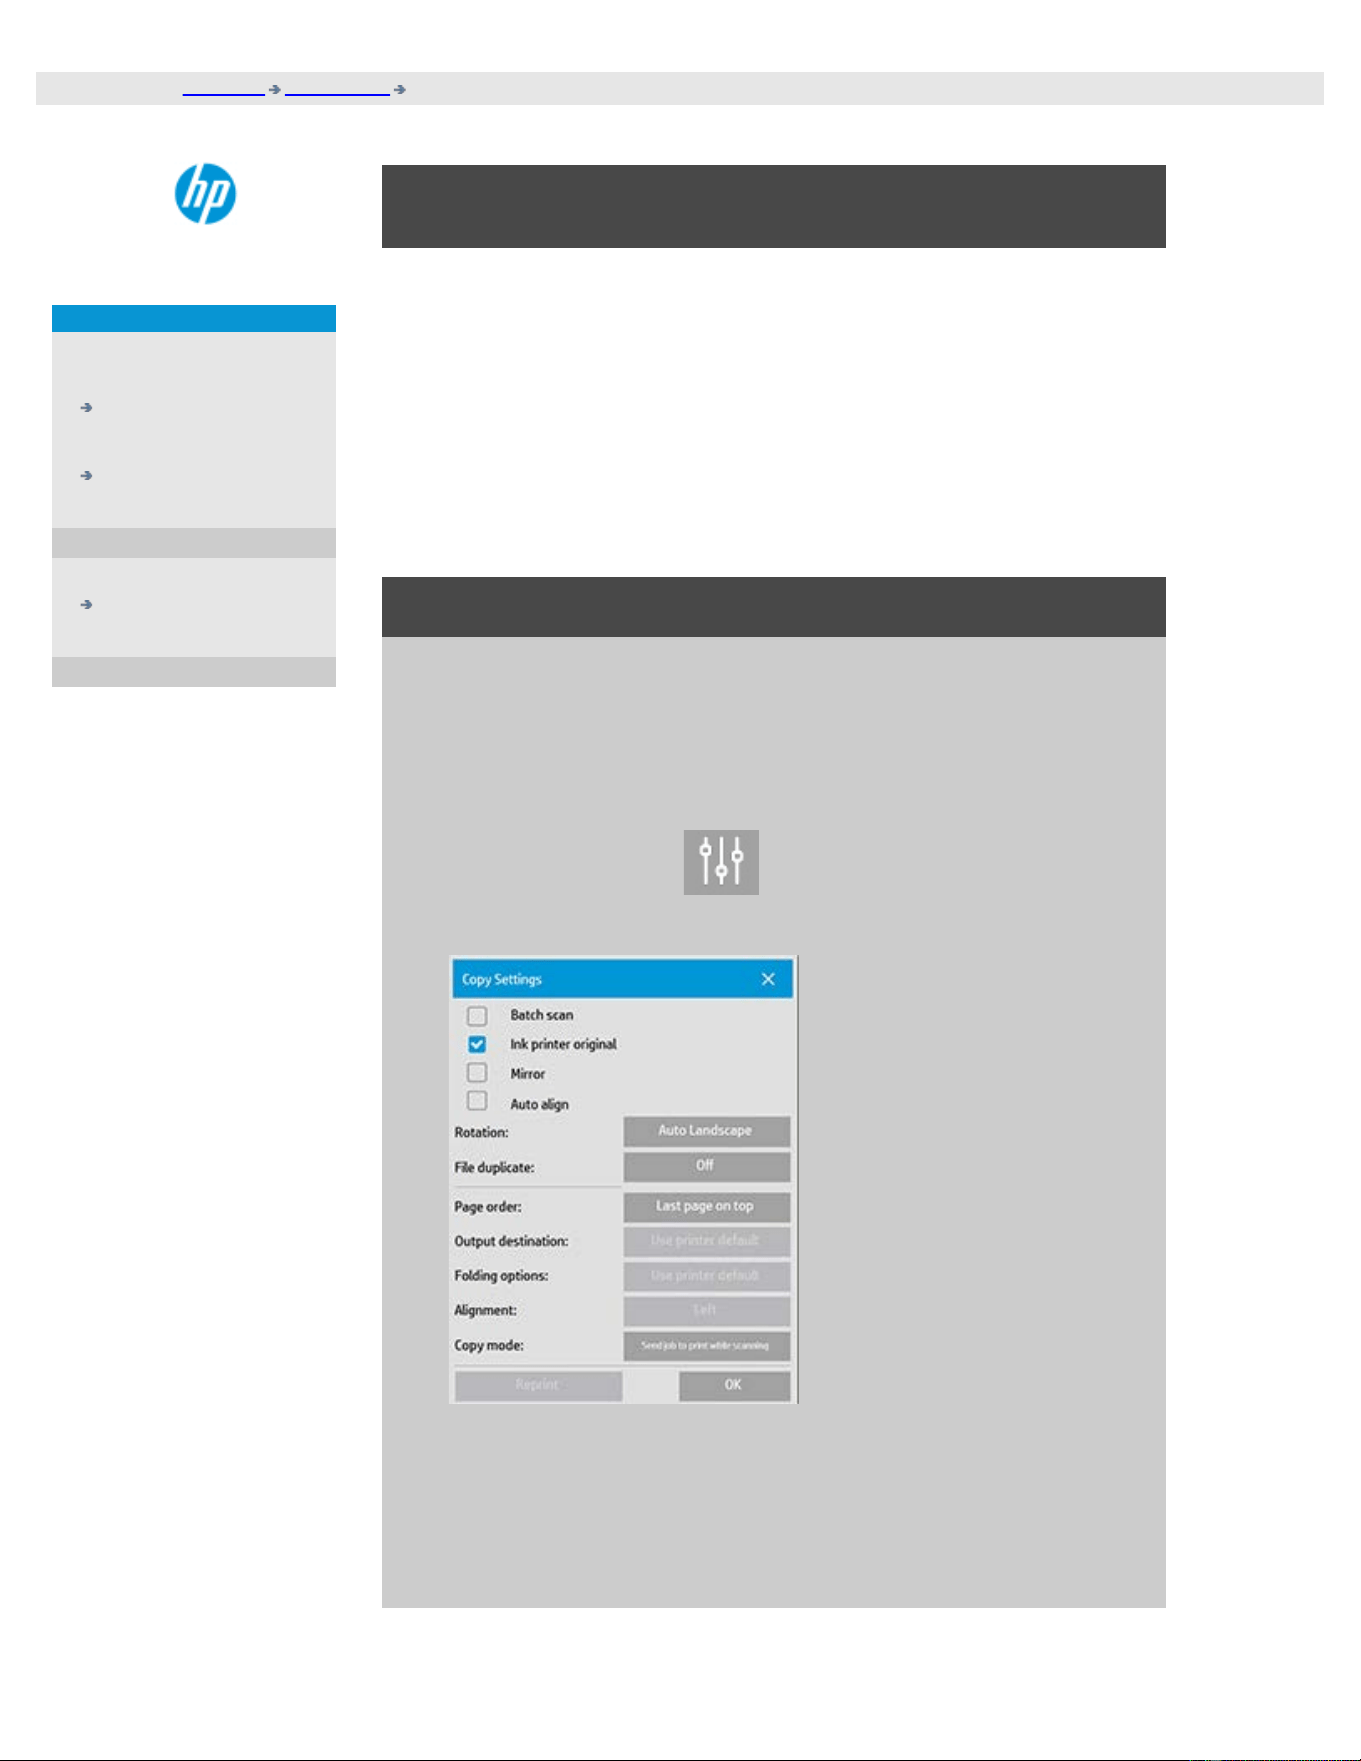
you are here: welcome how do I...? Rotate the output 90 degrees
HP Pro Scanner
how do I...?
the problem is...
alphabetical index
how to rotate the output 90 degrees?
The "90° Right" option is useful when you want your copy output to be
rotated 90 degrees to the right. This is useful if e.g. a folding machine
requires a rotated output.
NOTE: The process of rotating the image is time and resource
consuming. Therefore, use this option only when you are forced to have
a 90 degree rotation of the output.
...rotate of the output 90 dregrees?
1. Select the Copy tab.
2. In the Copy tab, press
and the following dialog is
displayed:
3. Press the Rotation button and select "90° Right"
Press OK to save and exit
4. When 90° Right is active it force the scanned input to be output
with a rotation of 90 degrees to the right..

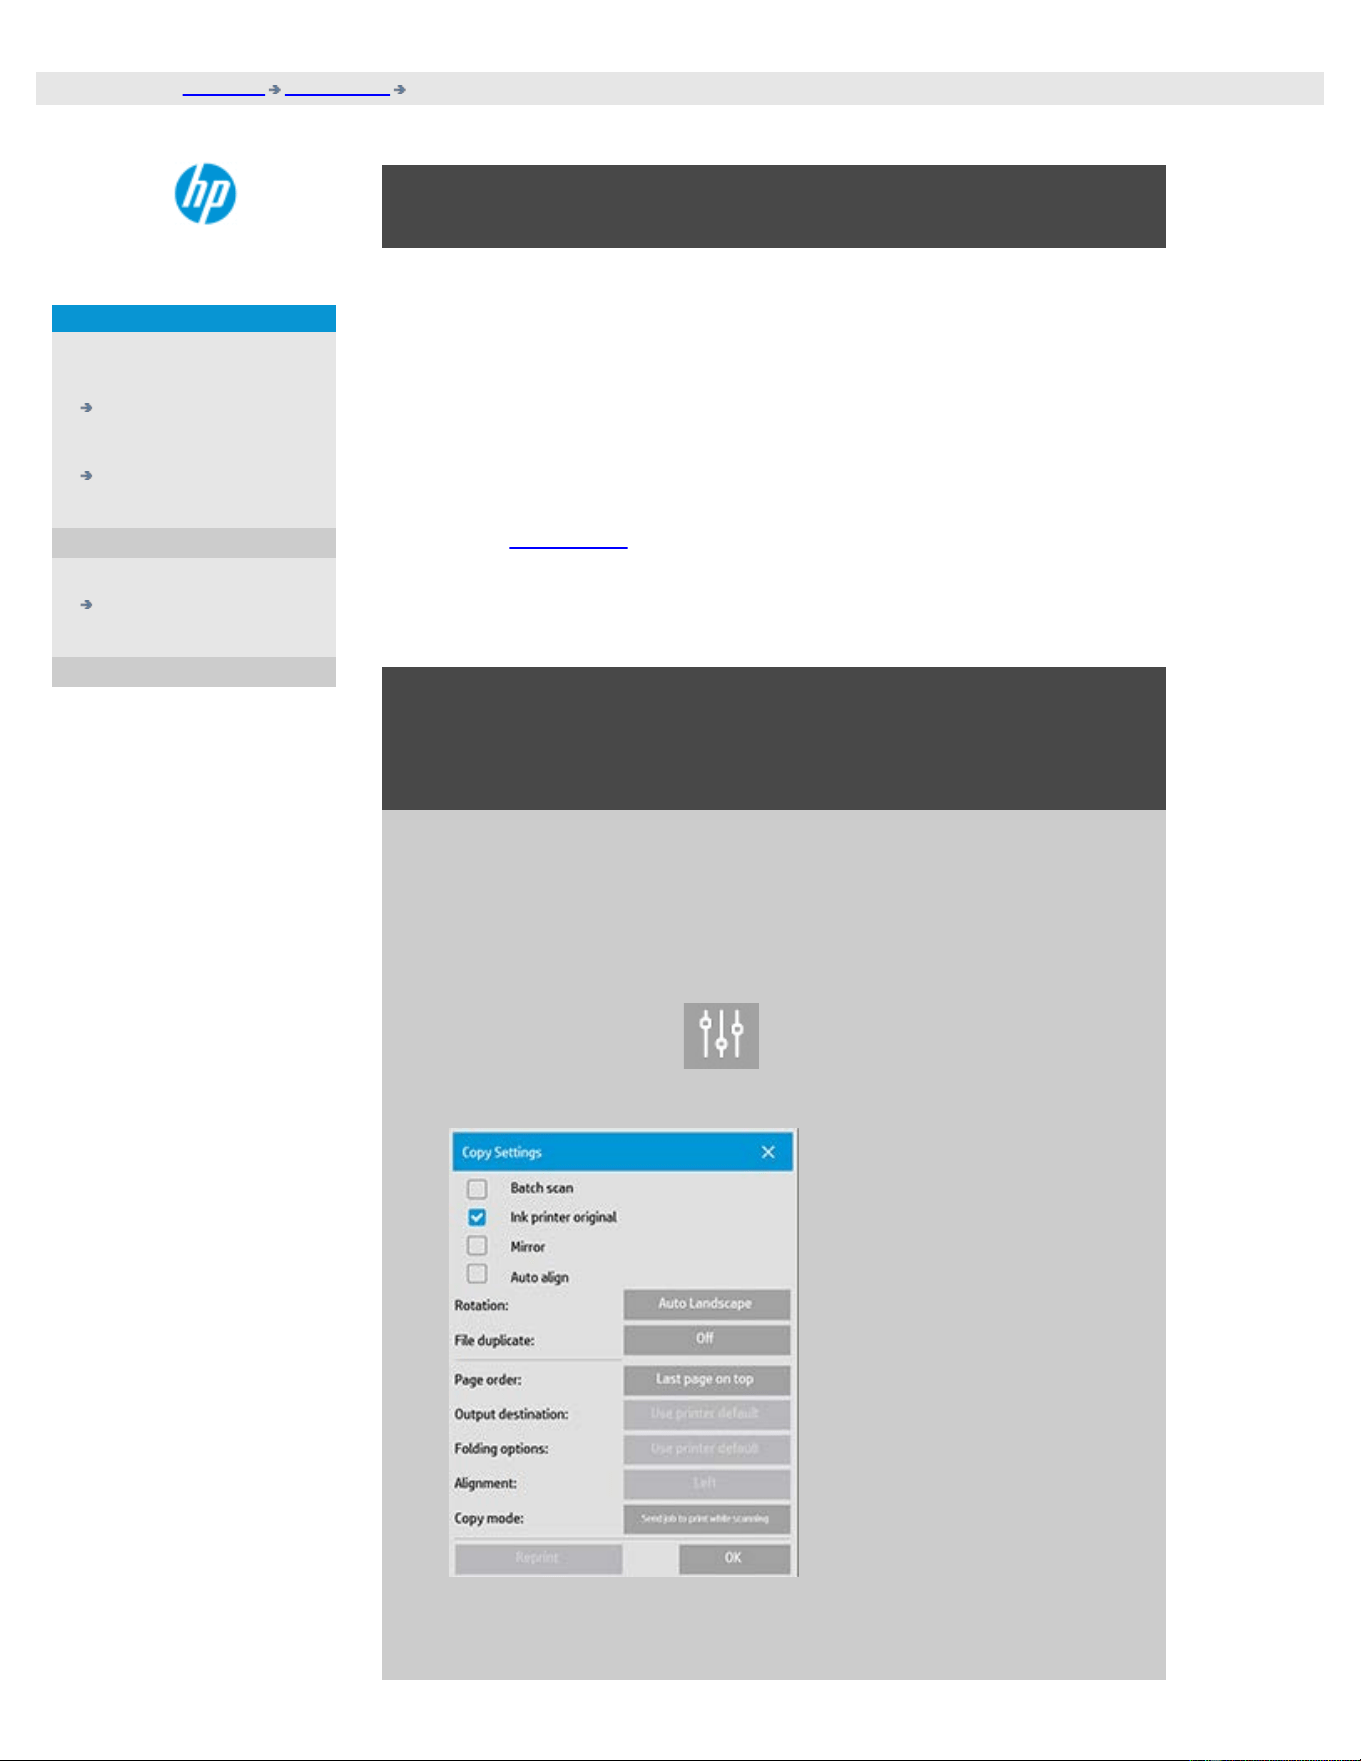
you are here: welcome how do I...? Set Output options
HP Pro Scanner
how do I...?
the problem is...
alphabetical index
how to set the different output options?
The output options are useful when you want to control your printed
copies with advanched options.
NOTE: The availability of the output options depends on the printer
model installed on the system.
NOTE: The copy mode setting will determine if output to the printer
should be send while scanning or hold back until last page has been
scanned.
...set page order?
1. Select the Copy tab.
2. In the Copy tab, press
and the following dialog is
displayed:
3. Press the Page order button and select in which order the
output should be printed.
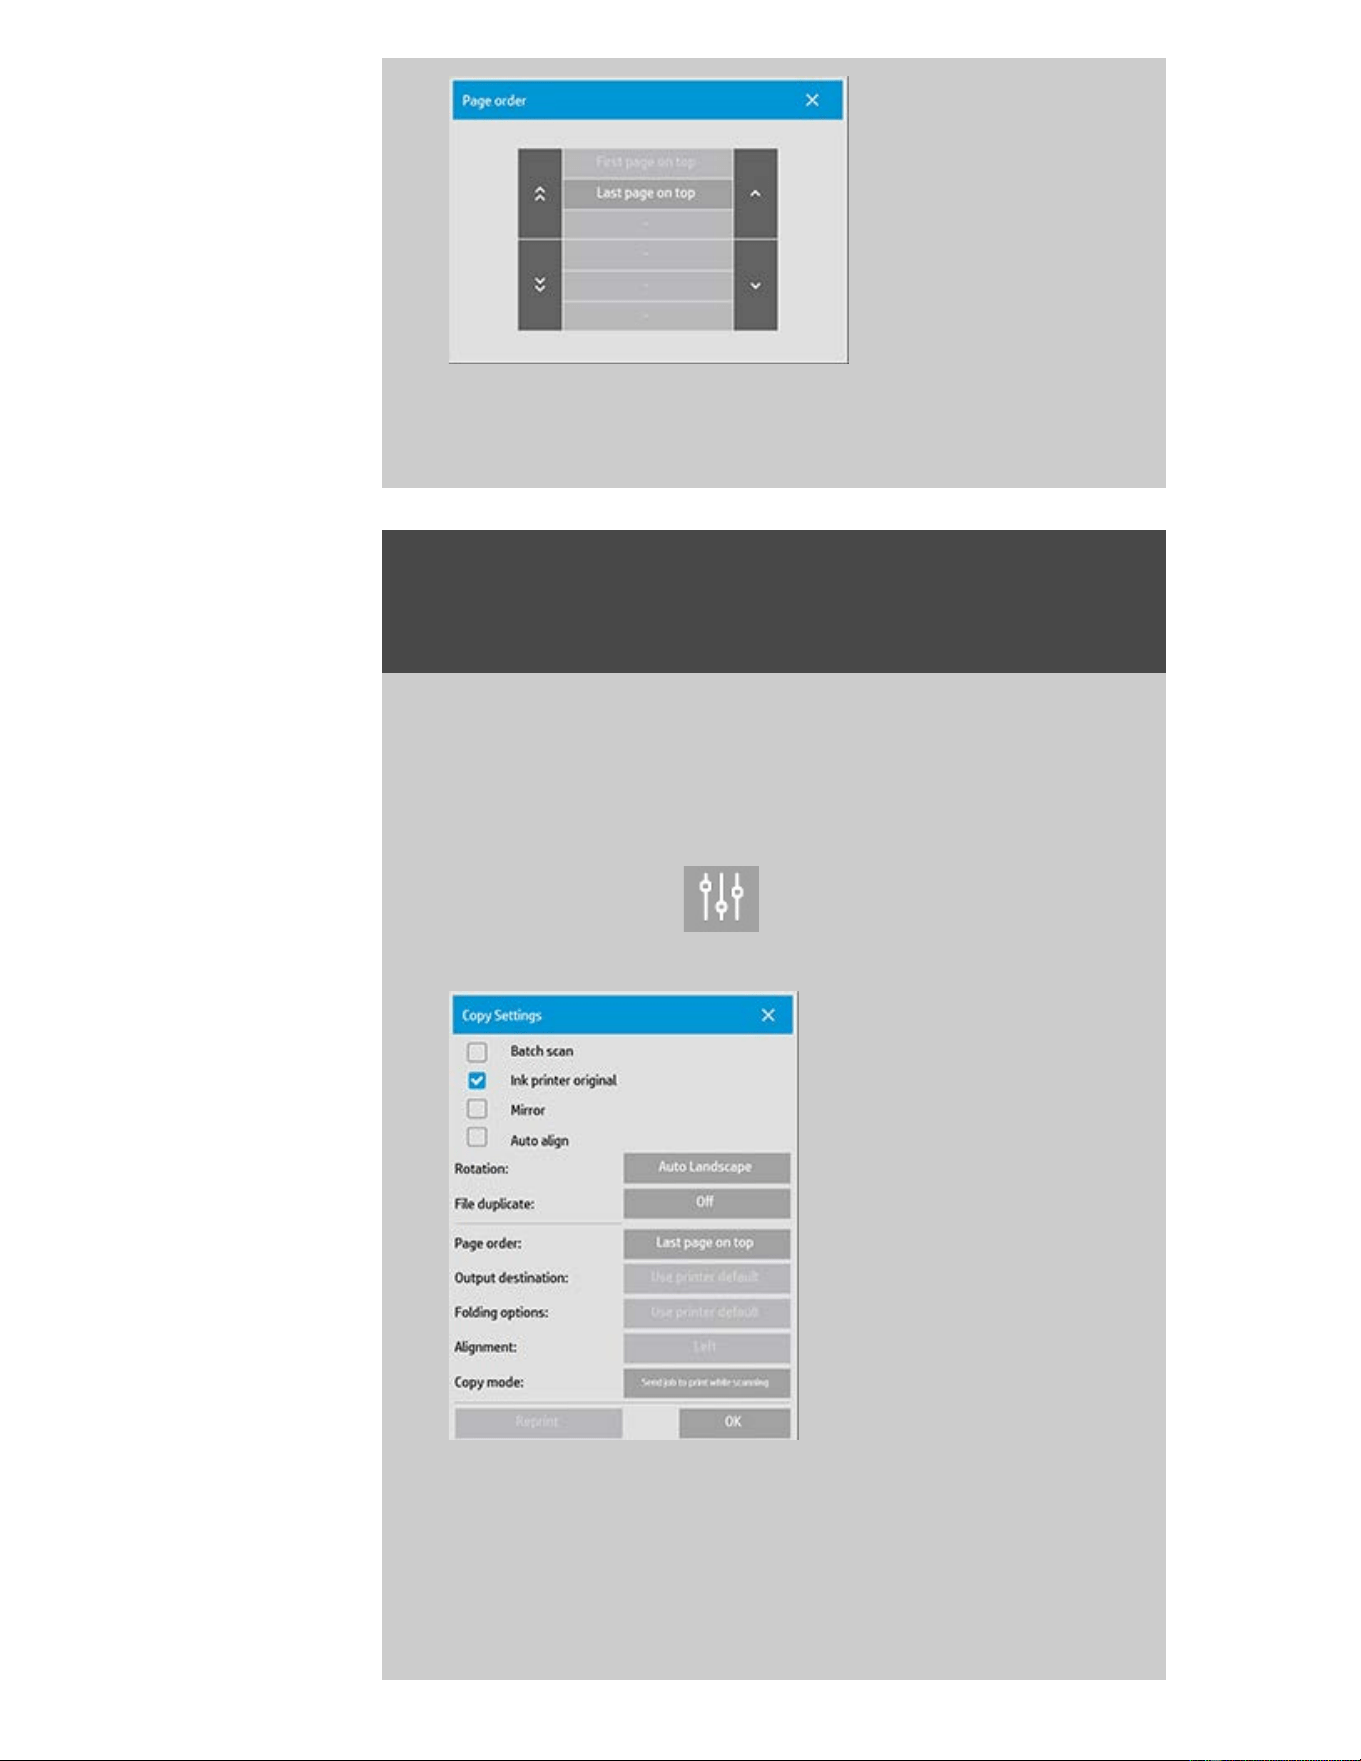
NOTE: The availability of the Page order option depends on
the printer model installed on the system.
...set output destination?
1. Select the Copy tab.
2. In the Copy tab, press
and the following dialog is
displayed:
3. Press the Output destination button and select which
destination should be use.

NOTE: The availability of the Output destination option
depends on the printer model installed on the system.
...set folding options?
1. Select the Copy tab.
2. In the Copy tab, press
and the following dialog is
displayed:
3. Press the Output destination and select "Folder".
When selected as Output destination then the "Folding options"
button will become available.
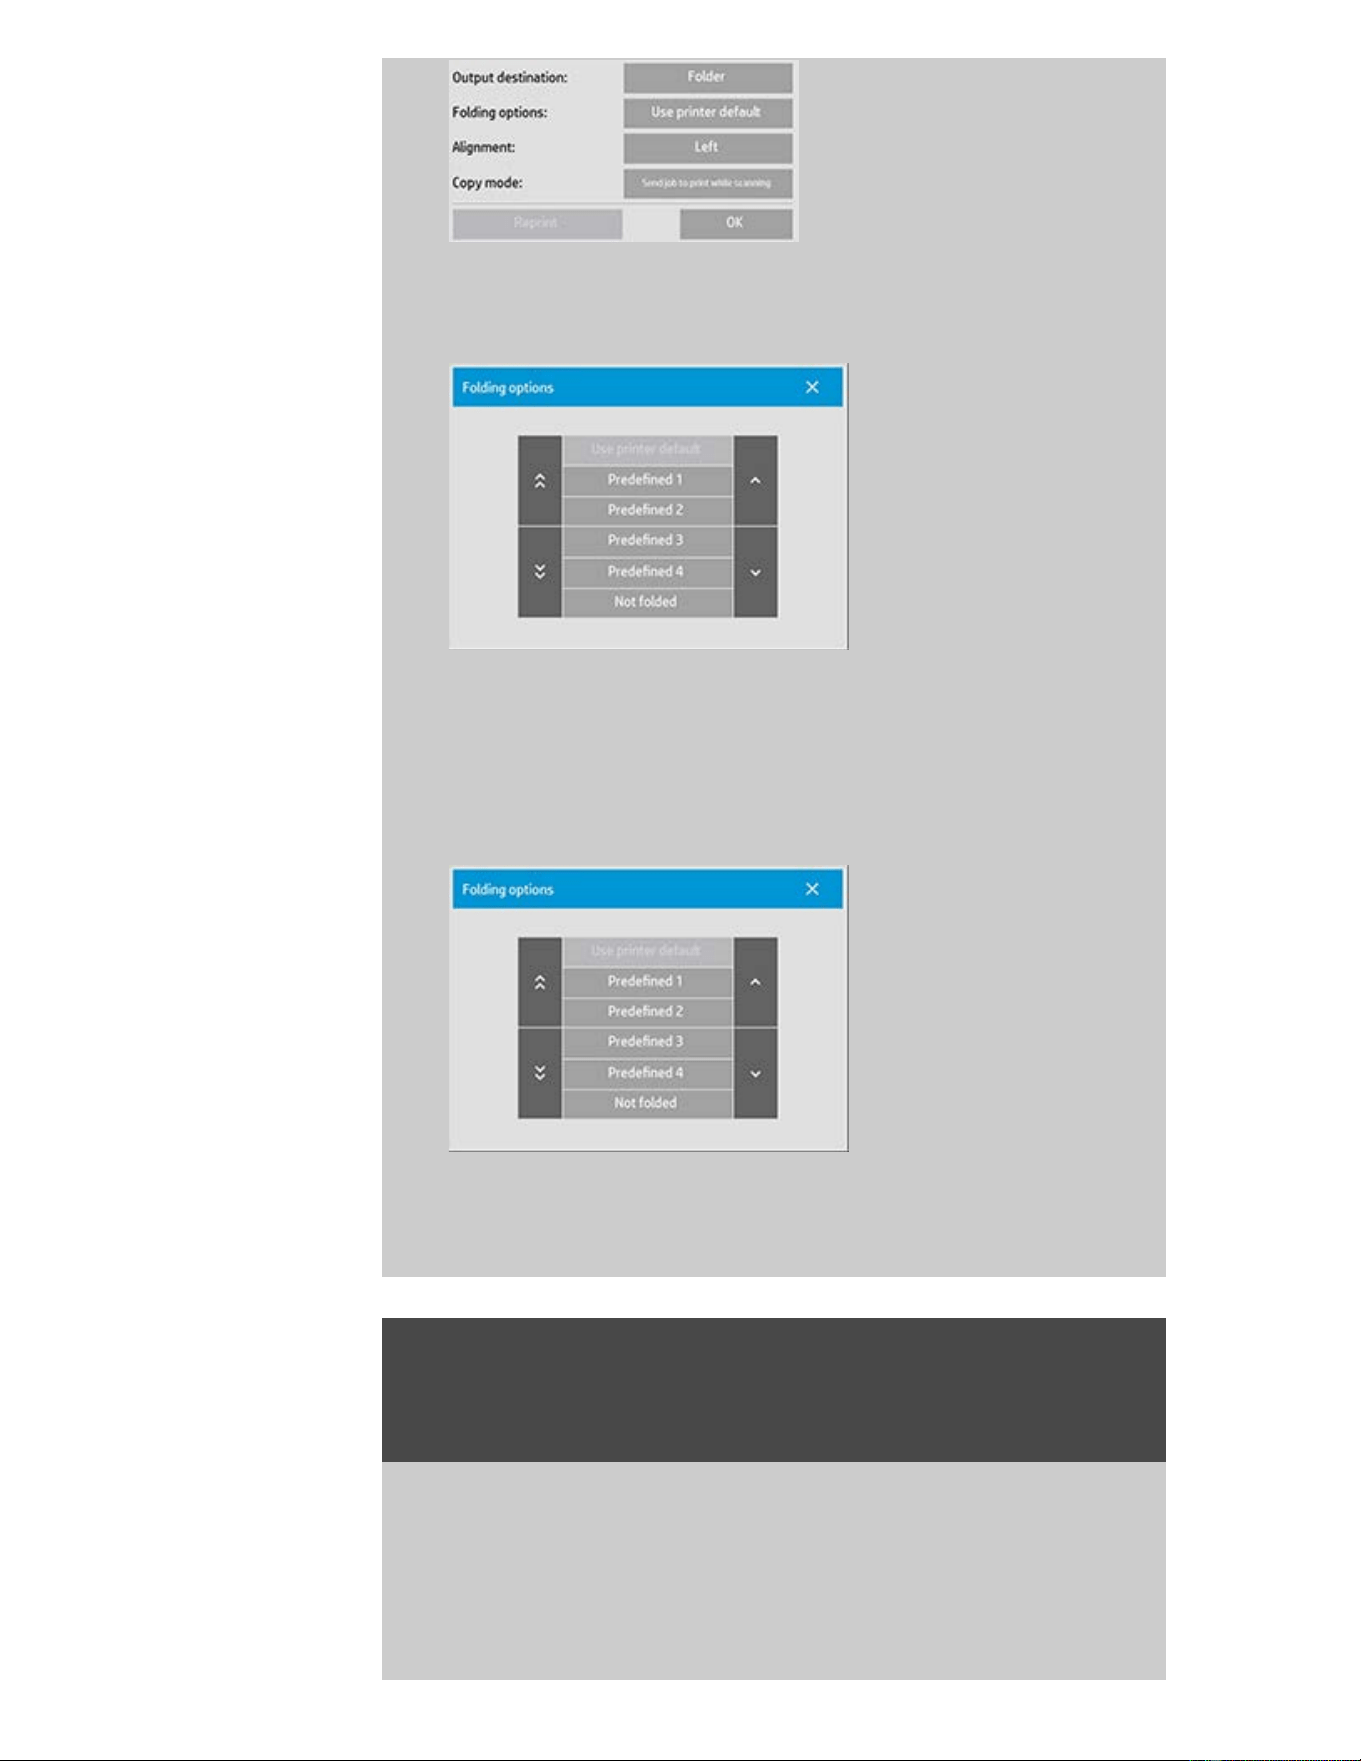
4. Press the Folding options button and select which folding type
should be used.
NOTE: The availability of the Folding option depends on the
printer model installed on the system.
5. Press the Folding options button and select which folding type
should be used.
NOTE: The availability of the Folding option depends on the
printer model installed on the system.
...set copy mode?
1. Select the Copy tab.
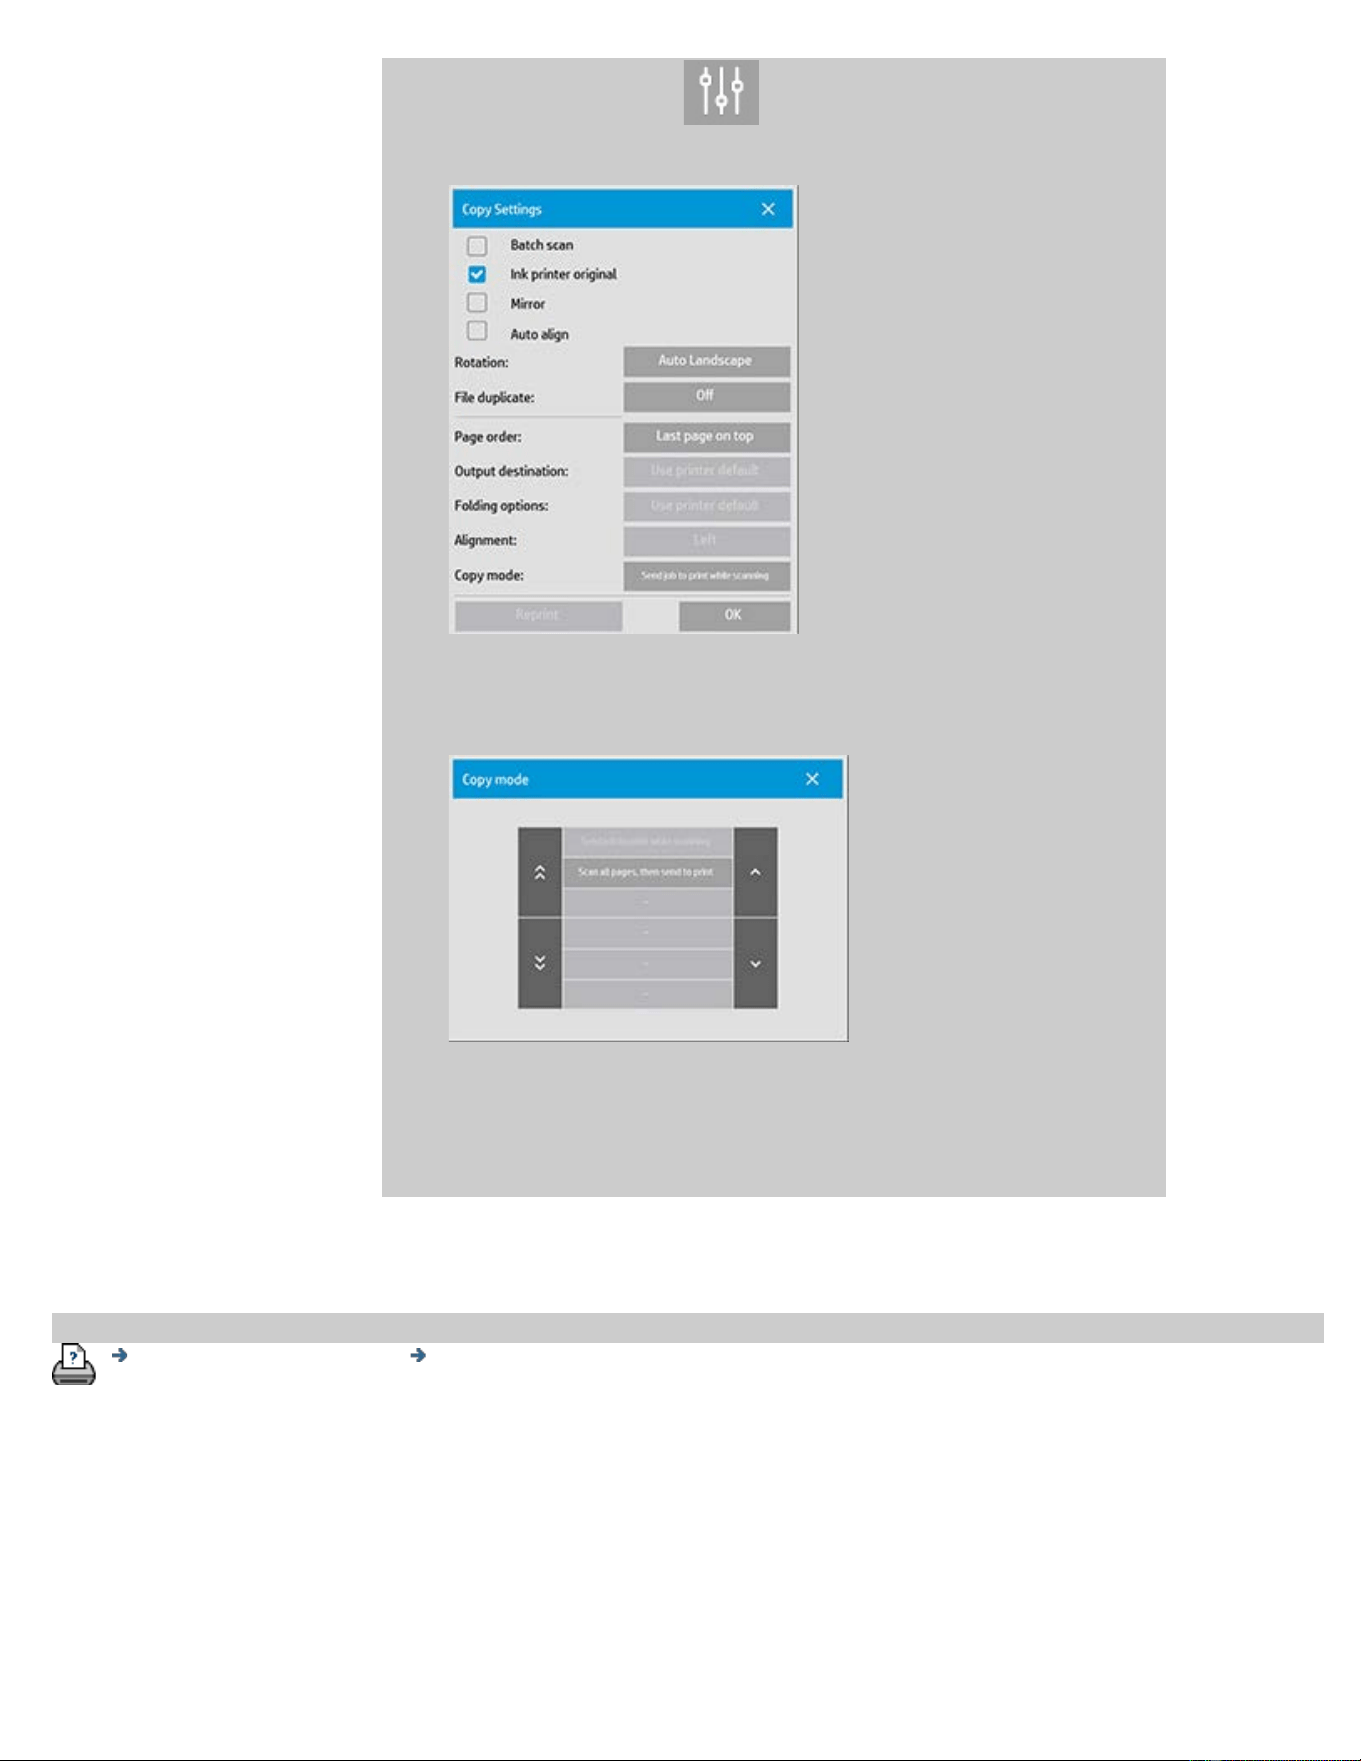
2. In the Copy tab, press and the following dialog is
displayed:
3. Press the Copy mode button and select in which copy mode
should be used.
NOTE: The "Scan all pages, then send to print" will avoid
blocking the printer queue and allow other users to print
while a multipage copy job is completed.
printing instructions legal information
© Copyright 2012, 2015 HP Development Company, L.P
you are here: welcome how do I...? Disable USB Storage
HP Pro Scanner
how do I...?
the problem is...
alphabetical index
how to disable USB set the different output options?
The disable USB storage is useful when you want to prevent scanning to
USB connected storage devices.
...disable USB storage?
1. Press Setup Tab >
2. Select System
3. Press the Advanced button.
4. Enter the Administrator password if prompted by the system.
5. Press the Security Setup button.
6. Press the Disable USB Storage button.
7. Select the "Disable USB Storage" option box and press OK.
8. With the "Disable USB Storage" option box selected, the system
will not show attached USB storage devices when using the File
Management or File Destination.
printing instructions legal information
© Copyright 2012, 2015 HP Development Company, L.P
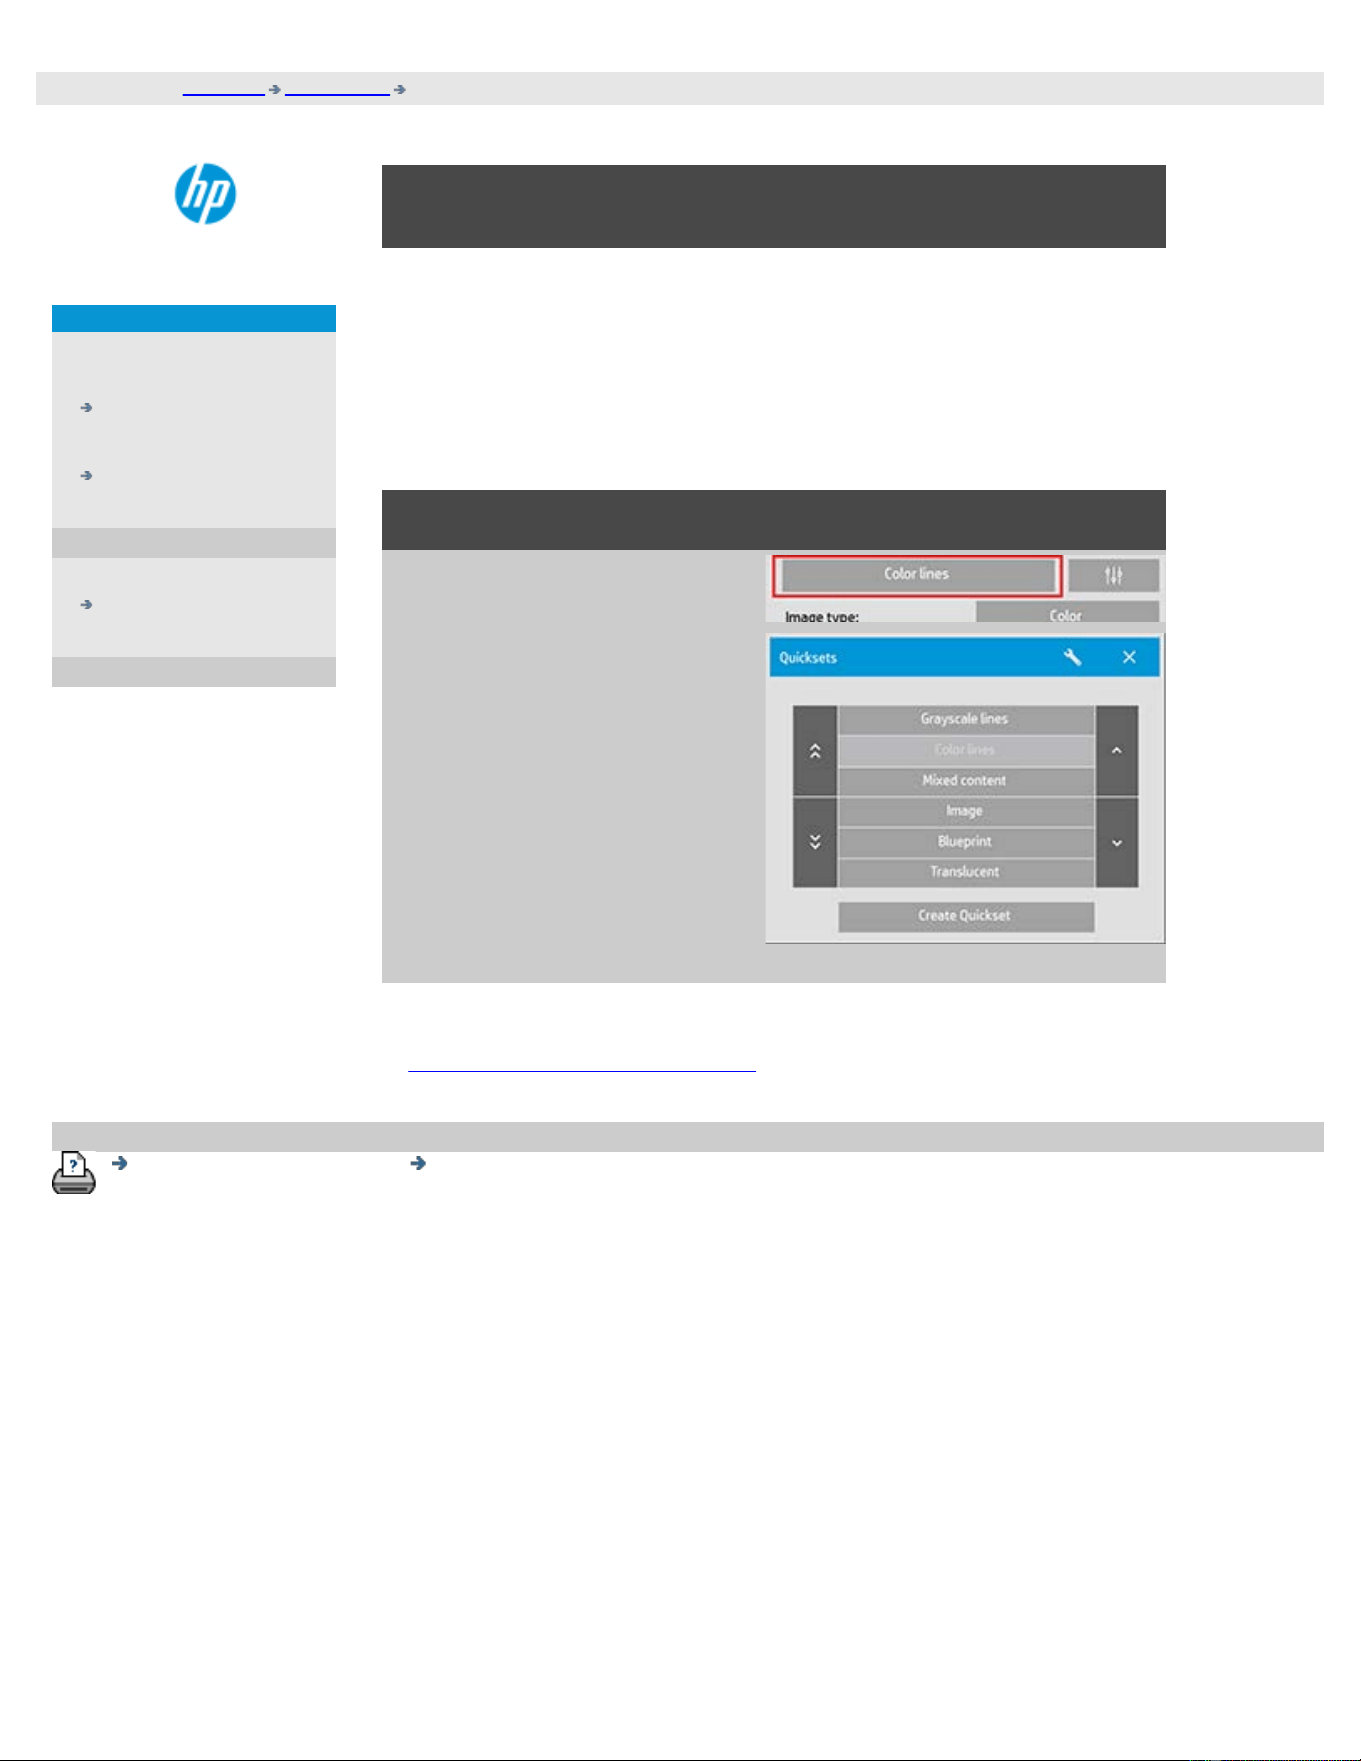
you are here: welcome how do I...? select a quickset template
HP Pro Scanner
how do I...?
the problem is...
alphabetical index
how do I select a quickset template?
The Quickset template defines the original you wish to input. Quickset
templates are used for both copy and scan-to-file jobs (Copy tab and
Scan tab).
to select a quickset template...
1. Press the Quickset button.
2. Select from the list a
Quickset template that
best describes your
current input.
See also:
...how do I make custom quicksets
printing instructions legal information
© Copyright 2012, 2015 HP Development Company, L.P
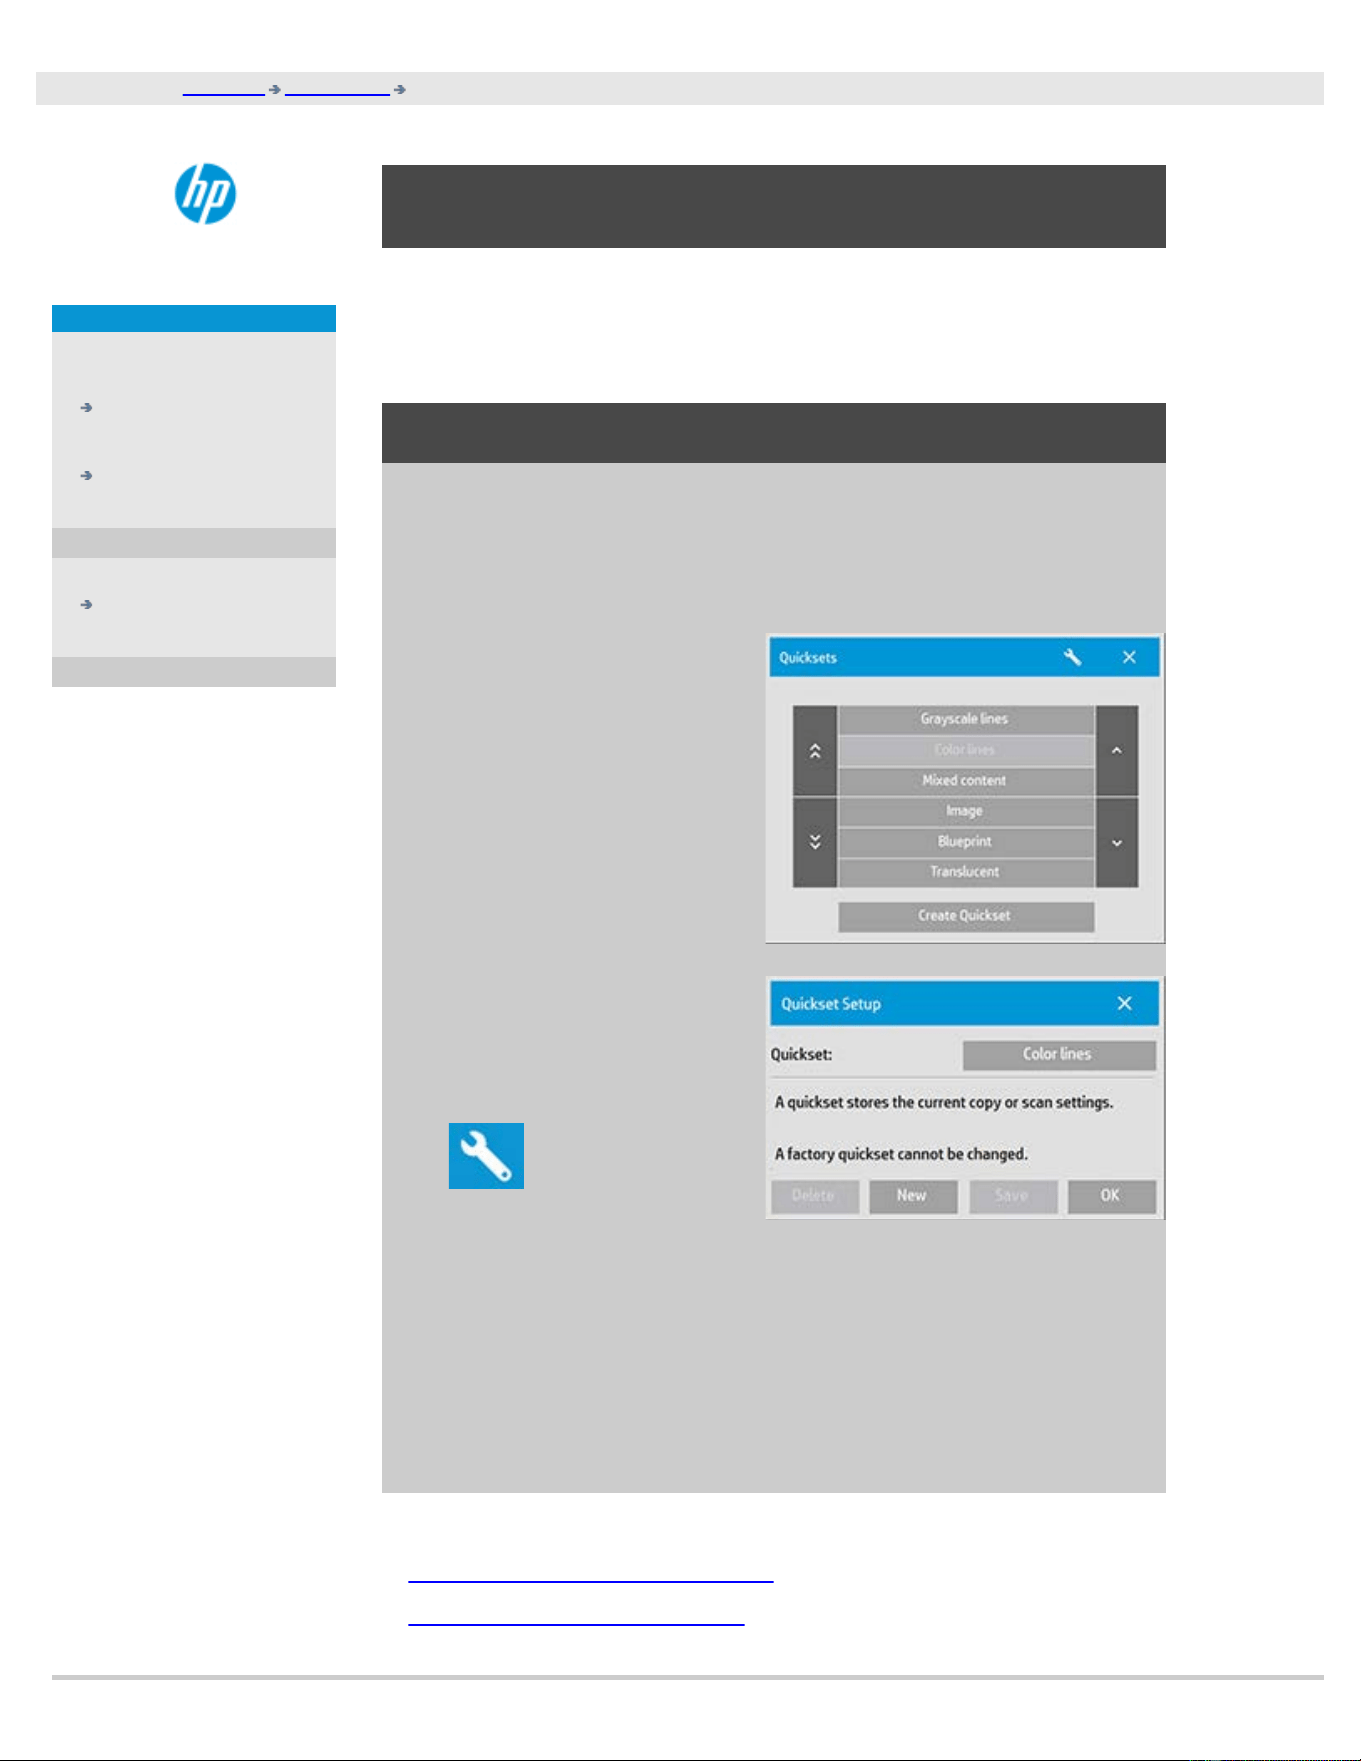
you are here: welcome how do I...? define a custom quickset
HP Pro Scanner
how do I...?
the problem is...
alphabetical index
how do I define a custom quickset?
Adjustments to a quickset template will normally be discarded when you
close the program. You can however choose to save them as a new
custom quickset.
to define a custom quickset...
1. Press the Copy tab or the Scan tab.
3. Press the Quickset button
to open the Quickset
(template) menu.
4. Press Use the Tool button
to open the Quickset
Setup dialog.
6. Press the New button and enter the name for your new
quickset.
Your new Quickset will be added to the top of the list of those already
available.
See also:
... how to select a quickset
template
...how do I make custom quickset