
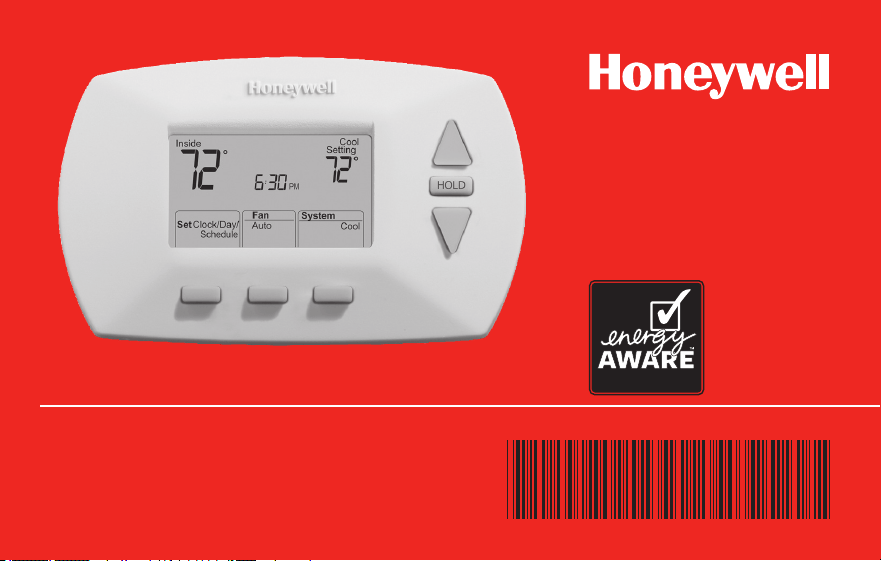
Operating
Manual
RTH6350/RTH6450/RET93E0/RET95E0 Series
Programmable Thermostat
69-2415ES-05
Read and save these instructions.
Need Help?
For assistance with this product please visit http://yourhome.honeywell.com
or call Honeywell Customer Care toll-free at 1-800-468-1502
® U.S. Registered Trademark.
US Patent No. D542,677 and other patents pending
Copyright © 2012 Honeywell International Inc. All rights reserved.
M28400
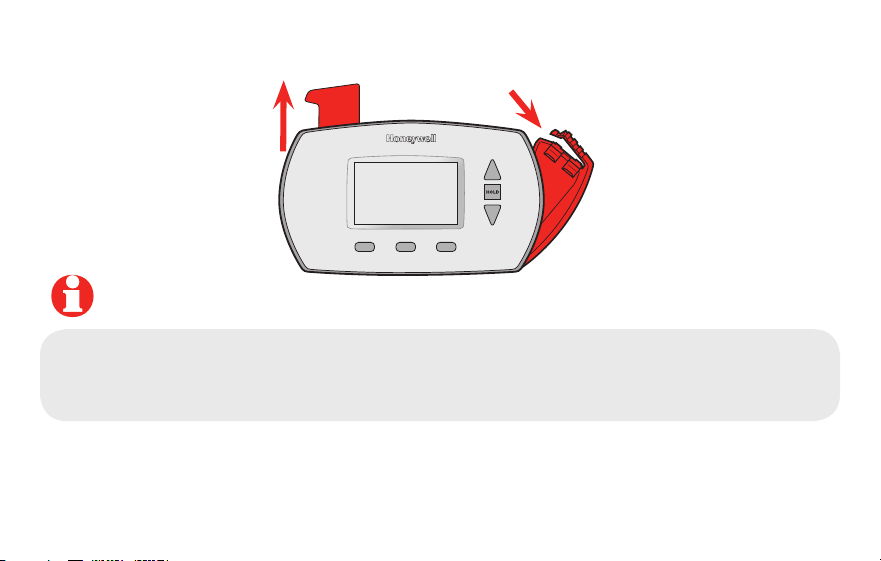
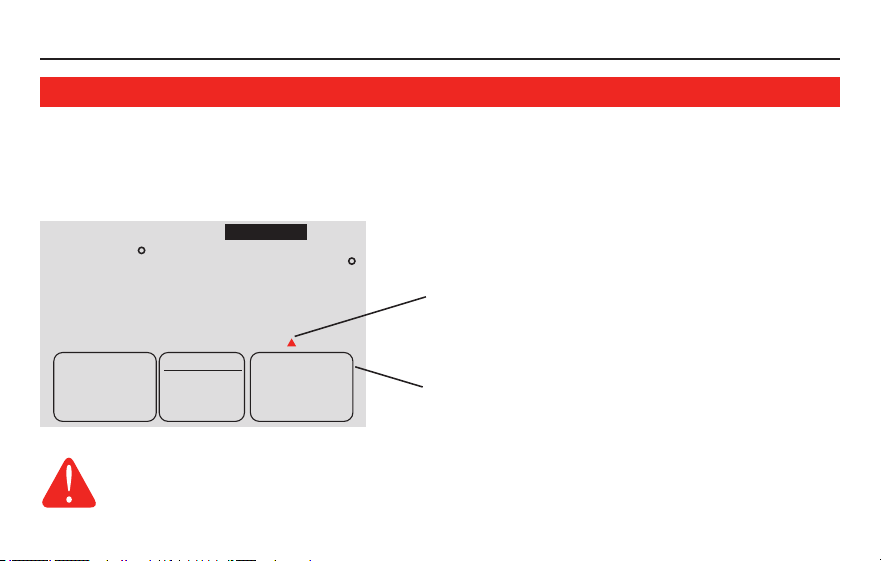
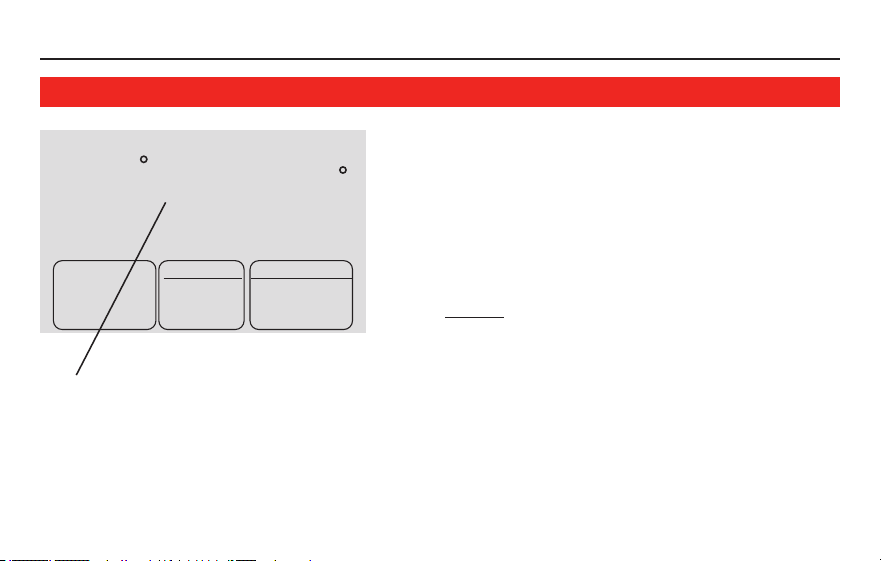
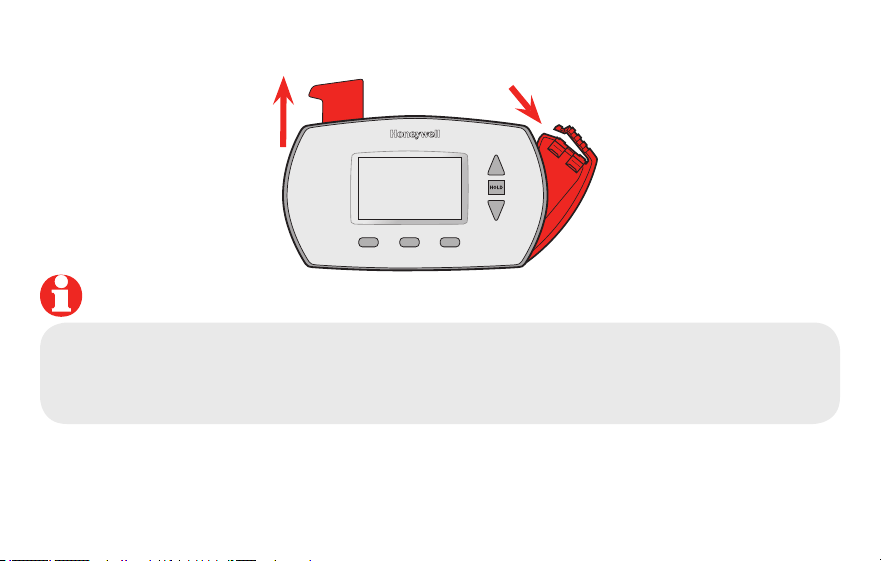
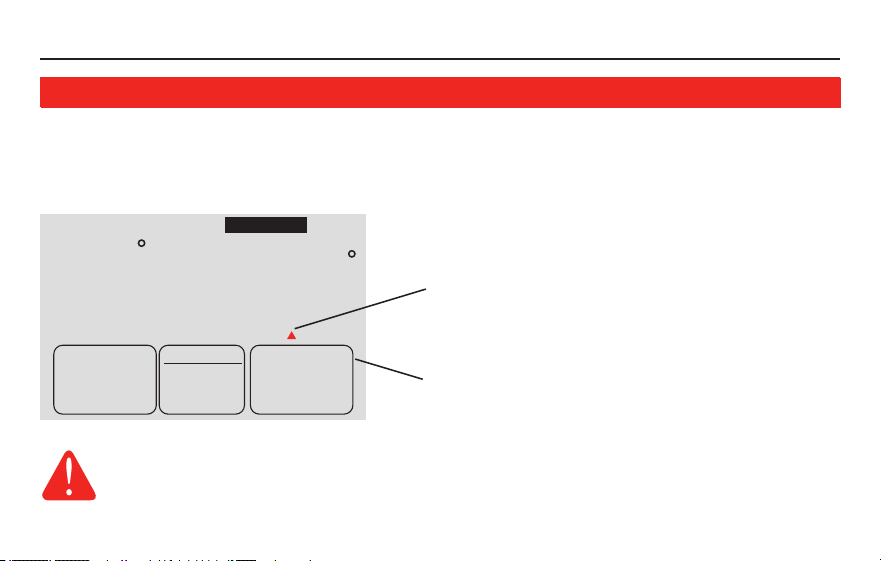
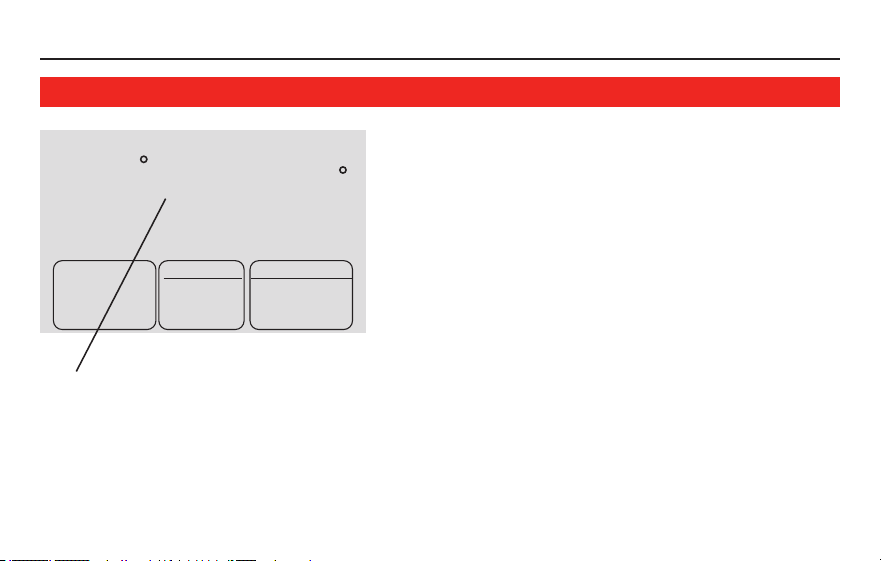
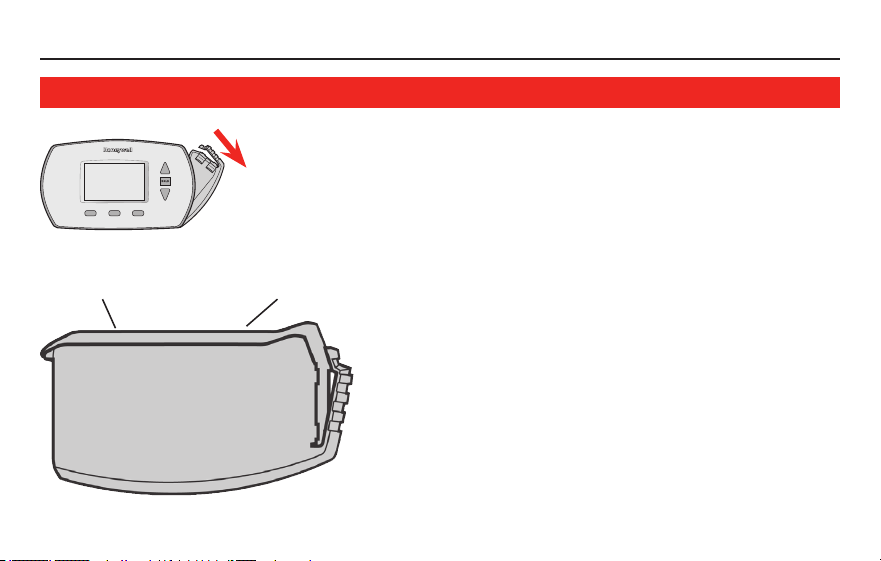
Quick Reference Card
Grasp and pull to see basic
operating instructions at a
glance.
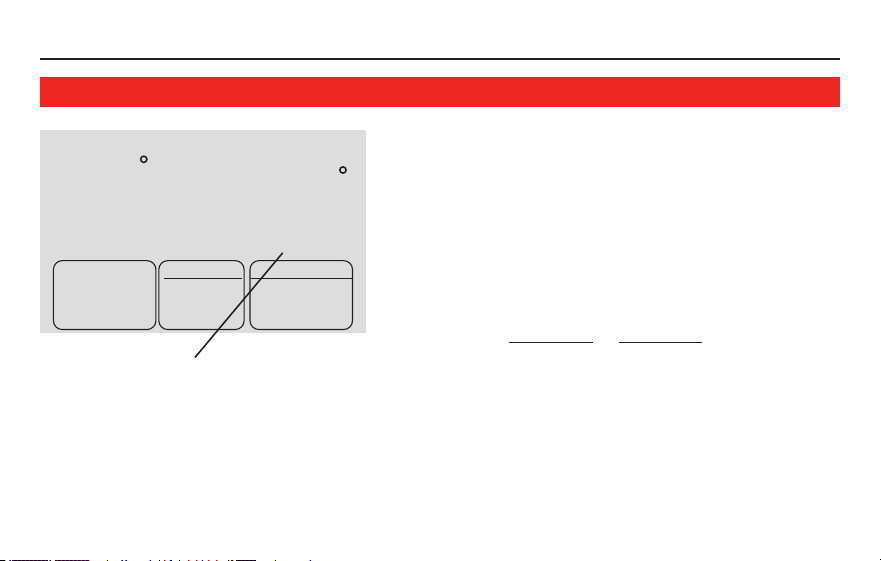
Battery Holder
Press down and pull to
remove batteries.
Batteries should be
replaced once a year
(see page 15).
NOTE: Remove battery holder; model number is on the battery holder.
This manual covers the RTH6350, RTH6450, RET93E0, and RET95E0 models.

RTH6350/RTH6450/RET93E0/RET95E0 Series
1 69-2415ES—05
About your new thermostat
About your new thermostat
Thermostat features ...................................2
Programming at a glance ..........................3
Quick reference to controls ....................... 4
Quick reference to display ........................5
Programming & Operation
Set time and day ........................................6
Select fan setting (auto/on) ...................... 7
Select system setting (heat/cool)..............8
Using program schedules .........................9
Program schedule overrides ...................13
Auto Changeover
(RTH6450 and RET95E0 only) .................15
Built-in compressor protection ...............17
Smart Response
®
Technology .................18
Appendices
Battery installation ................................... 19
Customer assistance ............................... 20
In case of difficulty...................................21
Limited warranty ......................................23
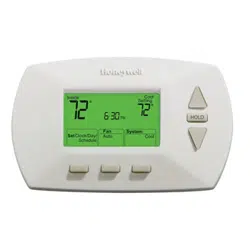
This thermostat is ready to go!
Your new thermostat is pre-programmed
and ready to go.
See page 3 to check settings.
Table of contents

Operating Manual
69-2415ES—05 2
About your new thermostat
Congratulations on the purchase of your new Honeywell thermostat. It has been
designed to give you many years of reliable service and easy-to-use, push-button
climate control.
Features
• Easy-to-followmenuprogramming.
• One-touchtempcontroloverridesprogramscheduleatanytime.
• Large,clear,backlitdisplayiseasytoread—eveninthedark.
• Displaysbothroomtemperatureandtemperaturesetting.
• Removablebatteryholderforfast,easyreplacement.
• Built-incompressorprotection.

RTH6350/RTH6450/RET93E0/RET95E0 Series
3 69-2415ES—05
This thermostat is ready to go!
Your new thermostat is pre-programmed and ready to go. All you have to do is set the
time and day. Then check the settings below and change if needed:
1. Set time and day (required for proper operation) .........................See page 6
2. Select fan setting (Auto/On): Preset to Auto .................To change, see page 7
3. Select system setting (Heat/Cool): Preset to Heat ......To change, see page 8
4. Program schedules: Preset to energy-saving levels
while you’re at work or asleep (assumes you wake at
6 am, leave at 8 am, return at 6 pm and go to bed
at 10 pm) ......................................................................To change, see pages 9-11
ONE-TOUCH TEMP CONTROL: You can override the program schedule at any time, and
manually adjust the temperature (see pages 12-13).
Operating Manual
69-2415ES—05 4
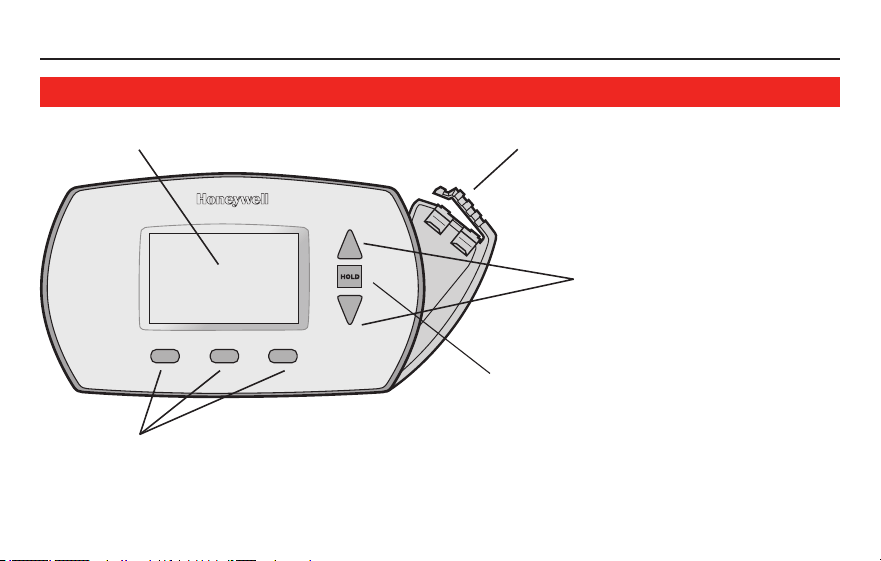
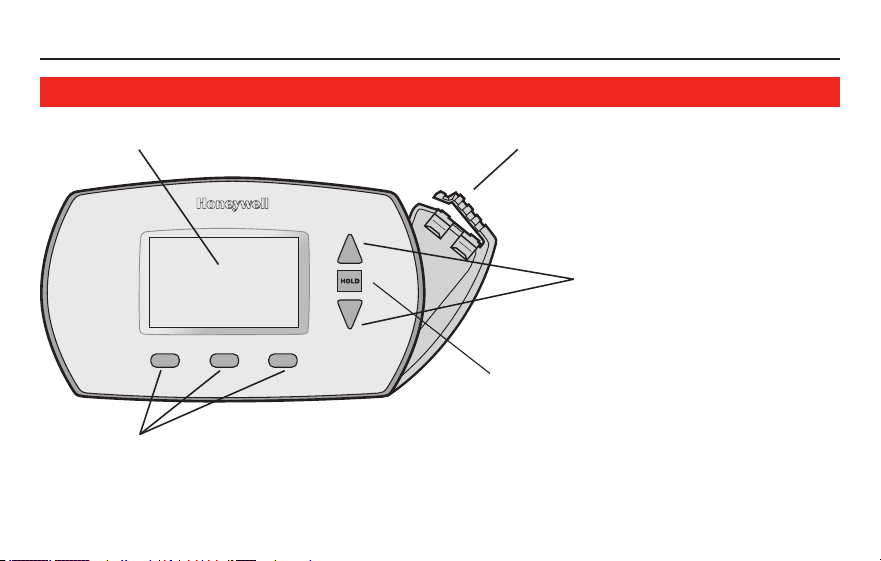
Quick reference to controls
M28401
Digital display (see page 5). Battery holder (see page 15).
Temperature buttons
Press to adjust temperature
settings (see pages 11-13).
Hold button
Press to override programmed
temperature control (see page 13).
Function buttons
Press to select the function displayed just above each button.
(Functions change depending on the task.)
RTH6350/RTH6450/RET93E0/RET95E0 Series
5 69-2415ES—05
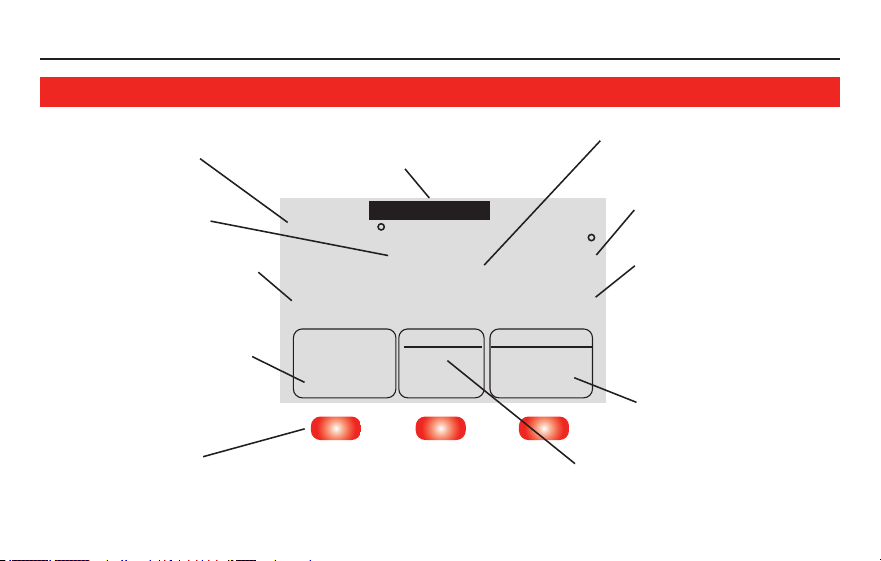
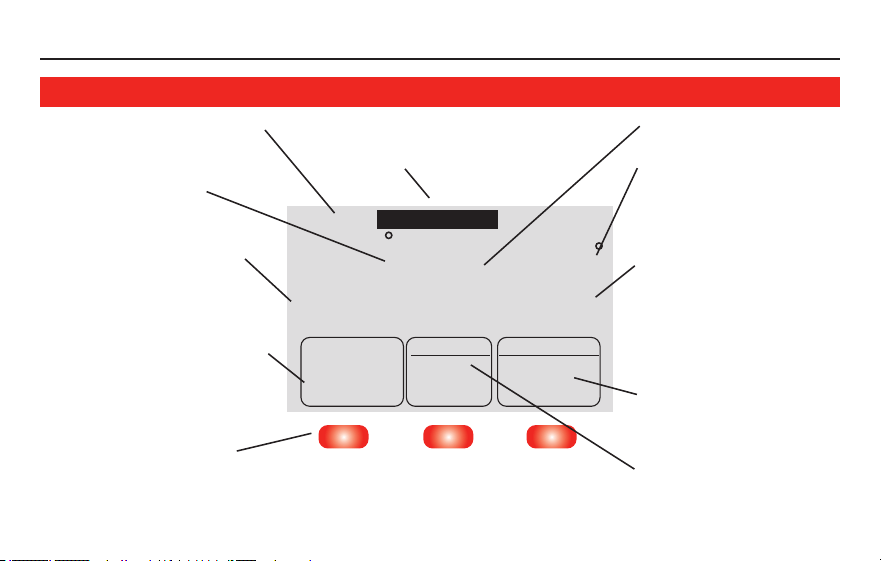
Quick reference to display screen
Set Clock/Day/
Schedule
Auto
Wake Wed
Fan System
Heat On
Heat
Heat
Setting
Inside
AM
75
75
6
:
30
Replace Battery
M28402
In Recovery
Current inside temperature
Current program period
Wake/Leave/Return/Sleep
(see pages 9-11)
Set clock/day/schedule
Press to set time, day or
program schedules (see
pages 6 & 11)
Function buttons
Press the button beneath each function to view or change
settings (functions change depending on the task)
Low battery warning
(see page 15)
Current time/day
(see page 6)
Temperature setting
(see pages 11-13)
System status
Onwhen“calling”for
heating or cooling;
flashes when waiting for
compressor restart (see
page 14)
System setting
Heat/Cool/Off
(see page 8)
Fan setting
Auto/On(seepage7)
Smart Response
®
technology in effect
(see page 17)
Operating Manual
69-2415ES—05 6
M28404
Wed
Set Day Set Schedule
Done
PM
4
:
30
Set Clock/Day/
Schedule
Auto
Fan System
Heat
M28403
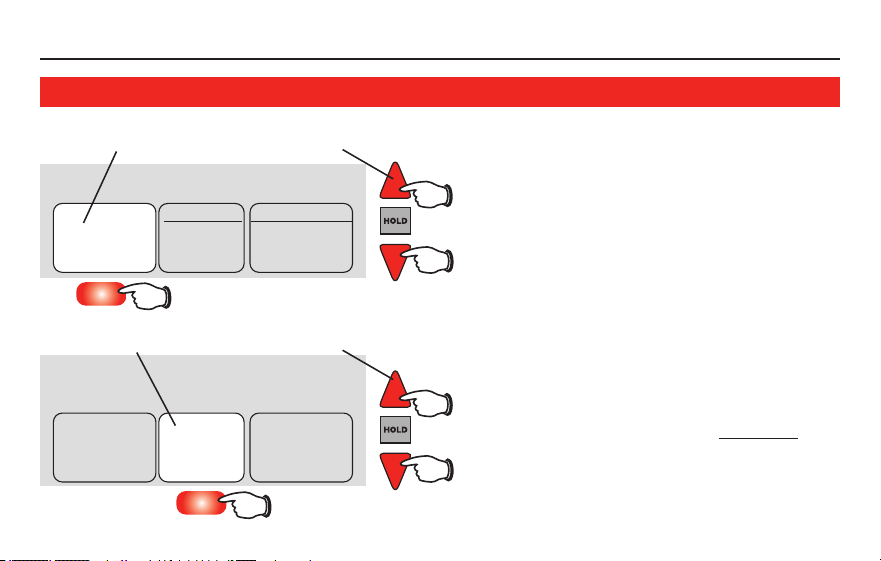
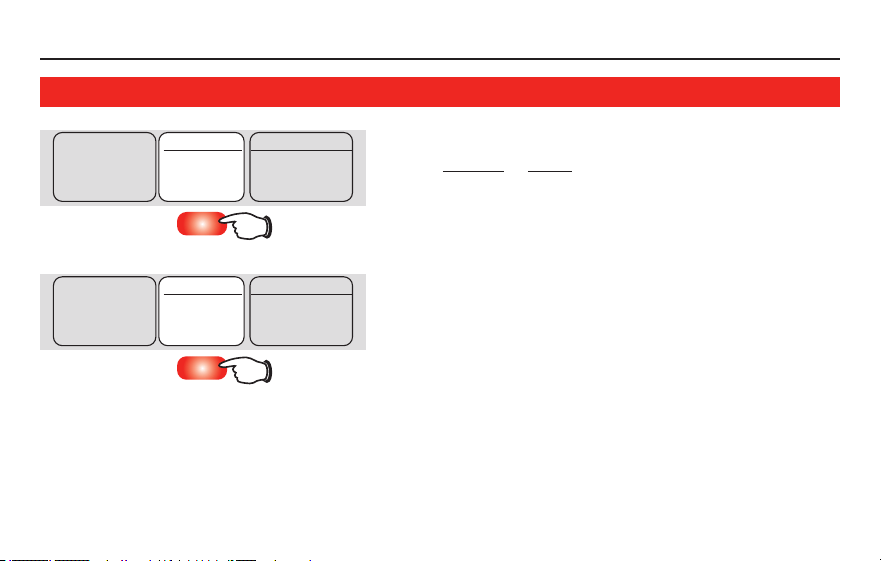
Set the time and day
1. Press the SET CLOCK/DAY/SCHEDULE
button, then press
s or t to set
the clock time.
2. Press the SET DAY button, then
press
s or t to select the day of
the week.
3. Press DONE to save & exit.
Note: If the SET CLOCK/DAY/SCHEDULE
option is not displayed, press DONE or
RUN SCHEDULE.
Note: If the display flashes Set Clock, the
thermostat will follow your settings for
theweekday“Wake”timeperioduntilyou
reset the time and day.
Press SET CLOCK/DAY/SCHEDULE, then adjust time
Press SET DAY, then select current day
RTH6350/RTH6450/RET93E0/RET95E0 Series
7 69-2415ES—05
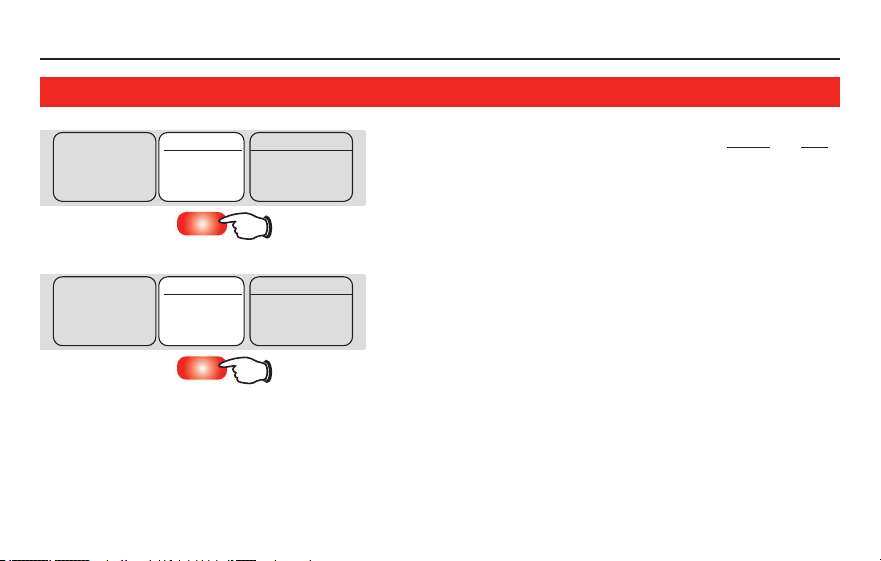
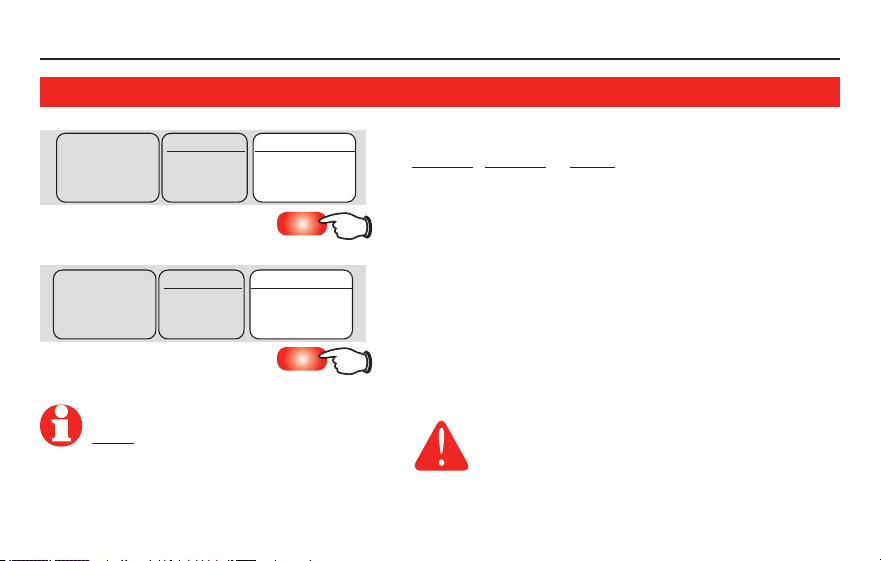
Select the fan setting
Press the FAN button to select Auto or On.
In“Auto”mode(themostcommonlyused
setting), the fan runs only when the heat-
ingorcoolingsystemison.Ifsetto“On,”
the fan runs continuously.
M28405
Set Clock/Day/
Schedule
Auto
Fan System
Heat
M28406
Set Clock/Day/
Schedule
On
Fan System
Heat
Operating Manual
69-2415ES—05 8
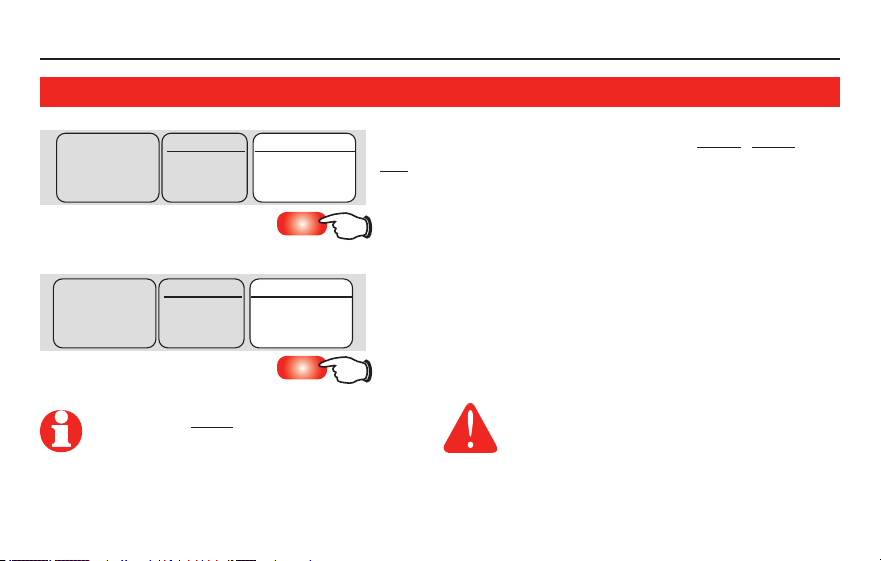
Select the system setting
Press the SYSTEM button to select Heat, Cool or
Off.
• Heat: Thermostat controls only the heating
system.
• Cool: Thermostat controls only the cooling
system.
• Off: Heating and cooling systems are off.
• Auto (RTH6450 and RET95E0 only):
Thermostat automatically selects heating or
cooling depending on the indoor temperature.
CAUTION: EQUIPMENT DAMAGE
HAZARD. To prevent possible
compressor damage, do not operate
cooling system when outdoor
temperature is below 50 °F (10 °C).
Note: The Auto setting may not
appear, depending on how your
themostat was installed.
M28407
Set Clock/Day/
Schedule
Auto
Fan
System
Heat
M28408
Set Clock/Day/
Schedule
Auto
Fan
System
Cool
RTH6350/RTH6450/RET93E0/RET95E0 Series
9 69-2415ES—05
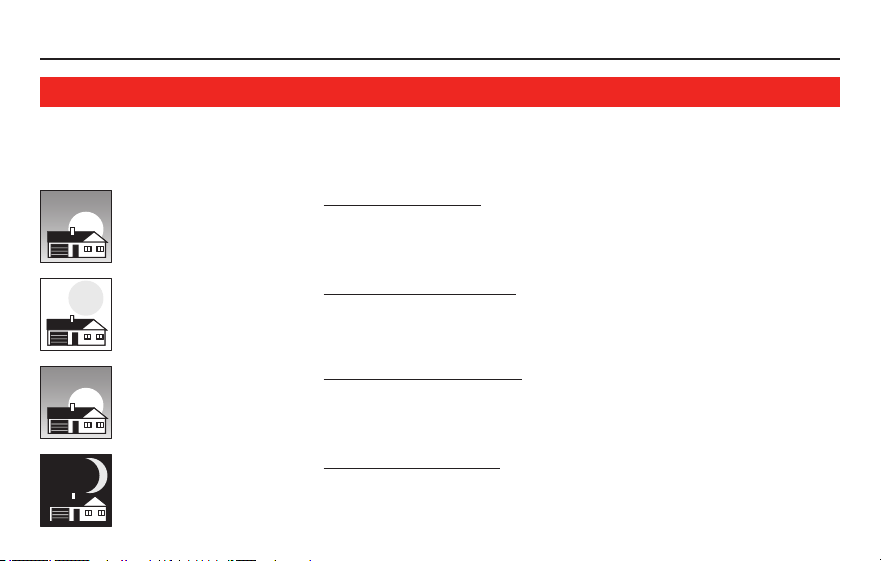
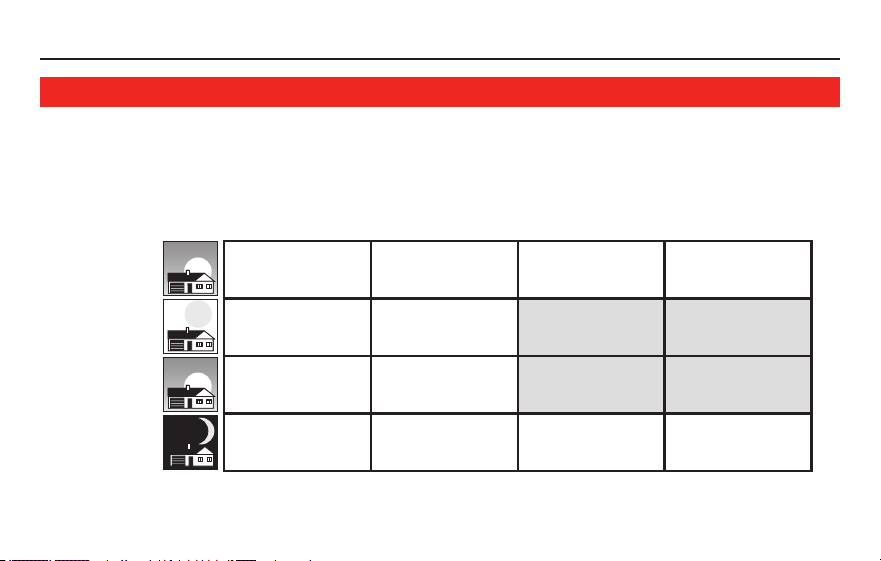
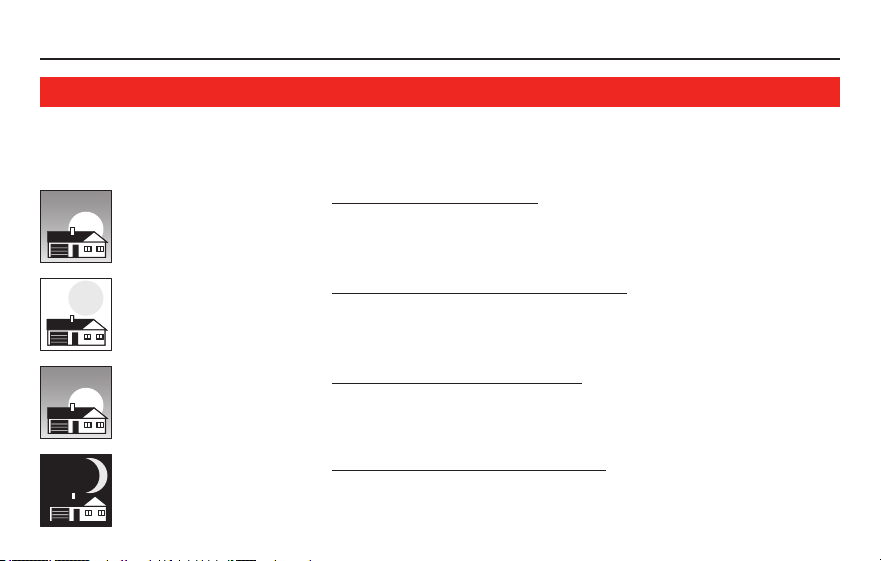
Save money by setting program schedules
It’s easy to program your system for maximum energy savings. You can program four
time periods each day, with different settings for weekdays, Saturday and Sunday.
Set to the time you awaken and the temperature you want
during the morning, until you leave for the day.
Set to the time you leave home and the temperature you
want while you are away (usually an energy-saving level).
Set to the time you return home and the temperature you
want during the evening, until bedtime.
Set to the time you go to bed and the temperature you want
overnight (usually an energy-saving level).
WAKE
6:00 am
70
°
LEAVE
8:00 am
62
°
RETURN
6:00 pm
70
°
SLEEP
10:00 pm
62
°
Operating Manual
69-2415ES—05 10
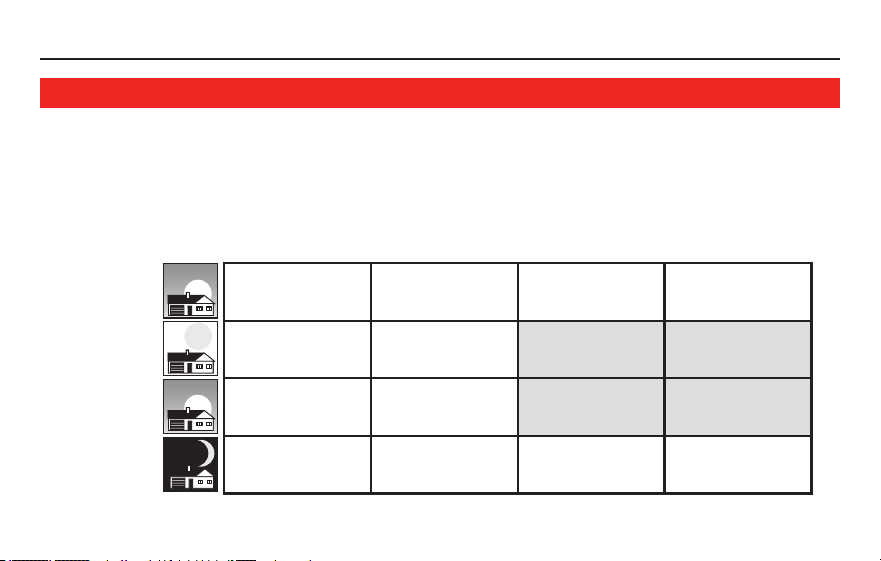
Energy-saving settings for maximum cost savings
This thermostat is pre-set with energy-saving program settings. We recommend these
settings, since they can reduce your heating/cooling expenses by as much as 33%.
(See next page to adjust times and temperatures of each time period.)
Wake
(6:00 am)
Leave
(8:00 am)
Return
(6:00 pm)
Sleep
(10:00 pm)
Cool (Mon-Fri)Heat (Mon-Fri) Heat (Sat-Sun) Cool (Sat-Sun)
70
°
75
°
70
°
75
°
62
°
83
°
62
°
[Orcancelperiod]
83
°
[Orcancelperiod]
70
°
75
°
70
°
[Orcancelperiod]
75
°
[Orcancelperiod]
62
°
78
°
62
°
78
°

RTH6350/RTH6450/RET93E0/RET95E0 Series
11 69-2415ES—05
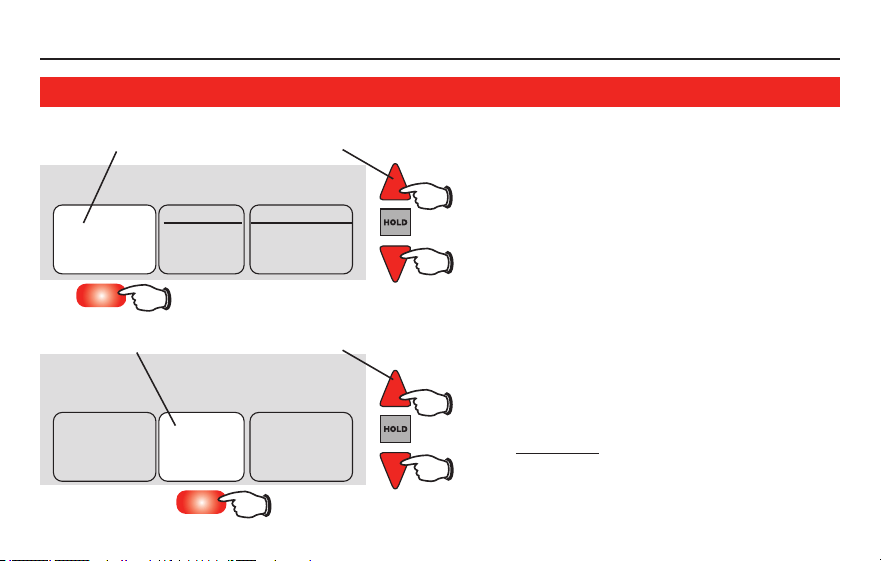
To adjust program schedules (RTH6350 and RET95E0 only)
1. Press SET CLOCK/DAY/SCHEDULE, then SET
SCHEDULE.
2. Press s or t to set your weekday Wake
time (Mon–Fri), then press NEXT.
3. Press s or t to set the temperature for this
time period, then press NEXT.
4. Set time and temperature for the next time
period (Leave). Repeat steps 2 and 3 for each
weekday time period.
5. Press NEXT to set weekend time periods (Sat-
Sun), then press DONE to save & exit.
Note: Make sure the thermostat is set to the system
you want to program (Heat or Cool).
Note: You can press CANCEL PERIOD to eliminate
unwanted time periods (except Wake).
M28409
Set Clock/Day/
Schedule
Auto
Fan System
Heat
Set Day Set Schedule
Done
Mon Tue Wed Thu FriLeave
Set Schedule
Heat
Setting
AM
62
8
:
00
Done
CancelPeriod
Next
Operating Manual
69-2415ES—05 12
About your new thermostatTo adjust program schedules (RTH6450 and RET95E0 only)
1. Press SET CLOCK/DAY/SCHEDULE, then SET
SCHEDULE.
2. Press s or t to set your weekday Wake
time (Mon–Fri), then press NEXT.
3. Press s or t to set the temperature for this
time period, then press NEXT.
4. Set time and temperature for the next time
period (Leave). Repeat steps 2 and 3 for each
weekday time period.
5. Press NEXT to set Saturday time periods.
6. Press NEXT to set Sunday time periods, then
press DONE to save & exit.
Note: Make sure the thermostat is set to the system
you want to program (Heat or Cool).
Note: You can press CANCEL PERIOD to eliminate
unwanted time periods (except Wake).
M28409
Set Clock/Day/
Schedule
Auto
Fan System
Heat
Set Day Set Schedule
Done
Mon Tue Wed Thu FriLeave
Set Schedule
Heat
Setting
AM
62
8
:
00
Done
CancelPeriod
Next
RTH6350/RTH6450/RET93E0/RET95E0 Series
13 69-2415ES—05
About your new thermostat
M28410
Heat
Setting
Inside
AM
69
75
6
:
30
Temporary
Run Schedule
Auto
Fan System
Heat
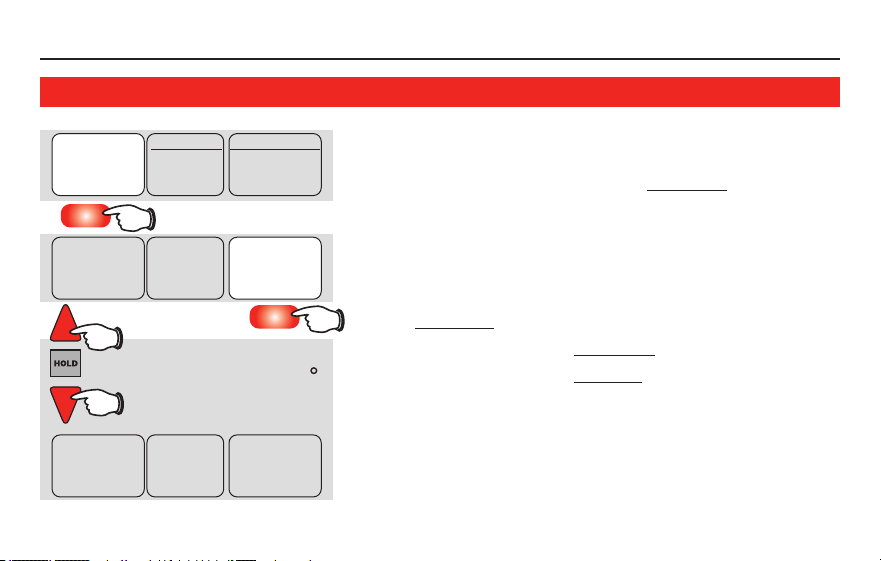
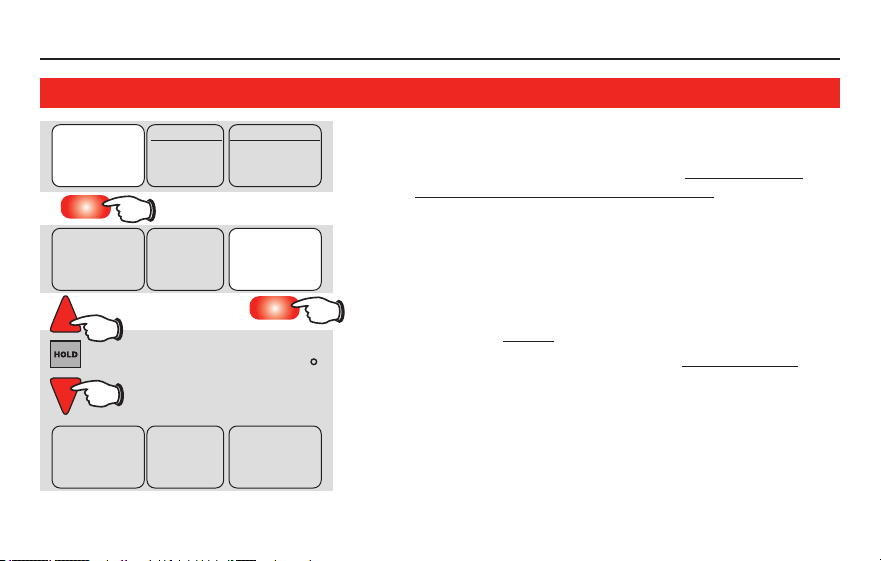
Program schedule override (temporary)
Press s or t to immediately adjust
the temperature. This will temporarily
override the temperature setting for the
current time period.
The new temperature will be
maintained only until the next
programmed time period begins (see
page 10). For example, if you want to
turn up the heat early in the morning, it
will automatically be lowered when you
leave for the day.
To cancel the temporary setting at any
time, press RUN SCHEDULE.
Press to cancel temporary setting and
resume program schedule.
Note: Make sure the thermostat is set
to the system you want to control (heat
or cool).
Press to temporarily adjust temperature.
Operating Manual
69-2415ES—05 14
About your new thermostat
M28411
Heat
Setting
Inside
AM
69
75
6
:
30
Run Schedule
Auto
Fan System
Heat
Hold
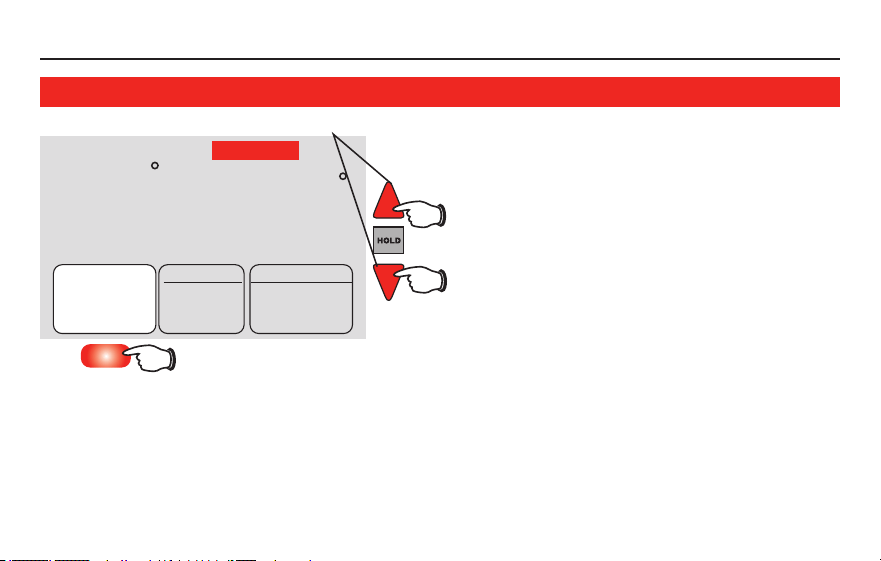
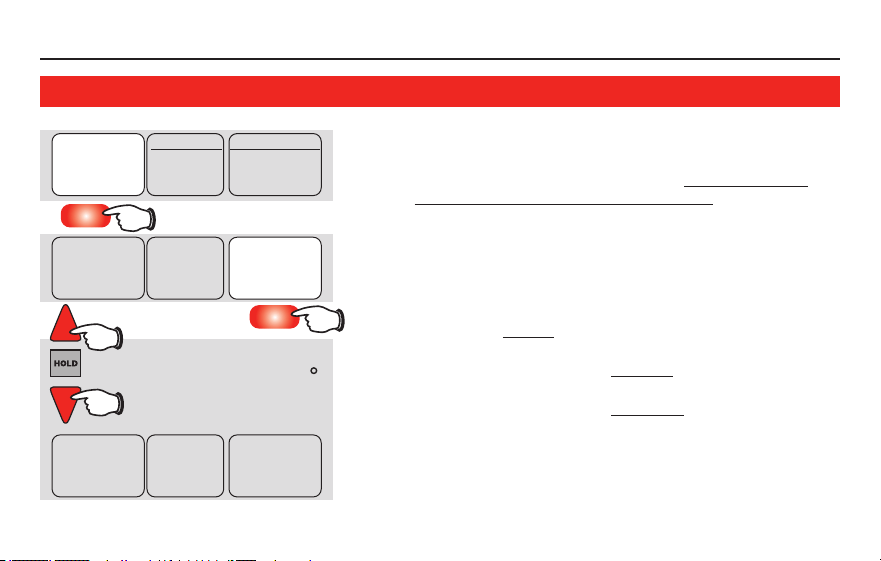
Program schedule override (permanent)
Press HOLD to permanently adjust
the temperature. This will override
the temperature settings for all time
periods.
The“Hold”featureturnsoffthe
program schedule and allows you
to adjust the thermostat manually,
as needed.
Whatever temperature you set will
be maintained 24 hours a day until
you manually change it, or press
RUN SCHEDULEtocancel“Hold”and
resume the programmed schedule.
Presstocancel“Hold”settingand
resume program schedule.
Note: Make sure the thermostat is set
to the system you want to control (heat
or cool).
Press to permanently adjust temperature.

RTH6350/RTH6450/RET93E0/RET95E0 Series
15 69-2415ES—05
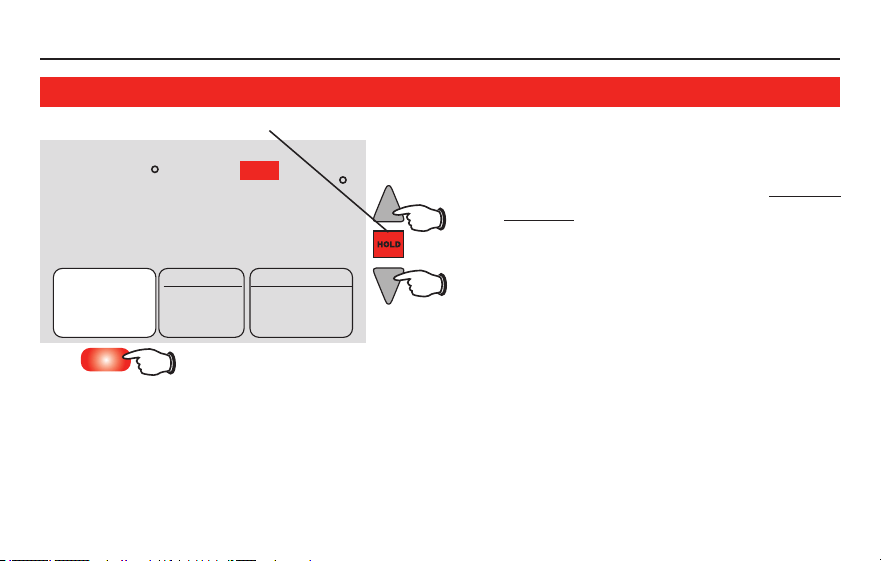
About your new thermostat
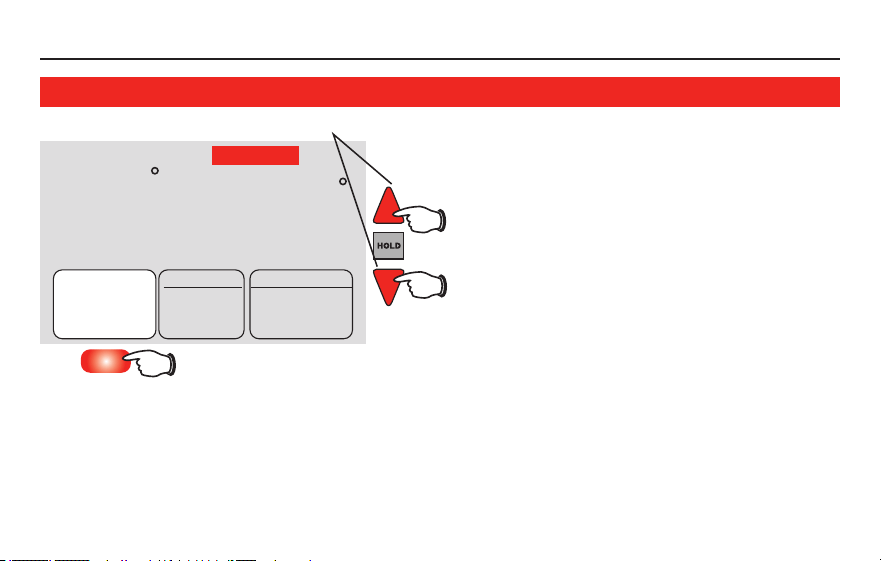
Use this feature in climates where both air conditioning and heating are used on the
same day. When the system mode is in Auto, the thermostat automatically selects
heating or cooling depending on the indoor temperature.
While in the Auto mode, if a schedule override takes place (temporarily or perma-
nently) the thermostat will automatically adjust the cooling and heating settings to
maintain a 3-degree separation between the cool and heat settings.
For example, if the heat temperature is raised to where it gets within 3-dgrees of the
coolsetting,thedisplaywillshowanuparrownextto“cool”toshowthethermostat
is raising the cool setting up to maintain a 3-dgreee separation.
Press the Select Heat/Cool button to select between the heat and cool to view/adjust
either mode.
Auto Changeover (RTH6450 and RET95E0 only)
Operating Manual
69-2415ES—05 16
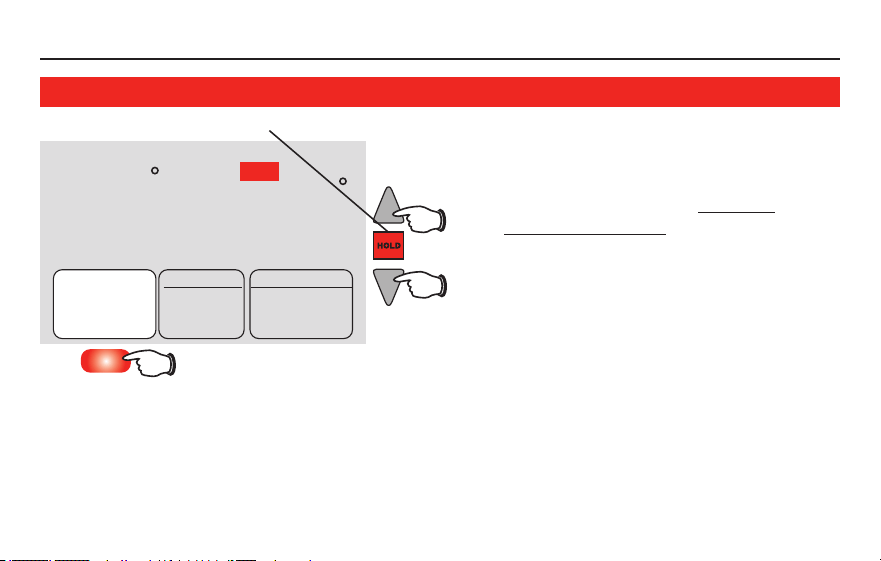
About your new thermostat
If the cool temperature is lowered to where it gets close to the heat setting, an arrow
next to heat will show the thermostat is lowering the heat setting down to maintain a
3-degree separation.
Auto Changeover (RTH6450 and RET95E0 only)
CAUTION: To avoid possible compressor damage, do not use Auto
Changeover if the outside temperature drops below 50ºF (10ºC).
Run Schedule
Auto
Cool
Fan
Select
Heat/Cool
Heat
Setting
Inside
PM
73
73
1
:
05
Temporary
M27477
Press Select Heat/Cool to set the heat or cool
temperature.
The triangle indicates the cool temperature is
increasing to maintain 3 degrees between heat
and cool settings.

RTH6350/RTH6450/RET93E0/RET95E0 Series
17 69-2415ES—05
About your new thermostat
M28412
Cool On
Cool
Setting
Inside
AM
75
75
6
:
30
Set Clock/Day/
Schedule
Auto
Fan System
Cool
Built-in compressor protection
This feature helps prevent damage to the
compressor in your air conditioning or heat
pump system.
Damage can occur if the compressor is
re-started too soon after shutdown. This
feature forces the compressor to wait a few
minutes before restarting.
During the wait time, the display will flash
the message CoolOn (or HeatOn if you have
a heat pump). When the safe wait time has
elapsed, the message stops flashing and the
compressor turns on.
Message flashes until safe restart
time has elapsed.
Operating Manual
69-2415ES—05 18
About your new thermostat
Smart Response
®
Technology: This feature
allowsthethermostatto“learn”howlong
the furnace and air conditioner take to reach
programmed temperature settings, so the
temperature is reached at the time you set.
For example: Set the Wake time to 6 am, and
the temperature to 70°. The heat will come
on before 6 am, so the temperature is 70°
bythetimeyouwakeat6.Themessage“In
Recovery”isdisplayedwhenthesystemis
activated before a scheduled time period.
Smart Response
®
Technology
M27476
Cool On
Cool
Setting
Inside
AM
75
75
6
:
38
Set Clock/Day/
Schedule
Auto
Fan System
Cool
In Recovery
Displays when Smart Response is active.
RTH6350/RTH6450/RET93E0/RET95E0 Series
19 69-2415ES—05
M28414
M28413
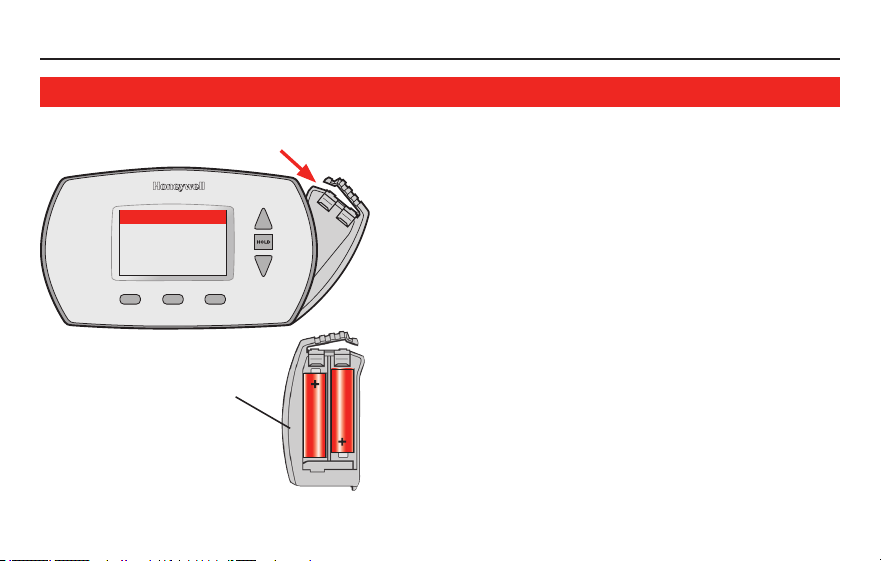
Replace Battery
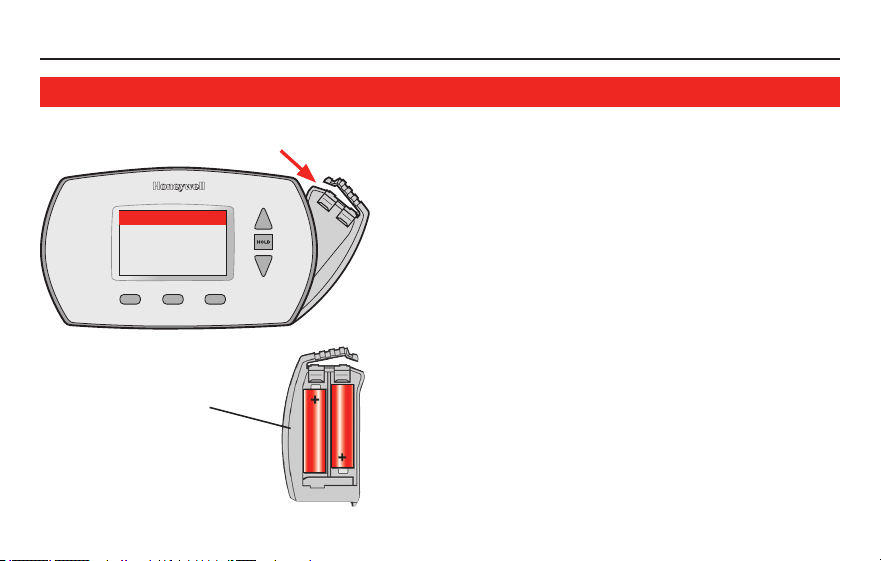
Battery replacement
Install fresh batteries immediately when the
REPLACE BATTERY warning begins flashing. The
warning flashes about two months before the
batteries are depleted.
Even if the warning does not appear, you
should replace batteries once a year, or before
leaving home for more than a month.
If batteries are inserted within two minutes, the
time and day will not have to be reset. All other
settings are permanently stored in memory and
do not require battery power.
Press down and pull to remove.
Insert fresh AA alkaline
batteries, then reinstall
battery holder.

Operating Manual
69-2415ES—05 20
M28416
Customer assistance
For assistance with this product, please visit
http://yourhome.honeywell.com.Orcall
Honeywell Customer Care toll-free at
1-800-468-1502.
To save time, please remove the battery holder
and note your model number and date code
before calling.
Accessories/replacement parts
To order, please call Honeywell Customer Care
toll-free at 1-800-468-1502.
Battery holder .................... Part No. 50007072-001
Cover plate assembly* ...... Part No. 50002883-001
*Use to cover marks left by old thermostats.
Model number Date code
xxxxxxx xxxxxxx
M28415

RTH6350/RTH6450/RET93E0/RET95E0 Series
21 69-2415ES—05
About your new thermostatIn case of difficulty
If you have difficulty with your thermostat, please try the following suggestions.
Most problems can be corrected quickly and easily.
Display is blank
• MakesurefreshAAalkalinebatteriesarecorrectlyinstalled
(see page 15).
Temperature
settings do not
change
Make sure heating and cooling temperatures are set to acceptable ranges:
• Heat:40°to90°F(4.5°to32°C).
• Cool:50°to99°F(10°to37°C).
To restore
default schedule
settings
Follow these steps to restore default schedule settings (see page 10):
1. Press SET CLOCK/DAY/SCHEDULE.
2. Press SET SCHEDULE.
3. Press DONE and NEXT at the same time for 4 seconds.

Operating Manual
69-2415ES—05 22
About your new thermostatIn case of difficulty
Heating or
cooling system
does not respond
• PressSYSTEM button to set system to Heat. Make sure the temperature
is set higher than the Inside temperature.
• PressSYSTEM button to set system to Cool. Make sure the temperature
is set lower than the Inside temperature.
• Checkcircuitbreakerandresetifnecessary.
• Makesurepowerswitchatheating&coolingsystemison.
• Makesurefurnacedoorisclosedsecurely.
• Wait5minutesforthesystemtorespond.
“Cool On” or
“Heat On” is
flashing
• Compressor protection feature is engaged. Wait 5 minutes for the system
to restart safely, without damage to the compressor (see page 14).
Other problems
• Iftheabovemeasuresdonotresolvetheproblem,checktheInCaseof
Difficulty section in your thermostat
Installation Guide
.

RTH6350/RTH6450/RET93E0/RET95E0 Series
23 69-2415ES—05
About your new thermostat1-year limited warranty
Honeywell warrants this product, excluding battery, to be free from defects in the workmanship or materi-
als, under normal use and service, for a period of one (1) year from the date of purchase by the consumer. If
at any time during the warranty period the product is determined to be defective or malfunctions, Honeywell
shall repair or replace it (at Honeywell’s option).
If the product is defective,
(i) return it, with a bill of sale or other dated proof of purchase, to the place from which you purchased it; or
(ii) call Honeywell Customer Care at 1-800-468-1502. Customer Care will make the determination whether
the product should be returned to the following address: Honeywell Return Goods, Dock 4 MN10-3860, 1885
Douglas Dr. N., Golden Valley, MN 55422, or whether a replacement product can be sent to you.
This warranty does not cover removal or reinstallation costs. This warranty shall not apply if it is shown by
Honeywell that the defect or malfunction was caused by damage which occurred while the product was in the
possession of a consumer.
Honeywell’s sole responsibility shall be to repair or replace the product within the terms stated above.
HONEYWELLSHALLNOTBELIABLEFORANYLOSSORDAMAGEOFANYKIND,INCLUDINGANY
INCIDENTALORCONSEQUENTIALDAMAGESRESULTING,DIRECTLYORINDIRECTLY,FROMANYBREACH
OFANYWARRANTY,EXPRESSORIMPLIED,ORANYOTHERFAILUREOFTHISPRODUCT.Somestatesdo
not allow the exclusion or limitation of incidental or consequential damages, so this limitation may not apply
to you.

Operating Manual
69-2415ES—05 24
About your new thermostat1-year limited warranty
THISWARRANTYISTHEONLYEXPRESSWARRANTYHONEYWELLMAKESONTHISPRODUCT.THE
DURATIONOFANYIMPLIEDWARRANTIES,INCLUDINGTHEWARRANTIESOFMERCHANTABILITYAND
FITNESSFORAPARTICULARPURPOSE,ISHEREBYLIMITEDTOTHEONE-YEARDURATIONOFTHIS
WARRANTY.
Some states do not allow limitations on how long an implied warranty lasts, so the above limitation may not
apply to you. This warranty gives you specific legal rights, and you may have other rights which vary from
state to state.
If you have any questions concerning this warranty, please write Honeywell Customer Relations, 1985 Douglas
Dr,GoldenValley,MN55422orcall1-800-468-1502.InCanada,writeRetailProductsON15-02H,Honeywell
Limited/HoneywellLimitée,35DynamicDrive,Toronto,OntarioM1V4Z9.

RTH6350/RTH6450/RET93E0/RET95E0 Series
25 69-2415ES—05

® U.S. Registered Trademark.
© 2012 Honeywell International Inc.
69-2415ES—05M.S.Rev.11-12
Printed in U.S.A.
Automation and Control Solutions
Honeywell International Inc.
1985 Douglas Drive North
Golden Valley, MN 55422
69-2415ES-05
Manual de
funcionamiento
Serie RTH6350/RTH6450/RET93E0/RET95E0
Termostato programable
® Marca registrada de los EE. UU.
Patente en EE.UU: Nº D542,677 y otras patentes pendientes
© 2012, Honeywell International Inc. Todos los derechos reservados.
Lea y guarde estas instrucciones.
¿Necesita asistencia?
Para obtener asistencia relacionada con este producto, visite http://yourhome.honeywell.com
o comuníquese con el número gratuito de servicio de atención al cliente de Honeywell, llamando al 1-800-468-1502
Tarjeta de referencia
rápida
Sujete la tarjeta y tire de
ella para ver rápidamente
las instrucciones de
funcionamiento básicas.
Soporte de la batería
Presione el soporte
y tire de él para quitar
las baterías.
Las baterías deben ser
reemplazadas una vez
al año (vea la página 15).
NOTA: Retire el soporte de la batería; el número de modelo está en el soporte de la batería.
M28400
Este manual cubre los modelos RTH6350, RTH6450, RET93E0, y RET95E0.

Serie RTH6350/RTH6450/RET93E0/RET95E0
1 69-2415ES—05
Acerca de su nuevo termostato
Acerca de su nuevo termostato
Características del termostato .................... 2
Programación rápida ................................... 3
Rápida referencia de los controles ............. 4
Rápida referencia de la pantalla ................. 5
Programación y funcionamiento
Configure la hora y el día ............................ 6
Seleccione la configuración del ventilador
(“auto/on”[automático/encendido]) .......... 7
Seleccione la configuración del sistema
(“heat/Cool”[calor/frío]) .............................. 8
Use los cronogramas del programa ........... 9
Programe la anulación del cronograma ... 13
Conversión automática
(RTH6450 y RET95E0 solamente). ........ 15
Protección del compresor incorporado ... 17
Tecnología Smart Response
®
.................... 18
Apéndices
Instalación de la batería ............................ 19
Ayuda al cliente ......................................... 20
En caso de inconvenientes ....................... 21
Garantía limitada ........................................ 23
¡Este termostato está listo
para funcionar!
Su nuevo termostato está preprogramado
y listo para funcionar.
Vea la página 3 para revisar
las configuraciones.
Índice

Manual de funcionamiento
69-2415ES—05 2
Acerca de su nuevo termostatoAcerca de su nuevo termostato
Felicitaciones por la compra del nuevo termostato Honeywell. El termostato ha sido
diseñado para brindarle muchos años de funcionamiento confiable y para brindarle
un control climático fácil de usar y con sólo apretar un botón.
Características
• Programaciónconmenúfácildeseguir.
• Elcontroldetemperaturaaltactoanularálaconfiguracióndelprograma
en cualquier momento.
• Pantallailuminadagrande,transparenteyfácildeleer,inclusoenlaoscuridad.
• Muestralatemperaturaambienteylaconfiguracióndelatemperatura.
• Soportedelabateríaextraíbleparaunreemplazorápidoyfácil.
• Proteccióndelcompresorincorporado.

Serie RTH6350/RTH6450/RET93E0/RET95E0
3 69-2415ES—05
¡Este termostato está listo para funcionar!
Su nuevo termostato está preprogramado y listo para funcionar. Todo lo que tiene que hacer es
configurar el día y la hora. Luego, revise las configuraciones de abajo y cámbielas si es necesario:
1. Configure la hora y el día (necesario para
un mejor funcionamiento) ...........................................................................Vea la página 6
2. Seleccione la configuración del ventilador (“Auto/on” [automático/encendido]):
Predetermine la función “Auto” ..............................................Para cambiar, vea la página 7
3. Seleccione la configuración del sistema (“heat/cool” [calor/frío]): Predetermine la
función “Heat” ......................................................................... Para cambiar, vea la página 8
4. Cronogramas del programa: Predetermine los niveles de ahorro de energía
para cuando esté en el trabajo o durmiendo (el termostato asume que usted
se levanta a las 6 a. m., se va a las 8 a. m., regresa a las 6 p. m. y vuelve
a acostarsea las 10 p. m.) ........................................... Para cambiar, vea las páginas 9 a 11
CONTROL DE TEMPERATURA AL TACTO: Usted podrá anular la configuración
del cronograma en cualquier momento y ajustar manualmente la temperatura
(vea las páginas 12 y 13).
Manual de funcionamiento
69-2415ES—05 4
M28401
Rápida referencia de los controles
Pantalla digital (vea la página 5).
Soporte de la batería (vea la página 15).
Botones de la temperatura
Presiónelos para ajustar las
configuraciones de temperatura
(vea las páginas 11 a 13).
Botón “Hold”
Presiónelo para anular el control
de temperatura programada
(vea la página 13).
Botones de funcionamiento
Presiónelos para elegir la función que se muestra justo
debajo de cada botón. (Las funciones cambian según la tarea).
Serie RTH6350/RTH6450/RET93E0/RET95E0
5 69-2415ES—05
Set Clock/Day/
Schedule
Auto
Wake Wed
Fan System
Heat On
Heat
Heat
Setting
Inside
AM
75
75
6
:
30
Replace Battery
M28402
In Recovery
Rápida referencia de la pantalla
Temperatura interior actual
Período de
programación actual
“Wake/Leave/Return/Sleep”
(horas en que se despierta,
se va de su casa, regresa
y se duerme); (vea las
páginas 9 a 11)
Ajuste “clock/day/schedule”
Presione estos botones para
configurar la hora, el día o las
configuraciones programadas
(vea las páginas 6 y 11)
Botones de funcionamiento
Presione el botón detrás de cada función para ver o cambiar
las configuraciones (las funciones cambian según la tarea)
Aviso de batería baja
(vea la página 15)
Hora y día actuales
(vea la página 6)
Configuración
de temperatura
(vea las páginas 11 a 13)
Estado del sistema
Encendido cuando
selecciona calor o frío.
Titila cuando espera que
se reinicie el compresor
(vea la página 14)
Configuración del
sistema “Heat/Cool/
Auto/Off/Em Heat”
(calor/frío/automático/
apagado/calentador
de emergencia);
(vea la página 8)
Configuración del
ventilador
“Auto/On”(vealapágina7)
Tecnología Smart
Response
®
en funciona-
miento (ver página 17)
Manual de funcionamiento
69-2415ES—05 6
M28404
Wed
Set Day Set Schedule
Done
PM
4
:
30
Set Clock/Day/
Schedule
Auto
Fan System
Heat
M28403
Configure la hora y el día
1. Presione el botón “SET CLOCK/DAY/
SCHEDULE”, luego, presione
s o t
para configurar la hora del reloj.
2. Presione el botón “SET DAY”
(configuración del día), luego,
presione
s o tpara configurar
la hora del reloj.
3. Presione “DONE” (listo) para guardar
y salir.
Nota: Si la opción “SET CLOCK/DAY/SCHEDULE”
no se muestra, presione “DONE” o “RUN SCHEDULE”
(funcionamiento del cronograma).
Nota: Si la pantalla muestra destellos
de “SetClock”, el termostato seguirá sus
configuraciones para los días de semana del
períododetiempo“Wake”hastaquevuelvaa
configurar la hora y el día.
Presione “SET CLOCK/DAY/SCHEDULE”, luego ajuste la hora
Presione “SET DAY” y luego seleccione el día actual
Serie RTH6350/RTH6450/RET93E0/RET95E0
7 69-2415ES—05
Seleccione la configuración del ventilador
Presione el botón “FAN” para seleccionar
“Auto” o “On”.
Enelmodo“Auto”,laconfiguraciónusada
comúnmente, el ventilador funciona
solamente cuando la calefacción o el
sistema de enfriamiento están encendidos.
Sisefijaen“On”,elventiladorfunciona
sin interrupción.
M28405
Set Clock/Day/
Schedule
Auto
Fan System
Heat
M28406
Set Clock/Day/
Schedule
On
Fan System
Heat
Manual de funcionamiento
69-2415ES—05 8
Seleccione la configuración del sistema
Presione el botón “SYSTEM” para seleccionar
“Heat”, “Cool” o “Off”.
• “Heat”: El termostato controla solamente
el sistema de calefacción.
• “Cool”: El termostato controla solamente
el sistema de enfriamiento.
• “Off”: Los sistemas de calefacción
y enfriamiento están apagados.
• “Auto”
(RTH6450 y RET95E0 solamente):
El termostato elige automáticamente
cuándo calentar o enfriar, dependiendo
de la temperatura interior.
PRECAUCIÓN: PELIGRO DE DAÑO EN
EL EQUIPO. Para evitar posibles daños en
el compresor, no haga que el termostato
funcione cuando la temperatura exterior
sea inferior a 50 ºF (10 ºC).
Nota: Quizás la configuración
Auto (automático) del sistema
no aparezca, dependiendo de
como haya sido instalado el
termostato.
M28407
Set Clock/Day/
Schedule
Auto
Fan
System
Heat
M28408
Set Clock/Day/
Schedule
Auto
Fan
System
Cool
Serie RTH6350/RTH6450/RET93E0/RET95E0
9 69-2415ES—05
Ahorre dinero configurando los cronogramas del programa
Es fácil programar su sistema que permite un ahorro máximo de energía. Usted puede programar
cuatro períodos de tiempo por día, con diferentes configuraciones para los días de semana,
sábado y domingo.
Programe la hora en que se despierta y la temperatura que quiere
durante la mañana, hasta que usted se va de su casa.
Programe la hora en que usted se va de su casa y la temperatura que
quiere mientras no esté en su casa (por lo general, un nivel de ahorro
de energía).
Programe la hora en que regresa a su casa y la temperatura que quiere
durante la tarde hasta que se va a dormir.
Programe la hora en que usted se va a dormir y la temperatura que quiere
durante toda la noche (por lo general, un nivel de ahorro de energía).
“WAKE”
6:00 a. m.
70
°
“LEAVE”
8:00 a. m.
62
°
“RETURN”
6:00 p. m.
70
°
“SLEEP”
10:00 p. m.
62
°
Manual de funcionamiento
69-2415ES—05 10
Configuraciones de ahorro de energía para máximo ahorro de costos
Este termostato viene predeterminado con configuraciones para un programa de ahorro
de energía. Recomendamos estas configuraciones debido a que reducen los gastos de
calefacción y enfriamiento hasta en un 33%. Vea la siguiente página para ajustar las horas y las
temperaturas de cada período de tiempo.
“Wake”
(6:00 a. m.)
“Leave”
(8:00 a. m.)
“Return”
(6:00 p. m.)
“Sleep”
(10:00 p. m.)
“Cool” (de lunes a viernes)
“Heat” (de lunes a viernes) “Heat” (sábado y domingo) “Cool” (sábado y domingo)
70
°
75
°
70
°
75
°
62
°
83
°
62
°
[Ocanceleelperíodo]
83
°
[Ocanceleelperíodo]
70
°
75
°
70
°
[Ocanceleelperíodo]
75
°
[Ocanceleelperíodo]
62
°
78
°
62
°
78
°
Serie RTH6350/RTH6450/RET93E0/RET95E0
11 69-2415ES—05
Para ajustar los cronogramas del programa (RTH6350 y RET95E0)
1. Presione “SET CLOCK/DAY/SCHEDULE” y luego
“SET SCHEDULE”.
2. Presione s o t para configurar la hora en que
se despierta los días de la semana (de lunes
a viernes), luego presione “NEXT”.
3. Presione s o t para configurar la temperatura
para este período de tiempo, luego, presione
“NEXT”.
4. Configure la hora y la temperatura para el próximo
períododetiempo(“Leave”).Repitalospasos2y3
para cada día de la semana.
5. Presione “NEXT” para configurar los días de fin
de semana (sábado y domingo), luego, presione
“DONE” para guardar y salir.
Nota: Asegúrese de que el termostato esté configurado con el
sistema que quiere programar (calor o frío).
Nota: Puede presionar “CANCEL PERIOD” (cancelar período) para
eliminarlosperíodosnodeseados(excepto“Wake”).
M28409
Set Clock/Day/
Schedule
Auto
Fan System
Heat
Set Day Set Schedule
Done
Mon Tue Wed Thu FriLeave
Set Schedule
Heat
Setting
AM
62
8
:
00
Done
CancelPeriod
Next
Manual de funcionamiento
69-2415ES—05 12
Acerca de su nuevo termostato
Para ajustar los cronogramas del programa (RTH6450 y RET95E0)
1. Presione “SET CLOCK/DAY/SCHEDULE” y luego “SET
SCHEDULE”.
2. Presione s o t para configurar la hora en que
se despierta los días de la semana (de lunes a
viernes), luego presione “NEXT”.
3. Presione s o t para configurar la temperatura
para este período de tiempo, luego, presione
“NEXT”.
4. Configure la hora y la temperatura para el próximo
períododetiempo(“Leave”).Repitalospasos2y3
para cada día de la semana.
5. Presione NEXT (siguiente) para configurar los
períodos de tiempo del sábado.
6. Presione NEXT (siguiente) para configurar los
períodos de tiempo del domingo, y seguidamente
presione DONE (terminado) para guardar y salir.
Nota: Asegúrese de que el termostato esté configurado
con el sistema que quiere programar (calor o frío).
Nota: Puede presionar “CANCEL PERIOD” (cancelar período)
paraeliminarlosperíodosnodeseados(excepto“Wake”).
M28409
Set Clock/Day/
Schedule
Auto
Fan System
Heat
Set Day Set Schedule
Done
Mon Tue Wed Thu FriLeave
Set Schedule
Heat
Setting
AM
62
8
:
00
Done
CancelPeriod
Next
Serie RTH6350/RTH6450/RET93E0/RET95E0
13 69-2415ES—05
Acerca de su nuevo termostato
M28410
Heat
Setting
Inside
AM
69
75
6
:
30
Temporary
Run Schedule
Auto
Fan System
Heat
Programe la anulación del cronograma (temporario)
Presione s o t para ajustar la temperatura
en forma inmediata. Esto anulará temporariamente
la configuración de la temperatura para el período
de tiempo actual.
La nueva temperatura se mantendrá solamente
hasta que comience el próximo período
programado (vea la página 10). Por ejemplo,
si quiere aumentar el calor a la mañana temprano,
disminuirá automáticamente más tarde, cuando
usted se vaya de su casa.
Para cancelar la configuración en cualquier
momento, presione “RUN SCHEDULE”.
Presione para anular la configuración
temporaria y volver al cronograma del
programa.
Nota: Asegúrese de que el termostato esté
configurado con el sistema que usted quiere
controlar (calor o frío).
Presione para ajustar temporariamente la temperatura.
Manual de funcionamiento
69-2415ES—05 14
Acerca de su nuevo termostato
M28411
Heat
Setting
Inside
AM
69
75
6
:
30
Run Schedule
Auto
Fan System
Heat
Hold
Programe la anulación del cronograma (permanente)
Presione “HOLD” para ajustar
permanentemente la temperatura.
Esto anulará las configuraciones
de la temperatura para todos los
períodos de tiempo.
Lafunción“Hold”apagaelcronograma
del programa y le permite ajustar el
termostato manualmente, según sea
necesario.
Cualquiera que sea la temperatura que
configure, ésta se mantendrá las 24 horas
del día, hasta que la cambie manualmente
o presione “RUN SCHEDULE” para anular
“Hold”yretomarelcronograma.
Presioneparaanularlaconfiguración“Hold”
y volver al cronograma del programa.
Nota: Asegúrese de que el termostato esté
configurado con el sistema que usted quiere
controlar (calor o frío).
Presione para ajustar permanentemente la temperatura.

Serie RTH6350/RTH6450/RET93E0/RET95E0
15 69-2415ES—05
Acerca de su nuevo termostato
Utilice esta característica en climas donde se utilicen tanto el aire acondicionado
como la calefacción durante el mismo día. Cuando el sistema está configurado en
Auto (automático), el termostato elige automáticamente cuándo calentar o enfriar,
dependiendo de la temperatura interior.
Mientras está en la modalidad Auto (automático), si ocurre una anulación del
cronograma (temporal o permanente) el termostato ajustará automáticamente las
configuraciones de frío y calor para mantener una separación de 3 grados entre ellas.
Por ejemplo, si la temperatura de calefacción se eleva a un punto donde queda a 3
grados de la configuración de aire acondicionado, la pantalla mostrará una flecha
ascendentealladode“cool”(frío)paramostrarqueeltermostatoestáelevandola
configuración de frío para mantener una separación de 3 grados.
Presione el botón Select Heat/Cool (selección de calor/frío) para elegir entre el calor y
el frío para ver/ajustar cualquier modalidad.
Conversión automática (RTH6450 y RET95E0 solamente)
Manual de funcionamiento
69-2415ES—05 16
Acerca de su nuevo termostato
Si la temperatura fría desciende a donde queda cercana a la configuración de cale-
facción, una flecha al lado del calor mostrará que el termostato está bajando la con-
figuración de calor para mantener una separación de 3 grados.
Conversión automática (RTH6450 y RET95E0 solamente)
Run Schedule
Auto
Cool
Fan
Select
Heat/Cool
Heat
Setting
Inside
PM
73
73
1
:
05
Temporary
M27477
PRECAUCIÓN: Para evitar posibles daños al compresor, no utilice la
Conversión Automática si la temperatura externa es inferior a 50ºF (10ºC).
Presione Select Heat/Cool (selección de calor/
frío) para colocar la temperatura de calor o frío.
El triángulo indica que la temperatura fría está
aumentando para mantener 3 grados entre las
configuraciones para calor y frío.
Serie RTH6350/RTH6450/RET93E0/RET95E0
17 69-2415ES—05
Acerca de su nuevo termostato
M28412
Cool On
Cool
Setting
Inside
AM
75
75
6
:
30
Set Clock/Day/
Schedule
Auto
Fan System
Cool
Protección del compresor incorporado
Esta función ayuda a prevenir el daño del compresor
en su acondicionador de aire o en su sistema de
bomba de calor.
El compresor puede dañarse si se vuelve a iniciar
inmediatamente después de ser apagado. Esta
característica hace que el compresor demore unos
minutos antes de volver a iniciarse.
Durante el tiempo de espera, el indicador mostrará
el mensaje “CoolOn” (o “HeatOn” si tiene una
bomba de calor). Cuando haya transcurrido el
tiempo de espera de seguridad, el mensaje dejará
de titilar y se encenderá el compresor.
El mensaje titila hasta que haya
transcurrido el tiempo de reinicio
de seguridad.
Manual de funcionamiento
69-2415ES—05 18
Acerca de su nuevo termostato
Tecnología Smart Response
®
: Permite que el
termostato“aprenda”cuántotiempolesllevaa
la estufa y al acondicionador de aire alcanzar la
temperatura programada, de modo que se alcance
la temperatura a la hora fijada. Por ejemplo, fije
la hora de levantarse a las 6 AM y la temperatura
a 70°. La calefacción se encenderá antes de las
6 AM, para que la temperatura alcance los 70º
cuandoustedsedespiertealas6.Elmensaje“In
Recovery”apareceráenpantallacuandoelsistema
se active antes del horario del período fijado.
Tecnología Smart Response
®
M27476
Cool On
Cool
Setting
Inside
AM
75
75
6
:
38
Set Clock/Day/
Schedule
Auto
Fan System
Cool
In Recovery
Se muestra cuando Smart Response
está activa.
Serie RTH6350/RTH6450/RET93E0/RET95E0
19 69-2415ES—05
M28413
M28414
Reemplazo de la batería
Instale las baterías nuevas inmediatamente cuando
la advertencia “REPLACE BATTERY” (reemplazo de
baterías) comience a titilar. La advertencia titilará
durante alrededor de dos meses antes de que se
consuman las baterías.
Aunque la advertencia no aparezca, deberá
reemplazar las baterías una vez por año o antes
de abandonar el hogar por más de un mes.
Si las baterías se colocan antes de que transcurran
dos minuntos, el tiempo y el día no deberán ser
configurados nuevamente. Todos los ajustes se
almacenan de manera permanente en la memoria
y no requieren energía de la batería.
Presione el soporte y tire de él para quitar.
Inserte dos baterías nuevas
AA alcalinas, luego, vuelva
a instalar el soporte de la
batería.
Replace Battery
Manual de funcionamiento
69-2415ES—05 20
Acerca de su nuevo termostato
M28416
M28415
Ayuda al cliente
Para obtener asistencia relacionada con este producto,
visite http://yourhome.honeywell.com.
OcomuníqueseconelnúmerogratuitodeAtenciónal
cliente de Honeywell 1-800-468-1502.
Para ahorrar tiempo, anote el número de modelo y el
código de fecha antes de llamar.
Accesorios y piezas de repuesto
Para hacer el pedido, comuníquese con el número
gratuito de Atención al cliente de Honeywell
1-800-468-1502.
Soporte de la batería ............N.º de pieza 50007072-001
Ensamblado de la placa
de cubierta* ...........................N.º de pieza 50002883-001
* Úselo para cubrir las marcas que dejan los termostatos viejos.
Número de modelo Código de la fecha
xxxxxxx xxxxxxx

Serie RTH6350/RTH6450/RET93E0/RET95E0
21 69-2415ES—05
Acerca de su nuevo termostatoEn caso de inconvenientes
Si tiene dificultades con el termostato, intente seguir las sugerencias que se indican a continuación.
La mayoría de los problemas pueden corregirse rápida y fácilmente.
La pantalla
está vacía
• AsegúresedequelasbateríasAAalcalinasesténinstaladascorrectamente
(vea la página 15).
Las configuraciones
de la temperatura
no cambian
Asegúrese de que las temperaturas de calor y frío estén configuradas en rangos
aceptables:
• “Heat”:De40°Fa90°F(de4,5°Ca32°C).
• “Cool”:De50°Fa99°F(de10°Ca37°C).
Para restituir las
configuraciones
predeterminadas del
programa
Siga estos pasos para restituir las configuraciones predeterminadas del programa (vea la
página 10):
1. Presione “SET” “CLOCK/DAY/SCHEDULE”.
2. Presione “SET” “CLOCK/DAY/SCHEDULE”.
3. Presione “DONE” y “NEXT” al mismo tiempo durante 4 segundos.

Manual de funcionamiento
69-2415ES—05 22
Acerca de su nuevo termostatoEn caso de inconvenientes
El sistema
de calefacción
o enfriamiento
no responde
• Presioneelbotón “SYSTEM” para configurar el sistema en “Heat”.
Asegúrese de que la temperatura sea más alta que la temperatura interna.
• Presioneelbotón “SYSTEM” para configurar el sistema en “Cool”.
Asegúrese de que la temperatura sea más baja que la temperatura interna.
•Controleelinterruptordecircuitoy,siesnecesario,reinícielo.
• Asegúresedequeelinterruptordeenergíadelsistemadecalefacción
y enfriamiento esté encendido.
• Asegúresedequelapuertadelsistemadecalefacciónestébiencerrada.
• Espere5minutosparaquerespondaelsistema.
El mensaje “Cool On”
o “Heat On” titila
• La función de la protección del compresor está funcionando. Espere 5 minutos
para que el sistema se vuelva a iniciar de forma segura, sin dañar el compresor
(vea la página 14).
Otros invonvenientes
• Silamedidaantesdescritanosolucionaelproblema,vealasección
En caso de inconvenientes de la
Guía de instalación
del termostato.

Serie RTH6350/RTH6450/RET93E0/RET95E0
23 69-2415ES—05
Acerca de su nuevo termostatoGarantía limitada de 1 año
Honeywell garantiza este producto, a excepción de la batería, por el término de
un (1) año contra cualquier defecto de fabricación o de los materiales, a partir de la fecha de compra por
parte del consumidor. Si en cualquier momento durante el período de garantía se verifica que el producto
tiene un defecto o que funciona
mal, Honeywell lo reparará o reemplazará (a elección de Honeywell).
Si el producto tiene defectos,
(i) devuélvalo, con la factura de venta u otra prueba de compra fechada, al lugar donde lo compró; o
(ii) comuníquese con el Centro de atención al cliente de Honeywell al 1-800-468-1502. Atención al cliente
decidirá si se debe devolver el producto a la siguiente dirección: Devolución de mercaderías de Honeywell,
Dock 4 MN10-3860, 1885 Douglas Dr. N., Golden Valley, MN 55422, o si se le puede enviar un producto en
reemplazo.
Esta garantía no cubre los costos de extracción o reinstalación. Esta garantía no se
aplicará si Honeywell demuestra que el defecto o mal funcionamiento estaba causado
por daños ocurridos mientras el producto estaba en posesión de un consumidor.
La única responsabilidad de Honeywell será reparar o reemplazar el producto dentro
delosplazosestablecidosanteriormente.HONEYWELLNORESPONDERÁPORLAPÉRDIDAODAÑODE
NINGÚNTIPO,INCLUIDOELDAÑOINCIDENTALOINDIRECTO

Manual de funcionamiento
69-2415ES—05 24
Acerca de su nuevo termostatoGarantía limitada de 1 año
DERIVADO,DIRECTAOINDIRECTAMENTE,DELINCUMPLIMIENTODELASGARANTÍAS,EXPRESAS
OIMPLICÍTAS,ODEOTRASFALLASDEESTEPRODUCTO.Algunosestadosnopermitenlaexclusióno
limitación del daño incidental o indirecto, entonces, esta limitación puede no resultar aplicable a su caso.
LAPRESENTEGARANTÍAESLAÚNICAGARANTÍAEXPRESAQUEHONEYWELLPROPORCIONARESPECTO
DEESTEPRODUCTO.LADURACIÓNDELASGARANTÍAS
IMPLÍCITAS,INCLUÍDASLASGARANTÍASDECOMERCIABILIDADYAPTITUDPARAUNOBJETIVO
PARTICULAR,ESTÁLIMITADAALADURACIÓNDEUNAÑODELAPRESENTEGARANTÍA.
Algunos estados no permiten las limitaciones sobre la duración del período de una garantía implícita, entonces
la limitación anterior puede no resultar aplicable a su caso.
Esta garantía le brinda derechos legales específicos, y usted podrá tener otros derechos
que varían según el estado.
Si tiene preguntas sobre la presente garantía, sírvase escribir a Honeywell Customer Relations, 1985 Douglas
Dr, Golden Valley, MN 55422 o llamar al 1-800-468-1502.
EnCanadá,escribaaRetailProductsON15-02H,HoneywellLimited/HoneywellLimitée,
35DynamicDrive,Toronto,OntarioM1V4Z9.

Serie RTH6350/RTH6450/RET93E0/RET95E0
25 69-2415ES—05

® Marca registrada de los EE. UU.
© 2012 Honeywell International Inc.
69-2415ES—05M.S.Rev.11-12
Impreso en EE. UU.
Honeywell International Inc.
1985 Douglas Drive North
Golden Valley, MN 55422
Soluciones para automatización y control
