www.klarstein.com
www.klarstein.com
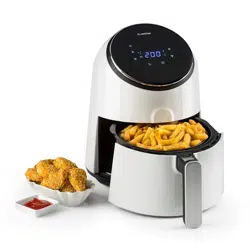
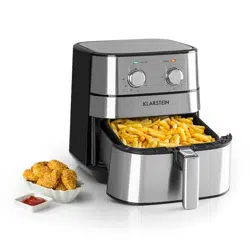
VITA PRO
Heißluftfritteuse mit Dampfgaren
Air Fryer with Steam Cooking
Friteuses à air chaud et cuisson vapeur
Freidoras de aire caliente con cocción
al vapor
Friggitrice ad aria con cottura a vapore
10041333 10041334


3
DE
Sehr geehrter Kunde,
wir gratulieren Ihnen zum Erwerb Ihres Gerätes. Lesen Sie
die folgenden Hinweise sorgfältig durch und befolgen Sie
diese, um möglichen Schäden vorzubeugen. Für Schäden,
die durch Missachtung der Hinweise und unsachgemäßen
Gebrauch entstehen, übernehmen wir keine Haftung.
Scannen Sie den folgenden QR-Code, um Zugri auf die
aktuellste Bedienungsanleitung und weitere Informationen
rund um das Produkt zu erhalten.
Technische Daten 4
Sicherheitshinweise 5
Geräteübersicht 7
Inbetriebnahme 11
Bedienung 13
Voreinstellungen und Einstellungsbereich 16
Reinigung und Wartung 19
Fehlersuche und Fehlerbehebung 20
Schaltplan 22
Spezielle Entsorgungshinweise für Verbraucher in Deutschland 23
Hinweise zur Entsorgung 25
Hersteller & Importeur (UK) 25
INHALT

4
DE
TECHNISCHE DATEN
Artikelnummer 10041333, 10041334
Stromversorgung 220–240 V ~ 50-60 Hz
Leistung 2450 W
Temperaturbereich 50–230 °C
Topfgröße 18 l
Fassungsvermögen des
Wassertanks
800 ml
Gewicht 14,5 kg
5
DE
SICHERHEITSHINWEISE
Allgemeine Hinweise
• Waschen Sie das Gehäuse niemals mit ießendem Wasser ab, um die
elektrischen Komponenten nicht zu beschädigen.
• Lassen Sie kein Wasser oder andere Flüssigkeiten in das Gerät eindringen, um
einen Stromschlag zu vermeiden.
• Kinder ab 8 Jahren, psychisch, sensorisch und körperlich eingeschränkte
Menschen dürfen das Gerät nur benutzen, wenn sie vorher von einer für
sie verantwortlichen Aufsichtsperson ausführlich mit den Funktionen und
den Sicherheitsvorkehrungen vertraut gemacht wurden und die damit
verbundenen Risiken verstehen.
• Prüfen Sie vor der Benutzung die Spannung auf dem Typenschild.
Schließen Sie das Gerät nur an Steckdosen an, die der Spannung des Geräts
entsprechen.
• Verwenden Sie dieses Produkt nicht, wenn der Stecker, das Netzkabel oder
das Produkt beschädigt ist.
• Falls das Netzkabel oder der Stecker beschädigt sind, müssen sie vom
Hersteller, einem autorisierten Fachbetrieb oder einer ähnlich quali zierten
Person ersetzt werden.
• Achten Sie darauf, dass Kinder nicht mit dem Gerät spielen.
• Fassen Sie den Stecker oder das Bedienfeld nicht mit nassen Händen an.
• Stellen Sie dieses Produkt nicht auf oder neben Tischdecken, Vorhänge und
andere brennbare Materialien.
• Lassen Sie um das Gerät herum mindestens 10 cm Platz zu allen Seiten.
Stellen Sie keine Gegenstände auf das Gerät.
• Lassen Sie das Gerät während des Gebrauchs nicht unbeaufsichtigt.
VORSICHT
Verbrennungsgefahr! Bei Ö nen der Ofentür kann heißer Dampf
austreten. Halten Sie einen Sicherheitsabstand ein, um ein
Verbrühen zu vermeiden.
• Stecken Sie keine Fremdkörper in die Geräteö nungen.
• Verwenden Sie zur Reinigung keinen Dampfreiniger.
• Vergewissern Sie sich, dass das Gerät ausgeschaltet ist, bevor Sie die Lampe
austauschen, um einen Stromschlag zu vermeiden.
• Das Gerät darf nicht in einen Schrank eingebaut werden, da es sich sonst
überhitzt.

6
DE
Hinweise zum sicheren Gebrauch
VORSICHT
Verbrennungsgefahr! Während des Gebrauchs wird das Gerät heiß.
Achten Sie darauf, dass Sie die Heizelemente im Inneren des Ofens
nicht berühren und benutzen Sie Ofenhandschuhe.
• Ziehen Sie vor der Reinigung den Stecker aus der Steckdose und lassen Sie
das Gerät komplett abkühlen.
• Installieren Sie das Gerät auf einer trockenen, achen Ober äche und lassen
Sie um das Gerät herum mindestens 10 cm Platz in alle Richtungen, damit die
Luft ausreichend zirkulieren kann.
• Schließen Sie das Gerät nicht an Steckdosen an, an die bereits andere
Küchengeräte angeschlossen sind.
• Stellen Sie das Gerät nicht in die Nähe von brennbaren Gegenständen.
Installieren Sie es weit entfernt von Fenstervorhängen, Türvorhängen,
Tapeten und ähnlichen Gegenständen, um einen Brand zu verhindern. Stellen
oder legen Sie keine Gegenstände auf das Gerät.
• Reinigen Sie die Türscheibe des Ofens mit einem weichen und feuchten Tuch.
Verwenden Sie keine Scheuermittel oder Metallschaber, da sie die Ober äche
zerkratzen.
• Schließen Sie das Gerät nicht an externe Zeitschaltuhren oder ferngesteuerte
Steckdosen an.
• Prüfen Sie vor dem Gebrauch, ob Ihr Kochgeschirr für dieses Produkt geeignet
ist. Wir empfehlen Ihnen hitzebeständige Glasbehälter oder Keramikbehälter
zu benutzen. Befüllen Sie den Behälter maximal auf zwei Drittel.
• Überfüllen Sie nicht den Wassertank. Orientieren Sie sich beim Befüllen an der
MAX-Markierung im Tank.
• Stellen Sie keine Behälter auf die geö nete Ofentür.
• Erhitzen Sie keine Lebensmittel in einem versiegelten Behälterww, da
der Behälter sonst explodieren kann. Füllen Sie die Lebensmittel vor der
Erwärmung in ein hitzebeständiges Gefäß um.
Verwendungshinweise
• Die Wasserversorgungsfrequenz ist schnell. Deshalb kann es manchmal
vorkommen, dass aus dem Lufteinlass etwas Wasser herausspritzt. Dies ist
normal.
• Überschüssiger Dampf im Geräteinneren kühlt sich schnell ab und wird
während der Zubereitung über den Luftauslass abgegeben. Ein kleiner
Dampfanteil kondensiert an den Lamellen des Luftauslasses, dies ist normal.
• Spannungsschwankungen beein ussen die Zubereitungszeit und
das Zubereitungsergebnis: Wenn die Spannung in einem Bereich von
-10 % bis +5 % schwankt, kann das Gerät normal funktionieren. Sollten
die Spannungsschwankungen höher oder niedriger sein, wird die
Ausgangsleitung relativ erhöht oder gesenkt, so dass die Zubereitungszeit
und das Zubereitungsergebnis beein usst werden. Dies ist normal.
7
DE
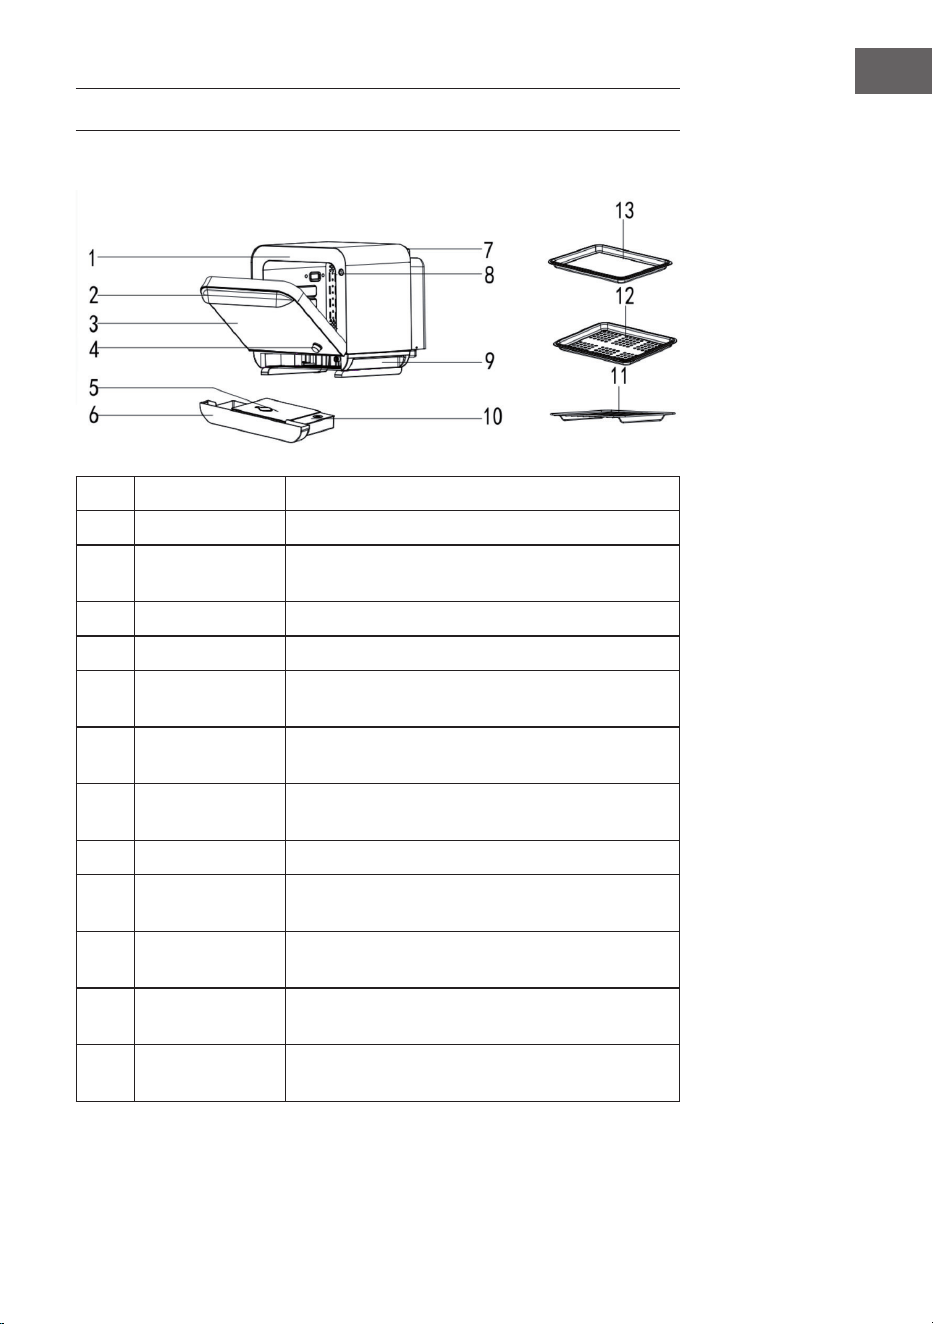
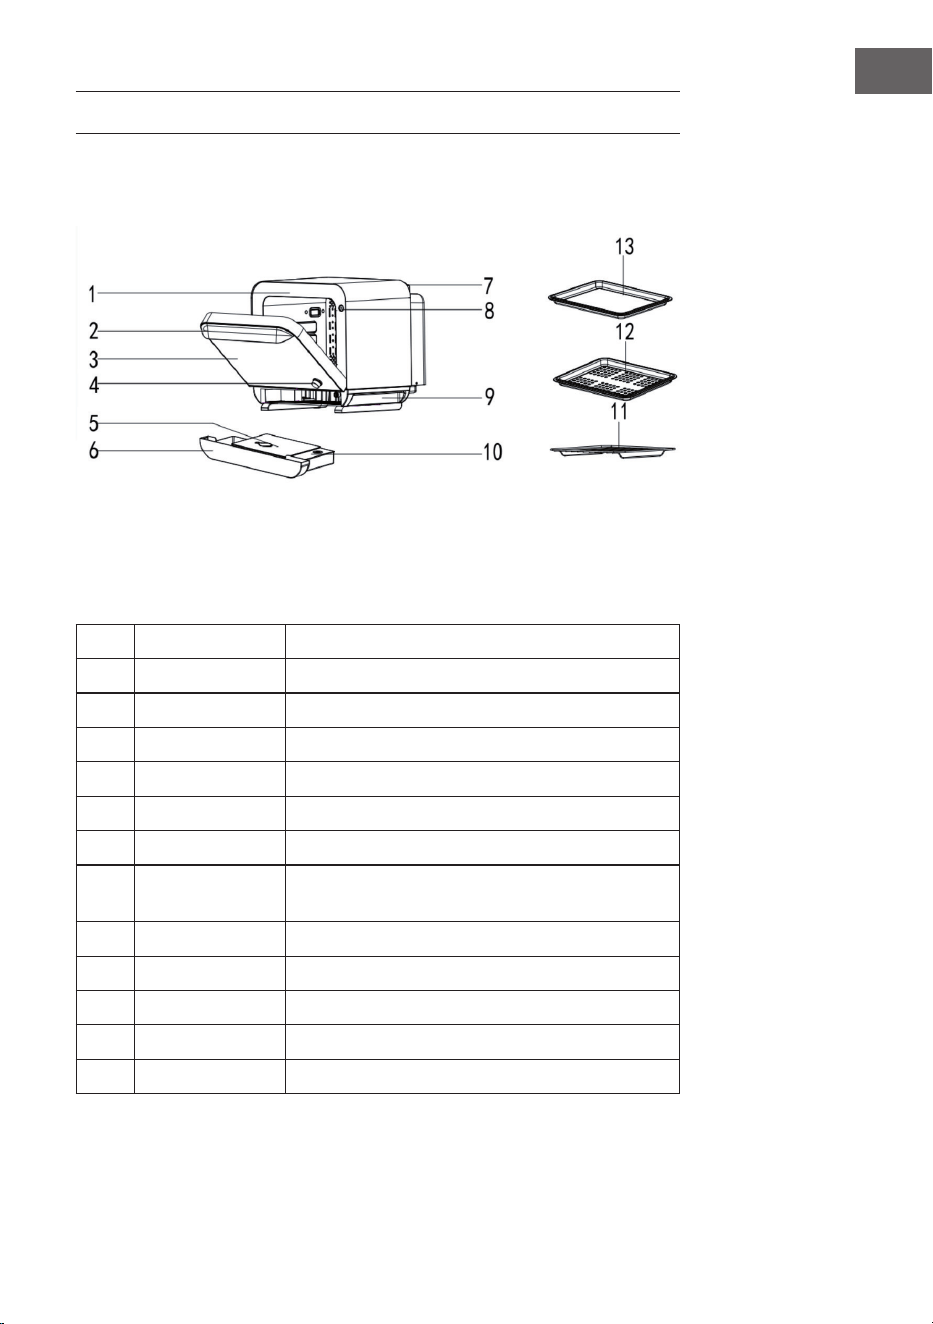
GERÄTEÜBERSICHT
Teile des Geräts
1 Türrahmen Stabilisiert das Gerät.
2 Griff Zum Ö nen und Schließen des Geräts.
3 Sichtfenster Überwachung der Lebensmittel während der
Zubereitung.
4 Drehregler Funktionswahl
5 Wassertank Lagerung des Wassers zur Produktion von Dampf.
6 Abtropfschale Sammelt während der Zubereitung entstandenes
überschüssiges Wasser.
7 Luftauslass Überschüssiger Dampf wird über den Luftauslass
abgegeben.
8 Türsicherung Stellt sicher, dass die Tür des Geräts geschlossen ist
und das Gerät laufen kann.
9 Griff Kann zum Bewegen des Geräts verwendet werden.
10 Wasserbehälter Sammelt während der Zubereitung entstandenes
überschüssiges Wasser.
11 Ablage Backbleche oder andere Backformen können
darauf platziert werden.
12 Dämpfeinsatz Nicht wasserhaltige Lebensmittel können darin
zubereitet werden.
13 Backblech Lebensmittel wie Suppe, Gebäck etc. können
darauf platziert werden.

8
DE
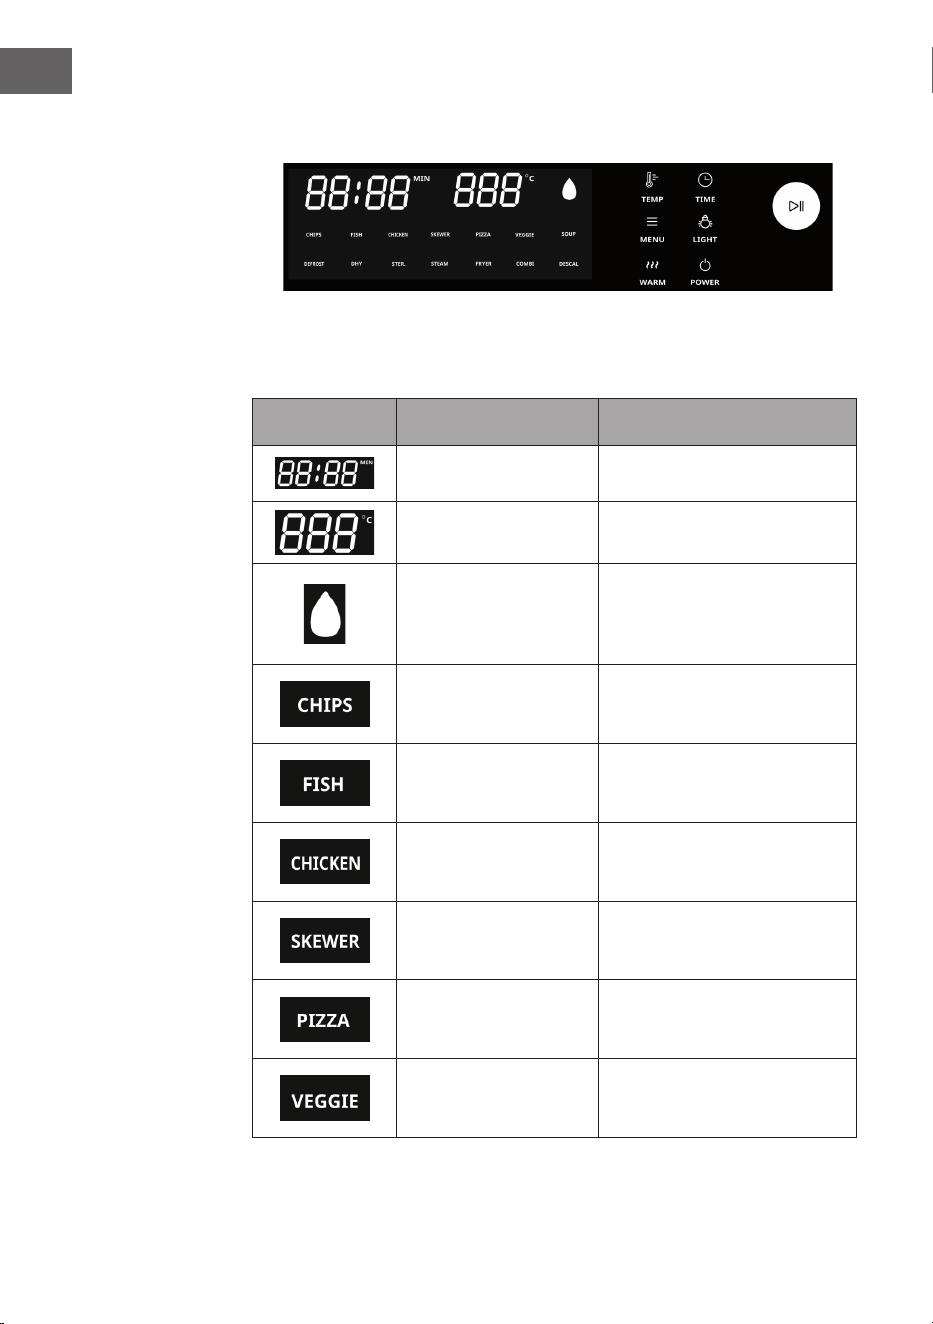
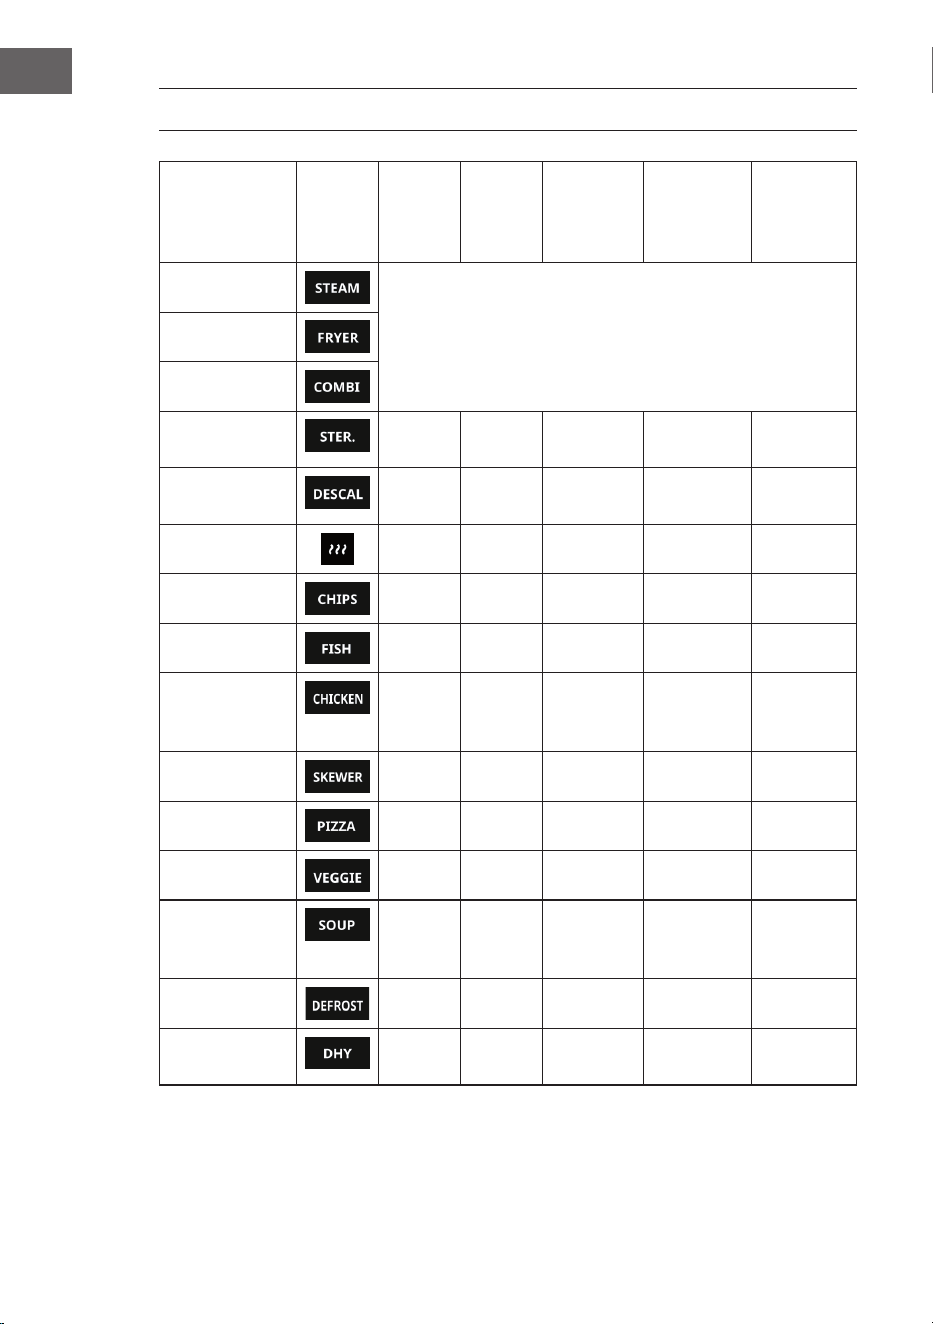
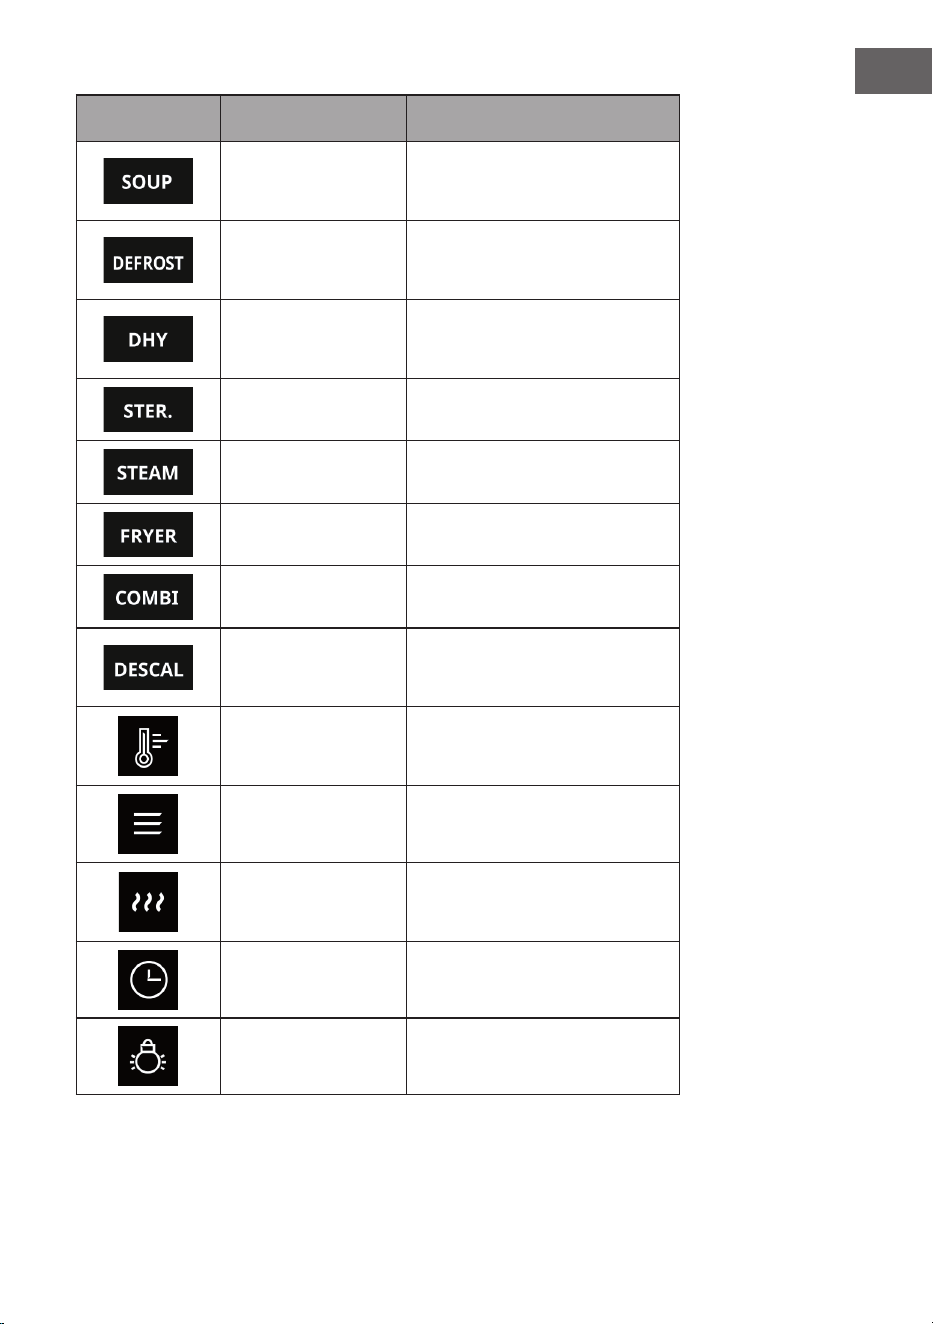
Bedienfeld
Symbol Modus Beschreibung
Zeit Zeigt die Zubereitungszeit an.
Temperatur Zeigt die Betriebstemperatur an.
Kein Wasser Das Symbol blinkt und der Alarm-
ton erklingt lange, um anzuzeigen,
dass sich im Wassertank kein
Wasser mehr bendet.
Automatischer
Menümodus (Chips)
Automatisches Menü. Die Zeit und
die Temperatur können während
des Betriebs angepasst werden.
Automatischer
Menümodus (Fisch)
Automatisches Menü. Die Zeit und
die Temperatur können während
des Betriebs angepasst werden.
Automatischer
Menümodus e (Huhn)
Automatisches Menü. Die Zeit und
die Temperatur können während
des Betriebs angepasst werden.
Automatischer
Menümodus (Spieß)
Automatisches Menü. Die Zeit und
die Temperatur können während
des Betriebs angepasst werden.
Automatischer
Menümodus (Pizza)
Automatisches Menü. Die Zeit und
die Temperatur können während
des Betriebs angepasst werden.
Automatischer
Menümodus (Gemüse)
Automatisches Menü. Die Zeit und
die Temperatur können während
des Betriebs angepasst werden.

9
DE
Symbol Modus Beschreibung
Automatischer
Menümodus (Suppe)
Automatisches Menü. Die Zeit
und die Temperatur können nicht
angepasst werden.
Automatischer
Menümodus (Autauen)
Automatisches Menü. Die Zeit und
die Temperatur können während
des Betriebs angepasst werden.
Automatischer
Menümodus (Dörr-
modus)
Automatisches Menü. Die Zeit und
die Temperatur können während
des Betriebs angepasst werden.
Desinzieren Dampfsterilisation
Dämpfen bei niedriger
Temperatur
Untermenümodus
Grill- und Backmodus Untermenümodus
Dämpfen bei hoher
Temperatur
Untermenümodus
Entkalken Das Symbol leuchtet auf und der
Alarm ertönt lange, wenn Sie
diesen Modus auswählen.
Temperaturregler Drücken Sie diese Taste und dre-
hen Sie zur Temperaturanpassung
am Regler.
Menütaste Drücken Sie diese Taste, um in die
Menüeinstellung zu gelangen.
Warmhaltetaste Drücken Sie diese Taste, voreinge-
stellt sind 65 °C, 20 min.
Die Zeit ist einstellbar bis 180 Min.
Zeiteinstellung Drücken Sie diese Taste und
drehen Sie zur Zeiteinstellung am
Regler.
Innenbeleuchtung Wenn Sie diese Taste drücken,
leuchtet die Innenbeleuchtung
auf.

10
DE
Symbol Modus Beschreibung
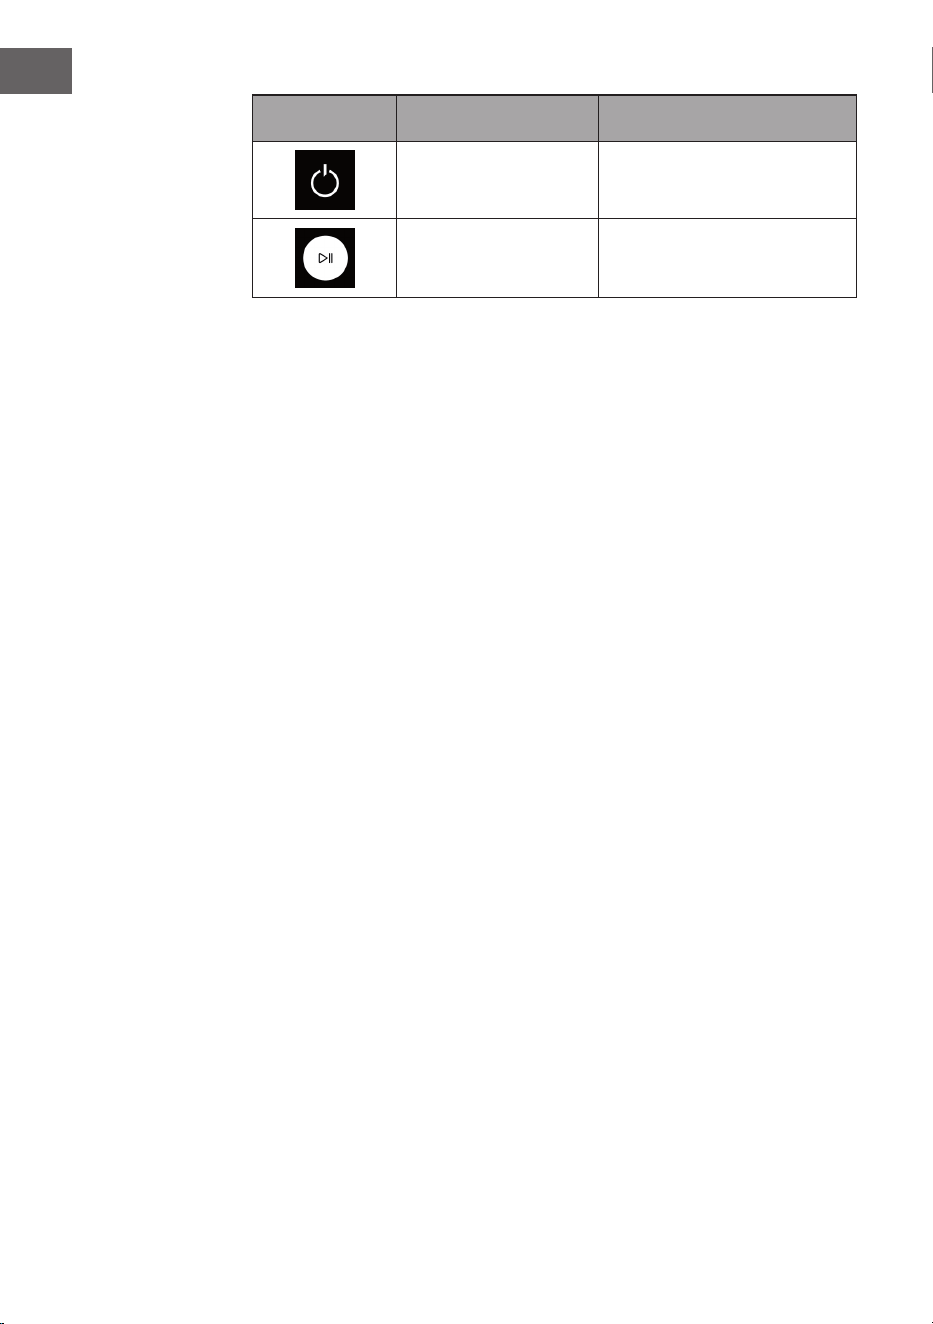
Standbytaste Wenn Sie diese Taste drücken,
wird das Gerät in den Standbymo-
dus versetzt.
Drehregler Drehen Sie am Drehregler um
Temperatur, Zeit oder Menü anzu-
passen. Drücken Sie den Drehreg-
ler nach unten, um den Betrieb zu
starten oder zu pausieren.

11
DE
INBETRIEBNAHME
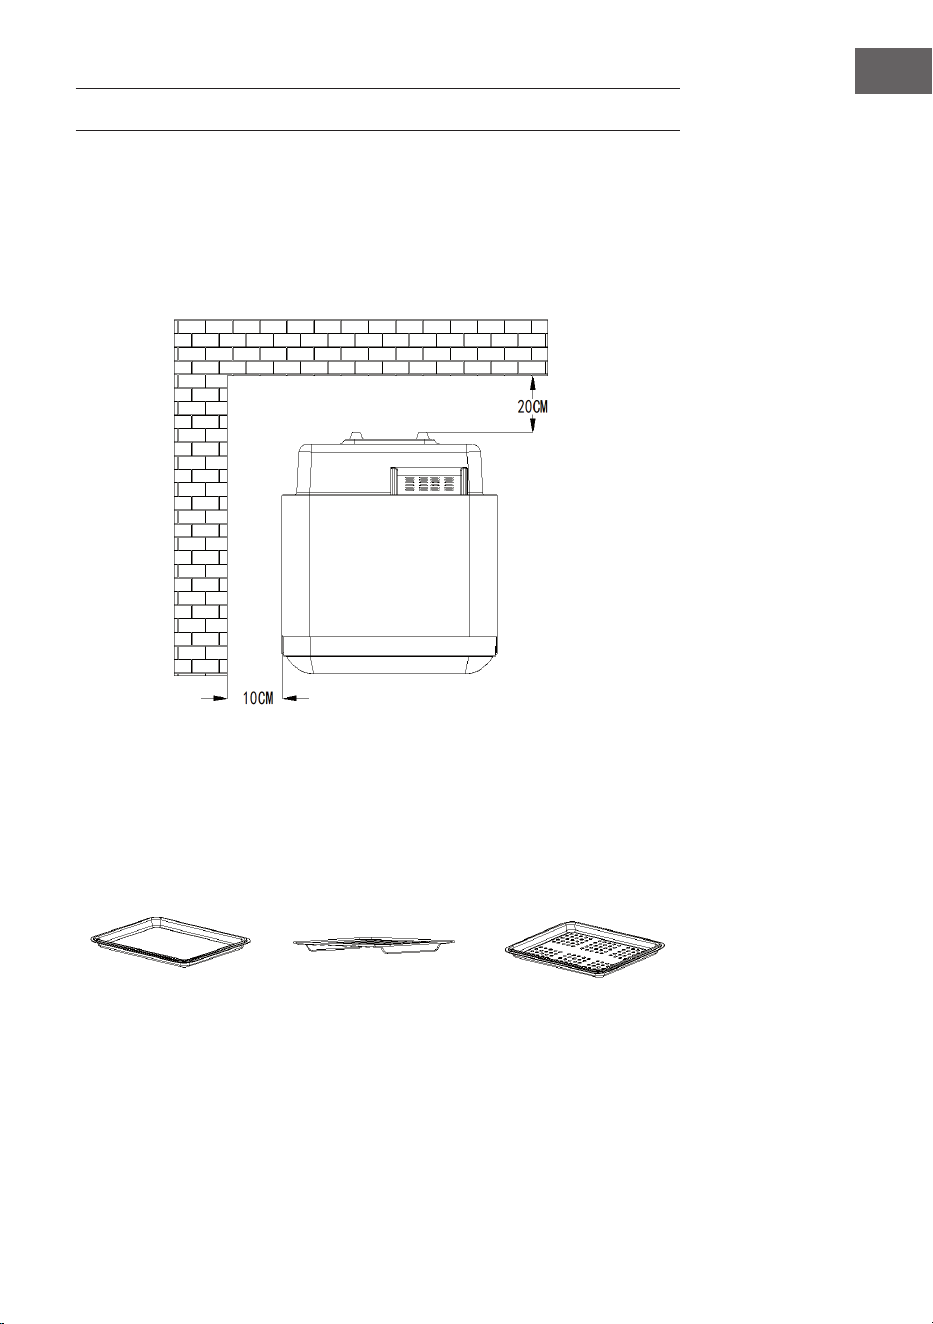
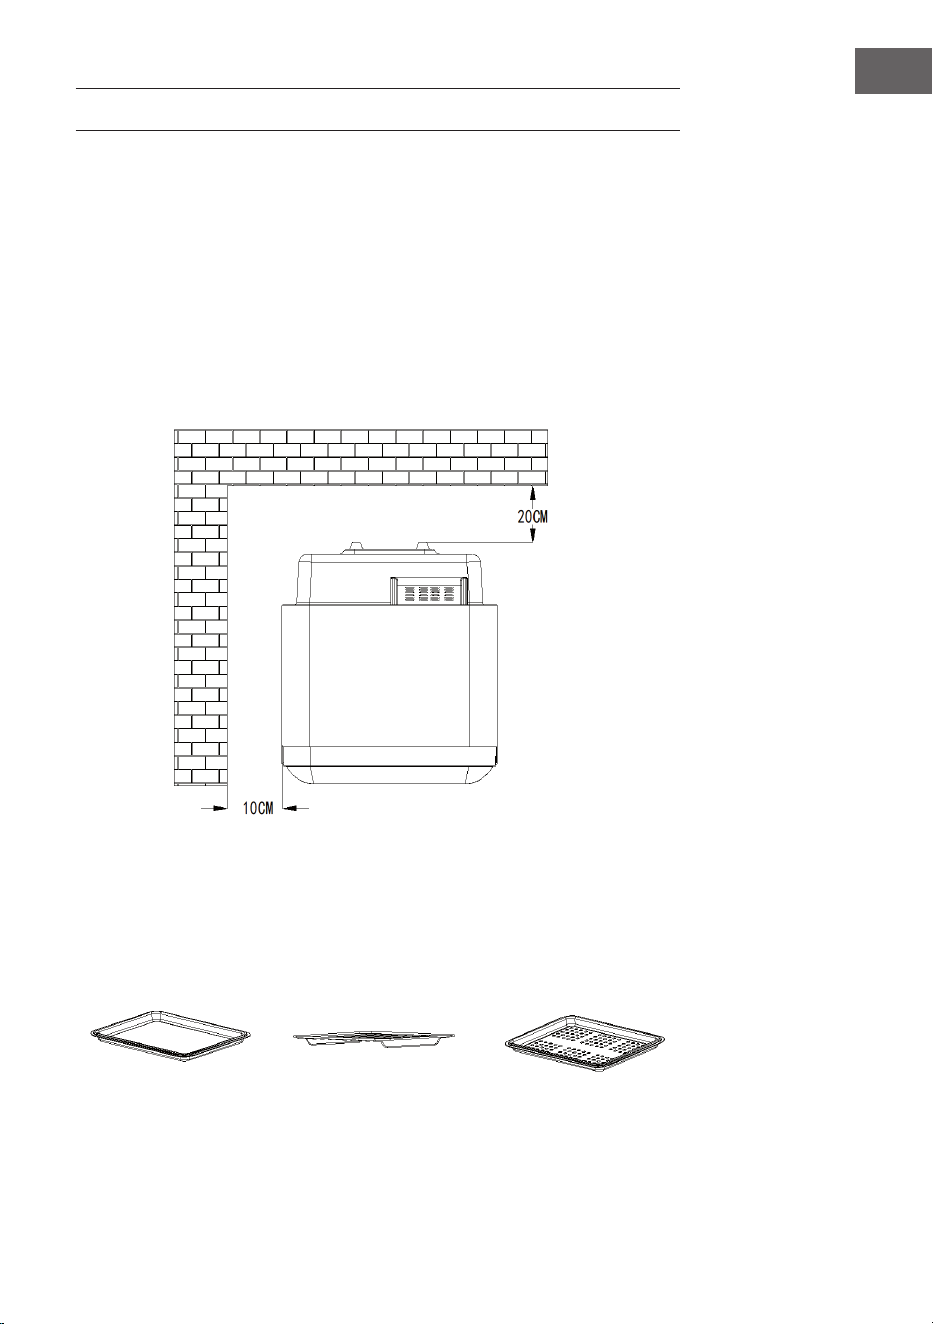
1. Entpacken Sie das Gerät und entfernen Sie das gesamte Verpackungsmaterial.
Befestigen Sie die Trennwand an der Rückseite des Geräts. Platzieren Sie das
Gerät auf einer stabilen, horizontalen Ober äche. Achten Sie darauf, dass zur
Rückseite des Geräts ein Mindestabstand von 20 cm und zu beiden Seiten ein
Mindestabstand von 10 cm eingehalten wird (siehe Abbildung). Stellen Sie
das Gerät nicht in unmittelbarer Nähe von Vorhängen, Wandteppichen oder
anderen brennbaren Materialien auf.
2. Legen Sie die gewünschten Lebensmittel in das entsprechende Zubehör (siehe
Abbildung) und schieben Sie dieses in das Geräteinnere hinein.

12
DE
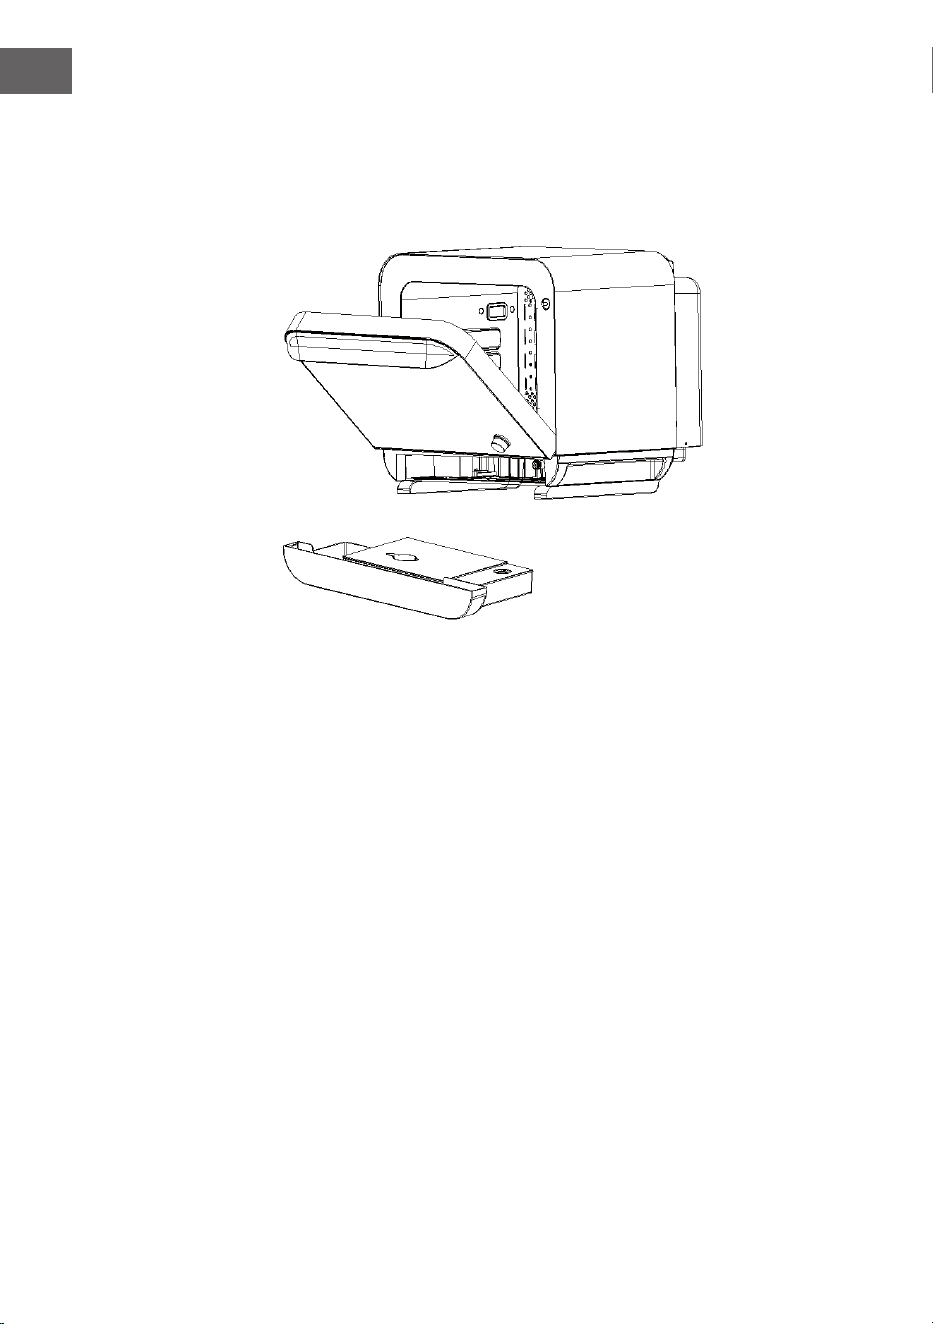
3. Entnehmen Sie den Wassertank. Entleeren Sie die Abtropfschale und den
Wasserbehälter. Befüllen Sie den Wassertank mit Wasser. Befestigen Sie die
Wassertankabdeckung und achten Sie darauf, dass diese richtig sitzt. Setzen
Sie den Wassertank anschließend in das Gerät ein (siehe Abbildung).
Hinweise
• Verschiedene Zubereitungsmethoden erfordern unterschiedliches Zubehör.
• Entnehmen Sie nach der Zubereitung den Dämpfeinsatz, das Backblech, das
Backgitter oder die Kuchenform mit Ofenhandschuhen oder Top appen aus
dem Gerät, um Verbrennungen zu vermeiden.
• Das Gerät kann nur dann in Betrieb genommen werden, wenn die Tür richtig
geschlossen ist. Andernfalls blinkt der Bildschirm auf.
Vor der ersten Verwendung
1. Entfernen Sie das gesamte Verpackungsmaterial und platzieren Sie das Gerät
auf einer stabilen Ober äche.
2. Reinigen Sie Backblech, Dämpfeinsatz, Backgitter, Kuchenform und anderes
Zubehör mit Wasser, Spülmittel und einem nicht abreibenden Schwamm.
3. Befüllen Sie den Wassertank mit Wasser (destilliertes oder puri ziertes
Wasser).
4. Reiben Sie das Innere und das Äußere des Geräts mit einem Tuch ab.
5. Geben Sie bei der ersten Verwendung des Geräts keine Lebensmittel hinein.
Verwenden Sie die Funktion „STEAM“ und lassen Sie das Gerät einen Zyklus
lang durchlaufen. In dieser Zeit kann ein leichter Geruch und Rauch auftreten.
Dies ist normal.

13
DE
BEDIENUNG
Einschalten
Wenn das Gerät eingeschaltet wird, ist ein Piepton zu hören. Der Digitalbildschirm
und alle Anzeigeleuchten blinken auf und gehen anschließend aus. Lediglich die
Betriebsanzeige der Taste ON/OFF blinkt langsam auf. Dies weist darauf hin, dass
das Gerät sich im Standbymodus bendet. Wenn Sie die Taste ON/OFF drücken,
leuchten alle Anzeigeleuchten des Bedienfelds auf. Drücken Sie die Taste MENU,
um in das Funktionsmenü zu gelangen.
Funktionsauswahl
Die werkseitig eingestellte Funktion ist der Modus „Dämpfen bei hoher
Temperatur“. Drücken Sie die Taste MENU und wählen Sie mit dem Drehregler die
gewünschte Funktion aus. Die Funktionen werden beim Drehen nacheinander auf
dem Bildschirm angezeigt.
Temperatureinstellung
Drücken Sie die Taste TEMP. Drehen Sie zur Temperaturanpassung am Drehregler.
Im Betriebszustand können Sie, zusätzlich zum Automatikmenü, durch Drücken
der Taste TEMP die Temperatur anpassen. Nach der Anpassung wird das Gerät
automatisch gestartet oder kann durch Drücken der Starttaste gestartet werden.
Zeiteinstellung
Drücken Sie die Taste TIME. Drehen Sie zur Zeitanpassung am Drehregler. Im
Betriebszustand können Sie, zusätzlich zum Automatikmenü, durch Drücken der
Taste TIME die Zeit anpassen. Nach der Anpassung wird das Gerät automatisch
gestartet oder kann durch Drücken der Starttaste gestartet werden.
Auftaufunktion
Wenn Sie nach dem Einschalten die Taste ON/OFF drücken, leuchten alle
Anzeigeleuchten auf dem Bedienfeld auf. Drücken Sie dann die Taste MENU, um
die Oberäche für die Funktionsauswahl aufzurufen. Wenn Sie den Drehknopf
in den Auftaumodus drehen, blinkt das Symbol für die Auftaufunktion und die
anderen Symbole leuchten auf. Drücken Sie die Taste TEMP und der Signalton
ertönt. Das Auftausymbol leuchtet auf und die anderen Symbole sind aus.
Drehen Sie den Drehregler, um die gewünschte Temperatur für das Auftauen
zu wählen. Drücken Sie die Taste TIME, woraufhin der Signalton ertönt. Drehen
Sie am Drehregler, um die gewünschte Zeit für das Auftauen auszuwählen.
Drücken Sie anschließend den Drehregler, um mit dem Betrieb zu beginnen. Auf
dem Bildschirm werden die eingestellte Temperatur und die verbleibende Zeit
angezeigt. Diese Funktion kann zum Auftauen von Tiefkühlkost etc. verwendet
werden.
Sterilisationsfunktion
Drücken Sie nach dem Einschalten des Geräts die Taste ON/OFF, alle
Anzeigeleuchten auf dem Bedienfeld leuchten auf. Drücken Sie anschließend die
Taste MENU, um die Funktionsauswahl aufzurufen. Stellen Sie den Drehregler
auf den Sterilisationsmodus. Das Sterilisationssymbol blinkt, die anderen

14
DE
Symbole leuchten auf. Drücken Sie die Taste TIME und der Signalton ertönt. Das
Sterilisationssymbol leuchtet auf, die anderen Symbole sind erloschen. Drehen Sie
den Drehregler, um die gewünschte Zeit für die Sterilisation zu wählen. Drücken
Sie den Drehregler, um mit dem Betrieb zu beginnen. Auf dem Bildschirm werden
die eingestellte Temperatur und die verbleibende Zeit angezeigt.
Niedriger Wasserstand im Wassertank
Wenn sich im Wassertank zu wenig Wasser bendet, blinkt das Symbol
auf. „Time“ blinkt. Der Betrieb wird unterbrochen und der Signalton erklingt.
Drücken Sie die Taste Start, um die Zubereitung nach dem Hinzufügen von
Wasser automatisch fortzusetzen. Setzen Sie während des Betriebszustands
den Wassertank ein, um die Zubereitung direkt fortzusetzen. Der Alarm für
den niedrigen Wasserstand im Wassertank geht nur bei Verwendung der
Dampunktion an. Nach dem Hinzufügen von Wasser sollte die Taste Start
gedrückt werden, um die Zubereitung fortzusetzen.
Funktionsmenü
Drücken Sie nach dem Einschalten die Taste ON/OFF. Alle Bedienfeldleuchten
leuchten auf. Drücken Sie anschließend die Taste MENU, um in das Funktionsmenü
zu gelangen. Drehen Sie am Drehregler, um die verschiedenen Menüpunkte
auszuwählen. Stellen Sie, nachdem Sie das gewünschte Menü ausgewählt haben,
die Temperatur und die Zeit ein und drücken Sie zum Starten den Drehregler.
Drücken Sie den Drehregler erneut, um die ausgewählte Funktion abzubrechen.
Drehen Sie erneut am Drehregler, um eine andere Funktion auszuwählen.
Entkalken
Die Dampunktion kann akkumuliert 80 Stunden lang verwendet werden und geht
im Anschluss in die Ausgangsschnittstelle über. Das Symbol „DESCSAL“ leuchtet
auf, die anderen Symbole sind aus. Dies weist den Nutzer darauf hin, das Gerät zu
reinigen. Geben Sie Zitronensäure in den Wassertank und gießen Sie mehr als 600
ml gereinigtes Wasser ein. Schließen Sie die Tür und drücken Sie direkt auf den
Drehregler. Die Entkalkungsfunktion wird gestartet. Die Entkalkungsfunktion ist
in drei Stufen unterteilt: Entkalkung (30 Minuten), Grundreinigung (10 Minuten)
und Sekundärreinigung (10 Minuten). Nachdem die Entkalkungsfunktion 30
Minuten lang gelaufen ist, ertönt der Signalton. Gießen Sie zu diesem Zeitpunkt
das Wasser aus dem Schmutzwassertank und dem Reinwassertank aus, und füllen
Sie frisches, sauberes Wasser in den Wassertank ein. Nachdem Sie den Wassertank
in das Gehäuse eingesetzt haben, schließen Sie die Tür, um die Hauptreinigung
zu starten. Nach 10 Minuten ertönt erneut der Signalton. Gießen Sie zu diesem
Zeitpunkt das Wasser aus dem Schmutzwassertank und dem Reinwassertank aus,
und füllen Sie frisches, sauberes Wasser in den Wassertank. Nachdem Sie den
Wassertank in das Gehäuse eingesetzt haben, schließen Sie die Tür, um die zweite
Reinigung zu starten. Nach dem obigen Vorgang ist die Entkalkung abgeschlossen.
Wenn Sie das Gerät zu diesem Zeitpunkt nicht reinigen möchten, können Sie den
Drehknopf drehen oder andere Tasten außer der Starttaste drücken, um in den
normalen Betriebszustand zu gelangen. Wenn das Gerät jedoch das nächste Mal
eingeschaltet wird, werden Sie erneut an die Reinigung des Geräts erinnert. Der
Signalton ertönt so lange, bis Sie diesen Modus auswählen oder in den normalen

15
DE
Betriebsmodus wechseln.
Hinweis:
Nach der Entkalkung müssen Sie den Netzstecker ziehen. Sie können das Gerät
erst wieder verwenden, wenn es abgekühlt ist; die Entkalkungszeit beträgt 50
Minuten.
Modus wechseln
Drücken Sie lange auf den Drehregler (3 Sekunden), um den Vorgang
abzubrechen, und drehen Sie dann den Drehregler, um den Modus zu ändern.
Lampenfunktion
Drücken Sie nach dem Einschalten die Taste ON/OFF. Alle Lichter auf dem
Bedienfeld leuchten auf. Drücken Sie die Lampentaste
, um die Lampe
einzuschalten. Die Lampe kann jederzeit in jedem Betriebsmodus ein- oder
ausgeschaltet werden.
Warmhaltefunktion
Drücken Sie nach dem Einschalten die Taste ON/OFF. Alle Leuchten auf
dem Bedienfeld leuchten auf. Drücken Sie dann die Taste
, um die
Warmhaltefunktion zu starten. Drücken Sie die TEMP-Taste. Der Signalton ertönt.
Das Symbol „K-WARM“ leuchtet auf, die anderen Symbole sind aus. Drehen Sie den
Drehregler, um die gewünschte Temperatur für die Warmhaltefunktion zu wählen.
Drücken Sie die Taste TIME. Der Signalton ertönt. Durch Drehen des Drehreglers
kann die gewünschte Zeit für die Warmhaltefunktion eingestellt werden. Drücken
Sie den Drehregler, um den Betrieb zu starten. Auf dem Bildschirm werden die
eingestellte Temperatur und die verbleibende Zeit angezeigt.
Hinweise
• Die obigen Einstellungen sind Richtwerte. Da Herkunft, Form, Größe und
Sorte der Zutaten unterschiedlich sind, können wir die beste Einstellung für
Ihre Zutaten nicht garantieren. Sie können die Einstellung entsprechend der
tatsächlichen Situation vornehmen. Je größer die Menge der zu garenden
Lebensmittel ist, desto länger ist die Garzeit.
• Wenn Sie während der Zubereitung einiger Speisen den Topf herausnehmen
und die Speisen wenden, können Sie diese gleichmäßiger und besser garen.
• Wenn die Zutaten noch nicht gar genug sind, kann man sie direkt wieder in
den Topf geben und mit einer angemessenen Zeit kochen.
• Marinierte Lebensmittel sollten in das Innere der Speisen eindringen, damit
sie besser und leckerer schmecken.

16
DE
VOREINSTELLUNGEN UND EINSTELLUNGSBEREICH
Menü Symbol Zuberei-
tungs-
modus
Temp. Temp.-
bereich
Zeit Zeitbe-
reich
Dämpfen
Untermenü-Modus
Frittieren
Dämpfen &
Frittieren
Sterilisieren / 110 °C Nicht an-
passbar
0:30 min 10 min - 2 h
Entkalken
/ / Nicht an-
passbar
0:50 min Nicht an-
passbar
Warmhalten
/ 65 ℃ 50-80 ℃ 0:20 min 1 min - 3 h
Pommes
Frittie-
ren
220 ℃ 200-230 ℃ 0:25 min 15-35 min
Fisch
Frittie-
ren
190 ℃ 170-200 ℃ 0:40 min 1-50 min
Huhn
Dämp-
fen &
Frittie-
ren
220 ℃ 210-230 ℃ 0:45 min 1 min - 1 h
Spieß
Frittie-
ren
200 ℃ 180-220 ℃ 0:15 min 15-35 min
Pizza
Frittie-
ren
180 ℃ 170-190 ℃ 0:20 min 1-30 min
Vegetarisch
Dämp-
fen
100 ℃ 95-130 ℃ 0:10 min 1-20 min
Suppe
Frittie-
ren
200 ℃ +
110 ℃ +
150 ℃
Nicht an-
passbar
0:30 + 170
+ 0:10 min
Nicht an-
passbar
Auftauen
Frittie-
ren
45 ℃ 35-70 ℃ 1:00 h 1 min - 8 h
Dörren
Frittie-
ren
70 ℃ 70 ℃ -
95 ℃
8:00 h 1 min - 8 h
17
DE
Untermenüs
Reiner Dämpfmodus
Menü-
code
Menüs Zeit
HH:MM
Temp.
(°C)
Zeit-
bereich
(min)
Temp.-
bereich
(°C)
01 Gebratener
Eierkuchen
00:15 100 1-20 90-110
02 Geröstete
Kastanien
00:15 100 1-20 90-110
03 Gugelhupf 00:15 110 1-20 110-120
04 Bagel 00:18 100 1-25 90-110
05 Makrone 00:20 110 1-30 110-130
06 Pommes 00:28 110 1-35 110-130
07 Knuspriger Toast 00:40 100 1-50 90-120
08 Knusprig
gebackene
Brötchen
00:13 90 1-35 90-110
09 DIY 01:00 130 1-60 90-130
Reiner Frittiermodus
Menü-
code
Menüs Zeit
HH:MM
Temp.
(°C)
Zeit-
bereich
(min)
Temp.-
bereich
(°C)
01 Hähnchenügel 00:20 180 1-35 170-200
02 Ganze Ente
01:00 200
1 min
- 2 h
180-220
03 Roast Beef 0:20 190 1-35 180-220
04 Geröstete
Süßkartoeln
00:40 230
1-50 200-230
05 Gebackener Mais 00:25 200 1-30 180-220
06 Kekse 00:30 150 1-50 140-190
07 Gebratener
Eierkuchen
00:20 200
1-35 180-220
08 Geröstete
Kastanien
00:30 180
1-50 180-220
18
DE
09 Gugelhupf
0:20 + 0:10
130
+ 160
15-25
+ 7-13
100-140
+ 140-180
10 Bagel 00:20 190 1-30 180-220
11 Makrone 00:15 150 1-30 140-190
12 Pommes 00:18 200 1-30 180-220
13 Knuspriger Toast 00:10 200 1-20 180-220
14 Knusprig
gebackene
Brötchen
00:07 180 1-20 170-200
15 DIY 01:00 230 1-60 35-230
Kombinationsmodus Dämpfen + Frittieren
Menü-
code
Menüs Zeit HH:MM Temp. (°C) Zeitbereich (min) Temp.-
bereich
(°C)
01 Steak 0:15 190 1-20 180-220
02 Fisch Dämpfen 0:10
+ Frittieren 0:20
Dämpfen 100
+ Frittieren 180
Dämpfen 5-13
+ Frittieren 15-30
100-120
+ 170-200
03 Huhn 00:50 Dämpfen 190
+ Frittieren
30 min - 1 h 180-220
04 Rotgegartes
Schweineeisch
Dämpfen 0:20
+ Frittieren 0:15
Dämpfen 110
+ Frittieren 200
Dämpfen 10-30
+ Frittieren 5-20
100-120
+ 170-220
05 Brot aufwärmen
(Kühlschrank)
Dämpfen 0:08
+ Dämpfen
+ Frittieren 0:07
Dämpfen 80
+ Dämpfen
+ Frittieren 180
Dämpfen 5-10
+ Dämpfen
+ Frittieren 5-10
80-100
+ 170-200
06 Brot aufwärmen
(Raum-
temperatur)
Dämpfen 0:06
+ Dämpfen
+ Frittieren 0:07
Dämpfen 80
+ Dämpfen
+ Frittieren 180
Dämpfen 5-10
+ Dämpfen
+ Frittieren 5-10
80-100
+ 170-200
07 DIY 01:00 200 1-60 50-220
Hinweis: Beim Dämpfen und Frittieren blinkt die Menüanzeige des gewählten Hauptmenüs
(beispielsweise „Reiner Frittiermodus“) auf. Drücken Sie den Drehregler, um in den
Untermenümodus zu gelangen. Die entsprechende Nummer wird auf dem Bildschirm angezeigt,
wenn Sie am Drehregler drehen. Beispielsweise ist Dampfmodus 01 „gebratener Eierkuchen“.
Drücken Sie den Drehregler, um das gewünschte Menü zu bestätigen. Die Temperatur und die Zeit
können durch Drehen des Drehreglers angepasst werden. Drücken Sie den Drehregler, um Ihre
Auswahl zu bestätigen. Der Timer beginnt herunterzuzählen und das entsprechende Hauptmenü
und die ausgewählte Nummer leuchten auf. Wenn Sie sich die eingestellte Temperatur ansehen
möchten, drücken Sie die Temperaturtaste. Die Anzeige wechselt auf die eingestellte Temperatur.
Nach 30 Sekunden wird der Menücode wieder auf dem Bildschirm angezeigt.

19
DE
REINIGUNG UND WARTUNG
• Verwenden Sie zur Reinigung keine aggressiven Reinigungsmittel, Benzin,
abreibendes Pulver oder eine Metallbürste.
• Wenn das Gerät über einen längeren Zeitraum verwendet wird,
kann es vorkommen, dass das Geräteinnere seltsam riecht. Gehen
Sie folgendermaßen vor, falls dies der Fall sein sollte: Legen Sie
5 – 6 Zitronenscheiben in das Geräteinnere und stellen Sie die Funktion
„Dämpfen bei niedriger Temperatur“ ein. Lassen Sie das Gerät 15 – 20 Minuten
mit 100 °C laufen. Der seltsame Geruch wird dadurch entfernt.
• Schalten Sie das Gerät vor der Reinigung aus und ziehen Sie den Netzstecker
aus der Steckdose.
• Halten Sie das Geräteinnere immer sauber. Sollten sich Lebensmittelreste
oder Spritzer an der Innenwand benden, können diese mit einem feuchten
Tuch entfernt werden. Reinigen Sie das Geräteinnere keinesfalls mit harten
Materialien. Sollte das Geräteinnere verschmutzt sein, reinigen Sie dieses mit
einem weichen Tuch und mildem Reinigungsmittel. Verwenden Sie keinesfalls
aggressive Reinigungsmittel oder scheuernde Materialien.
• Befüllen Sie den Wassertank ausschließlich mit destilliertem oder puriziertem
Wasser, da Leitungswasser zu Kalkablagerungen führen kann.
• Überprüfen Sie den Wassertank mindestens einmal pro Monat. Der
Wassertank kann zur Reinigung entnommen und anschließend wieder
eingesetzt werden.
• Reinigen Sie die Abtropfschale, den Wassertank und den Wasserbehälter nach
jeder Verwendung.
• Reinigen Sie die Türdichtung regelmäßig mit einem weichen, trockenen Tuch.
• Wenn das Bedienfeld und der Drehregler nass sein sollten, reiben Sie
diese mit einem weichen, trockenen Tuch trocken und verwenden Sie kein
aggressives Reinigungsmittel. Schalten Sie das Gerät vor der Reinigung aus
und ziehen Sie den Netzstecker aus der Steckdose, um ein versehentliches
Einschalten zu vermeiden.
• Ziehen Sie den Netzstecker aus der Steckdose und reinigen Sie das gesamte
Gerät, wenn Sie dieses über einen längeren Zeitraum nicht verwenden. Lagern
Sie das Gerät an einem trockenen, ausreichend belüfteten Ort.
• Reinigen Sie die Glastür des Geräts keinesfalls mit aggressiven
Reinigungsmitteln oder scharfen Metallschabern, da das Glas dadurch
beschädigt werden und zerbrechen könnte.
• Reinigen Sie das Zubehör ausschließlich mit mildem Reinigungsmittel und
einem weichen Tuch. Andernfalls könnte das Zubehör zerkratzt und dessen
Schutzschicht beschädigt werden.
• Beachten Sie bei der Entsorgung des Geräts die lokalen
Umweltschutzbestimmungen.
• Bei Fehlfunktionen muss das Gerät vom Hersteller, dem Kundendienst oder
einer in ähnlicher Weise qualizierten Person ersetzt werden. Andernfalls
kann es zu Sach- und/oder Personenschäden kommen.
20
DE
FEHLERSUCHE UND FEHLERBEHEBUNG
Problem Mögliche Ursache Lösung
Das Gerät funktioniert
nicht, piept aber beim
Einschalten und der
Bildschirm wird beim
Einstecken angezeigt.
Inkorrekte Verwendung. Lesen Sie sich die gesamte
Bedienungsanleitung aufmerksam durch.
Beschädigte Komponenten Kontaktieren Sie den Kundendienst, falls
dies der Fall sein sollte.
Das Gerät funktioniert
nicht, piept nicht beim
Einschalte und auf
dem Bildschirm wird
beim Einstecken nichts
angezeigt.
Der Netzstecker ist nicht
eingesteckt.
Stecken Sie den Netzstecker in die
Steckdose.
Die Steckdose ist defekt. Ersetzen Sie die Steckdose.
Beschädigte Komponenten. Kontaktieren Sie den Kundendienst, falls
dies der Fall sein sollte.
Die Lampe leuchtet nicht
auf.
Die Lampe ist beschädigt. Kontaktieren Sie den Kundendienst, falls
dies der Fall sein sollte.
Bei der ersten
Verwendung tritt Rauch
aus dem Gerät auf.
Bei der ersten Verwendung
wird beim Erhitzen das vom
Herstellungsprozess verbliebene Öl
im Geräterhitzt und verbrannt und
Rauch bildet sich.
Dies ist normal und kein Grund zur
Beunruhigung.
Seltsamer Geruch
Der Geruch tritt nach einem länge-
ren Verwendungszeitraum auf.
Legen Sie 5 – 6 Zitronenscheiben in
das Gerät und lassen Sie dieses 15 – 20
Minuten lang bei 100 °C mit der Funktion
„Dämpfen bei niedriger Temperatur“
laufen.
Das Zubehör im Gerät ist ver-
schmutzt.
Reinigen und trocknen Sie das Zubehör.
Im Geräteinneren bendet sich
Lebensmittelreste.
Entfernen Sie die Lebensmittelreste vor
der erneuten Verwendung.
Das Netzkabel ist beschädigt. Kontaktieren Sie den Kundendienst und
halten Sie das Netzkabel zukünftig von
heißen Oberächen fern.
Die Lebensmittel sind
nicht vollständig gar.
Die ausgewählte Funktion ent-
spricht nicht den Zubereitungs-
anforderungen der verwendeten
Lebensmittel.
Stellen Sie die Zeit und die Temperatur
gemäß des Rezepts und Ihrer persönli-
chen Erfahrung ein.
21
DE
Fehlermeldung
Fehlercode Mögliche Ursache Lösung
E1
Überhitzen oder NTC-
Kurzschluss
Kontaktieren Sie den
Kundendienst.
E4
Oener NTC-Kreislauf Kontaktieren Sie den
Kundendienst.
E2
Überhitzen oder
Kurzschluss des 1 NTC
Verdampfers.
Kontaktieren Sie den
Kundendienst.
E5
Oener Kreislauf des 1 NTC
Verdampfers.
Kontaktieren Sie den
Kundendienst.
E3
Überhitzen oder
Kurzschluss des 2 NTC-
Verdampfers.
Kontaktieren Sie den
Kundendienst.
E6
Kurzschluss des 2 NTC-
Verdampfers.
Kontaktieren Sie den
Kundendienst.

SCHALTPLAN

23
DE
SPEZIELLE ENTSORGUNGSHINWEISE FÜR
VERBRAUCHER IN DEUTSCHLAND
Entsorgen Sie Ihre Altgeräte fachgerecht. Dadurch wird gewährleistet, dass die
Altgeräte umweltgerecht verwertet und negative Auswirkungen auf die Umwelt
und menschliche Gesundheit vermieden werden. Bei der Entsorgung sind
folgende Regeln zu beachten:
• Jeder Verbraucher ist gesetzlich verpichtet, Elektro- und
Elektronikaltgeräte (Altgeräte) sowie Batterien und Akkus
getrennt vom Hausmüll zu entsorgen. Sie erkennen die
entsprechenden Altgeräte durch folgendes Symbol der
durchgestrichene Mülltonne (WEEE Symbol).
• Sie haben Altbatterien und Altakkumulatoren, die nicht vom Altgerät
umschlossen sind, sowie Lampen, die zerstörungsfrei aus dem Altgerät
entnommen werden können, vor der Abgabe an einer Entsorgungsstelle vom
Altgerät zerstörungsfrei zu trennen.
• Bestimmte Lampen und Leuchtmittel fallen ebenso unter das Elektro- und
Elektronikgesetz und sind dementsprechend wie Altgeräte zu behandeln.
Ausgenommen sind Glühbirnen und Halogenlampen. Entsorgen Sie
Glühbirnen und Halogenlampen bitte über den Hausmüll, sofern Sie nicht das
WEEE Symbol tragen.
• Jeder Verbraucher ist für das Löschen von personenbezogenen Daten auf dem
Elektro- bzw. Elektronikgerät selbst verantwortlich.
Rücknahmepicht der Vertreiber
Vertreiber mit einer Verkaufsäche für Elektro- und Elektronikgeräte von
mindestens 400 Quadratmetern sowie Vertreiber von Lebensmitteln mit einer
Gesamtverkauäche von mindestens 800 Quadratmetern, die mehrmals im
Kalenderjahr oder dauerhaft Elektro- und Elektronikgeräte anbieten und auf dem
Markt bereitstellen, sind verpichtet,
1 bei der Abgabe eines neuen Elektro- oder Elektronikgerätes an einen Endnutzer
ein Altgerät des Endnutzers der gleichen Geräteart, das im Wesentlichen die
gleichen Funktionen wie das neue Gerät erfüllt, am Ort der Abgabe oder in
unmittelbarer Nähe hierzu unentgeltlich zurückzunehmen und
2 auf Verlangen des Endnutzers Altgeräte, die in keiner äußeren Abmessung
größer als 25 Zentimeter sind, im Einzelhandelsgeschäft oder in unmittelbarer
Nähe hierzu unentgeltlich zurückzunehmen; die Rücknahme darf nicht an den
Kauf eines Elektro- oder Elektronikgerätes geknüpft werden und ist auf drei
Altgeräte pro Geräteart beschränkt.

24
DE
• Bei einem Vertrieb unter Verwendung von Fernkommunikationsmitteln
ist die unentgeltliche Abholung am Ort der Abgabe auf Elektro- und
Elektronikgeräte der Kategorien 1, 2 und 4 gemäß § 2 Abs. 1 ElektroG, nämlich
„Wärmeüberträger“, „Bildschirmgeräte“ (Oberäche von mehr als 100 cm²)
oder „Großgeräte“ (letztere mit mindestens einer äußeren Abmessung
über 50 Zentimeter) beschränkt. Für andere Elektro- und Elektronikgeräte
(Kategorien 3, 5 ,6) ist eine Rückgabemöglichkeit in zumutbarer Entfernung
zum jeweiligen Endnutzer zu gewährleisten
• Altgeräte dürfen kostenlos auf dem lokalen Wertstohof oder in folgenden
Sammelstellen in Ihrer Nähe abgegeben werden: www.take-e-back.de
• Für Elektro- und Elektronikgeräte der Kategorien 1, 2 und 4 an bieten wir auch
die Möglichkeit einer unentgeltlichen Abholung am Ort der Abgabe. Beim
Kauf eines Neugeräts haben sie die Möglichkeit eine Altgerätabholung über
die Webseite auszuwählen.
• Batterien können überall dort kostenfrei zurückgegeben werden, wo sie
verkauft werden (z. B. Super-, Bau-, Drogeriemarkt). Auch Wertsto- und
Recyclinghöfe nehmen Batterien zurück. Sie können Batterien auch per Post
an uns zurücksenden. Altbatterien in haushaltsüblichen Mengen können Sie
direkt bei uns von Montag bis Freitag zwischen 07:30 und 15:30 Uhr unter der
folgenden Adresse unentgeltlich zurückgeben:
Chal-Tec GmbH
Member of Berlin Brands Group
Handwerkerstr. 11
15366 Dahlwitz-Hoppegarten
Deutschland
• Wichtig zu beachten ist, dass Lithiumbatterien aus Sicherheitsgründen vor der
Rückgabe gegen Kurzschluss gesichert werden müssen (z. B. durch Abkleben
der Pole).
• Finden sich unter der durchgestrichenen Mülltonne auf der Batterie zusätzlich
die Zeichen Cd, Hg oder Pb ist das ein Hinweis darauf, dass die Batterie
gefährliche Schadstoe enthält. (»Cd« steht für Cadmium, »Pb« für Blei und
»Hg« für Quecksilber).
Hinweis zur Abfallvermeidung
Indem Sie die Lebensdauer Ihrer Altgeräte verlängern, tragen Sie dazu bei,
Ressourcen ezient zu nutzen und zusätzlichen Müll zu vermeiden. Die
Lebensdauer Ihrer Altgeräte können Sie verlängern indem Sie defekte Altgeräte
reparieren lassen. Wenn sich Ihr Altgerät in gutem Zustand bendet, könnten Sie
es spenden, verschenken oder verkaufen.
25
DE
HINWEISE ZUR ENTSORGUNG
Wenn es in Ihrem Land eine gesetzliche Regelung
zur Entsorgung von elektrischen und elektronischen
Geräten gibt, weist dieses Symbol auf dem Produkt oder
auf der Verpackung darauf hin, dass dieses Produkt
nicht im Hausmüll entsorgt werden darf. Stattdessen
muss es zu einer Sammelstelle für das Recycling von
elektrischen und elektronischen Geräten gebracht
werden. Durch regelkonforme Entsorgung schützen
Sie die Umwelt und die Gesundheit Ihrer Mitmenschen
vor negativen Konsequenzen. Informationen zum
Recycling und zur Entsorgung dieses Produkts,
erhalten Sie von Ihrer örtlichen Verwaltung oder Ihrem
Hausmüllentsorgungsdienst.
HERSTELLER & IMPORTEUR (UK)
Hersteller:
Chal-Tec GmbH, Wallstraße 16, 10179 Berlin, Deutschland.
Importeur für Großbritannien:
Berlin Brands Group UK Ltd
PO Box 1145
Oxford, OX1 9UW
United Kingdom


27
EN
Dear Customer,
Congratulations on purchasing this device. Please read the
following instructions carefully and follow them to prevent
possible damages. We assume no liability for damage
caused by disregard of the instructions and improper use.
Scan the QR code to get access to the latest user manual
and more product information.
Technical Data 28
Safety Instructions 29
Product Description 31
Getting Started 35
Operation 37
Preset Parameters and Adjustment Range 40
Cleaning and Maintenance 43
Common Problems and Solutions 44
Circuit Principle Diagram 46
Disposal Considerations 47
Manufacturer & Importer (UK) 47
CONTENTS

28
EN
TECHNICAL DATA
Item number 10041333, 10041334
Power supply 220–240 V ~ 50-60 Hz
Power rating 2450 W
Temperature range 50–230 °C
Pot capacity 18 l
Water tank capacity 800 ml
Weight 14.5 kg
29
EN
SAFETY INSTRUCTIONS
General information
• Never wash the cabinet with running water to prevent damage to the
electrical components.
• To prevent electric shock, do not allow water or other liquids to enter the unit.
• This device may be only used by children 8 years old or older and persons with
limited physical, sensory and mental capabilities and / or lack of experience
and knowledge, provided that they have been instructed in use of the device
by a responsible person who understands the associated risks.
• Before use, check the voltage on the device‘s sticker. Only connect the device
to sockets that correspond to the voltage of the device.
• Do not use this product if the plug, power cord, or product is damaged.
• If the power cord or plug is damaged, it must be replaced by the
manufacturer, an authorized service centre, or a similarly quali ed person.
• Do not allow children to play with the product.
• Do not handle the plug or control panel with wet hands.
• Do not place this product on or near tablecloths, curtains, or other
combustible materials.
• Allow at least 10 cm of space around the product on all sides. Do not place any
objects on top of the unit.
• Do not leave the unit unattended during use.
CAUTION
Danger of burns! Hot steam may escape when the oven door is
opened. Keep a safe distance to avoid scalding.
• Danger of burns! Hot steam may escape when the oven door is opened. Keep
a safe distance to avoid scalding.
• Do not insert any foreign bodies into the openings of the appliance.
• Do not use a steam cleaner for cleaning.
• Make sure that the appliance is switched o before replacing the lamp to
avoid electric shock.
• Do not install the unit in a cabinet, as it may overheat.

30
EN
Instructions for safe use
CAUTION
Danger of burns! The appliance becomes hot during use. Take care
not to touch the heating elements inside the oven and use oven
gloves.
• Before cleaning, unplug the appliance from the wall outlet and allow it to cool
completely.
• Install the appliance on a dry, at surface and leave at least 10 cm of space
around the appliance in all directions so that the air can circulate su ciently.
• Do not plug the appliance into an outlet that is already connected to other
kitchen appliances.
• Do not place the appliance near ammable objects. Install it away from
window curtains, door curtains, wallpaper, and similar objects to prevent re.
Do not place or place any objects on the unit.
• Clean the door panel of the stove with a soft and damp cloth. Do not use
abrasives or metal scrapers as they will scratch the surface.
• Do not connect the unit to external timers or remotely controlled power
sockets.
• Before use, check that your cookware is suitable for this product. We
recommend that you use heat-resistant glass containers or ceramic
containers. Fill the container to a maximum of two thirds.
• Do not over ll the water tank. When lling, use the MAX mark in the tank as a
guide.
• Do not place any containers on the open oven door.
• Do not heat food in a sealed container, otherwise the container may explode.
Transfer the food into a heat-resistant container before heating.
The following phenomena are normal:
• Air inlet spray water : the frequency of water supply is fast, the air inlet
sometimes spray a small amount of water, it’s normal.
• The steam condenses at the air outlet : the excess steam in the chamber is
quickly cooled and discharged through the exhaust port during cooking, but a
small amount of steam will condense at the louver exhaust port, it’s normal.
• Voltage uctuation will a ect cooking time and e ect: When the voltage
uctuates from -10% to + 5%, the steam air fryer can still work, but it is
a ected by the higher or lower voltage, and the output power is relatively
increased or decreased, so the cooking time and e ect will di erent, it’s
normal.
31
EN
PRODUCT DESCRIPTION
Product components
1 Door frame Fixes the whole machine.
2 Handle Used for open/close the door.
3 Glass observe the internal food state.
4 Knob used for adjust the function.
5 Water tank used to store water that produces steam.
6 Condensate tray collect excess water during cooking.
7 Air outlet used to exhaust excess steam from the air fryer.
8 Door control
switch
Ensure that the oven door is closed, then the
appliance can run.
9 Handle Used to move the appliance.
10 Water tray Collect excess water during cooking.
11 Shelf loading baking tray and other baking moulds
12 Steaming plate Used for loading waterless food to be cooked.
13 Baking tray Used for loading food with soup / biscuit etc.
32
EN
Control panel
Diagram Function description Working mode
Time Displays the set time while
working.
Temperature Displays the set temperature
while working.
Water shortage This icon ickers and the buzzer
sounds for a long time, indicat-
ing that the water tank is short
of water.
(Chips) Automatic menu
mode
Automatic menu, time and
temperature can be adjusted
during operation.
(FISH) Automatic menu
mode
Automatic menu, time and
temperature can be adjusted
during operation.
(CHICKEN) Automatic
menu mode
Automatic menu, time and
temperature can be adjusted
during operation.
(SKEWER) Automatic
menu mode
Automatic menu, time and
temperature can be adjusted
during operation.
(PIZZA) Automatic menu
mode
Automatic menu, time and
temperature can be adjusted
during operation.
(VEGGIE) Automatic
menu mode
Automatic menu, time and
temperature can be adjusted
during operation.

33
EN
Diagram Function description Working mode
(SOUP) Automatic menu
mode
Automatic menu, time and
temperature cannot be adjusted.
(DEFROST) Automatic
menu mode
Automatic menu, time and
temperature can be adjusted
during operation.
(DEHYDRATE) Automatic
menu mode
Automatic menu, time and
temperature can be adjusted
during operation.
Sterilize mode Steam sterilization
Low temperature
steaming mode
Submenu mode
Barbecue / baking mode Submenu mode
High temperature
steaming and baking
mode
Submenu mode
Descaling mode This icon lights up and the
buzzer sounds for a long time
when this mode is chosen.
Temperature button Press this button, rotate
the adjustment knob, to set
temperature.
Menu button Press this button to enter the
built-in menu settings.
Heat preservation
button
Press this button, preset 65 ℃,
20 min. The time is adjustable
up to 180 min.
Time button Press this button, rotate the
adjustment knob, to set time.
LAMP button Press this button, the built-in
light lights up.
34
EN
Diagram Function description Working mode
Standby button Press this button, enter standby
mode or o mode.
Adjustment knob Rotate to adjust temperature,
time, menu, press the knob to
start / pause.
35
EN
GETTING STARTED
1. After unpacking, fasten the partition wall block to the back of the machine.
Place the machine on a stable horizontal surface. Leave not less than 20 cm in
the back and not less than 10 cm on both sides of the space, and pay attention
to keep away from curtains, wall cloth and other combustible materials, as
picture shows.
2. Put the corresponding food on the corresponding accessories, and then push
into the housing, as picture shows.
36
EN
3. Take out the water tank, empty the condensate tray and water tray, ll the
tank with water and tighten the water tank lid, then put it into the houst. As
picture shows.
Note
• Di erent cooking options, di erent accessories.
• After cooking done, remove the steaming plate, baking tray ,rack or cake plate
from the oven with gloves or other anti scald tools.
• Only when the oven door is closed can the machine work properly, or the
display will ash.
Before rst use
1. Remove all packaging materials, place the machine on a stable horizontal
surface.
2. Clean the baking tray ,steaming plate, rack, cake plate and other accessories
with hot water, liquid detergent and non-abrasive sponge.
3. Fill the tank with water (distilled or puri ed water).
4. Wipe the inside and outside of the appliance with a cloth.
5. First use, please don't put any food in the pot, ll the tank with puri ed
water,use preset function - “STEAM” to run one cycle, which time may smell a
slight smell and smoke, don’t worry, it’s a normal phenomenon.

37
EN
OPERATION
Power on
When the product is powered on, there will have a "Bi" sound, the digital screen
and all indicator lights icker and then turn o, only the ON/OFF button indicator
light ashes slowly, indicating that the appliance is power on state (the power on
state is the standby mode), press ON/OFF button, all lights on the control panel
light up, then press the MENU button to enter the function selection interface.
Function selection
The steam air fryer defaults to high temperature steaming mode, press the MENU
button, turn the knob to the right, select the menu of the interface in turn, which
can be selected circularly.
Temperature adjustment
Press the TEMP button, turn the knob to adjust the temperature. During working,
in addition to the automatic menu, press the temperature button to adjust the
temperature, after adjustment, it will enter the working mode automatically or
press the start knob.
Time adjustment
Press the TIME time button, turn the knob to adjust the time.During working, in
addition to the automatic menu, press the time button to adjust the time, after
adjustment, it will enter the working mode automatically or press the start knob.
Defrost function introduction
Press the ON/OFF button after power on, all lights on the control panel light up,
then press the MENU button to enter the function selection interface. Turn the
knob to defrost mode, defrost icon ashes, other icons light on; press the TEMP
button and the buzzer will ring, defrost icon lights on, other icons are o; rotate
the knob to select the required temperature for defrost, press the TIME button,
the buzzer will ring, rotate the knob to select the required time for defrosting,
press the knob to start working. The screen displays the set temperature and the
remaining time. This function can be used to thaw frozen food and so on.
Sterilize function introduction
Press the ON/OFF button after power on, all lights on the control panel light up,
then press the MENU button to enter the function selection interface. Turn the
knob to Sterilize mode, the Sterilize icon ashes, other icons light on. Press the
TIME button and the buzzer will ring, Sterelize icon lights on, other icons are o.
Rotate the knob to select the required time for Sterilizing, press the knob to start
working. The screen displays the set temperature and the remaining time.
Water shortage function introduction
If the water tank is short of water, the
icon ashes. “Time” ashes. The work
is suspended, and the buzzer will ring. Press the “start” button to continue the
baking process automatically after adding water: During working, insert the water
tank to run directly. Alarm water shortage when just start-up the steam function .

38
EN
After adding water, should press the start knob to continue the baking process.
Menu function introduction
Press the ON/OFF button after powering on. All lights on the control panel light
up. Then press the MENU button to enter the menu mode. Rotate the selection
knob, the menu is cycling on the digital screen. After selecting the desired menu,
set the temperature and time, and press the selection knob to start. To cancel the
menu, press the knob again, press the menu button and rotate the selection knob
to select the menu again.
Descaling function introduction
The steam function accumulates to 80H, and enter the initial interface. The icon
"DESCSAL" lights up rst, other icons are o, reminder the user to clean. Add citric
acid into the water tank and pour in more than 600ml puried water, close the
door ,press the selection knob directly, the descaling function is started. As the
descaling function is divided into three stages: descaling (30 minutes), primary
cleaning (10 minutes) and secondary cleaning (10 minutes), the appliance alarm
will "dididi" sound after the descaling function working for 30 minutes, at this
time, pour out the water from the waste water box and water tank, and add new
puried water into the water tank. After putting the water tank into the housing,
close the door to start the primary cleaning step, 10 minutes later, the appliance
alarm will "dididi" sound again, at this time, pour out the water from the waste
water box and water tank, and add new puried water into the water tank. After
putting the water tank into the housing, close the door to start the secondary
cleaning. After the above operation, the descaling is completed.
If the user does not clean, can turn the knob or press other buttons except the
start button to enter the normal initial state. But if the user does not clean, the
descaling will still be remindered by next time when it’s power on. The buzzer rings
for a long time until the user selects this mode or enter the normal operation
interface.
Note:
Need unplug after descaling, you can continue to use it only when the the
appliance cool down, the descaling time is 50 minutes.

39
EN
Mode change
Long press the selection knob (3 seconds) to cancel the operation, and then turn
the knob to change the mode.
Lamp function
Press the ON/OFF button after power on, all lights on the control panel light up,
press the lamp button
to turn on the lamp. The lamp can be turned on or o at
any time under any operation mode.
Heat preservation function introduction
Press the ON/OFF button after power on, all lights on the control panel light up,
then press the
button to start the heat preservation function ,press the TEMP
button and the buzzer will ring, the “K-WARM” icon lights on, other icons are o;
rotate the knob to select the required temperature for heat preservation, press
the “time” button, the buzzer will ring, rotate the knob to select the required time
for heat preservation, press the knob to start working. The screen displays the set
temperature and the remaining time.
Notes
• The above settings are all directional, we can't guarantee the best setting of
your ingredients when the origin, shape, size and brand of ingredients are
dierent; You can set it according to the actual situation,the larger the amount
of food you cook, the longer time it takes.
• During cooking some food, pulling out the pot and turning over the food can
help to cook more evenly and cook better.
• If the ingredients are not well cooked enough, it can be put back to the pot
directly and cooked with an appropriate time.
• Marinate food should penetrate into the interior of the food, to taste better
and more delicious.
40
EN
PRESET PARAMETERS AND ADJUSTMENT RANGE
Menu Icon Cook
mode
Default
temper-
ature
Tempera-
ture ad-
justment
range
Default
time
(HH:MM)
Time ad-
justment
range
Steam
Submenu mode
Fryer
Steam & Fryer
Sterilize / 110 °C Can’t
adjust
0:30 min 10 min - 2 h
Descaling
/ / Can’t
adjust
0:50 min Can’t adjust
Keep warm
/ 65 ℃ 50-80 ℃ 0:20 min 1 min - 3 h
Chips
Fryer 220 ℃ 200-230 ℃ 0:25 min 15-35 min
Fish
Fryer 190 ℃ 170-200 ℃ 0:40 min 1-50 min
Chicken
Steam
with
Fryer
220 ℃ 210-230 ℃ 0:45 min 1 min - 1 h
Skewer
Fryer 200 ℃ 180-220℃ 0:15 min 15-35 min
Pizza
Fryer 180 ℃ 170-190℃ 0:20 min 1-30 min
Veggie
Steam 100 ℃ 95-130℃ 0:10 min 1-20 min
Soup
Fryer 200 ℃ +
110 ℃ +
150 ℃
Can’t
adjust
0:30 + 170 +
0:10 min
Can’t adjust
Defrost
Fryer 45 ℃ 35-70 ℃ 1:00 h 1 min - 8 h
Dehydrate
Fryer 70 ℃ 70 ℃ -
95 ℃
8:00 h 1 min - 8 h
41
EN
Sub-menus
Pure Steam Mode
Menu
code
Menus Time
HH:MM
Temp.
(°C)
Time
range
(min)
Temp.
range
(°C)
01 Steamed eggs 00:15 100 1-20 90-110
02 Steamed scallops
with garlic and fans
00:15 100 1-20 90-110
03 Heat up pastry 00:15 110 1-20 110-120
04 Steamed crab 00:18 100 1-25 90-110
05 Steamed bun 00:20 110 1-30 110-130
06 Steamed pork ribs 00:28 110 1-35 110-130
07 Steam sweet potato 00:40 100 1-50 90-120
08 Baby warm milk 00:13 90 1-35 90-110
09 DIY 01:00 130 1-60 90-130
Pure Fryer Mode
Menu
code
Menus Time Temp.
(°C)
Time
range
(min)
Temp.
range
(°C)
01 Chicken wings 00:20 180 1-35 170-200
02 Whole duck
01:00 200
1 min
-2 h
180-220
03 Roast beef 0:20 190 1-35 180-220
04 Roast sweet potato 00:40 230 1-50 200-230
05 Baked corn 00:25 200 1-30 180-220
06 Cookies 00:30 150 1-50 140-190
07 Roast egg tart 00:20 200 1-35 180-220
08 Roasted chestnuts 00:30 180 1-50 180-220
09 Chion cake
0:20 + 0:10
130
+160
15-25
+ 7-13
100-140 +
140-180
42
EN
10 Bagel 00:20 190 1-30 180-220
11 Macaron 00:15 150 1-30 140-190
12 Chips 00:18 200 1-30 180-220
13 Crisp toast 00:10 200 1-20 180-220
14 Crispy baked buns 00:07 180 1-20 170-200
15 DIY 01:00 230 1-60 35-230
Steam + Fryer Combination Mode
Menu
code
Menus Time
HH:MM
Temp.
(°C)
Time range
(min)
Temp.
range
(°C)
01 Steak 0:15 190 1-20 180-220
02 Fish Steam 0:10
+ Fryer 0:20
Steam 100
+ Fryer 180
Steam 5-13
+ Fryer 15-30
100-120
+ 170-200
03 Chicken 00:50 190 ℃ Steam
+ Fryer
30 min - 1 h 180-220
04 Red-cooked
pork
Steam 0:20
+ Fryer0:15
Steam 110
+ Fryer 200
Steam 10-30
+ Fryer 5-20
100-120
+170-220
05 Reheat bread
(refrigerator)
Steam 0:08
+ Steam
+ Fryer 0:07
Steam 80
+ Steam
+ Fryer 180
Steam 5-10
+ Steam
+ Fryer 5-10
80-100
+170-200
06 Reheat
bread (room
temperature)
Steam 0:06
+ Steam
+ Fryer 0:07
Steam 80
+ Steam
+ Fryer 180
Steam 5-10
+ Steam
+ Fryer 5-10
80-100
+ 170-200
07 DIY 01:00 200 1-60 50-220
Note: For steaming, roasting, and selecting the corresponding main menu, the menu light
ashes. Press the knob to enter the submenu mode. At this time, the corresponding number
will appear when you turn the knob. For example, steaming---01 is the steamed eggs point.
Press the knob to conrm this menu, enter to adjust the temperature and time, set the
temperature and time, and press the knob to conrm. At this time, the time counts down,
and the corresponding main menu and corresponding number light up. If you want to
view the set temperature, press the temperature key at this time. The number will switch to
the set temperature, and the 30-second internal operation will automatically switch to the
corresponding submenu code.

43
EN
CLEANING AND MAINTENANCE
Notes
• Do not use any corrosive detergent, gasoline, abrasive powder or metal brush
to clean any part of the appliance.
• The appliance may have some peculiar smell after a long time of use, can put
5-6 slices of lemon into the chamber, and use the low-temperature steaming
function to run 15-20 minutes with 100 ℃, the peculiar smell can be removed.
• Turn o the appliance and unplug from the outlet before cleaning.
• Always keep the chamber clean, when food or soup splashes on the inner wall
of the chamber, it can be wiped o with a wet cloth. It is not suitable to clean
with hard materials. If the chamber is dirty, please use soft detergent instead
of rough and abrasive detergent.
• Use distilled or puried water when cooking, as minerals in tap-water will
cause scale in the chamber.
• The water tank shall be inspected at least once a month. Can take out the
water tank to clean if necessary, and then put back to its original place.
• Clean the water tray, water tank and residual water in chamber in time after
each use.
• Should clean the sealing edge of the door with soft dry cloth frequently.
• If the control panel and knob are wet, please wipe with a soft dry cloth instead
of rough and abrasive detergent. When wiping the control panel and knob,
please cut o the power supply to avoid misoperation.
• If the appliance is not used for a long time, unplug the appliance, clean the
chamber, and place it in a ventilated, dry and no corrosive environment.
• Do not use rough detergent or sharp metal scraper to clean the appliance
glass door or its edge,as it is easy to cause the glass broken.
• When cleaning the food plates , oil receiving plates and other utensils, please
use soft materials (such as cloth materials) to clean. Do not use hard materials
(such as metal materials) to avoid scratching utensils and damaging the
protective layer.
• Should comply with the local environmental regulations when disposal this
product.
• If the appliance breaks down, it must be repaired by the designated
professional maintenance personnel. It’s dangerous for anyone else to repair
it.

44
EN
COMMON PROBLEMS AND SOLUTIONS
Problem Matters to be
conrmed
Solution
The product have a
prompt sound when
does not work , and the
screen can display when
it is plugged in.
Correct operation or not. Read the manual carefully.
If the components
damaged or not.
Please contact customer service.
The product have no
a prompt sound when
does not work , and
the screen can’t display
when it is plugged in.
If plug the power cord
or not.
Plug the power cord into the socket.
If the power socket in
good contact or not.
Replace the power socket.
If the components
damaged or not.
Please contact customer service.
The lamp doesn’t light
up.
The lamp is damaged. Please contact customer service.
Smoke comes out of the
oven for rst use.
It’s a normal
phenomenon, please
feel free to use.
For the rst use, the grease in the oven
must be heated and burned, and there is
smoke during this operation.
Peculiar smell.
After a period of use. Put 5-6 slices of lemon into the appliance,
and use the low-temperature steaming
function to run 15-20 minutes with
100 ℃.
If the accessories in the
chamber are cleaned.
Clean and dry the accessories .
If there any debris in the
chamber.
Remove the debris before using.
If the power cord is
damaged or not.
Keep the power cord away from hot
parts, and please contact after-sales
service.
Food is not completely
cooked.
The setting mode does
not match the required
temperature and time of
the food.
Set time and temperature based
on combining recipes and personal
experience.

45
EN
Error alarm
Error code Cause Solution
E1
Over temperature or
short circuit of the
furnace NTC.
Excessive temperature
or damage, please
contact after-sales
service.
E4
Open circuit of the
furnace NTC.
NTC fall o, please
contact after-sales
service.
E2
Over temperature or
short circuit of the
evaporator 1 NTC.
Excessive temperature
or damage, please
contact after-sales
service.
E5
Open circuit of the
evaporator 1 NTC.
NTC fall o, please
contact after-sales
service.
E3
Over temperature or
short circuit of the
evaporator 2 NTC.
Excessive temperature
or damage, please
contact after-sales
service.
E6
Open circuit of the
evaporator 2 NTC.
NTC fall o, please
contact after-sales
service.

46
EN
CIRCUIT PRINCIPLE DIAGRAM

47
EN
DISPOSAL CONSIDERATIONS
If there is a legal regulation for the disposal of electrical
and electronic devices in your country, this symbol on the
product or on the packaging indicates that this product
must not be disposed of with household waste. Instead,
it must be taken to a collection point for the recycling
of electrical and electronic equipment. By disposing of
it in accordance with the rules, you are protecting the
environment and the health of your fellow human beings
from negative consequences. For information about the
recycling and disposal of this product, please contact your
local authority or your household waste disposal service.
MANUFACTURER & IMPORTER (UK)
Manufacturer:
Chal-Tec GmbH, Wallstrasse 16, 10179 Berlin, Germany.
Importer for Great Britain:
Berlin Brands Group UK Ltd
PO Box 1145
Oxford, OX1 9UW
United Kingdom


49
FR
Cher client, chère cliente,
Toutes nos félicitations pour l’acquisition de ce nouvel
appareil. Lisez attentivement les indications suivantes et
suivez-les pour éviter d'éventuels dommages. Nous ne
saurions être tenus pour responsables des dommages dus
au non-respect des consignes et à la mauvaise utilisation
de l’appareil. Scannez le QR-Code pour obtenir la dernière
version du mode d'emploi ainsi que d'autres informations
concernant le produit.
Fiche technique 50
Consignes de sécurité 51
Aperçu de l'appareil 53
Mise en marche 57
Utilisation 59
Préférences et zone de réglage 62
Nettoyage et maintenance 65
Identication et résolution des problèmes 66
Schéma électrique 68
Conseils pour le recyclage 69
Fabricant et importateur (UK) 69
SOMMAIRE

50
FR
FICHE TECHNIQUE
Numéro d'article 10041333, 10041334
Alimentation 220-240 V ~ 50-60 Hz
Puissance 2450 W
Plage de température 50-230 °C
Taille de la cuve 18 l
Capacité du réservoir d'eau 800 ml
Poids 14,5 kg

51
FR
CONSIGNES DE SÉCURITÉ
Consignes générales
• Ne lavez jamais le boîtier à l'eau courante a n de ne pas endommager les
composants électriques.
• Pour éviter toute décharge électrique, ne laissez pas d'eau ou d'autres liquides
pénétrer dans l'appareil.
• Les enfants à partir de 8 ans et les personnes sou rant de handicaps
mentaux, sensoriels et physiques ne peuvent utiliser l'appareil que s'ils ont été
parfaitement familiarisés avec les fonctions et les précautions de sécurité par
une personne responsable et s'ils comprennent les risques associés.
• Véri ez la tension indiquée sur la plaque signalétique avant utilisation.
Connectez l'appareil uniquement à des prises qui correspondent à sa tension.
• N'utilisez pas ce produit si la che, le cordon d'alimentation ou le produit est
endommagé.
• Si le cordon d'alimentation ou la che sont endommagés, ils doivent être
remplacés par le fabricant, une entreprise spécialisée agréée ou une personne
de quali cation similaire.
• Veillez à ce que les enfants ne jouent pas avec l'appareil.
• Ne touchez ni le panneau de commande ni la che avec les mains mouillées.
• Ne placez pas ce produit sur ou à côté de nappes, de rideaux ou d'autres
matériaux in ammables.
• Laissez un espace d'au moins 10 cm de tous les côtés autour de l'appareil. Ne
posez aucun objet sur cet appareil.
• Ne laissez jamais l'appareil en fonctionnement sans surveillance.
ATTENTION
Risque de brûlure ! De la vapeur chaude peut s'échapper à
l'ouverture de la porte du four. Maintenez une distance de sécurité
a n d'éviter de vous ébouillanter.
• N'insérez aucun objet dans les ouvertures de l'appareil.
• N'utilisez pas de nettoyeur à vapeur pour le nettoyage.
• Assurez-vous que l'appareil est éteint avant de remplacer la lampe a n d'éviter
tout risque d'électrocution.
• L'appareil ne doit pas être encastré dans une niche car il risquerait de
surchau er.

52
FR
Consignes pour une utilisation en toute sécurité
ATTENTION
Risque de brûlure ! Pendant l'utilisation, l'appareil devient chaud.
Veillez à ne pas toucher les éléments chau ants à l'intérieur du
four et utilisez des gants de four.
• Avant le nettoyage, débranchez la che de la prise et laissez l'appareil refroidir
complètement.
• Installez l'appareil sur une surface sèche et plane et laissez au moins 10 cm
d'espace autour de l'appareil dans toutes les directions pour que l'air puisse
circuler su samment.
• Ne branchez pas l'appareil sur une prise multiple déjà utilisée par d'autres
appareils électroménagers.
• N'installez pas l'appareil à proximité d'objets in ammables. Installez-le loin
des voilages, des rideaux de porte, du papier peint et d'autres objets similaires
a n d'éviter tout incendie. Ne posez et ne laissez aucun objet sur cet appareil.
• Nettoyez la vitre de la porte du four avec un chi on doux et humide. N'utilisez
pas de produits abrasifs ou de grattoirs métalliques, car ils rayeraient la
surface.
• Ne connectez jamais l'appareil à une minuterie externe ou à une prise
télécommandée.
• Avant d'utiliser ce produit, véri ez que votre ustensile de cuisine est adapté à
ce produit. Nous vous recommandons d'utiliser des récipients en verre ou en
céramique résistants à la chaleur. Remplissez le récipient au maximum aux
deux tiers.
• Ne remplissez pas trop le réservoir d'eau. Lors du remplissage, reportez-vous
au repère MAX du réservoir.
• Ne placez pas de récipients sur la porte ouverte du four.
• Ne réchau ez pas d'aliments dans un récipient scellé, car le récipient pourrait
exploser. Transférez les aliments dans un récipient résistant à la chaleur avant
de les réchau er.
Conseils d'utilisation
• La fréquence d'approvisionnement en eau est rapide. C'est pourquoi il peut
parfois arriver qu'un peu d'eau jaillisse du conduit d'air. Cela est normal.
• L'excédent de vapeur à l'intérieur de l'appareil se refroidit rapidement et
est évacué par la sortie d'air pendant la préparation. Une petite quantité de
vapeur se condense sur les conduites d'évacuation d'air, c'est normal.
• Les variations de tension in uencent le temps de préparation et le résultat
de la préparation : si la tension varie dans une fourchette de -10 % à +5 %,
l'appareil peut fonctionner normalement. Si les variations de tension sont
plus ou moins importantes, la ligne de sortie sera relativement augmentée ou
diminuée, pour que le temps de préparation et le résultat de la préparation
soient in uencés. Cela est normal.

53
FR
APERÇU DE L'APPAREIL
Pièces de l'appareil
1 Cadre de porte Stabilise l'appareil.
2 Poignée Pour ouvrir et fermer l'appareil.
3 Fenêtre de
visualisation
Surveillance des aliments pendant la préparation.
4 Bouton rotatif Sélecteur de fonction
5 Réservoir d'eau Stockage de l'eau pour la production de vapeur.
6 Bac récepteur Recueille l'excédent d'eau produit pendant la
préparation.
7 Évacuation d'air L'excédent de vapeur est évacué par le conduit
d'évacuation d'air.
8 Sécurité des
portes
S'assure que la porte de l'appareil est fermée et
que l'appareil peut fonctionner.
9 Poignée Peut être utilisée pour déplacer l'appareil.
10 Réservoir d'eau Recueille l'eau excédentaire produite pendant la
préparation.
11 Plateau Les plaques de cuisson ou autres moules peuvent
être placés dessus.
12 Panier à étuver Les aliments qui ne contiennent pas d'eau peuvent
y être préparés.
13 Plaque de
cuisson
Les aliments tels que la soupe, les pâtisseries, etc.
peuvent être placés dessus.
54
FR
Panneau de commande
Symbole Mode Description
Durée Indique le temps de préparation.
Température Indique la température de fonc-
tionnement
Pas d'eau Le symbole clignote et l'alarme
retentit longuement pour indiquer
qu'il n'y a plus d'eau dans le réser-
voir d'eau.
Mode menu automa-
tique (chips)
Menu automatique. La durée et la
température peuvent être ajustées
en cours de fonctionnement.
Mode menu automa-
tique (poisson)
Menu automatique. La durée et la
température peuvent être ajustées
en cours de fonctionnement.
Mode menu automa-
tique (poulet)
Menu automatique. La durée et la
température peuvent être ajustées
en cours de fonctionnement.
Mode menu automa-
tique (brochette)
Menu automatique. La durée et la
température peuvent être ajustées
en cours de fonctionnement.
Mode menu automa-
tique (pizza)
Menu automatique. La durée et la
température peuvent être ajustées
en cours de fonctionnement.
Mode menu automa-
tique (légumes)
Menu automatique. La durée et la
température peuvent être ajustées
en cours de fonctionnement.
55
FR
Symbole Mode Description
Mode menu automa-
tique (soupe)
Menu automatique. La durée et la
température ne peuvent pas être
ajustées.
Mode menu automa-
tique (décongélation)
Menu automatique. La durée et la
température peuvent être ajustées
en cours de fonctionnement.
Mode menu automa-
tique (mode déshydra-
tation)
Menu automatique. La durée et la
température peuvent être ajustées
en cours de fonctionnement.
Désinfecter Stérilisation à la vapeur
Faire cuire à la vapeur
à basse température
Mode sous-menu
Mode gril et cuisson
au four
Mode sous-menu
Faire cuire à la vapeur
à haute température
Mode sous-menu
Détartrage Le symbole s'allume et l'alarme
retentit longuement lorsque vous
sélectionnez ce mode
Régulateur de tempé-
rature
Appuyez sur ce bouton et tournez
le régulateur pour ajuster la
température
Touche menu Appuyez sur cette touche pour
accéder aux paramètres du menu.
Bouton de maintien au
chaud
Appuyez sur cette touche, le ré-
glage par défaut est 65 °C, 20 min.
Durée réglable jusqu’à 180 min.
Réglage de l'heure Appuyez sur ce bouton et tournez
le régulateur pour régler l'heure
Éclairage intérieur Lorsque vous appuyez sur ce bou-
ton, l'éclairage intérieur s'allume.

56
FR
Symbole Mode Description
Touche de veille Une nouvelle pression sur cette
touche met l'appareil en mode
veille.
Bouton rotatif Tournez le bouton rotatif pour
ajuster la température, la durée ou
le menu. Appuyez sur le bouton
rotatif vers le bas pour démarrer
ou mettre en pause le fonction-
nement
57
FR
MISE EN MARCHE
1. Déballez l'appareil et retirez tous les matériaux d'emballage. Fixez la cloison
à l'arrière de l'appareil. Placez l'appareil sur une surface plane horizontale.
Veillez à respecter une distance minimale de 20 cm à l'arrière de l'appareil et
une distance minimale de 10 cm de chaque côté (voir illustration). Ne placez
pas l'appareil à proximité immédiate de rideaux, de tapisseries ou d'autres
matériaux in ammables.
2. Placez les aliments souhaités dans l'accessoire correspondant (voir illustration)
et insérez-le à l'intérieur de l'appareil.

58
FR
3. Retirez le réservoir d'eau. Videz le bac d'égouttage et le récipient d'eau.
Remplissez le réservoir d'eau. Fixez le couvercle du réservoir d'eau en veillant
à ce qu'il soit bien en place. Insérez ensuite le réservoir d'eau dans l'appareil
(voir illustration).
Remarque
• Di érentes méthodes de préparation nécessitent di érents accessoires.
• Après la préparation, retirez le panier à étuver, la plaque de cuisson, la grille
de cuisson ou le moule à gâteau de l'appareil avec des maniques pour éviter
les brûlures.
• L'appareil ne peut être mis en service que si la porte est correctement fermée.
Dans le cas contraire, l'écran clignote.
Avant la première utilisation
1. Retirez tout le matériel d'emballage et placez l'appareil sur une surface stable.
2. Nettoyez la plaque de cuisson, le panier à étuver, la grille de cuisson, le moule
à gâteau et les autres accessoires avec de l'eau, du liquide vaisselle et une
éponge non abrasive.
3. Remplissez le réservoir d'eau avec de l'eau puri ée (de l'eau distillée ou
puri ée).
4. Essuyez l'intérieur et l'extérieur de l'appareil avec un chi on.
5. Lors de la première utilisation de l'appareil, n'y mettez pas d'aliments. Utilisez
la fonction "STEAM" et laissez l'appareil e ectuer un cycle. Pendant cette
période, une légère odeur et de la fumée peuvent apparaître. Cela est normal.

59
FR
UTILISATION
Allumer
Lorsque l'appareil est mis en marche, un bip sonore retentit. Les lumières de
l'écran numérique et des voyants clignotent avant de s'éteindre. Seul le témoin
de fonctionnement de la touche ON/OFF clignote lentement. Cela indique que
l'appareil est en mode veille. Lorsque vous appuyez sur le bouton ON/OFF, tous les
voyants du panneau de commande s'allument. Appuyez sur MENU pour accéder
au menu des fonctions.
Sélection des fonctions
La fonction réglée en usine est le mode "Cuisson à la vapeur à haute température".
Appuyez sur le bouton MENU et utilisez le bouton rotatif pour sélectionner la
fonction souhaitée. Les fonctions s'achent les unes après les autres à l'écran
lorsque l'on tourne.
Réglage de la température
Appuyez sur la touche TEMP. Tournez le bouton rotatif pour ajuster la température
En mode de fonctionnement, vous pouvez, en plus du menu automatique, ajuster
la température en appuyant sur la touche TEMP. Après l'adaptation, l'appareil
démarre automatiquement ou peut être démarré en appuyant sur le bouton de
démarrage.
Réglage de l'heure
Appuyez sur la touche TIME. Tournez le bouton rotatif pour régler l'heure. En
mode de fonctionnement, vous pouvez, en plus du menu automatique, régler
l'heure en appuyant sur la touche TIME. Après l'adaptation, l'appareil démarre
automatiquement ou peut être démarré en appuyant sur le bouton de démarrage.
Fonction de décongélation
Lorsque vous appuyez sur le bouton ON/OFF après l'avoir allumé, tous les voyants
du panneau de commande s'allument. Appuyez ensuite sur le bouton MENU pour
acher l'interface de sélection des fonctions. Lorsque vous tournez le bouton
rotatif en mode décongélation, le symbole de décongélation clignote et les autres
symboles s'allument. Appuyez sur le bouton TEMP et le signal sonore retentit. Le
symbole de décongélation s'allume et les autres symboles sont éteints. Tournez le
bouton rotatif pour sélectionner la température souhaitée pour la décongélation.
Appuyez sur le bouton TIME et le signal sonore retentit. Tournez le bouton rotatif
pour sélectionner la durée souhaitée de décongélation. Appuyez ensuite sur
le bouton rotatif pour commencer à utiliser l'appareil. La température réglée
et le temps restant s'achent à l'écran. Cette fonction peut être utilisée pour
décongeler des aliments surgelés, etc.
Fonction de stérilisation
Après avoir allumé l'appareil, appuyez sur le bouton ON/OFF, tous les voyants
du panneau de commande s'allument. Appuyez ensuite sur le bouton MENU
pour acher la sélection des fonctions. Placez le bouton rotatif sur le mode de
stérilisation. Le symbole de stérilisation clignote, les autres symboles s'allument.

60
FR
Appuyez sur le bouton TIME et le signal sonore retentit. Le symbole de stérilisation
s'allume, les autres symboles sont éteints. Tournez le bouton rotatif pour
sélectionner la durée souhaitée pour la stérilisation. Appuyez sur le bouton rotatif
pour commencer à utiliser l'appareil. La température réglée et le temps restant
s'achent à l'écran.
Niveau d'eau bas dans le réservoir d'eau
S'il y a trop peu d'eau dans le réservoir d'eau, le symbole
clignote. "Time"
clignote. Le fonctionnement est interrompu et le signal sonore retentit. Appuyez
sur le bouton Démarrer pour que la préparation reprenne automatiquement
après l'ajout d'eau. Pendant l'état de fonctionnement, insérez le réservoir
d'eau pour continuer directement la préparation. L'alarme de niveau d'eau
bas dans le réservoir d'eau ne se déclenche que lorsque la fonction vapeur est
utilisée. Appuyez sur le bouton Démarrer pour que la préparation reprenne
automatiquement après l'ajout d'eau.
Menu de fonctions
Après avoir allumé l'appareil, appuyez sur le bouton ON/OFF. Tous les voyants
du panneau de commande s'allument. Appuyez ensuite sur MENU pour
accéder au menu des fonctions. Tournez le bouton rotatif pour sélectionner
diérents éléments du menu. Après avoir sélectionné le menu souhaité, réglez
la température et la durée, puis appuyez sur le bouton rotatif pour démarrer.
Appuyez à nouveau sur le bouton rotatif pour annuler la fonction sélectionnée.
Tournez à nouveau l'encodeur pour sélectionner une autre fonction.
Détartrage
La fonction vapeur peut être utilisée pendant 80 heures cumulées et passe ensuite
à l'interface de sortie. Le symbole "DESCSAL" s'allume, les autres symboles sont
éteints. Cela indique à l'utilisateur qu'il doit nettoyer l'appareil. Ajoutez de l'acide
citrique dans le réservoir d'eau et versez plus de 600 ml d'eau puriée. Fermez
la porte et appuyez directement sur le bouton rotatif. La fonction de détartrage
est lancée. La fonction de détartrage est divisée en trois étapes : détartrage (30
minutes), nettoyage primaire (10 minutes) et nettoyage secondaire (10 minutes).
Après que la fonction de détartrage a fonctionné pendant 30 minutes, le signal
sonore retentit. À ce moment-là, videz l'eau du réservoir d'eau sale et du réservoir
d'eau propre et remplissez le réservoir d'eau avec de l'eau fraîche et propre.
Après avoir inséré le réservoir d'eau dans le boîtier, fermez la porte pour lancer le
nettoyage principal. Au bout de 10 minutes, le signal sonore retentit à nouveau.
À ce moment-là, videz l'eau du réservoir d'eau sale et du réservoir d'eau propre et
remplissez le réservoir d'eau avec de l'eau fraîche et propre. Après avoir inséré le
réservoir d'eau dans le boîtier, fermez la porte pour lancer le deuxième nettoyage.
Après la procédure ci-dessus, le détartrage est terminé.
Si vous ne souhaitez pas nettoyer l'appareil à ce moment-là, vous pouvez tourner
le bouton rotatif ou appuyer sur d'autres boutons que le bouton de démarrage
pour revenir à l'état de fonctionnement normal. Toutefois, la prochaine fois que
l'appareil sera mis en marche, un rappel vous sera adressé pour le nettoyage de
l'appareil. Le signal sonore retentit jusqu'à ce que vous sélectionniez ce mode ou
que vous passiez au mode de fonctionnement normal.

61
FR
Remarque :
Après le détartrage, vous devez débrancher la che d'alimentation. Vous ne
pouvez réutiliser l'appareil qu'une fois refroidi : le temps de détartrage est de 50
minutes.
Changer de mode
Appuyez longuement sur le bouton rotatif (3 secondes) pour annuler l'opération,
puis tournez le bouton rotatif pour changer de mode.
Fonction de la lampe
Après avoir allumé l'appareil, appuyez sur le bouton ON/OFF. Tous les voyants du
panneau de commande s'allument. Appuyez sur la touche
d'éclairage pour
allumer la lumière. La lampe peut être allumée ou éteinte à tout moment dans
n'importe quel mode de fonctionnement.
Fonction maintien au chaud
Après avoir allumé l'appareil, appuyez sur le bouton ON/OFF. Tous les voyants
du panneau de commande s'allument. Appuyez ensuite sur le bouton
pour
démarrer la fonction de maintien au chaud. Appuyez sur la touche TEMP. Le
signal sonore retentit. Le symbole "K-WARM" s'allume, les autres symboles sont
éteints. Tournez le bouton rotatif pour sélectionner la température souhaitée
pour la fonction de maintien de chaleur. Appuyez sur la touche TIME. Le signal
sonore retentit. En tournant le bouton rotatif, il est possible de régler la durée
souhaitée pour la fonction de maintien au chaud. Appuyez sur le bouton rotatif
pour commencer à utiliser l'appareil. La température réglée et le temps restant
s'achent à l'écran.
Remarques
• Les paramètres ci-dessus sont donnés à titre indicatif. L'origine, la forme,
la taille et la variété des ingrédients étant diérentes, il n'est pas possible
de garantir que les paramètres ci-dessous seront les meilleurs pour vos
ingrédients. Vous pouvez eectuer le réglage en fonction de la situation réelle.
Plus la quantité d'aliments à cuire est importante, plus le temps de cuisson est
long.
• Si vous retirez la casserole et retournez les aliments pendant la préparation de
certains plats, vous pourrez mieux les cuire et plus uniformément.
• Si les ingrédients ne sont pas assez cuits, on peut les remettre directement
dans la casserole et les faire cuire avec un temps raisonnable.
• Les aliments marinés doivent pénétrer à l'intérieur des plats pour les rendre
plus savoureux et plus savoureux.
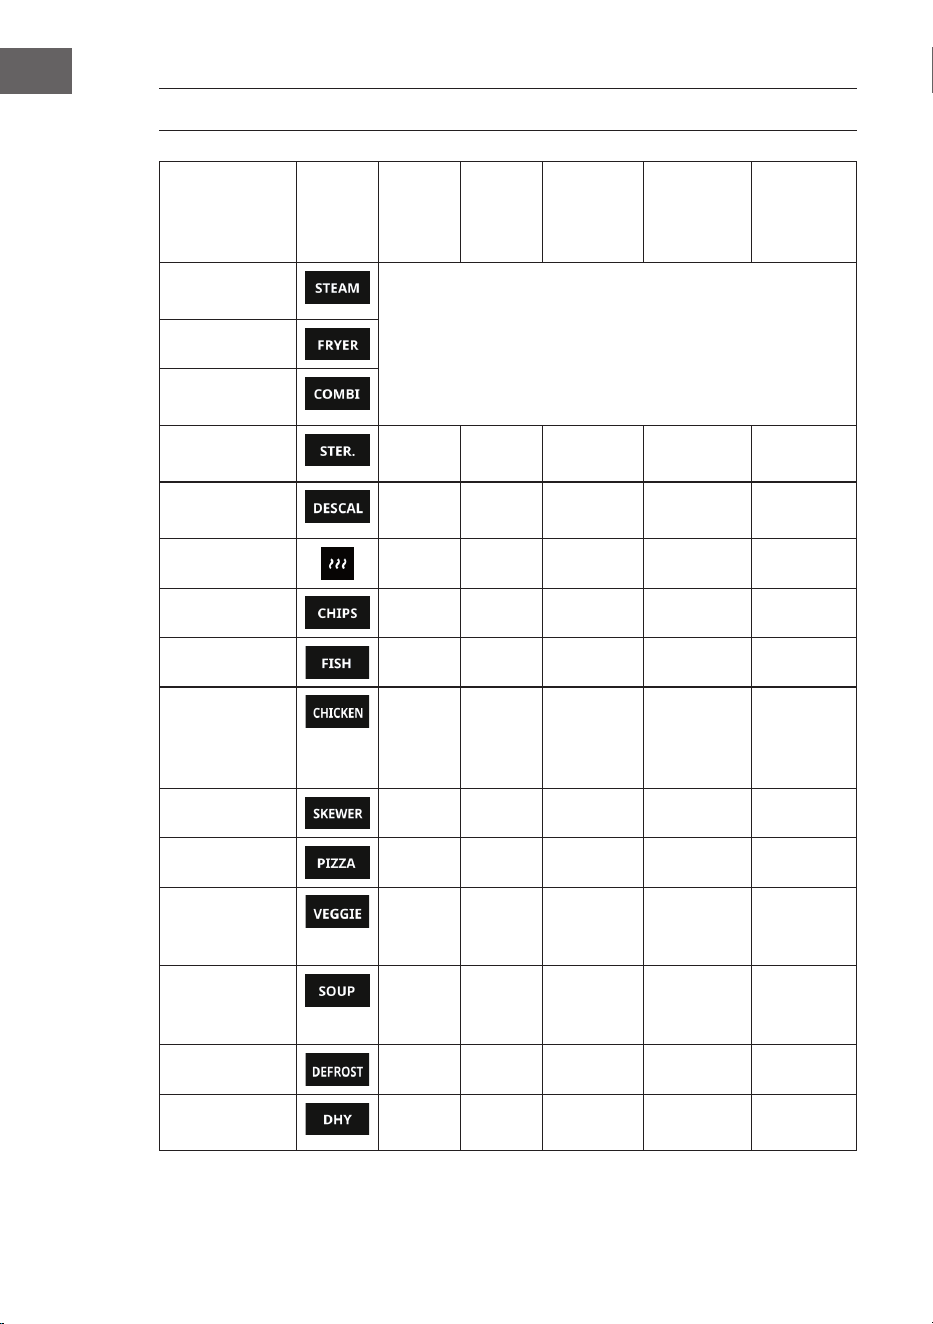
62
FR
PRÉFÉRENCES ET ZONE DE RÉGLAGE
Menu Sym-
bole
Mode
de
prépa-
ration
Temp. Plage de
tempéra-
ture
Durée Plage de
temps
Cuisson à la
vapeur
Mode sous-menu
Frire
Cuire à la va-
peur & frire
Stériliser / 110 °C Non
réglable
0:30 min 10 min - 2 h
Détartrage
/ / Non
réglable
0:50 min Non ré-
glable
Réchauage
/ 65 ℃ 50-80 ℃ 0:20 min 1 min - 3 h
Frites
Frire 220 ℃ 200-230 ℃ 0:25 min 15-35 min
Poisson
Frire 190 ℃ 170-200 ℃ 0:40 min 1-50 min
Poulet
Cuire
à la
vapeur
& frire
220 ℃ 210-230 ℃ 0:45 min 1 min - 1 h
Brochette
Frire 200 ℃ 180-220 ℃ 0:15 min 15-35 min
Pizza
Frire 180 ℃ 170-190 ℃ 0:20 min 1-30 min
Végétarien
Cuisson
à la
vapeur
100 ℃ 95-130 ℃ 0:10 min 1-20 min
Soupe
Frire 200 ℃+
110 ℃+
150 ℃
Non
réglable
0:30 + 170 +
0:10 min
Non ré-
glable
Décongélation
Frire 45 ℃ 35-70 ℃ 1:00 h 1 min - 8 h
Déshydrater
Frire 70 ℃ 70 ℃-
95 ℃
8:00 h 1 min - 8 h
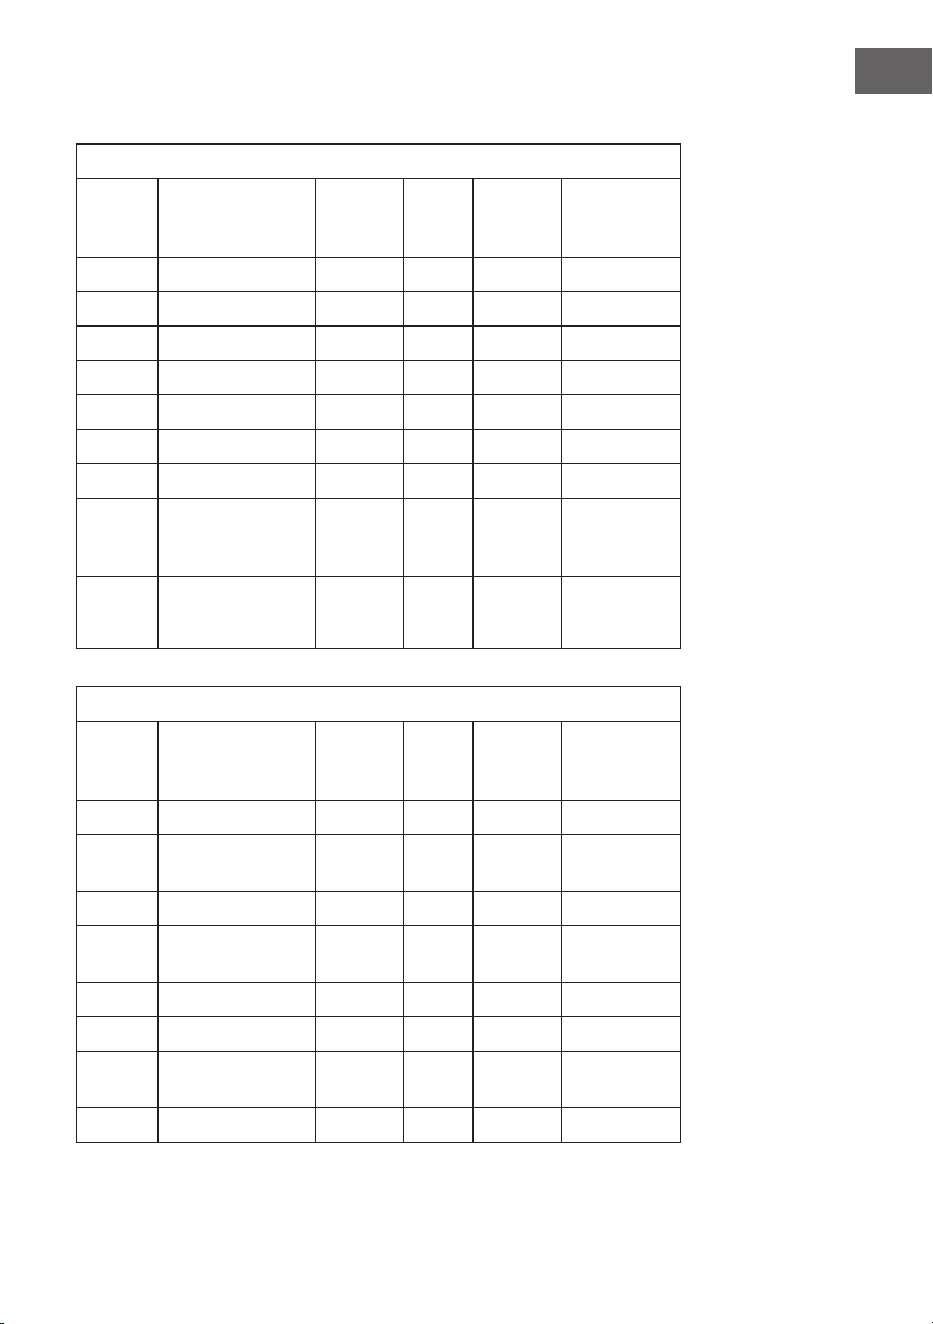
63
FR
Sous-menus
Mode vapeur pur
Code de
menu
Menus Heure
HH:MM
Temp.
(°C)
Plage de
temps
(min.)
Plage de
température
(°C)
01 Oeufs frits 00:15 100 1-20 90-110
02 Marrons grillés 00:15 100 1-20 90-110
03 Kouglof 00:15 110 1-20 110-120
04 Bagel 00:18 100 1-25 90-110
05 Macaron 00:20 110 1-30 110-130
06 Frites 00:28 110 1-35 110-130
07 Toasts croustillants 00:40 100 1-50 90-120
08 Petits pains
croustillants cuits
au four
00:13 90 1-35 90-110
09 DIY 01:00 130 1-60 90-130
Mode friture pure
Code de
menu
Menus Heure
HH:MM
Temp.
(°C)
Plage de
temps
(min.)
Plage de
température
(°C)
01 Ailes de poulet 00:20 180 1-35 170-200
02 Canard entier
01:00 200
1 min –
2 h
180-220
03 Rôti de bœuf 0:20 190 1-35 180-220
04 Patates douces
grillées
00:40 230
1-50 200-230
05 Maïs cuit au four 00:25 200 1-30 180-220
06 Biscuit 00:30 150 1-50 140-190
07 Crêpes
croustillantes
00:20 200
1-35 180-220
08 Marrons grillés 00:30 180 1-50 180-220
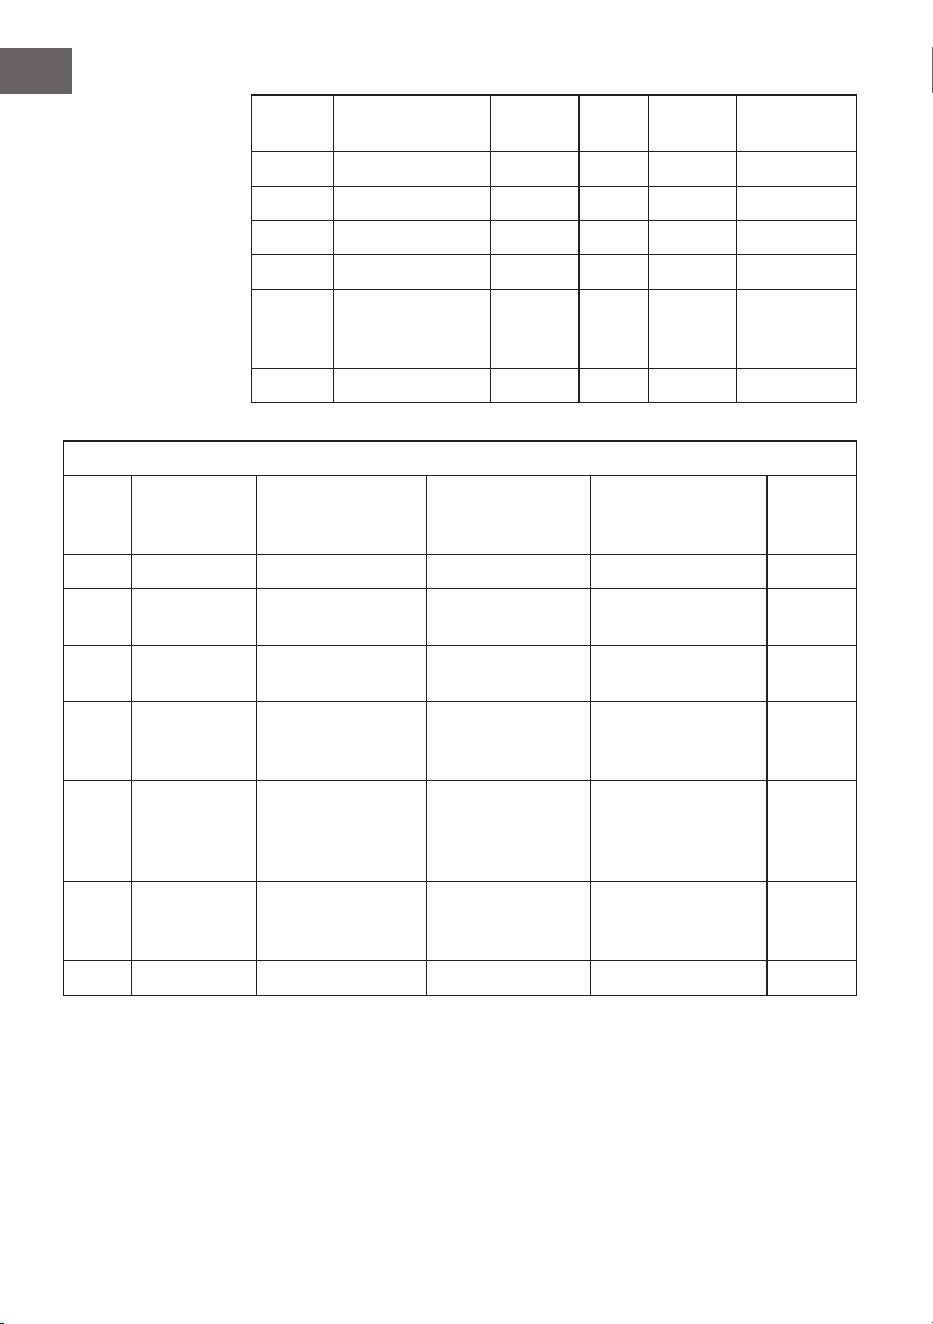
64
FR
09 Kougelhopf
0:20 + 0:10
130
+ 160
15-25
+ 7-13
100-140
+ 140-180
10 Bagel 00:20 190 1-30 180-220
11 Macaron 00:15 150 1-30 140-190
12 Frites 00:18 200 1-30 180-220
13 Toasts croustillants 00:10 200 1-20 180-220
14 Petits pains
croustillants au
four
00:07 180 1-20 170-200
15 DIY 01:00 230 1-60 35-230
Mode combiné cuisson à la vapeur + friture
Code
menu
Menus Heure HH:MM Temp. (°C) Plage temps (min.) Plage
temp.
(°C)
01 Steak 0:15 190 1-20 180-220
02 Poisson Cuisson vapeur 0:10
+ frire 0:20
Cuisson vapeur 100
+ frire 180
Cuisson vapeur 5-13
+ frire 15-30
100-120
+ 170-200
03 Poulet 00:50 Cuisson vapeur 190
+ frire
30 min - 1 h 180-220
04 Viande
de porc
saignante
Cuisson vapeur 0:20
+ frire 0:15
Cuisson vapeur 110
+ frire 200
Cuisson vapeur 10-30
+ frire 5-20
100-120
+ 170-220
05 Réchauer
le pain
(réfrigérateur)
Cuisson vapeur 0:08
+ cuisson à la vapeur
+ frire 0:07
Cuisson vapeur 80
+ cuisson à la
vapeur
+ frire 180
Cuisson vapeur 5-10
+ cuisson vapeur
+ frire 5-10
80-100
+ 170-200
06 Réchauer le
pain (temp.
ambiante)
Cuisson vapeur 0:06
+ cuisson vapeur
+ frire 0:07
Cuisson vapeur 80
+ cuisson vapeur
+ frire 180
Cuisson vapeur 5-10
+ cuisson vapeur
+ frire 5-10
80-100
+ 170-200
07 DIY 01:00 200 1-60 50-220
Remarque : pendant la cuisson à la vapeur et la friture, l'achage du menu principal sélectionné
(par exemple "Mode friture pure") clignote. Appuyez sur le bouton rotatif pour accéder au mode
sous-menu. Le numéro correspondant s'ache à l'écran lorsque vous tournez le bouton rotatif.
Par exemple, le mode vapeur 01 est "Oeufs frits". Appuie sur le bouton rotatif pour conrmer
le menu souhaité. La température et la durée peuvent être ajustées en tournant le bouton de
réglage. Appuyez ensuite sur le bouton rotatif pour conrmer votre choix. La minuterie commence
le décompte et le menu principal correspondant ainsi que le numéro sélectionné s'allument. Si
vous voulez voir la température réglée, appuie sur le bouton de température. L'achage ache la
température réglée. Après 30 secondes, le code du menu s'ache à nouveau à l'écran.

65
FR
NETTOYAGE ET MAINTENANCE
• Pour le nettoyage, n'utilisez pas de produits de nettoyage agressifs, d'essence,
de poudre abrasive ou de brosse métallique...
• Si l'appareil est utilisé pendant une période prolongée, il peut arriver que
l'intérieur de l'appareil dégage une odeur étrange. Si c'est le cas, procédez
comme suit : placez 5 à 6 tranches de citron à l'intérieur de l'appareil et réglez
la fonction "Cuisson à la vapeur à basse température". Faites fonctionner
l'appareil à 100 °C pendant 15 à 20 minutes. L'odeur étrange disparaît ainsi.
• Avant le nettoyage, éteignez l'appareil et débranchez la che de la prise.
• Gardez l'intérieur de l'appareil propre. Si des restes d'aliments ou des
éclaboussures se trouvent sur la paroi intérieure, ils peuvent être enlevés avec
un chion humide. Ne nettoyez en aucun cas l'intérieur de l'appareil avec des
matériaux durs. Si l'intérieur de l'appareil est sale, nettoyez-le avec un chion
doux et un détergent doux. N'utilisez en aucun cas des produits de nettoyage
agressifs ou des matériaux abrasifs.
• Remplissez le réservoir d'eau uniquement avec de l'eau distillée ou puriée,
car l'eau du robinet peut entraîner des dépôts de calcaire.
• Vériez le réservoir d'eau au moins une fois par mois. Le réservoir d'eau peut
être retiré pour être nettoyé, puis remis en place.
• Nettoyez le bac d'égouttement, le réservoir d'eau et le récipient d'eau après
chaque utilisation.
• Nettoyez le joint de la porte avec un chion doux et sec.
• Si le panneau de commande et le bouton rotatif sont mouillés, essuyez-les
avec un chion doux et sec et n'utilisez pas de produit de nettoyage agressif.
Avant le nettoyage, éteignez l'appareil et débranchez la che de la prise, pour
éviter une mise en marche accidentelle.
• Débranchez le cordon d'alimentation de la prise de courant et nettoyez
entièrement l'appareil si vous ne l'utilisez pas pendant une période prolongée.
Stockez l'appareil dans un endroit sec et susamment aéré.
• Ne nettoyez en aucun cas la porte en verre de l'appareil avec des produits de
nettoyage agressifs ou des racloirs métalliques tranchants, car cela pourrait
endommager le verre et le casser.
• Nettoyez les accessoires uniquement avec un détergent doux et un chion
doux. Dans le cas contraire, l'accessoire pourrait être rayé et sa couche de
protection endommagée.
• Lors de la mise au rebut de l'appareil, respectez les réglementations locales en
matière de protection de l'environnement.
• En cas de dysfonctionnement, l'appareil doit être remplacé par le fabricant, le
service après-vente ou une personne qualiée similaire. Sinon, vous risquez
des dommages matériels et/ou des blessures corporelles.
66
FR
IDENTIFICATION ET RÉSOLUTION DES PROBLÈMES
Problème Cause possible Solution
L'appareil ne fonctionne
pas, mais il émet un
bip lors de la mise
en marche et l'écran
s'ache lorsqu'on le
branche.
Utilisation incorrecte. Lisez attentivement et entièrement le
mode d'emploi.
Composants endommagés Contactez le service clientèle si c'est le
cas.
L'appareil ne fonctionne
pas, n'émet pas de
bip lors de la mise en
marche et rien ne s'af-
che à l'écran lorsqu'on
le branche.
La che n'est pas branchée. Branchez la che dans la prise.
La prise est défectueuse. Remplacez la prise.
Composants endommagés. Contactez le service clientèle si c'est le
cas.
Le voyant ne s'allume
pas.
Le voyant est endommagé. Contactez le service clientèle si c'est le
cas.
Lors de la première
utilisation, de la fumée
s'échappe de l'appareil.
Lors de la première utilisation,
l'huile qui reste du processus de
fabrication est chauée et brûlée
dans l'appareil lors du chauage et
de la fumée se forme.
C'est normal et il n'y a pas lieu de s'in-
quiéter.
Odeur étrange
L'odeur apparaît après une longue
période d'utilisation.
Placez 5 à 6 tranches de citron dans l'ap-
pareil et faites-le tourner pendant 15 à 20
minutes à 100 °C avec la fonction "Cuis-
son à la vapeur à basse température".
Les accessoires dans l'appareil sont
sales.
Nettoyez et séchez les accessoires.
Des restes d'aliments se trouvent à
l'intérieur de l'appareil.
Enlevez les restes d'aliments avant de les
réutiliser.
Le câble secteur est endommagé. Contactez le service après-vente et tenez
à l'avenir le câble secteur éloigné des
surfaces chaudes.
Les aliments ne sont pas
totalement cuits.
La fonction sélectionnée ne corres-
pond pas aux exigences de prépara-
tion des aliments utilisés.
Réglez le temps et la température en
fonction de la recette et de votre expé-
rience personnelle.
67
FR
Message d'erreur
Code erreur Cause possible Solution
E1
Surchaue ou court-circuit
NTC
Contactez le service
clientèle.
E4 Circuit ouvert NTC Contactez le service clients.
E2
Surchaue ou court-circuit
de l'évaporateur 1 NTC.
Contactez le service clients.
E5
Circuit ouvert de
l'évaporateur 1 NTC.
Contactez le service clients.
E3
Surchaue ou court-circuit
de l'évaporateur 2 NTC.
Contactez le service clients.
E6
Court-circuit de
l'évaporateur 2 NTC.
Contactez le service clients.

68
FR
SCHÉMA ÉLECTRIQUE

69
FR
CONSEILS POUR LE RECYCLAGE
S‘il existe une réglementation pour l‘élimination ou le
recyclage des appareils électriques et électroniques dans
votre pays, ce symbole sur le produit ou sur l‘emballage
indique que cet appareil ne doit pas être jeté avec les
ordures ménagères. Vous devez le déposer dans un point
de collecte pour le recyclage des équipements électriques
et électroniques. La mise au rebut conforme aux règles
protège l‘environnement et la santé de vos semblables
des conséquences négatives. Pour plus d‘informations
sur le recyclage et l‘élimination de ce produit, veuillez
contacter votre autorité locale ou votre service de
recyclage des déchets ménagers.
FABRICANT ET IMPORTATEUR (UK)
Fabricant :
Chal-Tec GmbH, Wallstraße 16, 10179 Berlin, Allemagne.
Importateur pour la Grande Bretagne :
Berlin Brands Group UK Ltd
PO Box 1145
Oxford, OX1 9UW
United Kingdom


71
ES
Estimado cliente:
Le felicitamos por la adquisición de este producto. Lea
atentamente el siguiente manual y siga cuidadosamente las
instrucciones de uso con el n de evitar posibles daños. La
empresa no se responsabiliza de los daños ocasionados por
un uso indebido del producto o por haber desatendido las
indicaciones de seguridad. Escanee el siguiente código QR
para obtener acceso al manual de usuario más reciente y
otra información sobre el producto.
Datos técnicos 72
Indicaciones de seguridad 73
Vista general del aparato 75
Puesta en marcha 79
Funcionamiento 81
Gama de preferencias y ajustes 84
Limpieza y mantenimiento 87
Detección y reparación de anomalías 88
Esquema del circuito 90
Indicaciones sobre la retirada del aparato 91
Fabricante e importador (Reino Unido) 91
CONTENIDO

72
ES
DATOS TÉCNICOS
Número del artículo 10041333, 10041334
Suministro eléctrico 220–240 V ~ 50-60 Hz
Potencia 2450 W
Rango de temperaturas 50-230 °C
Tamaño de la olla 18 l
Capacidad del depósito
de agua
800 ml
Peso 14,5 kg

73
ES
INDICACIONES DE SEGURIDAD
Indicaciones generales
• No lave nunca la carcasa con agua corriente para no dañar los componentes
eléctricos.
• No permita que entre agua u otros líquidos en la unidad para evitar una
descarga eléctrica.
• Los niños mayores de 8 años y las personas con discapacidad física, sensorial
o psíquica pueden utilizar el aparato si han sido previamente instruidos por
una persona responsable sobre el funcionamiento del mismo y conocen las
funciones, las indicaciones de seguridad y los riesgos asociados.
• Compruebe el voltaje en la placa de características antes de utilizarlo. Conecte
el aparato únicamente a tomas de corriente que se adecuen a su tensión.
• No utilice este producto si el enchufe, el cable de alimentación o el producto
están dañados.
• Si el cable de alimentación o el enchufe están dañados, deberán ser
sustituidos por el fabricante, una empresa autorizada o una persona
cuali cada.
• No permita que los niños jueguen con el aparato.
• No toque ni el enchufe ni el panel de control con las manos mojadas.
• No coloque este producto sobre o cerca de manteles, cortinas y otros
materiales combustibles.
• Deje al menos 10 cm de espacio alrededor del aparato. No coloque ningún
objeto sobre el aparato.
• No deje el aparato sin supervisión durante su funcionamiento.
ATENCIÓN
¡Peligro de quemaduras! El vapor caliente puede salir al abrir la
puerta del horno. Mantenga una distancia de seguridad para evitar
quemaduras.
• No introduzca objetos extraños en las aberturas del aparato.
• No utilice un limpiador de vapor para la limpieza.
• Asegúrese de que el aparato está apagado antes de sustituir la lámpara para
evitar una descarga eléctrica.
• No instale el aparato en un armario, ya que se sobrecalentará.

74
ES
Notas sobre el uso correcto
ATENCIÓN
¡Peligro de quemaduras! El aparato se calienta durante su uso.
Tenga cuidado de no tocar las resistencias en el interior del horno
y utilice guantes de cocina.
• Desenchufe el aparato y deje que se enfríe totalmente antes de limpiarlo.
• Instale el aparato en una super cie seca y plana y deje al menos 10 cm de
espacio alrededor del aparato en todas las direcciones para que el aire pueda
circular libremente.
• No conecte el aparato a tomas de corriente a las que ya estén conectados
otros aparatos de cocina.
• No coloque el aparato cerca de objetos in amables. Instálelo lejos de las
cortinas de las ventanas, las cortinas de las puertas, el papel pintado y otros
objetos similares para evitar incendios. No coloque ningún objeto sobre el
aparato.
• Limpie el cristal de la puerta del horno con un paño suave y húmedo. No
utilice limpiadores abrasivos o rascadores de metal, ya que rayarán la
super cie.
• No conecte el aparato a temporizadores externos ni a tomas de corriente con
mando a distancia.
• Antes de utilizarlo, compruebe que su batería de cocina es adecuada para
este producto. Le recomendamos que utilice recipientes de vidrio resistentes
al calor o recipientes de cerámica. Llene el recipiente hasta un máximo de dos
tercios.
• No llene demasiado el depósito de agua. Llene hasta la marca MAX del
depósito.
• No coloque ningún recipiente sobre la puerta abierta del horno.
• No caliente los alimentos en un recipiente cerrado, de lo contrario el
recipiente podría explotar. Coloque los alimentos en un recipiente resistente
al calor antes de calentarlos.
Indicaciones de uso
• La frecuencia del suministro de agua es rápida. Por lo tanto, a veces puede
ocurrir que salga un poco de agua por la entrada de aire. Esto es totalmente
normal.
• El exceso de vapor en el interior del aparato se enfría rápidamente y se libera
a través de la salida de aire durante la preparación. Una pequeña cantidad de
vapor se condensa en las rejillas de la salida de aire, esto es normal.
• Las variaciones de tensión afectan al tiempo de preparación y al resultado de
la misma: si la tensión varía dentro de un rango de -10 % a +5 %, el aparato
puede funcionar normalmente. Si las variaciones de tensión son mayores o
menores, el conducto de salida aumentará o disminuirá relativamente, lo que
afectará al tiempo de preparación y al resultado. Esto es totalmente normal.
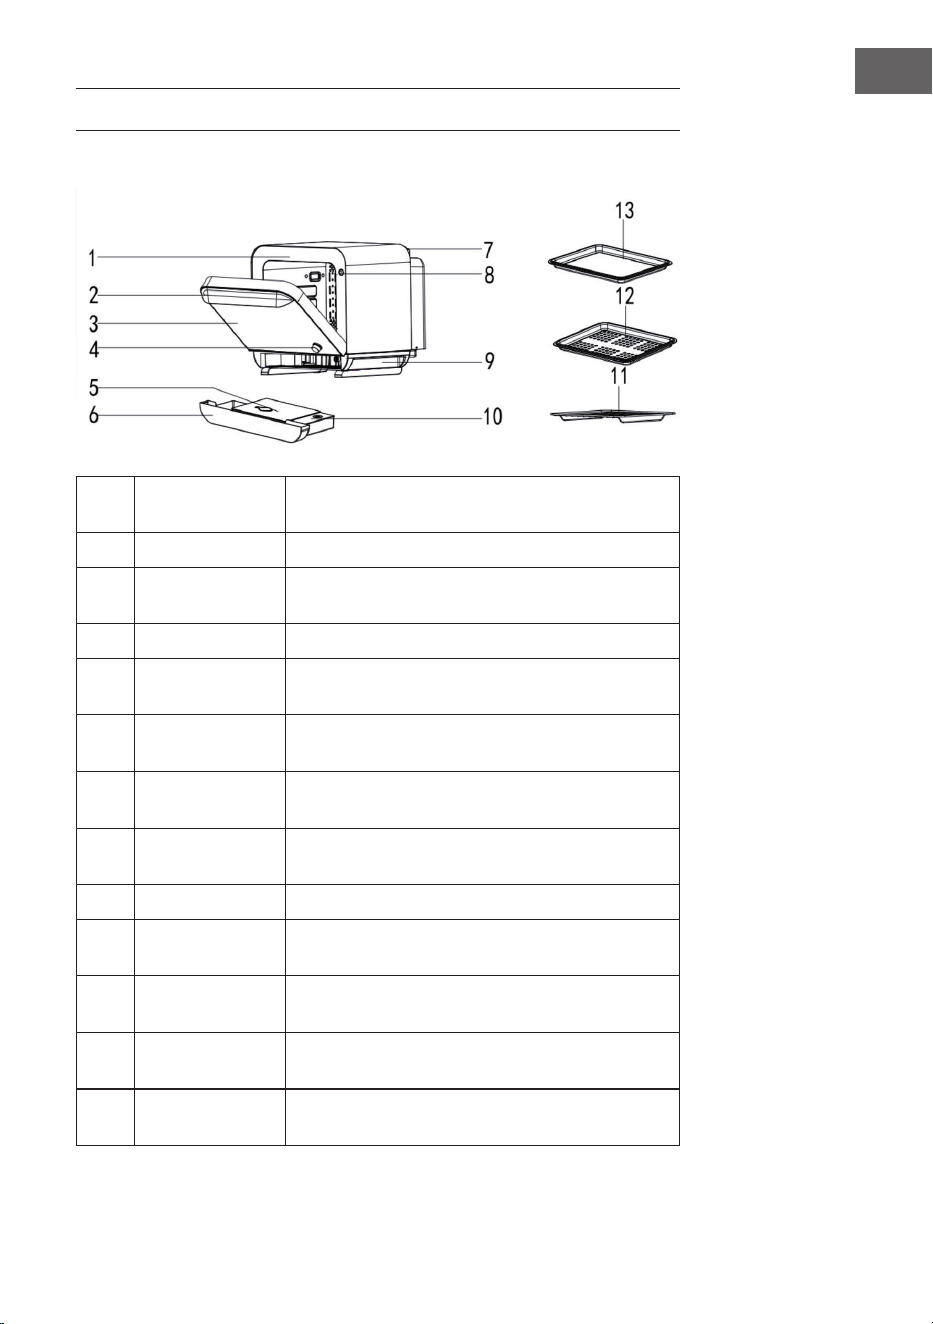
75
ES
VISTA GENERAL DEL APARATO
Partes del aparato
1 Marco de la
puerta
Estabiliza el aparato.
2 Asa Para abrir y cerrar el aparato.
3 Ventana de
seguridad
Permite controlar los alimentos durante su
preparación.
4 Regulador Selector de funciones
5 Depósito de
agua
Almacena el agua para la producción de vapor.
6 Bandeja de
goteo
Recoge el exceso de agua producido durante la
preparación.
7 Salida del aire El exceso de vapor se libera a través de la salida
de aire.
8 Seguridad de las
puertas
Asegura que la puerta del aparato está cerrada y
que el aparato puede funcionar.
9 Asa Se usa para mover el aparato.
10 Recipiente para
el agua
Recoge el exceso de agua producido durante la
preparación.
11 Compartimento Encima se pueden colocar bandejas de horno u
otros recipientes para horno.
12 Vaporera Se usa para preparar alimentos que no contengan
agua.
13 Bandeja de
horno
Encima se pueden colocar alimentos como sopa,
pasteles, etc.

76
ES
Panel de control
Símbolo Modo Descripción
Tiempo Muestra el tiempo de preparación.
Temperatura Muestra la temperatura de funcio-
namiento.
Sin agua El símbolo parpadea y la alarma
suena durante un tiempo prolon-
gado para indicar que no hay agua
en el depósito de agua.
Modo de menú
automático (patatas
fritas)
Menú automático. El tiempo y la
temperatura se pueden ajustar
durante el funcionamiento.
Modo de menú au-
tomático (pescado)
Menú automático. El tiempo y la
temperatura se pueden ajustar
durante el funcionamiento.
Modo de menú au-
tomático (pollo)
Menú automático. El tiempo y la
temperatura se pueden ajustar
durante el funcionamiento.
Modo de menú au-
tomático (brocheta)
Menú automático. El tiempo y la
temperatura se pueden ajustar
durante el funcionamiento.
Modo de menú au-
tomático (pizza)
Menú automático. El tiempo y la
temperatura se pueden ajustar
durante el funcionamiento.
Modo de menú au-
tomático (verdura)
Menú automático. El tiempo y la
temperatura se pueden ajustar
durante el funcionamiento.
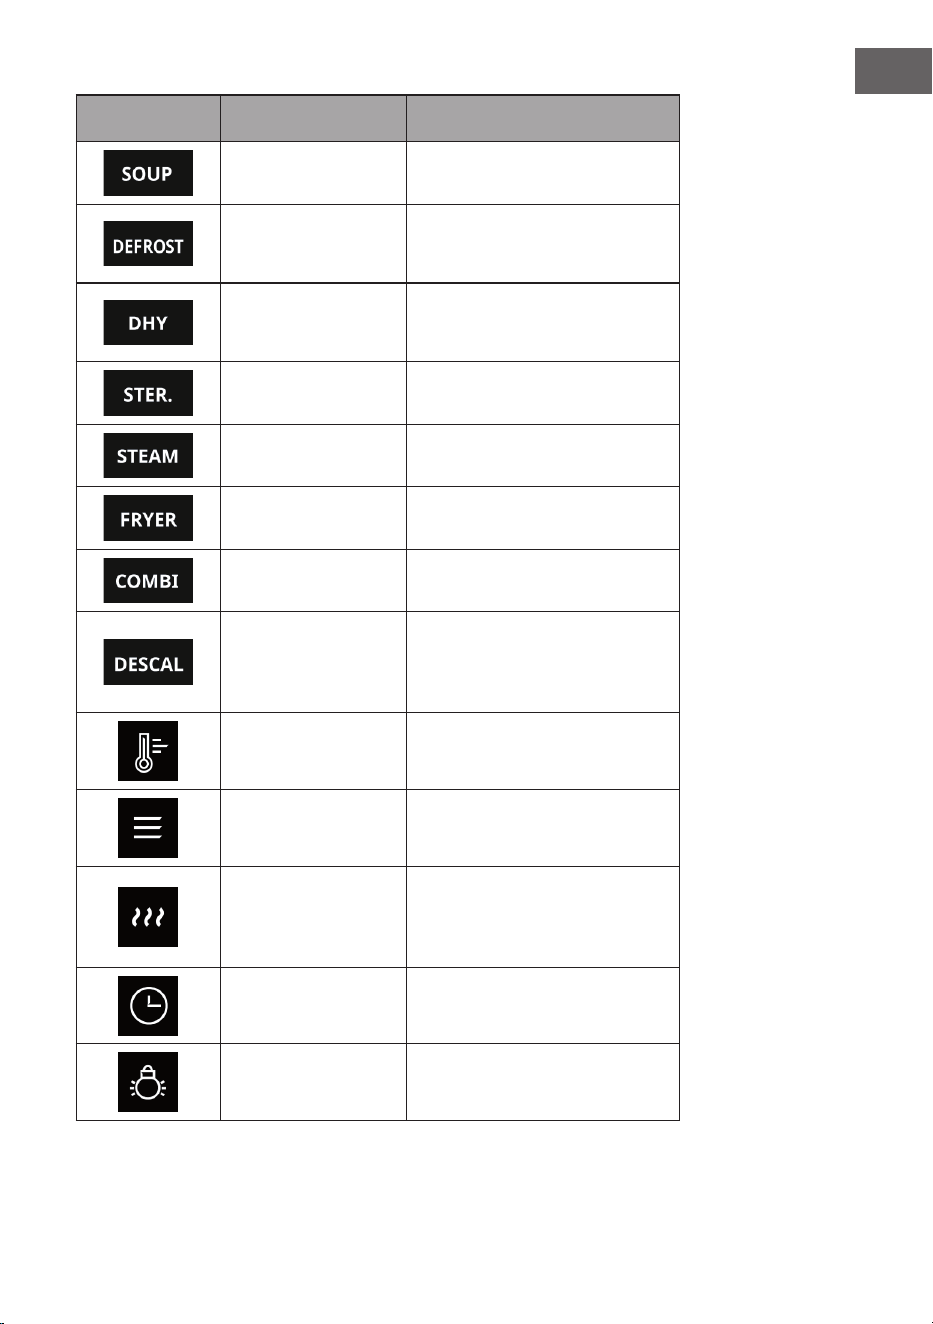
77
ES
Símbolo Modo Descripción
Modo de menú au-
tomático (sopa)
Menú automático. El tiempo y la
temperatura no se pueden ajustar.
Modo de menú au-
tomático (descongelar)
Menú automático. El tiempo y la
temperatura se pueden ajustar
durante el funcionamiento.
Modo de menú au-
tomático (desecar)
Menú automático. El tiempo y la
temperatura se pueden ajustar
durante el funcionamiento.
Desinfectar Esterilización por vapor
Cocinar al vapor a baja
temperatura
Modo de submenú
Modo de asado y
horneado
Modo de submenú
Cocinar al vapor a alta
temperatura
Modo de submenú
Descalcicación El símbolo se ilumina y la alarma
suena durante un tiempo prolon-
gado cuando se selecciona este
modo.
Regulador de tem-
peratura
Pulse este botón y gire el mando
para ajustar la temperatura .
Botón MENÚ Pulse el botón para acceder a los
ajustes de menú.
Botón Mantener
caliente
Pulse este botón, el ajuste por
defecto es 65 °C, 20 min.
El tiempo se puede ajustar hasta
180 minutos.
Conguración del
tiempo
Pulse este botón y gire el mando
para ajustar el tiempo.
Iluminación interior Al pulsar este botón, se enciende
la luz interior.

78
ES
Símbolo Modo Descripción
Botón Standby Al pulsar este botón, el aparato
pasa al modo de espera.
Regulador Gire el regulador para ajustar la
temperatura, el tiempo o el menú.
Pulse el regulador hacia abajo
para iniciar o pausar el funciona-
miento.

79
ES
PUESTA EN MARCHA
1. Desembale el aparato y retire todo el material de embalaje. Fije el separador
en la parte posterior del aparato. Coloque el aparato sobre una super cie
plana y estable. Asegúrese de que haya una distancia mínima de 20 cm a la
parte posterior del aparato y una distancia mínima de 10 cm a ambos lados
(véase la ilustración). No coloque el aparato cerca de cortinas, tapices u otros
materiales in amables.
2. Coloque el alimento deseado en el accesorio correspondiente (véase la
ilustración) e introdúzcalo dentro del aparato.

80
ES
3. Retire el depósito de agua. Vacíe la bandeja de goteo y el recipiente de agua.
Llene el depósito de agua con agua. Coloque la tapa del depósito de agua y
asegúrese de que está bien asentada. A continuación, introduzca el depósito
de agua en el aparato (véase la ilustración).
Indicaciones
• Los diferentes métodos de preparación requieren diferentes accesorios.
• Después de la cocción, retire la vaporera, la bandeja de horno, la rejilla o el
molde para pasteles del aparato utilizando guantes de cocina o manoplas
para evitar quemarse.
• El aparato sólo se pone en funcionamiento cuando la puerta está bien
cerrada. De lo contrario, la pantalla parpadea.
Antes del primer uso
1. Retire todo el material de embalaje y coloque el aparato en una super cie
estable.
2. Limpie la bandeja de horno, la vaporera, la rejilla, el molde para pasteles y
otros accesorios con agua, un producto de limpieza y una esponja no abrasiva.
3. Llene el depósito de agua con agua destilada o puri cada.
4. Frote el interior y exterior del aparato con un paño.
5. No introduzca alimentos en el aparato cuando lo utilice por primera vez.
Utilice la función «STEAM» y deje que el aparato funcione durante un ciclo.
Durante este tiempo puede producirse un ligero olor y humo. Esto es
totalmente normal.

81
ES
FUNCIONAMIENTO
Encendido
Cuando se enciende el aparato, suena un pitido. La pantalla digital y los
indicadores luminosos parpadean y luego se apagan. Sólo el indicador de
funcionamiento del botón «ON/OFF» parpadea lentamente. Esto indica que el
aparato está en modo de espera. Al pulsar el botón «ON/OFF», se encienden
todos los indicadores luminosos del panel de control. Pulse el botón «MENU» para
acceder al menú de funciones.
Selección de funciones
La función congurada de fábrica es el modo «Cocinar a alta temperatura». Pulse
el botón «MENU» y seleccione la función deseada con el regulador. Las funciones
se muestran en la pantalla una tras otra a medida que se gira.
Ajuste de temperatura
Pulse el botón «TEMP». Gire el regulador para ajustar la temperatura. En el modo
de funcionamiento, además del menú automático, puede ajustar la temperatura
pulsando el botón «TEMP». Tras el ajuste, el aparato se pone en marcha
automáticamente. También puede ponerlo en marcha pulsando el botón de inicio.
Ajuste del tiempo
Pulse el botón «TIME». Gire el regulador para ajustar el tiempo. En el modo de
funcionamiento, además del menú automático, puede ajustar el tiempo pulsando
el botón «TIME». Tras el ajuste, el aparato se pone en marcha automáticamente.
También puede ponerlo en marcha pulsando el botón de inicio.
Función de descongelación
Si después de encender el aparato pulsa el botón «ON/OFF», se encienden todos
los indicadores luminosos del panel de control. A continuación, pulse el botón
«MENU» para acceder a la interfaz de selección de funciones. Al girar el regulador
al modo de descongelación, el símbolo de descongelación parpadea y los demás
símbolos se iluminan. Pulse el botón «TEMP», se escuchará un pitido. El símbolo
de descongelación se enciende y los demás símbolos se apagan. Gire el regulador
para seleccionar la temperatura deseada para la descongelación. Pulse el botón
«TIME», se escuchará un pitido. Gire el regulador para seleccionar el tiempo
de descongelación deseado. A continuación, pulse el regulador para iniciar el
funcionamiento. La temperatura y el tiempo congurados aparecen en la pantalla.
Puede usar esta función para descongelar alimentos congelados, etc.
Función de esterilización
Después de encender el aparato, pulse el botón «ON/OFF»; se encienden todos
los indicadores luminosos del panel de control. A continuación, pulse el botón
«MENU» para acceder a la selección de funciones. Gire el regulador al modo
de esterilización. El símbolo de esterilización parpadea, los demás símbolos
se iluminan. Pulse el botón «TIME», se escuchará un pitido. El símbolo de
esterilización se ilumina, los demás símbolos se apagan. Gire el regulador para
seleccionar el tiempo deseado para la esterilización. Pulse el regulador para

82
ES
iniciar el funcionamiento. La temperatura y el tiempo congurados aparecen en la
pantalla.
Nivel de agua bajo en el depósito de agua
Cuando en el depósito de agua queda poca agua, el símbolo
parpadea. El
indicador «tiempo» parpadea. El funcionamiento se interrumpe y suena la señal
acústica. Pulse el botón de inicio para continuar la preparación automáticamente
después de añadir el agua. Durante el estado de funcionamiento, monte el
depósito de agua para continuar con la preparación. La alarma de bajo nivel de
agua en el depósito de agua sólo se activa cuando se utiliza la función de cocción
al vapor. Después de añadir el agua, pulse el botón de inicio para continuar con la
preparación.
Menú de funciones
Pulse el botón «ON/OFF» después de encender el aparato. Se encienden todos
los indicadores luminosos del panel de control. A continuación, pulse el botón
«MENU» para acceder al menú de funciones. Gire el regulador para seleccionar
los diferentes puntos del menú. Después de seleccionar el menú deseado, ajuste
la temperatura y el tiempo, y pulse el regulador para comenzar. Pulse de nuevo el
regulador para cancelar la función seleccionada. Gire de nuevo el regulador para
seleccionar otra función.
Descalcicación
La función de cocción al vapor puede utilizarse durante 80 horas seguidas
y luego pasa a la interfaz de salida. El símbolo «DESCSAL» se enciende y los
demás símbolos se apagan. De este modo, se notica al usuario de que debe
limpiar el aparato. Añada ácido cítrico al depósito de agua y vierta más de 600
ml de agua puricada. Cierre la puerta y pulse el regulador. Se inicia la función
de descalcicación. La función de descalcicación se divide en tres etapas:
descalcicación (30 minutos), limpieza básica (10 minutos) y limpieza secundaria
(10 minutos). Después de que la función de descalcicación haya funcionado
durante 30 minutos, suena un pitido. Vierta el agua del depósito de agua sucia y
del depósito de agua limpia y añada agua fresca y limpia en el depósito de agua.
Tras introducir el depósito de agua en la carcasa, cierre la puerta para iniciar la
limpieza principal. Después de 10 minutos, el pitido vuelve a sonar. Vierta el agua
del depósito de agua sucia y del depósito de agua limpia y añada agua fresca y
limpia en el depósito de agua. Tras introducir el depósito de agua en la carcasa,
cierre la puerta para iniciar una segunda limpieza. Tras el procedimiento anterior,
la descalcicación está completa.
Si no desea limpiar el aparato en este momento, puede girar el regulador o pulsar
otros botones, excepto el de inicio, para entrar en el modo de funcionamiento
normal. Sin embargo, la próxima vez que se encienda el aparato, se le recordará
de nuevo que debe limpiarlo. El pitido suena hasta que se selecciona este modo o
se cambia al modo de funcionamiento normal.
Nota:
Después de la descalcicación, debe desconectar el enchufe de la red. No
podrá volver a utilizar el aparato hasta que se haya enfriado; el tiempo de

83
ES
descalcicación es de 50 minutos.
Cambio de modo
Mantenga pulsado el regulador (3 segundos) para cancelar el procedimiento y
luego gire el regulador para cambiar el modo.
Función de la lámpara
Pulse el botón «ON/OFF» después de encender el aparato. Se encienden todos los
indicadores luminosos del panel de control. Pulse el botón de lámpara
para
encender la lámpara. Puede encender o apagar la lámpara en cualquier momento
en cualquier modo de funcionamiento.
Función «Mantener el calor»
Pulse el botón «ON/OFF» después de encender el aparato. Se encienden todos
los indicadores luminosos del panel de control. Pulse el botón «
» para iniciar
la función «Mantener el calor». Pulse el botón «TEMP». Suena la señal acústica.
El símbolo «K-WARM» se enciende y los demás símbolos se apagan. Gire el
regulador para seleccionar la temperatura deseada para la función «Mantener
el calor». Pulse el botón «TIME». Suena la señal acústica. Gire el regulador para
ajustar el tiempo deseado para la función «Mantener el calor». Pulse el regulador
para iniciar el funcionamiento. La temperatura congurada y el tiempo restante
aparecen en la pantalla.
Nota
• Los ajustes anteriores son indicativos. Como el origen, la forma, el tamaño
y la variedad de los ingredientes varían, no podemos garantizar los mejores
parámetros para sus ingredientes. Puede adaptar los ajustes según los
alimentos que va a preparar. Cuanto mayor sea la cantidad de alimentos que
cocinar, mayor será el tiempo de cocción.
• Si saca la olla y gira los alimentos durante la preparación, podrá cocinarlos
más uniformemente y mejor.
• Si los ingredientes aún no están lo sucientemente cocidos, puede volver a
ponerlos directamente en la olla y cocinarlos durante un tiempo razonable.
• Los alimentos marinados deben penetrar en el interior de los mismos para
que tengan un mejor sabor y sean más deliciosos.
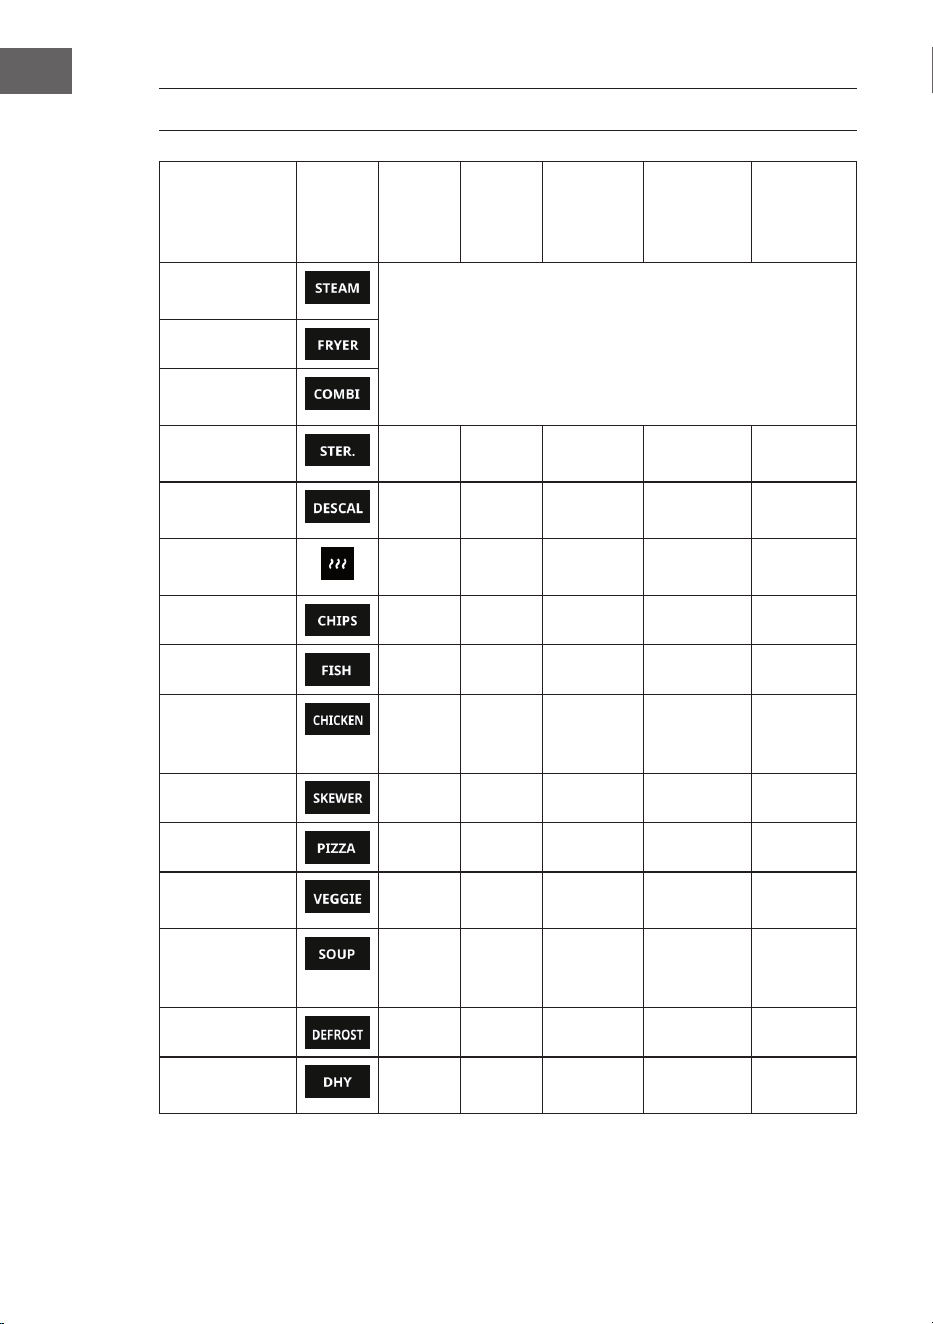
84
ES
GAMA DE PREFERENCIAS Y AJUSTES
Menú Símbolo Modo
de
prepa-
ración
Temp. Rango de
tempera-
tura
Tiempo Rango de
tiempo
Cocción al
vapor
Modo de submenú
Freír
Cocinar al vapor
y freír
Esterilizar / 110 °C No ajust-
able
0:30 min 10 min - 2 h
Descalcicación
/ / No ajust-
able
0:50 min No ajust-
able
Mantener el
calor
/ 65 ℃ 50-80 ℃ 0:20 min 1 min - 3 h
Patatas fritas
Freír 220 ℃ 200-230 ℃ 0:25 min 15-35 min
Pescado
Freír 190 ℃ 170-200 ℃ 0:40 min 1-50 min
Pollo
Cocinar
al vapor
y freír
220 ℃ 210-230 ℃ 0:45 min 1 min - 1 h
Brocheta
Freír 200 ℃ 180-220 ℃ 0:15 min 15-35 min
Pizza
Freír 180 ℃ 170-190 ℃ 0:20 min 1-30 min
Vegetariano
Cocción
al vapor
100 ℃ 95-130 ℃ 0:10 min 1-20 min
Sopa
Freír 200 ℃ +
110 ℃ +
150 ℃
No ajust-
able
0:30 + 170 +
0:10 min
No ajust-
able
Descongelar
Freír 45 ℃ 35-70 ℃ 1:00 h 1 min - 8 h
Deshidratar
Freír 70 ℃ 70 ℃ -
95 ℃
8:00 h 1 min - 8 h
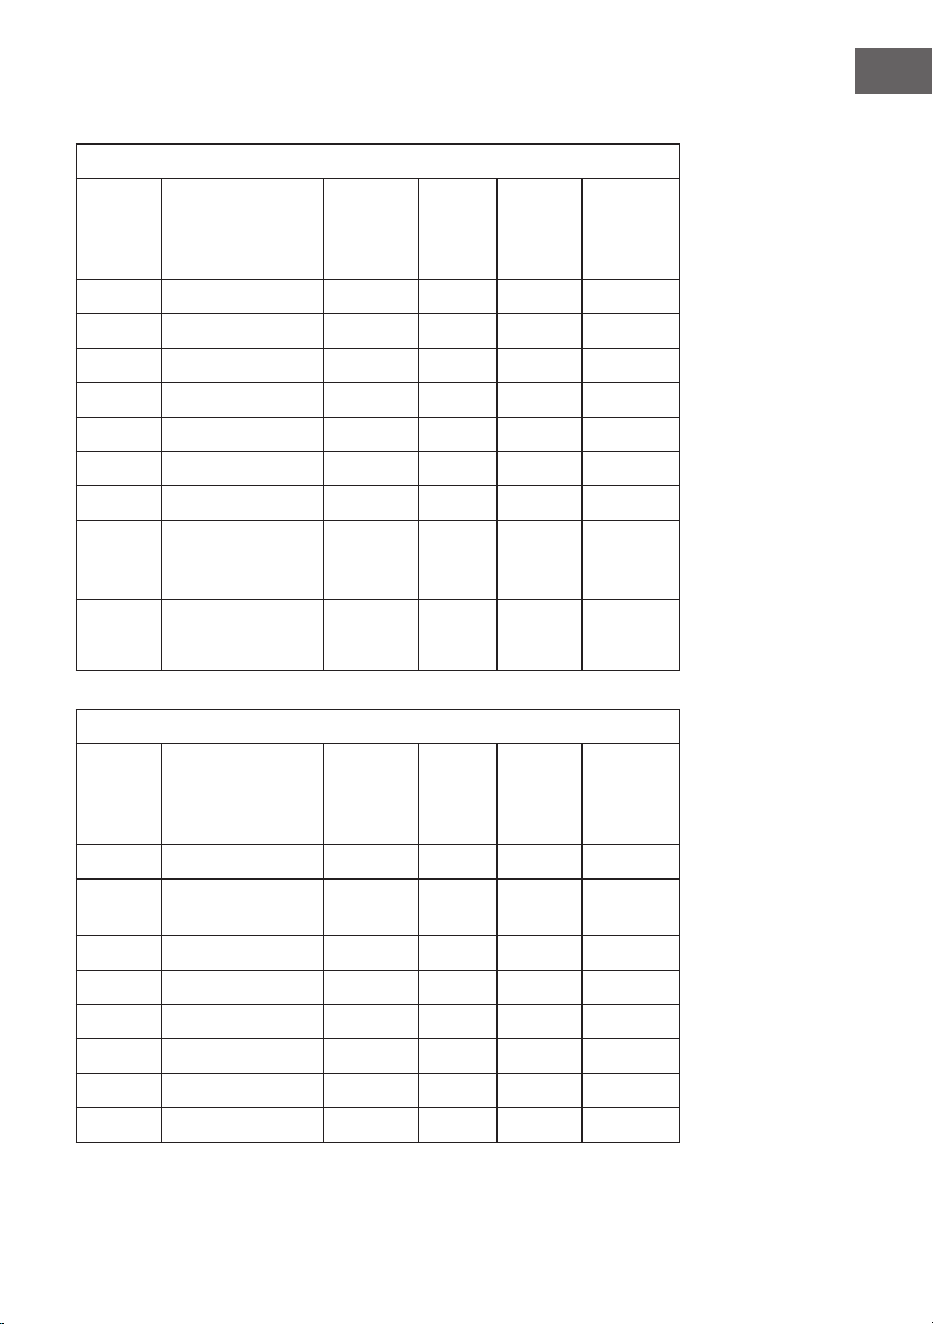
85
ES
Submenús
Modo de cocción al vapor completo
Código
del
menú
Menús Tiempo
HH:MM
Temp.
(°C)
Rango
de
tiempo
(min)
Rango de
temp. (ºC)
01 Crepe frita 00:15 100 1-20 90-110
02 Castañas asadas 00:15 100 1-20 90-110
03 Gugelhupf 00:15 110 1-20 110-120
04 Bagel 00:18 100 1-25 90-110
05 Macarrón 00:20 110 1-30 110-130
06 Patatas fritas 00:28 110 1-35 110-130
07 Tostadas crujientes 00:40 100 1-50 90-120
08 Panecillos
crujientes
horneados
00:13 90 1-35 90-110
09 Repostería propia 01:00 130 1-60 90-130
Modo de fritura completo
Código
del
menú
Menús Tiempo
HH:MM
Temp.
(°C)
Rango
de
tiempo
(min)
Rango de
temp. (ºC)
01 Alitas de pollo 00:20 180 1-35 170-200
02 Pato entero
01:00 200
1 min –
2 h
180-220
03 Rosbif 0:20 190 1-35 180-220
04 Batatas asadas 00:40 230 1-50 200-230
05 Maíz al horno 00:25 200 1-30 180-220
06 Galletas 00:30 150 1-50 140-190
07 Crepe frita 00:20 200 1-35 180-220
08 Castañas asadas 00:30 180 1-50 180-220
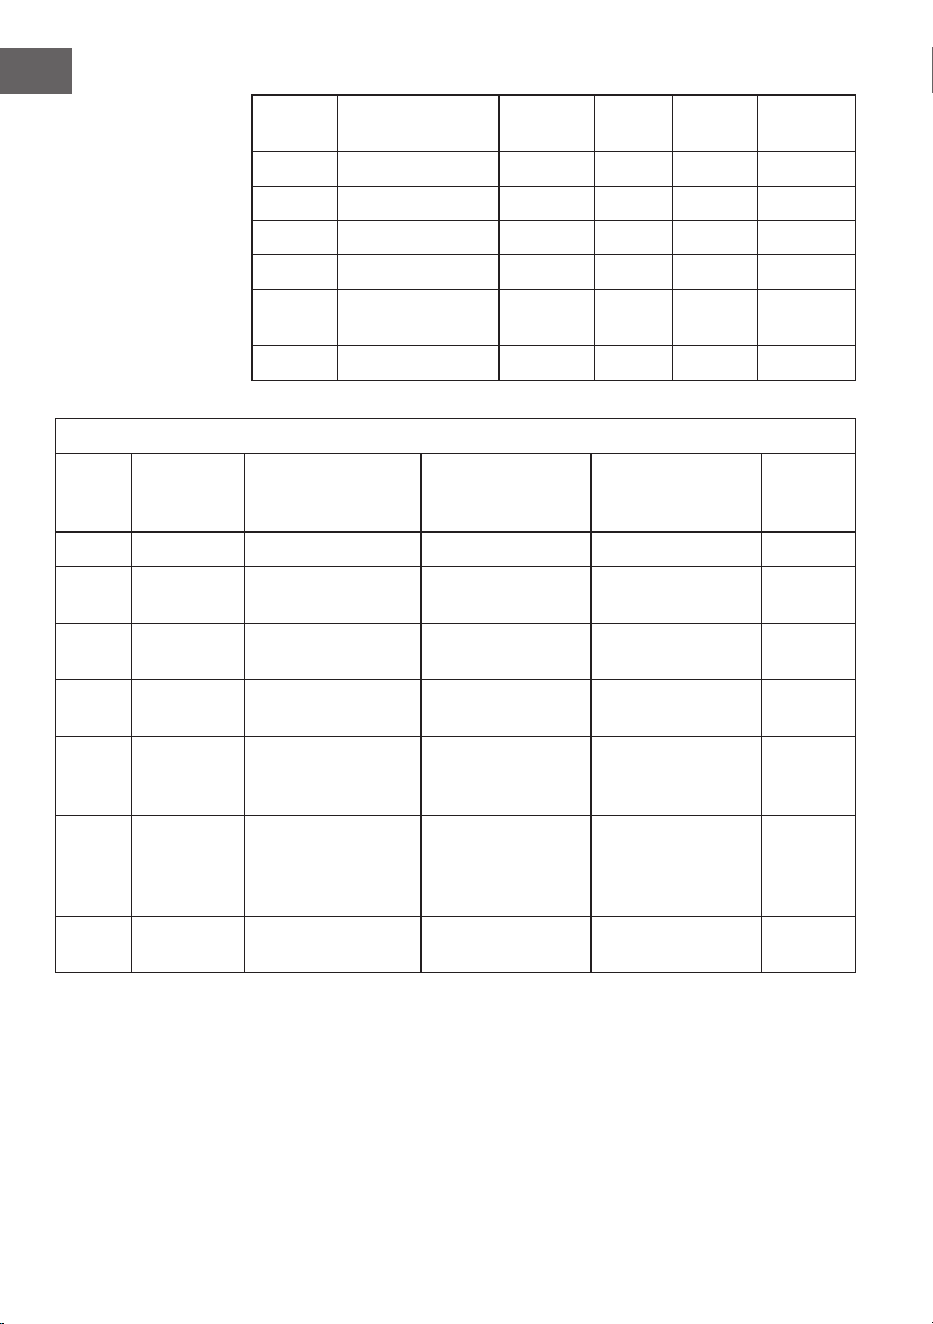
86
ES
09 Gugelhupf
0:20 + 0:10
130
+ 160
15-25
+ 7-13
100-140
+ 140-180
10 Bagel 00:20 190 1-30 180-220
11 Macarrón 00:15 150 1-30 140-190
12 Patatas fritas 00:18 200 1-30 180-220
13 Tostadas crujientes 00:10 200 1-20 180-220
14 Panecillos
crujientes al horno
00:07 180 1-20 170-200
15 Repostería propia 01:00 230 1-60 35-230
Modo combinado de cocción al vapor + fritura
Código
del
menú
Menús Tiempo HH:MM Temp. (°C) Rango de tiempo
(min)
Rango
de temp.
(ºC)
01 Filete 0:15 190 1-20 180-220
02 Pescado Cocción vapor 0:10
+ fritura 0:20
Cocción vapor 100
+ fritura 180
Cocción vapor 5-13
+ fritura 15-30
100-120
+ 170-200
03 Pollo 00:50 Cocción al vapor 190
+ fritura
30 min - 1 h 180-220
04 Cerdo cocido Cocción al vapor 0:20
+ fritura 0:15
Cocción vapor 110
+ fritura 200
Cocción vapor 10-30
+ fritura 5-20
100-120
+ 170-220
05 Calentar
el pan
(frigoríco)
Cocción vapor 0:08
+ Cocción vapor
+ fritura 0:07
Cocción vapor 80
+ Cocción al vapor
+ fritura 180
Cocción vapor 5-10
+ Cocción vapor
+ fritura 5-10
80-100
+ 170-200
06 Calentar el
pan (a
temperatura
ambiente)
Cocción al vapor 0:06
+ Cocción al vapor
+ fritura 0:07
Cocción al vapor 80
+ Cocción al vapor
+ fritura 180
Cocción al vapor
5-10
+ Cocción al vapor
+ fritura 5-10
80-100
+ 170-200
07 Repostería
propia
01:00 200 1-60 50-220
Nota: durante la cocción al vapor y la fritura, la pantalla del menú principal seleccionado (por
ejemplo, «Modo de fritura completo») parpadea. Pulse el regulador para acceder al modo
de submenú. El número correspondiente se muestra en la pantalla al girar el regulador. Por
ejemplo, el modo de vapor 01 es «Crepe frito». Pulse el regulador para conrmar el menú
deseado. La temperatura y el tiempo se pueden ajustar girando el regulador. Pulse el regulador
para conrmar la selección. El temporizador inicia la cuenta atrás y se iluminan el menú principal
correspondiente y el número seleccionado. Si desea ver la temperatura ajustada, pulse el botón
de temperatura. La pantalla cambia a la temperatura ajustada. Transcurridos 30 segundos, el
código del menú vuelve a aparecer en la pantalla.

87
ES
LIMPIEZA Y MANTENIMIENTO
• No utilice productos de limpieza agresivos, gasolina, polvo abrasivo o un
cepillo metálico para la limpieza.
• Si el aparato se utiliza durante un largo período de tiempo, su interior puede
llegar a oler de forma extraña. Si este es el caso, siga estos pasos: introduzca
5-6 rodajas de limón en el interior del aparato y programe la función «Cocción
al vapor a baja temperatura». Deje que el aparato funcione a 100 °C durante
15 - 20 minutos. De esta forma, se eliminará el olor extraño.
• Apague el aparato y desconecte el enchufe de la toma de corriente antes de
limpiarlo.
• Mantenga el interior del aparato siempre limpio. Elimine con un paño húmedo
cualquier resto de comida o salpicadura en la pared interioro Nunca limpie el
interior del aparato con materiales duros. Si el interior del aparato está sucio,
límpielo con un paño y un producto de limpieza suaves. No utilice productos
de limpieza agresivos ni materiales abrasivos.
• Llene el depósito de agua solo con agua destilada o puricada, ya que el agua
del grifo puede dejar depósitos de cal.
• Revise el depósito de agua al menos una vez al mes. Puede desmontar el
depósito de agua para limpiarlo mejor y volver a montarlo.
• Limpie la bandeja de goteo, el depósito de agua y el recipiente de agua
después de cada uso.
• Limpie la junta de la puerta regularmente con un paño suave y seco.
• Si el panel de control y el regulador se mojan, séquelos con un paño suave y
seco y no utilice ningún producto de limpieza agresivo. Apague el aparato y
desconecte el enchufe de la toma de corriente antes de limpiarlo para evitar
encenderlo por accidente.
• Desenchufe el aparato cuando no vaya a utilizarlo durante un periodo de
tiempo prolongado. Guarde el aparato en un lugar seco y bien ventilado.
• No limpie nunca la puerta de cristal del aparato con productos de limpieza
agresivos o rascadores metálicos alados, ya que podría dañar y romper el
cristal.
• Limpie los accesorios únicamente con un producto de limpieza suave y
un paño delicado. De lo contrario, podría rayar los accesorios y dañar su
revestimiento protector.
• Respete la normativa medioambiental local a la hora de desechar el aparato.
• En caso de mal funcionamiento, el aparato debe ser sustituido por el
fabricante, el servicio posventa o una persona con cualicación similar. Si no
lo hace, puede provocar daños materiales o personales.
88
ES
DETECCIÓN Y REPARACIÓN DE ANOMALÍAS
Anomalía Posible causa Solución
El aparato no funciona,
pero emite un pitido
cuando se enciende y se
muestra la pantalla al
enchufarlo.
Uso incorrecto. Lea atentamente todo el manual de
instrucciones.
Componentes dañados Póngase en contacto con el servicio técni-
co si es el caso.
El aparato no funcio-
na, no emite un pitido
cuando se enciende y no
se muestra la pantalla al
enchufarlo.
El cable de alimentación no está
enchufado.
Enchufe el cable de alimentación a la
toma de corriente.
La toma de corriente está dañada. Cambie la toma de corriente.
Componentes dañados. Póngase en contacto con el servicio técni-
co si es el caso.
La lámpara no se enci-
ende.
La lámpara está dañada. Póngase en contacto con el servicio técni-
co si es el caso.
El aparato emite humo
cuando se utiliza por
primera vez.
Cuando se utiliza por primera vez,
el aceite sobrante del proceso de
fabricación se calienta y se quema
en el aparato y se forma humo.
Es normal y no debe preocuparse.
Olor extraño
El olor aparece después de un
período más largo de uso.
Introduzca 5-6 rodajas de limón en el
aparato y déjelo funcionar durante 15-20
minutos a 100 °C con la función «Cocción
al vapor a baja temperatura».
Los accesorios del aparato están
sucios.
Limpie y seque los accesorios.
Hay restos de comida en el interior
del aparato.
Limpie los restos de comida antes de
volver a utilizar el aparato.
El cable de alimentación está
dañado.
Póngase en contacto con el servicio técni-
co y mantenga el cable de alimentación
lejos de supercies calientes en el futuro.
La comida está poco
hecha.
La función seleccionada no cumple
con los requisitos de preparación
del alimento utilizado.
Ajuste el tiempo y la temperatura según
la receta y su experiencia personal.
89
ES
Mensaje de error
Código de
error
Posible causa Solución
E1
Sobrecalentamiento o
cortocircuito del NTC
Contacte con el servicio
técnico.
E4
Circuito NTC abierto Contacte con el servicio
técnico.
E2
Sobrecalentamiento
o cortocircuito del
evaporador de 1 NTC.
Contacte con el servicio
técnico.
E5
Circuito abierto del
evaporador de 1 NTC.
Contacte con el servicio
técnico.
E3
Sobrecalentamiento
o cortocircuito del
evaporador de 2 NTC.
Contacte con el servicio
técnico.
E6
Cortocircuito del
evaporador de 2 NTC.
Contacte con el servicio
técnico.
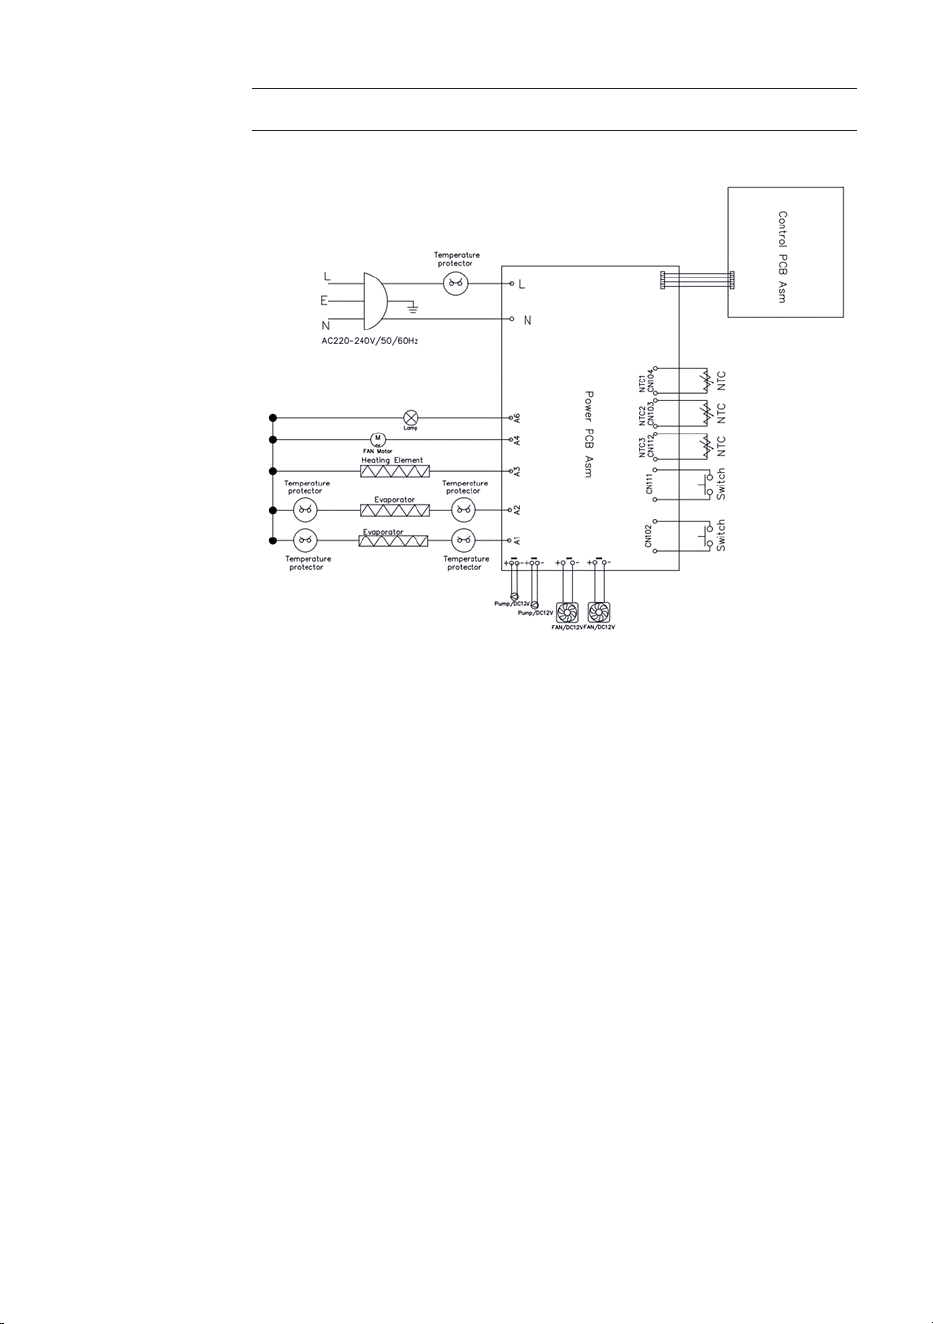
ESQUEMA DEL CIRCUITO

91
ES
INDICACIONES SOBRE LA RETIRADA DEL APARATO
Si en su país existe una disposición legal relativa a la
eliminación de aparatos eléctricos y electrónicos, este
símbolo estampado en el producto o en el embalaje
advierte que no debe eliminarse como residuo doméstico.
En lugar de ello, debe depositarse en un punto de
recogida de reciclaje de aparatos eléctricos y electrónicos.
Una gestión adecuada de estos residuos previene
consecuencias potencialmente negativas para el medio
ambiente y la salud de las personas. Puede consultar más
información sobre el reciclaje y la eliminación de este
producto contactando con su administración local o con
su servicio de recogida de residuos.
FABRICANTE E IMPORTADOR (REINO UNIDO)
Fabricante:
Chal-Tec GmbH, Wallstraße 16, 10179 Berlín, Alemania.
Importador para Gran Bretaña:
Berlin Brands Group UK Ltd
PO Box 1145
Oxford, OX1 9UW
United Kingdom


93
IT
Gentile cliente,
La ringraziamo per l'acquisto del dispositivo. La preghiamo
di leggere attentamente le seguenti indicazioni e di
seguirle per prevenire eventuali danni. Non ci assumiamo
alcuna responsabilità per danni scaturiti da una mancata
osservanza delle avvertenze di sicurezza e da un uso
improprio del dispositivo. Scansionare il seguente codice
QR per accedere al manuale d'uso più recente e ricevere
informazioni sul prodotto.
Dati tecnici 94
Avvertenze di sicurezza 95
Descrizione del dispositivo 97
Messa in funzione 101
Utilizzo 103
Congurazione predenita e impostazioni 106
Pulizia e manutenzione 109
Ricerca e correzione degli errori 110
Schema elettrico 112
Avviso di smaltimento 113
Produttore e importatore (UK) 113
INDICE
94
IT
DATI TECNICI
Numero articolo 10041333, 10041334
Alimentazione 220–240 V ~ 50-60 Hz
Potenza 2450 W
Intervallo di temperatura 50 - 230 °C
Dimensioni della camera
di cottura
18 l
Capacità del serbatoio
d'acqua
800 ml
Peso 14,5 kg

95
IT
AVVERTENZE DI SICUREZZA
Avvertenze generiche
• Non lavare mai l'alloggiamento con acqua corrente per evitare di danneggiare
i componenti elettrici.
• Non lasciare che acqua o altri liquidi penetrino nel dispositivo, in modo da
evitare scosse elettriche.
• Bambini a partire da 8 anni e persone con limitate capacità siche, psichiche
e sensoriali possono utilizzare il dispositivo solo se sono stati istruiti da
una persona responsabile della loro sicurezza sulle modalità d'uso e sulle
procedure di sicurezza e comprendono i rischi associati.
• Prima dell'utilizzo, controllare la tensione sulla targhetta del dispositivo.
Collegare il dispositivo solo a prese elettriche con tensione corrispondente a
quella indicata.
• Non usare questo prodotto se la spina, il cavo di alimentazione o il prodotto
stesso sono danneggiati.
• Se il cavo di alimentazione o la spina sono danneggiati, devono essere
sostituiti dal produttore, da un'azienda tecnica autorizzata o da una persona
con quali ca equivalente.
• Assicurarsi che i bambini non giochino con il dispositivo.
• Non toccare la spina o il pannello di controllo con le mani bagnate.
• Non posizionare questo prodotto sopra o vicino a tovaglie, tende e altri
materiali in ammabili.
• Lasciare almeno 10 cm di spazio intorno a tutti i lati del dispositivo. Non
poggiare oggetti sopra al dispositivo.
• Non lasciare il dispositivo privo di supervisione mentre è in funzione.
ATTENZIONE
Pericolo di ustioni! Quando si apre lo sportello del dispositivo può
fuoriuscire vapore bollente. Mantenere una distanza di sicurezza
per evitare ustioni.
• Non inserire corpi estranei nelle aperture del dispositivo.
• Non usare pulitori a vapore per la pulizia del dispositivo.
• Assicurarsi che il dispositivo sia spento prima di sostituire la lampada per
evitare scosse elettriche.
• Il dispositivo non deve essere installato in un armadio per evitare il
surriscaldamento.

96
IT
Indicazioni per un utilizzo sicuro
ATTENZIONE
Pericolo di ustioni! Il dispositivo diventa estremamente caldo
durante l'uso. Fare attenzione a non toccare gli elementi riscaldanti
all'interno del dispositivo e usare guanti da forno.
• Prima della pulizia, staccare la spina e lasciar ra reddare completamente il
dispositivo.
• Installare il dispositivo su una super cie piana e asciutta e lasciare almeno
10 cm di spazio in tutte le direzioni in modo che l'aria possa circolare
su cientemente.
• Non collegare il dispositivo a prese elettriche, a cui sono già collegati altri
elettrodomestici da cucina.
• Non posizionare il dispositivo vicino a oggetti in ammabili. Installarlo lontano
dalle tende di porte e nestre, da carta da parati e da oggetti simili per evitare
incendi. Non poggiare o conservare oggetti sopra al dispositivo.
• Pulire lo sportello del dispositivo con un panno morbido inumidito. Non usare
detergenti abrasivi o raschietti metallici per evitare gra sulla super cie.
• Non collegare assolutamente il dispositivo a timer esterni o a prese elettriche
con comando a distanza.
• Prima dell'uso, assicurarsi che le stoviglie siano adatte a questo prodotto. Si
consiglia di utilizzare contenitori di vetro resistenti al calore o di ceramica.
Riempire il contenitore di cottura no a un massimo di due terzi.
• Non riempire eccessivamente il serbatoio dell'acqua. Fare riferimento
all'indicazione MAX nel serbatoio.
• Non mettere contenitori sullo sportello del dispositivo aperto.
• Non riscaldare alimenti in un contenitore sigillato, altrimenti potrebbe
esplodere. Trasferire gli alimenti in un contenitore resistente al calore prima
di scaldarli.
Istruzioni per l'uso
• La frequenza di erogazione dell'acqua è elevata. Per questo motivo a volte
può succedere che un po' d'acqua schizzi fuori dall'apertura di circolazione
dell'aria. Questo è normale.
• Il vapore in eccesso all'interno del dispositivo si ra redda rapidamente e viene
rilasciato attraverso l'uscita dell'aria durante la preparazione. Una piccola
quantità di vapore si condensa sulle griglie dell'uscita dell'aria, questo è
normale.
• Le uttuazioni di tensione in uiscono sul tempo di preparazione e sul risultato
della preparazione: se la tensione oscilla in un intervallo da -10 % a +5 %, il
dispositivo funziona normalmente. Se le uttuazioni di tensione sono più
alte o più basse, la potenza di uscita aumenterà o diminuirà di conseguenza,
in uenzando il tempo di preparazione e il risultato. Questo è normale.
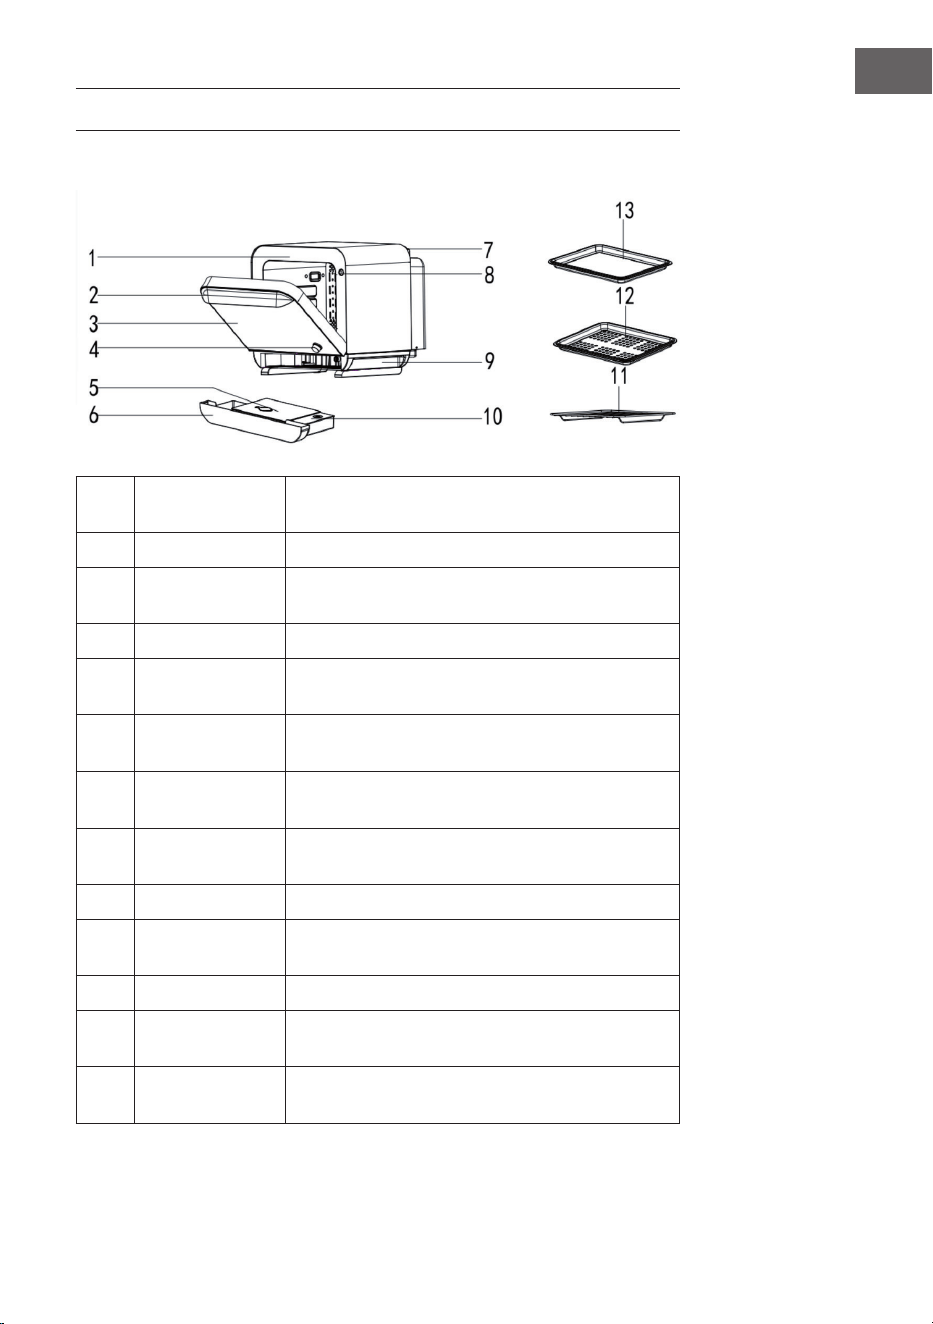
97
IT
DESCRIZIONE DEL DISPOSITIVO
Componenti del dispositivo
1 Telaio dello
sportello
Stabilizzare l'unità.
2 Impugnatura Per aprire e chiudere l'unità.
3 Finestra di
visualizzazione
Monitoraggio degli alimenti durante la
preparazione.
4 Manopola Manopola di selezione della funzione
5 Serbatoio
dell'acqua
Immagazzinamento dell'acqua per la produzione
di vapore.
6 Vaschetta di
sgocciolamento
Raccoglie l'acqua in eccesso prodotta durante la
preparazione.
7 Uscita dell'aria Il vapore in eccesso viene rilasciato attraverso
l'uscita dell'aria.
8 Chiusura dello
sportello
Assicurarsi che lo sportello sia chiuso e che il
dispositivo possa essere messo in funzione.
9 Impugnatura Può essere usato per spostare l'unità.
10 Serbatoio
dell'acqua
Raccoglie l'acqua in eccesso prodotta durante la
preparazione.
11 Ripiano Possono esservi posizionate teglie o altre piro le.
12 Inserto per la
cottura a vapore
Qui si possono preparare cibi che non contengono
acqua.
13 Teglia Possono esservi collocati alimenti come zuppe,
prodotti da forno, ecc.
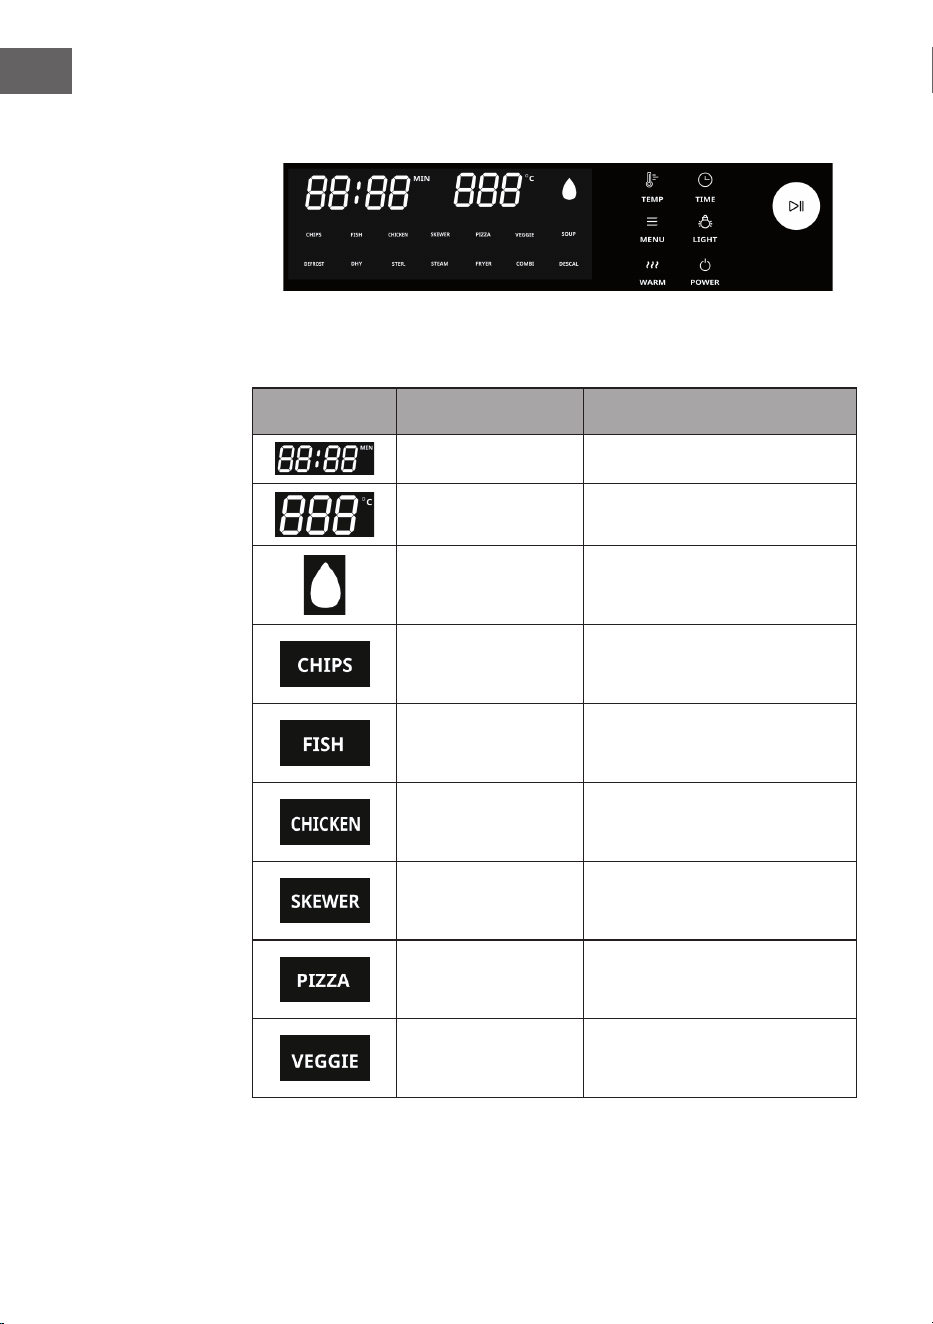
98
IT
Pannello di controllo
Simbolo Modalità Descrizione
Tempo Indica il tempo di preparazione.
Temperatura Visualizza la temperatura impo-
stata.
Non c'è acqua Il simbolo lampeggia e l'allarme
suona a lungo per indicare che
non c'è più acqua nel serbatoio.
Modalità menu auto-
matico (patatine)
Menu automatico. Il tempo e la
temperatura possono essere rego-
lati durante il funzionamento.
Modalità menu auto-
matico (pesce)
Menu automatico. Il tempo e la
temperatura possono essere rego-
lati durante il funzionamento.
Modalità menu auto-
matico (pollo)
Menu automatico. Il tempo e la
temperatura possono essere rego-
lati durante il funzionamento.
Modalità menu auto-
matico (spiedino)
Menu automatico. Il tempo e la
temperatura possono essere rego-
lati durante il funzionamento.
Modalità menu auto-
matico (pizza)
Menu automatico. Il tempo e la
temperatura possono essere rego-
lati durante il funzionamento.
Modalità menu auto-
matico (verdure)
Menu automatico. Il tempo e la
temperatura possono essere rego-
lati durante il funzionamento.
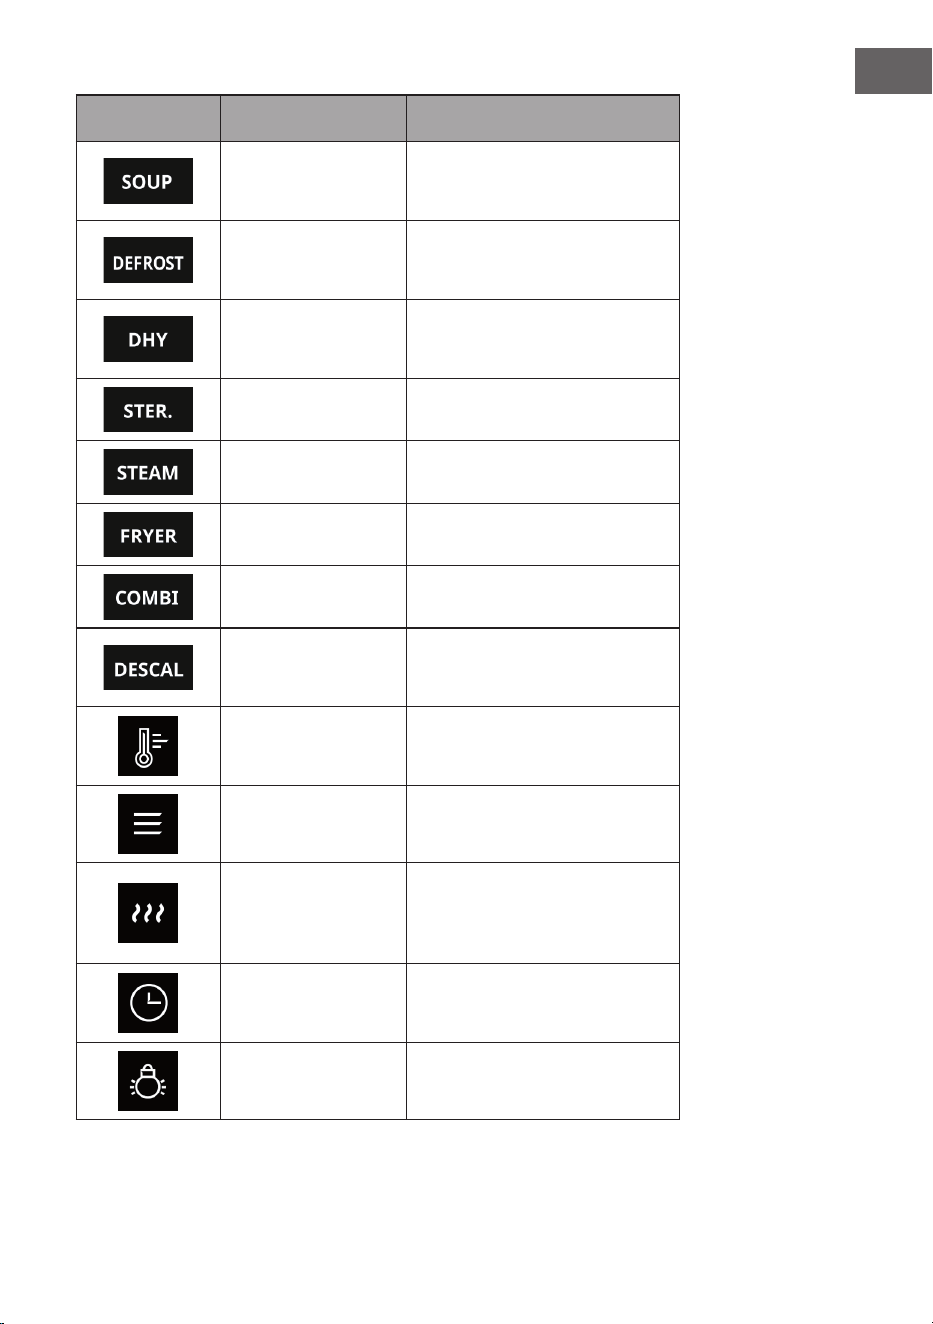
99
IT
Simbolo Modalità Descrizione
Modalità menu auto-
matico (zuppa)
Menu automatico. Il tempo e la
temperatura non possono essere
regolati.
Modalità menu
automatico (scongela-
mento)
Menu automatico. Il tempo e la
temperatura possono essere rego-
lati durante il funzionamento.
Modalità menu
automatico (modalità
essiccatore)
Menu automatico. Il tempo e la
temperatura possono essere rego-
lati durante il funzionamento.
Disinfettare Sterilizzazione a vapore
Cottura a vapore a
bassa temperatura
Modalità sottomenu
Modalità griglia e
forno
Modalità sottomenu
Cottura a vapore ad
alta temperatura
Modalità sottomenu
Decalcicazione Il simbolo si accende e l'allarme
suona a lungo quando si seleziona
questa modalità.
Regolazione della
temperatura
Premere questo pulsante e girare
la manopola per regolare la tem-
peratura.
Pulsante menu Premere questo pulsante per acce-
dere alle impostazioni del menu.
Pulsante di manteni-
mento del calore
Premere questo pulsante, ll’im-
postazione predenita è 65 °C,
20 min. Il tempo può essere impo-
stato no a 180 min.
Impostazione tempo Premere questo pulsante e girare
la manopola per impostare il
tempo.
Illuminazione interna Quando si preme questo pulsante,
la luce interna si accende.

100
IT
Simbolo Modalità Descrizione
Tasto standby Premendo questo tasto, il disposi-
tivo entrerà in modalità standby.
Manopola Ruotare la manopola per impo-
stare la temperatura, il tempo o il
menu. Premere la manopola verso
il basso per avviare o mettere in
pausa il funzionamento.

101
IT
MESSA IN FUNZIONE
1. Disimballare il dispositivo e rimuovere tutto il materiale della confezione.
Fissare il divisorio sul retro dell'unità. Posizionare il dispositivo su una
super cie stabile e piana. Assicurarsi che ci sia una distanza minima di 20 cm
dal retro del dispositivo e di 10 cm da entrambi i lati (vedi illustrazione). Non
posizionare l'apparecchio nelle immediate vicinanze di tende, arazzi o altri
materiali in ammabili.
2. Collocare l'alimento desiderato nell'accessorio corrispondente (vedi
illustrazione) e spingerlo all'interno dell'apparecchio.

102
IT
3. Rimuovere il serbatoio dell'acqua. Svuotare la vaschetta di sgocciolamento
e il serbatoio dell'acqua. Riempire il serbatoio d'acqua. Fissare il coperchio
del serbatoio dell'acqua e assicurarsi che sia posizionato correttamente. Poi
inserire il serbatoio dell'acqua nella macchina (vedi illustrazione).
Nota
• Metodi di preparazione diversi richiedono accessori diversi.
• Dopo la cottura, rimuovere l'inserto per la cottura a vapore, la teglia, la griglia
o la tortiera dal dispositivo indossando guanti da forno o utilizzando delle
presine per evitare ustioni.
• Il dispositivo può essere messo in funzione solo quando lo sportello è ben
chiuso. Altrimenti lo schermo lampeggia.
Operazioni preliminari
1. Rimuovere tutto il materiale di imballaggio e posizionare l'unità su una
super cie stabile.
2. Pulire la teglia, l'inserto per la cottura a vapore, la griglia, la tortiera e gli altri
accessori con acqua, detersivo e una spugna non abrasiva.
3. Riempire il serbatoio dell'acqua con acqua (distillata o puri cata).
4. Stro nare l'interno e l'esterno dell'unità con un panno.
5. Non inserire cibo nel dispositivo al primo utilizzo. Impostare la funzione
"VAPORE" e lasciare che l'unità esegua un ciclo di cottura. Un leggero odore e
del fumo possono veri carsi durante questo passaggio. Questo è normale.

103
IT
UTILIZZO
Accensione
Quando il dispositivo viene acceso, emette un segnale acustico. Lo schermo
digitale e tutte le spie lampeggiano e poi si spengono. Solo l'indicatore di
funzionamento del tasto ON/OFF lampeggia lentamente. Questo indica che l'unità
è in modalità standby. Premendo il tasto ON/OFF, tutte le spie sul pannello di
controllo si accendono. Premere il pulsante MENU per entrare nel menu delle
funzioni.
Selezionare la funzione
La funzione preimpostata è la modalità "Vapore ad alta temperatura". Premere il
pulsante MENU e selezionare la funzione desiderata con la manopola. Le funzioni
vengono visualizzate sullo schermo in successione man mano che si gira.
Impostazione della temperatura
Premere il tasto TEMP. Girare la manopola per regolare la temperatura. Nella
impostazioni di funzionamento, oltre al menu automatico, è possibile selezionare
la temperatura premendo il pulsante TEMP. Dopo la congurazione, il dispositivo si
avvia automaticamente o può essere avviato premendo l'apposito pulsante.
Impostazione tempo
Premere il tasto TIME. Girare la manopola per impostare il tempo. Nella
impostazioni di funzionamento, oltre al menu automatico, è possibile impostare
il tempo premendo il pulsante TIME. Dopo la congurazione, il dispositivo si avvia
automaticamente o può essere avviato premendo l'apposito pulsante.
Funzione di scongelamento
Premendo il tasto ON/OFF dopo l'accensione, tutte le spie sul pannello di controllo
si accendono. Quindi premere il pulsante MENU per accedere all'interfaccia di
selezione delle funzioni. Girando la manopola in modalità scongelamento, il
simbolo dello scongelamento lampeggia e gli altri simboli si accendono. Premere il
pulsante TEMP e sarà emesso un segnale acustico. Il simbolo dello scongelamento
si accende e gli altri simboli sono spenti. Girare la manopola per selezionare
la temperatura desiderata per lo scongelamento. Premere il pulsante TIME e
sarà emesso un segnale acustico. Girare la manopola per impostare il tempo
desiderato per lo scongelamento. Poi premere la manopola di controllo per
mettere in funzione il dispositivo. La temperatura impostata e il tempo rimanente
vengono visualizzati sullo schermo. Questa funzione può essere usata per
scongelare alimenti congelati, ecc.
Funzione di sterilizzazione
Premere il tasto ON/OFF dopo l'accensione dell'unità, tutte le spie sul pannello
di controllo si accendono. Poi premere il tasto MENU per accedere alla selezione
delle funzioni. Selezionare con la manopola la modalità di sterilizzazione. Il
simbolo della sterilizzazione lampeggia, gli altri simboli si accendono. Premere il
pulsante TIME e sarà emesso un segnale acustico. Il simbolo della sterilizzazione si
accende, gli altri simboli si spengono. Girare la manopola per selezionare il tempo

104
IT
desiderato per la sterilizzazione. Premere poi la manopola di controllo per mettere
in funzione il dispositivo. La temperatura impostata e il tempo rimanente vengono
visualizzati sullo schermo.
Livello dell'acqua nel serbatoio basso
Se nel serbatoio non c'è suciente acqua, il simbolo
lampeggia. "Time"
lampeggia. Il funzionamento viene interrotto e viene emesso il segnale acustico.
Premere il pulsante Start per proseguire la cottura automaticamente dopo aver
aggiunto l'acqua. Inserire il serbatoio dell'acqua mentre il dispositivo è in funzione,
per continuare direttamente la cottura. L'allarme per il basso livello dell'acqua
nel serbatoio si attiva solo quando si usa la funzione vapore. Dopo aver aggiunto
l'acqua, il pulsante Start deve essere premuto per continuare la preparazione.
Menù funzioni
Dopo l'accensione, premere il pulsante ON/OFF. Tutte le luci del pannello di
controllo si accendono. Premere successivamente il pulsante MENU per accedere
al menu delle funzioni. Ruotare la manopola di controllo per selezionare le
diverse voci del menu. Dopo aver selezionato il menu desiderato, impostare la
temperatura e l'ora e premere il quadrante di controllo per avviare la cottura.
Premere nuovamente la manopola di controllo per annullare la funzione
selezionata. Ruotare nuovamente la manopola di controllo per selezionare un'altra
funzione.
Decalcicazione
La funzione vapore può essere usata per 80 ore accumulate e poi passa
all'interfaccia di uscita. Il simbolo "DESCSAL" si accende, gli altri simboli sono
spenti. Questo avverte l'utente di eettuare la pulizia dell'unità. Aggiungere l'acido
citrico al serbatoio dell'acqua e versare più di 600 ml di acqua puricata. Chiudere
lo sportello e premere direttamente il quadrante di controllo. La funzione di
decalcicazione viene avviata. La funzione di decalcicazione è divisa in tre fasi:
decalcicazione (30 minuti), pulizia generale (10 minuti) e pulizia secondaria (10
minuti). Dopo aver eseguito la decalcicazione per 30 minuti, verrà emesso un
segnale acustico. A questo punto, svuotare il serbatoio dell'acqua sporca e quello
dell'acqua pulita e riempire il serbatoio con acqua fresca e pulita. Dopo aver
inserito il serbatoio dell'acqua nell'alloggiamento, chiudere lo sportello per avviare
la pulizia principale. Dopo 10 minuti, il segnale acustico risuona di nuovo. A questo
punto, svuotare il serbatoio dell'acqua sporca e quello dell'acqua pulita e riempire
il serbatoio con acqua fresca e pulita. Dopo aver inserito il serbatoio dell'acqua
nell'alloggiamento, chiudere lo sportello per avviare la pulizia secondaria. Dopo
questa procedura, la decalcicazione è completa.
Se non si desidera pulire l'apparecchio in questo momento, è possibile ruotare
la manopola o premere altri pulsanti - ad eccezione del pulsante di avvio - per
entrare nella modalità di funzionamento normale. Tuttavia, alla successiva
accensione dell'unità, verrà ricordato di nuovo di pulire l'unità. Il segnale
acustico suona nché non si seleziona questa modalità o si passa alla modalità di
funzionamento normale.

105
IT
Nota:
Dopo la decalcicazione, è necessario scollegare la spina di alimentazione. È
possibile utilizzare nuovamente il dispositivo solo quando si è rareddato; il tempo
di decalcicazione è di 50 minuti.
Cambiare modalità
Tenere premuto la manopola di controllo (3 secondi) per annullare l'operazione,
poi girare la manopola per cambiare la modalità.
Funzione lampada
Dopo l'accensione, premere il pulsante ON/OFF. Tutte le luci del pannello di
controllo si accendono. Premere il pulsante lampada
per accendere la
lampada. La lampada può essere accesa o spenta in qualsiasi momento in
qualsiasi modalità di funzionamento.
Funzione di mantenimento del calore
Dopo l'accensione, premere il pulsante ON/OFF. Tutte le luci del pannello di
controllo si accendono. Poi premere il pulsante
per avviare la funzione
di mantenimento del calore. Premere il pulsante TEMP. Il segnale acustico
suona. Il simbolo "K-WARM" si accende, gli altri simboli sono spenti. Girare la
manopola di controllo per selezionare la temperatura desiderata per la funzione
di mantenimento del calore. Premere il tasto TIME. Il segnale acustico suona.
Girare la manopola di controllo per impostare il tempo desiderato per la funzione
di mantenimento della temperatura. Premere poi la manopola di controllo per
mettere in funzione il dispositivo. La temperatura impostata e il tempo rimanente
vengono visualizzati sullo schermo.
Note
• Le impostazioni descritte rappresentano hanno carattere indicativo. Poiché
l'origine, la forma, la dimensione e la varietà degli ingredienti variano,
non possiamo garantire la migliore impostazione per i vostri ingredienti.
È possibile eettuare l'impostazione in base alla situazione specica.
All'aumentare della quantità di alimenti da cuocere, si prolunga anche il tempo
di cottura.
• Estraendo la pentola e girando il cibo durante la cottura di alcune pietanze, è
possibile cuocerle più uniformemente e con maggiore ecacia.
• Se gli ingredienti non sono ancora ben cotti, è possibile rimetterli
direttamente nella pentola e farli cuocere per il tempo opportuno.
• Gli ingredienti marinati devono penetrare all'interno della pietanza per
renderla più saporita e gustosa.
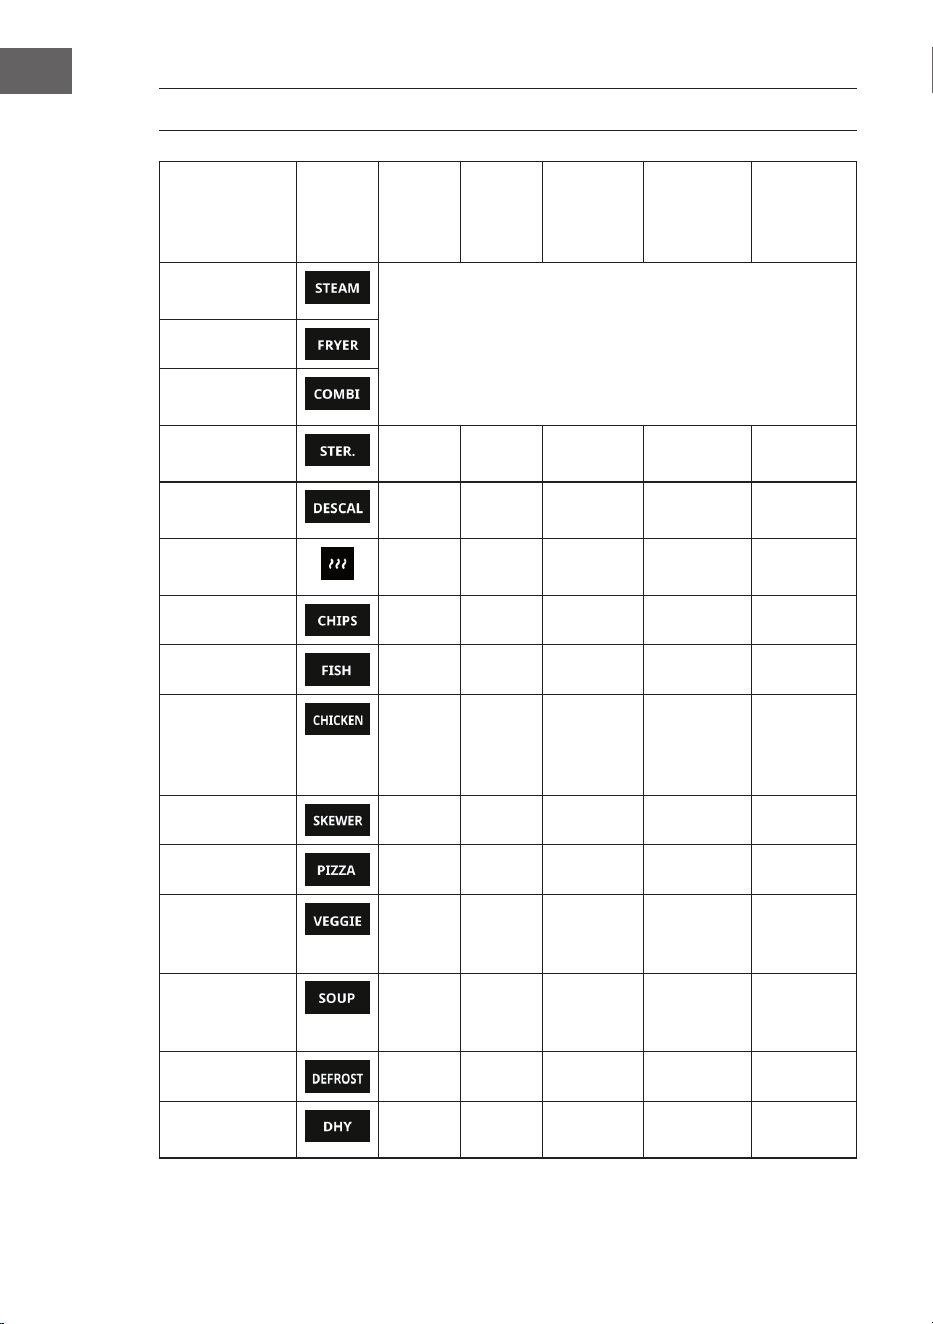
106
IT
CONFIGURAZIONE PREDEFINITA E IMPOSTAZIONI
Menu Simbolo Moda-
lità di
prepa-
razione
Temp. Intervallo
di tempe-
ratura
Tempo Intervallo
di tempo
Cottura al
vapore
Modalità sottomenu
Frittura
Cottura a vapo-
re & frittura
Sterilizzare / 110 °C Non rego-
labile
0:30 min 10 min - 2 h
Decalcicazione
/ / Non rego-
labile
0:50 min Non rego-
labile
Mantenimento
calore
/ 65 ℃ 50-80 ℃ 0:20 min 1 min - 3 h
Patatine fritte
Frittura 220 ℃ 200-230 ℃ 0:25 min 15-35 min
Pesce
Frittura 190 ℃ 170-200 ℃ 0:40 min 1-50 min
Pollo
Cottura
a vapore
& frit-
tura
220 ℃ 210-230 ℃ 0:45 min 1 min - 1 h
Spiedo
Frittura 200 ℃ 180-220 ℃ 0:15 min 15-35 min
Pizza
Frittura 180 ℃ 170-190 ℃ 0:20 min 1-30 min
Vegetariano
Cottu-
ra al
vapore
100 ℃ 95-130 ℃ 0:10 min 1-20 min
Zuppa
Frittura 200 ℃ +
110 ℃ +
150 ℃
Non rego-
labile
0:30 + 170 +
0:10 min
Non rego-
labile
Scongelamento
Frittura 45 ℃ 35-70 ℃ 1:00 h 1 min - 8 h
Essiccare
Frittura 70 ℃ 70 ℃ -
95 ℃
8:00 h 1 min - 8 h
107
IT
Sottomenu
Modalità di solo vapore
Codice
del
menu
Menu Tempo
HH:MM
Temp.
(°C)
Intervallo
tempo
(min)
Intervallo
temp. (°C)
01 Crespella fritta 00:15 100 1-20 90-110
02 Castagne arrostite 00:15 100 1-20 90-110
03 Torta marmorizzata 00:15 110 1-20 110-120
04 Bagel 00:18 100 1-25 90-110
05 Macaron 00:20 110 1-30 110-130
06 Patatine fritte 00:28 110 1-35 110-130
07 Toast croccante 00:40 100 1-50 90-120
08 Panini croccanti al
forno
00:13 90 1-35 90-110
09 FAI DA TE 01:00 130 1-60 90-130
Modalità di sola frittura
Codice
del
menu
Menu Tempo
HH:MM
Temp.
(°C)
Intervallo
tempo
(min)
Intervallo
di temp.
(°C)
01 Alette di pollo 00:20 180 1-35 170-200
02 Anatra intera 01:00 200 1 min - 2 h 180-220
03 Roast Beef 0:20 190 1-35 180-220
04 Patate dolci arrosto 00:40 230 1-50 200-230
05 Mais al forno 00:25 200 1-30 180-220
06 Biscotti 00:30 150 1-50 140-190
07 Crespella fritta 00:20 200 1-35 180-220
08 Castagne arrostite 00:30 180 1-50 180-220
108
IT
09 Torta marmorizzata
0:20 + 0:10
130
+ 160
15-25
+ 7-13
100-140
+ 140-180
10 Bagel 00:20 190 1-30 180-220
11 Macaron 00:15 150 1-30 140-190
12 Patatine fritte 00:18 200 1-30 180-220
13 Toast croccante 00:10 200 1-20 180-220
14 Panini croccanti al
forno
00:07 180 1-20 170-200
15 FAI DA TE 01:00 230 1-60 35-230
Modalità combinata cottura a vapore + frittura
Codice
menu
Menu Tempo HH:MM Temp. (°C) Intervallo tempo
(min)
Intervallo
temp.
(°C)
01 Bistecca 0:15 190 1-20 180-220
02 Pesce Cottura vapore 0:10
+ Frittura 0:20
Cottura vapore 100
+ Frittura 180
Cottura vapore 5-13
+ Frittura 15-30
100-120
+ 170-200
03 Pollo 00:50 Cottura vapore 190
+ Frittura
30 min - 1 h 180-220
04 Maiale in
cottura
tenera
Cottura vapore 0:20
+ Frittura 0:15
Cottura vapore 110
+ Frittura 200
Cottura vapore 10-30
+ Frittura 5-20
100-120
+ 170-220
05 Riscaldare
pane
(frigorifero)
Cottura al vapore 0:08
+ Cottura vapore
+ Frittura 0:07
Cottura al vapore 80
+ Cottura vapore
+ Frittura 180
Cottura vapore 5-10
+ Cottura vapore
+ Frittura 5-10
80-100
+ 170-200
06 Riscaldare
pane
(temp.
ambiente)
Cottura vapore 0:06
+ Cottura vapore
+ Frittura 0:07
Cottura vapore 80
+ Cottura vapore
+ Frittura 180
Cottura vapore 5-10
+ Cottura vapore
+ Frittura 5-10
80-100
+ 170-200
07 FAI DA TE 01:00 200 1-60 50-220
Nota: durante la cottura a vapore e la frittura, la voce del menu principale selezionata (per esempio
"Modalità solo frittura") lampeggia. Premere la manopola per accedere alla modalità sottomenu. Il
numero corrispondente viene visualizzato sullo schermo quando si gira la manopola. Per esempio, la
modalità Cottura a vapore 01 corrisponde a "crespella fritta". Premere la manopola per confermare
il menu desiderato. La temperatura e il tempo possono essere regolati girando la manopola.
Premere poi la manopola per confermare. Il timer avvia il conto alla rovescia e il menu principale
corrispondente e il numero selezionato si illuminano. Se si desidera visualizzare la temperatura
impostata, premere il pulsante della temperatura. Il display passa alla temperatura impostata. Dopo
30 secondi, il codice del menu viene visualizzato nuovamente sullo schermo.

109
IT
PULIZIA E MANUTENZIONE
• Non usare detergenti aggressivi, benzina, polvere abrasiva o una spazzola
metallica per la pulizia.
• Dopo aver usato l'unità per un lungo periodo di tempo, l'interno dell'unità
potrebbe avere un odore indesiderato. In tal caso, procedere come segue:
disporre 5 - 6 fette di limone all'interno del dispositivo e impostare la funzione
"Cottura a vapore a bassa temperatura". Lasciare funzionare il dispositivo a
100 °C per 15 - 20 minuti. Questo rimuove ogni odore.
• Prima della pulizia, spegnere il dispositivo e staccare la spina.
• Mantenere sempre pulito l'interno dell'apparecchio. Se ci sono residui
alimentari o schizzi sulla parete interna, questi possono essere rimossi con
un panno umido. Non pulire mai l'interno dell'apparecchio con materiali duri.
Se l'interno dell'apparecchio è sporco, pulirlo con un panno morbido e un
detergente delicato. Non usare mai detergenti aggressivi o materiali abrasivi.
• Riempire il serbatoio dell'acqua solo con acqua distillata o puricata, poiché
l'acqua del rubinetto può provocare depositi di calcare.
• Controllare il serbatoio dell'acqua almeno una volta al mese. Il serbatoio
dell'acqua può essere rimosso per la pulizia e poi reinserito.
• Pulire la vaschetta di sgocciolamento, il serbatoio dell'acqua e il contenitore
dell'acqua dopo ogni utilizzo.
• Pulire regolarmente la guarnizione dello sportello con un panno morbido e
asciutto.
• Se il pannello di controllo e la manopola rotante dovessero essere bagnati,
asciugarli con un panno morbido e asciutto e non usare alcun detergente
aggressivo. Prima della pulizia, spegnere il dispositivo e staccare la spina, per
evitare un'accensione accidentale.
• Scollegare il dispositivo dalla rete elettrica e procedere a una pulizia completa,
se non lo si utilizza per un periodo di tempo prolungato. Conservare il
dispositivo in un luogo asciutto e sucientemente ventilato.
• Non pulire mai lo sportello di vetro del dispositivo con detergenti aggressivi o
con spazzole metalliche, poiché ciò potrebbe danneggiare e rompere il vetro.
• Pulire gli accessori solo con un detergente delicato e un panno morbido.
Altrimenti, gli accessori potrebbero essere graati e il loro rivestimento
protettivo danneggiato.
• Osservare le norme ambientali locali per lo smaltimento del dispositivo.
• In caso di malfunzionamento, il dispositivo deve essere sostituito dal
produttore, dal servizio clienti o da persona analogamente qualicata.
Altrimenti possono vericarsi lesioni personali e/o danni alle cose.
110
IT
RICERCA E CORREZIONE DEGLI ERRORI
Problema Possibile causa Soluzione
Il dispositivo non funzio-
na, ma emette un segna-
le acustico all'accensione
e lo schermo si attiva
al momento dell'inseri-
mento della spina.
Uso non corretto. Leggere attentamente tutto il manuale
d'uso.
Componenti danneggiati In tal caso, contattare il servizio clienti.
Il dispositivo non
funziona, non emette
alcun segnale acustico
all'accensione e lo scher-
mo non visualizza nulla
al momento dell'inseri-
mento della spina.
La spina non è inserita. Inserire la spina nella presa elettrica.
La presa è difettosa. Sostituire la presa.
Componenti danneggiati In tal caso, contattare il servizio clienti.
La lampada non si
accende.
La lampada è danneggiata. In tal caso, contattare il servizio clienti.
Al primo utilizzo l’appa-
recchio emette del fumo.
Al primo utilizzo l'olio residuo del
processo di fabbricazione si riscalda
e si brucia nell'apparecchio produ-
cendo del fumo.
Questo è normale e non è motivo di
preoccupazione.
Odore inconsueto
L'odore appare dopo un lungo
periodo di utilizzo.
Collocare 5 - 6 fette di limone nel dispo-
sitivo e lasciarlo funzionare per 15 - 20
minuti a 100 °C con la funzione "Vapore a
bassa temperatura".
Gli accessori all'interno del dispositi-
vo sono sporchi.
Pulire e asciugare gli accessori.
Ci sono residui alimentari all'interno
del dispositivo.
Rimuovere i residui alimentari prima di
usarlo nuovamente.
Il cavo di alimentazione è danneg-
giato.
Contattare il servizio clienti e in futuro
tenere il cavo di alimentazione lontano da
superci calde.
Gli alimenti non sono
ben cotti.
La funzione selezionata non
soddisfa i requisiti di preparazione
dell'alimento utilizzato.
Impostare tempo e temperatura secondo
la ricetta e la propria esperienza perso-
nale.

111
IT
Messaggio di errore
Codice di
errore
Possibile causa Soluzione
E1
Surriscaldamento o corto
circuito NTC
Contattare il servizio di
assistenza clienti.
E4
Circuito NTC aperto Contattare il servizio di
assistenza clienti.
E2
Surriscaldamento o corto
circuito dell'evaporatore
1 NTC.
Contattare il servizio di
assistenza clienti.
E5
Circuito aperto
dell'evaporatore 1 NTC.
Contattare il servizio di
assistenza clienti.
E3
Surriscaldamento o corto
circuito dell'evaporatore
2 NTC.
Contattare il servizio di
assistenza clienti.
E6
Corto circuito
dell'evaporatore 2 NTC.
Contattare il servizio di
assistenza clienti.
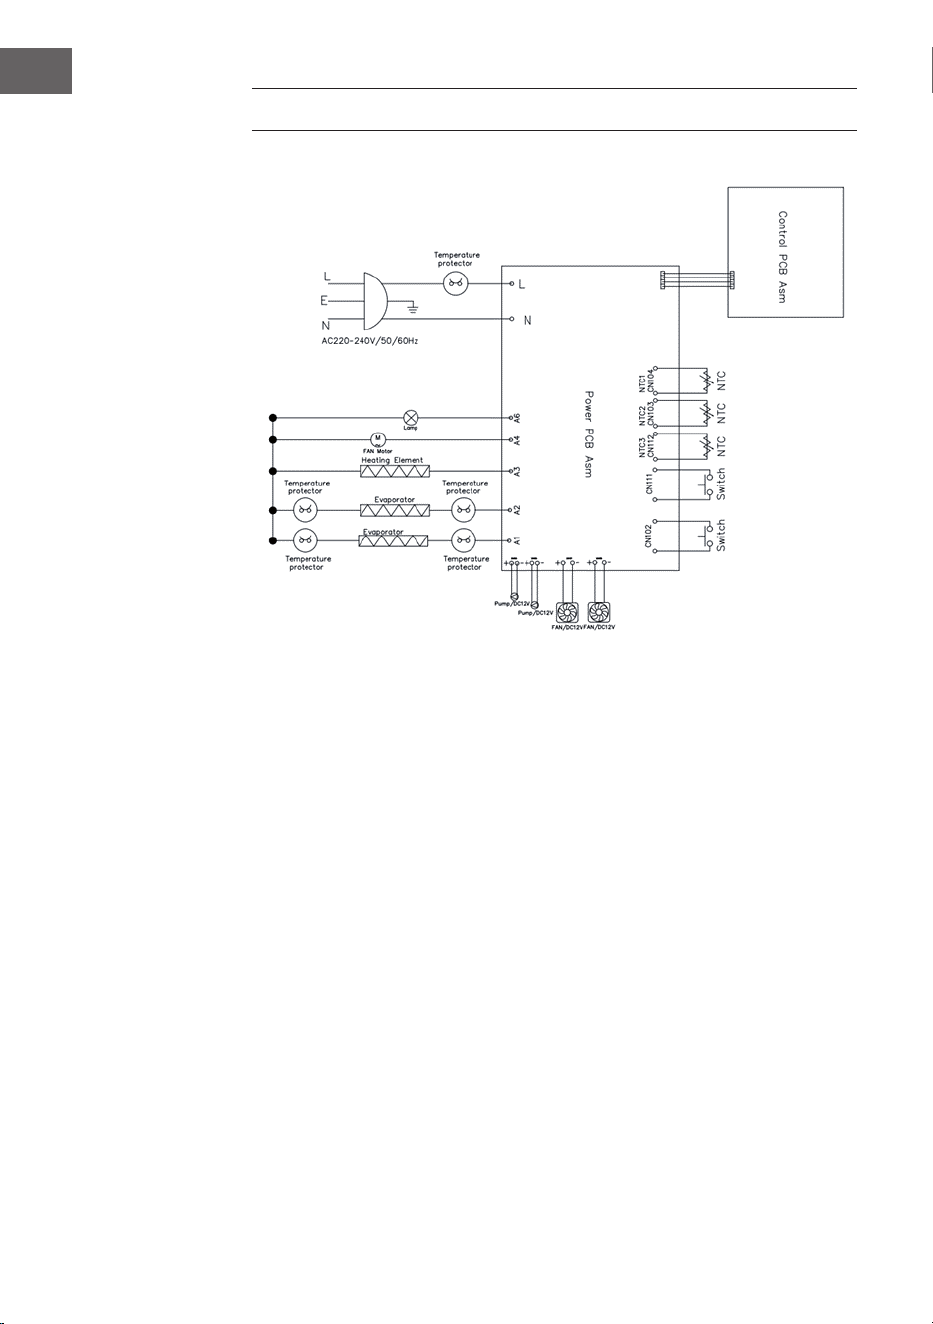
112
IT
SCHEMA ELETTRICO

113
IT
AVVISO DI SMALTIMENTO
Se nel proprio paese si applicano le regolamentazioni
inerenti lo smaltimento di dispositivi elettrici ed
elettronici, questo simbolo sul prodotto o sulla confezione
segnala che questi prodotti non possono essere
smaltiti con i riuti normali e devono essere portati a
un punto di raccolta di dispositivi elettrici ed elettronici.
Grazie al corretto smaltimento dei vecchi dispositivi si
tutela il pianeta e la salute delle persone da possibili
conseguenze negative. Informazioni riguardanti il riciclo
e lo smaltimento di questi prodotti si ottengono presso
l’amministrazione locale oppure il servizio di gestione dei
riuti domestici.
PRODUTTORE E IMPORTATORE (UK)
Produttore:
Chal-Tec GmbH, Wallstraße 16, 10179 Berlino, Germania.
Importatore per la Gran Bretagna:
Berlin Brands Group UK Ltd
PO Box 1145
Oxford, OX1 9UW
United Kingdom