
Technical Support and E-Warranty Certificate www. vevor. com/support
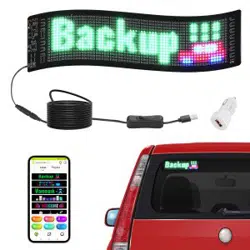
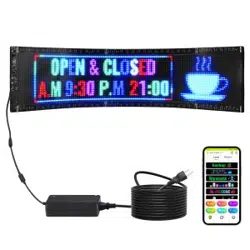
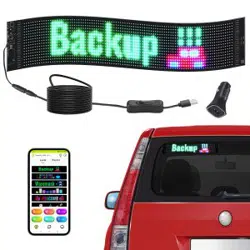
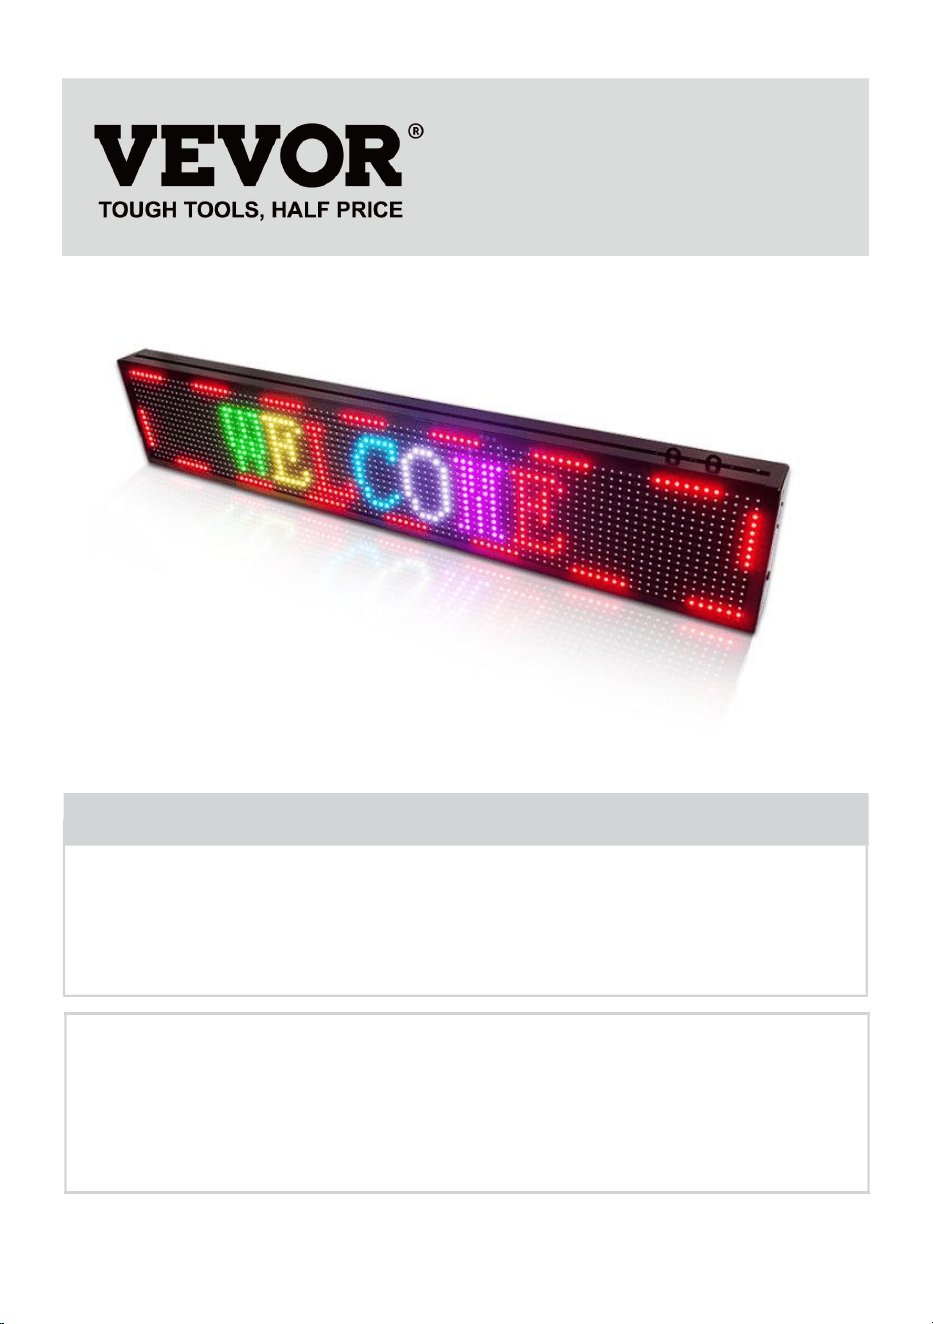
ROLLING SIGNAGE
We continue to be committed to provide you tools with competitive price.
"Save Half", "Half Price" or any other similar expressions used by us only represents an
estimate of savings you might benefit from buying certain tools with us compared to the major
top brands and does not necessarily mean to cover all categories of tools offered by us. You
are kindly reminded to verify carefully when you are placing an order with us if you are
actually saving half in comparison with the top major brands.


- 1 -
Have product questions? Need technical support? Please feel free to
contact us:
Technical Support and E-Warranty Certificate
www. vevor. com/support
NEED HELP? CONTACT US!
This is the original instruction, please read all manual instructions
carefully before operating. VEVOR reserves a clear interpretation of our
user manual. The appearance of the product shall be subject to the
product you received. Please forgive us that we won't inform you again
if there are any technology or software updates on our product.
ROLLING SIGNAGE
- 2 -
Warning-To reduce the risk of injury, user must read instructions
manual carefully.
Compliance is a EC security certification.
CORRECT DISPOSAL
This product is subject to the provision of European Directive
2012/19/EC. The symbol showing a wheelie bin crossed through
indicates that the product requires separate refuse collection in the
European Union. This applies to the product and all accessories
marked with this symbol. Products marked as such may not be
discarded with normal domestic waste, but must be taken to a
collection point for recycling electrical and electronic devices
IMPORTANT SAFEGUARDS
WARNING
READ THESE INSTRUCTIONS COMPLETELY AND CAREFULLY
WARNING: FAILURE TO FOLLOW THESE INSTRUCTIONS AND WARNINGS
MAY RESULT IN DEATH, SERIOUS INJURY OR
SIGNIFICANT PROPERTY DAMAGE. FOR YOUR PROTECTION, READ AND
FOLLOW THESE WARNINGS AND INSTRUCTIONS
CAREFULLY BEFORE INSTALLING OR MAINTAINING THIS EQUIPMENT.
THESE INSTRUCTIONS DO NOT ATTEMPT TO
COVER ALL INSTALLATION AND MAINTENANCE SITUATIONS. IF YOU DO
NOT UNDERSTAND THESE INSTRUCTIONS OR
ADDITIONAL INFORMATION IS REQUIRED, CONTACT THE
MANUFACTURER.
IMPORTANT SAFEGUARDS: WHEN USING ELECTRICAL EQUIPMENT,
BASIC SAFETY PRECAUTIONS SHOULD ALWAYS BE
FOLLOWED, INCLUDING THE FOLLOWING:
1. Do not use outdoors.
2. Equipment should be mounted in locations and at heights where it will not be
subject to tampering by unauthorized personnel.

- 3 -
3. Do not mount near gas or electric heaters. Keep combustible material away
from hot parts.
4. Cap unused wires with enclosed wire nuts or other approved methods. Do not
use this equipment for other than its intended use.The use of accessory
equipment not recommended by the manufacturer will void warranty and may
cause an unsafe condition.
5. Before wiring to power supply, turn off electricity at fuse or circuit breaker.
6. Use caution when servicing batteries.
7. Installation and servicing should be performed by qualified personnel. Consult
local building code for approved wiring and installation. Make sure wire
terminations are secure and leads are properly tucked in appropriate wire
channels.
WARNING:NEVER CONNECT TO, DISCONNECT FROM,OR SERVICE WHILE
EQUIPMENT IS ENERGIZED.
SAVE THESE INSTRUCTIONS
FCC INFORMATION
CAUTION:
Changes or modifications not expressly approved by the party responsible for
compliance could void the user's authority to operate the equipment!
This device complies with Part 15 of the FCC Rules. Operation is subject to the
following two conditions:
1) This product may cause harmful interference.
2)This product must accept any interference received, including interference that
may cause undesired operation.
WARNING:
Changes or modifications to this product not expressly approved by the
party.responsible for compliance could void the user's authority to operate the
product.
Note:
This product has been tested and found to comply with the limits for a Class B
digital device pursuant to Part 15 of the FCC Rules, These limits are designed to

- 4 -
provide reasonable protection against harmful interference in a residential
installation.
This product generates, uses and can radiate radio frequency energy, and if not
installed and used in accordance with the instructions, may cause harmful
interference to radio communications. However, there is no guarantee that
interference will not occur in a particular installation. If this product does cause
harmful interference to radio or television reception,which can be determined by
turning the product off and on, the user is encouraged to try to correct the
interference by one or more of the following measures.
· Reorient or relocate the receiving antenna.
· Increase the distance between the product and receiver.
· Connect the product to an outlet on a circuit different from that to which the
receiver is connected.
· Consult the dealer or an experienced radio/TV technician for assistance.
- 5 -
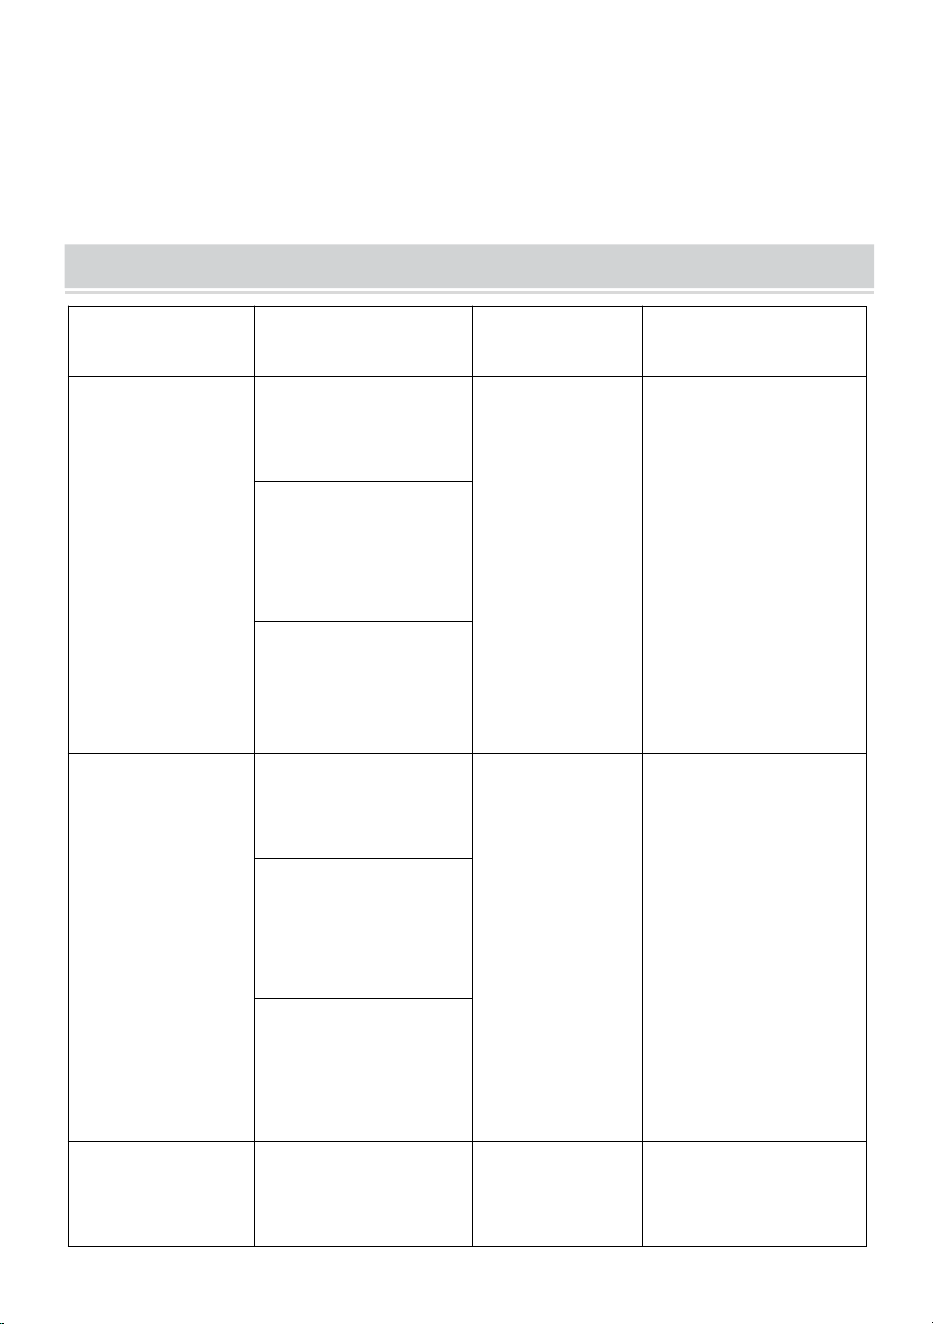
PRODUCT PARAMETERS
MODEL
Electrical
parameters
Pixel density
display resolution
P10-1696RGB
European Union:
AC220-240V 50Hz
EU PLUG
P10
(10mm
distance
between dots)
16 x 96 dots.
North America:
AC120V 60Hz
US PLUG
Australia:
AC220-240V 50Hz
AUS PLUG
P10-3296RGB
European Union:
AC220-240V 50Hz
EU PLUG
P10
(10mm
distance
between dots)
32 x 96 dots.
North America:
AC120V 60Hz
US PLUG
Australia:
AC220-240V 50Hz
AUS PLUG
P10-16128RGB
European Union:
AC220-240V 50Hz
EU PLUG
P10
(10mm
distance
between dots)
16 x 128 dots.
North America:
AC120V 60Hz
US PLUG
Australia:
AC220-240V 50Hz
AUS PLUG
- 6 -
P6-64160RGB
European Union:
AC220-240V 50Hz
EU PLUG
P6
(6mm
distance
between dots)
64 x 160 dots.
North America:
AC120V 60Hz
US PLUG
Australia:
AC220-240V 50Hz
AUS PLUG
P5-64128RGB
European Union:
AC220-240V 50Hz
EU PLUG
P5
(5mm
distance
between dots)
64 x 128 dots.
North America:
AC120V 60Hz
US PLUG
Australia:
AC220-240V 50Hz
AUS PLUG
Attachment: All models deliver a U disk with installation software(
Suitable for windows ),note that the software is not suitable for Apple
computers
Software: Android mobile phone system, Apple mobile phone system.
THE FOLLOWING ARE THE OPERATION STEPS
The following are the operation steps:
The computer operation steps:
Step 1: insert the USB flash disk into the computer, open the USB flash
disk, move the compressed file to the computer desktop for decompression
(note that the software is not suitable for Apple computers)
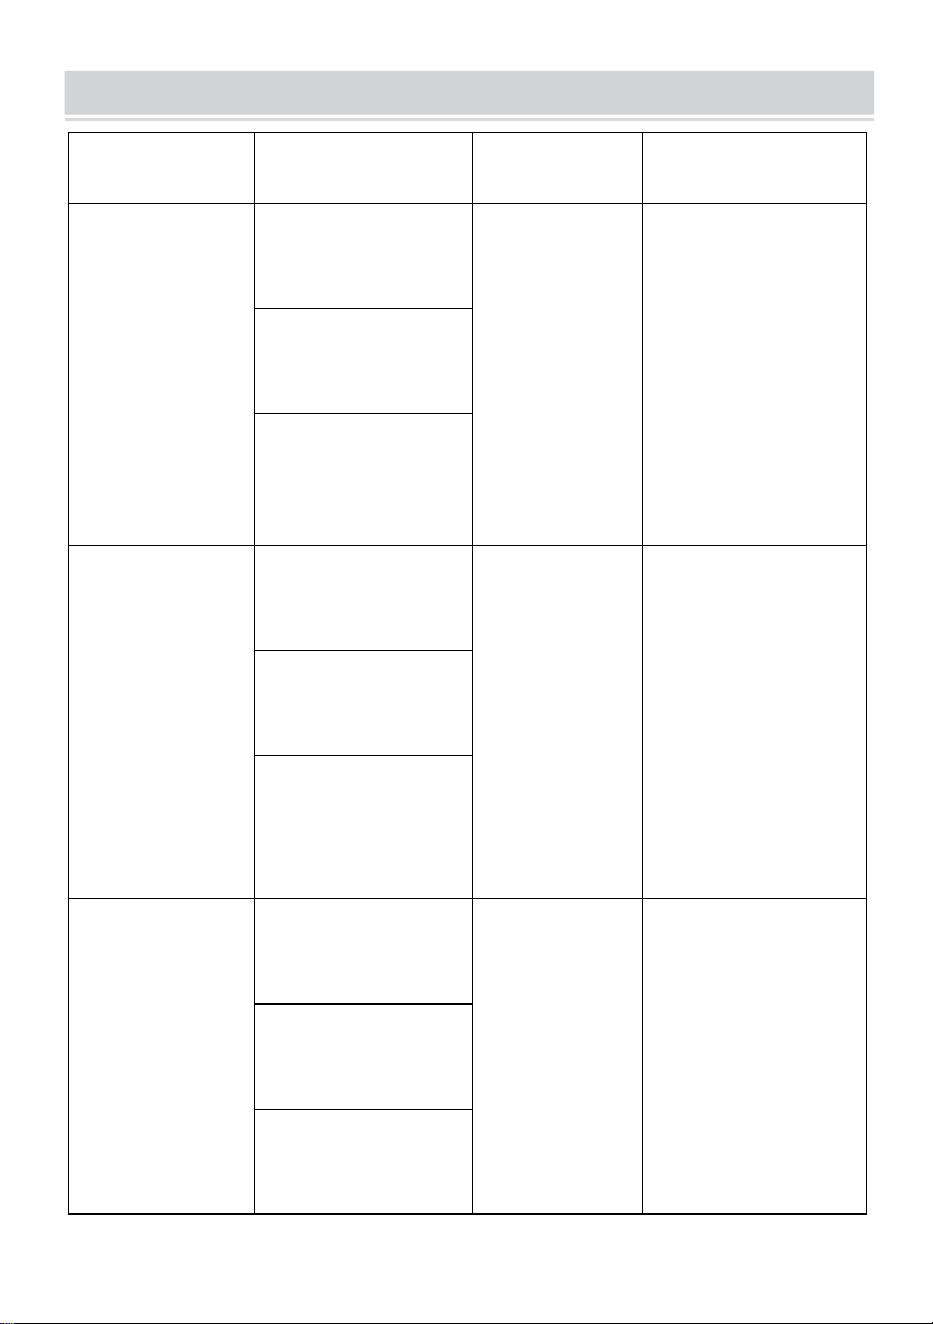
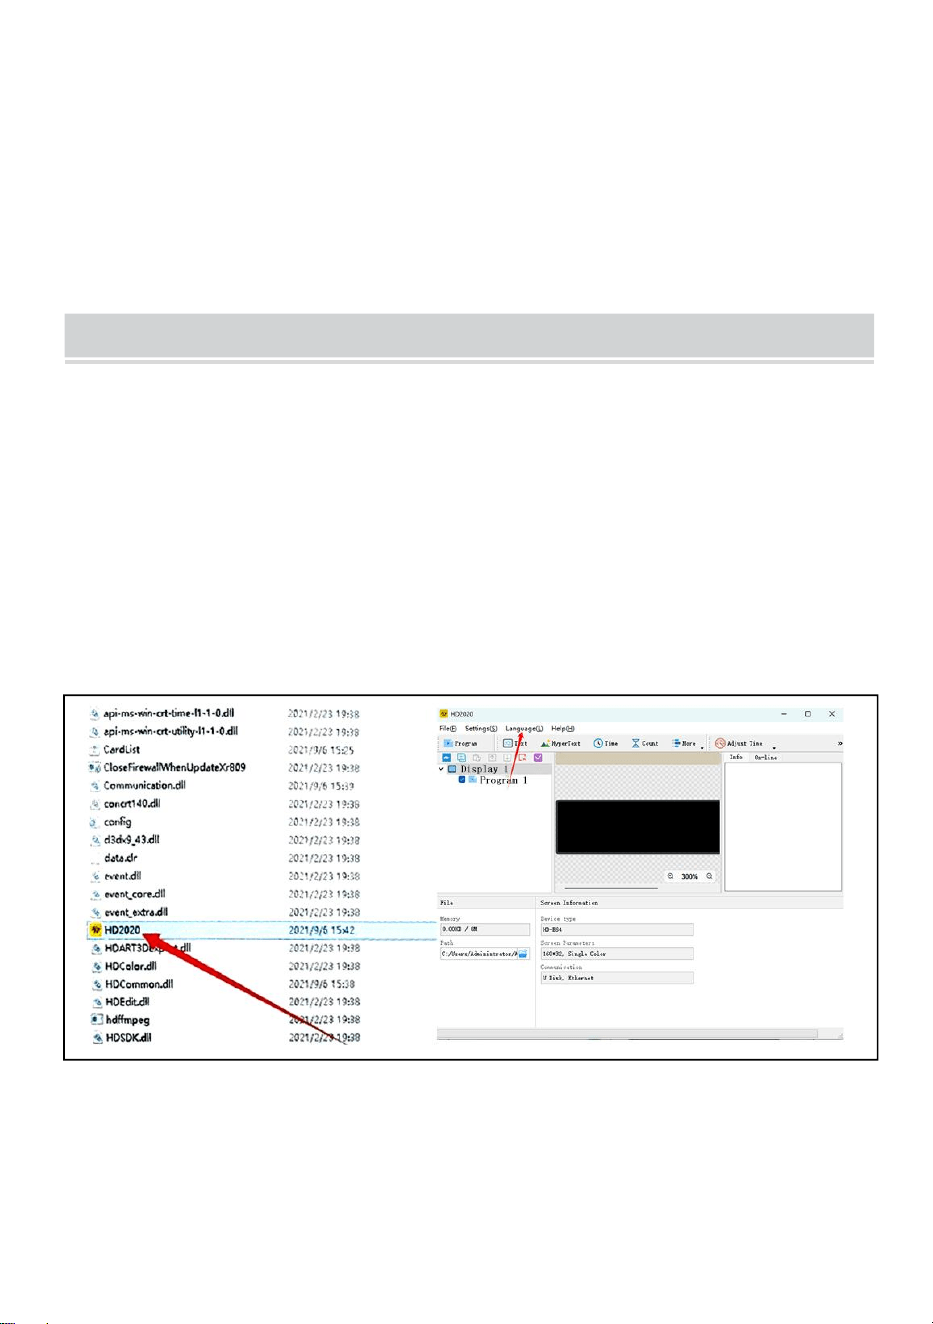
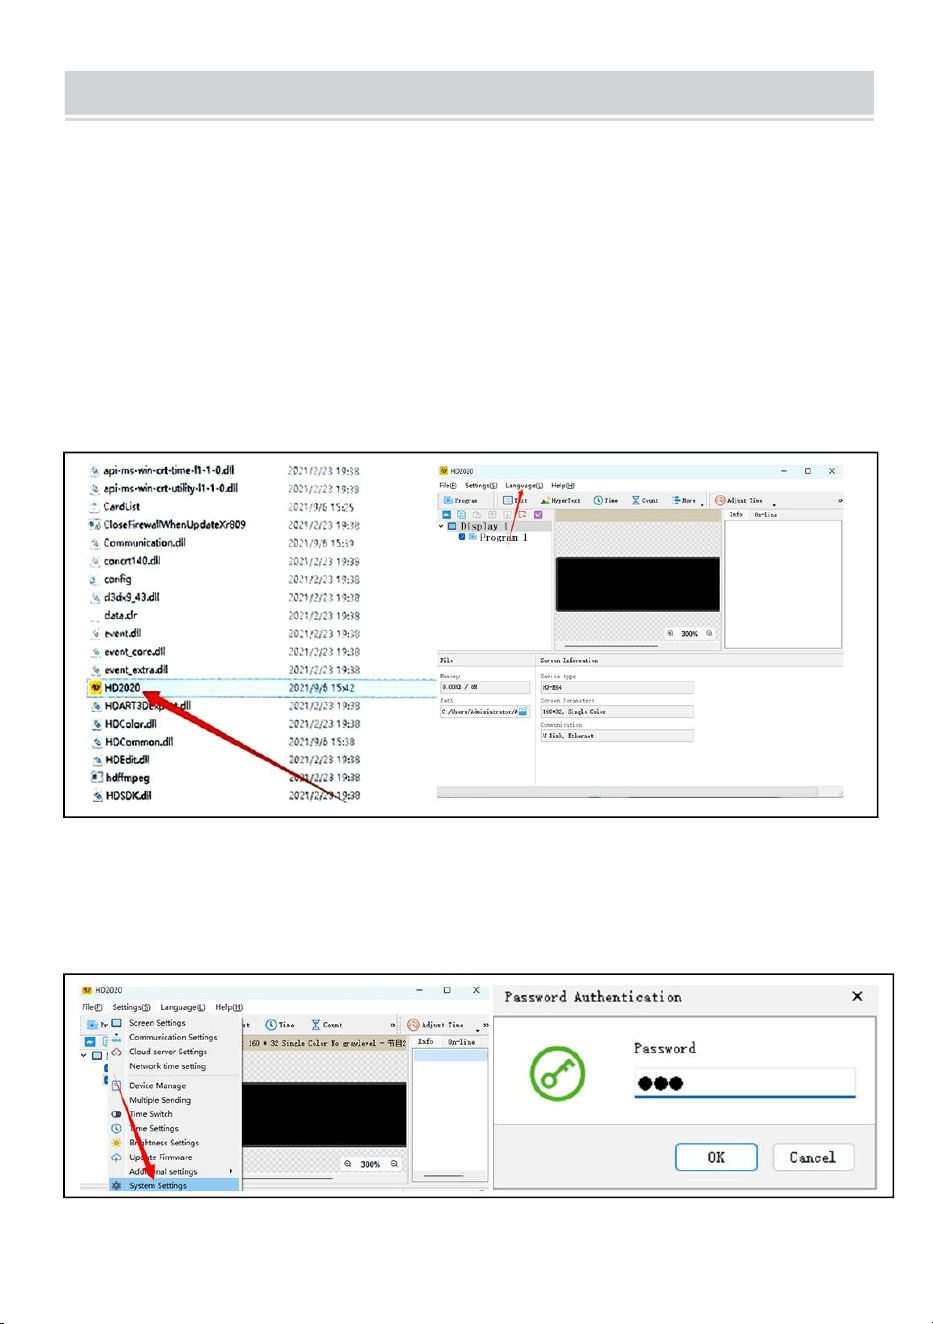
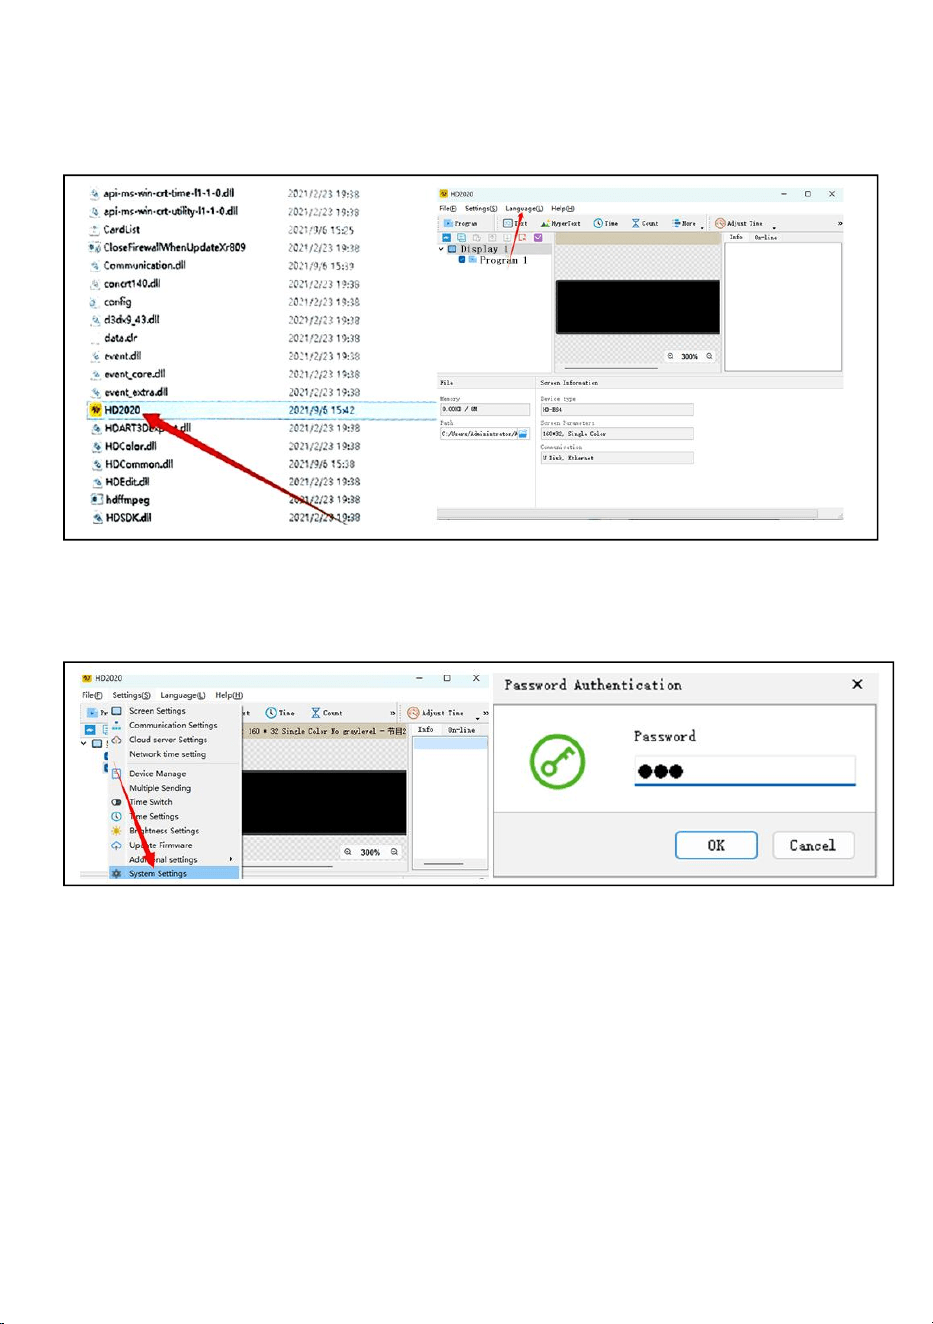
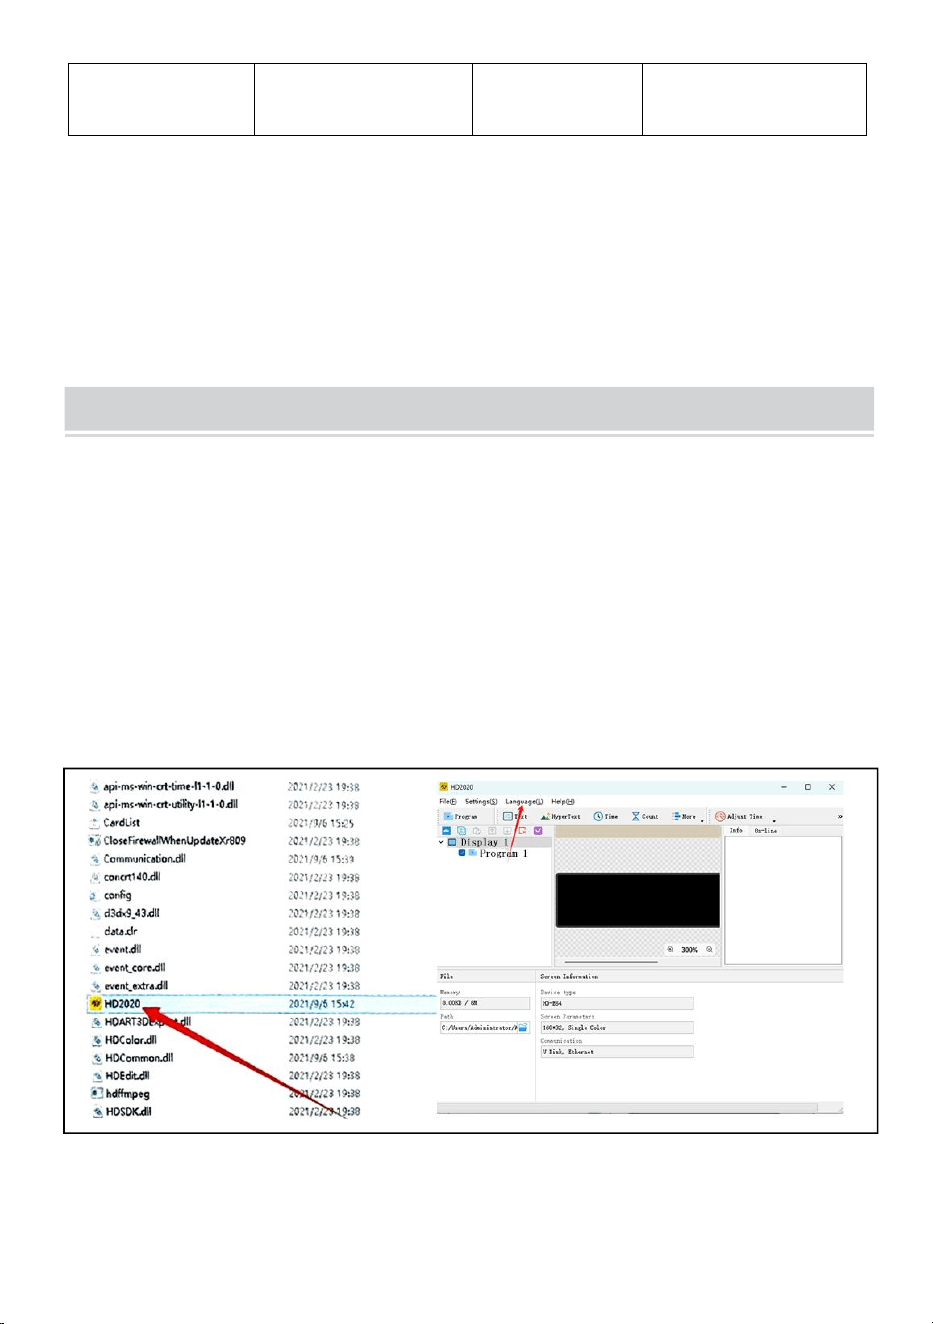
Step 2: open the unzipped folder, find hd2020, and double-click to open it
Step 3: Click language to select a language type
- 7 -
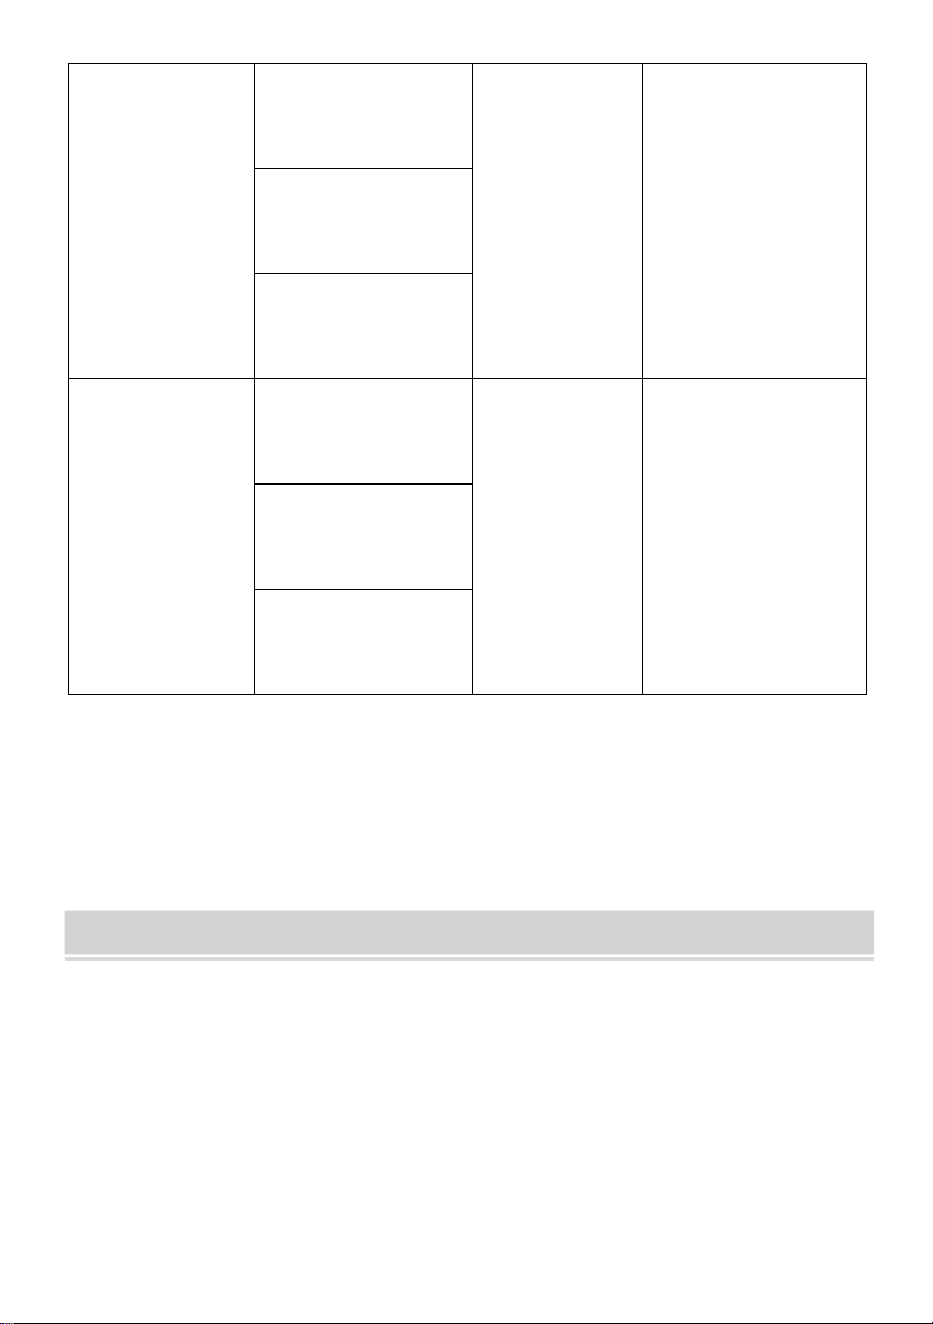
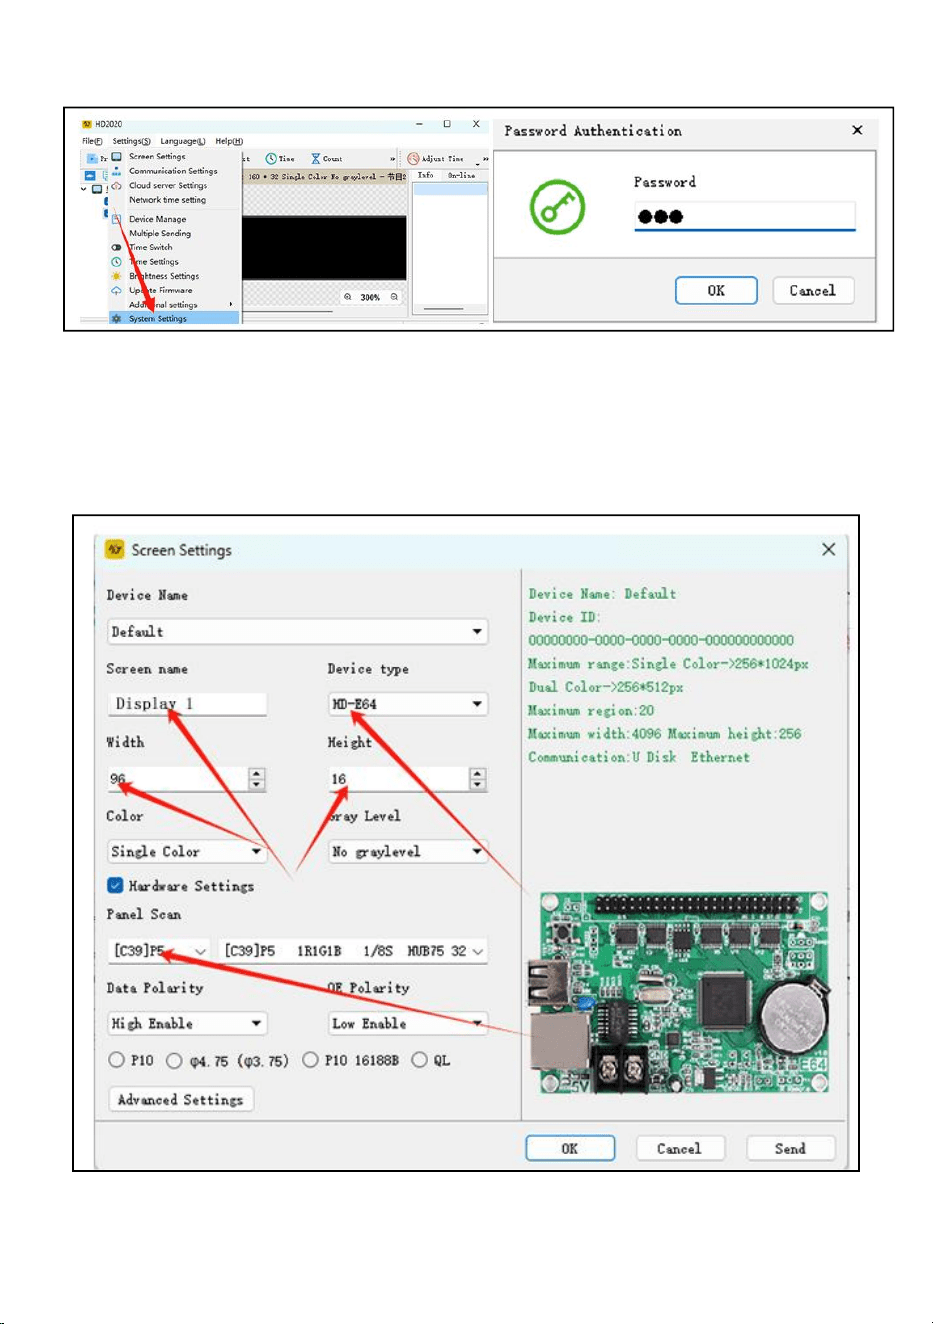
Step 4: Click Settings, select System Settings, enter password
The password is 168
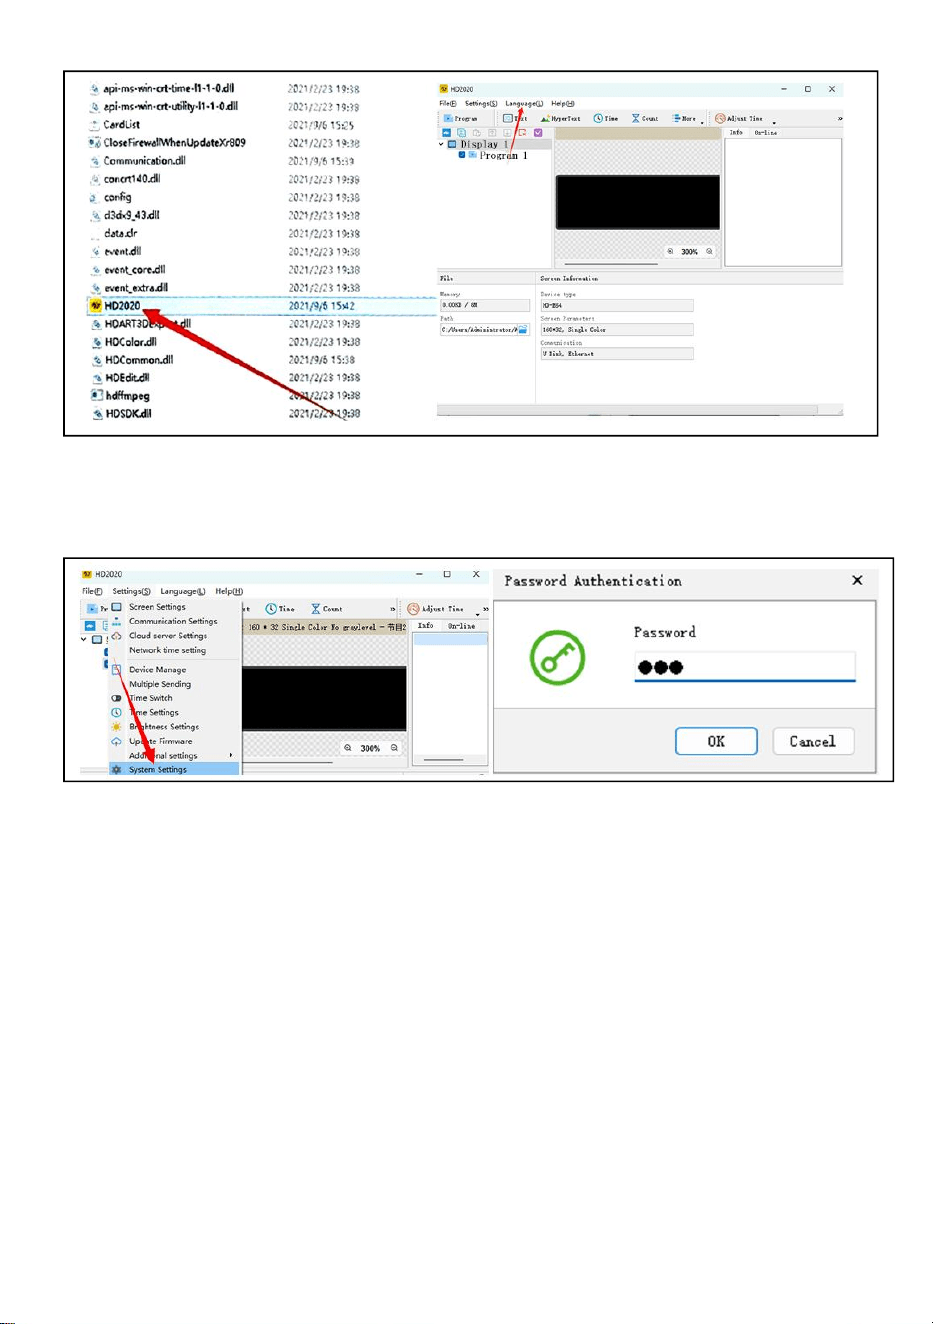
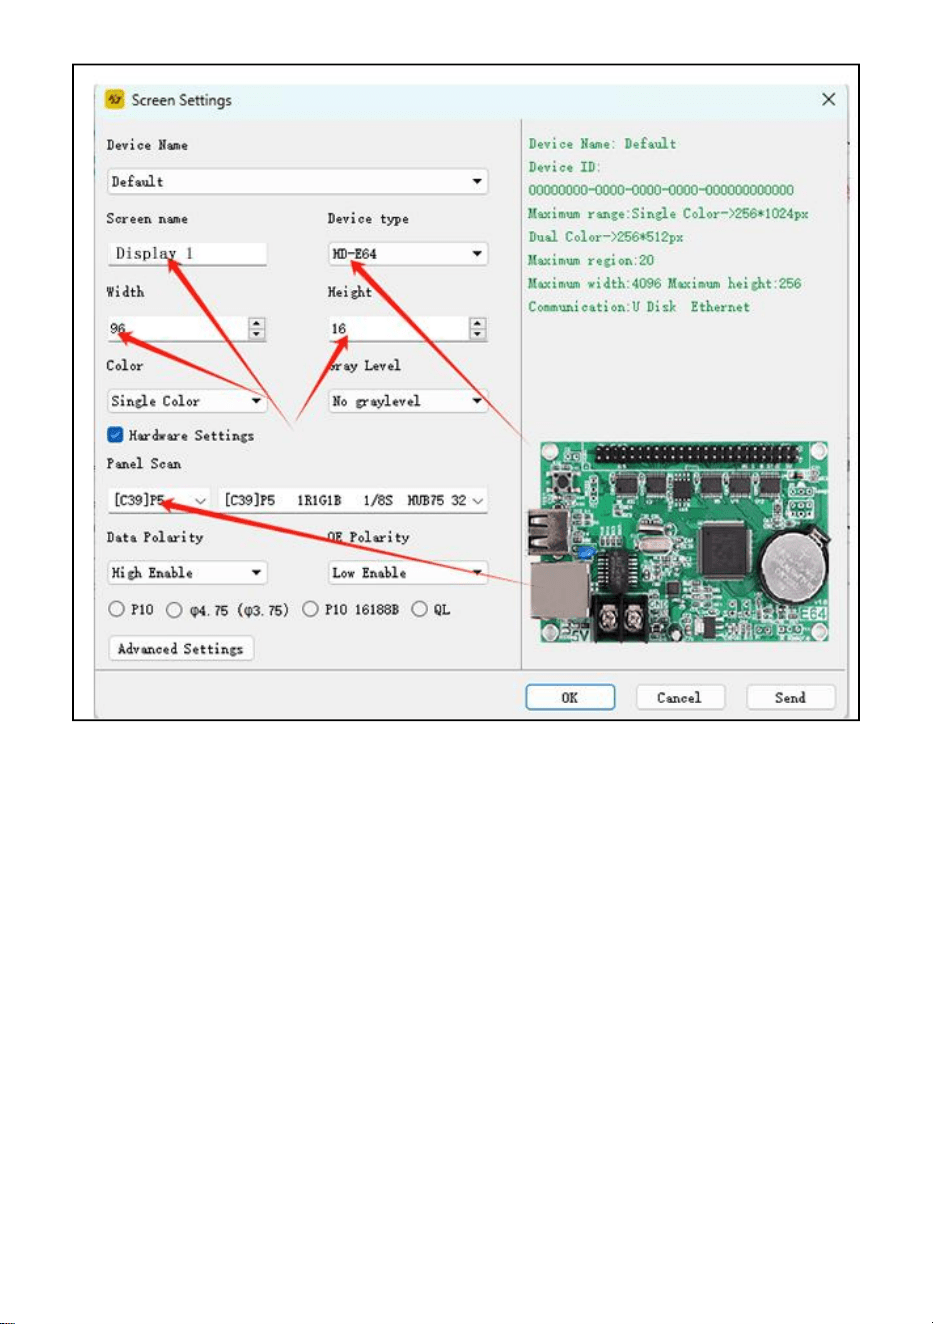
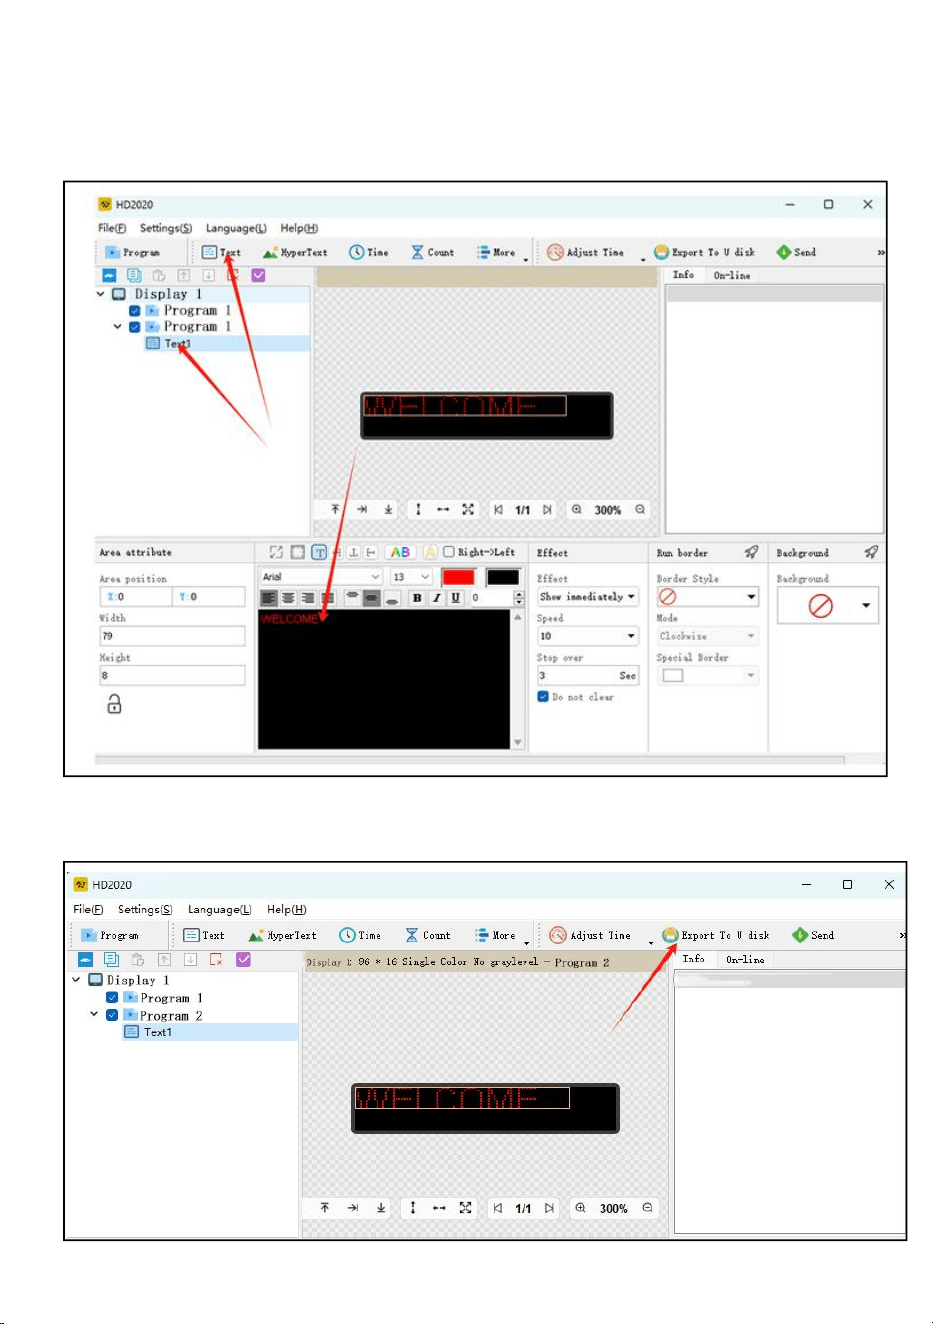
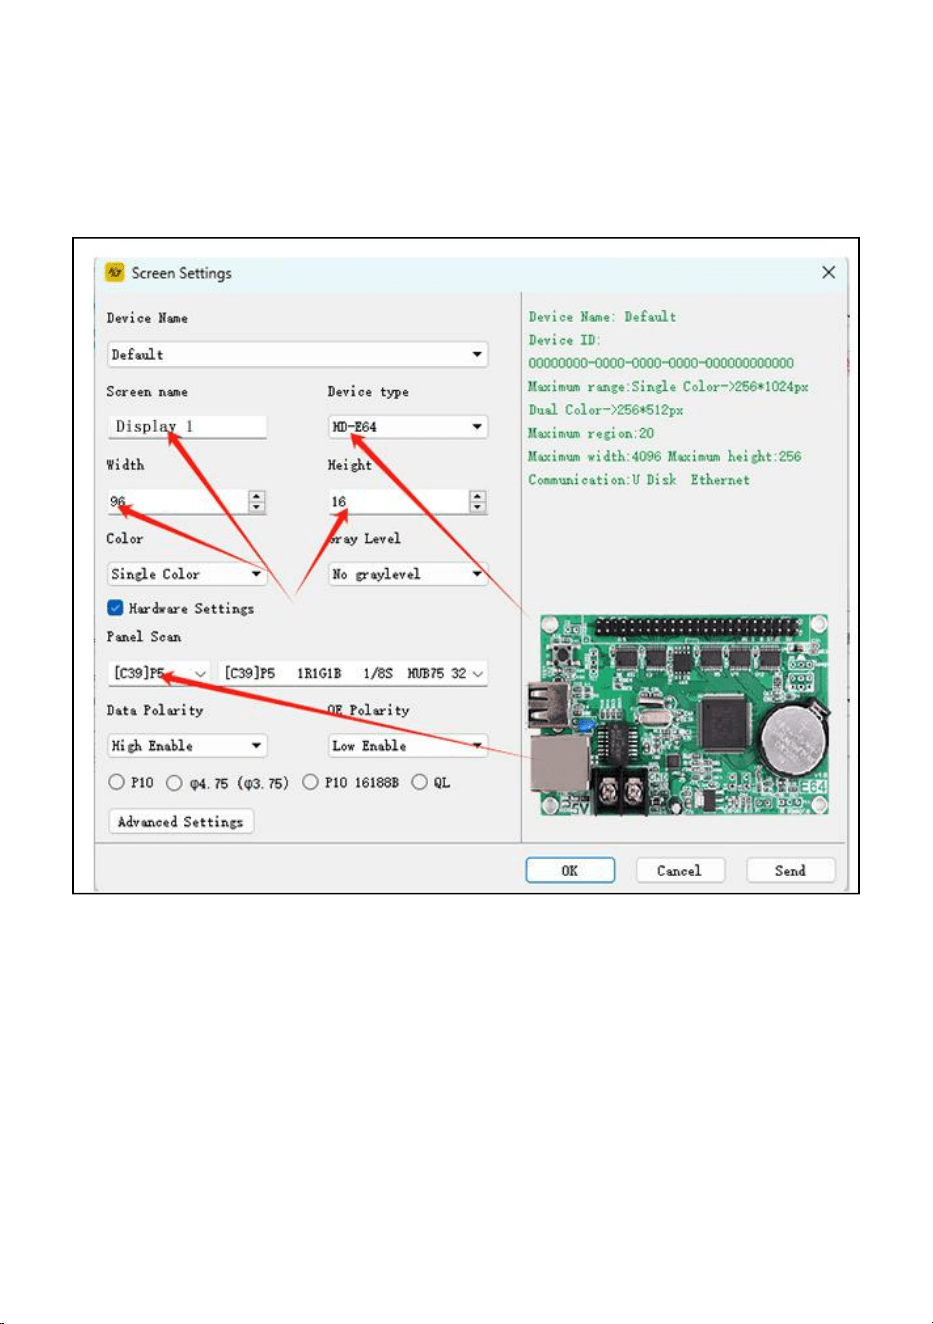
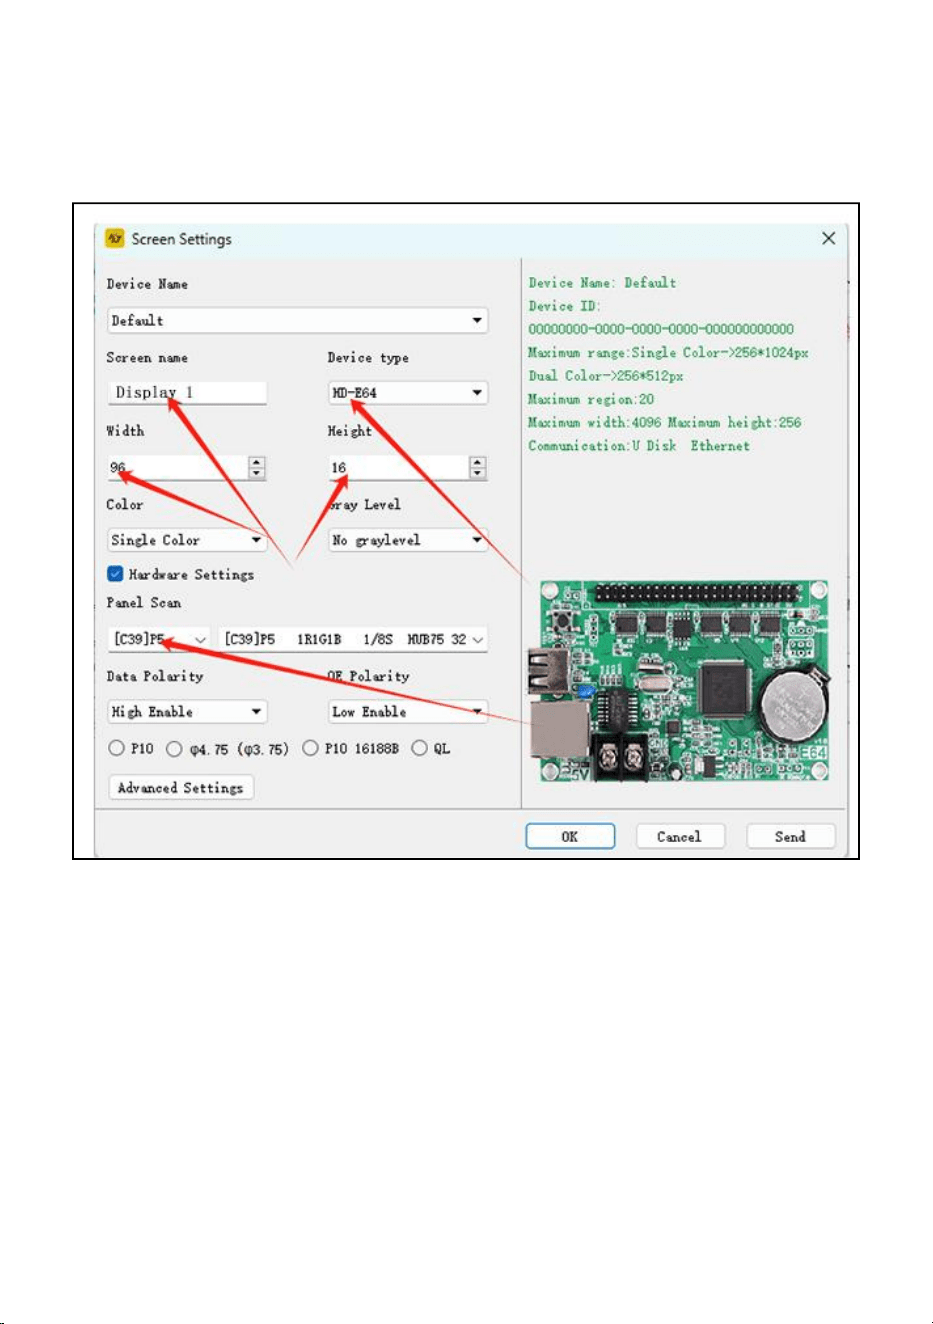
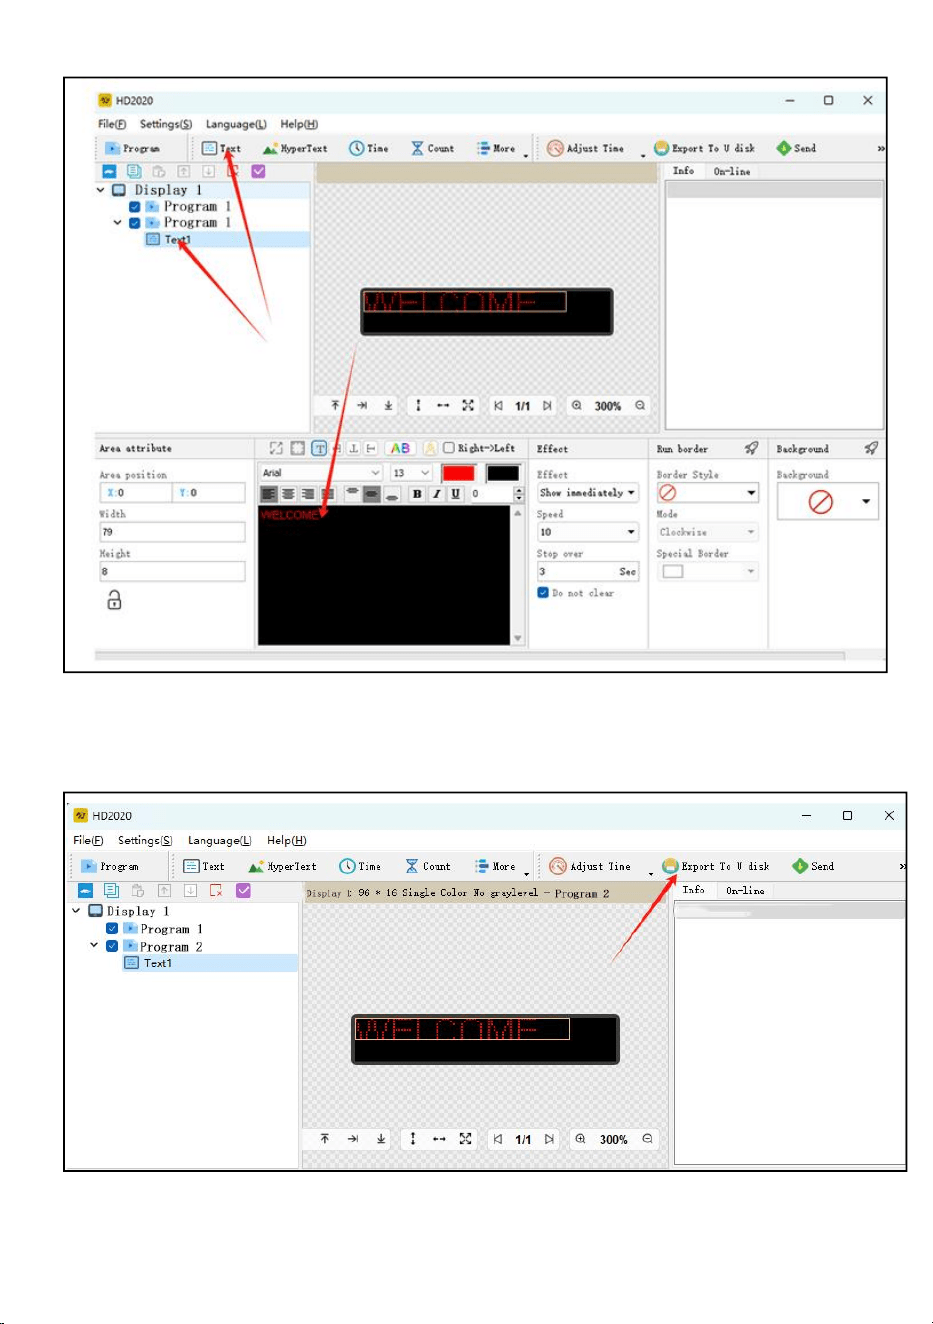
Step5: Screen Setting : Width96, Height16
Device type: HD-WF1
Click Hardware Settings, Panel Scan :(C39)
After all settings are completed, click OK
- 8 -
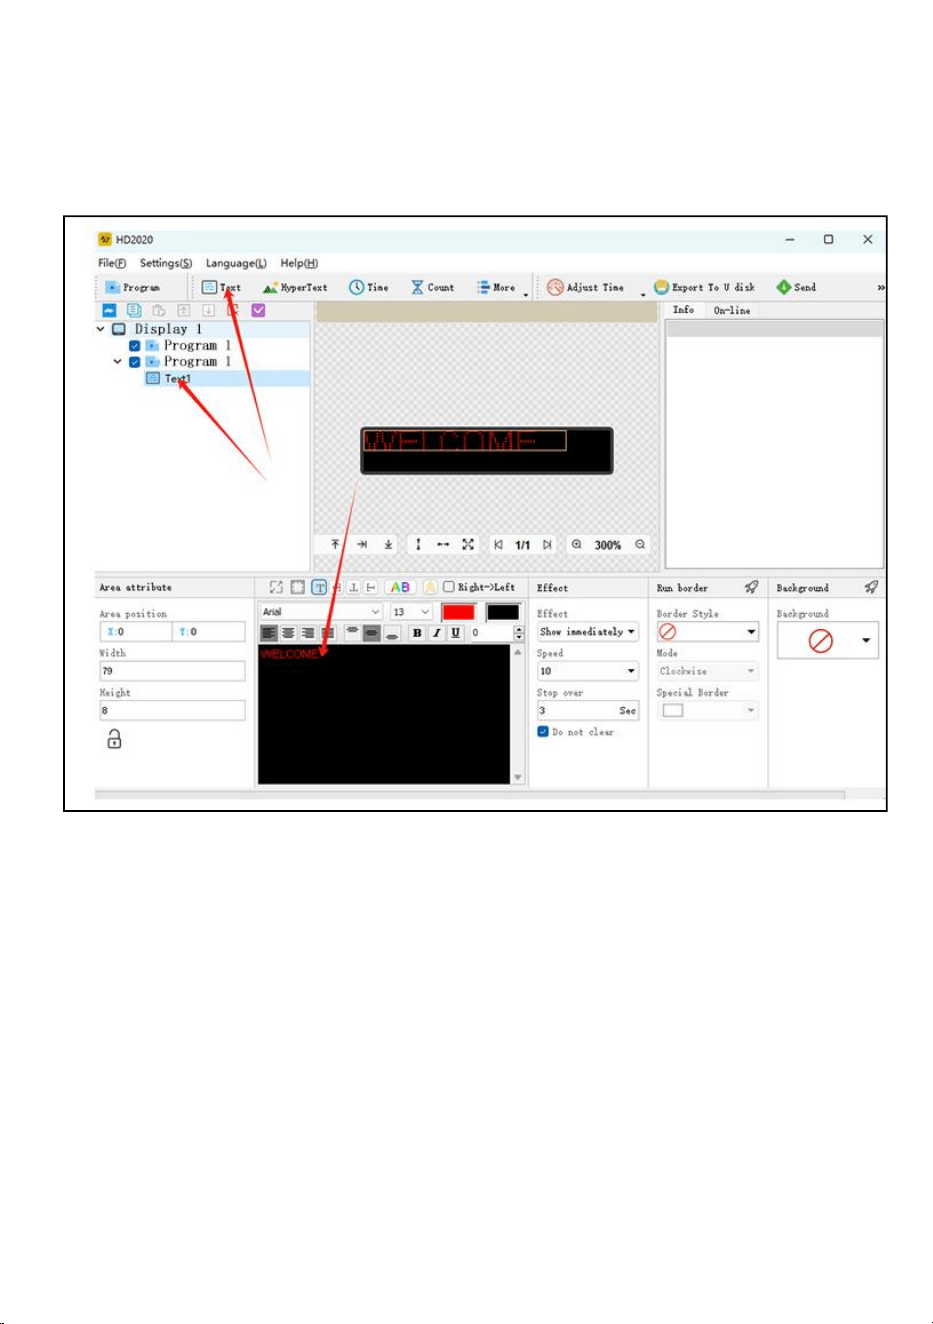
Step 6: click the text
Step 7: enter and edit the text you want in the black dialog box
Step 8: click "export to U disk" to export USB flash disk, and click OK
Step 9: export successfully. Whether to pull out the USB flash disk, click
OK

- 9 -
Step 10: pull out the USB flash disk. After power on, insert the USB flash
disk into the display screen. After about 5-6 seconds, pull out the USB flash
disk
- 10 -
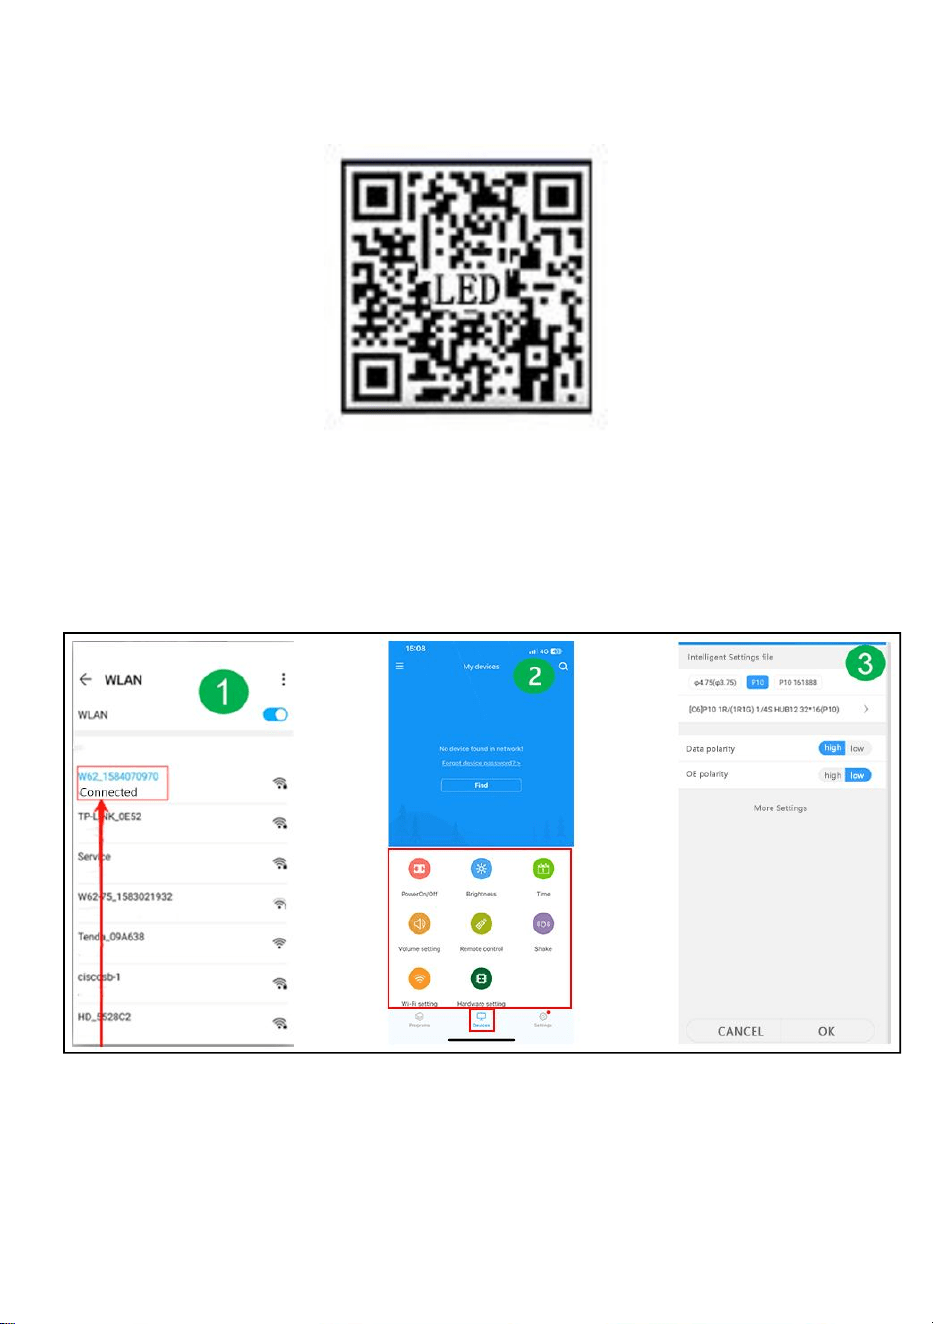
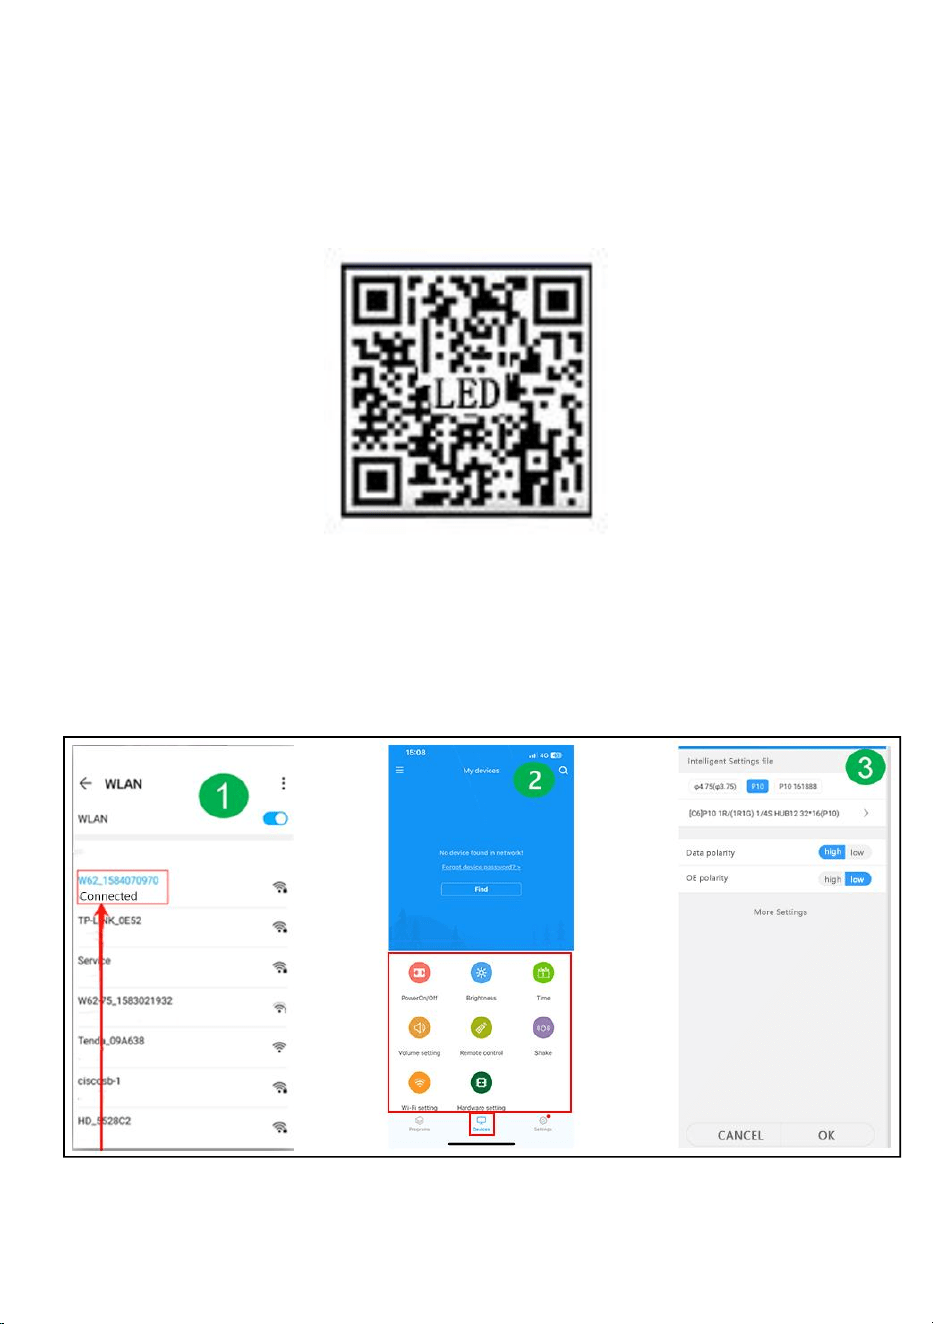
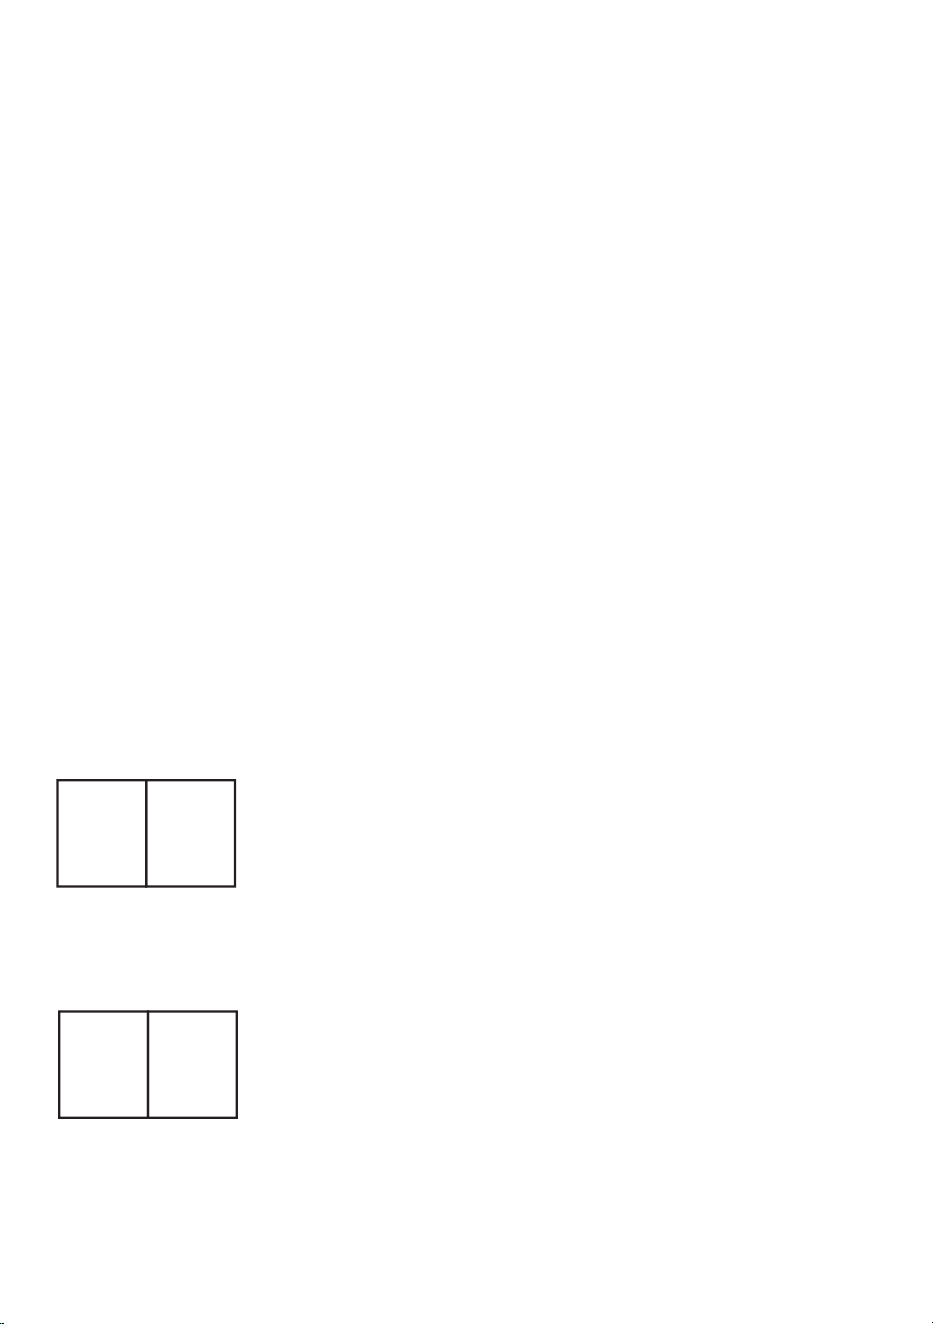
Mobile WIFI user manual (Screen control universal version)
Step 1: scan OR code to download
Step 2: First find the WIFI hotspot of the control card and click
Connect, password :88888888
Step 3: On the device interface, the control card automatically goes
online
Step 4: Click on Hardware Settings, password: 888
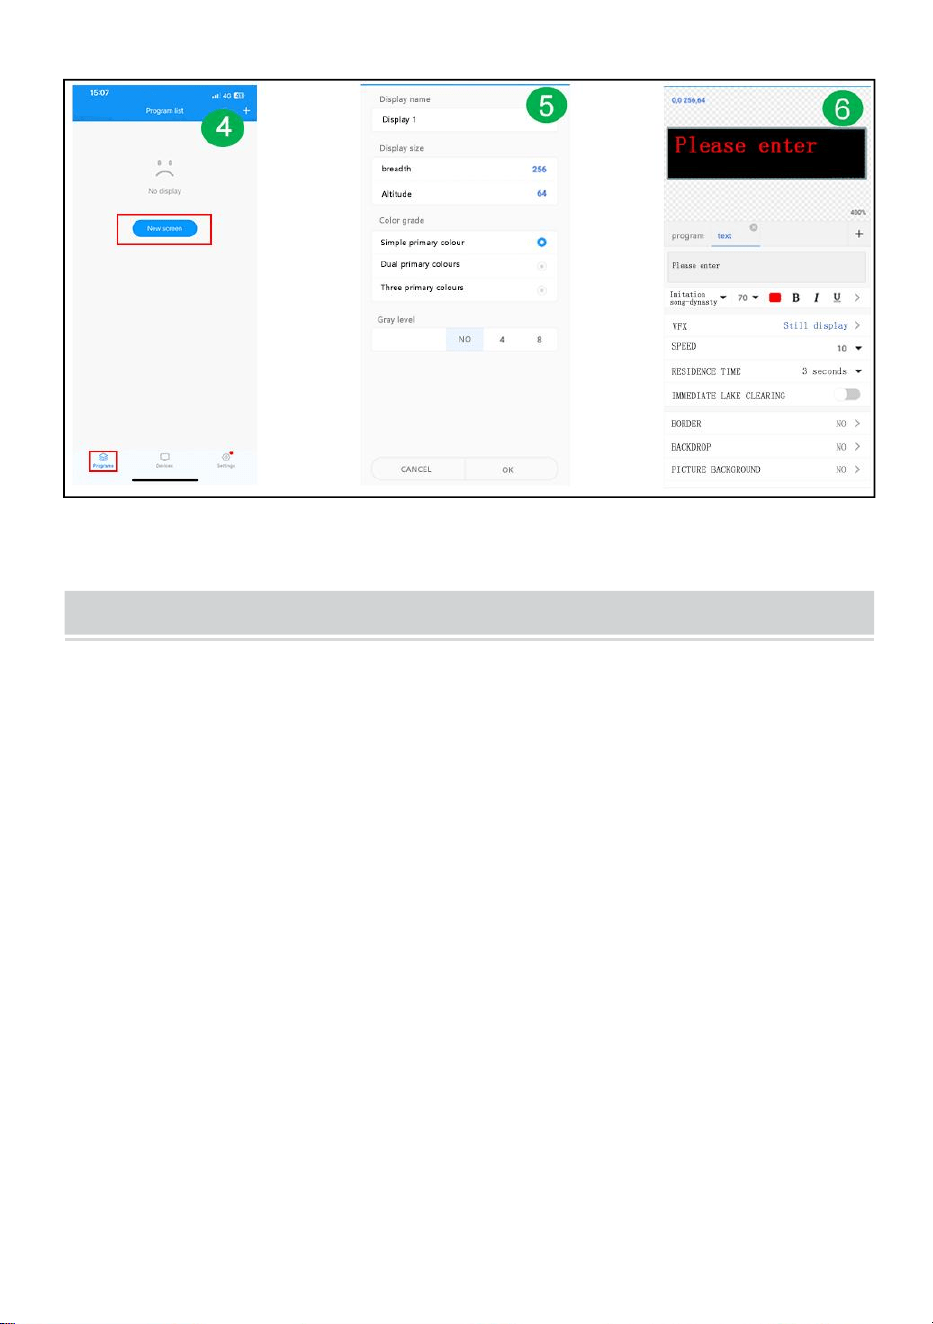
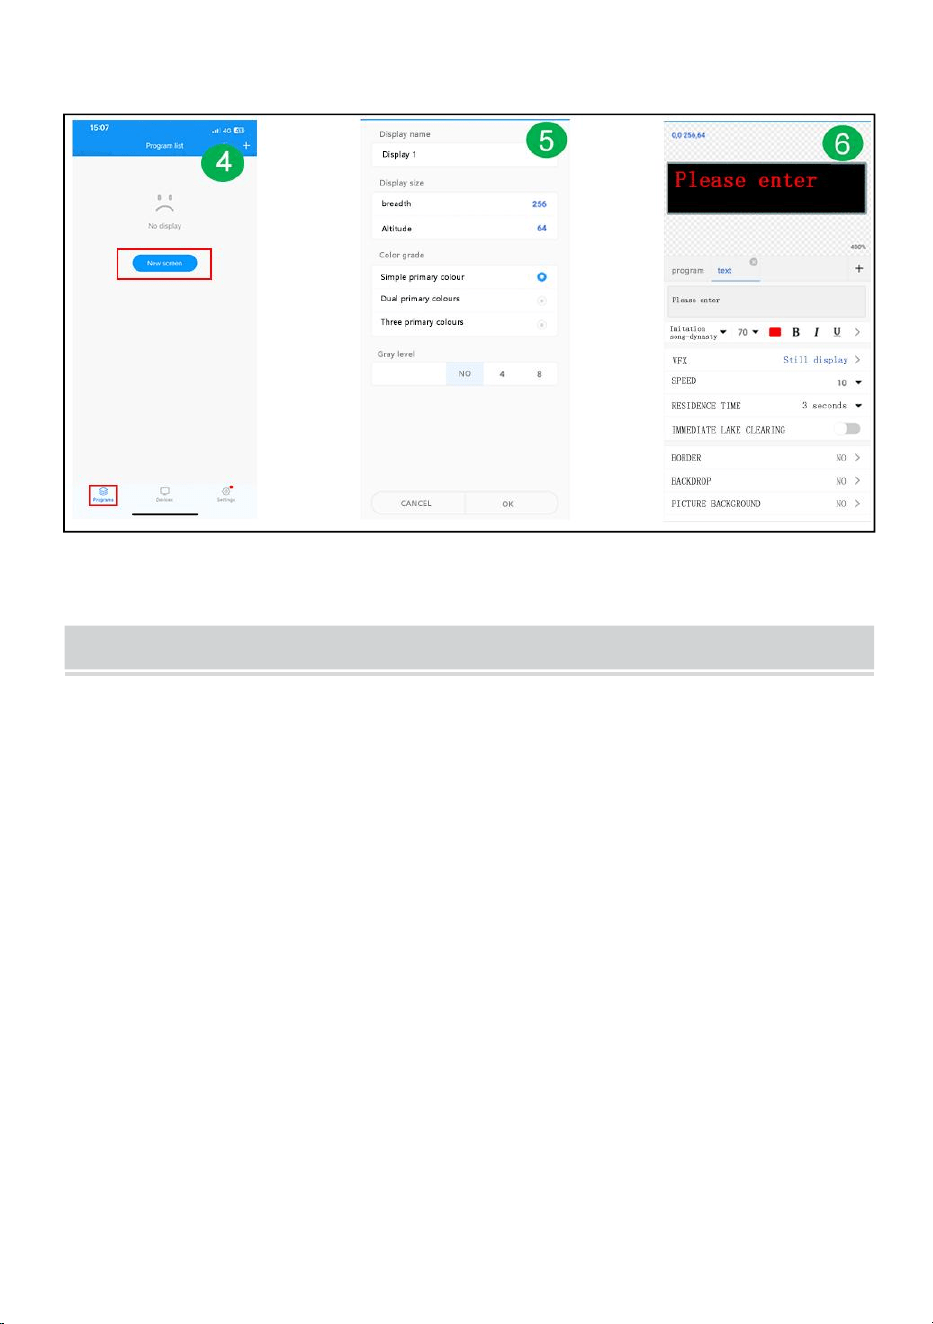
Step 5: Program Interface - New display
Step 6: Screen parameter setting
Step 7: Edit the program - click Send
- 11 -
FAULTS AND REMEDIES
1. If the product is warped, please reset it according to the instructions.
2. If a board is not bright or insufficient when the product is working, the cable
inside the product is loose. You can open the backboard, pull the cable, and
plug it in again.
3. If several lamp beads do not light up when the product works, you must
contact customer service to replace the module.
4. If you have any problems, please get in touch with our customer service
quickly and let us solve them for you faster.
- 12 -
Manufacturer: Shanghaimuxinmuyeyouxiangongsi
Address: Baoshanqu Shuangchenglu 803long 11hao 1602A-1609shi
Shanghai
Imported to AUS: SIHAO PTY LTD, 1 ROKEVA STREETEASTWOOD
NSW 2122 Australia
Imported to USA: Sanven Technology Ltd.
Suite 250,9166 Anaheim Place, Rancho Cucamonga, CA 91730
Made In China
REP
EC
SHUNSHUN GmbH
Römeräcker 9 Z2021,76351
Linkenheim-Hochstetten,Germany
euvertreter@gmail.com
+49 1727041930
REP
UK
Pooledas Group Ltd
Unit 5 Albert Edward House, The
Pavilions Preston, United Kingdom
pooledas12[email protected]
Tel: 01772418127


Techniczny Certyfikat wsparcia i e-gwarancji www . wevor . com/wsparcie
OZNAKOWANIE TOCZĄCE SIĘ
We continue to be committed to provide you tools with competitive price.
"Save Half", "Half Price" or any other similar expressions used by us only represents an
estimate of savings you might benefit from buying certain tools with us compared to the major
top brands and does not necessarily mean to cover all categories of tools offered by us. You
are kindly reminded to verify carefully when you are placing an order with us if you are
actually saving half in comparison with the top major brands.


- 1 -
Have product questions? Need technical support? Please feel free to
contact us:
Technical Support and E-Warranty Certificate
www. vevor. com/support
NEED HELP? CONTACT US!
This is the original instruction, please read all manual instructions
carefully before operating. VEVOR reserves a clear interpretation of our
user manual. The appearance of the product shall be subject to the
product you received. Please forgive us that we won't inform you again
if there are any technology or software updates on our product.
ROLLING SIGNAGE

- 2 -
Ostrzeżenie — aby zmniejszyć ryzyko obrażeń, użytkownik musi
uważnie przeczytać instrukcję obsługi .
Zgodność to certyfikat bezpieczeństwa WE.
PRAWIDŁOWA UTYLIZACJA
Ten produkt podlega przepisom Dyrektywy Europejskiej
2012/19/WE. Symbol przekreślonego kosza na śmieci oznacza, że
produkt wymaga selektywnej zbiórki śmieci na terenie Unii
Europejskiej. Dotyczy to produktu i wszystkich akcesoriów
oznaczonych tym symbolem. Produktów oznaczonych jako takie nie
można wyrzucać razem ze zwykłymi odpadami domowymi, lecz
należy je oddać do punktu zbiórki w celu recyklingu urządzeń
elektrycznych i elektronicznych
IMPORTANT SAFEGUARDS
OSTRZEŻENIE
PRZECZYTAJ CAŁKOWICIE I UWAŻNIE NINIEJSZĄ INSTRUKCJĘ
OSTRZEŻENIE: NIEPRZESTRZEGANIE TYCH INSTRUKCJI I OSTRZEŻEŃ
MOŻE SPOWODOWAĆ ŚMIERĆ, POWAŻNE OBRAŻENIA LUB
ZNACZĄCE SZKODY W MIeniu. DLA SWOJEJ OCHRONY NALEŻY
PRZECZYTAĆ I ZASTOSOWAĆ NINIEJSZE OSTRZEŻENIA I INSTRUKCJE
NALEŻY DOKŁADNIE PRZED INSTALACJĄ LUB KONSERWACJĄ TEGO
SPRZĘTU. NINIEJSZA INSTRUKCJA NIE JEST PRÓBĄ
OBEJMUJĄ WSZYSTKIE SYTUACJE INSTALACJI I KONSERWACJI. JEŚLI
NIE ROZUMIESZ TYCH INSTRUKCJI LUB
WYMAGANE JEST DODATKOWE INFORMACJE, SKONTAKTUJ SIĘ Z
PRODUCENTEM.
WAŻNE ZABEZPIECZENIA: PODCZAS KORZYSTANIA Z URZĄDZEŃ
ELEKTRYCZNYCH NALEŻY ZAWSZE ZACHOWAĆ PODSTAWOWE ŚRODKI
OSTROŻNOŚCI
NASTĘPUJĄCE, W TYM NASTĘPUJĄCE:
1. Nie używać na zewnątrz.

- 3 -
2. Sprzęt należy montować w miejscach i na wysokościach, na których nie będzie
narażony na manipulację przez osoby nieupoważnione.
3. Nie montuj w pobliżu grzejników gazowych lub elektrycznych. Trzymaj materiały
palne z dala od gorących części.
4. Zakryj nieużywane przewody dołączonymi nakrętkami lub w inny zatwierdzony
sposób. Nie używaj tego sprzętu do celów innych niż jego przeznaczenie.
Korzystanie z akcesoriów niezalecanych przez producenta spowoduje
unieważnienie gwarancji i może spowodować niebezpieczne warunki.
5. Przed podłączeniem do źródła zasilania należy wyłączyć zasilanie za pomocą
bezpiecznika lub wyłącznika automatycznego.
6. Zachowaj ostrożność podczas serwisowania akumulatorów.
7. Instalacja i serwisowanie powinny być wykonywane przez wykwalifikowany
personel. Aby uzyskać informacje o zatwierdzonym okablowaniu i instalacji, należy
zapoznać się z lokalnymi przepisami budowlanymi. Upewnij się, że zakończenia
przewodów są zabezpieczone, a przewody są prawidłowo umieszczone w
odpowiednich kanałach przewodów.
OSTRZEŻENIE: NIGDY NIE PODŁĄCZAJ, ODŁĄCZAJ LUB SERWISU, GDY
SPRZĘT JEST POD NAPIĘCIEM.
ZACHOWAJ TE INSTRUKCJE
FCC INFORMATION
OSTROŻNOŚĆ:
Zmiany lub modyfikacje, które nie zostały wyraźnie zatwierdzone przez stronę
odpowiedzialną za zgodność, mogą unieważnić uprawnienia użytkownika do
obsługi urządzenia!
To urządzenie jest zgodne z częścią 15 przepisów FCC. Działanie podlega
następującym dwóm warunkom:
1) Ten produkt może powodować szkodliwe zakłócenia.
2) Ten produkt musi akceptować wszelkie odbierane zakłócenia, w tym zakłócenia,
które mogą powodować niepożądane działanie.
OSTRZEŻENIE:
Zmiany lub modyfikacje tego produktu, które nie zostały wyraźnie zatwierdzone
przez stronę odpowiedzialną za zgodność, mogą unieważnić uprawnienia

- 4 -
użytkownika do obsługi produktu.
Notatka:
Ten produkt został przetestowany i stwierdzono, że spełnia ograniczenia dla
urządzeń cyfrowych klasy B zgodnie z częścią 15 przepisów FCC. Ograniczenia te
mają na celu zapewnienie rozsądnej ochrony przed szkodliwymi zakłóceniami w
instalacjach domowych.
Ten produkt generuje, wykorzystuje i może emitować energię o częstotliwości
radiowej, a jeśli nie zostanie zainstalowany i nie będzie używany zgodnie z
instrukcją, może powodować szkodliwe zakłócenia w komunikacji radiowej. Nie
ma jednak gwarancji, że w konkretnej instalacji nie wystąpią zakłócenia. Jeśli
produkt powoduje szkodliwe zakłócenia w odbiorze radia lub telewizji, co można
stwierdzić poprzez wyłączenie i włączenie produktu, zachęca się użytkownika do
podjęcia próby skorygowania zakłóceń za pomocą jednego lub kilku z poniższych
środków.
· Zmień orientację lub położenie anteny odbiorczej.
· Zwiększ odległość pomiędzy produktem a odbiornikiem.
· Podłącz produkt do gniazdka w innym obwodzie niż ten, do którego podłączony
jest odbiornik.
· Skonsultuj się ze sprzedawcą lub doświadczonym technikiem
radiowo-telewizyjnym w celu uzyskania pomocy.
- 5 -
PRODUCT PARAMETERS
MODEL
Parametry
elektryczne
Zagęszczenie
pikseli
rozdzielczość
wyświetlacza
P10-1696RGB
Unia Europejska:
AC 220-240 V 50
Hz
WTYCZKA UE
P10
(odległość
między
punktami 10
mm)
16 x 96 punktów.
Ameryka północna:
AC120 V 60 Hz
WTYCZKA USA
Australia:
AC 220-240 V 50
Hz
WTYCZKA AUSA
P10-3296RGB
Unia Europejska:
AC 220-240 V 50
Hz
WTYCZKA UE
P10
(odległość
między
punktami 10
mm)
32 x 96 punktów.
Ameryka północna:
AC120 V 60 Hz
WTYCZKA USA
Australia:
AC 220-240 V 50
Hz
WTYCZKA AUSA
P10-16128RGB
Unia Europejska:
AC 220-240 V 50
Hz
- 6 -
WTYCZKA UE
P10
(odległość
między
punktami 10
mm)
16 x 128 punktów.
Ameryka północna:
AC120 V 60 Hz
WTYCZKA USA
Australia:
AC 220-240 V 50
Hz
WTYCZKA AUSA
P6-64160RGB
Unia Europejska:
AC 220-240 V 50
Hz
WTYCZKA UE
P6
(odległość
między
kropkami 6
mm)
64 x 160 punktów.
Ameryka północna:
AC120 V 60 Hz
WTYCZKA USA
Australia:
AC 220-240 V 50
Hz
WTYCZKA AUSA
P5-64128RGB
Unia Europejska:
AC 220-240 V 50
Hz
WTYCZKA UE
P5
(odległość
między
kropkami 5
mm)
64 x 128 punktów.
Ameryka północna:
AC120 V 60 Hz
WTYCZKA USA
Australia:
AC 220-240 V 50
Hz
WTYCZKA AUSA
- 7 -
Załącznik: Wszystkie modele dostarczane są z dyskiem U z
oprogramowaniem instalacyjnym(
Nadaje się do systemu Windows), należy pamiętać, że oprogramowanie
jest nie nadaje się do komputerów Apple
Oprogramowanie: system telefonu komórkowego z systemem Android,
system telefonu komórkowego Apple .
THE FOLLOWING ARE THE OPERATION STEPS
Oto kroki operacji:
Etapy obsługi komputera:
Krok 1: włóż dysk flash USB do komputera, otwórz dysk flash USB,
przenieś skompresowany plik na pulpit komputera w celu dekompresji
(należy pamiętać, że oprogramowanie nie jest nadaje się do komputerów
Apple)
Krok 2: otwórz rozpakowany folder, znajdź hd2020 i kliknij dwukrotnie, aby
go otworzyć
Krok 3: Kliknij język, aby wybrać typ języka
Krok 4: Kliknij Ustawienia, wybierz Ustawienia systemowe, wprowadź
hasło
Hasło to 168

- 8 -
Krok 5: Ustawianie ekranu : Szerokość 96, Wysokość 16
Typ urządzenia: HD-WF1
Kliknij Ustawienia sprzętu, Skanowanie panelu :(C39)
Po zakończeniu wszystkich ustawień kliknij OK
Krok 6: kliknij tekst
Krok 7: wprowadź i edytuj żądany tekst w czarnym oknie dialogowym
- 9 -
Krok 8: kliknij „eksportuj na dysk U”, aby wyeksportować dysk flash USB, i
kliknij OK
Krok 9: eksport pomyślny. Czy wyciągnąć dysk flash USB, kliknij OK
Krok 10: wyciągnij dysk flash USB . Po włączeniu włóż dysk flash USB do
wyświetlacza ekran. Po około 5-6 sekundach wyciągnij dysk flash USB
- 10 -
Instrukcja obsługi mobilnego Wi-Fi (wersja uniwersalna ze
sterowaniem ekranowym)
Krok 1: zeskanuj LUB kod, aby pobrać
Krok 2: Najpierw znajdź hotspot WIFI na karcie kontrolnej i kliknij
Połącz, hasło: 88888888
Krok 3: W interfejsie urządzenia karta kontrolna automatycznie
przechodzi w tryb online
Krok 4: Kliknij Ustawienia sprzętu, hasło: 888
Krok 5: Interfejs programu - Nowy wyświetlacz
Krok 6: Ustawienie parametrów ekranu
- 11 -
Krok 7: Edytuj program - kliknij Wyślij
FAULTS AND REMEDIES
1. Jeśli produkt jest wypaczony, zresetuj go zgodnie z instrukcją.
2. Jeśli podczas pracy produktu tablica nie jest jasna lub niewystarczająca,
oznacza to, że kabel wewnątrz produktu jest luźny. Można otworzyć tablicę,
wyciągnąć kabel i podłączyć go ponownie.
3. Jeśli kilka koralików lampowych nie zaświeci się, gdy produkt działa, należy
skontaktować się z obsługą klienta w celu wymiany modułu.
4. Jeśli masz jakiekolwiek problemy, skontaktuj się szybko z naszym działem
obsługi klienta i pozwól nam szybciej je rozwiązać.

- 12 -
Producent: Shanghaimuxinmuyeyouxiangongsi
Adres: Baoshanqu Shuangchenglu 803long 11hao 1602A-1609shi
Szanghaj
Import do AUS: SIHAO PTY LTD, 1 ROKEVA STREETEASTWOOD NSW
2122 Australia
Import do USA: Sanven Technology Ltd.
Apartament 250 , 9166 Anaheim Place, Rancho Cucamonga, Kalifornia
91730
REP
EC
SHUNSHUN GmbH
Römeräcker 9 Z2021,76351
Linkenheim-Hochstetten,Germany
euvertreter@gmail.com
+49 1727041930
REP
UK
Pooledas Group Ltd
Unit 5 Albert Edward House, The
Pavilions Preston, United Kingdom
pooledas12[email protected]
Tel: 01772418127

- 13 -
Wyprodukowano w Chinach


Technisch Support- und E-Garantiezertifikat www . vevor . com/support
ROLLENDE BESCHILDERUNG
We continue to be committed to provide you tools with competitive price.
"Save Half", "Half Price" or any other similar expressions used by us only represents an
estimate of savings you might benefit from buying certain tools with us compared to the major
top brands and does not necessarily mean to cover all categories of tools offered by us. You
are kindly reminded to verify carefully when you are placing an order with us if you are
actually saving half in comparison with the top major brands.


- 1 -
Have product questions? Need technical support? Please feel free to
contact us:
Technical Support and E-Warranty Certificate
www. vevor. com/support
NEED HELP? CONTACT US!
This is the original instruction, please read all manual instructions
carefully before operating. VEVOR reserves a clear interpretation of our
user manual. The appearance of the product shall be subject to the
product you received. Please forgive us that we won't inform you again
if there are any technology or software updates on our product.
ROLLING SIGNAGE

- 2 -
Warnung: Um das Verletzungsrisiko zu verringern, muss der
Benutzer die Bedienungsanleitung sorgfältig lesen .
Compliance ist eine EG-Sicherheitszertifizierung.
RICHTIGE ENTSORGUNG
Dieses Produkt unterliegt den Bestimmungen der europäischen
Richtlinie 2012/19/EG. Das Symbol einer durchgestrichenen
Mülltonne weist darauf hin, dass das Produkt in der Europäischen
Union einer getrennten Müllsammlung bedarf. Dies gilt für das
Produkt und alle Zubehörteile, die mit diesem Symbol
gekennzeichnet sind. Als solche gekennzeichnete Produkte dürfen
nicht über den normalen Hausmüll entsorgt werden, sondern
müssen an einer Sammelstelle für das Recycling von Elektro- und
Elektronikgeräten abgegeben werden
IMPORTANT SAFEGUARDS
WARNUNG
LESEN SIE DIESE ANLEITUNG VOLLSTÄNDIG UND SORGFÄLTIG DURCH
WARNUNG: DIE NICHTBEACHTUNG DIESER ANWEISUNGEN UND
WARNUNGEN KANN ZUM TOD, ZU SCHWEREN VERLETZUNGEN ODER ZU
FÜHREN
ERHEBLICHER SACHSCHADEN. LESEN UND BEFOLGEN SIE ZU IHREM
SCHUTZ DIESE WARNHINWEISE UND ANWEISUNGEN
SORGEN SIE VOR DER INSTALLATION ODER WARTUNG DIESES GERÄTS
SORGFÄLTIG. DIESE ANWEISUNGEN VERSUCHEN NICHT
DECKEN ALLE INSTALLATIONS- UND WARTUNGSSITUATIONEN AB. WENN
SIE DIESE ANWEISUNGEN NICHT VERSTEHEN ODER
WEITERE INFORMATIONEN SIND ERFORDERLICH, KONTAKTIEREN SIE
DEN HERSTELLER.
WICHTIGE SICHERHEITSHINWEISE: BEI DER VERWENDUNG
ELEKTRISCHER GERÄTE SOLLTEN IMMER GRUNDLEGENDE
SICHERHEITSVORKEHRUNGEN BEACHTEN

- 3 -
FOLGENDES, EINSCHLIESSLICH DES FOLGENDEN:
1. Nicht im Freien verwenden.
2. Die Ausrüstung sollte an Orten und in Höhen montiert werden, an denen sie
nicht von unbefugtem Personal manipuliert werden kann.
3. Nicht in der Nähe von Gas- oder Elektroheizungen montieren. Brennbares
Material von heißen Teilen fernhalten .
4. Verschließen Sie unbenutzte Drähte mit beiliegenden Drahtmuttern oder
anderen zugelassenen Methoden. Verwenden Sie dieses Gerät nicht für andere
als den vorgesehenen Zweck. Die Verwendung von Zubehörgeräten, die nicht
vom Hersteller empfohlen werden, führt zum Erlöschen der Garantie und kann zu
einem Schaden führen unsicherer Zustand.
5. Schalten Sie vor dem Anschließen an die Stromversorgung den Strom an der
Sicherung oder am Schutzschalter aus.
6. Seien Sie bei der Wartung von Batterien vorsichtig.
7. Installation und Wartung sollten von qualifiziertem Personal durchgeführt
werden. Informationen zur zugelassenen Verkabelung und Installation finden Sie
in den örtlichen Bauvorschriften. Stellen Sie sicher, dass die Kabelanschlüsse
sicher sind und die Leitungen ordnungsgemäß in den entsprechenden
Kabelkanälen verstaut sind.
WARNUNG: NIEMALS AN DAS GERÄT ANSCHLIESSEN, ES ENTFERNEN
ODER WARTEN, WÄHREND DAS GERÄT UNTER STROM STEHT.
ANLEITUNG AUFBEWAHREN
FCC INFORMATION
VORSICHT:
Änderungen oder Modifikationen, die nicht ausdrücklich von der für die Einhaltung
verantwortlichen Partei genehmigt wurden, können zum Erlöschen der
Berechtigung des Benutzers zum Betrieb des Geräts führen!
Dieses Gerät entspricht Teil 15 der FCC-Bestimmungen. Der Betrieb unterliegt
den folgenden zwei Bedingungen:
1) Dieses Produkt kann schädliche Störungen verursachen.
2) Dieses Produkt muss alle empfangenen Störungen akzeptieren, einschließlich
Störungen, die zu unerwünschtem Betrieb führen können.

- 4 -
WARNUNG:
Änderungen oder Modifikationen an diesem Produkt, die nicht ausdrücklich von
der für die Einhaltung verantwortlichen Partei genehmigt wurden, können zum
Erlöschen der Berechtigung des Benutzers zum Betrieb des Produkts führen.
Notiz:
Dieses Produkt wurde getestet und entspricht den Grenzwerten für ein digitales
Gerät der Klasse B gemäß Teil 15 der FCC-Bestimmungen. Diese Grenzwerte
sollen einen angemessenen Schutz vor schädlichen Störungen in einer
Wohnanlage bieten.
Dieses Produkt erzeugt und verwendet Hochfrequenzenergie und kann diese
ausstrahlen. Wenn es nicht gemäß den Anweisungen installiert und verwendet
wird, kann es schädliche Störungen der Funkkommunikation verursachen. Es gibt
jedoch keine Garantie dafür, dass bei einer bestimmten Installation keine
Störungen auftreten. Wenn dieses Produkt schädliche Störungen beim Radio-
oder Fernsehempfang verursacht, was durch Aus- und Einschalten des Produkts
festgestellt werden kann, wird dem Benutzer empfohlen, zu versuchen, die
Störung durch eine oder mehrere der folgenden Maßnahmen zu beheben.
· Richten Sie die Empfangsantenne neu aus oder versetzen Sie sie.
· Erhöhen Sie den Abstand zwischen Produkt und Empfänger.
· Schließen Sie das Produkt an eine Steckdose an, die zu einem anderen
Stromkreis gehört als dem, an den der Empfänger angeschlossen ist.
· Wenden Sie sich für Hilfe an den Händler oder einen erfahrenen
Radio-/TV-Techniker.
- 5 -
PRODUCT PARAMETERS
MODELL
Elektrische
Parameter
Pixeldichte
Bildschirmauflösu
ng
P10-1696RGB
Europäische Union:
AC220-240V 50Hz
EU-STECKER
P10
(10 mm
Abstand
zwischen den
Punkten)
16 x 96 Punkte.
Nordamerika:
AC120V 60Hz
US-STECKER
Australien:
AC220-240V 50Hz
AUS-STECKER
P10-3296RGB
Europäische Union:
AC220-240V 50Hz
EU-STECKER
P10
(10 mm
Abstand
zwischen den
Punkten)
32 x 96 Punkte.
Nordamerika:
AC120V 60Hz
US-STECKER
Australien:
AC220-240V 50Hz
AUS-STECKER
- 6 -
P10-16128RGB
Europäische Union:
AC220-240V 50Hz
EU-STECKER
P10
(10 mm
Abstand
zwischen den
Punkten)
16 x 128 Punkte.
Nordamerika:
AC120V 60Hz
US-STECKER
Australien:
AC220-240V 50Hz
AUS-STECKER
P6-64160RGB
Europäische Union:
AC220-240V 50Hz
EU-STECKER
P6
(6mm Abstand
zwischen den
Punkten)
64 x 160 Punkte.
Nordamerika:
AC120V 60Hz
US-STECKER
Australien:
AC220-240V 50Hz
AUS-STECKER
P5-64128RGB
Europäische Union:
AC220-240V 50Hz
EU-STECKER
P5
(5mm Abstand
zwischen den
Punkten)
64 x 128 Punkte.
Nordamerika:
AC120V 60Hz
US-STECKER
Australien:
AC220-240V 50Hz
AUS-STECKER
Anhang: Alle Modelle liefern eine U-Disk mit Installationssoftware(
Geeignet für Windows ), beachten Sie, dass die Software geeignet ist
Nicht für Apple-Computer geeignet
Software: Android-Mobiltelefonsystem, Apple-Mobiltelefonsystem .
- 7 -
THE FOLLOWING ARE THE OPERATION STEPS
Im Folgenden sind die Arbeitsschritte aufgeführt:
Die Computer-Bedienungsschritte:
Schritt 1: Stecken Sie das USB-Flash-Laufwerk in den Computer, öffnen
Sie das USB-Flash-Laufwerk und bewegen Sie es komprimierte Datei zur
Dekomprimierung auf den Computer-Desktop (beachten Sie, dass die
Software dies nicht tut). geeignet für Apple-Computer)
Schritt 2: Öffnen Sie den entpackten Ordner, suchen Sie hd2020 und
doppelklicken Sie, um ihn zu öffnen
Schritt 3: Klicken Sie auf Sprache, um einen Sprachtyp auszuwählen
Schritt 4: Klicken Sie auf „Einstellungen“, wählen Sie
„Systemeinstellungen“ und geben Sie das Passwort ein
Das Passwort ist 168
- 8 -
Schritt 5: Bildschirmeinstellung : Breite 96, Höhe 16
Gerätetyp: HD-WF1
Klicken Sie auf „Hardwareeinstellungen“, „Panel-Scan“ :(C39)
Nachdem alle Einstellungen abgeschlossen sind, klicken Sie auf OK
Schritt 6: Klicken Sie auf den Text
Schritt 7: Geben Sie den gewünschten Text in das schwarze Dialogfeld ein
und bearbeiten Sie ihn
Schritt 8: Klicken Sie auf „Auf U-Disk exportieren“, um das
USB-Flash-Laufwerk zu exportieren, und klicken Sie auf „OK“.
Schritt 9: Erfolgreich exportieren. Wenn Sie das USB-Flash-Laufwerk
herausziehen möchten, klicken Sie auf „OK“.

- 9 -
Schritt 10: Ziehen Sie den USB- Stick heraus . Stecken Sie nach dem
Einschalten den USB-Stick in das Display Bildschirm. Ziehen Sie nach
etwa 5–6 Sekunden den USB-Stick heraus

- 10 -
Mobile WIFI-Benutzerhandbuch (Universalversion zur
Bildschirmsteuerung)
Schritt 1: Scannen Sie den ODER-Code zum Herunterladen
Schritt 2: Suchen Sie zunächst den WLAN-Hotspot der Steuerkarte
und klicken Sie auf „Verbinden“, Passwort: 88888888
Schritt 3: Auf der Geräteschnittstelle geht die Steuerkarte
automatisch online
Schritt 4: Klicken Sie auf Hardwareeinstellungen, Passwort: 888
Schritt 5: Programmoberfläche – Neue Anzeige
Schritt 6: Einstellung der Bildschirmparameter
Schritt 7: Bearbeiten Sie das Programm – klicken Sie auf Senden

- 11 -
FAULTS AND REMEDIES
1. Wenn das Produkt verzogen ist, setzen Sie es bitte gemäß den
Anweisungen zurück.
2. Wenn eine Platine während des Betriebs des Produkts nicht hell oder nicht
ausreichend ist, ist das Kabel im Inneren des Produkts locker. Sie können die
Rückwand öffnen, das Kabel herausziehen und es wieder anschließen.
3. Wenn mehrere Lampenperlen bei funktionierendem Produkt nicht
aufleuchten, müssen Sie sich an den Kundendienst wenden, um das Modul
auszutauschen.
4. Wenn Sie Probleme haben, wenden Sie sich bitte schnell an unseren
Kundenservice, damit wir diese schneller für Sie lösen können.
- 12 -
Hersteller: Shanghaimuxinmuyeyouxiangongsi
Adresse: Baoshanqu Shuangchenglu 803long 11hao 1602A-1609shi
Shanghai
Importiert nach AUS: SIHAO PTY LTD, 1 ROKEVA STREETEASTWOOD
NSW 2122 Australien
Importiert in die USA: Sanven Technology Ltd.
Suite 250 , 9166 Anaheim Place, Rancho Cucamonga, CA 91730
REP
EC
SHUNSHUN GmbH
Römeräcker 9 Z2021,76351
Linkenheim-Hochstetten,Germany
euvertreter@gmail.com
+49 1727041930
REP
UK
Pooledas Group Ltd
Unit 5 Albert Edward House, The
Pavilions Preston, United Kingdom
pooledas12[email protected]
Tel: 01772418127

- 13 -
In China hergestellt


Technique Assistance et certificat de garantie électronique www . vevor .
com/support
SIGNALISATION ROULANTE
We continue to be committed to provide you tools with competitive price.
"Save Half", "Half Price" or any other similar expressions used by us only represents an
estimate of savings you might benefit from buying certain tools with us compared to the major
top brands and does not necessarily mean to cover all categories of tools offered by us. You
are kindly reminded to verify carefully when you are placing an order with us if you are
actually saving half in comparison with the top major brands.


- 1 -
Have product questions? Need technical support? Please feel free to
contact us:
Technical Support and E-Warranty Certificate
www. vevor. com/support
NEED HELP? CONTACT US!
This is the original instruction, please read all manual instructions
carefully before operating. VEVOR reserves a clear interpretation of our
user manual. The appearance of the product shall be subject to the
product you received. Please forgive us that we won't inform you again
if there are any technology or software updates on our product.
ROLLING SIGNAGE
- 2 -
Avertissement : pour réduire le risque de blessure, l'utilisateur doit
lire attentivement le manuel d'instructions .
La conformité est une certification de sécurité CE.
ÉLIMINATION CORRECTE
Ce produit est soumis aux dispositions de la directive européenne
2012/19/CE. Le symbole représentant une poubelle barrée indique
que le produit nécessite une collecte sélective des déchets dans
l'Union européenne. Ceci s'applique au produit et à tous les
accessoires marqués de ce symbole. Les produits marqués comme
tels ne peuvent pas être jetés avec les ordures ménagères
normales, mais doivent être déposés dans un point de collecte pour
le recyclage des appareils électriques et électroniques.
IMPORTANT SAFEGUARDS
AVERTISSEMENT
LISEZ CES INSTRUCTIONS COMPLÈTEMENT ET ATTENTIVEMENT
AVERTISSEMENT : LE NON-RESPECT DE CES INSTRUCTIONS ET
AVERTISSEMENTS PEUT ENTRAÎNER LA MORT, DES BLESSURES GRAVES
OU
DOMMAGES MATÉRIELS IMPORTANTS. POUR VOTRE PROTECTION, LISEZ
ET SUIVEZ CES AVERTISSEMENTS ET INSTRUCTIONS
ATTENTIVEMENT AVANT D'INSTALLER OU D'ENTRETIEN CET ÉQUIPEMENT.
CES INSTRUCTIONS NE TENTENT PAS DE
COUVRENT TOUTES LES SITUATIONS D'INSTALLATION ET DE
MAINTENANCE. SI VOUS NE COMPRENEZ PAS CES INSTRUCTIONS OU
DES INFORMATIONS SUPPLÉMENTAIRES SONT REQUISES, CONTACTEZ
LE FABRICANT.
MESURES DE SÉCURITÉ IMPORTANTES : LORS DE L'UTILISATION
D'ÉQUIPEMENT ÉLECTRIQUE, DES PRÉCAUTIONS DE SÉCURITÉ DE BASE
DOIVENT TOUJOURS ÊTRE
SUIVI, Y COMPRIS LES SUIVANTS :

- 3 -
1. Ne pas utiliser à l'extérieur.
2. L'équipement doit être monté dans des endroits et à des hauteurs où il ne sera
pas sujet à altération par du personnel non autorisé.
3. Ne pas monter à proximité de radiateurs à gaz ou électriques. Gardez les
matériaux combustibles à l'écart des pièces chaudes.
4. Coiffez les fils inutilisés avec des serre-fils fournis ou d'autres méthodes
approuvées. N'utilisez pas cet équipement à des fins autres que celles prévues.
L'utilisation d'équipements accessoires non recommandés par le fabricant
annulera la garantie et peut entraîner un situation dangereuse.
5. Avant de procéder au câblage à l'alimentation électrique, coupez l'électricité au
niveau du fusible ou du disjoncteur.
6. Soyez prudent lors de l’entretien des batteries.
7. L'installation et l'entretien doivent être effectués par du personnel qualifié.
Consultez le code du bâtiment local pour le câblage et l'installation approuvés.
Assurez-vous que les terminaisons des fils sont sécurisées et que les fils sont
correctement rentrés dans les canaux de câbles appropriés.
AVERTISSEMENT : NE JAMAIS CONNECTER, DÉCONNECTER OU
ENTRETIEN PENDANT QUE L'ÉQUIPEMENT EST SOUS TENSION.
CONSERVEZ CES INSTRUCTIONS
FCC INFORMATION
PRUDENCE:
Les changements ou modifications non expressément approuvés par la partie
responsable de la conformité pourraient annuler le droit de l'utilisateur à utiliser
l'équipement !
Cet appareil est conforme à la partie 15 des règles FCC. L’exploitation est
soumise aux deux conditions suivantes :
1) Ce produit peut provoquer des interférences nuisibles.
2) Ce produit doit accepter toute interférence reçue, y compris les interférences
susceptibles de provoquer un fonctionnement indésirable.
AVERTISSEMENT:
Les changements ou modifications apportés à ce produit non expressément
approuvés par la partie responsable de la conformité pourraient annuler le droit de

- 4 -
l'utilisateur à utiliser le produit.
Note:
Ce produit a été testé et jugé conforme aux limites d'un appareil numérique de
classe B conformément à la partie 15 des règles FCC. Ces limites sont conçues
pour fournir une protection raisonnable contre les interférences nuisibles dans une
installation résidentielle.
Ce produit génère, utilise et peut émettre de l'énergie radiofréquence et, s'il n'est
pas installé et utilisé conformément aux instructions, il peut provoquer des
interférences nuisibles aux communications radio. Cependant, rien ne garantit que
des interférences ne se produiront pas dans une installation particulière. Si ce
produit provoque des interférences nuisibles à la réception radio ou télé, ce qui
peut être déterminé en éteignant et rallumant le produit, l'utilisateur est encouragé
à essayer de corriger les interférences en prenant une ou plusieurs des mesures
suivantes.
· Réorientez ou déplacez l'antenne de réception.
· Augmentez la distance entre le produit et le récepteur.
· Connectez le produit à une prise sur un circuit différent de celui auquel le
récepteur est connecté.
· Consultez le revendeur ou un technicien radio/TV expérimenté pour obtenir de
l'aide.
- 5 -
PRODUCT PARAMETERS
MODÈLE
Paramètres
électriques
Densité de
pixels
résolution
d'affichage
P10-1696RVB
Union européenne:
AC220-240V 50Hz
PRISE UE
P10
(distance de
10 mm entre
les points)
16 x 96 points.
Amérique du Nord:
AC120V 60Hz
PRISE
AMÉRICAINE
Australie:
AC220-240V 50Hz
PRISE AUS
P10-3296RVB
Union européenne:
AC220-240V 50Hz
PRISE UE
P10
(distance de
10 mm entre
les points)
32 x 96 points.
Amérique du Nord:
AC120V 60Hz
PRISE
AMÉRICAINE
Australie:
AC220-240V 50Hz
PRISE AUS
P10-16128RVB
Union européenne:
AC220-240V 50Hz
PRISE UE

- 6 -
P10
(distance de
10 mm entre
les points)
16 x 128 points.
Amérique du Nord:
AC120V 60Hz
PRISE
AMÉRICAINE
Australie:
AC220-240V 50Hz
PRISE AUS
P6-64160RVB
Union européenne:
AC220-240V 50Hz
PRISE UE
P6
(distance de
6 mm entre les
points)
64 x 160 points.
Amérique du Nord:
AC120V 60Hz
PRISE
AMÉRICAINE
Australie:
AC220-240V 50Hz
PRISE AUS
P5-64128RVB
Union européenne:
AC220-240V 50Hz
PRISE UE
P5
(distance de
5 mm entre les
points)
64 x 128 points.
Amérique du Nord:
AC120V 60Hz
PRISE
AMÉRICAINE
Australie:
AC220-240V 50Hz
PRISE AUS
Pièce jointe : tous les modèles fournissent un disque U avec le
logiciel d'installation (
Convient pour Windows), notez que le logiciel est ne convient pas aux
ordinateurs Apple
Logiciel : système de téléphonie mobile Android, système de téléphonie
mobile Apple .

- 7 -
THE FOLLOWING ARE THE OPERATION STEPS
Voici les étapes de l'opération :
Les étapes de fonctionnement de l'ordinateur :
Étape 1 : insérez le disque flash USB dans l'ordinateur, ouvrez le disque
flash USB, déplacez le fichier compressé sur le bureau de l'ordinateur pour
décompression (notez que le logiciel n'est pas adapté aux ordinateurs
Apple)
Étape 2 : ouvrez le dossier décompressé, recherchez hd2020 et
double-cliquez pour l'ouvrir
Étape 3 : Cliquez sur Langue pour sélectionner un type de langue
Étape 4 : Cliquez sur Paramètres, sélectionnez Paramètres système,
entrez le mot de passe
Le mot de passe est 168

- 8 -
Étape 5 : Réglage de l'écran : Largeur96, Hauteur16
Type d'appareil : HD-WF1
Cliquez sur Paramètres matériels, Analyse du panneau : (C39)
Une fois tous les paramètres terminés, cliquez sur OK
Étape 6 : cliquez sur le texte
Étape 7 : saisissez et modifiez le texte souhaité dans la boîte de dialogue
noire
Étape 8 : cliquez sur « exporter vers le disque U » pour exporter le disque
flash USB, puis cliquez sur OK
Étape 9 : exportez avec succès. Si vous souhaitez retirer le disque flash
USB, cliquez sur OK

- 9 -
Étape 10 : retirez le disque flash USB. Après la mise sous tension, insérez
le disque flash USB dans l'écran écran. Après environ 5 à 6 secondes,
retirez le disque flash USB
- 10 -
Manuel d'utilisation du WIFI mobile (version universelle de contrôle
d'écran)
Étape 1 : scannez OU codez pour télécharger
Étape 2 : recherchez d'abord le point d'accès WIFI de la carte de
contrôle et cliquez sur Connecter, mot de passe : 88888888.
Étape 3 : Sur l'interface de l'appareil, la carte de contrôle se met
automatiquement en ligne
Étape 4 : Cliquez sur Paramètres matériels, mot de passe : 888
Étape 5 : Interface du programme – Nouvel affichage
Étape 6 : Paramétrage de l'écran
Étape 7 : Modifiez le programme - cliquez sur Envoyer

- 11 -
FAULTS AND REMEDIES
1. Si le produit est déformé, veuillez le réinitialiser conformément aux
instructions.
2. Si une carte n'est pas lumineuse ou est insuffisante lorsque le produit
fonctionne, le câble à l'intérieur du produit est lâche. Vous pouvez ouvrir le
panneau arrière, tirer le câble et le rebrancher.
3. Si plusieurs perles de lampe ne s'allument pas lorsque le produit fonctionne,
vous devez contacter le service client pour remplacer le module.
4. Si vous rencontrez des problèmes, veuillez contacter rapidement notre
service client et laissez-nous les résoudre plus rapidement.
- 12 -
Fabricant : Shanghaimuxinmuyeyouxiangongsi
Adresse : Baoshanqu Shuangchenglu 803long 11hao 1602A-1609shi
Shanghai
Importé en Australie : SIHAO PTY LTD, 1 ROKEVA STREETASTWOOD
NSW 2122 Australie
Importé aux États-Unis : Sanven Technology Ltd.
Suite 250 , 9166 Anaheim Place, Rancho Cucamonga, CA 91730
Fabriqué en Chine
REP
EC
SHUNSHUN GmbH
Römeräcker 9 Z2021,76351
Linkenheim-Hochstetten,Germany
euvertreter@gmail.com
+49 1727041930
REP
UK
Pooledas Group Ltd
Unit 5 Albert Edward House, The
Pavilions Preston, United Kingdom
pooledas12[email protected]
Tel: 01772418127

- 13 -


Technisch Ondersteuning en e-garantiecertificaat www . kracht .
com/ondersteuning
ROLLENDE BEWEGWIJZERING
We continue to be committed to provide you tools with competitive price.
"Save Half", "Half Price" or any other similar expressions used by us only represents an
estimate of savings you might benefit from buying certain tools with us compared to the major
top brands and does not necessarily mean to cover all categories of tools offered by us. You
are kindly reminded to verify carefully when you are placing an order with us if you are
actually saving half in comparison with the top major brands.


- 1 -
Have product questions? Need technical support? Please feel free to
contact us:
Technical Support and E-Warranty Certificate
www. vevor. com/support
NEED HELP? CONTACT US!
This is the original instruction, please read all manual instructions
carefully before operating. VEVOR reserves a clear interpretation of our
user manual. The appearance of the product shall be subject to the
product you received. Please forgive us that we won't inform you again
if there are any technology or software updates on our product.
ROLLING SIGNAGE
- 2 -
Waarschuwing-Om het risico op letsel te verminderen, moet de
gebruiker de handleiding zorgvuldig lezen .
Compliance is een EG-veiligheidscertificering.
CORRECTE VERWIJDERING
Dit product valt onder de bepalingen van de Europese richtlijn
2012/19/EG. Het symbool met een doorgestreepte afvalcontainer
geeft aan dat het product in de Europese Unie een aparte
afvalinzameling vereist. Dit geldt voor het product en alle
accessoires die met dit symbool zijn gemarkeerd. Producten die als
zodanig gemarkeerd zijn, mogen niet met het normale huisvuil
worden weggegooid, maar moeten naar een inzamelpunt voor
recycling van elektrische en elektronische apparaten worden
gebracht
IMPORTANT SAFEGUARDS
WAARSCHUWING
LEES DEZE INSTRUCTIES VOLLEDIG EN ZORGVULDIG
WAARSCHUWING: HET NIET VOLGEN VAN DEZE INSTRUCTIES EN
WAARSCHUWINGEN KAN LEIDEN TOT DOOD, ERNSTIG LETSEL OF
AANZIENLIJKE SCHADE AAN EIGENDOMMEN. LEES EN VOLG DEZE
WAARSCHUWINGEN EN INSTRUCTIES VOOR UW BESCHERMING
ZORGVULDIG VOORDAT U DEZE APPARATUUR INSTALLEERT OF
ONDERHOUDT. DEZE INSTRUCTIES PROBEER DAT NIET
BEDEK ALLE INSTALLATIE- EN ONDERHOUDSITUATIES. ALS U DEZE
INSTRUCTIES NIET BEGRIJPT OF
AANVULLENDE INFORMATIE IS VEREIST. NEEM CONTACT OP MET DE
FABRIKANT.
BELANGRIJKE VEILIGHEIDSMAATREGELEN: BIJ GEBRUIK VAN
ELEKTRISCHE APPARATUUR MOETEN ALTIJD DE FUNDAMENTELE
VEILIGHEIDSMAATREGELEN
GEVOLGD, WAARONDER HET VOLGENDE:

- 3 -
1. Niet buitenshuis gebruiken.
2. Apparatuur moet worden gemonteerd op locaties en op hoogtes waar er niet
mee kan worden geknoeid door onbevoegd personeel.
3. Niet monteren in de buurt van gas- of elektrische verwarmingstoestellen. Houd
brandbaar materiaal uit de buurt van hete onderdelen.
4. Dek ongebruikte draden af met meegeleverde draadmoeren of op een andere
goedgekeurde manier. Gebruik deze apparatuur niet voor een ander doel dan
waarvoor deze bedoeld is. Het gebruik van accessoires die niet door de fabrikant
worden aanbevolen, maakt de garantie ongeldig en kan een onveilige toestand.
5. Voordat u bedrading op de voeding aansluit, schakelt u de elektriciteit uit via de
zekering of stroomonderbreker.
6. Wees voorzichtig bij het onderhoud van batterijen.
7. Installatie en onderhoud moeten worden uitgevoerd door gekwalificeerd
personeel. Raadpleeg de plaatselijke bouwvoorschriften voor goedgekeurde
bedrading en installatie. Zorg ervoor dat de draadaansluitingen goed vastzitten en
dat de kabels goed in de juiste draadkanalen zijn weggestopt.
WAARSCHUWING: MAAK NOOIT VERBINDING MET, ONTKOPPEL VAN OF
ONDERHOUD GEEN ONDERHOUD WANNEER DE APPARATUUR
BEKRACHTIGD IS.
BEWAAR DEZE INSTRUCTIES
FCC INFORMATION
VOORZICHTIGHEID:
Wijzigingen of aanpassingen die niet uitdrukkelijk zijn goedgekeurd door de partij
die verantwoordelijk is voor naleving kunnen de bevoegdheid van de gebruiker om
de apparatuur te bedienen ongeldig maken!
Dit apparaat voldoet aan Deel 15 van de FCC-regels. De werking is onderworpen
aan de volgende twee voorwaarden:
1) Dit product kan schadelijke interferentie veroorzaken.
2)Dit product moet alle ontvangen interferentie accepteren, inclusief interferentie
die een ongewenste werking kan veroorzaken.
WAARSCHUWING:
Wijzigingen of aanpassingen aan dit product die niet uitdrukkelijk zijn goedgekeurd

- 4 -
door de partij die verantwoordelijk is voor naleving kunnen de bevoegdheid van de
gebruiker om het product te bedienen ongeldig maken.
Opmerking:
Dit product is getest en voldoet aan de limieten voor een digitaal apparaat van
Klasse B overeenkomstig Deel 15 van de FCC-regels. Deze limieten zijn bedoeld
om redelijke bescherming te bieden tegen schadelijke interferentie in een
residentiële installatie.
Dit product genereert, gebruikt en kan radiofrequentie-energie uitstralen, en als
het niet wordt geïnstalleerd en gebruikt in overeenstemming met de instructies,
kan het schadelijke interferentie aan radiocommunicatie veroorzaken. Er is echter
geen garantie dat er geen interferentie zal optreden in een bepaalde installatie. Als
dit product schadelijke interferentie veroorzaakt aan radio- of televisieontvangst,
wat kan worden vastgesteld door het product uit en weer in te schakelen, wordt de
gebruiker aangeraden te proberen de interferentie te corrigeren door een of meer
van de volgende maatregelen.
· Heroriënteer of verplaats de ontvangstantenne.
· Vergroot de afstand tussen het product en de ontvanger.
· Sluit het product aan op een stopcontact op een ander circuit dan dat waarop de
ontvanger is aangesloten.
· Raadpleeg de dealer of een ervaren radio-/tv-technicus voor hulp.

- 5 -
PRODUCT PARAMETERS
MODEL
Elektrische
parameters
Pixel
dichtheid
schermresolutie
P10-1696RGB
Europeese Unie:
AC220-240V 50Hz
EU-STEKKER
P10
(10 mm
afstand tussen
punten)
16x96 stippen.
Noord Amerika:
AC120V 60Hz
Amerikaanse
stekker
Australië:
AC220-240V 50Hz
AUS-PLUG
P10-3296RGB
Europeese Unie:
AC220-240V 50Hz
EU-STEKKER
P10
(10 mm
afstand tussen
punten)
32 x 96 stippen.
Noord Amerika:
AC120V 60Hz
Amerikaanse
stekker
Australië:
AC220-240V 50Hz
AUS-PLUG
P10-16128RGB
Europeese Unie:
AC220-240V 50Hz
EU-STEKKER
- 6 -
P10
(10 mm
afstand tussen
punten)
16 x 128 stippen.
Noord Amerika:
AC120V 60Hz
Amerikaanse
stekker
Australië:
AC220-240V 50Hz
AUS-PLUG
P6-64160RGB
Europeese Unie:
AC220-240V 50Hz
EU-STEKKER
P6
(6 mm afstand
tussen
punten)
64 x 160 punten.
Noord Amerika:
AC120V 60Hz
Amerikaanse
stekker
Australië:
AC220-240V 50Hz
AUS-PLUG
P5-64128RGB
Europeese Unie:
AC220-240V 50Hz
EU-STEKKER
P5
(5 mm afstand
tussen
punten)
64 x 128 stippen.
Noord Amerika:
AC120V 60Hz
Amerikaanse
stekker
Australië:
AC220-240V 50Hz
AUS-PLUG
Bijlage: Alle modellen leveren een U-schijf met installatiesoftware(
Geschikt voor Windows), houd er rekening mee dat de software dat wel
is niet geschikt voor Apple-computers
Software: Android mobiele telefoonsysteem, Apple mobiele
telefoonsysteem .

- 7 -
THE FOLLOWING ARE THE OPERATION STEPS
Hieronder volgen de bedieningsstappen:
De computerbedieningsstappen:
Stap 1: plaats de USB-flashdisk in de computer, open de USB-flashdisk,
verplaats de gecomprimeerd bestand naar het bureaublad van de
computer voor decompressie (merk op dat de software dat niet is geschikt
voor Apple-computers)
Stap 2: open de uitgepakte map, zoek hd2020 en dubbelklik om deze te
openen
Stap 3: Klik op taal om een taaltype te selecteren
Stap 4: Klik op Instellingen, selecteer Systeeminstellingen en voer het
wachtwoord in
Het wachtwoord is 168
- 8 -
Stap 5: Scherminstelling : Breedte96, Hoogte16
Apparaattype: HD-WF1
Klik op Hardware-instellingen, Paneelscan: (C39)
Nadat alle instellingen zijn voltooid, klikt u op OK
Stap 6: klik op de tekst
Stap 7: voer de gewenste tekst in en bewerk deze in het zwarte
dialoogvenster
Stap 8: klik op "exporteren naar U-schijf" om de USB-flashschijf te
exporteren en klik op OK
Stap 9: succesvol exporteren. Of u de USB-flashschijf wilt verwijderen, klik
op OK

- 9 -
Stap 10: trek de USB-flashdisk eruit . Nadat het apparaat is ingeschakeld,
plaatst u de USB-flashschijf in het beeldscherm scherm. Trek na ongeveer
5-6 seconden de USB-flashschijf eruit

- 10 -
Mobiele WIFI-gebruikershandleiding (Universele versie voor
schermbediening)
Stap 1: scan OF code om te downloaden
Stap 2: Zoek eerst de WIFI-hotspot van de controlekaart en klik op
Verbinden, wachtwoord: 88888888
Stap 3: Op de apparaatinterface gaat de stuurkaart automatisch
online
Stap 4: Klik op Hardware-instellingen, wachtwoord: 888
Stap 5: Programma-interface - Nieuw display
Stap 6: Schermparameterinstelling
Stap 7: Bewerk het programma - klik op Verzenden

- 11 -
FAULTS AND REMEDIES
1. Als het product kromgetrokken is, reset het dan volgens de instructies.
2. Als een bord niet helder of onvoldoende is wanneer het product werkt, zit de
kabel in het product los. U kunt het achterbord openen, aan de kabel trekken en
deze weer aansluiten.
3. Als meerdere lampkralen niet oplichten wanneer het product werkt, moet u
contact opnemen met de klantenservice om de module te vervangen.
4. Als u problemen ondervindt, neem dan snel contact op met onze
klantenservice, zodat wij deze sneller voor u kunnen oplossen.
- 12 -
Fabrikant: Shanghaimuxinmuyeyouxiangongsi
Adres: Baoshanqu Shuangchenglu 803long 11hao 1602A-1609shi
Shanghai
Geïmporteerd naar AUS: SIHAO PTY LTD, 1 ROKEVA
STREETEASTWOOD NSW 2122 Australië
Geïmporteerd naar de VS: Sanven Technology Ltd.
Suite 250 , 9166 Anaheim Place, Rancho Cucamonga, CA 91730
Gemaakt in China
REP
EC
SHUNSHUN GmbH
Römeräcker 9 Z2021,76351
Linkenheim-Hochstetten,Germany
euvertreter@gmail.com
+49 1727041930
REP
UK
Pooledas Group Ltd
Unit 5 Albert Edward House, The
Pavilions Preston, United Kingdom
pooledas12[email protected]
Tel: 01772418127


Teknisk Support och e-garanticertifikat www . vevor . se/support
RULLANDE SKYLTAR
We continue to be committed to provide you tools with competitive price.
"Save Half", "Half Price" or any other similar expressions used by us only represents an
estimate of savings you might benefit from buying certain tools with us compared to the major
top brands and does not necessarily mean to cover all categories of tools offered by us. You
are kindly reminded to verify carefully when you are placing an order with us if you are
actually saving half in comparison with the top major brands.


- 1 -
Have product questions? Need technical support? Please feel free to
contact us:
Technical Support and E-Warranty Certificate
www. vevor. com/support
NEED HELP? CONTACT US!
This is the original instruction, please read all manual instructions
carefully before operating. VEVOR reserves a clear interpretation of our
user manual. The appearance of the product shall be subject to the
product you received. Please forgive us that we won't inform you again
if there are any technology or software updates on our product.
ROLLING SIGNAGE

- 2 -
Varning - För att minska risken för skada måste användaren läsa
instruktionerna noggrant .
Överensstämmelse är en EG-säkerhetscertifiering.
KORREKT AVFALLSHANTERING
Denna produkt omfattas av bestämmelserna i det europeiska
direktivet 2012/19/EC. Symbolen som visar en soptunna korsad
anger att produkten kräver separat sophämtning i EU. Detta gäller
för produkten och alla tillbehör märkta med denna symbol.
Produkter märkta som sådana får inte slängas tillsammans med
vanligt hushållsavfall, utan måste lämnas till en insamlingsplats för
återvinning av elektriska och elektroniska apparater
IMPORTANT SAFEGUARDS
VARNING
LÄS DESSA INSTRUKTIONER HELT OCH NOGGRANT
VARNING: UNDERLÅTANDE ATT FÖLJA DESSA INSTRUKTIONER OCH
VARNINGAR KAN RESULTERA I DÖDSFALL, ALLVARLIG SKADA ELLER
BETYDANDE EGENDOMSSKADA. FÖR DITT SKYDD LÄS OCH FÖLJ DESSA
VARNINGAR OCH INSTRUKTIONER
FÖRSIKTIGT INNAN DU INSTALLERAR ELLER UNDERHÅLLER DENNA
UTRUSTNING. DESSA INSTRUKTIONER FÖRSÖKER INTE
TÄCKAR ALLA INSTALLATIONS- OCH UNDERHÅLLSSITUATIONER. OM DU
INTE FÖRSTÅR DESSA INSTRUKTIONER ELLER
YTTERLIGARE INFORMATION KRÄVS, KONTAKTA TILLVERKAREN.
VIKTIGA SÄKERHETSÅTGÄRDER: VID ANVÄNDNING AV ELEKTRISK
UTRUSTNING BÖR ALLTID GRUNDLÄGGANDE SÄKERHETSÅTGÄRDER
VARA
FÖLJDE, INKLUSIVE FÖLJANDE:
1. Använd inte utomhus.
2. Utrustning bör monteras på platser och på höjder där den inte kommer att
utsättas för manipulering av obehörig personal.

- 3 -
3. Montera inte nära gas- eller elvärmare. Håll brännbart material borta från heta
delar.
4. Koppla över oanvända trådar med bifogade trådmuttrar eller andra godkända
metoder. Använd inte denna utrustning för annat än den avsedda användningen.
Användning av tillbehörsutrustning som inte rekommenderas av tillverkaren
upphäver garantin och kan orsaka osäkert tillstånd.
5. Stäng av strömmen vid säkring eller strömbrytare innan du kopplar in
strömförsörjningen.
6. Var försiktig när du servar batterier.
7. Installation och service ska utföras av kvalificerad personal. Konsultera lokala
byggregler för godkänd ledning och installation. Se till att ledningsavslutningarna
är säkra och att ledningarna är ordentligt instoppade i lämpliga ledningskanaler.
VARNING: ANSLUTA ALDRIG TILL, KOPPLA FRÅN ELLER SERVICE NÄR
UTRUSTNINGEN ÄR STRÖM.
SPARA DESSA INSTRUKTIONER
FCC INFORMATION
VARNING:
Ändringar eller modifieringar som inte uttryckligen godkänts av den part som
ansvarar för överensstämmelse kan ogiltigförklara användarens behörighet att
använda utrustningen!
Denna enhet uppfyller del 15 av FCC-reglerna. Driften är föremål för följande två
villkor:
1) Denna produkt kan orsaka skadliga störningar.
2) Denna produkt måste acceptera alla mottagna störningar, inklusive störningar
som kan orsaka oönskad funktion.
VARNING:
Ändringar eller modifieringar av denna produkt som inte uttryckligen godkänts av
den part som är ansvarig för efterlevnaden kan upphäva användarens behörighet
att använda produkten.
Notera:
Denna produkt har testats och befunnits överensstämma med gränserna för en
digital enhet av klass B i enlighet med del 15 av FCC-reglerna. Dessa gränser är

- 4 -
utformade för att ge rimligt skydd mot skadlig störning i en bostadsinstallation.
Denna produkt genererar, använder och kan utstråla radiofrekvensenergi, och om
den inte installeras och används i enlighet med instruktionerna kan den orsaka
skadliga störningar på radiokommunikation. Det finns dock ingen garanti för att
störningar inte kommer att inträffa i en viss installation. Om denna produkt orsakar
skadliga störningar på radio- eller tv-mottagning, vilket kan fastställas genom att
stänga av och på produkten, uppmanas användaren att försöka korrigera
störningen med en eller flera av följande åtgärder.
· Rikta om eller flytta mottagningsantennen.
· Öka avståndet mellan produkten och mottagaren.
· Anslut produkten till ett uttag på en annan krets än den som mottagaren är
ansluten till.
· Kontakta återförsäljaren eller en erfaren radio/TV-tekniker för hjälp.
PRODUCT PARAMETERS
- 5 -
MODELL
Elektriska
parametrar
Pixel densitet
skärmupplösning
P10-1696RGB
Europeiska
unionen:
AC220-240V 50Hz
EU-KOPPLING
P10
(10 mm
avstånd
mellan
prickarna)
16 x 96 punkter.
Nordamerika:
AC120V 60Hz
US PLUG
Australien:
AC220-240V 50Hz
AUS PLUG
P10-3296RGB
Europeiska
unionen:
AC220-240V 50Hz
EU-KOPPLING
P10
(10 mm
avstånd
mellan
prickarna)
32 x 96 punkter.
Nordamerika:
AC120V 60Hz
US PLUG
Australien:
AC220-240V 50Hz
AUS PLUG
P10-16128RGB
Europeiska
unionen:
AC220-240V 50Hz
EU-KOPPLING
P10
(10 mm
avstånd
mellan
prickarna)
16 x 128 punkter.
Nordamerika:
AC120V 60Hz
US PLUG
Australien:
AC220-240V 50Hz
AUS PLUG
- 6 -
P6-64160RGB
Europeiska
unionen:
AC220-240V 50Hz
EU-KOPPLING
P6
(6 mm avstånd
mellan
prickarna)
64 x 160 punkter.
Nordamerika:
AC120V 60Hz
US PLUG
Australien:
AC220-240V 50Hz
AUS PLUG
P5-64128RGB
Europeiska
unionen:
AC220-240V 50Hz
EU-KOPPLING
P5
(5 mm avstånd
mellan
prickarna)
64 x 128 punkter.
Nordamerika:
AC120V 60Hz
US PLUG
Australien:
AC220-240V 50Hz
AUS PLUG
Bilaga: Alla modeller levererar en U-skiva med installationsprogram(
Lämplig för Windows ), observera att programvaran är inte lämplig för
Apple-datorer
Programvara: Android-mobilsystem, Apple-mobiltelefonsystem .
THE FOLLOWING ARE THE OPERATION STEPS
Följande är operationsstegen:
Datordriftsstegen:
Steg 1: sätt in USB-flashdisken i datorn, öppna USB-flashdisken, flytta
komprimerad fil till datorns skrivbord för dekomprimering (observera att
programvaran inte är det lämplig för Apple-datorer)
- 7 -
Steg 2: öppna den uppackade mappen, hitta hd2020 och dubbelklicka för
att öppna den
Steg 3: Klicka på språk för att välja en språktyp
Steg 4: Klicka på Inställningar, välj Systeminställningar, ange lösenord
Lösenordet är 168
Steg 5: Skärminställning : Bredd96, Höjd16
Enhetstyp: HD-WF1
Klicka på Hardware Settings, Panel Scan :(C39)
När alla inställningar är klara klickar du på OK

- 8 -
Steg 6: klicka på texten
Steg 7: skriv in och redigera texten du vill ha i den svarta dialogrutan
Steg 8: klicka på "exportera till U-disk" för att exportera USB-flashdisk och
klicka på OK
Steg 9: exportera framgångsrikt. Om du vill dra ut USB-flashdisken, klicka
på OK
- 9 -
Steg 10: dra ut USB- flashdisken . När strömmen slagits på sätter du in
USB-flashdisken i displayen skärm. Efter cirka 5-6 sekunder drar du ut
USB-minnet

- 10 -
Mobil WIFI användarmanual (Universal version för skärmkontroll)
Steg 1: skanna ELLER kod för att ladda ner
Steg 2: Hitta först WIFI-hotspot för kontrollkortet och klicka på Anslut,
lösenord :88888888
Steg 3: På enhetens gränssnitt går kontrollkortet automatiskt online
Steg 4: Klicka på Maskinvaruinställningar, lösenord: 888
Steg 5: Programgränssnitt - Ny display
Steg 6: Skärmparameterinställning
Steg 7: Redigera programmet - klicka på Skicka

- 11 -
FAULTS AND REMEDIES
1. Om produkten är skev, vänligen återställ den enligt instruktionerna.
2. Om en bräda inte är ljus eller otillräcklig när produkten fungerar, är kabeln
inuti produkten lös. Du kan öppna ryggplattan, dra i kabeln och koppla in den
igen.
3. Om flera lamppärlor inte lyser när produkten fungerar måste du kontakta
kundtjänst för att byta ut modulen.
4. Om du har några problem, vänligen kontakta vår kundtjänst snabbt och låt
oss lösa dem åt dig snabbare.

- 12 -
Tillverkare: Shanghaimuxinmuyeyouxiangongsi
Adress: Baoshanqu Shuangchenglu 803long 11hao 1602A-1609shi
Shanghai
Importerad till AUS: SIHAO PTY LTD, 1 ROKEVA STREETEASTWOOD
NSW 2122 Australien
Importerad till USA: Sanven Technology Ltd.
Suite 250 , 9166 Anaheim Place, Rancho Cucamonga, CA 91730
Tillverkad i Kina
REP
EC
SHUNSHUN GmbH
Römeräcker 9 Z2021,76351
Linkenheim-Hochstetten,Germany
euvertreter@gmail.com
+49 1727041930
REP
UK
Pooledas Group Ltd
Unit 5 Albert Edward House, The
Pavilions Preston, United Kingdom
pooledas12[email protected]
Tel: 01772418127


Técnico Certificado de soporte y garantía electrónica www . vevor . es/soporte
SEÑALIZACIÓN RODANTE
We continue to be committed to provide you tools with competitive price.
"Save Half", "Half Price" or any other similar expressions used by us only represents an
estimate of savings you might benefit from buying certain tools with us compared to the major
top brands and does not necessarily mean to cover all categories of tools offered by us. You
are kindly reminded to verify carefully when you are placing an order with us if you are
actually saving half in comparison with the top major brands.

- 1 -
Have product questions? Need technical support? Please feel free to
contact us:
Technical Support and E-Warranty Certificate
www. vevor. com/support
NEED HELP? CONTACT US!
This is the original instruction, please read all manual instructions
carefully before operating. VEVOR reserves a clear interpretation of our
user manual. The appearance of the product shall be subject to the
product you received. Please forgive us that we won't inform you again
if there are any technology or software updates on our product.
ROLLING SIGNAGE

- 2 -
Advertencia: para reducir el riesgo de lesiones, el usuario debe leer
atentamente el manual de instrucciones .
El cumplimiento es una certificación de seguridad CE.
ELIMINACIÓN CORRECTA
Este producto está sujeto a las disposiciones de la Directiva
Europea 2012/19/CE. El símbolo que muestra un contenedor con
ruedas tachado indica que el producto requiere recogida selectiva
de basura en la Unión Europea. Esto se aplica al producto y a todos
los accesorios marcados con este símbolo. Los productos
marcados como tales no podrán desecharse con la basura
doméstica normal, sino que deberán llevarse a un punto de
recogida para el reciclaje de aparatos eléctricos y electrónicos.
IMPORTANT SAFEGUARDS
ADVERTENCIA
LEA ESTAS INSTRUCCIONES COMPLETA Y DETENIDAMENTE
ADVERTENCIA: EL NO SEGUIR ESTAS INSTRUCCIONES Y ADVERTENCIAS
PUEDE RESULTAR EN LA MUERTE, LESIONES GRAVES O
DAÑOS MATERIALES SIGNIFICATIVOS. PARA SU PROTECCIÓN, LEA Y
SIGA ESTAS ADVERTENCIAS E INSTRUCCIONES
CUIDADOSAMENTE ANTES DE INSTALAR O MANTENER ESTE EQUIPO.
ESTAS INSTRUCCIONES NO INTENTAN
CUBRA TODAS LAS SITUACIONES DE INSTALACIÓN Y MANTENIMIENTO.
SI NO ENTIENDE ESTAS INSTRUCCIONES O
SE REQUIERE INFORMACIÓN ADICIONAL, CONTACTE AL FABRICANTE.
MEDIDAS DE SEGURIDAD IMPORTANTES: AL UTILIZAR EQUIPOS
ELÉCTRICOS, SIEMPRE DEBEN TENERSE EN CUENTA LAS
PRECAUCIONES BÁSICAS DE SEGURIDAD.
SEGUIDO, INCLUYENDO LO SIGUIENTE:
1. No utilizar al aire libre.
2. El equipo debe montarse en lugares y alturas donde no esté sujeto a

- 3 -
manipulación por parte de personal no autorizado.
3. No lo monte cerca de calentadores de gas o eléctricos. Mantenga el material
combustible alejado de las piezas calientes.
4. Tape los cables no utilizados con las tuercas para cables incluidas u otros
métodos aprobados. No utilice este equipo para otro uso que no sea el previsto. El
uso de equipos accesorios no recomendados por el fabricante anulará la garantía
y puede causar un condición insegura.
5. Antes de realizar el cableado a la fuente de alimentación, apague la electricidad
mediante el fusible o el disyuntor.
6. Tenga cuidado al dar servicio a las baterías.
7. La instalación y el servicio deben ser realizados por personal calificado.
Consulte el código de construcción local para conocer el cableado y la instalación
aprobados. Asegúrese de que las terminaciones de los cables estén seguras y
que los cables estén correctamente metidos en los canales de cables apropiados.
ADVERTENCIA: NUNCA CONECTE, DESCONECTE O DAR SERVICIO
MIENTRAS EL EQUIPO ESTÉ ENERGIZADO.
GUARDA ESTAS INSTRUCCIONES
FCC INFORMATION
PRECAUCIÓN:
¡Los cambios o modificaciones no aprobados expresamente por la parte
responsable del cumplimiento podrían anular la autoridad del usuario para operar
el equipo!
Este dispositivo cumple con la Parte 15 de las normas de la FCC. La operación
está sujeta a las dos condiciones siguientes:
1) Este producto puede causar interferencias perjudiciales.
2) Este producto debe aceptar cualquier interferencia recibida, incluidas las
interferencias que puedan causar un funcionamiento no deseado.
ADVERTENCIA:
Los cambios o modificaciones a este producto que no estén aprobados
expresamente por la parte responsable del cumplimiento podrían anular la
autoridad del usuario para operar el producto.
Nota:

- 4 -
Este producto ha sido probado y cumple con los límites para un dispositivo digital
Clase B de conformidad con la Parte 15 de las reglas de la FCC. Estos límites
están diseñados para brindar una protección razonable contra interferencias
dañinas en una instalación residencial.
Este producto genera, usa y puede irradiar energía de radiofrecuencia y, si no se
instala y usa de acuerdo con las instrucciones, puede causar interferencias
dañinas en las comunicaciones por radio. Sin embargo, no hay garantía de que no
se produzcan interferencias en una instalación en particular. Si este producto
causa interferencias dañinas en la recepción de radio o televisión, lo cual se
puede determinar apagando y encendiendo el producto, se recomienda al usuario
que intente corregir la interferencia mediante una o más de las siguientes
medidas.
· Reorientar o reubicar la antena receptora.
· Aumentar la distancia entre el producto y el receptor.
· Conecte el producto a una toma de corriente de un circuito diferente al que está
conectado el receptor.
· Consulte al distribuidor o a un técnico experimentado en radio/TV para obtener
ayuda.
- 5 -
PRODUCT PARAMETERS
MODELO
Parámetros
eléctricos
Densidad de
pixeles
resolución de
pantalla
P10-1696RGB
Unión Europea:
CA 220-240 V 50
Hz.
ENCHUFE UE
P10
(distancia de
10 mm entre
puntos)
16 x 96 puntos.
América del norte:
CA 120 V 60 Hz.
ENCHUFE DE EE.
UU.
Australia:
CA 220-240 V 50
Hz.
ENCHUFE AUS
P10-3296RGB
Unión Europea:
CA 220-240 V 50
Hz.
ENCHUFE UE
P10
(distancia de
10 mm entre
puntos)
32 x 96 puntos.
América del norte:
CA 120 V 60 Hz.
ENCHUFE DE EE.
UU.
Australia:
CA 220-240 V 50
Hz.
ENCHUFE AUS
P10-16128RGB
Unión Europea:
CA 220-240 V 50
Hz.

- 6 -
ENCHUFE UE
P10
(distancia de
10 mm entre
puntos)
16 x 128 puntos.
América del norte:
CA 120 V 60 Hz.
ENCHUFE DE EE.
UU.
Australia:
CA 220-240 V 50
Hz.
ENCHUFE AUS
P6-64160RGB
Unión Europea:
CA 220-240 V 50
Hz.
ENCHUFE UE
P6
(distancia de 6
mm entre
puntos)
64 x 160 puntos.
América del norte:
CA 120 V 60 Hz.
ENCHUFE DE EE.
UU.
Australia:
CA 220-240 V 50
Hz.
ENCHUFE AUS
P5-64128RGB
Unión Europea:
CA 220-240 V 50
Hz.
ENCHUFE UE
P5
(distancia de 5
mm entre
puntos)
64 x 128 puntos.
América del norte:
CA 120 V 60 Hz.
ENCHUFE DE EE.
UU.
Australia:
CA 220-240 V 50
Hz.
- 7 -
ENCHUFE AUS
Adjunto: Todos los modelos entregan un disco U con software de
instalación (
Adecuado para Windows), tenga en cuenta que el software es no apto
para ordenadores Apple
Software: sistema de telefonía móvil Android, sistema de telefonía móvil
Apple .
THE FOLLOWING ARE THE OPERATION STEPS
Los siguientes son los pasos de la operación:
Los pasos de operación de la computadora:
Paso 1: inserte el disco flash USB en la computadora, abra el disco flash
USB, mueva el archivo comprimido al escritorio de la computadora para
descomprimirlo (tenga en cuenta que el software no adecuado para
ordenadores Apple)
Paso 2: abra la carpeta descomprimida, busque hd2020 y haga doble clic
para abrirlo
Paso 3: haga clic en idioma para seleccionar un tipo de idioma
Paso 4: haga clic en Configuración, seleccione Configuración del sistema,
ingrese la contraseña
- 8 -
La contraseña es 168.
Paso 5: Configuración de pantalla : Ancho96, Alto16
Tipo de dispositivo: HD-WF1
Haga clic en Configuración de hardware, Escaneo del panel: (C39)
Una vez completadas todas las configuraciones, haga clic en Aceptar
Paso 6: haz clic en el texto
Paso 7: ingresa y edita el texto que deseas en el cuadro de diálogo negro
- 9 -
Paso 8: haga clic en "exportar a disco U" para exportar el disco flash USB
y haga clic en Aceptar
Paso 9: exporta con éxito. Si desea extraer el disco flash USB, haga clic
en Aceptar
Paso 10: extraiga el disco flash USB . Después del encendido, inserte el
disco flash USB en la pantalla. pantalla. Después de unos 5 o 6 segundos,
extraiga la memoria flash USB.

- 10 -
Manual de usuario de WIFI móvil (Versión universal de control de
pantalla)
Paso 1: escanea O codifica para descargar
Paso 2: primero busque el punto de acceso WIFI de la tarjeta de
control y haga clic en Conectar, contraseña: 88888888
Paso 3: en la interfaz del dispositivo, la tarjeta de control se conecta
automáticamente
Paso 4: haga clic en Configuración de hardware, contraseña: 888

- 11 -
Paso 5: Interfaz del programa - Nueva pantalla
Paso 6: configuración de parámetros de pantalla
Paso 7: edite el programa; haga clic en Enviar
FAULTS AND REMEDIES
1. Si el producto está deformado, reinícielo según las instrucciones.

- 12 -
2. Si una placa no tiene brillo o es insuficiente cuando el producto está
funcionando, el cable dentro del producto está suelto. Puede abrir el tablero,
tirar del cable y enchufarlo nuevamente.
3. Si varias cuentas de lámpara no se encienden cuando el producto funciona,
debes comunicarte con el servicio al cliente para reemplazar el módulo.
4. Si tiene algún problema, comuníquese con nuestro servicio de atención al
cliente rápidamente y permítanos resolverlo más rápido.
Fabricante: Shanghaimuxinmuyeyouxiangongsi
Dirección: Baoshanqu Shuangchenglu 803long 11hao 1602A-1609shi
Shanghai
Importado a AUS: SIHAO PTY LTD, 1 ROKEVA STREETEASTWOOD
NSW 2122 Australia
Importado a EE. UU.: Sanven Technology Ltd.
Suite 250 , 9166 Anaheim Place, Rancho Cucamonga, CA 91730

- 13 -
Hecho en china
REP
EC
SHUNSHUN GmbH
Römeräcker 9 Z2021,76351
Linkenheim-Hochstetten,Germany
euvertreter@gmail.com
+49 1727041930
REP
UK
Pooledas Group Ltd
Unit 5 Albert Edward House, The
Pavilions Preston, United Kingdom
pooledas12[email protected]
Tel: 01772418127


Tecnico Supporto e certificato di garanzia elettronica www . vevor . com/supporto
SEGNALETICA MOBILE
We continue to be committed to provide you tools with competitive price.
"Save Half", "Half Price" or any other similar expressions used by us only represents an
estimate of savings you might benefit from buying certain tools with us compared to the major
top brands and does not necessarily mean to cover all categories of tools offered by us. You
are kindly reminded to verify carefully when you are placing an order with us if you are
actually saving half in comparison with the top major brands.


- 1 -
Have product questions? Need technical support? Please feel free to
contact us:
Technical Support and E-Warranty Certificate
www. vevor. com/support
NEED HELP? CONTACT US!
This is the original instruction, please read all manual instructions
carefully before operating. VEVOR reserves a clear interpretation of our
user manual. The appearance of the product shall be subject to the
product you received. Please forgive us that we won't inform you again
if there are any technology or software updates on our product.
ROLLING SIGNAGE

- 2 -
Avvertenza: per ridurre il rischio di lesioni, l'utente deve leggere
attentamente il manuale di istruzioni .
La conformità è una certificazione di sicurezza CE.
CORRETTO SMALTIMENTO
Questo prodotto è soggetto alle disposizioni della Direttiva Europea
2012/19/CE. Il simbolo del bidone della spazzatura barrato indica
che nell'Unione Europea il prodotto richiede la raccolta differenziata
dei rifiuti. Ciò vale per il prodotto e tutti gli accessori contrassegnati
da questo simbolo. I prodotti contrassegnati come tali non possono
essere smaltiti con i normali rifiuti domestici, ma devono essere
portati in un punto di raccolta per il riciclaggio di dispositivi elettrici
ed elettronici
IMPORTANT SAFEGUARDS
AVVERTIMENTO
LEGGERE COMPLETAMENTE E ATTENTAMENTE QUESTE ISTRUZIONI
ATTENZIONE: LA MANCATA OSSERVANZA DI QUESTE ISTRUZIONI E
AVVERTENZE PUÒ CAUSARE MORTE, LESIONI GRAVI O
DANNI MATERIALI SIGNIFICATIVI. PER LA VOSTRA TUTELA, LEGGERE E
SEGUIRE QUESTE AVVERTENZE E ISTRUZIONI
CON ATTENZIONE PRIMA DI INSTALLARE O MANUTENERE QUESTA
APPARECCHIATURA. QUESTE ISTRUZIONI NON TENTARONO DI
COPRE TUTTE LE SITUAZIONI DI INSTALLAZIONE E MANUTENZIONE. SE
NON COMPRENDETE QUESTE ISTRUZIONI O
SONO RICHIESTE ULTERIORI INFORMAZIONI, CONTATTARE IL
PRODUTTORE.
PRECAUZIONI IMPORTANTI: QUANDO SI UTILIZZA APPARECCHIATURA
ELETTRICA, LE PRECAUZIONI DI SICUREZZA FONDAMENTALI DEVONO
SEMPRE ESSERE
SEGUITO, COMPRESO QUANTO SEGUE:
1. Non utilizzare all'aperto.

- 3 -
2. L'apparecchiatura deve essere montata in luoghi e ad altezze tali da non essere
soggetta a manomissioni da parte di personale non autorizzato.
3. Non montare vicino a riscaldatori a gas o elettrici. Tenere il materiale
combustibile lontano dalle parti calde.
4. Coprire i cavi non utilizzati con i dadi per cavi inclusi o con altri metodi approvati.
Non utilizzare questa apparecchiatura per un uso diverso da quello previsto. L'uso
di apparecchiature accessorie non consigliate dal produttore annullerà la garanzia
e potrebbe causare un condizioni insicure.
5. Prima di effettuare il collegamento all'alimentazione, disattivare l'elettricità
tramite il fusibile o l'interruttore automatico.
6. Prestare attenzione durante la manutenzione delle batterie.
7. L'installazione e la manutenzione devono essere eseguite da personale
qualificato. Consultare il codice edilizio locale per il cablaggio e l'installazione
approvati. Assicurarsi che le terminazioni dei cavi siano sicure e che i cavi siano
correttamente inseriti nei canali appropriati.
ATTENZIONE: NON COLLEGARSI, SCOLLEGARSI O ASSISTERE MENTRE
L'APPARECCHIATURA È ALIMENTATA.
CONSERVA QUESTE ISTRUZIONI
FCC INFORMATION
ATTENZIONE:
Cambiamenti o modifiche non espressamente approvati dalla parte responsabile
della conformità potrebbero invalidare il diritto dell'utente a utilizzare
l'apparecchiatura!
Questo dispositivo è conforme alla Parte 15 delle norme FCC. Il funzionamento è
soggetto alle seguenti due condizioni:
1) Questo prodotto può causare interferenze dannose.
2)Questo prodotto deve accettare qualsiasi interferenza ricevuta, comprese le
interferenze che potrebbero causare un funzionamento indesiderato.
AVVERTIMENTO:
Cambiamenti o modifiche a questo prodotto non espressamente approvati dalla
parte responsabile della conformità potrebbero annullare l'autorità dell'utente a
utilizzare il prodotto.

- 4 -
Nota:
Questo prodotto è stato testato ed è risultato conforme ai limiti di un dispositivo
digitale di Classe B ai sensi della Parte 15 delle norme FCC. Questi limiti sono
progettati per fornire una protezione ragionevole contro interferenze dannose in
un'installazione residenziale.
Questo prodotto genera, utilizza e può irradiare energia in radiofrequenza e, se
non installato e utilizzato in conformità con le istruzioni, può causare interferenze
dannose alle comunicazioni radio. Tuttavia, non vi è alcuna garanzia che non si
verifichino interferenze in una particolare installazione. Se questo prodotto causa
interferenze dannose alla ricezione radiofonica o televisiva, cosa che può essere
determinata spegnendo e accendendo il prodotto, si consiglia all'utente di provare
a correggere l'interferenza adottando una o più delle seguenti misure.
· Riorientare o riposizionare l'antenna ricevente.
· Aumentare la distanza tra il prodotto e il ricevitore.
· Collegare il prodotto ad una presa su un circuito diverso da quello a cui è
collegato il ricevitore.
· Consultare il rivenditore o un tecnico radio/TV esperto per assistenza.
- 5 -
PRODUCT PARAMETERS
MODELLO
Parametri elettrici
Densità di
pixel
risoluzione dello
schermo
P10-1696RGB
Unione Europea:
CA 220-240 V 50
Hz
SPINA UE
P10
(Distanza tra i
punti 10 mm)
16 x 96 punti.
Nord America:
CA 120 V 60 Hz
SPINA DEGLI
STATI UNITI
Australia:
CA 220-240 V 50
Hz
SPINA AUSTRALIA
P10-3296RGB
Unione Europea:
CA 220-240 V 50
Hz
SPINA UE
P10
(Distanza tra i
punti 10 mm)
32 x 96 punti.
Nord America:
CA 120 V 60 Hz
SPINA DEGLI
STATI UNITI
Australia:
CA 220-240 V 50
Hz
SPINA AUSTRALIA
P10-16128RGB
Unione Europea:
CA 220-240 V 50
Hz
SPINA UE
P10
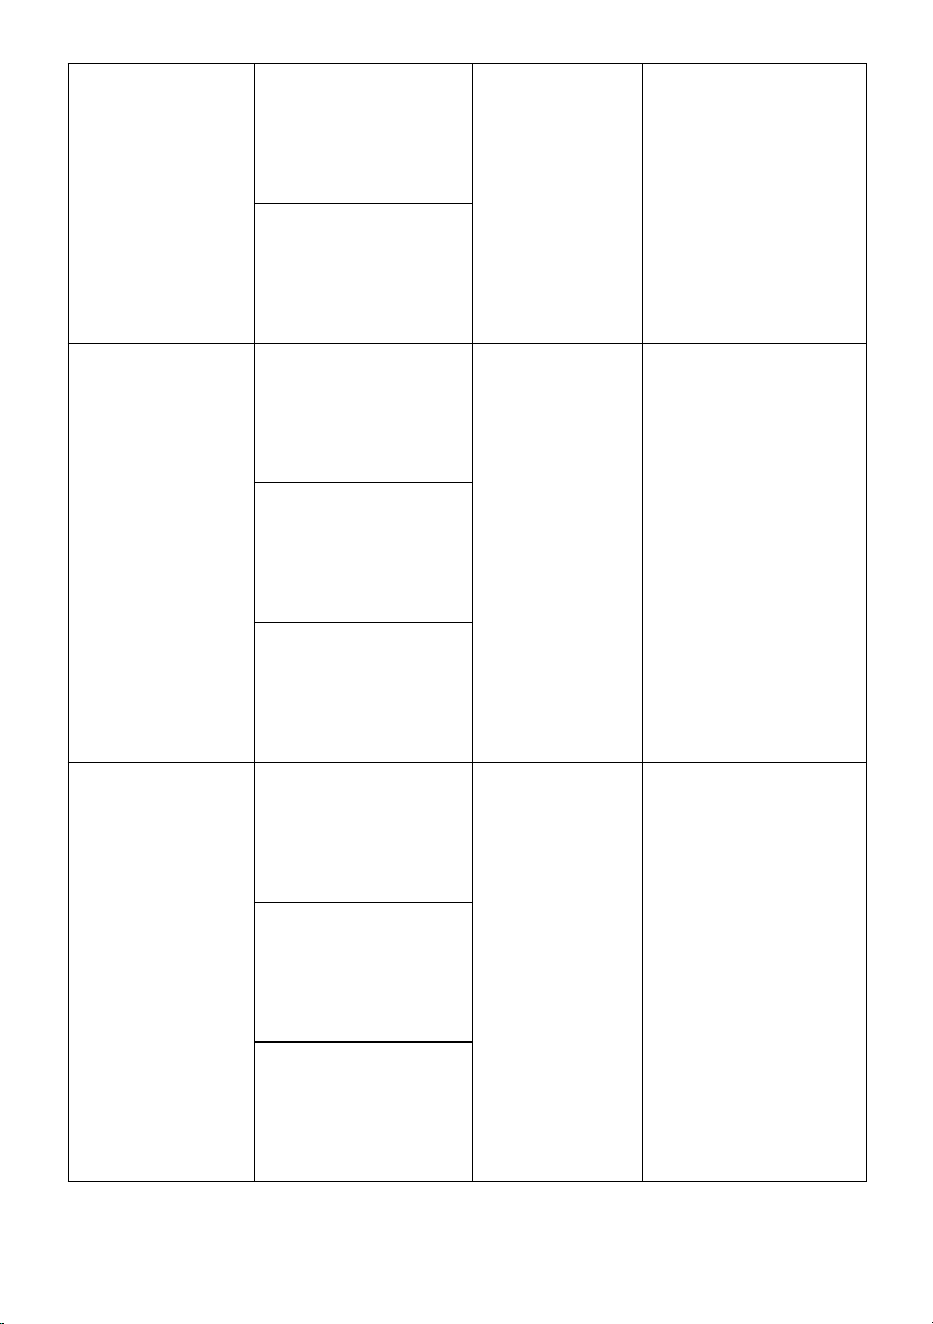
- 6 -
(Distanza tra i
punti 10 mm)
16 x 128 punti.
Nord America:
CA 120 V 60 Hz
SPINA DEGLI
STATI UNITI
Australia:
CA 220-240 V 50
Hz
SPINA AUSTRALIA
P6-64160RGB
Unione Europea:
CA 220-240 V 50
Hz
SPINA UE
P6
(Distanza tra i
punti 6 mm)
64 x 160 punti.
Nord America:
CA 120 V 60 Hz
SPINA DEGLI
STATI UNITI
Australia:
CA 220-240 V 50
Hz
SPINA AUSTRALIA
P5-64128RGB
Unione Europea:
CA 220-240 V 50
Hz
SPINA UE
P5
(Distanza di 5
mm tra i punti)
64 x 128 punti.
Nord America:
CA 120 V 60 Hz
SPINA DEGLI
STATI UNITI
Australia:
CA 220-240 V 50
Hz
SPINA AUSTRALIA
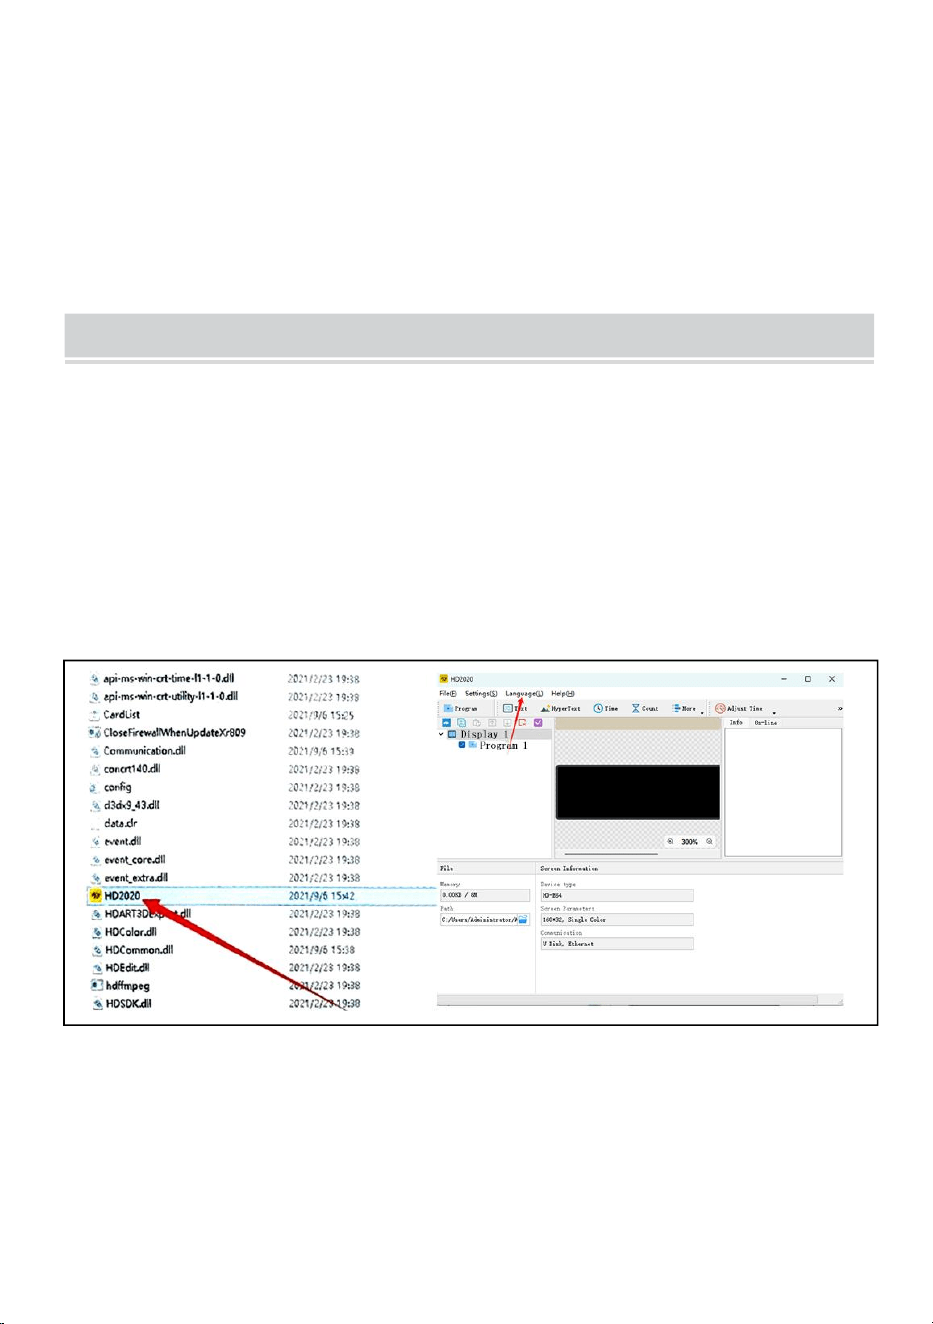
- 7 -
Allegato: tutti i modelli forniscono un disco U con il software di
installazione(
Adatto per Windows), tieni presente che il software lo è non adatto per
computer Apple
Software: sistema di telefonia mobile Android, sistema di telefonia mobile
Apple .
THE FOLLOWING ARE THE OPERATION STEPS
Di seguito sono riportate le fasi operative:
Le fasi operative del computer:
Passaggio 1: inserire il disco flash USB nel computer, aprire il disco flash
USB, spostare il file compresso sul desktop del computer per la
decompressione (nota che il software non è adatto per computer Apple)
Passaggio 2: apri la cartella decompressa, trova hd2020 e fai doppio clic
per aprirla
Passaggio 3: fare clic su lingua per selezionare un tipo di lingua
Passaggio 4: fare clic su Impostazioni, selezionare Impostazioni di sistema,
inserire la password
La password è 168
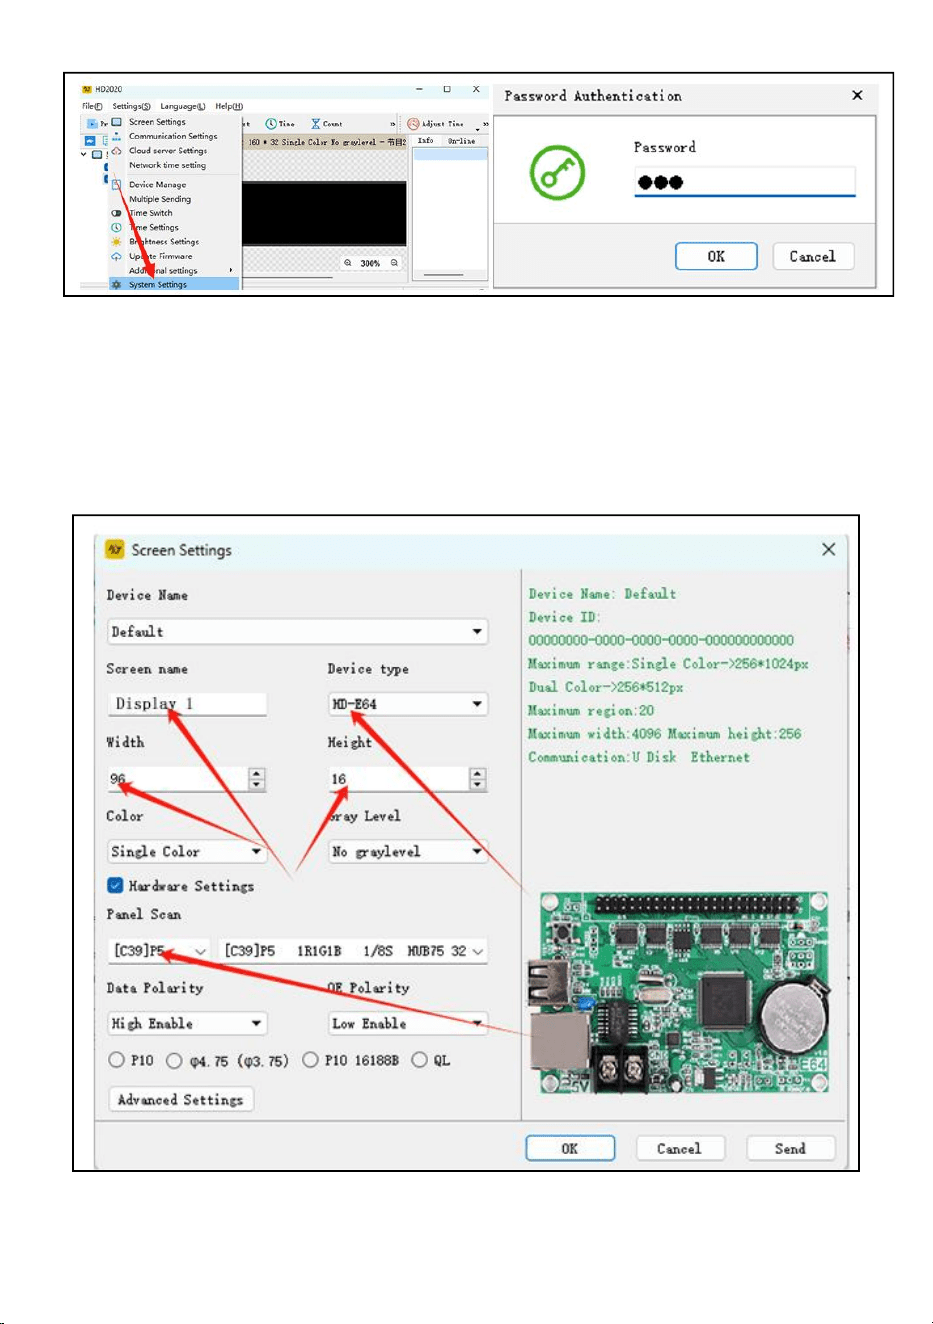
- 8 -
Passaggio 5: impostazione dello schermo : larghezza 96, altezza 16
Tipo di dispositivo: HD-WF1
Fare clic su Impostazioni hardware, Scansione pannello:(C39)
Una volta completate tutte le impostazioni, fare clic su OK
Passaggio 6: fare clic sul testo
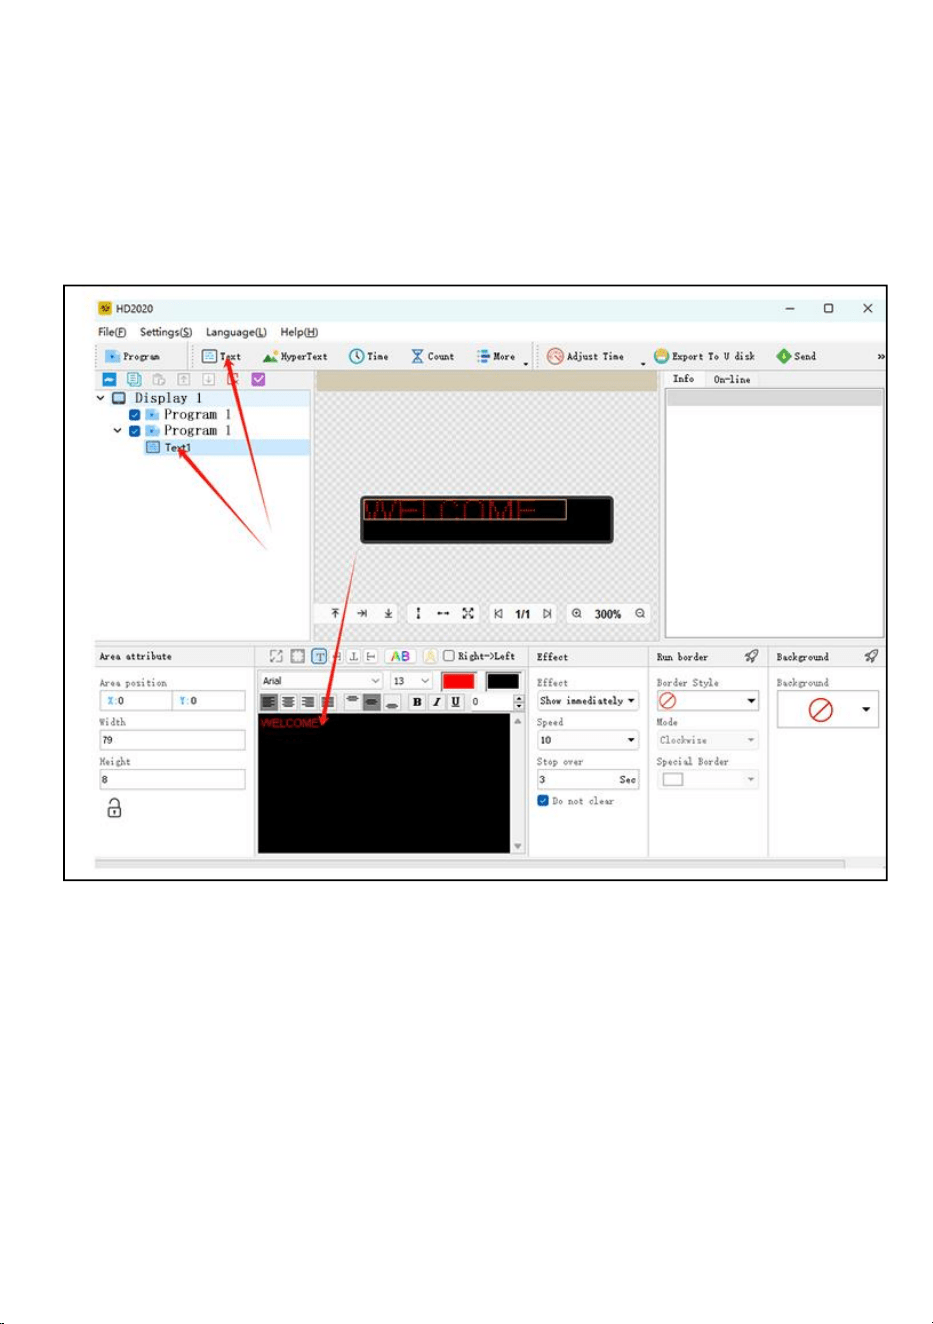
- 9 -
Passaggio 7: inserisci e modifica il testo desiderato nella finestra di dialogo
nera
Passaggio 8: fare clic su "Esporta su disco U" per esportare il disco flash
USB e fare clic su OK
Passaggio 9: esportazione riuscita. Se estrarre il disco flash USB, fare clic
su OK
Passaggio 10: estrarre il disco flash USB . Dopo l'accensione, inserire il
disco flash USB nel display schermo. Dopo circa 5-6 secondi, estrarre il
disco flash USB
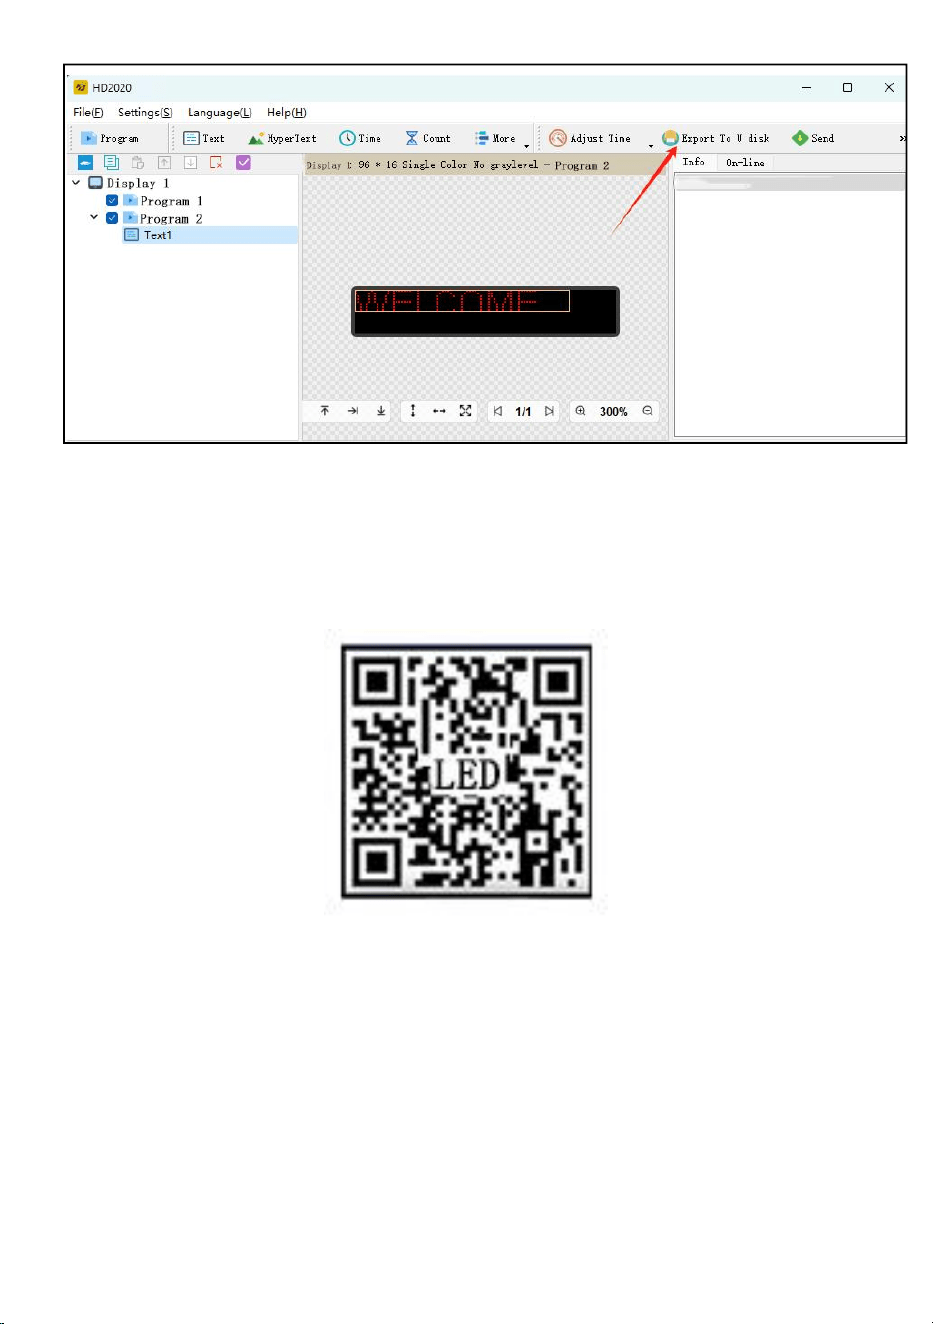
- 10 -
Manuale utente Mobile WIFI (versione universale con controllo dello
schermo)
Passaggio 1: scansiona il codice OR per scaricarlo
Passaggio 2: individuare innanzitutto l'hotspot WIFI della scheda di
controllo e fare clic su Connetti, password:88888888
Passaggio 3: sull'interfaccia del dispositivo, la scheda di controllo va
automaticamente online
Passaggio 4: fare clic su Impostazioni hardware, password: 888
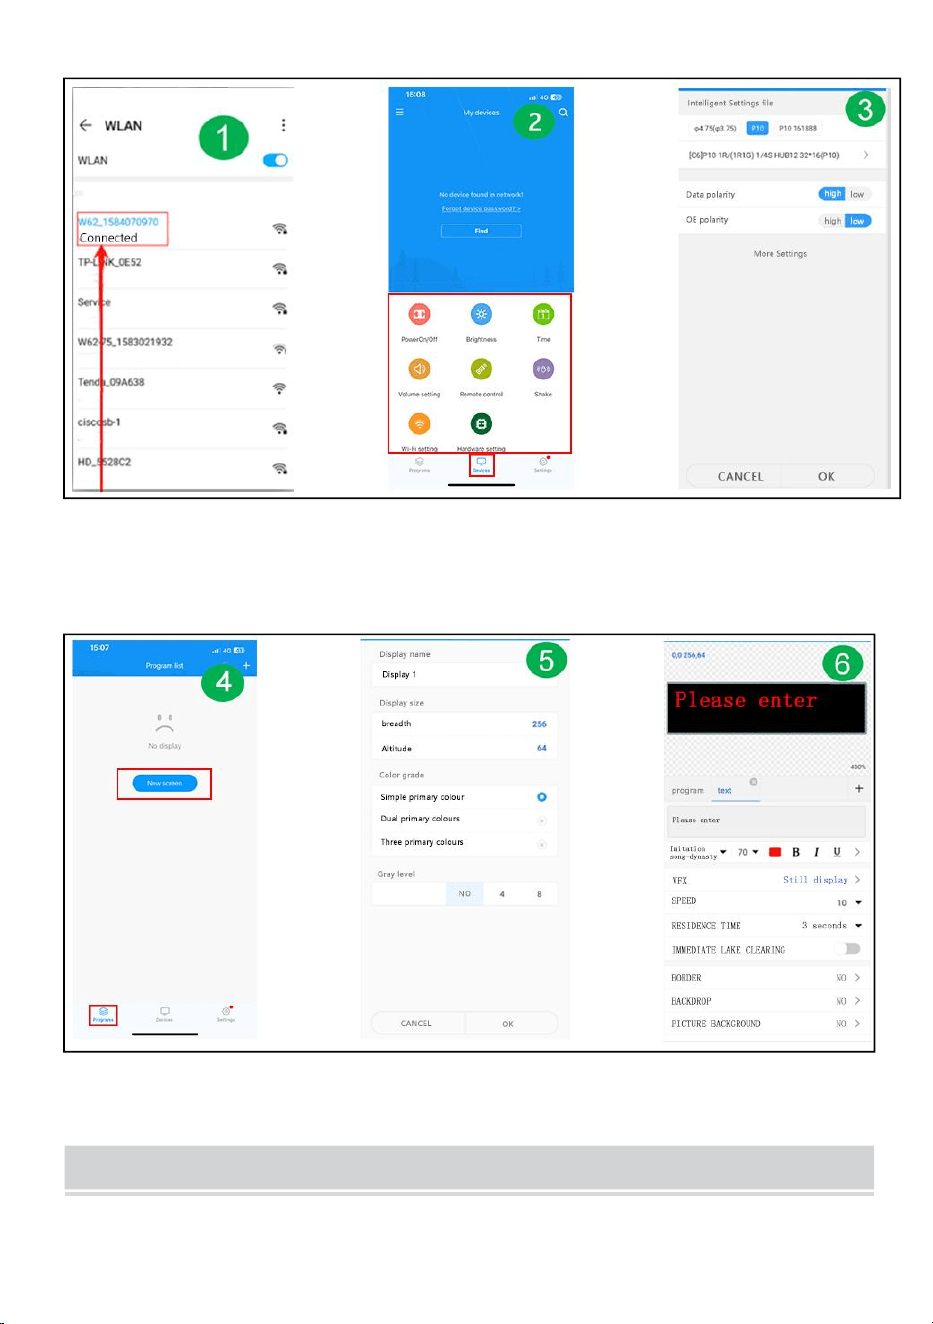
- 11 -
Passaggio 5: interfaccia del programma: nuovo display
Passaggio 6: impostazione dei parametri dello schermo
Passaggio 7: modifica il programma: fai clic su Invia
FAULTS AND REMEDIES
1. Se il prodotto è deformato, ripristinarlo secondo le istruzioni.

- 12 -
2. Se la luminosità della scheda non è sufficiente o è insufficiente quando il
prodotto è in funzione, il cavo all'interno del prodotto è allentato. È possibile
aprire il tabellone, tirare il cavo e ricollegarlo.
3. Se diverse sfere della lampada non si accendono quando il prodotto
funziona, è necessario contattare il servizio clienti per sostituire il modulo.
4. In caso di problemi, contatta rapidamente il nostro servizio clienti e lasciaci
risolverli più rapidamente.
Produttore: Shanghaimuxinmuyeyouxiangongsi
Indirizzo: Baoshanqu Shuangchenglu 803long 11hao 1602A-1609shi
Shanghai
Importato in AUS: SIHAO PTY LTD, 1 ROKEVA STREETEASTWOOD
NSW 2122 Australia
Importato negli Stati Uniti: Sanven Technology Ltd.
Suite 250 , 9166 Anaheim Place, Rancho Cucamonga, CA 91730
- 13 -
Made in China
REP
EC
SHUNSHUN GmbH
Römeräcker 9 Z2021,76351
Linkenheim-Hochstetten,Germany
euvertreter@gmail.com
+49 1727041930
REP
UK
Pooledas Group Ltd
Unit 5 Albert Edward House, The
Pavilions Preston, United Kingdom
pooledas12[email protected]
Tel: 01772418127