Scan to register
bellakitchenware.com
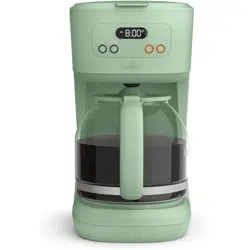
12-Cup Programmable
Coffee Maker
Instruction Manual
12-Cup Programmable
Coffee Maker
Manual de instrucciones y guía de recetas
35194_35203_35204_35205_35206_Bella_12 Cup Prog_CoffeeMaker_IM V3_R6.indd 135194_35203_35204_35205_35206_Bella_12 Cup Prog_CoffeeMaker_IM V3_R6.indd 1 2024-10-18 9:28 AM2024-10-18 9:28 AM

35194_35203_35204_35205_35206_Bella_12 Cup Prog_CoffeeMaker_IM V3_R6.indd 235194_35203_35204_35205_35206_Bella_12 Cup Prog_CoffeeMaker_IM V3_R6.indd 2 2024-10-18 9:28 AM2024-10-18 9:28 AM

TABLE OF CONTENTS
IMPORTANT SAFEGUARDS ................................................................................................................................................ 1-2
SAVE THESE INSTRUCTIONS ................................................................................................................................................2
NOTES ON THE PLUG ..............................................................................................................................................................2
NOTES ON THE CORD.............................................................................................................................................................2
COFFEE YIELD .............................................................................................................................................................................3
GETTING TO KNOW YOUR COFFEE MAKER .................................................................................................................3
CONTROL PANEL ......................................................................................................................................................................3
BEFORE USING FOR THE FIRST TIME .................................................................................................................................4
USING YOUR COFFEE MAKER ............................................................................................................................................4
SETTING THE CLOCK ...............................................................................................................................................................4
PAUSE AND SERVE ....................................................................................................................................................................4
DELAY BREW ..............................................................................................................................................................................5
CLEANING AND MAINTENANCE ......................................................................................................................................5
DESCALING AND CLEANING ..............................................................................................................................................5
HINTS FOR GREAT-TASTING COFFEE ................................................................................................................................5
USER MAINTENANCE INSTRUCTIONS ............................................................................................................................5
LIMITED TWO-YEAR WARRANTY ....................................................................................................................................... 6
ÍNDICE
PRECAUCIONES IMPORTANTES ..................................................................................................................................... 7-8
GUARDE ESTAS INSTRUCCIONES ................................................................................................................................... 8
NOTAS SOBRE EL ENCHUFE .................................................................................................................................................8
NOTAS SOBRE EL CABLE ........................................................................................................................................................8
RENDIMIENTO DEL CAFÉ ...................................................................................................................................................... 9
CONOZCA SU CAFETERA .................................................................................................................................................... 9
PANEL DE CONTROL .............................................................................................................................................................. 9
ANTES DE UTILIZARLA POR PRIMERA VEZ ....................................................................................................................10
CÓMO USAR SU CAFETERA ...............................................................................................................................................10
AJUSTE DEL RELOJ ................................................................................................................................................................. 10
PAUSAR Y SERVIR ....................................................................................................................................................................10
PREPARACIÓN DIFERIDA ................................................................................................................................................10-11
LIMPIEZA Y MANTENIMIENTO ...........................................................................................................................................11
DESCALCIFICACIÓN Y LIMPIEZA ....................................................................................................................................... 11
CONSEJOS PARA UN CAFÉ DE BUEN SABOR ..............................................................................................................11
INSTRUCCIONES DE MANTENIMIENTO PARA EL USUARIO .................................................................................11
GARANTÍA LIMITADA DE DOS AÑOS .............................................................................................................................12
35194_35203_35204_35205_35206_Bella_12 Cup Prog_CoffeeMaker_IM V3_R6.indd 135194_35203_35204_35205_35206_Bella_12 Cup Prog_CoffeeMaker_IM V3_R6.indd 1 2024-10-18 9:28 AM2024-10-18 9:28 AM

1
IMPORTANT SAFEGUARDS
Before using the electrical appliance, the following basic precautions should
always be followed including the following:
1. READ ALL INSTRUCTIONS.
2. Do not let the coffee maker operate without water.
3. Make sure that your outlet voltage corresponds to the voltage stated
on the rating label of the coffee maker.
4. To protect against fire, electric shock and injury to persons do not immerse cord
or plug, in water or any other liquid.
5. Close supervision is necessary when your appliance is operating. Do not leave
the appliance in the standby mode for a long time. Never allow children
or persons with reduced physical, sensory or mental capabilities to operate
the appliance.
6. Unplug from outlet when not in use and before cleaning. Allow the unit to cool
down before putting on or taking off parts, and before cleaning the appliance.
7. Do not operate any appliance with a damaged cord or plug or after
the appliance malfunctions or has been damaged in any manner.
Return appliance to an authorized service facility for examination,
repair or adjustment.
8. The use of attachments not recommended by the appliance manufacturer
may result in fire, electric shock or injury to persons.
9. Do not use outdoors.
10. Place appliance on flat surface or table, do not let cord hang over edge
of table or counter, or touch hot surface.
11. Do not place on or near a hot gas or electric burner, or in a heated oven.
12. Do not use appliance for other than intended use and place it in a
dry environment.
13. To disconnect, off the unit by pressing the BREW/OFF button, remove plug
from wall outlet. Always hold the plug, never pull the cord.
14. Some parts of appliance are hot when operated, do not touch with hand
directly. Use handles or knobs only.
15. The carafe is designed for use with this appliance. It must never be used
on a range top.
16. Do not clean the carafe with cleansers, steel wool pads, or other
abrasive material.
17. Never leave an empty carafe on the keep warm plate, otherwise the carafe
is liable to crack.
18. Never use the appliance if the carafe shows any signs of cracks or carafe
having a loose or weakened handle. Only use the carafe with this appliance.
Use carefully as the carafe is very fragile.
19. Do not set a hot carafe on a hot or cold surface.
20. The appliance must not be immersed.
21. This appliance is intended to be used in households only.
35194_35203_35204_35205_35206_Bella_12 Cup Prog_CoffeeMaker_IM V3_R6.indd 135194_35203_35204_35205_35206_Bella_12 Cup Prog_CoffeeMaker_IM V3_R6.indd 1 2024-10-18 9:28 AM2024-10-18 9:28 AM

2
22. If the supply cord is damaged, it must be replaced by the manufacturer,
its service agent or similarly qualified persons in order to avoid a hazard.
23. This appliance can be used by children aged from 8 years and above if they
have been given supervision or instruction concerning use of the appliance
in a safe way and if they understand the hazards involved. Cleaning and user
maintenance shall not be made by children unless they are older than 8 years
old and supervised. Keep the appliance and its cord out of reach of children
aged less than 8 years.
24. Appliances can be used by persons with reduced physical, sensory or mental
capabilities or lack of experience and knowledge if they have been given
supervision or instruction concerning use of the appliance in a safe way
and understand the hazards involved.
25. Children shall not play with the appliance.
26. Do not touch hot surfaces. Use handles or knobs.
27. Close supervision is necessary when any appliance is used by or near children.
28. Scalding may occur if the lid is removed during the brewing cycles.
SAVE THESE INSTRUCTIONS
HOUSEHOLD USE ONLY
NOTES ON THE PLUG
This appliance has a polarized plug, to reduce the risk of electric shock, this plug
is intended to fit into a polarized outlet only one way, If the plug does not fit fully
into the outlet, reverse the plug, if it still does not fit, contact a qualified electrician,
Do not attempt to modify the plug in any way.
NOTES ON THE CORD
a) A short power-supply cord (or detachable power-supply cord) is provided
to reduce risks resulting from becoming entangled in or tripping
over a longer cord.
b) Longer detachable power-supply cords or extension cords are available
and may be used if care is exercised in their use.
c) If a long detachable power-supply cord or extension cord is used:
1) The marked electrical rating of the detachable power-supply cord
or extension cord should be at least as great as the electrical rating
of the appliance.
2) If the appliance is of the grounded type, the extension cord should be a
grounding type 3-wire cord.
3) The longer cord should be arranged so that it will not drape over
the countertop or table top where it can be pulled on by children
or tripped over.
35194_35203_35204_35205_35206_Bella_12 Cup Prog_CoffeeMaker_IM V3_R6.indd 235194_35203_35204_35205_35206_Bella_12 Cup Prog_CoffeeMaker_IM V3_R6.indd 2 2024-10-18 9:28 AM2024-10-18 9:28 AM

3
COFFEE YIELD
12 Cup Coffee Maker: 12 (5 oz.) cups
NOTE: A 5-oz.cup is the American industry standard and is used by most Coffee
Maker manufacturers. To fill your favorite over-sized mug, fill the Coffee Maker
reservoir with enough water for 3 to 4 cups (15 to 20 ounces).
NOTE: The amount of brewed coffee will always be less than the amount of water
placed into the water reservoir; as much as 10% may be absorbed by coffee
grounds and steam loss.
WARNING: To avoid the risk of fire or electric shock, do not unscrew the under
side cover. There are no user-serviceable parts inside. repair should be done by
authorized service personnel only.
SAVE THESE INSTRUCTIONS
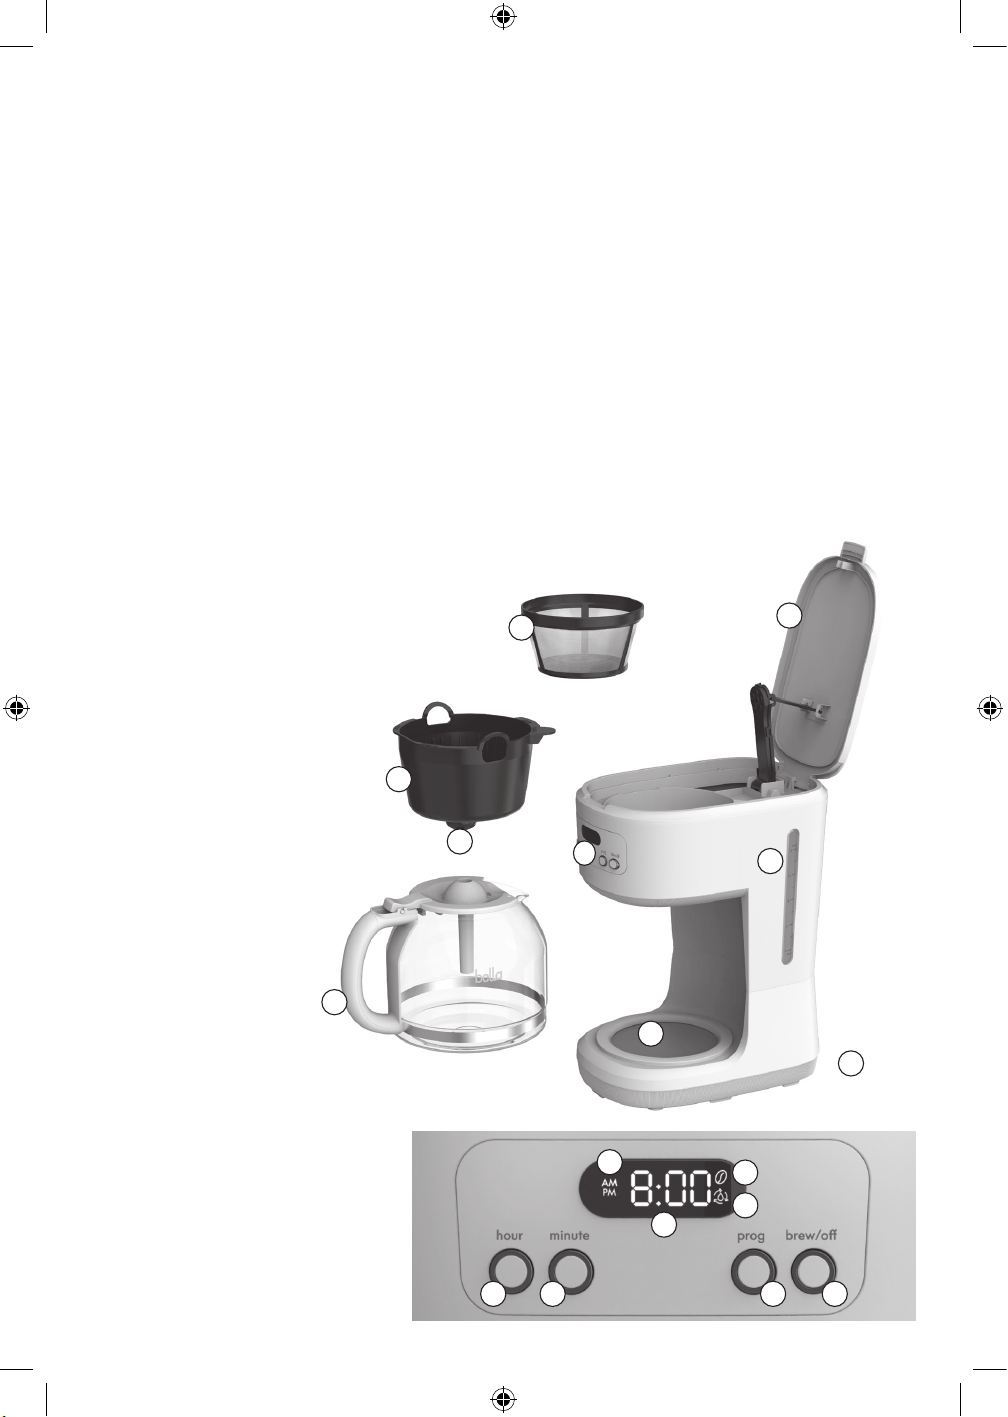
GETTING TO KNOW YOUR COFFEE MAKER
Product may vary slightly from illustration.
1. Gold Tone Filter
2. Lid
3. Filter Basket Holder
4. Pause and Serve Valve
5. Water Level Window
6. Keep Warm Plate
7. Glass carafe with lid mixing tube
8. Cord with velcro cord wrap
(not shown)
9. Control panel with 4 buttons
and LED screen
CONTROL PANEL
1. Hour Button
2. Minute Button
3. Program Button
4. Brew Off Button
5. Bold Brew Icon
6. Cleaning Cycle Icon
7. Time (12 hour clock)
8. AM and PM
1 2 3 4
5
6
7
8
1
2
3
4
5
6
8
7
9
35194_35203_35204_35205_35206_Bella_12 Cup Prog_CoffeeMaker_IM V3_R6.indd 335194_35203_35204_35205_35206_Bella_12 Cup Prog_CoffeeMaker_IM V3_R6.indd 3 2024-10-18 9:28 AM2024-10-18 9:28 AM

4
BEFORE USING FOR THE FIRST TIME
CAUTION: To protect against electrical shock, do not immerse the Coffee Maker or allow power cord to come into
contact with water or other liquids.
1. Remove all packing material and labels from the inside and outside of the Coffee Maker. Place the unit
on a flat, clean surface.
2. Before preparing coffee, thoroughly clean the glass carafe with lid, removable filter holder and gold tone
permanent coffee filter in hot, sudsy water. Rinse and dry. Replace disassembled parts. See Care & Cleaning
Instructions for a detailed description.
3. Clean the inside of the Coffee Maker by brewing 2 full carafes of tap water (see “setting up the machine”).
Do not add the permanent gold tone coffee filter or ground coffee for this initial cleaning.
USING YOUR COFFEE MAKER
IMPORTANT: Before brewing, always check to make sure water level is past the MIN line and add water if needed.
Never exceed the MAX fill line.
NOTE: The amount of brewed coffee will always be less than the amount of water placed into the water reservoir;
as much as 10% is absorbed by coffee grounds and filter.
1. Open the top lid and fill the water tank with water. The water level should not exceed MAX level as indicated
in the water tank.
2. Place the filter into the filter holder, make sure it is assembled correctly, otherwise the top cover will not close.
3. Add medium ground coffee into the filter. Measure 2 level tablespoons or 1 scoop with the provided coffee
scoop, of drip or regular ground coffee for each cup of coffee desired. For stronger or milder coffee,
adjust amount of coffee to suit your taste. Close the top lid completely.
4. Insert the carafe on the warming plate.
5. Plug the power cord into the outlet, the LED display will show “AM 12:00” flashing. If you want to adjust
the coffee strength, press the PROG button for 3 seconds. The indicator in the LED display will illuminate.
Press the BREW/OFF button and the coffee maker will brew strong coffee.
6. Press BREW/OFF button. The BREW/OFF indicator light will illuminate, and the coffee maker will begin brewing.
7. The brewing process can be interrupted by pressing the BREW/OFF button at any time. The corresponding
indicator light and the BREW/OFF indicator light will turn off, indicating that the coffee maker is off.
8. Remove the carafe to serve when brewing is finished (about one minute later after the coffee stops dripping.)
9. When the brewing is finished, if you do not want to serve immediately, the coffee can be kept warm on the
warming plate. The coffee maker will shut off automatically after 2 hours if it has not been manually turned
off after brewing. For optimal coffee taste, serve just after brewing.
10. Always turn the coffee maker off and disconnect the power supply when not use.
SETTING THE CLOCK
Once the power is on, the clock will display AM 12:00 and flashes until the user adjusts the time, the number will
stop flashing if the time is not adjusted within 5 seconds, and the middle colon will flash. The time is flashing when
the HOUR button is pressed once, and the LED display time increases by 1 hour. If you press the HOUR button
for 2 seconds and don’t let go, the clock will increase rapidly by 4-5 values per second. When you press the MIN
button once, the LED display time increases by 1 minute. If you press the MIN button for 2 seconds and s don’t let go,
the minute will increase rapidly by 4-5 values per seconds. To reset the clock, press and hold HOURR or MIN buttons
for 3 seconds, the time flash and the time can be reset.
NOTE: The time cycle is 12 hours.
PAUSE AND SERVE
If you wish to serve a cup of coffee before the brew cycle is complete, simply remove carafe from the warming plate.
Dripping will automatically cease. Return the carafe onto the warming plate; dripping will resume.
CAUTION: To prevent injury when utilizing the pause and serve feature, replace carafe within 30 seconds after
removing during the brewing process.
35194_35203_35204_35205_35206_Bella_12 Cup Prog_CoffeeMaker_IM V3_R6.indd 435194_35203_35204_35205_35206_Bella_12 Cup Prog_CoffeeMaker_IM V3_R6.indd 4 2024-10-18 9:28 AM2024-10-18 9:28 AM

5
DELAY BREW
If you do not want the coffee maker to start operation immediately; for example, the time now is AM 8:00,
and you want the coffee maker to start brewing automatically at PM 1:00, first follow steps 1 to 5 of USING YOUR
COFFEE MAKER, and then you can set the automatic start function as follows:
1. Set the current time by pressing the buttons HOUR or MIN for 3 seconds, until you reach your desired time.
2. Press the PROG button once and the indicator will flash. The LED display will indicate “AM 12:00”. Set the
automatic start time that is PM 1:00 by pressing the buttons of hour and min.
NOTE: The time cycle is 12 hours.
3. After setting the delay brew time, press the PROG button again or wait 5 seconds. The PROG indicator light
will illuminate, and the coffee maker will enter into the delay brew mode.
4. When the time reaches the auto-start time, the PROG indicator light will turn off, and BREW/OFF indicator light
will illuminate at the same time, and the coffee maker will start to brew coffee.
5. NOTE: After the delay brew mode is activated, to cancel this function press the PROG button, and the coffee
maker will enter into the standby mode.
6. When the brewing is finished, if you do not want to serve immediately, the coffee can be kept warm on the
warming plate. The coffee maker will shut off automatically after 2 hours if it has not been manually turned off
at the end of brewing. For an optimal taste, serve it just after brewing.
CLEANING AND MAINTENANCE
CAUTION: Be sure to unplug this appliance before cleaning. To protect against electrical shock, do not immerse cord,
plug or unit in water or liquid. After each use, always make sure plug is first removed from wall outlet.
1. Clean all detachable parts after each use in hot, sudsy water.
2. Wipe the coffee makers exterior surface with a soft, damp cloth to any remove stains.
3. Water droplets may buildup in the area above the funnel and drip onto the product base during brewing.
To control the dripping, wipe off the area with a clean, dry cloth after each use.
4. Use a damp cloth to gently wipe the warming plate. Never use abrasive cleaner to clean it.
5. Replace all parts for next the use.
DESCALING AND CLEANING
NOTE: Minerals in water can detract from the flavor of the coffee and possibly lengthen the brew time.
To keep your coffee maker running optimally you should periodically clean the mineral deposits left by the water.
The frequency of cleaning depends on the water quality in your area and how often you use your coffee maker. We
recommend removing mineral deposits as follows: When the coffee maker needs to be descaled, the
icon on the
LED display will flash.
1. Combine 6 cups of white vinegar and 6 cups of cold water in the carafe.
2. Pour the vinegar solution into the water reservoir and close coffee maker lid.
3. Insert the carafe onto the warming plate.
4. Ensure the filter basket holder is assembled in place.
5. Press the HOUR and MIN buttons at the same time for 3 seconds. The indicator
icon in the LED display will
illuminate, press the BREW/OFF button and the BREW/OFF indicator light will illuminate, and the coffee maker
will enter the descaling mode.
6. After the coffee maker is finished descaling, it will enter into the standby mode.
7. Rinse by running the coffee maker with water at least 3 times.
NOTE: The user can perform descaling at any time by following the above operation even though the descaling
icon is not shown on the LED screen.
HINTS FOR GREAT-TASTING COFFEE
1. A clean coffee maker is essential for making great-tasting coffee. Regularly clean the coffeemaker as specified
in the CLEANING AND MAINTENANCE section. Always use fresh, cold water in the coffee maker.
2. Store unused ground coffee in a cool, dry place once the package is opened. Reseal it tightly and store
it in a refrigerator to maintain its freshness.
3. For an optimal coffee taste, buy whole coffee beans and grind the beans just before brewing.
4. Do not reuse ground since this will greatly reduce the coffee’s flavor. Reheating coffee is not recommended
as coffee is at its peak flavor immediately after brewing.
5. Clean the coffee maker when over extraction causes oiliness. Small oil droplets on the surface of brewed,
black coffee are due to the extraction of oil from the coffee beans.
6. Oiliness may occur more frequently if dark roasted coffees are used.
USER MAINTENANCE INSTRUCTIONS
This appliance requires little maintenance. It contains no user-serviceable parts. Any servicing requiring disassembly
other than cleaning must be performed by a qualified appliance repair technician.
35194_35203_35204_35205_35206_Bella_12 Cup Prog_CoffeeMaker_IM V3_R6.indd 535194_35203_35204_35205_35206_Bella_12 Cup Prog_CoffeeMaker_IM V3_R6.indd 5 2024-10-18 9:28 AM2024-10-18 9:28 AM

6
SENSIO Inc. hereby warrants that for a period of TWO YEARS from the date of purchase,
this product will be free from mechanical defects in material and workmanship, and
for 90 days in respect to non-mechanical parts. At its sole discretion, SENSIO Inc. will
either repair or replace the product found to be defective, or issue a refund on the
product during the warranty period.
The warranty is only valid for the original retail purchaser from the date of initial retail
purchase and is not transferable. Keep the original sales receipt, as proof of purchase is
required to obtain warranty validation. Retail stores selling this product do not have the
right to alter, modify, or in any way revise the terms and conditions of the warranty.
EXCLUSIONS:
The warranty does not cover normal wear of parts or damage resulting from any of the
following: negligent use of the product, use of improper voltage or current, improper
routine maintenance, use contrary to the operating instructions, disassembly, repair, or
alteration by anyone other than qualied SENSIO Inc. personnel. Also, the warranty
does not cover Acts of God such as re, oods, hurricanes, or tornadoes.
SENSIO Inc. shall not be liable for any incidental or consequential damages caused
by the breach of any express or implied warranty. Apart from the extent prohibited
by applicable law, any implied warranty of merchantability or tness for a particular
purpose is limited in time to the duration of the warranty. Some states, provinces or
jurisdictions do not allow the exclusion or limitation of incidental or consequential
damages, or limitations on how long an implied warranty lasts, and therefore, the
above exclusions or limitations may not apply to you. The warranty covers specic legal
rights which may vary by state, province and/or jurisdiction.
HOW TO OBTAIN WARRANTY SERVICE:
You must contact Customer Service at our toll-free number: 1-866-832-4843.
A Customer Service Representative will attempt to resolve warranty issues over the
phone. If the Customer Service Representative is unable to resolve the problem, you will
be provided with a case number and asked to return the product to SENSIO Inc. Attach
a tag to the product that includes: your name, address, daytime contact telephone
number, case number, and description of the problem. Also, include a copy of the
original sales receipt. Carefully package the tagged product with the sales receipt,
and send it (with shipping and insurance prepaid) to SENSIO Inc.’s address. SENSIO
Inc. shall bear no responsibility or liability for the returned product while in transit to
SENSIOInc.’s Customer Service Center.
LIMITED TWO-YEAR WARRANTY
35194_35203_35204_35205_35206_Bella_12 Cup Prog_CoffeeMaker_IM V3_R6.indd 635194_35203_35204_35205_35206_Bella_12 Cup Prog_CoffeeMaker_IM V3_R6.indd 6 2024-10-18 9:28 AM2024-10-18 9:28 AM

7
PRECAUCIONES IMPORTANTES
Antes de utilizar el aparato eléctrico, deben seguirse siempre las siguientes
precauciones básicas, entre las que se incluyen las siguientes:
1. LEA TODAS LAS INSTRUCCIONES.
2. No deje que la cafetera funcione sin agua.
3. Asegúrese de que el voltaje de su toma de corriente se corresponde con el
voltaje indicado en la etiqueta de características de la cafetera.
4. Para protegerse contra incendios, descargas eléctricas y lesiones personales,
no sumerja el cable ni el enchufe en agua ni en ningún otro líquido.
5. Es necesario supervisar de cerca el funcionamiento del aparato. No deje el
aparato en modo de espera durante mucho tiempo. No permita nunca que
niños o personas con capacidades físicas, sensoriales o mentales reducidas
manejen el aparato.
6. Desenchúfelo de la toma de corriente cuando no lo utilice y antes de
limpiarlo. Deje que el aparato se enfríe antes de poner o quitar piezas y
antes de limpiarlo.
7. No haga funcionar ningún aparato con un cable o enchufe dañado o
después de que el aparato funcione mal o haya sufrido algún tipo de daño.
Envíe el aparato a un servicio técnico autorizado para que lo examinen,
reparen o ajusten.
8. El uso de accesorios no recomendados por el fabricante del aparato puede
provocar incendios, descargas eléctricas o lesiones personales.
9. No lo utilice al aire libre.
10. Coloque el aparato sobre una superficie plana o una mesa, no deje que
el cable cuelgue del borde de la mesa o encimera, ni que toque una
superficie caliente.
11. No lo coloque sobre o cerca de un quemador de gas o eléctrico caliente, ni en
un horno caliente.
12. No utilice el aparato para un uso distinto del previsto y colóquelo en un
lugar seco.
13. Para desconectar el aparato, apáguelo pulsando el botón BREW/OFF
(PREPARAR/APAGAR) y desenchúfelo de la toma de corriente. Sujete siempre
el enchufe, nunca tire del cable.
14. Algunas partes del aparato se calientan cuando se utiliza, no las toque
directamente con la mano. Utilice solo las asas o perillas.
15. La jarra está diseñada para utilizar con este aparato. Nunca debe utilizarse
sobre la encimera de la cocina.
16. No limpie la jarra con productos de limpieza, almohadillas de acero u otro
material abrasivo.
17. No deje nunca una jarra vacía sobre la placa para mantener caliente, de lo
contrario la jarra podría agrietarse.
18. No utilice nunca el aparato si la jarra muestra signos de grietas o si tiene el
asa suelta o debilitada. Utilice la jarra solo con este aparato. Utilícela con
cuidado ya que la jarra es muy frágil.
19. No ponga una jarra caliente sobre una superficie caliente o fría.
35194_35203_35204_35205_35206_Bella_12 Cup Prog_CoffeeMaker_IM V3_R6.indd 735194_35203_35204_35205_35206_Bella_12 Cup Prog_CoffeeMaker_IM V3_R6.indd 7 2024-10-18 9:28 AM2024-10-18 9:28 AM

8
20. El aparato no debe sumergirse.
21. Este aparato está destinado únicamente para uso doméstico.
22. Si el cable de alimentación está dañado, debe ser sustituido por el fabricante,
su agente de servicio o personas con cualificación similar para evitar riesgos.
23. Este aparato puede ser utilizado por niños a partir de 8 años si han recibido
supervisión o instrucciones sobre el uso del aparato de forma segura y si
comprenden los peligros que conlleva. La limpieza y el mantenimiento por
parte del usuario no deben ser realizados por niños a menos que sean
mayores de 8 años y estén supervisados. Mantenga el aparato y su cable
fuera del alcance de los niños menores de 8 años.
24. Los aparatos pueden ser utilizados por personas con capacidades físicas,
sensoriales o mentales reducidas o con falta de experiencia y conocimientos
si han recibido supervisión o instrucciones sobre el uso del aparato de forma
segura y comprenden los peligros que conlleva.
25. Los niños no deben jugar con el aparato.
26. No toque las superficies calientes. Utilice las asas o perillas.
27. Es necesaria una estrecha supervisión cuando cualquier aparato sea utilizado
por niños o cerca de ellos.
28. Pueden producirse escaldaduras si se retira la tapa durante los ciclos
de preparación.
GUARDE ESTAS INSTRUCCIONES
SOLO PARA USO DOMÉSTICO
NOTAS SOBRE EL ENCHUFE
Este aparato tiene un enchufe polarizado, para reducir el riesgo de descarga
eléctrica. Este enchufe está diseñado para encajar en una toma polarizada solo
de una manera. Si el enchufe no encaja completamente en la toma, delo vuelta. Si
aún así no encaja, póngase en contacto con un electricista cualificado. No intente
modificar el enchufe de ninguna manera.
NOTAS SOBRE EL CABLE
a) Se suministra un cable de alimentación corto (o cable de alimentación
desmontable) para reducir los riesgos derivados de enredarse o tropezar con
un cable más largo.
b) Existen cables de alimentación desmontables o alargadores más extensos y
pueden utilizarse si se tiene cuidado en su uso.
c) Si se utiliza un cable de alimentación desmontable extenso o un alargador:
1) La capacidad eléctrica marcada del cable de alimentación desmontable
o del alargador debe ser como mínimo igual a la capacidad eléctrica
del aparato.
2) Si el aparato es del tipo con toma de tierra, el alargador debe ser un
cable de 3 hilos con toma de tierra.
3) El cable más largo debe colocarse de manera que no quede colgando
sobre la encimera o la mesa, donde los niños puedan tirar de él o
tropezar con él.
35194_35203_35204_35205_35206_Bella_12 Cup Prog_CoffeeMaker_IM V3_R6.indd 835194_35203_35204_35205_35206_Bella_12 Cup Prog_CoffeeMaker_IM V3_R6.indd 8 2024-10-18 9:28 AM2024-10-18 9:28 AM
9
1
2
3
4
5
6
8
7
9
RENDIMIENTO DEL CAFÉ
Cafetera de 12 tazas: 12 tazas (5 onzas)
NOTA: Una taza de 5 onzas es el estándar de la industria americana y es utilizada
por la mayoría de los fabricantes de cafeteras. Para llenar su taza grande
favorita, llene el depósito de la cafetera con agua suficiente para 3 o 4 tazas (de
15 a 20 onzas).
NOTA: La cantidad de café preparado será siempre inferior a la cantidad de agua
colocada en el depósito; hasta un 10 % se puede quedar en la borra del café y
perderse con el vapor.
ADVERTENCIA: Para evitar el riesgo de incendio o descarga eléctrica, no
desenrosque la tapa inferior. En su interior no hay piezas que puedan ser
reparadas por el usuario. Las reparaciones deben ser realizadas únicamente por
personal de servicio autorizado.
GUARDE ESTAS INSTRUCCIONES
CONOZCA SU CAFETERA
El producto puede variar ligeramente con
respecto a la ilustración.
1. Filtro de tono dorado
2. Tapa
3. Soporte de la cesta del filtro
4. Válvula de pausa y servicio
5. Visor del nivel de agua
6. Placa para mantener caliente
7. Jarra de vidrio con tapa
tubo mezclador
8. Cable con cinta de velcro
(no se muestra)
9. Panel de control con 4 botones
y pantalla LED
PANEL DE CONTROL
1. Botón de horas
2. Botón de minutos
3. Botón de programa
4. Botón de dejar de preparar
5. Ícono para preparación fuerte
6. Ícono de ciclo de limpieza
7. Hora (reloj de 12 horas)
8. AM y PM
1 2 3 4
5
6
7
8
35194_35203_35204_35205_35206_Bella_12 Cup Prog_CoffeeMaker_IM V3_R6.indd 935194_35203_35204_35205_35206_Bella_12 Cup Prog_CoffeeMaker_IM V3_R6.indd 9 2024-10-18 9:28 AM2024-10-18 9:28 AM

10
ANTES DE UTILIZARLA POR PRIMERA VEZ
PRECAUCIÓN: Para protegerse contra descargas eléctricas, no sumerja la cafetera ni permita que el cable de
alimentación entre en contacto con agua u otros líquidos.
1. Retire todo el material de embalaje y las etiquetas del interior y el exterior de la cafetera. Colóquela sobre una
superficie plana y limpia.
2. Antes de preparar el café, limpie a fondo con agua caliente y jabón la jarra de vidrio con tapa, el soporte del
filtro extraíble y el filtro de café permanente de tono dorado. Enjuáguelos y séquelos. Vuelva a colocar las
piezas desmontadas. Consulte las instrucciones de cuidado y limpieza para una descripción detallada.
3. Limpie el interior de la cafetera preparando 2 jarras llenas de agua del grifo (ver “puesta en marcha de la
cafetera”). No coloque el filtro de café dorado permanente ni el café molido para realizar esta limpieza inicial.
UTILIZACIÓN DE LA CAFETERA
IMPORTANTE: Antes de preparar el café, compruebe siempre que el nivel de agua sobrepase la línea MIN (MÍNIMO)
y añada agua si es necesario. No sobrepase nunca la línea de llenado MAX (MÁXIMO).
NOTA: La cantidad de café preparado será siempre inferior a la cantidad de agua colocada en el depósito; hasta un
10 % queda en la borra del café y el filtro.
1. Abra la tapa superior y llene el depósito de agua. El nivel de agua no debe superar el nivel MAX (MÁXIMO)
indicado en el depósito de agua.
2. Coloque el filtro en el soporte para el filtro, asegúrese de que esté bien montado, de lo contrario la tapa
superior no se cerrará.
3. Añada café molido medio en el filtro. Mida 2 cucharadas soperas rasas o 1 cucharada con el cucharón
suministrado, de café molido normal o de filtro por cada taza de café que desee. Para un café más fuerte o
más suave, ajuste la cantidad de café a su gusto. Cierre completamente la tapa superior.
4. Coloque la jarra en la placa de calentamiento.
5. Enchufe el cable de alimentación a la toma de corriente, la pantalla LED mostrará “AM 12:00” parpadeando.
Si desea ajustar la intensidad del café, pulse el botón PROG (PROGRAMA) durante 3 segundos. El indicador
de la pantalla LED se iluminará. Pulse el botón BREW/OFF (PREPARAR/APAGAR) y la cafetera preparará
un café fuerte.
6. Pulse el botón BREW/OFF (PREPARAR/APAGAR). El indicador luminoso BREW/OFF (PREPARAR/APAGAR) se
iluminará y la cafetera comenzará a preparar café.
7. El proceso de preparación puede interrumpirse pulsando el botón BREW/OFF (PREPARAR/APAGAR) en
cualquier momento. La luz indicadora correspondiente y la luz indicadora BREW/OFF (PREPARAR/APAGAR) se
apagarán, indicando que la cafetera está apagada.
8. Retire la jarra para servir cuando haya terminado la preparación (aproximadamente un minuto después de
que el café deje de gotear.)
9. Cuando termine la preparación, si no desea servir inmediatamente, el café puede mantenerse caliente
en la placa de calentamiento. La cafetera se apagará automáticamente al cabo de 2 horas si no se ha
apagado manualmente después de la preparación. Para obtener un sabor óptimo del café, sírvalo enseguida
de prepararlo.
10. Apague siempre la cafetera y desconecte la fuente de alimentación cuando no la utilice.
AJUSTE DEL RELOJ
Una vez que la cafetera está encendida, el reloj mostrará AM 12:00 y parpadeará hasta que el usuario ajuste la hora.
El número dejará de parpadear si la hora no se ajusta en 5 segundos, y los dos puntos centrales parpadearán. La hora
parpadea cuando se pulsa el botón HOUR (HORAS) una vez, y el tiempo que muestra el LED aumenta en 1 hora. Si
pulsa el botón HOUR (HORAS) durante 2 segundos y no lo suelta, el reloj aumentará rápidamente de 4 a 5 valores
por segundo. Si pulsa el botón MIN (MINUTOS) una vez, el tiempo que muestra el LED aumentará en 1 minuto. Si pulsa
el botón MIN (MINUTOS) durante 2 segundos y no lo suelta, los minutos aumentarán rápidamente de 4-5 valores
por segundo. Para reajustar el reloj, mantenga pulsados los botones HOUR (HORAS) o MIN (MINUTOS) durante 3
segundos. La hora parpadeará y podrá reajustarla.
NOTA: El ciclo de tiempo es de 12 horas.
PAUSAR Y SERVIR
Si desea servir una taza de café antes de que finalice el ciclo de preparación, simplemente retire la jarra de la placa
de calentamiento. El goteo cesará automáticamente. Vuelva a colocar la jarra en la placa de calentamiento y se
reanudará el goteo.
PRECAUCIÓN: Para evitar lesiones al utilizar la función de pausa y servir, vuelva a colocar la jarra antes de que
transcurran 30 segundos desde que la retiró durante el proceso de preparación.
PREPARACIÓN DIFERIDA
Si no desea que la cafetera empiece a funcionar inmediatamente; por ejemplo, la hora actual es 8:00 A.M., y desea
que la cafetera empiece a preparar automáticamente a la 1:00 P.M., siga primero los pasos 1 a 5 de CÓMO USAR SU
CAFETERA, y después puede ajustar la función de inicio automático de la siguiente manera:
35194_35203_35204_35205_35206_Bella_12 Cup Prog_CoffeeMaker_IM V3_R6.indd 1035194_35203_35204_35205_35206_Bella_12 Cup Prog_CoffeeMaker_IM V3_R6.indd 10 2024-10-18 9:28 AM2024-10-18 9:28 AM

11
1. Ajuste la hora actual pulsando los botones HOUR (HORAS) o MIN (MINUTOS) durante 3 segundos, hasta
llegar a la hora deseada.
2. Pulse el botón PROG (PROGRAMA) una vez y el indicador parpadeará. La pantalla LED indicará “AM 12:00”.
Ajuste la hora de inicio automático que es 1:00 P.M. pulsando los botones HOUR (HORAS) y MIN (MINUTOS).
NOTA: El ciclo de tiempo es de 12 horas.
3. Después de ajustar el tiempo de preparación diferida, pulse de nuevo el botón PROG (PROGRAMA) o
espere 5 segundos. La luz indicadora PROG (PROGRAMA) se iluminará y la cafetera entrará en el modo de
preparación diferida.
4. Cuando se alcance la hora de inicio automático, la luz indicadora PROG (PROGRAMA) se apagará y la
luz indicadora BREW/OFF (PREPARAR/APAGAR) se iluminará al mismo tiempo, y la cafetera comenzará a
preparar café.
5. NOTA: Una vez activado el modo de preparación diferida, para cancelar esta función pulse el botón PROG
(PROGRAMA), y la cafetera entrará en el modo de espera.
6. Cuando termine la preparación, si no desea servir inmediatamente, el café puede mantenerse caliente en la
placa de calentamiento. La cafetera se apagará automáticamente al cabo de 2 horas si no se ha apagado
manualmente al final de la preparación. Para obtener un sabor óptimo, sirva el café enseguida de prepararlo.
LIMPIEZA Y MANTENIMIENTO
PRECAUCIÓN: Asegúrese de desenchufar este aparato antes de limpiarlo. Para protegerse contra descargas
eléctricas, no sumerja el cable, el enchufe ni el aparato en agua o líquidos. Después de cada uso, asegúrese siempre
de desenchufar primero el aparato de la toma de corriente.
1. Limpie todas las piezas desmontables después de cada uso en agua caliente con jabón.
2. Limpie la superficie exterior de la cafetera con un paño suave y húmedo para eliminar cualquier mancha.
3. En la zona situada sobre el embudo pueden acumularse gotas de agua y gotear sobre la base del producto
durante la preparación. Para controlar el goteo, limpie la zona con un paño limpio y seco después de cada uso.
4. Utilice un paño húmedo para limpiar suavemente la placa de calentamiento. No utilice nunca limpiadores
abrasivos para limpiarla.
5. Vuelva a colocar todas las piezas para utilizar la cafetera nuevamente.
DESCALCIFICACIÓN Y LIMPIEZA
NOTA: Los minerales en el agua pueden restar sabor al café y posiblemente prolongar el tiempo de preparación. Para
que su cafetera funcione óptimamente, debe limpiar periódicamente los depósitos de minerales que deja el agua. La
frecuencia de la limpieza depende de la calidad del agua de su zona y de la frecuencia con que utilice su cafetera.
Le recomendamos que elimine los depósitos de minerales del siguiente modo: Cuando sea necesario descalcificar la
cafetera, el icono de la pantalla LED parpadeará.
1. Mezcle 6 tazas de vinagre blanco y 6 tazas de agua fría en la jarra.
2. Vierta la solución de vinagre en el depósito de agua y cierre la tapa de la cafetera.
3. Coloque la jarra en la placa de calentamiento.
4. Asegúrese de que el soporte de la cesta del filtro esté colocado en su sitio.
5. Pulse los botones HOUR (HORAS) y MIN (MINUTOS) al mismo tiempo durante 3 segundos. El indicador en la
pantalla LED se iluminará. Pulse el botón BREW/OFF (PREPARAR/APAGAR), se encenderá la luz indicadora de
BREW/OFF (PREPARAR/APAGAR) y la cafetera entrará en el modo de descalcificación.
6. Una vez finalizada la descalcificación, la cafetera entrará en el modo de espera.
7. Enjuague dejando correr la cafetera con agua al menos 3 veces.
NOTA: El usuario puede realizar la descalcificación en cualquier momento siguiendo la operación anterior aunque el
icono de descalcificación no aparezca en la pantalla LED.
CONSEJOS PARA UN CAFÉ DE BUEN SABOR
1. Una cafetera limpia es esencial para preparar un café de buen sabor. Limpie regularmente la cafetera como se
especifica en la sección LIMPIEZA Y MANTENIMIENTO. Utilice siempre agua dulce y fría en la cafetera.
2. Una vez abierto el envase, guarde el café molido que no haya utilizado en un lugar fresco y seco. Vuelva a
cerrarlo herméticamente y guárdelo en el frigorífico para mantener su frescura.
3. Para obtener un sabor óptimo del café, compre granos enteros y muela los granos justo antes de prepararlo.
4. No reutilice el café molido, ya que reducirá en gran medida su sabor. No se recomienda recalentar el café, ya
que éste alcanza su máximo sabor inmediatamente después de ser preparado.
5. Limpie la cafetera cuando el exceso de extracción provoque grasa. Las pequeñas gotas de aceite en la
superficie del café negro preparado se deben a la extracción del aceite de los granos de café.
6. La oleosidad puede aparecer con más frecuencia si se utilizan cafés de tueste oscuro.
INSTRUCCIONES DE MANTENIMIENTO PARA EL USUARIO
Este aparato requiere poco mantenimiento. No contiene piezas que puedan ser reparadas por el usuario. Cualquier
mantenimiento que requiera un desmontaje distinto a la limpieza debe ser realizado por un técnico cualificado en
reparación de electrodomésticos.
35194_35203_35204_35205_35206_Bella_12 Cup Prog_CoffeeMaker_IM V3_R6.indd 1135194_35203_35204_35205_35206_Bella_12 Cup Prog_CoffeeMaker_IM V3_R6.indd 11 2024-10-18 9:28 AM2024-10-18 9:28 AM

12
Mediante la presente, SENSIO Inc. garantiza que, durante el plazo de DOS AÑOS a partir
de la fecha de compra, este producto no presentará defectos mecánicos en el material
ni en la mano de obra, y durante 90 días, no los presentará en las piezas no mecánicas.
A su entera discreción, SENSIO Inc. reparará o reemplazará el producto que resulte
defectuoso, o emitirá un reembolso por el producto durante el plazo de garantía.
Esta garantía es válida únicamente para el comprador minorista original a partir de
la fecha de compra minorista inicial y no es transferible. Conserve el recibo de compra
original, ya que se exige una prueba de compra para obtener la validación de la garantía.
Las tiendas minoristas no tienen derecho a alterar, modicar ni corregir de ninguna
manera los términos y condiciones de la garantía.
EXCLUSIONES:
La garantía no cubre el desgaste normal de las piezas ni el daño ocasionado por
cualquiera de las siguientes causas: uso negligente del producto, uso de un voltaje
o corriente incorrectos, mantenimiento de rutina inadecuado, uso contrario al de las
instrucciones de funcionamiento, desarmado, reparación o alteración a cargo de personas
que no sean miembros del personal calicado de SENSIO Inc. Asimismo, la garantía no
cubre actos de la naturaleza, como incendios, inundaciones, huracanes o tornados.
SENSIO Inc. no asumirá responsabilidad por daños incidentales o resultantes ocasionados
por la violación de cualquier garantía expresa o implícita. Salvo en la medida en que lo
prohíban las leyes aplicables, cualquier garantía implícita de comerciabilidad o aptitud
para un propósito particular se limita temporalmente a la duración de la garantía. Algunos
estados, provincias o jurisdicciones no permiten la exclusión ni la limitación de daños
incidentales o resultantes, o limitaciones sobre la duración de una garantía implícita y, por
lo tanto, es posible que las exclusiones o limitaciones mencionadas no le correspondan.
La garantía cubre derechos legales especícos que pueden variar de un estado, una
provincia o una jurisdicción a otros.
CÓMO OBTENER EL SERVICIO DE GARANTÍA:
Debe comunicarse con el Servicio de atención al cliente a nuestro número telefónico
gratuito: 1-866-832-4843. Un representante del Servicio de atención al cliente intentará
resolver los problemas referidos a la garantía por teléfono. Si este no puede resolver el
problema, le proporcionarán un número de caso y le solicitarán que devuelva el producto
a SENSIO Inc. Adhiera una etiqueta al producto que incluya: su nombre, dirección,
número telefónico de contacto durante el día, número de caso y descripción del problema.
Además, incluya una copia del recibo de compra original. Envuelva cuidadosamente
el producto etiquetado con el recibo de compra, y envíelo (con el envío y el seguro
prepagados) a la dirección de SENSIO Inc. SENSIO Inc. no asumirá obligación ni
responsabilidad alguna por el producto devuelto que esté en el trayecto hacia el Centro
de servicio al cliente de SENSIO Inc.
GARANTÍA LIMITADA DE DOS AÑOS
35194_35203_35204_35205_35206_Bella_12 Cup Prog_CoffeeMaker_IM V3_R6.indd 1235194_35203_35204_35205_35206_Bella_12 Cup Prog_CoffeeMaker_IM V3_R6.indd 12 2024-10-18 9:28 AM2024-10-18 9:28 AM

For customer service questions or comments
Dudas o comentarios contactar el departamento de servicio al cliente
1-866-832-4843 / help@bellahousewares.com
Sensio Inc.
dba Made by Gather
TM
New York, NY 10016/USA
35194, 36203, 35204, 35205, 35206, R. 6
35194_35203_35204_35205_35206_Bella_12 Cup Prog_CoffeeMaker_IM V3_R6.indd 1335194_35203_35204_35205_35206_Bella_12 Cup Prog_CoffeeMaker_IM V3_R6.indd 13 2024-10-18 9:28 AM2024-10-18 9:28 AM