EN
Quick Guide
1
THANK YOU FOR BUYING AHOTPOINT ARISTON PRODUCT.
In order to receive amore complete assistance, please
register your appliance on: www.hotpoint.eu/register
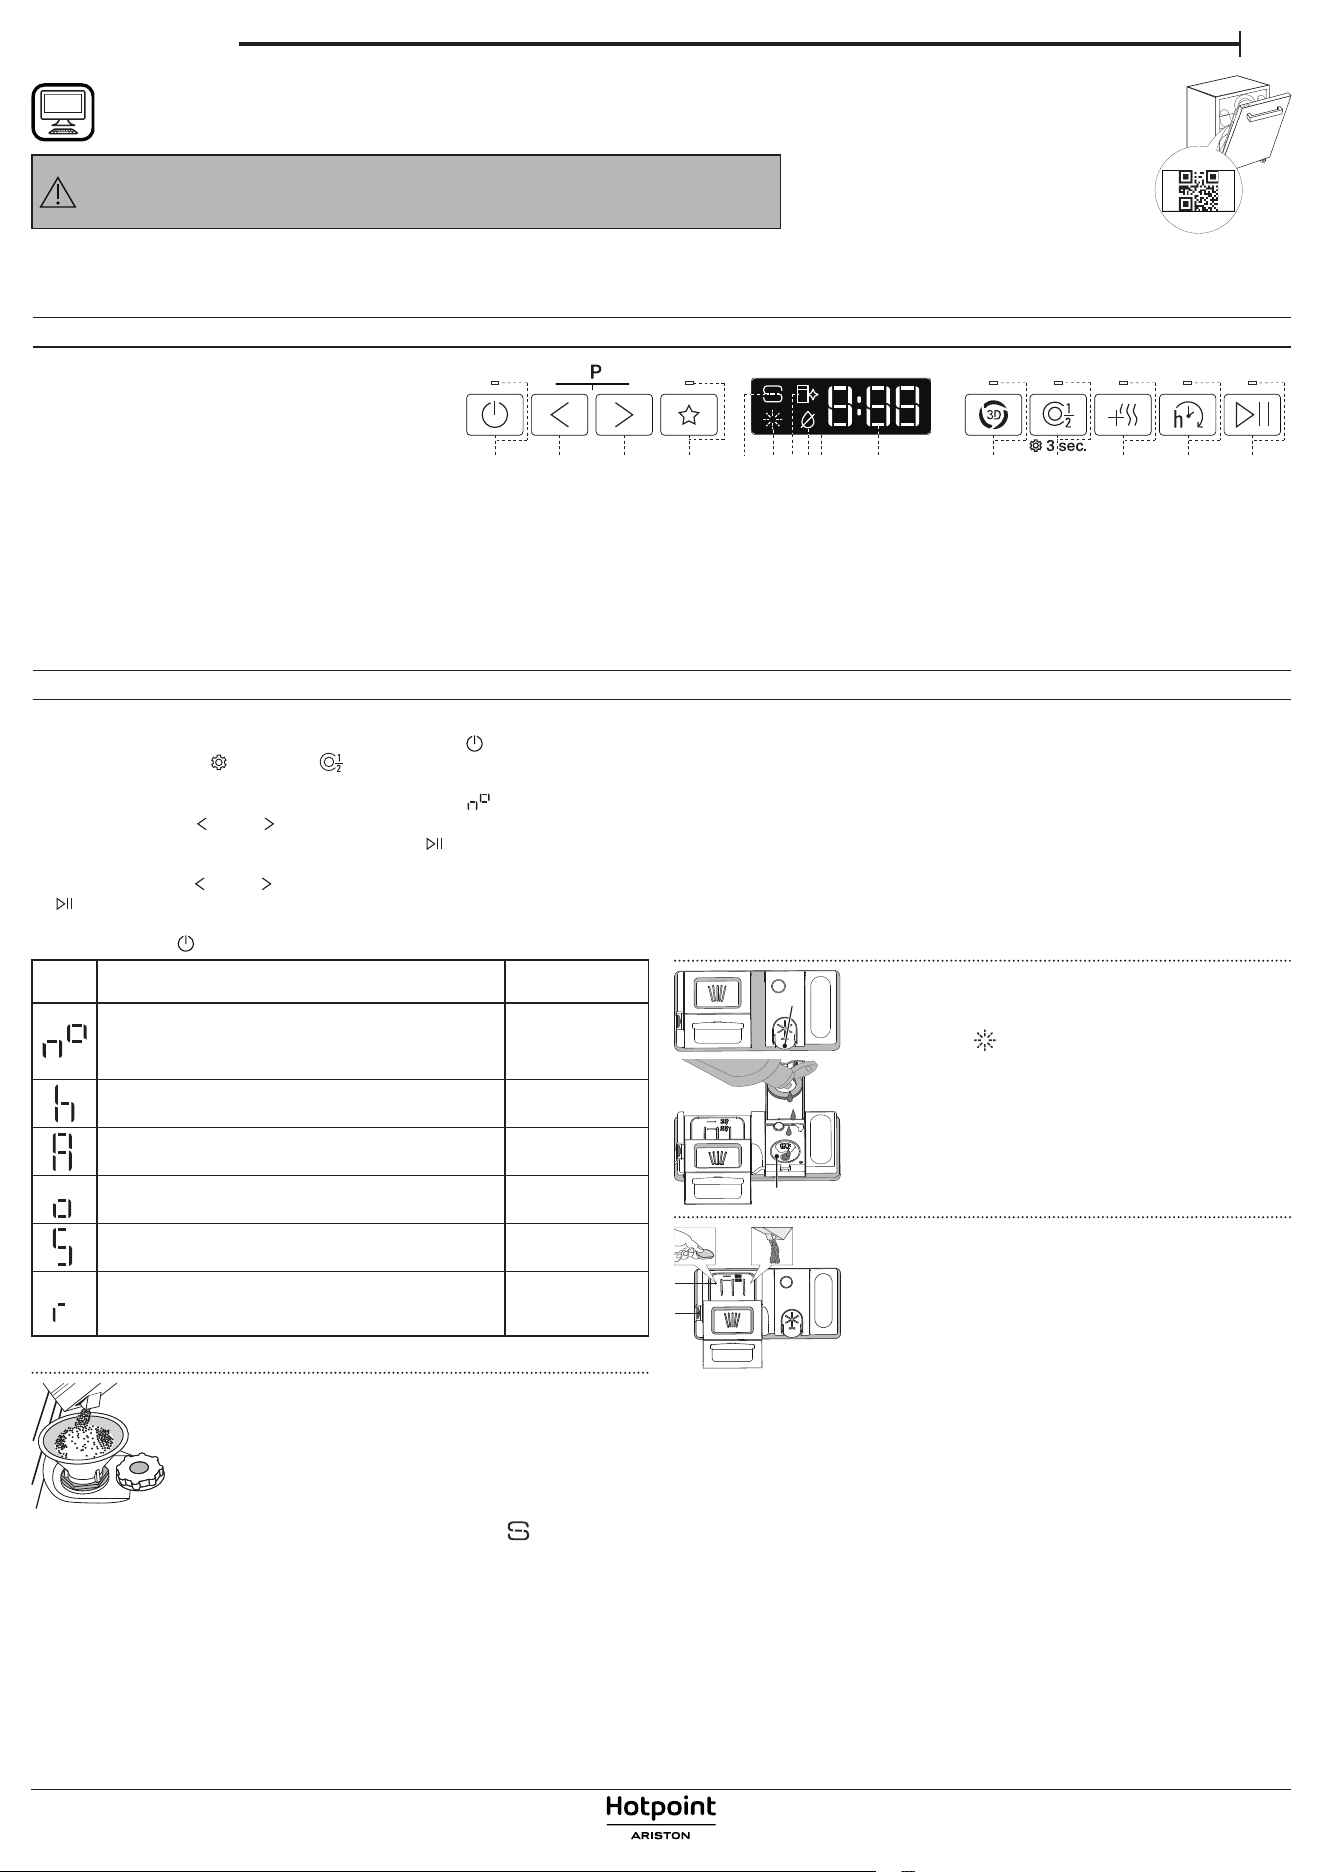
SETTING MENU
1. Switch on the appliance by pressing the ON-OFF button.
2. Hold the Settings (Half Load ) button for 3 seconds, until you hear
a beep and the display shows „SEt”.
3. After one second the rst available setting (letter „ ”) will be displayed.
4. Press PREVIOUS /NEXT to scroll through the list of available settings
(see table below), then press START/Pause to view and change the
value of the currently selected setting.
5. Press PREVIOUS /NEXT to change the value, then press START/Pause
to save the new value or return to the main menu.
6. To change another setting, repeat points 4 and 5.
7. Press ON-OFF or wait 30 seconds to exit the menu.
LETTER
SETTING
VALUES
(Default - in bold)*
Cycle Counter - number of washing cycles
carried out by the dishwasher.
Eg. 25 cycles: 25;
Eg. 13.947 cycles:
13_947
(scrolling
for 3 times)
Water Hardness Level (see “SETTING THE WA-
TER HARDNESS” and “WATER HARDNESS TABLE”)
1 | 2 | 3 | 4 | 5
Rinse Aid Level
(see “ADJUSTING THE DOSAGE OF RINSE AID”)
0 | 1 | 2 | 3 | 4 | 5
ActiveDry (see “OPTIONS AND FUNCTIONS”)
“1” = On, “0” = O
1 | 0
Sound
“1” = On, “0” = O
1 | 0
Factory Settings - press START/Pause to re-
store to the factory default all the values of the
settings included in the settings menu.
-
*) The default value does not apply to the Cycle Counter.
FILLING THE SALT RESERVOIR
The use of salt prevents the formation of LIMESCALE on
the dishes and on the machine’s functional components.
The salt reservoir is located in the lower part of the dish-
washer (under the lower rack on the left side).
• It is mandatory that the salt reservoir never be empty.
• It is important to set the water hardness.
• Salt must be lled when the SALT REFILL indicator light on the control
panel is lit.
1. Remove the lower rack and unscrew the reservoir cap (anticlockwise).
2. Position the funnel (see gure) and ll the salt reservoir right up to its
edge (approximately 0,5 kg); it is not unusual for alittle water to leak out.
3. Only the rst time you do this: ll the salt reservoir with water.
4. Remove the funnel and wipe any salt residue away from the opening.
Make sure the cap is screwed on tightly so that no detergent can get into
the container during the wash program (this could damage the water sof-
tener beyond repair).
Run aprogram every time as soon as you completed relling the salt
reservoir to avoid corrosion.
WATER SOFTENING SYSTEM
Water softener automatically reduces water hardness, consequently pre-
venting scale buildup on the heater, contributing also to better cleaning ef-
ciency. This system regenerates itself with salt, therefore it is required
to rell the salt container when empty.
The frequency of regeneration depends on the water hardness level setting
- regeneration takes place once per 4-6 Eco cycles with the water hardness
level set to 3. The regeneration process occurs at the beginning of the cycle
with additional fresh water.
• Single regeneration consumes ~3 L of water;
• Takes up to 5 additional minutes for the cycle;
• Consumes below 0.005 kWh of energy.
A
B
FILLING THE RINSE AID DISPENSER
Rinse aid makes dish DRYING easier. The rinse aid dis-
penser Ashould be lled when the RINSE AID REFILL
indicator light in the control panel is lit.
1. Open the dispenser B by pressing and pulling up
the tab on the lid.
2. Pour in the rinse aid (max. 110 ml), making sure it
does not overow from the dispenser. If this hap-
pens, clean the spill immediately with adry cloth.
3. Press the lid down until you hear aclick to close it.
NEVER pour the rinse aid directly into the appli-
ance tub.
D
C
FILLING THE DETERGENT DISPENSER
To open the detergent dispenser use the opening
device C. Introduce the detergent into the dry dis-
penser D only. Place the amount of detergent for
pre-washing directly inside the tub.
1. When measuring out the detergent refer to the
mentioned earlier information to add the proper
quantity. Inside the dispenser D, there are indica-
tions to help the detergent dosing.
2. Remove detergent residues from the edges of the dispenser and close
the cover until it clicks.
3. Close the lid of the detergent dispenser by pulling it up until the closing
device is secured in place.
The detergent dispenser automatically opens up at the right time accord-
ing to the program.
Usage of detergent not designed for dishwashers may cause malfunc-
tion or damage to the appliance.
CONTROL PANEL
FIRST TIME USE
More information in the Daily Reference Guide on website.
Before using the appliance carefully read Safety and Installation Instructions.
After installation, please remember to remove all transport protection parts from
the dishwasher.
1. ON-OFF/Reset button with indicator light
2. PREVIOUS program button
3. NEXT program button
4. FAVOURITE program button
with indicator light
5. Salt reservoir empty indicator light
6. Rinse Aid reservoir empty indicator light
7. DESCALE indicator light
8. Closed Water Tap indicator light
9. Display
10. Program number and remaining time indicator
11. 3D Zone Wash option button with indicator light
12. Half Load option button with indicator light/ Settings - 3 sec. press
13. Extra Dry option button with indicator light
14. Delay option button with indicator light
15. START/Pause button with indicator light
W11558344 panel
W11569662 button R
W11569657 button L
W11569647 display
1 2 3 4
11 12 13
14
15
5 6 7 8 9 10
PLEASE SCAN THE
QR CODE ON YOUR
APPLIANCE IN
ORDER TO HAVE
MORE DETAILED
INFORMATION
EN
2
Quick Guide
CYCLE COUNTER - This feature shows the number of cycles the
dishwasher has performed.
For the number of cycles from 0-999, a xed number will be displayed.
Example for 25 cycles.
When the cycle number is higher than 1000, the number will scroll in
the display. The “_” represents the “
.
”, as for instance: 1.000 = 1_000,
13.947= 13_947 (the number will scroll for 3 times).
Example for
13.947 cycles:
After the cycle visualization, the display will return to visualize
„ ”
.
NOTE: The dishwasher may have already performed about 30 cycles.
This is due to the extended quality process carried out during
production. It guarantees higher product quality.
ECO program data is measured under laboratory conditions according to European Standard EN 60436:2020.
Note for Test Laboratories:
For information on comparative EN testing conditions, please send an email to the following address: [email protected]
Pre-treatment of the dishes is not needed before any of the programs.
*) Not all options can be used simultaneously.
**) Values given for programs other than the program Eco are indicative only. The actual time may vary depending on many factors such as temperature and
pressure of the incoming water, room temperature, amount of detergent, quantity and type of load, load balancing, additional selected options and sensor cali-
bration. The sensor calibration can increase program duration by up to 20 min.
EXTRA DRY - The higher temperature during the final rinse and the
extended drying phase allow improved drying. The EXTRA DRY option
results in the lengthening of the wash cycle.
DELAY - The start of the program may be delayed for a period of time
between 0:30 and 24 hours.
The DELAY function cannot be set once a program has been started.
WATER TAP CLOSED – Alarm - Flashes when there is no inlet water or
water tap is closed.
ActiveDry - It is aconvection drying system which automatically opens the
door during/after drying phase to ensure exceptional drying performance
every day. Door opens at the temperature that is safe to your kitchen fur-
niture. As additional steam protection, special designed protection foil is
added together with the dishwasher.
SENSING - When the sensor is detecting the soil level an animation
appears in the display (around 20 min.) and the cycle duration is
updated. SENSING is for the level of soiling on the dishes and is
present for all cycles (excepting Eco) adjusting the program accordingly.
HALF LOAD - If there are not many dishes to be washed, HALF LOAD is
used to save water, electricity or time, depending on the selected
program. Remember to halve the amount of detergent.
OPTIONS can be selected/ deselected, after choosing the program, directly by pressing the corresponding button (if available - the indicator
lights up) (see CONTROL PANEL). If an option is not compatible with the selected program (see PROGRAMS TABLE), the corresponding LED ashes rap-
idly 3 times and beeps will sound. The option will not be enabled. An option can change time or water or energy consumption for the program.
DESCALE – Alarm - Limescale accumulation was detected on the
internal components of the appliance. Check if the Water Hardness
Setting is at the correct value and salt is present in the salt container (see
FIRST TIME USE), then use a descaling product (WPro brand is recommended)
with Self-Clean program. After a successful descaling, the icon will stop
being displayed.
If the actions above are not performed, product performance will deteriorate.
DESCALE warning will start blinking and «dES» alarm will appear on the
display. If still no action is taken, the appliance will only allow a certain
number of cycles to be started (indicated during «dES» alarm display) and
then will be BLOCKED to prevent component damage, with only the Self-
Clean program available. Performing a full descaling will unblock the
product. In the case of extremely high amounts of limescale, descaling may
have to be performed twice to be ecient.
PROGRAMS TABLE
OPTIONS AND FUNCTIONS
Please scan the QR code on your product in order to have more detailed information.
Program Programs description
Drying
phase
ActiveDry
Available
options
*)
Duration
of wash
program
(h:min)
**)
Water
consumption
(litres/cycle)
Energy
consumption
(kWh/cycle)
P1
Eco 50°- Program is suitable to clean normally soiled tableware, that
for this use, it is the most ecient program in terms of its combined
energy and water consumption, and that it is used to assess compli-
ance with the EU Ecodesign legislation.
3:30 9.9 0.77
P2
Auto Intensive 65° - Automatic program for
heavily soiled dishes and pans.
Senses the level of soil-
ing on the dishes and
adjusts the program
accordingly. When the
sensor is detecting the
soil level an animation
appears in the display
and the cycle duration
is updated.
2:25-3:10 17.0-25.0 1.30-1.70
P3
Auto Mixed 55° - Automatic program for nor-
mally soiled dishes with dried food residues.
1:20-3:20 7.5-20.5 0.75-1.20
P4
Auto Fast Wash 50° - Automatic program for
normally and lightly soiled dishes. The every-
day cycle that ensures optimal cleaning and
drying performance in a shorter time.
1:00-1:50 8.0-16.0 0.70-1.10
P5
Rapid 45° - Program is recommended for limited amount of lightly-soiled
dishes with no dried food residues. Does not include the drying phase.
-
0:30-0:40 10.5-15.0 0.55-0.65
P6
Delicates 45° - Program for delicate items, which are more sensitive to
high temperatures, for example, glasses and cups.
1:40-1:50 12.5-17.0 0.95-1.20
P7
Good Night 55° - Suitable for night-time operation of the appliance.
Ensures optimal cleaning and drying performance with the lowest noise
emission.
3:50-4:10 10.5-14.5 0.80-1.15
P8
Sanitizing 65° - Normally or heavily soiled crockery, with additional anti-
bacterial wash. Can be used to perform maintenance of the dishwasher.
-
1:55-2:10 12.0-19.0 1.40-1.80
P9
Soak - Used to refresh crockery planned to be washed later. Nodeter-
gent is to be used with this program.
-
0:12 4.5 0.10
P10
Self Clean 65° -
Program to be used to perform maintenance of the
dishwasher, to be carried out only when the dishwasher is EMPTY using
specic detergents designed for dishwasher maintenance.
-
-
1:15 12.7 1.10
FAVOURITE PROGRAM - The FAVOURITE program may be saved and
will be easily accessible. Find the program using PREVIOUS/NEXT, and
then press the FAVOURITE program button for 3 seconds.
3D ZONE WASH - Thanks to the additional power jets this option
provides up to 80% more water power, a more intensive and powerful
wash in the lower rack, in the specic bottom area. This option is
recommended for washing pots and casseroles (please refer to the 3D loading
section).
EN
Quick Guide
3
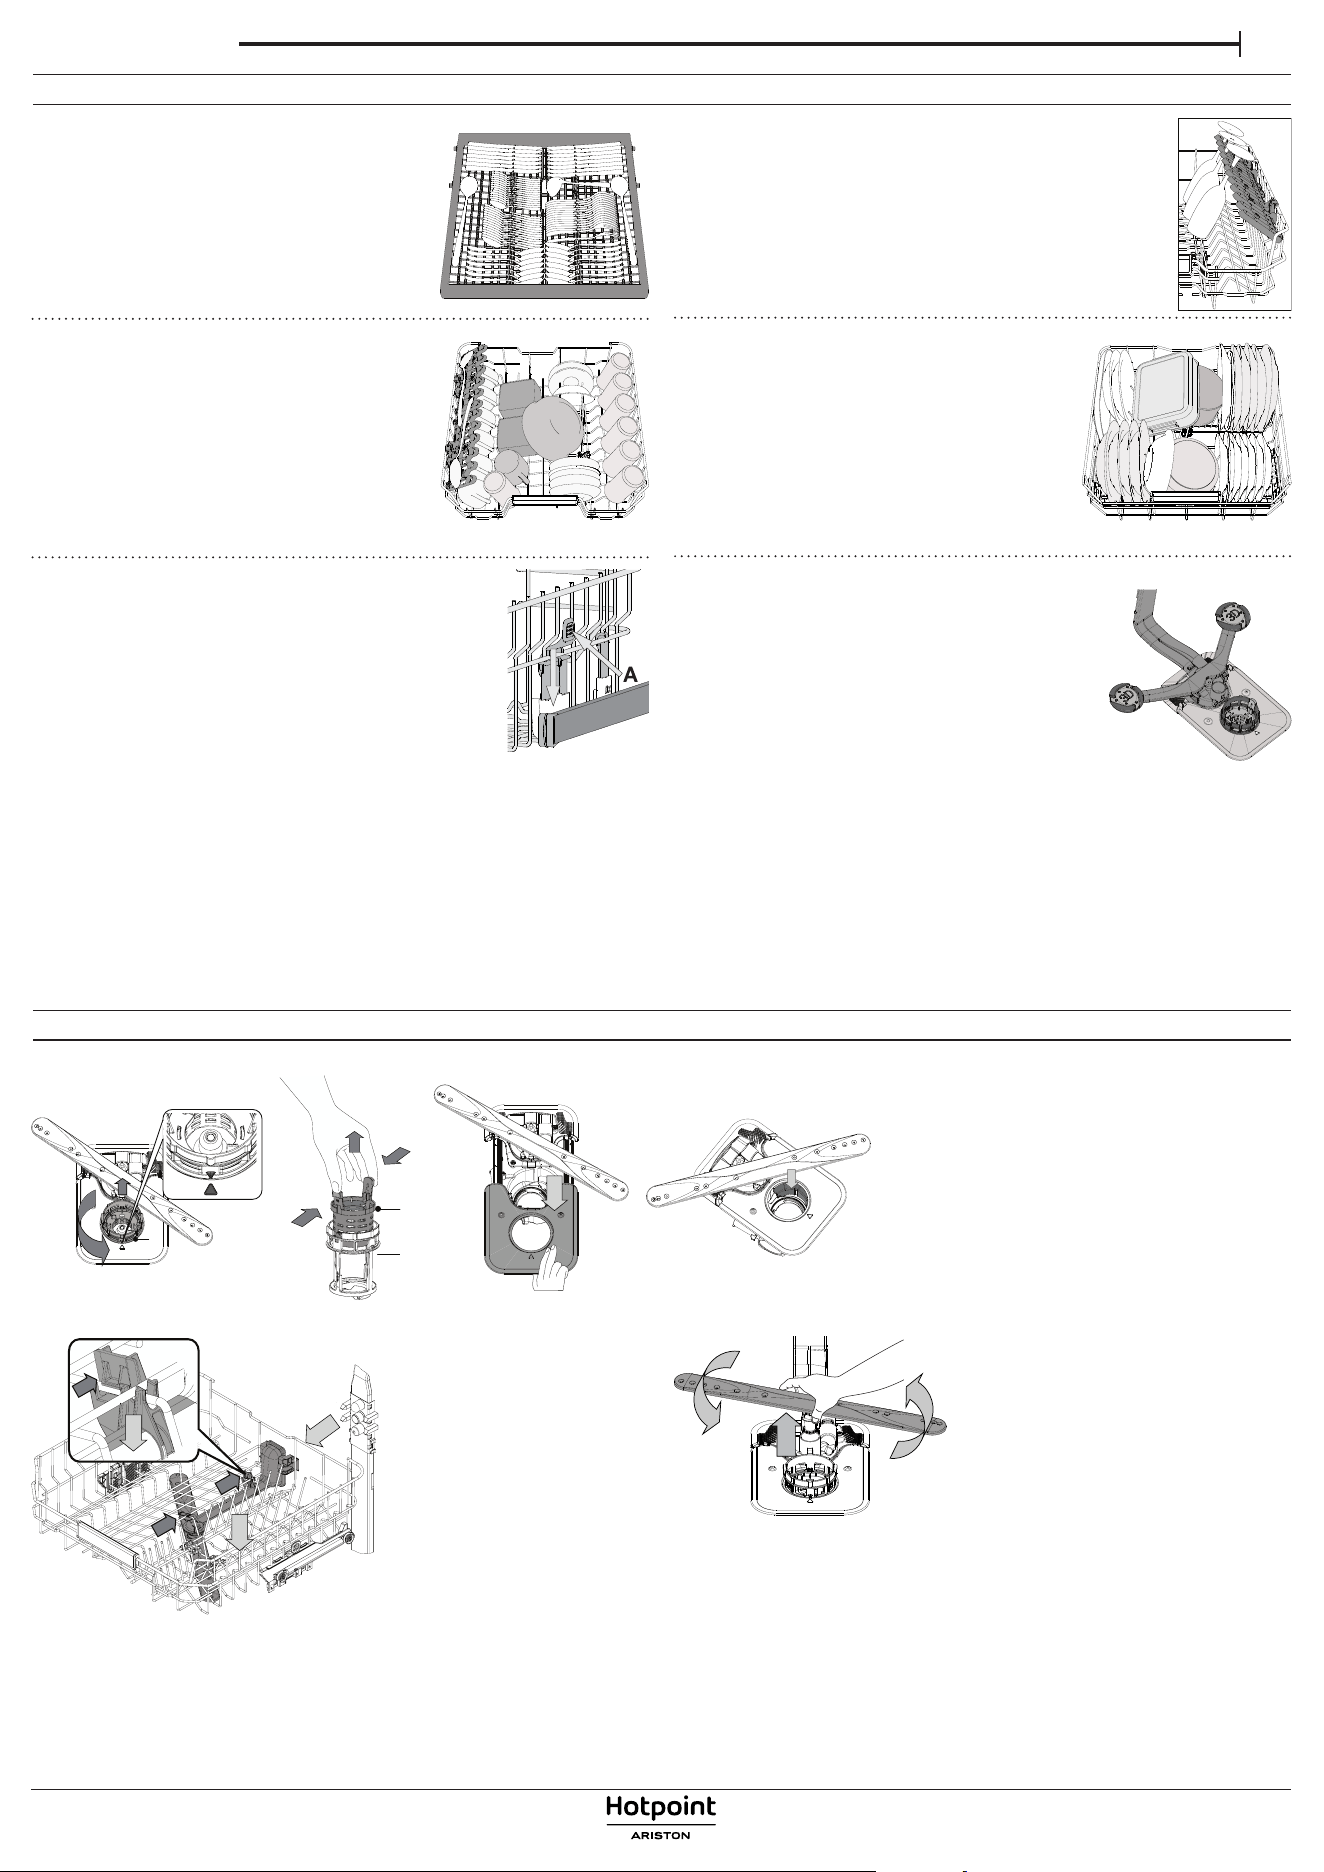
CLEANING THE FILTER ASSEMBLY
A
A
B
C
1 2 3 4
The dishwasher must not be used without l-
ters or if the lter is loose.
It is important when reinstalling the lter that
the two triangles shown on the zoom meet (Fig 1).
In case you nd foreign objects (such as broken
glass, porcelain, bones, fruit seeds etc.) please re-
move them carefully.
Inspect the trap and remove any food residues.
NEVER REMOVE the wash-cycle pump protec-
tion (shown by an arrow) (Fig 4).
CARE AND MAINTENANCE
More information in the Daily Reference Guide on website.
LOADING THE RACKS
CAPACITY: 16 standard place-settings
CLEANING THE SPRAY ARMS
On occasions, food residue
may become encrusted onto
the spray arms and block the
holes used to spray the water. It
is therefore recommended that
you check the arms from time
to time and clean them with
asmall non-metallic brush.
To remove the upper spray you
must remove it together with
the manifold.
The lower spray arm may be removed
by pulling it upwards and rotating it an-
ti-clockwise. Mounting back the spray
arm is by pulling it down and rotating it
clockwise.
CUTLERY RACK
The third rack was designed to house the cutlery.
Arrange the cutlery as shown in the gure.
A separate arrangement of the cutlery makes
collection easier after washing and improves
washing and drying performance.
Knives and other utensils with sharp edges
must be positioned with the blades facing
downwards.
UPPER RACK
Load delicate and light dishes: glasses, cups,
saucers, low salad bowls.
The upper rack has tip-up supports which can
be used in a vertical position when arranging
tea/ dessert saucers or in a lower position to
load bowls and food containers.
(loading example for the upper rack)
ADJUSTING THE HEIGHT OF THE UPPER RACK
The height of the upper rack can be adjusted: ahigh po-
sition to place bulky crockery in the lower basket and
alow position to make the most of the tip-up supports
by creating more space upwards and avoiding collision
with the items loaded into the lower rack.
We strongly recommend that you do not adjust the
height of the rack when it is loaded. NEVER raise or
lower the basket on one side only.
FOLDABLE FLAPS WITH ADJUSTABLE POSITION
The side foldable aps can be folded or unfolded to opti-
mize the arrangement of crockery inside the rack. Wine
glasses can be placed safely in the foldable aps by insert-
ing the stem of each glass into the corresponding slots.
LOWER RACK
For pots, lids, plates, salad bowls, cutlery etc. Large
plates and lids should ideally be placed at the
sides to avoid interferences with the spray arm.
The lower rack has tip-up supports which can
be used in a vertical position when arranging
plates or in ahorizontal position (lower) to load
pans and salad bowls easily.
(loading example for the lower rack)
3D ZONE WASH
3D Zone Wash uses additional water jets located
both: in the lower and upper part of the dishwasher
(marked with orange colour) to wash more inten-
sively heavily soiled items by increasing water cov-
erage on dishes.
Example: Load pots and casseroles facing the lower
part of 3D Zone Wash components and activate the
3D Zone Wash option on the panel.
EN
4
Quick Guide
In case your dishwasher doesn’t work properly, check if the problem can be solved by going through the following list. For other errors or is-
sues please contact authorized After-sales Service whose contact details can be found in the warranty booklet. Spare parts will be available
for aperiod of either up to 7 or up to 10 years, according to the specic Regulation requirements.
PROBLEMS POSSIBLE CAUSES SOLUTIONS
Descale
indicator is lit
or blinking;"dES"
alarm is displayed.
Limescale is accumulating on internal com-
ponents of the appliance.
Descale the appliance immediately using the Self Clean program and acommercially
available descaling product (see OPTIONS AND FUNCTIONS). Rell the reservoir with
salt. Check the water hardness setting. If the appliance is not descaled, it will stop
functioning.
The dishwasher
won’t drain.
Display shows:
F7 E3 or F9 E1
The lter is clogged with food residues or
limescale
Clean the lter and descale the appliance (see CLEANING THE FILTER ASSEMBLY and
DESCALE INSTRUCTION).
The drain hose is kinked. Check the drain hose (see INSTALLATION INSTRUCTION).
The sink drain pipe is blocked. Clean the sink drain pipe.
The dishwasher
does not ll the
water.
The display
shows: H
2
O and
is lit; acoustic
alarm sounds.
No water in the water supply or the tap is
closed.
Make sure there is water in the water supply and the water tap is open.
The water inlet hose is kinked.
Check the inlet hose (see INSTALLATION). Open dishwasher door, press START/Pause
button and close the door within 4 seconds.
The screen in the water inlet hose is
clogged; it is necessary to clean it.
Check and clean the screen in the water inlet hose. Open dishwasher door, press
START/Pause button and close the door within 4 seconds.
The dishwasher
nishes the cycle
prematurely.
The display
shows: F8 E3
The lter is clogged with food residues or
limescale.
Clean the lter and descale the appliance (see CLEANING THE FILTER ASSEMBLY and
DESCALE INSTRUCTION).
Drain hose positioned too low or siphoning
into the home sewage system.
Check if the end of the drain hose is placed at the correct height (see INSTALLATION).
Check for siphoning into the home sewage system, and install a siphon breaker/air admit-
tance valve if necessary.
An excessive amount of foam is present.
The detergent has not been measured out correctly or it is not suitable for use in
dishwashers (see FILLING THE DETERGENT DISPENSER).
Air in the water supply. Check water supply for leaks or other issues letting air inside.
The dishes are not
dried well.
Rinse aid is not present or the dosage is too
low.
Make sure the rinse aid dispenser is lled (see FILLING THE RINSE AID DISPENSER).
Multifunctional tablets only will not provide as good drying eects as the actual use
of liquid rinse aid.
The dishes have been unloaded after the
door was opened automatically but before
the actual cycle end.
Make sure the cycle has ended before starting to unload the dishes (see DAILY USE).
For even better drying results, it is recommended to let the dishes sit inside the dish-
washer with the door open for additional 15 minutes after the cycle ends.
The dishes are sitting too at.
If you notice puddles of water inside cavities of cups, mugs or bowls, try loading the
dishes (especially in the upper rack) providing more inclination to let larger amounts
of water drip down before drying starts.
The selected cycle does not have the dry-
ing phase.
Please check in the PROGRAMS TABLE if the selected program is equipped in the
drying phase.
Acycle without the drying phase may not deliver desired drying eciency, so it is
recommended to change cycle selection for the one that has the drying phase.
The dishes are made of non-stick or plastic. Some water drops remaining on this type of material are normal.
Dishes and glass-
es are covered
with limescale or
a whitish lm.
The salt reservoir is empty.
Rell the reservoir with salt as soon as possible. Using the appliance without salt may
cause damage to its internal components.
The water hardness setting is too low.
Increase the setting (see WATER HARDNESS TABLE).
The cap of the salt reservoir is not properly
closed.
Check and close the salt reservoir cap.
The rinse aid reservoir is empty or the rinse
aid dosage is insucient.
Rell the dispenser with rinse aid and check the dosage setting (for more information
- see FILLING THE RINSE AID DISPENSER).
The dishwasher
shows F8 E5
Valve is blocked or faulty. Close the water tap, if possible. Do not switch o the power supply. Call the service.
Detergent leaks.
Depends on the liquid detergent used and
can be emphasized in case of delay option
is activated.
Small leaks will not cause machine malfunction and can be avoided by changing
liquid detergent type or using tablets.
TROUBLESHOOTING
Please scan the QR code on your product in order to have more detailed information.
Policies, standard documentation, ordering of spare parts and additional product information can be found by:
• Using QR code on your product.
• Visiting our website docs.hotpoint.eu and parts-selfservice.europeanappliances.com
• Alternatively, contact our After-sales Service (See phone number in the warranty booklet).
When contacting our After-sales Service, please state the codes provided on your product’s identication plate.
The model information can be retrieved using the QR-Code reported in the energy label.
The label also includes the model identier that can be used to consult the portal of the registry at https://eprel.ec.europa.eu.
IEC 436
:
ITGuida Rapida
5
1. Tasto ACCENSIONE/SPEGNIMENTO/Ripristi-
no con relativa spia
2. Tasto programma PRECEDENTE
3. Tasto programma SUCCESSIVO
4. Tasto programma PREFERITO con relativa spia
5. Spia serbatoio Sale vuoto
6. Spia serbatoio Brillantante Vuoto
7. Spia DECALCIFICAZIONE
8. Spia Rubinetto Acqua Chiuso
9. Display
10. Numero di programma e indicatore di durata residua
11. Tasto opzione 3D Lavaggio Zona con relativa spia
12. Tasto opzione di Mezzo Carico con relativa spia / Impostazioni - pressione di 3 sec.
13. Tasto opzione Extra Asciutto con relativa spia
14. Tasto opzione Avvio Ritardato con relativa spia
15. Tasto AVVIO/Pausa con relativa spia
MENU IMPOSTAZIONI
1. Azionare l’apparecchio premendo il tasto ACCENSIONE/SPEGNIMENTO .
2. Tenere premuto il tasto Impostazioni (Mezzo Carico ) per 3 secon-
di, nché non si udirà un bip e il display visualizzerà “SEt” (Impostato).
3. Dopo un secondo, verrà visualizzata la prima impostazione disponibile
(lettera “ ”).
4. Premere PRECEDENTE /SUCCESSIVO per scorrere in avanti e indie-
tro l’elenco delle impostazioni disponibili (vedere la tabella sottostante),
quindi premere AVVIO/Pausa per visualizzare e modicare il valore
dell’impostazione attualmente selezionata.
5. Premere PRECEDENTE /SUCCESSIVO per modicare in avanti o in-
dietro il valore, quindi premere AVVIO/Pausa per salvare il nuovo va-
lore o tornare al menu principale.
6. Per modicare un’altra impostazione, ripetere i punti 4 e 5.
7. Premere ACCENSIONE/SPEGNIMENTO o attendere 30 secondi per
uscire dal menu.
LETTERA IMPOSTAZIONE
VALORI
(Predenito - in
grassetto)*
Contatore di cicli - Numero di cicli di lavag-
gio eettuati dalla lavastoviglie.
Es. 25 cicli: 25;
Es. 13.947 cicli:
13_947 (scorrere
per 3 volte)
Grado di durezza dell’acqua
(vedere “IMPOSTAZIONE DELLA DUREZZA
DELL’ACQUA” e “TABELLA DELLA DUREZZA
DELL’ACQUA”)
1 | 2 | 3 | 4 | 5
Livello del brillantante (vedere “REGOLAZIO-
NE DEL DOSAGGIO DI BRILLANTANTE”)
0 | 1 | 2 | 3 | 4 | 5
ActiveDry (vedere “OPZIONI E FUNZIONI”)
“1” = Accese, “0” = Spente
1 | 0
Segnale acustico
“1” = Accese, “0” = Spente
1 | 0
Impostazioni di fabbrica - Premere AVVIO/
Pausa per ripristinare i valori di fabbrica di
tutte le impostazioni incluse nel menu delle
impostazioni.
-
*) Il valore predenito non si applica al contatore di cicli.
RIEMPIMENTO DEL SERBATOIO SALE
L’uso di sale previene la formazione di CALCARE sulla su-
percie dei piatti e sui componenti della macchina.
Il serbatoio del sale si trova nella parte inferiore della lava-
stoviglie (sotto il cestello inferiore sul lato sinistro).
• È indispensabile che il serbatoio del sale non sia mai
vuoto.
• È essenziale quindi che il livello di durezza dell’acqua sia stato impostato.
• Il sale deve essere inserito quando la spia RIEMPIMENTO SALE sul pan-
nello comandi è accesa.
1. Togliere il cestello inferiore e svitare il tappo del serbatoio (ruotare in sen-
so antiorario).
2. Sistemare opportunamente l’imbuto (vedere gura) e rifornire il serbato-
io del sale no all’orlo (circa 0,5 kg); Non è inconsueto che l’acqua traboc-
chi leggermente.
3. Solo la prima volta: riempire d’acqua il serbatoio del sale.
4. Togliere l’imbuto ed eliminare qualsiasi residuo di sale dall’areacircostan-
te l’apertura.
Accertarsi che il tappo sia adeguatamente serrato per evitare l’ingresso di
detersivo all’interno della vaschetta durante il programma di lavaggio (ciò
potrebbe causare il danneggiamento del dispositivo addolcente senza pos-
sibilità di riparazione). Eseguire un programma ogni volta che si comple-
ta il riempimento del serbatoio del sale per evitare la corrosione.
SISTEMA DI ADDOLCIMENTO DELL’ACQUA
L’addolcitore riduce automaticamente la durezza dell’acqua, impedendo la
formazione di calcare sulla serpentina e contribuendo a migliorare l’ecienza
di lavaggio. Questo sistema si rigenera con il sale, che deve essere perciò
rabboccato quando il serbatoio del sale è vuoto. La frequenza di rigene-
razione dipende dal livello di durezza impostato - con la durezza dell’acqua
impostata al livello 3, la rigenerazione avviene ogni 4-6 cicli Eco.
Il processo di rigenerazione avviene all’inizio del ciclo con acqua fresca ag-
giuntiva.
Ogni rigenerazione comporta: un consumo di ~3 litri d’acqua;
Un prolungamento di 5 minuti della normale durata del ciclo;
Un consumo di energia minore di 0,005 kWh.
RIEMPIMENTO DEL DISTRIBUTORE BRILLANTANTE
A
B
L’utilizzo di brillantante facilita il processo di ASCIUGA-
TURA delle stoviglie. Il distributore di brillantante A
deve essere riempito ogni volta che a spia dell’ indicato-
re di RIEMPIMENTO BRILLANTANTE sul pannello co-
mandi è illuminata.
1. Aprire il distributore B esercitando opportuna
pressione e quindi sollevando la linguetta posta
sul coperchio.
2. Versare delicatamente il brillantante no al se-
gno che indica il livello di riferimento massimo
(110 ml), ma evitandone la fuoriuscita. Nel caso
in cui ciò si verichi, asciugare immediatamente
il liquido fuoriuscito mediante un panno asciutto.
3. Abbassare il coperchio no ad avvertire lo scatto che ne segnala la chiusura.
Non versare MAI il brillantante direttamente all’interno della vaschetta.
D
C
RIEMPIMENTO DEL DISTRIBUTORE DETERSIVO
Per aprire il distributore detersivo utilizzare il di-
spositivo di apertura C. Versare il detersivo esclu-
sivamente nel distributore D asciutta. Mettere la
dose di detersivo per il prelavaggio direttamente
all’interno del distributore.
1. Per il dosaggio corretto del detersivo fare rife-
rimento ai dati sopra riportati. La vaschetta D contie-
ne indicatori di livello per facilitare il dosaggio del detersivo.
2. Eliminare eventuali residui di detersivo dai bordi del distributore e chiu-
dere il coperchio no ad avvertire lo scatto caratteristico.
3. Chiudere il coperchio del distributore sollevandolo no a portare il di-
spositivo di chiusura in sede.
Il distributore del detersivo si apre automaticamente quando previsto dal
programma in uso.
L’uso di un detersivo non specico per lavastoviglie potrebbe causare
malfunzionamenti o danni all’apparecchio.
Prima di utilizzare l’apparecchio, legga attentamente le Istruzioni di sicurezza
e di installazione.
Dopo l’installazione, ricordarsi di rimuovere tutte le parti di protezione per il tra-
sporto dalla lavastoviglie.
PANNELLO DI CONTROLLO
PRIMO UTILIZZO
Maggiori informazioni nella Guida Rapida sul sito web.
SCANSIONARE
IL CODICE QR
SULL’APPARECCHIO
PER VISUALIZZARE
INFORMAZIONI PIÙ
DETTAGLIATE
GRAZIE PER AVER ACQUISTATO UN PRODOTTO HOTPOINT ARISTON.
Per ricevere assistenza in modo più completo, registrare il proprio
apparecchio sul sito: www.hotpoint.eu/register
W11558344 panel
W11569662 button R
W11569657 button L
W11569647 display
1 2 3 4
11 12 13
14
15
5 6 7 8 9 10
Guida RapidaIT
6
CONTATORE DI CICLI - Questa funzione mostra il numero di cicli che
la lavastoviglie ha eettuato.
Per il numero di cicli da 0 a 999, verrà visualizzato un numero sso.
Esempio per 25 cicli.
Quando il numero di cicli è superiore a 1000, il numero scorre sul display. Il
simbolo “_” rappresenta il “.”, come ad esempio: 1.000 = 1_000, 13.947= 13_947
(il numero scorre per 3 volte).
Esempio per
13.947 cicli:
Dopo la visualizzazione del ciclo, il display tornerà a visualizzare
„ ”
.
NOTA: La lavastoviglie potrebbe aver già eseguito circa 30 cicli. Ciò è
dovuto all’esteso processo di qualità eettuato durante la produzione.
Garantisce una maggiore qualità del prodotto.
La misurazione dei dati per la creazione del programma ECO avviene in condizioni di laboratorio secondo quanto prescritto dalle norme europee EN 60436:2020 .
Nota per i laboratori di Prove: per informazioni sulle condizioni della prova comparativa EN. farne richiesta all’indirizzo: [email protected]
Questi programmi non richiedono un pre-trattamento delle stoviglie.
*) Non è possibile selezionare tutte le opzioni contemporaneamente.
**) Ad eccezione del programma Eco, i valori riportati per gli altri programmi sono puramente indicativi. La durata eettiva può dipendere da molti fattori. quali
la temperatura e la pressione dell’acqua di alimentazione. la temperatura ambiente. la dose di detersivo utilizzata. la quantità e il tipo di carico e il suo bilancia-
mento. la selezione di determinate opzioni e la taratura dei sensori. La taratura dei sensori può prolungare la durata dei programmi anche di 20 minuti.
Programma
Descrizione dei programmi
Fase di asciu-
gatura
ActiveDry
Opzioni
disponibili
*)
Durata pro-
gramma di
lavaggio
(h:min)
**)
Consumo
d’acqua
(litri/ciclo)
Consumo
energeticon
(kWh/ciclo)
P1
Eco 50°- Il programma è indicato per le stoviglie mediamente sporche; è il
programma più eciente in termini di consumo combinato di acqua ed ener-
gia per questo tipo di stoviglie e viene usato per valutare la conformità dell’ap-
parecchio alla legislazione UE in materia di progettazione ecocompatibile.
3:30 9,9 0,77
P2
Auto Intensivo 65° - Il programma automatico
per piatti e pentole molto sporchi.
Rileva il livello di spor-
co delle stoviglie e se-
leziona il programma
adeguato. Durante il
rilevamento del livello
di sporco, sul display
compare un’animazio-
ne e la durata del ciclo
viene aggiornata.
2:25-3:10 17,0-25,0 1,30-1,70
P3
Auto Misti 55° - Il programma automatico per piat-
ti normalmente sporchi e con residui secchi di cibo.
1:20-3:20 7,5-20,5 0,75-1,20
P4
Auto Lavaggio Rapido 50° - Il programma auto-
matico per piatti normalmente e leggermente spor-
chi. Ciclo quotidiano; permette di ottenere risultati
di lavaggio e asciugatura ottimali in un tempo in-
feriore.
1:00-1:50 8,0-16,0 0,70-1,10
P5
Rapido 45° - Il programma è consigliato per una quantità limitata di piatti
poco sporchi e senza residui secchi di cibo. Non include la fase di asciugatura.
-
0:30-0:40 10,5-15,0 0,55-0,65
P6
Delicati 45° -
Il programma
adatto a oggetti delicati, più sensibili alle tem-
perature elevate, ad esempio bicchieri e tazze.
1:40-1:50 12,5-17,0 0,95-1,20
P7
Buona Notte 55° - Adatto al funzionamento nelle ore notturne. Permet-
te di ottenere risultati di lavaggio e asciugatura ottimali con una minima
emissione sonora.
3:50-4:10 10,5-14,5 0,80-1,15
P8
Antibatterico 65° - Sporco normale e molto sporco, con azione antibatte-
rica supplementare. Ciclo utilizzabile per la manutenzione della lavastoviglie.
-
1:55-2:10 12,0-19,0 1,40-1,80
P9
Ammollo - Da utilizzare per sciacquare le stoviglie da lavare successiva-
mente. Questo programma non richiede detersivo.
-
0:12 4,5 0,10
P10
Autopulente 65° - Il programma da utilizzare per la manutenzione della
lavastoviglie; deve essere eseguito solo con l’apparecchio VUOTO e usan-
do un detersivo specico per la manutenzione della lavastoviglie.
-
-
1:15 12,7 1,10
Le OPZIONI possono essere selezionate/deselezionate, dopo aver scelto il programma, direttamente premendo il pulsante corrispondente (se
disponibile - l’indicatore si accende) (vedere PANNELLO DI CONTROLLO). In caso di opzione non compatibile con il programma selezionato (vedere
TABELLA DEI PROGRAMMI), il LED corrispondente lampeggia 3 volte in rapida successione ed emette i previsti segnali acustici. L’opzione non è in
tal caso abilitata. Un’opzione può modicare il tempo o il consumo di acqua o di energia per il programma.
MEZZO CARICO - Se le stoviglie da lavare non sono numerose, la fun-
zione di mezzo carico MEZZO CARICO serve a risparmiare acqua, elet-
tricità o tempo, a seconda del programma selezionato.
Ricordare di ridurre la dose di detersivo.
EXTRA ASCIUTTO - La temperatura più elevata durante il risciacquo finale
e la fase di asciugatura prolungata consentono di migliorare l’asciugatura.
L’opzione EXTRA ASCIUTTO comporta una maggior durata del ciclo di lavaggio.
AVVIO RITARDATO - L’avvio del programma può essere ritardato per un
periodo di tempo compreso tra 30 minuti e 24 ore. Una volta avviato il
programma, non è più possibile impostare la funzione AVVIO RITARDATO.
DECALCIFICAZIONE - Allarme - È stato rilevato un accumulo di calcare
sui componenti interni dell’apparecchio. Vericare se l’impostazione
della durezza dell’acqua è al valore corretto e se nel contenitore del sale è
presente del sale (vedere PRIMO UTILIZZO), quindi utilizzare un prodotto
decalcicante (si raccomanda il marchio WPro) con il programma Autopuli-
zia. Dopo una corretta decalcicazione, l’icona smetterà di essere visualizzata.
Se le azioni di cui sopra non vengono eseguite, le prestazioni del prodotto si
deteriorano. L’avviso DECALCIFICAZIONE inizierà a lampeggiare e l’allarme
«dES» apparirà sul display. Se non si interviene, l’apparecchio consentirà
di avviare solo un certo numero di cicli (indicato durante la visualizzazione
dell’allarme «dES» e quindi si bloccherà per evitare danni ai componenti,
rendendo disponibile solo il programma Autopulente. Eseguendo una
decalcicazione completa, il prodotto si sblocca. In caso di quantità estre-
mamente elevate di calcare, potrebbe essere necessario eseguire la decal-
cicazione due volte per essere eciente.
ActiveDry - È un sistema di asciugatura a convezione che apre automatica-
mente lo sportello durante/dopo la fase di asciugatura, per garantire ogni
giorno prestazioni di asciugatura eccezionali. Lo sportello si apre ad una
temperatura sicura per i mobili della cucina. Come ulteriore protezione dal
vapore, insieme alla lavastoviglie viene aggiunta una pellicola di protezio-
ne appositamente progettata.
RILEVAMENTO - Quando il sensore rileva il livello del sporco,
sul display appare un’animazione (circa 20 minuti) e la durata
del ciclo viene aggiornata. Il RILEVAMENTO riguarda il livello di
sporco delle stoviglie ed è presente per tutti i cicli (tranne l’Eco), regolando
il programma di conseguenza.
TABELLA DEI PROGRAMMI
OPZIONI E FUNZIONI
Scansionare il codice QR sull’apparecchio per visualizzare informazioni più dettagliate.
3D LAVAGGIO ZONA - Grazie ai getti di potenza aggiuntivi, questa
opzione ore no all’80% di potenza d’acqua in più, un lavaggio più
intenso e potente nel cestello inferiore, nell’area specica del fondo. Questa
opzione è consigliata per il lavaggio di pentole e casseruole (fare riferimento
alla sezione di caricamento di 3D Lavaggio Zona).
ITGuida Rapida
7
PULIZIA DEL GRUPPO FILTRO
A
A
B
C
1 2 3 4
Non utilizzare mai la lavastoviglie priva dei l-
tri o con i ltri allentati.
Quando si reinstalla il ltro, è importante che
i due triangoli indicati sullo zoom coincidano
(Fig 1).
Se si trovano oggetti estranei (frammenti di vetro,
porcellana, ossa, semi di frutta, ecc.), rimuoverli
con attenzione.
Esaminare il sifone ed eliminare la presenza di
qualsiasi residuo di cibo. NON TOGLIERE MAI
l’elemento di protezione della pompa di lavaggio
(indicato da una freccia) (Fig 4).
CESTELLO PORTAPOSATE
Il terzo cestello è stato progettato per alloggiare
le posate durante il lavaggio. La possibilità di si-
stemare le posate aparte ne rende più semplice
la raccolta dopo il lavaggio emigliora le presta-
zioni sia nella fase di lavaggio che in quella di
asciugatura.
Coltelli ealtri utensili con bordi alati devo-
no essere sistemati con le lame rivolte verso
il basso.
CESTELLO SUPERIORE
Riporvi i piatti poco resistenti e le stoviglie delica-
te: vetri, tazze, piattini, insalatiere dai bordi bassi.
Il cestello superiore è munito di sponde ribal-
tabili da utilizzare in posizione verticale per la
sistemazione di piattini per tea/dessert oppure
in posizione abbassata per consentire il carico di
scodelle e recipienti per alimenti.
REGOLAZIONE IN ALTEZZA DEL CESTELLO SUPERIORE
È possibile regolare del cestello superiore nel senso
dell’altezza: la posizione rialzata consente di sfruttare
al massimo il cestello inferiore per riporvi le stoviglie di
dimensioni ingombranti, mentre la posizione ribassata
consente di utilizzare le sponde ribaltabili creando lo
spazio che esse richiedono e di evitare urti con gli og-
getti caricati nel cestello inferiore.
Si raccomanda vivamente di non procedere alla re-
golazione in altezza di cestelli già caricati.
Non rialzare o ribassare MAI il cestello agendo su un
lato soltanto.
(esempio di carico del
cestello superiore)
SPONDE RIBALTABILI CON POSIZIONE REGOLABILE
Le sponde ribaltabili laterali possono essere estese o ripiega-
te per ottimizzare la disposizione delle stoviglie nel cestello.
Si possono disporre i bicchieri da vino nelle sponde ribal-
tabili in modo assolutamente sicuro, inserendone lo stelo
negli appositi spazi.
CESTELLO INFERIORE
Per pentole, coperchi, piatti, insalatiere, sto-
viglie, ecc. In teoria conviene disporre piatti e
coperchi di grandi dimensioni ai lati, per evitare
interferenze con l’elemento aspersore. Il cestello
inferiore è munito di sponde ribaltabili da utiliz-
zare in posizione verticale per la migliore siste-
mazione dei piatti oppure in posizione orizzon-
tale (abbassata) per consentire il facile carico di
scodelle e recipienti per alimenti.
3D LAVAGGIO ZONA
L’opzione 3D LAVAGGIO ZONA utilizza getti d’acqua
supplementari posti sia nella parte inferiore che in
quella superiore della lavastoviglie (identicati dal
colore arancione) per intensicare l’azione di lav-
aggio sulle stoviglie molto sporche aumentando
l’apporto d’acqua. Esempio: caricare pentole e
tegami rivolti verso i componenti dell’opzione 3D
LAVAGGIO ZONA posti nella parte inferiore e atti-
vare l’opzione 3D LAVAGGIO ZONA sul pannello
comandi.
(esempio di carico nel
cestello inferiore)
CARICAMENTO DEI CESTELLI
CAPIENZA: 16 coperti standard
PULIZIA DEI BRACCI ASPERSORI
I residui di cibo possono occasio-
nalmente formare incrostazioni
sui bracci aspersori e bloccare
i fori utilizzati per l’irrorazione
dell’acqua.
Si raccomanda per-
tanto di ispezionare di volta in
volta i bracci e di pulirli median-
te piccola spazzola metallica.
Per rimuovere lo spruzzo supe-
riore, è necessario rimuoverlo
insieme al collettore.
CURA E MANUTENZIONE
Maggiori informazioni nella Guida Rapida sul sito web.
Il braccio di spruzzo inferiore può essere
rimosso tirandolo verso l’alto e ruotan-
dolo in senso antiorario. Il montaggio
posteriore del braccio di spruzzo avvie-
ne tirandolo verso il basso e ruotandolo
in senso orario.
RUBINETTO ACQUA CHIUSO - Allarme -Lampeggia, quando non è
presente acqua in ingresso o il rubinetto dell’acqua è chiuso.
PROGRAMMA PREFERITO - Il programma PREFERITO può essere salvato
e sarà facilmente accessibile. Trovare il programma utilizzando PRECEDEN-
TE/ SUCCESSIVO, quindi premere il tasto programma PREFERITO per 3 secondi.
Guida RapidaIT
8
Se la lavastoviglie non funziona correttamente, provare a risolvere il problema consultando l’elenco sotto riportato. Per errori o problemi di
altro tipo, contattare un Servizio Assistenza Tecnica autorizzato; i dati di contatto sono riportati nel libretto di garanzia. I ricambi saranno
disponibili per un periodo no a 7 o no a 10 anni, secondo i requisiti specici del regolamento.
PROBLEMI POSSIBILI CAUSE SOLUZIONE
La spia di
decalcicazione è
accesa o lampeggia; Viene
visualizzato l’allarme „dES”.
Il calcare si sta accumulando sui componenti
interni dell’apparecchio.
Decalcicare immediatamente l’apparecchio utilizzando il programma AUTOPULENTE e un
prodotto decalcicante disponibile in commercio (vedere OPZIONI E FUNZIONI). Riempire il
serbatoio di sale. Vericare l’impostazione della durezza dell’acqua. Se l’apparecchio non viene
decalcicato, smetterà di funzionare.
Lo scarico della lavasto-
viglie non avviene.
Sul display viene visua-
lizzato: F7 E3 o F9 E1
Il ltro è intasato da residui di cibo o calcare.
Pulire il ltro e decalcicare l’apparecchio (vedere PULIZIA DEL GRUPPO FILTRO e ISTRUZIONI PER
LA DECALCIFICAZIONE).
Il tubo essibile di drenaggio è attorcigliato. Controllare il tubo essibile di scarico (vedere ISTRUZIONI DI INSTALLAZIONE).
Tubo di scarico del lavandino ostruito. Pulire il tubo di scarico del lavandino.
La lavastoviglie non
esegue il carico dell’ac-
qua.
Il display mostra: H
2
O
e si accende; suona
l’allarme acustico.
Assenza di alimentazione idrica o rubinetto chiuso.
Assicurarsi che sia presente acqua nella rete idrica e che il rubinetto dell’acqua sia aperto.
Il tubo essibile di ingresso dell’acqua è
attorcigliato.
Controllare il tubo essibile di ingresso (vedere INSTALLAZIONE). Aprire la porta, premere il tasto
AVVIO/Pausa e richiudere la porta entro 4 secondi.
La griglia nel tubo essibile di ingresso dell’ac-
qua è intasata; è necessario pulirlo.
Controllare e pulire la griglia nel tubo essibile di ingresso dell’acqua. Aprire la porta, premere
il tasto AVVIO/Pausa e richiudere la porta entro 4 secondi.
La lavastoviglie termina
il ciclo di lavaggio trop-
po presto.
Il display mostra: F8 E3
Il ltro è intasato da residui di cibo o calcare.
Pulire il ltro e decalcicare l’apparecchio (vedere PULIZIA DEL GRUPPO FILTRO e ISTRUZIONI PER
LA DECALCIFICAZIONE).
Il tubo di scarico è posizionato troppo in basso
o crea un eetto sifone nell’impianto di scarico
domestico.
Controllare che l’estremità del tubo di scarico si trovi all’altezza corretta (vedere INSTALLAZIO-
NE). Vericare la presenza di eetti sifone nel sistema fognario domestico e, se necessario,
installare un interruttore sifone/una valvola di ammissione dell’aria.
È presente una quantità eccessiva di schiuma.
Il dosaggio del detersivo non è stato stabilito in modo corretto oppure il detersivo non è del
tipo adatto alle lavastoviglie (vedere RIEMPIMENTO DEL DISTRIBUTORE DETERSIVO).
Aria nella rete idrica.
Controllare che non vi siano perdite nell’impianto idraulico o altri problemi che causino l’in-
gresso di aria.
Le stoviglie non vengo-
no asciugate bene.
Il brillantante non è presente o il dosaggio è
troppo basso.
Assicurarsi che la vaschetta del brillantante sia piena (vedere RIEMPIMENTO DEL DISTRIBUTORE
BRILLANTANTE). Le sole compresse multifunzionali non garantiscono un eetto di asciugatura
altrettanto buono rispetto all’uso eettivo del brillantante liquido.
Le stoviglie sono state scaricate dopo l’apertu-
ra automatica della porta, ma prima della ne
del ciclo eettivo.
Assicurarsi che il ciclo sia terminato prima di iniziare a scaricare le stoviglie (vedere USO QUOTI-
DIANO). Per ottenere risultati di asciugatura ancora migliori, si consiglia di lasciare le stoviglie
all’interno della lavastoviglie con la porta aperta per altri 15 minuti dopo la ne del ciclo.
Le stoviglie sono troppo distese.
Se si notano ristagni d’acqua all’interno delle cavità di tazze, tazzine o ciotole, provare a carica-
re le stoviglie (soprattutto nel cestello superiore) fornendo una maggiore inclinazione per far
gocciolare una maggiore quantità d’acqua prima dell’inizio dell’asciugatura.
Il ciclo selezionato non prevede la fase di
asciugatura.
Vericare nella TABELLA DEI PROGRAMMI se il programma selezionato è predisposto per la fase di asciu-
gatura. Il ciclo senza la fase di asciugatura potrebbe non fornire l’ecienza di asciugatura desiderata,
quindi si raccomanda di cambiare la selezione del ciclo con quella che prevede la fase di asciugatura.
Piatti in materiale antiaderente o in plastica. La presenza di alcune gocce d’acqua su questo tipo di materiale è normale.
I piatti e i bicchieri sono
ricoperti di calcare o di
una pellicola bianca-
stra.
Il serbatoio del sale è vuoto.
Riempire il serbatoio di sale il prima possibile. L’utilizzo dell’apparecchio senza sale può causa-
re danni ai componenti interni.
L’impostazione della durezza dell’acqua è troppo
bassa.
Aumentare l’impostazione (vedere TABELLA DELLA DUREZZA DELL’ACQUA).
Tappo del serbatoio sale non correttamente
chiuso.
Controllare e chiudere il tappo del serbatoio del sale.
Il serbatoio del brillantante è vuoto o il dosag-
gio del brillantante è insuciente.
Riempire nuovamente la vaschetta con il brillantante e controllare l’impostazione del dosaggio
(per maggiori informazioni - vedere RIEMPIMENTO DEL DISTRIBUTORE BRILLANTANTE).
La lavastoviglie indica:
F8 E5
La valvola è bloccata o difettosa.
Chiudere il rubinetto dell’acqua, se possibile. Non interrompere l’alimentazione elettrica.
Chiamare l’assistenza.
La perdita di detergente.
Dipende dal detergente liquido utilizzato e
può essere accentuata in caso di opzione di
ritardo attivata.
Piccole perdite non causano malfunzionamenti della macchina e possono essere evitate cam-
biando il tipo di detergente liquido o utilizzando le pastiglie.
RISOLUZIONE DEI PROBLEMI
Maggiori informazioni nella Guida Rapida sul sito web.
Documentazione normativa, documentazione standard, ordinazione di pezzi di ricambio e altre informazioni sul
prodotto possono essere reperite:
• Utilizzo del codice QR sul prodotto.
• Visitando il nostro sito web docs.hotpoint.eu e parts-selfservice.europeanappliances.com
• Oppure, contattare il Servizio Assistenza Tecnica(al numero di telefono riportato sul libretto di garanzia). Quando si
contatta il Servizio Assistenza Tecnica, fornire i codici presenti sulla targhetta matricola del prodotto.
I dati del modello possono essere richiamati usando il codice QR riportato sull’etichetta energetica. L’etichetta riporta anche il
codice identicativo del modello che può essere utilizzato per consultare il portale di registrazione su https://eprel.ec.europa.eu.
IEC 436
:
400020021885
03/2025 dk - Xerox Fabriano
