Included Cleaning Tools:
49827.0000
Brush
26367.0000
Brush
53493.0000
Brush
55605.0000
Cleaning
Tablets
5
7382.0000 A 4/20 © 2020 Bunn-O-Matic Corporation
Bunn-O-Matic Corporation | Post Office Box 3227 | Springfield, Illinois 62708-3227 | Phone (217) 529-6601 | Fax (217) 529-6644
www.bunn.com
Crescendo
®
Care and Cleaning Instructions
GENERAL CLEANING
DAILY
The use of a damp cloth rinsed in any mild, non-abrasive, liquid detergent is
recommended for cleaning all surfaces on Bunn-O-Matic equipment.
Exterior Surfaces
Wipe the lower front panel, door, and cabinet with a clean, damp cloth.
• Do not use any abrasive materials.
• Use a soft, dry cloth to wipe down the exterior surfaces of the dispenser
to maintain the luster of the stainless steel finish.
• Wash the stainless steel exterior surfaces of the dispenser with warm, soapy
water. Rinse with warm, clear water. If the water is hard, wipe the dispenser
dry with a soft cloth to prevent water spotting.
• Stainless steel polish may be used if it is sprayed on a cloth before the cloth
is used to wipe down the exterior surfaces of the dispenser.
Rinse Cycle
Drip Tray
Remove and wash the drip tray and drip
tray cover in a mild detergent solution.
Rinse thoroughly.
Waste Bin
Remove and wash the waste bin in a mild
detergent solution. Rinse thoroughly.
6. Open the dispenser door, and place
the NORMAL/PROGRAM/RINSE
switch in the NORMAL position.
5. After rinse cycle is complete, discard
the rinse water collected in the
container.
NORMAL
PRGM
RINSE
65
4. Press any beverage selection button.
NOTE: The dispenser will automatically
run hot water through both soluble
mixing chambers, and flush the
espresso brew chamber with hot water.
3. Press the button under RINSE on
the screen.
2. Place a container under the
dispense nozzle with at least a
400ml capacity.
1. Open door and place the NORMAL/
PROGRAM/RINSE switch in the
RINSE position.
4
SELECT MODE
RINSE CLEAN
3
1. SELECT SIZE
2
NORMAL
PRGM
RINSE
1
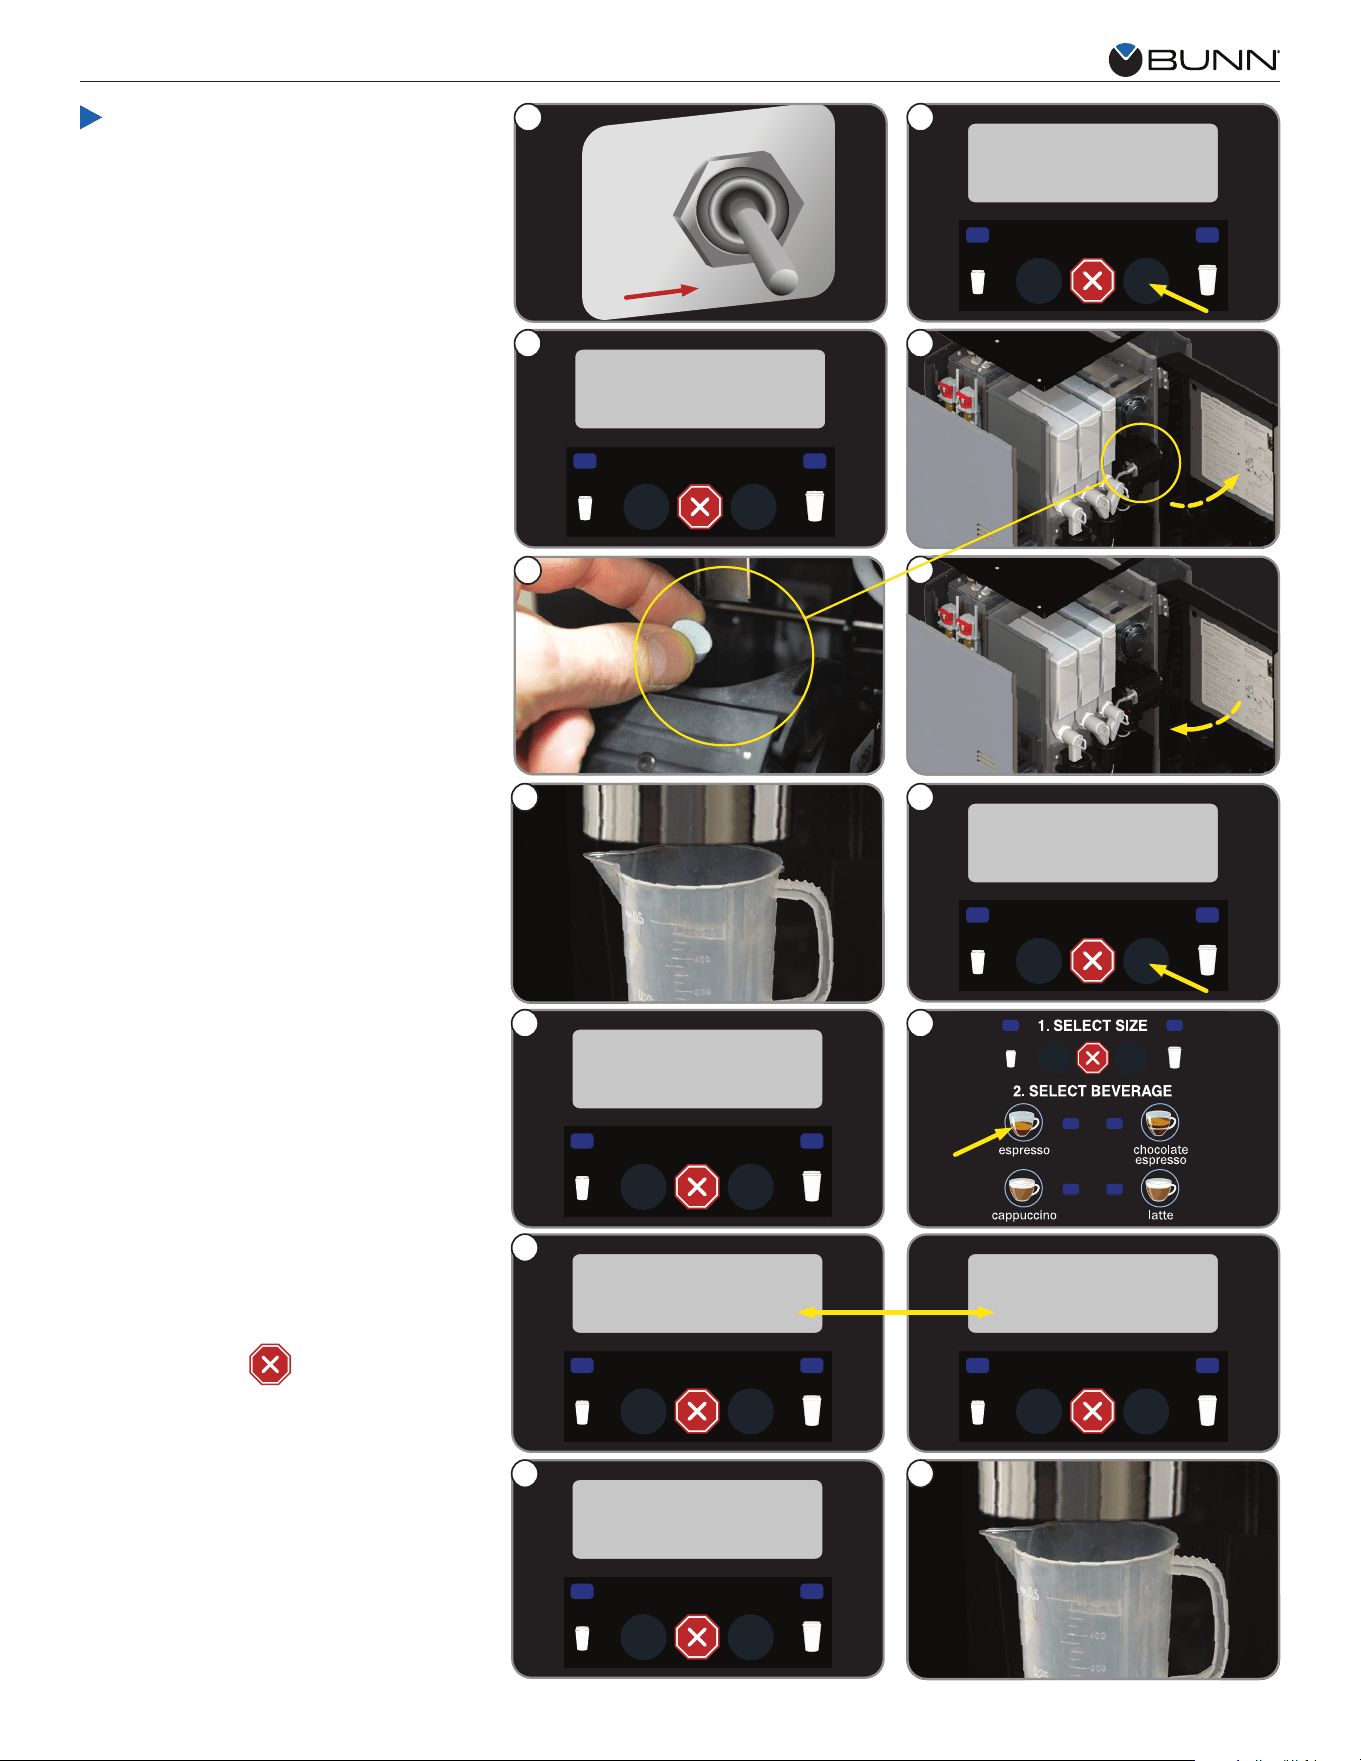
2
CLEANING CYCLE
IN PROGRESS
1. SELECT SIZE
Clean Cycle
11. During the cleaning cycle, two
messages will be displayed:
WEEKLY
Crescendo
®
Care and Cleaning Instructions
13
7
SELECT MODE
RINSE CLEAN
12
1. SELECT SIZE
13. Discard the waste water collected
from the cleaning cycle.
12. When cleaning cycle is complete,
the screen will display SELECT
MODE RINSE CLEAN.
10. Press any beverage selection button
to begin cleaning cycle.
9. Screen will display PRESS
DISPENSE TO START.
8. Press the button under NEXT.
SELECT MODE
RINSE CLEAN
1. SELECT SIZE
11
10
PRESS DISPENSE
TO START
9
1. SELECT SIZE
ADD CLEANING
TABLET NEXT
8
1. SELECT SIZE
CLEANING CYCLE IN PROGRESS
and PRESS
TO CANCEL.
7. Place a container under the
dispense nozzle with at least
a 500ml capacity.
continued >
5
1. Open the door and place the
NORMAL/PROGRAM/RINSE
switch in the RINSE position.
6. Close dispenser door.
5. Drop a cleaning tablet into the
opening above the espresso
brew chamber.
4. Open dispenser door.
3. Screen will prompt to ADD
CLEANING TABLET.
2. Press the button under CLEAN on
the screen.
6
4
ADD CLEANING
TABLET NEXT
3
1. SELECT SIZE
SELECT MODE
RINSE CLEAN
2
1. SELECT SIZE
NORMAL
PRGM
RINSE
1
3
Crescendo
®
Care and Cleaning Instructions
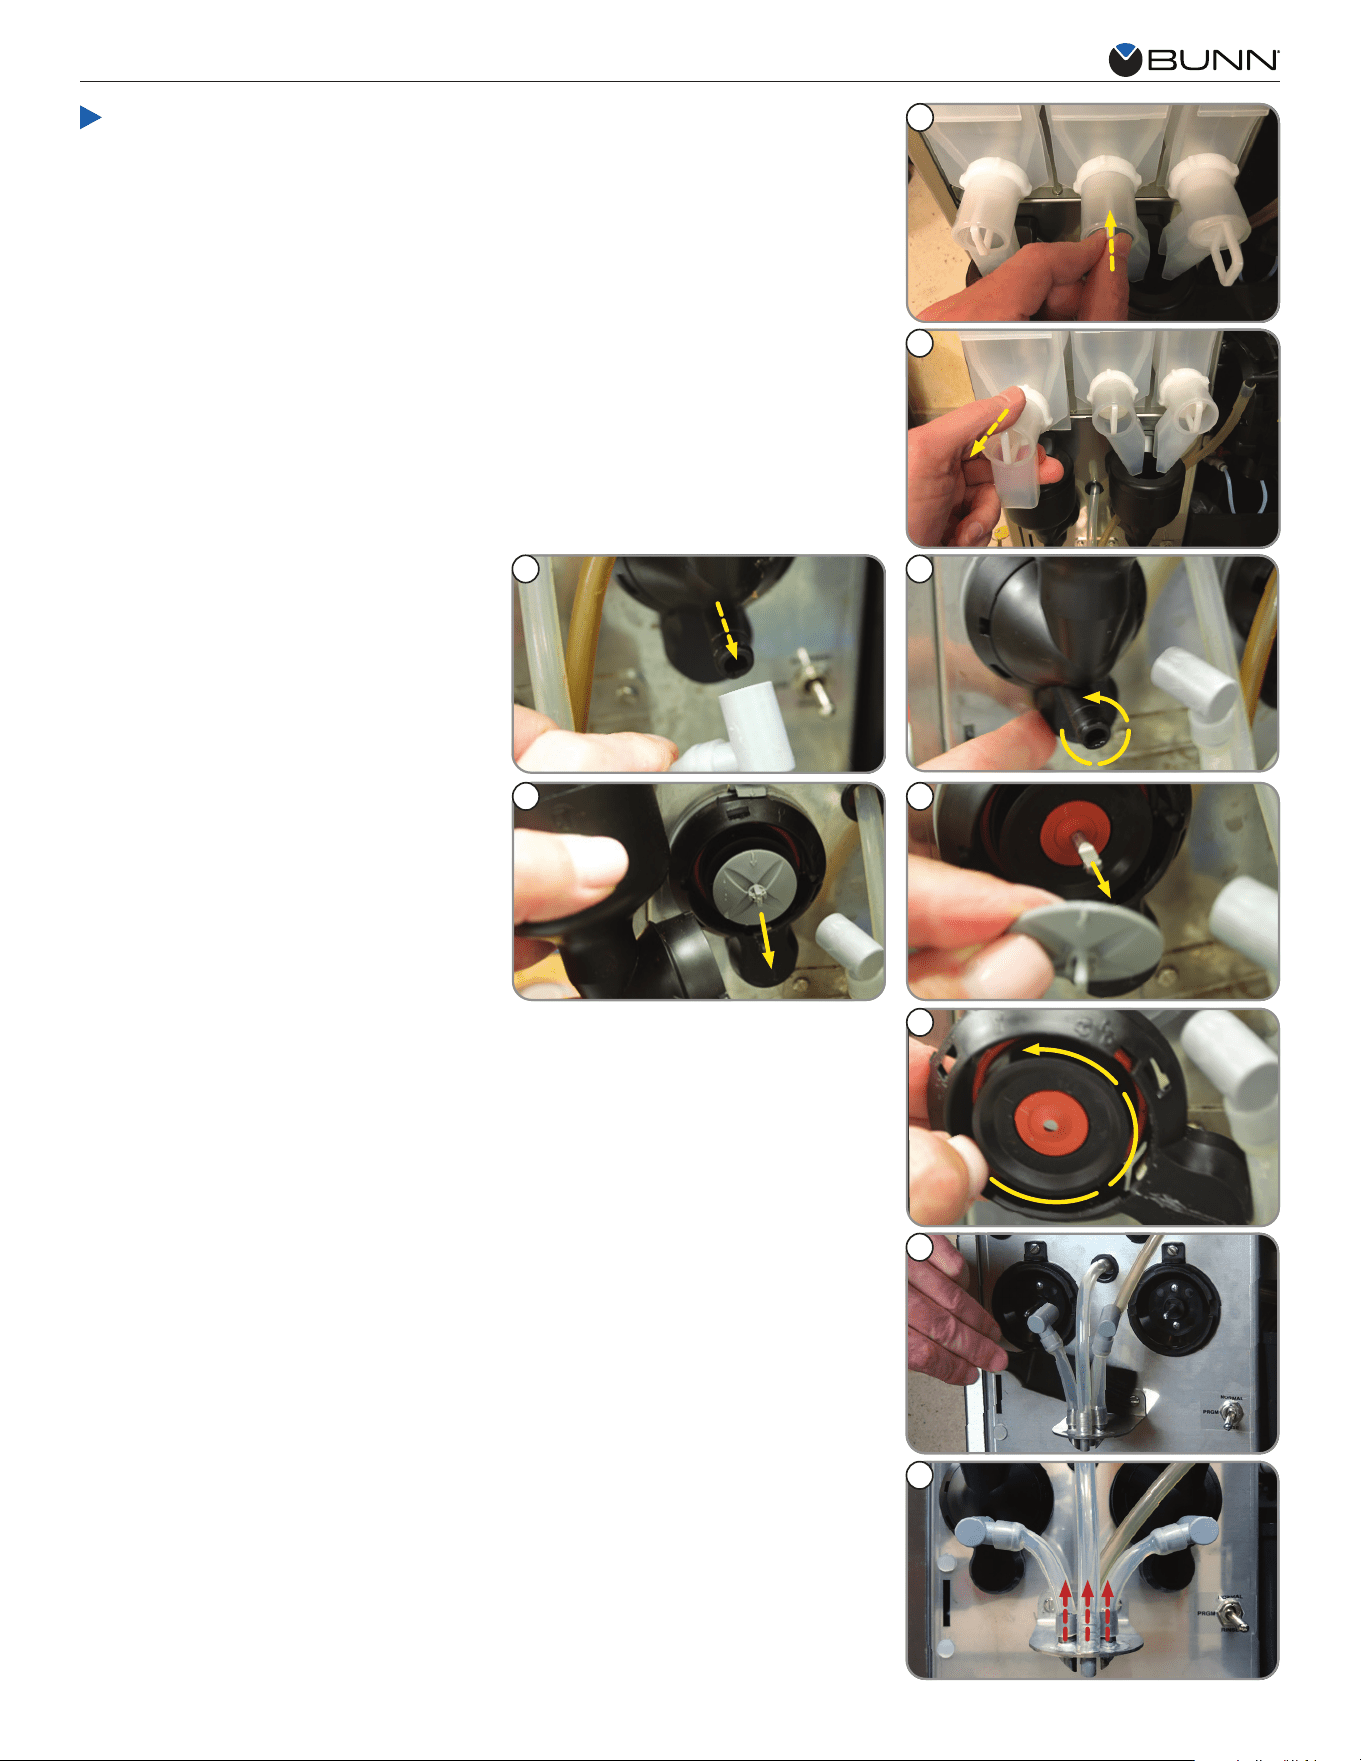
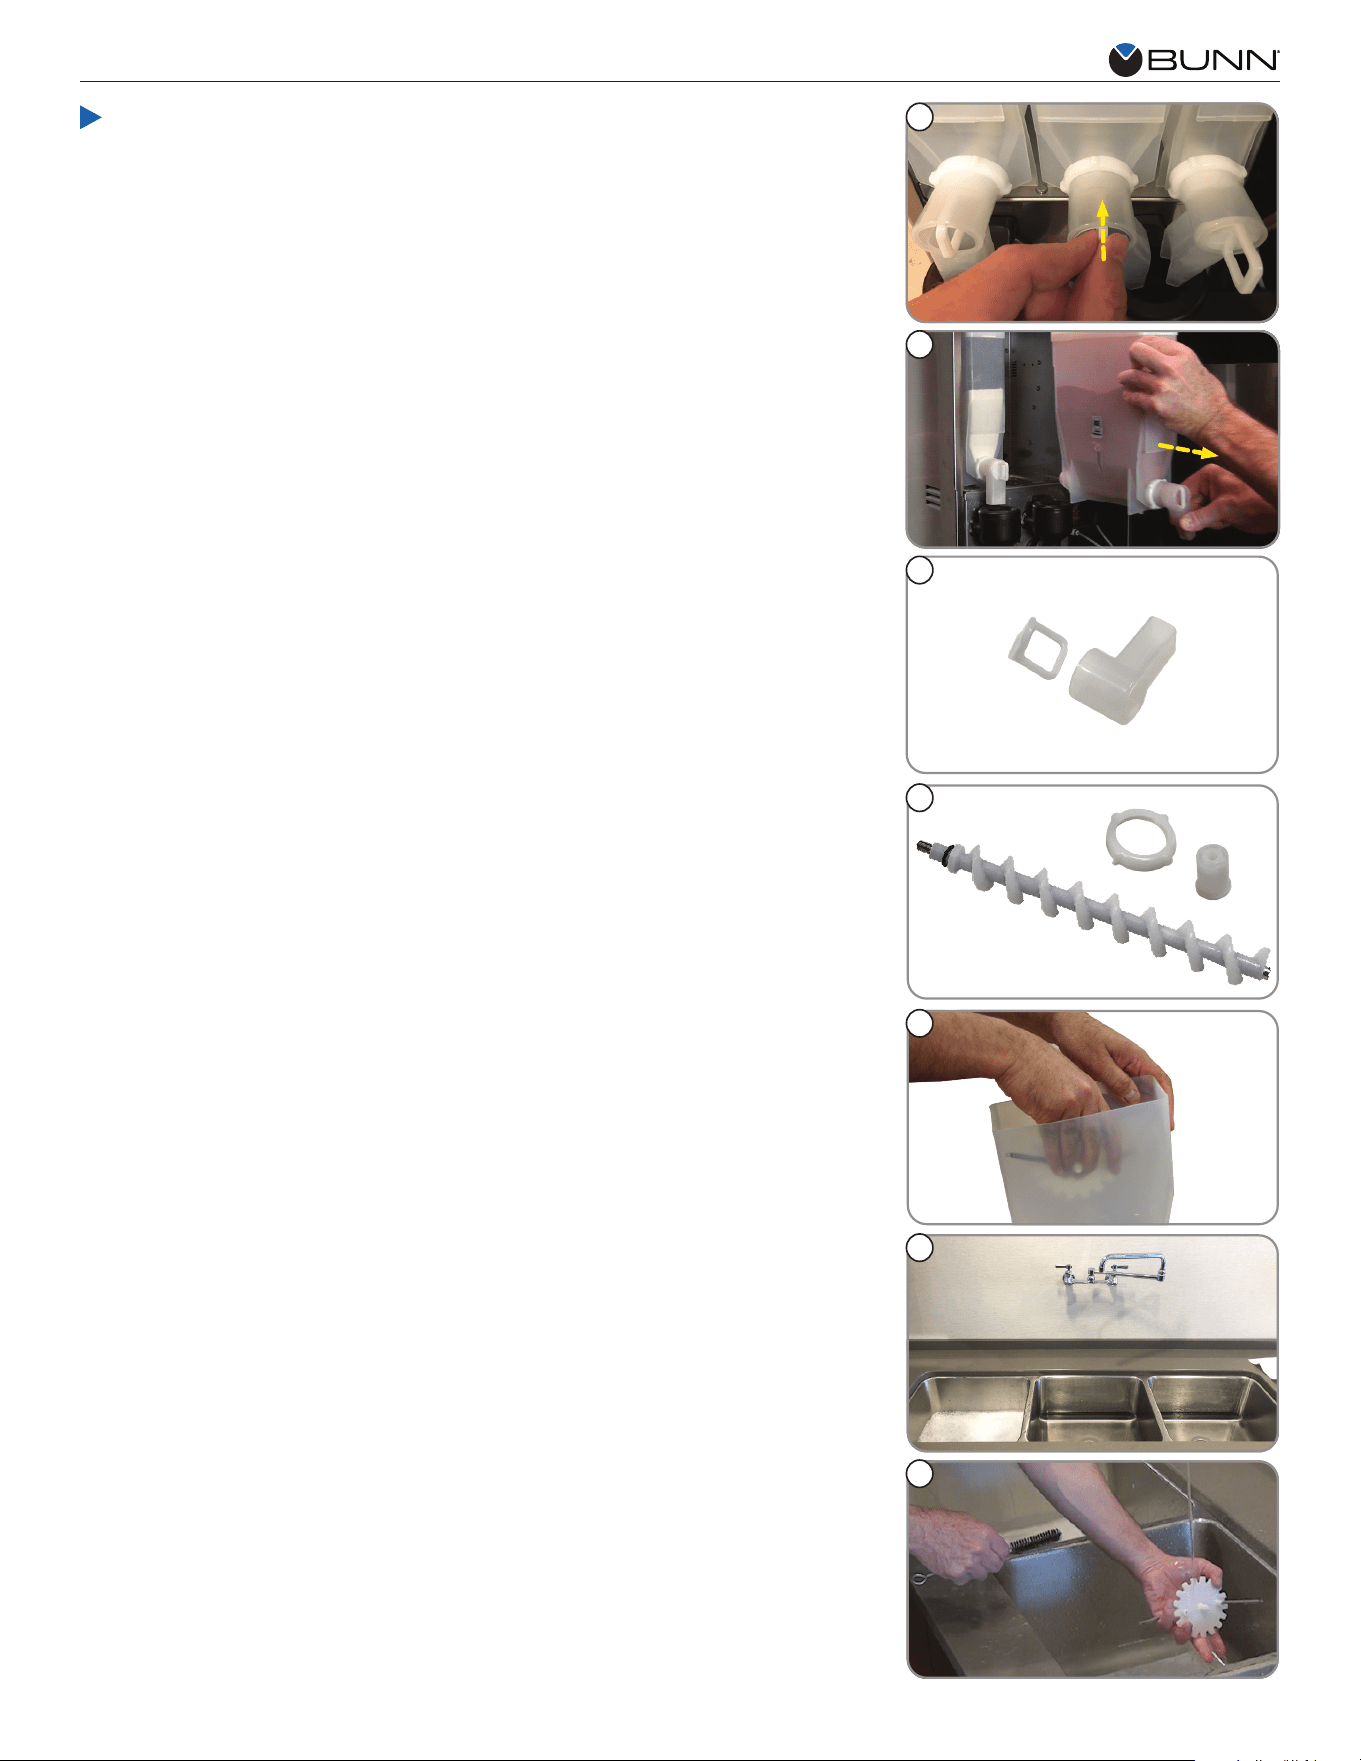
Parts Washing - Whipper Components
2. Remove hoppers.
1
2
9
8
9. Remove dispense tubes from dispense nozzle assembly.
8. Use flat brush to clean dispense tube connectors area.
7
7. Rotate tab on mixing chamber bases further counter clockwise, and remove from
shafts by pulling straight out.
6. Remove frother disks (Impellers)
from shafts by pulling straight out.
6
5
5. Remove mixing chambers by pulling
straight out.
4. Rotate tab at bottom of mixing
chamber bases. Twist counter clock-
wise to release bases.
43
3. Remove the elbow fittings from both
mixing chambers.
1. Push slide gates on the hopper
elbows in to close.
continued >
WEEKLY (continued)
4
Crescendo
®
Care and Cleaning Instructions
15
14
13
16
17
12
11
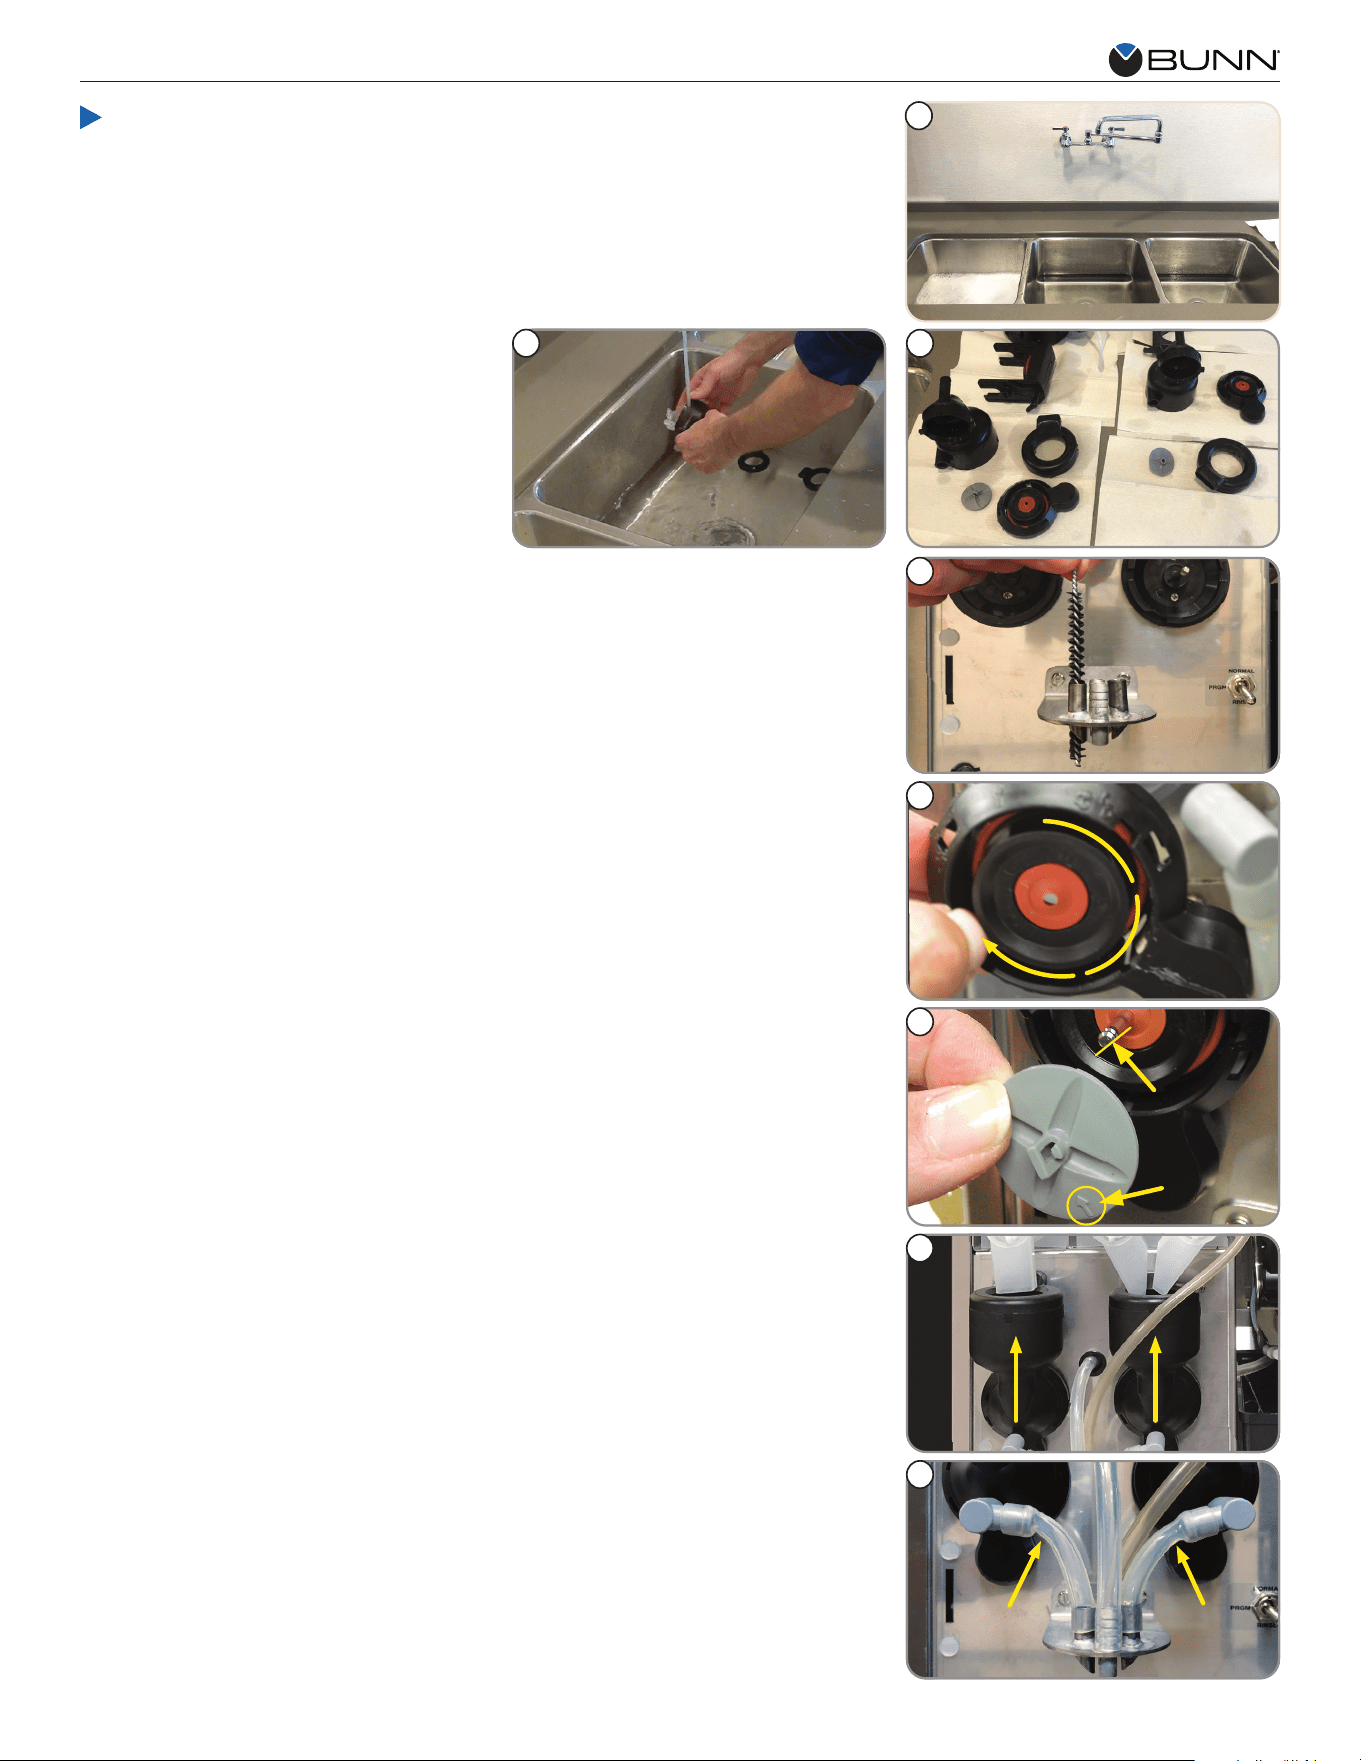
17. Replace dispense tubes.
NOTE: Confirm tubes don’t kink.
16. Replace mixing chambers.
15. Replace frother disks. Confirm that the arrows are aligned with the flat side of
the whipper motor shafts.
14. Replace whipper base. Rotate tab on whipper base clockwise to the vertical
position to lock mixing chamber.
NOTE: Ensure O-ring and shaft seal are in place during re-assembly.
13. Rinse cleaning brush, dip in sanitizing solution, and brush the bores of the
dispense nozzles. Repeat this procedure for each nozzle separately.
12. Soak all cleaned parts in sanitizing
solution for 5 minutes, then allow to
air dry.
11. Rinse parts thouroughly.
10. Prepare one-gallon (3.8 liter) of sanitizing solution with at least 100 ppm of
available chlorine in 120°F (48.9°C) water. Clean all parts in compartment sink.
NOTE: Do not use any abrasive materials.
Parts Washing - Whipper Components (continued)
10
continued >
WEEKLY (continued)
5
Crescendo
®
Care and Cleaning Instructions
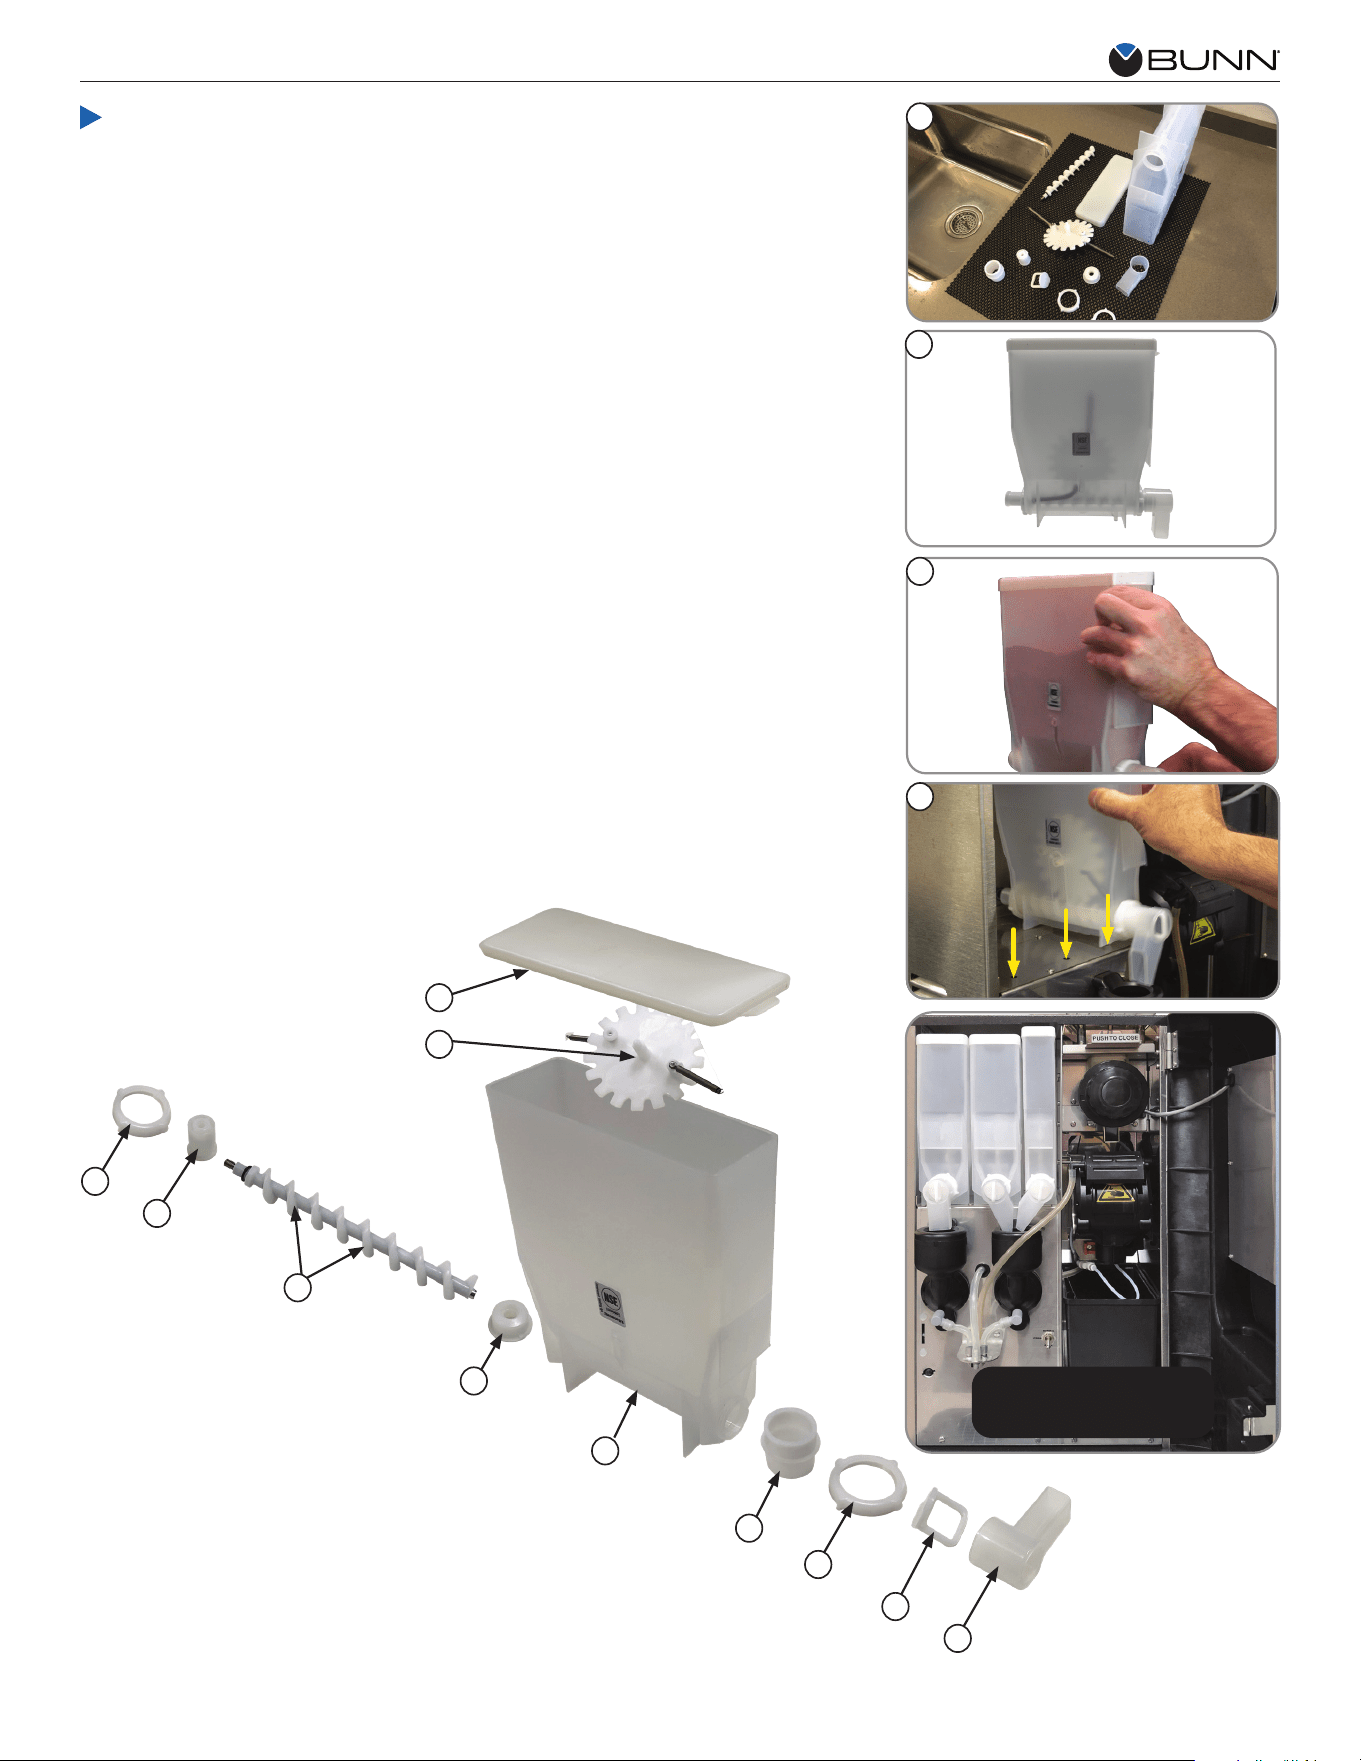
Parts Washing - Hopper Components
1. If not already removed, push the slide gates on the hopper elbows in
to close.
2. Remove hoppers, and empty product in a separate clean container.
4. Remove rear auger nut, then pull the auger and the rear auger bearing
out of the hopper.
5. Remove mixing wheel with springs from hopper by spreading the hopper side
wall with hand to release wheel from hopper.
6. If not already done, prepare one-gallon (3.8 liter) of sanitizing solution with
at least 100 ppm of available chlorine in 120°F (48.9°C) water.
1
2
3
4
5
7
6
7. Clean all parts in a 3 compartment sink. Do not use any abrasive materials.
Rinse parts thouroughly.
3. Remove powder hopper dispense elbow.
continued >
WEEKLY (continued)
6
Crescendo
®
Care and Cleaning Instructions
WEEKLY (continued)
Parts Washing - Hopper Components (continued)
8. Soak all cleaned parts in sanitizing solution for 5 minutes, then allow
to air dry.
8
9
10
11
1 Rear Auger Bearing Nut
2 Auger Drive Coupler
3 Auger with O-Ring
4 Rear Auger Bearing
5 Lid
6 Mixing Wheel
7 Hopper - 67mm x 240mm (Left or Middle)
8 Front Auger Bearing
9 Front Auger Bearing Nut
10 Slide Gate
11 Elbow
1
2
4
7
8
9
10
5
6
3
11
1 of 3 hopper groups
shown. Each should
be cleaned weekly,
or as needed.
11. Reinstall hoppers onto compartment platform. Ensure auger and hopper
locator peg are properly seated in position.
ALL HOPPERS
RE-INSTALLED
10. Refill hoppers with product.
9. Reassemble each hopper.
7
BI-WEEKLY (OR EVERY 1,000 CYCLES)
Espresso Brew Chamber
Crescendo
®
Care and Cleaning Instructions
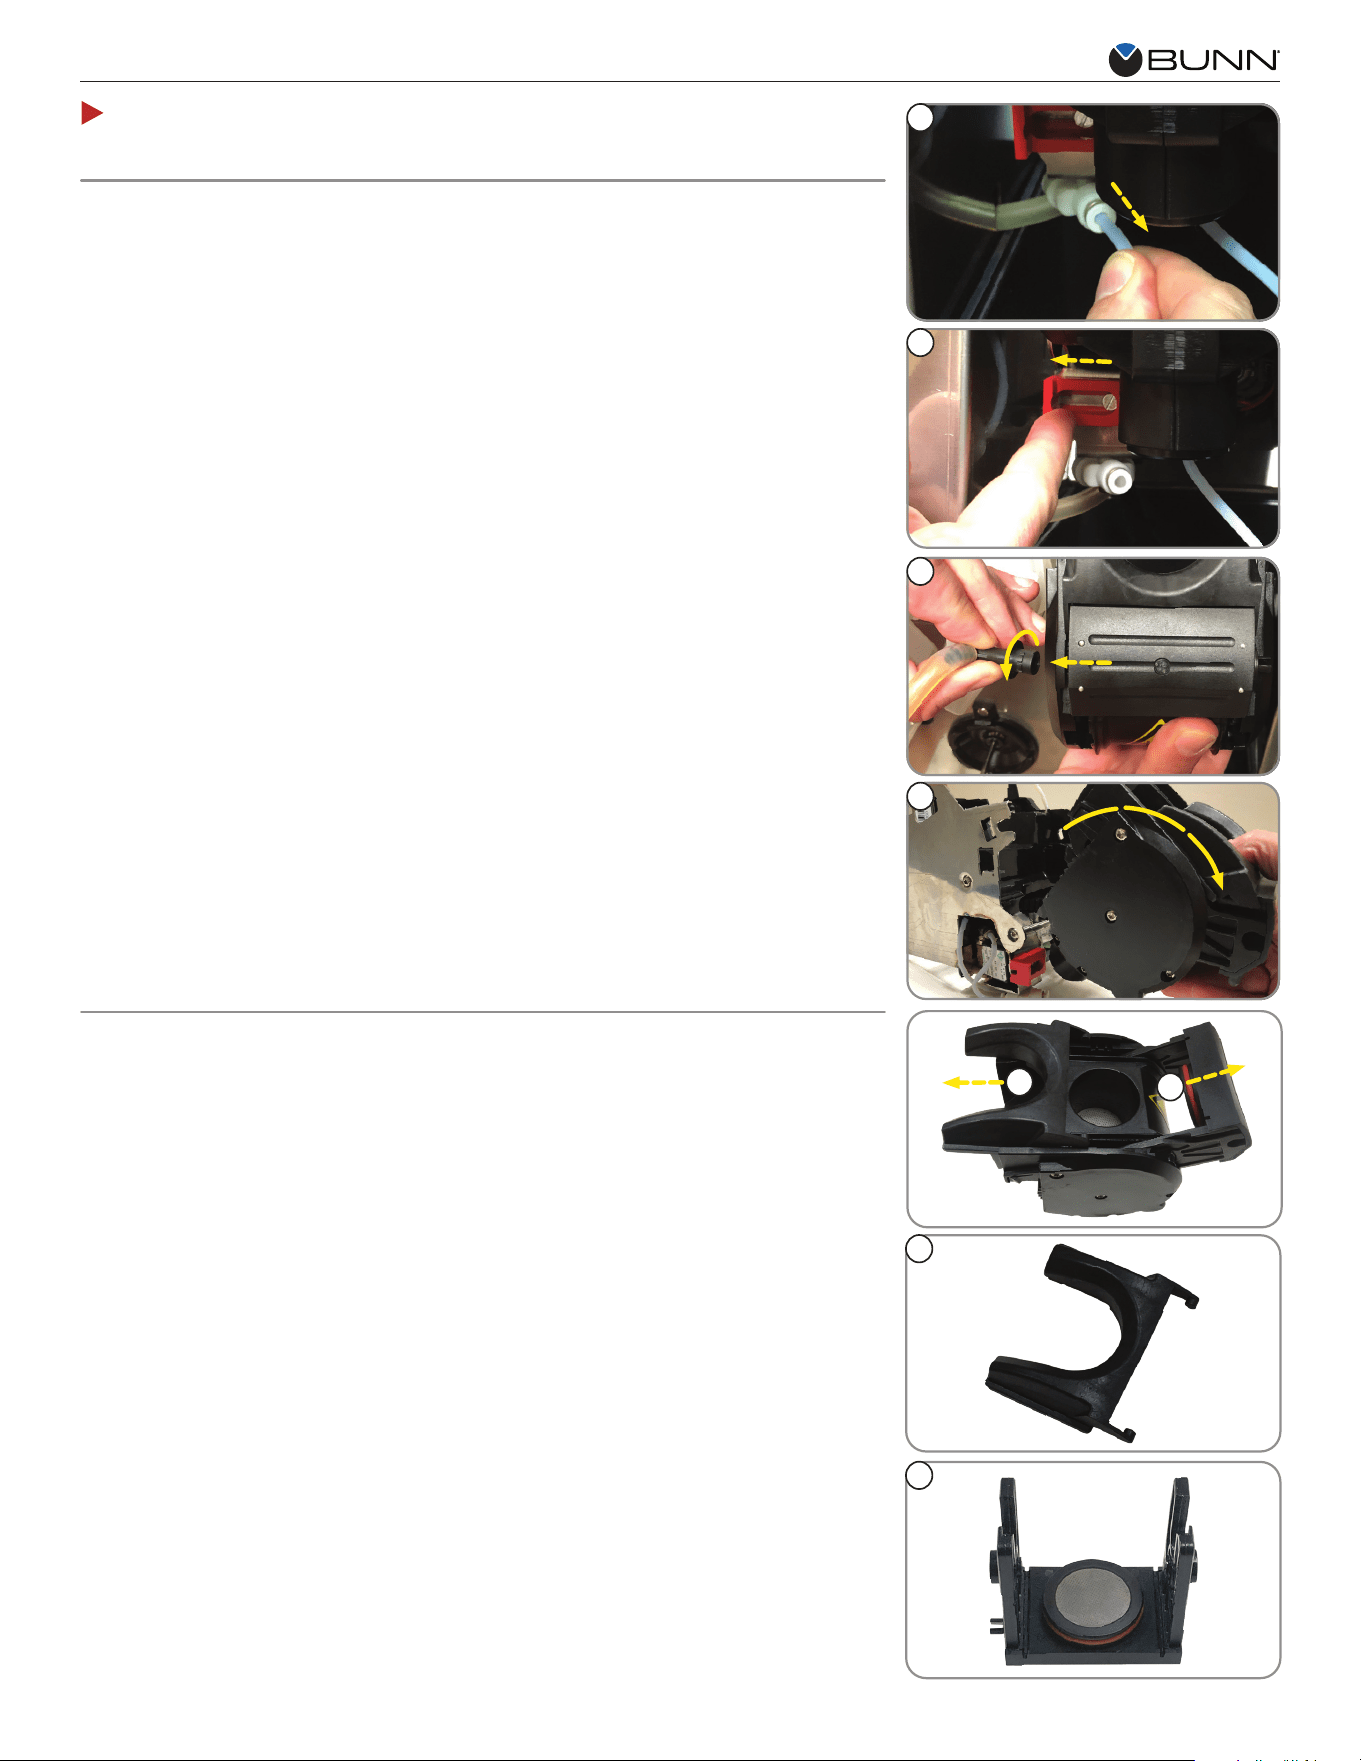
REMOVE BREW CHAMBER FROM ESPRESSO DRIVE
4. Pull brew chamber group out.
SEPARATING BREW CHAMBER PARTS
1. Slide cake pusher forward.
2. Pull sieve head out from brew chamber.
3. Remove cake pusher.
4. Remove sieve head.
1
2
1
2
3
3
continued >
3. Remove brew chamber outlet tube.
NOTE: Turn elbow until it releases from hole.
2. Slide red lock to left to unlock.
4
4
1. Remove water inlet tube.
NOTE: To release, press ring on fitting, and pull tube out.

8
Crescendo
®
Care and Cleaning Instructions
3
2
Espresso Brew Chamber (continued)
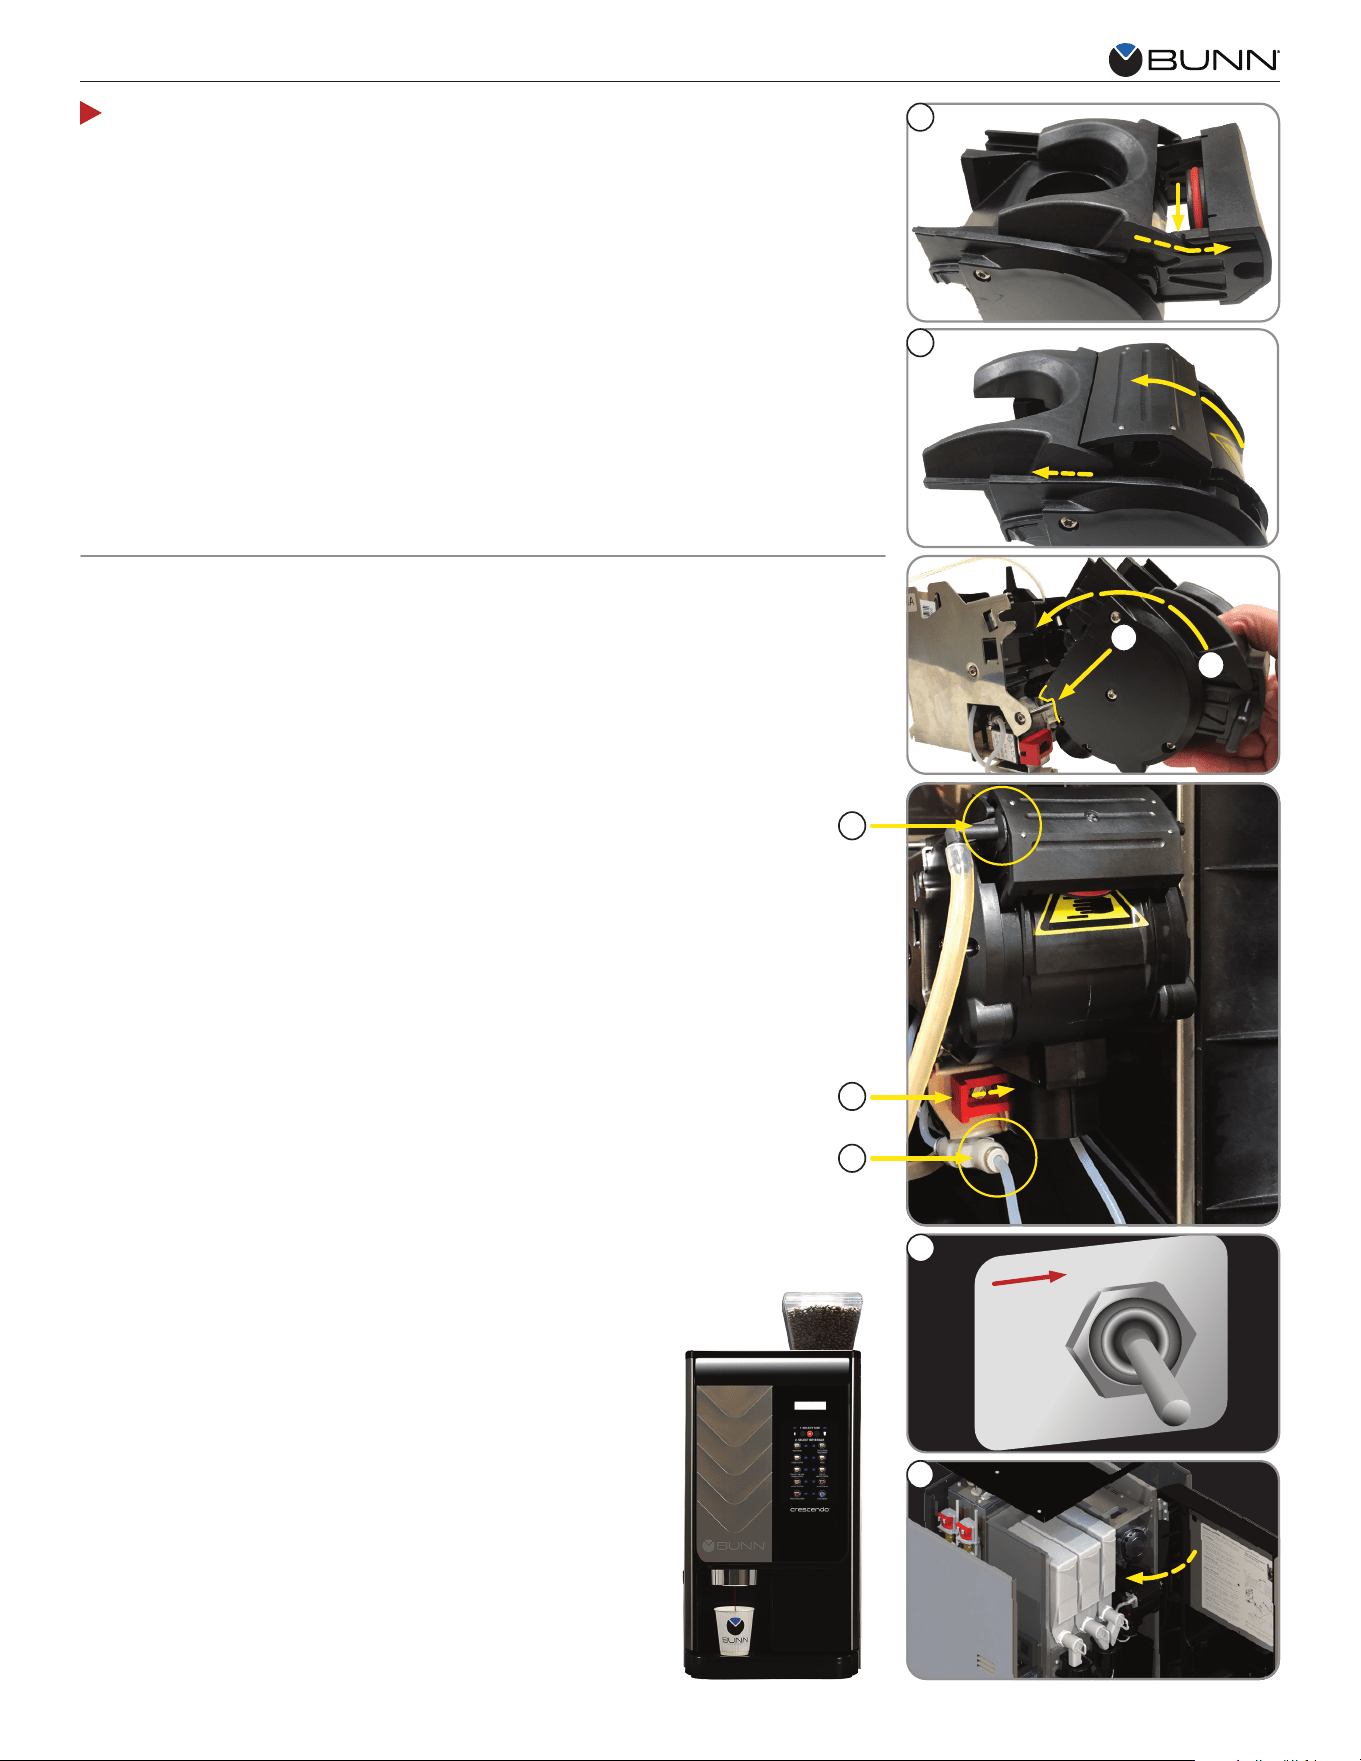
REASSEMBLING GROUP HEAD
1. Confirm all gears are aligned, and the slots to put the sieve head are open.
NOTE: Gap in gears should be showing.
2. Replace cake pusher in channels.
3. Place sieve head in gear opening, and push in.
BI-WEEKLY (OR EVERY 1,000 CYCLES) (continued)
5. Clean all sides of brew chamber.
NOTE: Turn gears in back of brew
chamber to clean all sections.
7. Place all parts out to air dry.
7
6. Clean cake pusher and sieve head in
warm water.
Cake Pusher
6
Sieve Head
5
Correct
1
Incorrect
4
CLEANING BREW CHAMBER PARTS
1. Brush espresso drive gears.
4. Use luke warm water only to rinse
all parts.
3
Gear
Channels
2
3. Use brush to clean brew chamber
housing and gear channels.
2. Brush sieve head
NOTE: Pay special attention to
the channels.
1
continued >
9
BI-WEEKLY (OR EVERY 1,000 CYCLES) (continued)
Crescendo
®
Care and Cleaning Instructions
Espresso Brew Chamber (continued)
REASSEMBLING GROUP HEAD (continued)
4. Align cake pusher tabs into slots on sides of sieve head.
5. Press sieve head and cake pusher forward until seated
REATTACHING GROUP HEAD TO ESPRESSO DRIVE
3. Connect brew chamber outlet tube.
4 Slide red lock to right until it locks.
5. Connect water inlet tube.
6. Place the NORMAL/PROGRAM/RINSE switch in the NORMAL position.
7. Close door.
5
1
2
3
4
5
NORMAL
PRGM
RINSE
6
7
4
1. Place groove on lower front of brew chamber onto mounting bar on
espresso drive.
2. Rotate the top of group head toward rear of machine until it snaps into place.