
Suitable for Hiseeu Wireless Ba�ery Camera System
A007-V3.0
Wireless Ba�ery Security
Camera System
USER MANUAL
※Please read the Quick Guide carefully before
using the product and keep it properly.

Thank You!
Friend of Hiseeu,
Greeng from Hiseeu Team! Thank you for choosing our products and
hope everything going well with you and your family.
Our products were cerficated with CE, FCC, and UL for safety. Any
difficules during operang the system, please feel free to contact with
us, we will always try our best to assist you.
lf you are sasfied with our product, could you please take a moment
to share your experience on Amazon? Your posive feedback means a
lot to us and will encourage us to go further.
And if unfortunately, our products didn't meet your expectaon, for
security concerns please help us delete the system from your phone
APP, and reset your NVR password, before sending it back to Amazon. lt
will erase your personal informaon (footage, email, etc.)
On behalf of all colleagues in Hiseeu, we sincerely appreciate your trust
and support. Please let us know if there is anything we can do to assist
you further. Thanks again and wish you all the best.
Yours Sincerely,
All staff in Hiseeu
Tel: 917-338-1084
Amazon Email: [email protected](US, CA, AU)
Amazon Email: [email protected](UK, EU)
Aliexpress Email: [email protected]
Protect your property with Hiseeu!
Please contact with the correct seller of the plaorm you bought!
Asin: B07719HQQS
Model: WKIT-4HB612-1T
Asin: B07QM5996S
Model: WK-4HB312-1T
Asin: B07T8ZDTTP
Model: WK-12V-4HB612-3T
Asin: B07F32X3XZ
Model: WK-10V-4HB612-1T
Asin: B097TFQYXF
Model: WK-3C40-1T
Asin: B08LD975F3
Model: WK-4HBC23-1T
Asin: B097CWL11T
Model: WK-4HD203-1T
Asin: B09HXM3R7Z
Model: WK-2C30
Asin: B09T9H83SH
Model: WK-2C80
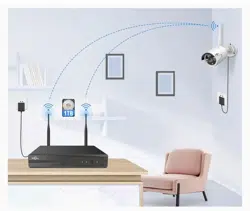
Thanks for purchasing Hiseeu wireless camera system, Hiseeu
expandablewireless NVR support connec�ng with 8 pieces cameras.
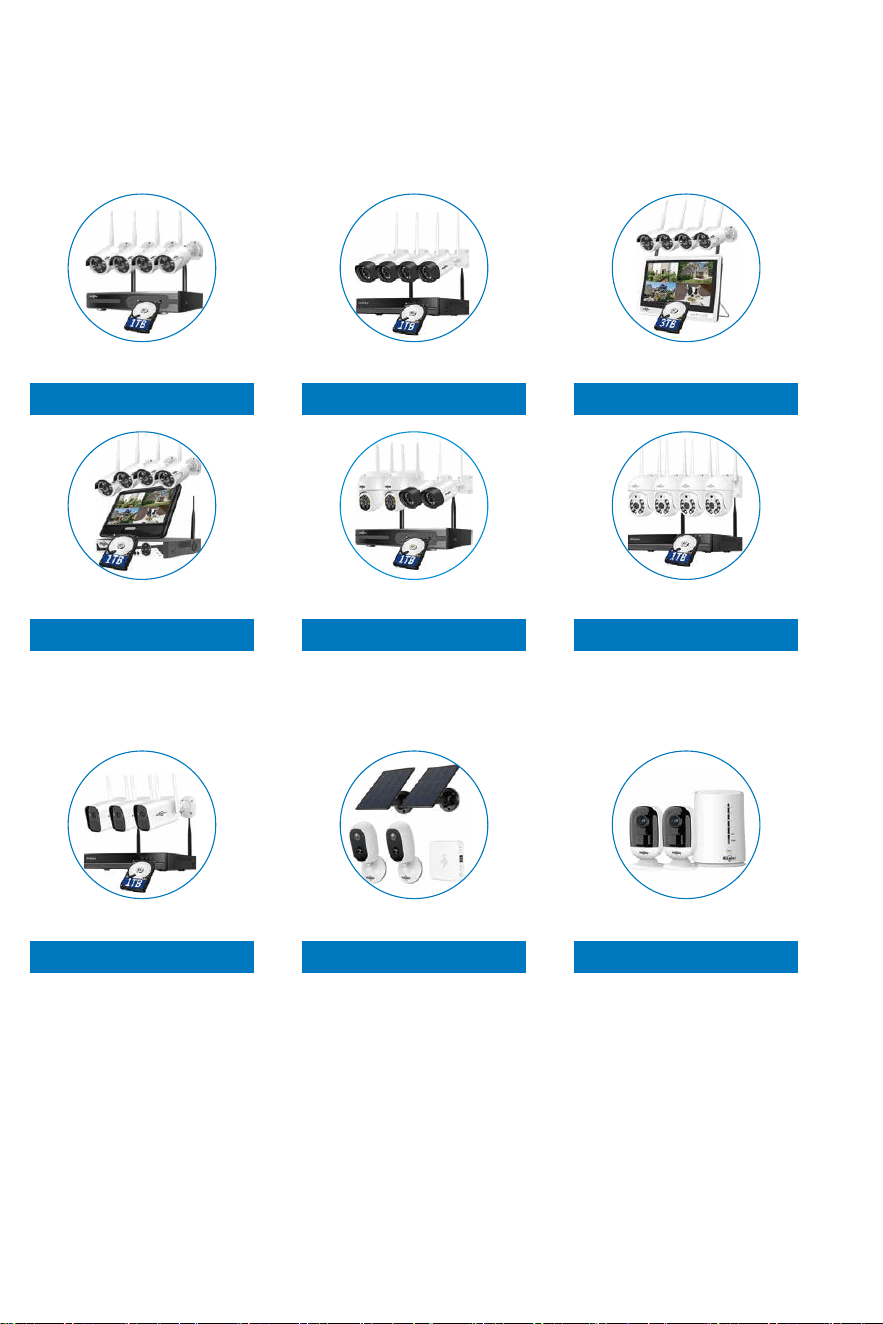
Hiseeu WiFi Camera Systems:
Ba�ery Cameras System:
-01--01-

Asin: B086L7ZYQV
Asin: B08JYMYPCM Asin: B08RHM6VF2 Asin: B081PRVDJ3
Model: FJ2C
Compa�ble with Below Cameras:
1. Indoor camera
3. PTZ camera
Asin: BO8HRPQMY3
Model: TZ-HC913
2. Dome camera
Model: WHD303 Model: WHD602Z(5X Op�cal) Model: AMZ-WHD902A
Asin: B097CW41XJ Asin: B094JF5HHF Asin: B08PY58W2M
Asin: B08HN4QXBY Asin: B08293P67Z Asin: B09MCR246C
4. Ba�ery camera
Model: WHD203 Model: WHD103Z(30X Op�cal) Model: TZ-HBK13
Model: C30 Model: C40 Model: WTD803
-02-
Accessories for System Work:
Asin: B08DKX3WYL
Model: TZ-HB412B
Asin: B07DW4YGYM
Model: 1TB-HDD
Asin: B07L3MKQBC
Model: 3TB-HDD
Asin: B07GP1DX4N
Model: 12V 2A-US
5. Bullet camera
Asin: B096XPT915
Model: WTDA03
Asin: B09TGPFNMN
Model: C80
Asin: B07JQZQRVG Asin: BO7K1CZN1L Asin: BO7FVSK6BY
Model: TZ-HB612 Model: TZ-HB612B Model: TZ-HB312
-03-

-04-
Statement ............................................................................................................................. 05
Safety Cau�on ....................................................................................................................... 05
Out of Box Audit ................................................................................................................... 05
All Products & Parts .............................................................................................................. 06
NVR..................................................................................................................................... 06
Ba�ery Cameras................................................................................................................. 07
Installa�on Instruc�on of WiFi NVR KIT............................................................................... 08
Setup the System ................................................................................................................. 09
Main Menu ........................................................................................................................... 13
Connect the System with Network by WiFi or Wired .......................................................... 15
MENU-DO What.................................................................................................................... 17
Menu Bar ........................................................................................................................... 17
Split Screen......................................................................................................................... 18
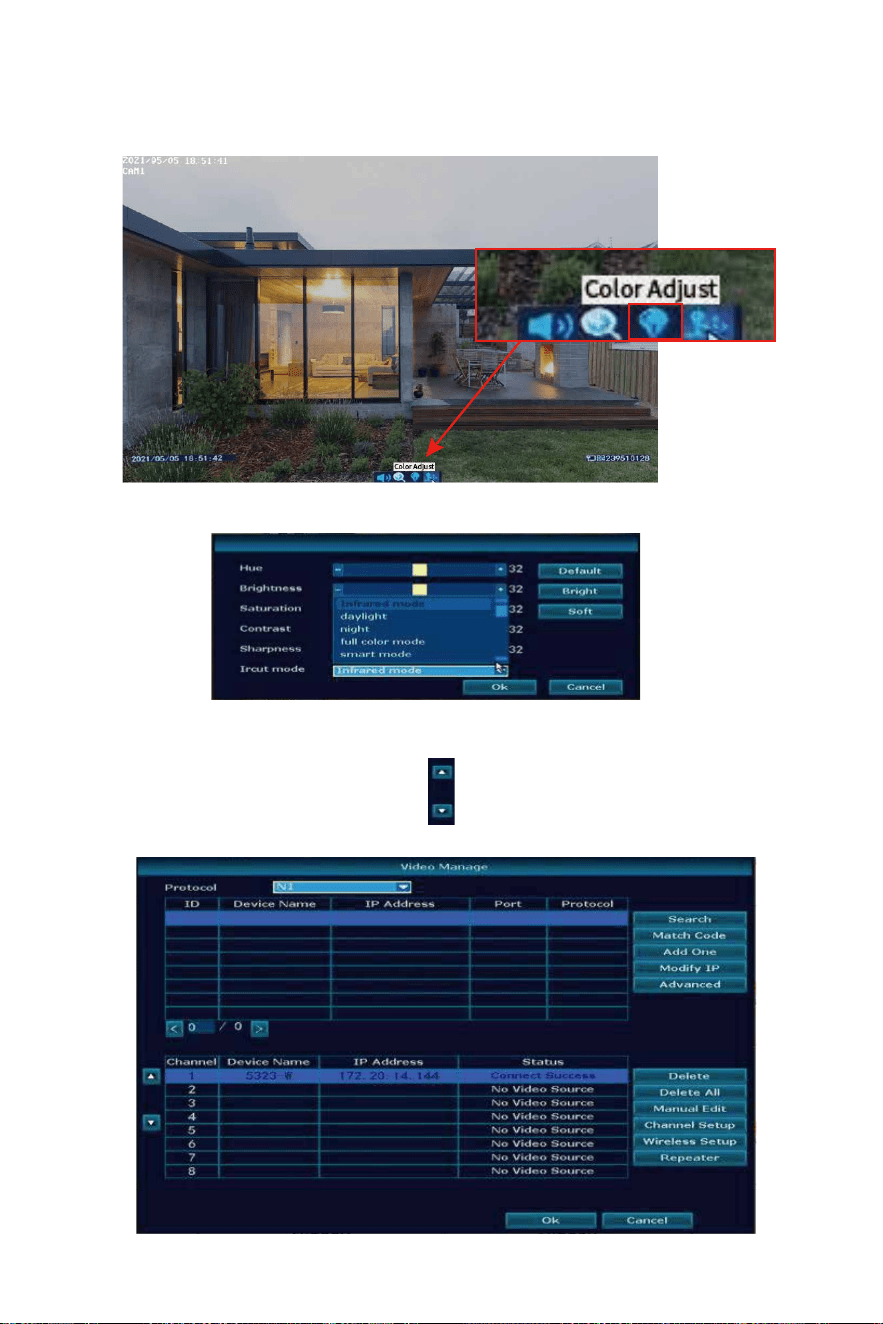
Video Manage .................................................................................................................... 18
System Setup ........................................................................................................................ 20
General setup.................................................................................................................... 20
Time Setup ........................................................................................................................ 21
HDD informa�on ............................................................................................................... 21
Error .................................................................................................................................. 21
Record Setup......................................................................................................................... 22
Network Setup...................................................................................................................... 23
E-Mail ................................................................................................................................. 25
Wireless Setup ................................................................................................................... 27
Wireless Internet................................................................................................................ 28
Channel Setup....................................................................................................................... 29
Encode Setup ..................................................................................................................... 29
Channel OSD ...................................................................................................................... 29
Video Detec�on ................................................................................................................. 30
IPC Upgrade........................................................................................................................ 32
Bitrate................................................................................................................................. 33
System Admin ....................................................................................................................... 33
System Version................................................................................................................... 33
System Log ......................................................................................................................... 34
User ................................................................................................................................... 34
System Upgrade ................................................................................................................. 36
System Maintenance.......................................................................................................... 37
Factory Se�ng ................................................................................................................... 37
Video Playback...................................................................................................................... 38
Video Backup ........................................................................................................................ 39
Repeater ............................................................................................................................... 39
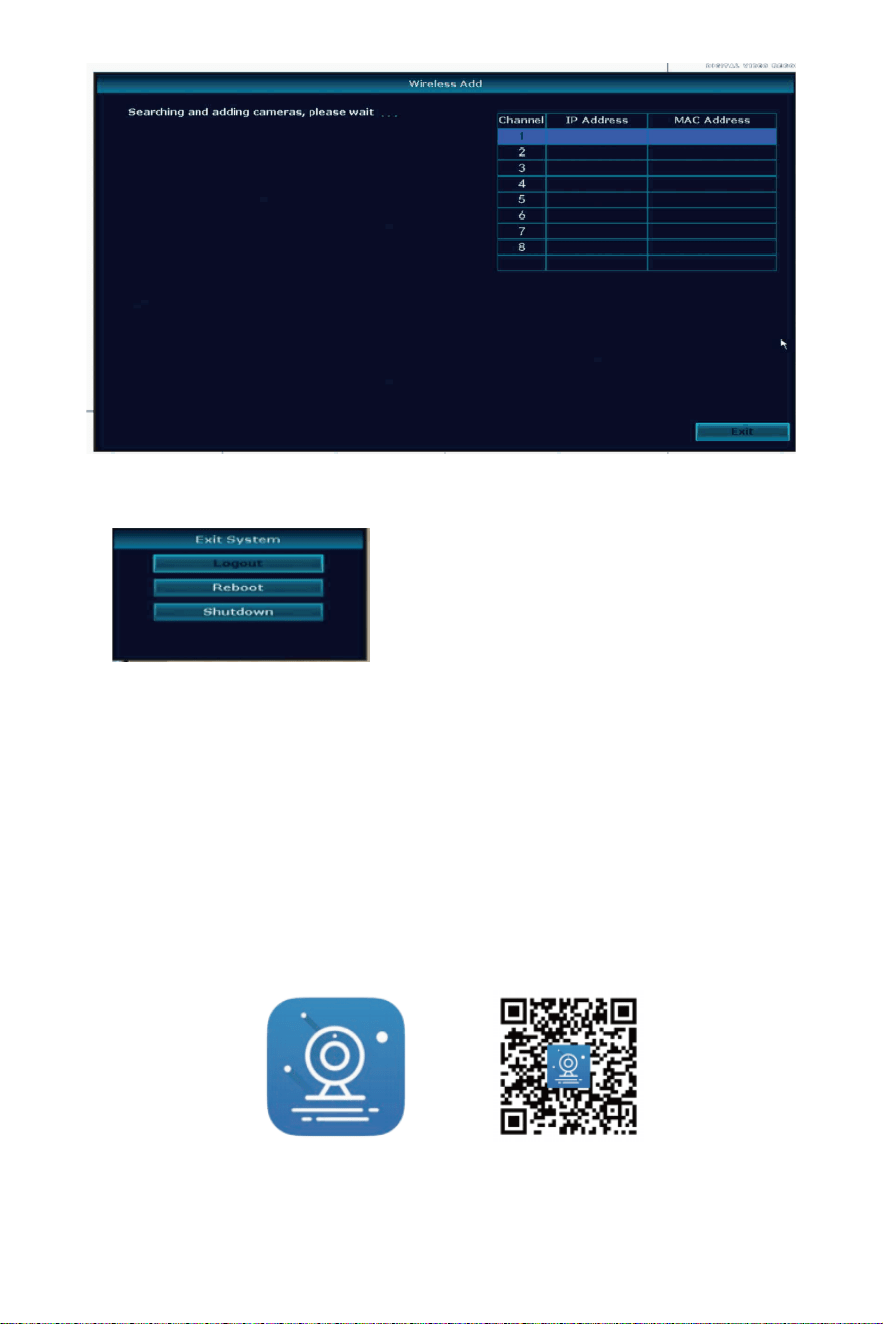
Wireless Add ......................................................................................................................... 39
Exit System ............................................................................................................................ 40
View System on Phone EseeCloud APP and Computer EseeCloud So�ware...................... 40
To View on Phone APP ...................................................................................................... 40
Download Free App EseeCloud....................................................................................... 40
Register Account ............................................................................................................. 41
Add system to phone APP .............................................................................................. 42
Func�on on APP ................................................................................................................ 43
Cloud Service................................................................................................................... 43
News................................................................................................................................ 44
Share................................................................................................................................ 44
Playback........................................................................................................................... 45
Livestream Interface........................................................................................................ 46
Se�ngs ............................................................................................................................ 47
Zoom and Focus Bo�on .................................................................................................. 48
To View on MAC and Windows Computer........................................................................ 48
Frequently Asked Ques�ons................................................................................................. 50
Contents
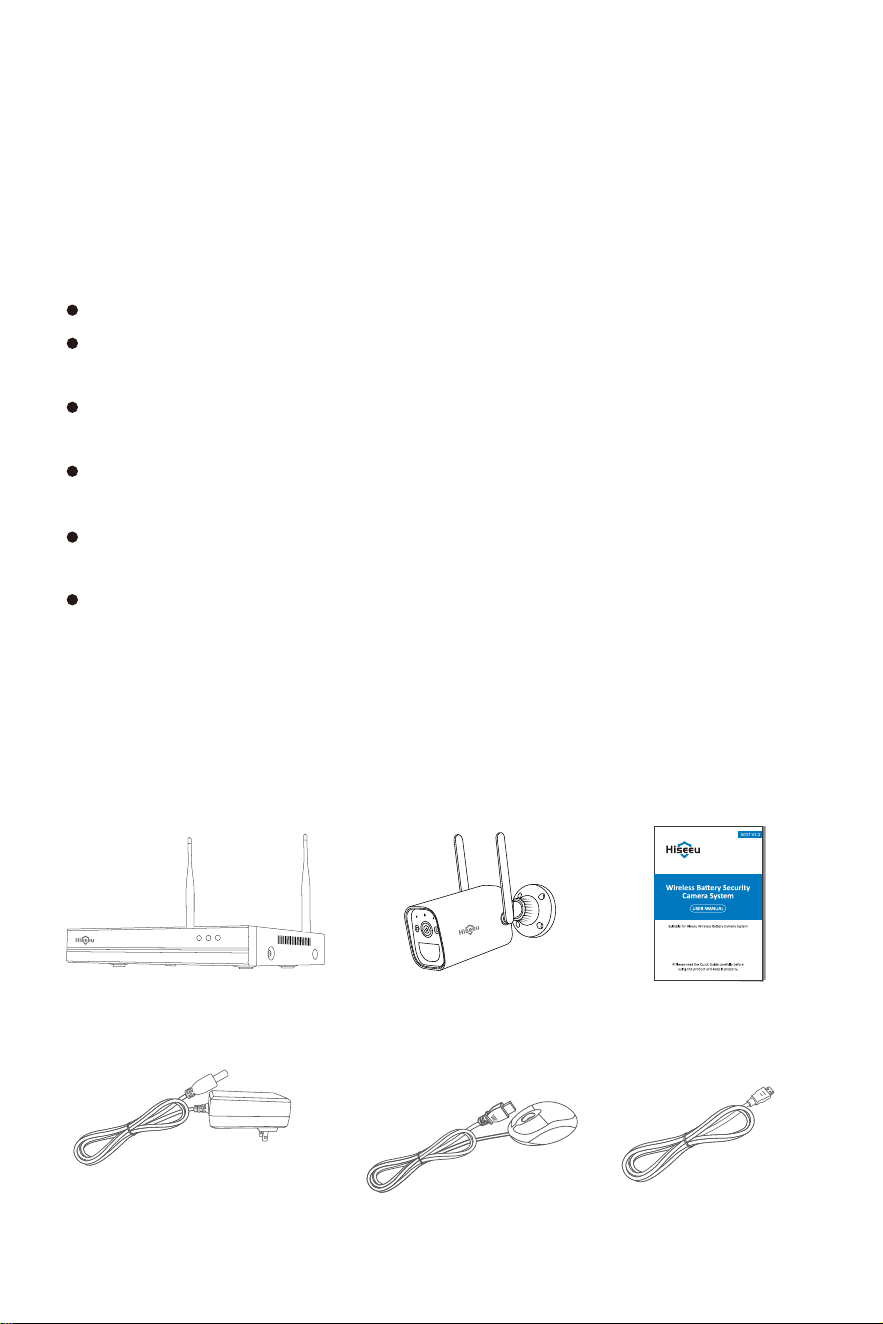
HDMI Cable×1
User Manual×1
Statement
The quick user guide will introduce most of the func�on of the system.
This user guide may contain inaccurate content due to hardware and
so�ware upgrade. For latest user manual, please email
[email protected]om to get it.
Safety Cau�on
Please do not put any fluid container on the product.
Please use the product in ven�lated environment and prevent
blocking the vents.
Please use included power supply with the product to prevent
damage to the product.
Please use the product under its standard working temperature and
humidity.(advised in this manual or distributor’s website)
Dust on PCB may cause short circuit.It is suggested to clean the dust
on PCB �mely to make the product work properly.
Please obey the regula�on and policy in your country and area
during the installa�on of this.
Out of Box Audit
A�er receiving the product, please check all products and according
to distributor’s package including informa�on. If the product missed
or damaged, please contact with the seller directly.
WiFi NVR×1 Ba�ery Camera×2/3/4
DC 12V 2A power
supply (for NVR)×1
USB Mousr×1
-05-
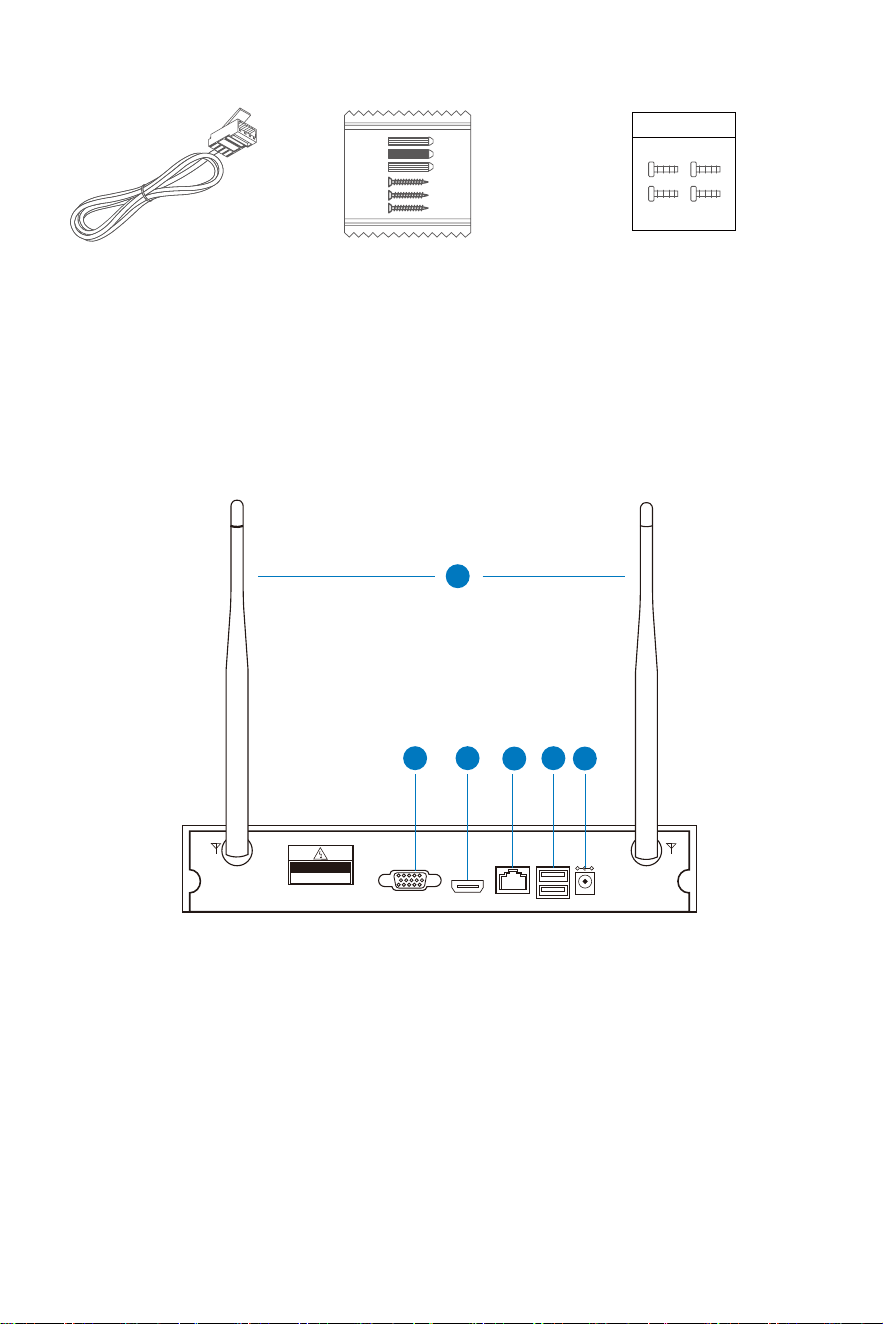
All Products & Parts
NVR
This product may require cabling , we suggest to test all products &
parts before installa�on and cabling.
1. WiFi Antenna: Double antennas to WiFi range.
2. VGA Port: View on VGA monitor.
3. HDMI Port: View on HDTV.
4. WLAN Port: Connect your NVR to Internet or data transmission
with cameras.
5. USB Ports: Mouse and data backup.
6. Power Input: Connect with 12V2A power adapter.
Network Cable×1
Screw bag (4 screws for HDD)×1
Screw bag (for Camera)×2/3/4
CAUTION
WARAING:
TO PREVENT FIRE OR SHOCKHAZARD,DO NOT
EXPOSE UNITSNOT SPECIFICALLY DESIGNED
FOR OUTDOOR USE TO RAIN OR MOISTURE
-
1
2 3
4
5
6
-06-
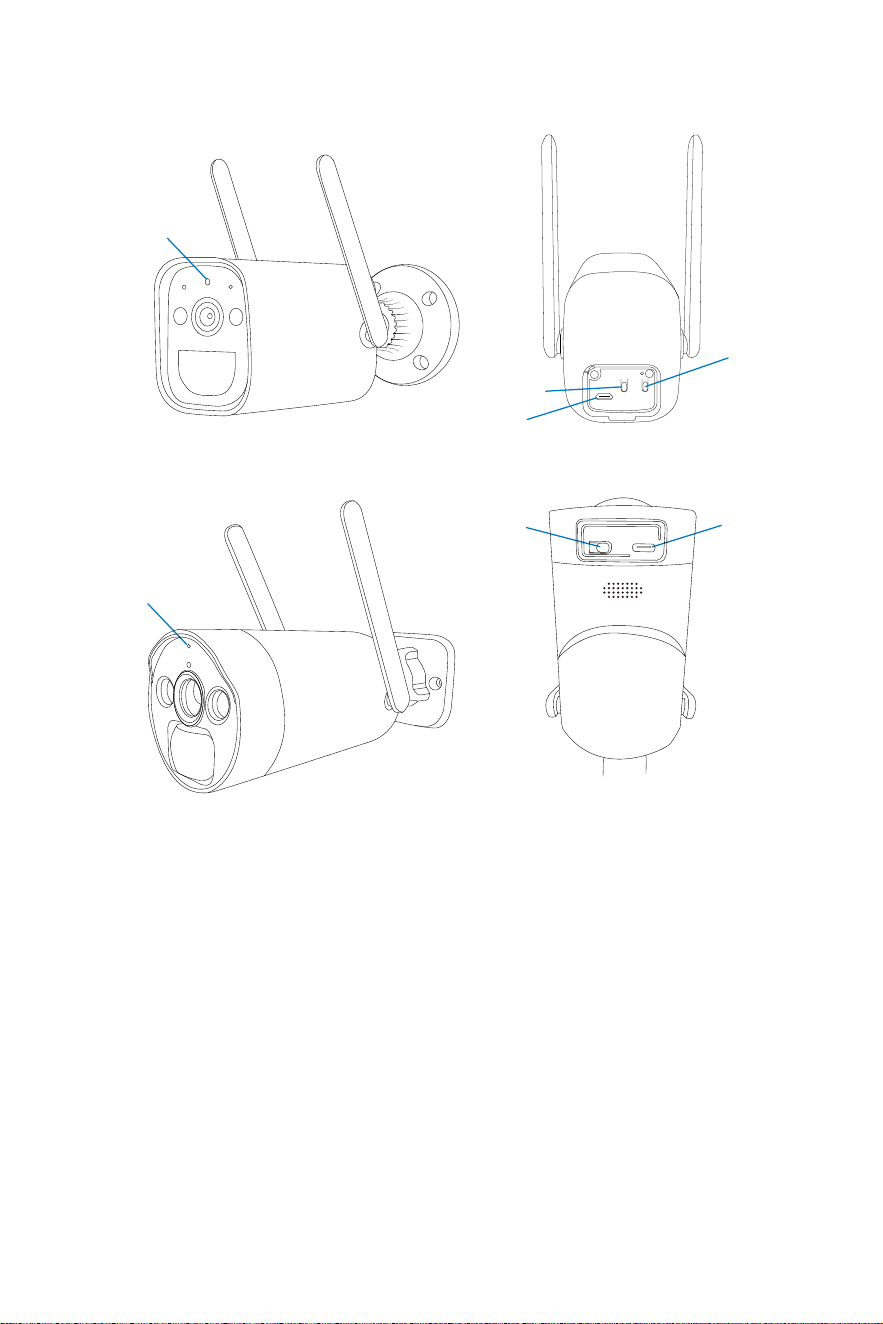
Blue light + red light always on: (Privacy light) Remotely previewing
the camera
Blue light on for 1 second: The device is on or awake
The blue light keeps flashing: Upgrading
Red light flashes 3 �mes quickly: Shutdown
Red light flashes con�nuously: Pairing
The red light con�nues to flash slowly: Connec�ng to the network
Constant red light: Low ba�ery
Ba�ery Camera LED Light Instruc�ons:
-07-
Ba�ery Cameras
Power Bu�on
Reset Bu�on
USB Port
Reset Bu�on/
Power Bu�on
Indicator Light
Indicator Light
Model 1
Model 2
SNYC DC/5V
USB Port
Installa�on Instruc�on of WiFi NVR KIT
Note: Two ways to connect the system with network.
Wired connec�on: When your NVR connect by RJ45 to your router, it
will get network se�ngs automa�cally.
Wireless connec�on: right click your NVR mouse and choose System
Setup → Network Setup → Wireless Internet → Enable the Wireless
LAN → find your own WiFi network, and input WiFi password → Click
Apply.
(please notes it doesn’t work with 5G WiFi network.)
Long press Power Bu�on for 2s in the shutdown state: Turn on/off
Model 1 (blue light on for 1s)
Long press Reset Bu�on for 2-3s: Turn on Model 2 (blue light on for 1s)
Short press Reset Bu�on 3 �mes con�nuously: Shut down Model 2
(red light flashes 3 �mes quickly)
Long press Reset Bu�on for 8s: Reset into pairing state (Red light
flashes)
-08-
Key Opera�on:
Setup the System
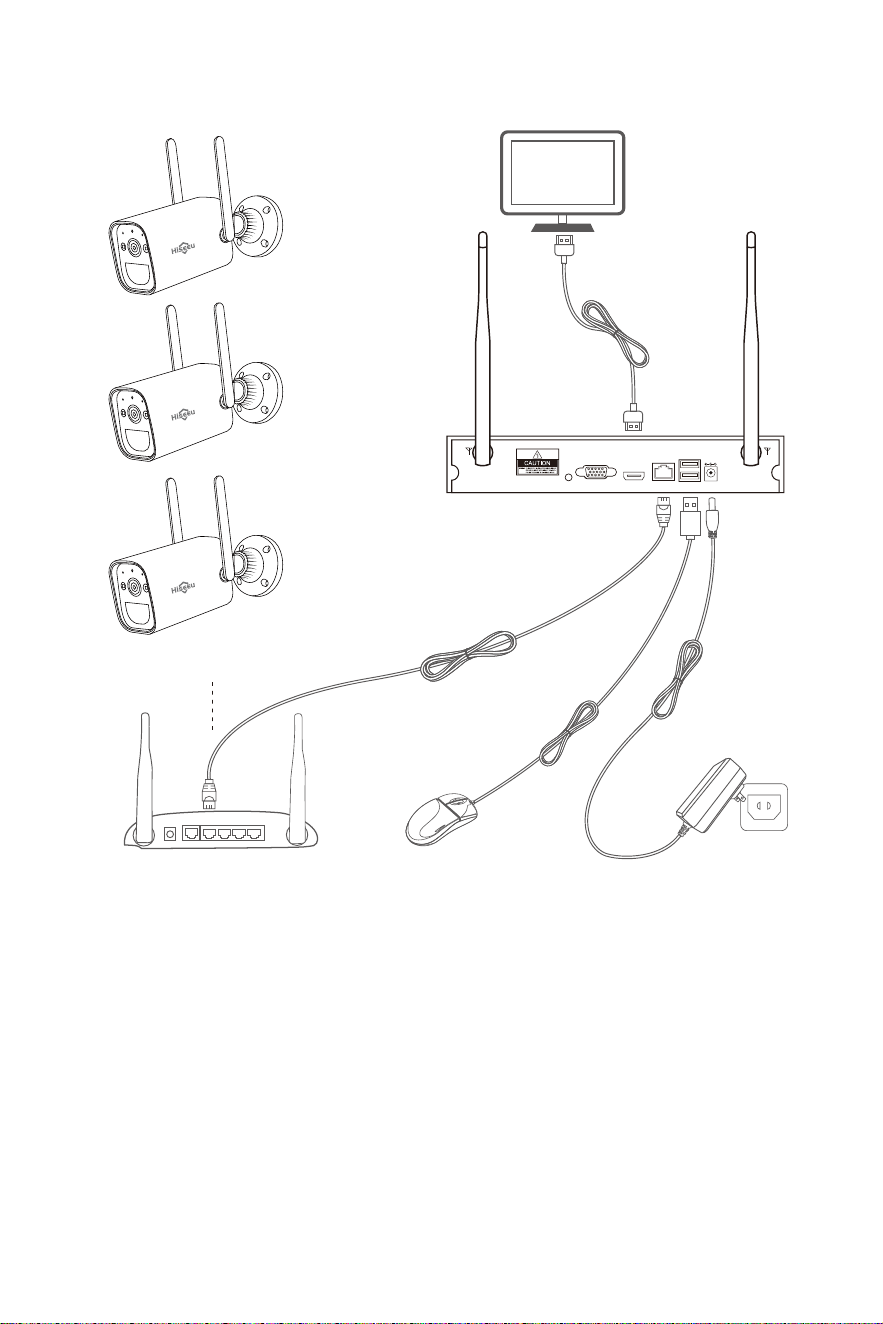
This system is standalone with embedded Linux Opera�ng System in
the NVR. Just like a desktop PC, need to hook a screen to the NVR to
enter the OS. Any TV, monitor with VGA or HDMI input should work
for it.
Please notes: All-in-one computer or Laptop can't work as a monitor.
Must need connect with PC or TV monitor.
Ba�ery Camera
HDMI Cable
Network Cable
Router
NVR
Mouse
Power
-09-
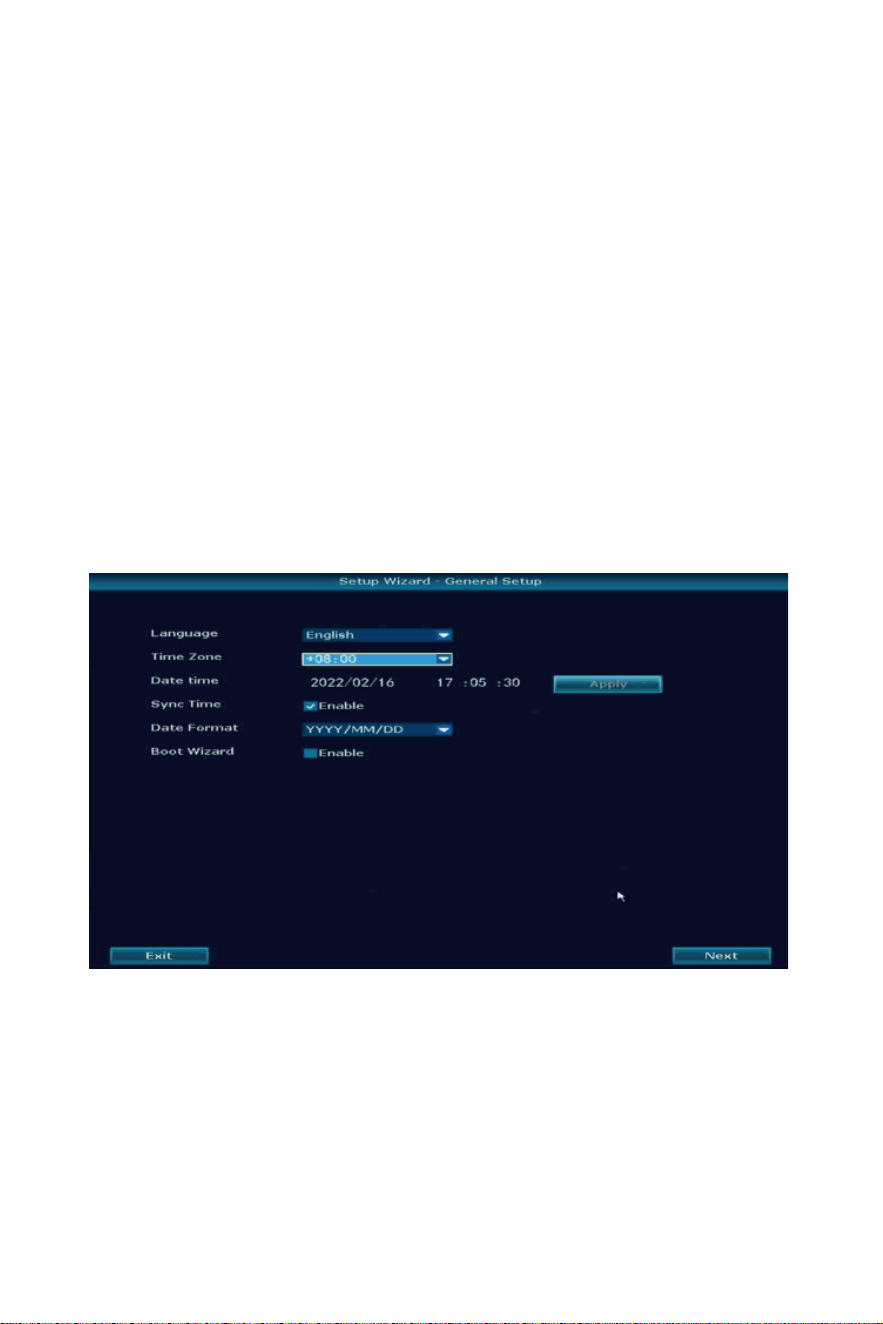
Once connect the cameras system successfully, will see below interface.
Language: support English, Chinese, Japanese, Spanish, Portuguese,
German, French and so on, choose the correct one.
Time Zone: select correct �me zone of the city which you live in, if you
don’t know it, please disable Sync Time, set the Date �me same as
your phone.
Date Format: select the one you like.
Boot Wizard: quick setup of the system, a�er your first �me setup, you
can disable it, click Next.
If you connect the NVR with monitor shows Hiseeu logo or shows
black, normally it is your monitor resolu�on is lower than the monitor.
You can press the le� side of the mouse for 30s, then it will reboot. If
s�ll can't work, pls change a monitor, thanks.
1. Stand up the camera antennas;
2. Connect a monitor to the NVR via its HDMI or VGA port(HDMI
cables is included for no monitor to NVR);
3. Turn on ba�ery cameras, charge it about 24 hours for your first �me
use;
4. Within seconds, you should see cameras' images on the screen;
5. Plug the mouse(included) to an USB port on back of NVR. Then you
can login in the system.
In the OS you can find fullest func�onali�es including live view, record,
playback, video backup and all se�ngs.
-10-
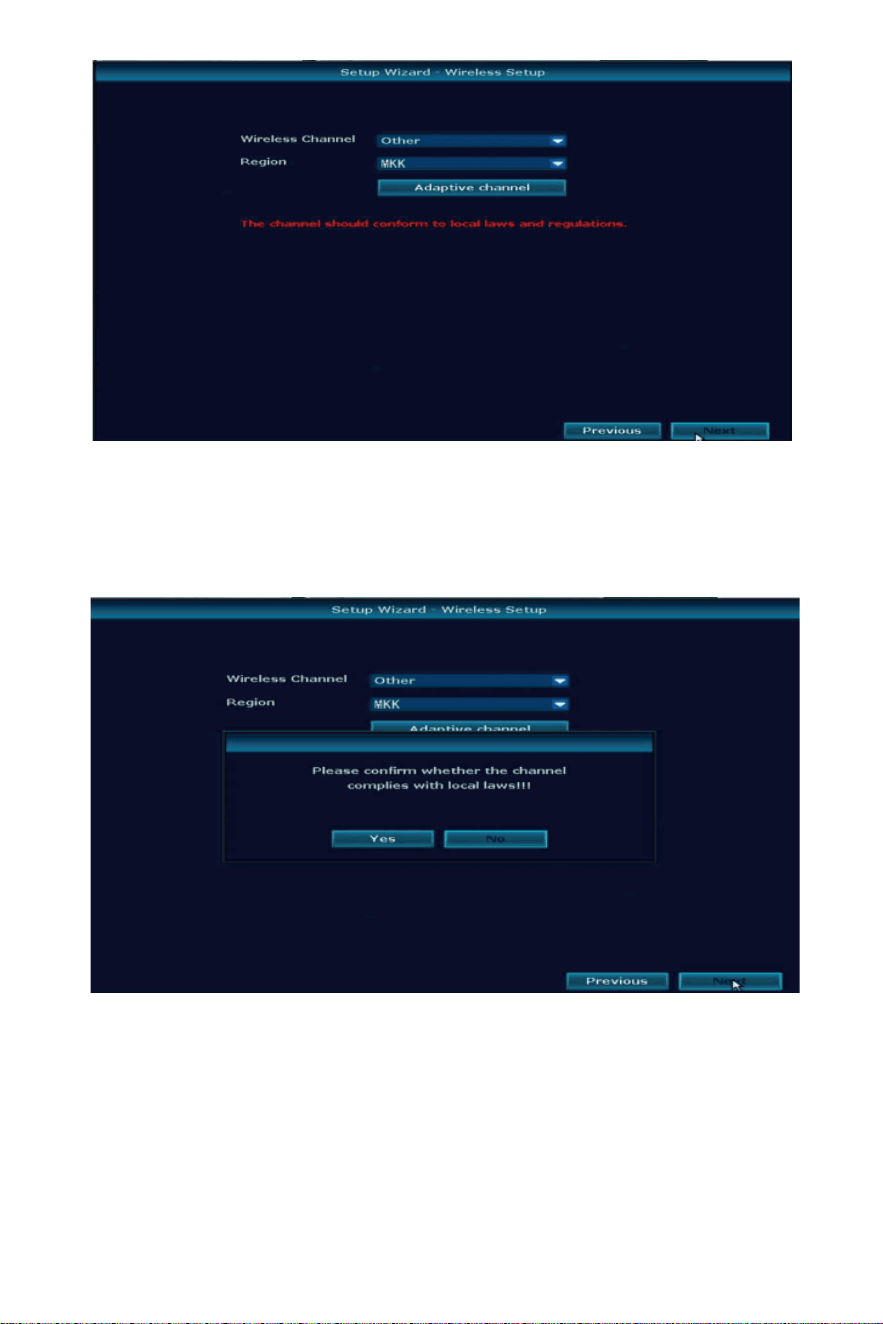
Wireless Channel: according to your country policy choose correct
one.
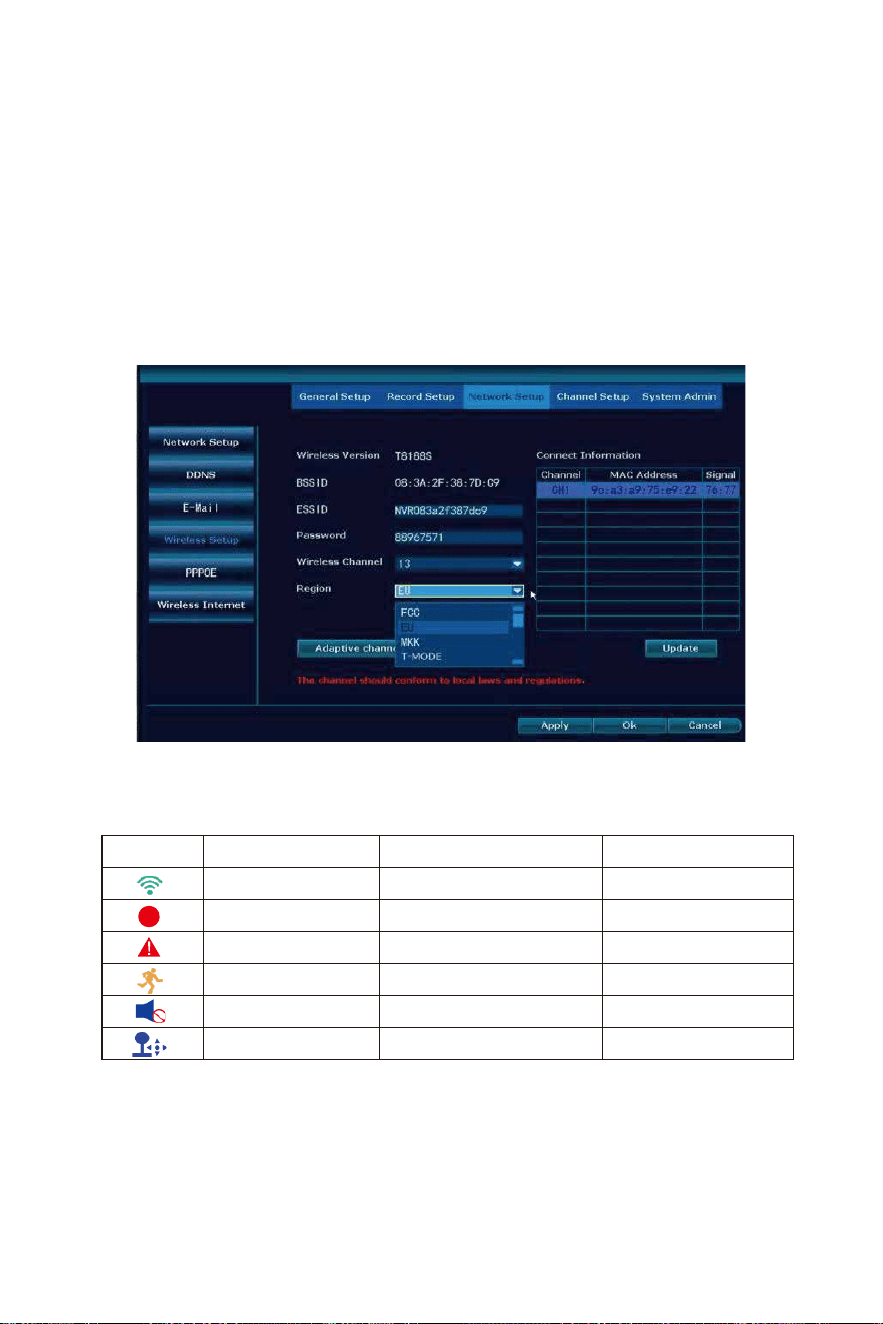
Region: US(FCC), EU(EU), Asia(MKK).
-11-
Cloud ID: online which means your NVR connect with network
successfully, Offline or network busy which means network doesn’t
connect.
Click Yes, Next.
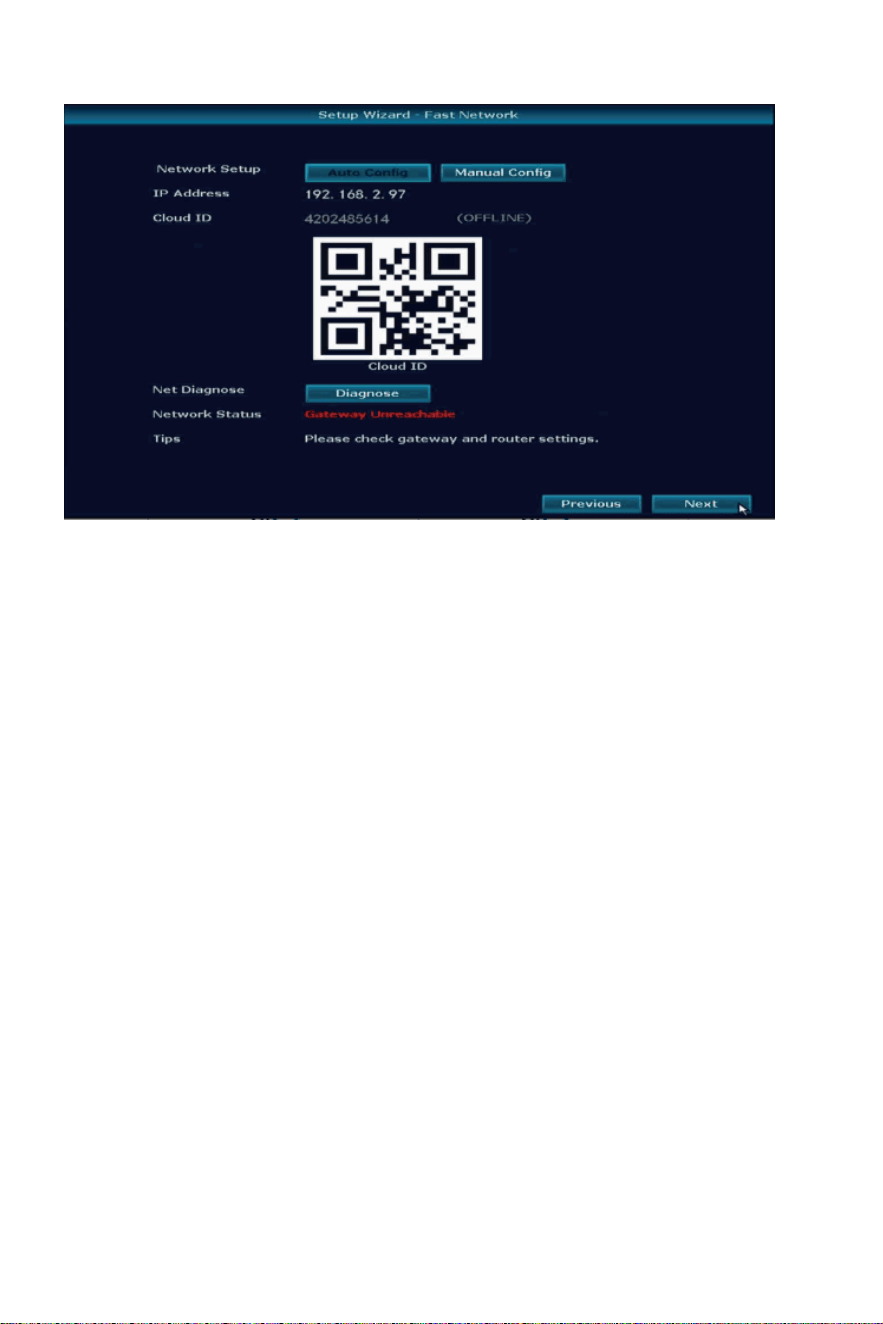
Network Status:
Healthy network: means no problem of network.
Gateway Unreachable: means NVR IP gateway and IP address not the
same as your router, Click Manual Config, then find your router correct
IP
gateway, such as 192.168.1.1, then IP address should be 192.168.1.***
which can’t be the same as your router, change it on NVR.
Request DNS Error: click Manual Config, change the preferred DNS to
8.8.8.8, reboot the NVR and your router.
If you don’t need connect with network, just Click Next.
-12-
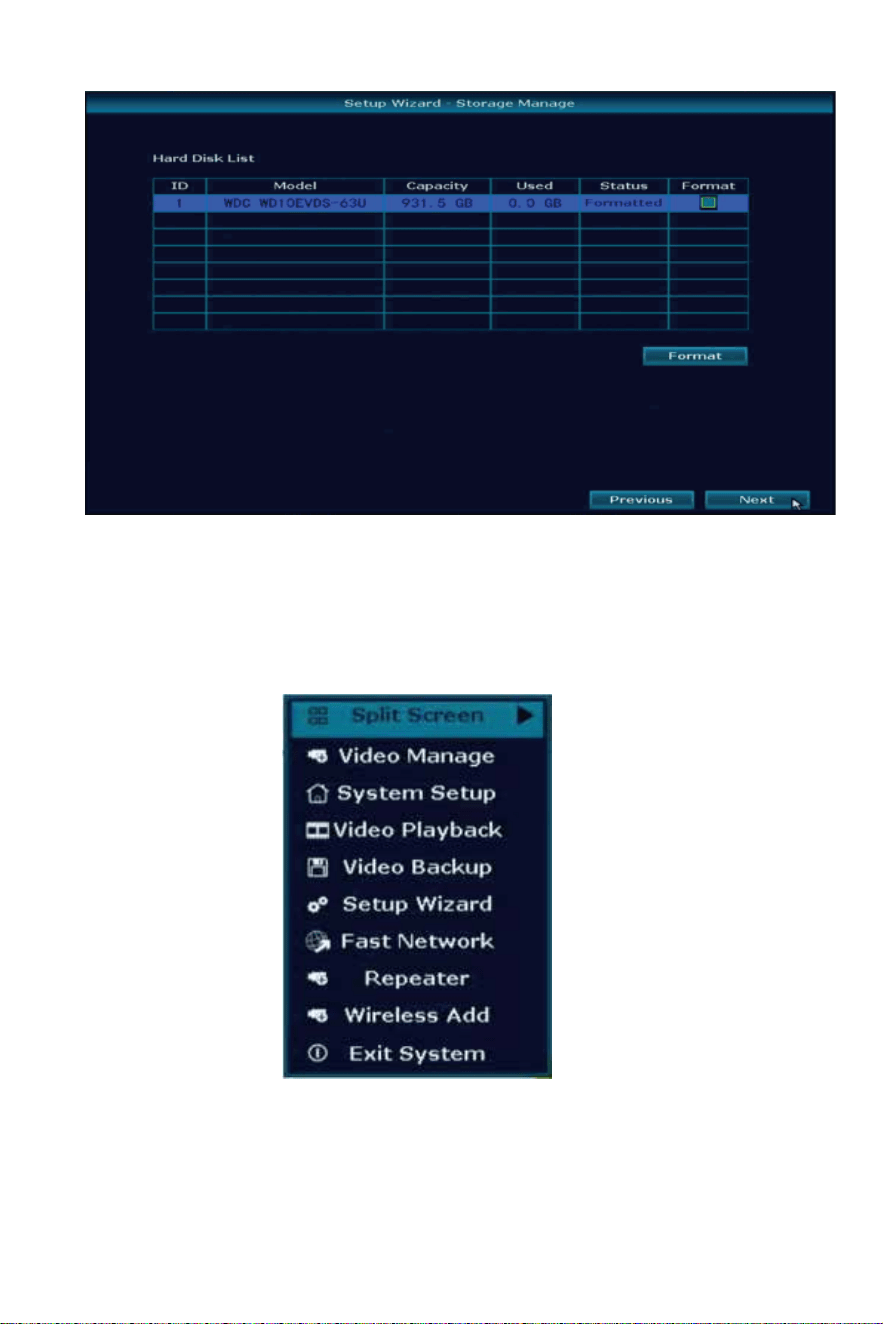
Main Menu
Right click the mouse choose any op�on to login the system, default
user name is admin and no password, just click ok.
Storage Manage: show the HDD informa�on and Capacity, first �me to
use please format the HDD at first, if your system not included HDD it
should be blank. Click Next to finish fast setup.
-13-

If it shows Username/Password is Incorrect!
There are 2 ways to reset the password:
1: Click ok you will see Cloud ID and the Date, then send below
photo to johnn[email protected] to get the super password.
2: on below frame quickly click the mouse:
right-le�-right-le�-right-le�-right-le�-right-le�-right-le� about 12 �mes,
see Restore default user. Are You Sure To Con�nue? click Yes.
It will show below interface, set New password and Repeated it, please
don’t set password over 12 charaters and with any special characters
as “_”.
-14-
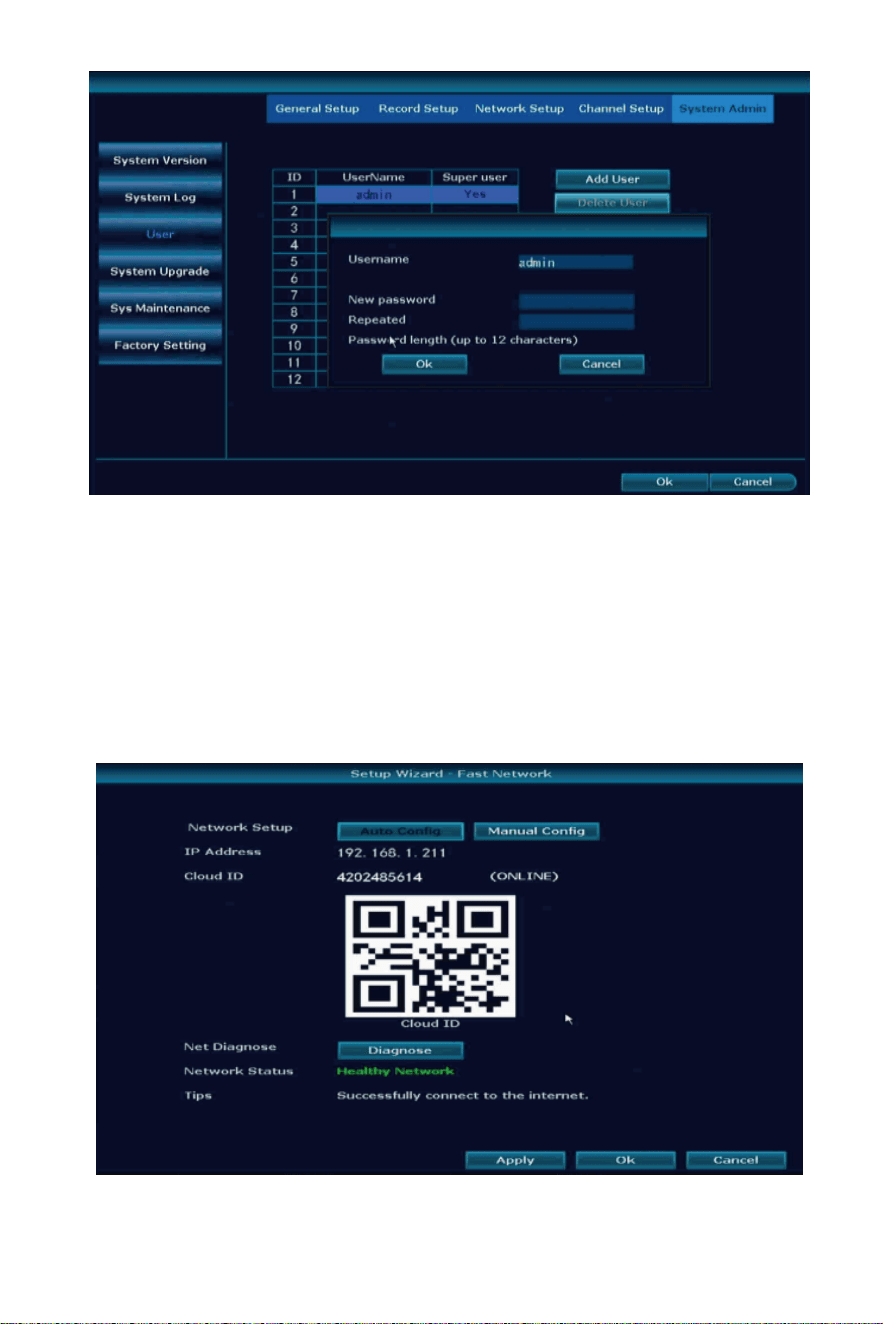
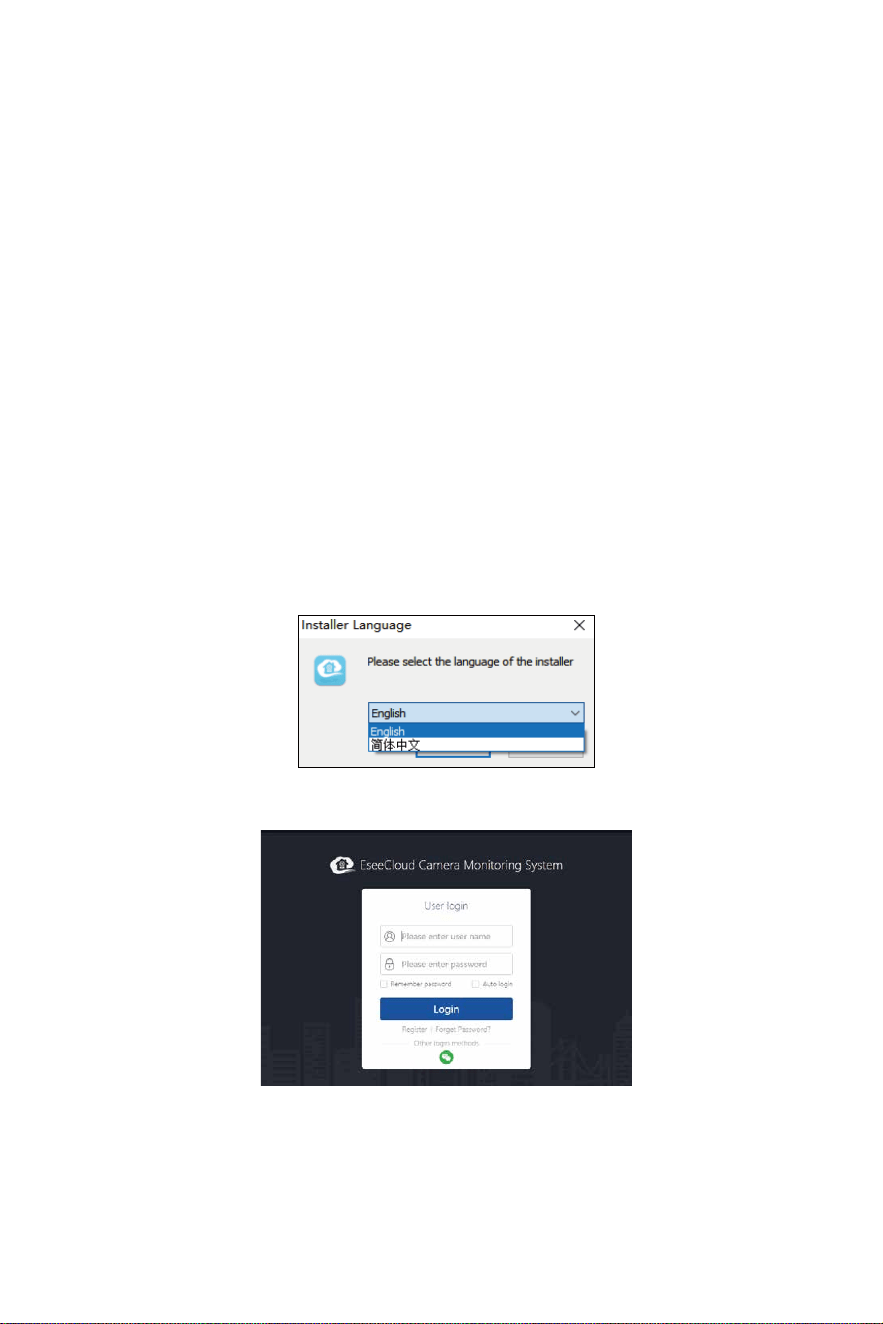
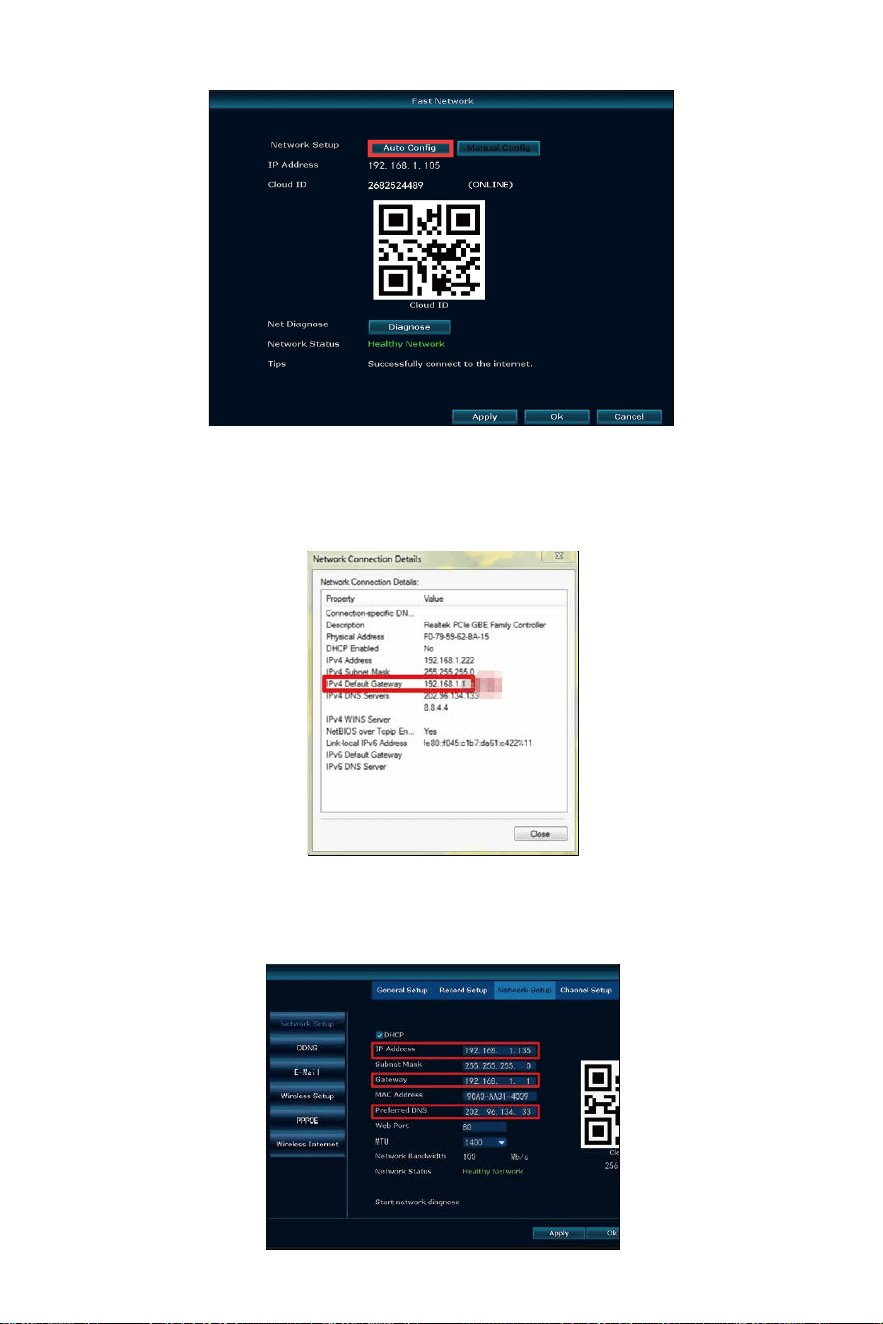
Connect the System with Network by WiFi or Wired
Right click the mouse of the NVR, choose Fast Network. In the middle of
the window you should see Cloud ID status as ONLINE and Network
Status as Healthy Network. If not show online and healthy network,
select Manual Config then enable DHCP, Click Apply , then power off the
NVR box, wait a few seconds and power up.
-15-

There are two ways to connect the NVR with network:
1. Wired connec�on
1) Wired connec�on, connect the NVR with router by ethernet cable.
2)Rright click your NVR mouse choose fast network, then click Auto
Config, check cloud ID status is online and network is healthy, then can
remotely check the system on your phone app.
3) If not online and healthy network, please click Manual config, and
check your router detail, make sure the NVR and your router is the
same IP gateway, IP address the first 3 number should be the same,
the last one can't be the same, Preferred DNS change to 8.8.8.8 and
apply it.
-16-

MENU-DO What
Menu Bar
2. WiFi connec�on
1) Please notes our NVR only can work with 2.4Ghz WiFi network.
2) Right click your NVR mouse choose system setup → network
setup → wireless internet → enable wireless LAN, then find your
house WiFi name, input password, apply it. (please note the WiFi
name can not included any special character, such as "_", otherwise it
will show connected failed.)
3) Check the status is connect failed or success, if it is failed, please
click view details, check the same WiFi network details on your phone
and your NVR, then change them to the same IP gateway, IP address
the first 3 number should be the same, the last one can't be the
same, preferred DNS please change to 8.8.8.8 and apply it.
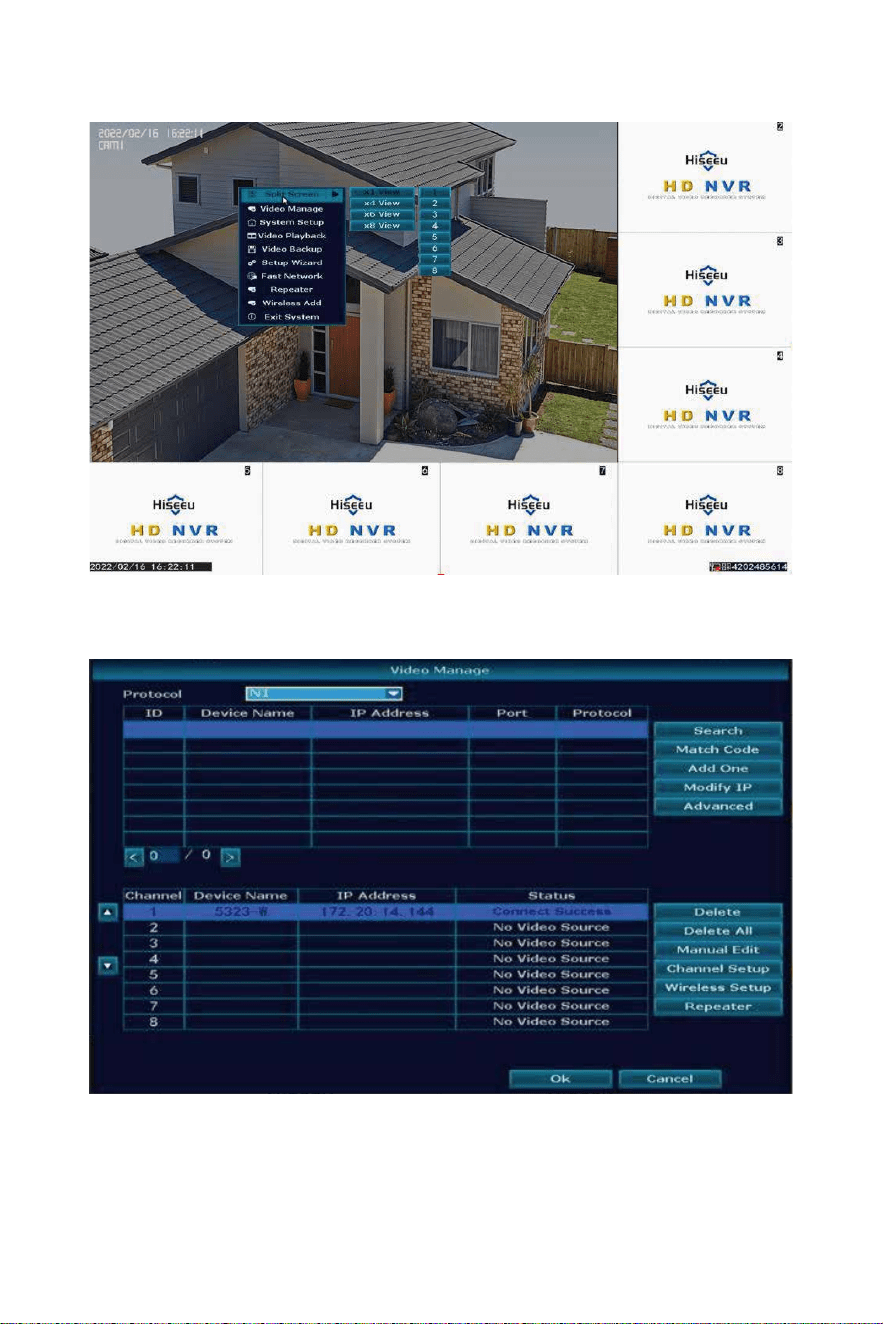
Split Screen: change status of live view. Support x1 view, x4 view, x6
view, x8 view
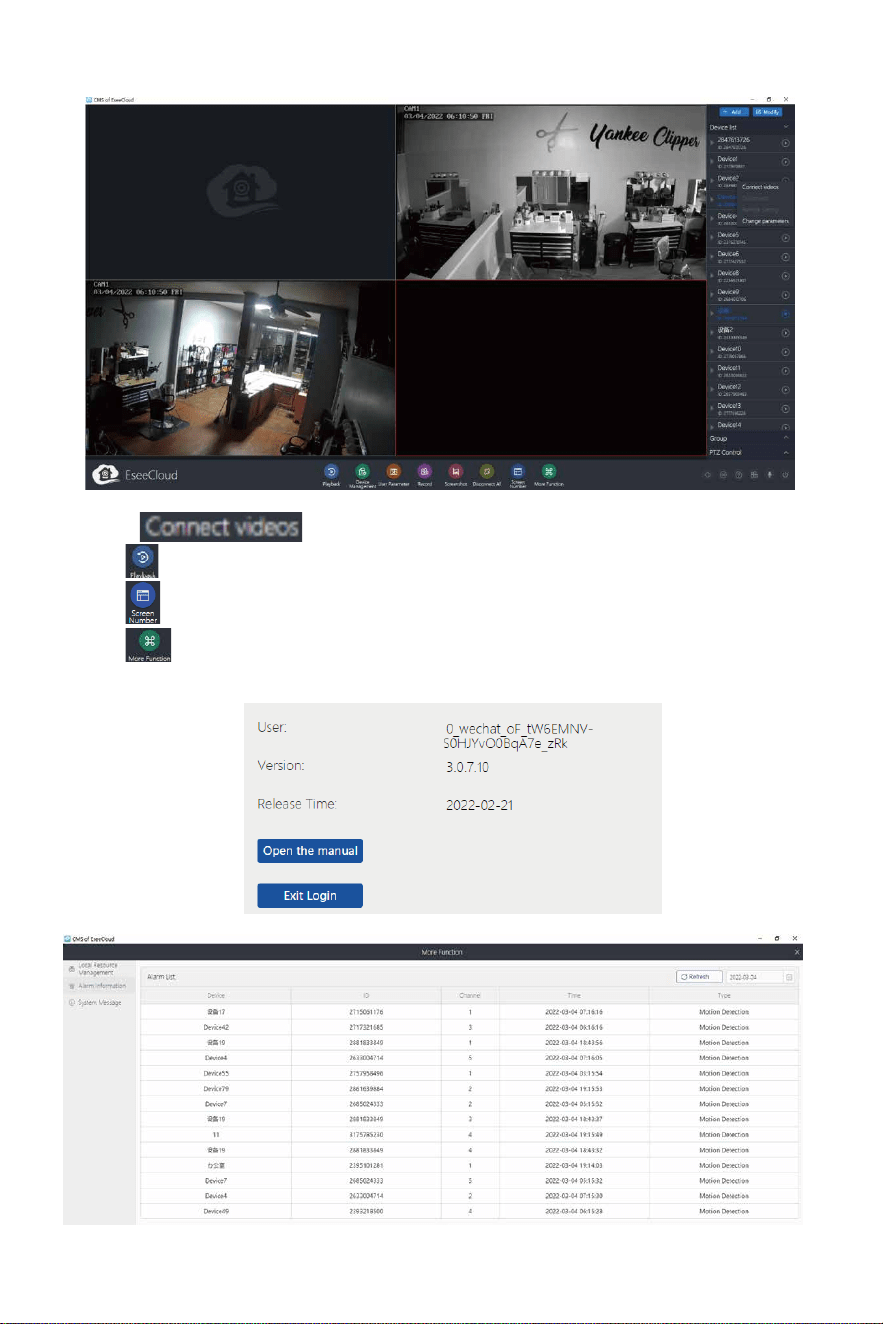
Video Manage: manage IP cameras and NVR channels.
System setup: all system se�ngs.
Video playback: playback recorded videos.
Video backup: backup recorded videos.
Setup Wizard: step by step guide of 1st �me general se�ngs.
Fast Network: shortcut to network se�ngs.
Repeater: set the WiFi repeater or camera as connect as repeater
func�on.
Wireless add: add IP cameras into NVR channels by WiFi connec�on.
Exit System: logout, reboot, close screen output and shut down the
system.
Click right mouse you can enter the main menu;
click right mouse again you can exit the current
menu or return.
-17-
Split Screen
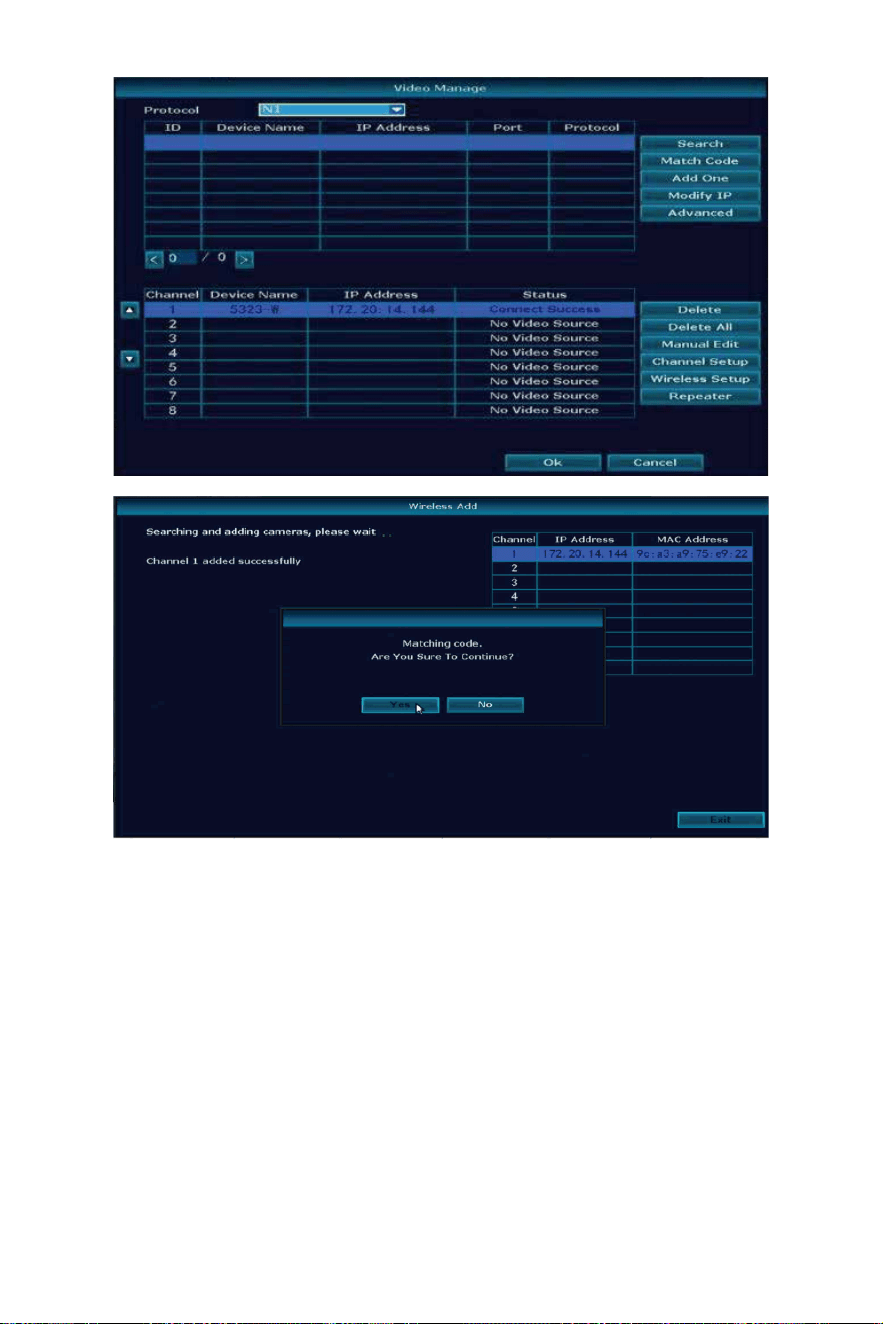
Video Manage
Search: wired connec�on camera with NVR to find new IP address or
connect by Onvif protocol to find the camera IP address
Match Code: wired connec�on transfer to WiFi connec�on with NVR
Add One: add the camera IP address directly to your channel
-18-
Modify IP: change the camera IP address when it show the same IP
address with other cameras
Advanced: allow to repeated to add the camera in more than 2
channels.
Delete: delete the camera from NVR
Delete All: delete all cameras on the NVR
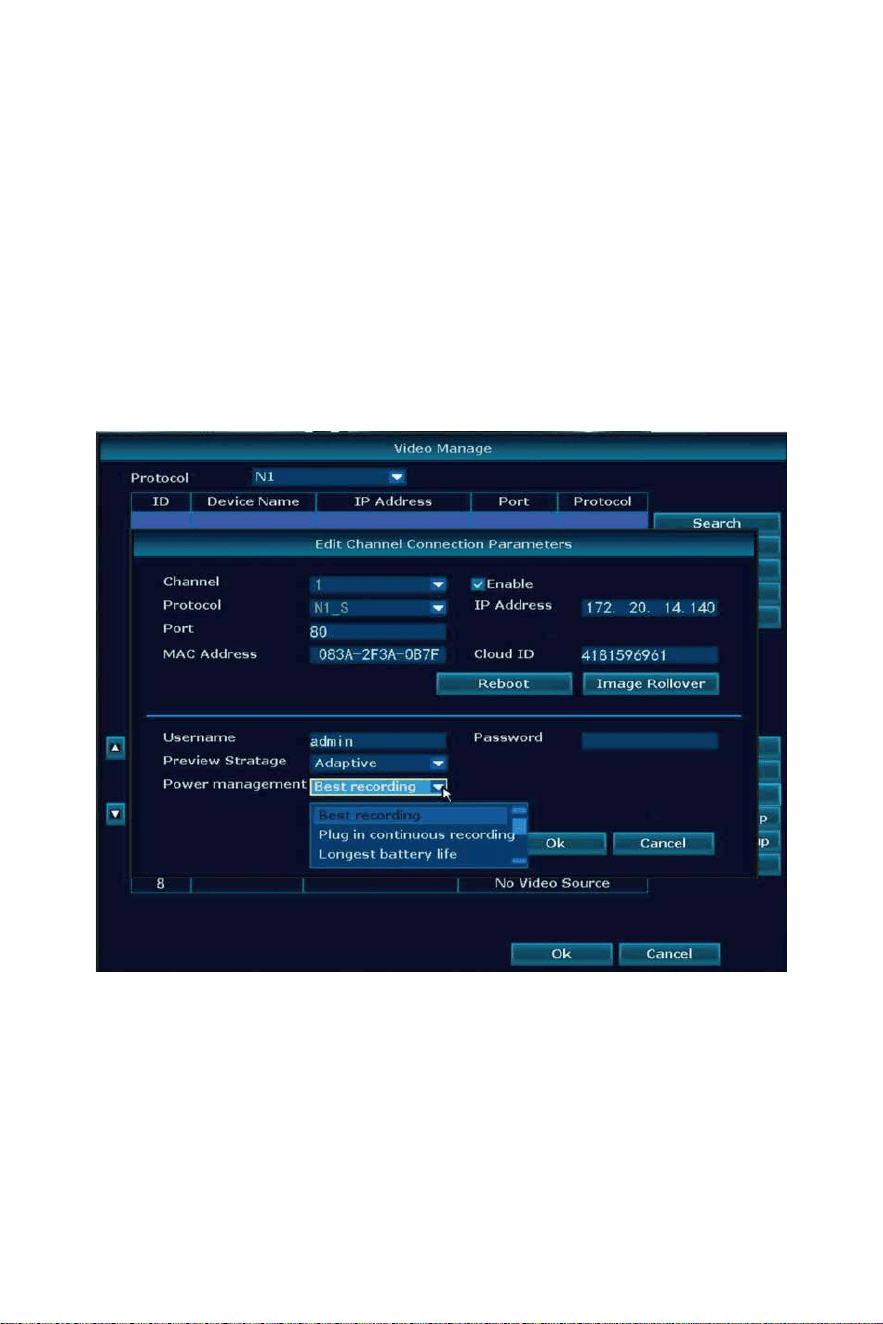
Manual Edit
IP address: change camera IP address
Password: when it shows Password Error to input correct camera
password(our camera doesn’t need password)
Image Rollover: flip the camera image up and down
-19-
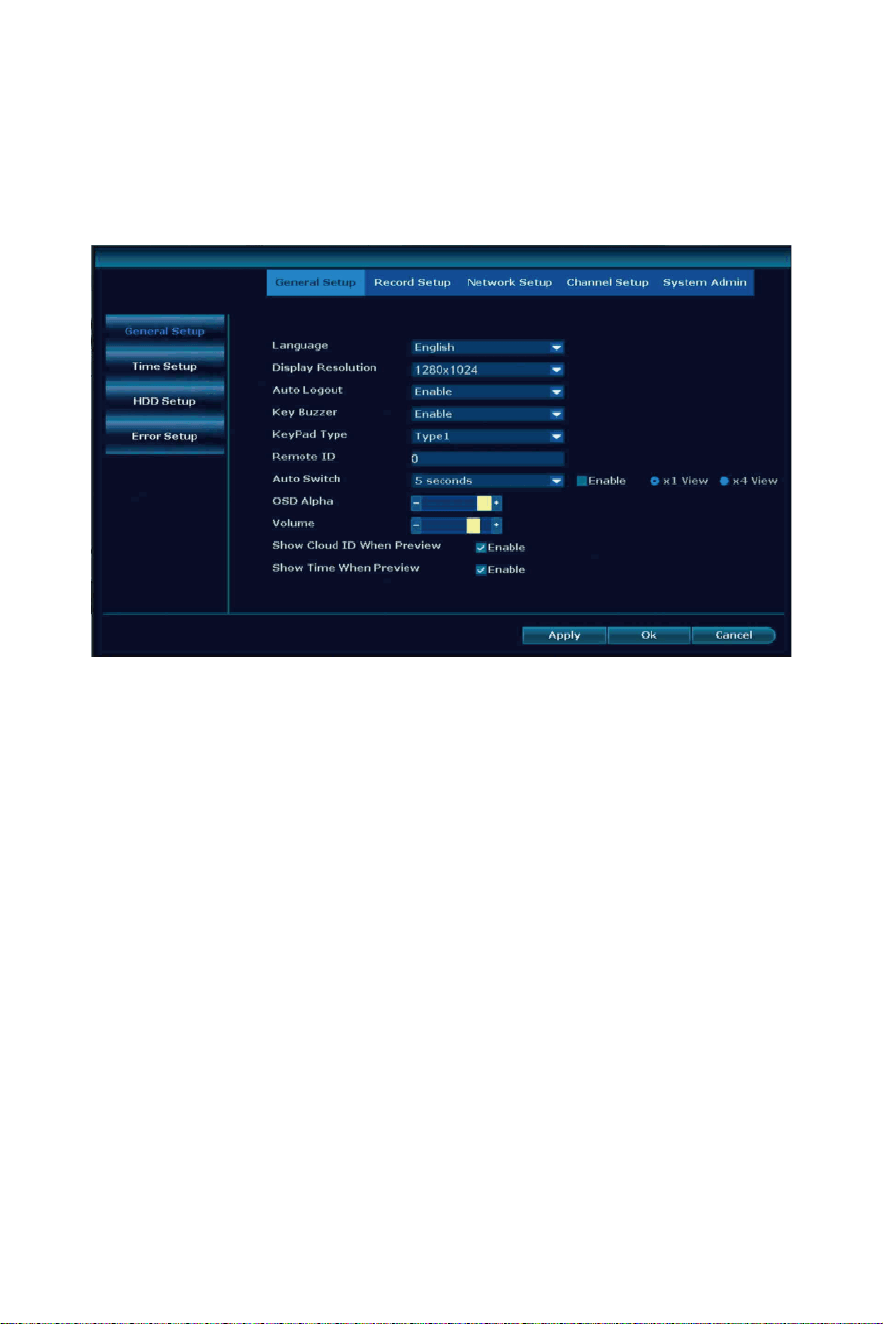
System Setup
General setup
Click right mouse → Choose System Setup; enter the menu that
enable you to do all se�ngs related to this system.
Language: support English, Chinese, Japanese, Spanish, Portuguese,
German, French and so on, choose the correct one.
Display Resolu�on: refer your monitor choose correct resolu�on.
Auto Logout: not operate the NVR system will log out the user, select
any menu need input password of the NVR.
Key Buzzer: when you use the keypad NVR will make a beep sound.
KeyPad Type: choose the one you preferred.
Auto Switch: x1 view(camera show one image one by one within few
seconds), x4 view(camera show 4 cameras image such as channel 1234
then to channel 5678).
OSD Alpha: Change menu transparency.
Volume: change volume of the sound from the NVR.
Slow Cloud ID When Preview: show the NVR ID on the right bo�om
corner.
Show Time When Preview: show the �me on the le� bo�om corner.
-20-
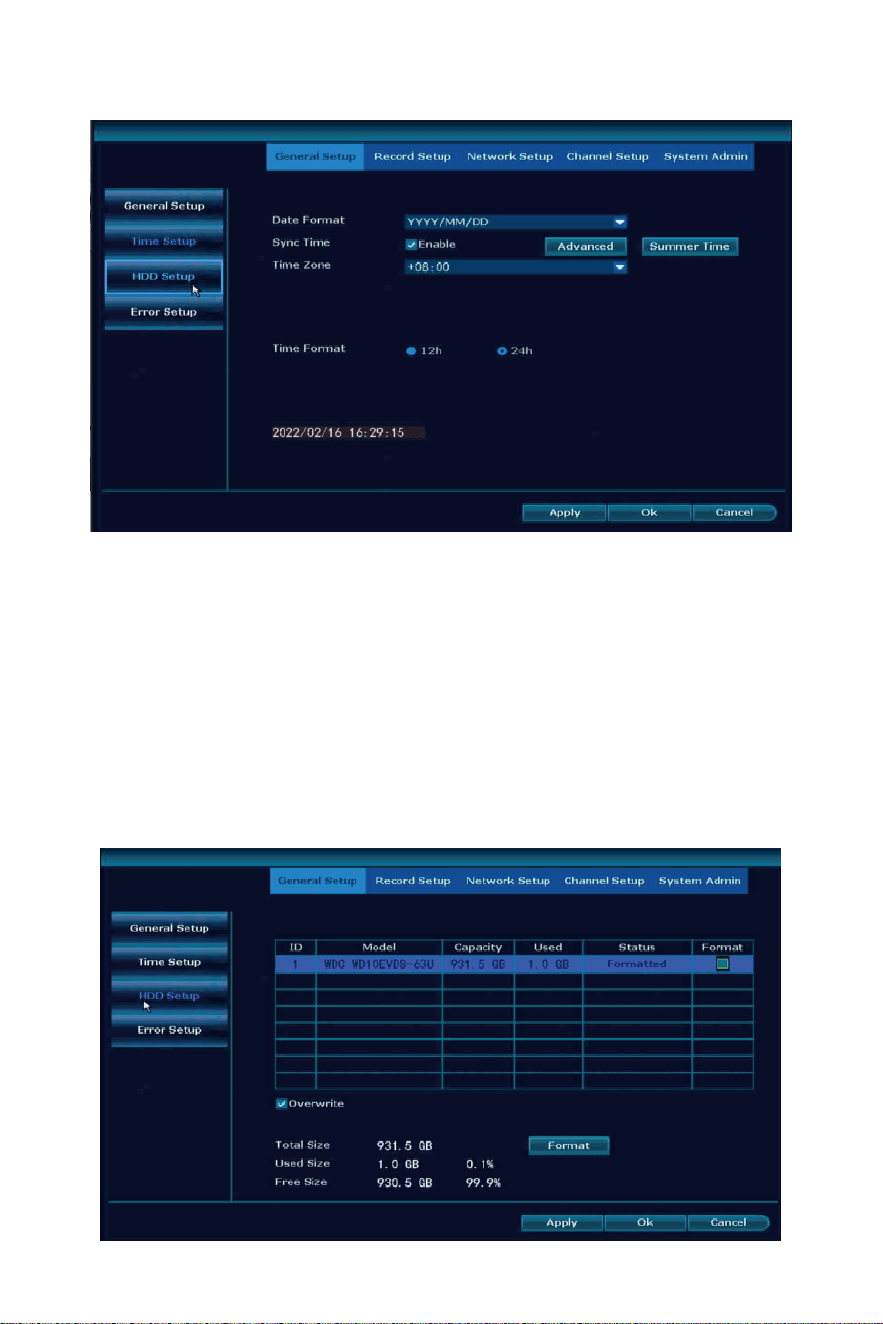
Date Format: select the one you like.
Sync Time: system connect the network will automa�cally use your
local �me.
Time Zone: find your city �me zone to input correct one.
Time Format: allow you choose 12h format and 24h format.
If you don’t know it, please disable Sync Time, set the Date �me same
as your phone.
Time Setup
HDD informa�on
-21-
Overwrite: when HDD full it will automa�cally delete old file and
make new record
Format: the first �me to use please format the HDD, it will delete all
record on your NVR
Please notes: if there is no any HDD informa�on, please make sure
the system you bought with HDD, and NVR power adapter output is
12V2A or 12V3A.
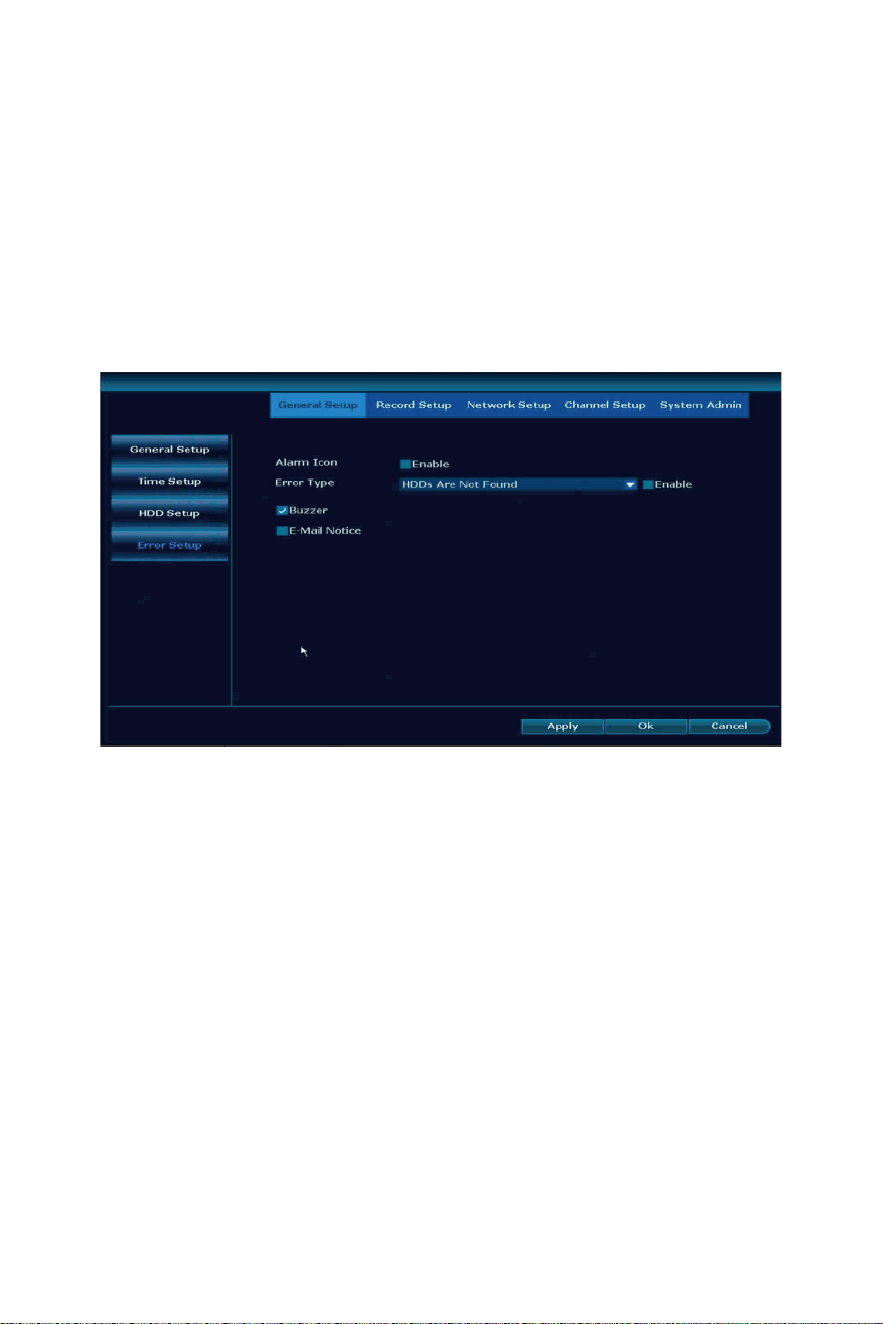
Alarm Icon: enable it will show a red triangle on the le� bo�om, click it
will shows what happened to your NVR, such as HDD Error, video loss...
Error Type: choose one you want to make no�fica�on on NVR.
Buzzer: when error happened NVR will make beep sound.
E-Mail No�ce: when error happened will send an email to email box.
This is a ba�ery camera system which only supported mo�on
detec�on recording, which means only when mo�on detec�on
happened camera will make record, set �me recording is useless.
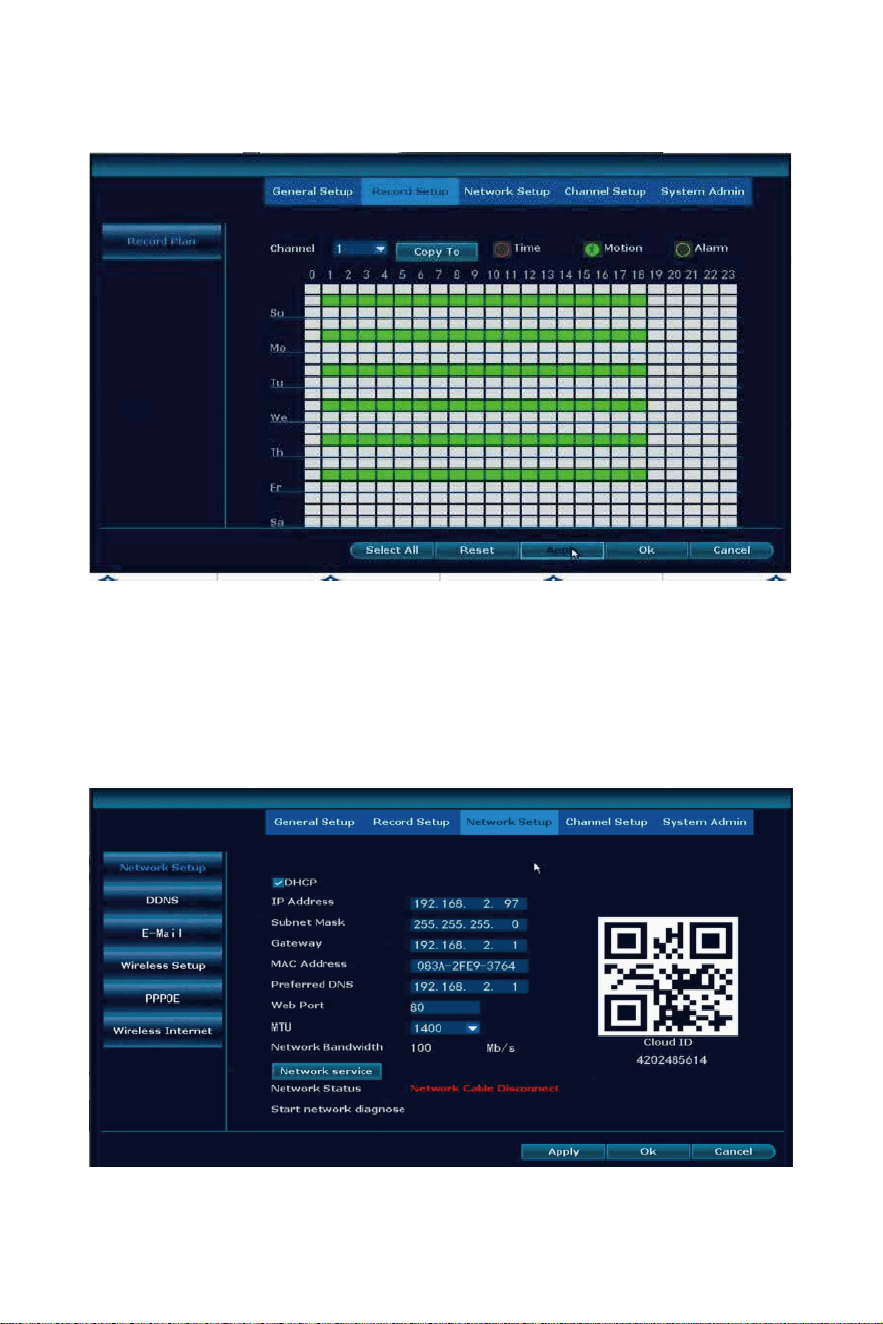
Record Setup
Error
-22-
Network Setup
Mo�on: select it to make mo�on detec�on record if you select 24/7
days will show all green line.
Copy To: Copy recording se�ng to other cameras.
Select All: will select 24/7 days.
Reset: clear all se�ng on record.
Alarm recording is useless, please ignore it.
-23-

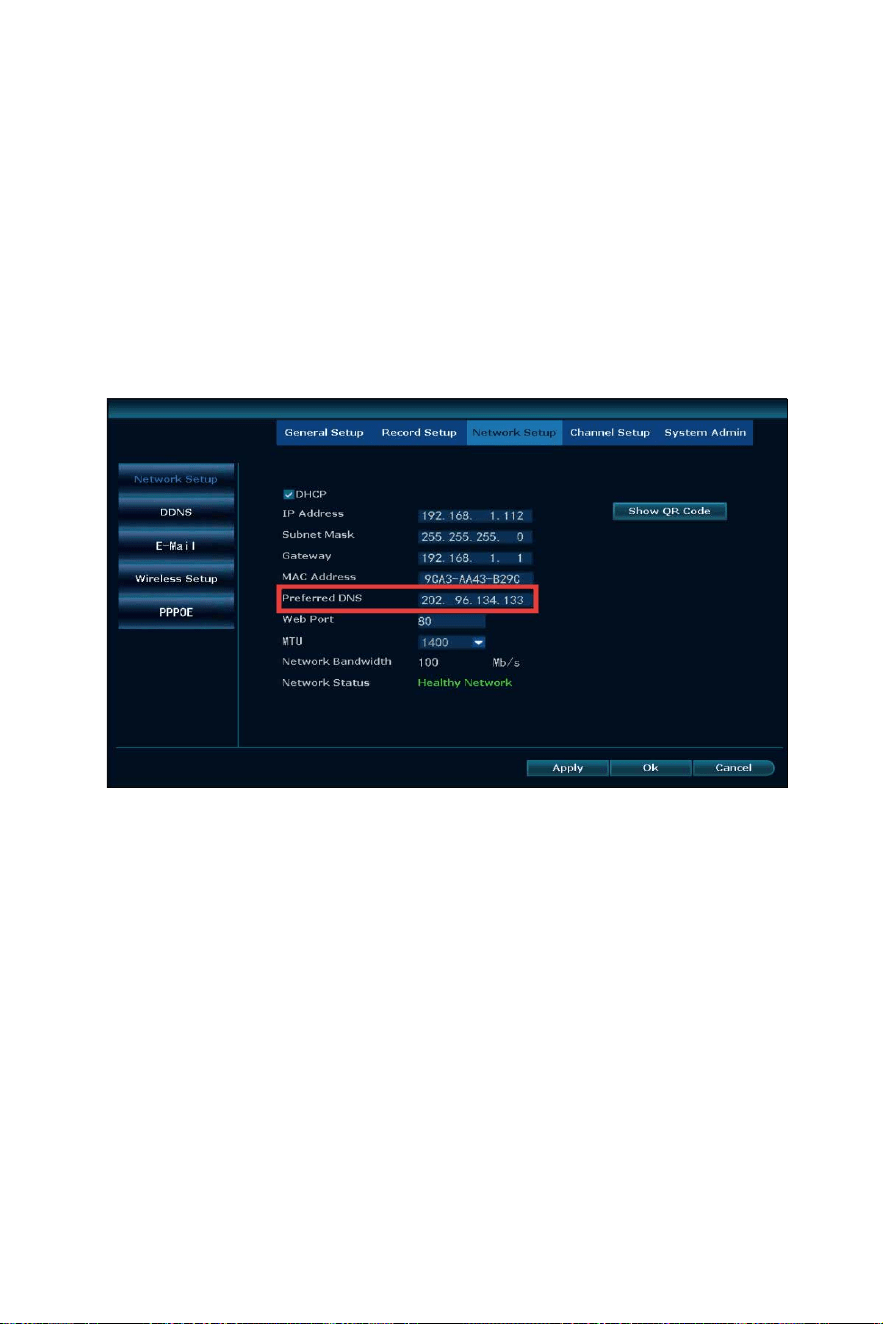
DHCP: adap�ve local network.
IP address: NVR IP address(according to your router change to the
same, the first 3 number should be the same, the last can’t be same,
otherwise it will show IPC conflict).
Subnet Mask: 255.255.255.0, no need change.
Gateway: use router Gateway.
MAC Address: system automa�cally grabs, no need change.
Preferred DNS: suggest use 8.8.8.8.
Web Port: 80.
MTU: on the phone app camera loading slowly can change it to 1000.
Network Bandwidth: 100.
Network Status:
Healthy network: network connect successfully
Gateway Unreachable: means NVR IP gateway and IP address not the
same as your router, Click Manual Config, then find your router
correct IP gateway, such as 192.168.1.1, then IP address should be
192.168.1.*** which can’t be the same as your router, change it on
NVR.
Request DNS Error: disable DHCP, change the preferred DNS to 8.8.8.8,
reboot the NVR and your router.
Network Cable Disconnect: make sure the NVR connect with router by
ethernet cable.
Network Card Not Found: on network setup page find PPPOE disable it.
Network Busy: disable DHCP, change the preferred DNS to 8.8.8.8,
reboot the NVR and your router.
-24-
Network Service:
Enable RTSP Server: rtsp://user:password@ipaddr:port/chN_M.264.
User: The user name defaults to admin.
Password: The password is empty by default.
Ipaddr: IP address of the device.
Port: 80 or 554.
N is the channel number: IPC is 0, 4 NVR is 0~3, 8 NVR is 0~7, and so
on.
M is the code stream number: the main code stream is 0, and the
secondary code stream is 1.
Alexa: enable it allow connect the system to Echo show .
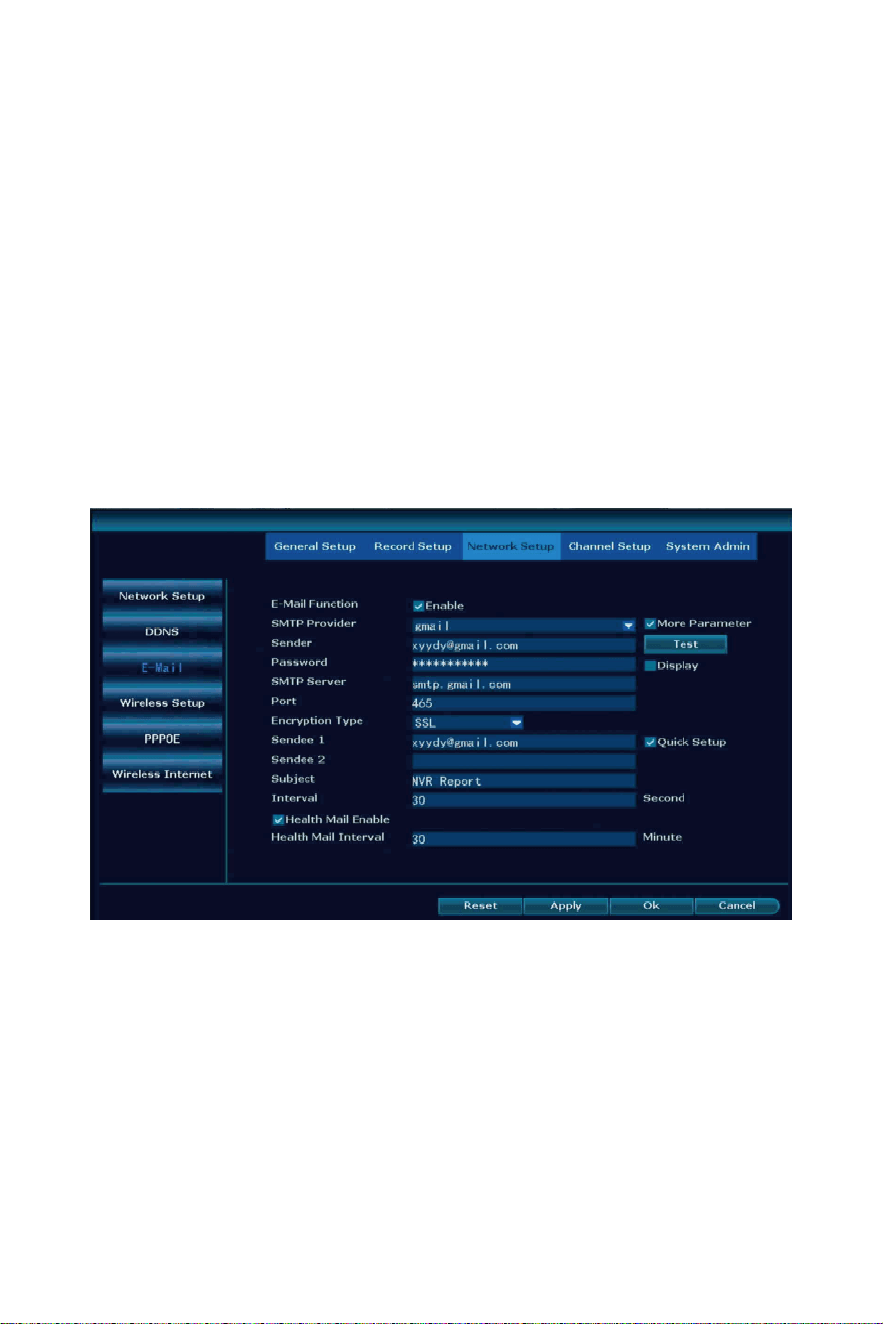
E-Mail
Email func�on is to get the error and mo�on detec�on from the NVR,
only show a message, doesn’t come with picture.
Before set the email, login in your own email box to enable IMAP and
SMTP service as below:
-25-
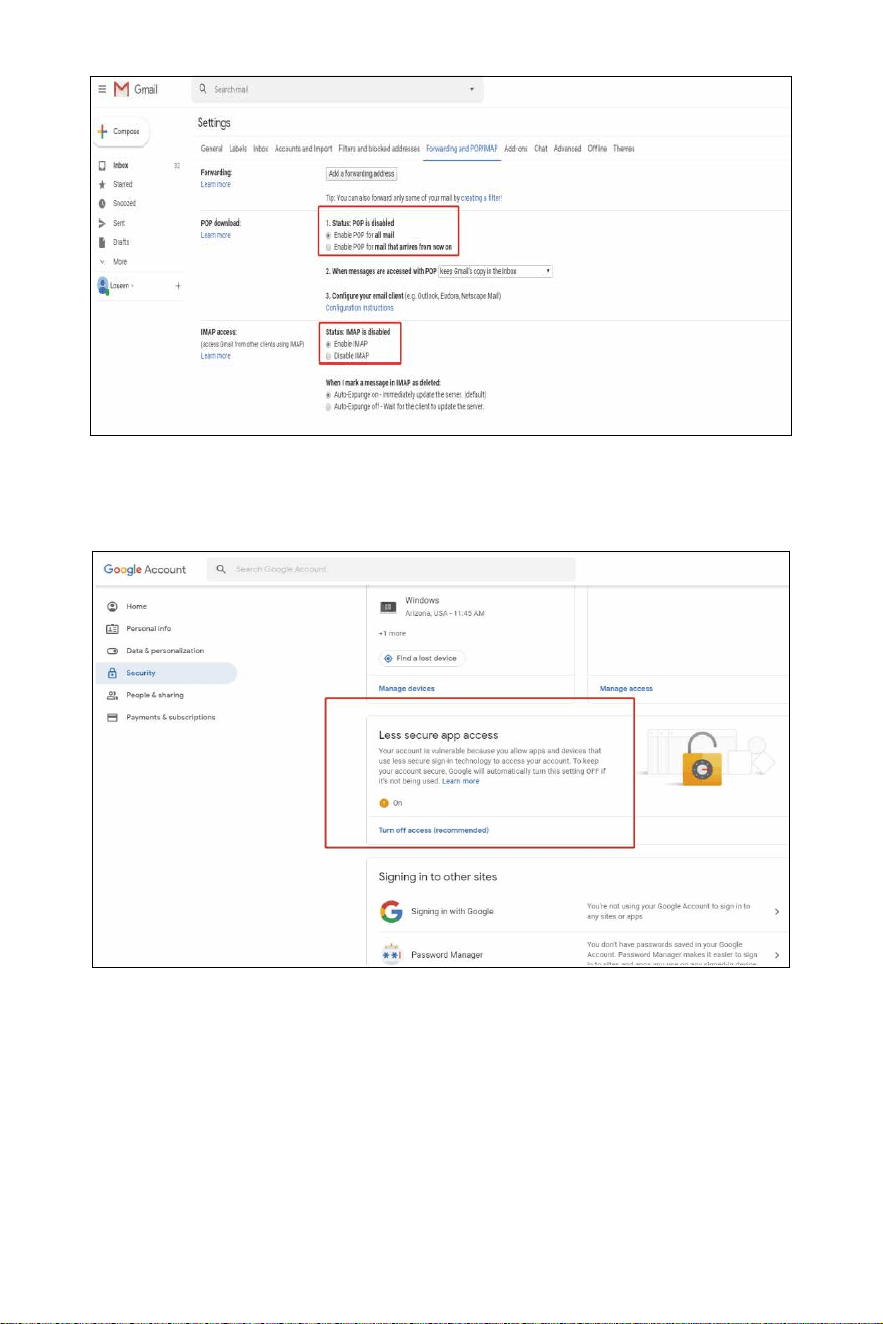
E-Mail Func�on: enable it to set email.
SMTP Provider: according to your email select correct provider.
Sender: email address which to receive the no�fica�on.
Password: sender email password (some email enable SMTP service
will generate a password, please input this password).
SMTP Server: select SMTP Provider it will input correct server
manually.
Gmail s�ll need login www.google.com to turn on Less secure app
access.
-26-

Port: according to your se�ng select correct one(refer this link to
find which one is correct: h�ps://www.arclab.com/en/kb/email/
list -of-smtp - and-imap-servers-mailserver-list.html).
Encryp�on Type: SSL.
Sendee 1/2: allow use the same sender email address .
Subject: Email subject to receive email.
Interval: 30s.
Health Mail Enable: √.
Health Mail Interval: 30M.
A�er all setup, click Test, test successfully which means you can get
no�fica�on on email.
Connect Informa�on: see each camera signal number, the number is
lower than 35 which means camera signal is not good, please take
camera close to the NVR or use repeater to extend signal .
ESSID: NVR hotspot(to pair with camera, can’t be changed).
Password: NVR hotspot password can’t be changed.
Wireless Channel: according to your country policy choose correct
one.
Region: US(FCC), EU(EU), Asia(MKK).
Wireless Setup
-27-
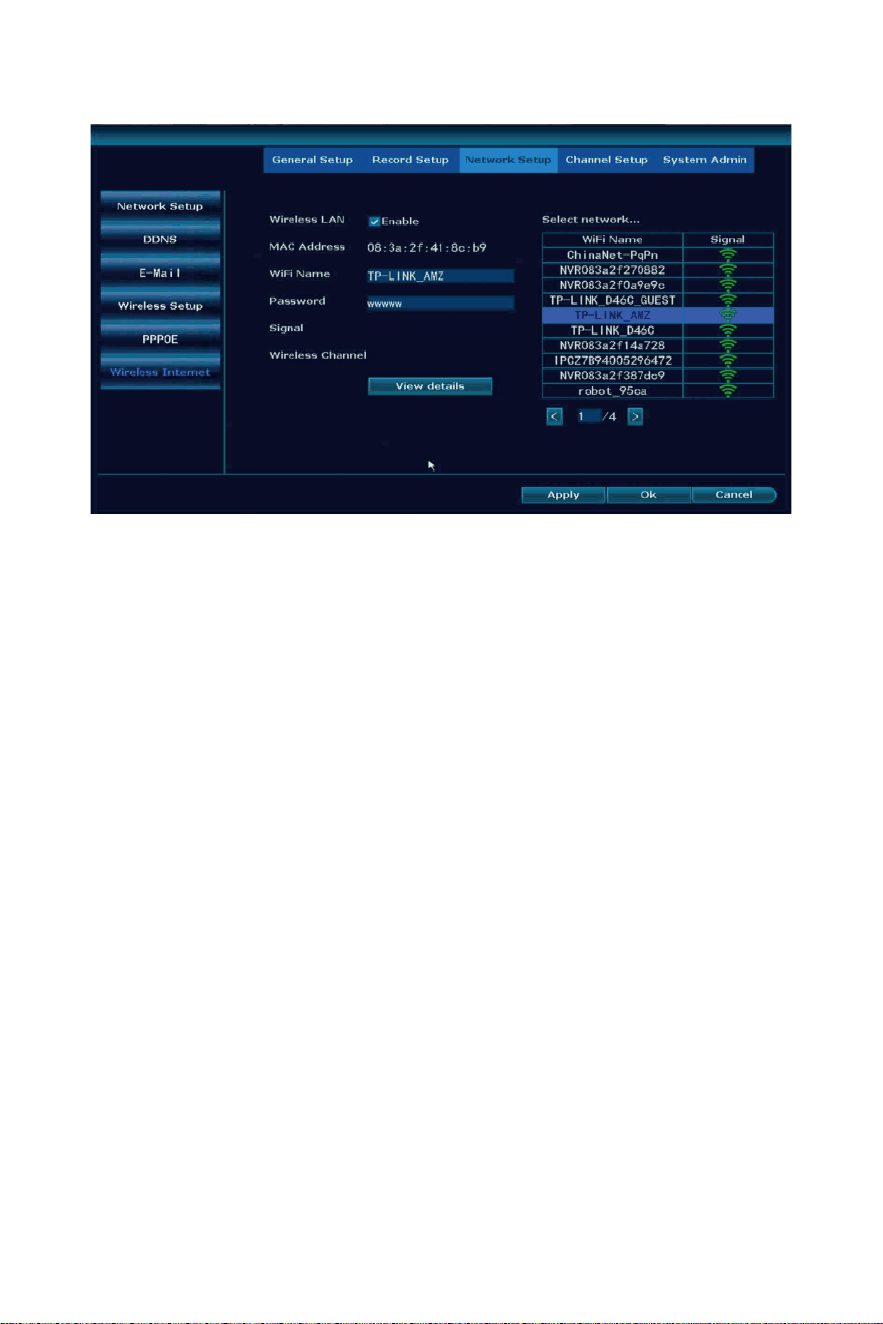
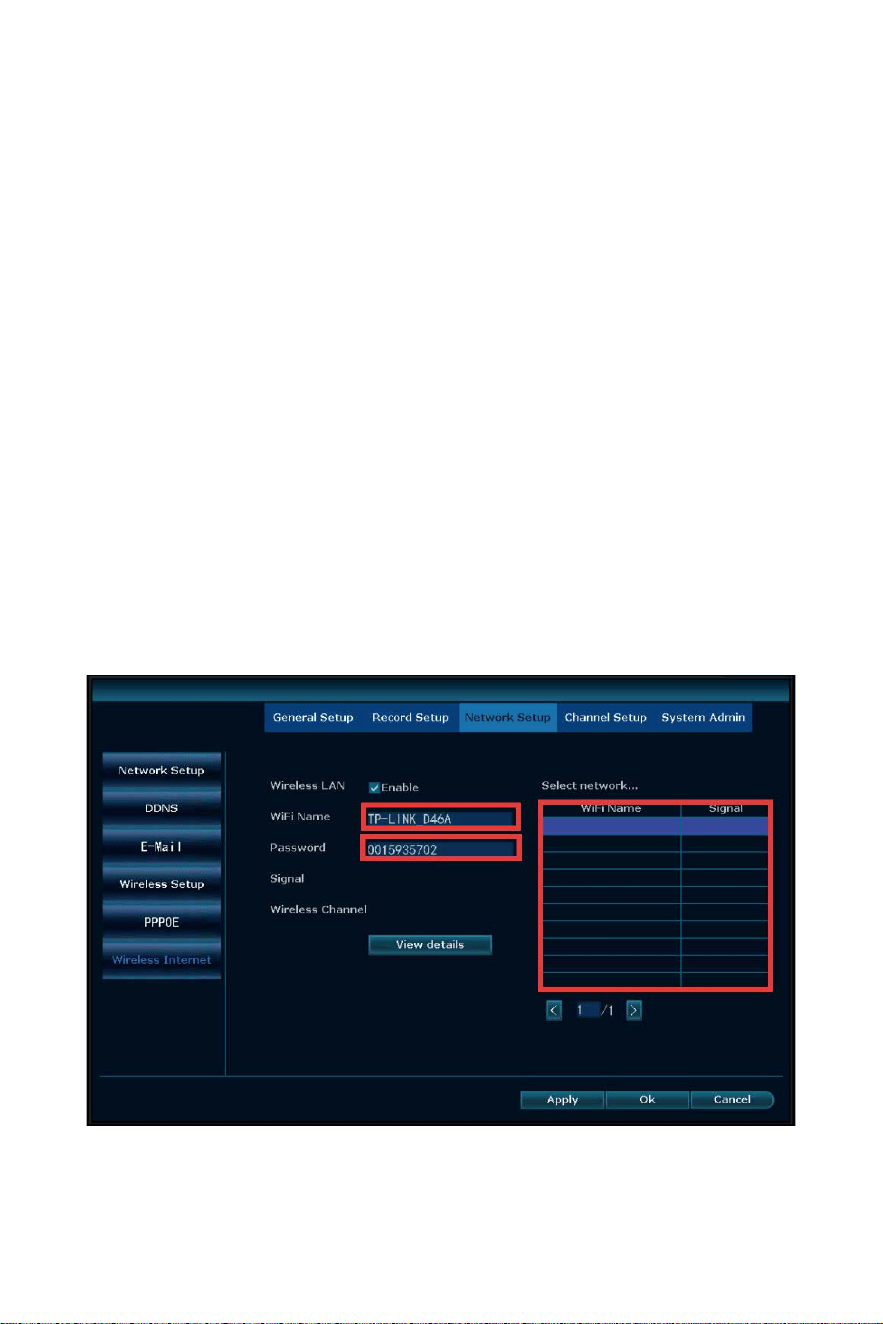
Wireless LAN: enable it to connect the NVR with WiFi network(doesn’t
support 5Ghz WiFi network).
WiFi Name: on the right find your home WiFi name select it(please
note the WiFi name be�er without any special characters, such as “-”).
Password: input home WiFi password.
Signal: check the WiFi signal of your router.
View detail: to see the IP address IP gateway.
If shows connect failed, please click View details to change the IP
address and IP gateway as your WiFi IP address(last number not be the
same) and IP gateway.
Wireless Internet
-28-
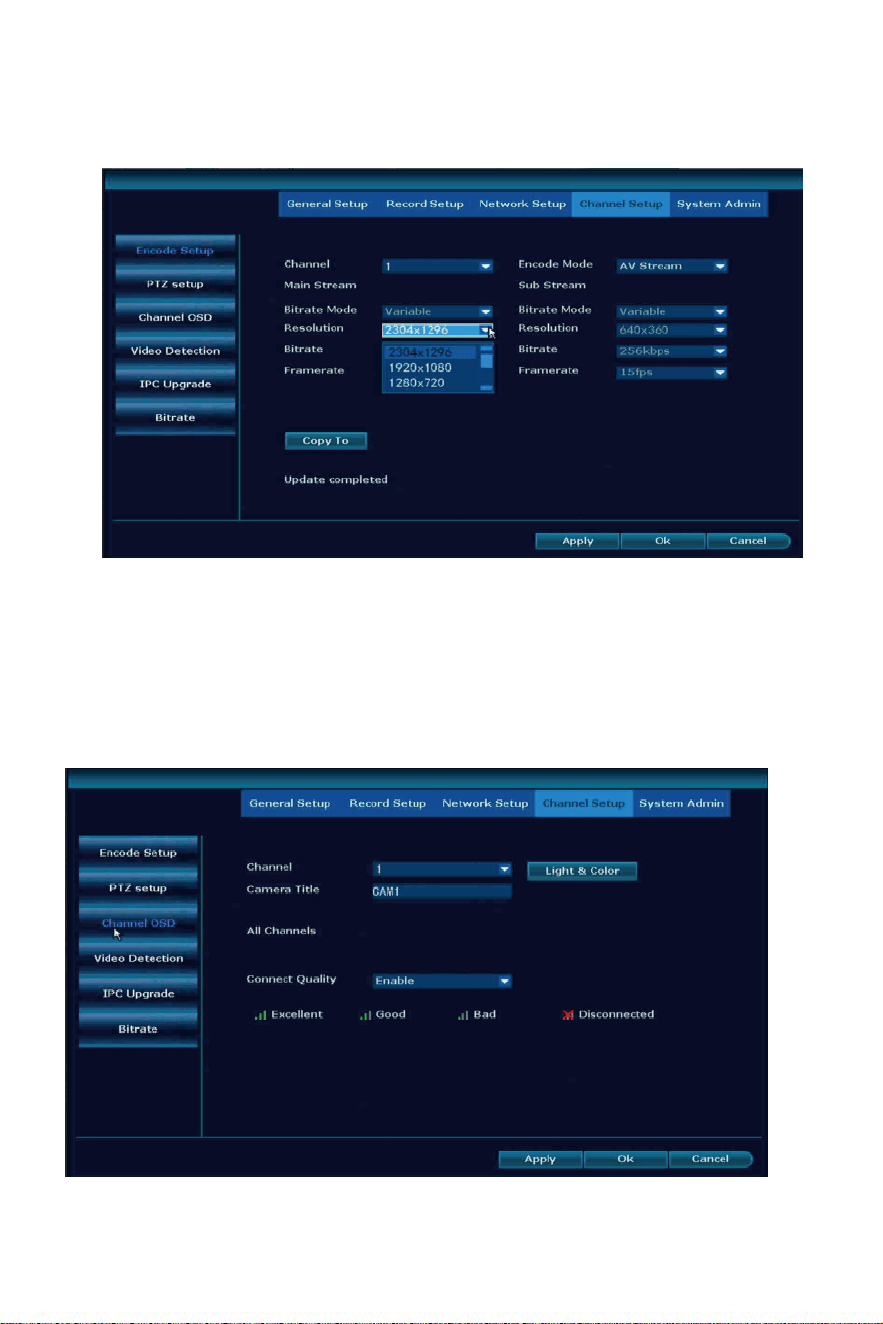
Channel Setup
Encode Setup
Channel OSD
Encode Mode: AV stream(turn on camera audio func�on), Video only
(turn off audio func�on of cameras).
Resolu�on: allow you change camera resolu�on.
Other func�ons doesn’t allow to change.
-29-
Light&Color: allow to change camera Brightness, Satura�on, Contrast,
Sharpness, not suggest to change.
Ircut mode:
Infrared mode: camera show color image at day�me, blank and white
at night.
Daylight: turn off Infrared light, only show color image, at night if no
light it can’t be seen clearly.
Night: show black and white image at the day�me and night.
Full color mode: camera with floodlight will turn on it and show color
image at night.
Smart mode: camera with floodlight will turn on when mo�on
detec�on work.
Camera Title: change cameras’ name.
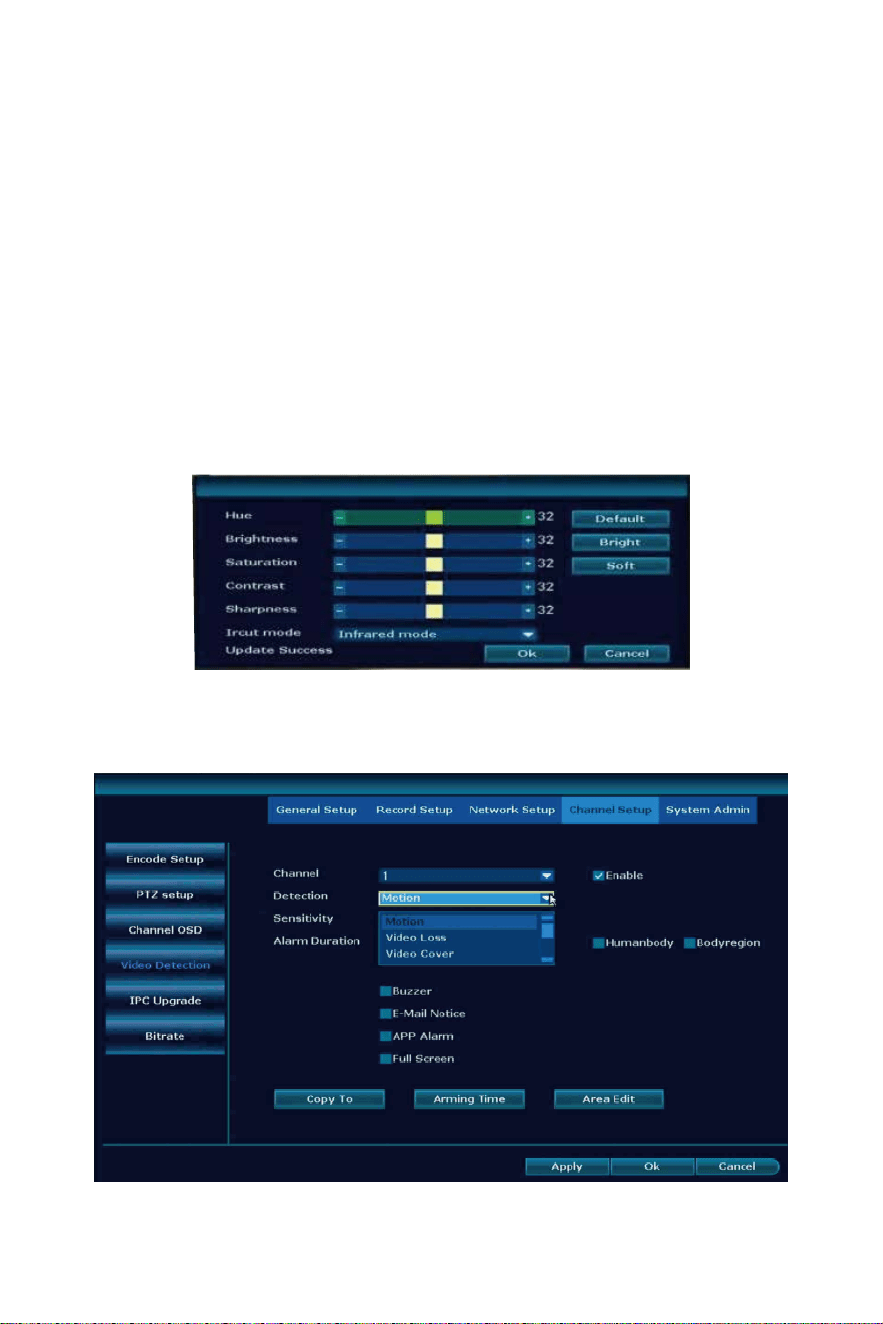
Video Detec�on
-30-
Detec�on:
Mo�on: set mo�on detec�on.
Video loss: camera not connect with NVR.
Video Cover: set a privacy area on camera, it will show a white frame
on live stream.
Sensi�vity: get many mo�on detec�on no�fica�on select lowest, less
mo�on detec�on no�fica�on select higher.
Humanoid Tracking: ba�ery camera not support this func�on.
Usage scenario: Indoor or outdoor.
Bodyregion: when it detec�on the body will make a frame .
Buzzer: enable it when mo�on detec�on work, NVR will make beep
sound.
E-mail No�ce: to set email no�fica�on.
APP Alarm: get no�fica�on on phone APP.
Full Screen: when one camera detec�on mo�on, this camera will
show full screen on the monitor.
Copy to: same se�ng to other cameras.
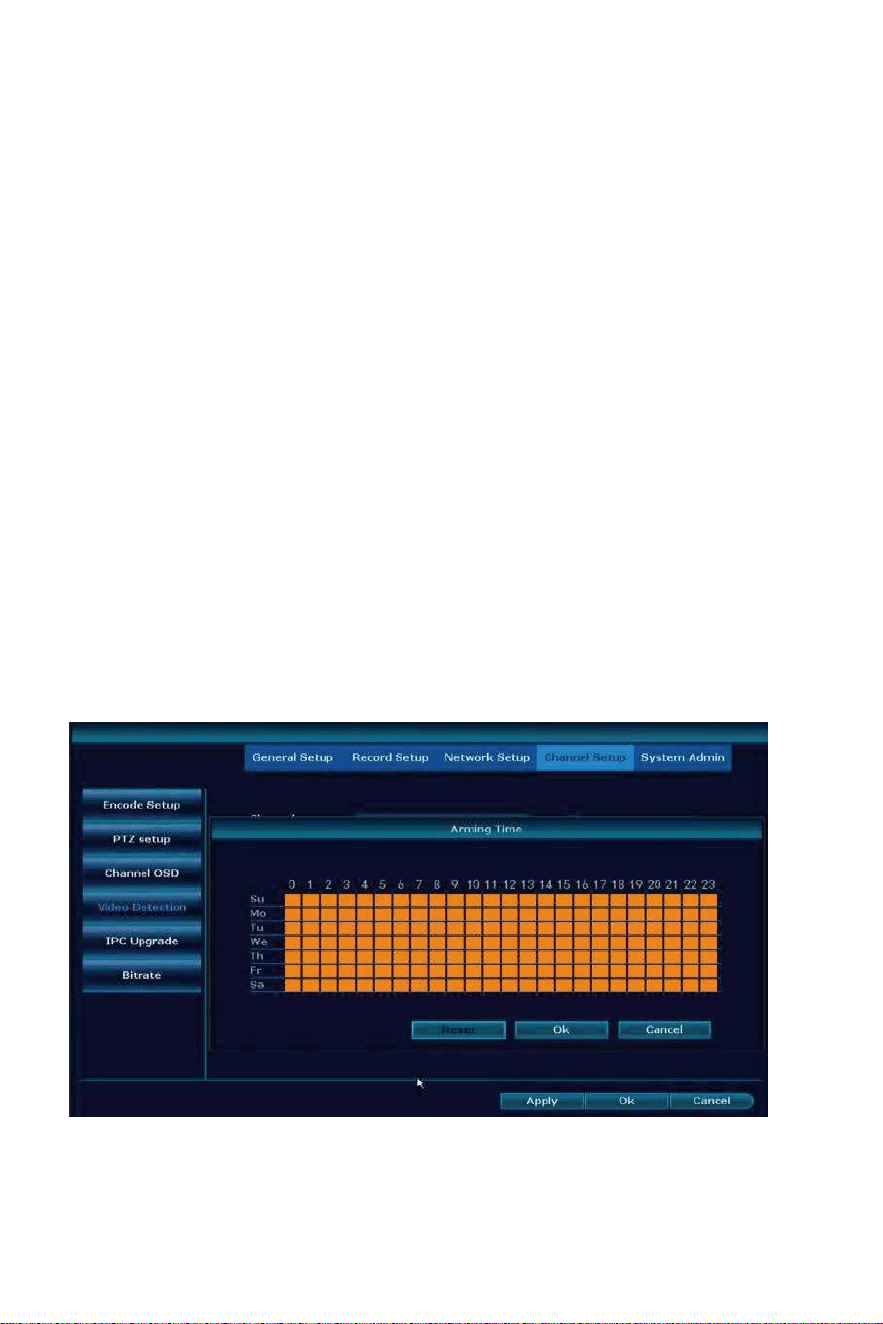
Arming Time: set the mo�on detec�on �me range, default 24/7days
selected, show orange color.
Area Edit: set the mo�on detec�on area, get many mo�on detec�on
no�fica�on, please narrow the area. Default select all area, show blue
color.
-31-

How to upgrade the camera?
Please firmware copy to USB DISK root( format should be FAT32), select
the correct channel → click start → remove mouse → insert USB
disk → wait for camera upgrade successfully.
Camera working without any problem, don’t suggest to upgrade the
camera. If any problem please take this photo and email
Johnn[email protected] to get the firmware.
IPC Upgrade
-32-
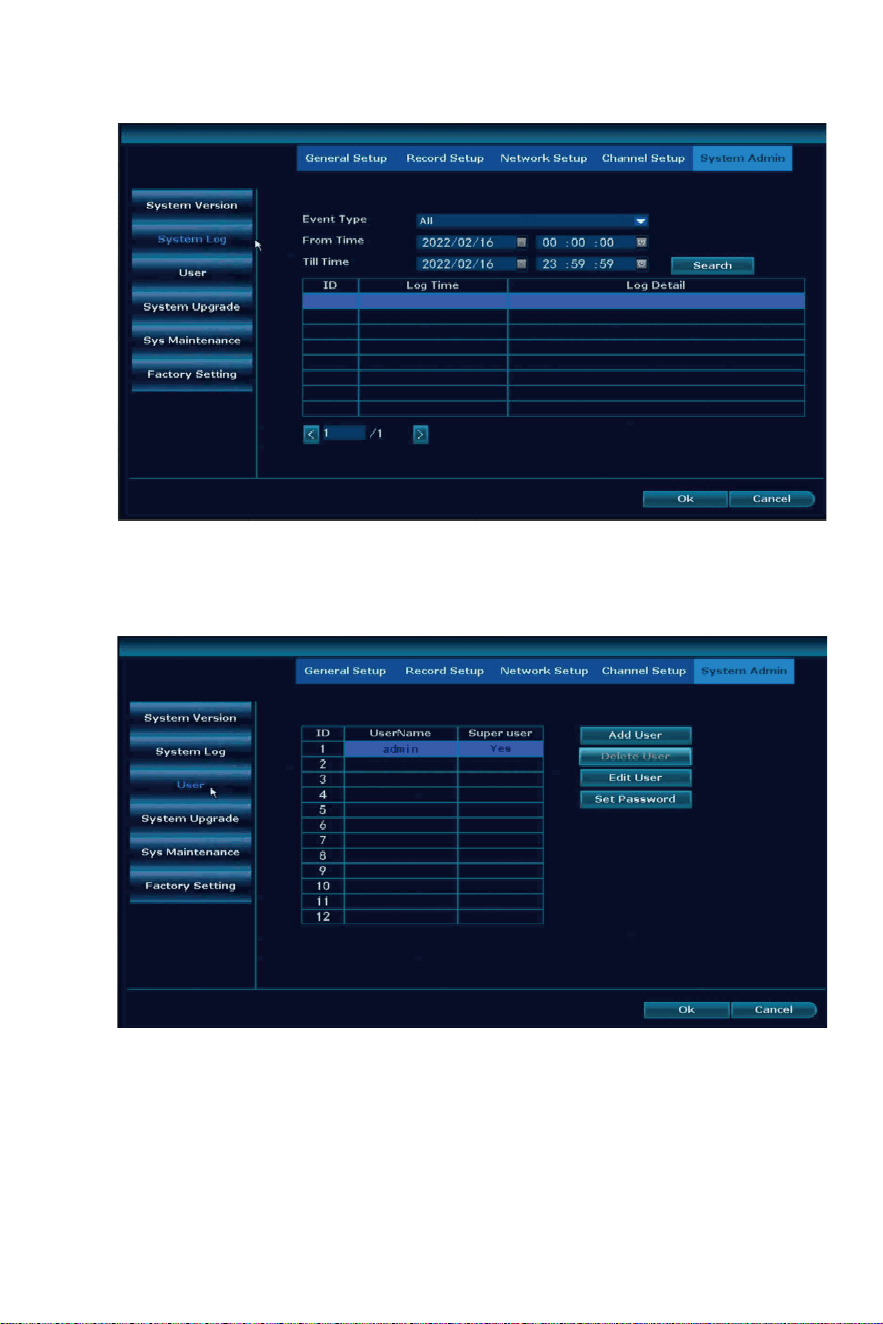
Device model: K8208-3WS
S/W version: 3.2.0.0M
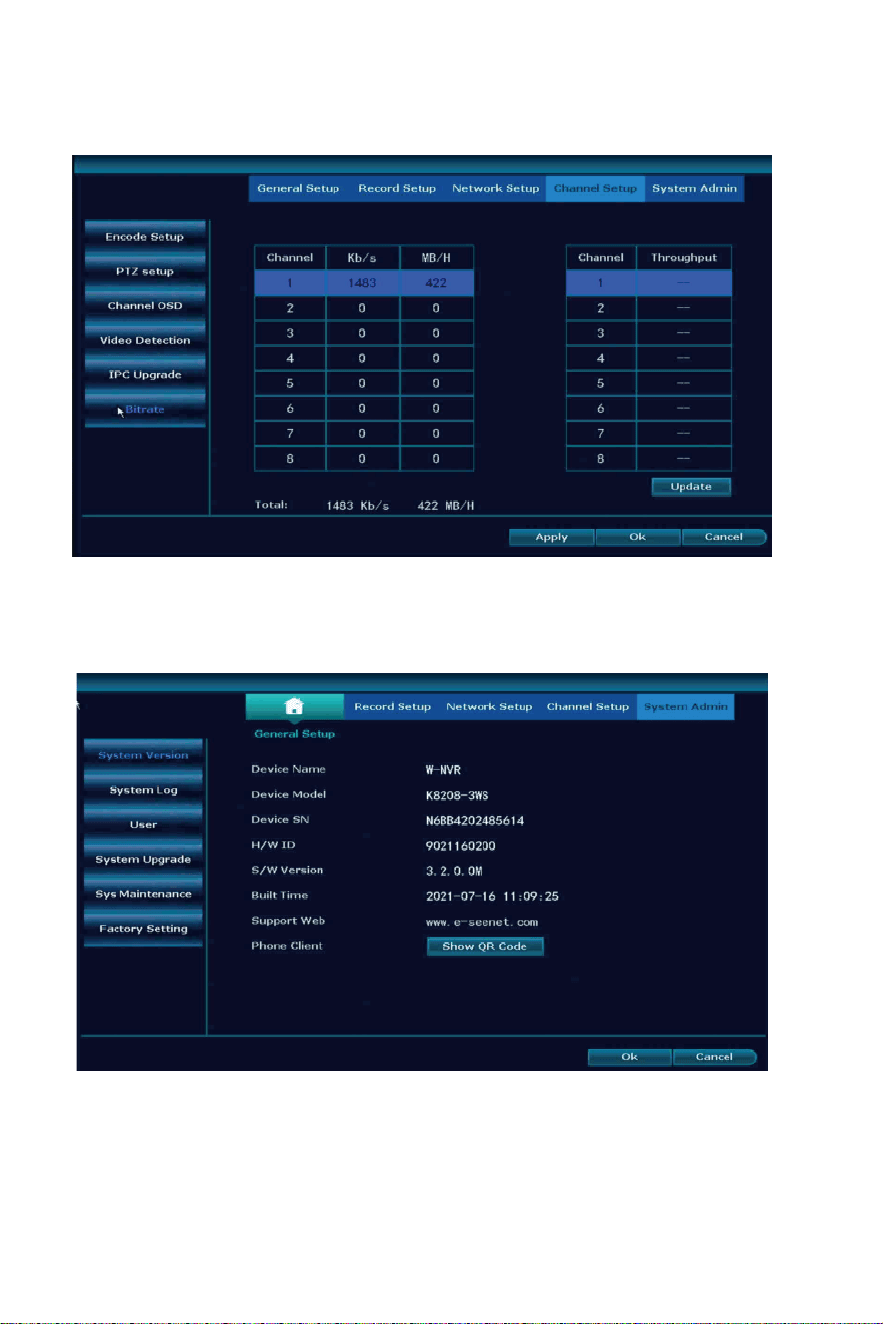
Show camera working speed.
Bitrate
System Admin
System Version
-33-
To see the opera�on of the NVR, HDD and camera working status.
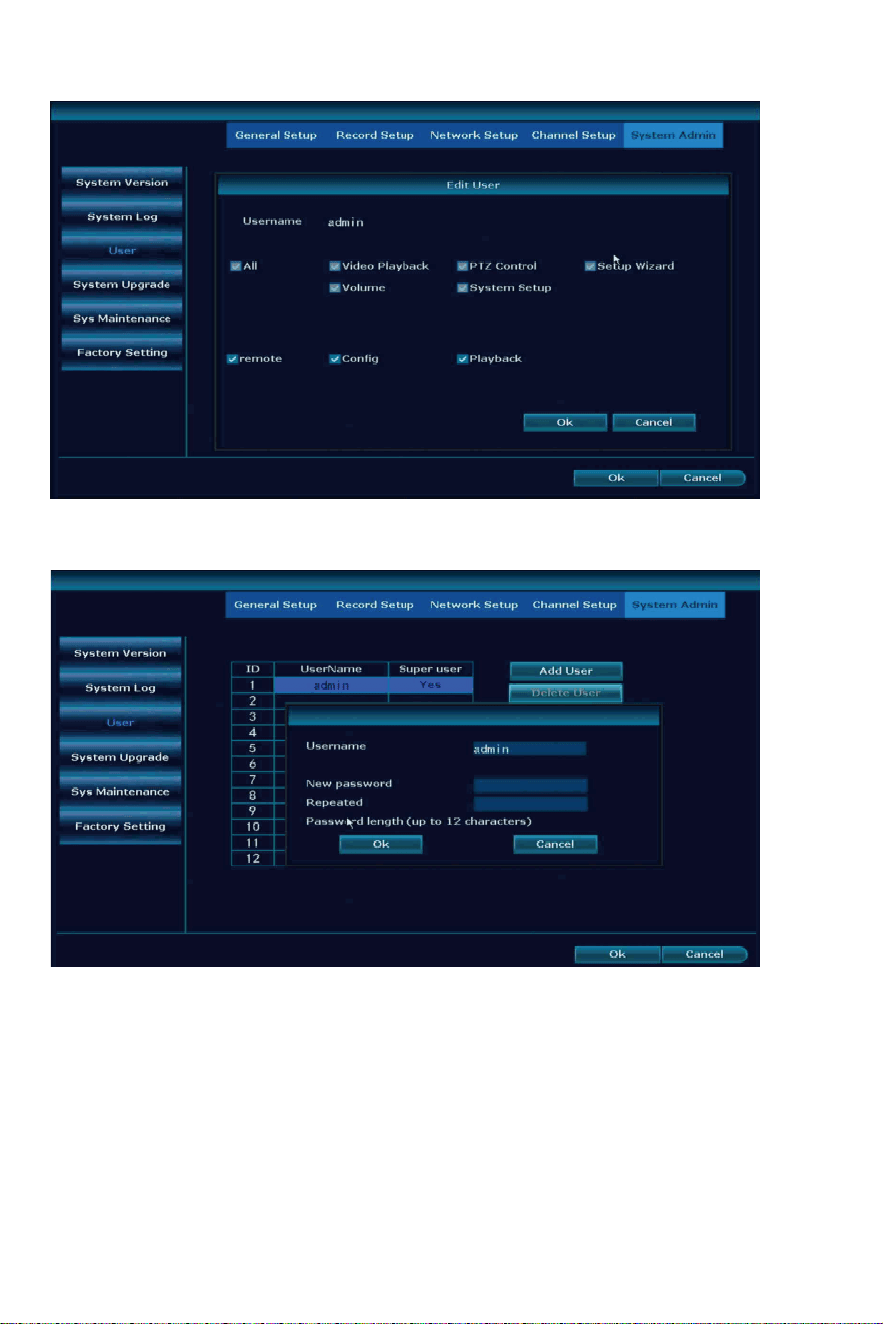
Add User: add a new user, default user admin can’t be changed
Delete User: delete the new user you set
Edit User: to set the permission of the user
System Log
User
-34-
Set Password: change the NVR password.
New password: don’t set it over 12 characters and without any
special characters .
Repeated: the same as your new password.
-35-
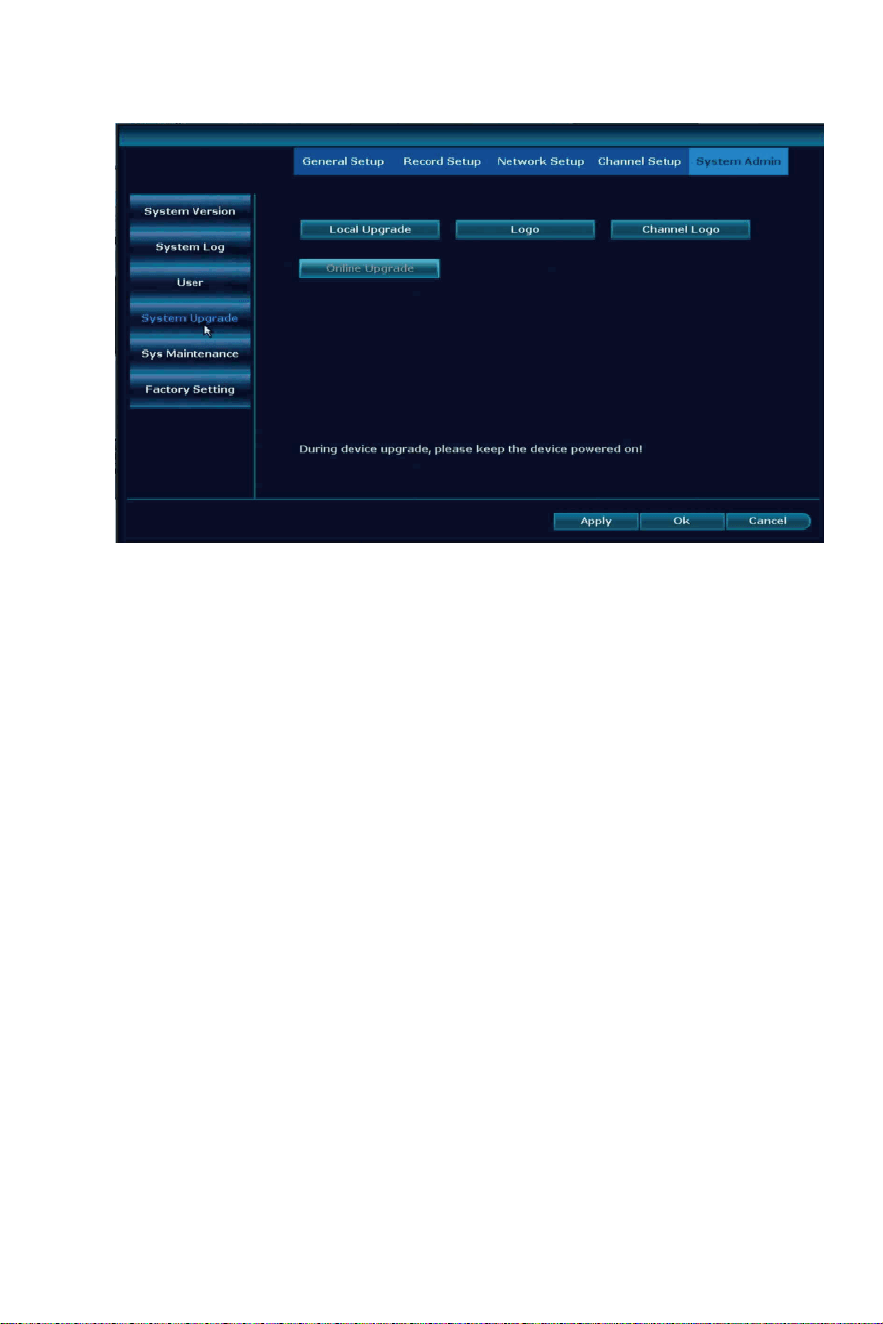
Local Upgrade: system not connect with network need to upgrade,
please take a photo of the System version to johnn[email protected] to
get firmware
How to upgrade the system by Local Upgrade?
1. Copy the file named FWHI*****.rom that sent to you, and copy it to
the root of the u disk (the place where the u disk is opened). Do not
change the name of the upgrade file.
2. Click Local Upgrade, remove the mouse and insert the USB disk
within 60 seconds.
3. Insert the USB flash drive into the USB socket on the rear panel of
the recorder, marked with a “USB” connector on the side.
4. Wai�ng for the progress bar to reach 100% and click OK. A�er the
upgrade is completed, the NVR will reboot.
Online Upgrade: system connec�on with network successfully you can
click Online Upgrade. If there is no new firmware it will no�ce you
latest firmware.
Please notes: NVR working without any problem please don’t upgrade
NVR.
System Upgrade
-36-
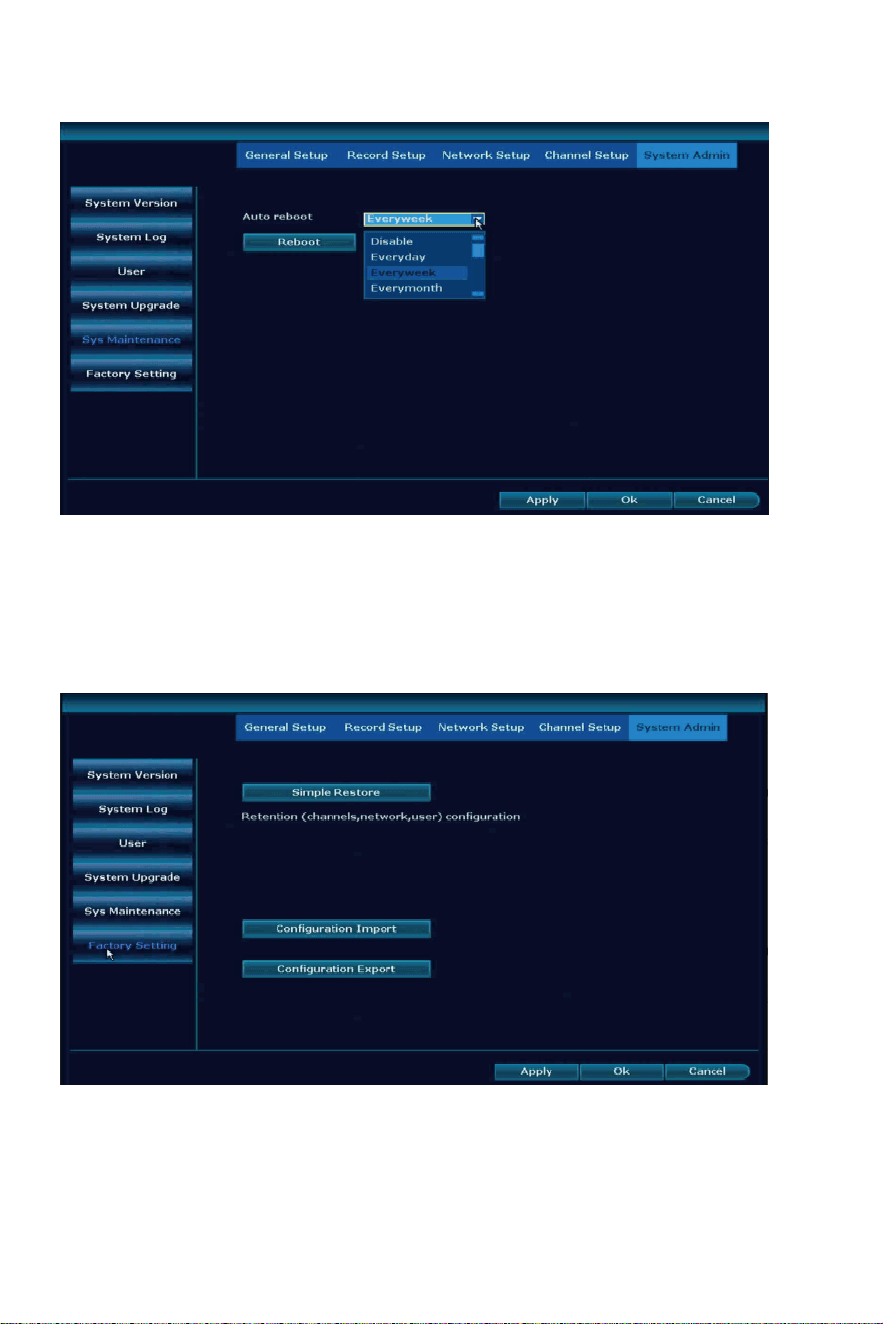
Auto reboot: allow Everyday, Everyweek, Everymonth to reboot the
NVR, all cameras if lost connec�on with NVR at the same �me,
please set system auto reboot func�on.
Simple Restore: Reten�on channel, network and user setup.
System Maintenance
Factory Se�ng
-37-
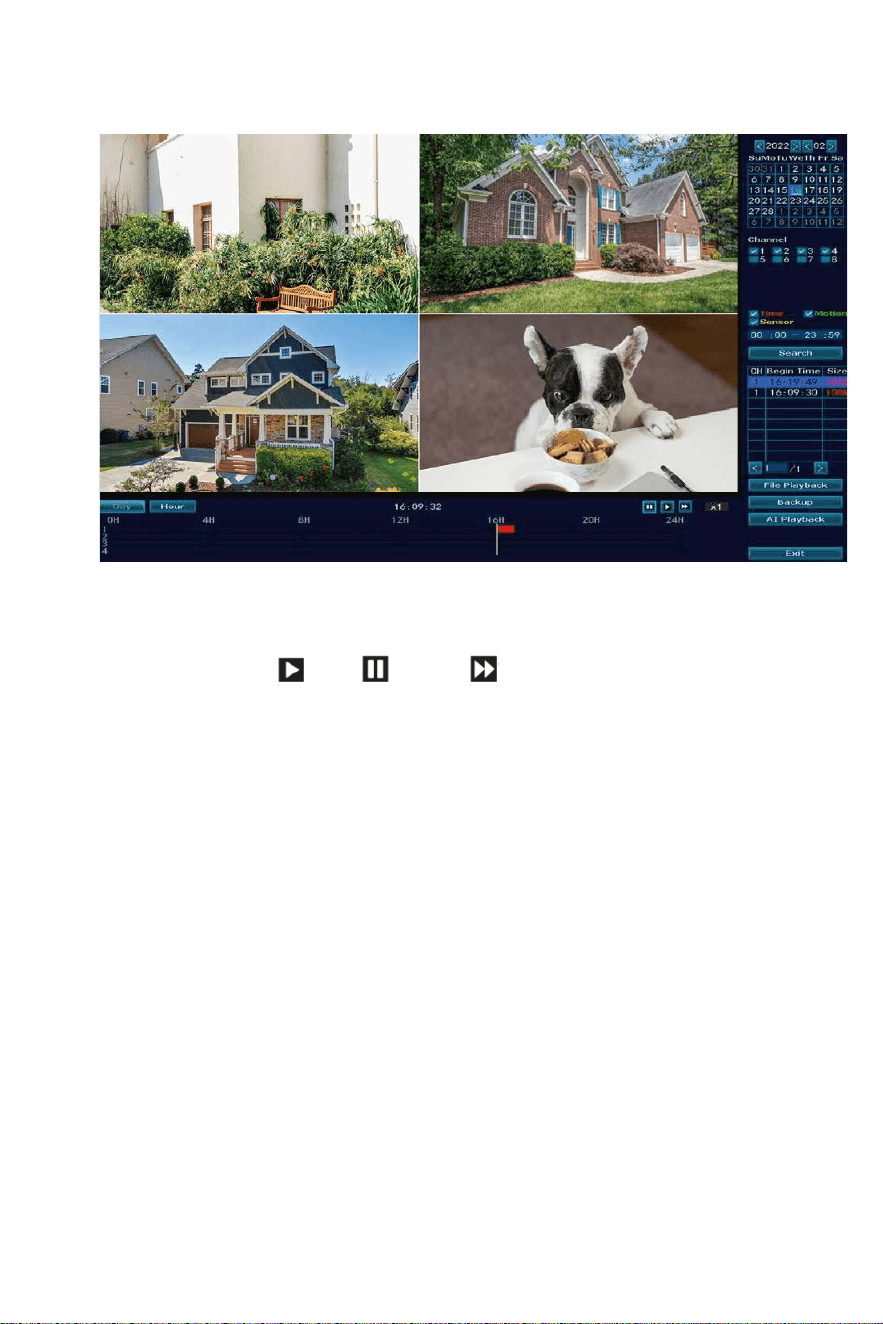
Warm prompt: Time record show red line, Mo�on record show green
line.
Playback bu�on: play, pause, fast forward*2,*4,*8.
File Playback: Choose the recording file in file list, as number “1”
shown in picture. Choose one of the recording, click “play” to play to
recording file.
Video backup: Choose the recording file in file list, as number
“1” shown in picture. Insert the U flash disk, click “video backup” to
backup the file.
Timeline: Click “date” and “�me” at le� bo�om to check the �meline
of recording, as number “2” shown in picture.
On the �meline with recording file, le� click the mouse, the can
playback the file.
Please notes: only support check 4 cameras one �me. If you need
check other channel, please disable channel 1-4 and select channel
5-8.
Video Playback
-38-
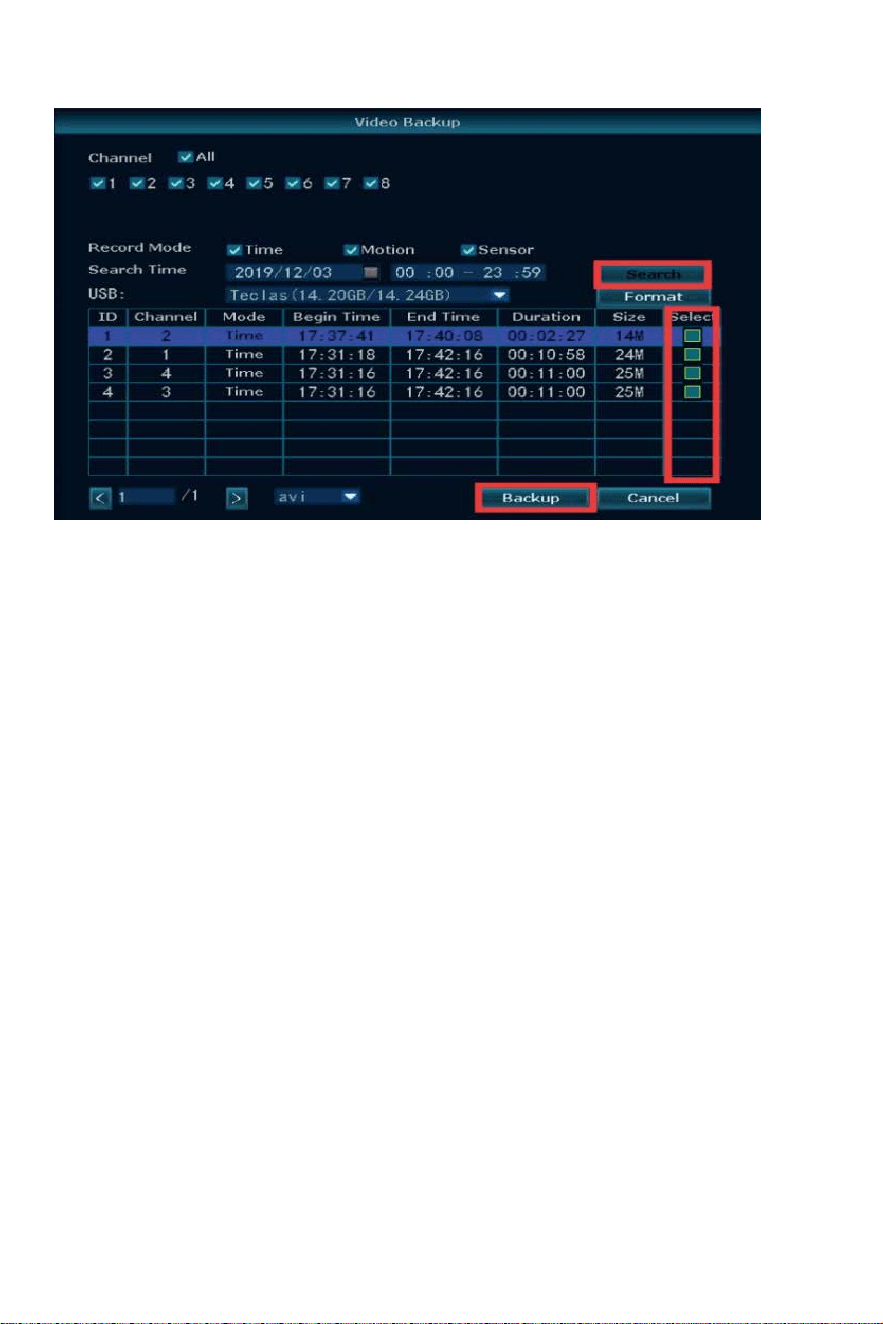
USB Format should be FAT32, search the playback and select the one
you want to make backup, suggest backup one file by one file it will
take a lot of �me to make backup.
If you need check the playback on computer, please use VLC player,
you can download windows so�ware here:
h�p://download.dvr163.com/tool/Video-player%20.zip, MAC OS
system please google VLC player to download.
Video Backup
Ba�ery camera doesn’t support repeater func�on.
Pair new camera to NVR, reset the camera by 6 seconds, wait for new
IP address show up, then exit.
Repeater
Wireless Add
-39-
Logout: logout user.
Reboot: restart the NVR.
Shutdown: turn off the NVR, then
unplug the power adapter.
Search free APP “EseeCloud” in APP store or Google play. The phone
App will be updated some�mes, if your phone App menu is different
from the menu in user manual, please contact us to get the latest
user manual.
Note: For IOS system, it requires IOS 9.0 version or above.
For Android, Android 5.0 or above.
Exit System
View System on Phone EseeCloud APP and
Computer EseeCloud So�ware
To View on Phone APP
Download Free App EseeCloud
EseeCloud App EseeCloud App Download
-40-
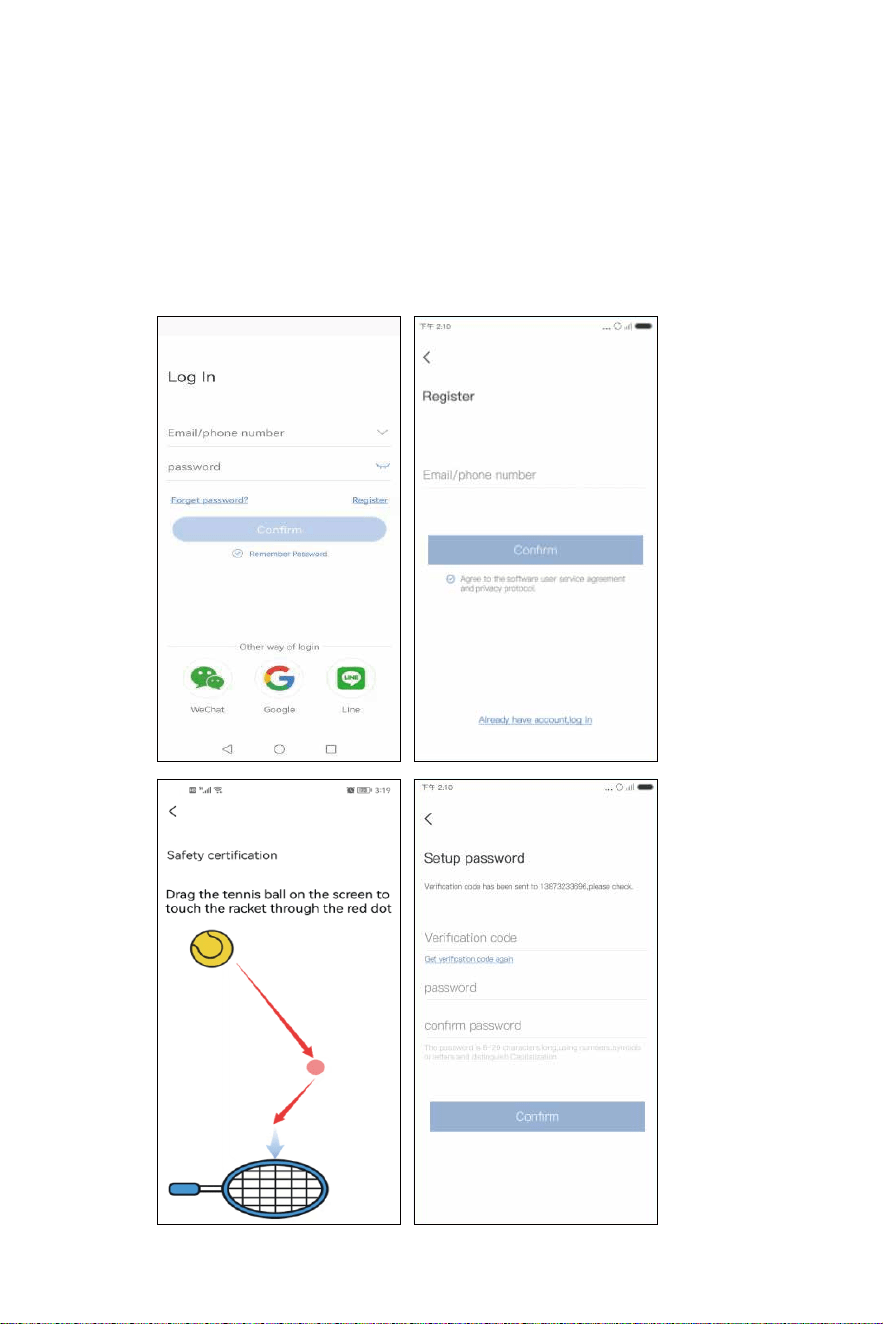
Go to login interface, click "Register".
Register with your phone number or email address, click "Confirm".
Manually press and hold the tennis ball, drag it to the red dot, and
then drag it to the tennis racket to go to the next step.
You’ll receive a verifica�on code, input the verifica�on code and set
up your own password, then click "Confirm" to complete.
Register Account
-41-
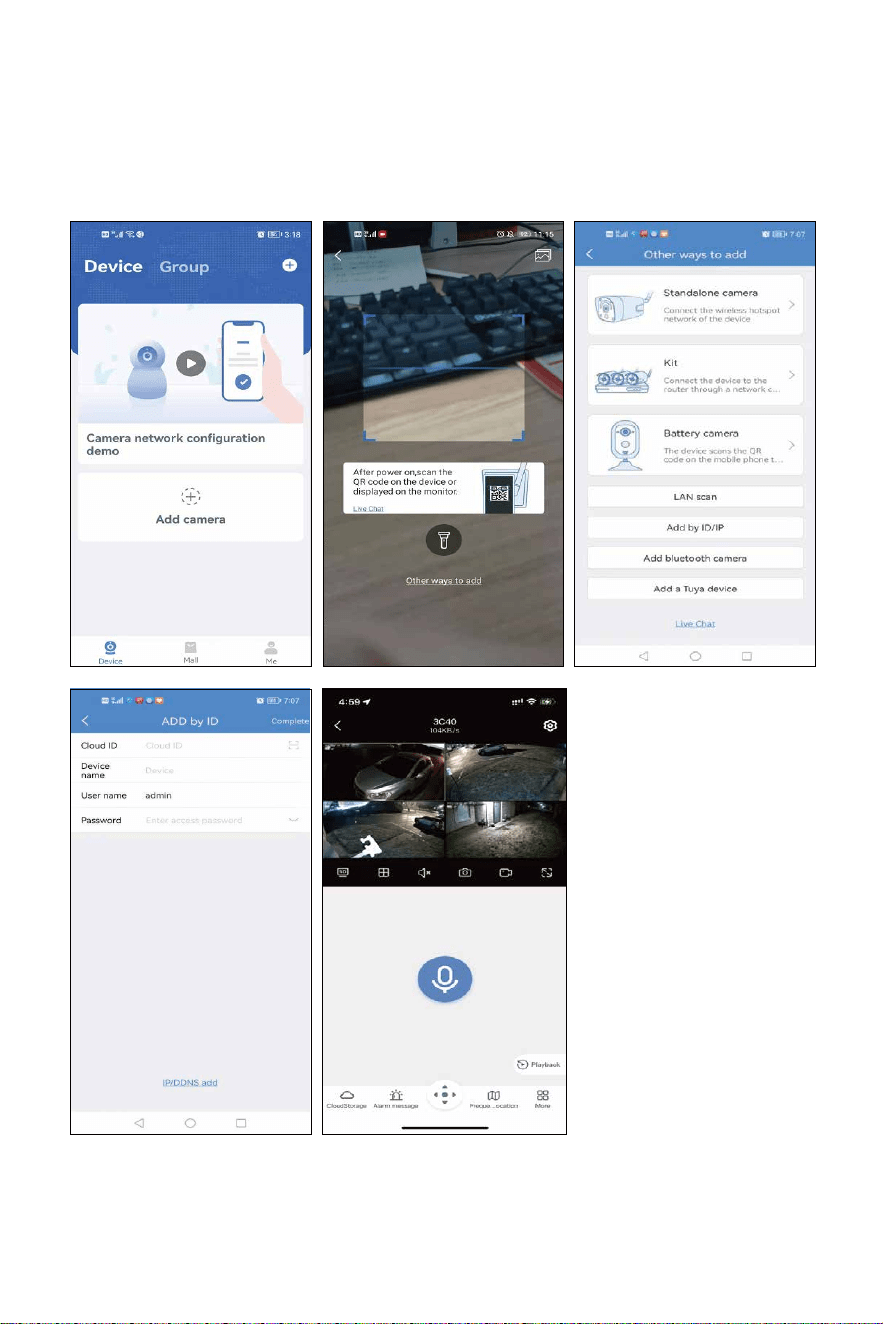
Before add the system please set the password for your NVR: right
click NVR mouse choose system setup → system admin → User →
set password.
Click Add camera → Other ways to add → Add by ID/IP → input NVR
Cloud ID → name the NVR → input the password of the NVR.
Add system to phone APP
-42-
Func�on on APP
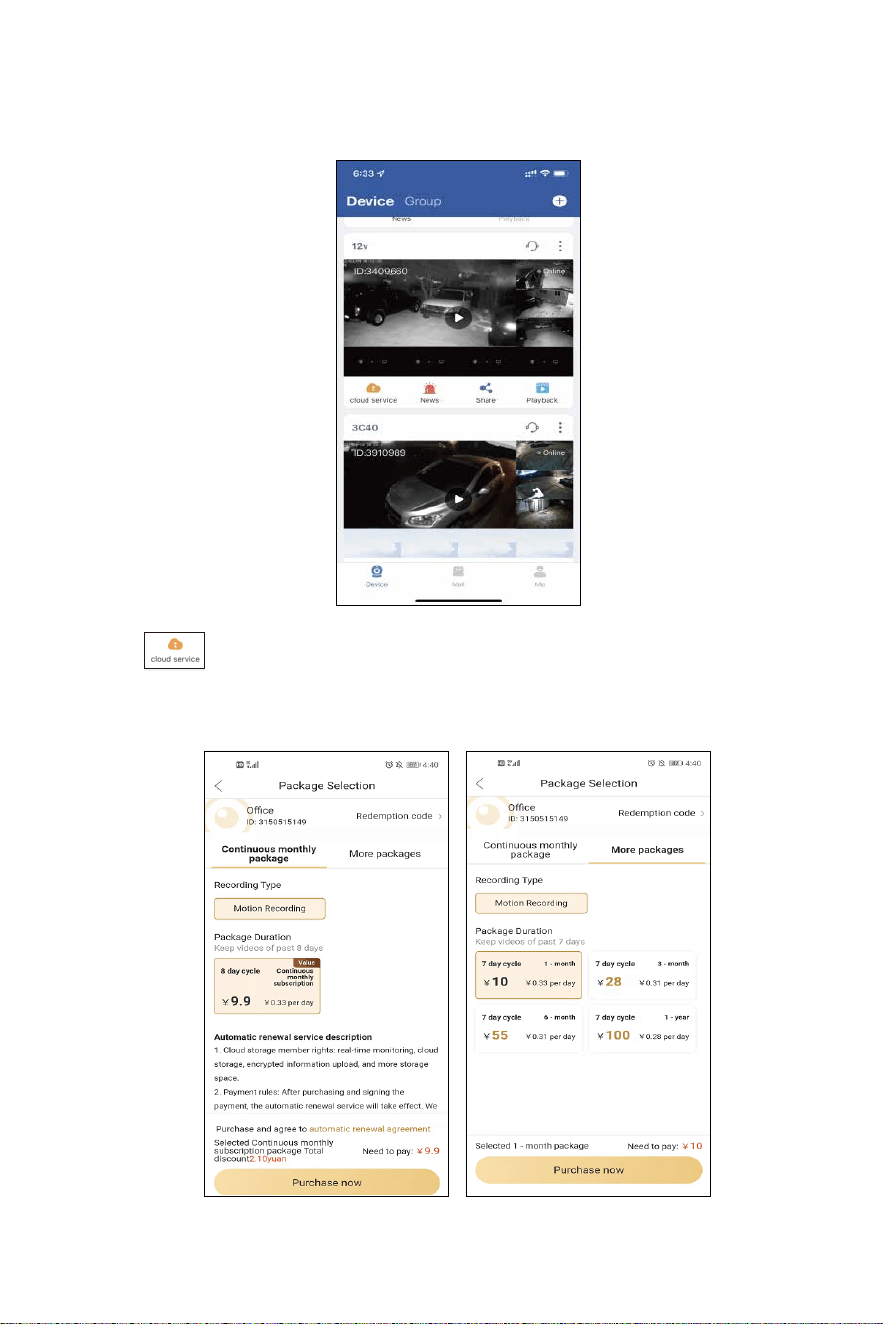
Click “ ”icon to buy cloud storage, NVR with HDD no need to
buy cloud storage. Cloud storage only support buy one channel by
one channel.
Cloud Service
-43-
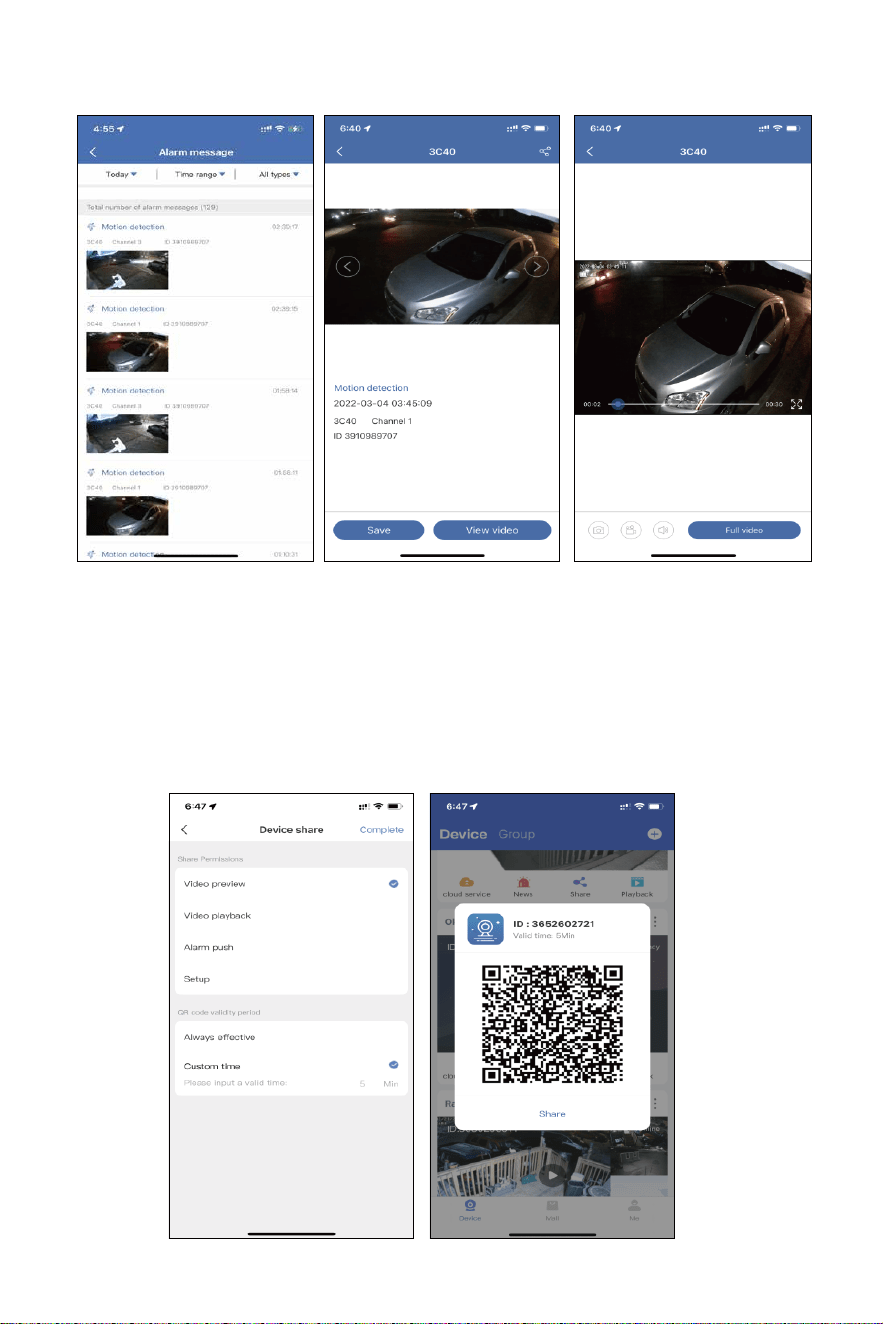
Check mo�on detec�on message and photo, click the photo →
View Video → Full video to see 30s mo�on playback.
Please notes if no playback on NVR monitor, it will show no video.
Make sure NVR set recording func�on.
News
Share
-44-
Click ” ” icon to share the device to your family members.
Share Permissions: set the permissions allow others to check.
QR code validity period: QR code valid �me to add the device on other
phone.
A�er all setup, click Complete to generate the QR code, others’ phone
need register a new account of EseeCloud APP, scan this QR code to add
it.
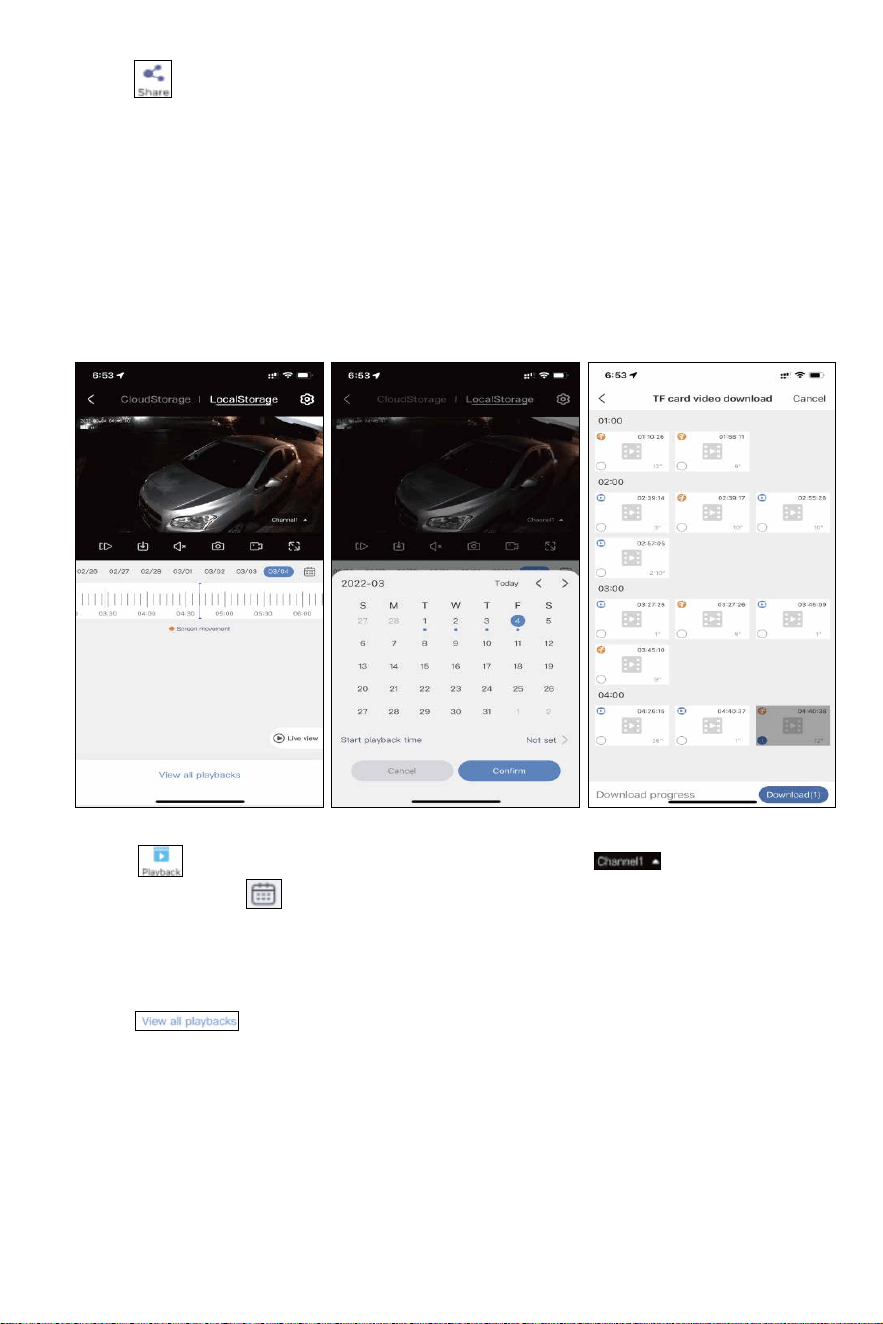
Click “ ” icon to see device playback , select ” ” icon to select
channel, select ” ” icon to select the date. It doesn’t support fast
forward or backward. Fast forward func�on supported on
CloudStorage which means you need buy cloud storage for the
camera.
Click ” ” icon allow to download the playback on the phone.
Playback
-45-
1. SD & HD Switch: switch the camera from SD mode to HD mode, due
to service not supported always in HD mode, each �me when preview
camera need change it manually
2. Split view: view by x1, x4, x6, x8 cameras
3. Volume: turn on/ off camera volume, if no any sound, please make
sure turn on phone volume
4. Photo capture: capture a photo of live stream, click Photo album to
check photos.
5. Manual record: manual record on cellphone, click Photo album to
check recordings.
6. Horizontal screen: turn image horizontal
7. Cloudstorage: Click it to buy cloudservice, if insert the SD no need buy
cloud storage it is not free
8. Alarm message/Events: check the mo�on detec�on informa�on
9. Microphone Func�on: talk to someone through the camera, click the
microphone icon below, so that you can talk to others, and then click the
"Hang up" bu�on to end the call.
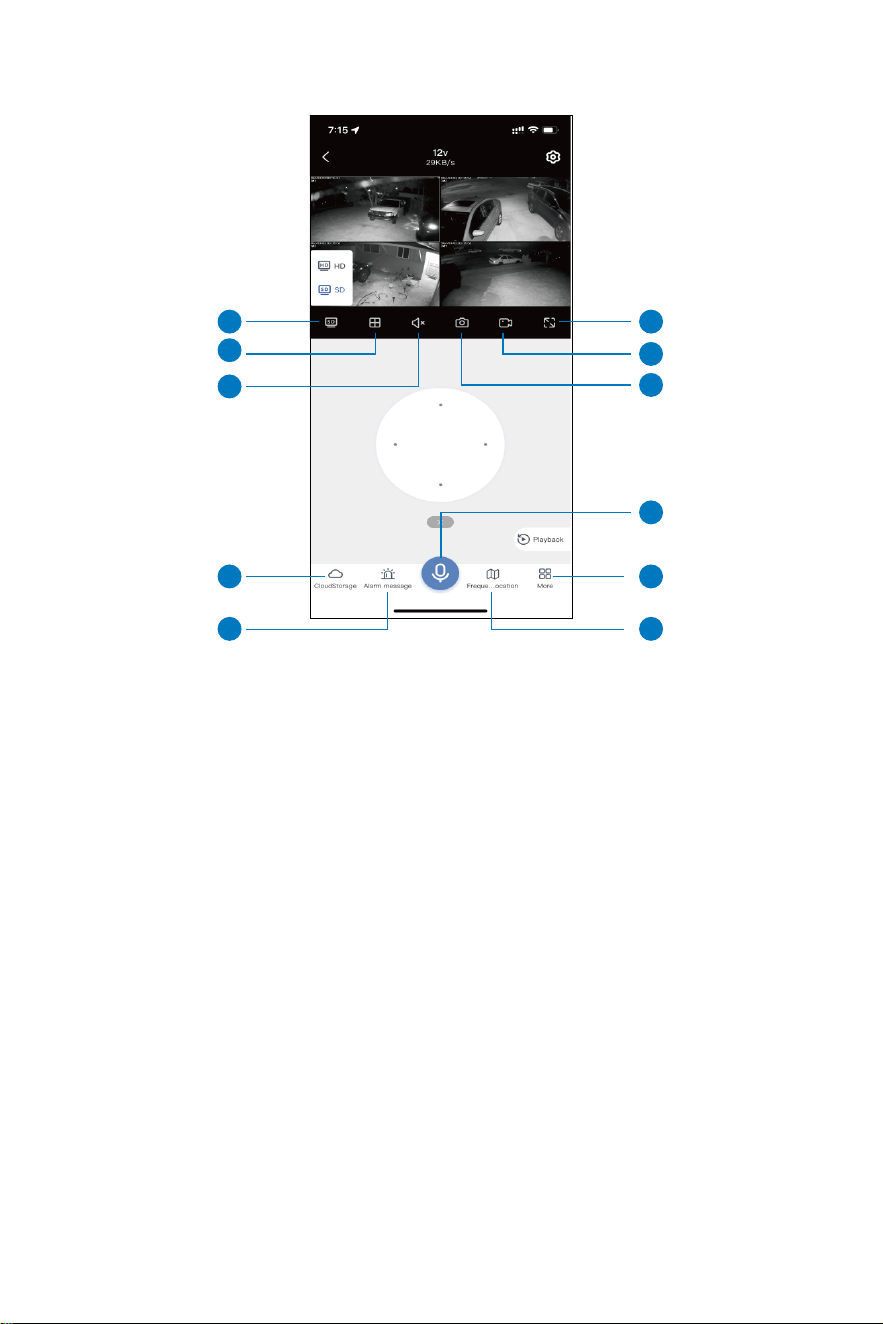
Livestream Interface
-46-
1
2
3
7
8
6
5
4
9
10
11
10. Frequently Viewed Loca�on: ba�ery camera doesn’t support this
func�on.
11. More:
Detect alarm: turn on/off mo�on detec�on alarm message.
Photo album: check manual record and photo capture file.
PTZ adjustment: C40 camera is not a PTZ camera, this func�on is useless.
Siren: camera prompt sound when mo�on detec�on happened.
Full color night vision:
“On” turn on the floodlight at night, show color image both day�me and
night �me.
“IR” day�me show color image, nigh�me show black and white.
“Auto” day�me turn on floodlight about 30s when it mo�on detec�on
happened.
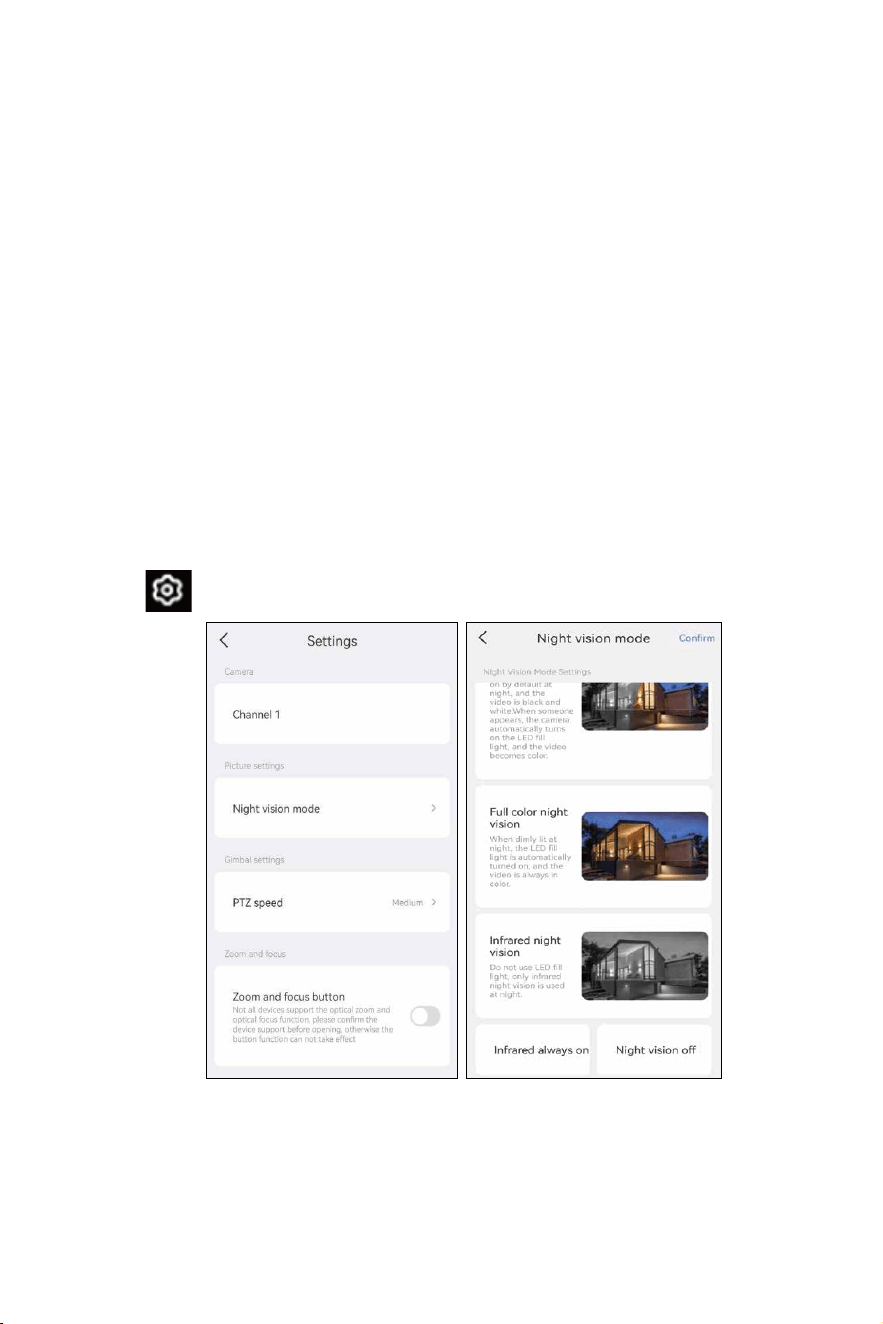
Se�ngs
Select ” ” icon go to change some func�on of camera.
Camera: the channel of the camera.
Night Vision mode: set the infrared light mode.
-47-
Smart night vision: when mo�on detec�on happened at night,
floodlight will turn on 30 seconds.
Full color night vision: floodlight will turn on all night, camera will
show color image at day and night �me.
Infrared night vision: day �me show color image, night �me show
black and white.
Infrared always on: day and night �me both show black and white
image.
Night vision off: day and night �me show color image, but at night if
no enough light, camera image will be blur.
To View on MAC and Windows Computer
Please email [email protected]om to get the so�ware download.
Zoom and Focus Bo�on
Select English to install the so�ware.
Login with phone EseeCloud account(email or phone number and
password).
Mac computer please click switch to cloud login then input phone
EseeCoud account.
A�er login, camera system will automa�cally synchronize on computer.
Ba�ery camera doesn’t support this func�on.
-48-
Select icon to see camera live stream on computer.
Click icon to see the playback.
Click allow to change the view channel from 1-64.
Click icon to see EseeCloud so�ware version and mo�on
detec�on message .
-49-

Q1: How can l troubleshoot camera issues: IPC disconnected /
Connect failed?
A: 1. Check camera is power on or not, you can see the indicator on
camera len, if no any indicator, please power camera about 8 hours
and check again, or turn off camera for few minutes then turn on
2. Take the camera close to NVR box to check whether you have
video or not.
3. lf there is no video, camera indicator working, please delete the
cameras which shows IPC disconnected or Connect failed on Video
manage, click match code, press camera reset bu�on about 10s,
wait for a new camera IP address show up, then Exit and install
camera outside.
4. Camera indicator not working indicates that the camera has
experienced a malfunc�on. In this case, please contact us for a�er
sale service.
Frequently Asked Ques�ons
Q2: How to add a new camera to your NVR?
A: To extend the NVR with 8 cameras, please refer below steps to
connect camera with NVR.
1. Turn on ba�ery camera, and put it close to NVR
2. Make camera antenna and the NVR WIFI antenna are parallel
3. Right click NVR mouse and choose Wireless Add
4. Press the camera reset bu�on for 10 seconds, then move the hand
away
5. New camera IP address 172.20.14.** show up , click Exit to complete
the connec�on
If the first �me camera doesn't show image, please try several �mes,
each �me wait about 1 minutes.
Refer to this youtube video: h�ps://youtu.be/Kaxvth-sd-Y
-50-
Q3: Connected the system with monitor, why nothing is showing here?
A: Default output resolu�on of the NVR is 1280*1024, which may not
be compa�ble with some monitor screens. There are a few op�ons you
can try to fix it:
1. Press the le� side of the mouse about 30s, don’t remove your finger
from the mouse, and wait the system reboot, it will change to the
minimum resolu�on.
2. Connect PC/TV monitor with NVR box by VGA cable first. On the
monitor, make sure the "input" is set to VGA. If no VGA cable, try
another monitor with HDMI cable un�l ge�ng video on the monitor
screen. Don't forget to change the input to HDMI on a TV.
-51-

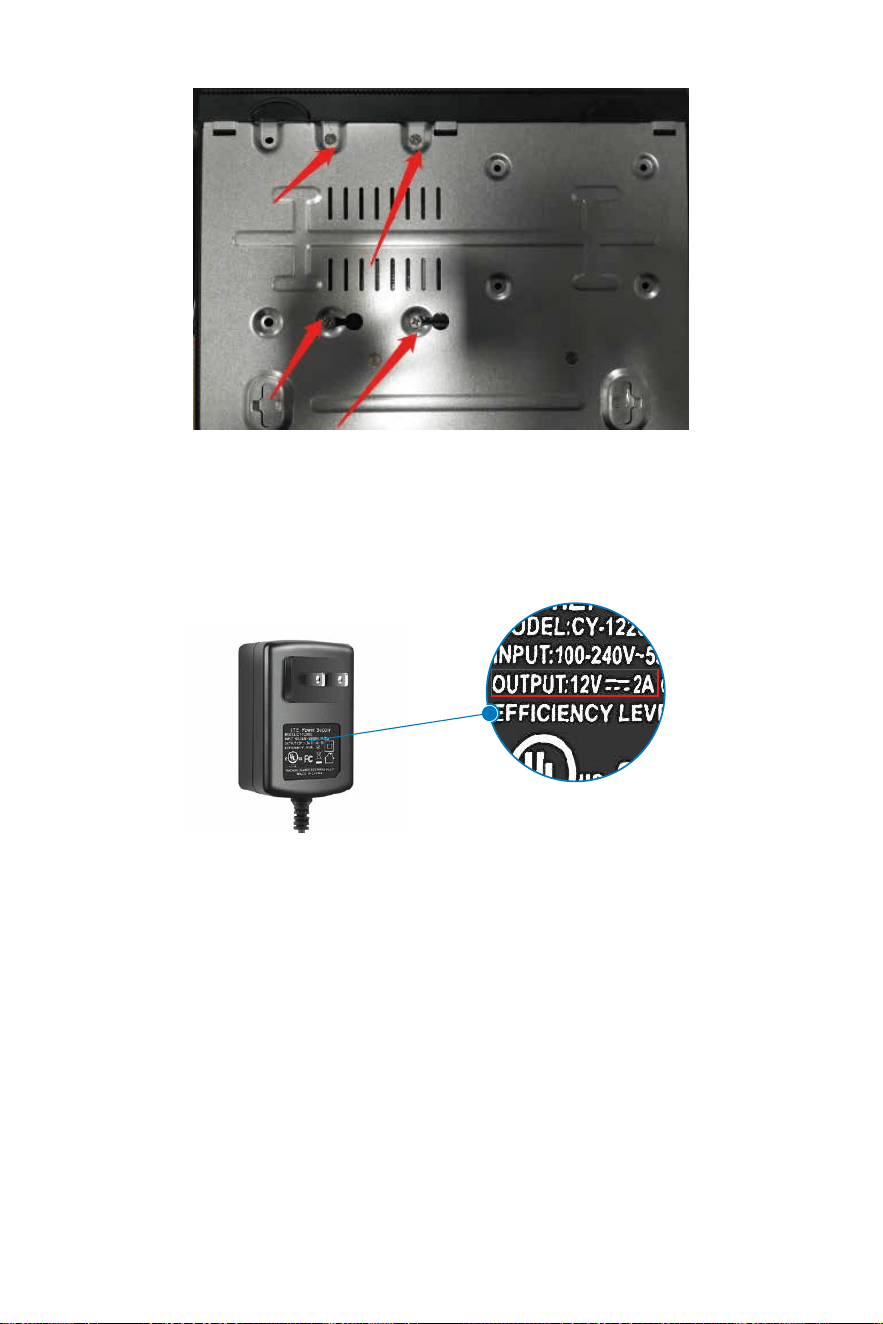
Unplug your NVR from power, unscrew and remove the top cover.
1) Unplug your NVR from power, unscrew and
remove the top cover.
2) Connect the SATA power and data cables
from the NVR to the corresponding ports
on your HDD.
3. When you see the video on another monitor, right click the mouse →
System setup → General setup, adjust the Display resolu�on to
1024x768, click OK. Finally. Change to connect system with the first TV
monitor, check if you can see the video once connected.
Q4: How to install the hard drive?
A: Some camera system is not include the hard drive, please order it by
yourself, the hard drive specifica�ons: internal 3.5" SATA HDD or 2.5"
SATA HDD, support 500GB to 4TB .
Below are the installa�on steps of the hard drive ( Or Email to
[email protected]om to get help)
-52-
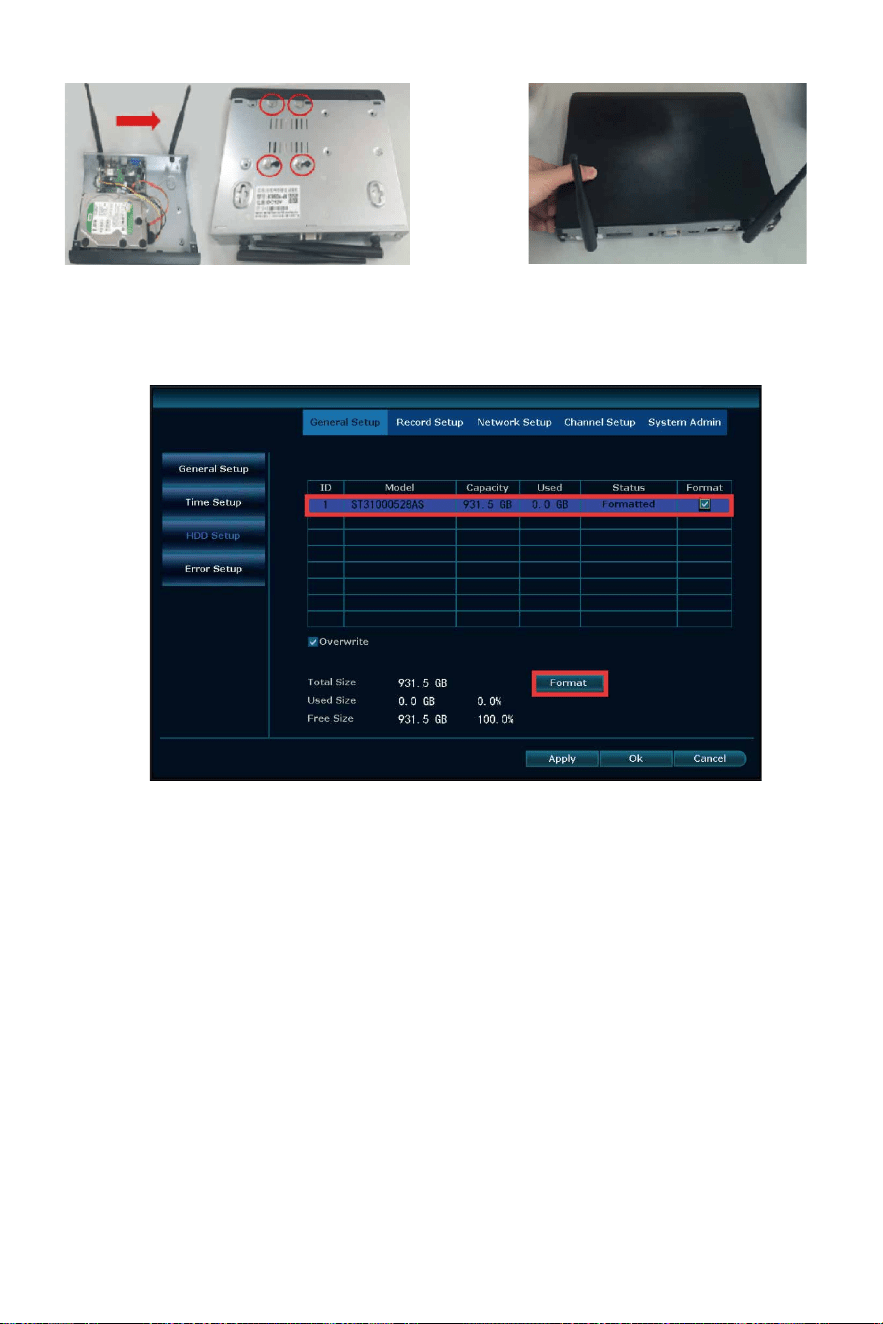
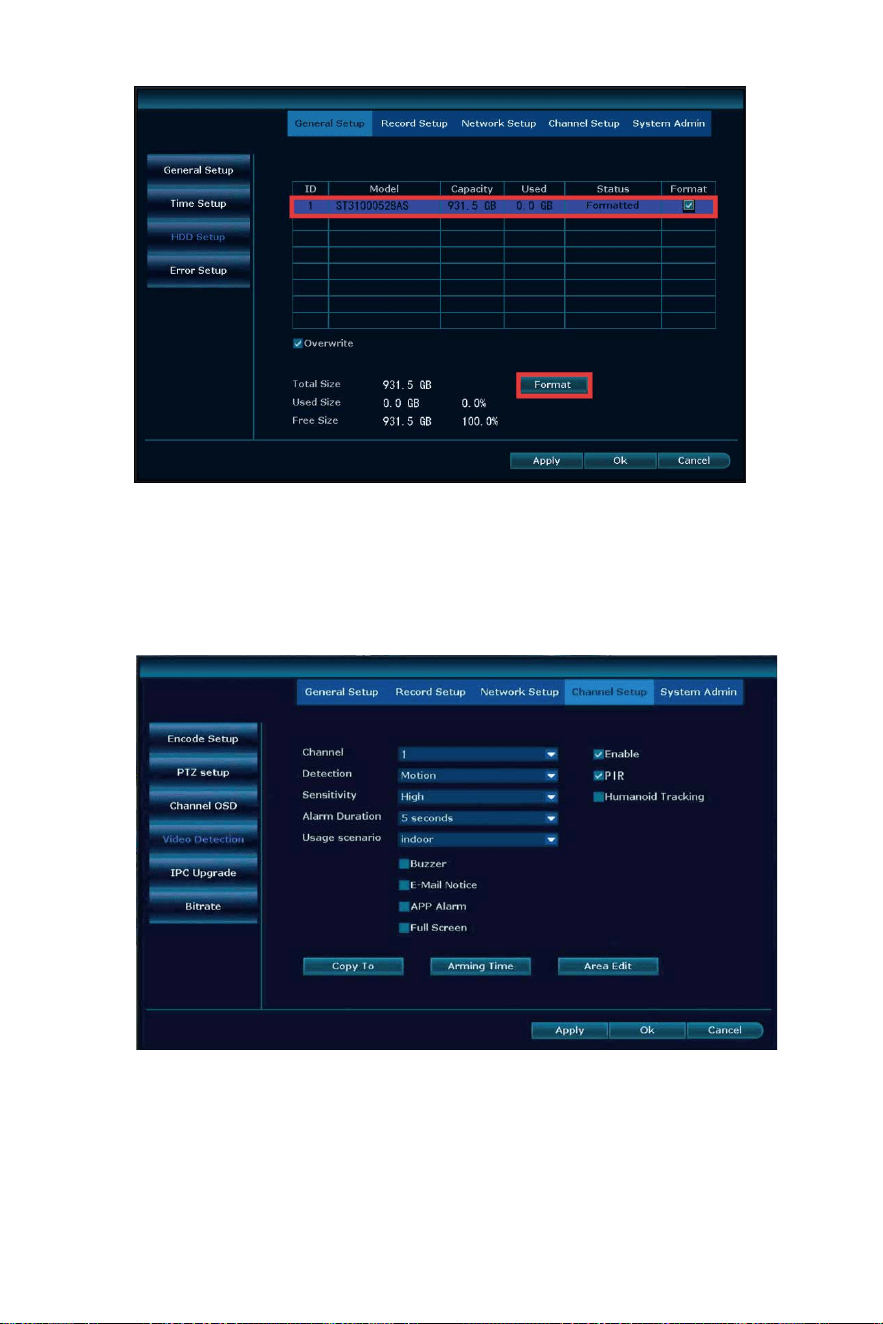
Right click the NVR mouse → System Setup→ General Setup → HDD
setup, click Format to format the HDD, when HDD is full, enable Over-
write, it will delete the old files automa�cally, and make new record.
Note: New HDD should be forma�ed before recording.
3) Holding the hard drive and the NVR, gently turn it over and line up the holes on the hard drive with the
holes on the NVR. Using a screwdriver screw the provided screws into the holes and assemble the cover.
Q5: What should do show HDD not found on NVR?
A: 1. Please make sure the system bought pre-install the hard drive. If
hard drive preinstalled, there are 4 screws at the bo�om of NVR box.
-53-
2. Check the power adapter connected to the NVR box. The NVR box
uses 12V 2A or 12V3A power supply. Connect the 12V 1A power supply
to the NVR, the NVR box will not have enough power to drive the hard
drive.
3. Check Hard Drive Informa�on on NVR box and Format it.
Right click the mouse → System setup → General setup → HDD
setup → select the hard disk → Click Format, if the progress bar always
shows a few percent and the forma�ng is unsuccessful, please
contact us.
Note: If the hard disk list shows that the hard disk is 3GB or the
progress bar stays at a percentage when forma�ng or the camera
system shuts down automa�cally when forma�ng, please contact us.
-54-
Q6: How to receive no�fica�on alarm message on cellphone?
A: 1. Right click the mouse → System setup → Channel Setup → Video
detec�on → Selec�ng the Channel for Mo�on Detec�on → enable APP
Alarm, a�er set it up, click Copy to to set to all channel.
-55-
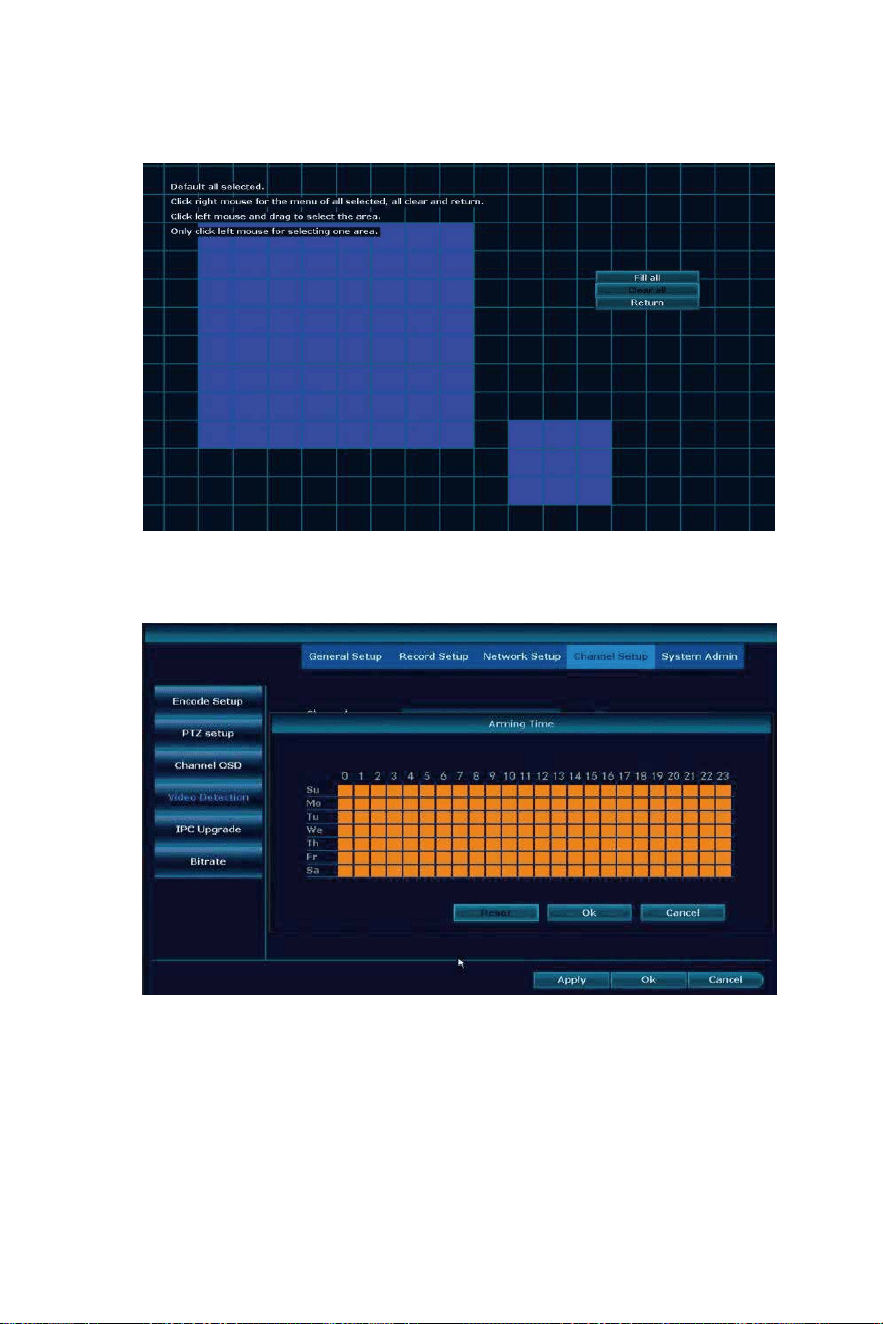
2. Set Area Edit, default all selected show Blue Color, support narrow
the mo�on detec�on area to decrease mo�on detec�on message.
3. Set the Arming Time, default 24/7 days show Orange color.
-56-
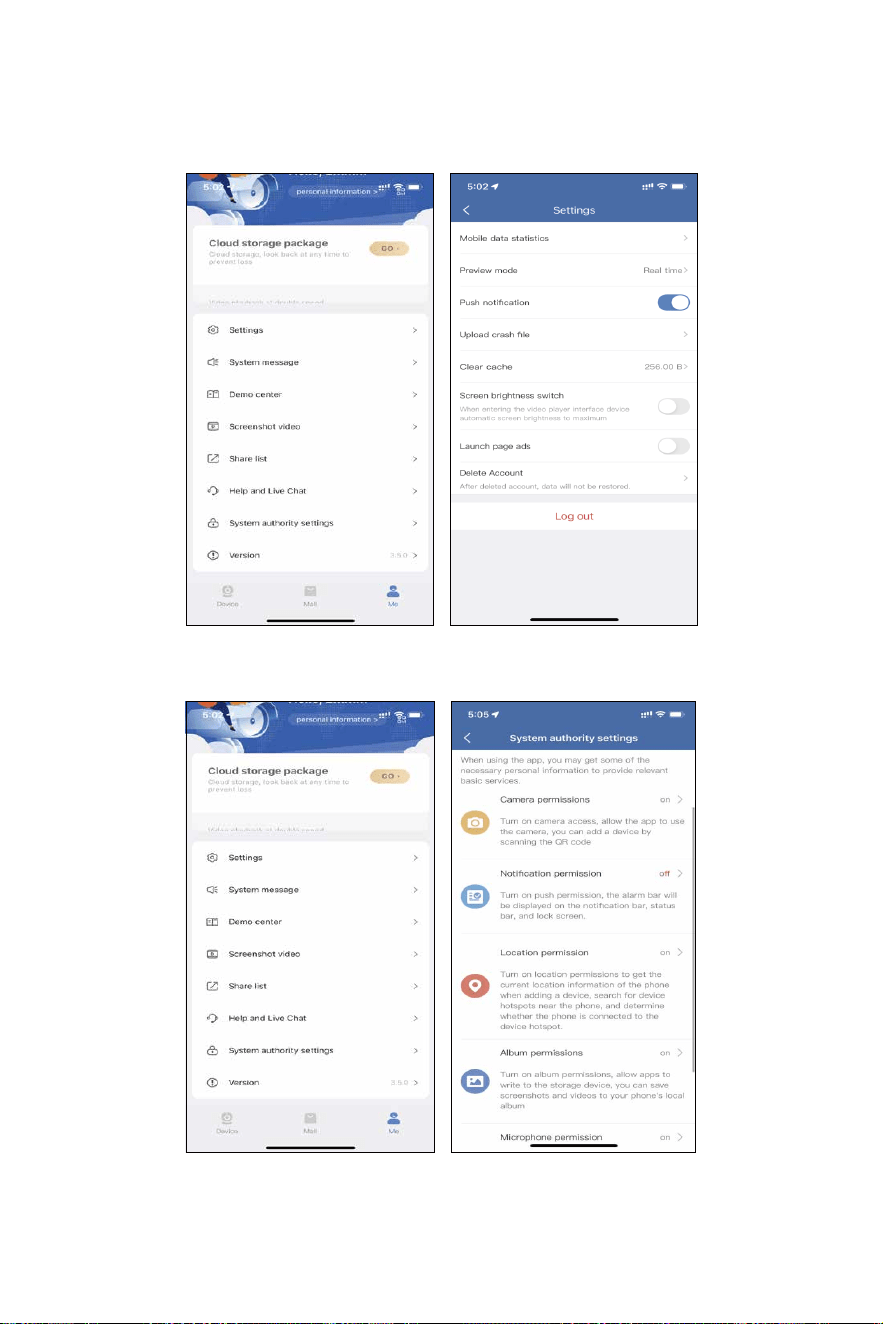
4. Enable App Alarm.
Click Me → Se�ngs → enable Push no�fica�on.
Click System authority se�ngs, turn on all permission of the app.
-57-
A: Select the camera , adjust the icon to move camera channel up
and down.
Q7: Night image mode doesn’t work correctly?
A: Click the mouse to select the screen → click Color Adjust.
Q8: How to adjust camera channel posi�on?
Select Ircut mode → change to Infrared mode.
-58-
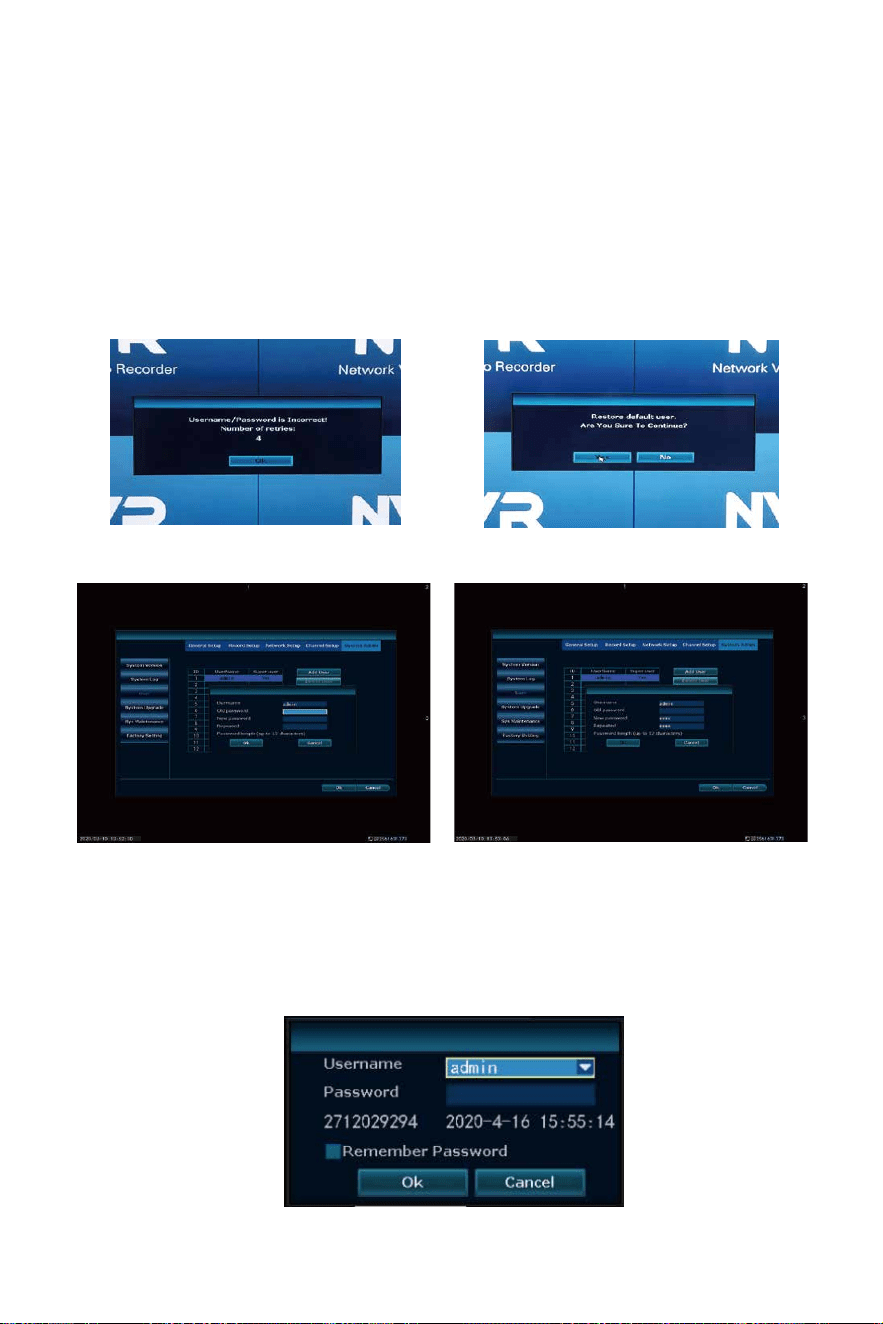
Q9: How to reset password of the NVR?
A: Input a wrong password "1"--get the picture as below (1)--at the
black area con�nuous rapid le� click and right click the mouse lasts 12
�mes--get the picture as below (2)--input a new password--repeated
the new password again, needn't put in old password, click ok.
(Note: User name and password should be within 7-10 characters and
should not contain such as &*I@(...#% and other special characters)
Reset password video: h�ps://youtu.be/KJpJnYFlGK8
If s�ll can’t work, please take below photo to our email :
Johnn[email protected] to get super password.
(1) (2)
(3) (4)
-59-
Q10: How to do if camera lost signal with NVR?
A: 1. Please check if the antenna on the camera is parallel .
change the wireless channel and region of the camera system, and the
antenna of NVR is be�er to stand up.
change region to FCC, wireless channel change to 1,6,11 to check.
change region to T-mode, wireless channel to 3.
change region to EU, wireless channel to 13.
Then reboot the NVR.
Q11: What's the meaning of IRON on the TV/PC monitor?
A:
Picture ICON Loca�on Meaning
Green bar Top Right Corner Wireless Signal
Red dot Top Right Corner Recording
Red Triangle Bo�om Le� Screen Alarm
Li�le Yellow man Top Right Corner Mo�on Detec�on
Blue Horn Bo�om Middle Screen Turn on/off volume
Blue PTZ Bo�om Middle Screen Camera PTZ
-60-
Q12: What should I do if the NVR always appear Offline?
A: Please Connect NVR to your router with an Ethernet cable. A�er
that right click the mouse → Fast network.
If Step 1 doesn't work, please check the Ethenet cable is broken or not
If there is no problem with the cable.
Please right click the mouse → system setup → Network setup → Do
not choose DHCP → Change.
Preferred DNS to 114.114.114.114.114 or 8.8.8.8 → Power off the NVR
and power on again. (Reboot the NVR)
For Gateway Unreachable or Netwok Error problem please kindly fellow
below steps:
Step 1:
1) You must check if the network line is faulty or not: check whether the
switch and router line connec�on are correct.
2) Can you connect to the external network normally through the
computer wired connec�on?
No�ce: Do not directly connect the recorder to the fiber.
Step 2:
Right click mouse and choose Fast Network → Auto config, check if the
network will be healthy or not.
-61-
Step 3:
If the auto config s�ll can't make it work, pls kindly check the same
network computer network se�ng.
Then "manual configura�on" set the recorder network se�ngs,
don't choose DHCP, input the same IP address and gateway and
submask same as your computer.
-62-

Q13: How to find hiseeu website?
A: Input link: h�p://www.hiseeu.com.
Check computer network parmeters on the same router that can
access the internet(Gateway, subnet mask, preferred DNS and
computer network parameters se�ngs are the same; the first three
se�ngs of the IP address are the same, the last paragraph should
not berepeater), if s�ll can’t work, can change DNS to 8.8.8.8 or
114.114.114.114.
-63-

-64-
How can I get product and technical support?
Website: www.hiseeu.com
Amazon
Aliexpress
- US Toll Free: 1-917-338-1084
(Available Pacific Time 5:00pm-12:00pm)
- Email: [email protected]om (For US)
[email protected] (For UK & EU)
- Skype ID: johnny.chen1204
- WeChat/Whatsapp: +8613392810296
- Email: [email protected]
- Whatsapp/Wechat:+8618126465980
