REACTOR
™
AUTOPILOT REMOTE CONTROL
INSTALLATION INSTRUCTIONS
Important Safety Information
WARNING
See the Important Safety and Product Information guide in the product box for product warnings and other
important information.
You are responsible for the safe and prudent operation of your vessel. The autopilot is a tool that enhances your
capability to operate your boat. It does not relieve you of the responsibility of safely operating your boat. Avoid
navigational hazards and never leave the helm unattended.
Always be prepared to promptly regain manual control of your boat.
Learn to operate the autopilot on calm and hazard-free open water.
Use caution when operating the autopilot near hazards in the water, such as docks, pilings, and other boats.
Getting Started
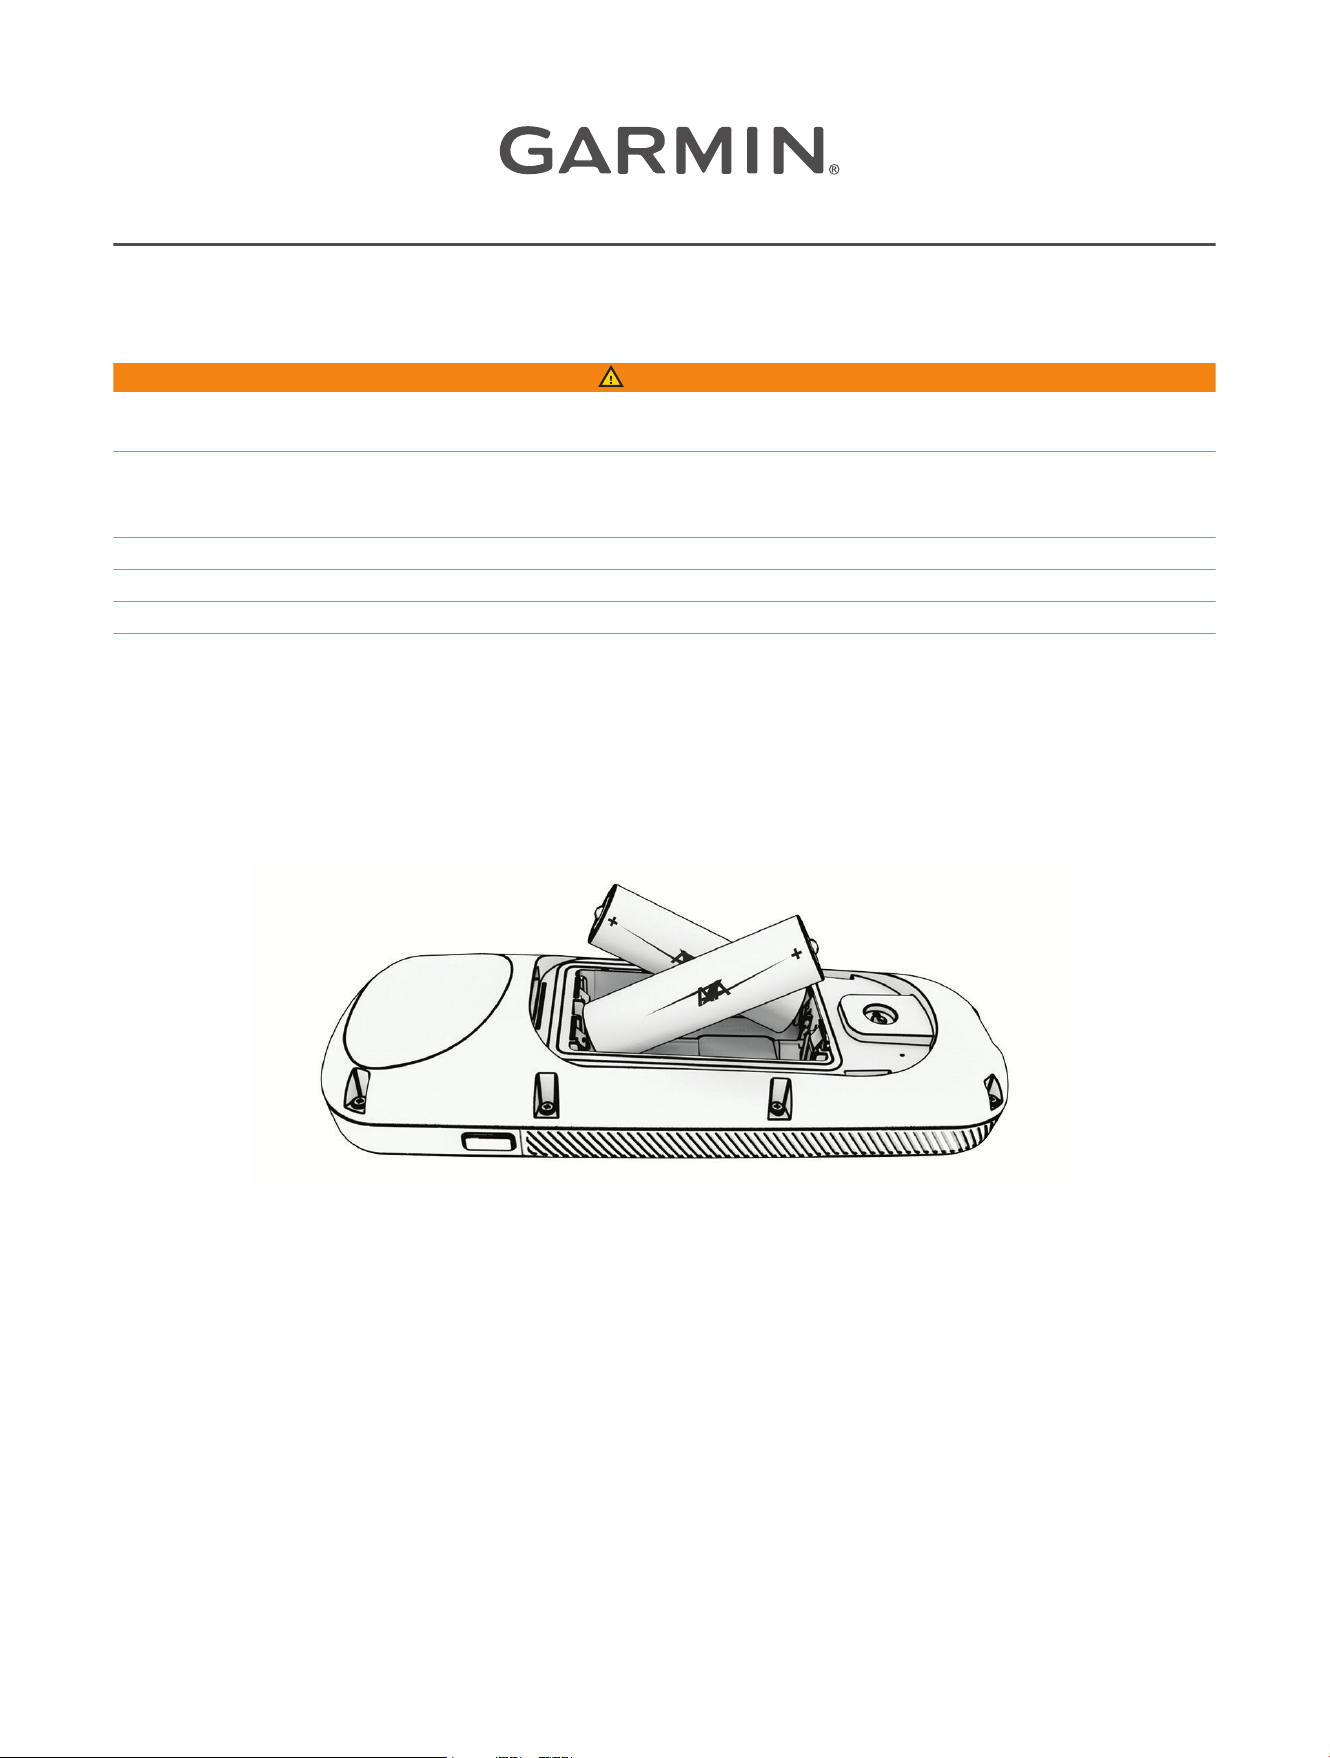
Installing Batteries
The remote control operates using two AA batteries (not included). Use lithium batteries for best results.
1 Turn the D-ring counter-clockwise, and pull up to remove the cover.
2 Insert two AA batteries, observing polarity.
3 Replace the battery cover, and turn the D-ring clockwise.
GUID-D8CF6438-8878-449E-B118-C6C446FAAF2D v5
March 2025
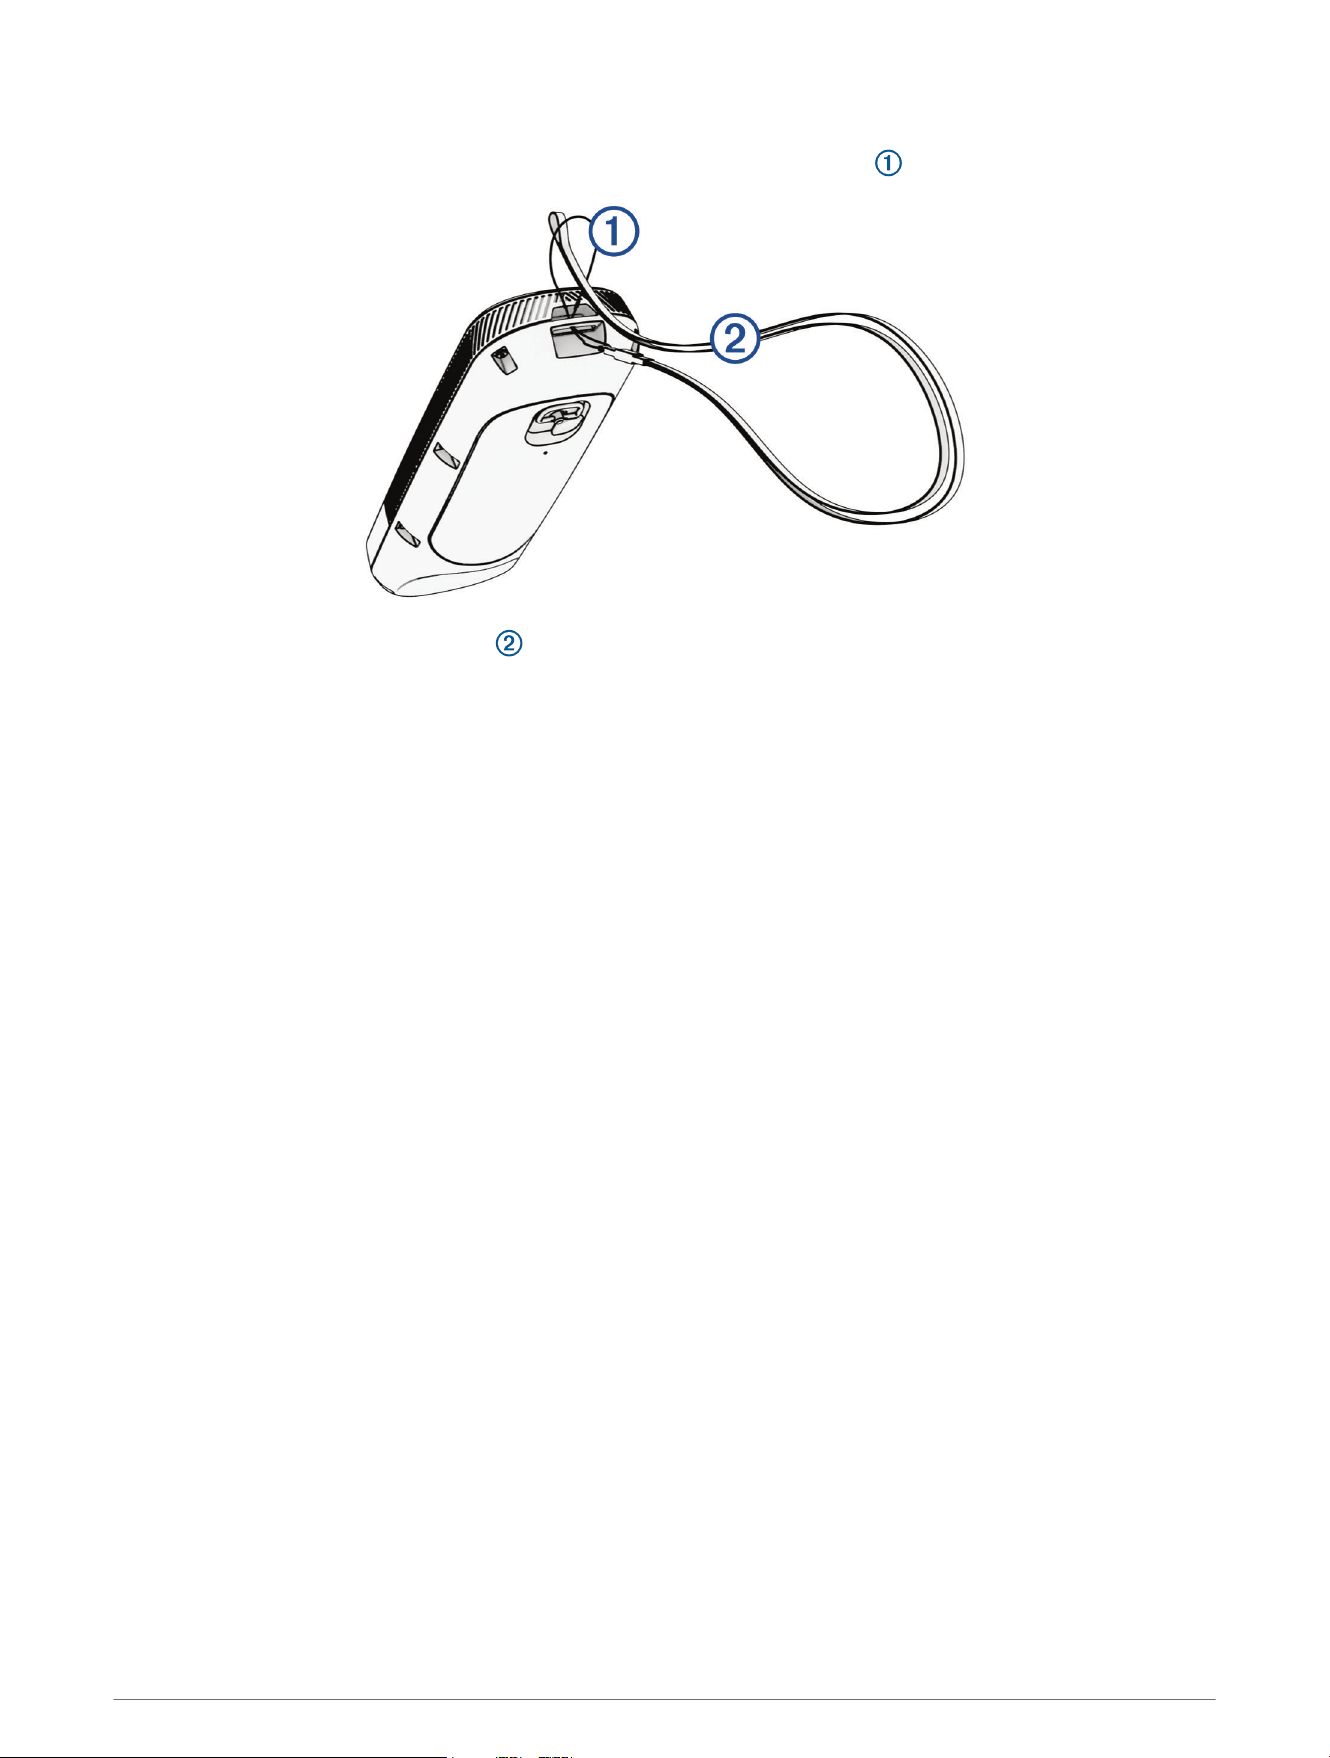
Attaching a Lanyard
1 Starting from the back of the remote control, insert the loop of the lanyard through the slot.
2 Thread the other end of the lanyard through the loop, and pull it tight.
3 If necessary, place the lanyard around your neck or wrist to tether it during use.
Installing the Cradle
You can install the included cradle to hold the remote control when not in use.
1 Using the cradle as a template, mark the pilot hole locations on the mounting surface.
2 Set the cradle aside.
Do not drill through the cradle.
3 Using a 3mm (
1
/
8
in.) drill bit, drill the pilot holes.
4 Using the included screws, secure the cradle to the mounting surface.
2
Keys
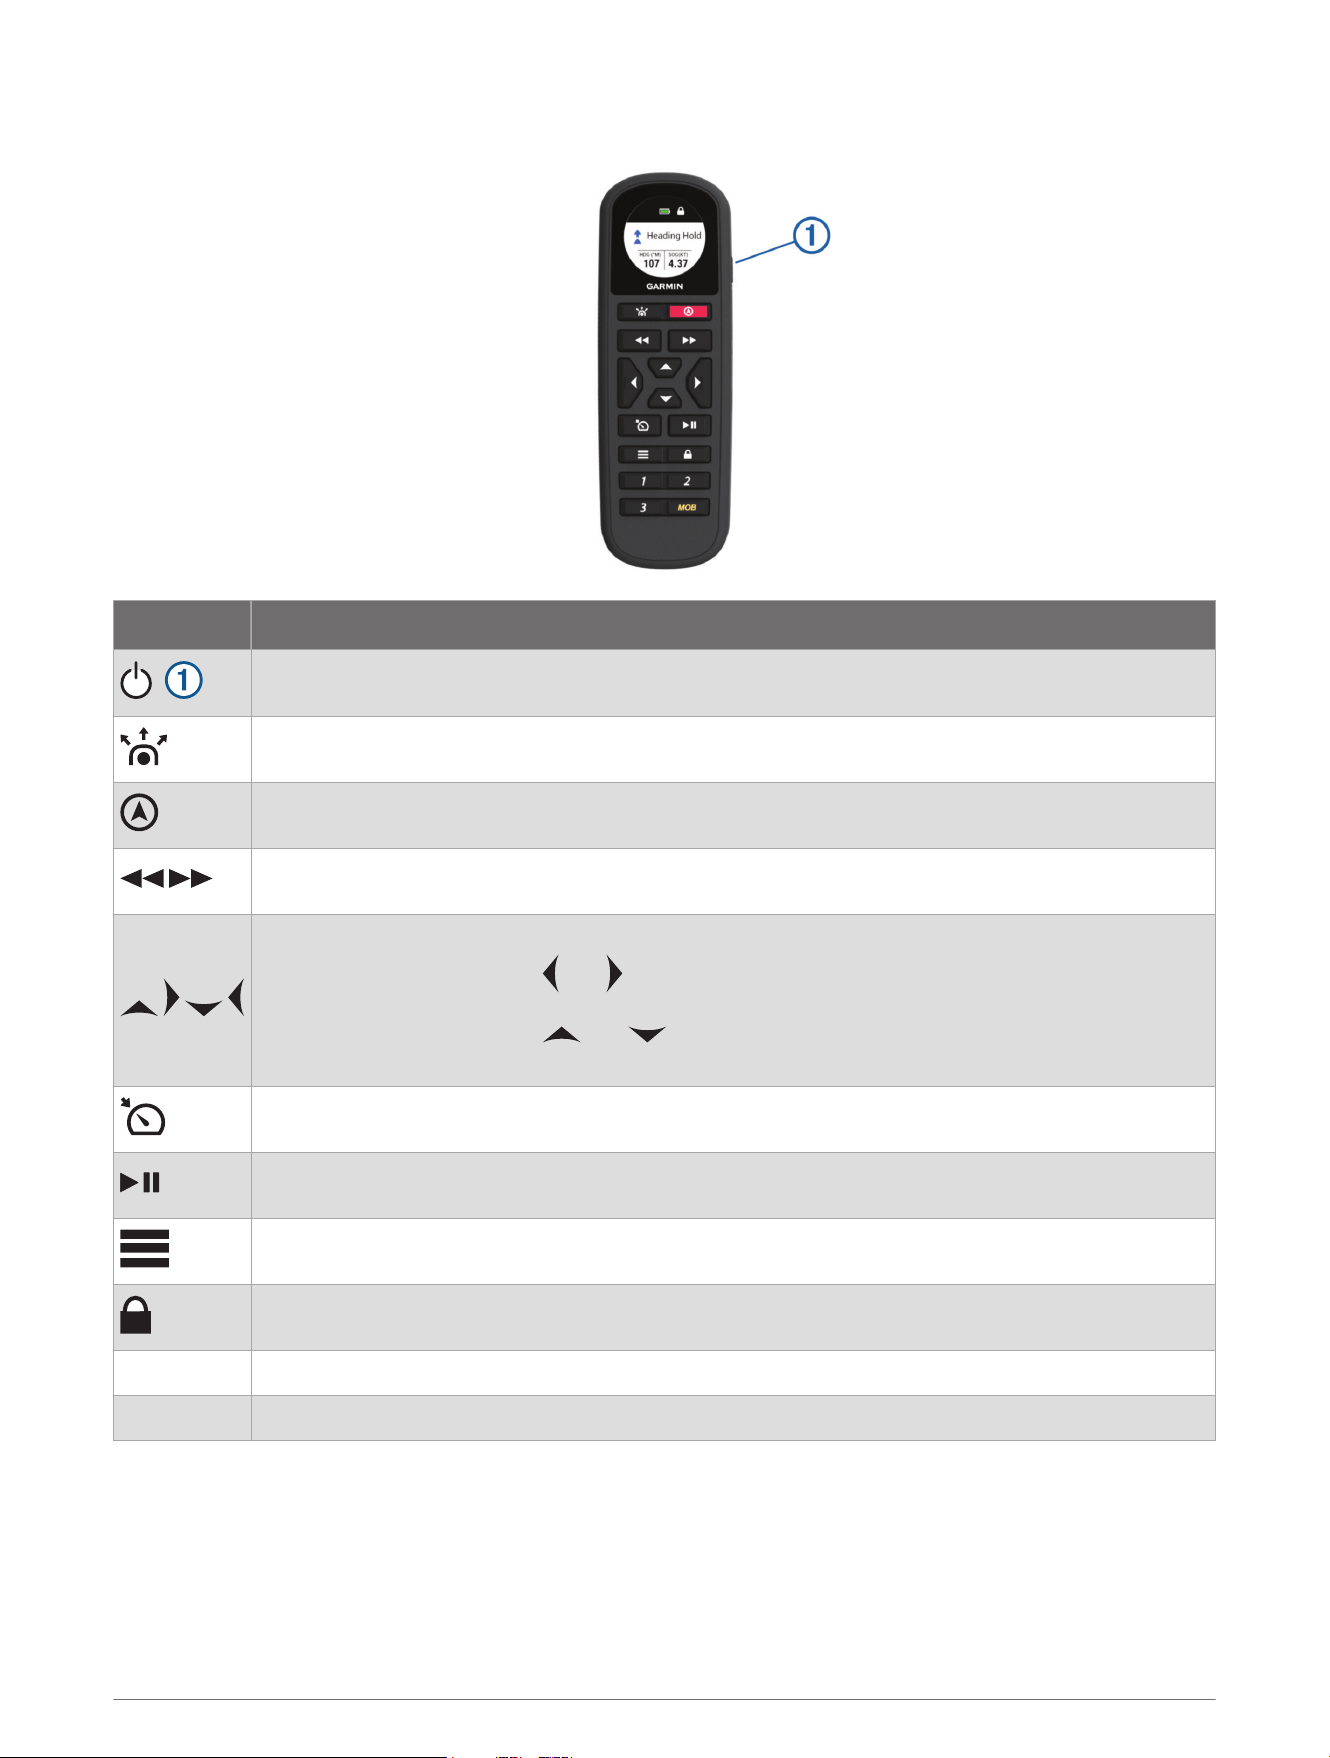
Key Description
( )
Turns the remote control on and off when held
Gesture controls (Gesture Controls, page5)
Engage or standby (Engaging and Disengaging Heading Hold, page4)
Step steering
Navigates the menu
When not in the menu, press and for single-degree step turns, or hold for rudder steering
When not in the menu, press and for incremental throttle changes, or hold for contin
uous throttle changes (available only on select autopilot models)
Cruise control (available only on select autopilot models)
Idle or resume (available only on select autopilot models)
Opens the remote control menu
Locks or unlocks the keys
1 through 3 Action keys (Activating Patterns or Actions Assigned to the Action Keys, page5)
MOB Man overboard (Marking and Starting Navigation to a Man Overboard Location, page6)
Pairing the Remote Control
Before you can use the remote control with your autopilot system, you must pair the remote control with a helm
control, such as a GHC
™
20, GHC 50, or a compatible chartplotter connected to the same NMEA 2000
®
network
as the autopilot system.
3
Pairing the Remote Control with a Helm Control
1 On the helm control, select Menu > Setup > Remote > Search for Remote.
Enabled appears on the screen.
2 Use the remote control to select the appropriate option based on your device.
• If you have a GHC20, select > Pair with GHC 20.
• If you have a GHC 50, select > Pair with GHC 50.
The helm control beeps and shows a confirmation message.
3 Select Connect.
Pairing the Wireless Remote Control with a Chartplotter
1 On the chartplotter, select Settings > Communications > Wireless Devices > Wireless Remotes > Autopilot
Remote.
2 If necessary, select Enable.
3 Select New Connection.
4 On the remote control, select > Pair with MFD.
The chartplotter beeps and shows a confirmation message.
5 On the chartplotter, select Yes to complete the pairing process.
Operation
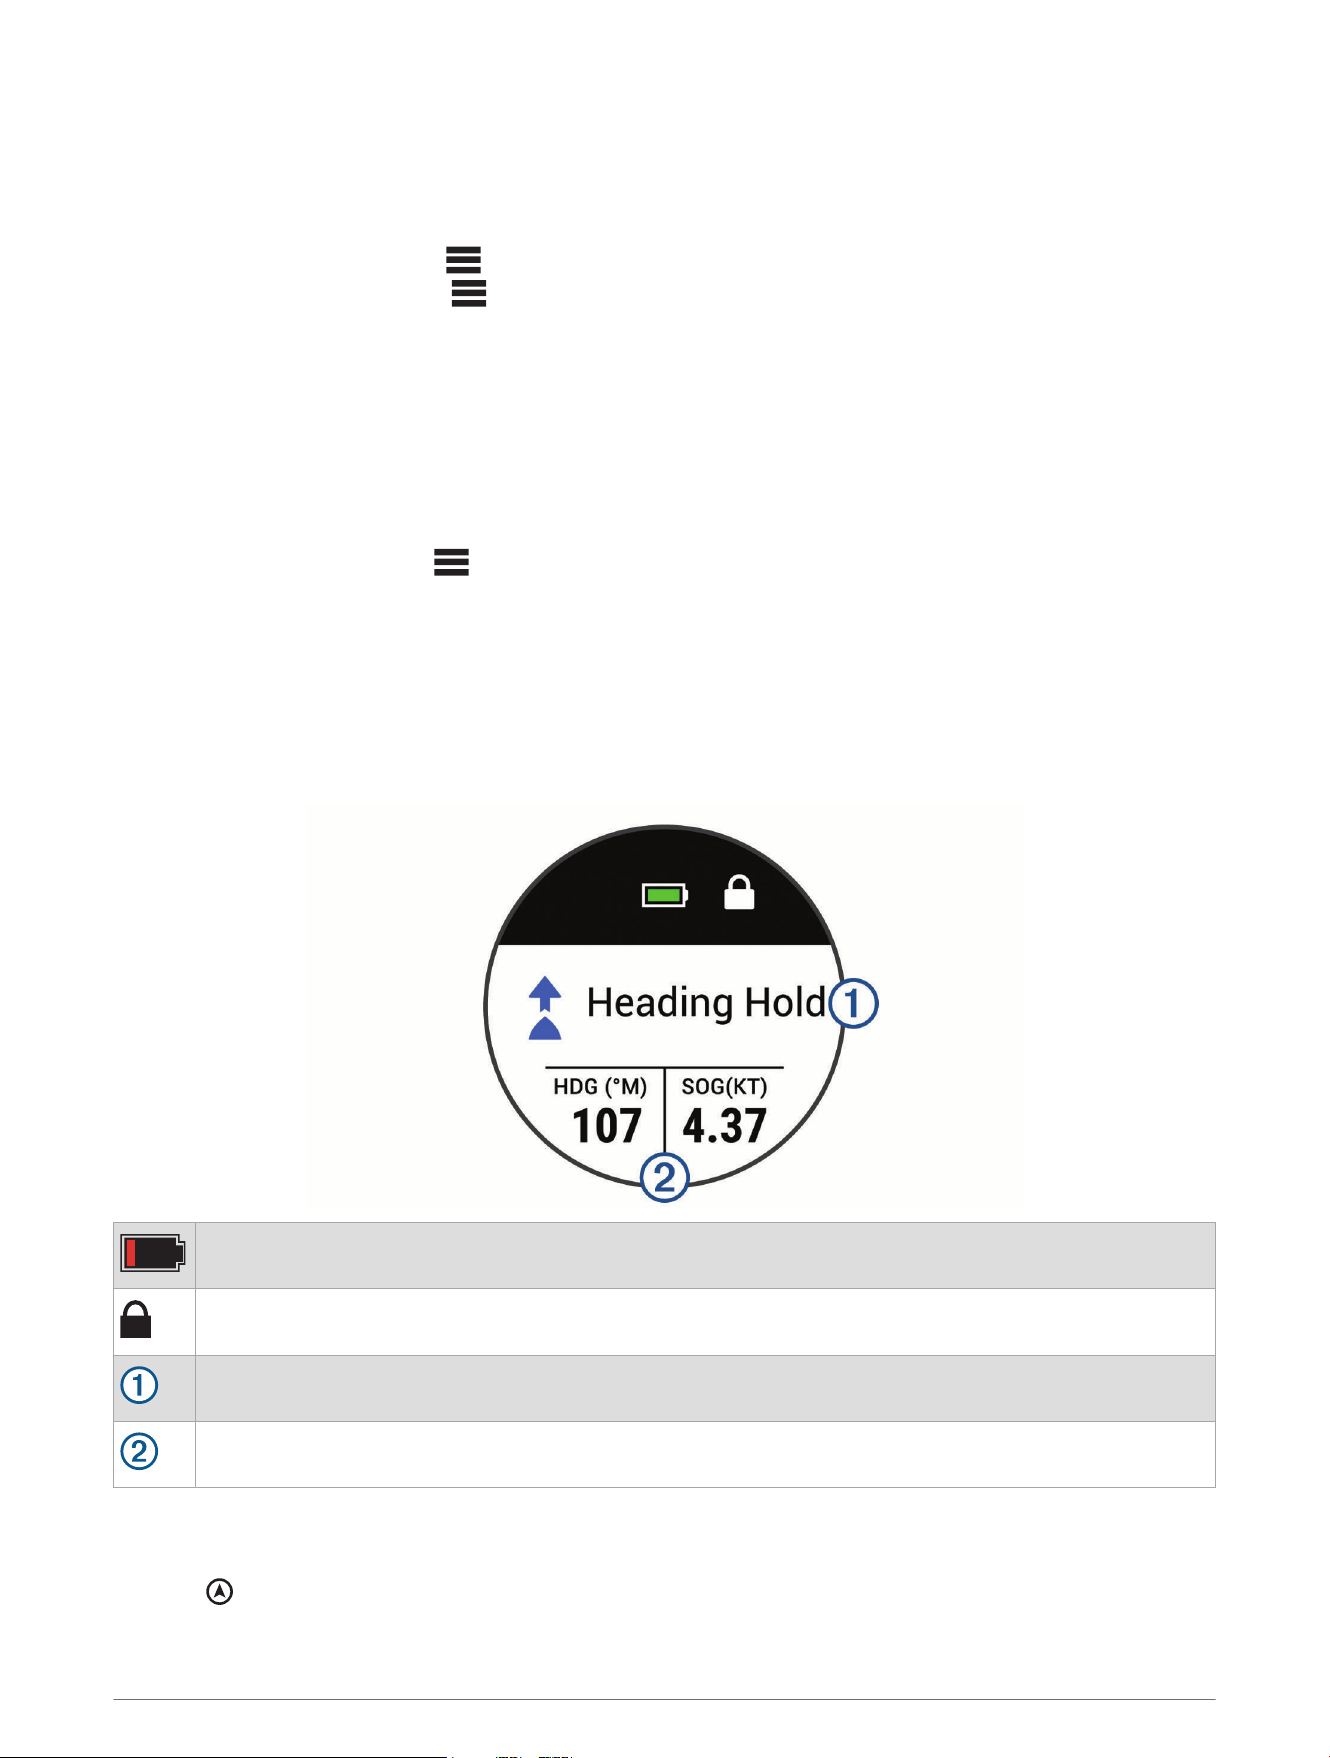
Remote Control Screen
The remote control screen shows the status of the autopilot and other important information.
Remote control battery level indicator.
Remote control key lock indicator. Appears when the keys are locked.
Autopilot status. Indicates when the autopilot is in standby, in a heading hold, or steering a pattern.
Autopilot data. Displays information relevant to the autopilot status.
Engaging and Disengaging Heading Hold
You can use the remote control to engage and disengage the autopilot.
Press .
The status of the autopilot changes on the remote screen.
4

Adjusting the Heading
1 If necessary, engage the autopilot.
2 Select an option:
• To adjust the heading one degree port or starboard, press or .
• To adjust the heading by the configured step-turn increment port or starboard, press or .
NOTE: The default step-turn increment is 10 degrees. You can configure the step-turn increment on the
connected helm control or chartplotter.
• To adjust the heading by multiple, accumulated step-turn increments, hold or .
• To steer the rudder port or starboard, hold or , and release.
Activating Patterns or Actions Assigned to the Action Keys
The action keys on the remote control are pre-programmed with patterns or other actions, depending on
the type of autopilot system. You can change the patterns or actions assigned to these keys (Changing the
Functions of the Action Keys, page5).
1 Press the action key assigned to the pattern or action you want to use.
The pattern or action appears on the remote control screen.
2 Select an option:
• If the pattern or action requires you to choose a direction, press or .
• If the pattern or action does not require you to choose a direction, press the action key again to begin the
pattern or action.
Changing the Functions of the Action Keys
You can change the patterns or actions assigned to the action keys using a connected helm control or
chartplotter.
1 Select an option:
• On a helm control, select Menu > Setup > Remote.
• On a chartplotter, select Settings > Communications > Wireless Devices > Wireless Remotes > Autopilot
Remote > Button Actions.
2 Select an action key to change.
3 Select a pattern or action to assign to the action key.
Activating a Route To Action
Before you can use the Route To feature on the remote control, you must connect your autopilot system to
a compatible chartplotter, assign the Route To action to a programmable key on the remote (Changing the
Functions of the Action Keys, page5), and define a route on the chartplotter.
1 Press the action key assigned to the Route To action.
Route To appears on the remote screen.
2 Press the action key again to activate the Route To action.
Changing Directions Using an Action Key
Before you can use an action key to change the autopilot direction (forward or reverse), you must program a key
for the direction control action (Activating Patterns or Actions Assigned to the Action Keys, page5).
1 Bring the boat to a stop and disengage the autopilot.
2 Press the action key assigned to the direction control action to switch between forward and reverse.
Gesture Controls
You can point or move the remote control to interact with the autopilot system. You must calibrate the compass
in the remote control before you can use the gesture-controls feature (Calibrating the Compass, page6).
5
Using Gesture Controls to Engage Heading Hold
You can use the remote control to set the autopilot heading hold in a specified heading.
1 Point the remote control toward where you want to engage or change the heading hold.
2 Press and release .
The autopilot engages or changes the heading hold, and steers the boat in the direction you were pointing
toward when you pressed the key.
Using Gesture Controls to Adjust your Heading
You can adjust the heading of the autopilot by moving the remote control.
1 If necessary, engage the autopilot.
2 Press and hold .
3 While holding , move the remote control to the left or right to adjust the heading port or starboard.
4 Release to stop adjusting the heading.
Calibrating the Compass
NOTICE
Calibrate the electronic compass outdoors. To improve heading accuracy, do not stand near objects that
influence magnetic fields, such as vehicles, buildings, and overhead power lines.
You must calibrate the compass in the remote control before you can use the gesture-controls feature. If
the gesture-controls feature is not working properly after calibration, you can repeat this process as often as
needed.
1 Select > Compass Calibration.
2 Follow the on-screen instructions.
Marking and Starting Navigation to a Man Overboard Location
1 Select MOB.
The name and image of the MOB search pattern appear on the screen.
2 Select or to select the direction and begin following the MOB pattern.
Sailboat Features
Sailing-specific functions and patterns are available for the programmable keys when you connect your remote
control to an autopilot on a sailboat.
Activating a Wind Hold Action
Before you can activate a wind hold, you must assign the wind hold action to an action key (Changing the
Functions of the Action Keys, page5).
1 Press the action key assigned to the wind hold action.
The wind hold direction appears on the remote control screen.
2 Press the action key again to activate wind hold.
Tacking and Gybing
Before you can activate a tack or gybe using the remote control, you must assign the tack and gybe action to an
action key (Changing the Functions of the Action Keys, page5).
Before you can activate a tack or a gybe from heading hold (as opposed to wind hold), you must define the
tack and gybe angle using the helm control or chartplotter. See the owner's manual for your helm control or
chartplotter for more information.
1 From heading hold or wind hold, select the action key assigned to Tack/Gybe.
2 Press or to tack or gybe to port or starboard.
6

Settings
These settings affect the remote control only. You must adjust the helm control or chartplotter settings on the
helm control or chartplotter.
Press .
Backlight: Adjusts the backlight level of the screen.
Beeper: Sets if and when audible sounds are used.
Compass Calibration: Calibrates the compass for the gesture-controls feature.
Units: Sets the units of measure.
Restore Defaults: Restores the remote control to factory default settings.
About: Shows information about the remote control.
Specifications
Dimensions (W×H×D) 152 x 52 x 32mm (6 x 2 x 1
1
/
4
in.)
Weight 109g (3.8oz.) without batteries
Material Glass-filled nylon
Display type Sunlight-visible, transflective memory-in-pixel (MIP)
Display resolution R240 x 240 pixels
Display size (diameter) 30.2mm (1
3
/
16
in.)
Operating temperature From -15° to 55°C (5° to 131°F)
Storage temperature From -40° to 85°C (-40° to 185°F)
Battery type 2 AA (not included)
Battery life 240 hr., typical use
Radio frequency 2.4GHz @ 3.4dBm nominal
Water rating IEC 60529 IPX7
1
Compass-safe distance 15cm (6in.)
© 2018 Garmin Ltd. or its subsidiaries
Garmin
®
and the Garmin logo are trademarks of Garmin Ltd. or its subsidiaries, registered in the USA and other countries. Reactor
™
and GHC
™
are trademarks of Garmin
Ltd. or its subsidiaries. These trademarks may not be used without the express permission of Garmin.
NMEA
®
, NMEA 2000
®
, and the NMEA 2000 logo are trademarks of the National Marine Electronics Association.
1
Withstands incidental exposure of water up to 1m for up to 30min.
7

© 2018 Garmin Ltd. or its subsidiaries
support.garmin.com
