GARMIN ONBOARD
™
Owner’s Manual

© 2025 Garmin Ltd. or its subsidiaries
All rights reserved. Under the copyright laws, this manual may not be copied, in whole or in part, without the written consent of Garmin. Garmin reserves the right to change
or improve its products and to make changes in the content of this manual without obligation to notify any person or organization of such changes or improvements. Go to
www.garmin.com for current updates and supplemental information concerning the use of this product.
Garmin
®
and the Garmin logo are trademarks of Garmin Ltd. or its subsidiaries, registered in the USA and other countries. Garmin OnBoard
™
and GOS
™
are a trademarks of Garmin
Ltd. or its subsidiaries. These trademarks may not be used without the express permission of Garmin.
M/N: AA4870
M/N: A04626
人员落海警示系统
人員落海警示系統

Table of Contents
Important Safety Information............1
Installing the System...............................1
Important Installation and Usage
Requirements.......................................... 1
MOB Tag.......................................... 2
Attaching the Band or Carabiner
Loop......................................................... 2
MOB Tag Roles........................................ 3
Turning an MOB Tag On and Off............ 5
Checking the Status of an MOB Tag...... 5
Disarming an MOB Tag........................... 5
Initiating an MOB Procedure from an
MOB Tag Manually.................................. 6
Replacing the MOB Tag Battery............. 6
Configuration................................... 7
Adding the MOB Tags Overlay............... 7
Pairing an MOB Tag................................ 8
Changing the Role of an MOB Tag......... 9
Changing the Name of an MOB Tag...... 9
Changing the Reacquisition Time for an
MOB Tag.................................................. 9
Removing an MOB Tag........................... 9
Restoring the Garmin OnBoard Engine
Cutoff System to Factory Default
Settings.................................................. 10
Restoring an MOB Tag to Factory Default
Settings.................................................. 10
System Bypass............................... 10
Bypassing the System From a
Chartplotter........................................... 10
Bypassing the System from the GOS 10
Hub......................................................... 11
Appendix........................................ 11
Software Updates................................. 11
Third-Party Software Attributions........ 11
Table of Contents i

Important Safety Information
WARNING
See the Important Safety and Product Information guide in the product box for product warnings and other
important information.
Installing the System
CAUTION
For the best possible performance and to avoid potential injury, damage to the device, or damage to your vessel,
installation by a qualified marine installer is recommended.
You must install and test the Garmin OnBoard engine cutoff system before using it on your vessel.
Follow the Garmin OnBoard Engine Cutoff System Installation Instructions provided in the product box to
install and test the system.
Important Installation and Usage Requirements
NOTICE
Users are responsible for ensuring that the installation and use of this device complies with the American Boat
and Yacht Council (ABYC) A-33 standard and any other applicable laws, regulations, or standards.
The Garmin OnBoard engine cutoff system is designed to meet the ABYC A-33 standard regarding emergency
engine/propulsion cut-off devices. When using this system, observe the following considerations:
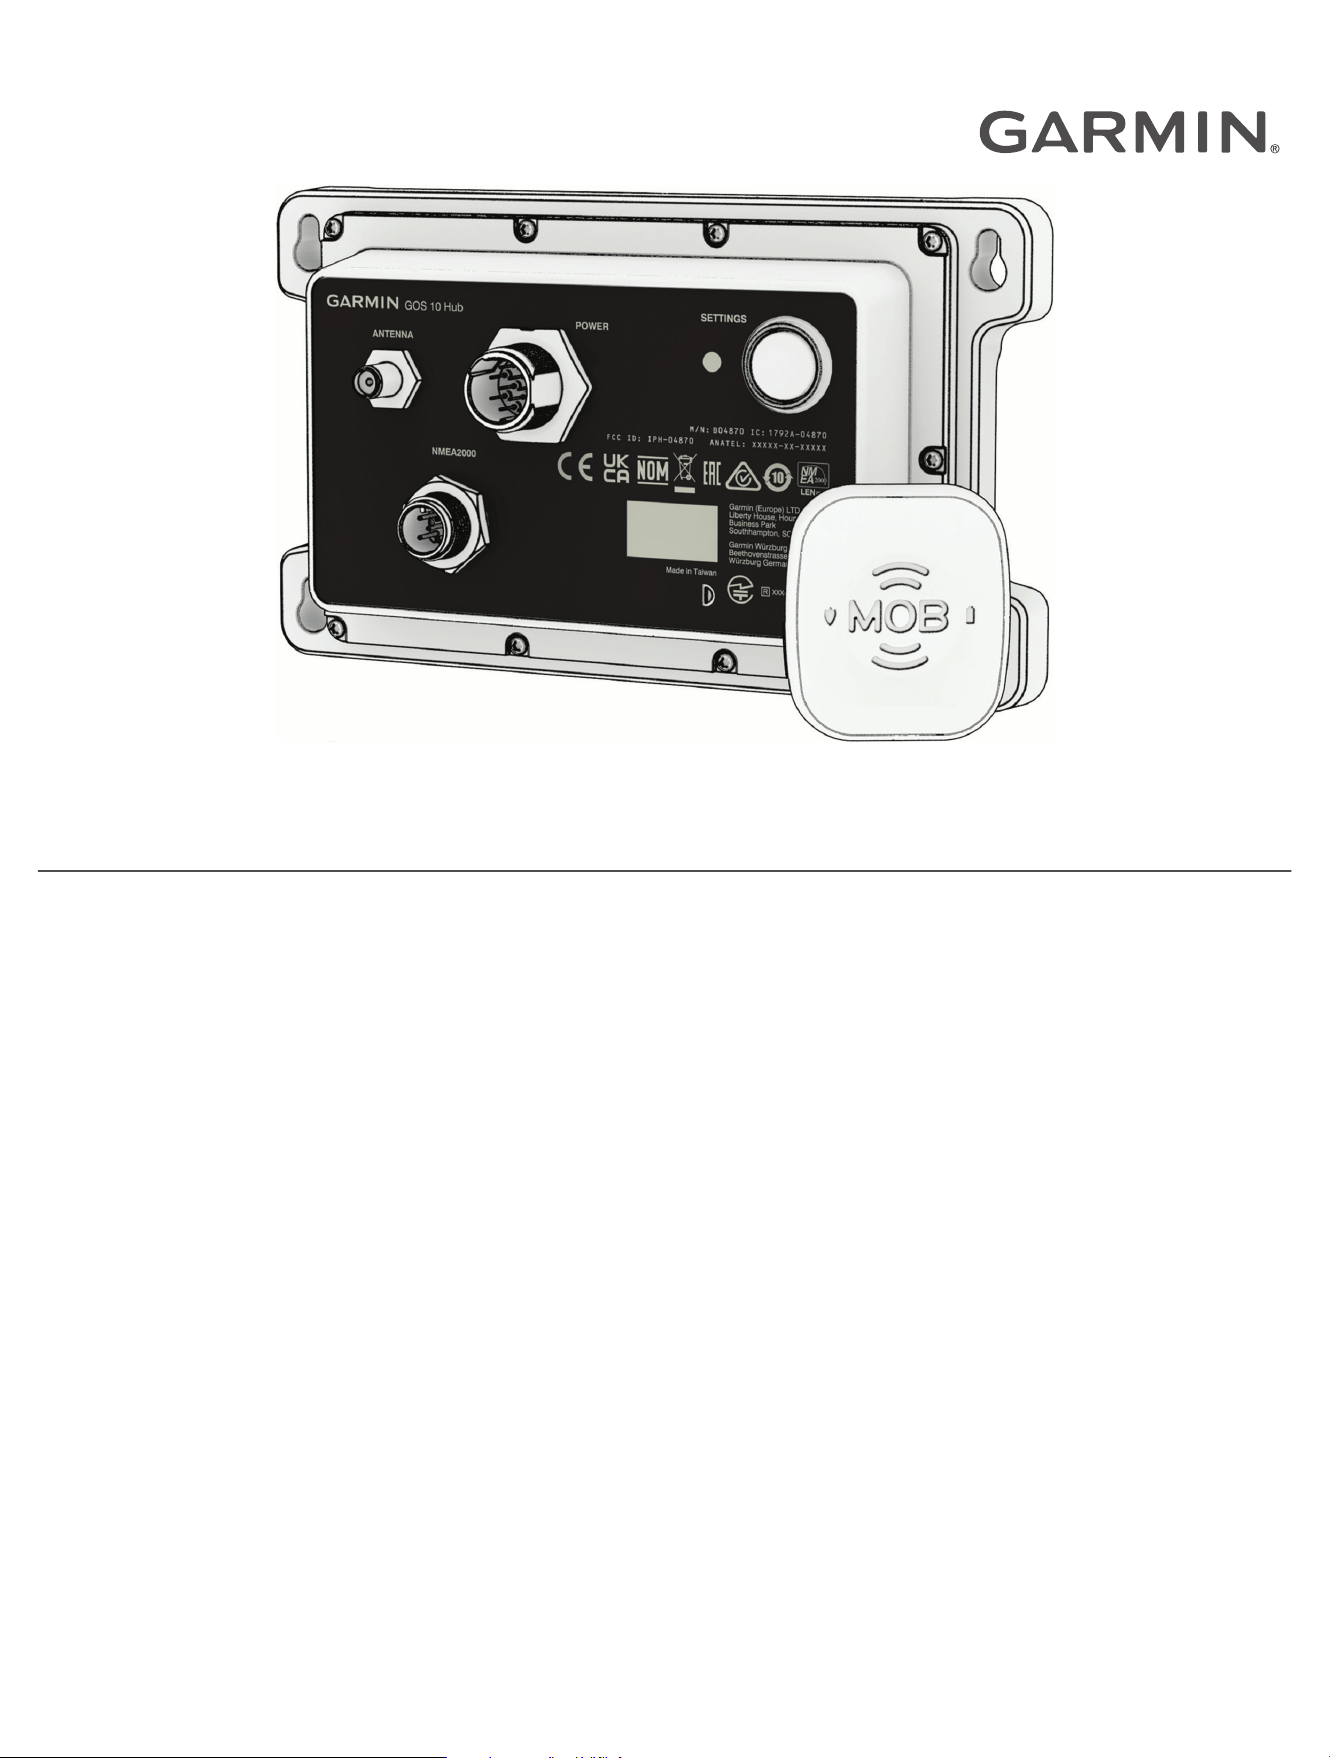
• Power to the GOS
™
10 hub should be tied to engine ignition in a way that it is operational when the engines
are running. If the Garmin OnBoard engine cutoff system is installed and not powered on when the engines
are running, it is not compliant with the A-33 standard.
• When the engines and the Garmin OnBoard engine cutoff system are running, you must have an MOB tag
with the Captain role assigned, paired, and connected.
Important Safety Information 1
MOB Tag
CAUTION
Users should wear the MOB tag in a location that would likely be submerged during a man overboard event,
such as on the wrist, belt, or lower part of a life jacket. The system may not activate as expected if the MOB tag
is worn in a different location that may not become submerged, such as on the shoulder.
One MOB tag must be worn by the captain when piloting the vessel. Additional tags
may be purchased and assigned as additional Captain tags or as Passenger tags.
These roles determine the behavior of the system when a tag is out of range.
NOTE: You can connect up to eight total tags to the Garmin OnBoard engine cutoff
system, and at least one tag must be assigned the Captain role.
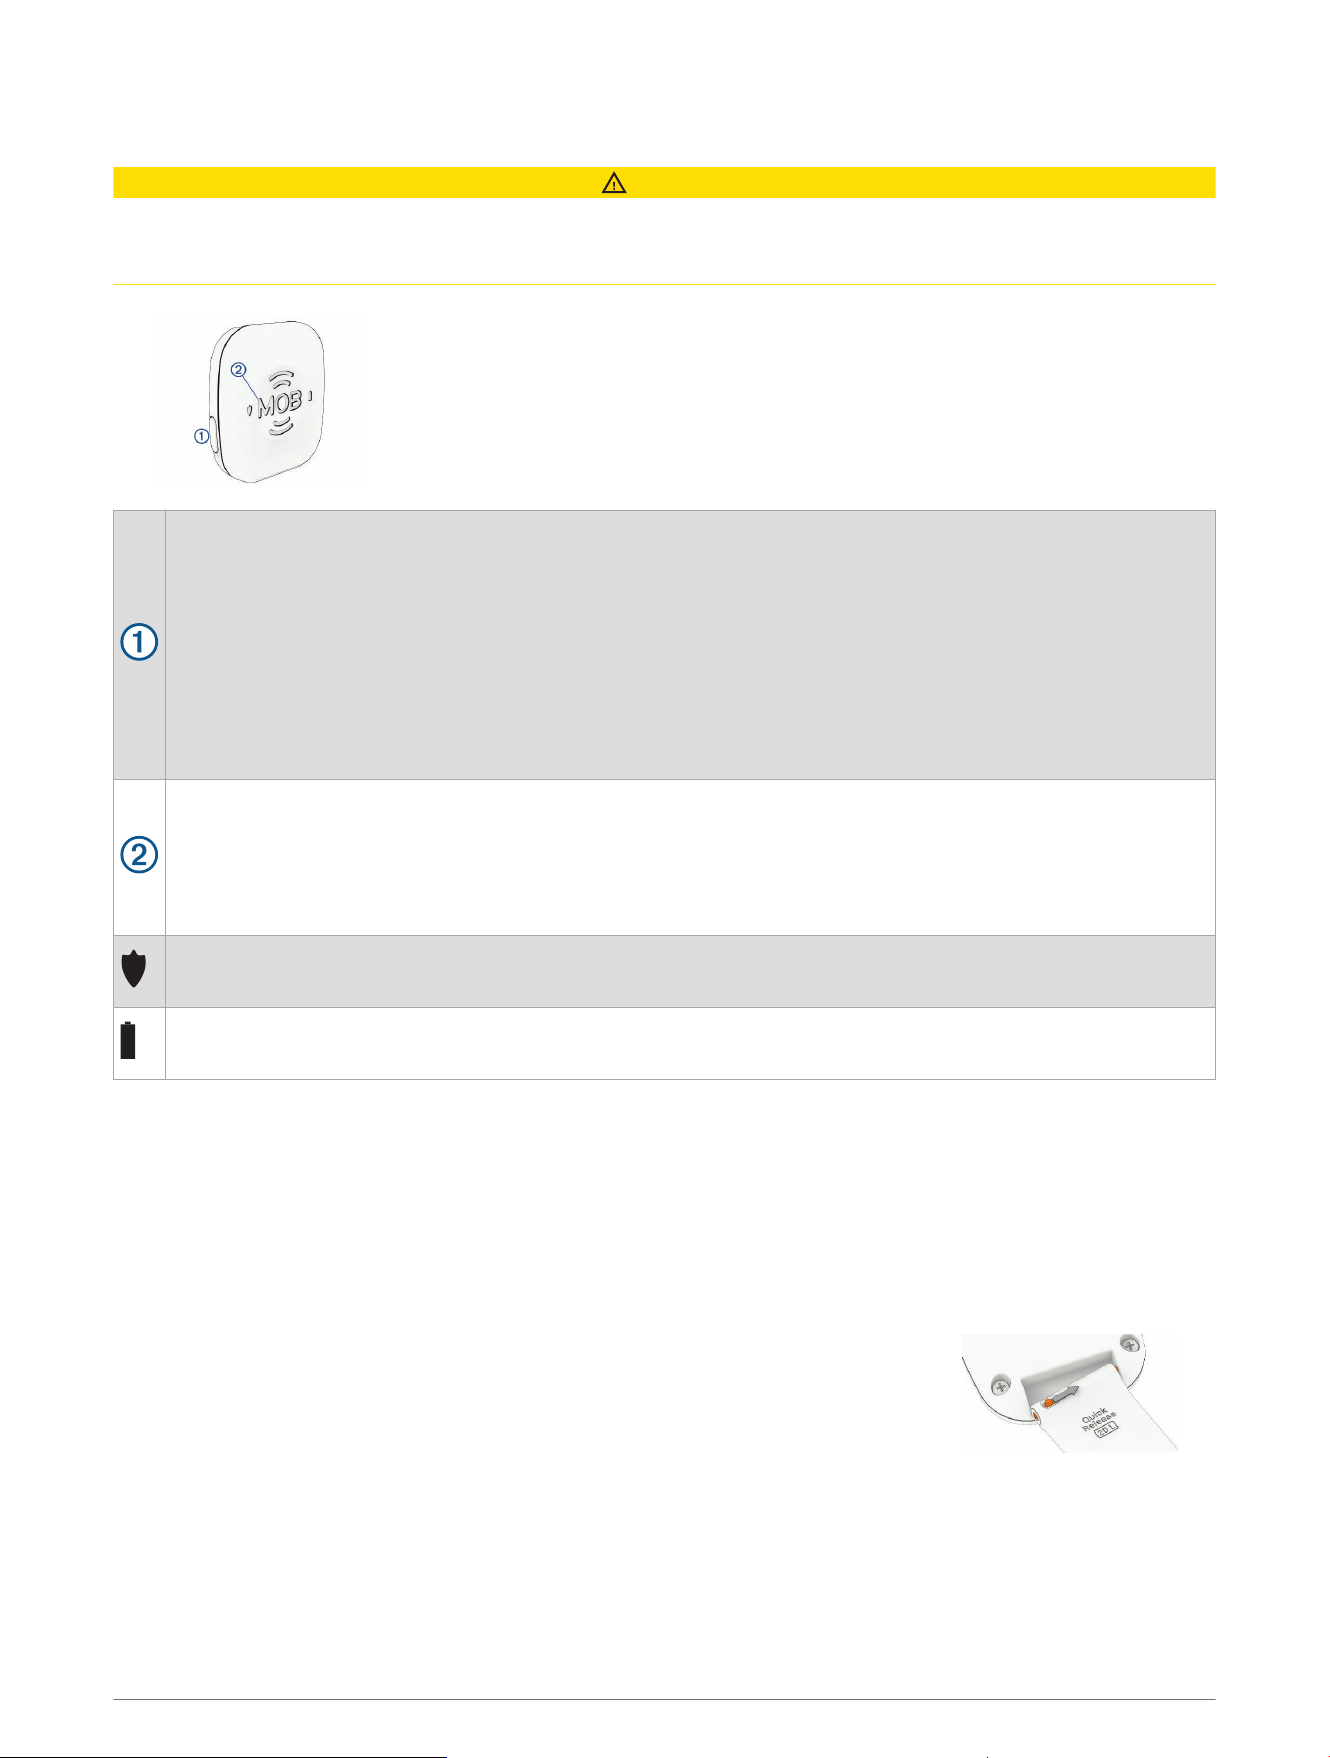
Power and interface button:
• If the tag is not connected to the Garmin OnBoard system, hold for two seconds to turn the tag on and
off.
• If the tag is connected to the Garmin OnBoard system:
◦ Hold for 2 seconds or longer to change the tag status from protected to disarmed and back to
protected.
◦ Press to show the status and battery level. The shield and battery icon LEDs flash different colors
(Checking the Status of an MOB Tag, page5).
◦ Hold for four seconds or longer to turn the tag on and off.
MOB button:
Press to initiate a Man Overboard (MOB) function (Initiating an MOB Procedure from an MOB Tag
Manually, page6).
On a tag with the Captain role, you can hold this for two seconds or longer to initiate a MOB function that
also kills the engine or engines.
Status indicator. When you press the power button, the LED color indicates the status of the tag
(Checking the Status of an MOB Tag, page5).
Battery-level indicator. When you press the power button, the LED color indicates the battery status of the
tag (Checking the Status of an MOB Tag, page5).
Attaching the Band or Carabiner Loop
The MOB tag is packaged with a carabiner loop, a wristband, and a floating keytag. You can use the carabiner
loop to attach the MOB tag to your clothing, or you can attach the MOB tag to the wristband to wear it on your
wrist. You can also attach the floating keytag to the carabiner or to the wristband to prevent the MOB tag from
sinking if it is accidentally lost in the water. Follow these steps to attach the wristband or the carabiner loop to
the MOB tag.
1 Insert one end of the spring bar on the band or carabiner loop into one of the holes on the MOB tag.
2 Slide the quick-release pin to retract the other end of the spring pin.
3 Align the spring bar with the other hole in the MOB tag, and release the pin.
2 MOB Tag
MOB Tag Roles
You can connect multiple MOB tags to the Garmin OnBoard engine cutoff system and assign different roles to
the tags, depending on who is wearing it. For details on the exact actions performed by each role, see (MOB Tag
Behavior, page3).
Captain: This role is intended for an MOB tag worn by a vessel captain or an individual responsible for
controlling the vessel. A tag with a Captain role allows the system to shut off the engine or engines during a
Man Overboard (MOB) event.
NOTICE
At least one MOB tag with the Captain role assigned must be paired for the Garmin OnBoard engine cutoff
system to function. You cannot change the role of a Captain tag if it is the only tag paired with the Captain role
assigned.
Passenger: This role is intended for an MOB tag worn by a passenger on the vessel. A tag with a Passenger
role allows the system to create alerts during a MOB event, but it does not allow the system to shut off the
engines.
CAUTION
When a tag with a Passenger role disconnects, the system does not shut off the engines. The system shuts off
the engines only when all Captain tags are disconnected.
MOB Tag Behavior
When a protected MOB tag disconnects from the Garmin OnBoard engine cutoff system by traveling out of
range of the GOS 10 hub, the Garmin OnBoard system considers this to be a man-overboard event. Based on the
role assigned to the tag, the performs these actions in this general order.
MOB Tag 3
Action
Captain
Role
Passenger
Role
A message banner appears on all connected chartplotters indicating that the
connection with the tag has been lost.
The alarm buzzer connected to the GOS 10 hub sounds a loud alert.
A three-second countdown timer appears on all connected chartplotters.
NOTE: You can cancel the timer and alert if the man-overboard event was an error.
If the countdown timer is not canceled, after three seconds, the system:
• cuts off power to the engines to stop the vessel
• creates a Man Overboard (MOB) waypoint on the chartplotter at the location
where the signal from the MOB tag was lost
• displays a message stating Engine Cutoff Initiated
NOTICE
If more than one MOB tag connected to the system are assigned the Captain role,
all of the Captain tags must disconnect before the system kills the engines and
triggers an MOB action.
A fifteen-second countdown timer appears on all connected chartplotters.
NOTE: You can cancel the timer and alert if the man-overboard event was an error.
If the countdown timer is not canceled, after fifteen seconds the system creates a
Man Overboard (MOB) waypoint on the chartplotter at the location where the signal
was lost.
The engines remain functional.
CAUTION
When a tag with a Passenger role disconnects, the system does not shut off the
engines. The system shuts off the engines only when all Captain tags are discon
nected.
You are prompted to begin navigation to the MOB waypoint.
If a compatible autopilot system is connected to the network, you can initiate a
route to the waypoint from this message.
NOTICE
For an MOB tag with a Captain role, you must acknowledge the Engine Cutoff
Initiated message on a chartplotter before power is restored to the engines and you
can begin navigating again.
An SOS script appears that can be used to make a VHF distress call.
From this view, you can also see the location of the MOB waypoint on the chart and
dismiss it if necessary.
CAUTION
The Garmin OnBoard system does not contact emergency services at any time. You
must initiate a distress call if needed.
4 MOB Tag
Turning an MOB Tag On and Off
When you are not using the tag, you can turn it off to preserve battery life.
NOTICE
You must turn on an MOB tag before it can communicate with the GOS 10 hub.
1 If the MOB tag is off, hold the power button on the side of the tag for at least two seconds.
The and icons flash green twice to indicate that the MOB tag is now on.
2 If the MOB tag is on, hold the power button on the side of the tag for at least 4 seconds.
The and icons flash red twice to indicate that the MOB tag is now off.
Checking the Status of an MOB Tag
Press and release the power button on the side of the MOB tag.
NOTE: You should not hold the power button when checking the status of the tag, as this turns off the tag.
Only press and release it to view status information.
Green Connected and protected
Yellow Connected, not protected
Red Not connected
White flash Appears after the status color to indicate that the tag is assigned a Captain role.
Green The battery is full or mostly full
Yellow The battery is getting low and should be replaced soon
Red The battery is critically low and should be replaced immediately
Disarming an MOB Tag
By default, when you turn on an MOB tag within range of the GOS 10 hub, it connects to the system in a
protected status. When a tag is in a protected status, it triggers an action based on its assigned role when it
loses communication with the GOS 10 hub.
On occasion, you may want to leave the vessel or otherwise keep a connected tag from triggering an event. To
do this, you can disarm a tag. A disarmed tag remains connected to the GOS 10 hub when in range, but it does
not trigger an action when it travels out of range or otherwise becomes disconnected.
By default, when you disarm an MOB tag, the system will attempt to protect it again after 15 minutes. If the
tag is out-of-range of the GOS 10 hub when this time elapses, it becomes protected the next time it connects.
You cannot change this default reacquisition time, although you can adjust an individual instance after you have
disarmed a tag (Changing the Reacquisition Time for an MOB Tag, page9).
1 If necessary, turn on the MOB tag you want to change.
2 Hold the power button on the side of the MOB tag for two seconds.
flashes yellow to indicate that the MOB tag is disarmed.
3 To change the status of a tag to protected again, you can repeat the previous step.
flashes green to indicate that the MOB tag is protected again.
TIP: You can also disarm connected MOB tags using the chartplotter (Configuration, page7).
MOB Tag 5
Initiating an MOB Procedure from an MOB Tag Manually
If a passenger falls overboard who is not wearing an MOB tag, or if you want to initiate a Man Overboard (MOB)
procedure without waiting for a tag to become out of range of the GOS 10 hub, you can manually trigger the
effect directly from any MOB tag connected to the Garmin OnBoard engine cutoff system.
Press the large MOB button on the face of a connected MOB tag.
NOTE: On a tag with the Captain role, you can hold the MOB button for at least two seconds to initiate a MOB
function that also kills the engine or engines.
The Garmin OnBoard system creates a Man Overboard (MOB) waypoint on the chartplotter at the location
where the button was pressed and prompts you begin navigating to the waypoint. An SOS script appears that
can be used to make a VHF distress call, and you see the location of the MOB waypoint on the chart and
dismiss it if necessary.
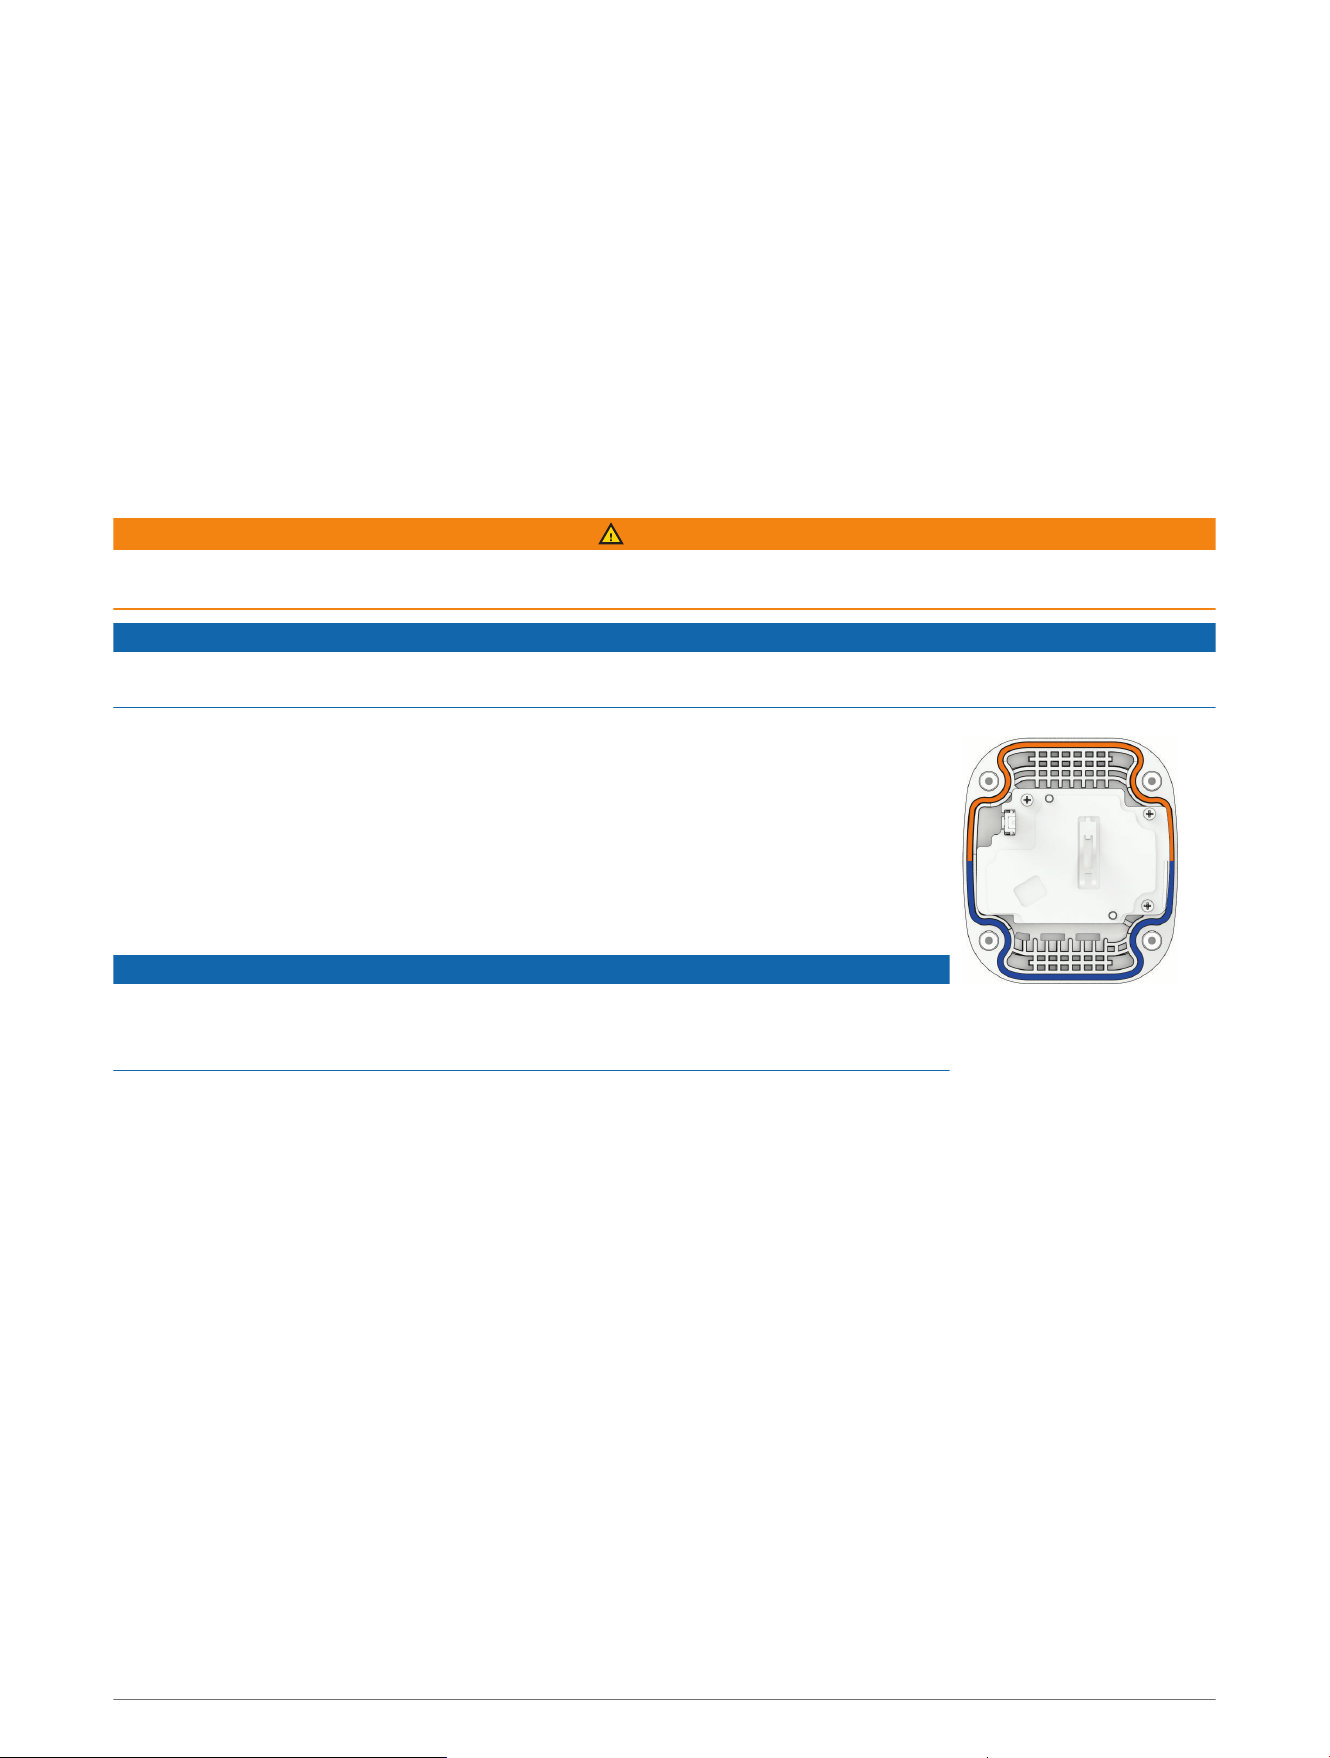
Replacing the MOB Tag Battery
WARNING
See the Important Safety and Product Information guide in the product box for product warnings and other
important information.
NOTICE
The MOB tag uses a CR2032 3V coin-cell battery. You must install a new CR2032 3V coin-cell battery as a
replacement. Using any other type of battery is not supported, and may result in a non-functioning system.
1 Using a #1 Phillips screwdriver, loosen the four captive screws to remove the
back cover.
2 Gently lift the white tab to release the battery from the back cover.
3 Place the new battery in the back cover, with the positive (+) side down.
4 Make sure the rubber gasket in the front cover of the MOB tag is not broken and
is fully seated in its groove.
The gasket fits in the groove in a specific orientation.
NOTICE
If the gasket is not properly and fully seated in the groove, it does not create a
seal, which leads to the failure of the MOB tag when it is exposed to water. Contact
Garmin
®
product support for information on purchasing a replacement gasket.
After you replace the battery, you may need to pair the MOB tag again (Pairing an MOB Tag, page8).
6 MOB Tag

Configuration
To configure the Garmin OnBoard engine cutoff system and MOB tags, on a connected chartplotter select
> Communications > Wireless Devices > OnBoard MOB System > MOB Tags, then select the name of a tag if
necessary.
Role: Changes the role of an MOB tag.
NOTE: The Garmin OnBoard engine cutoff system must have at least one paired tag with the Captain role
assigned. To change the role of an existing tag from Captain to Passenger, there must be more than one
paired tag with the Captain role.
Rename: Changes the name assigned to a tag for easier identification. Changing the name does not change the
role.
Review: Shows the status and other information about a tag.
Review > Remove Device: Unpairs and removes a tag from the Garmin OnBoard engine cutoff system.
Turn Off: Turns off a tag.
Protect: Changes the protection status of a tag. Protected tags trigger actions when leaving range of the hub,
disarmed tags do not trigger actions. Tags are protected by default, and can be disarmed for a set period of
time before automatically becoming protected again (Disarming an MOB Tag, page5).
Reacquire In: Available only when a tag is disarmed. Temporarily changes the time for when a disarmed tag
automatically becomes protected again. If the tag is out-of-range when this time elapses, it will become
protected again as soon as it is in range and connects to the hub.
New Connection: Begins the pairing process on the hub to connect a new MOB tag.
Adding the MOB Tags Overlay
1 From the page where you want to add the overlay, select Options > Edit Overlays.
TIP: You can also select Toolbars from the menu bar to quickly change the overlays.
2 Select Top Bar, Bottom Bar, Left Bar, or Right Bar.
3 Select MOB Tags > Back.
Configuration 7
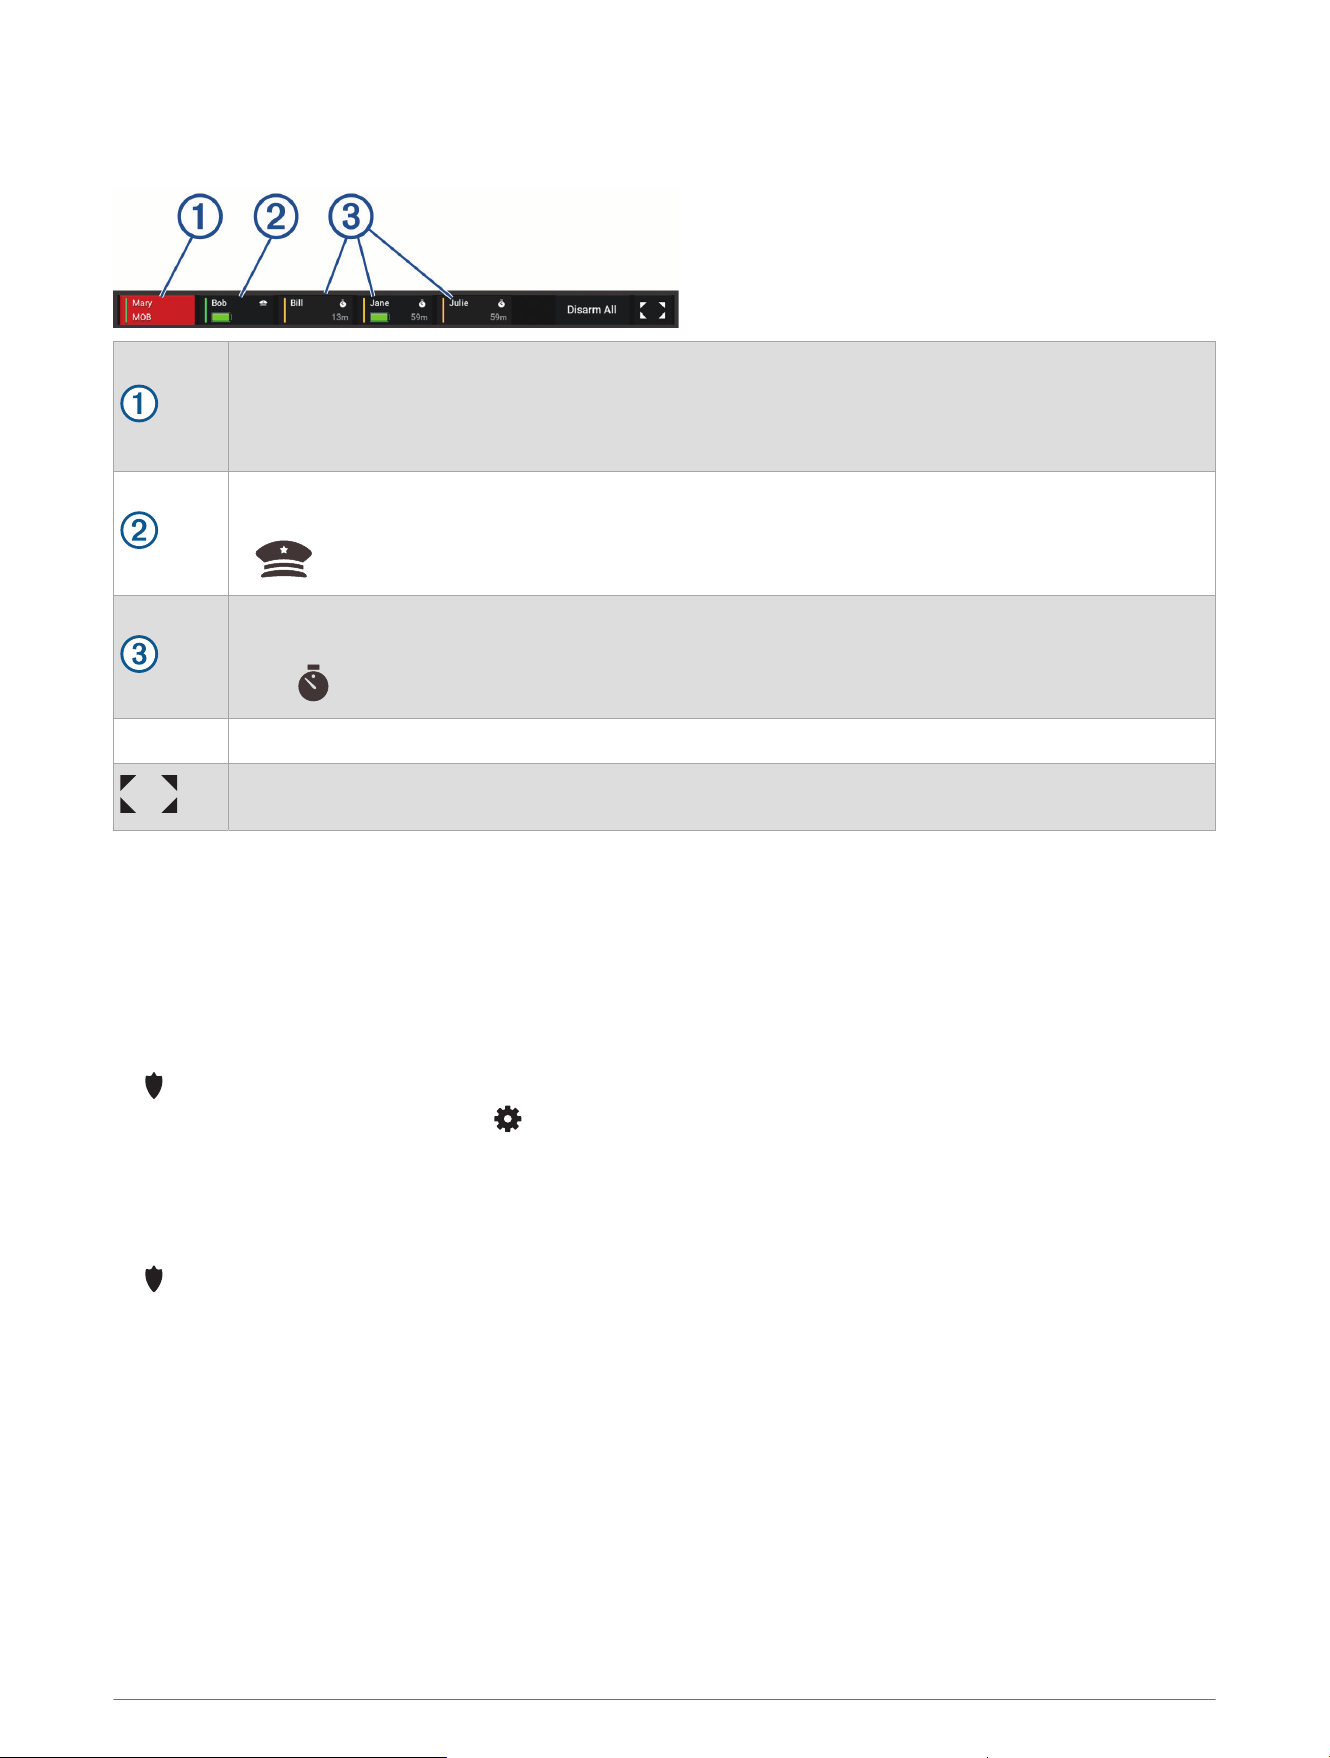
MOB Tags Overlay
When connected to a GOS 10 hub, you can add an overlay on the chartplotter to control MOB tag functions.
Protected Passenger tag in Man Overboard (MOB) status:
• The green line on the left indicates that the tag is protected.
• The red shading and "MOB" text indicates that the tag has left the range of the hub and is now in
an active MOB status (MOB Tag Behavior, page3).
Protected Captain tag:
• The green line on the left indicates that the tag is protected.
•
indicates that this is a captain tag.
Disarmed Passenger tags:
• The yellow line on the left indicates that the tag is disarmed.
•
The and time indicate when the system will attempt to protect the tag again automatically.
Disarm All Sets all connected tags to the Disarmed status.
Opens the full-screen MOB tag page.
Pairing an MOB Tag
When you purchase a Garmin OnBoard engine cutoff system, the MOB tag packaged with the system is already
paired with the GOS 10 hub and is ready to use. If you purchase additional tags you must pair them with the
GOS 10 hub.
1 If necessary, turn on the Garmin devices on the vessel, including the GOS 10 hub and any connected
chartplotters.
2 Hold the power button on the side of the MOB tag for more than two seconds to turn it on.
on the MOB tag flashes red to indicate that the tag is not connected to the GOS 10 hub.
3 On a connected chartplotter, select > Communications > Wireless Devices > OnBoard MOB System >
MOB Tags > New Connection.
If it is accessible, you can press the button on the GOS 10 hub three times to start the pairing process.
The LED on the GOS 10 hub flashes blue to indicate that it is in pairing mode.
4 On the MOB tag, press the power button on the side three times.
on the MOB tag flashes blue to indicate that it is in pairing mode.
A message is shown on the connected chartplotter screen, indicating a pairing request from the MOB tag to
the GOS 10 hub.
5 On the connected chartplotter, confirm the pairing request to complete the pairing process.
If this is the first MOB tag to be paired with the GOS 10 hub, it is assigned the Captain role by default. All
additional MOB tags paired to the GOS 10 hub are assigned the Passenger role by default.
8 Configuration

Changing the Role of an MOB Tag
NOTE: At least one MOB tag with the Captain role assigned must be paired for the Garmin OnBoard engine
cutoff system to function. You cannot change the role of a Captain tag if it is the only tag paired with the
Captain role assigned.
1 On a connected chartplotter, select > Communications > Wireless Devices > OnBoard MOB System >
MOB Tags.
2 Select the MOB tag you want to change.
3 Select Role.
4 Select the role you want to assign to the MOB tag.
Changing the Name of an MOB Tag
1 On a connected chartplotter, select > Communications > Wireless Devices > OnBoard MOB System >
MOB Tags.
2 Select the MOB tag you want to change.
3 Select Rename.
4 Enter a new name for the MOB tag.
Changing the Reacquisition Time for an MOB Tag
By default, when you disarm an MOB tag, the system attempts to protect it again after 15 minutes. You can
temporarily extend the length of time before a disarmed tag becomes protected again automatically. After the
disarmed tag becomes protected again, this value resets to the default of 15 minutes for the next time you
disarm the tag.
1 Disarm an MOB tag.
2 On a connected chartplotter, select > Communications > Wireless Devices > OnBoard MOB System >
MOB Tags.
3 Select the disarmed MOB tag.
4 Select Reacquire In.
5 Select a new value.
The system attempts to protect the disarmed MOB tag again after the newly-specified value elapses. After the
disarmed tag becomes protected again, this value resets to the default of 15 minutes for the next time you
disarm this tag.
Removing an MOB Tag
If you no longer want to use a paired MOB tag, you can remove it from the system.
NOTE: At least one MOB tag with the Captain role assigned must be paired for the Garmin OnBoard engine
cutoff system to function. You cannot remove a tag if it is the only tag paired with the Captain role assigned.
1 On a connected chartplotter, select > Communications > Wireless Devices > OnBoard MOB System >
MOB Tags.
2 Select the MOB tag you want to remove.
3 Select Review > Remove Device.
Configuration 9
Restoring the Garmin OnBoard Engine Cutoff System to Factory Default Settings
NOTICE
When performing a factory reset on the Garmin OnBoard engine cutoff system, the security event log stored
on the GOS 10 hub is cleared. All personal information, including locations and timestamps, as well as security-
event records are deleted.
1 Turn on the GOS 10 hub.
2 Press the button on the GOS 10 hub five times.
Restoring the GOS 10 hub software to factory defaults does not affect any paired MOB tags. Any previously-
paired MOB tags retain custom name and role information you may have applied, but are no longer paired to the
GOS 10 hub. Each previously-paired MOB tag must be reset individually if you want to clear custom name or role
configuration information stored on the tag.
Restoring an MOB Tag to Factory Default Settings
You can perform a procedure to restore an MOB tag to factory default settings, which clears any custom name
or role information stored on the tag.
1 Turn on the MOB tag you want to restore to factory default settings.
2 Disarm the MOB tag (Disarming an MOB Tag, page5).
NOTE: You cannot restore an MOB tag when it is in a protected status. You must disarm it first.
3 On the MOB tag, press the power button on the side five times.
4 Repeat this process for any additional MOB tag you want to restore.
System Bypass
The Garmin OnBoard engine cutoff system is designed with two methods you can use to bypass the system.
These methods allow you disable engine control and restore typical functionality in the case of an emergency.
Bypassing the System From a Chartplotter
One method to bypass the Garmin OnBoard engine cutoff system is by using a connected chartplotter.
Bypassing the engine cutoff system using the chartplotter is possible only when the system has cut off the
engines due to a man overboard event with a Captain tag, or when testing the system. This option is not
available during normal operation.
Within 30 seconds after the system has cut off the engines, select one of these options on a connected
chartplotter:
• Select Yes in the message that reads Do you want to be able to restart the engine now?
1
• On an MOB screen, select Disable Cutoff.
1
• Select > Communications > NMEA 2000 Setup > Device List, select the GOS 10 Hub, then select
Review > Engine Cutoff > Disable.
The Garmin OnBoard engine cutoff system is now disabled, and the engines should be restored to previous
functionality.
NOTICE
The system remains disabled until you enable it again or until you turn off the system and turn it back on again.
You must enable the system as soon as possible to be compliant with the AYBC A-33 standard.
To restore the Garmin OnBoard engine cutoff system functionality, select > Communications > NMEA 2000
Setup > Device List, select the GOS 10 Hub, then Review > Engine Cutoff > Enable.
1
This option is available only during an man-overboard event initiated by an MOB tag with the captain role. This message does not appear when testing the
system.
10 System Bypass
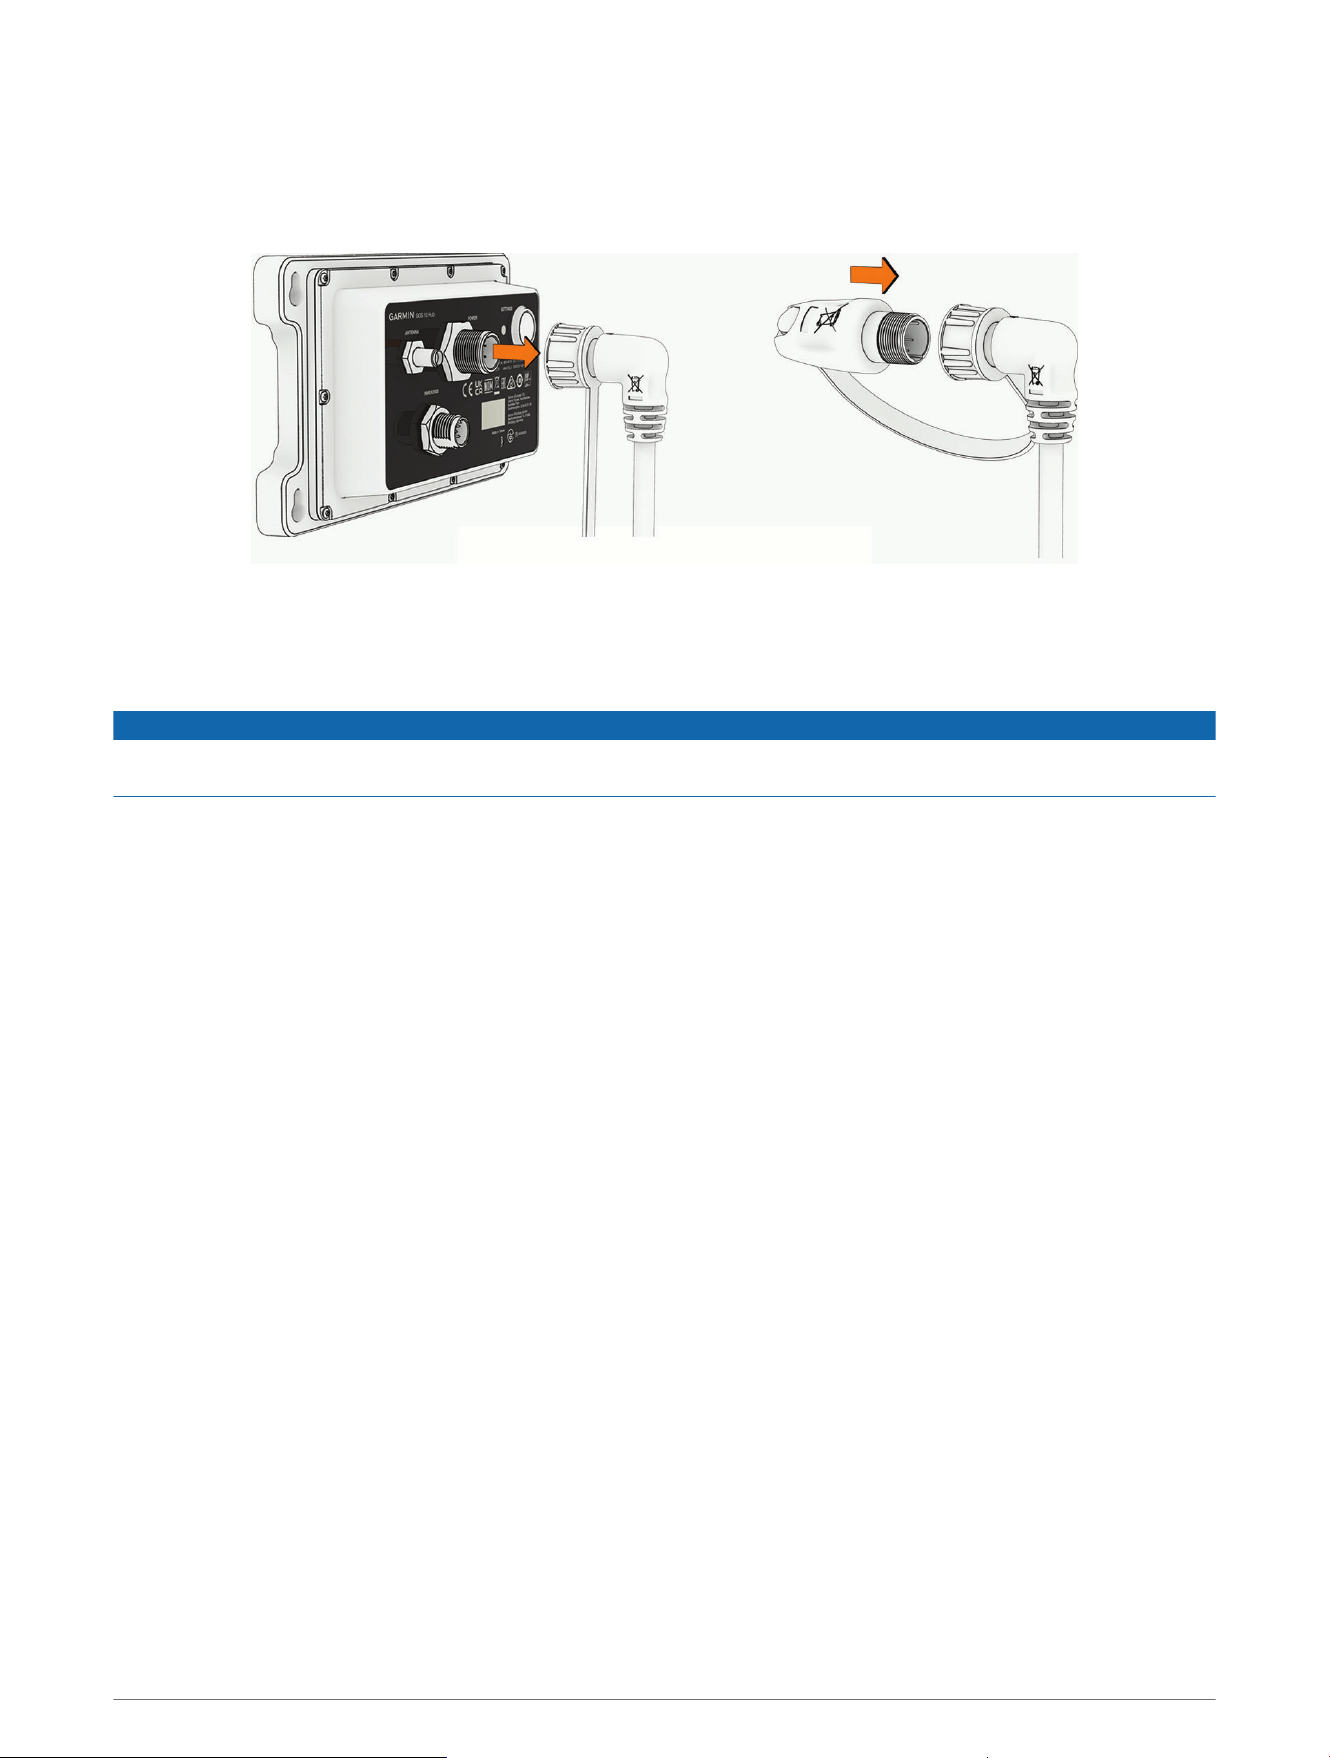
Bypassing the System from the GOS 10 Hub
If bypassing the Garmin OnBoard engine cutoff system using a connected chartplotter does not work as
expected, or if you prefer to use a different method, you can bypass the system directly from the GOS 10 hub.
1 Disconnect the wiring harness from the GOS 10 hub.
2 Connect the bypass module to the wiring harness connector, and tighten the locking ring.
The bypass module should be tethered to the connector end of the wiring harness.
The Garmin OnBoard engine cutoff system is now disabled, and the engines should be restored to previous
functionality.
NOTICE
The system remains disabled until you enable it again. You must enable the system as soon as possible to be
compliant with the AYBC A-33 standard.
To restore the Garmin OnBoard engine cutoff system again, disconnect the bypass module and reconnect the
wiring harness to the GOS 10 hub.
Appendix
Software Updates
You can go to garmin.com/support/software/marine/ to find information on the latest software updates for
your Garmin marine devices.
Third-Party Software Attributions
This product may include the following open source software subject to the following licenses.
GOS 10 Hub
• Apache-2.0: MCUboot, Mbed TLS, zcbor, Zephyr Project
• BSD-3-Clause: nRFX drivers, OpenAMP
• BSD-2-Clause: OpenAMP
• TinyCrypt by Intel Corporation
• Unicode License: Unicode software
MOB Tag
• Apache-2.0: Mbed TLS, Zephyr Project
• BSD-3-Clause: nRFX drivers
• TinyCrypt by Intel Corporation
Appendix 11

support.garmin.com
GUID-363DF15D-D1F1-4CBC-A87E-79F38BA2BE0D v2October 2025
