
Write the model and serial
numbers here:
Model # _________________
Serial # _________________
You can find them on a label
behind the door or drawer.
ENGLISH/ ESPAÑOL
OWNER’S MANUAL
RANGES
Electric
49-2001190 Rev. 3 09-24
GRS500PV
GE is a trademark of the General Electric Company. Manufactured under trademark license.
SAFETY INFORMATION ........... 3
USING YOUR APPLIANCE
Oven Controls ........................... 7
Settings ................................ 8
Sabbath Mode ........................... 9
Radiant Glass Cooktop .................. 10
Cookware for Radiant Glass Cooktop. . . . . . .12
Oven Cooking Modes ....................13
Oven Cookware .........................14
Oven Cooking Guide .....................15
Crisp Cooking Guide .....................16
Aluminum Foil and Oven Liners ............17
Oven Racks .............................17
Oven Air Vents ..........................17
CARE AND CLEANING
Cooktop Surfaces - Radiant Glass
...........18
Exterior Surfaces .......................20
Storage Drawer. . . . . . . . . . . . . . . . . . . . . . . . . .21
Interior Surfaces .......................22
Oven Door ............................. 23
Oven Light .............................24
TROUBLESHOOTING TIPS ........25
LIMITED WARRANTY ............. 28
ACCESSORIES .....................29
CONSUMER SUPPORT ............30

2 49-2001190 Rev. 3
THANK YOU FOR MAKING GE APPLIANCES A PART OF YOUR HOME.
Whether you grew up with GE Appliances, or this is your first, we’re happy to have you in the family.
We take pride in the craftsmanship, innovation and design that goes into every GE Appliances
product, and we think you will too. Among other things, registration of your appliance ensures that we
can deliver important product information and warranty details when you need them.
Register your GE appliance now online. Helpful websites and phone numbers are available in the
Consumer Support section of this Owner’s Manual. You may also mail in the pre-printed registration
card included in the packing material.

49-2001190 Rev. 3 3
READ AND SAVE THESE INSTRUCTIONS
IMPORTANT SAFETY INFORMATION
READ ALL INSTRUCTIONS BEFORE USING THE APPLIANCE
SAFETY INFORMATION
WARNING
Read all safety instructions before using the product. Failure to follow these instructions may result
in fire, electrical shock, serious injury or death.
WARNING
GENERAL SAFETY INSTRUCTIONS
Ŷ 8VHWKLVDSSOLDQFHRQO\IRULWVLQWHQGHGSXUSRVHDV
described in the Owner’s Manual.
Ŷ +DYH\RXUDSSOLDQFHLQVWDOOHGDQGSURSHUO\
grounded by a qualified installer in accordance with
the provided installation instructions.
Ŷ $Q\DGMXVWPHQWUHSDLURUVHUYLFHQRWVSHFLILFDOO\
recommended in the Owner’s Manual should be
performed ONLY by a qualified appliance installer
or service technician.
Ŷ %HIRUHSHUIRUPLQJDQ\VHUYLFHXQSOXJWKHDSSOLDQFH
or disconnect the power supply at the household
distribution panel by removing the fuse or switching
off the circuit breaker.
Ŷ %HVXUHDOOSDFNLQJPDWHULDOVDUHUHPRYHGIURPWKH
appliance before operating to prevent ignition of
these materials.
Ŷ $YRLGVFUDWFKLQJRULPSDFWLQJJODVVGRRUV
cooktops, or control panels. Doing so may lead to
glass breakage.
Ŷ 'RQRWFRRNRQDSURGXFWZLWKEURNHQJODVV6KRFN
fire, or cuts may occur.
Ŷ 'RQRWOHDYHFKLOGUHQDORQHRUXQDWWHQGHGLQDQ
area where an appliance is in use. They should
never be allowed to climb, sit or stand on any part
of the appliance.
Ŷ
CAUTION
Do not store items of interest
to children in cabinets above or on top of the
appliance - children climbing on the oven to reach
items could be seriously injured.
Ŷ 1HYHUXVH\RXUDSSOLDQFHIRUZDUPLQJRUKHDWLQJ
the room.
Ŷ 'RQRWDOORZDQ\RQHWRFOLPEVWDQGRUKDQJRQWKH
oven door, drawer, or cooktop. They could damage
the appliance or tip it over causing severe injury or
death.
Ŷ 8VHRQO\GU\SRWKROGHUV²PRLVWRUGDPSSRW
holders on hot surfaces may result in burns from
steam. Do not let pot holders touch surface units or
oven heating elements. Do not use a towel or other
bulky cloth in place of pot holders.
ANTI-TIP DEVICE
To reduce the risk of tipping the range, the range must
be secured by a properly installed anti-tip bracket. See
installation instructions shipped with the bracket for
complete details before attempting to install.
Remove any currently installed anti-tip bracket and
install the bracket provided with this unit.
To check if the bracket is installed and engaged
properly, look underneath the range to see that the
rear leveling leg is engaged in the bracket. On some
models, the storage drawer or kick panel can be
removed for easy inspection. If visual inspection is not
possible, slide the range forward, confirm the anti-tip
bracket is securely attached to the floor or wall, and
slide the range back so the rear leveling leg is under
the anti-tip bracket.
If your range is removed for cleaning, servicing, or
any reason, be sure the anti-tip device is reengaged
properly when the range is replaced. Failure to take
this precaution could result in tipping of the range
and can result in death or serious burns to children
or adults. Never completely remove the leveling legs
or the range will not be secured to the anti-tip device
properly.
• A child or adult can tip the range and be killed.
• Install the anti-tip bracket provided with the unit
to the wall or floor.
• Engage the range to the anti-tip bracket by sliding the
range back such that the foot is engaged.
• Re-engage the anti-tip bracket if the range is moved.
• Failure to do so can result in death or serious burns
to children or adults.
Tip-Over Hazard
WARNING
Anti-Tip
%UDFNHW
Leveling
Leg
Free-Standing and
Slide-In Ranges
Anti-Tip
%UDFNHW
24" Compact or
Professional Ranges
or
4 49-2001190 Rev. 3
WARNING
KEEP FLAMMABLE MATERIALS AWAY FROM THE RANGE
Failure to do so may result in fire or personal injury.
Ŷ 'RQRWVWRUHRUXVHIODPPDEOHPDWHULDOVLQDQRYHQ
or near the cooktop, including paper, plastic, pot
holders, linens, wall coverings, curtains, drapes and
gasoline or other flammable vapors and liquids.
Ŷ 1HYHUZHDUORRVHILWWLQJRUKDQJLQJJDUPHQWVZKLOH
using the appliance. These garments may ignite if
they contact hot surfaces causing severe burns.
Ŷ 'RQRWOHWFRRNLQJJUHDVHRURWKHUIODPPDEOH
materials accumulate in or near the appliance.
Grease in the oven or on the cooktop may ignite.
Ŷ Do not store any flammable materials or temperature
sensitive items inside of or on the appliance.
Ŷ Clean ventilating hoods frequently. Grease should not
be allowed to accumulate on the hood or filter.
Ŷ (On some models) Remote Operation – This
appliance is configurable to allow remote operation at
any time.
SAFETY INFORMATION
READ AND SAVE THESE INSTRUCTIONS
WARNING
IN THE EVENT OF A FIRE, TAKE THE FOLLOWING
STEPS TO PREVENT INJURY AND FIRE SPREADING
Ŷ 'RQRWXVHZDWHURQJUHDVHILUHV1HYHUSLFNXS
a flaming pan. Turn the controls off. Smother a
flaming pan on a surface unit by covering the pan
completely with a well-fitting lid, cookie sheet or flat
WUD\8VHDPXOWLSXUSRVHGU\FKHPLFDORUIRDPW\SH
fire extinguisher.
Ŷ ,IWKHUHLVDILUHLQWKHRYHQGXULQJEDNLQJVPRWKHU
the fire by closing the oven door and turning the
oven off or by using a multi-purpose dry chemical or
foam-type fire extinguisher.
Ŷ 2QVRPHPRGHOV,IWKHUHLVDILUHLQWKHRYHQ
during self-clean, turn the oven off and wait for
the fire to go out. Do not force the door open.
Introduction of fresh air at self-clean temperatures
may lead to a burst of flame from the oven. Failure
to follow this instruction may result in severe burns.
IMPORTANT SAFETY INFORMATION
READ ALL INSTRUCTIONS BEFORE USING THE APPLIANCE
WARNING
GENERAL SAFETY INSTRUCTIONS
Ŷ 'RQRWWRXFKWKHEXUQHUVJULGGOHVRQVRPH
models), grates (on some models), the cooktop or
oven heating elements, or the interior surface of
the oven. These surfaces may remain hot enough
to burn for an extended period of time following
cooking, even though they no longer appear to be
on or hot.
Ŷ 'XULQJDQGDIWHUXVHGRQRWWRXFKRUOHWFORWKLQJ
or other flammable materials contact any interior
area of the oven; allow sufficient time for cooling
first. Other surfaces of the appliance may become
hot enough to cause burns. Potentially hot surfaces
include burners or heating elements, grates
(on some models), cooktop surface, oven vent
openings, surfaces near the openings, crevices
around the oven door, metal trim parts above the
door, any backguard, or shelves located above
cooking surface.
Ŷ 'RQRWKHDWXQRSHQHGIRRGFRQWDLQHUV3UHVVXUH
could build up and the container could burst,
causing an injury.
Ŷ &RRNIRRGWKRURXJKO\WRKHOSSURWHFWDJDLQVW
foodborne illness. Minimum safe food temperature
UHFRPPHQGDWLRQVDUHSURYLGHGE\WKH86'$
DQG)'$8VHDIRRGWKHUPRPHWHUWRWDNHIRRG
temperatures and check several locations.
Ŷ .HHSWKHYHQWLODWRUKRRGDQGJUHDVHILOWHUVFOHDQ
to maintain good venting and to avoid grease fires.
Turn the ventilator OFF in case of a fire. The blower
if in operation, could spread the flames.
49-2001190 Rev. 3 5
SAFETY INFORMATION
READ AND SAVE THESE INSTRUCTIONS
IMPORTANT SAFETY INFORMATION
READ ALL INSTRUCTIONS BEFORE USING THE APPLIANCE
WARNING
COOKTOP SAFETY INSTRUCTIONS
Ŷ 1(9(52SHUDWHWKH7RS6XUIDFH&RRNLQJ6HFWLRQ
RIWKLV$SSOLDQFH8QDWWHQGHG%RLORYHUVFDQFDXVH
smoking and greasy spillovers that may catch on
fire. Failure to follow this warning statement could
result in fire, explosion, or burn hazard that could
cause property damage, personal injury, or death.
Ŷ 1HYHUOHDYHRLOXQDWWHQGHGZKLOHIU\LQJ,IDOORZHG
to heat beyond its smoking point, oil may ignite
resulting in fire that may spread to surrounding
FDELQHWV'2127$77(03772(;7,1*8,6+$1
OIL/GREASE FIRE WITH WATER.
Ŷ 8VHDGHHSIDWIU\LQJWKHUPRPHWHUZKHQHYHU
possible to monitor oil temperature. To avoid oil
spillover and fire, use a minimum amount of oil
when shallow pan-frying and avoid cooking frozen
foods with excessive amounts of ice.
Ŷ 8VHSURSHUSDQVL]H²VHOHFWFRRNZDUHKDYLQJIODW
bottoms large enough to cover the surface heating
element.
Ŷ 7RPLQLPL]HWKHSRVVLELOLW\RIEXUQVLJQLWLRQRI
flammable materials and spillage, the handle of a
container should be turned toward the center of the
range without extending over nearby surface units.
Ŷ 2QO\FHUWDLQW\SHVRIJODVVJODVVFHUDPLF
earthenware or other glazed containers are suitable
for cooktop service; others may break because of
the sudden change in temperature.
Ŷ :KHQSUHSDULQJIODPLQJIRRGVXQGHUDKRRGWXUQ
the fan on.
WARNING
GLASS COOKTOP SAFETY INSTRUCTIONS
Ŷ 8VHFDUHZKHQWRXFKLQJWKHFRRNWRS7KHJODVV
surface of the cooktop will retain heat after the
controls have been turned off.
Ŷ 'RQRWFRRNRQDEURNHQFRRNWRS,IJODVVFRRNWRS
should break, cleaning solutions and spillovers
may penetrate the broken cooktop and create a
risk of electric shock. Contact a qualified technician
immediately.
Ŷ $YRLGVFUDWFKLQJWKHJODVVFRRNWRS7KHFRRNWRS
can be scratched with items such as knives, sharp
instruments, rings or other jewelry, and rivets on
clothing.
Ŷ 'RQRWSODFHRUVWRUHLWHPVWKDWFDQPHOWRUFDWFK
fire on the glass cooktop, even when it is not being
used. If the cooktop is inadvertently turned on, they
may ignite. Heat from the cooktop or oven vent after
it is turned on may cause them to ignite also.
Ŷ 8VHFHUDPLFFRRNWRSFOHDQHUDQGDQRQVFUDWFK
cleaning pad to clean the cooktop. Read and follow
all instructions and warnings on the cleaning cream
label. Wait until the cooktop cools and the indicator
light goes out before cleaning. A wet sponge or cloth
on a hot surface can cause steam burns. Some
cleaners can produce noxious fumes if applied to a
hot surface. NOTE: Sugar spills are an exception.
They should be scraped off while still hot using an
oven mitt and a scraper. See the Cleaning the glass
cooktop section in the Owner's Manual for detailed
instructions.
WARNING
OVEN SAFETY INSTRUCTIONS
Ŷ 6WDQGDZD\IURPWKHDSSOLDQFHZKHQRSHQLQJWKH
oven door. Hot air or steam which escapes can
cause burns to hands, face and/or eyes.
Ŷ 'RQRWXVHWKHRYHQLIDKHDWLQJHOHPHQWGHYHORSV
a glowing spot during use or shows other signs
of damage. A glowing spot indicates the heating
element may fail and present a potential burn, fire,
or shock hazard. Turn the oven off immediately and
have the heating element replaced by a qualified
service technician.
Ŷ .HHSWKHRYHQYHQWXQREVWUXFWHG
Ŷ 1HYHUSODFHFRRNLQJXWHQVLOVSL]]DRUEDNLQJ
stones, or any type of foil or liner on the oven floor.
These items can trap heat or melt, resulting in
damage to the product and risk of shock, smoke or
fire.
Ŷ 3ODFHRYHQUDFNVLQGHVLUHGORFDWLRQZKLOHRYHQLV
cool. If rack must be moved while oven is hot, be
careful to avoid touching hot surfaces and do not let
pot holder contact hot heating element in oven.
6 49-2001190 Rev. 3
How to Remove Protective Shipping Film and Packaging Tape
Carefully grasp a corner of the protective shipping film
with your fingers and slowly peel it from the appliance
surface. Do not use any sharp items to remove the film.
Remove all of the film before using the appliance for the
first time.
To assure no damage is done to the finish of the
product, the safest way to remove the adhesive from
packaging tape on new appliances is an application of
a household liquid dishwashing detergent. Apply with a
soft cloth and allow to soak.
NOTE: All protective packing must be removed from all
parts. It cannot be removed if it is baked on.
Consider recycling options for your appliance packaging
material.
SAFETY INFORMATION
READ AND SAVE THESE INSTRUCTIONS
IMPORTANT SAFETY INFORMATION
READ ALL INSTRUCTIONS BEFORE USING THE APPLIANCE
WARNING
SELF-CLEANING OVEN SAFETY INSTRUCTIONS (On some models)
The self-cleaning feature operates the oven at temperatures high enough to burn away food soils in the oven.
Follow these instructions for safe operation.
Ŷ 'RQRWWRXFKRYHQVXUIDFHVGXULQJVHOIFOHDQ
RSHUDWLRQ.HHSFKLOGUHQDZD\IURPWKHRYHQGXULQJ
self-cleaning. Failure to follow these instructions
may cause burns.
Ŷ %HIRUHRSHUDWLQJWKHVHOIFOHDQF\FOHUHPRYHSDQV
shiny metal oven racks, and other utensils from
the oven. Only dark-colored porcelain-coated oven
racks may be left in the oven. Failure to do so may
cause damage to these items and the oven and
present a potential burn or fire hazard.
Ŷ %HIRUHRSHUDWLQJWKHVHOIFOHDQF\FOHZLSHJUHDVH
and food soils from the oven. Excessive amount of
grease may ignite leading to smoke damage to your
home.
Ŷ ,IWKHVHOIFOHDQLQJPRGHPDOIXQFWLRQVWXUQWKH
oven off and disconnect the power supply. Have it
serviced by a qualified technician.
Ŷ 'RQRWXVHRYHQFOHDQHUV1RFRPPHUFLDORYHQ
cleaner or oven liner protective coating of any kind
should be used in or around any part of the oven
unless certified for use in a self-cleaning oven.
Ŷ 'RQRWFOHDQWKHGRRUJDVNHW7KHGRRUJDVNHWLV
essential for a good seal. Care should be taken not
to rub, damage or move the gasket.
Ŷ IMPORTANT: The health of some birds is
extremely sensitive to the fumes given off during
the self-cleaning cycle of any range. Move birds to
another well-ventilated room.
WARNING
OVEN SAFETY INSTRUCTIONS (Cont.)
Ŷ 3ODFHRYHQUDFNVLQGHVLUHGORFDWLRQZKLOHRYHQLV
cool. If rack must be moved while oven is hot, be
careful to avoid touching hot surfaces and do not let
pot holder contact hot heating element in oven.
Ŷ 'RQRWOHDYHLWHPVVXFKDVSDSHUFRRNLQJXWHQVLOV
or food in the oven when not in use. Items stored in
an oven can ignite.
Ŷ 'RQRWOHDYHLWHPVRQWKHFRRNWRSQHDUWKHRYHQ
vent. Items may overheat resulting in a risk of fire or
burns.
Ŷ 1HYHUEURLOZLWKWKHGRRURSHQ
Ŷ .HHSWKHRYHQIUHHIURPJUHDVHEXLOGXS*UHDVHLQ
the oven may ignite.
Ŷ :KHQXVLQJFRRNLQJRUURDVWLQJEDJVLQWKHRYHQ
follow the manufacturer’s directions.
Ŷ SHOCK OR BURN HAZARD:%HIRUHUHSODFLQJ
oven light bulb, disconnect the electrical power to
the appliance at the main fuse or circuit breaker
panel. Failure to do so may result in electric shock
or burn.
Ŷ
CAUTION
BURN HAZARD: The glass cover
and bulb should be removed when cool. Touching
hot glass with bare hands or a damp cloth can
cause burns.
Ŷ 'RQRWXVHDQ\W\SHRIIRLORUOLQHUWRFRYHUWKH
oven bottom or anywhere in the oven, except as
described in the Owner’s Manual. Oven liners can
trap heat or melt, resulting in damage to the product
and risk of shock, smoke or fire.
PROPER DISPOSAL OF YOUR APPLIANCE
Dispose of or recycle your appliance in accordance with Federal and Local Regulations. Contact your local
authorities for the environmentally safe disposal or recycling of your appliance.
49-2001190 Rev. 3 7
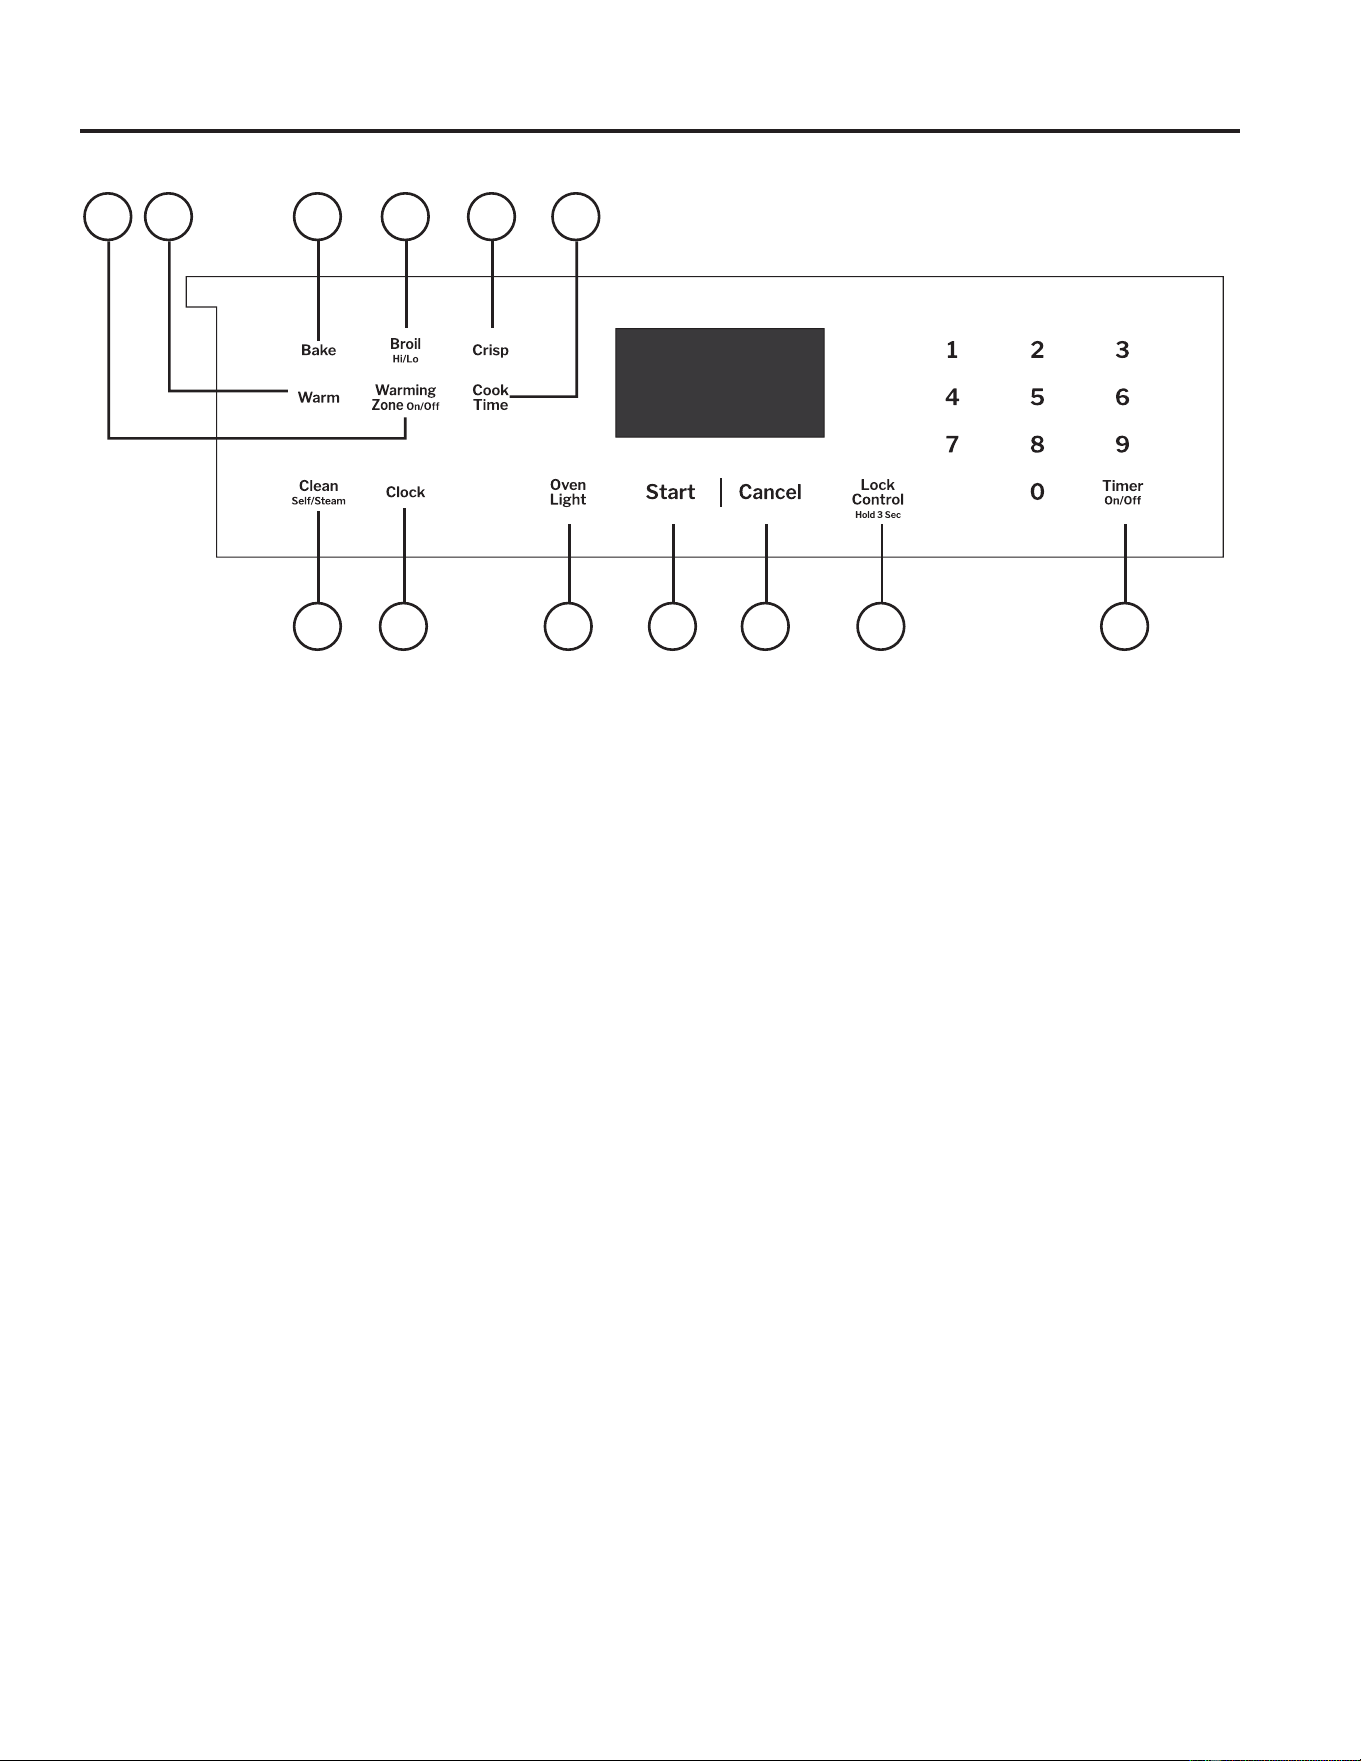
1. Bake: See the Cooking Modes section for more
information.
2. Broil High/Low: See the Cooking Modes
section for more information.
3. Crisp: The Crisp mode is designed to produce
foods with a crispier exterior than traditional oven
cooking. See the Cooking Modes section for more
information.
4. Warm: Warm mode is designed to keep hot
foods hot for up to 2 hours. See the Cooking
Modes section for more information.
5. Clean: Your oven has the following cleaning
modes: Self-Clean and Steam Clean. See the Care
and Cleaning section for important information about
using these modes.
6. Warming Zone: The Warming Zone will keep
hot, cooked food at serving temperatures. See the
8VLQJ <RXU &RRNWRS VHFWLRQ IRU PRUH LQIRUPDWLRQ
7. Start: Must be pressed to start any cooking,
cleaning, or timed function. Also used to start the
Warming Zone on the cooktop.
8. Cancel: Cancels ALL oven operations except the
clock and timer. Does NOT cancel the Warming
Zone on the cooktop.
9. Clock: Sets the oven clock time. Press the Clock
pad then use the number pads to enter the desired
time of day. Press Start to save the time.
10. Cook Time: Counts down cooking time and turns
off the oven when the cooking time is complete.
To use the Cook Time function, set the desired
cooking mode and cooking temperature, then press
the Cook Time SDG 8VH WKH QXPEHU SDGV WR HQWHU
the desired cooking time in hours and minutes.
Press Start to begin the countdown.
This can only be used with all Cooking Modes
H[FHSW %URLO DQG :DUP
11. Timer On/Off: Works as a countdown timer.
NOTE: The oven will continue to operate when the
timer countdown is complete. To set the timer, press
the Timer On/Off pad, then use the number pads to
enter the time in hours and minutes. Press Start to
begin the countdown. To turn the timer off, press the
Timer On/Off pad.
12. Oven Light: Turns the oven light on or off.
13. Lock Control: Locks out the control so that
pressing any pad does not activate the controls. To
use this feature, press and hold the Lock Control
pad, for three seconds to lock or unlock the control.
USING YOUR APPLIANCE: Oven Controls
Oven Controls
1462310
5 9 12 138711

8 49-2001190 Rev. 3
Settings
USING YOUR APPLIANCE: Settings
There are several settings on your range. To access and change these settings, press the Bake and Broil pads at the same
time and hold for three seconds, a beep sounds, then release the buttons and "OFSt" should appear in the display.
Scroll through the Settings menu using the 2 number pad for up and the 8 number pad for down until the desired feature is
displayed. To select a feature to change, or to confirm a change, press the 6 number pad. To cancel a change and return to
the Settings menu, press the 4 number pad. To exit the Settings menu, press Cancel.
Adjust the Oven Temperature (OFSt)
This feature allows the oven baking temperature to be
DGMXVWHGXSWR)KRWWHURUGRZQWR)FRROHU8VHWKLV
feature if you believe your oven temperature is running too
hot or too cold and wish to change it.
To adjust the oven temperature, enter the Settings menu as
listed above, then scroll through the features until “OFSt”
is displayed and press 6. A number between 35 and -35
ZLOOEHGLVSOD\HG8VHWKHQXPEHUSDGWRLQFUHDVHWKH
adjusted temperature or use the 8 number pad to decrease
the adjusted temperature. Press 6 to save the temperature
adjustment. Press Cancel or 4 to exit the Settings menu. This
DGMXVWPHQWZLOODIIHFW%DNH
8VHWKLVIHDWXUHLI\RXEHOLHYH\RXURYHQWHPSHUDWXUHLV
running too hot or too cold and wish to change it. Do not
use thermometers, such as those found in grocery stores, to
check the temperature inside your oven. These thermometers
may vary 20-40 degrees.
Sabbath Warmer Setting (Sabb)
This feature allows the user to increase the Sabbath Warm
temperature if the oven is operating cooler than desired.
To adjust this feature Lo or Hi, enter the Settings menu as
outlined above and scroll through the options until "Sabb" is
displayed, then press 6. Scroll to the desired option and press
6 again to confirm. Press Cancel to exit the Settings menu.
Sound Volume (Snd)
This feature allows the oven tone volume to be adjusted On
and Off (OFF). To adjust the tone volume, enter the Settings
menu as outlined above and scroll through the options until
“Snd” is displayed, then press 6. Scroll to the desired option
and press 6 again to confirm it. Press Cancel to exit the
Settings menu.
End of Timer Signals (End tonE)
This is the tone that signals the end of a timer. The tone
can be continuous (Cont) or one repeating beep (bEEP). A
continuous setting will continue to sound a tone until a pad
on the control is pressed. A single setting (bEEp) will sound
just a single tone at the end of the timer. To change the tone,
enter the Settings menu as outlined above and scroll through
the options until “End tonE” is displayed, then press 6. Scroll
to the desired option and press 6 again to confirm it. Press
Cancel to exit the Settings menu.
12-hr Auto Shut Off (12h Shut)
This feature turns off the oven after 12 hours of continuous
operation. To enable or disable this feature, enter the
Settings menu as listed above and scroll through the options
until “12h Shut” is displayed, then press 6. Scroll to the
desired option and press 6 again to confirm it. Press Cancel
to exit the Settings menu.
Fahrenheit / Celsius (dEg Unit)
The oven control is set to use Fahrenheit temperatures
(F), but you can change it to use Celsius temperatures (C).
To toggle between temperature measurements, enter the
Settings menu as listed above and scroll through the options
until “dEg Unit” is displayed, then press 6. Scroll to the
desired option and press 6 again to confirm it. Press Cancel
to exit the Settings menu.
Clock Display (CLoc diSP)
This feature specifies whether the clock appears in the
display. The clock display may be "On" or "OFF." To change
the display, enter the Settings menu as listed above and
scroll through the options until “CLoc diSP” is displayed,
then press 6. Scroll to the desired option and press 6 again to
confirm it. Press Cancel to exit the Settings menu.
Clock Configuration (CLoc cFg)
This feature specifies how the time of day will be displayed.
You can select a standard 12-hour clock (12) or 24-hour
military time display. To change the configuration, enter
the Settings menu as outlined above and scroll through the
options until “CLoc cFg” is displayed, then press 6. Scroll
to the desired option and press 6 again to confirm it. Press
Cancel to exit the Settings menu.
Remote Enable (APP EnbL)
(available with U+ Connect module)
Allows you to control your oven remotely. This feature may
be “on” or “oFF.” To change the configuration, enter the
Settings menu as outlined above and scroll through the
options until “APP EnbL” is displayed, then press 6. Scroll
to the desired option and press 6 again to confirm it. Press
Cancel to exit the Settings menu.
UPD (uPd)
(available with U+ Connect module)
7KH83'LQIRUPDWLRQPD\EHUHTXHVWHGZKHQFRQWDFWLQJ
service about your oven. To access the information, enter the
Settings menu as outlined above and scroll thru the options
until "uPd" is displayed, then press 6. A set of four characters
and numbers will display. Scroll down to see the next set of
four characters and numbers and then scroll down again to
see the final set of four characters and numbers. You can
also scroll up to review the previous sets. Press Cancel to
exit the Settings menu.
MAC ID (id)
(available with U+ Connect module)
The MAC ID information may be needed to connect to some
Wi-Fi systems. To access the information, enter the Settings
menu as outlined above and scroll thru the options until "id" is
displayed, then press 6. A set of four characters and numbers
will display. Scroll down to see the next set of four characters
and numbers and then scroll down again to see the final set of
four characters and numbers. You can also scroll up to review
the previous sets. Press Cancel to exit the Settings menu.

49-2001190 Rev. 3 9
Sabbath Mode
USING YOUR APPLIANCE: Sabbath Mode
Entering the Sabbath Schedule
Selection Menu
1. Press and hold the Timer On/Off and Oven Light
pads for 3 seconds until “SAbb” is displayed.
2. Scroll through the schedule options using the 0 number
pad. Select the desired schedule by pressing Start.
NOTE: An “S” in the schedule denotes 24hr + 1hr of oven
warming. An “H” in the schedule denotes a day of Holiday
as defined in the Holiday (“hoLi”) section below.
NOTE: Pressing the Cancel pad will exit the Sabbath
mode completely and return the range to normal function.
If no pads are pressed for 30 seconds, the control will
time out and return to normal function.
Sabbath Warm (SAbb)
Sabbath Warm will keep the oven warm for the
scheduled duration. To use the Sabbath Warm function,
1. Press and hold the Timer On/Off and Oven Light
pads for 3 seconds until “SAbb” is displayed. If a
continuous, 24hr Sabbath Warm is desired, press
Start.
2. If the default duration is not desired, press the Timer
On/Off pad while “SAbb” is displayed to enter the
Sabbath Warm Duration Selection menu. Scroll
through the duration options using the 0 number pad,
then select the desired duration by pressing Start.
NOTE: For time options less than 24 hours, the
appliance will complete the Sabbath Warm function
and transition to Sabbath Idle for the remainder of the
24-hour period. The oven lights will remain on, oven
tones will remain disabled, oven heating will be disabled,
and the control will display “IdLE”.
Holiday (hoLi)
Schedule options with the Holiday function included
will follow the schedule below automatically. No further
action is required after setting the desired schedule
option, as the appliance will transition between functions
on its own based on the initial time entered within the
1-hour window before sunset.
Sabbath Mode Power Outage Note
If a power outage occurs during the use of the Sabbath
Warm or Holiday modes, the appliance will return
to Sabbath Warm for the remainder of the chosen
schedule. If the power outage occurs during the Sabbath
Idle mode, the appliance will return to Sabbath Idle for
the remainder of the chosen schedule.
Your range offers a Sabbath mode that complies with
VWDQGDUGVVHWIRUWKE\2UWKRGR[8QLRQWKH&HQWUDO
Rabbinical Congress, and Halacha Tech, and is 100%
certified to the highest halacha standards. In this mode,
the oven lights will be turned off for the duration of use,
oven tones will be disabled, and gives the option to set
Sabbath schedules up to 72 hours in length.
NOTE: Ensure the oven clock is accurate before
entering the mode. For proper Sabbath operation, the
mode must be started within the 1-hour window before
sunset.
Menu
Options
Schedule Details
Duration
Options
Display
Shown
SAbb Sabbath Warm 24h (default),
48h, 72h 4h,
8h, 12h
SAbb
SH 24 hr + 1 hr Warm
24 hr Holiday
None hoLi
SHH 24 hr + 1 hr Warm
24 hr Holiday
24 hr Holiday
None hoLi
HS 24 hr Holiday
24 hr + 1 hr Warm
None hoLi
HHS 24 hr Holiday
24 hr Holiday
24 hr + 1 hr Warm
None hoLi
Menu Options Schedule Details
24hr 24hr + 1hr Sabbath Warm
48hr 48hr + 1hr Sabbath Warm
72hr 72hr + 1hr Sabbath Warm
4hr 4hr Sabbath Warm
20hr +1hr Sabbath Idle
8hr 8hr Sabbath Warm
16hr +1hr Sabbath Idle
12hr 12hr Sabbath Warm
12hr +1hr Sabbath Idle
Start Time End Time
+ROLGD\%DNH Initial Time Entered
(ITE)
ITE + 5 hrs or
Midnight (whichever
occurs first)
Holiday Warm ITE + 5 hrs or Midnight
(whichever occurs first)
8 AM
+ROLGD\%DNH 8 AM 12 Noon
Holiday Warm 12 Noon Initial Time Entered
10 49-2001190 Rev. 3
USING YOUR APPLIANCE: Radiant Glass Cooktop
Radiant Glass Cooktop
Home Canning Tips
%HVXUHWKHFDQQHULVFHQWHUHGRYHUWKHVXUIDFHXQLW
Make sure the canner is flat on the bottom. To prevent
burns from steam or heat, use caution when canning.
8VHUHFLSHVDQGSURFHGXUHVIURPUHSXWDEOHVRXUFHV
7KHVHDUHDYDLODEOHIURPPDQXIDFWXUHUVVXFKDV%DOO
®
DQG.HUU
®
and the Department of Agriculture Extension
Service.
)ODWERWWRPHGFDQQHUVDUHUHFRPPHQGHG8VHRIZDWHU
bath canners with rippled bottoms may extend the time
required to bring the water to a boil.
The radiant cooktop features heating surface units
beneath a smooth glass surface. The surface unit will
cycle on and off to maintain your selected control setting.
It is safe to place hot cookware on the glass surface
even when the cooktop is cool. Even after the surface
units are turned off, the glass cooktop retains enough
heat to continue cooking. To avoid overcooking, remove
pans from the surface units when the food is cooked.
Avoid placing anything on the surface unit until it has
cooled completely.
7KH&22.723+27LQGLFDWRUOLJKWZLOO
• Come on when the surface units are hot to the touch.
• Stay on even after the surface units are turned off.
• Stay on up to 30 minutes after the surface units are off.
NOTE: A slight odor is normal when a new cooktop is
used for the first time. It is caused by the heating of new
parts and insulating materials and will disappear in a
short time.
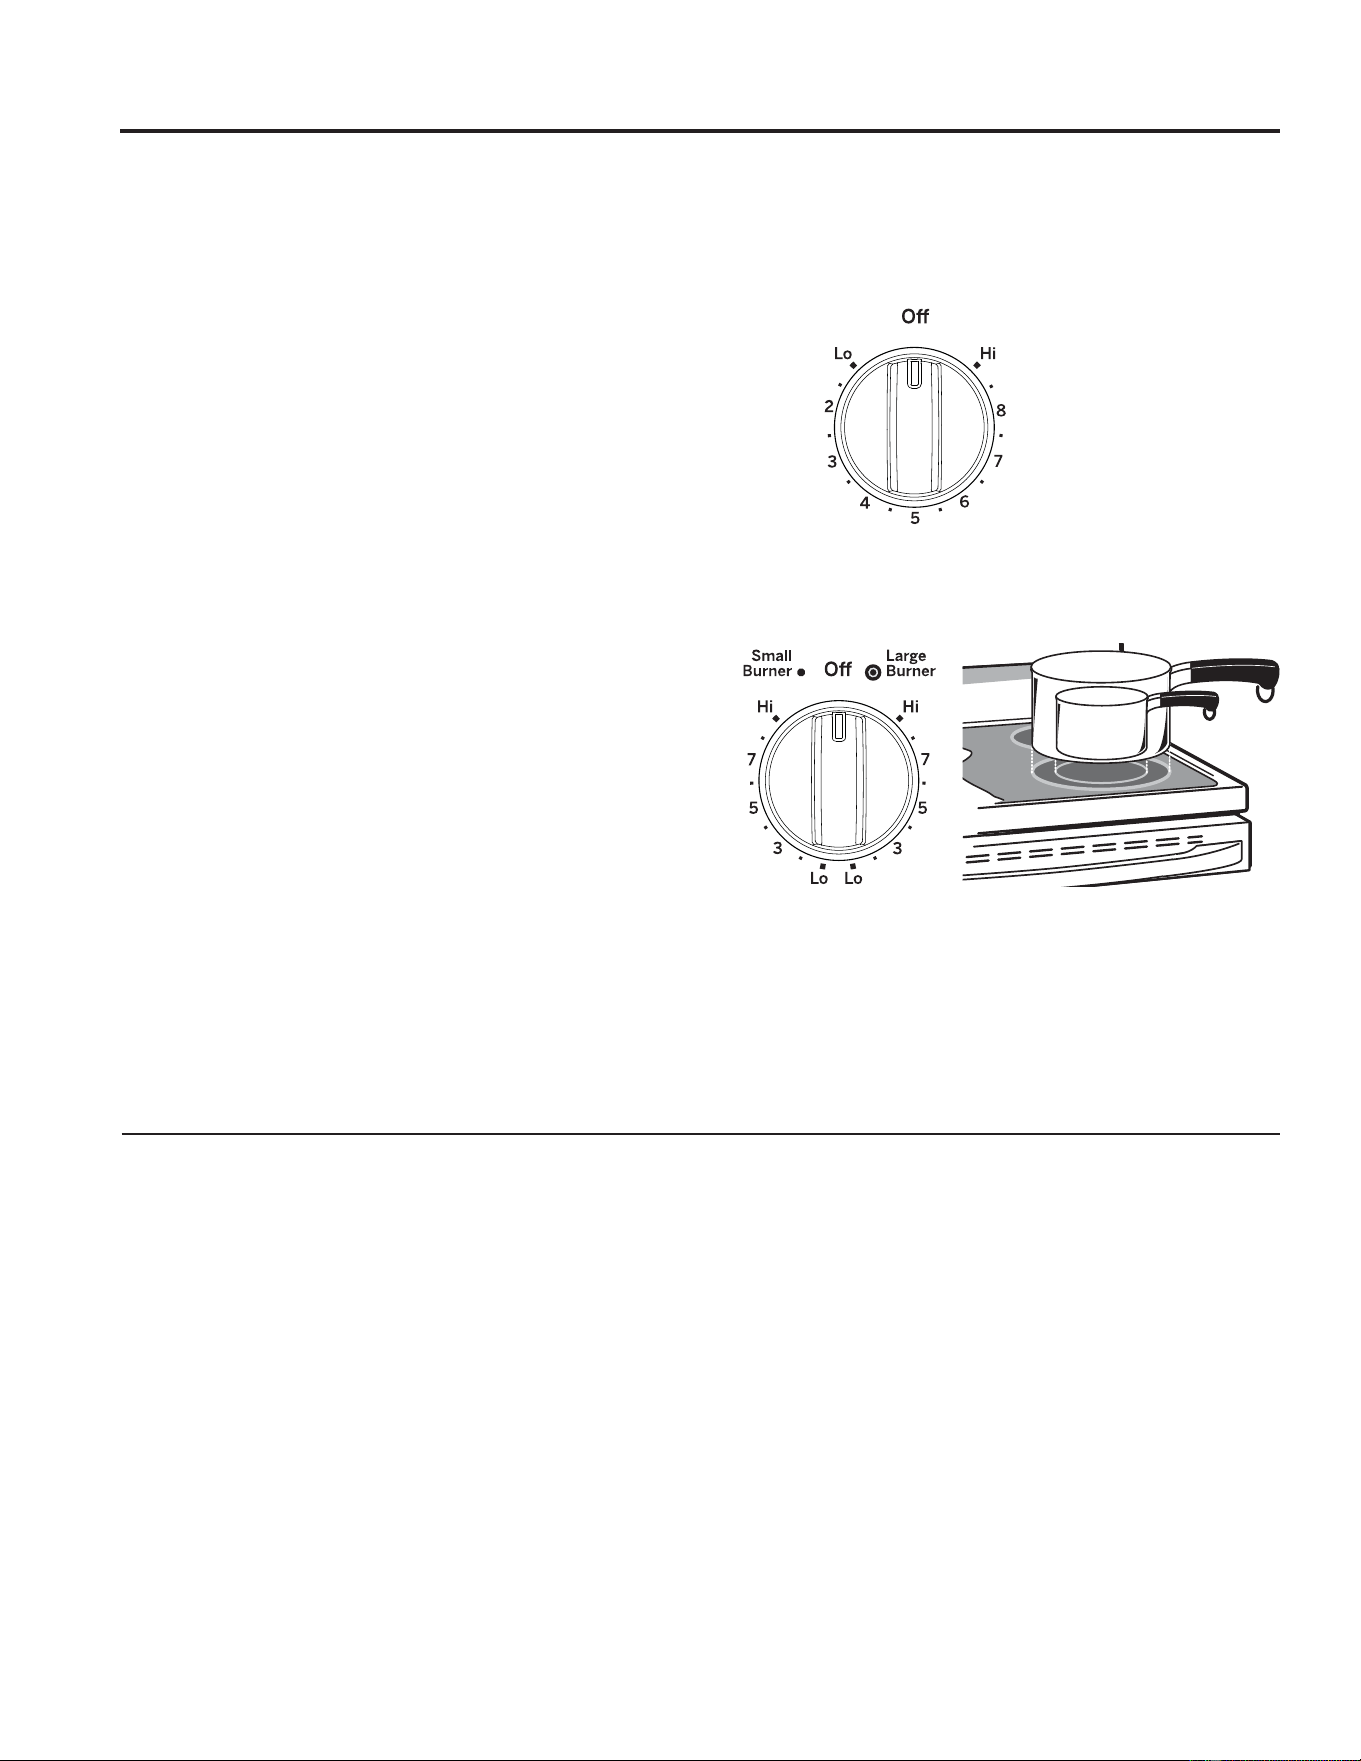
How to Use
To use the cooktop, push the knob in and turn in either
direction to the setting you want. A surface ON indicator
light will appear in the display when any surface unit is
on.
When setting a dual zone surface unit, make sure to
select the small or large surface unit best suited for the
pan being used.
.QREDSSHDUDQFH
may vary.
At both OFF and HI settings, the
control clicks into position. You
may hear slight clicking sounds
during cooking, indicating the
control is maintaining your
desired setting.
%HVXUH\RXWXUQWKHFRQWURO
knob to OFF when you finish
cooking.

49-2001190 Rev. 3 11
Radiant Glass Cooktop
USING YOUR APPLIANCE: Radiant Glass Cooktop
Temperature Limiter
Every radiant surface unit has a separate temperature
limiter for each element. The temperature limiter protects
WKHJODVVFRRNWRSIURPJHWWLQJWRRKRW8QGHUQRUPDO
conditions the temperature limiter will cycle off to
maintain the surface cooking temperature.
The temperature limiters may also cycle the surface units
off for a time if:
Ŷ WKHSDQERLOVGU\
Ŷ WKHSDQERWWRPLVQRWIODW
Ŷ WKHSDQLVRIIFHQWHU
Ŷ WKHUHLVQRSDQRQWKHXQLW
Using the Warming Zone
WARNING
FOOD POISON HAZARD:%DFWHULDPD\JURZLQIRRGDW
temperatures below 140°F. The Warming Zone, located
in the back center of the glass surface, will keep hot,
cooked food at serving temperature. Do not use warm
setting for more than 2 hours. Do not use to heat cold
food. Placing uncooked or cold food on the Warming
Zone could result in foodborne illness.
For best results, all foods on the Warming Zone should
be covered with a lid or aluminum foil. When warming
pastries or breads, the cover should be vented to allow
moisture to escape. The initial temperature, type and
amount of food, type of pan, and the time held will affect
the quality of the food.
To turn the Warming Zone on, press the Warming Zone
pad, the press Start.
Always use pot holders or oven mitts when removing
food from the Warming Zone, since cookware and
plates will be hot.
To turn off the Warming Zone, press the Warming Zone
pad.
NOTE: The surface warmer will not glow red like the
cooking surface units.
NOTE: The Cancel pad does not turn off the Warming
Zone.
12 49-2001190 Rev. 3
USING YOUR APPLIANCE: Cookware for Radiant Glass Cooktop
Cookware for Radiant Glass Cooktop
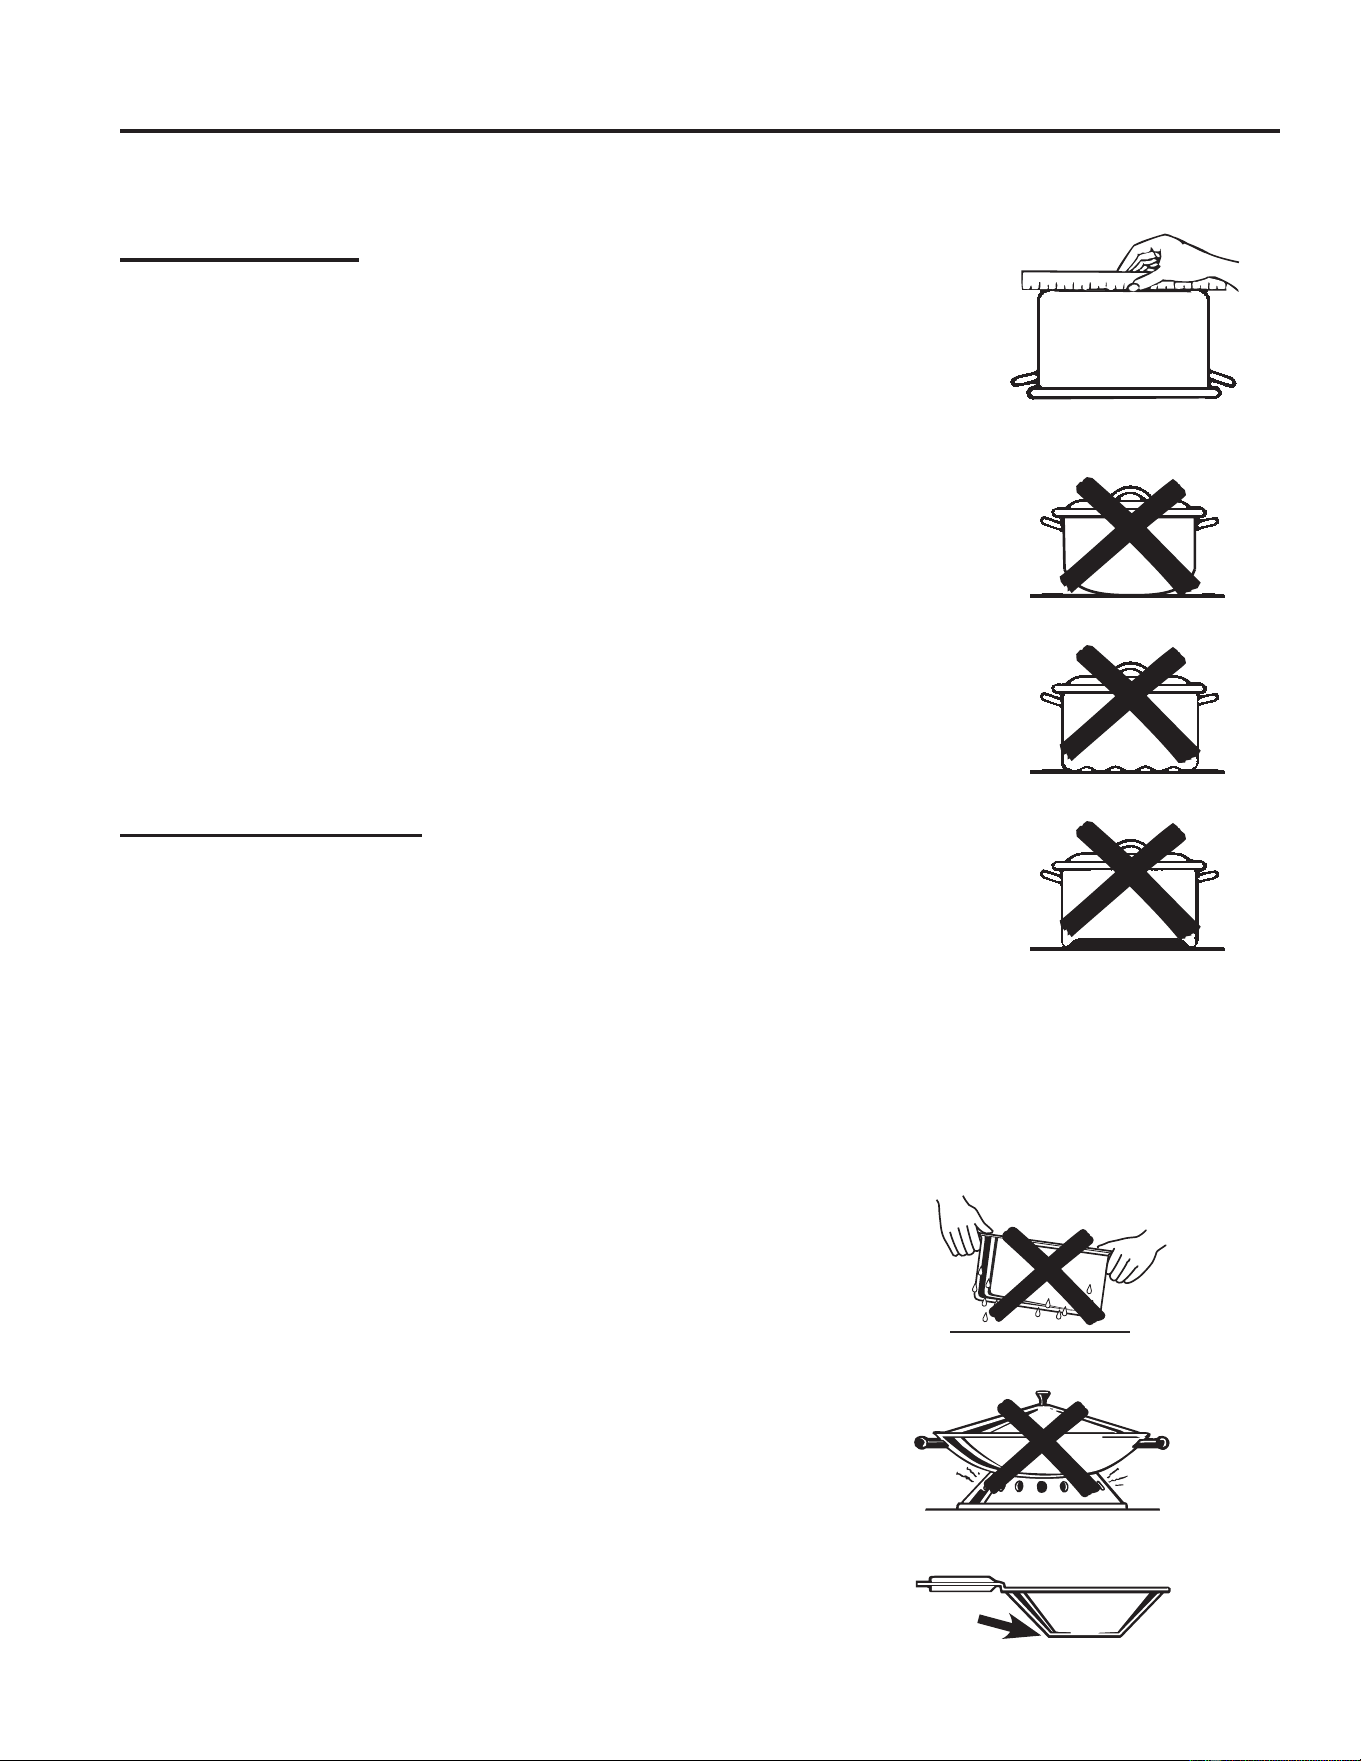
The following information will help you choose cookware which will give good performance on glass cooktops.
NOTE: Follow all cookware manufacturer’s recommendations when using any type of cookware on the ceramic cooktop.
Recommended
Stainless Steel
This metal alone has poor heating properties and is usually combined with copper,
aluminum or other metals for improved heat distribution. Combination metal skillets
usually work satisfactorily if they are used with medium heat or as the manufacturer
recommends.
Aluminum:
Heavy weight recommended. Good conductivity. Aluminum residues sometimes
appear as scratches on the cooktop but can be removed if cleaned immediately.
%HFDXVHRILWVORZPHOWLQJSRLQWWKLQZHLJKWDOXPLQXPVKRXOGQRWEHXVHG
Copper Bottom:
Copper may leave residues which can appear as scratches. The residues can be
removed, as long as the cooktop is cleaned immediately. However, do not let these
pots boil dry. Overheated metal can bond to glass cooktops. An overheated copper
bottom pot will leave a residue that will permanently stain the cooktop if not removed
immediately.
Enamel (painted) on Cast Iron:
Recommended if bottom of pan is coated
Not Recommended
Enamel (painted) on Steel:
Heating empty pans can cause permanent damage to cooktop glass. The enamel
can melt and bond to the ceramic cooktop.
Glass-ceramic:
Poor performance. Will scratch the surface.
Stoneware:
Poor performance. May scratch the surface.
Cast Iron:
Not recommended unless designed specifically for glass cooktops. Slow to absorb
heat. Will scratch the cooktop surface.
For Best Results
Ŷ &RYHULQJDSRWZLWKDOLGZLOOPDNHLWKHDWIDVWHU
Ŷ 3ODFHRQO\GU\SDQVRQWKHVXUIDFHXQLWV'RQRWSODFHOLGVRQWKH
surface units, particularly wet lids. Wet pans and lids may stick
to the surface when cool and may leave mineral deposits on the
cooktop that may affect the cooktop appearance.
Ŷ 'RQRWXVHZRNVWKDWKDYHVXSSRUWULQJV7KLVW\SHRIZRNZLOOQRW
heat on glass surface
units
. We recommend that you use only a
flat-bottomed wok. They are available at your local retail store.
The bottom of the wok should have the same diameter as the
surface
units
to ensure proper contact.
Ŷ 6RPHVSHFLDOFRRNLQJSURFHGXUHVUHTXLUHVSHFLILFFRRNZDUHVXFK
as pressure cookers or deep-fat fryers. All cookware must have
flat bottoms and be the correct size.
Check pans for flat bottoms by
using a straight edge.
Pans with rounded, curved,
ridged or warped bottoms are
not recommended.
Do not place wet pans on the glass cooktop.
Do not use woks with support rings on the glass cooktop.
8VHIODWERWWRPHGZRNVRQWKHJODVVFRRNWRS

49-2001190 Rev. 3 13
USING YOUR APPLIANCE: Oven Cooking Modes
Oven Cooking Modes
Your new oven has a variety of cooking modes to help you get the best results. These modes are described
below. Refer to the Cooking Guide section for recommended rack positions and other tips for using these modes
Remember, your new oven may perform differently than the oven it is replacing.
3ODFHUDFNVLQWKHGHVLUHGSRVLWLRQVSULRUWRVWDUWLQJWKHRYHQ)RUVRPHFRRNLQJPRGHVVXFKDV%DNHWKH
oven will preheat and a tone will sound when the oven is ready for cooking. Some cooking modes do not require
preheating. To reduce preheating times, remove unused racks and avoid opening the oven door until the preheat
tone sounds.
While in use, oven heaters will cycle on and off as needed to maintain appropriate cooking conditions. Avoid
frequently opening the oven door, as this can impact cooking times and performance.
NOTE (on some models): A cooling fan will turn on to cool internal parts when the oven is used. This is normal, and
the fan may continue to run after the oven is turned off.
Bake
7KH%DNHPRGHLVLQWHQGHGIRUEDNLQJDQGURDVWLQJRQD
single rack. To use this mode, press the Bake pad and
use the number pads to set the desired temperature,
then press Start.
Preheating is generally recommended when using this
mode, especially for preparing baked goods such as
cakes, cookies, and pastries.
Broil Modes
0RQLWRUIRRGFORVHO\ZKLOHEURLOLQJ8VHFDXWLRQZKHQ
broiling on upper rack positions as placing food closer
to the broil element increases smoking, spattering, and
fats igniting. For best performance center food below the
broil heating element. Try broiling foods that you would
normally grill. Adjust rack positions to adjust the intensity
RIWKHKHDWWRWKHIRRG$OZD\VXVHWKH%URLOPRGHZLWK
the oven door closed.
Broil High
%URLO+LJKXVHVLQWHQVHKHDWIURPWKHXSSHUHOHPHQWWR
VHDUIRRGV8VH%URLO+LJKIRUWKLQQHUFXWVRIPHDWDQGRU
when you would like to have a seared surface and less
done interior. To use this mode press the Broil pad once
and then press Start.
It is not necessary to preheat when using this mode.
Broil Low
%URLO/RZXVHVOHVVLQWHQVHKHDWIURPWKHXSSHUHOHPHQW
to cook food thoroughly while also browning the surface.
8VH%URLO/RIRUWKLFNHUFXWVRIPHDWDQGRUIRRGVWKDW
you would like cooked all the way through. To use this
mode, press the Broil pad twice and then press Start.
It is not necessary to preheat when using this mode.
Crisp
The Crisp mode is a special mode that is designed to
produce foods with a crispier exterior than traditional
oven cooking. The Crisp mode is intended for single rack
cooking only. To use this mode, press the Crisp pad and
use the number pads to set the desired temperature,
then press Start.
The temperature can be set between 300ºF and 500ºF.
There is a 2 minute preheat for this mode. Follow
recipe or package traditional bake guidelines for set
temperature and cook times. Adjust cook time to achieve
your desired crispness. Additional guidelines for using
this mode can be found in the Crisp Cooking Guide.
Warm
Warm mode is designed to keep hot foods hot. Do not
use warm to heat cold food, other than crisping crackers,
chips, or dry cereal. Cover foods that need to remain
moist and do not cover foods that should be crisp. It is
also recommended that food should not be kept warm
for more than two hours. To use this mode, press the
Warm pad, then press Start.
Preheating is not necessary for this mode.

14 49-2001190 Rev. 3
USING YOUR APPLIANCE: Oven Cookware
Oven Cookware
The material, finish, and size of cookware affect baking
performance. Dark, coated and dull pans absorb heat
more readily than light, shiny pans. Pans that absorb
heat more readily can result in a browner, crisper and
thicker crust. If using dark and coated cookware check
food earlier than the minimum cook time. If undesirable
results are obtained with this type of cookware consider
reducing oven temperature by 25º F next time.
• Shiny pans can produce more evenly cooked baked
goods such as cakes and cookies.
• Glass and ceramic pans heat slowly but retain heat
well. These types of pans work well for dishes such
as pies and custards.
• Air insulated pans heat slowly and can reduce
bottom browning.
• Stoneware heats slowly and retains heat well. It is
recommended to preheat this type of cookware if
possible. Additional cook time may be required.
• Cookware used in broil modes and air fry must be
broil-safe.
.HHSFRRNZDUHFOHDQWRSURPRWHHYHQKHDWLQJ
49-2001190 Rev. 3 15
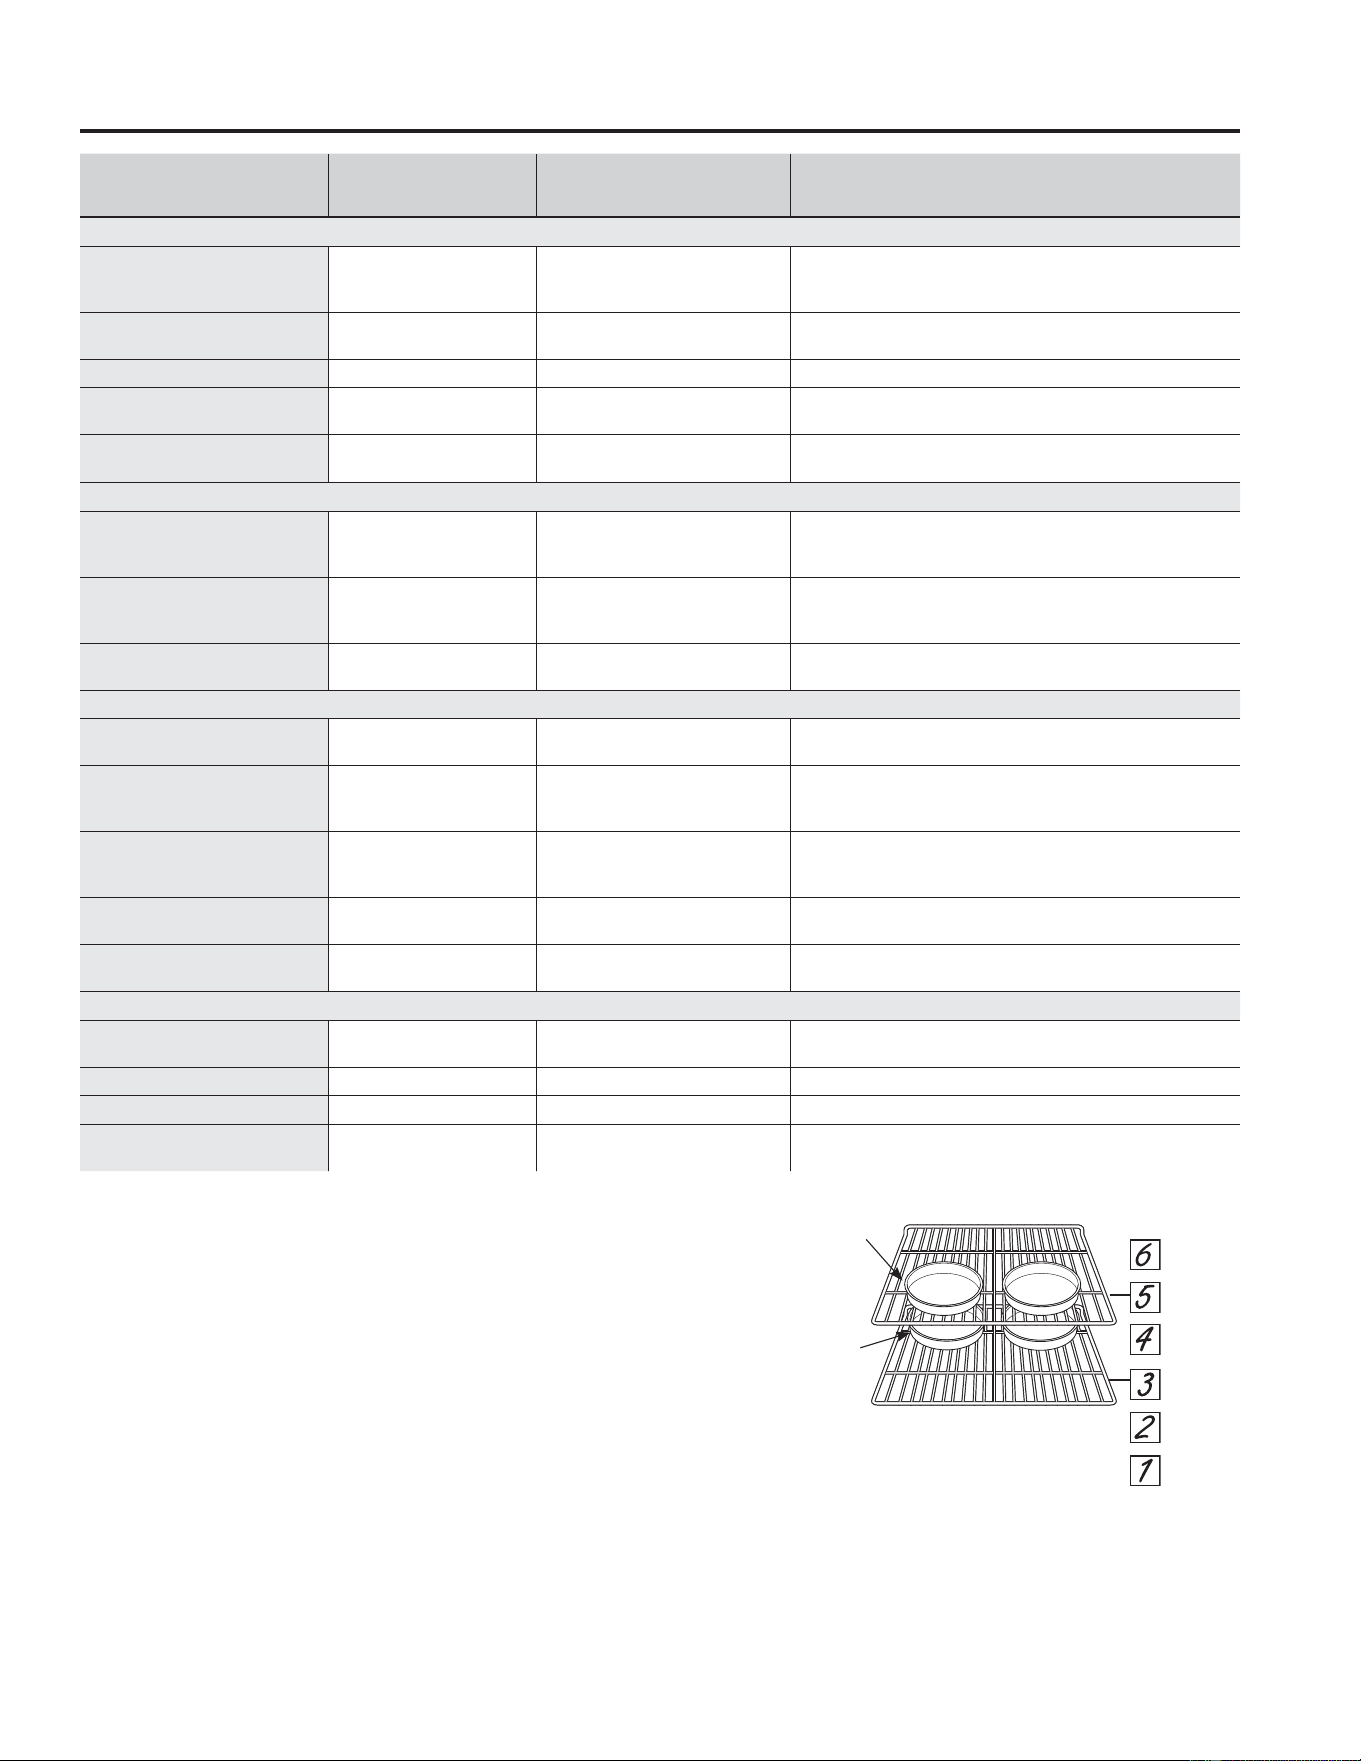
*When baking four cake layers at a time, use racks 3
and 5. Place the pans as shown so that one pan is not
directly above another.
Cook food thoroughly to help protect against food
bourne illness. Minimum safe food temperature
UHFRPPHQGDWLRQVDUHSURYLGHGE\WKH86'$DQG)'$
8VHDIRRGWKHUPRPHWHUWRWDNHIRRGWHPSHUDWXUHVDQG
check several locations.
USING YOUR APPLIANCE: Oven Cooking Guide
Oven Cooking Guide
FOOD TYPE
RECOMMENDED
MODE(S)
RECOMMENDED
RACK POSITION(S) ADDITIONAL SUGGESTIONS
Baked Goods
Layer Cakes, sheet cakes,
bundt cakes, muffins, quick
breads on a Single Rack
%DNH 3 8VHVKLQ\FRRNZDUHDQGHQVXUHDGHTXDWHDLUIORZ
Layer cakes* on Multiple
Racks
%DNH 3 and 5
8VHVKLQ\FRRNZDUHDQGHQVXUHDGHTXDWHDLUIORZ
(see illustration below).
Chiffon cakes (angel food) %DNH 1 8VHVKLQ\FRRNZDUHDQGHQVXUHDGHTXDWHDLUIORZ
Cookies, biscuits, scones on a
Single Rack
%DNH 3 8VHVKLQ\FRRNZDUHDQGHQVXUHDGHTXDWHDLUIORZ
Cookies, biscuits, scones on
Multiple Racks
%DNH 3 and 5 8VHVKLQ\FRRNZDUHDQGHQVXUHDGHTXDWHDLUIORZ
Beef & Pork
Hamburgers %URLO+L 6
8VHDEURLOSDQPRYHIRRGGRZQIRUPRUHGRQHQHVV
less searing. Watch food closely when broiling. For best
performance center food below the broil heater.
Steaks & Chops %URLO+L 5
8VHDEURLOSDQPRYHIRRGGRZQIRUPRUHGRQHQHVV
less searing. Watch food closely when broiling. For best
performance center food below the broil heater.
Roasts %DNH 3
8VHDORZVLGHGSDQVXFKDVDEURLOSDQ3UHKHDWLQJLVQRW
necessary.
Poultry
Whole chicken %DNH 3
8VHDORZVLGHGSDQVXFKDVDEURLOSDQ
Preheating is not necessary.
%RQHLQFKLFNHQEUHDVWVOHJV
thighs
%URLO/R 2
,IEUHDGHGRUFRDWHGLQVDXFHDYRLG%URLO+LPRGHV%URLOVNLQ
side down first. Watch food closely when broiling. For best
performance when broiling, center food below the broil heater.
%RQHOHVVFKLFNHQEUHDVWV
%URLO/R
%DNH
2
,IEUHDGHGRUFRDWHGLQVDXFHDYRLG%URLO+LPRGHV%URLOVNLQ
side down first. Watch food closely when broiling. For best
performance when broiling, center food below the broil heater.
Whole turkey %DNH 1
8VHDORZVLGHGSDQVXFKDVDEURLOSDQ
Preheating is not necessary.
7XUNH\%UHDVW %DNH 2
8VHDORZVLGHGSDQVXFKDVDEURLOSDQ
Preheating is not necessary.
Other
Fish %URLO/R
5 (1/2 thick or less)
4 (>1/2 inch)
Watch food closely when broiling. For best performance center
food below the broil heater.
Casseroles %DNH 3
Frozen Pizza on a single rack %DNH 3
Fresh or Frozen Snacks Crisp See Crisp cooking guide
8VHGDUNFRRNZDUHIRUPRUHEURZQLQJFULVSLQJ
use shiny cookware for less browning.
Rear Placement
Front Placement
Rack positions
16 49-2001190 Rev. 3
Crisp Cooking Guide
USING YOUR APPLIANCE: Crisp Cooking Guide
FOOD TYPE
RECOMMENDED
RACK
POSITION(S)
RECOMMENDED
SET TEMPERATURES
(F°)
RECOMMENDED
COOK TIME
(MIN) NOTES
Fresh boneless fish or
poultry pieces, breaded such
as nuggets, tenders, fillets
4 375-400 15-30
8VHU ORZHU VHW WHPSHUDWXUHV IRU ODUJHU SLHFHV
8VH VKLQ\ FRRNZDUH
Fresh bone in
chicken wings
4 375-400 25-40
Salt wings or coat in a dry rub. If using sauce,
apply after cooking or toward the end of cooking
Fresh bone in chicken
drumsticks or thighs
3 or 4 375-400 30-55
8VHU ORZHU VHW WHPSHUDWXUHV IRU ODUJHU DQG
thicker pieces.
Fresh French fries,
thin (< ½ inch)
4 400-425 15-30
Parchment paper is recommended when
preparing fresh French fries. For crispier fries,
toss fries in corn starch or rice flour before
cooking.
Fresh French fries,
thick (> ½ inch)
4 375-400 20-35
Parchment paper is recommended when
preparing fresh French fries. For crispier fries,
toss fries in corn starch or rice flour before
cooking.
Frozen packaged
foods
3 or 4
(use rack position 3 for
thicker foods)
8VH WUDGLWLRQDO RYHQ QRW $LU )U\ FRRNLQJ LQVWUXFWLRQV DV D JXLGHOLQH IRU VHW WHPSHUDWXUH DQG FRRN WLPH $GGLWLRQDO
cook time beyond recommended package time may be required for some foods. If oven is hot when starting, food
may cook faster than the minimum package time.
Crisp mode is a special cooking mode that is designed
to produce foods with a crispier exterior than traditional
oven cooking. Select Crisp, then input the desired set
temperature and press Start. The temperature can be
set between 300°F and 500°F.
Crisp Cookware Guidelines
• Only use broil safe cookware when using Crisp mode.
• A dark sheet pan is recommended. A dark pan
promotes better browning and crisping.
• Oven baking baskets and baking grids can also be
used. A sheet pan should be placed on the rack below
the foods to catch any drippings when using a baking
basket.
General Tips for Crisp Mode
• The Crisp mode is designed for cooking on a single
rack.
• The Crisp mode has a 2 minute preheat.
5DFN SRVLWLRQ LV UHFRPPHQGHG IRU PRVW IRRGV 8VH
rack position 3 for thicker foods.
• For frozen packaged foods, use traditional oven
cooking instructions for set temperature and expected
cook time. Adjust the cook time to achieve your desired
crispness.
• Foods may cook faster than expected if the oven is
already hot when food is placed in the oven.
• When crisping foods with sauce, it is recommended to
apply the sauce at the end of cooking.
• If foods are browning too quickly, try a lower rack
position or lower oven set temperature.
• It is not necessary to flip or stir food during cooking
• Arrange food in a single layer on the pan, do not
overload the pan.
• Cook food thoroughly to help protect against food
bourne illness. Minimum safe food temperature
UHFRPPHQGDWLRQV DUH SURYLGHG E\ WKH 86'$ DQG )'$
8VH D IRRG WKHUPRPHWHU WR WDNH IRRG WHPSHUDWXUHV DQG
check several locations.
Primary recommended cookware
Alternate cookware options
49-2001190 Rev. 3 17
USING YOUR APPLIANCE: Aluminum Foil / 2YHQ5DFNV2YHQ$LU9HQWV
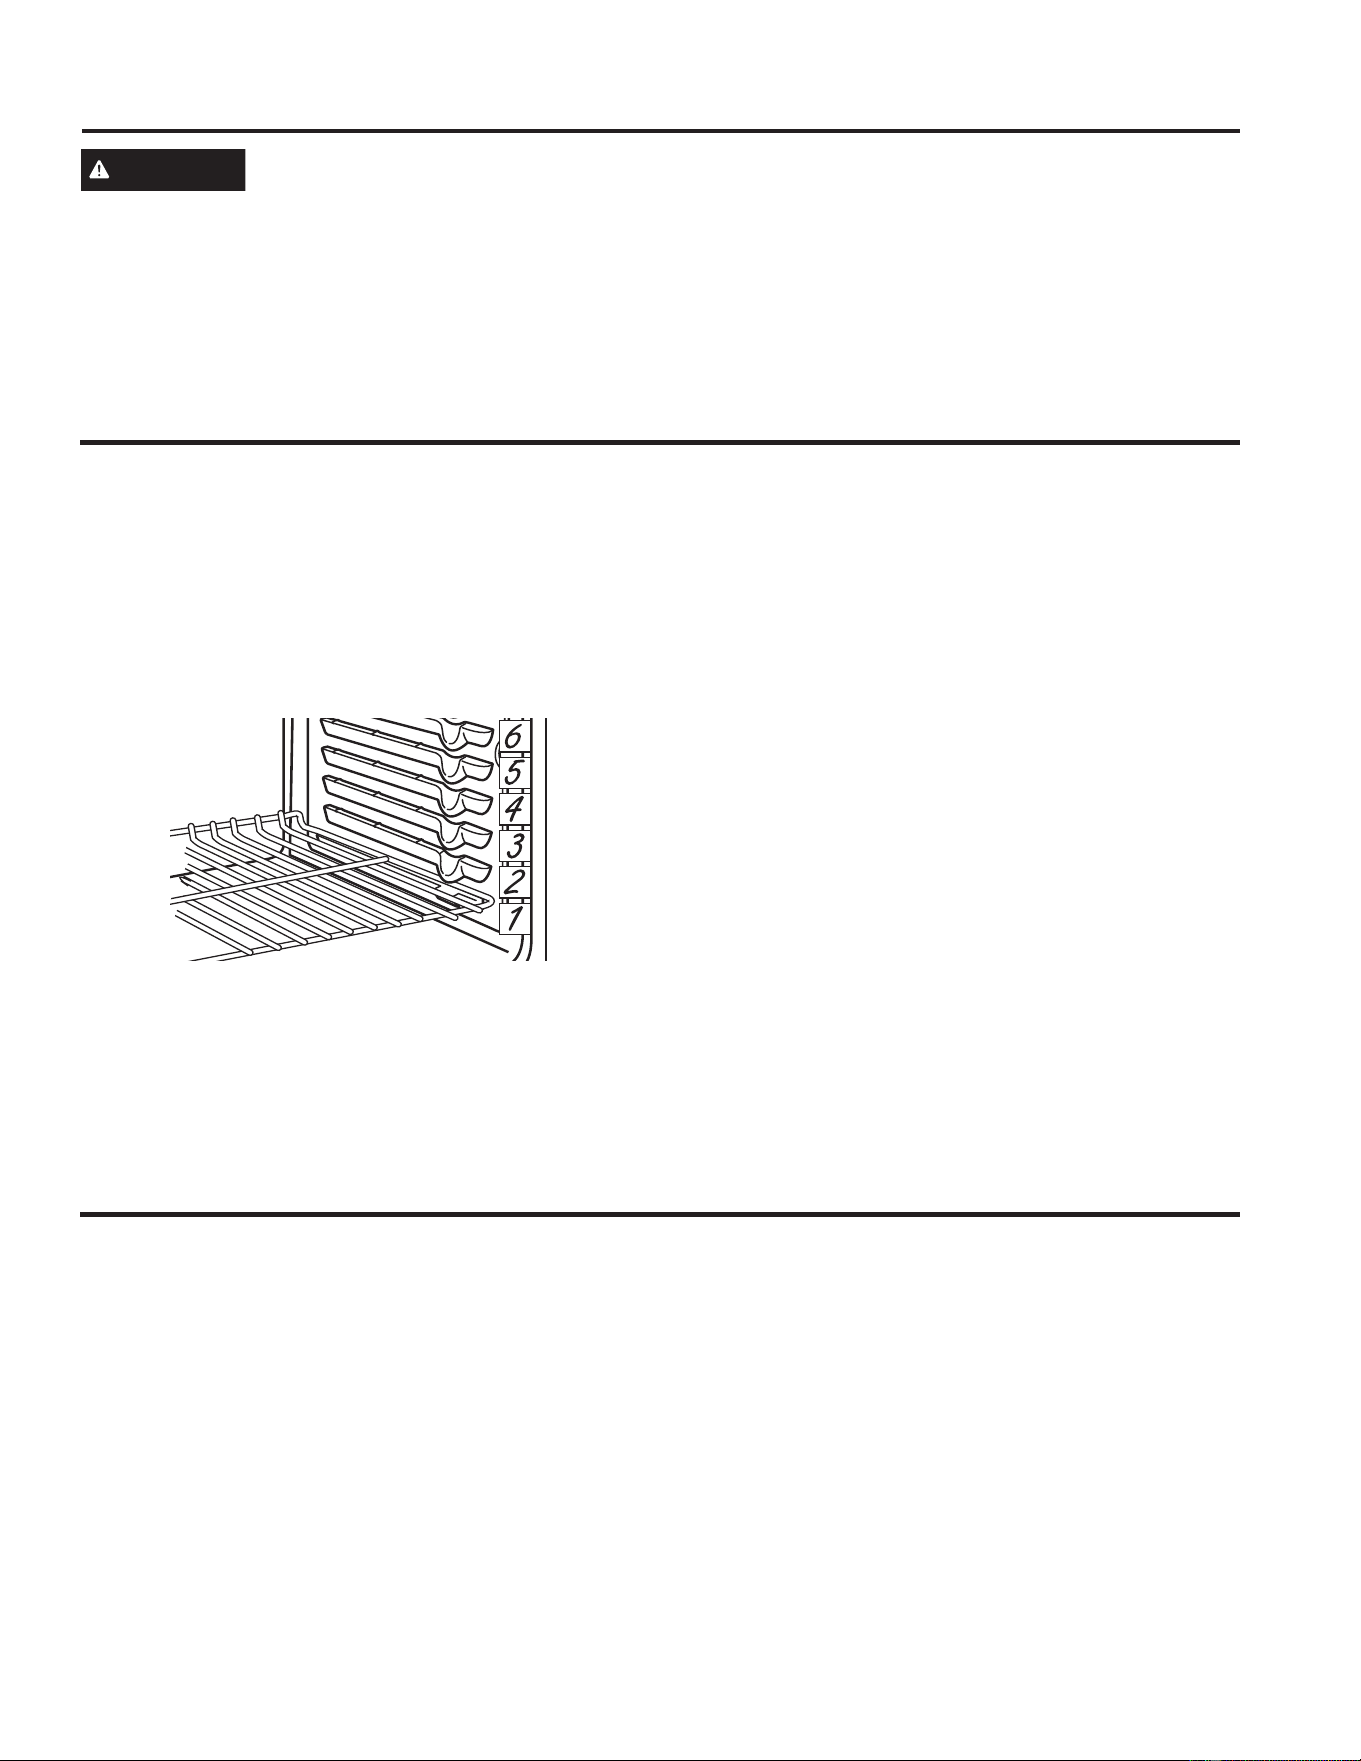
Rack Positions
Your oven has 6 rack positions. Recommended rack
positions for various types of foods are provided in the
Cooking Guide. Adjusting rack position is one way to
impact cooking results. For example, if you would prefer
darker tops on cakes, muffins, or cookies, try moving
food one rack position higher. If you find foods are too
brown on top try moving them down next time.
When baking with multiple pans and on multiple racks,
ensure there is at least 1½" between pans to allow
sufficient space for air to flow. This may improve cooking
evenness. To avoid possible burns, place the racks in
the desired position before you turn the oven on.
Flat Racks
When placing and removing cookware, pull the rack
out to the bump (stop position) on the rack support. To
remove a rack, pull it toward you until it reaches the stop
position, tilt up the front of the rack and pull it out. To
replace a rack, place the curved end of the rack onto the
rack supports. Tilt up the front of the rack and push the
rack in until it stops. Then lay the rack flat and push it in
until it is all the way into the oven.
Racks may become difficult to slide, especially after a
self-clean cycle. To improve sliding conditions, use a soft
cloth or paper towel to rub vegetable oil on the left and
right edges of the racks and/or rack supports. Do not use
other cooking oils like peanut oil, Pam
®
or other lubricant
sprays, since this can cause a discoloring or a rust like
color residue on the racks and cavity sides.
NOTE: Remove unused racks when using the oven
for faster preheat, improved efficiency and optimal
cooking performance. See the Accessories section for
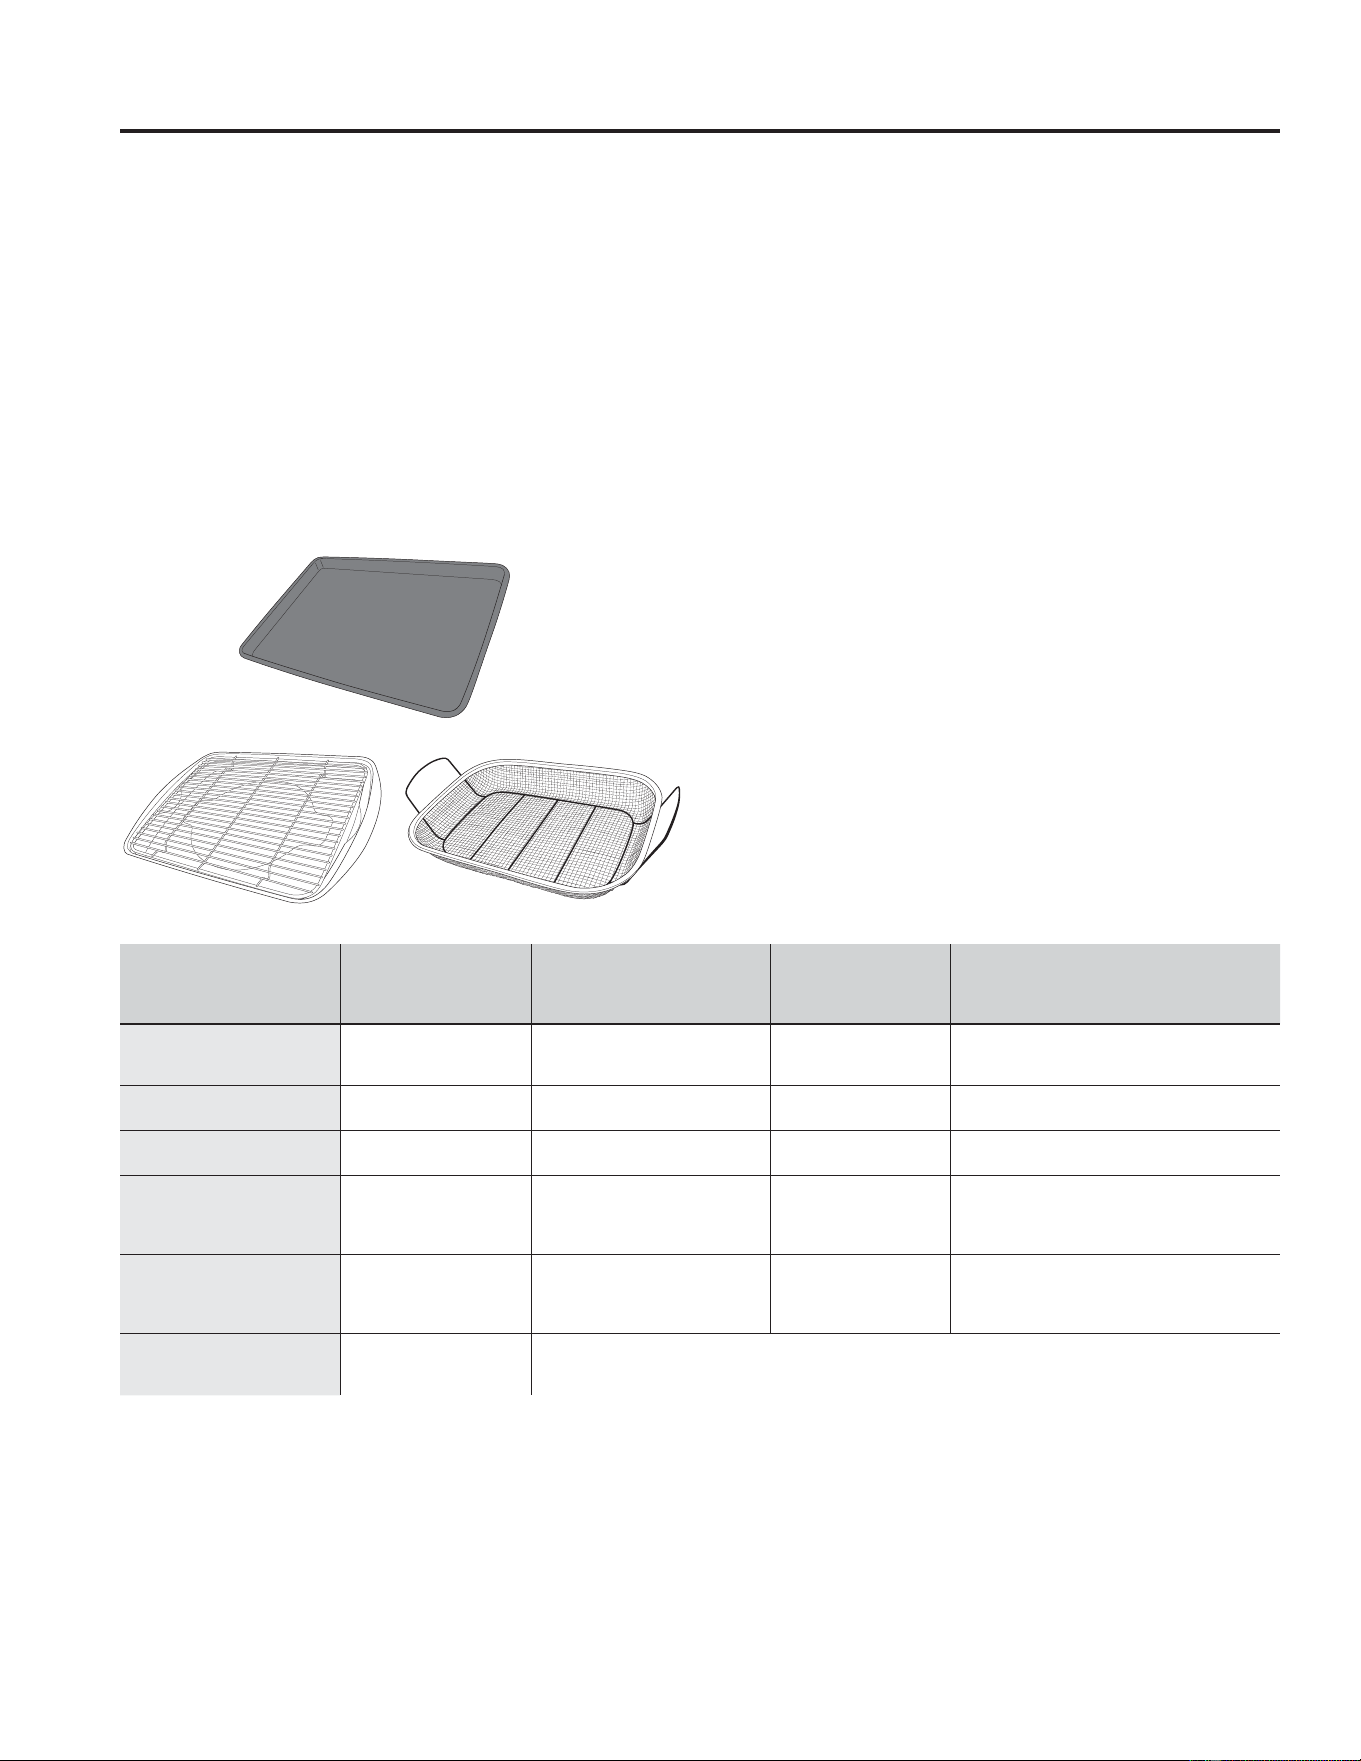
instructions on ordering additional racks.
Never block the vents (air openings) of the range. They provide the air for the inlet and outlet that are necessary for
the range to keep cool and operate properly. Air openings are located at the rear of the cooktop.
Oven Racks
Oven Air Vents
CAUTION
Do not use any type of foil or oven liner to cover the oven bottom. These items can trap heat
or melt, resulting in damage to the product and risk of shock, smoke or fire. Damage from improper use of
these items is not covered by the product warranty.
Foil may be used to catch spills by placing a sheet on a lower rack, several inches below the food. Do not use more
IRLOWKDQQHFHVVDU\DQGQHYHUHQWLUHO\FRYHUDQRYHQUDFNZLWKDOXPLQXPIRLO.HHSIRLODWOHDVW´IURPRYHQZDOOV
to prevent poor heat circulation.
Aluminum Foil and Oven Liners
18 49-2001190 Rev. 3
Cooktop Surfaces - Radiant Glass
Normal, Daily Use Cleaning
To maintain and protect the surface of your glass
cooktop, follow these steps: .
%HIRUHXVLQJWKHFRRNWRSIRUWKHILUVWWLPHFOHDQLW
with a ceramic cooktop cleaner. This helps protect the
glass top and makes cleanup easier.
2. Regular use of ceramic cooktop cleaner will help
keep the cooktop looking new.
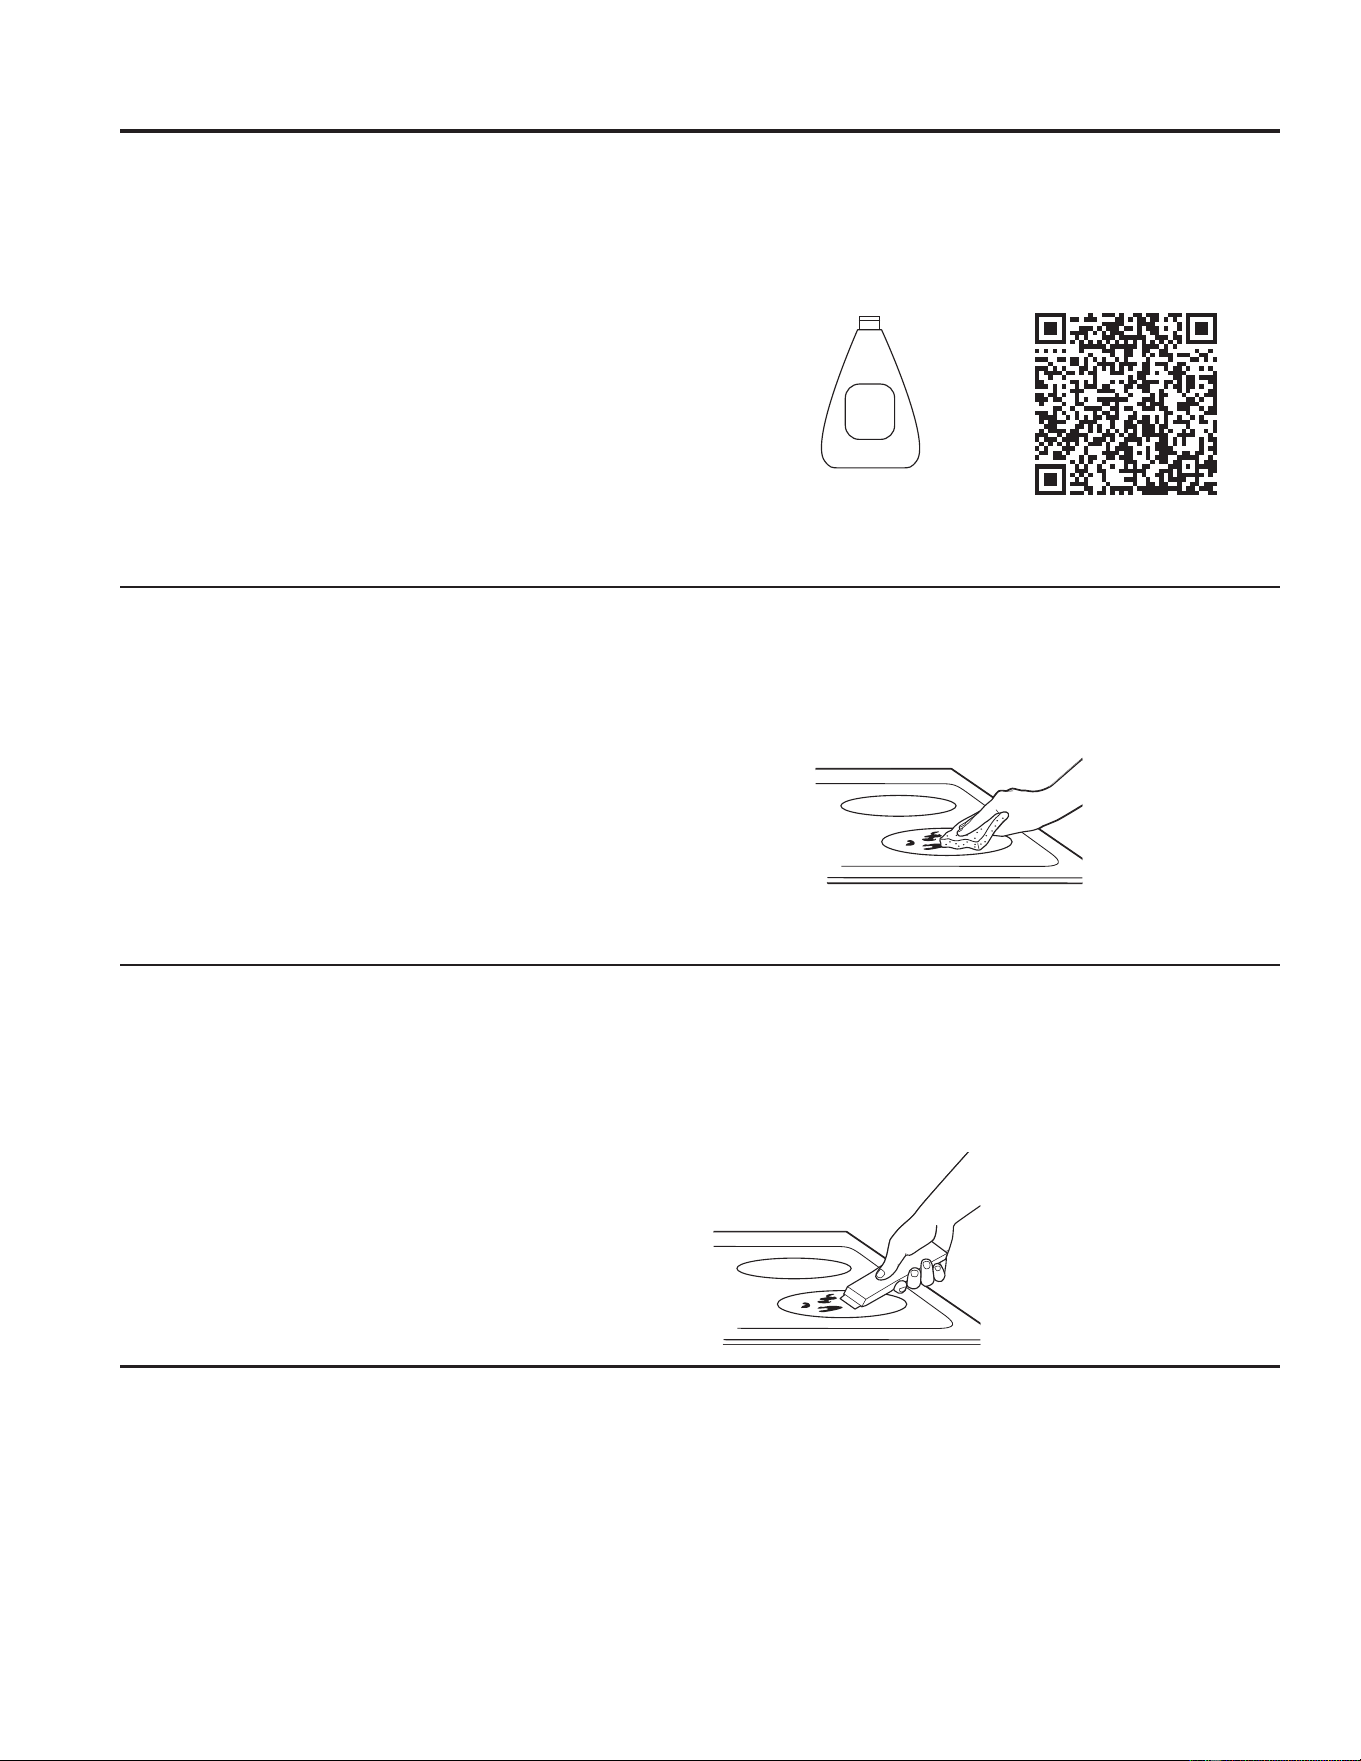
3. Shake the cleaning cream well. Apply a few drops of
ceramic cooktop cleaner directly to the cooktop.
8VHDSDSHUWRZHORUQRQVFUDWFKFOHDQLQJSDGIRU
ceramic cooktops to clean the entire cooktop surface.
8VHDGU\FORWKRUSDSHUWRZHOWRUHPRYHDOOFOHDQLQJ
residue. No need to rinse. NOTE: It is very important
that you DO NOT heat the cooktop until it has been
cleaned thoroughly.
CARE AND CLEANING: Cooktop Surfaces - Radiant Glass
Burned-On Residue
NOTE: DAMAGE to your glass surface may occur if you
use scrub pads other than those recommended.
1. Allow the cooktop to cool.
2. Spread a few drops of ceramic cooktop cleaner on
the entire burned residue area.
8VLQJDQRQVFUDWFKFOHDQLQJSDGIRUFHUDPLF
cooktops, rub the residue area, applying pressure as
needed.
4. If any residue remains, repeat the steps listed above
as needed.
5. For additional protection, after all residue has been
removed, polish the entire surface with ceramic
cooktop cleaner and a paper towel.
Heavy, Burned-On Residue
1. Allow the cooktop to cool.
8VHDVLQJOHHGJHUD]RUEODGHVFUDSHUDWDSSUR[LPDWHO\
a 45° angle against the glass surface and scrape the
soil. It will be necessary to apply pressure to the razor
scraper in order to remove the residue.
3. After scraping with the razor scraper, spread a few drops
of ceramic cooktop cleaner on the entire burned residue
DUHD8VHDQRQVFUDWFKFOHDQLQJSDGWRUHPRYHDQ\
remaining residue.
4. For additional protection, after all residue has been
removed, polish the entire surface with ceramic
cooktop cleaner and a paper towel.
NOTE: Do not use a dull or nicked blade.
8VHDQRQVFUDWFKFOHDQLQJSDGIRU
Ceramic Cooktops.
The ceramic cooktop scraper
and all recommended supplies
are available through our Parts
Center. See the Accessories
and Consumer Support
sections at the end of this
manual.
Clean your cooktop after
HDFKVSLOO8VHDFHUDPLF
cooktop cleaner.
Ceramic
Cooktop
Cleaner
For cleaning videos and
instructions, scan the QR
code with your device.
Metal Marks and Scratches
%HFDUHIXOQRWWRVOLGHSRWVDQGSDQVDFURVV\RXU
cooktop. It will leave metal markings on the cooktop
surface.
These marks are removable using the ceramic
cooktop cleaner with a non-scratch cleaning pad for
ceramic cooktops.
2. If pots with a thin overlay of aluminum or copper
are allowed to boil dry, the overlay may leave black
discoloration on the cooktop.
This should be removed immediately before heating
again or the discoloration may be permanent.
NOTE: Carefully check the bottom of pans for roughness
that would scratch the cooktop.
%HFDUHIXOQRWWRSODFHDOXPLQXPEDNLQJVKHHWVRU
aluminum frozen entrée containers on a hot cooktop
surface. It will leave shinny dots or markings on the
cooktop surface. These markings are permanent and
cannot be cleaned off.
49-2001190 Rev. 3 19
CARE AND CLEANING: Cooktop Surfaces - Radiant Glass
Cooktop Surfaces - Radiant Glass (Cont.)
Damage from Sugary Spills and Melted Plastic
Special care should be taken when removing hot substances to avoid permanent damage of the glass surface.
Sugary spillovers (such as jellies, fudge, candy, syrups) or melted plastics can cause pitting of the surface of your
cooktop (not covered by the warranty) unless the spill is removed while still hot. Special care should be taken when
UHPRYLQJKRWVXEVWDQFHV%HVXUHWRXVHDQHZVKDUSUD]RUVFUDSHU'RQRWXVHDGXOORUQLFNHGEODGH
1. Turn off all surface units. Remove hot pans.
2. Wearing an oven mitt: to protect your skin, use a
single-edge razor blade scraper to move the spill to
a cool area on the cooktop and remove the spill with
paper towels.
3. Any remaining spillover should be left until the surface
of the cooktop has cooled.
4. Don’t use the surface units again until all of the
residue has been completely removed.
NOTE: If pitting or indentation in the glass surface has
already occurred, the cooktop glass will have to be
replaced. In this case, service will be necessary.
Cooktop Perimeter
To clean the edges of the glass cooktop frame, use a
non-scratching cleaning pad for ceramic cooktops or a
soft bristle brush.
NOTE: Do not use a razor blade to clean this area.
20 49-2001190 Rev. 3
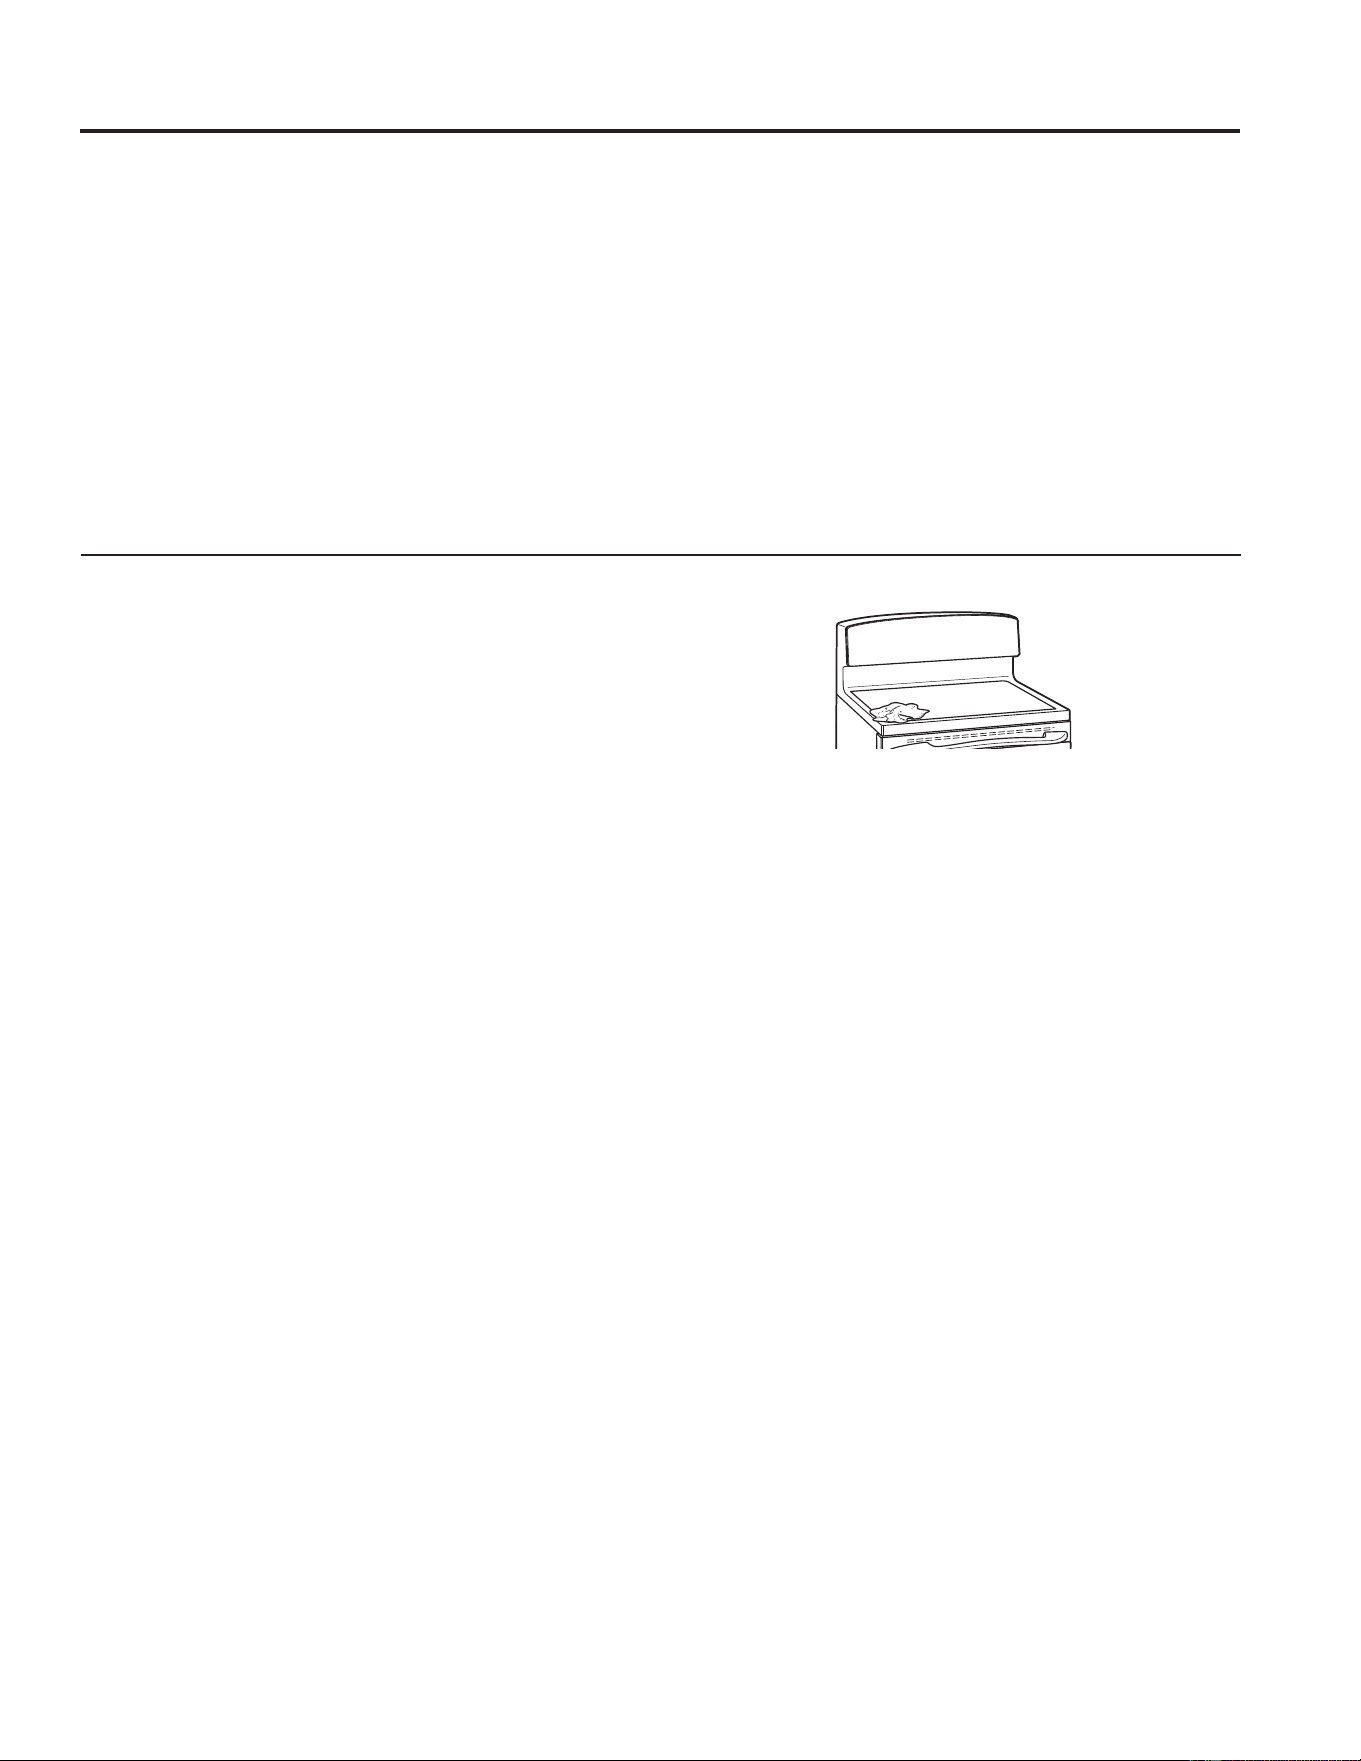
Exterior Surfaces
Control Knobs
The control knobs may be removed for easier cleaning.
Make sure the knobs are in the OFF positions and pull
them straight off the stems for cleaning. The knobs can
be cleaned in a dishwasher or they may also be washed
with soap and water. Make sure the inside of the knobs
are dry before replacing. Replace the knobs, in the OFF
position to ensure proper placement.
Control Panel
It’s a good idea to wipe the control panel after each use.
Clean with mild soap and water or vinegar and water,
rinse with clean water and polish dry with a soft cloth.
Do not use abrasive cleansers, strong liquid cleansers,
plastic scouring pads or oven cleaners on the control
panel - they will damage the finish.
If desired, the touch pads may be deactivated before
cleaning. To lock or unlock the controls, press and hold
the Lock Control pad for three seconds.
Oven Exterior Surfaces
Clean with a mild soap and water or a 50/50 solution of
vinegar and water. Rinse with clean water and dry with
a soft cloth. When cleaning surfaces, make sure that
they are at room temperature. Spillage of marinades,
fruit juices, tomato sauces and basting liquids containing
acids may cause discoloration and should be wiped up
as soon as hot surfaces cool, then clean and rinse. For
other spills such as fat spatterings, wash with soap and
water after the surface has cooled. Rinse well.
Do not use commercial oven cleaners, cleaning powders,
steel wool or harsh abrasives on any exterior surface.
Stainless Steel Surfaces (on some models)
Do not use a steel wool pad; it will scratch the surface.
To clean the stainless steel surface, use warm sudsy
water or a stainless steel cleaner or polish. Always wipe
the surface in the direction of the grain. Follow the cleaner
instructions for cleaning the stainless steel surface.
&OHDQHUVZLWKR[DOLFDFLGVXFKDV%DU.HHSHUV)ULHQG
Soft Cleanser™ will remove surface rust, tarnish and
VPDOOEOHPLVKHV8VHRQO\DOLTXLGFOHDQVHUIUHHRIJULW
and rub in the direction of the brush lines with a damp,
soft sponge. Wipe the appliance surface dry with a soft,
clean cloth or microfiber towel to avoid streaking or water
spotting and making sure to remove all cleaning residue.
CARE AND CLEANING: Exterior Surfaces
%HVXUHDOOFRQWUROVDUHRIIDQGDOOVXUIDFHVDUHFRROEHIRUHFOHDQLQJDQ\SDUWRIWKHUDQJH
WARNING
If your range is removed for cleaning, servicing or any reason, be sure the
anti-tip device is reengaged properly when the range is replaced. Failure to take this precaution
could result in tipping of the range and can result in death or serious burns to children or adults.
NOTE: DO NOT allow stainless steel cleaner to come in contact with any plastic parts such as
the control knobs or control panel. If unintentional contact of cleaners with plastic parts does
occur, clean plastic part with a sponge and mild detergent mixed with warm water.
NOTE: The ceramic cooktop cleaner is NOT recommended for use on external painted surfaces.
Fingerprint Resistant Stainless Steel and Other Finishes (on some models)
DO NOT use stainless steel cleaners on fingerprint
resistant stainless steel surfaces.
IMPORTANT: The use of incorrect products may
damage the outer finish of Fingerprint Resistant
Stainless and other finishes (i.e. white, black stainless,
slate, etc.). Please follow these instructions and use
only the appropriate items below to clean your appliance
surfaces. Clean interior/exterior surfaces with warm
water, mild soap or detergent, and a soft or microfiber
cloth to avoid damage. Wipe the appliance surface
dry with a soft, clean cloth or microfiber towel to avoid
streaking or water spotting and making sure to remove
all cleaning residue.

49-2001190 Rev. 3 21
CARE AND CLEANING: Storage Drawer
Storage Drawer
The storage drawer is a good place to store cookware and bakeware. Do not store plastics or flammable material
in the drawer. Most cleaning can be done with the drawer in place. However, the drawer may be removed if further
FOHDQLQJLVQHHGHGRUWRFOHDQXQGHUQHDWKWKHUDQJH8VHVRDSDQGZDUPZDWHUWRWKRURXJKO\FOHDQ1HYHUXVH
harsh abrasives or scouring pads.
Removing the Storage Drawer:
1. Pull the drawer straight out until it stops.
2. Tilt the front of the drawer upward and pull the drawer
free of the range.
Replacing the Storage Drawer:
1. Center the storage drawer left to right and insert the
drawer into the opening, setting the drawer guides on
the rails.
.HHSWKHGUDZHUOHYHODQGSXOOLWWRZDUGV\RXUVHOI
until you feel the drawer guides catch and settle on
the rails.
3. Push the drawer closed.
Guide
Rail

22 49-2001190 Rev. 3
The interior of your new oven can be cleaned manually or by using the Steam Clean mode or the Self Clean mode.
Spillage of marinades, fruit juices, tomato sauces and basting liquids containing acids may cause discoloration and
should be wiped up as soon as safely possible. Let hot surfaces cool, then clean and rinse.
Manual Cleaning
Do not use oven cleaners (unless certified for use in
a self-cleaning oven), abrasive cleaners, strong liquid
cleansers, steel wool, scouring pads, or cleaning
powders on the interior of the oven. Clean with a mild
soap and water or a 50/50 solution of vinegar and water.
Rinse with clean water and dry with a soft cloth. When
cleaning surfaces, make sure that they are at room
temperature.
Steam Clean Mode
Steam clean is intended to clean small spills using water
and a lower cleaning temperature than Self-Clean. The
steam clean cycle is designed to sufficiently heat the
water added to the oven bottom at the beginning of the
steam clean cycle, so that it increases in temperature
and can then condense onto food soils, softening them
and making them easier to remove.
To use the Steam Clean feature, allow the oven to cool
so that you can wipe grease and soils from the oven
bottom and to avoid pouring cold water onto a hot oven
bottom to prevent possible thermal shock and enamel
cracking. Pour 1/2 cup of water into the bottom of the
oven. Close the door.
Press the Clean Self/Steam pad twice and then press
Start. You should not open the door during the 30
minute steam clean as this will decrease the steam
clean performance. Wipe out any excess water and any
remaining soil.
NOTE: Water in the bottom of the oven may be hot right
after finishing the cycle.
Self Clean Mode
Read Self-Cleaning Oven Safety Instructions at the
beginning of this manual before using Self Clean Mode.
Self Clean uses very high temperatures to clean the
oven interior. The oven door will lock when using this
feature.
%HIRUHRSHUDWLQJWKHVHOIFOHDQF\FOHZLSHXSJUHDVH
and soils from the oven. Remove all items from the
oven other than enameled (dark color) racks. Shiny or
silver racks, and any cookware or other items should all
be removed from the oven before initiating a self-clean
cycle. Failure to remove items other than enameled (dark
racks) can result in permeant discoloring of shiny racks
and damage to cookware.
Close the door, press the Clean Self/Steam pad once
and then press Start.
The oven door will lock for the duration of the self-clean
cycle and will unlock after the oven cavity has cooled
down adequately.
The surface units are automatically disabled during the
self-clean cycle. Make sure that all surface unit controls
are turned off at all times during the self-clean cycle.
Wait until the self-clean cycle is finished to set and use
the surface units.
Interior Surfaces
Oven Racks
All racks can be washed with warm, soapy water. All
oven racks may be cleaned by hand with an abrasive
cleaner or steel wool. Nickel-plated (silver) racks should
not remain in the oven during the self clean cycle. Doing
so will tarnish the racks. Racks may be more difficult to
slide, especially after a Steam Clean or a Self-Clean.
Put some vegetable oil on a soft cloth or paper towel and
rub onto the left and right edges of the racks.
NOTE: 8VLQJRWKHUFRRNLQJRLOVOLNHSHDQXWRLO3DP
®
or
other lubricant sprays, will cause a discoloring or a rust
like color residue on the racks and cavity sides. To clean
this residue, use a soap and water or a vinegar and
water solution. Rinse with clean water and dry with a soft
cloth.
Oven Heating Elements
Do not clean the bake element or the broil element. Any
soil will burn off when the elements are heated. To clean
the oven floor, gently lift the bake element. Clean with
warm, soapy water.
Gently lift the bake element
CARE AND CLEANING: Interior Surfaces
49-2001190 Rev. 3 23
Porcelain Oven Interior
With proper care, the porcelain enamel finish on the
inside of the oven - top, bottom, sides, back and inside
of the door - will stay new-looking for years. Let the
oven cool before cleaning. We recommend that you
wear rubber gloves when cleaning the oven. Soap
and water will normally do the job. Heavy spattering
or spillovers may require cleaning with a mild abrasive
cleaner. Soap-filled scouring pads may also be used.
Do not allow food spills with a high sugar or acid content
(such as tomatoes, sauerkraut, fruit juices or pie filling)
to remain on the surface. They may cause a dull spot
even after cleaning. Household ammonia may make the
cleaning job easier. Place 1/2 cup in a shallow glass or
pottery container in a cold oven overnight. The ammonia
fumes will help loosen the burned-on grease and food. If
necessary, you may use an oven cleaner that is certified
for use in a self-cleaning oven. Follow the package
directions.
• Do not spray oven cleaner on the electrical controls
and switches because it could cause a short circuit
and result in sparking or fire.
• Do not allow a film from the cleaner to build up on
the temperature sensor - it could cause the oven to
heat improperly. (The sensor is located at the top of
the oven.) Carefully wipe the sensor clean after each
oven cleaning, being careful not to move the sensor
as a change in its position could affect how the oven
bakes.
• Do not spray any oven cleaner on the oven door,
handles or any exterior surface of the oven, cabinets
or painted surfaces. The cleaner can damage these
surfaces.
Interior Surfaces
CARE AND CLEANING: Interior Surfaces / Oven Door
7KH GRRU LV YHU\ KHDY\ %H FDUHIXO ZKHQ UHPRYLQJ DQG OLIWLQJ WKH GRRU 'R QRW OLIW WKH GRRU E\ WKH KDQGOH
To Clean the Door Exterior and Interior
8VH VRDS DQG ZDWHU WR WKRURXJKO\ FOHDQ WKH WRS VLGHV
and front of the oven door. Rinse well. You may also use
a glass cleaner to clean the glass on the outside of the
door. Do not let water drip into the vent openings, holes,
or slots in the door.
• If a stain on the door vent trim is persistent, use a
mild abrasive cleaner and a sponge-scrubber for best
results. Do not use this method on any other surface.
• Spillage of marinades, fruit juices, tomato sauces
and basting materials containing acids may cause
discoloration and should be wiped up as soon as
safely possible. When the surface is cool, clean and
rinse.
• Do not use oven cleaners, cleaning powders or harsh
abrasives on the outside of the door.
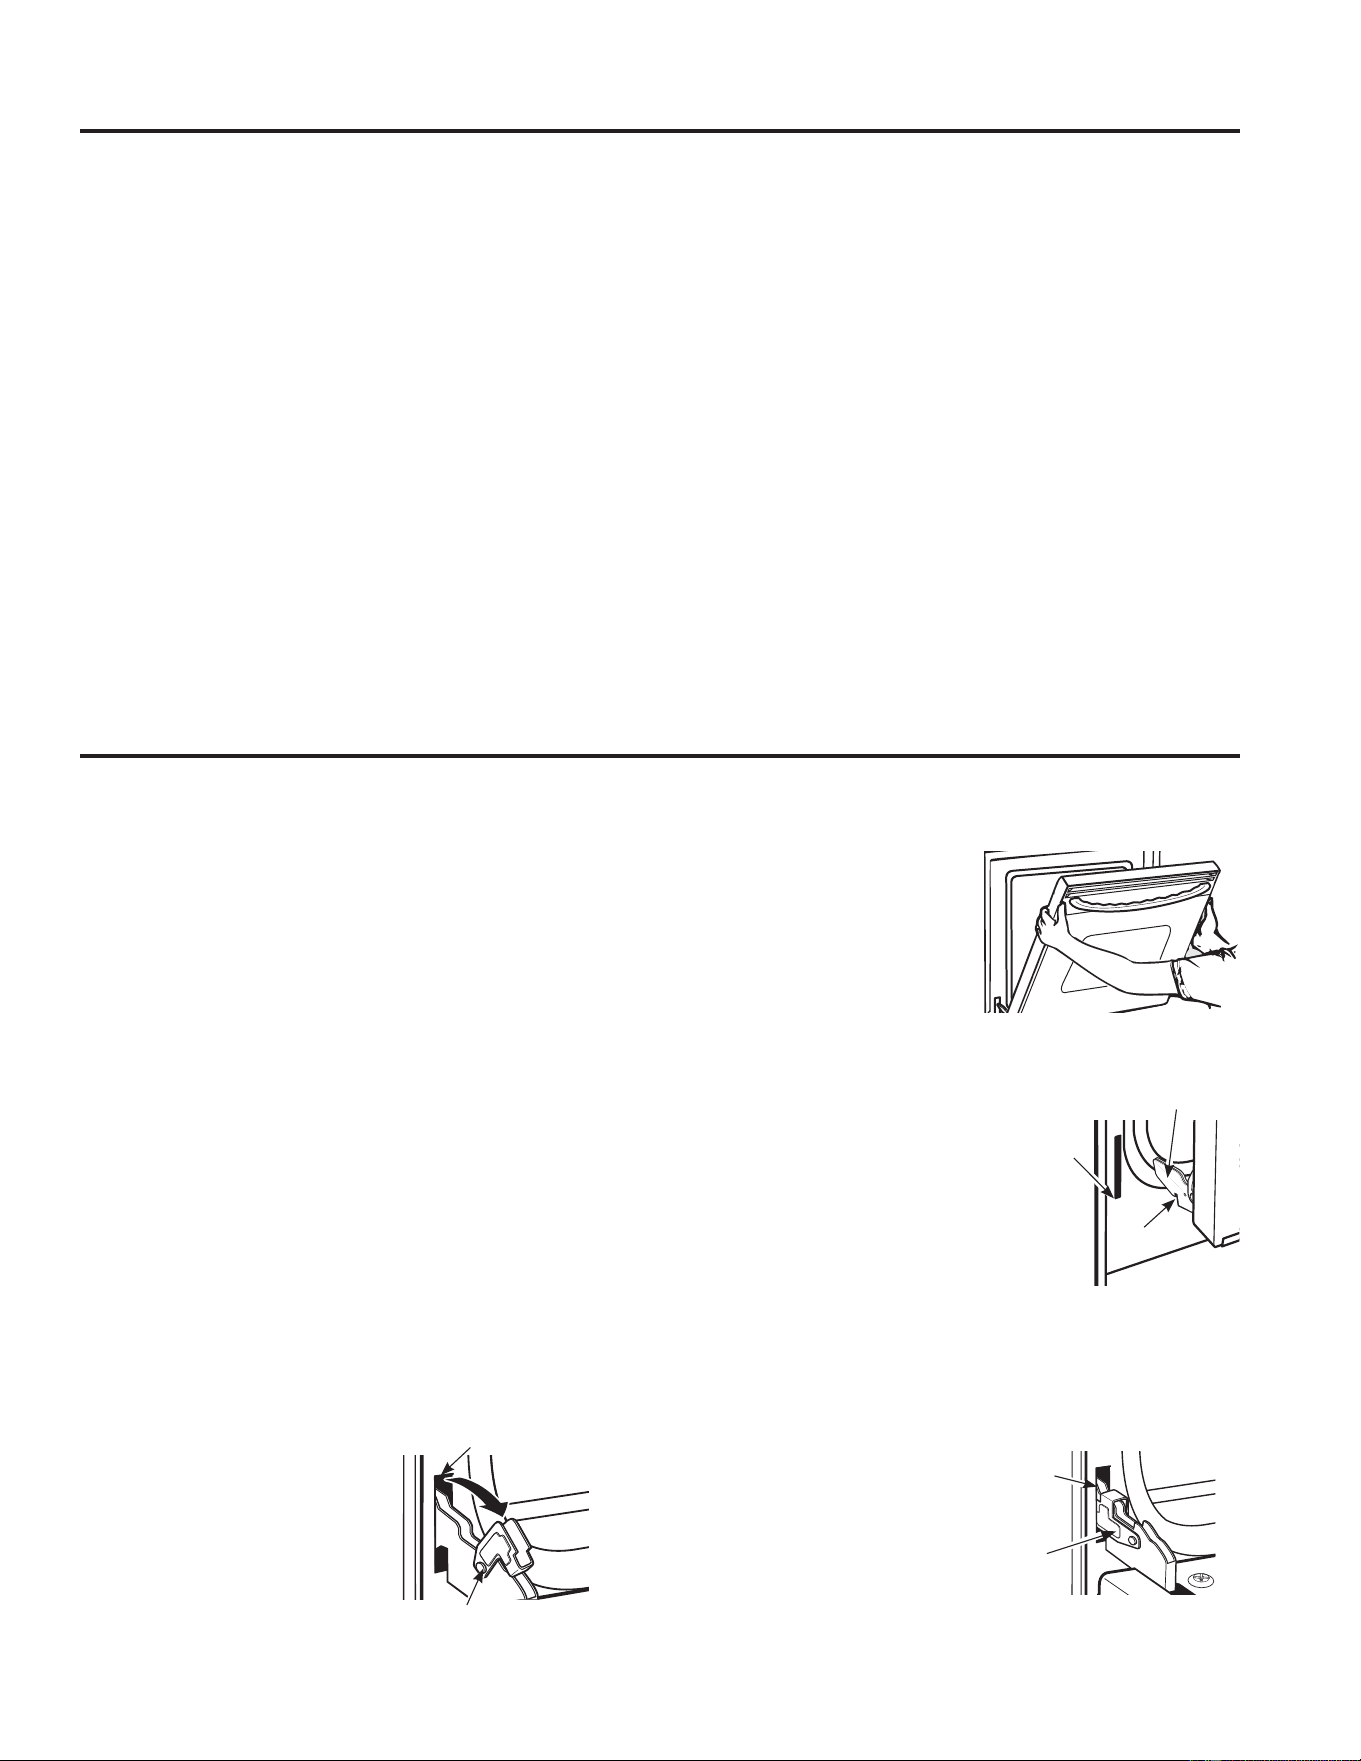
To remove the door:
NOTE: Door removal is not a requirement for installation
of the product but is an added convenience.
1. Fully open the door.
2. Pull the hinge locks down
toward the door frame, to
the unlocked position. A
tool, such as a small flat-
blade screwdriver, may
be required.
3. Firmly grasp both sides of
the door at the top.
4. Close door to the door removal position. The
door should be open
approximately 3" with no
obstruction above the door.
5. Lift door up and out until
both hinge arms are clear
of the slots in the range
frame.
To replace the door:
1. Firmly grasp both sides of the
door at the top.
2. With the door at the same
angle as the removal position,
rest the notch in the bottom
of the left hinge arm on the
bottom edge of the left hinge
slot. The notch in the hinge
arm must be fully seated onto the bottom of the slot.
Repeat for the right side.
3. Fully open the door. If the door will not fully open,
the notches in the bottoms of the hinge arms are not
seated correctly onto the
bottom edge of the slot. Lift
the door off the range and
repeat the previous step.
4. Push the hinge locks down to
the locked position.
5. Close the oven door.
Removal position
Oven Door
Hinge lock
Slot
Pull hinge locks down to unlock
Notch
%RWWRP
edge of
slot
Hinge arm
Push hinge locks
down to lock
Hinge
lock
Hinge
arm
24 49-2001190 Rev. 3
Oven Light
CARE AND CLEANING: Oven Light
WARNING
SHOCK OR BURN HAZARD:%HIRUHUHSODFLQJRYHQOLJKWEXOEGLVFRQQHFWWKHHOHFWULFDOSRZHUWRWKH
oven at the main fuse or circuit breaker panel. Failure to do so may result in electric shock or burn.
CAUTION
BURN HAZARD: The glass cover and bulb should be removed when cool. Touching hot glass with
bare hands or a damp cloth can cause burns.
To Remove the Light Bulb
1. Turn the glass cover counterclockwise until the glass
is removed. Wearing latex gloves may offer a better
grip.
8VLQJJORYHVRUDGU\FORWKUHPRYHWKHEXOEE\SXOOLQJ
it straight out.
To Replace the Light Bulb
8VHDQHZYROWKDORJHQEXOEQRWWRH[FHHG
50 watts. Replace the bulb with the same type of bulb
WKDWZDVUHPRYHG%HVXUHWKHUHSODFHPHQWEXOELV
rated 120 volts or 130 volts (NOT 12 volts) and has a
G9 base.
8VLQJJORYHVRUDGU\FORWKUHPRYHWKHEXOEIURPLWV
packaging. Do not touch the bulb with bare fingers. Oil
from skin will damage the bulb and shorten its life.
3. Push the bulb straight into the receptacle all the way.
4. Replace the glass cover. For improved lighting inside
the oven, clean the glass cover frequently using a
wet cloth. This should be done when the oven is
completely cool and the light is off.
5. Reconnect electrical power to the oven.
*%XOE
Socket
Glass cover
Receptacle
49-2001190 Rev. 3 25
TROUBLESHOOTING TIPS
Troubleshooting Tips ... %HIRUH\RXFDOOIRUVHUYLFH
Save time and money! Review the charts on the following pages first and you may not need to call for service.
Check out self-help videos and FAQ at GEAppliances.com/support.
Problem Possible Cause What To Do
Food does not cook
properly
Your new oven has a different cooking system
from your old oven and therefore may cook
differently than your old oven.
For the first few uses, follow your recipe times and
temperatures carefully. If you still think your new oven
is too hot or too cold, you can adjust the temperature
yourself to meet your specific cooking preference. See the
Settings section.
Oven controls improperly set. See the Cooking Modes section.
Rack position is incorrect or rack is not level. See the Cooking Modes section and Cooking Guide.
Incorrect cookware or cookware of improper size
being used.
See the Oven Cookware section.
Oven temperature needs adjustment. See the Settings section.
Ingredient substitution Substituting ingredients can change the recipe outcome.
Cakes are lopsided/uneven Appliance was not properly leveled when installed Level the oven. Reference the Installation Instructions for
the appliance.
Racks slide in or out on
their own
Appliance was not properly leveled when installed Level the oven. Reference the Installation Instructions for
the appliance.
Sometimes the oven takes
longer to preheat to the
same temperature
Cookware or food in oven. The cookware or food in the oven will cause the oven to take
longer to preheat. Remove items to reduce preheat time.
Number of racks in oven. Adding more racks to the oven will cause the oven to take
longer to preheat. Remove some racks.
8VLQJDQH[WHQVLRQUDFNLQVWHDGRIDIODWUDFN The extension rack is heavier than a flat rack and takes
more energy to heat. This is normal. To decrease preheat
time, use a flat rack.
Different cooking modes. The different cooking modes use different preheat
methods to heat the oven for the specific cooking mode.
Some modes will take longer than others.
Food does not broil
properly
Oven controls improperly set. Make sure you select the appropriate broil mode. See the
Cooking Modes section.
Improper rack position being used. See Cooking Guide for rack location suggestions.
Food being cooked in a hot pan. Make sure cookware is cool.
Cookware not suited for broiling. 8VHDSDQVSHFLILFDOO\GHVLJQHGIRUEURLOLQJ
Aluminum foil used on the broiling pan and
grid has not been fitted properly and slit as
recommended.
If using aluminum foil conform to pan slits.
Excessive smoking during
broiling
Food too close to the broil element. Lower the rack position of the food.
Strong odor An odor from the insulation around the inside of
the oven is normal for the first few times the oven
is used.
This is temporary and will go away after several uses or
UXQD%DNHDQGRU%URLO+LIRUPLQXWHV
Display is blank and the
oven does not work or
respond
A fuse in your home may be blown or the circuit
breaker tripped.
Replace the fuse or reset the circuit breaker.
Plug on range is not completely inserted in the
electrical outlet.
Make sure electrical plug is plugged into a live, properly
grounded outlet.
Display is blank The clock is turned off. See the Settings section.
Oven control does not
respond
Oven is in Sabbath Mode. 9HULI\WKDWWKHRYHQLVQRWLQ6DEEDWK0RGH6HHWKH
Sabbath Mode section.
Lock Controls is activated
If Loc appears in the display and
is illuminated, the
range control is locked. Turn this feature off to use the
range. See the Lock Control feature in the Oven Controls
section.
Display flashes Power outage or surge Reset the clock. If the oven was in use, you must reset it by
pressing the Cancel pad, setting the clock and resetting any
cooking function.
Unable to get into Settings Oven control pads were not touched properly. 7KH%DNHDQG%URLOSDGVPXVWEHWRXFKHGDWWKHVDPHWLPH
and held for 3 seconds.
Control beeps or flashes You forgot to enter a bake temperature or cleaning
time.
See the Oven Controls section on how to set the oven
26 49-2001190 Rev. 3
Troubleshooting Tips ... %HIRUH\RXFDOOIRUVHUYLFH
TROUBLESHOOTING TIPS
Problem Possible Cause What To Do
Fan Noise A cooling fan may automatically turn on and off. This is normal on models with a cooling fan. The cooling fan
will turn off and on to cool internal parts. It may run after the
oven is turned off.
“Crackling” or “popping”
sound
This is the sound of the metal heating and cooling
during both the cooking and cleaning functions.
This is normal.
Why is my range making a
"clicking" noise when using
my oven?
Your range cycles the heating elements by turning
relays on and off to maintain the oven temperature.
This is normal.
Oven light does not work Light bulb is loose or defective. Tighten or replace bulb. See the Care and Cleaning - Interior
Surfaces / Oven Light section for instructions on how to
replace the bulb.
Pad operating light is broken. Call for service.
Oven will not self-clean The temperature is too high to set a self-clean
operation.
Allow the oven to cool and reset the controls.
Oven controls improperly set. See the Care and Cleaning – Interior Surfaces section.
Oven door will not open or
light is on when you want
to cook.
The oven door is locked because the temperature
inside the oven has not dropped below the unlocking
temperature.
Press the Cancel pad. Allow the oven to cool below the
unlocking temperature.
flashes in the display
The self-clean cycle has been selected but the door
is not closed.
Close the oven door.
Oven door will not open after
a self-clean cycle
Oven too hot. 9HULI\WKDWWKHFRQWUROGLVSOD\VKRZVWKDWWKHXQLWLVVWLOOORFNHG
, and allow the oven to cool below unlocking temperature.
Excessive smoking during
self-clean cycle
Excessive soil or grease in oven cavity. Press the Cancel pad. Open the windows to rid the room of
smoke. Wait until the
light goes off. Wipe up the excess
soil or grease in the oven cavity and then reset the self-clean
cycle.
Oven not clean after a self-
clean cycle
Oven was heavily soiled. Clean up heavy spillovers before starting the clean cycle.
Heavily soiled ovens may need to self-clean again or for a
longer period of time.
Oven controls improperly set. See the Care and Cleaning – Interior Surfaces section.
Oven racks are difficult to
slide
The shiny, silver-colored racks were cleaned in a self-
clean cycle.
Apply a small amount of vegetable oil to a paper towel and
wipe the edges of the oven racks with the paper towel. Do
not spray with Pam® or other lubricant sprays or use peanut
oil. See the Care and Cleaning – Interior Surfaces section.
Dirty cavity and/or flat racks that need cleaning and
lubrication
See the Care and Cleaning – Interior Surfaces section.
Extension racks that need cleaning and lubrication 8VHWKHOXEULFDWLRQPHWKRGLQWKH&DUHDQG&OHDQLQJ±
Interior Surfaces section.
Self-clean, enameled racks See the Care and Cleaning – Interior Surfaces section.
Shiny, silver-colored racks
are discolored and dull in
appearance
The shiny, silver-colored racks were left in the oven
during a self-clean cycle.
Remove racks from the oven before running self-clean.
See the Care and Cleaning - Interior Surfaces section.
Steam from the vent When using the ovens, it is normal to see steam
coming out of the oven vents. As the number of
racks or amount of food being cooked increases, the
amount of visible steam will increase.
This is normal.
Water remaining on oven
floor after Steam Clean cycle
This is normal. Remove any remaining water with a dry cloth or sponge.
There is no steam during the
steam clean cycle
This is normal. See the Care and Cleaning - Interior Surfaces section.
Oven will not steam clean Oven controls improperly set See the Care and Cleaning – Interior Surfaces section.
Oven door is not closed. Make sure you close the door to start steam clean cycle and
do not open the door during the cycle. See the Care and
Cleaning - Interior Surfaces section.
49-2001190 Rev. 3 27
TROUBLESHOOTING TIPS
Troubleshooting Tips ... %HIRUH\RXFDOOIRUVHUYLFH
Problem Possible Cause What To Do
“F— and a number or
letter” appear or flash in
the display
You have a function error code. Press the Cancel pad. Allow the oven to cool and then put
the oven back into operation.
If the function code repeats. Press the Cancel pad. Disconnect all power to the oven for
at least 30 seconds and then reconnect power. If the function
error code repeats again, call for service.
My oven door glass
appears to be "tinted" or
have a "rainbow" color.
The inner oven glass is coated with a heat barrier to
reflect the heat back into the oven to prevent heat loss
and keep the outer door cool while baking.
7KLVLVQRUPDO8QGHUFHUWDLQOLJKWRUDQJOHV\RXPD\VHH
this tint or rainbow color.
Oven door is crooked The door is out of position. %HFDXVHWKHRYHQGRRULVUHPRYDEOHLWVRPHWLPHVJHWVRXW
of position during installation. To straighten the door, re-install
the door. See the Care and Cleaning – Exterior Surfaces –
Oven Door section.
Drawer does not slide
smoothly or drags
The drawer is out of alignment Fully extend the drawer and push it all the way in See the
Care and Cleaning – Exterior Surfaces – Storage Drawer
section.
Drawer is over-loaded or load is unbalanced. Reduce weight. Redistribute drawer contents.
Storage drawer won’t
close
Power cord may be obstructing drawer in the lower back
of the range.
Reposition the drawer and power cord. See the Care and
Cleaning – Exterior Surfaces – Storage Drawer section.
Rear drawer support is on top of the guide rail. Reposition the drawer. See the See the Care and Cleaning –
Exterior Surfaces – Storage Drawer section.
Surface units will not
maintain a rolling boil
or cooking is not fast
enough
Improper cookware being used 8VHSDQVZKLFKDUHIODWDQGPDWFKWKHGLDPHWHURIWKH
surface unit selected.
In some areas the heating value of the gas may be low Cover pan with a lid until desired heat is obtained.
Surface units do not work
properly
A fuse in your home may be blown or the circuit breaker
tripped.
Replace the fuse or reset the circuit breaker.
Cooktop controls improperly set. Check to see the correct control is set for the surface unit you
are using.
Surface unit stops
glowing when turned to a
lower setting
The appliance is still on and hot. This is normal.
Frequent cycling off and
on of surface units
The surface unit cycles on and off to maintain your
selected control setting.
This is normal. See Radiant Glass Cooktop - Temperature
Limiter.
Improper cookware being used. 8VHRQO\IODWFRRNZDUHWRPLQLPL]HF\FOLQJ
Scratches (may appear as
cracks) on cooktop glass
surface
Incorrect cleaning methods being used. Scratches are not removable. Tiny scratches will become
less visible in time as a result of cleaning. See the Care and
Cleaning Cooktop Surfaces - Radiant Glass section for more
details.
Cookware with rough bottoms being used or coarse
particles (salt or sand) were between the cookware and
the surface of the cooktop. Cookware has been slid
across the cooktop surface.
To avoid scratches, use the recommended cleaning
procedures. Make sure bottoms of cookware are clean
before use and use cookware with smooth bottoms. See the
Care and Cleaning Cooktop Surfaces - Radiant Glass section
for more details
Areas of discoloration on
the cooktop
Food spillovers not cleaned before next use. See the Care and Cleaning – Cooktop Surfaces section.
Hot surface on a model with a light-colored cooktop. This is normal. The surface may appear discolored when it is
hot. This is temporary and will disappear as the glass cools.
Plastic melted to the
surface
Hot cooktop came into contact with plastic placed on the
hot cooktop.
See the Care and Cleaning – Cooktop Surfaces - Radiant
Glass section for more details.
Pitting (or indentation) of
the cooktop
Hot sugar mixture spilled on the cooktop. Call a qualified technician for replacement.
28 49-2001190 Rev. 3
GEAppliances.com
All warranty service is provided by our Factory Service Centers, or an authorized Customer Care
®
technician. To schedule
service online, visit us at GEAppliances.com/service, or call GE Appliances at 800.GE.CARES (800.432.2737). Please
have your serial number and your model number available when calling for service.
Servicing your appliance may require the use of the onboard data port for diagnostics. This gives a GE Appliances factory
service technician the ability to quickly diagnose any issues with your appliance and helps GE Appliances improve its
products by providing GE Appliances with information on your appliance. If you do not want your appliance data to be
sent to GE Appliances, please advise your technician not to submit the data to GE Appliances at the time of service.
What GE Appliances will not cover:
Ŷ Service trips to your home to teach you how to use
the product.
Ŷ ,PSURSHULQVWDOODWLRQGHOLYHU\RUPDLQWHQDQFH
Ŷ )DLOXUHRIWKHSURGXFWLILWLVDEXVHGPLVXVHG
modified or used for other than the intended purpose
or used commercially.
Ŷ 'DPDJHWRWKHJODVVFRRNWRSFDXVHGE\XVHRI
cleaners other than the recommended cleaning
creams and pads.
Ŷ 'DPDJHWRWKHJODVVFRRNWRSFDXVHGE\KDUGHQHG
spills of sugary materials or melted plastic that
are not cleaned according to the directions in the
Owner's Manual.
Ŷ 5HSODFHPHQWRIKRXVHIXVHVRUUHVHWWLQJRIFLUFXLW
breakers.
Ŷ 'DPDJHWRWKHSURGXFWFDXVHGE\DFFLGHQWILUH
floods or acts of God.
Ŷ 'DPDJHWRILQLVKVXFKDVVXUIDFHUXVWWDUQLVKRUVPDOO
blemishes not reported within 48 hours of delivery.
Ŷ ,QFLGHQWDORUFRQVHTXHQWLDOGDPDJHFDXVHGE\
possible defects with this appliance.
Ŷ 'DPDJHFDXVHGDIWHUGHOLYHU\
Ŷ 3URGXFWQRWDFFHVVLEOHWRSURYLGHUHTXLUHGVHUYLFH
Ŷ 6HUYLFHWRUHSDLURUUHSODFHOLJKWEXOEVH[FHSWIRU
LED lamps.
Ŷ &RVPHWLFGDPDJHWRWKHJODVVFRRNWRSVXFKDVEXW
not limited to, chips, scratches, or baked on residue
not reported within 90 days of installation.
Ŷ 'DPDJHWRWKHJODVVFRRNWRS
due to impact or misuse. See
example.
EXCLUSION OF IMPLIED WARRANTIES
Your sole and exclusive remedy is product repair as provided in this Limited Warranty. Any implied warranties,
including the implied warranties of merchantability or fitness for a particular purpose, are limited to one year or
the shortest period allowed by law.
This limited warranty is extended to the original purchaser and any succeeding owner for products purchased for
KRPHXVHZLWKLQWKH86$,IWKHSURGXFWLVORFDWHGLQDQDUHDZKHUHVHUYLFHE\D*($SSOLDQFHV$XWKRUL]HG6HUYLFHU
is not available, you may be responsible for a trip charge or you may be required to bring the product to an Authorized
GE Appliances Service location for service. In Alaska, the limited warranty excludes the cost of shipping or service
calls to your home.
Some states do not allow the exclusion or limitation of incidental or consequential damages. This limited warranty
gives you specific legal rights, and you may also have other rights which vary from state to state. To know what your
legal rights are, consult your local or state consumer affairs office or your state’s Attorney General.
Warrantor: GE Appliances, a Haier company
/RXLVYLOOH.<
Extended Warranties: Purchase a GE Appliances extended warranty and learn about special discounts that are
available while your warranty is still in effect. You can purchase it online anytime at
GEAppliances.com/extended-warranty
or call 800.626.2224 during normal business hours. GE Appliances Service will still be there after your warranty expires.
For the period of GE Appliances will replace
One year
From the date
of the original
purchase
Any part of the range which fails due to a defect in materials or workmanship. During this
limited one-year warranty, GE Appliances will provide, free of charge, all labor and in-home
service to replace the defective part.
Staple your receipt here. Proof of the original purchase
date is needed to obtain service under the warranty.
LIMITED WARRANTY
GE Appliances Electric Range Limited Warranty

49-2001190 Rev. 3 29
ACCESSORIES
Looking For Something More?
GE Appliances offers a variety of accessories to
improve your cooking and maintenance experiences!
Refer to the Consumer Support page for phone numbers
and website information.
The following products and more are available:
Accessories
Accessories
6PDOO%URLOHU3DQô´[ó´[ò³
/DUJH%URLOHU3DQô´[ó´[ò³
;/%URLOHU3DQ´[ó´[³
Parts
Oven racks
Oven elements
Light bulbs
Cleaning Supplies
CitruShine™ Stainless Steel Wipes
Stainless Steel Appliance Cleaner
Non-scratch Cleaning Pads for Ceramic Cooktops
Ceramic Cooktop Cleaner
Ceramic Cooktop Scraper
.LW.LWLQFOXGHVFUHDPDQGFRRNWRSVFUDSHU
*The large broiler pan does not fit in 20”/24” ranges.
** The XL broiler pan does not fit in 24” wall ovens, 27” drop-ins or 20”/24” range.
NOTE: Go to GE Appliances website to view recommended cleaners.

30 49-2001190 Rev. 3
3ULQWHGLQWKH8QLWHG6WDWHV
Consumer Support
CONSUMER SUPPORT
GE Appliances Website
Have a question or need assistance with your appliance? Try the GE Appliances Website 24 hours a day, any day
of the year! You can also shop for more great GE Appliances products and take advantage of all our on-line support
VHUYLFHVGHVLJQHGIRU\RXUFRQYHQLHQFH,QWKH86GEAppliances.com
Register Your Appliance
Register your new appliance on-line at your convenience! Timely product registration will allow for enhanced
communication and prompt service under the terms of your warranty, should the need arise. You may also mail in
WKHSUHSULQWHGUHJLVWUDWLRQFDUGLQFOXGHGLQWKHSDFNLQJPDWHULDO,QWKH86GEAppliances.com/register
Schedule Service
Expert GE Appliances repair service is only one step away from your door. Get on-line and schedule your service at
\RXUFRQYHQLHQFHDQ\GD\RIWKH\HDU,QWKH86GEAppliances.com/service
or call 800.432.2737 during normal business hours.
Extended Warranties
Purchase a GE Appliances extended warranty and learn about special discounts that are available while your
warranty is still in effect. You can purchase it on-line anytime. GE Appliances Services will still be there after your
ZDUUDQW\H[SLUHV,QWKH86GEAppliances.com/extended-warranty
or call 800.626.2224 during normal business hours.
Parts and Accessories
Individuals qualified to service their own appliances can have parts or accessories sent directly to their homes
9,6$0DVWHU&DUGDQG'LVFRYHUFDUGVDUHDFFHSWHG2UGHURQOLQHWRGD\KRXUVHYHU\GD\
,QWKH86GEApplianceparts.com or by phone at 877.959.8688 during normal business hours.
Instructions contained in this manual cover procedures to be performed by any user. Other servicing
generally should be referred to qualified service personnel. Caution must be exercised, since improper
servicing may cause unsafe operation.
Contact Us
If you are not satisfied with the service you receive from GE Appliances, contact us on our Website with all the
details including your phone number, or write to:
,QWKH86*HQHUDO0DQDJHU&XVWRPHU5HODWLRQV_*($SSOLDQFHV$SSOLDQFH3DUN_/RXLVYLOOH.<
GEAppliances.com/contact

MANUAL DEL
PROPIETARIO
Escriba los números de modelo y
de serie aquí:
Nº de Modelo ____________
Nº de Serie ______________
Los encontrará en una etiqueta
detrás de la puerta o del cajón.
ESTUFAS
Eléctricas
GRS500PV
GE es una marca registrada de General Electric Company. Fabricado bajo licencia de marca.
49-2001190 Rev. 3 09 -24
INFORMACIÓN DE SEGURIDAD .... 3
USO DE LA COCINA
Controles del Horno .......................... 7
Configuraciones ............................. 8
Modo Sabático .............................. 9
Superficie de Cocción con Vidrio Radiante ......10
Utensilio para Placa de Cocción
para Vidrio Radiante .......................12
Modos de Cocción del Horno ..................13
Utensilios de Cocina para Horno ...............14
Guía de Cocción al horno .....................15
Guía de Cocción para Comidas Crujientes .......16
Papel de Aluminio y Cobertores del Horno ......17
Estantes del Horno ...........................17
Ventilaciones de Aire del Horno ...............17
CUIDADO Y LIMPIEZA
Superficies de Cocción - Vidrio Radiante .......18
Superficies Exteriores .......................20
Cajón de Almacenamiento ....................21
Superficies Interiores ....................... 22
Puerta del Horno ........................... 23
Luz del Horno ..............................24
CONSEJOS PARA LA
SOLUCIÓN DE PROBLEMAS ........ 25
GARANTÍA LIMITADA ................ 28
ACCESORIOS .......................... 29
SOPORTE PARA
EL CONSUMIDOR .....................30

2 49-2001190 Rev. 3
GRACIAS POR HACER QUE GE APPLIANCES SEA PARTE DE SU HOGAR.
Ya sea que haya crecido usando GE Appliances, o que ésta sea la primera vez, nos complace
tenerlo en la familia.
Sentimos orgullo por el nivel de arte, innovación y diseño de cada uno de los electrodomésticos de
GE Appliances, y creemos que usted también. Entre otras cosas, el registro de su electrodoméstico
asegura que podamos entregarle información importante del producto y detalles de la garantía
cuando los necesite.
Registre su electrodoméstico GE ahora a través de Internet. Sitios Web y números telefónicos útiles
están disponibles en la sección de Soporte para el Consumidor de este Manual del Propietario.
También puede enviar una carta en la tarjeta de inscripción preimpresa que se incluye con
el material embalado.
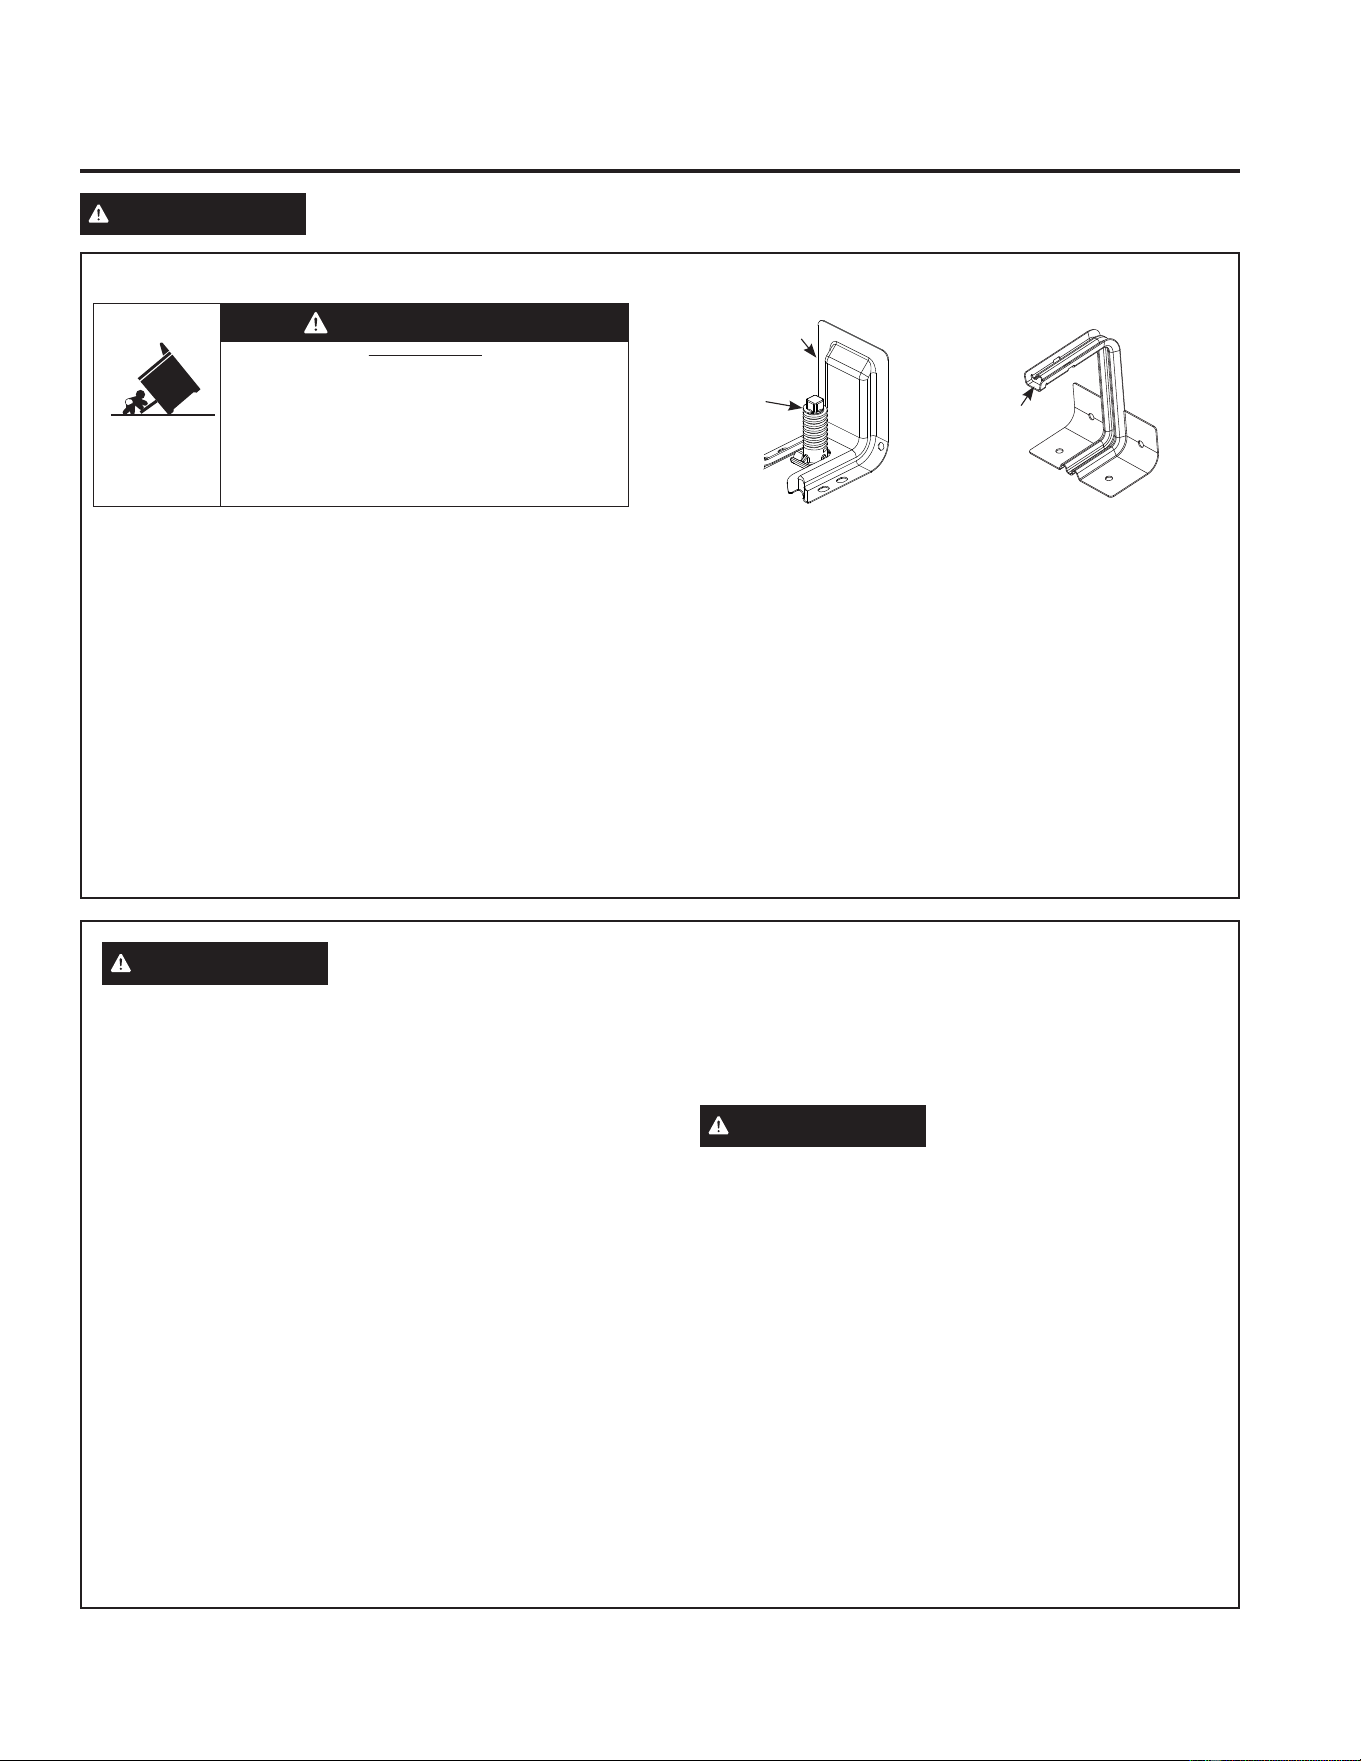
49-2001190 Rev. 3 3
LEA Y GUARDE ESTAS INSTRUCCIONES
INFORMACIÓN IMPORTANTE DE SEGURIDAD
LEA TODAS LAS INSTRUCCIONES ANTES DE USAR ESTE ELECTRODOMÉSTICO
INFORMACIÓN DE SEGURIDAD
ADVERTENCIA
Lea todas las instrucciones de seguridad antes de utilizar este producto. No seguir estas instrucciones
puede generar un incendio, una descarga eléctrica, lesiones corporales o la muerte.
DISPOSITIVO ANTI-VOLCADURAS
Para reducir el riesgo de volcar la cocina, ésta debe
sujetarse mediante un soporte anti-volcaduras con una
adecuada instalación. Ver las instrucciones de instalación
enviadas con el soporte para obtener detalles completos
antes de iniciar la instalación.
Retire cualquier soporte antivolcaduras actualmente
instalado y realice la instalación del soporte provisto con
esta unidad.
Para controlar si el soporte es instalado y ajustado de forma
apropiada, mire que debajo de la cocina la pata niveladora
trasera esté ajustada al soporte. En algunos modelos,
el cajón de almacenamiento o el panel de protección se
pueden retirar para una fácil inspección. Si no es posible
realizar una inspección visual, deslice la cocina hacia
adelante, confirme que el soporte anti-volcaduras esté
ajustado de forma segura al piso o la pared, y deslice la
cocina hacia atrás de modo que la pata niveladora trasera
se encuentre debajo del soporte anti-volcaduras.
Si la cocina es retirada para su limpieza, servicio técnico
o cualquier otra razón, asegúrese de que el dispositivo
anti volcaduras vuelva a ser colocado de forma correcta
cuando la cocina sea instalada nuevamente. Si no se toma
esta precaución, se podrán producir caídas de la cocina y
ocasionar la muerte o quemaduras graves en niños o adultos.
Nunca quite las patas de nivelación por completo ya que la
cocina no quedará bien sujeta al dispositivo anti-volcaduras.
• Un niño o adulto pueden volcar la estufa y morir.
• Instale el soporte anti-volcaduras sobre la pared o el piso.
•
Asegúrese la estufa al soporte anti-volcaduras deslizando
la unidad hacia atras de tal manera que la pata niveladora
sea enganchada.
• Vuelva a adherir el soporte anti-volcaduras si la estufa
se mueve de lugar.
• Si esto no se hace, se podrá producir la muerte o
quemaduras graves en niños o adultos.
Riesgo de Caída
ADVERTENCIA
Soporte
Anti-Volcaduras
Soporte
Anti-
Volcaduras
Pata
Niveladora
Estufas independientes
y deslizables
Compacto o profesional
estufas de 24"
O
ADVERTENCIA
INSTRUCCIONES GENERALES DE SEGURIDAD
Ŷ 8VHHVWHDSDUDWRVyORFRQHOREMHWLYRSDUDHOTXHIXH
creado, como se describe en este Manual del Propietario.
Ŷ 6ROLFLWHTXHXQLQVWDODGRUFDOLILFDGRLQVWDOHVXHVWXID\
que esté adecuadamente conectada a tierra, de acuerdo
con las instrucciones de instalación provistas.
Ŷ &XDOTXLHUDMXVWHUHSDUDFLyQRVHUYLFLRWpFQLFRQR
recomendado específicamente en este manual deberá
ser realizado SOLO por un instalador o técnico del
servicio con calificación en estufas.
Ŷ $QWHVGHUHDOL]DUFXDOTXLHUFODVHGHUHSDUDFLyQ
desenchufe la cocina o desconecte el suministro eléctrico
desde el panel de distribución doméstico quitando el
fusible o desconectando el interruptor de circuitos.
Ŷ $VHJ~UHVHGHTXHWRGRVORVPDWHULDOHVGHHPEDODMHVHDQ
retirados de la estufa antes de su uso, a fin de evitar que
los mismos se incendien.
Ŷ (YLWHUD\RQHVRLPSDFWRVVREUHODVSXHUWDVGHYLGULR
placas de cocción o paneles de control. Hacer esto podrá
producir la rotura de vidrios.
Ŷ 1RFRFLQHVREUHXQSURGXFWRFRQXQYLGULRURWR6H
podrán producir descargas, incendios o cortes.
Ŷ 1RGHMHDORVQLxRVVRORVRVLQDWHQFLyQHQXQiUHD
donde un aparato esté en uso. Nunca debe permitirse
que se suban, sienten o paren en cualquier parte de este
aparato.
Ŷ
PRECAUCIÓN
No guarde ítems de interés
para los niños en los gabinetes que están sobre o en la
parte superior de una estufa; si los niños trepan sobre la
estufa para alcanzar estos artículos podrán sufrir lesiones
graves.
Ŷ 1XQFDXVHHOHOHFWURGRPpVWLFRSDUDFDOHQWDUR
calefaccionar la habitación.
Ŷ 1RSHUPLWDTXHQDGLHVHWUHSHVHSDUHRFXHOJXHGH
la puerta del horno, del cajón o la placa de cocción. Se
podrá dañar la estufa o provocar su caída, ocasionando
lesiones graves o la muerte.
Ŷ 6yORXVHDJDUUDGHUDVVHFDVODVDJDUUDGHUDVK~PHGDV
o mojadas colocadas en superficies calientes pueden
provocar quemaduras de vapor. No permita que las
agarraderas tengan contacto con las unidades de la
superficie ni con los elementos para calentar del horno.
No utilice toallas u otras telas gruesas en lugar de una
agarradera.
4 49-2001190 Rev. 3
LEA Y GUARDE ESTAS INSTRUCCIONES
INFORMACIÓN DE SEGURIDAD
INFORMACIÓN IMPORTANTE DE SEGURIDAD
LEA TODAS LAS INSTRUCCIONES ANTES DE USAR ESTE ELECTRODOMÉSTICO
ADVERTENCIA
MANTENGA LOS MATERIALES INFLAMABLES ALEJADOS DE LA ESTUFA
Si esto no se cumple, se podrán sufrir lesiones personales graves o incendios.
Ŷ 1RDOPDFHQHRXWLOLFHPDWHULDOHVLQIODPDEOHVGHQWURGH
un horno o cerca de la estufa, tales como papel, plástico,
agarraderas, telas, recubrimientos de pared, cortinas y
gasolina u otros vapores y líquidos inflamables.
Ŷ 1XQFDXVHYHVWLPHQWDVKROJDGDVRDPSOLDVPLHQWUDV
utilice el aparato. Estas vestimentas pueden prenderse
fuego si entran en contacto con superficies calientes,
provocando quemaduras graves.
Ŷ 1RSHUPLWDTXHODJUDVDGHODFRFFLyQXRWURVPDWHULDOHV
inflamables se acumulen dentro de la estufa o en su
cercanía. La grasa dentro del horno o sobre la estufa
puede encenderse.
Ŷ 1RJXDUGHPDWHULDOHVLQIODPDEOHVQLtWHPVVHQVLEOHVDOD
temperatura dentro del electrodoméstico.
Ŷ /LPSLHODVFDPSDQDVGHYHQWLODFLyQGHIRUPDIUHFXHQWH
No se debe permitir la acumulación de grasa en la
campana o el filtro.
Ŷ (QDOJXQRVPRGHORV)XQFLRQDPLHQWR5HPRWR(VWH
electrodoméstico permite su configuración para permitir
un funcionamiento remoto en cualquier momento.
ADVERTENCIA
EN CASO DE INCENDIO, SIGA LOS SIGUIENTES PASOS
PARA EVITAR LA PROPAGACIÓN DEL FUEGO
Ŷ 1RXWLOLFHDJXDHQLQFHQGLRVGHJUDVD1XQFDOHYDQWH
una sartén en llamas. Apague los controles. Apague
una sartén en llamas sobre una unidad de superficie
cubriendo la sartén por completo con una tapa que
ajuste bien, una plancha para galletas o una bandeja
SODQD8WLOLFHXQTXtPLFRVHFRPXOWLXVRRXQH[WLQWRUGH
incendios de espuma.
Ŷ 6LKD\XQLQFHQGLRHQHOKRUQRGXUDQWHHOKRUQHDGR
apáguelo cerrando la puerta del horno y apagando el
FRQWURORXVDQGRXQTXtPLFRVHFRPXOWLXVRRXQH[WLQWRU
de incendios de espuma.
Ŷ 6LKD\XQLQFHQGLRHQHOKRUQRGXUDQWHODDXWROLPSLH]D
apague el horno y espere a que el incendio se consuma.
No abra la puerta del horno a la fuerza. El ingreso de aire
fresco a temperaturas de auto-limpieza puede provocar
XQDH[SORVLyQGHOODPDVGHVGHHOKRUQR1RVHJXLUHVWD
instrucción puede provocar quemaduras graves.
ADVERTENCIA
INSTRUCCIONES GENERALES DE SEGURIDAD (Cont.)
Ŷ 1RWRTXHORVTXHPDGRUHVSODQFKDVHQDOJXQRV
PRGHORVSDUULOODVHQDOJXQRVPRGHORVODVXSHUILFLH
de cocción o los elementos calefactores del horno, ni
la superficie interior del horno. Estas superficies podrán
permanecer lo suficientemente caliente como para
quemar durante un período de tiempo prolongado luego
de la cocción, incluso aunque ya no parezcan estar
encendidas o calientes.
Ŷ 'XUDQWH\GHVSXpVGHOXVRQRWRTXHQLSHUPLWDTXHWHODV
u otros materiales inflamables toquen cualquier área
interior del horno; espere a que haya pasado un tiempo
suficiente hasta que se enfríen. Otras superficies del
electrodoméstico se podrán calentar lo suficiente como
para ocasionar lesiones. Las superficies potencialmente
calientes incluyen quemadores o elementos calefactores,
SDUULOODVHQDOJXQRVPRGHORVVXSHUILFLHGHFRFFLyQ
aberturas de la ventilación del horno, superficies
cercanas a las aberturas, grietas alrededor de la puerta
del horno, partes con marcos metálicos por encima de la
puerta, cualquier protección trasera, o repisas ubicadas
encima de una superficie de cocción.
Ŷ 1RFDOLHQWHUHFLSLHQWHVFHUUDGRVGHDOLPHQWRV3RGUtD
haber una acumulación de presión en el recipiente y éste
SRGUtDH[SORWDUSURYRFDQGROHVLRQHV
Ŷ &RFLQHODFRPLGDFRPSOHWDPHQWHSDUDHYLWDUTXHVH
SURGX]FDQHQIHUPHGDGHVDSDUWLUGHODFRPLGD86'$
\)'$EULQGDQODVUHFRPHQGDFLRQHVGHWHPSHUDWXUD
PtQLPDSDUDXQDFRPLGDVHJXUD8WLOLFHXQWHUPyPHWUR
para tomar la temperatura de la comida y haga controles
en diferentes ubicaciones.
Ŷ 0DQWHQJDOLPSLDODFDPSDQDGHOYHQWLODGRU\ORVILOWURV
de grasa, con el fin de conservar una buena ventilación
y de evitar incendios con grasa. En caso de incendio,
DSDJXHHOYHQWLODGRU6LHOH[WUDFWRUVHHQFXHQWUDHQ
funcionamiento, podrá esparcir las llamas.
49-2001190 Rev. 3 5
LEA Y GUARDE ESTAS INSTRUCCIONES
INFORMACIÓN DE SEGURIDAD
INFORMACIÓN IMPORTANTE DE SEGURIDAD
LEA TODAS LAS INSTRUCCIONES ANTES DE USAR ESTE ELECTRODOMÉSTICO
ADVERTENCIA
INSTRUCCIONES DE SEGURIDAD DE LA ESTUFA
Ŷ 181&$3LHUGDGH9LVWDOD6HFFLyQ6XSHULRUGHOD
6XSHUILFLHGH&RFFLyQGHHVWH(OHFWURGRPpVWLFRDO8VDU
OD0LVPD/RVKHUYRUHVH[FHVLYRVSXHGHQJHQHUDU
vapores y derrames de grasa que se pueden incendiar.
No seguir esta advertencia podrá resultar en incendio,
H[SORVLyQRULHVJRVGHTXHPDGXUDVTXHSRGUiQ
ocasionar daños sobre la propiedad, lesiones personales
o la muerte.
Ŷ 1XQFDGHMHDFHLWHVLQDWHQFLyQPLHQWUDVIUtH6LVH
deja calentar más allá del punto de humeo, el aceite
puede encenderse, provocando un incendio que podría
propagarse a los gabinetes cercanos. NO INTENTE
(;7,1*8,5&21$*8$81,1&(1',2352'8&,'2
&21&20%867,%/(*5$6$
Ŷ 8VHXQWHUPyPHWURSDUDJUDVDVSURIXQGDVVLHPSUHTXH
sea posible, a fin de monitorear la temperatura del aceite.
Para evitar el derrame de aceite y un incendio, utilice una
cantidad mínima de aceite cuando fría en sartenes poco
profundas y evite la cocción de alimentos congelados con
XQDFDQWLGDGH[FHVLYDGHKLHOR
Ŷ 8VHXQWDPDxRGHVDUWpQDGHFXDGRVHOHFFLRQHXWHQVLOLRV
de cocina que tengan fondos planos lo suficientemente
grandes como para cubrir la superficie del elemento
calefactor.
Ŷ $ILQGHPLQLPL]DUODSRVLELOLGDGGHTXHPDGXUDVLQFHQGLR
de materiales inflamables y derrames, la manija de un
envase deberá ser inclinada hacia el centro de la estufa
VLQTXHVHH[WLHQGDVREUHODVXQLGDGHVGHODVXSHUILFLH
Ŷ 6yORFLHUWRVWLSRVGHYLGULRYLGULRFHUiPLFRtWHPVGHOR]D
u otros recipientes de vidrio son aptos para su uso en la
superficie de cocción; otros se podrán romper debido a
un cambio brusco de temperatura.
Ŷ 6LIODPEHDDOLPHQWRVEDMRODFDPSDQDHQFLHQGDHO
ventilador.
ADVERTENCIA
INSTRUCCIONES DE SEGURIDAD DE LA PLACA DE COCCIÓN
DE VIDRIO (en algunos modelos)
Ŷ 7HQJDFXLGDGRDOWRFDUODSODFDGHFRFFLyQ/DVXSHUILFLH
de vidrio de la placa de cocción retendrá el calor luego de
que se hayan apagado los controles
Ŷ 1RFRFLQHVREUHXQDSODFDGHFRFFLyQURWD6LODSODFDGH
cocción de vidrio sufre roturas, los productos de limpieza
y los derrames podrán penetrar sobre dichas roturas y
crear riesgos de descargas eléctricas. Comuníquese con
un técnico calificado de inmediato.
Ŷ (YLWHUD\DUODSODFDGHFRFFLyQGHYLGULR/DSODFDGH
cocción podrá sufrir rayones con ítems tales como
cuchillos, instrumentos afilados, anillos u otras joyas y
remaches de vestimentas.
Ŷ 1RFRORTXHQLJXDUGHtWHPVTXHVHSXHGDQGHUUHWLUR
incendiar sobre la placa de cocción de vidrio, incluso
cuando ésta no se encuentre en uso. Si la superficie
de cocción se enciende de forma accidental, dichos
productos se podrán incendiar. El calor de la placa de
cocción o de la ventilación del horno luego de que éste
fue encendido podrán hacer que dichos productos se
incendien también.
Ŷ 8VHXQOLPSLDGRUSDUDSODFDVGHFRFFLyQGHFHUiPLFD\
una almohadilla de limpieza antirayaduras para limpiar
la placa de cocción. Lea y siga todas las instrucciones y
advertencias que figuran sobre la etiqueta de la crema
de limpieza. Espere hasta que la placa de cocción se
enfríe y que la luz indicadora se apague antes de realizar
ODOLPSLH]D8QDHVSRQMDRWHODK~PHGDVVREUHXQD
superficie caliente podrán ocasionar quemaduras con
vapor. Algunos productos de limpieza pueden producir
gases nocivos si se aplican sobre una superficie caliente.
NOTA: Los derrames de productos azucarados son
XQDH[FHSFLyQ6HGHEHUiQUDVSDUPLHQWUDVD~QHVWpQ
calientes, utilizando un guante para horno y una espátula.
Para acceder a instrucciones detalladas, lea la sección
de Limpieza de la superficie de cocción de vidrio.
ADVERTENCIA
INSTRUCCIONES DE SEGURIDAD DEL HORNO
Ŷ 0DQWpQJDVHDOHMDGRGHOKRUQRDODEULUODSXHUWDGHO
mismo. El aire caliente o el vapor que sale puede causar
TXHPDGXUDVHQODVPDQRVURVWUR\XRMRV
Ŷ 1RXVHHOKRUQRVLXQHOHPHQWRGHFDOHQWDPLHQWRJHQHUD
un punto brillante durante el uso o aparecen otros signos
GHGDxRV8QSXQWREULOODQWHLQGLFDTXHHOHOHPHQWRSDUD
calentar puede fallar y generar una posible quemadura,
incendio o descarga eléctrica. Apague el horno de
inmediato y solicite a un técnico calificado del servicio
que reemplace el elemento para calentar.
Ŷ 0DQWHQJDGHVREVWUXLGDODYHQWLODFLyQGHOKRUQR
Ŷ 1XQFDFRORTXHORVXWHQVLOLRVGHFRFLQDSLHGUDVSDUD
pizza u horneado o cualquier otro tipo de aluminio o
cobertor en la base del horno. Estos ítems pueden
atrapar el calor o derretirse, ocasionando daños sobre el
producto y el riesgo de descargas, humo o incendios.
Ŷ &RORTXHORVHVWDQWHVGHOKRUQRHQODXELFDFLyQGHVHDGD
mientras éste se encuentra frío. Si es necesario mover el
estante mientras el horno está caliente, tenga cuidado de
evitar tocar superficies calientes y evite que el mango de
la olla tenga contacto con el elemento calentador en el
horno.
6 49-2001190 Rev. 3
LEA Y GUARDE ESTAS INSTRUCCIONES
INFORMACIÓN DE SEGURIDAD
INFORMACIÓN IMPORTANTE DE SEGURIDAD
LEA TODAS LAS INSTRUCCIONES ANTES DE USAR ESTE ELECTRODOMÉSTICO
ADVERTENCIA
INSTRUCCIONES DE SEGURIDAD DEL HORNO CON LIMPIEZA
AUTOMÁTICA (en algunos modelos)
La función de limpieza automática usa el horno en temperaturas lo suficientemente altas como para consumir la suciedad de
comida que haya dentro del horno. Para un funcionamiento seguro, siga estas instrucciones.
Ŷ 1RWRTXHODVVXSHUILFLHVGHOKRUQRGXUDQWHHOFLFORGH
limpieza automática. Mantenga a los niños alejados del
horno durante la limpieza automática. Si no se siguen
estas instrucciones, se podrán producir quemaduras.
Ŷ $QWHVGHXWLOL]DUHOFLFORGHOLPSLH]DDXWRPiWLFDUHWLUH
las ollas, estantes de metal brillante del horno y otros
utensilios que haya en el horno. Sólo se pueden dejar
dentro del horno los estantes para horno de color
oscuro con revestimiento de porcelana. No hacer esto
podrá ocasionar daños sobre estos ítems y el horno, y
presentar una posible quemadura o riesgo de incendio.
Ŷ $QWHVGHXWLOL]DUHOFLFORGHOLPSLH]DDXWRPiWLFDOLPSLH
ODJUDVD\UHVWRVGHFRPLGDTXHKD\DHQHOKRUQR8QD
FDQWLGDGH[FHVLYDGHJUDVDVHSXHGHLQFHQGLDUORFXDO
puede producir daños con humo en su hogar.
Ŷ 6LHOPRGRGHOLPSLH]DDXWRPiWLFDIXQFLRQDGHIRUPD
incorrecta, apague el horno y desconecte el suministro de
corriente. Solicite el servicio de un técnico calificado.
Ŷ 1RXVHOLPSLDGRUHVSDUDKRUQR1RVHGHEHUiXVDU
limpiadores comerciales para horno ni revestimientos
de protección para hornos de ningún tipo en o alrededor
de cualquier parte del horno, a menos que cuente
con certificación para uso en un horno con limpieza
automática.
Ŷ 1ROLPSLHODMXQWDGHODSXHUWD/DMXQWDGHODSXHUWDHV
esencial para un buen sellado. Se debe tener cuidado de
no frotar, dañar ni mover la junta.
Ŷ IMPORTANTE: La salud de algunas aves es
H[WUHPDGDPHQWHVHQVLEOHDORVKXPRVHPLWLGRVGXUDQWH
el ciclo de limpieza automática de cualquier estufa.
Coloque las aves en otra habitación bien ventilada.
ADVERTENCIA
INSTRUCCIONES DE SEGURIDAD DEL HORNO (Cont.)
Ŷ 1RGHMHSURGXFWRVWDOHVFRPRSDSHOXWHQVLOLRVGHFRFLQD
ni comida en el horno cuando éste no se encuentre en
uso. Los artículos guardados en el horno se pueden
incendiar.
Ŷ 1RGHMHDUWtFXORVVREUHODVXSHUILFLHGHFRFFLyQ
cerca de la ventilación del horno. Los ítems se
SRGUiQVREUHFDOHQWDU\H[LVWHHOULHVJRGHLQFHQGLRR
quemaduras.
Ŷ 1XQFDDVHFRQODSXHUWDDELHUWD
Ŷ 0DQWHQJDHOKRUQROLEUHGHDFXPXODFLyQGHJUDVD/D
grasa del horno se puede incendiar.
Ŷ $OXVDUODVEROVDVSDUDFRFLQDURGRUDUHQHOKRUQRVLJD
las instrucciones del fabricante.
Ŷ PELIGRO DE DESCARGA O QUEMADURAS: Antes
de reemplazar la bombilla de luz del horno, desconecte
ODFRQH[LyQHOpFWULFDGHOKRUQRGHVGHHOIXVLEOHSULQFLSDO
o desde el panel del disyuntor. Si esto no se cumple, se
podrá producir una descarga eléctrica o un incendio.
Ŷ
PRECAUCIÓN
RIESGO DE INCENDIO: La
tapa de vidrio y la bombilla de luz se deberán retirar
cuando estén frías. Tocar el vidrio caliente sin protección
en las manos o con una tela húmeda podrá ocasionar
quemaduras.
Ŷ 1RXVHQLQJ~QWLSRGHDOXPLQLRRFREHUWRUSDUDFXEULU
HOIRQGRGHOKRUQRRFXDOTXLHUSDUWHGHOKRUQRH[FHSWR
como se describe en este manual. Los cobertores de
horno pueden atrapar el calor o derretirse, ocasionando
daños sobre el producto y el riesgo de descargas, humo
o incendios.
Cómo Retirar la Película Protectora de Envío y la Cinta de Embalaje
&RQFXLGDGRWRPHXQH[WUHPRGHODSHOtFXODSURWHFWRUD
de envío con los dedos y lentamente retire la misma de la
superficie del electrodoméstico. No utilice ningún producto
filoso para retirar la película. Retire toda la película antes de
usar el electrodoméstico por primera vez.
Para asegurar que no haya daños sobre el acabado del
producto, la forma más segura de retirar el adhesivo de la cinta
de embalaje en electrodomésticos nuevos es aplicando un
detergente líquido hogareño para lavar platos. Aplique con una
tela suave y deje que se seque.
NOTA: El adhesivo deberá ser eliminado de todas las partes.
No se puede retirar si se hornea con éste dentro.
Tenga en cuenta las opciones de reciclaje del material de
embalaje de su electrodoméstico.
FORMA ADECUADA DE DESCARTAR SU ELECTRODOMÉSTICO
'HVFDUWHRUHFLFOHVXHOHFWURGRPpVWLFRGHDFXHUGRFRQODV5HJXODFLRQHV)HGHUDOHV\/RFDOHV&RPXQtTXHVHFRQODV
autoridades locales para descartar o reciclar su electrodoméstico de forma ambientalmente segura.

49-2001190 Rev. 3 7
1. Bake (Hornear): Para más información, consulte la
sección de Modos de Cocción.
2. Broil High/Low (Asado Alto/ Bajo): Para
más información, consulte la sección de Modos de
Cocción.
3. Crisp (Crujiente): (O PRGR &ULVS &UXMLHQWH IXH
GLVHxDGR SDUD SURGXFLU FRPLGDV FRQ XQ H[WHULRU PiV
crujiente que en la cocción de horno tradicional. Para más
información, consulte la sección de Modos de Cocción.
4. Warm (Calentar): (O PRGR :DUP &DOHQWDU HVWi
diseñado para mantener comidas calientes hasta durante
2 horas. Para más información, consulte la sección de
Modos de Cocción.
5. Clean (Limpieza): Su horno cuenta con los
VLJXLHQWHV PRGRV GH OLPSLH]D 6HOI &OHDQ /LPSLH]D
$XWRPiWLFD \ 6WHDP &OHDQ /LPSLH]D DO 9DSRU 3DUD
acceder a información importante sobre el uso de estos
modos, consulte la sección de Limpieza del Horno.
6. Warming Zone (Área para Calentar):
:DUPLQJ =RQH ÈUHD SDUD &DOHQWDU PDQWHQGUi ODV
comidas calientes y cocinadas en la temperatura para
VHUYLU 3DUD PiV LQIRUPDFLyQ FRQVXOWH OD VHFFLyQ GH 8VR
de su Superficie de Cocción.
7. Start (Iniciar): Se deberá presionar para comenzar
cualquier función de cocción, limpieza o por tiempo. Se
usa también para iniciar la Zona de Calentamiento de la
superficie de cocción.
8. Cancel (Cancelar): &DQFHODU 72'$6 ODV
RSHUDFLRQHV GHO KRUQR H[FHSWR HO UHORM \ HO WHPSRUL]DGRU.
12 FDQFHOD HO ÈUHD SDUD &DOHQWDU HQ OD VXSHUILFLH GH
cocción.
9. Clock (Reloj): Configure el tiempo del reloj del
horno. Presione la tecla Clock (Reloj) y luego use las
teclas +/- para ingresar la hora del día deseada. Presione
Start (Iniciar) para guardar la configuración de la hora.
10. Cook Time (Tiempo de Cocción): Cuenta
el tiempo de cocción en forma regresiva y apaga el
horno cuando el tiempo de cocción es completado.
3DUD XVDU OD IXQFLyQ &RRN 7LPH 7LHPSR GH &RFFLyQ
configure el modo de cocción y la temperatura de cocción
deseados, y luego presione la tecla Cook Time (Tiempo
de Cocción) 8VH ODV WHFODV QXPpULFDV SDUD LQJUHVDU HO
tiempo de cocción deseado en horas y minutos. Presione
Start (Iniciar) para comenzar la cuenta regresiva.
Esta función se puede usar con todos los Modos de
&RFFLyQ H[FHSWR %URLO $VDU \ :DUP &DOHQWDU
11. Timer On/Off (Temporizador de
Encendido/ Apagado): Funciona como un
temporizador con cuenta regresiva. NOTA: El horno
continuará funcionando cuando la cuenta regresiva
del temporizador se haya completado. Para configurar
el temporizador, presione la tecla Timer On/Off
(Temporizador Encendido/ Apagado), Luego use las
WHFODV SDUD LQJUHVDU HO WLHPSR HQ KRUDV \ PLQXWRV
Presione Start (Iniciar) para comenzar la cuenta
regresiva. Para apagar el temporizador, presione la tecla
Timer On/Off (Temporizador Encendido/ Apagado).
12. Oven Light (Luz del Horno): Enciende o
apaga la luz del horno.
13. Lock Control (Control de Bloqueo):
Bloquea el control de modo que al presionar cualquier
tecla no se activan los controles. Para usar esta función,
mantenga presionada la tecla Lock Control (Control
de Bloqueo) durante tres segundos para bloquear o
desbloquear el control.
USO DEL ELECTRODOMÉSTICO: Controles del Horno
Controles del Horno
1462310
5 9 12 138711

8 49-2001190 Rev. 3
Su estufa cuenta con varios tipos de configuraciones. Para acceder y cambiar estas configuraciones, mantenga presionadas las teclas Bake
(Hornear) y Broil (Asar) al mismo tiempo durante tres segundos hasta escuchar un pitido, luego libere los botones, y entonces se deberá
visualizar “OFSt” en pantalla.
3DVHDWUDYpVGHOPHQ~6HWWLQJV&RQILJXUDFLRQHVXVDQGRODWHFODQXPpULFD2 para ir hacia arriba y la tecla numérica 8 para ir hacia abajo, hasta
TXHVHH[KLEDODIXQFLyQGHVHDGD3DUDVHOHFFLRQDUXQDIXQFLyQSDUDFDPELDURSDUDFRQILUPDUXQFDPELRSUHVLRQHODWHFODQXPpULFD6. Para
FDQFHODUXQFDPELR\UHJUHVDUDOPHQ~6HWWLQJV&RQILJXUDFLRQHVSUHVLRQHODWHFODQXPpULFD43DUDVDOLUGHOPHQ~6HWWLQJV&RQILJXUDFLRQHV
vuelva a presionar la tecla Cancel (Cancelar).
Ajuste de la Temperatura del Horno (OFSt)
Esta función permite que la temperatura de horneado del horno sea
DMXVWDGDKDVWD)PiVFDOLHQWHR)PiVIUtD8VHHVWDIXQFLyQVL
considera que la temperatura de su horno está demasiado caliente o
demasiado fría y desea modificarla.
Para ajustar la temperatura del horno, ingrese al menú Settings
&RQILJXUDFLRQHVFRPRILJXUDPiVDUULED\OXHJRSDVHDWUDYpVGH
ODVIXQFLRQHVKDVWDTXHVHH[KLED³OFSt” y luego presione 6. Se
H[KLELUiXQQ~PHURHQWUH\8VHODWHFODQXPpULFD2 para
incrementar la temperatura ajustada o use la tecla numérica 8 para
reducir la temperatura ajustada. Presione 6 para guardar el ajuste
de temperatura. Presione Cancel (Cancelar) o 4 para salir del menú
6HWWLQJV&RQILJXUDFLRQHVEste ajuste afectará a la función Bake
+RUQHDU
8VHHVWDIXQFLyQVLFRQVLGHUDTXHODWHPSHUDWXUDGHVXKRUQRHVWi
demasiado caliente o demasiado fría y desea modificarla. No use
termómetros, tales como los que se encuentran en tiendas de
comestibles, para controlar la temperatura dentro del horno. Estos
termómetros pueden variar entre 20 y 40 grados.
Configuración del Calentador Sabático (Sabb)
Esta función le permite al usuario incrementar la temperatura de
6DEEDWK:DUP&DORU6DEiWLFRVLHOKRUQRHVWiIXQFLRQDQGRHQXQD
temperatura más fría que la deseada. Para ajustar esta función en Lo
%DMRR+L$OWRLQJUHVHDOPHQ~6HWWLQJV&RQILJXUDFLRQHVFRPR
se detalla más arriba, y pase a través de las opciones hasta que se
H[KLED³6DEE´\OXHJRSUHVLRQH6. Vaya hasta la opción deseada
y vuelva a presionar 6 para confirmar la misma. Presione Cancel
(Cancelar)SDUDVDOLUGHOPHQ~6HWWLQJV&RQILJXUDFLRQHV
Sound Volume (Snd)
Esta función le permite al horno configurar el volumen del tono en On
(QFHQGLGR\2II$SDJDGR3DUDDMXVWDUHOWRQRGHOYROXPHQLQJUHVH
DOPHQ~6HWWLQJV&RQILJXUDFLRQHVFRPRVHGHWDOODPiVDUULED\
SDVHDWUDYpVGHODVRSFLRQHVKDVWDTXHVHH[KLED³Snd”, y luego
presione 6. Vaya hasta la opción deseada y vuelva a presionar 6 para
confirmar la misma. Presione Cancel (Cancelar) para salir del menú
6HWWLQJV&RQILJXUDFLRQHV
Señales de Finalización del Temporizador
(End tonE)
Se trata de un tono que indica el final de un temporizador. El
WRQRSXHGHVHUFRQWLQXR&RQWRXQSLWLGRUHSHWLGRE((38QD
configuración continua seguirá haciendo que un tono suene hasta que
VHSUHVLRQHXQERWyQGHOFRQWURO8QDFRQILJXUDFLyQVLPSOHE((S
hará sonar un solo tono al final del temporizador. Para cambiar el
WRQRLQJUHVHDOPHQ~6HWWLQJV&RQILJXUDFLRQHVFRPRVHGHWDOOD
PiVDUULED\SDVHDWUDYpVGHODVRSFLRQHVKDVWDTXHVHH[KLED³End
TonE´7RQRGH)LQDOL]DFLyQ\OXHJRSUHVLRQH6. Vaya hasta la opción
deseada y vuelva a presionar 6 para confirmar la misma. Presione
Cancel (Cancelar)SDUDVDOLUGHOPHQ~6HWWLQJV&RQILJXUDFLRQHV
Apagado Automático en 12 Horas (12h Shut)
Esta función apaga el horno luego de 12 horas de funcionamiento
continuo. Para activar o desactivar esta función, ingrese al menú
6HWWLQJV&RQILJXUDFLRQHVFRPRVHGHWDOODPiVDUULED\SDVHD
WUDYpVGHODVRSFLRQHVKDVWDTXHVHH[KLED³12h Shut$SDJDGRHQ
KRUDV\OXHJRSUHVLRQH6. Vaya hasta la opción deseada y vuelva a
presionar 6 para confirmar la misma. Presione Cancel (Cancelar) para
VDOLUGHOPHQ~6HWWLQJV&RQILJXUDFLRQHV
Fahrenheit / Celsius (dEg Unit)
El control del horno está configurado para el uso con temperaturas
)DKUHQKHLW)SHURSXHGHVHUPRGLILFDGRDWHPSHUDWXUDV&HOVLXV&
Para alternar entre medidas de temperatura, ingrese al menú Settings
&RQILJXUDFLRQHVFRPRVHGHWDOODPiVDUULED\SDVHDWUDYpVGH
ODVRSFLRQHVKDVWDTXHVHH[KLED³dEg Snd”, y luego presione 6.
Vaya hasta la opción deseada y vuelva a presionar 6 para confirmar
la misma. Presione Cancel (Cancelar) para salir del menú Settings
&RQILJXUDFLRQHV
Pantalla del Reloj (CLoc diSP)
Esta función especifica si el reloj aparece en pantalla. La pantalla
GHOUHORMSRGUiHVWDUHQ³2Q´(QFHQGLGRX³2))´$SDJDGR3DUD
FDPELDUODSDQWDOODLQJUHVHDOPHQ~6HWWLQJV&RQILJXUDFLRQHVFRPR
se detalla más arriba, y pase a través de las opciones hasta que se
H[KLED³Cloc diSP”, y luego presione 6. Vaya hasta la opción deseada
y vuelva a presionar 6 para confirmar la misma. Presione Cancel
(Cancelar)SDUDVDOLUGHOPHQ~6HWWLQJV&RQILJXUDFLRQHV
Configuración del Reloj (CLoc cFg)
(VWDIXQFLyQHVSHFLILFDFyPRVHH[KLELUiODKRUDGHOGtD8VWHGSXHGH
H[KLELUODKRUDDWUDYpVGHXQUHORMHVWiQGDUGHKRUDVRXQ
reloj militar de 24 horas. Para cambiar la configuración, ingrese al
PHQ~6HWWLQJV&RQILJXUDFLRQHVFRPRVHGHWDOODPiVDUULED\SDVH
DWUDYpVGHODVRSFLRQHVKDVWDTXHVHH[KLED³Cloc cFg”, y luego
presione 6. Vaya hasta la opción deseada y vuelva a presionar 6 para
confirmar la misma. Presione Cancel (Cancelar) para salir del menú
6HWWLQJV&RQILJXUDFLRQHV
Acceso Remoto Activado (APP EnbL)
(disponible con el módulo de Conexión U+)
Le permite controlar el horno microondas de forma remota.
Esta función podrá estar encendida o apagada. Para cambiar la
FRQILJXUDFLyQLQJUHVHDOPHQ~6HWWLQJV&RQILJXUDFLRQHVFRPRVH
detalla más arriba, y pase a través de las opciones hasta que se
H[KLED³APP EnbL”, y luego presione 6. Vaya hasta la opción deseada
y presione 6 para confirmar la misma. Presione Cancel (Cancelar)
SDUDVDOLUGHOPHQ~6HWWLQJV&RQILJXUDFLRQHV
UPD (uPd)
(disponible con el módulo de Conexión U+)
(VSRVLEOHTXHVHUHTXLHUDODLQIRUPDFLyQ83'DOFRQWDFWDUDOVHUYLFLR
técnico de su horno. Para acceder a esta información, ingrese al
PHQ~6HWWLQJV&RQILJXUDFLRQHVFRPRVHGHWDOODPiVDUULED\SDVH
DWUDYpVGHODVRSFLRQHVKDVWDTXHVHH[KLED
“
uPd
”
, y luego presione
66HH[KLELUiXQDVHULHGHFXDWURFDUDFWHUHV\Q~PHURV9D\DKDFLD
abajo para visualizar la siguiente serie de cuatro caracteres y números
y luego vuelva a ir hacia abajo para visualizar la configuración final de
FXDWURFDUDFWHUHV\Q~PHURV8VWHGWDPELpQSRGUiLUKDFLDDUULEDSDUD
revisar las configuraciones anteriores. Presione Cancel (Cancelar)
SDUDVDOLUGHOPHQ~6HWWLQJV&RQILJXUDFLRQHV
MAC ID (id)
(disponible con el módulo de Conexión U+)
(VSRVLEOHTXHODLQIRUPDFLyQGH0$&,'VHDQHFHVDULDSDUDFRQHFWDU
algunos sistemas Wi-Fi. Para acceder a esta información, ingrese al
PHQ~6HWWLQJV&RQILJXUDFLRQHVFRPRVHGHWDOODPiVDUULED\SDVHD
WUDYpVGHODVRSFLRQHVKDVWDTXHVHH[KLEDLG´\OXHJRSUHVLRQH6. Se
H[KLELUiXQDVHULHGHFXDWURFDUDFWHUHV\Q~PHURV9D\DKDFLDDEDMR
para visualizar la siguiente serie de cuatro caracteres y números y
luego vuelva a ir hacia abajo para visualizar el conjunto final de cuatro
FDUDFWHUHV\Q~PHURV8VWHGWDPELpQSRGUiLUKDFLDDUULEDSDUDUHYLVDU
las configuraciones anteriores. Presione Cancel (Cancelar) para salir
GHOPHQ~6HWWLQJV&RQILJXUDFLRQHV
USO DEL ELECTRODOMÉSTICO: Configuraciones
Configuraciones
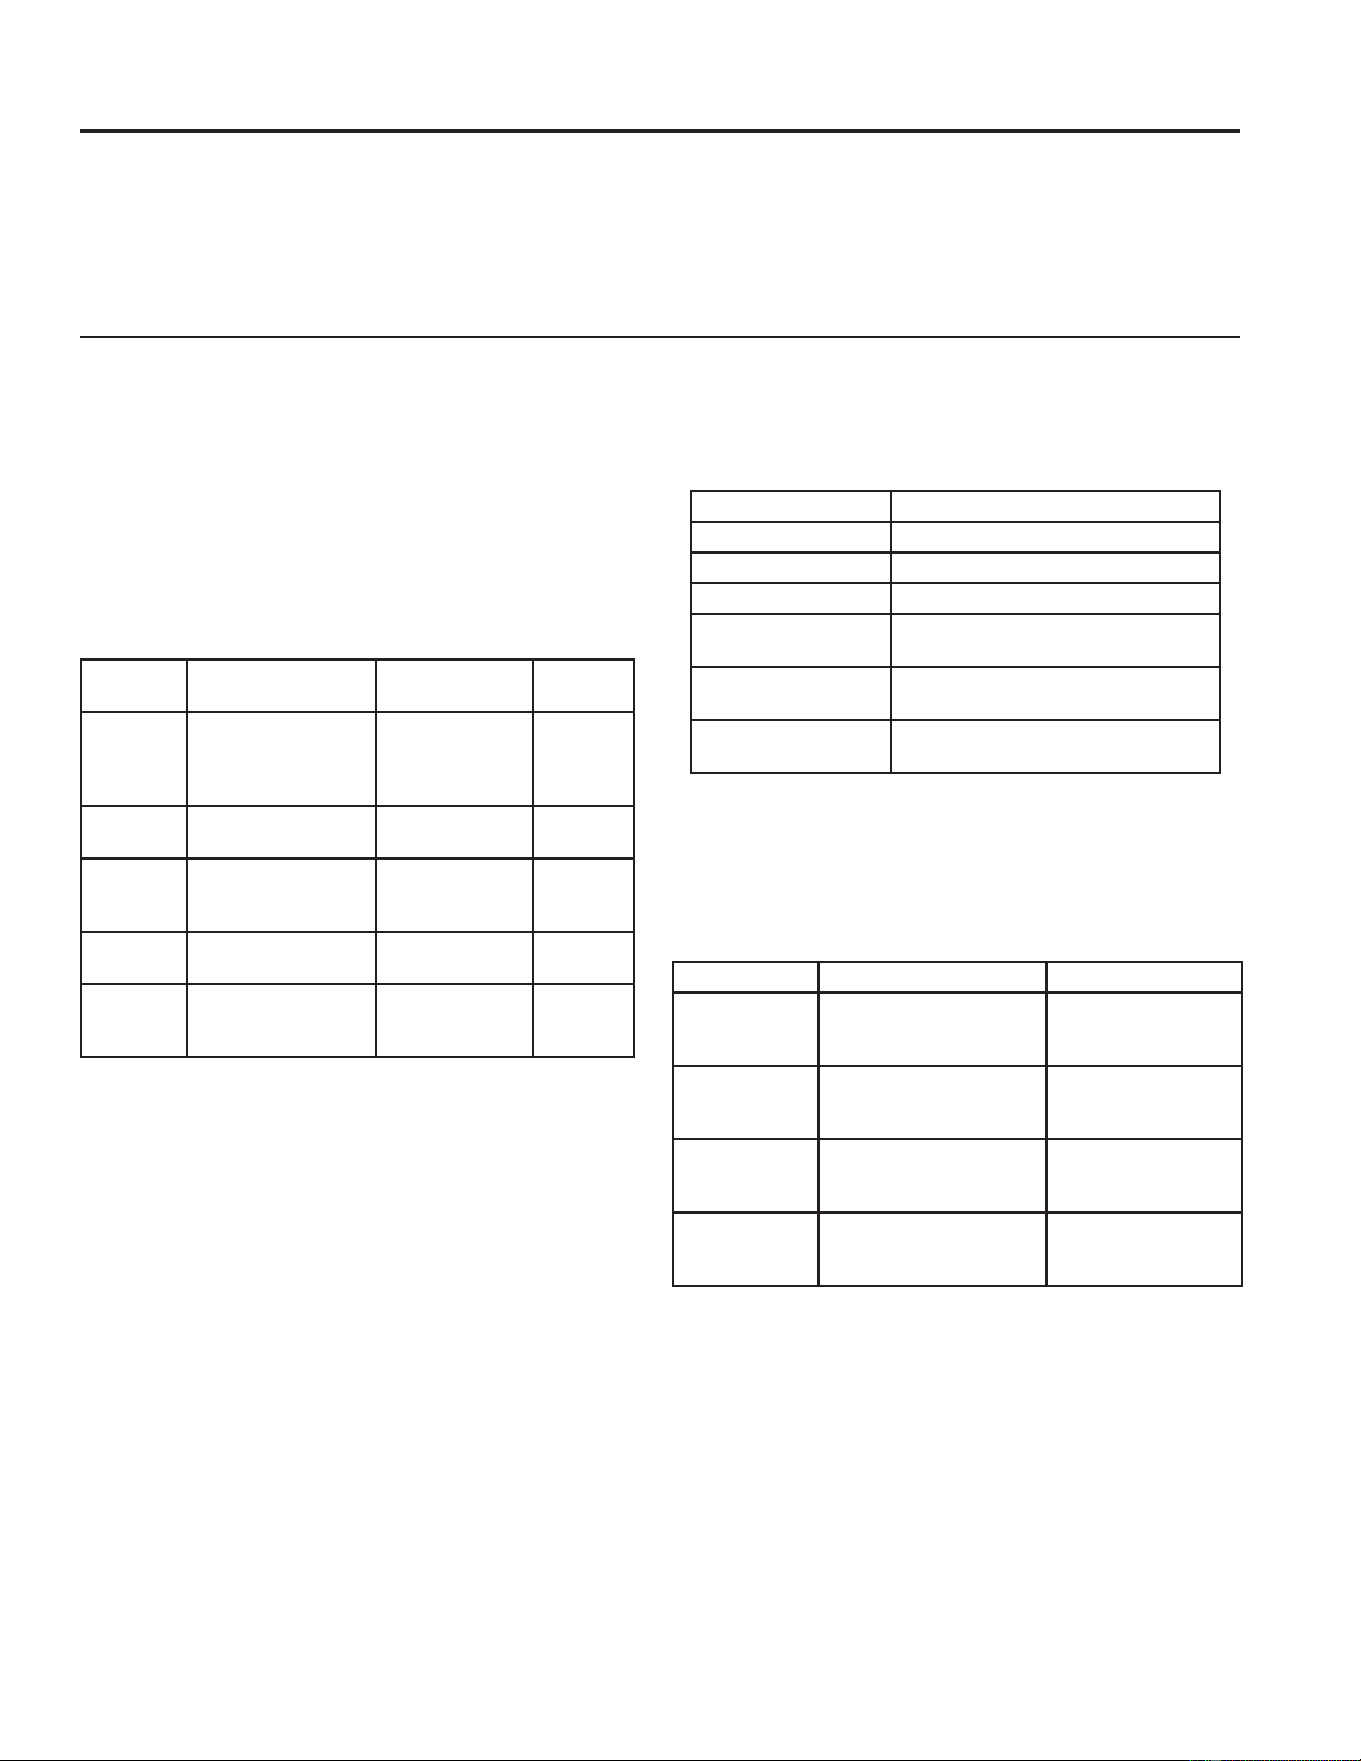
49-2001190 Rev. 3 9
Modo Sabático
USO DEL ELECTRODOMÉSTICO: Modo Sabático
Ingreso al Menú de Selección de la
Programación del Modo Sabático
0DQWHQJDSUHVLRQDGDVODVWHFODV7LPHU2Q2II7HPSRUL]DGRU
(QFHQGLGR$SDJDGR\2YHQ/LJKW/X]GHO+RUQRGXUDQWH
VHJXQGRVKDVWDTXHVHH[KLED³6DEE´
2. Pase a través de las opciones de programación usando la tecla
numérica 0. Seleccione la programación deseada presionando Start
(Iniciar).
NOTA: En la siguiente tabla, “S” en la programación denota 24 hrs. +
KUGHFDOHQWDPLHQWRGHOKRUQR8QD³+´HQODSURJUDPDFLyQGHQRWD
XQGtD)HULDGRGHDFXHUGRFRQORGHILQLGRHQODVHFFLyQ+ROLGD\³KR/L´
)HULDGRTXHILJXUDDFRQWLQXDFLyQ
NOTA: Presionar la tecla Cancel (Cancelar) producirá la salida
GHOPRGR6DEEDWK6DEiWLFRFRPSOHWDPHQWH\KDUiTXHODHVWXID
regrese a su funcionamiento normal. Si no se presione ninguna tecla
durante 30 segundos, el control finalizará el conteo y regresará al
funcionamiento normal.
Calor Sabático (Sabb)
/DIXQFLyQ6DEEDWK:DUP&DORU6DEiWLFRPDQWHQGUiHOKRUQR
caliente a lo largo de la duración programada. Para usar la función
6DEEDWK:DUP&DORU6DEiWLFR
1. Mantenga presionadas las teclas Timer On/Off (Temporizador
Encendido/ Apagado) y Oven Light (Luz del Horno) durante
VHJXQGRVKDVWDTXHVHH[KLED³Sabb”. Si se desea el
IXQFLRQDPLHQWRFRQWLQXRGHODIXQFLyQKU6DEEDWK:DUP&DORU
6DEiWLFRODVKUVSUHVLRQHStart (Iniciar).
2. Si no se desea la duración por omisión, presione la tecla Timer
On/Off (Temporizador Encendido/ Apagado)PLHQWUDVVHH[KLEH
“Sabb´SDUDLQJUHVDUDOPHQ~GH6HOHFFLyQGH'XUDFLyQGHO&DORU
Sabático. Pase a través de las opciones de duración usando
el teclado numérico
0
, y luego seleccione la duración deseada
presionando Start (Iniciar).
NOTA: Para opciones de tiempo inferiores a 24 horas, el
HOHFWURGRPpVWLFRFRPSOHWDUiODIXQFLyQ6DEEDWK:DUP&DORU6DEiWLFR
\SDVDUiD6DEEDWK,GOH0RGR6DEiWLFR,QDFWLYRGXUDQWHHOUHVWRGHO
período de 24 horas. Las luces del horno permanecerán encendidas,
los tonos del horno permanecerán desactivados, la calefacción del
KRUQRHVWDUiGHVDFWLYDGD\HOFRQWUROH[KLELUi³,G/(´,QDFWLYR
Feriado (hoLi)
/DVRSFLRQHVSURJUDPDGDVFRQODIXQFLyQ+ROLGD\)HULDGRVHJXLUiQOD
siguiente programación de forma automática. No se requiere ninguna
otra acción luego de configurar la opción de programación deseada, ya
que el electrodoméstico pasará entre las funciones por sí solo en base
al tiempo ingresado de forma inicial dentro de la ventana de 1 hora
antes de la caída del sol.
Nota sobre Corte de Corriente Durante el Modo
Sabático
Si se produce un corte de corriente durante el uso del modo Sabbath
6DEiWLFRRHQORVPRGRVGH+ROLGD\)HULDGRODXQLGDGUHJUHVDUDD
6DEEDWK:DUP&DORU6DEiWLFRGXUDQWHHOUHVWRGHODSURJUDPDFLyQ
elegida. Si se produce un corte de corriente durante el uso del modo
6DEEDWK,GOH6DEiWLFR,QDFWLYRODXQLGDGUHJUHVDUDD6DEEDWK,GOH
6DEiWLFR,QDFWLYRGXUDQWHHOUHVWRGHODSURJUDPDFLyQHOHJLGD
(QWRQFHVVXHVWXIDRIUHFHXQPRGR6DEEDWK6DEiWLFRTXHFXPSOH
FRQORVHVWiQGDUHVHVWDEOHFLGRVSRU2UWKRGR[8QLRQ8QLyQ2UWRGR[D
HO&HQWUDO5DEELQLFDO&RQJUHVV&RQJUHVR5DEtQLFR&HQWUDO\+DODFK
Tech, y está 100% certificada por los más altos estándares de Halacha.
En este modo, las luces del horno se apagarán durante todo el uso,
los tonos del horno estarán desactivados, y se tendrá la opción de
FRQILJXUDUSURJUDPDFLRQHVGH6DEEDWK6DEiWLFRGHKDVWDKRUDVGH
duración.
NOTA: Asegúrese de que el reloj del horno esté correctamente
configurado antes de ingresar al modo. Para un funcionamiento
FRUUHFWRGHOPRGR6DEEDWK6DEiWLFRHVWHPRGRVHGHEHUiLQLFLDU
dentro de la hora antes de la puesta de sol.
Opciones
del Menú
Detalles del Menú
Opciones de
Duración
Pantalla
Mostrada
SAbb Calentar en el Modo
Sabático
KVSRU
RPLVLyQKUV
72 hrs., 4 hrs., 8
hrs., 12 hrs.
SAbb
SH
Calentar 24 hrs. + 1 hr.
Feriado 24 hrs.
Ninguno hoLi
SHH
Calentar 24 hrs. + 1 hr.
Feriado 24 hrs.
Feriado 24 hrs.
Ninguno hoLi
HS Feriado 24 hrs.
Calentar 24 hrs. + 1 hr.
Ninguno hoLi
HHS Feriado 24 hrs.
Feriado 24 hrs.
Calentar 24 hrs. + 1 hr.
Ninguno hoLi
Opciones del Menú Detalles del Menú
24hrs. Calor Sabático 24hrs. + 1hr.
48hrs. Calor Sabático 48hrs. + 1hr.
72hrs. Calor Sabático 72hrs. + 1hr.
4hrs. Calor Sabático 4hrs.
Modo Sabático Inactivo 20hrs. + 1 hr.
8hrs. Calor Sabático 8hrs.
Modo Sabático Inactivo 16hrs. + 1hr.
12hrs. Calor Sabático 12hrs.
Modo Sabático Inactivo 12hrs. + 1hr.
Hora de Inicio Hora de Finalización
Horneado en el
Feriado
Tiempo Inicial Ingresado
,7(
ITE + 5 hrs. o
0HGLDQRFKHODTXH
VXFHGDSULPHUR
Calentar en el
Feriado
ITE + 5 hrs. o
0HGLDQRFKHODTXH
VXFHGDSULPHUR
8 AM
Holiday Bake
+RUQHDGRHQ
HO)HULDGR
8 AM 12 del Mediodía
Holiday Warm
&DOHQWDUHQHO
)HULDGR
12 del Mediodía Tiempo Inicial
Ingresado
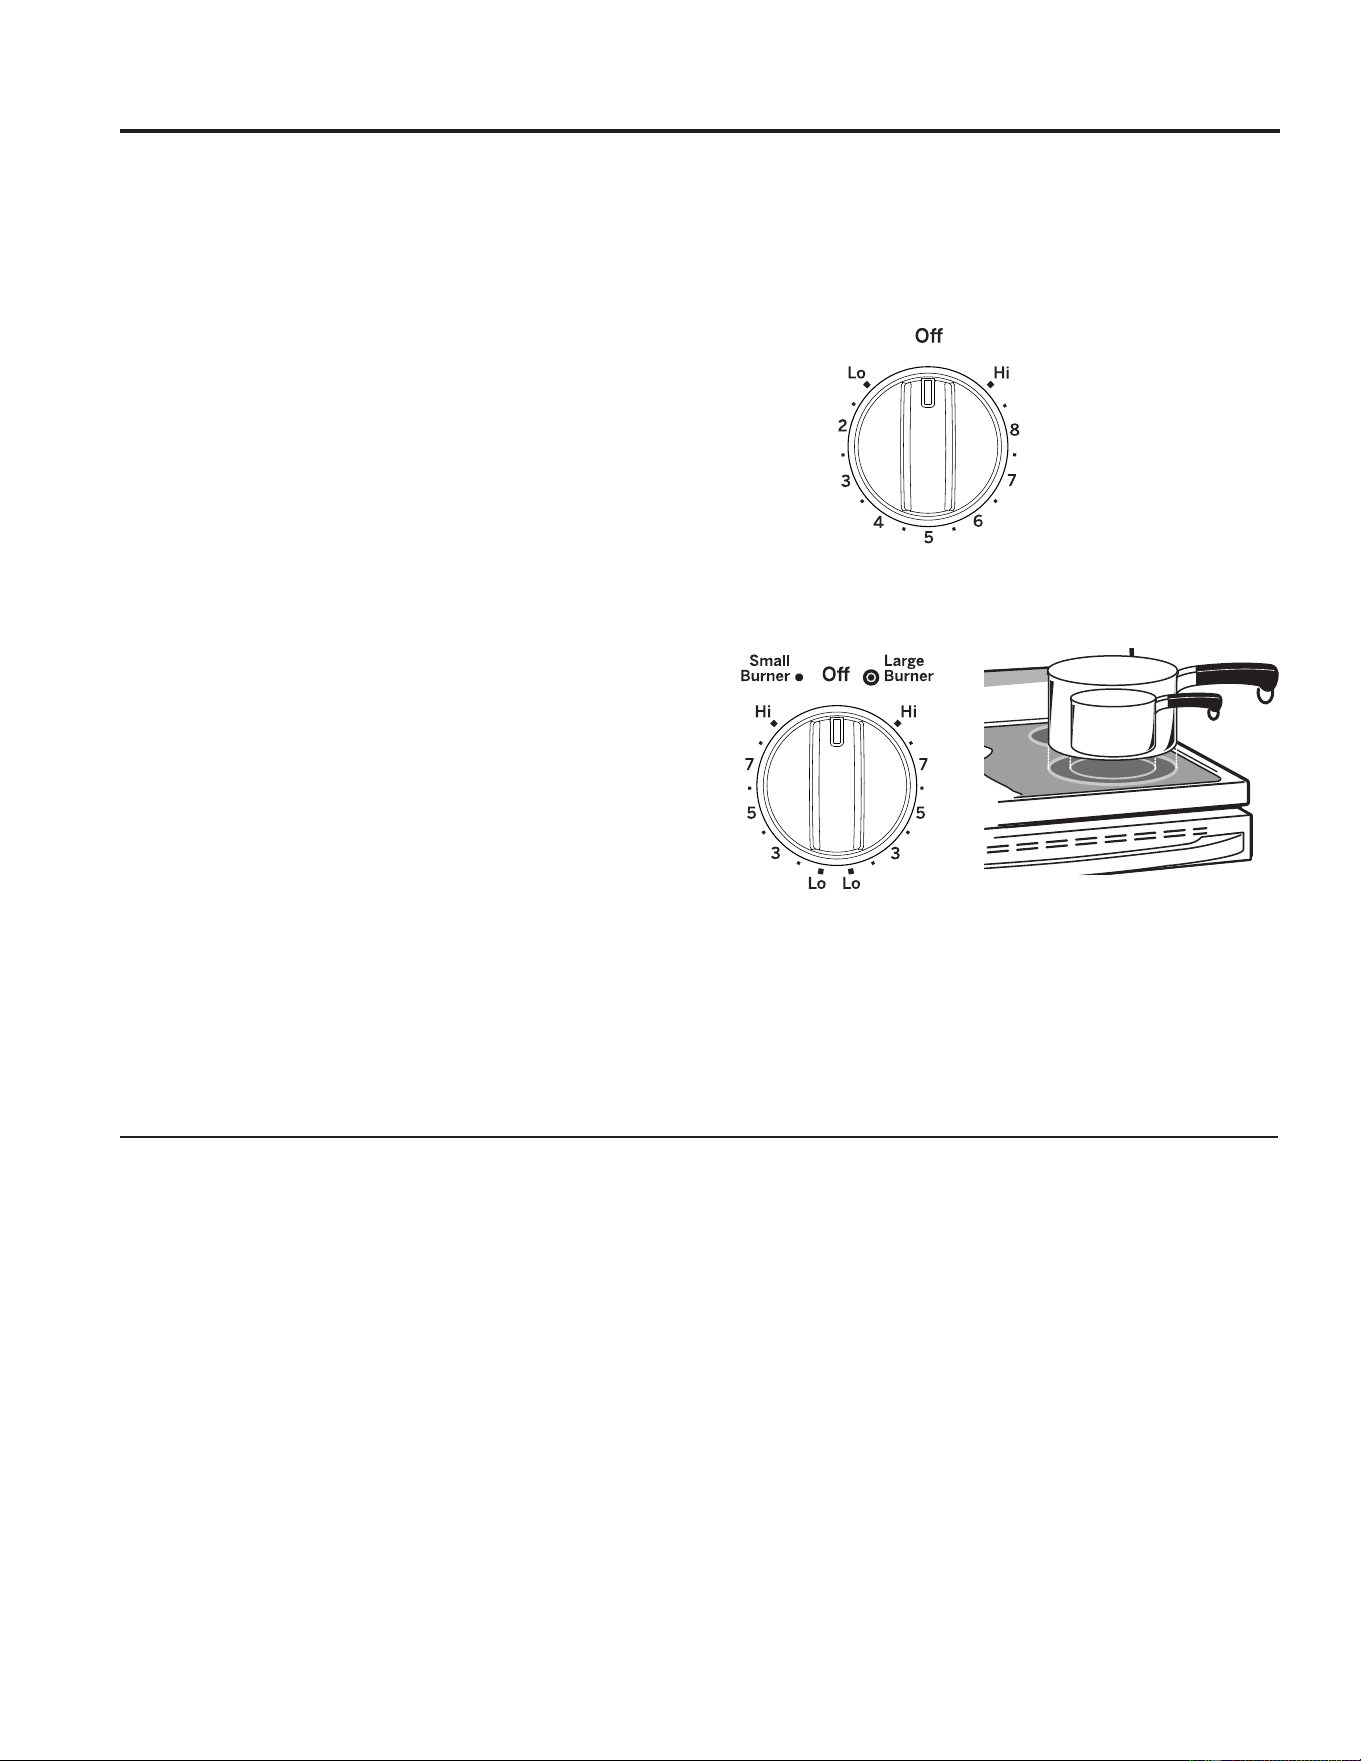
10 49-2001190 Rev. 3
USO DEL ELECTRODOMÉSTICO: Estufa de Vidrio Radiante
Estufa de Vidrio Radiante
Consejos para Productos Enlatados en el Hogar
Asegúrese que el producto enlatado se encuentre sobre la
unidad superficial. Asegúrese de que el producto enlatado sea
plano en su parte inferior. Para evitar quemadoras de vapor
RFDORUWHQJDFXLGDGRDOHQODWDUHOSURGXFWR8VHUHFHWDV\
procedimientos de fuentes confiables. Estos se encuentran
disponibles a través de fabricantes como Ball
®
y Kerr
®
y el
'HSDUWPHQWRI$JULFXOWXUH([WHQVLRQ6HUYLFH6HUYLFLRGHO
'HSDUWDPHQWRGH$JULFXOWXUD
El uso de enlatados cerrados a baño maría con fondos
RQGHDGRVSRGUiQH[WHQGHUHOWLHPSRUHTXHULGRSDUDWUDHUHO
agua al punto de hervor.
La superficie de cocción radiante cuenta con unidades de la
superficie de calentamiento debajo de una superficie de vidrio
pareja. La unidad superficial seguirá un ciclo de encendido
y apagado para mantener su configuración de control
seleccionada. Es seguro colocar utensilios calientes en la
superficie de vidrio, incluso cuando la estufa esté fría. Aunque
las unidades de superficie se hayan apagado, la estufa de
vidrio retiene suficiente calor para continuar la cocción. Para
evitar la sobrecocción, quite las ollas de las unidades de
superficie cuando los alimentos estén cocidos. No coloque
nada sobre la unidad de superficie hasta que se haya enfriado
por completo.
8QDOX]LQGLFDGRUDGH683(5),&,('(&2&&,Ï1&$/,(17(
• Se encenderá cuando las unidades de la superficie estén
calientes al tacto.
• Permanecerá encendida incluso luego de que las unidades
de la superficie estén apagadas.
• Permanecerá encendida hasta 30 minutos después de que
las unidades de la superficie se hayan apagado.
NOTA:8QOLJHURRORUHVQRUPDOFXDQGRXQDHVWXIDQXHYD
se utiliza por primera vez. Es provocado por el calentamiento
de piezas nuevas y materiales aislantes y desaparecerá en
poco tiempo.
Cómo Usar
Para usar la superficie de cocción, presione la perilla hacia
adentro y gire la misma en cualquiera de las direcciones hasta
ODFRQILJXUDFLyQGHVHDGD8QDOX]LQGLFDGRUDGHVXSHUILFLH21
(QFHQGLGRDSDUHFHUiHQSDQWDOODFXDQGRFXDOTXLHUXQLGDGGH
la superficie esté encendida.
Al configurar una unidad de la superficie del área doble,
asegúrese de seleccionar la unidad de la superficie pequeña o
grande que mejor se adapte a la charola que se use.
La apariencia de la
perilla puede variar.
Tanto en la configuración OFF
$SDJDGRFRPRHQ+,$OWRHO
control se ajusta en la posición.Es
posible que escuche leves sonidos de
ajuste durante la cocción, indicando
que el control está manteniendo su
configuración deseada.
Asegúrese de girar la perilla de
control a Off (Apagado) cuando
finalice la cocción.

49-2001190 Rev. 3 11
USO DEL ELECTRODOMÉSTICO: Estufa de Vidrio Radiante
Uso del Área para Calentar
ADVERTENCIA
RIESGO DE ENVENENAMIENTO CON COMIDA: Se pueden
desarrollar bacterias cuando la comida esté a una temperatura
inferior a los 140º. Warming Zone (Área para Calentar),
ubicada en la parte central trasera de la superficie de vidrio,
mantendrá la comida caliente y cocida a la temperatura para
servir. No use la configuración para calentar durante más de
2 horas. No use la función para calentar comida fría. Colocar
comida que no está cocinada o fría en el Warming Zone (Área
para Calentar) podría producir enfermedades desarrolladas
por bacterias en la comida.
Para obtener mejores resultados, todas las comidas en el
Warming Zone (Área para Calentar) deberían estar cubiertas
por una tapa o papel de aluminio. Al calentar pasteles o panes,
la tapa se deberá ventilar para dejar que la humedad salga. La
temperatura inicial, el tipo y la cantidad de comida, el tipo de
pan y el tiempo afectarán la calidad de la comida.
Para activar la función Warming Zone (Área para Calentar),
presione la tecla Warming Zone (Área para Calentar), y
luego presione Start (Iniciar).
3DUDDSDJDUHOÈUHDSDUD&DOHQWDUSUHVLRQHODWHFOD:DUPLQJ
=RQHÈUHDSDUD&DOHQWDU
Siempre use las manijas de las ollas o guantes para horno al
retirar comida del Warming Zone (Área para Calentar) ya que
los utensilios y platos estarán calientes.
NOTA: El calentador de la superficie emitirá un brillo rojo, al
igual que las unidades de la superficie de cocción.
NOTA: /DWHFOD&DQFHO&DQFHODUQRDSDJDODIXQFLyQ
:DUPLQJ=RQHÈUHDSDUD&DOHQWDU
Estufa de Vidrio Radiante
Limitador de Temperatura en Estufas de Vidrio Radiante
Cada unidad de superficie radiante cuenta con un limitador de temperatura
separado para cada elemento. El limitador de temperatura evita que la estufa
de vidrio se caliente en exceso. Bajo condiciones normales, el limitador de
temperatura apagará el ciclo para mantener la temperatura de la superficie
de cocción.
Los limitadores de temperatura también podrán apagar las unidades de la
superficie durante un tiempo determinado si:
Ŷ ODROODKLHUYHKDVWDVHFDUVH
Ŷ HOIRQGRGHODROODQRHVSODQR
Ŷ ODROODHVWiIXHUDGHOFHQWUR
Ŷ QRKD\ROODHQODXQLGDG
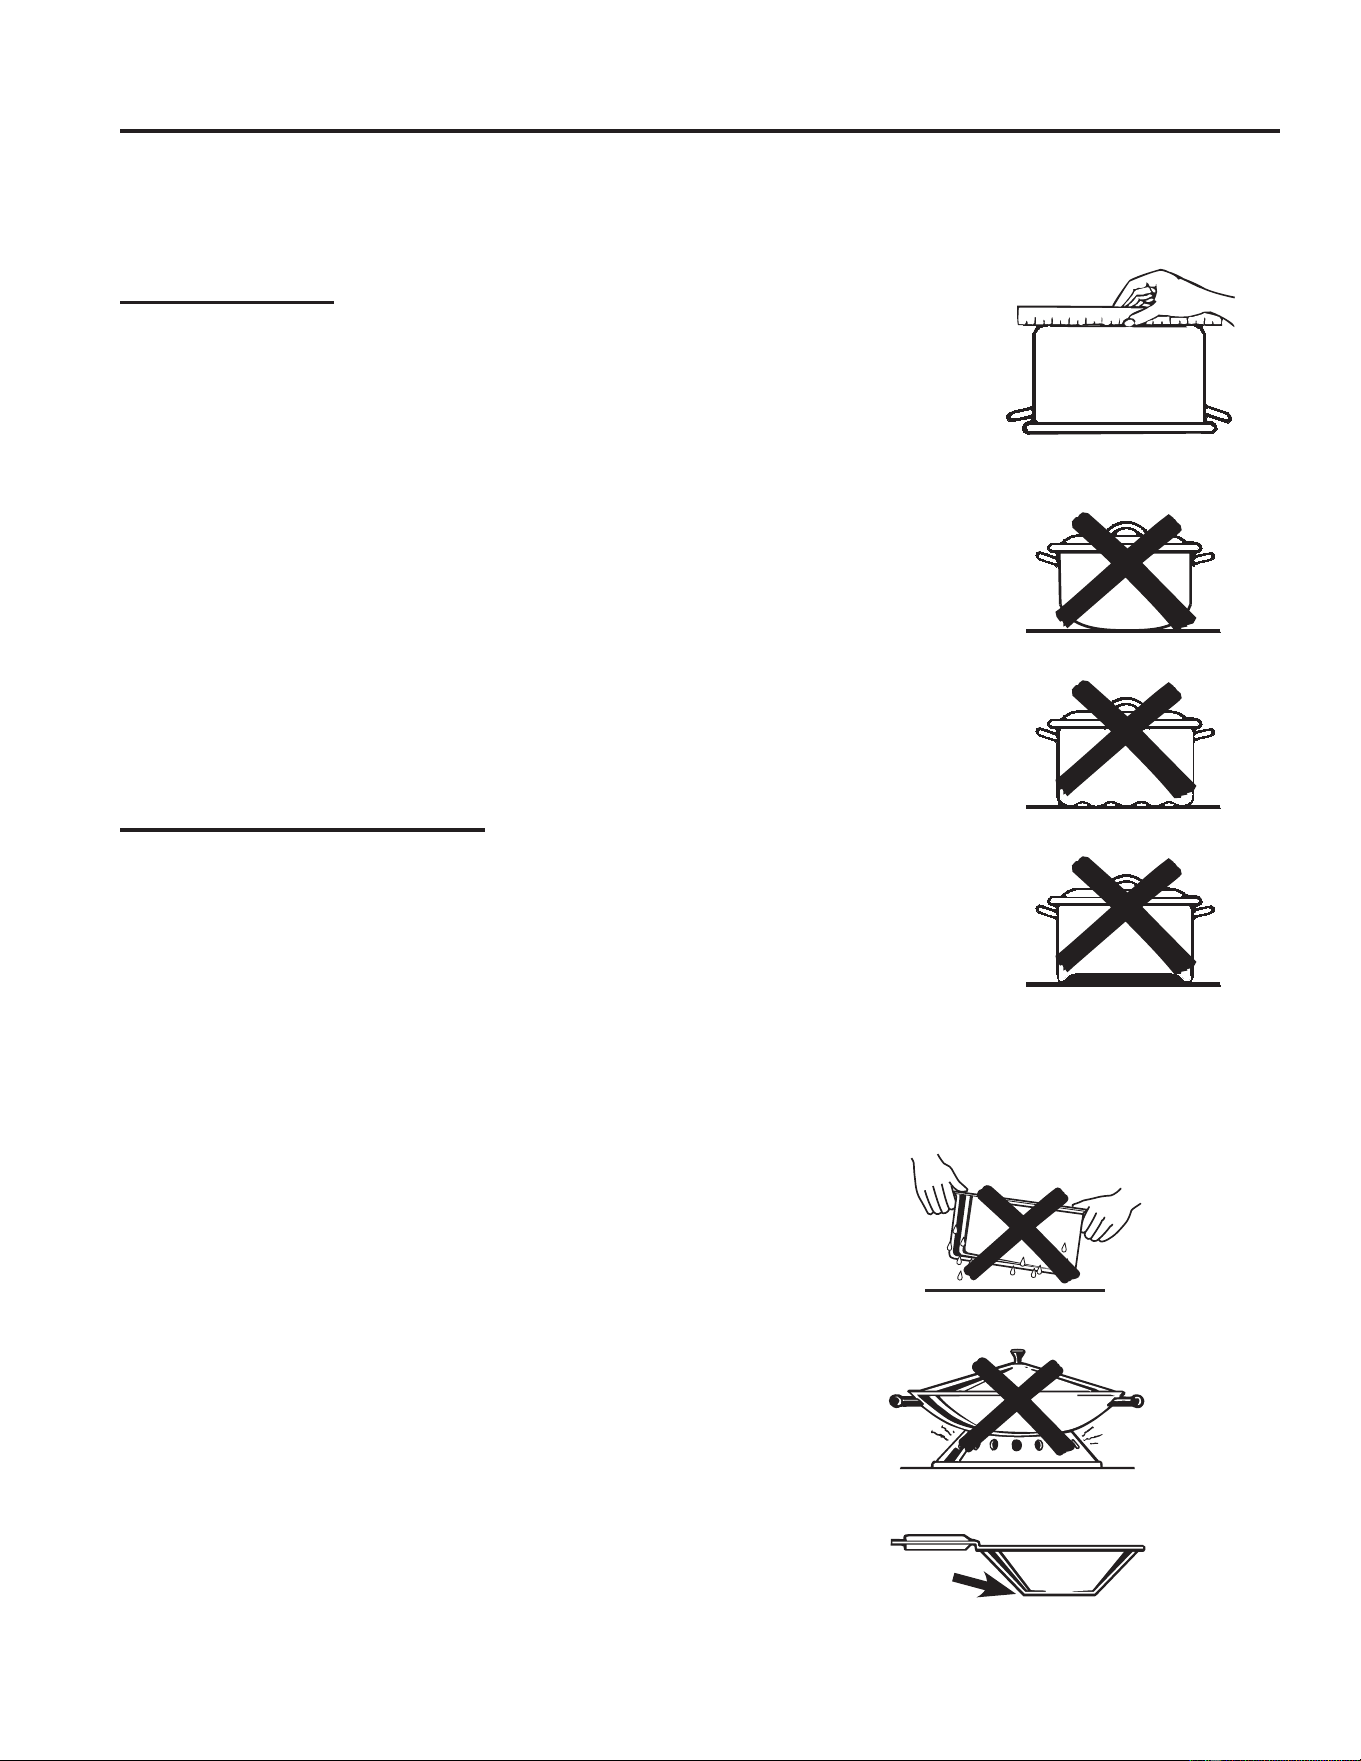
12 49-2001190 Rev. 3
USO DEL ELECTRODOMÉSTICO:8WHQVLOLRSDUD3ODFDGH&RFFLyQSDUD9LGULR5DGLDQWH
Utensilio para Placa de Cocción para Vidrio Radiante
La siguiente información lo ayudará a elegir los recipientes de cocción que brindan un buen desempeño en estufas de vidrio. Ver
el folleto sobre recipientes para usar con estufas de inducción.
NOTA: Siga todas las recomendaciones del fabricante de recipientes cuando utilice cualquier clase de recipiente de cocción
sobre la estufa cerámica.
Recomendado
Acero inoxidable
Este metal posee propiedades de calentamiento limitadas y normalmente se combina con
cobre, aluminio u otros materiales para una mejor distribución del calor. Las sartenes con
combinación de metales normalmente funcionan de forma satisfactoria si se usan con calor
medio, o como lo recomienda el fabricante.
Aluminio:
Se recomienda de capa gruesa.
Buena conductividad. Los residuos de aluminio a veces
SDUHFHQUD\RQHVVREUHODHVWXIDSHURSXHGHQTXLWDUVHVLVHORVOLPSLDGHLQPHGLDWR'HELGRD
su bajo punto de fusión, no debe utilizarse aluminio de capa fina.
Base de cobre:
El cobre puede dejar residuos que pueden parecer rayones. Los residuos pueden eliminarse,
siempre y cuando la estufa se limpie de inmediato. Sin embargo, no permita que estas ollas
hiervan en seco. El metal sobrecalentado puede adherirse a las estufas de vidrio. Si no se
elimina de inmediato, una olla con la base de cobre sobrecalentado dejará un residuo que
manchará la estufa en forma permanente.
Esmalte (pintado) sobre hierro fundido:
Se recomienda si la base de la olla se encuentra revestida.
Evitar/No se recomienda
Esmalte (pintado) sobre acero:
Calentar recipientes vacíos puede provocar daños permanentes al vidrio de las estufas. El
esmalte puede derretirse y adherirse a la estufa cerámica.
Vidrio-cerámico:
'HVHPSHxRSREUH5D\DODVXSHUILFLH
Cerámica:
'HVHPSHxRSREUH3XHGHUD\DUODVXSHUILFLH
Hierro fundido:
No se recomienda, a menos que se encuentre específicamente diseñado para estufas de
vidrio. Lentitud para absorber el calor. Raya la superficie de la estufa.
Para mejores resultados
Ŷ &XEULUXQDROODFRQODWDSDKDUiTXHVHFDOLHQWHPiVUiSLGR
Ŷ &RORTXHVyORFKDURODVVHFDVVREUHODVXQLGDGHVGHODVXSHUILFLH
No coloque tapas sobre las unidades de la superficie, en especial
tapas mojadas. Las ollas y tapas mojadas podrán quedar adheridas
a la superficie una vez frías y podrán dejar depósitos minerales
sobre la superficie de cocción, los cuales podrán afectar el aspecto
de la superficie de cocción.
Ŷ 1RXVHZRNVFRQDQLOORVGHVRSRUWH(VWHWLSRGHZRNQRVH
calentará sobre unidades con superficies de vidrio. Recomendamos
HOXVRGHZRNVGHEDVHSODQDVRODPHQWH6HHQFXHQWUDQ
GLVSRQLEOHVHQVXQHJRFLRPLQRULVWDORFDO/DSDUWHLQIHULRUGHOZRN
deberá poseer el mismo diámetro que las unidades de la superficie
para asegurar un contacto correcto.
Ŷ $OJXQRVSURFHGLPLHQWRVGHFRFFLyQHVSHFLDOHVUHTXLHUHQ
recipientes de cocción específicos, como ollas a presión, freidoras,
etc. Todos los recipientes de cocción deben tener bases planas y
ser del tamaño correcto.
Verifique que los recipientes tengan
bases planas utilizando una regla.
No se recomiendan recipientes con
bases redondeadas, curvadas, con
rebordes o torceduras..
No coloque recipientes mojados sobre la estufa de vidrio.
1RXVHZRNVFRQDQLOORVGHVRSRUWHVREUHODHVWXIDGHYLGULR
8WLOLFHZRNVGHEDVHSODQDVREUHODHVWXIDGHYLGULR

49-2001190 Rev. 3 13
USO DEL ELECTRODOMÉSTICO: Modos de Cocción del Horno
Modos de Cocción del Horno
Su nuevo horno posee una variedad de modos de cocción para que pueda obtener los mejores resultados. Estos modos se
describen a continuación. Consulte en la sección de la Guía de Cocción sobre posiciones de las parrillas recomendadas y otros
consejos para usar estos modos. Recuerde que es posible que su nuevo horno funcione de manera diferente que aquel que está
reemplazando.
&RORTXHODVSDUULOODVHQODSRVLFLyQHVGHVHDGDDQWHVGHLQLFLDUHOKRUQR3DUDDOJXQRVPRGRVGHFRFFLyQWDOHVFRPR%DNH
+RUQHDUHOKRUQRUHDOL]DUiXQSUHFDOHQWDPLHQWR\VRQDUiXQWRQRFXDQGRpVWHVHHQFXHQWUHOLVWRSDUDFRFLQDU$OJXQRVPRGRV
de cocción no requieren precalentamiento. A fin de reducir los tiempos del precalentamiento, retire las parrillas que no se usen y
evite abrir la puerta del horno hasta que suene el tono de precalentamiento.
Mientras se encuentre en uso, los calentadores del horno realizarán ciclos de encendido y apagado para mantener las
condiciones de cocción adecuadas. Evite la apertura frecuente de la puerta del horno, ya que esto podrá impactar en los tiempos
y en el rendimiento de la cocción.
NOTA (en algunos modelos): 8QYHQWLODGRUGHUHIULJHUDFLyQVHDFWLYDUiSDUDHQIULDUODVSLH]DVLQWHULRUHVFXDQGRHOKRUQRHVWp
en uso. Esto es normal, y es posible que el ventilador continúe funcionando luego de que el horno se apague.
Bake (Hornear)
(OPRGR%DNH+RUQHDUVHXWLOL]DSDUDKRUQHDU\GRUDUVREUH
un solo estante. Para usar este modo, presione la tecla Bake
(Hornear) y use las teclas +/- para configurar la temperatura
deseada, y luego presione Start (Iniciar).
El precalentamiento generalmente se recomienda al usar este
modo, especialmente para preparar productos horneados tales
como tortas, galletas y pasteles.
Modo para Asar
Monitoree la comida de cerca al asar. Tenga cuidado al
asar en posiciones de estantes superiores, ya que colocar
la comida más cerca del elemento para asar incrementa el
humo, salpicaduras y se incendien las grasas. Para un mejor
rendimiento, centre la comida debajo del elemento que emite
calor para asar. Intente asar las comidas que normalmente
haría a la parrilla. Ajuste las posiciones de los estantes para
ajustar la intensidad del calor a la comida. Siempre use el
PRGR%URLO$VDUFRQODSXHUWDGHOKRUQRFHUUDGD
Broil High (Asar Alto)
%URLO+L$VDGR$OWRXVDFDORULQWHQVRGHOHOHPHQWRVXSHULRU
SDUDVRDVDUODVFRPLGDV8VHODIXQFLyQ%URLO+L$VDGR$OWR
SDUDFRUWHVPiVGHOJDGRVGHFDUQH\RFXDQGRGHVHHTXHOD
superficie quede más soasada y el interior más jugoso. Para
usar este modo, presione la tecla Broil (Asar) una vez y luego
presione Start (Iniciar).
No es necesario realizar el precalentamiento al usar este modo.
Broil Low (Asar Bajo)
%URLO/RZ$VDGR%DMRXVDPHQRVFDORULQWHQVRGHOHOHPHQWR
superior para cocinar la comida completamente mientras
WDPELpQSURGXFHHOGRUDGRVXSHUILFLDO8VHODIXQFLyQ%URLO
/RZ$VDGR%DMRSDUDFRUWHVGHFDUQHPiVJUXHVRV\R
comidas que desee que queden completamente cocinadas.
Para usar este modo, presione la tecla Broil (Asar) dos veces
y luego presione Start (Iniciar). No es necesario realizar el
precalentamiento al usar este modo.
Crisp (Crujiente)
(OPRGR&ULVS&UXMLHQWHIXHGLVHxDGRSDUDSURGXFLUFRPLGDV
TXHHQVXH[WHULRUTXHGHQPiVFUXMLHQWHVTXHHQODFRFFLyQ
HQKRUQRVWUDGLFLRQDOHV(OPRGR&ULVS&UXMLHQWHIXH
diseñado para la cocción en una sola parrilla. Para usar este
modo, presione la tecla Crisp (Crujiente) y use las teclas
numéricas para configurar la temperatura deseada, y luego
presione Start (Iniciar).
La temperatura se puede configurar entre 300º y 500º. Este
modo necesita un precalentamiento de 2 minutos. Siga las
pautas de horneado tradicional de la receta o paquete para
configurar la temperatura y los tiempos de cocción. Ajuste el
WLHPSRGHFRFFLyQSDUDORJUDUODWH[WXUDFUXMLHQWHGHVHDGD6H
podrán encontrar pautas adicionales para utilizar este modo en
la Guía de Comidas Crujientes.
Calentar
(OPRGR:DUP&DOHQWDUIXHGLVHxDGRSDUDPDQWHQHU
calientes las comidas cocinadas. No use la función Warm
&DOHQWDUSDUDFDOHQWDUFRPLGDIUtDH[FHSWRJDOOHWDV
crujientes, patatas fritas o cereales secos. Cubra las comidas
que necesitan mantener la humedad y no cubra aquellas
comidas que deban quedar crujientes. También se recomienda
que la comida no se mantenga caliente por más de dos horas.
Para usar este modo, presione la tecla Warm (Caliente) y
luego presione Start (Iniciar).
No es necesario realizar el precalentamiento en este modo.

14 49-2001190 Rev. 3
Utensilios de Cocina para Horno
USO DEL ELECTRODOMÉSTICO:8WHQVLOLRVGH&RFLQDSDUD+RUQR
El material, el acabado y el tamaño de los utensilios afectan
el horneado. Las ollas oscuras, revestidas y opacas absorben
el calor más rápidamente que las ollas claras y brillantes. Al
usar ollas que absorben el calor más rápidamente, las comidas
podrán resultar más doradas, crocantes y con una capa más
gruesa. Si utiliza utensilios oscuros y revestidos, controle la
comida antes del tiempo mínimo de cocción. Si se obtienen
resultados no deseados con este tipo de utensilios, considere
la posibilidad de reducir la temperatura del horno en 25º F la
SUy[LPDYH]
• Las ollas brillantes pueden producir resultados de
horneado más parejos en tortas y galletas.
• Las ollas de vidrio y cerámica calientan con lentitud, pero
retienen bien el calor. Estos tipos de ollas funcionan bien
con platos tales como tartas y postres con natilla.
• Las ollas con aislante de aire calientan lentamente y
pueden producir fondos dorados.
• La cerámica se calienta de forma lenta y retiene
bien el calor. Si es posible, se recomienda
precalentar este tipo de utensilios. Se podrá requerir
tiempo de cocción adicional.
• El utensilio usado en los modos para asar y freír con
aire deberán ser de uso seguro para asar.
• Mantenga los utensilios limpios para una cocción más
pareja.
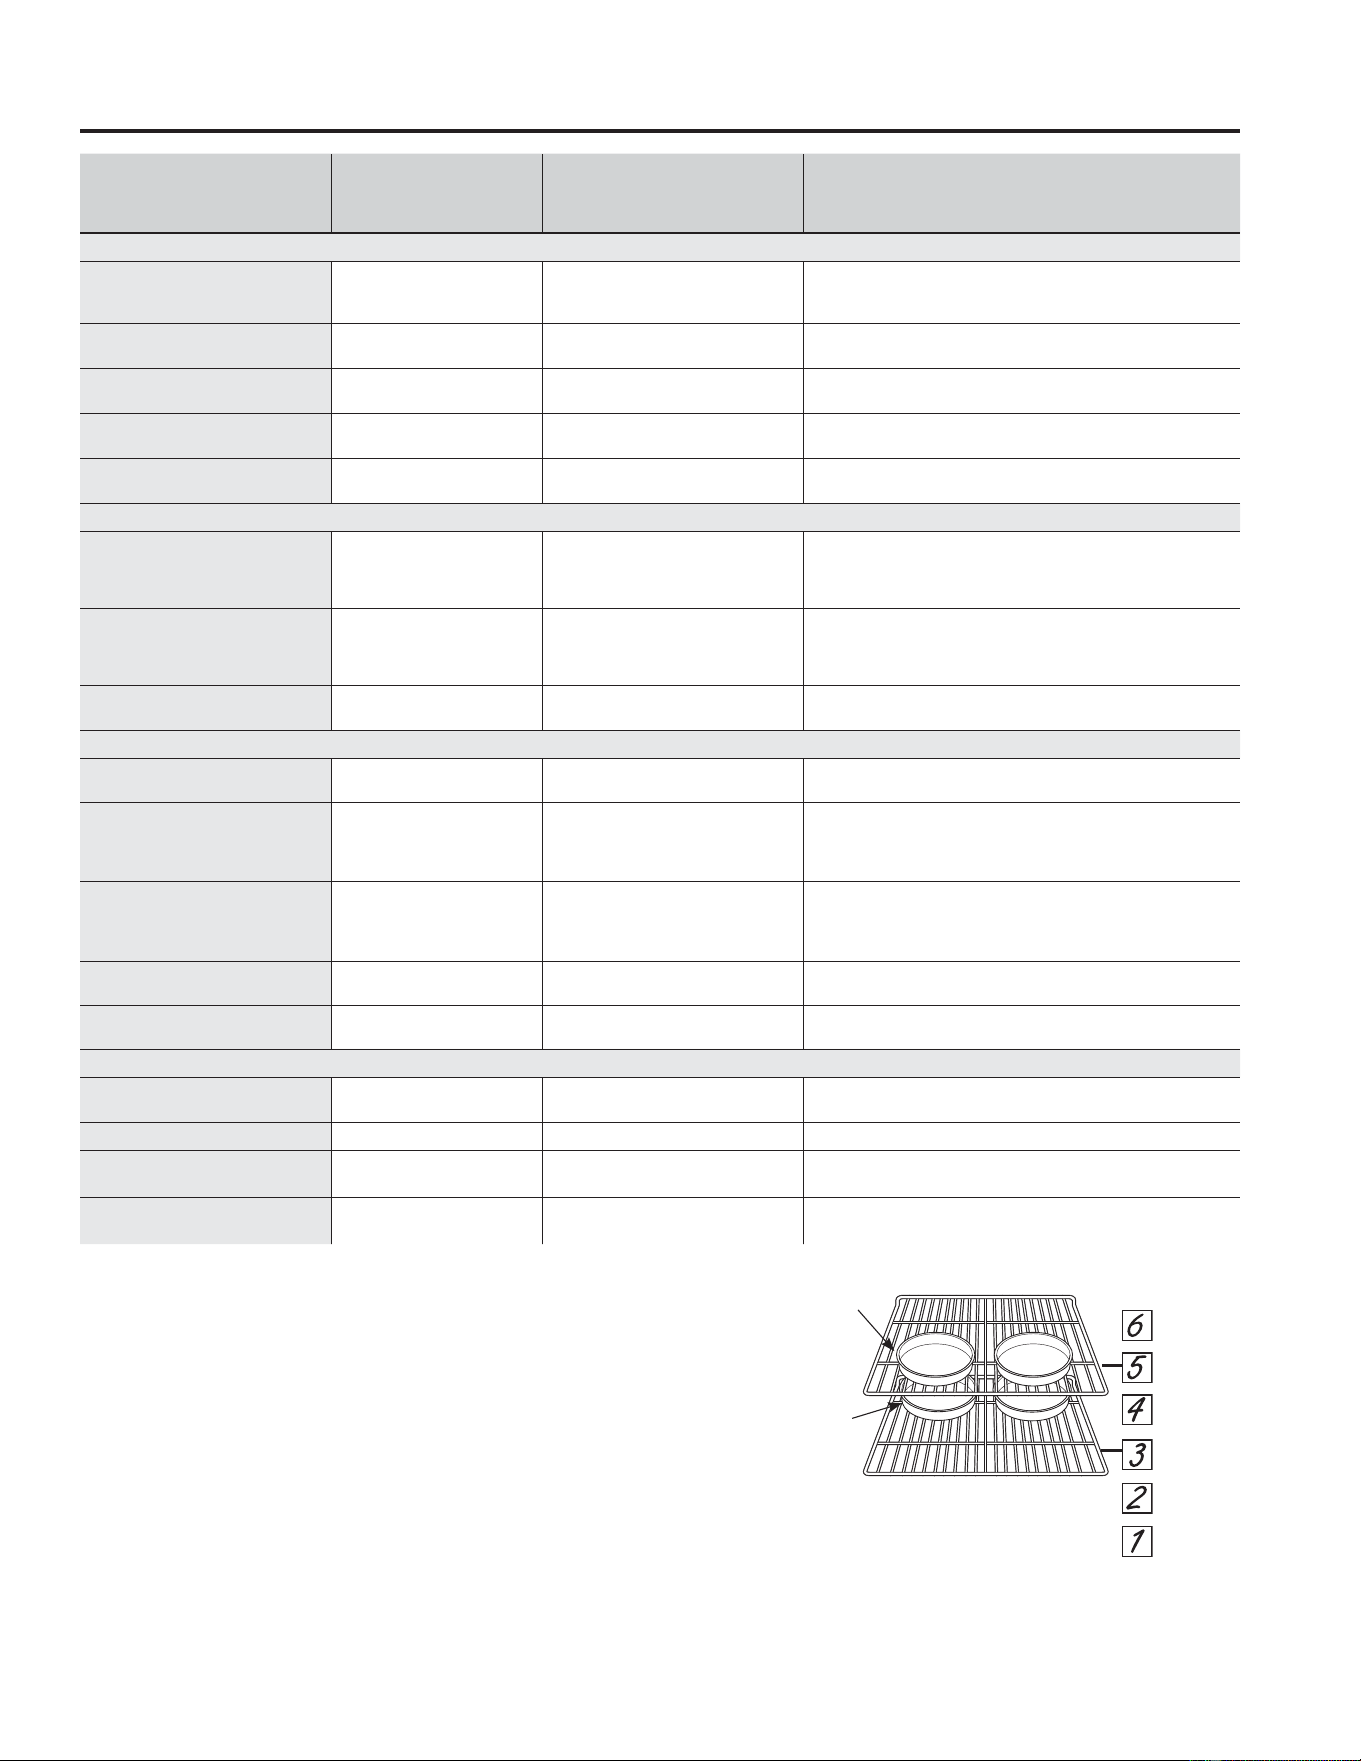
49-2001190 Rev. 3 15
USO DEL ELECTRODOMÉSTICO: Guía de Cocción en Horno
Guía de Cocción en Horno
TIPO DE COMIDA
MODO(S)
RECOMENDADO(S)
POSICIÓN(ES)
DE ESTANTES
RECOMENDADA SUGERENCIAS ADICIONALES
Productos Horneados
Tortas con capas, tortas
rectangulares, roscas, panecillos,
pan rápido en un Solo Estante
Hornear 3
8VHXWHQVLOLRVEULOODQWHV\DVHJ~UHVHGHTXHKD\DXQIOXMRGHDLUH
adecuado
Tortas con capas* en Múltiples
Estantes
Hornear 3 y 5
8VHXWHQVLOLRVEULOODQWHV\DVHJ~UHVHGHTXHKD\DXQIOXMRGHDLUH
DGHFXDGR9HDODLOXVWUDFLyQ
7RUWDVGHJUDVDSDVWHOGHiQJHO Hornear 1
8VHXWHQVLOLRVEULOODQWHV\DVHJ~UHVHGHTXHKD\DXQIOXMRGHDLUH
adecuado
Galletas, galletitas, bizcochitos
en un Solo Estante
Hornear 3
8VHXWHQVLOLRVEULOODQWHV\DVHJ~UHVHGHTXHKD\DXQIOXMRGHDLUH
adecuado
Galletas, galletitas, bizcochitos
en Múltiples Estantes
Hornear 3 y 5
8VHXWHQVLOLRVEULOODQWHV\DVHJ~UHVHGHTXHKD\DXQIOXMRGHDLUH
adecuado
Bife y Cerdo
Hamburguesas Asar Alto 6
8VHODSDUWHSDUDDVDUPXHYDODFRPLGDPiVDEDMRSDUDTXHTXHGHPiV
preparada y menos soasada. Preste atención a la comida al asarla. Para
un mejor rendimiento, centre la comida debajo del elemento que emite
calor para asar.
Bifes y Chuletas Asar Alto 5
8VHODSDUWHSDUDDVDUPXHYDODFRPLGDPiVDEDMRSDUDTXHTXHGHPiV
preparada y menos soasada. Preste atención a la comida al asarla. Para
un mejor rendimiento, centre la comida debajo del elemento que emite
calor para asar.
'RUDGRV Hornear 3
8VHXQDROODFKDWDWDOFRPRXQDROODSDUDDVDU
No se requiere precalentarla.
Ave
Pollo entero Hornear 3
8VHXQDROODFKDWDWDOFRPRXQDROODSDUDDVDU
No se requiere precalentarla.
Pechugas, patas, muslos con
huesos
Asado Bajo 2
6LVHHPSDQyRFXEULyFRQVDOVDHYLWHORVPRGRV%URLO+L$VDU
$OWR$VHGHOODGRGHODSLHOKDFLDDEDMRSULPHUR3UHVWHDWHQFLyQ
a la comida al asarla. Para un mejor rendimiento al asar, centre
la comida debajo del elemento que emite calor para asar.
Pechugas de pollo deshuesadas
Asado Bajo
Hornear
2
6LVHHPSDQyRFXEULyFRQVDOVDHYLWHORVPRGRV%URLO+L$VDU
$OWR$VHGHOODGRGHODSLHOKDFLDDEDMRSULPHUR3UHVWHDWHQFLyQ
a la comida al asarla. Para un mejor rendimiento al asar, centre
la comida debajo del elemento que emite calor para asar.
Pavo entero Hornear 1
8VHXQDROODFKDWDWDOFRPRXQDROODSDUDDVDU
No se requiere precalentarla.
Pechuga de Pavo Hornear 2
8VHXQDROODFKDWDWDOFRPRXQDROODSDUDDVDU
No se requiere precalentarla.
Otro
Pescado Asado Bajo
PLWDGGHOJURVRURPHQRV
!SXOJDGD
Preste atención a la comida al asarla. Para un mejor rendimiento,
centre la comida debajo del elemento calentador para asar.
Cazuelas Hornear 3
Pizza Congelada en un solo
estante
Hornear 3
Refrigerios Frescos o
Congelados
Crujiente Consulte la guía de Cocción Crujiente
8VHXQXWHQVLOLRRVFXURSDUDTXHTXHGHPiVGRUDGRFURFDQWH
use utensilios brillantes para un menor dorado.
*Al hornear cuatro tortas con capas a la vez, use los estantes
3 y 5 . Coloque las ollas como se muestra, de modo que no
quede una olla encima de la otra.
Cocine la comida completamente para evitar que se
SURGX]FDQHQIHUPHGDGHVWUDQVPLWLGDVSRUDOLPHQWRV(O86'$
\OD)'$EULQGDQODVUHFRPHQGDFLRQHVGHWHPSHUDWXUDPtQLPD
SDUDXQDFRPLGDVHJXUD8VHXQWHUPyPHWURSDUDFRPLGDV
para tomar la temperatura de las mismas y realice un control
sobre diferentes ubicaciones.
8ELFDFLyQ7UDVHUD
8ELFDFLyQ)URQWDO
Posiciones de los Estantes
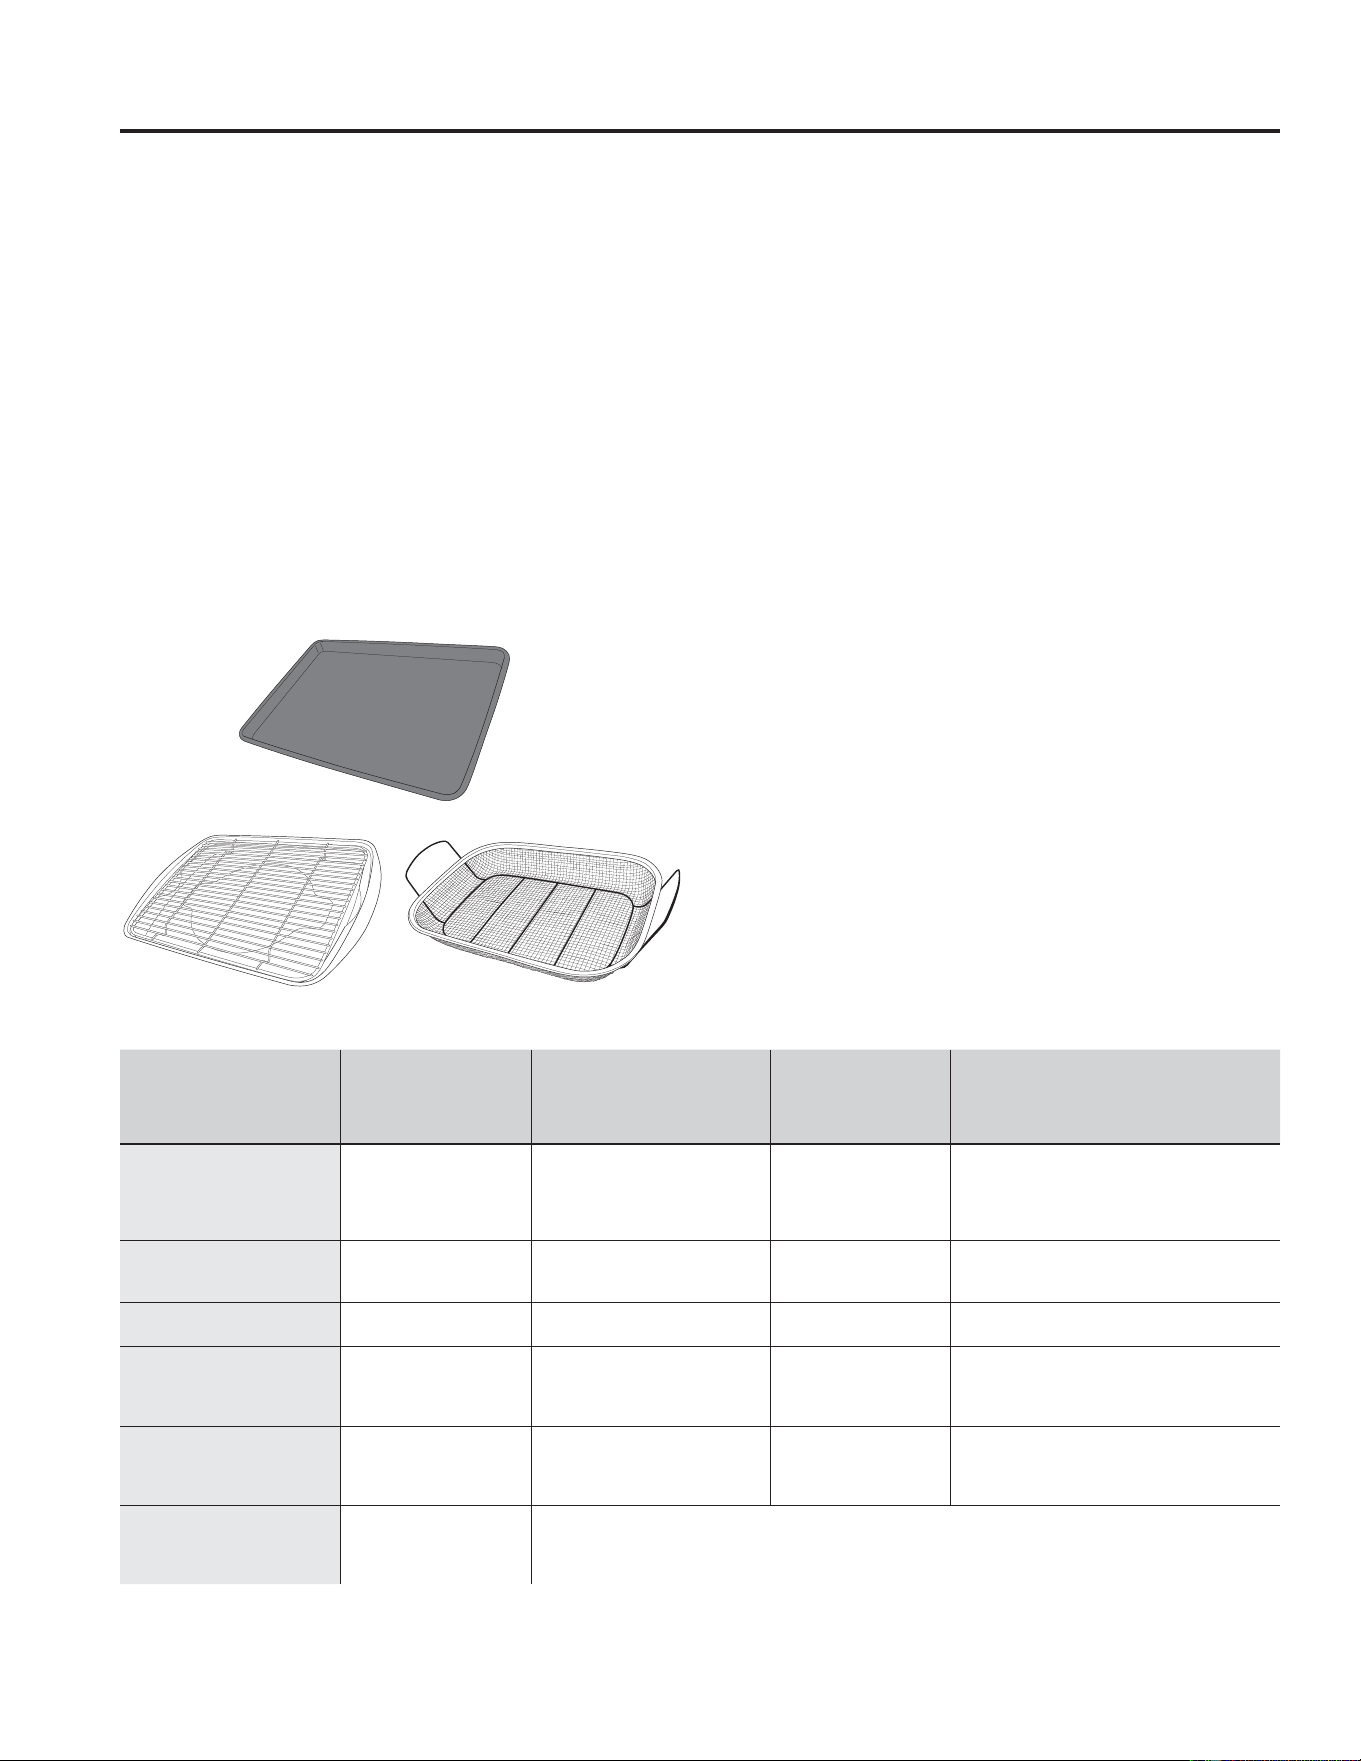
16 49-2001190 Rev. 3
Guía de Cocción para Comidas Crujientes
UUSO DEL ELECTRODOMÉSTICO: Guía de Cocción para Comidas Crujientes
TIPO DE COMIDA
POSICIÓN(ES)
DE ESTANTES
RECOMENDADAS
CONFIGURACIÓN
DE TEMPERATURA
RECOMENDADA (°F)
TIEMPO DE
COCCIÓN
RECOMENDADO
(MÍN.) NOTAS
Trozos de pescado
fresco deshuesado o ave,
empanados en forma de
patitas, frituras crocantes,
filetes
4 375-400 15-30
8VH FRQILJXUDFLRQHV GH WHPSHUDWXUD PiV
EDMDV SDUD SLH]DV PiV JUDQGHV 8VH XWHQVLOLRV
brillantes.
Huesos frescos de alitas
de pollo
4 375-400 25-40
Sale las alitas o cubra las mismas con un roce
en seco si usará salsa luego de la cocción o
hacia el final de la cocción.
Huesos frescos de patas o
muslos de pollo
3 o 4 375-400 30-55
8VH FRQILJXUDFLRQHV GH WHPSHUDWXUD PiV EDMDV
para piezas más grandes
y más voluminosas.
Papas fritas frescas y
GHOJDGDV ò SXOJDGD
4 400-425 15-30
Se recomienda el uso de papel para hornear al
preparar papas fritas frescas. Para frituras más
crocantes, mezcle las papas fritas con almidón
de maíz o harina de arroz antes de la cocción.
Papas fritas frescas y
GHOJDGDV ò SXOJDGD
4 375-400 20-35
Se recomienda el uso de papel para hornear al
preparar papas fritas frescas. Para frituras más
crocantes, mezcle las papas fritas con almidón
de maíz o harina de arroz antes de la cocción.
Comidas envasadas
congeladas
3 o 4
XVH OD SRVLFLyQ GH HVWDWH
3 para comidas más
JUXHVDV
8VH ODV LQVWUXFFLRQHV GH FRFFLyQ SDUD KRUQR WUDGLFLRQDO QR SDUD )UHtU FRQ $LUH FRPR JXtD GH FRQILJXUDFLyQ GH
temperatura y tiempo de cocción. Con algunas comidas, se podrá requerir un tiempo de cocción adicional diferente
al tiempo recomendado en el paquete. Si el horno está caliente al iniciar la cocción, la comida se podrá cocinar
más rápido que el tiempo mínimo que figura en el paquete.
(O PRGR &ULVS &UXMLHQWH IXH GLVHxDGR SDUD SURGXFLU FRPLGDV
TXH HQ VX H[WHULRU TXHGHQ PiV FUXMLHQWHV TXH HQ OD FRFFLyQ
en hornos tradicionales. Seleccione Crisp (Crujiente) y luego
ingrese la configuración de temperatura deseada y presione
Start (Iniciar). La temperatura se puede configurar entre
300°F and 500°F.
Pautas del Utensilio para Comidas
Crujientes
• 8VH VyOR XWHQVLOLRV GH XVR VHJXUR SDUD DVDU DO XWLOL]DU HO
PRGR &ULVS &UXMLHQWH
6H UHFRPLHQGD HO XVR GH XQD EDQGHMD GH OiPLQD RVFXUD 8QD
bandeja oscura promueve un mejor dorado y que la comida
quede más crocante.
• También se podrán usar canastas de horneado en el horno
y rejillas de horneado. Se deberá colocar una bandeja plana
sobre el estante debajo de las comidas, a fin de atrapar
cualquier goteo al usar la canasta de horneado.
Consejos Generales para el Modo de
Cocción Crujiente
(O PRGR &ULVS &UXMLHQWH IXH GLVHxDGR SDUD FRFLQDU HQ XQ
solo estante.
(O PRGR &ULVS &UXMLHQWH FXHQWD FRQ XQ SUHFDOHQWDPLHQWR GH
2 minutos.
• Se recomienda la posición de la parrilla 4 para la mayoría
GH ODV FRPLGDV 8VH OD SRVLFLyQ GH OD SDUULOOD SDUD FRPLGDV
más gruesas.
• Para comidas congeladas en paquete, utilice las
instrucciones de cocción tradicionales para horno en relación
a la configuración de temperatura y tiempos de cocción
HVSHUDGRV $MXVWH HO WLHPSR GH FRFFLyQ SDUD ORJUDU OD WH[WXUD
crujiente deseada.
• Las comidas se podrán cocinar más rápido de lo esperado si
el horno ya está caliente cuando se coloca la comida en el
mismo.
• Al cocinar comidas crujientes con salsa, se recomienda
aplicar esta última al final de la cocción.
• Si las comidas se doran demasiado rápido, intente colocar la
misma en un estante que se encuentre en un posición más
baja o en una configuración de temperatura de horno más baja.
• No es necesario voltear o revolver la comida durante la
cocción.
8ELTXH OD FRPLGD HQ XQD VROD FDSD VREUH OD EDQGHMD VLQ
sobrecargar la misma.
• Cocine la comida completamente para evitar que se
produzcan enfermedades transmitidas por alimentos. El
86'$ \ OD )'$ EULQGDQ ODV UHFRPHQGDFLRQHV GH WHPSHUDWXUD
PtQLPD SDUD XQD FRPLGD VHJXUD 8VH XQ WHUPyPHWUR SDUD
comidas para tomar la temperatura de las mismas y realice
un control sobre diferentes ubicaciones.
8WHQVLOLR UHFRPHQGDGR SULQFLSDOPHQWH
Opciones alternativas de utensilios
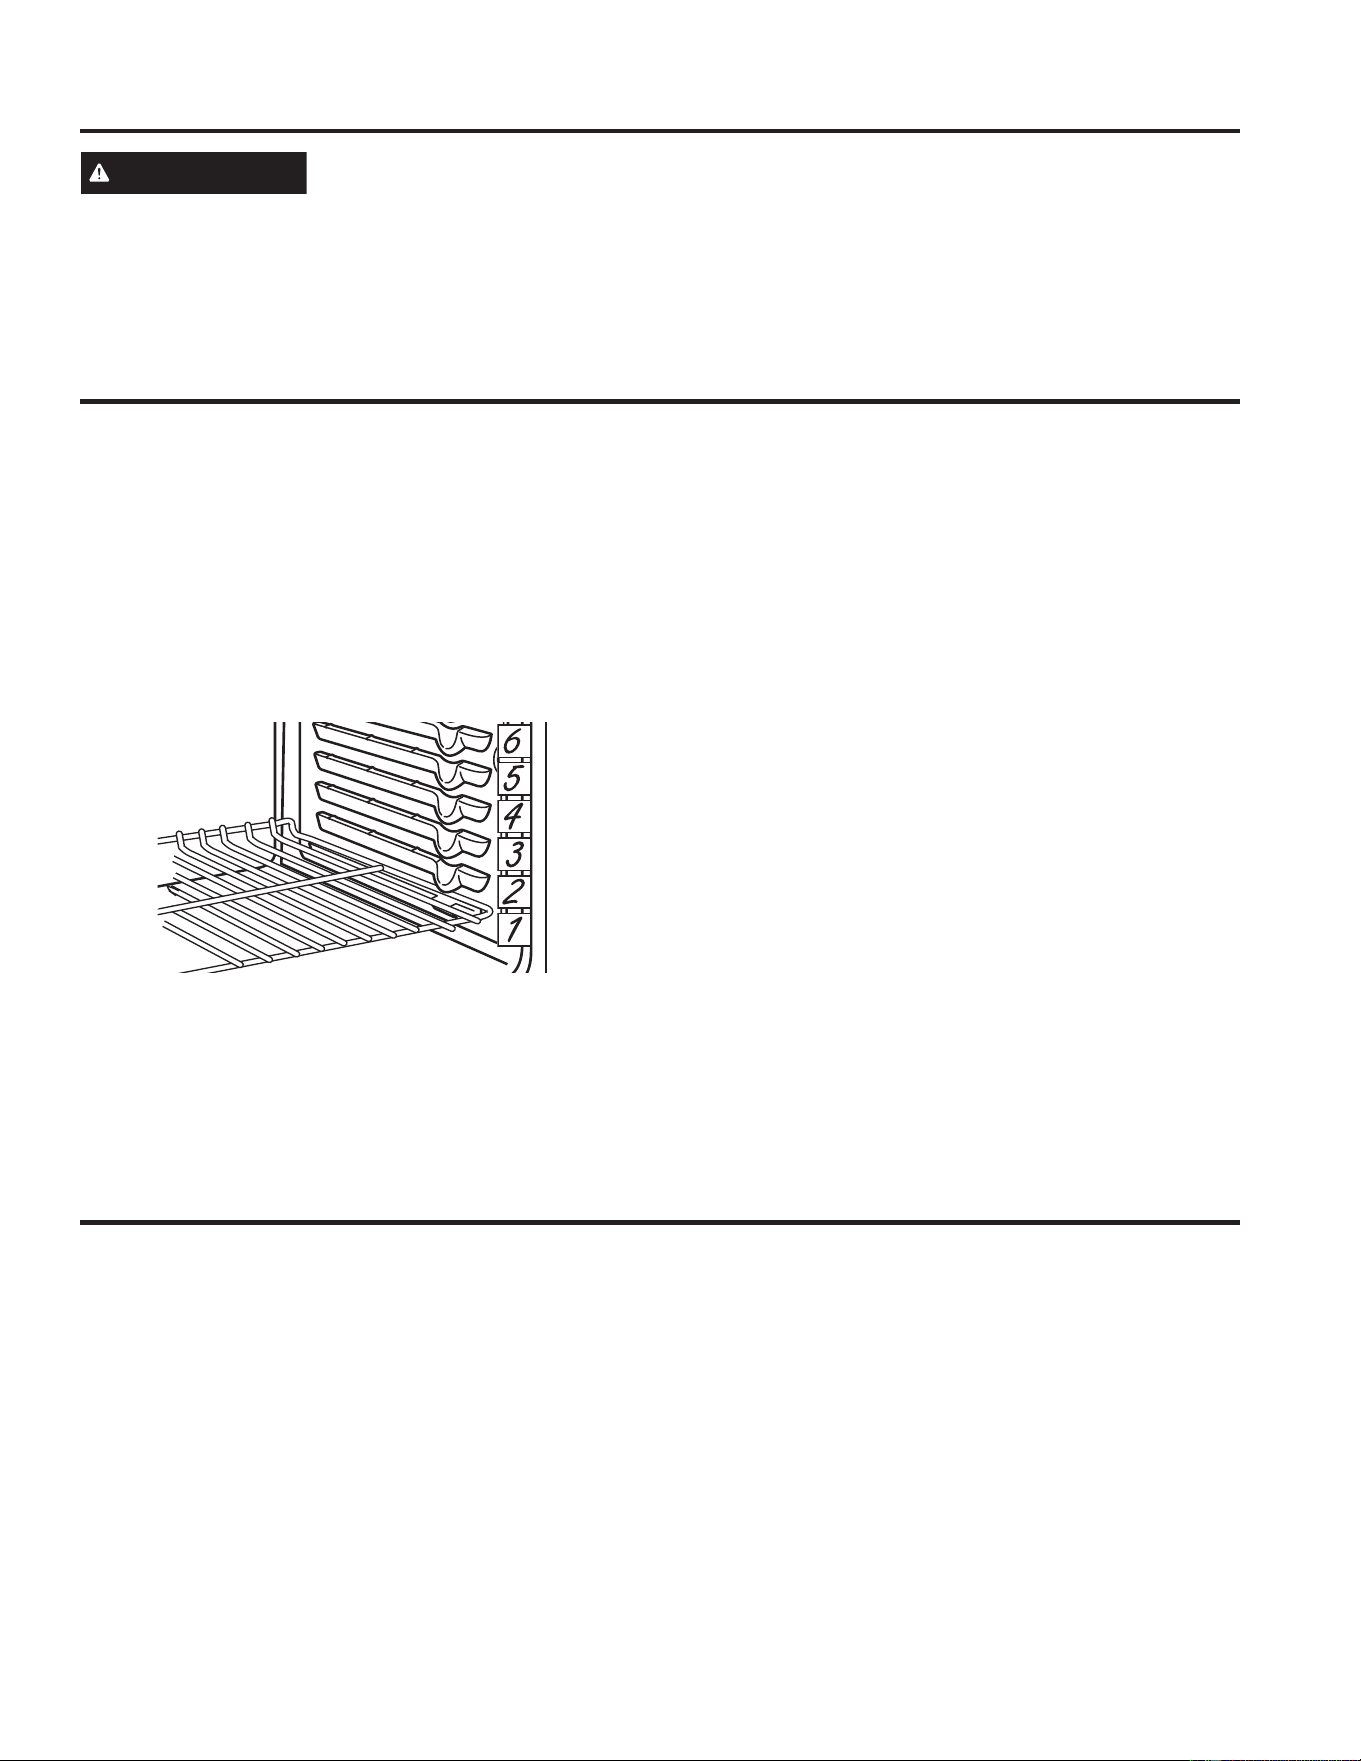
49-2001190 Rev. 3 17
USO DEL ELECTRODOMÉSTICO:
3DSHOGH$OXPLQLR(VWDQWHVGHO+RUQR9HQWLODFLRQHVGH$LUHGHO+RUQR
PRECAUCIÓN
No use ningún tipo de aluminio o cobertor de horno para cubrir el fondo del horno. Estos ítems
pueden atrapar el calor o derretirse, ocasionando daños sobre el producto y el riesgo de descargas, humo o incendios.
Los daños por uso inadecuado de estos ítems no están cubiertos por la garantía del producto.
Se podrá usar aluminio para evitar derrames, colocando una hoja sobre un estante inferior varias pulgadas debajo de la comida.
No use más aluminio que el necesario y nunca cubra totalmente el estante de un horno con papel de aluminio. Mantenga el
DOXPLQLRDSRUORPHQRV´GHODVSDUHGHVGHOKRUQRSDUDHYLWDUXQDFLUFXODFLyQGHILFLHQWHGHOFDORU
Papel de Aluminio y Cobertores del Horno
Posición de las Parrillas
El horno cuenta con 6 posiciones de parrillas. El horno cuenta
con seis posiciones de estantes. En la Guía de Cocción, se
brindan recomendaciones de posiciones de los estantes para
diferentes tipos de comidas. Se ajusta un estante en una
dirección para afectar los resultados de cocción. Por ejemplo,
si se prefieren partes superiores más oscuras en tartas,
panecillos o galletas, pruebe moviendo la comida a un estante
que se encuentre una posición más arriba. Si encuentra que
las comidas están demasiado doradas en la parte superior,
SUXHEHPRYLHQGRODVPLVPDVPiVDEDMRODSUy[LPDYH]
Al hornear con múltiples ollas y en múltiples estantes,
DVHJ~UHVHGHTXHKD\DSRUORPHQRV´HQWUHODVROODV
a fin de dejar suficiente espacio para que fluya el aire. Esto
podrá ayudar para lograr una cocción más pareja. Para evitar
posibles quemaduras, coloque los estantes en la posición
deseada antes de encender el horno.
Parrillas Planas
Al colocar y retirar utensilios de cocina, empuje el estante hacia
DIXHUDGHOWRSHSRVLFLyQGHGHWHQFLyQVREUHHOVRSRUWHGHO
estante. Para retirar un estante, empuje el mismo hacia usted
hasta que alcance la posición de detención, incline el frente
hacia arriba del estante y empuje el mismo hacia afuera. Para
UHHPSOD]DUXQHVWDQWHFRORTXHHOH[WUHPRFXUYRGHOHVWDQWH
sobre los soportes de las parrillas. Incline el frente del estante
hacia arriba y empuje hacia adentro hasta que se detenga.
Luego ubique el estante de forma plana y empuje el mismo
hacia adentro hasta que esté totalmente insertado en el horno.
Es posible que resulte difícil deslizar las parrillas,
especialmente luego del ciclo de limpieza automática. Para
mejorar las condiciones de deslizamiento, use una tela suave
o una toalla de papel para frotar aceite vegetal sobre los
H[WUHPRVL]TXLHUGR\GHUHFKRGHODVSDUULOODV\RORVVRSRUWHV
de las mismas. No use otros aceites de cocción tales como
aceite de cacahuete, Pam
®
u otros espráis lubricantes, ya que
esto podrá generar una descoloración o un residuo de color
y[LGRVREUHODVSDUULOODV\FDYLGDGHVODWHUDOHV
NOTA: Retire aquellas parrillas que se encuentren en desuso
al usar el horno para un precalentamiento más rápido, mayor
eficiencia y óptimo rendimiento de la cocción. Consulte la
sección de Accesorios para acceder a instrucciones sobre
cómo realizar una orden de parrillas adicionales.
Estantes del Horno
1XQFDEORTXHHODVYHQWLODFLRQHVDEHUWXUDVGHDLUHGHODHVWXIDeVWDVSURYHHQHODLUHHQODVHQWUDGDV\VDOLGDVHOFXDOHV
necesario para que la estufa se mantenga fresca y funcione de forma correcta. Las aberturas de aire se encuentran ubicadas en
la parte trasera de la superficie de cocción.
Ventilaciones de Aire del Horno

18 49-2001190 Rev. 3
Superficies de Cocción - Vidrio Radiante
CUIDADO Y LIMPIEZA: Superficies de Cocción - Vidrio Radiante
Limpieza para Uso Diario Normal
Para mantener y proteger la superficie de su estufa de vidrio,
VLJDHVWRVSDVRV
1. Antes de usar la estufa por primera vez, límpiela con el
limpiador de estufas cerámicas. Esto ayuda a proteger la
estufa y hace la limpieza más sencilla.
2. El uso diario del limpiador de estufas cerámicas ayudará a
que la estufa quede como nueva.
3. Agite bien la crema de limpieza. Aplique unas gotas del
limpiador de estufas cerámicas directamente sobre la
estufa.
8WLOLFHXQDWRDOODGHSDSHORXQSDxRGHOLPSLH]DSDUD
estufas cerámicas para limpiar toda la superficie de la
estufa.
8VHXQSDxRVHFRRXQDWRDOODGHSDSHOSDUDTXLWDUORV
restos del limpiador. No hace falta enjuagar. NOTA: Es muy
importante que NO CALIENTE la estufa hasta que la haya
limpiado por completo.
Residuos pegados
NOTA:6HSRGUiQSURGXFLU'$f26VREUHODVXSHUILFLHGH
vidrio si utiliza estropajos que no sean los recomendados.
'HMHHQIULDUODHVWXID
2. Coloque unas gotas del limpiador de estufas cerámicas
sobre toda el área de residuos pegados.
8WLOL]DQGRXQSDxRGHOLPSLH]DSDUDVXSHUILFLHVGHFRFFLyQ
de cerámica, frote el área sucia aplicando presión según
sea necesario.
4. Si quedan restos, repita los pasos indicados con
anterioridad.
5. Para protección adicional, después de haber quitado todos
los restos, pula toda la superficie con limpiador de estufas
cerámicas y una toalla de papel.
Residuos pegados rebeldes
'HMHHQIULDUODHVWXID
8WLOLFHHOUDVSDGRUGHILOR~QLFRDXQiQJXORDSUR[LPDGR
de 45 degrees contra la superficie del vidrio y raspe la
suciedad. Puede ser necesario aplicar presión al raspador
para quitar la suciedad.
'HVSXpVGHXWLOL]DUHOUDVSDGRUFRORTXHXQDVJRWDVGH
limpiador de estufas cerámicas sobre toda el área de
VXFLHGDGTXHPDGD8WLOLFHHOSDxRGHOLPSLH]DSDUDTXLWDUOD
suciedad restante.
4. Para protección adicional, después de haber quitado todos
los restos, pula toda la superficie con limpiador de estufas
cerámicas y una toalla de papel.
NOTA: No utilice hojas desafiladas o dañadas.
8WLOLFHXQSDxRGHOLPSLH]DSDUDHVWXIDV
cerámicas.
La espátula para superficies de
cocción de cerámica y todos los
elementos recomendados se
encuentran disponibles a través de
nuestro Centro de Piezas. Consulte
las secciones de Accesorios y
Soporte al Consumidor al final de
este manual.
Limpie la estufa después
GHFDGDGHUUDPH8WLOLFHHO
limpiador de estufas cerámicas
Ceramic
Cooktop
Cleaner
Para acceder a videos de
limpieza e instrucciones,
escanee el código QR con
su dispositivo.
Marcas de metal y rayones
1. Tenga cuidado de no deslizar ollas y sartenes a través de
VXHVWXID'HMDUiPDUFDVGHPHWDOVREUHODVXSHUILFLHGHOD
estufa.
Estas marcas pueden quitarse utilizando limpiador de
estufas cerámicas con el paño de limpieza para estufas
cerámicas.
2. Si se permite que ollas con una capa fina de aluminio
o cobre hiervan en seco, la capa puede dejar una
decoloración negra en la estufa.
Esto debe quitarse de inmediato antes de calentar de
nuevo o la decoloración puede llegar a ser permanente.
NOTA: Verifique con detenimiento que la base de las ollas no
sea áspera para no rayar la estufa.
3. Tenga cuidado de no colocar bandejas de horneado de
aluminio ni recipientes de platos principales congelados
de aluminio sobre una superficie caliente de la placa de
FRFFLyQeVWDVGHMDUiQSXQWRVEULOODQWHVRPDUFDVVREUHOD
superficie de cocción. Estas marcas son permanentes y no
se podrán eliminar.
49-2001190 Rev. 3 19
Superficies de Cocción - Vidrio Radiante
CUIDADO Y LIMPIEZA: Superficies de Cocción - Vidrio Radiante
Daños por derrames azucarados y plástico derretido
Se deberá tener especial cuidado al eliminar sustancias calientes, a fin de evitar daños permanentes sobre la superficie de
vidrio./RVGHUUDPHVD]XFDUDGRVFRPRJHODWLQDVGXOFHFDUDPHORMDUDEHVRSOiVWLFRVGHUUHWLGRVSXHGHQPDUFDUODVXSHUILFLH
GHODHVWXIDQRFXELHUWRSRUODJDUDQWtDDPHQRVTXHHOGHUUDPHVHTXLWHPLHQWUDVHVWiFDOLHQWH'HEHWHQHUVHPXFKRFXLGDGRDO
remover sustancias calientes. Asegúrese de utilizar un raspador nuevo y afilado. No utilice hojas desafiladas o dañadas.
1. Apague todas las unidades de superficie. Quite las ollas
calientes.
8VRGHJXDQWHSDUDKRUQRSDUDSURWHJHUODSLHOXVHXQ
raspador de filo único para desplazar el derrame a un área
fría de la estufa y quite el derrame con toallas de papel.
3. Cualquier derrame restante debe dejarse hasta que la
superficie de la estufa se haya enfriado.
4. No use las unidades de superficie de nuevo hasta que
todos los restos se hayan eliminado por completo.
NOTA: Si la superficie de vidrio ya ha sufrido marcas o
hendiduras, el vidrio de la estufa deberá cambiarse. En ese
caso, será necesaria la atención de un técnico.
Perímetro de la Superficie de Cocción
3DUDOLPSLDUORVH[WUHPRVGHOPDUFRGHODVXSHUILFLHGHFRFFLyQ
de vidrio, use una almohadilla de limpieza no adherente para
superficies de cocción cerámicas o un cepillo de cerda suave.
NOTA: No limpie esta superficie utilizando filos de navajas.
20 49-2001190 Rev. 3
Superficies Exteriores
Perillas de control
Las perillas de control se pueden retirar para facilitar la
limpieza. Verifique que las perillas estén en la posición OFF
(apagado) y sáquelas de los vástagos para la limpieza. Las
perillas pueden limpiarse en el lavavajillas o también pueden
lavarse con jabón y agua. Asegúrese de que la parte interna
de las perillas esté seca antes de volver a colocarse. Vuelva
a colocar las perillas en la posición OFF (apagado) para
asegurar una colocación correcta.
Panel de control
8QDEXHQDLGHDHVOLPSLDUHOSDQHOGHFRQWUROOXHJRGHFDGD
uso. Limpie con un jabón suave y agua o vinagre y agua,
enjuague con agua limpia y pula en seco con una tela suave.
No use limpiadores abrasivos, limpiadores líquidos fuertes,
almohadillas para fregar de plástico ni limpiadores de horno en
el panel de control; dañarán el acabado.
Si así lo desea, puede desactivar los botones de toque antes
de la limpieza. Para bloquear o desbloquear los controles,
mantenga presionada la tecla Lock Control (Control de
Bloqueo) durante tres segundos.
Superficies de Acero Inoxidable
Limpie con un jabón suave y agua o una solución que sea
mitad de vinagre y mitad de agua. Enjuague con agua limpia
y seque con una tela seca. Al limpiar supeficies, asegúrese de
que estén a temperatura ambiente. Si las manchas en el borde
de la ventana de la puerta son persistentes, use un limpiador
abrasivo suave o una esponja con estropajo para obtener un
mejor resultado. El derrame de adobo, jugos de fruta, salsas
de tomate y líquidos para humedecer que contengan ácidos
pueden ocasionar descoloración y se deberán limpiar tan
pronto como las superficies calientes se enfríen, y luego se
deberán lavar y enjuagar. Para otros derrames tales como
salpicaduras de grasa, lave con agua y jabón una vez que la
superficie se haya enfriado. Enjuague bien.
No use limpiadores comerciales para horno, polvos de
limpieza, estropajos de acero o abrasivos duros sobre
FXDOTXLHUVXSHUILFLHH[WHULRU
Superficies de Acero Inoxidable (en algunos modelos)
No use virutas de acero; éstas dañarán la superficie. Para
OLPSLDUODVXSHUILFLHGHDFHURLQR[LGDEOHXVHDJXDWLELDFRQ
MDEyQRXQOLPSLDGRURSXOLGRUSDUDDFHURLQR[LGDEOH6LHPSUH
limpie la superficie en la dirección del veteado. Siga las
instrucciones del limpiador para limpiar la superficie de acero
LQR[LGDEOH
/RVOLPSLDGRUHVFRQiFLGRR[iOLFRWDOHVFRPR%DU.HHSHUV
)ULHQG6RIW&OHDQVHUHOLPLQDUiQHOy[LGRGHVOXVWUHV\
SHTXHxDVPDQFKDV8VHVyORXQOLPSLDGRUOtTXLGROLEUHGH
material abrasivo y frote en la dirección de las líneas del cepillo
con una esponja suave y húmeda. Limpie las superficie del
electrodoméstico con una tela suave y limpia o con una toalla
de microfibra para evitar raspaduras o manchas de agua, y
asegurándose de eliminar cualquier residuo de limpieza.
Asegúrese de que todos los controles estén apagados y que las superficies estén frías antes de limpiar cualquier parte de la cocina.
ADVERTENCIA
Si se quita la cocina para efectuar una limpieza, reparaciones o cualquier otra
razón, verifique que el dispositivo anti-volcaduras se coloque de manera adecuada cuando vuelva a
instalarse la cocina. Si no toma esta precaución, la cocina puede volcarse y provocar lesiones.
NOTA:12SHUPLWDTXHHOOLPSLDGRUGHDFHURLQR[LGDEOHHQWUHHQFRQWDFWRFRQFXDOTXLHUSDUWHSOiVWLFD
tal como las perillas de control o el panel de control. Si se produce un contacto no intencional de los
limpiadores con las partes plásticas, limpie la parte plástica con una esponja y un detergente suave
mezclado con agua caliente.
NOTA: 12VHUHFRPLHQGDHOXVRGHOOLPSLDGRUGHODVXSHUILFLHGHFRFFLyQGHFHUiPLFDVREUHODVVXSHUILFLHVH[WHULRUHVSLQWDGDV
Acero Inoxidable Resistentes a Huellas Dactilares y Otros Acabados (en algunos modelos)
12XVHOLPSLDGRUHVGHDFHURLQR[LGDEOHVREUHVXSHUILFLHVGH
DFHURLQR[LGDEOHUHVLVWHQWHVDKXHOODVGDFWLODUHV
IMPORTANTE: El uso de productos incorrectos podrá dañar el
DFDEDGRH[WHULRUGH$FHURV,QR[LGDEOHV5HVLVWHQWHVD+XHOODV
'DFWLODUHV\RWURVDFDEDGRVHVGHFLUEODQFRQHJURLQR[LGDEOH
SL]DUUDHWF3RUIDYRUVLJDHVWDVLQVWUXFFLRQHV\XVHVyORORV
ítems adecuados que figuran a continuación para limpiar las
VXSHUILFLHVGHDFHURLQR[LGDEOH/LPSLHODVVXSHUILFLHVLQWHULRU
H[WHULRUFRQDJXDFDOLHQWHMDEyQRGHWHUJHQWHVXDYH\XQD
tela o microfibra suave para evitar daños.. Limpie las superficie
del electrodoméstico con una tela suave y limpia o con una
toalla de microfibra para evitar rayones o manchas de agua, y
asegurándose de eliminar cualquier residuo de limpieza.
CUIDADO Y LIMPIEZA:6XSHUILFLHV([WHULRUHV
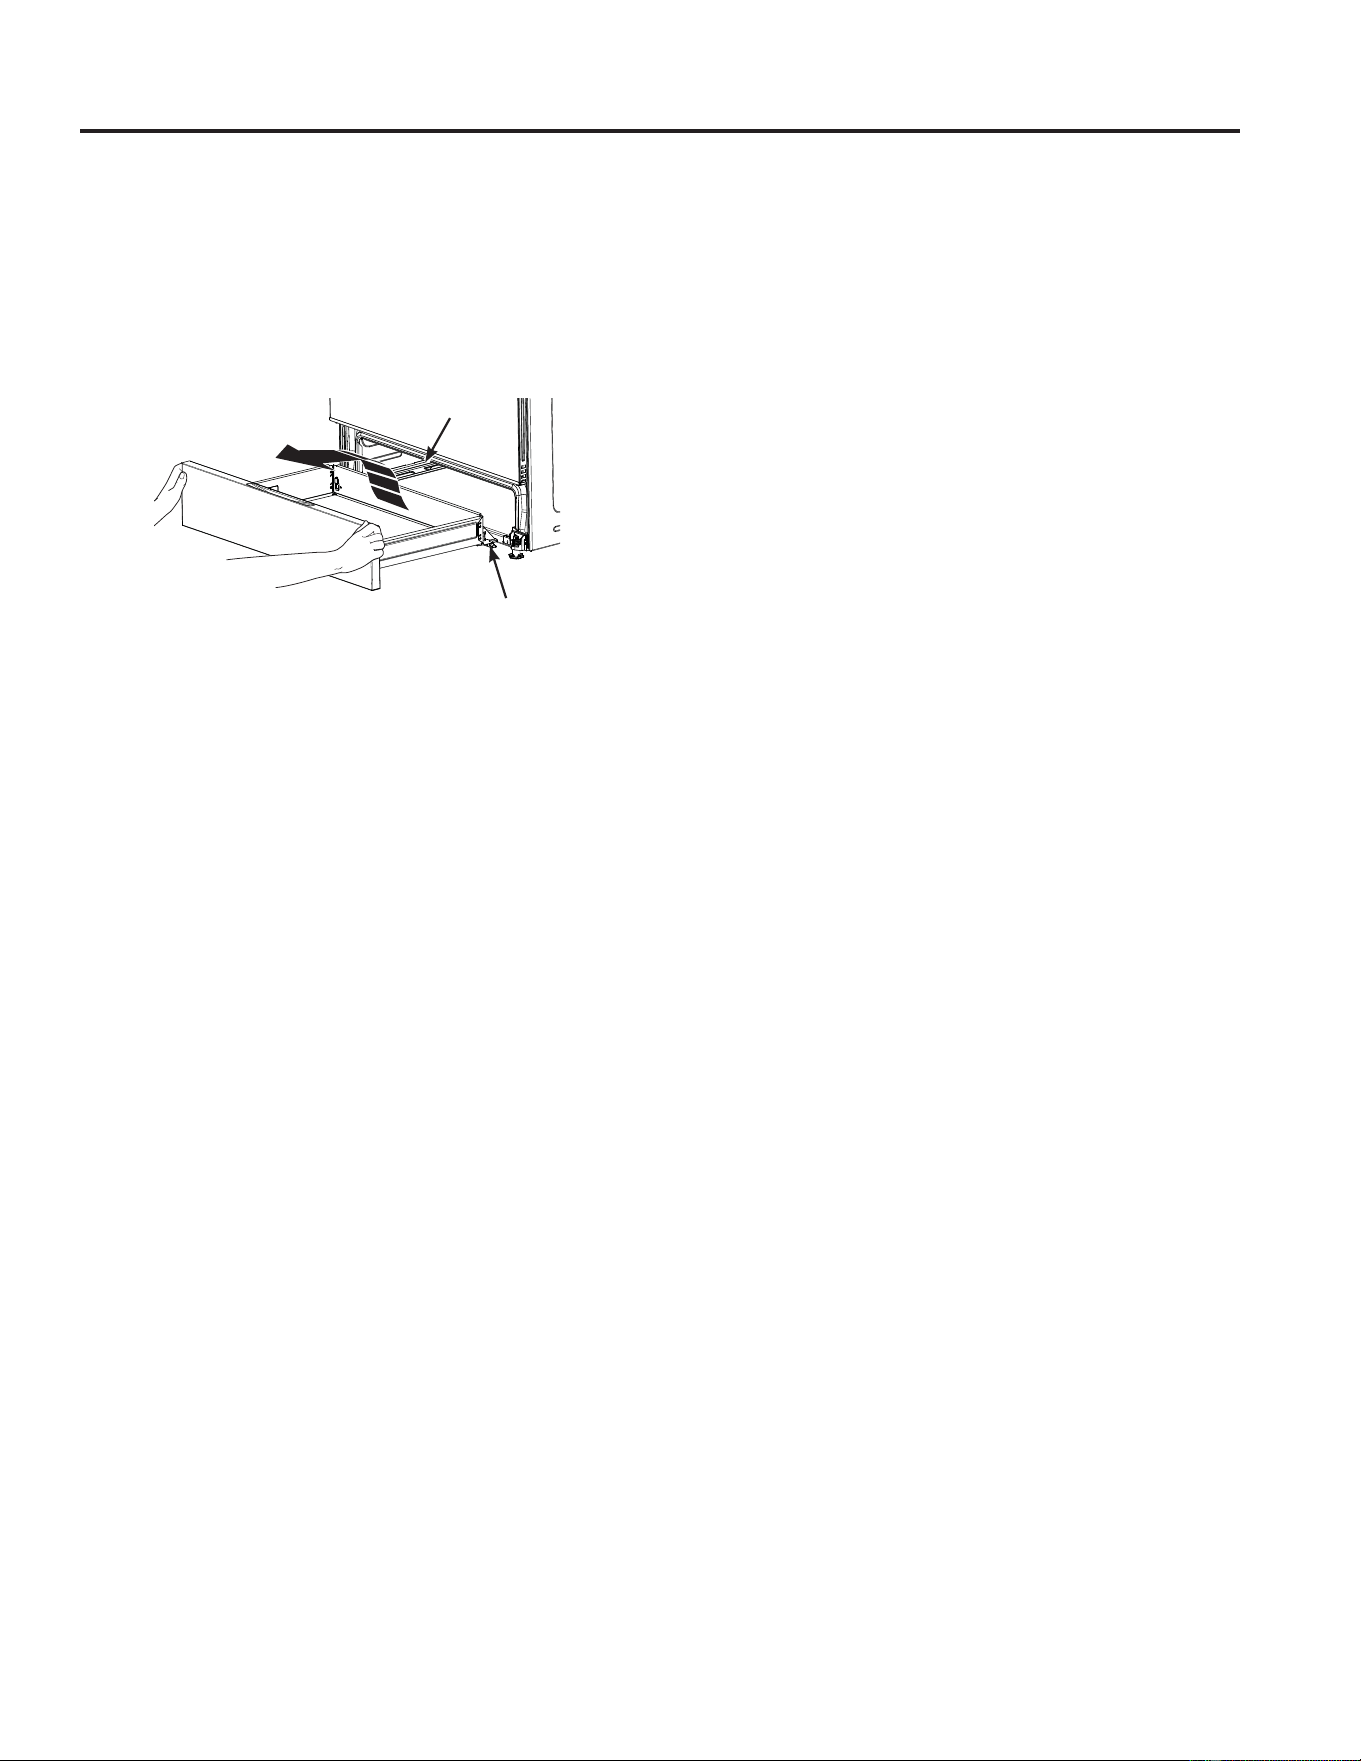
49-2001190 Rev. 3 21
CUIDADO Y LIMPIEZA: Cajón de Almacenamiento
Cajón de Almacenamiento
El cajón de almacenamiento es un buen lugar para guardar utensilios de cocina y panadería. No guarde plásticos ni materiales
inflamables en el cajón. La mayor parte de la limpieza se puede realizar con el cajón en su lugar. Sin embargo, el cajón se podrá
UHWLUDUHQFDVRGHTXHVHDQHFHVDULDXQDPD\RUOLPSLH]DRSDUDOLPSLDUGHEDMRGHODHVWXID8VHDJXDFDOLHQWH\MDEyQSDUD
limpiar a fondo. Nunca use abrasivos duros ni almohadillas para fregar.
Retiro del Cajón de Almacenamiento:
1. Empuje el cajón hacia afuera hasta que se detenga.
2. Incline el frente del cajón hacia adelante y empuje el cajón
fuera de la estufa.
Reemplazo del Cajón de Almacenamiento:
1. Centre el cajón de almacenamiento de izquierda a derecha
e inserte el mismo en la abertura, ajustando las guías del
cajón sobre los rieles.
2. Mantenga el cajón nivelado y empuje el mismo hacia usted
hasta que sienta que las guías del cajón encajen y apoyen
sobre los rieles.
3. Empuje el cajón hasta cerrarlo.
Guía
Riel

22 49-2001190 Rev. 3
CUIDADO Y LIMPIEZA: Superficies Interiores
Superficies Interiores
(OLQWHULRUGHVXQXHYRKRUQRVHSRGUiOLPSLDUGHIRUPDPDQXDORXWLOL]DQGRORVPRGRV6WHDP&OHDQ/LPSLH]DFRQ9DSRUR6HOI
&OHDQ/LPSLH]D$XWRPiWLFD
El derrame de adobo, jugos de fruta, salsas de tomate y líquidos para humedecer que contengan ácidos pueden ocasionar descoloración
y se deberán limpiar tan pronto como sea posible. Espere a que las superficies calientes se enfríen, y luego limpie y enjuague.
Limpieza Manual
No use limpiadoUHVGHKRUQRDPHQRVTXHHVWpQFHUWLILFDGRV
SDUDKRUQRVFRQOLPSLH]DDXWRPiWLFDOLPSLDGRUHVDEUDVLYRV
limpiadores líquidos fuertes, estropajos de acero, almohadillas
para fregar, ni polvos limpiadores en el interior del horno.
/LPSLHHOPLVPRFRQDJXD\MDEyQRFRQXQDVROXFLyQ
de vinagre y agua. Enjuague con agua limpia y seque con
una tela seca. Al limpiar supeficies, asegúrese de que estén a
temperatura ambiente y fuera del contacto con la luz solar.
Modo de Limpieza con Vapor
La limpieza con vapor está pensada para limpiar pequeños
derrames usando agua y una temperatura de limpieza más
EDMDTXHODGH6HOI&OHDQ/LPSLH]D$XWRPiWLFD(OFLFORGH
limpieza con vapor fue diseñado para calentar lo suficiente
el agua agregada en la parte inferior del horno al comenzar
el ciclo de limpieza con vapor, de modo que se incremente
su temperatura y que se la pueda luego condensar en las
suciedades generadas por la comida, ablandándolas y
haciendo más fácil su eliminación.
3DUDXVDUODIXQFLyQ6WHDP&OHDQ/LPSLH]DFRQ9DSRU
espere hasta que el horno se enfríe, de modo que pueda
limpiar la grasa y suciedad acumulada en la parte inferior
del horno y para evitar verter agua fría en un fondo de horno
caliente, evitando posibles choques térmicos y fisuras del
HVPDOWDGR9LHUWDòWD]DGHDJXDHQODSDUWHLQIHULRUGHOKRUQR
Cierre la puerta.
Presione la tecla Clean Self/Steam (Limpieza Automática/
con Vapor) dos veces y luego presione Start (Iniciar). No se
deberá abrir la puerta durante los 30 minutos de la limpieza con
vapor, ya que esto reducirá su rendimiento. Limpie cualquier
H[FHVRGHDJXD\FXDOTXLHUVXFLHGDGTXHKD\DTXHGDGR
NOTA: El agua en la parte inferior del horno podrá estar
caliente justo después de finalizado el ciclo.
Modo de Limpieza Automática
Lea las Instrucciones de Seguridad del Horno con Limpieza
Automática, en el comienzo de este manual antes de usar
HOPRGR6HOI&OHDQ/LPSLH]D$XWRPiWLFD(VWHPRGRXVD
temperaturas muy altas para limpiar el interior del horno.
Cuando use esta función, la puerta del horno se trabará.
Antes de utilizar el ciclo de limpieza automática, limpie la
grasa y restos de comida que haya en el horno. Retire todos
ORVDUWtFXORVGHOKRUQRH[FHSWRORVHVWDQWHVHVPDOWDGRVFRORU
RVFXUR/RVHVWDQWHVEULOODQWHVRGHSODWD\FXDOTXLHUXWHQVLOLR
u otros artículos deberían ser retirados del horno antes de
iniciar un ciclo de limpieza automática. No retirar los ítems
TXHQRVHDQHVPDOWDGRVSDUULOODVRVFXUDVSRGUiSURGXFLU
descoloraciones permanentes sobre las parrillas brillantes y
daños en el utensilio.
Cierre la puerta, presione la tecla Clean Self/Steam (Limpieza
Automática/ con Vapor) una vez y luego presione Start (Iniciar).
La puerta del horno se bloqueará a lo largo del ciclo de
limpieza automática y se desbloqueará una vez que la cavidad
del horno se haya enfriado de forma adecuada.
Las unidades de superficie se desactivan automáticamente
durante el ciclo de auto-limpieza. Verifique que todos los
controles de unidades de superficie estén apagados en todo
momento durante el ciclo de auto-limpieza.
Espere hasta que termine el ciclo de auto-limpieza para
configurar y usar las unidades de superficie.
Estantes
Todos los estantes se pueden lavar con agua caliente y
jabón. Todas las parrillas del horno se podrán limpiar a mano
con un limpiador abrasivo o viruta. Las parrillas de níquel
SODWHDGDVQRGHEHUiQSHUPDQHFHUHQHOKRUQRGXUDQWH
el ciclo de limpieza automática. Hacer esto deteriorará las
parrillas. Es posible que resulte más difícil deslizar las parrillas,
HVSHFLDOPHQWHOXHJRGHODVIXQFLRQHV6WHDP&OHDQ/LPSLH]D
FRQ9DSRUR6HOI&OHDQ/LPSLH]D$XWRPiWLFD
Coloque aceite vegetal en una tela húmeda o en una toalla
GHSDSHO\IURWHODVPLVPDVVREUHORVH[WUHPRVL]TXLHUGR\
derecho de las parrillas.
NOTA:8VDURWURVDFHLWHVGHFRFFLyQWDOHVFRPRDFHLWHGH
cacahuete, Pam
®
u otros espráis lubricantes, podrá generar
XQDGHVFRORUDFLyQRXQUHVLGXRGHFRORUy[LGRVREUHORV
estantes y cavidades laterales. Para limpiar este residuo, use
agua y jabón o una solución de vinagre y agua. Enjuague con
agua limpia y seque con una tela seca.
Elementos calentadores del horno
No limpie el elemento para hornear o el elemento para asar. Las
suciedades se quemarán cuando se calienten los elementos.
Para limpiar el piso del horno, levante ligeramente el elemento
para hornear.
Limpie con agua caliente y jabón.
Levante suavemente el
elemento para hornear.
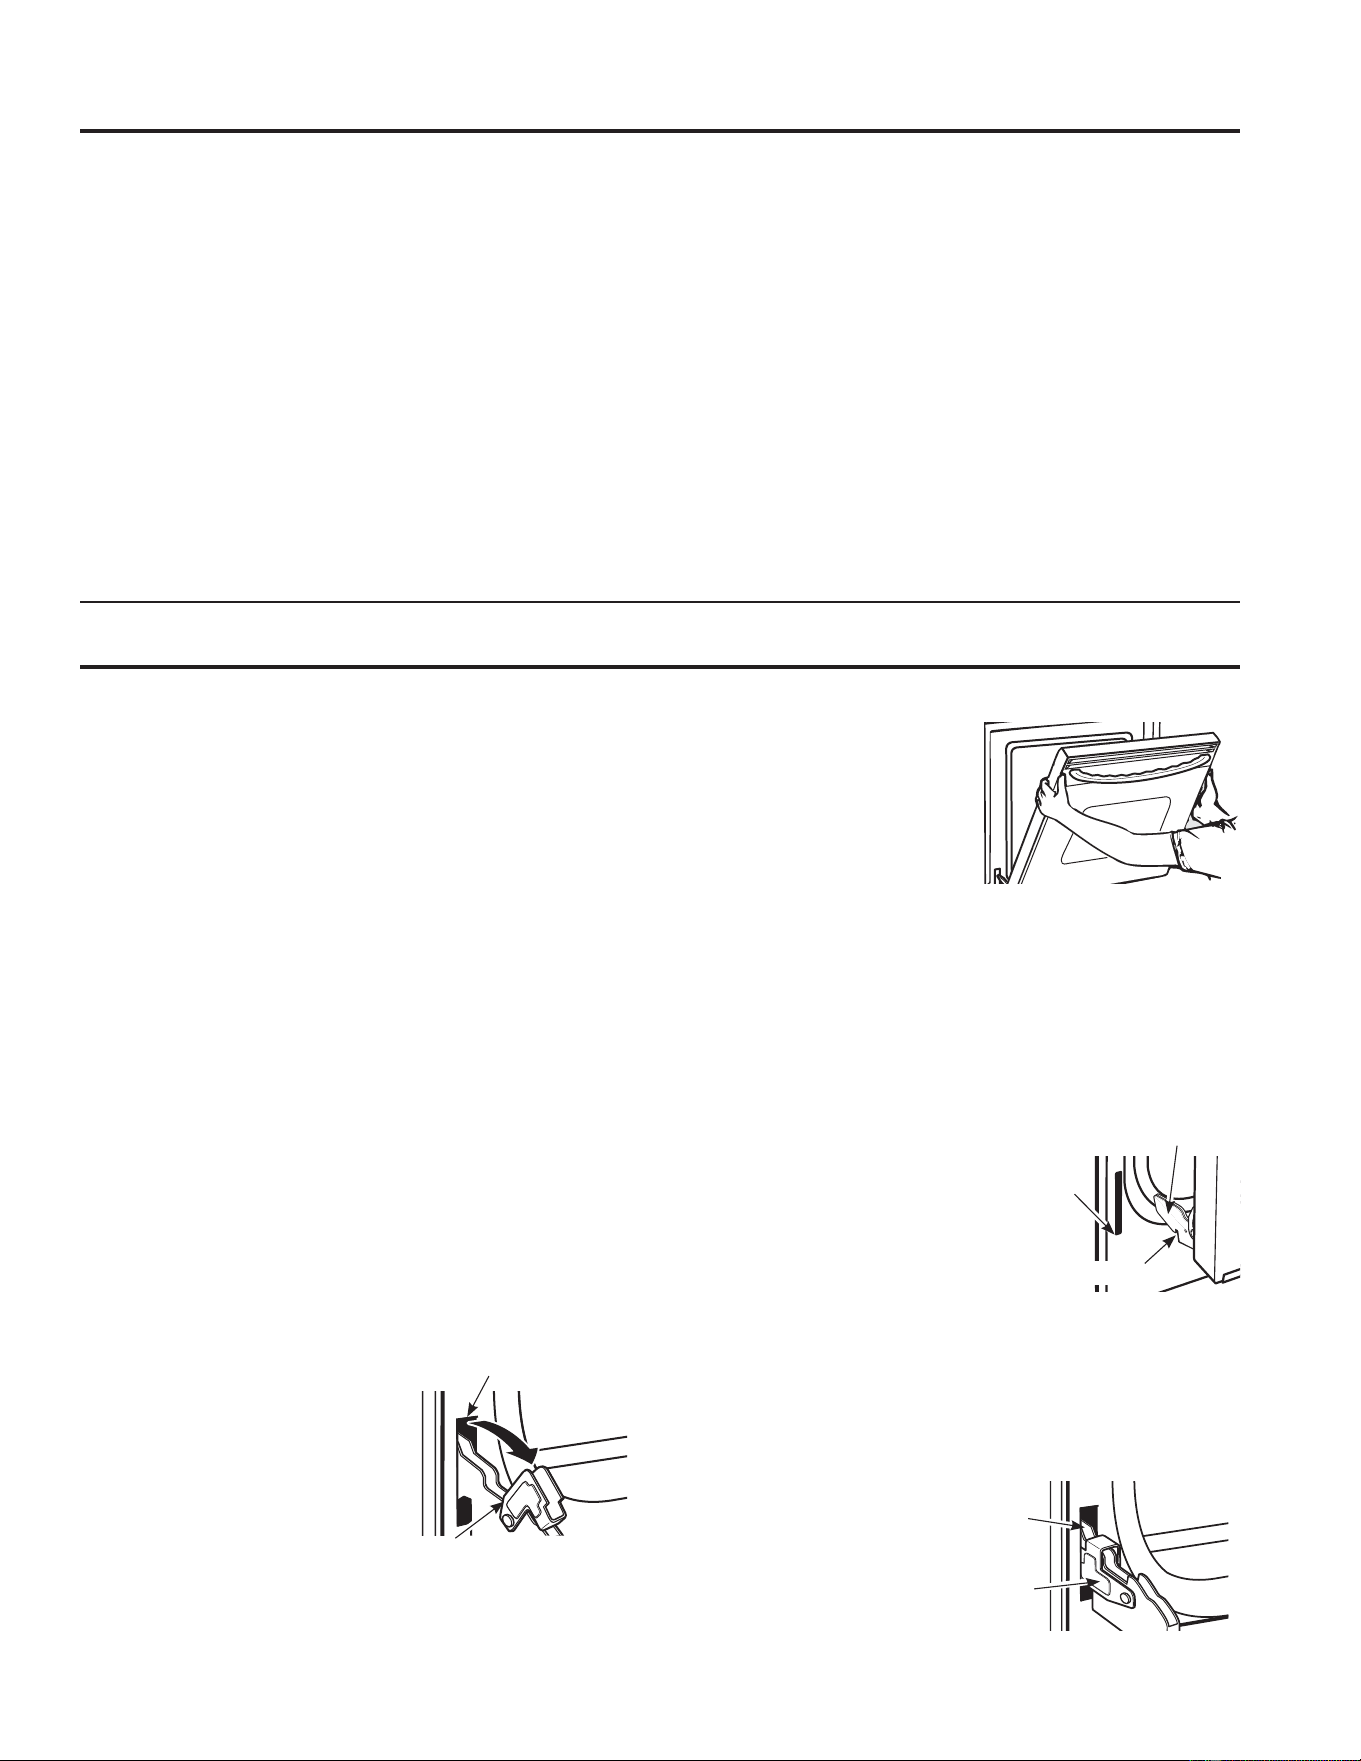
49-2001190 Rev. 3 23
CUIDADO Y LIMPIEZA: 6XSHUILFLHV ,QWHULRUHV 3XHUWD GHO +RUQR
Superficies Interiores (Continúa)
Interior del Horno de Porcelana
Con el cuidado apropiado, el acabado de esmalte de la
porcelana en el interior del horno – parte superior, inferior,
laterales, parte trasera e interior de la puerta - permanecerá
con un aspecto nuevo por años. Espere a que el horno se
enfríe antes de realizar su limpieza. Le recomendamos que
use guantes de goma para limpiar el horno. El jabón y el agua
normalmente harán el trabajo. Las salpicaduras y los derrames
importantes podrán requerir que la limpieza se realice con un
limpiador suave y abrasivo. También se podrán usar estropajos
con jabón. No permita que los derrames de comida con alto
FRQWHQLGR GH D]~FDU R iFLGR WDO FRPR WRPDWHV FKXFUXW MXJRV
GH IUXWD R UHOOHQRV GH WDUWDV SHUPDQH]FDQ HQ OD VXSHUILFLH
Podrán ocasionar una mancha importante luego de la limpieza.
El amoníaco hogareño podrá facilitar el trabajo de la limpieza.
&RORTXH ò WD]D HQ XQ YDVR GH YLGULR R HQYDVH GH FHUiPLFD
en un horno frío durante la noche. Los gases del amoníaco
D\XGDUiQ D DIORMDU OD JUDVD \ OD FRPLGD TXHPDGD 'H VHU
necesario, usted podrá usar un limpiador de horno certificado
para su uso en un horno con limpieza automática. Siga las
instrucciones del paquete.
• No rocíe el limpiador para horno sobre los controles y
enchufes eléctricos, ya que esto podrá ocasionar un
cortocircuito y producir chisporroteos o un incendio.
• Evite que una capa del limpiador se acumule en el sensor
de temperatura – podría hacer que el horno caliente de
IRUPD LQDGHFXDGD (O VHQVRU HVWi XELFDGR HQ OD SDUWH
VXSHULRU GHO KRUQR &RQ FXLGDGR OLPSLH HO VHQVRU OXHJR
de cada limpieza del horno, teniendo cuidado de no mover
el sensor, ya que un cambio de posición podría afectar la
forma de hornear del horno.
• No rocíe ningún limpiador para horno sobre la puerta,
PDQLMDV R FXDOTXLHU VXSHUILFLH H[WHULRU GHO KRUQR JDELQHWHV R
superficie pintada. El limpiador podrá dañar estas superficies.
La puerta es muy pesada. Tenga cuidado al retirar y levantar la puerta. No levante la puerta usando la manija.
Para Limpiar El Exterior e Interior de la
Puerta
8VH DJXD \ MDEyQ SDUD OLPSLDU FRPSOHWDPHQWH OD SDUWH
superior, los laterales y el frente de la puerta del horno.
Enjuague bien. También puede usar un limpiador de vidrio
SDUD OLPSLDU HO YLGULR GH OD SDUWH H[WHULRU GH OD SXHUWD 1R
permita el goteo de agua en las aberturas de la ventilación,
orificios, o ranuras de la puerta.
• Si una mancha en el marco de la ventilación de la puerta es
persistente, use un limpiador abrasivo suave o una esponja
con estropajo para obtener un mejor resultado. No use este
método sobre ninguna otra superficie.
• El derrame de adobo, jugos de fruta, salsas de tomate
y materiales glaseados que contengan ácidos podrán
ocasionar descoloración y se deberán limpiar de la forma
más inmediata y segura posible. Cuando la superficie esté
fría, lave y enjuague.
• No use limpiadores para horno, polvos de limpieza ni
DEUDVLYRV GXURV VREUH OD SDUWH H[WHULRU GH OD SXHUWD
Para retirar la puerta:
NOTA: No es un requisito que se retire la puerta para la
instalación del producto, pero es conveniente.
1. Abra la puerta totalmente.
2. Empuje los bloqueos de
la bisagra hacia abajo en
dirección a la estructura
de la puerta, hasta la
posición desbloqueada. Es
posible que necesite una
herramienta tal como un
destornillador pequeño de
punta plana.
3. Firmemente tome ambos
lados de la puerta por la
parte superior.
4. Cierre la puerta hasta la
posición de retiro de la misma.
La puerta debería ser abierta
DSUR[LPDGDPHQWH D ´ VLQ
obstrucción sobre la misma.
5. Mueva la puerta hacia arriba
y afuera, hasta que los brazos
de las bisagras queden fuera
de las ranuras del marco de la
estufa.
Para reemplazar la puerta:
1. Firmemente tome ambos lados de la puerta por la parte
superior.
2. Con la puerta en el mismo ángulo
que en la posición de retiro,
coloque la abertura sobre el lado
inferior del brazo de la bisagra
L]TXLHUGD VREUH HO H[WUHPR
inferior de la ranura de la bisagra
izquierda. La abertura en el
brazo de la bisagra deberá estar
totalmente apoyada en la parte
inferior de la ranura. Repita el
procedimiento del lado derecho.
3. Abra la puerta totalmente. Si la puerta no se abre
completamente, entonces las aberturas en las partes
inferiores de los brazos de las bisagras no se apoyaron de
IRUPD FRUUHFWD VREUH HO H[WUHPR LQIHULRU GH OD UDQXUD 5HWLUH
la puerta de la estufa y repita el paso anterior.
4. Empuje los bloqueos de la
bisagra hacia abajo hasta
la posición de bloqueo.
5. Cierre la puerta del horno.
Puerta del Horno
Posición de retiro
Hendidura
([WUHPR
inferior
de la
ranura
Brazo de la
bisagra
Bloqueo de la bisagra
Ranura
Empuje los bloqueos de la
bisagra hacia abajo para
desbloquear
Empuje los bloqueos de la bisagra
hacia abajo para bloquear
Bloqueo
de la
bisagra
Brazo
de la
bisagra
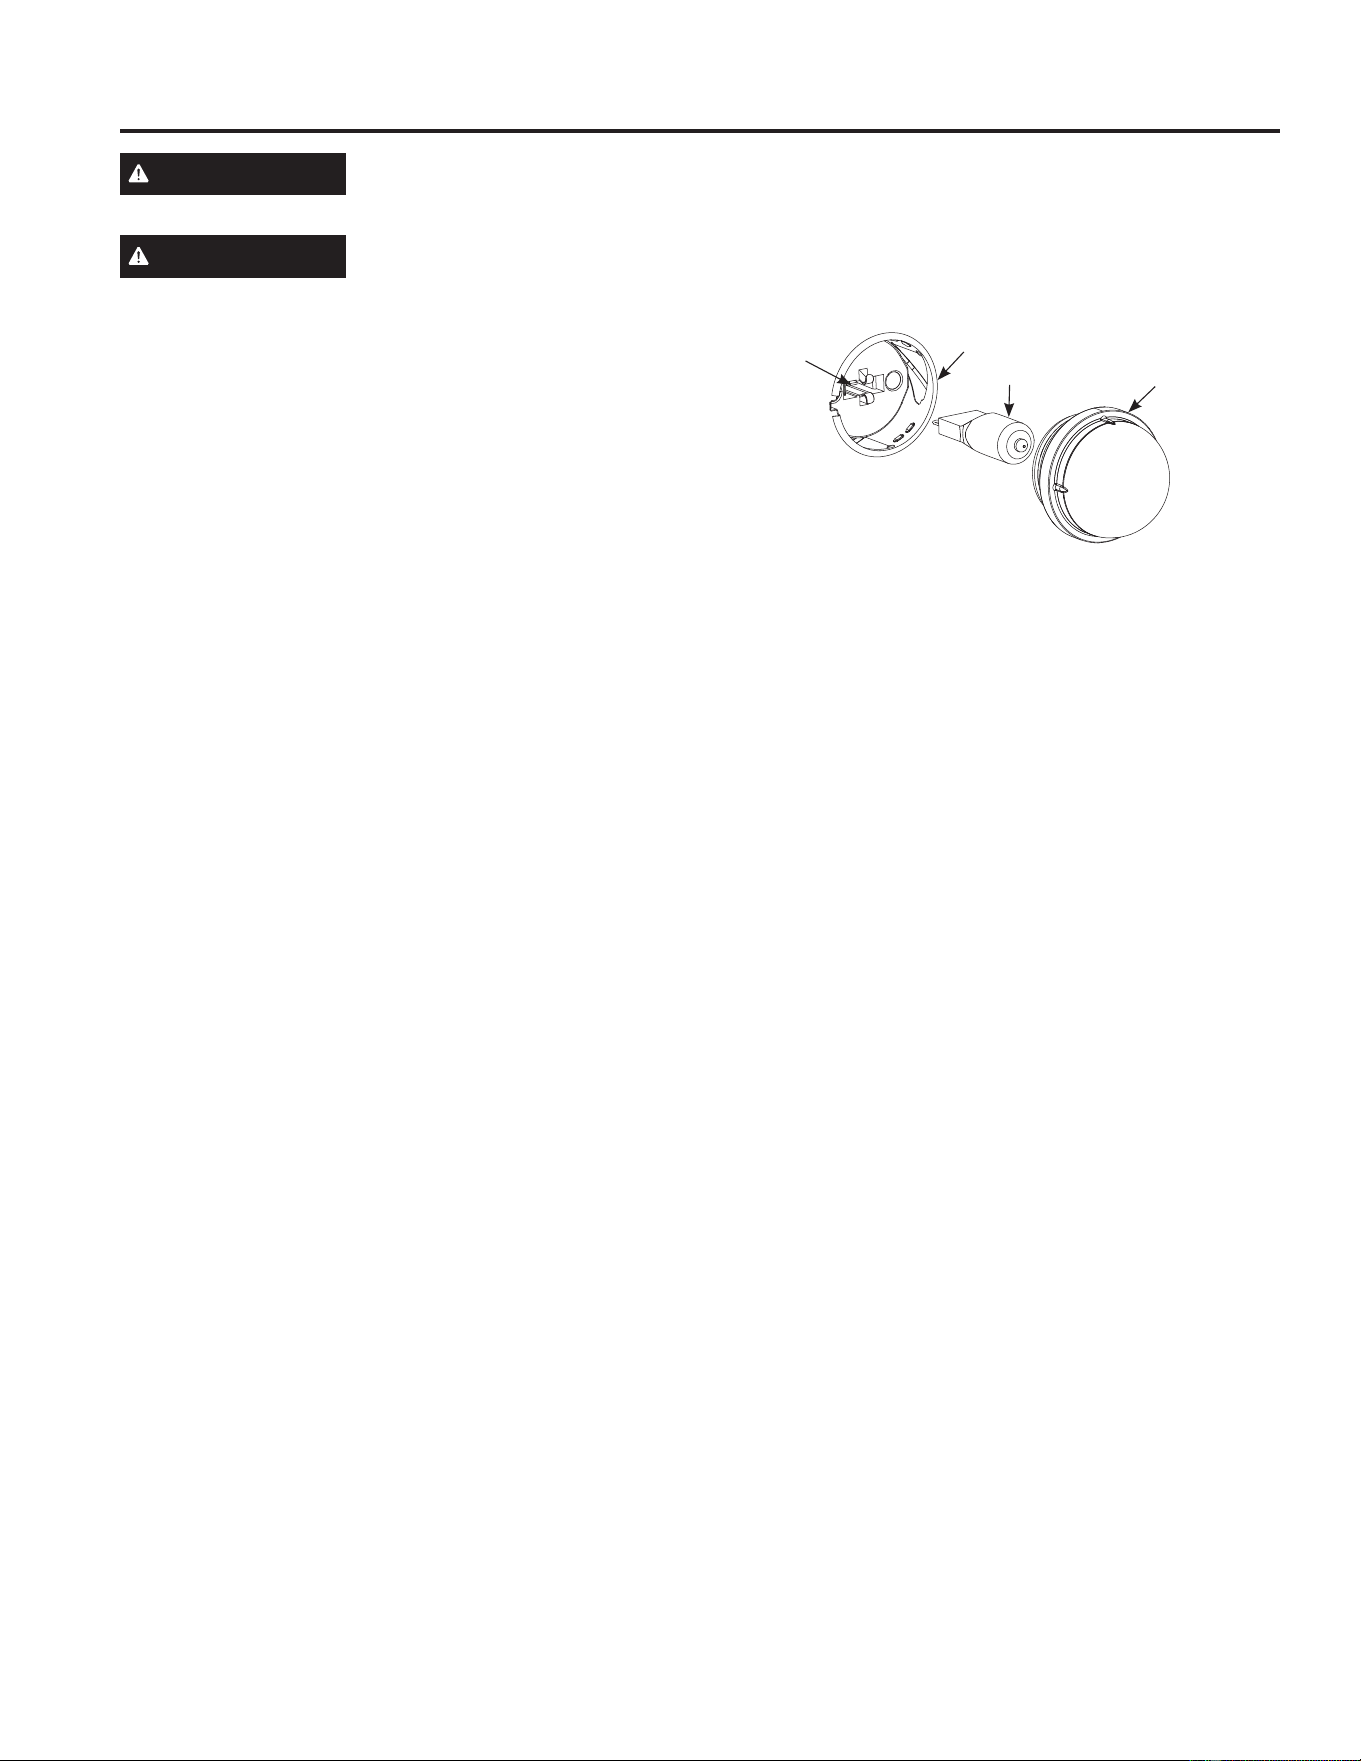
24 49-2001190 Rev. 3
Luz del Horno (Continúa)
CUIDADO Y LIMPIEZA: Luz del Horno
ADVERTENCIA
PELIGRO DE DESCARGA ELÉCTRICA O QUEMADURAS: Antes de reemplazar la bombilla del
horno, desconecte la alimentación de energía al horno desde el panel principal de fusibles o del
interruptor de circuitos. No hacerlo puede provocar una descarga eléctrica o una quemadura.
PRECAUCIÓN
RIESGO DE INCENDIO: La tapa de vidrio y la lámpara de luz se deberán retirar cuando estén frías. Tocar
el vidrio caliente sin protección en las manos o con un trapo húmedo puede ocasionar quemaduras.
Para quitar la bombilla:
1. Gire la tapa de vidrio en sentido antihorario hasta haber
UHWLUDGRHOYLGULR&RORFDUVHJXDQWHVGHOiWH[SXHGHEULQGDU
un mejor agarre.
8WLOL]DQGRJXDQWHVRXQSDxRVHFRUHPXHYDODERPELOOD
jalándola en línea recta.
Para reemplazar la bombilla:
8WLOLFHXQDQXHYDERPELOODKDOyJHQDGHYROWLRV
QRH[FHGDYDWLRV5HHPSODFHODOiPSDUDGHOX]FRQ
el mismo tipo de lámpara que se retiró. Asegúrese al
reemplazar la lámpara que sea de 120 volts o 130 volts
12GHYROWV\TXHSRVHDXQDEDVH*
8WLOL]DQGRJXDQWHVRXQSDxRVHFRUHPXHYDODERPELOODGH
su paquete. No toque la bombilla con los dedos desnudos.
El aceite para piel dañará la lámpara y acortará su tiempo
de duración.
3. Empuje la bombilla en línea recta dentro del receptáculo
hasta el tope.
4. Vuelva a colocar la tapa de vidrio. Para una mejor
iluminación dentro del horno, limpie frecuentemente la
cubierta de vidrio utilizando un paño húmedo. Esto debería
hacerse cuando el horno está completamente frío y la luz
apagada.
5. Conecte nuevamente el suministro eléctrico al horno.
Bombilla de G9
Portalámpara
Cubierta de vidrio
Receptáculo
49-2001190 Rev. 3 25
¡Ahorre tiempo y dinero! Primero revise los cuadros que aparecen en las siguientes páginas y es posible que no necesite solicitar
UHSDUDFLRQHV$FFHGDDORVYLGHRVGHD\XGD\SUHJXQWDVIUHFXHQWHV)$4DWUDYpVGHGEAppliances.com/support.
Consejos para la Solución de Problemas... Antes de solicitar el servicio técnico
CONSEJOS PARA LA SOLUCIÓN DE PROBLEMAS
Problema Causa Posible Qué Hacer
La comida no se cocina de
forma apropiada
Su horno nuevo cuenta con un sistema de cocción
diferente con relación al anterior y, por lo tanto, es posible
que cocine de forma diferente.
En los primeros usos, use los tiempos y temperaturas de su
receta con cuidado. Si aún piensa que su horno nuevo cocina con
demasiado calor o demasiado frío, podrá ajustar el termostato
usted mismo para aplicar su preferencia de cocción específica.
&RQVXOWHODVHFFLyQ6HWWLQJV&RQILJXUDFLRQHV
Controles del horno configurados de forma incorrecta. Consulte la sección Modos de Cocción.
La posición del estante es incorrecta o el estante no está
nivelado.
Consulte la sección Modos de Cocción y la Guía de Cocción.
8VRGHXQDFDFHURODLQFRUUHFWDRGHXQDFDFHURODGH
tamaño incorrecto.
&RQVXOWHODVHFFLyQ8WHQVLOLRGHO+RUQR
La temperatura del horno debe ser ajustada. Consulte la sección Configuraciones.
Sustitución de ingredientes Sustituir ingredientes puede modificar el resultado de la receta.
Las tortas quedan asimétricas/
desparejas
El aparato no fue nivelada de forma correcta durante su
instalación
Nivele el horno. Consulte las Instrucciones de Instalación del
aparato.
Las parillas se deslizan solas
hacia adentro y afuera
El aparato no fue nivelada de forma correcta durante su
instalación
Nivele el horno. Consulte las Instrucciones de Instalación del
aparato.
A veces el horno tarda más
en precalentarse a la misma
temperatura
8WHQVLOLRRFRPLGDHQHOKRUQR El utensilio o la comida en el horno hará que éste tarde más en
precalentarse. Retire estos artículos para reducir el tiempo de
precalentamiento.
Número de estantes en el horno Agregar más estantes al horno hará que éste tarde más en
precalentarse. Retire algunos estantes.
8VRGHXQDSDUULOODH[WHQVLEOHHQOXJDUGHXQDSDUULOOD
plana
/DSDUULOODH[WHQVLEOHHVPiVSHVDGDTXHXQDSDUULOODSODQD\
requiere más energía para calentar. Esto es normal. Para reducir
el tiempo de precalentamiento, use una parrilla plana.
'LIHUHQWHVPRGRVGHFRFFLyQ Los diferentes modos de cocción utilizan diferentes métodos de
precalentamiento para calentar el horno en un modo de cocción
específico. Algunos modos tardarán más que otros.
La comida no asa de forma
apropiada
Controles del horno configurados de forma incorrecta. Asegúrese de seleccionar el modo correcto para asar. Consulte la
sección de Modos de Cocción.
Se usó una posición incorrecta del estante. Para acceder a sugerencias de ubicación de estantes, consulte la
Guía de Cocción.
Se cocinó comida en una olla caliente. Asegúrese de que el utensilio esté frío
8WHQVLOLRGHFRFLQDLQDGHFXDGRSDUDDVDU 8VHXQDROODHVSHFtILFDPHQWHGLVHxDGDSDUDDVDU
El papel de aluminio usado para la olla y la rejilla para
asar no se ajustó ni cortó de forma apropiada, según lo
recomendado.
Si usará papel de aluminio, deberá usarse conforme con las
aberturas de la olla.
Humo excesivo al asar La comida está demasiado cerca del quemador y del
elemento para asar
Baje la posición del estante con comida.
Olor fuerte 8QRORUHQODDLVODFLyQDOUHGHGRUGHOLQWHULRUGHOKRUQR
es normal desde las primeras veces en que el horno es
usado.
Esto es temporario y desaparecerá luego de varios usos.
La pantalla queda en blanco
y el horno no funciona ni
responde
El fusible puede haberse quemado o el interruptor de
circuitos puede haber saltado.
Cambie el fusible o vuelva a configurar el interruptor de circuitos.
El enchufe de la cocina no está introducido del todo en el
tomacorriente.
Verifique que el enchufe eléctrico esté conectado a un
WRPDFRUULHQWHFRQWHQVLyQ\DGHFXDGDFRQH[LyQDWLHUUD
La pantalla queda en blanco El reloj está apagado. &RQVXOWHODVHFFLyQ6HWWLQJV&RQILJXUDFLRQHV
El control del horno no
responde
(OKRUQRVHHQFXHQWUDHQ6DEEDWK0RGH0RGR6DEiWLFR 9HULILTXHTXHHOKRUQRQRHVWpHQ6DEEDWK0RGH0RGR6DEiWLFR
&RQVXOWHODVHFFLyQ6DEEDWK0RGH0RGR6DEiWLFR
/DIXQFLyQ/RFN&RQWUROV&RQWUROHVGH%ORTXHRHVWi
activada
6LDSDUHFH/RF%ORTXHRHQODSDQWDOOD\
está iluminado,
el control de la estufa está bloqueado. Apague esta función
SDUDXVDUODHVWXID&RQVXOWHODIXQFLyQ/RFN&RQWURO&RQWUROGH
%ORTXHRHQODVHFFLyQGH&RQWUROHVGHO+RUQR
La pantalla parpadea &RUWHRH[FHVRGHFRUULHQWH Reinicie el reloj. Si el horno estuvo en uso, deberá reiniciar el
mismo presionando la tecla Cancel (Cancelar) configurando el
reloj y reiniciando cualquier función de cocción.
No es posible ingresar a
Settings (Configuraciones)
Las teclas del control del horno no se presionaron de
forma adecuada.
/DVWHFODV%DNH+RUQHDU\%URLO$VDUVHGHEHUiQPDQWHQHU
presionadas al mismo tiempo por 3 segundos.
El control emite un pitido y
parpadea
Olvidó ingresar una temperatura de horneado o tiempo
de limpieza.
Consulte sobre cómo configurar el horno en la sección de
Controles del Horno.
26 49-2001190 Rev. 3
Consejos para la Solución de Problemas... Antes de solicitar el servicio técnico
CONSEJOS PARA LA SOLUCIÓN DE PROBLEMAS
Problem Possible Cause What To Do
Se oye un ventilador 8QYHQWLODGRUGHFRQYHFFLyQSXHGHHQFHQGHUVH\
apagarse automáticamente.
Esto es normal. Mientras se encuentren en uso, el ventilador
de convección y los calentadores del horno realizarán ciclos de
encendido y apagado según sea necesario para mantener las
condiciones de cocción adecuadas.
Sonido de “chisporroteo” o
“traqueo”
eVWHHVHOVRQLGRGHPHWDOFDOHQWiQGRVHRHQIULiQGRVH
durante las funciones de cocción y limpieza..
Esto es normal.
¿Por qué la estufa hace un
sonido de “clic” cuando uso el
horno?
Su estufa fue diseñada para mantener un control más
ajustado sobre la temperatura del horno.
Esto es normal.
La luz del horno no funciona La lámpara está floja o presenta defectos. Ajuste o reemplace la lámpara. Consulte la sección de Cuidado y
/LPSLH]D±6XSHUILFLHV,QWHULRUHV/X]GHO+RUQRSDUDDFFHGHUD
instrucciones sobre cómo reemplazar la bombilla.
La luz de funcionamiento del interruptor está rota. Llame al servicio técnico.
El horno no realiza la limpieza
automática
La temperatura del horno es demasiado caliente como
para configurar la limpieza automática.
Espere a que el horno se enfríe y reinicie los controles.
Los controles del horno están configurados de forma
incorrecta.
Consulte la sección de Cuidado y Limpieza - Superficies
Interiores.
No es posible abrir la puerta
del horno o la luz
está
encendida cuando desea
cocinar.
La puerta del horno está bloqueada debido a que la
temperatura interior del horno no descendió por debajo de
la temperatura de bloqueo.
Presione la tecla Cancel (Cancelar). Espere hasta que el horno
se enfríe por debajo de la temperatura de bloqueo.
parpadea en la pantalla
El ciclo de limpieza automática fue seleccionado pero la
puerta no está cerrada.
Cierre la puerta del horno.
La puerta del horno no se
abrirá luego de un ciclo de
limpieza automática
El horno está demasiado caliente. Verifique que la pantalla de control muestre que la unidad aún se
HQFXHQWUDEORTXHDGD
\HVSHUHDTXHHOKRUQRVHHQIUtHSRU
debajo de la temperatura de desbloqueo.
Exceso de humo durante un
ciclo de limpieza automática
([FHVRGHVXFLHGDGRJUDVDHQODFDYLGDGGHOKRUQR Presione la tecla Cancel (Cancelar). Abra las ventanas para
liberar el humo en la habitación. Espere hasta que la luz se
DSDJXH/LPSLHHOH[FHVRGHVXFLHGDGRJUDVDHQODFDYLGDGGHO
horno y luego reinicie el ciclo de limpieza automática.
El horno no limpia luego de un
ciclo de limpieza automática
El horno estaba demasiado sucio. /LPSLHGHUUDPHVH[FHVLYRVDQWHVGHLQLFLDUHOFLFORGHOLPSLH]D
Es posible que sea necesario usar la limpieza automática
nuevamente en hornos con mucha suciedad o por períodos de
tiempo más prolongados.
Los controles del horno están configurados de forma
incorrecta.
Consulte la sección de Cuidado y Limpieza - Superficies
Interiores.
Es difícil deslizar las parrillas
del horno
Las parrillas de color plateado brillante se limpiaron en un
ciclo de limpieza automática.
Aplique una cantidad reducida de aceite vegetal a una toalla de
SDSHO\OLPSLHORVH[WUHPRVGHORVHVWDQWHVGHOKRUQRFRQODWRDOOD
de papel. No rocíe con Pam
®
u otros espráis lubricantes ni use
aceite de cacahuete. Consulte la sección de Cuidado y Limpieza -
Superficies Interiores.
&DYLGDGVXFLD\RSDUULOODVSODQDVTXHQHFHVLWDQOLPSLH]D
y lubricación
Consulte la sección de Cuidado y Limpieza - Superficies
Interiores.
3DUULOODVH[WHQVLEOHVTXHQHFHVLWDQOLPSLH]D\OXEULFDFLyQ 8VHHOPpWRGRGHOXEULFDFLyQHQODVHFFLyQGH&XLGDGR\
Limpieza – Superficies Interiores.
Limpieza automática, parrillas esmaltadas Consulte la sección de Cuidado y Limpieza - Superficies
Interiores.
Las parrillas de color plateado
brillante poseen un aspecto
descolorado y apagado
Las parrillas de color plateado brillante se dejaron en el
horno durante un ciclo de limpieza automática.
Retire las parrillas del horno antes de realizar un ciclo de
limpieza automática. Consulte la sección de Cuidado y Limpieza -
Superficies Interiores.
Emisión de vapor desde la
ventilación
Cuando se utilizan los hornos, es normal ver una emisión
de vapor de la ventilación del horno. A medida que el
número de bandejas o la cantidad de alimentos a cocinar
se incrementa, la cantidad de vapor visible se elevará.
Esto es normal.
Quedan restos de agua en la
puerta del horno luego del
ciclo Steam Cycle (Limpieza al
Vapor).
Esto es normal. Retire el agua restante con esponja o tela seca.
No se produce vapor durante el
ciclo de limpieza con vapor
Esto es normal. Consulte la sección de Cuidado y Limpieza - Superficies
Interiores.
El horno no realiza la limpieza
con vapor.
Los controles del horno se configuraron de forma
incorrecta.
Consulte la sección de Cuidado y Limpieza - Superficies
Interiores.
La puerta del horno no se cerró. Asegúrese de cerrar la puerta para iniciar el ciclo de limpieza con
vapor y no abra la puerta durante el mismo. Consulte la sección
de Cuidado y Limpieza - Superficies Interiores.
49-2001190 Rev. 3 27
CONSEJOS PARA LA SOLUCIÓN DE PROBLEMAS
Consejos para la Solución de Problemas... Antes de solicitar el servicio técnico
Problem Possible Cause What To Do
“F – y un número o letra”
titila en la pantalla
Tiene un código de error de función. Presione la tecla Cancel (Cancelar). Espere hasta que el horno
se enfríe y luego vuelva a ponerlo en funcionamiento.
Si el código de función se repite. Presione la tecla Cancel (Cancelar). 'HVFRQHFWHWRWDOPHQWHOD
corriente del horno durante por lo menos 30 minutos y vuelva
a conectar la misma. Si el código de error de función se repite,
llame al servicio técnico.
La puerta de vidrio del horno
parece estar “teñida” o tener
un color “arcoíris”.
El vidrio del horno interno está cubierto con una barrera de
calor que refleja este último nuevamente hacia el horno, a
fin de evitar la pérdida de calor y de mantener fría la puerta
H[WHUQDPLHQWUDVVHKRUQHD
Esto es normal en algunos modelos. Bajo ciertas luces y
ángulos, es posible que visualice esta tinta o arcoíris.
La puerta del horno
alineada.
La puerta no está bien 'DGRTXHODSXHUWDGHOKRUQRHVGHVPRQWDEOHDYHFHVHVWi
torcida se desequilibra durante la instalación. Para alinear
la puerta, vuelva a instalar la misma. Consulte la sección de
Cuidado y Limpieza - Superficies Interiores – Puerta del Horno.
El cajón no se desliza bien o
hay que tirar de él
El cajón no está bien alineado. ([WLHQGDHOFDMyQSRUFRPSOHWR\SUHVLyQHORKDVWDHOIRQGR9HUOD
VHFFLyQ&XLGDGR\/LPSLH]D±6XSHUILFLHV([WHULRUHV±&DMyQGH
Almacenamiento.
El cajón está muy cargado o la carga no está equilibrada. Reduzca el peso. Redistribuya el contenido del cajón.
El cajón de almacenamiento
no cierra
El cable de energía puede estar obstruyendo el cajón en la
parte trasera inferior de la cocina.
Reposicione el cajón
y el cable de corriente. Consulte la
VHFFLyQGH&XLGDGR\/LPSLH]D±6XSHUILFLHV([WHULRUHV±&DMyQ
de Almacenamiento.
El soporte del cajón trasero se encuentra en la parte superior
del riel de la guía.
Reposicione el cajón. Consulte la sección de Cuidado y Limpieza
±6XSHUILFLHV([WHULRUHV±&DMyQGH$OPDFHQDPLHQWR
Las unidades de superficie
no mantienen un hervor
constante o la cocción es
lenta
Se están utilizando recipientes de cocción inadecuados. 8VHUHFLSLHQWHVGHEDVHSODQD\TXHVHDMXVWHQDOGLiPHWURGHOD
unidad de superficie elegida.
(QDOJXQDVUHJLRQHVODHQHUJtDYROWDMHSXHGHVHUEDMD Cubra el recipiente con una tapa hasta obtener el calo deseado.
Las unidades de la
superficie no se encienden
El fusible puede haberse quemado o el interruptor de
circuitos puede haber saltado.
Cambie el fusible o vuelva a configurar el interruptor de circuitos.
Los controles de la estufa están mal configurados. Verifique que se haya configurado el control correcto para el
elemento de superficie que está utilizando.
La unidad de superficie deja
de resplandecer cuando se
cambia a una configuración
menor
El aparato sigue encendida y caliente. Esto es normal.
Ciclo de encendido y
apagado frecuente de las
unidades de la superficie
La unidad de la superficie realiza un ciclo de
encendido y apagado para mantener su configuración
de control seleccionada.
Esto es normal. Lea la sección del Limitador de
Temperatura.
Se usaron utensilios inadecuados. 8VHVyORXWHQVLOLRVSODQRVSDUDPLQLPL]DUORVFLFORV
Rayones (pueden parecer
como roturas) en la
superficie de vidrio de la
estufa
Se están usando métodos de limpieza incorrectos. Los rayones no pueden removerse. Los rayones más pequeños
se volverán menos visibles como resultado de la limpieza.
Para
más detalles, consulte la sección de Cuidado y Limpieza
de las Superficies de Cocción – sección de Vidrio
Radiante.
Se están usando recipientes con bases ásperas o hay
SDUWtFXODVJUXHVDVVDORDUHQDHQWUHHOUHFLSLHQWH\OD
superficie de la estufa. Se ha deslizado un recipiente a
través de la superficie de la estufa.
Para evitar rayones, use los procedimientos de limpieza
recomendados. Verifique que las bases de los recipientes estén
limpias antes del uso, y utilice recipientes con bases lisas.
Para
más detalles, consulte la sección de Cuidado y Limpieza
de las Superficies de Cocción – sección de Vidrio
Radiante.
Áreas de decoloración en la
estufa
No se limpiaron los derrames de alimentos antes del uso
siguiente.
Consulte la sección de Cuidado y Limpieza – sección de
Superficies de Cocción.
Superficie caliente en un modelo con una estufa de color
claro.
Esto es normal. La superficie puede parecer decolorada cuando
está caliente. Esto es temporal y desaparecerá a medida que se
enfría el vidrio.
Plástico derretido sobre la
superficie
La estufa caliente entró en contacto con plástico colocado
sobre la misma.
Para más detalles, consulte la sección de Cuidado y
Limpieza - Superficies de Cocción – sección de Vidrio
Radiante.
Marcas (o hendiduras) en la
estufa
Se ha derramado una mezcla azucarada caliente en la
estufa.
Llame a un técnico calificado para el reemplazo.

28 49-2001190 Rev. 3
Abroche su recibo aquí. Para acceder al servicio técnico de acuerdo con
la garantía deberá contar con la prueba de la fecha original de compra.
GEAppliances.com
Todo el servicio de garantía es provisto por nuestros Centros de Servicio de Fabricación, o un técnico autorizado de Customer Care
®
.
Para programar una visita del servicio técnico a través de Internet, visítenos en GEAppliances.com/service, o llame a GE Appliances
al 800.GE.CARES. Cuando llame para solicitar el servicio, tenga los números de serie y modelo disponibles.
Para realizar el servicio técnico de su electrodoméstico, se podrá requerir el uso de datos del puerto de abordaje para su diagnóstico.
Esto da al técnico del servicio de fábrica de GE Appliances la habilidad de diagnosticar de forma rápida cualquier problema con
su electrodoméstico, y de ayudar a GE Appliances a mejorar sus productos al brindarle a GE Appliances la información sobre su
electrodoméstico. Si no desea que los datos de su electrodoméstico sean enviados a GE Appliances, solicitamos que le indique a su
técnico no entregar los datos a GE Appliances en el momento del servicio.
Qué no cubrirá GE Appliances:
Ŷ 9LDMHVGHOWpFQLFRGHOVHUYLFLRDVXKRJDUSDUDHQVHxDUOH
sobre cómo usar el producto.
Ŷ ,QVWDODFLyQHQWUHJDRPDQWHQLPLHQWRLQDGHFXDGRV
Ŷ )DOODVGHOSURGXFWRHQFDVRGHDEXVRPDOXVRPRGLILFDFLyQ
o uso para propósitos diferentes al original o uso comercial.
Ŷ 'DxRVDODHVWXIDGHYLGULRSURYRFDGRVSRUHOXVRGH
limpiadores distintos de las cremas y paños recomendados.
Ŷ 'DxRVDODHVWXIDGHYLGULRSURYRFDGRVSRUGHUUDPHV
endurecidos de materiales azucarados o plástico derretido
que no se limpiaron de acuerdo con las instrucciones del
Manual del Propietario.
Ŷ 5HHPSOD]RGHIXVLEOHVGHODFDVDRUHLQLFLRGHGLV\XQWRUHV
Ŷ 'DxRVRFDVLRQDGRVVREUHHOSURGXFWRSRUDFFLGHQWH
incendio, inundaciones o catástrofes naturales.
Ŷ 'DxRVVREUHHODFDEDGRWDOHVFRPRy[LGRVREUHOD
superficie, deslustres o manchas pequeñas no informadas
dentro de las 48 horas luego de la entrega.
Ŷ 'DxRVLQFLGHQWDOHVRFRQVHFXHQWHVFDXVDGRVSRUSRVLEOHV
defectos sobre este producto.
Ŷ 'DxRFDXVDGRGHVSXpVGHODHQWUHJD
Ŷ 3URGXFWRQRDFFHVLEOHSDUDEULQGDUHOVHUYLFLRUHTXHULGR
Ŷ 6ROLFLWHHOVHUYLFLRWpFQLFRSDUDUHSDUDURUHHPSOD]DUODV
OiPSDUDVH[FHSWRODVOiPSDUDV/('
Ŷ 'DxRVHVWpWLFRVVREUHODSODFDGHFRFFLyQGHYLGULRWDOHV
como, pero sin limitarse a, astillas, rayones, o residuos
horneados que no se hayan reportado dentro de los 90 días
desde el momento de la instalación.
Ŷ 'DxRVVREUHODSODFDGHFRFFLyQ
de vidrio debido a impactos o uso
inadecuado. Vea el ejemplo.
GARANTÍA LIMITADA
Garantía limitada de la cocina eléctrica GE Appliances
EXCLUSIÓN DE GARANTÍAS IMPLÍCITAS
6X~QLFD\H[FOXVLYDDOWHUQDWLYDHVODUHSDUDFLyQGHOSURGXFWRFRPRVHLQGLFDHQOD*DUDQWtD/LPLWDGD/DV
garantías implícitas, incluyendo garantías implícitas de comerciabilidad o conveniencia sobre un propósito
particular, se limitan a un año o al período más corto permitido por la ley.
(VWDJDUDQWtDOLPLWDGDVHH[WLHQGHDOFRPSUDGRURULJLQDO\DFXDOTXLHUSURSLHWDULRSRVWHULRUGHORVSURGXFWRV
FRPSUDGRVSDUDXVRGRPpVWLFRGHQWURGH((88 Si el producto está en un área donde no se encuentra disponible
un Proveedor Autorizado del Servicio Técnico de GE Appliances, usted será responsable por el costo de un viaje o se
podrá requerir que traiga el producto a una ubicación del Servicio Técnico de GE Appliances autorizado para recibir el
servicio. (Q$ODVNDODJDUDQWtDOLPLWDGDH[FOX\HHOFRVWRGHHQYtRRYLVLWDVGHVHUYLFLRDVXGRPLFLOLR$OJXQRVHVWDGRV
QRSHUPLWHQODH[FOXVLyQROLPLWDFLyQGHGDxRVIRUWXLWRVRFRQVHFXHQWHV(VWDJDUDQWtDOLPLWDGDOHRWRUJDGHUHFKRV
legales específicos, y usted también podría tener otros derechos que varían de estado a estado. Para conocer cuáles
son sus derechos legales, consulte a la oficina de asuntos del consumidor local o estatal o al Fiscal de su estado.
Garante: GE Appliances, a Haier company
Louisville, KY
Garantías Extendidas:$GTXLHUDXQDJDUDQWtDH[WHQGLGDGH*($SSOLDQFHV\FRQR]FDORVGHVFXHQWRVHVSHFLDOHVTXH
están disponibles mientras su garantía aún está vigente. Puede acceder a la misma a través de Internet en cualquier
momento en
GEAppliances.com/extended-warranty
o llamando al 800.626.2224 durante el horario comercial. Los Servicios para los GE Appliances aún estarán
disponibles cuando su garantía caduque.
Por el Período de GE Appliances reemplazará
Un Año
'HVGHODIHFKDGHOD
compra original
Cualquier parteGHODFRFLQDTXHIDOOHGHELGRDXQGHIHFWRHQORVPDWHULDOHVRODIDEULFDFLyQ'XUDQWH
esta garantía limitada de un año, GE Appliances también proveerá, sin costo, todo el trabajo y el
servicio en el hogar para reemplazar la parte que presente defectos.

49-2001190 Rev. 3 29
ACCESORIOS
¿Busca Algo Más?
¡GE Appliances ofrece una variedad de accesorios para
mejorar sus experiencias de cocción y mantenimiento!
Para acceder a números telefónicos e información de sitios
Web, consulte la página de Soporte para el Consumidor.
(VWRV\RWURVSURGXFWRVHVWiQGLVSRQLEOHV
Accesorios
Accesorios
2OODSDUD$VDU3HTXHxDô´[ó´[ò³
2OODSDUD$VDU*UDQGHô´[ó´[ò³
2OODSDUD$VDU([WUD*UDQGHô´[ó´[ò³
Piezas
Estantes del horno
Elementos del horno
Lámparas de luz
Sonda
Suministros de Limpieza
/LPSLDGRUHVGH$FHUR,QR[LGDEOH&LWUL6KLQH™
/LPSLDGRUSDUD(OHFWURGRPpVWLFRVGH$FHUR,QR[LGDEOH
Almohadillas de Limpieza no Abrasivas para Superficies de Cocción de Cerámica
Limpiador para Superficies de Cocción de Cerámica
Espátula para Superficies de Cocción de Cerámica
.LWHONLWLQFOX\HFUHPD\HVSiWXODSDUDSODFDGHFRFFLyQ
/DROODSDUDDVDUJUDQGHQRHQWUDHQFRFLQDVGH´´
/DROOD;/QRHQWUDHQKRUQRVGHSDUHGGH´HPSRWUDEOHVGH´RFRFLQDVGH´´
NOTAS:9D\DDOVLWLRZHEGH*($SSOLDQFHVSDUDYHUORVOLPSLDGRUHVUHFRPHQGDGRV

30 49-2001190 Rev. 3
Soporte para el Consumidor
SOPORTE PARA EL CONSUMIDOR
Sitio Web de GE Appliances
¢'HVHDUHDOL]DUXQDFRQVXOWDRQHFHVLWDD\XGDFRQVXHOHFWURGRPpVWLFR"£,QWHQWHDWUDYpVGHO6LWLR:HEGH*($SSOLDQFHVODV
KRUDVGHOGtDFXDOTXLHUGtDGHODxR8VWHGWDPELpQSXHGHFRPSUDUPiVHOHFWURGRPpVWLFRVPDUDYLOORVRVGH*($SSOLDQFHV\
aprovechar todos nuestros servicios de soporte a través de Internet, diseñados para su conveniencia.
(Q((88GEAppliances.com
Registre su Electrodoméstico
£5HJLVWUHVXHOHFWURGRPpVWLFRQXHYRDWUDYpVGH,QWHUQHWVHJ~QVXFRQYHQLHQFLD8QUHJLVWURSXQWXDOGHVXSURGXFWRSHUPLWLUi
una mejor comunicación y un servicio más puntual de acuerdo con los términos de su garantía, en caso de surgir la necesidad.
También puede enviar una carta en la tarjeta de inscripción preimpresa que se incluye con el material embalado.
(Q((88GEAppliances.com/register
Servicio Programado
(OVHUYLFLRGHUHSDUDFLyQGHH[SHUWRVGH*($SSOLDQFHVHVWiDVyORXQSDVRGHVXSXHUWD&RQpFWHVHDWUDYpVGH,QWHUQHW\SURJUDPH
VXVHUYLFLRDVXFRQYHQLHQFLDFXDOTXLHUGtDGHODxR(Q((88GEAppliances.com/service
o comuníquese al 800.432.2737 durante el horario de atención comercial.
Garantías Extendidas
$GTXLHUDXQDJDUDQWtDH[WHQGLGDGH*($SSOLDQFHV\FRQR]FDORVGHVFXHQWRVHVSHFLDOHVTXHHVWiQGLVSRQLEOHVPLHQWUDVVX
garantía aún está vigente. La puede adquirir en cualquier momento a través de Internet. Los servicios de GE Appliances aún
estarán allí cuando su garantía caduque.
(Q((88GEAppliances.com/extended-warranty
o comuníquese al 800.626.2224 durante el horario de atención comercial.
Piezas y Accesorios
Aquellos individuos calificados para realizar el servicio técnico de sus propios electrodomésticos podrán solicitar el envío de
SLH]DVRDFFHVRULRVGLUHFWDPHQWHDVXVKRJDUHVVHDFHSWDQODVWDUMHWDV9,6$0DVWHU&DUG\'LVFRYHU2UGHQHKR\DWUDYpVGH
,QWHUQHWGXUDQWHODVKRUDVWRGRVORVGtDV(Q((88GEApplianceparts.com o de forma telefónica al 877.959.8688 durante
el horario de atención comercial.
Las instrucciones que figuran en este manual cubren los procedimientos que serán realizados por cualquier usuario.
Otros servicios técnicos generalmente deben ser derivados a personal calificado del servicio. Se deberá tener cuidado,
ya que una reparación indebida podrá hacer que el funcionamiento no sea seguro.
Contáctenos
Si no se encuentra satisfecho con el servicio que recibió de GE Appliances, comuníquese con nosotros a través de nuestro sitio
:HEFRQWRGRVORVGHWDOOHVLQFOX\HQGRVXQ~PHURWHOHIyQLFRRHVFULEDD
(Q((88*HQHUDO0DQDJHU&XVWRPHU5HODWLRQV_*($SSOLDQFHV$SSOLDQFH3DUN_/RXLVYLOOH.<
GEAppliances.com/contact
