WHOLE SLOW
JUICER
USER MANUAL
AMR8202
NEED HELP ? CONTACT US!
CUSTOMER SUPPORT
Email: [email protected]
Web: https://sifene.com/

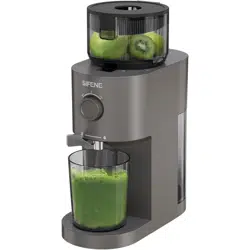
JUICE.
VITAMINS.
NUTRIENTS.
HEALTH.
QUESTIONS
OR
CONCERNS?
CONTACT US!
If you encounter any issues or have any questions about your new
product, please contact our helpful Customer Support Team.
Email: [email protected]
Web: https://sifene.com/

0201
Important Safeguards
What’ s Included
How To Assemble
Operating Instructions
How To Disassemble And Clean
Troubleshooting Q&A
Recipes
Specifications
Warranty
02
04
05
07
09
12
18
22
23
Table Of Contents
Important Safeguards
1. The input voltage for this product is 120V~60Hz. Please
confirm before using.
2. Do not touch the power cord with wet hands, as this could
cause electric shock.
3. Do not wash the main body under running water, as
this can easily cause short circuiting, fire, and electric shock.
4. Be sure to unplug the power before disassembling, install-
ing, or adjusting any parts of the product. If the juicing assem-
bly is difficult to detach from the main unit, turn the knob to
REV and allow the auger to spin in reverse for a few seconds
before unplugging and detaching the juicing assembly.
5. This product has a Y-type connection. If the power cord is
damaged, it must be replaced by the manufacturer, its service
agent, or similarly qualified personnel to avoid danger.
6. Before use, check the power cord, plug, strainer, auger,
juicing container, and other parts for damage. Stop using
immediately if damage is found, and contact customer service
for repair. Do not disassemble or repair it yourself to avoid
danger.
7. If the product needs repair during use, contact customer
service. Do not disassemble it yourself to avoid danger.
8. Before switching on the power, ensure the juicing container,
auger, strainer, juicing container lid, and other removable parts
are properly installed.
9. Do not insert hands or sharp objects into the feed chute
when the product is operating, as this could cause injury or
damage the product. Do not use any objects in place of the
pusher. Keep eyes away from the feed ladle to prevent

0403
1 . Main body
2 . Juice container
3 . Juice screen
4 . Auger
5 . Feed ladle
6 . Top cover
7 . Juice cup(small)
8 . Pulp cup(large)
9 . Pusher
10 . Cleaning brush
11.lce cream screen
What's Included
accidents.
10. Do not juice hard ingredients like sugarcane, coconut, ice cubes,
or frozen fruit. Remove all peels and pits.
11. Do not apply excessive force when pushing ingredients down, to
avoid damaging parts.
12. The strainer, juicing container, auger, and other parts may
become stained after juicing certain fruits and vegetables. This
is normal and does not affect consumption or health.
13. The product has an intelligent protection chip. After working
continuously for 30 minutes, it will beep 3 times then automatically
stop. The machine will then sleep for 60 minutes to allow the motor
to cool before use can continue. This helps extend the product's
lifespan.
14. The product has a current limiter design. When processing harder
ingredients, the motor can get jammed and draw increased current.
When the current exceeds 3A, the machine will beep once as a
prompt. The motor will then reverse for 2 seconds before forward
rotation resumes. This protects the motor from overcurrent and
extends its lifespan.
15. After use, turn the knob to 0. The motor will stop first then auto-
matically reverse for 1 second. Wait for the motor and auger to
completely stop rotating, and ensure the power is disconnected
before removing detachable parts.
16. Do not wash at temperatures of 60°C (140°F) or higher. Do not
wash in the dishwasher. This can cause wear or warping. All parts
contacting food are made of certified materials that are clean, sani-
tary, and reliable.
17. Do not use steel wool, abrasive cleaners, or corrosive liquids
(such as gasoline or acetone) to clean the product.
18. This product is intended only for personal or household use, not
for commercial use.
1 2 3 4 5
6
7 8 9 10 11
0605
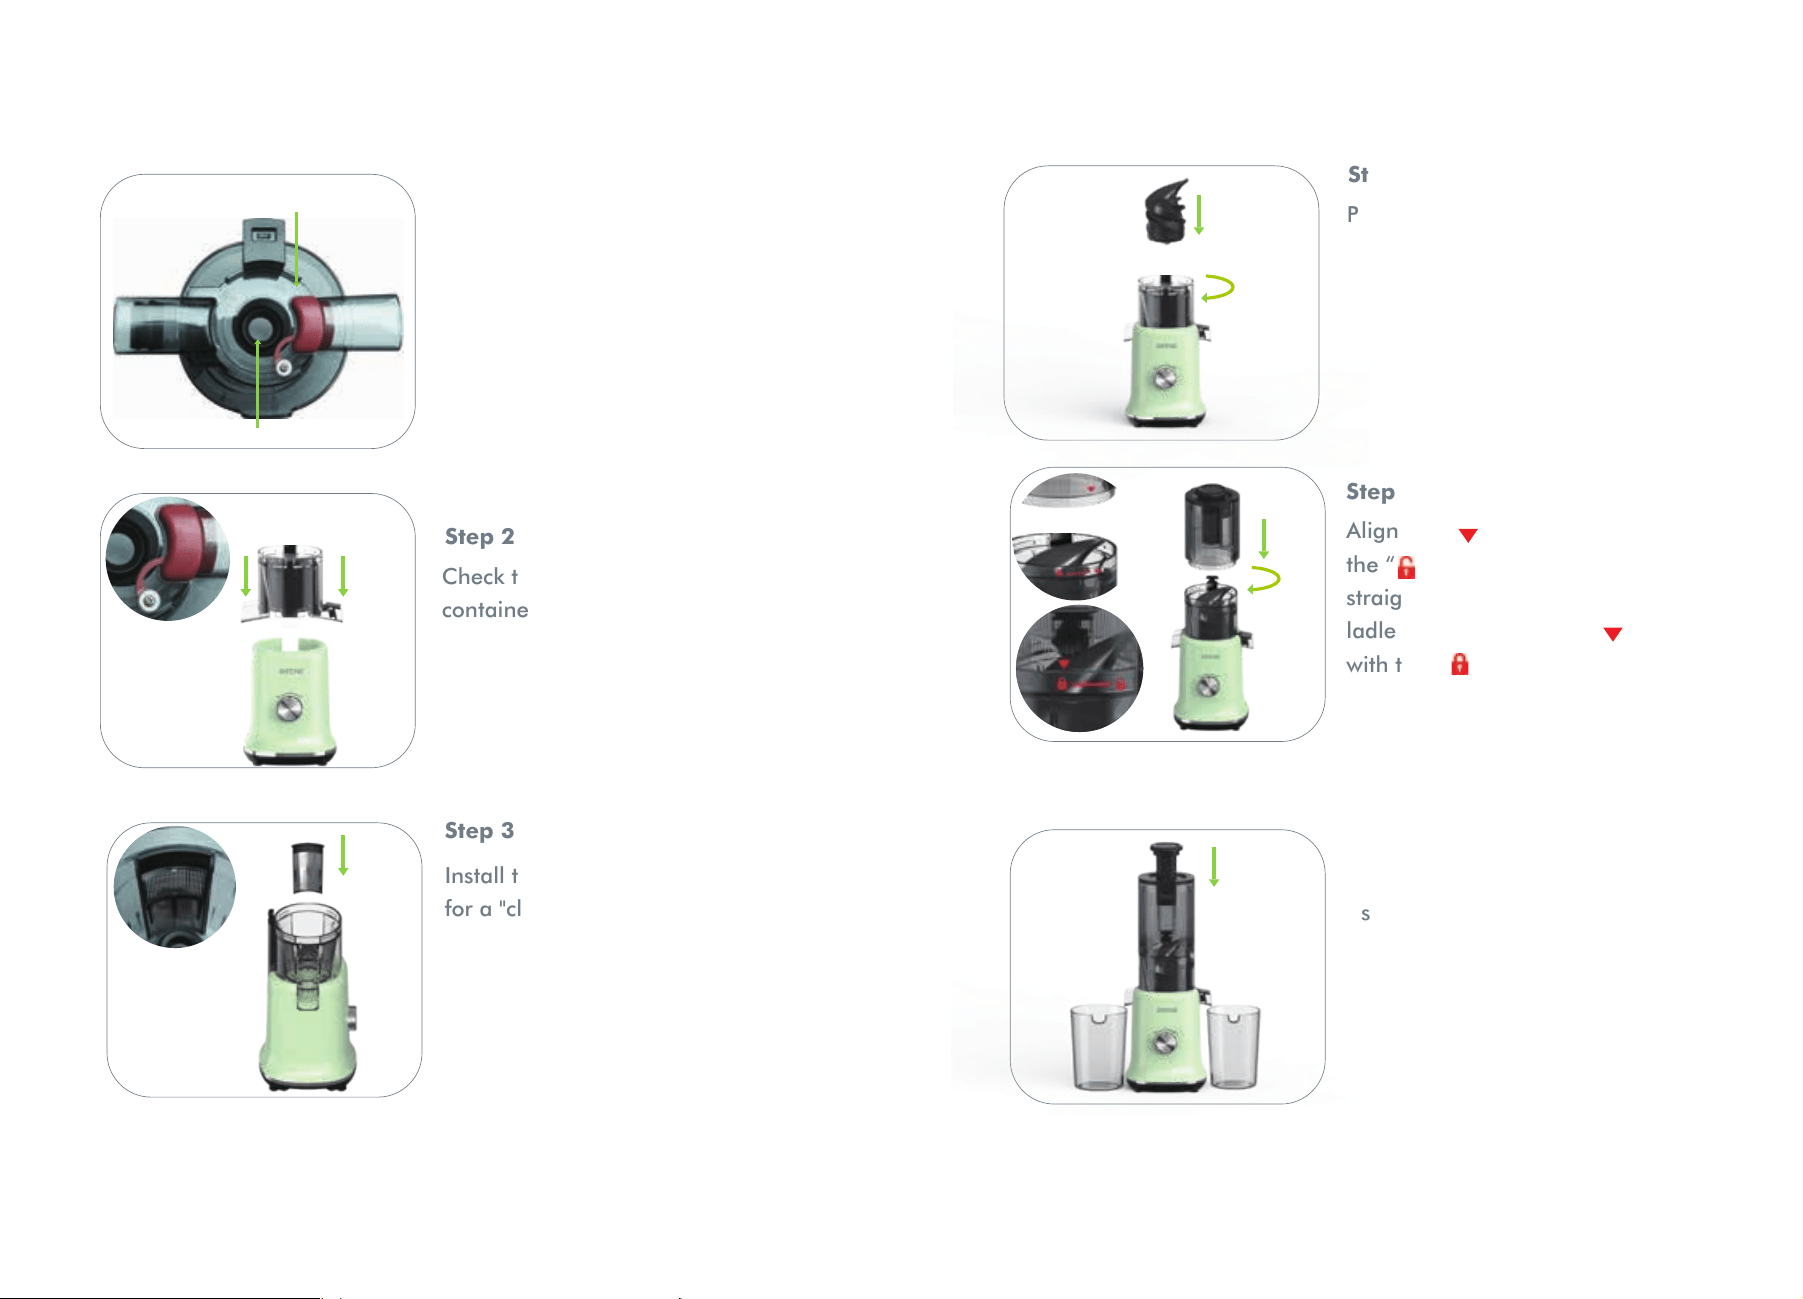
the pulp outlet silicone
sealing ring
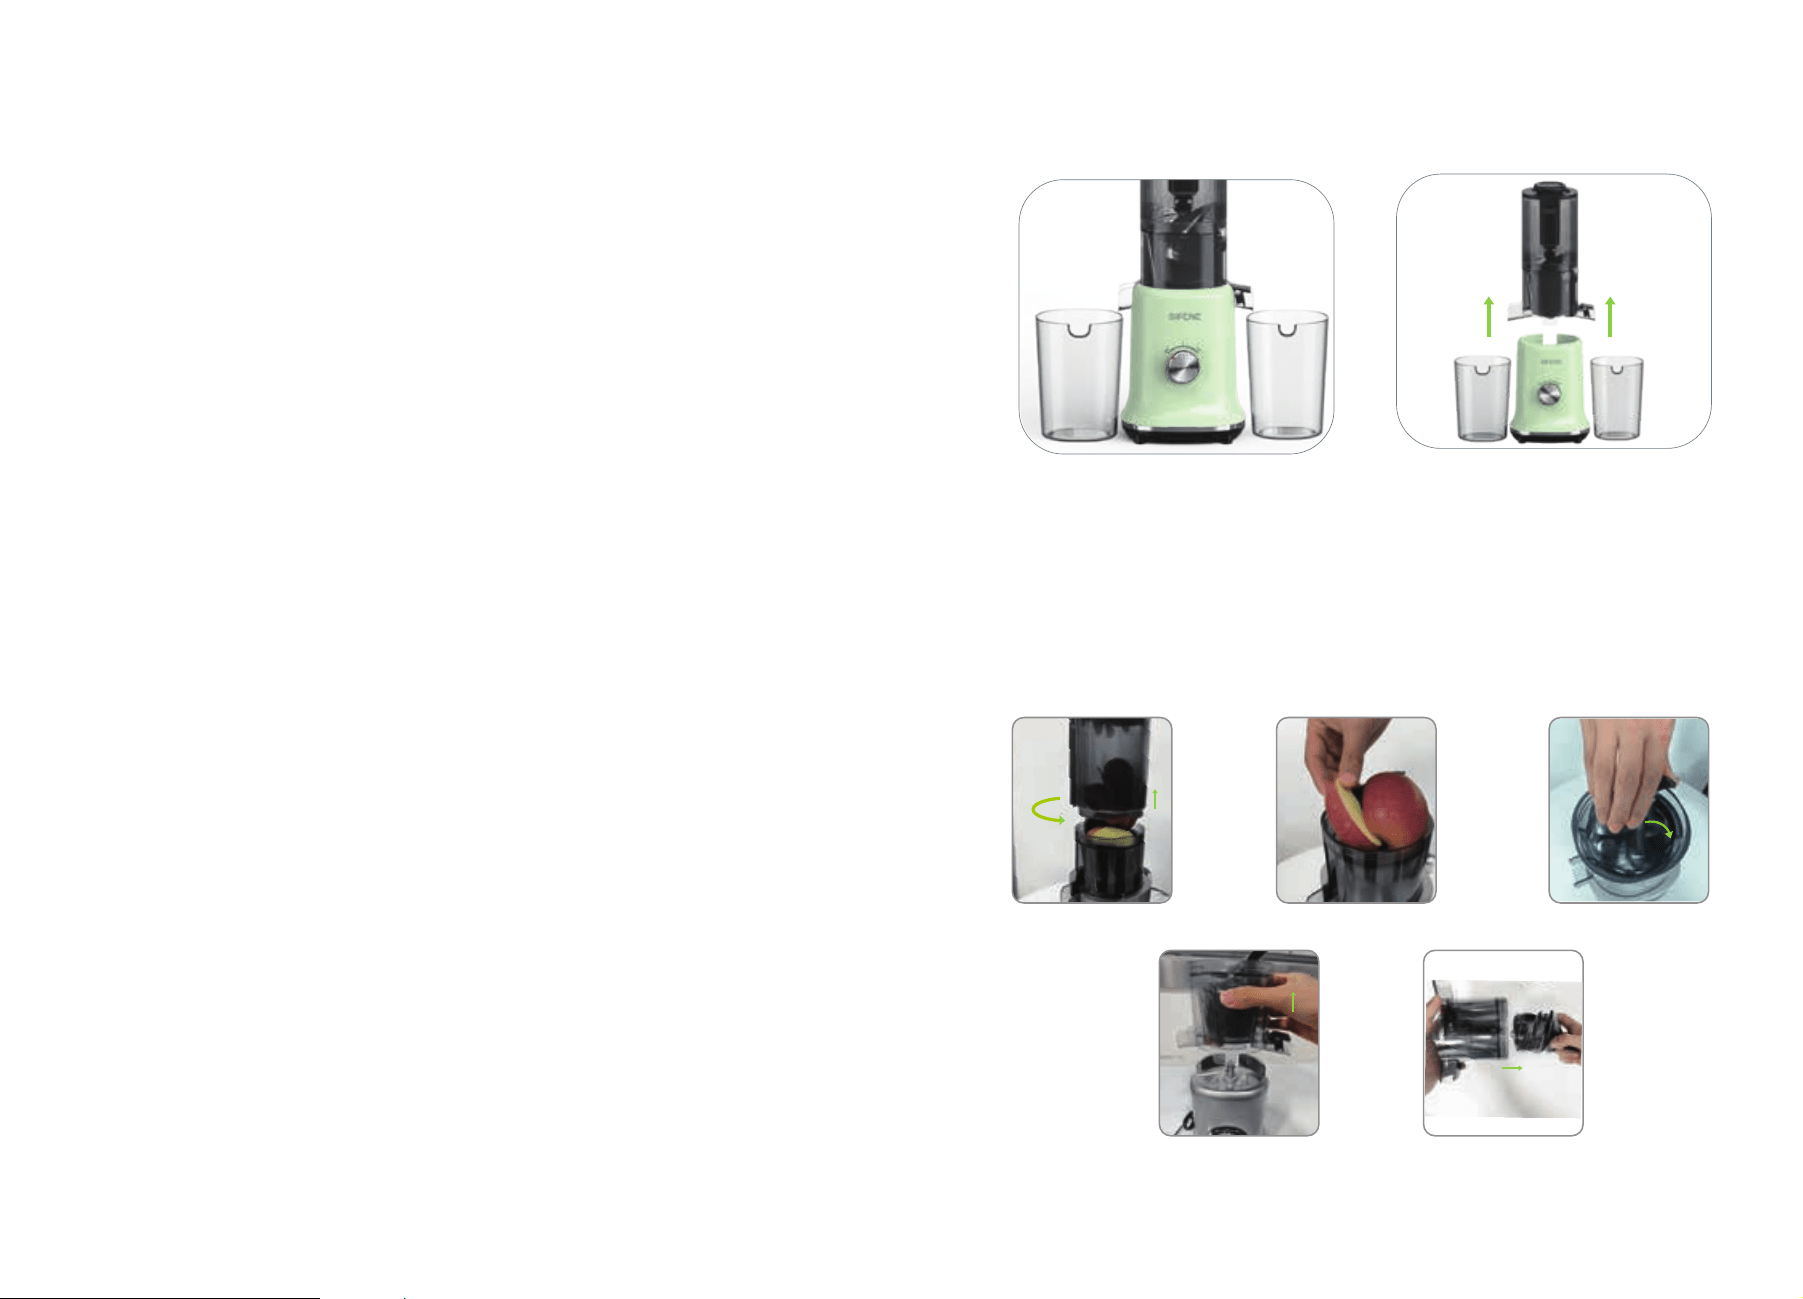
How To Assemble
Install the juicer screen, and listen
for a "click" sound
Place the large pulp cup (left) and
small juice cup (right) next to the
main body, partially inserting the
pusher.
Push down and rotate the auger
Align the “ " on the feed ladle with
the “ " on the juicing container. Push
straight down and then rotate the feed
ladle clockwise until the “ " aligns
with the “ " on the juicing container.
Step 2
Step 3
Step 4
Step 5
Step6
Check the gasket Install the juicer
container
Step 1
Check if the pulp outlet silicone on
the juicer body is installed in
place, and check if the sealing ring
in the middle of the juicer body is
installed in place.
0807
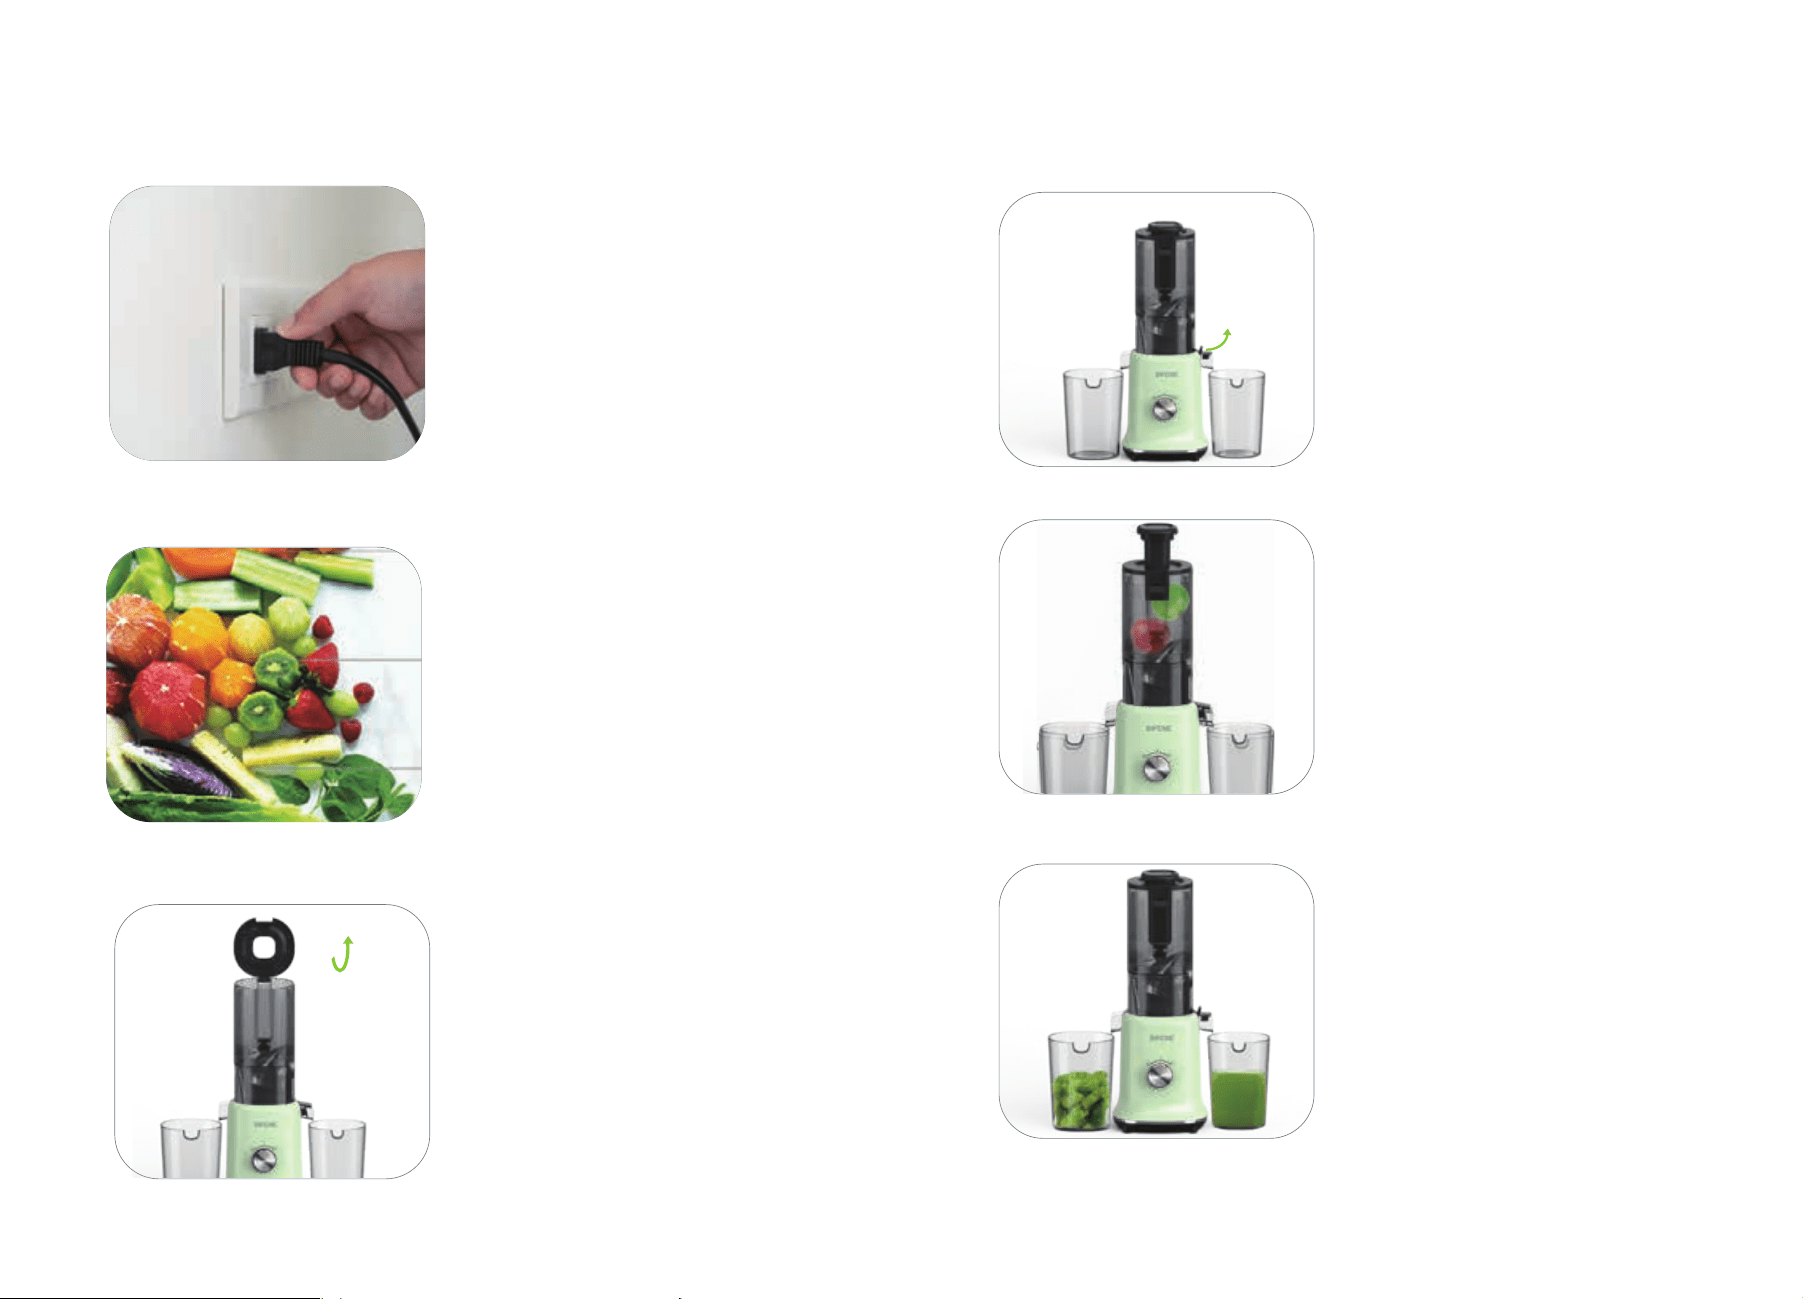
Plug in the power cord and open the
cover. Place the cut food into the
feed ladle of the juicing container
(you can also add food through the
center hole when the cover is
closed).
Step 3
Close the cover and open the juice
outlet. Turn the power switch to the
"ON" position and the product will
start working.
Step 4
If some ingredients do not go down,
use the pusher to push the food into
the chute. Or switch to "REV" for a
few seconds then continue forward
rotation.
Step 5
When juicing is complete and no
more juice flows from the outlet,
turn the switch to the "0" position
and wait for the auger to completely
stop rotating before removing the
juice and pulp cups.
Step 6
Operating Instructions
Plug in the power and prepare to
operate.
(Before plugging in, ensure the
switch is in the
OFF position.)
Step 1
. Wash the fruits and vegetables
. Do not juice hard ingredients like
sugarcane, coconut, ice cubes, or
frozen fruit. Remove all peels and
pits from ingredients.
. For hard vegetables and high-fiber
foods (carrots, celery, kale), it is
recommended to cut into 1.5 x 3
inch strips. Chop the leafy parts into
small pieces.
Step 2
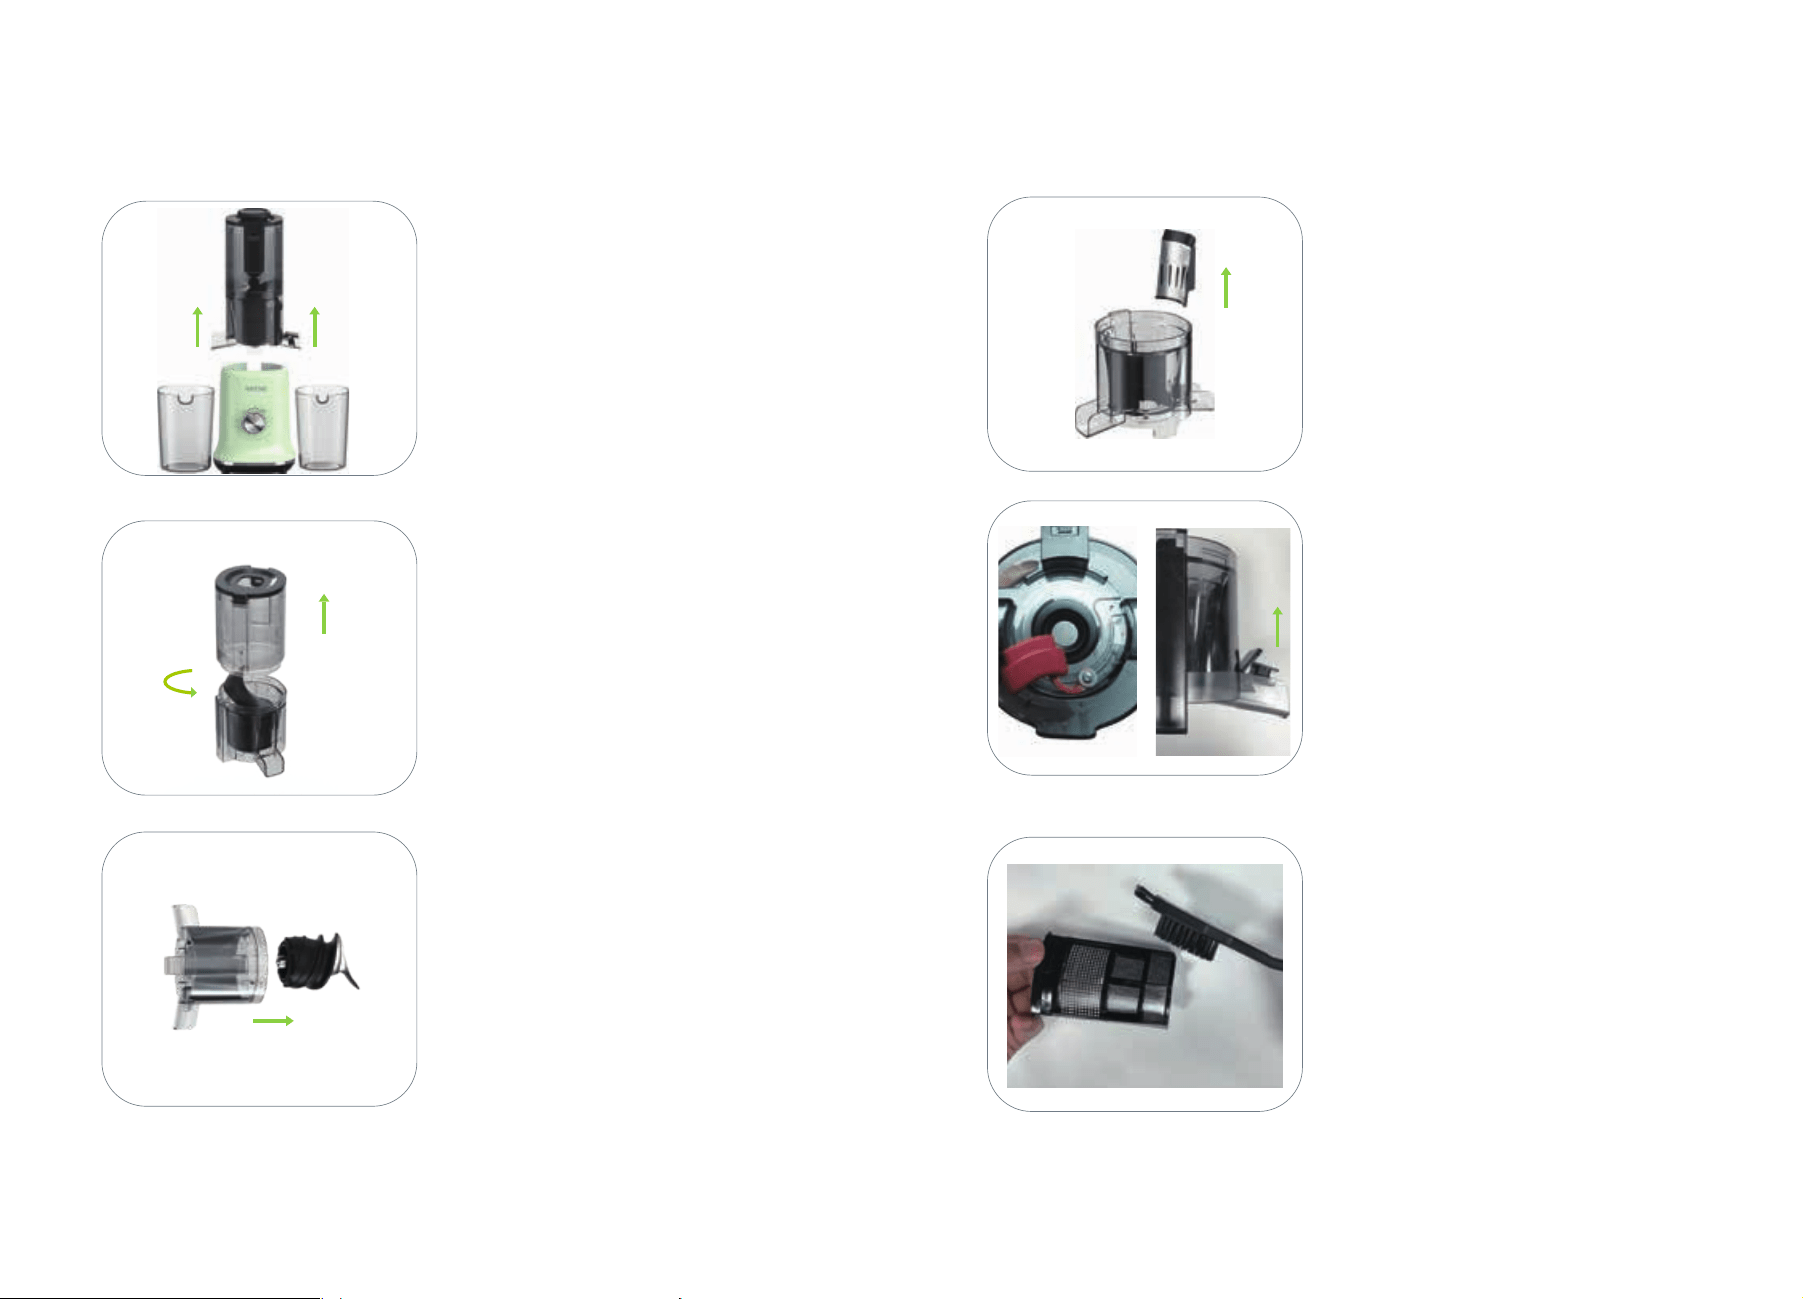
How To Disassemble And Clean
Turn off the switch and unplug the
power cord.Then remove the entire
assembly directly. Afterwards,
disassemble it step-by-step.
Step 1
Remove the feeding ladle in the
sink.
Step 2
Remove the auger in the sink.
Step 3
When cleaning the juice screen, use
a brush to carefully scrub every
corner.
Pull out the Juice screen.
Step 4
Open the pulp outlet silicone plug
and juice spout, and rinse directly
with running water.
Step 5
Step 6
1009

1211
Step 7
Step 8
After rinsing, place all parts in a dry
environment to air dry naturally.
Do not wash at temperatures of
60°C (140°F) or higher. Do not
wash in dishwasher.
Only wipe the base with a towel,
noting: if towel is too damp, wring
out excess water.
Troubleshooting Q&A
Why doesn't my machine start up after being plugged in?
1. Re-plug in the power cord properly.
2. Carefully check that each step of the installation guide has
been followed correctly.
3. The machine has a 30-minute auto shut-off protection
feature. Wait 60 minutes for the machine to reset before it can
turn on normally again.
Why does my machine stop during use?
1. Too much hard produce is jammed and stuck. Remove the
excess produce, clean, and reassemble.
2. After 30 minutes of continuous use, it will beep 3 times and
automatically shut off. Wait 60 minutes for the machine to
reset before it can be turned on normally again.
Why does my machine give off a burnt smell when in
use?
Although all motors are tested at the SIFENE factory, heavy use
will cause further curing of the motor windings in new
machines. This curing gives off a burning smell and is typical
for wound motors. This smell will quickly dissipate after a few
heavy uses.
In addition, the SIFENE motor is designed with Automatic
Overload Protection to protect itself from overheating. If the
motor should overheat, it may emit a burning smell.
If this occurs, turn the power off for up to 60 minutes, allowing
the machine to cool down.
1413
Why does my machine make strange noises while oper-
ating?
1. Carefully check that each step of the installation guide has
been followed correctly.
2. Long periods of idling can cause sounds as the auger and
juicing section rub together under very dry conditions. This is
normal. It is recommended to prepare ingredients beforehand
so they can be added quickly after turning on, and turn off
soon after juicing is complete.
3. Harder fruits and vegetables will cause more noise which is
normal. If too loud, try reducing the amount added each time.
Why can't I unscrew the feeding ladle from the juice
container?
1. There is oil residue on the surface, wipe clean with a dry
cloth.
2. There is unfinished produce in the chute, continue juicing to
clear it out, or reverse the direction for a few seconds on the
REV setting to empty out produce before removing the juicing
section.
Why can't I remove the juicing section assembly from the
base?
In case of a power outage, wait for power to be restored, turn
the knob to REV setting and let the auger spin in reverse for a
few seconds before removing the whole assembly together.
1.
If the auger won't detach from the motor shaft, first open the
feeding ladle to clear out large pulp pieces. Press down on top
of the auger while turning clockwise to ensure it disengages
completely from the motor shaft, then remove both the juicing
container and auger together.
2.
1615
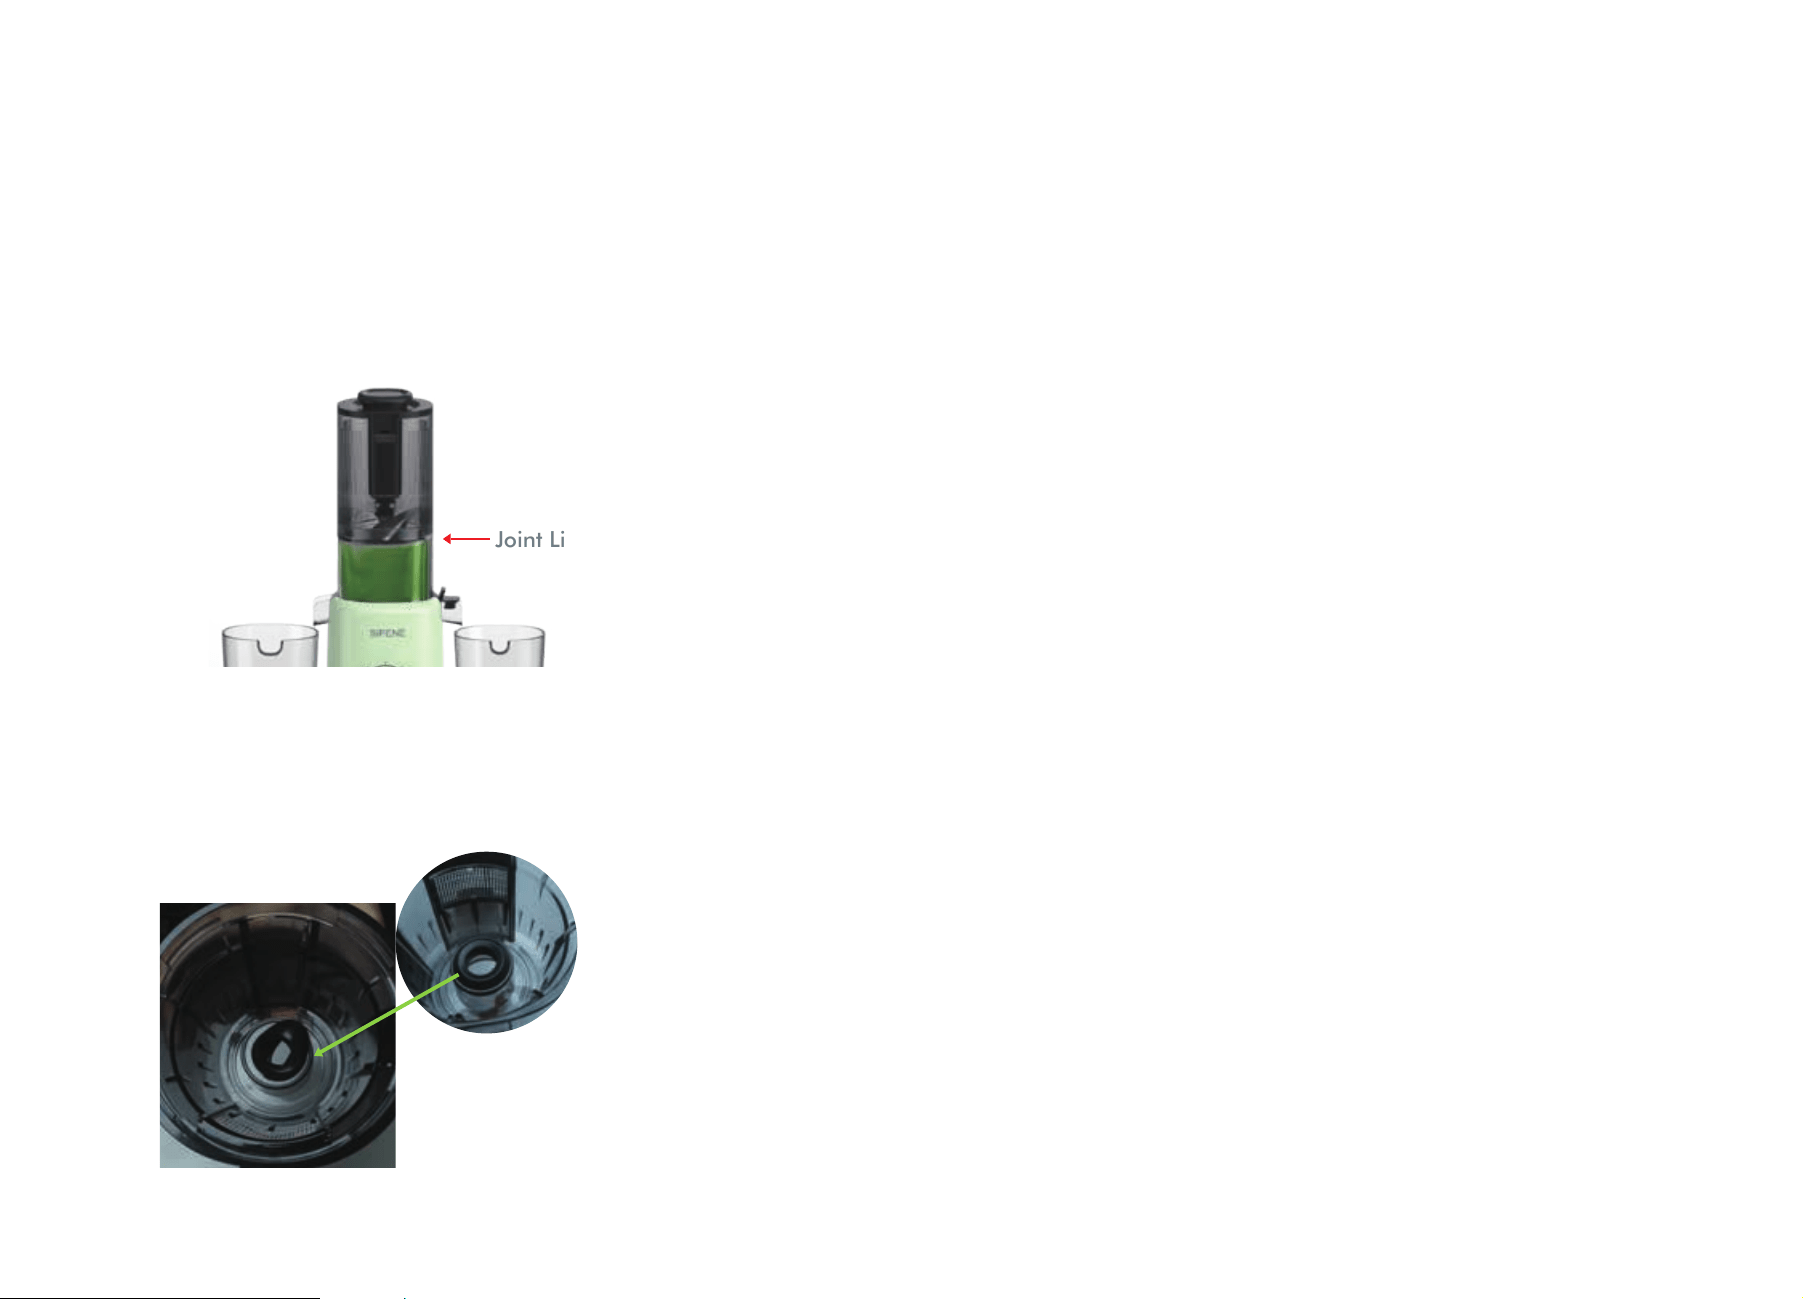
Why is juice leaking from where the juicing container
and feeding ladle join?
1. Make sure the juice spout is fully open.
2. Slow down the feeding rate when juicing high juice yield
produce, do not let juice rise above the joining line.
Why is there juice leaking near the motor shaft of my
machine?
Disassemble the juicing container and reinstall the silicone
sealing ring.
Why does the feed ladle shake during juicing?
The auger vibrating while pressing produce is normal. Lower
the feeding rate to reduce shaking.
Why is my juice separating into layers?
Depending on produce density, extracted juice can separate
into different layers.This is normal.
Why are there bubbles in my juice?
Vegetables contain inorganic salts that form bubbles when
combined with air. Bubbles are normal and juice is safe to
drink.
Why does my machine clog when juicing fibrous vegeta-
bles?
Cut fibrous veggies into 1.5-3 inch strips. Juice 18 oz at a time
and rinse the filter and juicing container to prevent clogs.
Why do the plastic parts discolor after use?
All parts are made from eco-friendly materials. Most fruits and
veggies contain natural pigments like carotenoids and oxalic
acid that can cause discoloration. This is normal and safe.
How to make fruit ice cream?
Remove all peels and pits, freeze the fruit for 6-12 hours, and
then defrost it for 10 minutes.
Using a closed metal filter, the ice cream will be squeezed out
from the slag outlet.
Joint Line

1817
Which fruits and vegetables should not be juiced?
1. Fruits with pits need pits removed before juicing, such as
peaches, apricots, plums.
2. Fruits with peels need to be peeled before juicing, like
pineapples, melons, oranges.
3. Frozen fruits need to be thawed before juicing, like frozen
strawberries, blueberries, raspberries.
4. Do not extract ingredients containing plant oils or animal
fats, such as sesame, butter, margarine, etc.
5. Do not juice very hard fruits, like coconuts, sugarcane, whole
grains, etc.
6. Do not juice fruits with low water content, like bananas,
mangoes, dragonfruit.
How can I more smoothly juice a blend of fruits and
vegetables?
Do it in steps - place cut leafy greens at the bottom of the
feeding chute, softer fruits and veggies in the middle, and
harder produce at the top.
Recipes
Grapefruit-Lime-Ginger
Makes 1 serving
Ingredients
1 large grapefruit, peeled and cut into quarters
¼ lime, peeled and halved
1 ½-inch piece ginger
Method
1. Open the juice and pulp spouts.
2. Turn the juicer to the ON position and process all ingredients.
3. When juicing is complete and no more juice flows from the outlet,
turn the switch to the "0" position
4. Stir and drink immediately, preferably over ice.
Orange PLUS Juice
Makes 2 servings
Ingredients
1 medium orange, peeled and cut into quarters
3 carrots
1 large grapefruit, peeled and cut into quarters
1 ½-inch piece ginger
1 quarter-inch piece turmeric root
¼ lemon, peeled and halved
Method
1. Open the juice and pulp spouts.
2. Turn the juicer to the ON position and process all ingredients.
3. When juicing is complete and no more juice flows from the outlet,
turn the switch to the "0" position
4. Stir and drink immediately.

2019
PineApple Refresh
Makes 2 servings
Ingredients
1 medium green apple, cut to fit the feed tube 3 – 4 tablespoons mint
(be sure mint is bunched together between two harder items, like the
apple and pineapple)
¼ pineapple, peeled and cut to fit the feed tube, if necessary
¼ lemon, peeled and halved
Method
1. Open the juice and pulp spouts.
2. Turn the juicer to the ON position and process all ingredients.
3. When juicing is complete and no more juice flows from the outlet,
turn the switch to the "0" position
4. Stir and drink immediately.
Bright Apple Juice
Makes 2 servings
Ingredients
2 medium green apples, cut to fit the feed tube
¼ lemon, peeled and halved
1 ½-inch piece ginger
Cayenne (optional), a pinch or more based on personal preference
Method
1. Open the juice and pulp spouts.
2. Turn the juicer to the ON position and process all ingredients
except the cayenne.
3. When juicing is complete and no more juice flows from the outlet,
turn the switch to the "0" position
4. Add the cayenne, if using, and then stir and drink immediately.
Green Medley
Makes 2 servings
Ingredients
4 stems kale, tough bottom
stems removed
1 cup packed spinach (baby or not)
4 celery stalks, each cut into thirds
½ medium cucumber, halved lengthwise
¼ lemon, peeled
¼ cup fresh parsley leaves and stems,
optional
Pinch sea salt, optional
Method
1. Open the juice and pulp spouts.
2. Turn the juicer to the ON position and process all ingredients,
except for the salt.
3. When juicing is complete and no more juice flows from the outlet,
turn the switch to the "0" position
4. Add the salt, if using, stir and drink immediately.
Veggie Pick-Me-Up
Makes 1 serving
Ingredients
2 medium to large carrots
¼ cup packed parsley
1 cup packed spinach
½ large beet, cut to fit the feed tube
½ orange, peeled and halved
¼ lemon, peeled
Method
1. Open the juice and pulp spouts.

• Model Name
• Rated Voltage
• Rated Power Consumption
• Rated Frequency
• RPM
• Rated Operating Time
• Intervals
Specifications
Product Name
• AMR8202
• 120V-
• 150W
• 60Hz
• 40-60rpm
• Less than 30 minutes
• More than 60 minutes
(To protect the motor)
SiFENE Whole Slow Juicer
2221
2. Turn the juicer to the ON position and process all ingredients, in
the order listed.
3. When juicing is complete and no more juice flows from the outlet,
turn the switch to the "0" position
4. Stir and drink immediately.
Sweet Zinger
Makes 2 servings
Ingredients
2 medium to large carrots
1 beet, cut to fit feed tube
1 apple, cut to fit feed tube
1 ½- to 1-inch piece ginger, based on personal preference
Method
1. Open the juice and pulp spouts.
2. Turn the juicer to the ON position and process all ingredients.
3. When juicing is complete and no more juice flows from the outlet,
turn the switch to the "0" position
4. Stir and drink immediately.
Nutritional information per
Apple-Berry Juice
Makes 2 servings
Ingredients
1 apple, cut to fit the feed tube
1½ cups strawberries
Method
1. Open the juice and pulp spouts.
2. Turn the juicer to the ON position and process all ingredients.
3. When juicing is complete and no more juice flows from the outlet,
turn the switch to the "0" position
4. Stir and drink immediately.

23
If you’re happy with this juicer, the line doesn’t stop here. Check out
https://sifene.com/ for a line of all our beautiful and thoughtfully
designed appliances. They might be right at home in your kitchen, too!
Improper use or installation
Cosmetic damage
Damage due to acts of nature. For example: lightning strikes, tornadoes
and similar
Accidents
Misuse
Negligence
Commercial use
Modifications to any part of the product, including the antenna
Connection to an incorrect voltage supply
Attempted repair by anyone other than an authorized facility
This warranty does not cover:
Warranty
2
YEARS
2 Years Motor
2 Years Spare Parts
What does this warranty cover?
What does the warranty not cover?
Warranty and Service
Default 24-Month Warranty
Thanks for choosing SiFENE Juicer. This product is covered with SiFENE
product and labor warranty for 24 months from the date of its original
purchase.