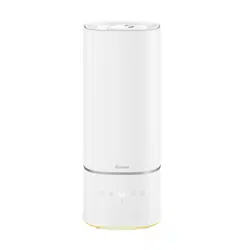
Govee Smart Humidifier
User Manual
Model
:
H7142


Safety Instructions
Specifications
Operate the Humidifier
Getting to Know Your Smart Humidifier
01
03
03
03
05
Getting Started
07
Using Your Smart Humidifier
10
Pairing Your Smart Humidifier with Govee Home App
Using the Aroma Box
Care & Maintenance
Descaling the Humidifier
11
12
13
14
Cleaning the Aroma Pad
16
Troubleshooting
17
Package Includes
Table of Contents

READ AND SAVE THESE INSTRUCTIONS
General Safety
Only use the humidier as described in this manual.
When not in use for an extended period, turn the humidier o and disconnect the plug from the outlet.
Do not use the humidier in wet environments.
Keep the humidier out of reach from children.
Do not attempt to disassemble the humidier or its components.
Always unplug the humidier from power before cleaning it or detaching the water tank from the
humidier base.
Always place the humidier on a at, horizontal surface before using.
Only ll the water tank with clean water. Never ll the water tank with any other liquids.
Do not place the humidier near heat sources such as stovetops, ovens, or radiators.
Do not place the humidier directly on carpets or rugs.
Do not use non-Govee humidier parts as replacement parts for this product.
Do not cover the nozzle while the humidier is on, as this may damage the humidier.
Remove the water tank from the base before moving the humidier.
Do not immerse the humidier base, power cord, or power plug in water.
If the humidier is damaged or is not functioning properly, stop using it and contact
Customer Support immediately.
Not for commercial use. Household use only.
To reduce the risk of re, electric shock, or other injury, always follow all instructions and safety
guidelines.
Ensure that the plug ts properly into a polarized outlet.
Do not handle the power cord or plug with wet hands. Keep the power cord and plug away from liquids.
Your humidier has a polarized plug (one prong is wider than the other), which ts into a polarized outlet
in only one orientation. This is a safety feature to reduce the risk of electric shock. If the plug does not t,
reverse the plug to the correct orientation. If it still does not t, do not bypass this safety feature and try
forcing the plug into the outlet; instead, do not use it with the outlet.
Power Cord & Plug
Do not add essential oils, supplemental water treatment liquids, or water lters into the water tank or
base chamber, as this may damage the humidier and cause leaks.
Only add essential oils to the aroma pad.
Risk of Leaks and Electric Shock
Safety Instructions
01

LIRE ET CONSERVER CES INSTRUCTIONS
La sécurité générale
Utilisez l'humidicateur seulement comme décrit dans ce manuel.
Lorsqu'il n'est pas utilisé pendant une période prolongée, éteignez l'humidicateur et débranchez la
che de la prise.
N'utilisez pas l'humidicateur dans des environnements humides.
Gardez l'humidicateur hors de la portée des enfants.
N'essayez pas de démonter l'humidicateur ou ses composants.
Débranchez toujours l'humidicateur du secteur avant de le nettoyer ou de détacher le réservoir d'eau
de la base de l'humidicateur.
Placez toujours l'humidicateur sur une surface plat et horizontale avant de l'utiliser.
Ne remplissez le réservoir d'eau qu'avec de l'eau propre. Ne remplissez jamais le réservoir d'eau avec
d'autres liquides.
Ne placez pas l'humidicateur à proximité de sources de chaleur telles que des fourneaux de cuisine, des
fours ou des radiateurs.
Ne placez pas l'humidicateur directement sur des tapis ou des moquettes.
N'utilisez pas de pièces d'humidicateur autres que Govee comme pièces de rechange pour ce produit.
Ne couvrez pas la buse lorsque l'humidicateur est allumé, car cela pourrait endommager l'humidica-
teur.
Retirez le réservoir d'eau de la base avant de déplacer l'humidicateur.
N'immergez pas la base de l'humidicateur, le cordon d'alimentation ou la che dans l'eau.
Si l'humidicateur est endommagé ou ne fonctionne pas correctement, arrêtez de l'utiliser et contactez
immédiatement le service client
Pas pour un usage commercial. Usage domestique uniquement.
Pour réduire le risque d'incendie, de choc électrique ou d'autres blessures, suivez toujours toutes les
instructions et consignes de sécurité.
Assurez-vous que la che s'insère correctement dans une prise polarisée.
Ne manipulez pas le cordon d'alimentation ou la che avec les mains mouillées. Gardez le cordon
d'alimentation et la che à l'écart des liquides.
Votre humidicateur a une che polarisée (une broche est plus large que l'autre), qui s'insère dans une
prise polarisée dans un seul sens. Il s'agit d'une fonction de sécurité pour réduire le risque de choc
électrique. Si la che ne rentre pas, inversez la che dans le bon sens. S'il ne rentre toujours pas, ne
contournez pas cette fonction de sécurité et essayez de forcer la che dans la prise. Au lieu de cela, ne
l'utilisez pas avec la prise.
Le cordon d'alimentation & la fiche
N'ajoutez pas d'huiles essentielles, de liquides de traitement d'eau supplémentaires ou de ltres à eau
dans le réservoir d'eau ou la chambre de base. Cela pourrait endommager l'humidicateur et provoquer
des fuites.
N'ajoutez que des huiles essentielles au coussin aromatique.
Le risque de fuites et de choc électrique
La consignes de sécurité
02

Package Includes
Item
Smart Humidier
Cleaning Brush
Aroma Pads (1 Pre-Installed)
Quick Start Guide
User Manual
Quantity
1
1
3
1
1
Specifications
Power Supply
Rated Power
Water Tank Capacity
Max Run Time (low mist setting)
Noise Level
Eective Range
Dimensions
Weight
AC 120V, 60Hz
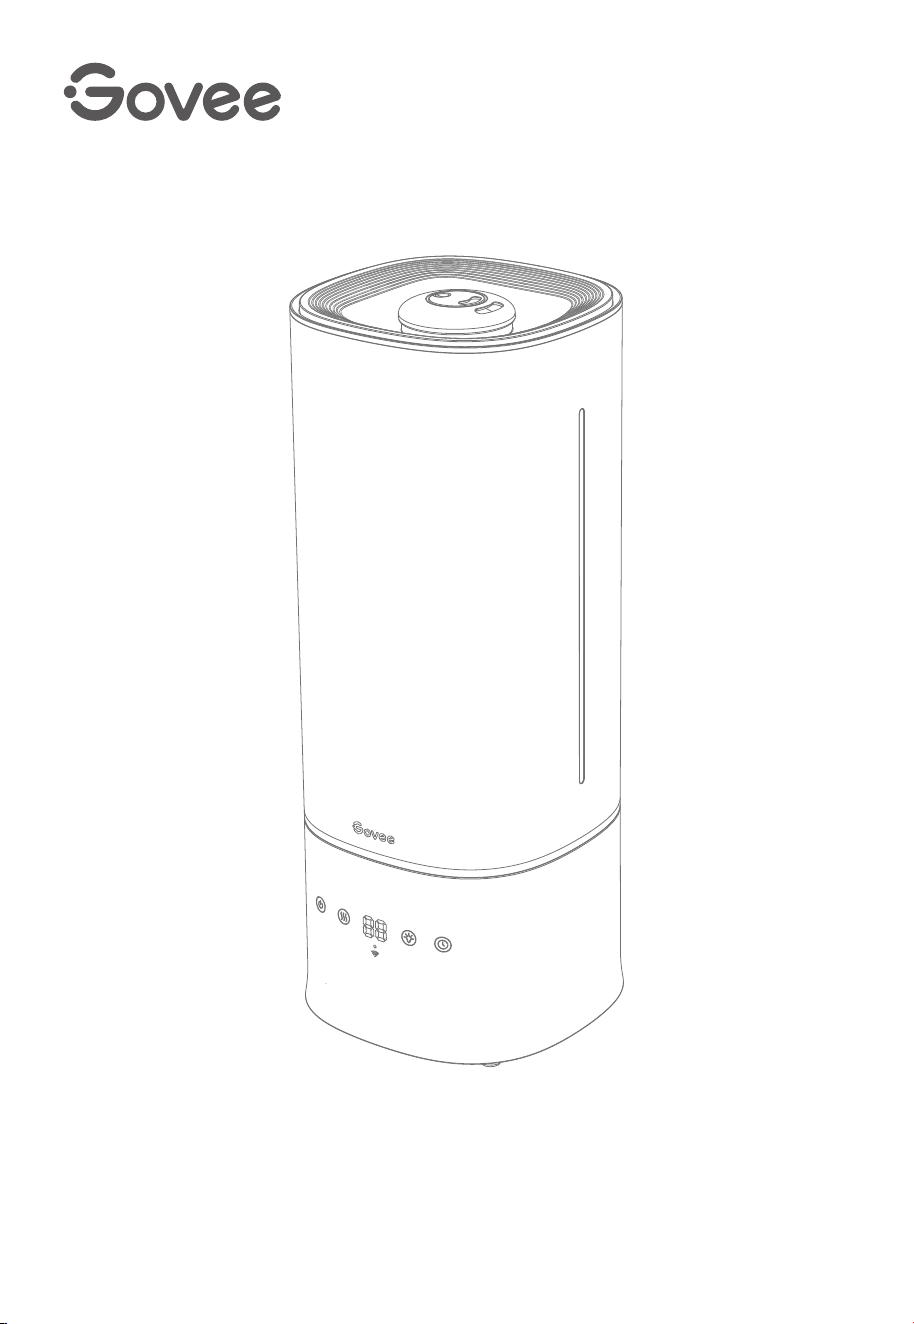
Getting to Know Your Smart Humidifier
26W
1.5gal/6L
≤30dB
≤602ft²/56㎡
7.28X7.28X18.27 inch/ 18.5X18.5X46.4cm
5.07lb/2.3kg
60 Hours
Note: The humidier may run for a longer or
shorter time depending on the environmental
temperature and humidity.
03
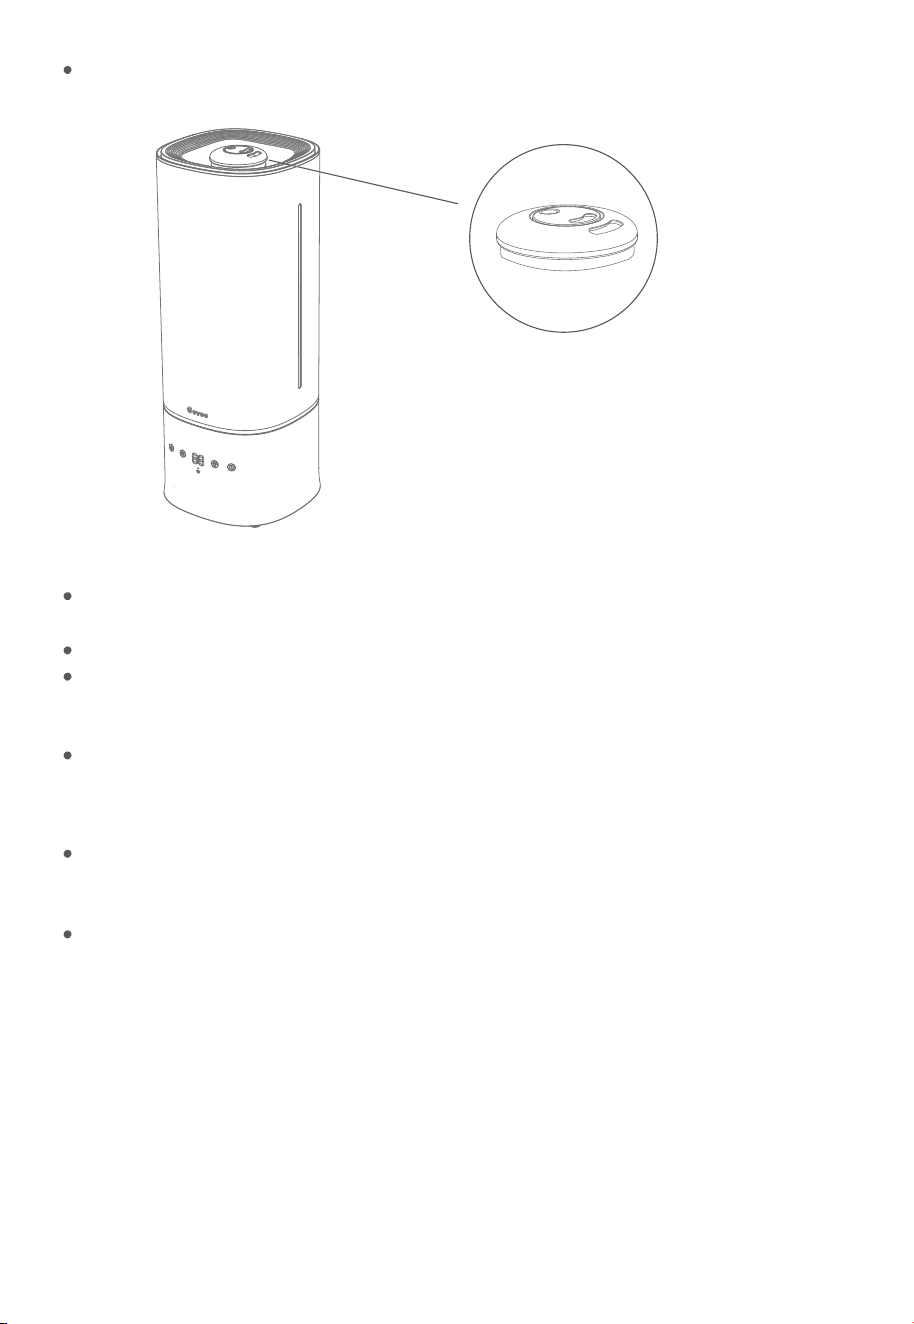
a. Mist Nozzle
b. Water Tank Cover
c. Handle
d. Mist Tube
e. Max Water Line
f. Water Tank
g. Water Outlet Valve
h. Cleaning Brush
i. UVC Light
j. Float
k. Bae
l. Air Outlet
m. Transducer
n. Aroma Box
o. Aroma Pad
p. Power Cord
q. Air Inlet
r. Non-slip Pad
s. Night Light
04
p
f
g
i
l
h
m
q
s
r
j
k
a
b
C
d
e
o
n

Besides the on-device buttons, Govee Home App can also be used to control the below
functions (as well as other app functions).
Operate the Humidifier
05
1.Controls
Power Button
Mist Level Button
Press to power on the humidier.
Note: When the humidier is powered o, its fan will continue spinning for 15 seconds to clear
away internal mist to avoid water vapor accumulation that may aect the life of the humidier.
Press repeatedly to cycle through mist settings: Auto Mode, Mist Level 1, Mist Level 2, Mist Level 3.
Note: The default target ambient humidity of Auto Mode is 60% when the humidier is not
connected to Govee Home App.
You can set the target humidity for Auto Mode via Govee Home App.
The Custom Mode can only be set and activated via Govee Home App and not directly on
the humidier.
Night Light Button
Press to turn on the night light.
Note: The brightness and color of the night light can be adjusted via Govee Home App.
Timer Button
Press repeatedly to select a timer for the humidier.

06
2. Display & LED Indicators
3. Memory Function
The humidier will remember its previous mist level, night light color/brightness, and Wi-Fi
connection settings when powered o. These settings will become active again when the
humidier is turned back on.
On-Device Display
Wi-Fi Indicator / Color / Status
Button Indicator Status
Button Display
AU
01
02
03
01-24
Humidity Level
Slowly Flashes Blue
Quickly Flashes Blue
Solid Blue
Ready to Connect
Wi-Fi Connecting
Wi-Fi Connected
Auto Mode
Mist Level 1
Mist Level 2
Mist Level 3
Length of Timer Setting
Current Humidity
Status
Mist Level Button
Wi-Fi Indicator
Button Indicator Color Status
Solid White Power On
Dim Power O
Solid Red Water Shortage
Flashes Red
Water Tank is not
Positioned Correctly
Power Button Indicator
Timer Button
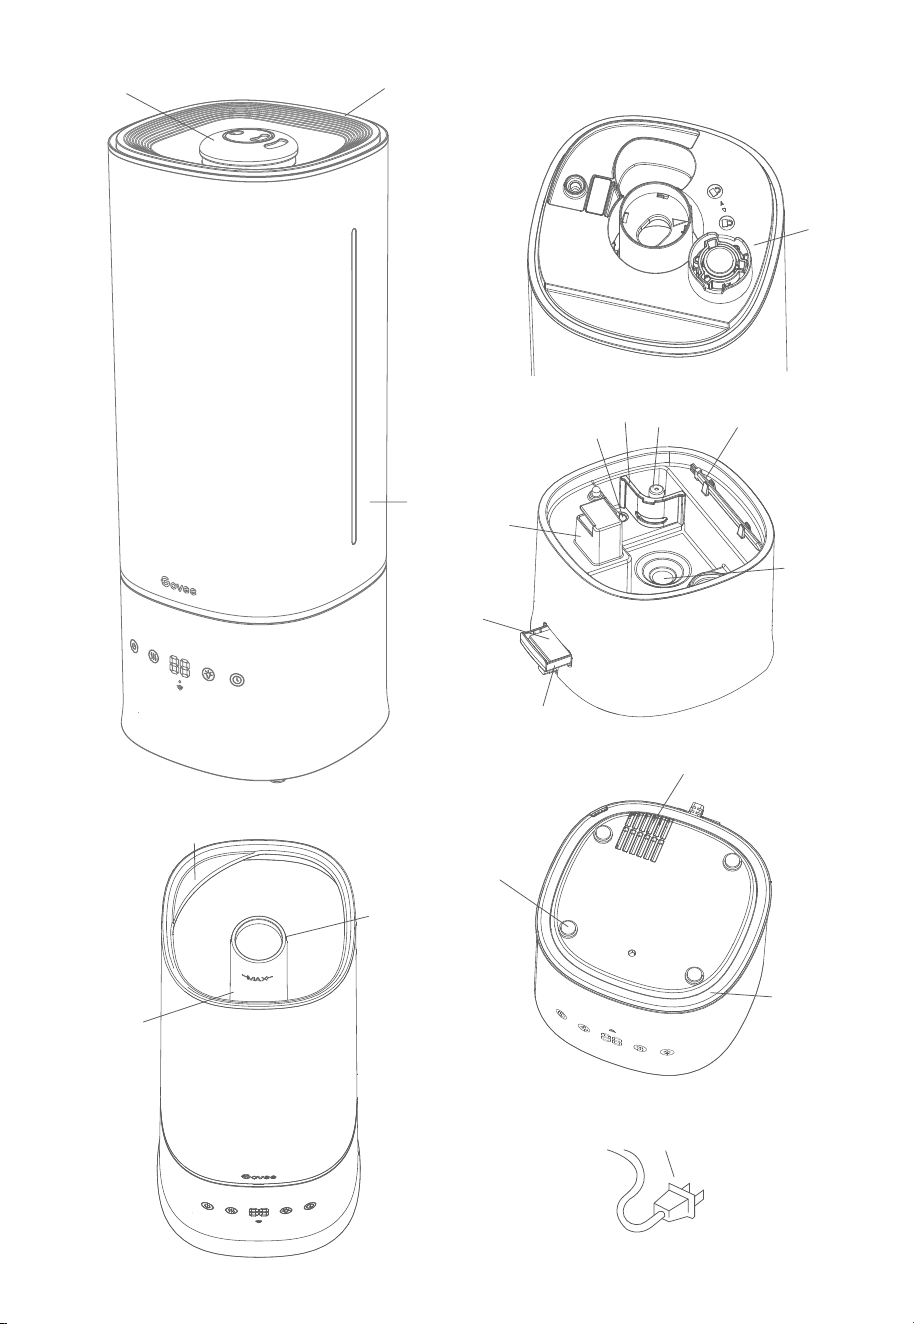
1. Remove all packaging and protective foams.
2. Place the humidier on a hard, at, water-resistant surface. The humidier should be least
12 inches/30 cm away from any walls.
3. Mist should be directed away from walls, furniture, bedding, and appliances.
Getting Started
12in/30cm
12in/30cm
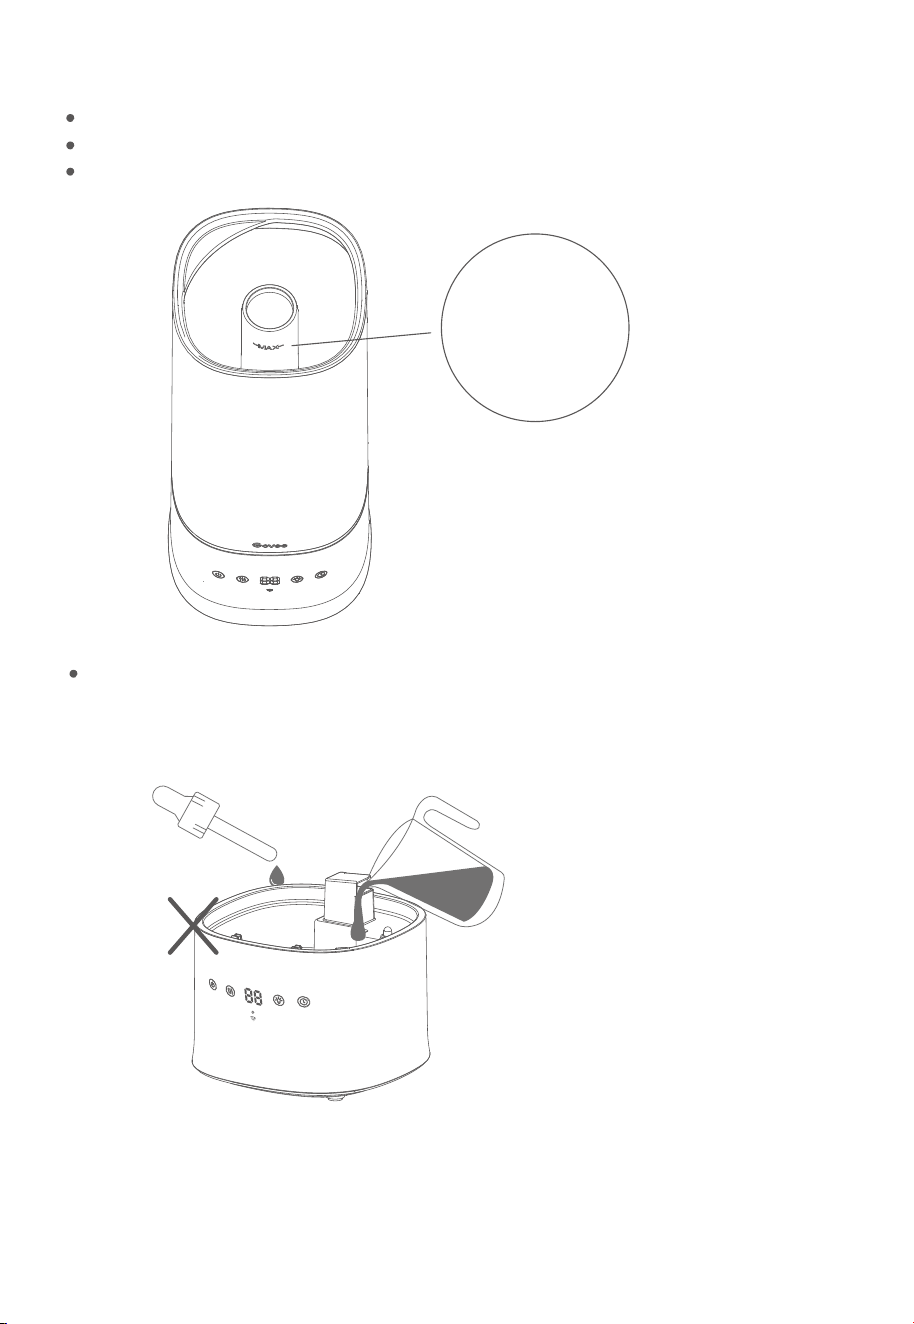
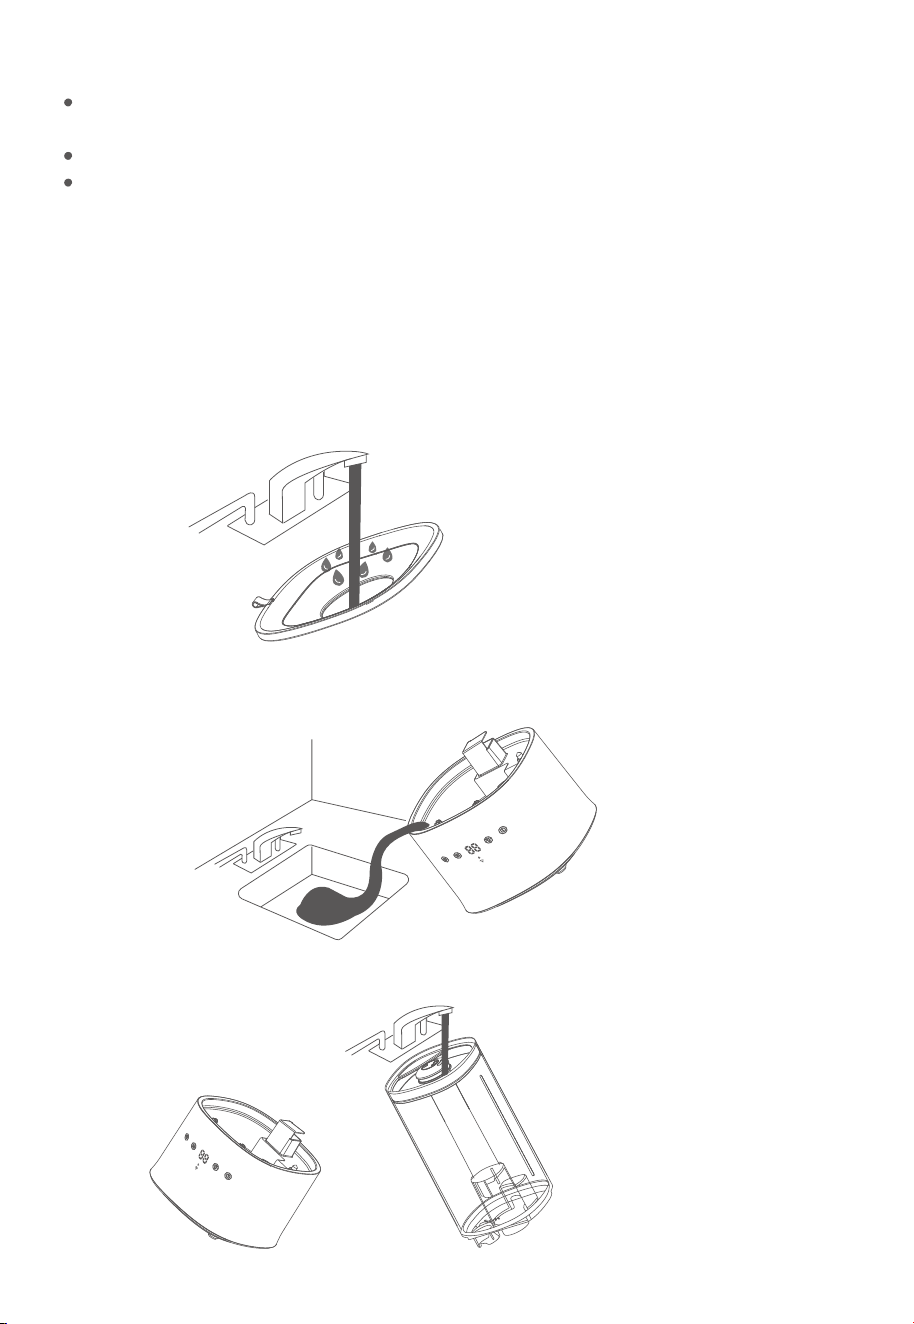
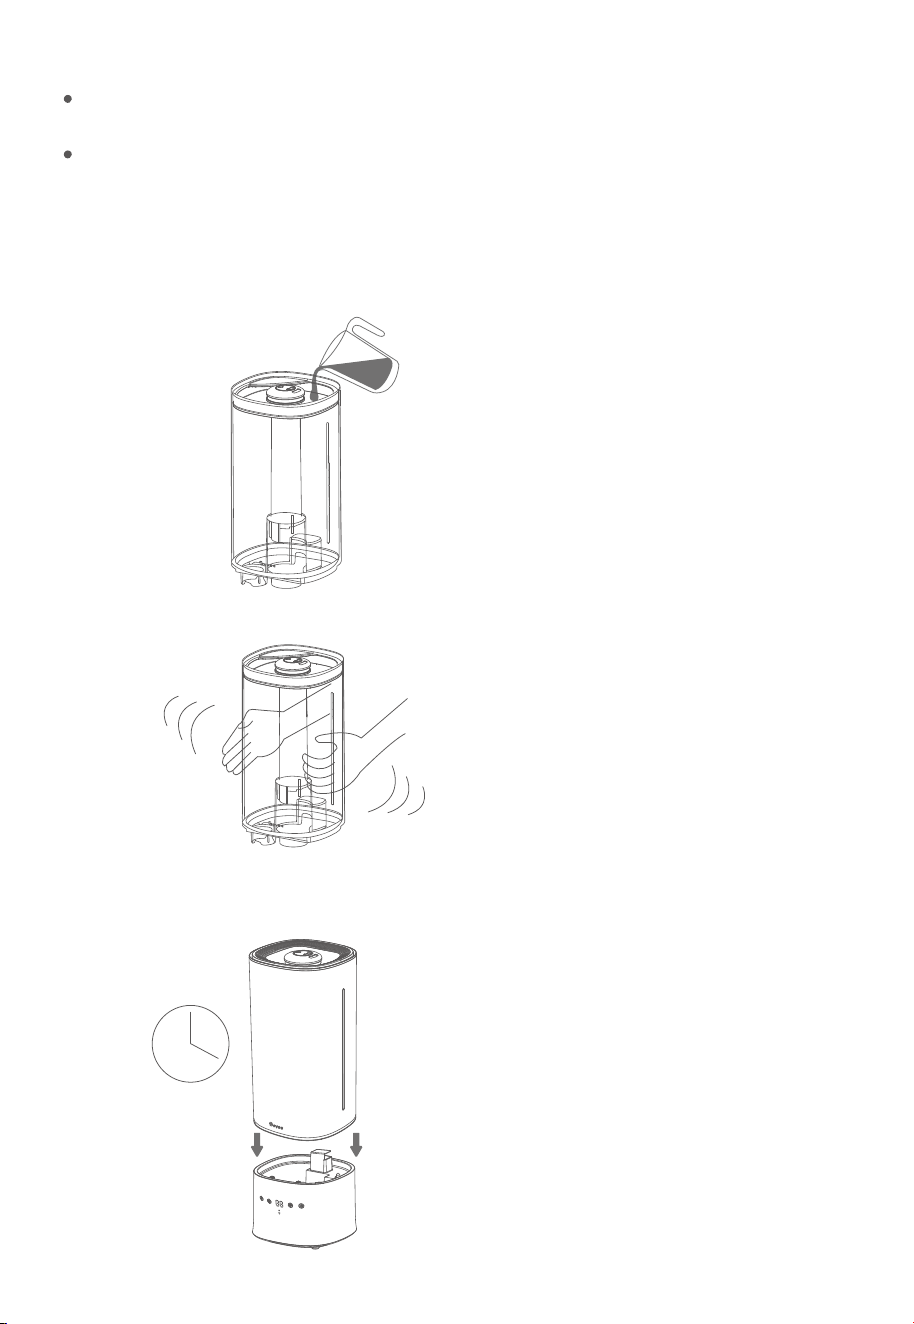
1. Remove the water tank cover using the small tab and add water directly into the tank.
The tank can also be lifted o the based using the interior tank handle.
Filling with Water
07
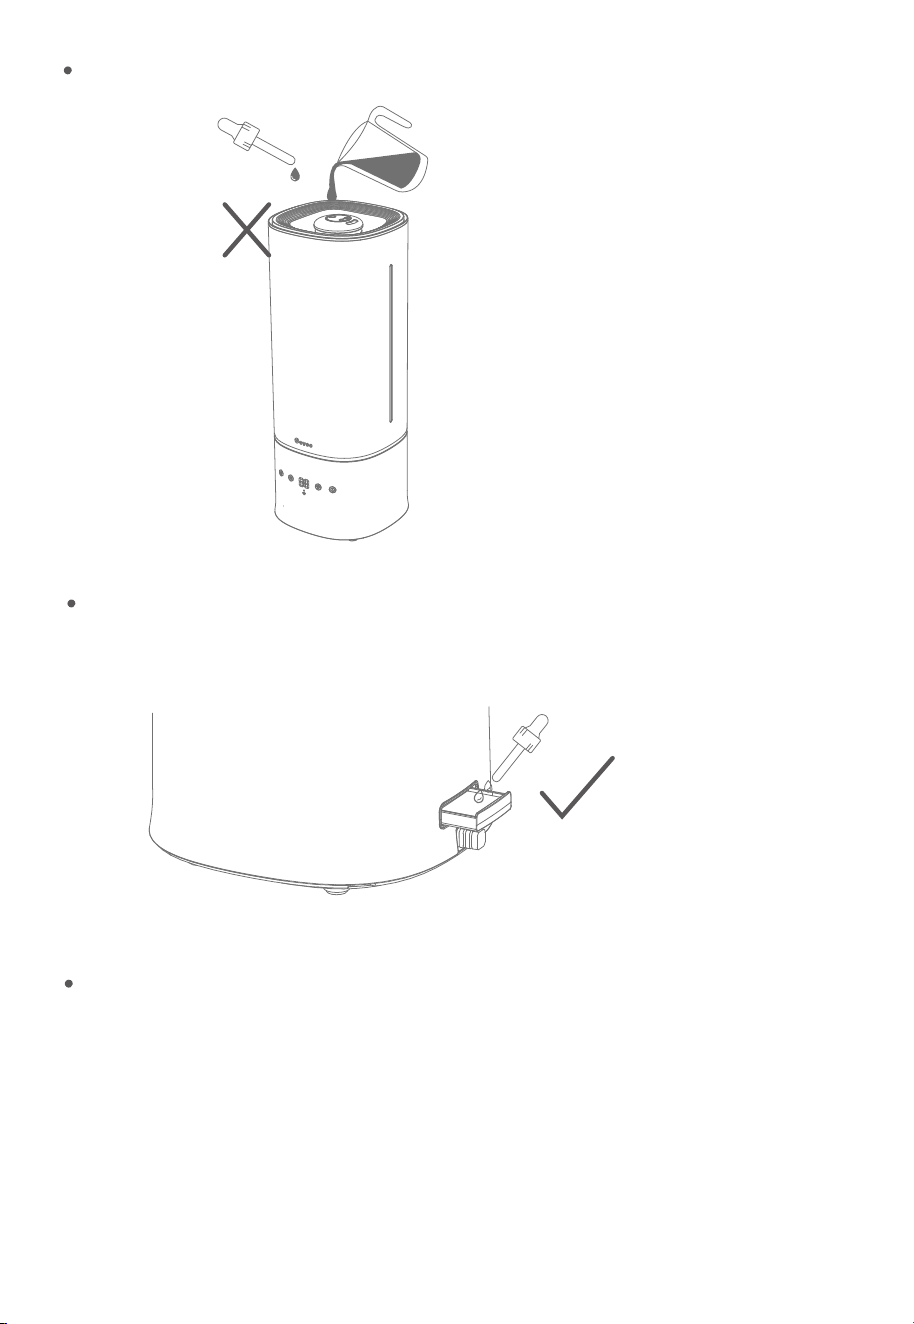
Do not add water or essential oils directly into the base chamber.
Fill the tank with room-temperature water. Do not ll with hot water.
It is recommended to ll the tank with puried or distilled water.
Do not ll past the tank’s max water line.
Note:
08
Max Water Line
Do not add water or essential oils into the mist tube.
Do not add essential oils directly into the humidier. Only add essential oils to the
aroma pad.
Do not use water treatment liquids or third-party water lters with this humidier.
09
Auto Mode: The humidier will automatically adjust mist level according to the ambient humidity
target set in-app, or 60% humidity when not connected to the app.
Custom Mode: You can customize this setting (running time & mist level) via the app. You can create up
to 3 custom presets in the app.
9 Levels of Mist Adjustment: You can access up to 9 levels of mist via Govee Home App for even
ner control of mist release.
UVC Light: Turn on the interior UVC light via Govee Home App to kill most bacteria and mold in the
base, making for cleaner mist.
Night Light: Adjust the color and brightness of the integrated night light via the app.
Using Your Smart Humidifier
2. Reattach the water tank cover and place the tank back on the base.
Note: Besides the on-device buttons, Govee Home App can also be used to control the below
functions (as well as other app functions).
Functions & Controls
Plug in your humidier and press the Power Button to turn it on. Press the Mist Level Button
repeatedly to cycle through Auto Mode and the three mist levels.
10
360° Double Mist Nozzle: Adjust the mist direction by rotating the two mist nozzles.
Humidity Monitor: You can check the current environmental humidity via the on-device
display or in Govee Home App.
Timers: You can set a 1-to-24-hour timer via the Timer Button or Govee Home App.
Scheduling: You can create up to 10 all-day schedules (power on/o & mist levels) via
Govee Home App.
Third-party Voice Assistants: You can control this humidier via third-party voice control
assistants such as Alexa and Google Assistant.
When the tank is detached from the base: The humidier’s fan will stop within 5 seconds
and mist will stop being produced. If the tank is properly placed back onto the base within 3
minutes, the humidier will continue working; if not, the humidier will automatically turn o.
No water left in the tank: The humidier will stop producing mist when there is not enough
water in the tank. The indicator light will show solid red and the fan will stop working within
5 seconds. Once sucient water is added back into the tank, the humidier will restart after
pressing the Power Button.
Pairing Your Smart Humidifier with
Govee Home App
Due to ongoing updates and improvements, Govee Home App’s interface and features may
be slightly dierent than those shown in the manual. In case of dierences, follow the
in-app instructions.
11
Note:
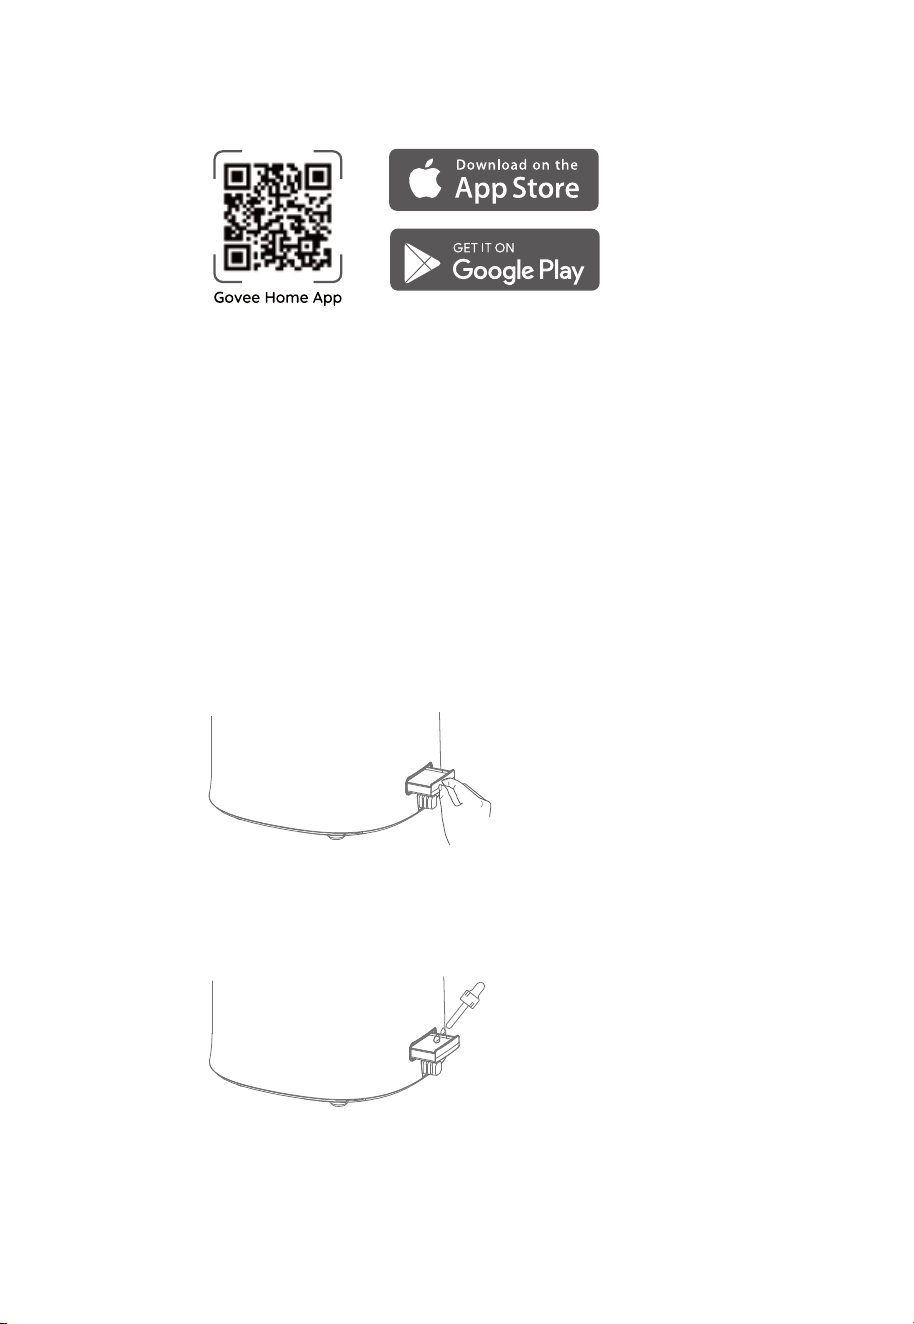
1. To download Govee Home App, scan the QR code or search for “GOVEE” in the Apple App
Store (iOS) or Google Play Store (Android)
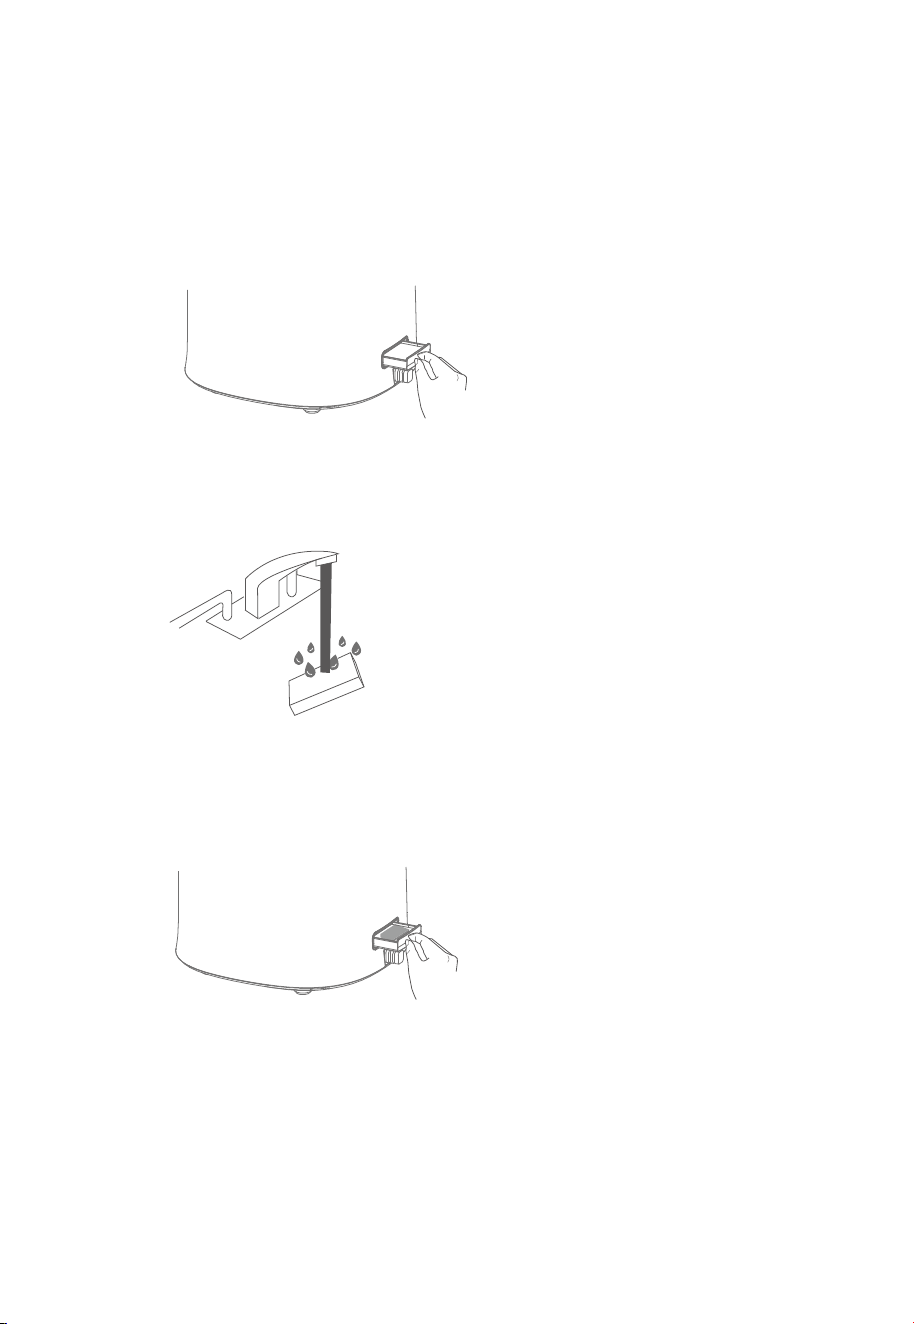
1. Press to pop out the aroma box from the back of the base.
2. Drip 8 to 10 drops of essential oil on the aroma pad.
3. Push the aroma box back into the humidier.
4. Turn on the humidier. The humidier will automatically diuse the aroma when used.
2. Turn on your smartphone’s Bluetooth.
3. Open Govee Home App, tap the “+” icon in the top right corner, and search for “H7142 .”
4. Tap the device icon and follow the on-screen instructions to complete pairing.
Note: For Android users, choose to “Allow” permissions to use Govee Home App.
Note: You can use Govee Home App to connect your smart humidier to Amazon Alexa or
Google Assistant. Follow the in-app instructions to connect Govee Home App to each
voice assistant.
Using the Aroma Box
12
Do not add essential oils, water treatment liquids, or third-party water lters directly into the
water tank or base chamber. Only add essential oils to the aroma pad.
The aroma pads can be cleaned and reused after diusing essential oils.
The aroma eect is intended to be light. This humidier is not a dedicated aroma diuser.
Note:
Care & Maintenance
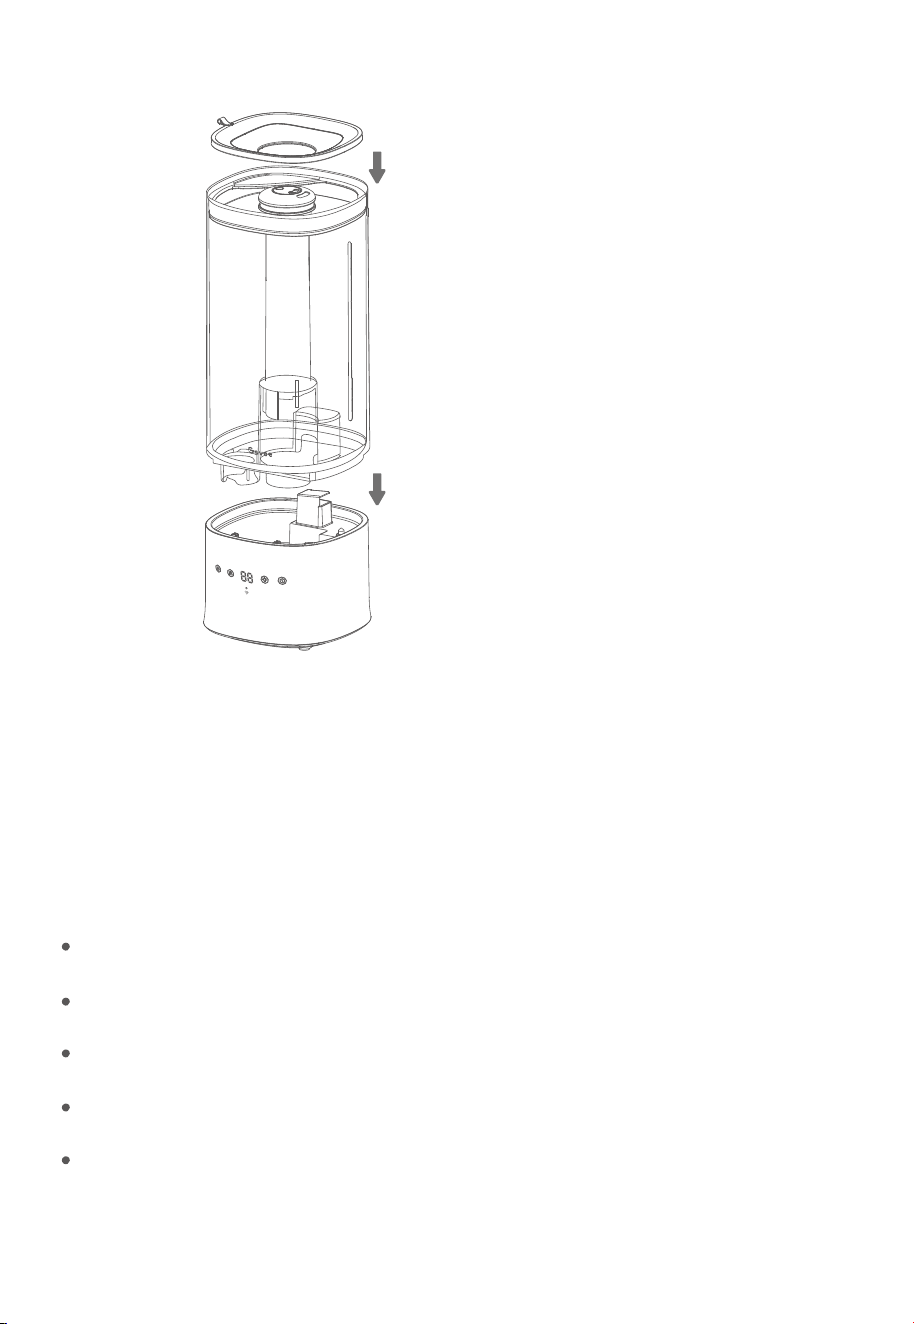
Cleaning the Humidifier
The humidier should be cleaned after being used for a week or before being stored.
Cleaning Steps
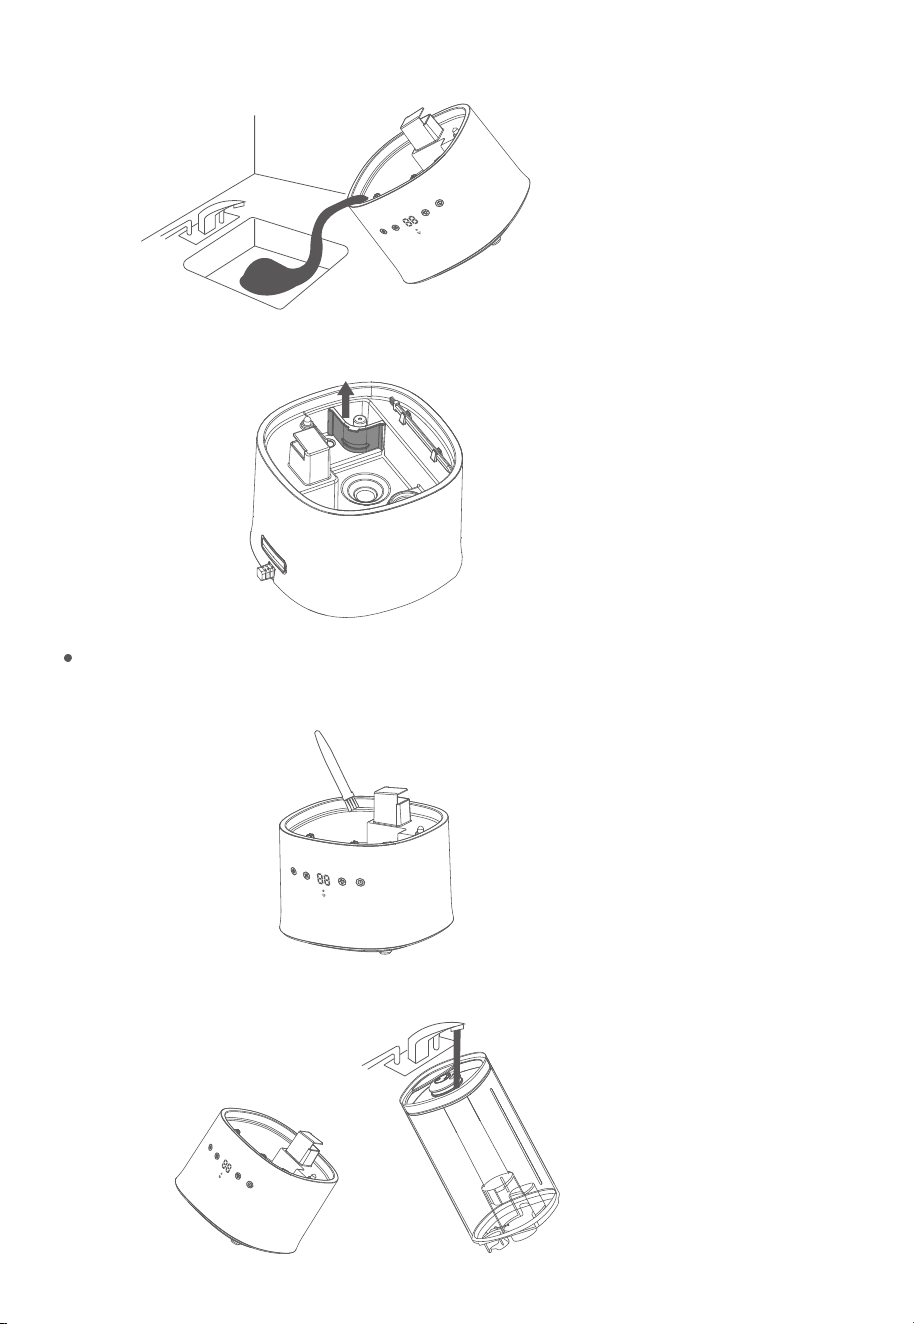
1. Unplug the humidier.
2. Remove and rinse the water tank cover.
3. Remove the water tank from the base and pour out any water from the tank and base chamber.
4. Rinse the tank and base chamber with room temperature water.
13
Keep the air inlet and outlet dry when cleaning the base with running water. Internal
components may be damaged if water enters the air inlet or outlet.
If water does accidentally enter the base’s inlet or outlet, place the humidier base in a
ventilated place to dry before using.
Note:
Descaling the Humidifier
1. Fill the tank with 3 cups/710 mL of distilled white vinegar.
2. Put the tank cover on and swish the vinegar around the tank.
3. Place the tank on the base and soak for 15–20 minutes. Vinegar will drain into the base
chamber and loosen scale (mineral buildup) in the tank and in the base chamber.
14
Note:
Put the oating bae back in place after removing it.
4. Remove the tank, remove the tank cover, and pour out all vinegar.
5. Remove the bae and lift up the oat. Use the cleaning brush to clean.
6. Use a soft cloth and the included cleaning brush to remove limescale from all parts.
7. Rinse all parts until the vinegar smell is completely gone.
15
8. Dry all parts with a cloth. Make sure all parts are completely dry before reassembling
or storing the humidier.
Cleaning the Aroma Pad
1. Press and pop out the aroma box from the back of the base.
2. Remove the pad and rinse it under warm running water.
3. Dry the pad with a clean cloth and place it back into the aroma box.
Note: Do not pour liquid cleaners or detergents into the aroma pad or box.
Storing
Follow the cleaning instructions and allow all parts to dry completely before storing the
humidier in a cool, dry place.
16

Troubleshooting
Problem Possible Solution
Humidier doesn’t turn on or it powers
o frequently.
Make sure the power cable is securely connected and press
Power Button again.
The water temperature may be too low. Use room
temperature water.
Check to see if the humidier is in Auto Mode. If so, the
humidier may automatically turn o when the humidity level
is above the target level.
Little or no mist comes out.
Add at least 1L puried or distilled water to the water tank.
Turn the mist level to a higher setting.
Make sure the air inlet on the bottom of the base is not blocked.
The humidier should not be set on carpet or other surfaces that
may block the air inlet.
There may be too much water in the base chamber. Empty the
base chamber and rell the water tank (not the base chamber)
and place the water tank properly onto the base.
Make sure the nozzle is not blocked or clogged.
Make sure the humidier is on a level surface.
Clean the water tank and base chamber.
Set the mist level to a lower setting.
Water temperature may be too low. Turn the mist level to the
highest setting and let the humidier run for a while, then adjust
to the desired setting.
The humidier uses up water based on the environmental
temperature and humidity. If the environment is cold and/or dry,
the humidier will run out of water faster.
If the water tank or base was washed with detergent, it should
be rinsed thoroughly with clean water to remove residual detergent.
Humidier uses water too fast.
Humidier produces an unusual smell.
Humidier makes a loud or
unusual noise.
If the humidier is new, unplug and rinse all parts, then place it
in a cool and dry place for 12 hours.
If essential oils were placed on the aroma pad, the pad should
be rinsed with clean water and left to dry.
White dust appears around the humidier.
The humidier may be malfunctioning. Stop using it and contact
Govee Customer Support.
We recommend using puried or distilled water to ll the
humidier. Avoid using water with high mineral content.
Clean the water tank and base chamber.
Make sure the silicone sealing ring around the water outlet
valve is secure.
17

Avoid running the humidier in a room with over 60%
relative humidity.
Do not shake the humidier.
Humidity may be too high. Turn down the mist level, turn o the
humidier, or open a door or window to the room.
Clean the water tank and base chamber regularly.
Make sure to place the humidier on a at, level surface.
Check the water tank for leaks. If there are leaks, contact Govee
Customer Support.
The humidity sensor at the bottom of the humidier may be
damp. Please turn o the humidier and dry the base.
Check whether the app is connected to the humidier.
Water leaks from the humidier.
The tank is short of water. Please rell the tank.
The water tank is not properly positioned. Please place the water
tank correctly on the base.
The space the humidier is being used in may be larger than that
intended for this product. Please use the humidier in a space less
than 602ft²/56㎡.
Add more essential oil. For best results, use pure essential oil.
Condensation forms around
humidier or windows.
The night light cannot be turned on or
adjusted via the app.
Power indicator ashes red.
Mold grows inside the humidier.
Essential oil has little or no smell.
Power indicator light shows solid red.
If the night light still cannot be operated when the app and the
humidier are connected, please contact Govee Customer Support.
18
The humidity shown on the display or in
the app is not accurate.

Auto Mode: The humidier will automatically adjust mist level according to the ambient humidity
target set in-app, or 60% humidity when not connected to the app.
Custom Mode: You can customize this setting (running time & mist level) via the app. You can create up
to 3 custom presets in the app.
9 Levels of Mist Adjustment: You can access up to 9 levels of mist via Govee Home App for even
ner control of mist release.
UVC Light: Turn on the interior UVC light via Govee Home App to kill most bacteria and mold in the
base, making for cleaner mist.
Night Light: Adjust the color and brightness of the integrated night light via the app.
For App & Connectivity
1. Cannot connect to Govee Home App.
Make sure the Bluetooth of your smartphone is enabled and your smartphone is not
connected with other Bluetooth Humidiers.
Enable the smartphone’s Location Services.
Try connecting with another smartphone.
Make sure your app is updated to the latest version.
Make sure you have connected to the 2.4GHz network, and conrm the network is
working correctly.
Make sure the Wi-Fi password you entered is correct.
Shorten the distance between the humidier, Wi-Fi router, and the smartphone.
Make sure your humidier and the Wi-Fi router are not placed near. appliances that
produce electromagnetic radiation (e.g. microwave ovens, refrigerators, etc.).
If you are using a VPN, try turning it o and then connecting the humidier. Disable portal
authentication for your Wi-Fi network. If portal authentication is enabled, this humidier
will not be able to access your Wi-Fi network, and setup will fail. Portal authentication means
that you need to sign in to your Wi-Fi network through a web page before you can use
the Internet.
2. Cannot nd the humidier within in nearby Bluetooth humidiers list.
3. The humidier is oine.
Make sure the humidier is plugged in and powered on, then refresh “My Humidiers” in
Govee Home App by swiping down on the screen.
Make sure your router is connected to the internet, and your phone’s network connection
is working.
If the Wi-Fi password has changed, the humidier will automatically go oine. Try connecting
it to the network again.
Delete the oine humidier from Govee Home App, then add and recongure the
humidier again in the app.
19
The humidier may be connected with another smartphone. Disconnect it from the other
smartphone rst.

FCC Statement
This device complies with Parts 15 & 18 of the FCC Rules. Operation is subject to the following two conditions:
(1) This device may not cause harmful interference, and
(2) This device must accept any interference received, including interference that may cause undesired operation.
Warning: Changes or modications not expressly approved by the party responsible for compliance could void the user's authority to
operate the equipment.
Note: This equipment has been tested and found to comply with the limits for a Class B digital device, pursuant to Parts 15 &18 of the FCC
Rules. These limits are designed to provide reasonable protection against harmful interference in a residential installation.
This equipment generates uses and can radiate radio frequency energy and, if not installed and used in accordance with the instructions, may
cause harmful interference to radio communications. However, there is no guarantee that interference will not occur in a particular
installation. If this equipment does cause harmful interference to radio or television reception, which can be determined by turning the
equipment o and on, the user is encouraged to try to correct the interference by one or more of the following measures:
(1) Reorient or relocate the receiving antenna.
(2) Increase the separation between the equipment and receiver.
(3) Connect the equipment into an outlet on a circuit dierent from that to which the receiver is connected.
(4) Consult the dealer or an experienced radio/TV technician for help.
The device has been evaluated to meet general RF exposure requirements. The device can be used in xed/mobile exposure condition. The
min separation distance is 20cm.
FCC ID:2AQA6-H7142
The following importer is the responsible party
Responsible party :
Name: GOVEE MOMENTS(US) TRADING LIMITED
Address: 13013 WESTERN AVE STE 5 BLUE ISLAND IL 60406-2448
Email: [email protected]
Contact information: https://www.govee.com/support
FCC Radio Frequency Exposure Statement
Customer Service
Warranty: 12-Month Limited Warranty
Support: Lifetime Technical Support
Email: [email protected]
Ocial Website: www.govee.com
@GoveeOcial@GoveeOcial
@govee.ocial
@goveeocial
@Govee
IC Statment
The Bluetooth word mark and logos are registered trademarks owned by Bluetooth SIG, Inc. and any use of such marks by
Shenzhen Intellirocks Tech. Co., Ltd. is under license.
This device complies with Industry Canada licence-exempt RSS standard(s). Operation is subject to the following two conditions:
(1) This device may not cause interference, and
(2) This device must accept any interference, including interference that may cause undesired operation of the device."
Le présent appareil est conforme aux CNR d'Industrie Canada applicables aux appareils radio exempts de licence. L'exploitation
est autorisée aux deux conditions suivantes:
(1) l'appareil nedoit pas produire de brouillage, et
(2) l'utilisateur de l'appareil doit accepter tout brouillage radioélectrique subi, même si le brouillage est susceptible d'en
compromettre le fonctionnement.
This Class B digital apparatus complies with Canadian ICES-001.
Cet appareil numérique de la classe B est conforme à la norme NMB-001 du Canada.
IC RF Statement:
When using the product, maintain a distance of 20cm from the body to ensure compliance with RF exposure requirements.
Lors de l'utilisation du produit, maintenez une distance de 20 cm du corps an de vous conformer aux exigences en
matière d'exposition RF.
®

www.govee.com
For FAQs and more information,
please visit: