
Highgrow Advanced
Hochbeet
Raised Bed
Maceta elevada
Platebande surélevée
Vaso rialzato
10034687 10034688 10034689


Sehr geehrter Kunde,
wir gratulieren Ihnen zum Erwerb Ihres Produktes.
Lesen Sie die folgenden Hinweise sorgfältig durch und
befolgen Sie diese, um möglichen Schäden vorzubeugen.
Für Schäden, die durch Missachtung der Hinweise und
unsachgemäßen Gebrauch entstehen, übernehmen wir
keine Haftung. Scannen Sie den folgenden QR-Code,
um Zugriff auf die aktuellste Bedienungsanleitung und
weitere Informationen rund um das Produkt zu erhalten:
Dear Customer,
Congratulations on purchasing this product. Please read
the following instructions carefully and follow them to
prevent possible damages. We assume no liability for
damage caused by disregard of the instructions and
improper use. Scan the QR code to get access to the
latest user manual and more product information.
Estimado cliente,
Le felicitamos por la adquisición de este producto.
Lea atentamente las siguientes instrucciones y sígalas
para evitar posibles daños. No asumimos ninguna
responsabilidad por los daños causados por el
incumplimiento de las instrucciones y el uso inadecuado.
Escanee el siguiente código QR para obtener acceso a
la última guía del usuario y más información sobre el
producto.
Chère cliente, cher client,
Toutes nos félicitations pour l’acquisition de ce nouveau
produit. Veuillez lire attentivement et respecter
les instructions de ce mode d’emploi an d’éviter
d’éventuels dommages. Nous ne saurions être tenus
pour responsables des dommages dus au non-respect
des consignes et à la mauvaise utilisation. Scannez le QR-
Code pour obtenir la dernière version du mode d‘emploi
et des informations supplémentaires concernant le
produit.
Gentile cliente,
La ringraziamo per aver acquistato il prodotto. La
preghiamo di leggere attentamente le seguenti istruzioni
per l’uso e di seguirle per evitare possibili danni. Non ci
assumiamo alcuna responsabilità per danni scaturiti da
una mancata osservazione delle avvertenze di sicurezza
e da un uso improprio del prodotto. Scansionare il codice
QR seguente, per accedere al manuale d’uso più attuale e
per ricevere informazioni sul prodotto.
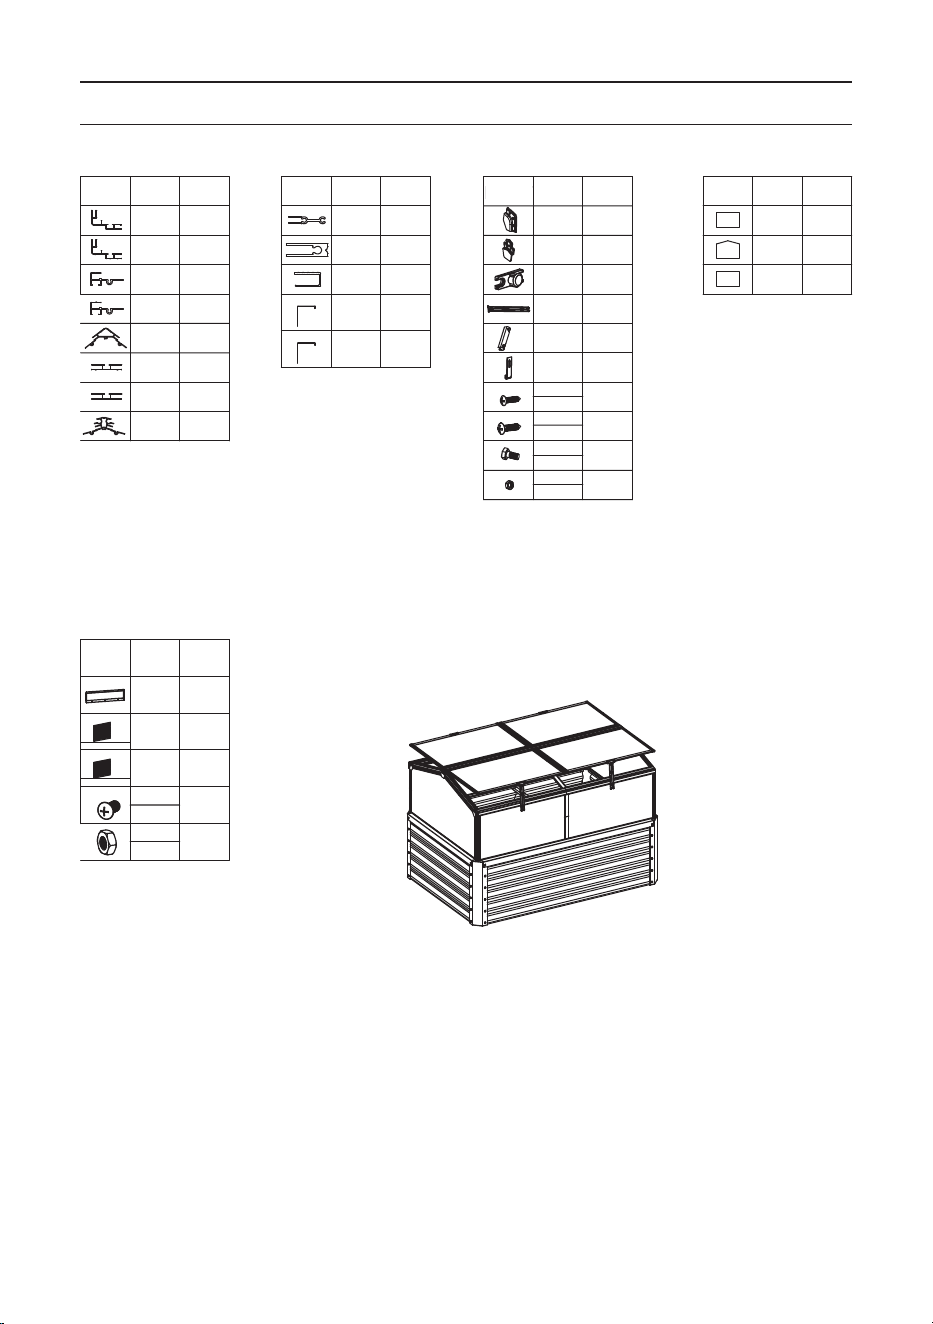
ZUSAMMENBAU
PART
NO
QTY
L01A 4
L01B 4
PART
NO
QTY
Z01
38
S01
22
M5X10
M01
M5
22
PART
NO
QTY
Y1
4
4
J 02
L06
4
L07
4
L08
8
PART
NO
QTY
16
Z02
L02A
2
L02B
2
L03A
2
L05A
1
2
J 03
4
J 08
4
J 09
2
Y2
Y4
4
4
J 07
W02
10
L04A
2
L04B
2
L33A
2
L33B
2
PART
NO
QTY
1100mm
800mm
W04
4
Y11
2
Y12
2
48
48
S02
M6X10
M02
M6
M4X12D
M4X8
TEIL
TEIL
TEIL TEIL TEILNR
NR
NR NR NRANZ
ANZ
ANZ ANZ ANZ

1
PART
NO
QTY
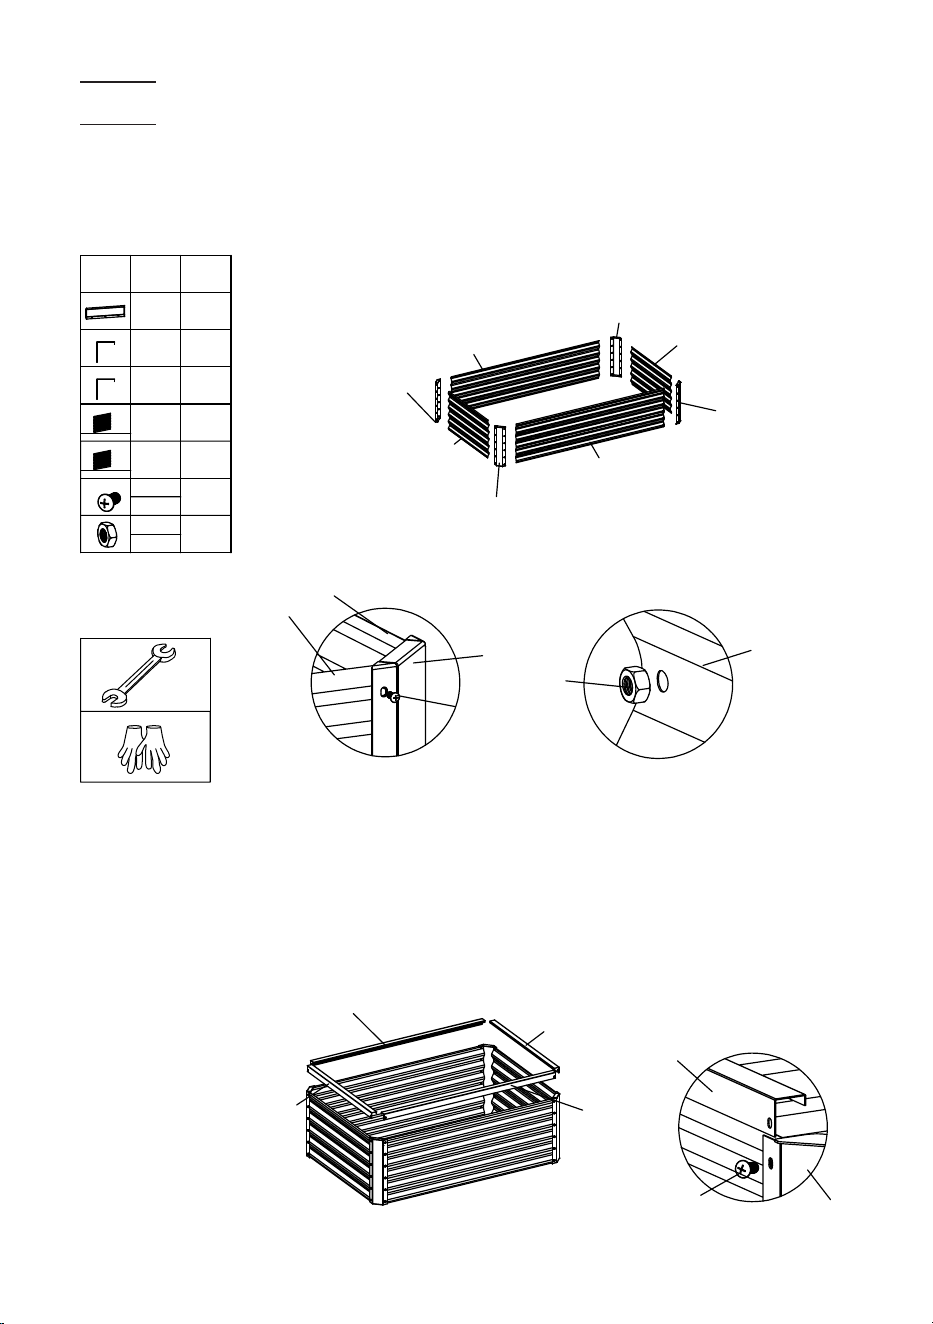
L06
1
L07
1
L08
2
2
1
Y4
L06
L08
L08
4*Z01
L07
Z02
4
Z01
J 08
Y4
J 08
2*Z02
J 08
L06
L08
L08
L07
1
J 09
Y4
1
J 09
J 09
M4X12D
M4X8
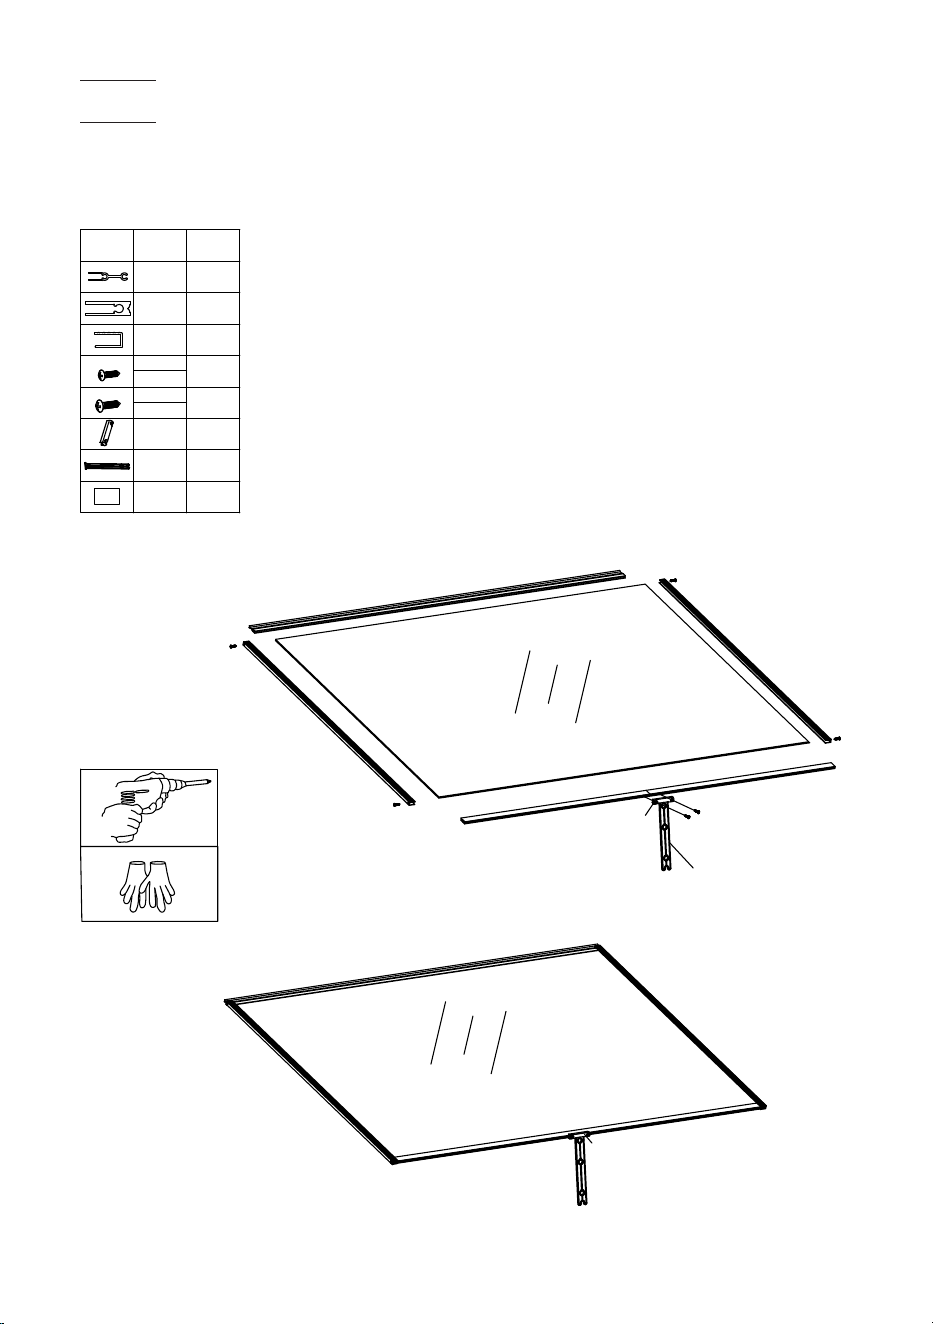
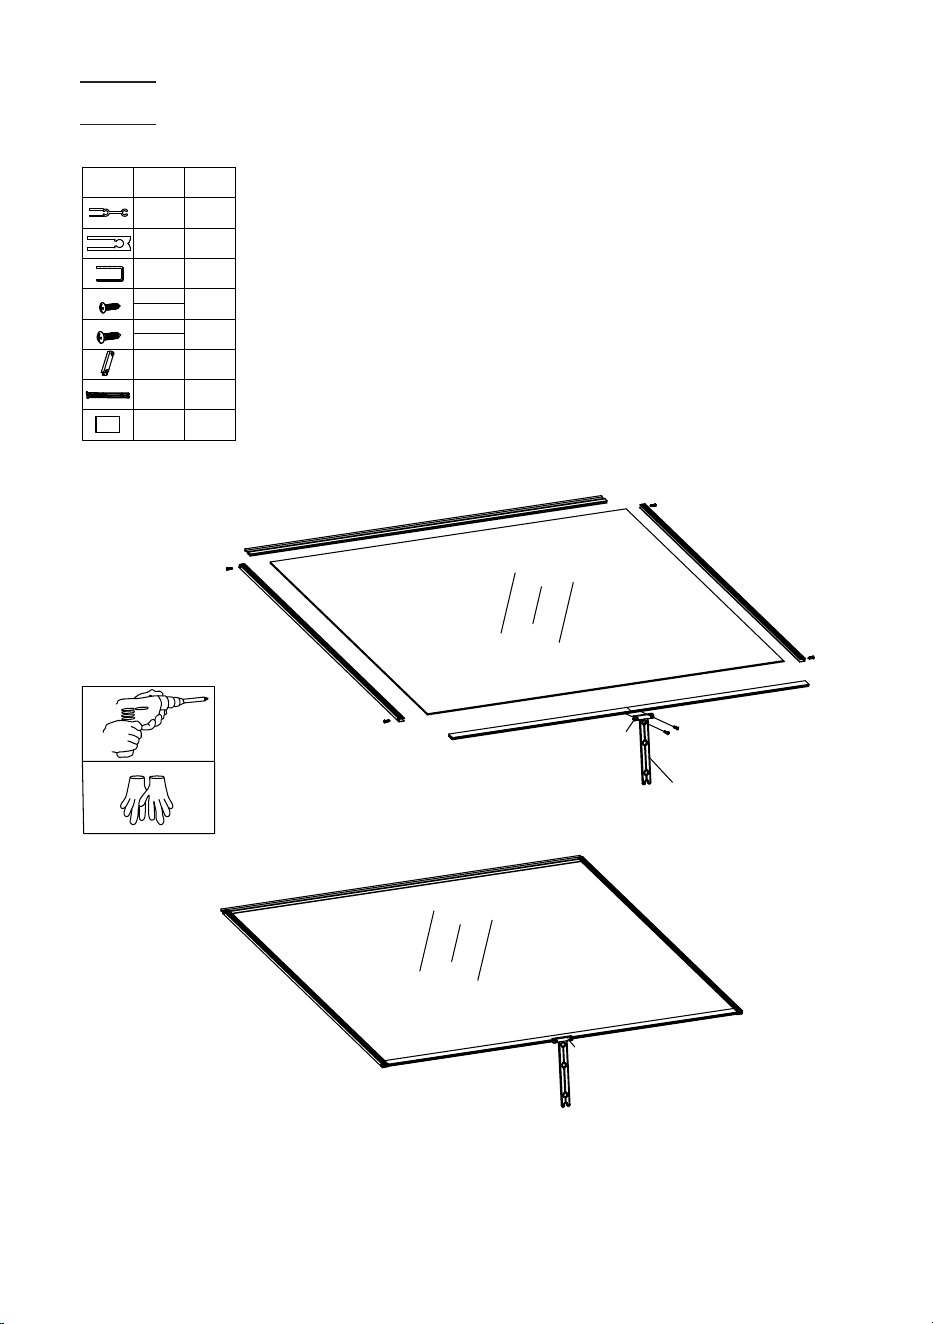
Window Assembly
TEIL NR ANZ
Fenstermontage
PART
NO
QTY
M02
Y11/Y12
S02
W04
Y12
Y11
1100mm
800mm
Y12
L33A&L33B
S02
W04
L33A
L33A
L33B
L33B
L33A
2
L33B
2
W04
4
Y11
2
Y12
2
48
48
S02
M6X10
M02
M6
Y11
Y11
Y12
Y12
W04
W04
W04
W04
Fix the plates together with W04, using S02 & M02 as shown
Fix L33A & L33B to W04 using S02 & M02
TEIL NR ANZ
Befestigen Sie die Platten mit den Ecken (W04). Verwenden Sie die Schrauben
S02 und M02.
Befestigen Sie die Teile L33 und L33B an W04. Verwenden Sie die Schrauben
S02 und M02.
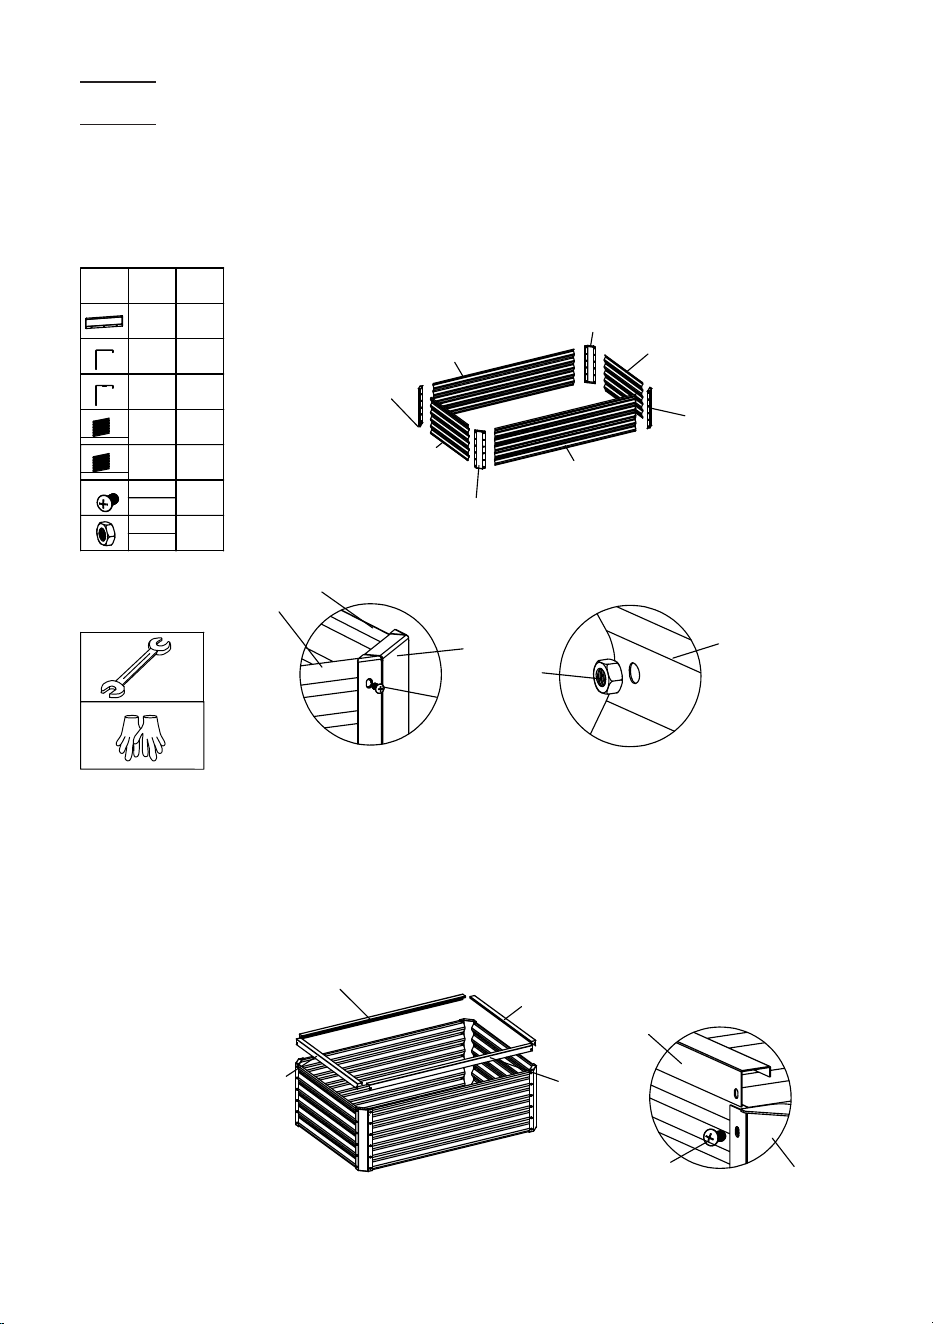
2

PART
NO
QTY
S01
14
M5X10
M01
M5
14
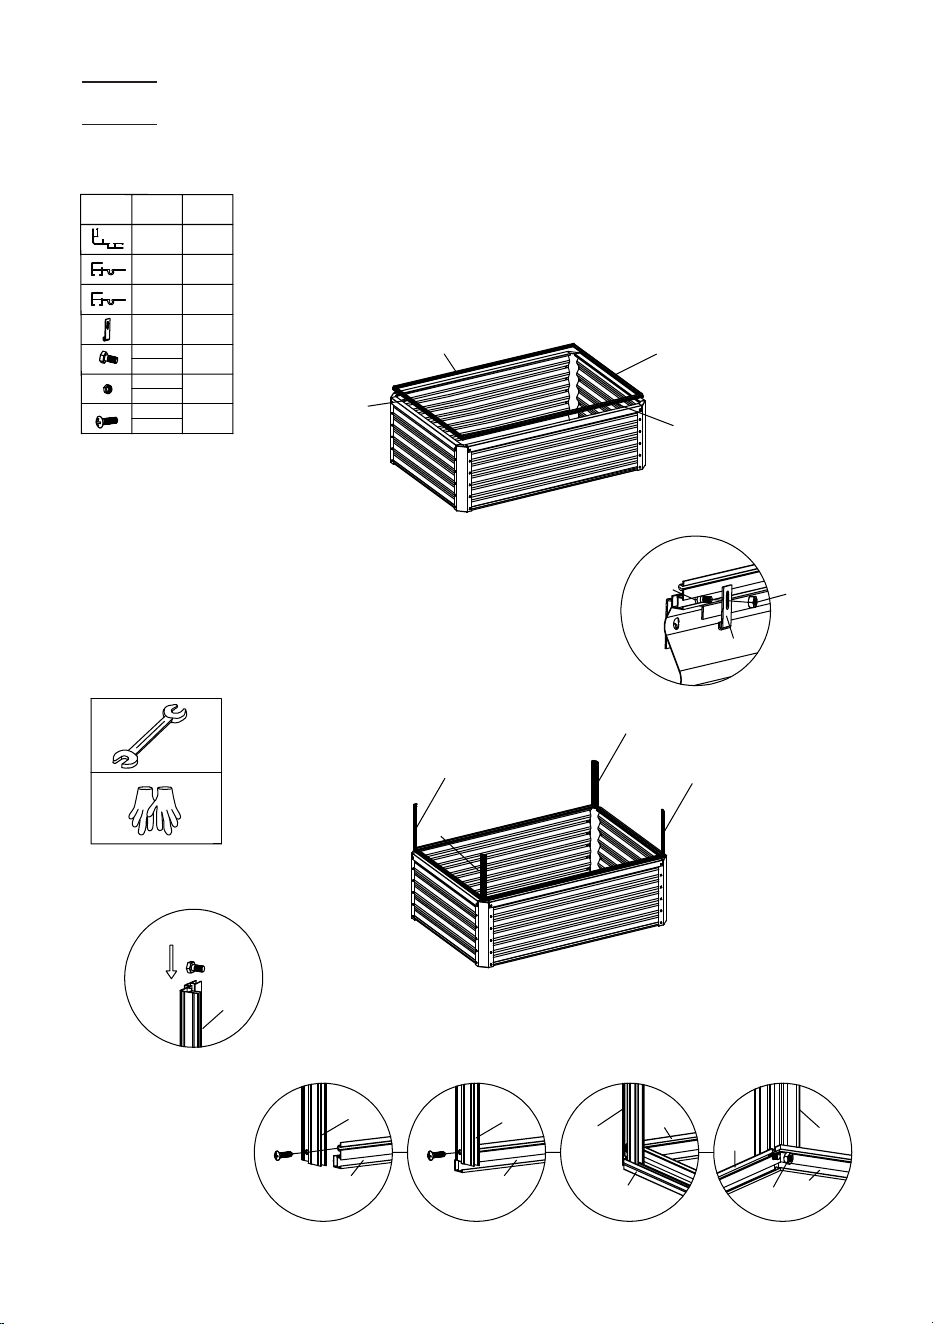
L01A 4
S01
L01A
Z01
L02B
Z01
L02B
L01A
L01A
L01A
L02A
L02B
L02A
L01A
M01
L02B
Z01
4
L02A
2
L02B
2
L02B
L02A
L02B
L02A
W02
M01
S01
W02
10
L01A
L01A
L01A
L01A
M4X12D
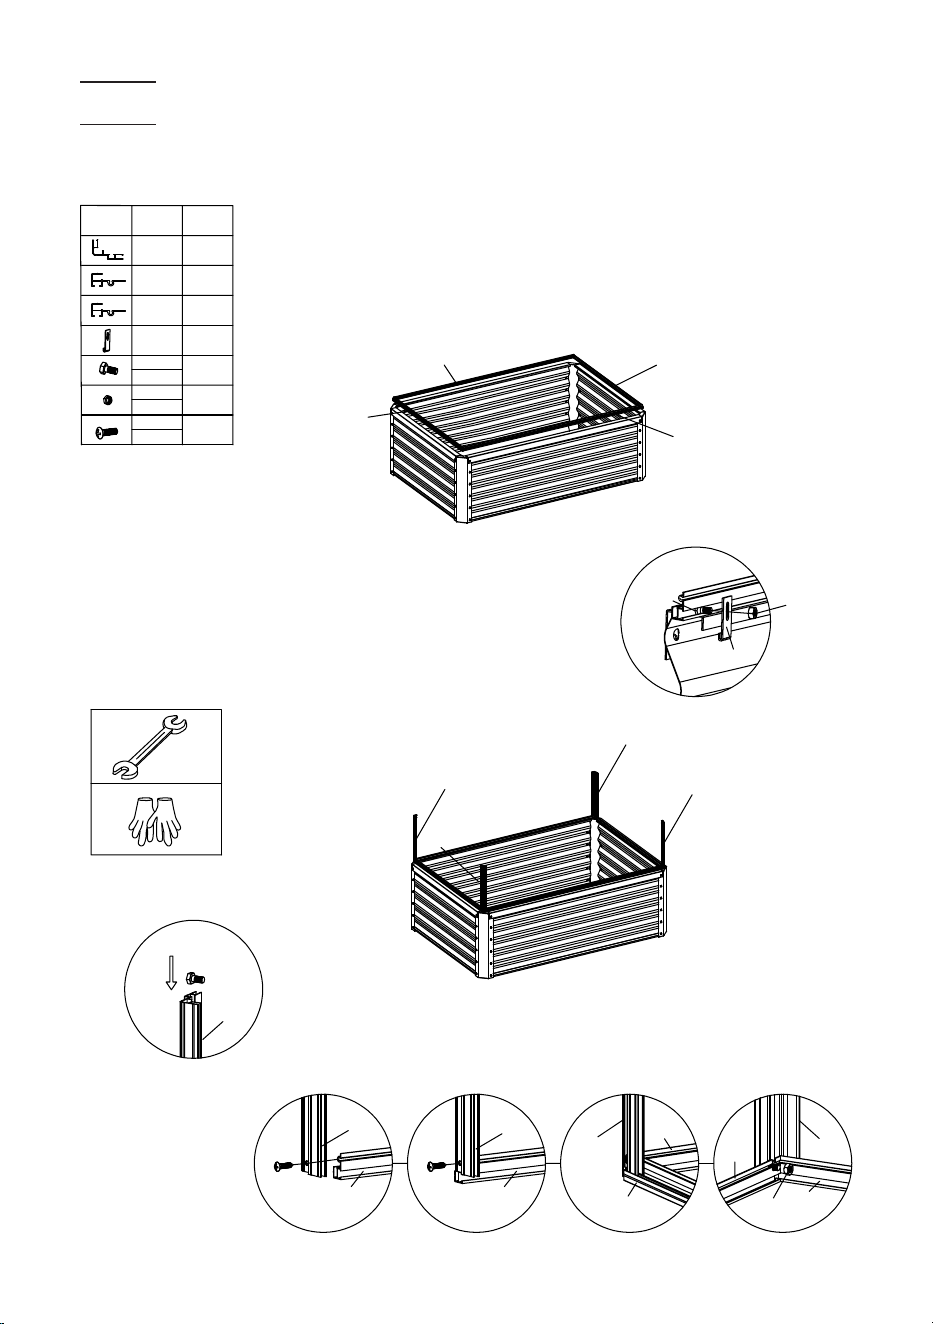
Slide 3*S01 into the channel of each L02A, fix L02A to L33A
using S01 & M01 at a distance about 40CM of each.
Slide 2*S01 into the channel of each L02B, fix L02B to L33B
using S01 & MO1 at a distance about 40CM of each.
Slide 1*S01 into the
channel of L01A
Fix L01A to L02A & L02B using S01 & M01 and screw Z01.
TEIL NR ANZ
Schieben Sie 3 Schrauben (S01) in die Schiene von L02A. Befestigen
Sie L02A an L33A. Verwenden Sie die Schrauben S01 und M01 in
einem Abstand von jeweils 40cm.
Schieben Sie 2 Schrauben S01 in die Schiene der beiden Teile L02B.
Befestigen Sie L02B an L33B. Verwenden Sie die Schrauben S01 und
M01 in einem Abstand von jeweils 40cm.
Bringen Sie L01A an L02B an. Verwenden Sie die Schrauben S01 und M01.
3
Schieben Sie die
Schraube (S01) in die
Schiene von L01A.

L04A
2
L04A
2*S01
L02A
L04A
S01
L01A
L03A
Z01
L03A
L01A
PART
NO
QTY
Z01
4
L03A
2
4
Y1
L03A
M01
M5
4
M01
2
1
1
1
1
1
L03A
2
L03A
2
Y1
S01
4
M5X10
L04A
L04A
Y1
Y1
Y1
M4X12D
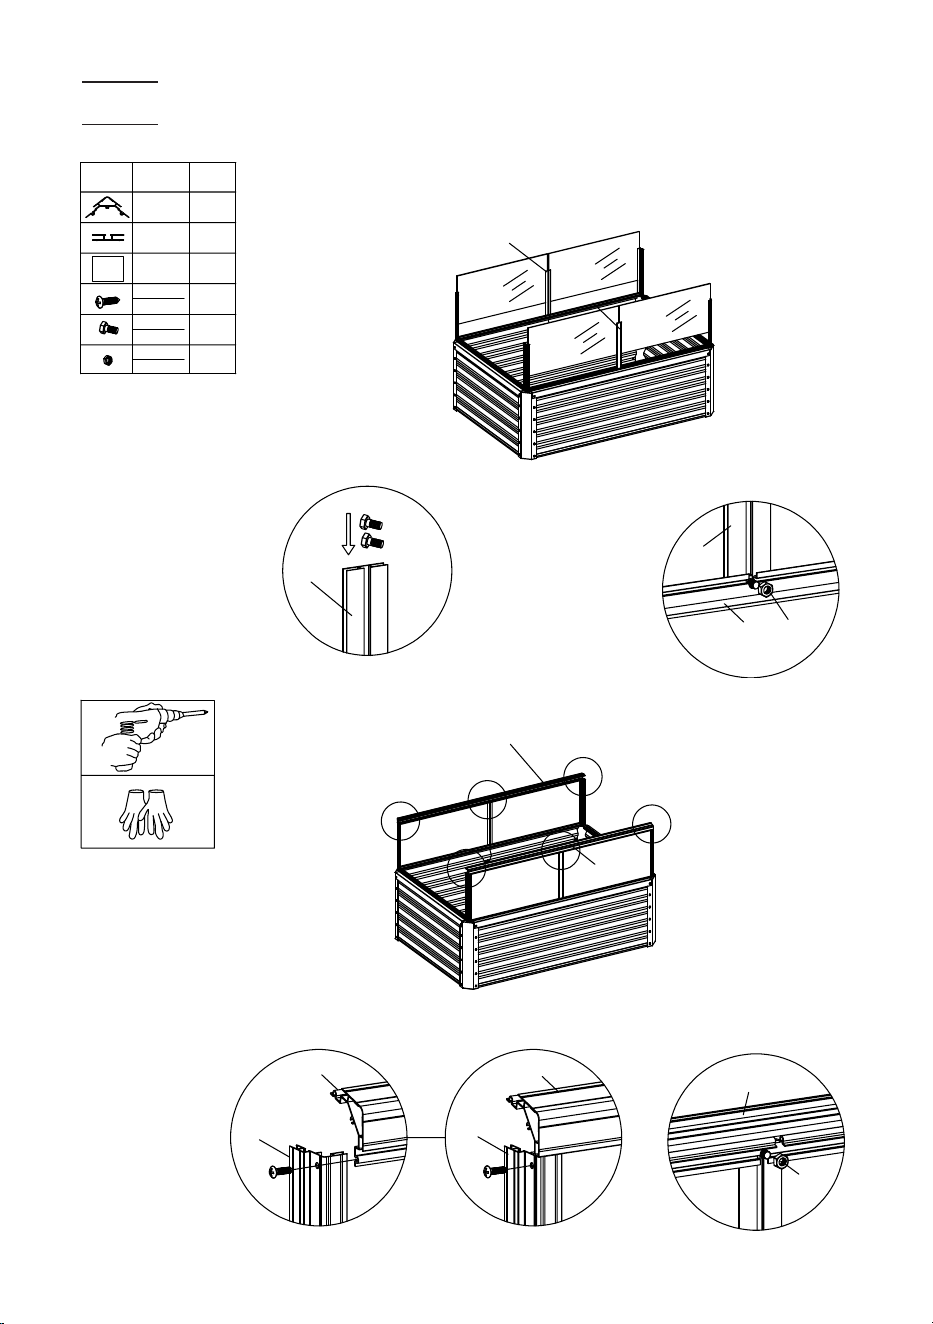
Slide 2*S01 into the channel of L04A
Fix L04A to L02A,
using one S01 & M01
Fix L03A to L01A, using Z01
Fix L03A to L04A,
using another S01 & M01
TEIL NR ANZ
Schieben Sie 2 Schrauben (S01) in die Schiene
von L04A.
Befestigen Sie L04A an L02A.
Verwenden Sie eine Schraube S01
und M01.
Befestigen Sie L03A an L04A.
Verwenden Sie eine weitere
Schraube S01 und M01.
Befestigen Sie die Teile L03A an
L01A mit einer Schraube Z01.
4

L01B
L03A
PART
NO
QTY
4
L01B
Z01
8
L05A
1
L01B
L05A
2
Y2
L01B
L05A
Y2
1
2
Y2
L01B
M4X12D
Insert Y2 into the channel of L01A
Fix L01B to L01A & L03A, using screw Z01.
Then, fix L05A to L01B using screw Z01.
TEIL
NR ANZ
Setzen Sie die Teile Y2 in die Schiene
von L01A ein.
Befestigen Sie das Teil L01A an L01A und L03A.
Dazu verwenden Sie eine Schraube Z01.
Befestigen Sie das Teil L05A an L01B mit einer
Schraube Z01.
5

wi ndow
1
1
2
1 2
L04B
L04B
PART
NO
QTY
2
L04B
S01
4
M5X10
M01
M5
4
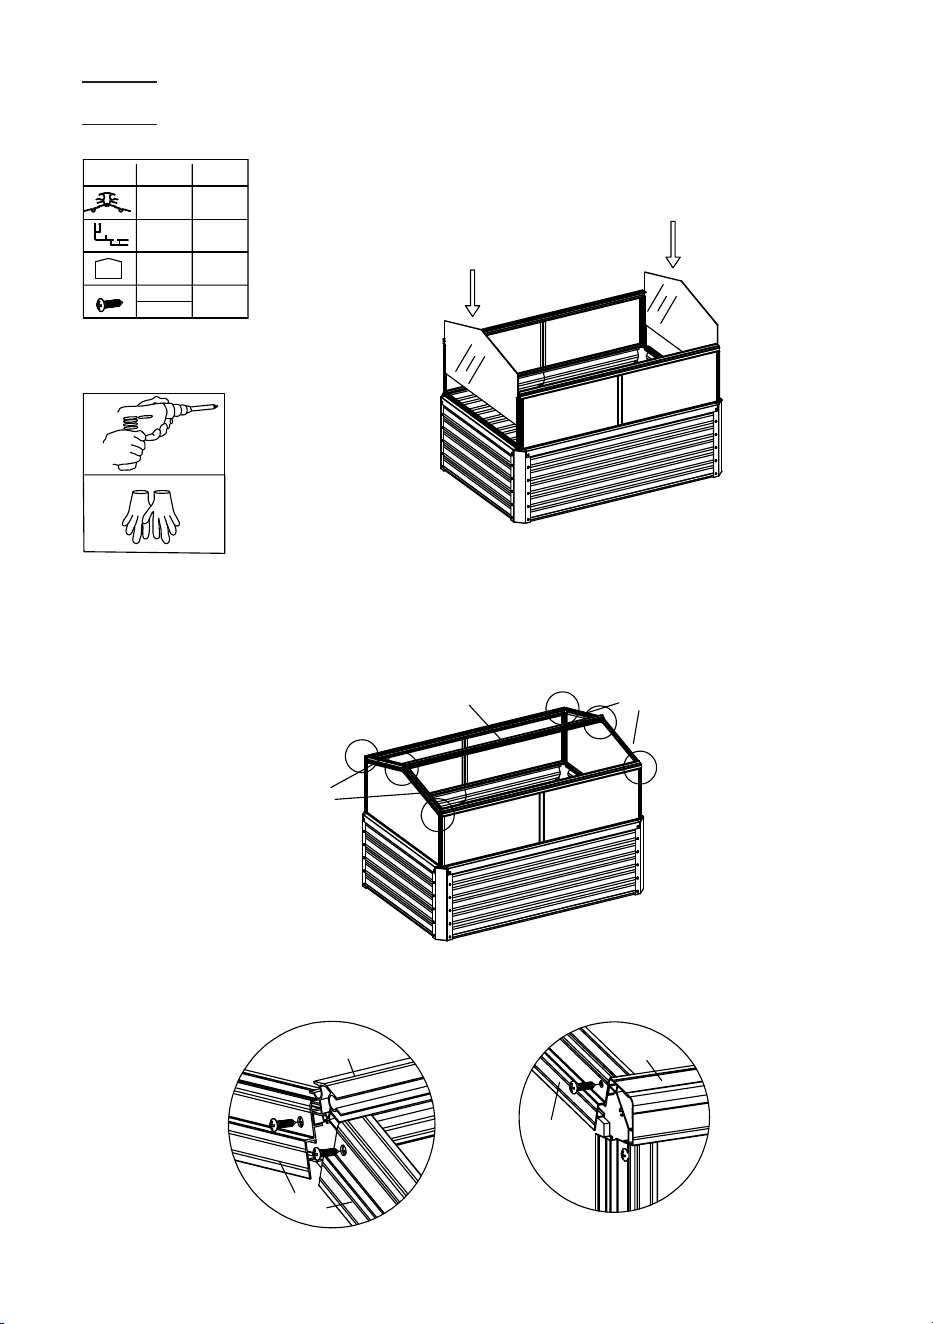
Slide 2*S01 into each L04B.
Fix L04B to L03A & L05A, using S01 & M01.
Slide the windows into the channel of L05A.
L04B
TEIL NR ANZ Setzen Sie 2 Schrauben S01 in jeweils ein Teil L04B.
Befestigen Sie L04B an L03A und L05A mit Hilfe der Schrauben S01 und
M01.
Schieben Sie die Fensterplatten in die
Schienen von L05A
Fenster
6

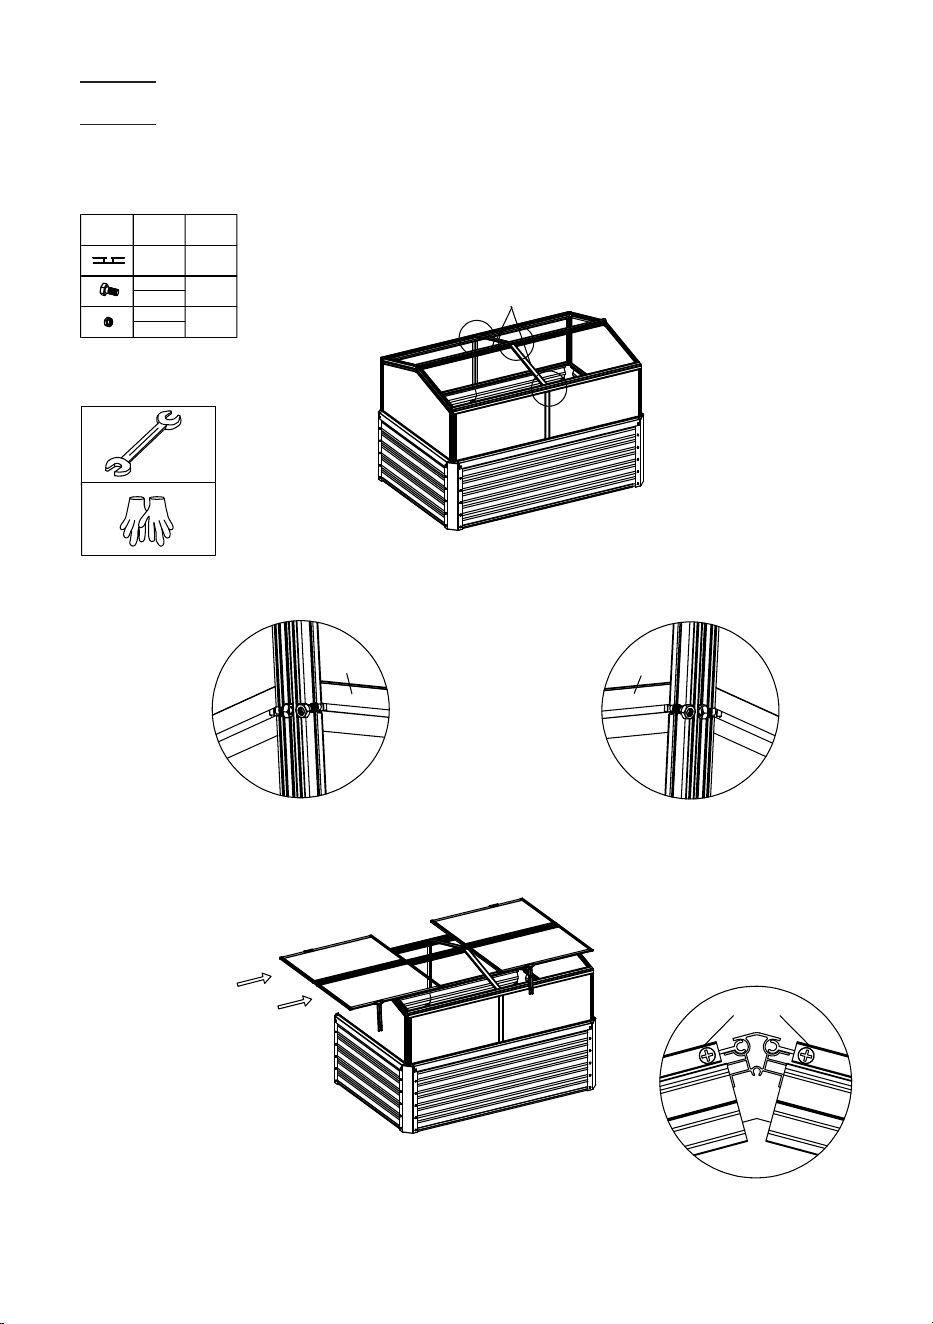
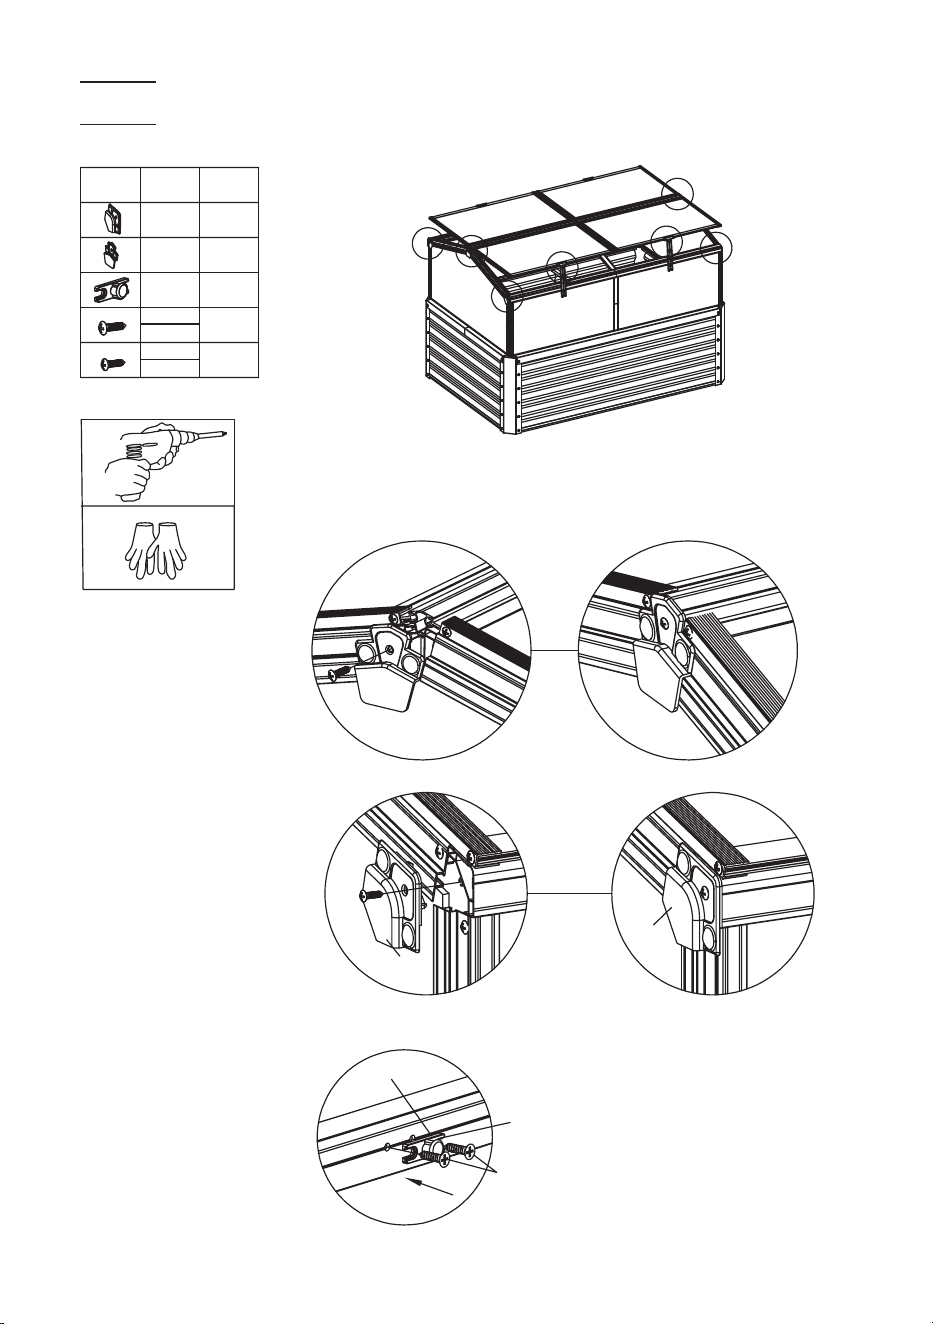
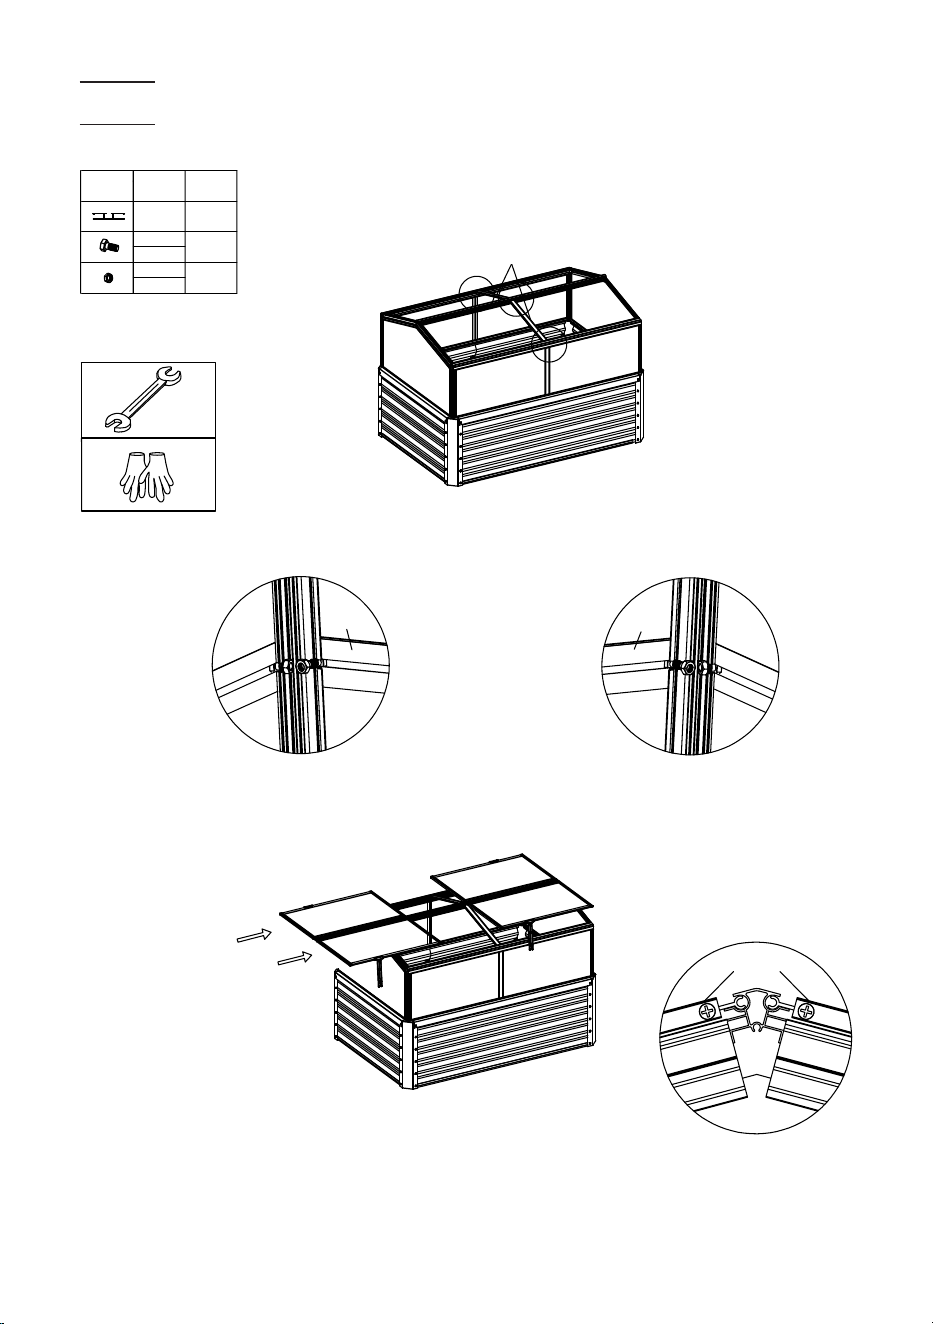
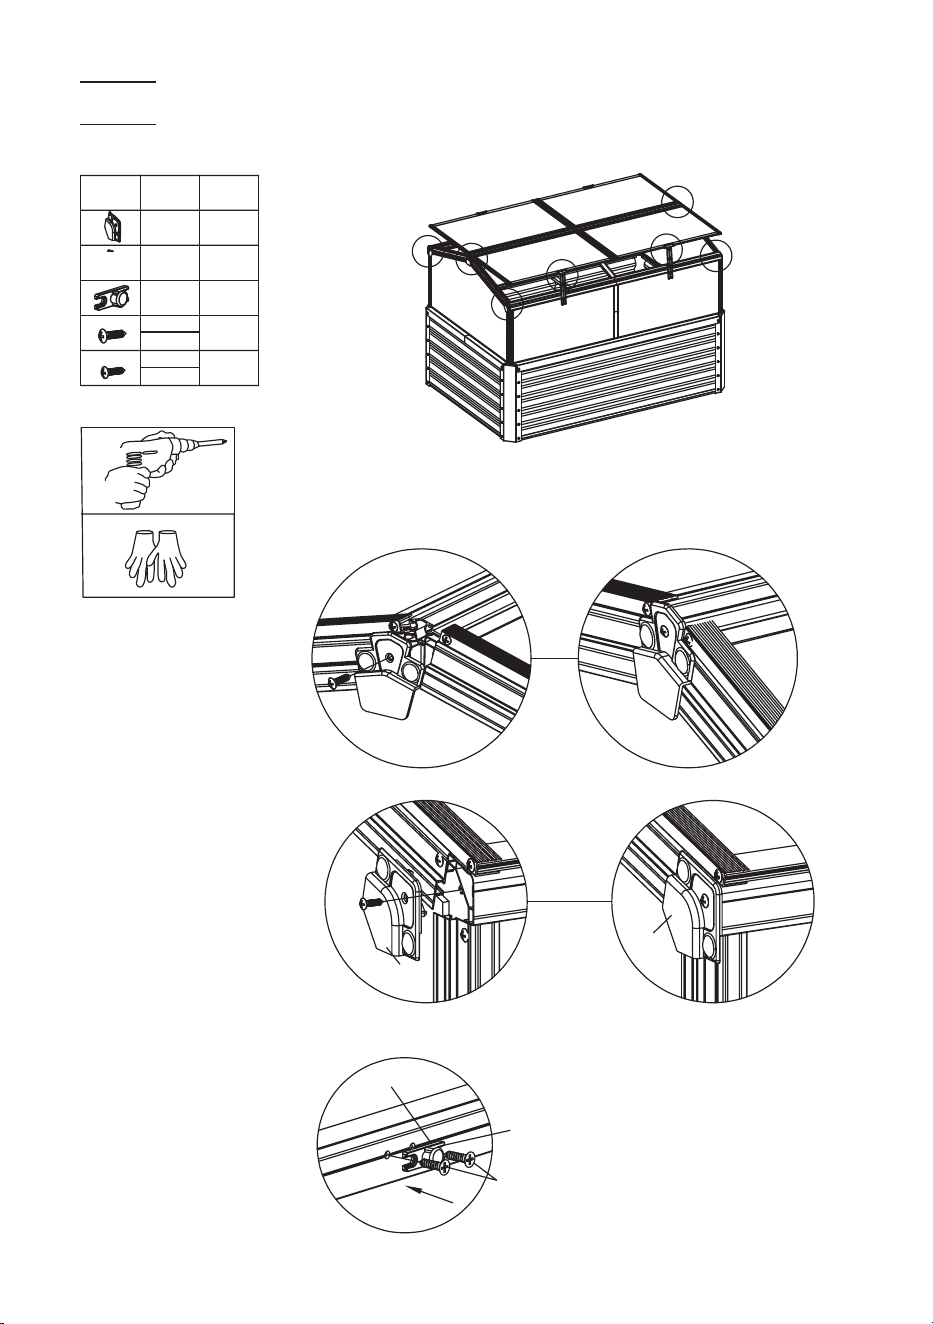
PART
NO
QTY
2
4
Z01
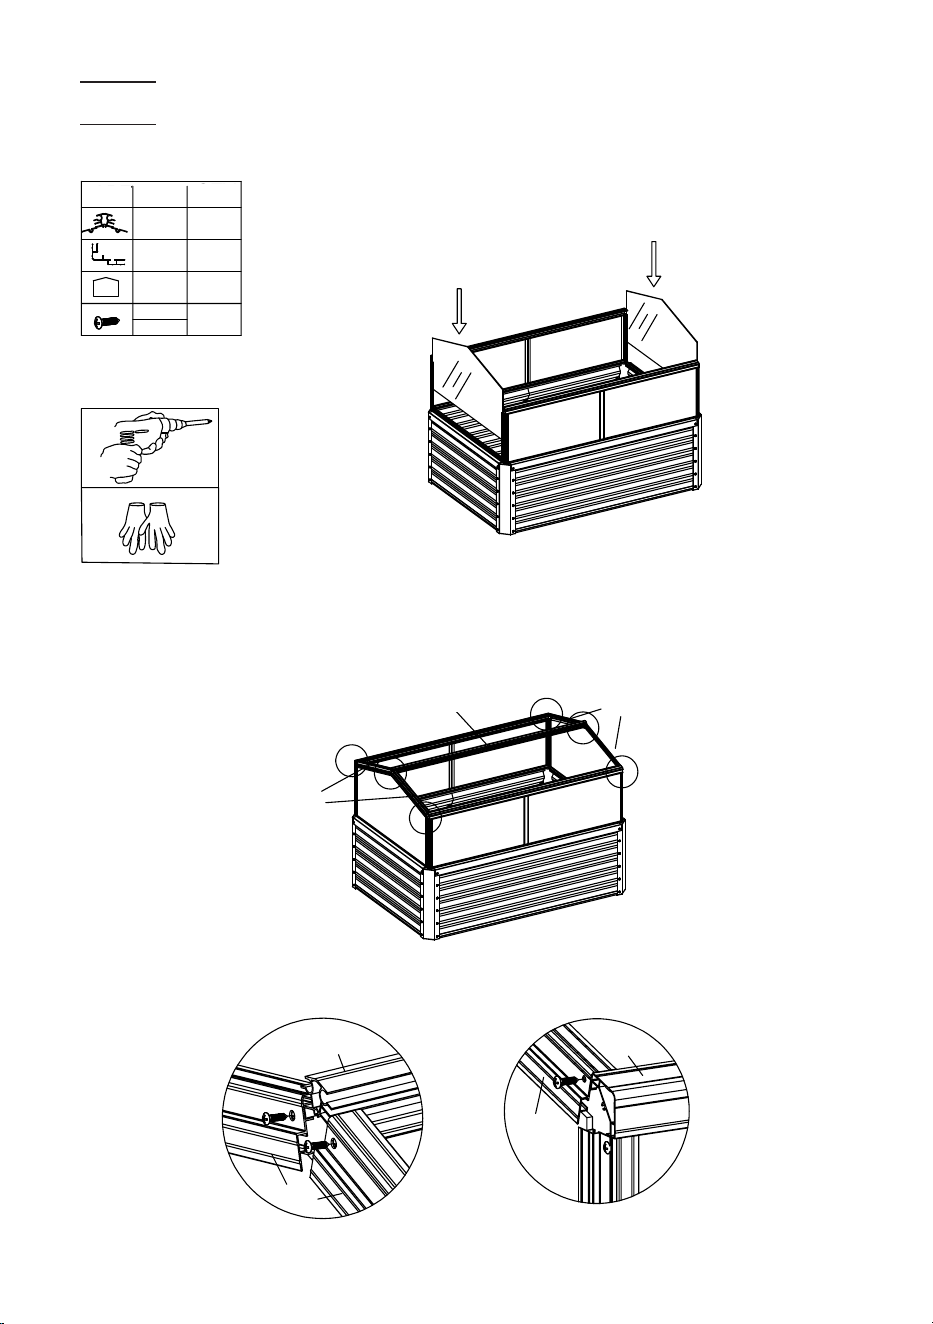
6
J 02
J 02
J 02
1
2
J 03
J 07
L03A
Z02
3
J 07
8
Z02
4
1
2
2
3
3
1
2
M4X12D
M4X8
TEIL NR
ANZ
7
TEIL
NR ANZ
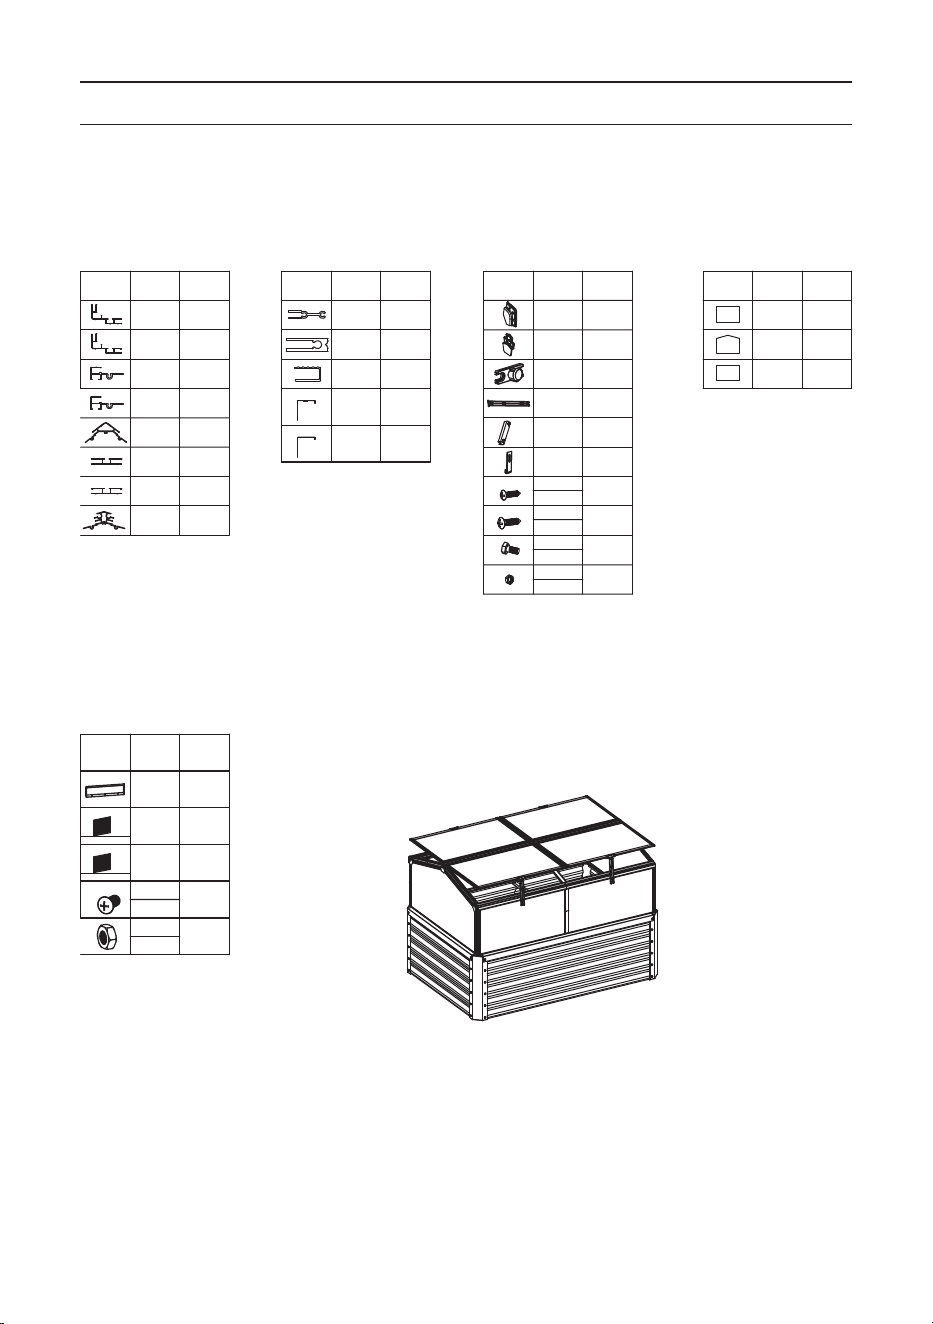
ASSEMBLY
Parts
PART
NO
QTY
L01A 4
L01B 4
PART
NO
QTY
Z01
38
S01
22
M5X10
M01
M5
22
PART
NO
QTY
Y1
4
4
J 02
L06
4
L07
4
L08
8
PART
NO
QTY
16
Z02
L02A
2
L02B
2
L03A
2
L05A
1
2
J 03
4
J 08
4
J 09
2
Y2
Y4
4
4
J 07
W02
10
L04A
2
L04B
2
L33A
2
L33B
2
PART
NO
QTY
1100mm
800mm
W04
4
Y11
2
Y12
2
48
48
S02
M6X10
M02
M6
M4X12D
M4X8
1
PART
NO
QTY
L06
1
L07
1
L08
2
2
1
Y4
L06
L08
L08
4*Z01
L07
Z02
4
Z01
J 08
Y4
J 08
2*Z02
J 08
L06
L08
L08
L07
1
J 09
Y4
1
J 09
J 09
M4X12D
M4X8
Window Assembly
PART
NO
QTY
M02
Y11/Y12
S02
W04
Y12
Y11
1100mm
800mm
Y12
L33A&L33B
S02
W04
L33A
L33A
L33B
L33B
L33A
2
L33B
2
W04
4
Y11
2
Y12
2
48
48
S02
M6X10
M02
M6
Y11
Y11
Y12
Y12
W04
W04
W04
W04
Fix the plates together with W04, using S02 & M02 as shown
Fix L33A & L33B to W04 using S02 & M02
2
PART
NO
QTY
S01
14
M5X10
M01
M5
14
L01A 4
S01
L01A
Z01
L02B
Z01
L02B
L01A
L01A
L01A
L02A
L02B
L02A
L01A
M01
L02B
Z01
4
L02A
2
L02B
2
L02B
L02A
L02B
L02A
W02
M01
S01
W02
10
L01A
L01A
L01A
L01A
M4X12D
Slide 3*S01 into the channel of each L02A, fix L02A to L33A
using S01 & M01 at a distance about 40CM of each.
Slide 2*S01 into the channel of each L02B, fix L02B to L33B
using S01 & MO1 at a distance about 40CM of each.
Slide 1*S01 into the
channel of L01A
Fix L01A to L02A & L02B using S01 & M01 and screw Z01.
3

L04A
2
L04A
2*S01
L02A
L04A
S01
L01A
L03A
Z01
L03A
L01A
PART
NO
QTY
Z01
4
L03A
2
4
Y1
L03A
M01
M5
4
M01
2
1
1
1
1
1
L03A
2
L03A
2
Y1
S01
4
M5X10
L04A
L04A
Y1
Y1
Y1
M4X12D
Slide 2*S01 into the channel of L04A
Fix L04A to L02A,
using one S01 & M01
Fix L03A to L01A, using Z01
Fix L03A to L04A,
using another S01 & M01
4
L01B
L03A
PART
NO
QTY
4
L01B
Z01
8
L05A
1
L01B
L05A
2
Y2
L01B
L05A
Y2
1
2
Y2
L01B
M4X12D
Insert Y2 into the channel of L01A
Fix L01B to L01A & L03A, using screw Z01.
Then, fix L05A to L01B using screw Z01.
5
wi ndow
1
1
2
1 2
L04B
L04B
PART
NO
QTY
2
L04B
S01
4
M5X10
M01
M5
4
Slide 2*S01 into each L04B.
Fix L04B to L03A & L05A, using S01 & M01.
Slide the windows into the channel of L05A.
L04B
6
PART
NO
QTY
2
4
Z01
6
J 02
J 02
J 02
1
2
J 03
J 07
L03A
Z02
3
J 07
8
Z02
4
1
2
2
3
3
1
2
M4X12D
M4X8
7

MONTAJE
PART
NO
QTY
L01A 4
L01B 4
PART
NO
QTY
Z01
38
S01
22
M5X10
M01
M5
22
PART
NO
QTY
Y1
4
4
J 02
L06
4
L07
4
L08
8
PART
NO
QTY
16
Z02
L02A
2
L02B
2
L03A
2
L05A
1
2
J 03
4
J 08
4
J 09
2
Y2
Y4
4
4
J 07
W02
10
L04A
2
L04B
2
L33A
2
L33B
2
PART
NO
QTY
1100mm
800mm
W04
4
Y11
2
Y12
2
48
48
S02
M6X10
M02
M6
M4X12D
M4X8
PIEZA
PIEZA
PIEZA PIEZA PIEZANÚM.
NÚM.
NÚM. NÚM. NÚM.
UDS.
UDS.
UDS. UDS. UDS.
1
PART
NO
QTY
L06
1
L07
1
L08
2
2
1
Y4
L06
L08
L08
4*Z01
L07
Z02
4
Z01
J 08
Y4
J 08
2*Z02
J 08
L06
L08
L08
L07
1
J 09
Y4
1
J 09
J 09
M4X12D
M4X8
Window Assembly
PIEZA NÚM.
UDS.
Instalación de ventanas

PART
NO
QTY
M02
Y11/Y12
S02
W04
Y12
Y11
1100mm
800mm
Y12
L33A&L33B
S02
W04
L33A
L33A
L33B
L33B
L33A
2
L33B
2
W04
4
Y11
2
Y12
2
48
48
S02
M6X10
M02
M6
Y11
Y11
Y12
Y12
W04
W04
W04
W04
Fix the plates together with W04, using S02 & M02 as shown
Fix L33A & L33B to W04 using S02 & M02
PIEZA NÚM.
UDS.
Fije los paneles en las esquinas (W04). Utilice para ello los tornillos S02 y M02.
Fije las piezas L33 y L33B a W04. Utilice para ello los tornillos S02 y M02.
2

PART
NO
QTY
S01
14
M5X10
M01
M5
14
L01A 4
S01
L01A
Z01
L02B
Z01
L02B
L01A
L01A
L01A
L02A
L02B
L02A
L01A
M01
L02B
Z01
4
L02A
2
L02B
2
L02B
L02A
L02B
L02A
W02
M01
S01
W02
10
L01A
L01A
L01A
L01A
M4X12D
Slide 3*S01 into the channel of each L02A, fix L02A to L33A
using S01 & M01 at a distance about 40CM of each.
Slide 2*S01 into the channel of each L02B, fix L02B to L33B
using S01 & MO1 at a distance about 40CM of each.
Slide 1*S01 into the
channel of L01A
Fix L01A to L02A & L02B using S01 & M01 and screw Z01.
PIEZA NÚM.
UDS.
Introduzca 3 tornillos (S01) en el riel de L02A. Una L02A con L33A.
Utilice los tornillos S01 y M01 a una distancia de 40 cm cada uno.
Introduzca 2 tornillos S01 en el riel de las dos piezas L02B. Una L02B
con L33B. Utilice los tornillos S01 y M01 a una distancia de 40 cm
cada uno.
Conecte L01A a L02B. Utilice para ello los tornillos S01 y M01.
3
Introduzca el tornillo
(S01) en el riel de
L01A.

L04A
2
L04A
2*S01
L02A
L04A
S01
L01A
L03A
Z01
L03A
L01A
PART
NO
QTY
Z01
4
L03A
2
4
Y1
L03A
M01
M5
4
M01
2
1
1
1
1
1
L03A
2
L03A
2
Y1
S01
4
M5X10
L04A
L04A
Y1
Y1
Y1
M4X12D
Slide 2*S01 into the channel of L04A
Fix L04A to L02A,
using one S01 & M01
Fix L03A to L01A, using Z01
Fix L03A to L04A,
using another S01 & M01
PIEZA NÚM.
UDS.
Introduzca 2 tornillos (S01) en el riel de L04A.
Una L04A con L02A. Utilice para ello
un tornillo S01 y M01.
Una L03A con L04A. Utilice
para ello otro tornillo S01 y
M01.
Fije las piezas L03A a L01A con un
tornillo Z01.
4

L01B
L03A
PART
NO
QTY
4
L01B
Z01
8
L05A
1
L01B
L05A
2
Y2
L01B
L05A
Y2
1
2
Y2
L01B
M4X12D
Insert Y2 into the channel of L01A
Fix L01B to L01A & L03A, using screw Z01.
Then, fix L05A to L01B using screw Z01.
PIEZA
NÚM.
UDS.
Introduzca las piezas Y2 en el riel de
L01A.
Fije la pieza L01A en L01A y L03A. Utilice para ello
un tornillo Z01.
Fije la pieza L05A a L01B con un tornillo Z01.
5

wi ndow
1
1
2
1 2
L04B
L04B
PART
NO
QTY
2
L04B
S01
4
M5X10
M01
M5
4
Slide 2*S01 into each L04B.
Fix L04B to L03A & L05A, using S01 & M01.
Slide the windows into the channel of L05A.
L04B
PIEZA
NÚM.
UDS. Introduzca 2 tornillos S01 en una pieza L04B cada uno.
Fije L04B a L03A y L05A con los tornillos S01 y M01.
Deslice los paneles de las ventanas en los
rieles de L05A
Ventana
6

PART
NO
QTY
2
4
Z01
6
J 02
J 02
J 02
1
2
J 03
J 07
L03A
Z02
3
J 07
8
Z02
4
1
2
2
3
3
1
2
M4X12D
M4X8
PIEZA
NÚM.
UDS.
7
PIEZA
NÚM.
UDS.

INSTALLATION
PART
NO
QTY
L01A 4
L01B 4
PART
NO
QTY
Z01
38
S01
22
M5X10
M01
M5
22
PART
NO
QTY
Y1
4
4
J 02
L06
4
L07
4
L08
8
PART
NO
QTY
16
Z02
L02A
2
L02B
2
L03A
2
L05A
1
2
J 03
4
J 08
4
J 09
2
Y2
Y4
4
4
J 07
W02
10
L04A
2
L04B
2
L33A
2
L33B
2
PART
NO
QTY
1100mm
800mm
W04
4
Y11
2
Y12
2
48
48
S02
M6X10
M02
M6
M4X12D
M4X8
PARTIE
PARTIE
PARTIE PARTIE PARTIE
N°
N°
N° N° N°IND
IND
IND IND IND

1
PART
NO
QTY
L06
1
L07
1
L08
2
2
1
Y4
L06
L08
L08
4*Z01
L07
Z02
4
Z01
J 08
Y4
J 08
2*Z02
J 08
L06
L08
L08
L07
1
J 09
Y4
1
J 09
J 09
M4X12D
M4X8
Window Assembly
PARTIE
N° IND
Installation de fenêtres

PART
NO
QTY
M02
Y11/Y12
S02
W04
Y12
Y11
1100mm
800mm
Y12
L33A&L33B
S02
W04
L33A
L33A
L33B
L33B
L33A
2
L33B
2
W04
4
Y11
2
Y12
2
48
48
S02
M6X10
M02
M6
Y11
Y11
Y12
Y12
W04
W04
W04
W04
Fix the plates together with W04, using S02 & M02 as shown
Fix L33A & L33B to W04 using S02 & M02
PARTIE
N° IND
Fixez les panneaux à l'aide des coins (W04). Utilisez les vis S02 et M02.
Fixer les parties L33 et L33B à W04. Utilisez les vis S02 et M02.
2

PART
NO
QTY
S01
14
M5X10
M01
M5
14
L01A 4
S01
L01A
Z01
L02B
Z01
L02B
L01A
L01A
L01A
L02A
L02B
L02A
L01A
M01
L02B
Z01
4
L02A
2
L02B
2
L02B
L02A
L02B
L02A
W02
M01
S01
W02
10
L01A
L01A
L01A
L01A
M4X12D
Slide 3*S01 into the channel of each L02A, fix L02A to L33A
using S01 & M01 at a distance about 40CM of each.
Slide 2*S01 into the channel of each L02B, fix L02B to L33B
using S01 & MO1 at a distance about 40CM of each.
Slide 1*S01 into the
channel of L01A
Fix L01A to L02A & L02B using S01 & M01 and screw Z01.
IND N° IND
Faites glisser 3 vis (S01) dans le rail de L02A. Attachez L02A à L33A.
Utilisez les vis S01 et M01 à une distance de 40 cm chacune.
Glisser 2 vis S01 dans le rail des deux parties L02B. Fixez L02B à
L33B. Utilisez les vis S01 et M01 à une distance de 40 cm chacune.
Fixez L01A à L02B. Utilisez les vis S01 et M01.
3
Faire glisser la vis (S01)
dans le rail de L01A.

L04A
2
L04A
2*S01
L02A
L04A
S01
L01A
L03A
Z01
L03A
L01A
PART
NO
QTY
Z01
4
L03A
2
4
Y1
L03A
M01
M5
4
M01
2
1
1
1
1
1
L03A
2
L03A
2
Y1
S01
4
M5X10
L04A
L04A
Y1
Y1
Y1
M4X12D
Slide 2*S01 into the channel of L04A
Fix L04A to L02A,
using one S01 & M01
Fix L03A to L01A, using Z01
Fix L03A to L04A,
using another S01 & M01
PARTIE
N° IND
Faire glisser 2 vis (S01) dans le rail de L04A.
Fixez L04A à L02A. Utilisez une vis
S01 et M01.
Fixez L03A à L04A. Utilisez une
autre vis S01 et M01.
Fixer les parties L03A à L01A avec
une vis Z01.
4

L01B
L03A
PART
NO
QTY
4
L01B
Z01
8
L05A
1
L01B
L05A
2
Y2
L01B
L05A
Y2
1
2
Y2
L01B
M4X12D
Insert Y2 into the channel of L01A
Fix L01B to L01A & L03A, using screw Z01.
Then, fix L05A to L01B using screw Z01.
PARTIE
N° IND
Insérer les parties Y2 dans le rail de
L01A.
Fixez la partie L01A à L01A et L03A. Pour ce faire,
utilisez une vis Z01.
Fixez la partie L05A à L01B avec une vis Z01.
5
wi ndow
1
1
2
1 2
L04B
L04B
PART
NO
QTY
2
L04B
S01
4
M5X10
M01
M5
4
Slide 2*S01 into each L04B.
Fix L04B to L03A & L05A, using S01 & M01.
Slide the windows into the channel of L05A.
L04B
PARTIE
N° IND Insérer 2 vis S01 dans une partie L04B chacune.
Fixer L04B à L03A et L05A à l'aide des vis S01 et M01.
Faites glisser les panneaux de la fenêtre
dans les rails du L05A
Fenêtre
6
PART
NO
QTY
2
4
Z01
6
J 02
J 02
J 02
1
2
J 03
J 07
L03A
Z02
3
J 07
8
Z02
4
1
2
2
3
3
1
2
M4X12D
M4X8
PARTIE
N°
IND
7
PARTIE
N° IND

MONTAGGIO
PART
NO
QTY
L01A 4
L01B 4
PART
NO
QTY
Z01
38
S01
22
M5X10
M01
M5
22
PART
NO
QTY
Y1
4
4
J 02
L06
4
L07
4
L08
8
PART
NO
QTY
16
Z02
L02A
2
L02B
2
L03A
2
L05A
1
2
J 03
4
J 08
4
J 09
2
Y2
Y4
4
4
J 07
W02
10
L04A
2
L04B
2
L33A
2
L33B
2
PART
NO
QTY
1100mm
800mm
W04
4
Y11
2
Y12
2
48
48
S02
M6X10
M02
M6
M4X12D
M4X8
PARTE
PARTE
PARTE PARTE PARTE
N.
N.
N. N. N.QTÀ.
QTÀ.
QTÀ. QTÀ. QTÀ.

1
PART
NO
QTY
L06
1
L07
1
L08
2
2
1
Y4
L06
L08
L08
4*Z01
L07
Z02
4
Z01
J 08
Y4
J 08
2*Z02
J 08
L06
L08
L08
L07
1
J 09
Y4
1
J 09
J 09
M4X12D
M4X8
Window Assembly
PARTE
N. QTÀ.
Montaggio nestre

PART
NO
QTY
M02
Y11/Y12
S02
W04
Y12
Y11
1100mm
800mm
Y12
L33A&L33B
S02
W04
L33A
L33A
L33B
L33B
L33A
2
L33B
2
W04
4
Y11
2
Y12
2
48
48
S02
M6X10
M02
M6
Y11
Y11
Y12
Y12
W04
W04
W04
W04
Fix the plates together with W04, using S02 & M02 as shown
Fix L33A & L33B to W04 using S02 & M02
PARTE
N. QTÀ.
Fissare i pannelli con gli angoli (W04). Utilizzare le viti S02 e M02.
Attaccare le parti L33 e L33B a W04. Utilizzare le viti S02 e M02.
2
PART
NO
QTY
S01
14
M5X10
M01
M5
14
L01A 4
S01
L01A
Z01
L02B
Z01
L02B
L01A
L01A
L01A
L02A
L02B
L02A
L01A
M01
L02B
Z01
4
L02A
2
L02B
2
L02B
L02A
L02B
L02A
W02
M01
S01
W02
10
L01A
L01A
L01A
L01A
M4X12D
Slide 3*S01 into the channel of each L02A, fix L02A to L33A
using S01 & M01 at a distance about 40CM of each.
Slide 2*S01 into the channel of each L02B, fix L02B to L33B
using S01 & MO1 at a distance about 40CM of each.
Slide 1*S01 into the
channel of L01A
Fix L01A to L02A & L02B using S01 & M01 and screw Z01.
PARTE
N. QTÀ.
Far scorrere 3 viti (S01) nella guida di L02A. Attaccare L02A a L33A.
Utilizzare le viti S01 e M01 a una distanza di 40cm ciascuna.
Inlare 2 viti S01 nella guida delle due parti L02B. Fissare L02B a
L33B. Utilizzare le viti S01 e M01 a una distanza di 40cm ciascuna.
Fissare L01A a L02B. Utilizzare le viti S01 e M01.
3
Far scorrere la vite
(S01) nella guida di
L01A.
L04A
2
L04A
2*S01
L02A
L04A
S01
L01A
L03A
Z01
L03A
L01A
PART
NO
QTY
Z01
4
L03A
2
4
Y1
L03A
M01
M5
4
M01
2
1
1
1
1
1
L03A
2
L03A
2
Y1
S01
4
M5X10
L04A
L04A
Y1
Y1
Y1
M4X12D
Slide 2*S01 into the channel of L04A
Fix L04A to L02A,
using one S01 & M01
Fix L03A to L01A, using Z01
Fix L03A to L04A,
using another S01 & M01
PARTE
N. QTÀ.
Far scorrere 2 viti (S01) nella guida di L04A.
Fissare L04A a L02A. Utilizzare una
vite S01 e una M01.
Fissare L03A a L04A. Utilizzare
una vite S01 e una M01.
Fissare le parti L03A a L01A con una
vite Z01.
4
L01B
L03A
PART
NO
QTY
4
L01B
Z01
8
L05A
1
L01B
L05A
2
Y2
L01B
L05A
Y2
1
2
Y2
L01B
M4X12D
Insert Y2 into the channel of L01A
Fix L01B to L01A & L03A, using screw Z01.
Then, fix L05A to L01B using screw Z01.
PARTE
N. QTÀ.
Inserire le parti Y2 nella guida di
L01A.
Fissare la parte L01A a L01A e L03A. In questo caso,
utilizzare una vite Z01.
Fissare la parte L05A a L01B con una vite Z01.
5

wi ndow
1
1
2
1 2
L04B
L04B
PART
NO
QTY
2
L04B
S01
4
M5X10
M01
M5
4
Slide 2*S01 into each L04B.
Fix L04B to L03A & L05A, using S01 & M01.
Slide the windows into the channel of L05A.
L04B
PARTE
N. QTÀ. Inserire 2 viti S01 in una parte L04B ciascuna.
Fissare L04B a L03A e L05A usando le viti S01 e M01.
Far scorrere i pannelli delle nestre nelle
guide di L05A.
Finestra
6

PART
NO
QTY
2
4
Z01
6
J 02
J 02
J 02
1
2
J 03
J 07
L03A
Z02
3
J 07
8
Z02
4
1
2
2
3
3
1
2
M4X12D
M4X8
PARTE N.
QTÀ.
7
PARTE
N. QTÀ.

HERSTELLER
Manufacturer | Fabricante | Fabricant | Produttore
Chal-Tec GmbH, Wallstraße 16, 10179 Berlin, Deutschland (Germany).
IMPORTEUR FÜR GROSSBRITANNIEN
Importer for Great Britain | Importador para Gran Bretaña | Importateur
pour la Grande Bretagne | Importatore per la Gran Bretagna
Berlin Brands Group UK Limited
PO Box 42
272 Kensington High Street
London, W8 6ND
United Kingdom