OWNER’S MANUAL
AIR CONDITIONER (SPLIT TYPE)
For general public use
Indoor unit
RAS-10, 13J2KV-HK
Outdoor unit
RAS-10, 13J2AV-HK
1118350275
ENGLISH
繁體中文
1118350275-00_S01_182x257_12p_S_p70_190327.indd 1 24/6/2562 11:23:07
●
Keepthismanualwheretheoperatorcaneasilyndit.
●
Readtheprecautionsinthismanualcarefullybeforeoperatingtheunit.
●
Thisapplianceisintendedtobeusedbyexpertortrainedusersinshops,inlight
industryandonfarms,orforcommercialusebylaypersons.
●
TheprecautionsdescribedhereinareclassiedasDANGER,WARNINGand
CAUTION.Theybothcontainimportantinformationregardingsafety.Besureto
observeallprecautionswithoutfail.
PRECAUTIONS FOR SAFETY
DANGER
●
Donotinstall,repair,openorremovethecover.Itmayexposeyouto
dangerousvoltages.Askthedealerorthespecialisttodothis.
●
Turningothepowersupplywillnotpreventpotentialelectricshock.
●
Theapplianceshallbeinstalledinaccordancewithnationalwiringregulation.
●
Meansfordisconnectionfromthesupplyhavingacontactseparationofatleast
3mminallpolesmustbeincorporatedinthexedwiring.
●
Theappliancemustbestoredinaroomwithoutcontinuouslyoperatingignition
sources(forexample,openames,anoperatinggasapplianceoranoperating
electricheater).
●
Inordertoavoidre,explosionorinjury,donotoperatetheunitwhenharmful
gases(e.g.ammableorcorrosive)aredetectedneartheunit.
WARNING
●
Donotexposeyourbodydirectlytocoolorwarmairforalongtime.
●
Donotinsertyourngeroranyarticleintotheairinlet/outlet.
●
Whenanabnormality(burningsmell,etc.)occurs,stoptheairconditionerand
disconnectthepowersupplyorturnothebreaker.
●
Thisappliancecanbeusedbychildrenagedfrom8yearsandaboveand
personswithreducedphysical,sensoryormentalcapabilitiesorlackof
experienceandknowledgeiftheyhavebeengivensupervisionorinstruction
concerninguseoftheapplianceinasafewayandunderstandthehazards
involved.Childrenshallnotplaywiththeappliance.Cleaninganduser
maintenanceshallnotbemadebychildrenwithoutsupervision.
●
Thisapplianceisnotintendedforusebyperson(includingchildren)with
reducedphysical,sensoryormentalcapabilities,orlackofexperienceand
knowledge,unlesstheyhavebeengivensupervisionorinstructionconcerning
useoftheappliancebyapersonresponsiblefortheirsafety.
●
Theairconditionermustbeinstalled,maintained,repairedandremovedbya
qualiedinstallerorqualiedserviceperson.Whenanyofthesejobsistobe
done,askaqualiedinstallerorqualiedservicepersontodothemforyou.
●
Childrenshouldbesupervisedtoensurethattheydonotplaywiththe
appliance.
●
Donotuseanyrefrigerantdierentfromtheonespecied(R410A)for
complementorreplacement.Otherwise,abnormallyhighpressuremaybe
generatedintherefrigerationcycle,whichmayresultinafailureorexplosionof
theproductoraninjurytoyourbody.
●
Donotusemeanstoacceleratethedefrostingprocessortoclean,otherthan
thoserecommendedbythemanufacturer.
1118350275-00_S01_182x257_12p_S_p70_190327.indd 2 24/6/2562 11:23:07
PRECAUTIONS FOR SAFETY
●
Theapplianceshallbestoredinaroomwithoutcontinuouslyoperatingignition
sources(forexample:openames,anoperatinggasapplianceoranoperating
electricheater).
●
Beawarethatrefrigerantsmaynotcontainanodour.
●
Donotpierceorburnastheapplianceispressurized.Donotexposethe
appliancetoheat,ames,sparks,orothersourcesorignition.Else,itmay
explodeandcauseinjuryordeath.
CAUTION
●
Donotwashtheunitwithwater.Itmaycauseanelectricshock.
●
Donotusethisairconditionerforotherpurposessuchaspreservingfood,
breedinganimal,etc.
●
Donotsteporputanythingontheindoor/outdoorunit.Itmaycauseaninjuryor
damagetheunit.
●
Donottouchaluminiumnbecauseitmaycauseaninjury.
●
Beforecleaningtheunit,turnothemainswitchorthecircuitbreaker.
●
Whentheunitwon’tbeusedforalongtime,turnothemainswitchorthe
circuitbreaker.
●
Itisrecommendedthatmaintenancebeperformedbyaspecialistwhentheunit
hasbeenoperatedforalongtime.
●
Themanufacturershallnotassumeanyliabilityforthedamagecausedbynot
observingthedescriptionofthismanual.
EN
1118350275-00_S01_182x257_12p_S_p70_190327.indd 3 24/6/2562 11:23:07
2
3
4
5
1
1ECO(White)
2Wi-Fiaccess(White)
3Hi-Power(White)
4Timer(White)
5Operation(White)
●
Displaybrightnesscanbeadjusted,followprocedureon#.
RequireWirelessLANconnectingadapterwhichavailableasaccessory.
INDOOR UNIT DISPLAY ONE-TOUCH
AUTOMATIC OPERATION
DRY OPERATION
Hi-POWER OPERATION
ECO OPERATION
TEMPORARY OPERATION
TIMER OPERATION
COOLING / HEATING / FAN ONLY OPERATION
PREPARATION BEFORE USE
1 5
6
8
9
10
11
12
7
2
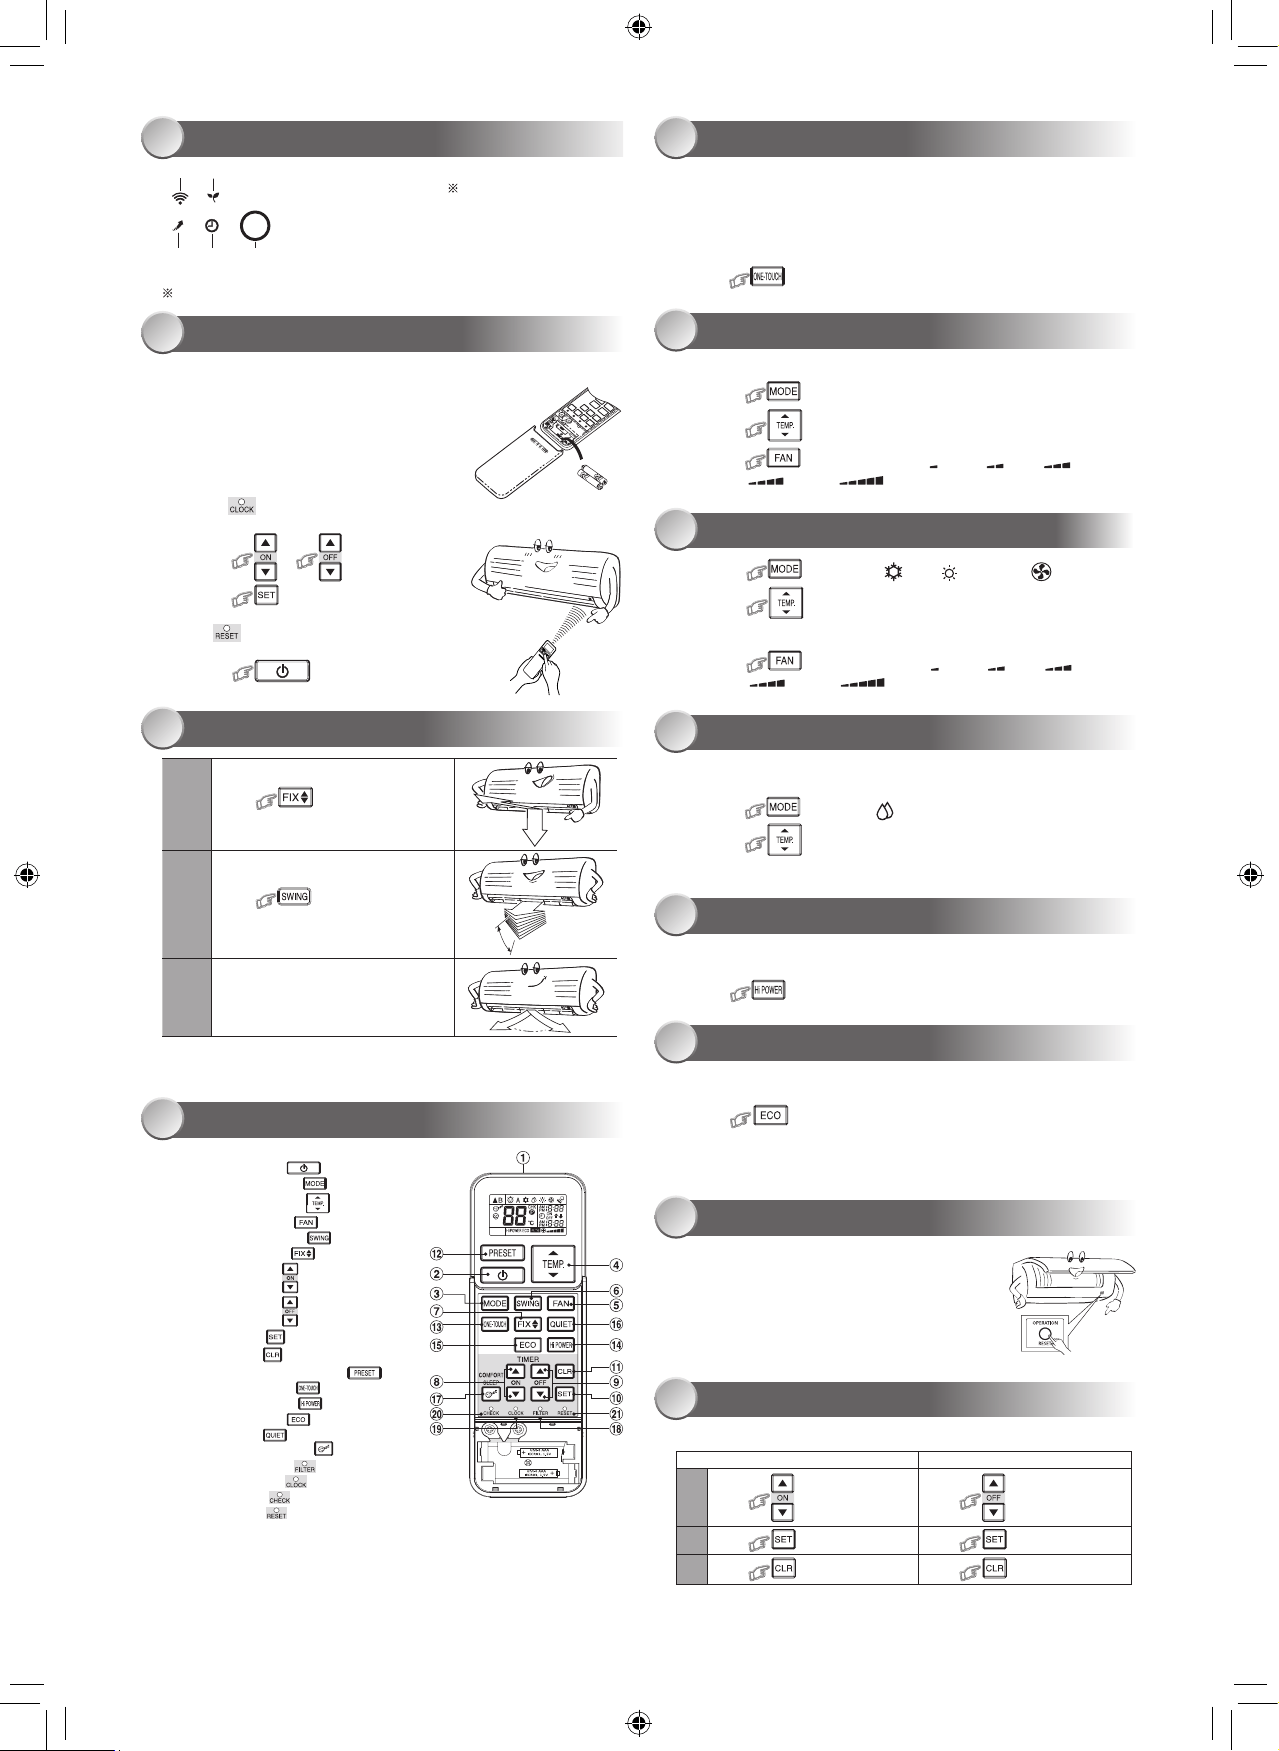
Preparing Filters
1.Opentheairinletgrilleandremovetheairlters.
2.Attachthelters.(seedetailintheaccessorysheet).
Loading Batteries (when use wireless operation.)
1.Removetheslidecover.
2.Insert2newbatteries(AAAtype)
followingthe(+)and(–)positions.
Clock Setup
1.Push bytipofthepencil.
Iftimerindicationisashing,gotothenextstep2.
2.Press or
:adjustthetime.
3.Press :Setthetime.
Remote Control Reset
Push bytipofthepencilor
1.Removethebatteries.
2.Press .
3.Insertthebatteries.
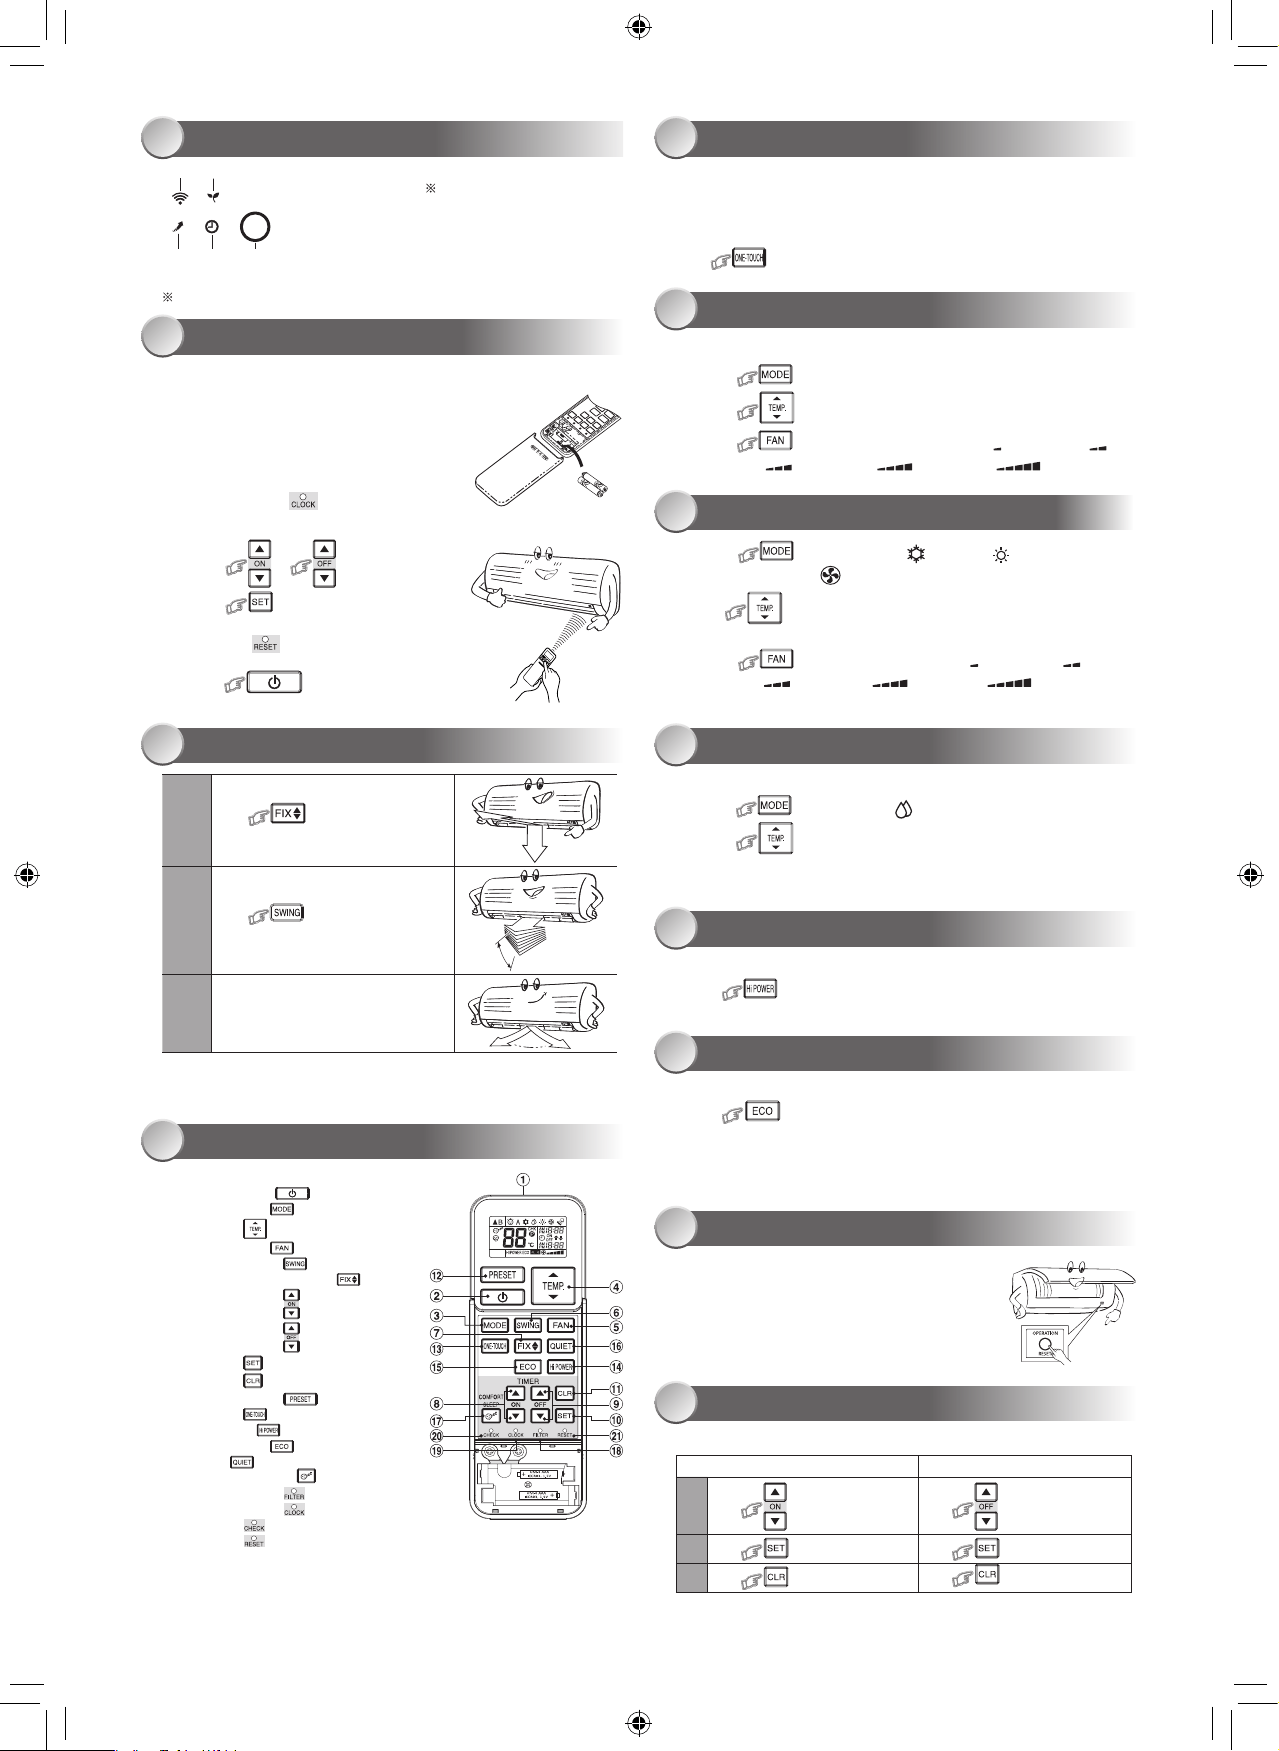
AIR FLOW DIRECTION
REMOTE CONTROL
3
4
1
Press :Movethelouverin
thedesiredverticaldirection.
2
Press :Swingtheair
automaticallyandpressagaintostop.
3
Forhorizontaldirection,adjust
manually.
Note:
• Donotmovethelouvermanuallybyothers.
• Thelouvermayautomationpositioningbysomeoperationmode.
Note:
• TheprovidedRemoteControllerisawirelesstype,whichalsocanbe
usedasawire.Pleasesee“HowtoConnectTheRemoteController
forWiredOperation”,locatedininstallationinstruction,incaseofwired
controlisrequired.
• Inwireoperation,remotecontrollerwillreturntoinitialcondition
(PRESET,TIMERandCLOCKwillreturntoinitialcondition)whenuser
shutdownpowersupplyofAirconditioner.
Pressthe“ONE-TOUCH”buttonforfullyautomatedoperationthatis
customizedtothetypicalconsumerpreferencedinyourregionoftheworld.
Thecustomizedsettingscontroltemperatureairflowstrength,airflow
directionandothersettingstoprovideyoualternatecontactwith
“ONE-TOUCH”ofthebutton.Ifyoupreferothersettingsyoucanselectfrom
themanyotheroperatingfunctionsofyourToshibaunit.
Press :Starttheoperation.
Toautomaticallyselectcooling,heatingorfanonlyoperation
1.Press :SelectAutoA.
2.Press :SetthedesiredtemperatureMin17°C,Max30°C.
3.Press :SelectAUTO,LOW ,LOW+ ,MED ,
MED+ orHIGH .
1.Press :SelectCool ,Heat orFanonly .
2.Press :Setthedesiredtemperature.
Min:17°C,Max:30°C,FanOnly:Notemperatureindication
3.Press :SelectAUTO,LOW ,LOW+ ,MED ,
MED+ orHIGH .
Fordehumidification,amoderatecoolingperformanceiscontrolled
automatically.
1.Press :SelectDry .
2.Press :SetthedesiredtemperatureMin17°C,Max30°C.
Note:DrymodefanspeedissettoAutoonly.
Toautomaticallycontrolroomtemperatureandairflowforfastercoolingor
heatingoperation(exceptinDRYandFANONLYmode)
Press :Startandstoptheoperation.
Toautomaticallycontrolroomtemperaturetosaveenergy(exceptinDRYand
FANONLYmode)
Press :Startandstoptheoperation.
Note:Coolingoperation;thesettemperaturewillincreaseautomatically1
degree/hourfor2hours(maximum2degreesincrease).
Forheatingoperationthesettemperaturewilldecrease.
Incaseofthemisplacedordischargedremotecontrol
• PressingtheRESETbutton,theunitcanstartor
stopwithoutusingtheremotecontrol.
• OperationmodeissetonAUTOMATICoperation,
presettemperatureis24°Candfanoperationis
automaticspeed.
Setthetimerwhentheairconditionerisoperating.
Daily timer allows the user to set both the ON & OFF timers and will be
activated on a daily basis.
Setting the ON Timer Setting the OFF Timer
1
Press :SetthedesiredON
timer.
Press :Setthedesired
OFFtimer.
2
Press :Setthetimer. Press :Setthetimer.
3
Press :Cancelthetimer. Press
:Cancelthetimer.
1 Infraredsignalemitter
2 Start/Stopbutton( )
3 Modeselectbutton( )
4 Temperaturebutton( )
5 Fanspeedbutton( )
6 Swinglouverbutton( )
7 Setlouverbutton( )
8 Ontimerbutton( )
9 Otimerbutton( )
0 Setupbutton( )
! Clearbutton( )
@ MemoryandPresetbutton( )
# One-Touchbutton( )
$ Highpowerbutton( )
% Economybutton( )
^ Quietbutton( )
& Comfortsleepbutton( )
* Filterresetbutton( )
( Setclockbutton( )
) Checkbutton( )
- Resetbutton( )
1118350275-00_S01_182x257_12p_S_p70_190327.indd 4 24/6/2562 11:23:08
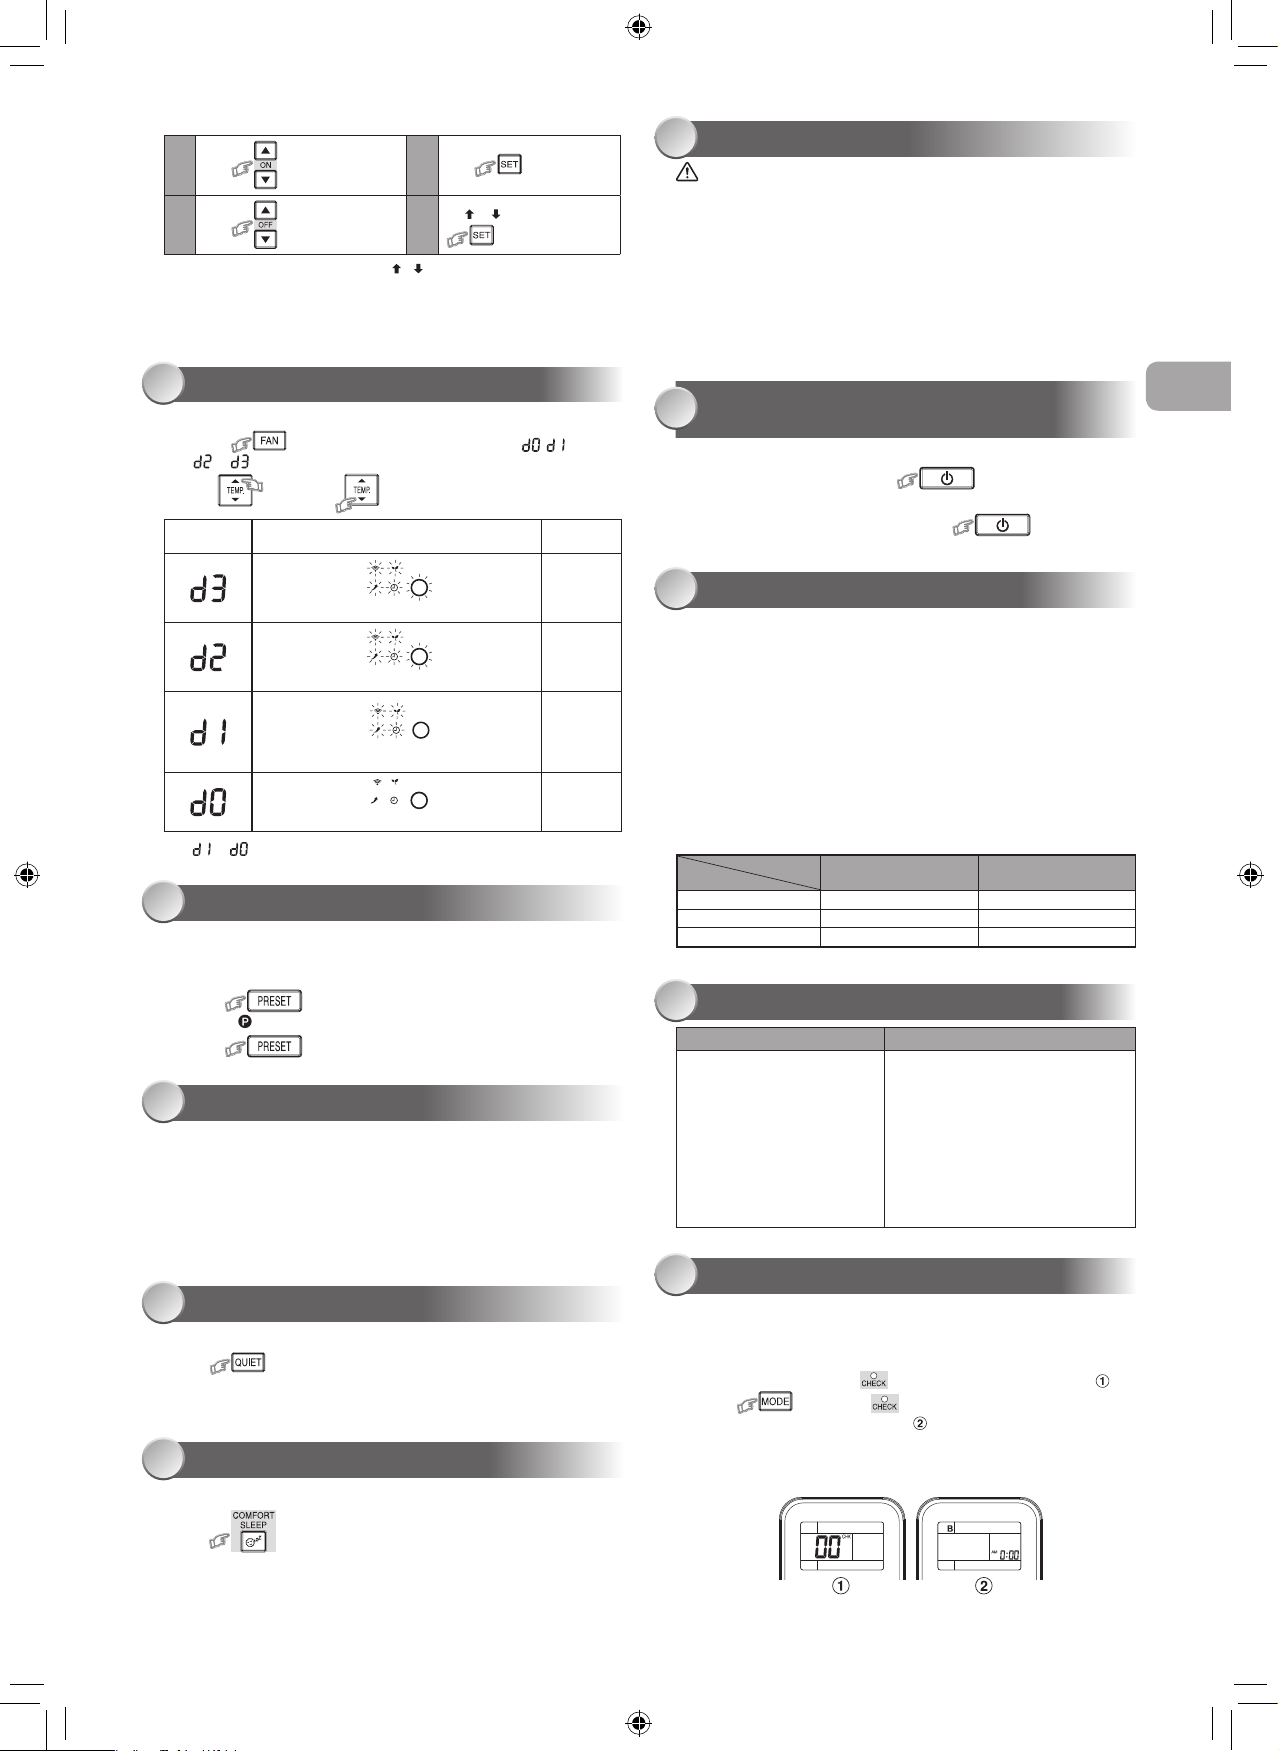
Toseparateusingofremotecontrolforeachindoorunitincaseof2air
conditionersareinstallednearly.
Remote Control B Setup.
1.PressRESETbuttonontheindoorunittoturntheairconditionerON.
2.Pointtheremotecontrolattheindoorunit.
3.Pushandhold buttonontheRemoteControlbythetipofthe
pencil.“00”willbeshownonthedisplay.(Picture )
4.Press duringpushing .“B”willshowonthedisplayand
“00”willdisappearandtheairconditionerwillturnOFF.TheRemote
ControlBismemorized.(Picture )
Note:1.RepeatabovesteptoresetRemoteControltobeA.
2.RemoteControlAhasnot“A”display.
3.DefaultsettingofRemoteControlfromfactoryisA.
DISPLAY LAMP BRIGHTNESS ADJUSTMENT
13
Setting Daily Timer
1
Press :SettheONtimer.
3
Press
2
Press :SettheOFFtimer.
4
Press buttonduring
the( or )markflashing.
• Duringthedailytimerisactivating,botharrows( , )areindicated.
Note:
• Keeptheremotecontrolinaccessibletransmissiontotheindoorunit;
otherwise,thetimelagofupto15minuteswilloccur.
• Thesettingwillbesavedforthenextsameoperation.
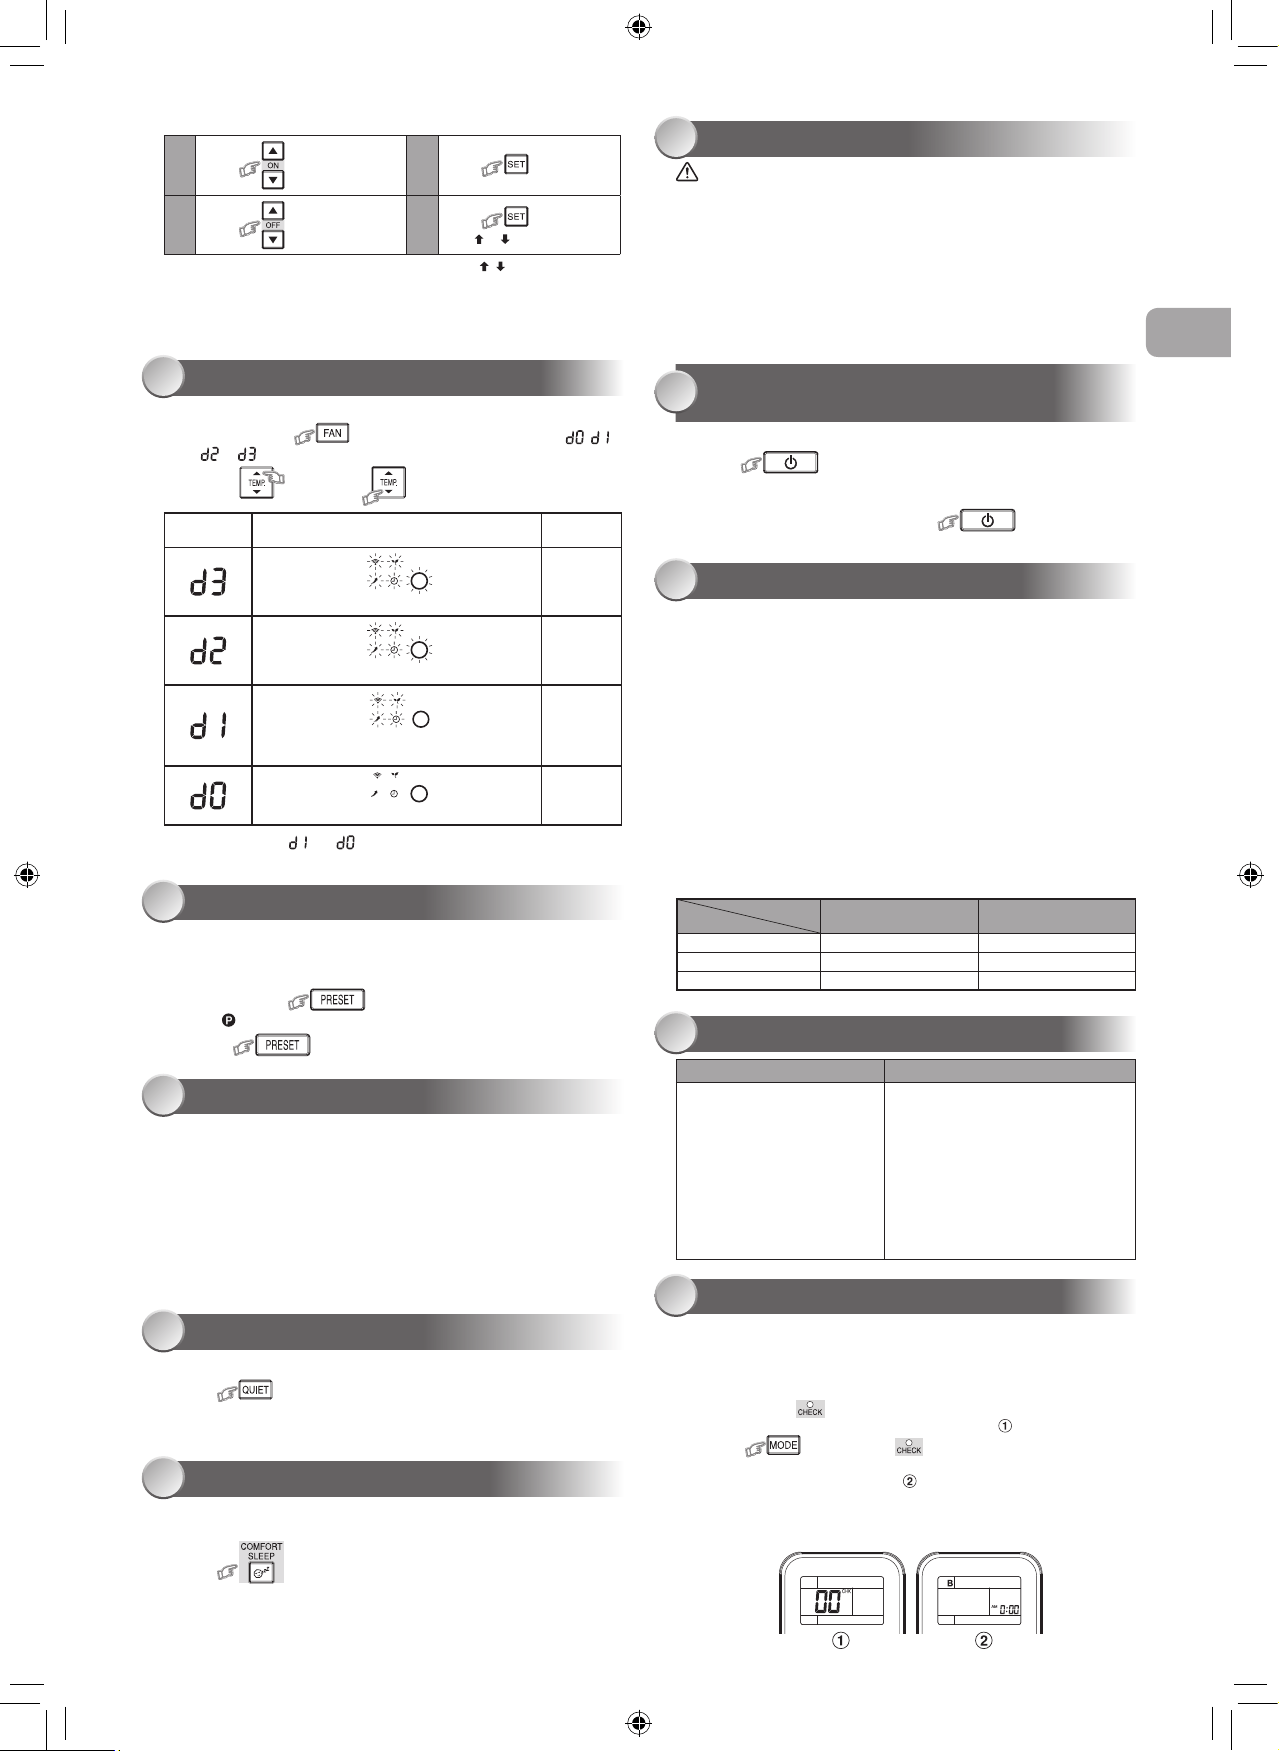
Todecreasethedisplaylampbrightnessorturnitoff.
1. Pressandhold for3secondsuntilbrightnesslevel( , ,
or )isshownonremotecontrolLCDthenreleasethebutton.
2. Press
Rise
or
Decrease
toadjustbrightnessin4levels.
• Intheexamplesof and ,thelampilluminatesfor5secondsbefore
goingoff.
Remotecontrol
LCD
Operationdisplay Brightness
Lampilluminatesfullbrightness.
100%
Lampilluminates50%brightness.
50%
Lampilluminates50%brightnessandthe
operationlampisturnedoff.
50%
Alllampsareturnedoff.
Allturnedoff
PRESET OPERATION
AUTO RESTART OPERATION
QUIET OPERATION
COMFORT SLEEP OPERATION
14
15
16
17
Setyourpreferredoperationforfutureuse.Thesettingwillbememorizedby
theunitforfutureoperation(exceptairflowdirection).
1.Selectyourpreferredoperation.
2.Pressandhold for3secondstomemorizethesetting.
The markdisplays.
3.Press :Operatethepresetoperation.
Toautomaticallyrestarttheairconditionerafterthepowerfailure(Powerof
theunitmustbeon.)
Setting
1.PressandholdtheRESETbuttonontheindoorunitfor3secondsto
settheoperation.(3beepsoundandOPERATIONlampblink5time/
secfor5seconds)
2.PressandholdtheRESETbuttonontheindoorunitfor3secondsto
canceltheoperation.(3beepsoundbutOPERATIONlampdoesnot
blink)
•
IncaseofONtimerorOFFtimerareset,AUTORESTART
OPERATIONdoesnotactivate.
Tooperateatsuperlowfanspeedforquietoperation(exceptinDRYmode)
Press :Startandstoptheoperation.
Note:Undercertainconditions,QUIEToperationmaynotprovideadequate
coolingduetolowsoundfeatures.
Forcomfortablesleep,automaticallycontrolairflowandautomaticallyturn
OFF.
Press :Select1,3,5or9hrsforOFFtimeroperation.
Note:Thecoolingoperation,thesettemperaturewillincreaseautomatically
1degree/hourfor2hours(maximum2degreesincrease).Forheating
operation,thesettemperaturewilldecrease.
MAINTENANCE
OPERATION AND PERFORMANCE
TROUBLESHOOTING (CHECK POINT)
REMOTE CONTROL A-B SELECTION
SELF CLEANING OPERATION (COOL
AND DRY OPERATION ONLY)
18
20
21
22
19
Firstly,turnoffthecircuitbreaker.
Indoor Unit and Remote Control
• Cleantheindoorunitandtheremotecontrolwithawetclothwhen
needed.
• Nobenzine,thinner,polishingpowderorchemically-treatedduster.
Air filters
Cleanevery2weeks.
1.Opentheairinletgrille.
2.Removetheairfilters.
3.Vacuumorwashandthendrythem.
4.Reinstalltheairfiltersandclosetheairinletgrille.
Toprotectbadsmellcausedbythehumidityintheindoorunit.
1.Ifthe buttonispressedonceduring“Cool”or“Dry”mode,
thefanwillcontinuetorunforother30minutes,thenitwillturnoff
automatically.Thiswillreducethemoistureintheindoorunit.
2.Tostoptheunitimmediately,pressthe more2timeswithin
30seconds.
1.Three-minuteprotectionfeature:Topreventtheunitfrombeingactivated
for3minuteswhensuddenlyrestartedorswitchedtoON.
2.Preheatingoperation:Warmuptheunitfor5minutesbeforetheheating
operationstarts.
3.Warmaircontrol:Whentheroomtemperaturereachestheset
temperature,thefanspeedisautomaticallyreducedandtheoutdoorunit
willstop.
4.Automaticdefrosting:Fanswillstopduringdefrostoperation.
5.Heatingcapacity:Heatisabsorbedfromoutdoorsandreleasedinto
theroom.Whentheoutdoortemperatureistoolow,useanother
recommendedheatingapparatusincombinationwiththeairconditioner.
6.Considerationforaccumulatedsnow:Selectthepositionforoutdoorunit
whereitwillnotbesubjectedtosnowdrifts,accumulationofleavesof
otherseasonaldebris.
7.Someminorcrackingsoundmayoccurwhenunitoperating.Thisis
normalbecausethecrackingsoundmaybecausedbyexpansion/
contractionofplastic.
Note:Item2to6forHeatingmodel
Air conditioner operating conditions
Temp.
Operation
Outdoor Temperature Room Temperature
Heating ‒10°C~24°C Lessthan28°C
Cooling ‒10°C~46°C 21°C~43°C
Dry ‒10°C~46°C 17°C~43°C
The unit does not operate. Cooling or Heating is abnormally low.
•Thepowermainswitchis
turnedoff.
•Thecircuitbreakeris
activatedtocutoffthepower
supply.
•Stoppageofelectriccurrent
•ONtimerisset.
•Thefiltersareblockedwithdust.
•Thetemperaturehasbeenset
improperly.
•Thewindowsordoorsareopened.
•Theairinletoroutletoftheoutdoor
unitisblocked.
•Thefanspeedistoolow.
•TheoperationmodeisFANorDRY.
•POWERSELECTIONfunctionis
set75%or50%(This function is
depend on remote controller).
EN
1118350275-00_S01_182x257_12p_S_p70_190327.indd 5 24/6/2562 11:23:08

●將本手冊放置在操作人員容易找到的地方。
●
在操作本設備之前,請仔細閱讀本手冊中的注意事項。
●
本設備供專業或經過培訓的用戶在商店、輕工業和農場作業內使用,
或供非專業人士的商業使用。
●
本文所述的預防措施分為危險、警告和小心。它們均包含有關安全的重要信息。
務必遵守所有注意事項的要求。
安全預防措施
危險
●
不要安裝、修理、打開或拆下蓋子。這樣做可能會讓你暴露在危險的電壓下。
請經銷商或專業人士來執行此操作。
●
關閉電源並不能防止潛在的觸電危險。
●
電器安裝應按照國家布線規範的規定執行。
●
固定布線中必須包含與電源斷開的裝置,所有電極的接觸間隔至少為3mm。
●
該設備必須存放於無持續操作火源(例如明火、操作中的燃氣設備或操作中的電加
熱器)的房間中。
●
為了避免火災、爆炸或傷亡,如在設備附近檢測到有害氣體(如易燃或腐蝕性氣體)
時,請勿操作啟用該設備。
警告
● 不要讓你的身體直接長時間暴露在冷氣中。
● 不要將手指或任何物品插入進風口/出風口。
● 當出現異常(焦味等)時,關閉空調並斷開電源或關閉斷路器。
● 如果年齡8歲及以上的兒童,身體、感官或精神能力下降或缺乏經驗和知識的人使
用該設備時,其應獲得使用本設備的安全監督或指導,並瞭解所涉及的危險後,方
可使用本設備。兒童不能觸碰本設備。未經監督的情況下,兒童不得從事清潔和用
戶維護的作業。
● 本設備不適用於體體能、感官或精神能力下降或缺乏經驗和知識的人(包括兒童)
使用,除非有一個負責其安全的人對設備的使用進行監督或指導。
● 空調必須由合格的安裝人員或合格的維修人員進行安裝、維護、修理和拆卸。
當需要執行上述工作時,請有資質的安裝人員或有資質的服務人員來執行進行
以上工作。
● 應監督兒童,確保他們能不觸碰該設備。
● 不要使用與所規定的(R410A)補充或替換制冷劑不同類型的制冷劑。否則,制冷循環
中可能會產生異常高壓,這可能導致產品出現故障或發生爆炸,或對身體造成傷害。
● 不要使用手 加速除 程或清洁,除了那些由制造商推荐的其他。
1118350275-00_S01_182x257_12p_S_p70_190327.indd 6 24/6/2562 11:23:08
安全預防措施
● 該設備必須存放於無持續操作火源(例如明火、操作中的燃氣設備或操作中的電加
熱器)的房間中。
● 註意制冷劑可能無氣味。
● 當設備被施壓時,不要刺穿或燃燒。不要將設備暴露在高溫、火焰、火花或其他火源
或點燃的環境中。否則可能發生爆炸並導致傷亡。
注意
●
請勿用水清洗設備。可能會導致觸電。
●
請勿將本空調用於其他用途,如保存食物、飼養動物等。
●
請勿在室內/室外機上踩踏或放置任何物品。它可能會導致人身傷害或設備損壞。
●
請勿觸摸鋁散熱片因其可能會造成傷害。
●
清潔設備前,關閉主開關或斷路器。
●
當長時間未使用設備時,關閉總開關或斷路器。
●
當長時間運行設備後應由專業人員對其進行維護。
●
對於因不遵守本手冊的說明而造成的損壞製造商不承擔任何責任。
CT
1118350275-00_S01_182x257_12p_S_p70_190327.indd 7 24/6/2562 11:23:09
準備過濾器
1.打開進氣格柵並拆下空氣濾清器。
2.安裝過濾器(詳見配件表)。
裝入電池(當使用無線操作時)
1.拆下滑動蓋。
2.插入2 新電池(AAA型)按照(+)和(–)的位置裝入。
時鐘設置
1.用鉛筆尖壓一下 鍵。
如果計時器指示燈閃爍,即轉到下一步第2步。
2.按下 或
鍵:調整時間。
3.按下 鍵:設定時間。
遙控器設置
用鉛筆 一下
鍵,或
1.取出電池。
2.按下 鍵。
3.插入電池。
1
2
3
4
5
6
7
8
9
0
!
@
#
$
%
^
&
*
(
)
-
注:
• 所提供的遙控器為無線型,也可用作有線遙控器。如需有線控制,請參閱安
裝說明中的“如何連接遙控器進行有線操作”。
• 在有線操作中,當用戶關閉空調電源時,遙控器將會回到初始狀態(預設、定
時器和時鐘將回到初始狀態)。
2
3
4
5
1
1ECO節能(白色)
2Wi-Fi連接(白色)
3高功率(白色)
4定時器(白色)
5操作(白色)
●顯示器亮度可以調整,請按照第#的步 操作。
需要隨配件而提供的無線局域網連接適配器。
室內機顯示器 單觸
自動操作
乾式操作
高功率運行
ECO節能操作
臨時操作
定時器操作
制冷 / 加熱 / 僅風扇操作
使用前的準備
1 5
6
8
9
10
11
12
7
2
氣流方向
遙控器
3
4
1
按下 鍵:沿所需的垂直方向
移動百葉窗。
2
按下 自動搖擺氣流,再按一
次以停止。
3
至於水平方向,則請手動調整。
注:
• 請勿用手或其他方式手動移動百葉窗。
• 百葉窗可以通過某種操作方式自動定位。
按下ONE-TOUCH(單觸)按鈕進行完全自動化的操作,它是根據所在地區用戶的
典型參數選擇定制的。定制設置控制溫度氣流強度、氣流方向和其他設置以便使
您可以選擇使用ONE-TOUCH按鈕。如果您更喜歡其他設置,可以從東芝設備的
許多其他操作功能中進行選擇。
按 :啟動操作。
自動選擇制冷、加熱或僅開啟風扇操作
1.按下 鍵:選擇自動A。
2.按下 鍵:設置所需溫度最低17°C,最高30°C。
3.按下 鍵:選擇(自動)AUTO,(低)LOW ,(低+)LOW+ ,
(中)MED ,(中+)MED+ 或(高)HIGH 。
1.按下 鍵:選擇制冷Cool ,加熱Heat
或僅風扇Fanonly 功能。
2.按 鍵:設置所需溫度。
最低:17°C,最高:30°C,僅風扇操作:無溫度指示。
3.按下 :選擇(自動)AUTO,(低)LOW ,(低+)LOW+ ,
(中)MED ,(中+)MED+ 或(高)HIGH 。
對於除濕,自動控制適度的制冷性能。
1.按下 鍵:選擇乾燥Dry 。
2.按下 鍵:設置所需溫度最低17°C,最高30°C。
注: 乾燥模式風扇轉速僅設置為自動。
自動控制室內溫度來節省能量(除了在除濕(DRY)和僅風扇(FANONLY)模式以外)
按下 鍵:開啓或停止操作。
室內自動控制以節能(除乾燥和僅風扇模式)
按下 鍵:開啓或停止操作。
注: 制冷操作;設定溫度將自動增加1度/小時,持續2小時(最多增加2度)。
對於加熱操作,設定溫度將降低。
如果遙控器放錯位置或被卸下
• 按下RESET(復位)按鈕,在無需使用遙控器的情況
下可啓動或停止設備。
• 運行模式設置為AUTOMATIC(自動)運行,
預設溫度為24°C,風扇運行為自動轉速。
空調運行時設置定時器。
Daily Timer(每日計時器)允許用戶設置開啓/關閉計時器,並將每日被激活。
ON(開啓)定時器設置 OFF(關閉)定時器設置
1
按下 鍵:設置所需的開啓
計時器。
按下 鍵:設置所需的關閉
計時器。
2
按下 鍵:設置定時器。 按下 鍵:設置定時器。
3
按下 鍵:取消定時器。 按下 鍵:取消定時器。
紅外信號發射器
啓動/停止按鈕( )
模式選擇按鈕( )
溫度按鈕( )
風扇轉速按鈕( )
百葉窗擺動按鈕( )
設置百葉窗上下擺動按鈕( )
開啓定時器按鈕( )
關閉定時器按鈕( )
設置按鈕( )
清除按鈕( )
內存和預設按鈕( )
單觸按鈕( )
大功率按鈕( )
節能模式按鈕( )
靜音鍵( )
舒適睡眠模式按鈕( )
過濾器重置按鈕( )
設置定時鐘按鈕( )
檢查按鈕( )
重置按鈕( )
1118350275-00_S01_182x257_12p_S_p70_190327.indd 8 24/6/2562 11:23:16
溫度
操作
室外溫度 室內溫度
加熱 –10°C~24°C 小於28°C
制冷 –10°C~46°C 21°C~43°C
乾燥 –10°C~46°C 17°C~43°C
在安裝兩台空調的情況下,每台室內機分別使用各自的遙控器。
遙控器B設置
1.按下室內機上的RESET(重設)按鈕來ON(打開)空調器。
2.將遙控器指向室內機。
3.用鉛筆尖壓住遙控器上的 按鈕。顯示屏上將顯示“00”。(圖片 )
4.推按 按鈕時按下 鍵。顯示屏上將顯示“B”,“00”消失,
空調被關閉。遙控器B被記憶。(圖片 )
注: 1.重復上述步,將遙控器重置為A。
2.遙控器A沒有“A”顯示。
3.出廠遙控默認設置為A。
顯示燈的亮度調節
13
設置每日計時器
• 在激活每日計時器期間,兩個箭頭( , )都會顯示。
注:
• 將遙控器保持在可向室內機無障礙傳輸信號的狀態,否則將會出現長達
15分鐘的延時現象。
• 設置將被保存以用於下一次相同操作。
•
在 和 示例中,燈亮5秒鐘後熄滅。
遙控器
LCD
操作顯示 亮度
指示燈將完全亮起。
100%
指示燈亮度為50%。
50%
指示燈亮度為50%,操作燈熄滅。
50%
關閉所有燈。
全部關閉
預設操作
自動重啓操作
靜音模式
安睡操作
14
15
16
17
設置您的首選操作以備將來使用。設備將記住該設置以便將來操作的運行
(氣流方向除外)。
1.設置您的首選操作。
2.按住 鍵3秒鐘來進行記憶設置。
顯示出 標記。
3.按下 :進行預設操作。
停電後可自動重啓空調(設備電源必須處於開啓狀態)。
設置
1. 按住室內機上的RESET按鈕3秒鐘以設置操作。(發出3聲響且
OPERATION(操作)燈閃爍5次/秒,持續5秒)。
2. 按住室內機上的RESET按鈕3秒鐘以取消操作。(發出3聲響且
OPERATION燈不閃爍)
• 果設置了開啓計時器或關閉計時器,則AUTORESTARTOPERATION
自動重啓操作將無法被激活。
在超低風扇速度下進行靜音運行(除濕(DRY)模式中除外)
按下 :啟動和停止操作。
注: 在某些條件下,由於低聲響特性,QUIET(靜音)操作可能無法提供足夠的製
冷效果。
為了舒適的睡眠,將自動控制氣流並自動將其關閉。
按下 鍵:選擇1,3,5或9小時以關閉計時器。
注: 制冷操作時,設定的溫度將自動增加1度/小時,持續2小時(最多增加2度)。
對於加熱操作,設定的溫度將降低。
維修
操作和性能
故障排除(檢查點)
遙控 A-B 選擇
自清潔操作
(僅用於制冷和乾燥操作)
18
20
21
22
19
首先,關閉斷路器。
室內機和遙控器
• 必要時用濕布清潔室內機和遙控器。
• 不可使用汽油、稀釋劑、拋光粉或化學處理的噴粉機。
空氣過濾器
每兩周清洗一次
1. 打開進氣格柵。
2. 拆下空氣過濾器。
3. 用真空吸塵器或水清洗,然後擦乾。
4. 重新安裝空氣過濾器並關閉進氣格柵。
防止室內機內濕度引起的異味。
1.如果在「冷卻」或「乾燥」模式下按 按鈕一次,風扇將繼續運行
30分鐘,然後自動關閉。這樣可以降低室內機的濕度。
2.要立即停止設備,請在30秒內按2次以上的 按鈕。
1.三分鐘保護功能:防止設備突然重啓或打開時啓動3分鐘。
2.預熱操作:在加熱操作開始前,預熱設備5分鐘。
3.暖風控制:當室內溫度達到設定的溫度時,風扇轉速自動降低,室外機停止。
4.自動除:除過程中風扇將停止運行。
5.加熱能力:熱量從室外吸收並釋放到室內。當室外溫度過低時,應與空調結
合使用另一種被推薦的加熱裝置。
6.積雪考慮:將室外機放置於一個不受積雪、樹葉堆積或其他季節性雜物影響
的位置。
7.設備運行時可能會發出輕微的開裂聲。這屬於正常現象,該破裂聲可能是由
塑料膨脹/收縮引起的。
注: 2-6項針對加熱模式。
空調運行條件
設備不工作 制冷或加熱異常低
•電源總開關關閉。
•激活斷路器切斷電源。
•電流中斷
•計時器打開設置
•過濾器被灰塵堵塞。
•溫度設置不當。
•車窗或車門打開。
•室外機進、出風口被堵塞。
•風扇轉速過低。.
•運行方式為FAN或DRY。
•POWERSLECTION(功率選擇)
功能設定為75%或50%(此功 能取 決於
遙控器)。
1
按下 鍵:設置ON(開啓)
計時器
3
按下
2
按下 鍵:設置OFF(關閉)
計時器。
4
在( 或 )標記閃爍時按下
鍵。
CT
降低或關閉顯示燈亮度.
1. 按住 鍵3秒鐘,直到遙控LCD上顯示亮度水平( , ,
或 ),然後松開按鈕。
2. 按
升高
鍵或
降低
鍵,在4個級別中調整亮度。
1118350275-00_S01_182x257_12p_S_p70_190327.indd 9 24/6/2562 11:23:18
1118350275-00_S01_182x257_12p_S_p70_190327.indd 10 24/6/2562 11:23:18
1118350275-00_S01_182x257_12p_S_p70_190327.indd 11 24/6/2562 11:23:18
1118350275
1118350275-00_S01_182x257_12p_S_p70_190327.indd 12 24/6/2562 11:23:19

