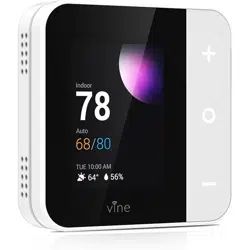
Smart Wi-Fi Programmable
Thermostat with Nightlight TJ-919T
User Manual
Vine
R
7870
72
℉
Set 70/78 until 11:00am
On
Auto
62%
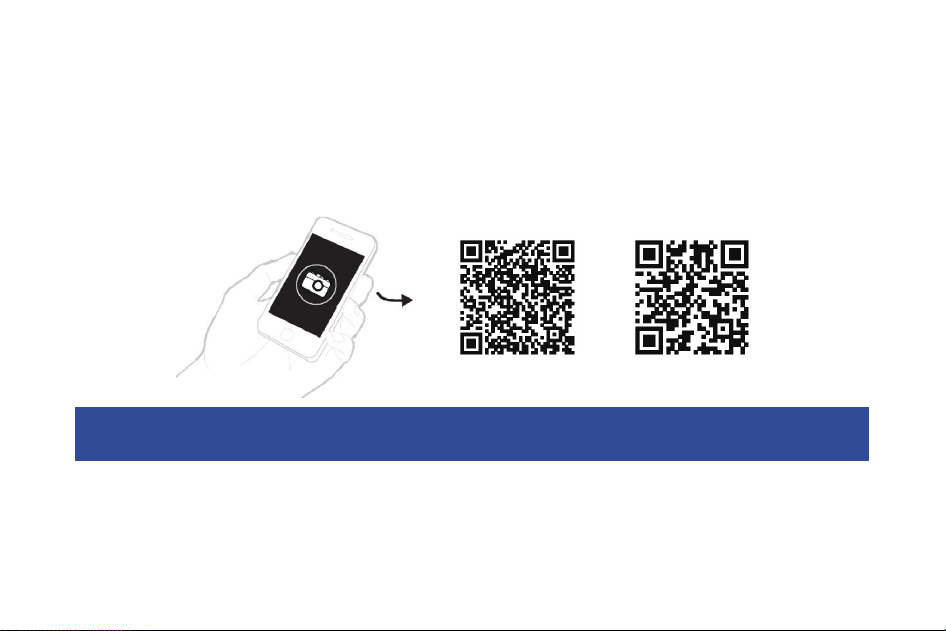
Electronic manual and installation video
1. This user manual only includes installation and simple setup instructions. For the more detailed operating
instructions and user guide, scan the QR code.
2. Watch installation video by scanning the QR code.
Online User Manual Installation Video
WE ARE HERE TO HELP, 24/7 !
WEBSITE: www.vineconnected.com
EMAIL: support@vineconnected.com
HOTLINE: 1-800-264-3457(09:00am~05:00pm MON~FRI PST)
01
01
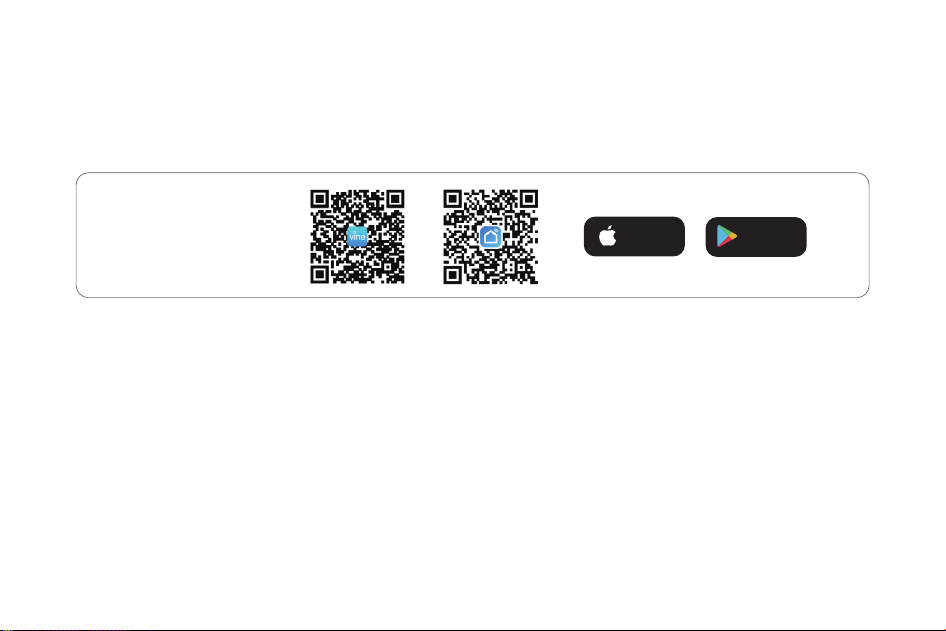
Vine App Setup
1. To download the "Vine Thermostat" or "Smart life" app, scan the QR code or search "Vine Thermostat" or
"Smart Life" in the Apple App Store or Google Play Store.
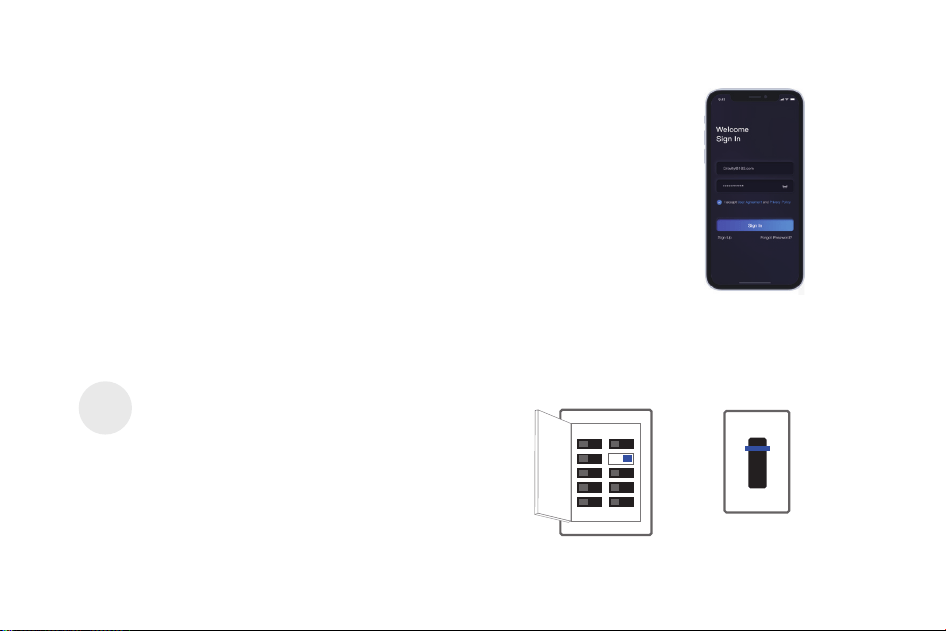
2. Open the "Vine Thermostat" or "Smart Life" app. If you already have an account, tap Sign In. To create a new
account, tap Sign Up.
Note: You must create your own Vine account to use third-party services and products. These will not work with a
guest account. With a Vine account, you can also allow your family and friends to control your smart thermostat.
3. Tap + and select your smart thermostat.
4. Follow the in-app instructions to set up your smart thermostat.
Note: You can change the name and icon at any time by going to the smart thermostat screen and tapping. You
can use the Vine app to connect your smart thermostat to Amazon Alexa or Google Assistant.
iOS/Android
App Download
Download on the
APP Store
GET IT ON
Google Play
02
02

03
Vine Wi-Fi Thermostat
Screw sets
Flathead screwdriver
Wire labels
Jumper wire
User Manual
1 piece
2 pairs
1 piece
1 piece
1 piece
1 piece
Vine Thermostat - A Smart Choice for Smart Life!
You may also need these tools:
Here's what you'll find in the box:
Phillips screwdriver Level
Pencil
Home Wi-Fi Password
Compatibility Section:
For conventional (gas/oil/propane/electric), Heat-pump, and Dual Fuel Systems.
> 2-Heat & 2-Cool > 1-Heat & 1-Cool > Heat Only > Cool Only
> Heat Pump with Auxiliary Heating and Emergency Heating
C-wire is required to power the thermostat
04
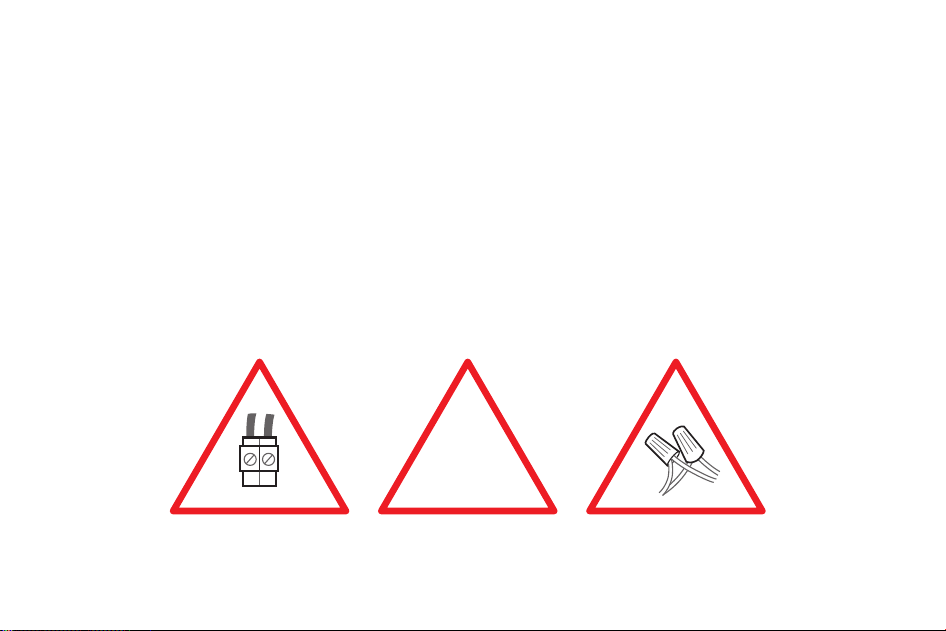
Incompatible wiring and voltage
Please check the wall plate of your old thermostat to see if there's any indication as follows:
• Does not work with electric baseboard heat(110VAC~240VAC)
• Does not work with millivolt systems
• Does not support S terminals for indoors and outdoors sensors.
NOTE : If you are unsure, please contact a professional for help or call 1-800-264-3457
110 VAC
or
120 VAC
or
240 VAC
L1 L2
Create an account
When the app is ready, we need to move to next step to create an account, which is
important for full functioning and remote access of the thermostat. Create an account
with a valid email address, Thermostat will send a verification code to the email, please
get the verification code to complete the registration.
Installation
Switch off power
Step 1
TJ-919T is designed to work with most of the standard 24V AC low voltage heating and cooling systems, such as gas
and oil furnaces, heat pumps, and single or dual-stage systems.
IMPORTANT as this protects you from blowing a fuse in
your equipment. To make sure the power is off, change
the temperature with your current thermostat and wait
for at least 5 minutes to be sure that the system is OFF.
Breaker Box
Switch
or
OFF
ON
05
Check that your system is off
Step 2
Remove your old thermostat from the wall plate
Step 3
Confirm your system is off by turning on your heat ( during winter ) or your AC ( during summer ). Wait a few
minutes—you should not feel air coming from your vents.
NOTE : If you have a digital thermostat
that has a blank display, skip this step.
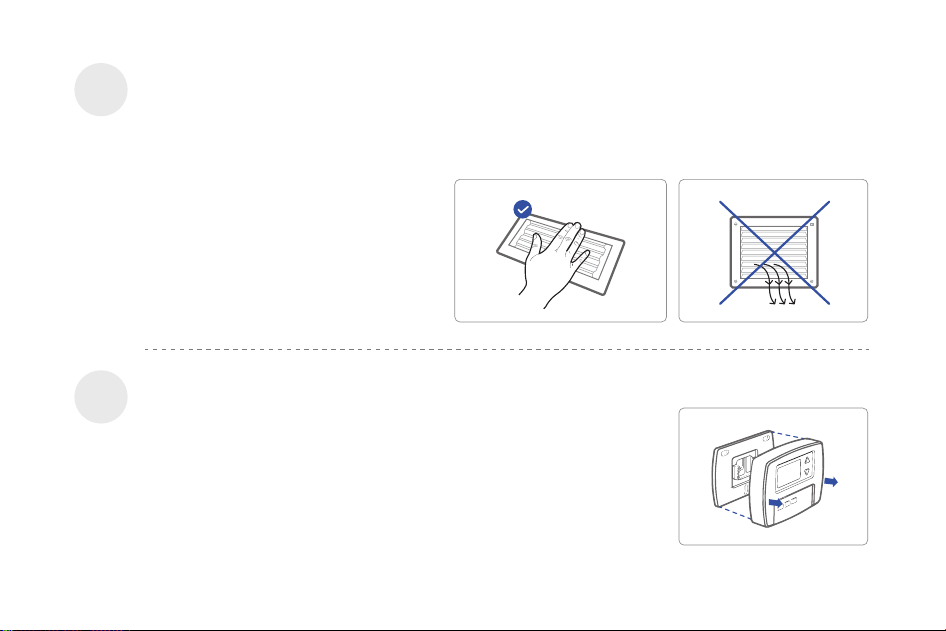
Most thermostats allow you to remove the main unit and provide access to
a wall plate which holds the wiring terminals, you can take off the
thermostat by grasping and gently pulling. Some thermostats may have
screws, buttons, or clasps.
NOTE : Do not remove any wires from your thermostat at this time!
06
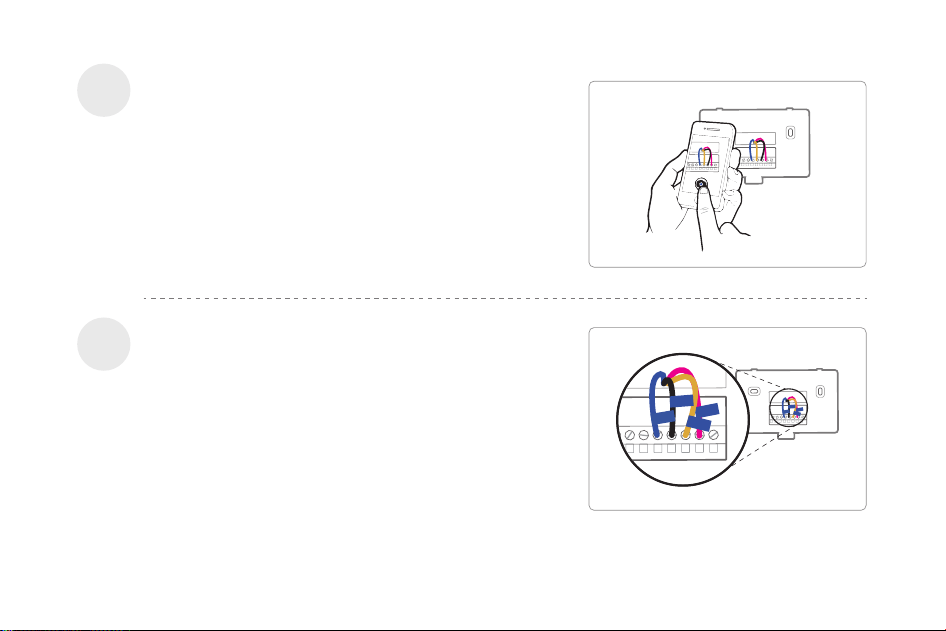
Take a picture of the wiring
Step 4
Take a clear picture of the wiring of your existing wall plate,
make sure the wire terminal labels are clear enough to be
read. This will be important reference for next step.
G
C
Y
R
Label the wires
Step 5
Label the old wall plate wires with labels from our new
thermostat box.
NOTE : If there's an Rc or Rh wire, attach the R lable to it.
G
C
Y
R
07
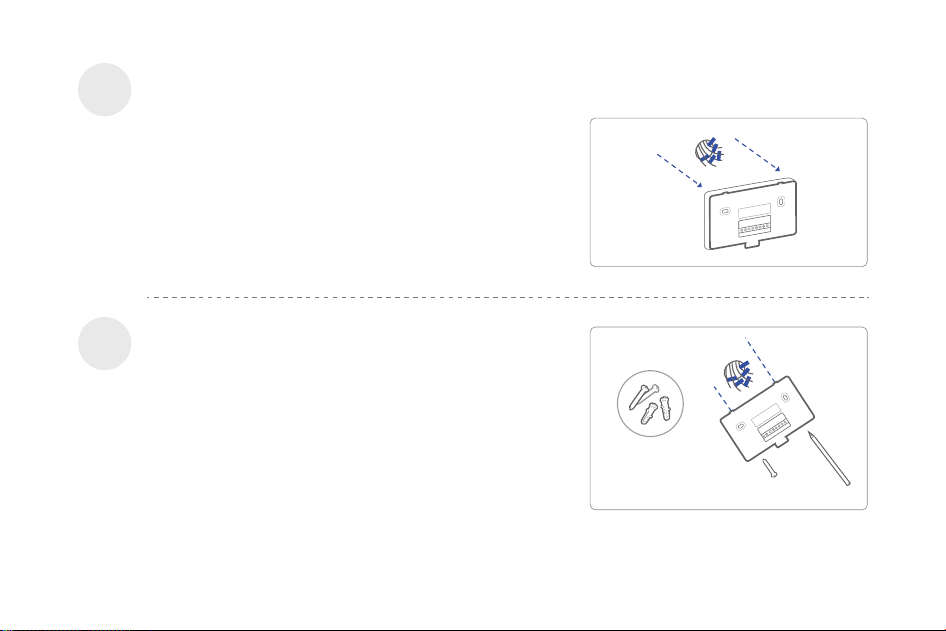
Use the screw set (screw & anchor) to mount the new
wall plate. In most cases, the old mounting position can
be used; if not, apply the new set. Be sure to check the
alignment of the new wall plate before and after the wall
plate installation.
Disconnect the wires from the old thermostat one by
one, you may need a screwdriver to release wires from
terminals.
NOTE : Wrap the wires around a pen or pencil so they
don’t fall back into the hole in the wall.
Step 6
Disconnect the wires and remove the old wall plate
Mount the New Wall Plate
Step 7
Compatibility
Checker
08
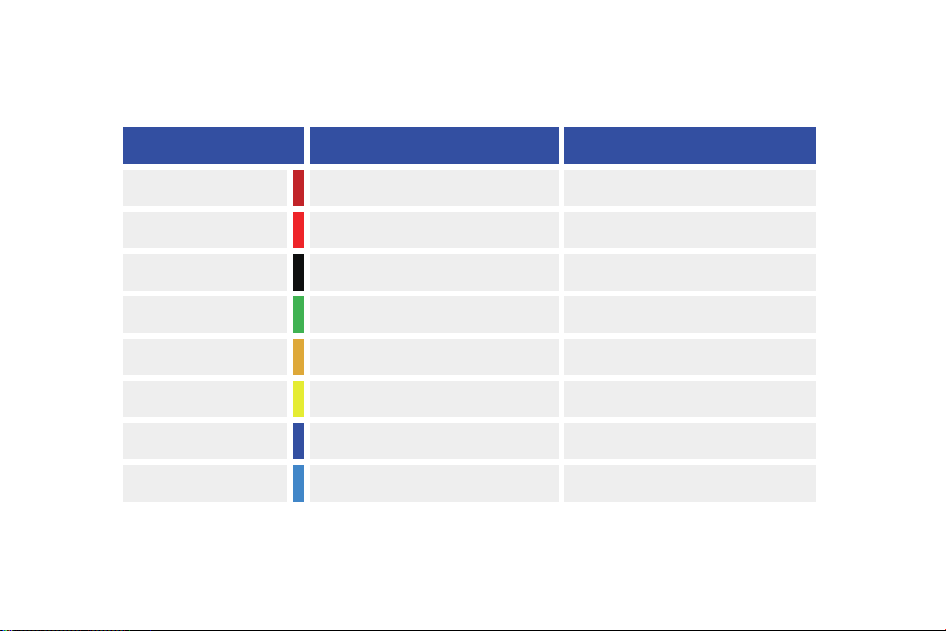
Use the picture you took before as reference to wire, the following chart is a wiring diagram for common systems,
please make sure that a C-wire exists in your old thermostat system.
Terminal
RC
RH
C
G
Y
Y2
W/E
O/B/W2
Conventional System
Power for cooling, 24V
Power for heating, 24V
Common wire, 24V
Fan
Power for cooling, 24V
Power for heating, 24V
Common wire, 24V
Fan
1st Stage Cool
2nd Stage Cool
1st Stage Heat
2nd Stage Heat
1st outdoor Stage Heat
2nd outdoor Stage Heat
1st Stage Auxiliary/Emergency Heat
Changeover (reversing valve)
connection for heat pump
Heat Pump System
09
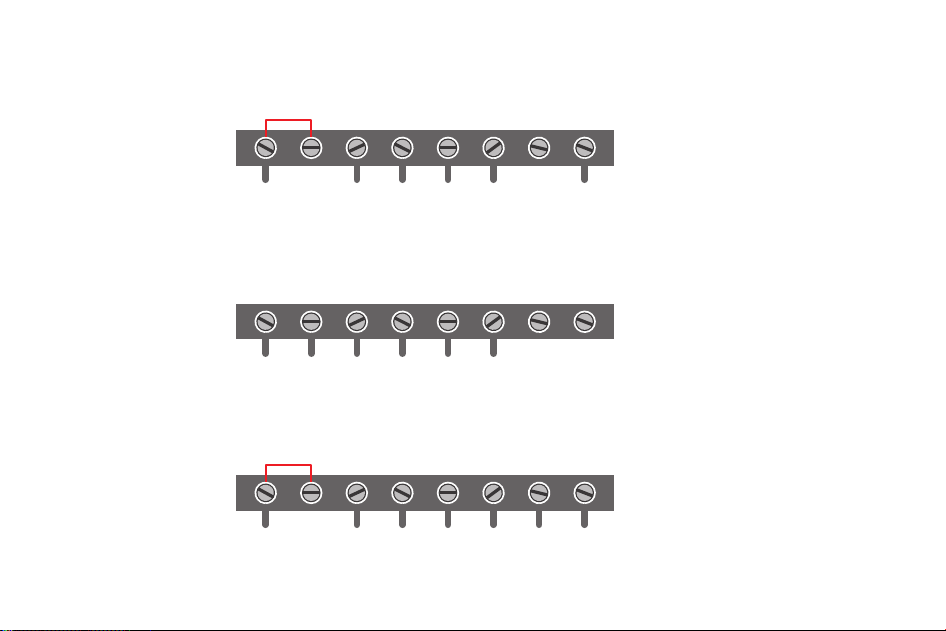
Thermostat
1st Stage Heat 2nd Stage Heat
RC RH
G W/E Y C Y2 O/B/W2
Single Stage Heat / Two Stage Heat- Furnace / Boiler with C-wire
Thermostat
RC RH G W/E Y C Y2 O/B/W2
Combined Single Stage Heat and Single Cool Stage with C-wire ( Remove Pre-installed
Jumper )
Cool Furnace and Air Conditioner
Thermostat
1st Stage
Heat
Emerg./AUX
Heating
2nd Stage
Heat
RC RH
G W/E Y C Y2 O/B/W2
Single Stage / Two Stage Heat Pump with Emergency Heat and Auxiliary Heat with
C-wire
10
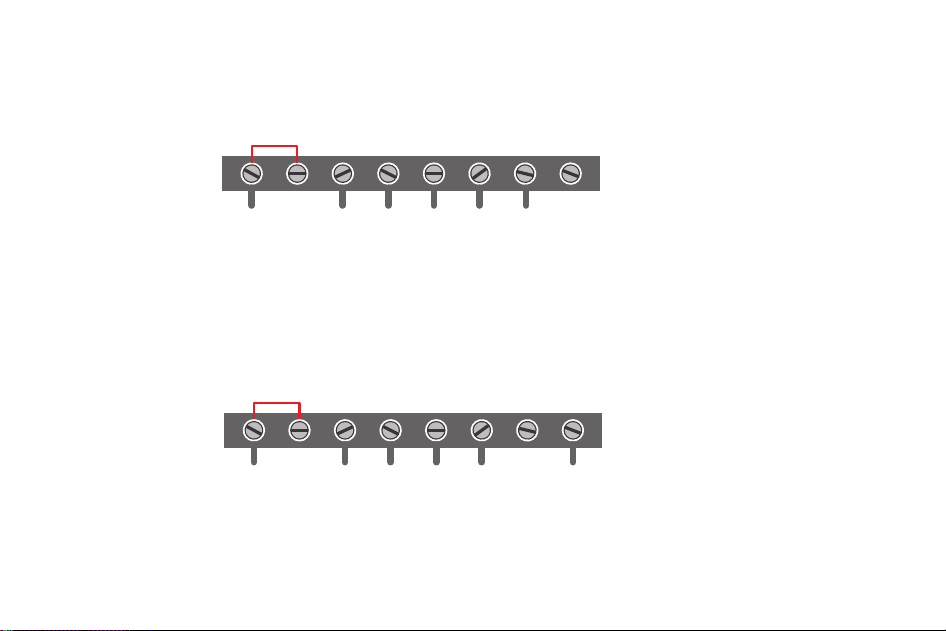
1st Stage Cool 2nd Stage Cool
Thermostat
Single Stage Cool / Two Stage Cool‒Air conditioner
G W/E Y C Y2 O/B/W2
RC RH
Dual Fuel System-Combined Single Stage Heat Pump and Single Stage Furnace
with C-wire
Thermostat
RC RH
G W/E Y C Y2 O/B/W2
11
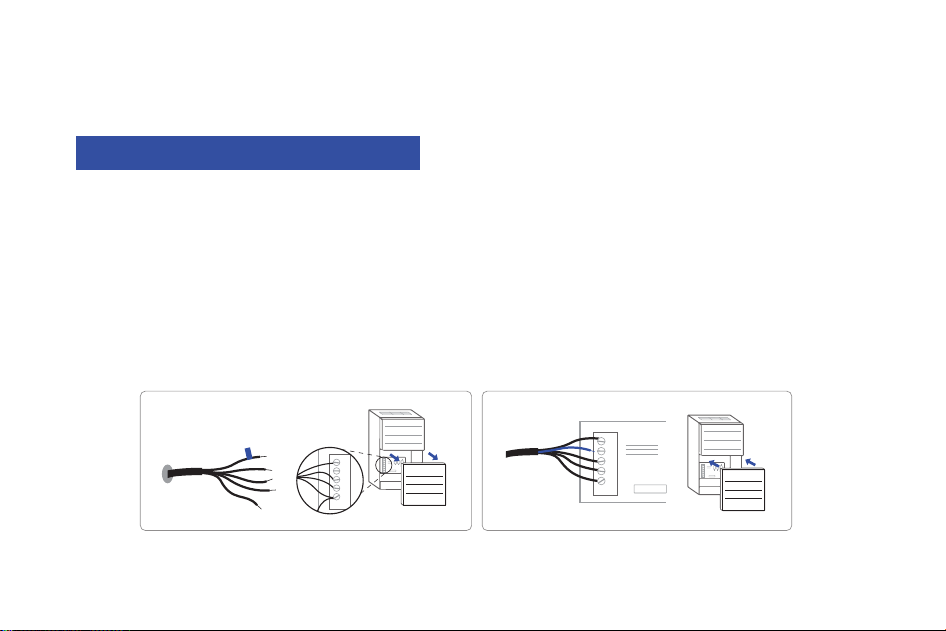
If C-wire does not exist in your system, check the instruction below:
Check for the spare wire behind your wall plate or old thermostat, if there's one, connect it to the C-terminal of
the new wall plate.
Remove the cover of the furnace or heating system, open the cover of the heating/cooling system to find the
control board where you should find the same terminal labels as of the thermostat.
Find the other end of the spare wire, locate the bundle of wire with the same labels as that of your thermostat
end.
Connect the spare wire to the C-terminal.
Close the cover of the furnace or heating system.
Do you have a spare wire? Yes.
1 .
2 .
3 .
4 .
5 .
G
C
R
W/E
Y
G
C
R
W/E
Y
c
12
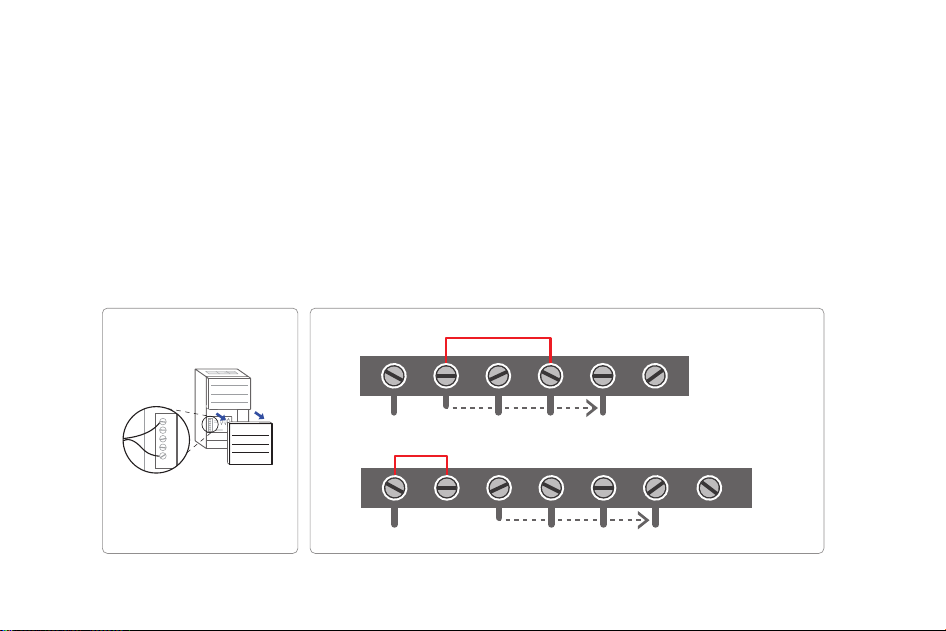
Conventional system without C wire ( also known as 4-wire system )
Remove the cover of the furnace or heating system, open the cover of the heating/cooling system to find the
control board where you should find the same terminal labels as of the thermostat, move the G-wire to the
C-wire, then connect G and Y terminals with the jumper wire (included in packing box).
At the same thermostat, connect C-wire and G-wire.
By this configuration, the thermostat will have NO fan control function.
NOTE :
This step should be install by a pro. You may need to unscrew the cover, the control board may be either at
the top or bottom.
1 .
2 .
3 .
Furnace
Thermostat
RC RH
G W/E Y C
O/B
Furnace wiring
terminal
Move G wire to C terminal
Move G wire to C terminal
R
G
W/E
Y
C O/B
jumper
G
C
R
W/E
Y
13
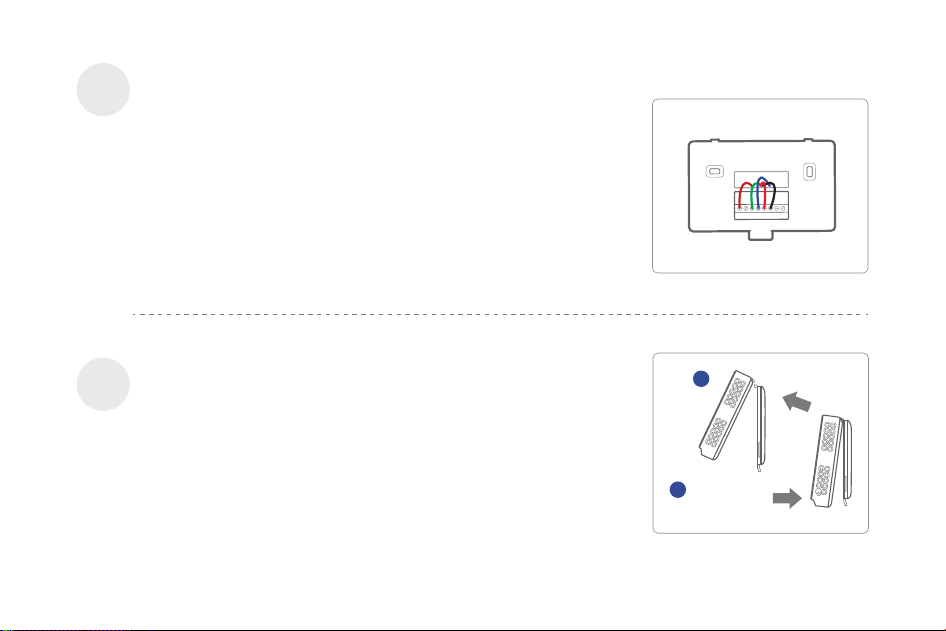
Refer to the above wiring diagram, insert all wires vertically from
the open socket into the proper terminal. Ensure each wire is
inserted into the matching terminal (refer to the photo taken
previously if needed). Pull wires gently to ensure wires are
securely fastened.
When all wires are connected well, place excess part of the wires
back to the wall.
First aim the two clips in upper part of the thermostat to the top
of the wall plate, then gently push and fit the wiring pole to the
terminals on the wall plate.
Connect the wires to the new wall plate
Step 8
Install the thermostat to the wall plate
Step 9
RC RH G W/E Y C Y2 O/B
/W2
push
1
2
clips
push
Firmly press
forward to secure it
into position.
14
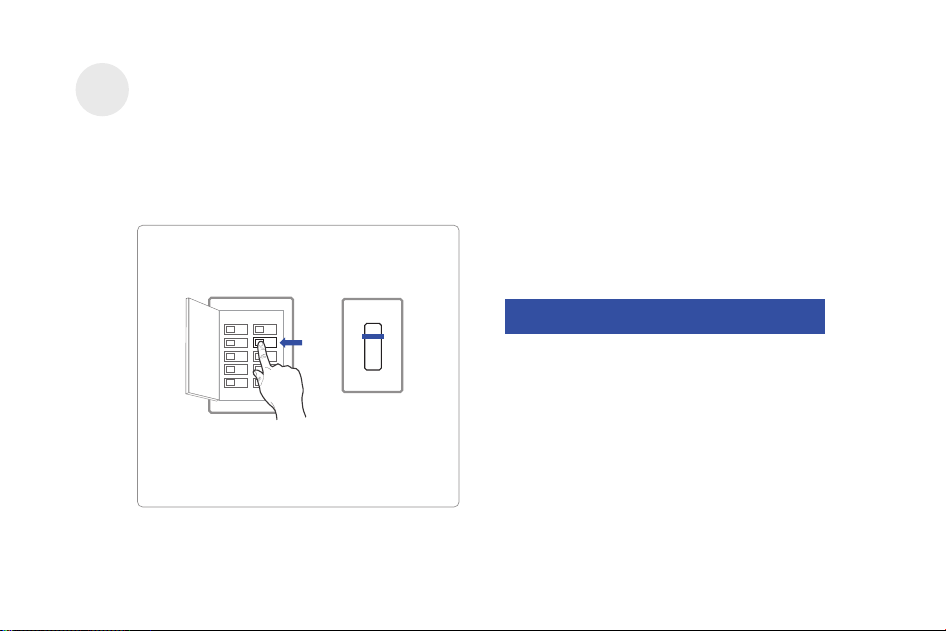
Turn on the switch that controls your heating and cooling system, the thermostat will be powered on
and prompt you to start the setup. If you have any trouble installing the device or app, check the below
information for help, or simply visit our websites for installation videos.
WE ARE HERE TO HELP, 24/7 !
WEBSITE : www.vineconnected.com
EMAIL : support@vineconnected.com
HOTLINE: 1-800-264-3457(09:00am~05:00pm
MON~FRI PST)
Breaker box
Switch
Power on and Enjoy
Step 10
ON
ON
OFF
15
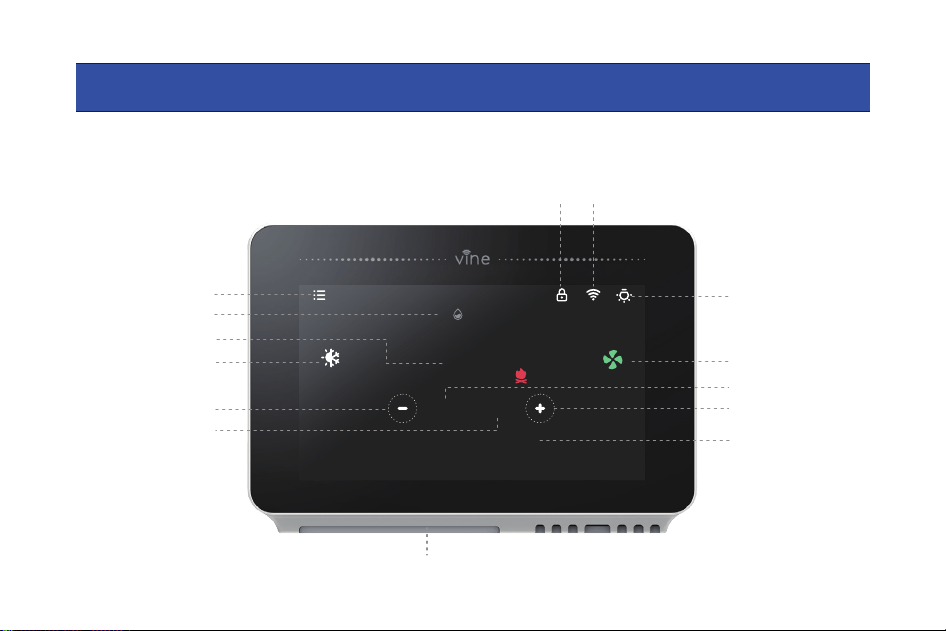
Main Screen
Next Schedule Period
Lock
7870
72
℉
Set 70/78 until 11:00am
On
Auto
62%
Wi-Fi
Current Humidity
Current Temperature
Current Mode
Decrease Temperature
Increase Temperature
16
Current Fan Mode
Cooling Setpoint
Heating Setpoint
Night-light Control
Night-light
Menu
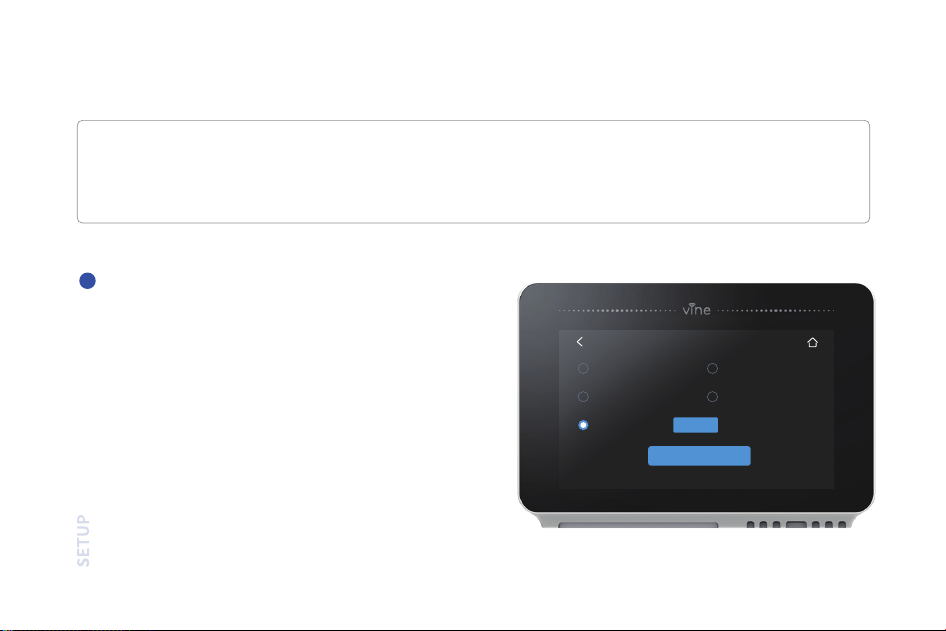
For a quick and easy way to start using your new smart thermostat, the device will automatically direct
you to the Initialization Setup process once it’s turned on for the first time.
Gas/oil/Furnace, Electric, Heat Pump, Dual Fuel or
no Heating. Select according to your heating
system.
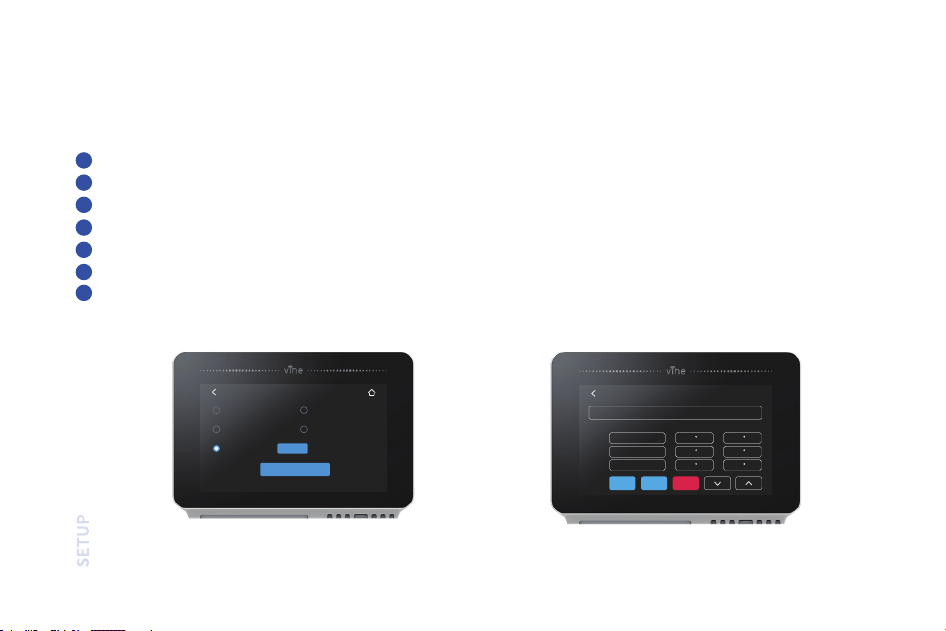
Equipment Type
Select your home's heating equipment type
from the options available:
Device Initial Setup
1
17
Equipment Type
Electric
Dual Fuel
No Heating
Heat Pump
Gas/ Oil/ Furnace
Setup
Next
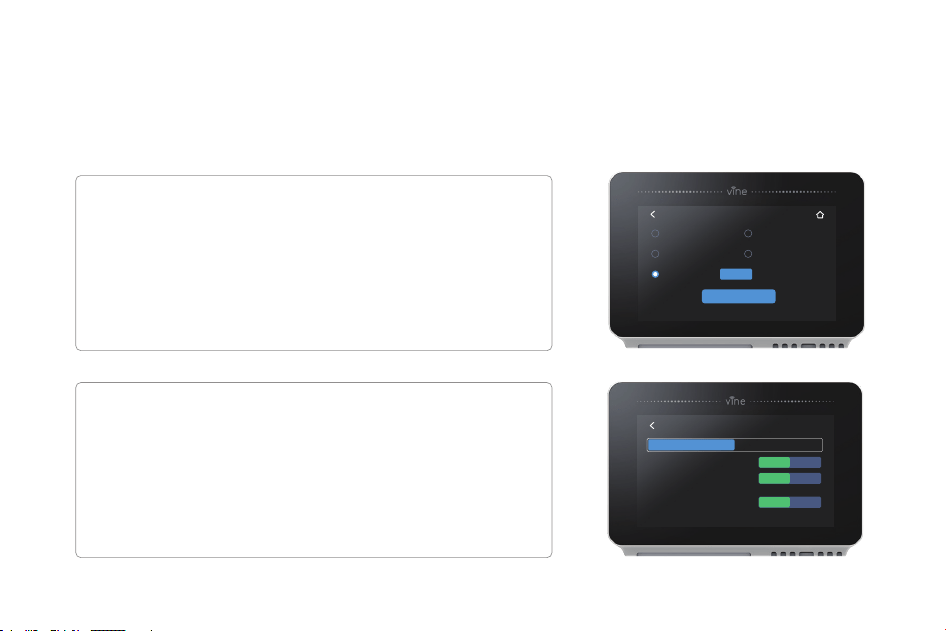
1. Select Gas/Oil/Furnace and tap "Setup".
2. Then select Appliance or Thermostat depending
on your personal preferences for fan control.
3. Tap "Next" at the bottom of the screen to continue.
1. Select Heat Pump and tap the "Setup button".
2. Then follow the on-screen instructions.
3. Tap "Next" at the bottom of the screen to continue.
Below is a list of possible examples which may help you to select correctly:
NOTE : If you are unsure of which option to select, contact 1-800-264-3457
If you have a furnace or boiler:
If you have a heat pump:
Equipment Type
Electric
Dual Fuel
No Heating
Heat Pump
Gas/ Oil/ Furnace
Setup
Next
Heat Pump
Heat Type
Stages
Cool
Enable
Heat
Disable
Enable Disable
Reversing Valve Energize:
Emergency Heating:
Enables an additional heating used only in Emergancy Heat Mode.
Enables an additional heating if the compressor can not satisfy the cur-rent
heating setpoint.
Auxiliary Heating:
18
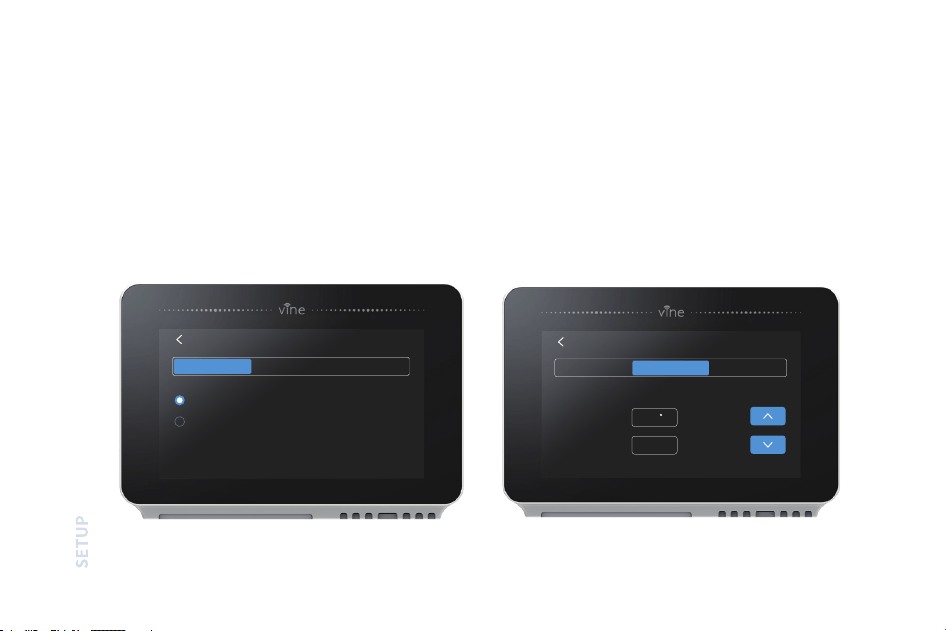
1. Select Dual Fuel and tap "Setup".
2. Then follow the on-screen instructions to configure the fossil fuel heating appliance settings
3. Tap "Next" at the bottom of the screen to continue.
4. Then follow the on-screen instructions to configure the heat pump heating appliance setting.
If you have a Dual fuel system:
19
Dual Fuel
Fossil Fuel Heat Pump
Allow the application to con-trol fan
Allow the thermostat to con -trol fan
Stages
Dual Fuel
Fossil Fuel
Reversing Valve Energize:
Balance Point
50
195
F
sec
Changeover Delay
Heat Pump
Stages
01
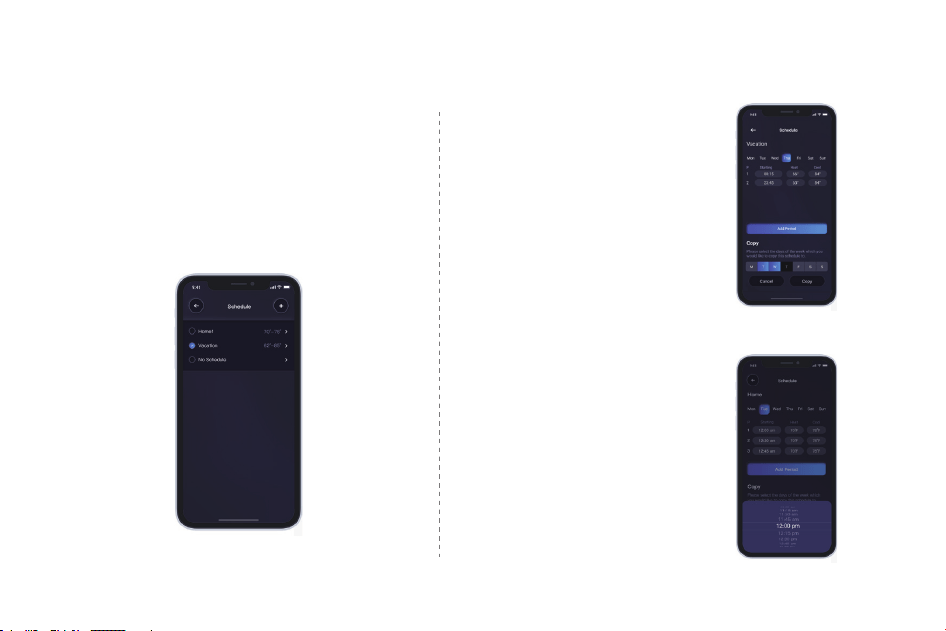
Only 2 schedules (Home & Vacation) will
be available during offline operation.
However, this list can be expanded to up to
4 schedules when a Wi-Fi connection is
established.
Schedule
2
ON DEVICE: Please enter your location’s current
date and time; once the device is registered or
linked to a user account, the date and time on the
device will be updated automatically to the current
time associated with the user account.
Date & Time
3
20
Schedule
Vacation
Home
Setup
No Schedule
Date & Time
12H
12
:
2023
07
10
00
AM
Hour
Year
Month
Day
Minute
24H

02
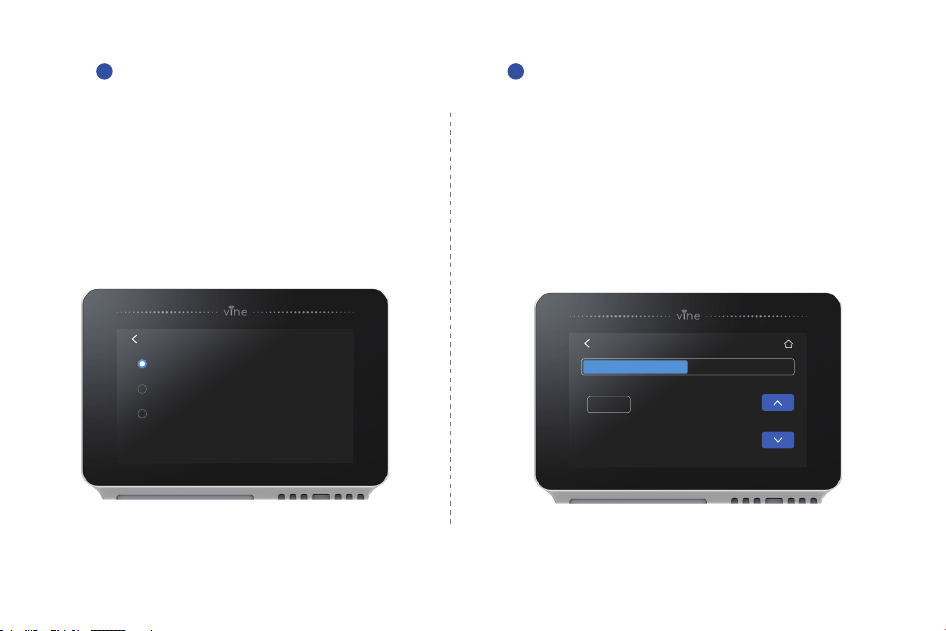
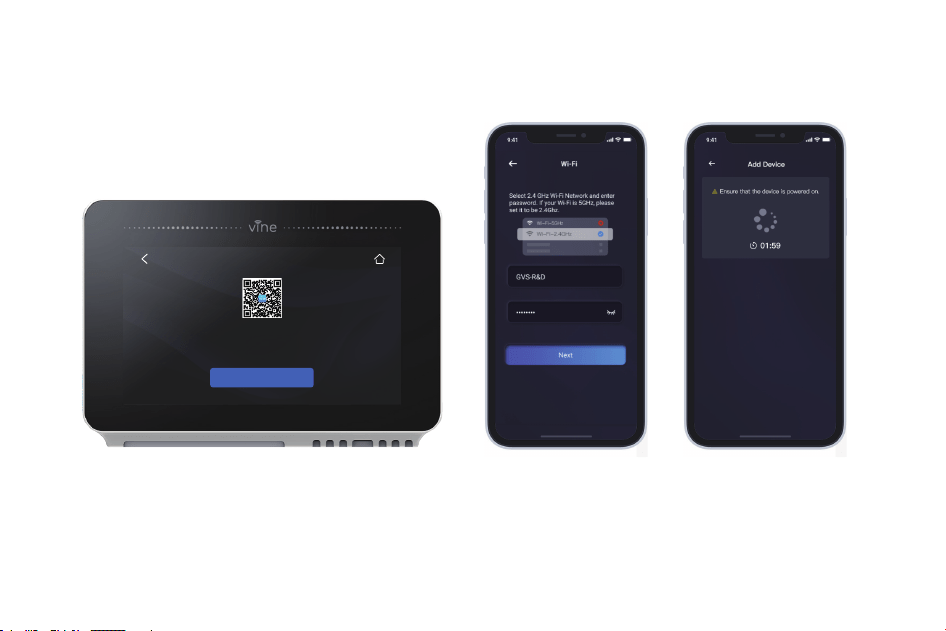
Add device
A reliable Wi-Fi connection is required in order to access smart features such as remote access, weather forecast and
more. Please follow on-screen instructions to complete the Wi-Fi setup.
1.Select“Wi-Fi Setup“ and follow instruction to start Wi-Fi connection.
2.After signing into your account, tap“+”icon on the screen to add new device, which under this case the ST300.
3.Follow the the step-by-step instruction in the Vine app. The Wi-Fi connection process will be slightly different
dependent to your phone’s operation system(iOS/Android).
4. Congratulation! Now you can enjoy to control your thermostat by App.
If you have your Vine thermostat installed by a professional or if a Vine
Thermostat is installed by yourself while it’s not yet connected to Wi-Fi,
choose“Yes, it is installed”, the App then will start right away to connect
your thermostat to Wi-Fi.
21
NOTE : If you skip this step during the first time connection, you will be required to connect Wi-Fi by
steps: Menu-> Wi-Fi Connect->Wi-Fi Setup and follow the instruction on screen to finish the Wi-Fi
connection.
Wi-Fi Setup
Wi-Fi Setup
Please scan the below QRCode to download
Smart Life" App and Create an account
to Add Device to setup Wi-Fi.
22
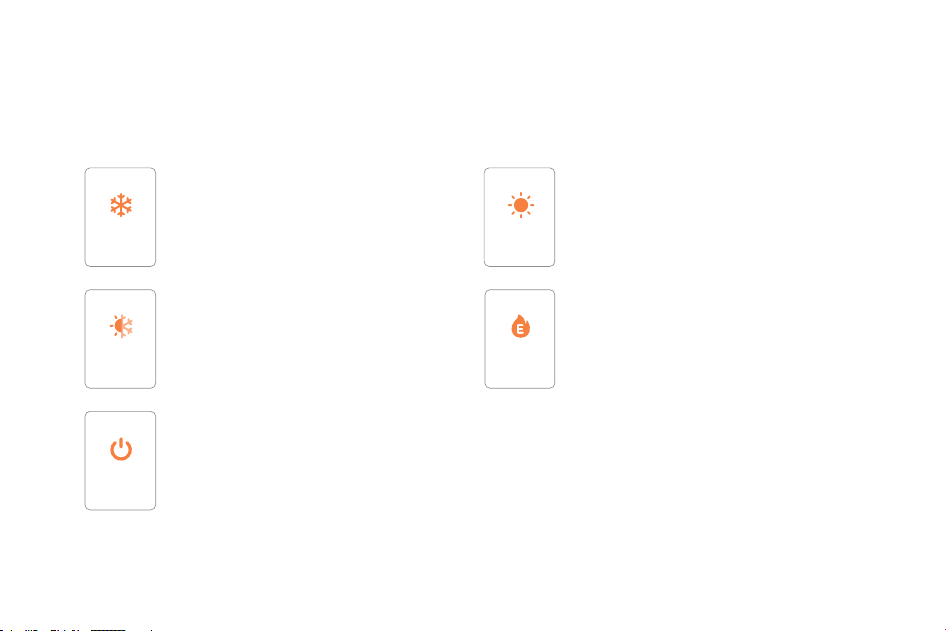
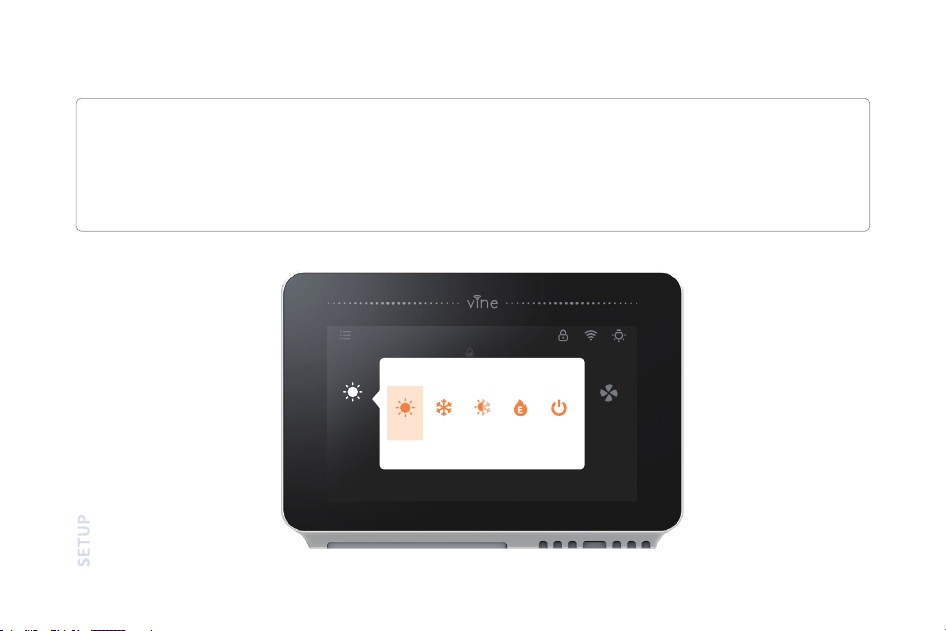
The HVAC system settings depends on the type of system you use, common options are shown below:
Mode Setup
Turn on cooling when the current temperature
rises above the setpoint.
Cool
Turn on heating when the current temperature
drops below the setpoint.
Heat
Activate the heating or cooling system as
required to keep your home within the
configured range of setpoint.
Auto
Use ONLY the Emergency Heat or backup
heat source to maintain the heat setpoint. This
option only appears if Emergency heat is
configured in the Equipment menu.
EM. Heat
Turn the system off. When the system is off,
only the current temperature will be
displayed on the Home screen.
Off
23
℉
On
62%
Heat
Heat
Cool
Auto Off
Heat
EM
Mode
On the Thermostat:
Tap the System Mode icon on the Home Screen to select your system mode of thermostat between:
Cool, Heat, Auto, Emergency Heat or Off.
Emergency Heat (Em Heat) mode is only available if you have selected Heat Pump as your Heat Type
and enabled the Emergency Heat function in the setup menu.
24
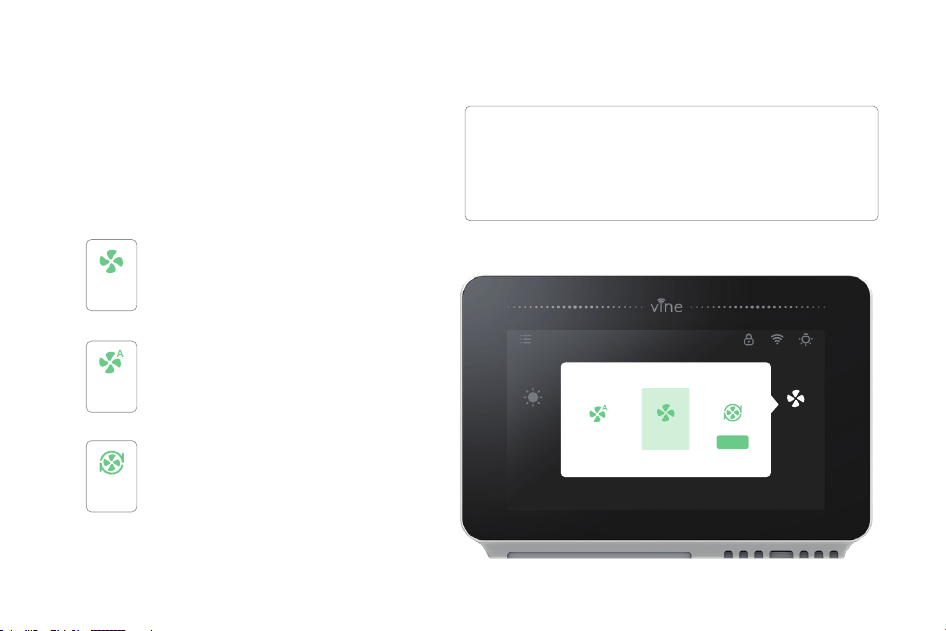
On
Auto
Heat
Fan Setup
The Fan menu displays the current furnace fan
setting. Depending on your system, one or
more of the following options are shown:
On Thermostat:
Force fan to run continuously, regardless of
the scheduled programming.
Enable fan when the system is actively
heating or cooling your home, or to satisfy
the Minimum Fan Runtime setting.
The Fan will turn on and off one a user
programmed schedule (Circulation
schedule can be programmed on the
device and the app).
On
On
Fan
Auto
Circulation
Circulation
Setup
Select Main Menu > Fan, tap the Fan Mode icon on
the Home Screen to select your system mode of
thermostat among Auto, On and Circulation.
25
7870
72
℉
Set 70/78 until 11:00am
On
Auto
62%
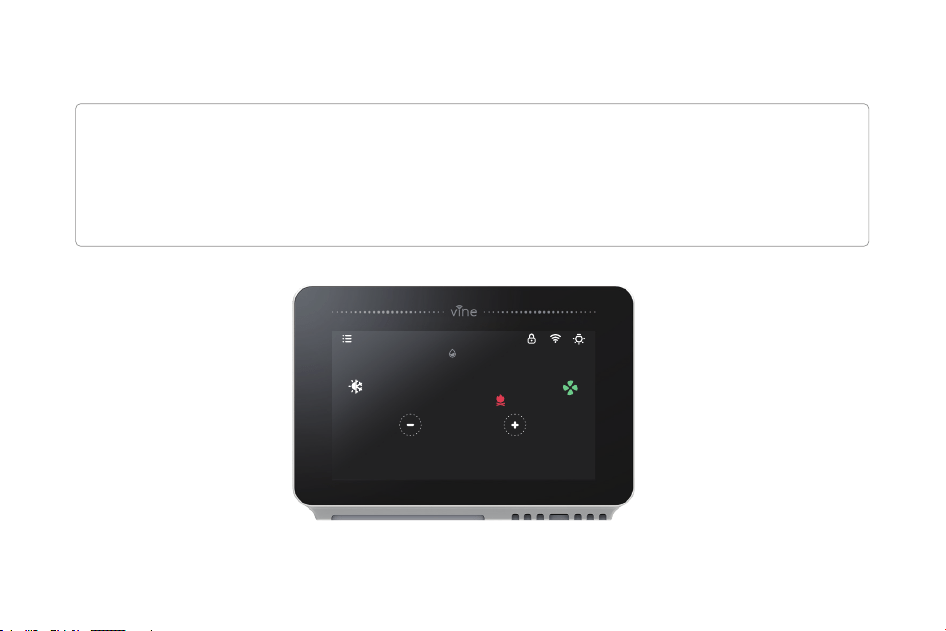
Adjust the Temperature:
rebmun der/eulb eht egnahc ot ”-“ dna”+“ eht gnippat yb erutarepmet deludehcs eht edirrevo nac uoY
which represents the cooling/heating set point.
When the thermostat is in Auto mode, you have to firstly set the heating and cooling set point so that the
mode will work to heat up or cool down.
26
7870
72
℉
Set 70/78 until 11:00am
On
Auto
62%
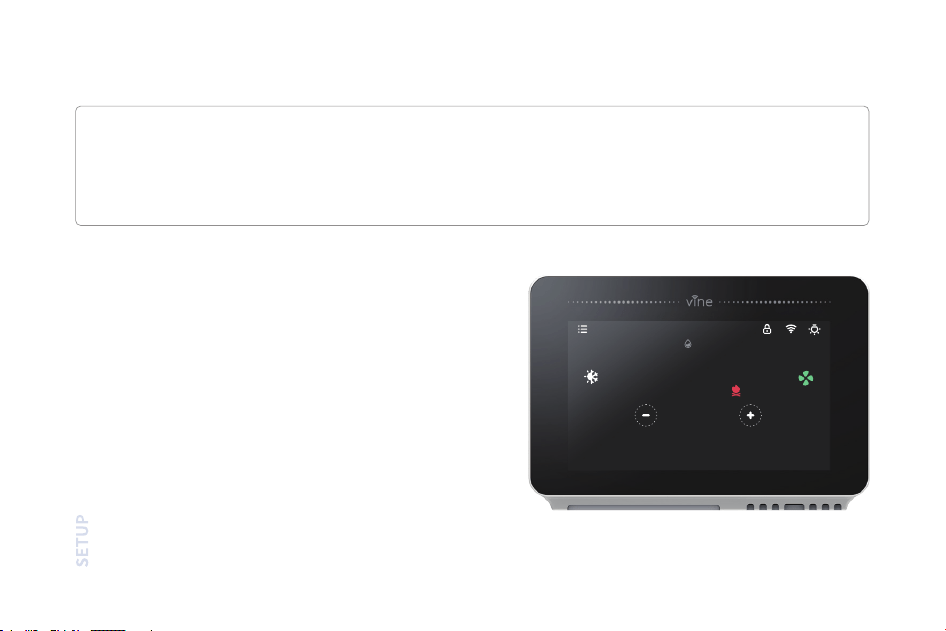
27
Temporary hold and holding one temperature
ruoy , tatsomreht no nottub ”-“ dna ”+“ eht esu ,tnioptes ruoy egnahc yliraropmet oT
thermostat will display the time it will hold for next to the setpoint, it will hold your new setpoint until the
next scheduled setpoint
If you want to hold one temperature, adjust the
set point by taping the setpoint to slide up and
down; then click “Hold”, the thermostat will hold
this setpoint until you click “Cancel” to cancel
your temporary adjustment.
Weather
Mon
Tue
Wed
Tur
Fri
26 ug/m³43
Sunny to cloudy
45%
68°-70°
68°-70°
68°-70°
68°-70°
68°-70°
26°
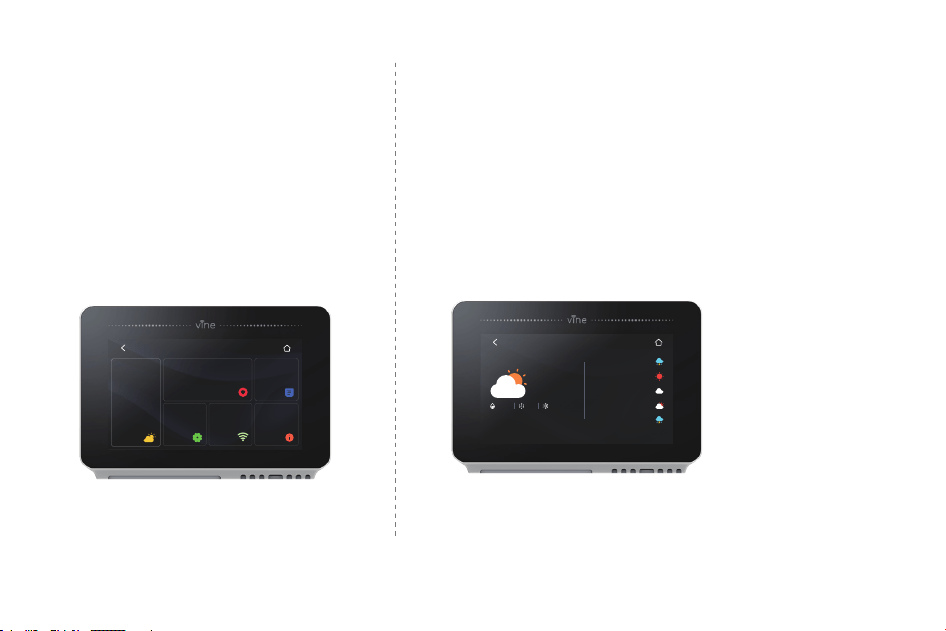
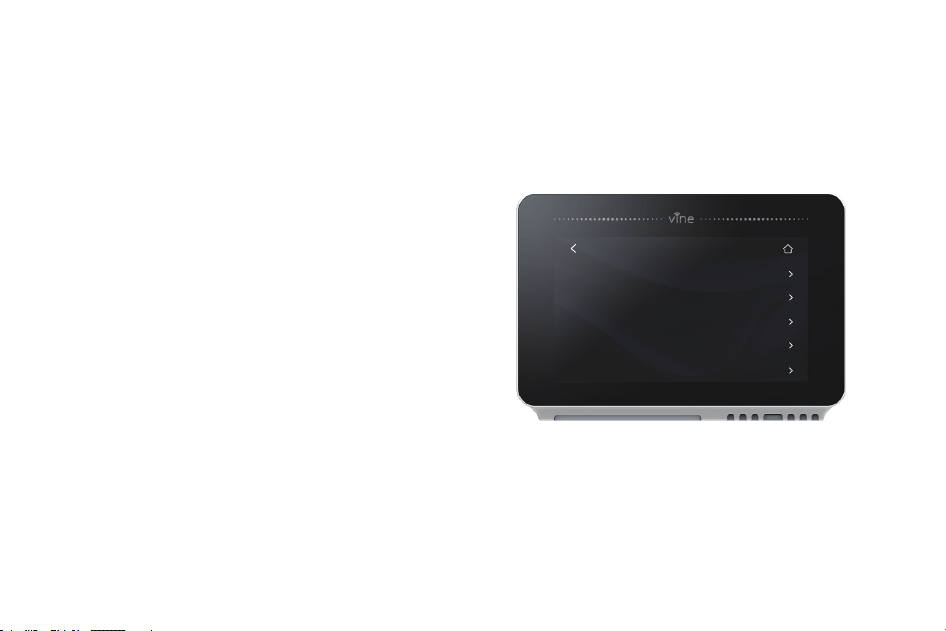
Menu Setting
Menu setting has included all
setting option for the
thermostat.
Weather
This helps to check the weather in your location and
the forecast of the 5 future days.
EZ Comfort
To have a quick setup for your setpoint at your home.
28
Menu
EZ Cormfort
64°
Home:84°
晴转多云
High
Low
Humidity
Comfort:86°
Sleep:48°
Away:56°
Setting Connect
About
Schedule
70°
64°
80%
Equipment Type
Electric
Dual Fuel
No Heating
Heat Pump
Gas/ Oil/ Furnace
Setup
Next
Mon
p
1 12:00 am 68
F
12:00 am
12:00 am
2
3
Starting
Heat Cool
Tue
Wed
Schedule
Thu Fri Sat Sun
68
F
68
DeleteAdd
Copy
F
68
F
68
F
68
F
There are only two default schedules (Home and Vacation) available for selection when the device is offline. If the
Internet connection is established, you may have up to 4 schedules, follow steps below to program:
Programming Schedules
”.eludehcS“ tceleS
Select which day type you want to edit: weekdays or weekend.
Select which set point you want to edit.
Adjust the set point using the up and down arrows.
Use the arrow in the upper left hand corner to save and return to the set points.
Continue to edit the set points as you desire.
.neercs ”eludehcS“ ot nruter ot renroc dnah tfel reppu eht ni worra eht esU
1
2
3
4
5
6
7
29
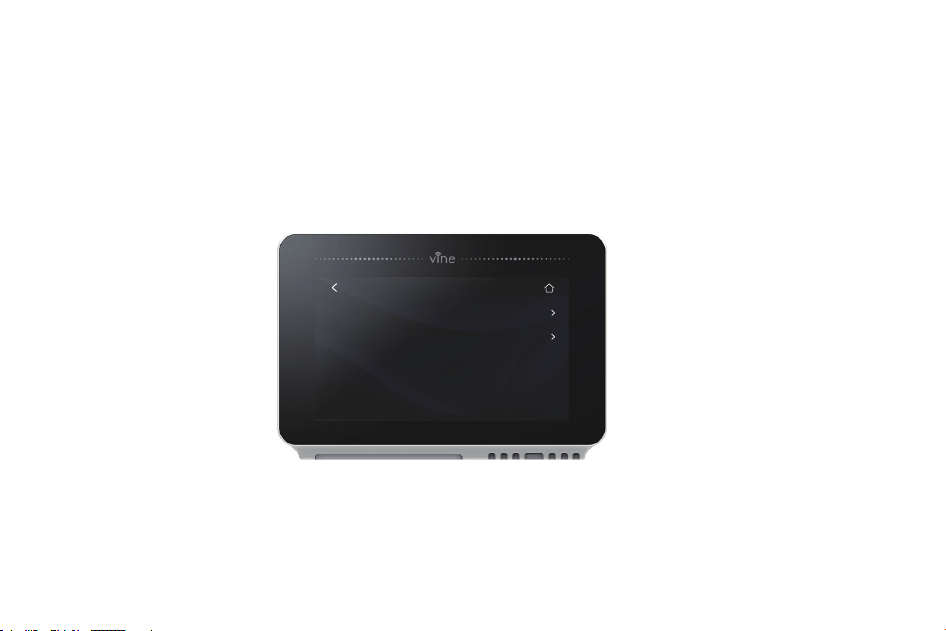
Date & Time
Setup your thermostat date & time
Screen
Select the brightness and time out of the screen
Temperature
Follow the on-screen instructions to set temperature
display unit (C/F) and temperature safety functions.
Advanced Setting
Designed for HVAC professional who want to modify
advanced feature for better unit control.
Reset
Allow users to re-set the device to factory setting, this
will clear all set schedules and preferences.
Nightlight
Select the brightness of the night-light.
Setting
1 .
2 .
3 .
4 .
5 .
6 .
30
Settings
Date & Time
Screen
Nightlight
Temperature
Advanced Setting

Advanced Setting:
Terminal
Deadband 1° F
Default
2° F
Max
0.5° F
Fan Delay 60s 120s 30s The time fan continues after mode turn off.
The min. time system on after engaging.
Waiting time between heating and cooling.
View system runtime, Heating, Cooling, Air Filter.
Min Run time 180s 300s 60s
Cycle time 180s 300s 60s
Runtime /
Sensor
Calibration
10° F -10° F
Min Description
A temperature range between the current
temperature and the heating setpoint,
where heating or cooling is not engaged.
Ability to adjust temperature readings to
improve sensor accuracy as the thermostat
nears the end of its lifecycle after years of use.
/
/
0° F
To access the Equipment Setup, click on a setting and use the scroll wheel to modify the default value by following
steps: Menu- Setting- Advanced setting.
31

Installer Access
space
123
Aa
q
a
z x c v
b
n
m
s
d
f
g
h
j
k l
w
e
r
t
y
u
i
o
p
OK
Installer Access
To access the Installer Access, click Advanced Settings, enter the Professional Access Code and enter the below
Action code in the parenthesis below to gain access to below setting.
Sensor Calibration (SC)
Ability to adjust temperature readings to improve
sensor accuracy as the thermostat nears the end
of its lifecycle after years of use.
Sensitivity Level (SS)
Ability to adjust how sensitive your thermostat
sensor is to changes in the air temperature. The
lower the level, the more your system cycles to
maintain the setpoint.
Initial Setup (IS)
Use this code to repeat the initial setup process.
32
33
About
Device Information
Support Information
About
Displays a quick glance at your thermostat information.
It includes your model number, MAC ID (uniquely identifies your thermostat), build date, firmware version,
technical support contact information.
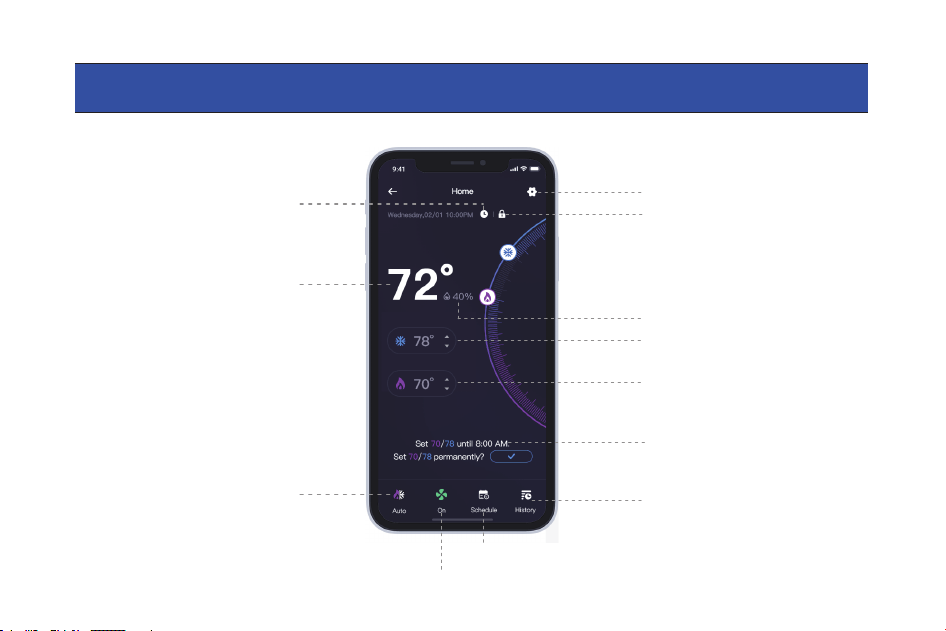
Indoor Temperature
Current Mode
Current Date & Time
Current Fan Mode
Schedule
Indoor Humidity
Heating Setpoint
Lock
Setting
Cooling Setpoint
Current Schedule Period
History
App Main Screen
34
Program/Adjust a schedule
1 . To modify an existing schedule, select one
from the list and edit.
2 . To delete an existing schedule, swipe left the
schedule and select "Delete".
Add a New Period
Add a new period
Tap "Add Period" button
and select and set starting
time, heating setpoint and
cooling setpoint.
Edit an existing period
Tap on the starting, heating
or cooling value of the
existing period to edit as you
desire.
35
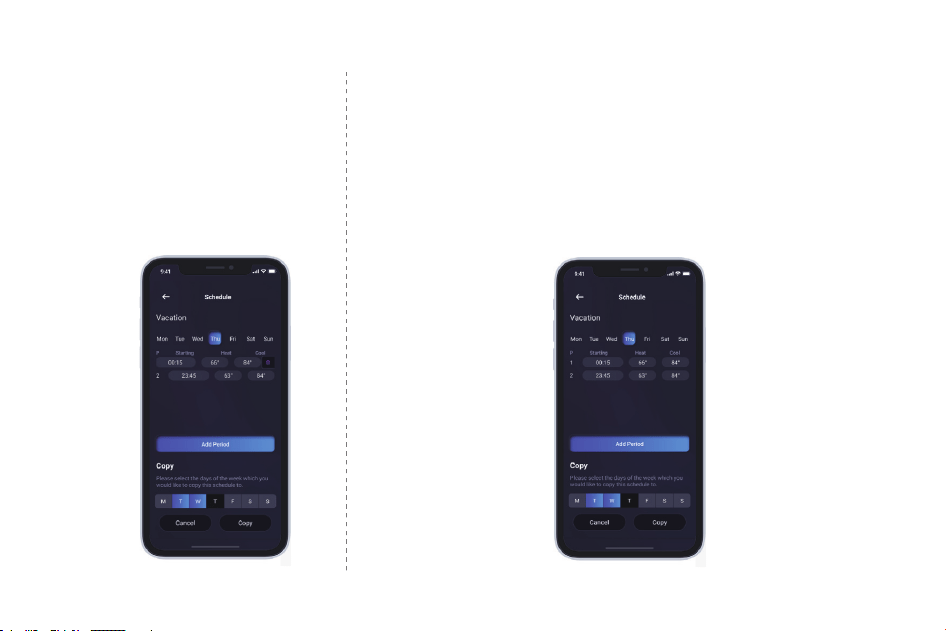
Delete an existing period
Swipe left the existing period and
select "Delete".
Copy a schedule
To copy a schedule to other days of the week, tap and select the days
you want to copy at the bottom of the screen, then tap "Copy".
Save schedule
Use the arrow on the upper left corner to save and return to the
schedule list.
36
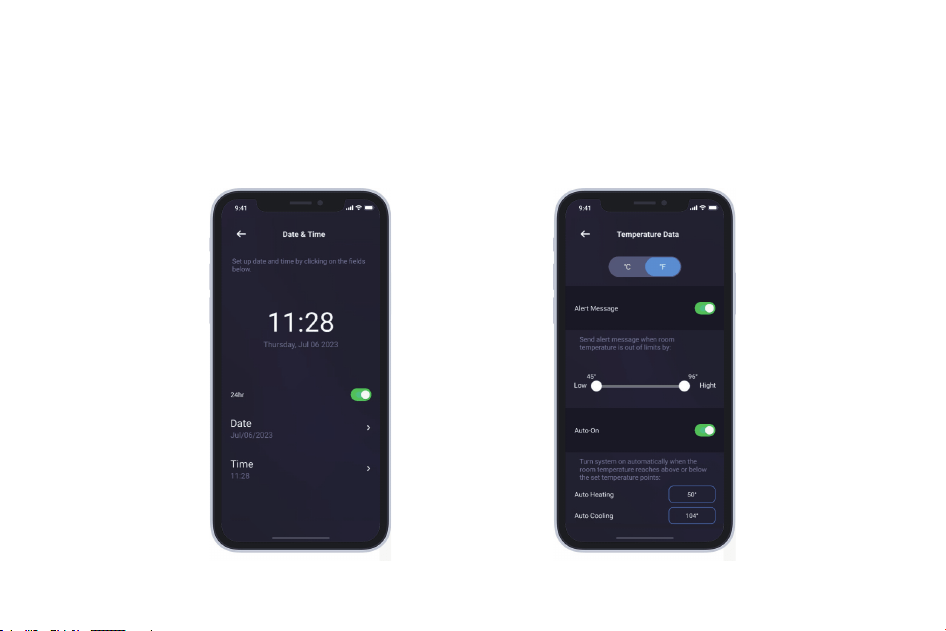
Device Settings
Follow the on-screen instructions to view and modify the thermostat settings for the night-light, brightness and schedule,
date & time, temperature units, safety functions regarding your thermostat.
37

Except from the afore-mentioned basic settings, Vine Smart Wi-Fi Thermostat also provide possibility to connect to
the Alexa and Google Assistant, hence control your room temperature through a simple voice comes true. Follow
our instructions below to get connected with Alexa/Google.
Advanced Features
Download the Vine Thermostat, create an account, and register your app to the TJ-919T thermostat.
Download Amazon Alexa app and set up your Alexa-enabled device.
Tap "Menu" button on the upper left corner of Alexa app main screen.
IMPORTANT step - link Skill.
Tap "Skills" in Alexa app menu.
Vine Thermostat
Vine Thermostat
Type and search "Vine Thermostat", then choose and tap "enable" to enable the skill.
ot tnuocca
ruoy knil ot ”woN kniL“ pat neht ,drowssap dna tnuocca PPA eht retnE
Alexa Skill.
Now you can control your thermostat over Amazon Alexa.
How to connect to Alexa?
1 .
2 .
3 .
4 .
1
2
3
38

Common commands for Alexa to control Vine Thermostat:
Control the device via voice commands Now you can control your thermostat with Echo. You can control your
thermostat with the following commands:
Alexa, turn (Device Name) on.
Alexa, turn (Device Name) off.
Alexa, Change (Device Name) Mode to Cool/Heat/Auto.
Alexa, Increase (Device Name) by __ degrees.
Alexa, Decrease (Device Name) by __ degrees.
Alexa, Set (Device Name) to __ degrees.
Alexa, what is the (Device Name) set to?
Alexa, what is the temperature of the (Device Name)?
5.
39

Download and register the thermostat as instructed in page 1 ~ 39.
Download Google Home app and set up your Google-enabled device.
Tap "+" button in the middle of the Google Home app screen.
IMPORTANT step - link Action.
Tap the sidebar menu on the upper left corner of the main page of Google Home, select "Home Control".
Tap the "+" button on the lower right corner and search for "Vine Thermostat"
Top open "Vine Thermostat" and select country, then enter app account/password and tap "Link Now"
to link your Vine account to Google.
Enter the Vine Thermostat app account and password, then tap “Link Now” to link your Vine Thermostat
accountChoose the room where your device is located, and then the skill will appear on the Home Control
account to Alexa Skill.
Now you can control your thermostat over Google Home.
How to connect to Google Assistant?
1 .
2 .
3 .
4 .
1
2
3
4
40

NOTE : Google Home currently supports only English Commands.
5 . Common commands for Google Home to control Vine Thermostat:
Now you can control your thermostat with Google Home, the supported commands include ( Google Home
currently only supports English commands ) :
Hey Google, what’s the __ temperature?
Hey Google, make it warmer (or cooler)
Ok Google, set the temperature to __ degrees
Ok Google, raise (or lower) the temperature __ degrees
“Ok Google, what is the current temperature in the Bedroom?
“Hey Google, what’s the Living Room set to?
“Ok Google, what’s the temperature of my thermostat?
”moordeB eht ni edom taeh no nrut ,elgooG kO“
“Hey Google, change to automatic mode in the Living Room”
“Ok Google, turn on cool mode in the Bedroom”
41
2. TOTAL SATISFACTION RETURN POLICY
If you are the original purchaser of the Product and you are not satisfied with this Product for any reason, you may return it in its original condition
within thirty days of the original purchase and receive a full refund.
Limited Warranty
THIS DOCUMENT CONSISTS OF IMPORTANT LIMITED WARRANTY INFORMATION REGARDING YOUR CLAIMS
AND ACCOUNTABILITY, AS WELL AS RESTRICTIONS AND EXCLUSIONS THAT MAY APPLY TO YOU.
1. WHAT THIS LIMITED WARRANTY ENTAILS; DURATION OF COVERAGE
VINE CONNECTED, Pleasanton, California USA, warrants to the owner of the enclosed product that the product contained in this box will be free from defects
in materials and workmanship for a period of two years from the date of delivery following the original retail purchase. If the Product fails to conform to this
Limited Warranty during the Warranty Period, VINE CONNECTED will, at its sole discretion, either (a) repair or replace any defective Product or component; or
(b) accept the return of the Product and refund the money actually paid by
the original purchaser for the Product. Repair or replacement may be made with a
new or refurbished product or components, at VINE CONNECTED’s sole discretion. If the Product or a component incorporated within it is no longer available,
VINE CONNECTED may, at its sole discretion, replace the Product with a similar product of similar function. This is your sole and exclusive remedy for breach
of this Limited Warranty. Any Product that has either been repaired or replaced under this Limited Warranty will be covered by the terms of this Limited
Warranty for the longer of (a) ninety days from the date of delivery of the repaired Product or replacement Product, or (b) the remaining Warranty Period. This
Limited Warranty is transferable from the original purchaser to subsequent owners, but the Warranty Period will not be extended in duration or expanded in
coverage for any such transfer.
Smart Wi-Fi Programmable Thermostat with Nightlight TJ-919TUser Manual
42

5. DISCLAIMER OF WARRANTIES
EXCEPT AS STATED ABOVE IN THIS LIMITED WARRANTY, AND TO THE MAXIMUM EXTENT PERMITTED BY APPLICABLE LAW, VINE CONNECTED DISCLAIMS ALL
EXPRESS, IMPLIED, AND STATUTORY WARRANTIES AND CONDITIONS WITH RESPECT TO THE PRODUCT, INCLUDING THE IMPLIED WARRANTIES OF MERCHANT-
ABILITY AND FITNESS FOR A PARTICULAR PURPOSE. TO THE MAXIMUM EXTENT PERMITTED BY APPLICABLE LAW, VINE CONNECTED ALSO LIMITS THE DURATION
OF ANY APPLICABLE IMPLIED WARRANTIES OR CONDITIONS TO THE DURATION OF THIS LIMITED WARRANTY.
3. WARRANTY TERMS;
HOW TO RECEIVE SERVICE IF YOU WANT TO CLAIM UNDER THIS LIMITED WARRANTY
Before making a claim under this Limited Warranty, the owner of the Product must (a) notify VINE CONNECTED of the intention to claim by visiting vineconnect-
ed.com/support during the Warranty Period and providing a description of the alleged failure, and (b) comply with VINE CONNECTED’ return shipping instructions.
VINE CONNECTED will have no warranty obligations with respect to a returned Product if it determines, in its reasonable discretion after examination of the returned
Product, that the Product is an Ineligible Product (defined below). VINE CONNECTED will bear all costs of return shipping to owner and will reimburse any shipping
costs incurred by the owner, except with respect to any Ineligible Product, for which owner will bear all shipping costs.
4. WHAT THIS LIMITED WARRANTY DOES NOT COVER
)ii( ;”SI SA“ dlos ro ,”elaS rof toN“ ro ”elpmas“ sa dekram stcudorP )i( :)”stcudorP elbigilenI“ ylevitcelloc( gniwollof eht revoc ton seod ytnarraW detimiL sihT
Products that have been subject to: (a) modifications, alterations, tampering, or improper maintenance or repairs; (b) handling, storage, installation, testing, or
use not in accordance with the User’s Guide or other instructions provided by VINE CONNECTED; (c) abuse or misuse of the Product; (d) breakdowns,
fluctuations, or interruptions in electric power or the telecommunications network; or (e) Acts of God, including but not limited to lightning, flood, tornado,
earthquake, or hurricane; or (iii) any non-VINE CONNECTED branded hardware products, even if packaged or sold with VINE CONNECTED hardware. This Limited
Warranty does not cover consumable parts, including batteries, unless damage is due to defects in materials or workmanship of the Product,
or software (even if
packaged or sold with the product). VINE CONNECTED recommends that you use only authorized service providers for maintenance or repair. Unauthorized use
of the Product or software can impair the Product’s performance and may invalidate this Limited Warranty.
43

6. LIMITATION OF DAMAGES
IN ADDITION TO THE ABOVE WARRANTY DISCLAIMERS, IN NO EVENT WILL VINE CONNECTED BE LIABLE FOR ANY CONSEQUENTIAL, INCIDENTAL, EXEMPLARY, OR
SPECIAL DAMAGES, INCLUDING ANY DAMAGES FOR LOST DATA OR LOST PROFITS, ARISING FROM OR RELATING TO THIS LIMITED WARRANTY OR THE PRODUCT,
AND VINE CONNECTED’ TOTAL CUMULATIVE LIABILITY ARISING FROM OR RELATED TO THIS LIMITED WARRANTY OR THE PRODUCT WILL NOT EXCEED THE
AMOUNT ACTUALLY PAID FOR THE PRODUCT BY THE ORIGINAL PURCHASER.
7. LIMITATION OF LIABILITY
REHTO RO STCUDORP ENIV RUOY GNIDRAGER )”NOITAMROFNI TCUDORP“( NOITAMROFNI UOY EDIVORP )”SECIVRES“( SECIVRES ENILNO DETCENNOC ENIV EHT
RUOY OT DETCENNOC EB YAM TAHT SLAREHPIREP TCUDORP FO EPYT EHT .)”SLAREHPIREP TCUDORP“( STCUDORP RUOY OT DETCENNOC SLAREHPIREP
PRODUCT MAY CHANGE FROM TIME TO TIME. WITHOUT LIMITING THE GENERALITY OF THE DISCLAIMERS ABOVE, ALL PRODUCT INFORMATION IS PROVIDED FOR
LLIW NOITAMROFNI TCUDORP TAHT EETNARAUG RO ,TNARRAW ,TNESERPER TON SEOD DETCENNOC ENIV .”ELBALIAVA SA“ DNA ,”SI SA“ ,ECNEINEVNOC RUOY
USE ALL PRODUCT INFORMATION, THE SERVICES, AND THE PRODUCT AT YOUR OWN DISCRETION AND RISK. YOU WILL BE SOLELY RESPONSIBLE FOR (AND VINE
CONNECTED DISCLAIMS) ANY AND ALL LOSS, LIABILITY, OR DAMAGES, INCLUDING TO YOUR WIRING, FIXTURES, ELECTRICITY,
HOME, PRODUCT, PRODUCT PERIPHERALS, COMPUTER, MOBILE DEVICE, AND ALL OTHER ITEMS AND PETS IN YOUR HOME, RESULTING FROM YOUR USE OF
THE PRODUCT INFORMATION, SERVICES, OR PRODUCT. PRODUCT INFORMATION PROVIDED BY THE SERVICES IS NOT INTENDED AS A SUBSTITUTE FOR
DIRECT MEANS OF OBTAINING THE INFORMATION. FOR EXAMPLE, A NOTIFICATION PROVIDED THROUGH THE SERVICE IS NOT INTENDED AS A SUBSTITUTE
FOR AUDIBLE AND VISIBLE INDICATIONS IN THE HOME AND ON THE PRODUCT, NOR FOR A THIRD-PARTY MONITORING SERVICE THAT MONITORS ALARM
STATE.
8. YOUR RIGHTS AND THIS LIMITED WARRANTY
This Limited Warranty gives you specific legal rights. You may also have other legal rights that vary by state, province, or jurisdiction. Likewise, some of the
limitations in this Limited Warranty may not apply in certain states, provinces or jurisdictions. The terms of this Limited Warranty will apply to the extent permitted
by applicable law. For a full description of your legal rights you should refer to the laws applicable in your jurisdiction and you may wish to contact a relevant
consumer advisory service. Please visit our website for the complete disclosure of this statement
44

FCC WARNING
This device complies with part 15 of the FCC Rules. Operation is subject to the following two conditions:
(1) this device may not cause harmful interference, and
(2) this device must accept any interference received, including interference that may cause undesired operation.
Any changes or modifications not expressly approved by the party responsible for compliance could void the user's
authority to operate the equipment.
NOTE: This equipment has been tested and found to comply with the limits for a Class B digital device, pursuant to
Part 15 of the FCC Rules. These limits are designed to provide reasonable protection against harmful interference in
a residential installation. This equipment generates, uses and can radiate radio frequen
cy energy and, if not installed
and used in accordance with the instructions, may cause harmful interference to radio communications.
However, there is no guarantee that interference will not occur in a particular installation.
If this equipment does cause harmful interference to radio or television reception,
which can be determined by turning the equipment off and on, the user is encouraged to try to correct the interference
by one or more of the following measures:
-- Reorient or relocate the receiving antenna.
-- Increase the separation between the equipment and receiver.
45


www.vineconnected.com
R