Before using your Commercial Ice Maker, please read this manual.
COMMERCIAL
ICE MAKER
HME030293N

BEFORE FIRST USE:
To prevent any internal damage, it is very important to
keep refrigeration units (like this one) upright throughout
their journey. Please leave it standing upright and outside
the box for 24 HOURS before plugging it in.

Important Safety Instructions 6-7
Parts Description 8-9
Operation 10-12
Maintenance 13-14
Troubleshooting 15
Warranty 16
Manufacturing Info 17
Warning 17
Contact Us 17
Technical Data 18
TABLE OF CONTENTS


on bringing home your new appliance!
C ongrat ulations
Don’t forget to register your product at homelabs.com/reg
for updates, coupons, and other relevant information.
Although greatly appreciated, product registration is not
required to activate any warranty.

6
When using your hOme
™
Commercial Ice Maker (appliance), basic safety precautions should always be followed to reduce the risk
of fire, electrical shock, and/or injury to persons. Incorrect operation due to ignoring instructions may cause harm or damage.
• Use this appliance only for its intended purpose as described in this manual.
• This Ice Maker must be properly installed in accordance with the installation instructions before it is used.
• The appliance must be positioned so that the plug is accessible.
• Connect the plug to properly polarized outlets only. No other appliance should be plugged into the same outlet. Be sure
that the plug is fully inserted into the receptacle.
• Do not run the power cord over carpeting or other heat insulators. Do not cover the cord. Keep the cord away from traffic
areas, and do not submerge in water or any other liquid.
• We do not recommend the use of an extension cord as it may overheat and cause a risk of fire. If you must use an
extension cord, use No.14AWG as a minimum size and rated no less than 1875 watts.
• If the supply cord is damaged, it must be replaced by the manufacturer, its service agent, or a similarly qualified person
in order to avoid a hazard.
• Disconnect the main plug from the socket when not in use for a long period of time.
• Unplug the appliance before cleaning or making any repairs or services.
• Never unplug your appliance by pulling the power cord. Always grasp the plug firmly and pull straight out from the outlet.
• Do not use your appliance outdoors. Keep the appliance away from direct sunlight and make sure that there are at least
15cm (6 inches) between the back of your appliance and the wall.
• Do not tip over the appliance. Otherwise, it will generate noises and make the size of each ice cube irregular. It may also
cause water leakage from the appliance.
• If the appliance is brought in from the outside during the winter season, give it a few hours to warm up to room
temperature before plugging it in.
• Do not use any other liquids to make ice cubes besides water.
• Do not clean your Ice Maker with flammable fluids. The fumes can create a fire hazard or explosion.
ELECTRICAL SHOCK HAZARD
WARNING
IMPORTANT SAFETY INSTRUCTIONS
• Plug into a grounding wall outlet.
• Never remove the ground prong.
• Use a separate power supply or receptacle.
• Never use an adapter.
• Never use an extension cord.
• Failure to follow these instructions can result in death, fire, or electrical shock.
• To avoid a hazard due to any instability of the appliance, it must be placed on a flat, sturdy surface.
• This appliance MUST be earthed. Use the proper power source according to the rating label.
Use 110-120V/60Hz earthed power supply.

7
DANGER: Risk Of Fire or Explosion. Flammable Refrigerant Used. Do Not Use Mechanical Devices To Defrost Ice Maker. Do Not Puncture
Refrigerant Tubing.
DANGER: Risk Of Fire Or Explosion. Flammable Refrigerant Used. To Be Repaired Only By Trained Service Personnel. Do Not Puncture
Refrigerant Tubing.
CAUTION: Risk Of Fire Or Explosion. Flammable Refrigerant Used. Consult Repair Manual/Owner’s Guide Before Attempting To Install or Service
This Product. All Safety Precautions Must be Followed.
CAUTION: Risk Of Fire Or Explosion. Dispose Of Property In Accordance With Federal Or Local Regulations. Flammable Refrigerant Used.
CAUTION: Risk Of Fire Or Explosion Due To Puncture Of Refrigerant Tubing;Follow Handling Instructions Carefully. Flammable Refrigerant Used.
The ice maker should be installed in accordance with the safety standard for Refrigeration Systems, ASHRAE15. The ice maker shall not be
installed in corridors or hallways of public buildings.
If the unit is with problem need to be maintained, that replacing with like components and that servicing shall be done by factory authorized
service personnel, so as to minimize the risk of possible ignition due to incorrect parts or improper service.
IMPORTANT: The wires in this main leads are colored in accordance with the following code:
Green or Green with a strip Yellow: Grounding
White: Neutral
Black: Live
To avoid the appliance falling or tipping over, always place on a flat, sturdy surface. Damage may occur if the appliance falls.
IMPORTANT SAFETY INSTRUCTIONS
SAVE THESE INSTRUCTIONS
For Indoor Use Only
8
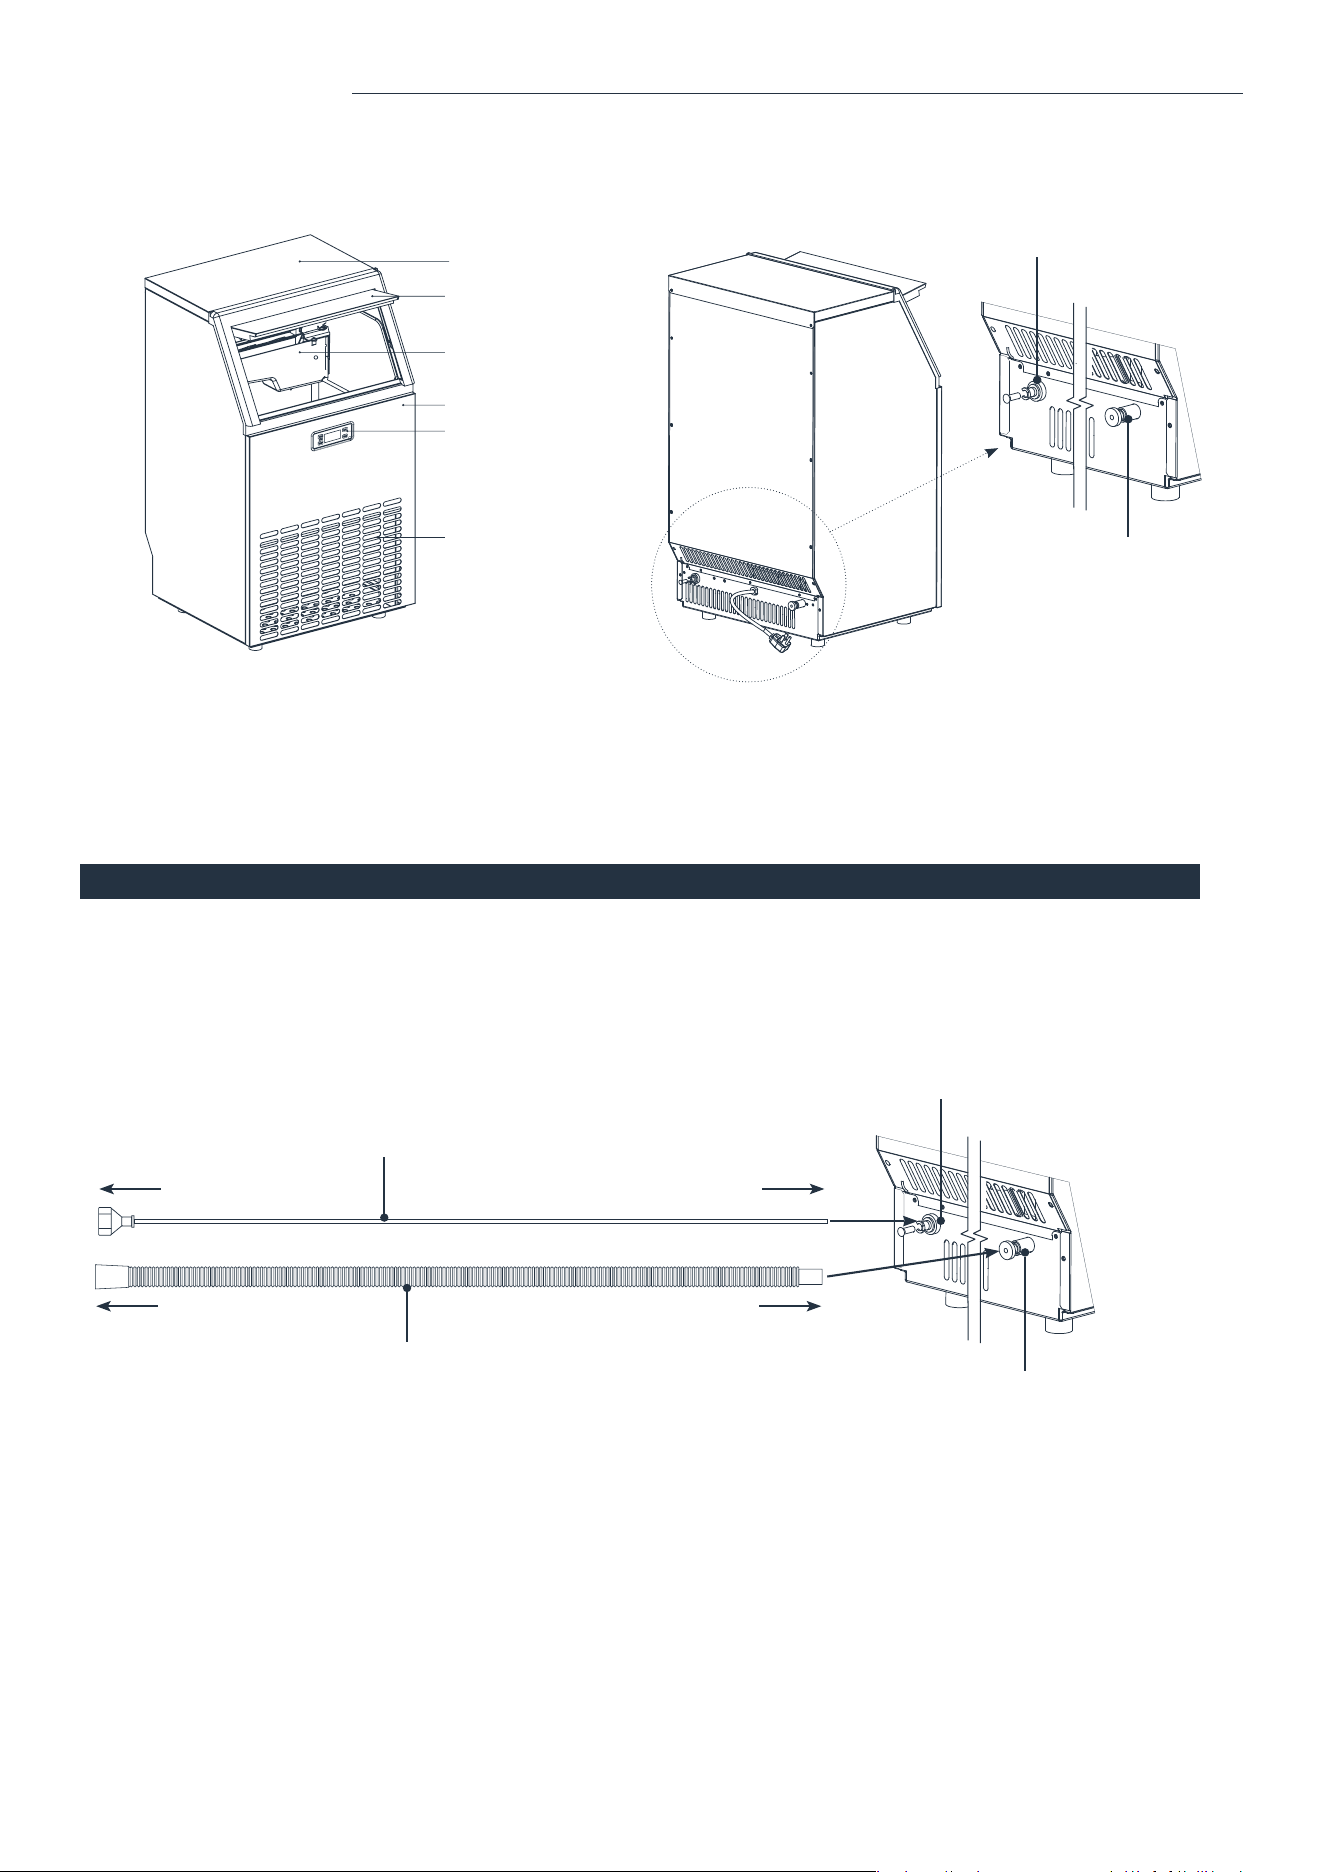
ACCESSORIES
PARTS DESCRIPTION
ACCESSORIES
Water supply hose port
(to be connected to the water supply)
Water draining hose port
Top cover
Ice bin door
Ice making & water tank assembly
Front panel
Control panel
Air outlet
Water supply hose port
(to be connected to the water supply)
Water draining hose port
Water draining hose (length: 6.5 feet)
To drain To drain hose port
Water supply hose (Length: 9 feet, Diameter: 0.25 inches)
To water supply To water supply hose port
NOTE: keep drain
hose below water
drain hose port.
9
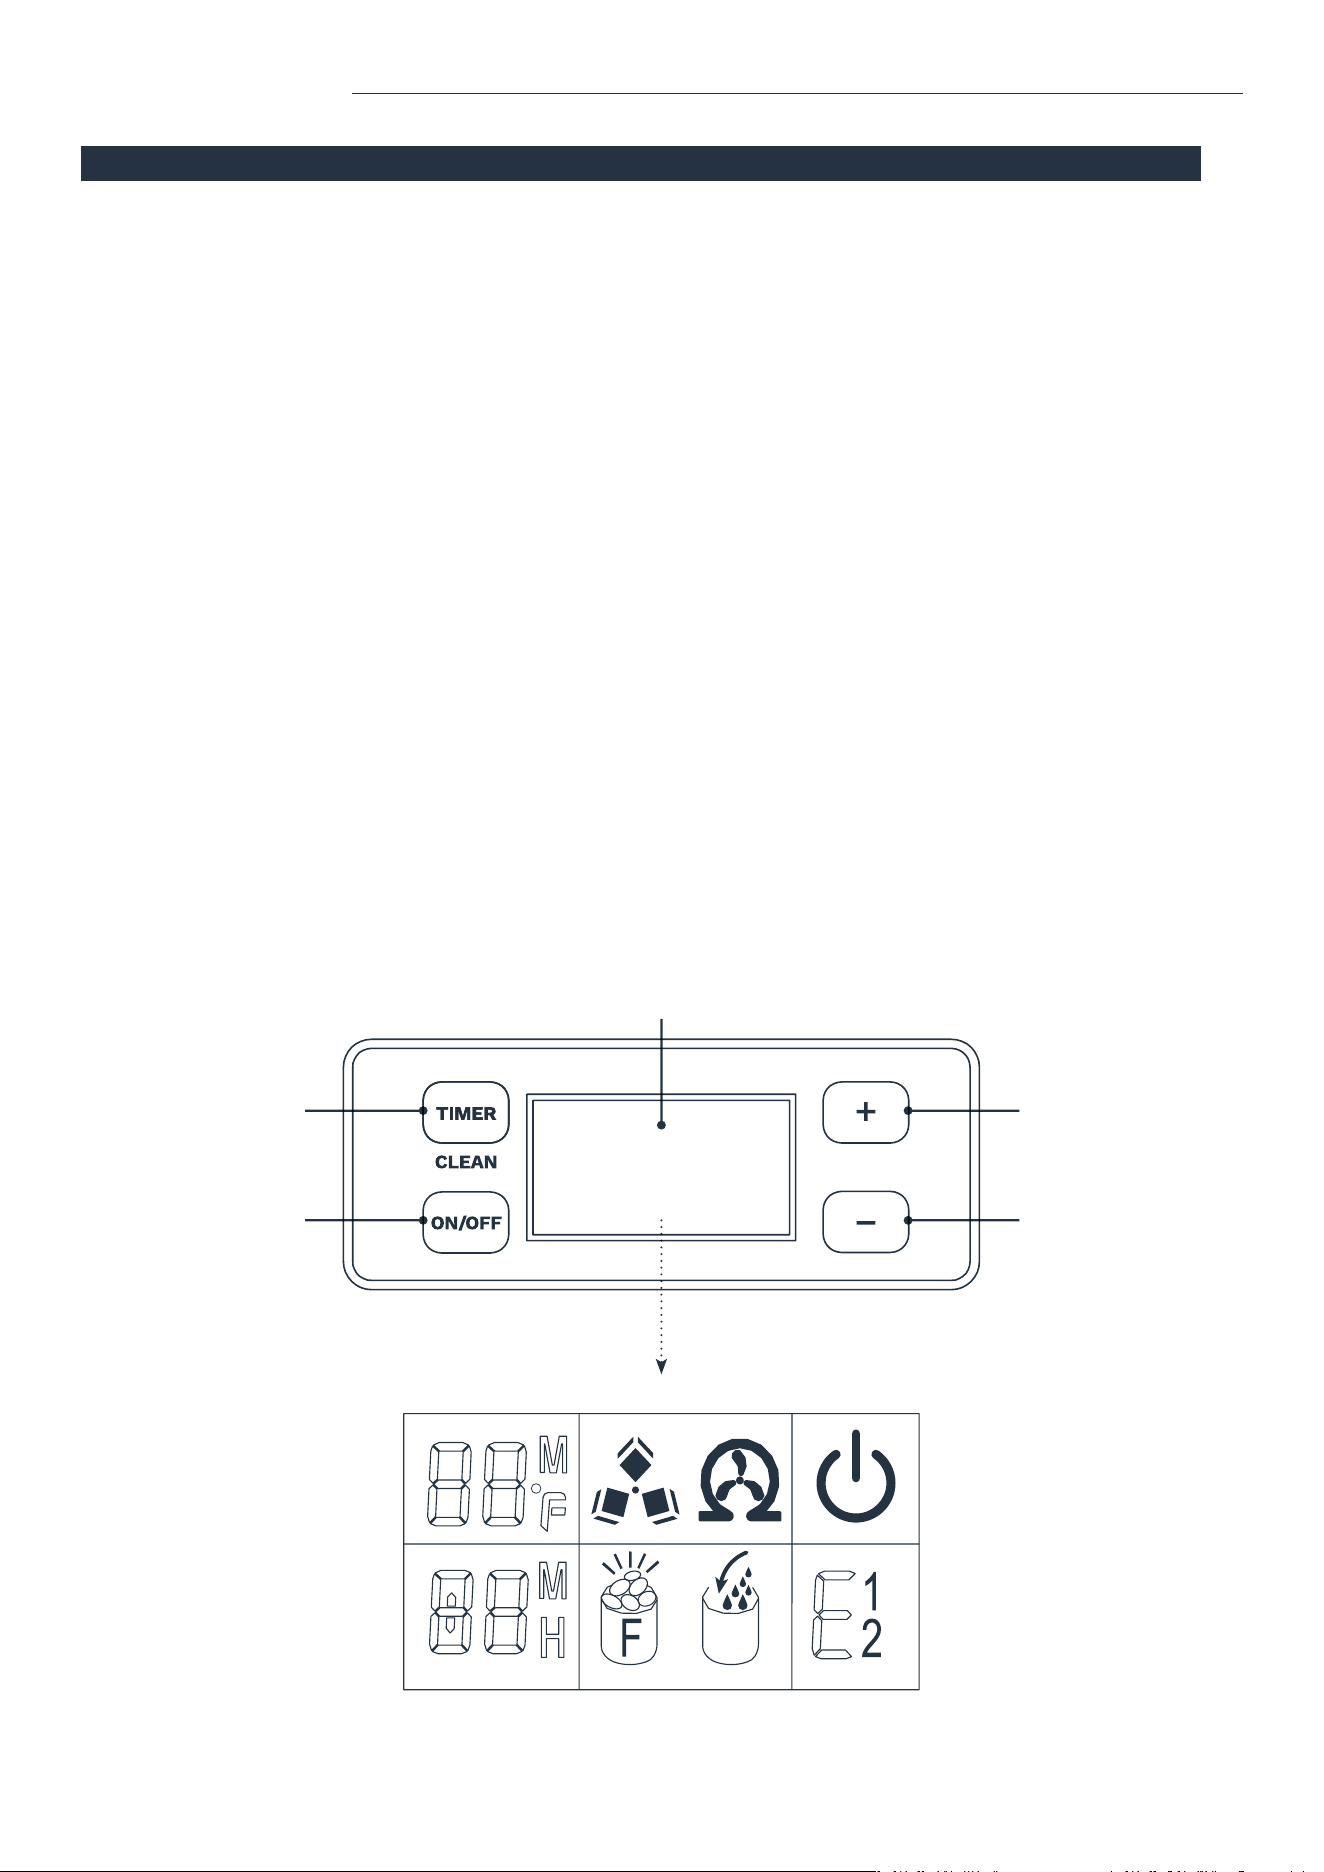
A. “TIMER/CLEAN” buon
Press this button to enter the TIMER setting program. Press and hold this button for more than 5 seconds to enter
the CLEAN program.
B. “ON/OFF” buon
Press this button to enter STANDBY mode. During Self-cleaning or Ice making program, press this button to turn
off the appliance. If the appliance is set with Timer, press this button to cancel the Timer setting.
When the appliance is making ice cubes, press and hold this button for more than 5 seconds to switch to the
ice collecting process.
C. LCD display
1. Environmental temperature and ice making time countdown. Unit of Ice making time countdown is Minutes (M).
Unit of environmental temperature is Fahrenheit (F).
2. Ice making and ice-collecting display. The rotation of the symbol indicates the process of ice making, while
the flash of the symbol indicates the process of ice-collecting.
3. Automatic self-cleaning.
4. On/Off status.
5. Error code display. E1 means the environmental temperature sensor is damaged. E2 means there is an ice making
error or refrigerant leak.
6. Water inflow and shortage display. When the symbol flashes, it indicates that there is enough water in the water tank.
When the symbol lights on, it indicates that there is not enough water in the water tank.
7. Ice full alarm. Take out the ice before the next ice making cycle.
8. Setting display. Unit for time switch machine is Hour (H). Unit for the ice making time is Minute (M).
D&E. “+” “-” buon
Adjust the ice making time length with the “+” or “-” button. The default setting is zero. There will be 1 minute added or
reduced per each press of the “+” or “-” button.
It is also used to adjust the delay time of the timer. The default setting is zero. There will be 1 hour added or reduced per
each press of the “+” or “-” button.
Press and hold the “+” or “-” button for 5 seconds to switch the temperature unit between Fahrenheit (°F) and Celsius (°C).
CONTROL PANEL & FUNCTIONS
PARTS DESCRIPTION
A E
B D
C
1
8
2
7
3
6
4
5
10
1. Remove the exterior and interior packaging. Check if all the accessories, including the instruction manual, ice scoop, water supply
hose, water hose connector, and the water draining hose are inside. If any parts are missing, please contact hOme
™
customer
service at 1-800-898-3002.
2. Remove the tape that is holding the door, inner cabinet, and ice scoop to the appliance. Clean the inside of the Ice Maker and
accessories with water. Let the appliance dry completely.
3. The unit comes with a removable protective film to prevent the unit from getting scratches during transport. Remove the film by
peeling off by hand or with the help of adhesive tape to pull the film. Put the appliance on a flat surface without direct sunlight
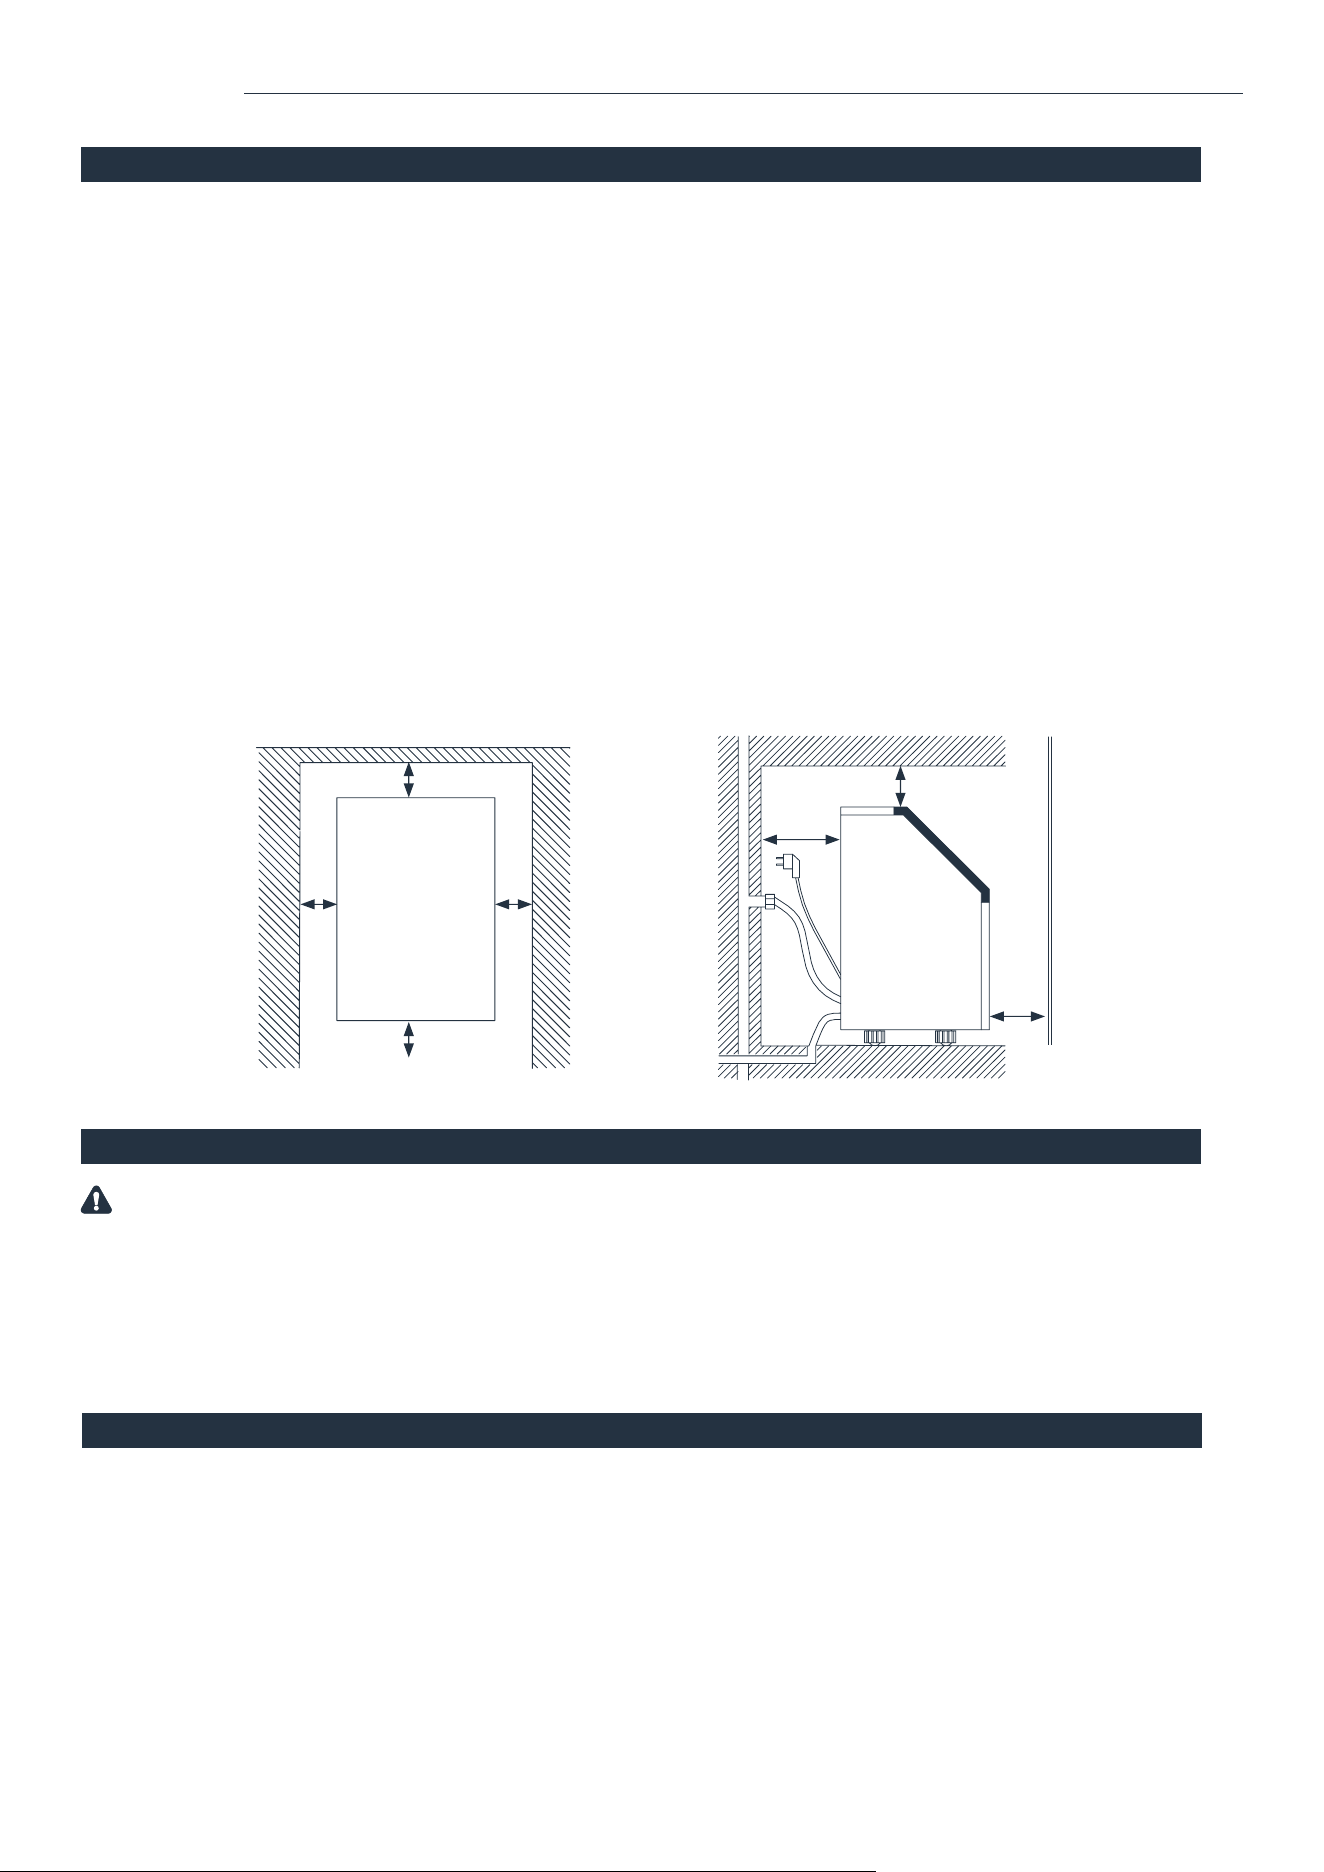
and/or other sources of heat (i.e. stove, furnace, radiator). Make sure there is at least a 20cm (8 inches) gap between the air outlet
and any obstacles, 25cm (10 inches) in front to open the door, and at least 15cm (6 inches) between the back and the wall.
4. The appliance must be positioned so that the plug is accessible.
5. Do not put anything on top of the Ice Maker.
6. When installing the Ice Maker under a counter, follow the recommended spacing dimensions. Place electrical supplies, water
supplies, and drain fixtures in the recommended locations as shown in the figure below.
7. Choose a well-ventilated area with the ambient temperature between 10°C (50°F) and 32°C (90°F). This appliance MUST be
installed in an indoor area without wind, rain, water, spray, or drips.
8. The Ice Maker requires a continuous water supply with the pressure of 0.04-0.6 MPa (5.8-87 psi). The temperature of the water
inflow should be between 5°C (41°F) and 25°C (77°F) for proper operation.
9. Keep in an upright position for 24 hours before the initial power up.
WARNING: Connect to the potable water supply only. Only use drinking water.
UNPACKING AND INSTALLATION
1. It is recommended to plug the unit on a dedicated outlet with a circuit breaker of 15A rating capacity. Use receptacles that cannot be
turned off by a switch or pull chain. If the supply cord or plug needs to be replaced, it should be done by a certified electrician.
2. Plug your appliance into a secure, properly installed, grounded wall outlet. Under any circumstances, do not cut or remove the
third (ground) prong from the power cord. Any questions concerning power and/or grounding should be directed toward a certified
electrician.
3. This appliance requires a standard 110-120 volt, 60Hz electrical outlet.
CONNECTING YOUR ICE MAKER
WARNING: Improper use of the grounded plug can result in the risk of electrical shock. If the power cord is damaged, please contact
hOme
™
Customer Service at 1-800-898-3002.
CLEANING YOUR ICE MAKER BEFORE FIRST USE
Before using your appliance, it is strongly recommended to clean it thoroughly.
1. Open the Door for ice taking.
2. Clean the inside with a special ice maker cleaning fluid (usually based on citric acid), warm water, and a soft cloth.
3. Then use potable water to rinse the inside parts. You can pull the water draining hose to drain out the rinsed water in the water tank.
4. Clean the ice storage cabinet in the same way. Drain out all rinsed water from the water draining hose, which is located at the
back of the Ice Maker.
5. You must reinstall the water draining hose of the water tank and the cap of the water draining port. Otherwise, the appliance will not
make ice normally. After cleaning, you should discard the ice cubes made from the first ice making cycle.
6. The outside of the Ice Maker should be cleaned regularly with a slightly damp cloth.
7. Dry the interior and exterior with a clean, soft cloth.
OPERATION
4cm (1.6")
15cm (6")
25cm (10")
15cm (6") 15cm (6")
15cm (6")
20cm
(8")
Door
clearance
Air outlet
clearance
Top View Side View
11
WATER CONNECTION FOR YOUR ICE MAKER
NOTE:
• Make sure to use the new hose sets supplied with the appliance to connect to the water supply. Old hose sets should not be reused.
• The water pressure of the main water supply system should be 0.04-0.6 MPa (5.8-87 psi).
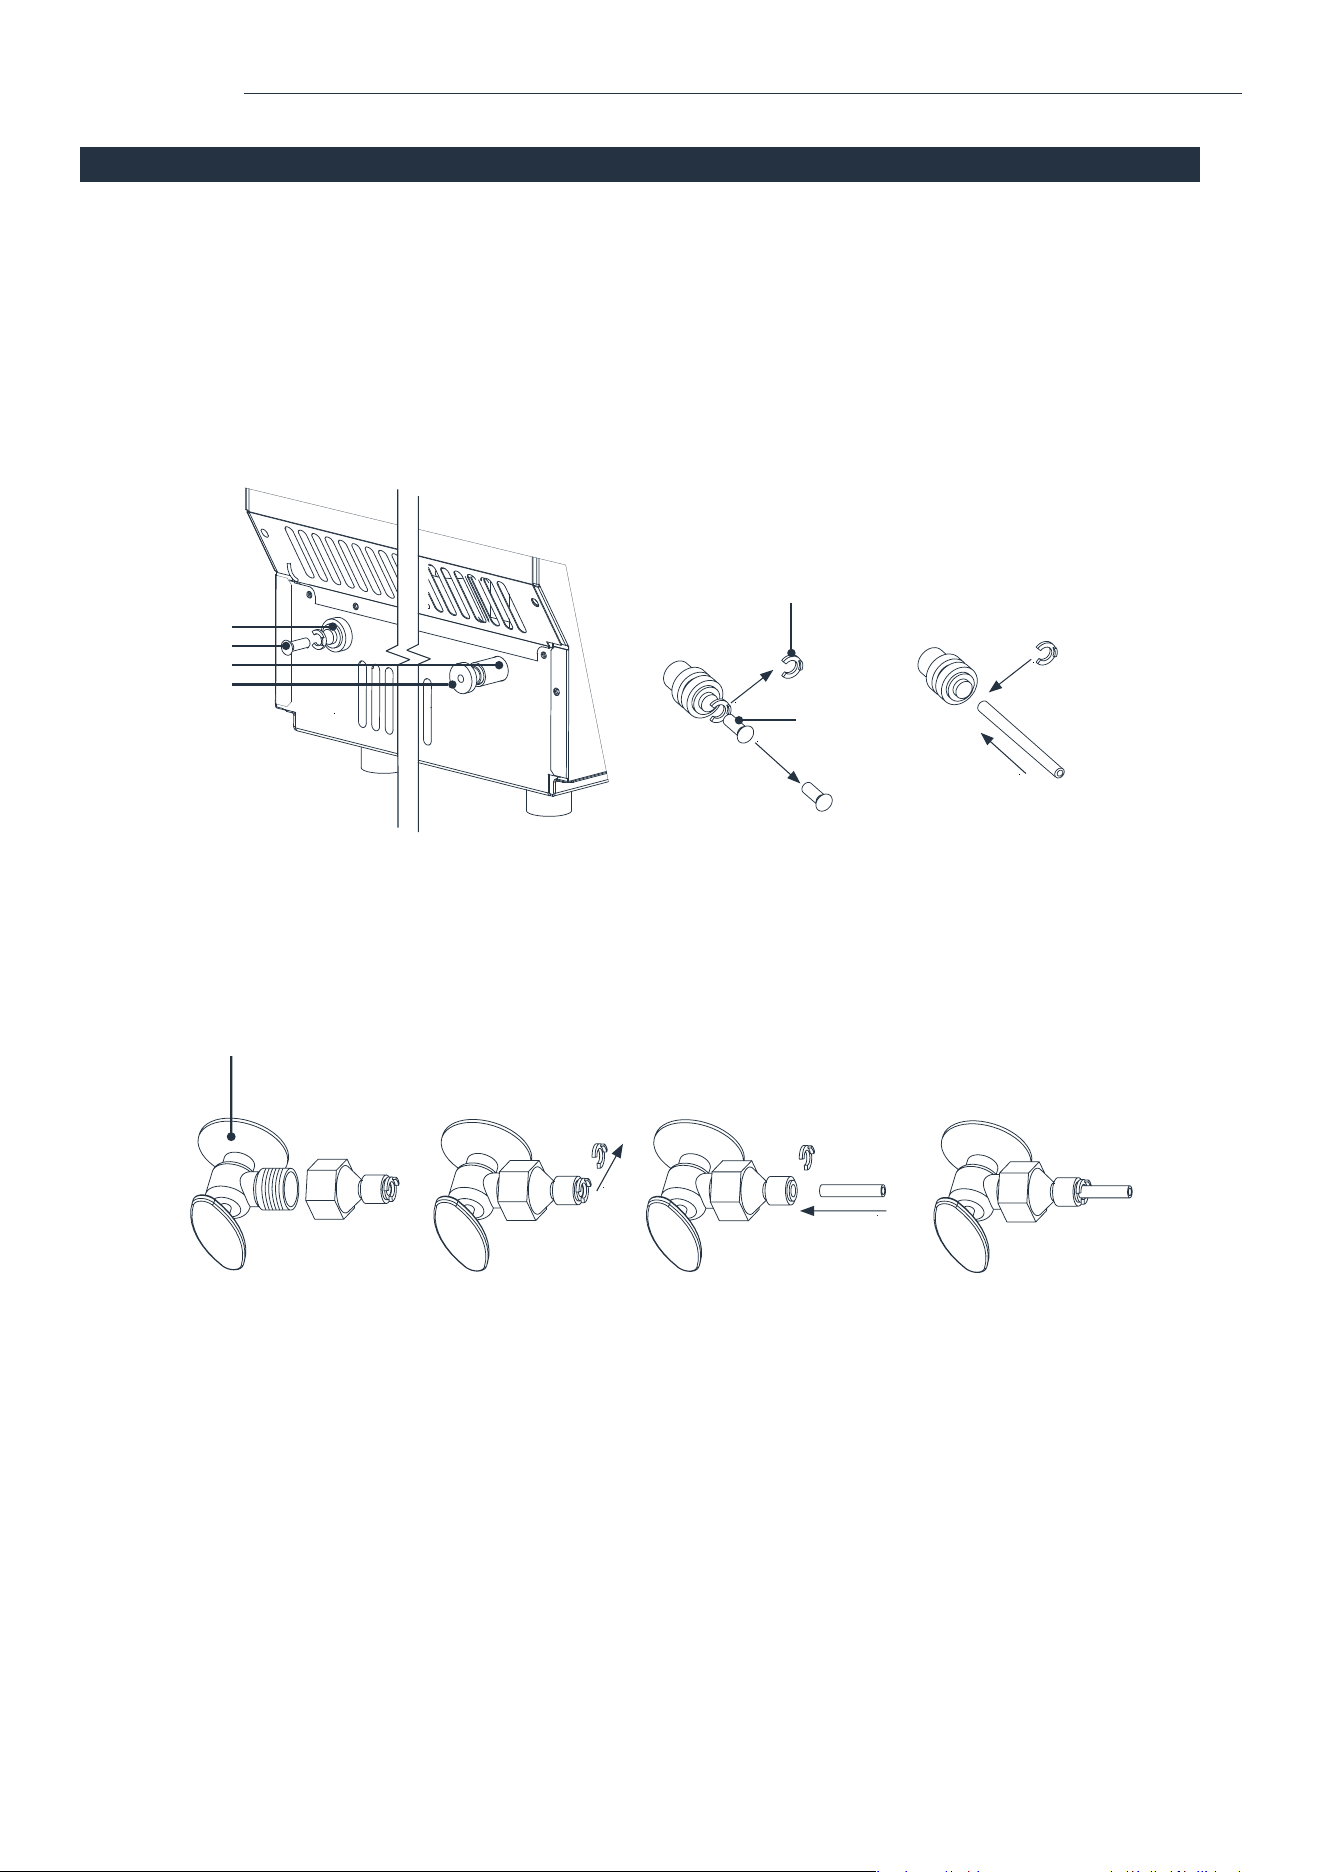
1. Connect the water supply hose to the appliance. Remove the clipper on the water supply hose port for the water supply
(indicated “B” in the following illustration), which is located at the back. Then push the anti-dust plug inwards. Use your finger to
press the circle to fix the anti-dust plug. Then take down the anti-dust plug. Insert one end of the white water hose into the water
inflow port. Push inwards completely and reinstall the clipper.
2. Connect the water draining hose. Pull out the water drainage cap (indicated “A” in the following illustration), then connect the draining
hose. Connect the other end of this draining hose to the main water drainage pipeline. Keep drain hose below water drainage port "A."
OPERATION
3. Connect the water supply hose to the water supply system. Install the connector to the water supply by the screw thread.
Remove the clipper from the water supply connector. Insert the other end of the hose into the water supply connector port
completely, then reinstall the clipper.
Under sink water supply
Clipper
NOTE: Remove
plug and discard.
B
Anti-dust plug
A
Anti-dust plug
NOTE: Remove
plugs and discard.

12
1. Plug in the Ice Maker. The ON/OFF symbol (4) will flash in the display window. Press the “ON/OFF” button on the control
panel. The Ice Maker will start to make ice cubes when the water reaches the standard level on the water tank through
the electromagnetic water valve. The symbol will change to a solid light and the Ice cube symbol (2) will start rotating.
The ambient temperature will be displayed in the upper left (1) of the display: “80F” means the ambient temperature is
80°F. A few minutes later, a number flashes in the same area: “10M,” which means the remaining ice making time for the
current cycle is 10 minutes.
2. When each ice making cycle is completed, it will enter the ice collecting process, and the Ice cube symbol (2) will flash.
The hose will add water to the water tank through the electromagnetic valve, and the arrow on the Water inflow symbol
(6) will flash until the water reaches the standard level. When the Water inflow symbol (6) light is off, it means the Ice
Maker is ready for the ice making cycle. In the case of a water shortage, the Ice Maker needs to be restarted. Otherwise,
it will start up automatically after 15 minutes.
NOTE: Each ice making cycle takes about 11-20 minutes based on the ambient and water temperature. The rst ice
making cycle will be longer because of the high water temperature in the water tank. However, it will last for less
than 30 minutes.
3. To adjust the ice thickness, press the “+” or “-” button on the control panel. The number at the bottom left of the display
shows the time setting of the ice making with the default “0”. Press the “+” button once to add one minute at a time, and
the ice cubes will be thicker. Press the “-” button once to reduce one minute at a time, and the ice cubes will be thinner.
NOTE: The adjustment only affects the next and subsequent ice making cycles.
4. When the Ice full alarm (7) lights up, the appliance stops working. It will work again after you take out the ice.
5. To turn off the appliance during the ice making process, press the “ON/OFF” button on the control panel to enter the
standby mode. If you press and hold “ON/OFF” for more than 5 seconds during ice making, the appliance enters into
the ice collecting process.
6. The timer setting range is between 1 to 24 hours. When the appliance is running, you can set up the time to turn it off.
When the appliance is on standby, you can set up the time to turn it on. To set up the timing, press the “TIMER” button.
The default time displays “1H” (H meaning hour). Press the “+” or “-” buttons to adjust to the time that you desire. During
the process of time adjustment, the “H” in the lower corner (8) will flash. After 5 seconds without any movement, the
"H" light will change from flashing to solid, meaning the timer setting has been completed. In standby mode where “5H”
is displayed, it means the appliance will start working automatically after 5 hours. During the ice making process where
“5H” is displayed, it means the appliance will turn off automatically after 5 hours. The “H” indicates that the appliance
currently has a timer setting on. The number before “H” indicates the time countdown. When it reaches zero, the
appliance enters into the mode you preset. Press the “TIMER” button to cancel the timer setting during the countdown.
7. To start the Self-cleaning program, plug in the main power plug after connecting the water hoses, then press and hold
the “TIMER/CLEAN” button for more than 5 seconds. The Automatic self-cleaning symbol (3) will rotate on display, and
the time countdown area will display 20M. This means the default cleaning time is 20 minutes. The “TIMER/CLEAN”
button will light on during this period. The water pump runs for 8 minutes and stops for 3 minutes, then recycles. The
total duration time is 20 minutes for one self-cleaning cycle. When the water pump stops working, water will flow to the
water tank automatically. When the program is completed, the Ice Maker will turn off automatically.
NOTE: You can press the “ON/OFF” buon to cancel the Self-cleaning program immediately.
OPERATING YOUR ICE MAKER
OPERATION

13
MAINTENANCE
CLEANING & MAINTENANCE OF YOUR ICE MAKER
WARNING: Before cleaning or maintenance, unplug the Ice Maker from the main power supply (Exception: Self-cleaning program).
Do not use any alcohol or fume for cleaning/sanitization of the Ice Maker. It may cause cracks on the plastic parts. Ask an authorized
service engineer to check and clean the condenser at least once a year, in order to keep the appliance working properly.
CAUTION: If the Ice Maker has been left unused for a long period of time, it must be thoroughly cleaned before the next use.
Follow the cleaning instructions below. Do not leave any solution inside the Ice Maker after cleaning.
Periodic cleaning and proper maintenance will ensure efficiency, performance, hygiene, and duration of the machine.
Never keep anything in the ice storage bin. Objects, like wine and beer bottles, are unsanitary and may cause obstruction
of the drain pipe.
Exterior Cleaning
To clean the outside of the Ice Maker, use a slightly damp cloth and wipe down the exterior. DO NOT use direct water or solvent-
based or abrasive cleaners.
NOTE:
Stainless steel products exposed to chlorine gas and moisture, such as in spas or swimming pools, may cause discoloration
of stainless steel. Discoloration from chlorine gas is normal.
Cleaning of Ice Storage
The ice storage cabinet should be sanitized occasionally. Clean the cabinet before the Ice Maker is used for the first time and
reused after a long period of time. Follow the steps below:
1. Turn off the Ice Maker and unplug the power cord.
2. Open the Door for ice taking and wipe down the interior with a special ice maker cleaning fluid (usually based on citric
acid) and follow the instructions provided by the manufacturer.
3. Rinse thoroughly with potable water. The rinsed water should be drained out via the drain hose.
4. Dry with a clean, soft cloth.
The ice scoop should be washed regularly. Wash it in the same fashion as you would any food container.
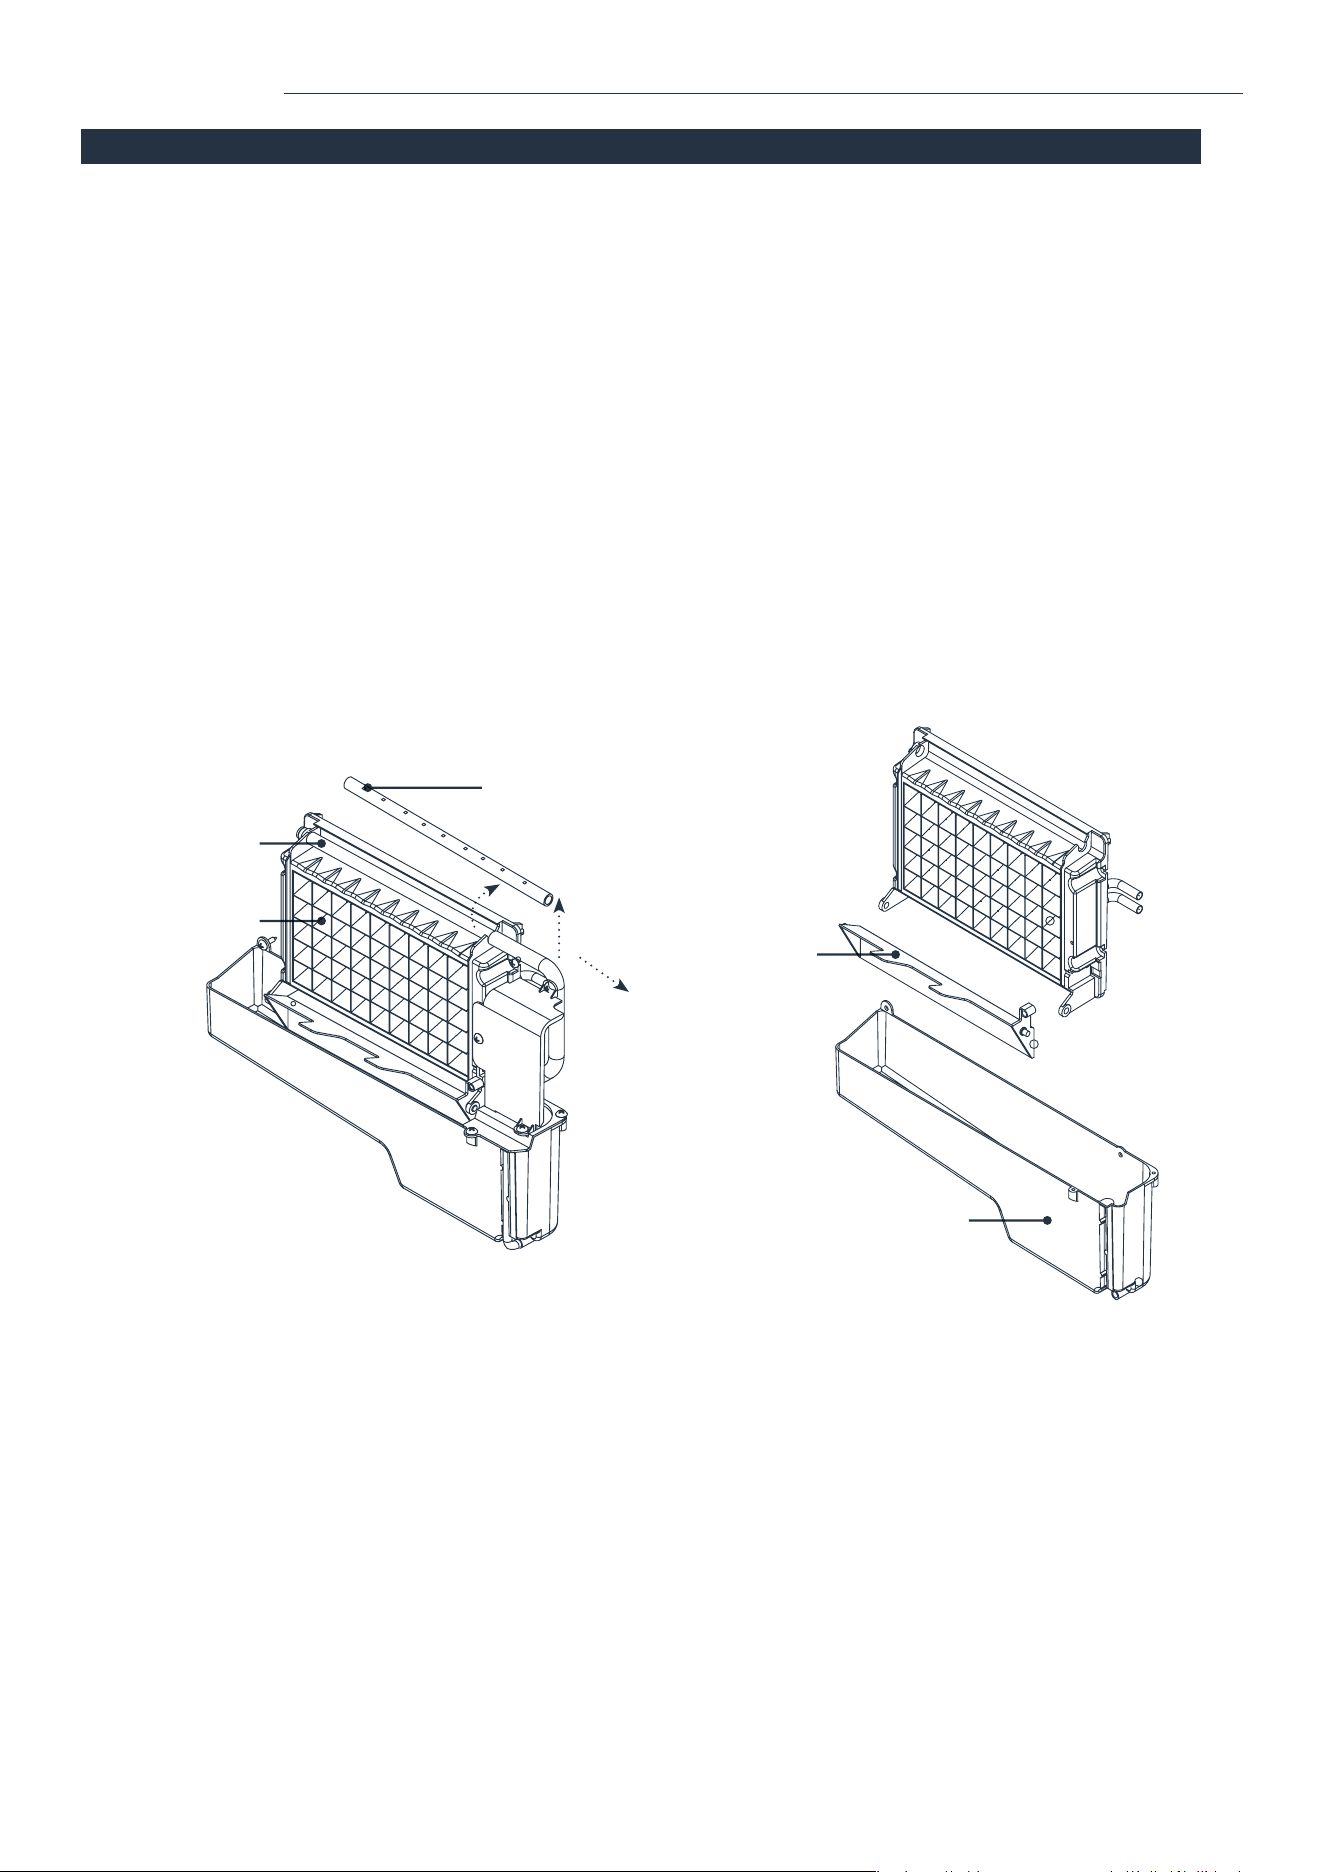
Cleaning of the Ice Making Parts
1. Repeat the above steps to clean the water tank and other inner parts of the Ice Maker.
2. When the water flowing from the water dividing pipe on the evaporator is very minor, disassemble the water dividing pipe
for cleaning. Clean each small hole on the water dividing pipe, like in the following illustration on Page 14. Make sure all
holes are unclogged, then reinstall the water dividing pipe to the original location.
3. If the ice cubes on the surface of the evaporator do not fall down easily, do not use mechanical force to remove them.
Press and hold the “ON/OFF” button for more than 5 seconds to switch to the ice collecting process. The ice cubes will
start to fall down. Turn off the Ice Maker and unplug the power cord to clean the surface of the evaporator.
14
CLEANING & MAINTENANCE OF YOUR ICE MAKER
MAINTENANCE
NOTE: After cleaning the interior parts of your Ice Maker, install the parts to the original position, then plug in
and turn on the machine. It is recommended to discard the first batch of ice.
Cleaning Suggestion
1. The Ice scoop, door for ice taking, and water outlet pipe should be cleaned after each use. Rinse the ice scoop
and wipe the door with a clean cloth.
2. The Water tank, Ice full detecting board, and the surface of the Evaporator should be cleaned twice every month.
3. All the components and surfaces exposed to water or ice cubes, like the Ice storage bin, water tank, evaporator,
water pump, silicone tube, water outlet pipe, etc. should be cleaned by using a nickel safe Ice Maker cleaner
6 months after the first use. This should be done by a professional service provider.
WARNING: Wear rubber gloves and safety goggles when handling the Ice Maker Cleaner or Sanitizer.
NOTE: Minerals that are removed from water during the ice making cycle will eventually form a hard, scaly deposit in
the water system. Clean the system regularly to remove the mineral scale buildup. The frequency of cleaning depends
on how hard your water is. With 4 to 5 grains/liter, it is recommended to clean the system every 6 months.
Ice full
detecting plate
Water tank
Hole dividers
Pull up first,
then move out
toward right
Water
dividing pipe
Evaporator

15
The “Water inflow and
shortage” (6) indicator is on.
The appliance starts to enter
the ice making process, but
water flows in and the
“ADD WATER” indicator flashes.
The water pump is working,
but there is little water flow
out from the water dividing pipe.
The transparency of the
ice cube is not very good.
Ice cube shape is irregular.
Ice cubes are too thin.
Ice cubes are too thick.
There are no ice cubes
produced from the normal
ice making cycle.
There is no water supply.
The floating ball of the water level detecting
switch is blocked and cannot rise.
Water flows out from the water tank.
Water flows out from the water draining hose
of the water tank.
The water supply hose is blocked or
water is flowing in very slowly.
The small holes on the water dividing
pipe are blocked.
Water quality is not good or the water
tank is dirty.
The small holes on the water dividing
pipe are blocked.
The ambient temperature is too high.
Air circulation around the appliance
is not good.
The ambient temperature is too low.
The ambient temperature or water
temperature in the water tank is too high.
There is a refrigerant leak.
The cooling system tube is clogged.
Check the water supply pressure and whether
the supply hose is blocked. Add water pressure
or clean the hose if needed. Clean the water tank
and the water level detecting switch. Place the
appliance on a flat surface, not on a slope.
Pull out the pipe and install back into the slot of
the water tank properly.
Check the water supply pressure and whether
the supply hose is blocked. Add water pressure
or clean the hose if needed.
Clean the water dividing pipe. Make sure all
nine holes are unclogged.
Change the water supply, or use the water filter
to soften or filter the water.
Clean the water tank and change to clean purified
water. Clean the water dividing pipe. Make sure all
nine holes are unclogged.
Move the appliance to a low-temperature space
or increase the time of each ice making cycle.
Make sure that there is at least a 20cm (8 inches)
gap between the air outlet and the obstacles,
25cm (10 inches) in front to open the door, and
at least 15cm (6 inches) between the back of the
appliance and the wall. Reduce the time of each
ice making cycle.
Move to a place with a temperature lower than
32 Celsius and use low-temperature water.
Call an authorized technical service engineer
to maintain the process.
TROUBLESHOOTING
POSSIBLE CAUSES SOLUTION
PROBLEM

16
WARRANTY
hOme
™
offers a limited two-year warranty (“warranty period”) on all of our products purchased new and unused from
hOme Technologies, LLC or an authorized reseller, with an original proof of purchase and where a defect has arisen, wholly or
substantially, as a result of faulty manufacture, parts or workmanship during the warranty period. The warranty does not apply
where damage is caused by other factors, including but without limitation: (a) normal wear and tear; (b) abuse, mishandling,
accident, or failure to follow operating instructions; (c) exposure to liquid or infiltration of foreign particles; (d) servicing or
modifications of the product other than by hOme
™
; (e) commercial or non-indoor use.
The hOme
™
warranty covers all costs related to restoring the proven defective product through repair or replacement of any
defective part and necessary labor so that it conforms to its original specifications. A replacement product may be provided
instead of repairing a defective product. HOme
™
’s exclusive obligation under this warranty is limited to such
repair or replacement.
A receipt indicating the purchase date is required for any claim, so please keep all receipts in a safe place. We recommend
that you register your product on our website, homelabs.com/reg. Although greatly appreciated, the product registration is
not required to activate any warranty and product registration does not eliminate the need for the original proof of purchase.
The warranty becomes void if attempts at repair are made by non-authorized third parties and/or if spare parts, other than
those provided by hOme
™
, are used.
You may also arrange for service after the warranty expires at an additional cost.
These are our general terms for warranty service, but we always urge our customers to reach out to us with any issue,
regardless of warranty terms. If you have an issue with a hOme
™
product, please contact us at 1-800-898-3002, and
we will do our best to resolve it for you.
This warranty gives you specific legal rights and you may have other legal rights, which vary from state to state, country
to country, or province to province. The customer may assert any such rights at their sole discretion.
17
WARNING
Keep all plastic bags away from children.
This manual is to be used with all items with the model number
HME030293N
MANUFACTURING INFO
SKU# : HME030293N
RATING: 115V, 60Hz
1-(800)-898-3002
CONTACT US
homelabs.com/chat
CHAT W ITH U S
CALL U S
EMAIL U S
18
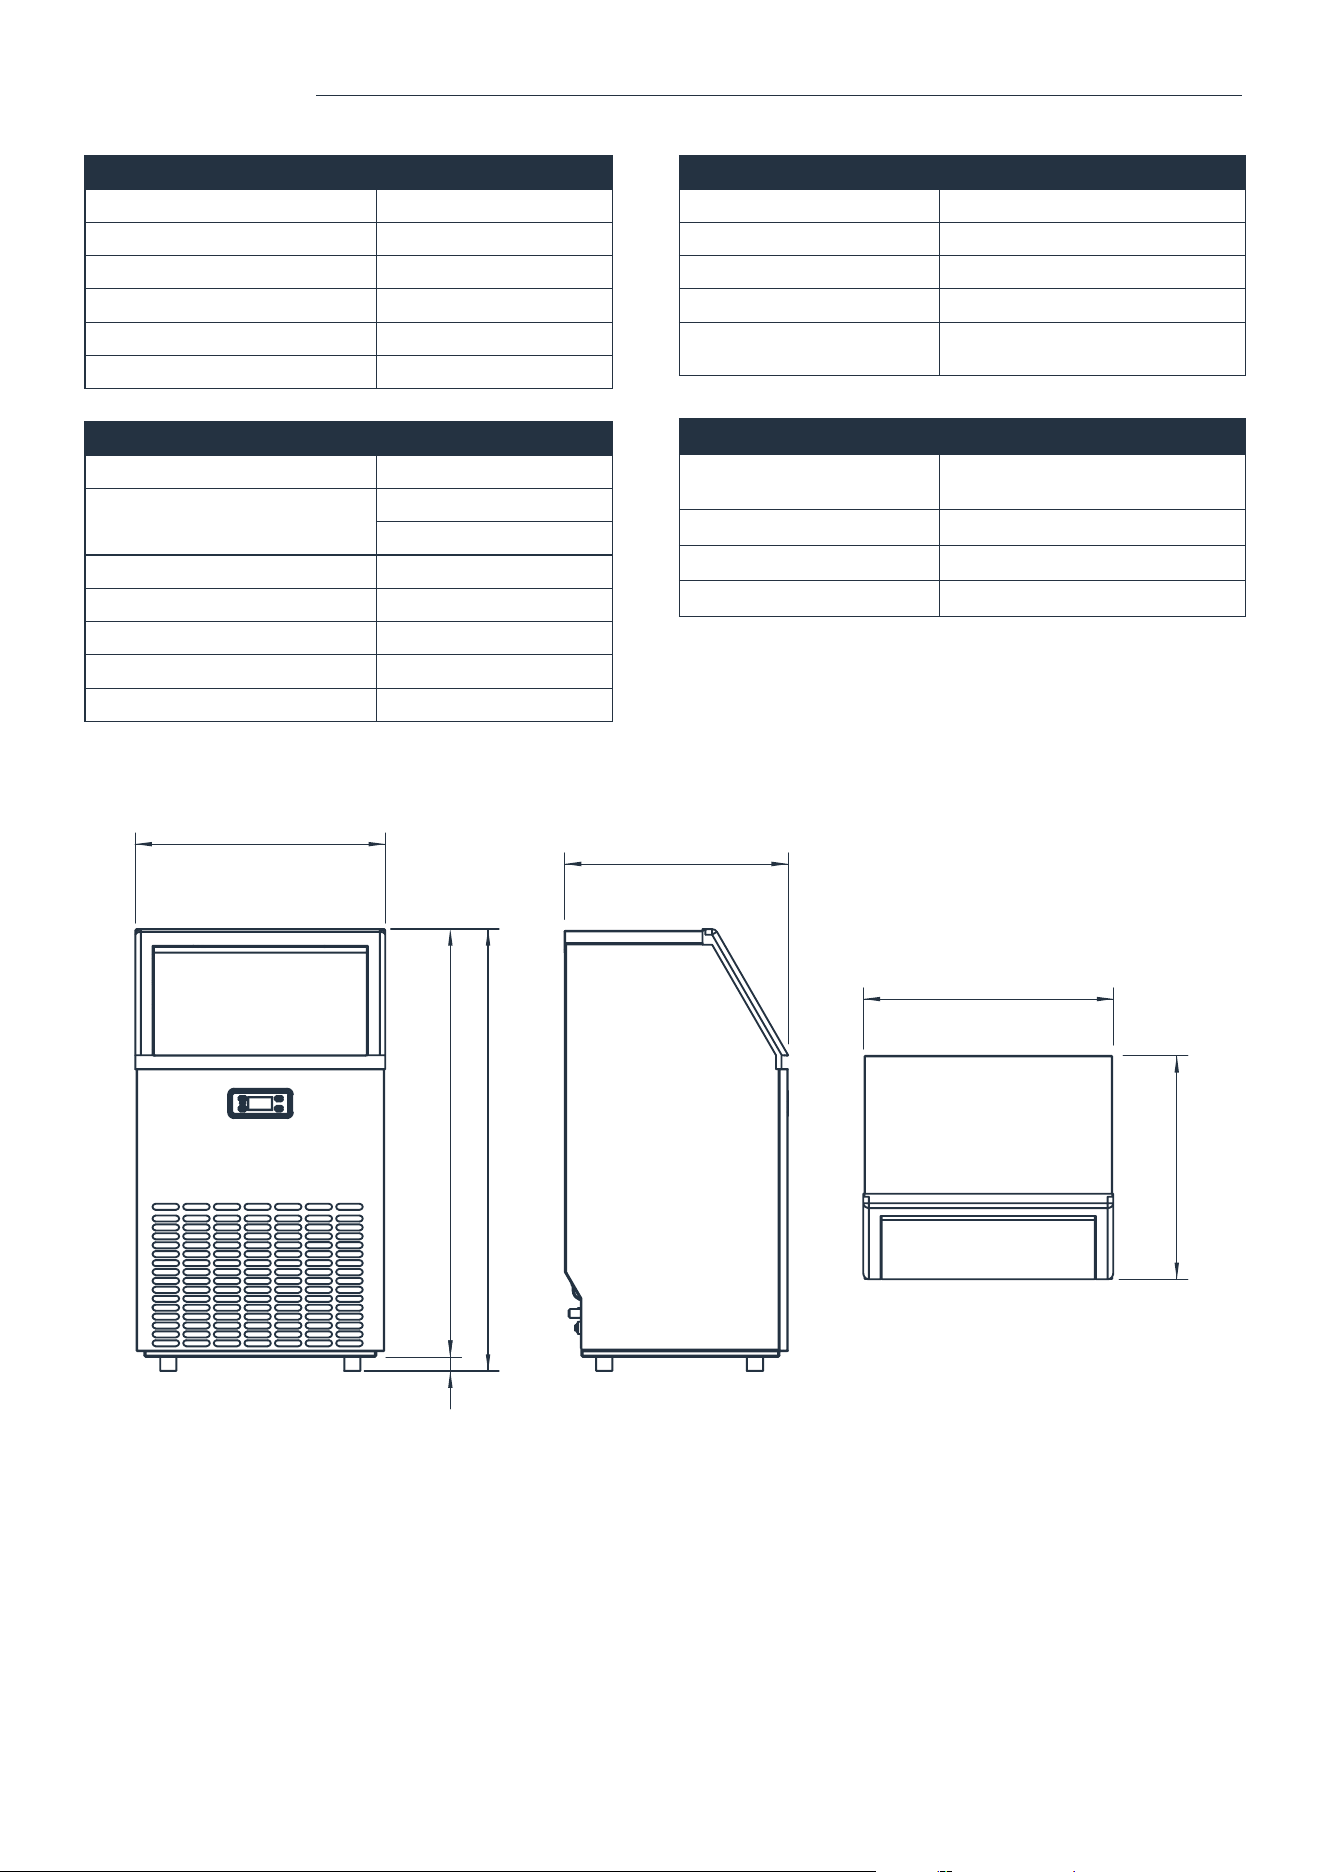
TECHNICAL DATA
DIMENSIONS
DIMENSIONS
Exterior dimension (L x W x H ) 17.6 X 15.8 X 31.2 inches
Interior dimension (L x W x H ) 15.4 X 11.8 X 10.6 inches
Product weight ( lbs ) 61.5 lbs
Package dimension (L x W x H ) 20.4 X 18.7 X 34.7 inches
Package weight ( lbs ) 70 lbs
Net volume (interior) 1.1 Cu. Ft.
ELECTRICAL
Rated input voltage 115V
Rated current (A)
Ice-making: 2.7A
Ice-harvest: 3.0A
Rated power Consumption (W) 300W
Frequency 60Hz
Phase
Plug type (UL)SJT-3*18AWG
Cord length 71 inches
ICE MAKING
Ice Making capacity (lbs/24h) 143 lbs/24h (50˚F water supply)
Ice Storage Capacity (lbs) 33 lbs
Refrigerant Type &Amount R290 90g
Foaming agent / Vesicant C
5H10
Pressure (High side and Low
side) (psig)
High/Max:280 psig, Low/Min:88 psig
CONSTRUCTION
Exterior material stainless steel sheet, cold-rolled
sheet metal, ABS
Interior material PS, ABS, copper coated with Nickel
Insulation material
C
5H10
Ice Storage Capacity (lbs) 33 lbs
17.6”
17.6”
1” 30.2”
31.2”
15.8”
15.8”


© 2018 hOme Technologies, LLC
37 East 18 Street, 7th Floor
New York, NY 10003
For Indoor Use
Only
All rights reserved, hOme
™
. Printed in China.
1-800-898-3002
homelabs.com/help