www.klarstein.com
PARTYTIME
Eiswürfelmaschine
Ice Cube Maker
Máquina de hielo
Machine à glaçons
Macchina per cubetti di ghiaccio
10035294 10035295

3
DE
Sehr geehrter Kunde,
wir gratulieren Ihnen zum Erwerb Ihres Gerätes. Lesen Sie
die folgenden Hinweise sorgfältig durch und befolgen Sie
diese, um möglichen Schäden vorzubeugen. Für Schäden,
die durch Missachtung der Hinweise und unsachgemäßen
Gebrauch entstehen, übernehmen wir keine Haftung. Scannen
Sie den folgenden QR-Code, um Zugriff auf die aktuellste
Bedienungsanleitung und weitere Informationen rund um das
Produkt zu erhalten.
INHALTSVERZEICHNIS
TECHNISCHE DATEN
Artikelnummer 10035294, 10035295
Stromversorgung 220-240 V~ 50 Hz
Leistung (Watt) 145 W
Klimaklasse ST/SN/N/T
Schutzklasse I
Kältemittel R600a/25 g
Auslegungsdruck (Überdruck)
Maximum: 20 bar (290 Psig),
Minimum: 9,5 bar (138 Psig)
Schaummittel C
5
H
10
Sicherheitshinweise4
Geräteübersicht6
Bedienfeld, Anzeigen und Tasten7
Installation8
Inbetriebnahme und Bedienung8
Reinigung und Pege10
Fehlersuche und Fehlerbehebung12
Spezielle Entsorgungshinweise für Verbraucher in Deutschland14
Hinweise zur Entsorgung16
Hersteller & Importeur (UK)16
English 17
Français 29
Español 41
Italiano 53

4
DE
SICHERHEITSHINWEISE
• Schließen Sie das Gerät nur an geerdete Steckdosen an, die der Spannung des
Geräts entsprechen.
• Wenn Sie das Gerät bewegen, benutzen Sie die Griffe.
• Stellen Sie das Gerät auf einen ebenen Untergrund.
• Benutzen Sie das Gerät nur in Innenräumen.
• Benutzen Sie das Gerät nicht in der Nähe einer Badewanne oder eines
Swimmingpools.
• Ziehen Sie den Stecker aus der Steckdose, wenn Sie das Gerät nicht benutzen.
• Tauchen Sie das Netzkabel und den Stecker niemals in Wasser oder andere
Flüssigkeiten.
• Benutzen Sie nur Zubehör, das vom Hersteller ausdrücklich für dieses Gerät
empfohlen wird.
• Stellen Sie das Gerät nicht direkt unter einer Steckdose auf.
• Lassen Sie das Netzkabel nicht von der Arbeitsäche hängen, damit Kinder nicht
daran ziehen können.
• Überfüllen Sie das Gerät nicht, andernfalls kann es zu Kurzschlüssen und
Stromschlägen kommen.
• Achten Sie darauf, dass der Deckel während des Betriebs immer geschlossen ist.
• Ziehen sie den Stecker nicht am Kabel aus der Steckdose, sondern halten Sie ihn
beim Abziehen mit der Hand fest.
• Verwenden Sie dieses Gerät nur für den vorgesehenen Zweck. Für Schäden,
die durch Missachtung der Hinweise und unsachgemäßen Gebrauch entstehen,
übernehmen wir keine Haftung. Benutzen Sie das Gerät nur im Haushalt.
• Schließen Sie das Gerät nicht an eine Zeitschaltuhr oder ferngesteuerte Steckdose an.
• Tauchen Sie das Gerät nicht in Wasser.
• Falls das Netzkabel oder der Stecker beschädigt sind, müssen sie vom Hersteller,
einem autorisierten Fachbetrieb oder einer ähnlich qualizierten Person ersetzt
werden.
• Halten Sie sich bei der Entsorgung an die örtlichen Vorschriften zur Entsorgung von
Geräten mit entzündlichem Gas.
• Bewahren Sie keine leicht entzündlichen oder explosiven Stoffe im Gerät auf.
• Befüllen Sie das Gerät nur mit Trinkwasser.
• Kinder ab 8 Jahren, psychisch, sensorisch und körperlich eingeschränkte Menschen
dürfen das Gerät nur benutzen, wenn sie vorher von einer für sie verantwortlichen
Aufsichtsperson ausführlich mit den Funktionen und den Sicherheitsvorkehrungen
vertraut gemacht wurden und die damit verbundenen Risiken verstehen.
Dieses Gerät enthält das Kältemittel Isobutan (R600a), ein Naturgas mit hoher
Umweltverträglichkeit, aber brennbar. Obwohl es brennbar ist, schädigt es nicht
die Ozonschicht und verstärkt nicht den Treibhauseffekt. Die Verwendung dieses
Kältemittels führt zu einer etwas höheren Geräuschentwicklung des Gerätes.
Zusätzlich zum Kompressorgeräusch können Sie den Fluss des Kältemittels hören.
Dies ist unvermeidlich und hat keine negative Wirkung auf die Leistung des Gerätes.
Seien Sie während des Transports vorsichtig, so dass der Kältemittelkreislauf nicht
beschädigt wird. Kältemittellecks können die Augen reizen.

5
DE
WARNUNG
Gefahr durch Feuer/brennbare Materialien. Bitte beachten Sie die
örtlichen Vorschriften zur Entsorgung von Geräten mit brennbaren
Kältemitteln und Gasen.
• Halten Sie Lüftungsöffnungen im Gerätegehäuse frei von Hindernissen.
• Beschädigen Sie nicht den Kältemittelkreislauf.
• Verwenden Sie keine mechanischen Vorrichtungen oder anderen Mittel, um den
Auftauprozess oder den Eisgewinnungsprozess zu beschleunigen.
• Verwenden Sie keine anderen Arten von Elektrogeräten im Inneren der
Eiswürfelmaschine.
Besondere Hinweise
• Achten Sie bei der Positionierung des Gerätes darauf, dass das Netzkabel nicht
eingeklemmt oder beschädigt ist.
• Achten Sie darauf, dass sich keine Mehrfachsteckdosen oder Netzteile auf der
Rückseite des Geräts benden.
Um eine Kontamination von Lebensmitteln zu vermeiden, beachten Sie bitte die
folgenden Anweisungen:
• Reinigen Sie regelmäßig Oberächen, die mit Lebensmitteln in Berührung kommen
können. Reinigen Sie regelmäßig den Wasserablauf.
• Sollte das Gerät einen Wassertank enhalten, reinigen Sie ihn, wenn das Gerät
48Stunden lang nicht benutzt wurde. Spülen Sie den Tank, wenn 5 Tage lang kein
Wasser entnommen wurde.
WARNUNG
Achten Sie bei Gebrauch, Wartung und Entsorgung des Gerätes auf
das linke Symbol, das sich auf der Rückseite oder am Kompressor des
Gerätes bendet. Dieses Symbol warnt vor möglichen Bränden. In den
Kältemittelleitungen und im Kompressor benden sich brennbare Stoffe.
Halten Sie das Gerät bei Gebrauch, Wartung und Entsorgung von
Feuerquellen fern.

6
DE
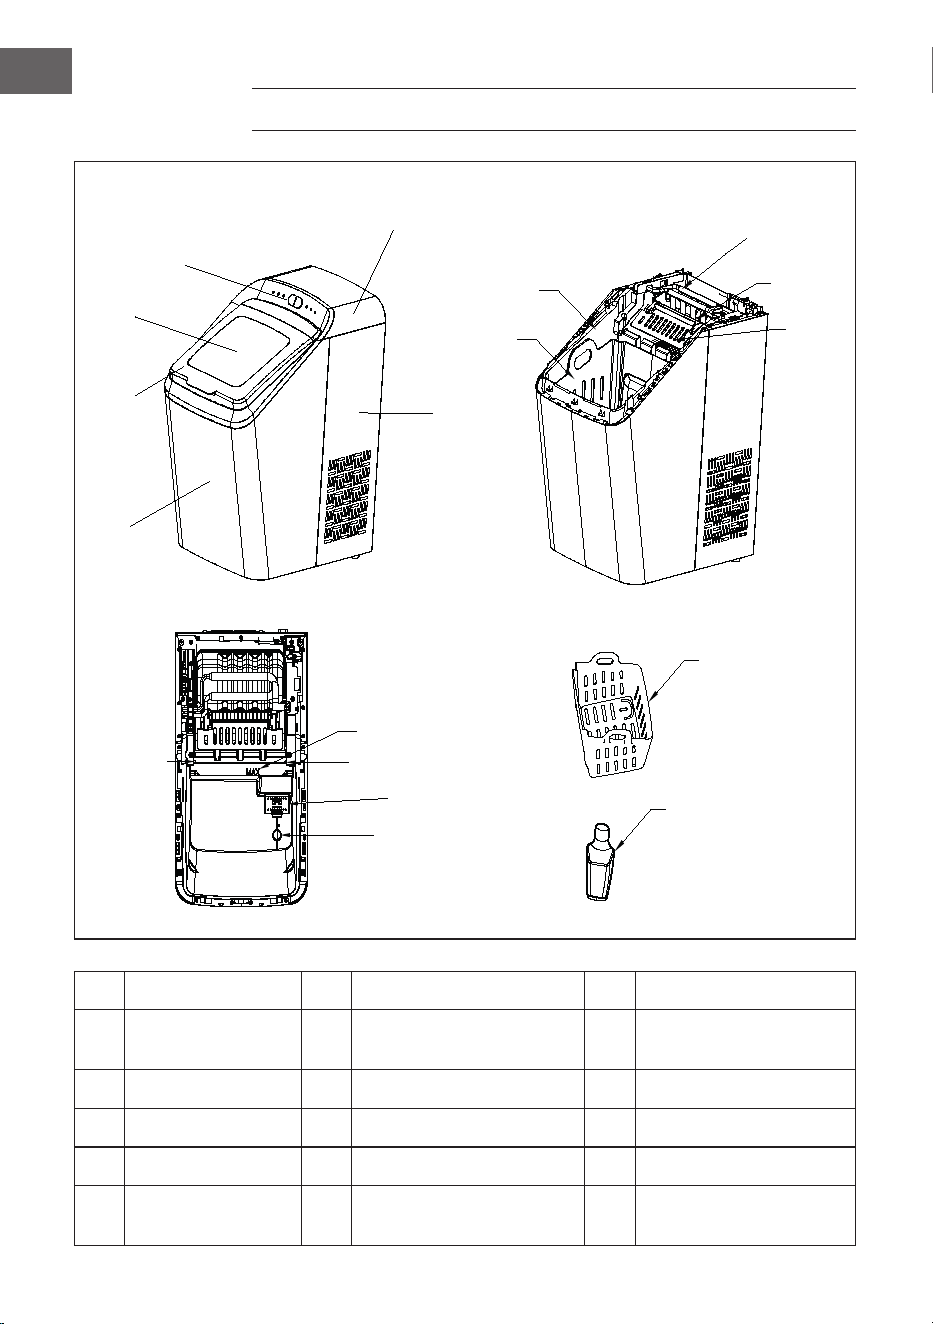
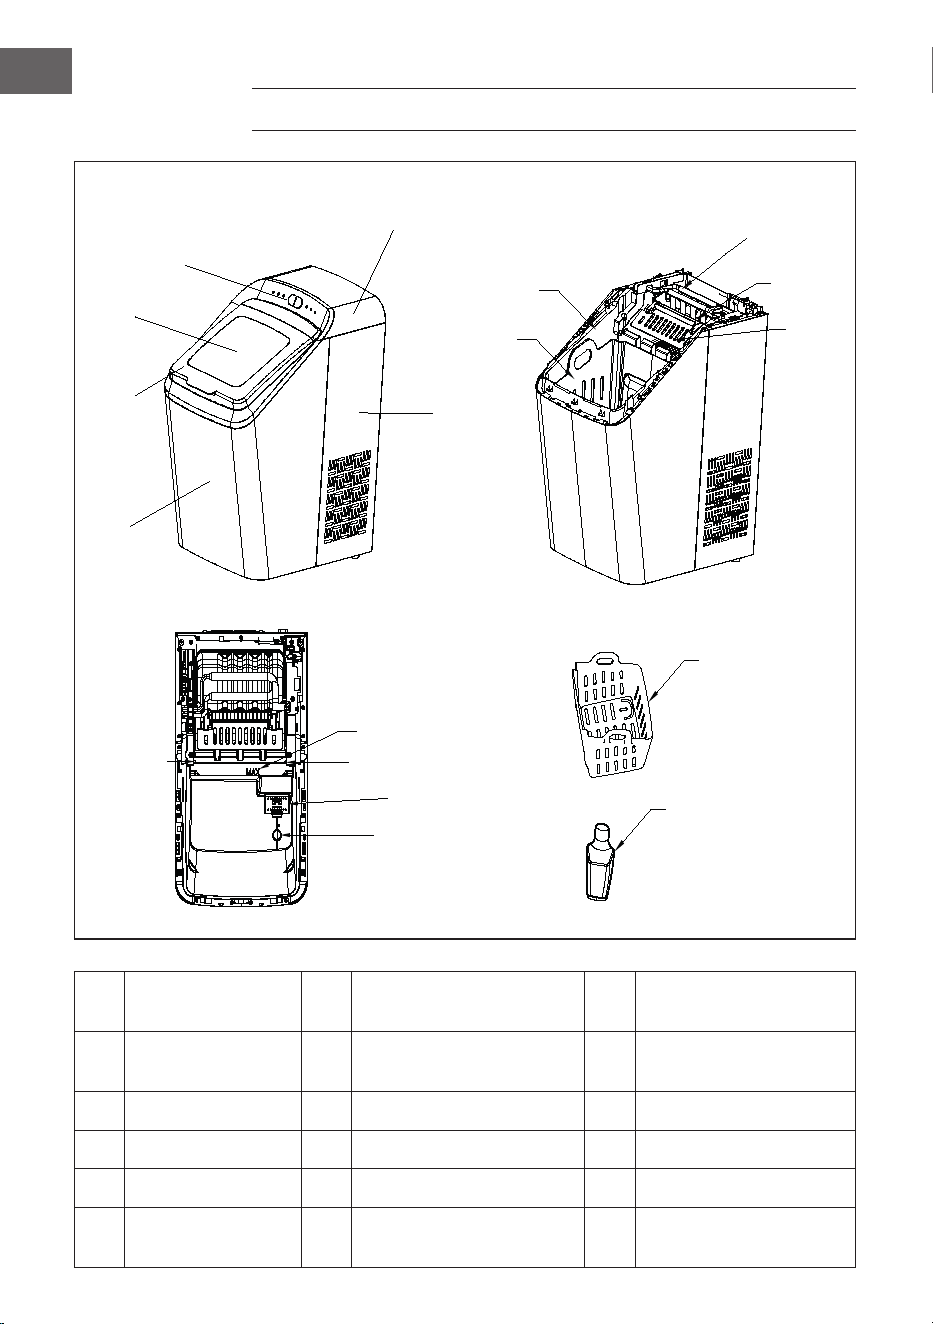
GERÄTEÜBERSICHT
1
6
2
3
4
5
7
8
9
10
11
12
13
14
15
16
17
18
1
Obere Abdeckung
7
Wassertank
13
MAX-Wasserstandsanzeige
2
Bedienfeld
8
Eiskorb
14
Infrarot-Licht-Emitter-Diode
3
Sichtfenster
9
Verdampfer
15
Filter
4
Vordere Abdeckung
10
Eisfach
16
Ablassstopfen
5
Vorderes Gehäuse
11
Eisschaufel
17
Eiskorb
6
Hinteres Gehäuse
12
Infrarot-Licht -Empfänger-Diode
18
Eislöffel

7
DE
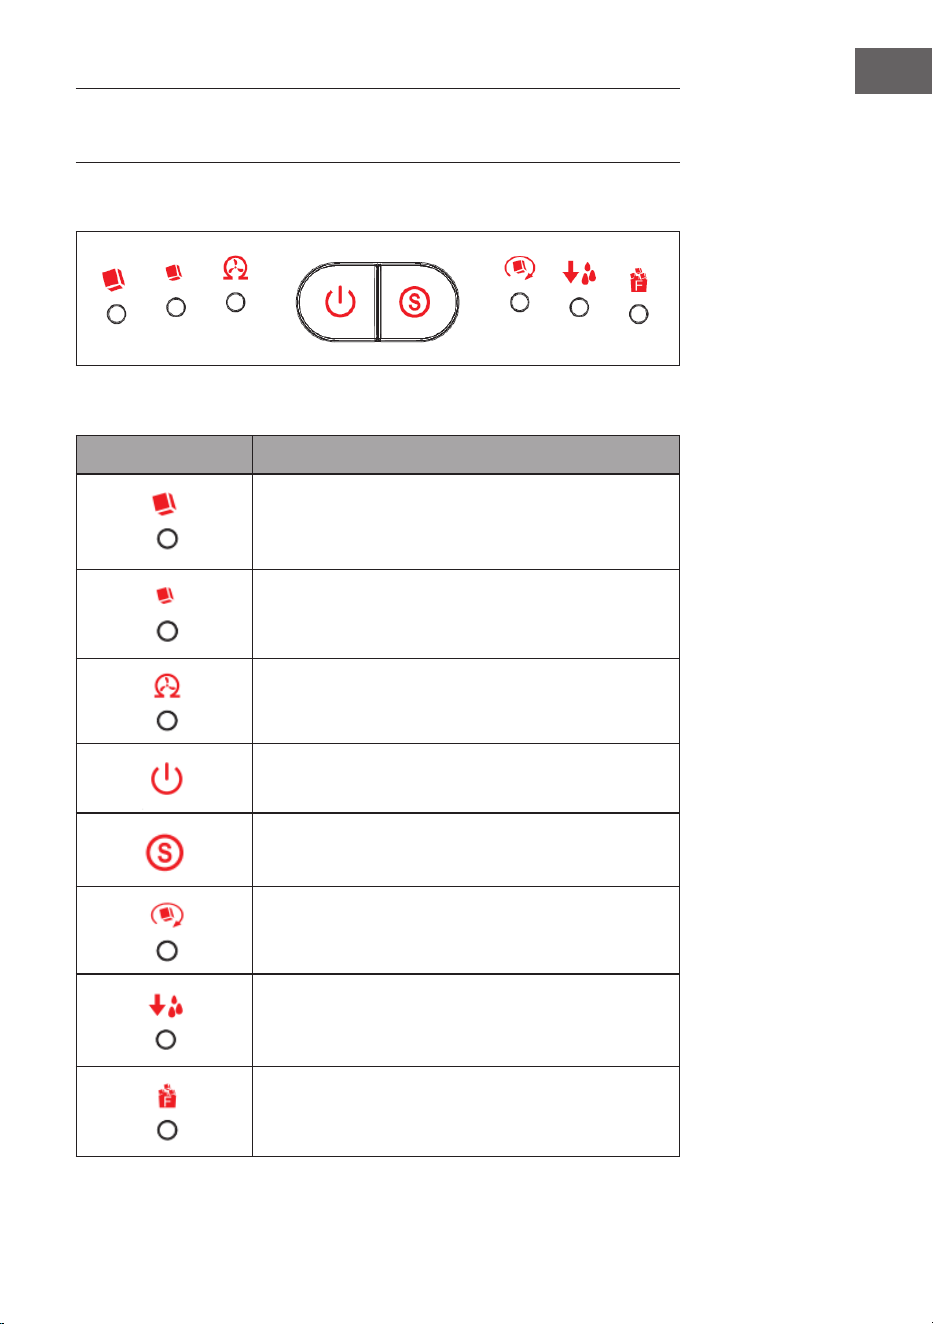
BEDIENFELD, ANZEIGEN UND TASTEN
Bedienfeld
Anzeigeleuchten und Tastenfunktionen
Anzeigen und Tasten Funktionen
Große Eiswürfel (Anzeige):
Wenn große Eiswürfel ausgewählt werden, leuchtet
diese Anzeigeleuchte grün auf.
Kleine Eiswürfel (Anzeige):
Wenn kleine Eiswürfel ausgewählt werden, leuchtet
diese Anzeigeleuchte grün auf.
Reinigung (Anzeige):
Wenn das Gerät gereinigt werden muss, leuchtet diese
Anzeigeleuchte grün auf.
Start/Stop (Taste):
Startet oder stoppt das Gerät.
Größenauswahl (Taste):
Wählen Sie die gewünschte Eiswürfelgröße (groß oder
klein) aus.
Eiswürfelherstellung (Anzeige):
Diese Anzeigeleuchte leuchtet bei der
Eiswürfelherstellung grün auf.
Wassertank leer (Anzeige):
Diese Anzeigeleuchte leuchtet rot auf, wenn der
Wassertank leer ist.
Eiskorb voll (Anzeige):
Diese Anzeigeleuchte leuchtet rot auf, wenn der Eiskorb
voll ist.
8
DE
INSTALLATION
1. Entnehmen Sie das Gerät aus der Verpackung und stellen Sie sicher, dass das
gesamte Zubehör (inkl. Eiskorb und Eislöffel) im Lieferumfang enthalten ist. Wenden
Sie sich an den Kundendienst, falls Zubehör fehlen sollte.
2. Stellen Sie sicher, dass das Gerät eben ausgerichtet ist und auf einem stabilen Tisch
oder einer stabilen Arbeitsäche steht, um Fehlfunktionen zu vermeiden.
3. Der Neigungswinkel des Gerätegehäuses sollte während des Transports und
insbesondere während der Verwendung 45° nicht überschreiten. Drehen Sie das
Gerät nicht kopfüber, da dadurch der Kompressor oder das Kühlsystem beschädigt
werden könnten. Lassen Sie das Gerät nach dem Bewegen oder dem Transport
des Geräts einige Zeit unbenutzt stehen, damit sich die Flüssigkeiten im Kompressor
absetzen können. Warten Sie vor der ersten Verwendung des Geräts und nachdem
Sie dieses an der geeigneten Stelle aufgestellt und richtig ausgerichtet haben
mindestens 2 Stunden, bevor Sie dieses in Betrieb nehmen.
4. Stellen Sie das Gerät an einem ausreichend belüfteten Ort auf einer trockenen und
ebenen Oberäche auf. Das Gerät darf nicht in der Nähe von Wärmequellen,
wie beispielsweise Öfen, Heizgeräten und korrosiven Gasen verwendet werden.
Halten Sie zu allen Geräteseiten einen Mindestabstand von 20cm ein, um eine
ausreichende Belüftung zu gewährleisten.
5. Befüllen Sie den Wassertank nicht mit heißem Wasser, da das Gerät dadurch
beschädigt werden könnte. Befüllen Sie den Wassertank am besten mit Wasser, das
Raumtemperatur hat oder kühler ist.
6. Verwenden Sie das Gerät nicht in kalter Umgebung (weniger als 5 °C).
7. Reinigen Sie das Gerät vor der Verwendung (siehe Abschnitt „Reinigung und
Pege“).
INBETRIEBNAHME UND BEDIENUNG
1. Stellen Sie sicher, dass der Ablassstopfen an der Unterseite des Wassertanks richtig
sitzt und dieser fest verschlossen ist.
2. Stecken Sie den Netzstecker des Geräts in die Steckdose. Die Anzeige
„Eiswürfelherstellung“ blinkt.
Hinweis: Wenn das Gerät bewegt wurde, lassen die Eiswürfelmaschine mindestens
30 Minuten ruhen, bevor Sie den Netzstecker in die Steckdose stecken.
3. Öffnen Sie die obere Abdeckung und entnehmen Sie den Eiskorb.
4. Befüllen Sie den Wassertank ausschließlich mit Trinkwasser.
Hinweis: Befüllen Sie den Wassertank nur bis zur MAX-Markierung mit Wasser.
5. Setzen Sie den Eiskorb wieder ein und schließen Sie die obere Abdeckung.
9
DE
6. Drücken Sie zur Auswahl der Eiswürfelgröße die Größenauswahl-Taste . Wenn
kleine Eiswürfel ausgewählt wurden, leuchtet die Anzeige „kleine Eiswürfel“ auf.
Wenn große Eiswürfel ausgewählt wurden, leuchtet die Anzeige„große Eiswürfel“
auf.
7. Wenn Sie die Start/Stop-Taste drücken, leuchtet die Anzeige „Eiswürfel herstel-
lung“ permanent auf.
8. Ein Eisherstellungszyklus dauert, abhängig von der Umgebungs- und der Wasser-
temperatur, 7-15 Minuten.
9. Die Eisherstellung beginnt damit, dass Wasser in das Eisfach gepumpt wird, das
sich unterhalb des Verdampfers bendet. Innerhalb der nächsten 7-15Minuten
bildet sich Eis auf dem Verdampfer. Sobald die Eiswürfelbildung abgeschlossen ist,
kippt das Eisfach nach hinten und das im Eisfach verbliebene Wasser läuft in den
Wassertank zurück. Die Eiswürfel werden dann aus dem Verdampfer fallengelassen
und von der Eisschaufel nach vorn in den Eiskorb geschoben. Das Eisfach kehrt
automatisch in die Ausgangsposition unter dem Verdampfer zurück und der nächste
Zyklus wird gestartet.
10. Sobald der Eiskorb voll ist, leuchtet die Anzeige „Eiskorb voll“ auf. Der
Eisherstellungszyklus wird automatisch unterbrochen. Entnehmen Sie die Eiswürfel
vorsichtig mit dem Eislöffel aus dem Eiskorb. Etwa 5 Sekunden später wird der
Eisherstellungszyklus automatisch wieder gestartet.
11 . Die Anzeige „Wassertank leer“ leuchtet auf, wenn der Wassertank leer ist.
Der Eiswürfelherstellungszyklus wird automatisch unterbrochen. Entnehmen Sie
den Eiskorb und füllen Sie den Wassertank mit Wasser auf. Setzen Sie den Eiskorb
wieder ein und drücken Sie die Start/Stop-Taste , um die Eiswürfelherstellung
wieder zu starten.
12. Drücken Sie, sobald die gewünschte Menge an Eiswürfeln hergestellt wurde, die
Start/Stop-Taste und ziehen Sie den Netzstecker aus der Steckdose.
13. Öffnen Sie die obere Abdeckung, entnehmen Sie die Eiswürfel mit dem Eislöffel und
legen Sie diese in das Gefrierfach.
Hinweis: Abhängig von der Umgebungstemperatur, überdauern die Eiswürfel circa
18Stunden im Gerät.
14. Lassen Sie das Gerät auf Raumtemperatur erwärmen.
15. Es wird empfohlen, das Wasser im Wassertank mindestens einmal wöchentlich
auszuwechseln. Entleeren Sie den Wassertank vollständig, wenn Sie das Gerät
über einen längeren Zeitraum nicht verwenden.
10
DE
REINIGUNG UND PFLEGE
Damit das Eis seinen frischen Geschmack behält und das Gerät in einem guten Zustand
verbleibt, sollten Sie das Gerät mindestens einmal pro Woche reinigen.
1. Stoppen Sie die Eiswürfelherstellung durch Drücken der Start/Stop-Taste .
Ziehen Sie den Netzstecker aus der Steckdose und lassen Sie das Gerät auf
Raumtemperatur erwärmen.
2. Falls sich im Eisfach noch Wasser benden sollte, kippen Sie das Eisfach vorsichtig
nach hinten, damit das gesamte Wasser in den Wassertank ablaufen kann.
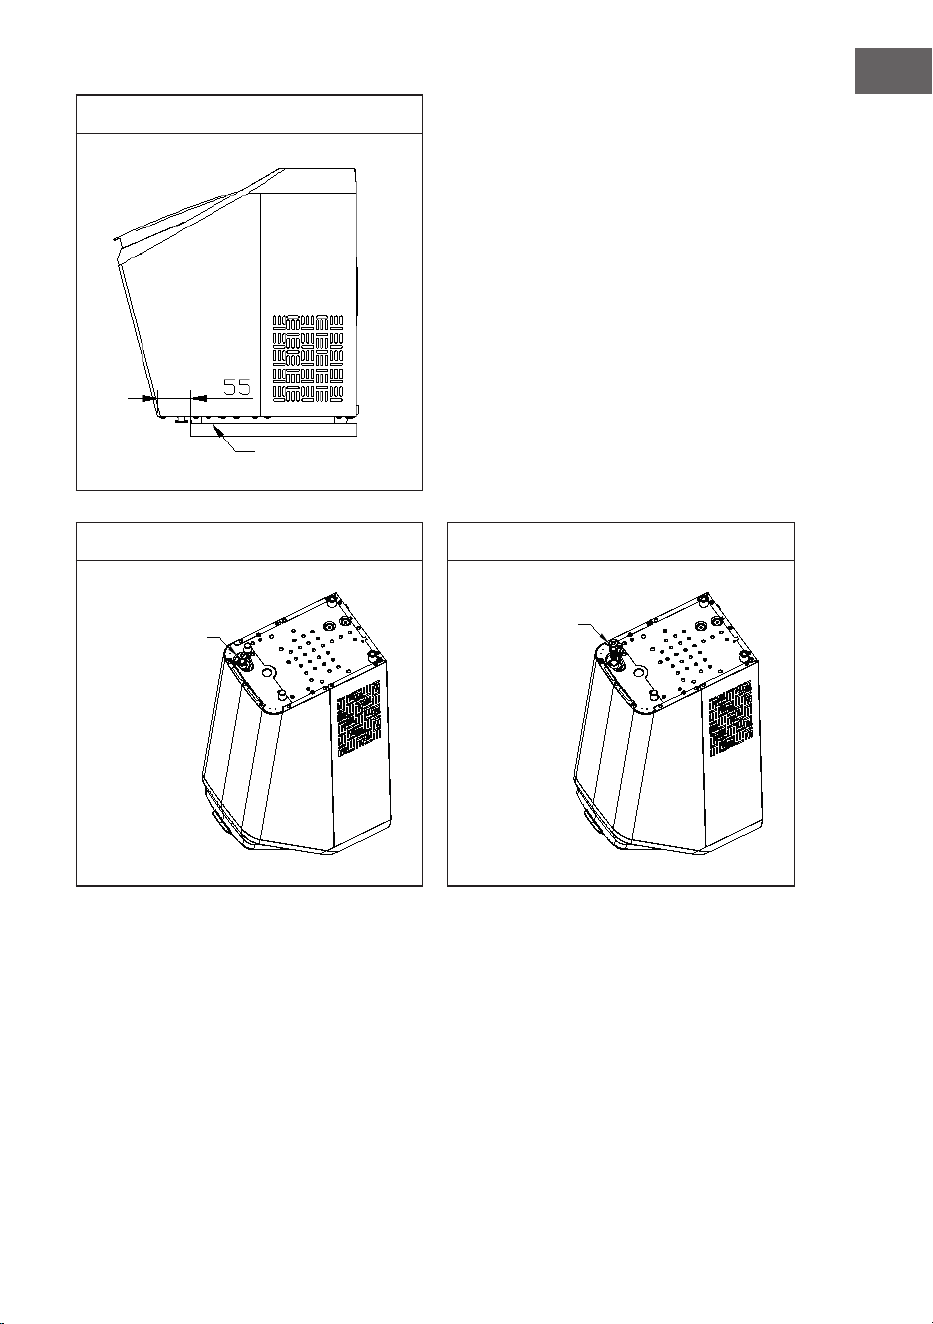
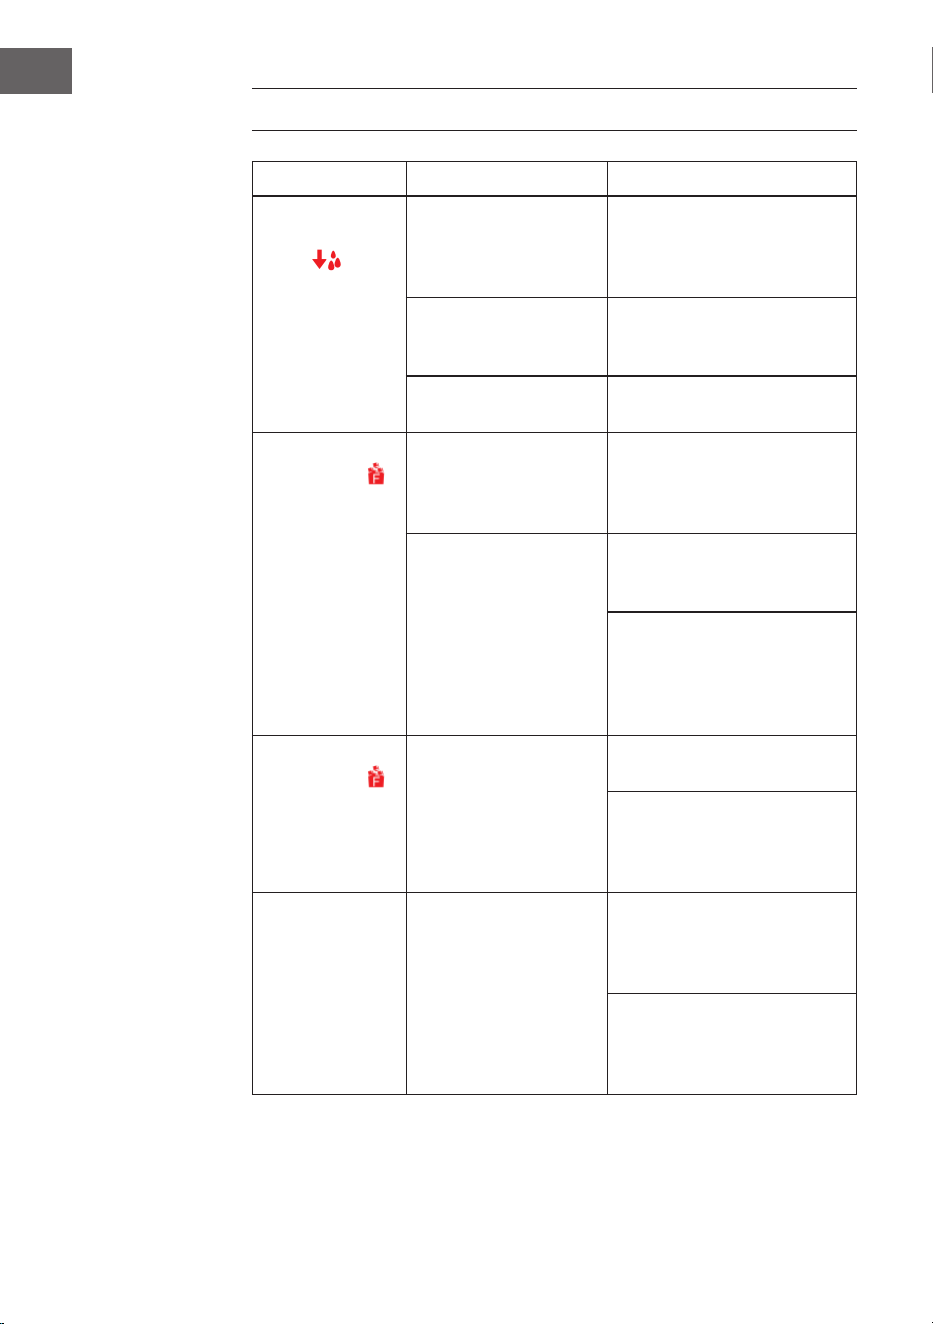
3. Schieben Sie das Gerät nach vorne, bis es 60 mm über die Kante der Arbeitsäche
hinausragt, damit der Ablassstopfen zugänglich wird. Öffnen Sie nun den
Ablassstopfen, um das überschüssige Wasser in eine Schüssel, einen Eimer oder
einen Ausguss ablaufen zu lassen (siehe Abbildung 1, 2 und 3).
4. Setzen Sie den Ablassstopfen wieder ein und stellen Sie sicher, dass er richtig
sitzt und der Wassertank dicht ist. Befüllen Sie den Wassertank nun mit sauberem
Wasser. Drücken Sie die Größenauswahl-Taste , bis die Anzeige „Reinigung“
aueuchtet. Wenn Sie nun die Start/Stop-Taste drücken, beginnt die
Pumpe, 6Minuten lang Wasser zu pumpen. Nach 6 Minuten wechselt das
Gerät automatisch in den Standby-Modus. Öffnen Sie nun den Ablasstopfen und
lassen Sie das gesamte Wasser in eine Schüssel, einen Eimer oder einen Ausguss
ablaufen.
5. Entnehmen Sie den Eiskorb.
6. Reinigen Sie das Geräteinnere mit einem weichen, mit warmem Wasser und Essig
getränkten Tuch. Spülen Sie das Geräteinnere anschließend mit klarem Wasser aus
und lassen Sie das Wasser vollständig ablaufen.
7. Setzen Sie den Ablassstopfen wieder ein. Waschen Sie den Eiskorb und den
Eislöffel mit warmem Seifenwasser ab, spülen Sie mit klarem Wasser nach und
trocknen Sie diese ab.
8. Reinigen Sie das Geräteäußere mit einem weichen Tuch. Verwenden Sie, falls
erforderlich, eine milde Seifenlösung.
Hinweis: Verwenden Sie zur Reinigung keine organischen Lösungsmittel, kochendes
Wasser, starke säurehaltige oder alkalische Lösungen etc.
9. Entleeren Sie den Wassertank und trocknen Sie ihn ab, wenn Sie das Gerät über
einen längeren Zeitraum nicht verwenden.

11
DE
Abbildung 1
Abbildung 2 Abbildung 3
Arbeitsäche
Ablassstopfen
Ablassstopfen
12
DE
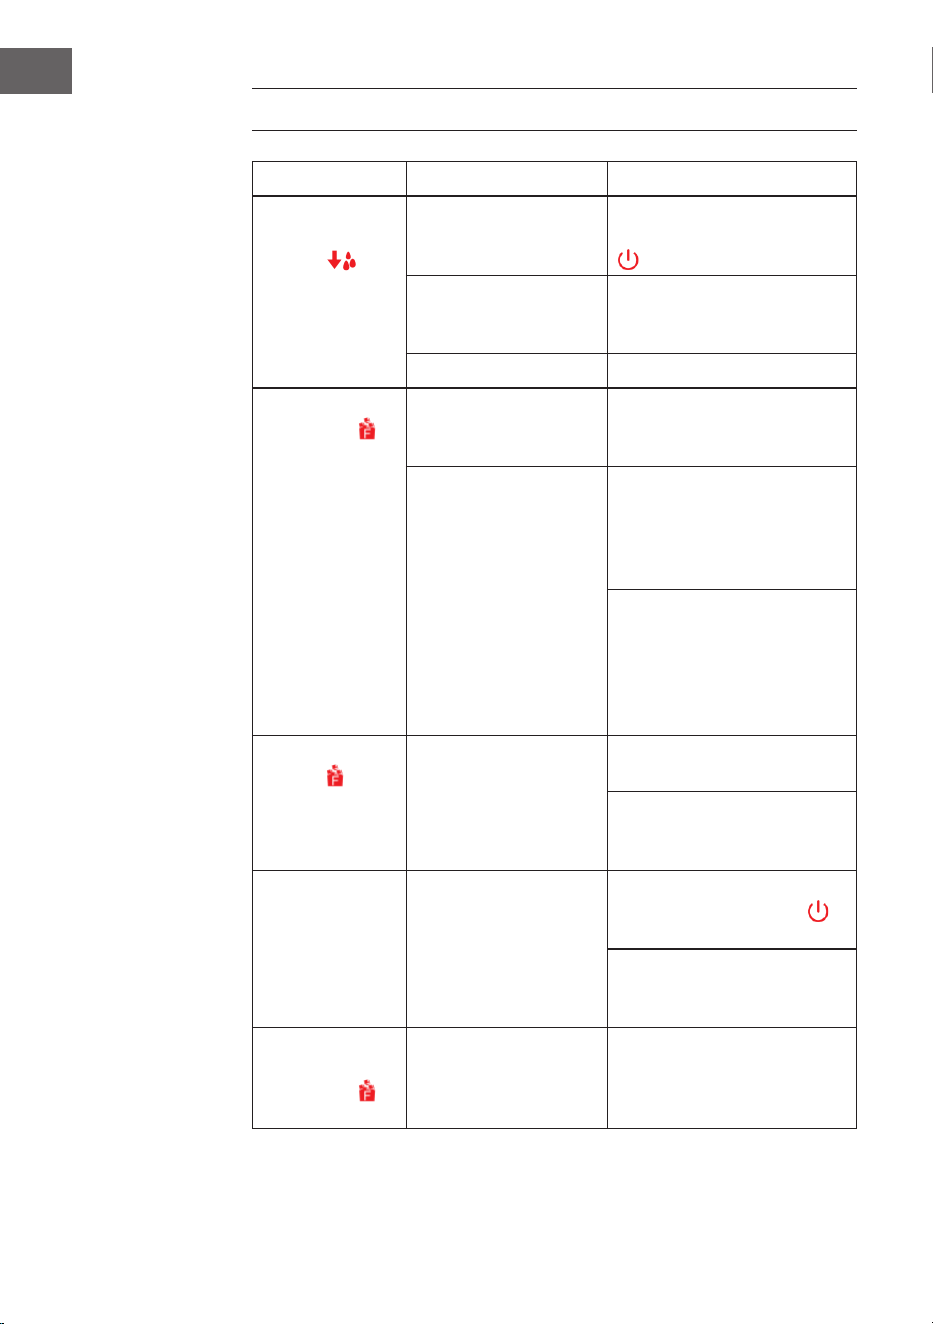
FEHLERSUCHE UND FEHLERBEHEBUNG
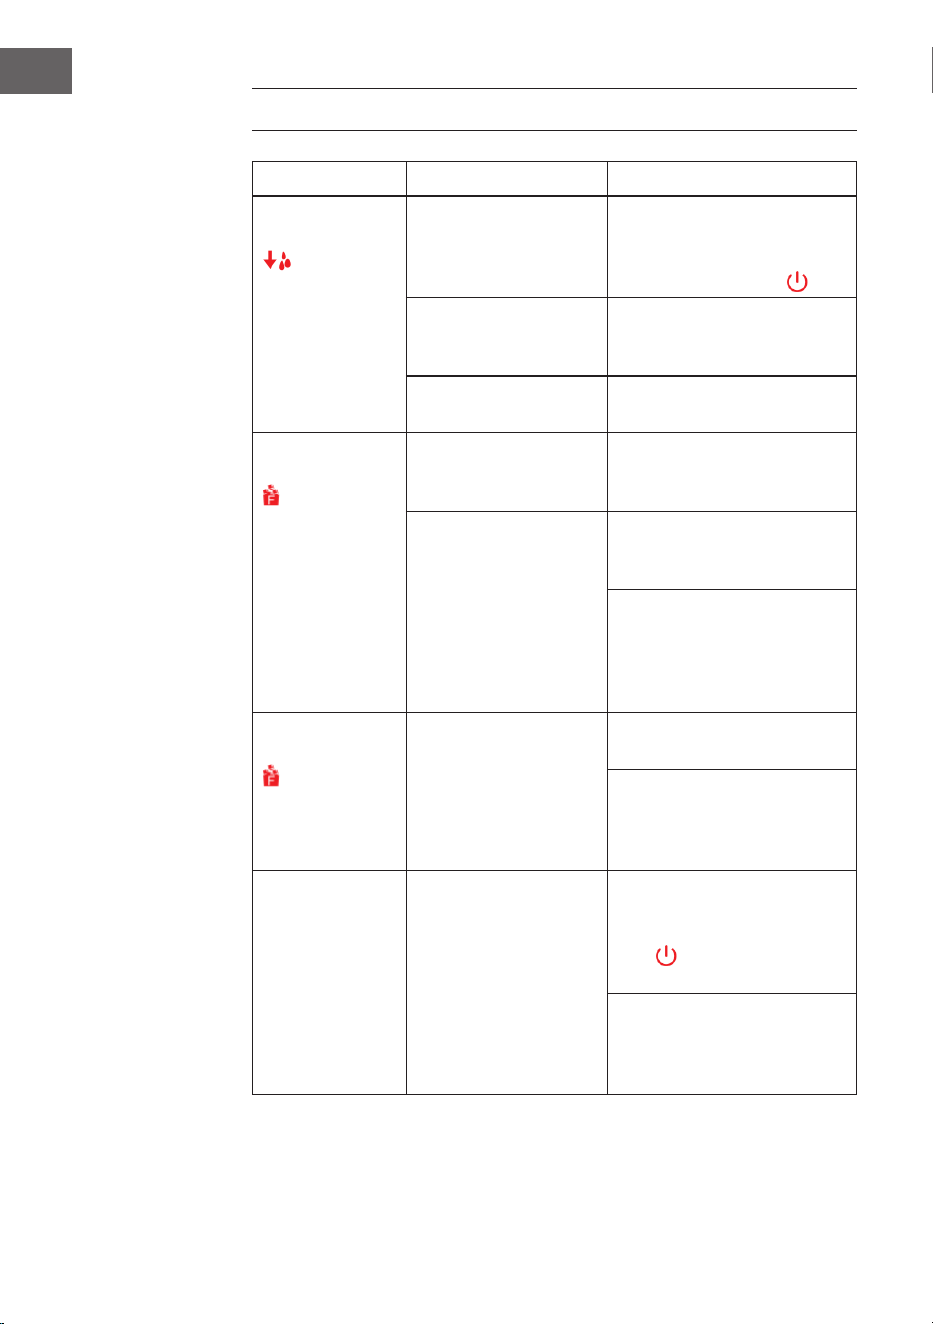
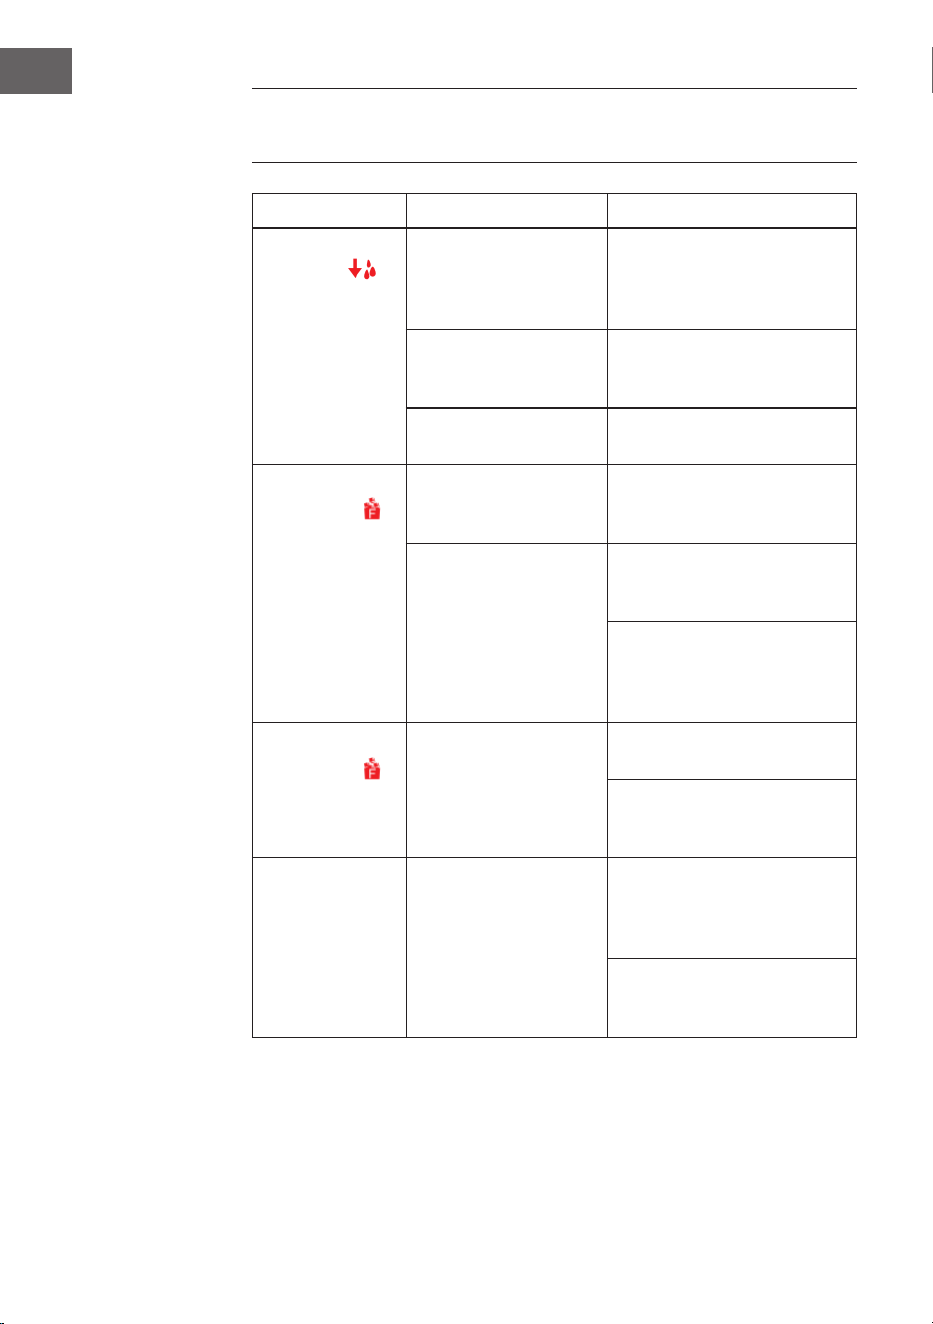
Problem Mögliche Ursache Lösung
Die Anzeige
„Wassertank leer“
leuchtet auf.
Niedriger Wasserstand
oder Wassertank leer.
Stoppen Sie die
Eiswürfelherstellung, füllen Sie
den Wassertank auf und drücken
Sie die Start/Stop-Taste .
Das Wassersieb an
der Unterseite des
Wassertanks ist blockiert.
Reinigen Sie das Gerät.
Fehlfunktion der Pumpe. Kontaktieren Sie den
Kundendienst.
Die Anzeige
„Eiskorb voll“
leuchtet auf.
Der Eiskorb ist voll und
das Infrarotlicht wird durch
das Eis blockiert.
Entnehmen Sie das Eis aus dem
Eiskorb.
Die Infrarot-Licht-Emitter-
Diode und die Infrarot-
Licht -Empfänger-Diode
funktionieren nicht.
Entfernen Sie Fremdkörper von
den Infrarot-Dioden und starten
Sie die Eiswürfelmaschine neu.
Kontaktieren Sie den
Kundendienst, wenn die Dioden
nach der Reinigung und nach
dem aus- und wieder einschalten
des Geräts nicht funktionieren.
Die Anzeige
„Eiskorb voll“
blinkt.
Die Eisschaufel ist
blockiert.
Entfernen Sie das Eis, das die
Eisschaufel blockiert.
Kontaktieren Sie den
Kundendienst, falls kein Eis die
Eisschaufel blockiert und die
Anzeige blinkt.
Das Gerät stoppt
den Betrieb.
Das Eisfach bendet
sich nicht in der richtigen
Position.
Entnehmen Sie das Eis aus
dem Eisfach und drücken Sie
anschließend die Start/Stop-
Taste , um das Gerät neu zu
starten.
Kontaktieren Sie den
Kundendienst, wenn das Gerät
nach dem Neustart immer noch
nicht funktioniert.
13
DE
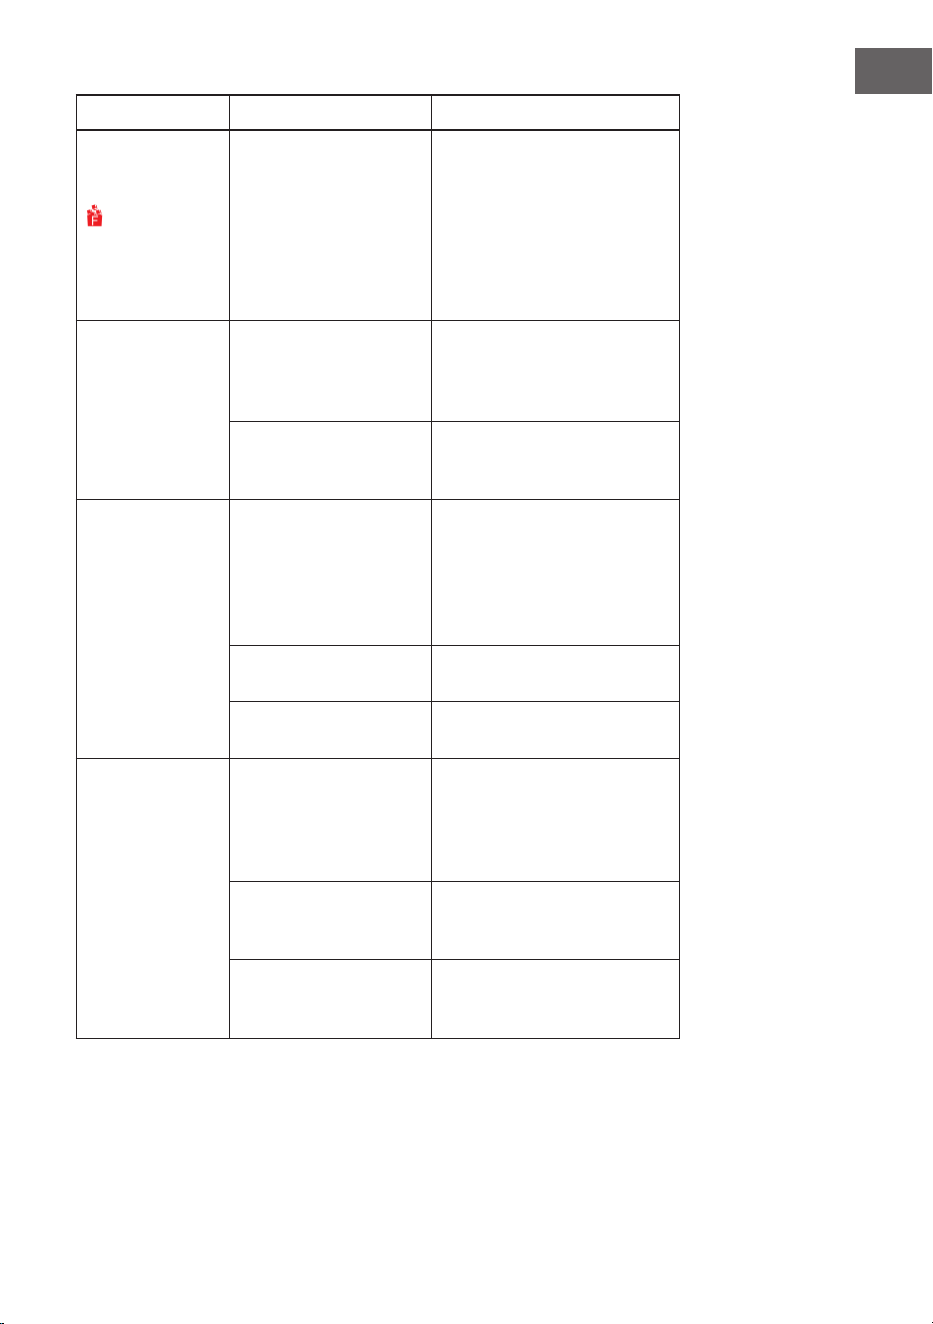
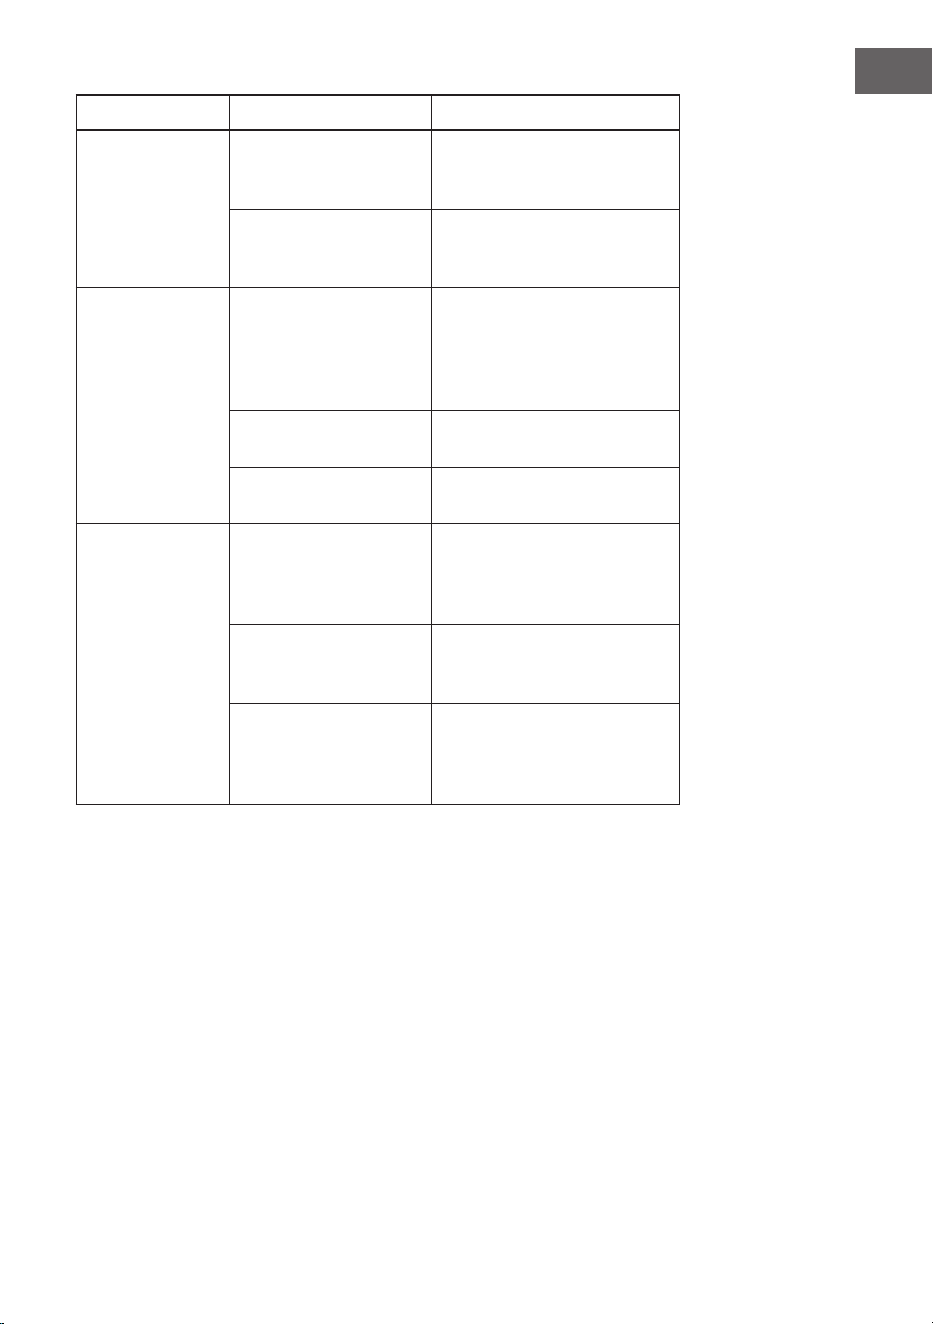
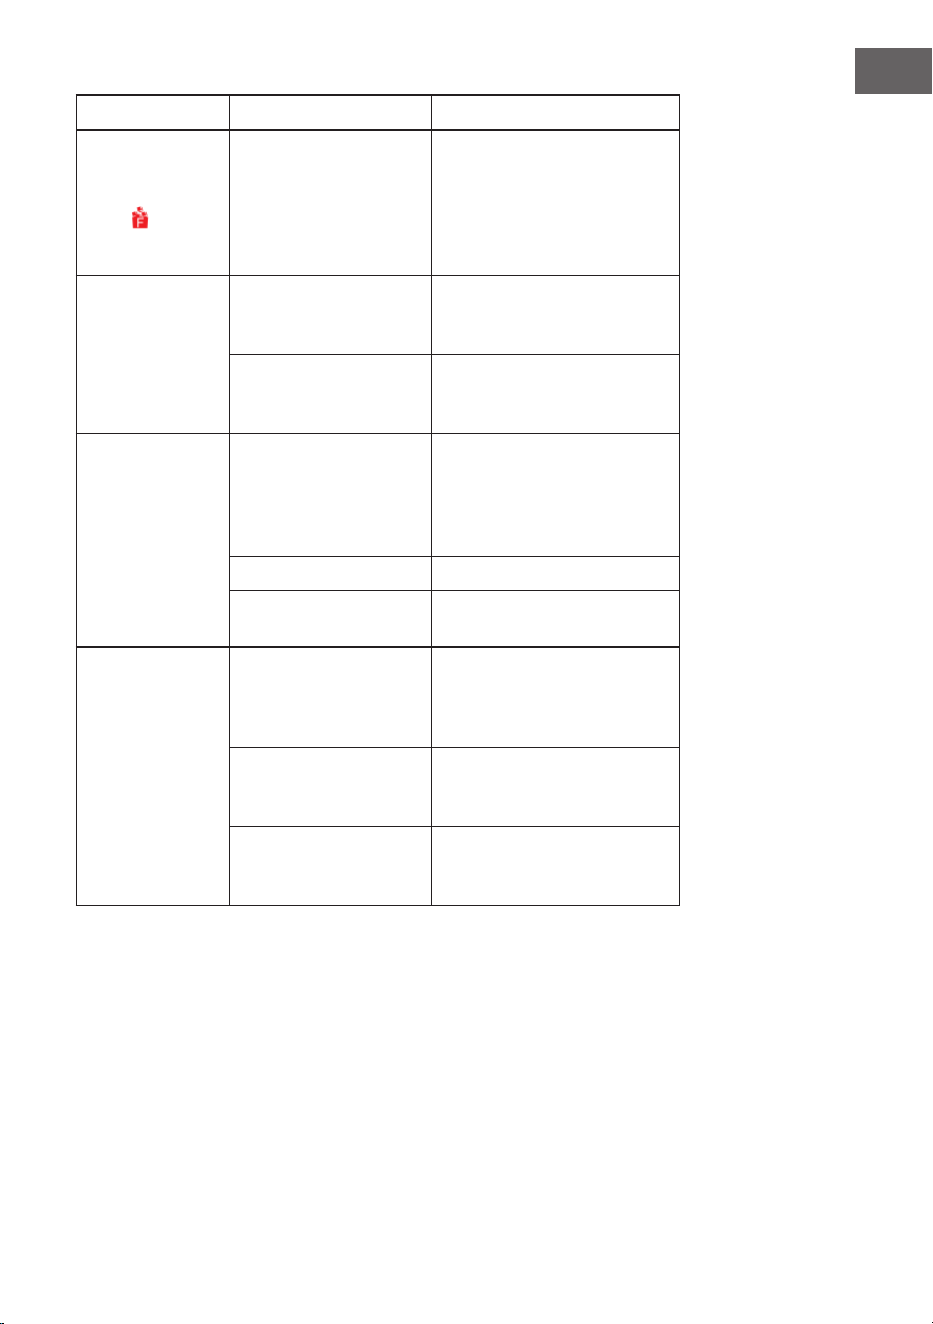
Problem Mögliche Ursache Lösung
Der Eiskorb ist voll
aber die Anzeige
„Eiskorb voll“
leuchtet nicht.
Das Infrarot-Lichtmodul
kann nicht erkennen, dass
der Eiskorb voll ist, weil
es durch einfallendes
Sonnenlicht gestört wird.
Schalten Sie das Gerät aus und
ziehen Sie den Netzstecker
aus der Steckdose. Stellen
Sie das Gerät an einen Ort,
an dem es keiner direkten
Sonneneinstrahlung ausgesetzt
ist. Schalten Sie das Gerät
anschließend wieder ein.
Die Eiswürfel
klumpen
zusammen.
Die Eiswürfelherstellung
dauert zu lange.
Stoppen Sie die
Eiswürfelherstellung und starten
Sie diese wieder, nachdem das
Eis geschmolzen ist.
Das Wasser im
Wassertank ist zu kalt.
Befüllen Sie den Wassertank mit
Wasser, das eine Temperatur
zwischen 8 °C und 25 °C hat.
Die
Eiswürfelherstellung
scheint normal
zu sein, aber
es werden
keine Eiswürfel
hergestellt.
Die Umgebungs- oder
die Wassertemperatur ist
zu hoch.
Starten Sie die Eiswürfel-
herstellung in einer Umgebung
mit einer Umgebungs temperatur
von unter 32 °C und befüllen Sie
den Wassertank mit etwas kaltem
Wasser.
Der Kältemittelkreislauf
leckt.
Kontaktieren Sie den
Kundendienst.
Der Kältemittelkreislauf
wird blockiert.
Kontaktieren Sie den
Kundendienst.
Die
Eiswürfelqualität ist
schlecht.
Schlechte
Wärmeableitung.
Halten Sie zu allen Seiten des
Geräts einen Mindestabstand
von 20 cm ein, um eine
ausreichende Belüftung zu
gewährleisten.
Die Wassertemperatur ist
zu hoch.
Befüllen Sie den Wassertank mit
Wasser, das eine Temperatur
zwischen 8 °C und 28 °C hat.
Die Umgebungstemperatur
ist zu hoch.
Verwenden Sie das Gerät bei
einer Umgebungstemperatur
zwischen 10°C und 32°C.
14
DE
SPEZIELLE ENTSORGUNGSHINWEISE FÜR
VERBRAUCHER IN DEUTSCHLAND
Entsorgen Sie Ihre Altgeräte fachgerecht. Dadurch wird gewährleistet, dass die
Altgeräte umweltgerecht verwertet und negative Auswirkungen auf die Umwelt und
menschliche Gesundheit vermieden werden. Bei der Entsorgung sind folgende Regeln
zu beachten:
• Jeder Verbraucher ist gesetzlich verpichtet, Elektro- und Elektro-
nikaltgeräte (Altgeräte) sowie Batterien und Akkus getrennt vom
Hausmüll zu entsorgen. Sie erkennen die entsprechenden Altgeräte
durch folgendes Symbol der durchgestrichene Mülltonne (WEEE
Symbol).
• Sie haben Altbatterien und Altakkumulatoren, die nicht vom Altgerät umschlossen
sind, sowie Lampen, die zerstörungsfrei aus dem Altgerät entnommen werden
können, vor der Abgabe an einer Entsorgungsstelle vom Altgerät zerstörungsfrei zu
trennen.
• Bestimmte Lampen und Leuchtmittel fallen ebenso unter das Elektro- und
Elektronikgesetz und sind dementsprechend wie Altgeräte zu behandeln.
Ausgenommen sind Glühbirnen und Halogenlampen. Entsorgen Sie Glühbirnen
und Halogenlampen bitte über den Hausmüll, sofern Sie nicht das WEEE Symbol
tragen.
• Jeder Verbraucher ist für das Löschen von personenbezogenen Daten auf dem
Elektro- bzw. Elektronikgerät selbst verantwortlich.
Rücknahmepicht der Vertreiber
Vertreiber mit einer Verkaufsäche für Elektro- und Elektronikgeräte von mindestens 400
Quadratmetern sowie Vertreiber von Lebensmitteln mit einer Gesamtverkaufäche von
mindestens 800 Quadratmetern, die mehrmals im Kalenderjahr oder dauerhaft Elektro-
und Elektronikgeräte anbieten und auf dem Markt bereitstellen, sind verpichtet,
1 bei der Abgabe eines neuen Elektro- oder Elektronikgerätes an einen Endnutzer ein
Altgerät des Endnutzers der gleichen Geräteart, das im Wesentlichen die gleichen
Funktionen wie das neue Gerät erfüllt, am Ort der Abgabe oder in unmittelbarer
Nähe hierzu unentgeltlich zurückzunehmen und
2 auf Verlangen des Endnutzers Altgeräte, die in keiner äußeren Abmessung größer
als 25 Zentimeter sind, im Einzelhandelsgeschäft oder in unmittelbarer Nähe hierzu
unentgeltlich zurückzunehmen; die Rücknahme darf nicht an den Kauf eines Elektro-
oder Elektronikgerätes geknüpft werden und ist auf drei Altgeräte pro Geräteart
beschränkt.

15
DE
• Bei einem Vertrieb unter Verwendung von Fernkommunikationsmitteln ist die
unentgeltliche Abholung am Ort der Abgabe auf Elektro- und Elektronikgeräte der
Kategorien 1, 2 und 4 gemäß § 2 Abs. 1 ElektroG, nämlich „Wärmeüberträger“,
„Bildschirmgeräte“ (Oberäche von mehr als 100 cm²) oder „Großgeräte“
(letztere mit mindestens einer äußeren Abmessung über 50Zentimeter)
beschränkt. Für andere Elektro- und Elektronikgeräte (Kategorien 3, 5, 6) ist eine
Rückgabemöglichkeit in zumutbarer Entfernung zum jeweiligen Endnutzer zu
gewährleisten.
• Altgeräte dürfen kostenlos auf dem lokalen Wertstoffhof oder in folgenden
Sammelstellen in Ihrer Nähe abgegeben werden: www.take-e-back.de
• Für Elektro- und Elektronikgeräte der Kategorien 1, 2 und 4 an bieten wir auch die
Möglichkeit einer unentgeltlichen Abholung am Ort der Abgabe. Beim Kauf eines
Neugeräts haben sie die Möglichkeit eine Altgerätabholung über die Webseite
auszuwählen.
• Batterien können überall dort kostenfrei zurückgegeben werden, wo sie verkauft
werden (z. B. Super-, Bau-, Drogeriemarkt). Auch Wertstoff- und Recyclinghöfe
nehmen Batterien zurück. Sie können Batterien auch per Post an uns zurücksenden.
Altbatterien in haushaltsüblichen Mengen können Sie direkt bei uns von Montag bis
Freitag zwischen 08:00 und 16:00 Uhr unter der folgenden Adresse unentgeltlich
zurückgeben:
Chal-Tec Fulllment GmbH
Norddeutschlandstr. 3
47475 Kamp-Lintfort
• Wichtig zu beachten ist, dass Lithiumbatterien aus Sicherheitsgründen vor der
Rückgabe gegen Kurzschluss gesichert werden müssen (z. B. durch Abkleben der
Pole).
• Finden sich unter der durchgestrichenen Mülltonne auf der Batterie zusätzlich die
Zeichen Cd, Hg oder Pb ist das ein Hinweis darauf, dass die Batterie gefährliche
Schadstoffe enthält. (»Cd« steht für Cadmium, »Pb« für Blei und »Hg« für
Quecksilber).
Hinweis zur Abfallvermeidung
Indem Sie die Lebensdauer Ihrer Altgeräte verlängern, tragen Sie dazu bei, Ressourcen
efzient zu nutzen und zusätzlichen Müll zu vermeiden. Die Lebensdauer Ihrer Altgeräte
können Sie verlängern indem Sie defekte Altgeräte reparieren lassen. Wenn sich
Ihr Altgerät in gutem Zustand bendet, könnten Sie es spenden, verschenken oder
verkaufen.
16
DE
HINWEISE ZUR ENTSORGUNG
Wenn es in Ihrem Land eine gesetzliche Regelung zur
Entsorgung von elektrischen und elektronischen Geräten
gibt, weist dieses Symbol auf dem Produkt oder auf der
Verpackung darauf hin, dass dieses Produkt nicht im
Hausmüll entsorgt werden darf. Stattdessen muss es zu
einer Sammelstelle für das Recycling von elektrischen
und elektronischen Geräten gebracht werden. Durch
regelkonforme Entsorgung schützen Sie die Umwelt und die
Gesundheit Ihrer Mitmenschen vor negativen Konsequenzen.
Informationen zum Recycling und zur Entsorgung dieses
Produkts, erhalten Sie von Ihrer örtlichen Verwaltung oder
Ihrem Hausmüllentsorgungsdienst.
HERSTELLER & IMPORTEUR (UK)
Hersteller:
Chal-Tec GmbH, Wallstraße 16, 10179 Berlin, Deutschland.
Importeur für Großbritannien:
Berlin Brands Group UK Limited
PO Box 42
272 Kensington High Street
London, W8 6ND
United Kingdom

17
EN
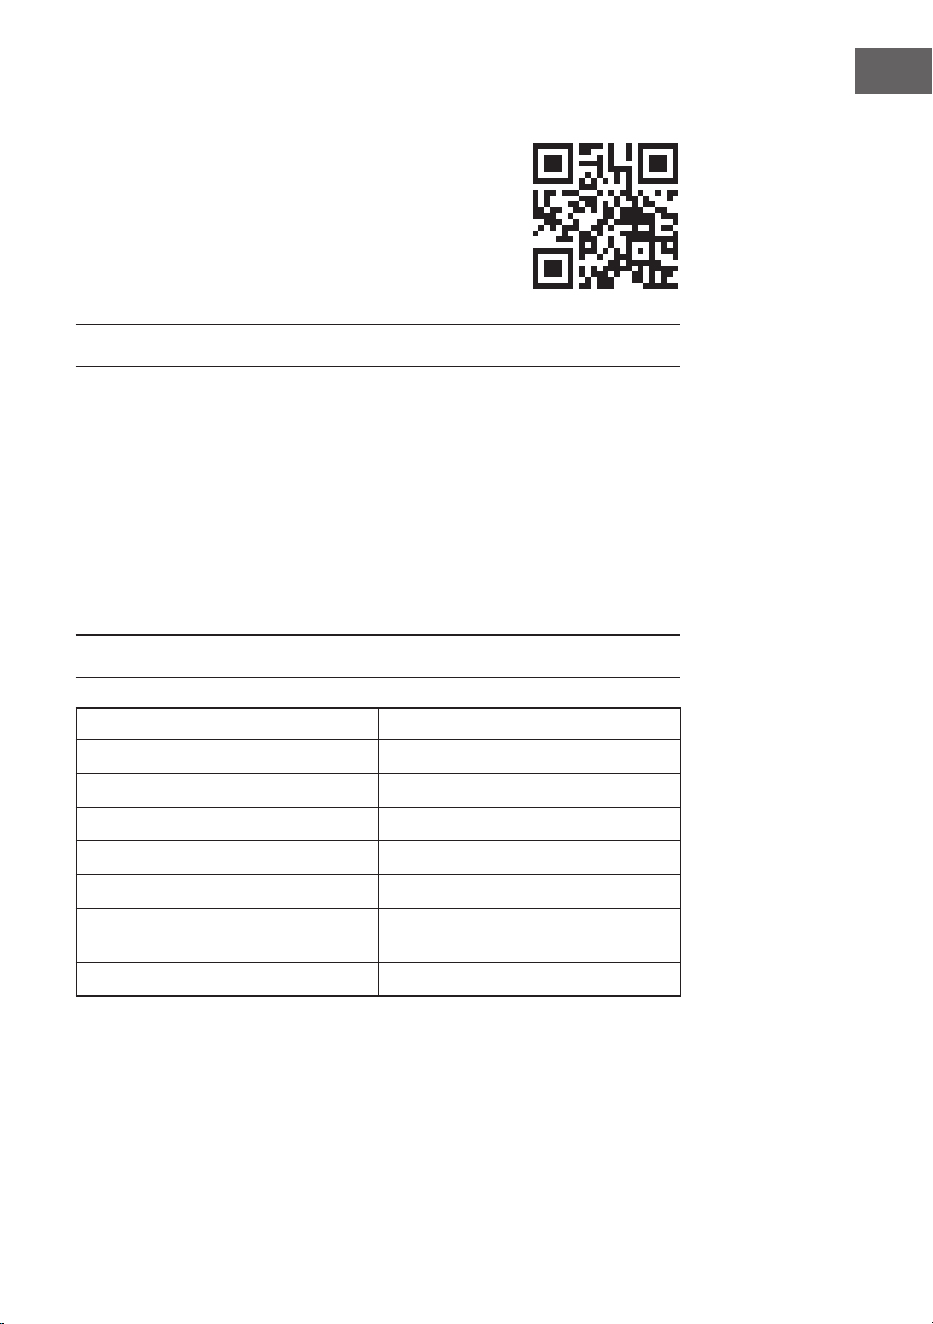
Dear Customer,
Congratulations on purchasing this device. Please read the
following instructions carefully and follow them to prevent
possible damages. We assume no liability for damage caused
by disregard of the instructions and improper use. Scan the QR
code to get access to the latest user manual and more product
information.
CONTENT
TECHNICAL DATA
Item number 10035294, 10035295
Power supply 220-240 V~ 50 Hz
Power consumption (watts) 145 W
Climate class ST/SN/N/T
Protection class I
Refrigerant R600a/25 g
Design Pressure (over pressure)
Maximum: 20 bar (290 Psig),
Minimum: 9,5 bar (138 Psig)
Foaming agent C
5
H
10
Safety Instructions18
Device Overview20
Control Panel, Indicators and Buttons21
Installation22
Commissioning and Operation22
Cleaning and Care24
Troubleshooting26
Disposal Considerations28
Manufacturer & Importer (UK)28

18
EN
SAFETY INSTRUCTIONS
• Check that the mains voltage corresponds to the rating of the appliance before
operating.
• Use handles or knobs when moving. Place on a at stable surface for use. Do not
use outdoors.
• Do not use near or in the immediate vicinity of a bath or swimming pool or any
source of liquid.
• Unplug from socket outlet when not in use.
• To protect against electric shock, do not immerse cord or plug in water or any other liquid.
• The use of accessory attachments not recommended by the appliance
manufacturer, may cause injury.
• Do not locate this appliance immediately below a socket outlet.
• Do not allow cord to overhang the counter top where it can be easily pulled by
children.
• Do not overll as this may cause a hazard. Ensure lid is closed when in operation.
• To remove plug from outlet, do not pull on supply cord. Grasp plug rmly and pull
to remove.
• Do not use this appliance for anything else other than its intended use. No liability
can be accepted for any damage caused by non-compliance with these instructions
or any other improper use or mishandling.
• This appliance is for household use only.
• This appliance is not intended to be operated by means of an external timer or
separate remote control system.
• This appliance is not intended to be immersed in water.
• If the supply cord is damaged, it must be replaced by the manufacturer or its service
agent or a similarly qualied person in order to avoid a hazard.
• Please according to local regulations regarding disposal of the appliance for its
ammable blowing gas.
• Do not store explosive substances such as aerosol cans with a ammable propellant
in this appliance.
• Fill with potable water only.
• This device may be only used by children 8 years old or older and persons with
limited physical, sensory and mental capabilities and / or lack of experience
and knowledge, provided that they have been instructed in use of the device by a
responsible person who understands the associated risks.
This appliance contains the coolant isobutane (R600a),a natural gas which
is environmentally friendly. Although it is ammable, it does not damage the
ozone layer and does not increase the greenhouse effect. The use of this coolant
has,however,led to a slight increase in the noise level of the appliance. In addition
to the noise of the compressor,you might be able to hear the coolant owing
around the system. This is unavoidable,and does not have any adverse effect on the
performance of the appliance. Care must be taken during the transportation and
setting up of the appliance that no parts of the cooling system are damaged. Leaking
coolant can damage the eyes.
19
EN
WARNING
Danger from re/ammable materials. Please observe the local
regulations for the disposal of units with ammable refrigerants and
gases.
• Keep ventilation openings in the unit housing free of obstacles.
• Do not damage the refrigerant circuit.
• Do not use any mechanical devices or other means to accelerate the defrosting
process or the ice recovery process.
• Do not use other types of electrical appliances inside the ice cube machine.
Special Notes
• When positioning the unit, make sure that the power cord is not pinched or
damaged.
• Make sure that there are no multiple sockets or power supplies on the back of the
unit.
To avoid contamination of food, please follow the instructions below:
• Regularly clean surfaces that may come into contact with food. Clean the water
drain regularly.
• If the appliance contains a water tank, clean it if it has not been used for 48 hours.
Rinse the tank if no water has been removed for 5 days.
WARNING
When using, servicing and disposing of the unit, pay attention to the left
symbol on the rear of the unit or on the compressor. This symbol warns
of possible res. There are ammable substances in the refrigerant lines
and in the compressor. Keep the appliance away from sources of re
during use, maintenance and disposal.

20
EN
DEVICE OVERVIEW
1
6
2
3
4
5
7
8
9
10
11
12
13
14
15
16
17
18
1
Top lid
7
Water reservoir
13
“MAX” water level
2
Control panel
8
Ice basket
14
Infrared light emitting diode
3
Viewing window
9
Evaporator
15
Filter
4
Front cover
10
Ice tray
16
Drain plug
5
Front housing
11
Ice shovel
17
Ice basket
6
Back housing
12
Infrared light receiving diode
18
Ice scoop

21
EN
CONTROL PANEL, INDICATORS AND BUTTONS
Control Panel
Indicators and Button Functions
Indicators and Buttons Functions
Large ice cubes (indicator):
The indicator lights in green when you select large ice.
Small ice cubes (indicator):
The indicator lights in green when you select small ice.
Cleaning (indicator):
The indicator lights in green when the appliance needs
to be cleaned.
Start/Stop (button):
Start or stop the appliance.
Size selection (button):
Select the desired ice cube size (large or small).
Ice making (indicator):
The indicator lights in green when making ice.
Water reservoir empty (indicator):
The indicator lights in red when there is a lack of water
in the water reservoir.
Ice basket full (indicator):
The indicator lights in red when the ice basket is full.
22
EN
INSTALLATION
1. Unpack the appliance, then check and make sure that all the accessories including
ice basket and ice scoop etc. are complete. Contact customer service if accessories
are missing.
2. Please ensure the ice cube maker is level and on a stable table or platform to avoid
malfunction.
3. The incline angle of the ice cube maker cabinet should not exceed 45° during
transportation or use. Do not turn the ice cube maker upside down. Doing so could
cause the compressor or refrigerating system to operate incorrectly. Please allow
time for the uids in the compressor to settle after the ice cube maker is moved
or transported. Before using the ice cube maker for the rst time, please wait for
2hours after the appliance has been leveled and positioned in the proper place.
4. The appliance must be placed on a dry and level surface with sufcient ventilation,
far from heat sources such as ovens, heaters and corrosive gases. Keep a minimum
distance of 20cm to all sides of the ice cube maker to ensure proper ventilation.
5. Do not ll the water reservoir with hot water. This may damage the ice cube maker.
It is best to ll the water reservoir with water of room temperature or lower.
6. Do not use the appliance at a very cold environment (lower than 5 °C).
7. Clean the appliance before use (see section “Cleaning and Care“).
COMMISSIONING AND OPERATION
1. Ensure that the drain plug at the bottom of water reservoir is closed well.
2. Plug the ice cube maker into the wall outlet, the “Ice making“ indicator blinks.
Note: If the appliance has been moved, allow the ice cube maker to rest for
30minutes before plugging the power plug into the wall outlet.
3. Open the top lid and remove the ice basket.
4. Fill the water reservoir with potable water only.
Note: Do not ll above the MAX water level mark.
5. Replace the ice basket and close the top lid.
6. Press the Size selection button to select the ice size. If small ice cubes are
selected, the “Small ice cubes“ indicator lights up. When large ice cubes are
selected, the “Large ice cubes“ indicator lights up.
7. Press the Start/Stop button and the ice making indicator lights solidly.
8. The ice-making cycle will last approximately 7-15 minutes, depending on the
ambient temperature and water temperature.
23
EN
9. The ice-making cycle starts with water being pumped into the ice tray situated
below the evaporator. Over the next 7-15 minutes ice forms on the evaporator.
Once this has completed, the ice tray will tilt backwards and the remaining water in
the ice tray is drained back into the water reservoir. The ice cubes are then dropped
from the evaporator and pushed forward into the ice basket by the ice shovel. The
ice tray will automatically move back into position under the evaporator and start
the next cycle.
10. The “Ice basket full“ indicator lights up when the ice basket is ful land then the
ice cube maker will stop the ice-making cycle automatically. Gently remove the ice
cubes from the ice basket with the ice scoop. About 5 seconds later, the ice cube
maker will restart its ice making function automatically.
11 . The “Water reservoir empty” indicator will light up when the water reservoir is
lack of water and the ice-making cycle will stop automatically. At that time, remove
the ice basket and add water to the water reservoir, and then press the Start/Stop
button again to restart the ice-making cycle.
12. When you have got your desired amount of ice, stop the ice making cycle by
pressing the Start/Stop button and unplug the appliance from the wall outlet.
13. Open the top lid, remove the ice cubes with the ice scoop and place them in the
freezer.
Note: The ice cubes will last in the ice cube maker for up to an 18-hour period,
depending on the ambient temperature.
14. Allow the ice cube maker to wall up to room temperature.
15. Suggest replacing the water at least once a week. Please empty the water reservoir
if the ice cube maker is not used for a long time.
24
EN
CLEANING AND CARE
To keep your ice tasting fresh and your ice cube maker looking great, we recommend
cleaning your ice cube maker at least once per week.
1. Stop the ice-making cycle by pressing the Start/Stop button . Unplug the ice
cube maker from the wall outlet and allow it to warm up to room temperature.
2. If residual water is found in the ice tray, gently push the ice tray back so that all
water drains into the water reservoir.
3. Move the appliance forward to a place 60mm away from the working table so
that the drain plug becomes accessible. Open the drain plug to drain out excess
water into a bowl, bucket or sink (see gure 1, 2 and 3).
4. Replace the drain plug. Check and make sure that the drain plug is properly tted
and the water reservoir is closed well. Fill the water reservoir with clean water. Press
the Size selection button until the “Cleaning” indicator ashes. Then press
the Start/Stop button , the pump will start to pump water and will keep running
for 6 minutes. It will enter into standby condition after running for 6 minutes. Finally,
open the drain plug and empty the water into a bowl, bucket or sink.
5. Remove the ice basket.
6. Clean the ice cube maker interior with a soft cloth soaked with warm water and
vinegar, then rinse with clean water and then drain all the water.
7. Replace the drain plug well in position. Wash the ice basket and ice scoop in warm
soapy water, rinse with clean water and and dry them.
8. Clean the exterior of the ice cube maker with a soft damp cloth. Use a mild
dishwashing soap, if necessary.
Note: Do not use organic solvent, boiled water, detergent, strong acid and strong
alkali etc. for cleaning.
9. Please empty the water reservoir and dry it for storage if the ice cube maker is not
used for a long time.

25
EN
Figure 1
Figure 2 Figure 3
Working table
Drainplug
Drainplug
26
EN
TROUBLESHOOTING
Problem Possible Cause Solution
The “Water
reservoir empty”
indicator turns
on.
Low water level or lack of
water.
Stop making ice, rell water and
then press the Start/Stop button
.
The water screen at the
bottom of the water
reservoir is blocked.
Clean the appliance.
Pump malfunction. Contact customer service.
The “Ice basket
full” indicator
lights up.
The Ice basket is full
and the infrared light is
blocked by the ice.
Remove the ice from the ice
basket.
The infrared light emitting
diode and the infrared
light receiving diode do
not work.
Wipe up the foreign objects on
the infrared light emitting diode
and the infrared light receiving
diode and restart the ice cube
maker.
Contact customer service if the
infrared light emitting diode and
the infrared light receiving diode
still do not work after wiping up
the foreign objects on them and
restarting the ice cube maker.
The “Ice basket full”
indicator blinks.
The ice shovel is blocked. Remove the ice that is blocking
the ice shovel.
Contact customer service if no ice
is blocking the ice shovel and the
indicator blinks.
The ice cube maker
stops working.
The ice tray is not in the
right position.
Remove the ice in the ice tray and
press the Start/Stop button to
restart the appliance.
Contact customer service if the
appliance still does not work
after restart.
The ice basket is full
but the “Ice basket
full” indicator
does not illuminate.
The “ice full” condition
can not be detected as
the infrared light module is
interfered by the sunlight.
Unplug the appliance and move
it to a place which is not exposed
to the sunlight, then plug the
appliance and activate it again.
27
EN
Problem Possible Cause Solution
The ice cubes
clump together.
Making ice takes too
much time.
Stop making ice and restart the
ice-making cycle after the ice has
melted.
The water in the water
reservoir has a too low
temperature.
Fill the water reservoir with
water ranges between 8℃°C and
25°C.
The ice-making
cycle seems
normal but no ice is
produced.
The ambient temperature
or water temperature is
too high.
Start the ice-making cycle at an
environment with an ambient
temperature less than 32°C and
ll the water reservoir with some
cold water.
The refrigerating system
leaks.
Contact customer service.
The refrigerant system is
blocked.
Contact customer service.
Poor ice-making
result.
Poor heat dissipation. Keep a minimum distance
of 20cm to all sides of the
appliance to ensure proper
ventilation.
The water temperature is
too high.
Fill the water reservoir with
water ranges between 8℃°C and
28°C.
The ambient temperature is
too high.
Operate the ice cube maker at
an environment with an ambient
temperature between 10°C℃ and
32°C.

28
EN
DISPOSAL CONSIDERATIONS
If there is a legal regulation for the disposal of electrical
and electronic devices in your country, this symbol on the
product or on the packaging indicates that this product must
not be disposed of with household waste. Instead, it must be
taken to a collection point for the recycling of electrical and
electronic equipment. By disposing of it in accordance with
the rules, you are protecting the environment and the health of
your fellow human beings from negative consequences. For
information about the recycling and disposal of this product,
please contact your local authority or your household waste
disposal service.
MANUFACTURER & IMPORTER (UK)
Manufacturer:
Chal-Tec GmbH, Wallstrasse 16, 10179 Berlin, Germany.
Importer for Great Britain:
Berlin Brands Group UK Limited
PO Box 42
272 Kensington High Street
London, W8 6ND
United Kingdom

29
FR
Chère cliente, cher client,
Toutes nos félicitations pour l’acquisition de ce nouvel appareil.
Veuillez lire attentivement et respecter les instructions de ce mode
d’emploi an d’éviter d’éventuels dommages. Nous ne saurions
être tenus pour responsables des dommages dus au non-respect
des consignes et à la mauvaise utilisation de l’appareil. Scannez
le QR-Code pour obtenir la dernière version du mode d‘emploi
ainsi que d‘autres informations concernant le produit.
SOMMAIRE
FICHE TECHNIQUE
Numéro d'article 10035294, 10035295
Alimentation 220-240 V~ 50 Hz
Puissance (watts) 145 W
Classe climatique ST/SN/N/T
Classe de protection I
Réfrigérant R600a/25 g
Pression de fabrication (Surpression)
Maximum: 20 bar (290 Psig),
Minimum: 9,5 bar (138 Psig)
Agent moussant C
5
H
10
Consignes de sécurité30
Aperçu de l‘appareil32
Panneau de contrôle, afchages et touches33
Installation34
Mise en marche et utilisation34
Nettoyage et entretien36
Identication et résolution des problèmes38
Informations sur le recyclage40
Fabricant et importateur (UK)40

30
FR
CONSIGNES DE SÉCURITÉ
• Connectez uniquement l‘appareil à des prises de terre correspondant à la tension
nominale de l‘appareil.
• Pour déplacer l‘appareil, utilisez les poignées.
• Placez l‘appareil sur une surface plane.
• N‘utilisez l‘appareil qu‘à l‘intérieur.
• N‘utilisez pas l‘appareil près d‘une baignoire ou d‘une piscine.
• Retirez la che de la prise lorsque vous n‘utilisez pas l‘appareil.
• N‘immergez jamais le cordon d‘alimentation et la che dans l‘eau ou tout autre
liquide.
• Utilisez uniquement des accessoires que le fabricant recommande expressément
pour cet appareil.
• Ne placez pas l‘appareil directement sous une prise électrique.
• Ne laissez pas le cordon d‘alimentation pendre de la surface de travail an que les
enfants ne puissent pas tirer dessus.
• Ne remplissez pas trop l‘appareil pour éviter les courts-circuits et des décharges
électriques.
• Assurez-vous que le couvercle est toujours fermé pendant le fonctionnement.
• Ne débranchez pas la che en tirant sur le câble, mais tirez sur la che elle-même.
• N‘utilisez cet appareil que pour l‘usage auquel il est destiné. Nous déclinons toute
responsabilité pour les dommages causés par le non-respect des informations et
une mauvaise utilisation. N‘utilisez l‘appareil qu‘à domicile.
• Ne connectez pas l‘appareil à une minuterie ou à une prise télécommandée.
• N‘immergez pas l‘appareil dans l‘eau.
• Si le cordon d‘alimentation ou la che sont endommagés, ils doivent être remplacés
par le fabricant, un spécialiste autorisé ou une personne de qualication similaire.
• Lors de l‘élimination de l‘appareil, respectez les réglementations locales relatives à
l‘élimination des appareils contenant des gaz inammables.
• Ne gardez aucune substance inammable ou explosive dans l‘appareil.
• Remplissez l‘appareil avec de l‘eau potable uniquement.
• Les enfants à partir de 8 ans ainsi que les personnes aux capacités physiques,
mentales ou sensorielles réduites ne doivent utiliser l’appareil qu‘après avoir été
familiarisés par une personne responsable de leur sécurité aux fonctionnalités et
aux mesures de sécurité et qu‘ils comprennent les risques associés.
Cet appareil contient du liquide réfrigérant Isobutane (R600a), un gaz naturel très
respectueux de l’environnement mais inammable. Bien qu’il soit inammable, il ne
détruit pas la couche d’ozone et ne renforce pas l’effet de serre. L’utilisation de ce
liquide réfrigérant provoque toutefois un niveau sonore de l’appareil légèrement
plus élevé. Outre les bruits du compresseur, vous pouvez percevoir le ux du liquide
réfrigérant. Cela est inévitable et n’a aucune inuence négative sur la puissance de
l’appareil. Faites attention pendant le transport an de ne pas endommager le circuit
réfrigérant. Les fuites de liquide réfrigérant peuvent irriter les yeux.
31
FR
MISE EN GARDE
Danger d‘incendie / matières inammables ! Veuillez respecter les
réglementations locales pour l‘élimination des appareils contenant des
réfrigérants et des gaz inammables.
• Gardez les ouvertures de ventilation dans le boîtier de l‘appareil dégagées.
• N‘endommagez pas le circuit frigorique.
• N‘utilisez pas d‘appareils mécaniques ou d‘autres moyens pour accélérer le
processus de dégivrage ou de fabrication de glace.
• N‘utilisez pas d‘autres types d‘équipements électriques à l‘intérieur de la machine
à glaçons.
Consignes particulières
• Lors du positionnement de l‘appareil, assurez-vous que le cordon d‘alimentation
n‘est pas pincé ou endommagé.
• Assurez-vous qu‘il n‘y a pas de multiprises ou blocs d‘alimentation à l‘arrière de
l‘appareil.
Pour éviter la contamination des aliments, veuillez suivre les instructions ci-dessous :
• Nettoyez régulièrement les surfaces qui peuvent entrer en contact avec les aliments.
Nettoyez régulièrement l‘évacuation d‘eau.
• Si l‘appareil contient un réservoir d‘eau, nettoyez-le s‘il n‘a pas été utilisé pendant
48 heures. Rincez le réservoir si aucune eau n‘a été prélevée pendant 5 jours.
MISE EN GARDE
Lors de l‘utilisation, de l‘entretien et de l‘élimination de l‘appareil, soyez
attentif au symbole à gauche, qui se trouve à l‘arrière ou sur le
compresseur de l‘appareil. Ce symbole avertit du risque d‘incendies.
Des substances inammables se trouvent dans les conduites de
réfrigérant et dans le compresseur. Gardez l‘appareil loin des sources
d‘incendie lors de son utilisation, de sa maintenance et de son
élimination.
32
FR
APERÇU DE L‘APPAREIL
1
6
2
3
4
5
7
8
9
10
11
12
13
14
15
16
17
18
1
Couvercle supérieur
7
Réservoir d'eau
13
Niveau d'eau MAX
2
Panneau de
commande
8
Panier à glace
14
Diode émettrice de lumière
infrarouge
3
Fenêtre de contrôle
9
Évaporateur
15
Filtre
4
Couvercle avant
10
Compartiment à glace
16
Bouchon de vidange
5
Boîtier avant
11
Pelle à glace
17
Panier à glace
6
Boîtier arrière
12
Diode réceptrice de lumière
infrarouge
18
Cuillère à glace
33
FR
PANNEAU DE CONTRÔLE, AFFICHAGES ET
TOUCHES
Panneau de commande
Voyants et fonctions des touches
Voyants et touches Fonctions
Gros glaçons (voyant): Lorsque vous choisissez de
gros glaçons, ce voyant passe au vert.
Petits glaçons (voyant) : Lorsque vous choisissez de
petits glaçons, ce voyant passe au vert.
Nettoyage (voyant) : Si l'appareil doit être nettoyé, ce
voyant s'allume en vert.
Start/Stop (touche) : Pour démarrer ou arrêter
l'appareil.
Choix de la taille (touche) : Sélectionnez la taille de
glaçon souhaitée (grande ou petite).
Fabrication de glaçons (voyant) : Ce voyant lumineux
s'allume en vert lors de la fabrication de glaçons.
Réservoir d'eau vide (voyant) : Ce voyant s'allume en
rouge lorsque le réservoir d'eau est vide.
Panier à glace plein (voyant) : Ce voyant s'allume en
rouge lorsque le panier de glace est plein.
34
FR
INSTALLATION
1. Retirez l‘appareil de l‘emballage et assurez-vous que tous les accessoires (y
compris le panier à glace et la cuillère à glace) sont bien présents. Contactez le
service client si des accessoires manquent.
2. Assurez-vous que l‘appareil est de niveau et sur une table ou une surface de travail
stable pour éviter les dysfonctionnements.
3. L‘angle d‘inclinaison du boîtier de l‘appareil ne doit pas dépasser 45° pendant le
transport et en particulier pendant l‘utilisation. Ne pas retourner l‘appareil car cela
pourrait endommager le compresseur ou le système de refroidissement. Après avoir
déplacé l‘appareil, laissez-le reposer pendant un moment pour que les liquides
dans le compresseur puissent se déposer. Attendez au moins 2 heures avant
d‘utiliser l‘appareil pour la première fois et après l‘avoir placé à l‘endroit approprié
et l‘avoir correctement installé.
4. Placez l‘appareil dans un endroit sufsamment aéré sur une surface sèche et plane.
L‘appareil ne doit pas être utilisé à proximité de sources de chaleur telles que des
cuisinières, des radiateurs ou des gaz corrosifs. Maintenez une distance minimale
de 20 cm sur tous les côtés de l‘appareil pour assurer une ventilation adéquate.
5. Ne remplissez pas le réservoir d‘eau avec de l‘eau chaude car cela pourrait
endommager l‘appareil. Il est préférable de remplir le réservoir avec de l‘eau à
température ambiante ou plus froide.
6. N‘utilisez pas l‘appareil dans un environnement froid (moins de 5 °C).
7. Nettoyez l‘appareil avant utilisation (voir la section „Nettoyage et entretien“).
MISE EN MARCHE ET UTILISATION
1. Assurez-vous que le bouchon de vidange sur le dessous du réservoir d‘eau est
correctement installé et qu‘il est bien fermé.
2. Branchez la che secteur de l‘appareil dans la prise. Le voyant „fabrication de
glaçons“ clignote.
Remarque : Si l‘appareil a été déplacé, laissez reposer la machine à glaçons
pendant au moins 30 minutes avant d‘insérer la che dans la prise.
3. Ouvrez le couvercle supérieur et retirez le panier à glace.
4. Remplissez le réservoir d‘eau uniquement avec de l‘eau potable.
Remarque : remplissez le réservoir d‘eau uniquement jusqu‘au repère MAX.
5. Remettez le panier à glaçons en place et fermez le couvercle supérieur.
35
FR
6. Appuyez sur le bouton de sélection de la taille pour sélectionner la taille des
glaçons. Si vous sélectionnez les petits glaçons, le voyant „petits glaçons“
s‘allume.
7. Si vous sélectionnez les gros glaçons, le voyant „gros glaçons“ s‘allume.
8. Appuyez sur Start/Stop , le voyant de „fabrication des glaçons“ reste
allumé en permanence.
9. Un cycle de fabrication dure environ 7 à 15 minutes en fonction de la température
ambiante et de l‘eau.
10. La fabrication de glace commence par pomper de l‘eau dans le compartiment
à glaçons situé sous l‘évaporateur. De la glace se forme sur l‘évaporateur dans
les 7 à 15 minutes suivantes. Dès que la formation des glaçons est terminée, le
compartiment à glace s‘incline vers l‘arrière et l‘eau qui reste dans le compartiment
à glace retourne dans le réservoir. Les glaçons tombent ensuite de l‘évaporateur
et sont poussés vers l‘avant par la pelle à glace dans le panier à glaçons. Le
compartiment à glaçons revient automatiquement à la position de départ sous
l‘évaporateur et le cycle suivant démarre.
11 . Dès que le panier à glaçons est plein, le voyant „Panier à glace plein“ s‘allume.
Le cycle de fabrication de glace est automatiquement interrompu. Utilisez la cuillère
à glace pour retirer délicatement les glaçons du panier à glaçons. Environ 5
secondes plus tard, le cycle de fabrication de glace redémarre automatiquement.
12. Le voyant „Réservoir d‘eau vide“ s‘allume lorsque le réservoir d‘eau est vide.
Le cycle de fabrication des glaçons est automatiquement interrompu. Retirez le
panier de glace et remplissez le réservoir d‘eau avec de l‘eau. Remettez le panier
de glace et appuyez sur marche / arrêt pour redémarrer la production de
glaçons.
13. Dès que la quantité souhaitée de glaçons a été produite, appuyez sur marche /
arrêt et retirez la che secteur de la prise.
14. Ouvrez le couvercle supérieur, retirez les glaçons avec la cuillère à glace et
placez-les au congélateur.
Remarque : En fonction de la température ambiante, les glaçons peuvent rester
environ 18 heures dans l‘appareil.
15. Laissez l‘appareil se réchauffer à température ambiante.
16. Il est recommandé de changer l‘eau du réservoir d‘eau au moins une fois par
semaine. Videz complètement le réservoir d‘eau si vous n‘utilisez pas l‘appareil
pendant une longue période.
36
FR
NETTOYAGE ET ENTRETIEN
Pour garder la glace fraîche et l‘appareil en bon état, vous devez nettoyer l‘appareil au
moins une fois par semaine.
1. Arrêtez la production de glaçons en appuyant sur Marche / Arrêt . Retirez la
che secteur de la prise et laissez l‘appareil se réchauffer à température ambiante.
2. S‘il y a encore de l‘eau dans le compartiment à glaçons, basculez soigneusement
le compartiment vers l‘arrière pour que toute l‘eau puisse s‘écouler.
3. Poussez l‘appareil vers l‘avant jusqu‘à ce qu‘il dépasse de 60 mm au-dessus du
bord de la surface de travail an que le bouchon de vidange soit accessible.
Ouvrez maintenant le bouchon de vidange pour vidanger l‘excès d‘eau dans un
bol, un seau ou un évier (voir les gures 1, 2 et 3).
4. Replacez le bouchon de vidange et assurez-vous qu‘il est correctement fermé et
que le réservoir d‘eau est étanche. Maintenant, remplissez le réservoir d‘eau avec
de l‘eau propre. Appuyez sur le bouton de sélection de taille jusqu‘à ce que
l‘indicateur „Nettoyage“ s‘allume. Appuyez maintenant sur le bouton marche
/ arrêt pour pomper de l‘eau pendant 6 minutes. Au bout de 6 minutes,
l‘appareil passe automatiquement en mode veille. Ouvrez maintenant le bouchon
de vidange et vidangez toute l‘eau dans un bol, un seau ou un évier.
5. Retirez le panier de glace.
6. Nettoyez l‘intérieur de l‘appareil avec un chiffon doux imbibé d‘eau tiède et
de vinaigre. Rincez ensuite l‘intérieur de l‘appareil à l‘eau claire et laissez l‘eau
s‘écouler complètement.
7. Remettez le bouchon de vidange. Lavez le panier à glace et la cuillère à glace
avec de l‘eau chaude savonneuse, rincez à l‘eau claire et séchez-les.
8. Nettoyez l‘extérieur de l‘appareil avec un chiffon doux. Si nécessaire, utilisez une
solution savonneuse douce.
Remarque : N‘utilisez pas de solvants organiques, d‘eau bouillante, de solutions
fortement acides ou alcalines, etc.
9. Videz le réservoir d‘eau et séchez-le si vous n‘utilisez pas l‘appareil pendant une
longue période.

37
FR
Figure 1
Figure 2 Figure 3
Plan de travail
Bouchon de
vidange
Bouchon de
vidange
38
FR
IDENTIFICATION ET RÉSOLUTION DES
PROBLÈMES
Problème Cause possible Solution
Le témoin „réservoir
d‘eau vide“
s‘allume.
Niveau d'eau bas ou
réservoir vide.
Arrêtez la fabrication de glaçons,
remplissez le réservoir d'eau et
appuyez sur le bouton marche
/ arrêt.
La crépine d'eau au fond
du réservoir d'eau est
bloquée.
Nettoyez l'appareil.
Dysfonctionnement de la
pompe.
Contactez le service client.
Le témoin „panier
à glace plein“
s‘allume.
Le panier à glace est plein
et la lumière infrarouge est
bloquée par la glace.
Retirez la glace du panier à
glace.
La diode émettrice de
lumière infrarouge et
la diode réceptrice de
lumière infrarouge ne
fonctionnent pas.
Retirez les objets étrangers des
diodes infrarouges et redémarrez
la machine à glaçons.
Contactez le service client si les
diodes ne fonctionnent pas après
le nettoyage et après avoir éteint
et rallumé l'appareil.
Le voyant „panier
à glace plein“
clignote.
La pelle à glace est
bloquée.
Retirez la glace qui bloque la
pelle à glace.
Contactez le service client s'il n'y
a pas de glace bloquant la pelle
à glace et que le voyant clignote.
L‘appareil s‘arrête. Le compartiment à glace
n'est pas dans la bonne
position.
Retirez la glace du compartiment
et appuyez sur la touche
marche/arrêt pour redémarrer
l'appareil.
Contactez le service client si
l'appareil ne fonctionne toujours
pas après le redémarrage.
39
FR
Problème Cause possible Solution
Le panier à glace
est plein mais le
voyant „panier
plein“ ne
s‘allume pas.
Le module de lumière
infrarouge ne peut pas
reconnaître que le panier
à glace est plein car il est
perturbé par la lumière du
soleil incidente.
Éteignez l'appareil et
débranchez la che secteur de la
prise. Placez l'appareil à l'abri de
la lumière directe du soleil. Puis
rallumez l'appareil.
Les glaçons se
collent les uns aux
autres.
La production de glaçons
est trop lente.
Arrêtez la fabrication et
recommencez une fois que la
glace a fondu.
L'eau du réservoir est trop
froide.
Remplissez le réservoir d'eau
avec de l'eau entre 8 ° C et 25
° C.
La fabrication des
glaçons semble
normale, mais
aucun glaçon n'est
fabriqué.
La température ambiante
ou de l'eau est trop
élevée.
Commencez à fabriquer des
glaçons avec une température
ambiante inférieure à 32 °C et
remplissez le réservoir d'eau
avec un peu d'eau froide.
Fuite du circuit réfrigérant. Contactez le service client.
Le circuit réfrigérant est
bloqué.
Contactez le service client.
La qualité des
glaçons est
mauvaise.
Mauvaise dissipation
thermique.
Maintenez une distance minimale
de 20 cm de tous les côtés de
l'appareil pour assurer une
ventilation adéquate.
La température de l'eau
est trop élevée.
Remplissez le réservoir d'eau
avec de l'eau entre 8 ° C et 28
° C.
La température ambiante
est trop élevée.
Utilisez l'appareil à une
température ambiante comprise
entre 10 ° C et 32 °C.

40
FR
INFORMATIONS SUR LE RECYCLAGE
S‘il existe une réglementation pour l‘élimination ou le
recyclage des appareils électriques et électroniques dans
votre pays, ce symbole sur le produit ou sur l‘emballage
indique que cet appareil ne doit pas être jeté avec les
ordures ménagères. Vous devez le déposer dans un point
de collecte pour le recyclage des équipements électriques
et électroniques. La mise au rebut conforme aux règles
protège l‘environnement et la santé de vos semblables des
conséquences négatives. Pour plus d‘informations sur le
recyclage et l‘élimination de ce produit, veuillez contacter
votre autorité locale ou votre service de recyclage des
déchets ménagers.
FABRICANT ET IMPORTATEUR (UK)
Fabricant :
Chal-Tec GmbH, Wallstraße 16, 10179 Berlin, Allemagne.
Importateur pour la Grande Bretagne :
Berlin Brands Group UK Limited
PO Box 42
272 Kensington High Street
London, W8 6ND
United Kingdom
41
ES
Estimado cliente:
le felicitamos por la compra de su dispositivo. Por favor, lea
las siguientes instrucciones con atención y sígalas para evitar
posibles daños. No aceptamos ninguna responsabilidad por los
daños causados por el incumplimiento de las instrucciones y un
uso indebido. Escanee el siguiente código QR para acceder al
último manual de usuario y otra información sobre el producto.
CONTENIDO
DATOS TÉCNICOS
Número del artículo 10035294, 10035295
Alimentación 220-240 V~ 50 Hz
Potencia (Watt) 145 W
Tipo de enfriamiento ST/SN/N/T
Tipo de protección I
Refrigerante R600a/25 g
Presión diseñada (sobre presión)
Max: 20 bar (290 Psig),
Min: 9,5 bar (138 Psig)
Agente espumante C
5
H
10
Instrucciones de seguridad42
Resumen del aparato44
Descripción del producto45
Instalación46
Puesta en marcha y funcionamiento46
Limpieza y mantenimiento48
Solución de problemas50
Indicaciones sobre la retirada del aparato52
Fabricante e importador (reino unido)52

42
ES
INSTRUCCIONES DE SEGURIDAD
• Conecte el dispositivo sólo a enchufes con toma de tierra que correspondan al
voltaje nominal del dispositivo.
• Cuando mueva la unidad, use las asas.
• Coloque la unidad en una supercie plana.
• Use la unidad sólo en el interior.
• No utilice la unidad cerca de una bañera o de una piscina.
• Desenchufe el aparato de la toma de corriente cuando no lo utilice.
• Nunca sumerja el cable de alimentación y/o el enchufe en agua u otros líquidos.
• Utilice sólo accesorios que hayan sido diseñados especícamente para este
dispositivo por el fabricante.
• No coloque la unidad directamente debajo de una toma de corriente.
• No deje el cable de alimentación colgando de la supercie de trabajo, para que
los niños no puedan tirar de él.
• No sobrecargue la unidad, de lo contrario puede causar cortocircuitos y
descargas eléctricas.
• Asegúrese de que la tapa esté siempre cerrada durante el funcionamiento.
• No saque el enchufe de la toma tirando del cable, sujételo por el asidero al
sacarlo.
• Utilice este aparato sólo para el propósito previsto. No asumimos ninguna
responsabilidad por los daños que surjan debidos a la inobservancia de las
instrucciones y a un uso indebido. Use el dispositivo sólo en el hogar.
• No conecte el aparato a un temporizador o a una toma de corriente con control
remoto.
• No sumerja el aparato en agua.
• Si el cable de alimentación o el enchufe están dañados, deben ser reemplazados
por el fabricante, por una empresa especializada autorizada o por una persona
cualicada.
• Al deshacerse del dispositivo, observe los reglamentos locales para la eliminación
de aparatos con gas inamable.
• No almacene sustancias altamente inamables o explosivas en la unidad.
• Llene la unidad sólo con agua potable.
• Niños a partir de 8 años de edad, discapacitados mentales, sensoriales y físicos
sólo podrán utilizar el dispositivo si un supervisor responsable de ellos se ha
familiarizado a fondo con las funciones y precauciones de seguridad y comprende
los riesgos que conlleva.
Esta unidad contiene el refrigerante isobutano (R600a), un gas natural de alta
compatibilidad ambiental pero combustible. Aunque es inamable, no daña la
capa de ozono y no aumenta el efecto invernadero. El uso de este refrigerante
resultará en un nivel de ruido ligeramente más alto del aparato. Además del ruido
del compresor, puedes oír el ujo del refrigerante. Esto es inevitable y no tiene
ningún efecto negativo en el rendimiento de la unidad. Tengan cuidado durante el
transporte para que el circuito de refrigerante no se dañe. Las fugas de refrigerante
pueden irritar los ojos.

43
ES
ADVERTENCIA
¡Peligro de incendio/materiales inamables! Por favor, observe las
regulaciones locales para la eliminación de aparatos que contengan
refrigerantes y gases inamables.
• Mantenga las aberturas de ventilación de la carcasa del dispositivo libres de
obstáculos.
• No dañe el circuito de refrigerante.
• No utilice dispositivos mecánicos u otros medios para alterar el proceso de
descongelación o para acelerar el proceso de fabricación de hielo.
• No utilice otros tipos de aparatos eléctricos dentro de la máquina de hielo.
Consideraciones especiales
• Cuando coloque la unidad, tenga cuidado de no pellizcar o dañar el cable de
alimentación.
• Asegúrese de que no haya múltiples enchufes o fuentes de alimentación en la parte
trasera de la unidad.
Para evitar la contaminación de los alimentos, por favor, siga las siguientes
instrucciones:
• Limpie regularmente las supercies que pueden entrar en contacto con los
alimentos. Limpie el drenaje de agua con regularidad.
• Si el aparato contiene un depósito de agua, límpielo cuando el aparato no se
haya utilizado durante 48 horas. Enjuague el tanque si no se ha sacado agua
durante 5 días.
ADVERTENCIA
Al utilizar, mantener y eliminar el aparato, preste atención al símbolo
de la izquierda, que se encuentra en la parte posterior o en el
compresor del aparato. Este símbolo advierte del riesgo de incendio.
Hay sustancias inamables en las líneas de refrigerante y en el
compresor. Mantenga la unidad alejada de las fuentes de fuego al
operar, mantener y desechar la unidad.
44
ES
RESUMEN DEL APARATO
1
6
2
3
4
5
7
8
9
10
11
12
13
14
15
16
17
18
1
Cubierta superior
7
Depósito de agua
13
Indicador de nivel de agua
MAX
2
Panel de mando
8
Cesta de hielo
14
Diodo emisor de luz
infrarroja
3
Ventanilla
9
Evaporador
15
Filtro
4
Tapa frontal
10
Compartimento del hielo
16
Tapón de drenaje
5
Cubierta frontal
11
Pala para hielo
17
Cesta de hielo
6
Cubierta trasera
12
Diodo receptor de luz
infrarroja
18
Cucharón de hielo

45
ES
DESCRIPCIÓN DEL PRODUCTO
Panel de control
Señales luminosas y funciones de las teclas
Símbolos y teclas Funciones
Grandes cubitos de hielo (Símbolo): Cuando se
seleccionan grandes cubos de hielo, esta luz indicadora
se vuelve verde.
Pequeños cubitos de hielo (símbolo): Cuando
se seleccionan pequeños cubos de hielo, esta luz
indicadora se vuelve verde.
Limpieza (símbolo): Cuando la unidad necesita ser
limpiada, esta luz indicadora se vuelve verde.
Inicio/Detención (botón): Inicia o detiene el
dispositivo.
Selección de tamaño (botón): Seleccione el tamaño
del cubo de hielo deseado (grande o pequeño).
Producción de cubitos de hielo (pantalla): Esta luz
indicadora se enciende en verde durante la fabricación
de los cubitos de hielo.
Depósito de agua vacío (pantalla): Esta luz
indicadora se enciende en rojo cuando el tanque de
agua está vacío.
Cesta de hielo llena (pantalla): Esta luz indicadora se
ilumina en rojo cuando el cubo de hielo está lleno.
46
ES
INSTALACIÓN
1. Saque el dispositivo del embalaje y asegúrese de que todos los accesorios
(incluyendo la cesta y la pala para el hielo) están incluidos en la entrega. Contacte
con el servicio de atención al cliente si falta algún accesorio.
2. Asegúrese de que el aparato esté nivelado y sobre una mesa o supercie de
trabajo estable para evitar un mal funcionamiento.
3. El ángulo de inclinación de la carcasa del dispositivo no debe exceder los 45°
durante el transporte y especialmente durante el uso. No ponga la unidad al revés,
ya que podría dañar el compresor o el sistema de refrigeración. Deje la unidad sin
usar durante algún tiempo después de moverla o transportarla para permitir que
los líquidos se asienten en el compresor. Espere al menos 2 horas antes de usar la
unidad por primera vez y después de colocar la unidad en el lugar adecuado y de
alinearla correctamente antes de ponerla en funcionamiento.
4. Coloque la unidad en un lugar bien ventilado sobre una supercie seca y nivelada.
No coloque la unidad cerca de fuentes de calor, como hornos, calentadores o
gases corrosivos. Mantenga una distancia mínima de 20 cm a todos los lados del
aparato para asegurar una ventilación adecuada.
5. No llene el depósito de agua con agua caliente, ya que podría dañar el aparato.
Lo mejor es llenar el tanque de agua con agua a temperatura ambiente o más fría.
6. No utilice la unidad en un ambiente frío (menos de 5°C).
7. Limpie la unidad antes de usarla (véase el apartado “Limpieza y mantenimiento”)
PUESTA EN MARCHA Y FUNCIONAMIENTO
1. Asegurarse de que el tapón de drenaje en la parte inferior del tanque de agua esté
bien asentado y que esté rmemente cerrado.
2. Enchufe el aparato en la toma de corriente. El indicador de “fabricación de cubitos
de hielo” parpadea.
Nota: Si se ha movido el aparato, deje que la máquina de hacer cubitos de hielo
descanse durante al menos 30 minutos antes de conectar el enchufe en la toma de
corriente.
3. Abra la tapa superior y quite la cesta de hielo
4. Llene el tanque de agua sólo con agua potable.
Nota: Llene el tanque de agua sólo hasta la marca MAX.
5. Vuelva a colocar la cesta de hielo y cierre la tapa superior.
47
ES
6. Presione el botón de selección de tamaño para seleccionar el tamaño de los
cubitos de hielo. Cuando se seleccionan pequeños cubitos de hielo, el indicador
se iluminará. Cuando se seleccionan grandes cubitos de hielo, el indicador
se iluminará.
7. Cuando se presiona el botón de Inicio/Detención , el indicador “Fabricador de
cubitos de hielo” se enciende permanentemente.
8. Un ciclo de fabricación de hielo dura, dependiendo de las condiciones
ambientales y del agua, un cierto período de tiempo, 7-15 minutos.
9. La fabricación de hielo comienza bombeando agua al compartimento del
congelador, que se encuentra debajo del evaporador. En los próximos 7-15
minutos se formará hielo en el evaporador. Tan pronto como se completa la
formación del cubito de hielo, el compartimento de hielo se inclina hacia atrás y
el agua que queda en el compartimento de hielo vuelve al depósito de agua. Los
cubitos de hielo se dejan caer del evaporador y son empujados hacia la cesta de
hielo por la pala de hielo. El compartimento de hielo vuelve automáticamente a su
posición original bajo el evaporador y se inicia el siguiente ciclo.
10. 10. En cuanto la bandeja de hielo está llena, se enciende el indicador de “bandeja
de hielo llena” . El ciclo de fabricación de hielo se interrumpe automáticamente.
Retire cuidadosamente los cubitos de hielo de la cesta con la cuchara. El ciclo
de fabricación de hielo comienza de nuevo automáticamente unos 5 segundos
después.
11 . El indicador “Tanque de agua vacío” se enciende cuando el tanque
de agua está vacío. El ciclo de fabricación del cubo de hielo se interrumpe
automáticamente. Retire la cesta de hielo y llene el tanque de agua con agua.
Vuelva a colocar la cesta de hielo y pulse el botón de Start/Stop para reiniciar
el ciclo de fabricación del cubo de hielo.
12. Una vez que se haya producido la cantidad deseada de cubitos de hielo, pulse el
botón Start/Stop y desenchufe el aparato de la toma de corriente.
13. Abra la tapa superior, saque los cubitos de hielo con la cuchara de hielo y
colócalos en el congelador.
Nota: Dependiendo de la temperatura ambiente, los cubitos de hielo duran unas 18
horas en el aparato.
14. Deje que la unidad se caliente a temperatura ambiente.
15. Se recomienda que el agua del tanque se reemplace semanalmente. Vacíe el
depósito de agua completamente si no utiliza el aparato durante un largo período
de tiempo.
48
ES
LIMPIEZA Y MANTENIMIENTO
Para asegurarse de que el hielo conserva su sabor fresco y el aparato se mantiene en
buenas condiciones, debe limpiar el aparato al menos una vez a la semana.
1. Detenga el proceso de fabricación de hielo presionando el botón Inicio/Detención
. Desenchufe el aparato de la toma de corriente y deje que se caliente a
temperatura ambiente.
2. Si todavía hay agua en el compartimiento de hielo, incline cuidadosamente el
compartimiento de hielo hacia atrás para que toda el agua pueda drenar hacia el
tanque de agua.
3. Empuje el aparato hacia adelante hasta que sobresalga 60 mm por encima del
borde de la encimera para acceder al tapón de drenaje. Ahora abra el tapón de
drenaje para drenar el exceso de agua en un tazón, cubo o caño (ver guras 1, 2
y 3).
4. Vuelva a colocar el tapón de drenaje y asegúrese de que esté bien asentado y
que el tanque de agua esté bien ajustado. Ahora llene el tanque de agua con
agua limpia. Presione el botón de selección de tamaño hasta que la pantalla
muestre ”Limpieza” y se ilumina. Si ahora presiona el botón de Start/Stop
, la bomba comienza a bombear agua durante 6 minutos. Después de 6 minutos,
el aparato pasa automáticamente al modo de espera. Ahora abra el tapón de
drenaje y deje que todo el agua se escurra en un tazón, cubo o caño.
5. Retire la cesta de hielo.
6. Limpie el interior del aparato con un paño suave humedecido con agua tibia y
vinagre. Luego enjuague el interior del dispositivo con agua limpia y dejar que el
agua se escurra completamente.
7. Vuelva a colocar el tapón de drenaje. Lave la cesta de hielo y la cuchara de hielo
con agua jabonosa tibia, enjuague con agua limpia y séquelas.
8. Limpie el exterior de la unidad con un paño suave. Usar si se requiere una solución
jabonosa suave.
Nota: No utilice disolventes orgánicos, agua hirviendo, soluciones ácidas o
alcalinas fuertes, etc. para la limpieza.
9. Vacíe el depósito de agua y séquelo si no utiliza el aparato durante un largo
período de tiempo.
49
ES
Imagen 1
Imagen 2 Imagen 3
Supercie
de trabajo
Tapón de
drenaje
Tapón de
drenaje
50
ES
SOLUCIÓN DE PROBLEMAS
Problema Posible causa Solución
La pantalla de
“Tanque de agua
vacío” se
ilumina.
Nivel de agua bajo o
tanque vacío.
Deje de hacer cubitos de hielo,
llene el tanque de agua y
pulse el botón de encendido/
apagado.
El colador de agua en el
fondo del tanque de agua
está bloqueado.
Limpiar la unidad.
La bomba no funciona. Contacte con el servicio de
atención al cliente.
El indicador “Cesta
de hielo llena”
se ilumina
La cesta de hielo está
llena y la luz infrarroja
está bloqueada por el
hielo.
Quita el hielo de la cesta de
hielo.
El diodo emisor de luz
infrarroja y el diodo
receptor de luz infrarroja
no funcionan.
Retire los objetos extraños de los
diodos infrarrojos y reinicie la
máquina de hielo.
Contacte con el servicio de
atención al cliente si los LED no
funcionan después de la limpieza
y después de apagar y volver a
encender la unidad.
El indicador “Cesta
de hielo llena”
se ilumina.
La pala de hielo está
bloqueada.
Quite el hielo que está
bloqueando la pala.
Contacte con el servicio de
atención al cliente si no hay hielo
que bloquee la cuchara de hielo
y la luz parpadea.
La unidad deja de
funcionar.
El compartimento de hielo
no está en la posición
correcta.
Retire el hielo del compartimento
y pulse el botón de encendido/
apagado para reiniciar la
unidad.
Contacte con el servicio
de atención al cliente si el
dispositivo sigue sin funcionar
después del reinicio.

51
ES
Problema Posible causa Solución
La cesta de hielo
está llena, pero la
pantalla “Cesta de
hielo llena” no
se ilumina.
El módulo de luz infrarroja
no puede detectar que la
cesta de hielo está llena
porque es perturbada por
la luz solar.
Apague el aparato y
desenchúfelo.Ponga el
dispositivo en un lugar,donde no
le de luz solar directa. Entonces
encienda el dispositivo de nuevo.
Los cubos de
hielo se están
agrupando.
La producción de hielo es
demasiado lenta.
Detener la producción y
comenzar de nuevo una vez que
el hielo se haya derretido.
El agua del tanque está
demasiado fría.
Llene el tanque de agua con
agua entre 8°C y 25°C.
Los cubos de
hielo parecen
estar hechos
normalmente, pero
no se hacen cubos
de hielo.
La temperatura ambiente
o del agua es demasiado
alta.
Empieza a hacer cubitos de hielo
con una temperatura ambiente
inferior a 32°C y llena el tanque
de agua con un poco de agua
fría.
El circuito de refrigerante
tiene una fuga.
Contacte con el servicio de
atención al cliente.
El circuito de refrigerante
está bloqueado.
Contacte con el servicio de
atención al cliente.
La calidad de los
cubos de hielo es
pobre.
Mala disipación del calor. Mantenga una distancia mínima
de 20 cm de todos los lados de
la unidad para asegurar una
ventilación adecuada.
La temperatura del agua
es demasiado alta.
Llene el tanque de agua con
agua entre 8°C y 28°C.
La temperatura ambiente
es demasiado alta.
Utilice el dispositivo a una
temperatura ambiente entre
10°C y 32°C.
52
ES
INDICACIONES SOBRE LA RETIRADA DEL
APARATO
Si en su país existe una disposición legal relativa a la
eliminación de aparatos eléctricos y electrónicos, este
símbolo estampado en el producto o en el embalaje
advierte que no debe eliminarse como residuo doméstico.
En lugar de ello, debe depositarse en un punto de recogida
de reciclaje de aparatos eléctricos y electrónicos. Una
gestión adecuada de estos residuos previene consecuencias
potencialmente negativas para el medio ambiente y la salud
de las personas. Puede consultar más información sobre el
reciclaje y la eliminación de este producto contactando con
su administración local o con su servicio de recogida de
residuos.
FABRICANTE E IMPORTADOR (REINO UNIDO)
Fabricante:
Chal-Tec GmbH, Wallstraße 16, 10179 Berlín, Alemania.
Importador para Gran Bretaña:
Berlin Brands Group UK Limited
PO Box 42
272 Kensington High Street
London, W8 6ND
United Kingdom

53
IT
Gentile Cliente,
La ringraziamo per aver acquistato il dispositivo. La preghiamo
di leggere attentamente le seguenti istruzioni per l’uso e di
seguirle per evitare possibili danni tecnici. Non ci assumiamo
alcuna responsabilità per danni scaturiti da una mancata
osservazione delle avvertenze di sicurezza e da un uso
improprio del dispositivo. Scansionare il codice QR seguente,
per accedere al manuale d’uso più attuale e per ricevere
informazioni sul prodotto.
INDICE
DATI TECNICI
Numero articolo 10035294, 10035295
Alimentazione 220-240 V~ 50 Hz
Potenza (Watt) 145 W
Classe climatica ST/SN/N/T
Classe di protezione I
Refrigerante R600a/25 g
Pressione nominale (sovrapressione)
Max: 20 bar (290 Psig),
Min: 9,5 bar (138 Psig)
Schiumogeno C
5
H
10
Avvertenze di sicurezza54
Descrizione del dispositivo56
Descrizione del prodotto57
Installazione58
Messa in funzione e utilizzo58
Pulizia e manutenzione60
Ricerca e correzione degli errori62
Avviso di smaltimento64
Produttore e importatore (UK)64

54
IT
AVVERTENZE DI SICUREZZA
• Collegare il dispositivo solo a prese elettriche con messa a terra e tensione
corrispondente a quella del prodotto.
• Utilizzare le apposite impugnature per spostare il dispositivo.
• Posizionare il dispositivo su un fondo piano.
• Utilizzare il dispositivo solo in ambienti chiusi.
• Non utilizzare il dispositivo vicino a vasche o piscine.
• Staccare la spina se non si utilizza il dispositivo.
• Non immergere mai cavo di alimentazione e spina in acqua o altri liquidi.
• Utilizzare solo accessori espressamente consigliati dal produttore per questo
dispositivo.
• Non posizionare il dispositivo direttamente sotto a una presa elettrica.
• Non lasciare che il cavo penzoli dalla supercie di lavoro, in modo che i bambini
non possano tirarlo.
• Non riempire eccessivamente il dispositivo, altrimenti possono risultare cortocircuiti
e scosse elettriche.
• Assicurarsi che il coperchio sia sempre chiuso mentre il dispositivo è in funzione.
• Non staccare la spina dalla presa elettrica tirando il cavo, ma impugnando sempre
la spina stessa.
• Utilizzare il dispositivo solo per gli scopi previsti. Non ci assumiamo alcuna
responsabilità per danni scaturiti dal mancato rispetto delle avvertenze o da usi
impropri. Utilizzare il dispositivo solo in contesti casalinghi.
• Non collegare il dispositivo a timer o prese elettriche con comando a distanza.
• Non immergere il dispositivo in acqua.
• Se cavo o spina sono danneggiati, devono essere sostituiti dal produttore, da
un’azienda autorizzata o da una persona con qualica equivalente.
• Durante lo smaltimento, rispettare le norme locali relative allo smaltimento di
dispositivo con gas inammabili.
• Non conservare nel dispositivo materiali facilmente inammabili o esplosivi.
• Riempire il dispositivo solo con acqua potabile.
• Bambini a partire da 8 anni e persone con limitate capacità siche e psichiche
possono utilizzare il dispositivo solo se sono stati istruiti in modo esaustivo da una
persona responsabile del loro controllo sulle funzioni e sulle procedure di sicurezza
e comprendono i rischi connessi.
Questo dispositivo contiene il refrigerante isobutano (R600a), un gas naturale
con elevata sostenibilità ecologica, ma inammabile. Sebbene sia inammabile,
non rovina lo strato di ozono e non incrementa l’effetto serra. L’utilizzo di questo
refrigerante comporta una maggiore rumorosità del dispositivo. Oltre al rumore del
compressore, è possibile sentire anche il usso del refrigerante. Questo è inevitabile
e non ha effetti negativi sulle prestazioni del dispositivo. Fare attenzione durante
il trasporto, in modo da non danneggiare il circuito del refrigerante. Perdite di
refrigerante possono causare irritazioni agli occhi.
55
IT
AVVERTENZA
Pericolo dovuto a fuoco/materiali inammabili. Rispettare le normative
locali relative allo smaltimento di dispositivo con refrigeranti e gas
inammabili.Mantenga las aberturas de ventilación de la carcasa del
dispositivo libres de obstáculos.
• Tenere le aperture di ventilazione nell’alloggiamento libere da ostacoli.
• Non danneggiare il circuito del refrigerante.
• Non utilizzare dispositivi meccanici o altri mezzi per velocizzare il processo di
sbrinamento o di produzione del ghiaccio.
• Non utilizzare altri elettrodomestici all’interno del dispositivo.
Avvertenze particolari
• Quando si posiziona il dispositivo, assicurarsi che il cavo non venga schiacciato o
danneggiato.
• Assicurarsi che non ci siano prese elettriche multiple o alimentatori sul retro del
dispositivo.
Per evitare una contaminazione degli alimenti, rispettare le seguenti indicazioni:
• Pulire regolarmente le superci che entrano in contatto con alimenti. Pulire
regolarmente lo scarico dell’acqua.
• Se il dispositivo contiene un serbatoio, pulirlo se il dispositivo non è stato utilizzato
per 48 ore. Sciacquarlo se non è stata tolta acqua per 5 giorni.
AVVERTENZA
Durante utilizzo, manutenzione e smaltimento del dispositivo, fare
attenzione al simbolo a sinistra, presente sul retro del dispositivo o sul
compressore. Questo simbolo avverte di possibili incendi. Nei condotti
del refrigerante e nel compressore ci sono materiali inammabili.
Durante utilizzo, manutenzione e smaltimento, tenere il dispositivo
lontano da fonti di ignizione.

56
IT
DESCRIZIONE DEL DISPOSITIVO
1
6
2
3
4
5
7
8
9
10
11
12
13
14
15
16
17
18
1
Copertura superiore
7
Serbatoio
13
Indicazione livello dell’acqua
MAX
2
Pannello di controllo
8
Cestello del ghiaccio
14
Diodo luce infrarossi
trasmettitore
3
Finestra
9
Vaporizzatore
15
Filtro
4
Copertura anteriore
10
Vano del ghiaccio
16
Tappo di scarico
5
Parte anteriore
11
Pala di spinta del ghiaccio
17
Cestello del ghiaccio
6
Parte posteriore
12
Diodo luce infrarossi ricevitore
18
Paletta del ghiaccio
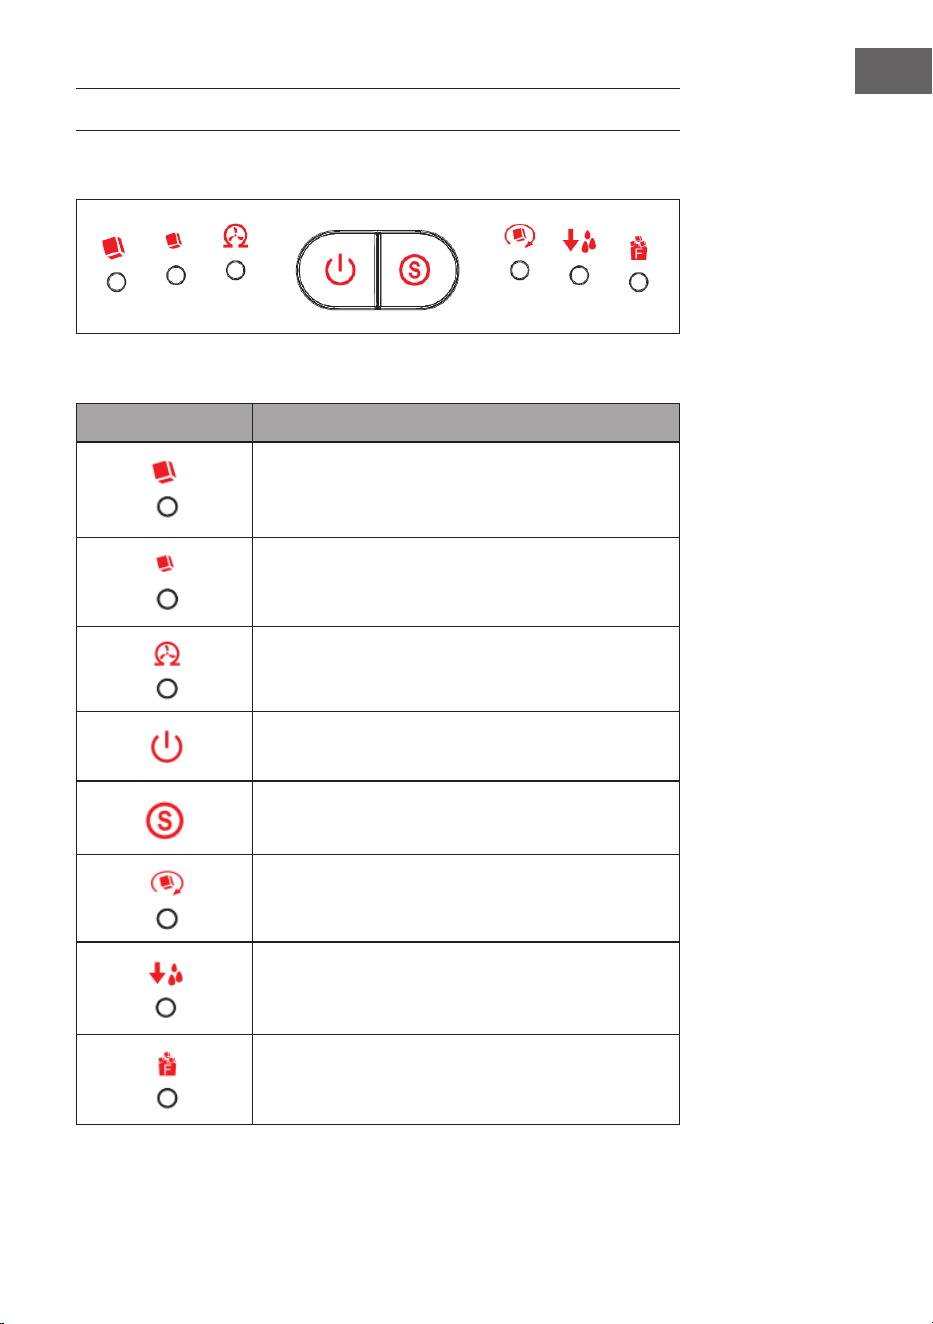
57
IT
DESCRIZIONE DEL PRODOTTO
Pannello di controllo
Spie di indicazione e tasti funzione
Indicazioni e tasti Funzioni
Cubetti di ghiaccio grandi (indicazione): Se si
selezionano i cubetti grandi, questa spia si illumina di
verde.
Cubetti di ghiaccio piccoli (indicazione): Se si
selezionano i cubetti piccoli, questa spia si illumina di
verde.
Pulizia (indicazione): Quando è necessario pulire il
dispositivo, questa spia si illumina di verde.
Start/Stop (tasto): Avviare o arrestare il dispositivo.
Selezionare la dimensione (tasto): Selezionare la
dimensione dei cubetti desiderata (grandi o piccoli).
Produzione di cubetti di ghiaccio (indicazione):
Questa spia si illumina di verde durante la produzione
di ghiaccio.
Serbatoio vuoto (indicazione): Quando il serbatoio è
vuoto, questa spia si illumina di rosso.
Cestello del ghiaccio pieno (indicazione): Quando
il cestello del ghiaccio è pieno, questa spia si illumina
di rosso.
58
IT
INSTALLAZIONE
1. Togliere il dispositivo dall’imballaggio e assicurarsi che nel volume di consegna
siano inclusi tutti gli accessori (incl. cestello e paletta del ghiaccio). Se dovessero
mancare accessori, rivolgersi al servizio di assistenza ai clienti.
2. Assicurarsi che il dispositivo sia in piano e che si trovi su un tavolo o una supercie
di lavoro stabili, in modo da evitare malfunzionamenti.
3. L’inclinazione dell’alloggiamento del dispositivo non deve superare i 45° durante il
trasporto e, in particolare, durante l’utilizzo. Non rovesciare il dispositivo, altrimenti
si potrebbero danneggiare compressore o sistema di raffreddamento. Prima del
primo utilizzo, attendere di aver posizionato correttamente il dispositivo in un luogo
adatto e aspettare almeno 2 ore prima di metterlo in funzione.
4. Posizionare il dispositivo in un luogo ben ventilato, su una supercie asciutta e
piana. Non posizionare il dispositivo vicino a fonti di calore, come forni, stufe o a
gas corrosivi. Tenere una distanza minima di 20 cm su tutti i lati del dispositivo, in
modo da garantire una ventilazione sufciente.
5. Non riempire il serbatoio con acqua bollente, altrimenti si potrebbe danneggiare il
dispositivo. Riempire il serbatoio con acqua a temperatura ambiente o più fredda.
6. Non utilizzare il dispositivo in ambienti freddi (con temperature sotto i 5 °C).
7. Pulire il dispositivo prima dell’utilizzo (v. “Pulizia e manutenzione”).
MESSA IN FUNZIONE E UTILIZZO
1. Assicurarsi che il tappo di scarico sul lato inferiore del serbatoio sia posizionato
correttamente e chiuso saldamente.
2. Inserire la spina nella presa elettrica. La spia “Produzione di cubetti di ghiaccio”
si illumina.
Nota: se il dispositivo è stato spostato, lasciare che la macchina del ghiaccio si
“riposi” per almeno 30 minuti prima di inserire la spina nella presa.
3. Aprire la copertura superiore e togliere il cestello del ghiaccio.
4. Riempire il serbatoio solo con acqua potabile.
Nota: riempire il serbatoio solo no al segno MAX.
5. Riposizionare il cestello del ghiaccio e chiudere la copertura superiore.
6. Premere il tasto di selezione della dimensione per scegliere la grandezza dei
cubetti. Se si scelgono i cubetti piccoli, si illumina l’indicazione “cubetti piccoli” .
Se si scelgono i cubetti grandi, si illumina l’indicazione “cubetti grandi” .
7. Se si preme Start/Stop SYMBOL, l’indicazione “Produzione di cubetti di ghiaccio”
SYMBOL resta continuamente accesa.
8. Un ciclo di produzione del ghiaccio dura tra 7 e 15 minuti, in base alla temperatura
ambiente e a quella dell’acqua.
59
IT
9. 9. La produzione inizia con il pompaggio dell’acqua nel vano del ghiaccio,
che si trova sotto al vaporizzatore. Nel giro di 7-15 minuti si forma ghiaccio sul
vaporizzatore. Non appena la formazione di cubetti è terminata, il vano del
ghiaccio si inclina all’indietro e l’acqua che rimane nel vano del ghiaccio scorre
nuovamente nel serbatoio. I cubetti vengono poi fatti cadere dal vaporizzatore e
vengono spinti dalla pala del ghiaccio nell’apposito cestello di raccolta. Il vano del
ghiaccio torna automaticamente nella posizione di partenza sotto al vaporizzatore
e inizia il ciclo successivo.
10. Non appena il cestello del ghiaccio è pieno, si illumina l’indicazione “Cestello
del ghiaccio pieno” . Il ciclo di produzione viene interrotto automaticamente.
Togliere i cubetti con l’apposita paletta. Dopo circa 5 secondi viene ripreso
automaticamente il ciclo di produzione.
11 . L’indicazione “Serbatoio vuoto” si illumina quando il serbatoio è vuoto. Il ciclo
di produzione viene interrotto automaticamente. Togliere il cestello del ghiaccio e
riempire il serbatoio. Riposizionare il cestello del ghiaccio e premere Start/Stop
per avviare la produzione.
12. Non appena è stata prodotta la quantità di cubetti desiderata, premere Start/Stop
e staccare la spina.
13. Aprire la copertura superiore, togliere i cubetti con la paletta e metterli in freezer.
Nota: in base alla temperatura ambiente, i cubetti resistono no a 18 ore nel
dispositivo.
14. Lasciare che il dispositivo si scaldi no a raggiungere la temperatura ambiente.
15. Si consiglia di cambiare l’acqua nel dispositivo almeno una volta a settimana.
Svuotare completamente il serbatoio se non si usa il dispositivo per tempi
prolungati.
60
IT
PULIZIA E MANUTENZIONE
Per garantire che il ghiaccio abbia sempre un sapore fresco e che il dispositivo rimanga
in buono stato, è necessario pulire la macchina almeno una volta a settimana.
1. Arrestare la produzione di ghiaccio premendo Start/Stop . Staccare la spina e
lasciare che il dispositivo torni a temperatura ambiente.
2. Se c’è ancora acqua nel vano del ghiaccio, inclinarlo con cura all’indietro e
scaricarla nel serbatoio.
3. Spingere il dispositivo in avanti, no a farlo sporgere di 60 mm dal bordo del
piano di lavoro, in modo da avere accesso al tappo di scarico. Aprire il tappo e far
scorrere l’acqua in una ciotola, un secchio o in uno scarico (v. immagini 1, 2 e 3).
4. 4. Inserire nuovamente il tappo di scarico e assicurarsi che sia posizionato
saldamente e che il serbatoio sia chiuso perfettamente. Riempire il serbatoio con
acqua pulita. Premere il tasto di selezione delle dimensioni no a quando
si illumina l’indicazione “Pulizia” . Se ora si preme Start/Stop , la
pompa inizia a pompare acqua per 6 minuti. Dopo 6 minuti, il dispositivo passa
automaticamente in modalità standby. Aprire il tappo di scarico e far uscire tutta
l’acqua in una ciotola, un secchio o uno scarico.
5. Togliere il cestello del ghiaccio.
6. Pulire l’interno del dispositivo con un panno morbido imbevuto con acqua calda e
aceto. Sciacquare poi l’interno con acqua pulita e scaricarla completamente.
7. Riposizionare il tappo di scarico. Lavare il cestello del ghiaccio e la paletta con
acqua calda e sapone, sciacquarli e asciugarli.
8. Pulire l’esterno del dispositivo con un panno morbido. Se necessario, utilizzare una
soluzione saponosa delicata.
Nota: per pulire il dispositivo, non utilizzare solventi organici, acqua bollente,
soluzioni fortemente acide o alcaline, ecc.
9. Svuotare il serbatoio e asciugarlo se non si usa il dispositivo per tempi prolungati.
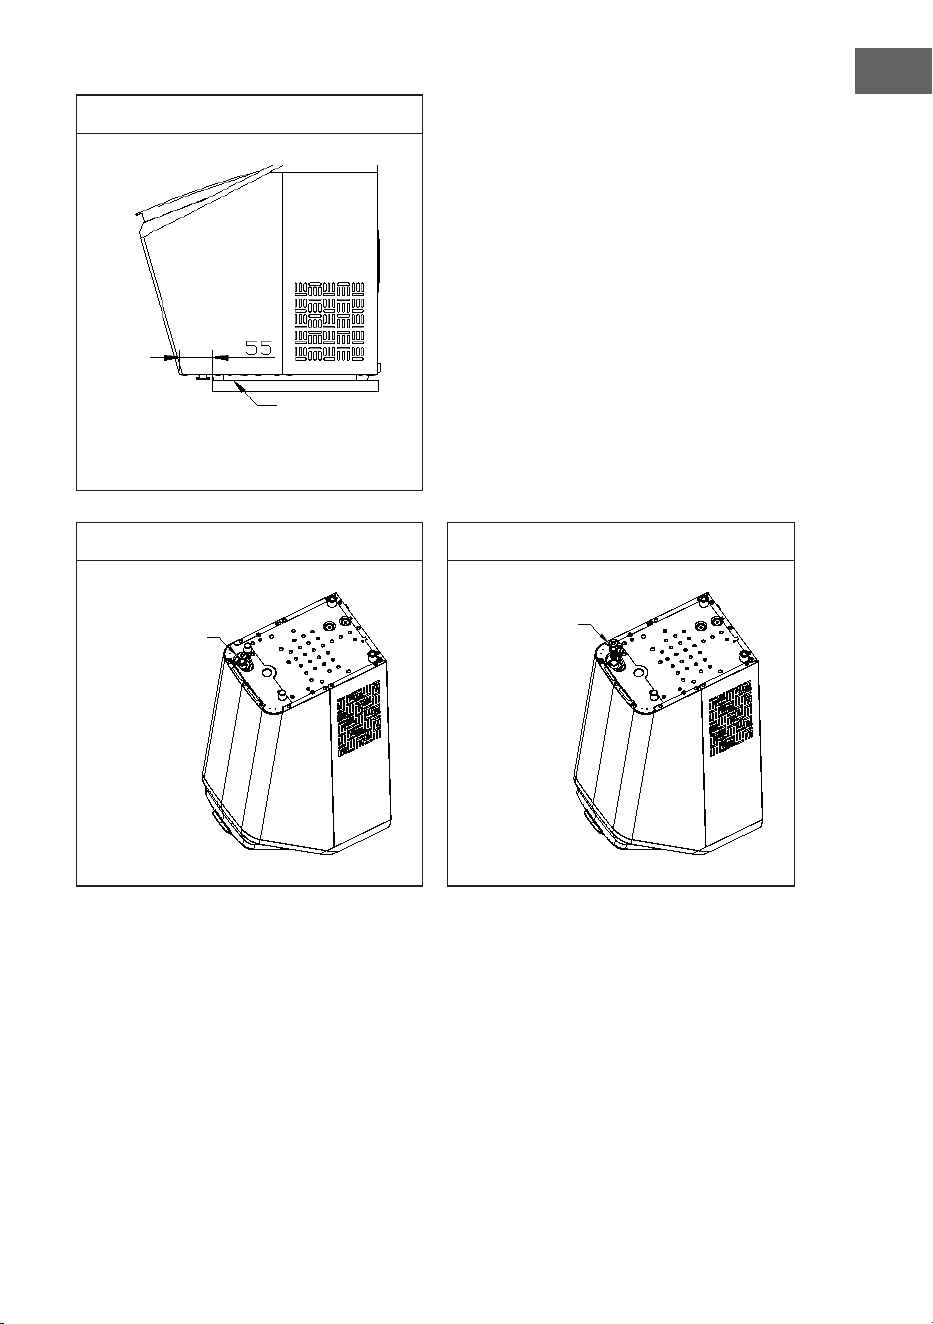
61
IT
Figura 1
Immagine 2 Immagine 3
Supercie
di lavoro
Tappo di
scarico
Tappo di
scarico
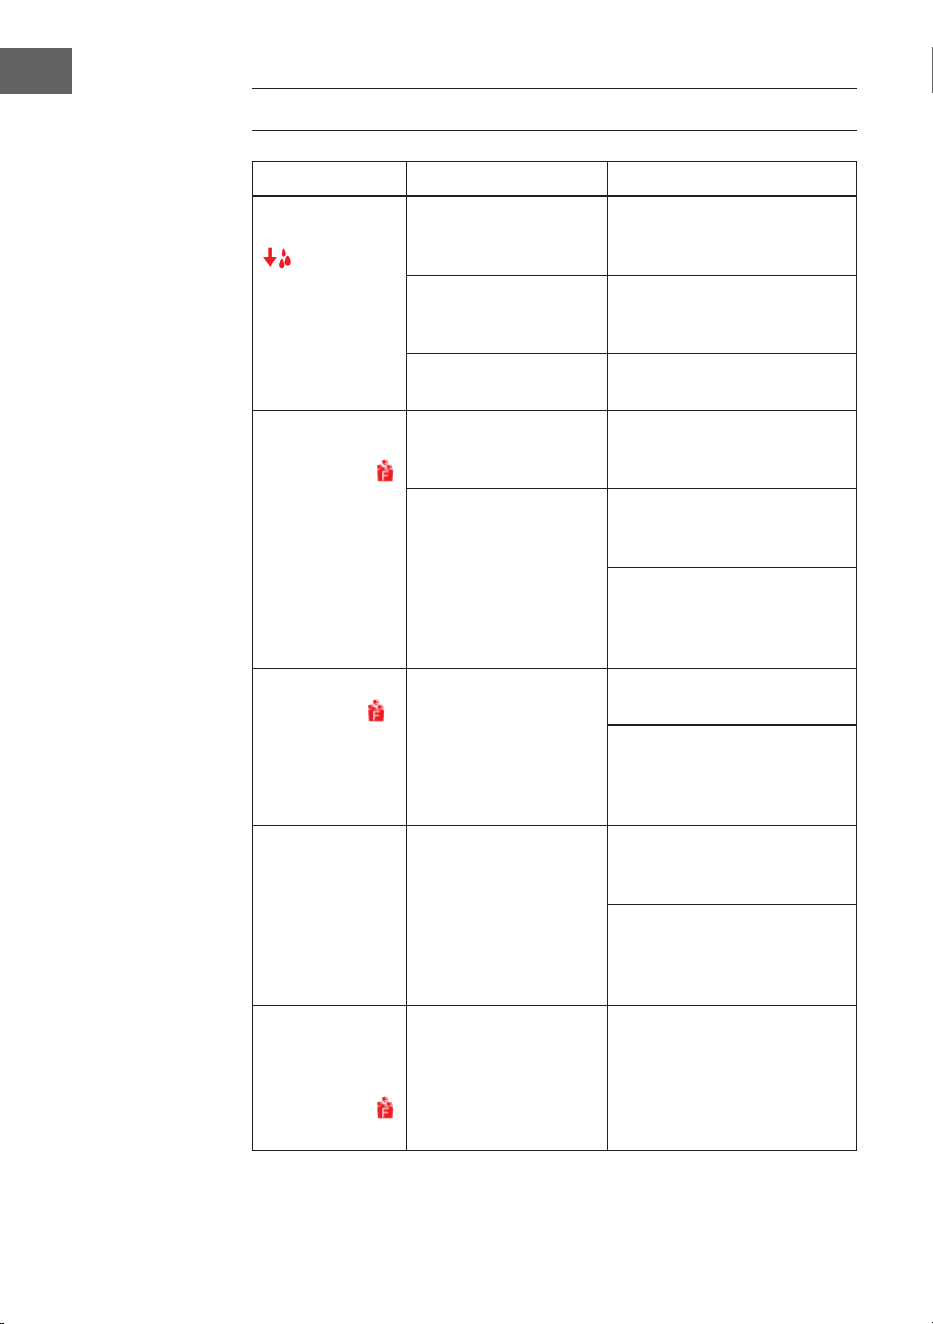
62
IT
RICERCA E CORREZIONE DEGLI ERRORI
Problema Possibile causa Soluzione
L’indicazione
“Serbatoio vuoto”
si illumina.
Poca acqua nel serbatoio
o serbatoio vuoto.
Fermare il ciclo di produzione,
riempire il serbatoio e premere
Start/Stop.
Il ltro dell’acqua sul lato
inferiore del serbatoio è
bloccato
Pulire il dispositivo.
Malfunzionamento della
pompa.
Contattare il servizio di
assistenza ai clienti.
L’indicazione
“Cestello del
ghiaccio pieno”
si illumina.
Il cestello è pieno e la luce
a infrarossi viene bloccata
dal ghiaccio.
Togliere il ghiaccio dal cestello.
Il diodo della luce a
infrarossi del trasmettitore
e del ricevitore non
funzionano.
Rimuovere corpi estranei dai
diodi a infrarossi e riavviare la
macchina del ghiaccio.
Contattare il servizio di
assistenza ai clienti se i diodi non
funzionano dopo la pulizia e la
riaccensione del dispositivo.
El indicador “Cesta
de hielo llena”
se ilumina.
La pala di spinta del
ghiaccio è bloccata.
Togliere il ghiaccio che blocca
la pala.
Contattare il servizio di
assistenza ai clienti se non c’è
ghiaccio che blocca la pala e
l’indicazione lampeggia.
Il dispositivo arresta
il funzionamento.
Il vano del ghiaccio non
si trova nella posizione
corretta.
Togliere il ghiaccio dal vano e
premere Start/Stop per riavviare
il dispositivo.
Contattare il servizio di
assistenza ai clienti se il
dispositivo non funziona anche
dopo il riavvio.
Il cestello del
ghiaccio è pieno,
ma l’indicazione
“Cestello del
ghiaccio pieno”
non si illumina.
Il modulo della luce a
infrarossi non rileva che
il cestello è pieno perché
è disturbata dalla luce
del sole.
Spegnere il dispositivo e staccare
la spina. Posizionare il dispositivo
in un altro luogo in cui non è
esposto a luce solare diretta.
Riaccendere il dispositivo.

63
IT
Problema Possibile causa Soluzione
I cubetti si
attaccano uno
all’altro.
La produzione di cubetti
dura troppo a lungo.
Arrestare la produzione e
riavviarla dopo che il ghiaccio si
è sciolto.
L’acqua nel serbatoio è
troppo fredda.
Riempire il serbatoio con acqua
tra 8 e 22 °C.
La produzione del
ghiaccio sembra
normale, ma non
vengono prodotti
cubetti.
La temperatura ambiente
o quella dell’acqua è
troppo elevata.
Iniziare la produzione di cubetti
a una temperatura ambiente
sotto i 32 °C e riempire il
serbatoio con un po’ di acqua
fredda.
Il circuito del refrigerante
perde.
Contattare il servizio di
assistenza ai clienti.
Il circuito del refrigerante è
bloccato.
Contattare il servizio di
assistenza ai clienti.
Cattiva qualità dei
cubetti di ghiaccio.
Cattiva dispersione del
calore.
Tenere una distanza minima di
20 cm su tutti i lati per garantire
una buona ventilazione.
Temperatura dell’acqua
troppo alta.
Riempire il serbatoio con acqua
tra 8 e 22 °C.
Temperatura ambiente
troppo alta.
Utilizzare il dispositivo a
temperature ambiente tra 10 e
32 °C.

64
IT
AVVISO DI SMALTIMENTO
Se nel proprio paese si applicano le regolamentazioni
inerenti lo smaltimento di dispositivi elettrici ed elettronici,
questo simbolo sul prodotto o sulla confezione segnala che
questi prodotti non possono essere smaltiti con i riuti normali
e devono essere portati a un punto di raccolta di dispositivi
elettrici ed elettronici. Grazie al corretto smaltimento dei
vecchi dispositivi si tutela il pianeta e la salute delle persone
da possibili conseguenze negative. Informazioni riguardanti il
riciclo e lo smaltimento di questi prodotti si ottengono presso
l’amministrazione locale oppure il servizio di gestione dei
riuti domestici.
PRODUTTORE E IMPORTATORE (UK)
Produttore:
Chal-Tec GmbH, Wallstraße 16, 10179 Berlino, Germania.
Importatore per la Gran Bretagna:
Berlin Brands Group UK Limited
PO Box 42
272 Kensington High Street
London, W8 6ND
United Kingdom