Page 1 of 43
Infinite Series
OWNERS MANUAL
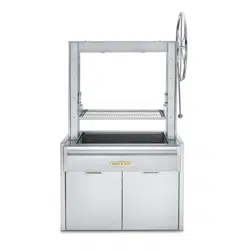
Argentinian Grill
2024

Page 2 of 43
MH64834
WARNING: FOR YOUR SAFETY
DO NOT store or use gasoline or other flammable vapors and liquids in the vicinity of this or any
other appliance.
DO NOT store an LP cylinder that is not connected for use in the vicinity of this or any other
appliance.
DO NOT obstruct the flow of combustion and ventilation air to the unit.
DO NOT
place combustibles on the undershelf. Do not stand on the undershelf as it could result in
injury or irreparable damage.
DO NOT leave your unit unattended while in operation.
DO NOT use under the influence of alcohol or drugs.
DO NOT use this unit until you have read and understood all of the information in this manual.
WARNING: Damage caused by a failure to follow the warnings and safety
instructions provided in this manual is not covered under warranty.
Page 3 of 43
Congratulations and thank you for choosing Crown
Verity.
The Infinite Series Product line was developed for
high performance and flexibility of design making it
distinctly different than any other grill line.
This manual contains important information
necessary for the proper and safe use of the
product. Please read this manual carefully and
follow all warnings and instructions to ensure safe
operation and to maximize your cooking
enjoyment.
Crown Verity is here to help. Should you ever have
any questions about cooking with or caring for your
Crown Verity product, please contact our customer
service desk at:
1-888-505-7240 or service@crownverity.com
Please have your model number and serial number
ready when you call or include it in your email.
Model Number
Serial Number
Note: The serial number and model number can be found on the rating plate (See Appendix A
for rating plate references).
THIS MANUAL MUST REMAIN WITH THE PRODUCT
OWNER FOR FUTURE REFERENCE.
PROUDLY MADE IN
NORTH AMERICA

Page 4 of 43
For your Safety
WARNING: This appliance shall be used only in a well-ventilated space and shall not be used in
a building, garage, or any other enclosed area. Ensure that the clearances to combustibles are
adhered to as listed in this manual.
WARNING: Improper installation, adjustment, alteration, service or maintenance can cause
property damage, injury or death. Please read the operating and maintenance instructions
provided in this manual thoroughly before installing or servicing this equipment. It is your
responsibility to see that your units are properly assembled, installed, and cared for.
WARNING: Keep any electrical supply cords and fuel supply hose(s) away from any hot
surfaces.
WARNING: This is an outdoor cooking appliance and is not intended to be installed in or on a
boat or recreational vehicle.
California Proposition 65 Warning
The burning of gas cooking fuel generates some by-products that are on the list of substances
which are known by the State of California to cause cancer or reproductive harm. California law
requires businesses to warn customers of potential exposure to such substances. To minimize
exposure to these substances, always operate the unit according to this Owner’s Manual, and
ensure you provide proper ventilation when cooking with gas.
IMPORTANT: Damage caused by a failure to follow the warnings and safety
instructions provided in this manual is not covered under warranty.

Page 5 of 43
Inspecting Your Shipped Appliances
IF SHIPMENT ARRIVES DAMAGED
This product was carefully inspected and tested before leaving the factory. Upon acceptance of
the shipment, all freight damage responsibility is relinquished by the freight carrier.
VISIBLE LOSS OR DAMAGE
• Be sure any visible damage to the carton is noted on the freight bill or express receipt and
signed by the person making the delivery.
• FILE CLAIM OR DAMAGES IMMEDIATELY, regardless of extent of damage.
CONCEALED LOSS OR DAMAGE
• If damage is unnoticed until the appliance is unpacked, notify the transportation company
or carrier immediately and file a “concealed damage” claim with them. This should be done
within 5 days of the date delivery is made to you. Be sure to hold on to the packaging for
inspection. We cannot assume responsibility for damage or loss incurred in transit.
Unpacking and Assembly
The appliance arrives fully assembled and ready to use. Please follow the uncrating and
unpacking steps to avoid damage to the product.
The shipping weight on smaller units is approximately 300 lbs. and larger units may weigh over
500 lbs.
WARNING:
Use two or more people to move or install this unit. Failure to follow
instructions can result in personal injuries.
REMOVING THE CARTON
• Remove the staples at the bottom of the carton.
• Lift off the carton
• Cut straps holding the appliance to the pallet. The straps are installed under load, wear
protective eyewear when cutting the straps as they may spring back.
• With assistance, remove the appliance from the pallet and place into desired location.
For appliances with wheels, the appliance will not directly roll off of the pallet. An option to
safely remove the appliance off the pallet is by lifting one end of the appliance high enough to
place a ramp under the wheels and then lift the other end while rolling the appliance off the
pallet.

Page 6 of 43
When moving a Crown Verity appliance across uneven surfaces be cautious and move slowly. It
is highly recommended that a carpet dolly is used to ensure no damage is caused to the
structure of the cart. Failure to do so will not be covered under the warranty.
INTERIOR PACKING
Crown Verity takes all necessary measures in securing and protecting the appliance to ensure it
arrives in the same condition that it left our factory.
BE SURE YOU HAVE REMOVED ALL TIE DOWNS BEFORE USING THE APPLIANCE.
BE SURE YOU HAVE REMOVED ALL OF THE PROTECTIVE PAPER ON THE STAINLESS STEEL
SURFACES BEFORE USING THE APPLIANCE.
• Remove any loose items located under the cabinet or in the firebox, such packaging
material, manuals or any other accessory you may have purchased with your grill.
• Carefully cut the tie downs securing the cooking grates in place.
• Remove any stainless-steel protective paper on the exterior of the appliance. It is important
to clean any area that you have removed the protective paper, to ensure no glue residue is
left over. Using the grill burner prior to removing the protective paper will permanently
adhere the paper to the appliance and will not be covered under warranty.

Page 7 of 43
Table of Contents
For your Safety _______________________________________________________________ 4
California Proposition 65 Warning _______________________________________________ 4
Inspecting Your Shipped Appliances ______________________________________________ 5
Unpacking and Assembly _______________________________________________________ 5
Table of Contents _____________________________________________________________ 7
Safe Operation _______________________________________________________________ 9
Before You Cook- Positioning Your Argentinian Grill ________________________________ 10
CHOOSING A LOCATION ____________________________________________________________ 10
LEVEL GROUND ___________________________________________________________________ 11
Specifications and Installations _________________________________________________ 11
INSTALLATIONS ___________________________________________________________________ 11
BUILT-IN INSTALLATIONS ___________________________________________________________ 12
CLEARANCE TO COMBUSTIBLES ______________________________________________________ 12
OVERHEAD PROTECTION AND EXHAUST REMOVAL ______________________________________ 12
FIGURE 1. CLEARANCES TO COMBUSTIBLES ____________________________________________ 13
FIGURE 2. EXHAUST HOOD REQUIREMENTS ____________________________________________ 13
FIGURE 3. REFERENCE DRAWING FOR CUT-OUT DIMENSIONS _____________________________ 15
Built-In Cut-out Dimensions ____________________________________________________ 16
General Operating Procedures _________________________________________________ 16
BEFORE FIRST USE _________________________________________________________________ 16
BEFORE EACH USE _________________________________________________________________ 16
WHILE YOU ARE COOKING __________________________________________________________ 17
GRILL DIMENSIONS – IAG36 MODULAR GRILL ___________________________________________ 18
GRILL DIMENSIONS – IBIAG36 BUILT-IN GRILL __________________________________________ 19
GRILL DIMENSIONS – IBIAG36-IJ BUILT-IN GRILL WITH INSULATED JACKET ___________________ 20
INSTALLING THE WHEEL ____________________________________________________________ 21
INSTALLING THE FIRE BRICKS ________________________________________________________ 24
RAISING AND LOWERING THE GRILL SURFACE __________________________________________ 26
Basic Grilling ________________________________________________________________ 27
RECOMMENDED EQUIPMENT _______________________________________________________ 27
PREPARING A WOOD FIRE __________________________________________________________ 27

Page 8 of 43
COOKING OVER A WOOD FIRE _______________________________________________________ 30
COOKING OVER CHARCOAL _________________________________________________________ 30
Caring for Your Grill __________________________________________________________ 30
Contacting Crown Verity Customer Care __________________________________________ 31
Installation Checklist _________________________________________________________ 32
RESIDENTIAL LIMITED WARRANTY TERMS & CONDITIONS
________________________________ 33
COMMERCIAL LIMITED WARRANTY TERMS & CONDITIONS
_______________________________ 35
Exploded Parts View _________________________________________________________ 38
Grill Parts List _______________________________________________________________ 39

Page 9 of 43
Safe Operation
This manual covers Crown Verity Argentinian Grill models listed below. Some features and
options will vary based upon which model you purchased. Read this manual thoroughly to
ensure proper operations of the specific appliance model(s) purchased.
CROWN VERITY MODELS COVERED BY THIS MANUAL
BUILT-IN
MODULAR
IBIAG36
IAG36
WARNING:
Certain surfaces of your grill can get hot enough to cause severe burns. Never leave
the appliance unattended when in use to prevent unintentional contact.
WARNING:
Children should never be left alone or unattended in an area where a grill is located.
Place your grill well away from areas where children play. Do not store items that may interest
children in or around the appliance, in the cart, or in the masonry enclosure.
IMPORTANT:
Improper use or installation of the appliance is dangerous. The grill produces
intense heat and therefore the risk of accidents or potential injuries is increased. Carefully
follow all instructions, including the following:
• To reduce the risk of fire, burns or other injury, read this manual thoroughly. Begin by
ensuring proper installation and servicing. Do not repair or replace any part of the grill
yourself unless it is specifically recommended in the manual.
• Always have an ABC Fire Extinguisher accessible — never attempt to extinguish a grease fire
with water or other liquids.
• Do not operate the grill under an unprotected combustible construction. Use only in a well-
ventilated area. The unit is for outdoor use only.
• Do not obstruct any of the openings on the grill or otherwise obstruct the flow of
combustion and ventilation air.
• Do not build the grill into any combustible structure that is closer than 12 inches (30.5 cm)
below the body of the grill. Maintain at least 36 inches (91.4 cm) above the grill body from
the sides and back of the grill from any combustible surface or structure.
• Keep all gas hoses away from the hot surfaces of the grill, including all external surfaces of
the unit.
• Keep all electrical cords away from the hot surfaces of the appliance.
•
Ensure proper installation and servicing by following all instructions in this manual and any
other instructions or markings provided with this product.
• Do not heat unopened food containers on the appliance. The buildup of pressure resulting
from the heat may cause the container to burst.

Page 10 of 43
• Never lean on any part of the grill.
• The cabinet below the grill is not for storage. It is for service access and cleaning. Do not
store combustible materials in the cabinet below the grill or items made with materials that
might melt or otherwise be damaged by heat.
• Never move the appliance when hot. When in use, portions of the grill are hot enough to
cause severe burns.
• Always use dry potholders or gloves on hot surfaces or cooking tools: moist or damp
potholders or gloves may cause steam burns. Never use a towel or bulky cloth in place of
potholders. Do not let potholders touch hot portions of the grill surfaces or allow them to
get near the open flame.
•
Never grill without the ash tray in place. Always ensure the ash tray is pushed all the way to
the back of the grill.
• The grill will retain heat after use, especially the cooking grates. Use caution when coming
in contact with the unit immediately after use.
• Be sure the unit is cool before using any aerosol cleaner on it or near it. The chemical used
for aerosol propellant could ignite in the presence of heat. Never use aerosol cleaner on the
cooking surfaces.
• Do not use any cleaner, including water, on a hot grill.
• Do not burn manufactured logs, driftwood, trash, leaves, paper, cardboard, plywood,
painted or stained or pressure treated wood. Avoid using softwoods such as pine or cedar
that can throw sparks.
• Do not use near or under overhanging trees or shrubs.
• Do not use in windy conditions.
• Do not leave the fire unattended.
•
Allow 24 hours after last use before attempting to empty the ash bin.
Before You Cook- Positioning Your Argentinian Grill
CHOOSING A LOCATION
Important considerations for all grill placements include exposure to wind, proximity to foot
traffic or areas where people congregate.
• DO NOT place the grill in a location that is likely to be exposed to a strong wind. A strong
enough wind might blow hot embers towards combustible materials or structures.
• DO NOT place the grill where it is likely to be bumped into or inadvertently touched by
passersby.
• DO NOT place the grill on a surface that is unable to safely support the weight of the unit as
it may topple or tip over.

Page 11 of 43
• DO NOT place the grill on any surface that would allow it to change position easily or
inadvertently.
• When in use, if applicable, always have the casters in the locked position.
• NEVER locate the grill in a building, breezeway, shed or other such enclosed areas.
• DO NOT place the built-in grill on a combustible surface.
• The grill is not intended to be installed in or on a boat or recreational vehicle.
• For ease of use and safe operation, it is recommended the surface on which the built-in grill
sits be at least 36 inches (91.4 cm) high (counter-height) and not more than 42 inches
(106.7 cm) high (bar-height).
LEVEL GROUND
It is critical that this appliance is level upon installation. A grill that is not level will cause uneven
heating. A carpenter’s spirit level should be used to level the grill both front to back and side to
side. If the floor is uneven or has a slope, re-leveling may be required each time you move a
freestanding unit.
Specifications and Installations
INSTALLATIONS
The installation of this appliance must be in accordance with:
All applicable local codes, or in the absence of local codes; Canada: must conform to current
National Standard CAN/CGA B149.1&.2 - natural gas/ propane installation code. U.S.A.: must
conform to national Fuel Gas Code, ANSI Z223.1/NFPA 54 edition.
• Maintain minimal clearances to combustible materials (See “Figure 1”).
36 inches (91.4 cm) from side(s)
36 Inches (91.4 cm) from back
60 inches (152.4 cm) from Non-combustible overhangs
IMPORTANT: • Do not build the grill into any combustible structure that is closer
than 12 inches (30.5 cm) below the body of the grill. Maintain at least 36 inches
(91.4 cm) above the grill body from the sides and back of the grill from any
combustible surface or structure.

Page 12 of 43
• Always keep the area surrounding your grill clear of all combustible materials, gasoline, or
other flammable liquids.
• Use your grill OUTDOORS ONLY and in a well-ventilated space, preferably 10 ft. (3 m) from
dwellings or outbuildings.
• Casters, if applicable, must be locked when the appliance is in operation.
BUILT-IN INSTALLATIONS
The Crown Verity Built-In Grills are designed for easy installation into masonry enclosures.
NOTE: Crown Verity Built-In Grills are intended either for installation in a built-in enclosure
constructed of non-combustible materials or for an installation in a built-in enclosure
constructed of combustible material when installed with an insulated jacket.
For non-combustible applications, the grill drops into the opening specified in the cutout detail
drawings (See “Figure 3”) and hangs from its countertop trim.
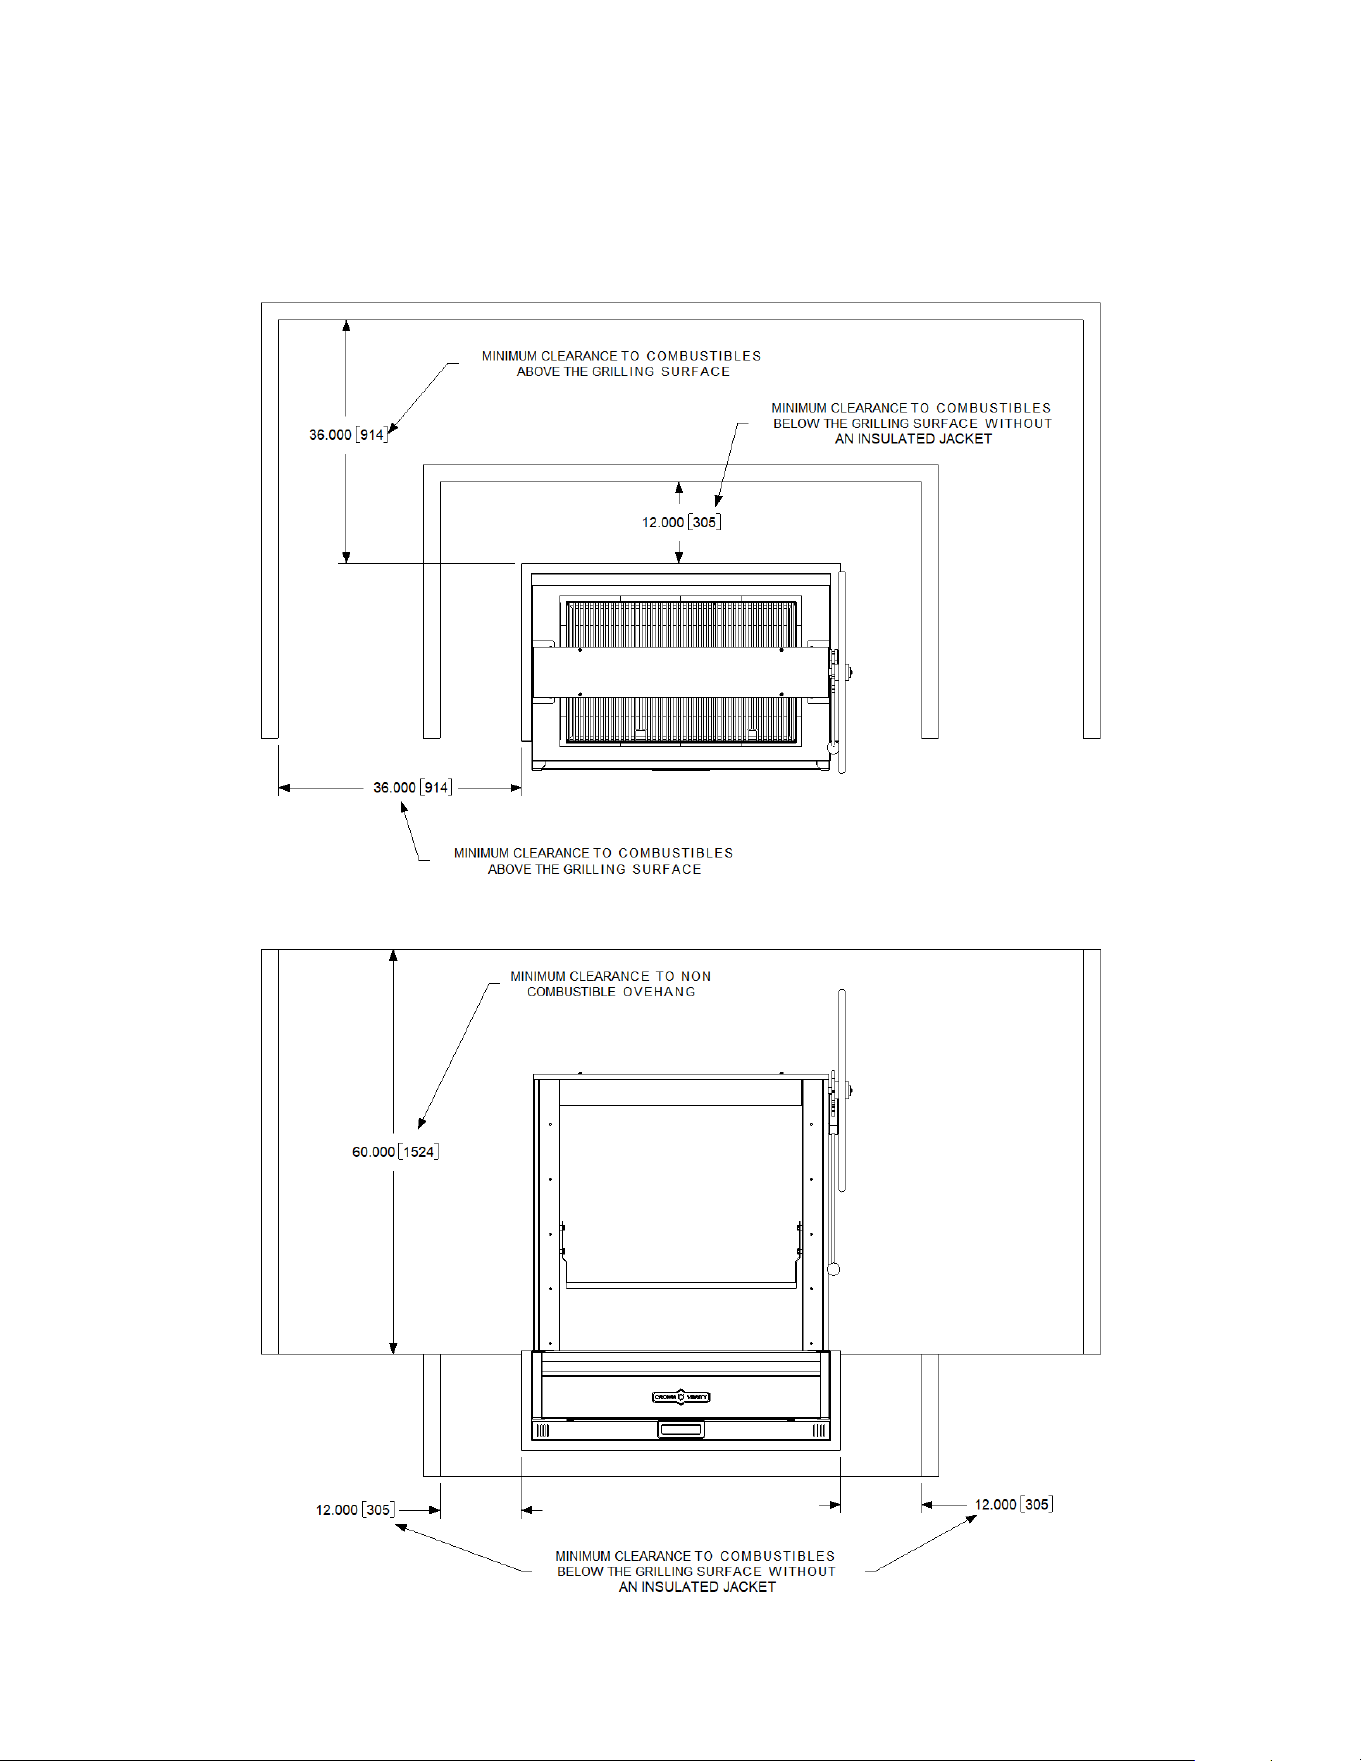
CLEARANCE TO COMBUSTIBLES
Minimum clearance from the sides and back of the grill firebox to adjacent construction below
the countertop surface is 12” (30.5 cm).
Minimum clearance from the sides and back of the grill to any adjacent construction above the
countertop surface is 36” (91.4 cm).
A minimum of 12 inches (30.5 cm) clearance is required on the left and right side of the grill
above the countertop for the rotisserie motor and spit rod.
If the grill is to be placed into a combustible enclosure, an approved insulated jacket is
necessary and is available only through your Crown Verity dealer. Crown Verity insulated
jackets have been designed and tested specifically for your grill.
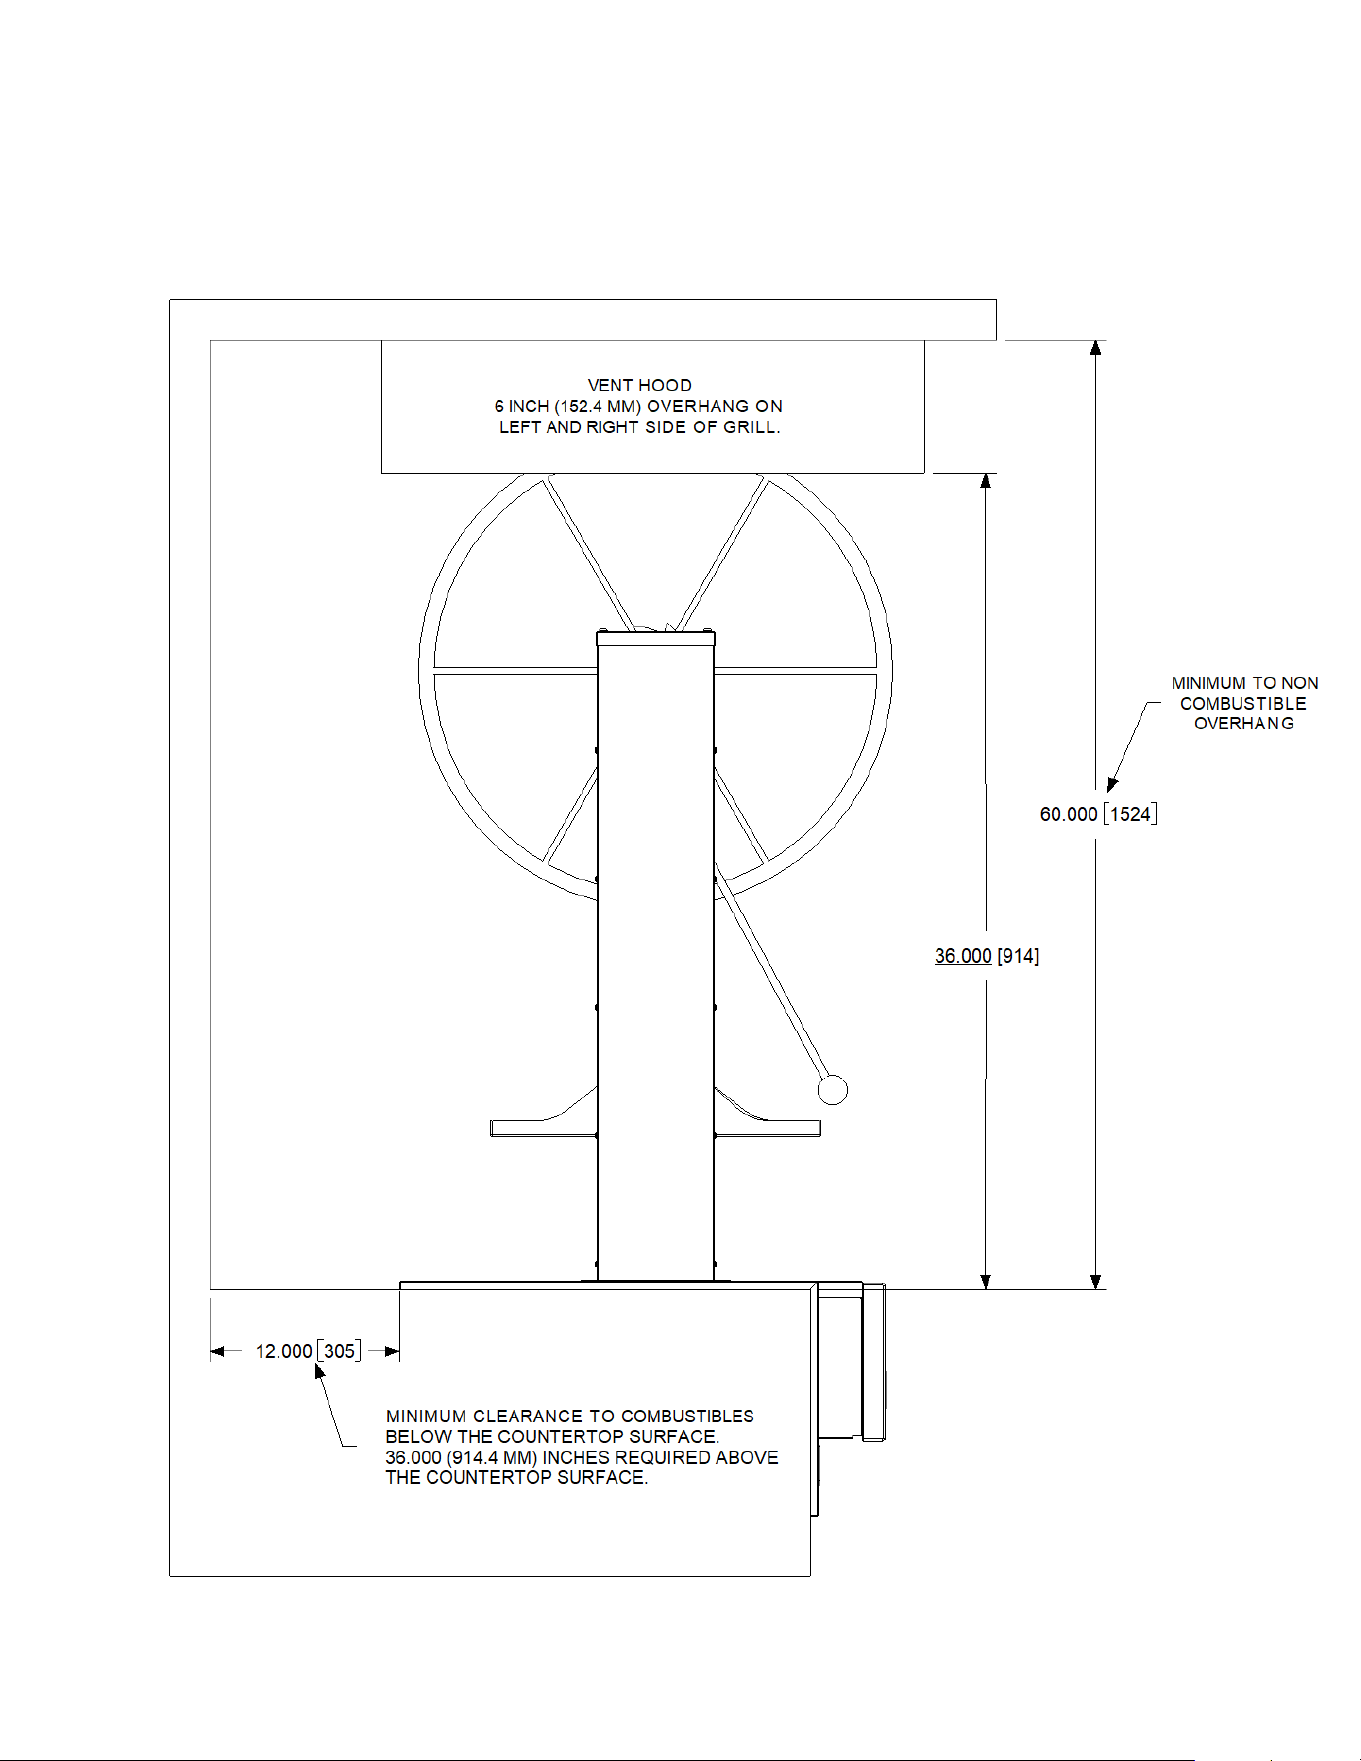
OVERHEAD PROTECTION AND EXHAUST REMOVAL
If installed under any combustible construction the cooking area over the grill MUST be covered
with an exhaust hood. The hood must provide 6 inches (15.2 cm) of overhang on all exposed
sides. The exhaust hood shall provide no less than 1,200 CFM for proper exhaust ventilation.
The hood must be approved for outdoor installation and provided with a dedicated GFCI
protected branch circuit (See “Figure 2” for further details).
Page 13 of 43
FIGURE 1. CLEARANCES TO COMBUSTIBLES
IBIAG36 Shown
All appliances covered by this manual are subject to the clearances shown in Figure 1.
Page 14 of 43
FIGURE 2. EXHAUST HOOD REQUIREMENTS
IBI36AG Package Shown
All appliances covered by this manual are subject to the clearances shown in Figure 2.

Page 15 of 43
FIGURE 3. REFERENCE DRAWING FOR CUT-OUT DIMENSIONS

Page 16 of 43
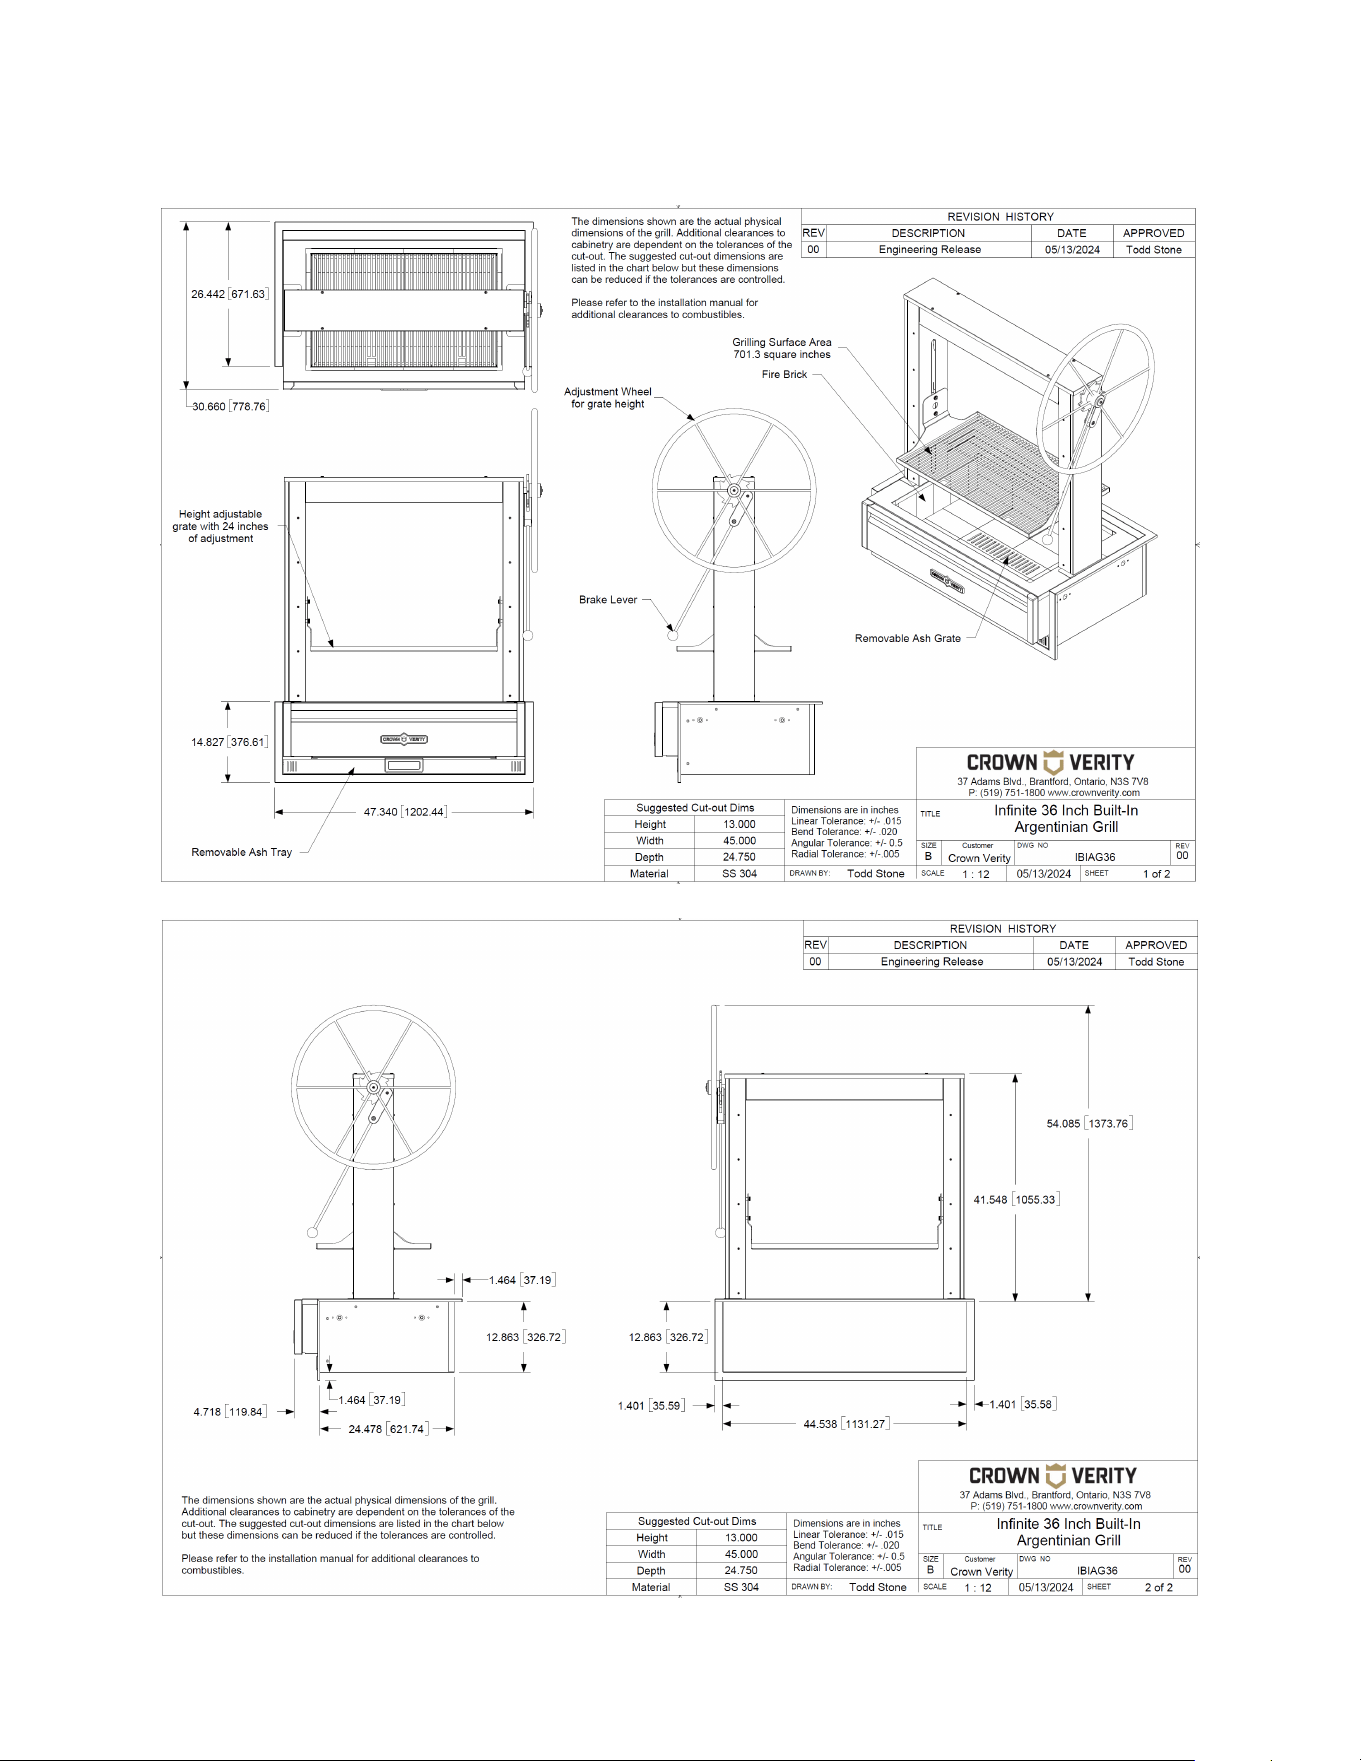
Built-In Cut-out Dimensions
The measurements and dimensions detailed below are designed to assist with planning your
outdoor kitchen. Due to continuing product innovation, specifications are subject to change
without notice. Please reference the Manual for details on the proper installation of your
Crown Verity Argentinian Grill.
General Operating Procedures
BEFORE FIRST USE
A quick safety check should be performed before using your appliance for the first
time. Please ensure that:
1.
All packing materials and tie-downs have been removed from the appliance. (See
INDEX: “Unpacking & Assembly” for further details.)
BEFORE EACH USE
A quick safety check should be performed before each time you use the grill (for your
safety).
1.
Check that the area near the appliance is clear of combustible materials and vapors,
including alcohol, gasoline, aerosol containers and dry goods. Keep electrical cords
from being in contact with the unit.
2.
Do not use the appliance with overly loose-fitting clothing, especially loose sleeves
that may come in contact with the hot surfaces.
3.
Have insulated gloves with long cuffs ready and available.
BUILT-IN ARGENTINIAN GRILLS
H1
W1
D1
IBIAG36
13.000
45.000
24.750
(cm)
33.0
114.3
62.9
BUILT-IN ARGENTINIAN GRILLS WITH
INSULATED JACKET
H1
W1
D1
IBIAG36
14.500
47.845
26.250
(cm)
36.8
121.6
66.7

Page 17 of 43
4. Never grill without the ash tray in place. Always ensure that the tray is pushed all the way to
the back.
WHILE YOU ARE COOKING
The appliance surfaces get very hot as will the food you are cooking. Follow these tips while
operating the grill:
• Never leave the appliance unattended
• Never move the appliance while it is in use or when it is hot.
• The use of alcohol, prescription or non-prescription drugs may impair your ability to safely
operate the appliance.
•
Do not touch the grill rack, any surfaces inside or around the firebox, the uprights
or cross member while the grill is hot. These surfaces can cause serious burns.
•
Use caution when touching the wheel. The wheel can become hot under certain
cooking and wind conditions. Insulated gloves are recommended.
•
Always control the movement of the wheel when raising and lowering the grill rack.
• Be very careful transporting any hot food items. They can cause serious burns to yourself or
those around you.
• Only use long-handled tools with brass or stainless bristles to clean the cooking surface. The
handle must be long enough that your hands stay safely outside of the appliance’s cooking
area.
•
Always wait at least 24 hours after the grill has been hot before emptying the ash
pan.
IMPORTANT: Practice with your grill to understand the temperature variables and
nuances of your unit before hosting your guests.
WARNING: Always control the movement of the wheel when raising and lowering
the grill rack. (See INDEX: “Raising and Lowering the Grill Surface” for further
details.)
Page 18 of 43
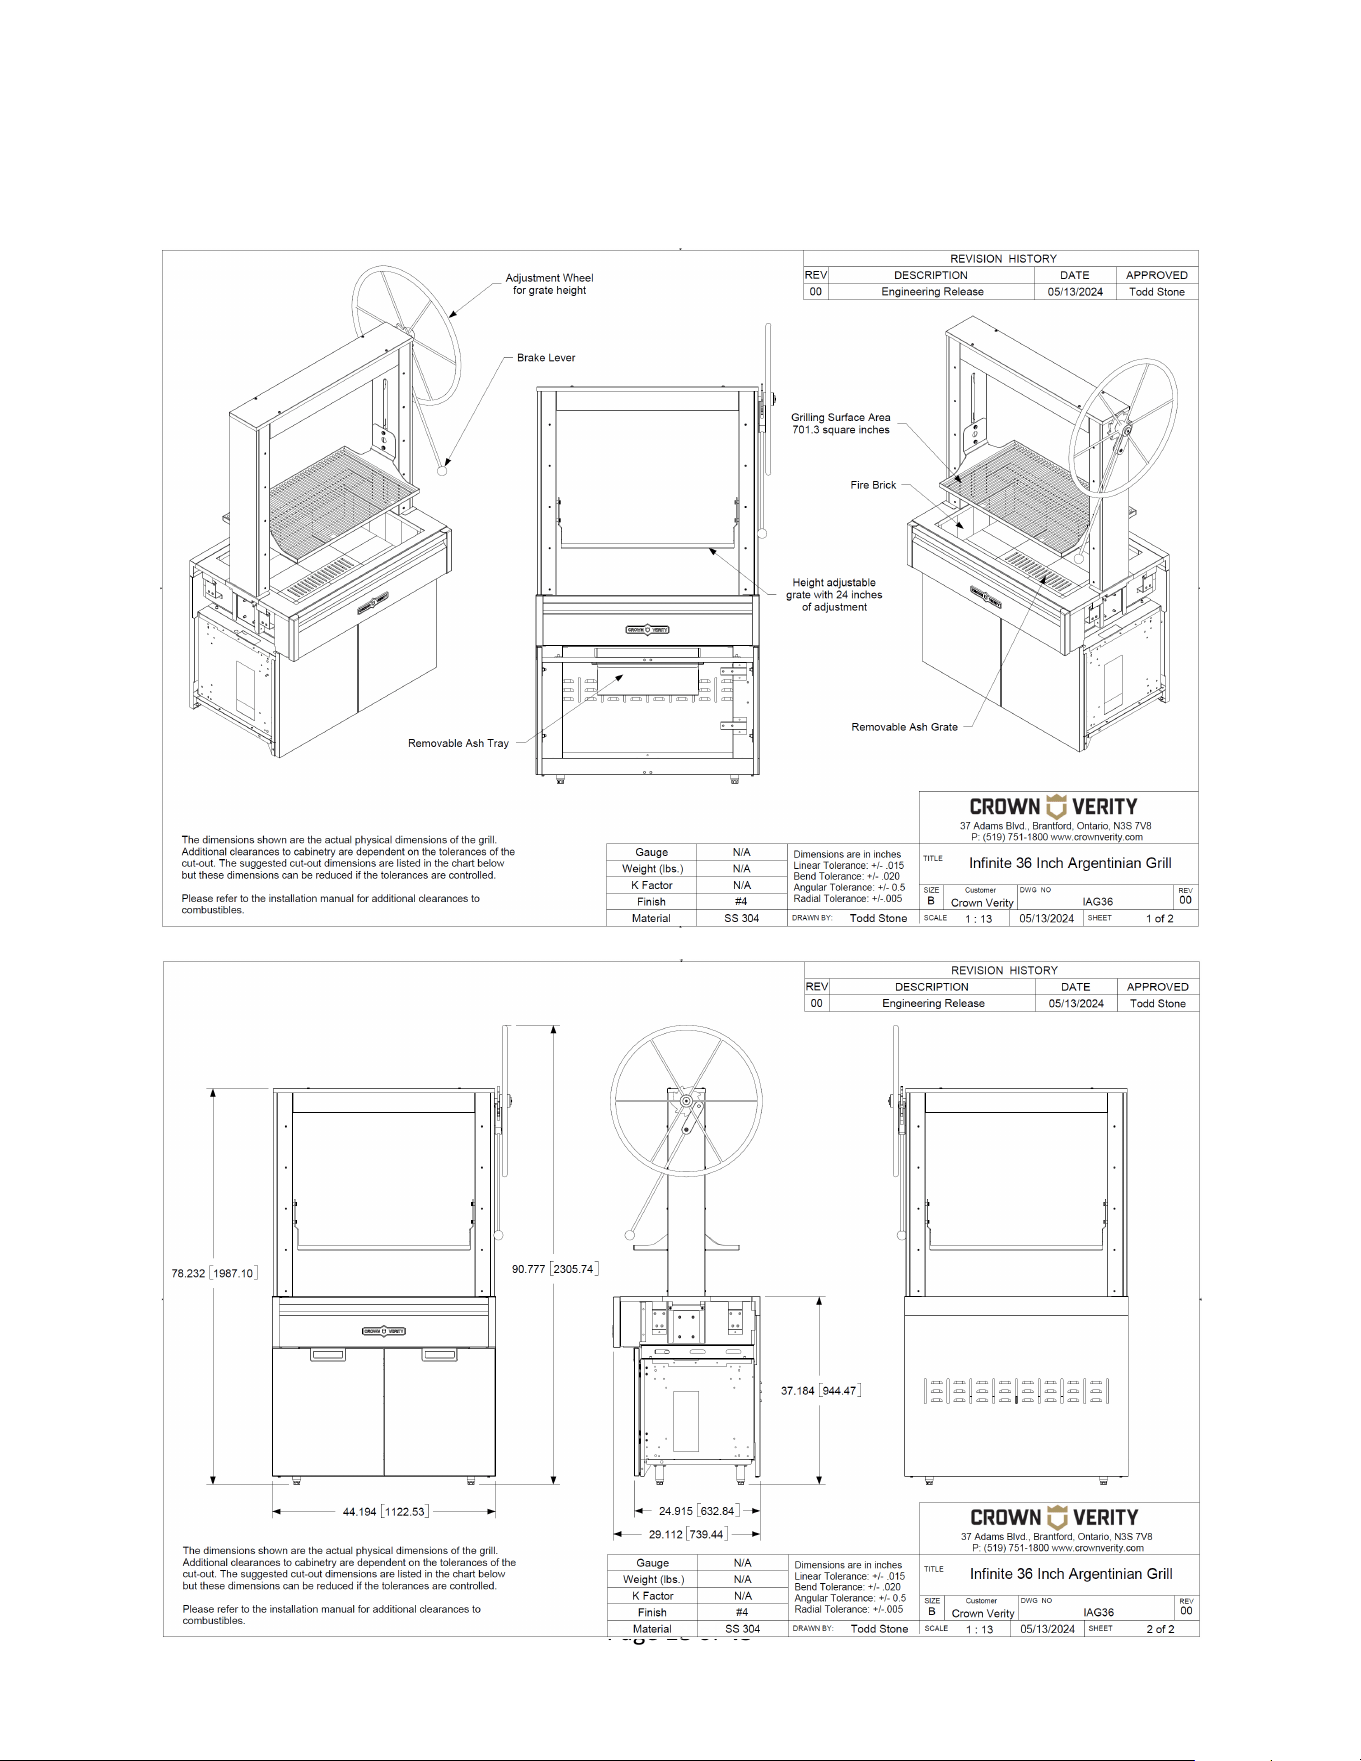
5.
GRILL DIMENSIONS – IAG36 MODULAR GRILL
Page 19 of 43
GRILL DIMENSIONS – IBIAG36 BUILT-IN GRILL
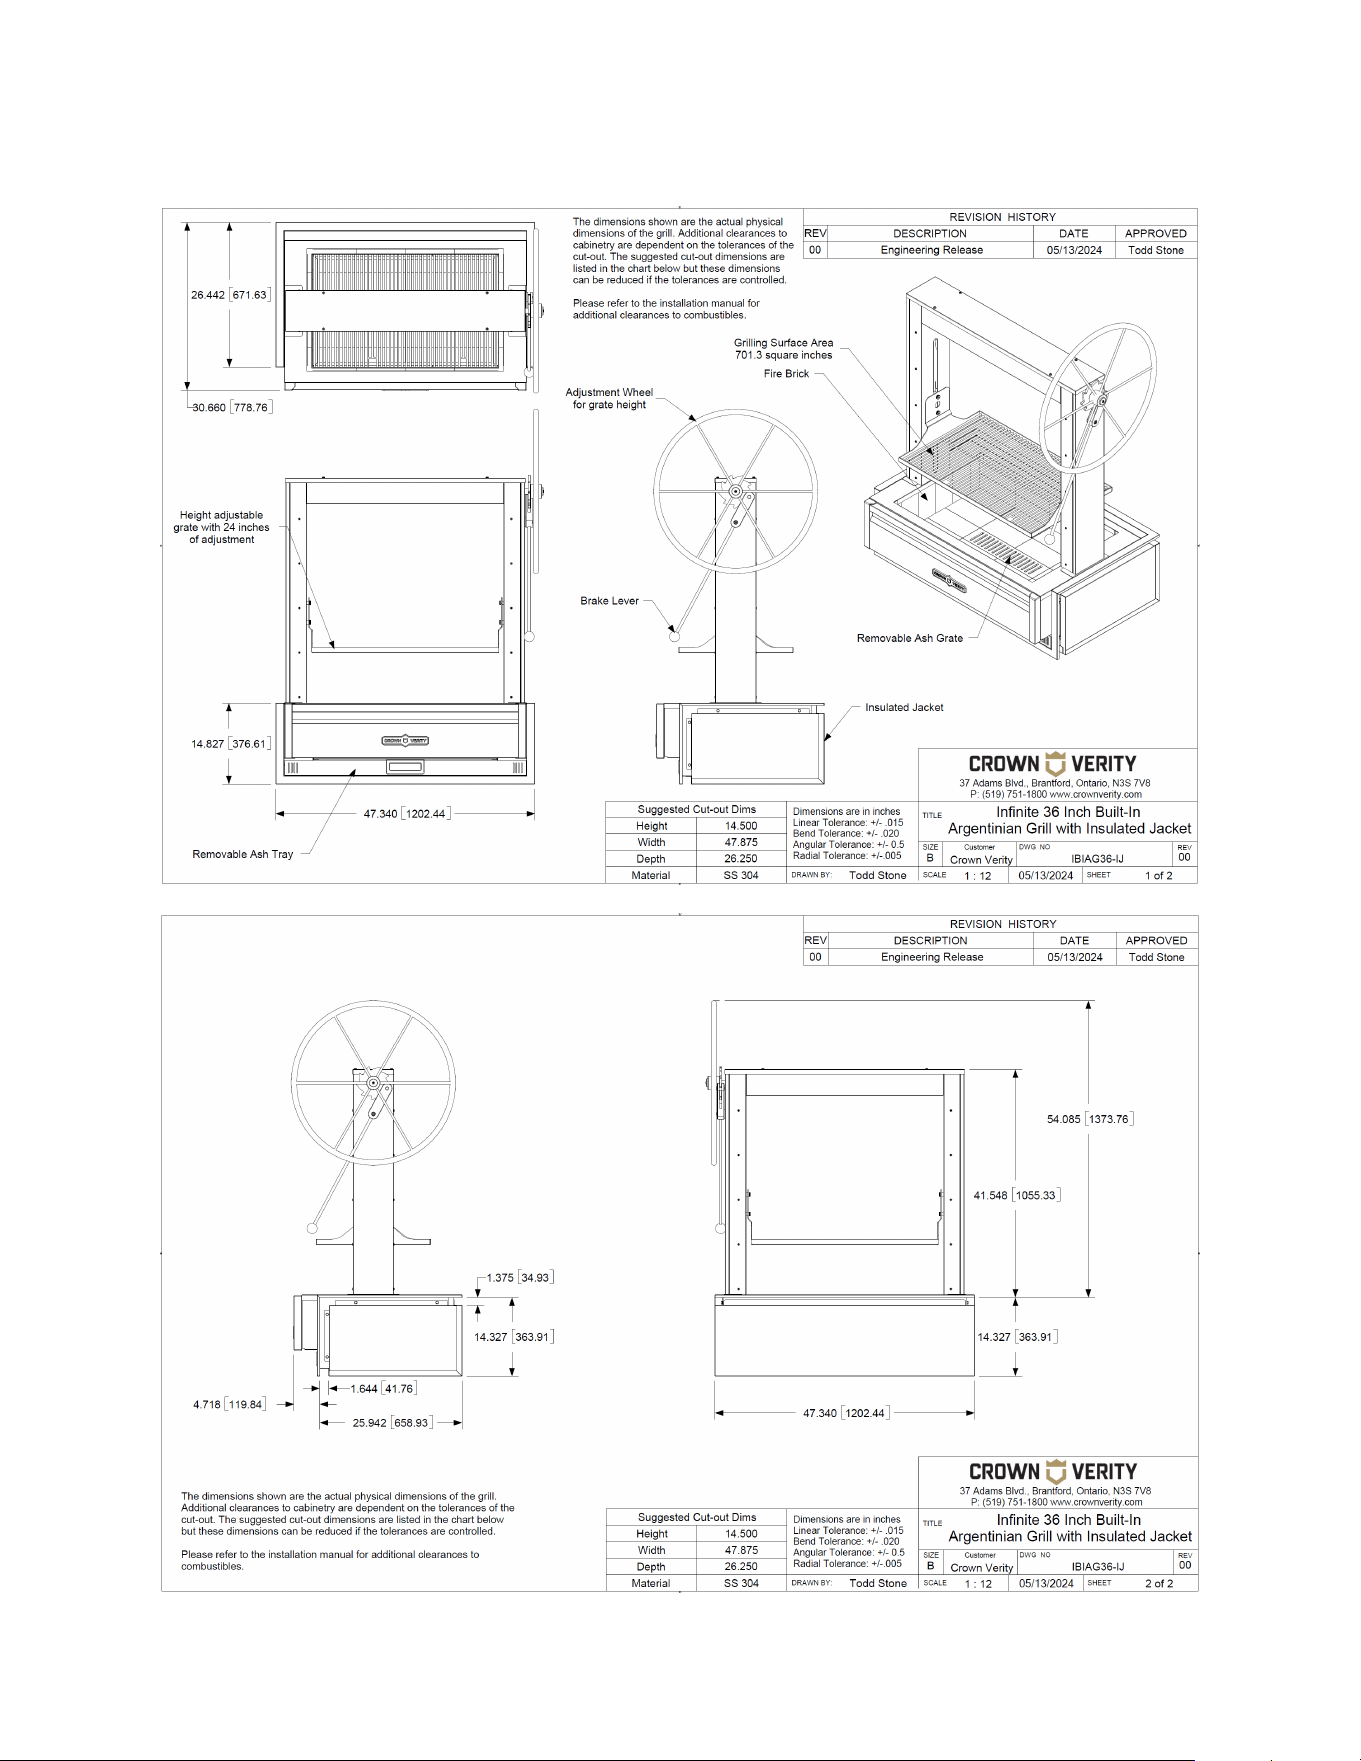
Page 20 of 43
GRILL DIMENSIONS – IBIAG36-IJ BUILT-IN GRILL WITH INSULATED JACKET
Page 21 of 43
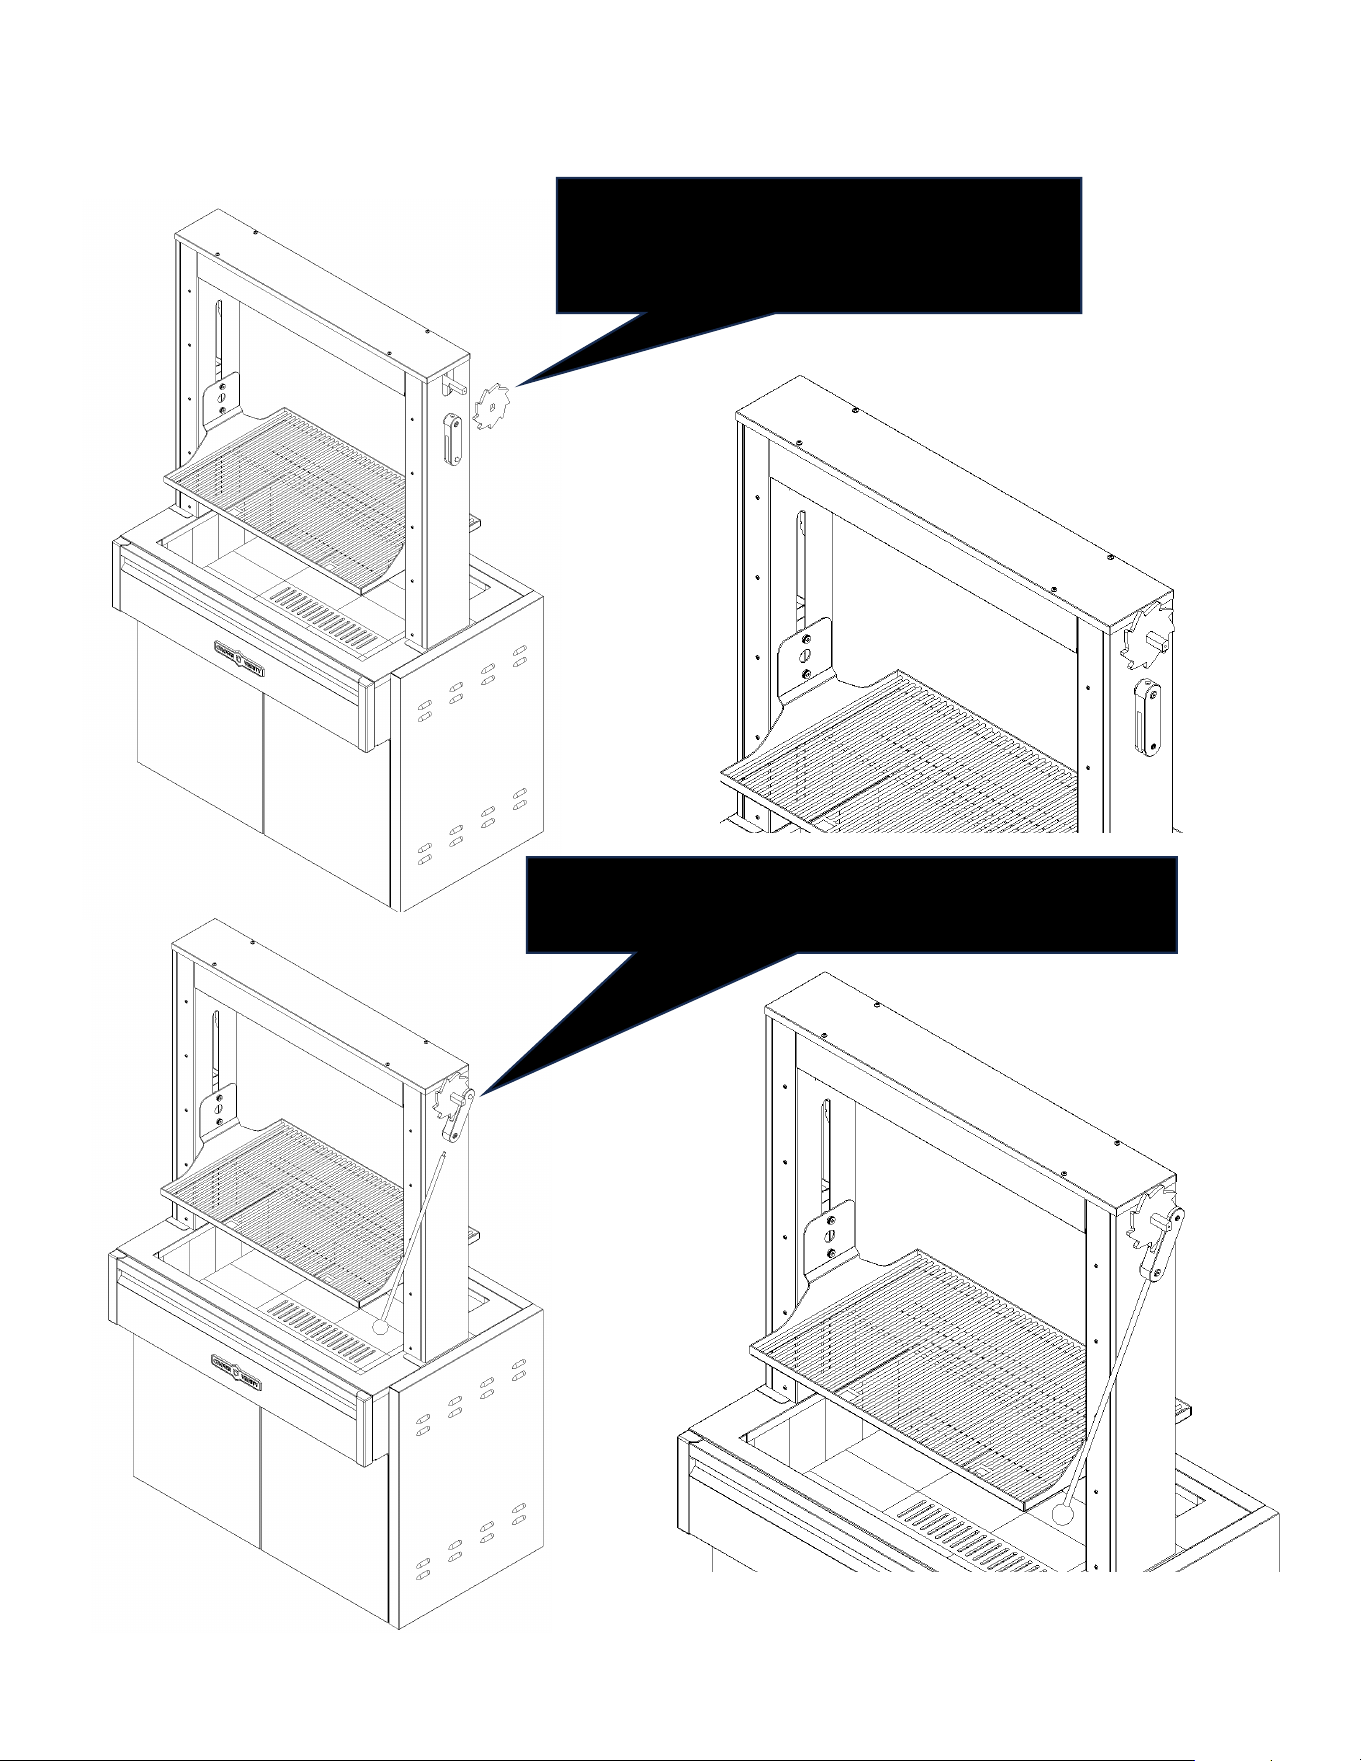
INSTALLING THE WHEEL
STEP 1: Install the spur gear by sliding it onto
the exposed end of the shaft until it stops.
Make sure the gear is positioned as shown.
STEP 2: Rotate the brake until it engages on the spur
washer. Thread the brake lever handle onto the brake.
Page 22 of 43
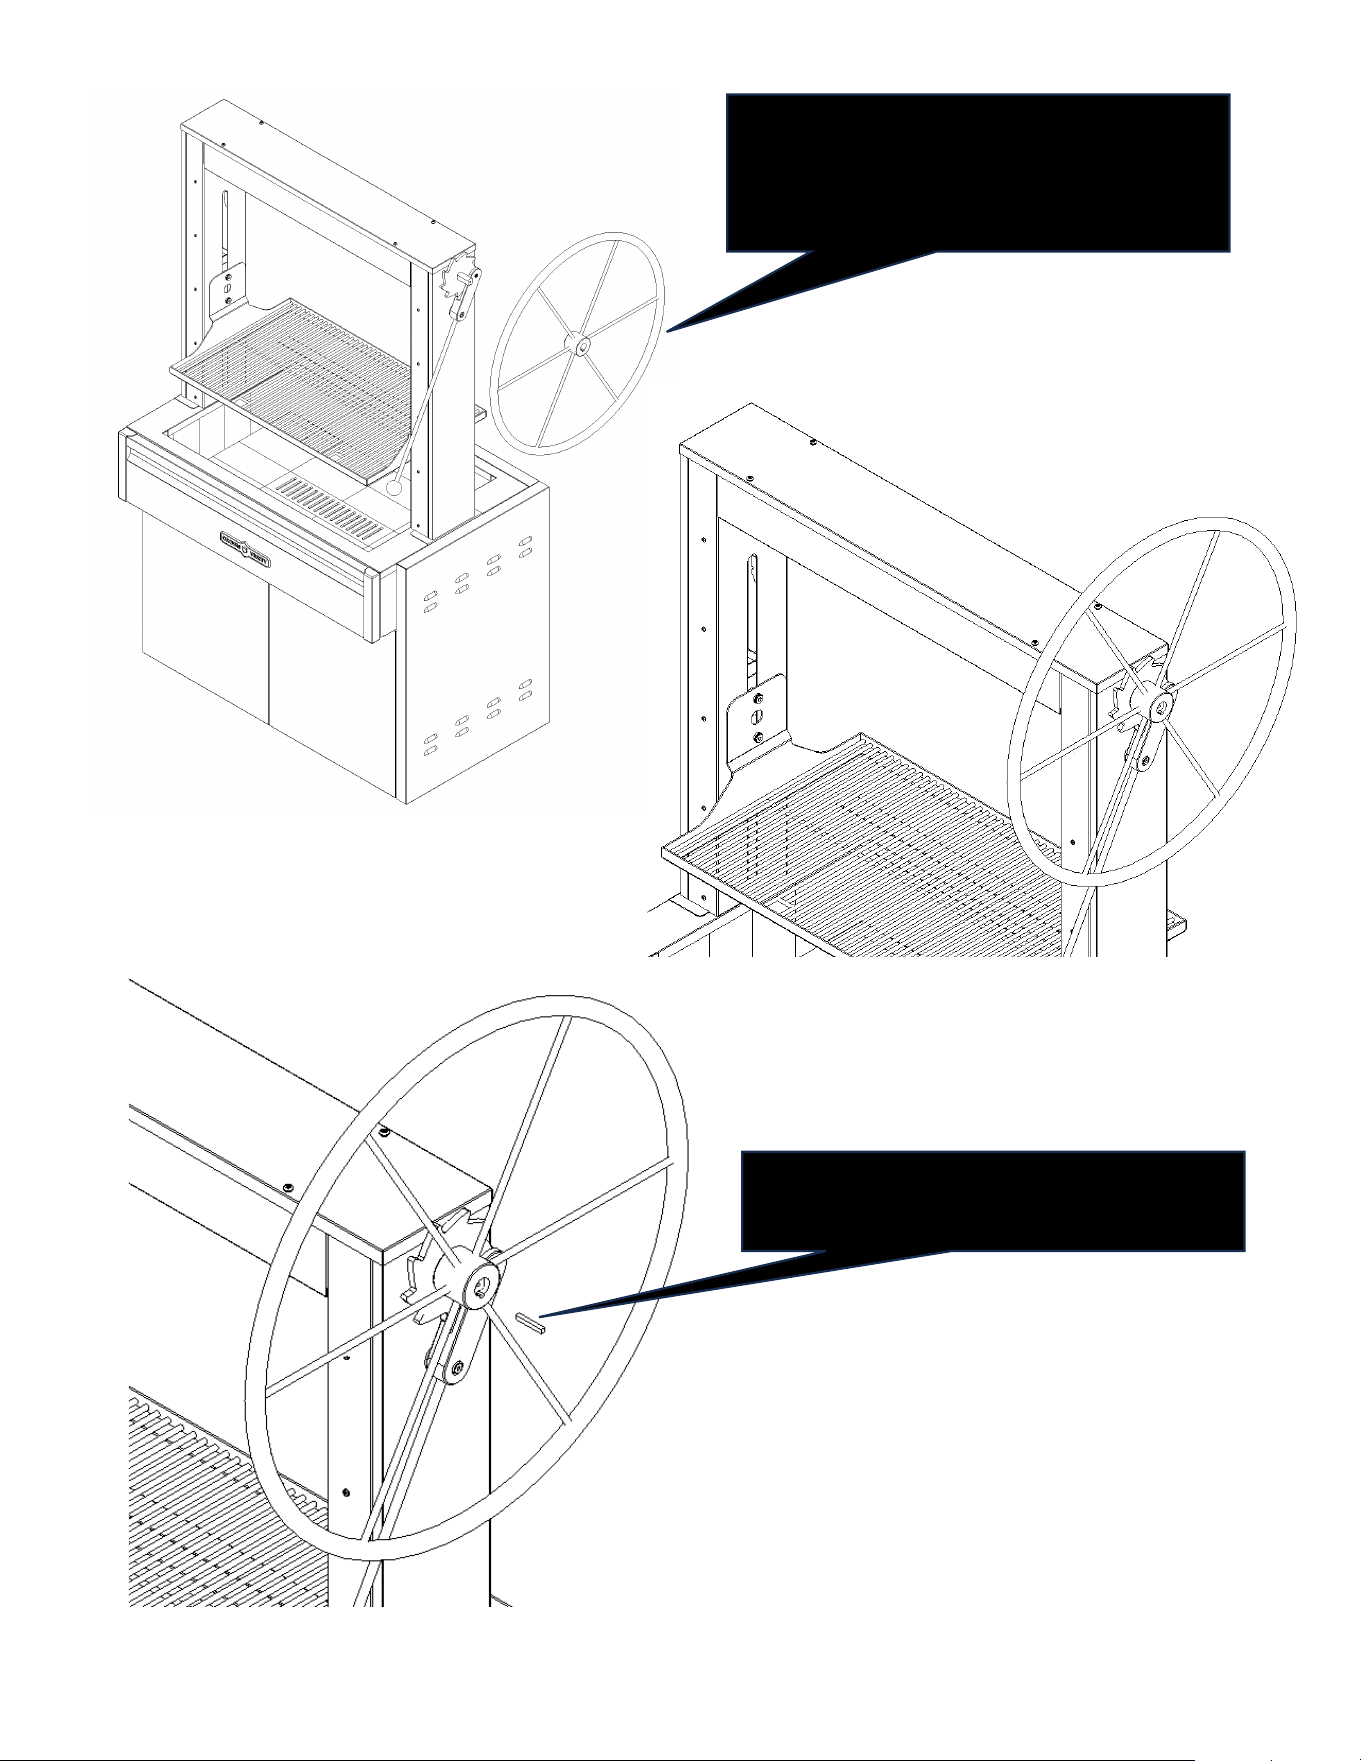
STEP 3: Slide the wheel onto the shaft until
it stops against the spur gear. Rotate the
wheel until the wheel keyway aligns with
the keyway on the shaft.
STEP 4: With the keyways aligned, slide the
key into the keyways until it stops.
Page 23 of 43
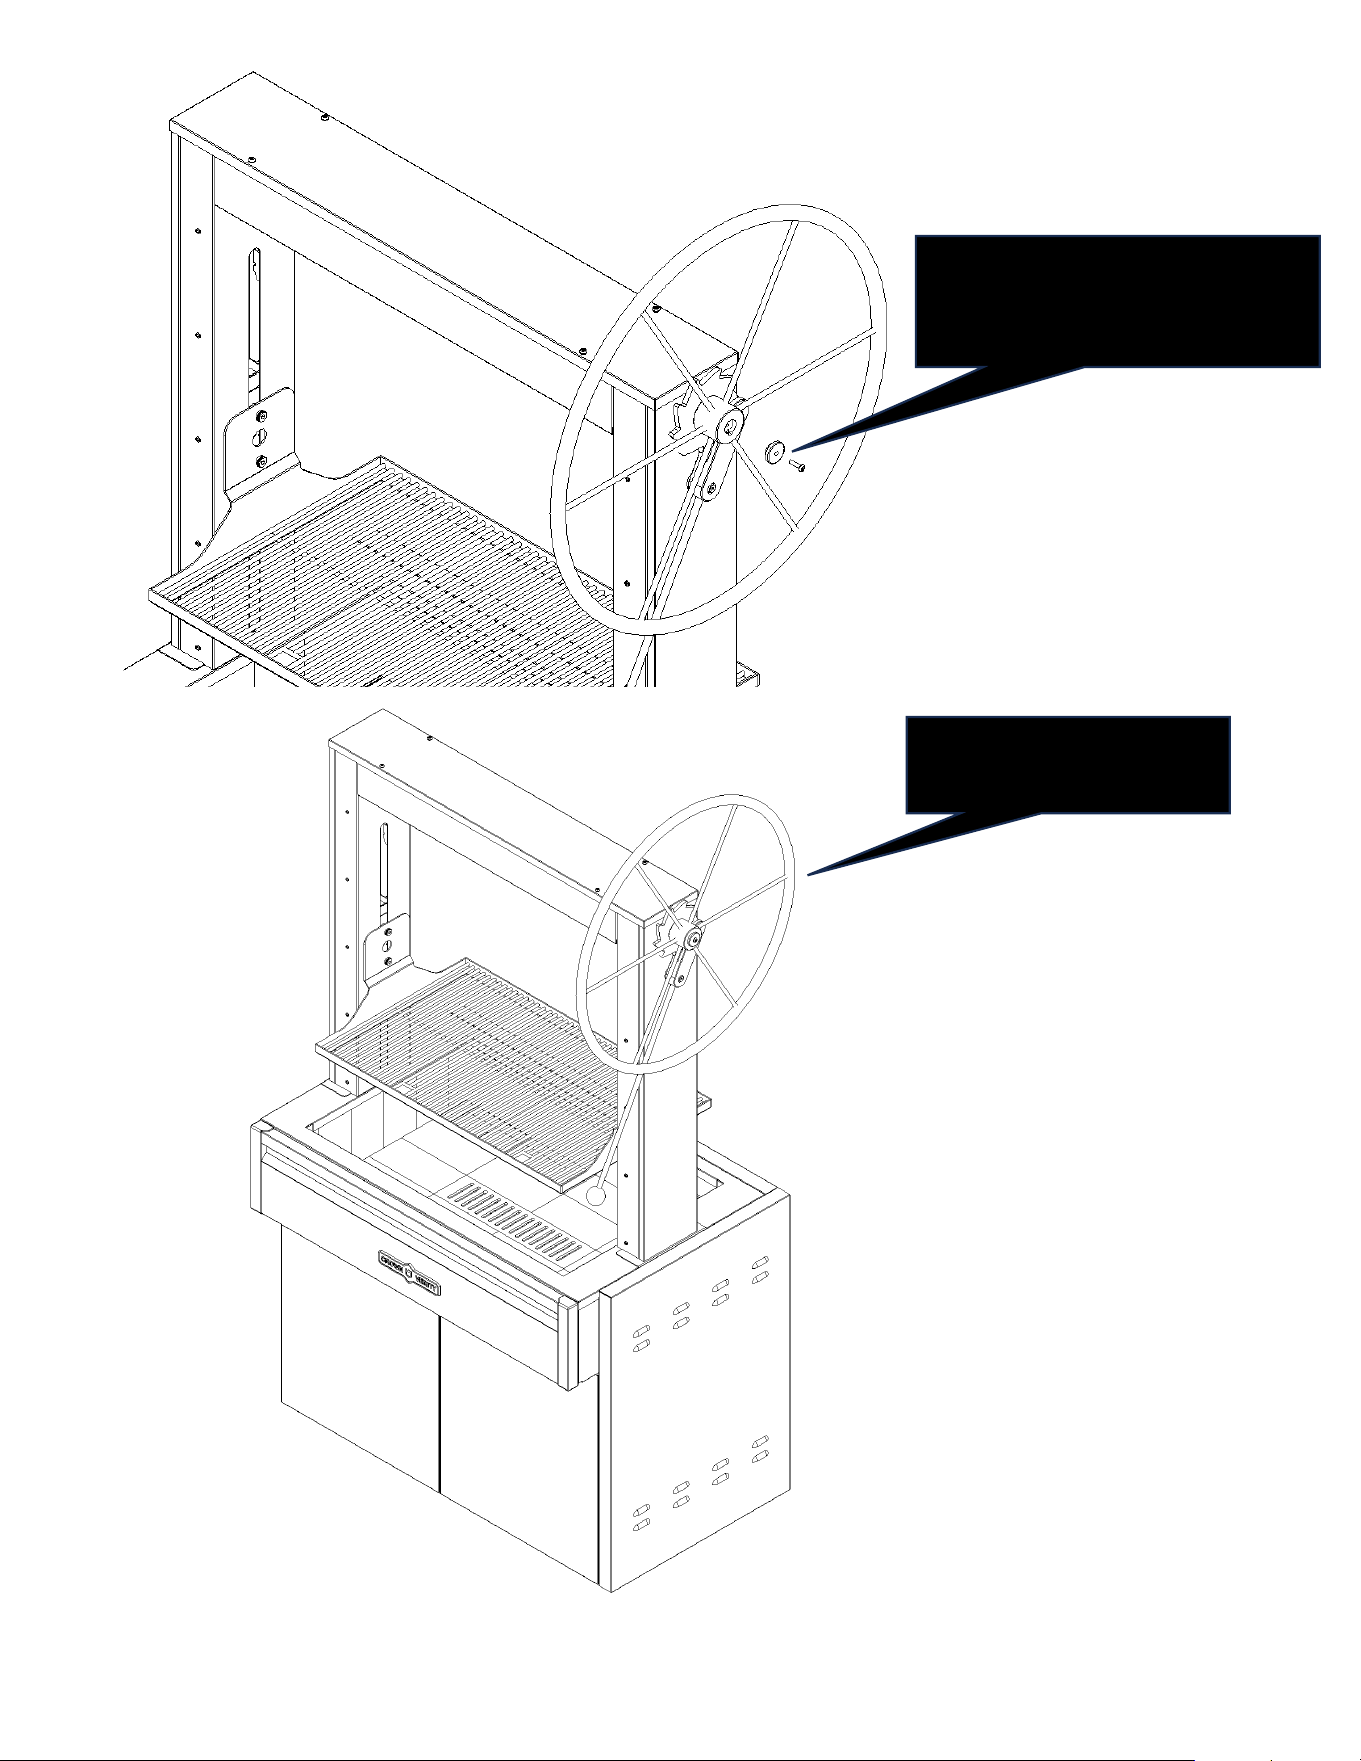
STEP 5: Install the wheel plug to
secure the wheel in place with
the screw provided.
Completed wheel
assembly.
Page 24 of 43
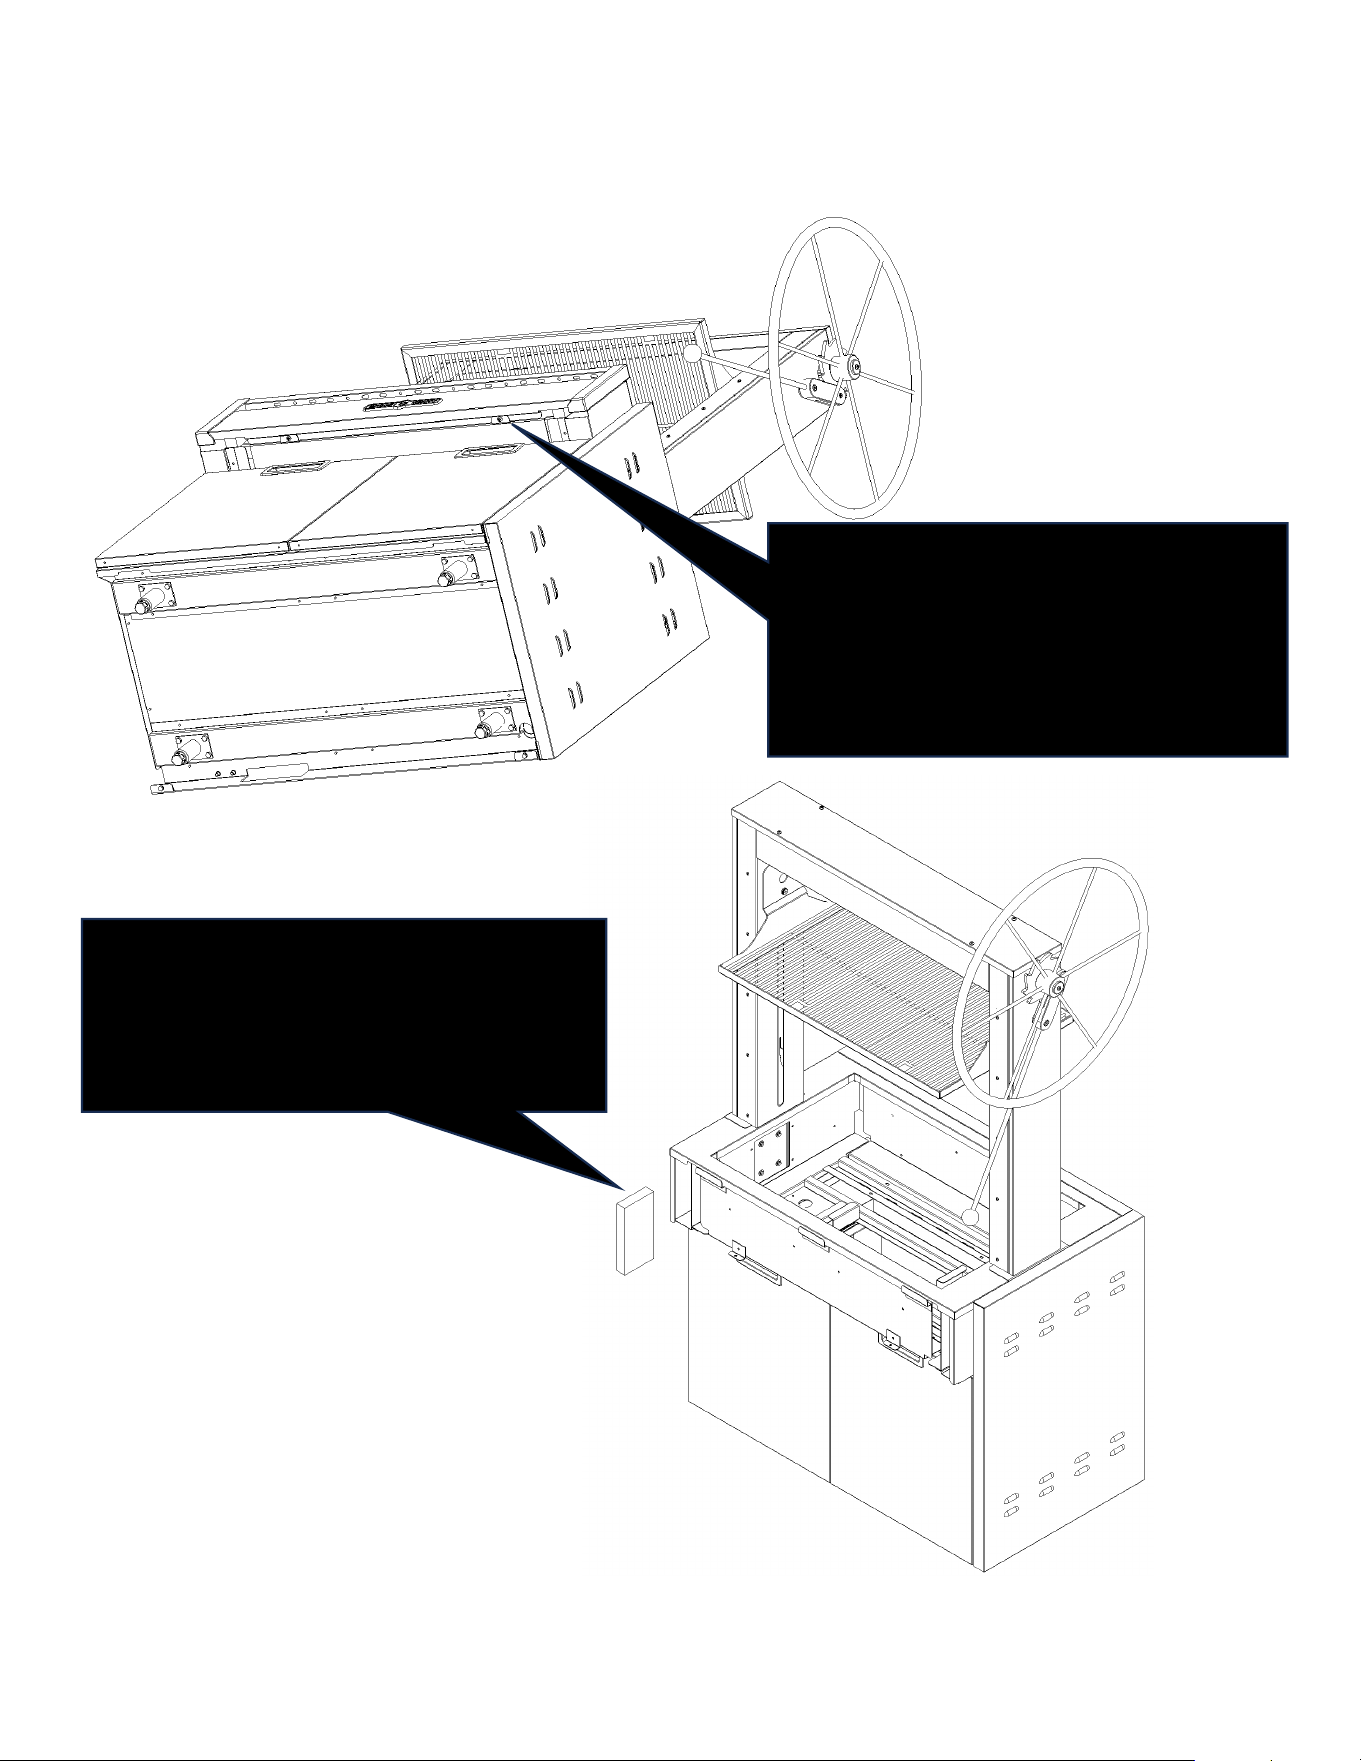
INSTALLING THE FIRE BRICKS
STEP 1: Remove the grill face by removing
the two screws holding it in place on the
underside of the face. Once the screws are
removed, gently lift the face up and off.
Place the face so that it faces up to avoid
scratches or other damage.
STEP 2: Install the bricks on the left and
rights sides of the firebox by sliding them
into the channels from the front of the grill.
There are 6 bricks per side.
Page 25 of 43
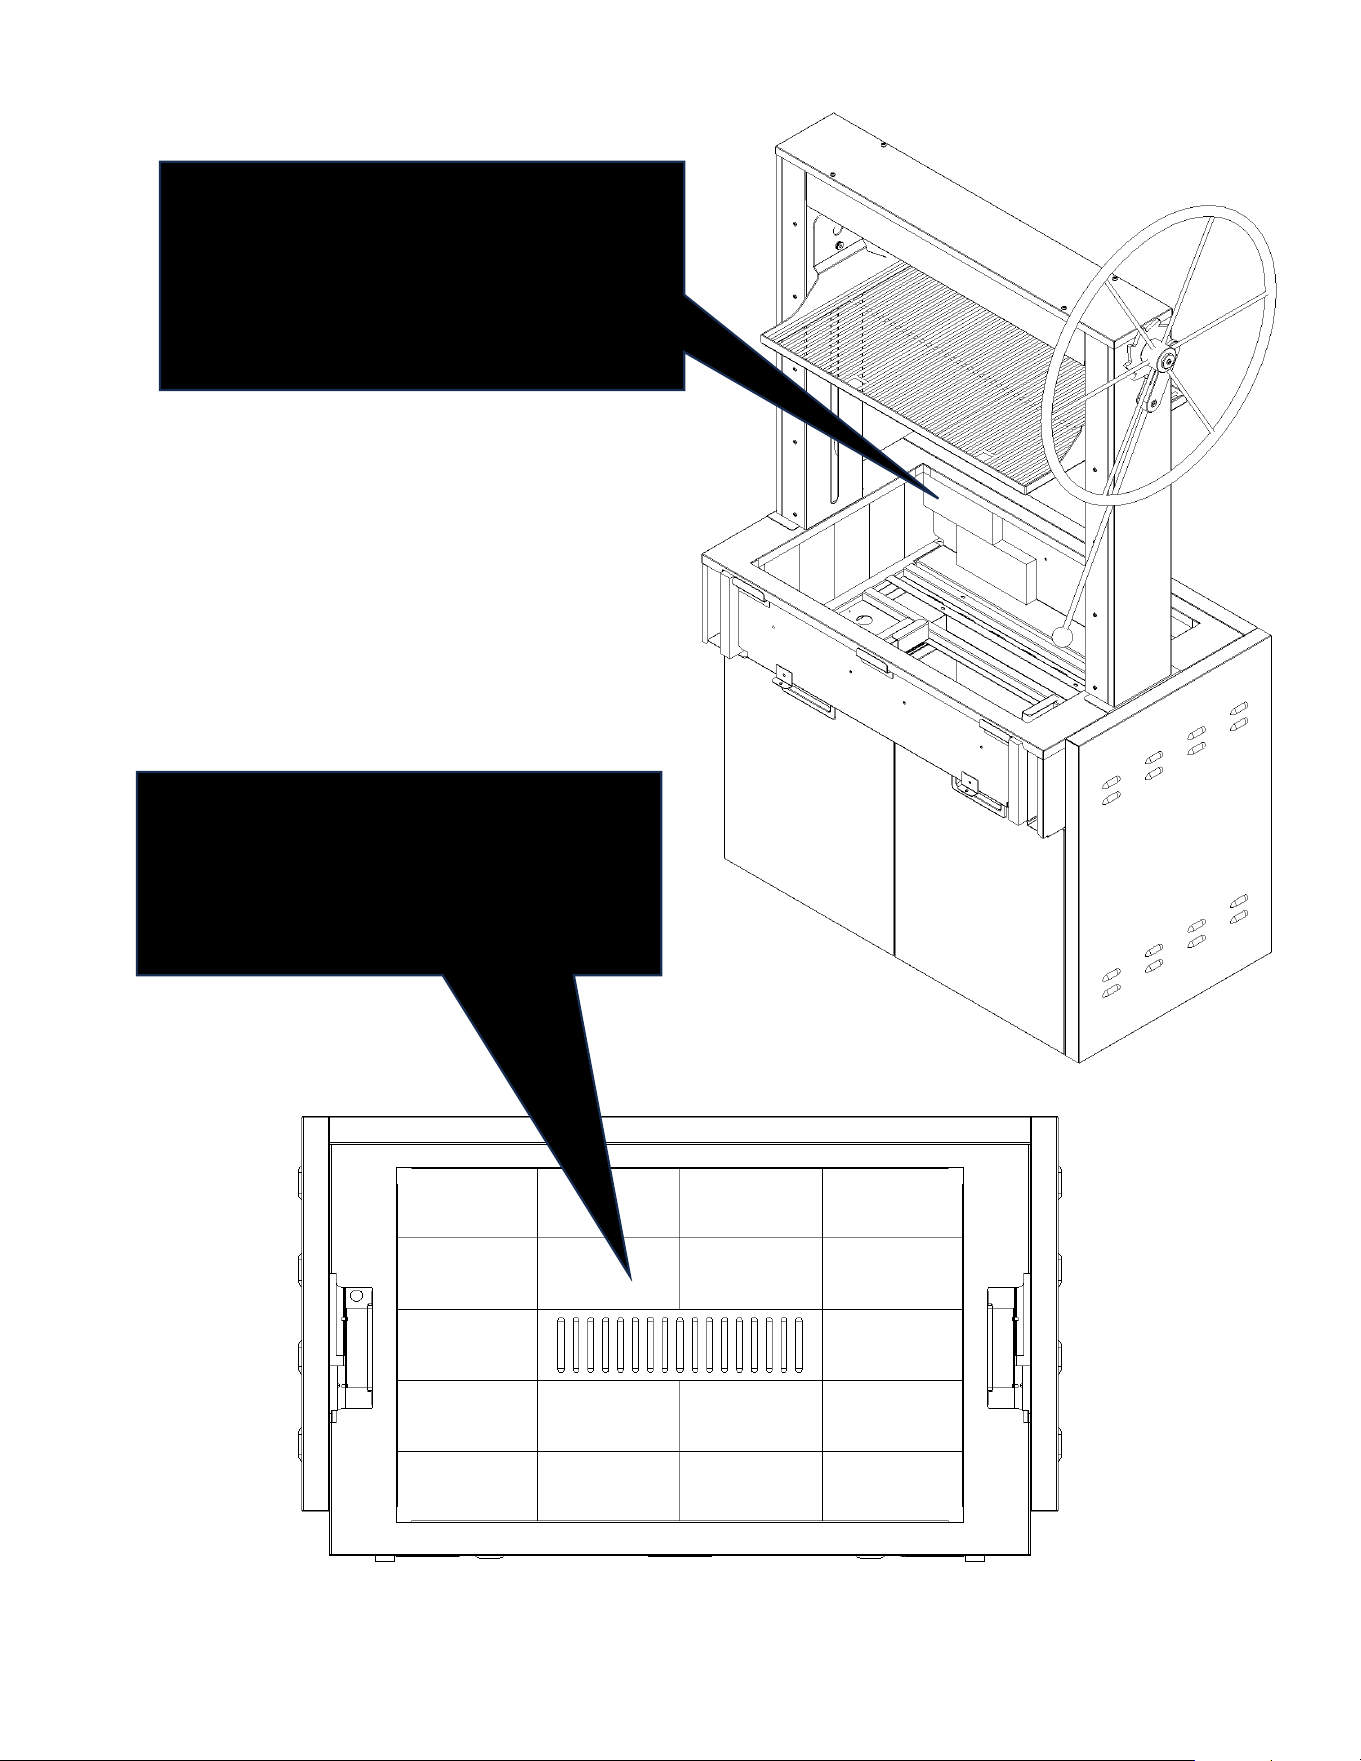
STEP 3: Install the front and rear bricks in the
firebox by first installing the upper brick by
sliding it up into the channel. Slide the lower
brick under the upper brick to hold it in
place. There are 8 bricks in the rear and
front of the firebox.
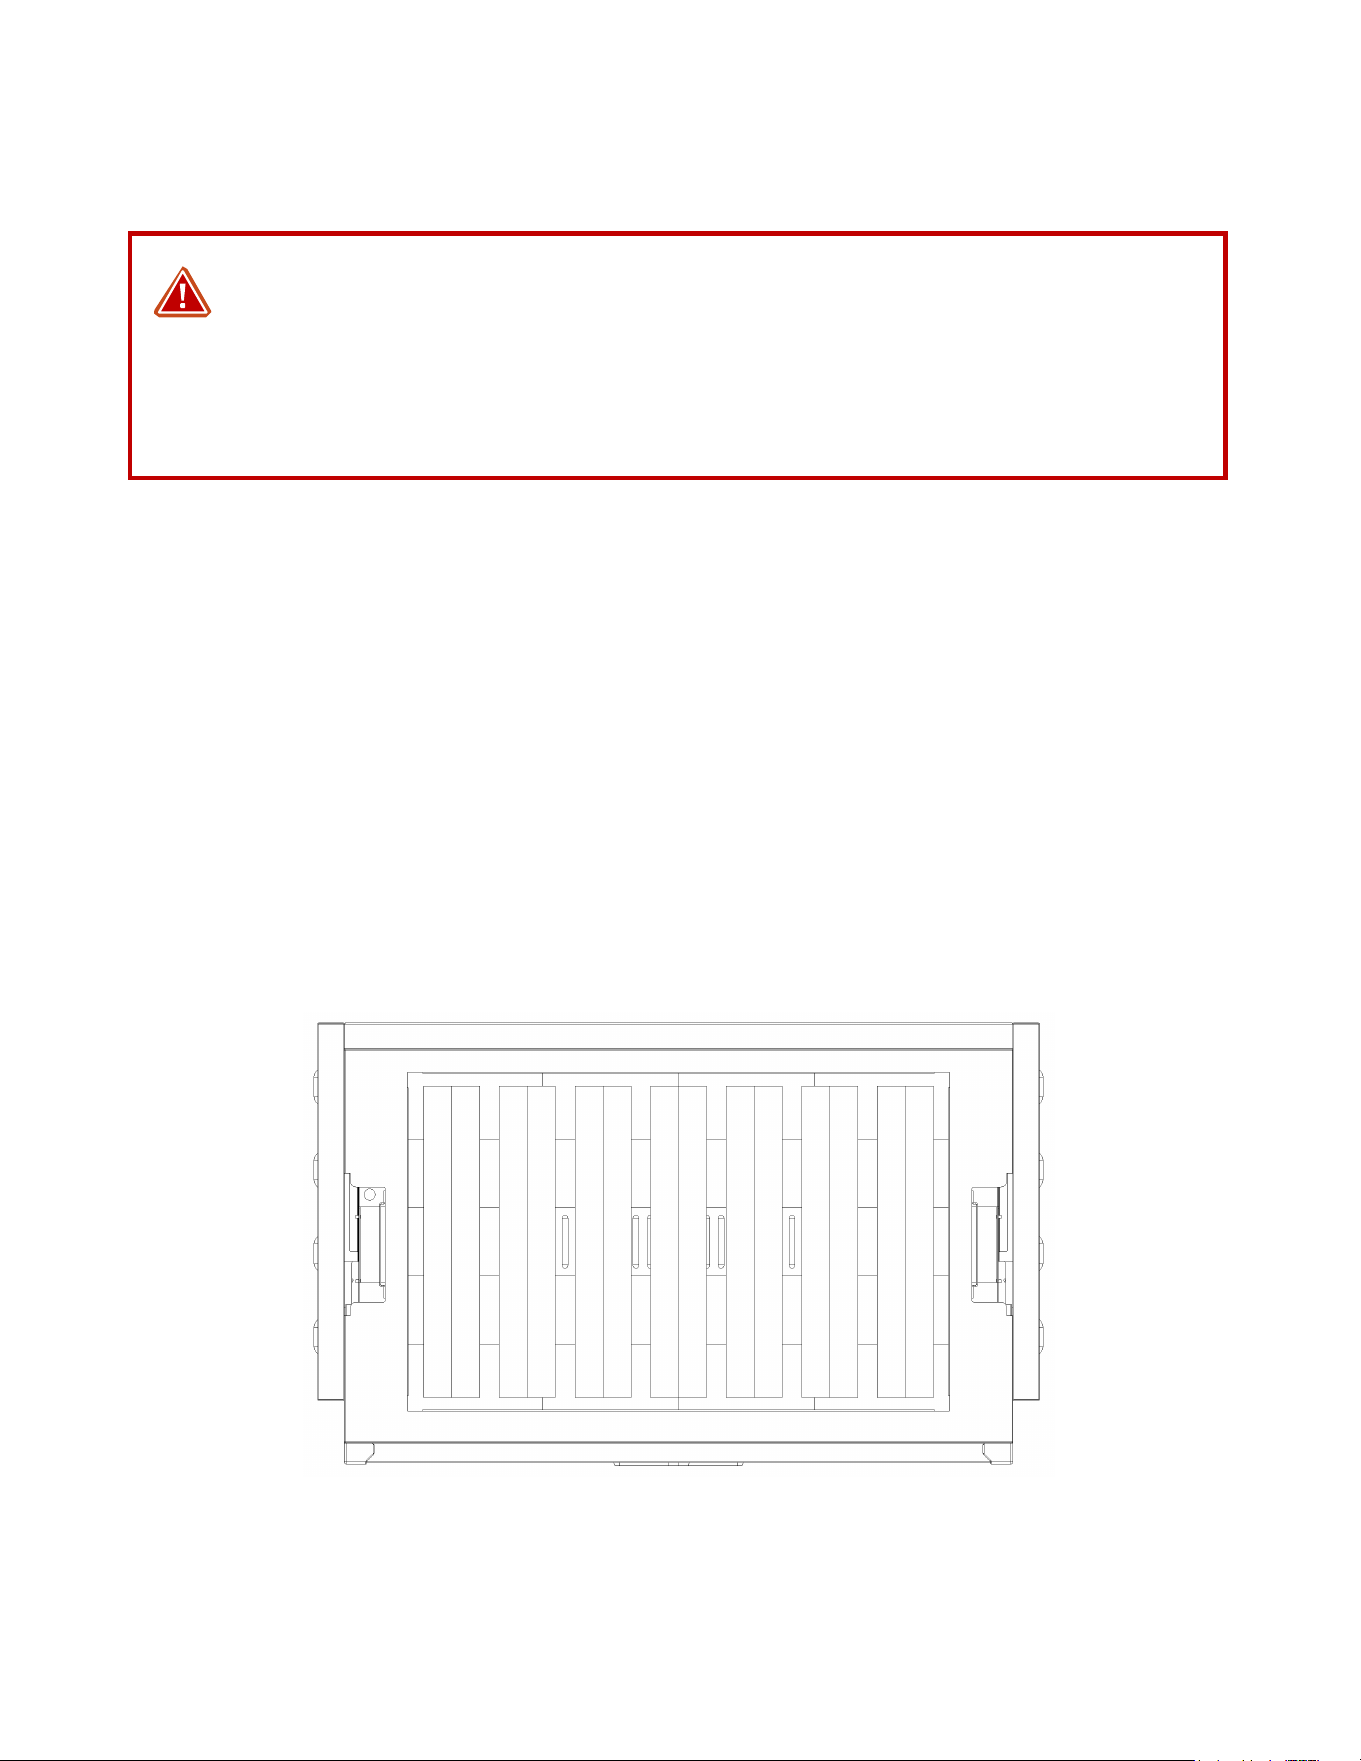
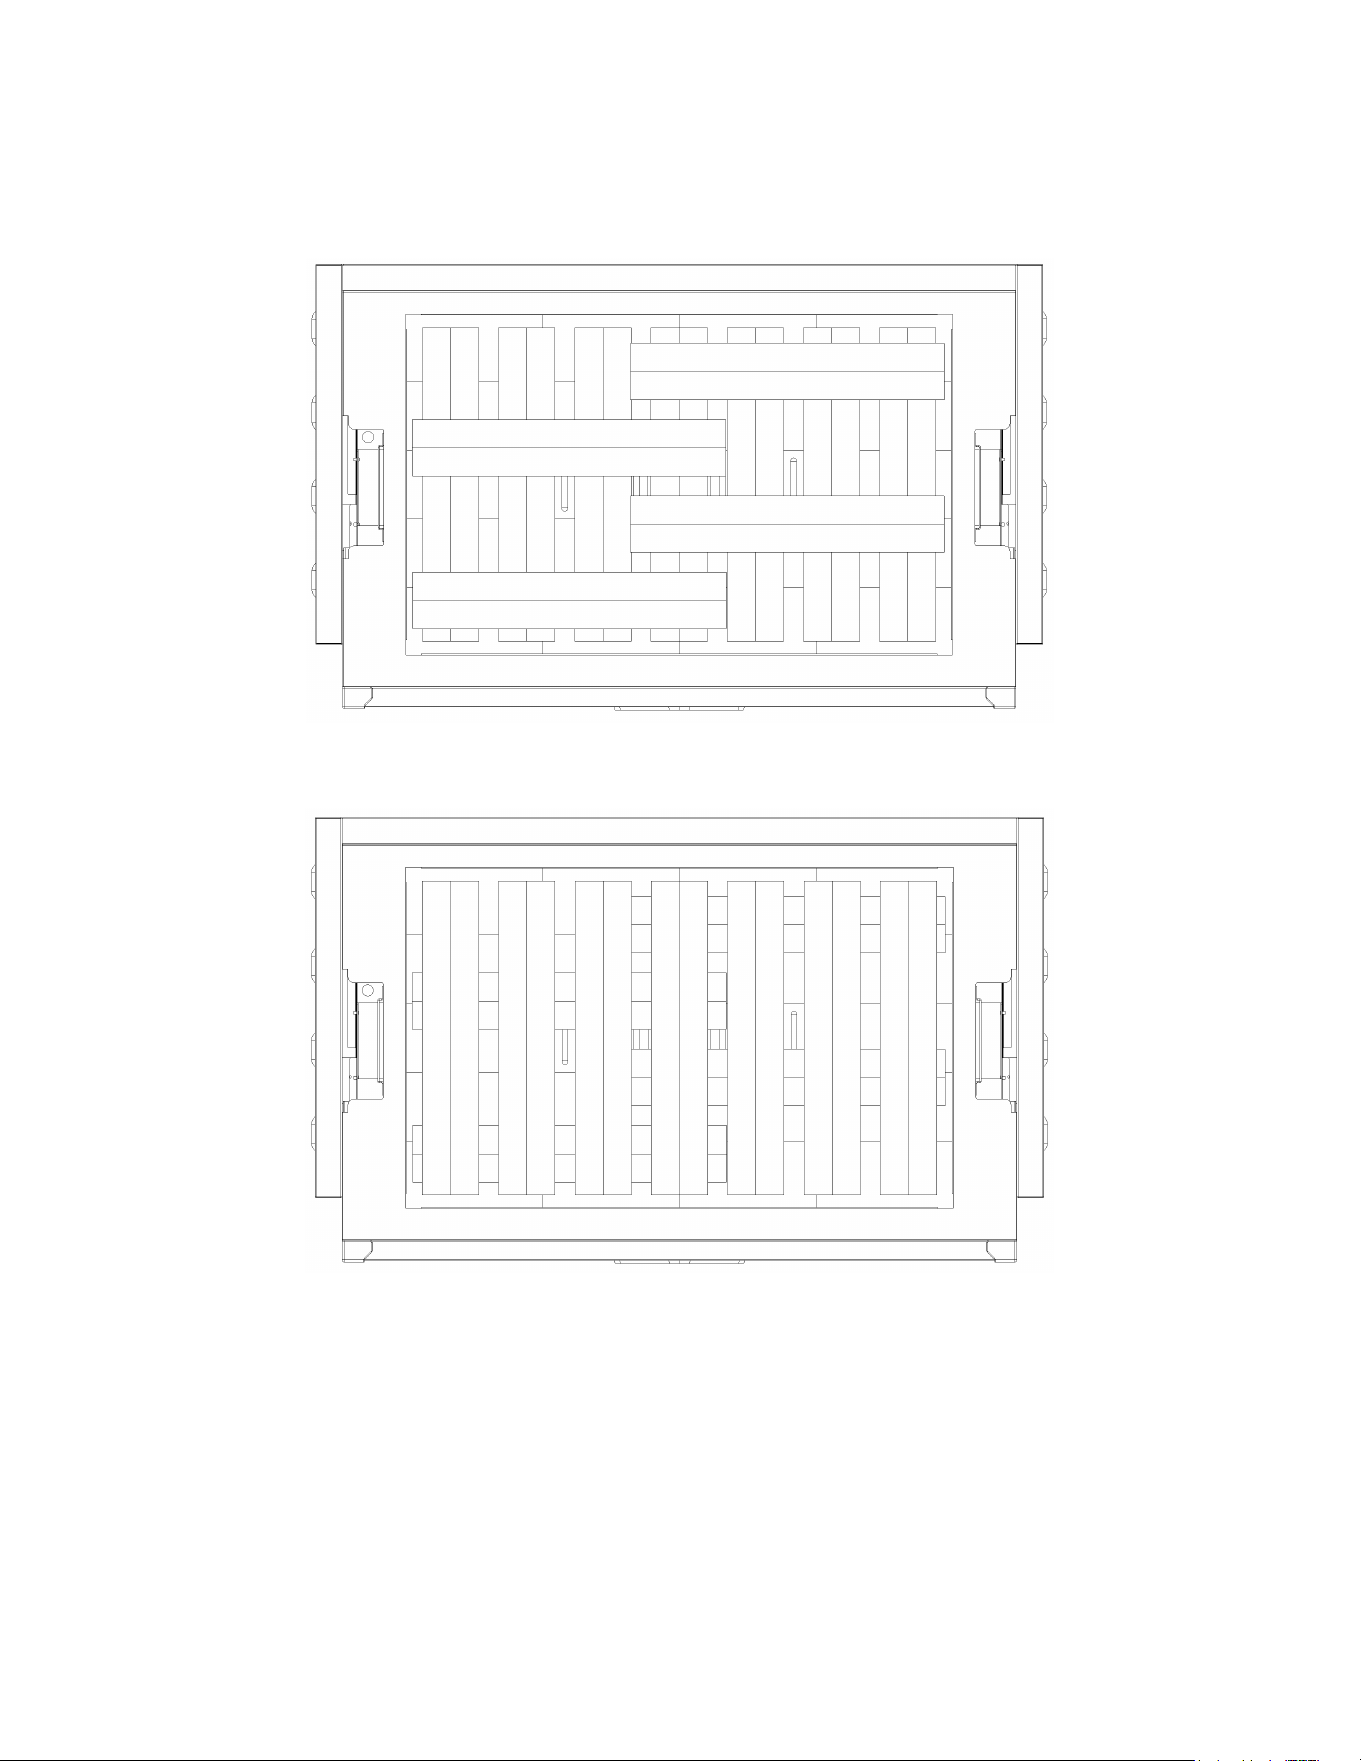
STEP 3: (The tower and grates have been
removed from the image for clarity.) Install
the bricks on the bottom of the firebox
positioning the ash grate in the middle as
shown. There are 18 bricks in total.

Page 26 of 43
WARNING: Use caution when touching the
wheel. The wheel can become hot under
certain cooking and wind conditions.
Insulated gloves are recommended.
RAISING AND LOWERING THE GRILL SURFACE
To raise the grilling
surface, pull the
wheel forward in a in
a counterclockwise
rotation to the
desired height.
To lower the grilling
surface, grasp the wheel
firmly with one hand so
that it cannot rotate
freely. Release the brake
mechanism with the other
hand and slowly let the
wheel rotate in a
clockwise direction to the
desired height.
Page 27 of 43
Basic Grilling
RECOMMENDED EQUIPMENT
•
Leather insulated gloves with long cuffs to protect your hands and forearms.
•
Stainless steel brush for cleaning the cooking surfaces.
•
Long-handled grill tongs (minimum 18" long).
PREPARING A WOOD FIRE
Placing the Wood in the Firebox: Raise the grill rack to its highest position. The ideal stacked
method is to use three layers of wood. Place the first layer so the wood is oriented front to
back. Leave space between the wood to allow for air circulation.
WARNING: DO NOT LEAVE THE GRILL UNATTENDED
Argentinian Grills get very hot. Use caution when working with the grill and do
not leave the grill unattended. Use insulated gloves with a long cuff to protect
your hands and forearms from heat.
Page 28 of 43
The second layer would be placed perpendicular to the first layer again allowing space for air
circulation and.
The third layer would be laid in the same orientation as the first.
The three layer approach allows the fire to start quickly and will create an even layer of coals as
the wood collapses while it burns.
Here are some of the most popular woods used by professional and amateur chefs:
Cherry: Cherry is a very sweet smelling wood, and it has a beautiful light red color. It can be
used for smoking, grilling, and baking. It is best suited to use in the summer months because of
its light color and low heat output. You can take your portable charcoal BBQ grill to celebrate
the new year with your loved ones and cook with cherry wood for delicious food!

Page 29 of 43
Cherry wood is a very popular choice for smoking meat because it imparts a mild flavor that
compliments the meat. However, it has a low heat output, so it should not be used for cooking
over direct heat.
Apple: Apple is a great choice for smoking and grilling because it adds a sweet, fruity flavor to
foods. It’s also perfect for beginners who want to try their hand at smoking meat but aren’t yet
ready to tackle the stronger flavors of hickory or mesquite. Apple has a milder flavor than some
other woods, so it doesn’t overpower the flavors of your food.
Apple is great for smoking ribs and pork shoulder because they’re both long-cooking cuts that
benefit from the added sweetness apple provides. The sweet smoke will help keep these cuts
moist, too!
Apple is also good for smoking chicken, turkey, fish and vegetables on your Barbeque grill – the
same way you might use other milder hardwoods like hickory or mesquite in these applications.
Hickory: Hickory is a popular choice of wood for charcoal grills, as it burns hot and fast. The
strong, smoky flavor adds delicious depth to foods like pork and beef.
Hickory is a very hard wood that has to be burned down before you can use it in your grill. This
means you have to wait for the logs to reach the right temperature before you can put them on
your coals.
You should keep in mind that the weight of the logs, combined with their high density, makes
them difficult to handle and store. Hickory is also more expensive than other types of wood, but
it is absolutely worth it.
Maple: Maple is a popular choice for many BBQ enthusiasts. It has a mild flavor and low smoke
point, adds an additional layer of complexity to any food item, which makes it perfect to use
with fish as it won’t overpower the flavor. However, maple also has one major drawback: it’s
not as hard as other woods like hickory or oak. This means that you should be careful about
how long you leave your food on the grill – you don’t want to burn the meat!
Mesquite: Mesquite is a hardwood that burns hot and long. It can be used to smoke meat and
fish, but it also tastes great in coals for grilling. Because this wood has a distinctive flavor, it’s
best to use mesquite for meats that have strong flavors of their own—beef, pork and chicken
work well with this wood. Mesquites are not suitable for smoking vegetables or fish because
their high temperature produces too much charring on the outside of those foods while they
remain raw inside.
There are many types of wood to choose from when it comes to cooking on an Argentinian
Grill. Each one has its own unique flavor and aroma that can be used to create the perfect meal.

Page 30 of 43
COOKING OVER A WOOD FIRE
Do not cook over a roaring fire. Cook over a bed of coals 2 to 3 inches deep, adding pieces of
wood at a time as needed to maintain the bed of coals. Place the food on the grill grates and
control the intensity of the heat by raising and lowering the grill rack. The closer the food is to
the fire, the more intense the heat will be. Food can be brought close to the coals to sear it on
the outside and then raised higher to cook to the desired wellness.
COOKING OVER CHARCOAL
The Argentinian Grill can also be used with charcoal. Charcoal can be purchased at most
supermarkets. The challenge of using charcoal versus wood is getting it lit and hot so that it
starts to generate embers. Once they are lit, the coals will stay hot for hours and simply adding
new coal to the fire will ensure a steady supply of new coals. Restaurants favour charcoal
because it is usually reliable, and it is easier to find than firewood.
As with cooking over wood, place the food on the grill grates and control the intensity of the
heat by raising and lowering the grill rack. The closer the food is to the fire, the more intense
the heat will be. Food can be brought close to the charcoal coals to sear it on the outside and
then raised higher to cook to the desired wellness.
Caring for Your Grill
STAINLESS STEEL CARE:
The Crown Verity Grills is built from 304 stainless steel, which is a high-quality, non-
magnetic stainless steel that is very corrosion resistant. It is also a highly sanitary
surface.
The stainless steel components of your grill are warranted for life against
structural deterioration or failure (See INDEX: “Commercial and Residential Warranty”
for further details). With proper care, your grill should last a lifetime. The stainless
steel will discolor from the intense heat over time; this condition is normal. Always
clean your stainless steel grill with a mild, food-safe, organic degreaser, followed by a
stainless steel polish.
ALWAYS SCRUB WITH THE GRAIN, NEVER ACROSS
.
Remove all cleaner
residue before lighting the grill in order avoid a build-up of film from the cleaner.
POOLS AND CHLORINE: chlorine in the air from pools can also damage 304
Stainless steel over time. Again, the best thing you can do to protect it is to
clean it frequently. We recommend cleaning all stainless steel surfaces at least
every two weeks to keep your grill in prime condition. When not in use, we
recommend that you keep the cover on the appliance.

Page 31 of 43
COOKING GRATE CARE:
Clean the cooking grates with a long-handled brass or stainless brush, or wooden
paddle. It is best to do this while the cooking grates are warm to hot.
•
Wear long, insulated gloves and use caution when doing so.
•
Never drop the cooking grates, as the welds along the rungs can crack.
CLEANING THE ASH TRAY:
WARNING:
The ash tray gets extremely hot when the grill oven is operating. Empty the
tray only when the grill and bin are completely cool. Empty the ash tray before each
use, but always be sure the grill and any leftover wood/embers are completely cool.
Dispose of the ash in an appropriate container and reposition the ash tray ensuring
that it is pushed all the way back.
Contacting Crown Verity Customer Care
Before calling Crown Verity Customer Care, please make sure you have the following
information:
• Model Number
• Date of purchase
• Proof of purchase by original owner
• Serial number
For warranty service, contact Crown Verity Service Department for an authorized service agent
near you at: (888) 505-7240 or [email protected]ity.com
Contact Crown Verity for replacement parts. Parts are shipped F.O.B Brantford, ON or
Bowling Green, KY.
SALTWATER ENVIRONMENTS: 304 Stainless steel is corrosion resistant but is not
impervious to rust in salt-water environments. Exposure to salt air and sea spray
will eventually damage the appliance if not cared for properly. The best thing
you can do to protect it is to clean it frequently. Don’t give the salt time to
establish the chemical reaction that contributes to rust. In salt air environments,
we recommend cleaning all stainless steel surfaces at least every two weeks to
keep your grill in prime condition. When not in use, we recommend that you
keep the cover on the appliance.

Page 32 of 43
Installation Checklist
Installer should initial next to each item:
Specified clearances maintained.
Initial assembly completed — all tape and internal packaging removed.
Wheel installed.
Ash Tray is in place.
Cooking grates installed.
Raising and lowering of the grill rack is working properly.
Customer is fully trained on the proper use of the brake lever.
Leave this Manual with the owner.
Installer Signature Date
Please ensure the installer completes the checklist,
explaining each item to you. The
installer should initial each item above
and sign below.

Page 33 of 43
Commercial & Residential Warranty
RESIDENTIAL LIMITED WARRANTY TERMS & CONDITIONS
This warranty is limited to products manufactured by Crown Verity Inc., to the original
purchaser, commencing on the date of purchase and is valid only with proof of purchase. This
warranty page and its coverage only applies to Infinite SeriesTM, Estate SeriesTM and PRO
SeriesTM grills. The warranty covers defects in material and workmanship under normal use,
providing that:
1. The equipment is properly installed per Crown Verity’s Operator’s Manual and by a
qualified professional installer, including all start-up checks.
2. The equipment has not been accidentally or intentionally damaged, altered, or misused.
3. The serial number rating plate affixed to the equipment has not been intentionally
defaced or removed.
4. The equipment is used in a residential application as defined by ANSI Z21.58/ CSA 1.6
current versions.
To activate the Crown Verity warranty please visit our warranty registration page
https://crownveritycanada.ca/support#faqs This warranty is limited to the original purchaser and
cannot be transferred.
WARRANTY COVERAGE
LIMITED WARRANTY
Crown Verity will warrant replacement parts for Canada and the Continental United States for
the following period:
Limited Lifetime Warranty: The stainless-steel grill body, stainless steel gas burners and
cooking grates are warranted to be free from defects in material and workmanship when
subjected to normal domestic use and maintenance for the lifetime of the original purchaser.
This warranty excludes surface corrosion, scratches, and discoloration which may occur during
normal use. Failure to perform required maintenance will void this warranty.

Page 34 of 43
Limited Six-Year Warranty: The Radiants, Manifolds and Gas valves are warranted to be free
from defects in material and workmanship when subjected to normal domestic use and
maintenance for six (6) years from the original date of purchase. Failure to perform required
maintenance will void this warranty.
Limited One-Year Warranty: For a period of one (1) year from the original date of purchase,
Crown Verity will replace, or repair parts found to be defective at no cost to the original
purchaser. This includes the cost of shipping replacement parts and, where necessary, service
labor at prevailing local rates by a Crown Verity authorized service person. Service will be
provided during normal business hours and must be authorized in advance by Crown Verity.
All non-grill components, such as modular and built-in cabinetry, fall under the Limited One Year
Warranty.
WARRANTY LIMITATIONS
The Crown Verity warranty does not apply to damages caused by:
• Negligence.
• Installation or start-up, damages or problems caused by improper installation or use.
• Unauthorized repair by anyone other than a Factory Authorized Service Agent.
• Erratic voltages or gas supply.
• Air and Gas adjustment.
• Damage caused by nature.
• Ordinary wear and tear.
• Display models are sold “as is”. If you have purchased a display model, please be
advised that it is sold “as is” and that it is subject to the following warranty exclusions:
any exterior or cosmetic damage is non-warrantable; any missing components will be
replaced at consumer’s expense; major handling damage to manifold, valve and ignition
system will be serviced at consumer’s expense; all other warranties will remain in effect.
• The equipment is properly installed per Crown Verity’s Operator’s Manual and by a
qualified professional installer, including all start-up checks.
• The cost of a service call to diagnose complaint.
• Modification to Crown Verity product will void related warranties.

Page 35 of 43
WARRANTY EXCLUSIONS
The Crown Verity warranty does not apply to labor or repairs required for:
• Batteries, fuses, and other wearable items
• Door adjustments and or lid adjustments
• Tightening of screws or fasteners
• Damage in shipment
• Adjustments and cleaning of main burners pilot burners or orifices
• Accessories such as brushes, spatulas, and cylinders
• Normal discoloration of materials
• Units used in a commercial application. Refer to our Commercial Warranty.
COMMERCIAL LIMITED WARRANTY TERMS & CONDITIONS
This warranty is limited to products manufactured by Crown Verity Inc., to the original
purchaser, commencing on the date of purchase and is valid only with proof of purchase. The
warranty covers defects in material and workmanship under normal use, providing that:
1. The equipment is properly installed per Crown Verity’s Operator’s Manual and by a
qualified professional installer, including all start-up checks.
2. The equipment has not been accidentally or intentionally damaged, altered, or misused.
3. The serial number rating plate affixed to the equipment has not been intentionally
defaced or removed.
4. The equipment is used in a commercial application as defined by ANSI Z83.11/CSA 1.8.
To activate the Crown Verity warranty please visit our warranty registration page.
https://crownverity.ca/ support#faqs. This warranty is limited to the original purchaser and
cannot be transferred.
WARRANTY COVERAGE
LIMITED WARRANTY
Crown Verity will warrant replacement parts for Canada and the Continental United States for
the following period:
Limited Lifetime* Warranty: The stainless-steel grill body and cooking grates are warranted to
be free from defects in material and workmanship when subjected to normal domestic use and
maintenance for the lifetime of the original purchaser. This warranty excludes surface

Page 36 of 43
corrosion, scratches, and discoloration which may occur during normal use. Failure to perform
required maintenance will void this warranty.
* Applies to all grills sold after January 1, 2015 or with a serial number higher than 21010.
Limited Ten-Year Warranty: The stainless steel gas burners are warranted to be free from
defects in material and workmanship when subjected to normal domestic use and maintenance
for ten (10) years from the original date of purchase. Failure to perform required maintenance
will void this warranty.
Limited One-Year Warranty: For a period of one (1) year from the original date of purchase,
Crown Verity will replace, or repair parts found to be defective at no cost to the original
purchaser. This includes the cost of shipping replacement parts and, where necessary, service
labor at prevailing local rates by a Crown Verity authorized service person. Service will be
provided during normal business hours and must be authorized in advance by Crown Verity.
The limited one-year warranty covers Crown Verity Grills, Griddles, Fryers, Steamers, Sinks &
Pizza Ovens.
WARRANTY LIMITATIONS
The Crown Verity warranty does not apply to damages caused by:
• Negligence.
• Installation or start-up, damages or problems caused by improper installation or use.
• Unauthorized repair by anyone other than a Factory Authorized Service Agent.
• Erratic voltages or gas supply.
• Air and Gas adjustment.
• Damage caused by nature.
• Ordinary wear and tear.
• Display models are sold “as is”. If you have purchased a display model, please be
advised that it is sold “as is” and that it is subject to the following warranty exclusions:
any exterior or cosmetic damage is non-warrantable; any missing components will be
replaced at consumer’s expense; major handling damage to manifold, valve and ignition
system will be serviced at consumer’s expense; all other warranties will remain in effect.
• The equipment is properly installed per Crown Verity’s Operator’s Manual and by a
qualified professional installer, including all start-up checks.
• The cost of a service call to diagnose complaint.
• Modification to Crown Verity product will void related warranties.

Page 37 of 43
WARRANTY EXCLUSIONS
The Crown Verity warranty does not apply to labor or repairs required for:
• Batteries, fuses, and other wearable items
• Door adjustments and or lid adjustments
• Tightening of screws or fasteners
• Damage in shipment
• Adjustments and cleaning of main burners pilot burners or orifices
• Accessories such as brushes, spatulas, and cylinders
• Normal discoloration of materials
Page 38 of 43
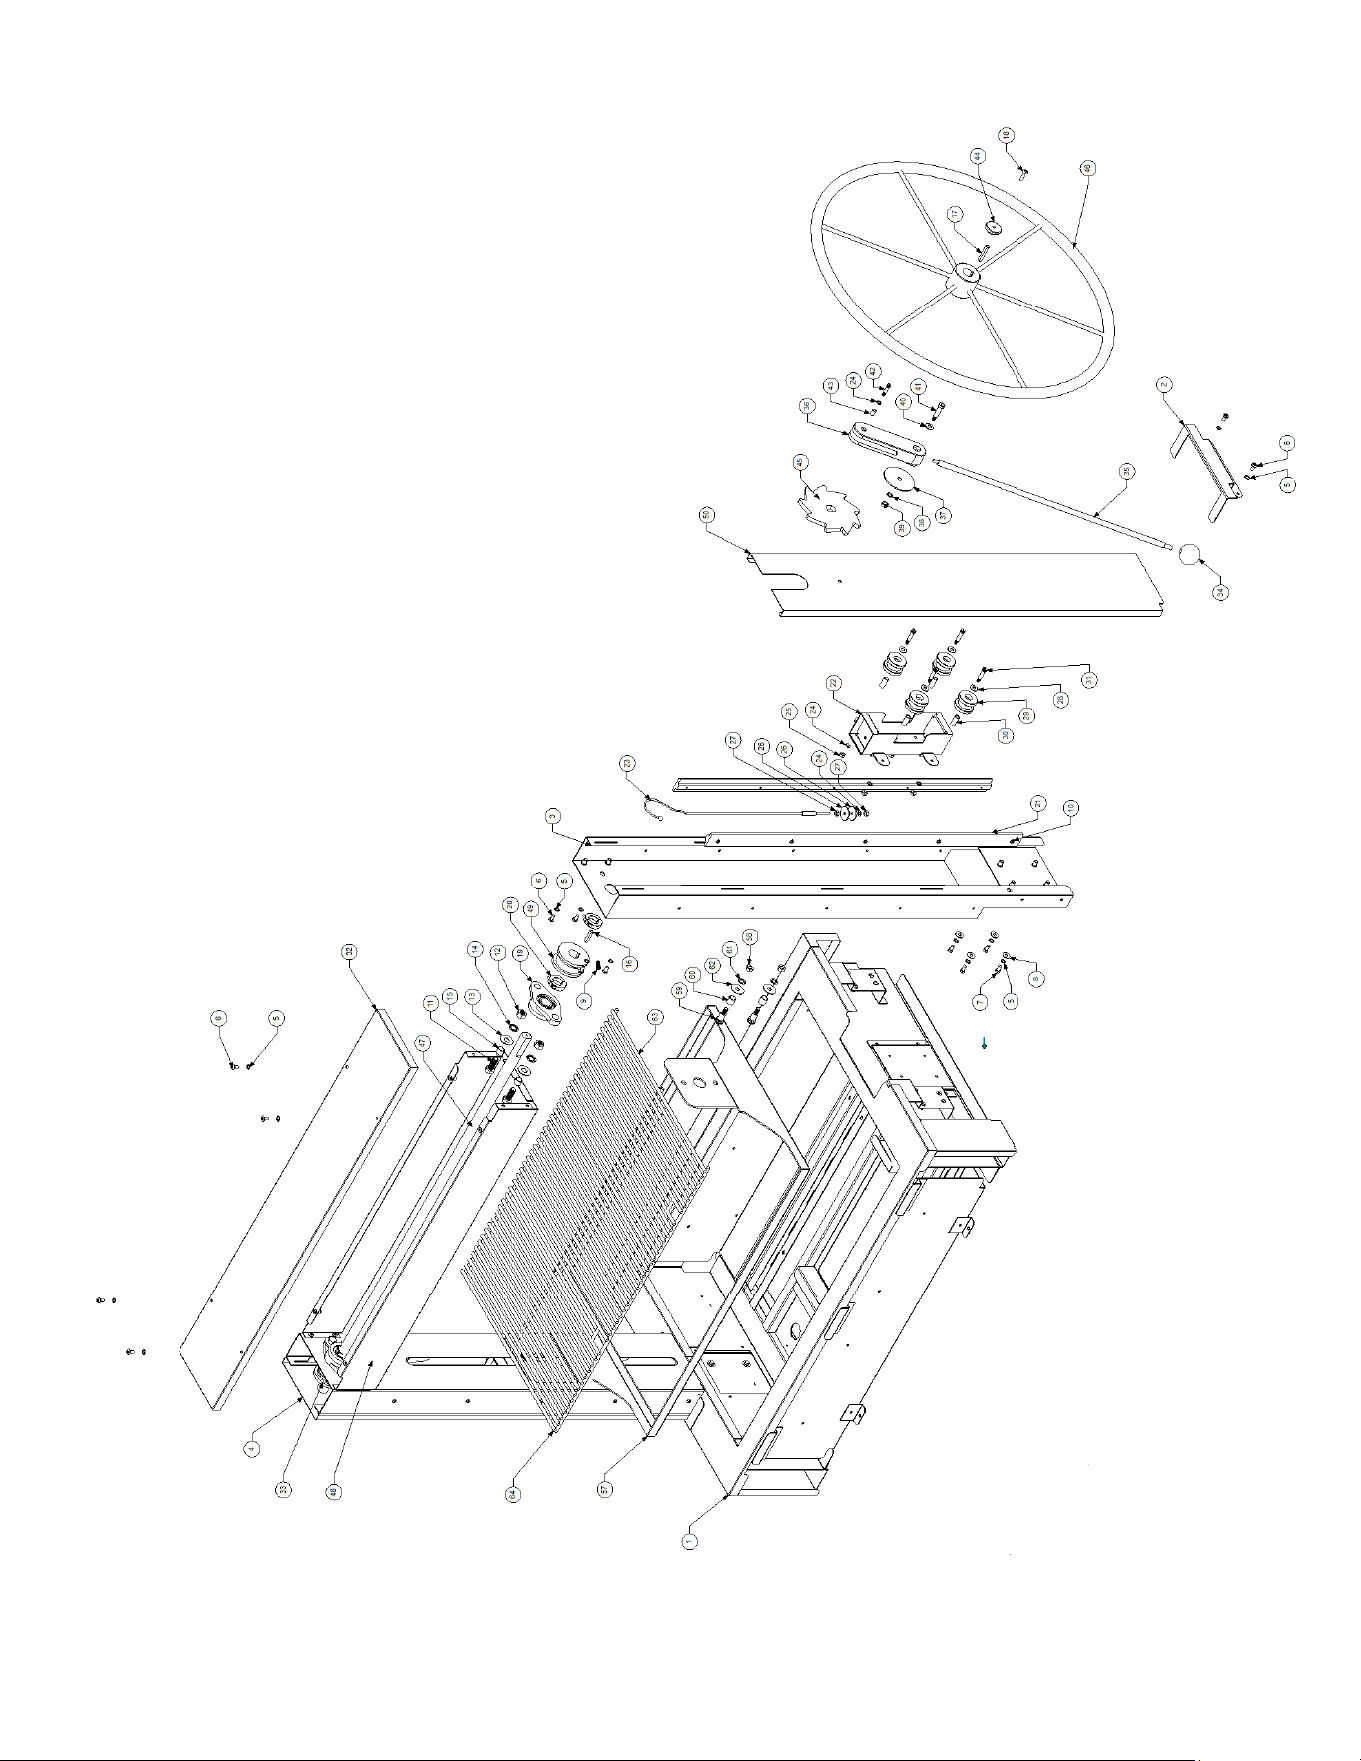
Exploded Parts View – IAG36
Page 39 of 43

Page 40 of 43
Grill Parts List – IAG36
Item
No.
Qty
Part Number
Description
1
1
IAG36-1
36" Fire Box Assembly
2
2
ZCV-IAG-1
Vertical Column Collar
3
2
ZCV-IAG-4
Vertical Column Weld Assembly
4
1
ZCV-IAG-2
Vertical Column Cover
5
26
ZCV-2018
Lock Washer, Internal Tooth, 1/4"
6
4
ZCV-2501
Machine Screw 1/4-20 x 1/2" SS
7
8
ZCV-2026
Hex Cap Screw, 1/4-20x5/8" (Handles)
8
10
ZSC-9216
Washer 1/4 - 20 For PHS-5
9
2
ZCV-1074
Socket Head Screw, 1/4"-20 Thread Size, 3/4" Long
10
20
ZCV-2073
MACHINE SCREW, #10-24x1/2", PAN PHILLIPS (MANIFOLDS)
11
4
ZCV-1075
Hex Head Screw, 1/2"-13 Thread Size, 1-1/4" Long
12
4
ZCV-2022
Hex Nut, 1/2"-13 Thread Size
13
4
ZCV-2146
Washer for 1/2" Screw Size, 0.531" ID, 1.25" OD
14
4
ZCV-1076
Internal-Tooth Lock Washer for 1/2" Screw Size, 0.512" ID, 0.9" OD
15
4
ZCV-1077
Sleeve Bearing for 1/2" Shaft Diameter and 5/8" Housing ID, 1/2" Long
16
2
ZCV-IAG-14
Stainless Steel Machine Key .250 x 1.250
17
1
ZCV-IAG-15
Stainless Steel Machine Key .250 x 1.750
18
1
ZCV-2198
Machine Screw, 1/4-20x7/8", Round-Slot, (Tank Brkt)
19
2
ZCV-1AG-6-2
AMCAN Bearing MUCSFL205-16G
20
4
ZCV-1AG-6-1
AMCAN Shaft Collar SS2SC-16SS
21
4
ZCV-IAG-9
Guide Rail
22
2
ZCV-IAG-5-1
Carrier Body Weld Assembly
23
2
ZCV-IAG-5-3
Lift Cable Assembly
24
11
ZCV-2018
LOCK WASHER, INT. TOOTH, 1/4"
25
8
ZSC-9215
LOCK NUT 1/4 - 20
26
4
ZCV-2019
Fender Washer, 1/4" x 1.25" (Handles)
27
4
ZCV-1071
.250-28 Hex Nut, SS
28
8
ZCV-2012
Flat Washer 5/16" (RD)
29
8
ZCV-IAG-5-2
Carrier Wheel
30
8
ZCV-1073
.3125 x 1.000 MMC Sleeve Bearing
31
8
ZCV-1072
Shoulder Screw, 5/16" Shoulder Dia.1" Shoulder Length
32
1
ZCV-IAG36-3-6
Horizontal Channel Cover
33
1
ZCV-IAG-8
Cable Reel LH
34
1
ZCV-IAG-12-2
Stainless Knob
35
1
ZCV-IAG-12-3
Brake Lever Threaded Rod
36
1
ZCV-IAG-12-4
Brake Lever Swivel

Page 41 of 43
37
1
ZCV-IAG-12-5
Washer Plate 3" Diameter with 5/16 Mounting Hole
38
1
ZCV-2013
LOCK WASHER,5/16", INT. TOOTH (MCB LEGS)
39
1
ZCV-2506
REVERSE LOCK NUT S/S REV LOK 5/16-18
40
1
ZCV-2009
FLAT WASHER, SML. OD, 3/8 ID x .75" OD -- RD'S
41
1
ZCV-1078
Screw, 3/8" Shoulder Diameter, 1-1/4" Shoulder Length, 5/16"-18 Thread
42
1
ZCV-1079
Shoulder Screw, 1/4" Shoulder Diameter, 3/4" Shoulder Length, 1/4"-20 Thread
43
1
ZCV-1080
Sleeve Bearing for 1/4" Shaft Diameter and 3/8" Housing ID, 1/2" Long
44
1
ZCV-IAG-11
Wheel Lock
45
1
ZCV-IAG-10
Gear Brake
46
1
ZCV-IAG-13
30" 6 Spoke Wheel - 1" Straight Shaft
47
1
ZCV-IAG36-3-4
Drive Shaft Wheel Option
48
1
ZCV-IAG36-3-5
Horizontal Channel Weld Assembly No Lights
49
1
ZCV-IAG-7
Cable Reel LH
50
1
ZCV-IAG-3
Vertical Column Cover Wheel
51
1
ZCV-EMC-GB-1002
EMC Face Plate End Cap Asy RH
52
1
ZCV-EMC-GB-1003
EMC Face Plate End Cap Asy LH
53
1
IAG36-1-5-1000-1
IAG36 Front Face No Lights
54
2
.250-20 Rivnut 18 GA
.250-20 Rivnut 18 GA
55
1
ZCV-2003-2016
Name Plate, CV New Logo 2016, Bronze
56
3
ZCV-2016
Retainer Clip, Bronze Name Plate, -- RD'S
57
1
ZCV-IAG36-4-1
Grate Support Weld Assembly
58
4
ZCV-2011
Nut, Full Hex, 3/8"-16
59
4
ZCV-1081
Shoulder Screw, 1/2" Shoulder Diameter, 3/4" Shoulder Length
60
4
ZCV-1082
Sleeve Bearing for 1/2" Shaft Diameter and 5/8" Housing ID, 5/8" Long
61
4
ZCV-2010
Lock Washer, Internal Tooth, 3/8"
62
4
ZCV-1083
Washer 0.406" ID, 1.250" OD, 0.043"-0.057" Thick
63
1
ZCV-2170
Grate, Cooking, 12", MCB
64
1
ZCV-2150
Grate, Cooking, 22", MCB
65
1
ZCV-IAG36-2-1
IAG36 Cabinet Weld Assembly
66
1
ZCV-IAG36-2-2
IAG36 Ash Tray, Modular, Metal Components
67
1
ZCV-EMC-BC42-5-1000
BC42 Hinged Vertical Door LH Weld Asy
68
2
ZCV-EMC-DH2
Cast Handle Assembly Small
69
2
ZCV-4001
Hinge 9238 Inlay
70
1
ZCV-EMC-BC42-2-1000
BC42 Hinged Vertical Door RH Weld Asy
71
2
ZCV-4001
Hinge 9238 Overlay
72
1
ZCV-EMC-BC42-4
SEE SHEET 2
73
4
Rubber Bumper A0759
Rubber Bumper A0759
74
2
ZCV-2029
Front Shelf Mounting Bolt, SS -- (RFS) - Shorter Thread
75
2
ZCV-2026
HEX CAP SCREW, 1/4-20x5/8" (HANDLES)
Page 42 of 43
76
4
ZCV-4000
SS304 - Adjustable Leg 100-160mm
77
16
ZSC-2078
Hex Cap Screw, 5/16-18 X 1/2", Zinc (PHS)
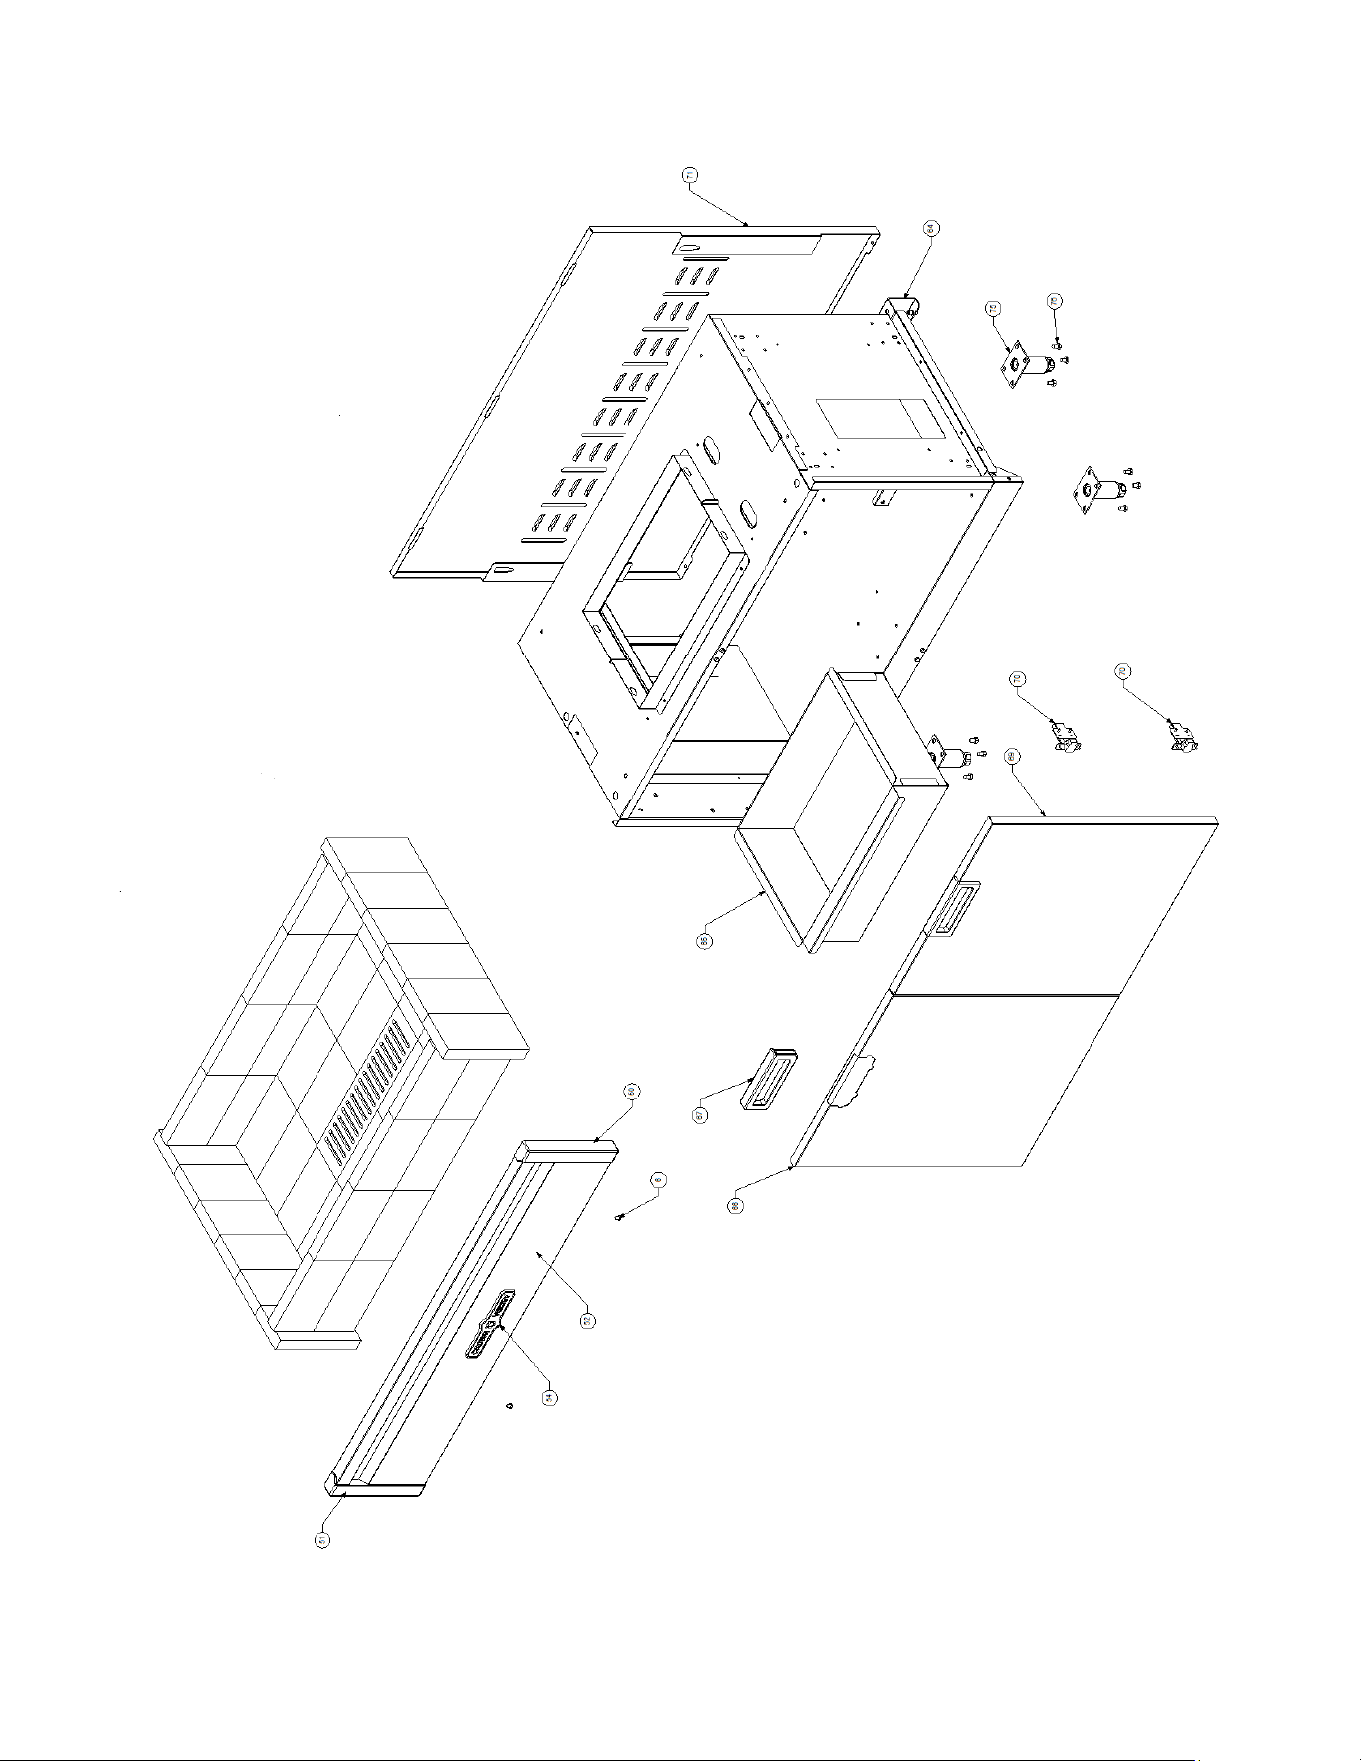
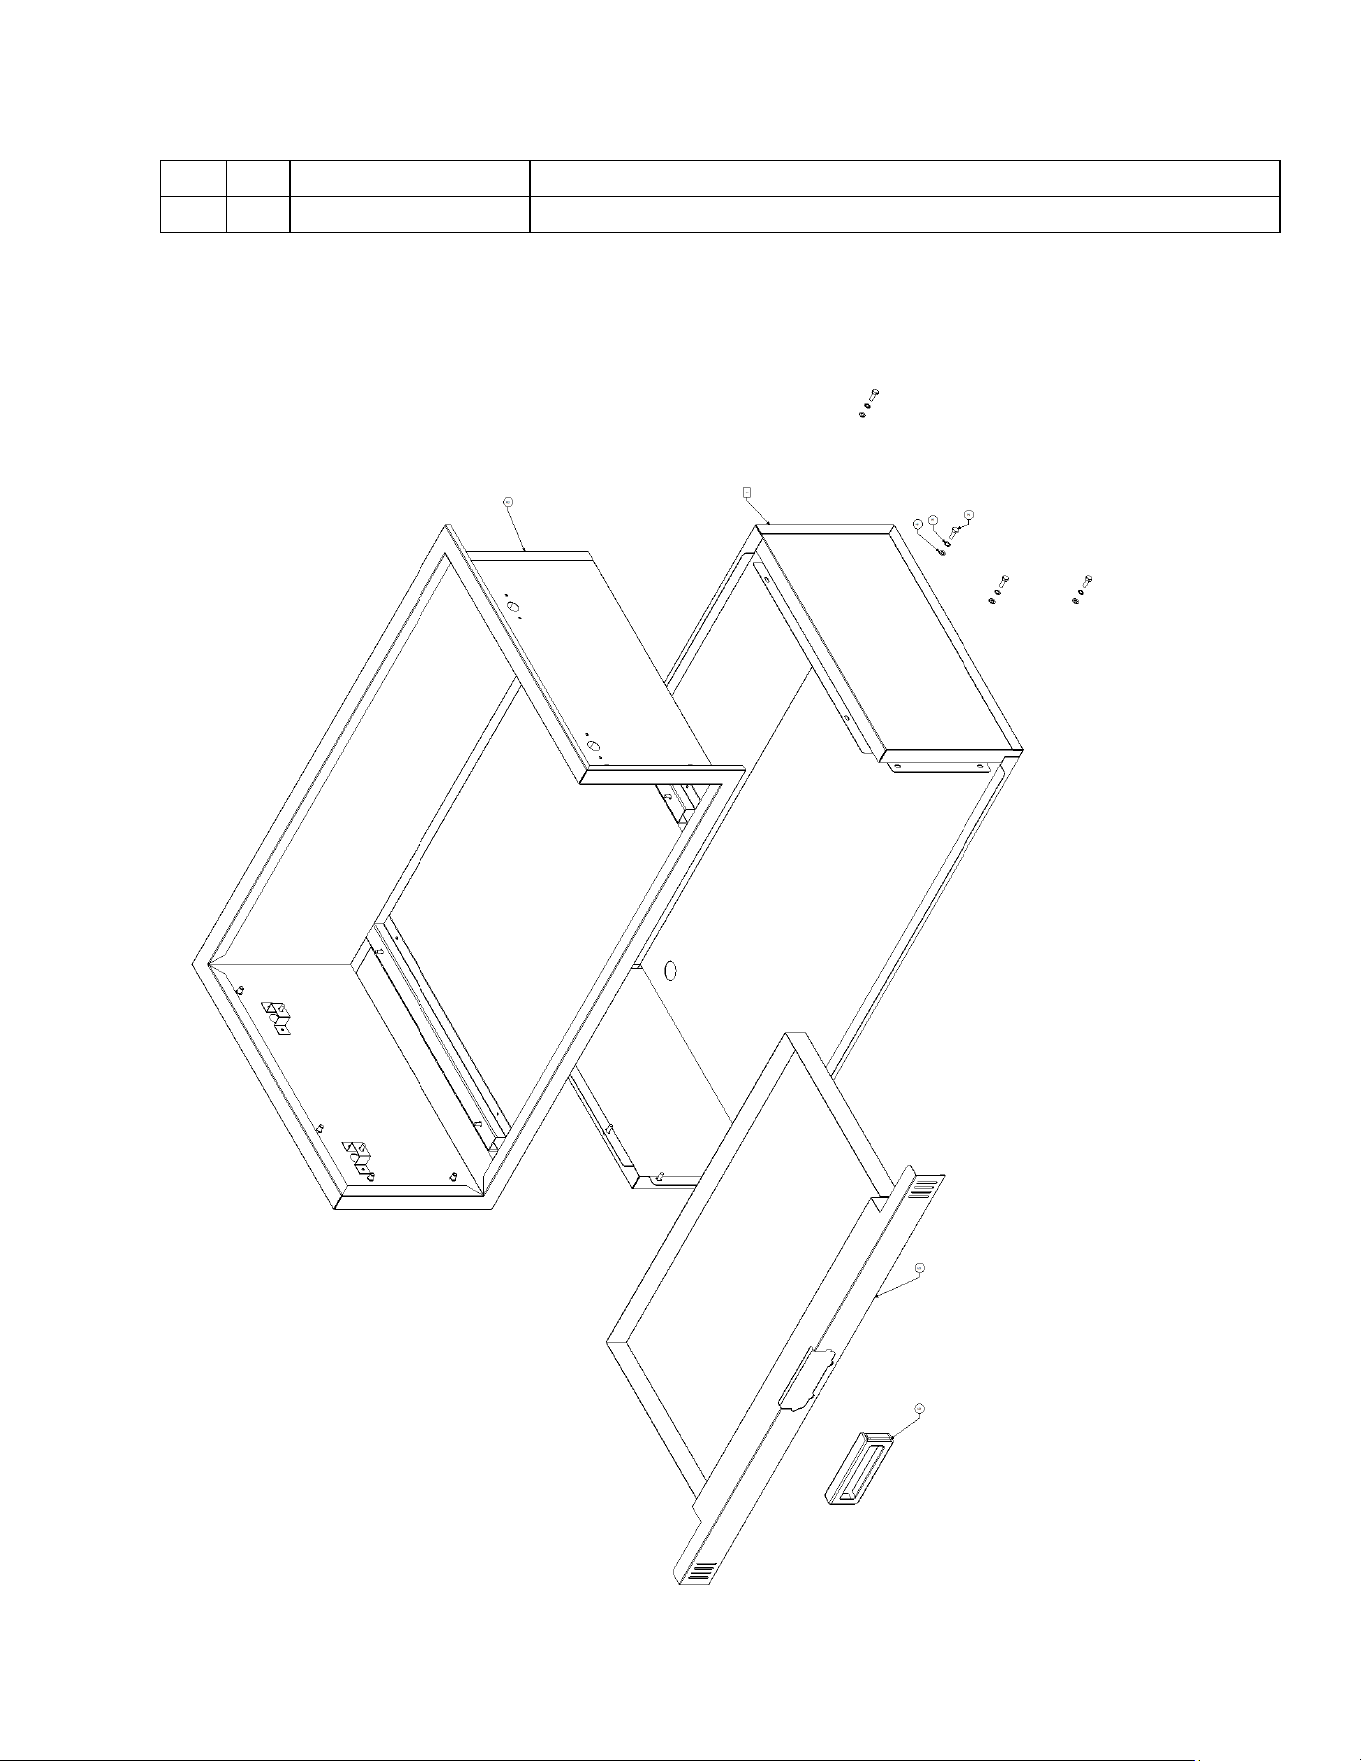
Exploded Parts View – IBIAG36 (Shell only)

Page 43 of 43
Grill Parts List – IBIAG36 (Shell Only)
Item
No.
Qty
Part Number
Description
1
1
IAG36-7-3-1000
IAG36 Built-In Shell Insulating Jacket Weld Assembly
2
16
ZCV-2026
Hex Cap Screw, 1/4-20x5/8" (Handles)
3
16
ZCV-2018
Lock Washer, Internal Tooth, 1/4"
4
16
ZSC-9216
Washer 1/4 - 20 For PHS-5
5
1
IAG36-7-1-1000
IAG36 Built-In Ash Drawer
6
1
ZCV-EMC-DH2
Cast Handle Assembly Small
8
1
IAG36-7-2
IAG36 Built-In Shell Weld Assembly