Thank you for your purchase!
Instructions
made easy
Register your
product
Discover more innovative
lighting at
www.enbrightenme.com.
Read instructions or watch
an easy-to-follow video.
Scan code or visit
byjasco.com/85102i.
Receive exclusive deals and
register your product.
Scan code or visit
byjasco.com/deals.
Like our product?
Leave a review on your
favorite retailer website
or amazon.com.
Having problems?
Let us know how we
can help.
Call 1-800-654-8483, M-F
Permanent Outdoor Wi-Fi
Eternity
™
Lights
Congrats on your Enbrighten VIBE Eternity Lights! These dynamic LEDs showcase your
lifestyle with endless customizations and smart controls using the free Enbrighten app. Plus,
they’re designed to last for a lifetime! Please read this entire manual and all safety warnings
before installing. Save these instructions for later.
Models:
85102, 85103
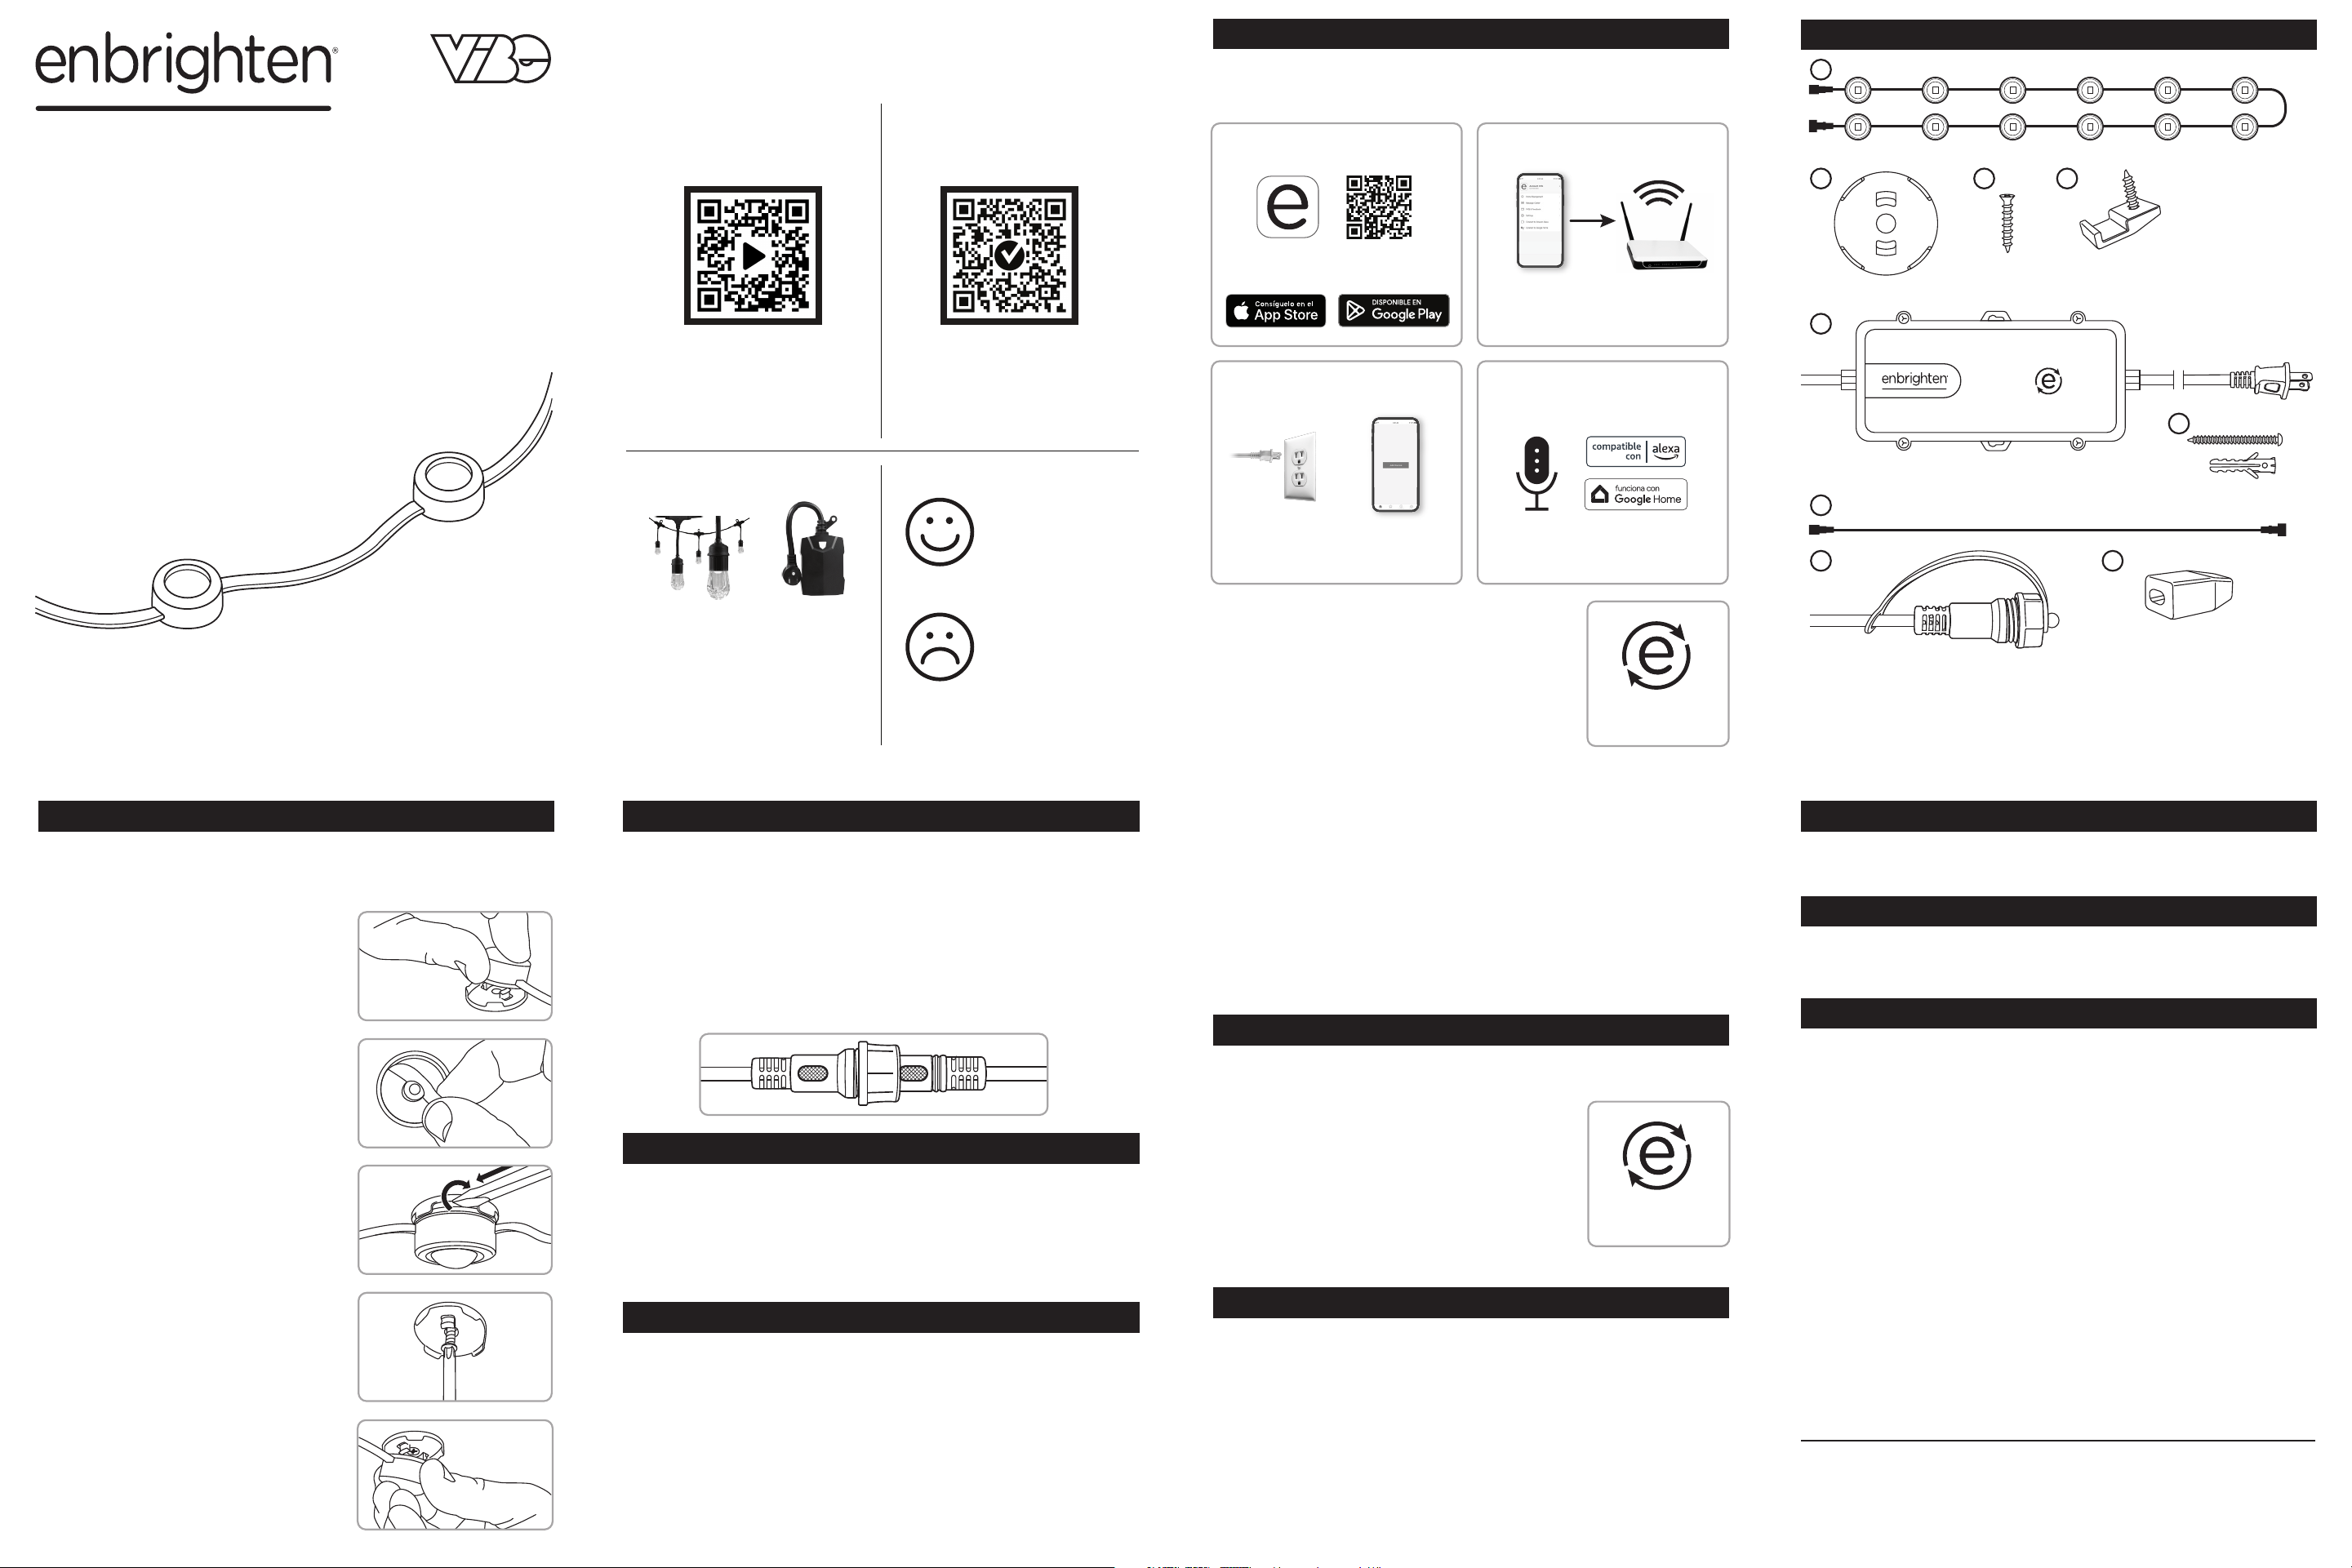
INSIDE THE BOX
INSTALLATION LINKING ADDITIONAL STRANDS
MANUAL CONTROL
FCC/ISED
WARRANTY INFORMATION
SPECIFICATIONS
WARNINGS
Download the app
Scan the QR code or search Enbrighten on the
Apple App Store or on Google Play
Remotely operate your Eternity Lights with the easy-to-use Enbrighten
app. Follow the available instructions and resources to set up your smart
device.
Voice control works with Amazon
Alexa or Google Assistant
Select “Support” in the Enbrighten app or follow
the steps in the Amazon Alexa or Google Home
app to connect your Enbrighten account
1. 2.
Setup and installation
Add devices, control
the Eternity Lights
from anywhere and
create schedules
3. 4.
Setup and installation
Voice control
IMPORTANT — PLEASE READ
Refer to the manual or visit www.byjasco.com for limitations and restrictions on warranties and the product registration information.
This Jasco product has a limited-lifetime replacement warranty. Please contact our U.S.-based Consumer Care at 1-800-654-8483
(option 1), M-F or www.enbrightenme.com/warranty if the unit should prove defective within the warranty period.
A. Light strand x9
B. Mounting brackets x110
C. Bracket screws x110
D. Power cord clips x11
E. Power supply x1
F. Power supply screws/anchors x2
G. 10ft. extension cable x1
H. Plastic end cap
I. Silicone end cap
NOTE: When installing, ideal temperature
for tape application is between 70-100°F
(21-38°C). Surface temperatures below
50°F (10°C) is NOT recommended.
1. Uncoil the power supply cord (F) and
Eternity Lights (A) and plan your
installation. Make sure an outlet is
within reach.
2. Mount the power supply (F) using the
included screws and anchors (G). Use
the power cord clips (D) to secure the
power cord as needed.
3. Attach each bracket (B) to the back
of LED pucks — press until they click
into place.
WARNING: To avoid damage or
excess strain, do not stretch the cord
between the pucks when installing.
4. IMPORTANT: Steps 5-8 should be
done one LED puck at a time.
5. Peel the red paper backing from the
tape and firmly press the combined
LED puck and bracket onto the
mounting surface.
6. Use a flathead screwdriver to gently
pop the LED puck out of the bracket.
7. Use a #1 Phillips-head screwdriver to
secure the bracket with the included
screws (C).
8. Reattach the LED puck to the secured
mounting bracket.
9. Repeat the process for each LED puck.
10. Secure the cord length between the
LED pucks and around corners using
the flat cord clips (E), as needed.
Fasten the clip over the cord and
secure it using the pre-installed screw.
Install the lights on eaves, balconies, pergolas and more using the
included screws and double-sided tape. Ensure the intended surface
is clean and dry before proceeding. (Scan QR code for alternate
installation methods.)
Link multiple sets for a total length of 200ft. (60.9m).
IMPORTANT: Linking strands over 150ft. (45.5m) will lead to reduced
lumen output.
1. Unplug the power supply.
2. Loosen the plastic end cap (I) on the end of the first strand and
plug in the new set of lights.
3. Fasten the gasket to secure the connection.
4. Install each strand following the installation instructions.
5. Plug in the power supply. When plugged back in, the power
supply will register the newly linked strands.
Press the pairing button on the power supply to manually cycle
through the following modes:
Suppliers Declaration of Conformity | Model #: 85102, 85103 | Jasco Products Co., 10 E. Memorial Rd., Oklahoma City, OK
73114, www.byjasco.com
This device complies with part 15 of the FCC and ISED license-exempt RSS standards. Operation is subject to the following
two conditions: (1) this device may not cause harmful interference, and (2) this device must accept any interference received,
including interference that may cause undesired operation.
FCC NOTE: The manufacturer is not responsible for any radio or TV interference caused by unauthorized modifications to
this equipment. Such modifications could void the user’s authority to operate the equipment.
NOTE: This equipment has been tested and found to comply with the limits for a Class B digital device, pursuant to Part 15 of
the FCC Rules. These limits are designed to provide reasonable protection against harmful interference in a residential
installation. This equipment generates, uses and can radiate radio frequency energy and, if not installed and used in
accordance with the instructions, may cause harmful interference to radio communications. However, there is no guarantee
that interference will not occur in a particular installation. If this equipment does cause harmful interference to radio or
television reception, which can be determined by turning the equipment o and on, the user is encouraged to try to correct
the interference by one or more of the following measures:
— Reorient or relocate the receiving antenna.
— Increase the separation between the equipment and receiver.
— Connect the equipment into an outlet on a circuit dierent from that to which the receiver is connected.
— Consult the dealer or an experienced radio/TV technician for help.
CAN ICES-3(B)/NMB-3(B)
1. Amber, 2200K
2. Warm white, 3000K
3. Daylight, 5000K
4. Color fade
5. Stop color fade
6. Red
7. Green
8. Blue
9. Yellow
10. Purple
11. Pink
12. Orange
13. Teal
14. Christmas
15. July 4th
16. Rainbow
17. Halloween
18. Twinkle
19. OFF
ADDING 10FT. EXTENSION CABLE
Connect anywhere along the strand, between linked strands. Ensure
the lights are unplugged before proceeding. The total combined
length of strands and extensions cannot exceed 200ft. (60.9m).
Ensure the safety cap is covering any unused end of the cord.
NOTE: For proper light operation, do not install the extension cable
between the power supply and first light strand.
TRIMMING THE END OF THE STRAND
The very last light strand in a series of strands may be cut to remove
unwanted LED pucks.
WARNING: Completely unplug the power supply before proceeding.
DO NOT remove more than eight LED pucks from a strand. A minimum
of four must remain for the power supply to register the lights. Strands
cannot be cut, then reconnected. Cutting a strand will reduce the
ingress protection (IP) rating of the product. DO NOT put cut strands
in a location where water may accumulate.
1. Unplug the power supply.
2. Using wire cutters, cut the light strand in a straight line leaving at
least 1in. of cord for easy installation of the silicone end cap (J).
3. Firmly push the silicone end cap over the cut cord until it is firmly
in place. To ensure the best water seal, apply a small amount of
silicone caulk sealant in the end cap before installation.
4. Plug in the power supply.
5. In the Enbrighten app, manually disable the removed LED pucks
following the available instructions and resources.
Model: 85102, 85103
Electrical Ratings Input: 120VAC, 60Hz
Length: 150ft.
Maximum Length: 200ft. (Linking strands over 150ft. will lead to reduced lumen output)
Input power: 91.8W, 1.51A
Output power: 30VDC, 78.8W, 2.63A
WARNING: When using outdoor portable luminaires, basic safety precautions should always be followed to reduce the risk of fire,
electrical shock and personal injury, including the following:
a) Ground fault circuit interrupter (GFCI) protection is to be provided on the circuit(s) or outlet(s) to be used for the wet location
portable luminaire. Receptacles are available having built-in GFCI protection and can be used for this measure of safety.
b) Use only with an extension cord for outdoor use, such as an extension cord of cord type SEW, SEOW, SEOOW, SOW, SOOW,
STW, STOW, STOOW, SJEW, SJEOW, SJEOOW, SJW, SJOW, SJOOW, SJTW, SJTOW, or SJTOOW.
WARNING: Keep packaging bags away from babies and children. Do not use in cribs, beds, carriages, or playpens. The thin film may
cling to nose and mouth and prevent breathing.
RISK OF ELECTRIC SHOCK
• RECEPTACLE OUTLETS USED FOR POWERING ETERNITY LIGHTS SHALL COMPLY WITH ALL NATIONAL
AND LOCAL ELECTRICAL CODES. CONSULT LOCAL ELECTRICIAN IF UNSURE OF COMPLIANCE
REQUIREMENTS.
• DO NOT SUBMERSE.
• DO NOT USE AROUND AQUARIUMS.
• EAVE LIGHTS ARE A WET LOCATION PRODUCT AND HAVE NO SERVICEABLE PARTS.
• DO NOT USE WITH EXTENSION CORD NEAR WATER OR WHERE WATER MAY ACCUMULATE.
• KEEP LAMPS AT LEAST 16FT. (4.8M) FROM POOLS AND SPAS.
• KEEP PLUGS AND RECEPTACLES DRY.
• AVOID DAMAGE TO THE CORDS AND LAMP ASSEMBLIES DURING INSTALLATION. PERIODICALLY INSPECT
THE EAVE LIGHTS FOR PHYSICAL DAMAGE OR OTHER DAMAGE CAUSED BY OUTDOOR EXPOSURE TO THE
ELEMENTS.
• REPLACE ANY DAMAGED EAVE LIGHT STRINGS.
• DO NOT INSTALL IN LOCATIONS WHERE EAVE LIGHTS CAN BE STEPPED ON.
• ENSURE ETERNITY LIGHTS ARE UNPLUGGED FROM POWER DURING INSTALLATION.
• CHILDREN SHOULD NOT BE ALLOWED TO PLAY WITH EAVE LIGHTS.
• UL RECOMMENDS TESTING RECEPTACLES EVERY MONTH TO ENSURE PROPER OPERATION.
RISK OF FIRE
• ETERNITY LIGHTS ARE DESIGNED TO BE LINKED BY USING THEIR ELECTRICAL PLUGS AND RECEPTACLES
TO A MAXIMUM OF 200FT.
• EAVE LIGHT INTERCONNECTING RECEPTACLES ARE INTENDED ONLY FOR THE LINKING OF COMPATIBLE
EAVE LIGHT STRINGS. DO NOT USE EAVE LIGHT RECEPTACLES FOR ANY OTHER ELECTRICAL PURPOSE.
• NOT INTENDED FOR INSTALLATION OF POWER SUPPLY, LED PUCK, OR CORDS IN CEILINGS, SOFFITS,
CABINETS, ATTICS OR OTHER ENCLOSED SPACES.
MADE IN THAILAND
Distributed by Jasco Products Company LLC,
10 E. Memorial Rd., Oklahoma City, OK 73114.
©JASCO 2024 | 85102, 85103 | 09/30/24 v1
PATENTS/PATENTS PENDING
WWW.BYJASCO.COM/PATENTS
App Store is a service mark of Apple Inc.
Google, Google Play and Google Home are
trademarks of Google LLC.
Amazon, Alexa and all related logos are
trademarks of Amazon.com, Inc. or its aliates.
A
B
x9
x1
x2
x2
x110
E
G
F
C
x110
D
x64
Place the lights in the
desired area to test
Wi-Fi strength before
installing following the
provided instructions
SETUP
Pairing button
Step 3
Step 5
Step 7
Step 8
H I
Step 6
Create an account in
the Enbrighten app
Pair the Eternity
Lights near your
router*
*After pairing, download any app or device updates
to access the latest features.
Test the lights
Plug your lights into an outlet. Press the pairing
button on the power supply a few times to
ensure all the LEDs work.
Pairing button
PATENTES/PATENTES PENDIENTES
WWW.BYJASCO.COM/PATENTS
¡Gracias por su compra!
Instrucciones
fáciles
Registre su
producto
Descubra una iluminación más
innovadora en
www.enbrightenme.com.
Lea las instrucciones o mire el
video con el paso a paso.
Escanee el código o visite
byjasco.com/85102i.
Recibe ofertas exclusivas
y registra tu producto.
Escanee el código o visite
byjasco.com/deals.
¿Le gusta nuestro
producto?
Deje una reseña en el
sitio web de su
comercio favorito o en
amazon.com.
¿Tiene algún
problema?
Díganos cómo podemos
ayudar.
Llame al 1-800-654-8483,
de lunes a viernes
Luces permanentes wifi
Eternity
™
para exterior
Felicitaciones por sus luces Enbrighten VIBE Eternity! Estos LED dinámicos muestran su
estilo de vida con infinitas personalizaciones y controles inteligentes mediante la aplicación
Enbrighten gratuita. Además, ¡están diseñados para durar toda la vida! Lea este manual
completo y todas las advertencias de seguridad antes de realizar la instalación. Guarde
estas instrucciones para más tarde.
Modelos:
85102, 85103
DENTRO DE LA CAJA
INSTALACIÓN UNIR TIRAS DE LUCES ADICIONALES
CONTROL MANUAL
FCC/ISED
INFORMACIÓN DE GARANTÍA
ESPECIFICACIONES
ADVERTENCIAS
Descarga la aplicación
Escanee el código QR o busque Enbrighten en
Apple App Store o en Google Play
Opere de forma remota sus luces Eternity con la aplicación Enbrighten
fácil de usar. Siga las instrucciones y los recursos disponibles para
configurar su dispositivo inteligente.
El control por voz funciona con Amazon Alexa
o Google Assistant
Seleccione "Soporte" en la aplicación Enbrighten
o siga los pasos en la aplicación Amazon Alexa o
Google Home para conectar su cuenta
Enbrighten
1. 2.
Configuración e instalación
3.
Configuración e instalación
Control de voz
IMPORTANTE, LEER
Consulte el manual o visite www.byjasco.com para conocer las limitaciones y restricciones de las garantías y la información de registro del producto.
Este producto Jasco tiene una garantía de reemplazo de por vida limitada. Comuníquese con nuestro Servicio de atención al consumidor con sede en EE.
UU. al 1-800-654-8483 (opción 1), de lunes a viernes o www.byjasco.com si la unidad resulta defectuosa dentro del período de garantía.
A. Tira de luces x9
B. Soportes de montaje x110
C. Tornillos para soportes x110
D. Clips para cordón plano x64
E. Fuente de alimentación x1
F. Tornillos/anclajes de fuente de
alimentación x2
G. Cable de extensión de 10 pies (3m) x1
H. Tapa de plástico
I. Tapa de silicona
NOTA: Al realizar la instalación, la
temperatura ideal para la aplicación de la
cinta es entre 70 y 100 °F (21 y 38 °C). NO
se recomiendan temperaturas de la
superficie inferiores a 50 °F (10 °C).
1. Desenrolle el cable de alimentación (F) y
las luces Eternity (A) y planifique su
instalación. Asegúrese de que haya un
tomacorriente a su alcance.
2. Monte la fuente de alimentación (F)
utilizando los tornillos y anclajes
incluidos (G). Utilice los clips del cable
de alimentación (D) para asegurar el
cable de alimentación según sea
necesario.
3. Coloque cada soporte (B) en la parte
posterior de los discos LED; presione
hasta que encajen en su lugar.
ADVERTENCIA: Para evitar daños o
tensión excesiva, no estire el cable entre
los discos durante la instalación.
4. IMPORTANTE: Los pasos 5 a 8 deben
realizarse con un disco LED a la vez.
5. Despegue el papel rojo de la cinta y
presione firmemente el disco LED y el
soporte combinados sobre la superficie
de montaje.
6. Utilice un destornillador de punta plana
para sacar suavemente el disco LED del
soporte.
7. Utilice un destornillador Phillips n.º 1 para
fijar el soporte con los tornillos incluidos (C).
8. Vuelva a colocar el disco LED en el
soporte de montaje asegurado.
9. Repita el proceso para cada disco LED.
10. Asegure la longitud del cable entre los
discos LED y alrededor de las esquinas
usando los clips para cables planos (E),
según sea necesario. Fije el clip sobre el
cable y asegúrelo con el tornillo
preinstalado.
Instale las luces en aleros, balcones, pérgolas y más usando los
tornillos incluidos y la cinta de doble cara. Asegúrese de que la
superficie prevista esté limpia y seca antes de continuar. (Escanee el
código QR para conocer métodos de instalación alternativos).
Una varios juegos de luces para obtener una longitud total de 200 pies (60.9m).
IMPORTANTE: Unir tiras de luces de más de 150 pies (45.5m) puede
reducir la salida de lúmenes.
1. Desenchufe la fuente de alimentación.
2. Afloje la tapa de plástico (I) en el extremo de la primera tira y
conecte el nuevo juego de luces.
3. Fije la junta para asegurar la conexión.
4. Instale cada tira siguiendo las instrucciones de instalación.
5. Conecte la fuente de alimentación. Cuando se vuelva a enchufar, la
fuente de alimentación registrará las tiras recién conectadas.
Presione el botón de emparejamiento en la fuente de alimentación
para recorrer manualmente los siguientes modos:
Declaración de conformidad de proveedores | Modelo n.º 85102, 8503 | Jasco Products Co., 10 E. Memorial Rd., Oklahoma City, OK 73114,
www.byjasco.com.
Este dispositivo cumple con la Parte 15 de los estándares RSS exentos de licencia de la FCC y de ISED. El funcionamiento está sujeto a las
dos condiciones siguientes: (1) este dispositivo no puede causar interferencias dañinas y (2) este dispositivo debe aceptar cualquier
interferencia recibida, incluidas las interferencias que puedan causar un funcionamiento no deseado.
NOTA de la FCC: El fabricante no es responsable de ninguna interferencia de radio o televisión causada por modificaciones no
autorizadas a este equipo. Dichas modificaciones podrían anular la autoridad del usuario para operar el equipo.
NOTA: Este equipo ha sido probado y cumple con los límites para un dispositivo digital Clase B, de conformidad con la Parte 15 de las
reglas de la FCC. Estos límites están diseñados para proporcionar una protección razonable contra interferencias dañinas en una
instalación residencial. Este equipo genera, usa y puede irradiar energía de radiofrecuencia y, si no se instala y usa de acuerdo con las
instrucciones, puede causar interferencias dañinas en las comunicaciones por radio. Sin embargo, no hay garantía de que no se produzcan
interferencias en una instalación en particular. Si este equipo causa interferencias dañinas en la recepción de radio o televisión, lo cual se
puede determinar encendiendo y apagando el equipo, se recomienda al usuario que intente corregir la interferencia mediante una o más
de las siguientes medidas:
— Reorientar o reubicar la antena receptora.
— Aumentar la distancia entre el equipo y el receptor.
— Conecte el equipo a una toma de corriente de un circuito diferente al que está conectado el receptor.
— Consulte al distribuidor o a un técnico experimentado en radio/TV para obtener ayuda.
CAN ICES-3(B)/NMB-3(B)
1. Ámbar, 2200K
2. Blanco cálido, 3000K
3. Luz, 5000K
4.
Desvanecimiento del color
5.
Detener la pérdida de color
6. Rojo
7. Verde
8. Azul
9. Amarillo
10. Púrpura
11. Rosa
12. Naranja
13. Verde azulado
14. Navidad
15. 4 de julio
16. Arcoíris
17. Noche de brujas
18. Centelleo
19. APAGADO
AGREGANDO 10 PIES CABLE DE EXTENSIÓN
Conéctelo en cualquier lugar a lo largo de la tira, entre tiras unidas. Asegúrese de que
las luces estén desconectadas antes de continuar. La longitud total combinada de
tiras y cables de extensión no puede exceder los 200 pies (60.9m). Asegúrese de
que la tapa de seguridad cubra cualquier extremo no utilizado del cable.
NOTA: Para un correcto funcionamiento de la luz, no instale el cable de extensión
entre la fuente de alimentación y la primera tira de luces.
RECORTAR EL FINAL DE LA TIRA DE LUCES
La última tira de luz de una serie de tiras se puede cortar para
eliminar los discos LED no deseados.
ADVERTENCIA: Desenchufe completamente la fuente de
alimentación antes de continuar. NO retire más de ocho discos LED
de una tira. Deben quedar un mínimo de cuatro para que la fuente de
alimentación registre las luces. Las tiras de luces no se pueden cortar
y, luego, volver a conectar. Cortar una tira reducirá la clasificación de
protección de ingreso (IP) del producto. NO coloque tiras cortadas
en un lugar donde se pueda acumular agua.
1. Desenchufe la fuente de alimentación.
2. Con un cortacables, corte la tira de luces en línea recta dejando al
menos 1 pulgada de cable para una fácil instalación de la tapa de
extremo de silicona (J).
3. Empuje firmemente la tapa de extremo de silicona sobre el cable
cortado hasta que quede firmemente en su lugar. Para garantizar
el mejor sellado contra el agua, aplique una pequeña cantidad de
sellador de silicona en la tapa del extremo antes de la instalación.
4. Enchufe la fuente de alimentación.
5. En la aplicación Enbrighten, desactive manualmente los discos
LED retirados siguiendo las instrucciones y los recursos
disponibles.
Modelo: 85102, 85103
Especificaciones eléctricas de entrada: 120VCA, 60Hz
Longitud: 150 pies
Longitud máxima: 200 pies (Unir tiras de más de 150 pies ocasionará una reducción de la salida de lúmenes)
Potencia de entrada: 91.8W, 1.51A
Potencia de salida: 30VCC, 78.8W, 2.63A
ADVERTENCIA: Cuando utilice luminarias portátiles para exterior, siempre respete las precauciones básicas para reducir el riesgo
de incendio, descargas eléctricas y lesiones a personas, incluidas las siguientes:
a) Proteja los circuitos o los tomacorrientes que utilizará para alimentar las luminarias portátiles en lugares húmedos mediante
un interruptor de circuito de falla de puesta a tierra (GFCI). Es posible conseguir tomacorrientes con protección GFCI
incorporada para cumplir con esta medida de seguridad.
b) Utilice solo con un cable de extensión para uso exterior, como un cable de extensión de tipo SEW, SEOW, SEOOW, SOW,
SOOW, STW, STOW, STOOW, SJEW, SJEOW, SJEOOW, SJW, SJOW, SJOOW, SJTW, SJTOW o SJTOOW.
ADVERTENCIA: Mantenga las bolsas de empaque lejos del alcance de bebés y niños. No use en cunas, camas, cochecitos ni
corralitos para bebés. La película fina puede adherirse a la nariz y la boca e impedir la respiración.
RIESGO DE SHOCK ELÉCTRICO
• LOS TOMACORRIENTES QUE SE UTILICEN PARA ALIMENTAR LAS LUCES ETERNITY PARA EXTERIOR DEBEN CUMPLIR
CON LOS CÓDIGOS ELÉCTRICOS LOCALES Y NACIONALES. CONSULTE A UN ELECTRICISTA LOCAL SI NO ESTÁ
SEGURO DEL CUMPLIMIENTO DE LOS REQUISITOS.
• NO SUMERJA.
• NO USE CERCA DE ACUARIOS.
• LAS LUCES DE ALERO SON UN PRODUCTO PARA UBICACIONES HÚMEDAS Y NO TIENEN PIEZAS REPARABLES.
• NO LO USE CON UN CABLE DE EXTENSIÓN CERCA DEL AGUA O DONDE PUEDA ACUMULARSE AGUA.
• MANTENGA LAS LUCES A UNA DISTANCIA MÍNIMA DE 16 PIES (4.8M) DE PISCINAS Y SPAS.
• MANTENGA SECOS LOS ENCHUFES Y RECEPTÁCULOS.
• EVITE DAÑOS A LOS CABLES Y CONJUNTOS DE LÁMPARAS DURANTE LA INSTALACIÓN. REVISE PERIÓDICAMENTE
LAS LUCES DE ALERO A FIN DE DETECTAR DAÑOS FÍSICOS U OTROS DAÑOS PROVOCADOS POR LA EXPOSICIÓN A LA
INTEMPERIE.
• REEMPLACE LAS TIRAS DE LUCES DE ALERO QUE ESTÉN DAÑADAS.
• NO INSTALE LAS LUCES DE ALERO EN LUGARES EN QUE SEA PROBABLE PISARLAS.
• ASEGÚRESE DE QUE LAS LUCES ETERNITY PARA EXTERIOR ESTÉN DESENCHUFADAS DURANTE LA INSTALACIÓN.
• NO SE DEBE PERMITIR QUE LOS NIÑOS JUEGUEN CON LAS LUCES DE ALERO.
• UL RECOMIENDA PROBAR LOS RECEPTÁCULOS CADA MES PARA GARANTIZAR EL FUNCIONAMIENTO ADECUADO.
RIESGO DE FUEGO
• LAS LUCES ETERNITY ESTÁN DISEÑADAS PARA UNIRSE USANDO SUS ENCHUFES ELÉCTRICOS Y TOMACORRIENTES A
UNA DISTANCIA MÁXIMA DE 200 PIES (60.9M).
• LOS TOMACORRIENTES INTERCONECTABLES DE LAS LUCES DE ALERO ESTÁN DISEÑADOS SOLO PARA UNIR LUCES
DE ALERO COMPATIBLES. NO USE LOS TOMACORRIENTES DE LAS LUCES DE ALERO PARA NINGÚN OTRO FIN
ELÉCTRICO.
• NO DISEÑADO PARA INSTALACIÓN DE FUENTES DE ENERGÍA, LUCES LED DE DISCO O CABLES EN TECHOS, SOFITOS,
GABINETES, ÁTICOS U OTROS ESPACIOS CERRADOS.
HECHO EN TAILANDIA
Distribuido por Jasco Products Company LLC,
10 E. Memorial Rd., Oklahoma City, OK 73114.
App Store es una marca de servicio de Apple Inc.
Google, Google Play y Google Home son marcas comerciales de Google LLC.
Amazon, Alexa y todos los logotipos relacionados son marcas comerciales de
Amazon.com, Inc. o sus afiliados.
A
B
x9
x1
x2
x2
x110
E
G
F
C
x110
PREPARACIÓN
Paso 3
Paso 5
Paso 7
Paso 8
H I
Paso 6
Botón de
emparejamiento
Coloque las luces en el área
deseada para probar la
intensidad del Wi-Fi antes de
instalarlas siguiendo las
instrucciones proporcionadas
Añade dispositivos,
controla las luces de paisaje
inteligentes desde cualquier
lugar y crea horarios
4.
Crea una cuenta en la
aplicación Enbrighten
Empareje las luces
Eternity cerca de
su enrutador*
*Después del emparejamiento, descargue cualquier
aplicación o actualización del dispositivo para
acceder a las últimas funciones
Pruebe las luces
Enchufe las luces en un tomacorriente. Presione
el botón de emparejamiento en la fuente de
alimentación varias veces para asegurarse de
que todos los LED funcionen.
Botón de
emparejamiento
D
x64