
Operating instructions
Wine conditioning unit
It is essential to read these operating and installation instructions
before installing and using the appliance. This prevents both personal
injury and damage to the appliance.
en- AU, NZ M.-Nr. 12 596 120

Contents
2
Warning and Safety instructions ............................................................................... 5
Sustainability and environmental protection.......................................................... 14
Caring for the environment ...........................................................................................
14
How to save energy.......................................................................................................
15
Familiarising yourself with the appliance ................................................................ 16
Guide to the appliance ..................................................................................................
16
Appliance overview .................................................................................................. 16
Display........................................................................................................................ 18
Settings mode ...........................................................................................................
19
Feature lighting .................................................................................................... 19
Lock function/.................................................................................................. 19
Switching off the wine conditioning unit (both wine conditioning zones) .. 19
Sabbath mode ....................................................................................................... 19
Information on Sabbath mode............................................................................. 19
Time before door alarm is triggered...................................................................
19
Miele@home ....................................................................................................... 20
Keypad tone/................................................................................................... 21
Alarms and buzzers/ ...................................................................................... 21
Display brightness............................................................................................... 21
Temperature unit °C/°F............................................................................................ 21
Demo mode............................................................................................................ 21
Factory default settings ..................................................................................... 21
Information on the wine conditioning unit......................................................... 22
ActiveAirCleanfilter display .............................................................................. 22
Accessories supplied.....................................................................................................
22
Safety ...............................................................................................................................
23
Temperature alarm.................................................................................................... 23
Door alarm ................................................................................................................. 24
Adjusting the interior fittings ........................................................................................
24
Removing and reinserting the wooden shelves ................................................... 24
Maximum capacity ................................................................................................... 25
Loading the wooden shelves................................................................................... 25
Labelling the labelling strips (NoteBoards)........................................................... 26
Using the PresenterFrame....................................................................................... 26
Commissioning.............................................................................................................. 28
Before using for the first time.......................................................................................
28
Connecting the wine conditioning unit.................................................................. 28
Activating the charcoal filter (ActiveAirCleanfilter) ...................................... 28
Switching on the wine conditioning unit.....................................................................
28
Switching off the wine conditioning unit ....................................................................
28
Switching off for longer periods of time ................................................................ 28

Contents
3
Operation........................................................................................................................ 29
Setting the temperatures in the wine conditioning zones .......................................
29
Temperature range.................................................................................................... 29
Temperature display for the wine conditioning zones......................................... 29
Setting the humidity
(ActiveHumidity) in the lower wine conditioning zone.......................................
30
Humidity range.......................................................................................................... 30
Adjusting settings ......................................................................................................... 31
Explanation of the different settings............................................................................
31
Setting the brightness of the feature lighting................................................. 31
Switching the lock function/ on.................................................................... 31
Switching Sabbath mode on ............................................................................... 32
Switching Sabbath mode off............................................................................... 32
Changing the time before the door alarm is triggered ....................................
32
Setting up Miele@home for the first time............................................................ 33
Deactivating the Wi-Fi connection ........................................................................ 33
Activating the Wi-Fi connection............................................................................. 33
Switching off the keypad tone ......................................................................... 34
Switching on the keypad tone .......................................................................... 34
Changing the volume of the alarms and buzzers/ ..................................... 34
Changing the display brightness ....................................................................... 34
Changing the temperature unit °C/°F.................................................................... 34
Switching off Demo mode ................................................................................... 34
Resetting the settings to their factory default settings ................................ 35
Activating the ActiveAirCleanfilter display..................................................... 35
Cleaning and care ......................................................................................................... 36
Cleaning agents ..............................................................................................................
36
Preparing the wine conditioning unit for cleaning .....................................................
36
Cleaning the interior of the appliance .........................................................................
37
Replacing an ActiveAirCleanfilter (charcoal filter)...................................................
37
Confirming that the ActiveAirCleanfilter has been changed............................ 38
Cleaning the front of the appliance and the side panels ..........................................
38
Cleaning the door seal...................................................................................................
39
Cleaning the ventilation gaps .......................................................................................
39
After cleaning ..................................................................................................................
39
Automatic defrosting .....................................................................................................
39
Problem solving guide.................................................................................................. 40
Service............................................................................................................................. 46
Contact in case of fault..................................................................................................
46
Warranty ..........................................................................................................................
46
Optional accessories.................................................................................................... 47

Contents
4
Installation...................................................................................................................... 48
Installation site ...............................................................................................................
48
Climate range ............................................................................................................ 49
Ventilation requirements...............................................................................................
49
Installing several wine conditioning units/refrigeration appliances........................
50
Changing the door hinging ............................................................................................
50
Fitting the supplied wall spacers..................................................................................
51
Installing the wine conditioning unit............................................................................
51
Aligning the wine conditioning unit........................................................................ 52
Integrating the wine conditioning unit in a run of kitchen units ..............................
52
Appliance dimensions....................................................................................................
54
Electrical connection .....................................................................................................
56
Warning and Safety instructions
5
This wine conditioning unit complies with all current local and
national safety requirements. However, inappropriate use can lead
to personal injury and damage to property.
Read the operating and installation instructions carefully before
using the wine conditioning unit. They contain important
information on installation, safety, use and maintenance. This is to
protect yourself from injury, and from damaging your wine
conditioning unit.
In accordance with standard IEC60335-1, Miele expressly and
strongly advises that you read and follow the instructions in
“Installation”, as well as in the “Warning and safety instructions”.
Miele cannot be held liable for injury or damage caused by non-
compliance with these instructions.
Keep these instructions in a safe place and pass them on to any
future owner.
Risk of injury from broken glass.
If installed at altitudes above 1500m, there is a risk of the glass in
the appliance door breaking because of changes in air pressure.
Shards of glass can cause severe injury.
Danger of injury and damage to the appliance due to the wine
conditioning unit tipping over.
The wine conditioning unit is very heavy and can tip forwards when
the appliance door is open.
Keep the appliance door shut until the wine conditioning unit has
been built in and secured in its building-in niche in accordance with
these operating and installation instructions.

Warning and Safety instructions
6
Correct application
This appliance is designed for domestic use and for use in similar
environments by guests in hotel or motel rooms, bed & breakfasts
and other typical living quarters. This does not include common/
shared facilities or commercial facilities within hotels, motels or bed
& breakfasts. This wine conditioning unit is not suitable for outdoor
use.
The wine conditioning unit is intended exclusively for domestic use
for storing wine.
The wine conditioning unit is not suitable for freezing food.
Any other usage is not permitted.
This wine conditioning unit is not suitable for storing and keeping
cool medicines, blood plasma, laboratory preparations or similar
substances or products. Incorrect use of the wine conditioning unit
for such purposes may cause deterioration of the items stored. The
wine conditoning unit is also not suitable for use in areas where there
is a risk of explosion.
Miele cannot be held liable for damage resulting from incorrect or
improper use or operation of the appliance.
This appliance is not intended for use by persons (including
children) with reduced physical, sensory or mental capabilities or lack
of experience and knowledge, unless they have been given
supervision and instruction concerning its use by a person
responsible for their safety.
They may only use the appliance unsupervised if its operation has
been clearly explained to them and they are able to use it safely and
are able to understand and recognise the possible dangers caused by
incorrect operation.
Safety with children
Young children must not be allowed to use this appliance.
Older children may only use the wine conditioning unit if its
operation has been clearly explained to them and they are able to use
it safely. They must be able to understand and recognise the possible
dangers of misuse.
Cleaning work may only be carried out by older children under the
supervision of an adult.

Warning and Safety instructions
7
Children should be supervised in the vicinity of the wine
conditioning unit. Never allow children to play with the wine
conditioning unit.
The wine conditioning unit door hinges can cause injury. Keep
children away at all times.
Danger of suffocation! Children may be able to wrap themselves in
packing material (e.g. foil) or pull it over their head with the risk of
suffocation. Keep packaging material away from children.
Warning and Safety instructions
8
Technical safety
The refrigerant circuit has been checked for leaks. The wine
conditioning unit complies with all current local and national safety
requirements.
Warning: fire hazard/flammable materials. This symbol is on the
compressor and indicates flammable materials. Do not remove this
sticker.
The refrigerant inside the appliance (details on the data plate) is
environmentally friendly but flammable.
The use of this refrigerant does, however, sometimes lead to a slight
increase in the noise level of the appliance. In addition to the noise of
the compressor, you might be able to hear the refrigerant flowing
around the system. Unfortunately, this cannot be avoided, but it does
not affect the performance of the wine conditioning unit.
When transporting and installing the wine conditioning unit, ensure
that no parts of the cooling circuit are damaged. Splashes of
refrigerant can damage the eyes and leaking refrigerant can ignite.
In the event of any damage:
- Avoid naked flames or anything which creates a spark.
- Disconnect the wine conditioning unit from the mains electricity
supply.
- Ventilate the room in which the wine conditioning unit is located
for several minutes.
- Call Miele.
The more coolant there is in a wine conditioning unit, the larger the
room should be in which it is installed. In the event of a leakage, if the
appliance is in a small room, there is the danger of a combustible
gas/air mixture building up. For every 8g of coolant, at least 1m
3
of
room space is required. The amount of coolant in the wine
conditioning unit is stated on the data plate inside the appliance.

Warning and Safety instructions
9
Ensure that the connection data on the wine conditioning unit's
data plate (fuse rating, frequency and voltage) match the electricity
supply to prevent damage to the wine conditioning unit.
Compare this before connecting the appliance to the mains
electricity.
If in any doubt, consult a qualified electrician.
The electrical safety of this wine conditioning unit can only be
guaranteed when continuity is complete between it and an effective
earthing system. It is most important that this basic safety
requirement is present.
If in doubt, the electrical installation should be checked by a qualified
electrician.
Temporary or permanent operation with a self-sufficient or non-
mains synchronous energy supply system (e.g. isolated networks,
back-up systems) is possible. A requirement for the operation is that
the energy supply system complies with all current local and national
requirements that apply to stand-alone, solar and/or battery systems.
The protective measures provided in the installation and in this Miele
product must also be assured in their function and operation in
isolated operation or in non-mains synchronous operation, or
replaced with equivalent measures in the installation.
The socket must be easily accessible so that the wine conditioning
unit can be quickly disconnected from the electrical supply in case of
an emergency.
If the electrical connection cable supplied is damaged, it must only
be replaced by an original spare part to prevent a hazard for the user.
Miele can only guarantee the safety of the appliance when original
Miele parts are used. For safety reasons, replacement may only be
carried out by a suitably qualified specialist or Miele Customer
Service.
Multi-socket adapters and extension leads do not guarantee the
required safety of the appliance (e.g. danger of overheating). Do not
use these to connect the wine conditioning unit to the mains
electricity supply.
If moisture gets into electrical components or into the mains
connection cable, it could cause a short circuit. Therefore, do not
operate this wine conditioning unit in areas which are exposed to
moisture (e.g in a garage or utility room).
This wine conditioning unit must not be installed and operated in
mobile installations (e.g. on a ship).

Warning and Safety instructions
10
Damage to the wine conditioning unit can compromise your safety.
Before using the wine conditioning unit, check it for any visible
damage. Never use a damaged wine conditioning unit.
This wine conditioning unit is not intended for use as a built-in
appliance.
During installation, maintenance and repair work, the wine
conditioning unit must be completely disconnected from the mains
electricity supply. It is only completely isolated from the electricity
supply when:
- the mains circuit breaker is switched off, or
- the screw-out fuse is removed (in countries where this is
applicable), or
- it is switched off at the wall socket and the plug is withdrawn from
the socket, or it is switched off at the isolator. Pull on the plug and
not the cable when disconnecting it from the power supply.
Repairs and other work by unqualified persons could be
dangerous. Installation must be performed by a suitably qualified and
competent person. Maintenance and repairs must only be carried out
by a Miele authorised technician.
The manufacturer's warranty will be invalidated if the appliance is
not repaired by a Miele approved service technician.
Faulty components must only be replaced with genuine Miele
original spare parts. Miele can only guarantee the safety standards of
the appliance when Miele spare parts are used.
This wine conditioning unit is supplied with a special lamp to cope
with particular conditions (e.g. temperature, moisture, chemical
resistance, abrasion resistance and vibration). This lamp must only be
used for the purpose for which it is intended. The lamp is not suitable
for room lighting. Replacement lamps may only be fitted by a
qualified electrician or a Miele authorised technician.
Correct installation
Change the door hinging (if necessary) as described in the
installation instructions supplied with the appliance.
Always wear protective gloves when transporting and installing the
wine conditioning unit.
Two people are required to install the wine conditioning unit.

Warning and Safety instructions
11
Correct use
This wine conditioning unit is designed for use within specific
ambient temperatures (climate range). Do not use it in ambient
temperatures for which it is not designed. The climate range is stated
on the data plate inside the wine conditioning unit. A lower ambient
temperature will cause the compressor to switch off for longer
periods, meaning that the wine conditioning unit is unable to
maintain the required temperature in some circumstances.
To ensure proper air flow in and out of the appliance, the
ventilation gaps in the appliance and built-in structure must not be
covered or blocked in any way. This would also increase the energy
consumption and could cause damage to the appliance.
If the wine conditioning unit is used for storing food which
contains fat or oil, make sure that it does not come into contact with
plastic components. Any spillages of oil or fat could cause stress
cracks to the plastic and cause it to break or split.
Risk of fire and explosion! Do not store explosive materials in the
wine conditioning unit or any products containing propellants (e.g.
spray cans). Electrical components can cause flammable mixes of
gases to ignite.
Danger of explosion! Do not operate any electrical appliances
inside the wine conditioning unit. Danger of sparking and explosion.
In areas which may be subject to infestation by cockroaches or
other vermin, pay particular attention to keeping the appliance and its
surroundings clean at all times. Any damage caused by cockroaches
or other vermin will not be covered by the warranty.
Accessories and spare parts
Only use original Miele accessories. Using spare parts or
accessories from other manufacturers will invalidate the warranty,
and Miele cannot accept liability.
Miele will guarantee to supply functional spare parts for a
minimum of 10years and up to 15years following the discontinuation
of your wine unit.
Cleaning and care
Do not use any oils or grease on the door seals, as these will cause
the seals to deteriorate and become porous with time.

Warning and Safety instructions
12
The steam from a steam cleaning appliance could reach electrical
components and cause a short circuit.
Do not use a steam cleaning appliance to clean this appliance.
Warning: Do not use any mechanical tools or other types of aid
which are not recommended by the manufacturer to accelerate the
defrosting process.
Sharp edged objects will damage the evaporator, causing
irreversible damage to the wine conditioning unit. Therefore, do not
use sharp objects to:
- remove layers of ice.
- remove label residues, for example.
Transport
Always transport the wine conditioning unit upright and in its
packaging to avoid it being damaged.
Risk of injury and damage! The wine conditioning unit is very heavy
and must be transported by two people.
Disposal of your old appliance
Children playing could become trapped in the wine conditioning
unit and could suffocate.
- Remove the appliance door.
- Leave the wooden/metal shelves in the wine conditioning unit so
children cannot climb inside.
- If the wine conditioning unit has a door lock, make sure that
children cannot lock themselves inside while playing as this could
endanger their lives.
Risk of electric shock!
- Cut the electrical plug off the power supply cord.
- Cut the power supply cord off the old appliance.
Dispose of the electrical plug and power supply cord separately from
the old appliance.
During and after disposal, make sure that the wine conditioning
unit is not placed near petrol or other flammable gases and liquids.
Warning and Safety instructions
13
Risk of fire due to escaping oil or refrigerant!
The refrigerant and oil inside the appliance are flammable. In high
enough concentrations, escaping refrigerant or oil may ignite if they
come into contact with an external heat source.
During disposal, make sure that the cooling circuit is not damaged in
order to prevent refrigerant and oil escaping in an uncontrolled
manner (see the data plate for details of the refrigerant).
Splashes of coolant can damage the eyes. Be careful not to
damage any part of the pipework whilst awaiting disposal, e.g. by
- puncturing the refrigerant channels in the condenser,
- bending any pipework, or
- scratching the surface coating.
Symbol on the compressor (depending on model)
This information is only relevant for recycling. There is no risk during normal
operation.
The oil in the compressor can be fatal if swallowed or if it
penetrates the airways.
Sustainability and environmental protection
14
Caring for the environment
Disposal of the packing material
The transport and protective packaging
has been selected from materials which
are environmentally friendly for disposal,
and can normally be recycled.
Recycling the packaging reduces the
use of raw materials in the
manufacturing process and also reduces
the amount of waste in landfill sites.
Ensure that any plastic wrappings, bags
etc. are disposed of safely and kept out
of the reach of babies and young
children. Danger of suffocation.
Only for Australia: Note for installer:
Expanded polystyrene (EPS) packaging
included. Please retain and dispose of
EPS packaging responsibly. For further
information, please contact Miele.
Disposing of your old appliance
Electrical and electronic appliances
contain many valuable materials. They
also contain certain materials,
compounds, and components which
were essential for their correct
functioning and safety. These could be
hazardous to human health and to the
environment if disposed of with general
waste or if handled incorrectly. Please
do not, therefore, dispose of your old
appliance with your household waste.
Take care not to damage your
refrigeration appliance before or during
disposal in an authorised,
environmentally friendly manner.
This is to ensure that refrigerant in the
cooling circuit and oil in the compressor
is contained, and will not leak into the
environment.
Please dispose of it at your local
community waste collection/recycling
centre for electrical and electronic
appliances, or contact Miele. You are
also responsible for deleting any
personal data that may be stored on the
appliance prior to disposal. You should
remove any old batteries which are not
securely enclosed by the appliance and
remove any lamps without destroying
them, where this is possible. These
must be taken to a suitable collection
point where they can be handed in free
of charge. Please ensure that your old
appliance presents no danger to
children while being stored awaiting
disposal.

Sustainability and environmental protection
15
How to save energy...
Installation site The wine conditioning unit has to cool more often at higher
ambient temperatures and consumes more energy in the
process. Therefore, you should:
- Install the wine conditioning unit in a well-ventilated room.
- Do not install the wine conditioning unit near to a heat source
(heater element, cooker).
- Protect the wine conditioning unit from direct sunlight.
- Ensure an ideal ambient temperature of 20°C.
- Clean the ventilation openings on a regular basis to remove any
dust.
Temperature
setting
The colder the temperature, the higher the energy consumption.
The following settings are recommended:
- +12 to +14°C.
Use Energy consumption is increased by heat input and impeded air
circulation. Therefore, you should:
- only open the appliance door when necessary and for as short
a time as possible arrange the wine bottles in a way that
makes them easy to find in the appliance
- always close the appliance door properly after opening it
- keep wooden shelves arranged as they were when the
appliance was delivered
- avoid overfilling the wooden shelves to allow air to circulate
- keep the fan air ducts in the wine conditioning unit clear
- Use the wall spacers. The wall spacers on the back of your
wine conditioning unit are designed to ensure that the declared
energy consumption is achieved.
Familiarising yourself with the appliance
16
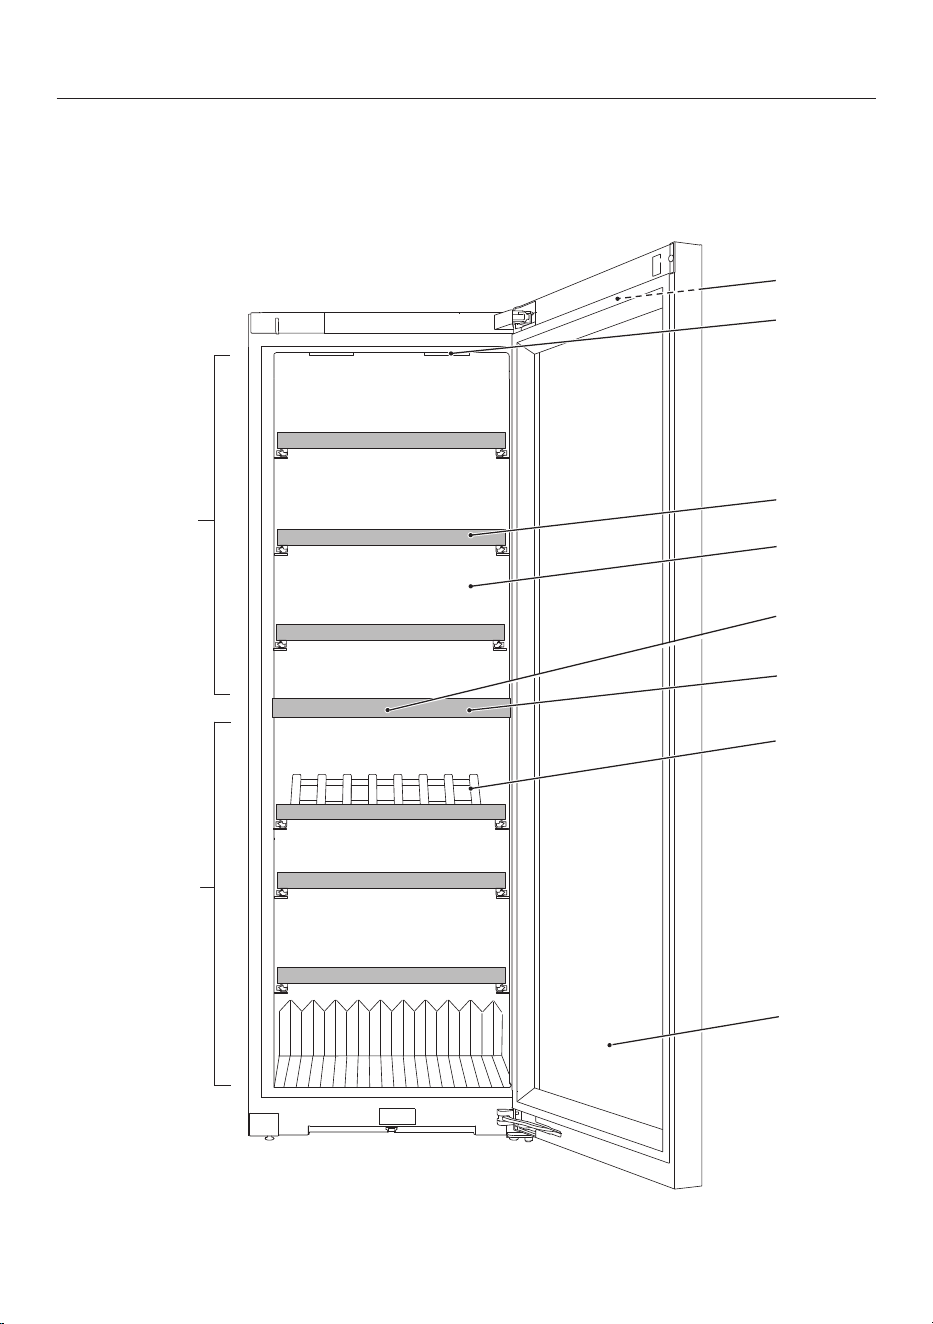
Guide to the appliance
Appliance overview

Familiarising yourself with the appliance
17
a
Outer display on appliance door
b
Interior lighting and feature lighting
(in both wine conditioning zones): thanks to the use of LEDs, the wine will not
be adversely affected by heat or UV light.
c
Wooden shelves with labelling strips (NoteBoards)
d
Dry rear wall for preventing the formation of condensation
e
Charcoal filter: the Active AirClean filter is located behind the NoteBoard.
f
Insulating plate between the wine conditioning zones: different types of wine
can be stored at different temperatures at the same time.
g
PresenterFrame
h
Glass door: the safety glass door with UV filter protects your wine from harmful
UV rays.
i
Lower wine conditioning zone with humidity setting
(ActiveHumidity) for long-term storage
j
Upper wine conditioning zone
Familiarising yourself with the appliance
18
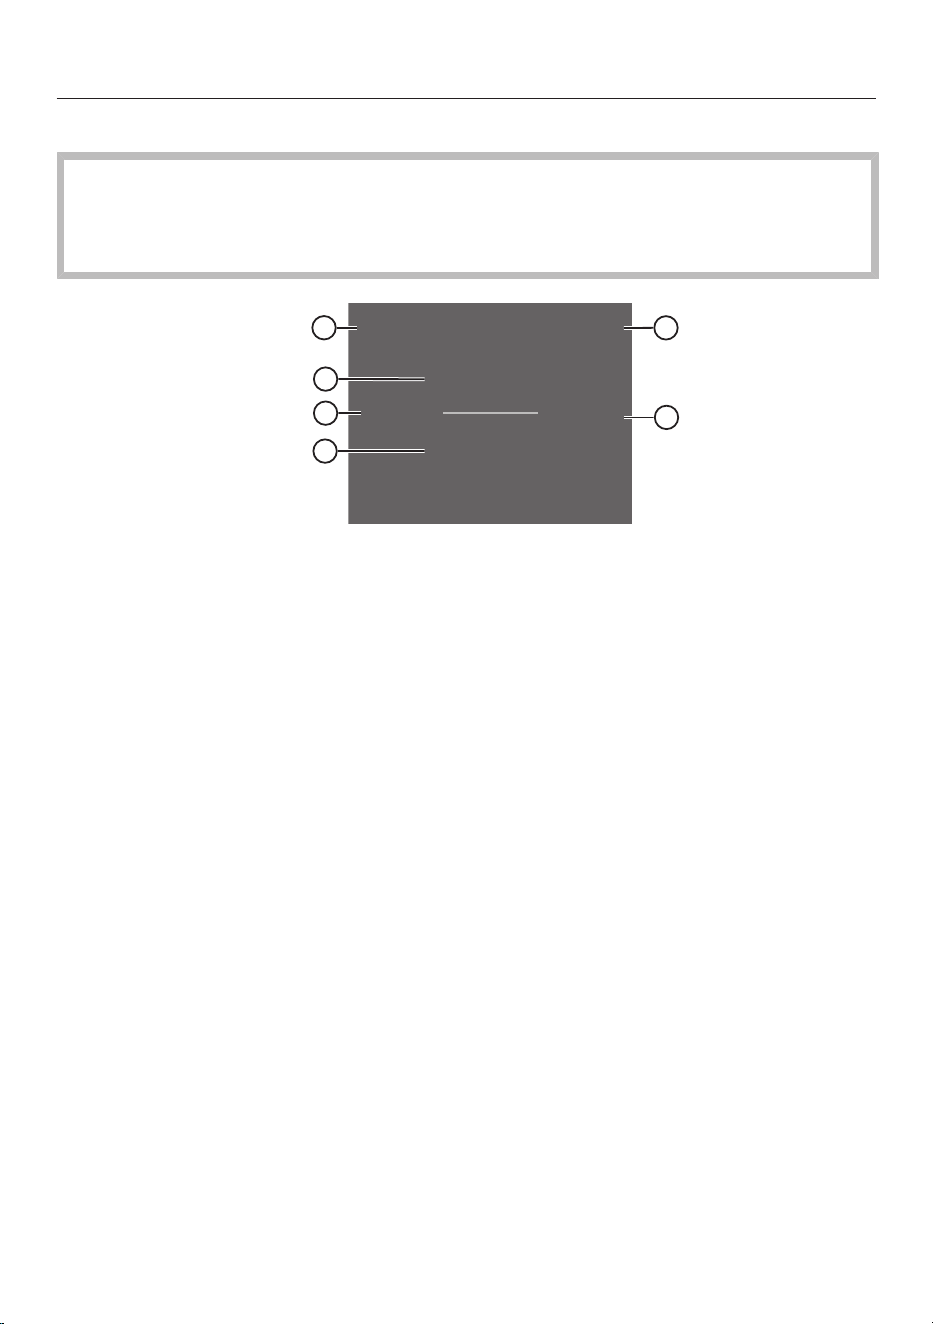
Display
The display can be scratched by pointed or sharp objects, e.g. pens.
Only touch the display with your fingertips.
It is possible that the display will not react to finger contact if your fingers are
cold.
12
°C
12
°C
2
4
6
5
1
3
a
Demo mode display
(only visible when the Demo mode function has been switched on)
b
Temperature display for upper wine conditioning zone and
sensor control for setting the temperature
c
Feature lighting sensor control
For switching the interior lighting on and off when the appliance door is closed
d
Temperature display for lower wine conditioning zone and
sensor control for setting the temperature and humidity
(ActiveHumidity)
e
Settings mode sensor
For adjusting various functions in Settings mode
f
Display for Miele@home connection status
(only visible when the Miele@home function has been set up)
Familiarising yourself with the appliance
19
Settings mode
Feature lighting
The interior lighting can be set to remain
on when the appliance door is closed so
your wines can be on display at all
times.
The feature lighting is switched on and
off using the sensor control in the
display. When the feature lighting is
switched on, the sensor control
lights up orange.
The feature lighting can be switched on
or off separately for each individual wine
conditioning zone (see “Adjusting
settings”).
Lock function/
When the lock function is switched on,
it protects the wine conditioning unit
from being switched off unintentionally
and being adjusted unintentionally by
unauthorised persons, e.g. children.
If you just want to adjust the
temperature quickly, for example, you
can deactivate the lock function
temporarily (see “Adjusting settings”).
Switching off the wine conditioning
unit (both wine conditioning zones)
See “Commissioning – Switching off
the wine conditioning unit”.
Sabbath mode
The wine conditioning unit offers a
Sabbath mode for the purposes of
religious observance (see “Adjusting
settings”).
When Sabbath mode is switched on,
the following are deactivated
temporarily:
- the interior lighting when the
appliance door is opened
- feature lighting when the appliance
door is closed
- the display
- all audible and visual signals
- an active Wi-Fi connection
- reminders (e.g. ActiveAirCleanfilter
display): the set time interval is
paused
All other functions switched on
previously remain activated.
When Sabbath mode is switched on,
you cannot adjust any settings on your
wine conditioning unit.
Information on Sabbath mode
You can call up the Sabbath mode
version here.
Time before door alarm
is triggered
You can set the time before the
appliance door alarm is triggered here
(see “Adjusting settings”).
Familiarising yourself with the appliance
20
Miele@home
Your wine conditioning unit is
equipped with an integrated Wi-Fi
module.
Networking is deactivated at the
factory.
Here you can set up the Miele@home
function for the first time, deactivate
and activate the Wi-Fi or reset the
network configuration (see “Adjusting
settings”).
To use this feature, you will need:
- a Wi-Fi network
- the Miele App
- a Miele user account. You can create a
user account via the Miele App.
The Miele App will guide you as you
connect your wine conditioning unit to
your home Wi-Fi network.
Once your wine conditioning unit is
connected to your Wi-Fi network, you
can use the App to carry out the
following activities, for example:
- Call up information on the operating
status of your wine conditioning unit
- Change the settings on your wine
conditioning unit
Connecting your wine conditioning unit
to your Wi-Fi network will increase
energy consumption, even when the
wine conditioning unit is switched off.
Make sure that the signal of your Wi-
Fi network is sufficiently strong in the
place where you want to set up your
wine conditioning unit.
Availability of the Wi-Fi connection
The Wi-Fi connection shares a
frequency range with other appliances
(including microwave ovens and remote
control toys). This may result in sporadic
or even complete connection failures.
Therefore, a constant availability of
featured functions cannot be
guaranteed.
Miele@home availability
The ability to use the Miele App
depends on the availability of the
Miele@home service in your country.
The Miele@home service is not
available in every country.
For information about availability, please
visit www.miele.com.
Familiarising yourself with the appliance
21
Miele App
You can download the Miele App from
the Apple App Store
®
or the Google Play
Store™ free of charge (only functional in
selected countries).
Keypad tone
/
You can switch the keypad tone on or
off here (see “Adjusting settings”).
Alarms and buzzers/
You can change the volume of the
alarms and buzzers (e.g. in the event of
a door alarm or a fault message) here.
Alternatively, you can switch the alarms
and buzzers off completely if you find
them annoying (see “Adjusting
settings”).
Display brightness
You can adjust the display brightness to
the lighting conditions in the room here
(see “Adjusting settings”).
Temperature unit °C/°F
You can set the required temperature
unit (°Celsius or °Fahrenheit) here (see
“Adjusting settings”).
Demo mode
You can switch off demo mode here if it
has been switched on as a default
setting ( will appear in the display) (see
“Adjusting settings”).
Demo mode allows the wine
conditioning unit to be presented in
the showroom without the cooling
system being switched on. Do not
activate this setting for domestic use.
Factory default settings
You can reset the wine conditioning
unit's settings to their factory default
settings here (see “Adjusting settings”).
Useful tip: Reset the settings to the
factory default settings when disposing
of your wine conditioning unit, selling it
or putting a used wine conditioning unit
into operation. This will reset the
network configuration so that your
personal data is deleted from the wine
conditioning unit. This will also ensure
that a previous owner is no longer able
to access the wine conditioning unit.
Familiarising yourself with the appliance
22
Information on the wine conditioning
unit
You can call up the model identifier and
serial number of your wine conditioning
unit here.
Keep this appliance data to hand:
- for integrating the wine conditioning
unit into your Wi-Fi network (see
“Adjusting settings – Setting up
Miele@home for the first time”)
- when reporting an appliance fault to
Miele Customer Service (see
“Service”)
ActiveAirCleanfilter display
Filtering the air through the
ActiveAirCleanfilter ensures that the
air remains free from dust and odours.
The ActiveAirCleanfilter display
will remind you approx. every
12months that the
ActiveAirCleanfilter has to be
replaced (see “Cleaning and care –
Replacing the ActiveAirCleanfilter
(active charcoal filter)”).
You can activate the
ActiveAirCleanfilter display here
(see “Adjusting settings”).
Accessories supplied
ActiveAirCleanfilters
The ActiveAirCleanfilter between the
wine conditioning zones ensures
optimum air quality by filtering the
incoming air.
Chalk pen
Use the chalk pen supplied to label the
NoteBoards on the wooden shelves. By
labelling the NoteBoards you will have a
good overview of the types of wine
being stored.

Familiarising yourself with the appliance
23
Safety
Temperature alarm
The wine conditioning unit is equipped
with a temperature alarm so that the
temperature cannot rise or fall
unnoticed and therefore damage the
wine.
If the temperature becomes too warm
or too cold,
will light up red in the
corresponding temperature display.
An alarm will also sound until the cause
of the alarm is rectified or the alarm is
switched off.
The set temperature determines when
the appliance recognises a temperature
as being too warm or too cold.
The audible and visual signals may be
activated in the following situations:
- Too much warm ambient air enters
the wine conditioning unit when
you are rearranging or taking out
wine bottles.
- You are storing a large number of
wine bottles.
- There was a power outage.
- There is a fault with the wine
conditioning unit.
Switching the temperature alarm off
early
Before you switch the temperature
alarm off, you must determine the
cause and rectify it.
You can switch the alarm off early if you
wish.
Tap
.
goes out and the alarm will stop.
The warmest temperature recorded in
the wine conditioning zone concerned
will flash for about 1minute in the
temperature display for the wine
conditioning zone. Then the
temperature display will change to the
current temperature in the wine
conditioning zone.
Familiarising yourself with the appliance
24
Door alarm
The wine conditioning unit is fitted
with a door alarm to avoid increased
energy consumption if the door is left
open and prevent the stored wine
bottles being affected by temperature
fluctuations.
If the appliance door is left open for a
longer period of time,
will light up
yellow in the display. An alarm will also
sound and the interior lighting will flash.
The amount of time until the door alarm
is triggered can be changed (see
“Adjusting settings – Changing the time
before the door alarm
is triggered”).
The door alarm’s audible signal can also
be switched off (see “Adjusting settings
– Changing the volume of the alarms
and buzzers/”).
The alarm will stop and
will go out in
the display as soon as the appliance
door is closed.
Switching the door alarm off early
Tap
.
The alarm will stop,
will go out and
the interior lighting will light up
constantly.
If the appliance door is not closed, the
door alarm will sound again after
around 1minute.
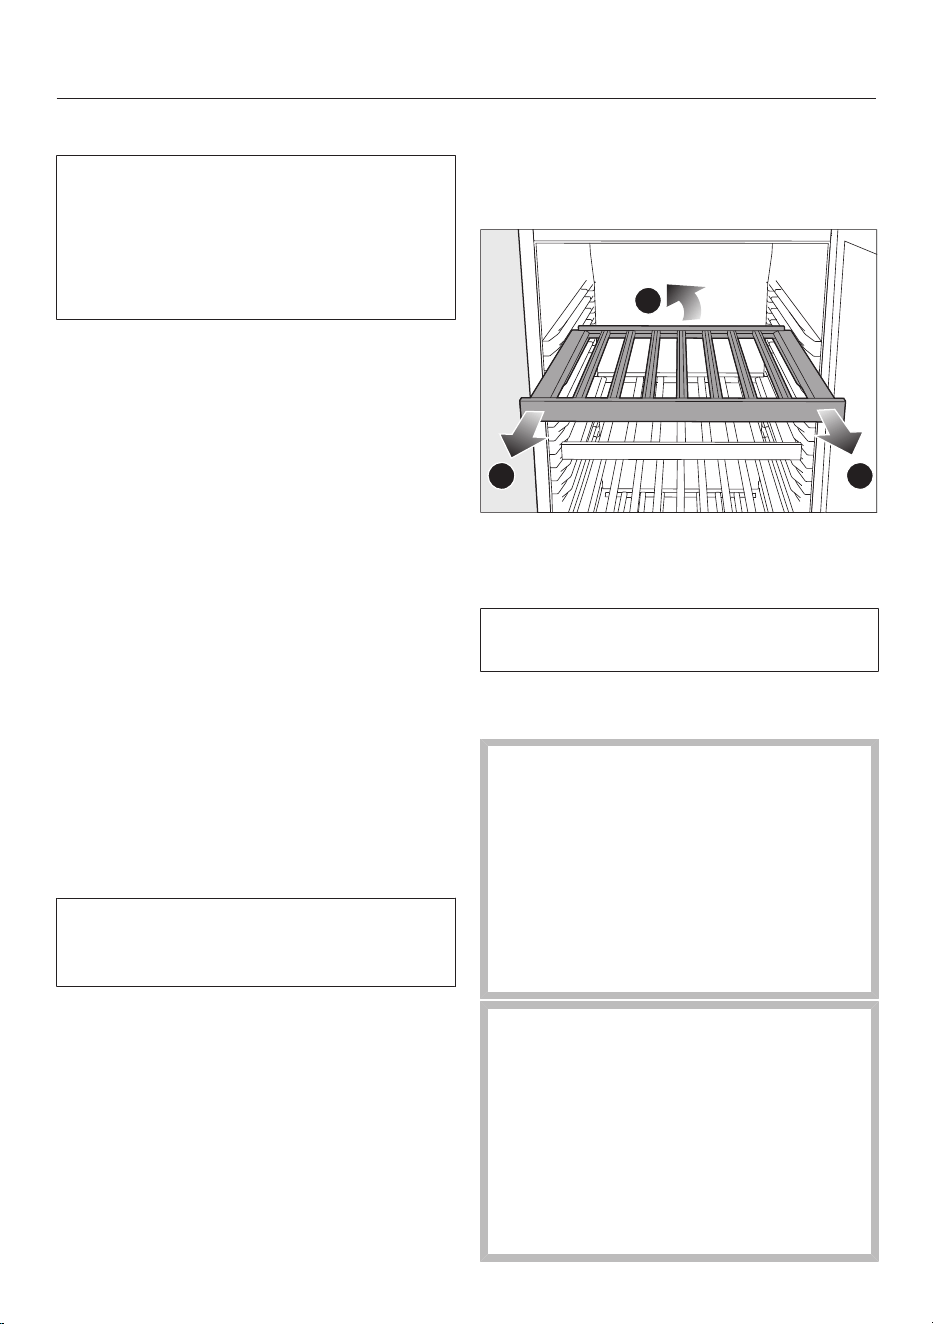
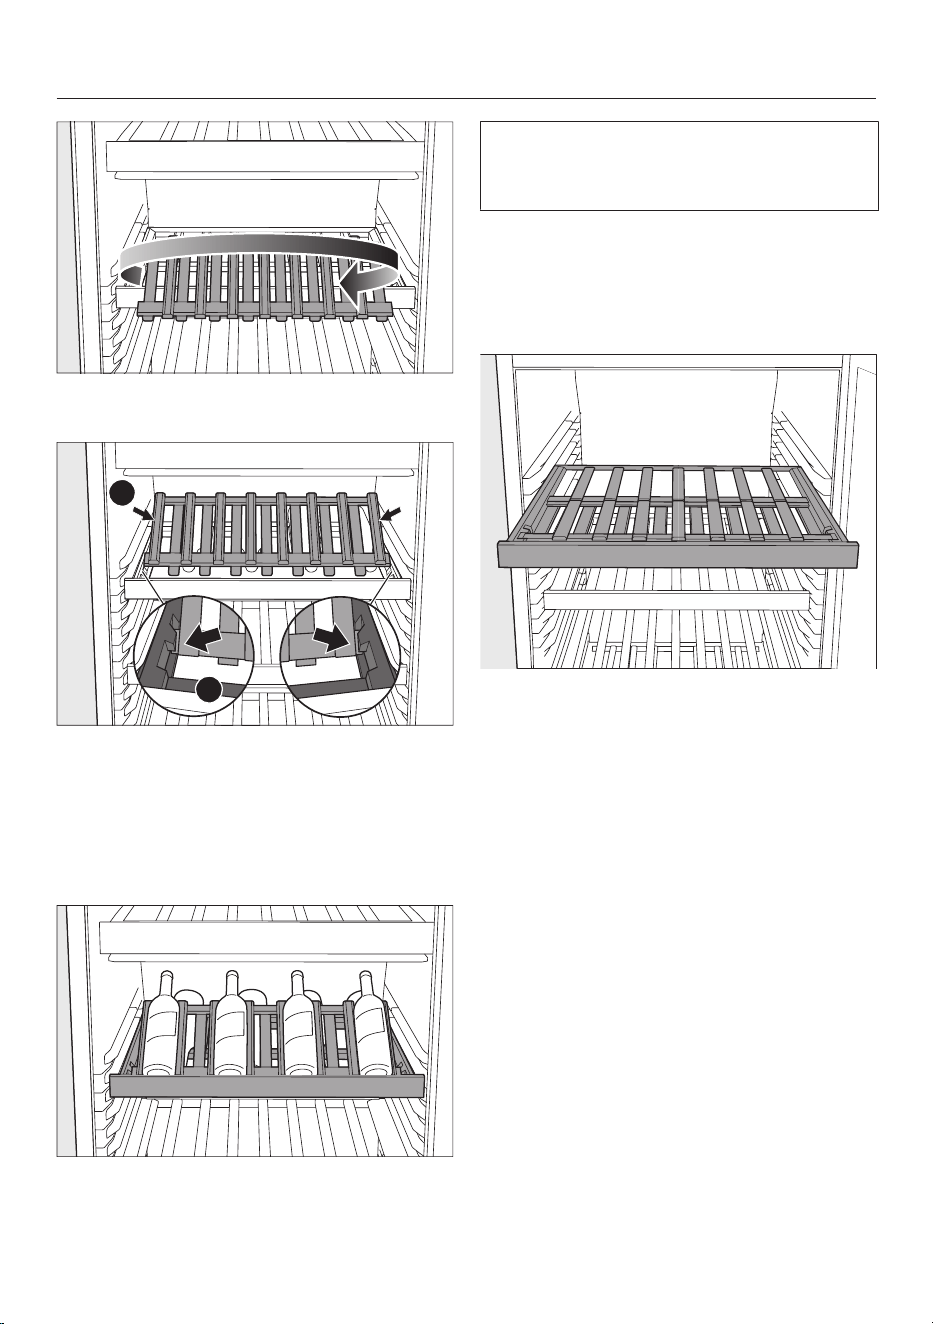
Adjusting the interior fittings
Removing and reinserting the wooden
shelves
1
2 2
Lift the wooden shelf slightly at the
back and pull it out towards the
front.
Stoppers prevent the wooden shelves
from being dislodged by mistake.
Reinsert the wooden shelf at the
required position.
Risk of injury from falling wine
bottles.
Wine bottles may become wedged in
the wooden shelves above and fall
out of the wine conditioning unit/
refrigeration appliance when the
shelves are pulled out.
Always pull out the wooden shelves
slowly and carefully.
Risk of damage and injury from
broken glass.
If wooden shelves and bottles
protrude too far forwards, they may
damage the glass door when it is
closed.
Please ensure that the wooden
shelves and wine bottles do not
protrude.
Familiarising yourself with the appliance
25
Maximum capacity
16
24
24
16
16
16
24
17
Up to 153Bordeaux bottles (0.75l) can
be stored in the wine conditioning unit:
- 80 bottles in the upper wine
conditioning zone and
- 73 bottles in the lower wine
conditioning zone.
Loading the wooden shelves
Arrangement of the lower row of bottles on
the wooden shelves or PresenterFrame
Risk of damage due to
overloading.
Exceeding the maximum
recommended capacity can lead to
damage to the wooden shelves.
Do not exceed the maximum load-
bearing capacity of 40kg for each
wooden shelf.
The PresenterFrame can also bear a
load of 40kg.
Familiarising yourself with the appliance
26
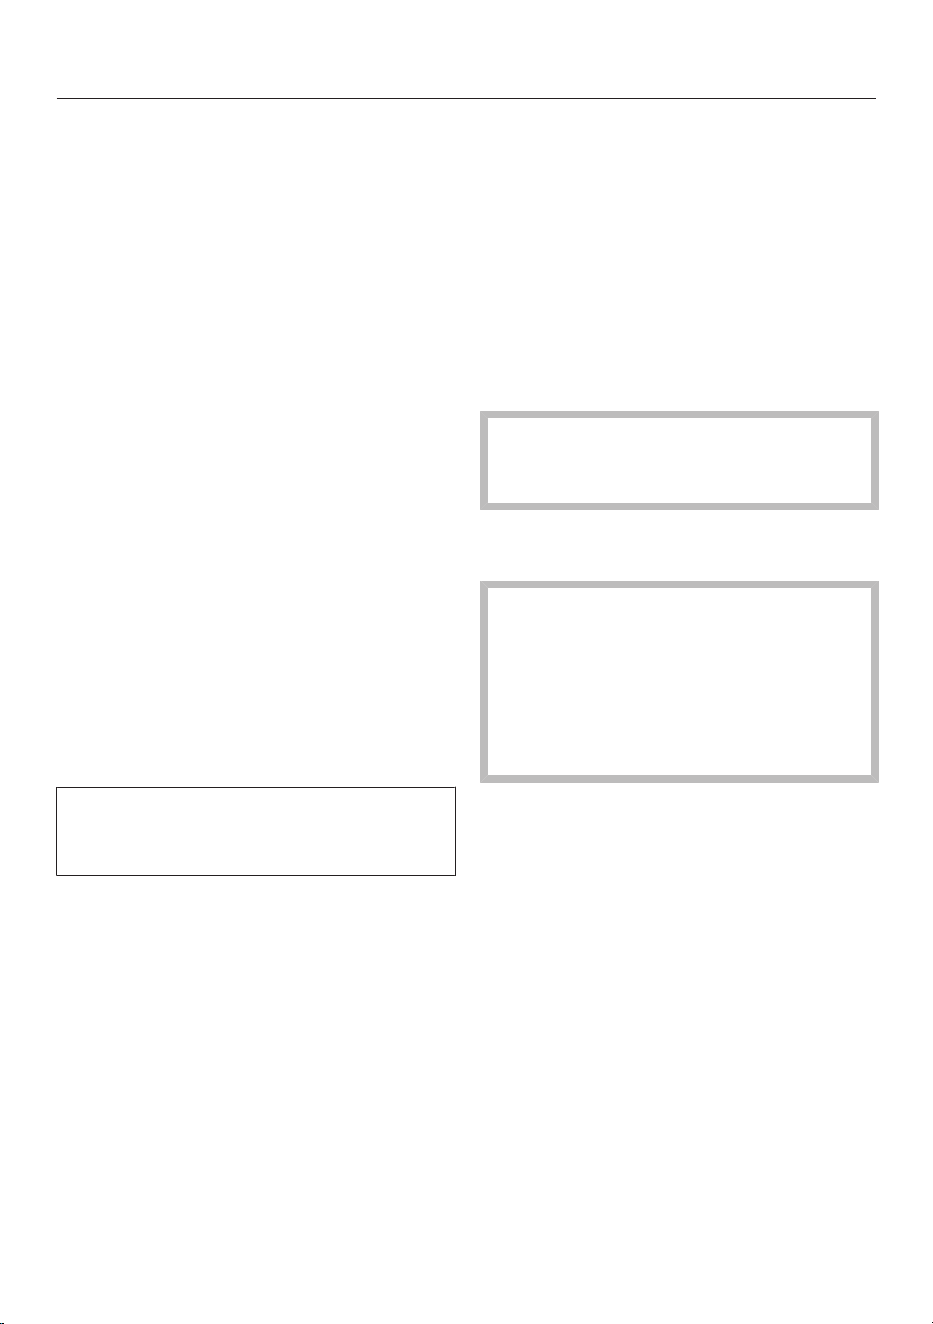
Labelling the labelling strips
(NoteBoards)
For quick and easy identification of the
wines stored, you can write on the
NoteBoards on the wooden shelves.
11
2
2
Pull the wooden shelf out a little
towards the front.
Pull the NoteBoard to one side away
from the wooden shelf.
The labelling strip can be wiped clean
with a damp cloth.
Risk of damage from unsuitable
cleaning agents.
Cleaning the labelling strips
(NoteBoards) with a cleaning agent
may damage the coating on them.
Use clean water only to wipe the
NoteBoards.
Label the NoteBoard with the chalk
pen supplied.
Alternatively, we recommend the
following products for labelling:
- liquid chalk pens,
such as an edding4095 chalk marker
- traditional blackboard chalk
Risk of damage due to writing
with the wrong products.
Never write on the NoteBoard with a
ballpoint pen, crayon or pencil,
correction pencil, wax crayon, oil
chalk or felt-tip pen (e.g. permanent
marker, highlighter, foil pen, etc.).
These products are difficult or
impossible to remove from the
NoteBoard.
Only use the products recommended
to write on the NoteBoard as these
can be removed easily.
Slide the NoteBoard back onto the
wooden shelf from the side.
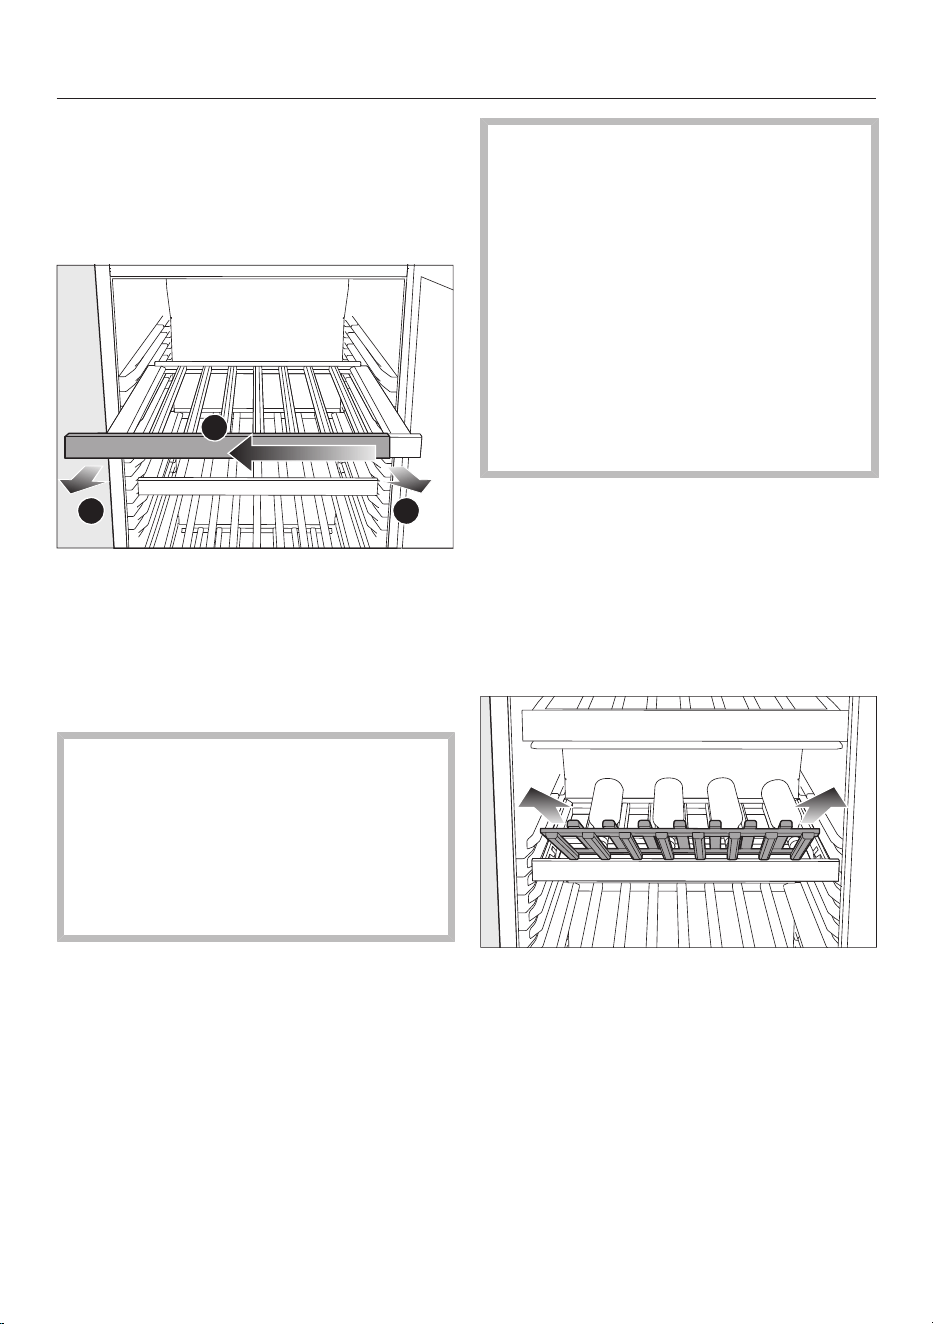
Using the PresenterFrame
The PresenterFrame can be used to
present selected wines so that the
labels on the bottles are visible even
with the appliance door closed.
Pull the PresenterFrame upwards and
out.
Familiarising yourself with the appliance
27
180°
Rotate the PresenterFrame 180°
about its own axis.
1
2
2
Insert the PresenterFrame so that it
engages into the holders on the left
and right of the wooden shelf.
Useful tip: The PresenterFrame has
been inserted correctly if there are
wooden slats at each end.
Place the wine bottles on the
PresenterFrame.
In particular, wine bottles that have
already been opened can be perfectly
stored on the PresenterFrame.
If required, switch on the feature
lighting (see “Familiarising yourself
with the appliance – Settings
mode”) to highlight the selected
wine bottles.
If you do not need the
PresenterFrame, rotate the
PresenterFrame 180° about its own
axis and replace it onto the frame of
the wooden shelf.
Commissioning
28
Before using for the first time
Remove all packaging material and
protective film.
Clean the inside of the appliance and
the accessories (see “Cleaning and
care”).
Connecting the wine conditioning unit
Connect the wine conditioning unit to
the electricity supply as described in
“Installation – Electrical connection”.
Mielewill then appear in the appliance
display, followed by.
Activating the charcoal filter
(ActiveAirCleanfilter)
Activate the Active AirCleanfilter
display (see “Adjusting settings –
Activating the ActiveAirCleanfilter
display”).
Switching on the wine
conditioning unit
Tap on the display.
If you do not interact with the display
for a certain period of time, it switches
to energy-saving mode and goes dark.
The wine conditioning unit will start to
cool and the interior lighting will come
on when the appliance door is opened.
Depending on the ambient temperature
and the temperature setting, it can take
the appliance a few hours to reach the
temperature required in the
corresponding wine conditioning zones
and for this temperature to then be
shown as a constant temperature in the
display.
Switching off the wine
conditioning unit
Tap.
Swipe left or right until is shown in
the middle.
Tap.
The cooling and interior lighting are
switched off.
will appear in the display.
Please note: the wine conditioning
unit is not disconnected from the
power supply when it is switched off.
Switching off for longer periods of
time
If, during a long absence, the wine
conditioning unit is switched off but
not cleaned and the door is left shut,
there is a danger of mould building up
inside the appliance.
The wine conditioning unit must be
cleaned.
If the wine conditioning unit is not going
to be used for a longer period of time,
observe the following:
Switch the wine conditioning unit off.
Switch off at the wall and withdraw
the plug from the socket, or switch off
the mains circuit breaker.
Clean the wine conditioning unit and
leave the door ajar to air the wine
conditioning unit and avoid odours
building up inside it.
Operation
29
Setting the temperatures in the
wine conditioning zones
The temperatures in the 2 wine
conditioning zones can be set
independently of one another.
A temperature of between 12 and
14°C is recommended to store wine
over the long term.
Tap the temperature display for the
wine conditioning zone you want to
change.
Lower wine conditioning zone: tap.
Swipe left or right until the
temperature you want is shown in the
middle.
Tap the temperature you want to
confirm.
To leave this Settings level, tap.
The temperature display will then
change back to the current temperature
in the wine conditioning zone.
The temperature in the wine
conditioning unit will rise:
- the more often the appliance door is
opened and the longer it is kept open.
- the more wine bottles there are being
stored.
- the warmer the newly stored wine
bottles are.
- the higher the ambient temperature
surrounding the wine conditioning
unit. This wine conditioning unit is
designed for use within specific
ambient temperatures (climate range).
Do not use it in ambient temperatures
for which it is not designed.
Temperature range
In all wine conditioning zones, it is
possible to set temperatures between 5
and 20°C.
Temperature display for the wine
conditioning zones
In normal operating mode, the
temperature display shows the current
average temperature inside the
corresponding wine conditioning zone.
Depending on the ambient temperature
and the temperature setting, it can take
the appliance a few hours to reach the
temperature required and for this
temperature to then be shown as a
constant temperature in the display.
Operation
30
Setting the humidity
(ActiveHumidity) in the lower
wine conditioning zone
An ambient temperature of between
19 and 28°C is required to ensure that
the humidity level is set correctly.
Tap the temperature display for the
lower wine conditioning zone.
Swipe left until is shown in the
middle.
Tap .
Swipe left or right until the humidity
( or ) you want is shown in the
middle.
Tap the setting you want to confirm.
To leave this Settings level, tap .
Depending on the ambient
temperature and the set humidity
level, it can take the appliance a few
days to reach the set humidity level.
Humidity range
You can set the humidity to 2levels and
therefore adapt it to your individual
needs.
- : Low humidity
- : High humidity
If you would like to use the lower wine
conditioning zone for the long-term
storage of wine bottles with natural
corks, we recommend setting a high
humidity level.
Please bear in mind that energy
consumption will increase slightly as
the set humidity level is increased.

Adjusting settings
31
Explanation of the different
settings
The door alarm and other warnings are
automatically disabled when the
appliance is in Settings mode.
Setting the brightness of the feature
lighting
The feature lighting can be set
separately at different brightness levels
for each individual wine conditioning
zone or switched off completely.
Tap.
Swipe left or right until is shown in
the middle.
Tap.
Swipe left or right until the wine
conditioning zone you want is shown
in the middle.
Tap the wine conditioning zone you
want.
Select the brightness you want by
swiping the segment bar to the left or
right (level 1–7).
If you want to switch the feature
lighting off completely, swipe to the
left until the segment bar goes out
completely.
Confirm the setting you want by
tapping the segment bar.
Alternatively: confirm the setting you
want by tapping .
To leave this Settings level, tap.
Switching the lock function/ on
Tap .
Swipe left or right until is shown in
the middle.
Tap .
When the lock function is switched on,
will light up orange.
To leave this Settings level, tap .
Open and close the appliance door.
Only then will the lock function be
active.
Deactivating the lock function/
temporarily
Touch the temperature display for the
wine conditioning zone you want to
change.
Touch for approx. 6seconds.
The display switches to the temperature
controls.
Now select the required settings.
Opening and closing the appliance door
will reactivate the lock function.
Switching the lock function/ off
completely
Tap .
Touch for approx. 6seconds.
Swipe left or right until is shown in
the middle.
Tap .
When the lock function is switched off,
will light up white.
To leave this Settings level, tap .
Adjusting settings
32
Switching Sabbath mode on
When Sabbath mode is switched on,
you cannot adjust any settings.
Tap.
Swipe left or right until is shown in
the middle.
Tap.
lights up orange.
To leave this Settings level, tap.
If Sabbath mode is switched on, this
is indicated in the display for approx.
3seconds.
The display then switches off.
Ensure that the appliance door is
properly closed, as visual and audible
alarms are switched off.
Switching Sabbath mode off
The Sabbath mode function will
switch off automatically after approx.
80hours.
However, you can switch the Sabbath
mode function off early.
Tap on the black display.
will appear in the display.
Tap.
lights up orange.
Tap the icon again.
When Sabbath mode is switched off,
will light up white.
To leave this Settings level, tap.
Changing the time before the door
alarm
is triggered
Tap .
Swipe left or right until
is shown
in the middle.
Tap
.
Swipe left or right until the time you
want between 30seconds and
3minutes 30seconds is shown in the
middle.
Tap the setting you want to confirm.
To leave this Settings level, tap .
Adjusting settings
33
Setting up Miele@home for the first
time
Tap.
Swipe left or right until is shown in
the middle.
Tap.
Tap on the connection method you
wish to use (App or WPS).
After you have successfully logged in,
will appear in the display.
If a connection could not be created,
will appear.
In this case, start the process again.
To leave this Settings level, tap.
Deactivating the Wi-Fi connection
Tap.
Swipe left or right until is shown in
the middle.
Tap.
Tap to deactivate the Wi-Fi
connection.
will appear in the display.
To leave this Settings level, tap.
Activating the Wi-Fi connection
Tap.
Swipe left or right until is shown in
the middle.
Tap.
Tap to activate the Wi-Fi
connection.
will appear in the display.
To leave this Settings level, tap.
When the Wi-Fi connection is active,
will light up in the display.
Resetting the network configuration
Tap.
Swipe left or right until is shown in
the middle.
Tap.
Swipe right until is shown in the
middle.
Tap.
Tap.
To leave this Settings level, tap.
All entered settings and values for
Miele@home are reset to the default
settings.
The Wi-Fi connection has been
deactivated. will go out in the display.
The network configuration should be
reset whenever a wine conditioning
unit is being disposed of or sold, or if
a used wine conditioning unit is being
put into operation. All personal data
is removed from the wine
conditioning unit. This will also
ensure that a previous owner is no
longer able to access the wine
conditioning unit.

Adjusting settings
34
Switching off the keypad tone
Tap.
Swipe left or right until
is shown
in the middle.
Tap
.
If the keypad tone is switched off,
will light up white.
To leave this Settings level, tap.
Switching on the keypad tone
Tap.
Swipe left or right until
is shown
in the middle.
Tap
.
If the keypad tone is switched on,
will light up orange.
To leave this Settings level, tap.
Changing the volume of the alarms
and buzzers/
Tap.
Swipe left or right until is shown in
the middle.
Tap.
Select the volume you want by
swiping the segment bar to the left or
right (level 1–7).
If you want to switch the alarms and
buzzers off completely, swipe to the
left until the segment bar goes out
completely.
Confirm the setting you want by
tapping the segment bar.
When the alarms and buzzers are
switched off, will light up white.
When the alarms and buzzers are
switched on, will light up orange.
To leave this Settings level, tap.
Changing the display brightness
Tap.
Swipe left or right until is shown in
the middle.
Tap.
Select the brightness you want by
swiping the segment bar to the left or
right (level 1–7).
Confirm the setting you want by
tapping the segment bar.
To leave this Settings level, tap.
Changing the temperature unit °C/°F
Tap.
Swipe left or right until°C or °F is
shown in the middle.
Tap °C or °F to change the
temperature unit.
°C or °F will appear in the display.
To leave this Settings level, tap.
Switching off Demo mode
Tap.
Tap.
Swipe left or right until is shown in
the middle.
Tap.
After demo mode has been switched
off, the wine conditioning unit shuts
down and must be switched on again.

Adjusting settings
35
Resetting the settings to their factory
default settings
Tap.
Swipe left or right until is shown in
the middle.
Tap.
will appear in the display.
Tap.
The wine conditioning unit shuts down
and must be switched on again.
Activating the ActiveAirCleanfilter
display
Tap.
Swipe left or right until is shown in
the middle.
Tap.
If the ActiveAirCleanfilter display is
activated, will light up orange.
To leave this Settings level, tap.
Cleaning and care
36
The data plate located inside the wine
conditioning unit must not be
removed. It contains information
which is required in the event of a
fault.
Do not let water get into the
electronic unit or the lighting.
Risk of damage due to moisture
ingress.
The steam from a steam cleaning
appliance can damage plastic parts
and electrical components.
Do not use a steam cleaner to clean
the wine conditioning unit.
Health risk due to soiling entering
the appliance.
Soiling that enters the appliance from
outside (such as food or drink
residues) can cause fungus to form in
the wine conditioning unit at
increased temperature and humidity
levels.
Only place clean wine bottles and
clean accessories in the wine
conditioning unit.
Cleaning agents
Cleaning and care products used
inside the wine conditioning unit
must be food safe.
To avoid damaging the surfaces of your
appliance, do not use:
- cleaning agents containing soda,
ammonia, acid or chloride
- cleaning agents containing descaling
agents
- abrasive cleaning agents, e.g. powder
cleaners and cream cleaners
- solvent-based cleaning agents
- stainless steel cleaners
- dishwasher cleaners
- oven sprays
- cleaning agents for ceramic glass
cooktops (except to clean the glass
front)
- glass-cleaning agents (except to clean
the glass front: for this a glass-
cleaning agent containing a little
alcohol, but no citric or similar
additives, may be used)
- hard, abrasive sponges and brushes,
e.g. pot scourers
- dirt eraser sponges
- sharp metal scrapers
We recommend using lukewarm water
with a little washing-up liquid to clean
the appliance.
Preparing the wine conditioning
unit for cleaning
Switch the wine conditioning unit off.
appears in the display and the cooling
system is switched off.
Take any wine bottles out of the wine
conditioning unit and store them in a
cool place.
If necessary, take out all removable
parts for cleaning (see “Familiarising
yourself with the appliance –
Adjusting the interior fittings”).
Remove the labelling strips
(NoteBoards) from the wooden
shelves before cleaning them.
Cleaning and care
37
Cleaning the interior of the
appliance
Clean the wine conditioning unit
regularly, or at least once a month.
If soiling is left on for any length of
time, it may become impossible to
remove under certain circumstances.
Surfaces may suffer discolouration or
damage.
Remove any soiling immediately.
Clean the interior with a clean
sponge, lukewarm water and a little
washing-up liquid.
Rinse all parts by hand. Do not wash
in a dishwasher.
The wooden shelves should only be
wiped with a well wrung-out moist
cloth. They must not be allowed to
get wet.
Risk of damage from unsuitable
cleaning agents.
Cleaning the labelling strips
(NoteBoards) with a cleaning agent
may damage the coating on them.
Use clean water only to wipe the
NoteBoards.
After cleaning, wipe with a damp
cloth and dry with a soft cloth.
Leave the door open to air the wine
conditioning unit sufficiently for a
short while and to prevent odour
build-up.
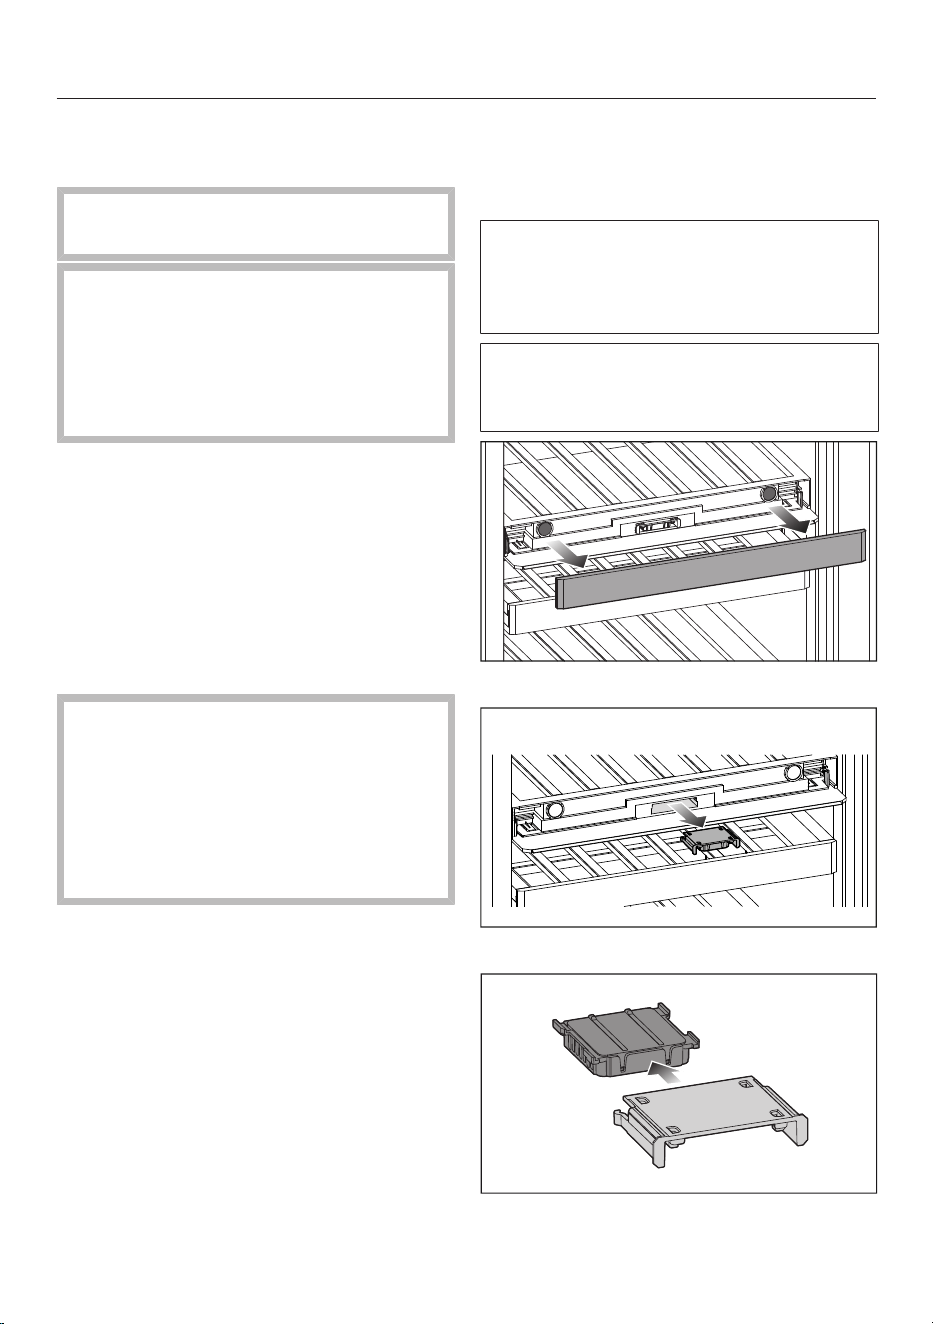
Replacing an
ActiveAirCleanfilter (charcoal
filter)
New Active AirClean filters are
available from Miele Customer
Service, from a specialist dealer or on
the Miele website.
The Active AirClean filter is located
behind the NoteBoard (labelling strips)
between the wine conditioning zones.
Pull the NoteBoard off.
Pull the filter holder out.
Remove the used
ActiveAirCleanfilter.
Cleaning and care
38
Used ActiveAirCleanfilters can be
disposed of with normal household
waste.
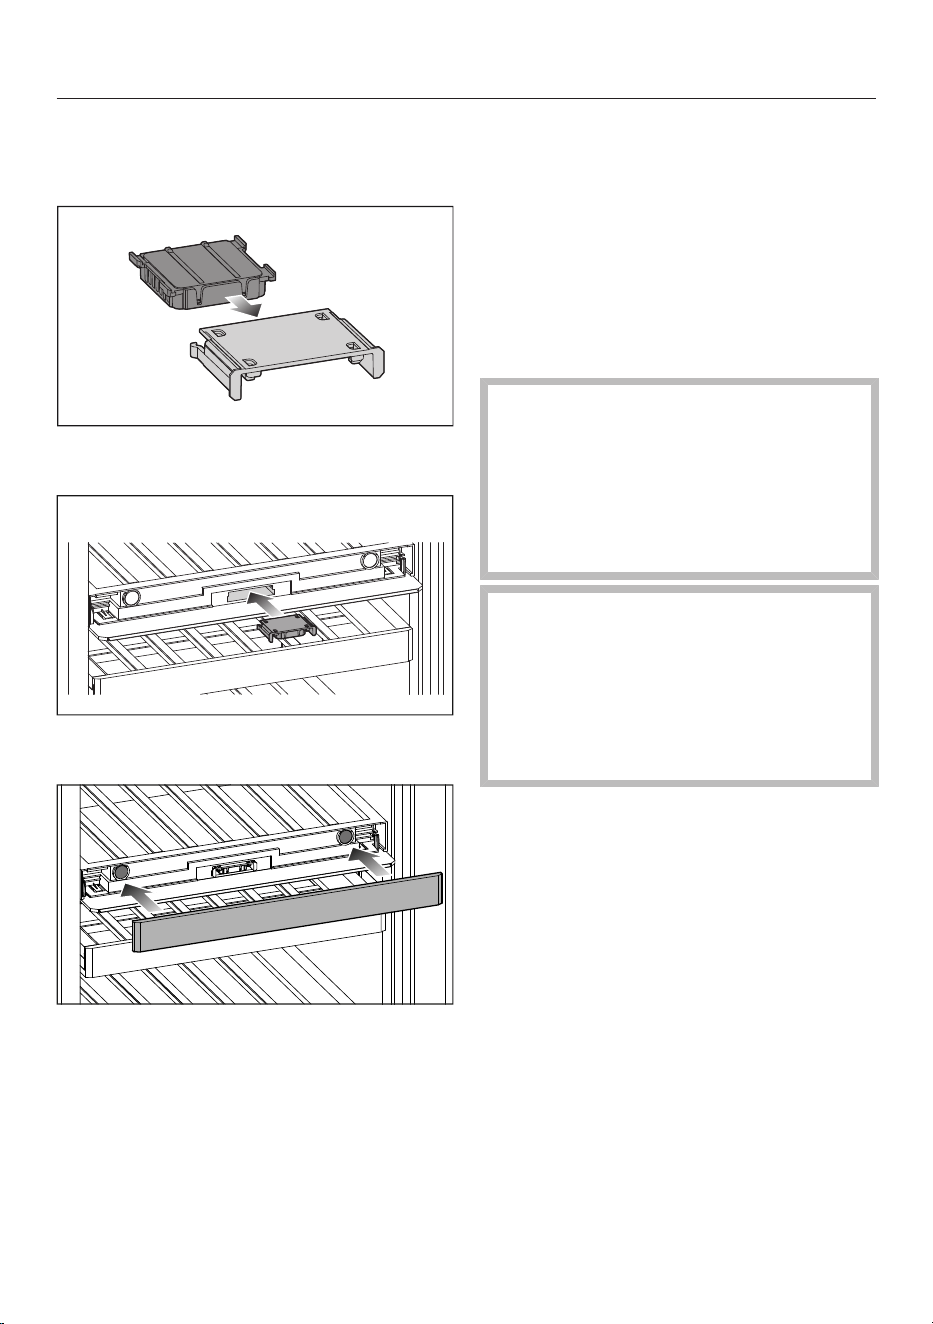
Insert the new ActiveAirCleanfilter
into the filter holder.
Reinsert the filter holder with the new
Active AirClean filter.
Fit the NoteBoard in position.
Confirming that the
ActiveAirCleanfilter has been
changed
Touch the symbol in the display.
will go out in the display and the
counter will be reset.
Cleaning the front of the
appliance and the side panels
If soiling is left on for any length of
time, it may become impossible to
remove. Surfaces may suffer
discolouration or damage.
Therefore it is best to remove soiling
from the appliance doors and side
panels immediately.
All surfaces are susceptible to
scratching. Contact with unsuitable
cleaning agents can alter or discolour
the surfaces.
See the information on “Cleaning
agents” at the beginning of this
section.
Clean the surfaces with a clean
sponge and a solution of warm water
and washing-up liquid. A clean, damp
microfibre cloth without cleaning
agent can also be used.
After cleaning, wipe with clean water
and dry with a soft cloth.
Clean the appliance door with a
proprietary glass cleaner.

Cleaning and care
39
Cleaning the door seal
Risk of damage due to incorrect
cleaning.
If you treat the door seal with oils or
grease, it can become porous.
Do not use any oils or grease on the
door seals.
The door seal should be cleaned
regularly with clean water, and then
wiped dry with a soft cloth.
Cleaning the ventilation gaps
The ventilation gaps should be
cleaned on a regular basis with a
brush or vacuum cleaner (you could
use a Miele Vacuum Cleaner dusting
brush, for example).
After cleaning
Refit all shelves and accessories in
the wine conditioning unit.
Switch the wine conditioning unit on.
Place the wine bottles in the wine
conditioning unit and close the
appliance door.
Automatic defrosting
The wine conditioning unit defrosts
automatically.
Problem solving guide
40
Many malfunctions and faults can be easily remedied. You can save time and
money in many cases, as you do not need to contact Customer Service.
More information to help you remedy faults yourself can be found at
www.miele.com.au/support/customer-assistance or
www.miele.co.nz/support/customer-assistance.
To prevent cold from escaping, open the appliance as little as possible until the
fault has been corrected.
Problem Possible cause and remedy
The compressor is
switching on more
frequently and for longer
periods of time. The
temperature in the wine
conditioning unit is
falling.
The ventilation openings are covered or have become
too dusty.
Do not block the ventilation openings.
Clean the dust from the ventilation openings on a
regular basis.
The appliance door has been opened too frequently. A
large number of wine bottles have been placed in the
appliance.
Only open the appliance door when necessary and
for as short a time as possible.
After a while, the temperature will return to normal by
itself.
The appliance door is not properly closed.
Close the appliance door.
After a while, the temperature will return to normal by
itself.
The ambient temperature is too high. The higher the
ambient temperature, the longer the compressor runs.
See the information in “Installation – Installation
site”.
The temperature in the wine conditioning unit is set
too low.
Correct the temperature setting.
Problem solving guide
41
General problems with the wine conditioning unit
Problem Possible cause and remedy
The humidity inside the
lower wine conditioning
zone cannot be set to
the required level.
The ambient temperature is too high or too low.
Ensure an ambient temperature of 19 to 28°C.
The temperature in the lower wine conditioning zone
was set too high.
A temperature of between 12 and 14°C is
recommended to store wine over the long term.
The ambient humidity is too low.
If the ambient humidity is very low, it is sometimes
not possible to achieve a high humidity level in the
wine conditioning zones.
The humidity inside the wine conditioning unit
depends on how often and for how long the door is
opened, on the ambient temperature and ambient
humidity, on how full the appliance is, and on the
appliance settings.
There is no audible alarm
even though the
appliance door has been
open for a long time.
This is not a fault. The alarm has been switched off in
Settings mode. If you want to switch the audible alarm
back on again:
Tap.
Swipe left or right until is shown in the middle.
Tap.
Select the volume you want by swiping the segment
bar to the right.
Confirm the setting you want by tapping the
segment bar.
When the alarms and buzzers are switched on,
orangewill appear.
Problem solving guide
42
Messages in the display
Message Possible cause and remedy
lights up in the display
and the wine
conditioning unit is not
getting cold. However,
the appliance and the
interior lighting are
working fine.
Demo mode has been activated.
Tap.
Tap.
Swipe left or right until is shown in the middle.
Tap.
After demo mode has been switched off, the wine
conditioning unit shuts down and must be switched
on again.
Nothing is visible in the
display. The display is
dark.
Sabbath mode is switched on: the interior lighting
is switched off and the wine conditioning unit is
cooling.
Tap on the black display.
will appear in the display.
Tap.
lights up orange.
Tap the icon again.
When Sabbath mode is switched off, the symbol
will light up white.
The display is not connected to the wine
conditioning unit correctly.
Was the door hinging changed correctly? Check
the plug connection between the wine conditioning
unit and the display again (see accompanying
installation instructions).
Energy-saving mode is switched on: if you do not
interact with the display for a certain period of time, it
switches to energy-saving mode and goes dark.
lights up in the
display and the wine
conditioning unit cannot
be used.
The lock function has been activated.
Unlock the wine conditioning unit temporarily or
switch the lock function off completely (see
“Adjusting settings”).
Problem solving guide
43
Message Possible cause and remedy
lights up in the
display and a buzzer
sounds.
The ActiveAirCleanfilter display is reminding you
that the ActiveAirCleanfilter needs to be changed.
Replace the ActiveAirCleanfilter (see “Cleaning and
care – Replacing an Active AirClean filter (charcoal
filter)”). Confirm that you have changed the
ActiveAirCleanfilter by touching in the display.
will go out in the display.
will light up yellow in
the display; an alarm will
also sound and the
interior lighting will
flash.
The door alarm has been activated.
Tap
.
The alarm will stop,
will go out and the interior
lighting will light up again constantly.
will light up red in
one of the wine
conditioning zones and
an alarm will also sound.
The temperature alarm has been activated. The
temperature in the wine conditioning zone concerned
has risen higher or fallen lower than the temperature
set.
Tap
.
goes out and the alarm will stop.
The warmest temperature recorded in the wine
conditioning zone concerned will flash for about
1minute in the temperature display for the wine
conditioning zone. Then the temperature display will
change to the current temperature in the wine
conditioning zone.
You can exit the flashing temperature display early:
Touch the temperature display for the wine
conditioning zone.
The warmest temperature displayed will disappear.
The temperature display will then revert to showing
the current temperature in the wine conditioning zone.
Rectify the cause of the alarm.
Problem solving guide
44
Message Possible cause and remedy
lights up red in the
display and an alarm
also sounds.
Indication of a power failure: the temperature in the
wine conditioning unit over the last few days or hours
has risen too high because of a power failure or
interruption to the power supply.
Tap
.
goes out and the alarm will stop.
The warmest temperature recorded in the wine
conditioning unit will flash for about 1minute in the
temperature display. Then the temperature display will
change to the current temperature.
You can exit the flashing temperature display early:
Tap the temperature display.
The warmest temperature displayed will disappear.
The temperature display will revert to showing the
current temperature. The wine conditioning unit will
go back to the last temperature setting when the
power is back on.
Rectify the cause of the alarm.
lights up red in the
display and a fault code
F with numbers may
appear. An alarm tone
also sounds.
There is a fault.
Tap on the display to switch the alarm off.
Call Customer Service.
To report the fault, you need the fault code and also
the model identifier and serial number of your wine
conditioning unit. You can access this information in
the display.
To do this, touch in the display.
The appliance data required will be shown in the
display.
Confirm with to exit the information display and the
fault code will be shown again in the display.
The wine conditioning unit can be switched off directly
from the fault message display.
There is an appliance fault: this display always has
priority over any settings which have just been
selected.
An appliance fault has priority over any current door
and/or temperature alarms in the display.
Problem solving guide
45
Interior lighting
Problem Possible cause and remedy
Risk of electric shock due to exposed, live electrical components!
When removing the lighting cover, there is a risk of coming into contact with
live electrical components.
Do not remove the lighting cover. The LED lighting must only be repaired or
replaced by a qualified technician.
Danger of injury from LED lighting.
This lighting corresponds to risk group RG2. If the cover is defective, there is a
risk of eye injury.
Do not look from a close range directly into the lighting with optical
instruments (e.g. magnifying glass or similar).
Problem Possible cause and remedy
The interior lighting is
not working.
The wine conditioning unit is not switched on.
Switch the wine conditioning unit on.
Sabbath mode is switched on: the display is dark
and the wine conditioning unit is cooling.
Tap on the black display.
will appear in the display.
Tap.
lights up orange.
Tap the icon again.
When Sabbath mode is switched off, will light up
white.
To avoid overheating, the interior lighting switches
itself off automatically after approx. 15minutes if the
appliance door is left open. If this is not the case,
there is a fault.
Call Customer Service.
The interior lighting is on
even when the appliance
door is closed.
This is not a fault. The feature lighting is switched on.
To switch off the feature lighting, touch the sensor
control for the feature lighting in the display.
The sensor control no longer lights up orange.
Service
46
You can find information on how to
remedy faults yourself at
www.miele.com.au/support/
customer-assistance or
www.miele.co.nz/support/customer-
assistance and about Miele spare
parts at www.miele.com.au/service or
www.miele.co.nz/service.
Contact in case of fault
In the event of a fault which you cannot
remedy yourself, please contact Miele.
You can book a Miele customer service
call-out online at www.miele.com.au/
service or www.miele.co.nz/service.
Contact information for Miele can be
found at the end of this booklet.
Please quote the model and serial
number of your appliance when
contacting Miele. Both of these can be
found on the data plate inside the
refrigeration appliance or, depending on
the model, in the settings mode under
information.
Warranty
The manufacturer's warranty for this
appliance is 2years.
For further information, please refer to
your warranty booklet.
Optional accessories
47
Miele all purpose microfibre
cloth
The all purpose microfibre cloth helps
remove fingerprints and light soiling on
stainless steel fronts, appliance control
panels, windows, furniture, car
windows, etc.
ActiveAirCleanfilters
The ActiveAirCleanfilter between the
wine conditioning zones ensures
optimum air quality by filtering the
incoming air.
Optional accessories can be ordered
from the Miele webshop. They can
also be ordered directly from Miele
(see end of this booklet for contact
details).

Installation
48
Installation site
Risk of damage due to high
humidity.
In environments with high humidity,
condensation can build up on the
external wine conditioning unit
panels.
This condensate can cause corrosion
on external appliance panels.
Install the wine conditioning unit with
sufficient ventilation in a dry and/or
air-conditioned room.
After installation, please make sure
that the appliance door closes
properly and that the specified
ventilation openings are adhered to.
Fire hazard and risk of damage
from appliances that give off heat.
Appliances which give off heat can
catch fire and set fire to the wine
conditioning unit.
Do not place appliances which give
off heat, such as mini-ovens, double
burner cooktops or toasters, on the
wine conditioning unit.
Fire risk and danger of damage
from open flames!
Open flames can set fire to the wine
conditioning unit.
Keep open flames (e.g. a candle)
away from the wine conditioning unit.
This appliance should be installed in a
dry, well-ventilated room.
When deciding on the installation site,
please bear in mind that the energy
consumption increases if the wine
conditioning unit is installed near a
heater, a cooker or another appliance
that gives off heat.
Avoid direct sunlight.
The higher the ambient temperature,
the longer the compressor runs and
the higher the energy consumption is.
When installing the wine conditioning
unit, please note the following:
- The mains socket must not be located
directly behind the appliance and
should be easily accessible.
- The power plug and mains connection
cable must not touch the rear of the
wine conditioning unit as they could
be damaged by vibrations from the
appliance.
- Do not plug other appliances into
sockets behind this appliance.
- When installing the wine conditioning
unit, make sure that the mains
connection cable does not get
trapped or damaged.
- Do not position or operate multi-
socket adapters, distributor strips or
other electronic devices (such as
halogen transformers) at the rear of
the appliance.
- The floor at the installation site must
be horizontal and level and must be as
high as the surrounding floor.
Installation
49
Climate range
This wine conditioning unit is designed
for use within specific ambient
temperatures (climate range). Do not
use it in ambient temperatures for
which it is not designed. The climate
range is stated on the data plate inside
the wine conditioning unit.
Climate range Ambient
temperature
SN 10to32°C
N 16to32°C
ST 16to38°C
T 16to43°C
SN-ST 10to38°C
SN-T 10to43°C
A lower ambient temperature will cause
the compressor to switch off for longer
periods, meaning that the wine
conditioning unit is unable to maintain
the required temperature in some
circumstances.
Ventilation requirements
Risk of fire and damage due to
insufficient ventilation!
If the wine conditioning unit is not
ventilated sufficiently, the
compressor will run more frequently
and for longer periods. This will result
in increased energy consumption and
a higher operating temperature of the
compressor. This, in turn, can result
in damage to the compressor.
Please ensure that there is adequate
ventilation around the wine
conditioning unit.
It is essential to observe the required
ventilation openings.
The ventilation openings must not be
covered or blocked in any way.
They must also be cleaned on a
regular basis to remove dust.
Air at the back of the wine conditioning
unit gets warm. Sufficient space for
proper ventilation must therefore be
ensured (see “Installation - Appliance
dimensions”).
Installation
50
Installing several wine
conditioning units/refrigeration
appliances
Risk of damage due to
condensation on the external
appliance panels.
In environments with high humidity,
condensation can build up between
the external wine conditioning unit
panels, which can cause corrosion.
Do not place different wine
conditioning units/refrigeration
appliances directly next to one
another.
A distance of at least 70mm must be
maintained between the wine
conditioning units/refrigeration
appliances.
Changing the door hinging
The wine conditioning unit is supplied
with right-hand hinging. If left-hand
hinging is required, the door hinging
must be changed (see accompanying
installation instructions).
Useful tip: Place a suitable cover on the
floor in front of the wine conditioning
unit to protect the appliance door and
your floor from damage.
Risk of injury and damage due to
live electrical components.
You will come into contact with live
electrical components while you are
changing the hinging.
Switch off the appliance at the wall
socket and withdraw the plug before
changing the hinging.
Danger of injury and damage to
the appliance due to heavy door.
There is an increased danger of injury
and damage if the door hinging is
installed by a single person.
Always change the door hinging with
the help of a second person.
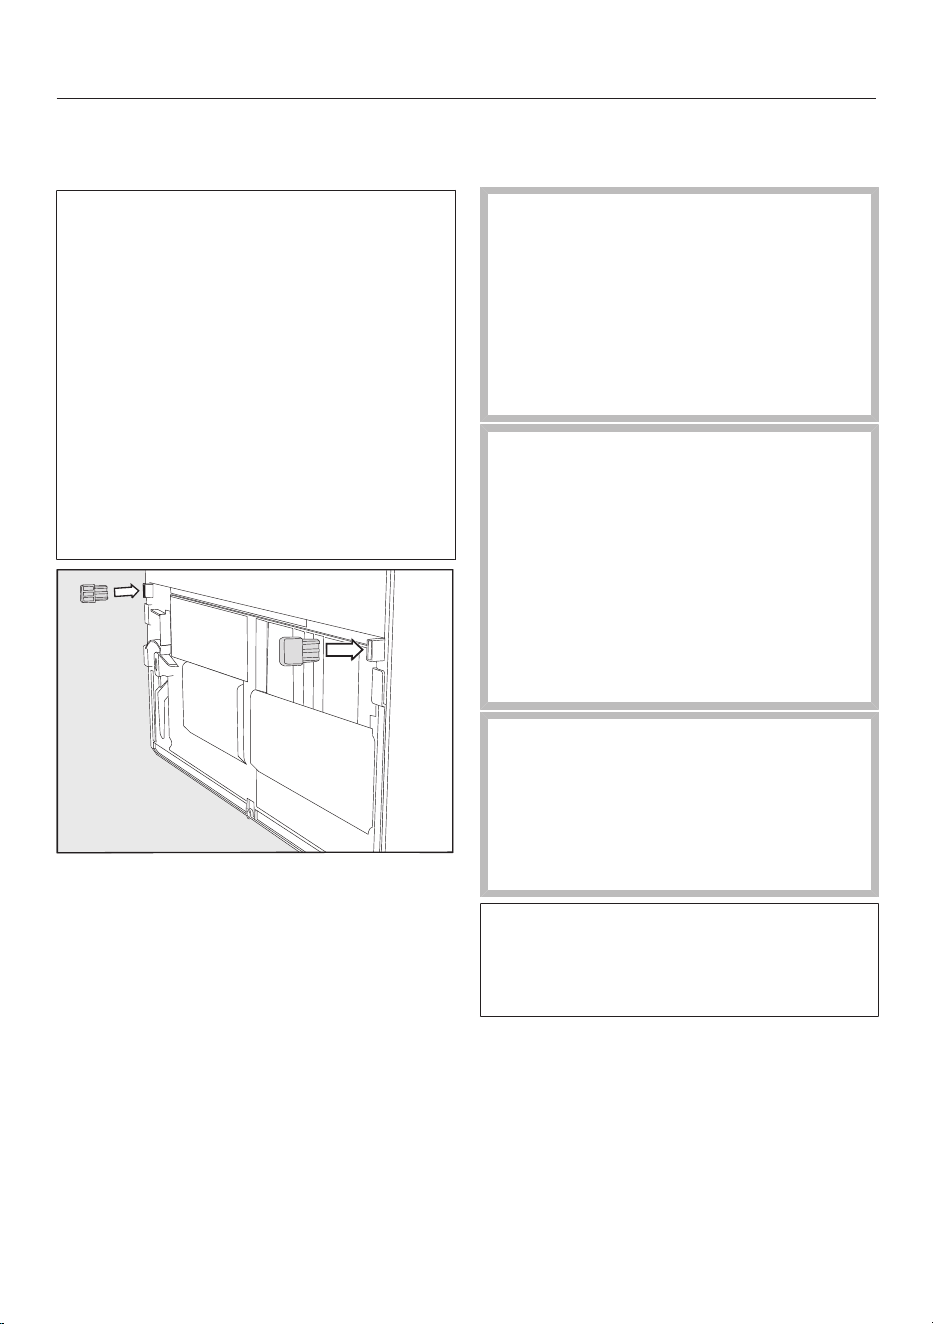
Installation
51
Fitting the supplied wall
spacers
The wall spacers supplied must be
used in order to achieve declared
energy consumption values and to
prevent the build-up of condensation
at high ambient temperatures. The
wine conditioning unit depth is
increased by approx. 15mm for
appliances with wall spacers fitted.
If the wall spacers are not used, the
functionality of the wine conditioning
unit is not affected. However, energy
consumption is slightly increased with
less distance between the appliance
and the wall.
Fit the wall spacers onto the back of
the wine conditioning unit on the
bottom left and right.
Installing the wine conditioning
unit
Risk of injury and damage due to
the wine conditioning unit tipping
over.
There is an increased risk of injury
and damage if the wine conditioning
unit is installed by a single person.
Two people are always required to
install the wine conditioning unit.
Risk of damage and injury caused
by appliance door impact.
The appliance door could hit the wall
of the room resulting in damage to
the door. If the door is made of glass,
the damaged glass can lead to
injuries.
Protect the appliance door by fitting a
felt stopper, for example, to the wall
of the room.
Risk of damaging the floor.
Moving the wine conditioning unit
can cause damage to the floor.
Move the wine conditioning unit
carefully on floors that are sensitive
to scratching.
For easier installation, there are
transport handles on the back at the
top and transport wheels underneath
the wine conditioning unit.
Useful tip: The wine conditioning unit
must be empty when it is installed.
Prepare the wine conditioning unit for
installation as close as possible to its
intended installation site.
Connect the wine conditioning unit to
the electricity supply as described in
“Installation – Electrical connection”.
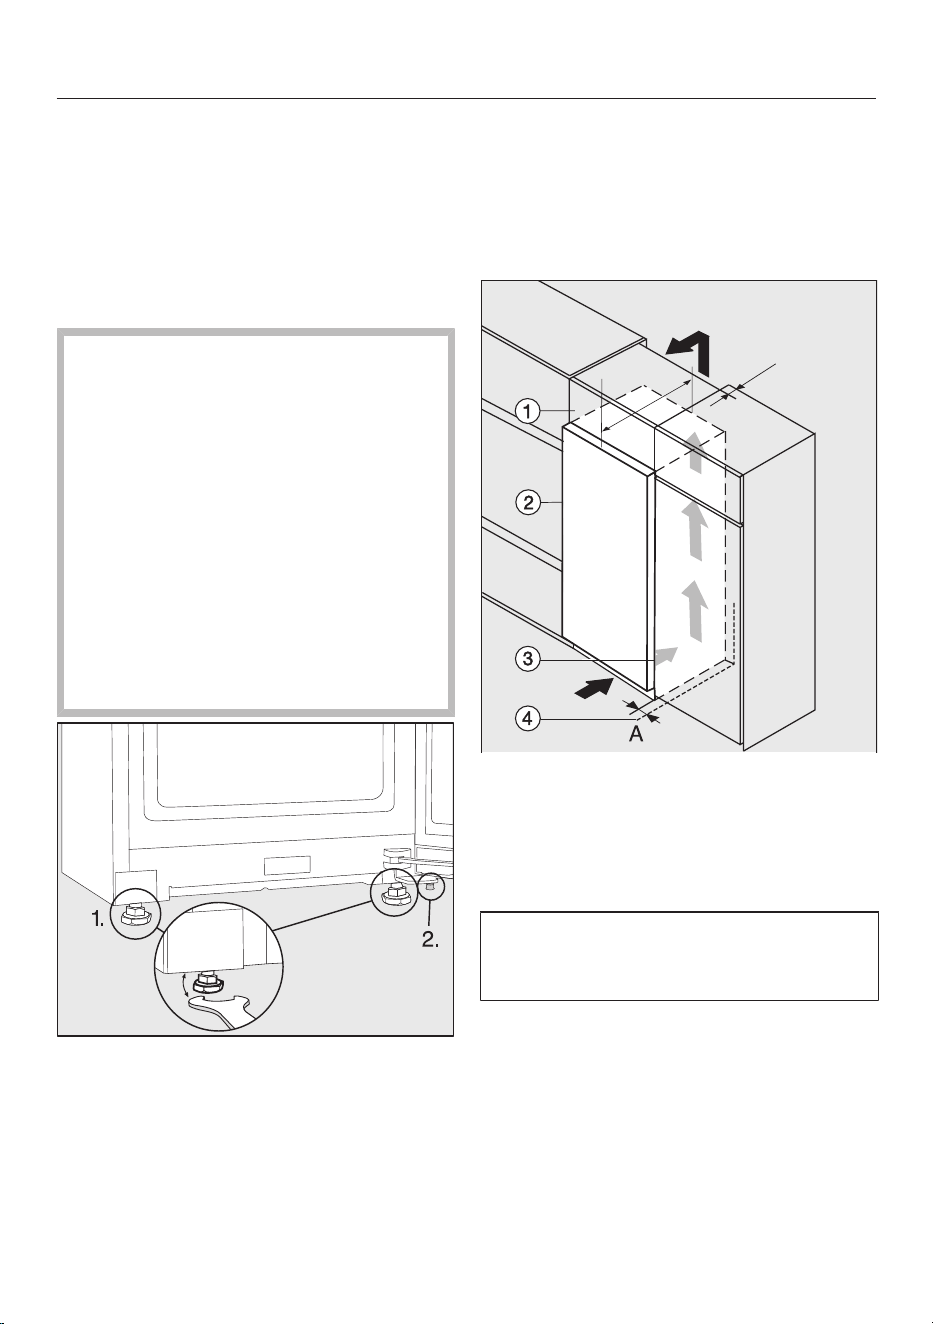
Installation
52
Move the wine conditioning unit
carefully to its intended installation
site.
Position the wine conditioning unit
with the wall spacers (if fitted) or the
back of the appliance against the wall.
Aligning the wine conditioning unit
Risk of damage and injury caused
by the appliance door falling out or
the wine conditioning unit tipping
over.
If the additional adjustable foot on
the hinge plate at the bottom is not
resting firmly on the floor, the
appliance door can fall out or the
wine conditioning unit can tip over.
Use the spanner supplied with the
appliance to unscrew the adjustable
foot until it is resting on the floor.
Then unscrew it by a further quarter
turn.
Use a spirit level and the spanner
supplied to align the wine
conditioning unit and support the
appliance door.
1. Adjust the front adjustable feet.
2. Unscrew the additional adjustable
foot until it is touching the floor. Then
unscrew it by a further quarter turn.
Integrating the wine
conditioning unit in a run of
kitchen units
The wine conditioning unit can be
surrounded by kitchen units.
679 mm*
≥ 13 mm
≥ 300 cm
mm
2
≥ 50
Top box
Wine conditioning unit, door depth =
75mm
Kitchen unit
Wall
* The appliance depth is increased by
approx. 15mm for wine conditioning
units with wall spacers fitted.
Installation
53
Risk of fire and damage due to
insufficient ventilation!
If the wine conditioning unit is not
ventilated sufficiently, the
compressor will run more frequently
and for longer periods. This will result
in increased energy consumption and
a higher operating temperature of the
compressor. This, in turn, can result
in damage to the compressor.
Please ensure that there is adequate
ventilation around the wine
conditioning unit.
It is essential to observe the required
ventilation openings.
The ventilation openings must not be
covered or blocked in any way.
They must also be cleaned on a
regular basis to remove dust.
The larger the ventilation gap, the
more economically the compressor
will work.
Install the wine conditioning unit next
to the kitchen unit.
- The appliance front must protrude in
front of furniture fronts by at least the
door depth. This enables the
appliance door to be opened and shut
without being obstructed.
- When installing the wine conditioning
unit next to a wall, a distance (A)
must be maintained on the hinge side
between the wall and the wine
conditioning unit.
- To match the height of the rest of the
kitchen units, the wine conditioning
unit can be fitted with a suitable top
box.
A ventilation gap of at least 50mm
depth must be provided across the
whole width of the top box.
The ventilation gap under the ceiling
must be at least 300cm
2
to ensure
that the warm air can escape
unhindered.
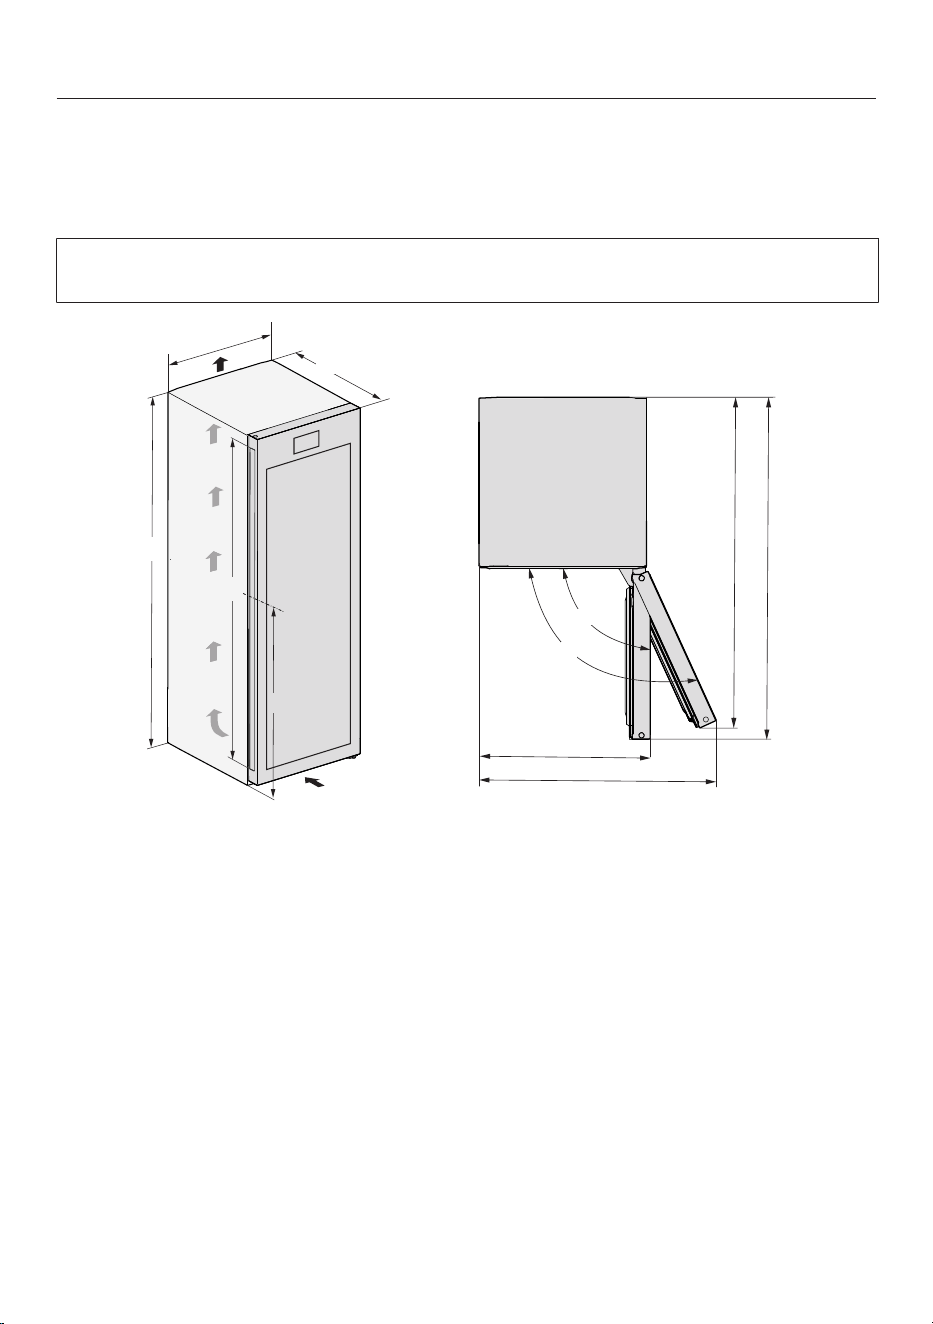
Installation
*INSTALLATION*
54
Appliance dimensions
Installation dimensions/View from above
All dimensions are given in mm.
The wine conditioning unit will function correctly if the specified ventilation
openings are kept clear.
597
1853
679*
1685
944
613
851
1216*
1176*
90°
115°
* Dimensions without wall spacers fitted. Appliance depth is increased by 15mm with the
wall spacers supplied fitted.
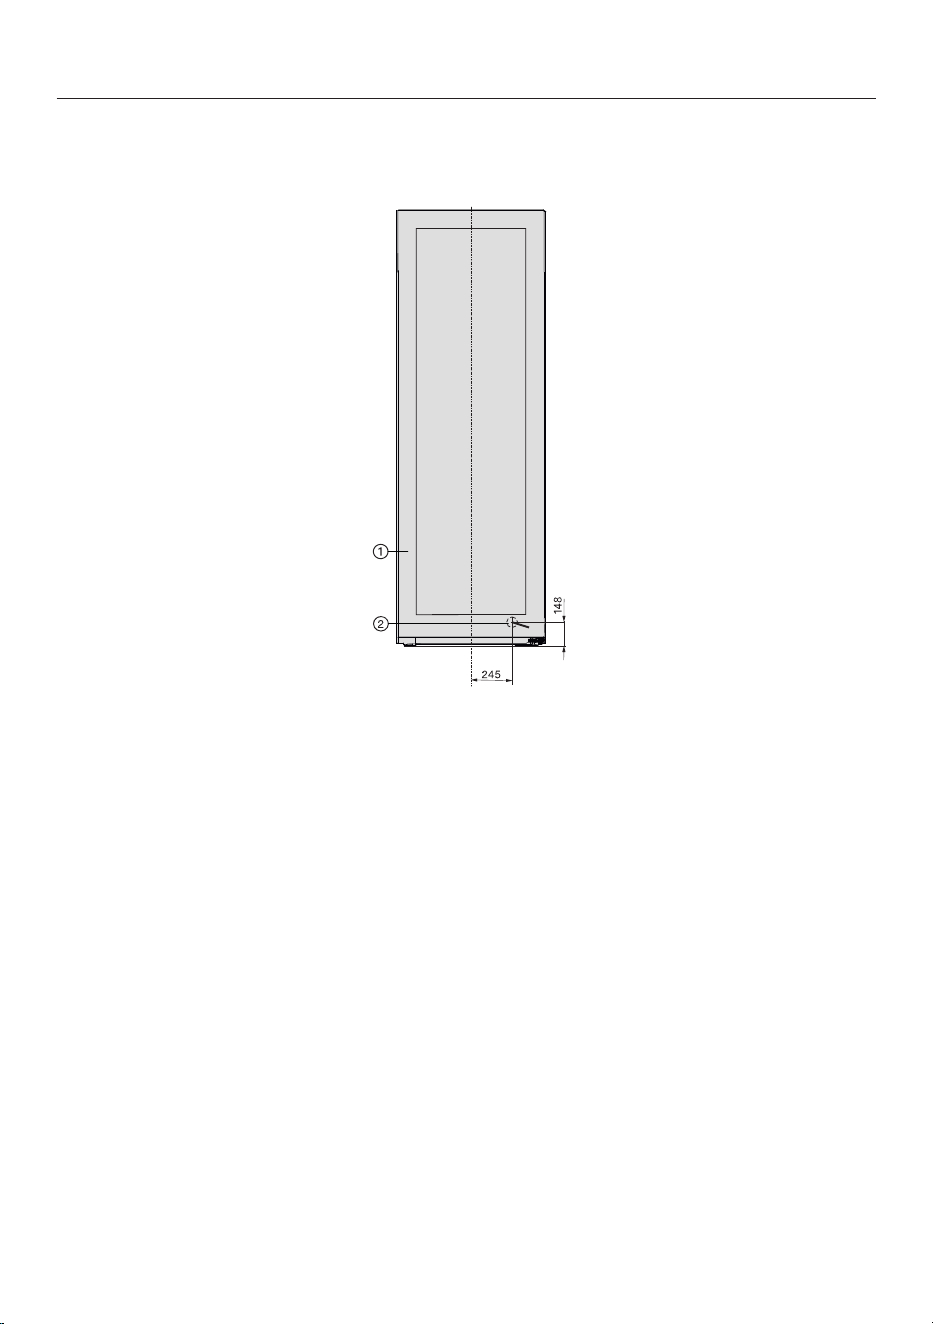
Installation
*INSTALLATION*
55
Connections
All dimensions are given in mm.
a
Front view
b
Mains connection cable, length = 2000mm
A longer mains connection cable is available from Miele
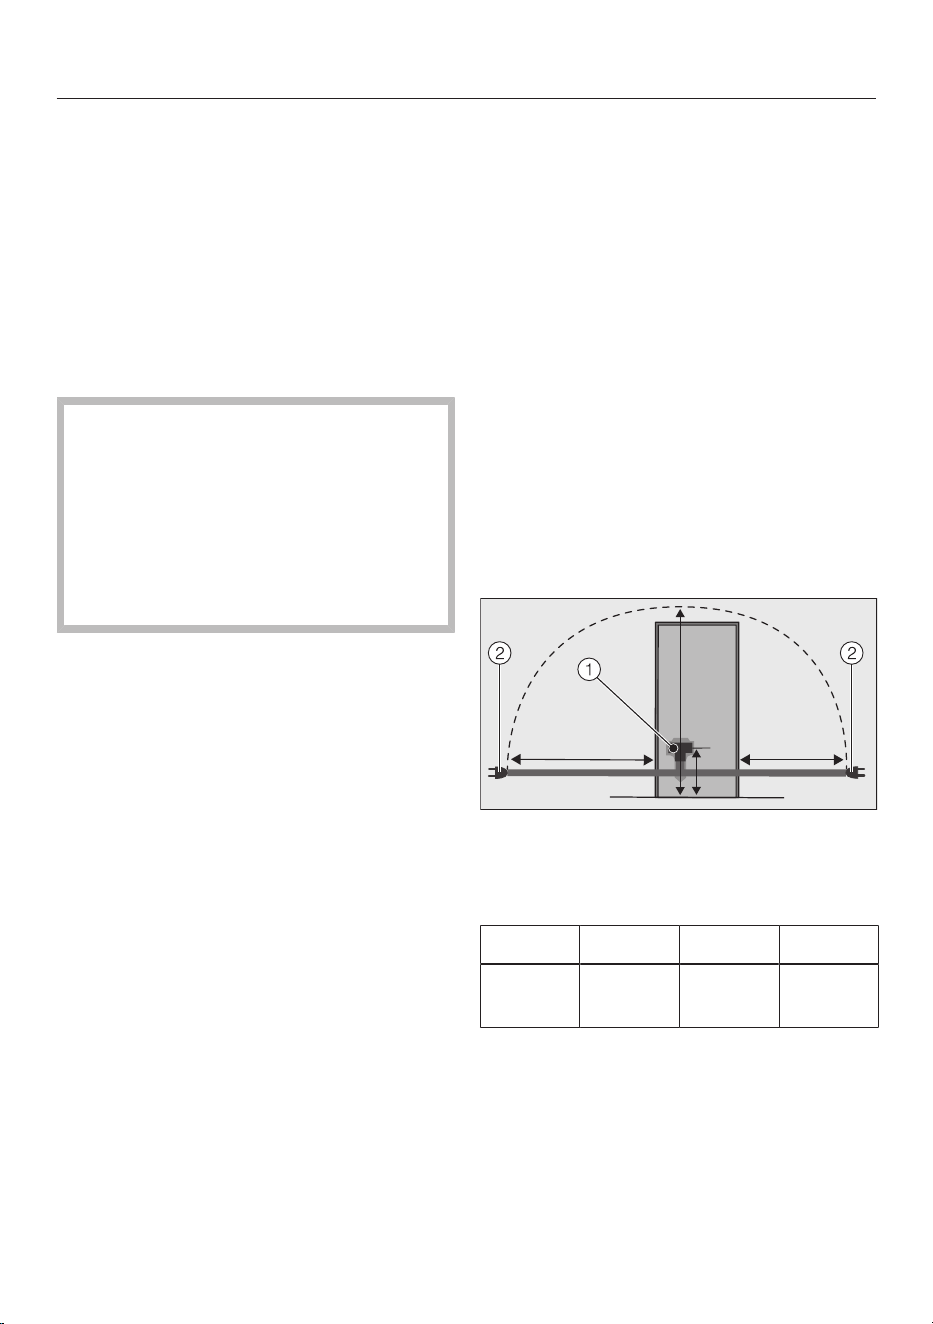
Installation
*INSTALLATION*
56
Electrical connection
The wine conditioning unit must only be
connected to an earthed socket using
the mains connection cable supplied.
The socket should be easily accessible
after the wine conditioning unit has
been installed. If the socket is not easily
accessible, ensure that a suitable
means of disconnection is provided on
the installation side for each pole.
Risk of fire from overheating.
Connecting the wine conditioning
unit to a multi-socket adapter or to
an extension lead can overload the
mains connection cable.
For safety reasons, do not use an
extension cable or multi-socket
adapter.
All electrical work must be carried out
by a suitably qualified and competent
person in strict accordance with
national and local safety regulations.
For extra safety, it is advisable to install
a suitable residual current device (RCD)
with a trip current of 30mA. Ensure
power is not supplied to the appliance
until after the installation has been
completed.
If the mains connection cable is
damaged, it must only be replaced with
a specific mains connection cable of the
same type (available from Miele
Customer Service). For safety reasons,
replacement may only be carried out by
a suitably qualified specialist or Miele.
These operating instructions and the
data plate indicate the nominal power
consumption and the appropriate fuse
rating. Compare this information with
the data of the on-site electrical
connection. If in any doubt, consult a
qualified electrician.
Temporary or permanent operation with
a self-sufficient or non-mains
synchronous energy supply system (e.g.
isolated networks, back-up systems) is
possible. A requirement for the
operation is that the energy supply
system complies with all current local
and national requirements that apply to
stand-alone, solar and/or battery
systems.
The protective measures provided in the
domestic installation and in this Miele
product must also be assured in their
function and operation in isolated
operation or in non-mains synchronous
operation, or replaced with equivalent
measures in the installation.
Connection dimensions
a
b
c
d
Back of the refrigeration appliance/wine
conditioning unit
Appliance plug connector
Power plug
a b c d
1800m
m
1400m
m
2100m
m
200m
m

Installation
*INSTALLATION*
57
Connecting the wine conditioning unit
Plug the appliance plug connector
into the appliance socket.
Make sure that the plug connector has
locked into position correctly.
Insert the plug of the wine
conditioning unit into the socket and
switch on at the socket.
The wine conditioning unit is now
connected to the electricity supply.


Miele Australia Pty. Ltd.
Miele New Zealand Limited
Miele Global Headquarters
Germany
Miele & Cie. KG
Carl-Miele-Straße 29
33332 Gütersloh
Federal Republic of Germany
IRD 98 463 631
8 College Hill
Freemans Bay, Auckland 1011
ACN 005 635 398
ABN 96 005 635 398
Level 4, 141 Camberwell Road
Hawthorn East, VIC 3123
0800 464 353 (0800 4 MIELE)
www.miele.co.nz
1300 464 353 (1300 4 MIELE)
www.miele.com.au

M.-Nr. 12 596 120 / 04en- AU, NZ
KWTS 4785 ...
