
Digital Multifunctional
System
BP-1360M/BP-1250M
User's Manual
Operations
2
1 Preface
1 Preface
This manual lists various functions that can be performed on the touch panel display.
In addition, this manual uses screen images that show all optional units and optional products
equipped to describe operations.
Note
The values set at the machine can be checked by printing out the Configuration Report.
Refer
Refer to "Logging in to Authentication Mode" (P.15) when logging in to Administrator Mode.
Refer to Internet Services help for details of Internet Services.
Refer to
User’s Manual - Main Unit
for trademarks or manual conventions.
1.1 Acquiring the Latest Software
The latest software version for items such as the printer driver, scanner driver and utilities can be
acquired from our official website.
https://global.sharp/restricted/products/copier/downloads/select_us_driver.html
This manual may not be edited, modified or copied in whole or part without the written consent
of the publisher.
Parts of this manual is subject to change without prior notice.
The screen shots and the illustrations in this manual are used as examples. They may differ from
yours depending on the model, the software, or the OS.

3
2.1 Administrator Information
2 Setup
2.1 Administrator Information
It is recommended to change the administrator User ID and password to prevent the settings from
being changed and to maintain security.
Refer
Refer to
Setup Manual
for the default administrator ID and password.
Refer to "[Administrator Settings]" (P.158) for how to set.
2.2 Using Internet Services
Internet Services is a service that uses a web browser to display the machine’s status and job history,
and also change machine settings.
This service can be used at a client computer connected over a network with the machine in a TCP/IP
environment.
1. Start the web browser.
2. Enter the machine’s IP address or the Internet address in the web browser’s address bar and then
press the <Enter> key.
Note
If the network uses DNS (Domain Name System) and the machine’s host name has been registered at the
DNS name server, the machine can be accessed using the Internet address that contains the host name
and domain name. If the host name is “myhost” and the domain name is “example.com”, the Internet
address will be “myhost.example.com”.
When setting the port number, use a colon “:” after the IP address or Internet address and then enter the
port number.
Refer
Refer to "Device Status" (P.18) for the IP address.
Refer to Internet Services help for operations.

4
2 Setup
2.3 Scan Feature
It is necessary to log in to Administrator Mode to perform settings.
Scan to Folder
TCP/IP Address
Refer to "[Protocol Settings]" (P.134).
Enable ports
Set each port for [SNMP], [SOAP] and [WebDAV] to [Enabled]. For details, refer to "[Port
Settings]" (P.125).
Registering a Folder
Refer to "Registering a Folder" (P.62).
Scan (to PC)
TCP/IP Address
Refer to "[Protocol Settings]" (P.134).
Enable ports
Set each port for [FTP Client], [SFTP Client] and [SMB Client] to [Enabled]. For details, refer to
"[Port Settings]" (P.125).
Create the transfer destination folder
- FTP/SFTP Transfer
Create the transfer destination folder on the login server and then set the write permission.
- SMB Transfer
Create the folder on the client computer and then set it to a shared folder. Set the write
permission for the shared folder.
Note
An account (login name and password) are required to use FTP/SFTP transfer.
When using SMB with macOS/OS, it is necessary to set [System Preferences] > [Shared] > [File Sharing].
Scan (Email)
Refer to "Email Feature" (P.5).
My Folder
This feature is available when"[Authentication/Accounting Settings]" (P.155) is set to [Remote].
TCP/IP Address
Refer to "[Protocol Settings]" (P.134).
Enable ports
Set the [SMB Client] port to [Enabled]. For details, refer to "[Port Settings]" (P.125).
Start the service and set the transfer method
Use Internet Services to set the My Folder feature.
Scan to USB
Scan to USB feature can be switched between Enabled/Disabled using Internet Services.
If it is set disabled, [Scan to USB] is no longer be displayed in [USB] on the Home screen, or [Print
from USB] is displayed instead of [USB].
5
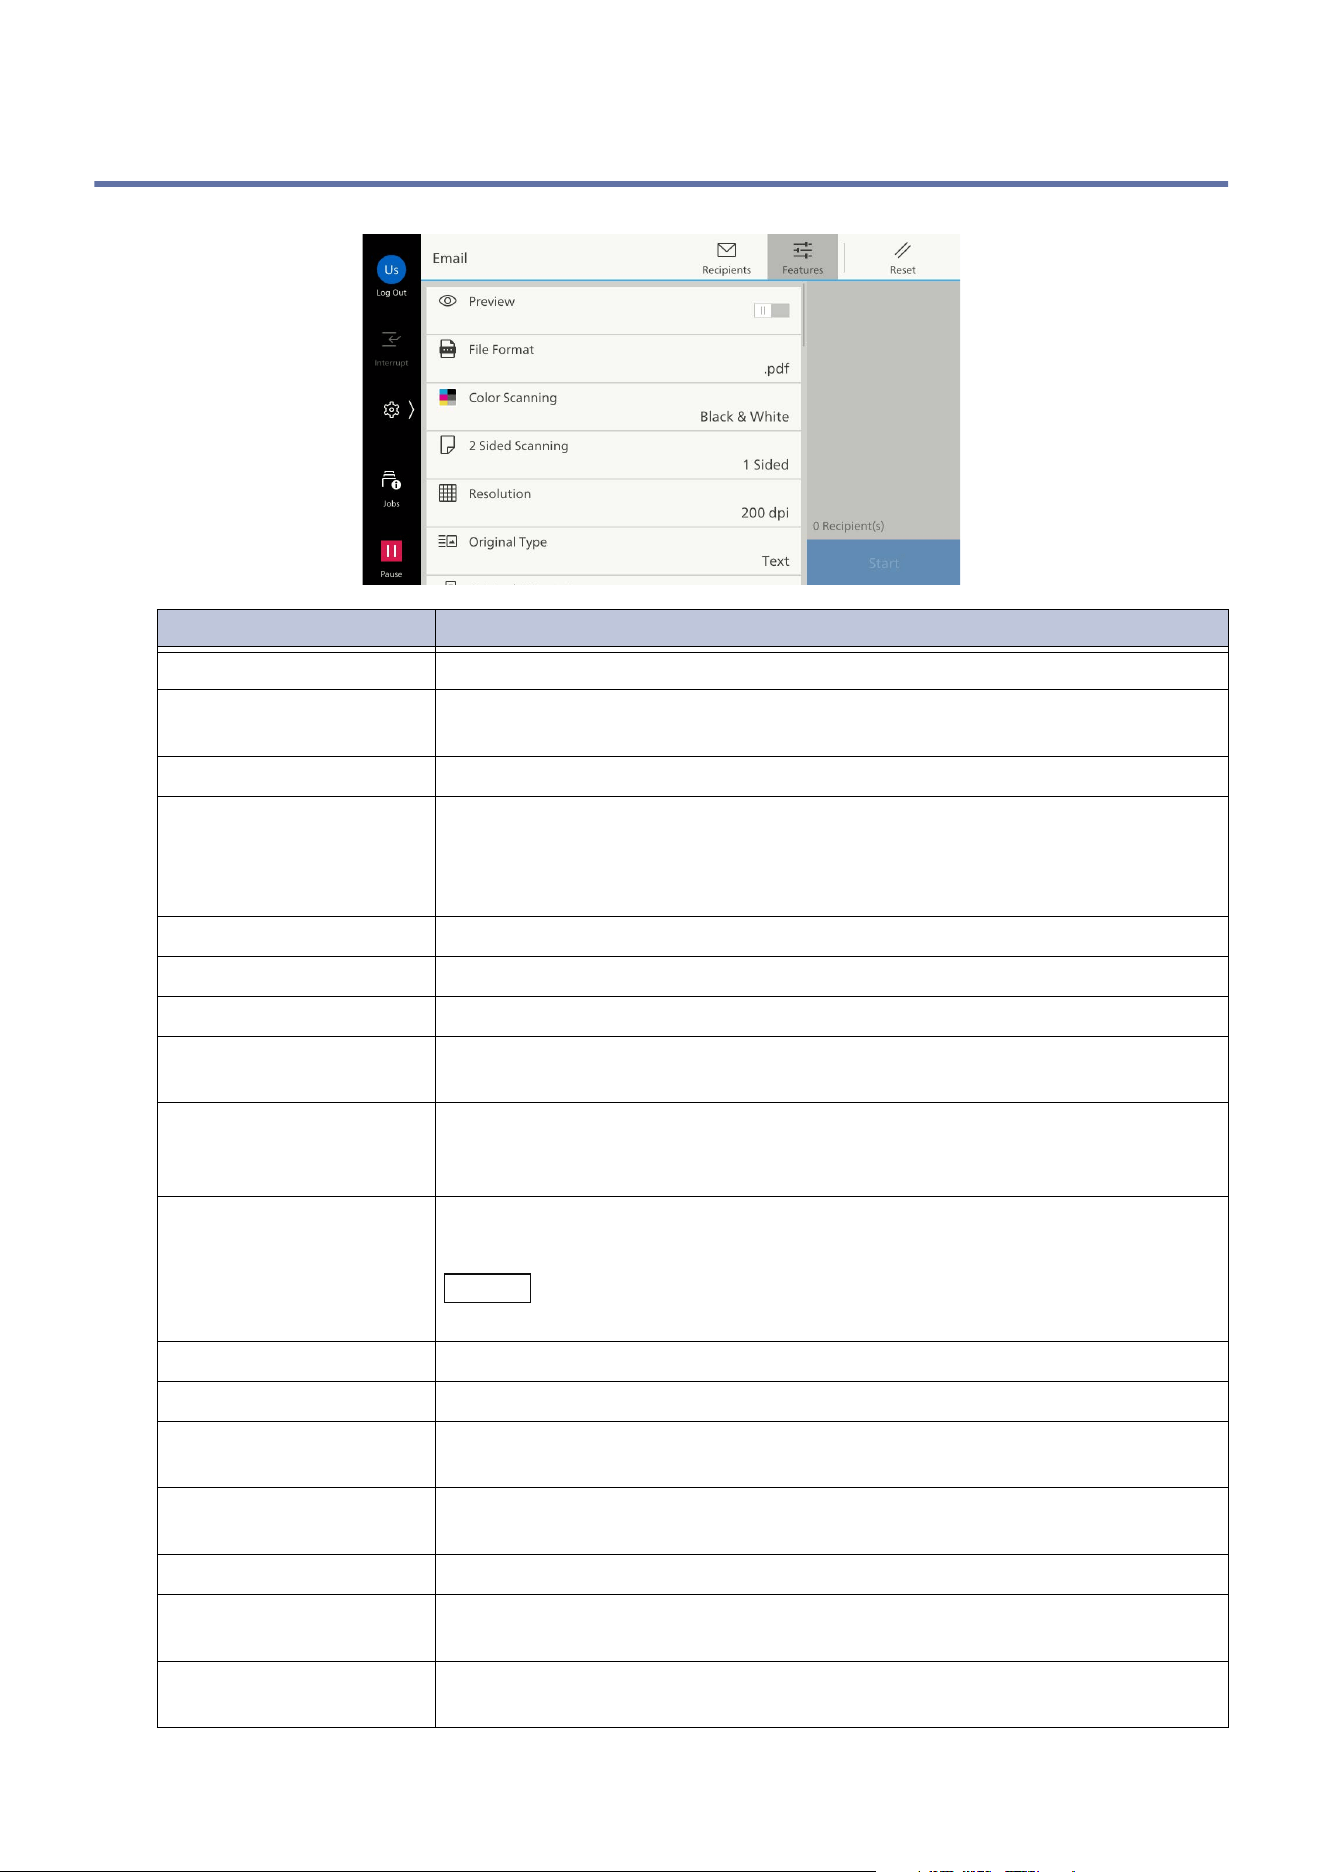
2.4 Email Feature
Scan to Desktop
Note
The scan function cannot be used with the default settings in Windows Server.
TCP/IP Address
Refer to "[Protocol Settings]" (P.134).
Enable ports
Set the [WSD] port to [Enabled]. For details, refer to "[Port Settings]" (P.125).
2.4 Email Feature
It is necessary to log in to Administrator Mode to perform settings.
Note
A certificate is required in advance to send and receive Email after attaching a digital signature to the
Email and encrypting the Email using S/MIME.
Setting items Refer to
TCP/IP Address "[Protocol Settings]" (P.134)
Email Port "[Receive Email]" (P.129)
"[Send Email]" (P.130)
"[Email Notification Service]" (P.130)
Machine’s Email Address "[Device Email Address / Host Name]" (P.138)
Protocol to Receive Email "[Other Settings]" (P.151) > [Protocol to
Receive Email]
SMTP Server Address (Set as required) "[Outgoing/Incoming Email Settings]" (P.140)
SMTP AUTH Login Name, Password (Set as
required)
POP3 Serv
er Address (Set as required)
POP3 Login Name, Password (Set as required)
Subnet Mask (Set as required) "[TCP/IP - Network Settings]" (P.136)
Gateway Address (Set as required)
DNS Server Address (Set as required)
S/MIME (Set as required) "[S/MIME Settings]" (P.147)
6
2 Setup
2.5 Paper Tray Settings
After loading paper in the paper tray, set information of loaded paper such as the paper size, the
paper type, and the paper color.
Refer
Refer to “Basic Operations of the Machine” in
User’s Manual - Main Unit
for how to load paper.
1. Tap on > [Device] > [Paper Tray Settings].
2. Tap on a tray to change its paper settings.
Refer
Refer to "[Common Settings]" (P.91) for [Common Settings] displayed in Administrator Mode.
3. As needed, configure the setting items.
Item Details
[Paper Size] [Auto Detect]: The machine specifies the paper size automatically.
[Manual Size Input]: Enter the paper size you use.
[Paper Type] Set the paper type.
Note
You can select the paper for which the detail settings or name has been
registered in advance (custom paper). For how to set the custom paper,
refer to "Setting of Custom Paper" (P.7).
[Paper Color] Set the paper color.
7
2.5 Paper Tray Settings
4. Tap on [OK].
Setting of Custom Paper
1. Tap on > [Device] > [Paper Tray Settings] > [Common Settings].
2. Tap on [Custom Paper Settings].
3. Tap on a tray to change its settings.
4. As needed, configure the setting items.
[Auto Tray Switching] Set whether to use this tray automatically, when paper specified by a
user is loaded, or when paper on the tray in use run out in the middle
of a job.
Note
You can set this item in Administrator Mode.
[Priority] If [Auto Tray Switching] is enabled, set a priority of this tray when
there are several trays to be switched.
Note
You can set this item in Administrator Mode.
[Standard Size Defaults] If tray 5 (bypass tray) was selected, set the paper size displayed for
tray 5 in [Paper Supply] from the features list.
Note
You can set this item in Administrator Mode.
Item Description
[Name] Set name for custom paper.
[Paper Type] Select the paper type to be set to the custom paper.
Item Details
8
2 Setup
[Adjust Air Assist Values] Air assist is the function that feeds air into the machine as paper is
fed to prevent multi-feeding and paper jams.
When the High Capacity Feeder is installed, you can select [Auto],
[Disabled] or [Enabled].
[Auto]: Not normally used. Our service person customizes the
adjustment value when using special paper.
Note
For details, call for service.
[Disabled]: Air assist does not work.
[Enabled]: The value of air to feed is adjusted automatically.
If the Air Suction Feeder is installed, [Air Blower A]/[Air Blower B]/
[Air Blower C]/[Air Blower D]/[Air Blower E] can be adjusted
individually.
Refer
Refer to
Setting of Air Assist Value Adjustment Profile
in the following
cases.
- When coated paper (weight: 64 - 80 g/m
2
or 177 - 216 g/m
2
) is used
- When coated paper (weight: 106 - 135 g/m
2
or 177 - 216 g/m
2
) is
used
- When paper jam occurs
[Adjust Alignment] Select the alignment adjustment setting registered in "[Manual
Alignment]" (P.172).
[Adjust Image Transfer] Enables setting of the optimal image transfer value for the custom
pa
per when the image is not transferred in the optimal condition to
paper. Specify the percentage of the voltage value to be applied
numerically, or adjust it using a sample print.
[Adjust Regi-Loop] When performing skew adjustment for the pre-register feed, the
adjustment value can be set for each user paper.
The adjustment value of the pre-register feed can be set in the range
of
- 9 to 9 mm, in 0.3 mm increments.
[Adjust Fold Position] Select the adjustment value registered in "[Adjust Finisher]" (P.180)
> [Adjust Fold Position].
[Adjust Image Transfer for
Paper Edges]
If uneven colors due to transfer failure occur only at the front edge or
the trail edge of the paper, adjusting the voltage ratio of the second
transfer roll may improve the transfer failure. Execute this item when
th
e transfer failure does not improve even after Adjust Image
Transfer.
[Adjust Paper Speed] When heavyweight paper or see-through paper is used, if uneven
colors occur only at specific spots adjusting the paper feed speed
may it.
You can set the adjustment value of the fusing and the registration
speed.
Item Description
9
2.5 Paper Tray Settings
5. If confirming the adjustment results with the values you set, tap on [Sample Printout] to print the
sample.
1)Select the paper tray where the corresponding paper is set, change the print setting as
required.
2)Tap on [Start].
3)When printing is completed, tap on [Close].
4)Tap on [×] on the top left of the [Sample Printout] screen.
6. Tap on [OK].
[Adjust Fusing
Temperature]
Adjusts the fusing unit temperature. If the toner peels off the paper,
increasing the temperature may improve it.
Note
If you decrease the temperature too much, the toner on the high
density images is not fused enough and it may peel off from the paper.
If the temperature is raised too high when printing on lightweight
paper, a paper jam may occur in the fusing and peeling section.
When changing the settings, check the print results. Also return the
value to the default “0” after printing because the environmental
condition is always different.
[Adjust Transfer Load] Adjusts the transfer pressure according to the paper to be used and
outputs it with appropriate image quality.
[Output Paper Alignment] Sets whether to use the function to align the output paper when you
use the stacker tray of the finisher.
Item Description
10
3 Basic Operations
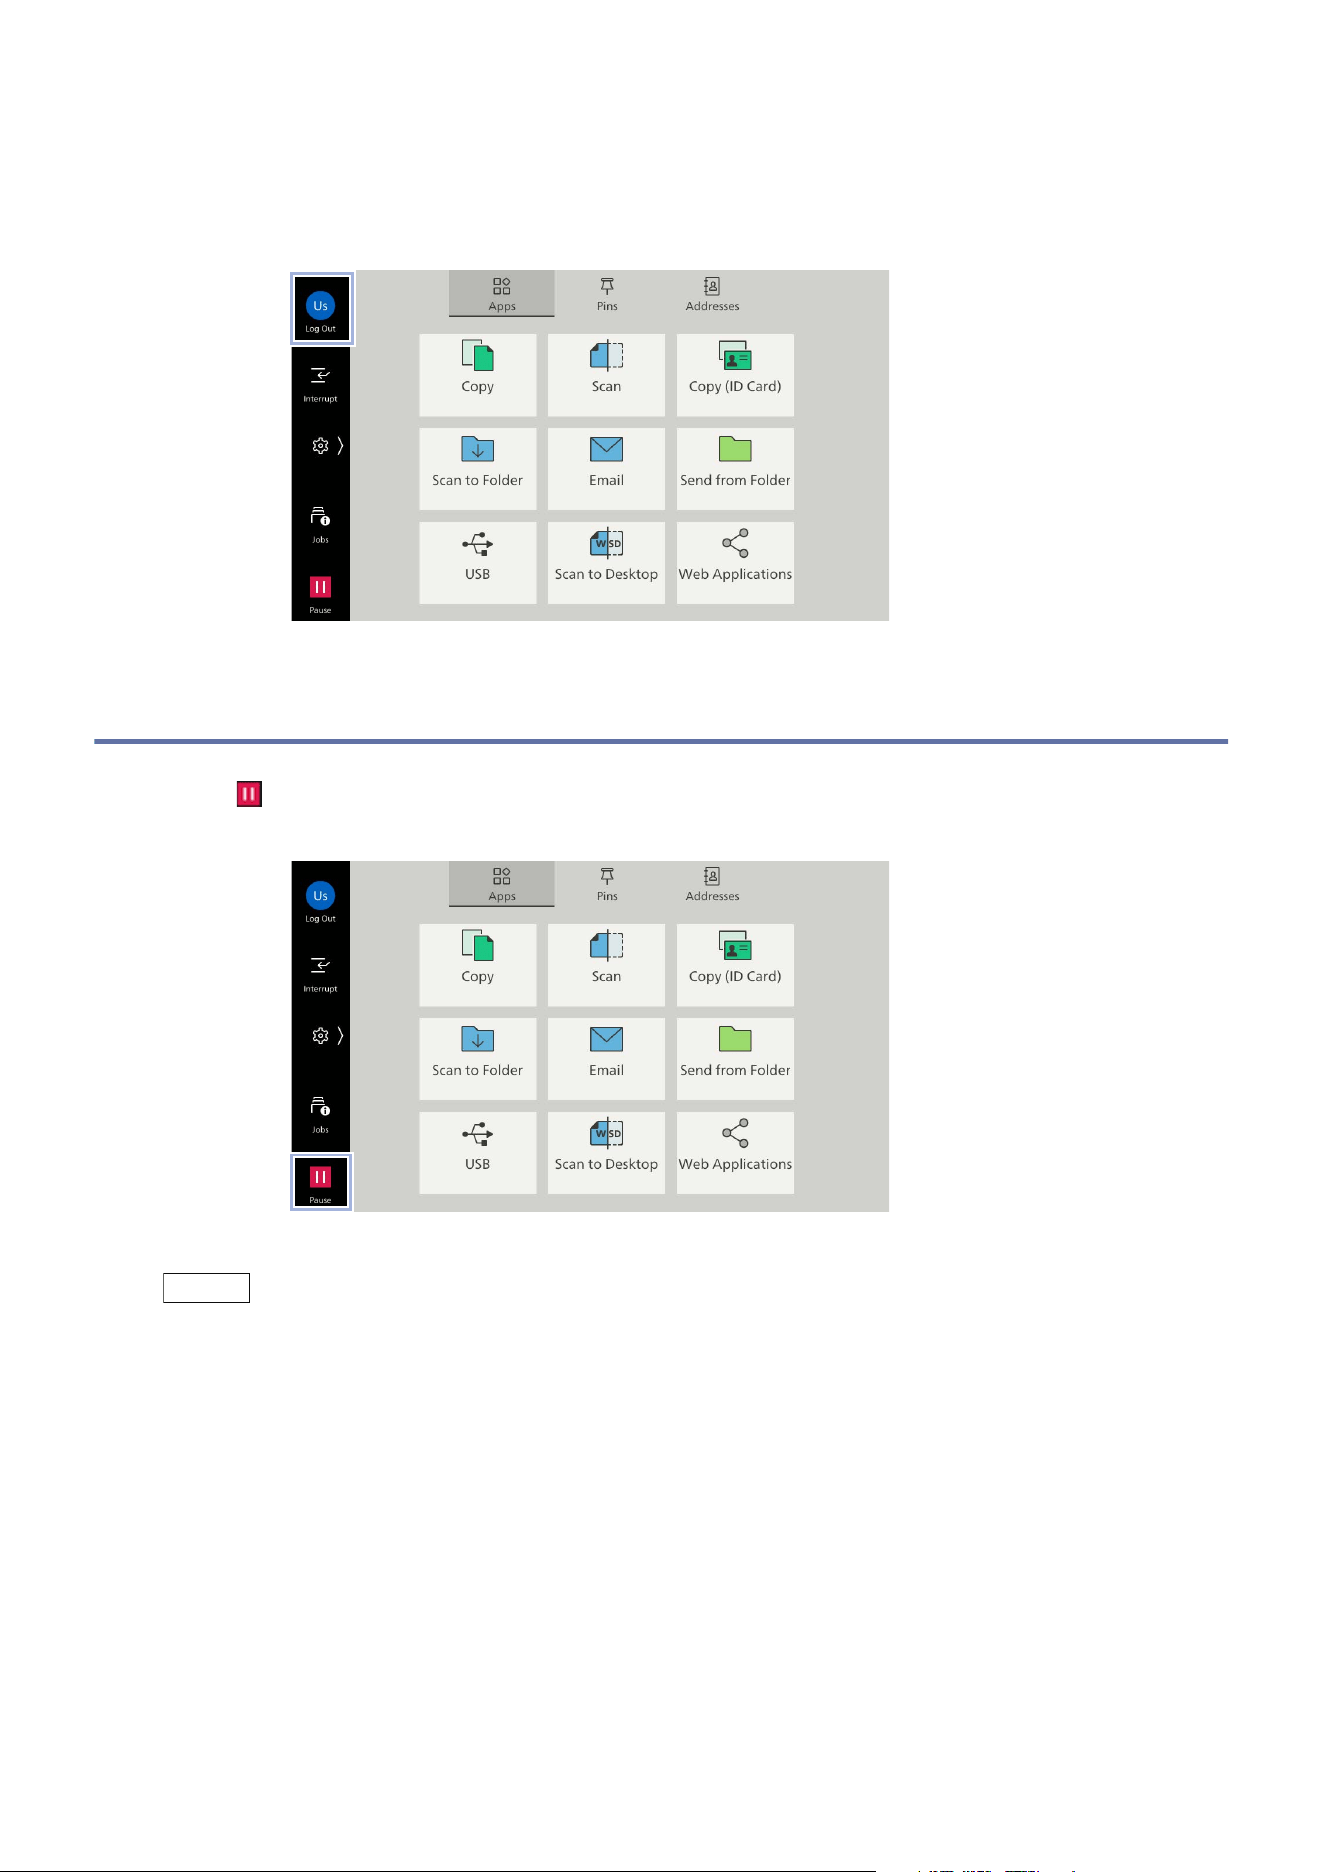
3 Basic Operations
3.1 Touch Panel Display
Home Screen
This is the screen to access the various features of the machine.
You can display only the feature used frequently or change the display order.
Note
You can change the default settings of the Home screen. For details, refer to "[Screen/Button Settings]"
(P.94).
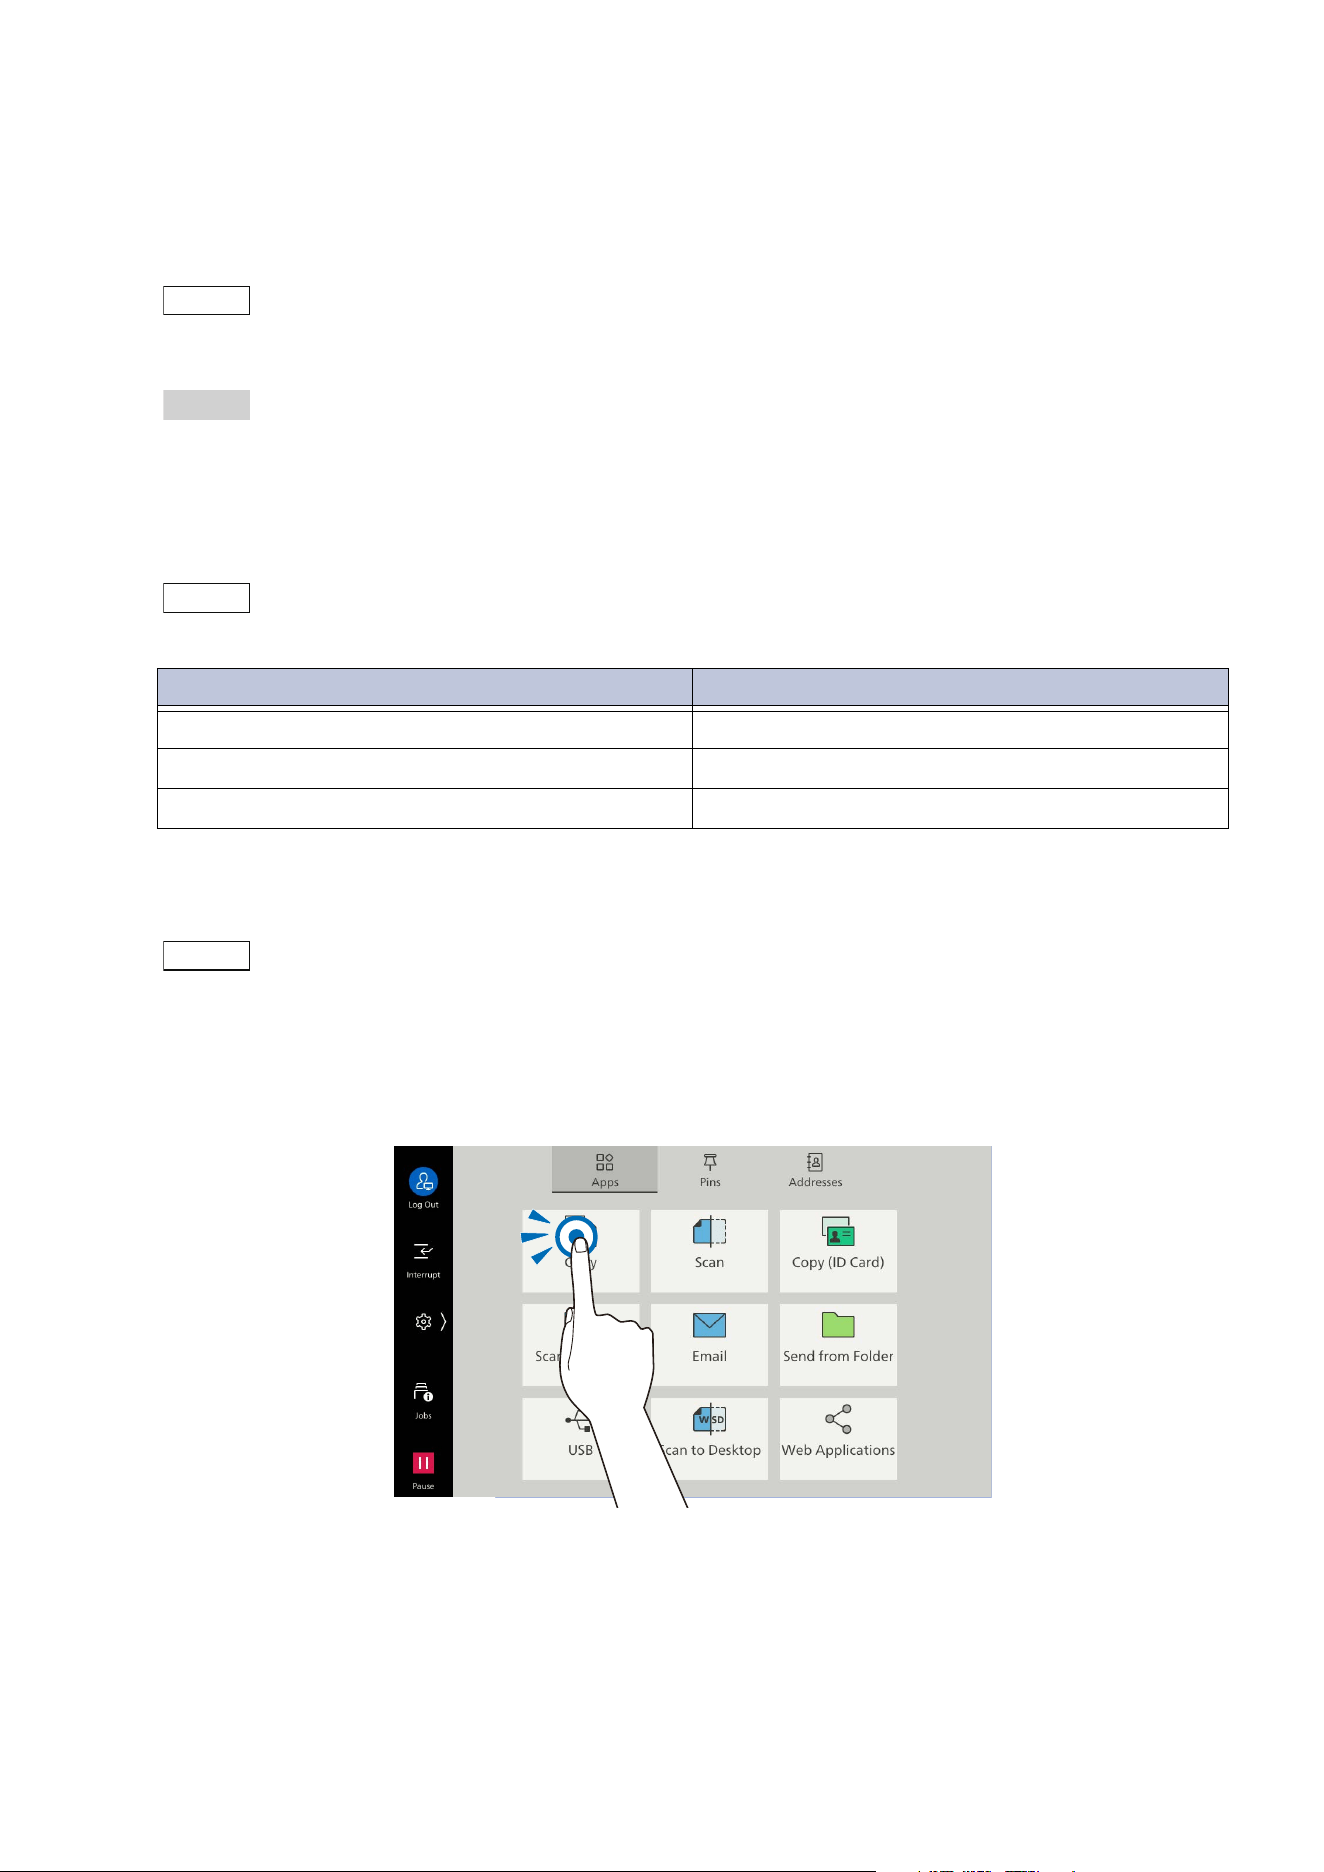
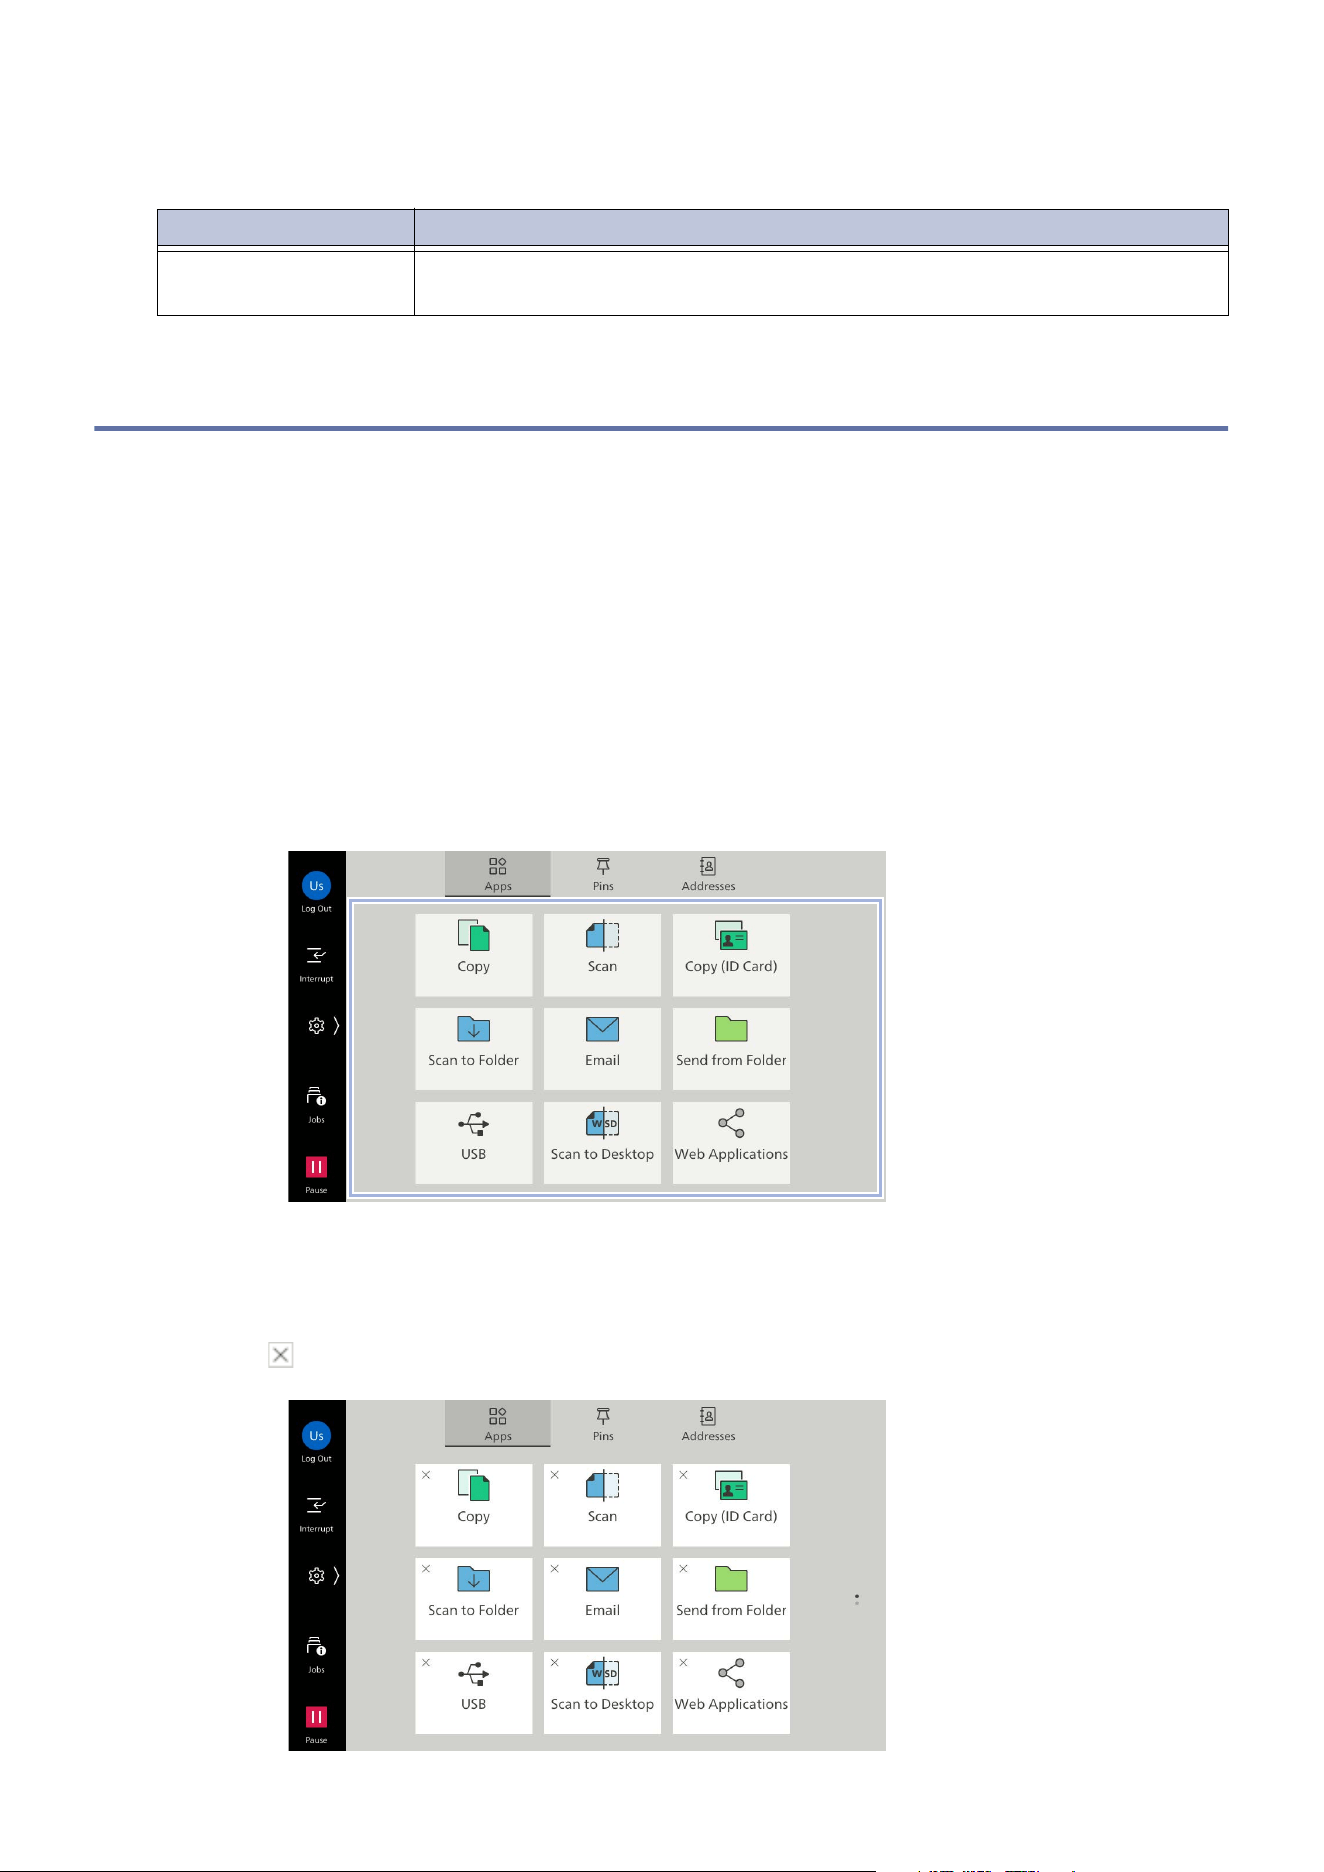
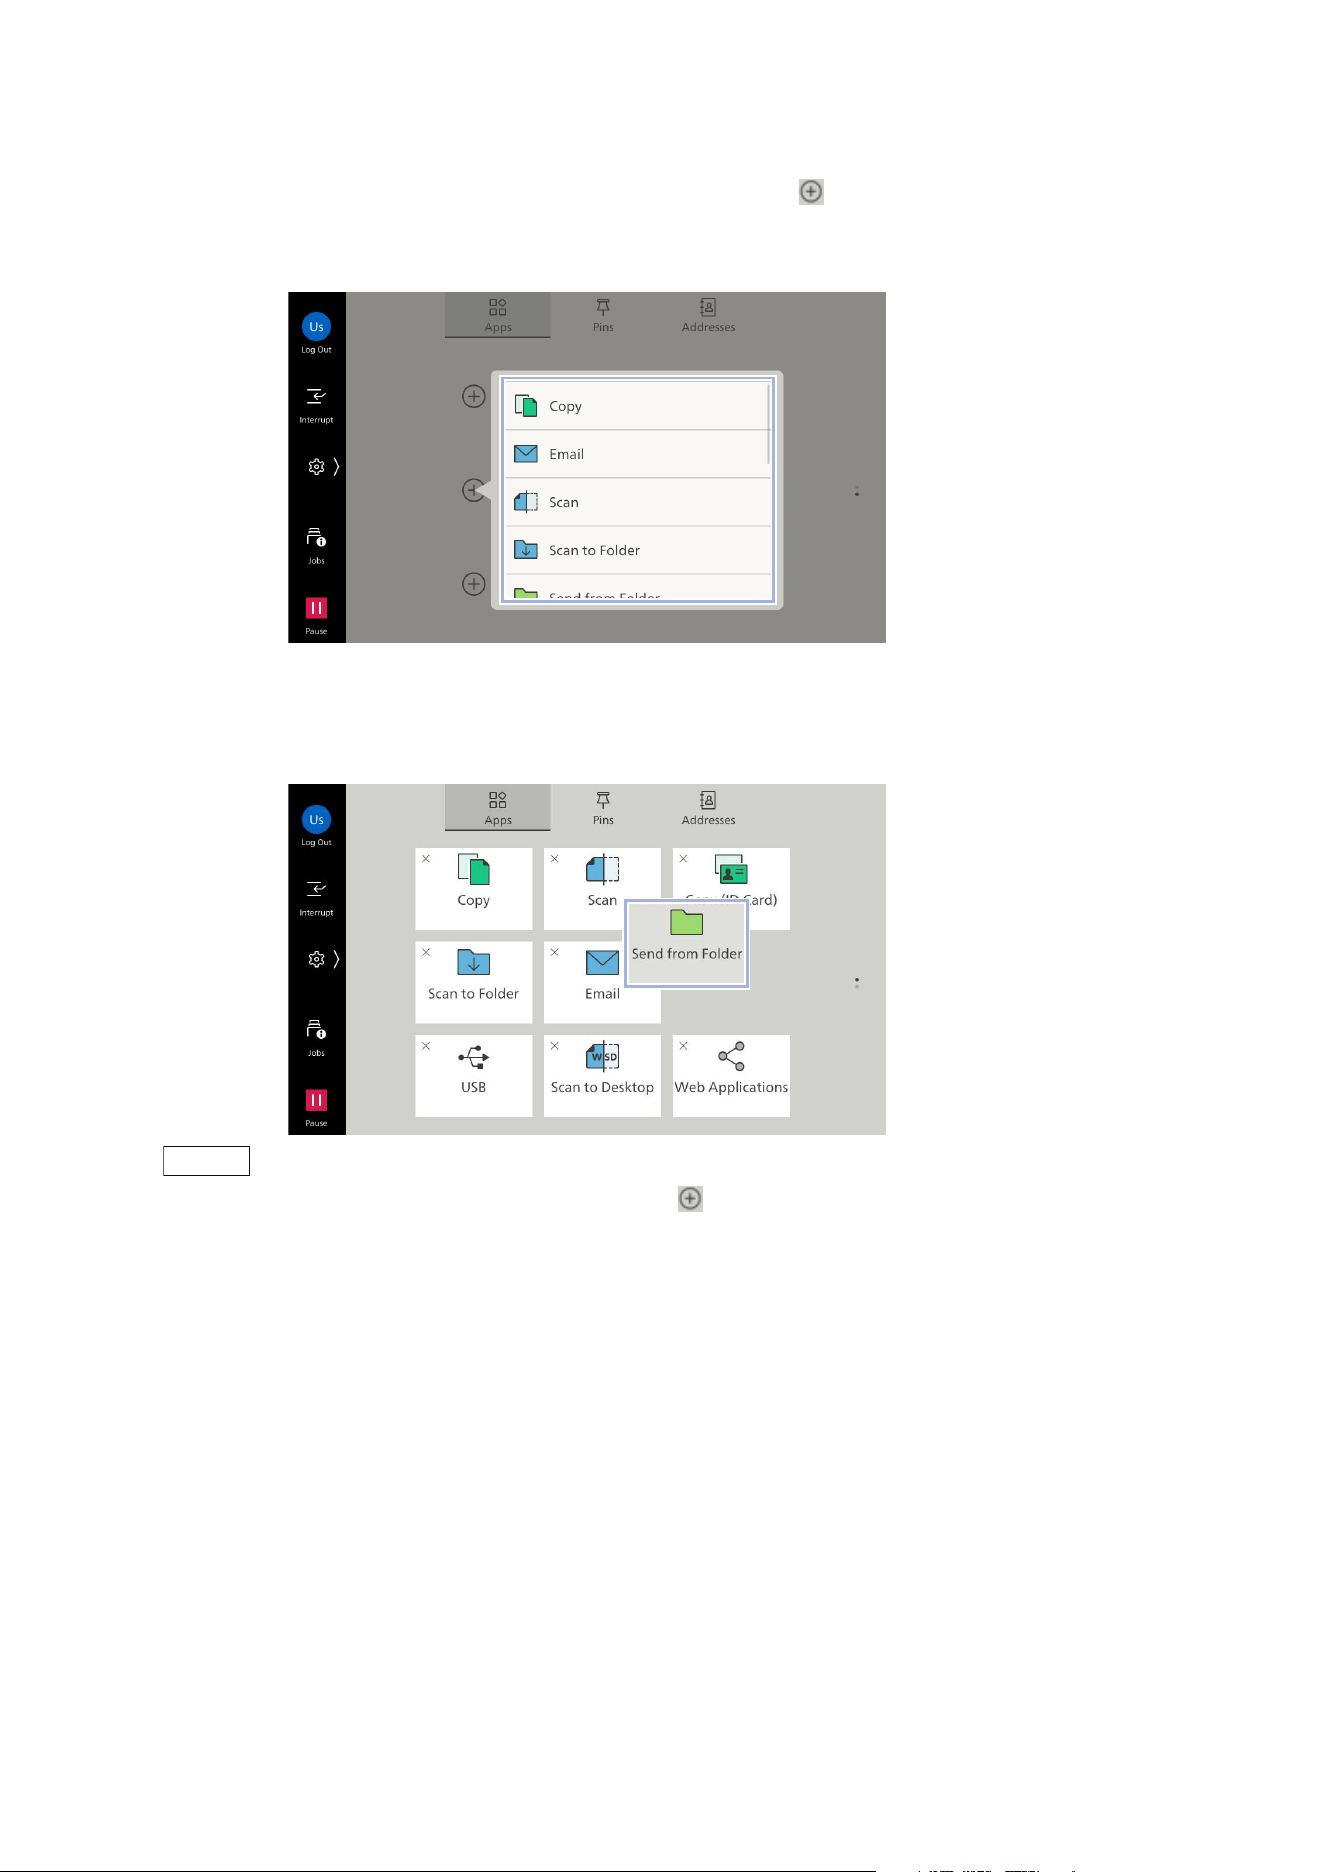
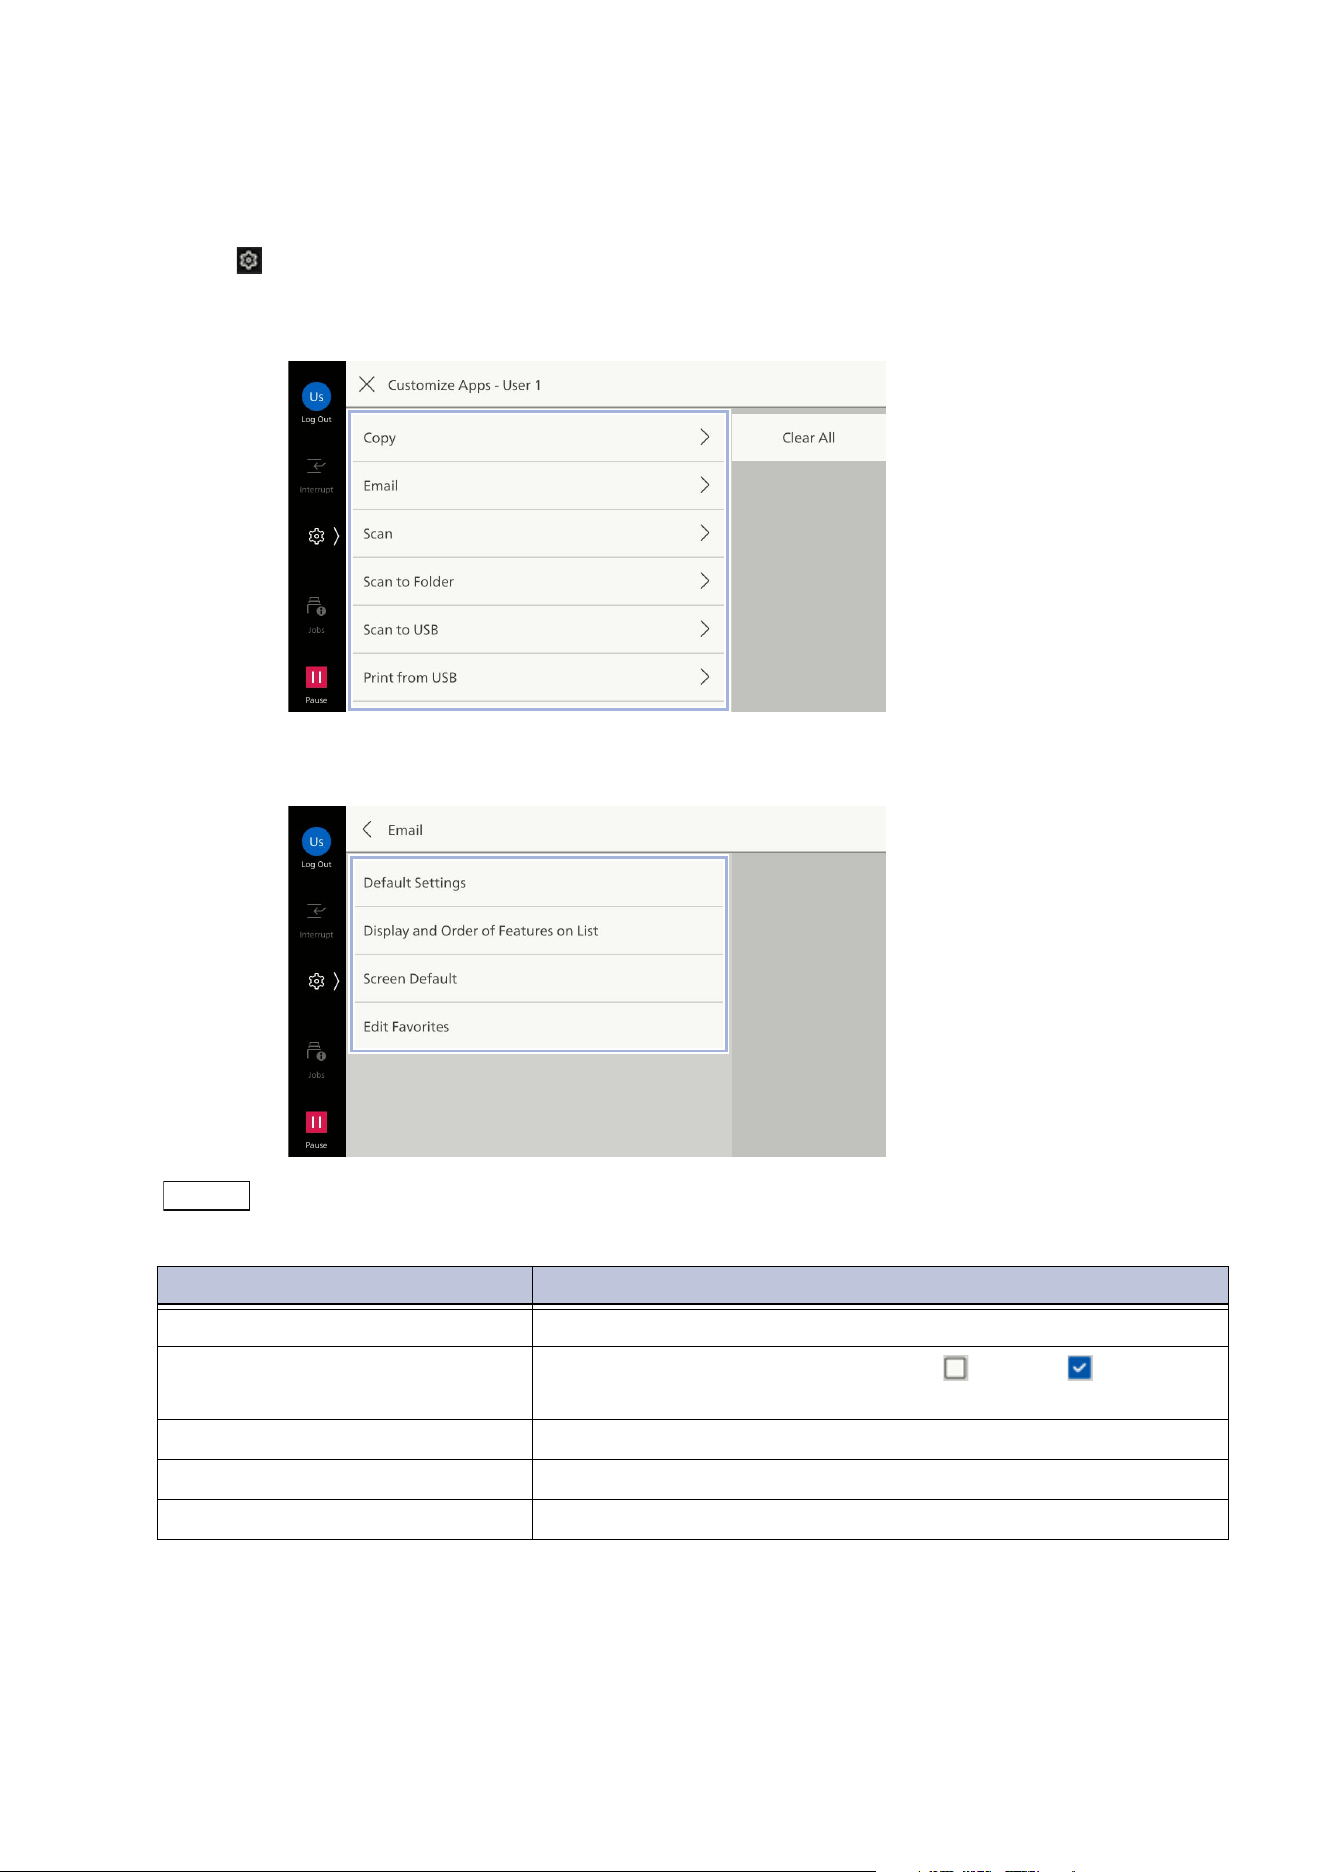
1. App display area
Select [Apps] on the Home tab, and then available apps are displayed.
If logging in as a system administrator or an authenticated user, you can change apps to display or
display position. For details, refer to "Customizing the Home Screen" (P.23).
3
2
4
1
App name Feature Overview Listed location
[Copy] Operate the copy feature. "Copy" (P.39)
[Scan] Transfer the scanned data to the client
computer on the network.
You can also perform [URL], [Email] and [My
Folder].
"Scan" (P.54)
[Copy (ID Card)] Both the front and rear of documents whose size
cannot be automatically detected, such as an ID
card, can be copied side by side onto a single
sheet of paper.
"Copy (ID Card)" (P.42)
[Scan to Folder] Save the scanned data in the folder on the
ma
chine.
"Scan to Folder" (P.53)
[Email] Sends the scanned data as an Email attachment. "Basic Operations (Email)"
(P.49)
11
3.1 Touch Panel Display
2. Control Tab
Tap on and then the control menu opens. To close, tap on on the right side of the screen.
[Send from
Folder]
Operate the data saved in the folder on the
machine.
"Folder" (P.62)
[USB] You can save the scanned data in the USB
memory device, or print data saved in the USB
memory device.
Note
If either the scan to USB or print from USB
feature cannot be used, [Scan to USB] or [Print
from USB] is displayed.
"Scan to USB" (P.55)
"Print from USB" (P.37)
[Scan to Desktop] Saves the scanned data to a specified client
computer.
"Scan to Desktop" (P.56)
[Web
Applications]
Access the web server via the network from the
browser programed in the machine, then save or
display the data.
User’s Manual - Appendix
[Private Charge
Print]
Pr
int private charge print files. "Private Charge Print"
(P.37)
[Secure Print] Print Secure Print files (files with password set). "Secure Print" (P.35)
[Sample Set] Print the remaining number of copies of the file
specified for Sample Set (printing one copy for
trial).
"Sample Set" (P.34)
[Delayed Print] Enables you to print the Delayed Print files (files
with specified print time) before the specified
time.
"
Delayed Print" (P.35)
[Charge Print] Print charge print files. "Charge Print" (P.36)
App name Feature Overview Listed location
Feature name Listed location/description
[Interrupt] "Interrupt" (P.26)
[Jobs] "Jobs" (P.17)
[Pause] "Pausing Active Jobs" (P.16)
[Device] "Device" (P.90)
[Customize Apps] "Customizing the Apps Screen" (P.25)
[Device Status] "Device Status" (P.18)
12
3 Basic Operations
Note
The feature icon displayed on the left side of the screen can be displayed and tapped even when the
control menu is closed.
The features to display or positions can be changed in [Edit Control Menu] of "[Screen/Button Settings]"
(P.94). [Pause] is, however, always displayed on the bottom left, and cannot be customized.
[Printer Lockout] in "[System Clock / Timers]" (P.92) needs setting to [Allow User to Lock Out] to display
[Auto Printing] on the control menu.
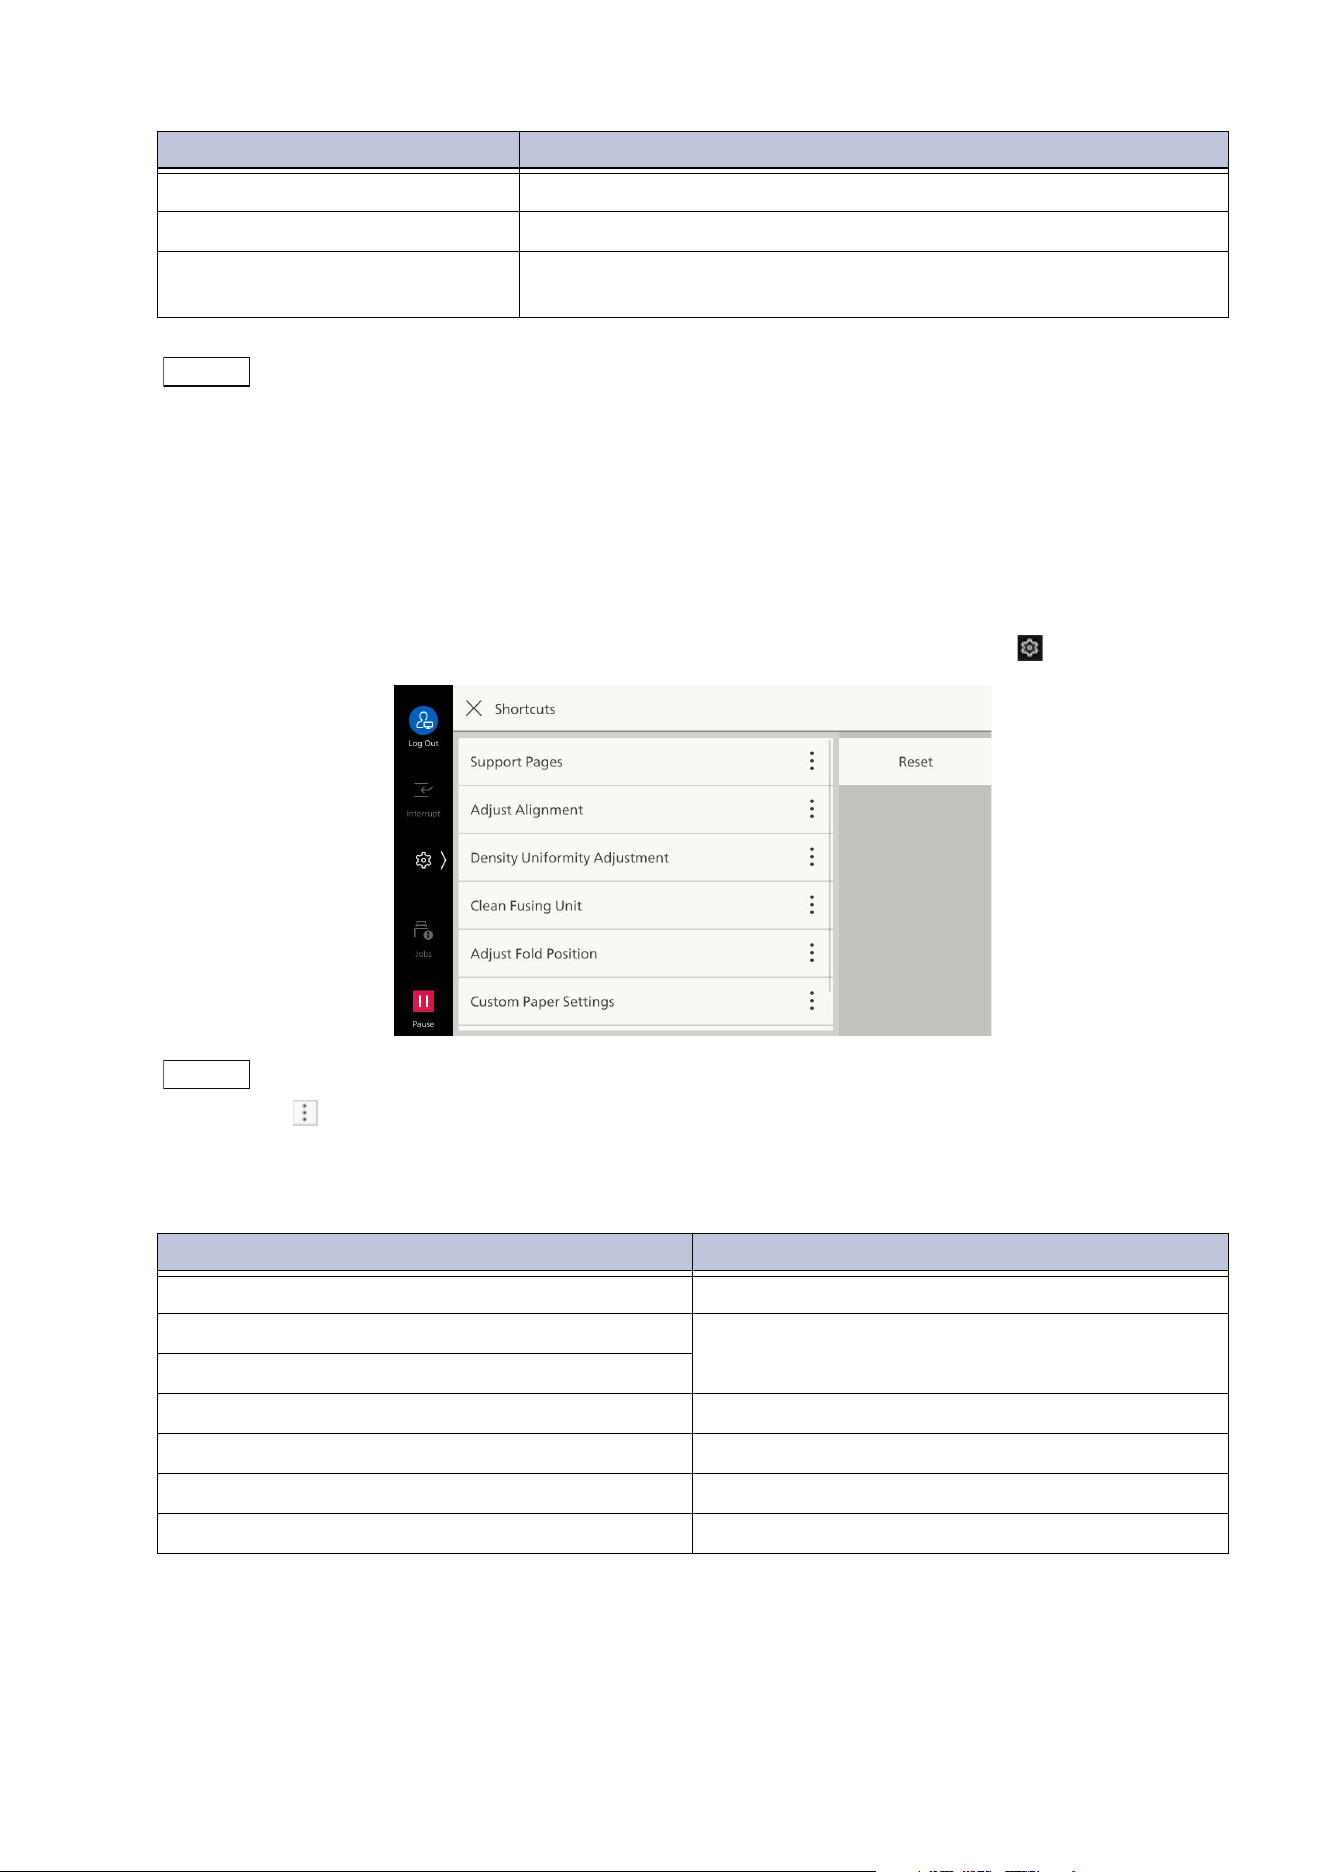
[Shortcuts]
Register the features frequently used in shortcut, and you can access them from > [Shortcuts].
Note
Tap on displayed on the right of each feature in Administrator Mode, you can change the display order
or delete the feature from the list. Tap on [Reset] to restore the list to the state at factory shipment.
Tap on [Shortcut] displayed on the top right on the screen of the features to register, and add to
[Shortcuts].
[Language] This function is not used.
[Shortcuts] "[Shortcuts]" (P.12)
[Auto Printing] When
[Disabled] is selected, printing can be temporarily
disabled. When [Enabled] is selected, printing is enabled.
Feature name Listed location/description
Features that can be registered Listed location
[Support Pages] "[Support Pages]" (P.163)
[Adjust Alignment] "[Image Quality]" (P.167)
[Density Uniformity Adjustment]
[Clean Fusing Unit] "[Clean Fusing Unit]" (P.182)
[Adjust Fold Position] "[Adjust Finisher]" (P.180)
[Custom Paper Settings] "Setting of Custom Paper" (P.7)
[Screen Brightness] "[Screen/Button Settings]" (P.94)
13
3.1 Touch Panel Display
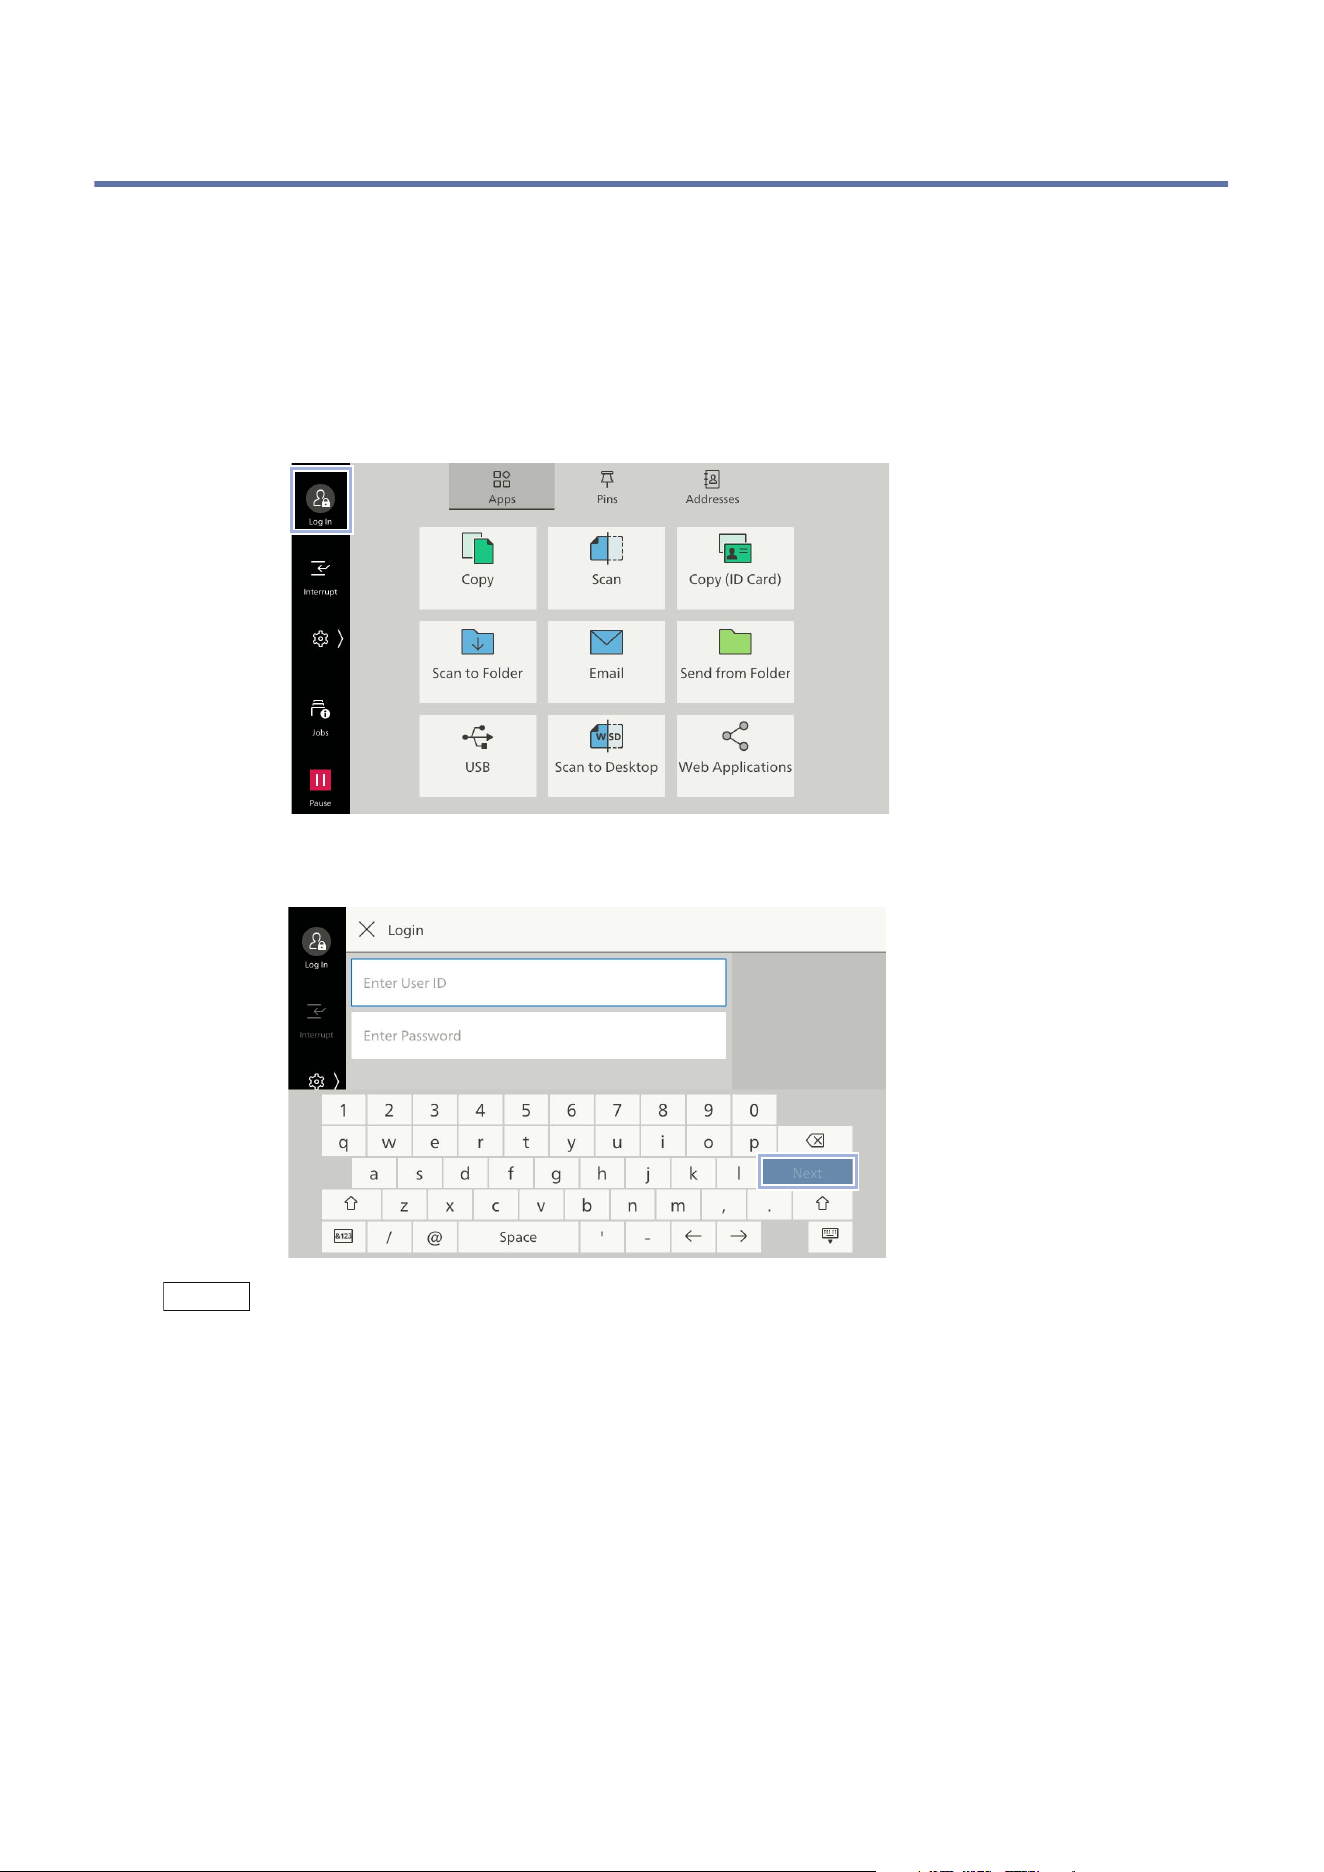
3. Login Information Field
The user is authenticated when the user enters the User ID and logs in.
While the user is authenticated, tapping on the login information field logs out the user, and the state
becomes [Anonymous].
Note
When [Authentication] > [User Details Setup] > [Logout Confirmation Screen] is enabled, the
confirmation screen is displayed before logout.
Refer
For details, refer to "Logging in to Authentication Mode" (P.15).
4. Home Tab
Switches between the Home screens.
Note
The tab to display first can be changed in [Home Screen Default] of "[Screen/Button Settings]" (P.94).
Basic Operation Method
Note
Except for the Preview screen, the pinch-in (zoom in operation by pinching the screen with two fingers)
and pinch-out (zoom out operation by spreading two fingers on the screen) are not available.
Tap
Lightly touch the touch panel display and then immediately lift up your finger.
Tab name Listed location
[Apps] "1. App display area" (P.10)
[Pins] "Pins" (P.27)
[Addresses] "Address Book" (P.82)
14
3 Basic Operations
Swipe
While lightly touching the touch panel display, move your finger up and down to scroll the screen up
and down.
A flick action (lightly sweeping the screen to a desired direction with your finger) is also available.
Long-tap
Touch and keep your finger on an app icon or Menu item. While maintaining the long-tap, dragging
your finger to your desired position can change the position of the icon.
Keyboard
Tapping text input field displays a keyboard when entering the login information or destination, etc.
Tap [OK] after completing input.
15
3.2 Logging in to Authentication Mode
3.2 Logging in to Authentication Mode
The icon changes at the login information field after logging in to Authentication Mode. Open the
control menu to confirm the login user name.
When not using the authentication feature, [Local User] is displayed.
When the user logs in with the administrator rights, [Administrator] is shown in this area.
1. Tap on login information field.
2. Enter the User ID and then tap on [OK].
Note
Input the password if a password input field is displayed.
In case of that the password change screen is displayed when entering the password, the security
strength has been changed. Confirm the password security strength and change the password.
When linked to Microsoft Entra ID, enter the user name that comes before @ for the User ID.
For example, enter “User1” for [email protected].
For the remote accounts (other than LDAP), tap on [Domain] and select the domain.
If [Select from List] is set for how to specify the User ID in Internet Services, you can specify the User ID
on the [Select User] screen.
16
3 Basic Operations
Canceling the Authentication
1. Tap on the login information field.
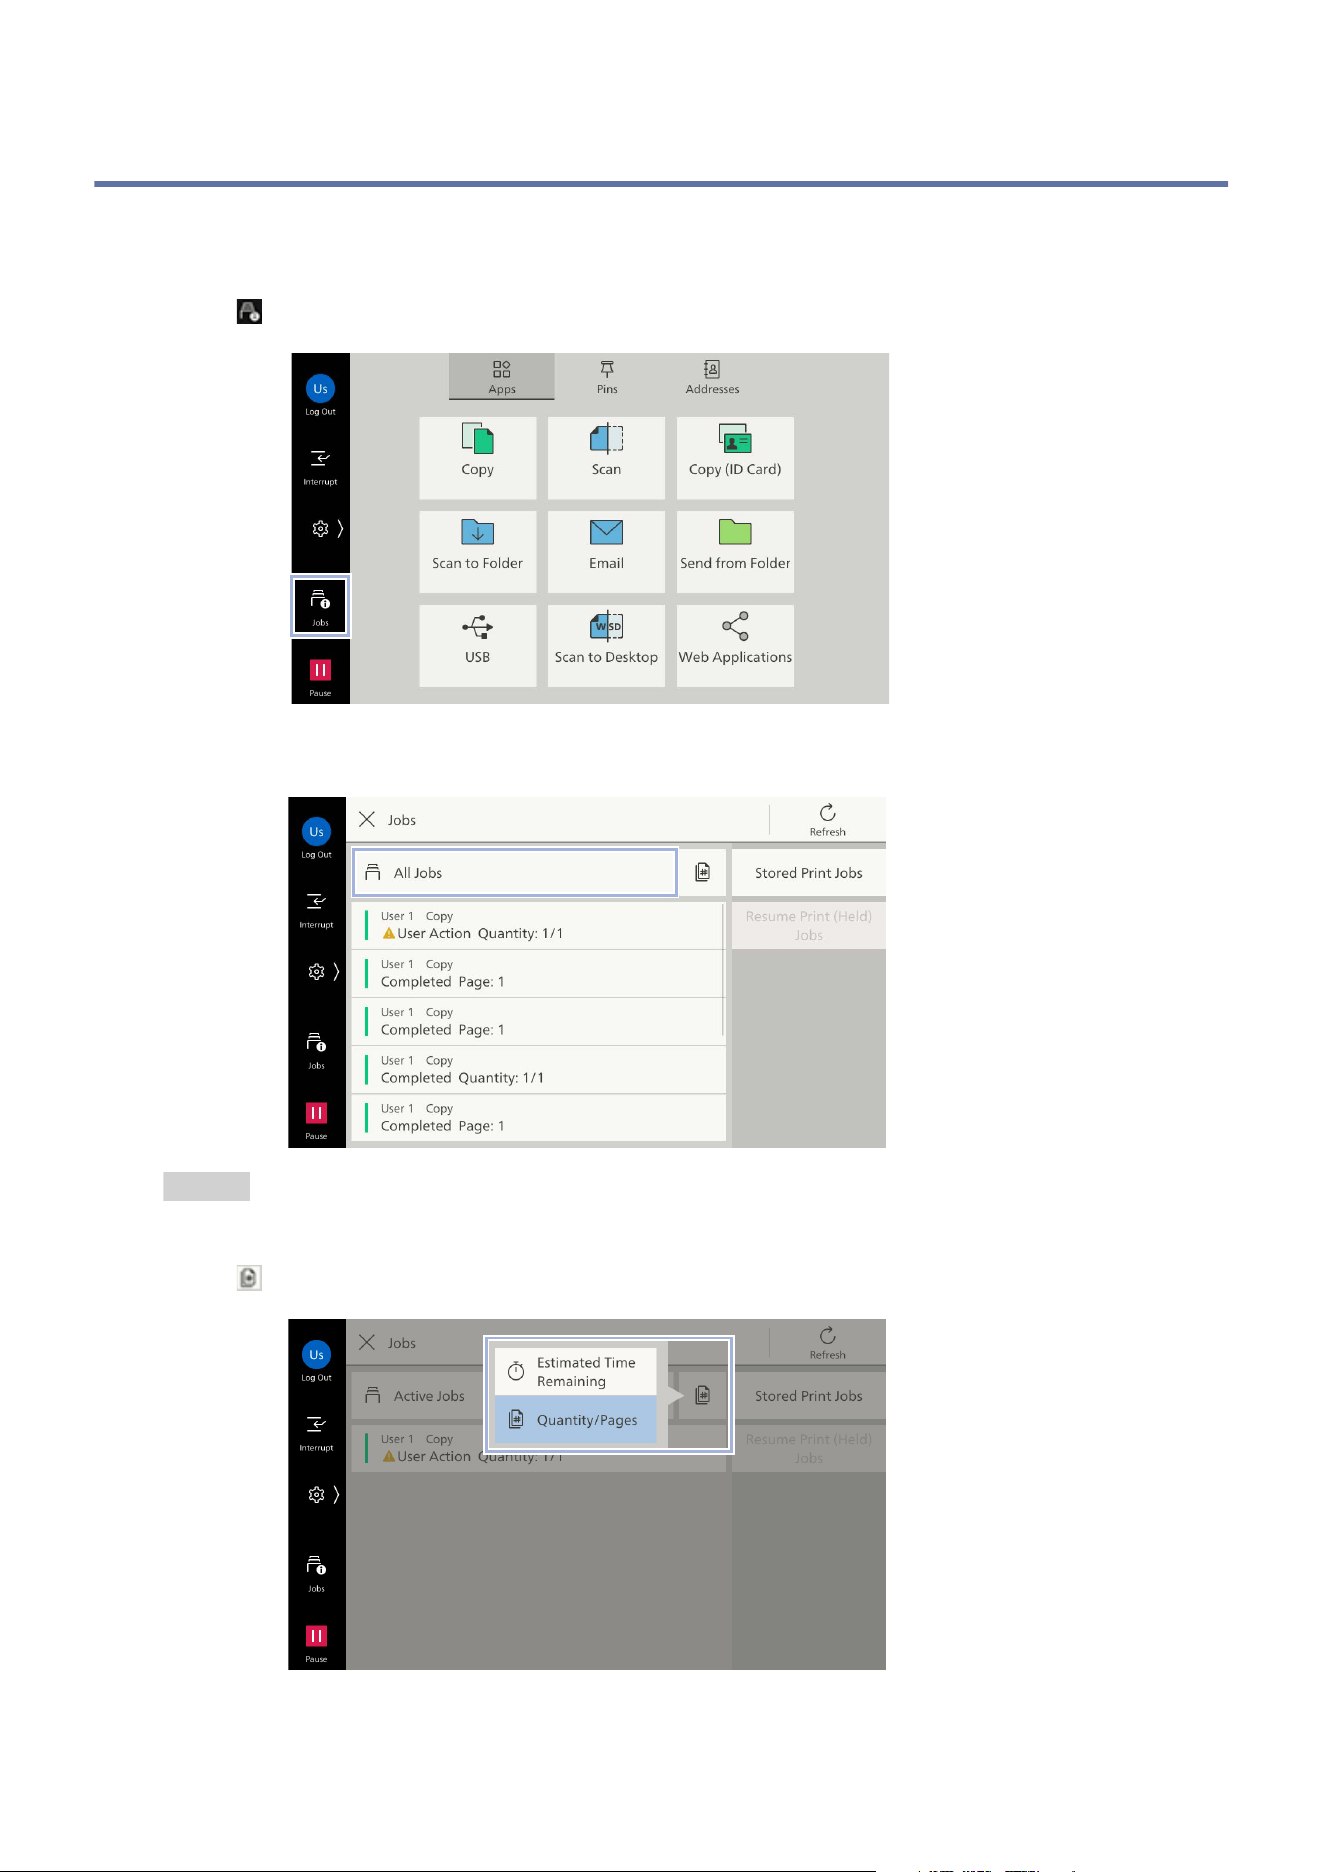
3.3 Pausing Active Jobs
1. Tap on ([Pause]) on the bottom left of the screen while the document is scanned and the job is
running.
You can select to continue or pause jobs on the displayed screen.
Note
When multiple jobs are running, the [Jobs] screen is displayed and you can select the job to operate.
17
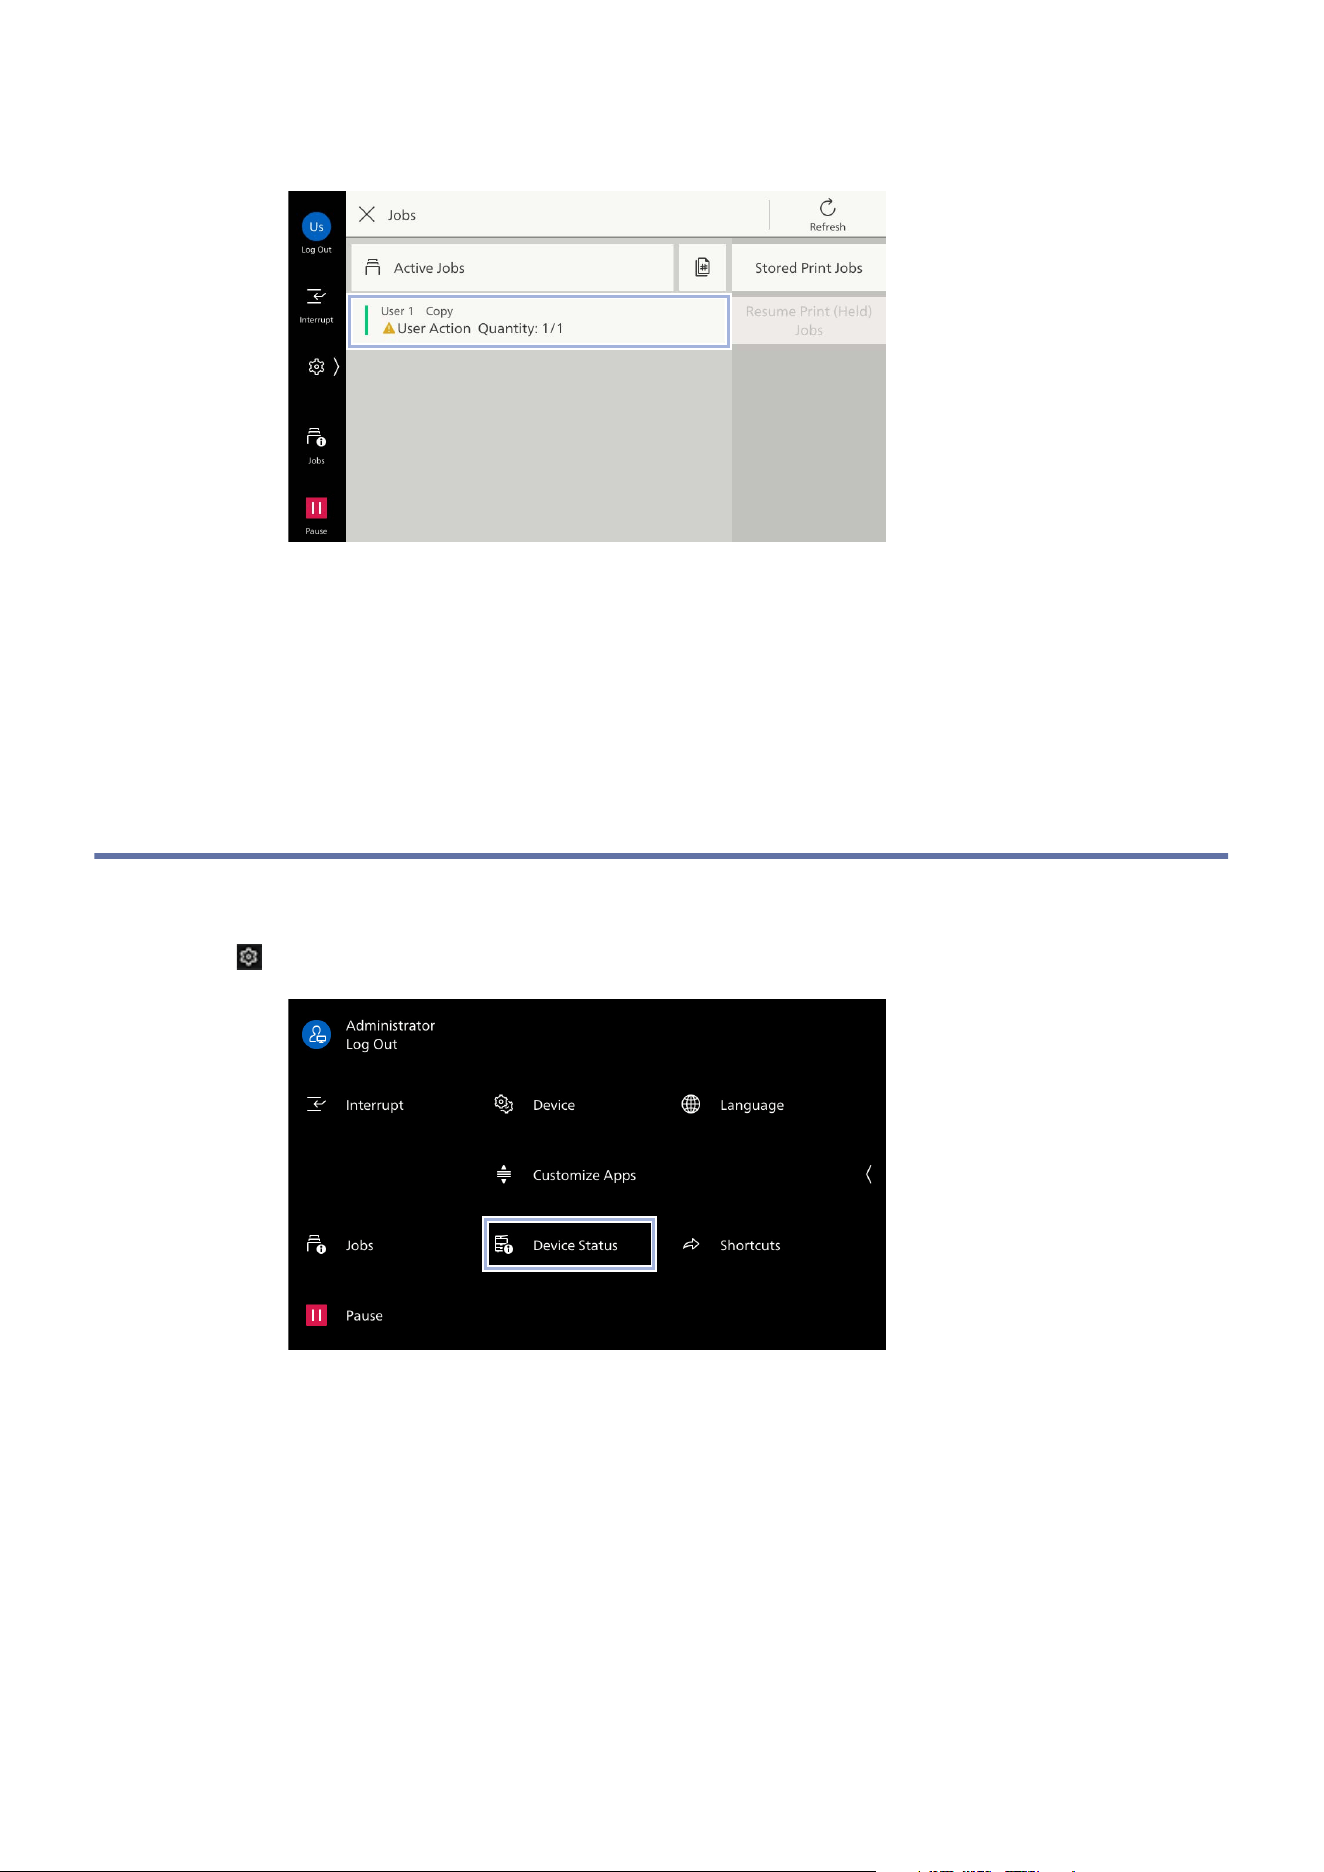
3.4 Jobs
3.4 Jobs
You can check active jobs (both running and waiting) and completed jobs. It is also possible to cancel
printing and print a job that is waiting to be printed or waiting for operation.
1. Tap on ([Jobs]).
2. Tap on [All Jobs], and switch the job type to display.
Refer
Refer to "Printing Stored Data" (P.34) for [Stored Print Jobs].
3. Tap on , and select whether to display [Estimated Time Remaining] or [Quantity/Pages].
18
3 Basic Operations
4. Tap on the job to operate.
5. Select the next operation on the displayed screen.
For running or paused jobs, you can instruct the machine to stop or resume the job. Also, tap on
[Promote] to prioritize and run the selected job.
For completed jobs, you can confirm the job results or output the report.
For the job flow jobs or stored jobs, tap on [Child Jobs] and display the list of child jobs.
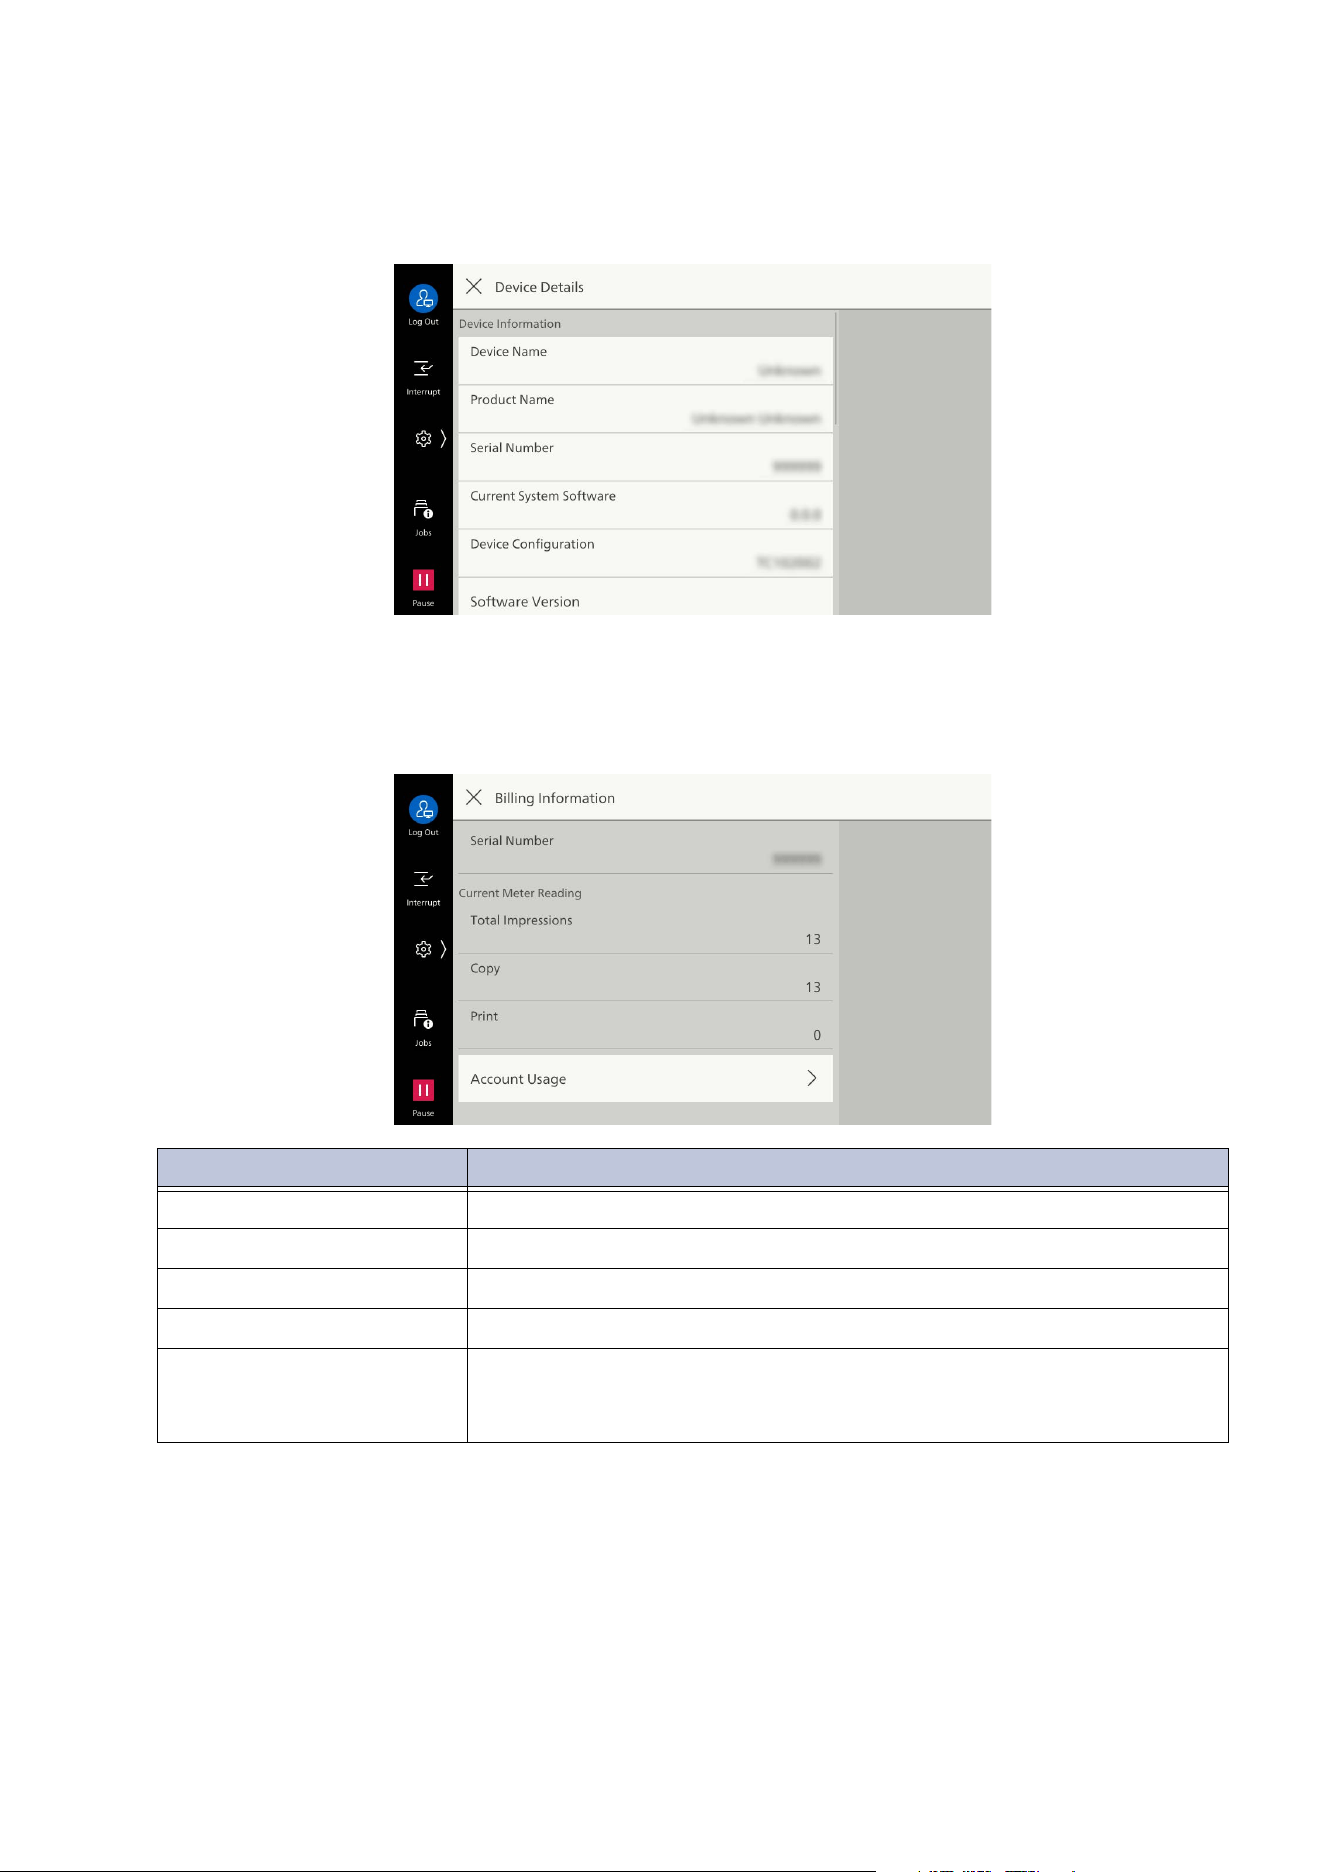
3.5 Device Status
You can confirm the status of the machine or print the report.
1. Tap on > [Device Status].
19
3.5 Device Status
[Device Details]
Enables confirmation on screen of various types of information pertaining to the machine, such as
machine configuration.
[Billing Information]
Enables confirmation of number of output pages for each meter.
Item Settings
[Serial Number] Displays serial number of the machine.
[Total Impressions] Displays total number of pages for copies and prints.
[Copy] Displays total number of pages for copies.
[Print] Displays total number of pages for prints.
[Account Usage] Enables confirmation of number of pages by user.
If the accounting feature has been set to enabled, it is possible to
confirm the meter for the currently authenticated user ID.
20
3 Basic Operations
Counting of Blank Pages
When a blank page is printed, the meter counts it.
Note
When Skip Blank Pages is set in the printer driver, a blank page without drawing is not printed. However,
the blank page may be printed in the following cases.
- When only a line break is on the page
- When only a white space character is on the page
- When only a line break and a white space character are on the page
- In addition, when a command such as of drawing white background is passed from the ap
plication
Counting of Long Paper
Each meter value per page is as follows based on the area of A3 (297.2 x 420.4 mm).
1.5 or more to 2 or less times (when width: 330.0 mm, length: 568.0 to 757.2 mm): 2
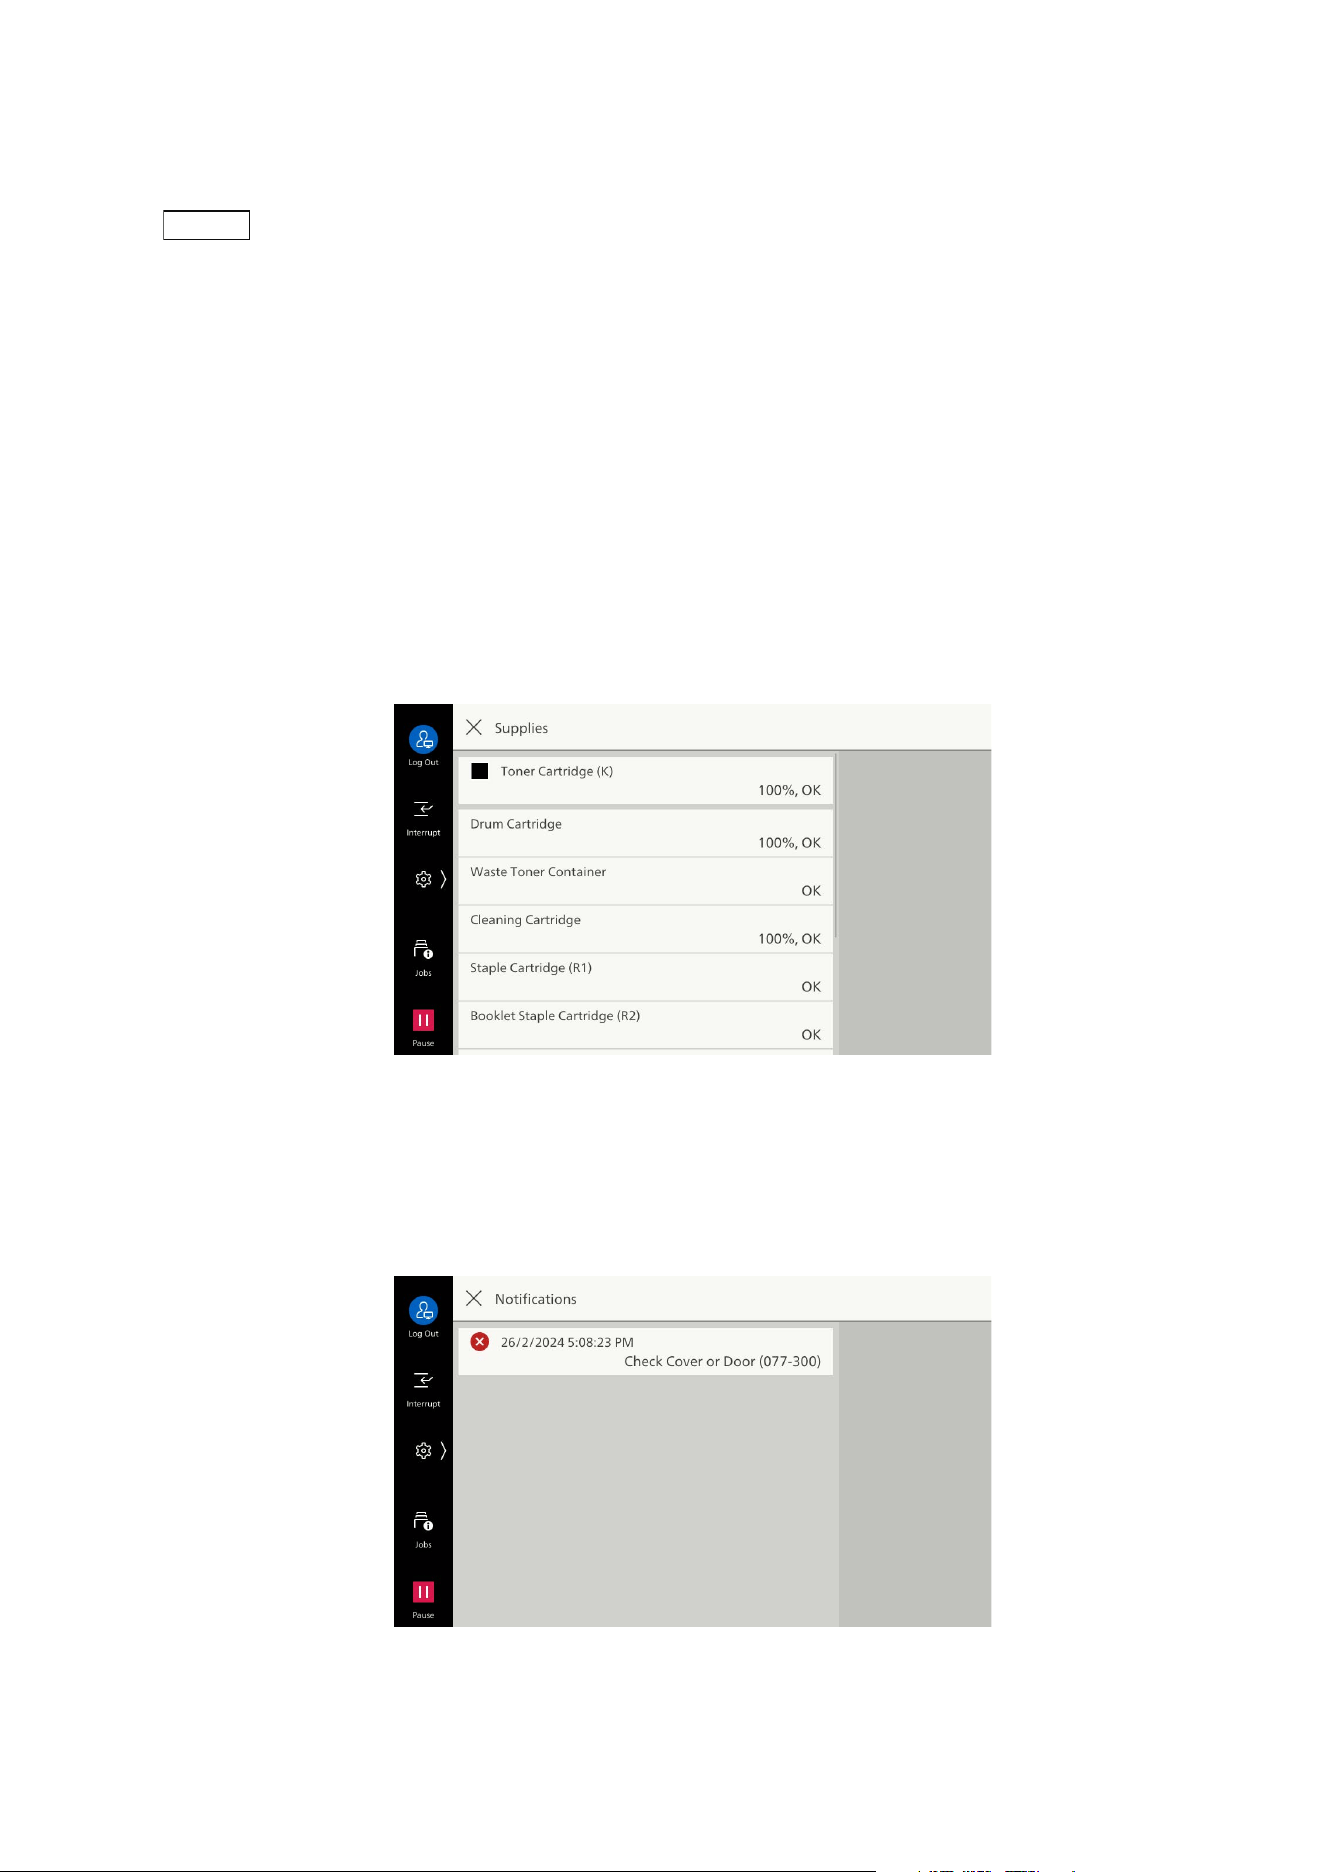
[Supplies]
Enables confirmation of the status of supplies.
[Notifications]
Displays notifications from the machine on the status of problems, replacement periods, and other
important messages, in order of importance.
If notifications is selected, details and related pages can be confirmed.
21
3.5 Device Status
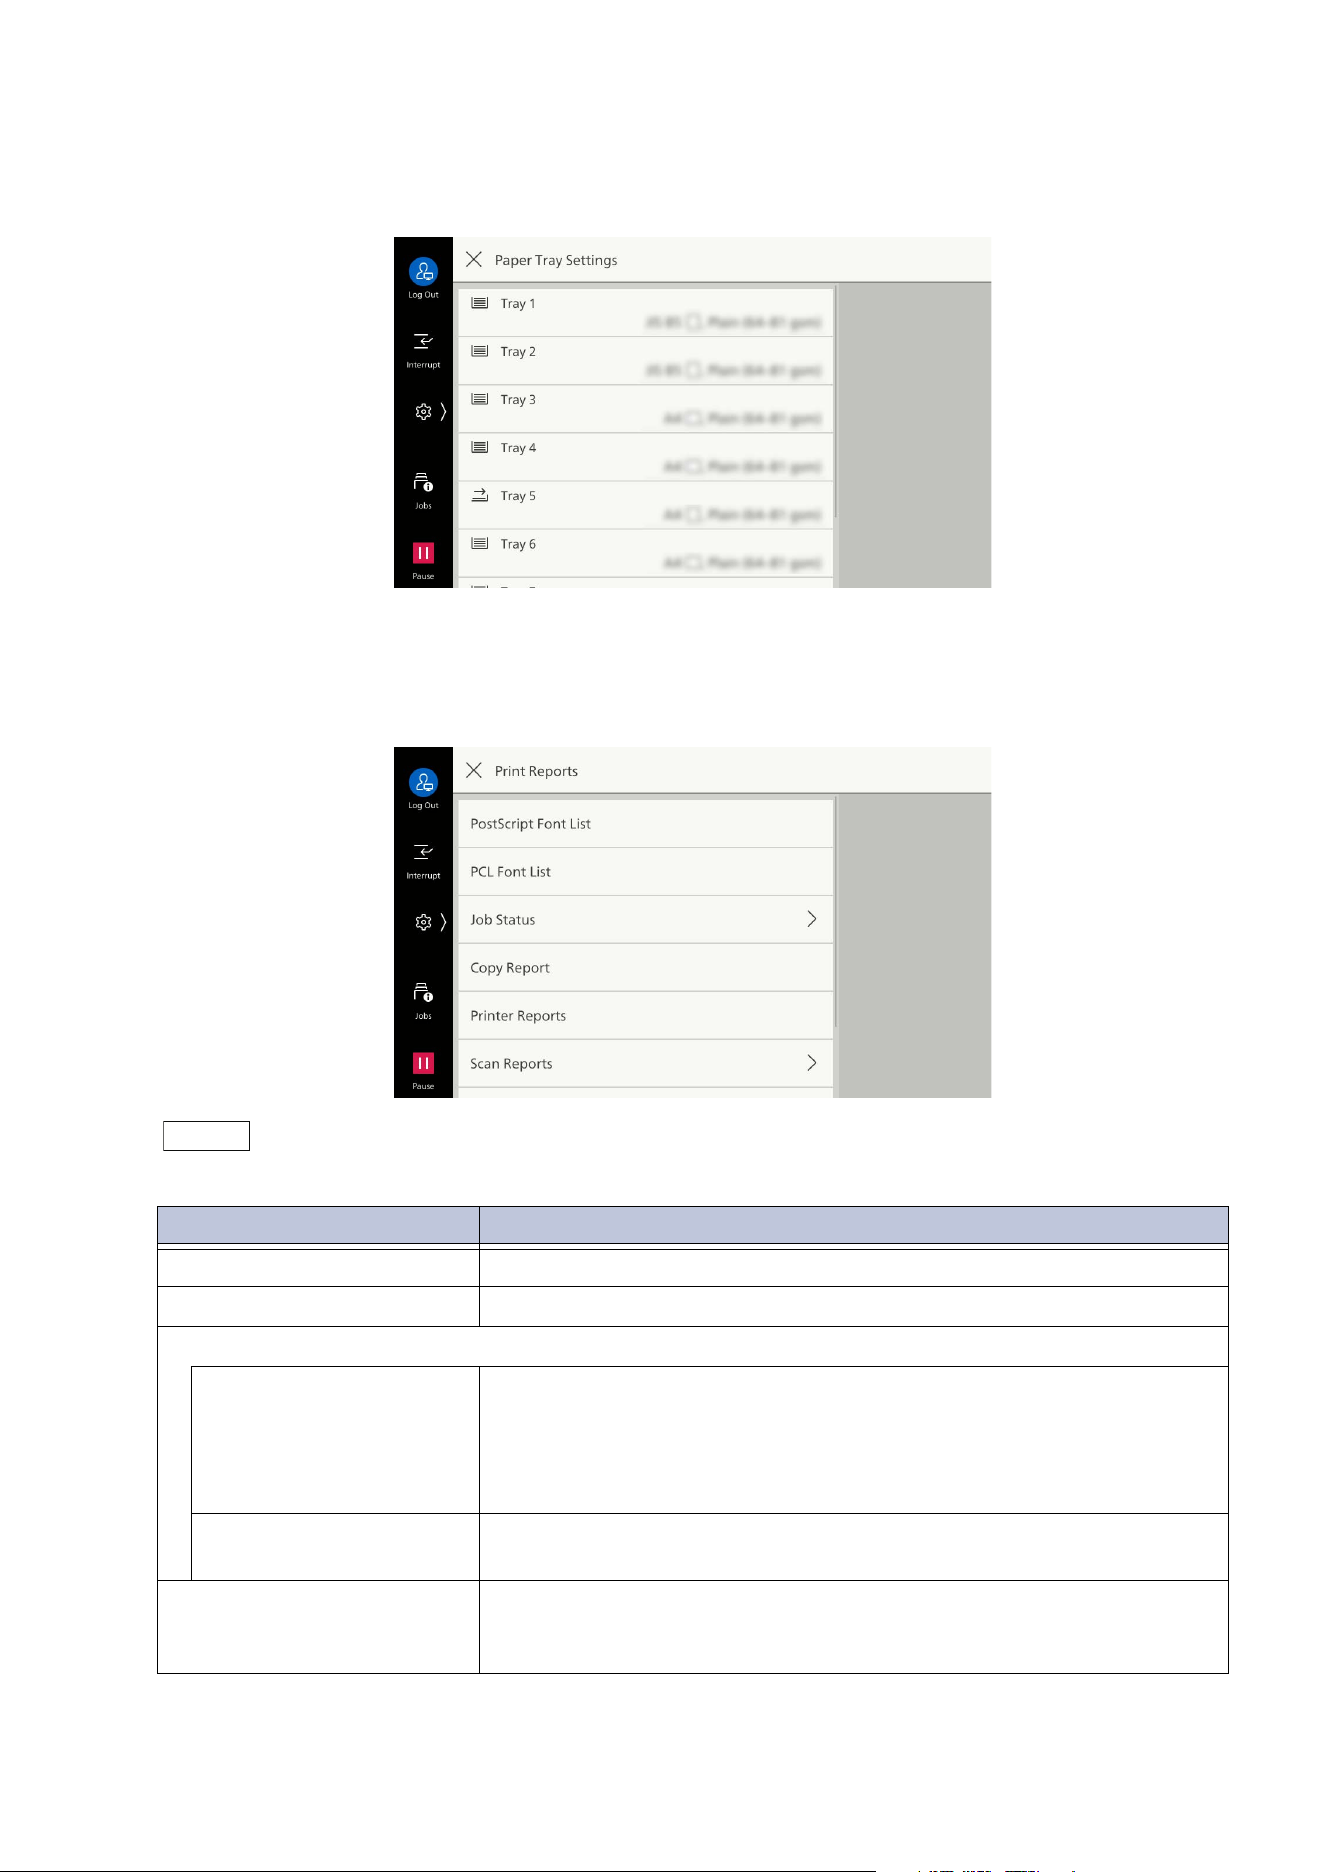
[Paper Tray Settings]
Enables confirmation of the setting and status of paper trays.
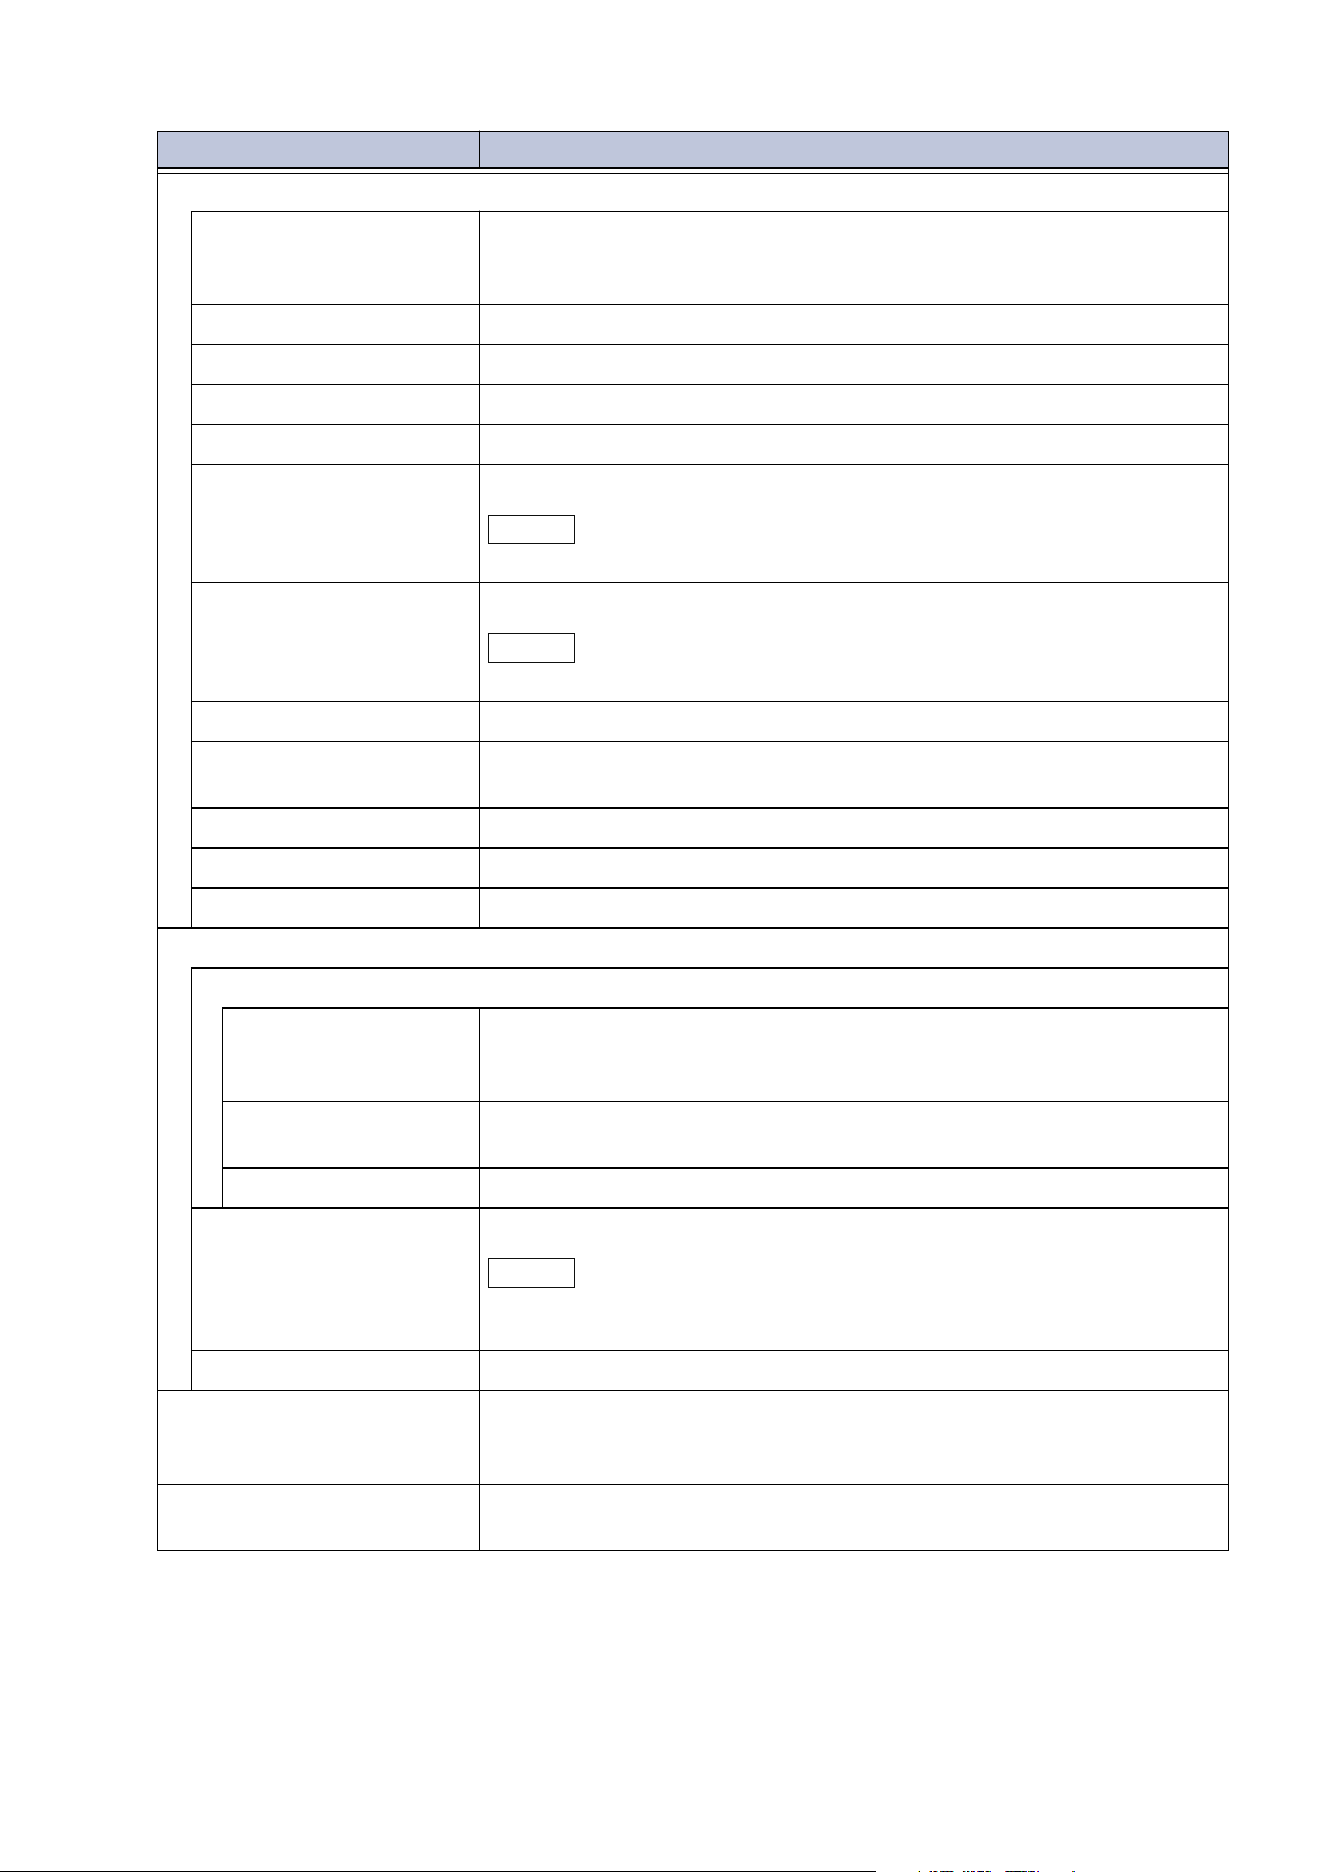
[Print Reports]
Enable printing of a report or list.
Note
Some items can be displayed only in Administrator Mode.
Item Description
[PostScript Font List] Prints fonts usable with PostScript.
[PCL Font List] Prints fonts usable with PCL.
[Job Status]
[Job History Report] Prints results of running jobs, up to the most recent 200 jobs.
Printing can also be done by job type.
Applying a check mark in [Include Child Jobs] prints each related job
on each one line. Disabling prints related jobs (including job flow
jobs) together in one line.
[Er
ror History Report] Prints information on errors that have occurred with the machine, up
to the most recent 50 errors.
[Copy Report] Prints configuration report enabling confirmation of the machine’s
hardware configuration, network information, and setting status of
print and copy features.
22
3 Basic Operations
[Printer Reports]
[Configuration Report] Prints configuration report enabling confirmation of the machine’s
hardware configuration, network information, and setting status of
print and copy features.
[PCL Settings List] Prints settings for PCL print mode.
[PCL Macro List] Prints list of forms created for PCL print mode.
[PDF Settings List] Prints settings for PDF print mode.
[TIFF/JPEG Settings List] Prints each setting for TIFF and JPEG print mode.
[TIFF/JPEG Logical
P
rinters List]
Prints list of logical printers created in TIFF and JPEG print mode.
Note
Setting of TIFF and JPEG logical printers is done with Internet Services.
[PostScript Logical
Printers List]
Prints list of logical printers created with PostScript.
Note
Setting of PostScript logical printers is done with Internet Services.
[HP-GL/2 Settings List] Prints settings for HP-GL, HP-GL/2, and HP-RTL emulation mode.
[HP-GL/2 Logical
Printers List]
Prints settings for logical printers in HP-GL, HP-GL/2, and HP-RTL
emulation mode.
[Font List] Prints list of usable fonts.
[PCL Font List] Prints fonts usable with PCL.
[PostScript Font List] Prints fonts usable with PostScript.
[Sca
n Reports]
[Reports]
[Configuration
Report]
Prints configuration report enabling confirmation of the machine’s
hardware configuration, network information, and setting status of
print and copy features.
[Scan/Fax
Configuration Report]
Prints setting status relating to scanner features.
[Domain Filter List] Prints setting status of domains with filtering.
[Address Book] Prints the registered information of the Address Book.
Note
Enabling [Print Details] prints information also such as Address Type or
Starting Rate.
[Group List] Prints the registered information of the group in the Address Book.
[Job Counter Report] Prints breakdown of actual use by feature (print quantity, number of
uses, etc.) and cumulative time not in use (standby time, Low Power
Mode time, Sleep Mode time, power off time, etc.) in minute units.
[Error History Report] Prints information on errors that have occurred with the machine, up
to
the most recent 50 errors.
Item Description
23
3.6 Customization
Other Settings
3.6 Customization
You can customize the display of app icons and the default value of the features list in each app.
When not using the authentication feature, the settings customized in Administrator Mode are
applied for all users.
When using the authentication feature, the machine can be customized for each user, and the
customized settings is for individuals. For the authenticated users who have not customized the
ma
chine or anonymous users, the settings customized in Administrator Mode are applied.
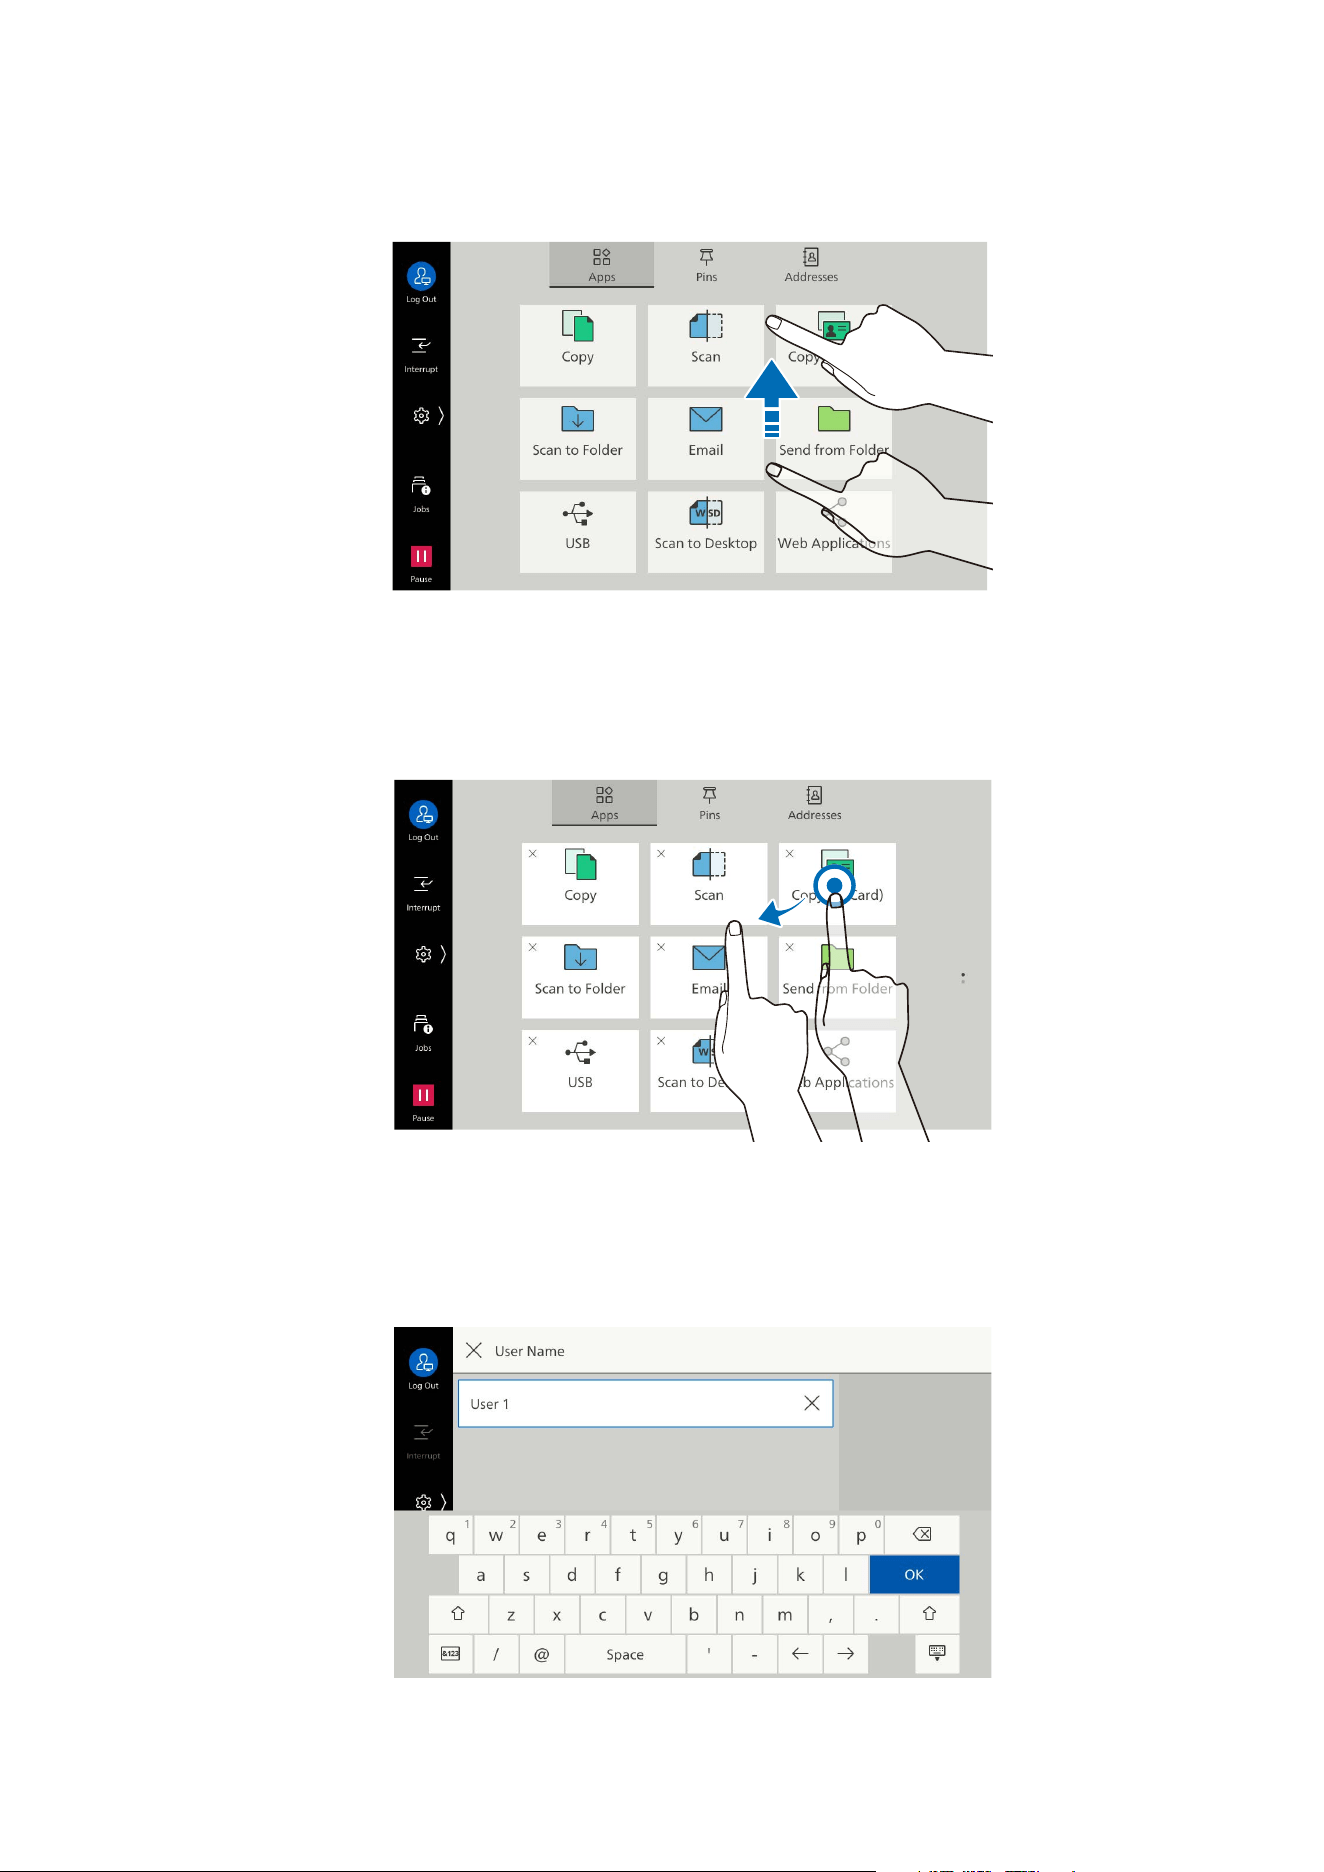
Customizing the Home Screen
Allows you to display or hide app icons or change their positions.
1. Touch and keep your finger on the app display area.
2. Perform the following operation.
Hiding icons
1)Tap on to hide the icon.
Item Listed location/description
[Print Mode] "Switching Between Online and Offline" (P.26)
“Emulation” in
User’s Manual - Appendix
24
3 Basic Operations
Displaying icons
1)On the page where you want the icon to display, tap on .
2)Tap on the apps to add.
Changing the icon’s position
1)Move the icon to the target position while long-tapping.
Note
You cannot move icons between pages. Tap on on the page you want to place the desired icon.
3. When you complete the customization, tap on the outside area of the apps icons.
25
3.6 Customization
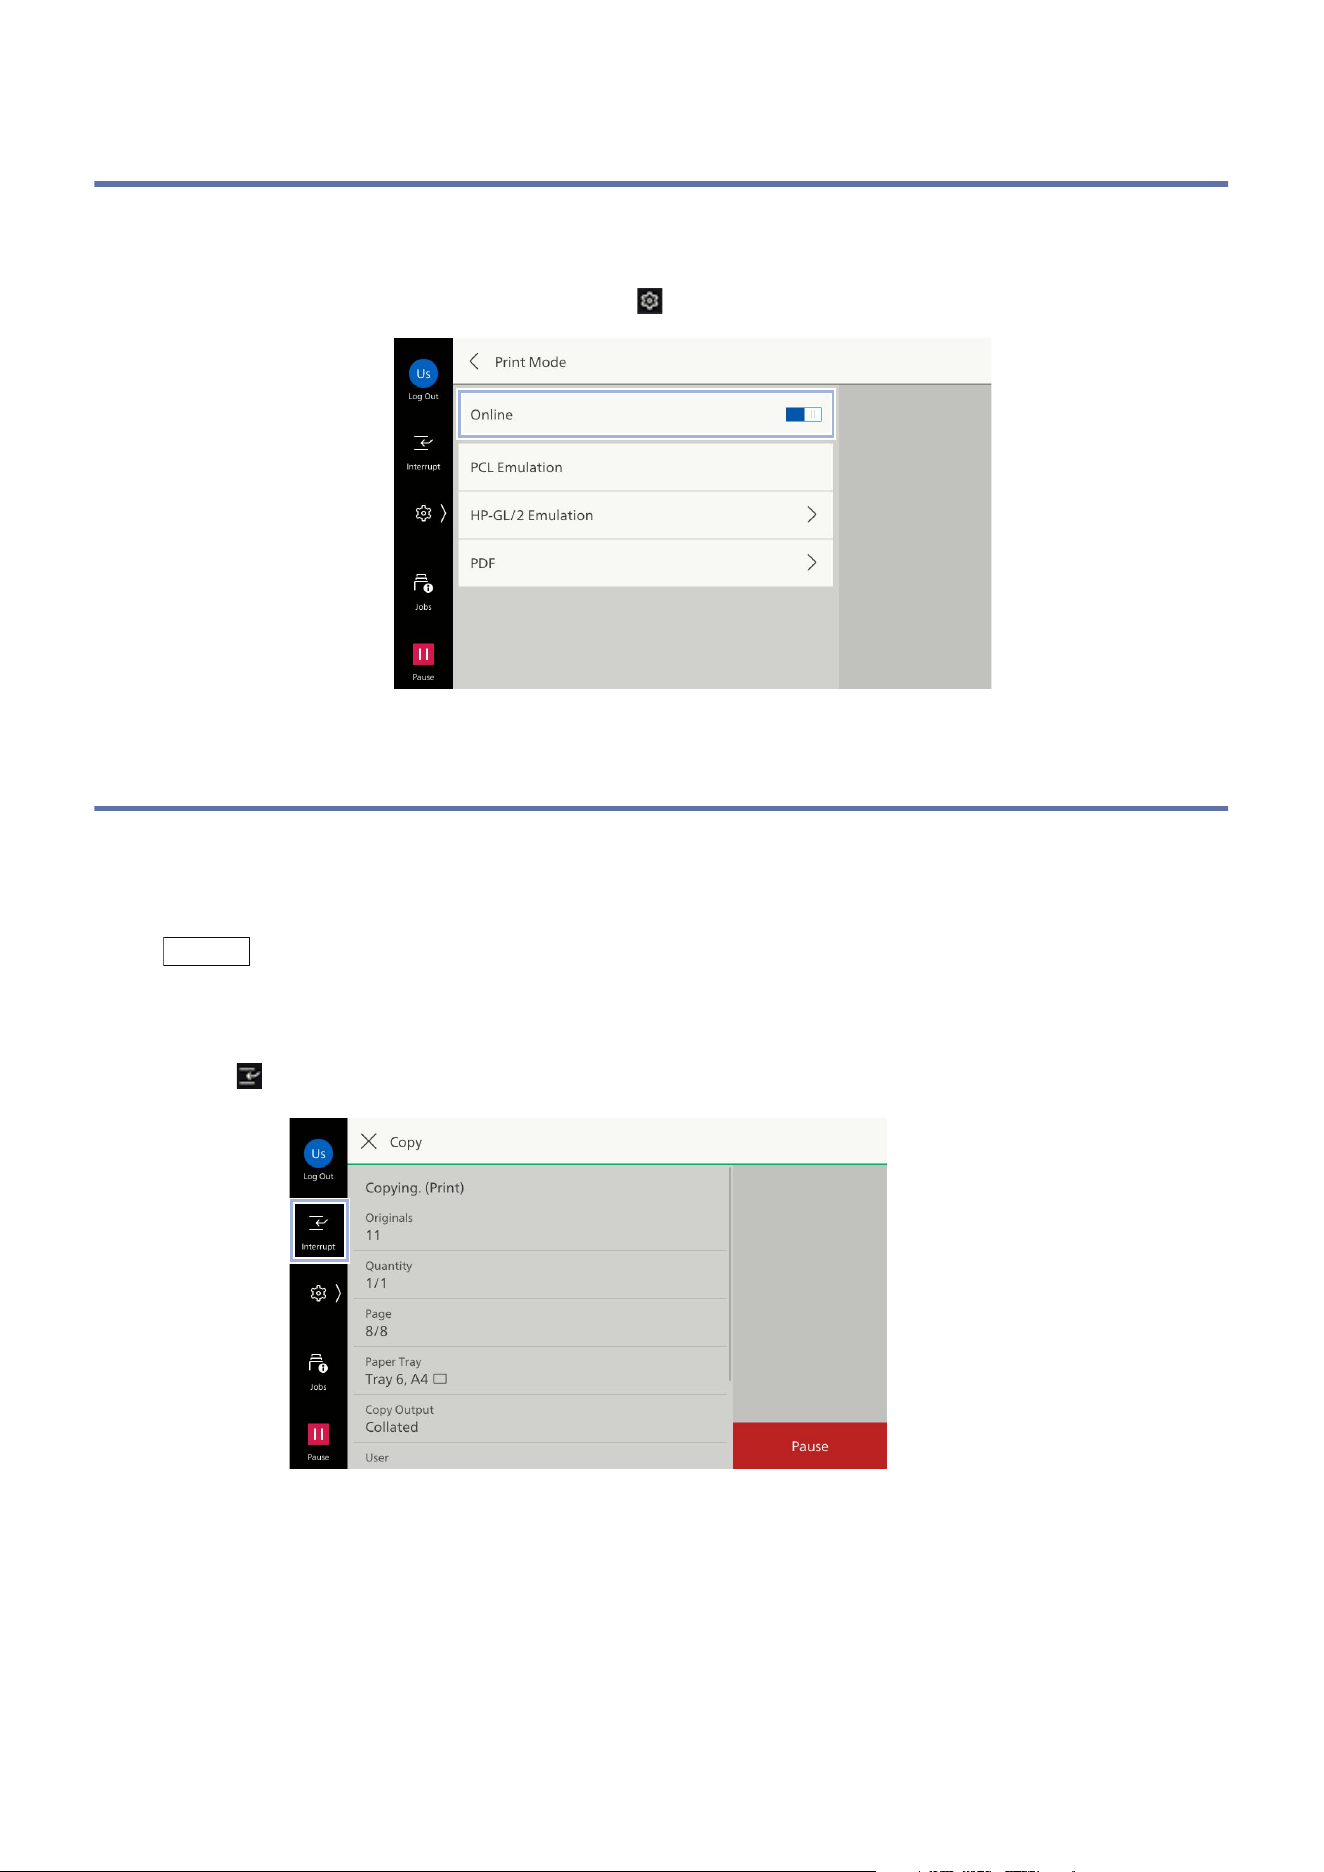
Customizing the Apps Screen
Allows you to customize the screen display of the apps such as copy or scan.
1. Tap on > [Customize Apps].
2. Tap on the app to customize.
3. Select the item to customize.
Note
Displayed Items differ depending on the login status or apps.
Item Function
[Default Settings] Sets the default value when launching the app.
[Display and Order of Features
on List]
Tap on each feature and change Hide /Display . You can
change the display order by long-tap.
[Screen Default] Sets the screen that displays when launching the app.
[Edit Favorites] Sets contacts that display in favorites.
[Clear All] Deletes all customized settings.
26
3 Basic Operations
3.7 Switching Between Online and Offline
The machine cannot receive data from computers while it is offline.
The machine goes offline while its settings are changed or it is under maintenance.
You can switch between online and offline in > [Device Status] > [Print Mode].
3.8 Interrupt
This feature allows you to prioritize another job during consecutive copying or printing by suspending
a currently-running job. Below is an example of copying using the interrupt feature during
consecutive copying.
Note
[Interrupt] may not be accepted while copying 10 copies or less using the document glass surface.
If documents are being scanned or there are queued jobs, [Interrupt] cannot be used.
1. Tap on ([Interrupt]) during continuous copying.
2. Load the document to be copied during the interruption.
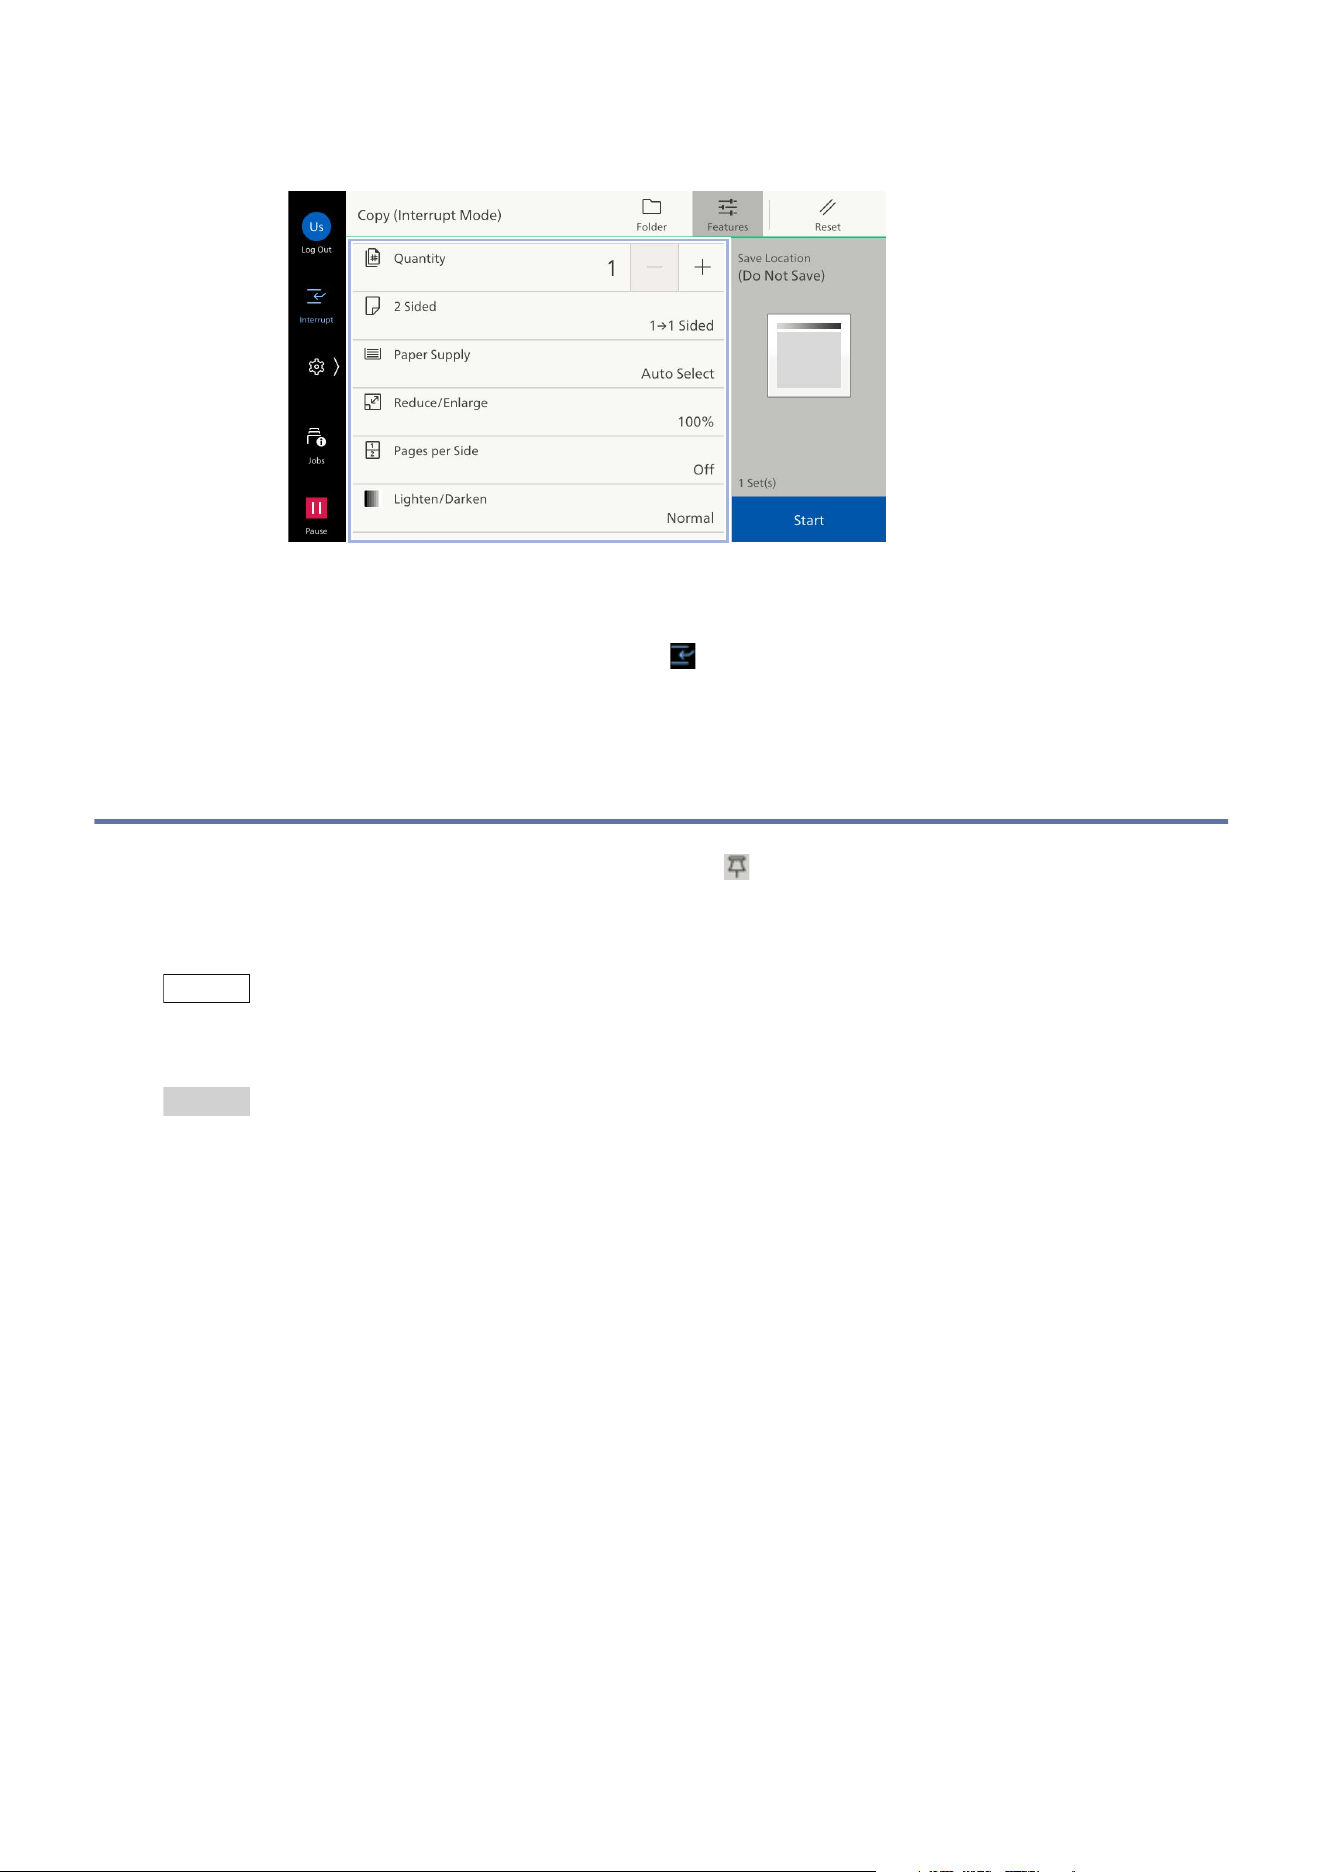
27
3.9 Pins
3. Set each feature as needed.
4. Tap on [Start].
5. After an interrupt copy job is complete, tap on ([Interrupt]).
The job before the interrupt is restarted.
3.9 Pins
The job history of copy and scan are saved in [Pins] ( ).
This feature enables you to launch an app to restart a job selected from the job history.
Setting [Create Pin] also enables you to restart a job directly, without launching any app.
Note
When using the authentication feature, the job history is saved for each user and you can use [Pins].
The job history for which the administrator has set [Create Pin] is displayed to all users.
Refer
Refer to "[Pins Settings]" (P.95) for controlling the use of [Pins].
Launching an App
1. Load the document.
2. Tap on [Pins].
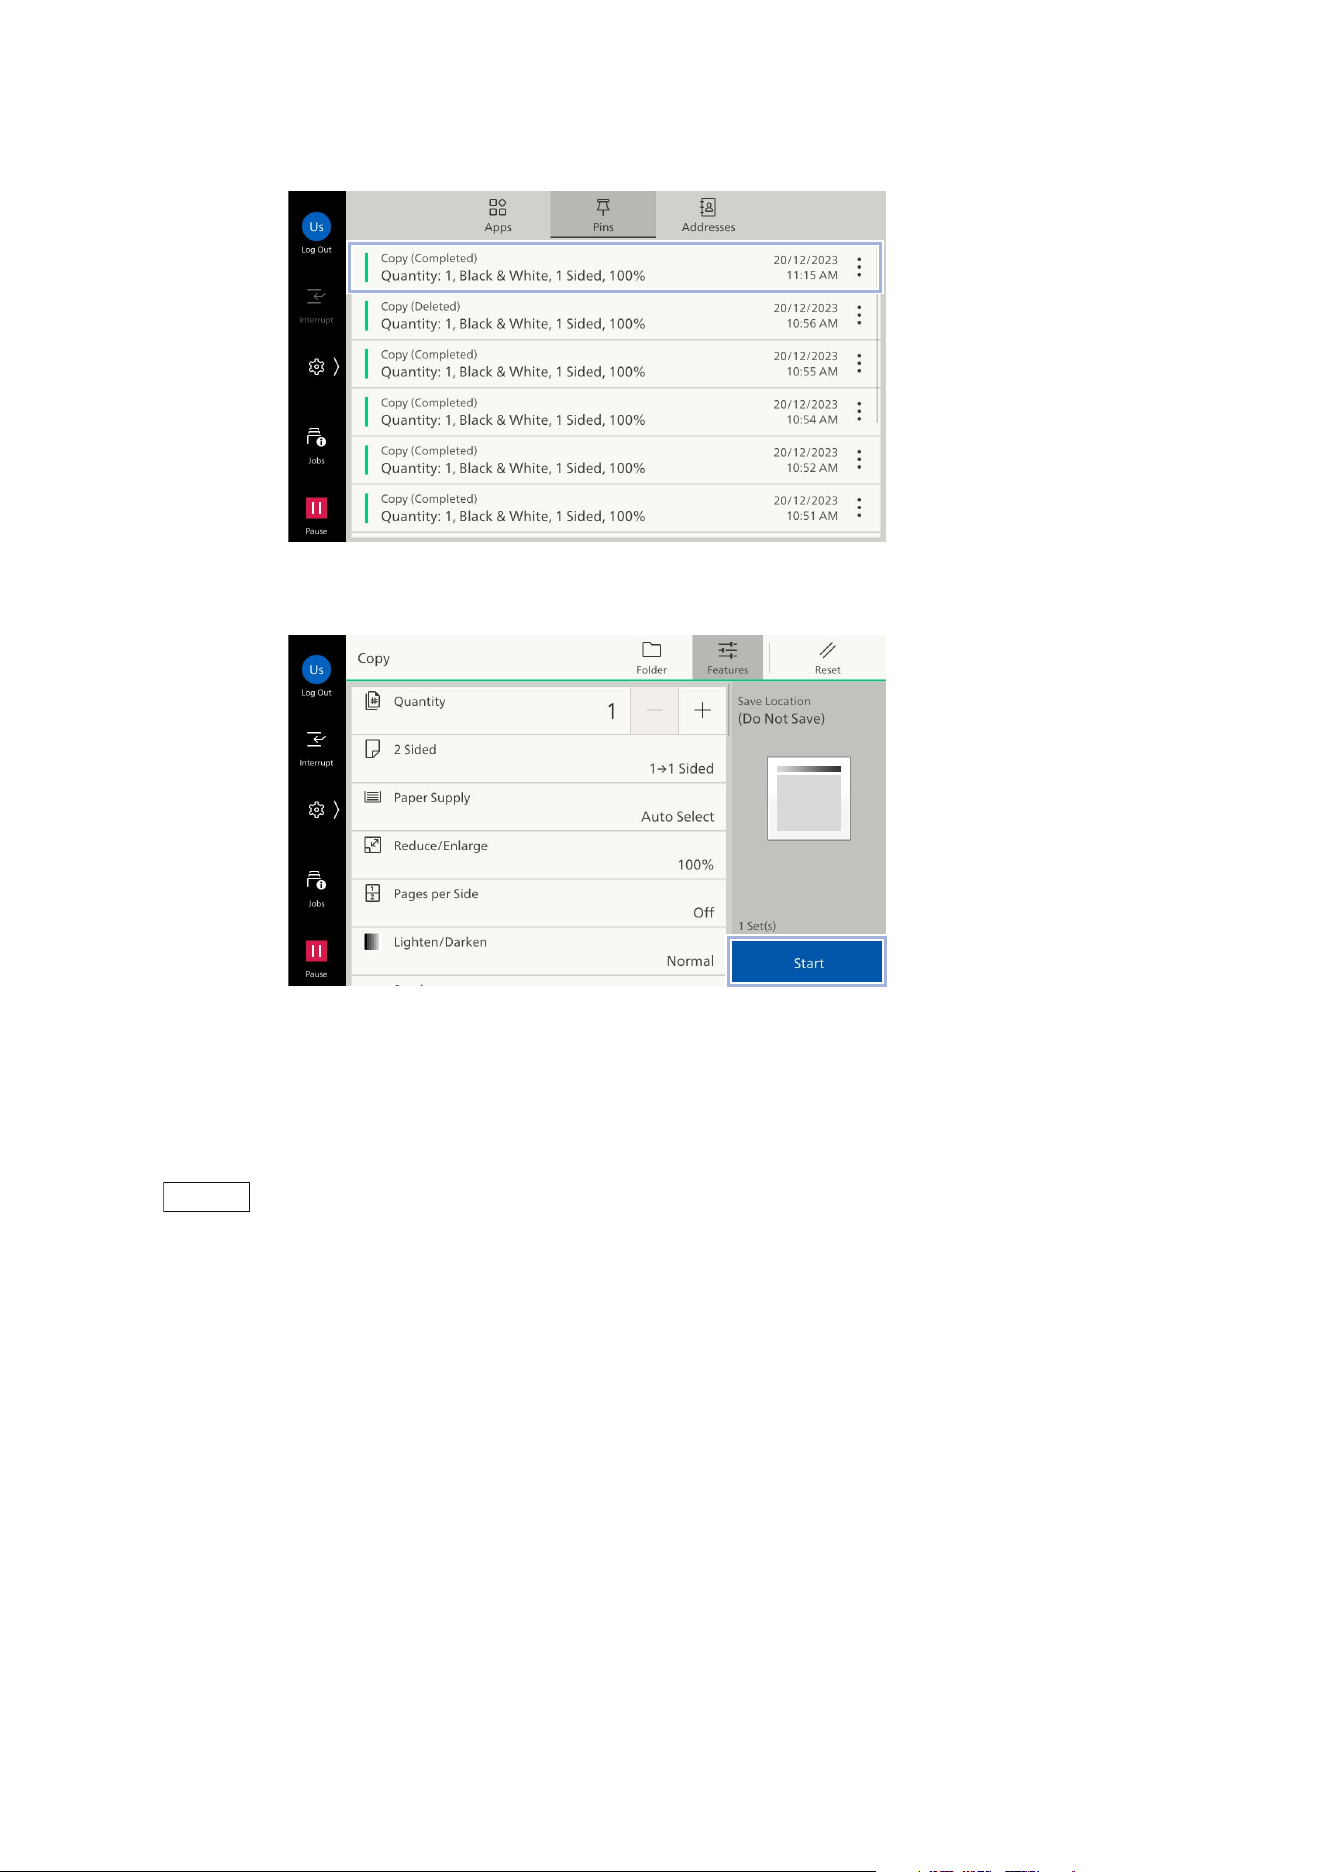
28
3 Basic Operations
3. Tap on the job history to be used.
4. Tap on [Start].
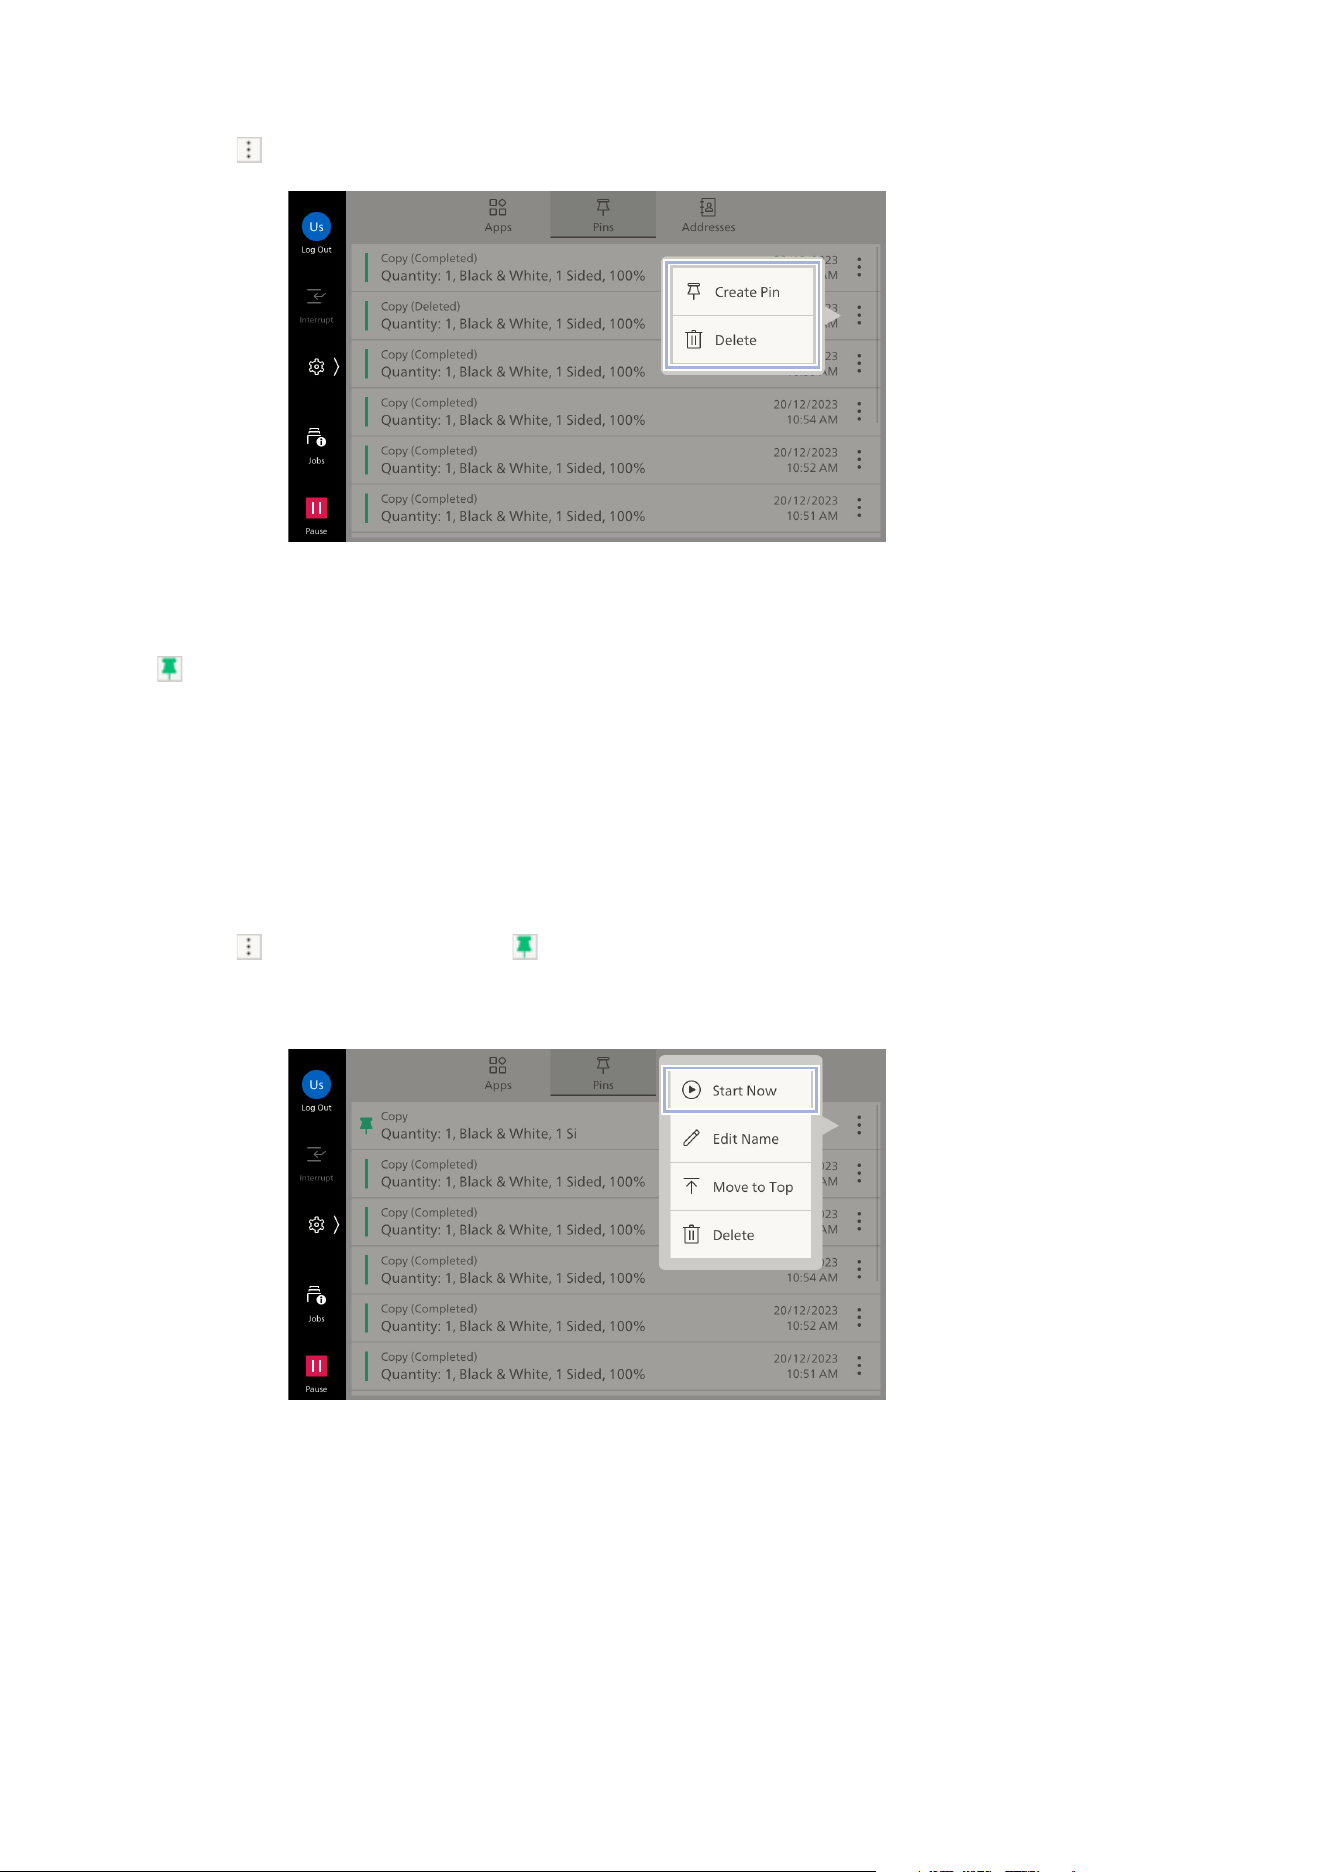
Setting Pins
If [Create Pin] is set for the job history, the following operation can be performed.
[Start Now]: Run the job using the setting saved in the job history.
Note
This cannot be displayed depending on the feature.
[Edit Name]: Edit the name for the saved pin.
[Move to Top]: Move to the top of the list.
[Delete]: Delete from the list.
1. Tap on [Pins].
29
3.9 Pins
2. Tap on > [Create Pin] in the job history.
If you tap on [Delete], the job history is deleted.
3. Enter the name to save, and then tap on [OK].
is displayed in the job history.
Direct Restart
1. Load the document.
2. Tap on [Pins].
3. Tap on in the job history with .
4. Tap on [Start Now].

30
3 Basic Operations
3.10 Power Saver
This feature enables you to reduce power consumption.
When the machine is not used for a fixed period of time, it will enter Low Power Mode and then after
a set period of time has elapsed, it will switch to Sleep Mode.
Refer
Refer to "[Power Saver Settings]" (P.93).
Power Saver Mode
The <Power/Power Saver> button flashes when the machine is in Power Saver Mode.
When pressing the <Power/Power Saver> button and then tapping on [Enter Power Saver]
When the machine has not been operated, when a job has not been run, and when print data has
not been received before the time to switch to Power Saver Mode
Exiting from Power Saver Mode
When the <Power/Power Saver> button was pressed
When a job such as print is received
When clicking [Save] in Internet Services
When a document was loaded in the document feeder
When the document cover was opened
Cooling Mode
If the inside of the machine becomes hot, it will automatically switch to Cooling Mode. When cooling
is finished, the screen indicating Cooling Mode will close automatically.
Important
Do not open the cover or turn off the power while in Cooling Mode, as the fan inside the machine
operates to dissipate heat.
Note
Tapping on [Close] will close the screen, but Cooling Mode will not be canceled, so you will not be able to
operate the machine.
While operating in Cooling Mode, the machine will not switch to Sleep Mode.

31
3.11 USB Memory Device
3.11 USB Memory Device
You can print data saved on the USB memory device or save scanned data.
Compatible Files for Printing
PDF file (extension: pdf)
TIFF file (extension: tif, MH/MMR compression, 8-bit grayscale (uncompressed, PackBits
compression, JPEG compression), 8-bit RGB index color (uncompressed, PackBits compression),
24-bit RGB color (uncompressed, PackBits compression, JPEG compression))
XPS file (extension: xps, oxps)
Exif 2.0 to Exif 2.2 file (extension: jpg, tif)
JPEG (JFIF) file (extension: jpg, grayscale (8-bit), color (24-bit, sRGB color space))
Cautions for Use
Media devices that have more than 900 folders may not be recognized correctly.
If the full path of the file (all hierarchical folder names and character strings contained in the file
names) exceeds 257 characters, it will not be displayed.
The number of files that can be processed by Media Print is 900 files.
Use the USB memory device formatted. Supported formats are FAT12, FAT16 and FAT32 only.
NTFS, exFAT formats are not supported.
CMYK TIFF files and JPEG (JFIF) files are not supported.
It may take from a few minutes to over 20 minutes to print depending on the number of files on the
USB memory device and the capacity of the device.
The data in the USB memory device may be damaged. Be sure to back up the data in advance.
Please note that we are not responsibility for any direct or indirect damages caused by your data
loss.
If the machine is in Power Saver Mode, cancel it before inserting the USB memory device.
It is not possible to install and use multiple USB memory devices simultaneously.
The following USB memory devices cannot be used.
- The USB memory device that requires utility separately
- The USB memory device with several partitions
- The USB memory device connected via an external hub
“System Volume Information” is a folder that is not displayed on your computer. Do not select as a
folder to save files in.
Removal
Note
Remove the USB memory device before turning off power to the machine.
1. Tap on ([Remove]).
2. Tap on [Confirm].
3. Remove the USB memory device.

32
3 Basic Operations
3.12 Error Code
When an error occurs and printing does not finish normally, or when a failure occurs in this machine,
the message and error code (***-***) are displayed on the control panel.
Note
If an error code is displayed, the print data remaining in the machine or the information stored in the
memory of the machine are not guaranteed.
Refer to
Information for error codes
for how to treat the error codes.
If an error does not disappear even after following the treating method in
Information for error
codes
, call for service.
33
4.1 Printing by a Client Computer
4 Print
Printing Specified from a Client Computer
Printing using a printer driver
Direct Print
Printing a document attached to an Email (Print Email)
Printing Data Stored in this Machine
Sample Set
Delayed Print
Secure Print
Charge Print
Private Charge Print
Printing Data Saved on a USB memory Device (Media Print)
Print from USB
Other Printing Services
Emulation
Refer
Refer to
User’s Manual - Appendix
for Direct Print and emulation.
4.1 Printing by a Client Computer
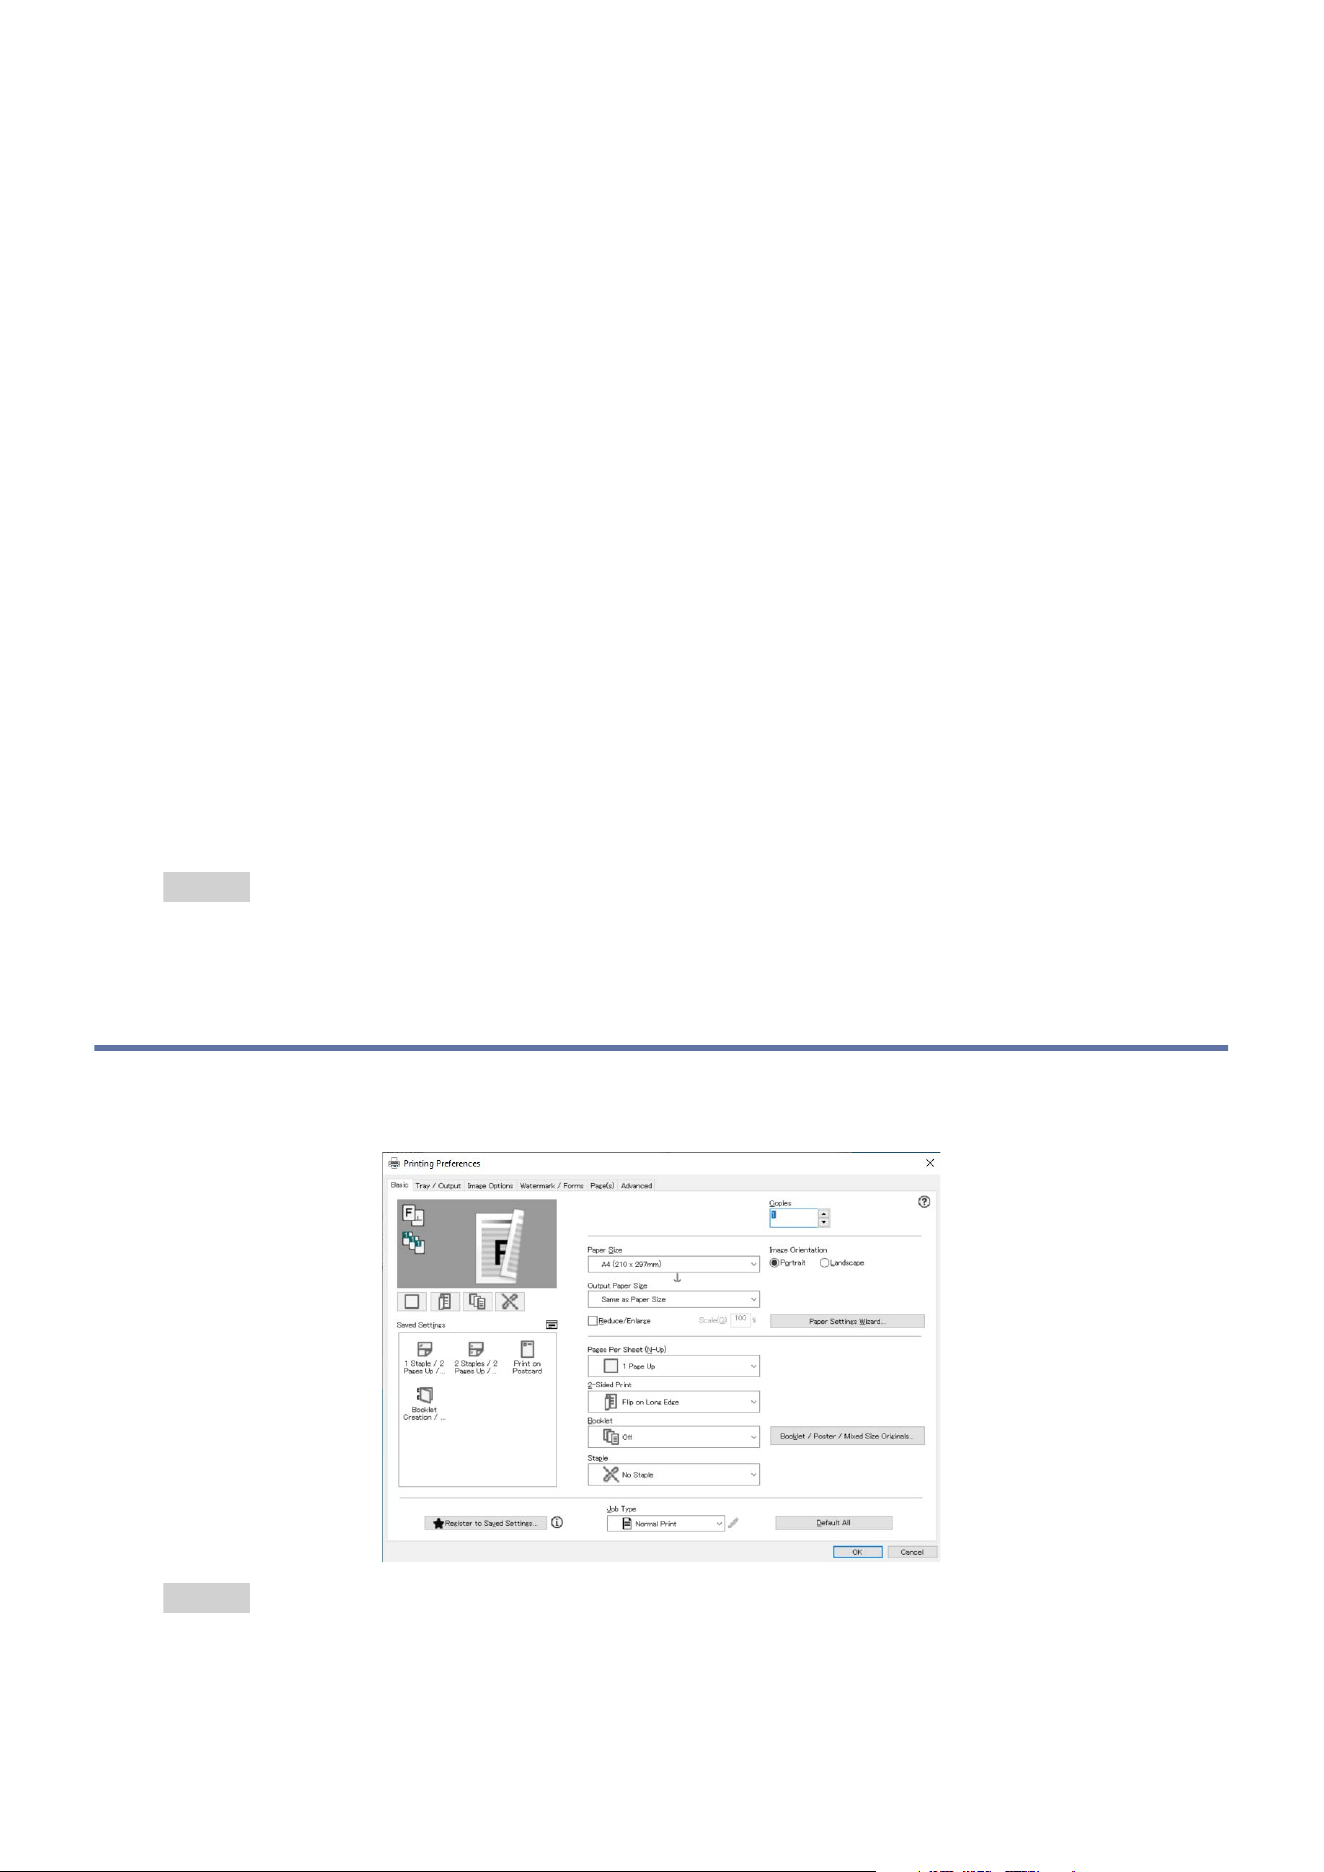
Printing Using a Printer Driver
Refer
Refer to the printer driver help for the printing method.
34
4 Print
Print Email
When the Email address of this machine is specified as the recipient and an Email is sent, printing is
performed in accordance with the settings of the machine.
Receiving Email from a Client Computer
Both text format and HTML format can be used in the email message. However the text part in HTML
format is printed only when the email has both data of HTML and text format. Note that if no text
part is sent in a HTML format email, the message will not be printed.
At
tachment files with extensions other than “.tif”, “.tiff”, “.pdf”, “.jpeg”, “.jpg”, “.jpe”, “.jfif”, “.xps”,
and “.oxps”, may not be printed correctly.
If the file extension of an attachment file is “.txt”, it is printed only when “text/plain” is specified for
Content-Type and charset is specified.
4.2 Printing Stored Data
Temporarily store the print data sent from the printer driver and print them by operations on the
touch panel display.
Note
To save received jobs to the Charge Print or Private Charge Print, the setting in "[Authentication]"
(P.158) > [Charge/Private Print Settings] > [Receive Control] is required. In this case, even if you instruct
the Sample Set, Delayed Print, or Secure Print by the printer driver, it may be ignored.
When each app is displayed on the Home screen by the customization feature, you can operate directly
from such apps.
Sample Set
Prints the remaining number of copies of the file specified for Sample Set (printing one copy for trial).
1. Tap on > [Jobs] > [Stored Print Jobs] > [Sample Set].
2. Tap on the target user.
3. Tap on the file to be printed, to apply a check mark.
4. Change the print quantity as needed.
Note
The print quantity displayed is the print quantity set in the printer driver less one copy.
35
4.2 Printing Stored Data
5. Tap on [Start].
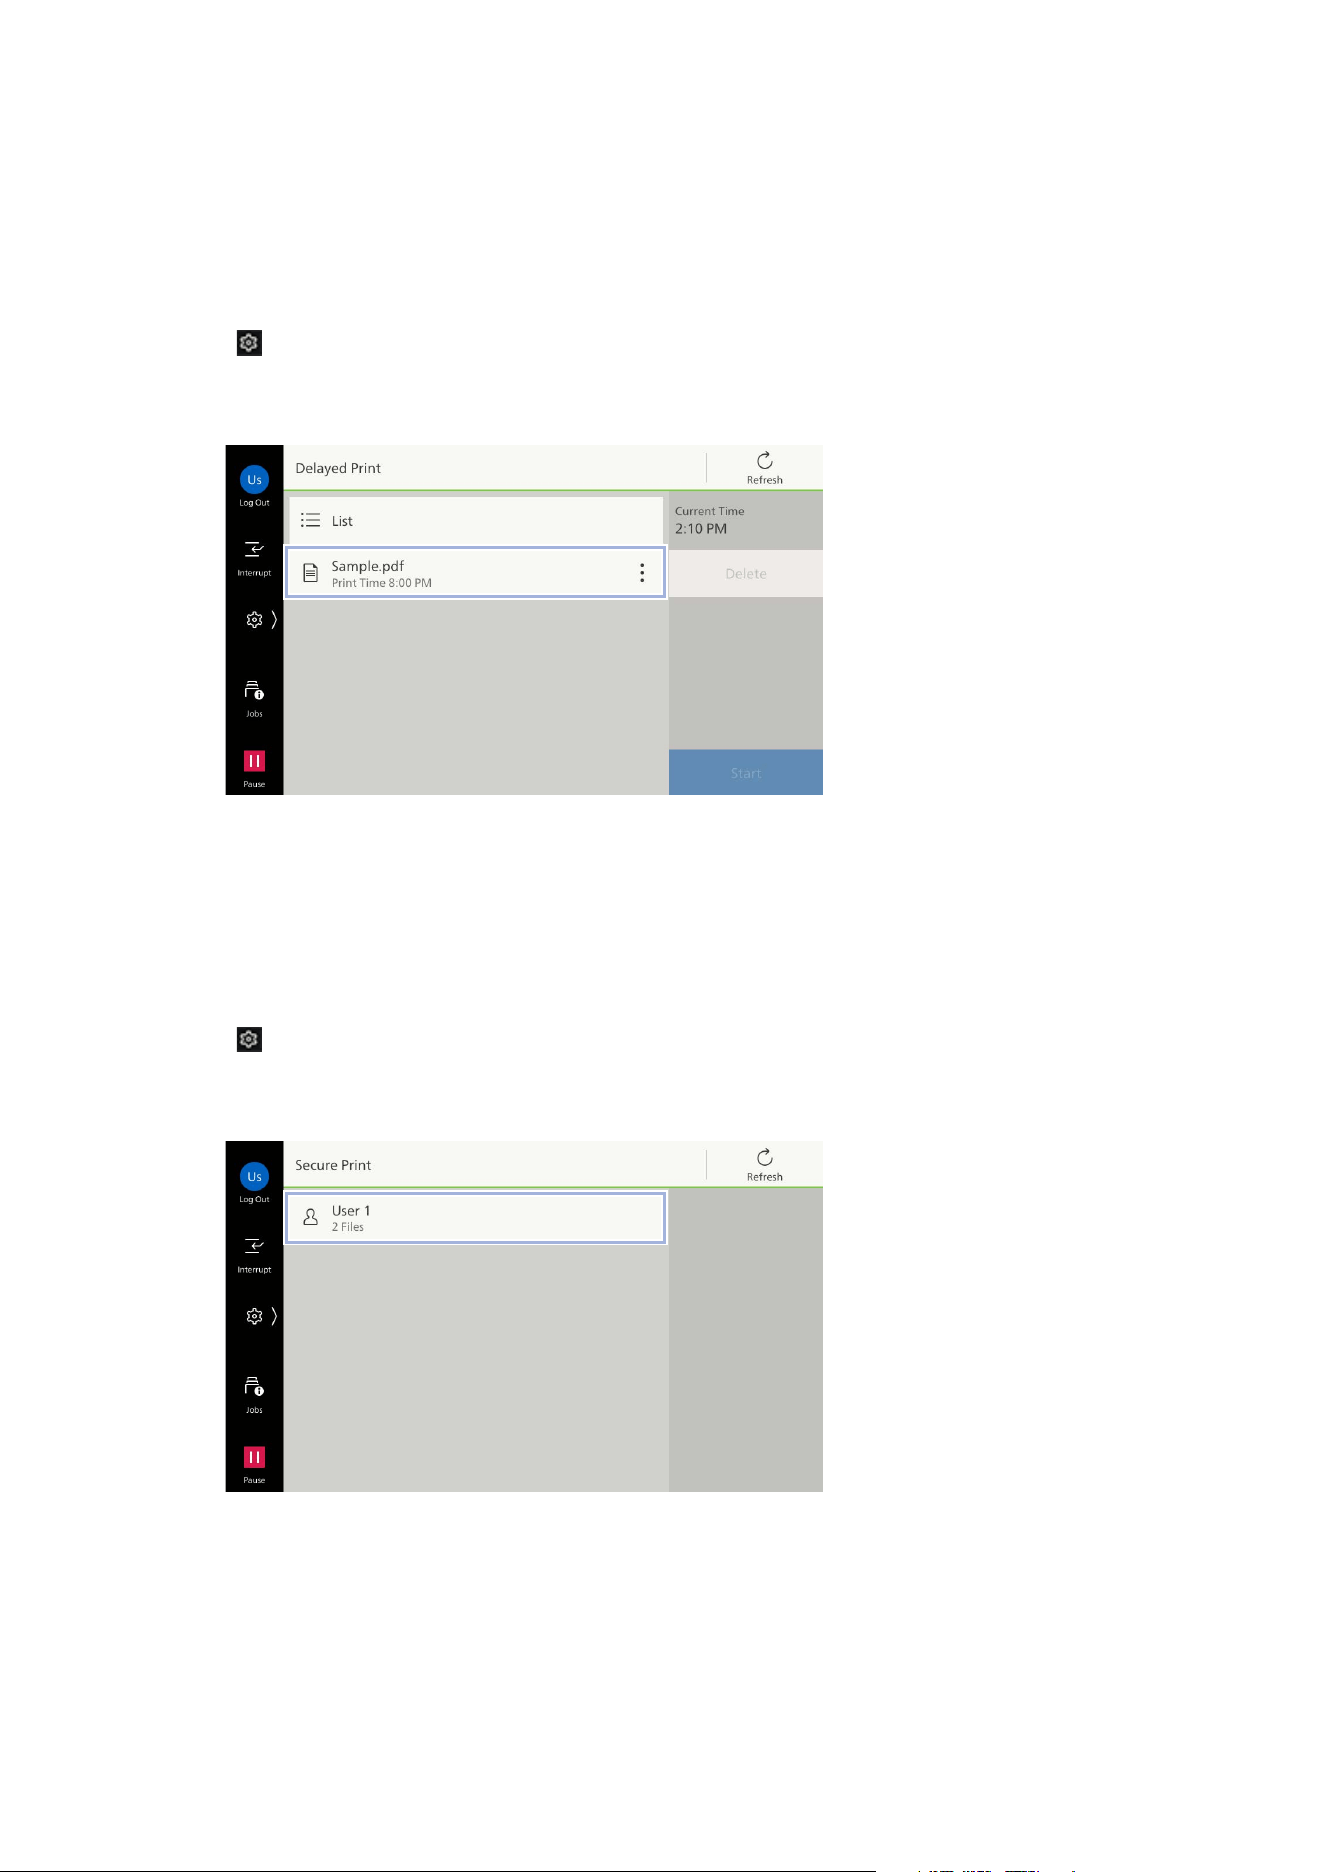
Delayed Print
Delayed Print files (files with specified print time) can be printed before the specified time.
1. Tap on > [Jobs] > [Stored Print Jobs] > [Delayed Print].
2. Tap on the file to be printed.
3. Tap on [Start].
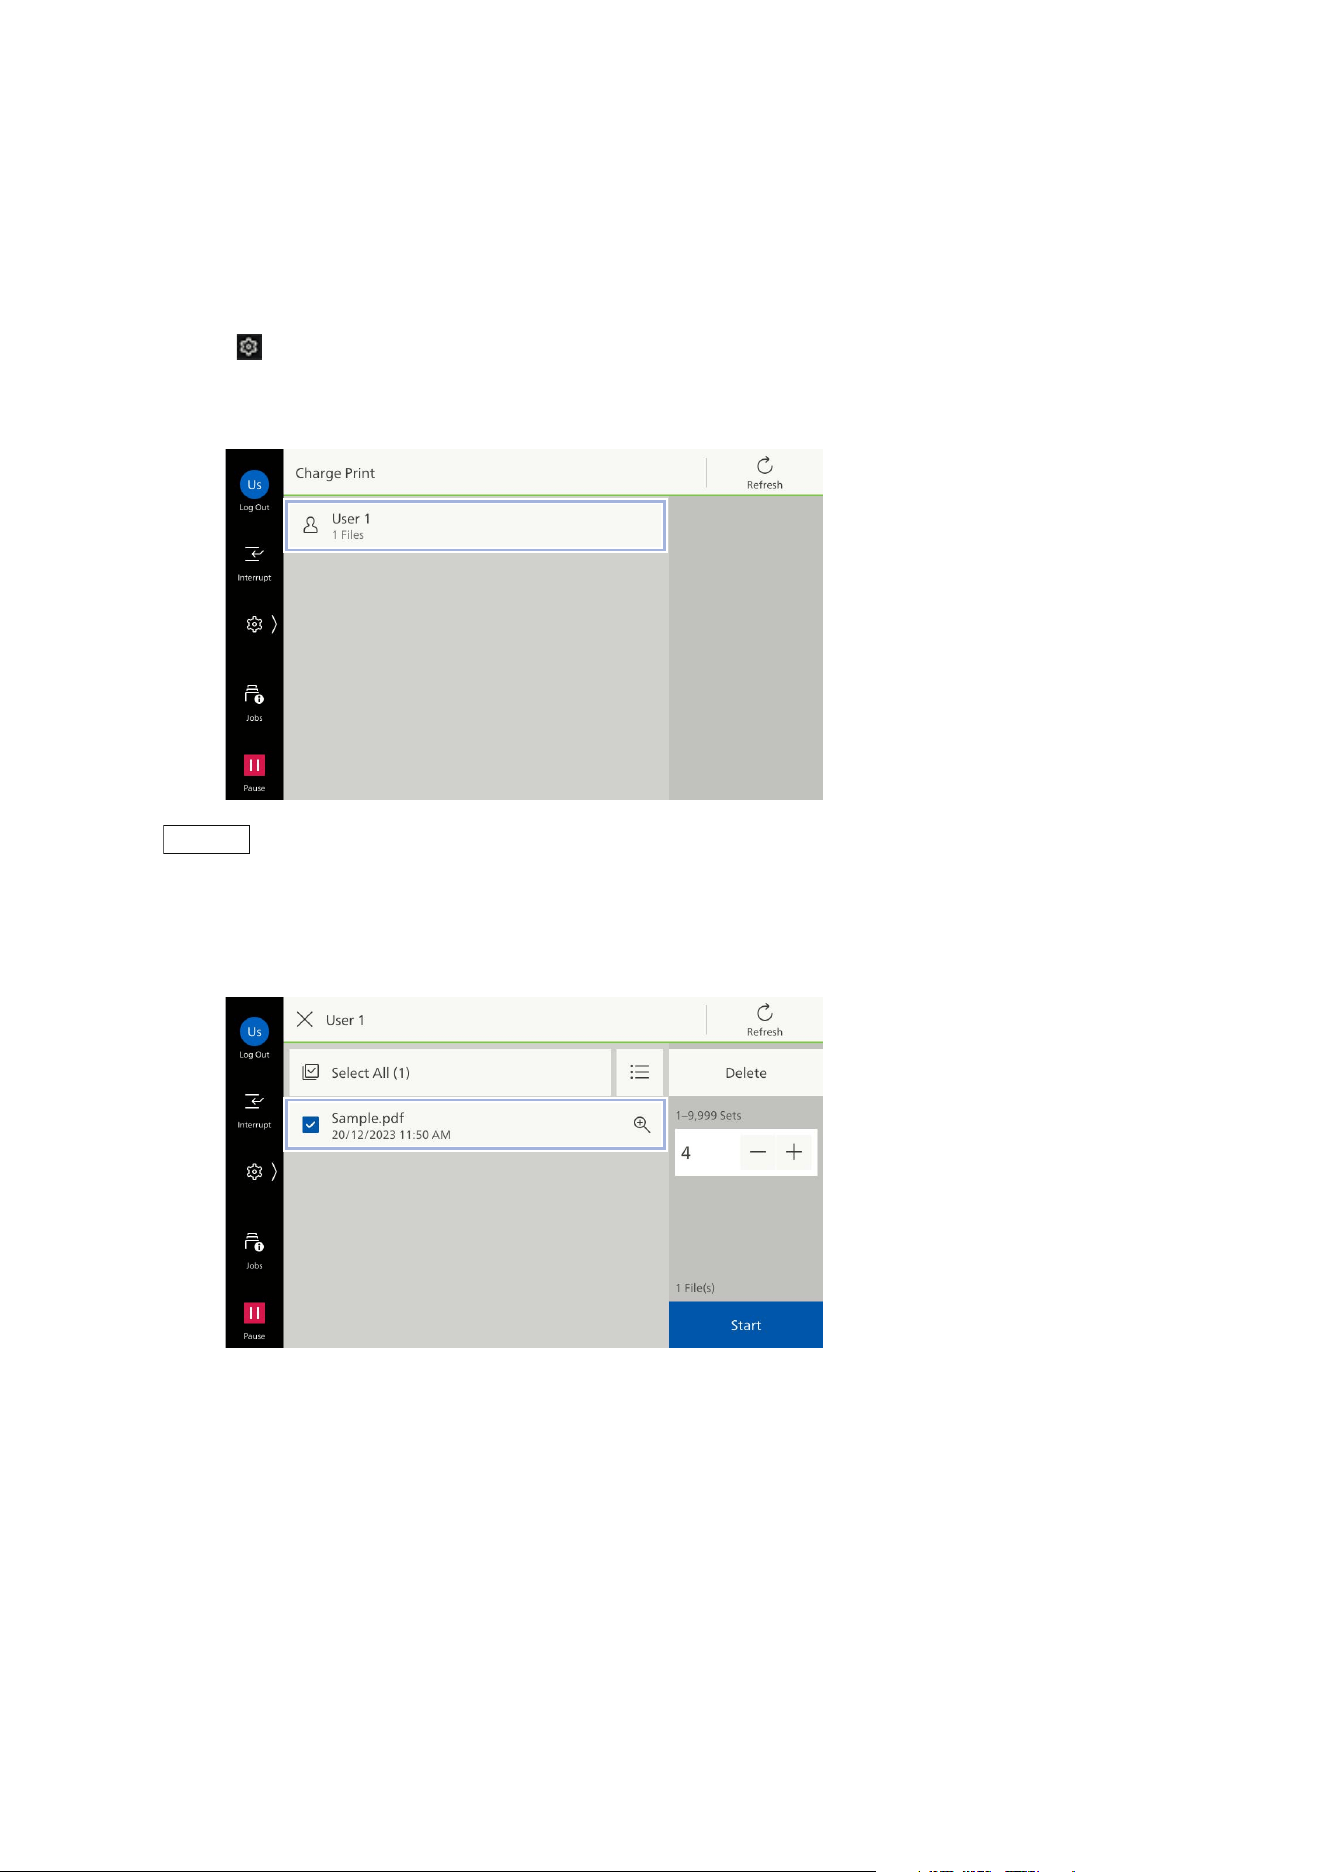
Secure Print
Print Secure Print files (files with password set).
1. Tap on > [Jobs] > [Stored Print Jobs] > [Secure Print].
2. Tap on the target user.
3. Enter the password specified in the printer driver, and tap on [OK].
4. Tap on the file to be printed, to apply a check mark.
5. Change the print quantity as needed.
6. Tap on [Start].
36
4 Print
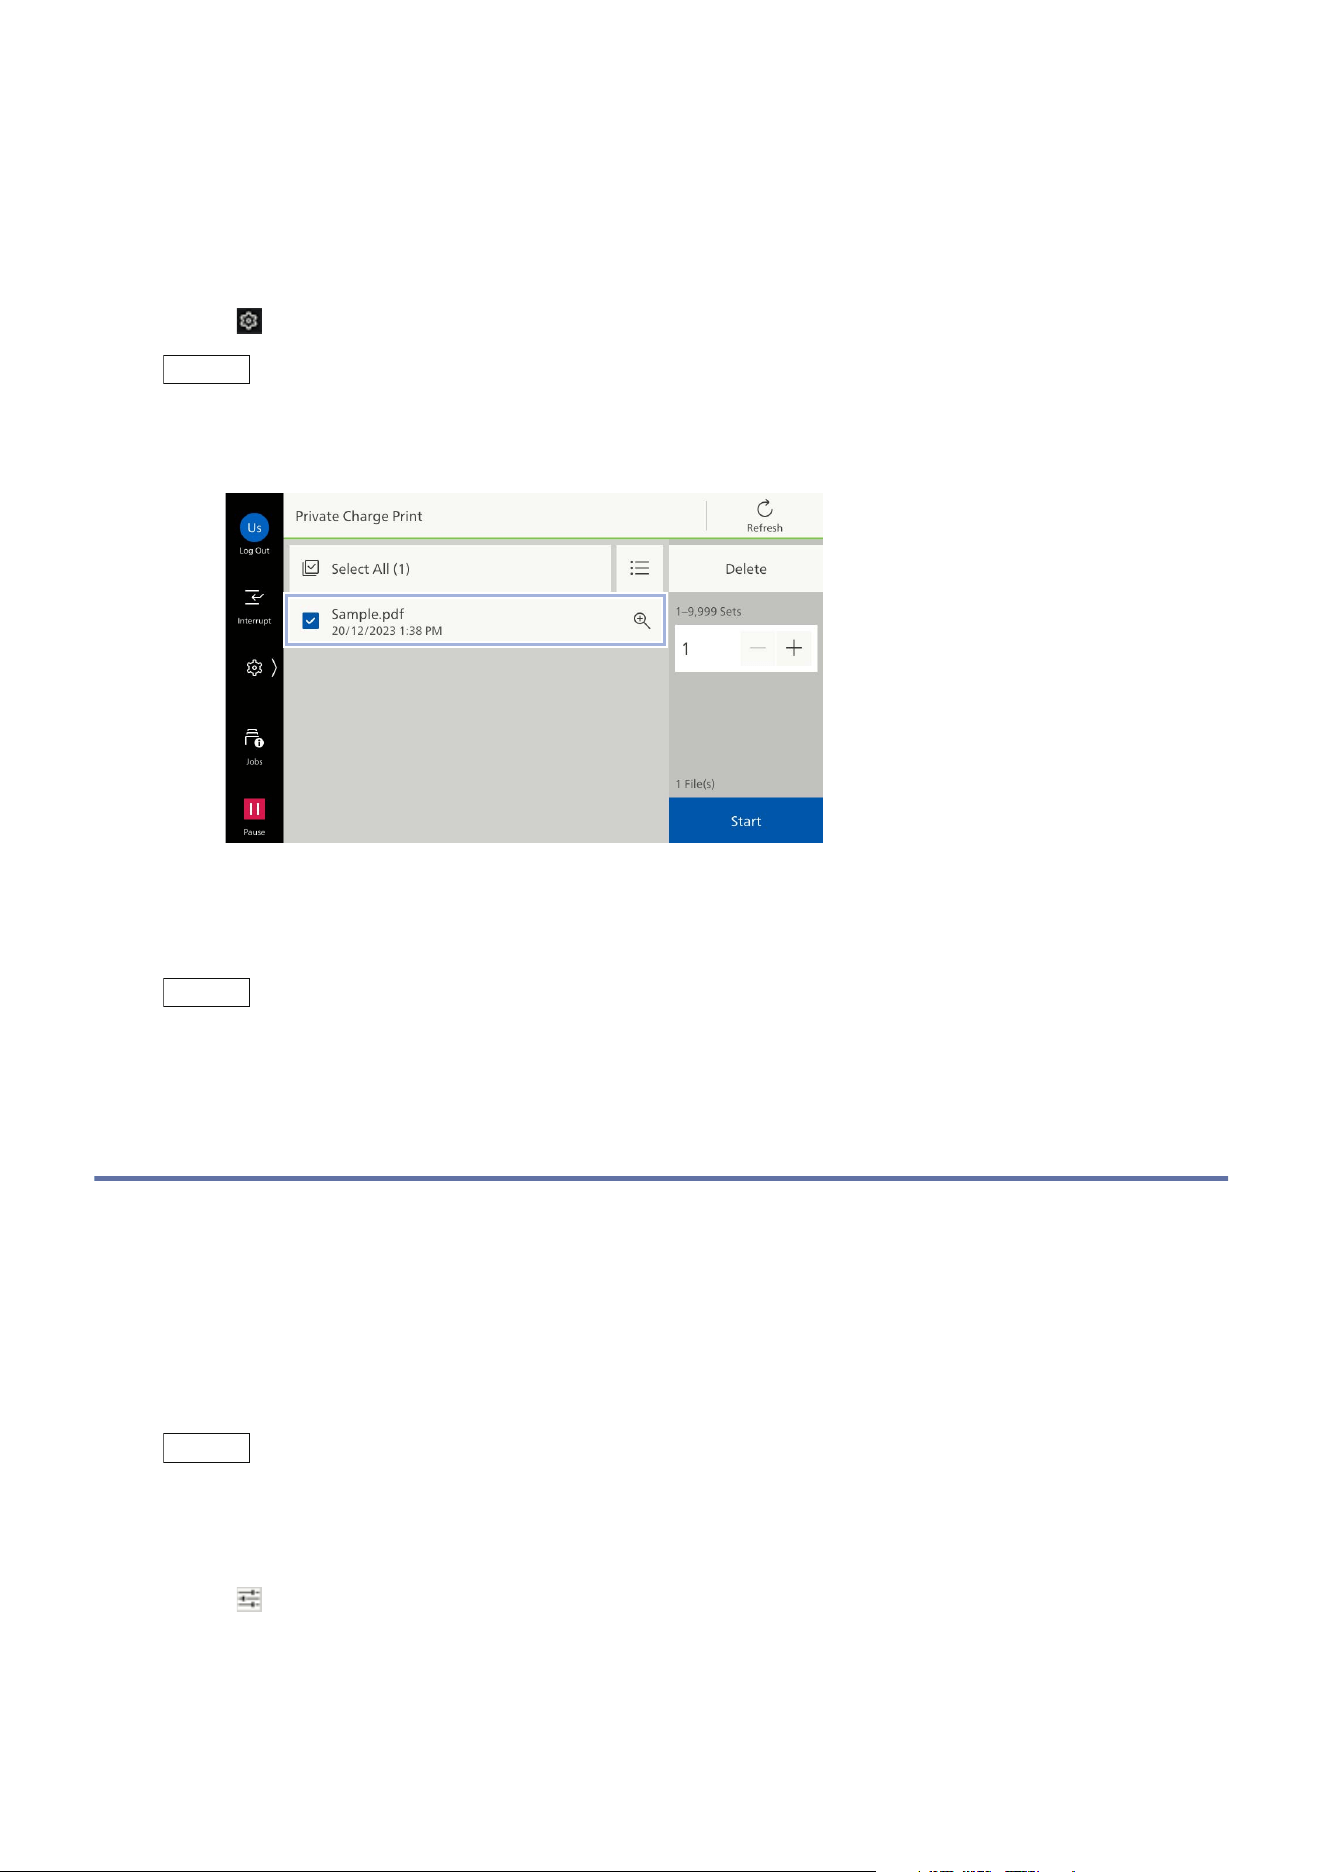
Charge Print
Print Charge Print files. Charge Print files are saved for each user ID for storage set in the printer
driver. When you do not set the user ID for storage, the file is saved in [(No User ID)].
1. Log in to Authentication Mode.
2. Tap on > [Jobs] > [Stored Print Jobs] > [Charge Print].
3. Tap on the target user.
Note
When the Secure Print Passcode is set in the printer driver, the screen to enter the Passcode displays.
Enter the Passcode, and tap on [OK].
4. Tap on the file to be printed, to apply a check mark.
5. Change the print quantity as needed.
6. Tap on [Start].
37
4.3 Print from USB
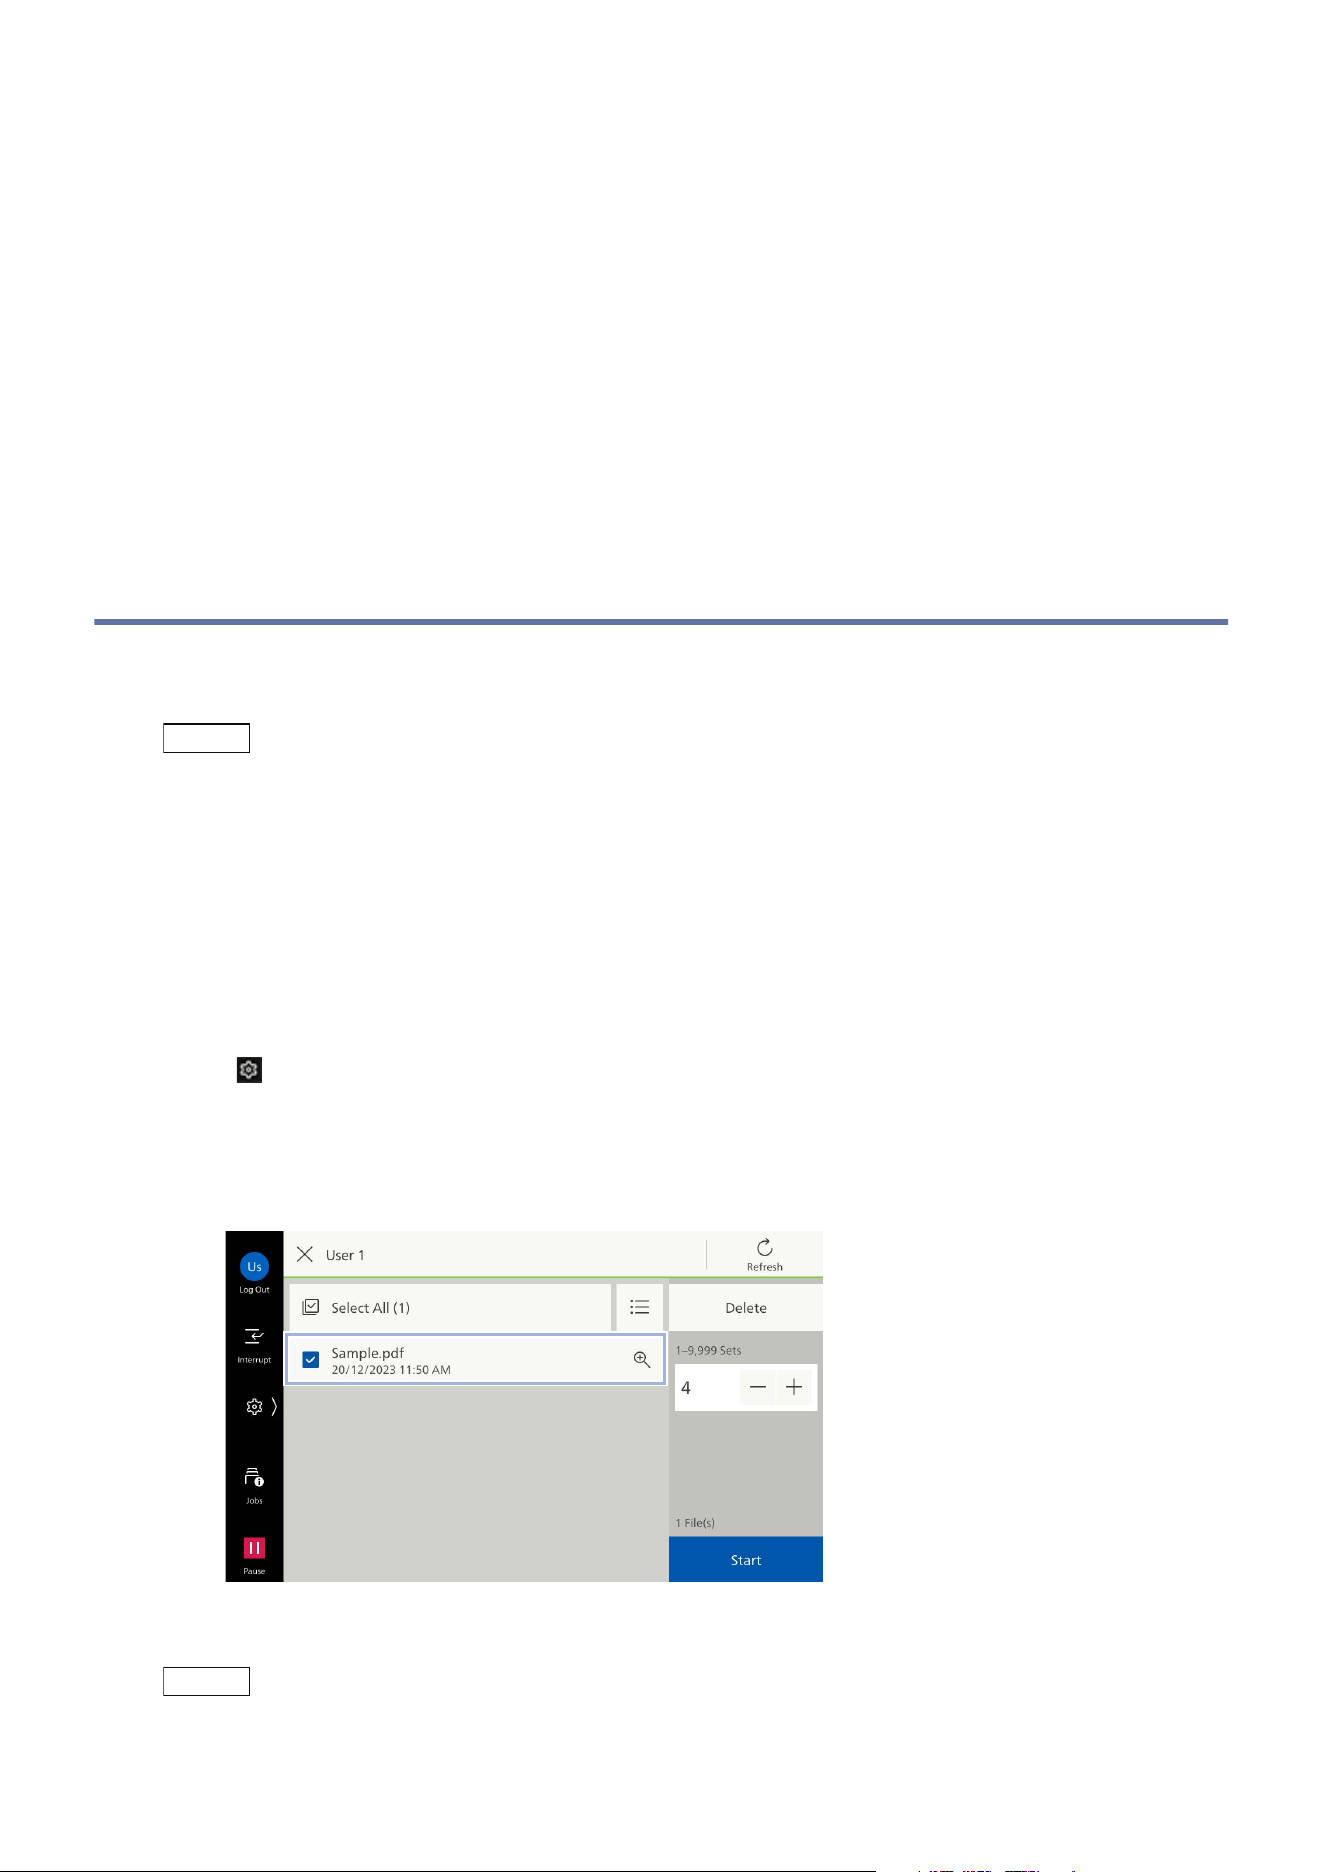
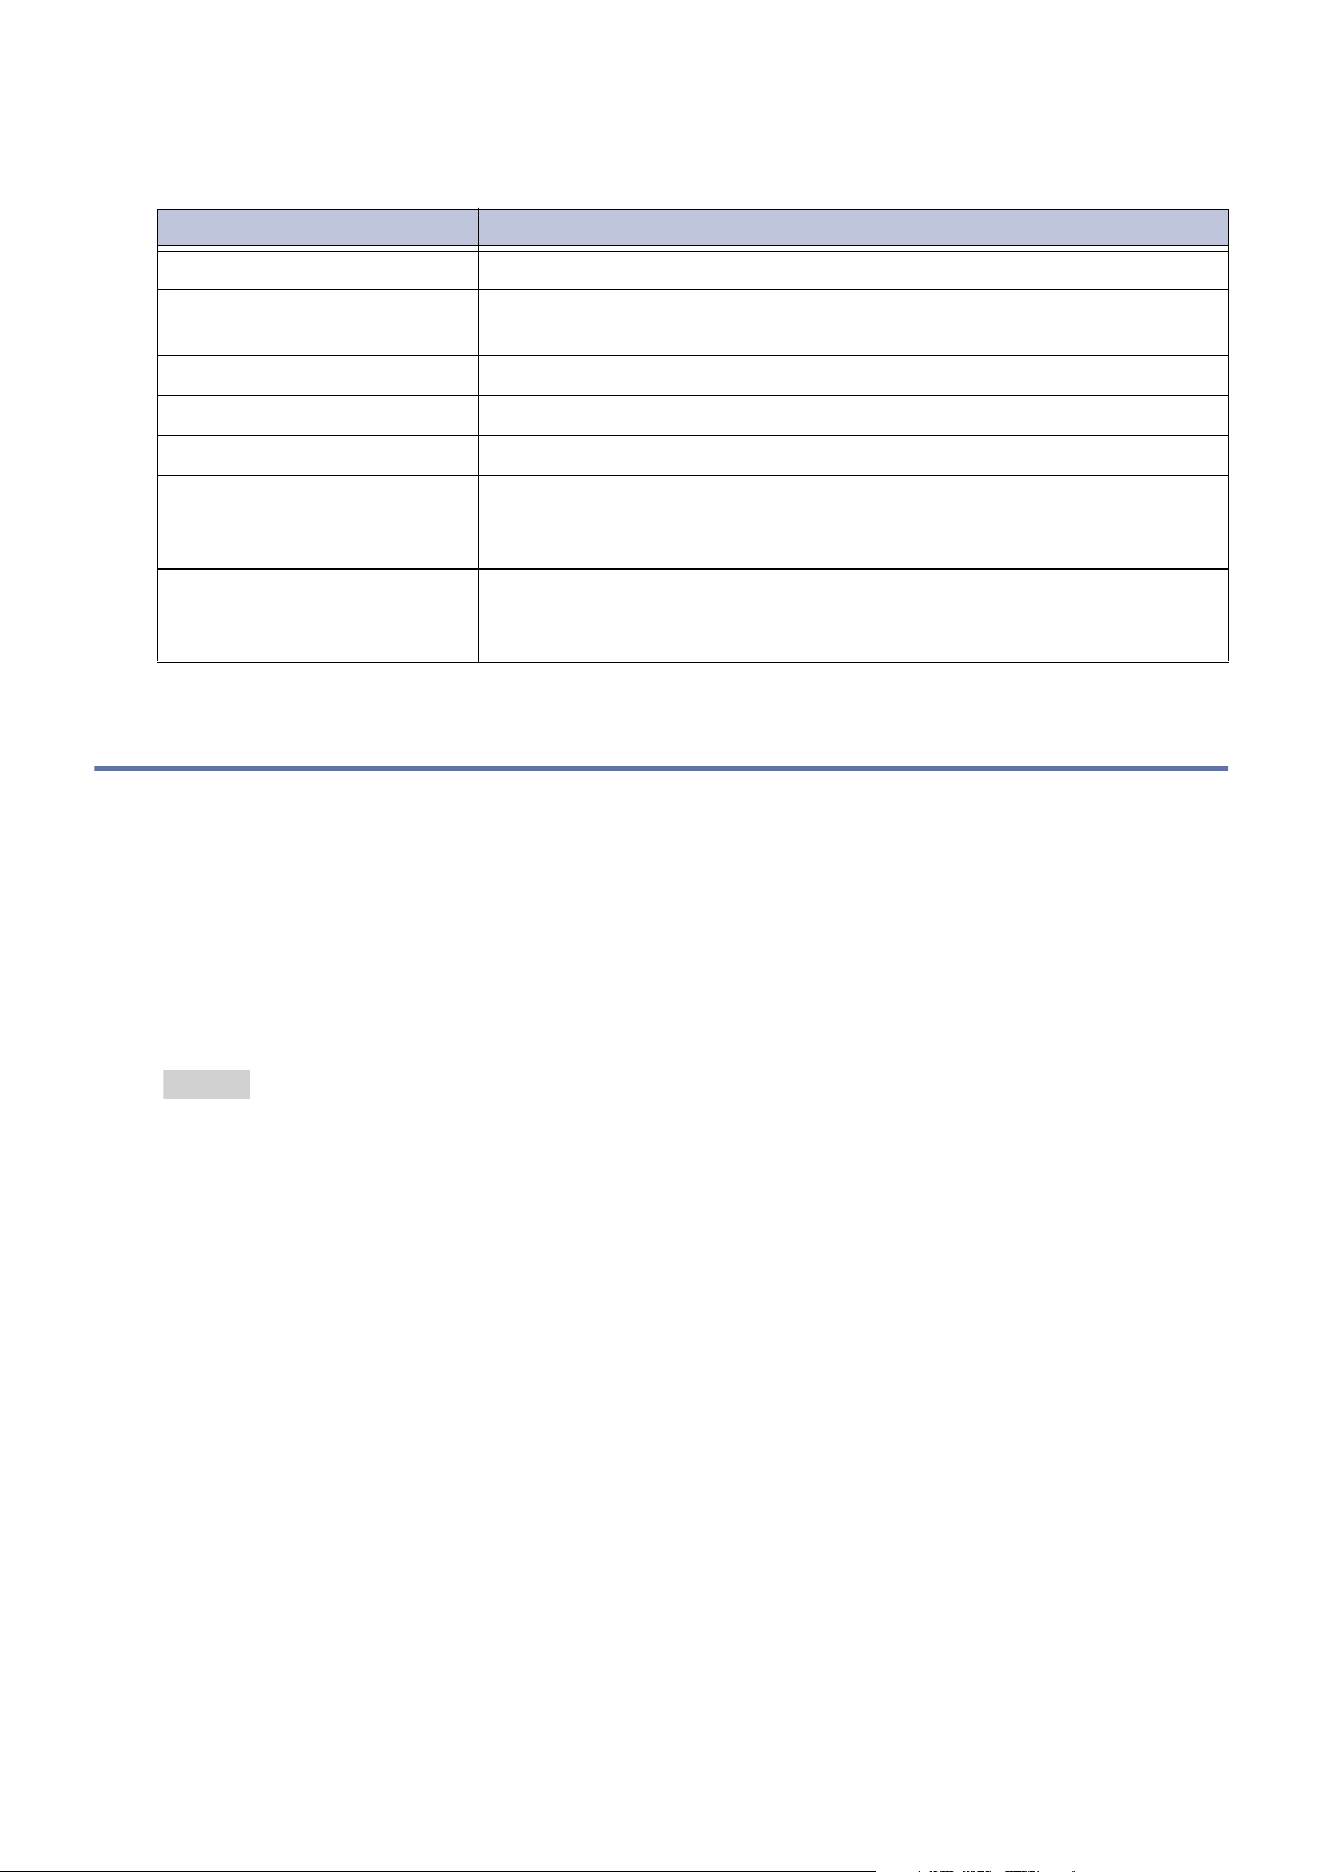
Private Charge Print
Print private charge print files. Private charge print files are saved for each user ID.
1. Log in to Authentication Mode.
2. Tap on > [Jobs] > [Stored Print Jobs] > [Private Charge Print].
Note
Up to 100 files can be printed at a time.
3. Tap on the file to be printed, to apply a check mark.
4. Change the print quantity as needed.
5. Tap on [Start].
Note
When printing with the finisher function specified while in a status where it cannot be used, this
specification is deleted and the printing is performed.
4.3 Print from USB
You can print data saved in the USB memory device.
1. Insert the USB memory device.
2. Tap on [Confirm].
3. Tap on [Print from USB].
Note
You can use this feature from [USB] > [Print from USB] or [Print from USB] on the Home screen.
4. Tap on the file to be printed from the target folder.
5. Tap on and set each feature as needed.
6. Tap on [Start].
38
4 Print
Features List
4.4 Other Printing Services
Printing by Chrome OS
For printing, refer to Google LLC official website.
Universal Print
Universal Print is a cloud printing service provided by Microsoft Corporation. You can print with the
machine everywhere using the Microsoft Entra ID authentication without installing any printer driver
or specific software.
Refer
For how to enable the Universal Print settings, refer to the Internet Services help.
For printing, refer to the Microsoft Corporation official website.
Item Description
[Quantity] Enter the number of copies.
[Paper Supply] Select the paper tray. If [Auto Select] is selected, an appropriate
paper tray will be selected.
[2 Sided] Print on both sides.
[Staple] Set the position for stapling.
[Hole Punch] Set the position of the hole punch.
[Pages per Side] Multiple page documents can be copied onto one page. Specify the
layout and the orientation of the loaded document is set when
pr
inting.
[Bitmap Smoothing] Specify whether to improve the image quality by performing
corrections associated with rotation, enlargement, or reduction of
images.
39
5.1 Basic Operations
5 Copy
5.1 Basic Operations
1. Load the document.
Refer
For how to load documents, refer to “Basic Operations” in
User’s Manual - Main Unit
.
2. Tap on [Copy].
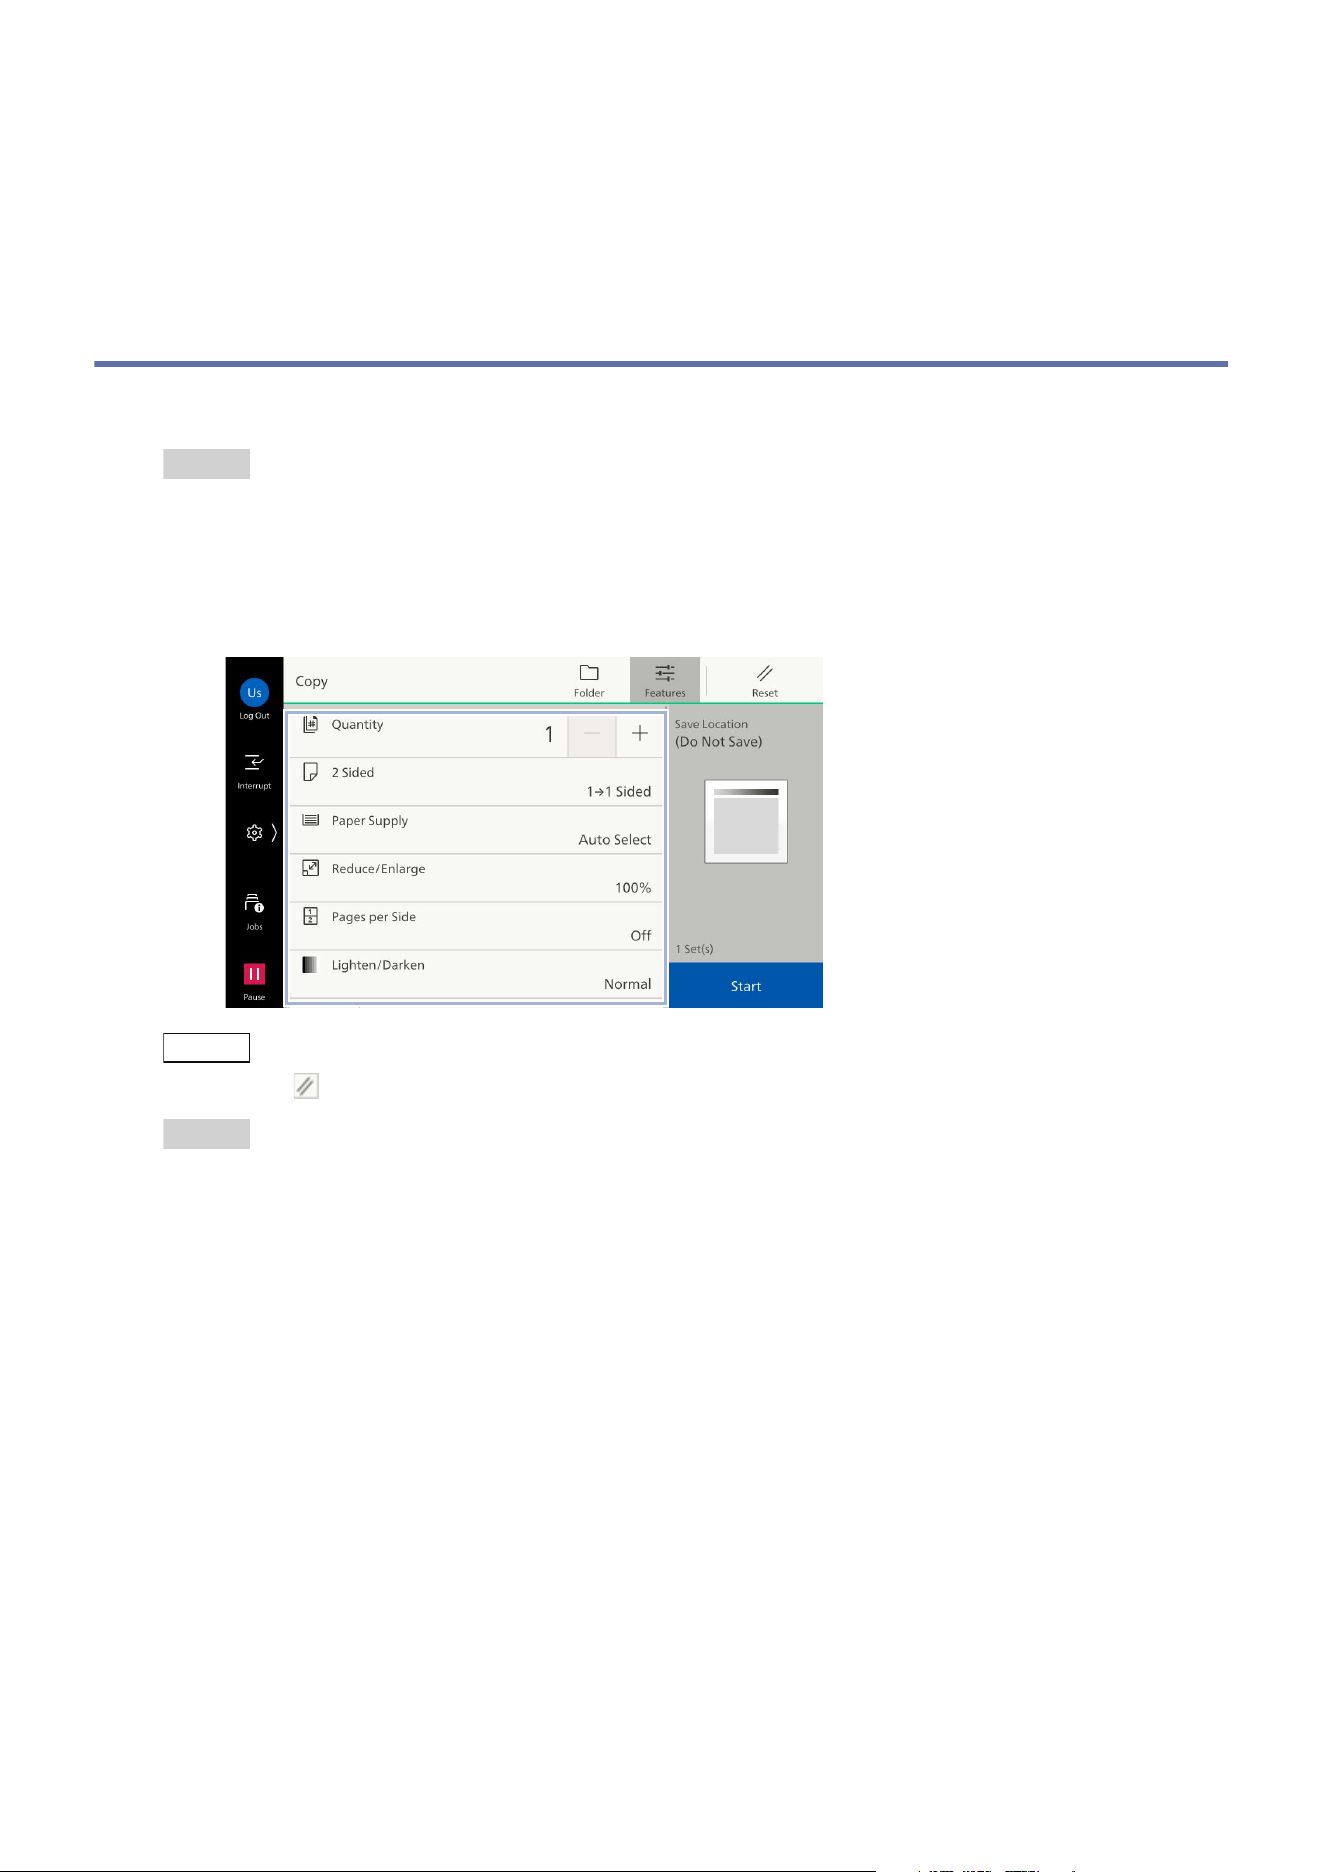
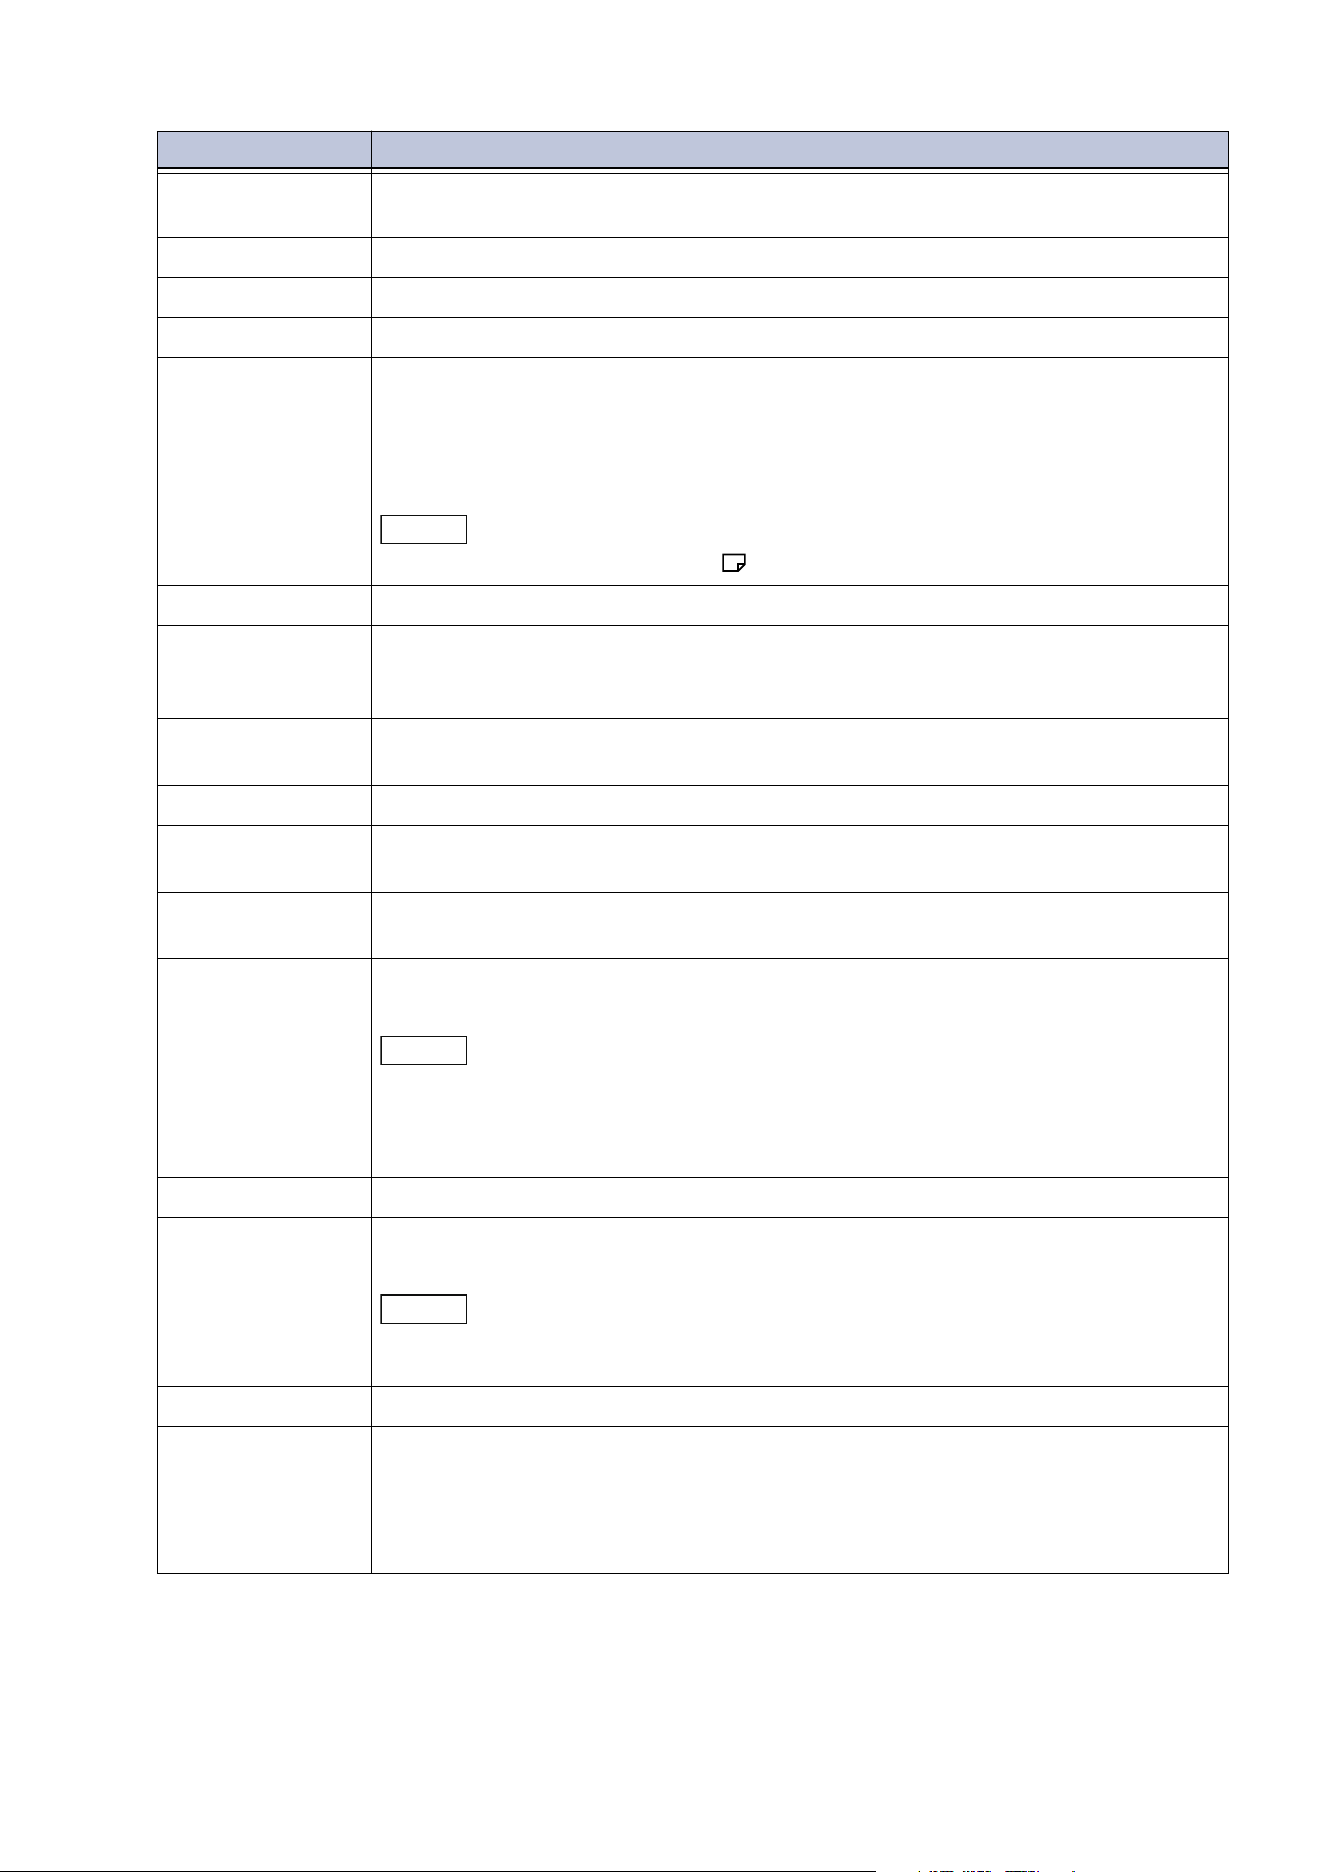
3. Configure the print quantity and the setting items.
Note
Tap on ([Reset]) when turning the setting value to default.
Refer
Refer to "Features List" (P.43) for the description of each item.
4. Tap on [Start].
40
5 Copy
Deleting
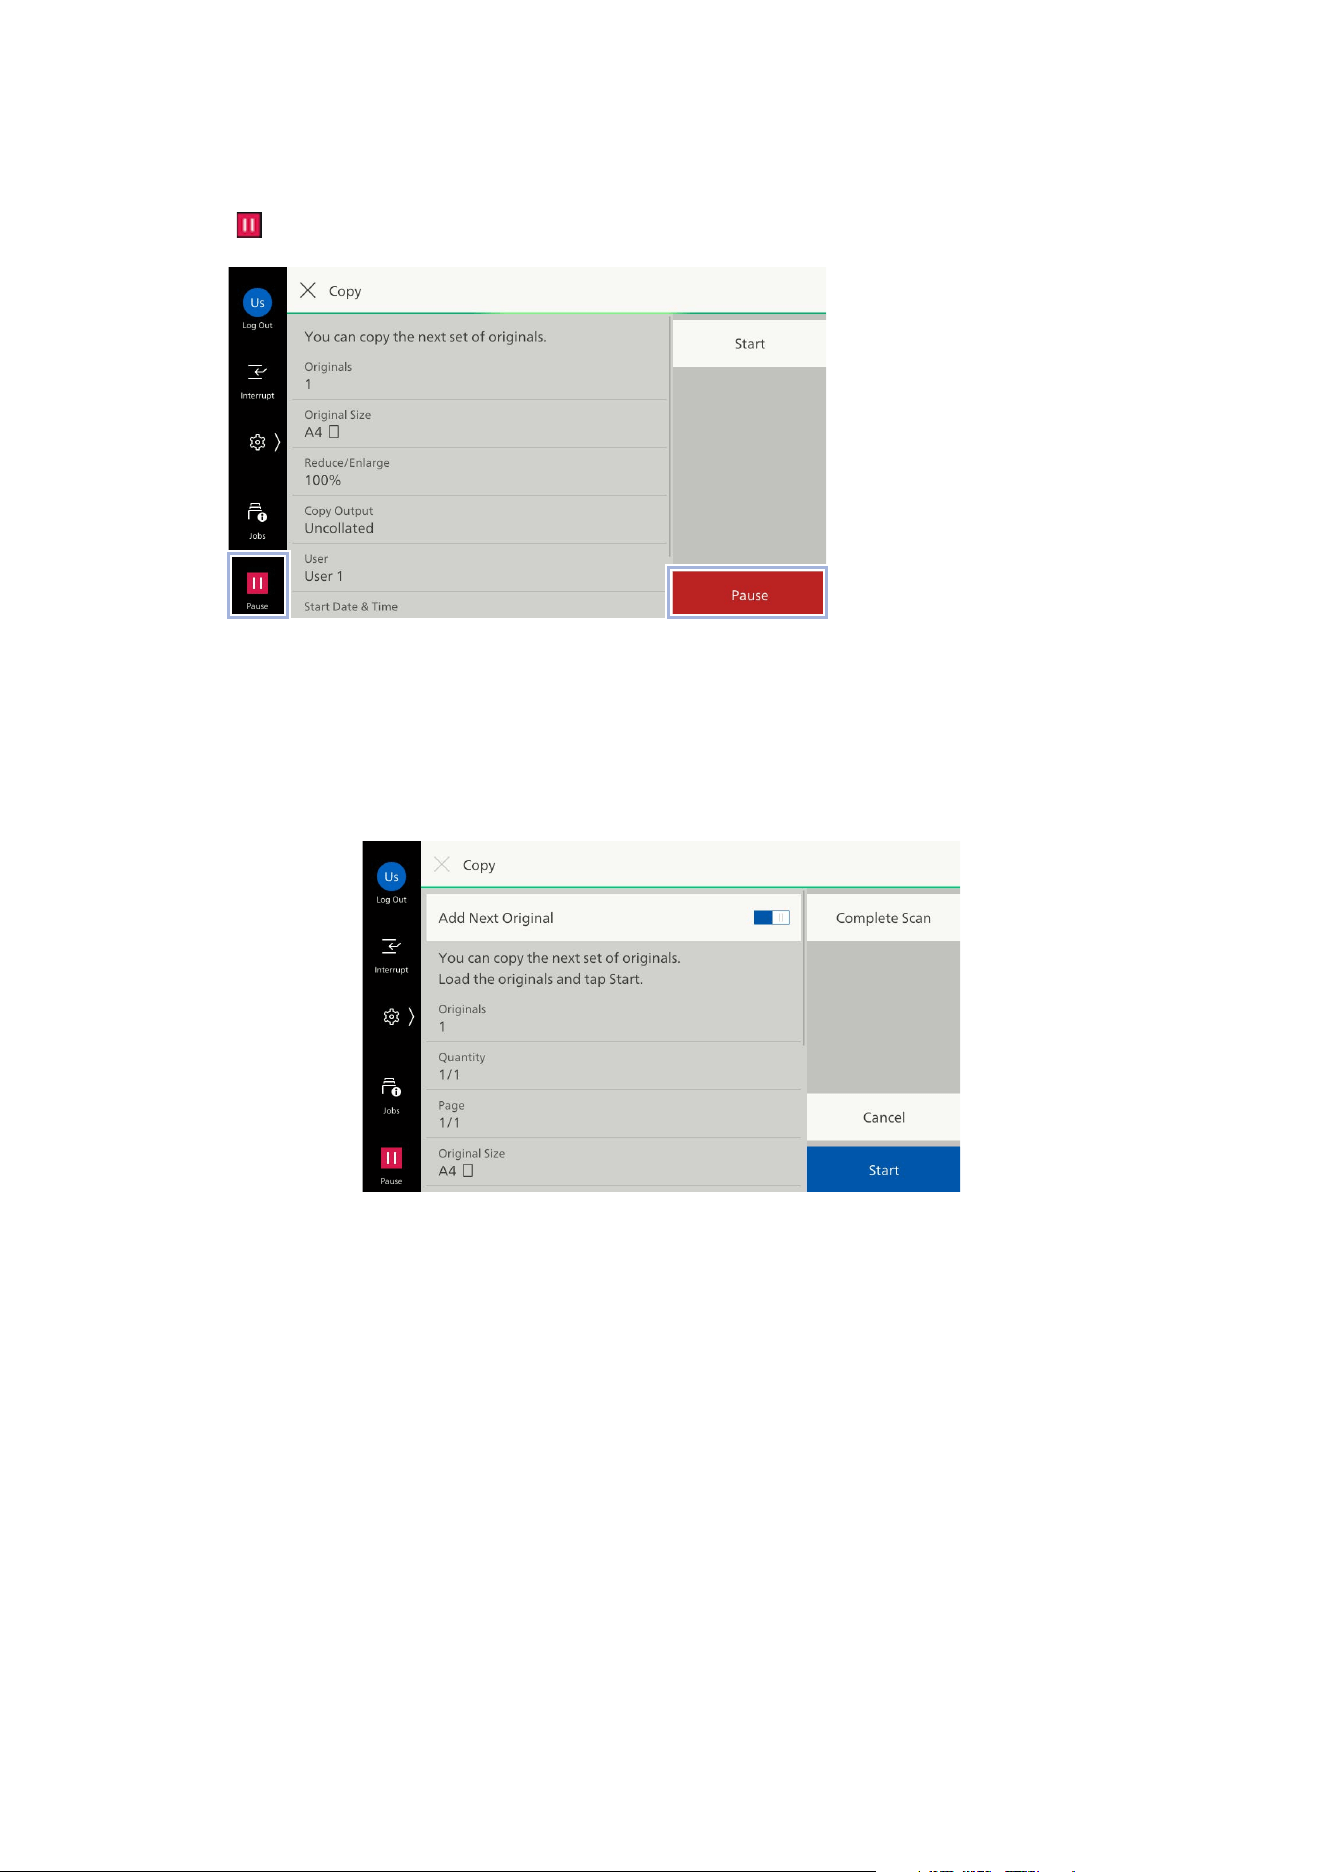
1. Tap on or [Pause].
2. Tap on [Cancel].
Continuous Copying
The following confirmation screen appears if you set [Next Original] to [On] in the features list.
1. When reading the previous document is completed, load the next document.
2. Tap on [Start].
3. When all the documents have been scanned, tap on [Complete Scan].
41
5.2 Store File for Reprinting
5.2 Store File for Reprinting
You can save the document loaded in copying as data in the folder for reprint of the machine.
It is necessary to register a folder in advance to use the folder for reprint.
Refer
Refer to "Registering a Folder" (P.62) for registering a folder.
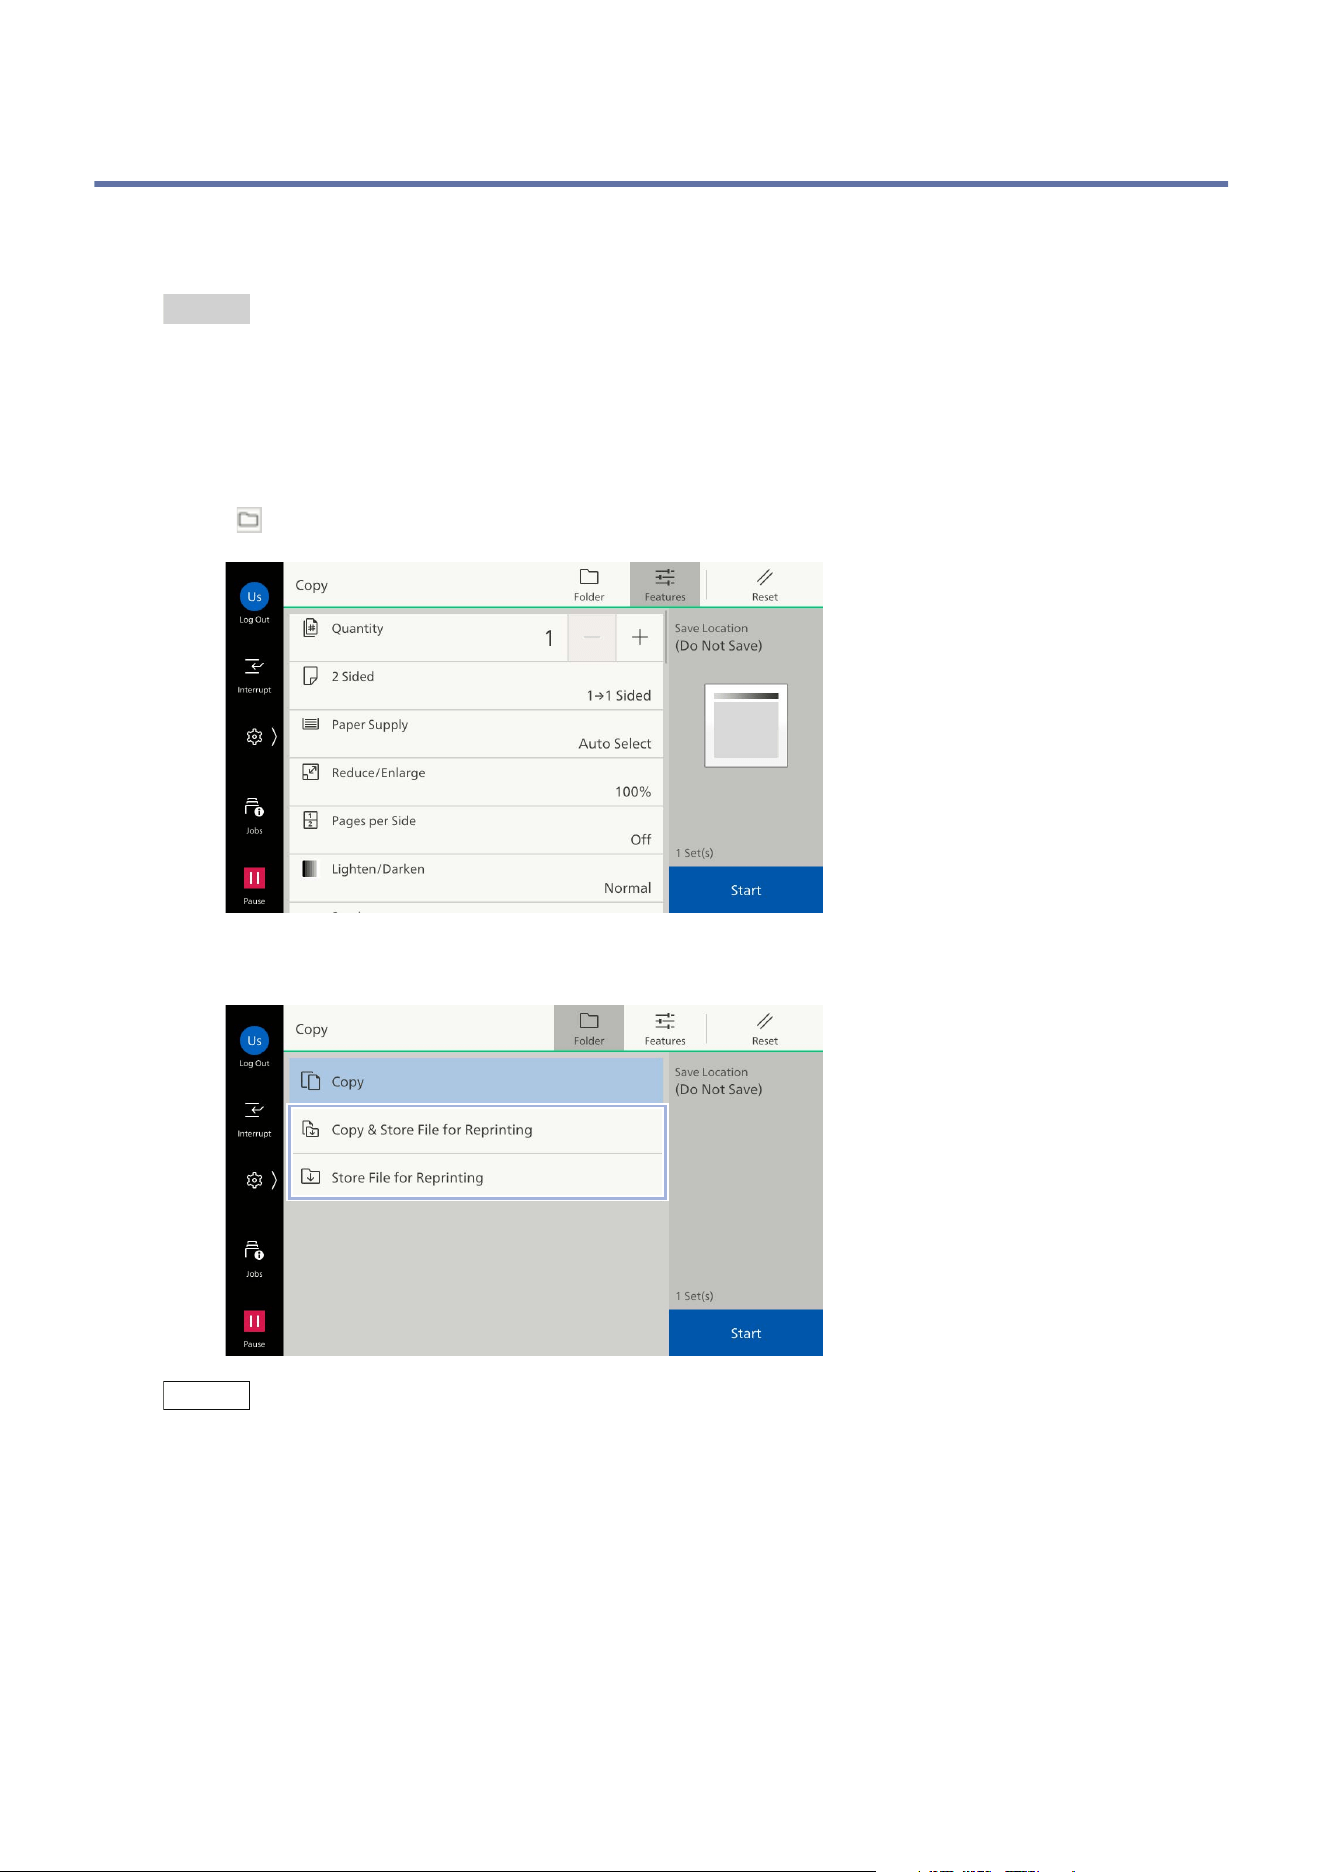
1. Load the document.
2. Tap on [Copy].
3. Tap on on the upper side of the screen.
4. Tap on [Copy & Store File for Reprinting] or [Store File for Reprinting].
Note
If you want just to execute copy but cancel storing to the set destination folder, tap on [Copy].
42
5 Copy
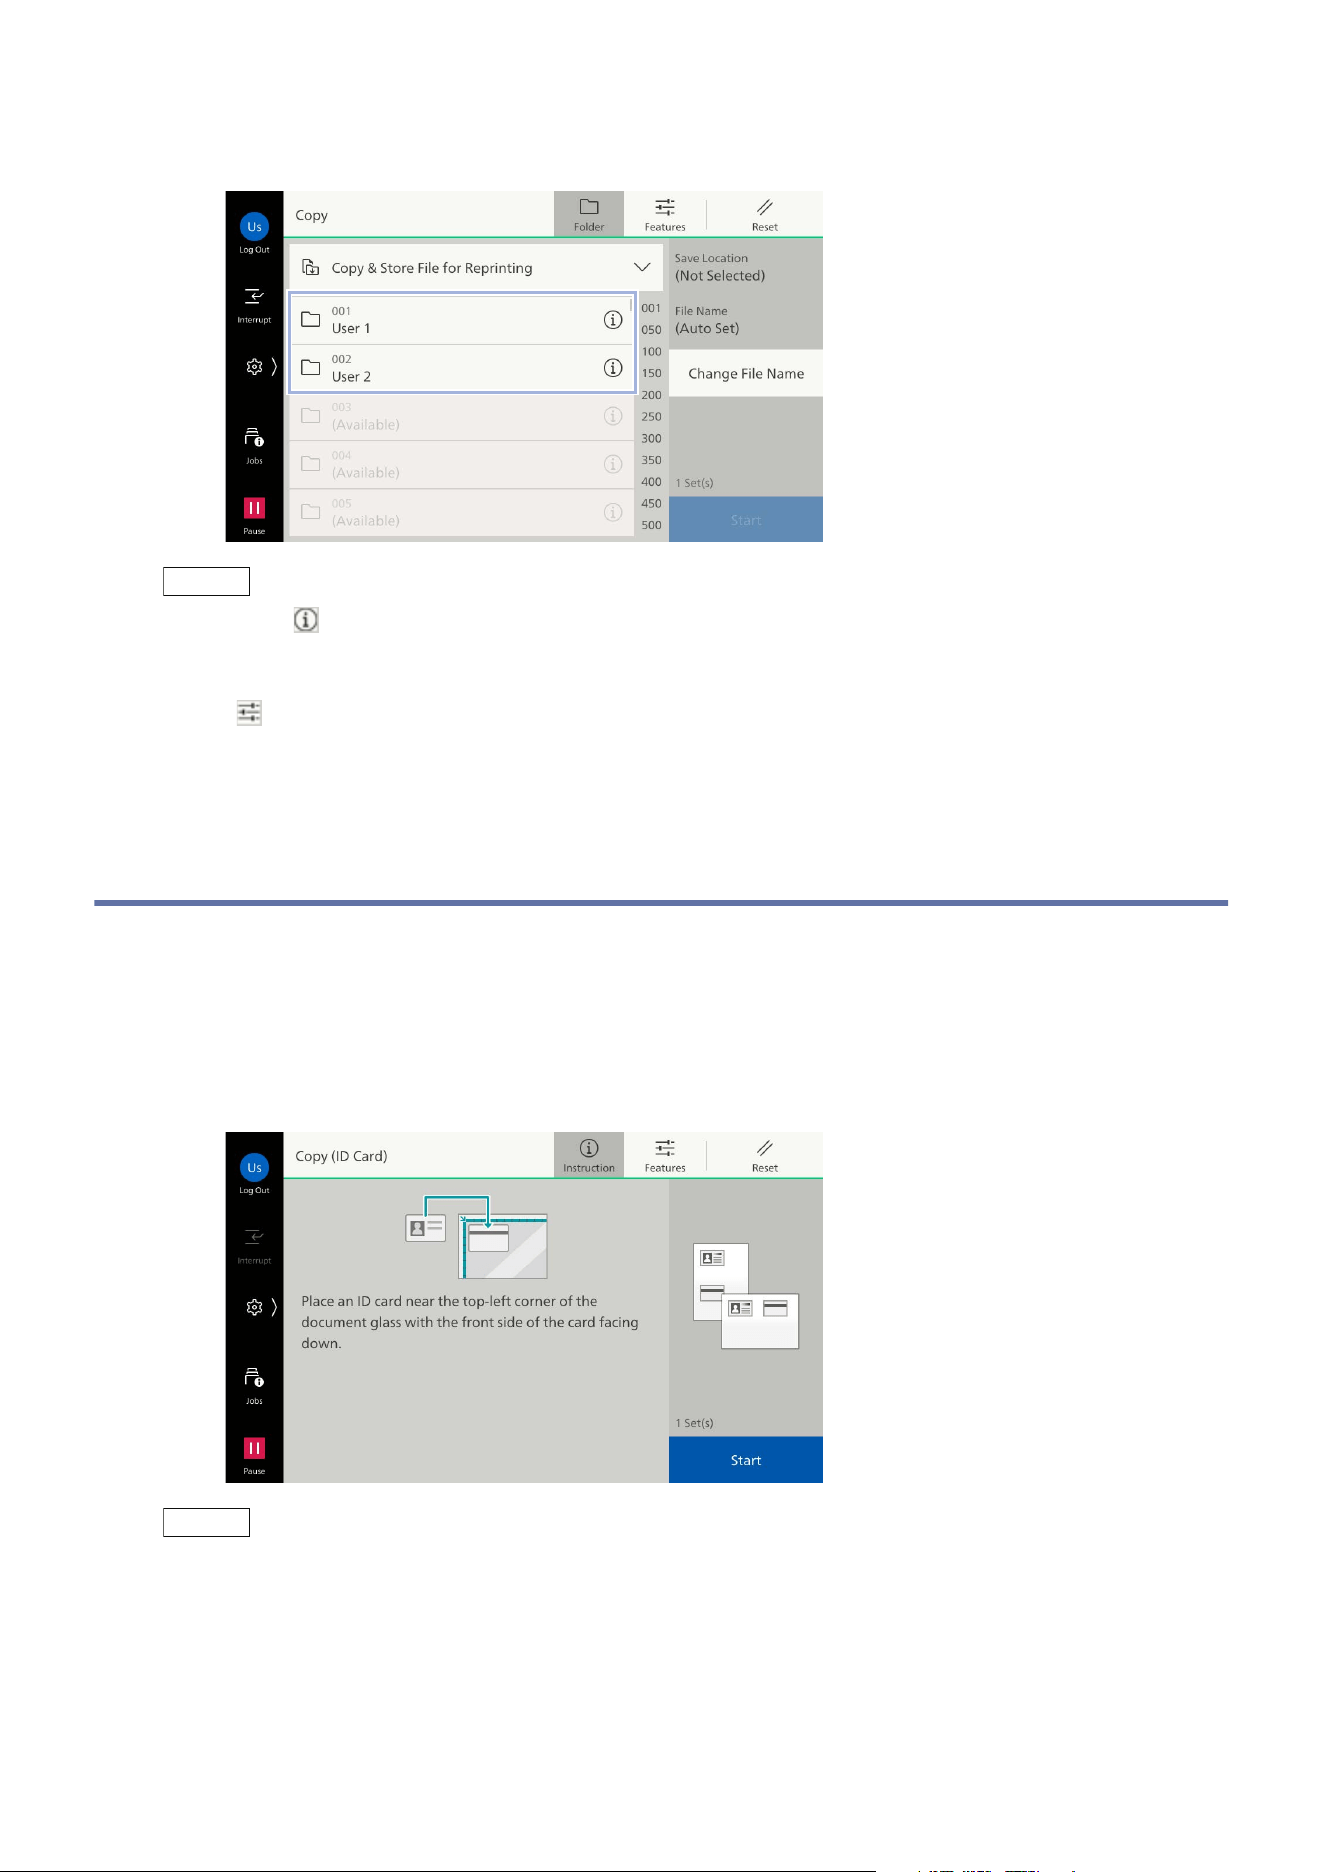
5. Tap on the folder to be saved to.
Note
Tap on on the right side of each folder to check the files saved for reprinting.
You can specify the name of the file by tapping on [Change File Name].
6. Tap on on the upper side of the screen, and set each item.
7. Tap on [Start].
5.3 Copy (ID Card)
This feature allows you to copy both sides of the original whose size cannot be automatically
detected, such as an ID Card, onto a single sheet of paper.
1. Tap on [Copy (ID Card)].
2. Open the document cover and load the ID card with the side to be copied facing down.
Note
Load the ID card in a position at least 5 mm from the top edge and left edge of the document glass.
3. Close the document cover.
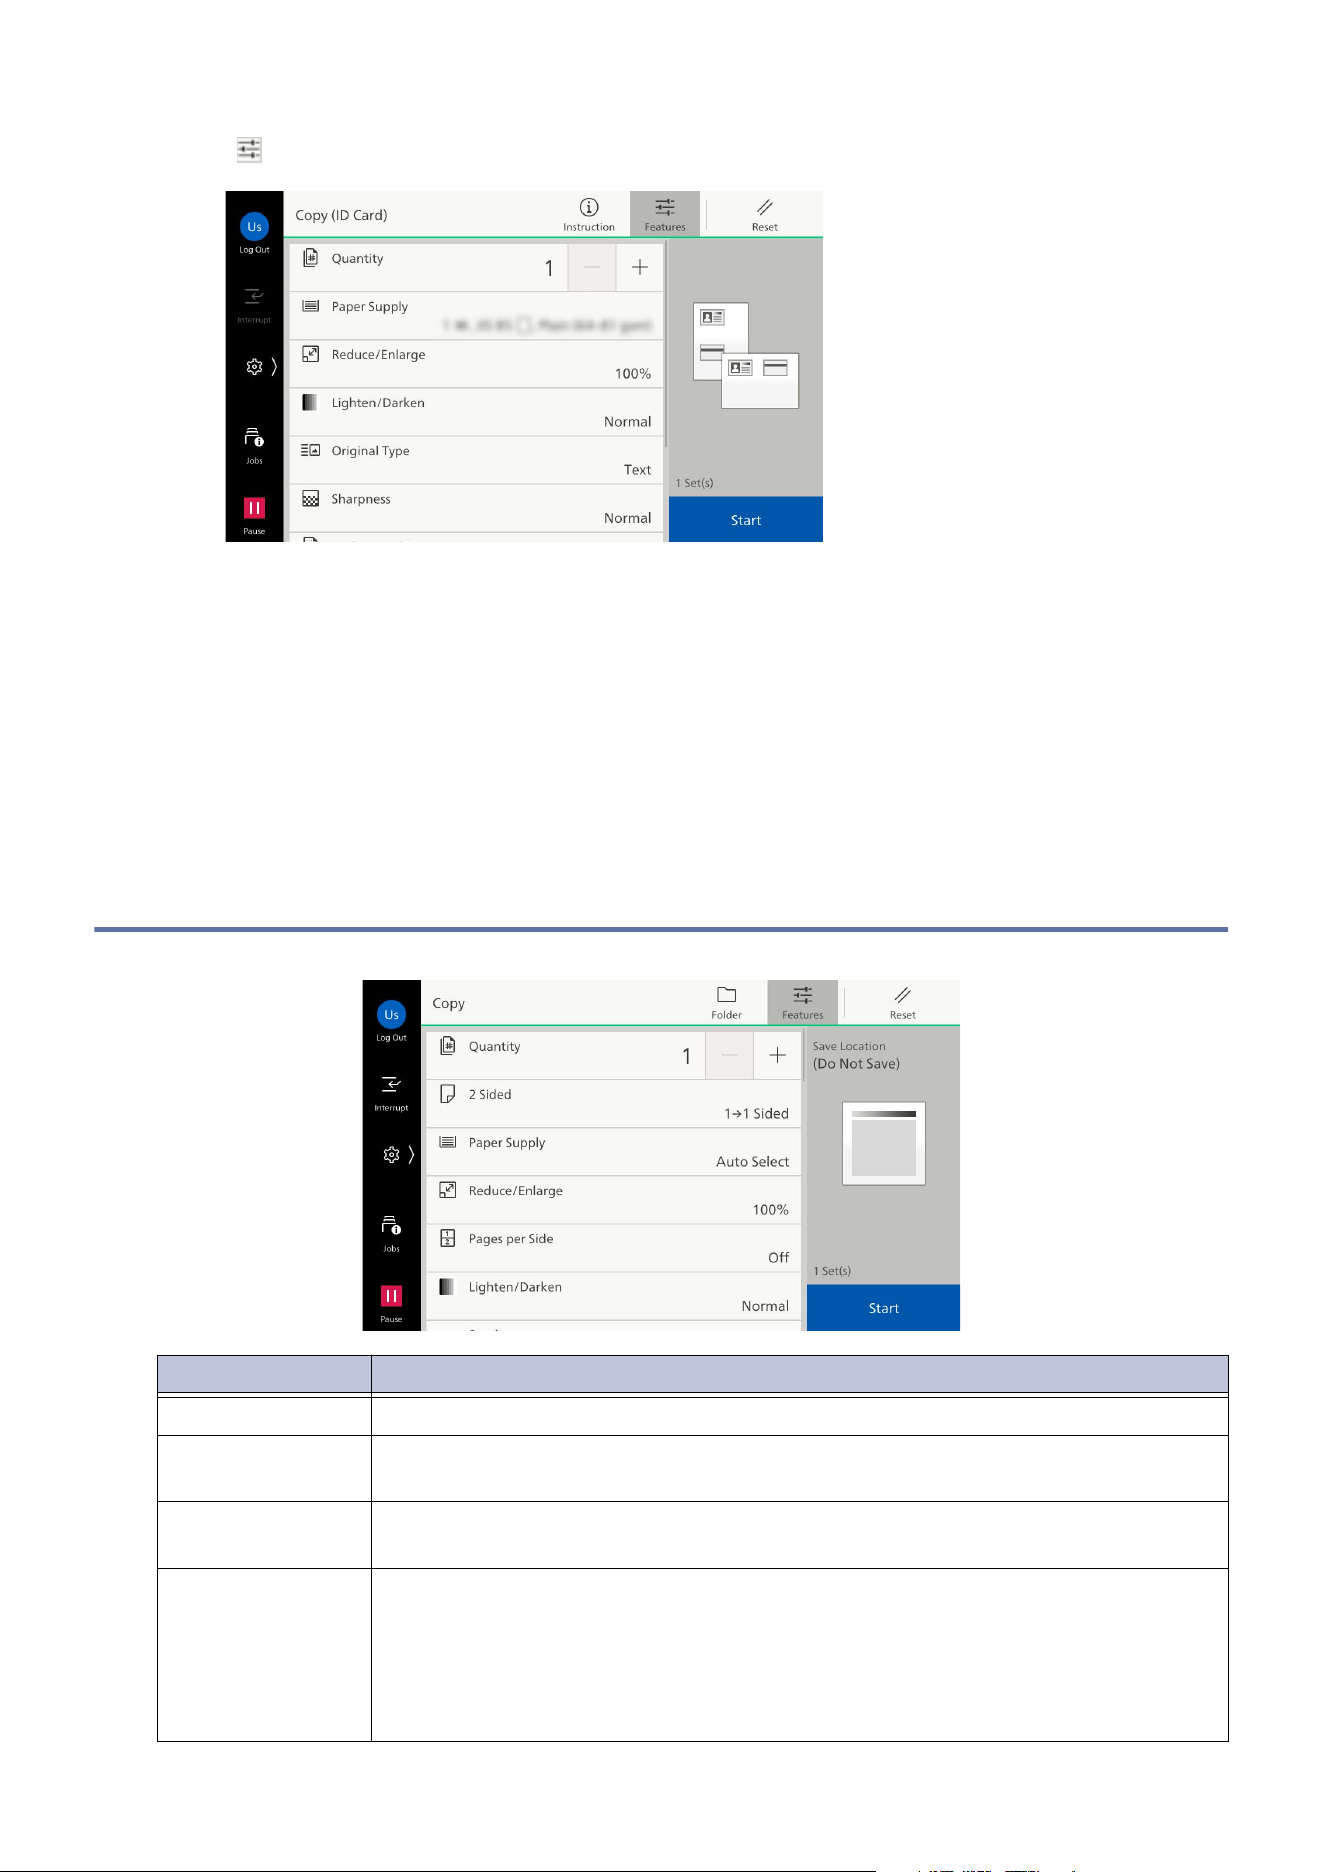
43
5.4 Features List
4. Tap on on the upper side of the screen, and set each item.
5. Tap on [Start].
6. Open the document cover and load the ID card with the side to be copied facing down same as the
step 2.
7. Close the document cover.
8. Tap on [Start].
5.4 Features List
Item Description
[Quantity] Enter the number of copies.
[2 Sided] Set whether to scan both sides of the document and whether to print on both
sides of the paper.
[Paper Supply] Select the paper tray. If [Auto Select] is selected, an appropriate paper tray will
be selected.
[Reduce/Enlarge] Set the percentage reduction/enlargement when copying.
When [Auto %] is selected, the appropriate percentage is set from the
docum
ent size and the paper size.
When entering the value, you can copy with specified reduce/enlarge value.
When [Slight Reduction] is enabled, copy slightly smaller than the selected
percentage, so that an image is not clipped.
44
5 Copy
[Pages per Side] Multiple page documents can be copied onto 1 page. Specify the layout and
the orientation of the loaded documents set when copying.
[Lighten/Darken] Adjust the copy to lighten/darken it.
[Staple] Set the position for stapling.
[Hole Punch] Set the position of the hole punch.
[Folding] Fold the copied paper and output.
If [Print Position] is displayed, set whether the print position is on the inside or
on
the outside.
If the Square Back Fold Trimmer is installed, you can set [Trimming] and
[Folding] when [Single Fold] is selected.
Note
The orientation of the paper is restricted.
[Copy Output] Set the direction for outputting the paper.
[Output
Destination /
Offset Stacking]
Select the destination paper tray. Also, sets to stack by alternately shifting the
stacking position of paper so that the partitions can be easily seen.
[Face Up/Down
Output]
Set the face up/down output.
[Original Type] Set the document type.
[Mixed Size
Originals]
You can scan documents of various sizes at one time and make copies on each
siz
e or a single size of paper.
[Original
Orientation]
Set the orientation in which you load the document in the document glass or
the document feeder.
[Original Size] Specify the size when scanning documents of irregular sizes or copying
different sizes.
Note
When the document is loaded in the document feeder, the origin of the reading
size of the portrait direction ([Y]) is in the center. For example, when the size to be
read is specified as 100 mm, the size to be read is 50 mm upward from the mid half
of the document and 50 mm downward from the mid half.
[Sharpness] Adjust the sharpness.
[Background
Suppression]
Remove the background color on newspapers or documents with a
background color.
Note
When the [Original Type] setting is [Photo], background suppression is not
possible.
[Book Copying] Copy the pages of double-page spread such as books separately in page order.
[2 Sided Book
Copying]
Copy double-pages of books, booklets, etc. on both sides of paper, allocating
pages so that the copied document can be viewed in the same way as the
document. Also, the starting page and the ending page can be specified for the
left
and right of double-page spreads, and the range for elimination of the
center binding shadow can be specified.
Item Description
45
5.4 Features List
[Edge Erase] When a document is copied with the document cover opened or when a
booklet is copied, a dark shadow can be formed around the periphery or in the
center binding part. In these cases erase the shadows when copying.
Note
For 2 sided documents, the same amount of edge erasing is set for both side 1 and
side 2 of the document.
When [Reduce/Enlarge] is set, the percentage is proportional, and the amount of
edge erasing is also reduced or enlarged.
When copying a 2 sided document using the document glass, the setting [Mirror
Side 1] is disabled. In this case, use the document feeder or for the document that
is not suitable for the document feeder, select [Joint Job] and change the edge
erase setting, on side 1 and side 2.
The whole side cannot be copied even if the edge erase width is set to 0 mm. Refer
to “Print Area” in
User’s Manual - Main Unit
for information on the area that can
actually be copied.
[Image Shift] Move the position of the image of the document vertically and horizontally,
move the center of the document onto the center of the paper, and copy. Also,
copying can be performed with top and bottom and left and right margins
(binding margins) applied. For 2 sided printing, you can set the moving
positions both for [Side 1] and [Side 2].
[Mirror Image] Copy a document image with the left-right direction reversed.
[Negative Image] An original image is reversed to monochrome and copied.
Note
When both [Negative Image] and [Edge Erase] are set, the edge erase area
becomes white.
[Image Rotation] When the orientations of the loaded document and the paper that has been
loaded in the paper tray are different, rotate the document image, and copy
with the vertical and horizontal orientation of the document and the paper
aligned. Also, when there is a mixture of LEF and SEF documents, it is possible
to
select which is the reference for rotation.
Item Description
46
5 Copy
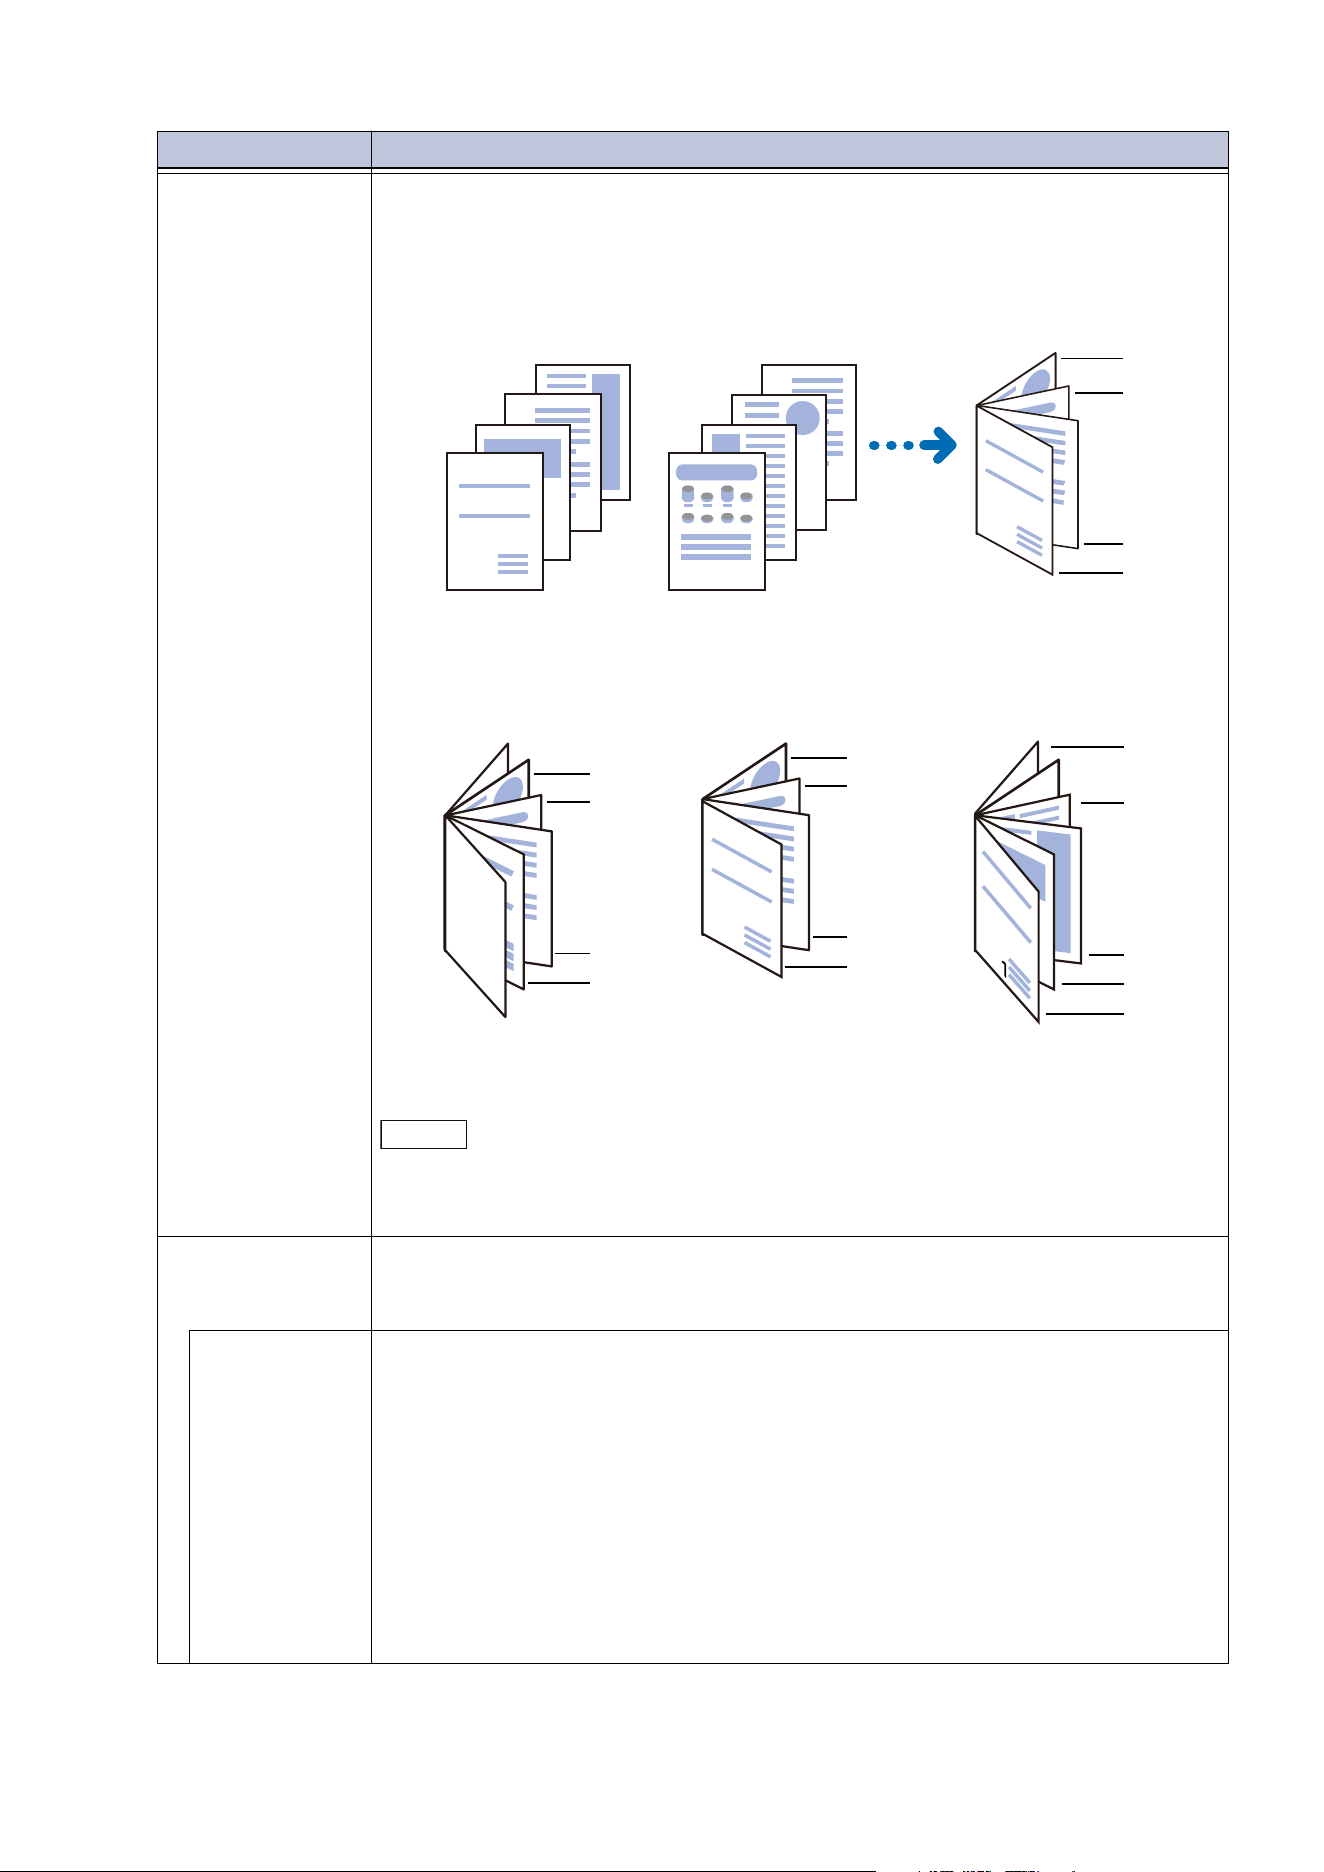
[Booklet
Creation]
Copy the document copied on multiple pages with the page sequence
allocated so that it forms a booklet (saddle stitched booklet). Also, when
producing a booklet, the center binding margin and covers can be set.
[Create Left/Top Bound Booklet]
[Covers]
[Blank Cover]/[Print on Both Sides]/[Print on Side Facing Outside]
If the Square Back Fold Trimmer is installed, you can set [Trimming], [Square
Back] and [Fold Firmly] when [Fold], [Crease] or [Fold & Staple] is selected.
Note
Four pages of documents are copied onto one sheet of paper, so if the number of
the document pages is not four times the number of pages, the remaining pages
will be blank.
[Covers] Copy with covers. Different paper (colored paper, heavyweight paper, etc.) can
be used as the first page of a document and copied as the front cover and back
cover.
[Front Cover]
[Off]
A cover is not provided.
[Blank Cover]
White paper or paper copied for the cover can be added. Specify the number
of sheet or type of paper to attach.
[Print on Side 1]
Copy the 1st page of the document onto side 1 of the cover.
[Print on Side 2]
Copy the 1st page of the document onto side 2 of the cover.
[Print on Both Sides]
Copy the 1st page and the 2nd page of the document onto the two sides of
the cover.
Item Description
A
B
3
H
B
3
A
B
3
Report
1
5
Report
1
1
2
3
4
5
6
7
8
1, 2
3, 4
5, 6
7, 8
3
A
B
2
Report
1
3
A
B
2
Report
1
1, 2
3, 4
5, 6
7, 8
1, 2
3, 4
5, 6
7, 8
2, 3
4, 5
6, 7
1
8
Report

47
5.4 Features List
[Back Cover]
[Off]
A cover is not provided.
[Blank Cover]
White paper or paper copied for the cover can be added. Specify the number
of sheet or type of paper to attach.
[Print on Side 1]
Copy the 1st page of the document onto side 1 of the cover.
[Print on Side 2]
Copy the 1st page of the document onto side 2 of the cover.
[Print on Both Sides]
Copy the 1st page and the 2nd page of the document onto the two sides of
the cover.
Note
Select the paper tray to be used for the cover if adding a cover.
When both [Front Cover] and [Back Cover] are set, scan the document for the
back cover first. It is copied as the front cover document from the document next
to the back cover document.
[Poster] Divide the scanned image into multiple sheets and copy enlarged.
By pasting the divided copies, a large size poster can be produced. There is a
margin
for glue, so that the copied sheets can be cut and pasted. The margin
for glue is fixed at 10 mm.
[Repeat Image] Copy a scanned image repeatedly a specified number of times onto a single
sheet of paper.
When the magnification or reduction is automatically specified, the repeated
image is copied so that it fits onto the selected paper. Also, the arrangement
direction of the scanned image can be specified.
[Pr
eset Repeat
Image]
Copy the same image of a single document repeatedly onto a single sheet of
paper that is uniformly divided in accordance with the specified number.
[Annotations] Combines and copies text at any position on the paper. Sets whether to add a
predetermined string, such as [CONFIDENTIAL] or [Copy Prohibited], date, or
page number. The details such as the print position or size can be selected
fro
m formats prepared in advance.
Note
If a layout template is set with [Apply Layout Template to Copy/Print Jobs] in
[Force Annotation] set here is superimposed on that template.
[Watermark] Copies a set string of characters repeatedly and thinly composited over the
entire background of the paper.
When you print [Control Number], for example, if the starting number is set to
“1”, then “1” will be printed on every page of the first copy, and “2” will be
printed on every page of the second copy.
This can be used as a serial number that associates each distributed copy with
a
person, in order to prevent duplication of confidential documents, etc.,
distributed at a meeting.
Note
If a layout template is set with [Apply Layout Template to Copy/Print Jobs] in
[Force Annotation], the watermark data is printed superimposed on that template.
If [Force Watermark - Copy] is set to [On], it cannot be changed.
Item Description
48
5 Copy
[Secure
Watermark]
Sets the protection information to be embedded in the copy to restrict
duplication of documents and ensure better security control.
Note
If a layout template is set with [Apply Layout Template to Copy/Print Jobs] of
[Force Annotation], the information to prevent duplication is embedded
superimposed on that template.
[Joint Job] Change and save the settings for each page or bundle of pages of a document,
and finally copy the document together with the different settings as a single
job. Also the separator can be insert before the document.
[Sa
mple Job] When making multiple sets of copies, you can print a sample set to check the
output and then print the remaining copy sets. You can select whether to
continue or cancel the job after the confirmation. Also, the number of copy sets
can be changed. The sample copy is included in the total number of copy sets.
[Delete Outside /
Delete Inside]
Copy only the required area. Set the area by specifying two points on the
ima
ge, and extract or delete it. Up to three areas can be specified. Also, the
target side of the document can be specified.
[Form Overlay] The first original is stored as the form original for overlay, and is copied overlaid
on the second and subsequent originals.
[Next Original] Set this item to copy the number of sheets that exceed the maximum of
available number of sheets loaded at a time in the document feeder and to
cop
y multiple documents as a single job using the document glass.
Item Description
49
6.1 Basic Operations (Email)
6 Scan
6.1 Basic Operations (Email)
Note
As the scanning methods there are also [Scan to Folder], [Scan], [Scan to USB] and [Scan to Desktop].
To send an e-mail, the e-mail settings need to be configured in the machine beforehand.
1. Load the document.
Refer
For how to load documents, refer to “Basic Operations” in
User’s Manual - Main Unit
.
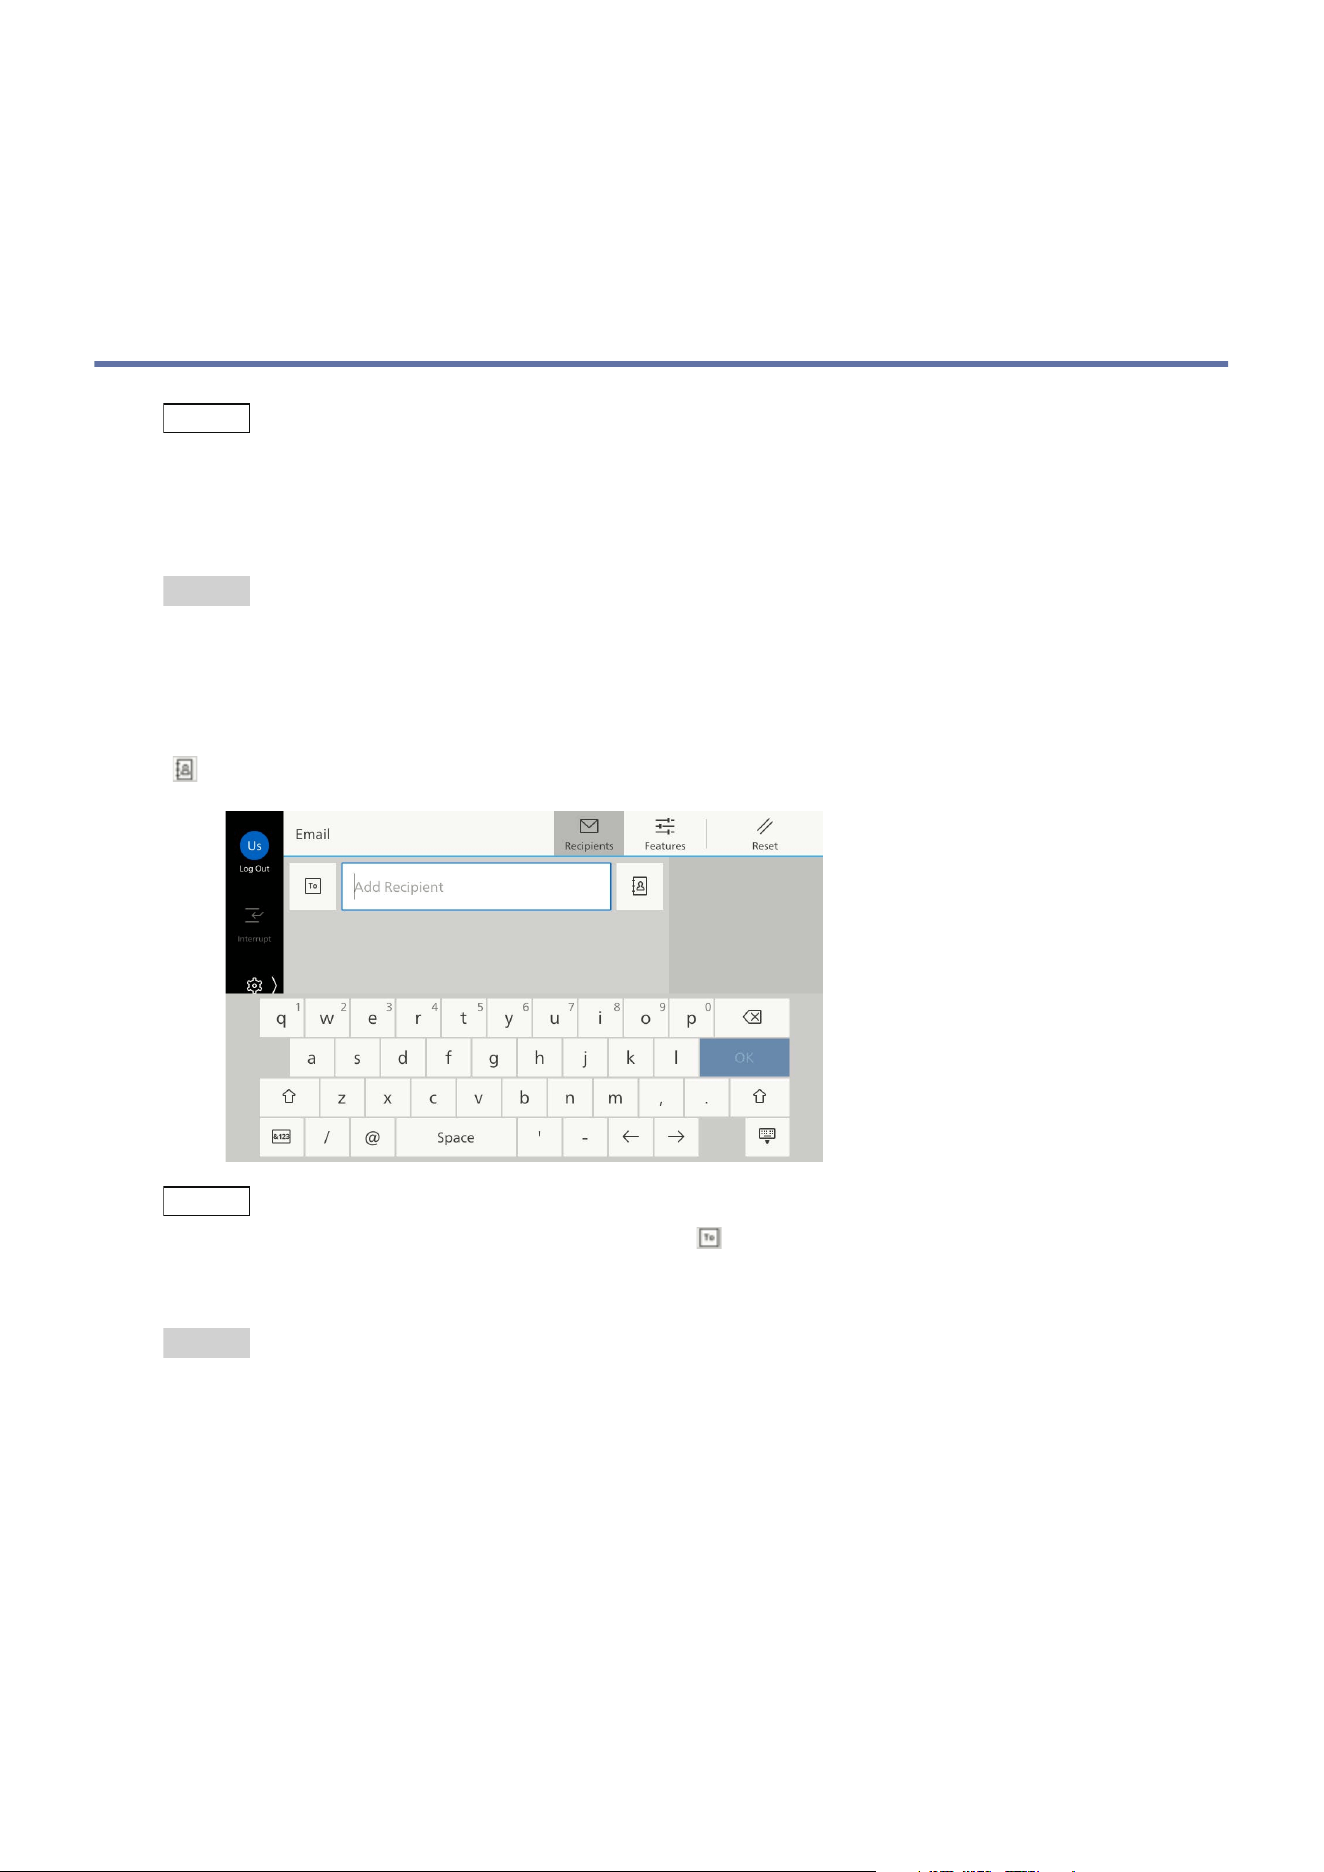
2. Tap on [Email].
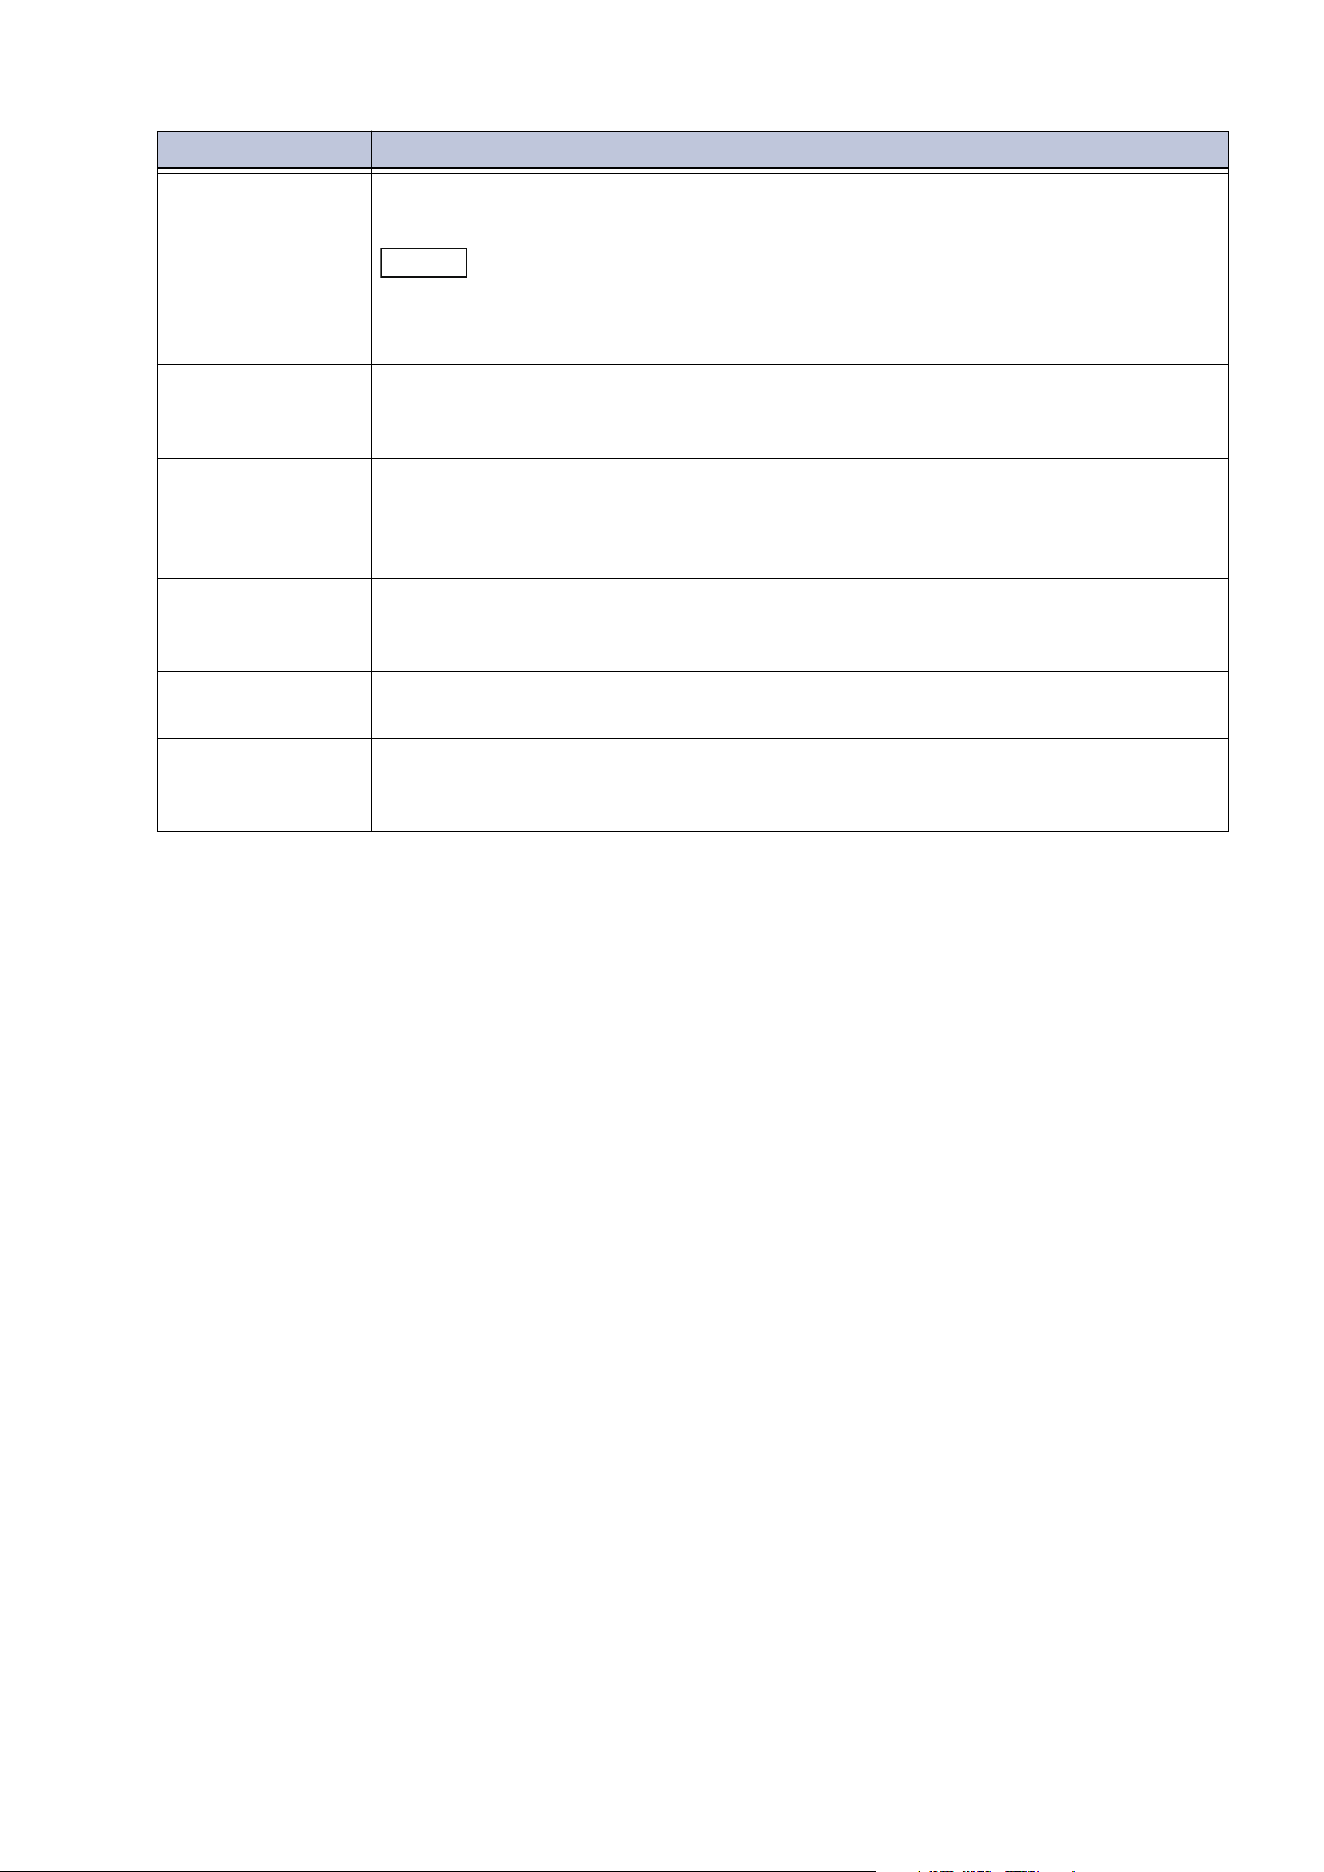
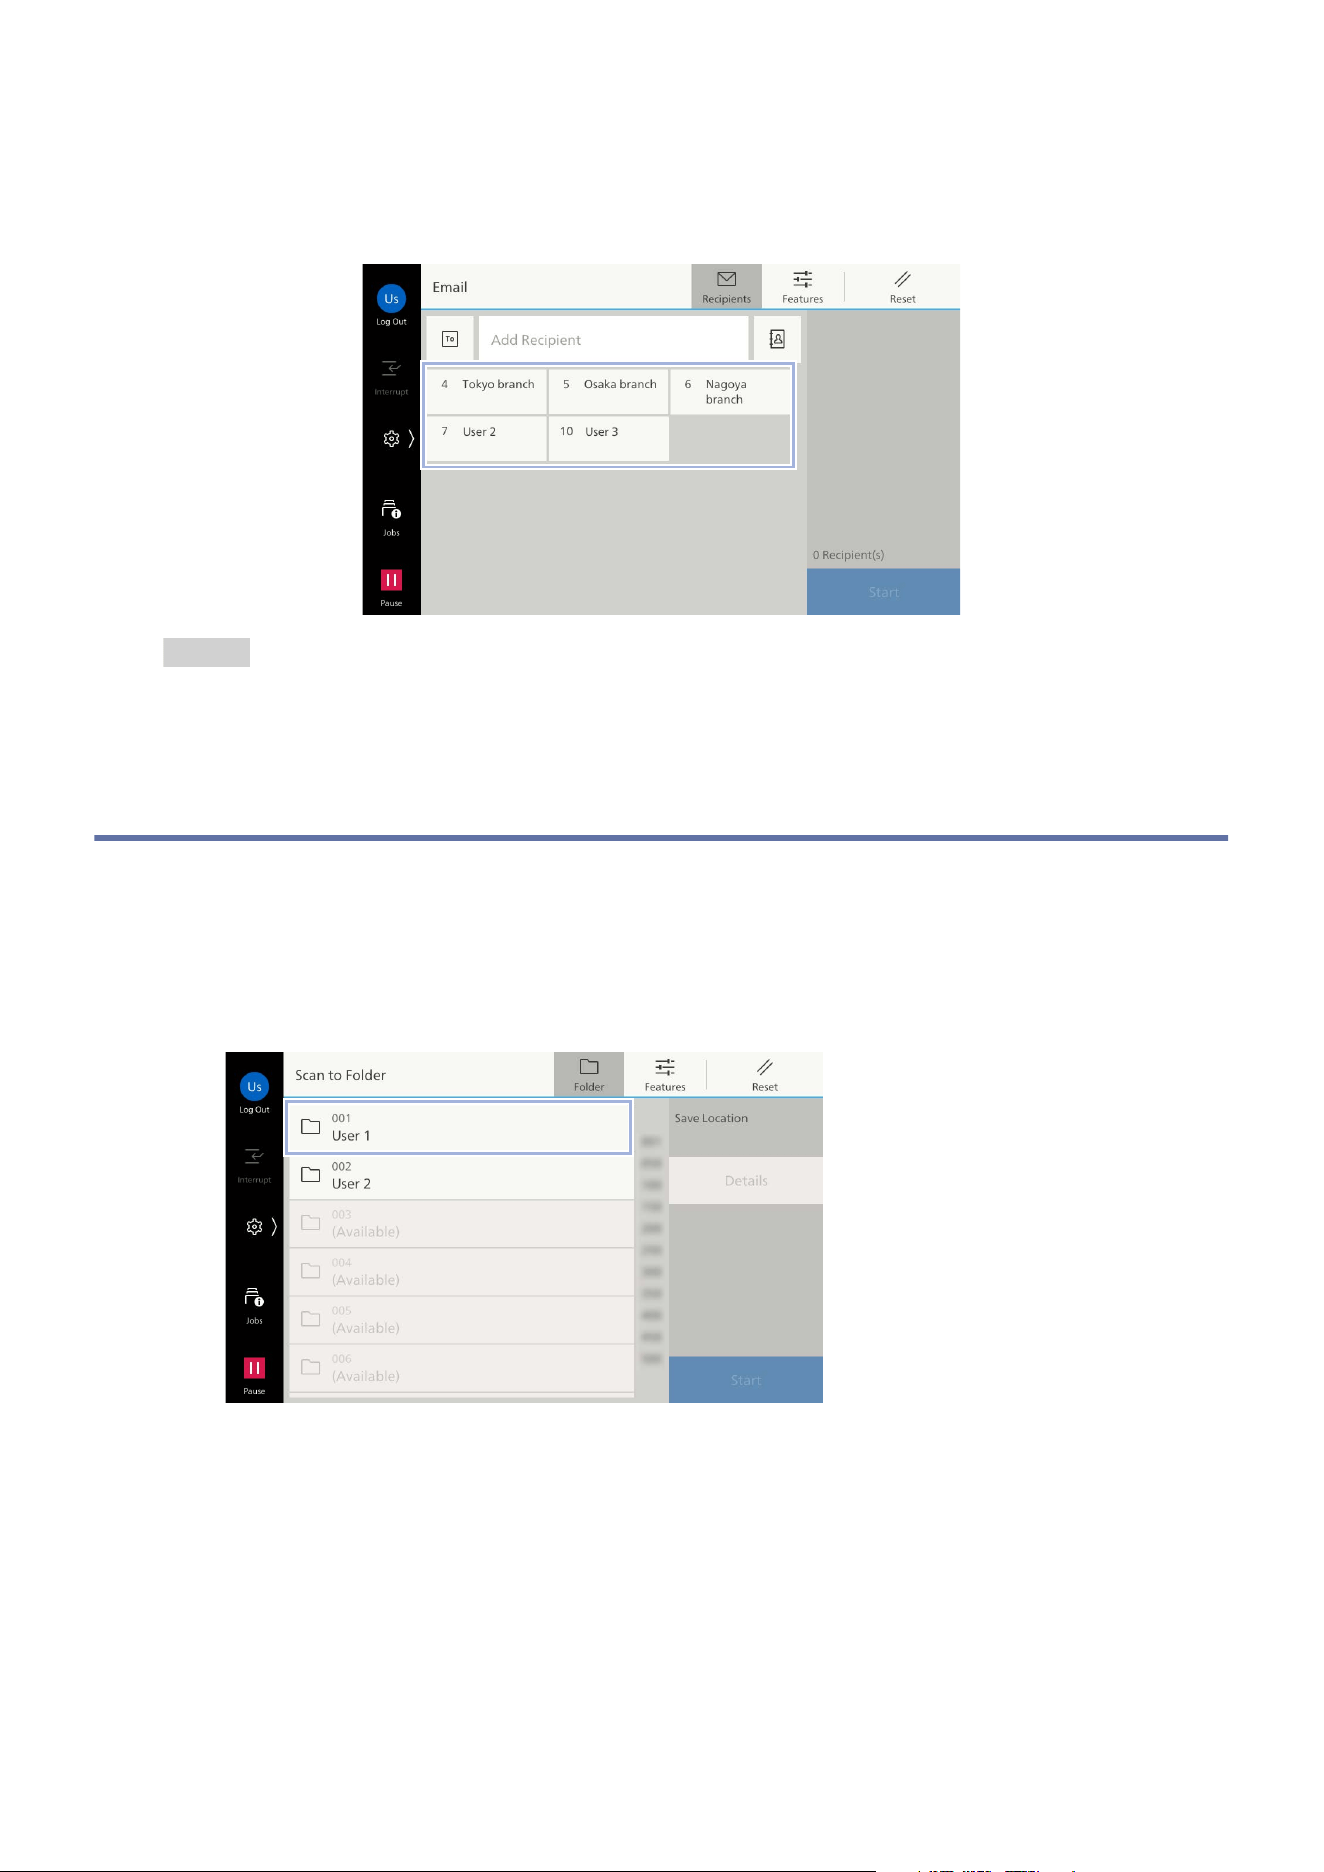
3. Specify the recipient by directly entering using the keyboard, or by tapping on the Address Book
( ).
Note
To change the recipient type (To/Cc/Bcc), tap on .
The displayed screen differs depending on the setting of [Screen Default] in "Customizing the Apps
Screen" (P.25).
Refer
Refer to "One-touch Button" (P.53) for specifying the recipient using one-touch button.
51
6.1 Basic Operations (Email)
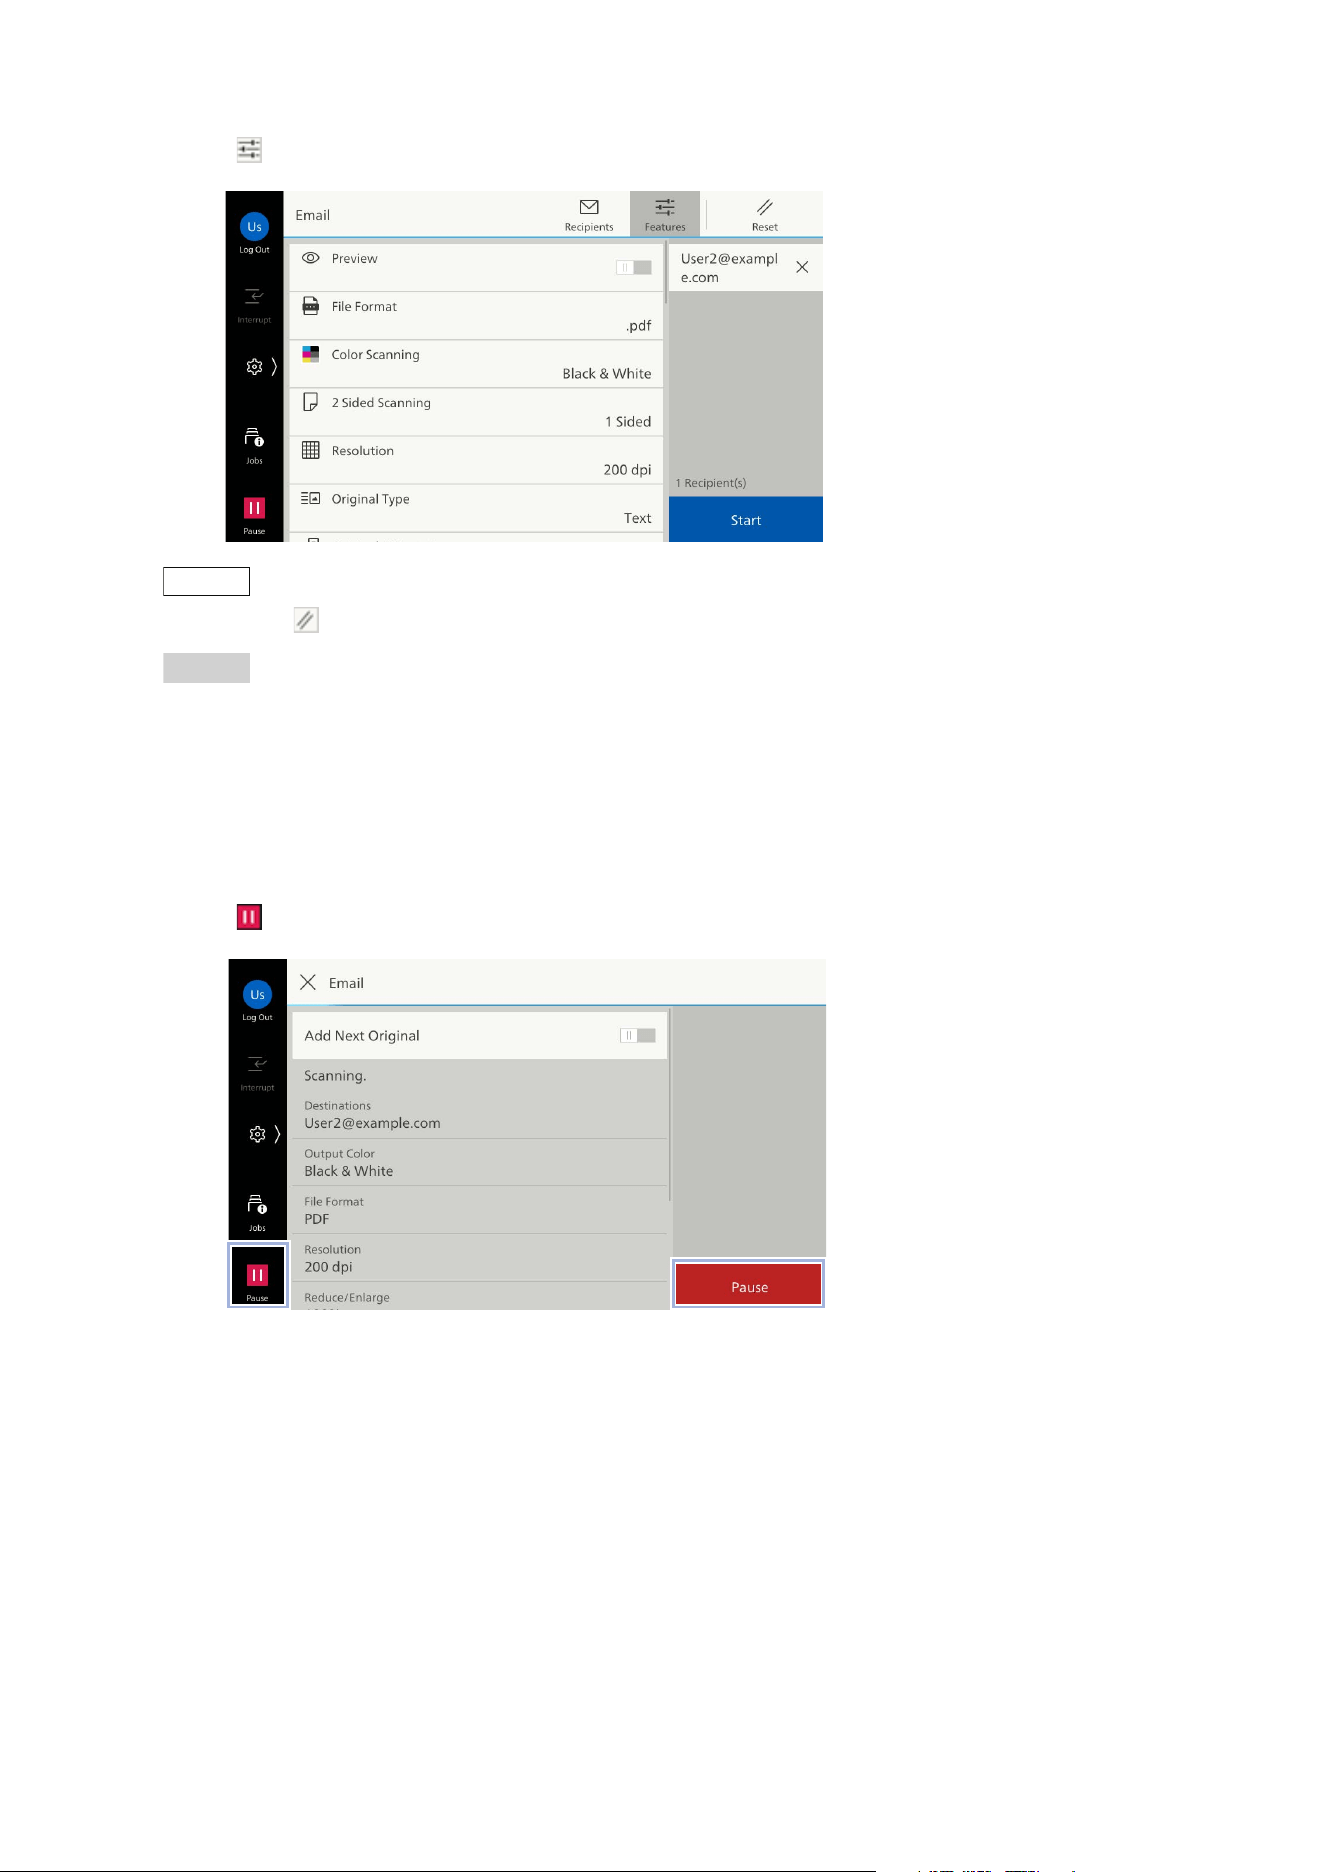
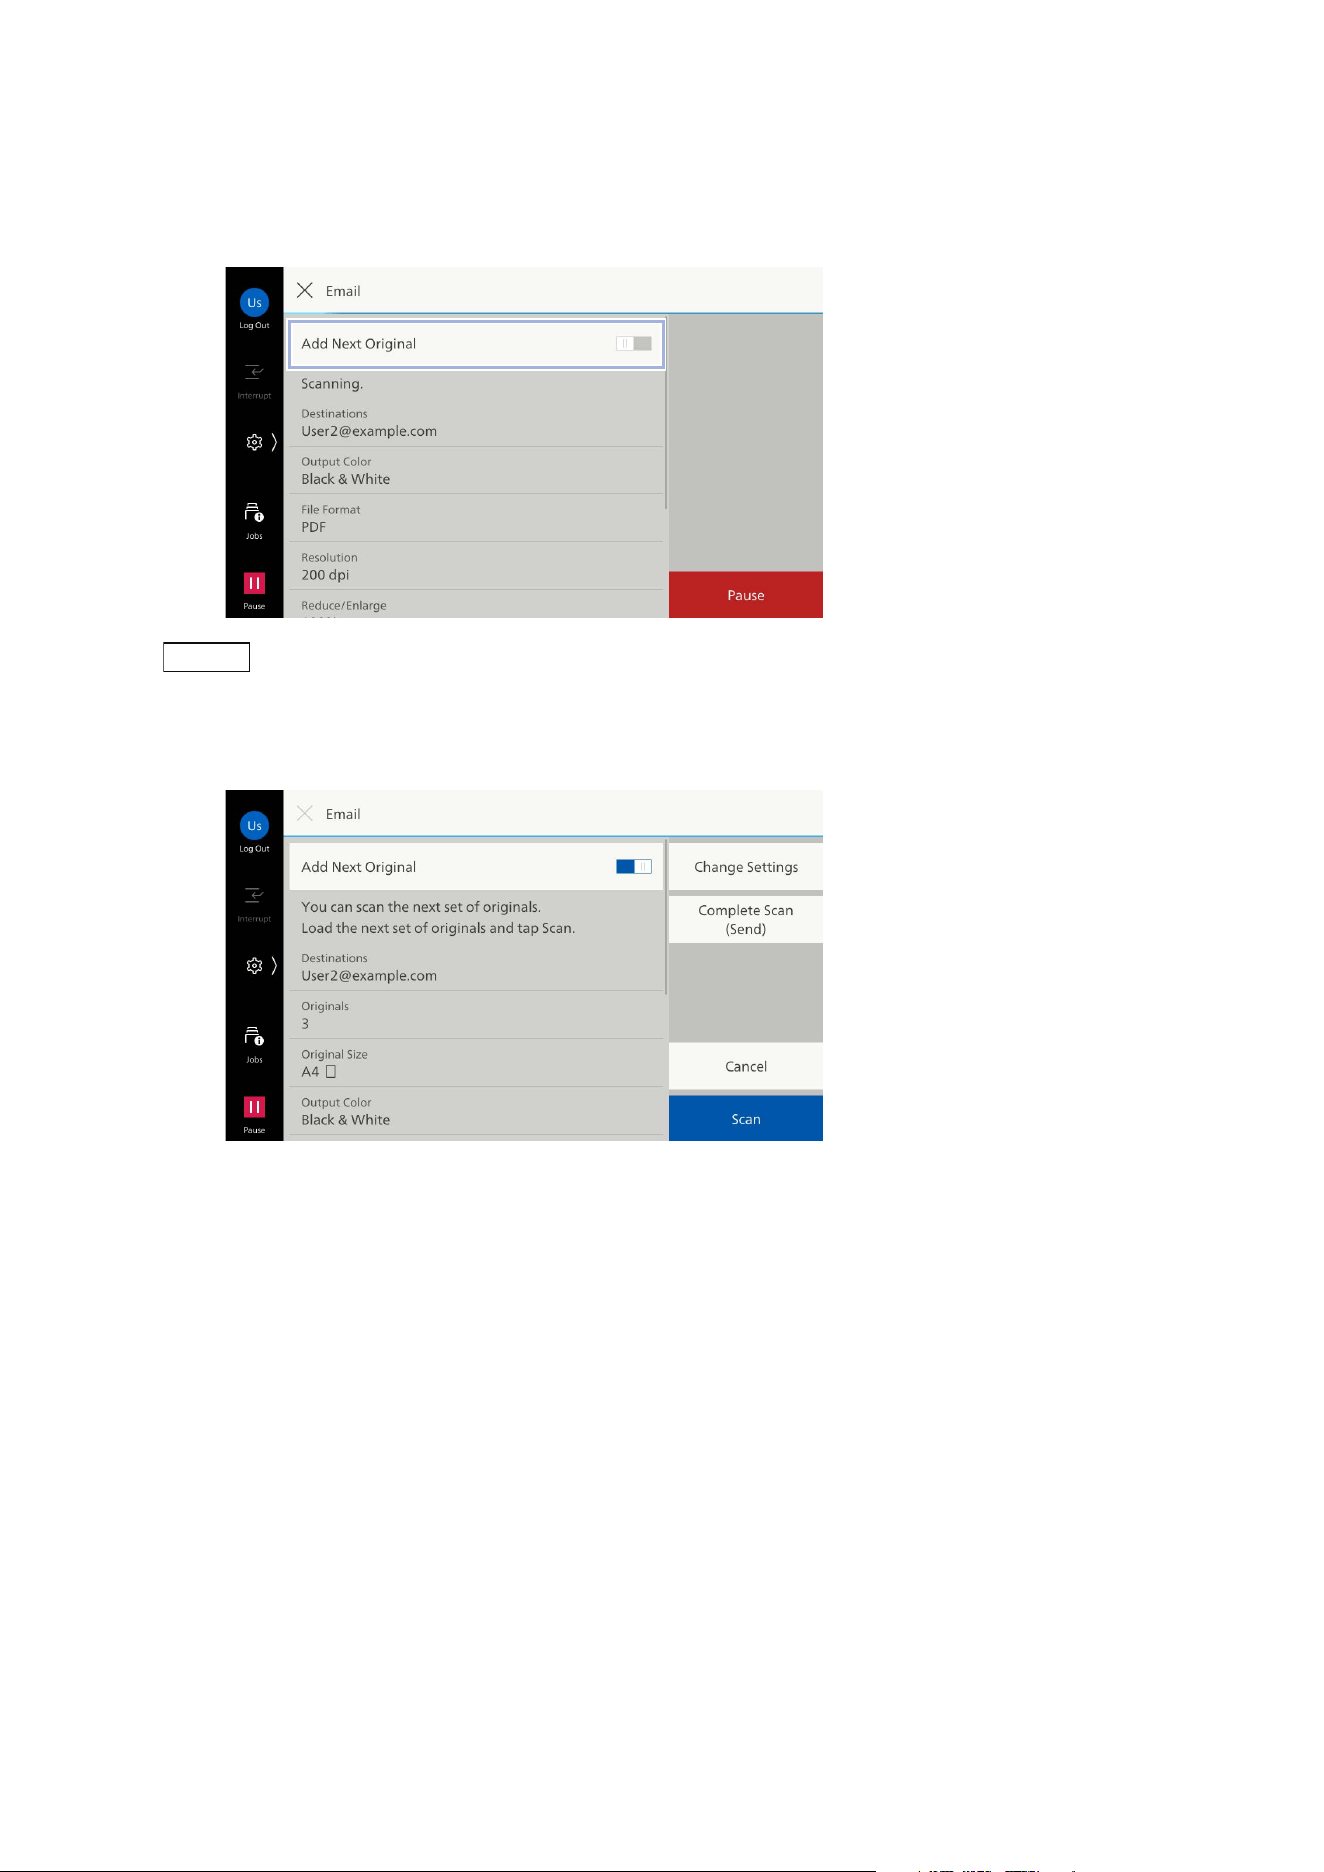
Continuous Scanning
1. Tap on [Add Next Original].
Note
Even when [Next Original] is set to [On] in the features list, the divided documents can be scanned.
2. Select the following operation.
Scan Next Document
1)Load the next document.
2)Tap on [Scan].
Changing the Settings of the Next Document
1)Load the next document.
2)Tap on [Change Settings].
3)Change the features list settings.
4)Tap on [Scan].
3. When all the documents have been scanned, tap on [Complete Scan (Send)].
52
6 Scan
Editing Recipient
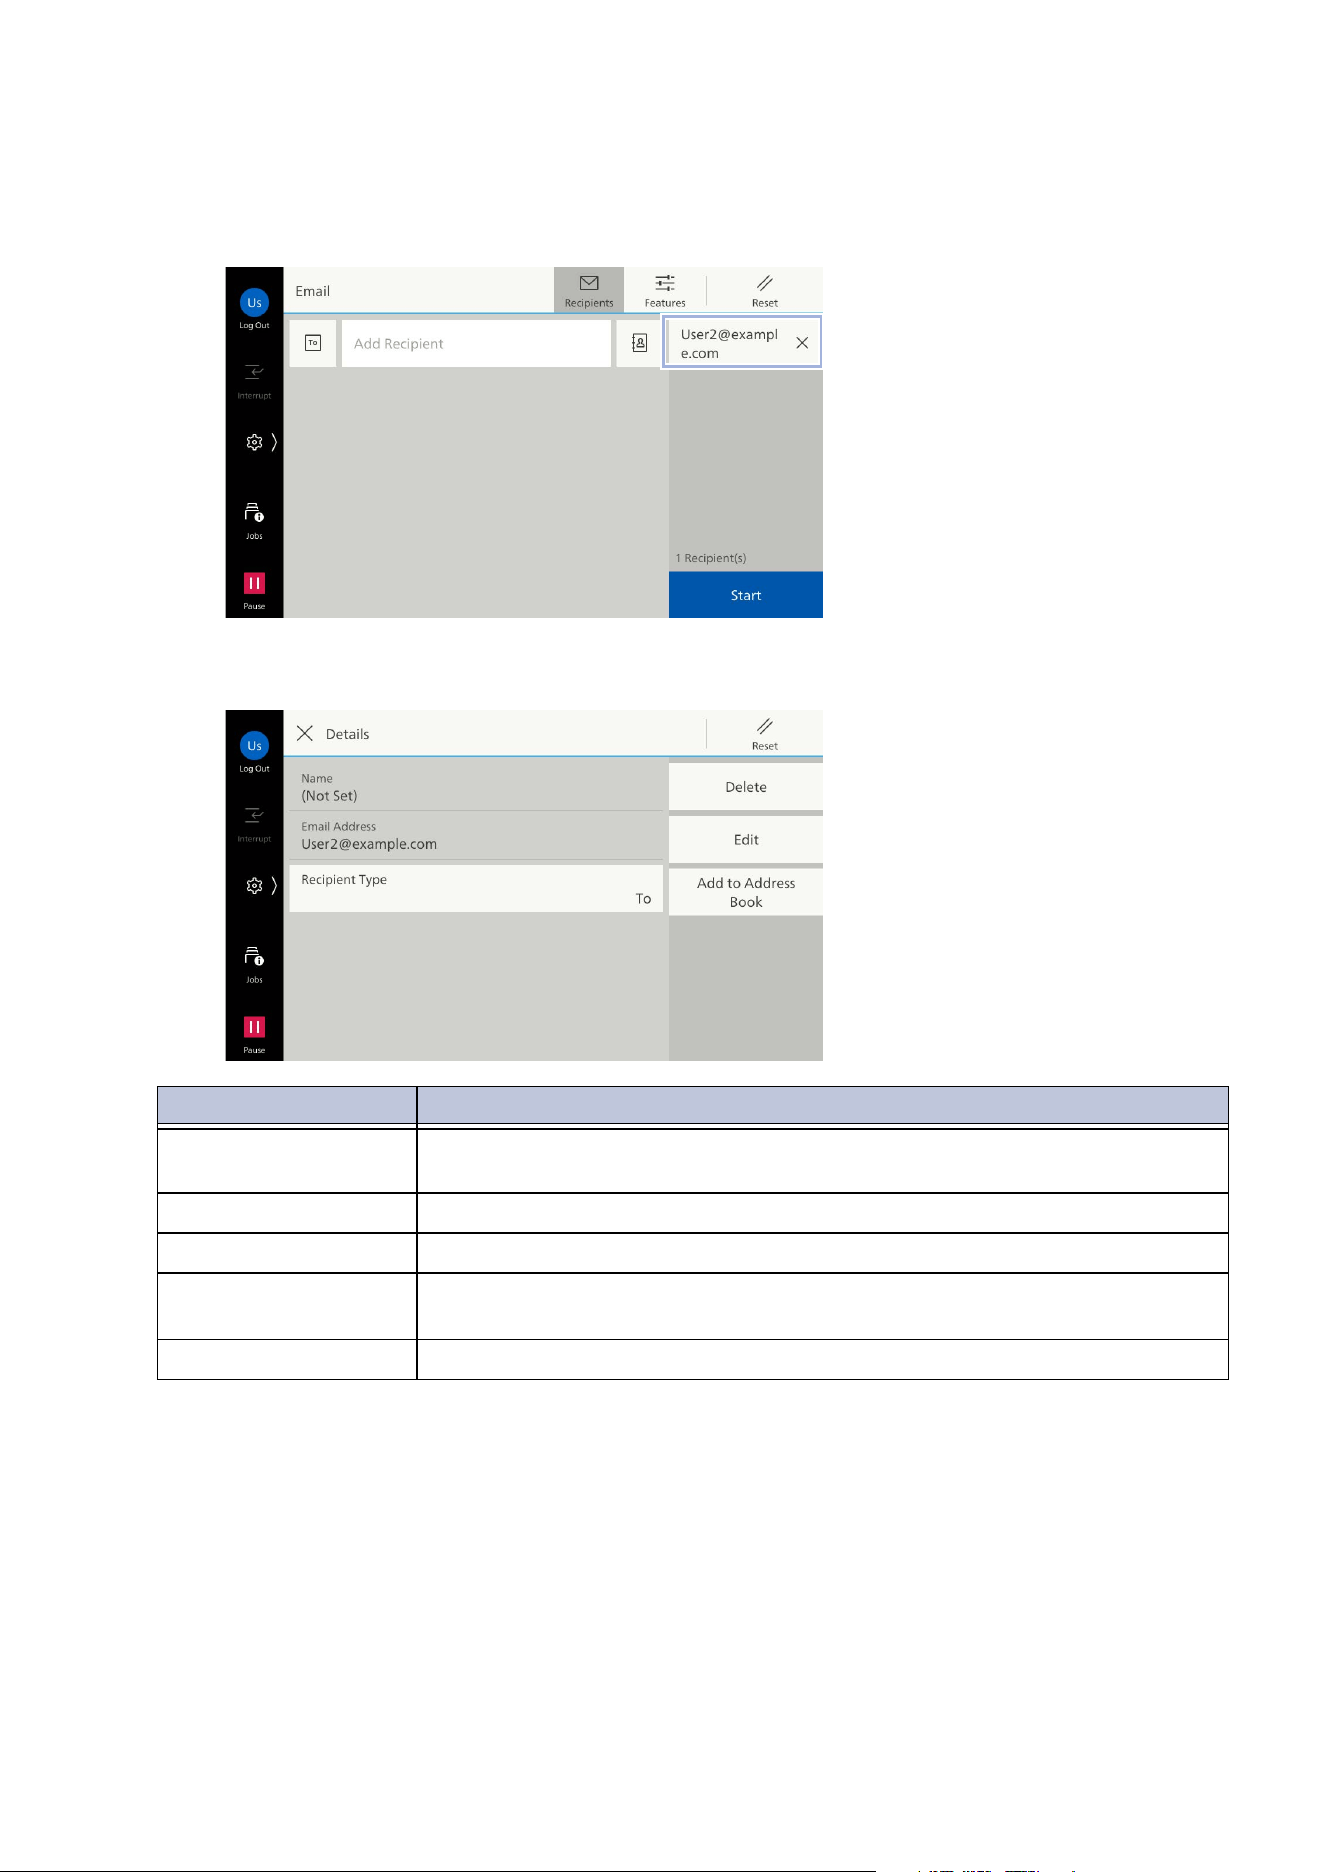
1. Tap on the recipient.
2. Select the following operation.
Item Description
[Recipient Type] [To], [Cc], or [Bcc] can be specified for Email. For Scan, only [To] can be
set.
[Delete] Delete a recipient.
[Edit] Correct a recipient.
[Add to Address
Book]
Create a new contact. Or, add an address to an existing contact.
[Browse] Refer to the network and display the recipient.
53
6.2 Scan to Folder
One-touch Button
If registering recipients to one-touch button in advance, you can specify the recipient only by tapping
a button.
Refer
Refer to "[One-Touch Button Settings]/[One-Touch Button and Address Number Settings]/[Address
Number Settings]" (P.123) for registering the recipient to one-touch button.
6.2 Scan to Folder
1. Load the document.
2. Tap on [Scan to Folder].
3. Tap on the folder to be saved to.
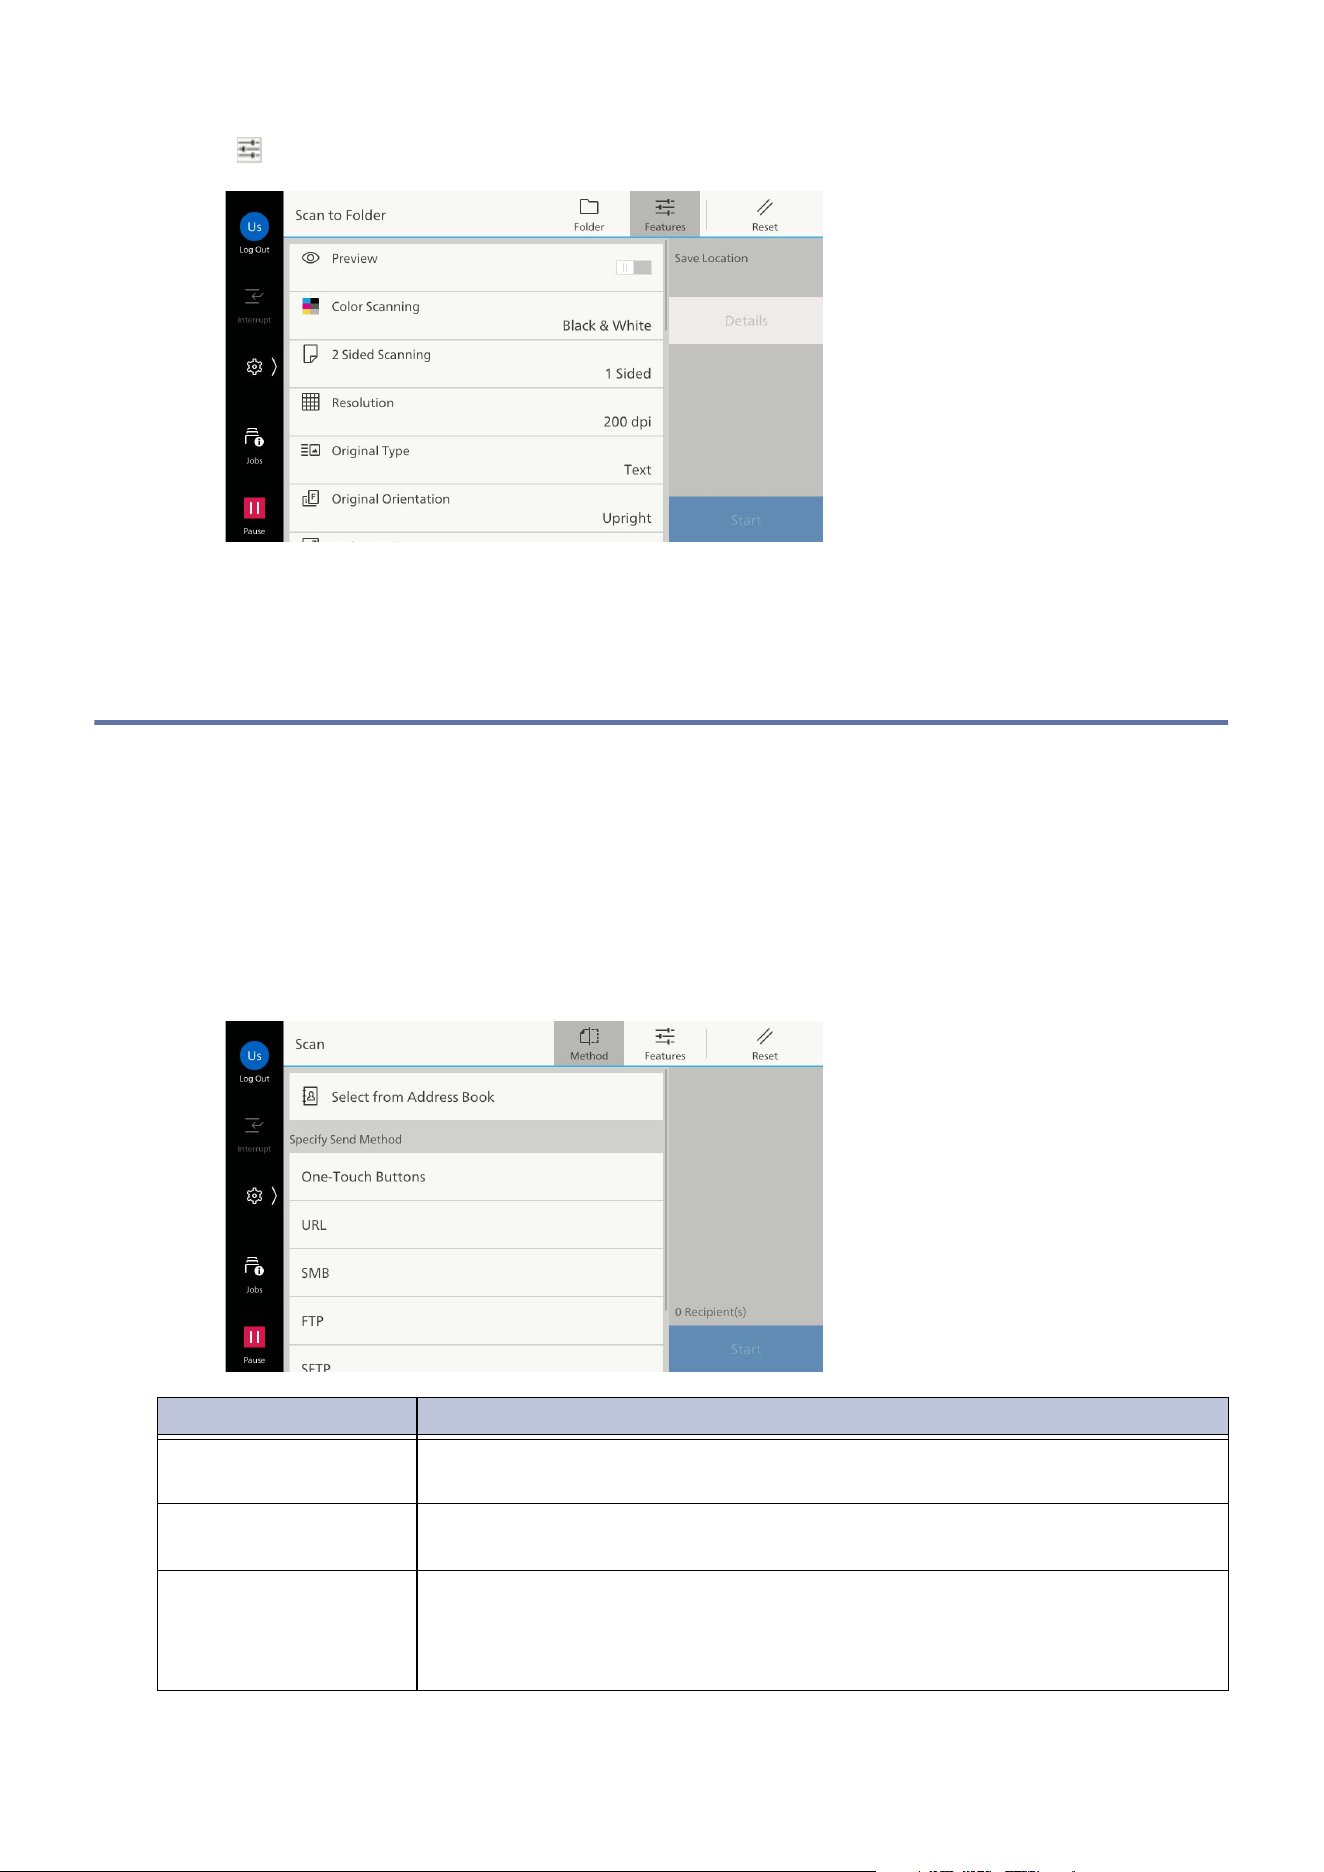
54
6 Scan
4. Tap on , and set each item.
5. Tap on [Start].
6.3 Scan
You can send scanned data in various ways.
You can also send data using multiple features at the same time.
1. Load the document.
2. Tap on [Scan].
3. Sets the sending method.
Feature Description
[Select from Address
Book]
Start the relevant app from the recipient.
[One-Touch Buttons] Send the scanned data to the recipient registered in the one-touch
buttons.
[URL] Save the scanned data on the machine then send an Email with the URLs
for downloading and for deleting the scanned data to the registered Email
address of the authenticated user. Only users authorized on this machine
can be recipients.
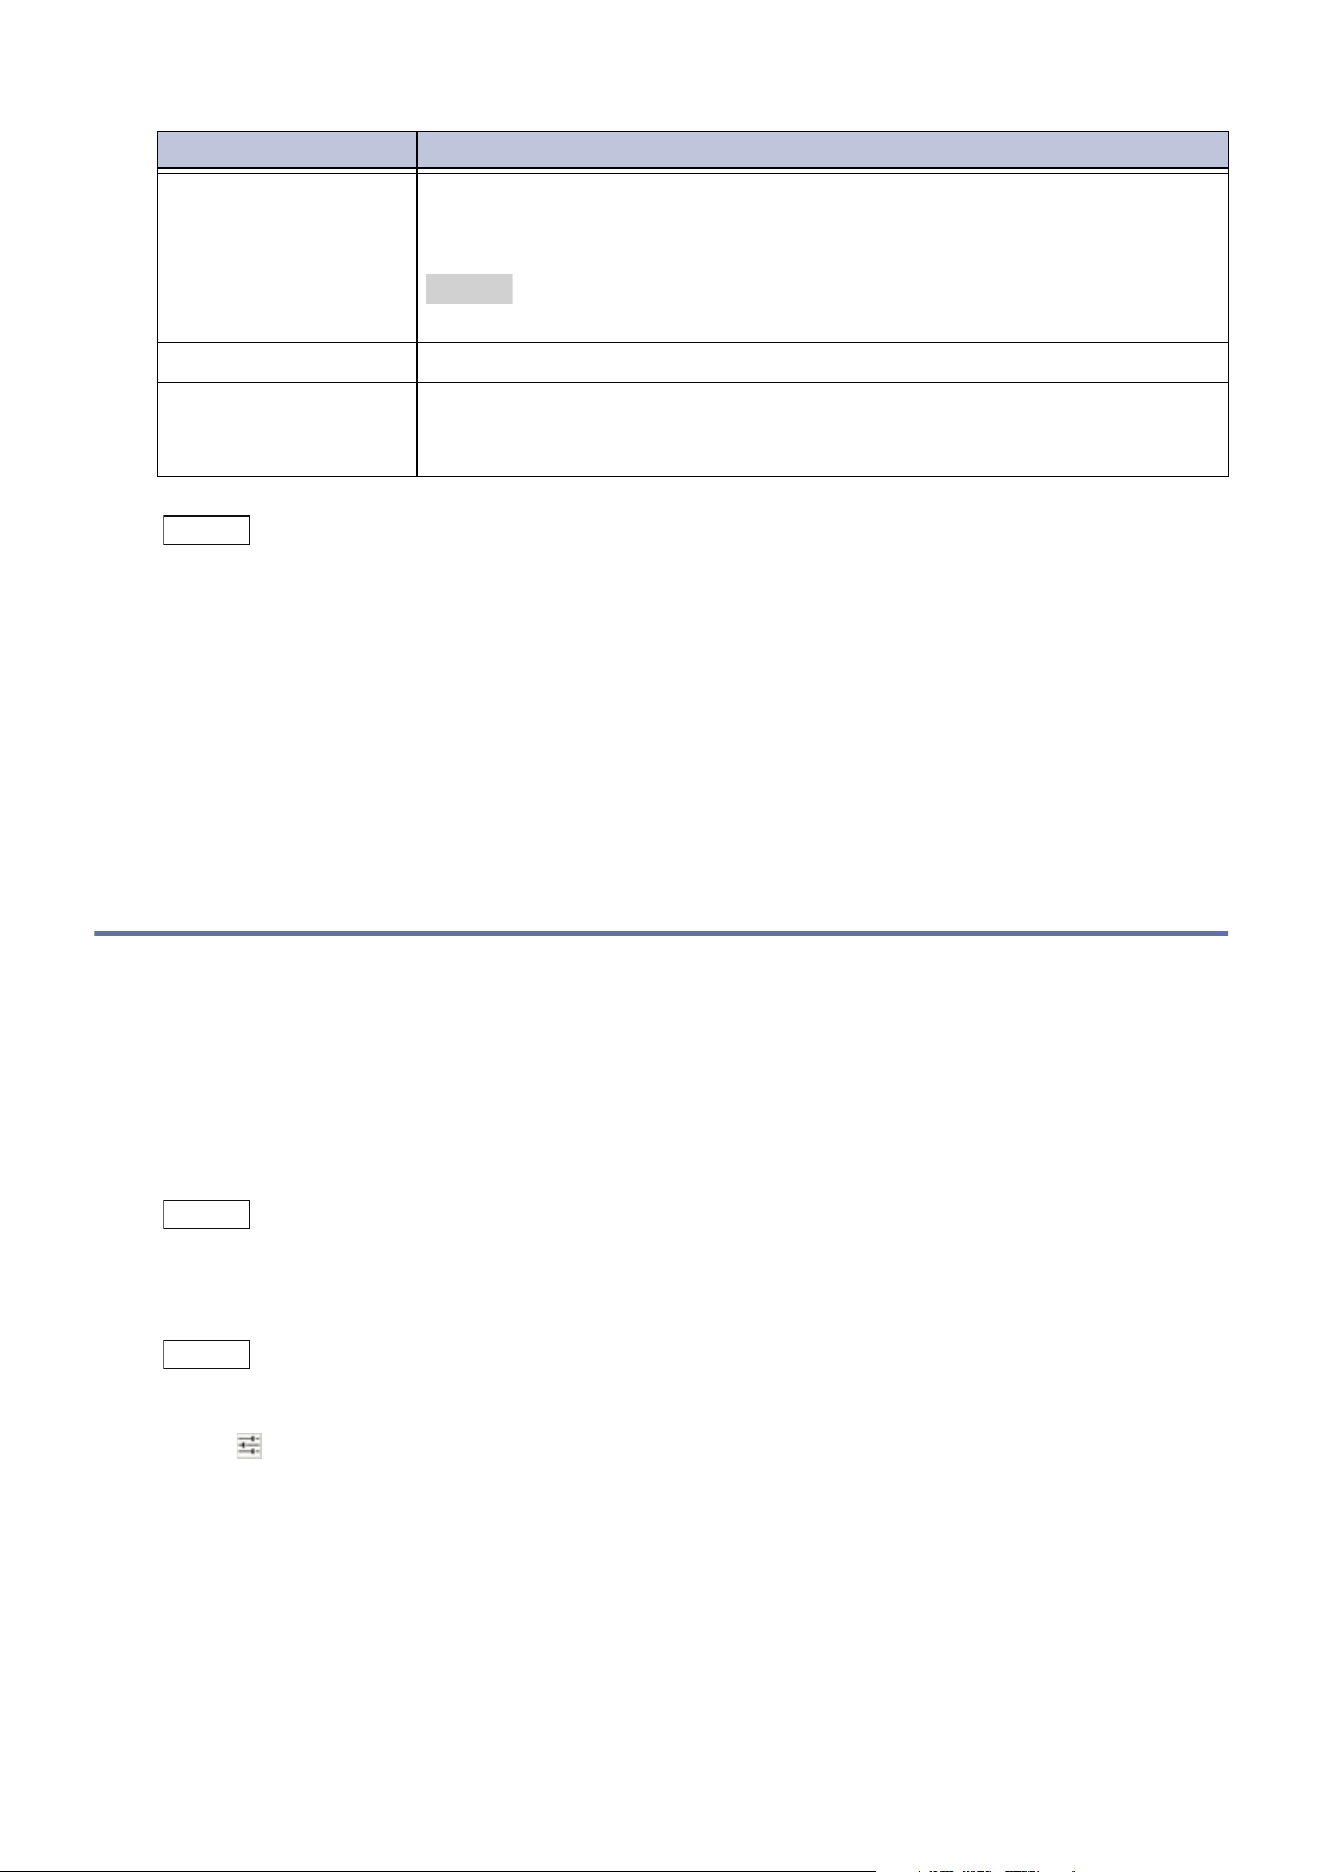
55
6.4 Scan to USB
Note
The displayed screen differs depending on the setting of [Screen Default] in "Customizing the Apps
Screen" (P.25).
When SMBv1 is disabled on the server, a recipient cannot be searched with [SMB]. In this case input
directly.
When the SMB NetBIOS function is disabled on Internet Services, the following are not possible.
- Searching for recipients with [SMB]. In this case select [Save Location] for inputting.
- Sending by specifying just the host with [SMB].
4. The following operation is the same as step 3 onwards in "Basic Operations (Email)" (P.49).
6.4 Scan to USB
1. Load the document.
2. Insert the USB memory device.
3. Tap on [Confirm].
4. Tap on [Scan to USB].
Note
You can use this feature from [USB] > [Scan to USB] or [Scan to USB] on the Home screen.
5. Select the folder where the file will be saved.
Note
If the save destination is not specified, the scanned data will be saved directly below the root directory.
6. Tap on , and set each item.
7. Tap on [Start].
[SMB]/[FTP]/[SFTP] Transfer the scanned data to the computer.
Set the destination information on the screen that appears when you tap
on the item. You can also search for the destination on the network.
Refer
Refer to "Setting Detailed Items for Each Service" (P.83) for setting items.
[Email] Attach scanned data to an Email and send.
[My Folder] This feature is available when "[Authentication/Accounting Settings]"
(P.155) is set to [Remote]. Transfer the scanned document to different
destinations depending on the authenticated user.
Feature Description

56
6 Scan
6.5 Scan to Desktop
Saves the scanned data to a specified client computer.
Note
Specify the settings for the resolution, file format, etc., in scan profile of Windows.
Save
1. Load the document.
2. Tap on [Scan to Desktop].
3. Select the save destination from the list in accordance with the use.
4. Tap on [Scan].
Remote Scan
Here an example of operation with Windows 10 is explained.
1. Load the document.
2. From the [Start] menu, select [Windows Accessories] > [Windows Fax and Scan].
3. Tap on [New Scan].
4. Check that the model name of this machine is displayed to the right of [scanner].
Note
If the model name of this machine is not displayed, click [Change], and select this machine.
5. Select [Profile] > [Document].
6. As needed, configure the setting items.
7. Tap on [Scan].
8. When all the documents have been scanned, tap on [Save (Last Original)].

57
6.6 Importing Scanned Data
6.6 Importing Scanned Data
TWAIN Compliant Applications
The scanner driver is used for importing using TWAIN compliant applications.
Note
To export scanned data in TIFF format, a TIFF Viewer is used.
If the Secondary Ethernet kit is mounted, “Network Scanner Utility 3” does not operate, even if the
Ethernet 2 IP address is specified.
1. Start up the application.
2. Select the command to select the scanner (source) from the [File] menu.
3. Click [SHARP Network Scanner 3 TWAIN] > [Choose].
4. Select the command to import an image from the scanner from the [File] menu.
5. From the displayed list, click the name of a scanner to be connected to this machine, and click
[Next].
Note
If nothing is displayed, click [Search again].
The scanner names displayed are only the scanners on the same network. To display scanners on other
networks, click [Search/Display Settings], and register the IP address and the scanner name.
6. Enter the folder number where the file to be imported is stored in [Folder Number], and the
password in [Password].
7. Click [Save].
8. Select the file to be imported from the list, and click [Import].
Folder Viewer
When Folder Viewer 3 is used, importing can be performed without the use of an application.
58
6 Scan
6.7 Features List
Item Description
[Preview] Confirm the scan results on the screen.
[File Format] Set the saving format of the scan results. For details, refer to "File
Format" (P.61).
[Color Scanning] Set the output color when importing the document.
[2 Sided Scanning] This is effective when using the document feeder. Specify the side of the
document to be read.
When the document stitching method is set, the documents are read
with
the front and reverse top edges aligned.
[Resolution] Set the resolution for scan.
[Original Type] Set the document type.
[Original Orientation] Set the document orientation to specify the upper part of the document.
[Reduce/Enlarge] Reduce or enlarge the scanned image by the specified percentage.
Select from among fixed percentages, or input and specify a value.
[Original Size] Specify the document size.
Th
e size can be specified when reading documents of irregular sizes or
reading at a size that is different from that of the loaded document.
[Mixed Size Originals] Scan documents of various sizes at once, send each size, and send as a
single size.
Note
Set [Original Size] to [Auto Detect].
[Lighten/Darken] Adjust the density for scan.
[Sharpness] Adjust the sharpness.
[PDF Security - File
Open Password]
When a password is set by applying a check mark, the password is
required to open the file.
[Quality / File Size] Select the compression percentage of the image when scanning in
[Color] or [Grayscale] in [Color Scanning].
[Photographs] Select this for scanning color photograph documents.
[Ba
ckground
Suppression]
Newspapers or documents with a background color can be scanned with
the background color removed.
[Contrast] When [Color Scanning] is [Auto Detect], [Color] or [Grayscale], adjust
the contrast.
59
6.7 Features List
[Shadow Suppression] When scanning documents with double sided printing on thin paper, the
shadow from the reverse side of the document can be suppressed.
Set when [Color Scanning] is [Auto Detect], [Color] or [Grayscale].
[Color Space] Specify [Color Space] for scanning.
[sRGB] Scanning is in the standard color representation (color space) in
accordance with sYCC.
[Device Color
Space]
An ind
ividual color representation standard (color space) can be
specified for scanning. Use this for advanced color processing to
faithfully reproduce colors.
Note
The ICC profile is effective when performing special processing with an
application that specializes in handling colors on data scanned with [Device
Color Space] specified. You can download the ICC profile for the device
color space from our official website.
[Auto Upright
Orientation]
Set whether to automatically determine the orientation of the original.
At the same time, set the language to determine the text on the original.
[Skew Correction] Set whether to correct the image skew.
[Skip Blank Pages] If the scanned page is blank, set whether to exclude it from the scan
data.
[Book Scanning] Scan the pages of double-page spread such as books separately in page
order.
[Edge Erase] When a document is scanned with the document cover opened or when
a booklet is scanned, a dark shadow can be formed around the periphery
or
in the center binding part. In these cases the shadows are erased
when scanning.
Note
For 2 sided documents, the same amount of edge erasing is set for both side
1 and side 2 of the document.
When [Reduce/Enlarge] is set, the percentage is proportional, and the
amount of edge erasing is also reduced or enlarged.
[File Name] Enter the file name to send/save.
[File Name Conflict] Set the process when there is already a file with the same name in the
specified save destination.
[Scan (URL) - Email
Su
bject]
Enter the subject of Scan (URL).
[Scan (URL) - Email
Message]
Enter the message for Scan (URL).
[Subject] Enter the subject of the Email.
["From" Address] Display the Email address of the sender.
[Reply To] Tap on the address entry area, and set the reply address. Tap [Reply to
Me] to input the address set by the sender in the Reply To address.
[Message] Enter the message for the Email.
Item Description
60
6 Scan
[Split Send] When using the Email feature and when the volume of data to be
attached is large, it is possible to send split into a set number of page
units or constant data volume units.
[Split by Page] Split the data into page units.
Note
This can be set only when either [.pdf] is selected for [File Format], or when
a check mark is not applied to [Single File for Each Page] for [.tif].
[Split by Data Size] Split the data into constant data volumes.
Note
Select [Split by Data Size] when the receiver supports message/partial.
[Read Receipts] Set to receive the notification of the sending result from the Email
recipient when using the Email feature. It is necessary that the other
party supports the MDN function.
Note
When multiple Emails are sent with [Split Send], an Email opening
confirmation is requested for each Email.
[Encryption] Email can be sent encrypted by S/MIME. When sending an encrypted
Email, select an Email address associated with a certificate that can be
encrypted from the Address Book.
Note
To send an Email encrypted by S/MIME it is necessary to have in advance a
certificate for this machine and the recipient’s machine. Refer to Internet
Services help for the certificates.
[Digital Signature] Email can be send digitally signed by S/MIME.
If it is digitally signed, the recipient can check whether the content of an
Email has been altered, whether an Email has been sent by the correct
sender, etc.
[Next Original] Set this item to scan the number of sheets that exceed the maximum of
av
ailable number of sheets loaded at a time in the document feeder and
to scan multiple documents as a single job using the document glass.
Item Description
61
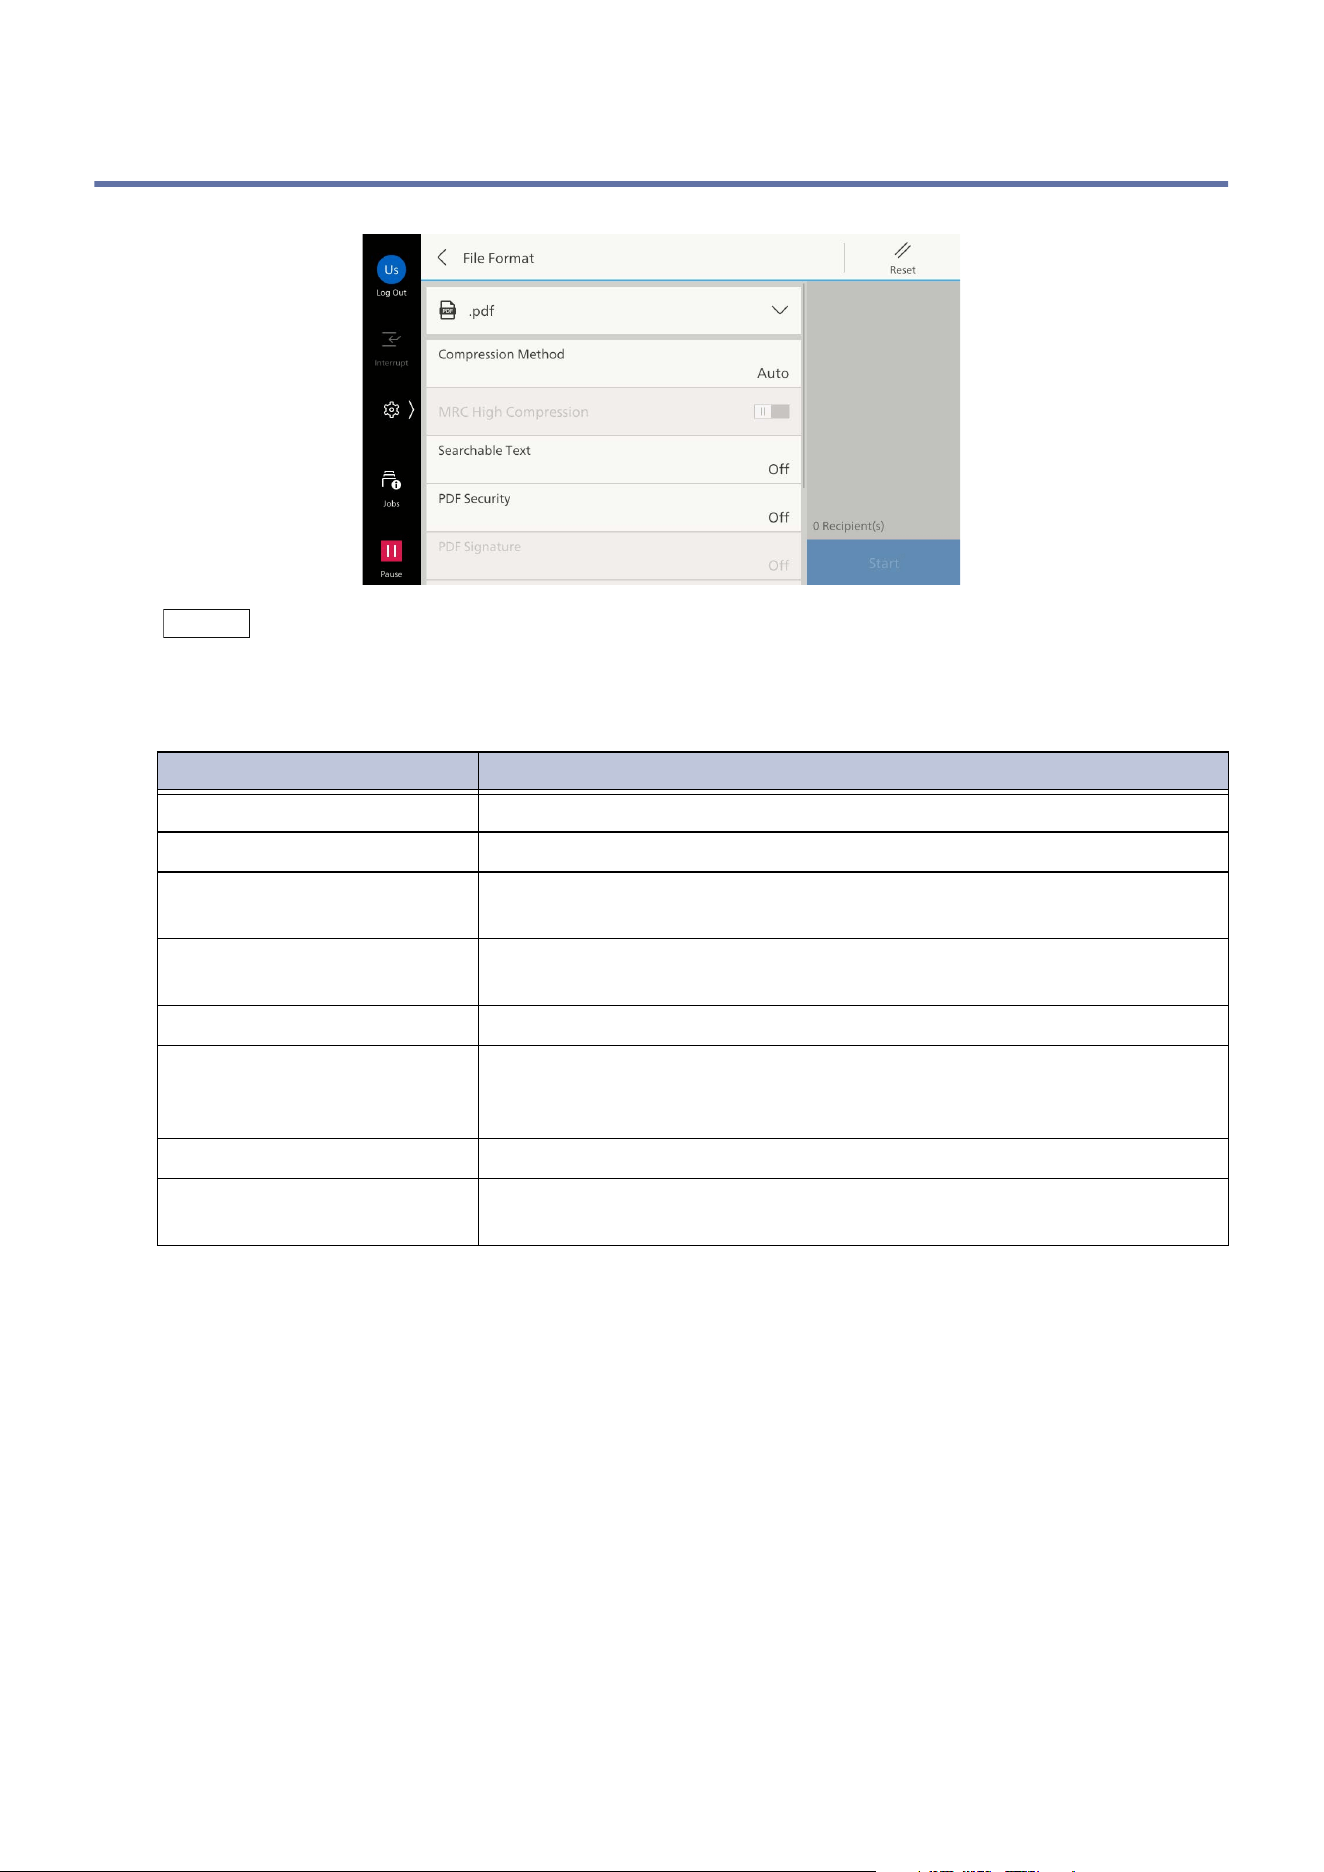
6.8 File Format
6.8 File Format
Note
The items that can be set is different depending on the selected file format.
When [.tif/.jpg (Auto Select)] is selected, automatic full color and gray scale images are set for [.jpg], and
monochrome images are set for [.tif] for each page.
Item Description
[Compression Method] Sets the format for compression of image data after scanning.
[MRC High Compression] Saves PDF files in a high compression format.
[Searchable Text] Sets whether PDF files are in a searchable text format or not.
At the same time, set the language for searchable text.
[PDF Security] Sets the security for data saved in PDF format, to prevent
unauthorized access.
[PDF Signature] Applies
a signature to a file.
[Specific Color] Compresses and saves a document with a small number of colors.
The file size is smaller than when saving after selecting [MRC High
Compression].
[Single File for Each Page] Sets a single file for each page, and saves in the specified format.
[Optimize for Quick Web
View]
Enables the time for displaying a page to be shortened, when a PDF
is displayed on a web browser.
62
7 Folder
7 Folder
Folder is the location where you can save scanned data and files for print submitted from a client
computer. Folder can be used also as the folder for reprint that stores files for making copy or
printing.
The files stored in a folder can be sent with an Email, checked, printed, or retrieved from the client
computer via a network.
Personal folders and shared folders can also be registered and used for different purposes.
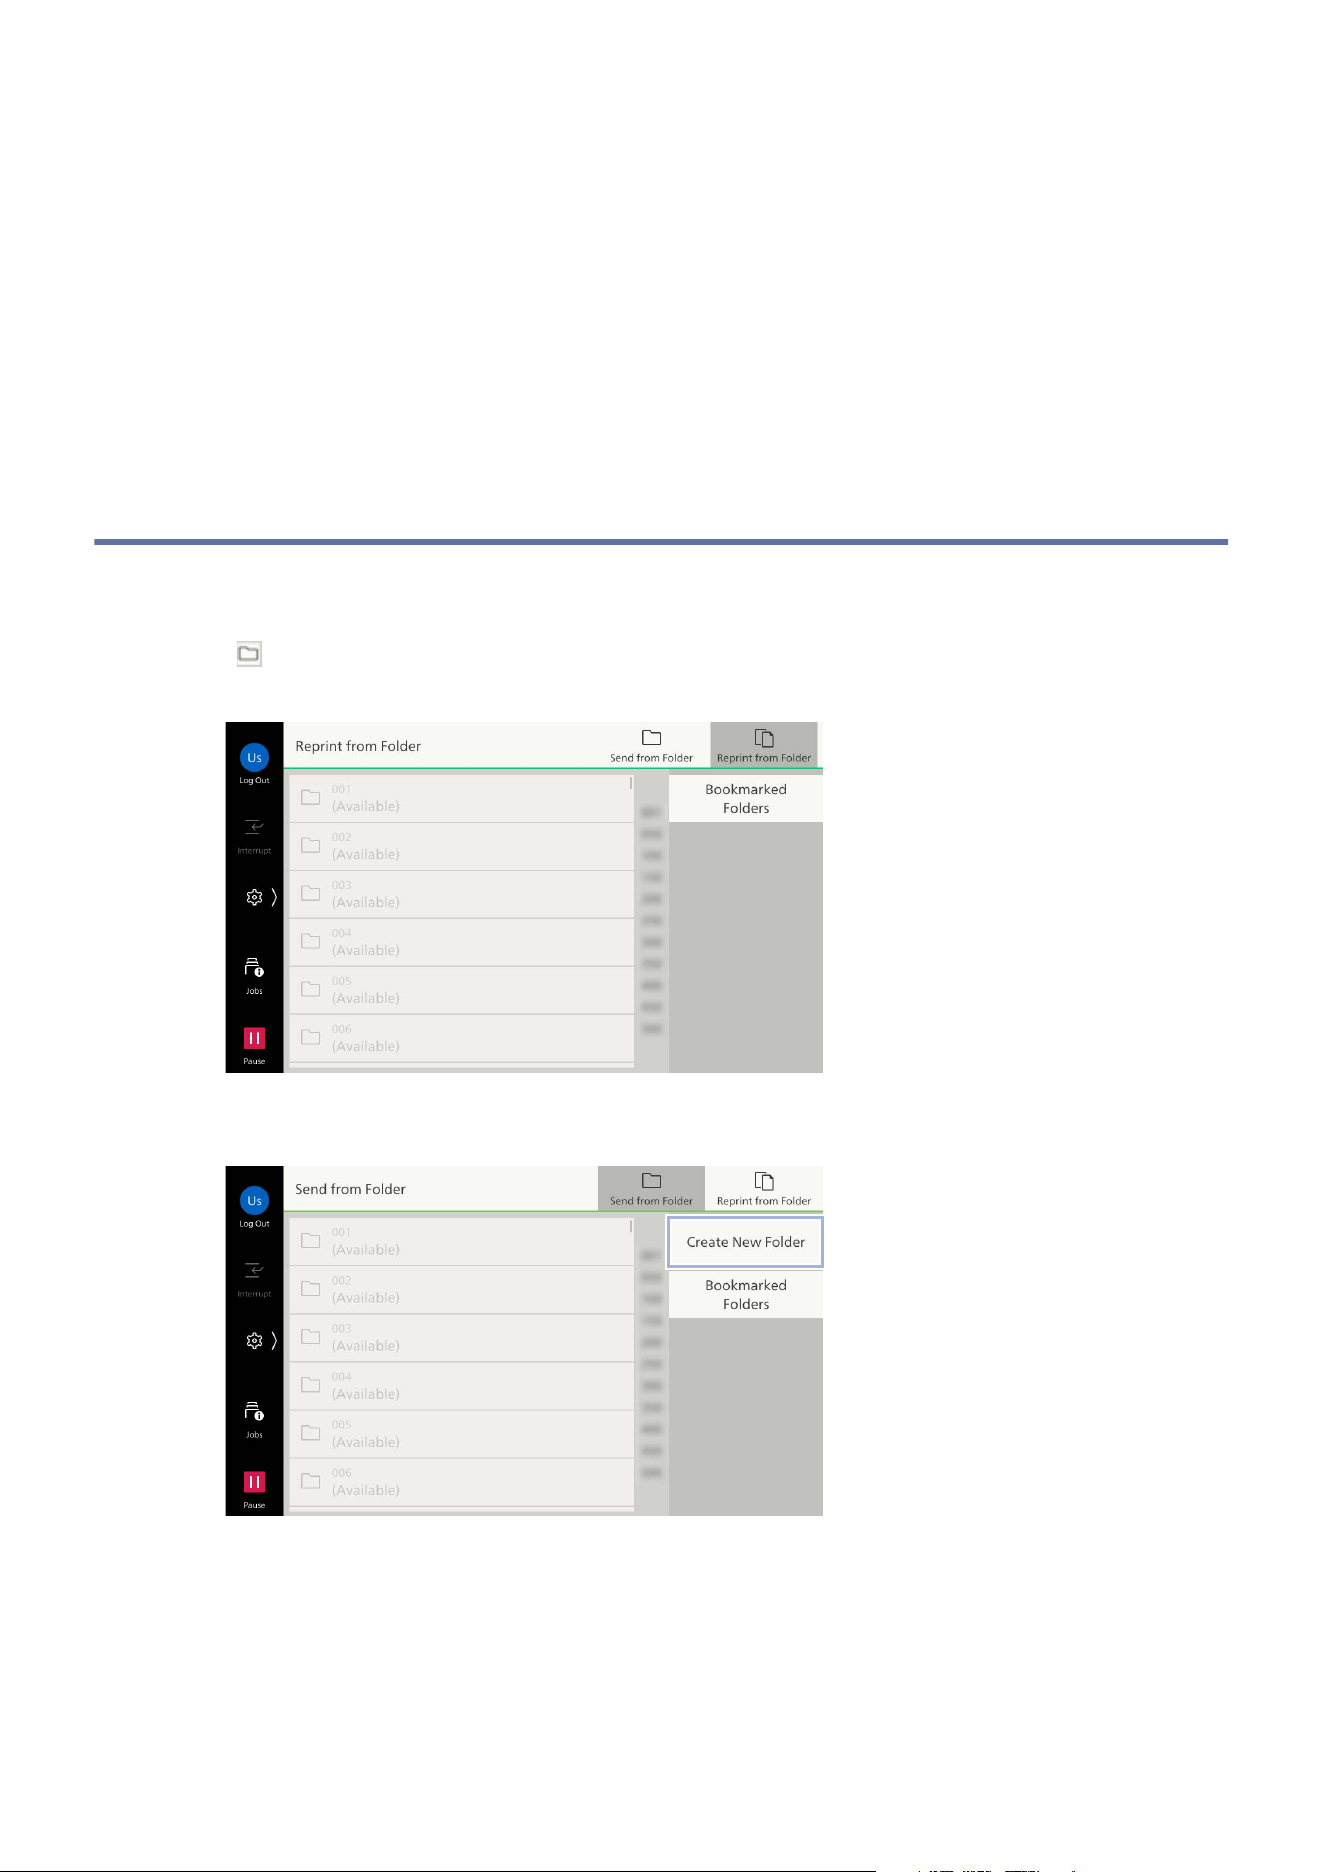
7.1 Registering a Folder
1. Tap on [Send from Folder].
2. Tap on ([Send from Folder]) of the upper side of the screen when the [Reprint from Folder]
screen is displayed.
3. Tap on [Create New Folder].
63
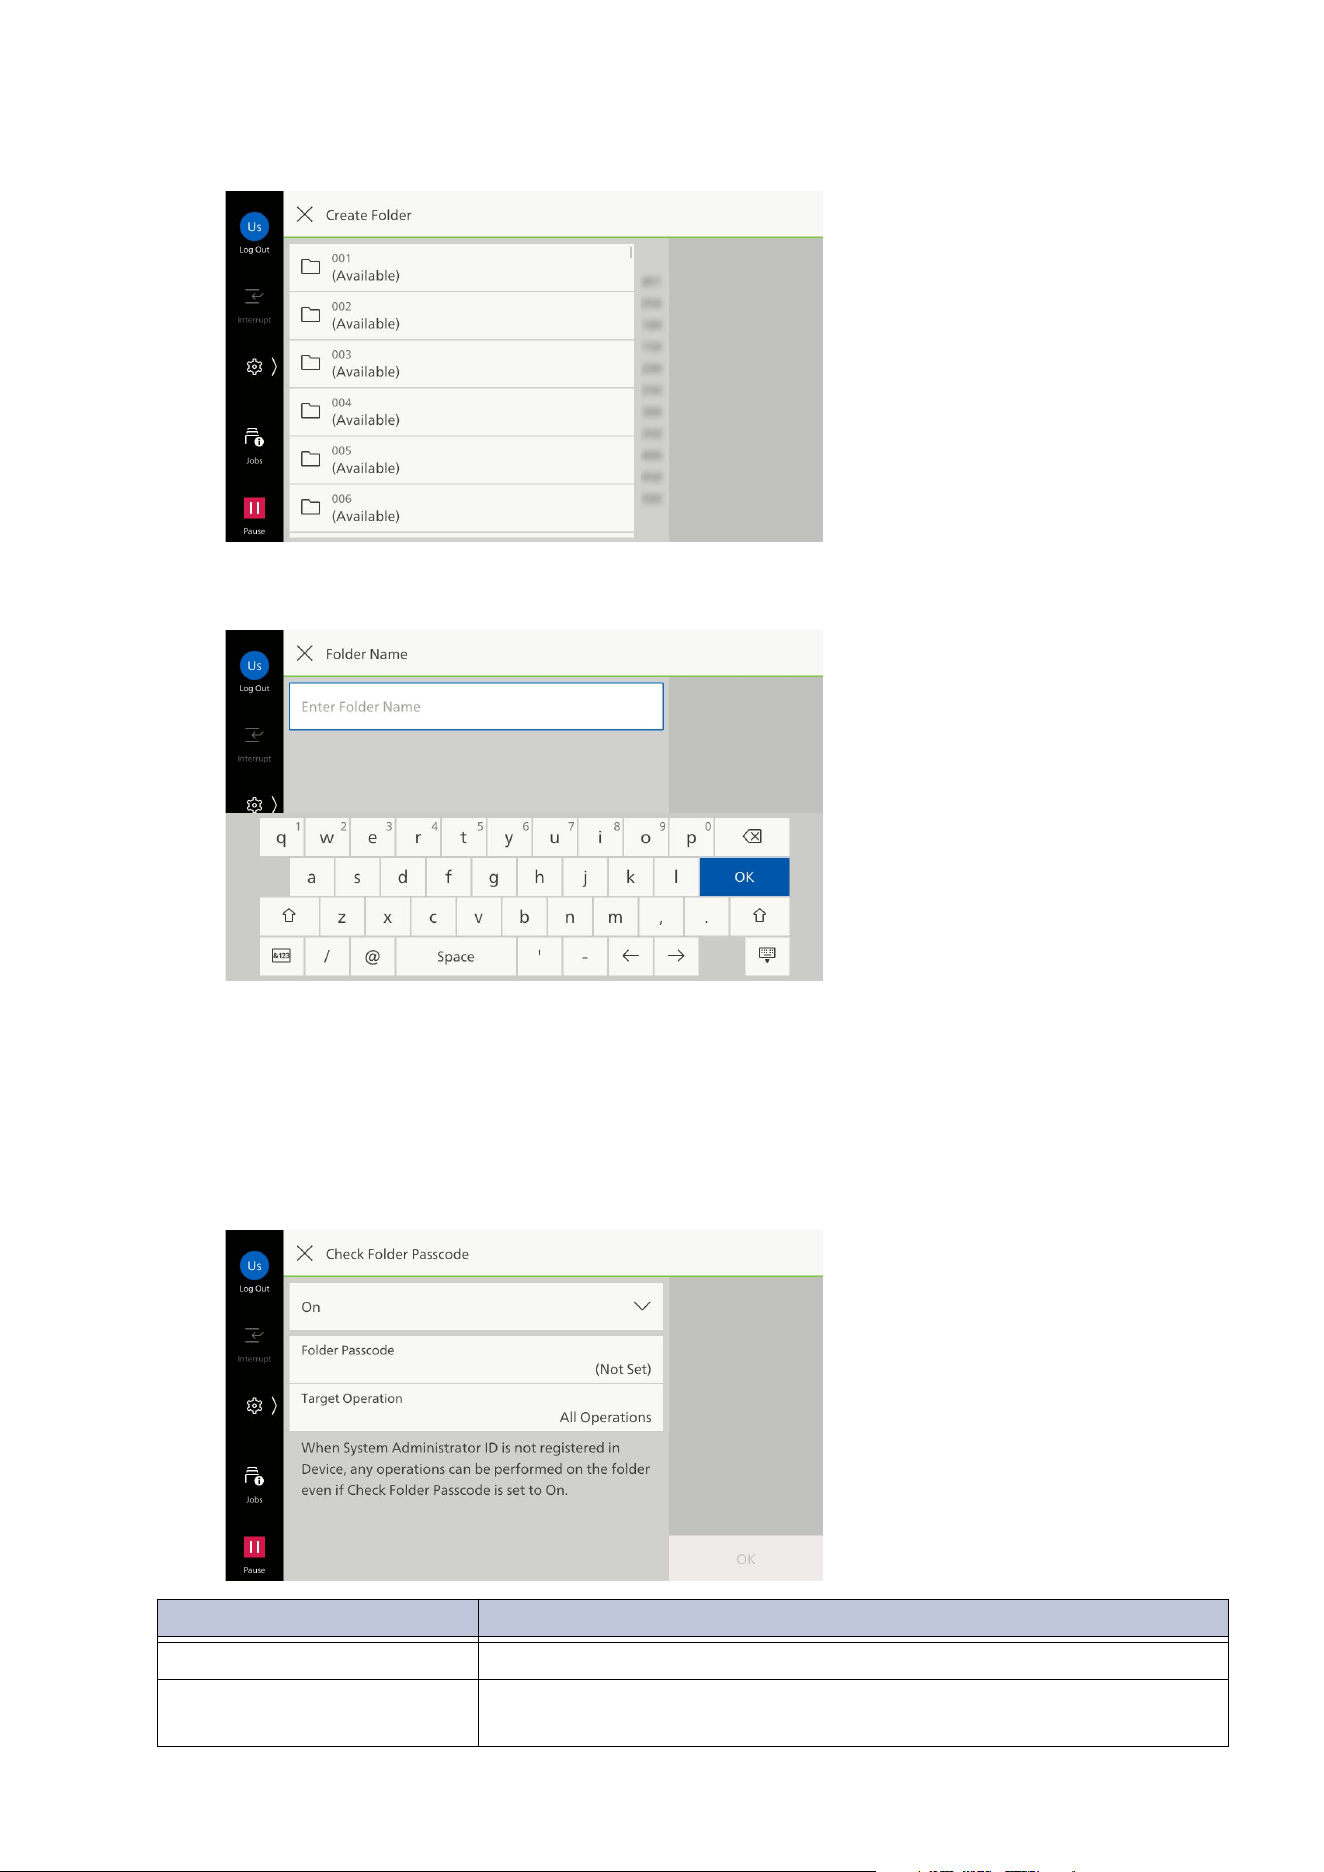
7.1 Registering a Folder
4. Tap on the folder to be registered.
5. Enter the folder name.
6. Tap on [OK].
7. When you set the access control for the folder, perform the followings.
1)Tap on [Check Folder Passcode] > [On].
2)As needed, configure the setting items.
Item Description
[Folder Passcode] Enter the password for use with the folder.
[Target Operation] Specify the operations that require a password when using the
folder.
64
7 Folder
3)Tap on [OK].
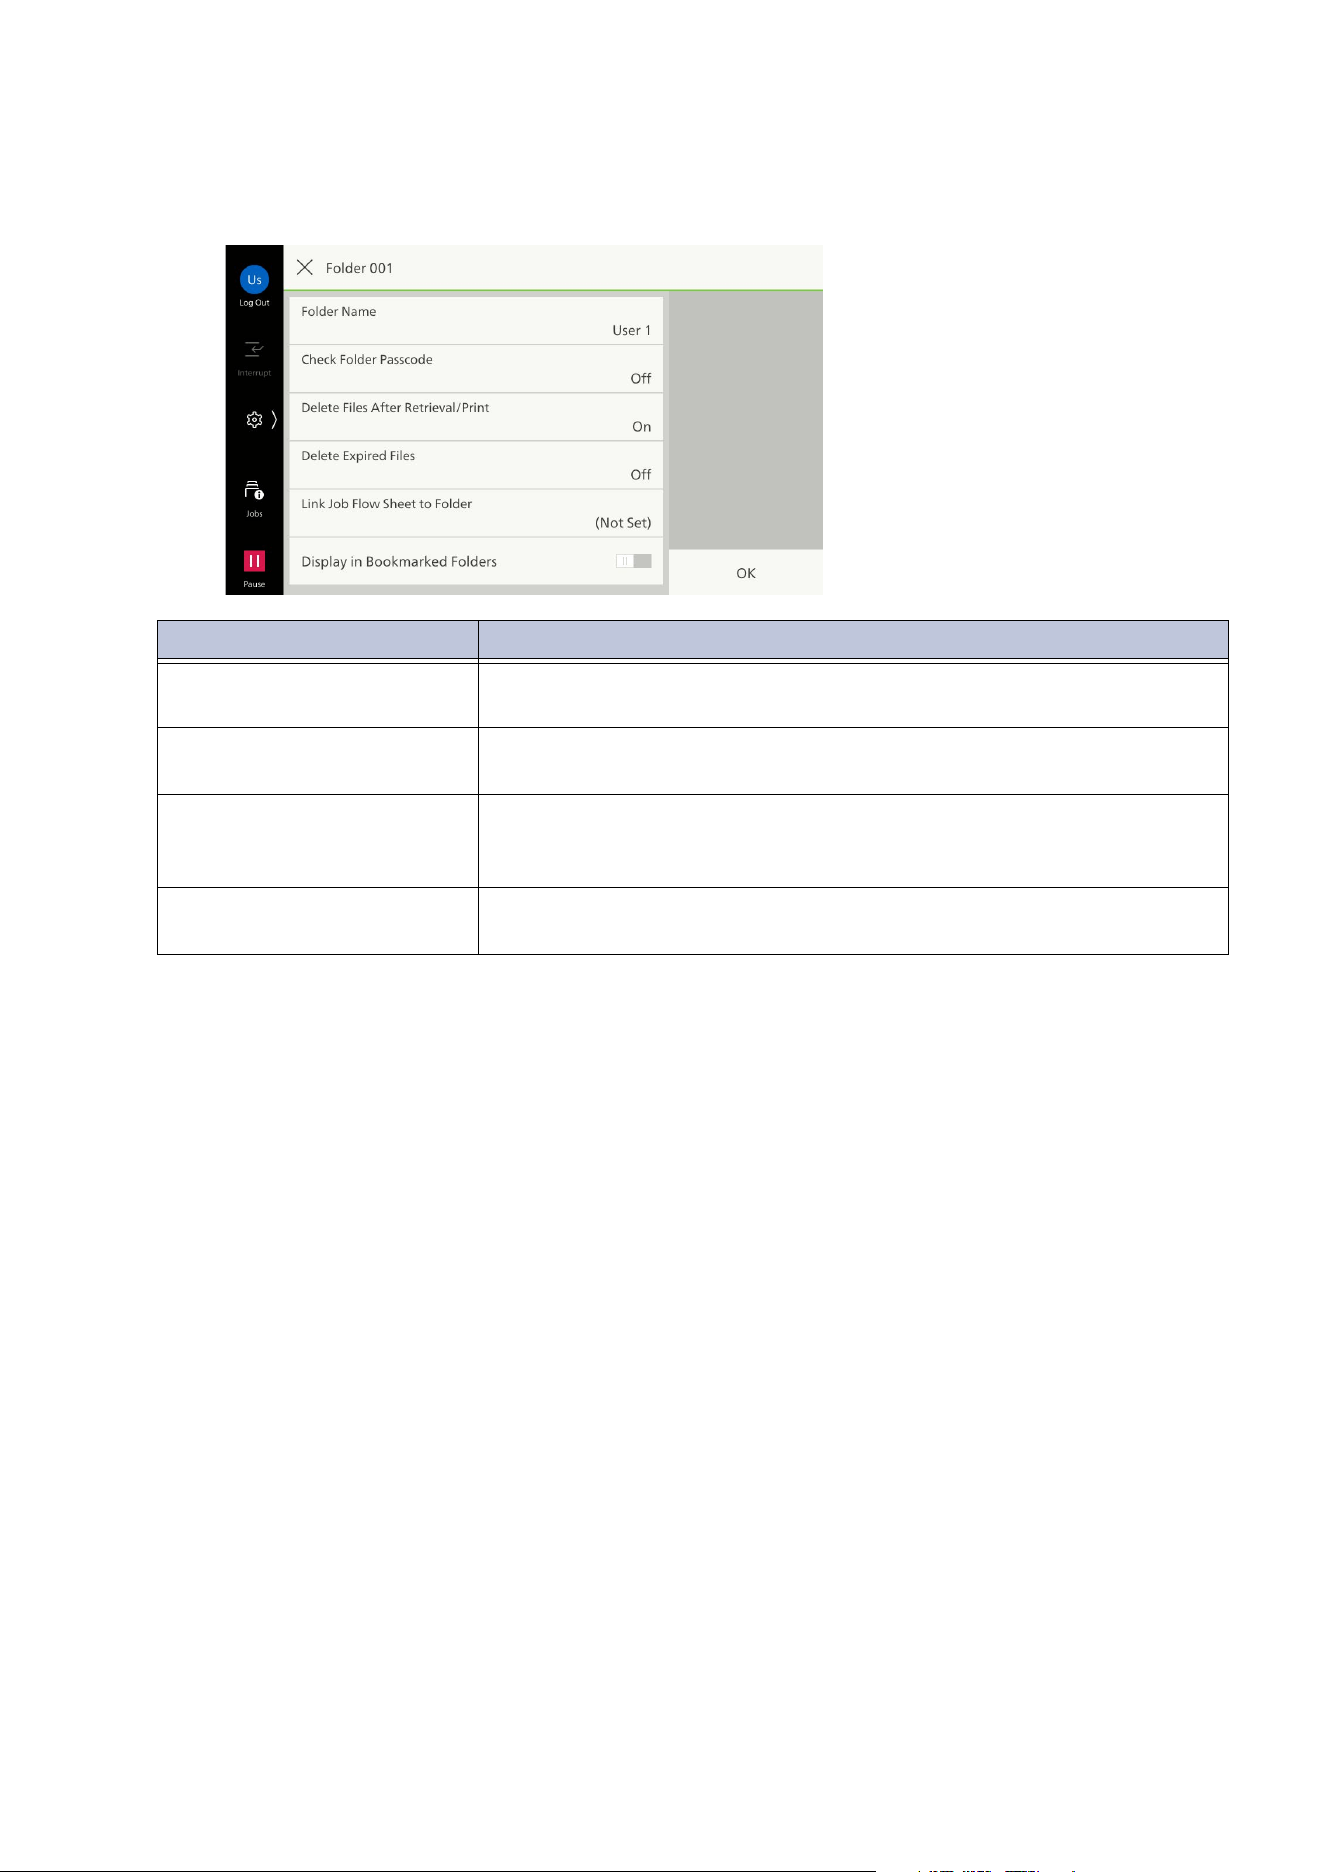
8. As needed, configure the setting items.
9. Tap on [OK].
Item Description
[Delete Files After Retrieval/
Print]
After retrieve or print a file, set whether or not to delete a file.
[Delete Expired Files] Files that have been saved in a folder are deleted after the saving
period has passed.
[Link Job Flow Sheet to
Folder]
A job flow sheet can be associated with a folder. It is possible to set
the method of processing a file saved within a folder by linking to a
job flow sheet in which is registered a series of actions.
[Dis
play in Bookmarked
Folders]
If it is set enabled it is displayed in [Bookmarked Folders] on the
[Send from Folder] screen. Up to 10 folders can be set.
65
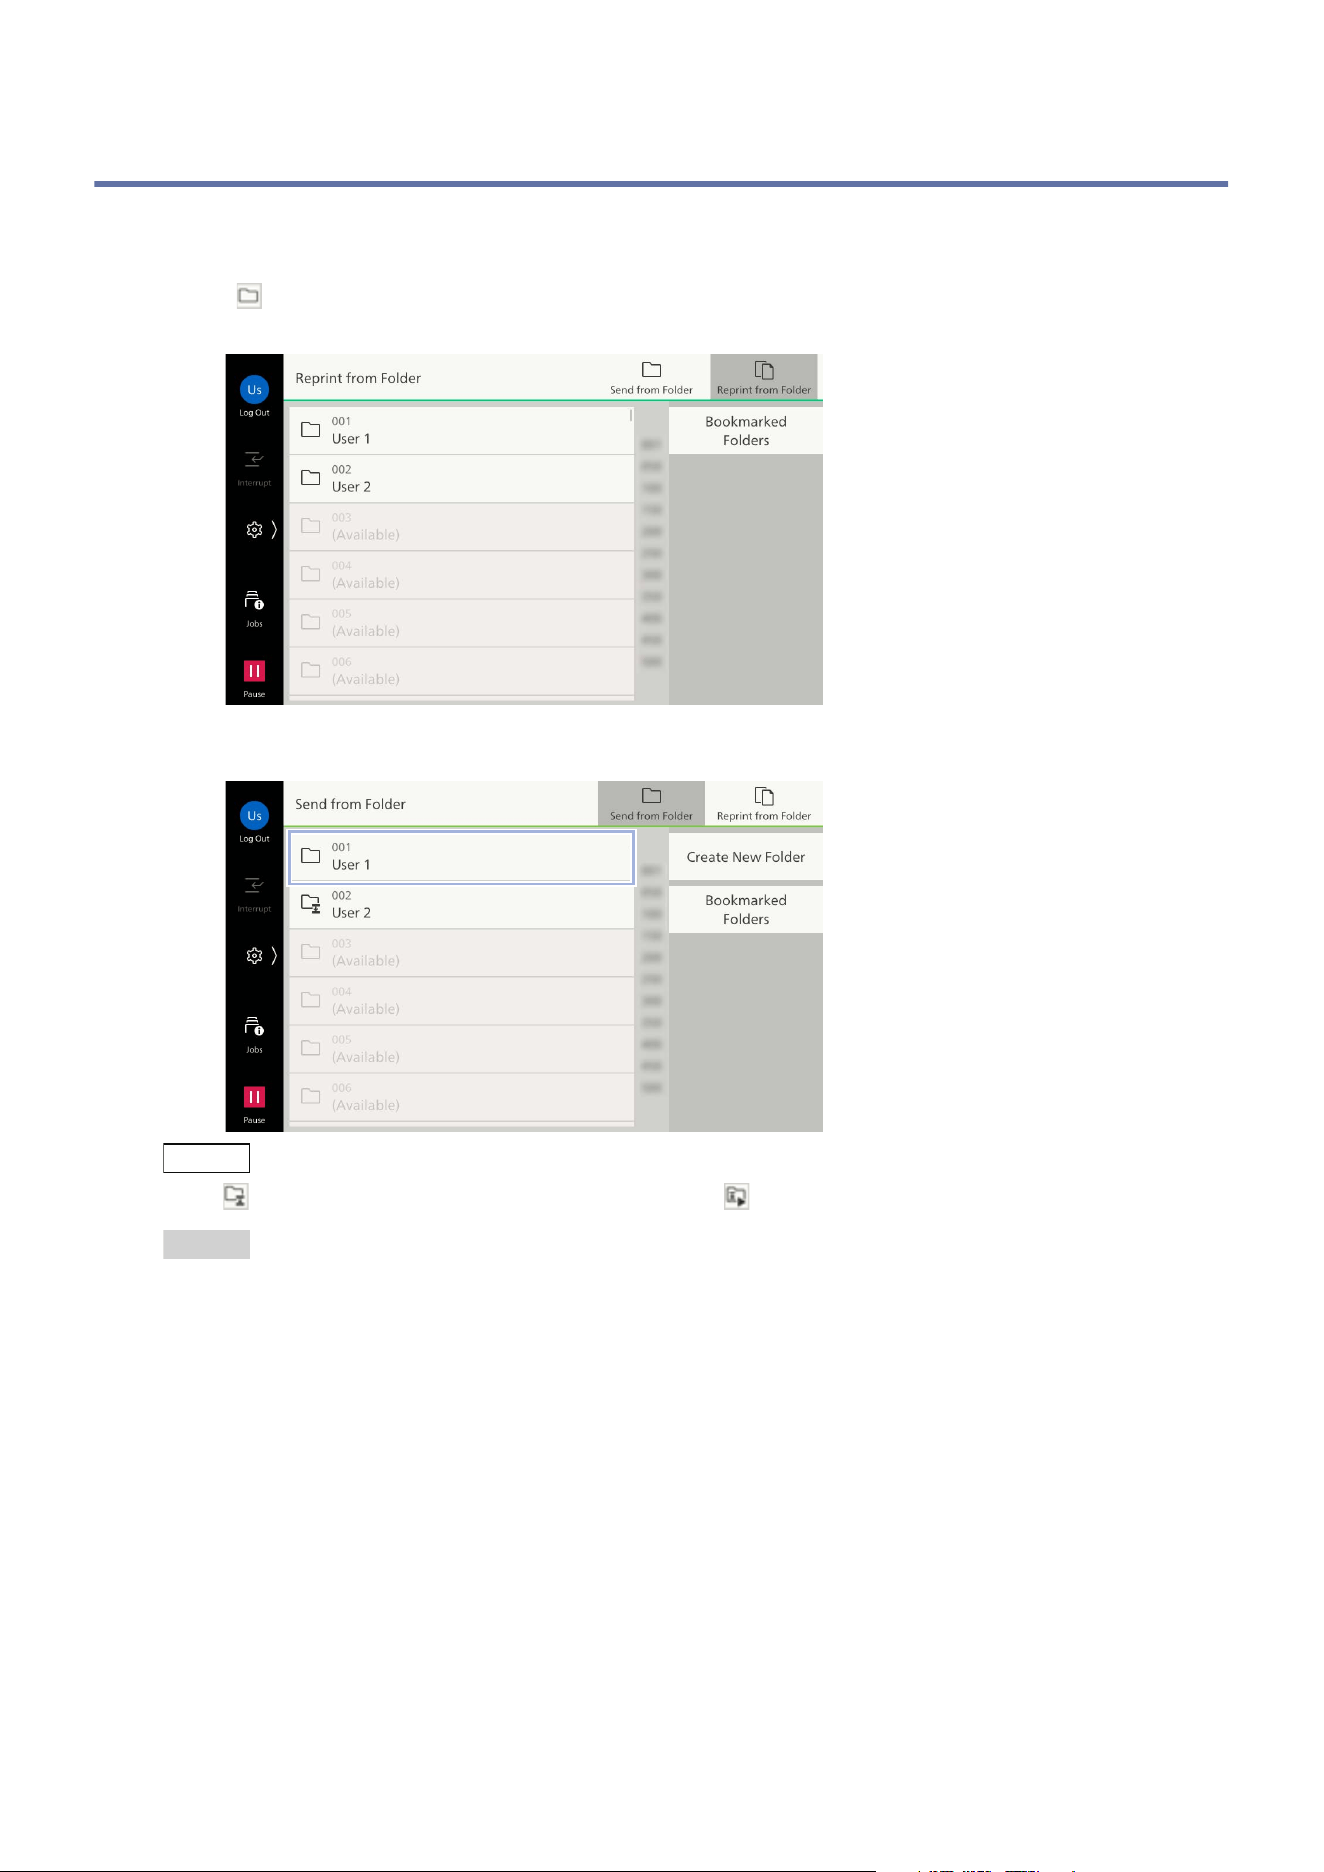
7.2 Folder Operations
7.2 Folder Operations
1. Tap on [Send from Folder].
2. Tap on ([Send from Folder]) of the upper side of the screen when the [Reprint from Folder]
screen is displayed.
3. Tap on the folder.
Note
is displayed at a folder linked to a job flow sheet. is displayed at a folder for which Auto Start is set.
Refer
Refer to "Executing Job Flow Sheets" (P.80) for the operations about the job flow.
66
7 Folder
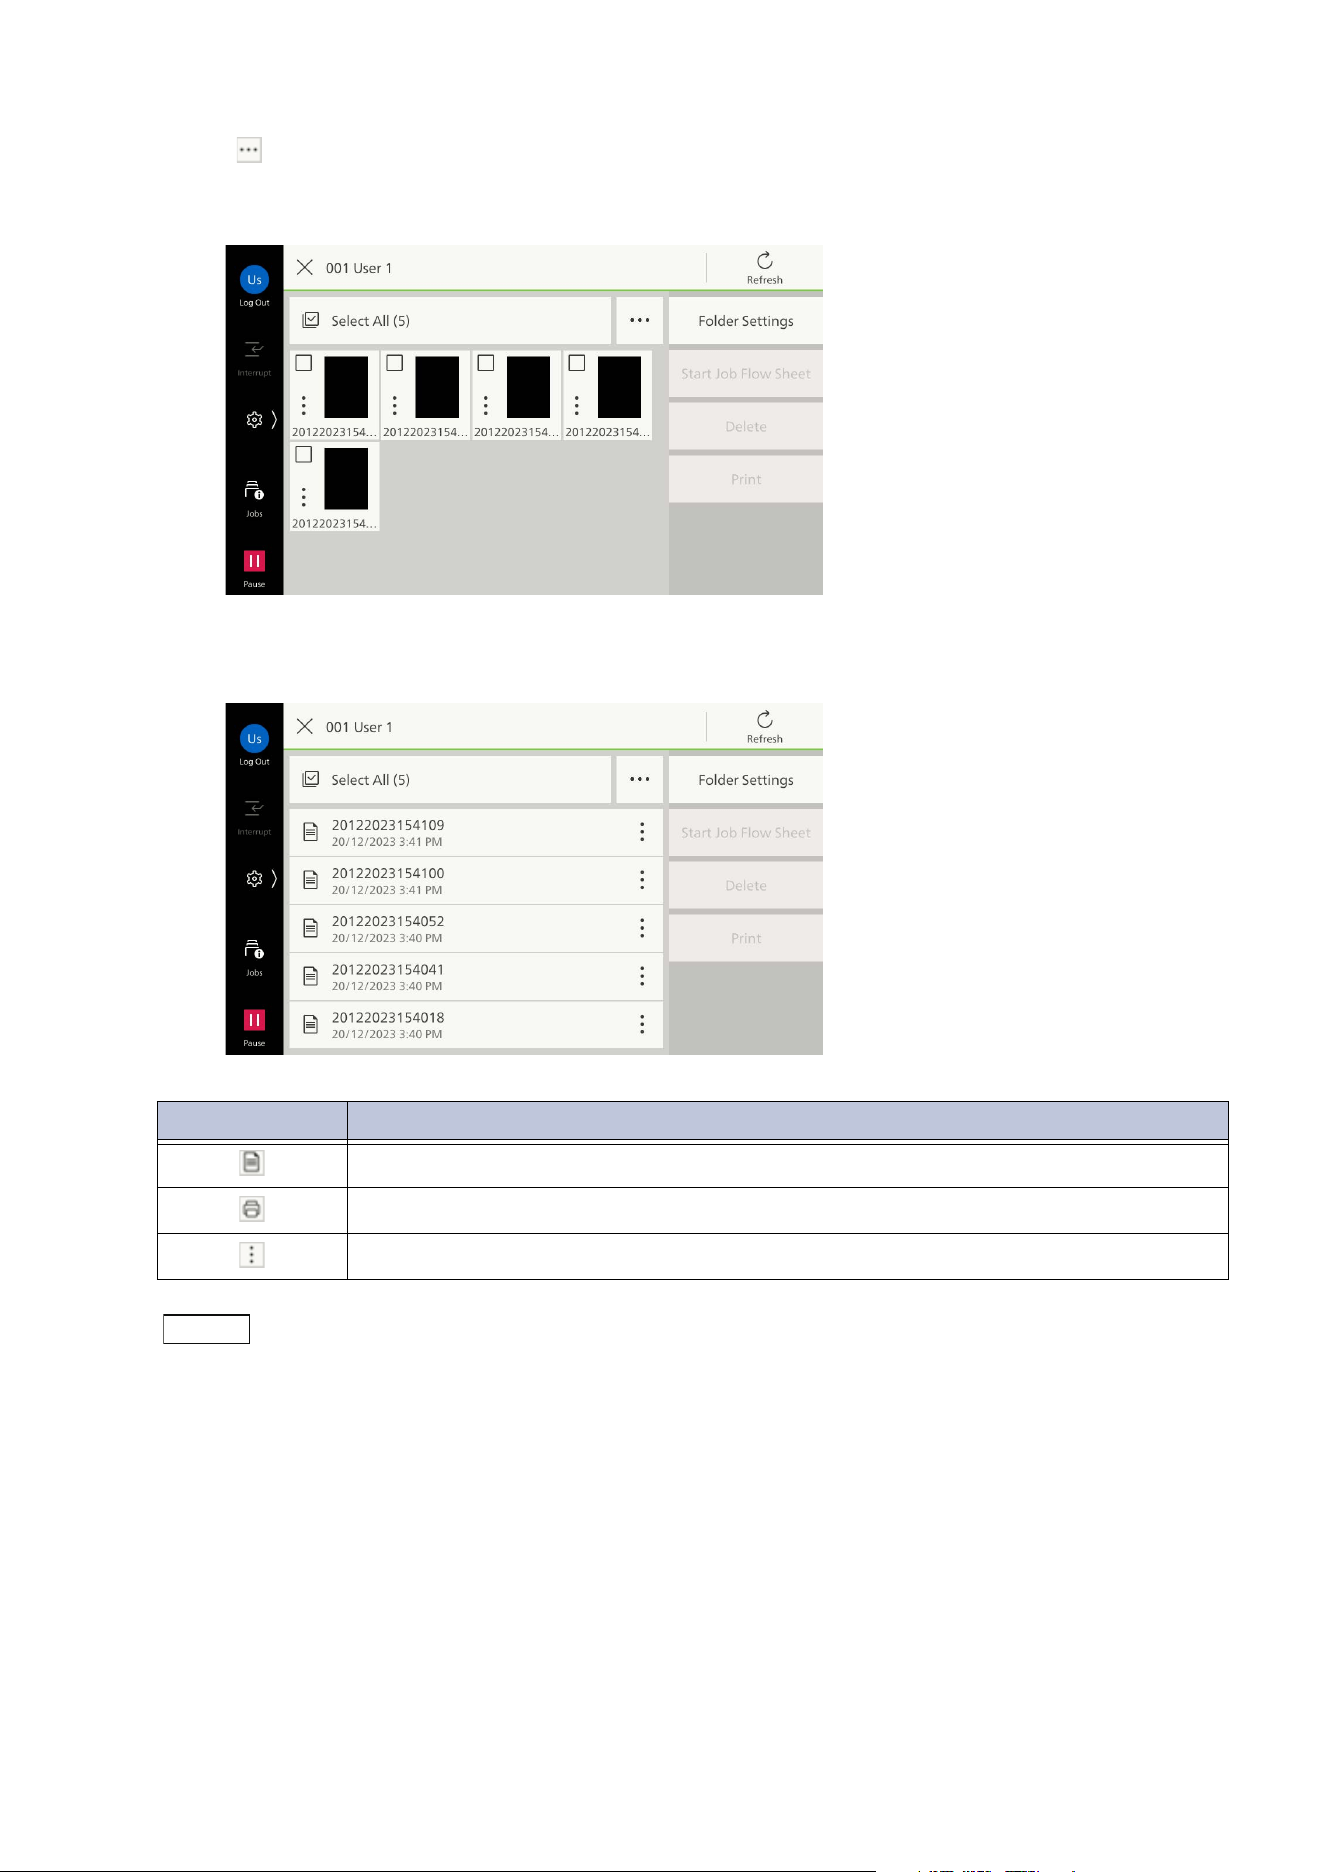
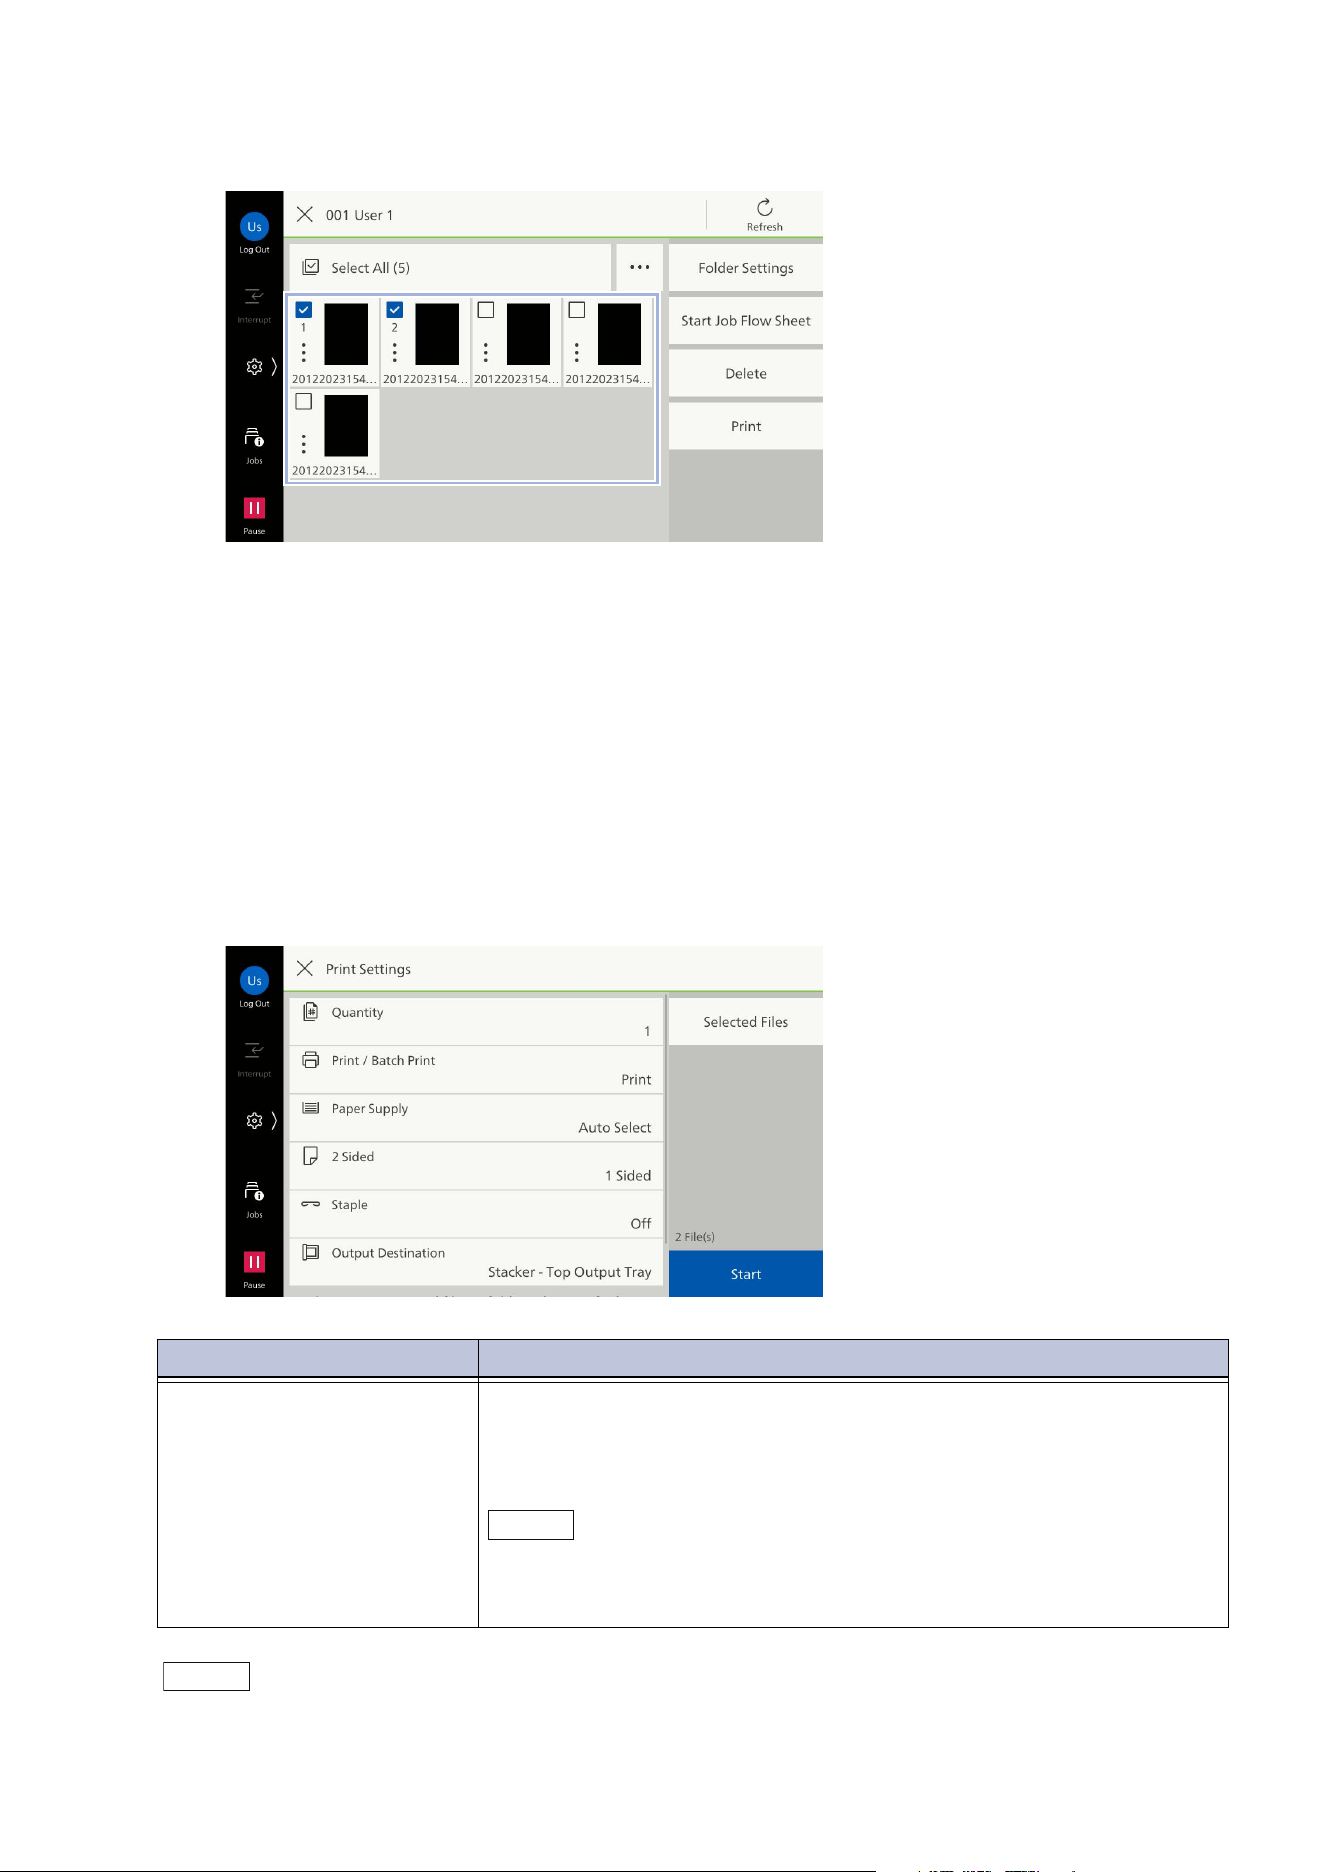
4. Tap on on the upper right of the screen as needed to switch display methods and orders.
If [Thumbnail] is selected in [Change View]
If [List] is selected in [Change View]
Note
To change or delete the folder settings, tap on [Folder Settings].
To check the files stored by copying for reprint, see the folders for reprint.
Icon Description
Indicates a scanned file.
Indicates a stored file from print driver.
You can confirm the file details and preview by tapping on this icon.
67
7.2 Folder Operations
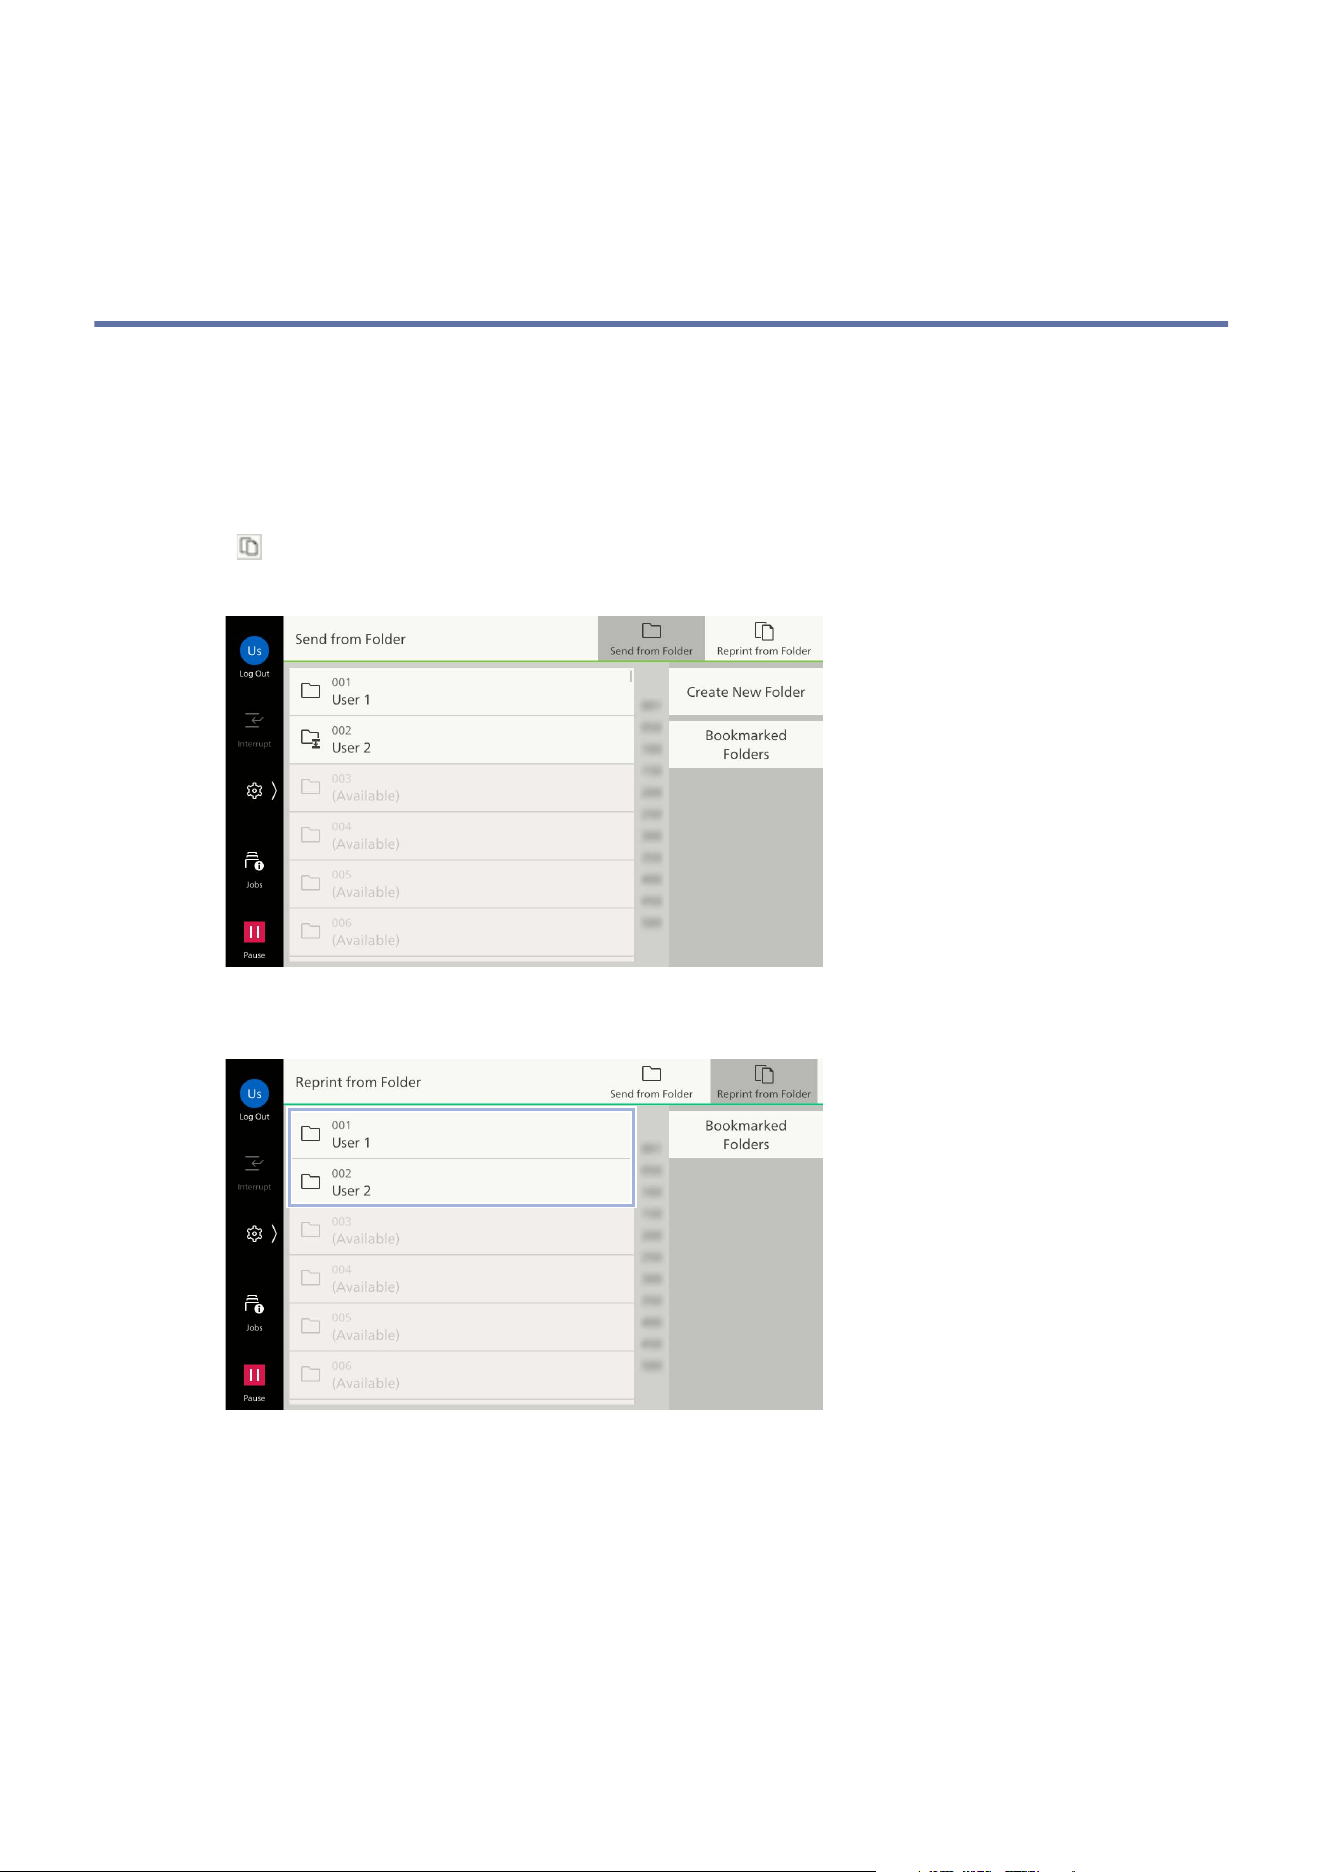
5. Tap on the file to be operated and apply a check mark.
6. Execute the operation for the selected file.
Deleting
1)Tap on [Delete].
2)Tap on [Delete].
Printing
1)Tap on [Print].
2)As needed, configure the setting items.
Note
For other items, refer to the features list for the applicable feature.
Item Description
[Print / Batch Print] If multiple files have been selected, set either [Print] or [Batch Print].
When Batch Print is set, the documents can be printed as a single
file. The files are collated in the selected sequence. Up to 100 files
can be printed at a time.
Note
If different size files are mixed as a result of tying documents together,
there is a possibility that documents will be printed with unintended
orientation.
68
7 Folder
3)Tap on [Start].
4)Tap on [Print].
7.3 Operations of Folder for Reprint
The folder for reprint displays files stored by copy for reprint and files stored from print driver.
You can edit and print files. If you edit a file stored from print driver, it will no longer appear in the
normal folder.
1. Tap on [Send from Folder].
2. Tap on ([Reprint from Folder]) of the upper side of the screen when the [Send from Folder]
screen is displayed.
3. Tap on the folder.
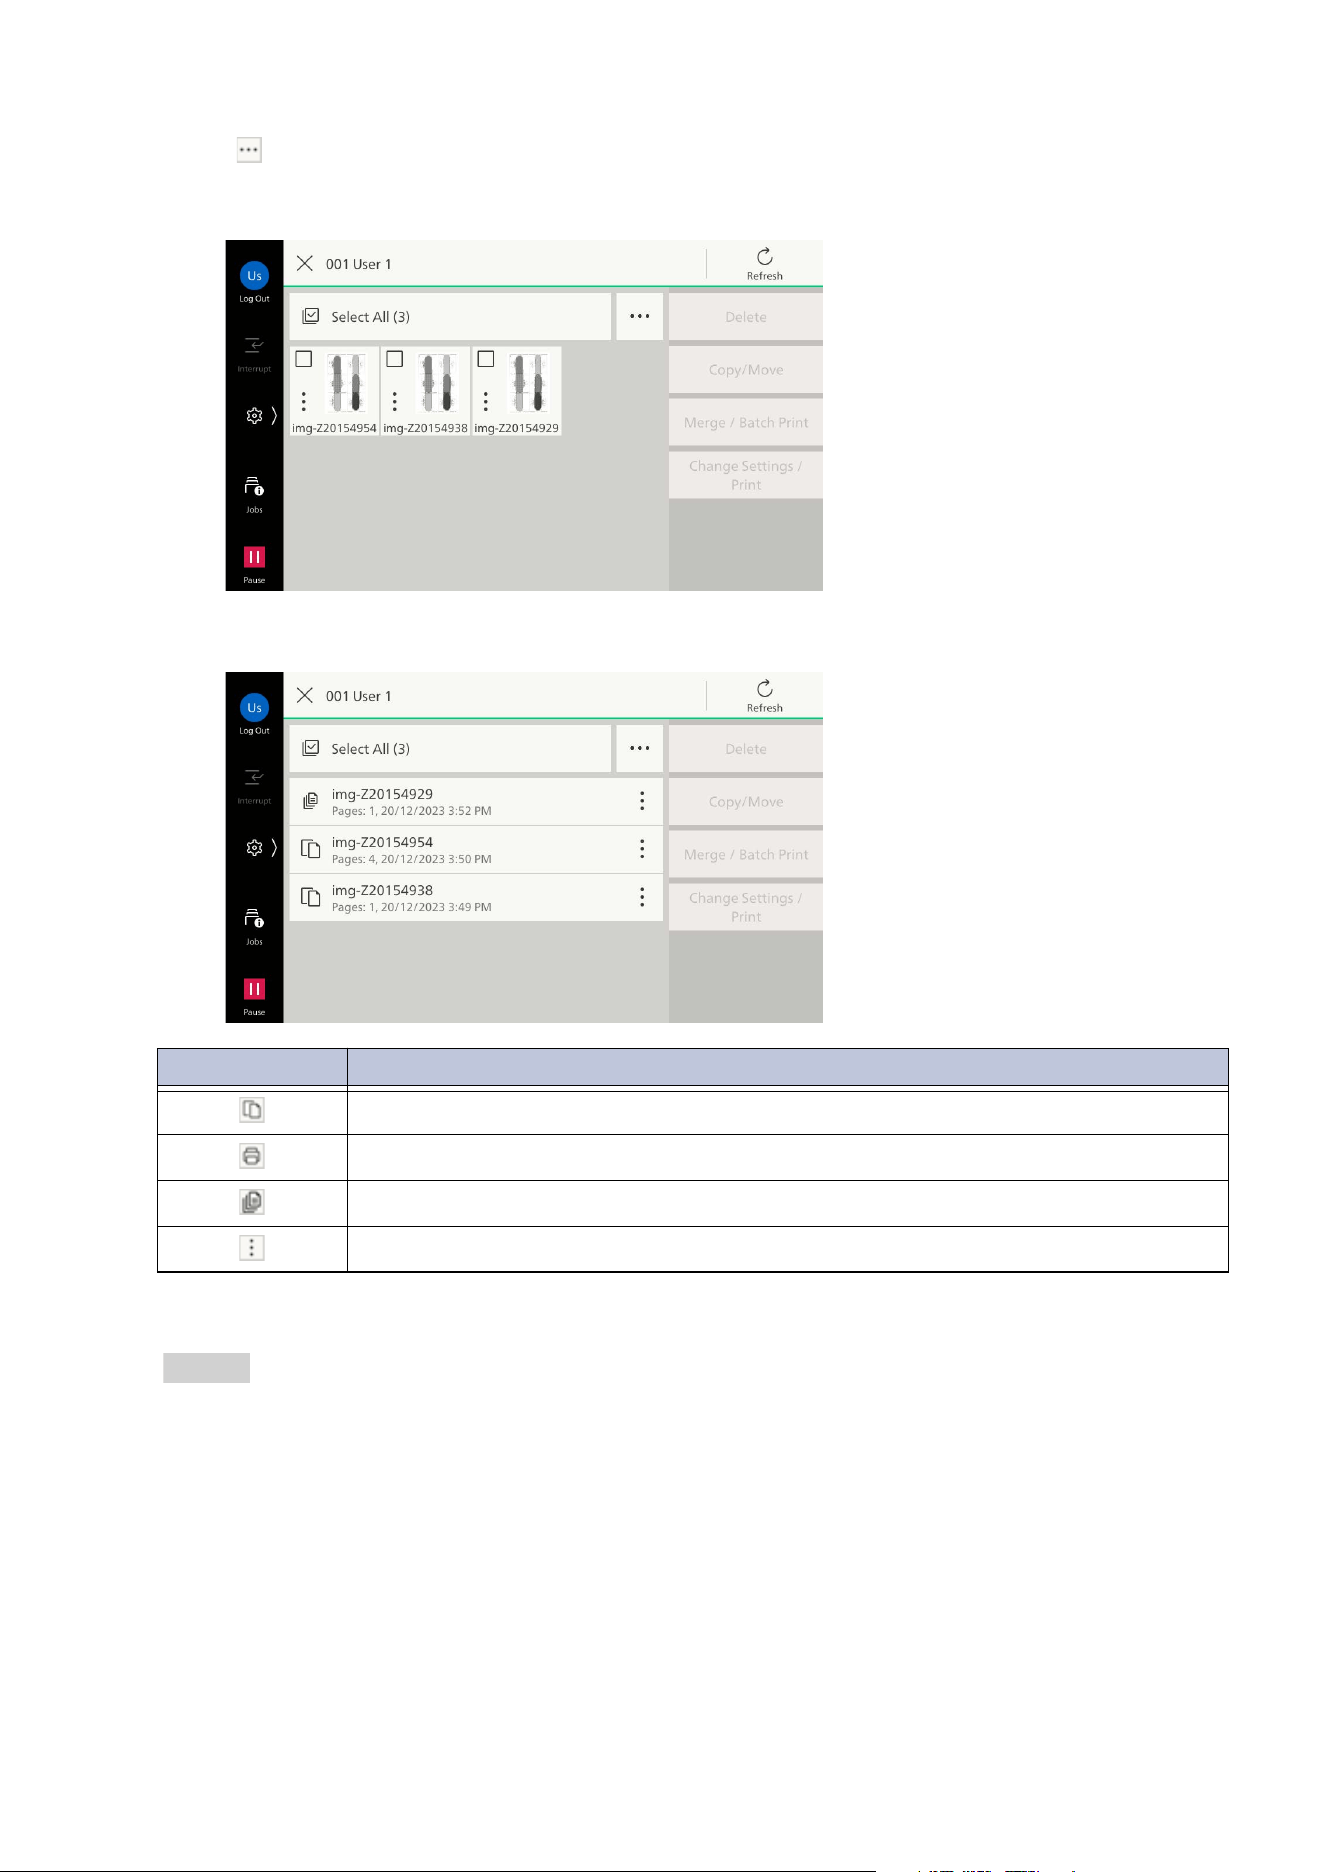
69
7.3 Operations of Folder for Reprint
4. Tap on on the upper right of the screen as needed to switch display methods and orders.
If [Thumbnail] is selected in [Change View]
If [List] is selected in [Change View]
5. Execute the operation for the file.
Refer
"Deleting Files" (P.70)
"Copying/Moving Files" (P.71)
"Printing Multiple Files (Merging)" (P.72)
"Printing Files" (P.74)
"Editing a File" (P.76)
Icon Description
Indicates a file stored by copy for reprint.
Indicates a stored file from print driver.
Indicates an edited file.
You can confirm the file details, preview and edit the file by tapping on this icon.
70
7 Folder
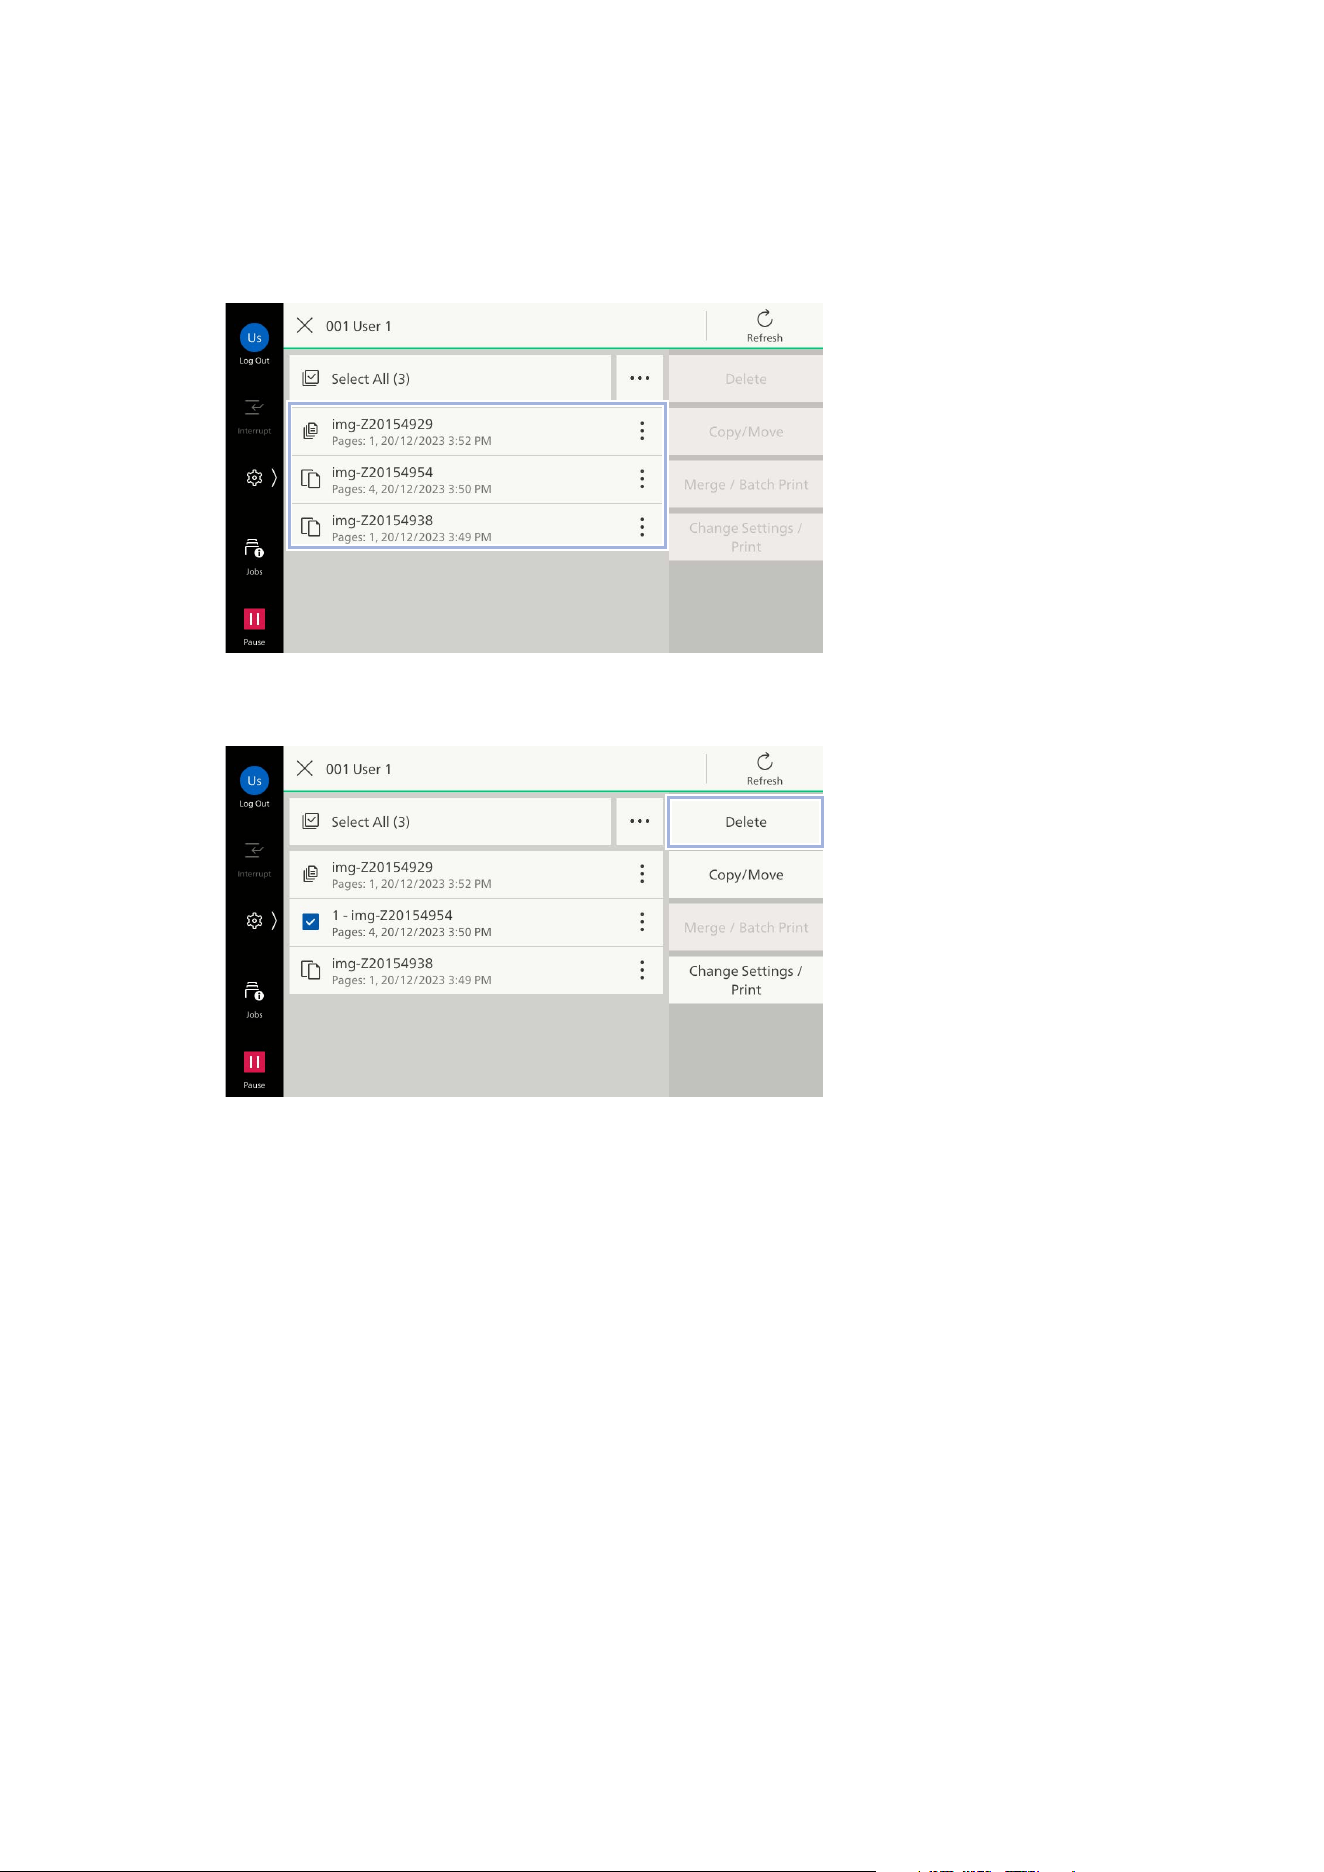
Deleting Files
Delete the files stored in the folder for reprint.
1. Tap on the file and apply a check mark.
2. Tap on [Delete].
3. Tap on [Delete].
71
7.3 Operations of Folder for Reprint
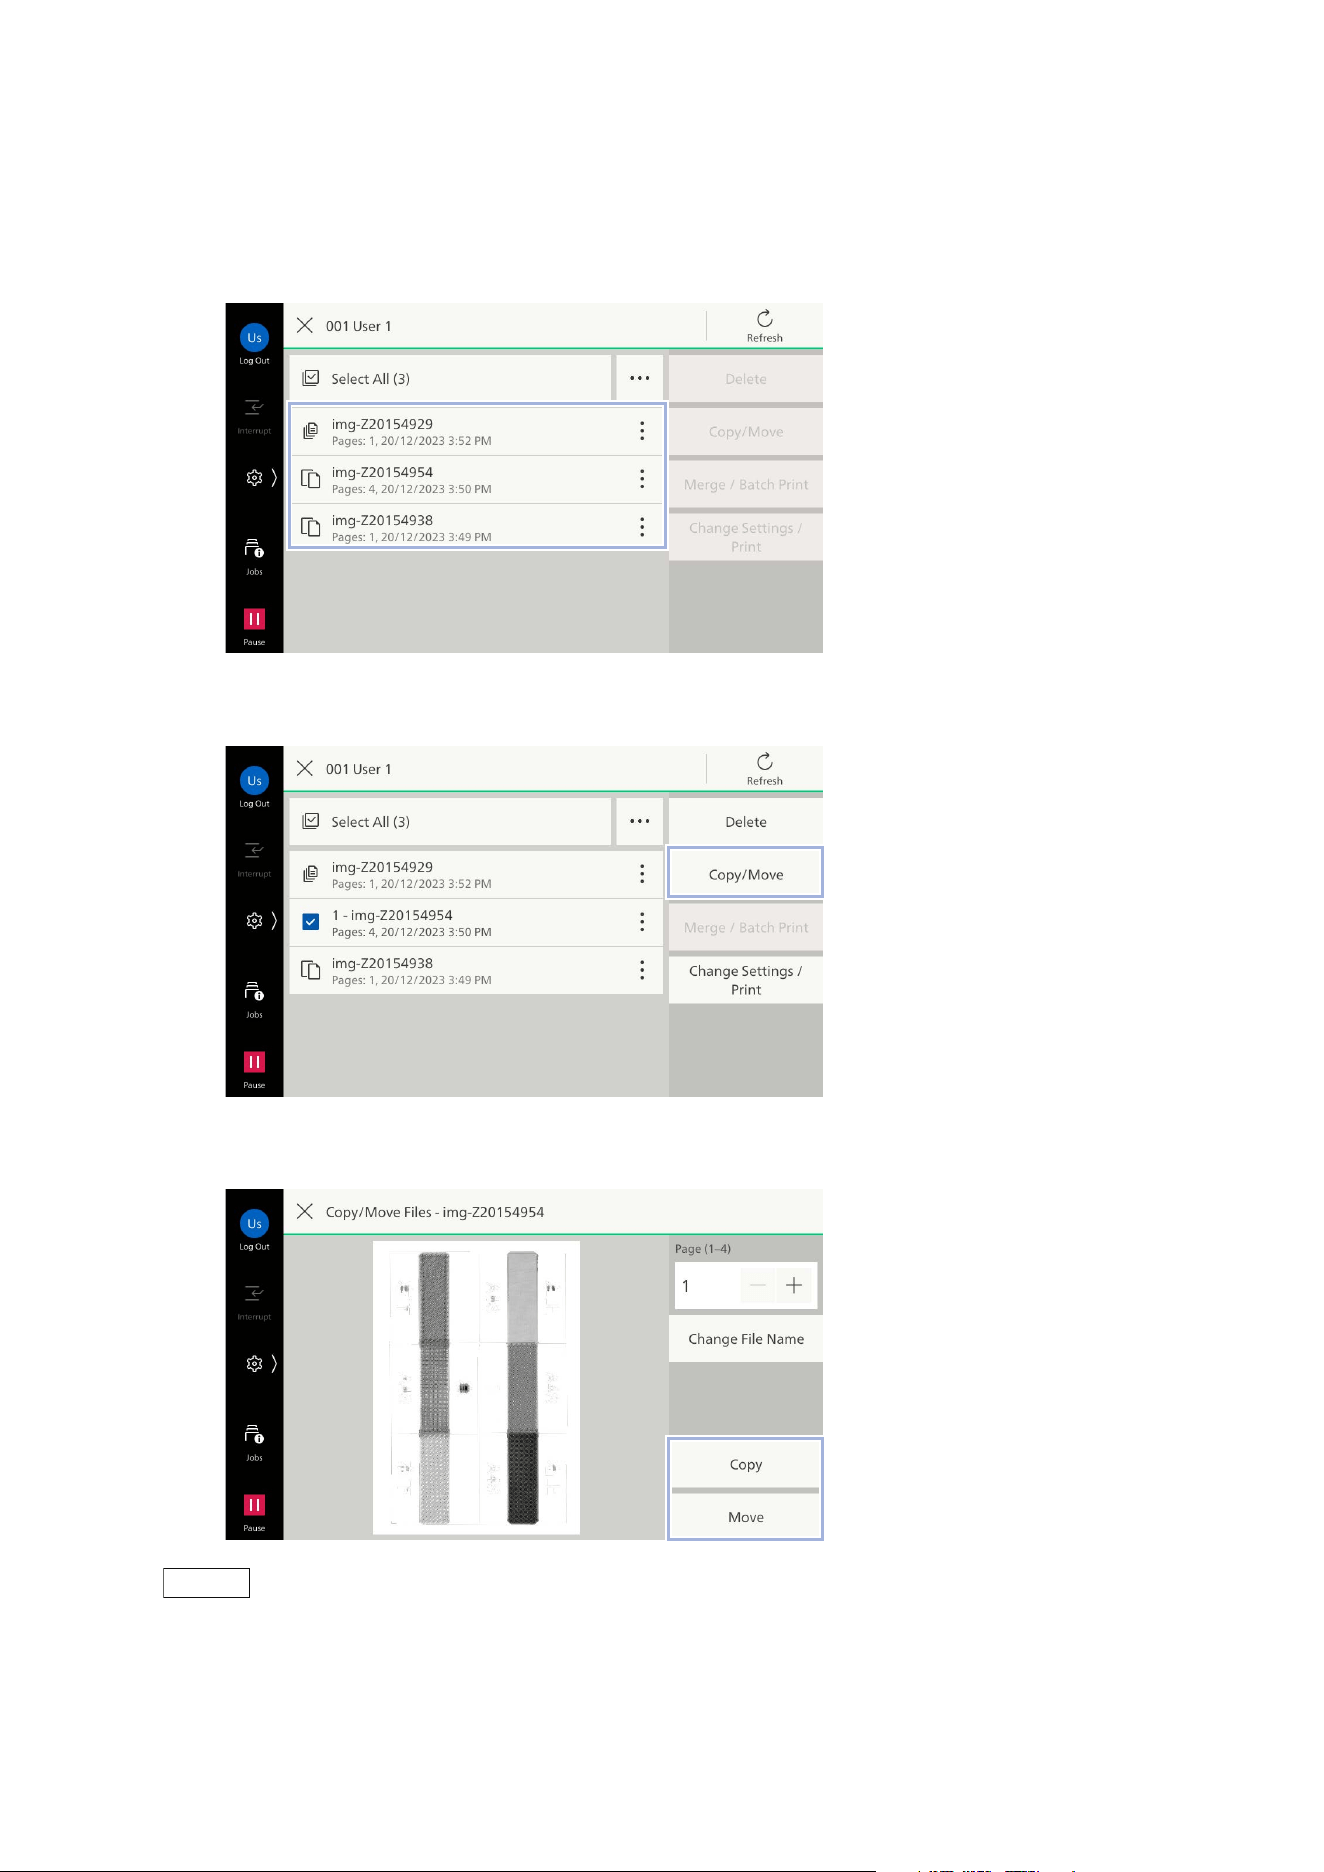
Copying/Moving Files
You can copy or move the files stored in the folder for reprint to another folder.
1. Tap on the file and apply a check mark.
2. Tap on [Copy/Move].
3. Tap on [Copy] or [Move].
Note
You can change the name of the file to copy or move by tapping on [Change File Name].
4. Select the destination folder for the file to copy or move, and tap on [Move].
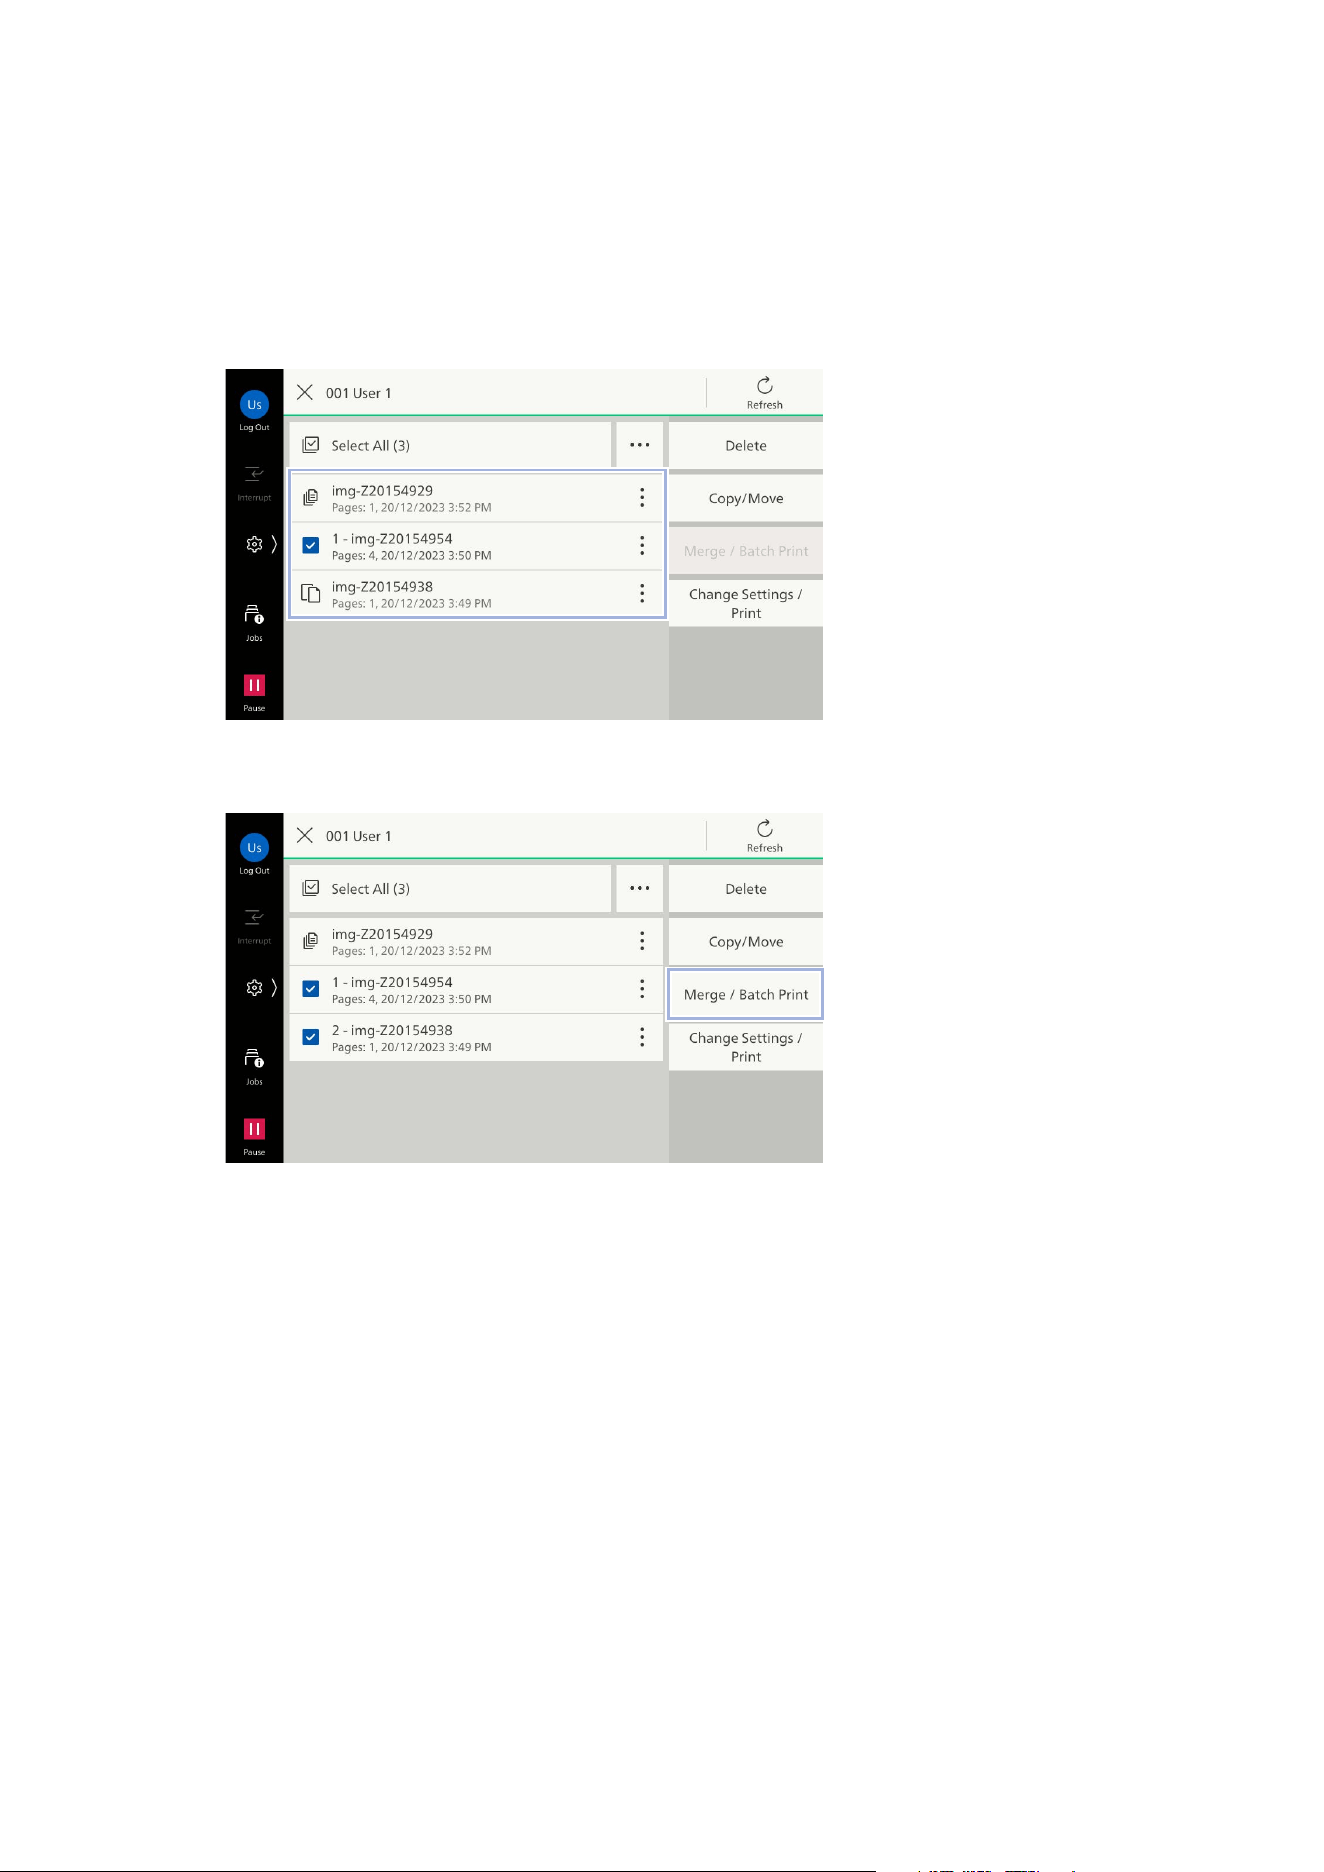
72
7 Folder
Printing Multiple Files (Merging)
Merge the multiple files stored in the folder for reprint and then print.
You can also save the merged file.
1. Tap on the files in order of merging and apply a check mark.
Numbers are displayed in the file names in the order you tapped them.
2. Tap on [Merge / Batch Print].
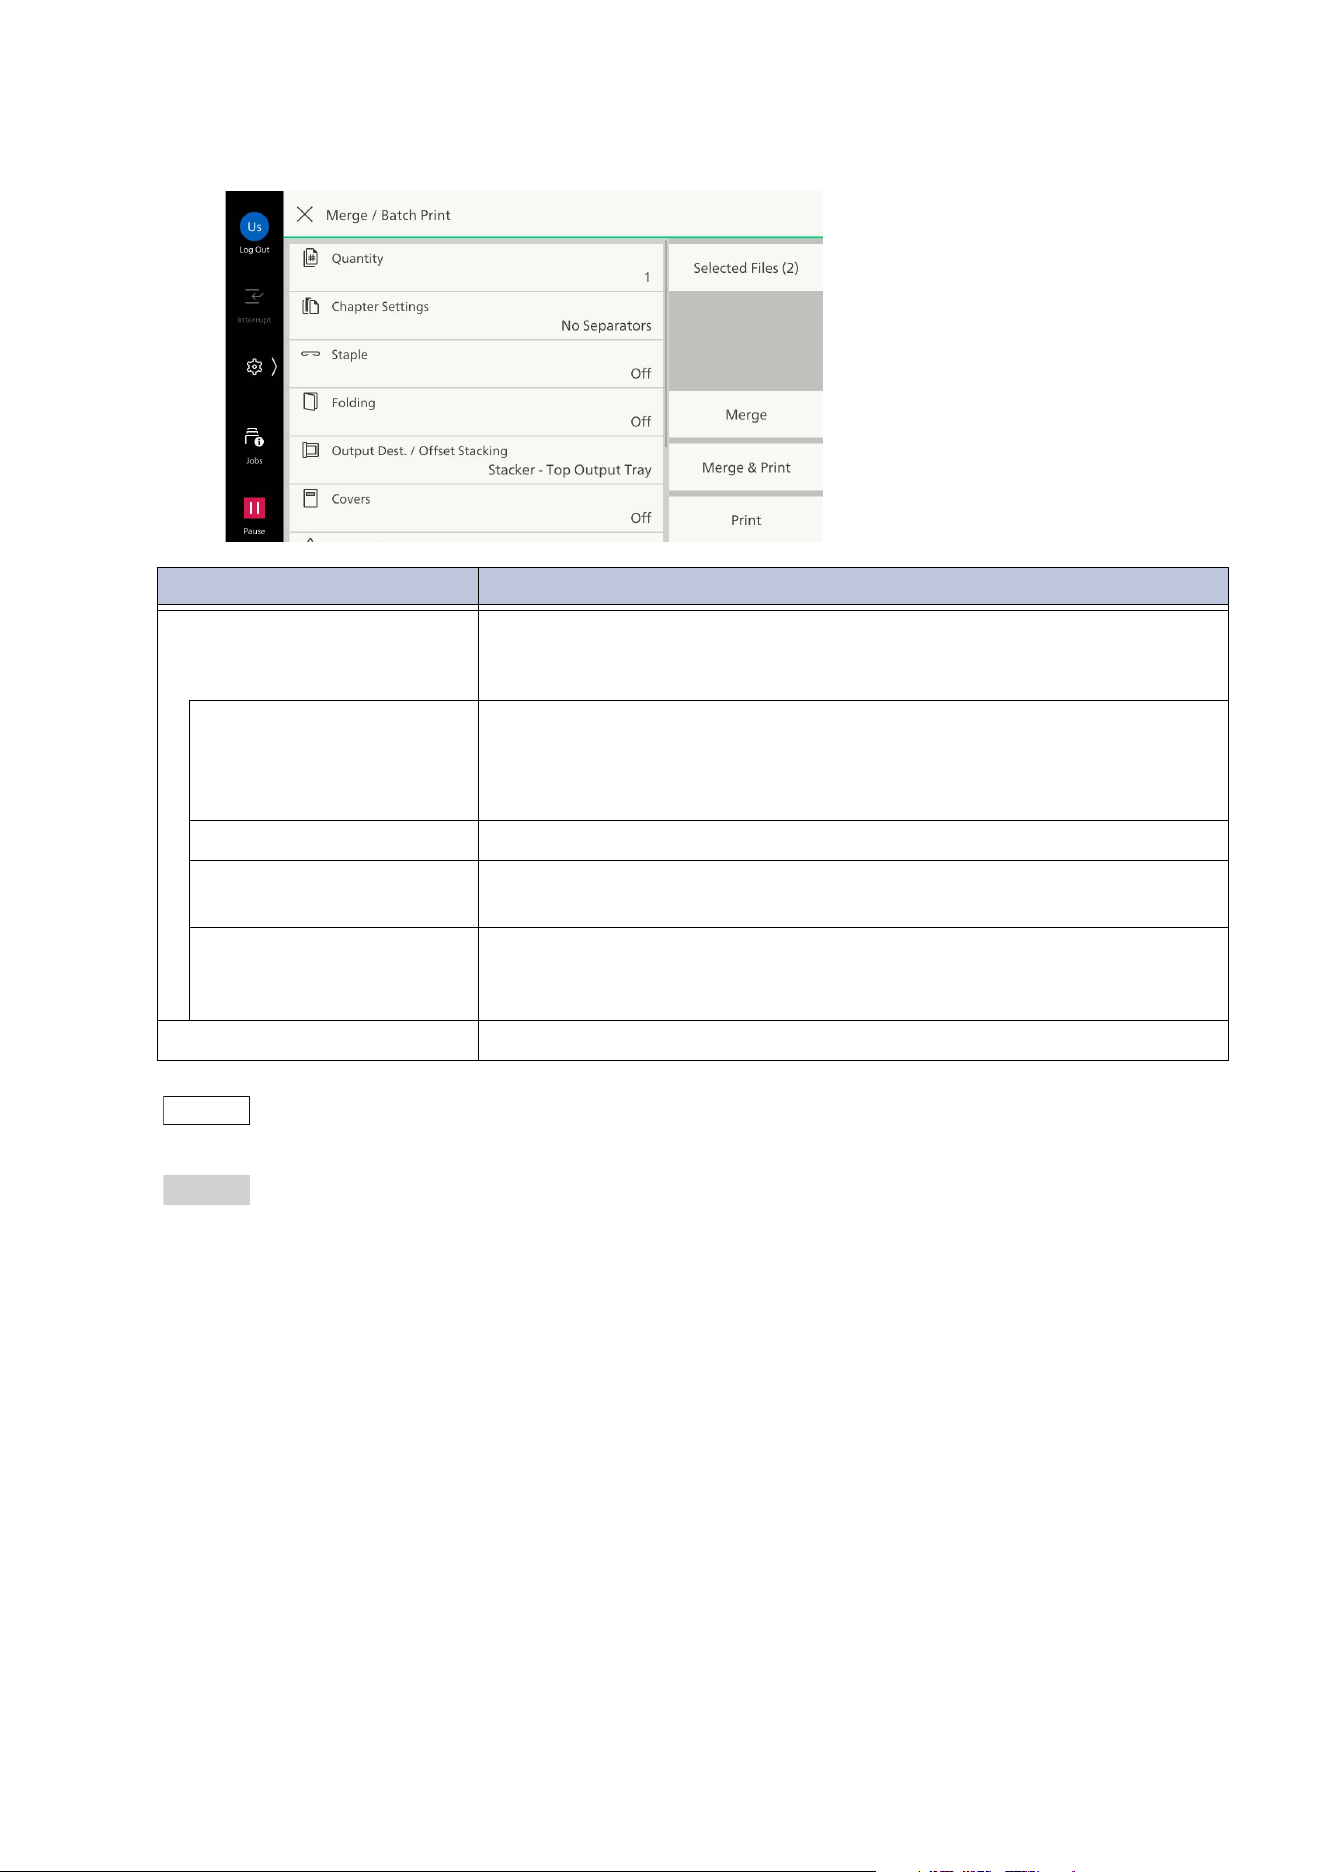
73
7.3 Operations of Folder for Reprint
3. As needed, configure the setting items.
Note
Tap on [Selected Files] to confirm the currently selected file.
Refer
For other items, refer to "Features List" (P.43) of the copy function.
4. Save or print the merged file.
[Merge]
Save the merged file without printing.
[Merge & Print]
Save and print the merged file.
[Print]
Print the merged file.
Item Description
[Chapter Settings] Merges the files by inserting the separator between the selected files
or combining files as continuous pages without dividing them into
chapters.
[No Separators] Separates each file to be individual chapters and merges them into a
single file. For both sides printing, even if the last page of the
previous file is the front side, the next file is printed from the front
side.
[Bla
nk Separators] Inserts the blank separator between the selected files.
[Printed Separators] Sets the first page of each file to be printed on different paper as a
chapter's title page.
[No Chapters] Sets to print the multiple files as a single two-sided file without
separating them into chapters. When the last page of the previous
file is the front side, the next file is printed from the back side.
[File
Name] Sets the file name after merging.
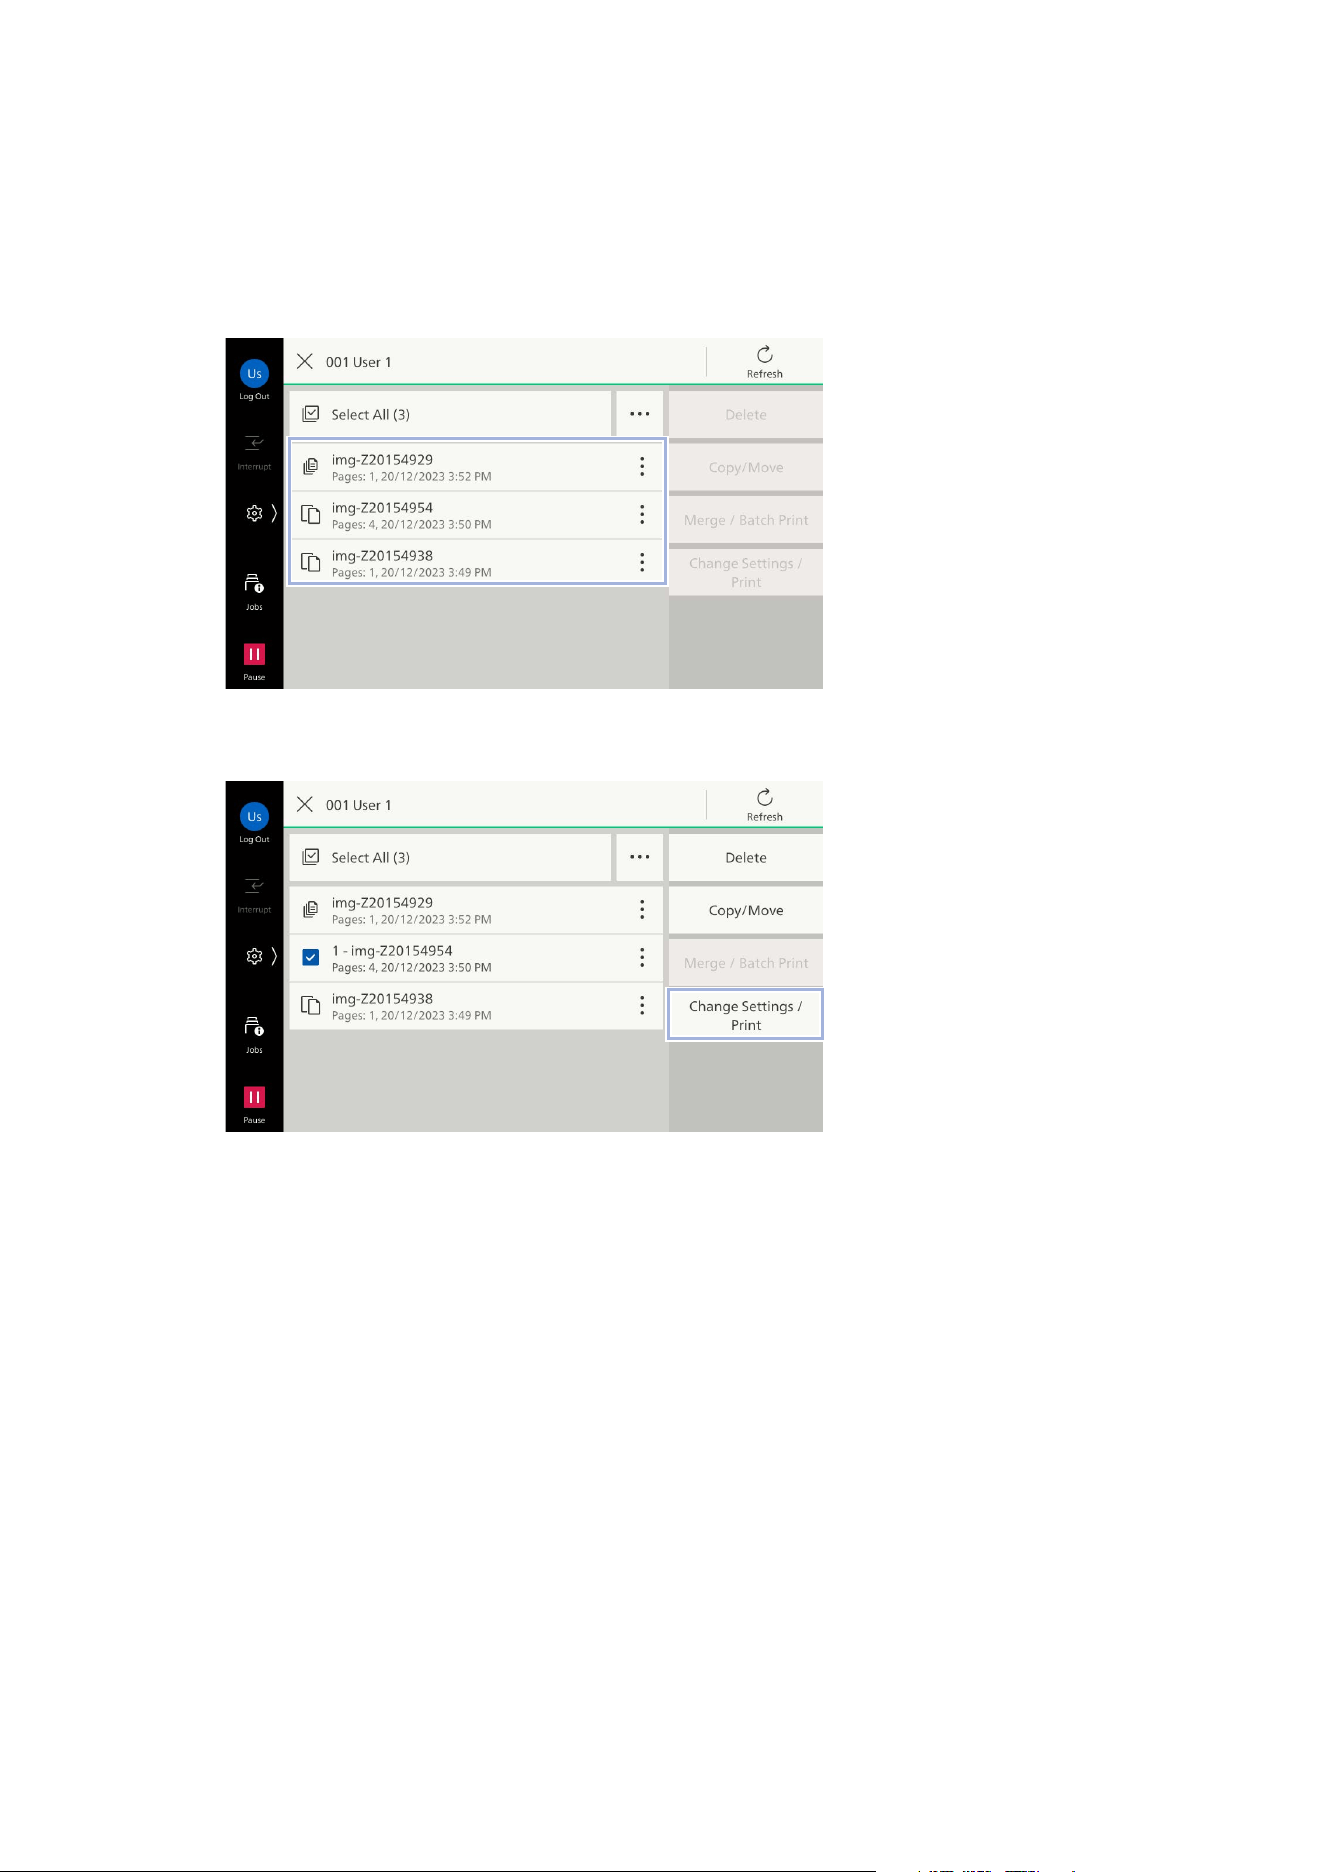
74
7 Folder
Printing Files
Print the files stored in the folder for reprint.
You can also re-save the file with changed print settings.
1. Tap on the file and apply a check mark.
2. Tap on [Change Settings / Print].
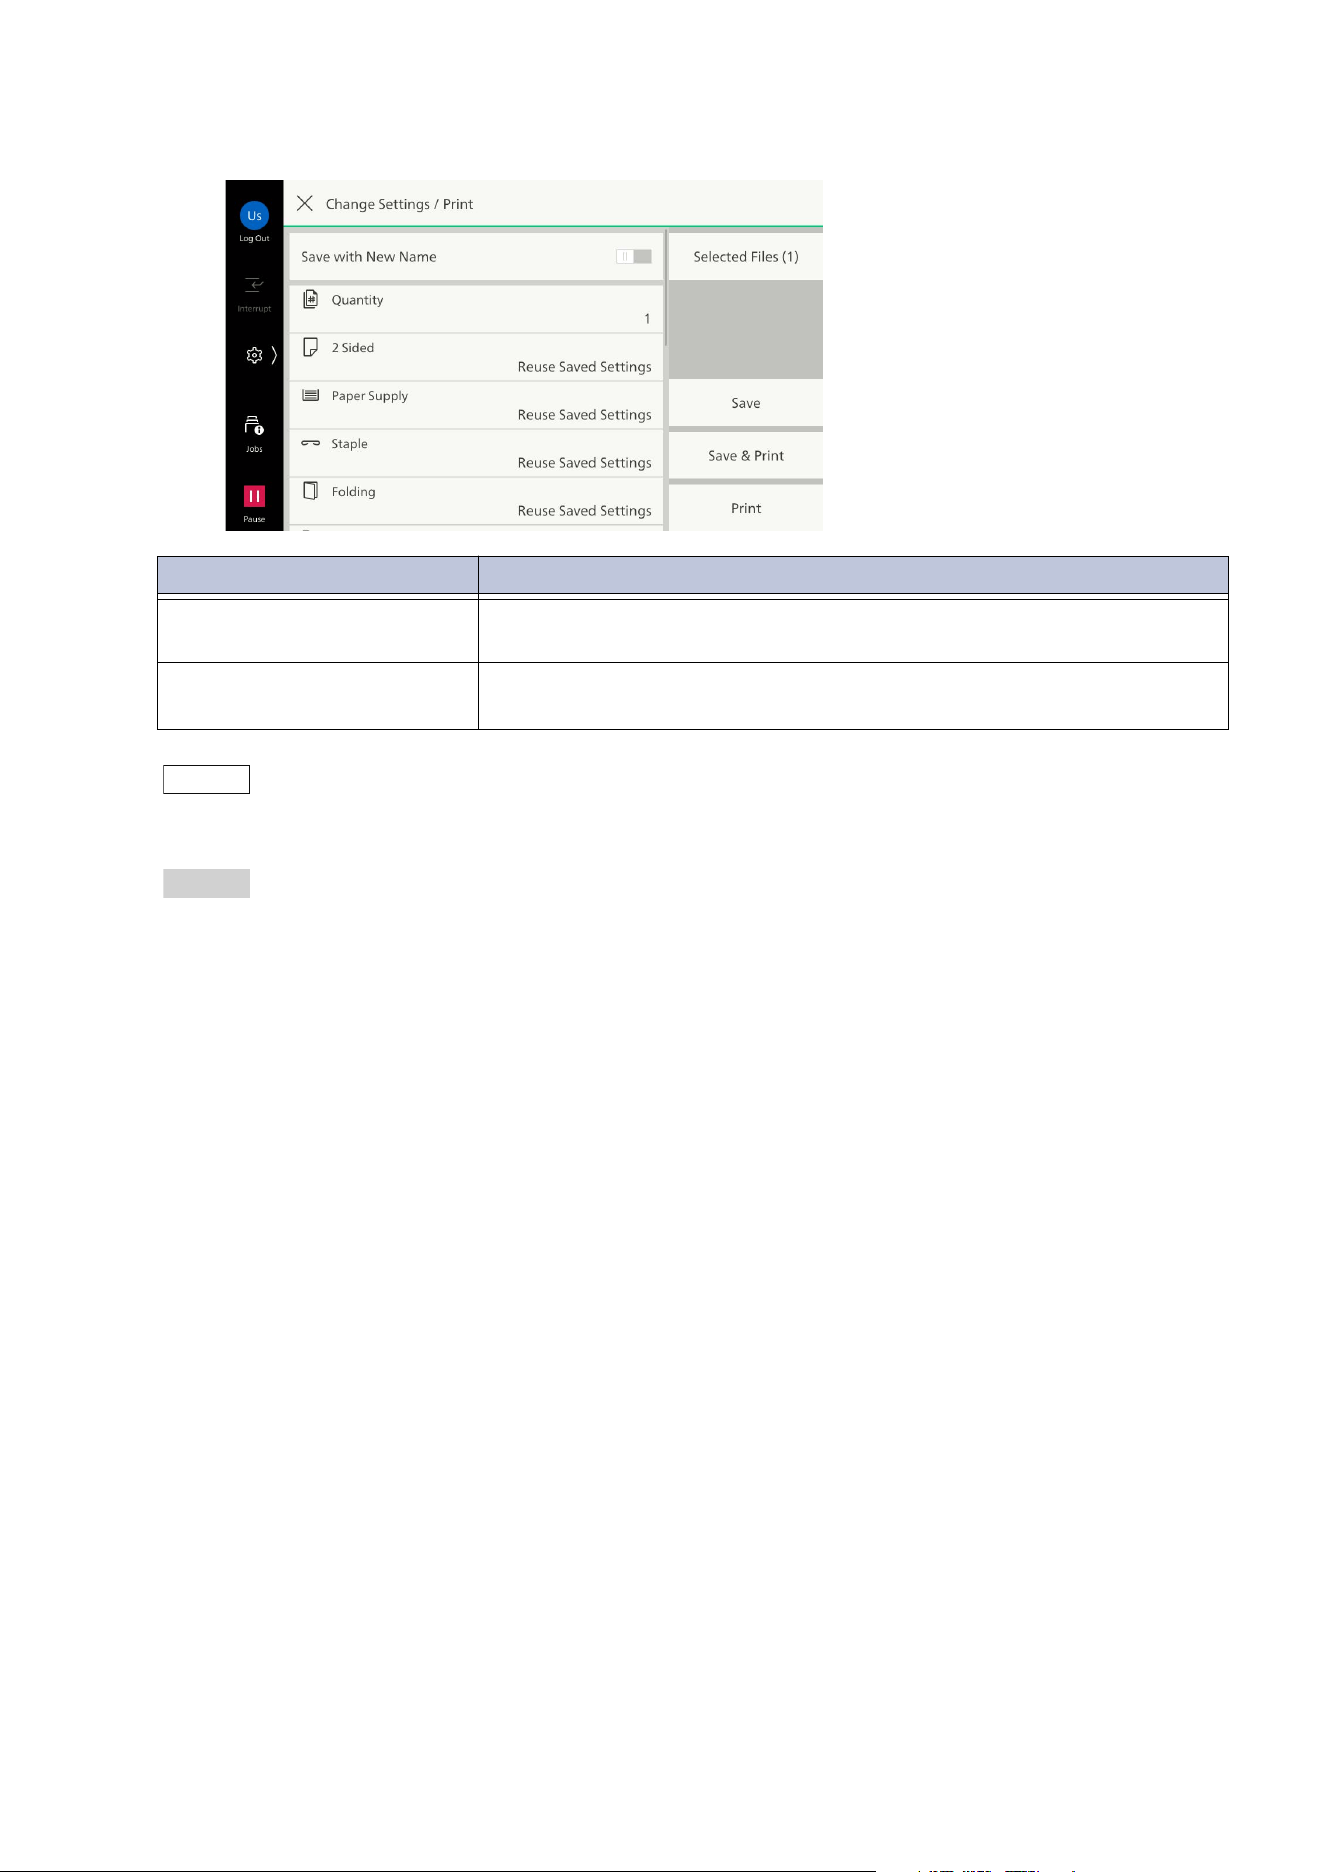
75
7.3 Operations of Folder for Reprint
3. As needed, configure the setting items.
Note
Tap on [Selected Files] to preview the currently selected file. If you select the multiple files, the list of files
are displayed.
Refer
For other items, refer to "Features List" (P.43) of the copy function.
4. Save or print the file.
[Save]
Save the file without printing.
[Save & Print]
Save and print the file.
[Print]
Print the file.
Item Description
[Save with New Name] The screen to enter the file name is displayed when you re-save the
file.
[Sample Set] When printing multiple sets, you can print a sample set to check the
output and then print the remaining sets.
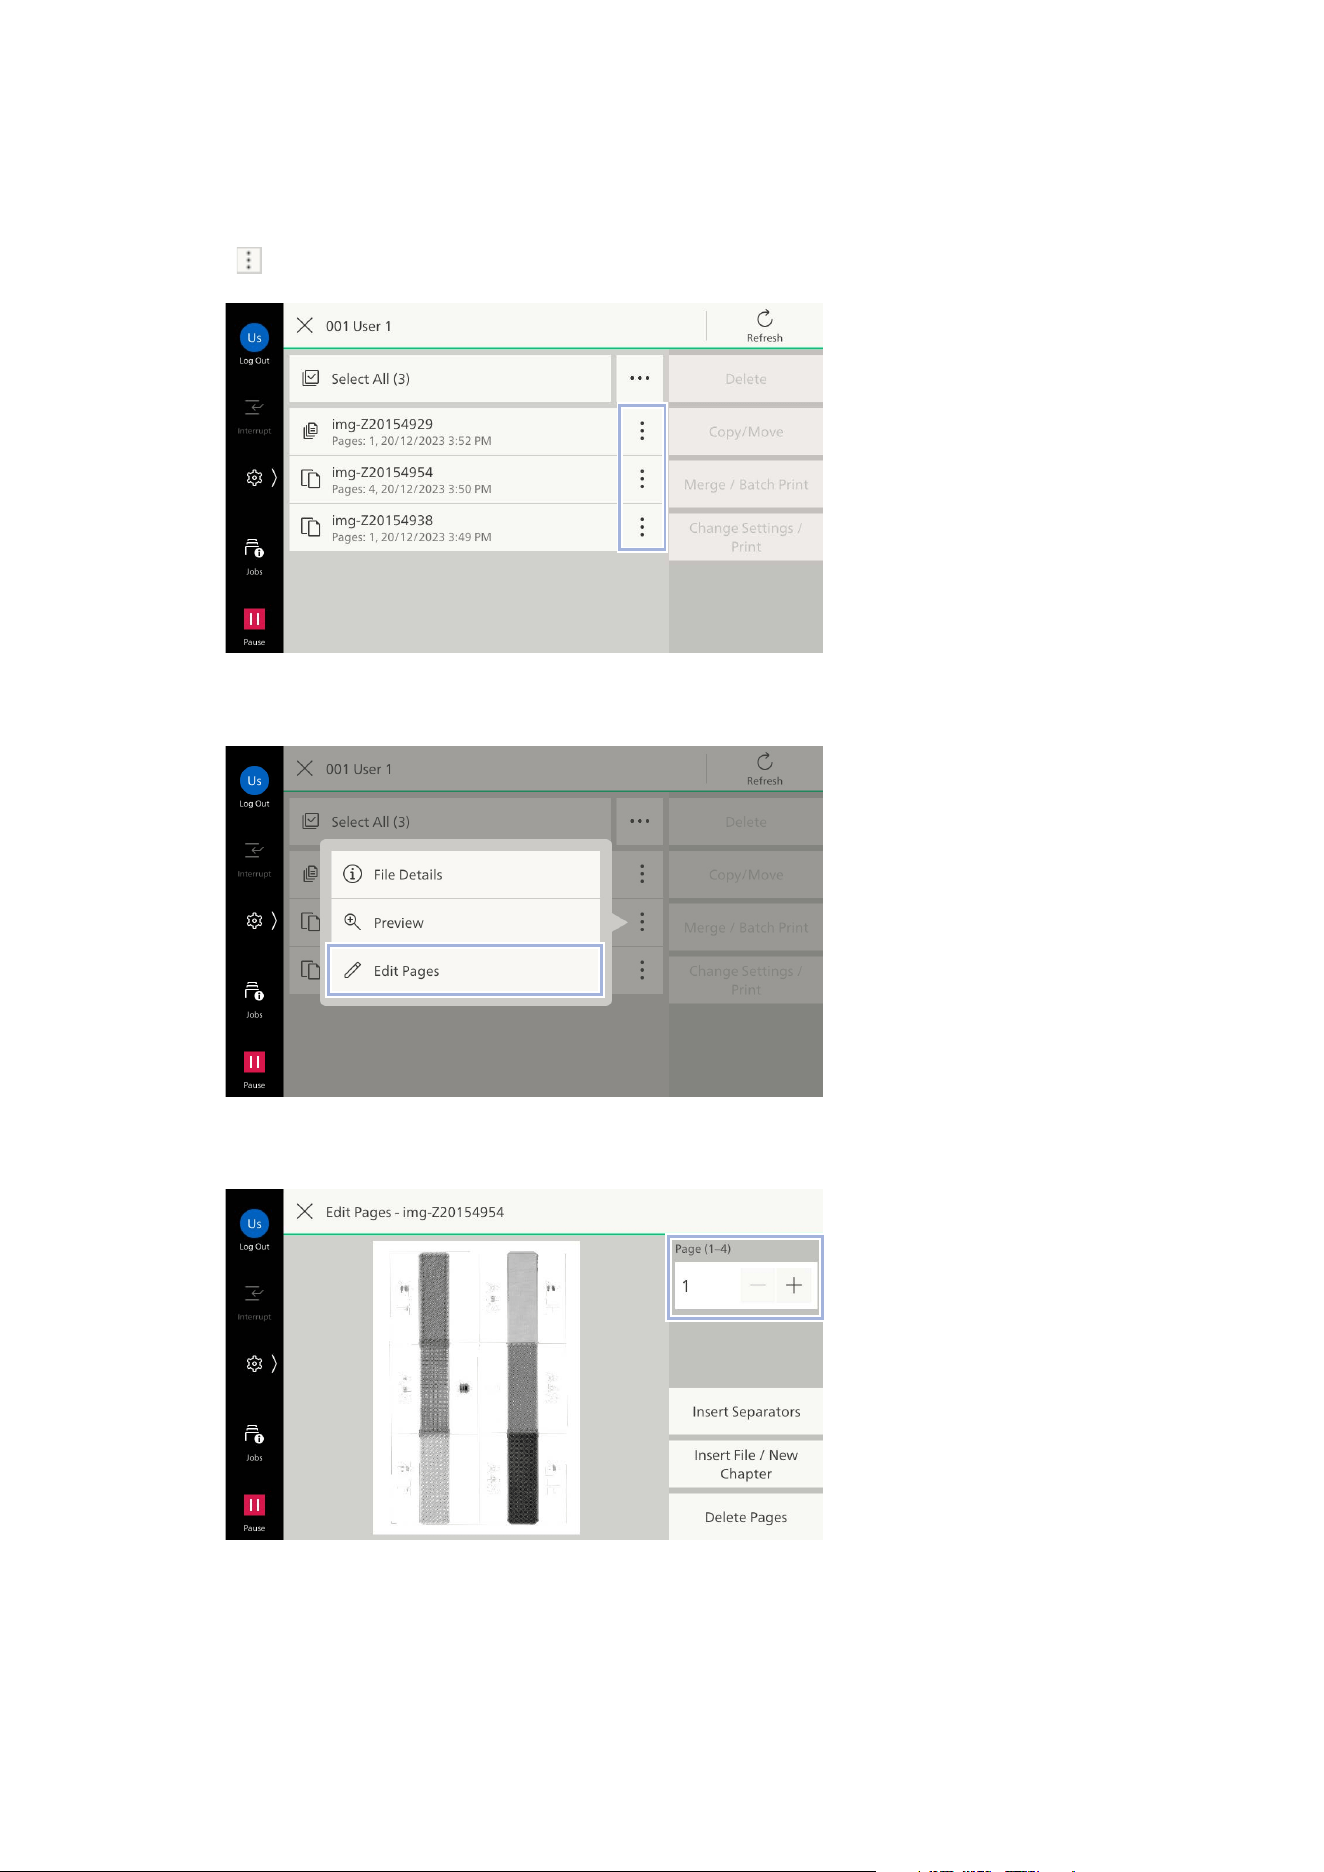
76
7 Folder
Editing a File
You can edit the files saved in the folder for reprint, such as inserting a separator or deleting a page.
1. Tap on of the file to edit.
2. Tap on [Edit Pages].
3. Display the page to edit.
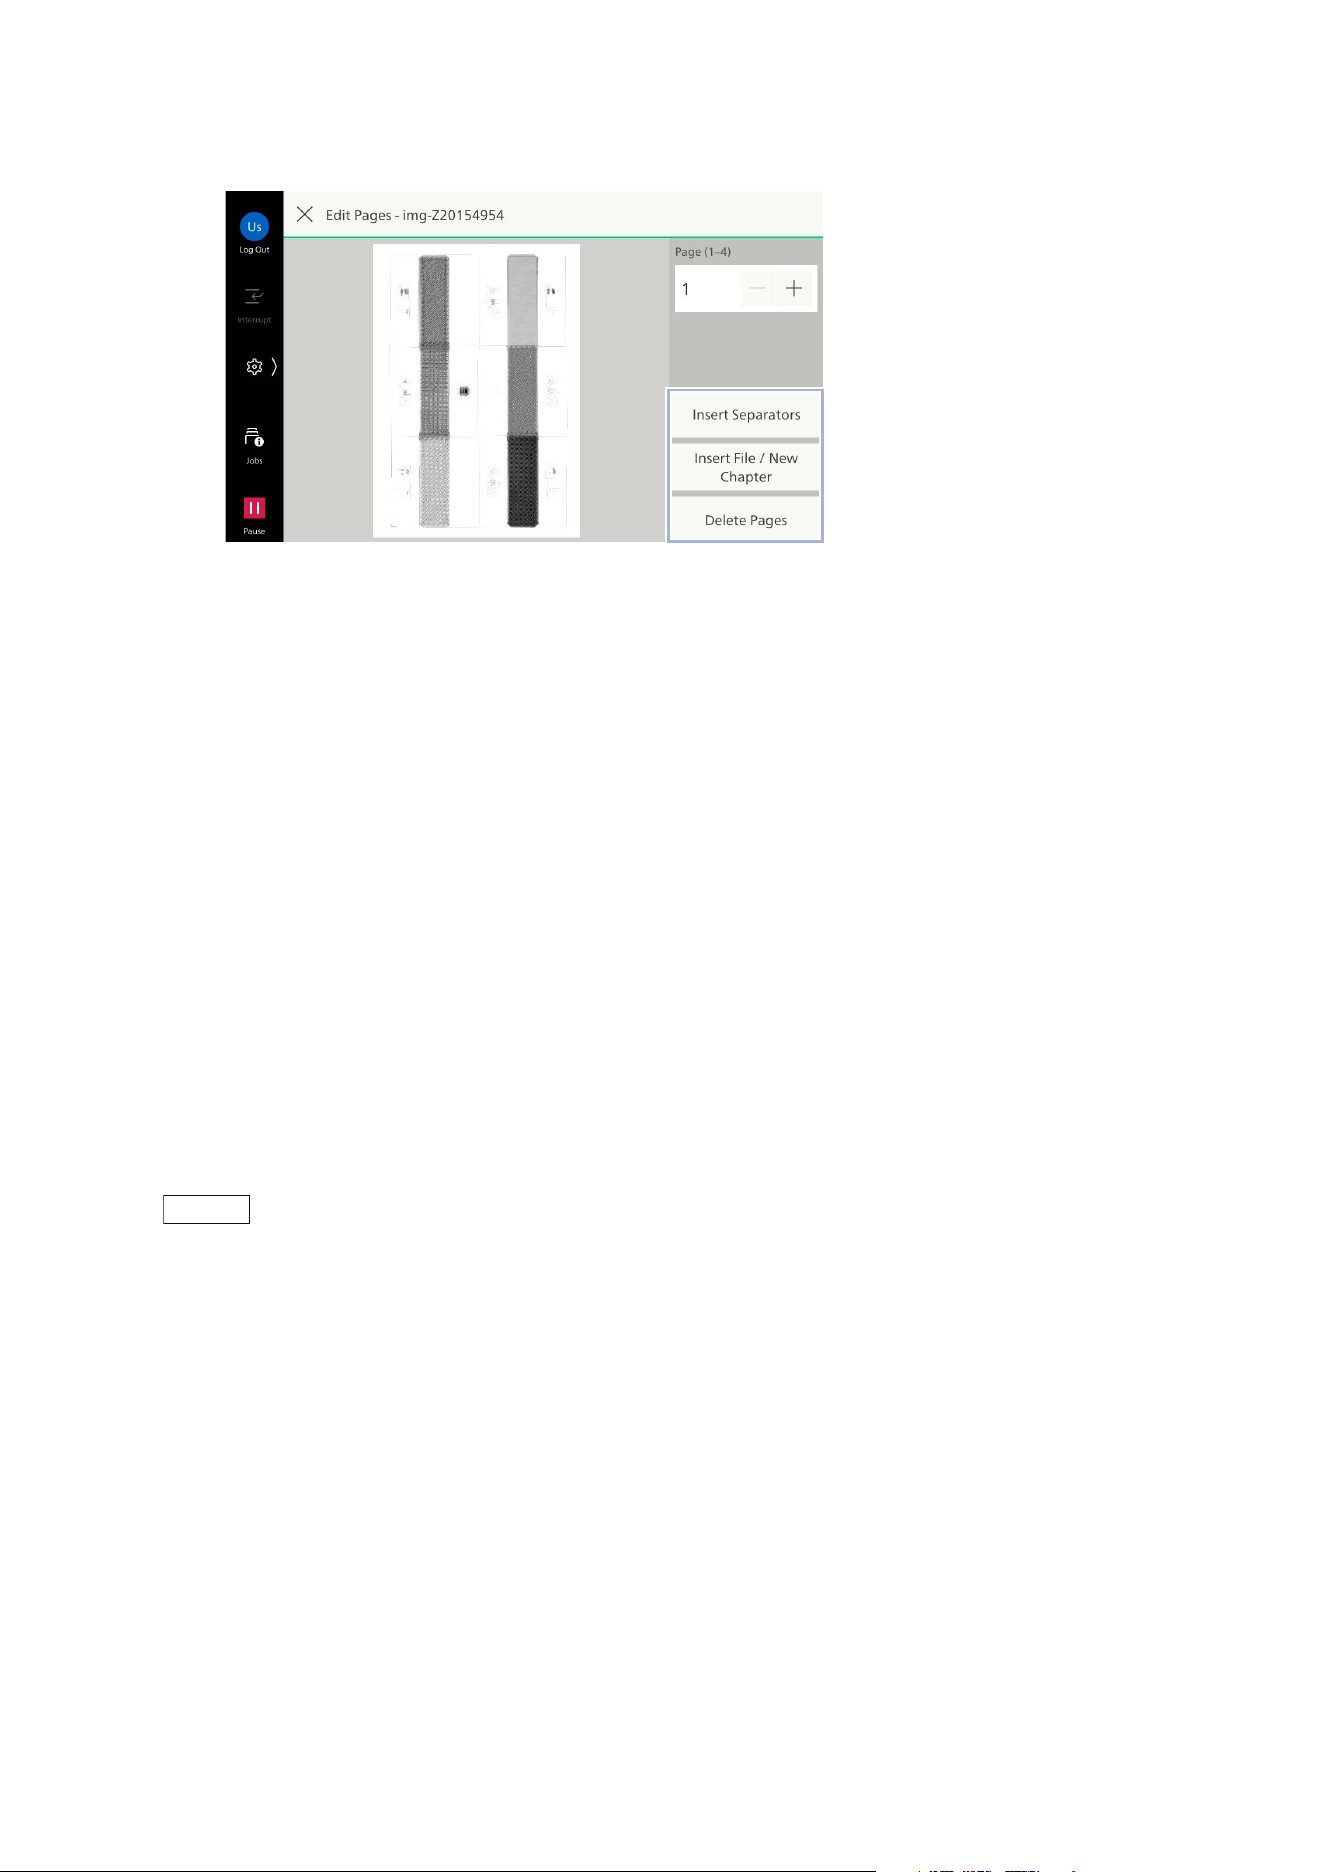
77
7.3 Operations of Folder for Reprint
4. Select the edit option.
Inserting separators
Insert the separator after the displaying page.
1)Tap on [Insert Separators].
2)Select the paper tray to be used for the separator and enter the number of sheets to insert.
3)Tap on [Insert].
Inserting files
Insert another file saved in the same folder after the displaying page.
1)Tap on [Insert File / New Chapter].
2)Select the file to insert and tap on [Insert File & New Chapter] or [Insert File].
[Insert File & New Chapter]
Insert the file after the displaying page to start the new chapter. For both sides printing, even if the
displaying page is the front side, the inserted file is printed from the front side.
[Insert File]
Insert
the files after the displayed page without starting the new chapter. In two-sided printing, even
if the displayed page is the front side, the inserted file is printed from the back side.
Note
In [Insert File], the file needs to meet the following conditions:
- Not including different size pages
- Not including cover page or separator
- Being same orientation and size with the file to edit
You cannot insert the file between cover pages or separators.
Deleting pages
Delete pages from the file.
1)Tap on [Delete Pages].
2)Apply a check mark in the page to be deleted.
3)Tap on [Delete].
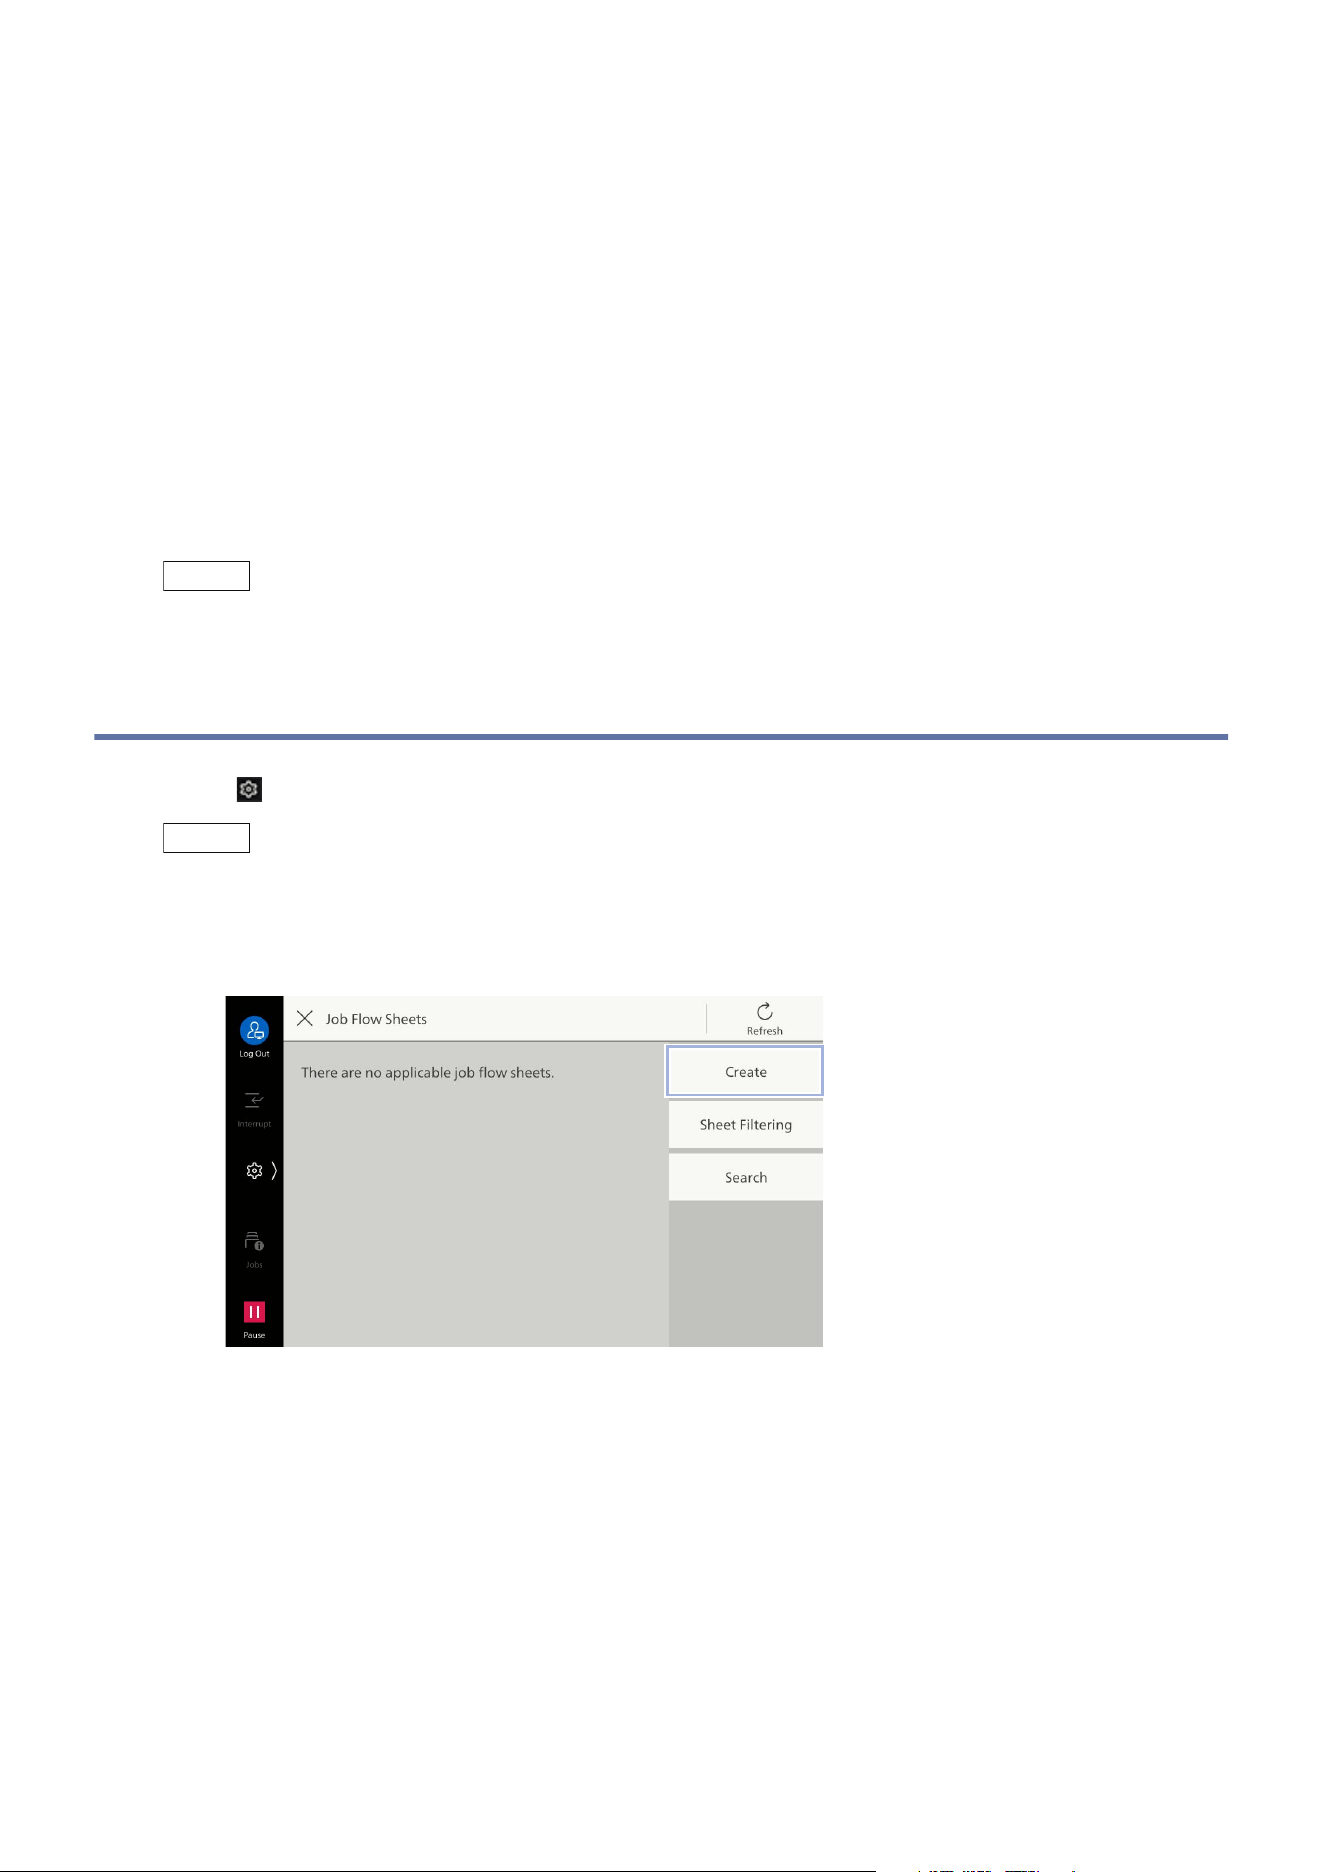
78
8 Job Flow Sheets
8 Job Flow Sheets
This feature enables executing a series of actions registered. Up to 1,000 job flow sheets can be
registered.
You can link a folder with a job flow sheet to print stored files or send stored files to specified
recipients.
There are following methods to execute a job flow sheet.
It is automatically executed when a file is saved in the folder.
Select a file saved in a folder and manually execute the associated job flow sheet.
Select a file saved in a folder and a job flow sheet, and manually execute them.
Note
The job flow sheet starting from a scan cannot be used.
8.1 Creating Job Flow Sheets
1. Tap on > [Device] > [App Settings] > [Job Flow Sheets Settings] > [Create Job Flow Sheet].
Note
A job flow sheet created from [Send from Folder] can only be used for the folder for which the job flow
sheet was created. It cannot be used with other folders.
2. Tap on [Create].

79
8.1 Creating Job Flow Sheets
3. Enter the job flow sheet name in [Name].
4. Set [Description] and [Keyword] as needed.
5. Tap on the job flow sheets feature.
6. Set each items.
7. Tap on [OK].
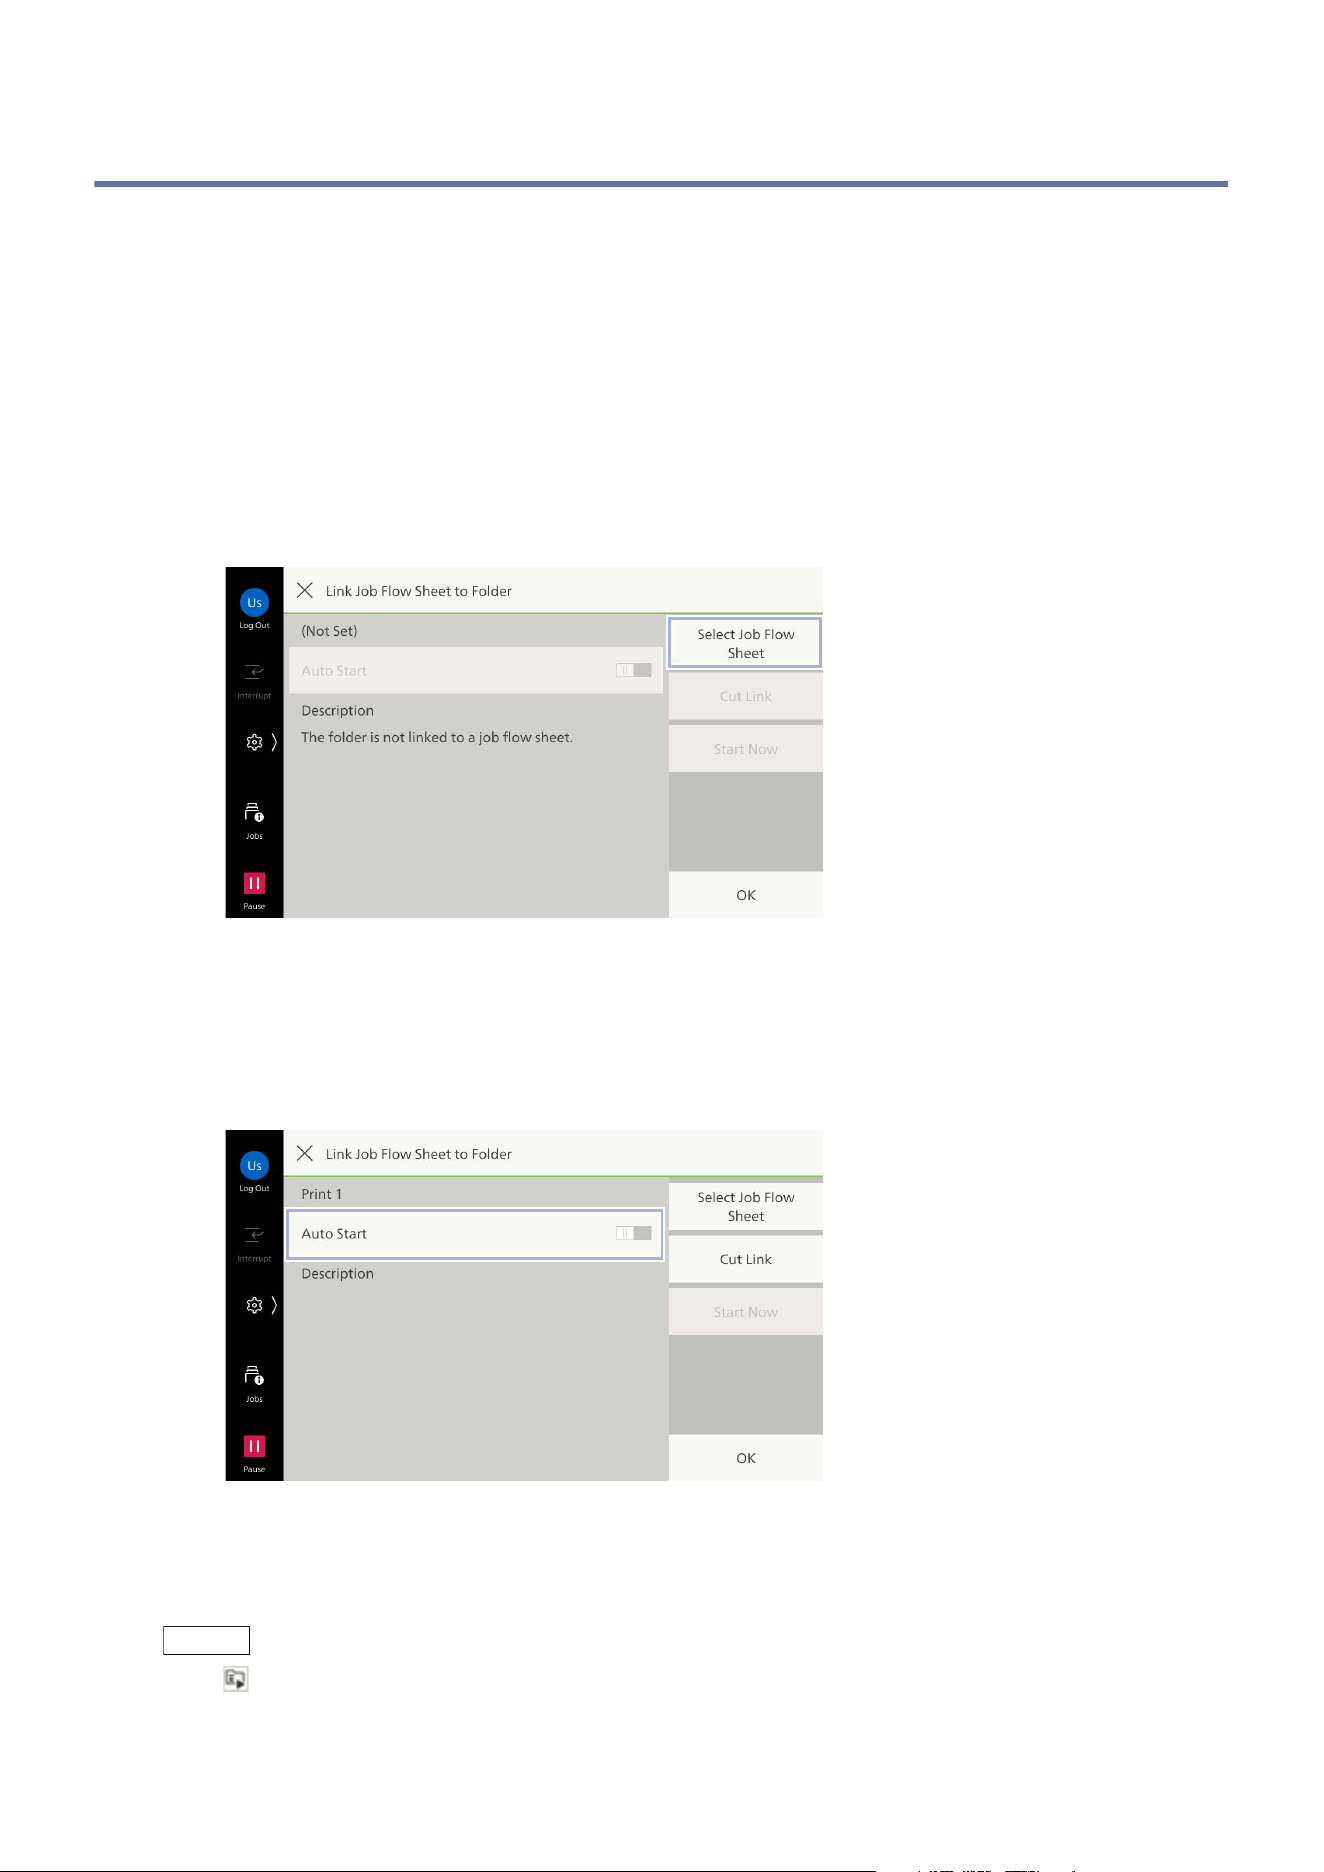
80
8 Job Flow Sheets
8.2 Executing Job Flow Sheets
Auto Start
Link the job flow sheet to the folder and execute automatically.
1. Tap on [Send from Folder].
2. Tap on the folder.
3. Tap on [Folder Settings] > [Link Job Flow Sheet to Folder].
4. Tap on [Select Job Flow Sheet].
5. Tap on the job flow sheet to be used.
6. Tap on [OK].
7. Tap on [Auto Start] to enable.
8. Tap on [OK].
9. Tap on [OK] on the folder confirmation screen.
Note
is displayed at a folder for which Auto Start is set to the folder.
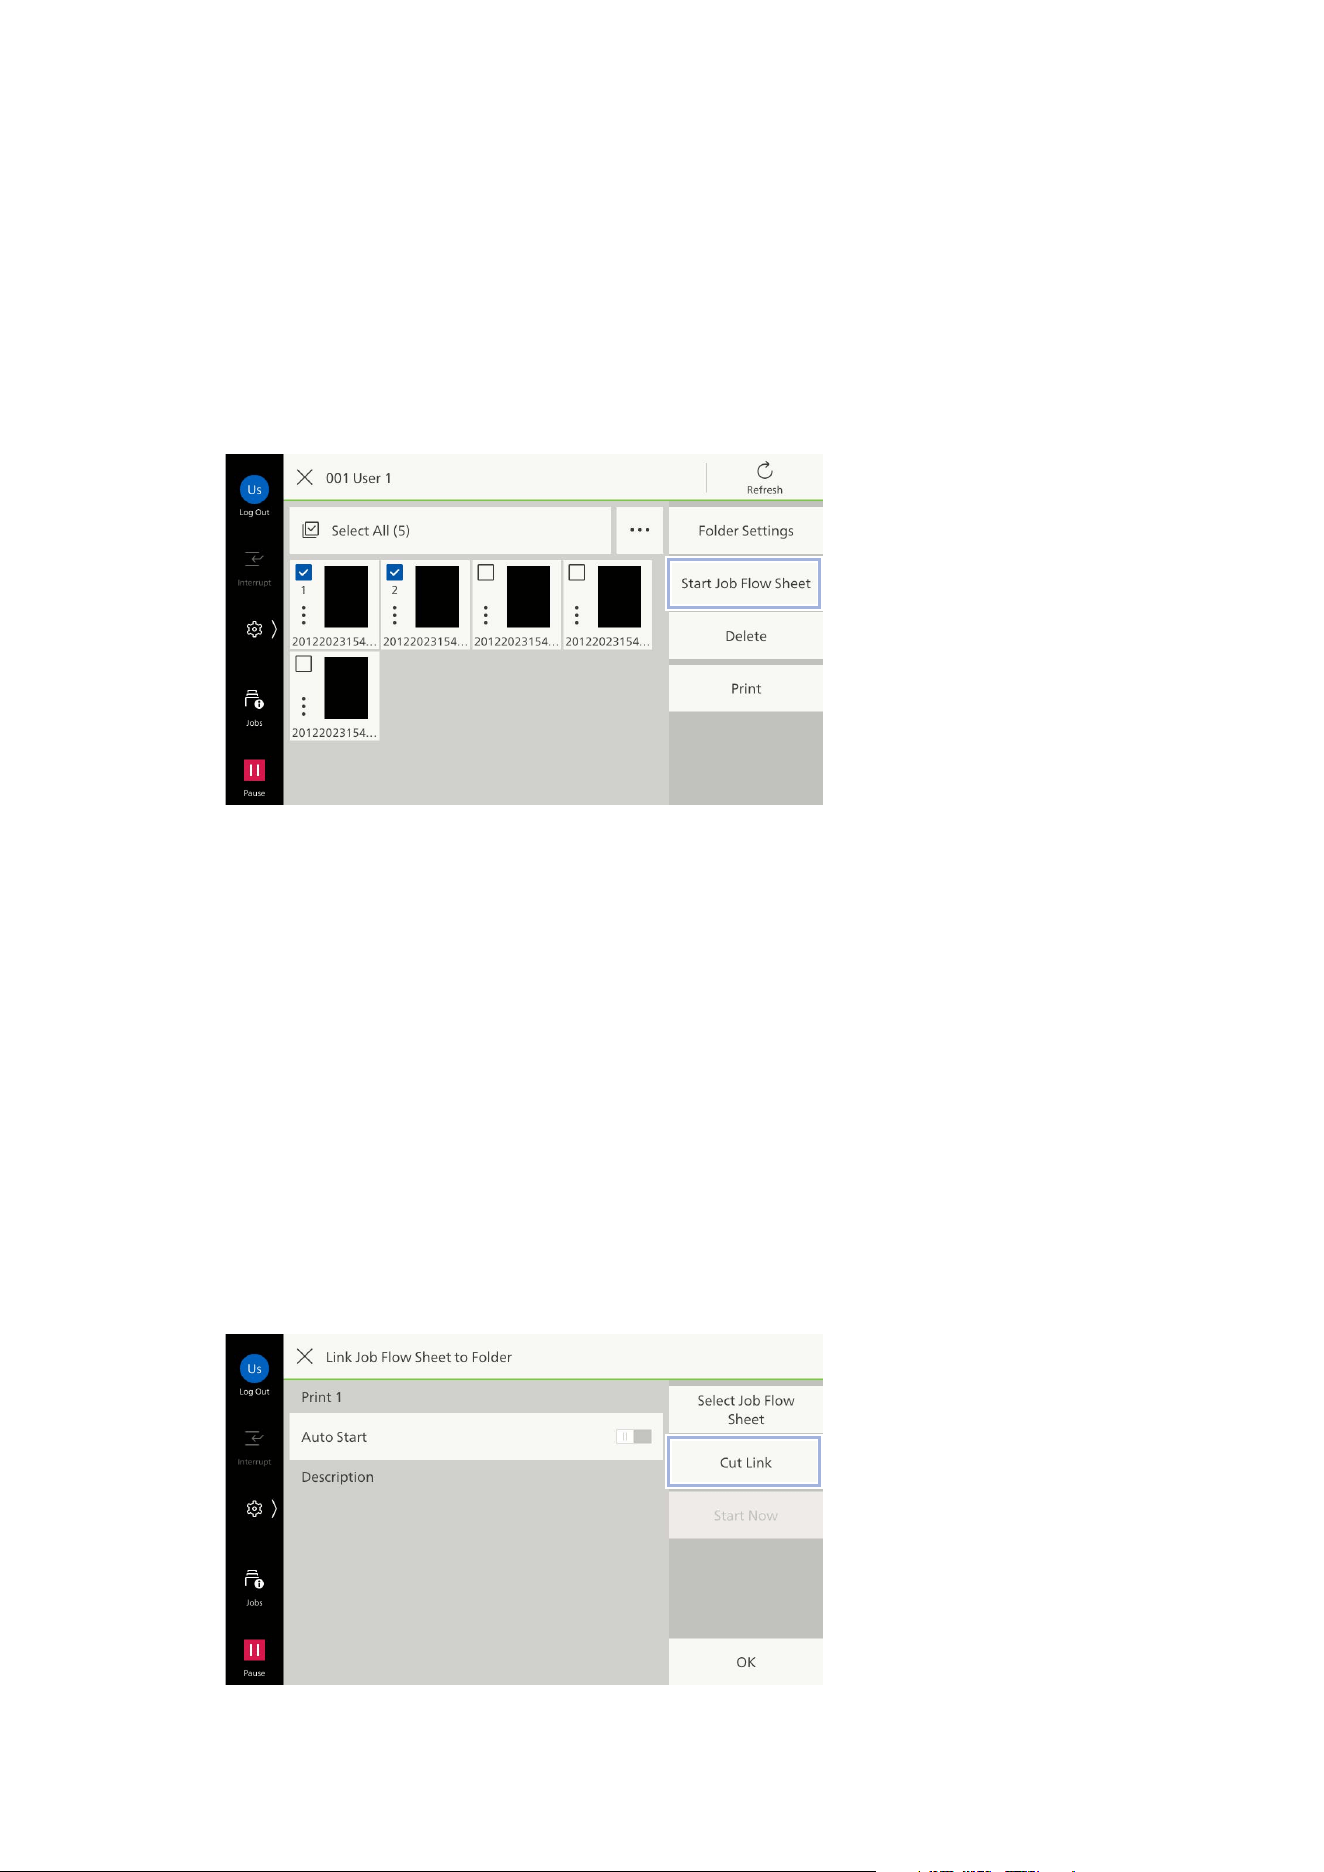
81
8.2 Executing Job Flow Sheets
Manual Start
Manually execute the job flow sheet by selecting the files.
1. Tap on [Send from Folder].
2. Tap on the folder.
3. Tap on the file to be operated and apply a check mark.
4. Tap on [Start Job Flow Sheet].
5. If there is no link between the folder and job flow sheets, select a job flow sheet to use and then
tap on [OK].
6. Tap on [Start].
Canceling
Cut the link to the job flow sheet associated with the folder.
1. Tap on [Send from Folder].
2. Tap on the folder whose job flow sheet is to be canceled.
3. Tap on [Folder Settings] > [Link Job Flow Sheet to Folder].
4. Check the linked job flow sheet, and tap on [Cut Link].
5. Tap on [Clear].

82
9 Address Book
9 Address Book
Using information registered with the Address Book, you can easily specify recipients or transfer
destinations of Email and Scan features. Starting apps from the Address Book entries is also
available.
9.1 Registering Contacts
5,000 contacts can be registered with the Address Book in the machine. A single contact can contain
recipients for Email and Server each up to one.
Note
Using Internet Services, a large volume of address information can be registered at one time in CSV
format.
1. Tap on [Addresses].
2. Tap on > [Add Contact].
3. Tap on [Display Name] to enter the name to be displayed.
Note
To register in [Favorites], tap on .
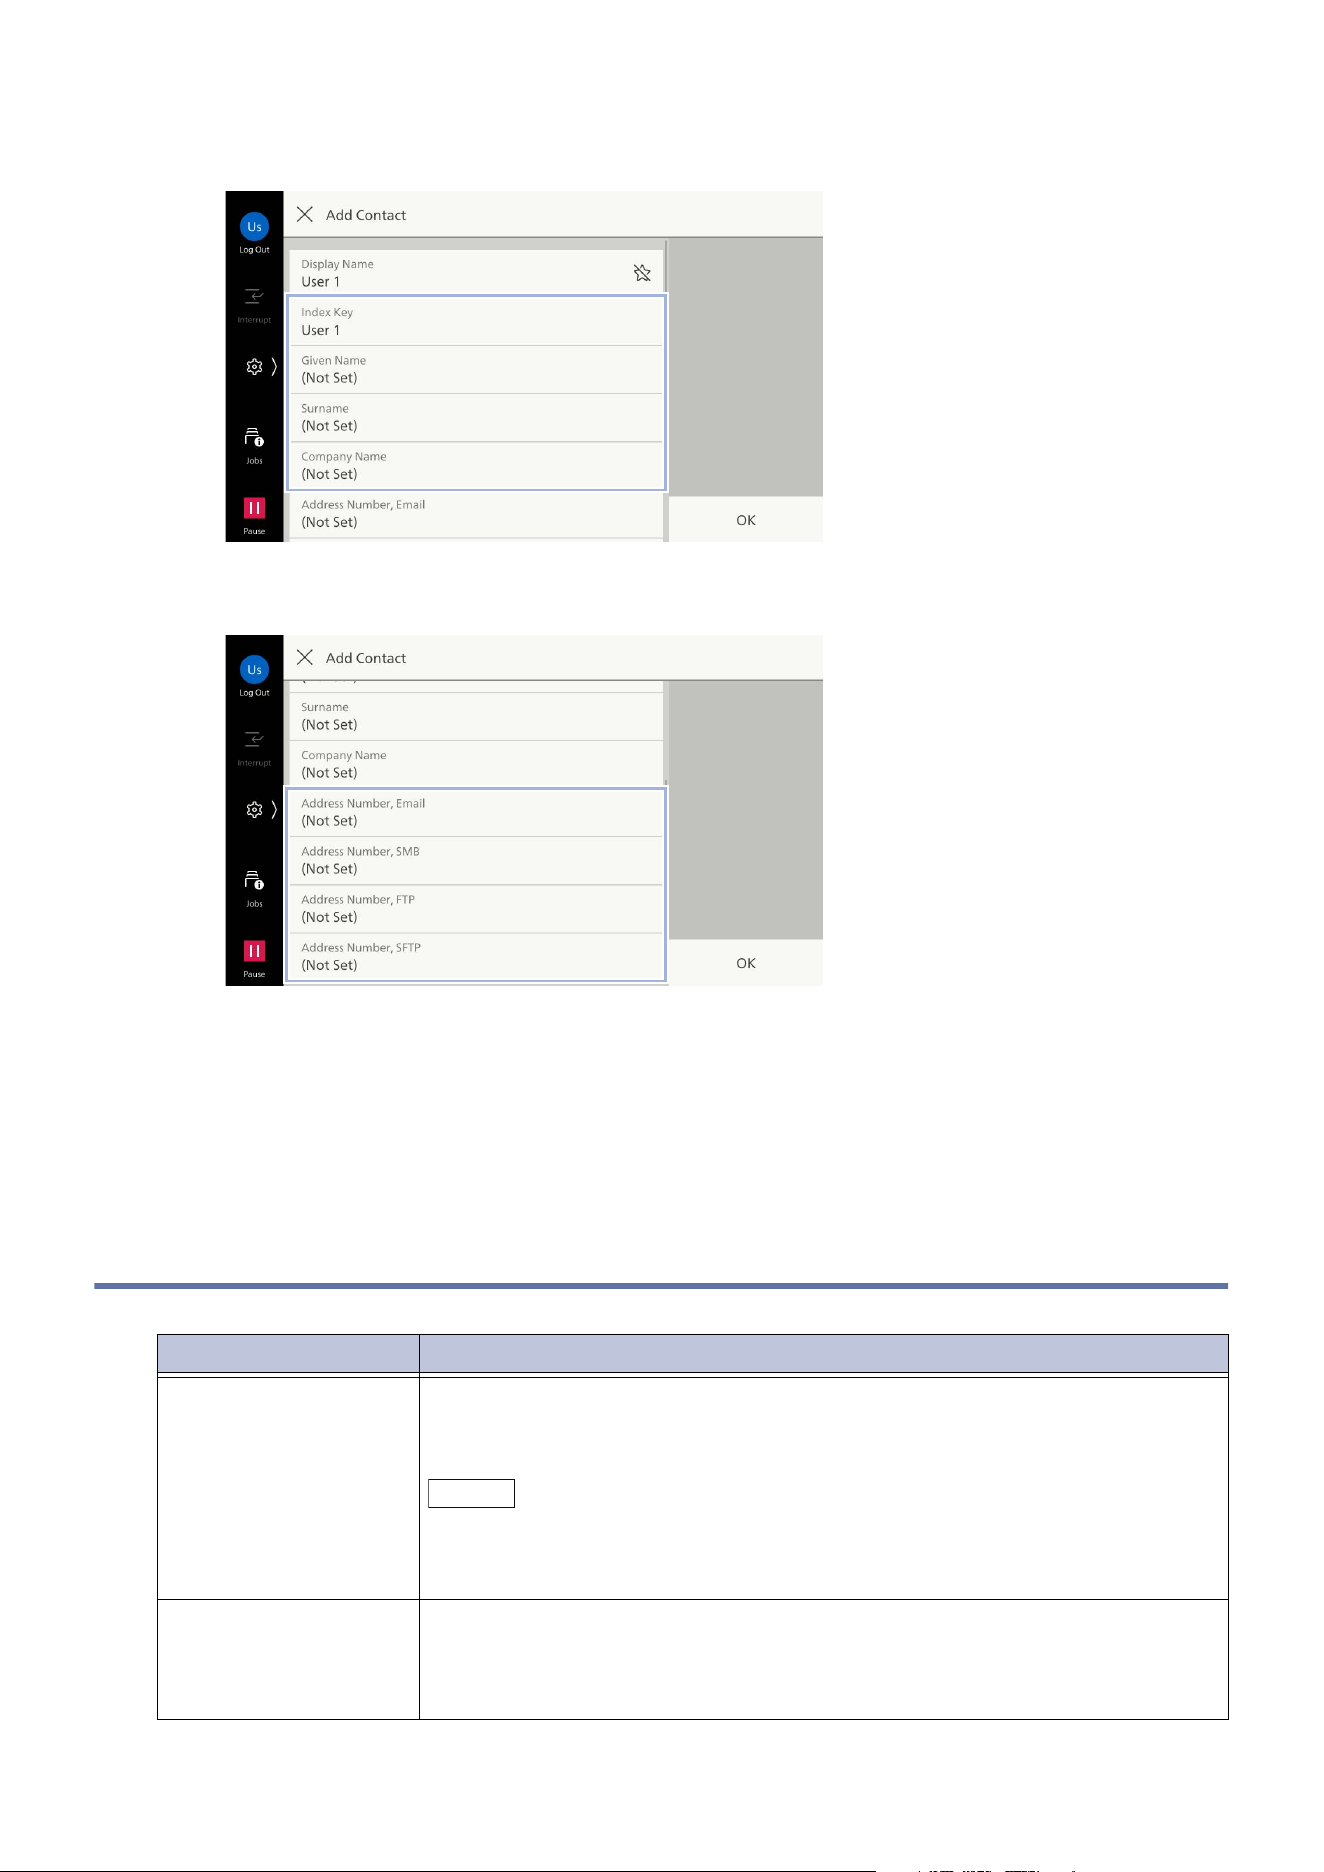
83
9.2 Setting Detailed Items for Each Service
4. Modify [Index Key] or enter [Surname], [Given Name] and [Company Name] as necessary.
5. Tap on each feature and enter the recipient.
6. Tap on [OK] or [Complete].
7. Set the detailed items for each service and tap on [OK].
8. Tap on [OK].
9.2 Setting Detailed Items for Each Service
Item Description
[Address Number] Set the registration number of the address.
If [Display One-Touch Buttons] is enabled, the contact is set as the one-
touch button when you set its address number from 1 to 72.
Note
Assign the respective Address Numbers per destination type.
[Address Number] is displayed when [Display Address Number] in "[Address
Book Settings]" (P.119) is set to [On].
Telephone Number,
Office, Post
Enter each items.
Item names can be changed by setting [Attribute Name of Custom Item 1]
from [Attribute Name of Custom Item 3] of "[LDAP Server / Directory
Service Settings]" (P.143).

84
9 Address Book
[S/MIME Certificate] Associate S/MIME certificates. It is necessary to prepare the certificate in
advance.
To associate a certificate, tap on [Attach Certificate], and select a
certificate from the screen displayed. To cut a link, tap on [Cut Link].
Note
If a certificate linked to an S/MIME certificate in the Address Book is lost
owing to the execution of [Device] > [Reset] > [Restore Factory Defaults] or
the deletion of the certificate, the linkage with the S/MIME certificate
becomes invalid. You have to manually set the S/MIME certificate linkage on
the Address Book again after re-registering the S/MIME certificate.
If there are multiple certificates registered on this machine, associating the
certificates may take time.
Refer
Refer to Internet Services help.
[Server] Enter [Server Name] or the IP address of the transfer destination.
[Share Name] Enter the shared name set in the SMB Folder.
Note
Do not use “/” at the beginning of the shared name.
[Port Number] Specify the port number of the transfer destination.
[Save Location] Enter the directory where the file will be saved. In the case of SMB, input in
UNC format.
FTP/SFTP Transfer
Example) To save in directory bbb of directory aaa in the root directory
when logged in
aaa/bbb
SMB Transfer
Example) To save in directory bbb of directory aaa of the specified
volume
aaa\bbb
[User Name] If the server of the transfer destination requires a user name to be input,
set the user name.
UPN Format
User name@domain name
Input example: U[email protected] (User1: user name, example.com:
domain name)
NetBIOS Format
Domain name\user name
Input example: example\User1 (example: domain name, User1: user
name)
Work Group
Local User Name
Input example: User-1
[Password] If the server of the transfer destination requires a user name to be input,
set
the password.
[Browse] Refer to the network and display the list of destination you can specify.
Item Description
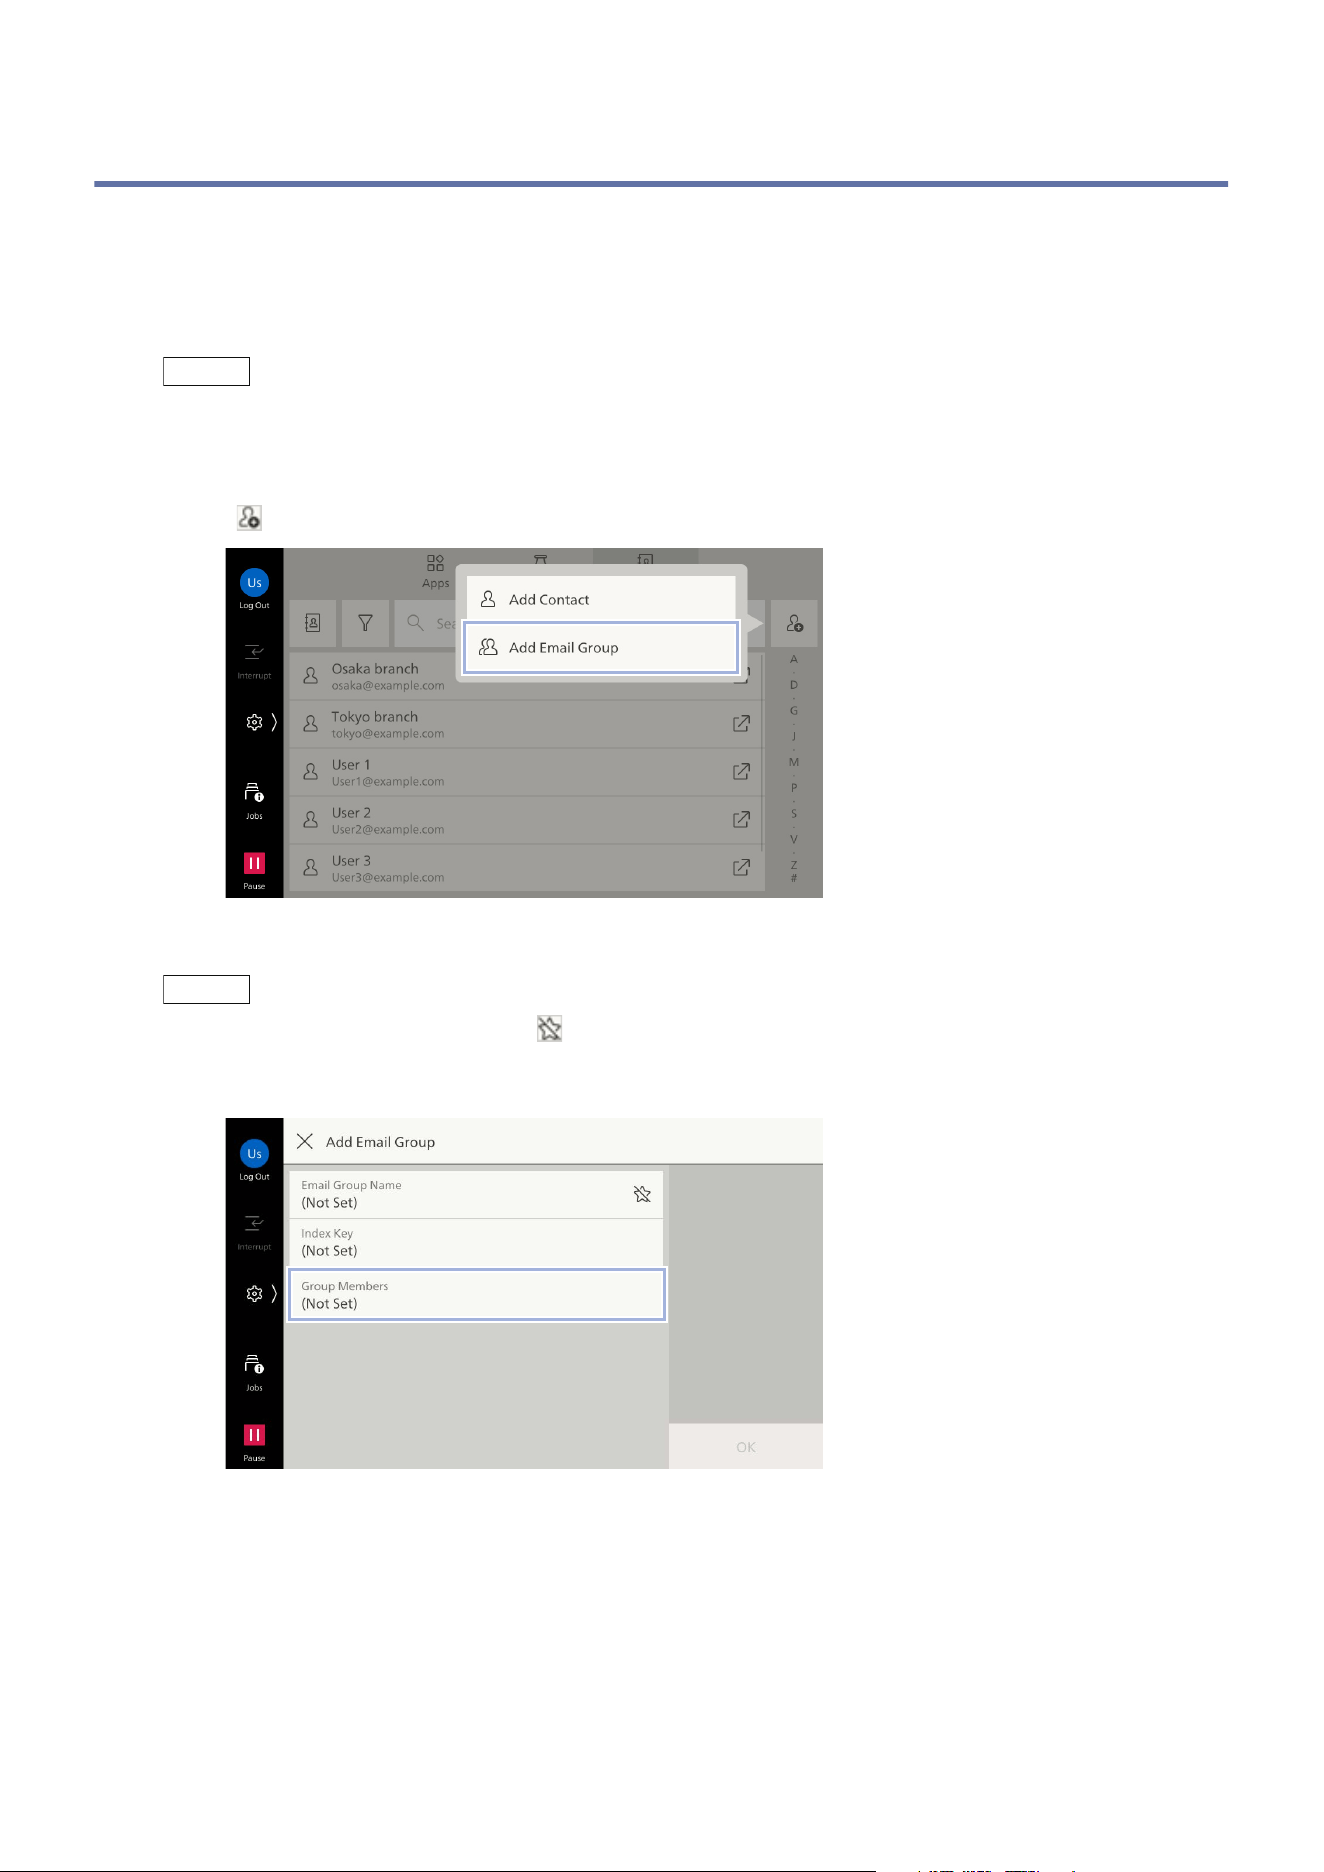
85
9.3 Creating Recipient Groups
9.3 Creating Recipient Groups
You can register multiple recipients as a group to send the same file at a time.
Note that it is necessary to register in advance in the Address Book the recipients to include to a
recipient group.
A recipient group can become a recipient of Email.
Note
Up to 250 groups can be registered group. One group can include 100 recipients.
1. Tap on [Addresses].
2. Tap on > [Add Email Group].
3. Enter [Email Group Name] and [Index Key].
Note
To register in [Favorites], tap on .
4. Tap on [Group Members].
5. Tap on [Edit].
6. Tap on the member to be registered, to apply a check mark.
7. Tap on [OK].
8. Confirm the group member and tap on [OK].
9. Tap on [OK].
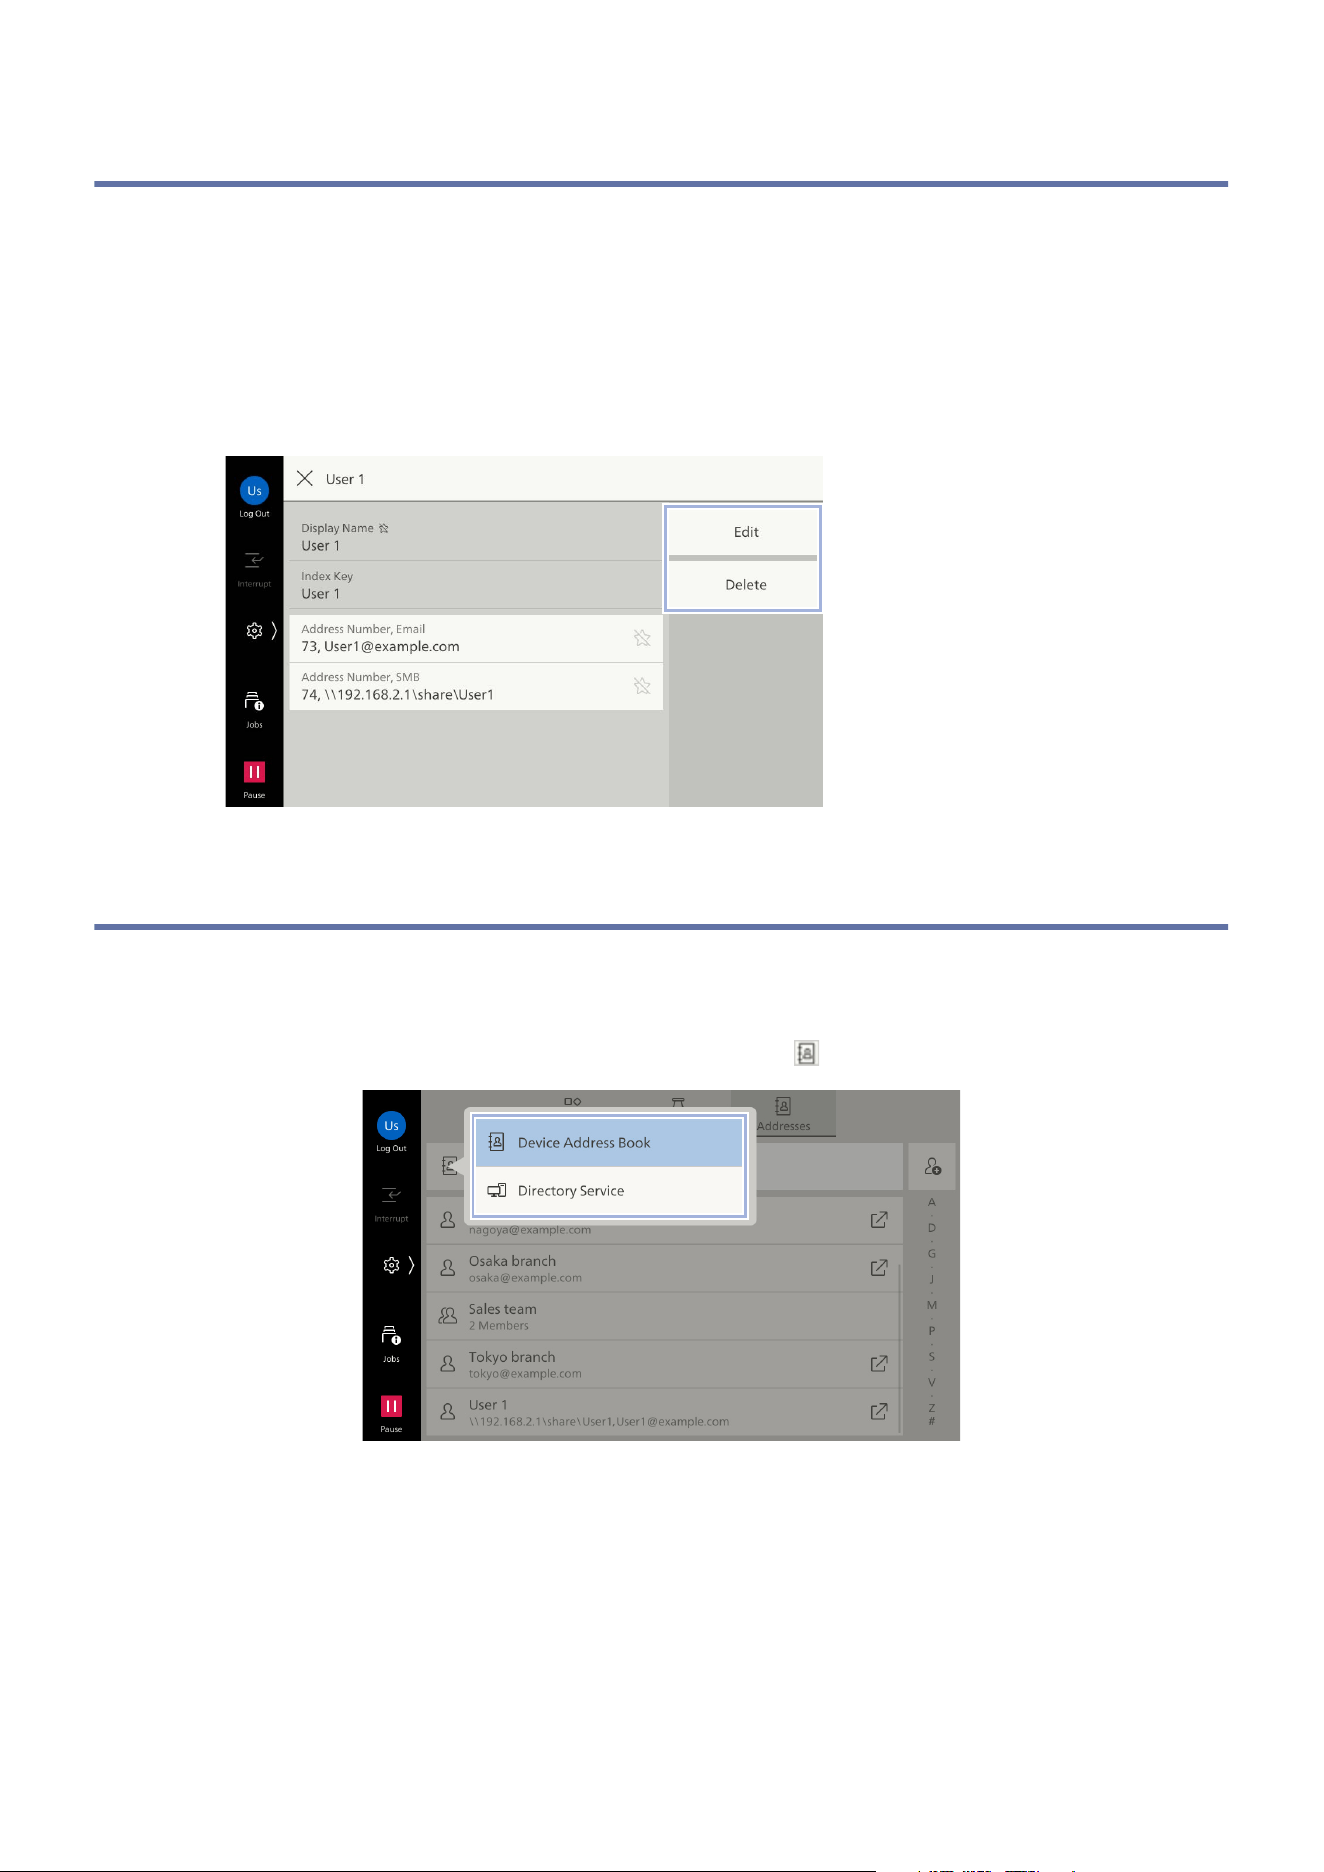
86
9 Address Book
9.4 Editing/Deleting a Contact
1. Tap on [Addresses].
2. Tap on the contact.
3. Tap on [Edit] or [Delete].
When you tap on [Edit], the following operation is the same as step 4 onwards "Registering
Contacts" (P.82).
9.5 Switching the Display of Contacts
Switching the Address Book
You can switch the Address Book type to use by tapping on .
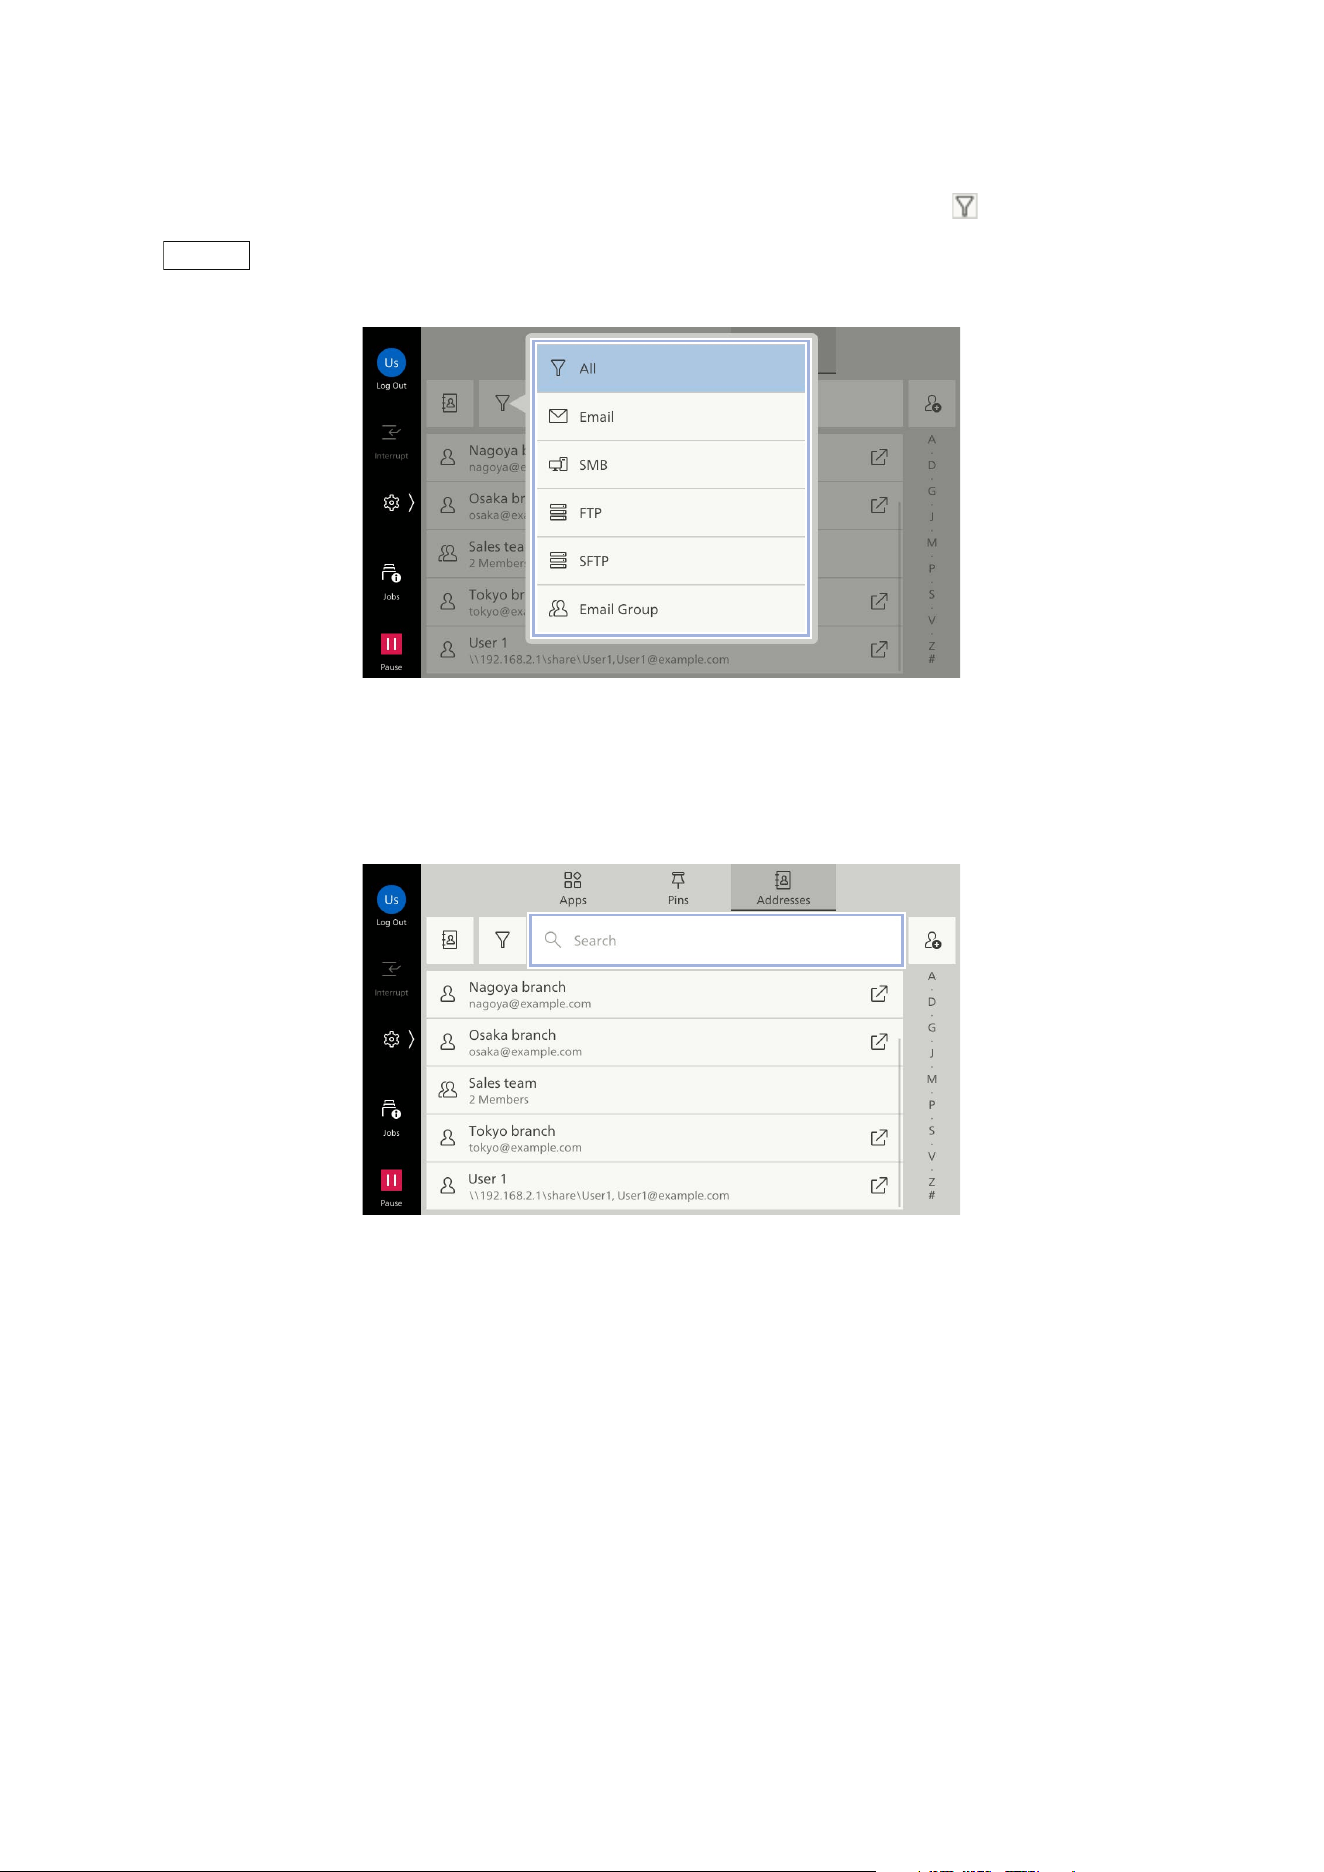
87
9.5 Switching the Display of Contacts
Filter
You can narrow down the address type to display on the list by tapping on .
Note
The filter function is available only when the Device Address Book is displayed.
Text String Search
Tap on the [Search] box and enter the text string to search, then the contacts containing the entered
text string are displayed.
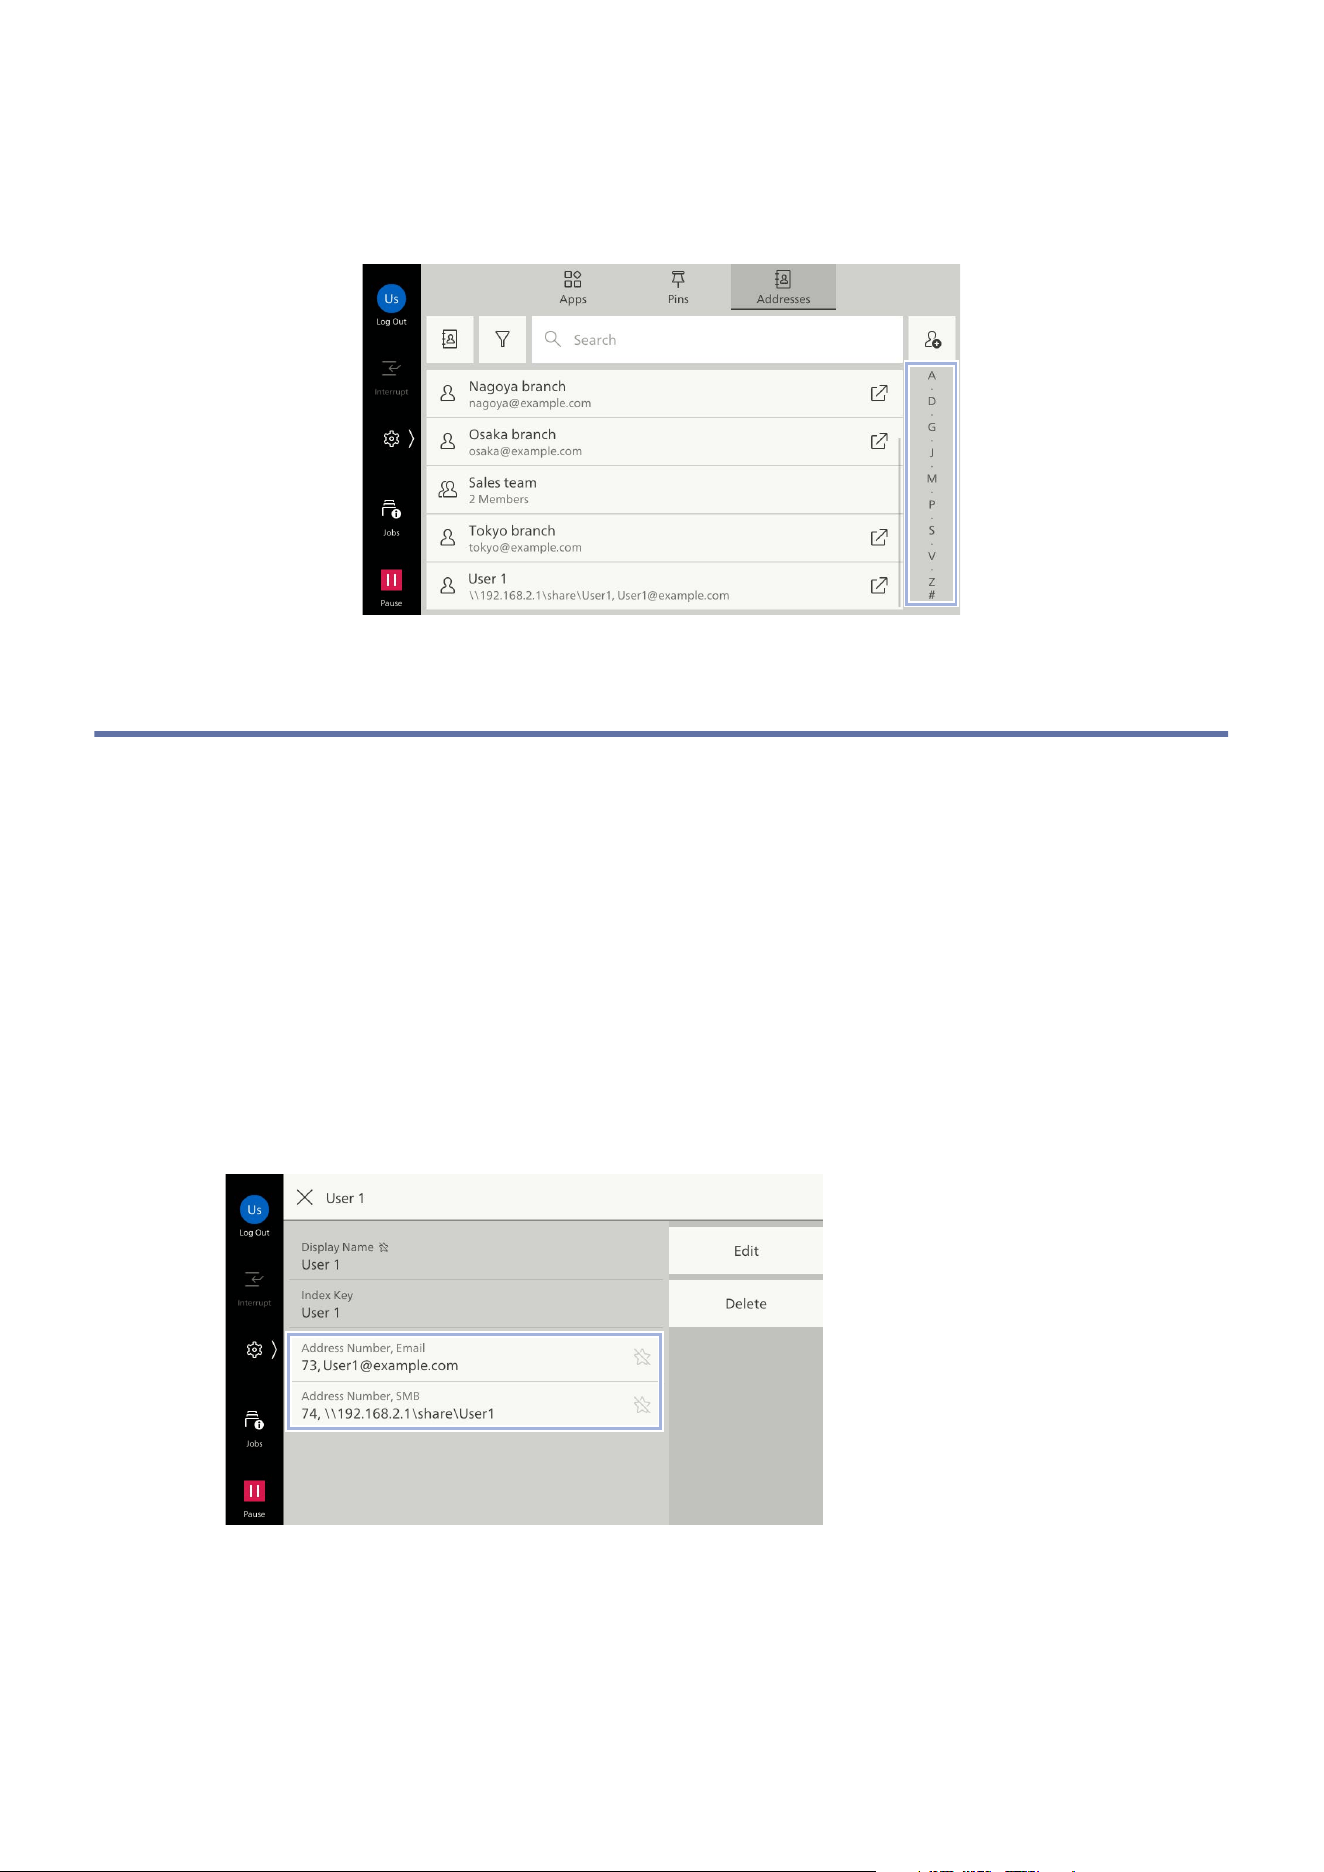
88
9 Address Book
Index Search
Tap on any index letter and switch the starting position of the list display according to the registered
text [Index Key].
9.6 Launching the App from a Contact
You can launch the app to be used directly from a contact registered in the Address Book to start
sending operation.
Launching the App After Checking the Destination
Details
1. Tap on [Addresses].
2. Tap on the contact.
3. Tap on the destination to send.
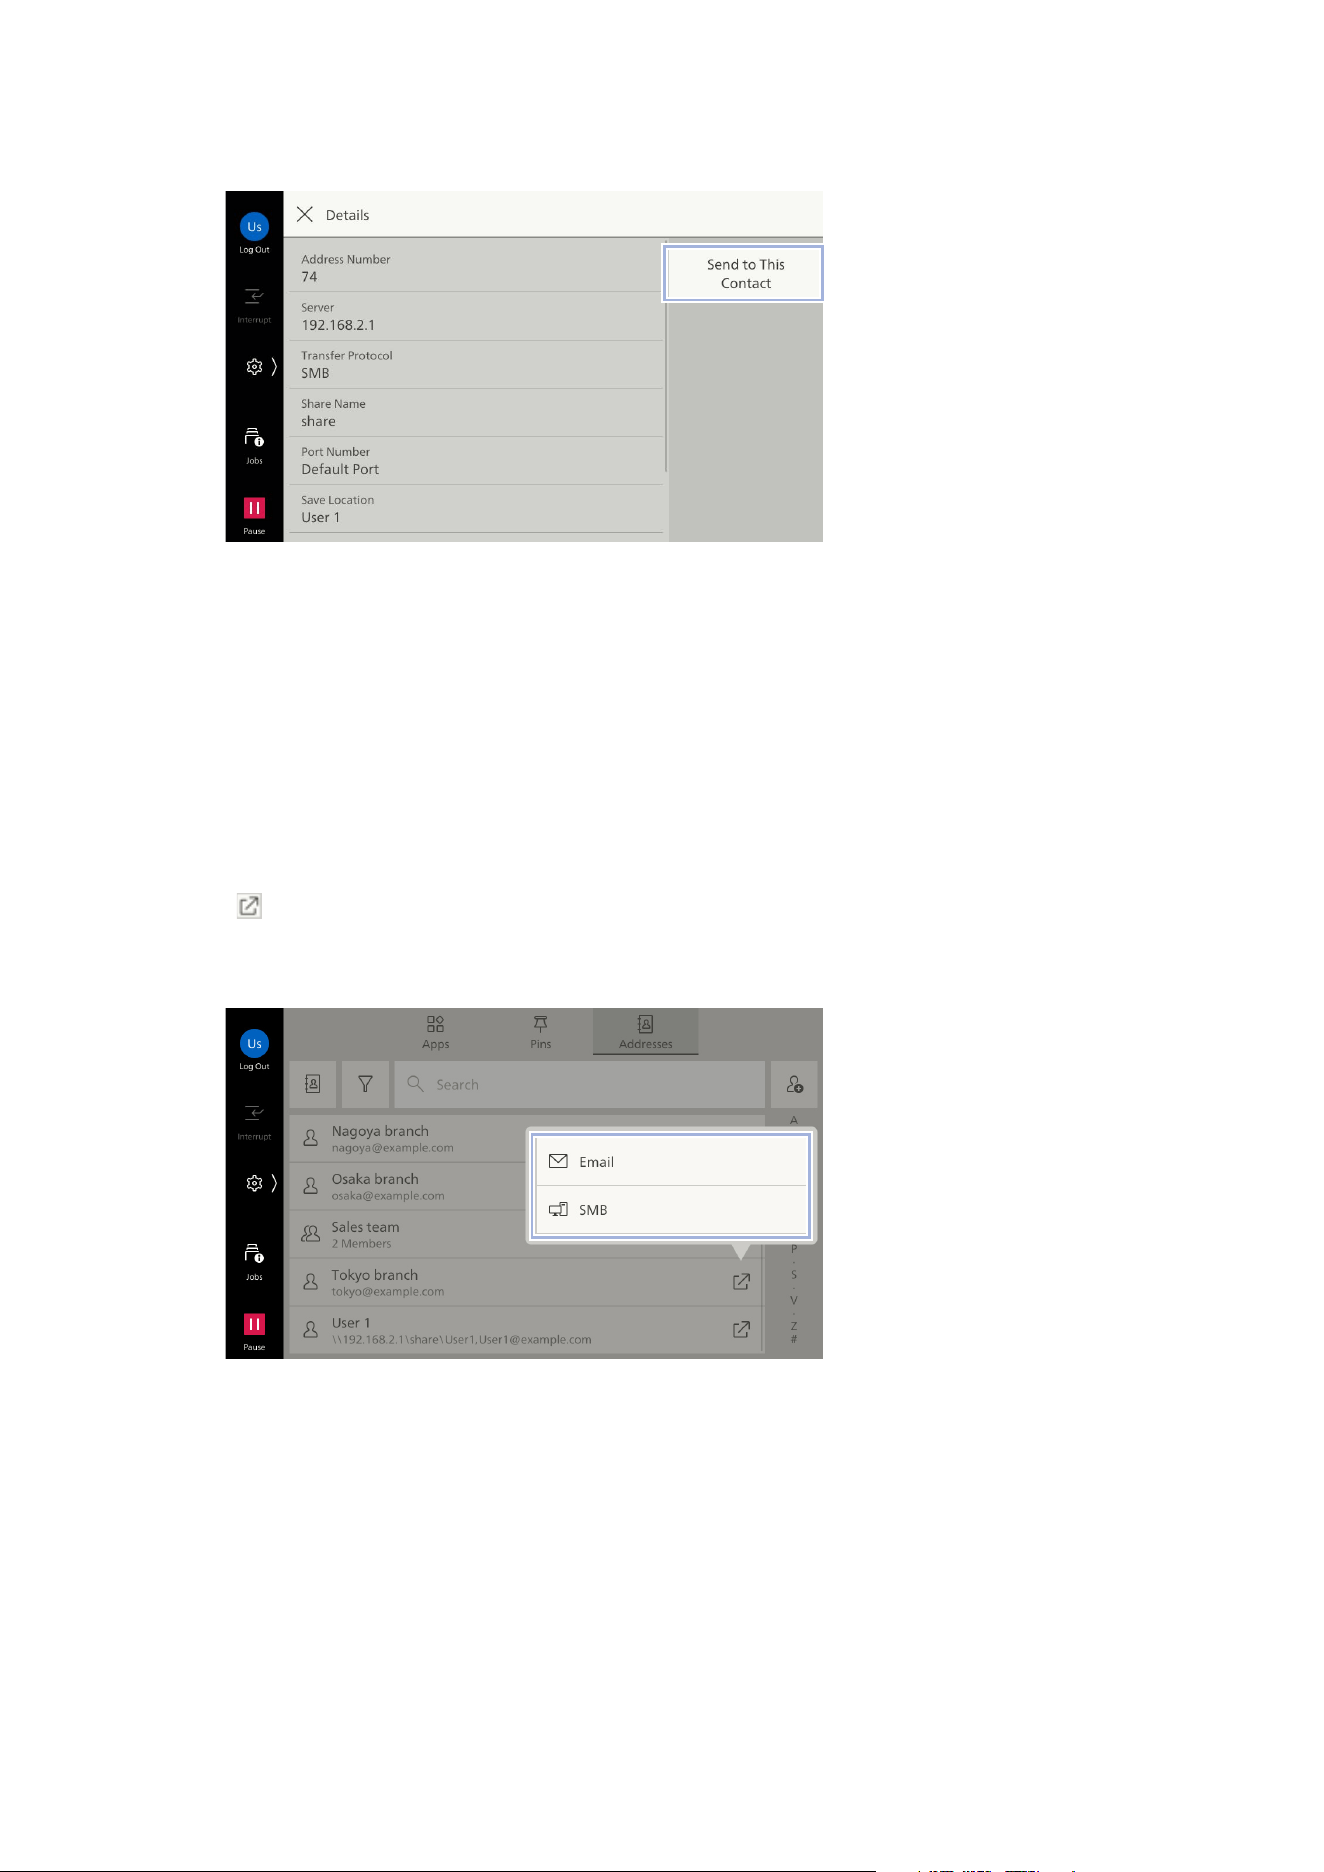
89
9.6 Launching the App from a Contact
4. Tap on [Send to This Contact].
The send screen of the app to be used is displayed.
5. Set each items.
6. Tap on [Start].
Launching the App by Selecting the Destination Type
1. Tap on [Addresses].
2. Tap on of the contact.
3. Tap on the destination type if there are two or more destinations registered.
The send screen of the app to be used is displayed.
4. Set each items.
5. Tap on [Start].
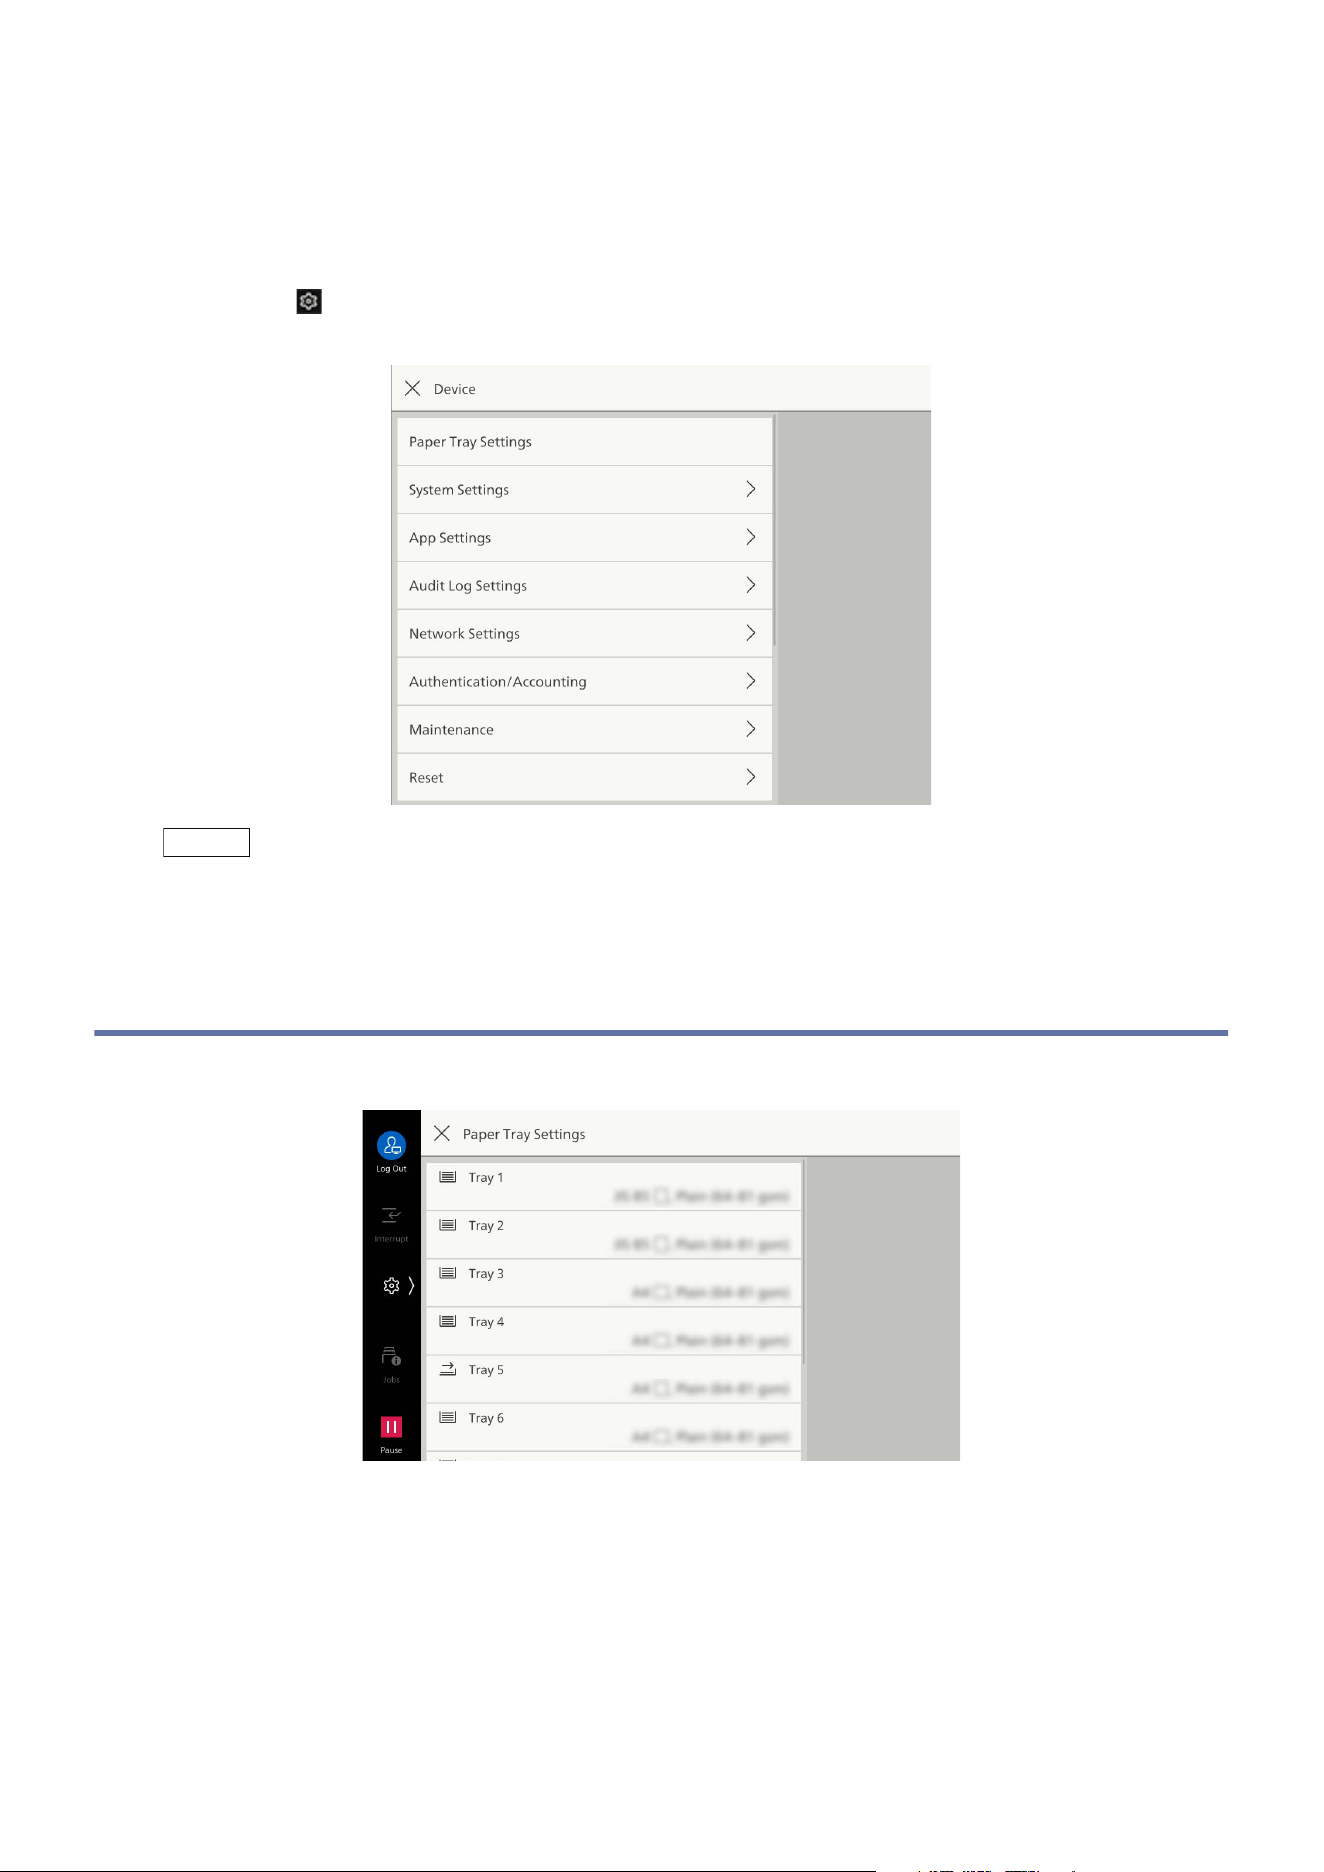
90
10 Device
10 Device
If you tap on > [Device] on the Home screen, the [Device] screen can be displayed on the Home
screen. Configure the various settings of this machine here.
Note
The section also covers settings that can only be manipulated in Administrator Mode.
10.1 [Paper Tray Settings]
The type of paper loaded is set by tapping on a tray number.
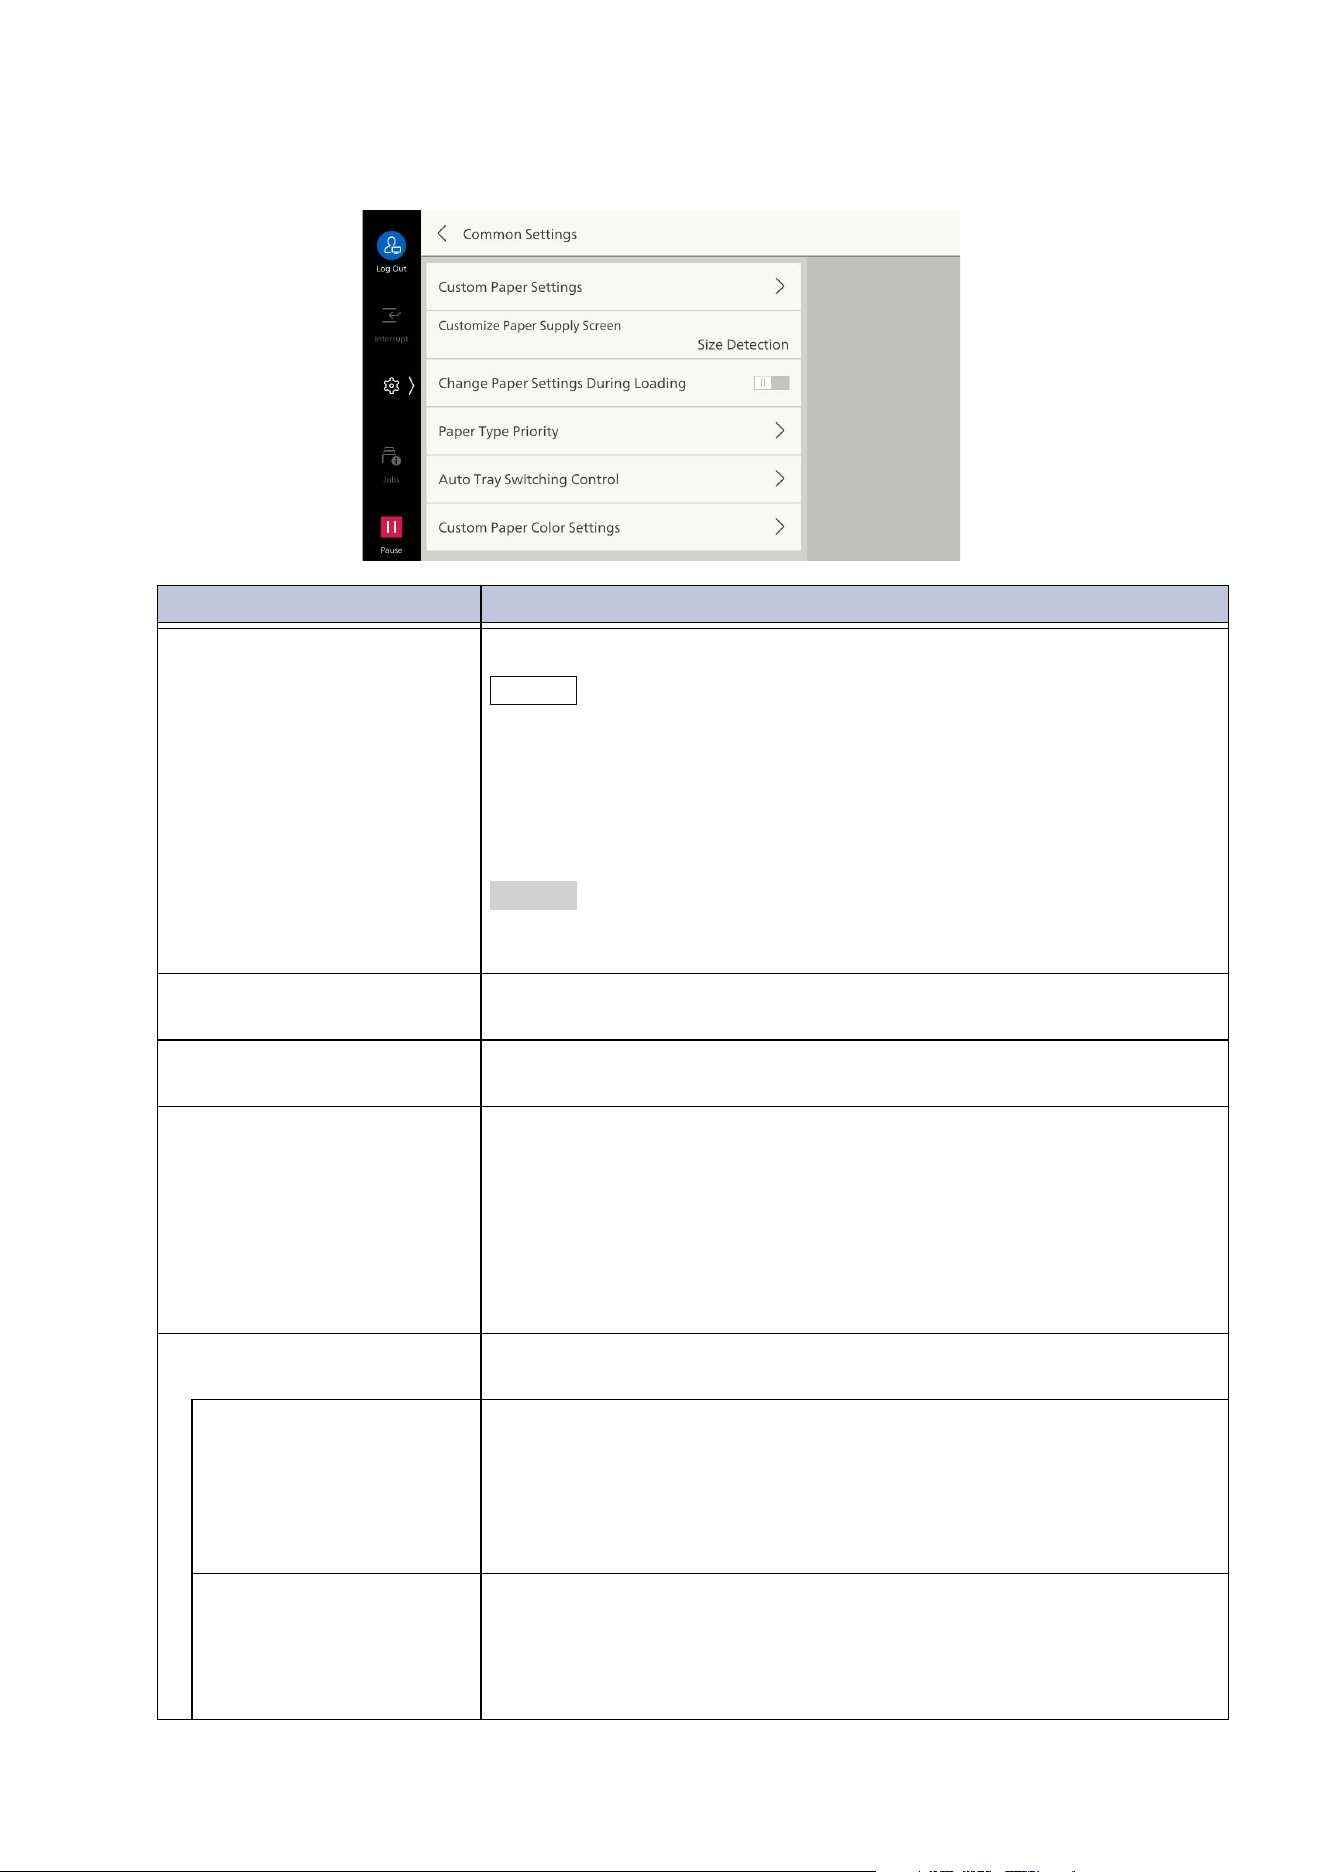
91
10.1 [Paper Tray Settings]
[Common Settings]
Item Settings
[Custom Paper Settings] Enables you to register custom paper.
Note
You can register the shortcut of this item to [Shortcuts] of the control
menu by tapping on [Shortcut].
The custom paper can be set to allow local users to register them. Set
[Local User Access - Maintenance] to [Enabled] in "[Other Settings]"
(P.101). Local users should use the adjustment menu from [Shortcuts]
of the control menu.
Refer
For setting details or how to register, refer to "Setting of Custom
Paper" (P.7).
[Customize Paper Supply
Screen]
Displays on/off setting of auto detect for the paper tray on the Paper
Supply screen.
[Change Paper Settings
During Loading]
Displays paper setting when paper is loaded.
[Paper Type Priority] Sets the priority of the paper tray where the paper type to be used
has been loaded if multiple paper types with the same size and same
dir
ection have been loaded during auto tray select.
Priority is assigned based on the [Priority] set for each tray.
However, if the same priority is set for different paper types, then
the selected paper is determined by the [Priority]. If a tray is loaded
with a paper type set to [Auto Paper Off], it cannot be the target of
auto tray select.
[Auto Tray Switching
Control]
Sets
the switching condition and target when paper in a selected
tray runs out.
[Auto Tray Switching] Sets conditions for auto switching.
[Enable When Auto Select Is Set]
Enables when [Auto Select] is set for the Paper Supply setting.
[Enable for Same Type, Weight, and Color]
Enables every time, only the tray with same paper type, paper
weight and color as switching target.
[Targeted Paper Type
(Copy Jobs)]
Sets handling of paper type when selecting tray automatically.
[According to Priority]
Operates following [Paper Type Priority].
[Selected Paper Type Only]
Specifies paper type.
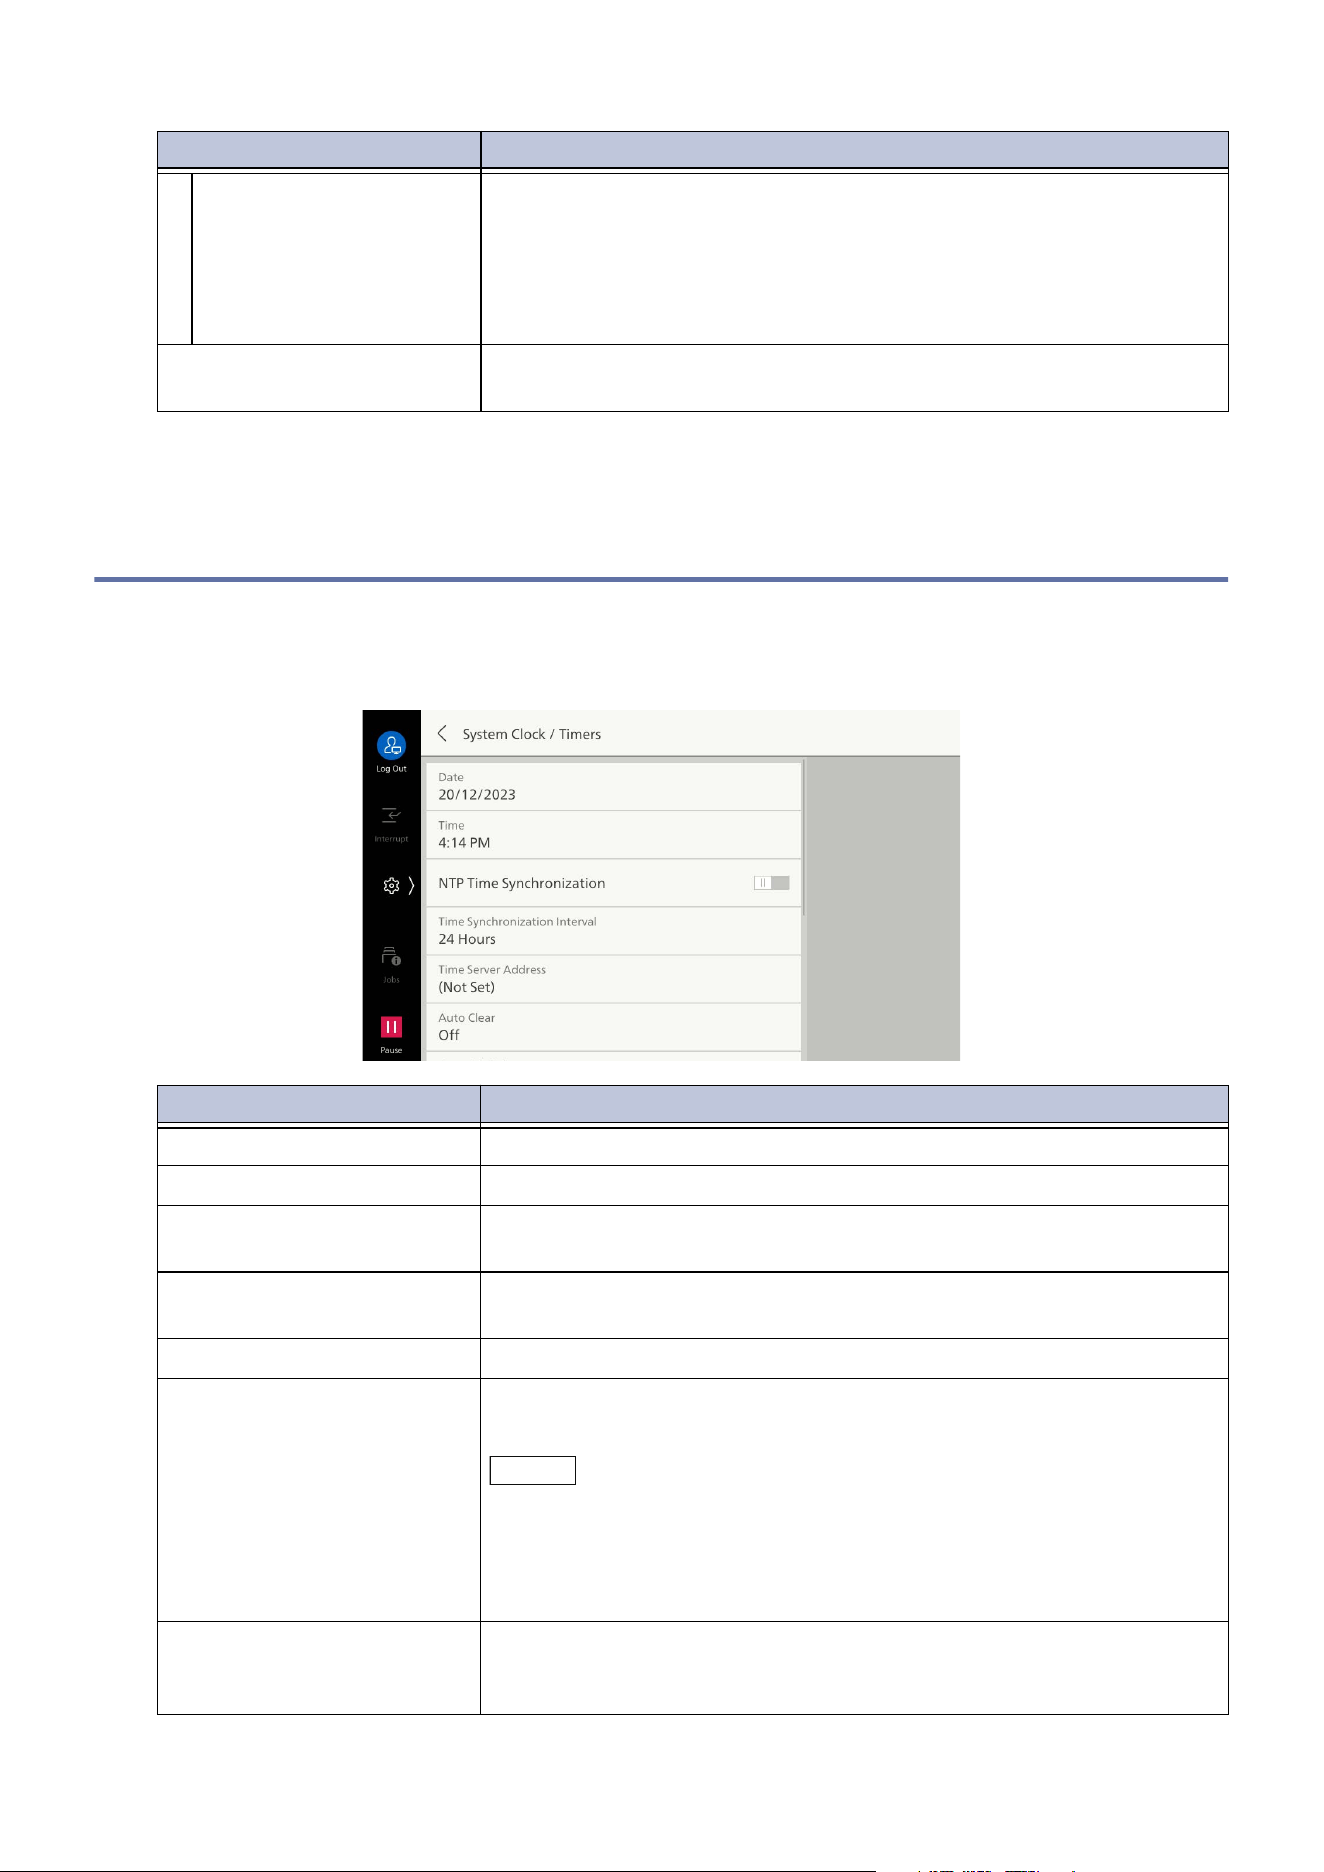
92
10 Device
10.2 [System Settings]
[System Clock / Timers]
[Targeted Paper Color
(Copy Jobs)]
Sets handling of paper color when selecting tray automatically
during copying.
[All Colors]
Sets all paper colors as target.
[Selected Color Only]
Specifies paper color.
[Custom Paper Color
Settings]
Sets name for custom paper color.
Item Description
[Date] Sets the date of the machine’s system clock.
[Time] Sets time of the machine’s system clock.
[NTP Time Synchronization] Retrieves time from server and adjusts the machine’s time to be the
same as time of the time server (NTP: Network Time Protocol).
[Time Synchronization
Interval]
Sets interval (in hours) for connecting to time server.
[Time Server Address] Sets server name or IP address of time server.
[Auto Clear] Sets whether auto clear is performed when a fixed time has passed
in a state with no operation. If [On] is selected, the time is set.
Note
Even if this is set to [Off], if no operation is performed for 1 minute
while a job is suspended, auto clear may be performed and the job may
be resumed. Job operation after auto clear is set with “Paused Job
Handling”. For details of paused job handling, refer to "[Other
Settings]" (P.101).
[Auto Job Release] Sets the time for releasing the current job, until the next job can be
run, when an error (paper replenishing, document jam, paper jam,
etc.) has occurred during copying or scanning.
Item Settings
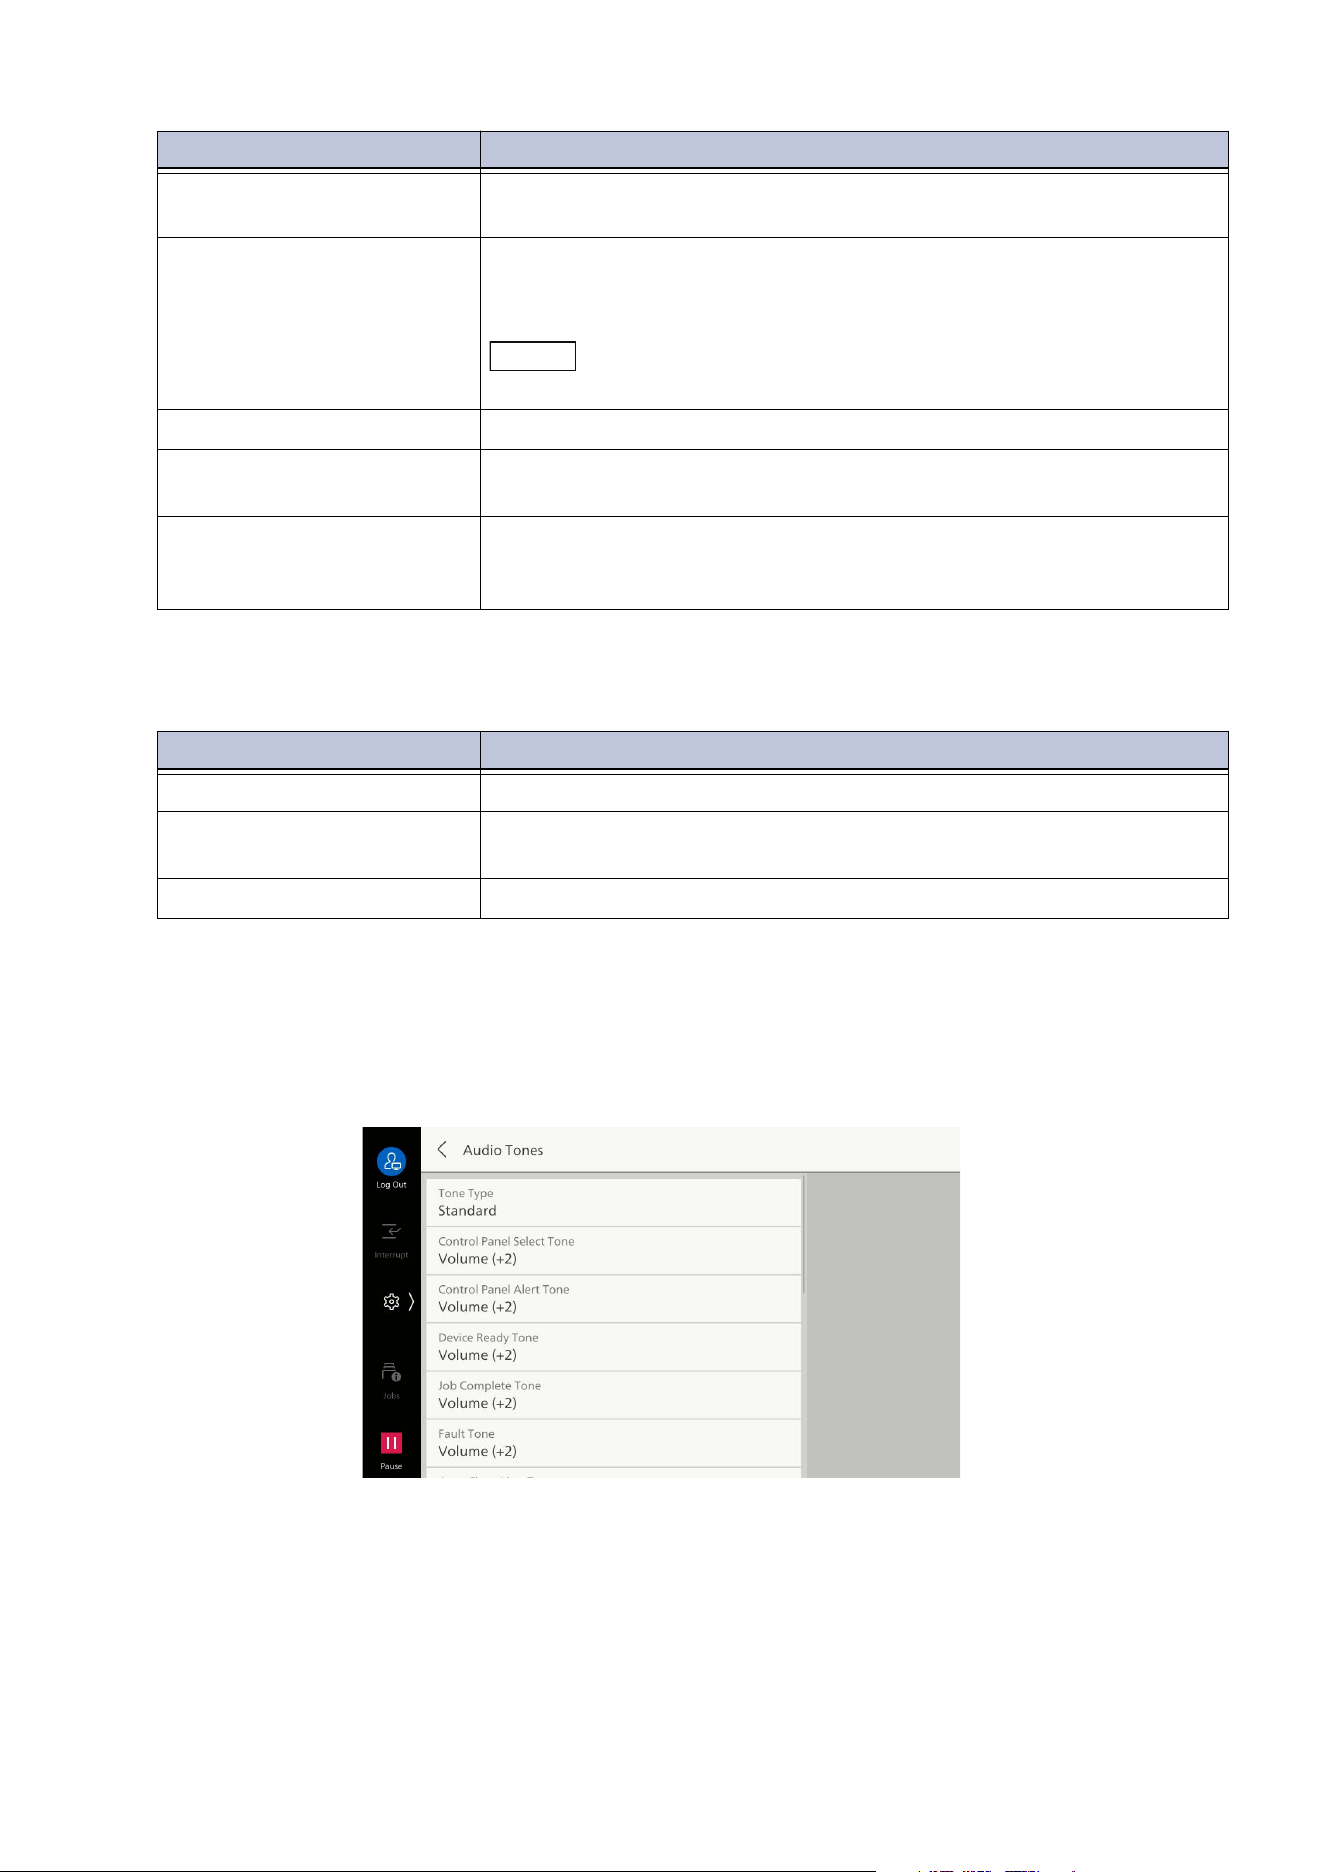
93
10.2 [System Settings]
[Power Saver Settings]
[Audio Tones]
Sets type and volume of audio output during operation and when an error occurs.
You can set whether to repeat the alert on [Continuous Alert/Warning Tone]. If it is set enabled, the
alert repeats until the error is cleared or a user operates the control panel.
[Specify Auto Print Time] Sets time until printing can be done after operating the touch panel
dis
play (except [Start]).
[Printer Lockout] Sets whether to display [Auto Printing] in the control menu.
If it is set to [Allow User to Lock Out], [Auto Printing] can be
displayed on the control menu in [Edit Control Menu].
Note
A specific time slot can be set to printer lockout with Internet Services.
[Time Zone] Sets within the range - 12 hours to + 12 hours relative to GMT.
[Daylight Savings] Sets daylight savings time. During the set period, time is determined
by adding 1 hour to the current time.
[Print-on-Demand
Duration]
Sets enabled time when printing using web applications. A print
instruction is disabled when no print data is received from the
rem
ote server within the time set here after the print instruction.
Item Description
[Power Saver Timers] Input the time for entering each mode.
[Sleep Mode Settings] For operation during Sleep Mode, sets whether [Prioritize Power
Saver] or [Prioritize Wake Up Time].
[Scheduled Power Off] Sets so power goes off at the set time.
Item Description
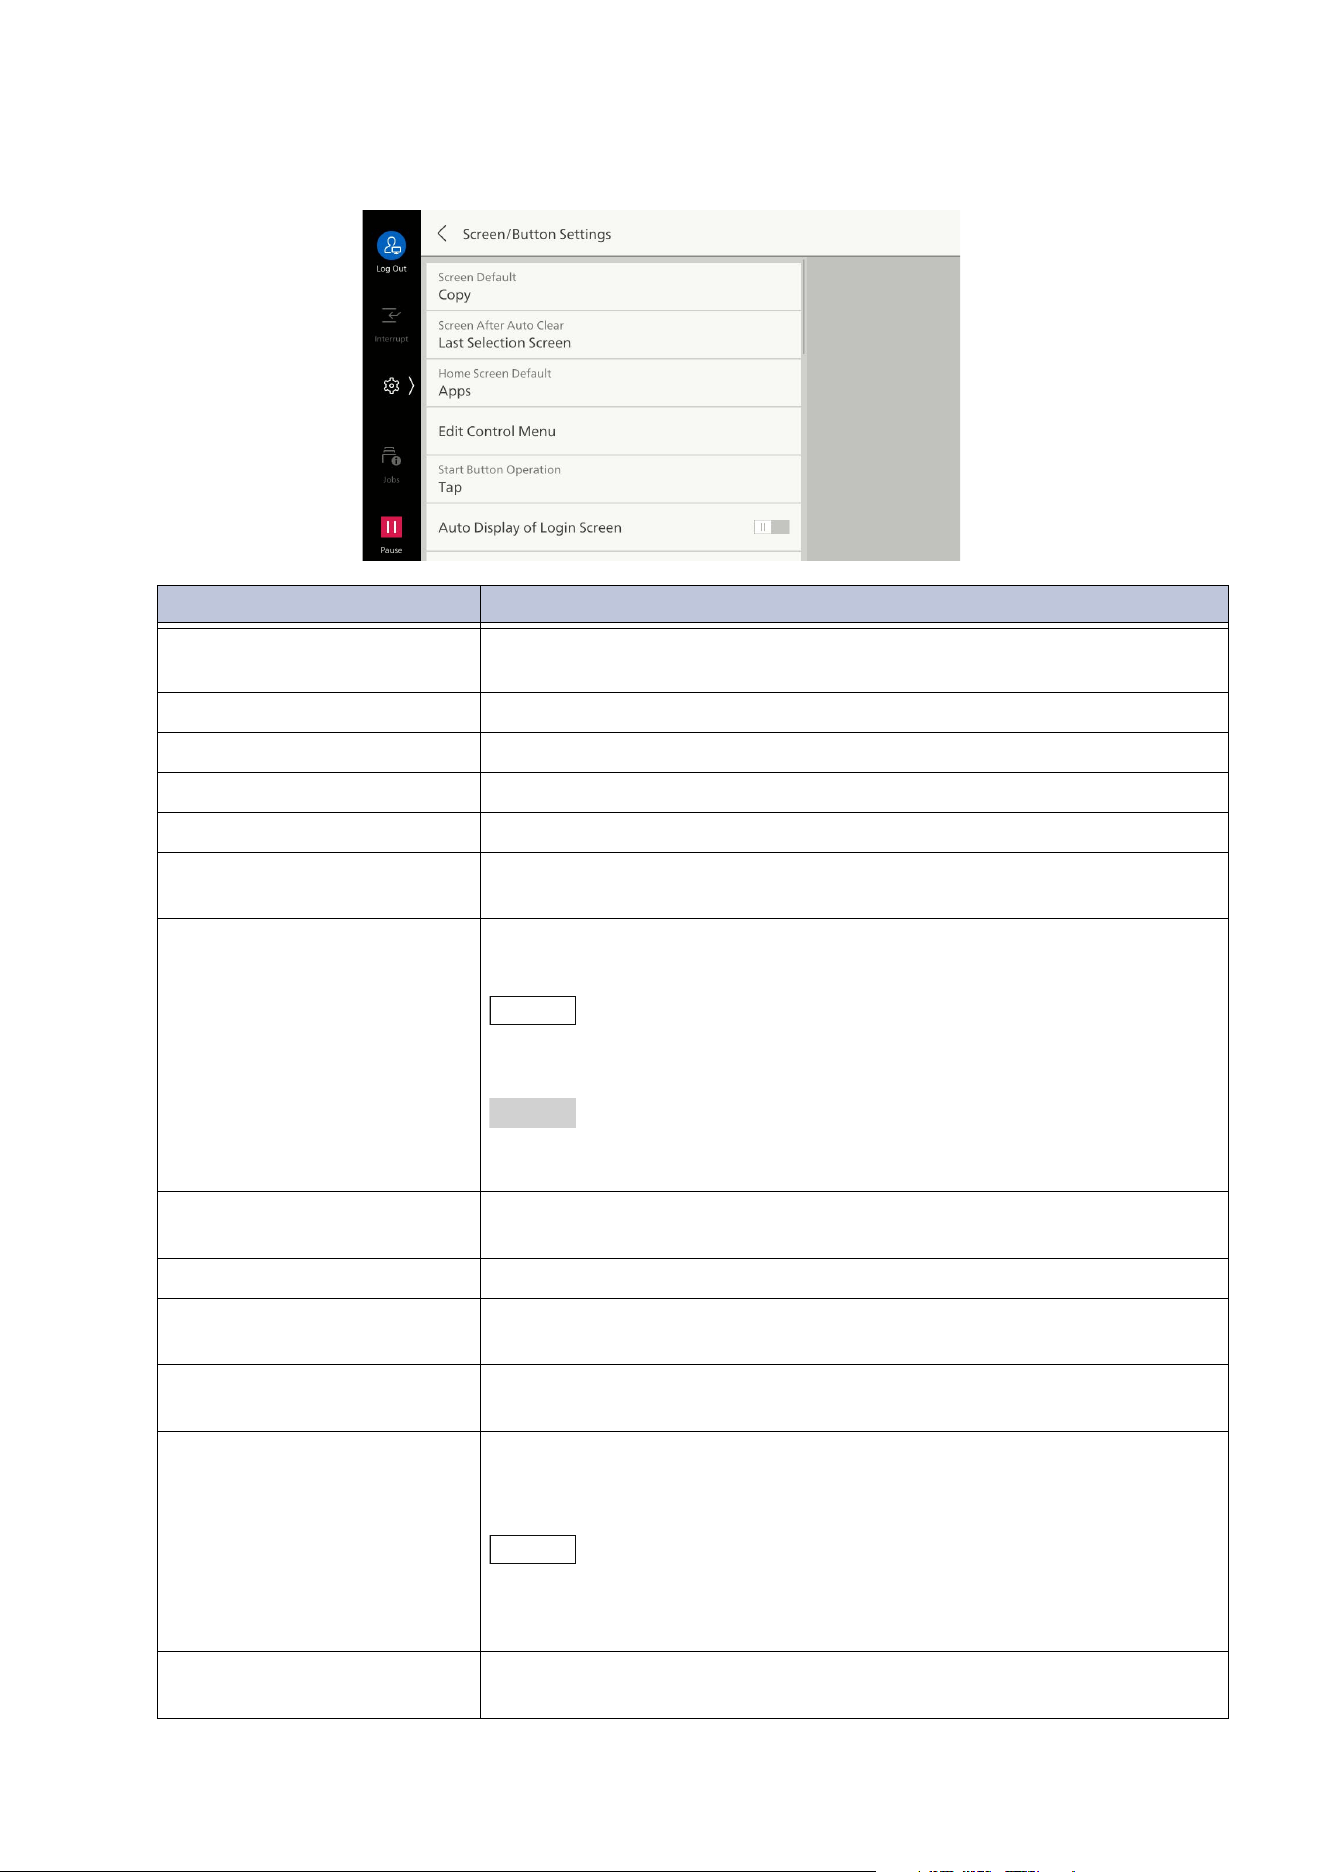
94
10 Device
[Screen/Button Settings]
Item Description
[Screen Default] Sets screen displayed when power is turned on or power saver is
deactivated.
[Screen After Auto Clear] Sets screen displayed after auto clear.
[Home Screen Default] Sets the Home tab to display on the Home screen for the first time.
[Edit Control Menu] Sets the features to display in the control menu.
[Start Button Operation] Sets the types of the [Start] buttons to operate copy or scan.
[Au
to Display of Login
Screen]
Enables display of login screen when power is turned on or power
saver is deactivated while using the authentication feature.
[Display One-Touch
Buttons]
Set in [Scan] and [Email] so that you can specify recipients from
one-touch button.
Note
Assignment to the one-touch button is performed in [One-Touch
Button Settings].
Refer
Refer to "[One-Touch Button Settings]/[One-Touch Button and
Address Number Settings]/[Address Number Settings]" (P.123).
[Default Language] Switches the language and keyboard layout displayed when the
power is turned on.
[Screen Brightness] Adjusts brightness of touch panel display.
[Reconfirm Email
Recipients]
Enables display of screen for reconfirming recipient when sending
Email.
[Display Supplies Screen] Set the timing to display the information when to replace the
con
sumables.
[Screen After Inserting USB] Sets whether to switch the screen display when the USB memory
device has been inserted into the USB memory port. This also sets
the screen type at the time.
Note
If set to [App Selection Screen], a screen for selecting [Scan to USB] or
[Print from USB] can be displayed when the USB memory device is
inserted.
[Display Warning Screen
After Inserting USB]
Displays confirmation screen when USB is inserted.

95
10.2 [System Settings]
[Pins Settings]
[Keyboard Input Restriction] Enables restriction of characters that can be input from the
keyboard displayed on the machine to ASCII only.
[Security Warning
(Administrator)]
Displays security warning when the machine logging in to
Administrator Mode.
[Security Warning (SNMP)]
[Security Warning (Global
IP)]
[Disable Notification
Messages]
Reduce the number of messages displayed in pop-ups. You can
con
firm in [Notifications] of [Device Status] the messages which are
not displayed.
[Message Display Time] Selects message display time.
Item Description
[Enable Feature] Set the use of the [Pins] feature on the Home tab.
[Anonymous Users' Job
Parameter Sets]
Set whether to maintain the job history of anonymous users in [Pins]
for each type of the jobs.
[Auto Delete Job Parameter
Sets]
Set to delete automatically the job history saved in [Pins] after a
certain period of time.
[Maximum Number] Set the maximum number of pins that can be saved in [Pins].
Item Description
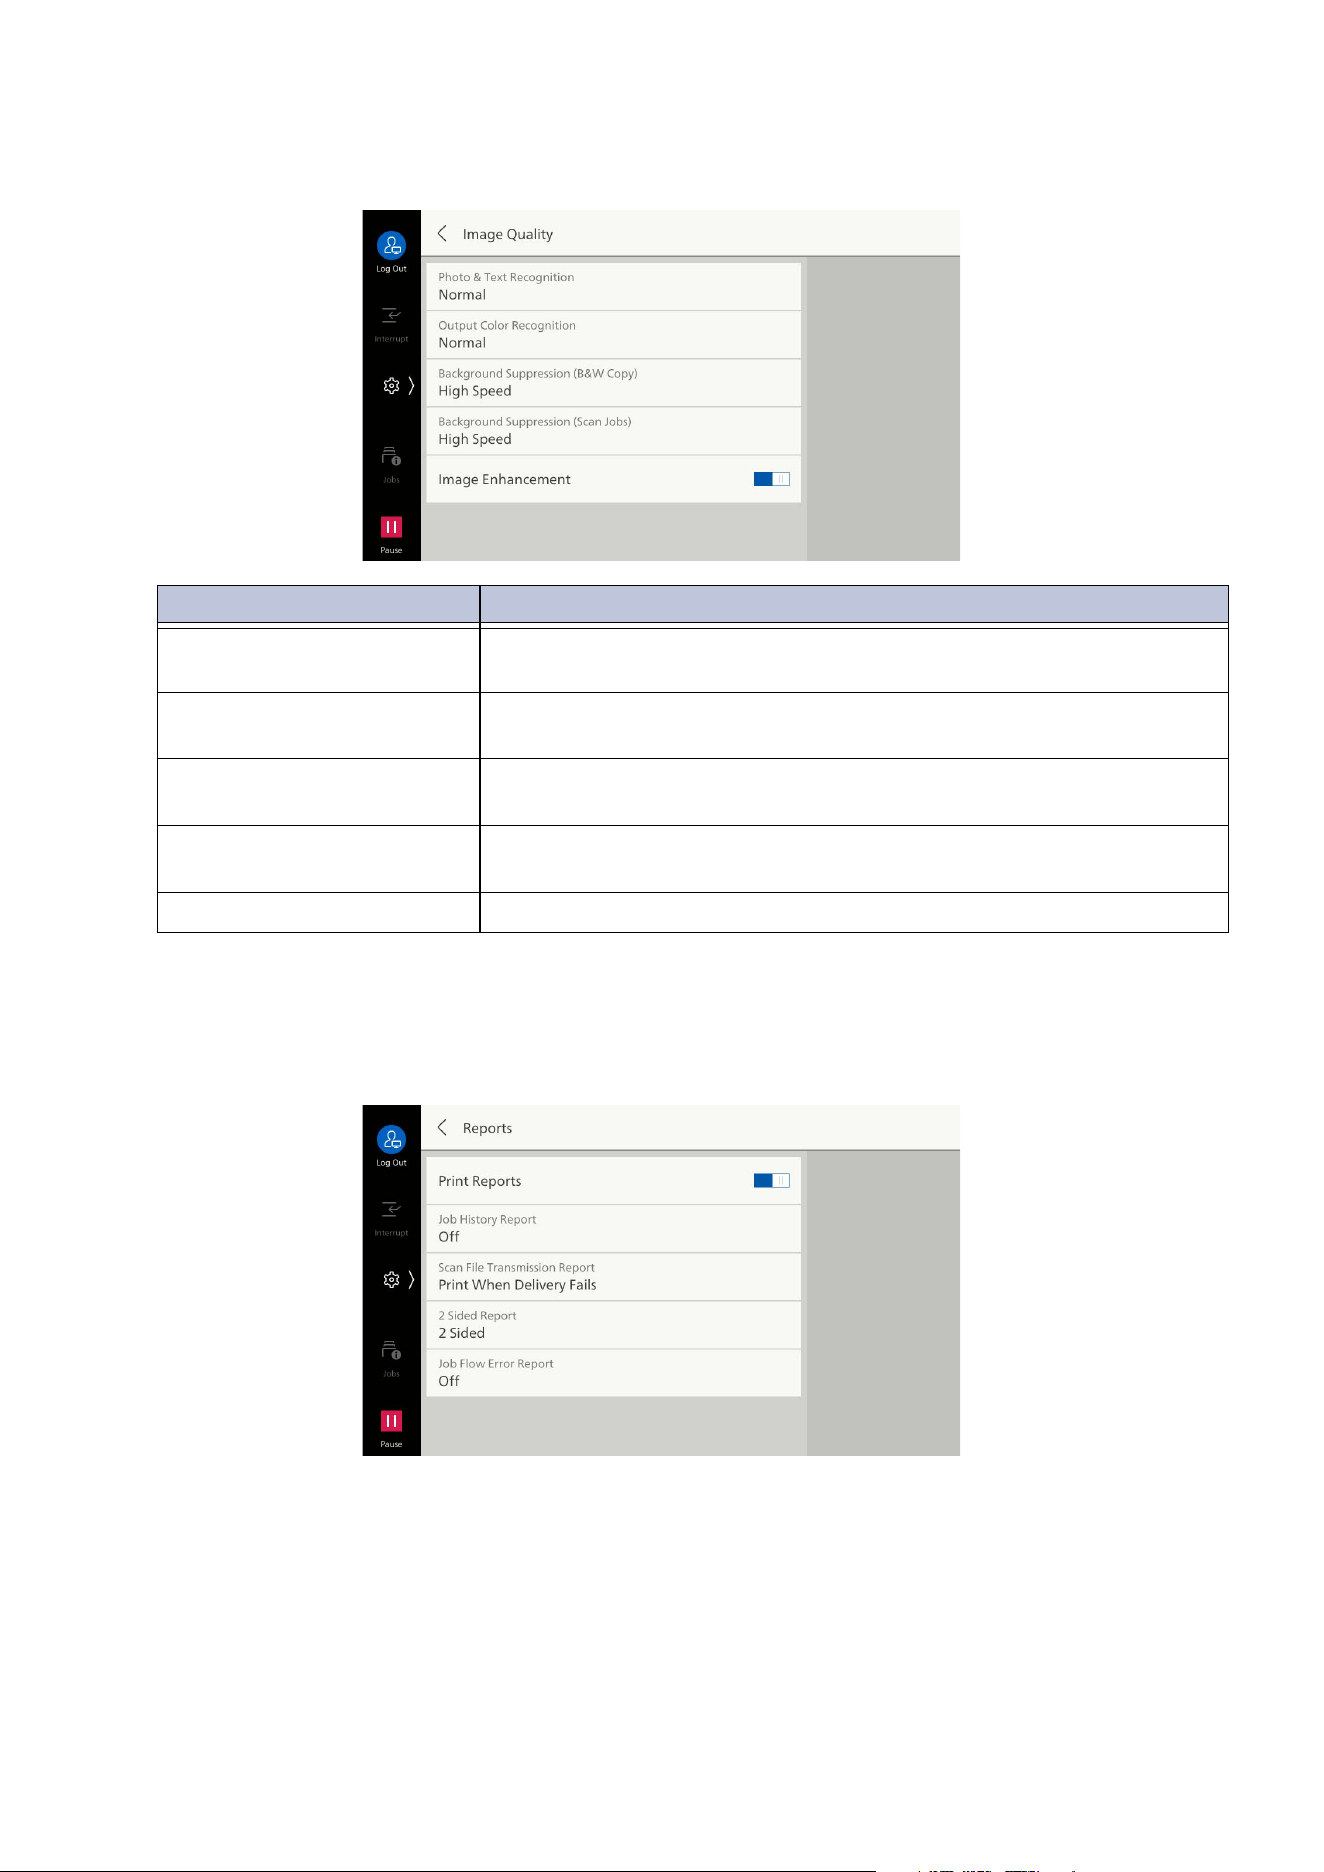
96
10 Device
[Image Quality]
[Reports]
Sets whether to display the content of [Print Reports] when not in Administrator Mode, or to print
each report automatically.
Item Description
[Photo & Text Recognition] Sets the level for discriminating text or photo when copying, or
scanning a document, with [Photo & Text] for [Original Type].
[Output Color Recognition] Sets the level for discriminating whether a document is B & W or
color when [Output Color] has been set to [Auto Detect].
[Background Suppression
(B&W Copy)]
Sets method of background suppression when copying in B & W.
[Ba
ckground Suppression
(Scan Jobs)]
Sets method of background suppression when scanning.
[Image Enhancement] Processes image to be printed with copy so it appears smooth.
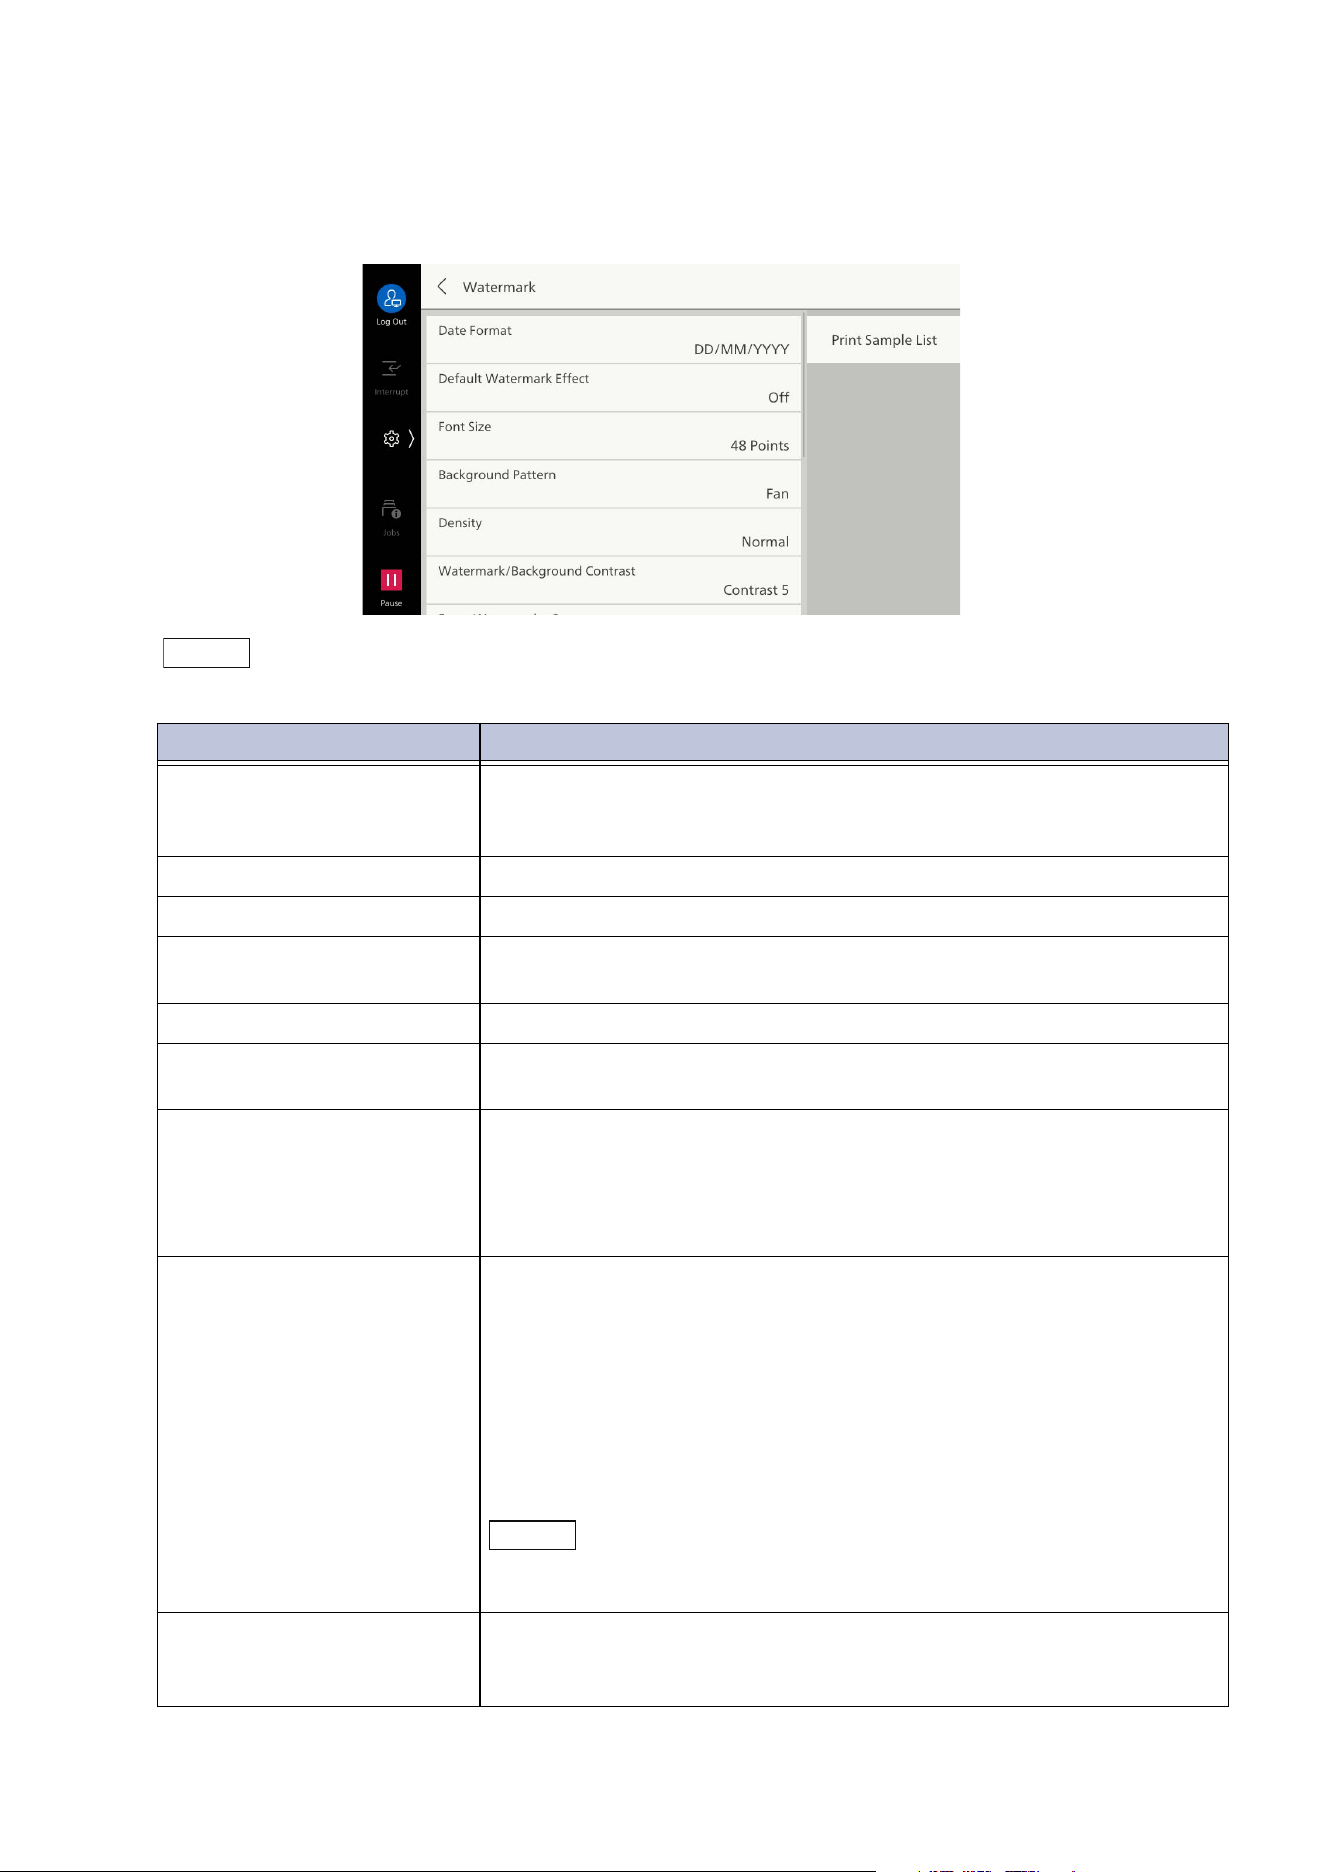
97
10.2 [System Settings]
[Watermark]
The Watermark feature prints text string or background pattern on the whole page to inhibit the
replication of documents.
Note
The user control number may not be printed, depending on Authentication Mode setting.
Item Description
[Date Format] Sets date format.
The value set here is applied to [Annotations], [Watermark], and
[Force Annotation].
[Default Watermark Effect] Sets default of secure watermark effect for watermark.
[Font Size] Sets size of text printed as watermark.
[Background Pattern] Sets background pattern for embedding text string used in secure
watermark.
[Density] Sets density of text printed as watermark.
[Wa
termark/Background
Contrast]
Sets contrast of text/background printed as watermark.
You can set by referring to samples printed with [Print Sample List].
[Force Watermark - Copy] Sets whether to force watermarking when copying. When set to
[On], [Watermark] for the copy feature is fixed to [On] and cannot
be changed.
The printed text string is the user control number, machine ID, and
copy date & time.
[Fo
rce Watermark - Client
Print]
Sets whether to force watermarking when printing from client
computer.
To promote settings of the machine, select [Allow Device Settings to
Override], and to promote settings of software (such as copy
protection tool) or print servers, select [Allow Client Settings to
Override].
If [Allow Device Settings to Override] has been selected, either user
details, or the user control number, machine ID and printing date &
tim
e, are printed.
Note
This is the same as [Client Print] in [Force Secure Watermark]. For
Force Secure Watermark, refer to "[Secure Watermark]" (P.98).
[Force Watermark - Print
Stored File]
Sets whether to force watermarking when printing from folder.
The printed text string is the user control number, machine ID, and
printing date & time.
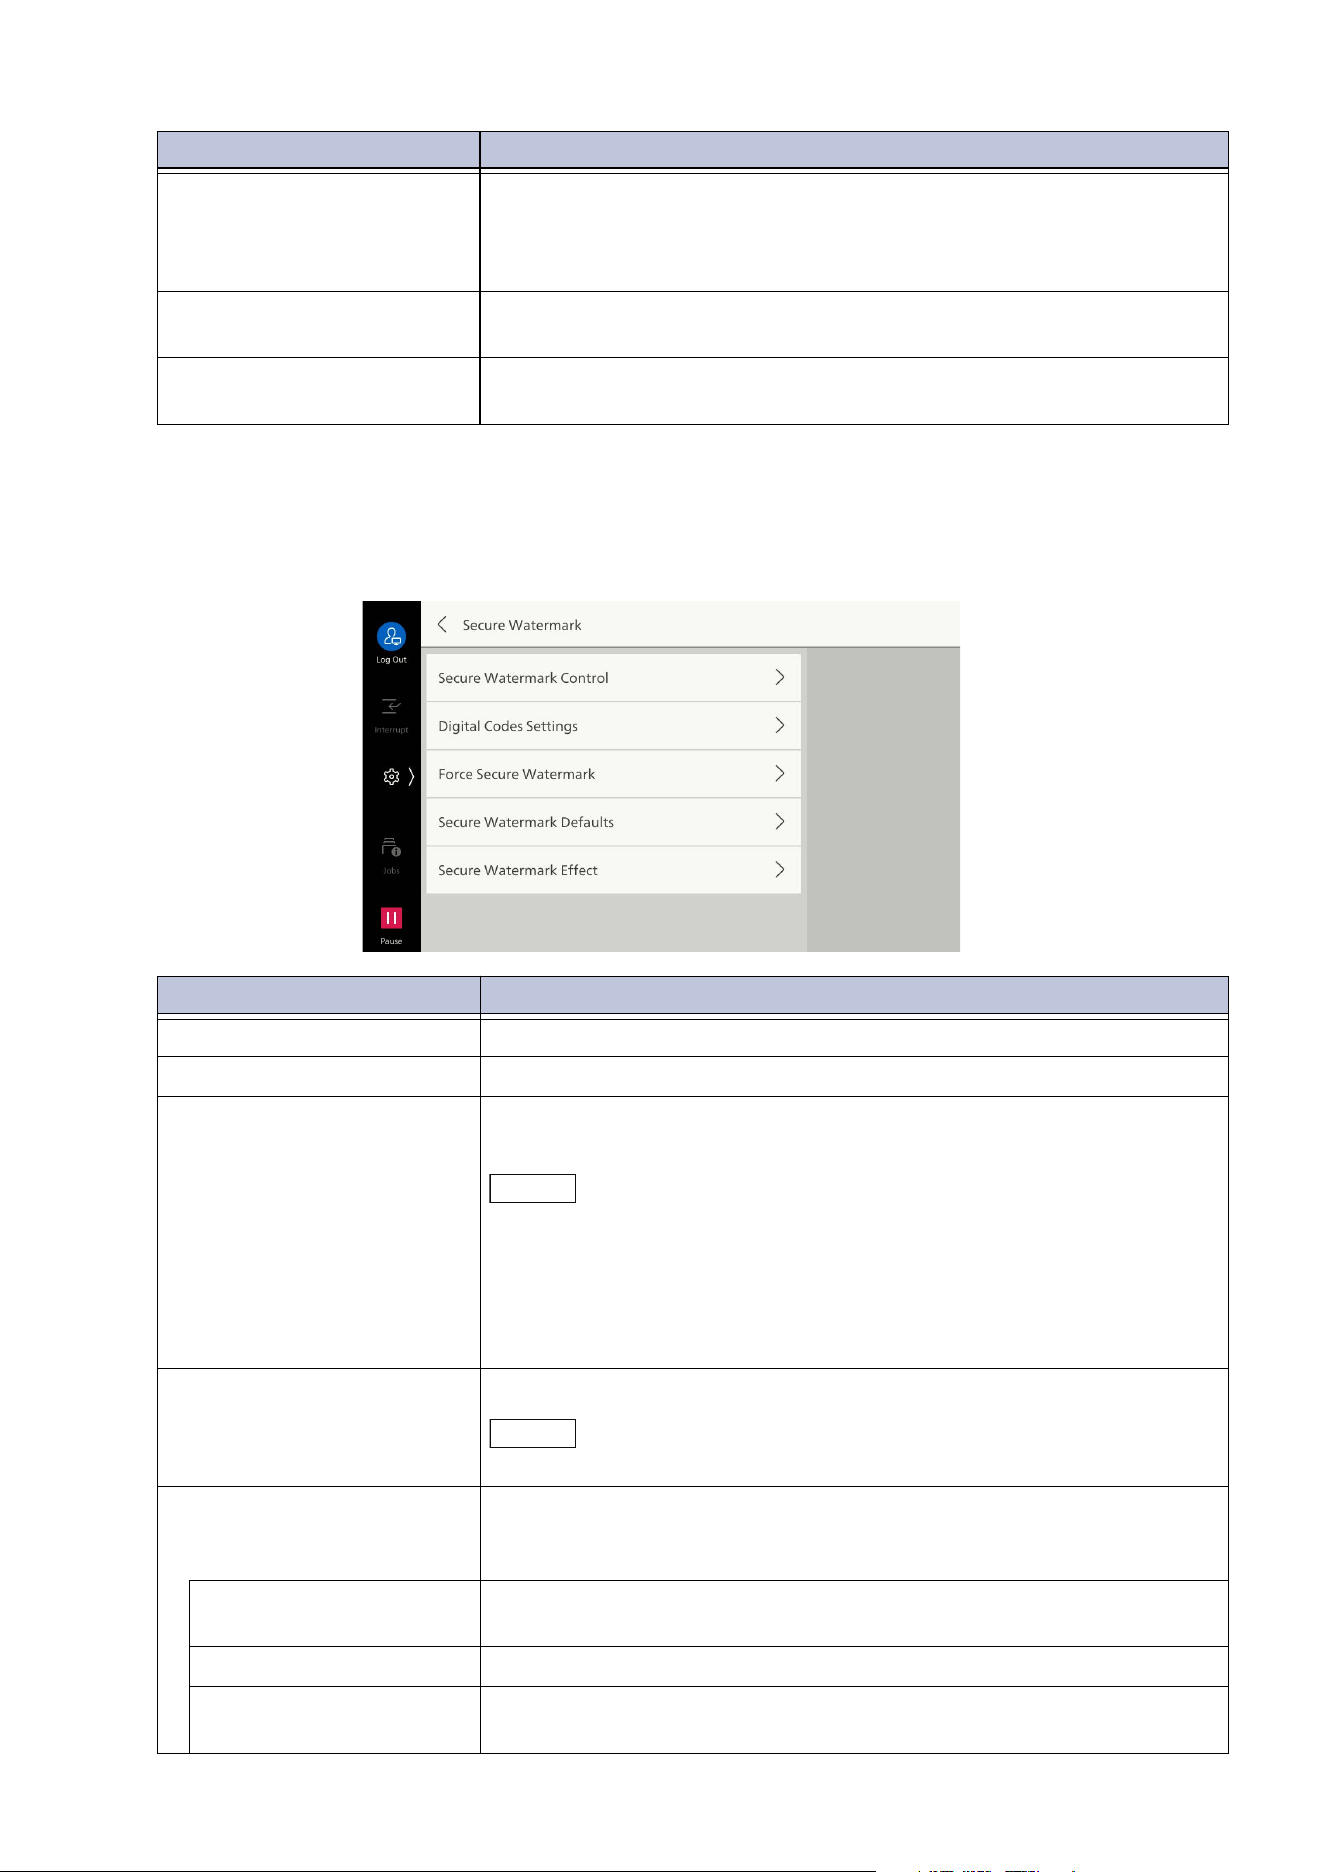
98
10 Device
[Secure Watermark]
Sets whether to detect protection code embedded in a document. When a document with an
embedded protection code is scanned, the job is forced to cancel.
[Force Watermark - Media
Print]
Sets whether to force watermarking when performing Print from
USB.
The printed text string is the user control number, machine ID, and
printing date & time.
[Custom Watermark 1] to
[Custom Watermark 3]
Set
s text string printed as watermark.
[Print Sample List] Prints multiple samples with different background contrast. Set
[Watermark/Background Contrast] based on the print sample.
Item Description
[Secure Watermark Control] Sets whether to detect protection code embedded in a document.
[Digital Codes Settings] Sets character string for digital code to be embedded in documents.
[Force Secure Watermark] Sets whether to force use of the secure watermark feature for each
job type.
Note
To promote settings of the machine with [Client Print], select [Allow
Device Settings to Override], and to promote settings of software or
print servers, select [Allow Client Settings to Override].
Settings for [Client Print] are the same as “Force Watermark-Client
Print”. For Force Watermark-Client Print, refer to "[Watermark]"
(P.97).
[Secure Watermark
Defaults]
Sets whether to embed a protection code.
Note
The set protection code also provides the same limits in scan operation.
[Secure Watermark Effect] If watermark text is set, the watermark text is embedded in the file
to be copied/printed. If the file with embedded watermark text is
copied, the embedded watermark text is blanked out.
[Default Secure
Watermark]
Sets text string of secure watermark.
[Background Pattern] Sets background pattern of secure watermark.
[W
atermark/Background
Contrast]
Sets watermark/background contrast of secure watermark.
You can set by referring to samples printed with [Print Sample List].
Item Description
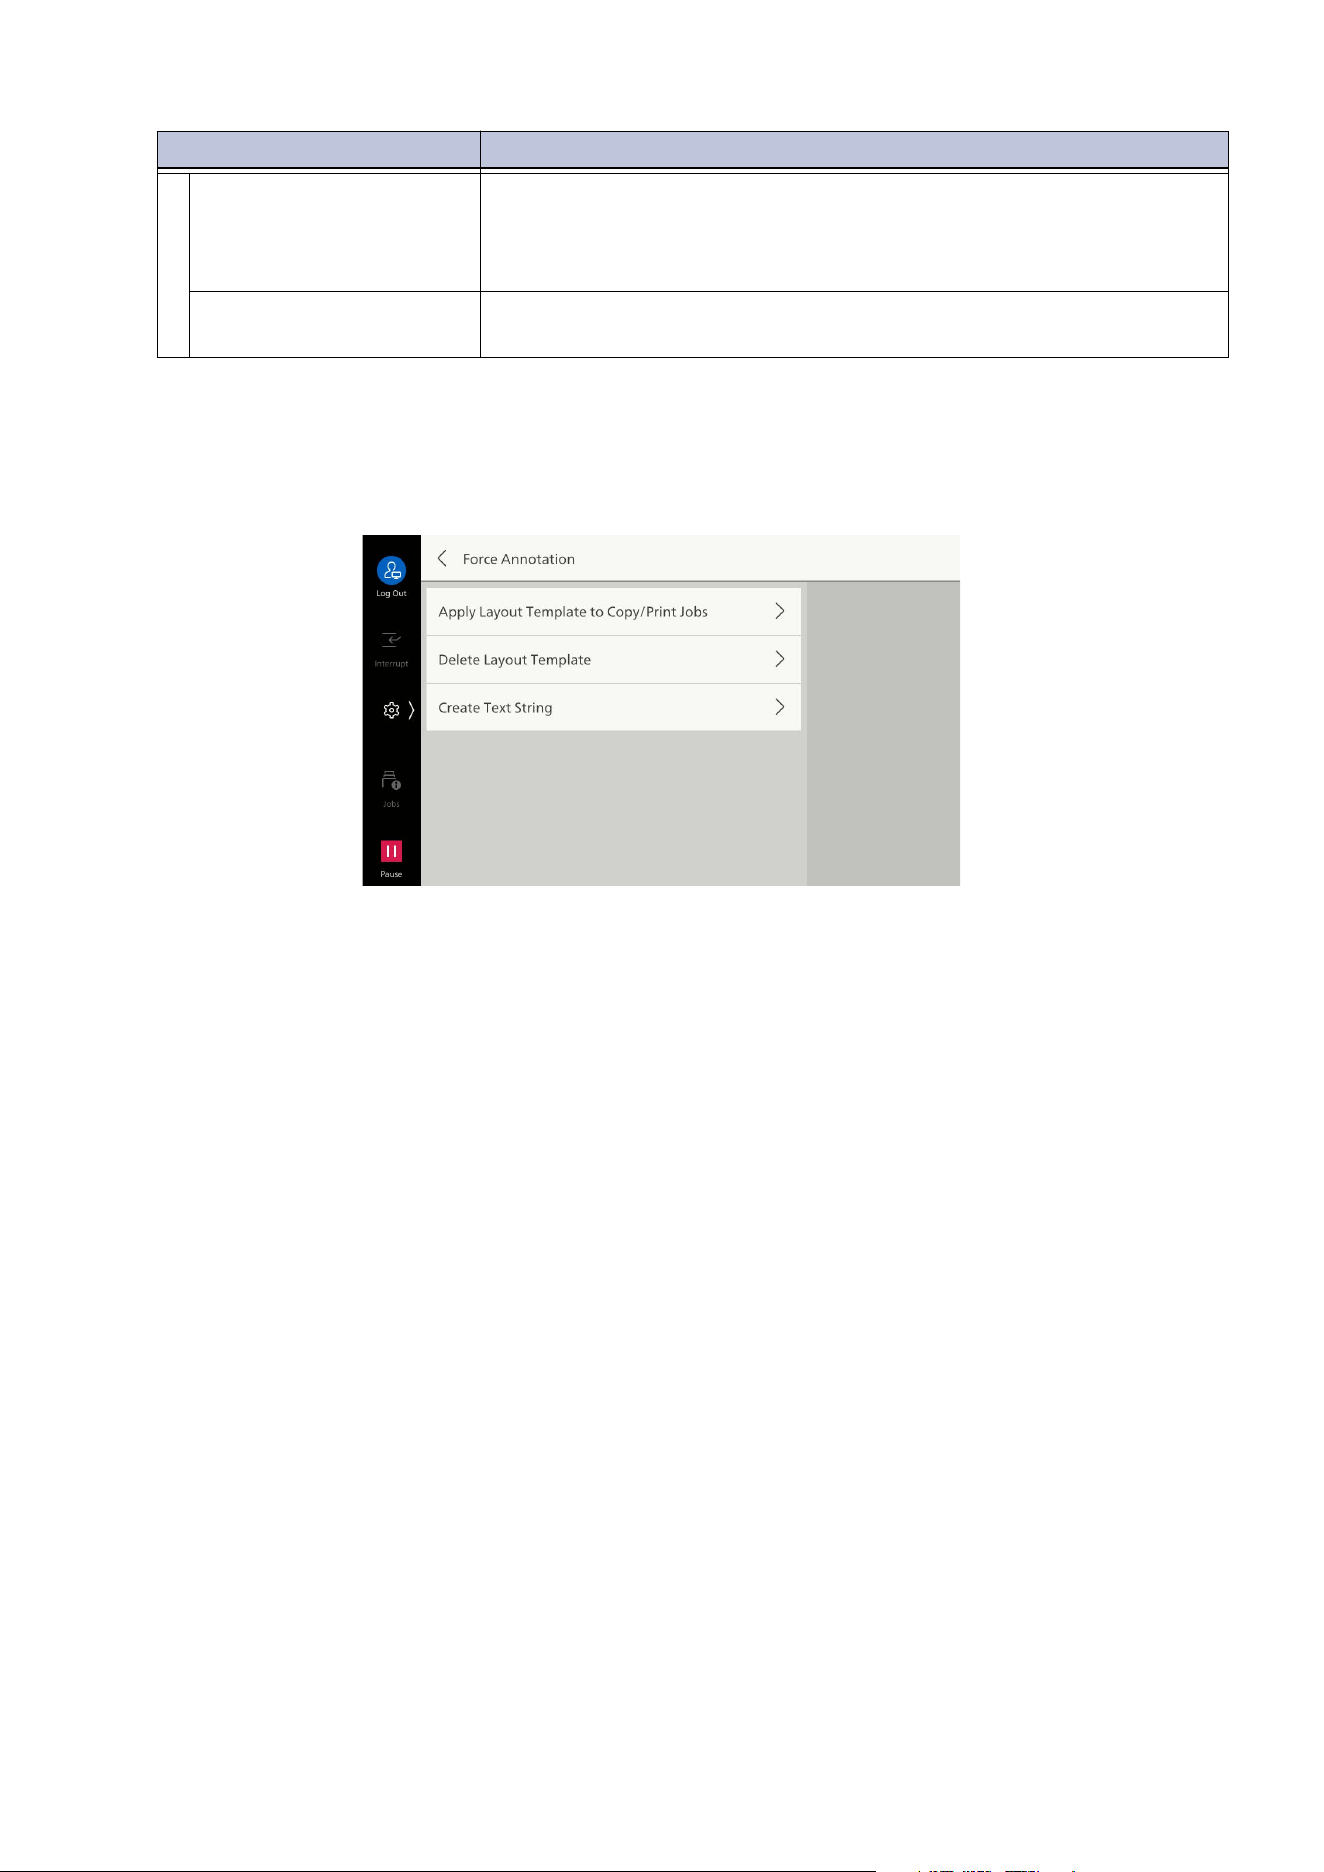
99
10.2 [System Settings]
[Force Annotation]
This feature performs forced printing of text strings such as user names or dates (annotations)
according to a layout template applied to each job type.
[preset1]
Print position: Bottom right
Printed items: File name, client computer IP address, user name, card ID, user ID, date & time
[preset2]
Print position: Bottom left
Printed items: File name, client computer IP address, user name, card ID, user ID, date & time
[preset3]
Print position: Bottom right
Printed items: User ID, date & time
[preset4]
Print position: Bottom left
Printed items: User ID, date & time
[Custom Secure
Watermark 1] to
[Custom Secure
Watermark 3]
Sets text string of secure watermark.
[Print Sample List] Prints multiple samples with different background contrast. Set
[Watermark/Background Contrast] based on printed sample.
Item Description
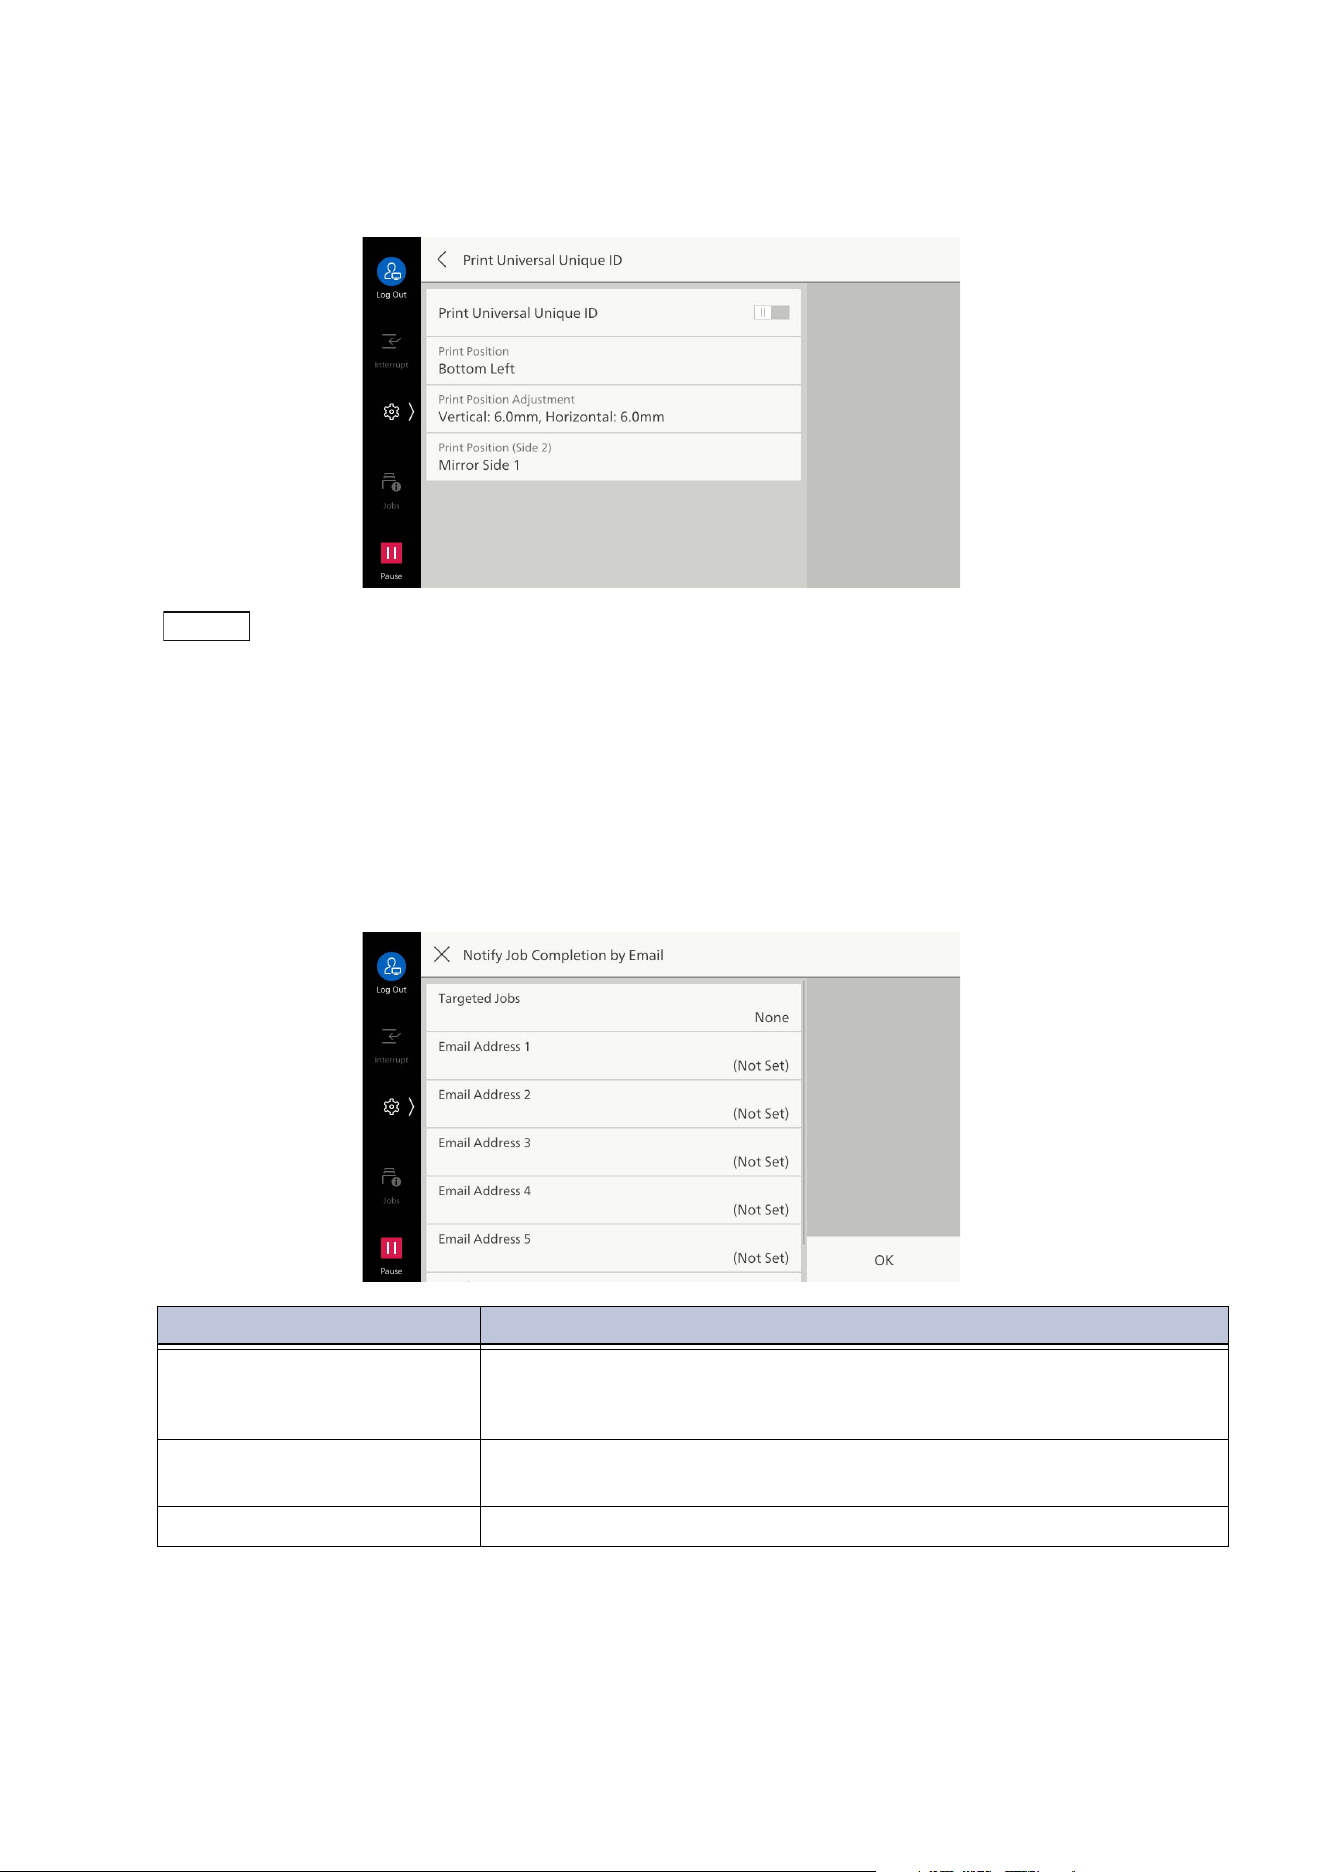
100
10 Device
[Print Universal Unique ID]
Allows you to print an identifying ID (UUID) to enable identification of jobs for each data.
Note
If a layout template is set with [Apply Layout Template to Copy/Print Jobs] for [Force Annotation], then
the text set here is printed on the set template.
Increasing the fine-tune value, taking the paper edge as 0 mm, results in movement in the direction of the
paper center. However, if [Top Center] or [Bottom Center] is selected in [Print Position], then the fine-
tune value in the length takes the paper center to be 100 mm. If [To
p Center] or [Bottom Center] is
selected in [Print Position], adjust after first setting the fine-tune value to 100 mm.
[Notify Job Completion by Email]
Item Description
[Targeted Jobs] Sets service for notification of the results of running jobs, and the
timing of notification. If one or more targeted jobs have been set,
then [Selected] is displayed.
[Email Address 1] to [Email
Address 5]
Sets notification destination for Email.
[Email Message] Enables input of comment attached to Email.
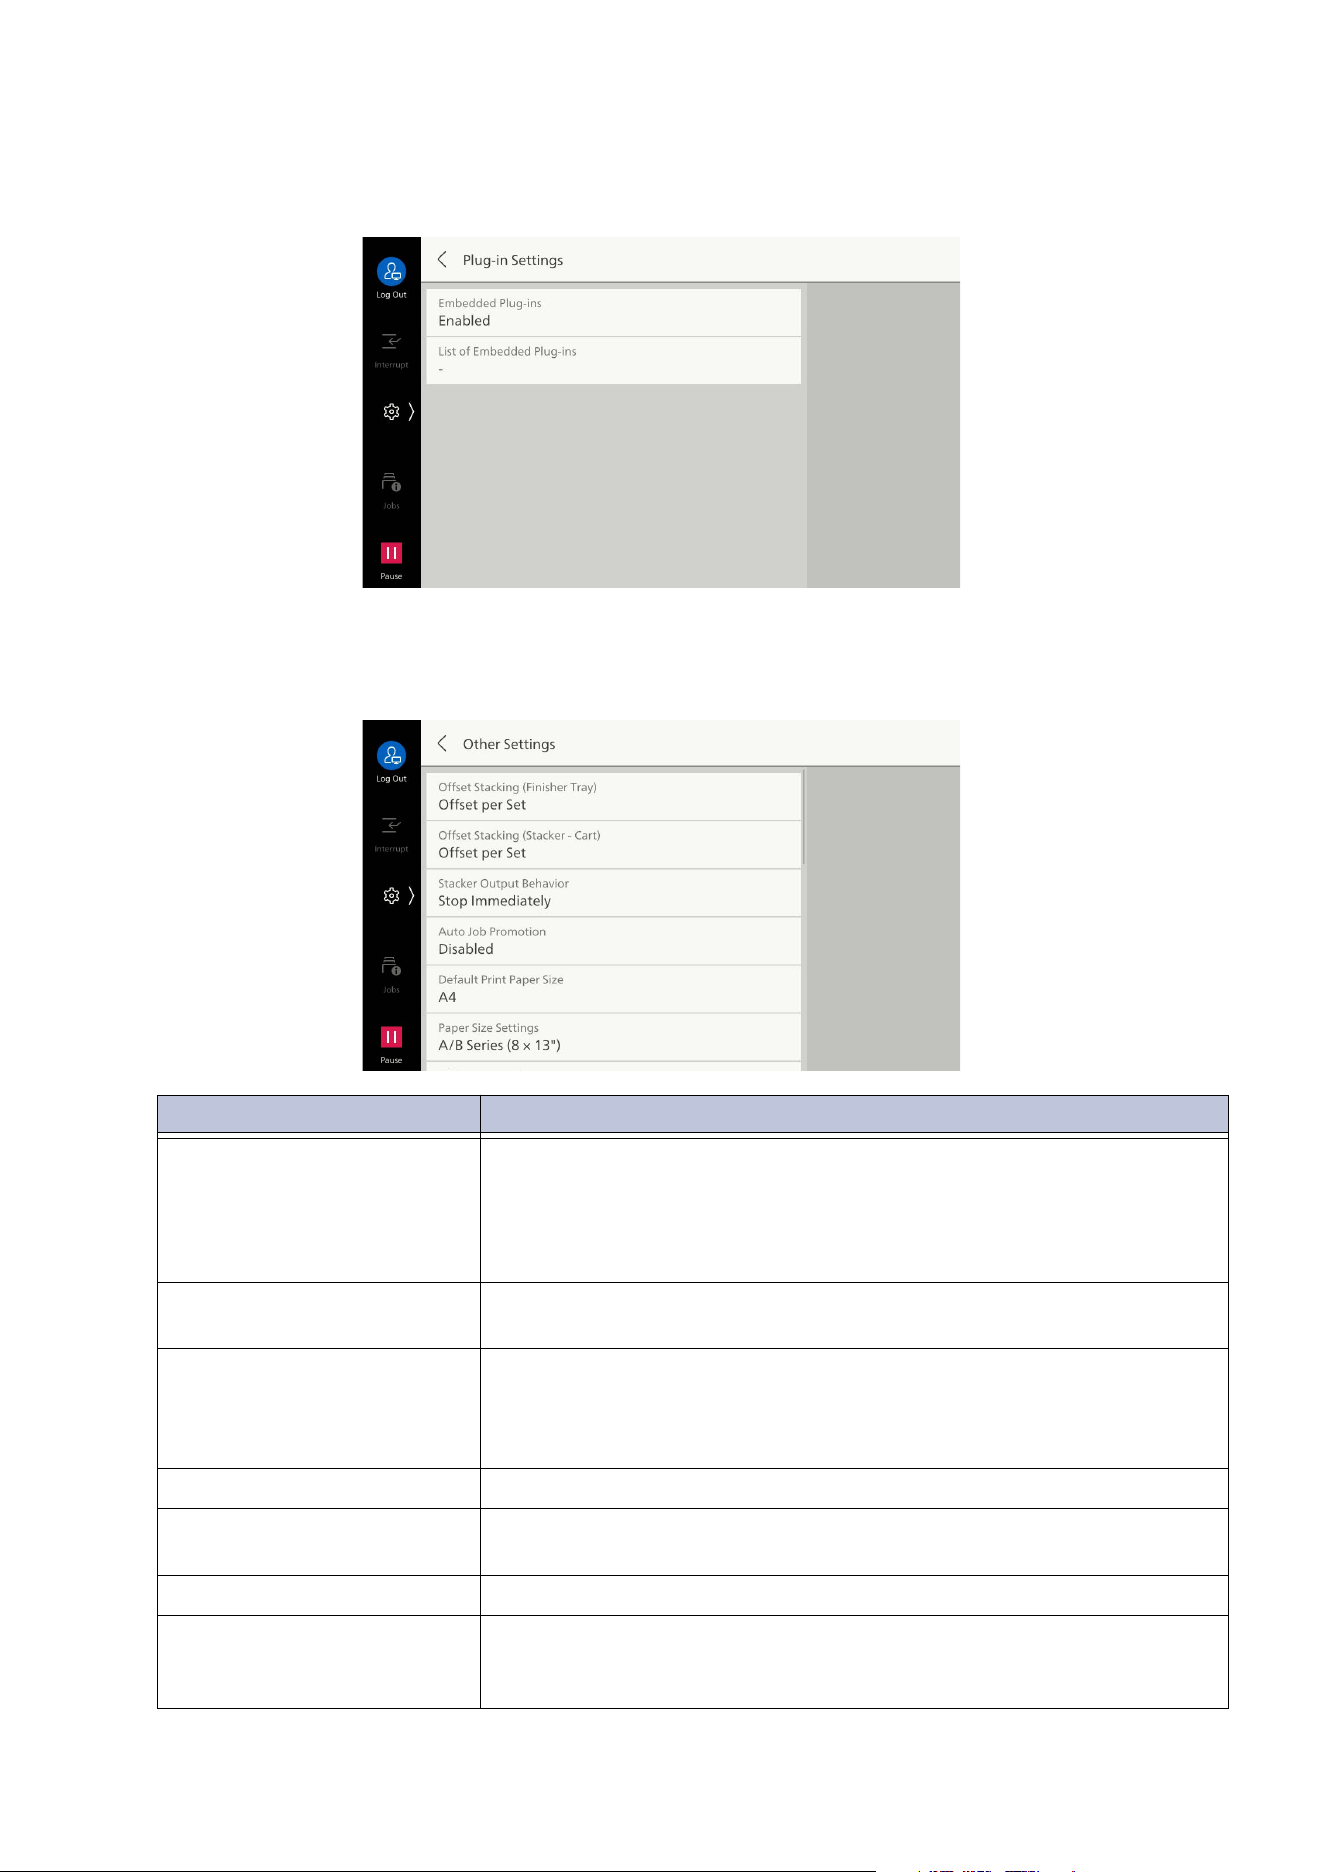
101
10.2 [System Settings]
[Plug-in Settings]
Set the display of the list of available Plug-ins and switching Plug-ins.
[Other Settings]
Item Description
[Offset Stacking] Sets to stack by alternately shifting the stacking position of paper so
that the partitions can be easily seen.
If set to [Offset per Set], offset stacking is performed in print
quantity units. If set to [Offset per Job], offset stacking is performed
in job (print instruction) units.
[Stacker Output Behavior] Sets the paper output operation when the removing stacker button
is
tapped on.
[Auto Job Promotion] If the machine cannot start a job for some reason (e.g., if paper in the
paper tray runs out when trying to start copying or printing), this
allows auto job promotion when there is another job that can start
running.
[Default Print Paper Size] Sets the paper size used when printing a report/list.
[Paper Size Settings] Sets the paper size group when detecting standard size documents
an
d paper.
[Millimeters/Inches] Sets units displayed on the screen.
[Data Encryption] Performs encryption of data such as saved address information,
authentication information, and stored files. Encryption is also
performed when writing copied, scanned, or printed data.
102
10 Device
[Encryption Key for
Confidential Data]
Sets encryption key for encryption of confidential data such as
administrator passwords, and folder passwords.
Note
The encryption key is set to the default administrator password at
factory shipment. Refer to
Setup Manual
for the default administrator
password.
[Service Operation
Restriction]
You can restrict the service person operation to prevent machine
security settings from being changed by someone impersonating a
service person.
This setting requires a service person to input a maintenance
password to perform maintenance work on the machine. Set a
ma
intenance password of 4 to 12 alphanumeric characters.
Note
This setting makes it necessary to replace a circuit board in order to
change restrictions or perform maintenance work. Replacing a circuit
board requires a charge for the board and for replacement labor, so be
careful not to forget the user ID and password of the administrator, and
the maintenance password.
[Document Feeder Quiet
Mode]
Sets whether to reduce operating noise when scanning a document
with the document feeder.
To reduce operating noise, select [Enabled].
[Document Feeder Tray
Elevation]
Sets the timing for elevating the document feeder tray when a
document is loaded in the document feeder.
[Check Document Guides
Position]
Displays a confirmation screen when the guide position of the
document feeder is set to 8.5" and scanning is started.
[Multi-feed Detection] Sets whether to detect multi-feed.
[Es
timated Job Time] For the waiting jobs, sets the information displayed in expected time
until the job completes.
[Cumulative Time for All Jobs]
Displays the remaining time until the job, including active jobs or
other preceding waiting jobs, completes.
[Time Required for Single Job]
Displays the time required to print the target job.
[Status Indicator (Green)] Enables the lamp which lights/flashes while the machine is
performing some operation such as during active jobs.
[Data Indicator] Sets Data Indicator.
[Document Feeder
Attention Light]
Sets the feature to prevent forgetting to remove the document
loa
ded in the document feeder and output after scanning.
[Detect Original Left on
Glass]
Sets the feature not to forget to taking away the document loaded in
the document glass.
If it is set to [Enabled], the message, status indicator or sound
notifies you.
[Paused Job Handling] Sets the handling method after operation of a job that has been
started is paused, and left until the specified with [Auto Clear] has
elap
sed.
[Interrupt Mode] Sets enable/disable Interrupt Mode. If it is set to [Disabled],
[Interrupt] on the control menu is deleted.
Item Description
103
10.3 [App Settings]
10.3 [App Settings]
[Copy Settings]
[Copy Controls]
[Local User Access -
Maintenance]
Allows local users to register the custom paper or adjust the image
quality and folding position.
Refer
For registering the custom paper, refer to "[Paper Tray Settings]"
(P.90).
For the image quality adjustment, refer to "[Image Quality]" (P.167).
For the folding position adjustment, refer to "[Adjust Finisher]"
(P.180).
Item Description
[Memory Full Procedure] Suspends scanning of a document if storage area runs short while
scanning a document.
This sets the handling method after a fixed time has elapsed from
suspension, in a state with no operation.
[Maximum Stored Pages] Sets maximum stored pages of the copy document.
[Auto Paper Off] Sets tray selected when [Auto Select] for [Paper Supply], on the
[Copy] screen, is canceled.
[Mix
ed Size Originals - 2
Sided Copy]
Sets paper for copying side 2, when papers with different sizes for
side 1 and side 2 have been selected in auto paper supply, in a case
where the document size is different for side 1 and side 2 in 2 sided
copying.
[Copy to New Sheet] Copies on side 1 of the new paper selected as the side 2.
[Copy to Side 2] Copies as is on side 2 of same paper as side 1, without changing
pa
per size.
[Fine-Tune 100%] Reduces/enlarges when copying with no reduce (100%). The setting
is applied to the reduce/enlarge [100%] on the [Copy] screen.
Item Description

104
10 Device
[Pseudo-Photo Gradation
Mode]
Enables setting of gradation expression mode for photo original.
Switches processing method for parts of intermediate brightness
(gray) to approach photo image quality. Set to [Error Diffusion] or
[Dither].
[Original Type - See-
Through Paper]
Enables display of [Text on See-Through Paper] for [Original Type].
[Face Up/Down Output -
Reverse Order]
Displays [Face Up (Reverse Order)] in [Face Up/Down Output] on
th
e [Copy] screen.
[Face Up/Down - Auto
(Single Sheet)]
If [Auto] is selected in [Face Up/Down Output], sets the operation
when the number of output paper is one.
[Default Trim Margin] Sets the default trimming value for the fore edge trim.
The fore edge trim is the feature to align the edge of the booklet by
trimming its spine and opposite.
[Auto Img Positioning-
10
5gsm or Less]
Sets the image positioning value when 105 g/m
2
or less paper is
used.
The image positioning is the feature to adjust the image position to
print at the same position from the edges of inside and outside
paper for booklet creation.
[Auto Img Positioning-
106gsm or More]
Sets the image positioning value when 106 g/m
2
or less paper is
used.
[Annotations - Comment
Density]
Sets density of comments printed in annotations.
[Com
ment - Top Left] to
[Comment - Bottom Right]
Adjusts position for printing comment in annotations.
[Date - Top Left] to [Date -
Bottom Right]
Adjusts position for printing date in annotations.
[Page Number - Top Left] to
[Page Number - Bottom
Right]
Adjusts position for printing page number in annotations.
[Bates Stamp - Top Left] to
[Bates Stamp - Bottom
Right]
Adjusts positio
n for printing Bates stamp in annotations.
[Annotations - Edit
Comment 1] to
[Annotations - Edit
Comment 8]
Allows users to set or change text strings printed as annotations.
When set to [Do Not Allow], no users, including the administrator,
can edit text strings.
[Maximum Number of Sets] Sets the number of sets. This makes it impossible to set a number of
sets exceeding the number set here.
[Sa
mple Output to Stacker -
Top Tray]
Sets whether to include sample sets output to the Top Output Tray
in the number of copies while jobs are being output to the High
Capacity Stacker.
Item Description
105
10.3 [App Settings]
[Original Size Defaults]
Sets the document size displayed at [Manual Size Input] for [Original Size].
In situations like frequently copying documents with custom sizes, the operation of inputting the
document size for each copy can be eliminated by setting the custom size beforehand.
[Reduce/Enlarge Presets]
Sets reduce/enlarge displayed on [Proportional %] for [Reduce/Enlarge].
This enables changing the reduce/enlarge assigned to buttons other than [100%] and [Auto].
106
10 Device
[Copy (ID Card) Settings]
The settings other than [Copy (ID Card) - Reduce/Enlarge] in [Copy Controls] is the same as [Copy
Settings].
Refer
Refer to "[Copy Settings]" (P.103) for each item.
[Copy Controls]
Item Description
[Copy (ID Card) - Reduce/
Enlarge]
Sets reduce/enlarge when performing Copy (ID Card).
Note
For users save the default value, the setting in this item may not be
reflected. Refer to "Customizing the Apps Screen" (P.25) for saving the
default value.
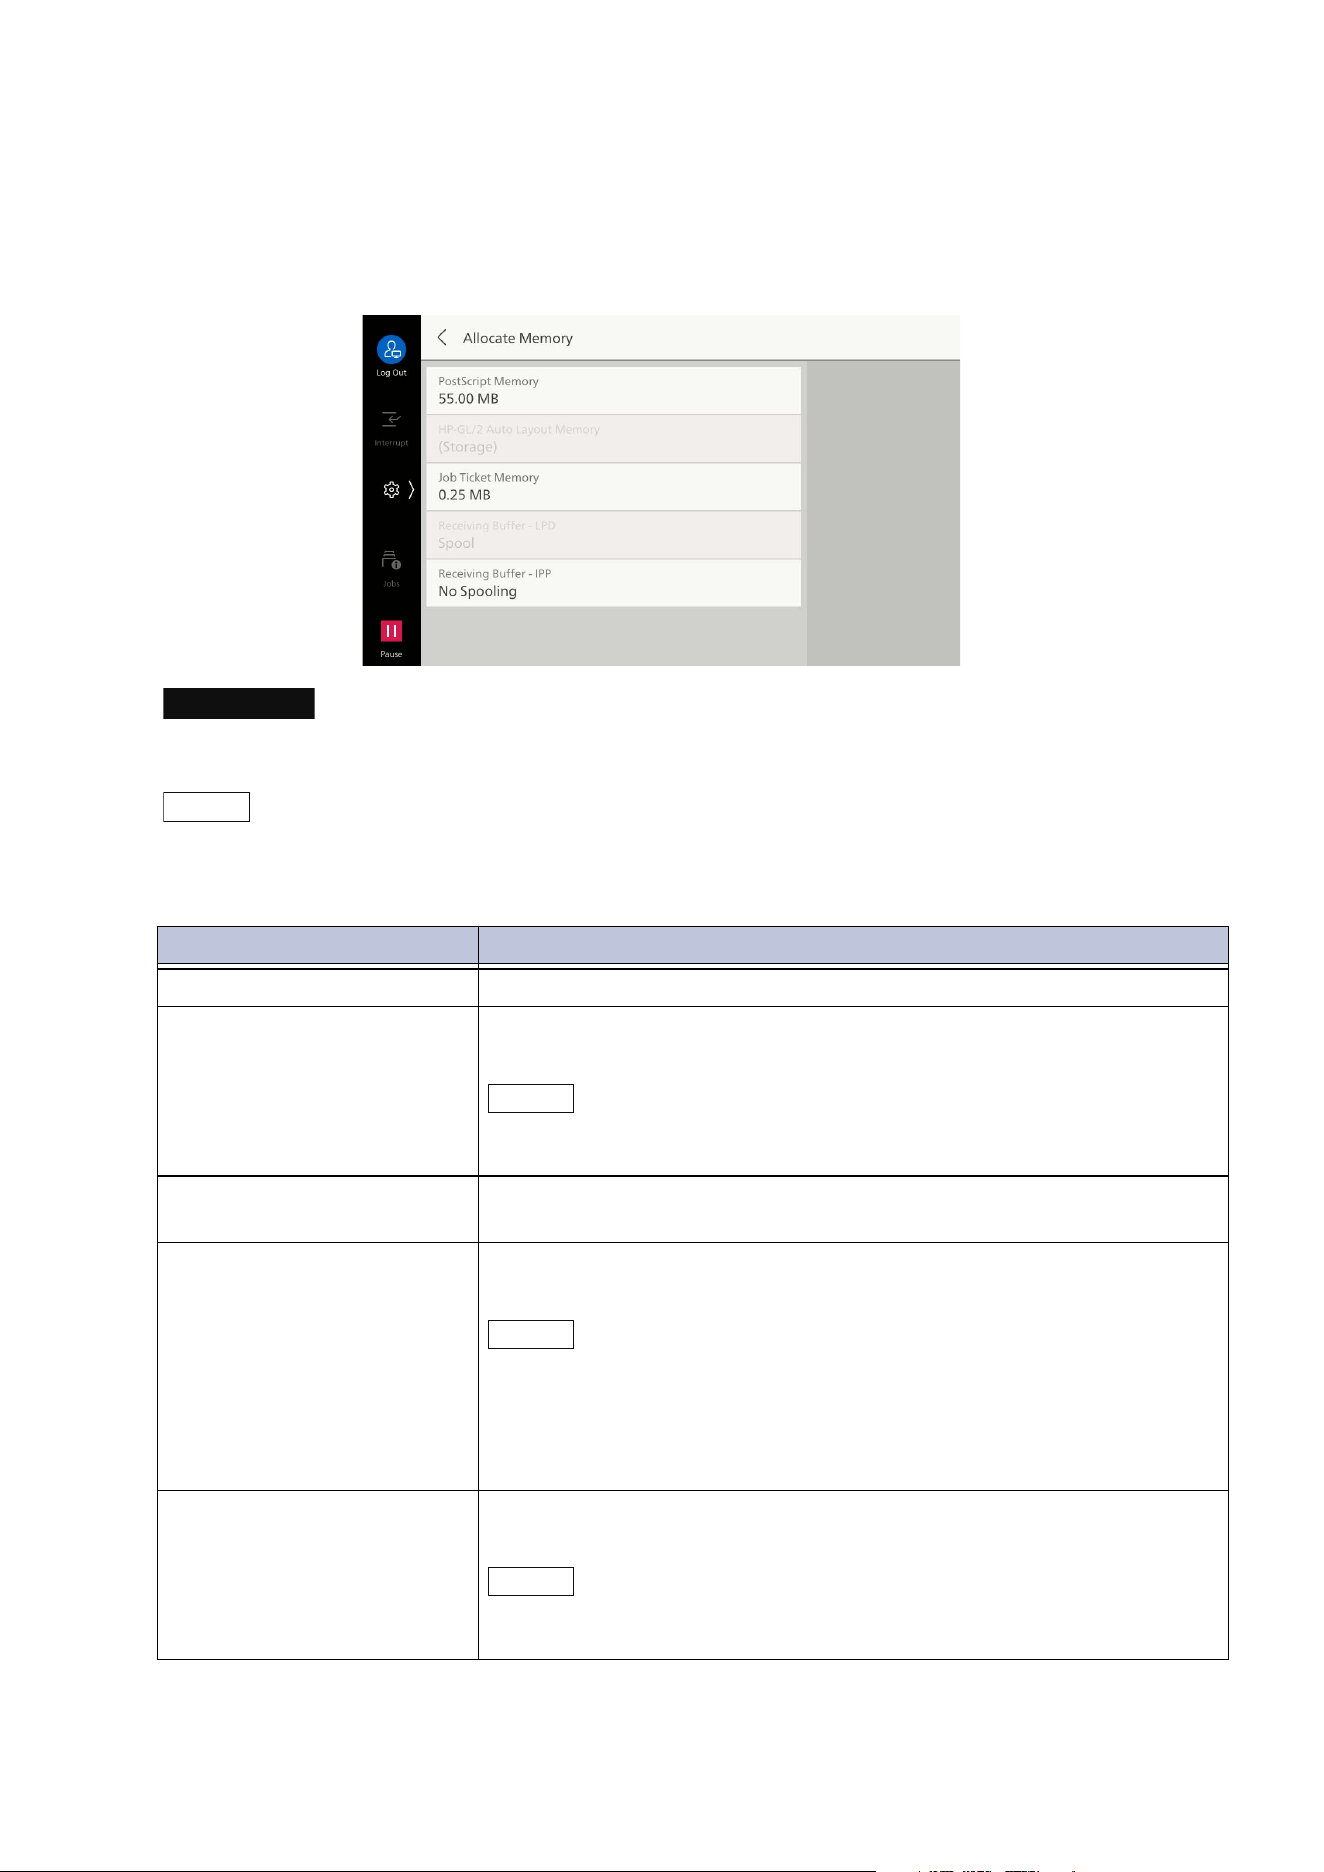
107
10.3 [App Settings]
[Print Settings]
[Allocate Memory]
Sets memory capacity to use for each printer mode.
Important
When memory capacity is changed, memory is reset. Therefore, all data stored in each memory area is
erased.
Note
The memory capacity of receive buffer (place for temporarily storing data sent from client) can be
changed for each interface to suit the use situation and purpose. If the receive buffer capacity is
increased, then the release of clients responding to each interface may become faster.
Item Description
[PostScript Memory] Specifies the memory capacity for PostScript.
[HP-GL/2 Auto Layout
Memory]
Sets the memory area for work when you use the HP-GL/2 auto
layout feature.
Note
When storage is installed, the storage is specified and cannot be
changed.
[Job Ticket Memory] Specifies the memory capacity to use for processing the job ticket
(which describes the output number of jobs or post-processing).
[Receiving Buffer - LPD] Sets whether to execute the spool process. Storage is used for the
receive buffer for the spool process.
Note
When [No Spooling] is set, you cannot receive the data with the same
interface from other clients during processing the LPD printing.
Depending on the setting of [LPD Print Queue], [Receiving Buffer -
LPD] cannot be changed. For [LPD Print Queue], refer to "[Other
Settings]" (P.111).
[Receiving Buffer - IPP] Sets whether to execute the spool process. Storage is used for the
receive buffer for the spool process.
Note
When [No Spooling] is set, you cannot receive the data with the same
interface from other clients during processing the IPP printing.
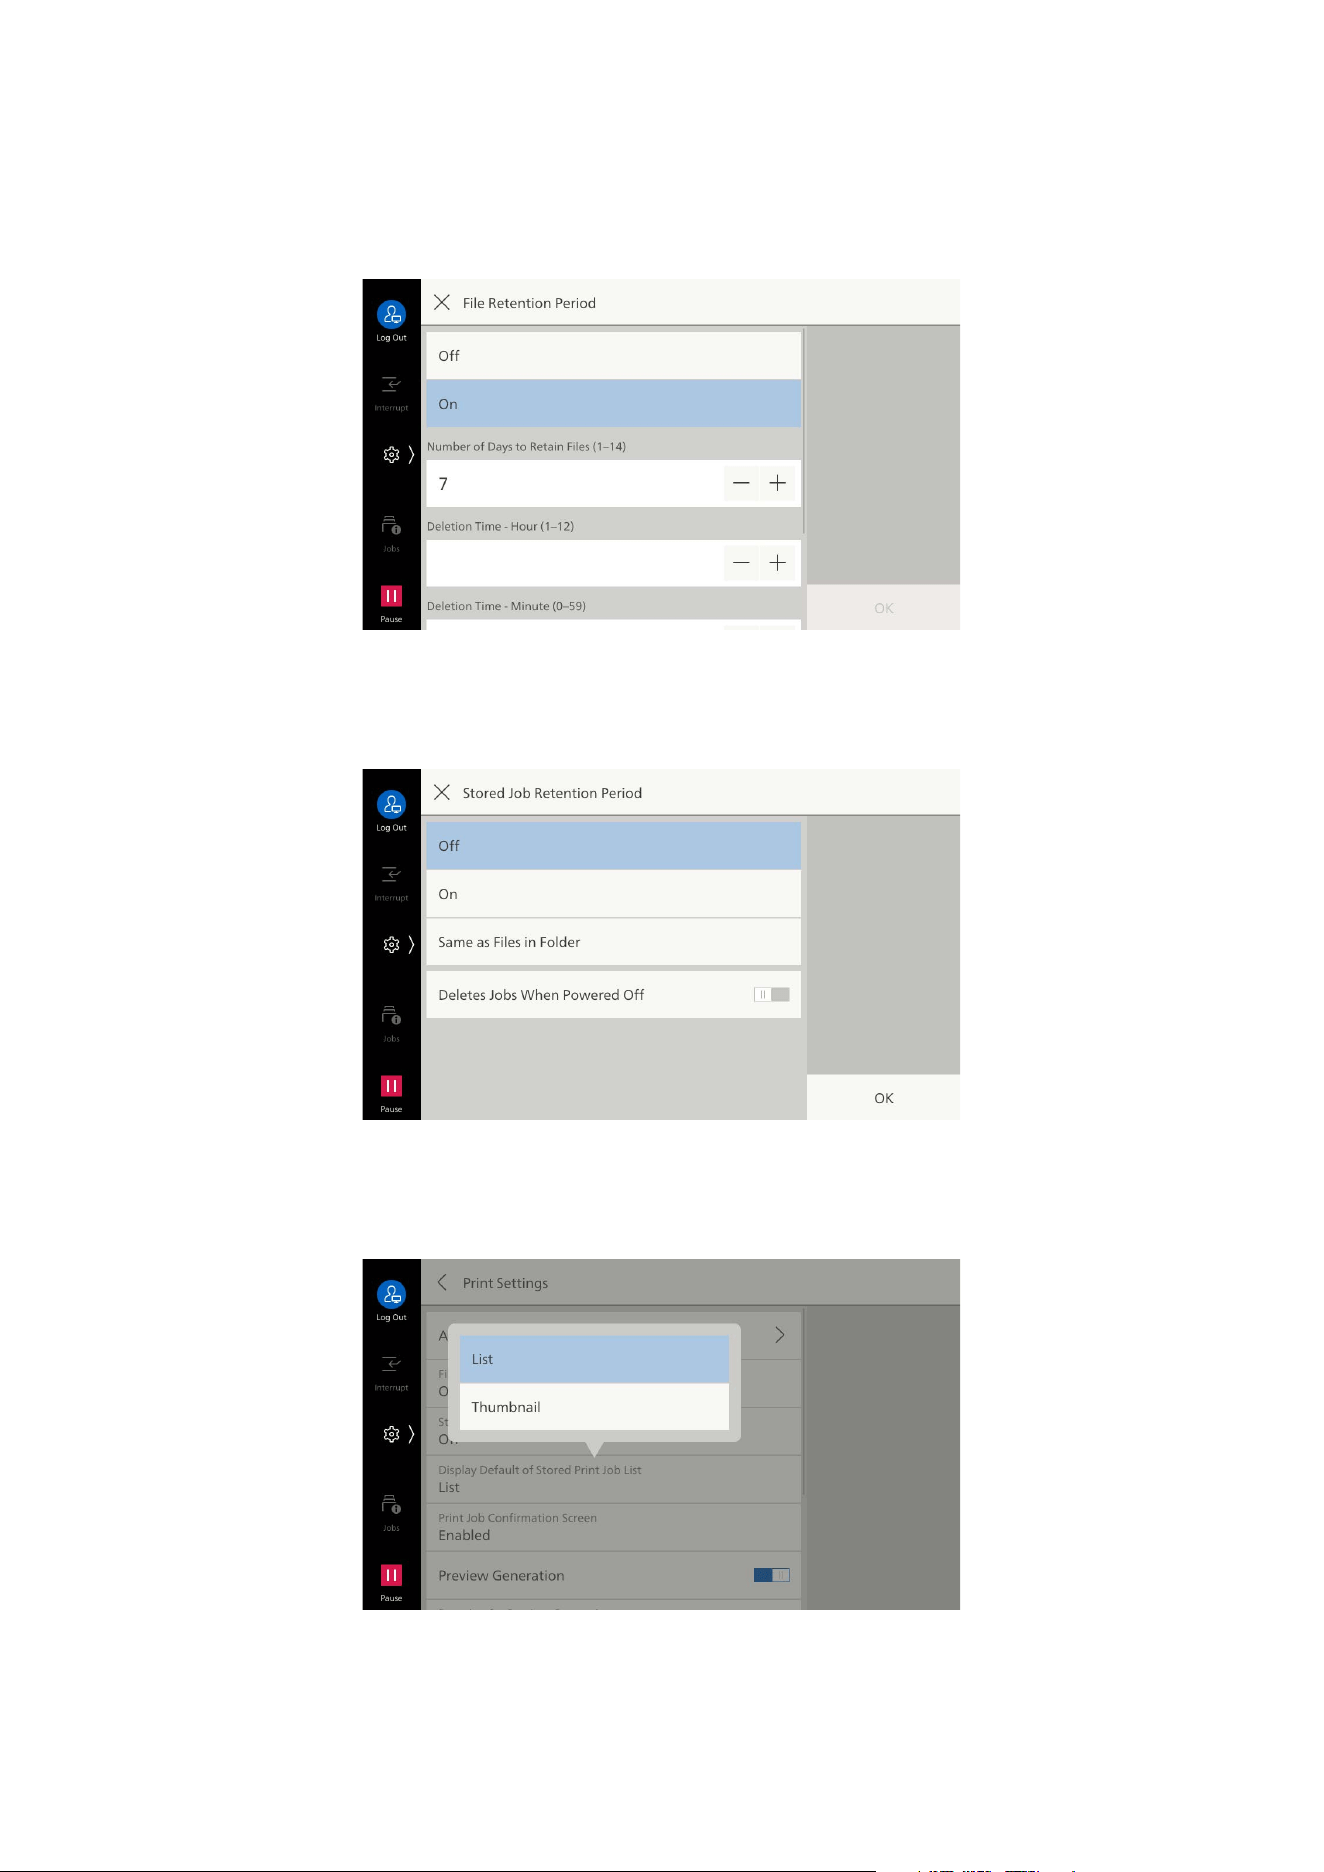
108
10 Device
[File Retention Period]
Sets the retention period for files in folders, after which they will be deleted. When this is set, files are
deleted when the time set with [File Deletion Time] arrives after the retention period has elapsed.
The setting is common for all folders.
[Stored Job Retention Period]
Sets delete method for stored print jobs.
[Display Default of Stored Print Job List]
Sets [List] or [Thumbnail] display for stored print job list.
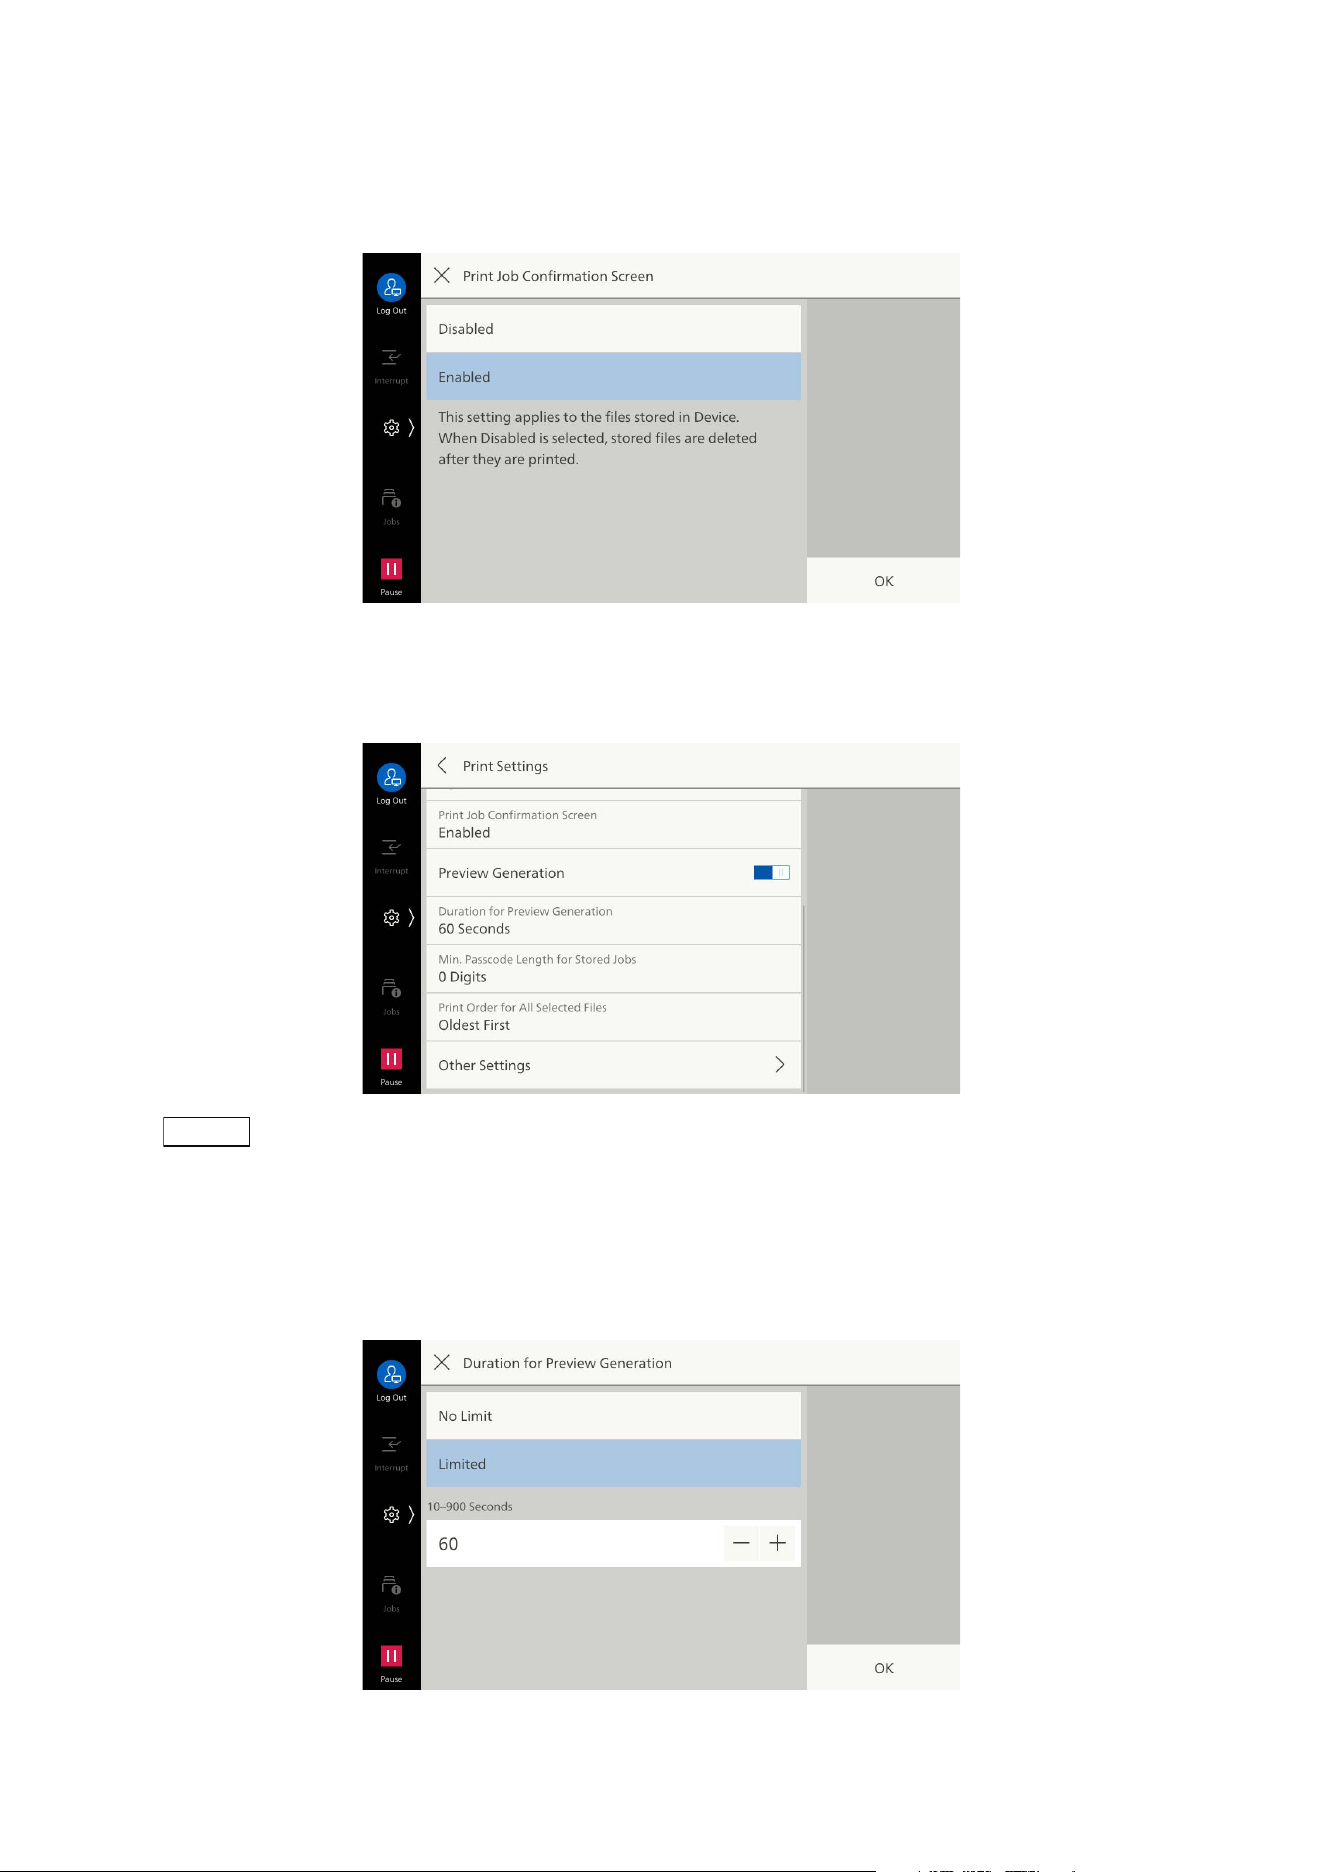
109
10.3 [App Settings]
[Print Job Confirmation Screen]
When printing a stored print job, a confirmation screen can be displayed for deletion of the file after
printing. If set to [Disabled], the job is deleted after printing.
[Preview Generation]
Enables creation of a preview image when displaying the list of stored print jobs.
Note
This also enables setting from the printer driver whether to create a preview image.
[Duration for Preview Generation]
Enables limitation of preview image creation time for stored print jobs. When set to [Limited], only
the preview image created within the limited time is displayed.
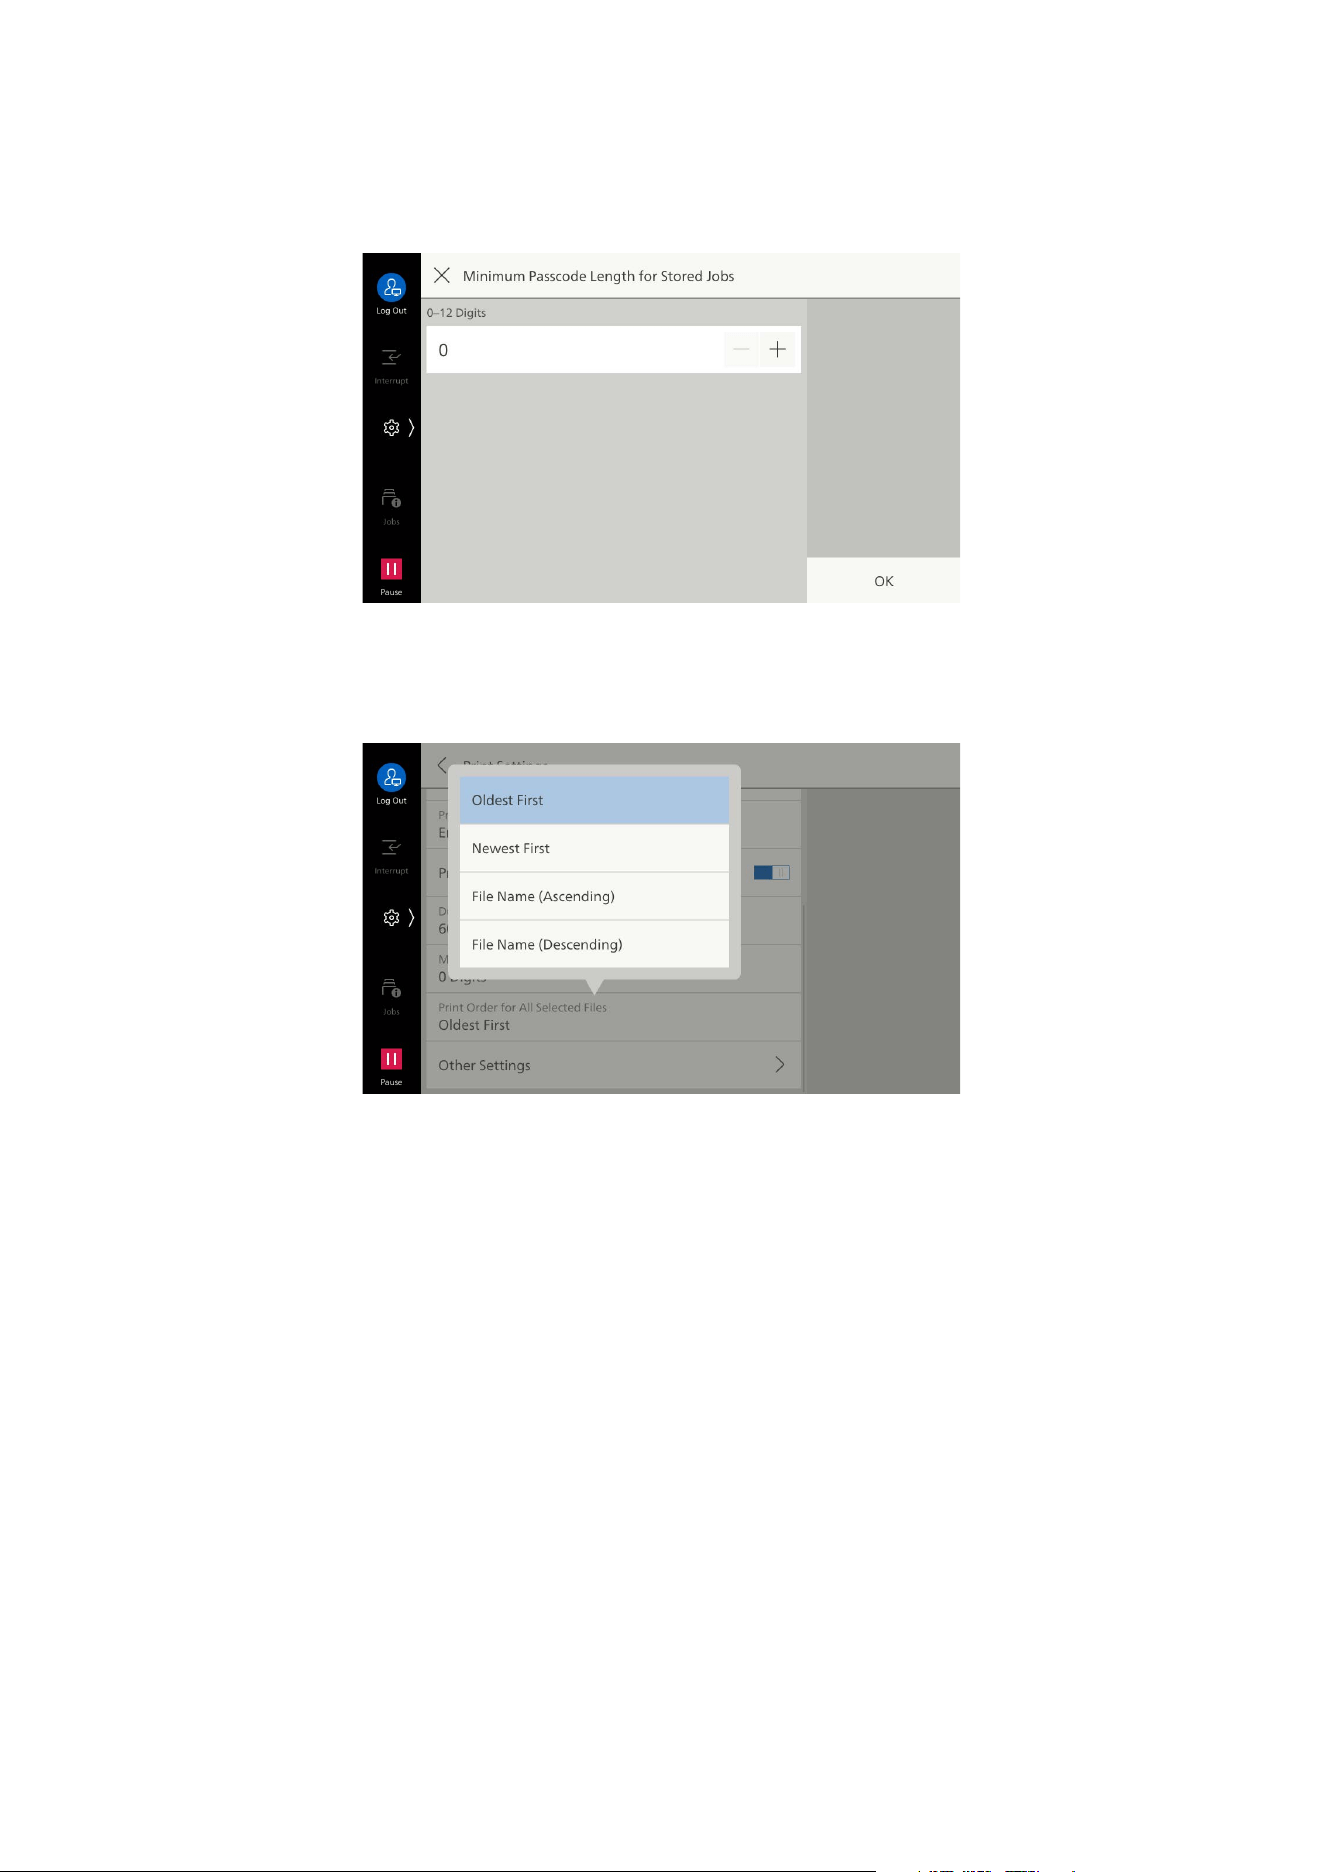
110
10 Device
[Minimum Passcode Length for Stored Jobs]
Sets the minimum number of digits for the password number needed when storing or printing secure
print files or charge print files.
[Print Order for All Selected Files]
Enables setting of print sequence when all files are selected for stored print jobs.

111
10.3 [App Settings]
[Other Settings]
Item Description
[Print Area] Expands print area.
[Substitute Tray] Sets processing when paper of the specified paper size has not been
loaded in the tray.
Note
If printing is done using the emulation such as HP-GL/2, then the
message prompting to supply paper is displayed regardless of the
setting here.
[Display Message] Displays the message to replenish paper, without substitution.
[Use Larger Size] Prints with no reduction on paper of the next larger size above the
specified paper size.
[Use Closest Size] Prints on paper of the size closest to the specified paper size. Prints
by
reducing if paper length or width is insufficient for the paper size.
[Use Closest Size (No
Reduce)]
Prints on paper of the size closest to the specified paper size.
No reduction is performed, even if the image will not fit.
[Use Closest Size
(Works When Invalid
Size Is Specified)]
Prints on paper of the size closest to the specified paper size even if
its size cannot be output by this machine.
Pr
ints by reducing if paper length or width is insufficient for the
paper size.
[Use Closest (No
Reduce, Works When
Invalid Size Is Specified)]
Prints on paper of the size closest to the specified paper size even if
its size cannot be output by this machine.
No reduction is performed, even if the image will not fit.
[Select Tray 5] Prints from tray 5 (bypass tray) at the specified paper size. If paper
of
a different size is loaded, a message is displayed to load paper of
the selected size.
[Switch Size Series] Prints by switching between the papers in the AB-based size series
and inch-based size series.
The switchable combinations are as follows.
A5 and 5.5 x 8.5"
A4 and Letter (8.5 x 11")
A3 and 11 x 17"
[Paper Type Mismatch] Sets processing when paper type specified for printing with the
pr
inter driver, etc., does not match the paper type loaded in the
paper tray.
[Print] Prints with the paper type set for the paper tray.
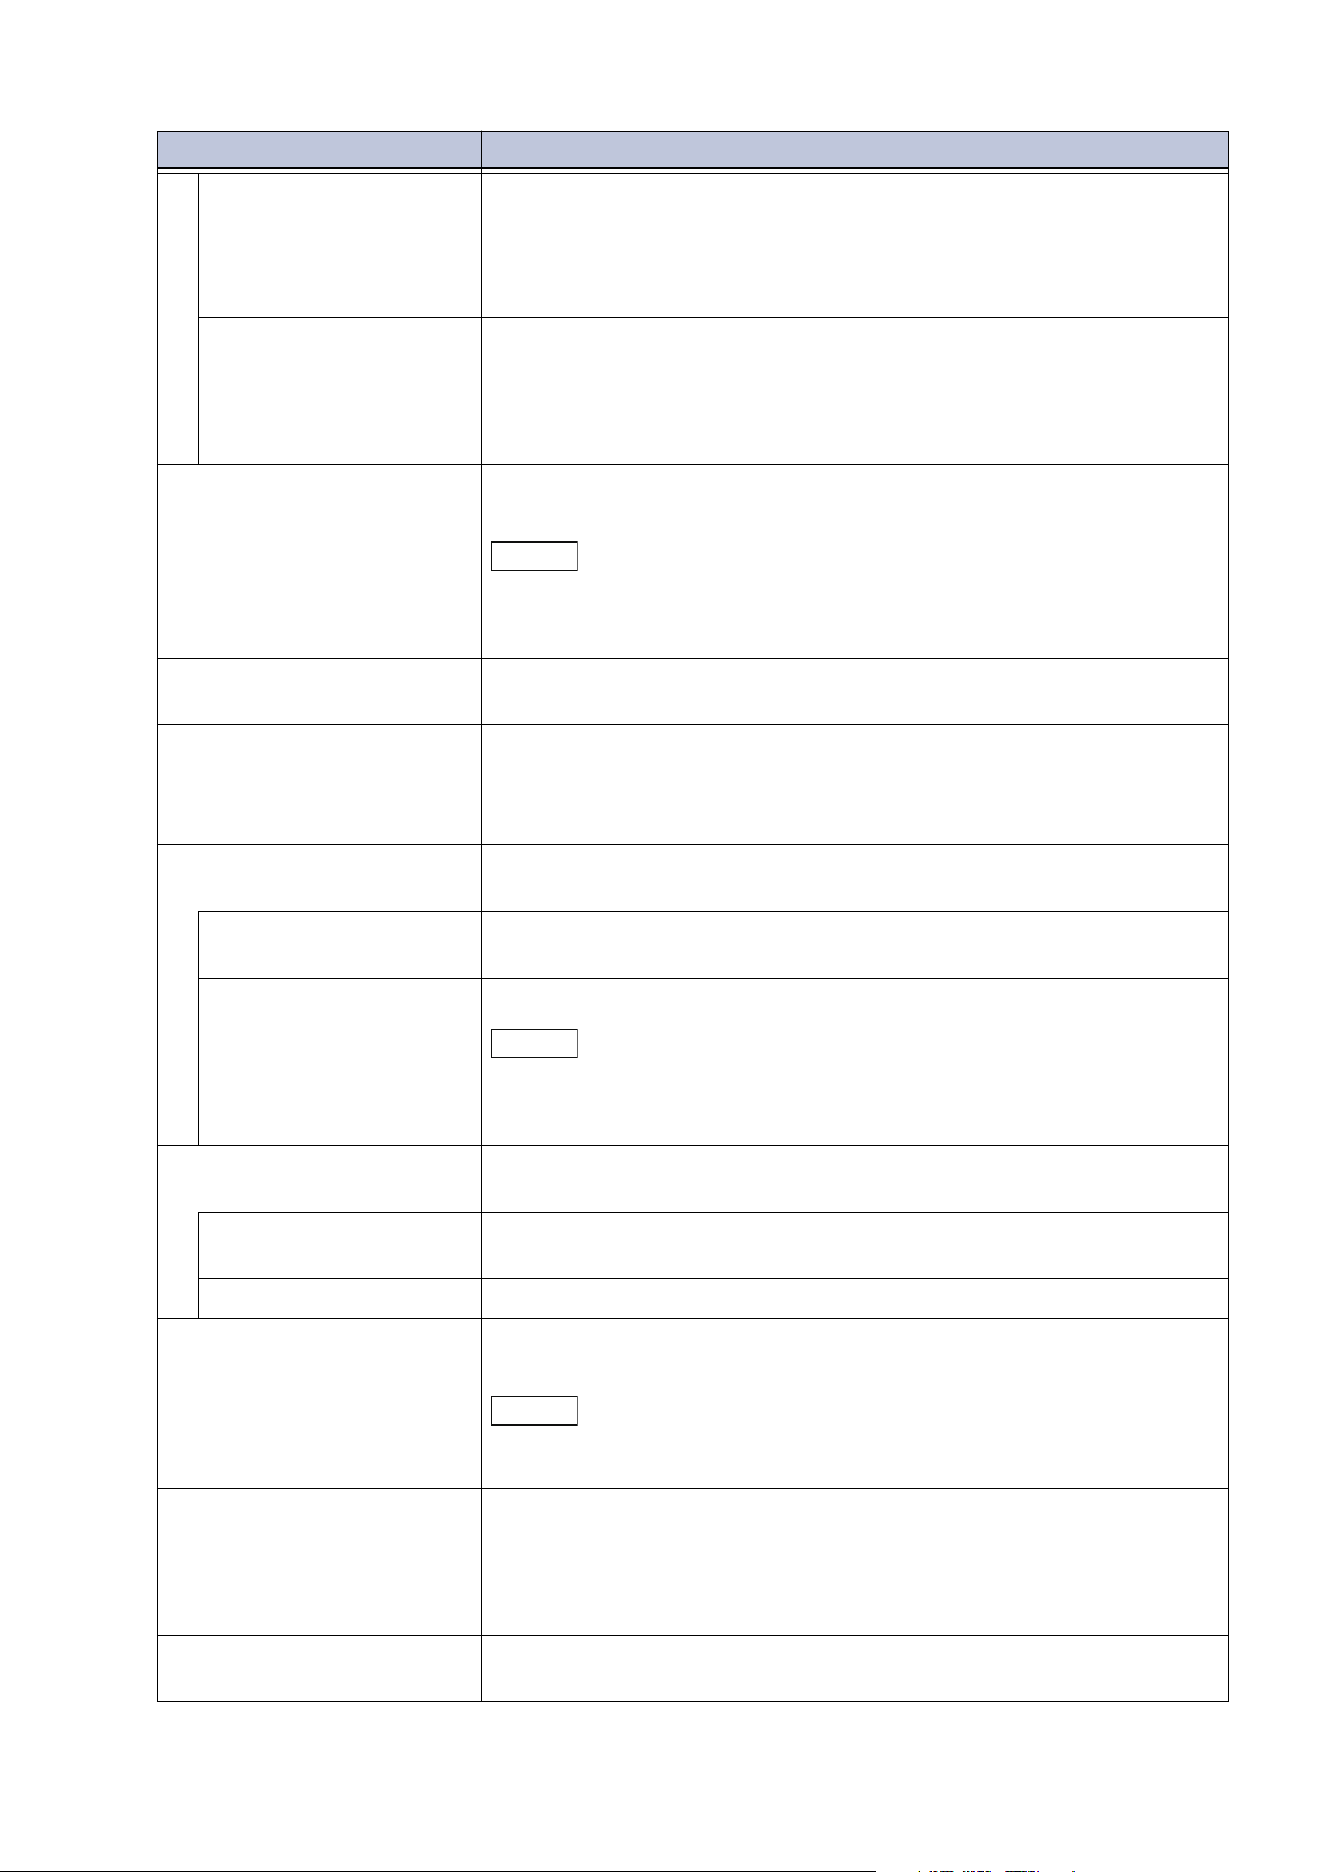
112
10 Device
[Display Confirmation
Screen]
Displays confirmation screen to continue printing.
When printing, specification of the paper type specified for printing
with the printer driver, etc., is disabled, and printing is done
according to the [Priority], paper size, and [Substitute Tray]
settings.
[Display Paper Supply
Screen]
Displays the screen to change the settings of the paper tray.
If [Start] is tapped after switching paper in the paper tray in
acco
rdance with the message displayed on the display, the paper
type set for the paper tray is changed to the paper type setting
displayed on the display, and then printing is done.
[Prioritize Bypass Tray] When [Paper Tray] is set to [Automatically Select] with the printer
driver, tray 5 (bypass tray) can be selected with priority.
Note
If there is a match between paper size and paper type specified in the
print job, and loaded paper, then paper is supplied from tray 5 (bypass
tray).
[Check Type and Size for
Bypass]
Displays a screen for confirming the loaded paper, when printing on
paper in tray 5 (bypass tray).
[Unregistered Forms] Sets the processing method when the form indicated for printing in
the form data file (overlay printing) is unregistered on the printer
sid
e. When set to [Print], only the data is printed because there is no
specified form.
[Resume Job After Print
Error]
Sets the method of resuming subsequent jobs when a print job has
been canceled due to an error, etc.
[Resume Job
Automatically]
Cancels job, and resumes printing of subsequent jobs.
[Resume by User] Displays confirmation screen before job is canceled.
Note
When a job is canceled, the subsequent print jobs are limited, and thus
enter the offline state. When the machine is returned to online, printing
of subsequent jobs is resumed.
[When Paper Jam Occurs] Sets print processing method when an error occurs such as a paper
jam during printing.
[Resume Job After Jam
Clearance]
Resumes printing from the next page after the last normally ejected
page when handling of a paper jam is finished.
[Delet
e Job] Cancels printing, and deletes that print job.
[Print User ID] Enables printing of the user ID when printing using the printer driver.
The first 64 characters of the user ID are printed.
Note
To use the print user ID feature, it is necessary to set the user ID
beforehand with the printer driver.
[Banner Pages] In cases such as when the machine is used by multiple users, this
prints banner pages to separate the jobs of each user, and prevent
mixing of printed materials.
Items such as date, time, user name, and file name are printed on
the banner page.
[Banner Page Offset] Enables offset stacking when printing papers for sorting (banner
pa
ges).
Item Description

113
10.3 [App Settings]
[Banner Page Tray] Sets tray for supplying papers for sorting (banner pages).
Tray 5 (bypass tray) cannot be set.
[PostScript Paper Supply] Enables PostScript deferred media selection at time of paper supply.
To enable deferred media selection, set to [Auto Select], and to
disable, set to [Select Paper Tray].
When printing PostScript data generated by a source other than the
printer driver, the tray may not be selected as intended depending
on
the method of defining PostScript data. In that case, set to
[Select Paper Tray].
[PostScript Font Absence] Sets processing when the PostScript font specified in the job is
absent. If the specified font is absent when set to [Substitute Font
and Print], the font is switched to Courier.
[PostScript Font
Substitution]
Enables use of ATCx as a font substitution when the PostScript font
sp
ecified in the job is absent.
[XPS Print Ticket
Processing]
Sets operation of the machine when scanning print setting (print
ticket) defined in an XPS file.
[Off] Print ticket processing is not performed.
[Standard Mode] Performs print ticket processing in standard mode.
[Compatible Mode] Sets print settings defined in print ticket through operation
compatible with Microsoft specifications.
[LP
D Print Queue] Sets order of LPD printing.
[Print upon Receipt] Prints data immediately after receipt.
[Data Processing Order] Prints data in the order in which it enters a printable state, after data
is received.
When multiple files are printed consecutively, even if data that
requires time for data processing is received first, data for which
data processing is finished may be printed first.
[Fir
st In First Out] Print LPR in the order of receipt.
[OCR Font Glyphs (0x5C)] Sets whether to print the “0x5C” character as a backslash (\) or yen
symbol (¥) when using an OCR font.
Item Description
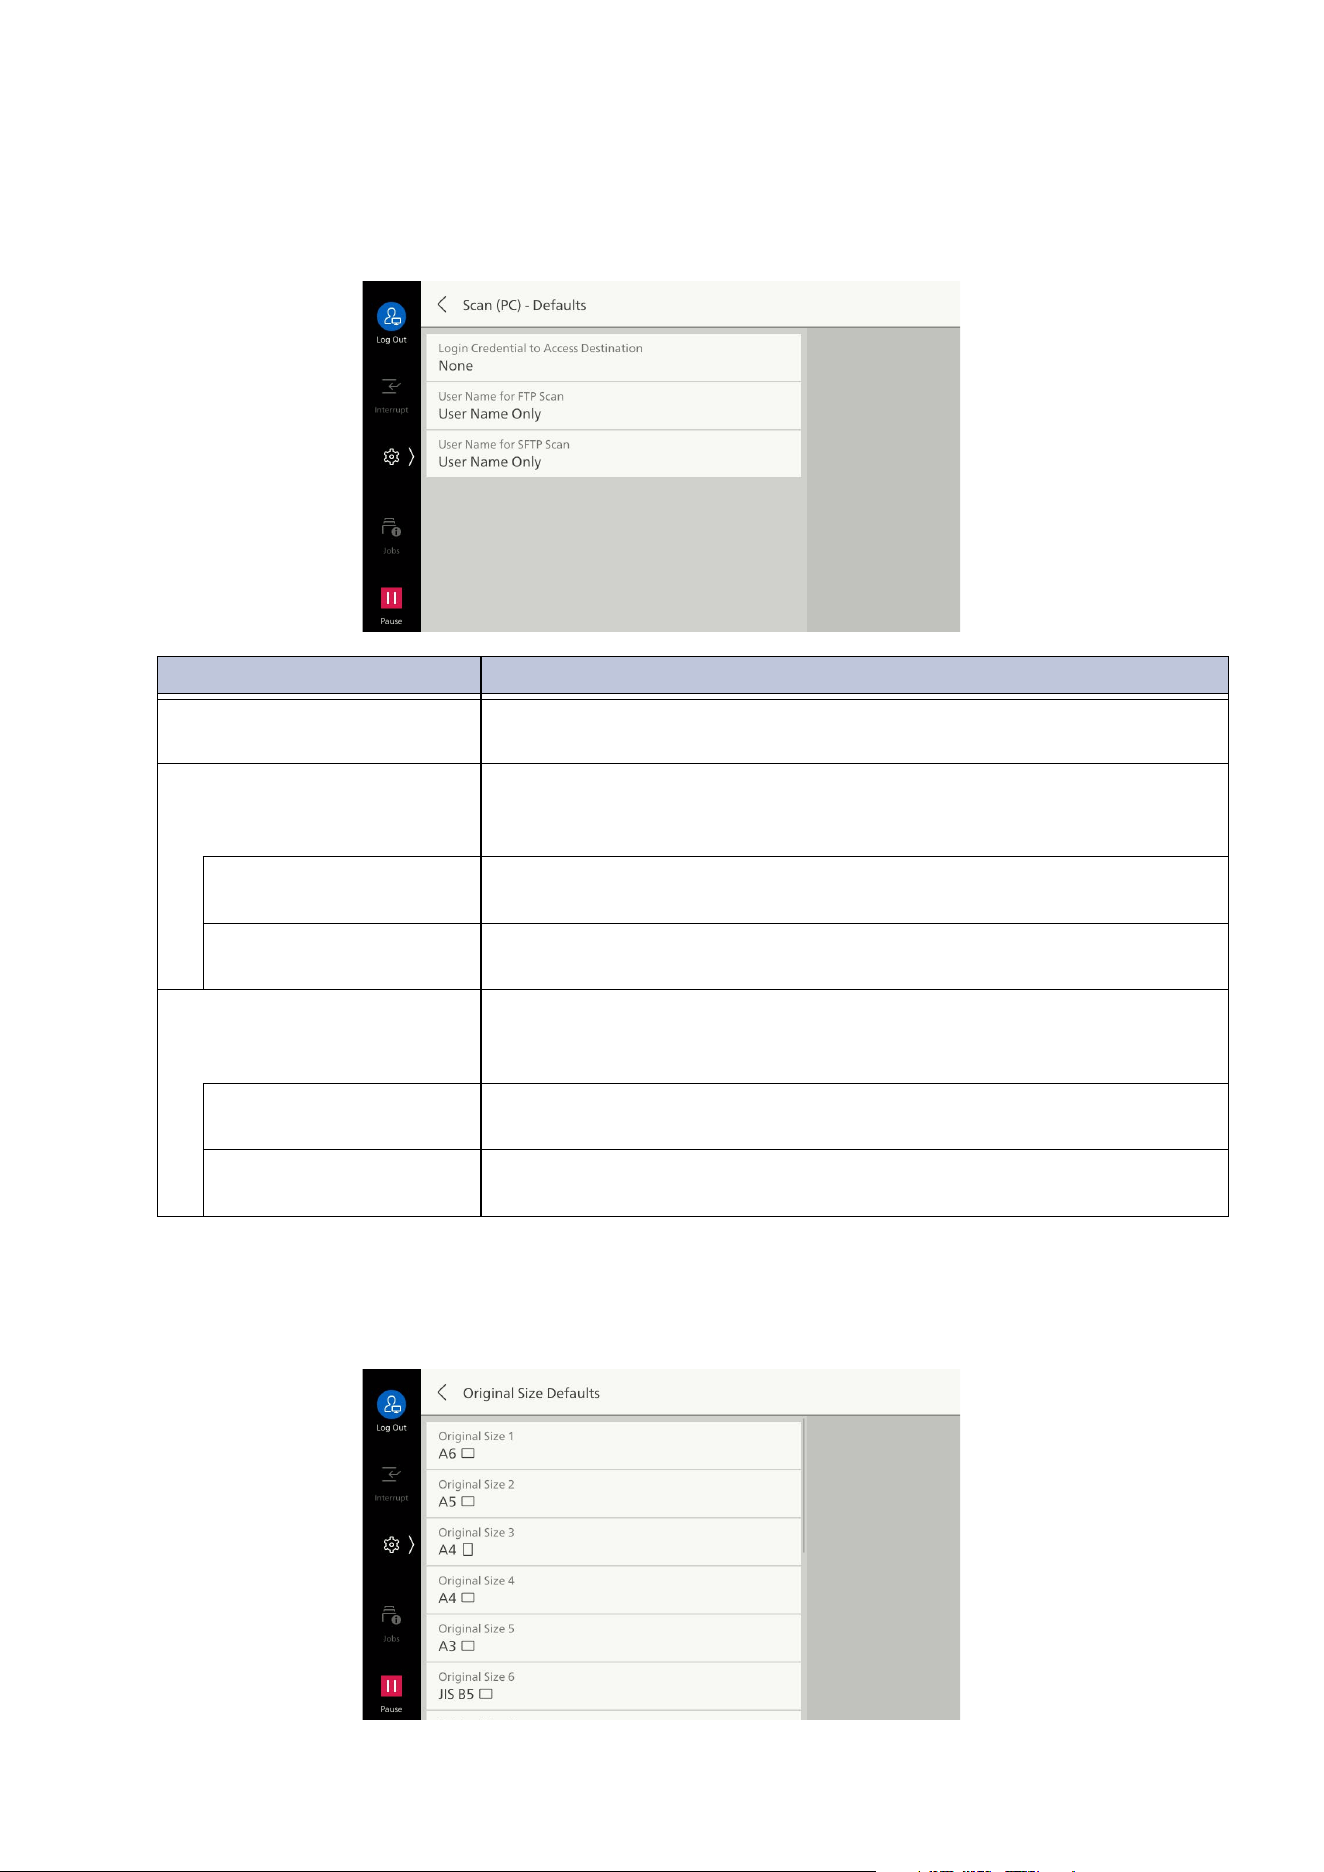
114
10 Device
[Scan Settings]
[Scan (PC) - Defaults]
[Original Size Defaults]
Sets the document size displayed at [Manual Size Input] for [Original Size]. Original sizes are
assigned to each button other than [Auto Detect].
Item Description
[Login Credential to Access
Destination]
Enables use of credential logged in to remote accounts when logging
in to a client computer through SMB/FTP/SFTP transmission.
[User Name for FTP Scan] Enables use of domain part of login credential when using a
credential logged in to remote accounts for the login user name with
FTP transmission.
[User Name Only] Uses only the user name part (before “@”) of the login user name as
the login name, and the domain part is not used.
[Ad
d Domain Name] Uses login user name including domain name of the login user name
(after “@”) as the login name.
[User Name for SFTP Scan] Enables use of domain part of login credential when using a
credential logged in to remote accounts for the login user name with
SFTP transmission.
[User Name Only] Uses only the user name part (before “@”) of the login user name as
the login name, and the domain part is not used.
[Add Domain Name] Uses login user name including domain name of the login user name
(a
fter “@”) as the login name.
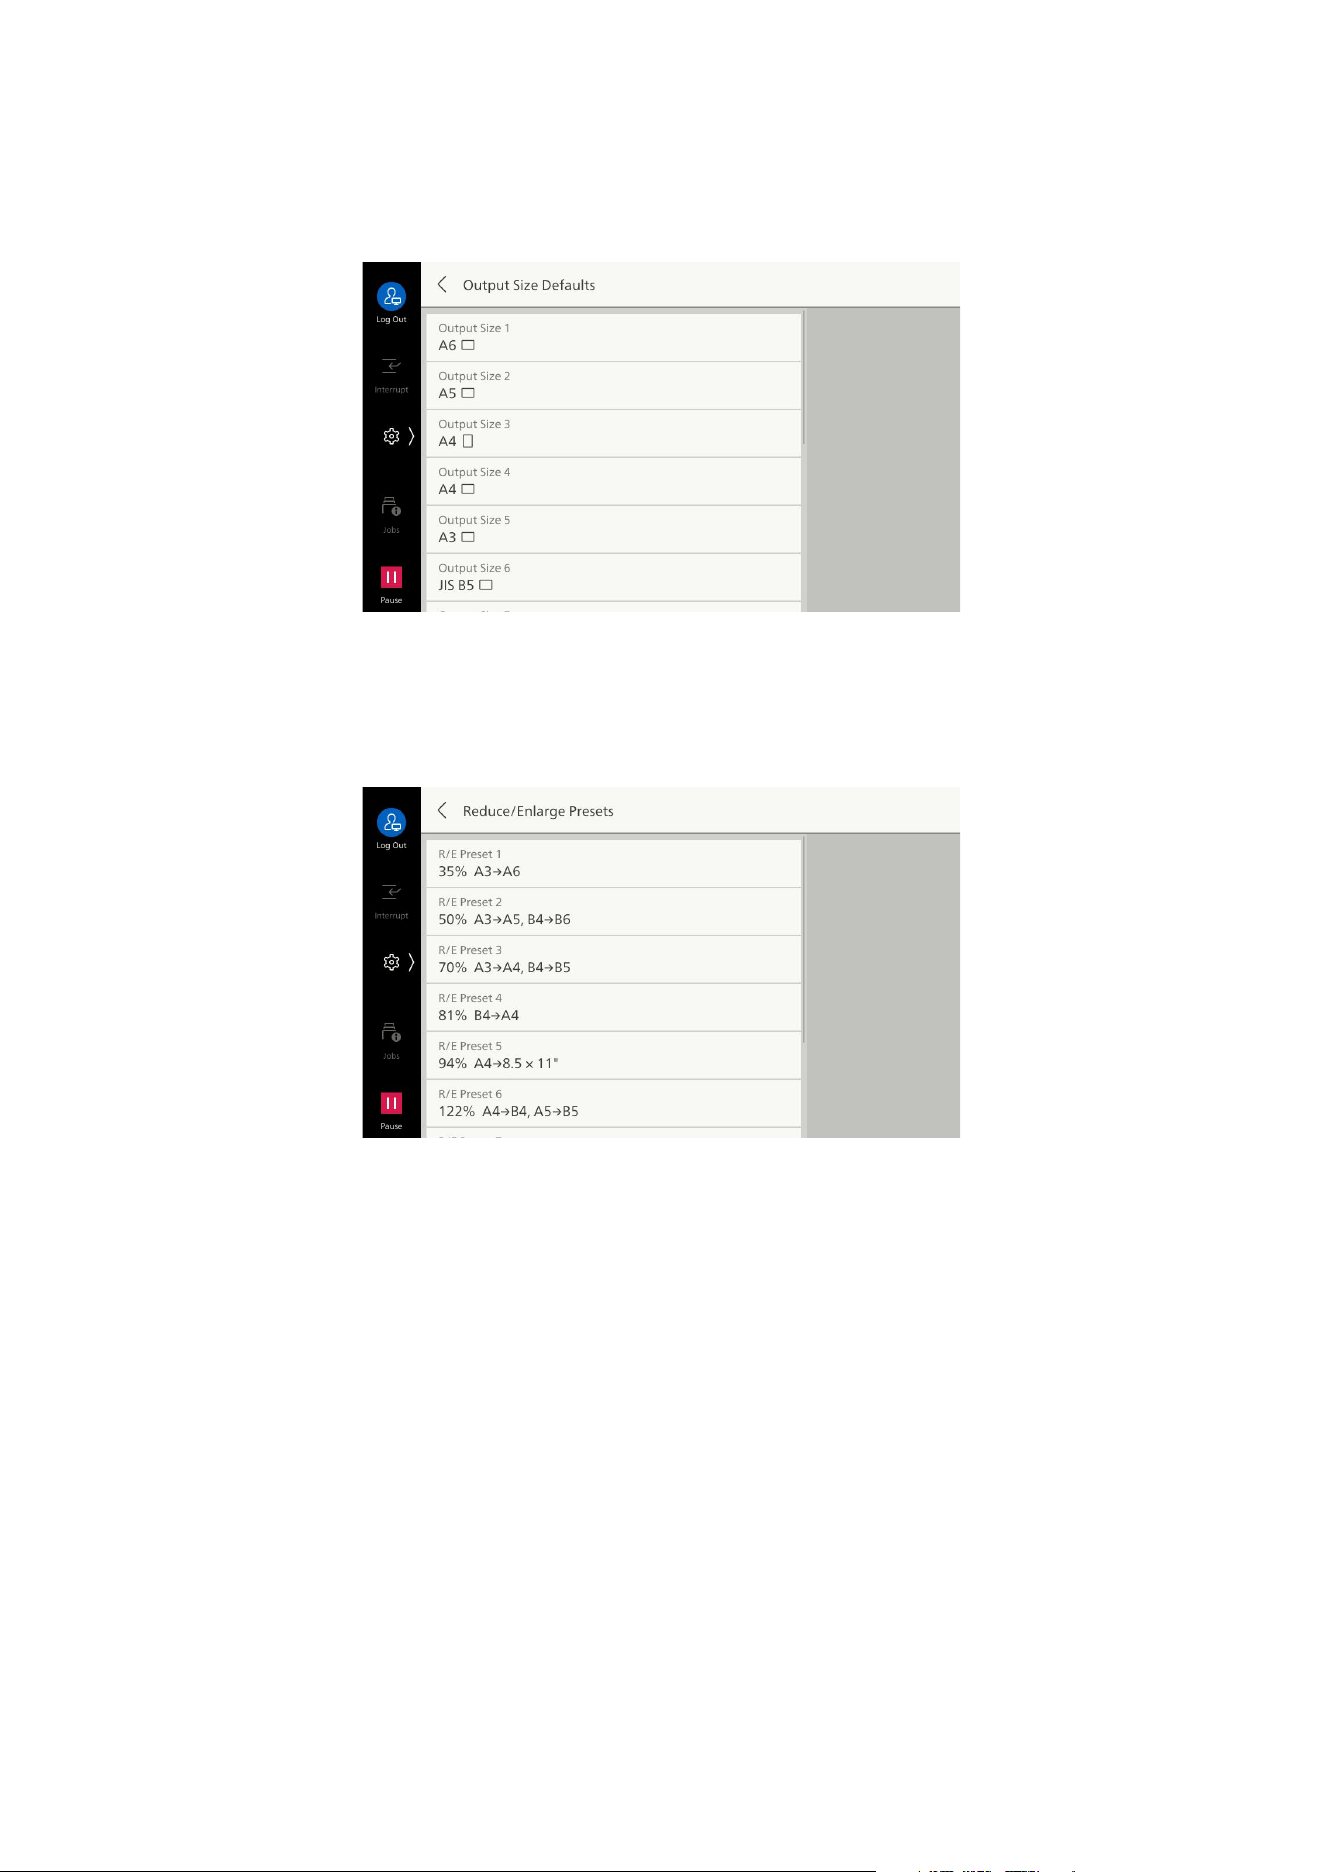
115
10.3 [App Settings]
[Output Size Defaults]
Sets size displayed at [Auto (Select Output Size)] for [Reduce/Enlarge].
This enables assignment of any desired output size to output size button.
[Reduce/Enlarge Presets]
Sets reduce/enlarge displayed on [Proportional %] for [Reduce/Enlarge].
This enables assignment of any desired reduce/enlarge to each button other than [100%].
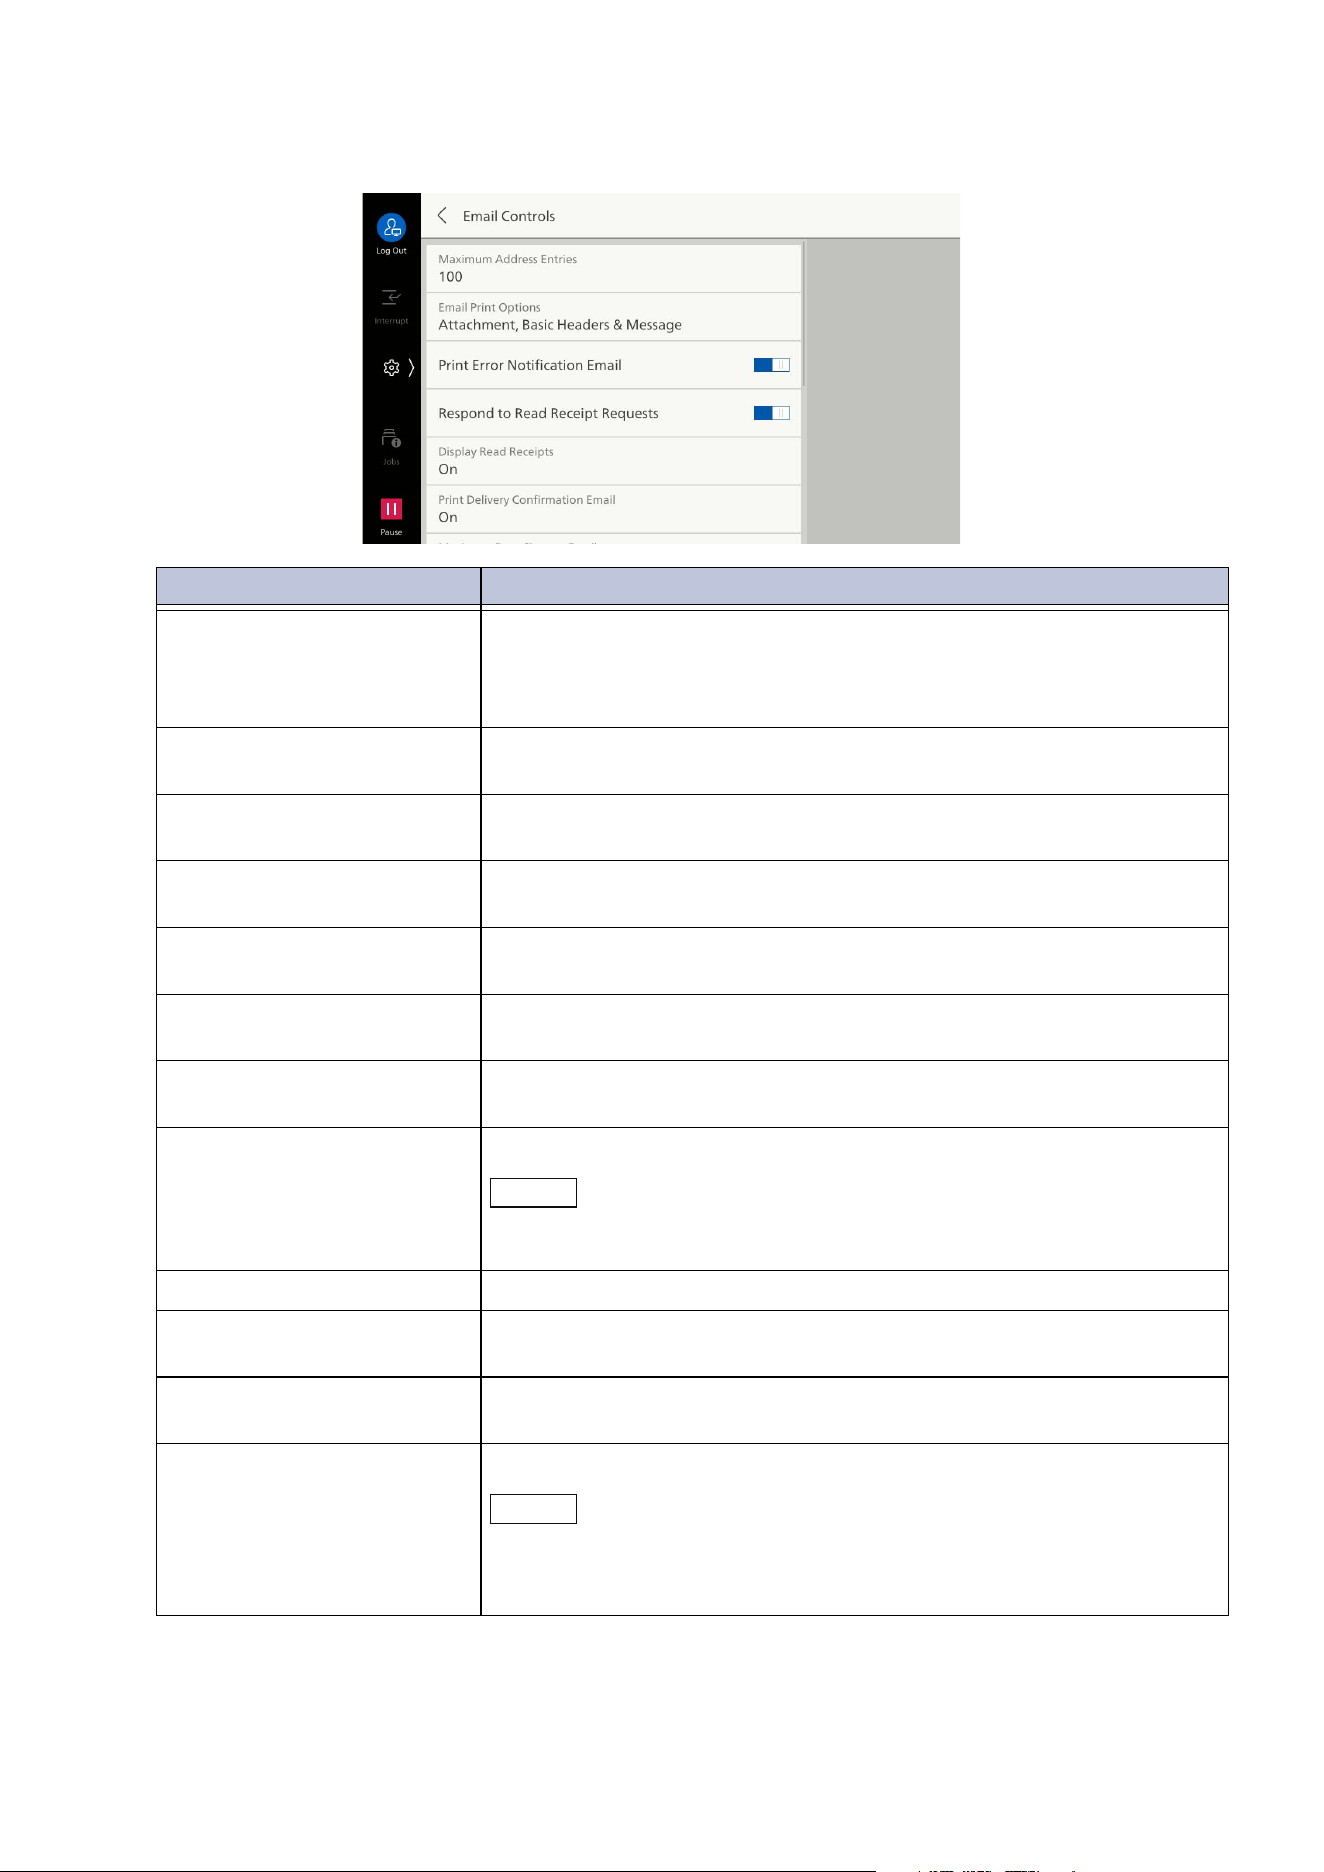
116
10 Device
[Email Controls]
Item Description
[Maximum Address Entries] Sets maximum number of recipient addresses when sending Email.
The number of recipient addresses is the total of TO/CC/BCC.
If the maximum number of recipient addresses is exceeded, sending
of the Email is canceled.
[Email Print Options] Enables setting of printing when Email is received addressed to the
Email address of the machine.
[Print Error Notification
Email]
Enables printing of error notification Email if a mistaken address is
set
, or if sending is impossible due to occurrence of an error.
[Respond to Read Receipt
Requests]
Sets to notify sender that message has been read when Email
requesting a read receipt is read.
[Display Read Receipts] Enables use of read receipt feature when sending Email from the
machine.
[Print Delivery Confirmation
Email]
Enables printing of send result Email (DSN reply Email/MDN reply
Em
ail).
[Maximum Data Size per
Email]
Sets maximum data size per a single Email.
[Maximum Total Data Size] Sets maximum data size of Email.
Note
When you attach a file to an email, the actual data size may be larger
than the size displayed by your email software.
[Maximum Split Count] Sets maximum split count when splitting Email.
[Edit "From" Field] Enables editing of a sender’s address in ["From" Address] of feature
list when sending Email.
[When Sender's Address Is
Unknown]
Enables limitation of use of Email sending when login user cannot
retrieve Email address.
[Add Me to "To" Field] Enables
addition of sender address to [To] field.
Note
When you use [Scan], the sender address is added to the [To] field.
Change the setting for when using [Email] in [Email Settings] > "[Email
Controls]" (P.119).
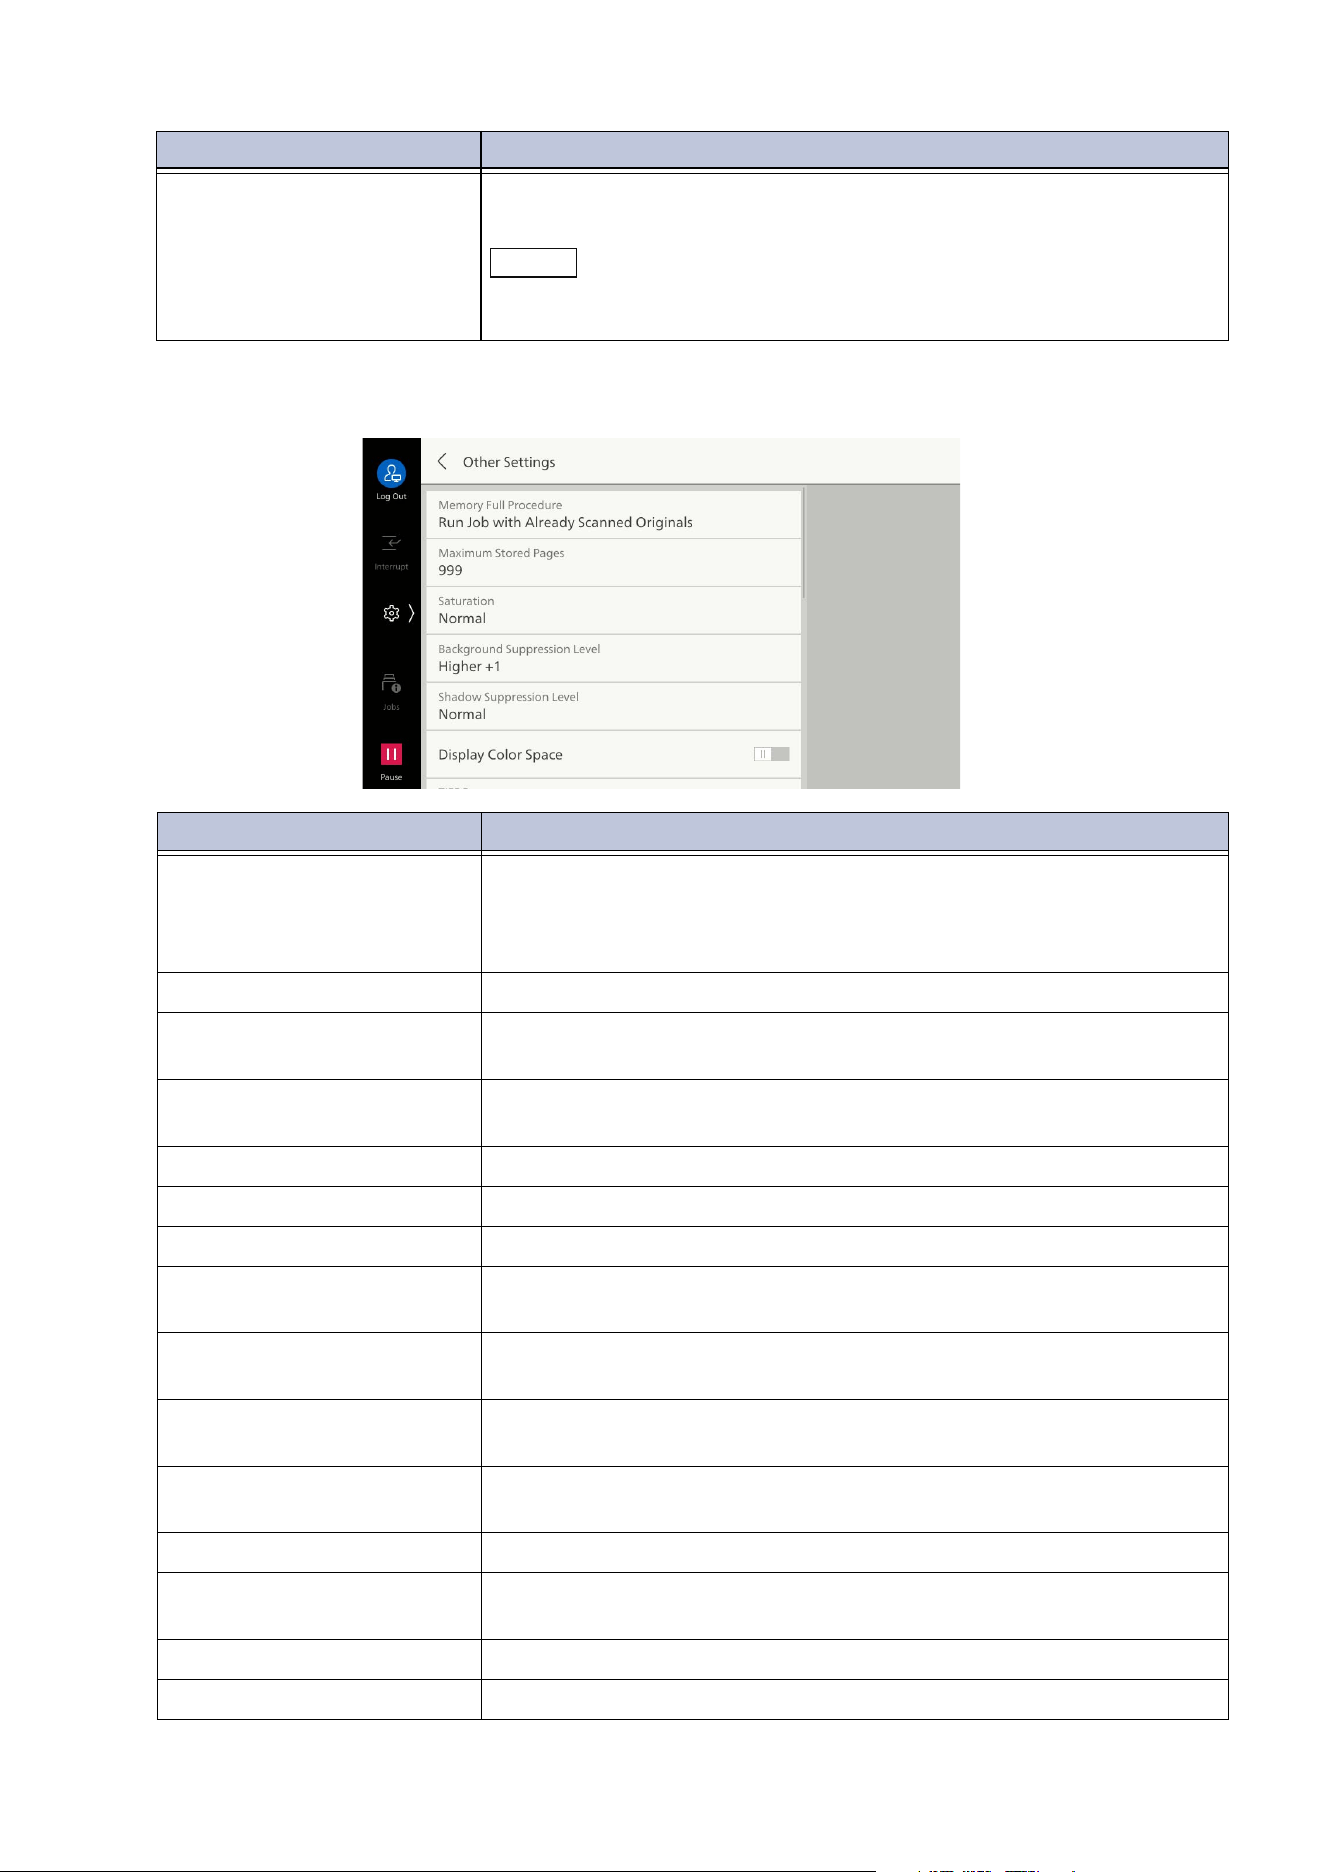
117
10.3 [App Settings]
[Other Settings]
[Edit Email Recipients] Sets whether to enable local users to edit or add the recipient of To/
CC/BCC.
Note
If [Edit Email Recipients] is set to [Disabled], you cannot edit or add the
email address. Set [Add Me to "To" Field] enabled to use [Email].
Item Description
[Memory Full Procedure] Suspends scanning of a document if storage area runs short while
scanning a document.
This sets the handling method after a fixed time has elapsed from
suspension, in a state with no operation.
[Maximum Stored Pages] Sets maximum stored pages of the scan document.
[Saturation] Sets saturation when scanning a color document. When scanning,
adjustment is done according to the value set here.
[Ba
ckground Suppression
Level]
Sets background suppression level.
[Shadow Suppression Level] Sets shadow suppression level.
[Display Color Space] Enables display of [Color Space] in feature list.
[TIFF Format] Sets TIFF format when scanning scan data.
[Conversion Mode for
Searchable]
Sets the processing accuracy for searchable text (OCR).
[Page Orientation for
Searchable]
Enables processing so that text
is upright when a document is
scanned using searchable text.
[Auto Upright Mode] Sets precision of feature for processing so that text is upright when a
document is scanned using searchable text.
[Display Image Transfer
Screen]
Enables display of transfer screen after a document has been
scanned.
[File Name Format] Sets format of filenames for scanned files.
[Add Date to Email
Attachment Name]
Enables
addition of date and page number to file name of file sent
when using [Email].
[URL File Expiration] Sets URL file expiration.
[Generation of URL Link] Sets method of generating URL link for sending in URL sending.
Item Description
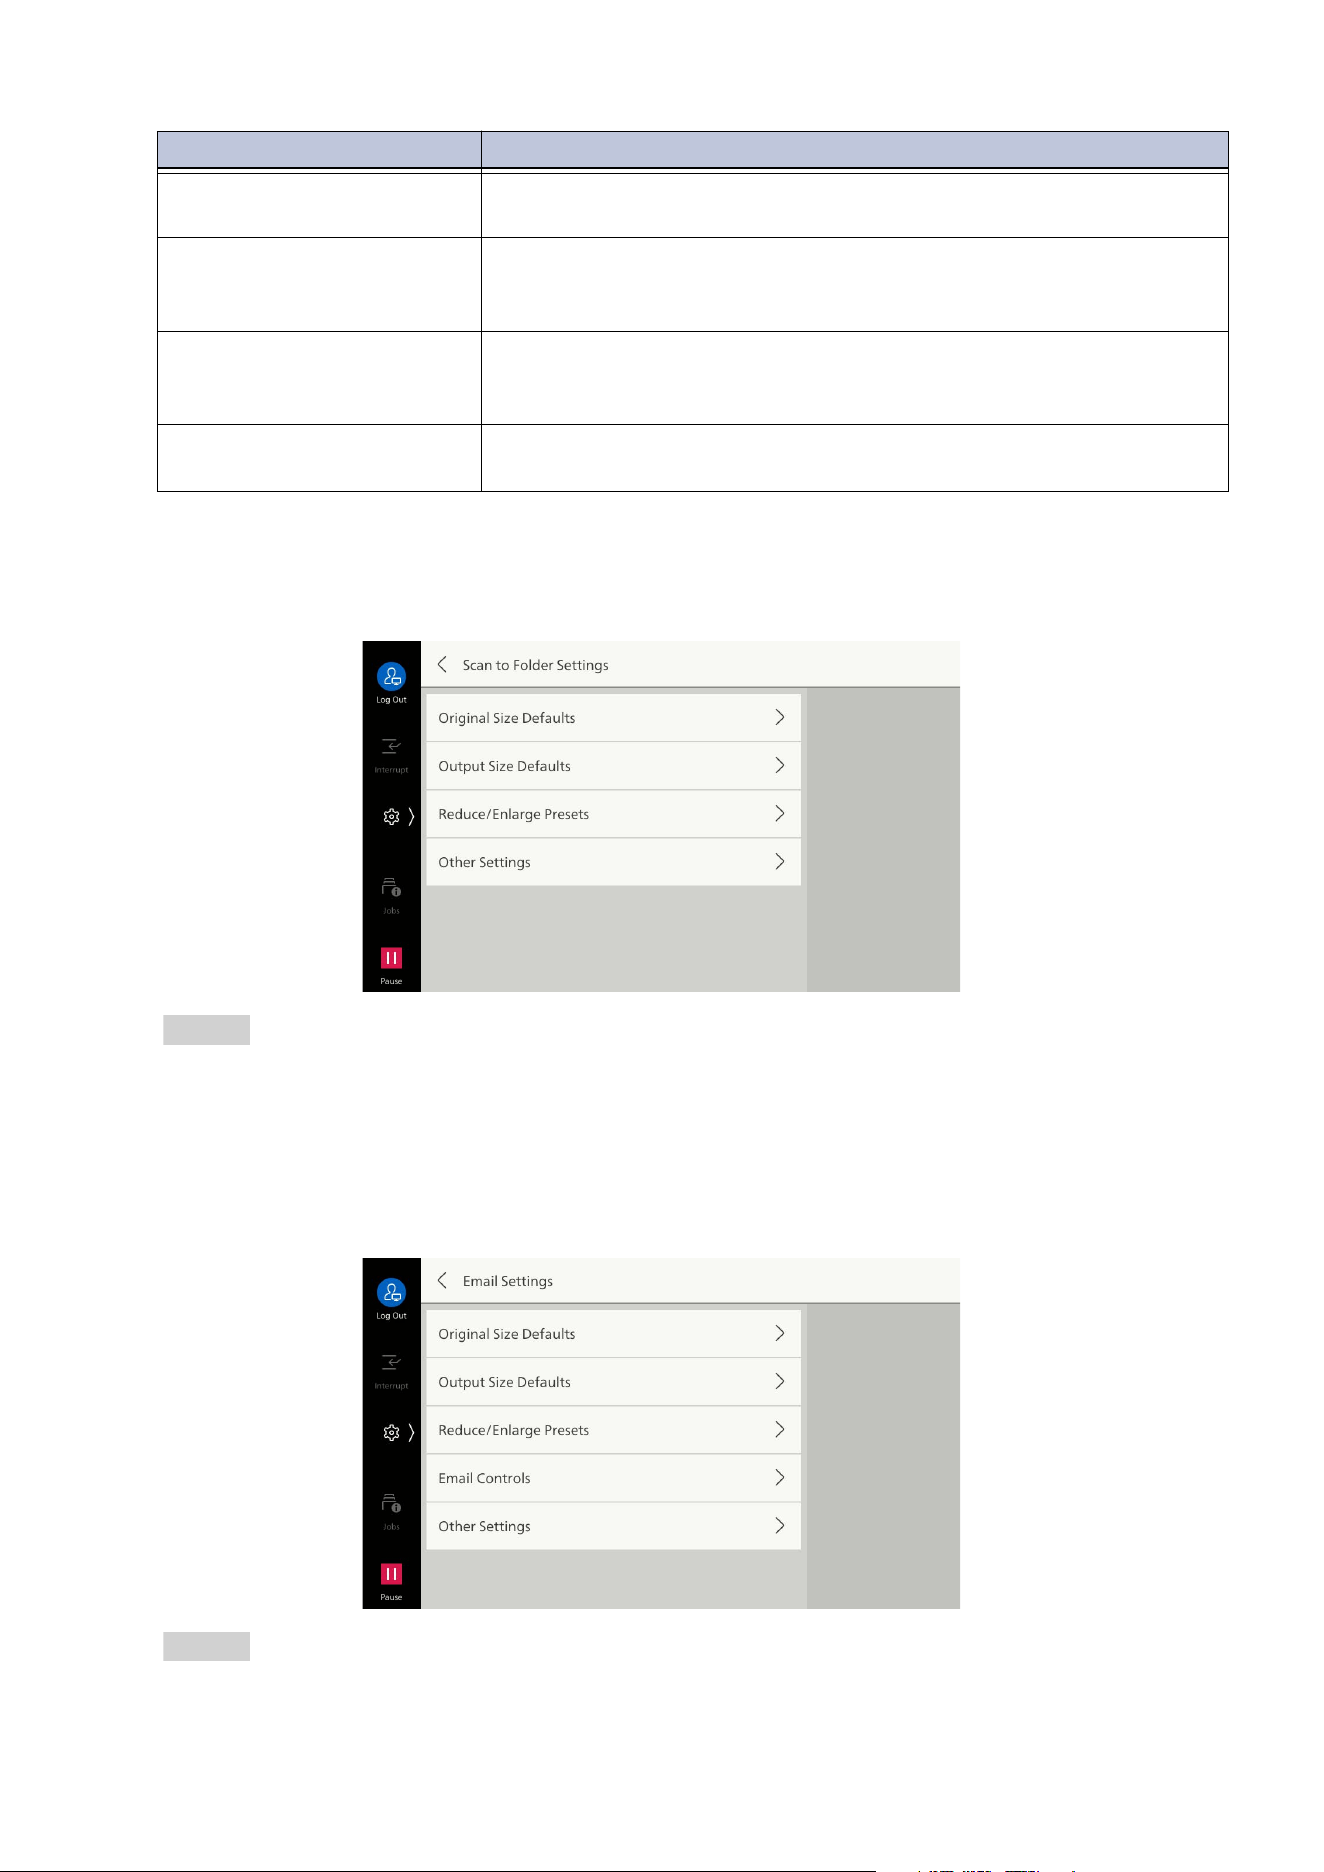
118
10 Device
[Scan to Folder Settings]
This is the same as [Scan Settings].
Refer
Refer to "[Scan Settings]" (P.114) for each item.
[Email Settings]
The settings other than [Add Me to "To" Field] and [Add Me to "Cc" Field] in [Email Controls] are the
same as [Scan Settings].
Refer
Refer to "[Scan Settings]" (P.114) for each item.
[Scan (URL) - Maximum File
Size]
Sets maximum image size of file for URL sending.
[Add Login Name to PDF
Properties]
Enables addition of login user name to [Creator ID] of attribute
information for saved PDF file when scanning is done in PDF format
using log in to local accounts, or log in to remote accounts, etc.
[Reset Settings After Job
Execution]
Sets whether to reset the sending settings including the recipient
aft
er job operated, and whether to display the message when the
settings are not reset.
[SMB/FTP/SFTP Save
Locations]
Sets whether to enable local users to edit or add the recipient of
SMB/FTP/SFTP.
Item Description
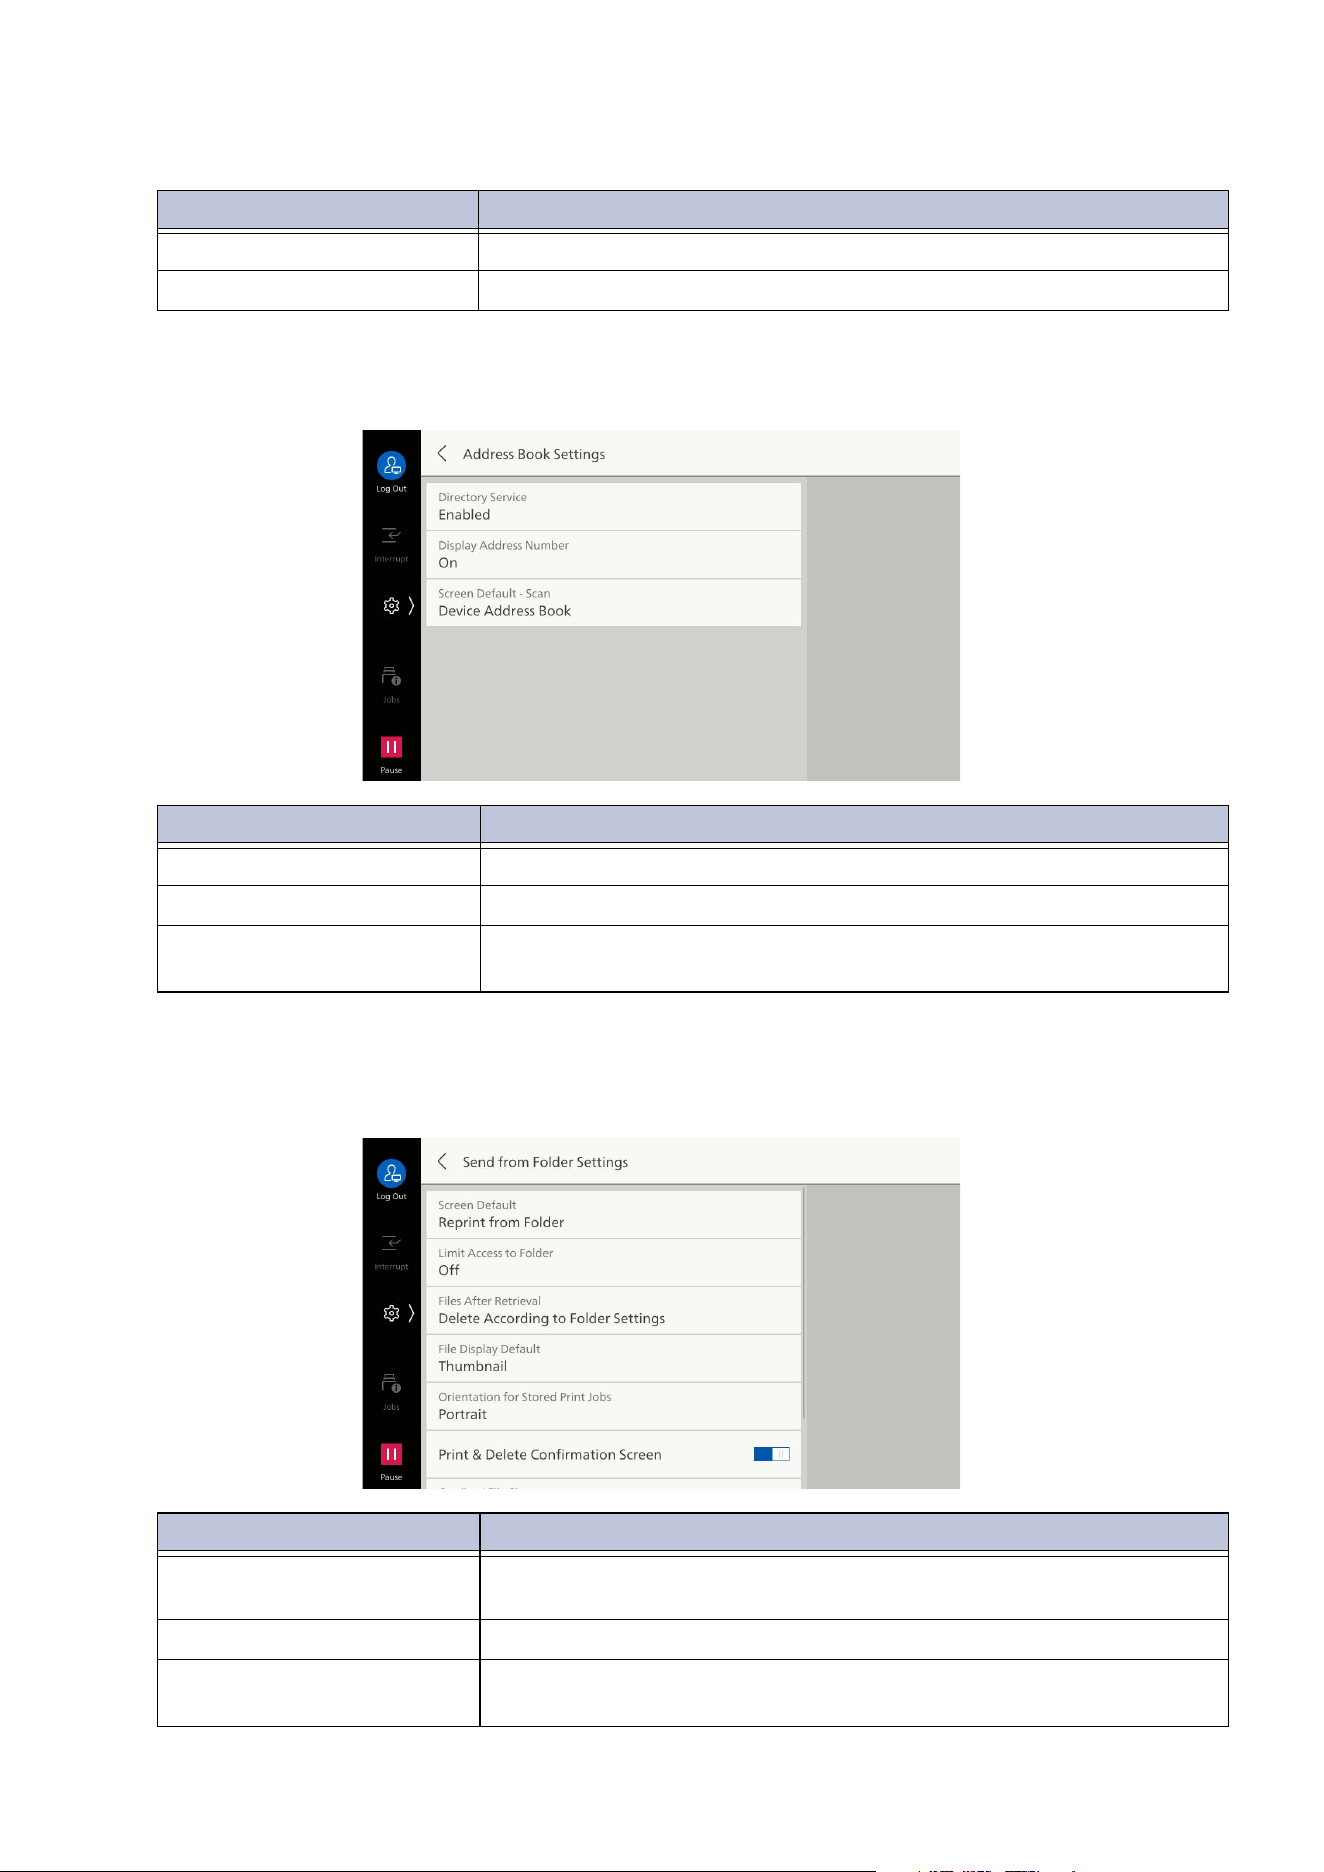
119
10.3 [App Settings]
[Email Controls]
[Address Book Settings]
[Send from Folder Settings]
Sets method of processing files saved in folder.
Item Description
[Add Me to "To" Field] Enables addition of sender address to [To] field.
[Add Me to "Cc" Field] Enables addition of sender address to [Cc] field.
Item Description
[Directory Service] Enables use of the Address Book saved on directory server.
[Display Address Number] Sets whether to display the address number on the Address Book.
[Screen Default - Scan] Sets the type of Address Book to be displayed first when displaying
the Address Book from Email and Scan features.
Item Description
[Screen Default] Sets the screen displayed first when launching the [Send from
Folder] app.
[Limit Access to Folder] Enables making password input mandatory.
[Files After Retrieval] Enables deletion of files when files saved in a folder have been
retrieved from the client side.
120
10 Device
[Jobs Settings]
This is the same as [Print Settings].
Refer
Refer to "[Print Settings]" (P.107) for each item.
[Job Flow Sheets Settings]
[Link and Start Job Flow Sheets]
Set whether to disable [Link Job Flow Sheet to Folder] of the folder. If [Disabled] is set, you cannot
also manually execute the job flow from the folder.
[File Display Default] Sets method of display when screen listing files in folder has been
opened.
[Orientation for Stored Print
Jobs]
Sets orientation when saving custom size files. Even if [Portrait] is
sp
ecified, saving in [Landscape] is forced if a print job is saved with
an orientation that cannot be loaded into the paper tray.
[Print & Delete Confirmation
Screen]
Enables display of confirmation screen for deleting file after printing
file in folder.
[Quality / File Size] Sets file image quality and file size for high compression and retrieval
of files from folder.
[File
Retention Period] Sets the retention period for files in folders. Files are deleted when
the retention period expires. The setting is common for all folders.
Item Description
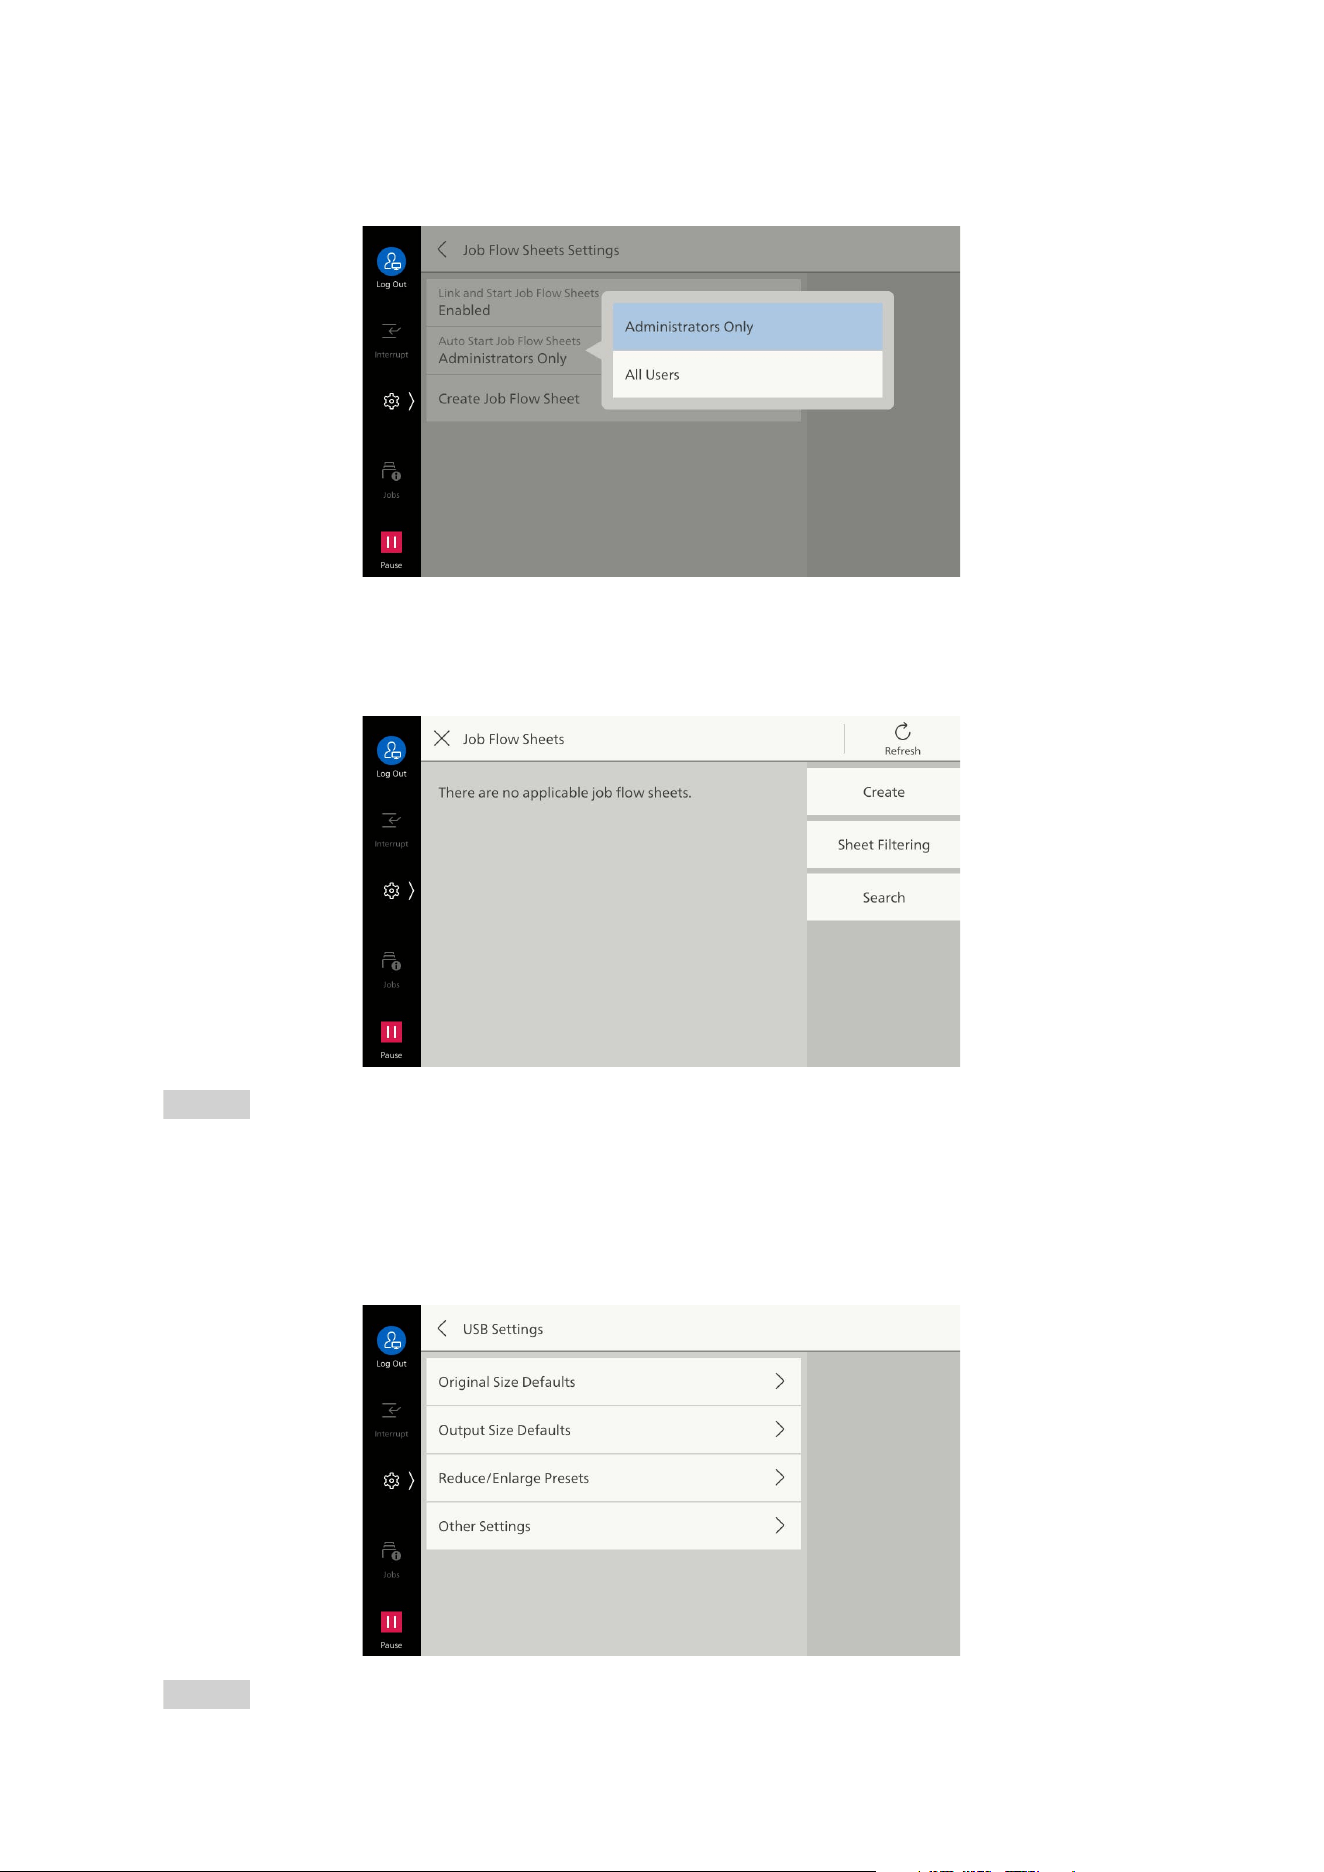
121
10.3 [App Settings]
[Auto Start Job Flow Sheets]
Sets users allowed to start job flow.
[Create Job Flow Sheet]
Enables tasks such as creating a new job flow, or changing its content.
Refer
Refer to "Creating Job Flow Sheets" (P.78).
[USB Settings]
This is the same as [Scan Settings].
Refer
Refer to "[Scan Settings]" (P.114) for each item.

122
10 Device
[Web Applications Setup]
Feature for carrying out tasks such as directly displaying remote services linked with the machine,
uploading files scanned with the machine to remote services, and directly printing by selecting a file
saved on a remote server.
[Web Browser Setup]
Item Description
[Server Setup] Sets up server for web applications.
[Other Settings]
[When Sending User
Details]
Enables display of confirmation screen when sending user details
from user authentication on the machine (authenticated user ID,
password, Email address, service restrictions, etc.) to the connection
destination server for web applications.
Item Description
[Delete Persistent Cookie
upon Closing]
Enables deletion of persistent (expiring) cookies when closing
access to web applications.
[Clear Cache upon Closing] Enables deletion of cache when closing access to web applications.
[Use Cache] Enables use of cache.
[Accept Cookies] Enables use of cookies.
[SSL Cert Verification
Failure]
Sets whether to display an access confirmation screen asking
whether to cancel access to server when verification of SSL server
cert
ificate has failed.
[Functional Code] Set as necessary for the external access linkage service to be used.
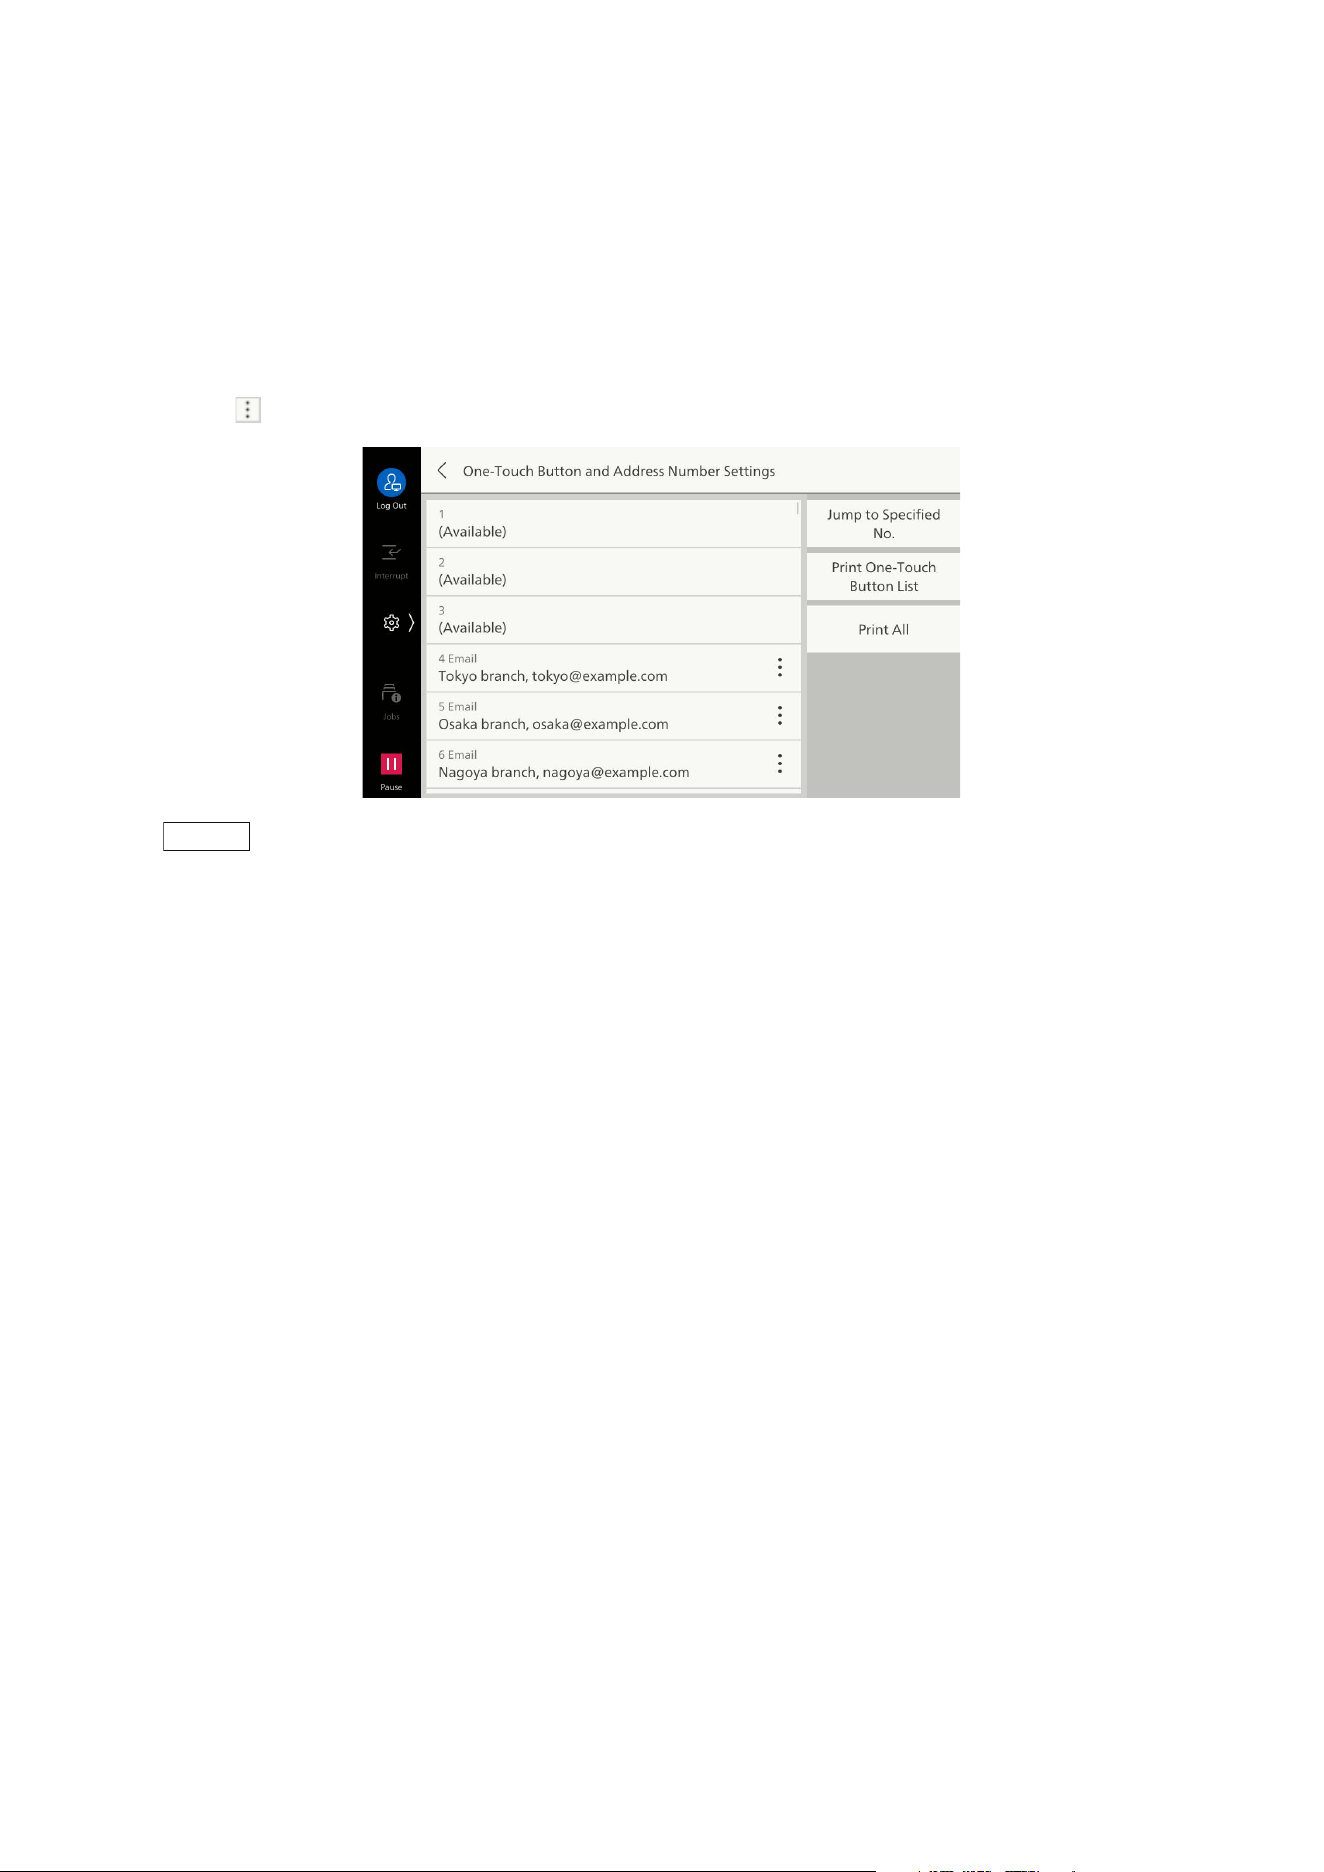
123
10.3 [App Settings]
[One-Touch Button Settings]/[One-Touch Button
and Address Number Settings]/[Address Number
Settings]
Assigns recipients set in the Address Book to the address numbers.
If [Display One-Touch Buttons] is enabled, the address numbers from 1 to 72 are displayed on the
one-touch button.
Tap on of each number to set the destination or confirm details.
Note
Tap on [Jump to Specified No.] to specify the number to be displayed on the top row.
Tapping on [Print One-Touch Button List]/[Print] allows you to print the list of the destination assigned
to one-touch buttons.
Tapping on [Print All] allows you to print the list of all the destinations. Depending on the number of
destinations registered, printed number of pages may become large.
To display the Address Number, set [Display Address Number] to [On] under "[Address Book Settings]"
(P.119).
To use the One-touch button, set [Display One-Touch Buttons] enabled in "[Screen/Button Settings]"
(P.94).
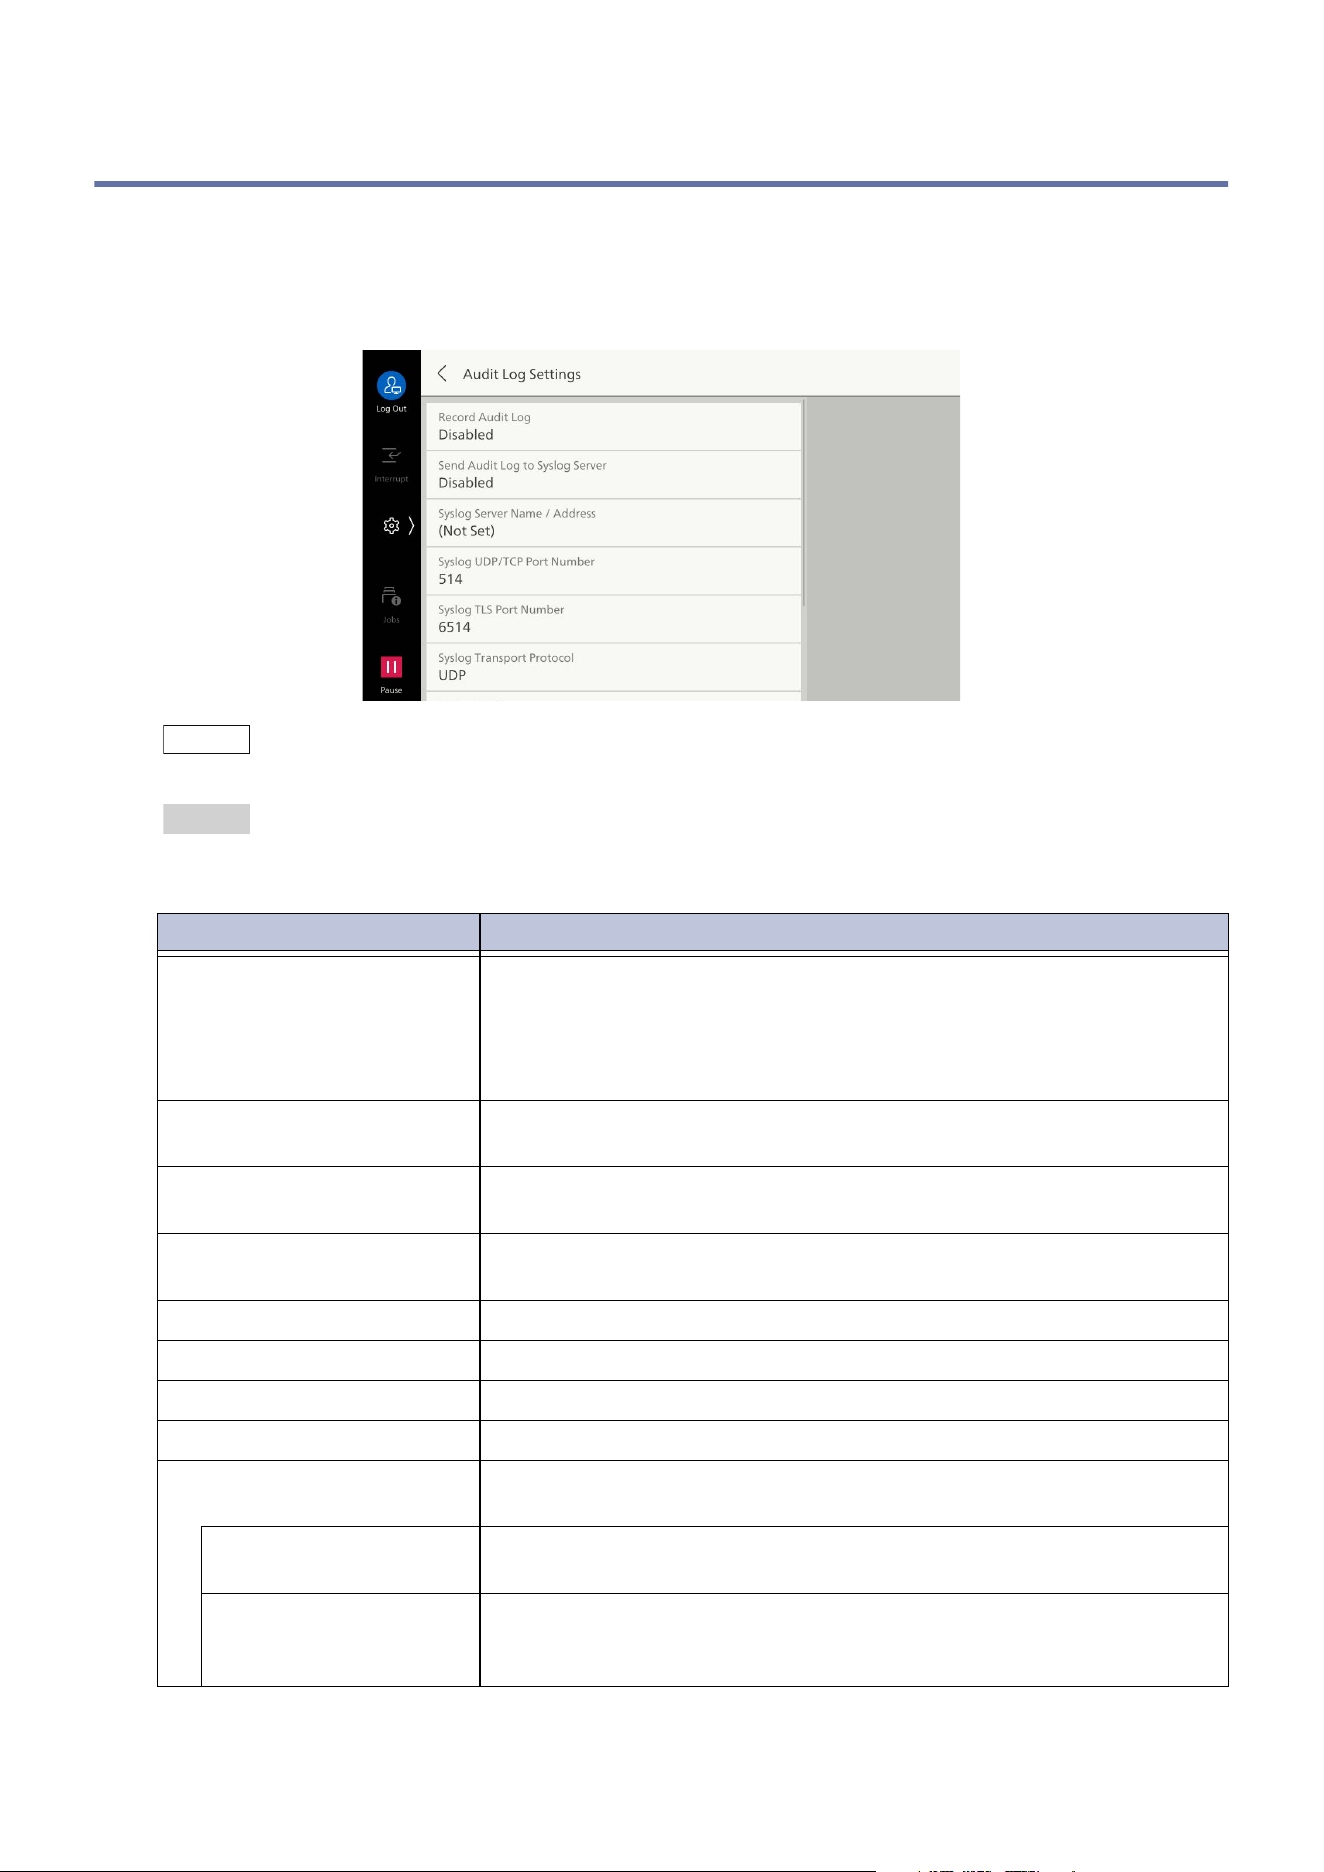
124
10 Device
10.4 [Audit Log Settings]
Sets settings for the audit log, and set settings relating to the Syslog. (The audit log is sent to other
client computers on the network using the Syslog protocol.)
The audit log records who did what work and when with the machine. If the audit log feature is used,
it is possible to monitor for improper use of the machine, or attempts at improper use.
Note
Internet Services are used to retrieve the audit log.
Refer
For information on the items recorded in the audit log, refer to
Audit Log Reference Guide
provided at our
official website.
Item Description
[Record Audit Log] Sets whether to record the audit log.
An audit log is recorded in the machine if the audit log feature is
enabled.
Up to 15,000 logs are recorded in the log, and the logs with the older
date are deleted if 15,000 is exceeded.
[Send Audit Log to Syslog
Server]
Sets whether to send the audit log to the Syslog server.
[Syslog Server Name /
Address]
Input server name or IP address of Syslog server.
[Sy
slog UDP/TCP Port
Number]
Input the Syslog UDP or TCP port number.
[Syslog TLS Port Number] Input TLS port number of Syslog server.
[Syslog Transport Protocol] Sets transport protocol when sending to Syslog.
[Syslog Facility] Input facility number of audit log sent to Syslog.
[Syslog Timeout Value] Input sending timeout for sending to Syslog.
[When Send Error Occurs] Sets operation when audit log in machine reaches maximum number
of
logs while sending to Syslog is not finished.
[Prioritize Device
Operation]
Overwrites logs, starting from the oldest dates. Syslog sending is
impossible for overwritten audit logs.
[Prioritize Audit Log] A system error occurs, and the machine stops. Reboot after setting
to the state where the machine and Syslog server can be connected
for restarting machine.

125
10.5 [Network Settings]
10.5 [Network Settings]
Note
Do not use the same port numbers as other ports for LPD, port 9100, HTTP-SSL/TLS communication,
primary server, and secondary server.
Do not use the same port numbers as LPD, port 9100, or HTTP-SSL/TLS communication for ports which
use HTTP (IPP, Internet services (HTTP), UPnP discovery, SOAP, WSD).
If any of the following port numbers are set, the machine may fail to operate normally due to the port
setting situation.
- 25
- 139
- 427
- 445
- 631
- 15000
[Port Settings]
Sets settings of interfaces of the machine connected to clients.
[USB]
Item Description
[Port Status] Set to [Enabled] to use USB.
[Print Mode] Set type of print language used. If set to [Auto], it is determined
what language is used to express data received from host, and
appropriate print processing is performed in accordance with the
data.
[PJL] PJL (Printer Job Language) commands are data attached at the
beginning of an actual print job. Normally, the machine is used with
this left set to [Enabled].
[Au
to Eject Time] Sets time from when it becomes impossible for data to be sent to the
machine until paper is ejected.
[Adobe Communication Protocol]
[Standard] Set when printer driver output protocol is ASCII format.
[Binary] Set when printer driver output protocol is BCP format.
[TBCP] Set when printer driver output protocol is TBCP format.

126
10 Device
[LPD]
[SMB Client]
[RAW] Set when printer driver output protocol is ASCII format or binary
format.
Data is output as is, without any control by the Adobe
communication protocol.
[PostScript Wait Timeout] When set to [Disabled], the time until the connection is
disconnected when printing data follows [Auto Eject Time].
If set to [Enabled], the time complies with the PostScript timeout.
Note
Set [Adobe Communication Protocol] to [RAW].
Item Description
[Port Status] Set to [Enabled] to use LPD.
[Port Number] Set port number used with LPD.
[Maximum Number of
Sessions]
Set maximum number of clients that can be connected
simultaneously to the machine with LPD.
Item Description
[Port Status] Set to [Enabled] to use SMB. This is set when performing SMB
transfer using [Scan].
Item Description

127
10.5 [Network Settings]
[IPP]
[Bonjour]
Item Description
[Port Status] Set to [Enabled] to use IPP.
This is set when printing via the Internet using IPP (Internet Printing
Protocol).
[Added Port Number] Set a port number that receives IPP at a non-standard port number.
Item Description
[Port Status] Set to [Enabled] to use Bonjour.

128
10 Device
[Port 9100]
[SNMP]
Item Description
[Port Status] Set to [Enabled] to use Port 9100.
Set when using RAW protocol with standard TCP/IP port monitor of
Windows.
[Port Number] Set port number used with Port 9100.
Item Description
[Port Status] Set to [Enabled] to use SNMP. This is set when using applications
made by us for managing the machine using a network.
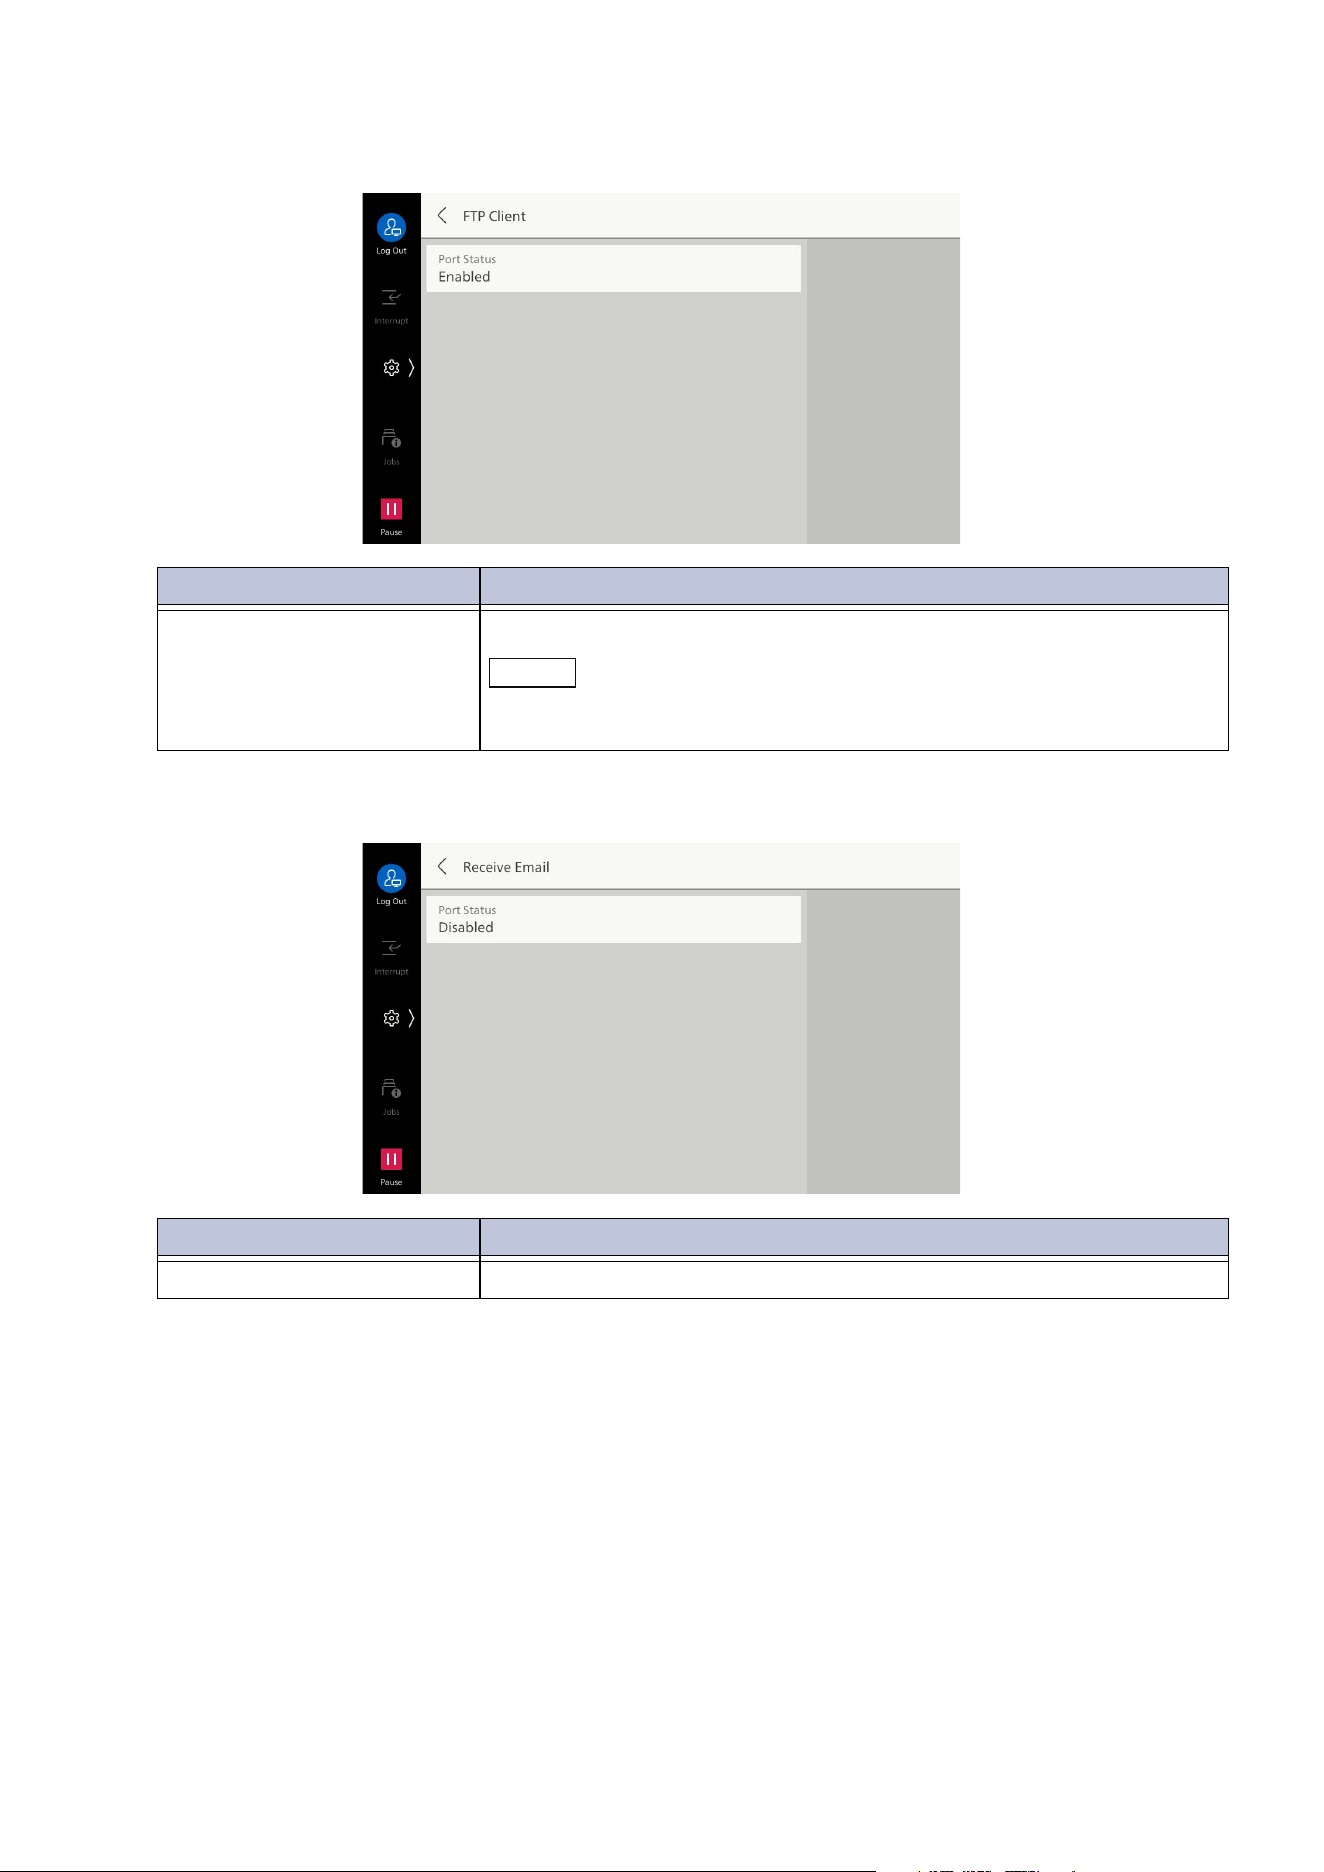
129
10.5 [Network Settings]
[FTP Client]
[Receive Email]
Item Description
[Port Status] Set to [Enabled] to use FTP.
Note
Setting of the starting rate when sending a scanned image via FTP
communication is performed with Internet Services.
Item Description
[Port Status] Set to [Enabled] to receive Email.

130
10 Device
[Send Email]
[Email Notification Service]
Item Description
[Port Status] Set to [Enabled] to send Email.
Item Description
[Port Status] Set to [Enabled] to use Email notification service or [Notify Job
Completion by Email].
The status of the notified machine is: “Consumables Status”, “Parts
Status”, “Paper Tray Status”, “Output Tray Status”, “Jam Status”,
“Interlock Status”, or “Fault Notice”.
Note
Setting of Email Notification Service is done with Internet Services.
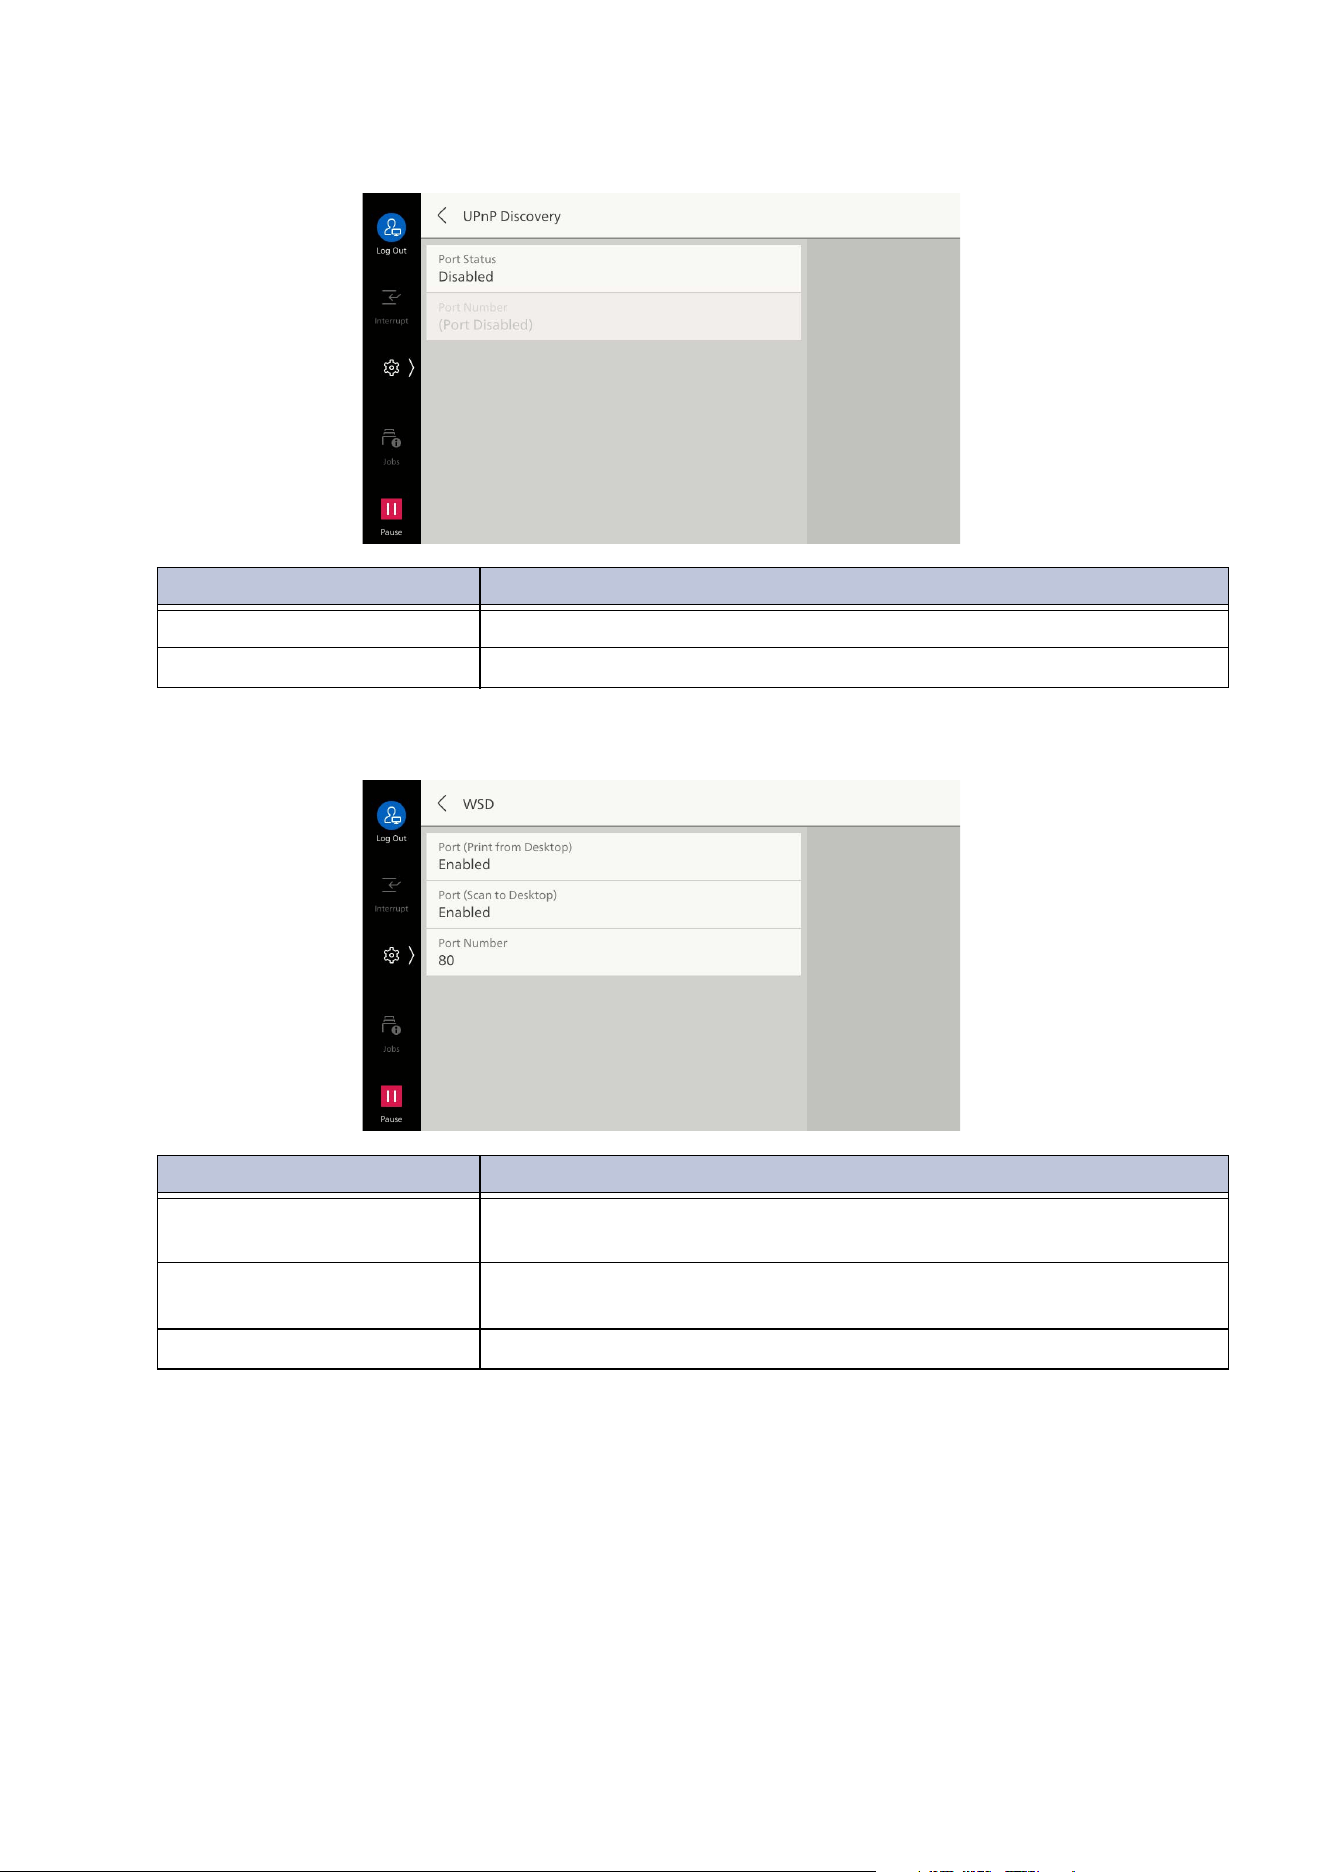
131
10.5 [Network Settings]
[UPnP Discovery]
[WSD]
Item Description
[Port Status] Set to [Enabled] to use UPnP.
[Port Number] Set port number used with UPnP communication.
Item Description
[Port (Print from Desktop)] Set to [Enabled] to use WSD print.
This is set when searching devices on a network from Windows OS.
[Port (Scan to Desktop)] Set to [Enabled] to use scan to desktop.
This is set when searching devices on a network from Windows OS.
[Port Number] Set port number used with WSD communication.
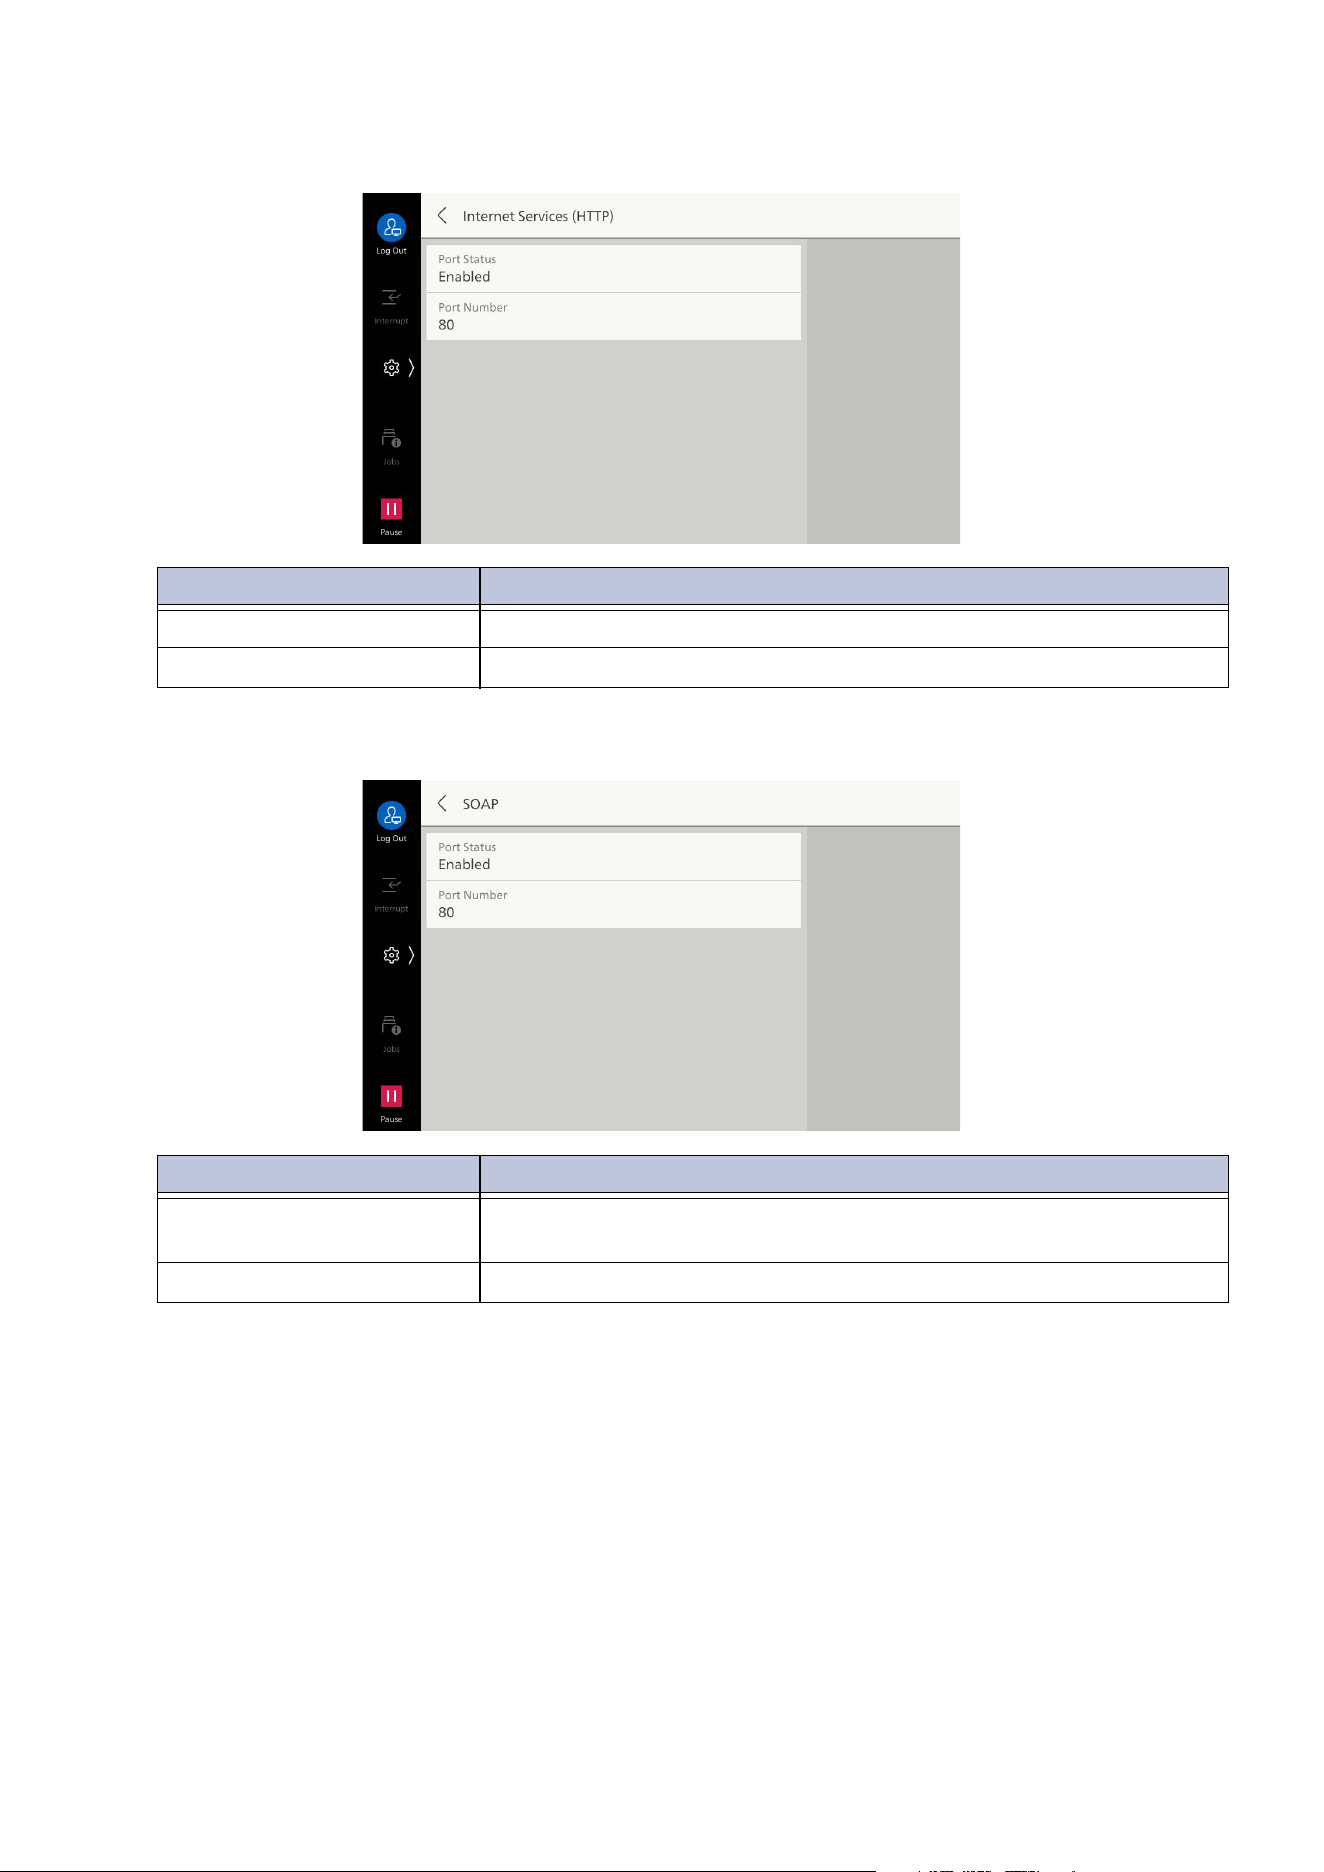
132
10 Device
[Internet Services (HTTP)]
[SOAP]
Item Description
[Port Status] Set to [Enabled] to use Internet Services.
[Port Number] Set port number used with Internet Services.
Item Description
[Port Status] Set to [Enabled] to use SOAP port. This is set when using
applications such as Device Setup.
[Port Number] Set port number used with SOAP.

133
10.5 [Network Settings]
[WebDAV]
[ThinPrint]
Item Description
[Port Status] Set to [Enabled] to use WebDAV. This is set when accessing the
machine’s folder using an application.
[Port Number] Set port number used with WebDAV.
[Operation Timeout] Set timeout time.
Item Description
[Port Status] Set to [Enabled] to use ThinPrint.
The machine supports printing in the ThinPrint environment. Printing
is done by decompressing data compressed and sent from the server
(Windows Server).
[Port Number] Set port number used with ThinPrint.
Note
Can be used when communication protocol operates with IPv4.
The maximum number of simultaneous connections is 3.
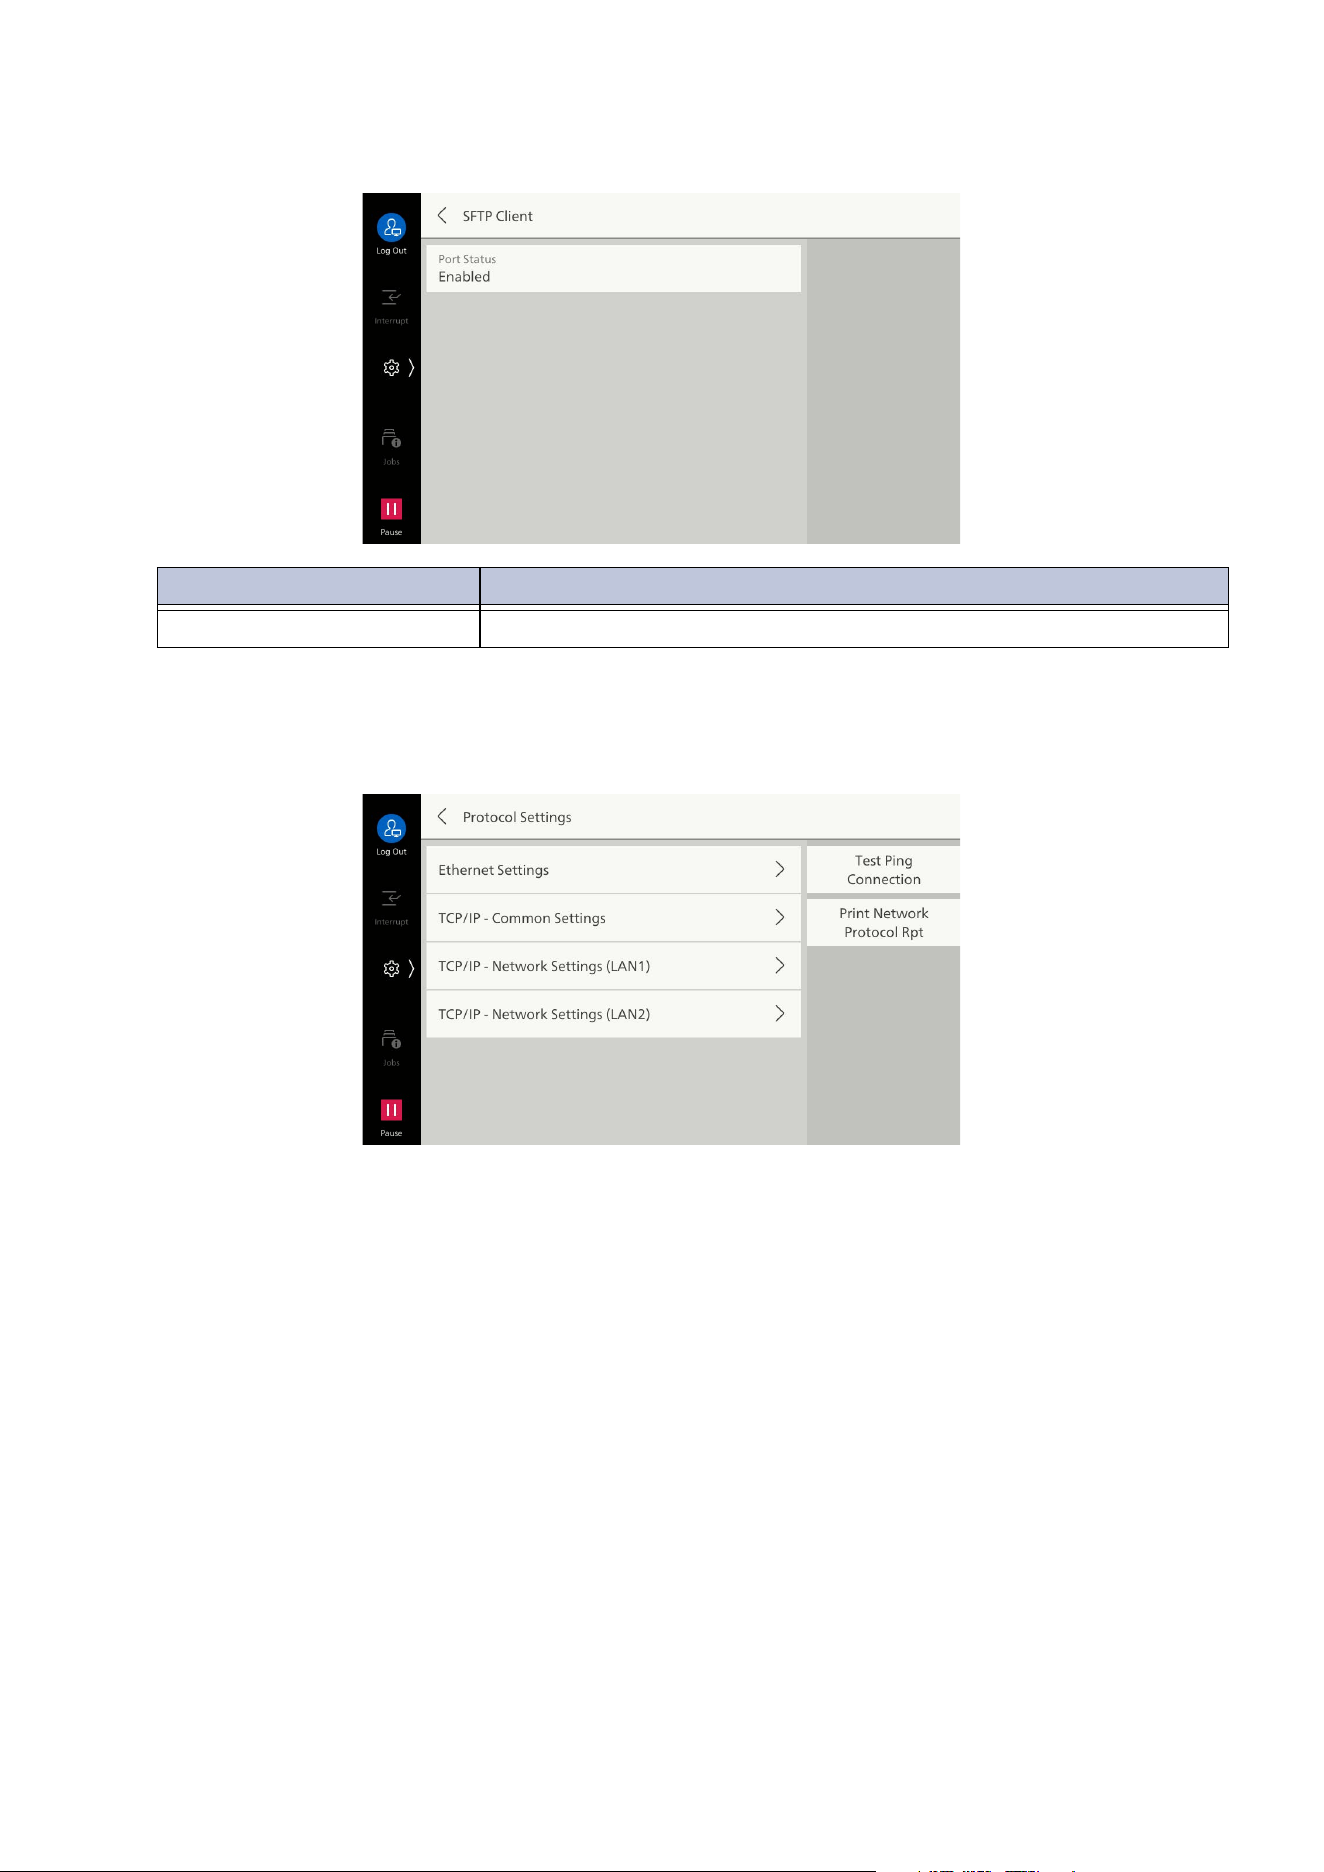
134
10 Device
[SFTP Client]
[Protocol Settings]
Sets the conditions needed for communication.
Item Description
[Port Status] Set to [Enabled] to use SFTP.
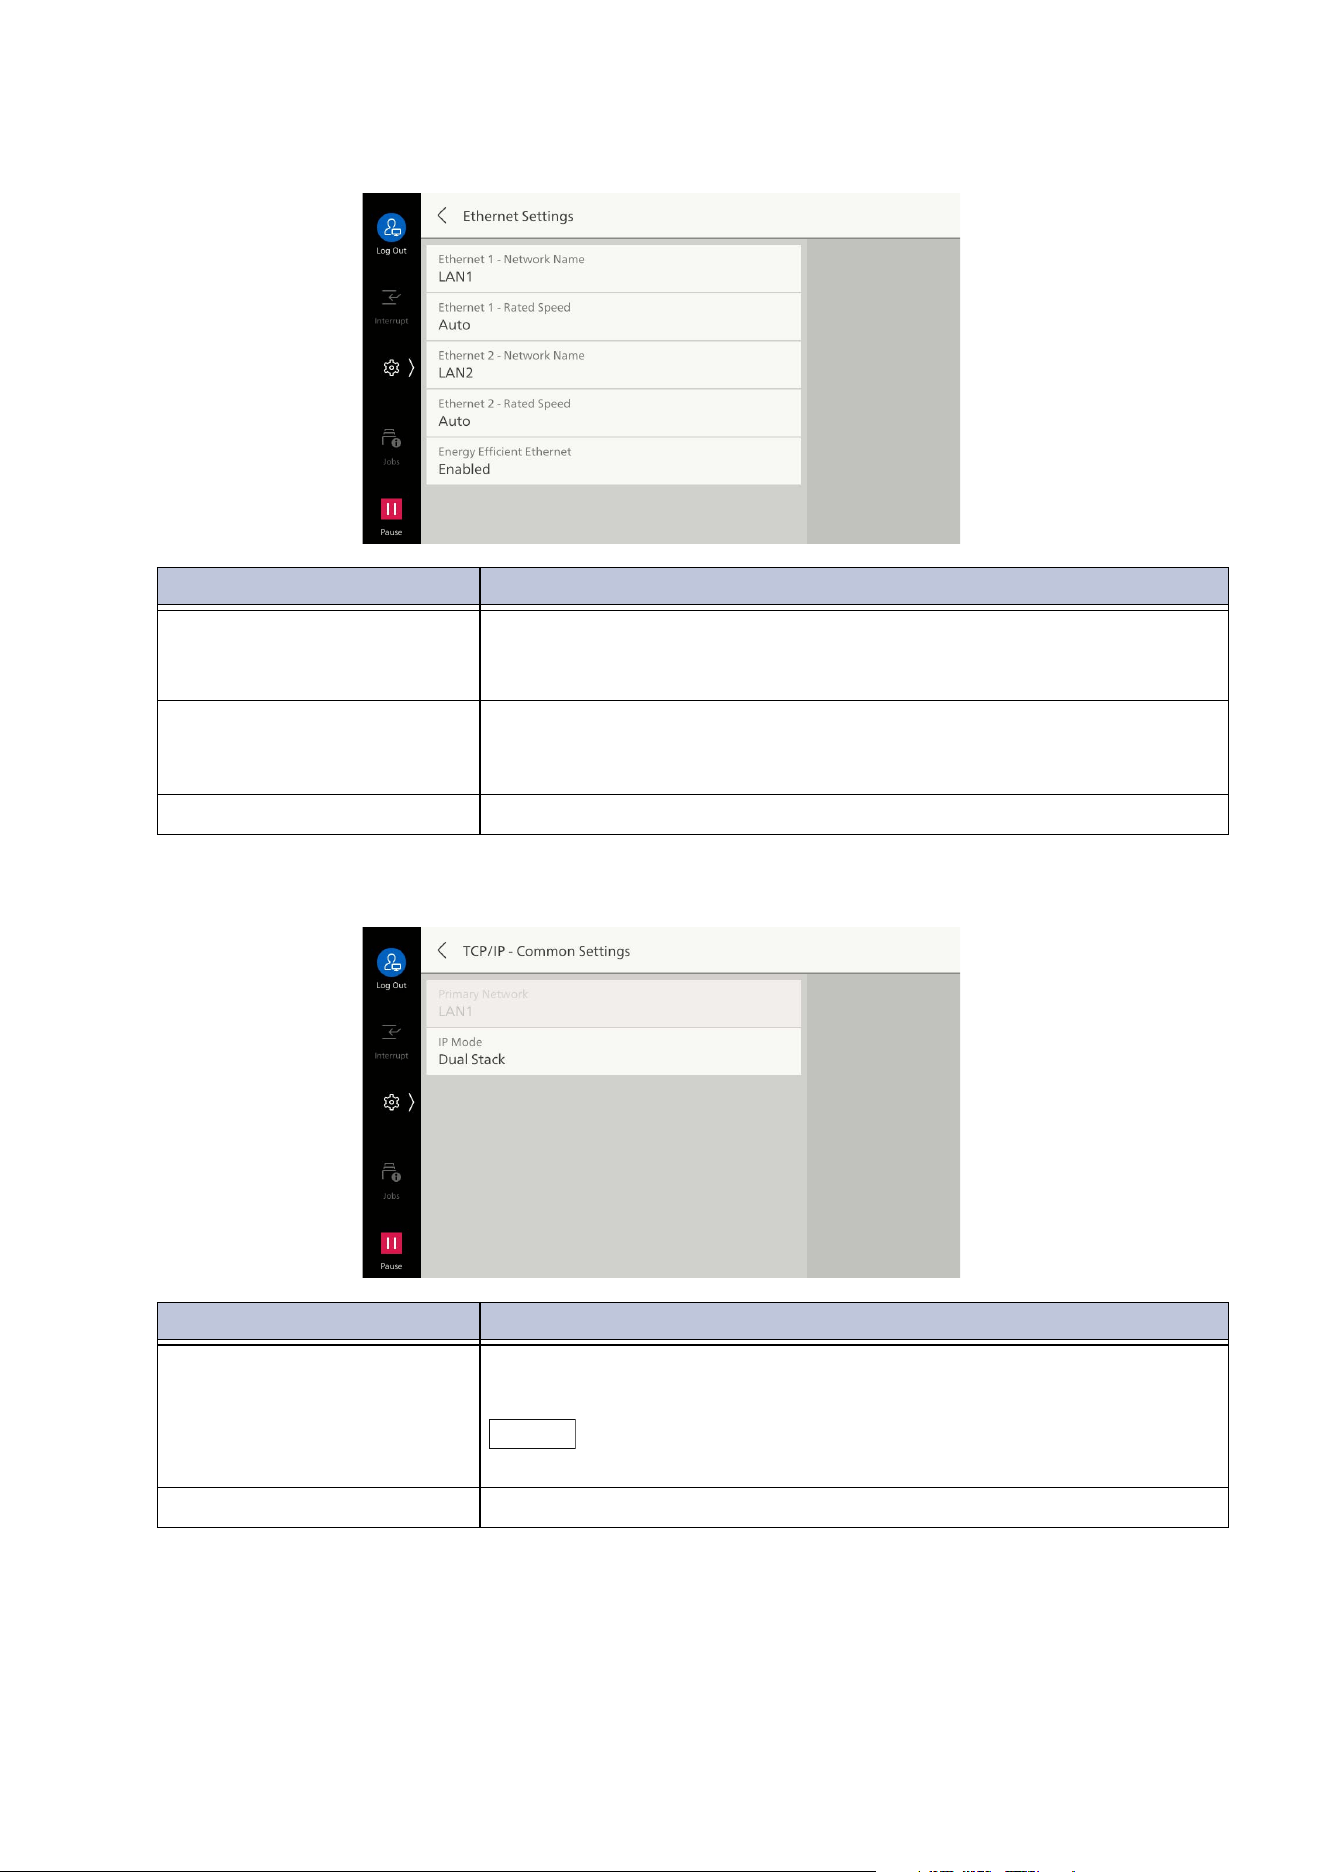
135
10.5 [Network Settings]
[Ethernet Settings]
[TCP/IP - Common Settings]
Item Description
[Ethernet 1 - Network
Name]/[Ethernet 2 -
Network Name]
Sets the names of each line when using 2 Ethernet interface lines.
[Ethernet - Rated Speed]/
[Ethernet 1 - Rated Speed]/
[Ethernet 2 - Rated Speed]
Sets communication speed of Ethernet interface. Select auto detect
or fixed speed according to the connected network environment.
[Energy Efficient Ethernet] Enables energy efficient feature of Ethernet interface.
Item Description
[Primary Network] Displays name of network operating as primary network when using
multiple interfaces.
Note
Setting of the primary network is done with Internet Services.
[IP Mode] Sets TCP/IP operation mode.
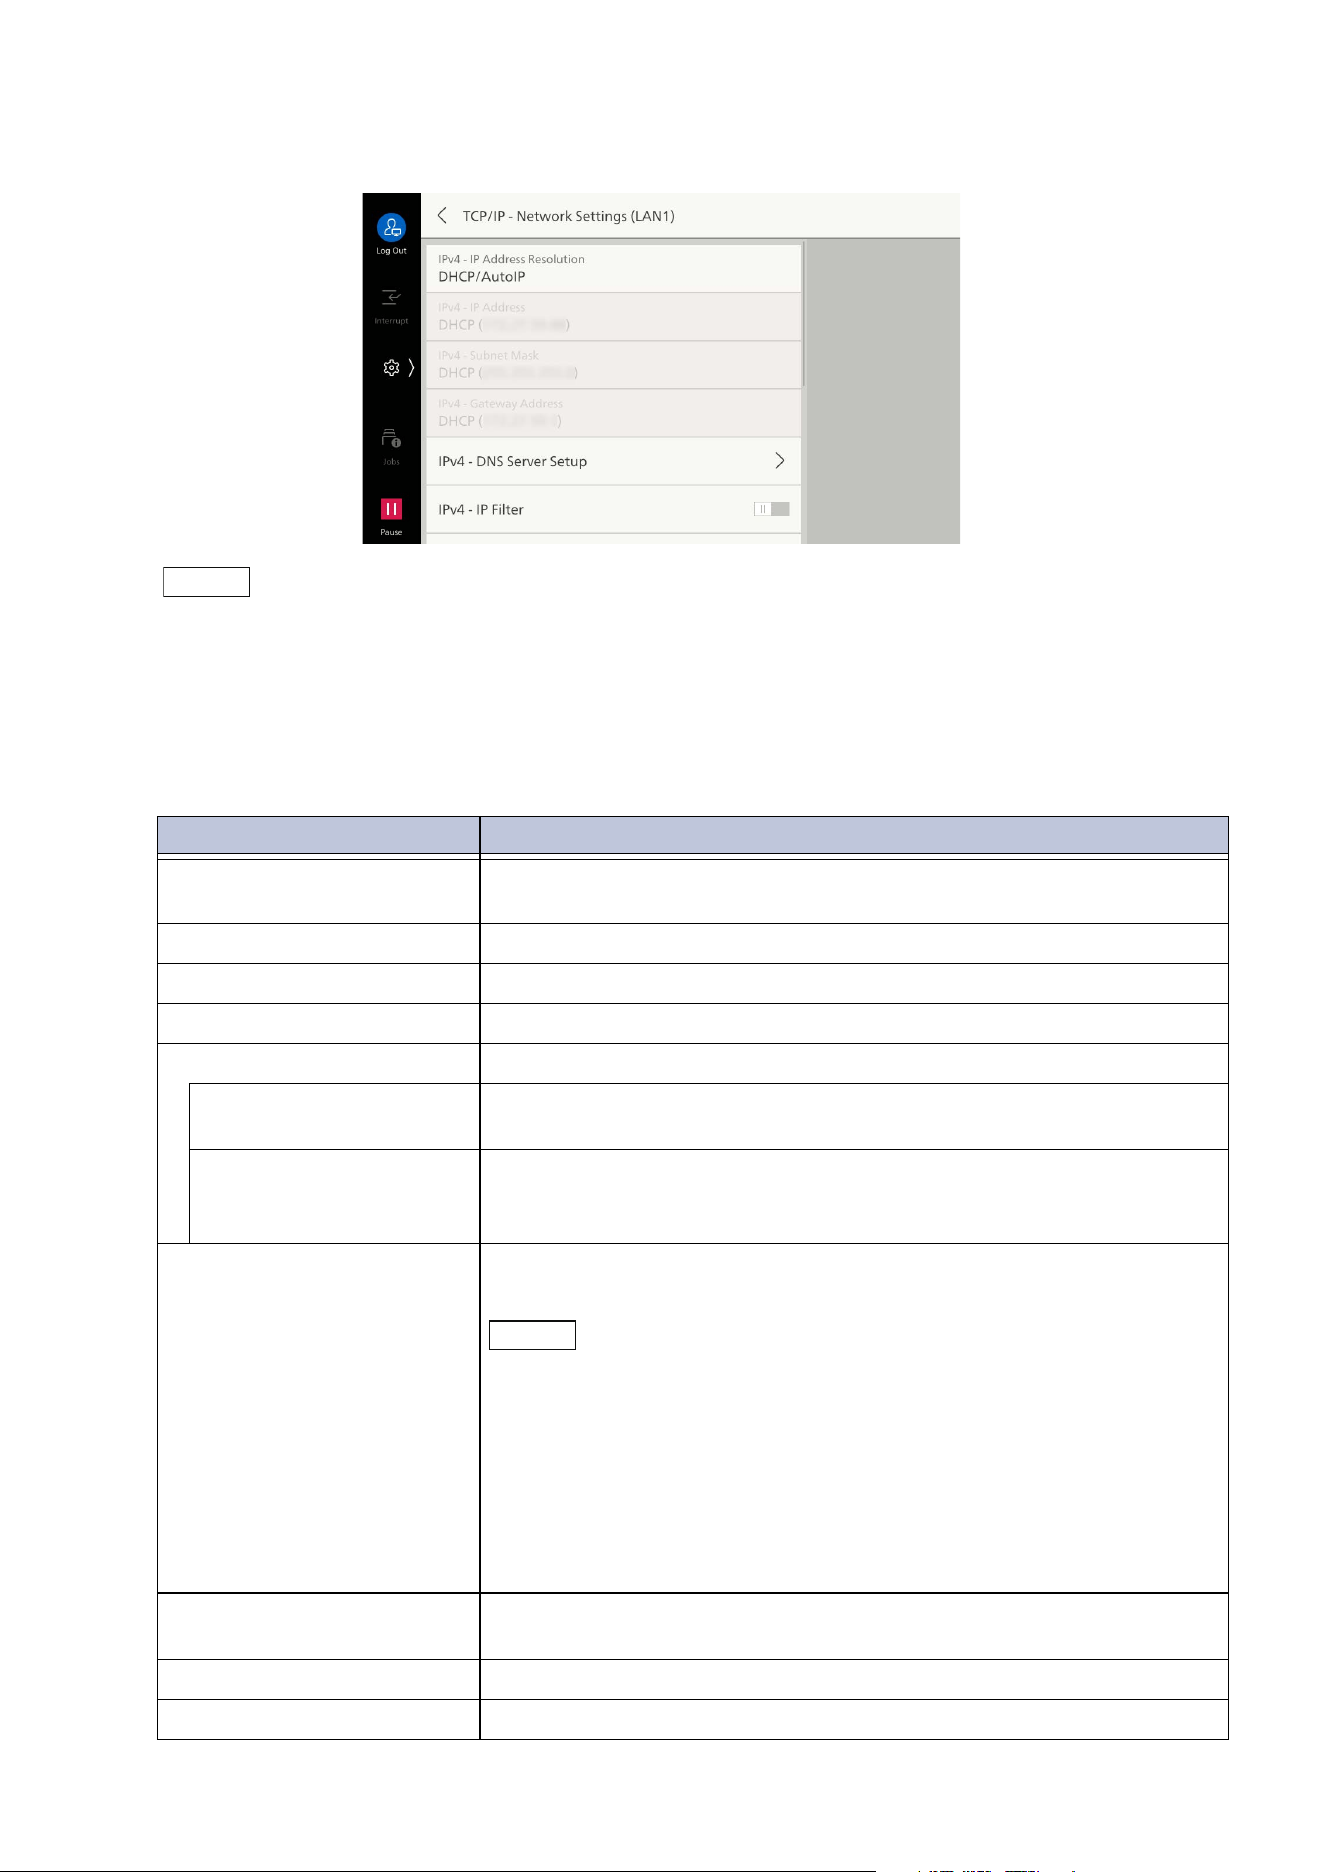
136
10 Device
[TCP/IP - Network Settings]
Note
If you use multiple interfaces, this item is displayed [TCP/IP - Network Settings (Ethernet 1)]/[TCP/IP -
Network Settings (Ethernet 2)].
The same IP address cannot be set in [TCP/IP - Network Settings (Ethernet 1)] and [TCP/IP - Network
Settings (Ethernet 2)].
Ports usable in a secondary network are: LPD, Port 9100, SNMP, Internet services (HTTP), Bonjour, IPP,
ThinPrint, and WSD. A secondary network interface may fail to operate if it is set with an application that
uses another port.
Item Description
[IPv4 - IP Address
Resolution]
Sets method of retrieving IP address, subnet mask, and gateway
address.
[IPv4 - IP Address] Specifies IP address.
[IPv4 - Subnet Mask] Specifies subnet mask.
[IPv4 - Gateway Address] Specifies gateway address.
[IPv4 - DNS Server Setup] Sets DNS server.
[Get IP Address from
DHCP]
Enables retrieval of DNS server address from DHCP server.
[DNS Server Address 1]
to [DNS Server Address
3]
Set
s address of DNS server manually. Enables setting of substitute
DNS server address for alternate DNS server 2 and 3.
[IPv4 - IP Filter] Enables limitation of connection to the machine with the IPv4
address.
Note
[IPv4 - IP Filter] applies to all features using TCP/IP. For example,
printing, scan jobs (folder scan), Internet Services, and web
applications.
To enable [IPv4 - IP Filter] and perform FTP transfer of a scanned image
from the machine, be sure to switch the FTP starting rate to [Active
Mode]. Switching of the FTP starting rate is done using Internet
Services.
Setup of the IPv4 address for receiving connections is done with [IP
Filter] of Internet Services.
[IPv6 Address Manual
Configuration]
Enables manual setting of IPv6 address.
[IPv6 - Manual Address] Specifies IPv6 address.
[IPv6 - Manual Prefix] Sets prefix length.
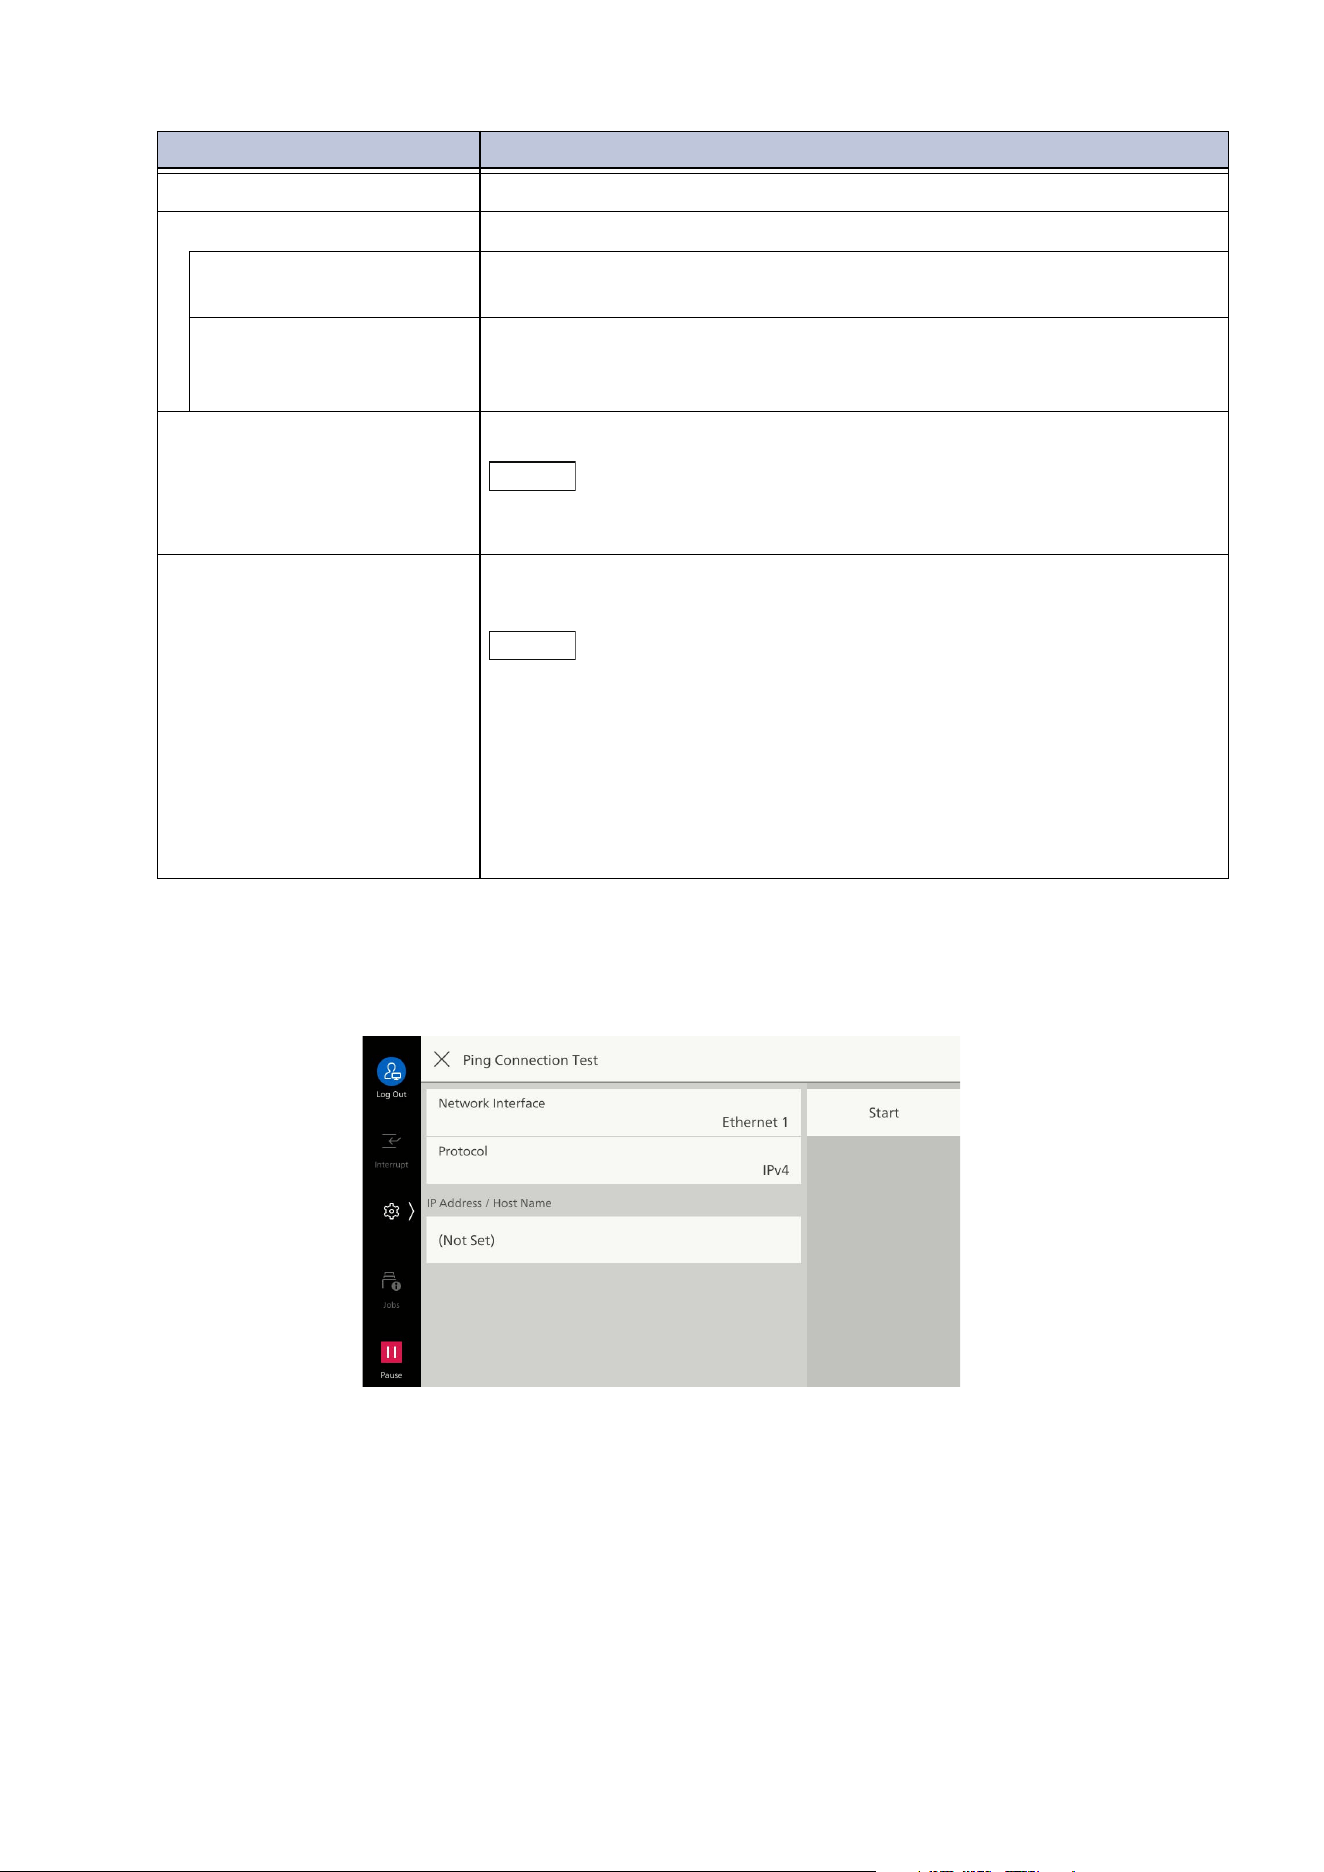
137
10.5 [Network Settings]
[Ping Connection Test]
Enables confirmation whether normal communication is possible between the machine and client
computer under the set conditions.
[IPv6 - Manual Gateway] Sets gateway address.
[IPv6 - DNS Server Setup] Sets DNS server.
[Get IP Address from
DHCP]
Enables retrieval of DNS server address from DHCP server.
[DNS Server Address 1]
to [DNS Server Address
3]
Sets address of DNS server manually. Enables setting of substitute
DN
S server address for alternate DNS server 2 and 3.
[Auto Configured IPv6
Address]
Displays set IP address.
Note
If the IP address is set manually, up to 2 addresses can be assigned with
stateless automatic configuration.
[IPv6 - IP Filter] Enables limitation of connection to the machine with the IPv6
address.
Note
[IPv6 - IP Filter] applies to all features using TCP/IP. For example,
printing, scan jobs (folder scan), Internet Services, and web
applications.
To enable [IPv6 - IP Filter] and perform FTP transfer of a scanned image
from the machine, be sure to switch the FTP starting rate to [Active
Mode]. You can set the FTP starting rate in Internet Services.
Setup of the IPv6 address for receiving connections is done with [IP
Filter] of Internet Services.
Item Description
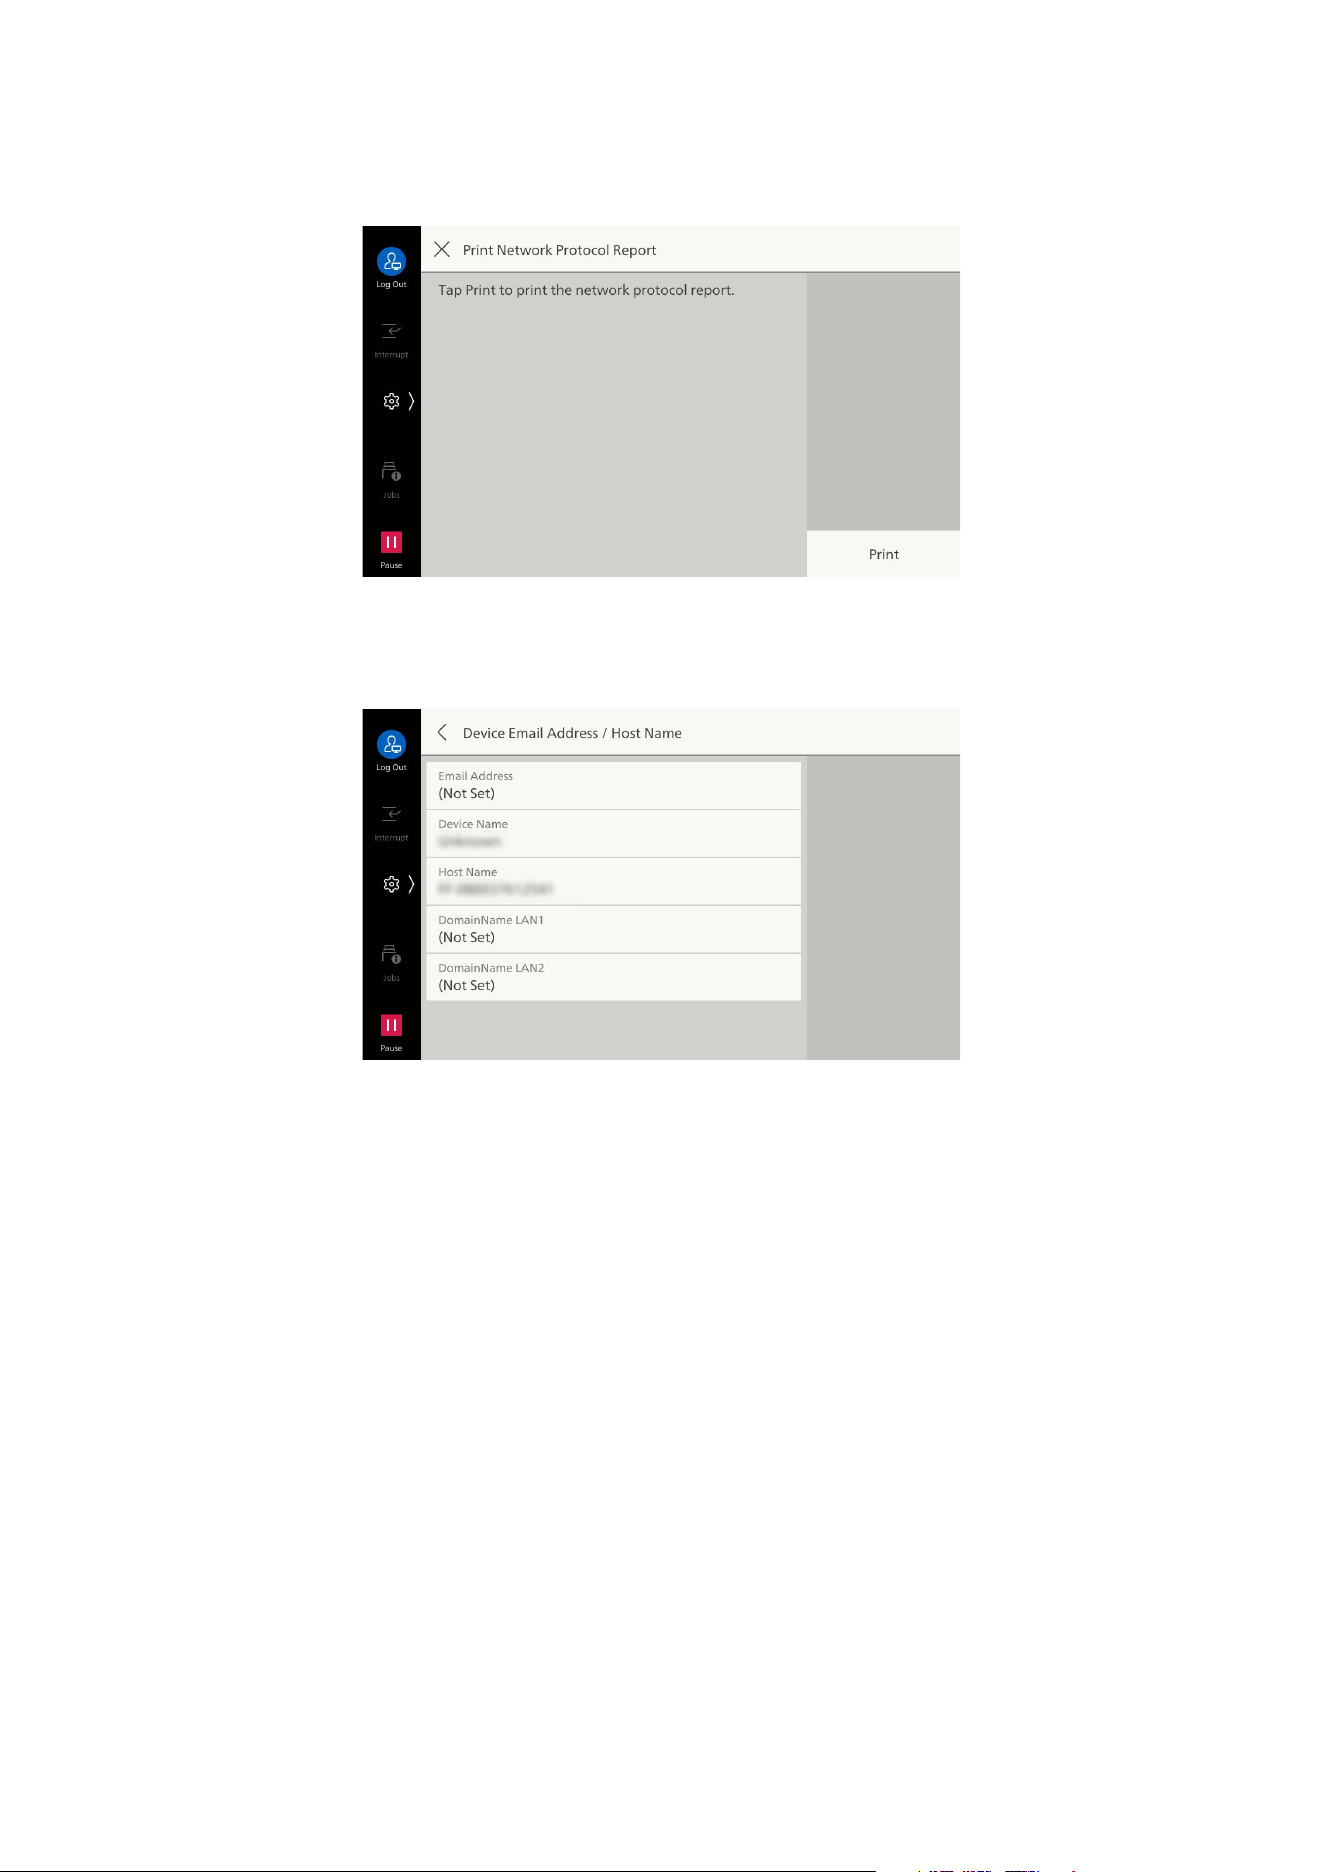
138
10 Device
[Print Network Protocol Report]
Outputs report on protocol settings for primary interface.
[Device Email Address / Host Name]
[Email Address]
Input the Email address of the machine up to 128 characters.
SMTP Reception
Any name can be set for the account (part to the left of the @ mark). Set the combination of the host
name and domain name as the address part (part to the right of the @ mark). An alias cannot be set.
For example,
Account name: mymail
Host name: myhost
Domain name: example.com
In this case, the Email address is [email protected].
POP3 Reception
Specify the Email Address for receiving emails.
[Device Name]
Input the name of the machine up to 32 characters.
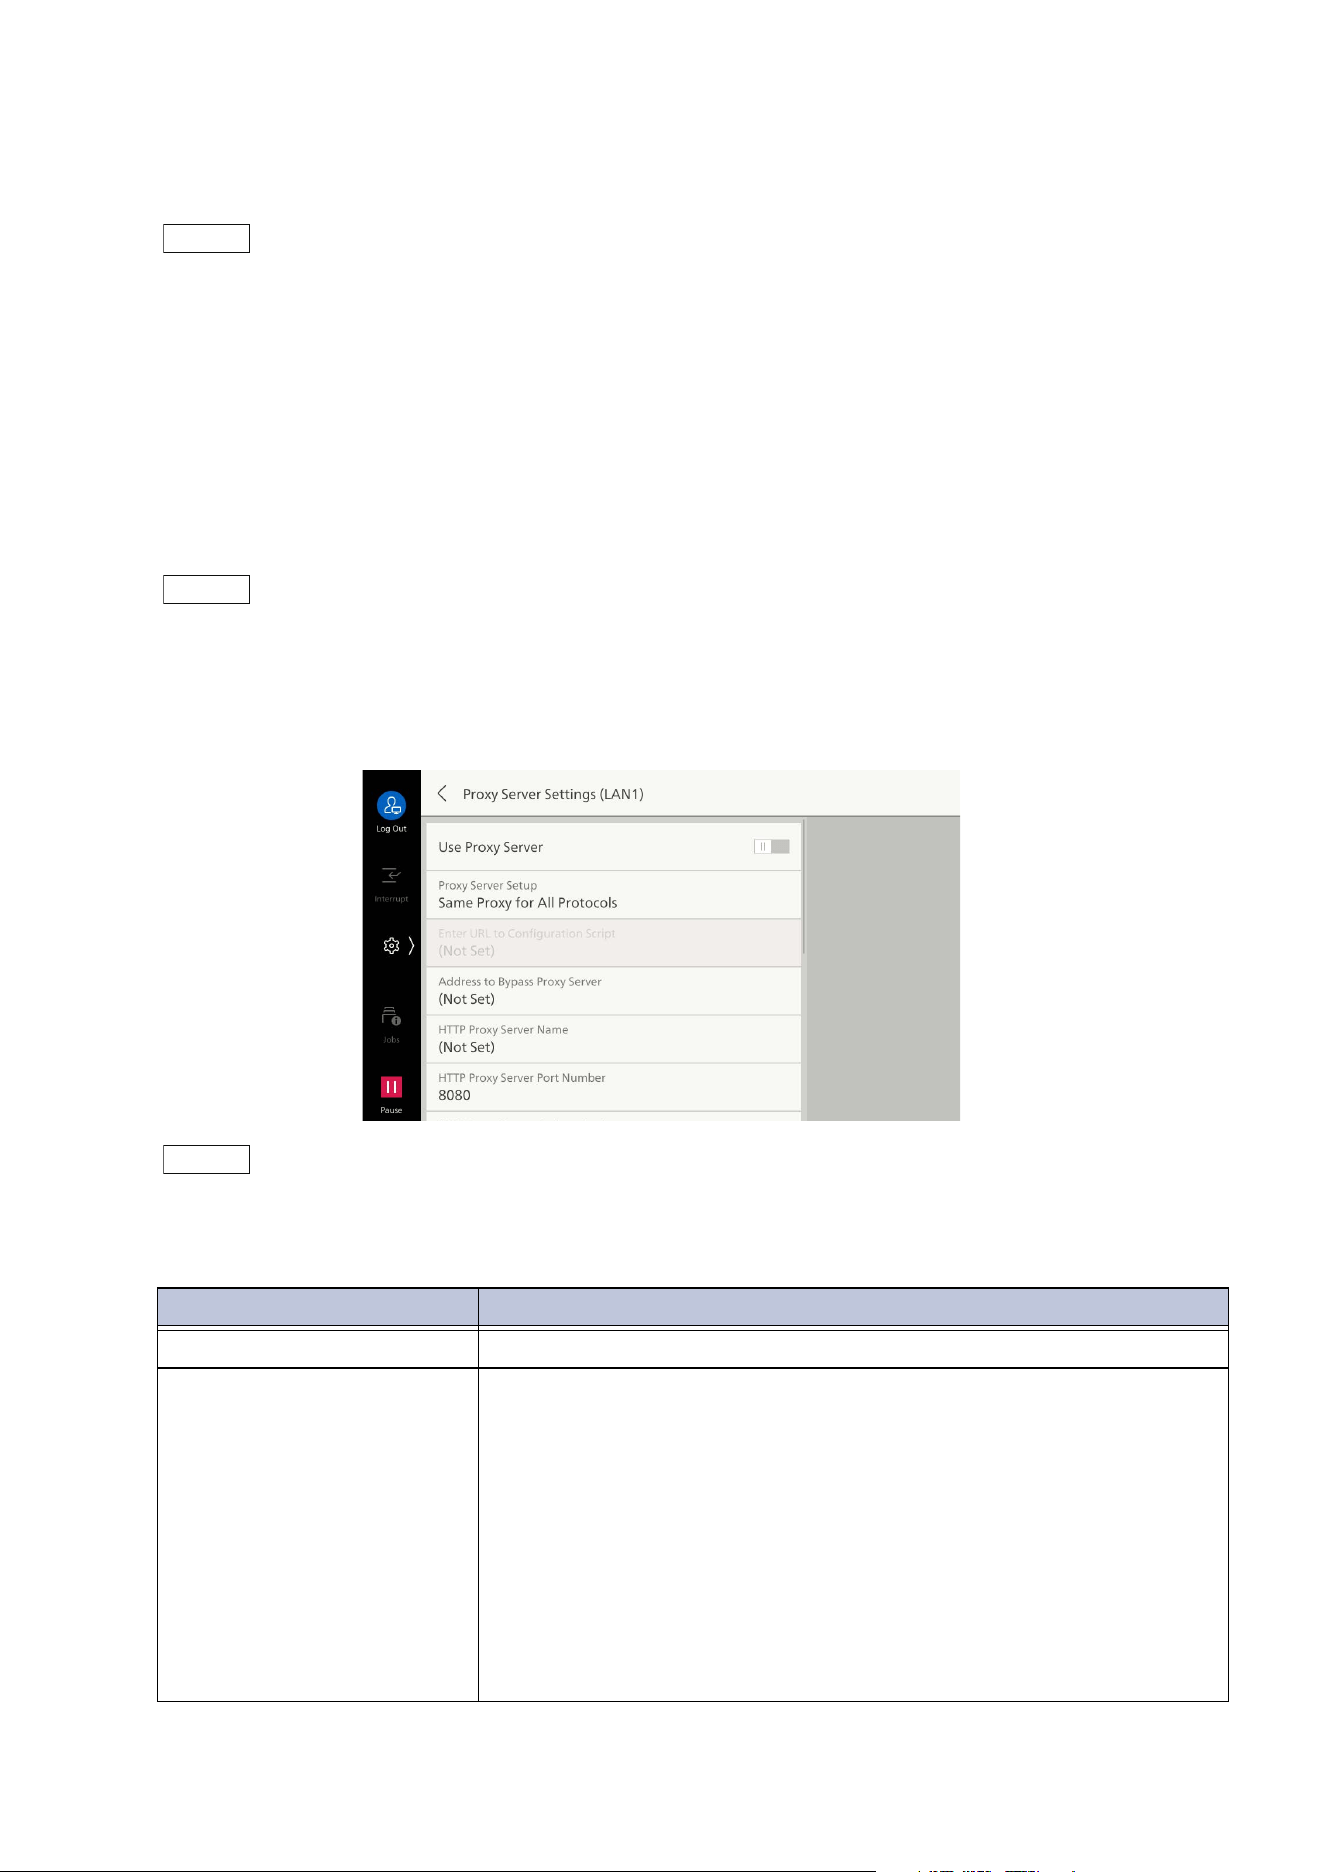
139
10.5 [Network Settings]
[Host Name]
Input the host name in 32 half-size characters or less.
Note
In communication with SMB, the part from the beginning to 15 half-size characters is used as a host
name. To correctly identify the machine, set the host name to 15 half-sized characters or less.
[Domain Name]
Input the domain name up to 255 characters.
[Proxy Server List]
Set when using web applications.
Note
Change the settings only when using services that require proxy setting.
[Proxy Server Settings]
Proxy server settings can be set for each interface, in accordance with the network environment.
Note
If you use multiple interfaces, this item is displayed [Proxy Server Settings - Ethernet 1]/[Proxy Server
Settings - Ethernet 2].
These are also applied to connection with SFTP servers.
Item Description
[Use Proxy Server] Enables use of proxy server.
[Proxy Server Setup] Sets method of specifying proxy server.
[Same Proxy for All Protocols]
Settings for HTTP proxy server are also applied to HTTPS proxy
server.
[Different Proxy for Each Protocol]
Enables different settings for HTTPS proxy server and HTTP proxy
server, respectively.
[Use Automatic Proxy Configuration Script]
Setting is done by using PAC file for setting HTTPS proxy server
and HTTP proxy server.
[Automatically Detect Settings]
Detects settings for HTTPS proxy server and HTTP proxy server.
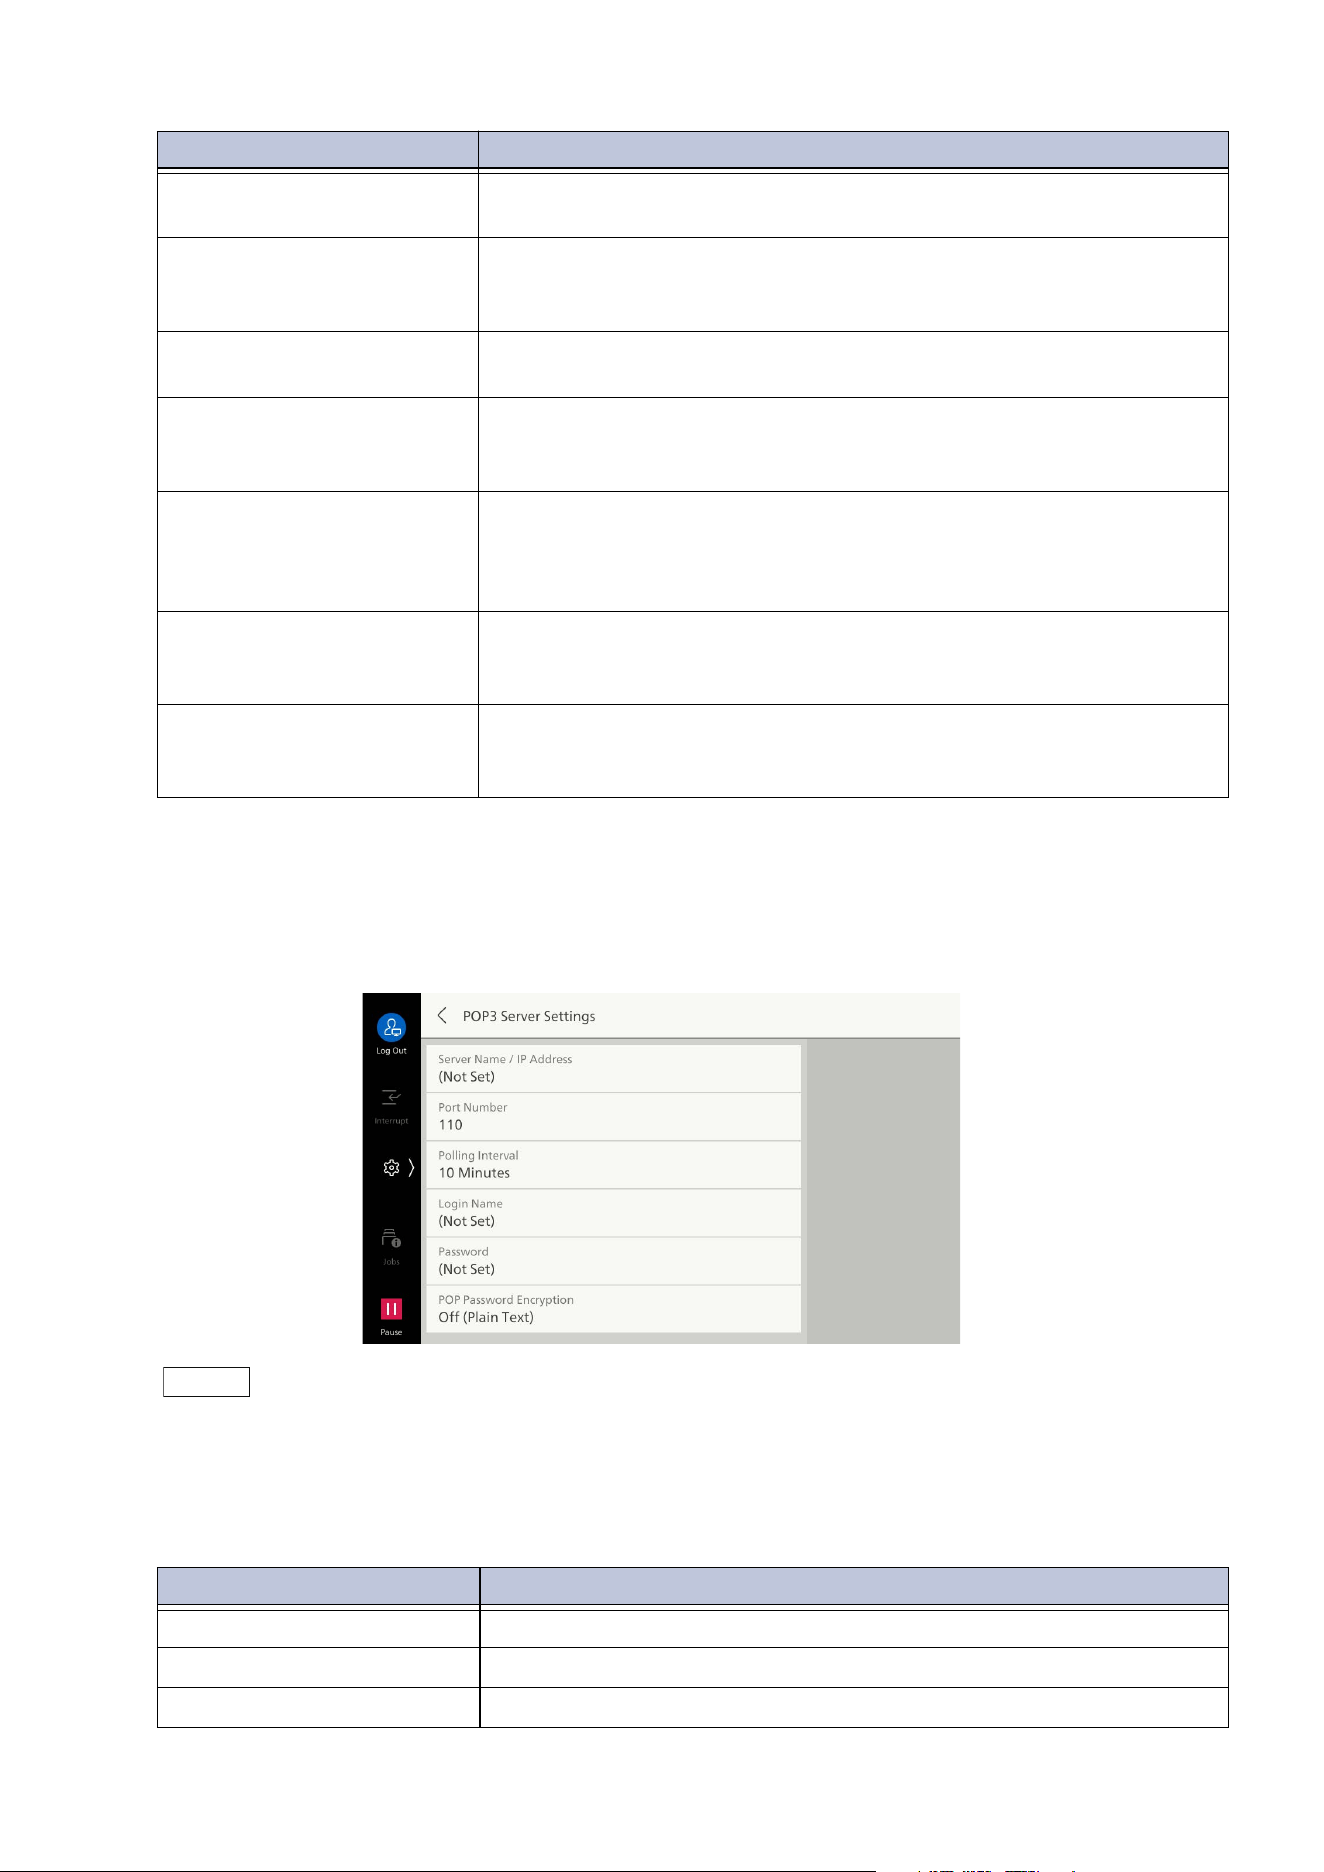
140
10 Device
[Outgoing/Incoming Email Settings]
[POP3 Server Settings]
Note
You can set the POP3 server of Exchange Online which uses Oauth2.0 authentication using Internet
Services.
You can set only one POP3 server. The settings you made later takes effect.
If you set the POP3 server of Exchange Online which uses Oauth2.0 authentication, the setting of this
item is not used.
[Enter URL to Configuration
Script]
Specifies URL when setting [Proxy Server Setup] to [Use Automatic
Proxy Configuration Script].
[Address to Bypass Proxy
Server]
Sets addresses for not using a proxy server. Specification can be
done with IPv4 address, IPv6 address, and FQDN format.
Specification can also be done using “*” (wild card).
[HTTP Proxy Server Name]/
[HTTPS Proxy Server Name]
Input server name or IP address. Specification can be done with IPv4
address, IPv6 address, and FQDN format.
[HTTP Proxy Server Port
Number]/[HTTPS Proxy
Server Port Number]
Sp
ecifies port number of HTTP proxy server and HTTPS proxy server.
[HTTP Proxy Server
Authentication]/[HTTPS
Proxy Server
Authentication]
Set to [Enabled] if authentication is necessary when connecting to
an HTTP proxy server or HTTPS proxy server.
[HTTP Proxy Server Login
Name]/[HTTPS Proxy Server
Login Name]
Input the login name.
[HTTP Proxy Server
Password]/[HTTPS Proxy
Server Password]
Input password.
Item Description
[Server Name / IP Address] Input server name or IP address of POP3 server.
[Port Number] Sets port number of POP3 server.
[Polling Interval] Sets interval for checking POP3 server for Email.
Item Description
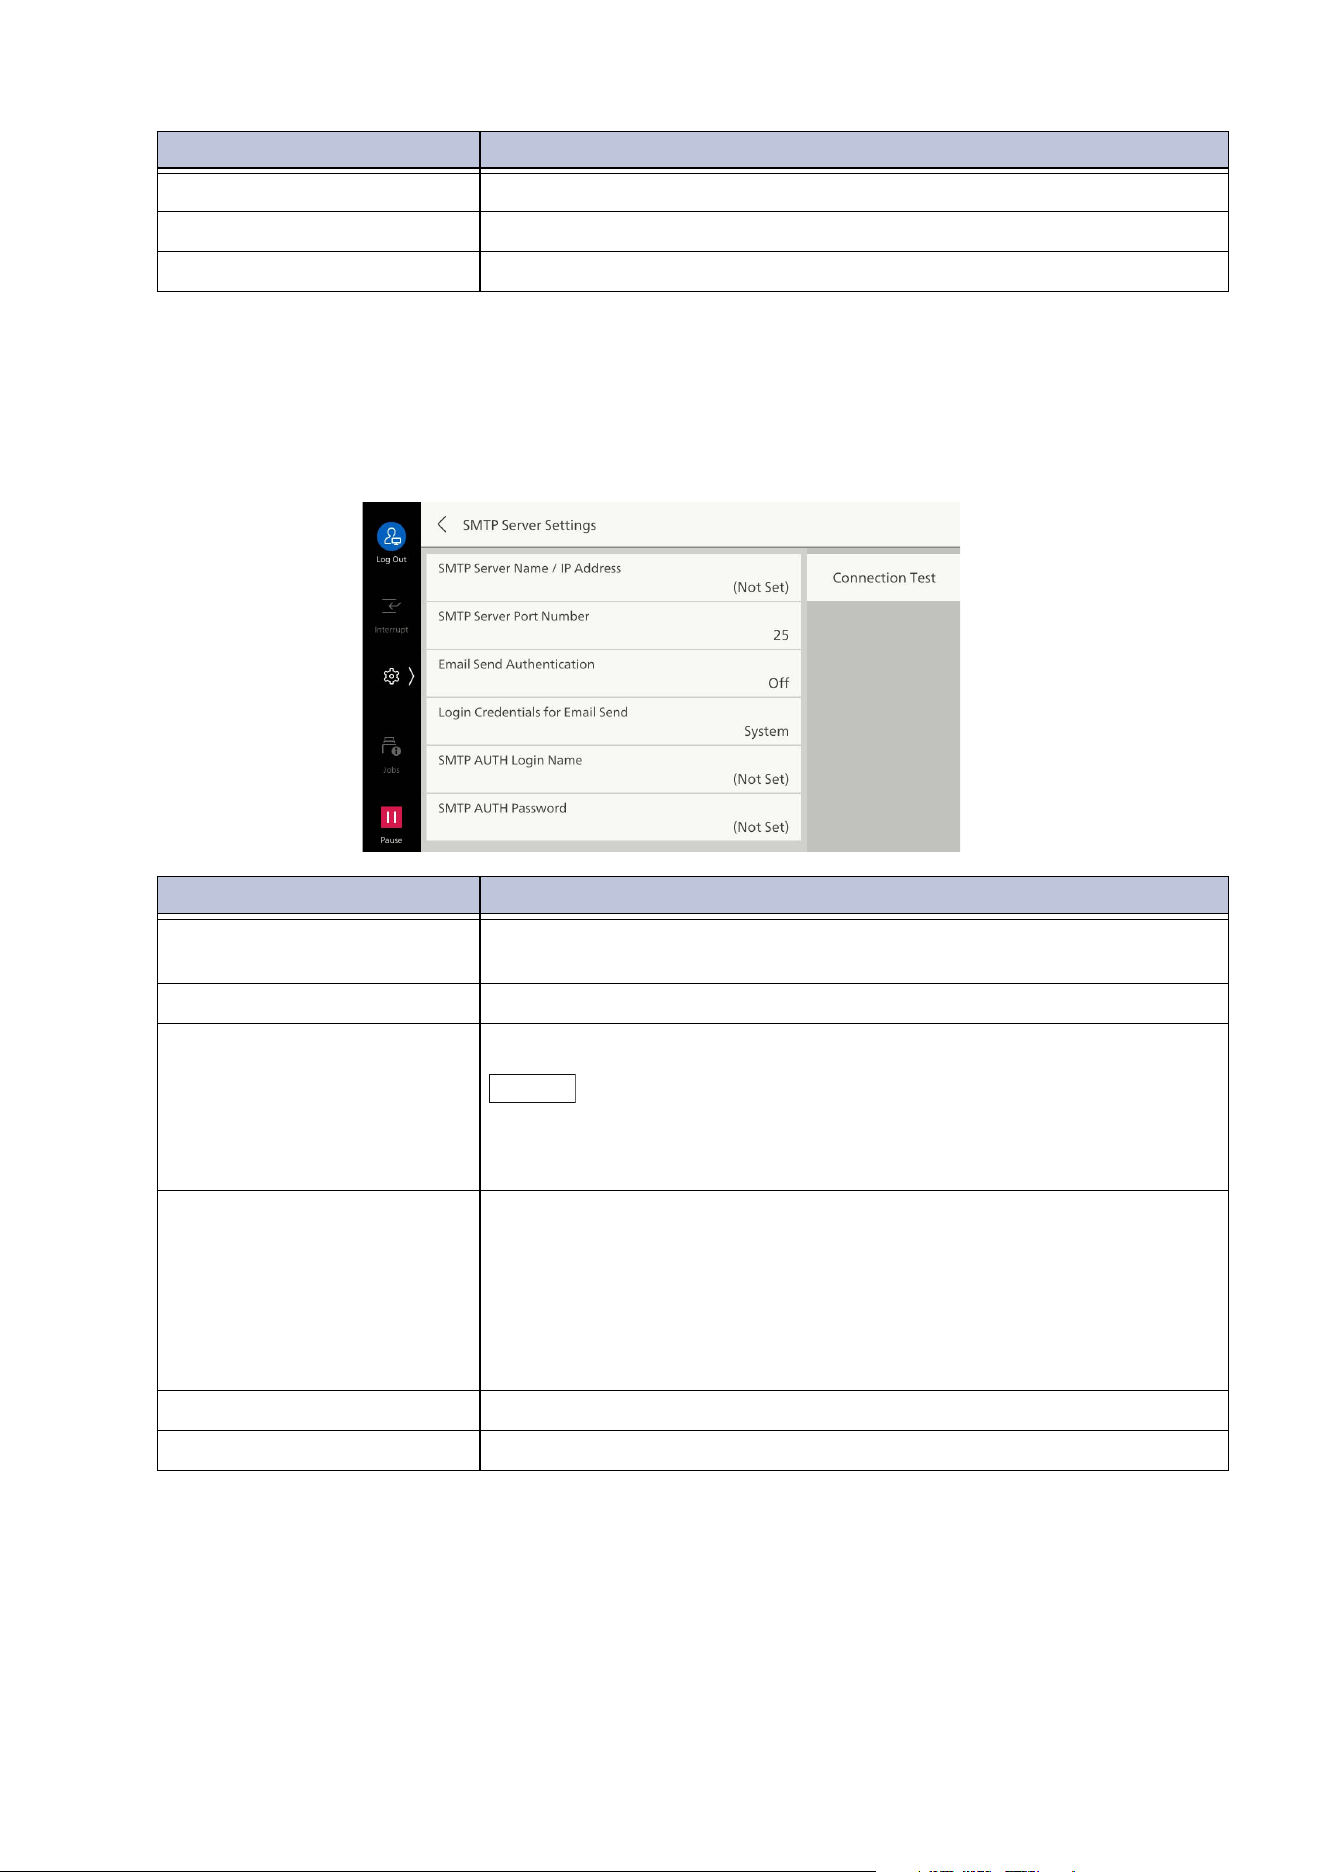
141
10.5 [Network Settings]
[SMTP Server Settings]
Enables confirmation of the connection situation between the machine and SMTP server by tapping
on [Connection Test] and sending a test Email to an Email address specified by the machine. Also, if
[Connection Test] > [Print SMTP Comm Report] is selected, a report is printed showing the specifics
of the SMTP communication protocol sent/received by the machine.
[Login Name] Input name fo
r logging in to POP3 server.
[Password] Sets password for POP reception.
[POP Password Encryption] Enables password encryption.
Item Description
[SMTP Server Name / IP
Address]
Input server name or IP address of SMTP server.
[SMTP Server Port Number] Sets port number of SMTP server.
[Email Send Authentication] Sets method of authentication for sending via SMTP.
Note
As authentication methods, the system supports AUTH GSSAPI (only
when specifying Kerberos), AUTH NTLMv2, AUTH NTLMv1, AUTH
PLAIN, AUTH LOGIN, and AUTH CRAM-MD5.
[Login Credentials for Email
Send]
Sets Login Credentials for Email Send.
If set to [Remotely Authenticated User], login to the SMTP server is
performed with the remote authentication user name/password if
log in to remote accounts is performed on the machine prior to
running a job. You can also select Operation in case login fails. If log
in to remote accounts is not used, then the user name/password set
for the machine is used.
[SMTP AUTH Login Name] Sets login name for SMTP server.
[SMTP AUTH Password] Sets login password for SMTP server.
Item Description
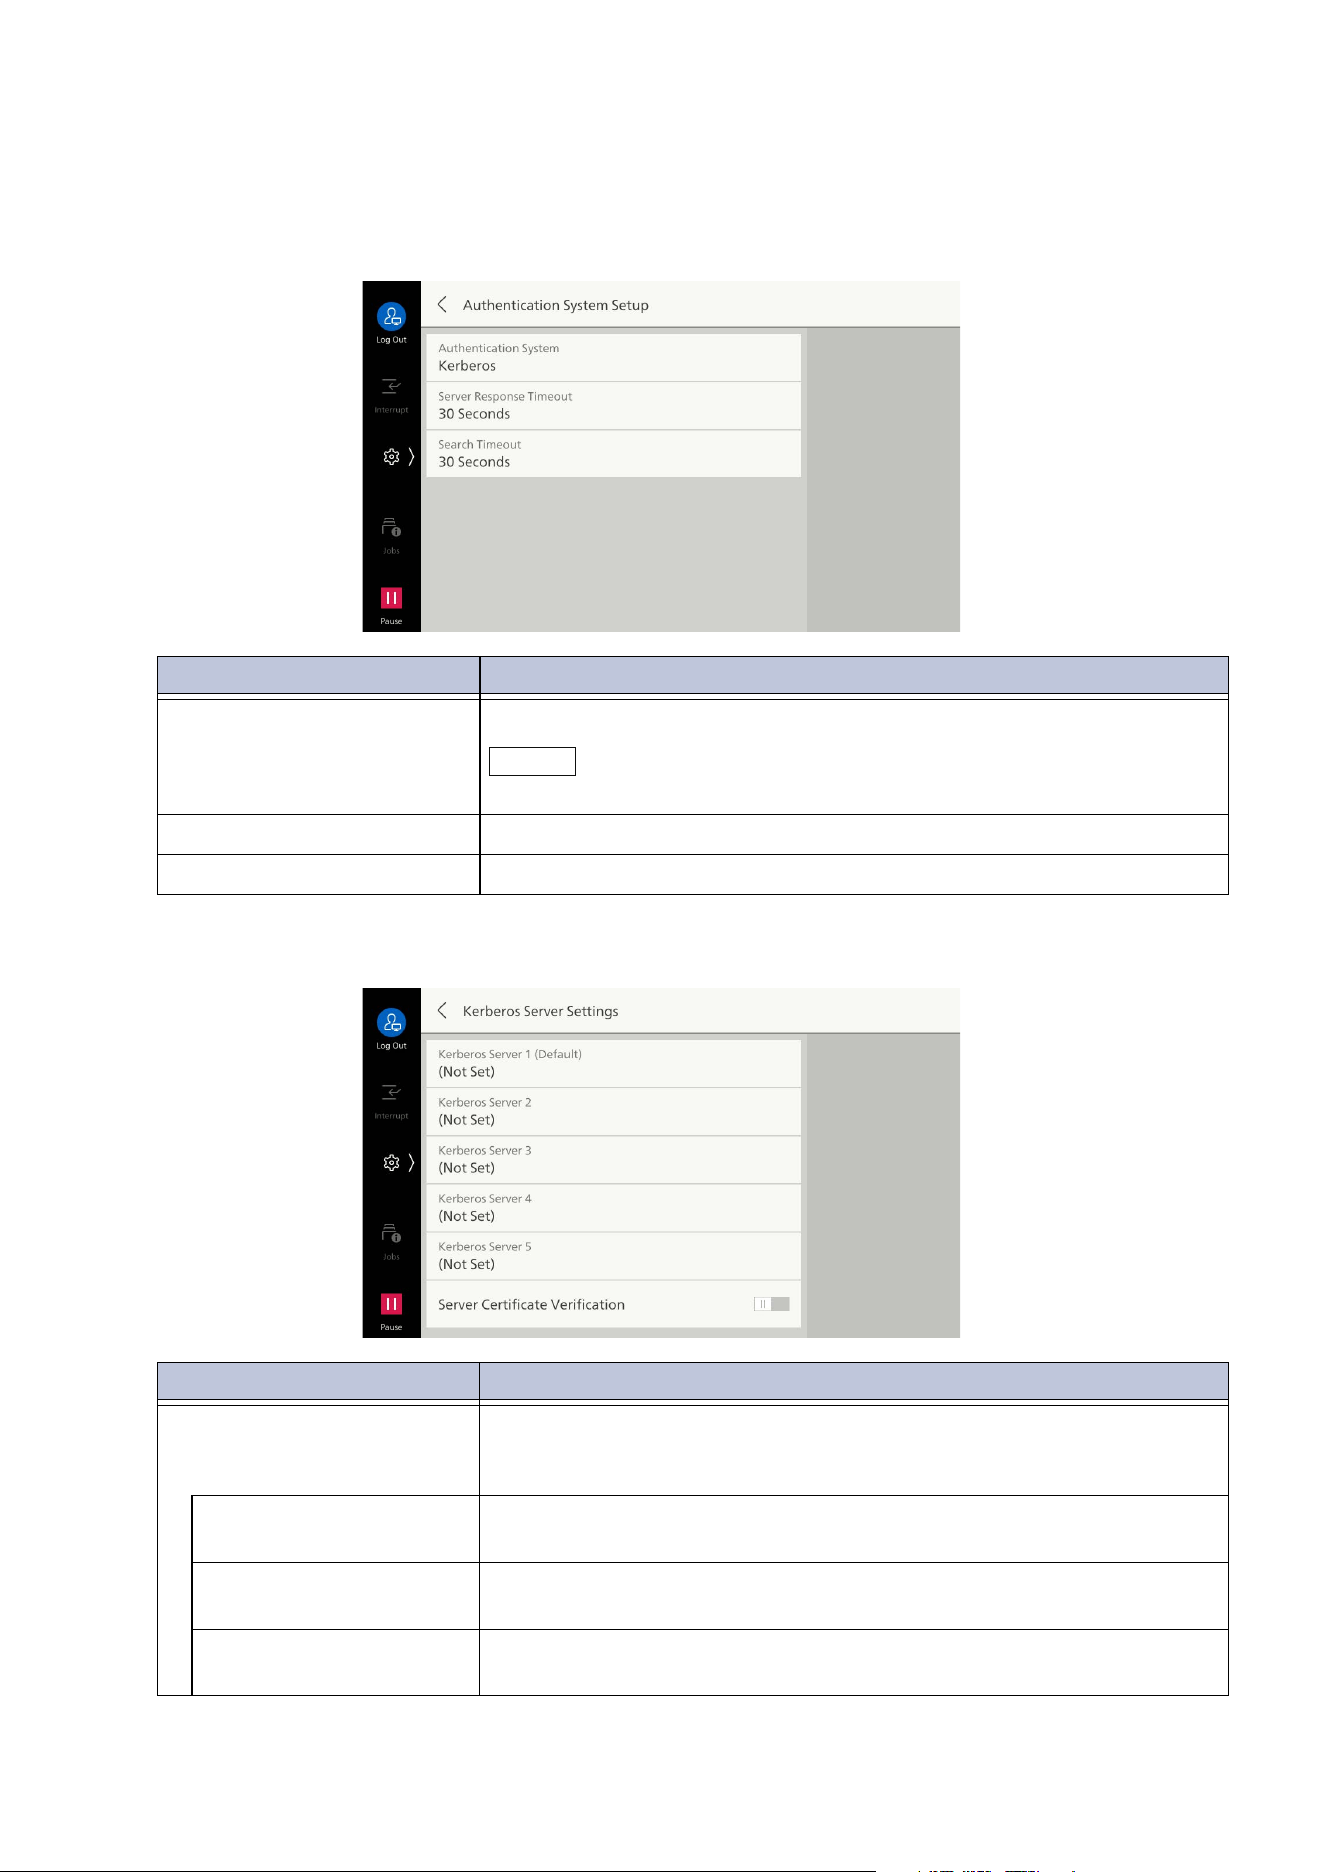
142
10 Device
[Remote Authentication / Directory Service]
[Authentication System Setup]
[Kerberos Server Settings]
Item Description
[Authentication System] Selects system for performing authentication.
Note
Setting of the Microsoft Entra ID is done with Internet Services.
[Server Response Timeout] Sets server response timeout for authentication.
[Search Timeout] Sets timeout for user details search.
Item Description
[Kerberos Server 1
(Default)] to [Kerberos
Server 5]
Kerberos Server 1 to 5 are set, respectively, as follows.
The specifics set for Kerberos Server 1 are used as the default for
authentication.
[Primary Server Name/
Address]
Input server name or IP address of primary server.
[Primary Server - Port
Number]
Input port number of primary server.
[Secondary Server
Name/Address]
Input server name or IP address of secondary server.
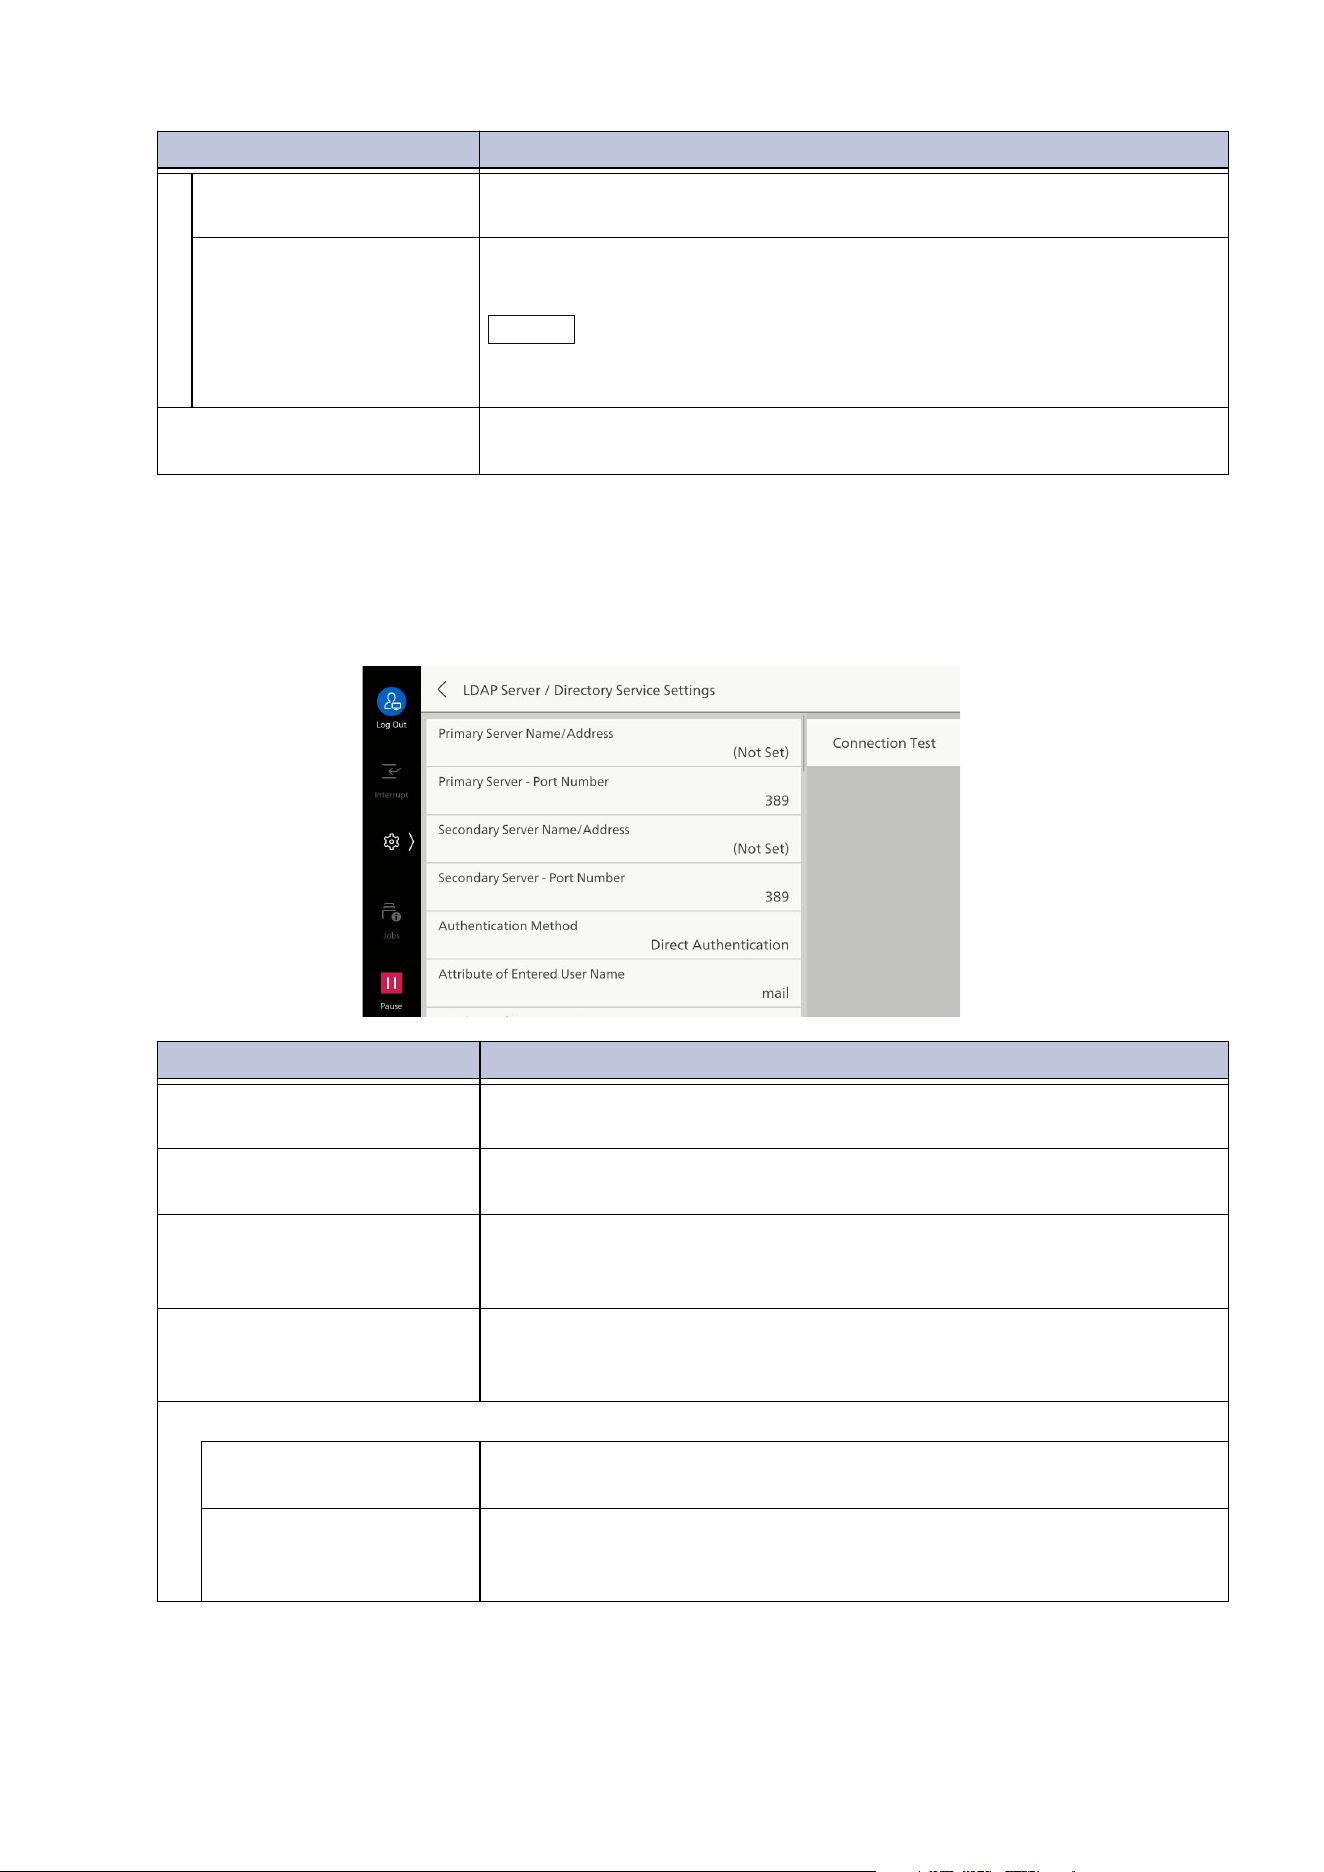
143
10.5 [Network Settings]
[LDAP Server / Directory Service Settings]
Sets items such as the directory server and the attributes and scope for search when LDAP
authentication and the Address Book search using LDAP is used.
Connection with the server can be confirmed by tapping on [Connection Test].
[Secondary Server - Port
Number]
Input port number of secondary server.
[Domain Name] When using Active Directory of a Windows Server as the server, set
th
e domain name of Active Directory as the domain name.
Note
Be sure to set the domain name in all uppercase letters. An
authentication error will occur if set in lowercase letters.
[Server Certificate
Verification]
Server Certificate can be verified.
Item Description
[Primary Server Name/
Address]
Input server name or IP address of primary server.
[Primary Server - Port
Number]
Input port number of primary server.
[Secondary Server Name/
Address]
Input server name or IP address of secondary server.
Connects to substitute server when communication is down due to
primary server maintenance, etc.
[Secondary Server - Port
Number]
Input port number of secondary server.
Con
nects to substitute server when communication is down due to
primary server maintenance, etc.
[Authentication Method]
[Direct Authentication] Authentication for the LDAP server is performed with the entered
user ID and password.
[Authentication of User
Attributes]
Authentication for the LDAP server is performed based on specific
attribute information. This sets the attribute name for [Attribute of
En
tered User Name].
Item Description
144
10 Device
[Attribute of Entered User
Name]
Sets attribute name when authentication method for LDAP
authentication is [Authentication of User Attributes].
Authentication for the LDAP server is performed based on specific
attribute information. This sets the attribute name for [Attribute of
Entered User Name]. For example, set “mail” to have users input
their Email address.
Note
Set an attribute that guarantees that each user is provided with a
unique value.
[Attribute of Login User
Name]
Input the attribute name to be used as the user’s display name or
identifier.
Note
Set an attribute that guarantees that each user is provided with a
unique value.
Login is not possible if the set attribute cannot be retrieved from the
LDAP server.
If the authentication method is [Direct Authentication], set to an item
the same as the user ID attribute input at authentication from the
operation panel.
[Use Added Text String] Enables automatic addition of information input with [Text String
Added to User Name] when entering user details from the touch
panel display.
[Text String Added to User
Name]
If [Use Added Text String] is set for [Enabled], that fixed text string
is input.
For example, if “@myhost.example.com” is set when authenticating
using an Email address ([email protected]), login can be
done by entering “user” only.
[Login Credentials to Search
Entries]
Sets credentials used when searching.
[Login Name] Sets user name when accessing directory server using the Address
Bo
ok search and LDAP certification via the [Authentication of User
Attributes] method. This is the setting only for only when directory
service authentication is necessary.
Note
Input should basically be done in the DN format. However, attribute
values such as display name can also be specified in the case of Active
Directory. For details, visit the official website of Microsoft.
[Password] Sets login password of user specified with [Login Name].
[Search Directory Root] Input the text string to serve as the root for search.
Note
The root specified here serves as the basis for user search. Specify the
root of the hierarchy containing the users who log in. However, if the
number of users or groups contained in the hierarchy below the root is
too large, it may take some time to log in to the machine.
[Search Scope] Sets the search scope from the directory root.
[Object Class of Search
Target]
Input the object class for search.
[LDAP Referrals] En
ables reconnection to specified server when an instruction to
connect to another LDAP server is given by the connected LDAP
server.
Item Description

145
10.5 [Network Settings]
[LDAP Referral Hop Limit] When using the referral feature this sets how many times to allow
switching of the connected server.
[LDAP Server] Sets software used with directory server.
[Search Entries by Common
Name]
Enables use of the attribute type of name as a search condition when
searching with a name as the search key.
[Search Entries by Surname] Enables use of the attribute type of surname as a search condition
wh
en searching with a name as the search key.
[Search Entries by Given
Name]
Enables use of the attribute type of given name as a search condition
when searching with a name as the search key.
[Attribute Type of Name] Sets attribute type of recipient name. This enables input of attribute
name of field used as recipient name from the among items of user
details set for the LDAP server to be used. For Windows, input “cn”
for the attribute name used as the recipient name.
[At
tribute Type of Surname] Sets attribute type of recipient surname.
[Attribute Type of Given
Name]
Sets attribute type of recipient given name.
[Attribute Type of Email
Address]
Sets attribute type of Email address. Sets attribute name of field
used as Email information from among the items of user details set
for the LDAP server to be used. For Windows, input “mail” for the
attribute name used as the Email information.
[Attribute Type of Custom
It
em 1] to [Attribute Type of
Custom Item 3]
Sets LDAP attribute types for custom items 1 to 3. Enables free
specification of user attributes set at LDAP server that is the search
target, other than [Attribute Type of Name] or [Attribute Type of
Email Address].
[Attribute Name of Custom
Item 1] to [Attribute Name
of Custom Item 3]
Sets attributes names assigned to custom items 1 to 3.
[At
tribute Type of
Certificate]
Sets attribute type of certificate. This enables input of attribute
name of field used as certificate from among the items of user
details set for the LDAP server to be used.
For Windows, input “userCertificate;binary” for the attribute name
of the certificate. This information is used as an S/MIME certificate
when selecting a recipient using directory service, and end an Email
encrypted with S/MIME.
Note
To carry out encrypted communication, setup is necessary for all the
trusted root certificate authorities and intermediate certificate
authorities set in the certificate path used for the machine.
[Maximum Number of
Search Results]
Sets the number of results for displaying addresses matching search
conditions. If the search results exceed the maximum number,
further search processing is suspended.
[Search Timeout] Set
s search timeout time.
Item Description
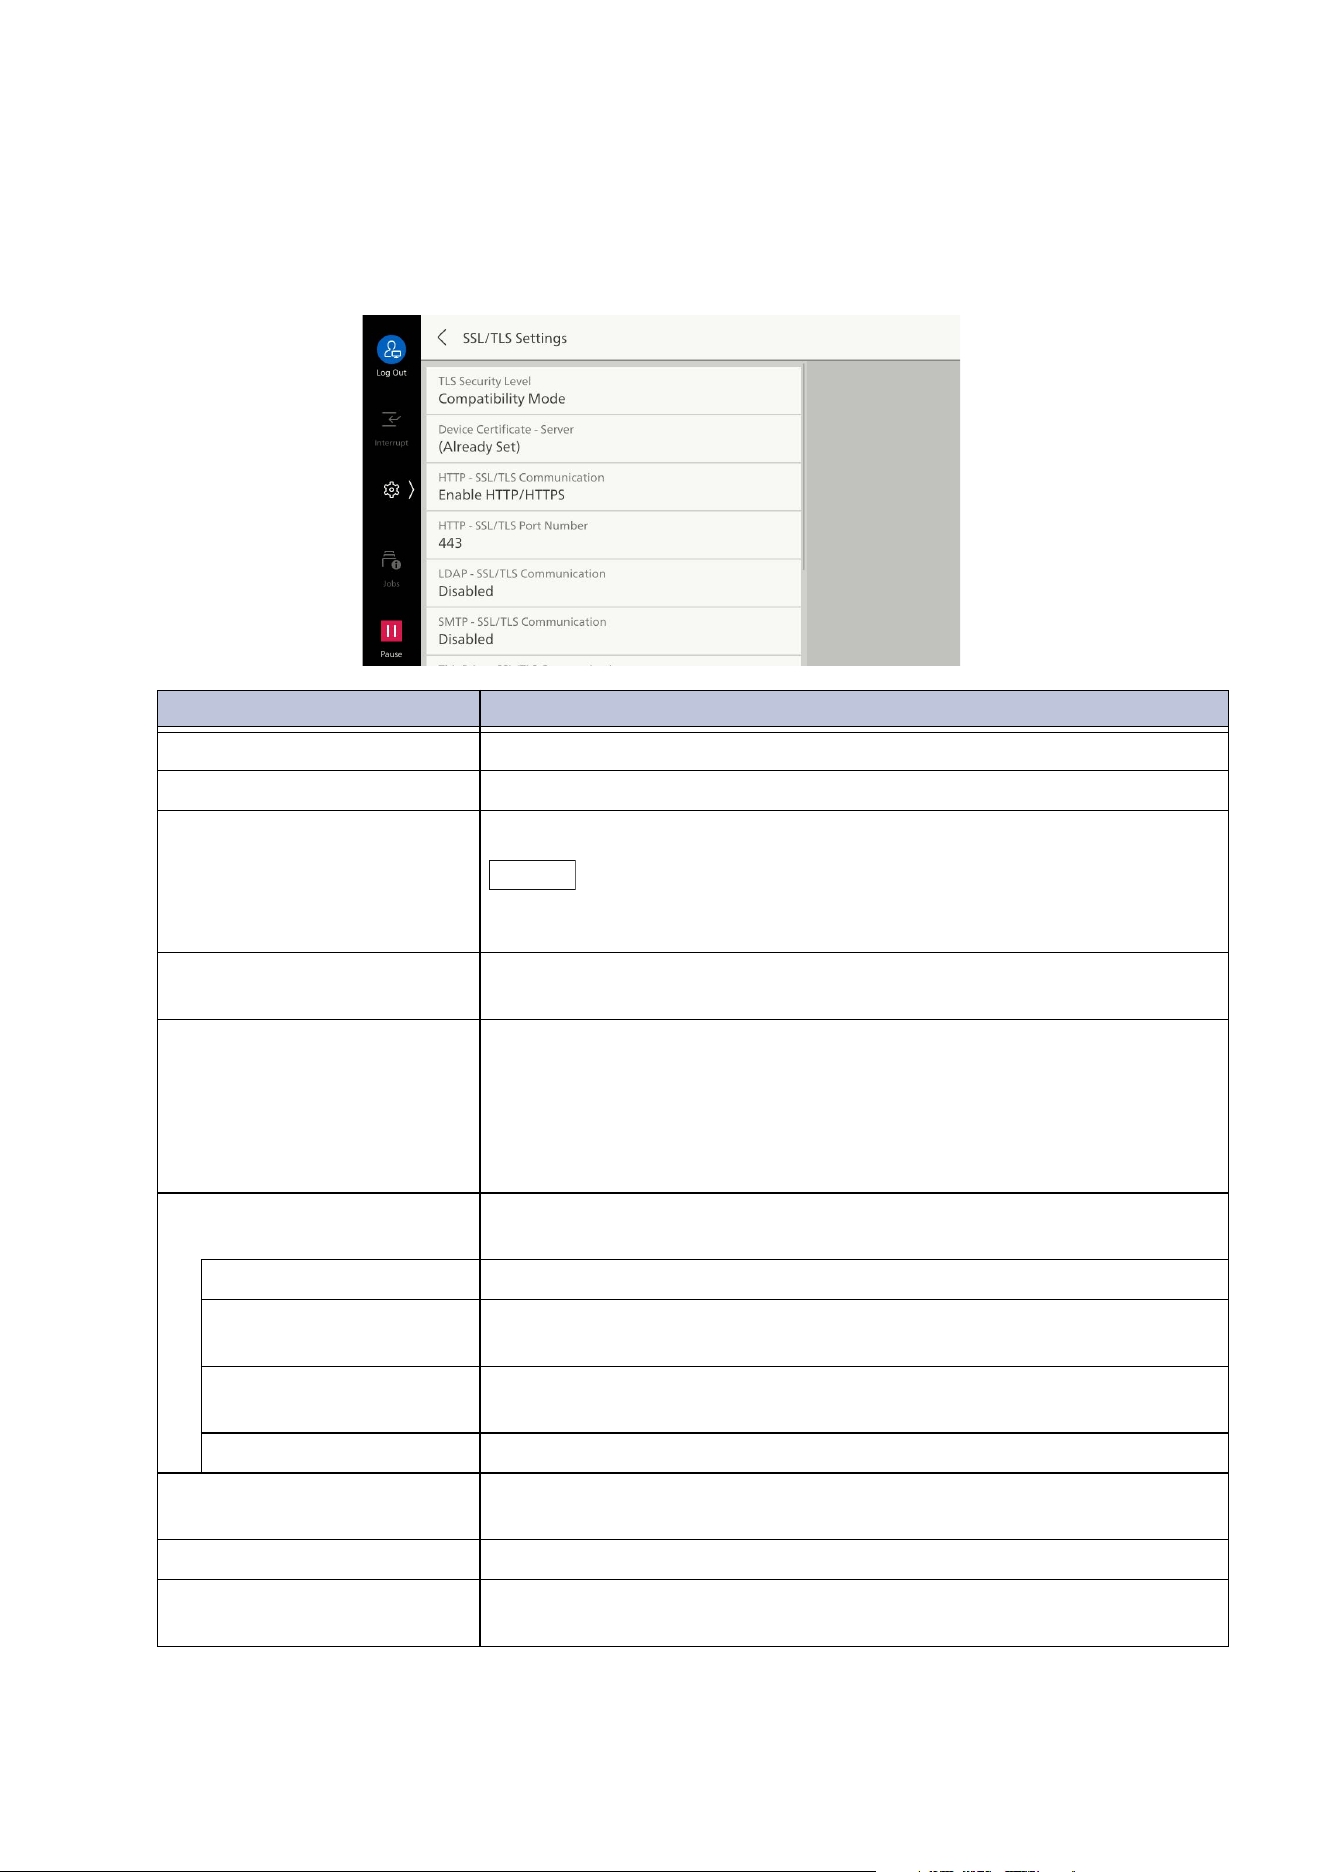
146
10 Device
[Security Settings]
[SSL/TLS Settings]
Set when encrypting communication between the machine and servers or client computers.
Item Description
[TLS Security Level] Sets the mode of encrypted communication.
[Device Certificate - Server] Sets server certificate for SSL/TLS communication.
[HTTP - SSL/TLS
Communication]
Enables use of SSL/TLS communication only.
Note
If set to [Enable HTTPS Only], the ports for [UPnP Discovery] and
[WSD] are stopped.
[HTTP - SSL/TLS Port
Number]
Specifies port number for SSL/TLS communication.
[LDAP - SSL/TLS
Communication]
Enables SSL/TLS communication for accessing authentication,
search, etc.
To enable SSL communication, it is necessary to change [Primary
Server - Port Number] and [Secondary Server - Port Number] for
[LDAP Server / Directory Service Settings]. The port number for SSL
com
munication of the LDAP directory server is ordinarily 636.
[SMTP - SSL/TLS
Communication]
Sets settings for SSL/TLS communication.
[Disabled] SSL/TLS communication is not performed.
[STARTTLS (If
Available)]
Performs SSL/TLS communication after verifying certificate. SSL/TLS
communication is not performed if certificate cannot be verified.
[STARTTLS] Perf
orms SSL/TLS communication after verifying certificate.
Communication is not performed if certificate cannot be verified.
[SSL/TLS] Performs SSL/TLS communication.
[ThinPrint - SSL/TLS
Communication]
Enables SSL/TLS communication.
[Device Certificate - Client] Sets client certificate for performing SSL/TLS communication.
[Verify Remote Server
Certificate]
Enables verification of remote server certificate when operating the
ma
chine as an SSL client.
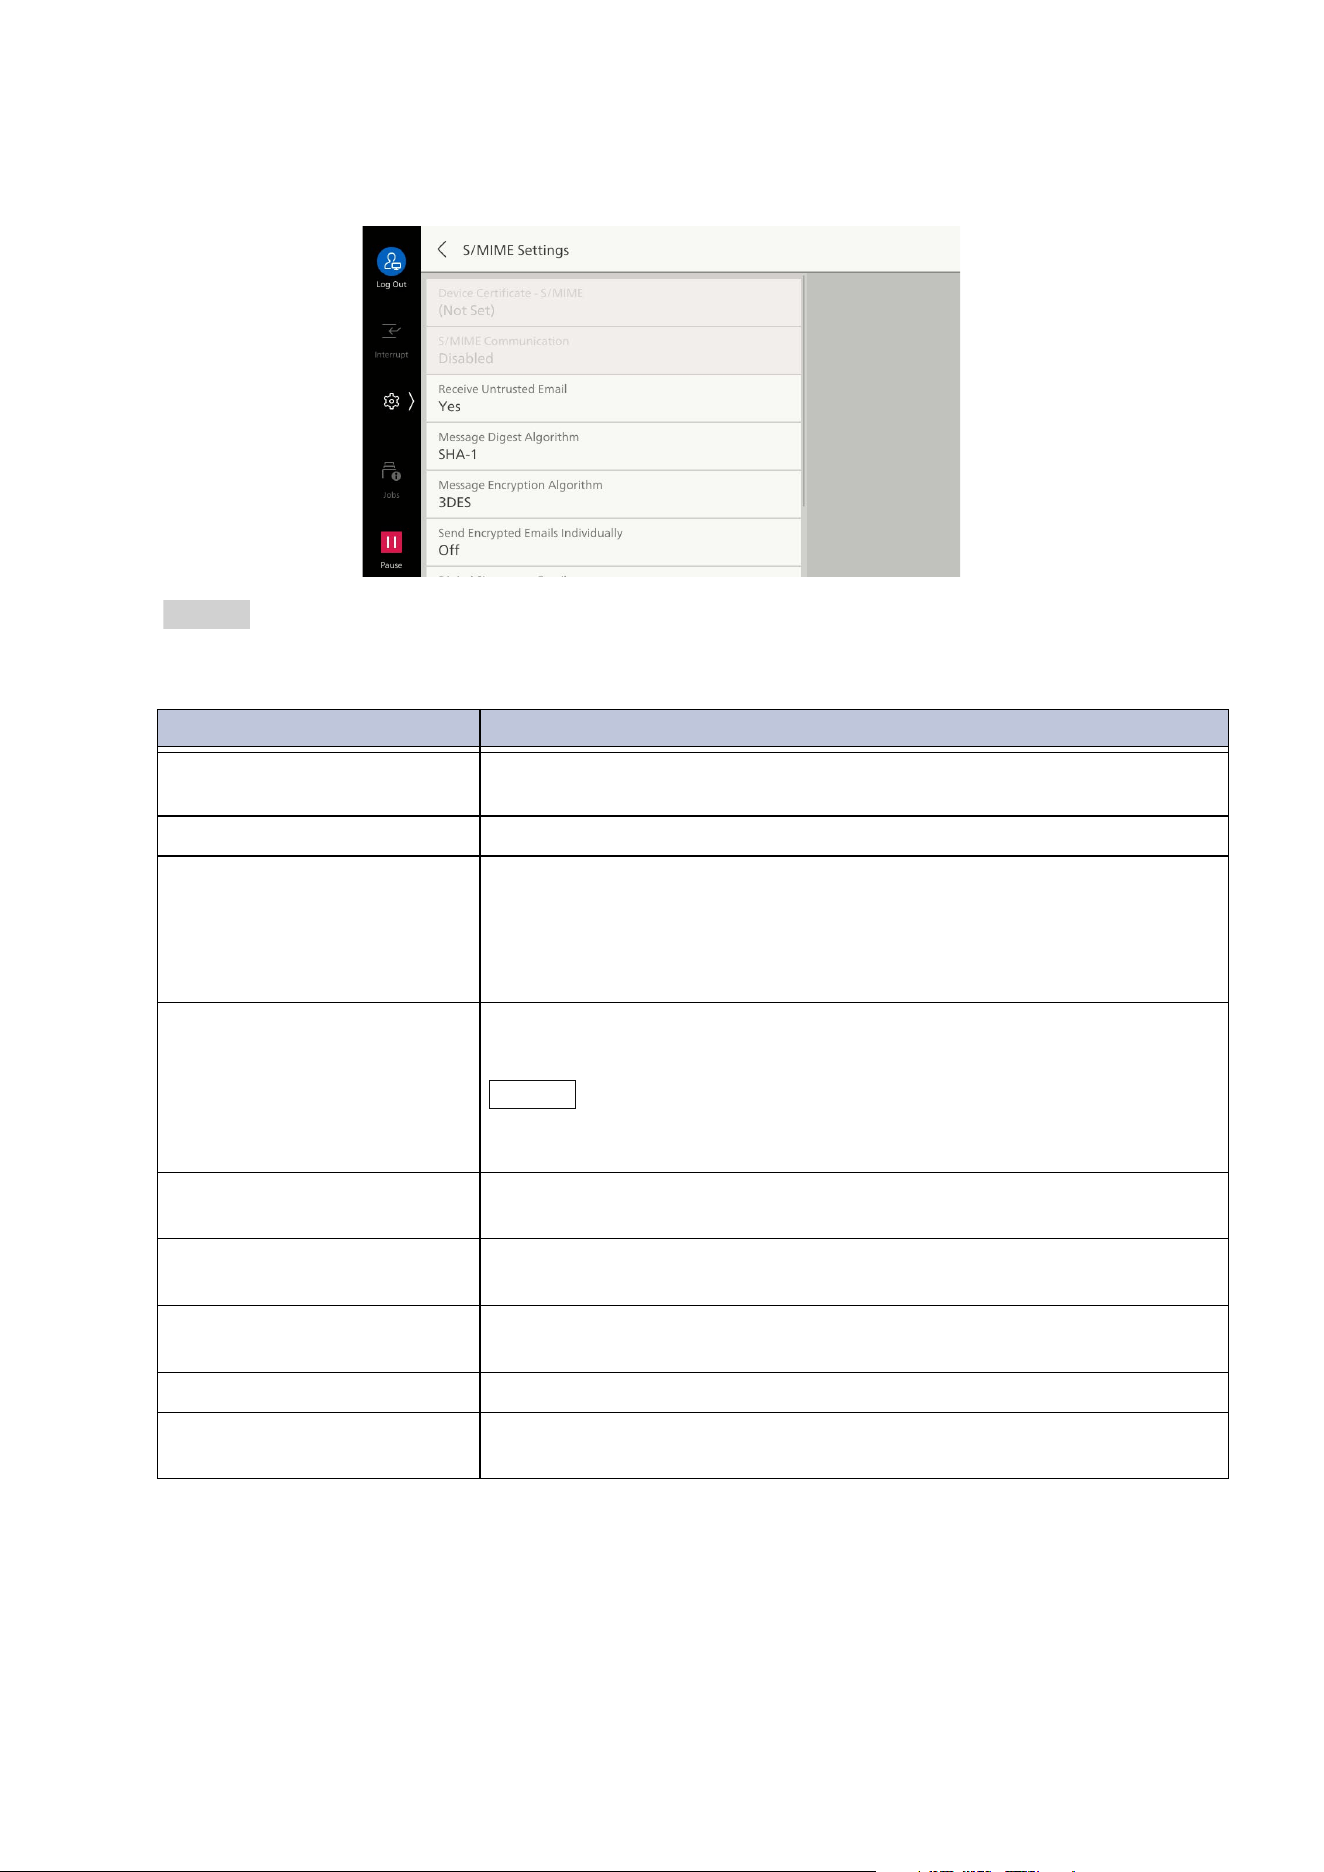
147
10.5 [Network Settings]
[S/MIME Settings]
Set when sending and receiving Emails using encryption or signature features.
Refer
For more information on encryption and signature features, refer to “Encryption and Signature Features”
in
User’s Manual - Appendix
.
Item Description
[Device Certificate -
S/MIME]
Sets certificate used in S/MIME communication.
[S/MIME Communication] Enables S/MIME communication.
[Receive Untrusted Email] The following Emails cannot be received when set to [No].
Email other than S/MIME when [S/MIME Communication] has
been set to enabled
Emails for which signature/verification has failed
Emails whose attached certificate is expired
[Message Digest Algorithm] Sets cryptography method used when converting Emails to a hash
va
lue called a message digest.
Note
If the public key of the certificate is RSA 512-bit, then incomplete Email
may be sent if set to [SHA-512].
[Message Encryption
Algorithm]
Sets message encryption algorithm.
[Send Encrypted Emails
Individually]
Enables sending of encrypted Emails individually for each recipient.
[Digital Signature - Email] Sets whether to always use a digital signature, or to select when
sending, when sending Email.
[Signing Certificate (Email)] Specifies the certificate used in [Digital Signature] for sending Email.
[Cert
ificate Auto Store] Enables saving of certificate when an Email with S/MIME certificate
attached is received from an Email address set in the Address Book.
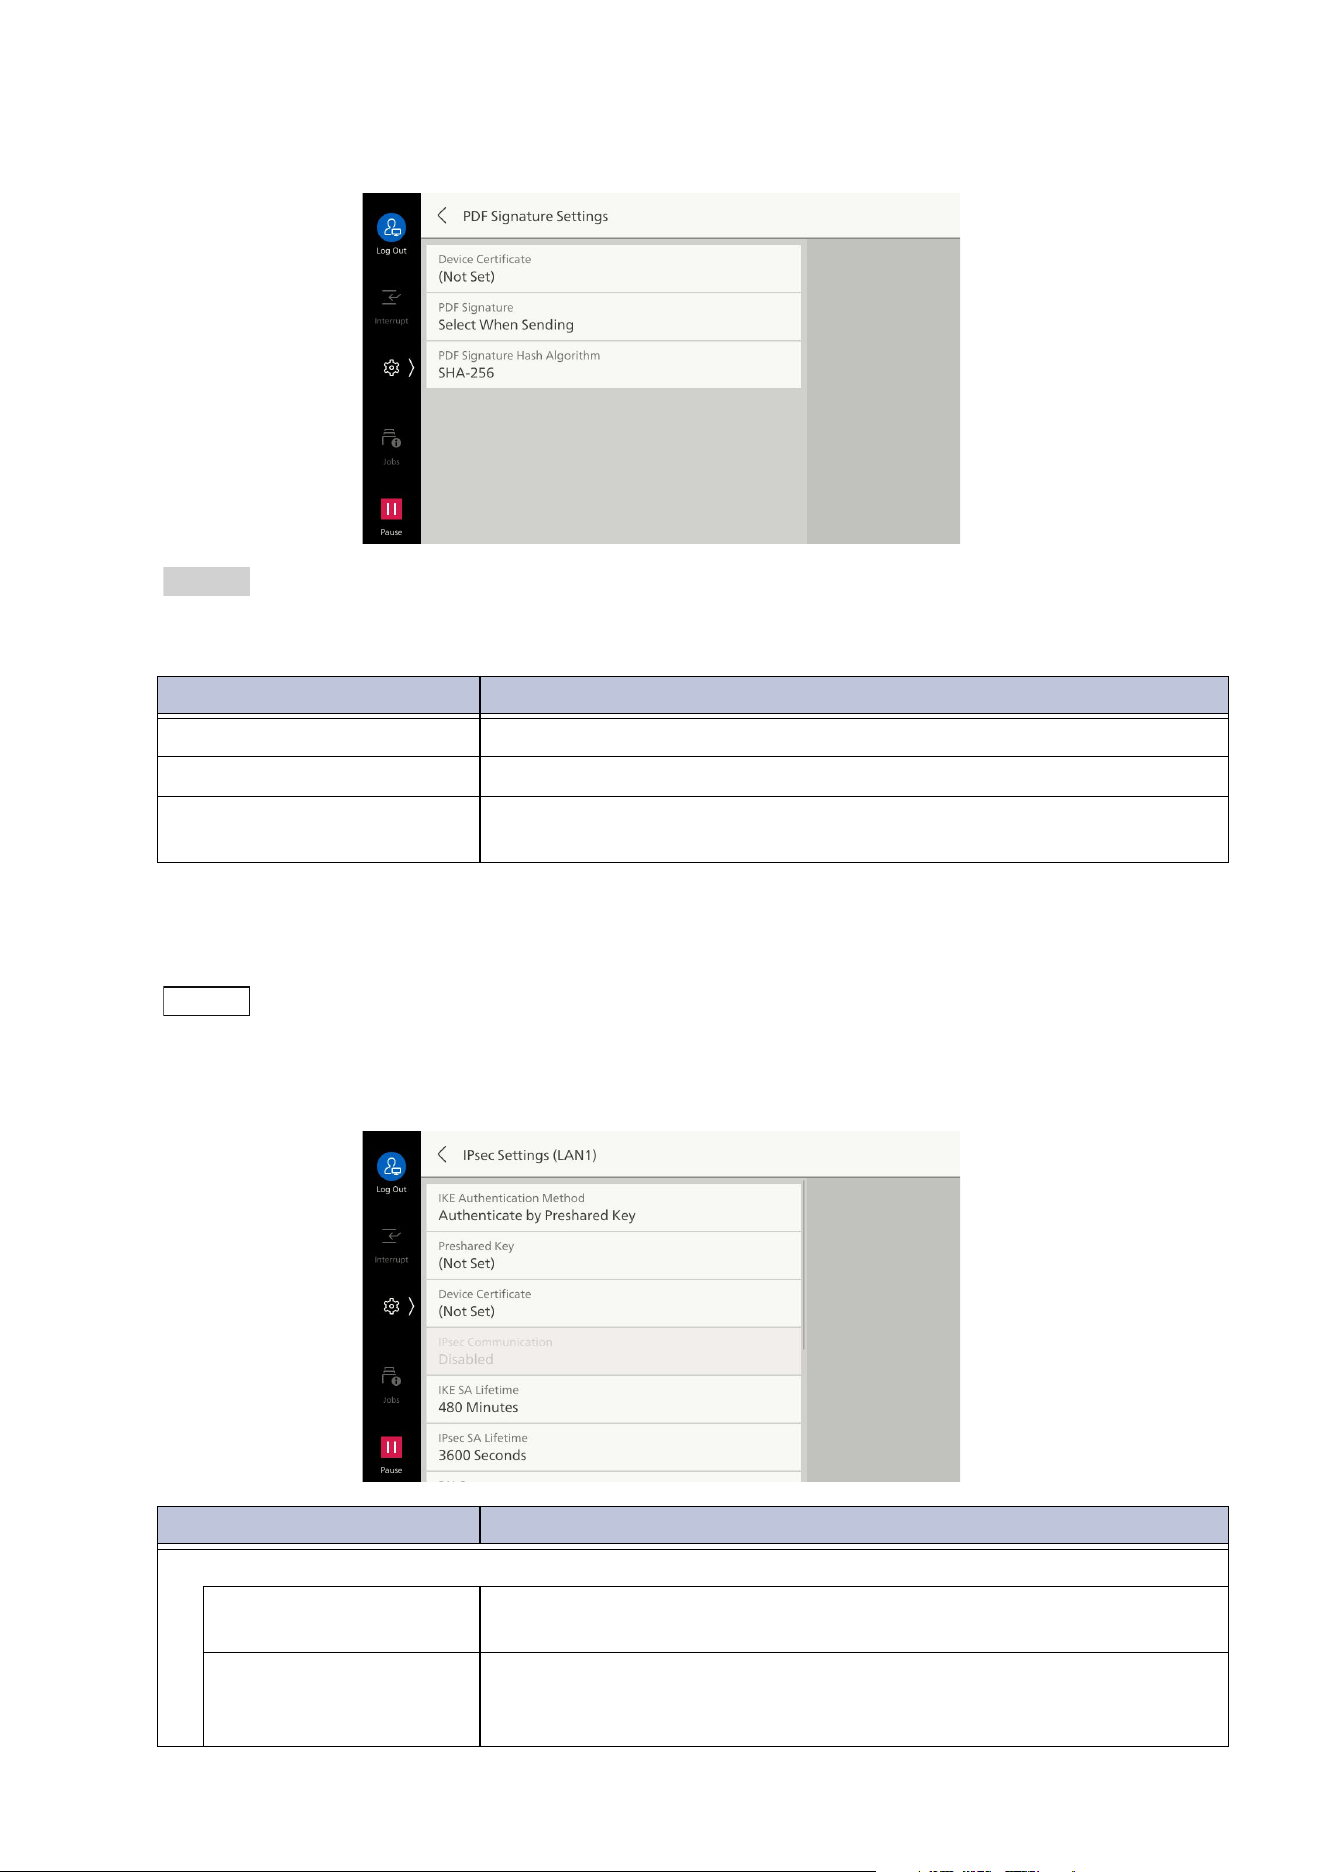
148
10 Device
[PDF Signature Settings]
Refer
For more information on signature features, refer to “Encryption and Signature Features” in
User’s
Manual - Appendix
.
[IPsec Settings]
Sets to ensure safe communication by encrypting the network in packet units.
Note
If the Secondary Ethernet kit is installed, this item can only be specified for the primary network.
Check with the network administrator regarding [IKE Authentication Method], [Preshared Key], [DH
Group], and [PFS Settings].
Item Description
[Device Certificate] Sets certificate used for signature.
[PDF Signature] Enables signing of PDF files.
[PDF Signature Hash
Algorithm]
Sets hash algorithm used for PDF signatures.
Item Description
[IPsec Settings]/[IPsec Settings (Ethernet 1)]/[IPsec Settings (Ethernet 2)]
[IKE Authentication
Method]
Sets IKE authentication method.
[Preshared Key] Input preshared key.
Set when [IKE Authentication Method] is [Authenticate by
Preshared Key].
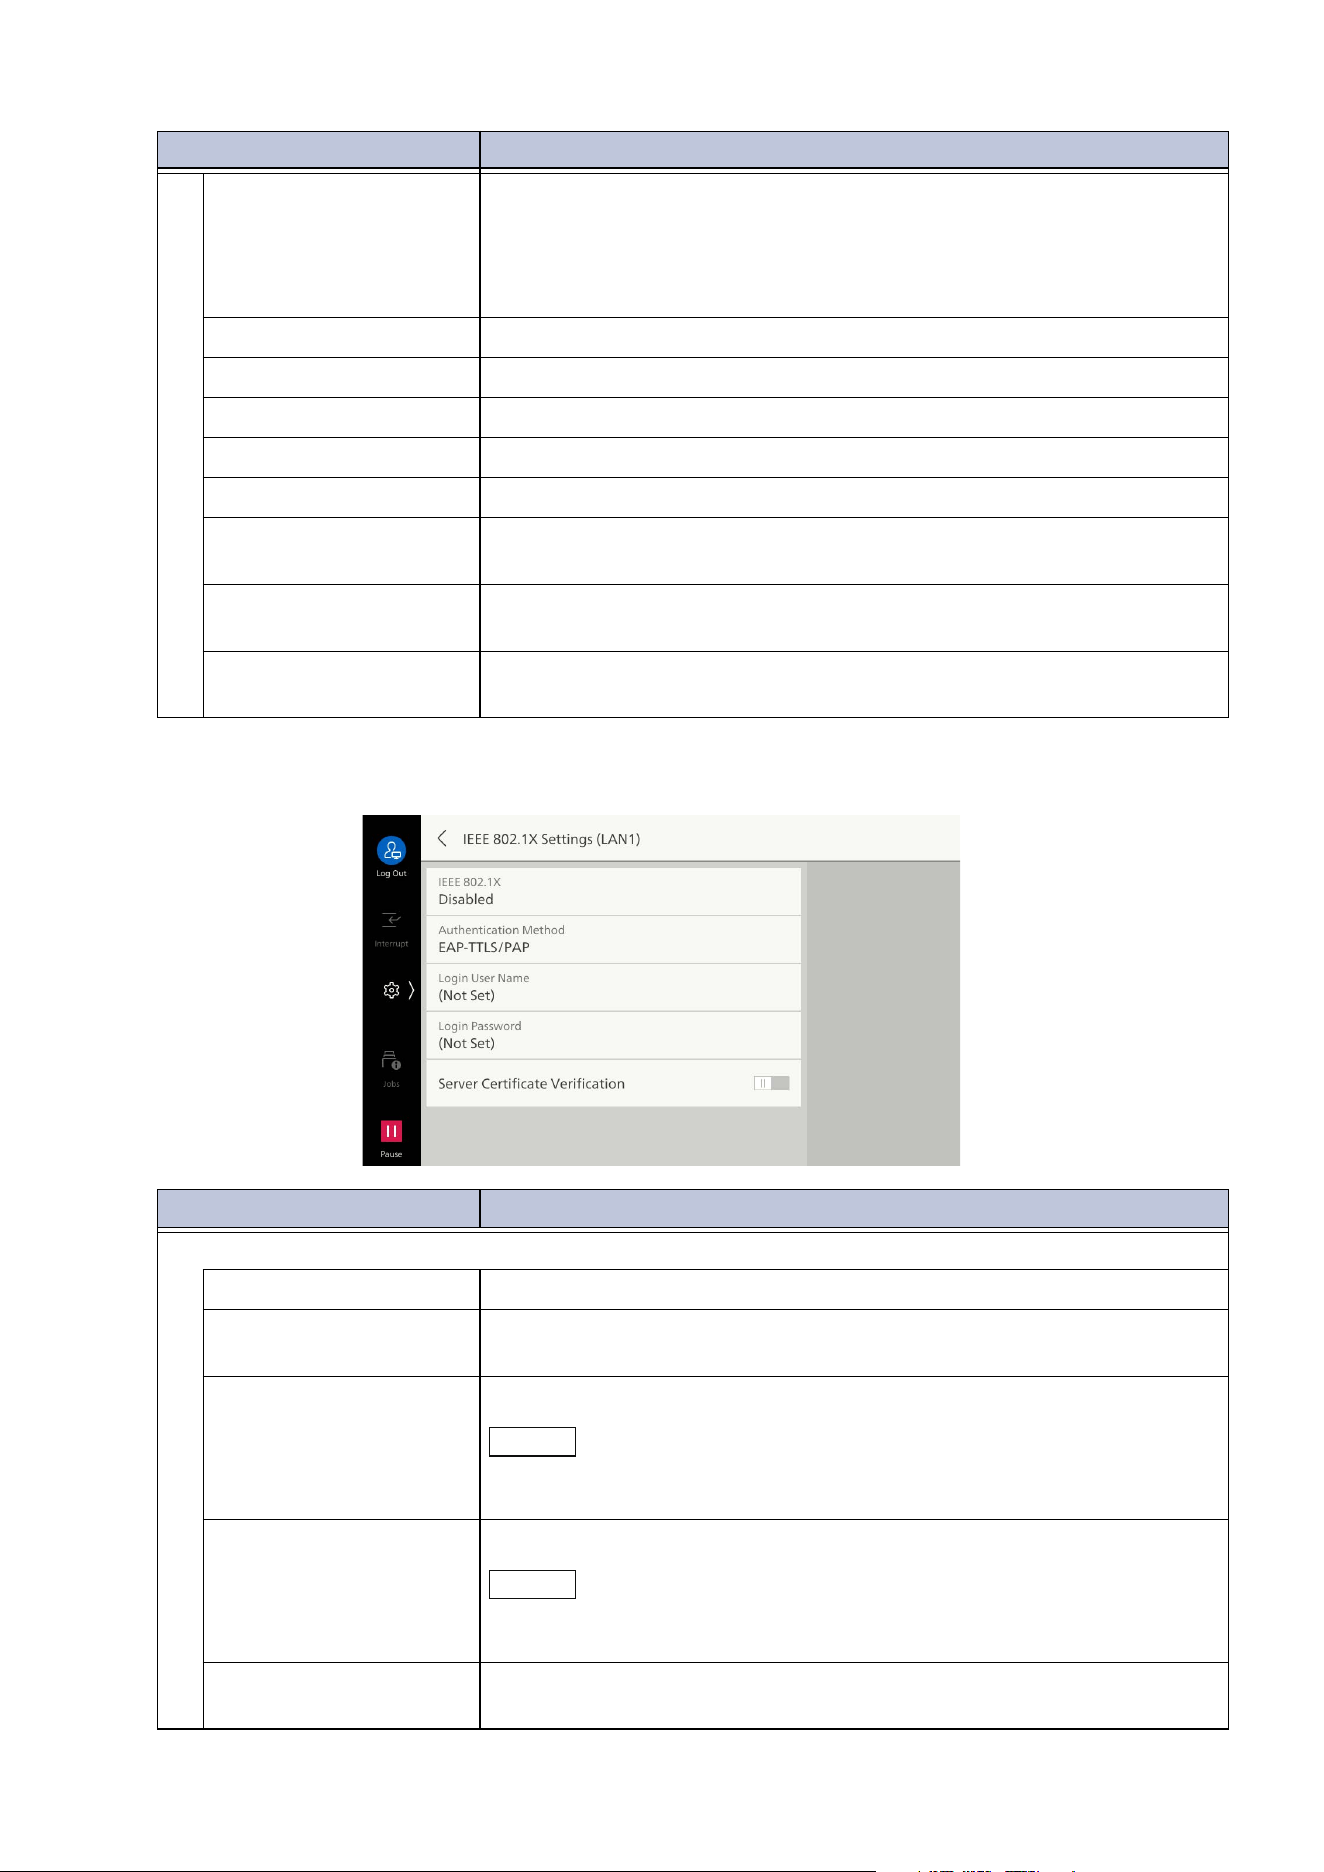
149
10.5 [Network Settings]
[IEEE 802.1X Settings]
[Device Certificate] Sets certificate used in IPsec communication.
Set when [IKE Authentication Method] is [Authenticate by Digital
Signature].
Here, a self-signed certificate created with Internet Services cannot
be used.
[IPsec Communication] Enables IPSec communication.
[IKE SA Lifetime] Sets valid period of IKE SA.
[IPsec SA Lifetime] Sets valid period of IPsec SA.
[DH Group] Sets
DH group.
[PFS Settings] Enables PFS.
[Destination IPv4
Address]
Sets IPv4 address or range of destinations for allowing
communication.
[Destination IPv6
Address]
Sets IPv6 address or range of destinations for allowing
communication.
[Communicate with
Non-IPsec Devices]
Enables communication with devices not supported by IPsec, at
addresses other than those set with the destination address.
Item Description
[IEEE 802.1X Settings]/[IEEE 802.1X Settings (Ethernet 1)], [IEEE 802.1X Settings (Ethernet 2)]
[IEEE 802.1X] Enables use of IEEE 802.1x authentication.
[Authentication
Method]
Sets IEEE 802.1x authentication method.
[Login User Name] Input the login user name up to 128 characters.
Note
If you set [Authentication Method] to [EAP-TLS], the user name in the
client certificate is used.
[Login Password] Input login password in 1 to 128 bytes or less.
Note
If you set [Authentication Method] to [EAP-TLS], the password is not
necessary for authentication.
[Server Certificate
Verification]
Enables verification of the server certificate if the [Authentication
Method] is [PEAP/MS-CHAPv2].
Item Description

150
10 Device
[Certificate Revocation Settings]
Item Description
[Level of Certificate
Verification]
Sets level of certificate verification.
[Certificate Revocation
Check]
Sets method for retrieval of certificate status.
Set to [By Retrieving CRL] if the machine retrieves and verifies the
certificate revocation list (CRL) from the validation authority. Set to
[By OCSP] if confirmation is done by inquiring with the certification
authority or validation authority using the OCSP (Online Certificate
St
atus Protocol) enabling confirmation of the validity of the
certificate.
[Auto Retrieval of CRL] Enables auto retrieval of certificate revocation list (CRL).
[CRL Retrieval Timeout] Sets upper limit on lime for retrieving certificate revocation list
(CRL).
[Query to OCSP Responder] Specifies method of specifying OCSP responder.
Can be set to [Use URL in Certificate] or [Use U
RL Set by
Administrator].
[URL of OCSP Responder] Set URL of inquiry contact when [Use URL Set by Administrator] has
been selected for [Query to OCSP Responder].
[OCSP Communication
Timeout]
Sets upper limit of communication time with OCSP responder.
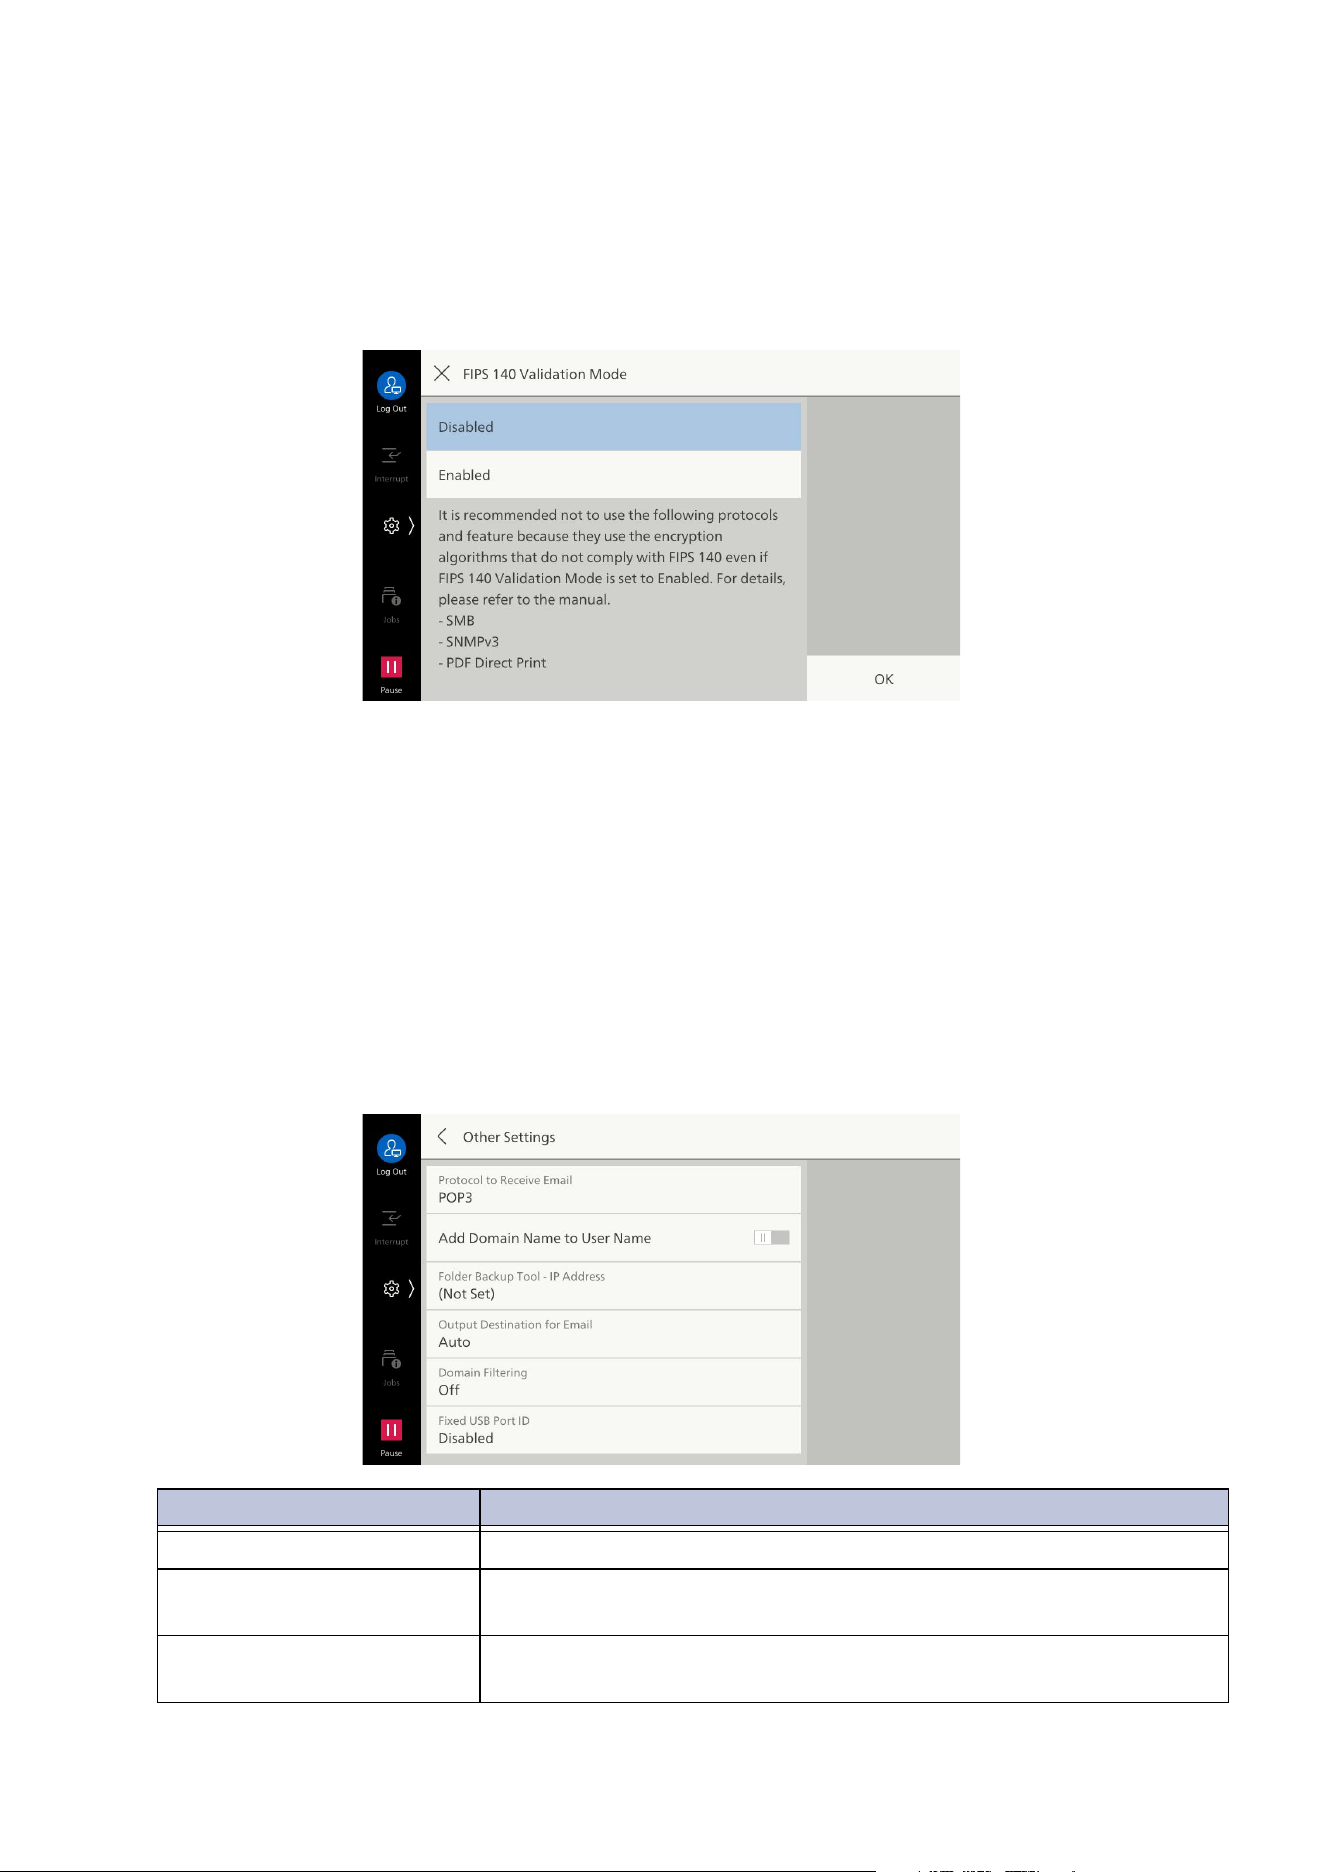
151
10.5 [Network Settings]
[Other Settings]
[FIPS 140 Validation Mode]
FIPS 140 (Federal Information Processing Standard 140) is a U.S. Federal Standard prescribing
specifications for security requirements relating to cryptography modules.
Security can be further strengthened by setting the FIPS 140-2 mode to [Enabled].
The following features operate using cryptography algorithms that are not FIPS 140 certified. Use in
an environment compatible with FIPS 140 is recommended.
Em
ail is applicable only when S/MIME or SMTP AUTH has been used.
[Other Settings]
Sets other settings relating to the network.
SMTP authentication
HTTP authentication
SMB Transfer
Scan to Folder
LDAP authentication
Kerberos authentication
802.1x authentication
Email
PDF direct print
Item Description
[Protocol to Receive Email] Set according to use environment.
[Add Domain Name to User
Name]
Enables addition of domain name to user name.
[Folder Backup Tool - IP
Address]
Set the host name (FQDN) or IP address of the client computer to
use Folder Backup Tool.
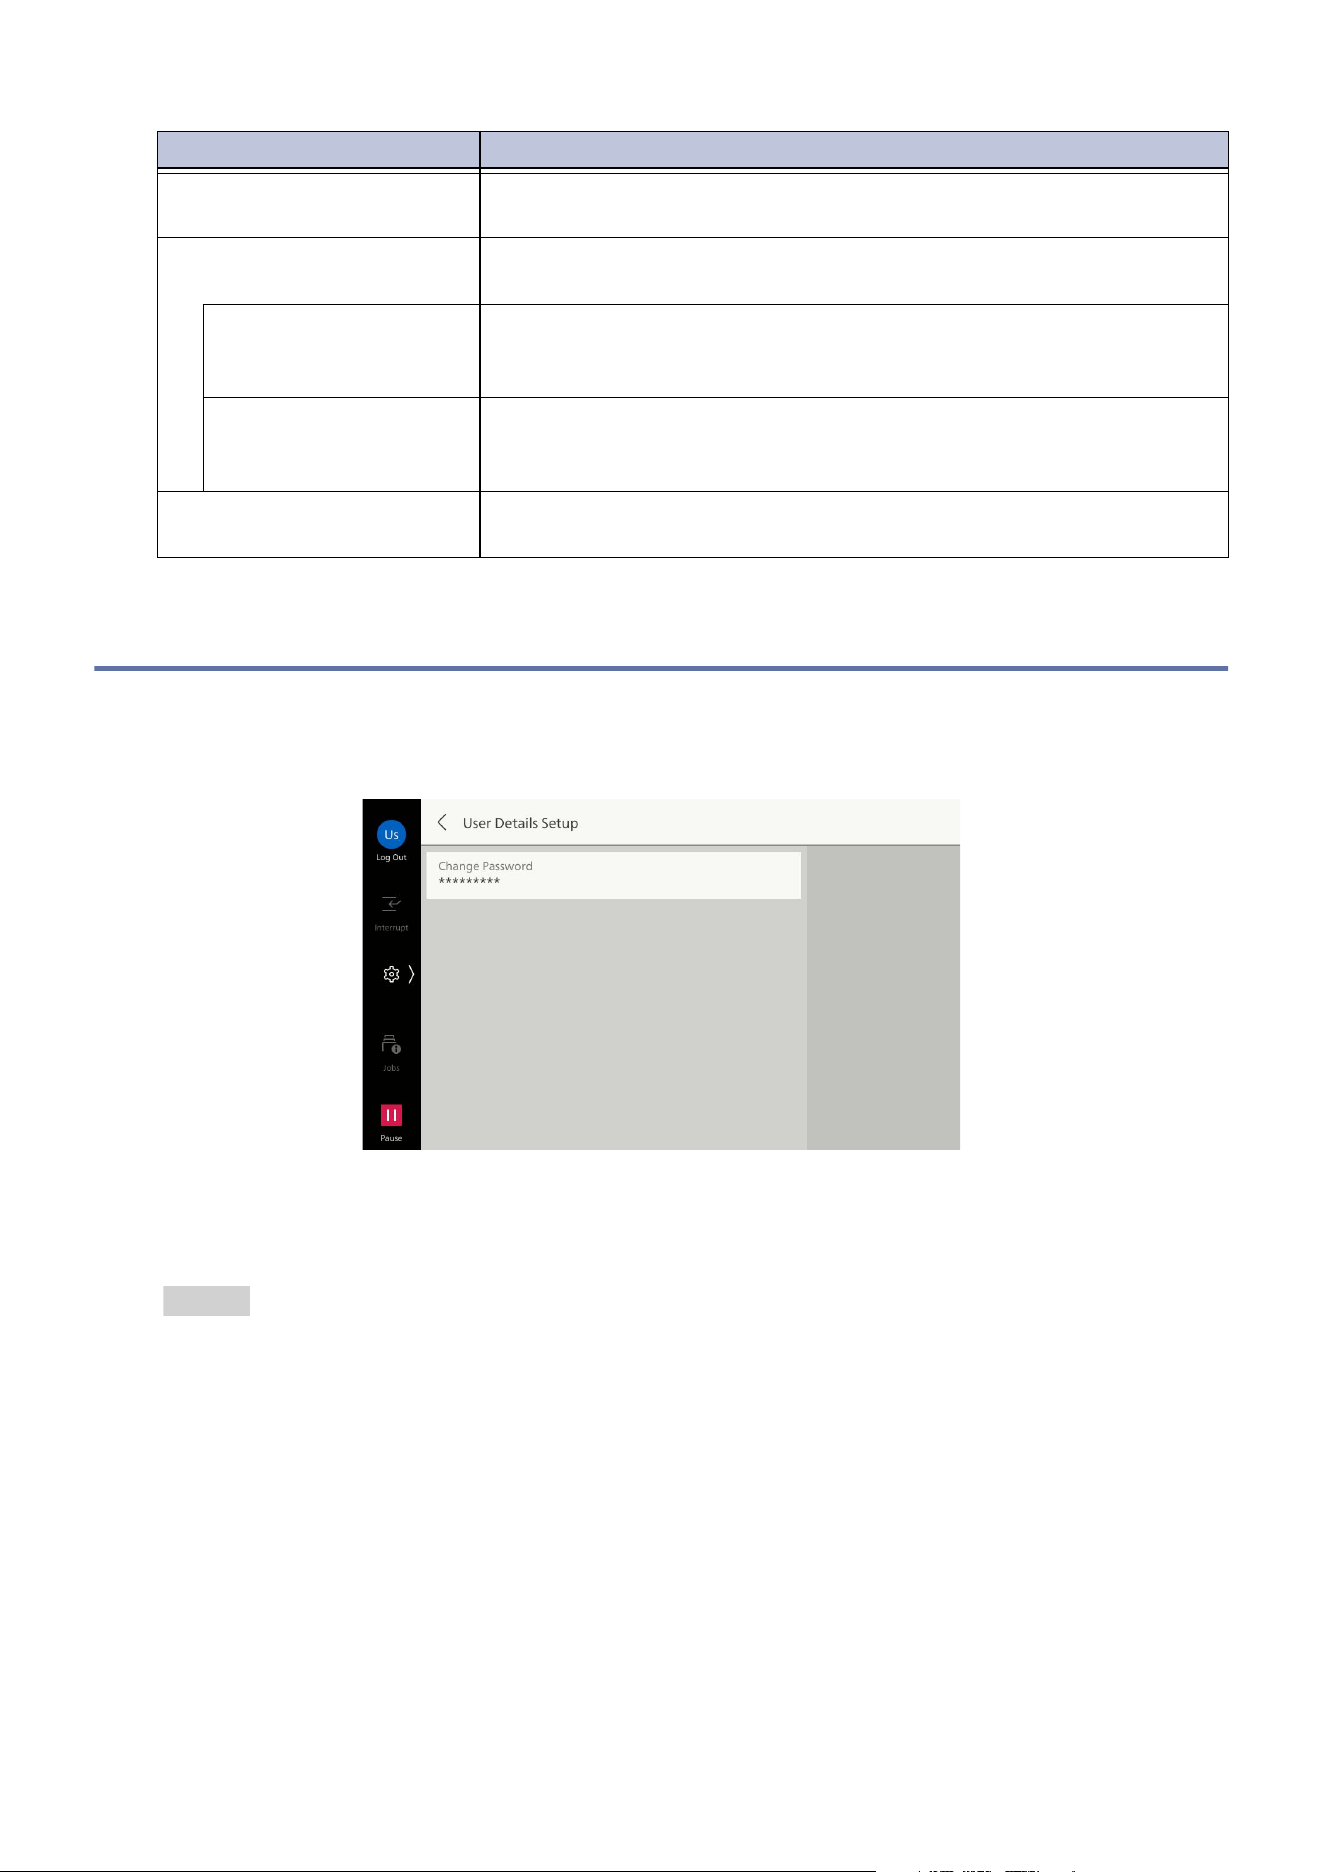
152
10 Device
10.6 [Authentication/Accounting]
[User Details Setup]
[Change Password]
Enables login users to change their own passwords.
Refer
Refer to "Changing a Registered User Password" (P.203).
[Output Destination for
Email]
Sets output destination for printing Email. If set to [Auto], the output
destination set as the default for output destination is selected.
[Domain Filtering] Sets domains for allowing, or disabling sending and receiving of
Email.
[Domain Filtering] Enables specification of domains for allowing sending and receiving
when set to [Allow Domains]. Enables specification of domains for
dis
abling sending and receiving when set to [Block Domains].
[Domain 1] to [Domain
50]
Enables specification of domain names for sending and receiving
when [Domain Filtering] is set to [Allow Domains] or [Block
Domains].
[Fixed USB Port ID] Sets whether to use a serial number or to use a fixed value as the ID
for notification via the USB interface.
Item Description
153
10.6 [Authentication/Accounting]
[Accounting]
Performs account setup for machine users, and sets authentication and accounting type.
Refer
Refer to "Authentication and Accounting Feature" (P.186).
[Create/View User Accounts]
Creates user IDs and user names for authentication of created users if accounting is set to enabled.
The maximum use quantity can be set for each user using the machine. This also enables
management like confirming the cumulative pages for each created user.
This is the same as [Authentication/Security Settings] > [Authentication] > [Create/View User
Acco
unts].
Note
Create user accounts after setting Accounting Mode to be used with "[Authentication/Accounting
Settings]" (P.155).
This item is not displayed when "[Authentication/Accounting Settings]" (P.155) is set to [Network],
[Remote] or [Custom].
If you change the "User ID" of a registered user who has stored the Private Charge Print, the stored files
will be deleted.
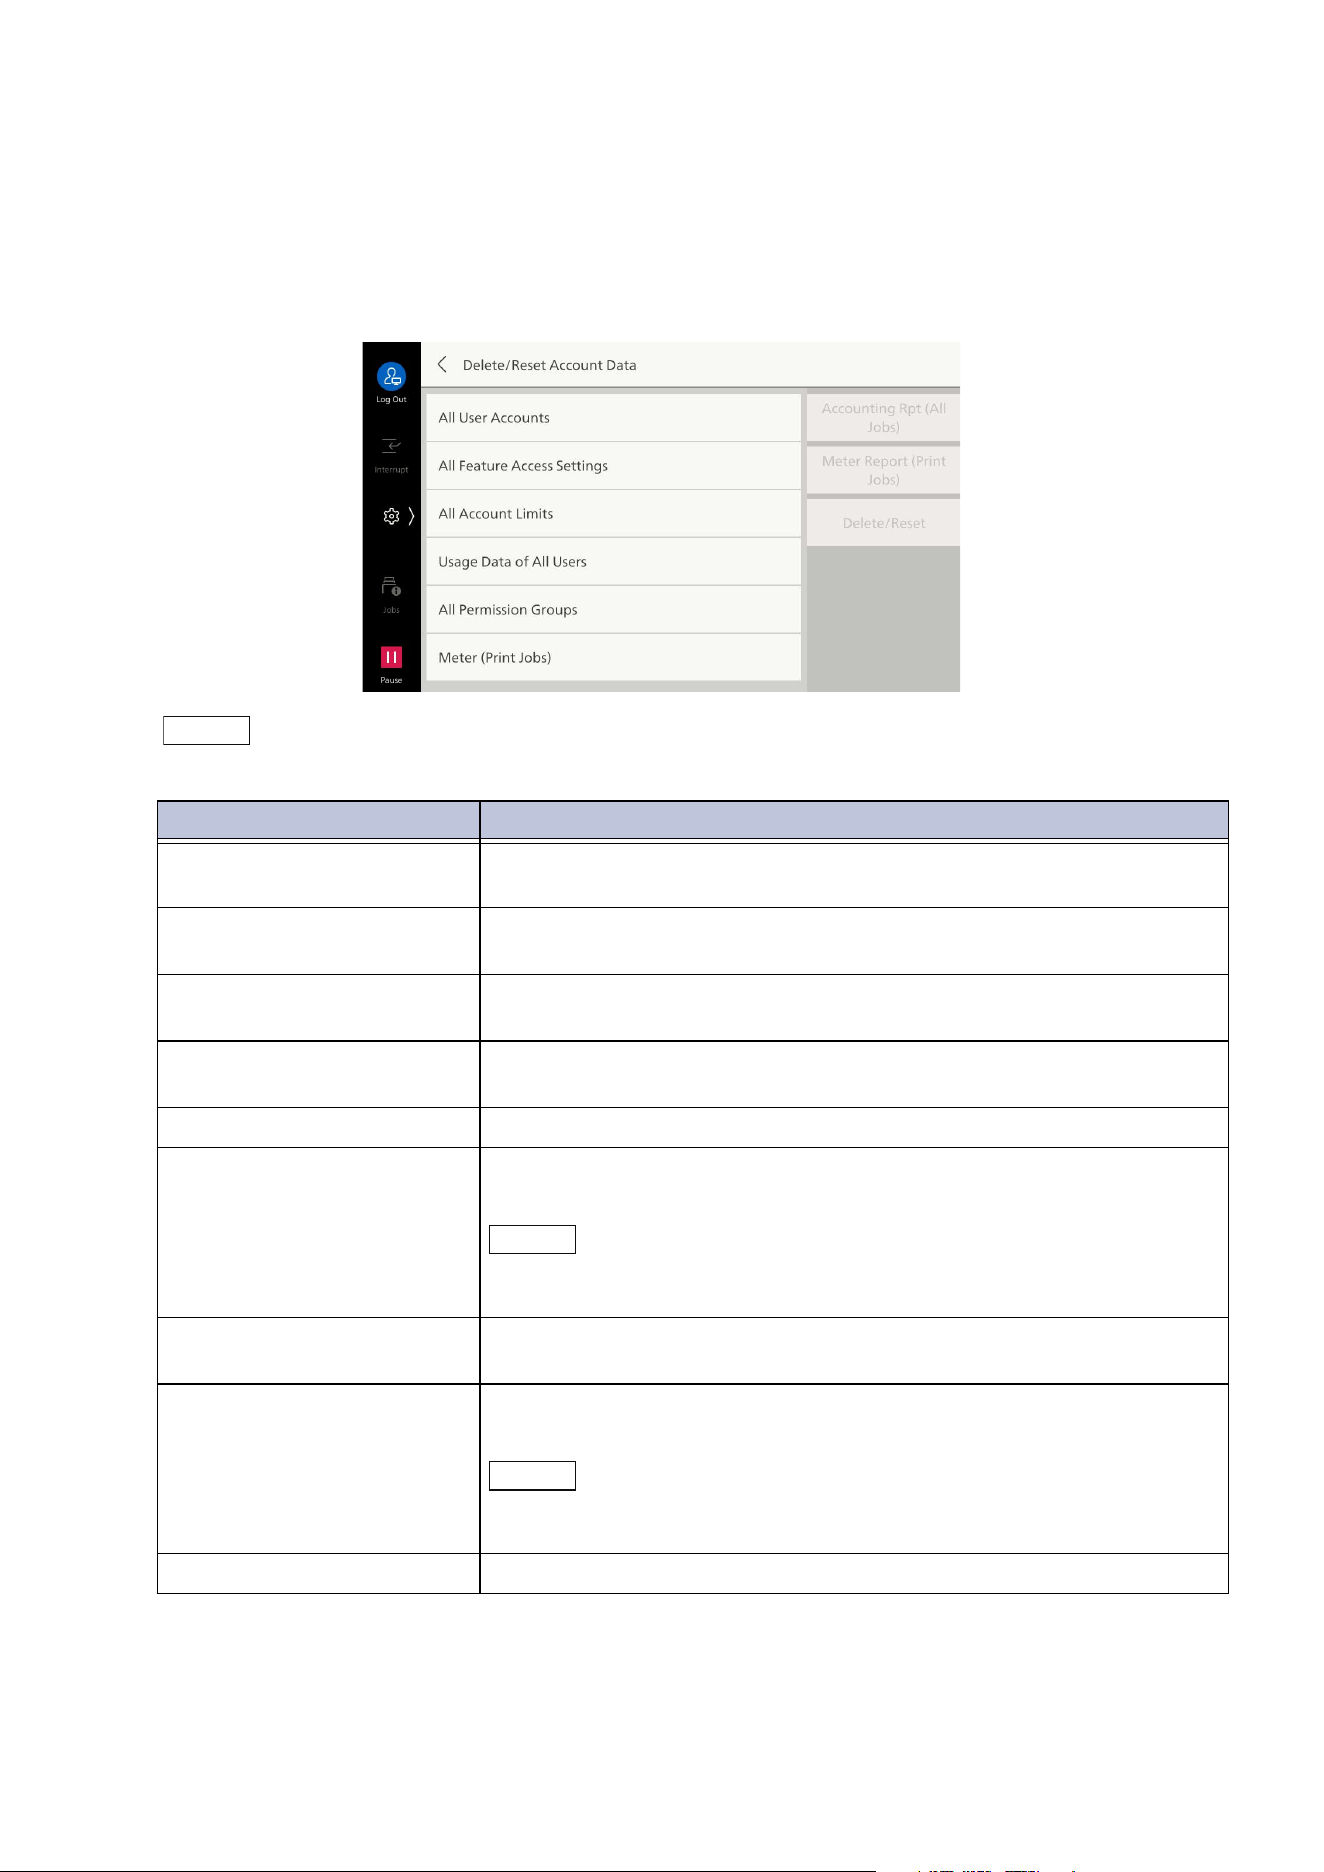
154
10 Device
[Delete/Reset Account Data]
Enables tasks such as deleting user accounts for all users, and resetting meter data. Before deleting/
resetting, it is also possible to print a report and confirm beforehand the information to be deleted/
reset.
This is the same as [Authentication/Security Settings] > [Authentication] > [Delete/Reset Account
Data].
Note
This item is not displayed when "[Authentication/Accounting Settings]" (P.155) is set to [Network].
Item Description
[All User Accounts] Deletes all setting specifics set for each user. Also deletes all data
such as account limits, cumulative pages, and meter (print jobs).
[All Feature Access
Settings]
Deletes all feature access settings for all users.
[All Account Limits] Resets the upper limit settings of the available number of pages per
user all to the default.
[Usage Data of All Users] Resets all total impressions for all users, including the administrator.
Nu
mber of pages is also reset to “0”.
[All Permission Groups] Resets all authorization groups for all users.
[Meter (Print Jobs)] Resets all meters (print jobs), and deletes automatically created job
owner names. All meter printing counts are reset to “0”.
Note
[Meter (Print Jobs)] is displayed if the setting is to disable accounting
for printers.
[Accounting Rpt (All Jobs)] Enables printing of report on accounting data for all apps. Used
when confirming beforehand the information to be deleted/reset.
[Meter Report (Print Jobs)] Enables printing of report on accounting data for printing. Used
when confirming beforehand the information to be deleted/reset.
Note
[Meter Report (Print Jobs)] is displayed if the setting is to disable
accounting for printers.
[Delete/Reset] Deletes/resets data for selected item.
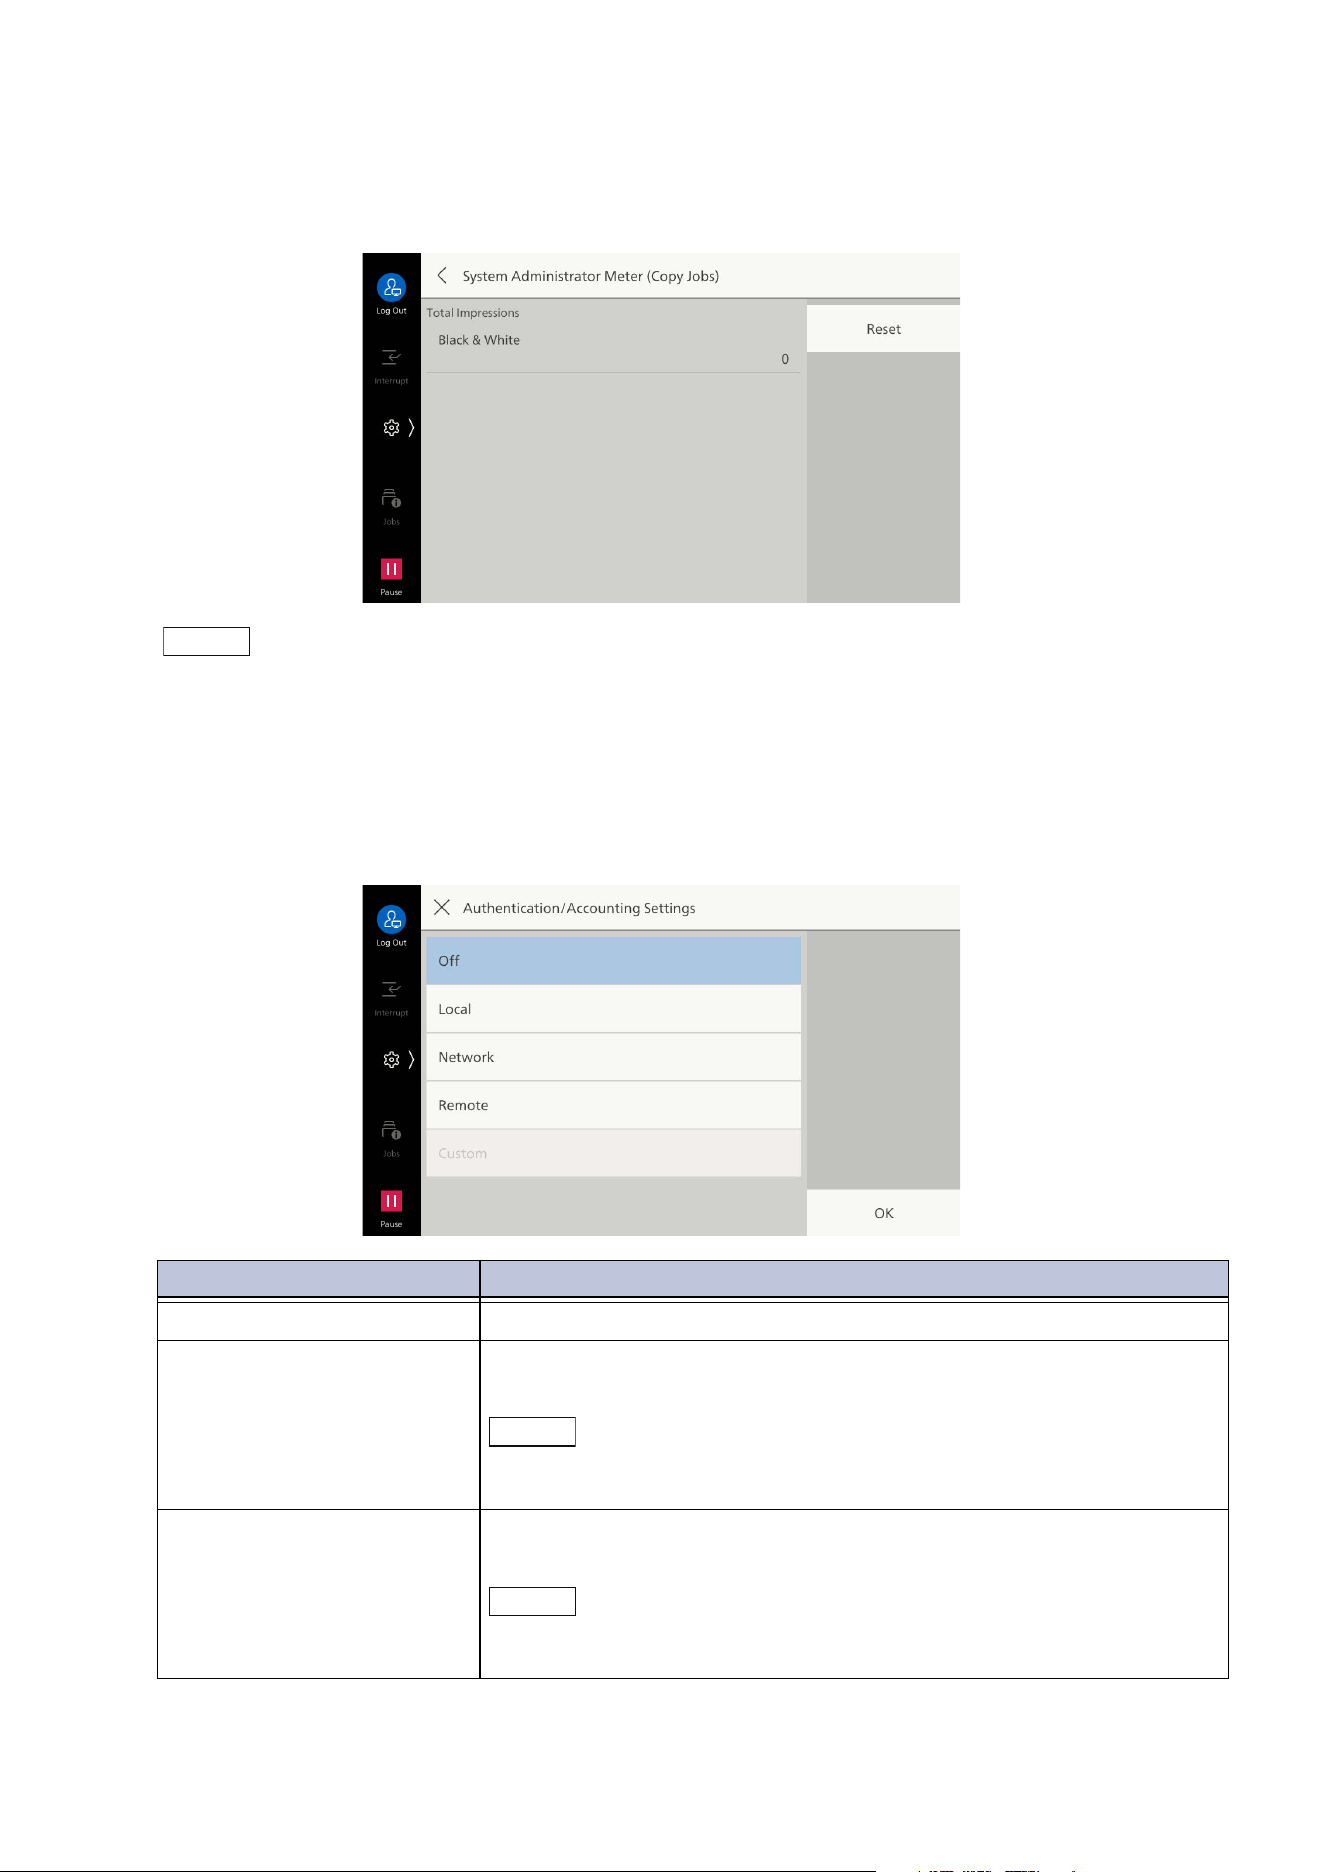
155
10.6 [Authentication/Accounting]
[System Administrator Meter (Copy Jobs)]
Enables confirmation/resetting on screen of cumulative pages of copying used from Administrator
Mode.
Note
This item is not displayed when "[Authentication/Accounting Settings]" (P.155) is set to [Network].
[Authentication/Accounting Settings]
Sets the authentication/accounting method.
This is the same as [Authentication/Security Settings] > [Authentication] > [Authentication/
Accounting Settings].
Item Description
[Off] Does not use the authentication and accounting feature.
[Local] Uses user details set in the machine for authentication and
accounting.
Note
If the setting is changed from [Local] to [Off] or [Remote], all user
details set in the machine are deleted.
[Network] Register the user details managed with remote services and
performs authentication and accounting using the details.
Note
[Account ID] can be input at the authentication screen displayed when
an attempt is made to use services requiring accounting.
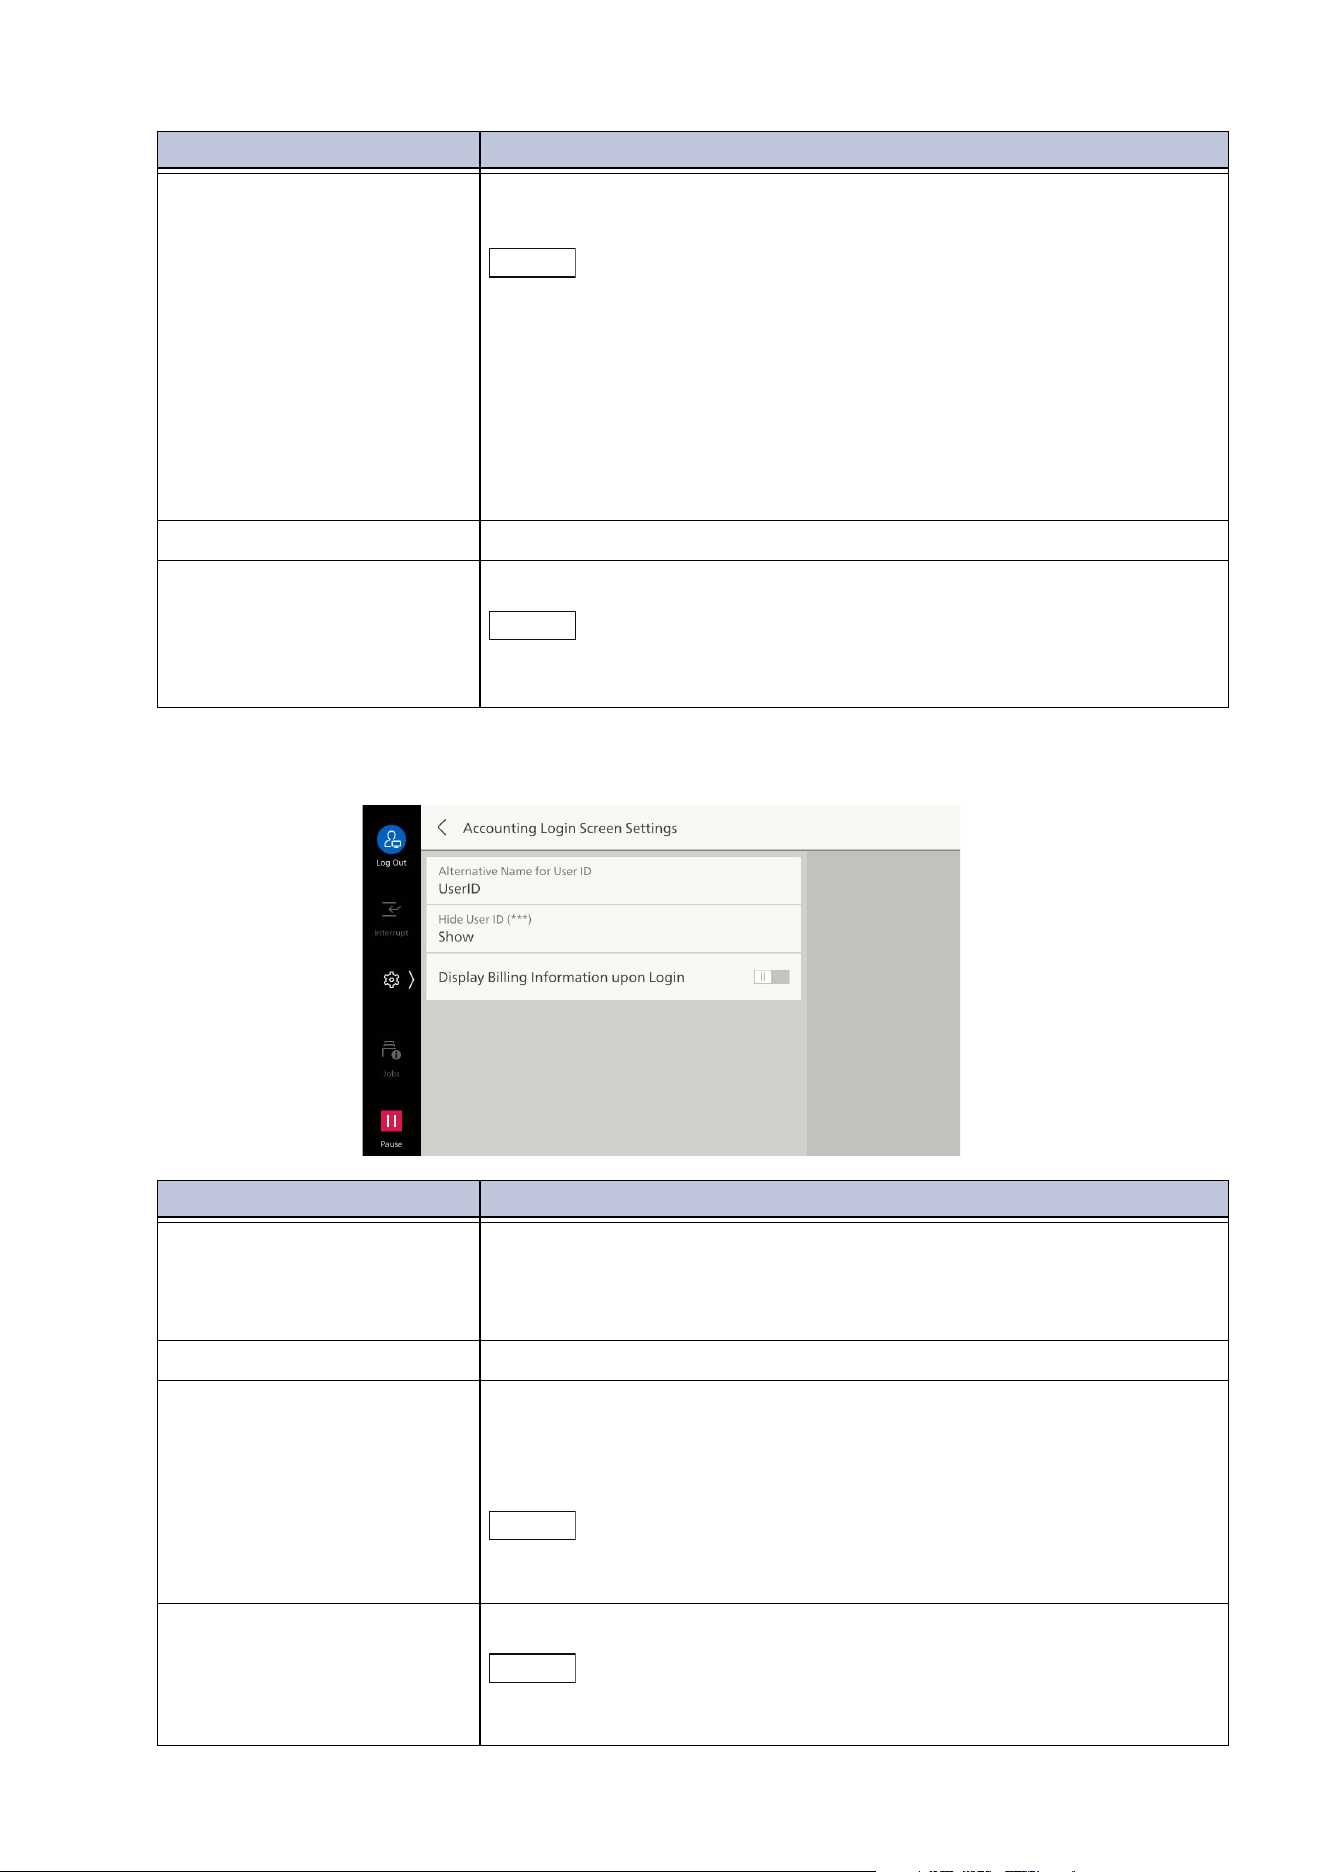
156
10 Device
[Accounting Login Screen Settings]
[Remote] Uses user details set in a remote authentication server for
authentication.
Note
Enables saving of user details used for log in to remote accounts in the
machine. Even if the remote authentication server has not started at
the time of login to remote accounts, the machine can be used by
logging in the user using user details saved in the machine.
Set [Save Remote Accounts in This Device] to [Off] when not saving
user details used for remote accounts in the machine. Refer to
"[Authentication]" (P.158) for [Save Remote Accounts in This Device].
When [Authentication System] is [Authentication Agent], accounting is
performed using an authentication server.
[Custom] This feature is unavailable.
[Accounting Mode] Enables use of accounting feature for each service.
Note
The displayed items differ depending on the installed services.
[Client Scan] is displayed, but is not supported by this product.
Item Description
[Alternative Name for User
ID]
Enables changing the indication, displayed as the “User ID” on the
login screen displayed when the login information field on the touch
panel display is tapped on, to another such as “UserName” or
“Number” as required.
[Hide User ID (***)] Sets method of displaying text string when entering user ID.
[Alternative Name for
Account ID]
Changes the indication, displayed as the “Account ID” on the login
screen displayed when the login information field on the touch panel
display is tapped on, to another such as “Account Name” or
“Number” as required.
Note
This item is displayed when "[Authentication/Accounting Settings]"
(P.155) is set to [Network].
[Hide Account ID (***)] Sets method of displaying text string when entering account ID.
Note
This item is displayed when "[Authentication/Accounting Settings]"
(P.155) is set to [Network].
Item Description
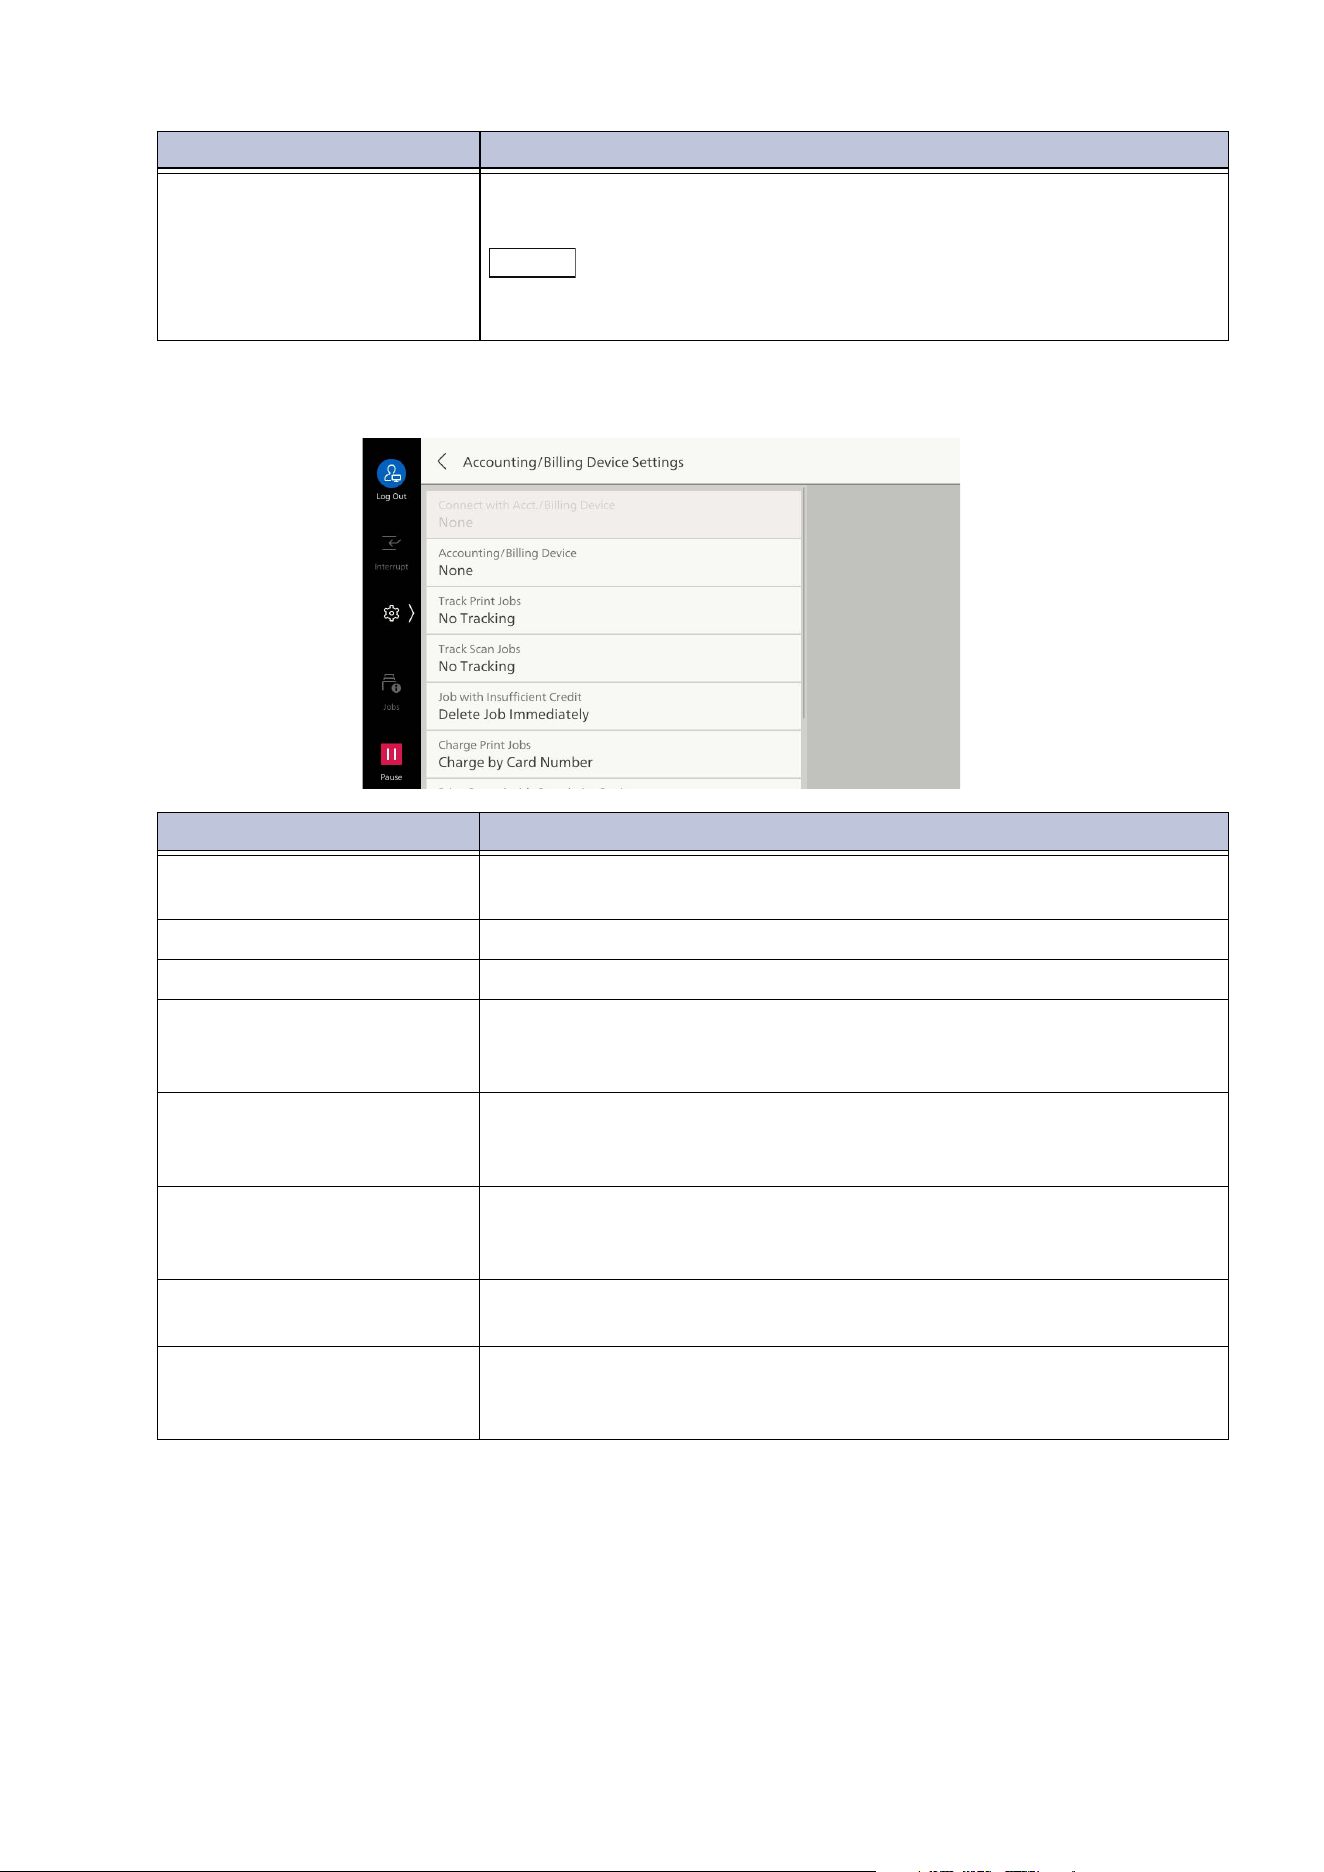
157
10.6 [Authentication/Accounting]
[Accounting/Billing Device Settings]
[Display Billing Information
upon Login]
Enables display of billing information for each user immediately after
authentication.
Note
This item is displayed when "[Authentication/Accounting Settings]"
(P.155) is set to [Local].
Item Description
[Connect with Acct./Billing
Device]
Sets whether to use a connected accounting/billing device.
[Accounting/Billing Device] Selects type of accounting/billing device.
[Track Print Jobs] Sets whether to track print jobs.
[Track Scan Jobs] Sets whether to track scan jobs.
This can be used when equipment other than a payment device and
dispenser is installed.
[Job with Insufficient Credit] Sets whether to cancel or hold jobs when credit is insufficient.
Th
is can be used when equipment other than a card-type cumulative
device is installed.
[Charge Print Jobs] Sets whether to charge print jobs by card number.
This can be used when a card-type cumulative device or card-type
subtracter is installed.
[Print Control with
Cumulative Device]
Sets timing for billing of print or copy jobs.
This can be used when a card-type cumulative device is installed.
[Sca
n Ahead for Copy Job] Sets whether to scan ahead for copy job.
This can be used when a card-type cumulative device or card-type
subtracter is installed.
Item Description
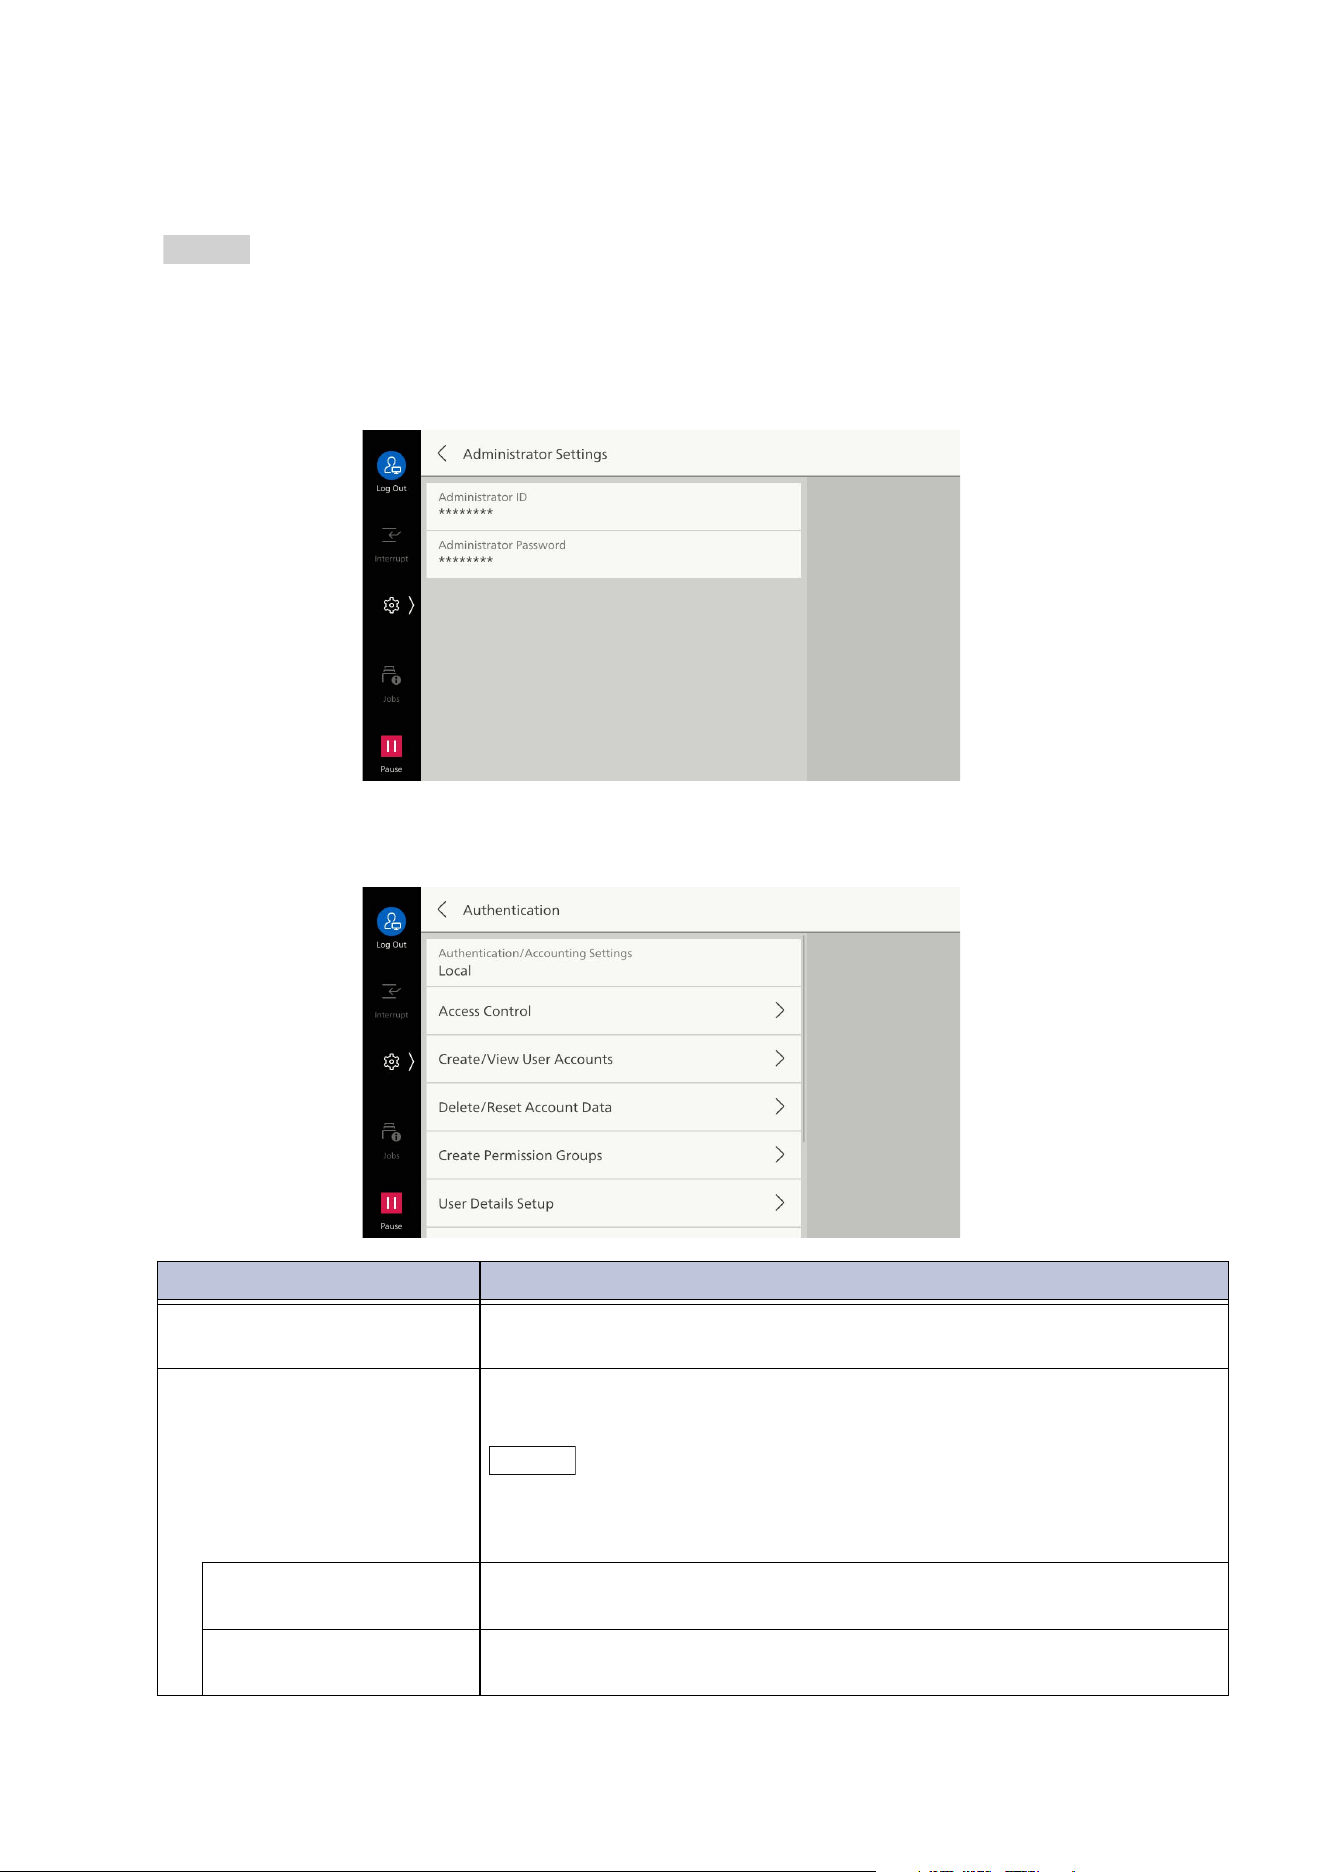
158
10 Device
[Authentication/Security Settings]
Enables creation of users of the machine, and setting of authentication and security.
Refer
Refer to "Authentication and Accounting Feature" (P.186).
[Administrator Settings]
Sets user ID and password for the administrator.
[Authentication]
Item Description
[Authentication/Accounting
Settings]
Sets the authentication/accounting method.
This is the same as "[Authentication/Accounting Settings]" (P.155).
[Access Control] You can restrict access to the machine and each service in
Authentication Mode. User login is necessary to use this.
Note
When logging in to remote accounts (other than when using our
products), this is based on access permission information for usable
services, retrieved from the remote authentication server.
[System Settings
Access]
Enables limitation of changes to machine settings by anyone other
than the administrator.
[Device Access] Enables restriction of button operation on touch panel display of the
machine.

159
10.6 [Authentication/Accounting]
[App Access] Enables limitation of each service of the machine.
Note
If a service is set to [Locked (Hide Icon)], the pertinent service is not
displayed on the Home screen. The pertinent service is also displayed
when authentication is finished.
[Feature Access]
[Print Files from
Folder]
Enables limitation of printing files from folder.
[Retrieve Files from
Folder]
Enables limitation of sending and transfer of files from folder.
[Recipient Selection
Method]
Enables limitation of selecting recipients not set in the Address Book
wh
en sending Email.
When set to [Only from Address Book], it becomes impossible to
input the recipient from a keypad or keyboard. Sending is limited
only to recipients set in the Address Book.
[Address Book
Editing]
Enables limitation of creating or changing recipients in the Address
Book by local users.
[Create/View User
Accounts]
Creates user IDs and user
names for authentication of created users
if authentication is set to enabled.
The maximum use quantity can be set for each user using the
machine. This also enables management like confirming the
cumulative pages for each created user. User data can be created for
up to 1,000 accounts.
This is the same as "[Create/View User Accounts]" (P.153).
[Delete/Reset Account
Data]
Enables tasks such as deleting user accounts for all users, and
res
etting meter data. Before deleting/resetting, it is also possible to
print a report and confirm beforehand the information to be deleted/
reset.
This is the same as "[Delete/Reset Account Data]" (P.154).
[Create Permission Groups] Enables the administrator to grant “Authorization” enabling use of
features that cannot normally be used to login users. If an
authorization group is created, management can be done by
grouping users by authorization.
[Us
er Details Setup] Sets information needed when logging in.
[Alternative Name for
User ID]
Enables changing the indication, displayed as the “User ID” on the
login screen displayed when the login information field on the touch
panel display is tapped on, to another such as “UserName” or
“Number” as required.
[Hide User ID (***)] Enables setting of method of displaying text string when entering
user ID. Set items such as strengthening of security if necessary.
When set to [Show], the display shows the entered text string when
a
user ID is input. If set to [Hide], [*****] is displayed.
[Failed Access Log] Sets the number of login attempts for detecting unauthorized
access. If login fails the number of times set here within a specified
time (10 minutes), it is recorded as an error.
[Logout Confirmation
Screen]
Enables display of a confirmation screen when logging out.
Item Description
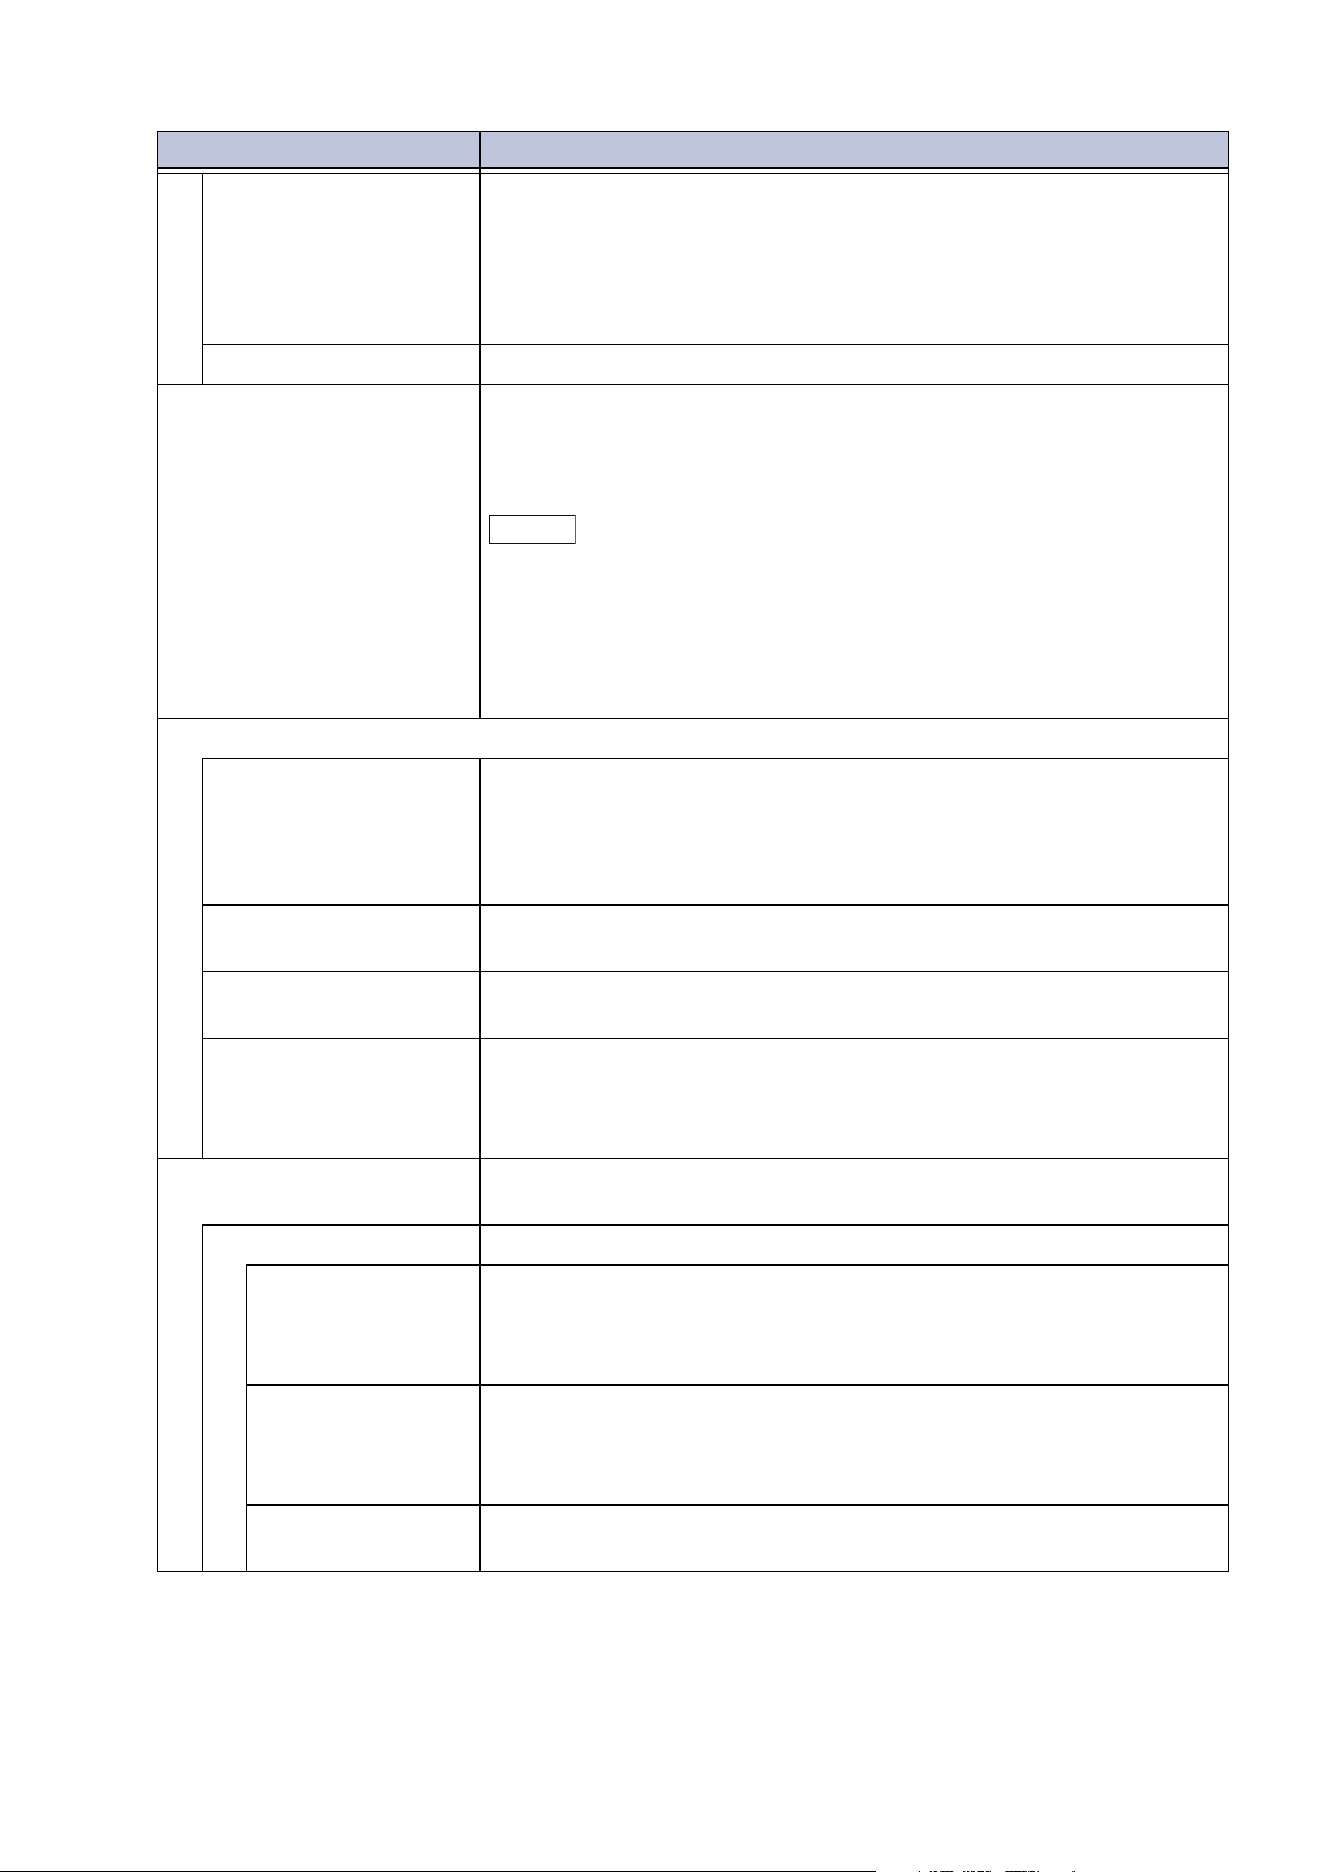
160
10 Device
[User ID for Login] Sets text type of user ID for login.
When set to [Case Sensitive], login is done with the user ID in the
created form (including both upper and lower case). When set to
[Non-Case Sensitive], login is done without distinguishing upper and
lower case, even if there is mixture of upper and lower case in the
user ID.
[Guest User] Enables use of guest users in case of log in to remote accounts.
[In
valid Login Settings] Sets this setting so that invalid operation is not performed through
impersonation. Sets the number of attempts until access is denied
for the [Maximum Failed Attempts], so that access is denied if there
are consecutive failures in authenticating the same user ID.
Note
When the machine is restarted, the number of failed attempts is reset.
When setting, set [Maximum Login Attempts - System Administrator]
or [Maximum Login Attempts - Local User] to [On].
Restart the machine to cancel the access denied state.
Maximum login attempts for local users can be set in the case of login
to local accounts.
[Password Policy]
[Password for Control
Panel Login]
Enables input of a password when a user uses the machine.
If set to [On], the [Password] for [Create/View User Accounts] is
enabled.
If set to [Off], password input is not required, even if a password is
specified with the above setting.
[Minimum Password
Length]
Specifies minimum password length.
[Maximum Password
Length]
Specifies maximum password length.
[Authentication from
External Services]
Set whether to accept authentication that does not involve login
op
erations such as print jobs when the set password no longer
satisfies the requirements as a result of changing the password
security strength.
[Charge/Private Print
Settings]
Sets for control of the Charge Print or Private Charge Print.
[Receive Control] Sets how to handle received print jobs.
[Control by Job
Login Results]
Sets handling of jobs for, respectively, [Job Login
Success], [Job
Login Failure] and [Job Without User ID] when [Printer] in [App
Access] is set to [Locked] using the authentication/accounting
feature.
[Save as Private
Charge Print Job]
Saves all jobs with user ID attached as private charge prints,
regardless of whether the authentication feature is used or not. This
sets handling of jobs for, respectively, [Job Without User ID] and
[Non-PJL Command Jobs].
[Sa
ve as Charge
Print Job]
Saves all received jobs as charge prints, regardless of whether the
authentication feature is used or not.
Item Description
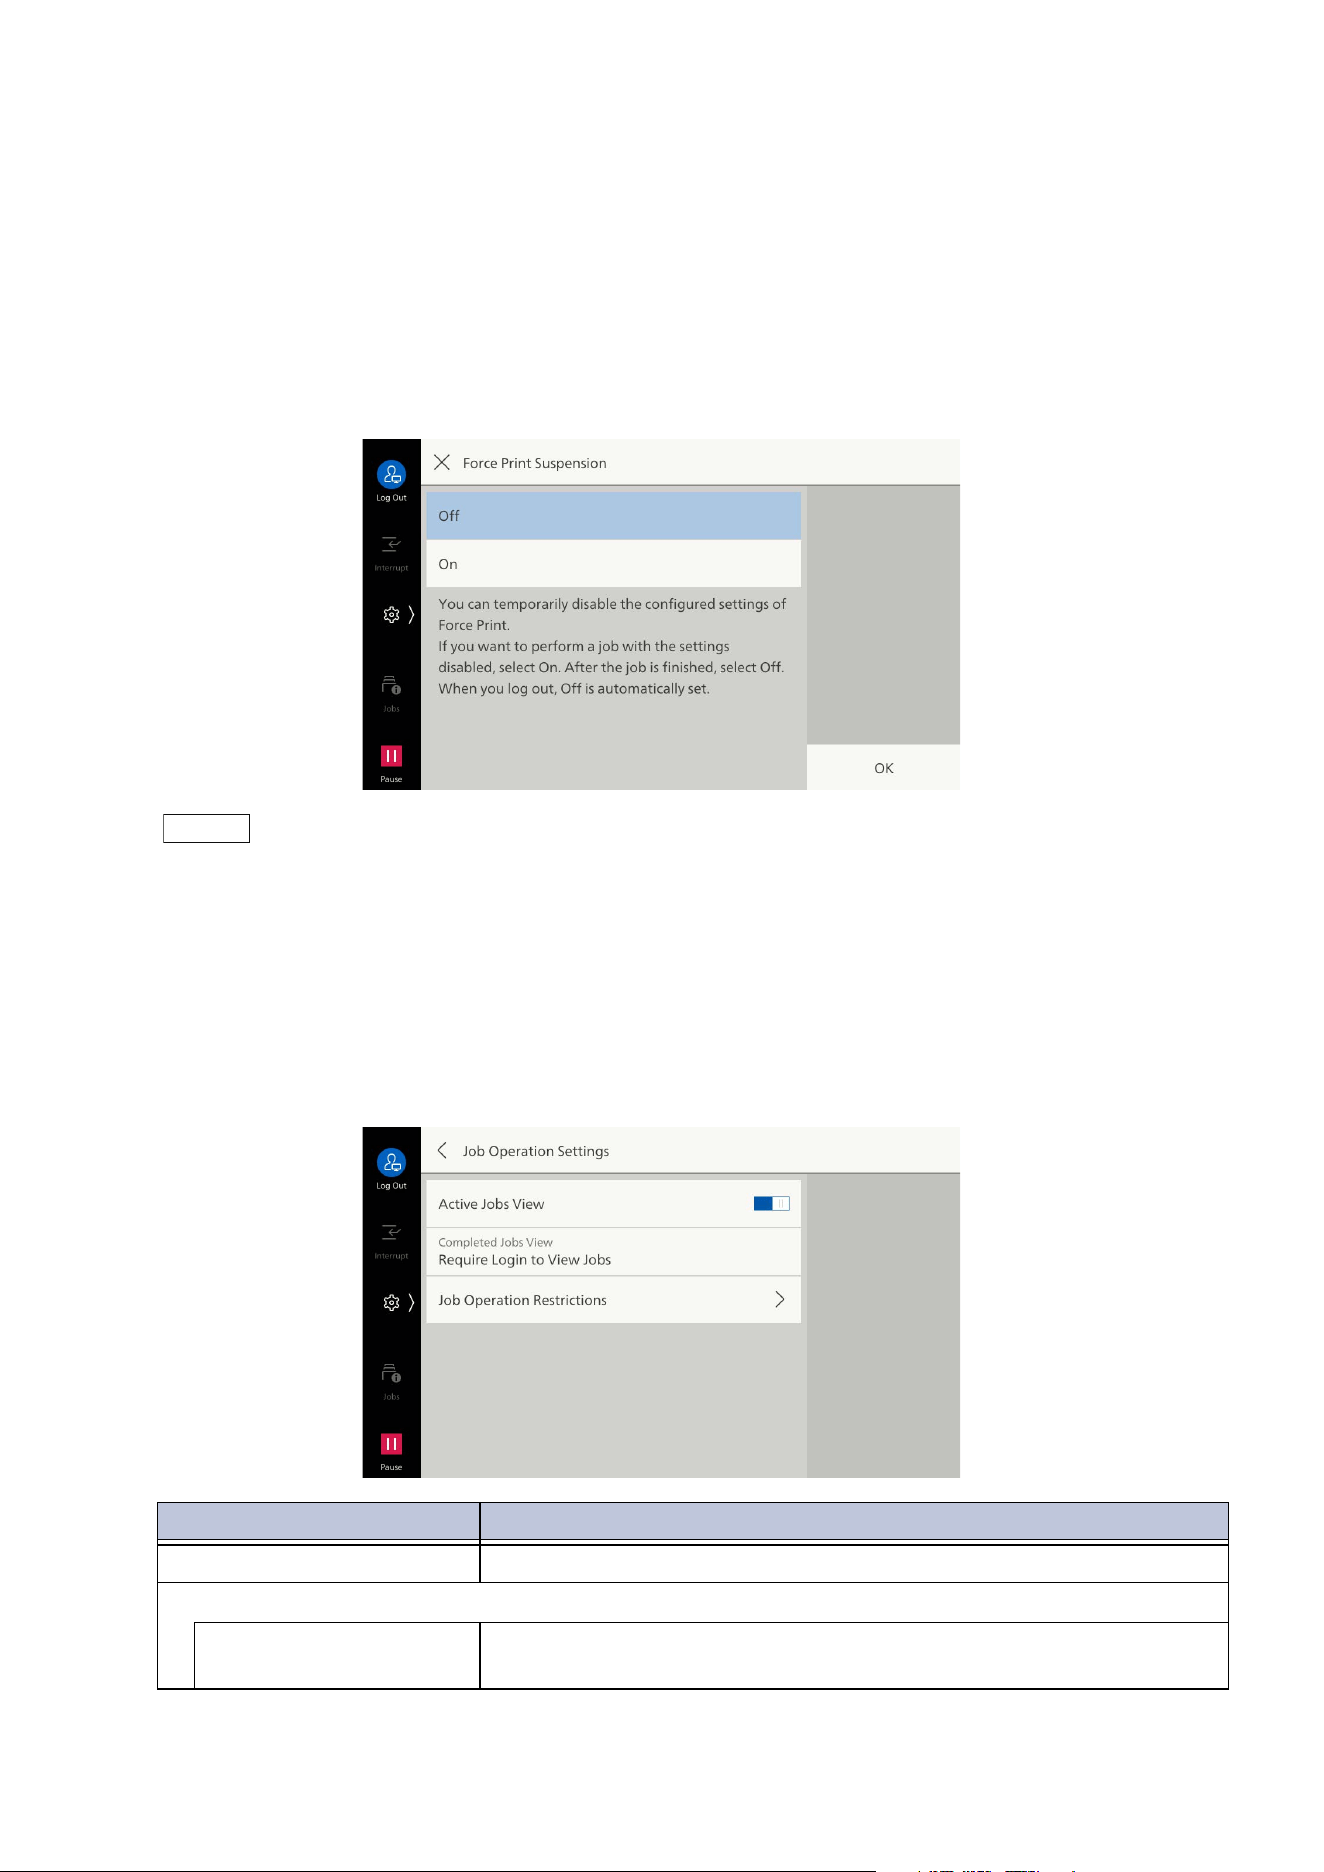
161
10.6 [Authentication/Accounting]
[Force Print Suspension]
Used in cases such as printing where forced printing is done, but there is no forced printing for
specific output only.
Active settings can be temporarily disabled, even if active settings have been set, such as force
watermark, force secure watermark, print universal unique ID, and force annotation.
If copy, stored file print, or print from USB is performed in the state set to [On], then active settings
ar
e disabled. (They are not disabled in the case of an ordinary print, or report/list.)
This is displayed only when [Force Print Suspension] for the authorization group to which the login
user belongs has been set to [Allow].
Note
Active settings can be disabled even in cases where a file in a folder is selected and running is done
manually using job flow sheets.
This can be set for users with administrator rights, regardless of the authorization group.
For watermarks specified by the user in copying this setting is disabled even if it's allowed.
[Job Operation Settings]
Enables restriction of display of active jobs. This protects privacy and deters information leaks for
unauthenticated users and users who are not job owners.
Item Description
[Active Jobs View] Enables restriction of display of information for active jobs.
[Completed Jobs View]
[Allow Job Viewing at All
Times]
Enables confirmation all finished jobs, regardless of login. Display of
detailed information on jobs can be restricted.
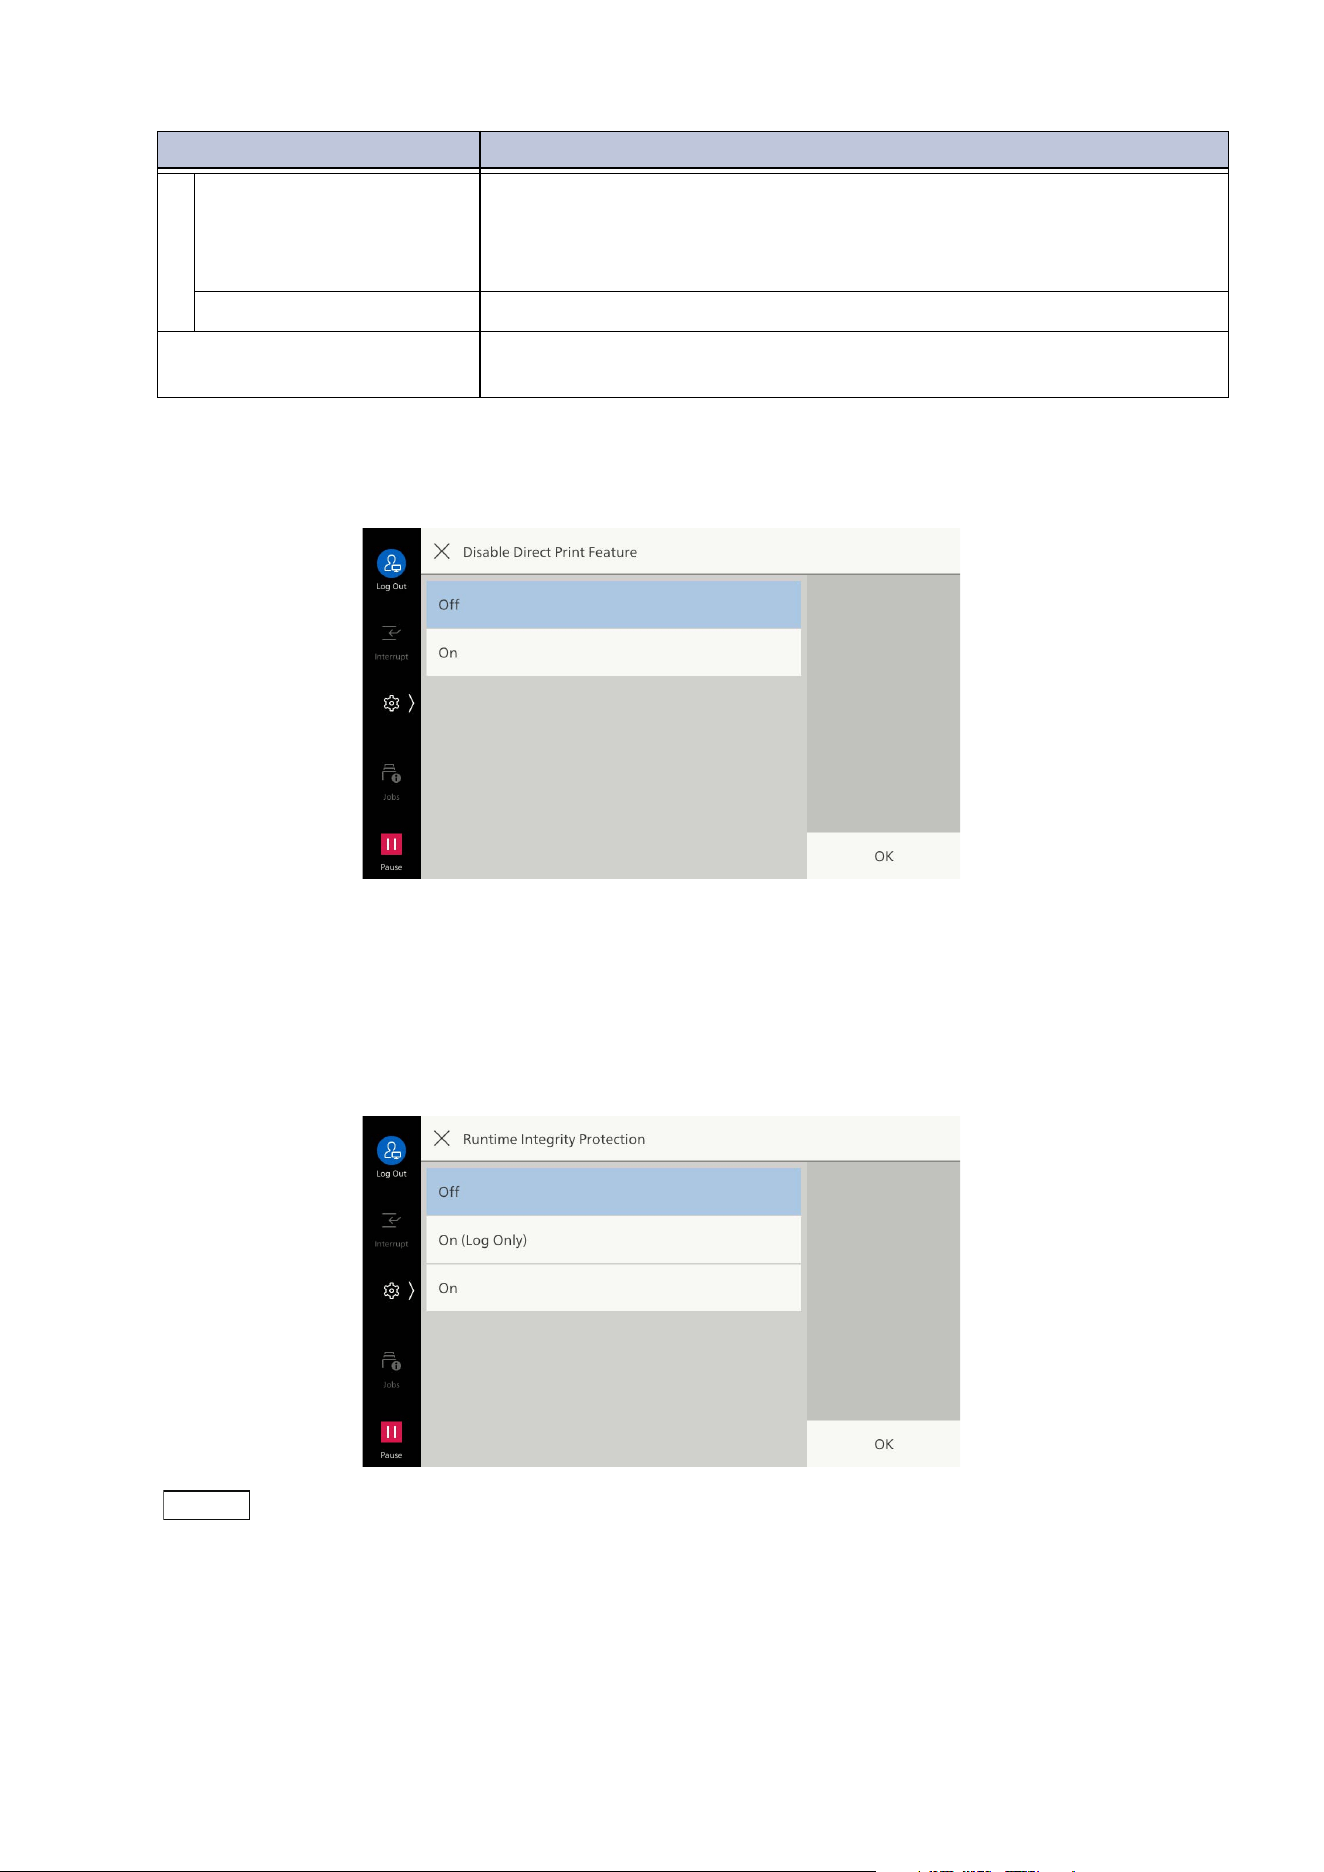
162
10 Device
[Disable Direct Print Feature]
When set to [On], direct print features are disabled, such as Print from USB and Print Email.
[Runtime Integrity Protection]
Sets whether to detect access to or running of unauthorized file during machine operation.
If set to [On], file writing or running are denied, and the specifics of the access are recorded in the
audit log.
If set to [On (Log Only)], recording is done in the audit log, but access to the file is not denied.
Note
The audit log feature must be set to enabled to record in the audit log. For details, refer to "[Audit Log
Settings]" (P.124).
[Require Login to View
Jobs]
Enables confirmation of finished jobs only by users currently logged
into the machine. Display of detailed information on jobs can be
restricted by setting jobs that can be confirmed to only the jobs of
logged in users.
[Hide] Disables display of all finished jobs, regardless of login.
[Jo
b Operation Restrictions] Sets range of users allowed to perform job operation for each type of
operation.
Item Description
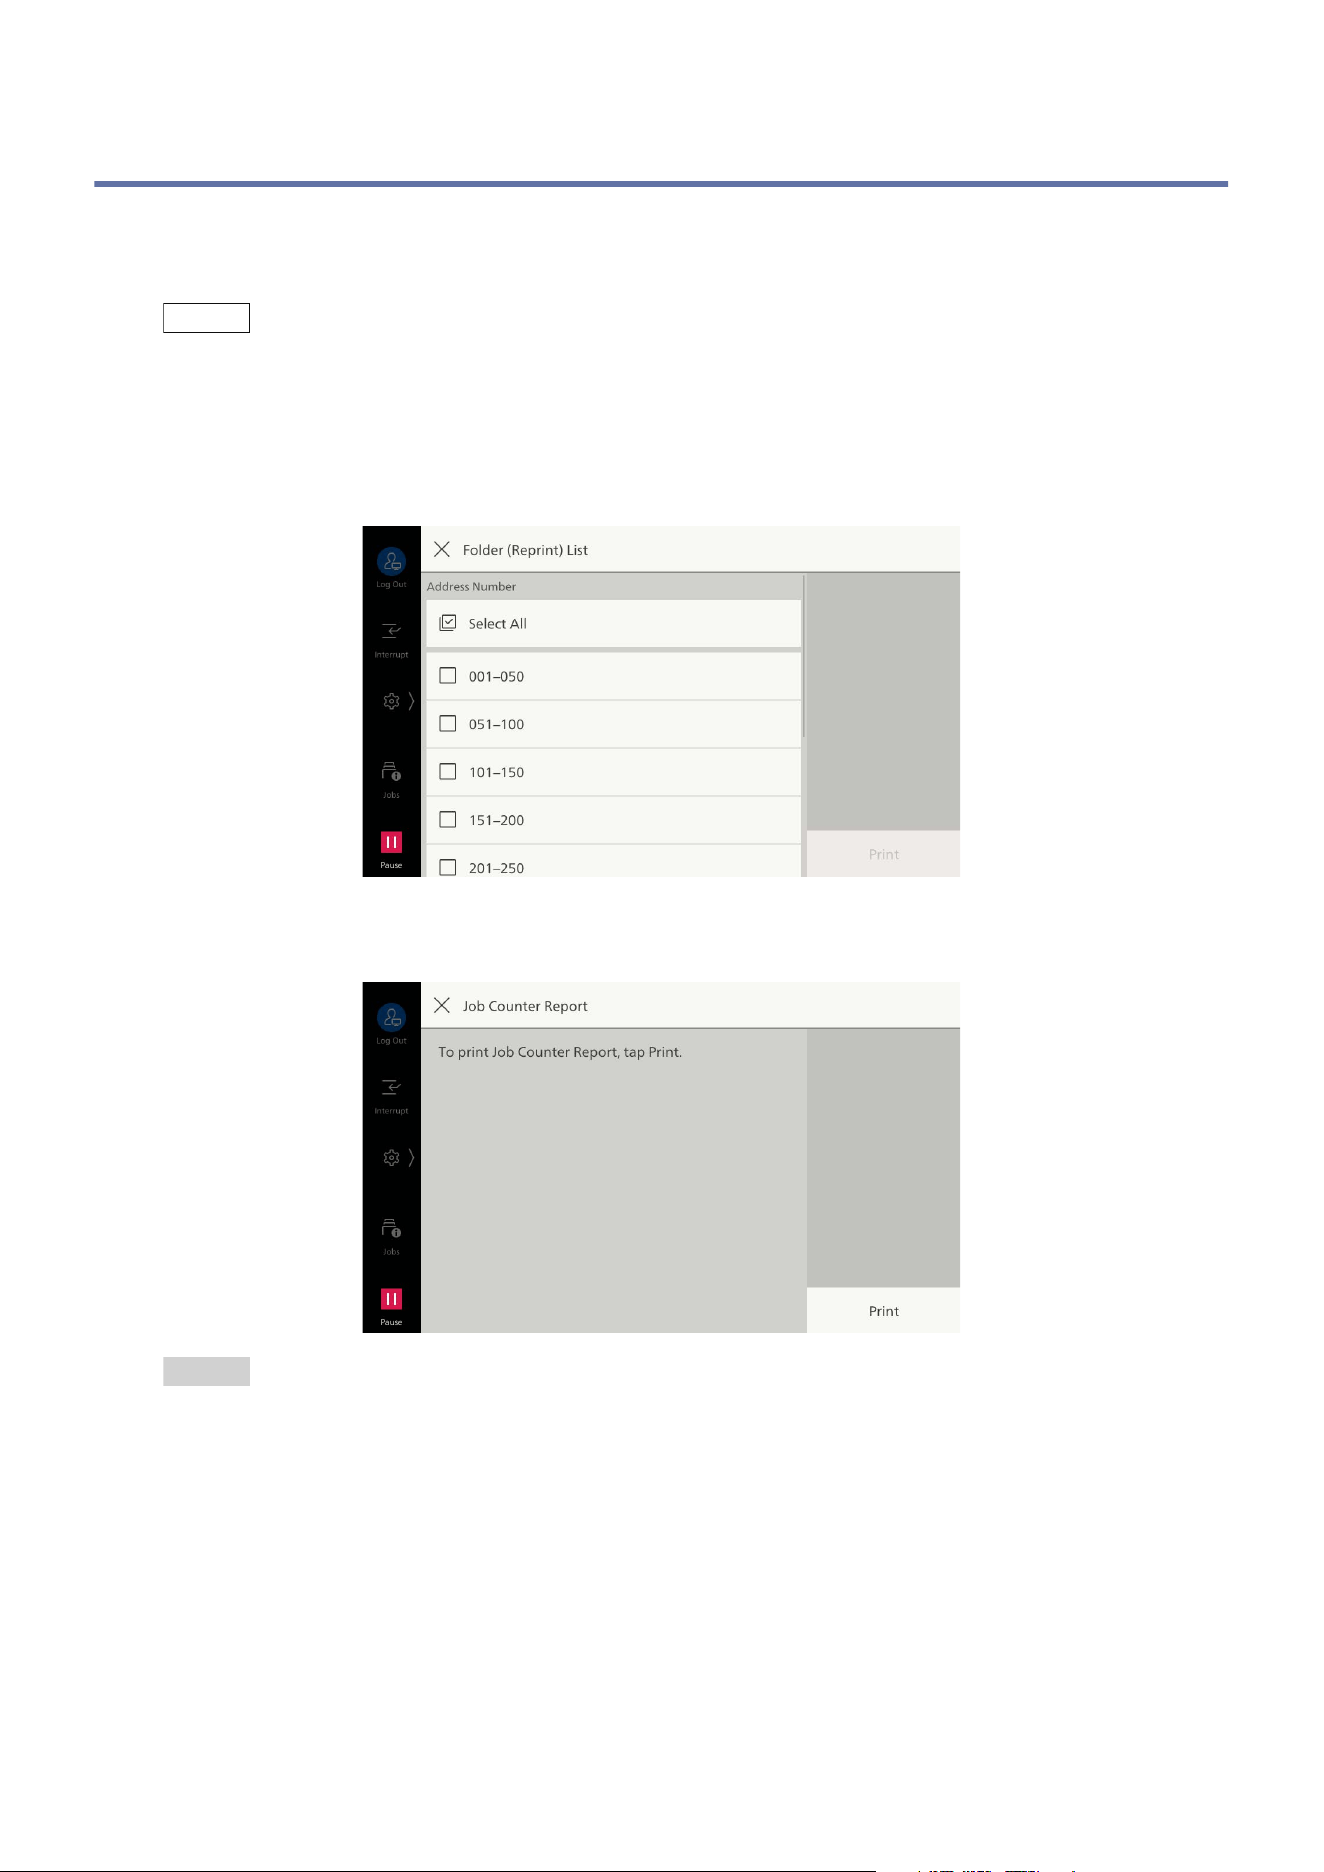
163
10.7 [Maintenance]
10.7 [Maintenance]
[Support Pages]
Note
You can register the shortcut of this item to [Shortcuts] of the control menu by tapping on [Shortcut].
[Folder (Reprint) List]
Prints the list of settings and processing methods during folder storage for folders in the range of
specified numbers.
[Job Counter Report]
Refer
For the job counter report, refer to "[Print Reports]" (P.21).
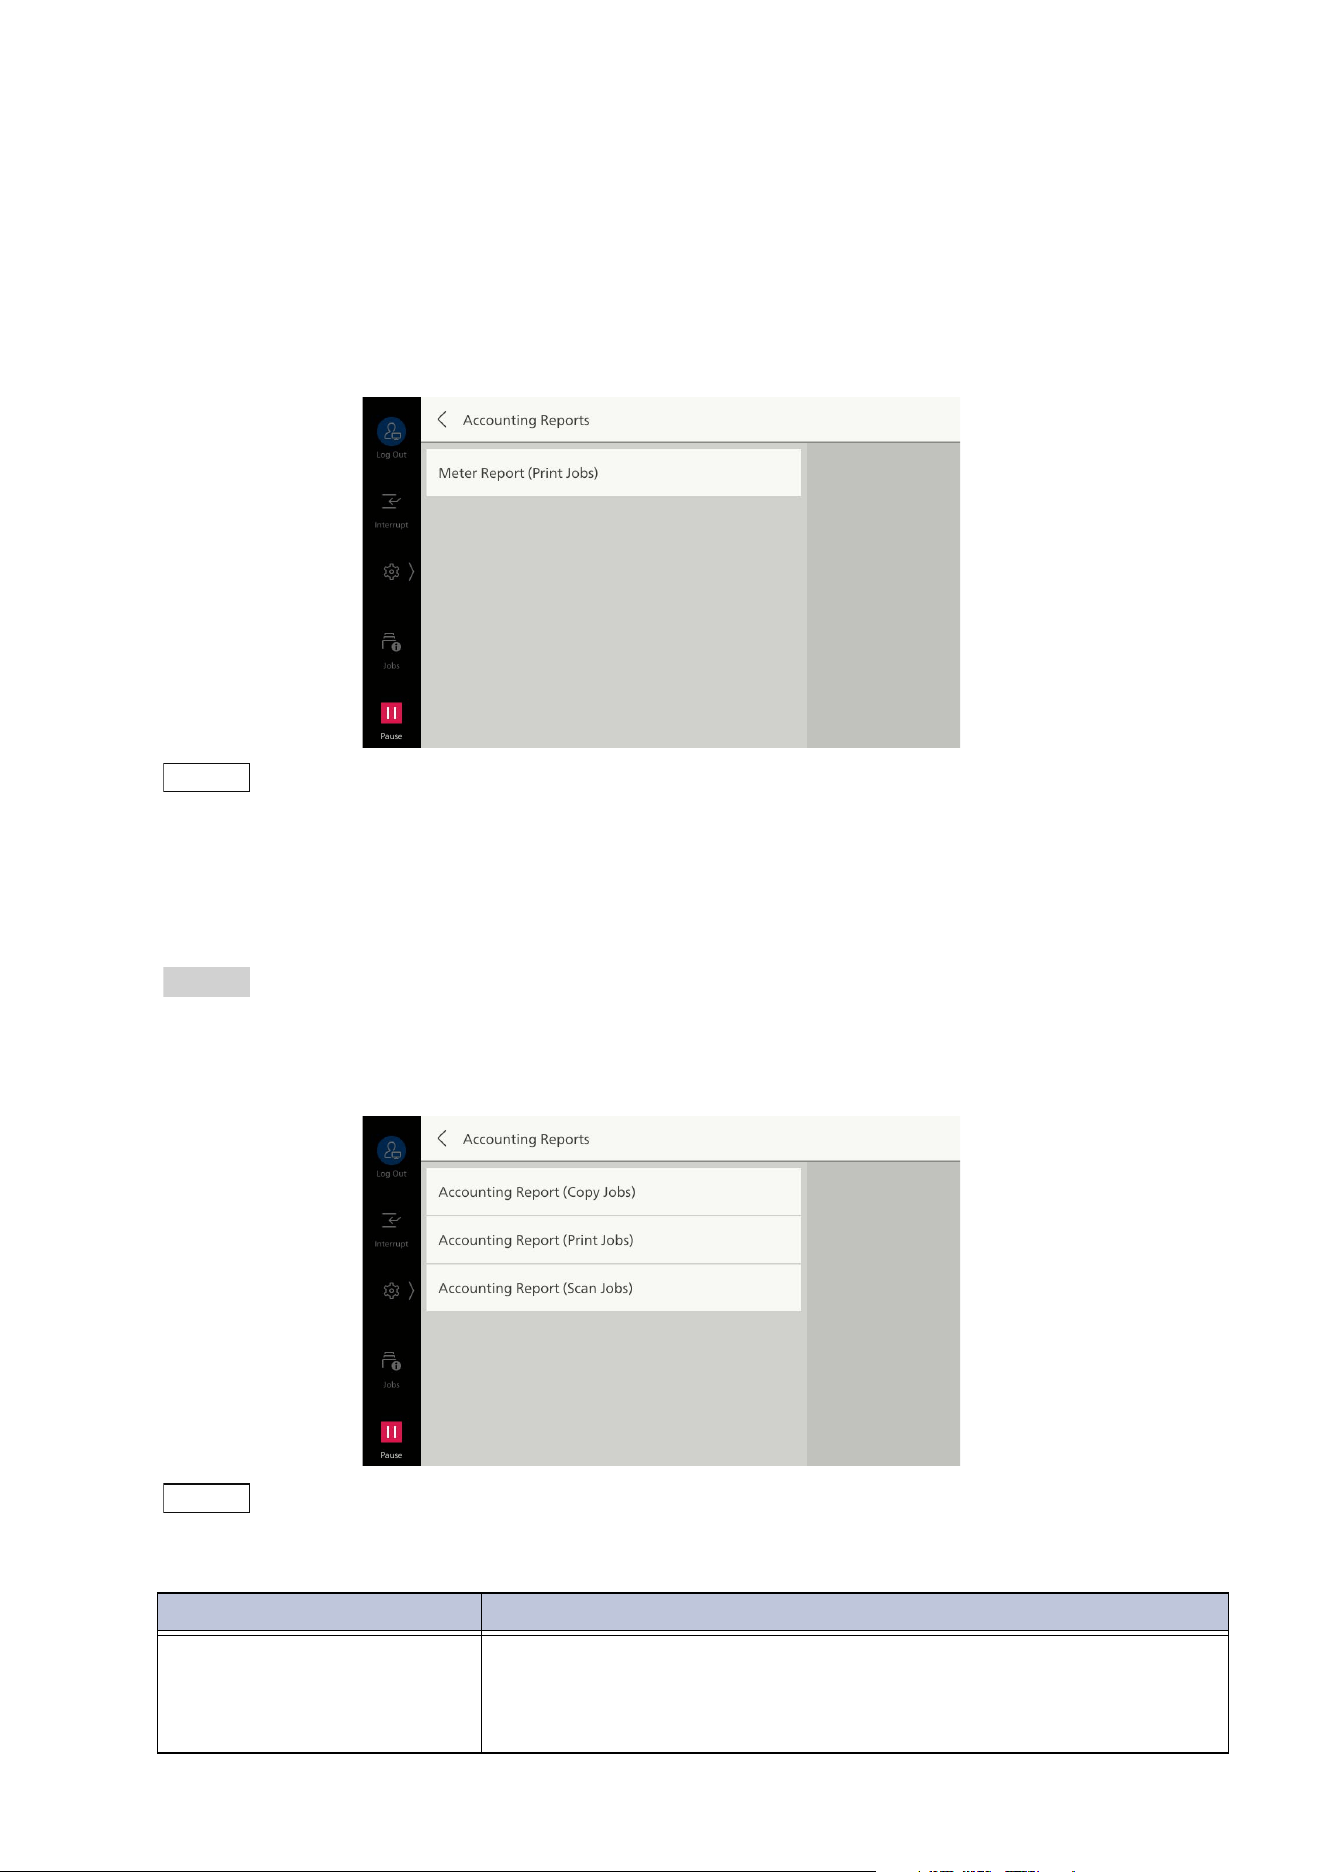
164
10 Device
[Accounting Reports]
Enables printing of accounting reports by user. The accounting reports that can be output varies
depending on whether the accounting feature is enabled.
If [Authentication/Accounting Settings] is set to something other than [Local]
The following screen is displayed, and a meter report (print jobs) can be printed. This enables
confirmation of total pages printed with the machine, and the total sheets of paper used, for each
client (job owner).
Note
[Meter Report (Print Jobs)] counts from the time that data was initialized.
If [Authentication/Accounting Settings] is set to [Local]
The [Accounting Reports] screen is displayed. This enables printing by feature of accounting reports
by user for features for which the accounting feature has been set to [Enable Accounting].
Refer
Refer to "[Accounting]" (P.153).
To print an accounting report, select any accounting report, and specify the range of user numbers.
Note
The [No.] indicated on the report is the No. (user control no.) set at account setup with [Accounting] and
[Authentication/Security Settings].
Item Description
[Accounting Report (Copy
Jobs)]
Enables confirmation of total pages copied, or pages printed, with
the machine. If page limits have been set, those limit values are
displayed. [Accounting Report (Copy Jobs)] counts from the time
that data was initialized.
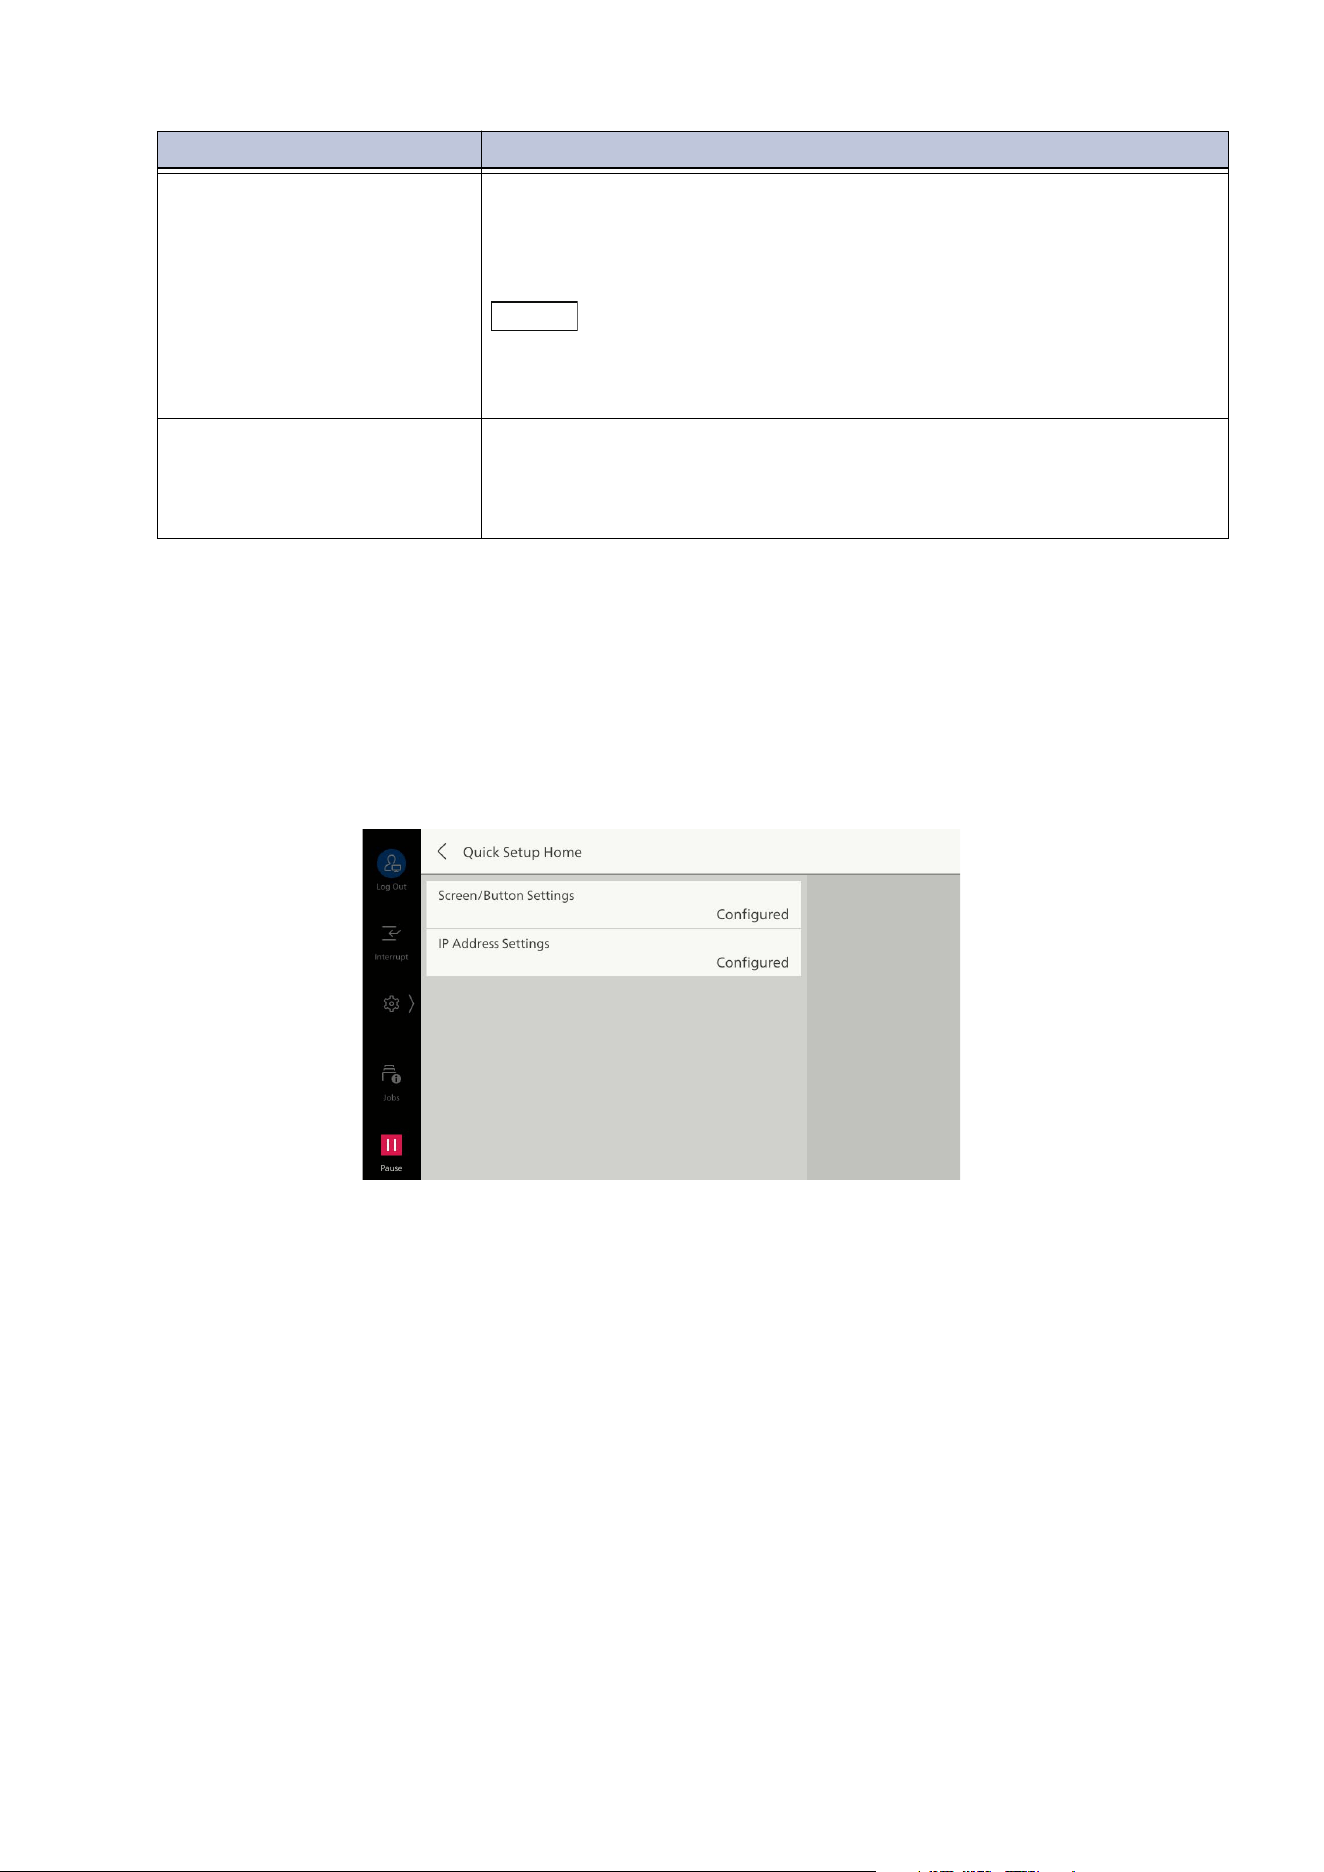
165
10.7 [Maintenance]
[NVM Read/Write History Report]
You can print the history changed in [NVM Read/Write].
[Quick Setup Home]
Confirms that quick setup for using the machine is finished. The setting screen can be started from
here for items that have not been finished with quick setup.
[Software Options]
Set by a service person.
[Accounting Report (Print
Jobs)]
Enables confirmation of total pages printed with the machine, and
the total sheets of paper used, for each client (job owner).
[A
ccounting Report (Print Jobs)] counts from the time that data was
initialized.
Note
When [Printer] is set to [Disable Accounting] in [Accounting Mode] of
[Authentication/Accounting Settings], not [Accounting Report (Print
Jobs)] but [Meter Report (Print Jobs)] is displayed.
[Accounting Report (Scan
Jobs)]
Enables confirmation of total pages scanned with the machine. If
page limits have been set, those limit values are displayed.
[Accounting Report (Scan Jobs)] counts from the time that data was
init
ialized.
Item Description
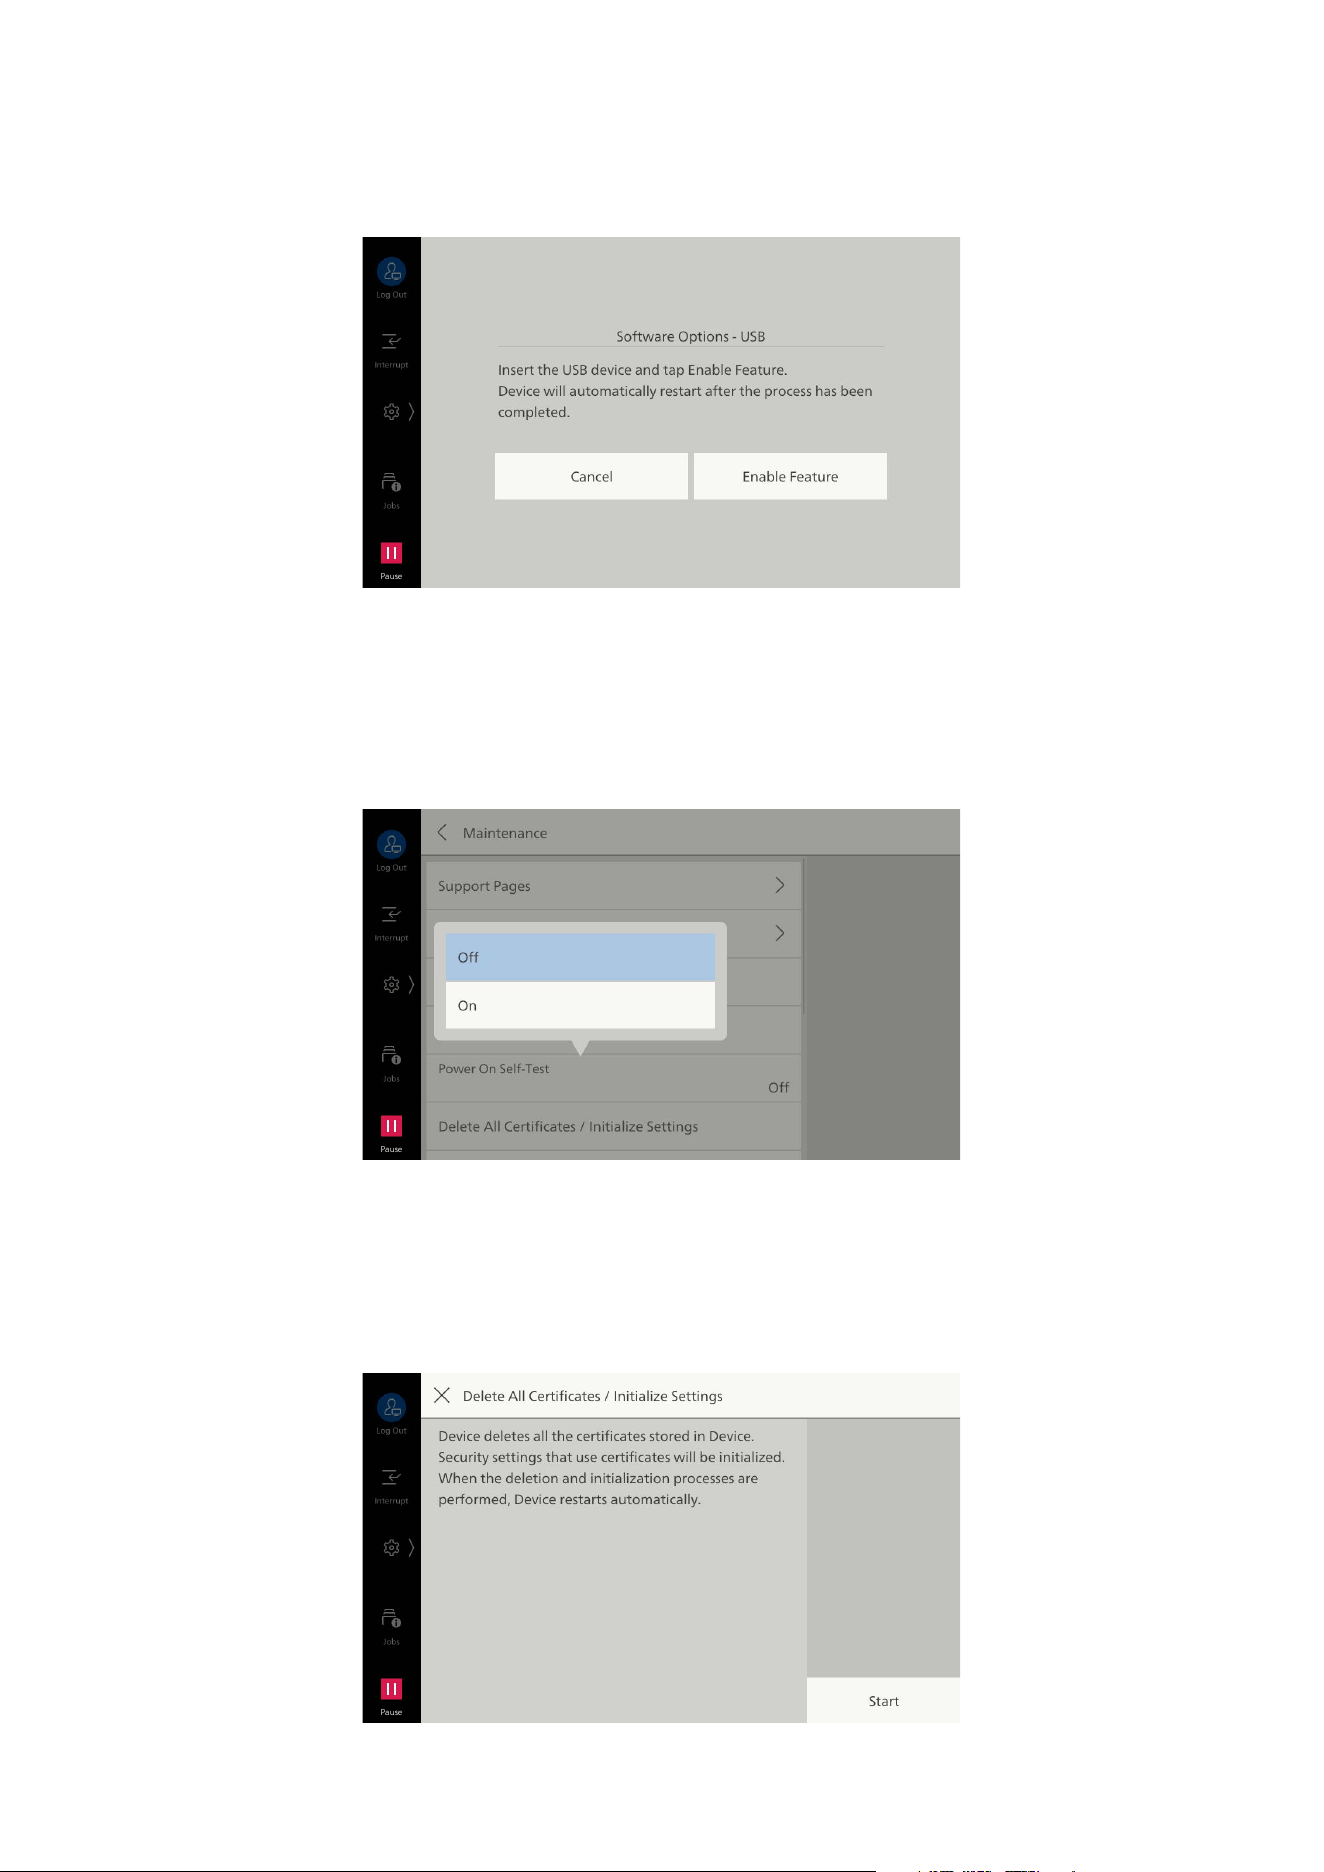
166
10 Device
[Software Options - USB]
Enables use of options by mounting a USB dongle.
[Power On Self-Test]
Enables self testing when machine power is turned on.
If a problem is found in the self test, such as intentional rewriting of the program, startup is stopped,
and a record is left in the audit log.
[Delete All Certificates / Initialize Settings]
Deletes all certificates and initializes settings. This is used when certificate data can no longer be
used for reasons such as errors with certificate files, even though the machine has been set to use
certificates with [Network Settings] > [Security Settings] > [SSL/TLS Settings].
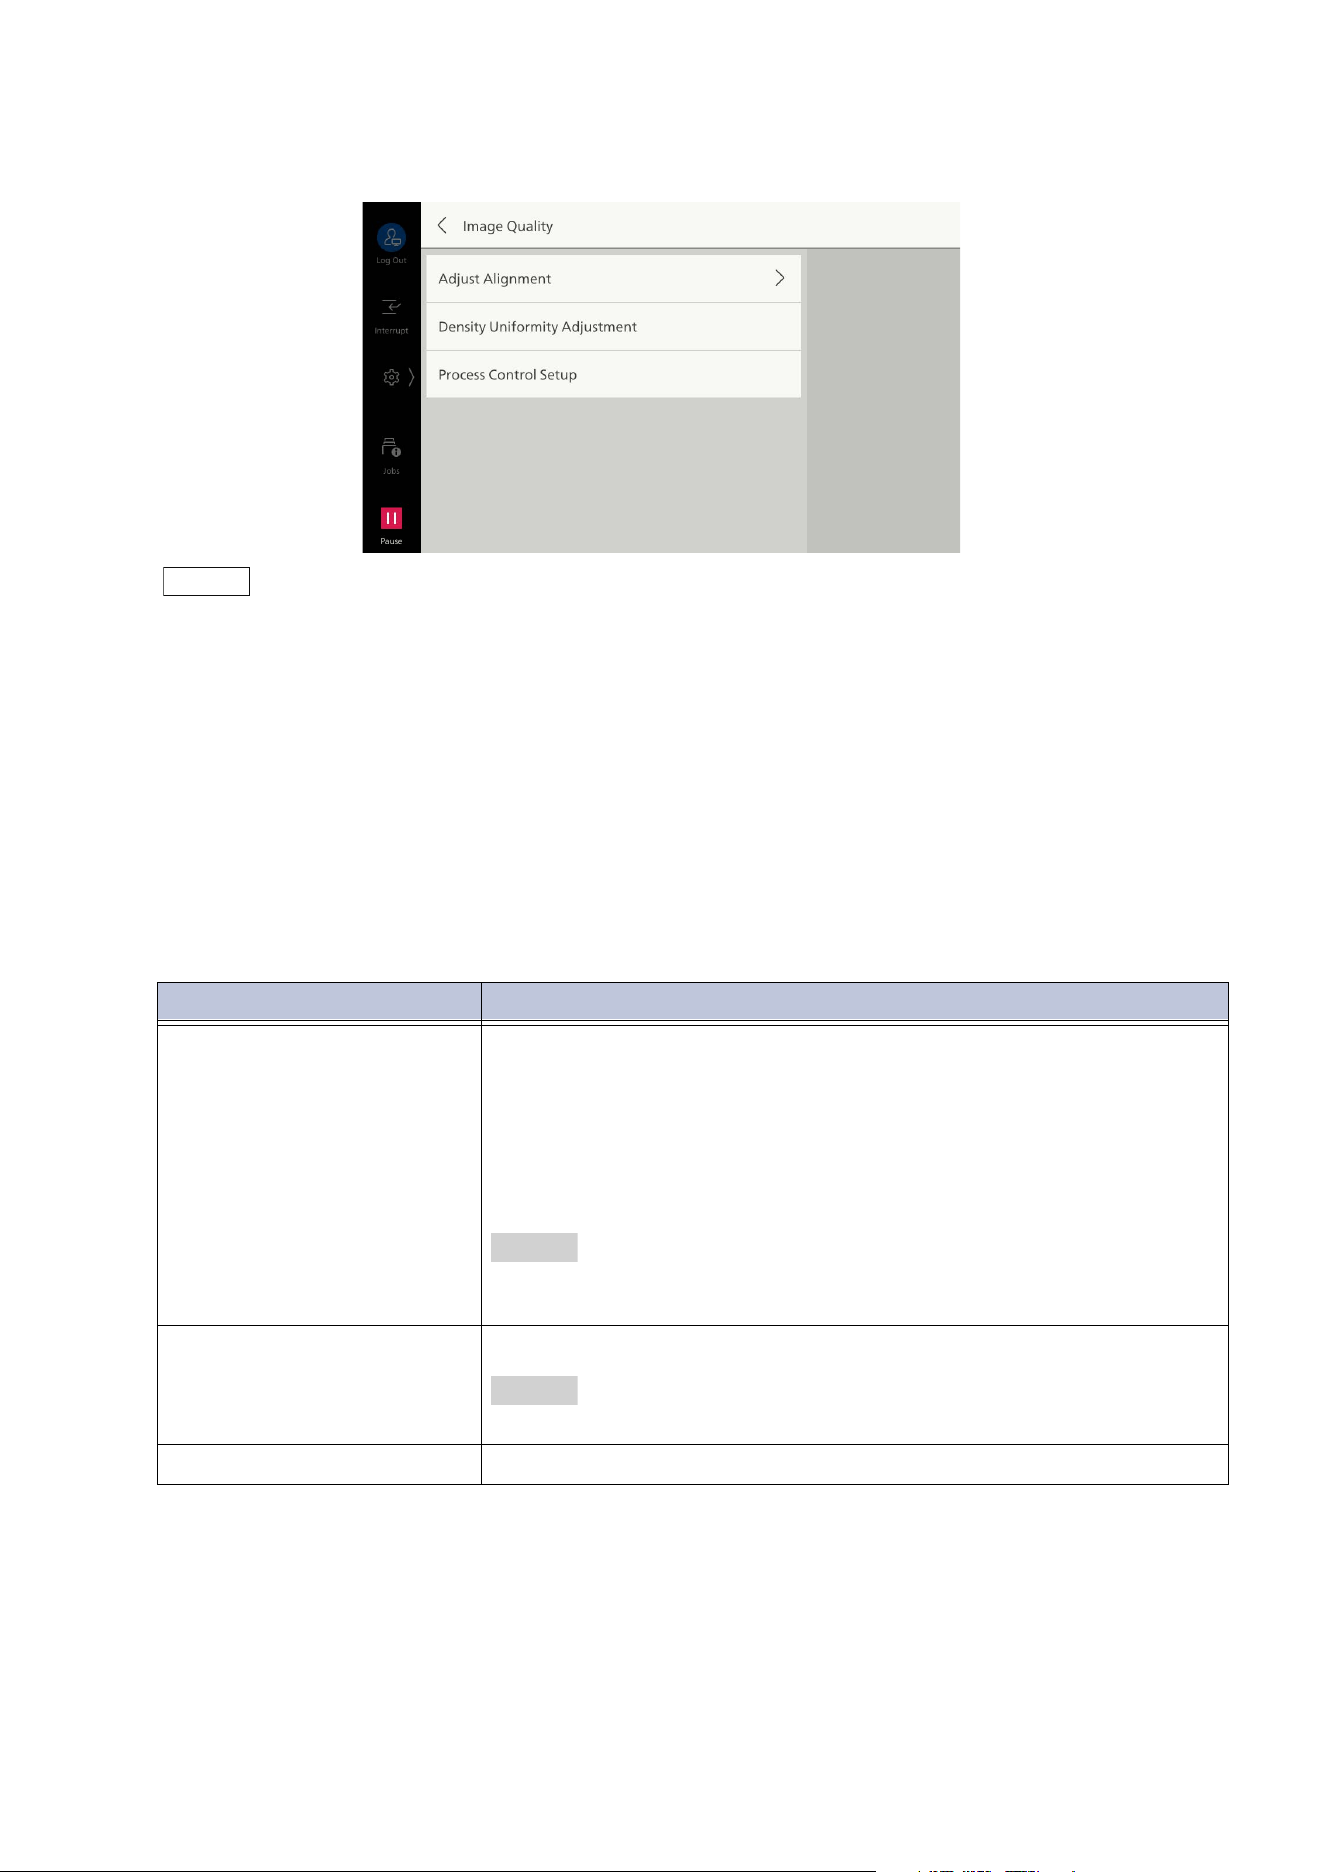
167
10.7 [Maintenance]
[Image Quality]
Note
The following items can be used when there is free capacity of the total amount of folder spaces.
- [Spots/Streaks Diagnostics]
- [Auto Alignment]
For the items with [Shortcut] displayed on the top right of the screen, you can register the shortcut of this
item to [Shortcuts] of the control menu.
If [Local User Access - Maintenance] is set to [Enabled] in "[Other Settings]" (P.101), local users can
adjust the following items. Loc
al users should use the adjustment menu from [Shortcuts] of the control
menu.
- [Adjust Alignment]
- [Density Uniformity Adjustment]
If the situation does not improve even though image quality adjustment is regularly carried out, call for
service.
Item Description
[Adjust Alignment] Adjusts position of image for printing on paper.
[Auto Alignment]
Adjusts the image position.
[Manual Alignment]
Registers the adjustment value of image position.
You can select the registered alignment value in the paper tray
assignment or custom paper setting.
Refer
For details, refer to "[Auto Alignment]" (P.168)/"[Manual Alignment]"
(P.172).
[Density Uniformity
Adjustment]
Adjusts uniformity of density of image printed on paper.
Refer
For details, refer to "[Density Uniformity Adjustment]" (P.178).
[Process Control Setup] Automatically adjusts the calibration.
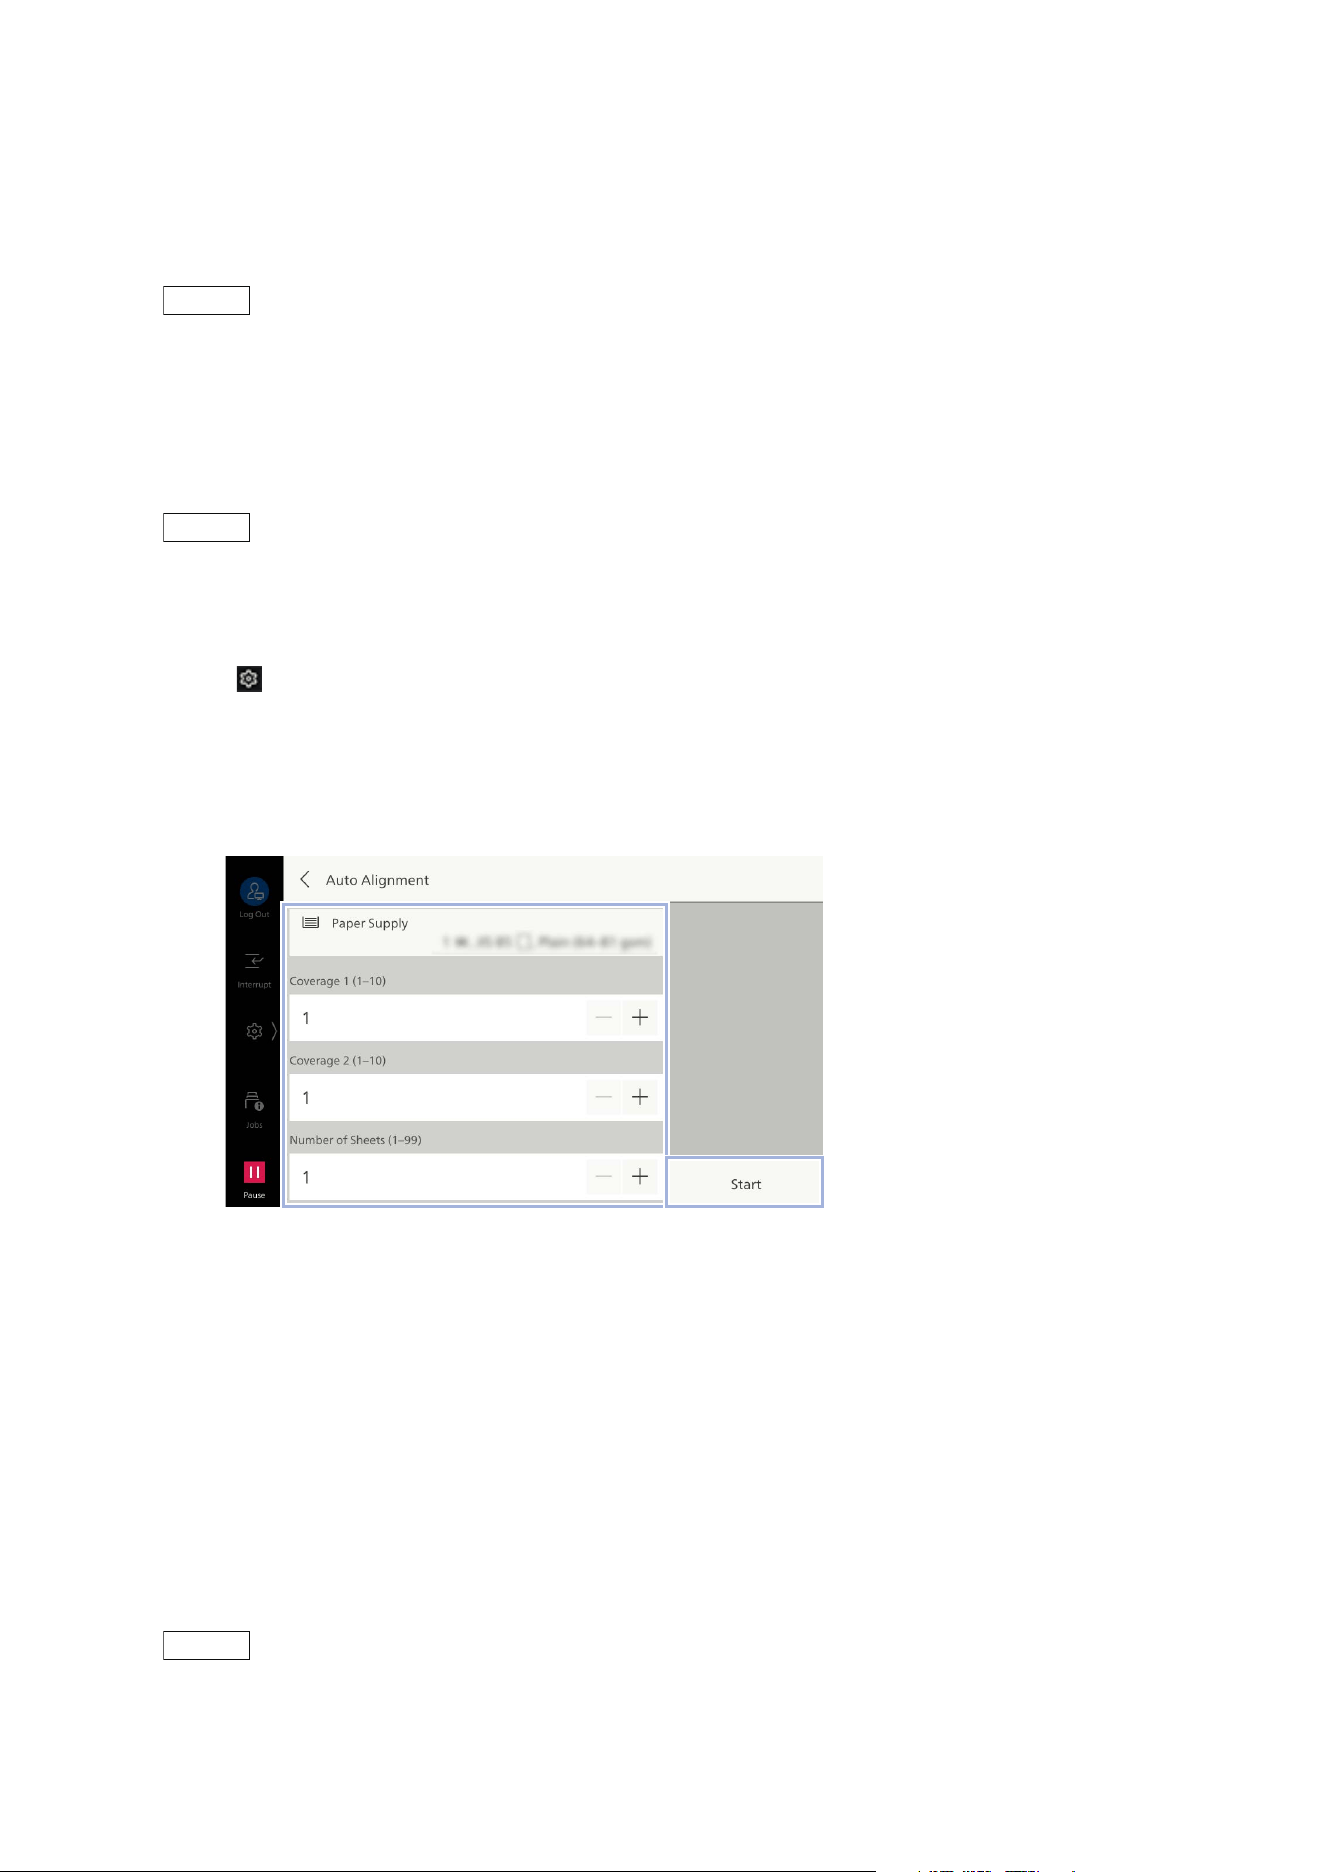
168
10 Device
[Auto Alignment]
Adjusts the output image position per each paper tray.
Adjust the output image position when it is misaligned due to paper stretching, cutting accuracy, or
paper storage conditions.
Note
Adjust it with the calibration chart on the document glass. For the background sheet, print “SIQA_sheet"
at the end of
User’s Manual - Appendix
.
Printing the Calibration Chart
1. Load the paper for adjustment in the tray for adjustment.
Note
When printing the calibration chart, load paper of size at least 182 x 182 mm.
2. Log in to Administrator Mode.
3. Tap on > [Device] > [Maintenance] > [Image Quality] > [Adjust Alignment].
4. Tap on [Auto Alignment].
5. Set each item and tap on [Start].
[Paper Supply]
Select the tray where paper was loaded in step 1.
[Coverage 1]/[Coverage 2]
Set two types of density to print on the calibration chart.
[Number of Sheets]
Set the number of charts to be printed. To calculate the average value of image variation, it is
recommended to print 3 or more copies.
[Print Calibration Charts]
If already printing the calibration chart and only reading it, set it
off.
Note
When adjusting multiple paper trays at the same time, reselect the paper trays in [Paper Supply] and
print again.
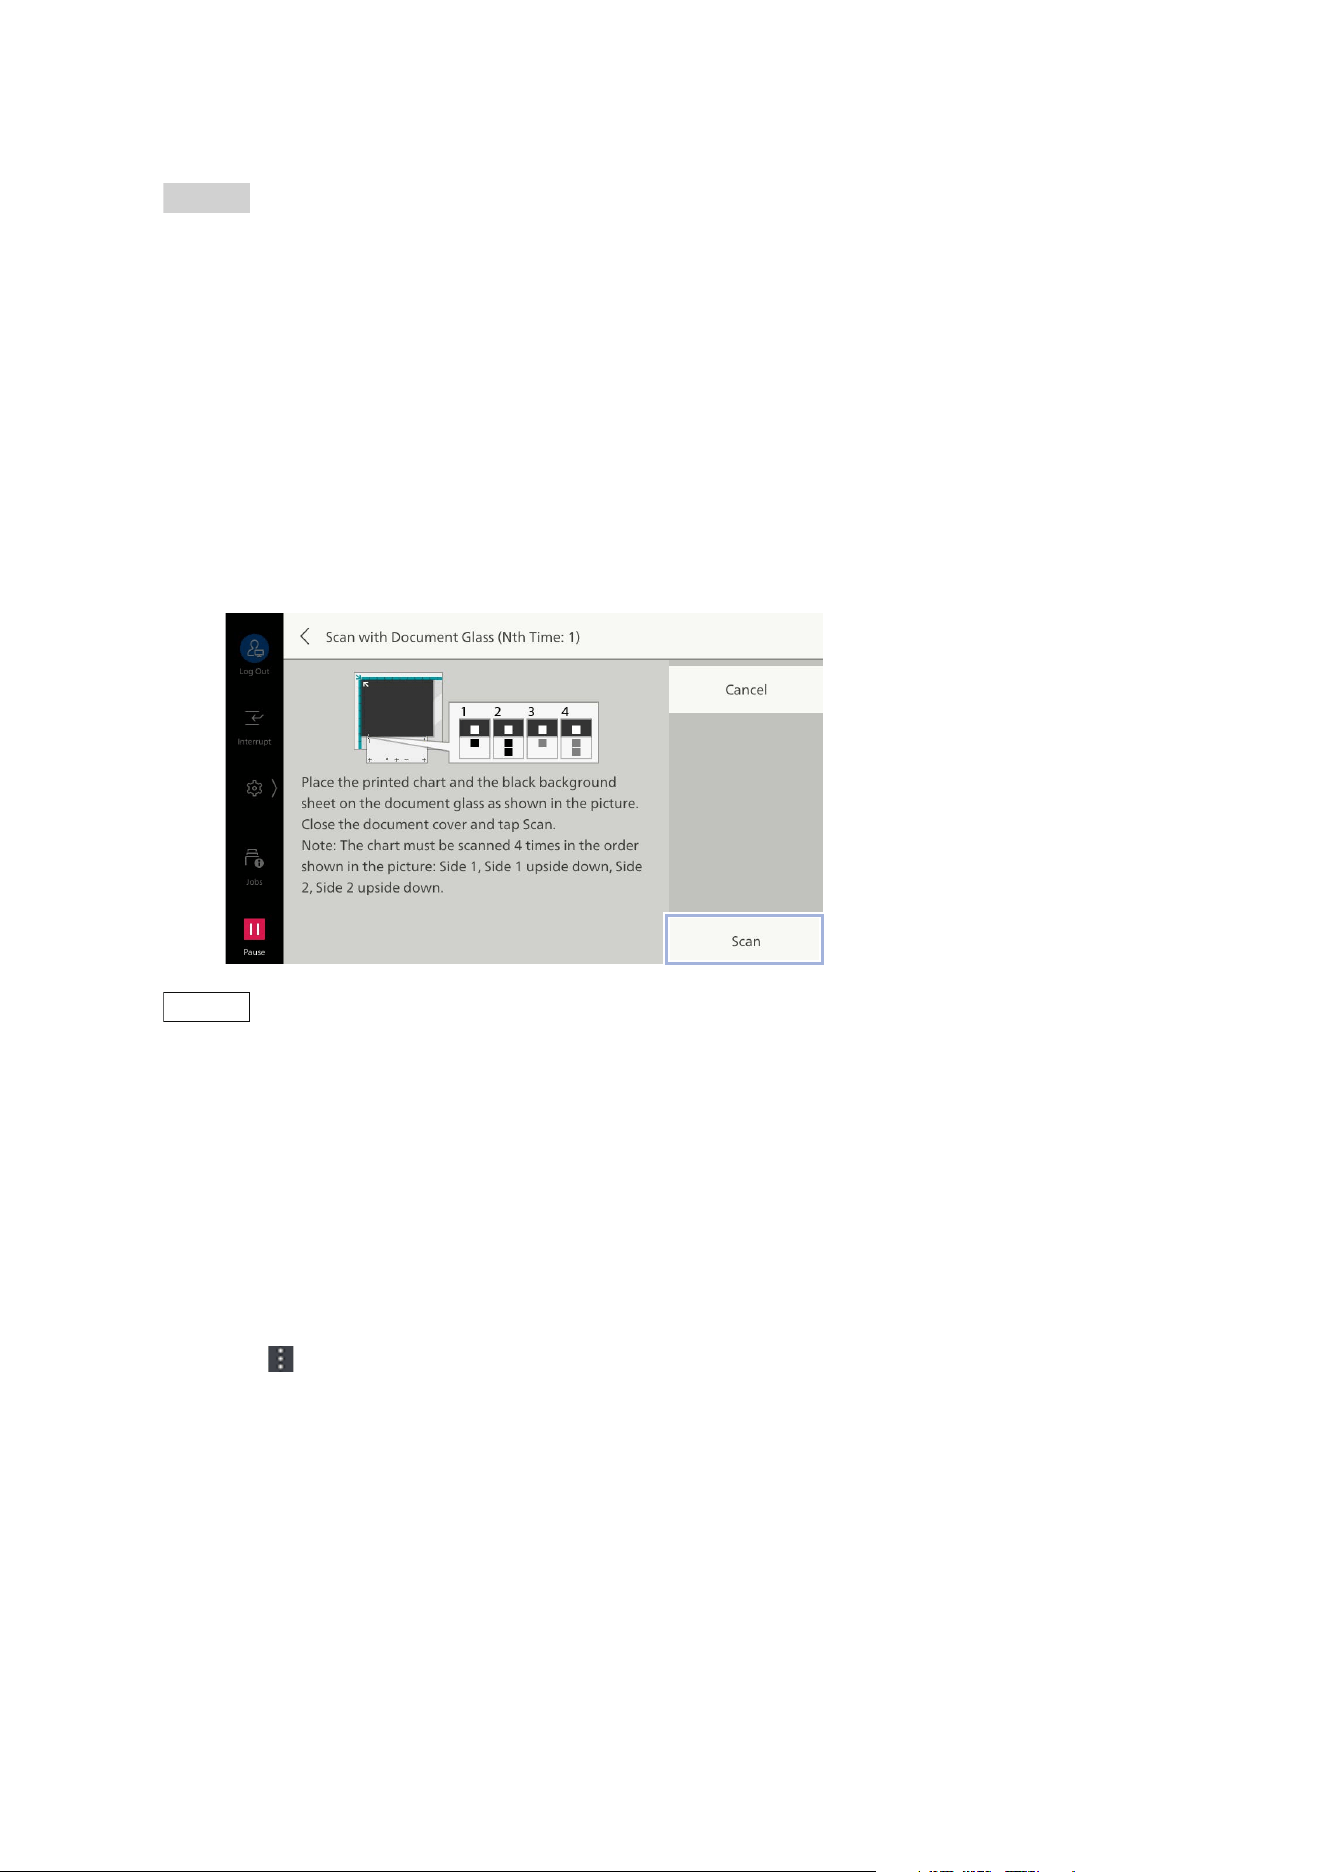
169
10.7 [Maintenance]
6. Read the printed calibration chart.
Refer
"Document Glass Adjustment" (P.169)
"Document Feeder Adjustment" (P.170)
"Reading Accuracy Adjustment of Document Feeder" (P.171)
Document Glass Adjustment
Adjust the document glass by reading the calibration chart with it.
1. Tap on [Scan with Document Glass].
2. Load the calibration chart, following the instruction on the screen, and tap on [Scan].
Align the square marks of the background sheet and the calibration chart, and read them twice on
the front side and twice on the back side.
Note
Align the line at the top of the square mark on the calibration chart with the bottom edge of the
background sheet.
3. When printing multiple calibration charts, tap on [Scan Next Chart] to repeat loading as many as
the number of the charts.
4. When reading the calibration chart is completed, tap on [Start Adjustment].
5. Set the alignment adjustment type.
If [(Not Set)] is displayed on the tray or if you want to change the set type, perform the followings.
1)Tap on of the tray for which you want to set the type.
2)Tap on [Type Setup].
3)Tap on the type to register the adjustment value.
The adjustment value is applied.
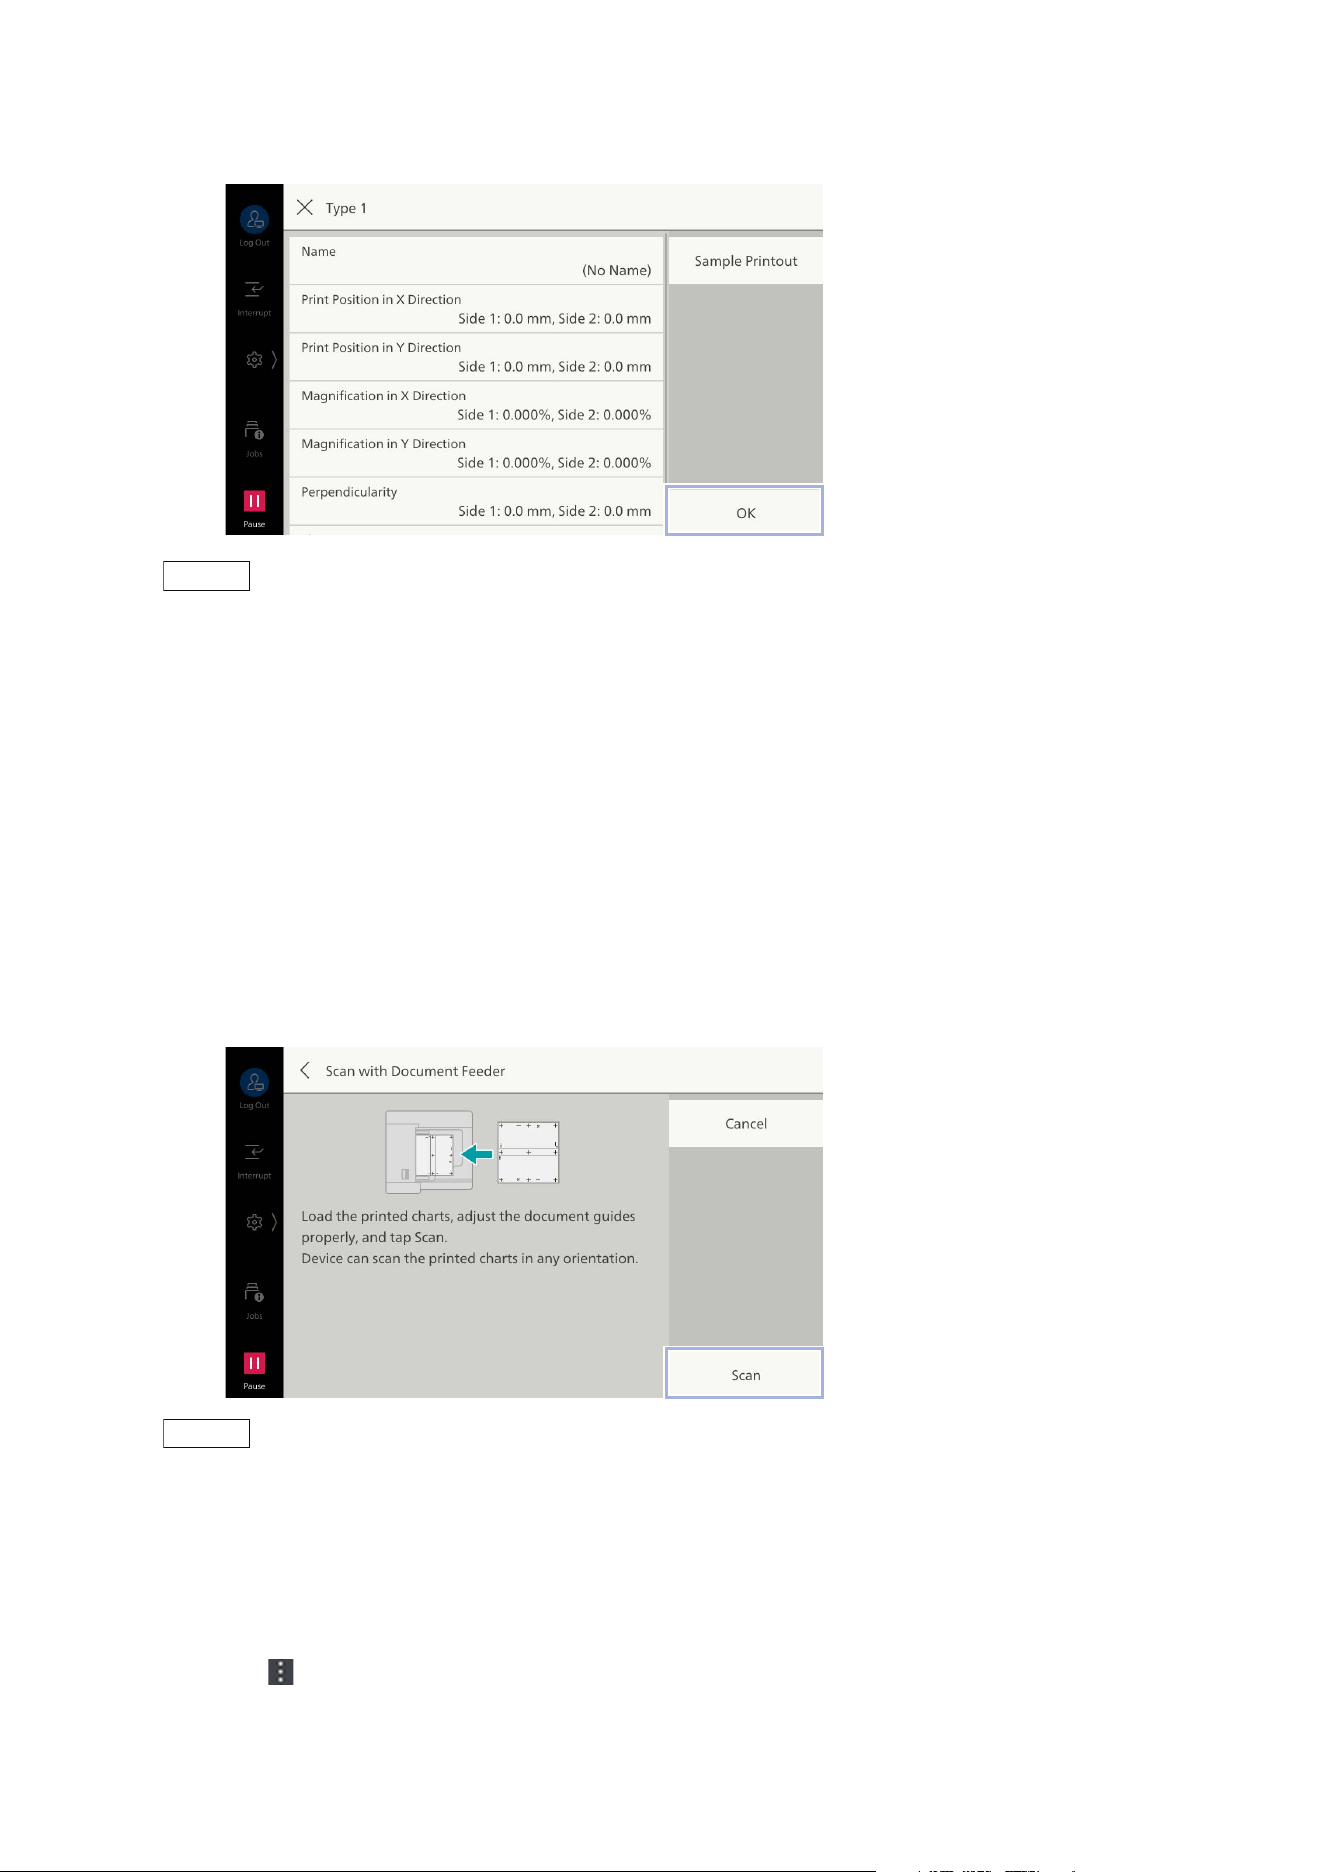
170
10 Device
4)Tap on [OK].
Note
Print the print sample with [Sample Printout], and confirm adjustment results, then you can make fine
adjustment as necessary. For fine adjustment, refer to "[Manual Alignment]" (P.172).
5)Tap on [x].
6)Select the type you set and tap on [OK].
6. Confirm a check mark is applied to the tray to reflect the adjustment value and tap on [OK].
Document Feeder Adjustment
Adjust the document feeder by scanning the calibration chart with it.
1. Tap on [Scan with Document Feeder].
2. Load the calibration chart, following the instruction on the screen, and tap on [Scan].
Note
Multiple calibration charts can be read at the same time. Also in case of the different paper tray, read the
tray information automatically.
Do not set calibration charts of different sizes together.
3. Set the alignment adjustment type.
If [(Not Set)] is displayed on the tray or if you want to change the set type, perform the followings.
1)Tap on of the tray for which you want to set the type.
2)Tap on [Type Setup].
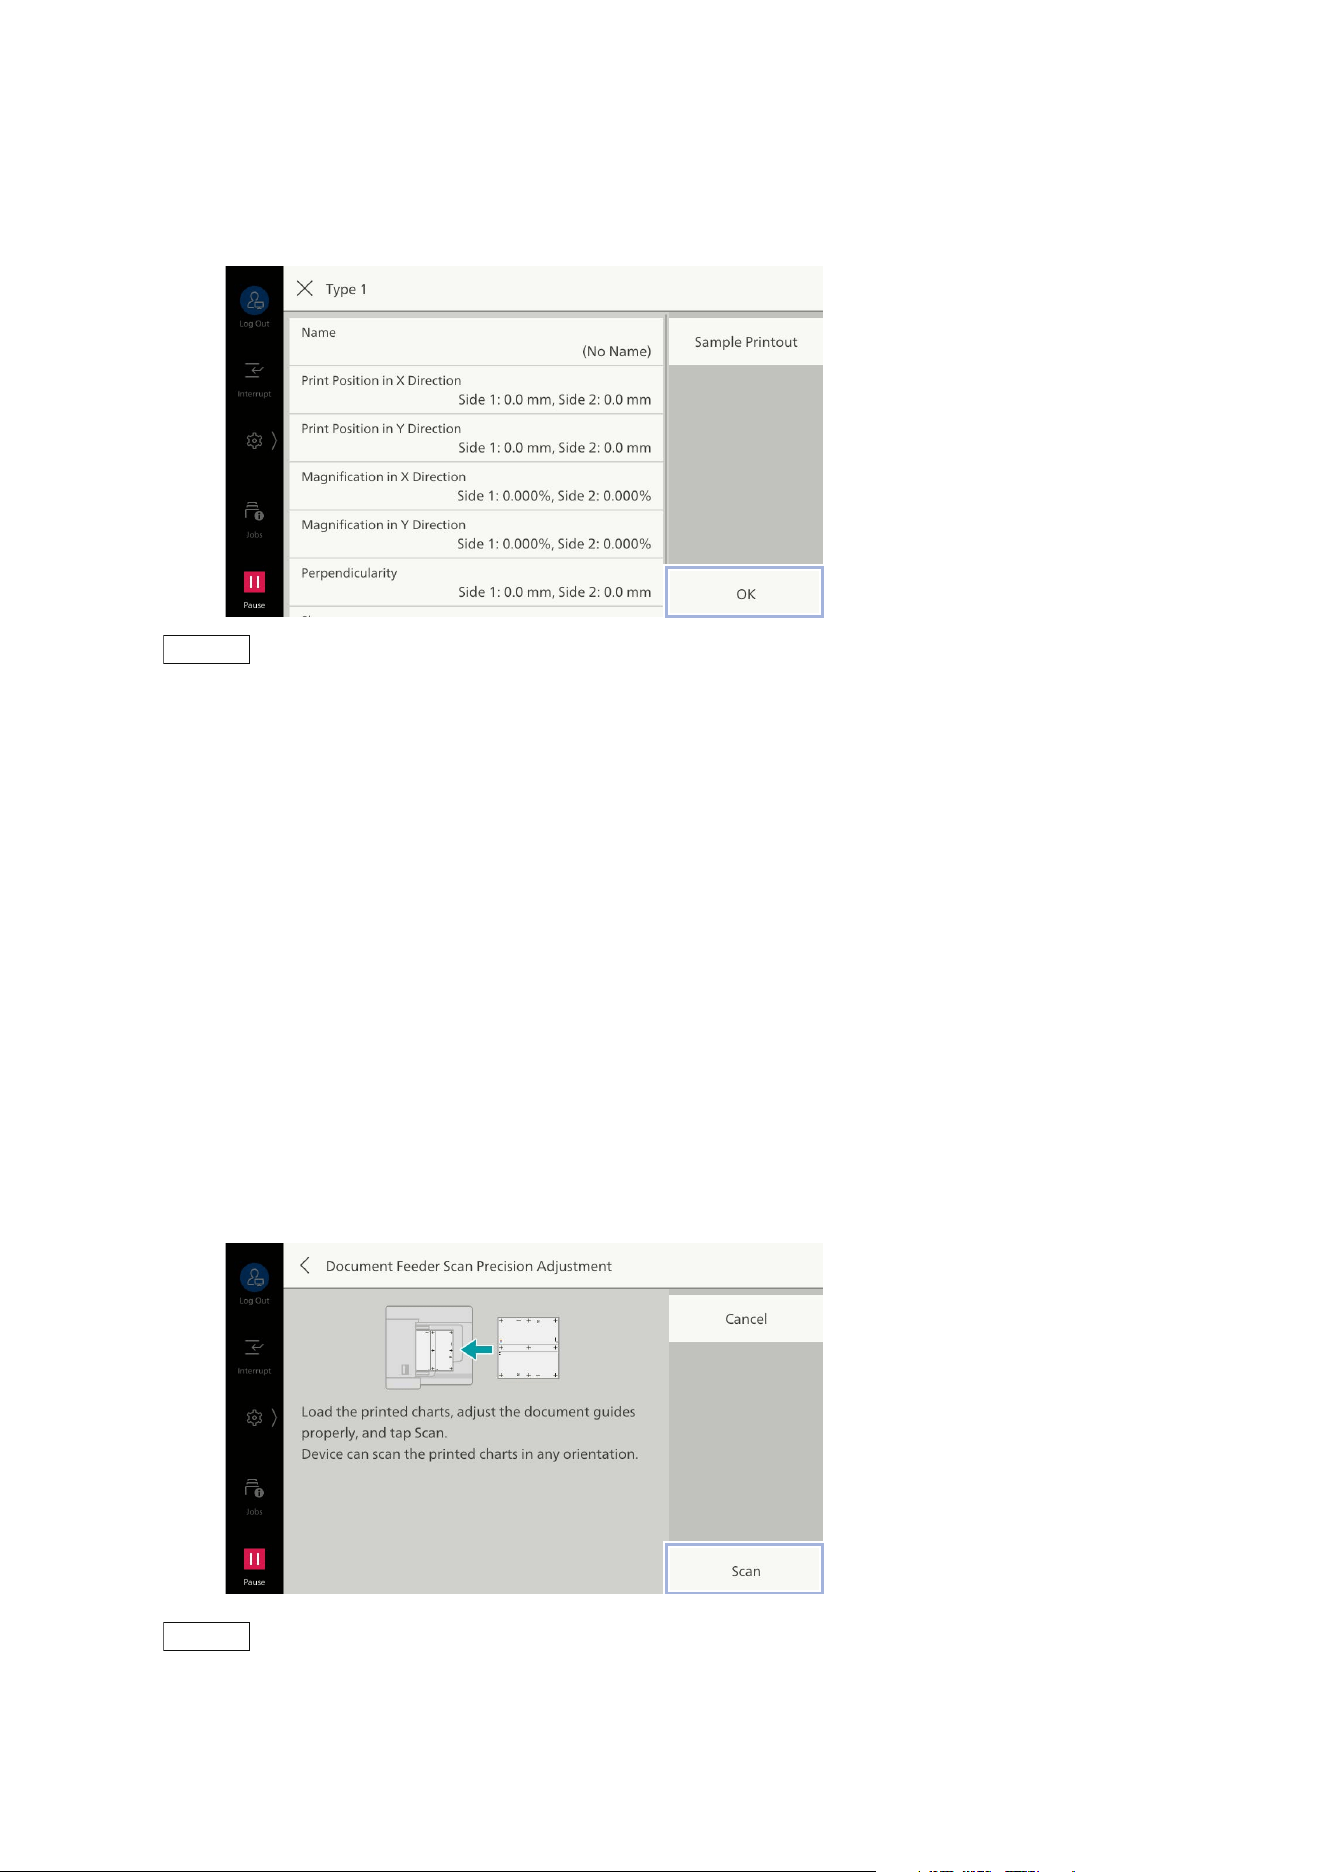
171
10.7 [Maintenance]
3)Tap on the type to register the adjustment value.
The adjustment value is applied.
4)Tap on [OK].
Note
Print the print sample with [Sample Printout], and confirm adjustment results, then you can make fine
adjustment as necessary. For fine adjustment, refer to "[Manual Alignment]" (P.172).
5)Tap on [x].
6)Select the type you set and tap on [OK].
4. Confirm a check mark is applied to the tray to reflect the adjustment value and tap on [OK].
Reading Accuracy Adjustment of Document Feeder
Adjusts accuracy of reading with the document feeder as reading with the document glass. Adjusts
when executing Auto Alignment using the document feeder for the first time or when the huge
difference between the adjustment results of the document feeder and the document glass.
After scanning the calibration chart with the document feeder, scan the same chart with the
document glass to adjust.
1. Tap on [Document Feeder Scan Precision Adjustment].
2. Load the calibration chart, following the instruction on the screen, and tap on [Scan].
Note
Multiple calibration charts can be scanned at the same time.
Do not set calibration charts of different sizes together.
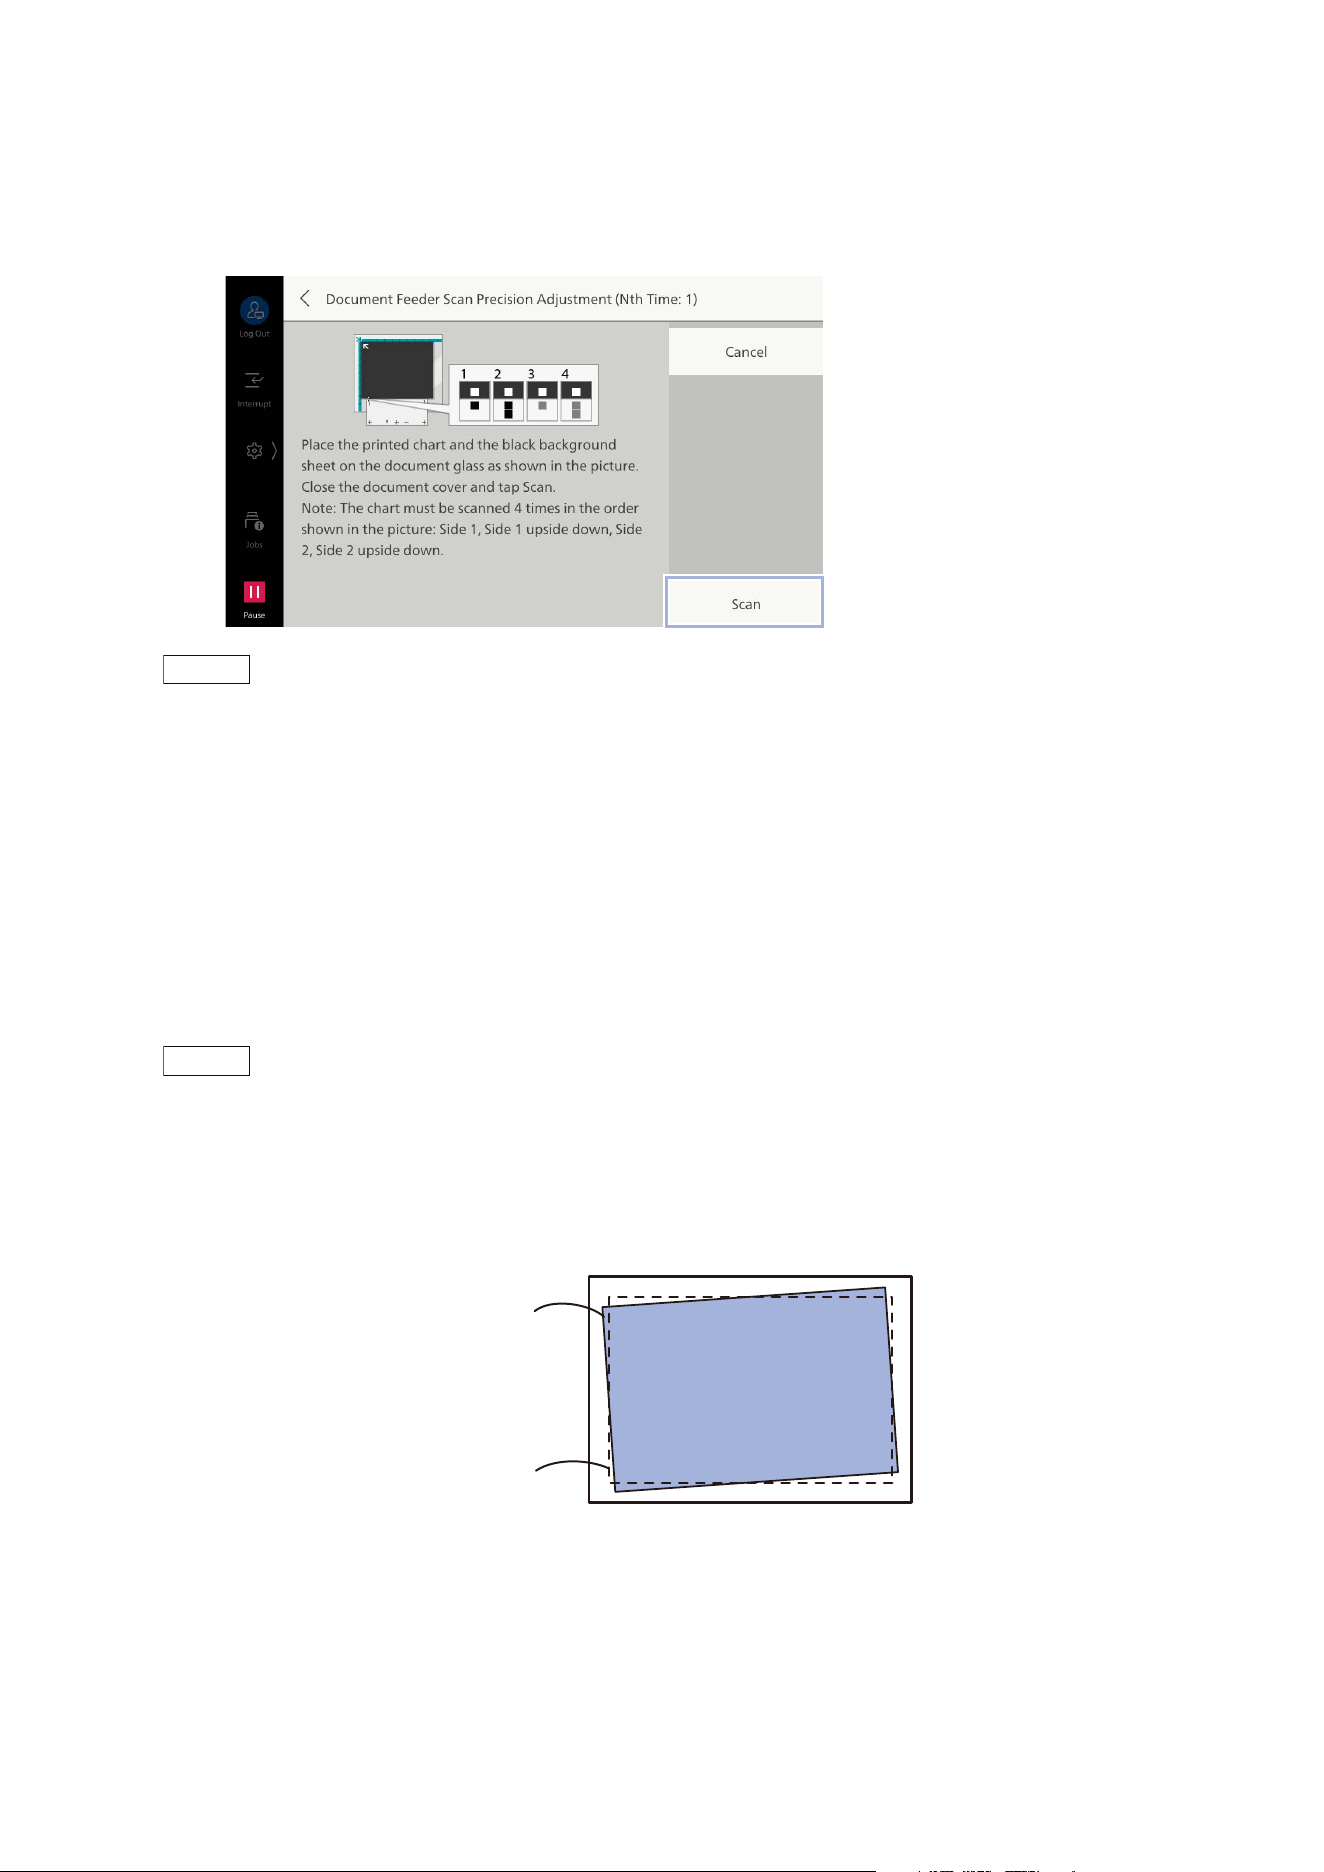
172
10 Device
3. Load the calibration chart and the background sheet on the document glass, following the
instruction on the screen, and tap on [Scan].
Align the square mark of the background sheet and the square mark of the calibration chart, and
read them twice on the front side and twice on the back side.
Note
Align the line at the top of the square mark on the calibration chart with the bottom edge of the
background sheet.
4. When printing multiple calibration charts, tap on [Scan Next Chart] to repeat loading as many as
the number of the charts.
5. When loading the calibration chart is completed, tap on [Start Adjustment].
[Manual Alignment]
Register the alignment value with a name in accordance with paper properties. The registered
alignment value can be set in [Adjust Alignment] of the paper tray.
Note
The alignment value is also assigned to [Custom Paper Settings].
Correction Items Possible to Be Registered
[Skew]
Adjusts skewing image in sub scan direction (paper feed direction).
Actual image
Ideal image
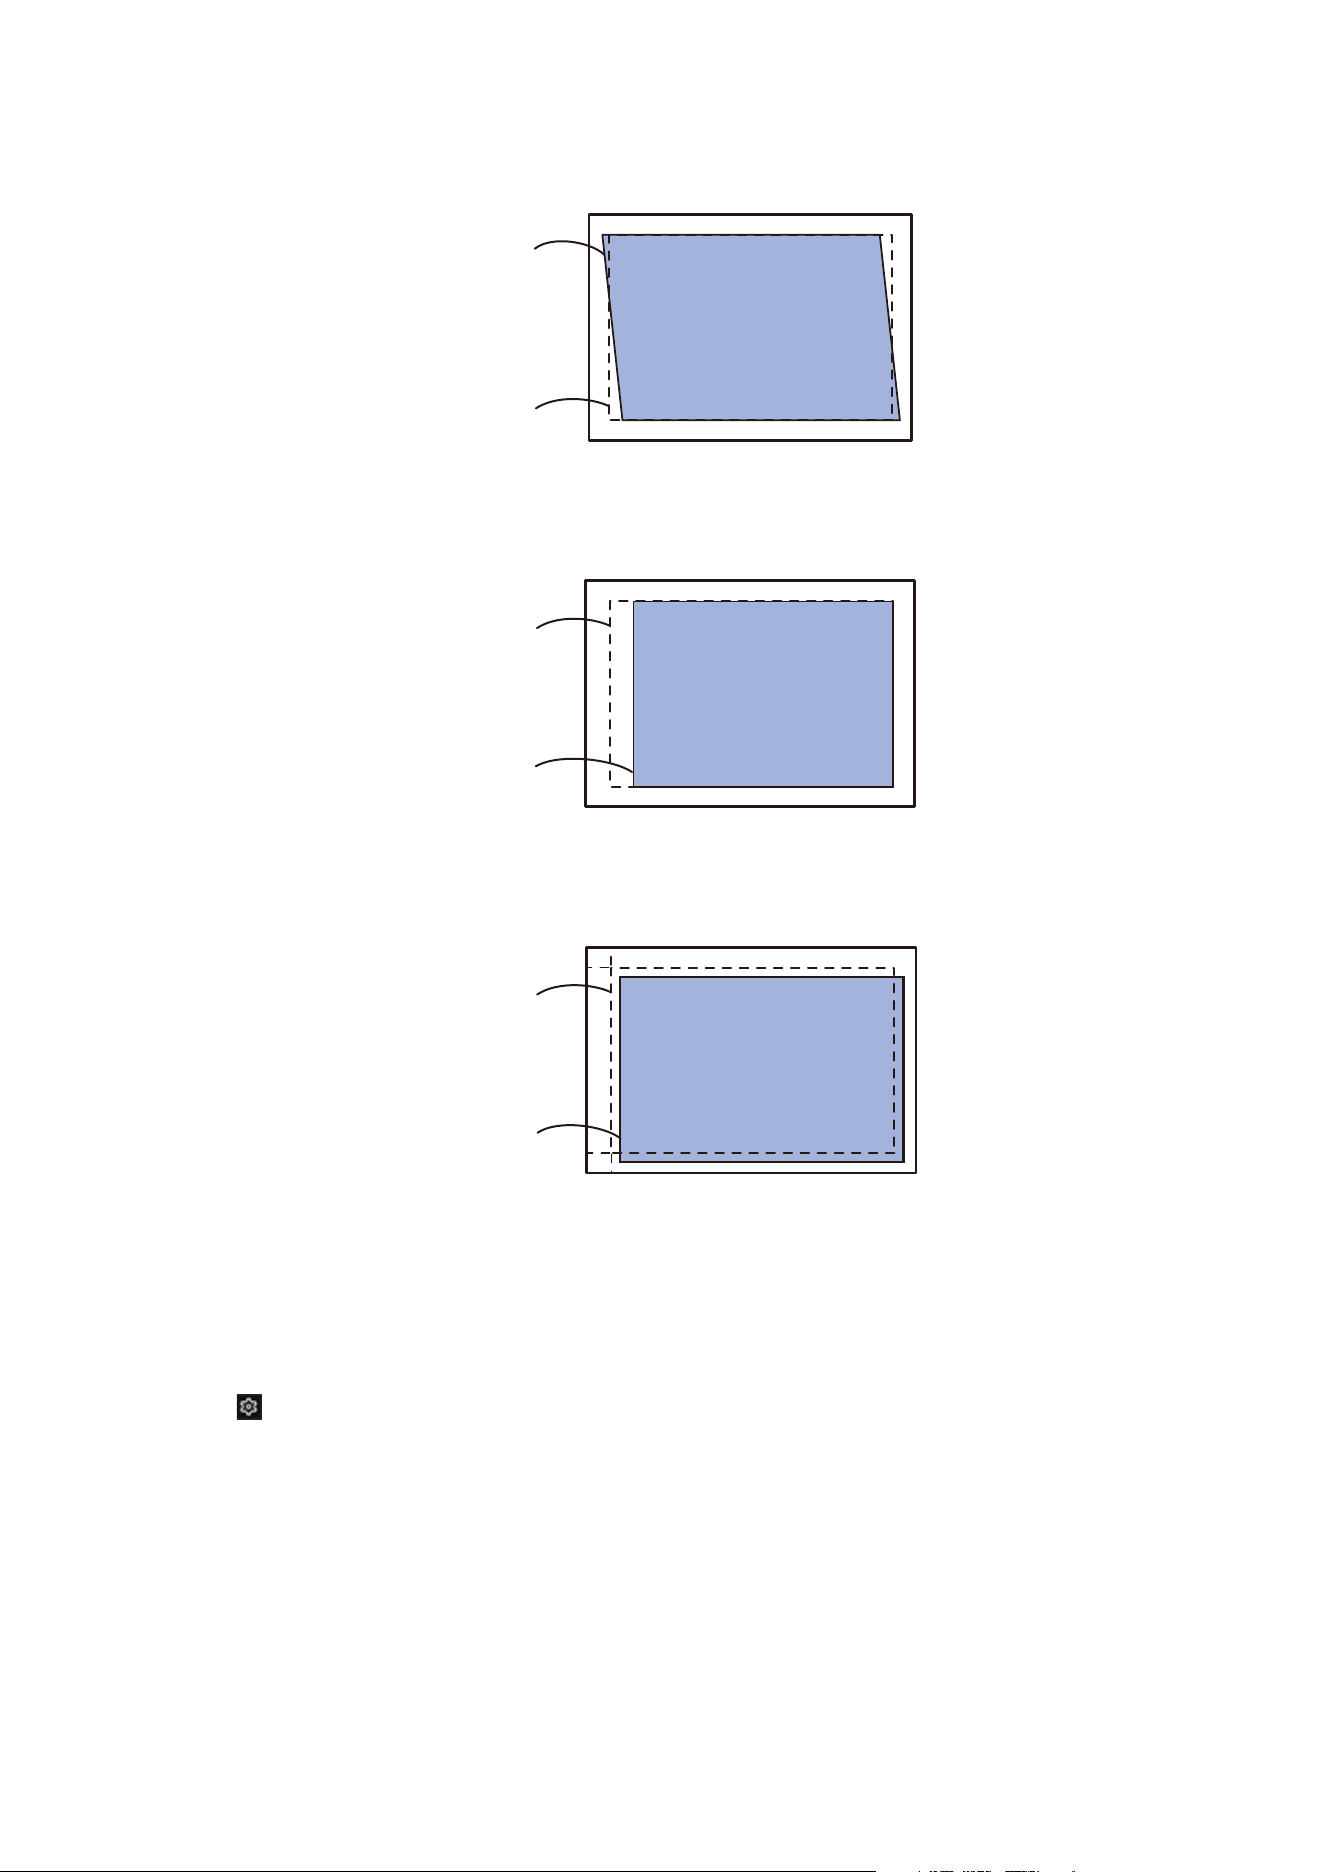
173
10.7 [Maintenance]
[Perpendicularity]
Adjusts image distortion (parallelogram) in the sub scan direction (paper feed direction).
[Magnification in X Direction]/[Magnification in Y Direction]
Adjusts reduce/enlarge of image in sub scan direction (paper feed direction) and main scan direction
(perpendicular direction with respect to the paper feed direction).
[Print Position in X Direction]/[Print Position in Y Direction]
Adjusts position of image in sub scan direction (paper feed direction) and main scan direction
(perpendicular direction with respect to the paper feed direction).
Adjustment Procedure
1. Load the paper for adjustment in the tray for adjustment.
2. Log in to Administrator Mode.
3. Tap on > [Device] > [Maintenance] > [Image Quality] > [Adjust Alignment].
4. Tap on [Manual Alignment] > [Type Setup].
Actual image
Ideal image
Ideal image
Actual image
Ideal image
Actual image
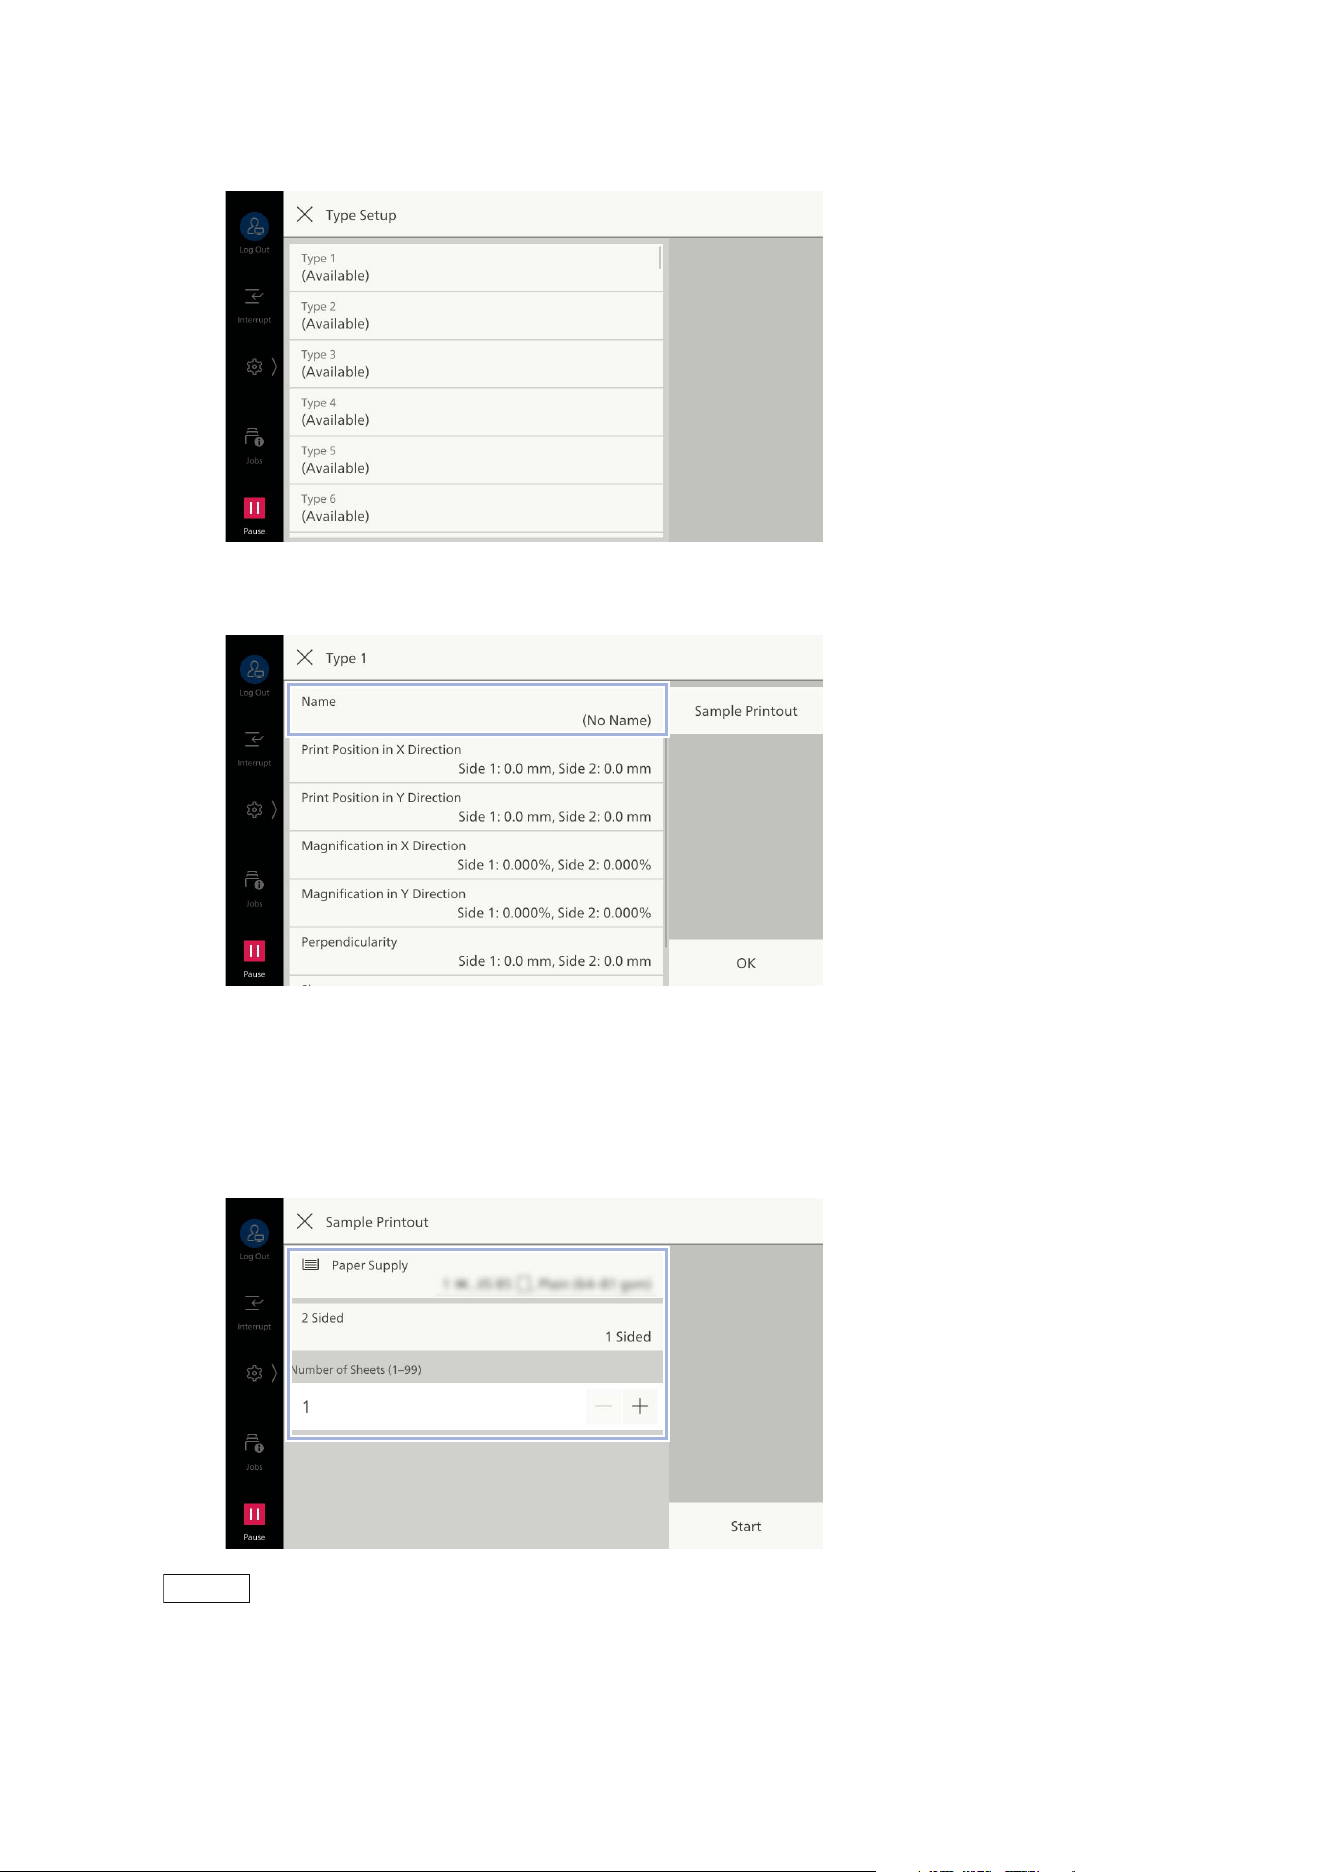
174
10 Device
5. Tap on the field to be registered.
6. Tap on [Name].
7. Enter a name and tap on [OK].
8. Tap on [Sample Printout].
9. Select the tray where paper was loaded in step 1 and set 2 Sided/1 Sided and Number of Sheets.
Note
Due to image variation, it is recommended to print 10 or more copies.
10. Tap on [Start].
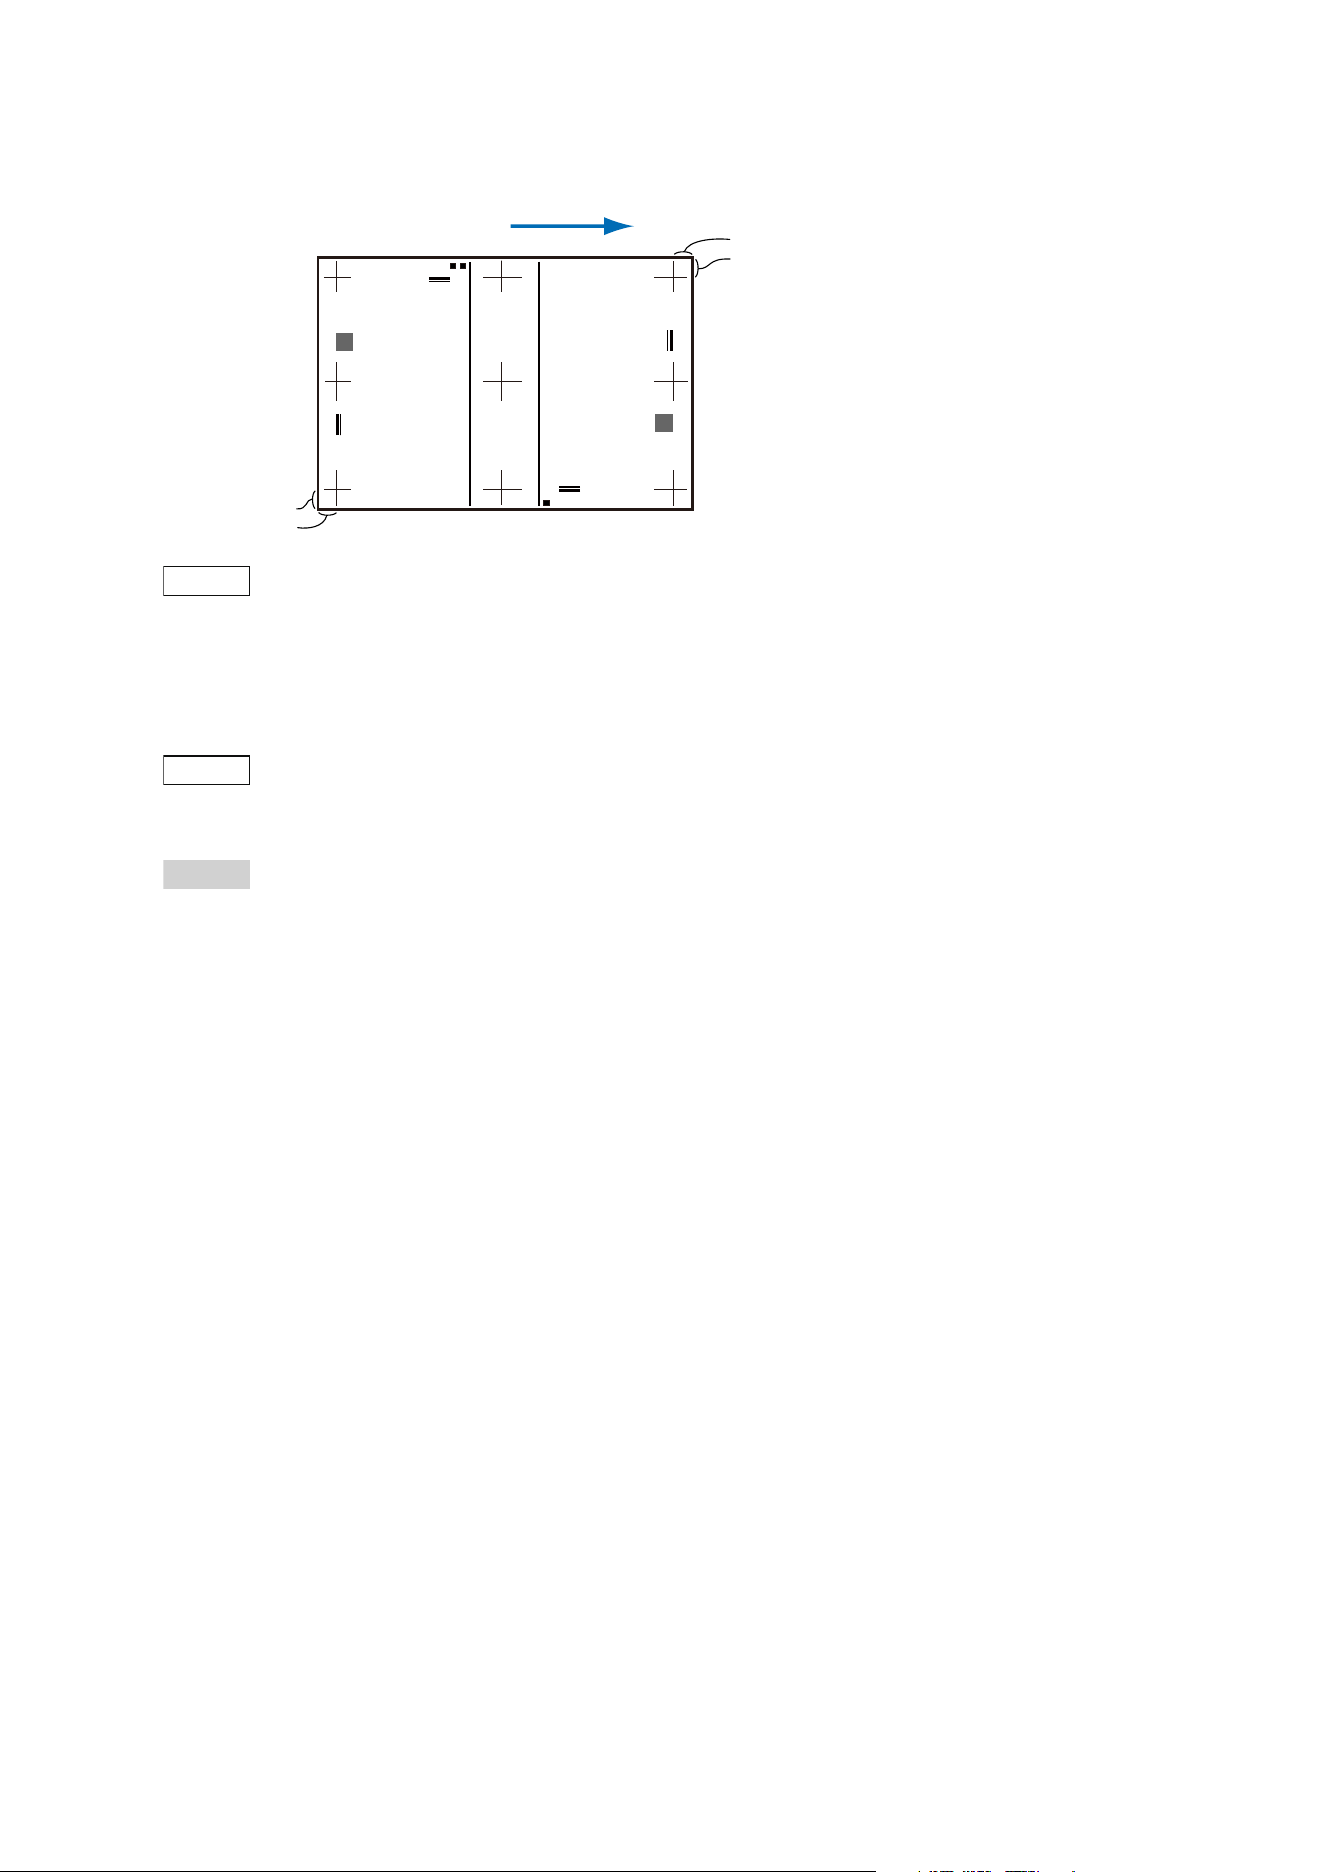
175
10.7 [Maintenance]
11. Measure the gap on the sample copy printed.
Note
The black square for the upside and the gray square for the downside of the image are printed on the
sample copy printed in [Sample Printout]. The side with one black square is the front side of the paper
feed direction, and the side with two black squares is the back side.
12. If the position gap occurs, enter the gap value.
Note
If adjusting multiple gaps, operate in order of [Skew] -> [Perpendicularity] -> [Magnification in X
Direction]/[Magnification in Y Direction] -> [Print Position in X Direction]/[Print Position in Y Direction].
Refer
"[Skew] Adjustment" (P.176)
"[Perpendicularity] Adjustment" (P.176)
"[Magnification in X Direction]/[Magnification in Y Direction] Adjustment" (P.177)
"[Print Position in X Direction]/[Print Position in Y Direction] Adjustment" (P.177)
13. Tap on [Sample Printout] again.
The sample copy reflecting the adjustment value you entered is printed.
14. If you can adjust correctly, tap on [OK].
Paper feed direction
15 mm
15 mm
15 mm
15 mm
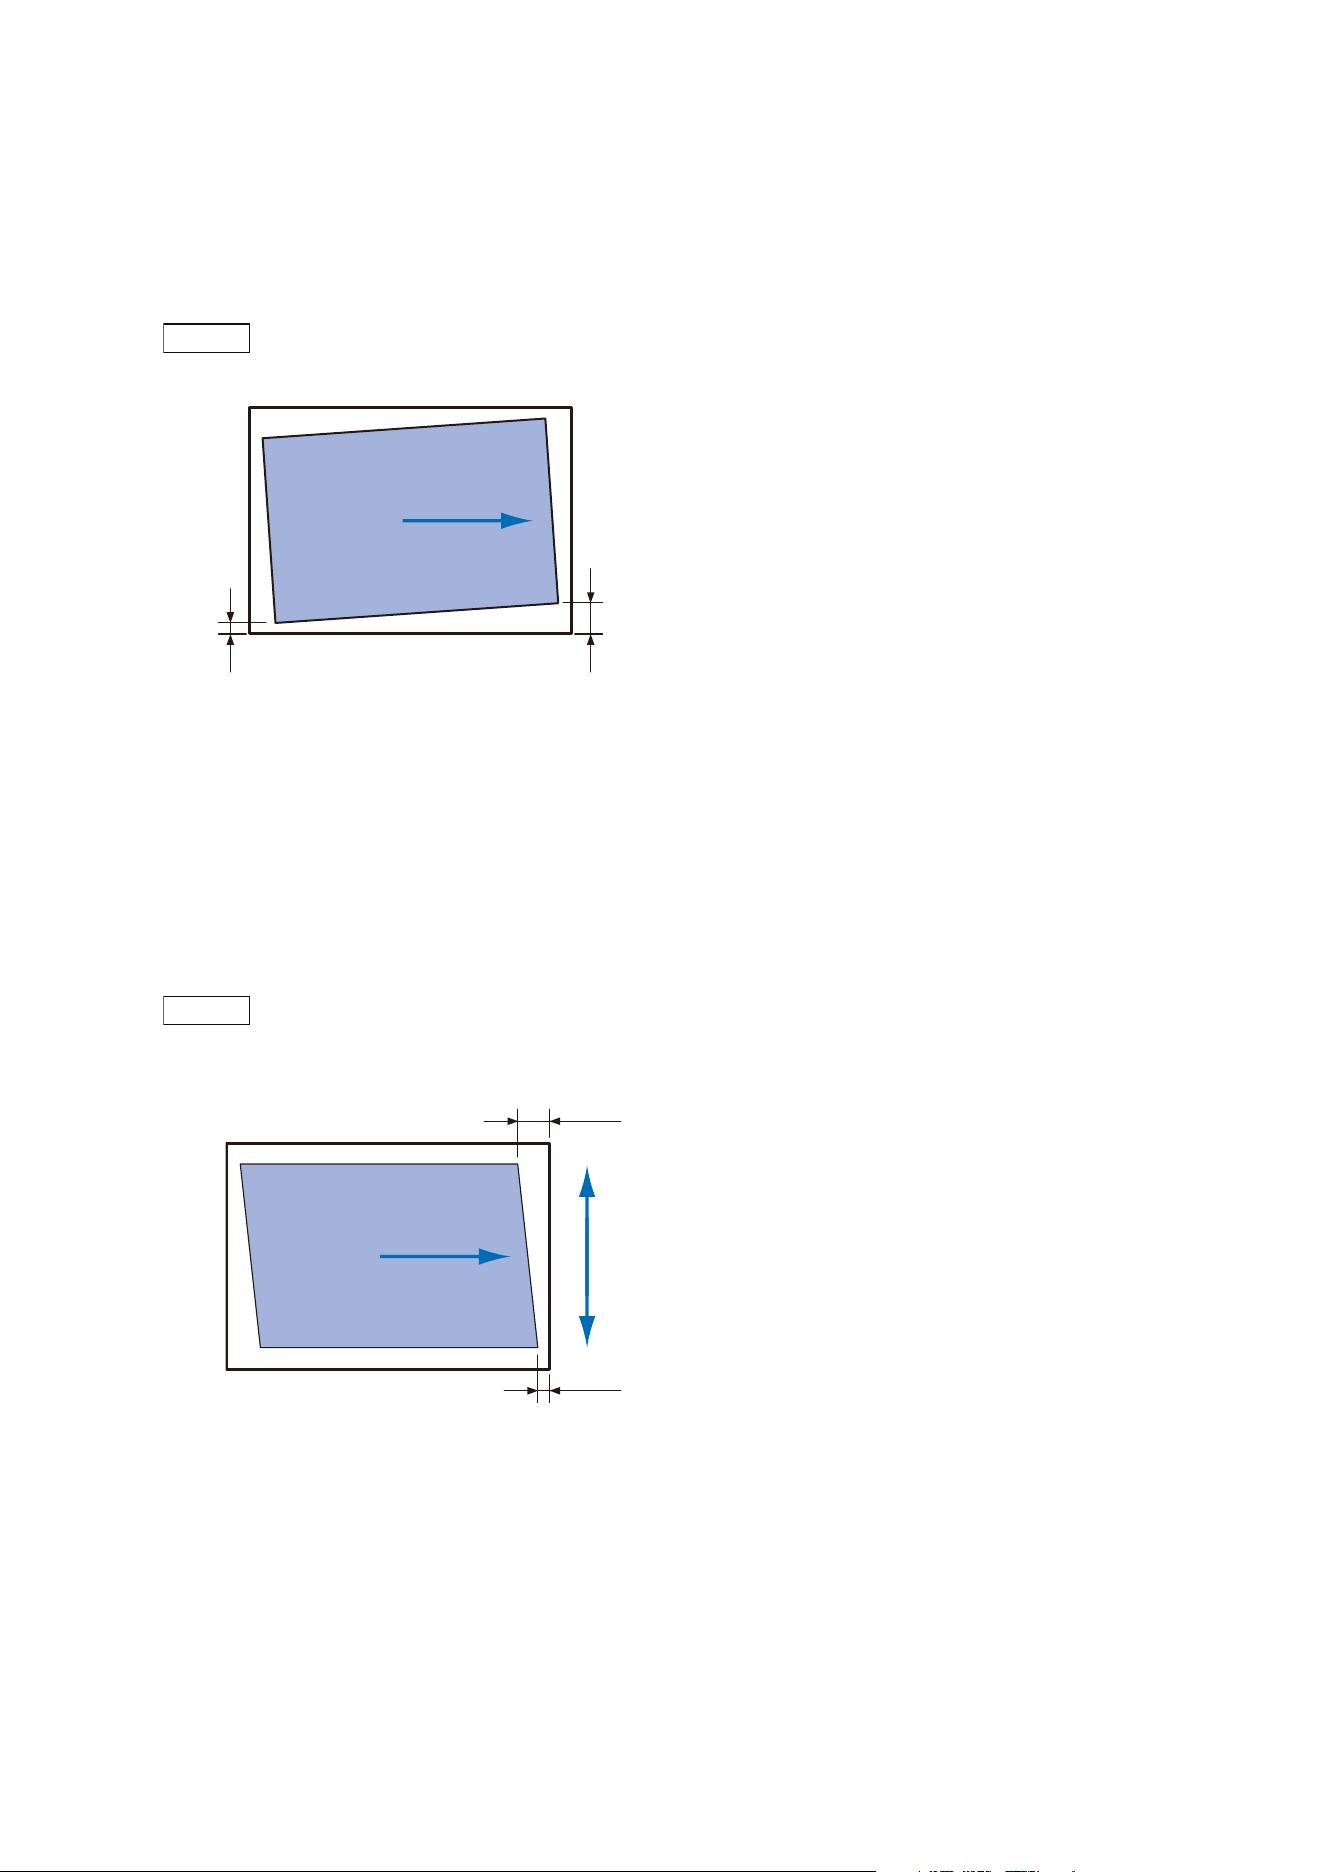
176
10 Device
[Skew] Adjustment
1. Tap on [Skew].
2. Enter the value obtained by adding the adjustment amount to the current setting (1 step = 0.1
mm).
Note
Adjustment amount (mm) = A - B
3. Tap on [OK].
[Perpendicularity] Adjustment
1. Tap on [Perpendicularity].
2. Enter the value obtained by adding the adjustment amount to the current setting (1 step = 0.1
mm).
Note
Adjustment amount (mm) = Inclination amount (A - B) (mm) x 400 ÷ (width in main scanning direction of
paper (mm) - 30)
3. Tap on [OK].
Sub scan direction
(Paper feed direction)
BA
Main scan
direction
A
B
Sub scan direction
(Paper feed direction)
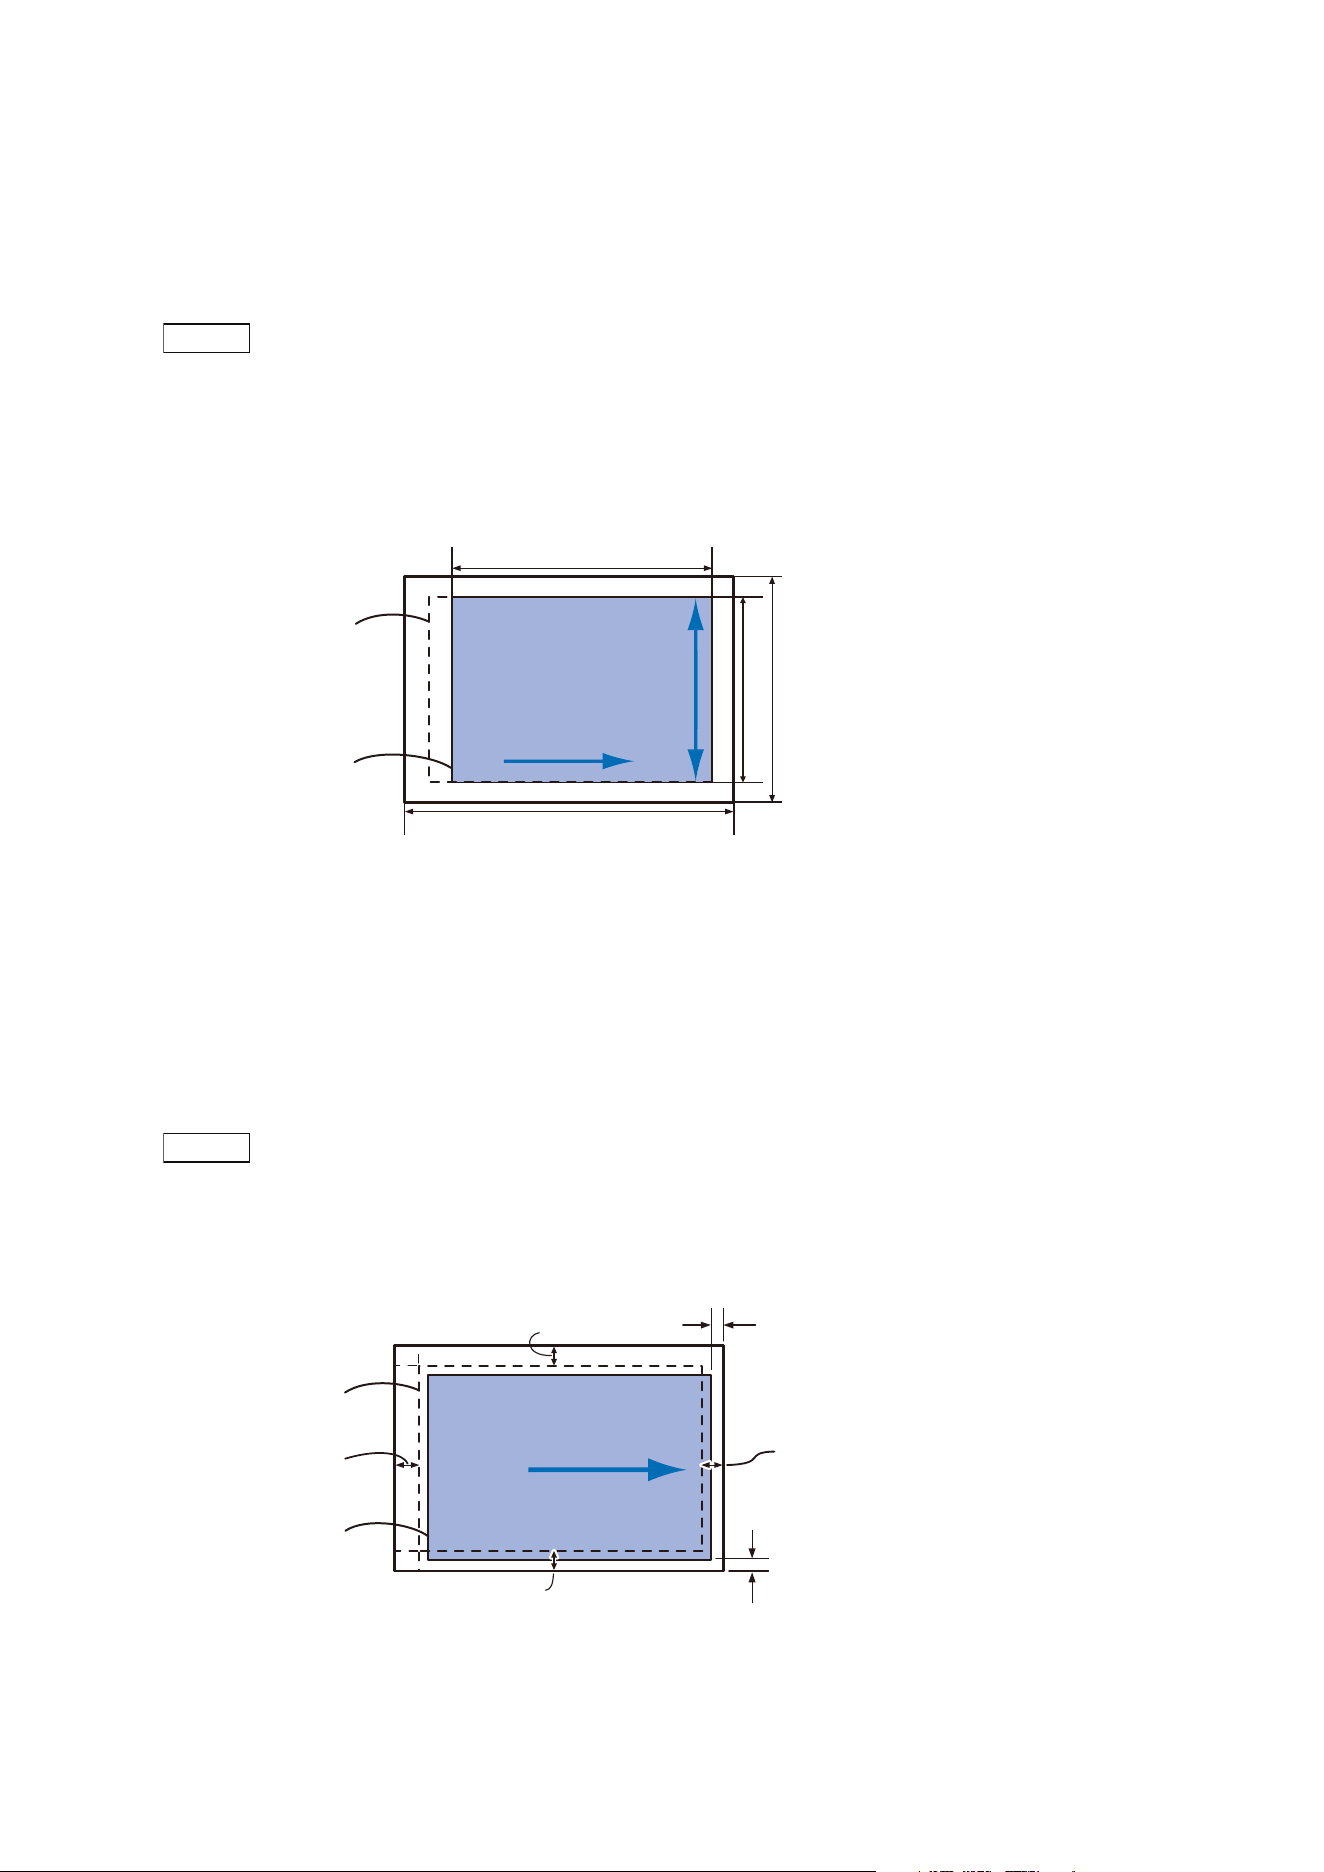
177
10.7 [Maintenance]
[Magnification in X Direction]/[Magnification in Y Direction] Adjustment
1. Tap on [Magnification in X Direction] or [Magnification in Y Direction].
2. Enter the value obtained by adding the adjustment amount to the current setting (1 step =
0.025%).
Note
[Magnification in X Direction]
Adjustment amount (%) = (Paper length in sub scan direction (mm) - 30 - A) ÷ (Paper length in sub scan
direction (mm) - 30) x 100
[Magnification in Y Direction]
Adjustment amount (%) = (Paper length in main scan direction (mm) - 30 - B) ÷ (Paper length in main scan
direction (mm) - 30) x 100
3. Tap on [OK].
[Print Position in X Direction]/[Print Position in Y Direction] Adjustment
1. Tap on [Print Position in X Direction] or [Print Position in Y Direction].
2. Enter the value obtained by adding the adjustment amount to the current setting (1 step = 0.1
mm).
Note
[Print Position in X Direction]
Adjustment amount (mm) = 15 - A (mm)
[Print Position in Y Direction]
Adjustment amount (mm) = 15 - B (mm)
3. Tap on [OK].
Ideal image
Actual image
A
B
Paper length in sub scan direction
Paper length in
main scan direction
Sub scan direction
(Paper feed direction)
Main scan direction
Ideal image
Actual image
15 mm
A
15 mm
B
15 mm
15 mm
Sub scan direction
(Paper feed direction)

178
10 Device
[Density Uniformity Adjustment]
Adjusts manually density uniformity of output image.
1. Load the paper for adjustment in the tray for adjustment.
2. Log in to Administrator Mode.
3. Tap on > [Device] > [Maintenance] > [Image Quality] > [Density Uniformity Adjustment].
4. Tap on [Print Sample].
5. Set each item and tap on [Print].
[Coverage 1]/[Coverage 2]
Two types of density can be set to print on the print sample.
[Paper Supply]
Select the tray where paper was loaded in step 1.
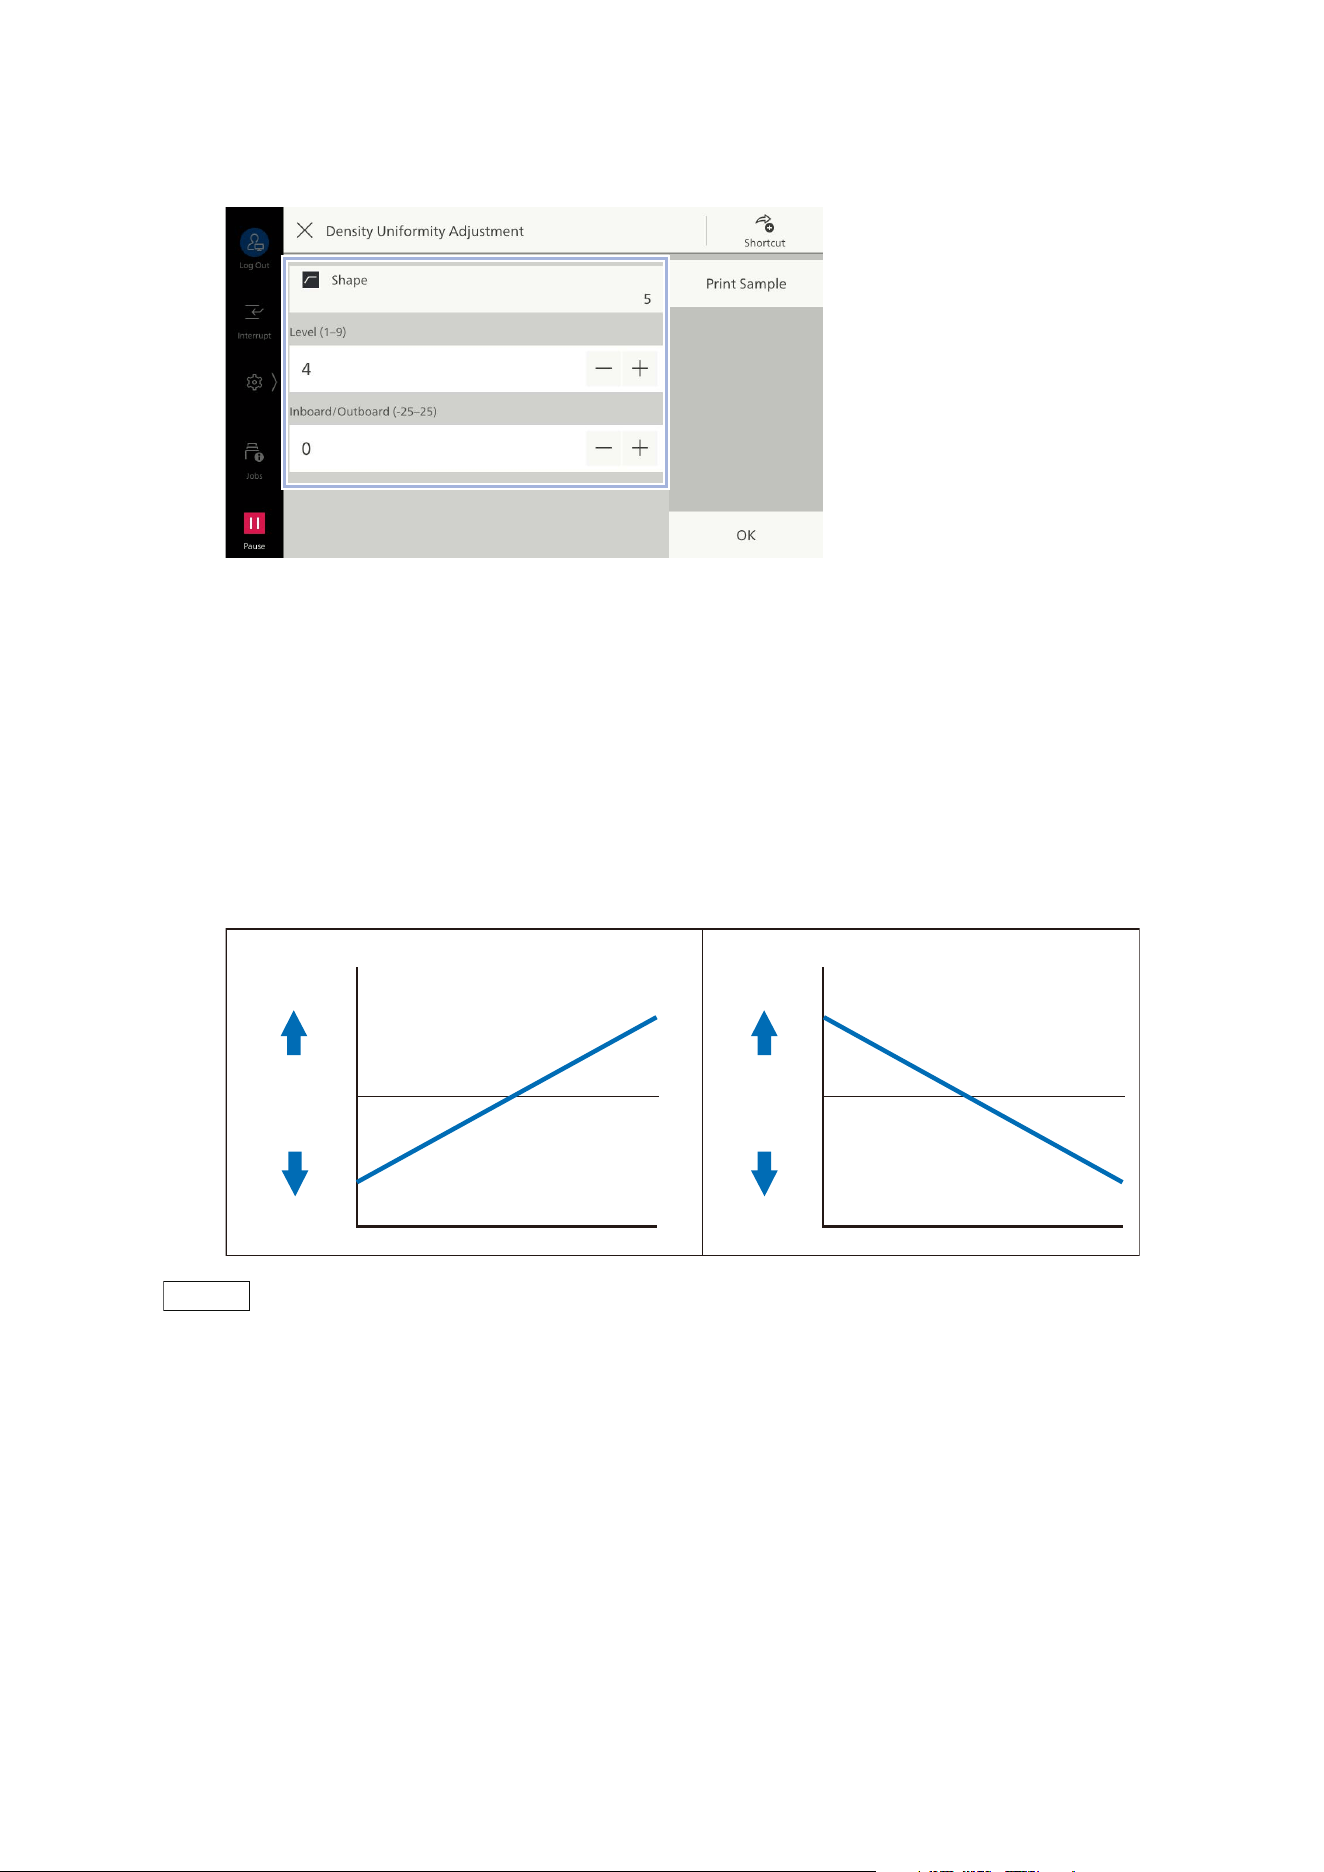
179
10.7 [Maintenance]
6. Confirm the printed sample, and if there is any non-uniformity, adjust density.
[Shape]
Select the amount of density distribution adjustment for the print sample from shapes 1 to 6.
[Level]
Select the level of the density difference of the print sample from 1 to 6. Level 1 indicates no
adjustment, and the larger the value, the larger the adjustment amount.
[Inboard/Outboard]
Adjust the density distribution as follows with respect to the print sample. Set the adjustment
amount in the range -17 to 17.
Th
e larger the value, the larger the adjustment amount.
Note
When the density distribution differs from these patterns, adjust using [Shape] and [Level].
7. After adjustment, print the print sample again with [Print Sample], and confirm adjustment
results.
8. If you can adjust correctly, tap on [OK].
Input “+” value Input “-” value
Darker
Lighter
Density
Adjustment
amount
Darker
Lighter
Density
Adjustment
amount
IN OUT IN OUT
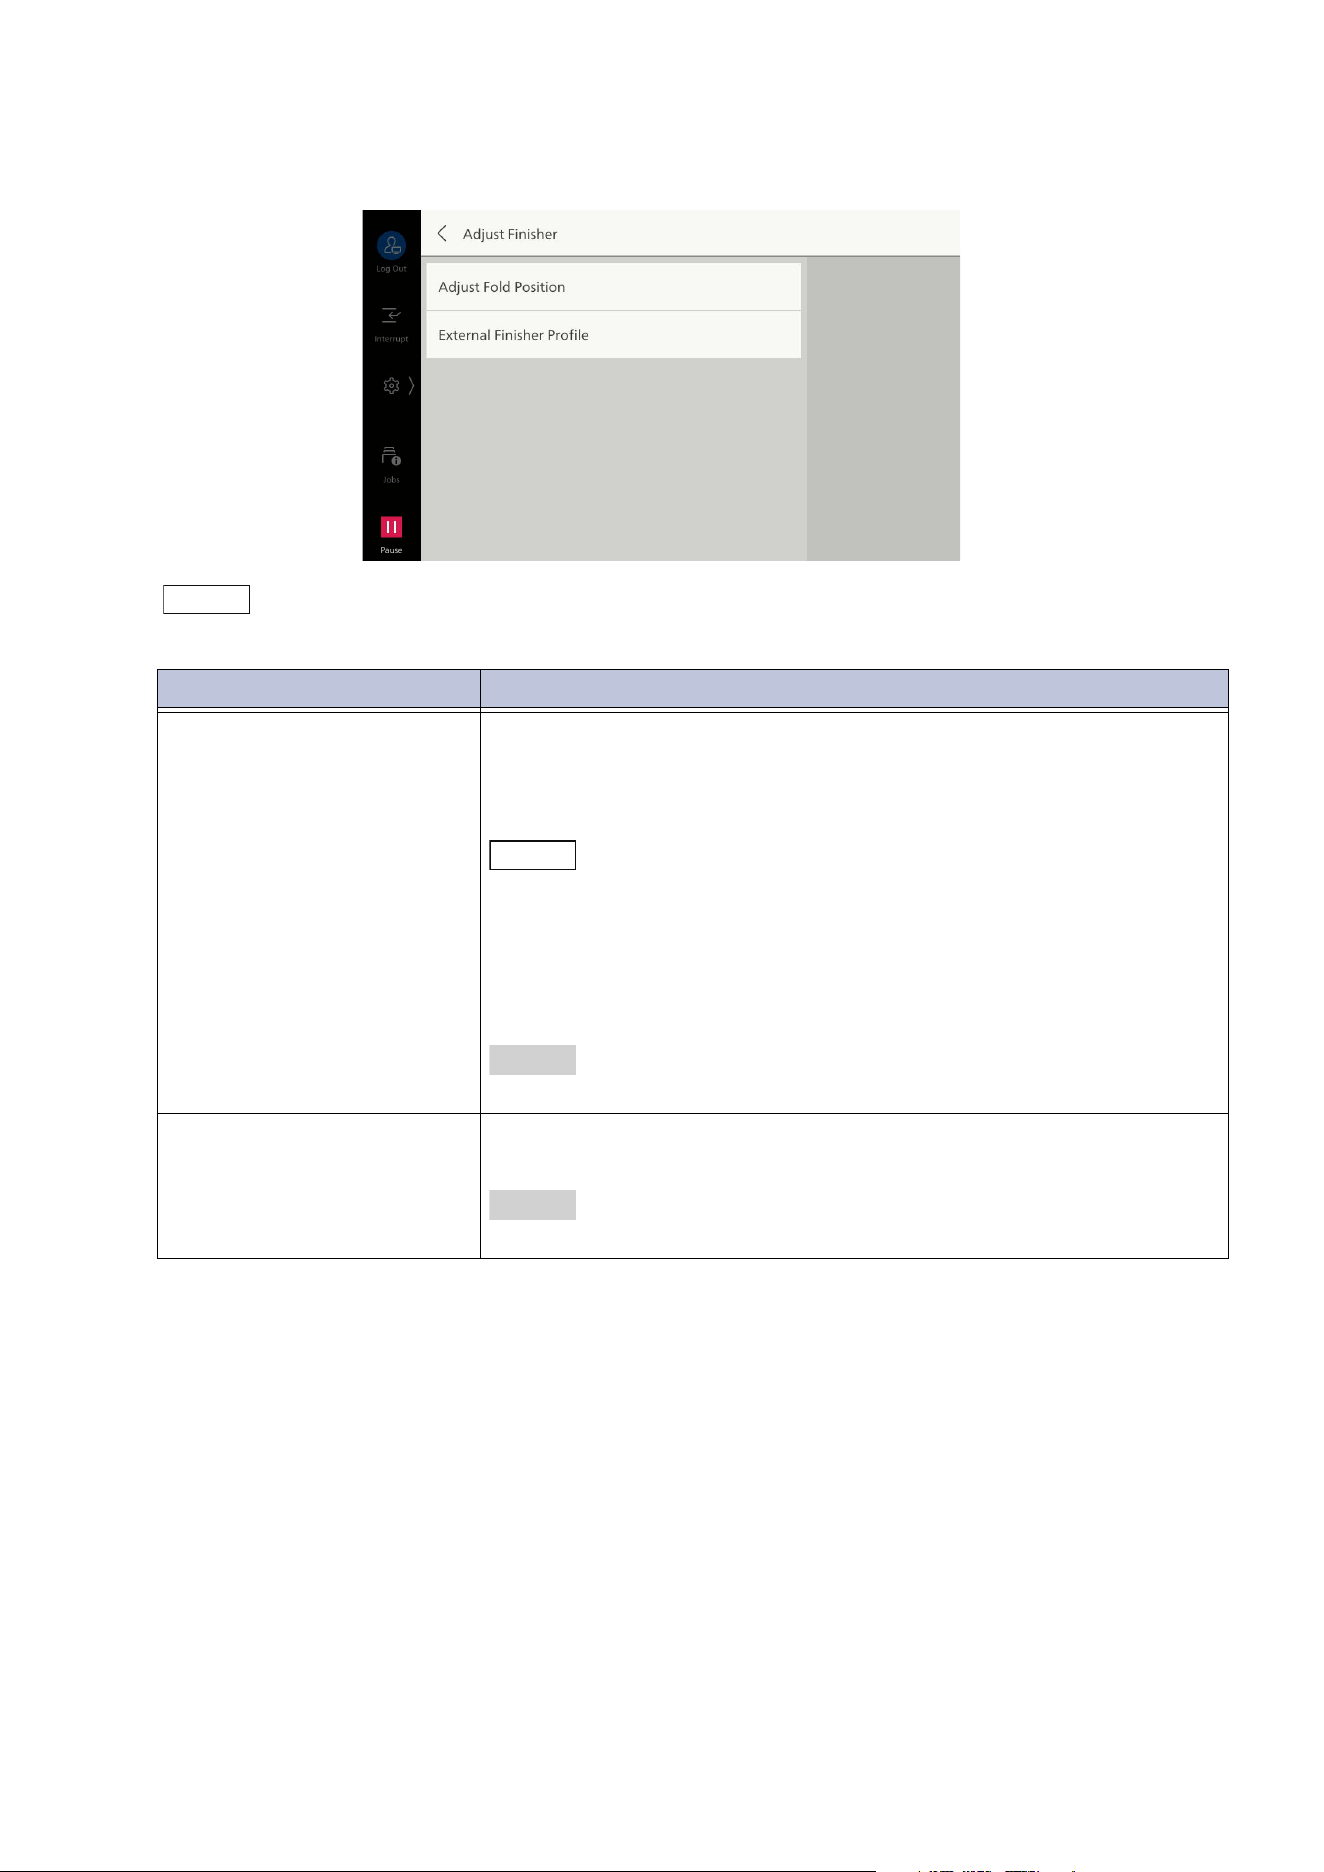
180
10 Device
[Adjust Finisher]
Note
The displayed items differ depending on the machine configurations.
Item Description
[Adjust Fold Position] Registers the folding positions and the adjustment value according
to paper type or number of sheets.
You can select the registered alignment value in the paper tray
assignment or custom paper setting.
Note
You can register the shortcut of this item to [Shortcuts] of the control
menu by tapping on [Shortcut].
This item can be set to allow local users to adjust this item. Set [Local
User Access - Maintenance] to [Enabled] in "[Other Settings]" (P.101).
Local users should use the adjustment menu from [Shortcuts] of the
control menu.
Refer
For details, refer to "[Adjust Fold Position] Type Setup" (P.181).
[External Finisher Profile] You can register the adjustment value of the finisher when a third-
party product is installed.
Refer
For details, refer to the manual attached to the finisher.
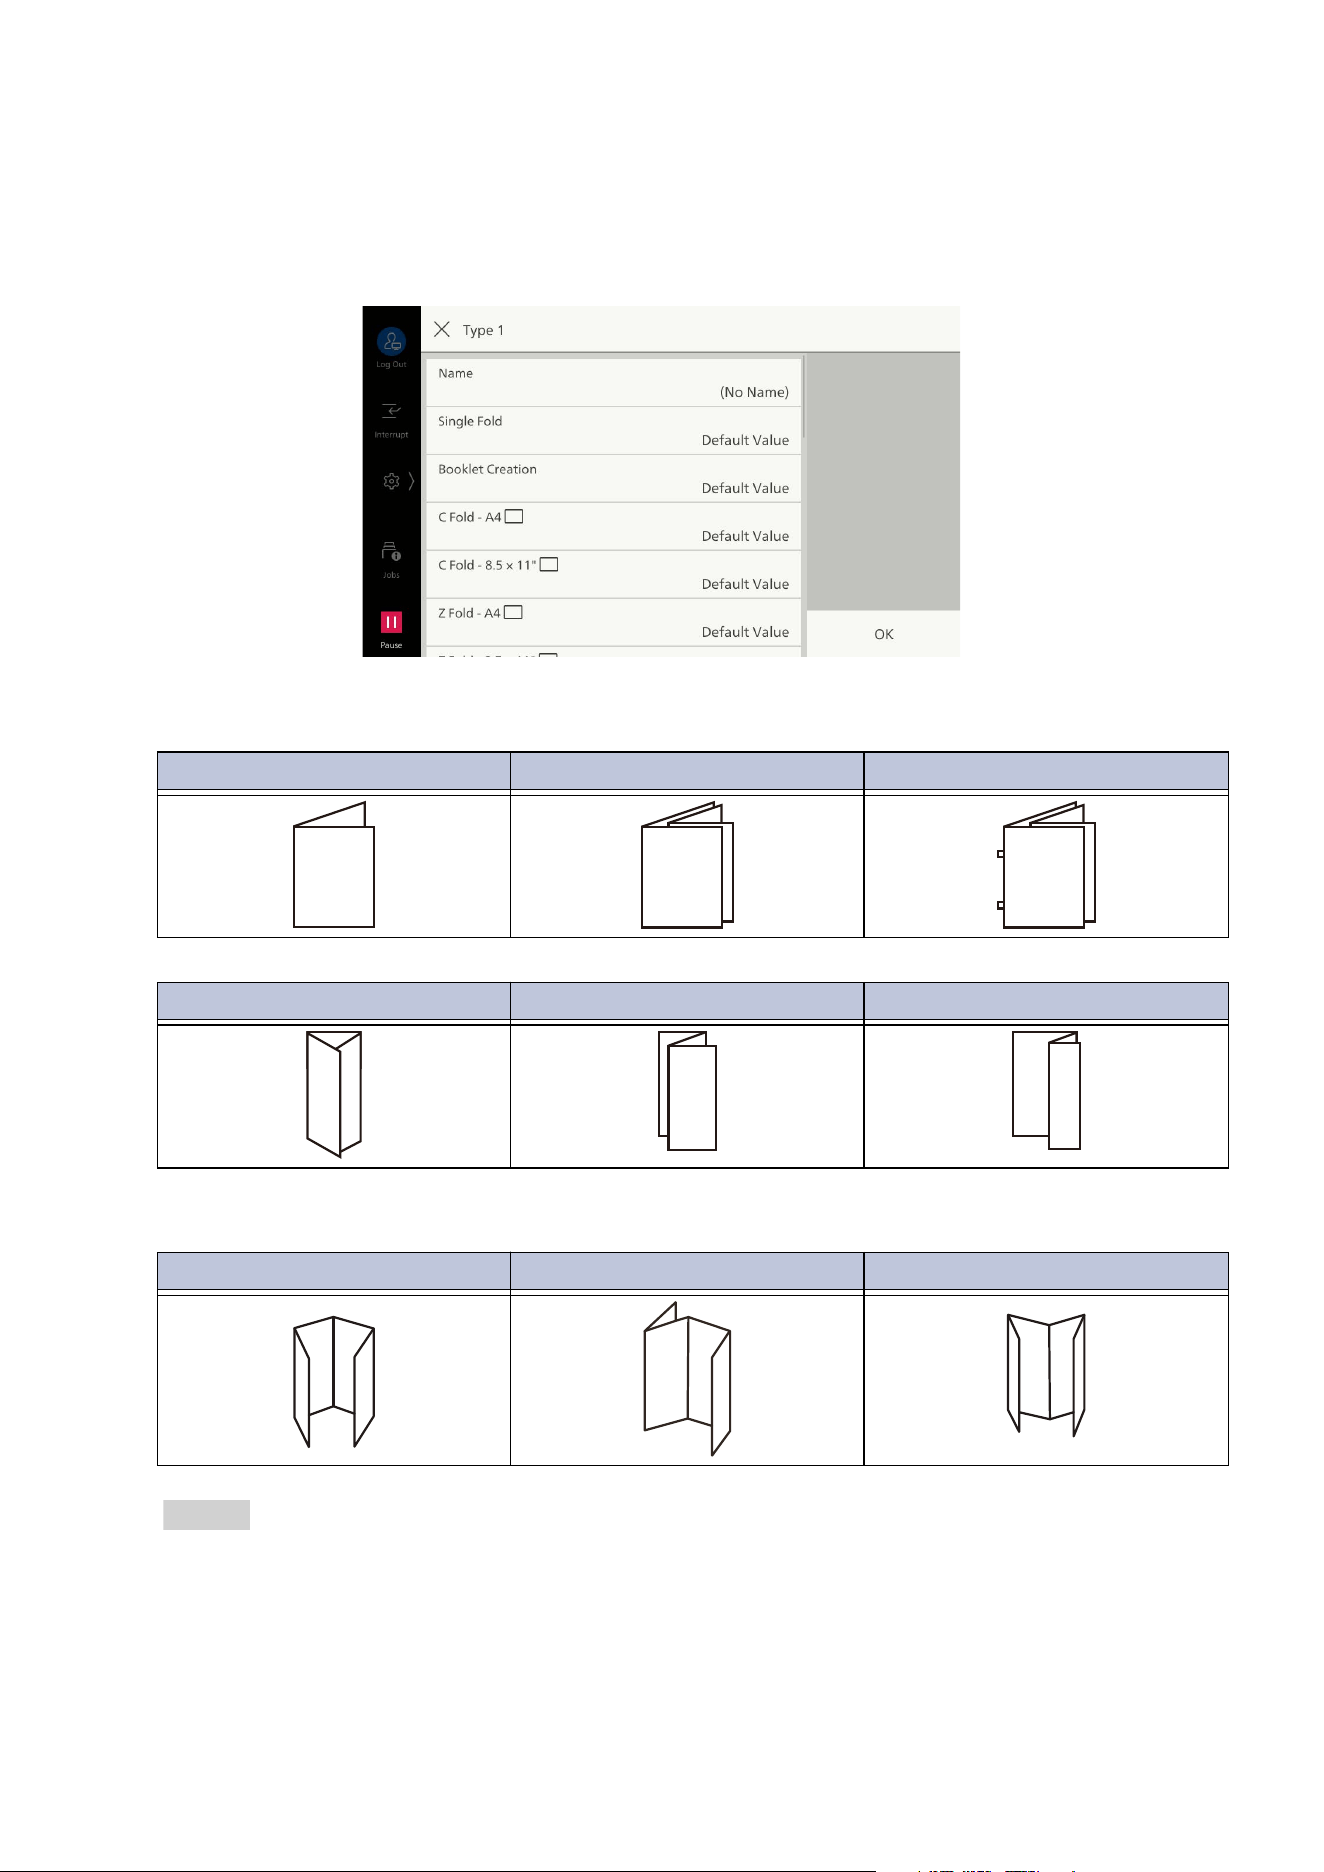
181
10.7 [Maintenance]
[Adjust Fold Position] Type Setup
Assign the names for each type, and by following the screen, set the adjustment value for fold
position for Single Fold, Booklet, C Fold, Z Fold, and Z Fold Half Sheet. If the Crease/Two-Sided
Trimmer is installed, you can adjust the positions of folds for Single Fold, C Fold, Z Fold, Z Fold Half
Sheet, Double Gate Fold, Double Parallel Fold and Accordion Fold.
Folding
Crease
Refer
Refer to “Folding Position Adjustment” in
User’s Manual - Appendix
, for how to adjust the folding
position.
Single Fold Booklet Creation Booklet Creation + Staple
C Fold Z Fold Z Fold Half Sheet
Double Gate Fold Double Parallel Fold Accordion Fold
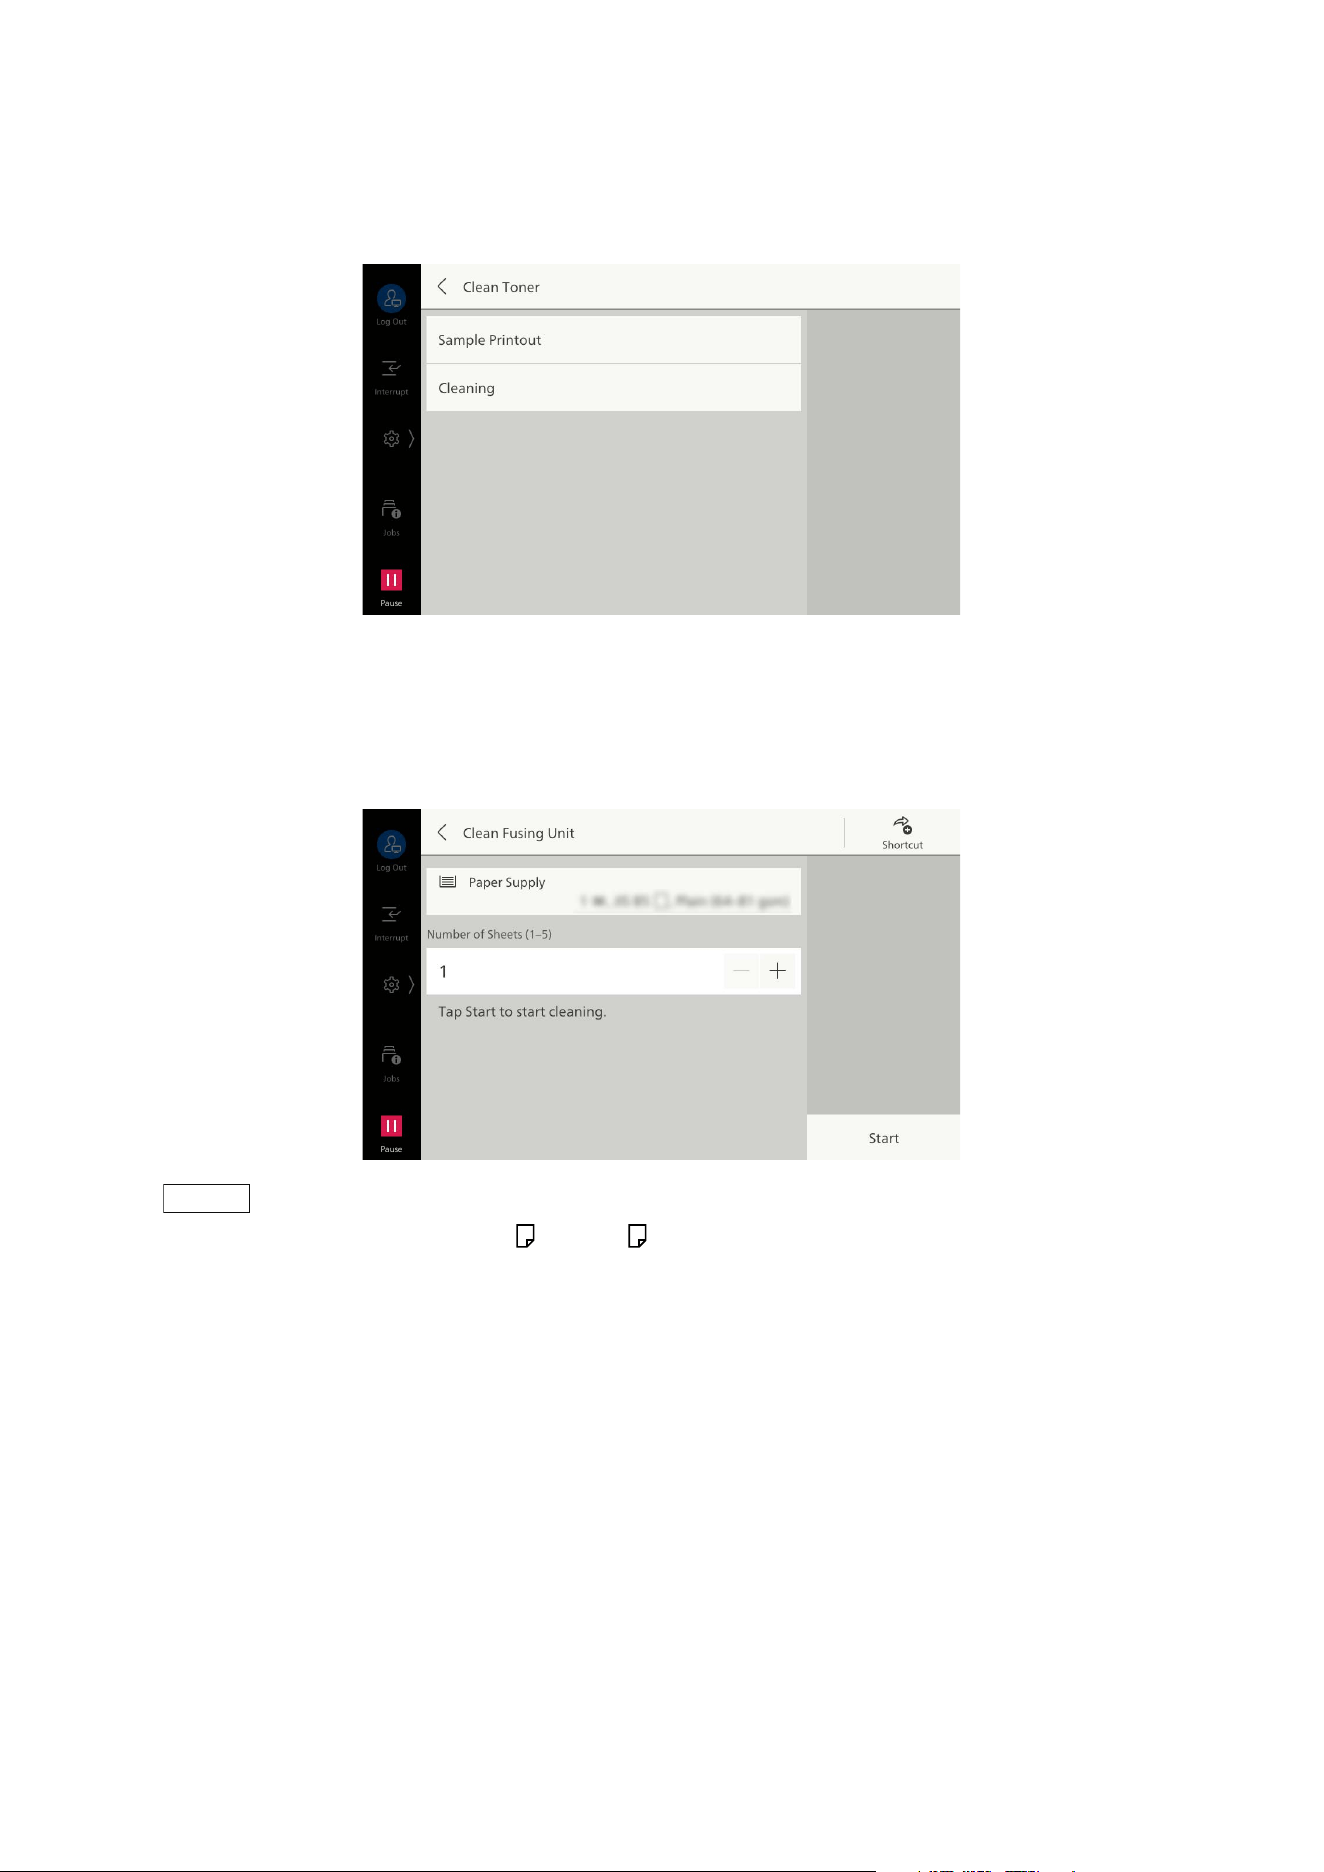
182
10 Device
[Clean Toner]
Output the toner that has passed the time remaining in the developer, and supply the new toner with
the developer to improve the image quality.
[Clean Fusing Unit]
Enables improving black spots and black line stains by cleaning the dirt on the fusing roll.
Clean the fusing unit using the loaded paper.
Note
Load the paper larger than A4 or Letter .
You can register the shortcut of this item to [Shortcuts] of the control menu by tapping on [Shortcut].
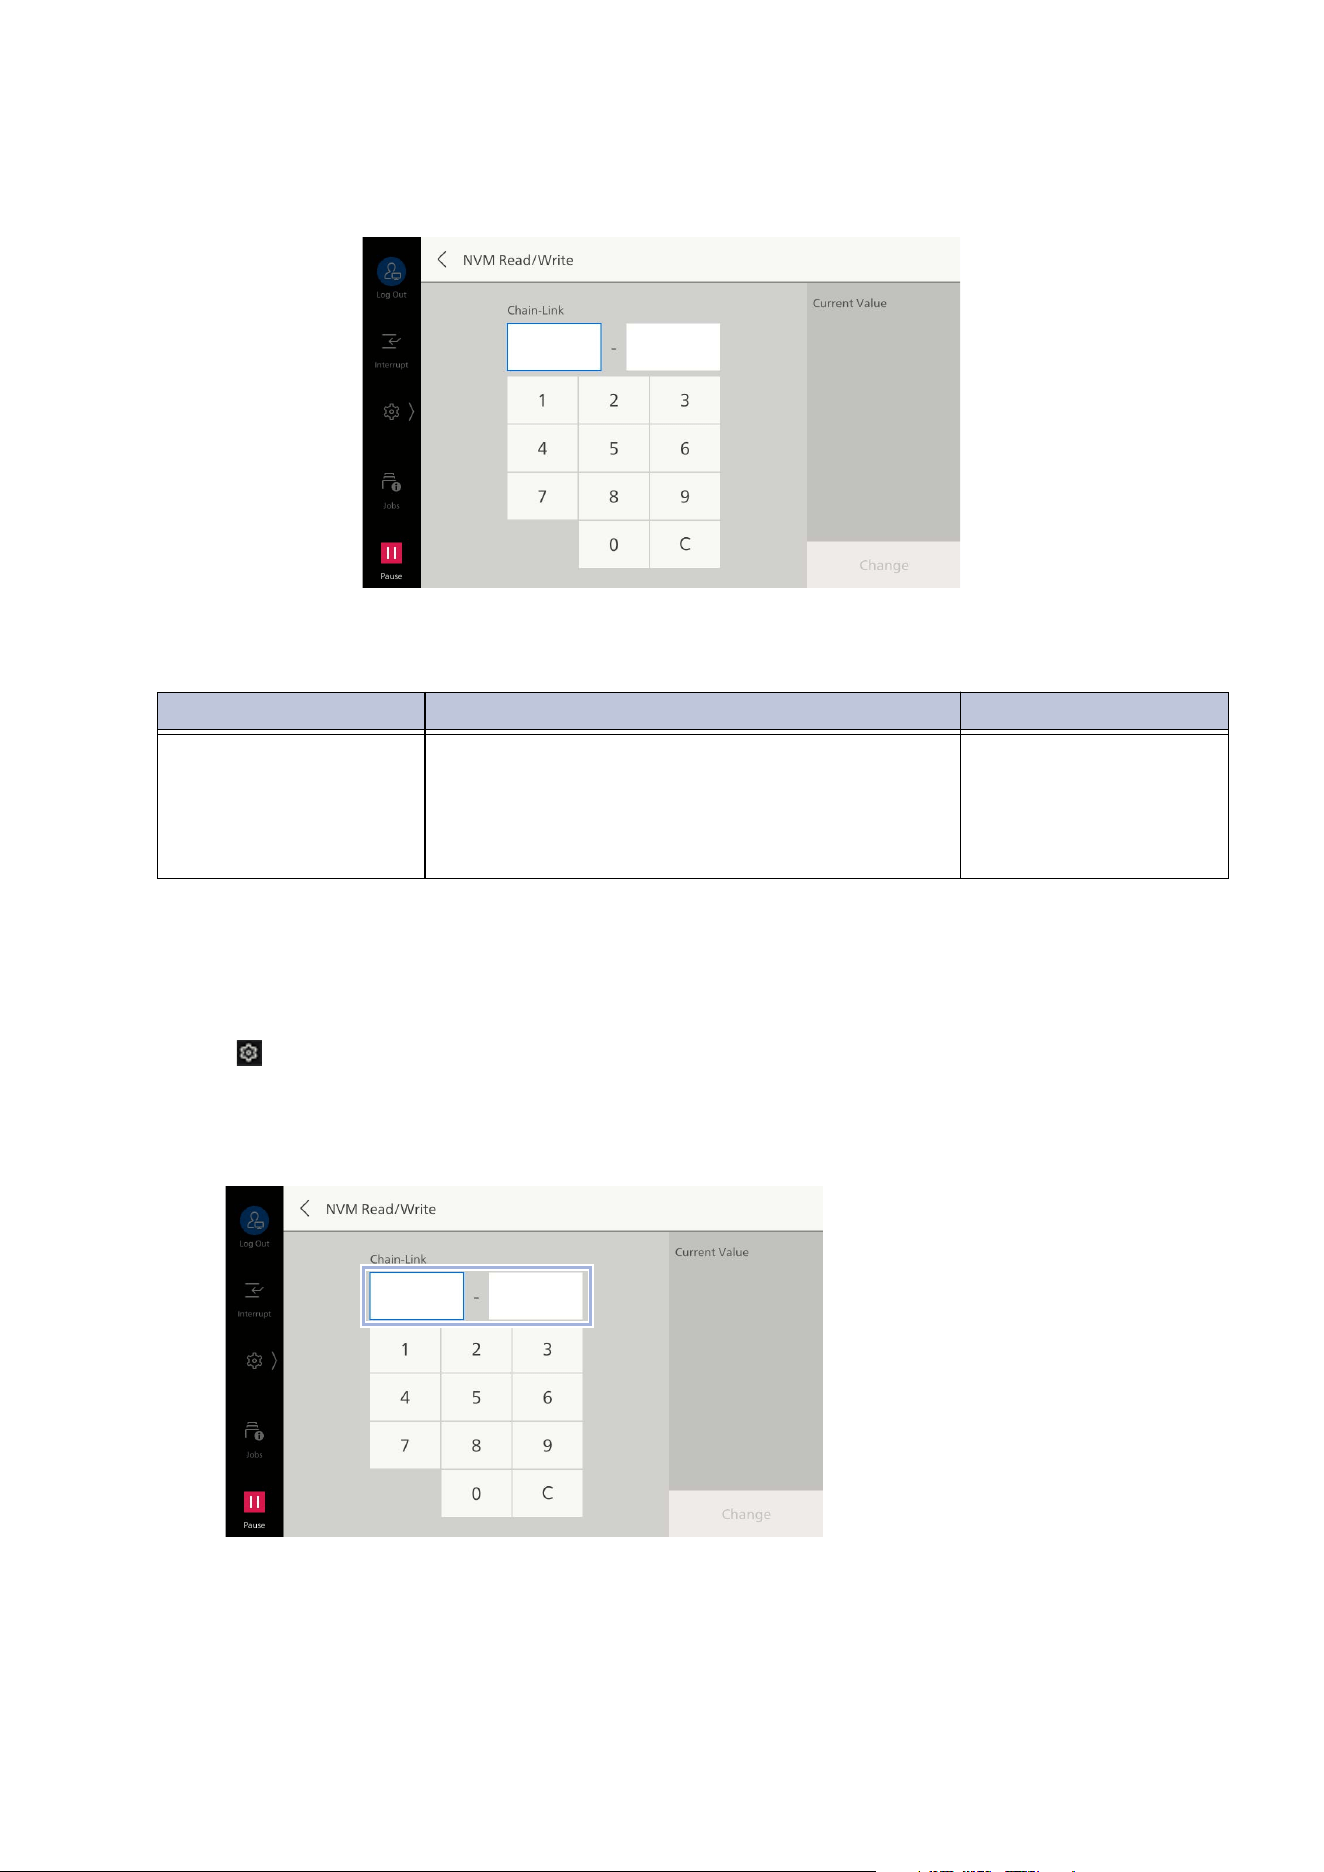
183
10.7 [Maintenance]
[NVM Read/Write]
Set the details of the machine operation.
Main Features That Can Be Set
Changing the Setting Value of [NVM Read/Write]
1. Log in to Administrator Mode.
2. Tap on > [Device] > [Maintenance] > [NVM Read/Write].
3. Enter the settings number in [Chain-Link].
The current value of the settings number is displayed on [Current Value].
4. Tap on [Change].
Setting Number Description Setting
785 - 070 Set whether to reset all documents or reset all
but the ejected documents when the paper jam
or multi-feeding occurs.
1: Start over from the
first document
2: Restart from the
jammed document
(default)
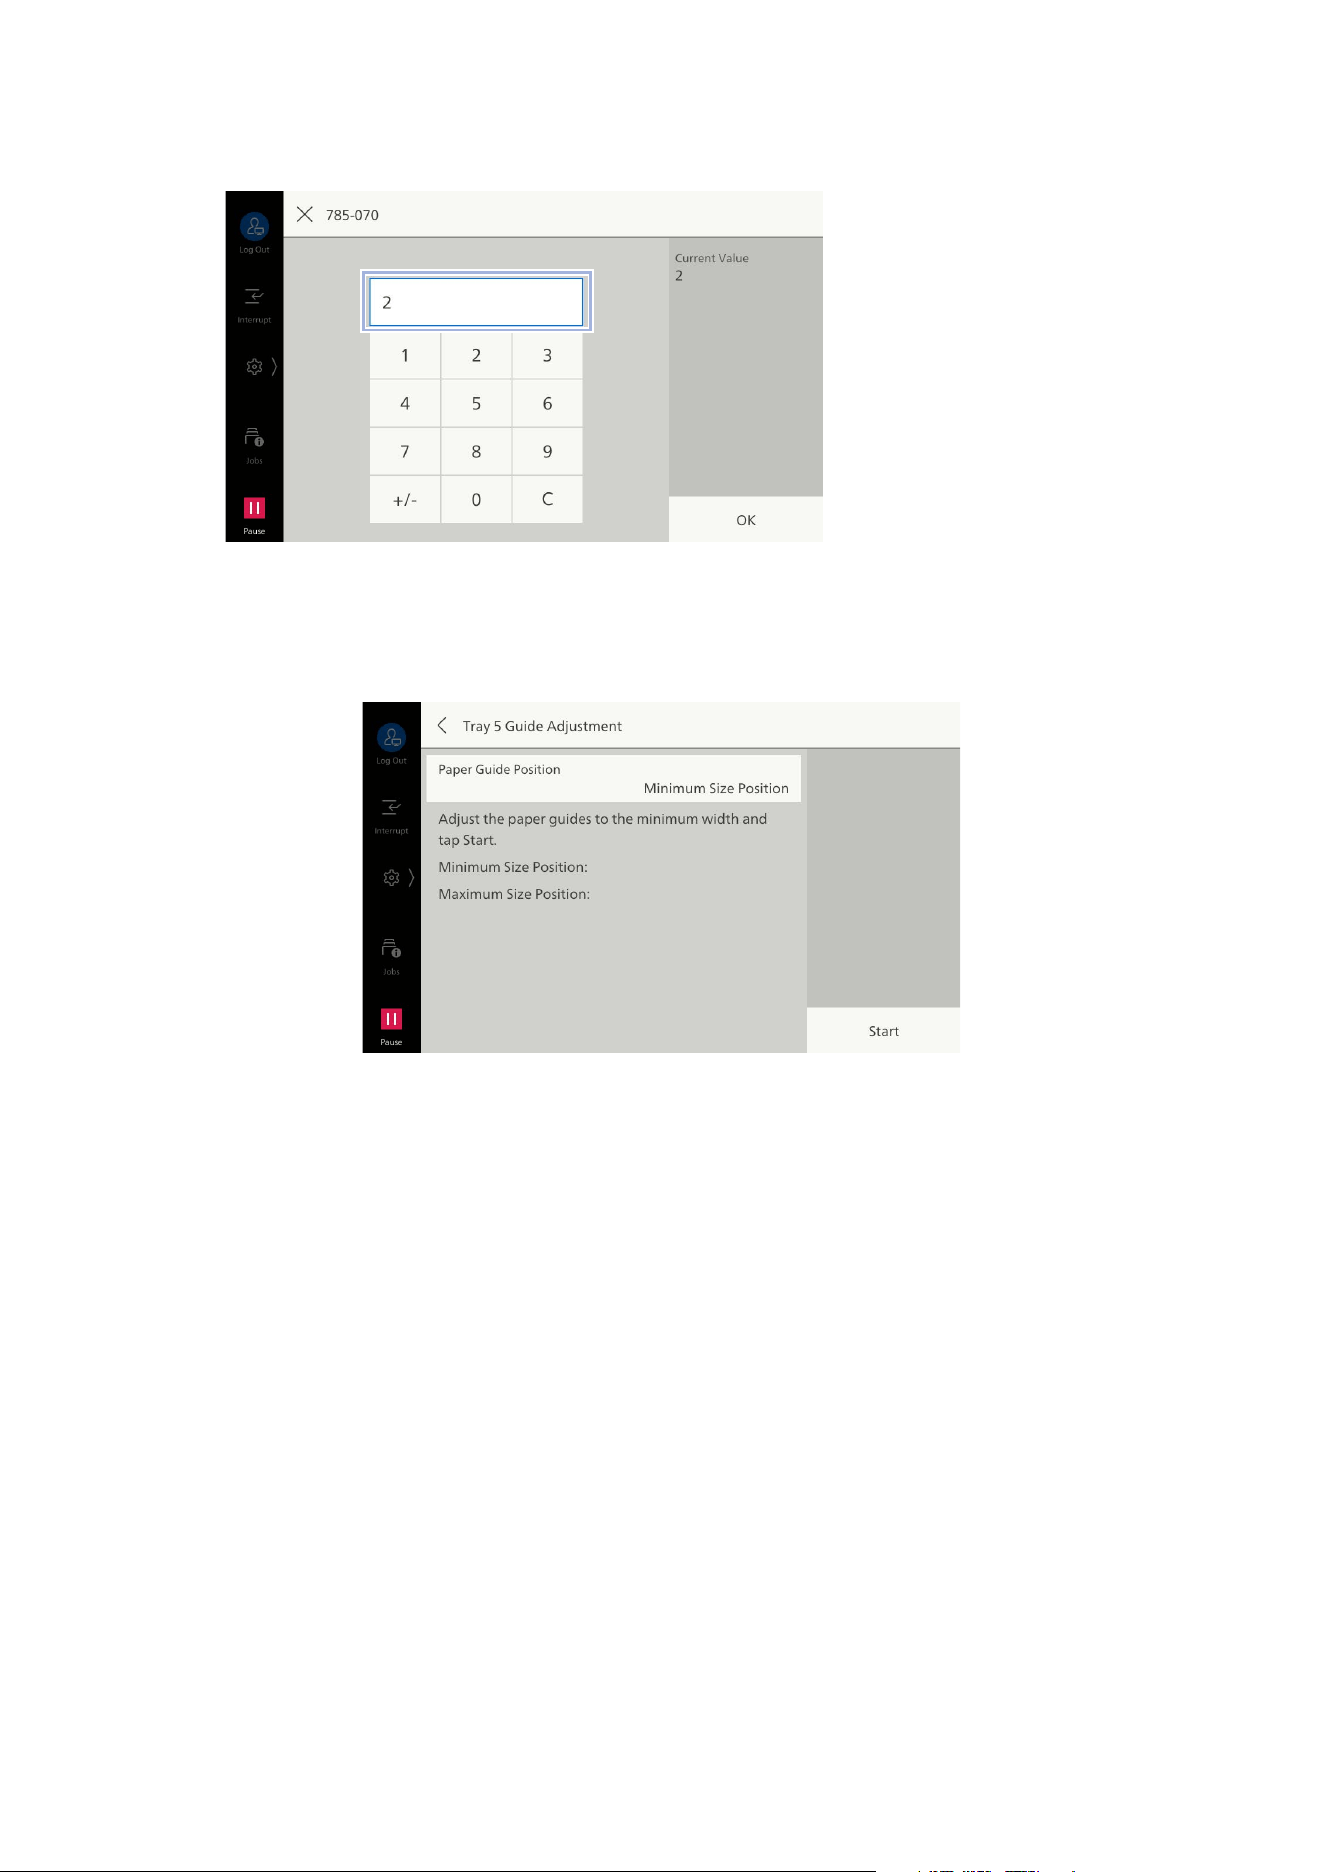
184
10 Device
5. Enter the setting value to be changed and tap on [OK].
[Tray 5 Guide Adjustment]
Adjusts detection precision of guide width of [Tray 5] (bypass tray).
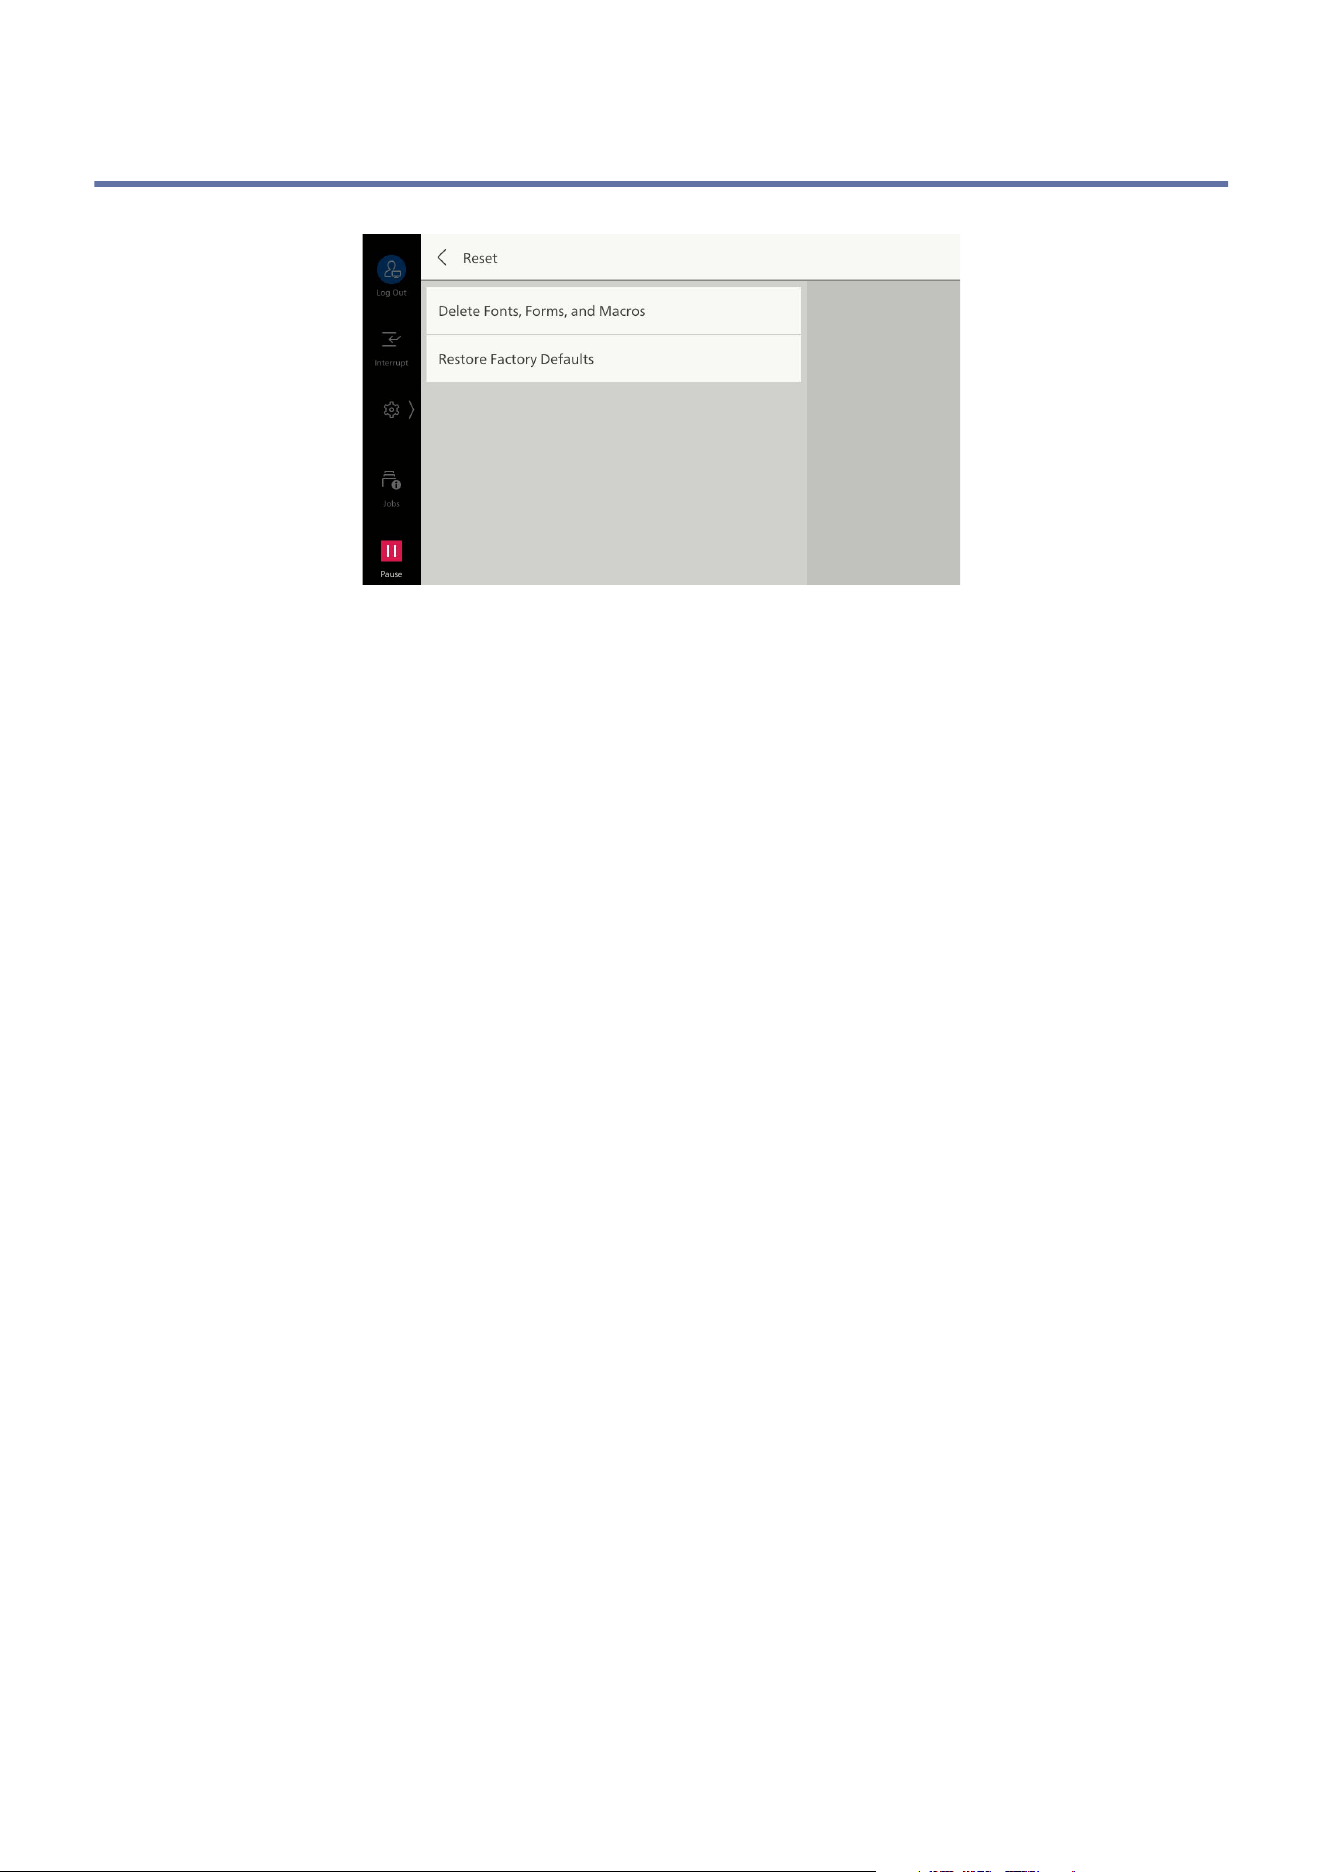
185
10.8 [Reset]
10.8 [Reset]
[Delete Fonts, Forms, and Macros]
Erases all font data, form data, and macro data downloaded into the machine.
[Restore Factory Defaults]
Restores all settings of the machine to state at factory shipment.

186
11 Authentication and Accounting Feature
11 Authentication and
Accounting Feature
11.1 Summary
Use the authentication feature to restrict access to the machine itself, or restrict access for each
service. This also allows users to process and manage data on service usage status per user.
Types of Users
Users are grouped into the following categories when using the authentication feature.
Administrator
This type of user is able to register and change system setting value according to the user
environment.
Administrators use a specially defined user ID called an administrator ID.
Login User
This type of user is registered to the machine or an external server. Each user is authenticated by a
user ID.
Guest User
This type of user has not been registered.
Guest users cannot access restricted services.
Administrator Permissions and Authorization Groups
Administrator permissions and authorization groups can be set for each user on the machine.
If using LDAP or Microsoft Entra ID as the remote accounts, set them in Internet Services.
Administrator Permissions
You can configure administrator and account administrator permissions for each authenticated user.
Administrator
The same permissions as the administrator can be granted. However, the following actions will be
unavailable.
Folder Operations
Controlling job flow sheets
Changing administrator passwords

187
11.1 Summary
Account Administrator
The following permissions can be granted.
Regarding, deleting, changing (password cannot be changed by themselves) or referencing (may
be unavailable based on some setting configurations) user information
Registering, deleting, changing or referencing accounting data
Changing alternative name for user ID/mask user ID (***)
Changing alternative name for account ID/mask account ID (***)
Printing accounting reports
Authorization Groups
You can divide permissions allowing access to features for registering authenticated users. Users
belonging to an authorization group can perform the same actions as the administrator.
Refer
Refer to "Authorization Groups" (P.195) for more information.
Usage Limit
Usage Limit Across Entire System
You can restrict access to the machine and each service in Authentication Mode. User authentication
is required to use this.
Refer
Refer to "[Authentication]" (P.158) for more information.
Usage Limit by User
You can restrict the creation, editing and use of Usage Limit, Account Limit, Job Flow Sheets and
Folder for a service for each user.
Refer
Refer to "Services that Allow Usage Limit or Accounting Settings for Authentication/Accounting Mode"
(P.190) and "Authentication for Job Flow Sheets and Folders" (P.191) for more information.

188
11 Authentication and Accounting Feature
Types of Authentication and Authentication Method
Types of Authentication
Log In to Local Accounts
Authentication is performed using user information registered to the machine.
Authentication/Accounting Mode is set to [Local]/[Network], Authentication becomes “Local
Accounting”.
Note
Print information sent directly from the client computer is authenticated by comparing authentication
information preset in client-side printer drivers with authentication information registered to the
machine, before it can be received by the machine.
If [Network] is set, register the user details managed with remote services and performs authentication
using the details.
Log In to Remote Accounts
Authentication is performed using user information managed in an external authentication server.
For users using an external server (LDAP, Kerberos, or Microsoft Entra ID). User information is not
registered to the machine.
Authentication/Accounting Mode is set to [Remote], Authentication becomes “Remote Account”.
Note
When using remote accounts, you can select available services from the touch panel display on the
machine based on access permission information retrieved from the external authentication server.
User IDs and passwords registered to the external authentication server must be 32 characters and 128
characters or less, respectively.
Authentication Method
User ID Authentication
User information such as User IDs and passwords is registered to the machine or an external
authentication server in advance for users to enter in their user ID and password from the touch
panel display on the machine directly for authentication.
Accounting Feature
Types of Accounting Modes
Local Accounting
Accounting reports are performed using authenticated user information registered to the machine.
Authentication/Accounting Mode is set to [Local], Authentication becomes “Local Accounting”.
Note
The following users can print accounting reports.
- Administrator
- Users granted administrator permissions
- Users granted account administrator permissions
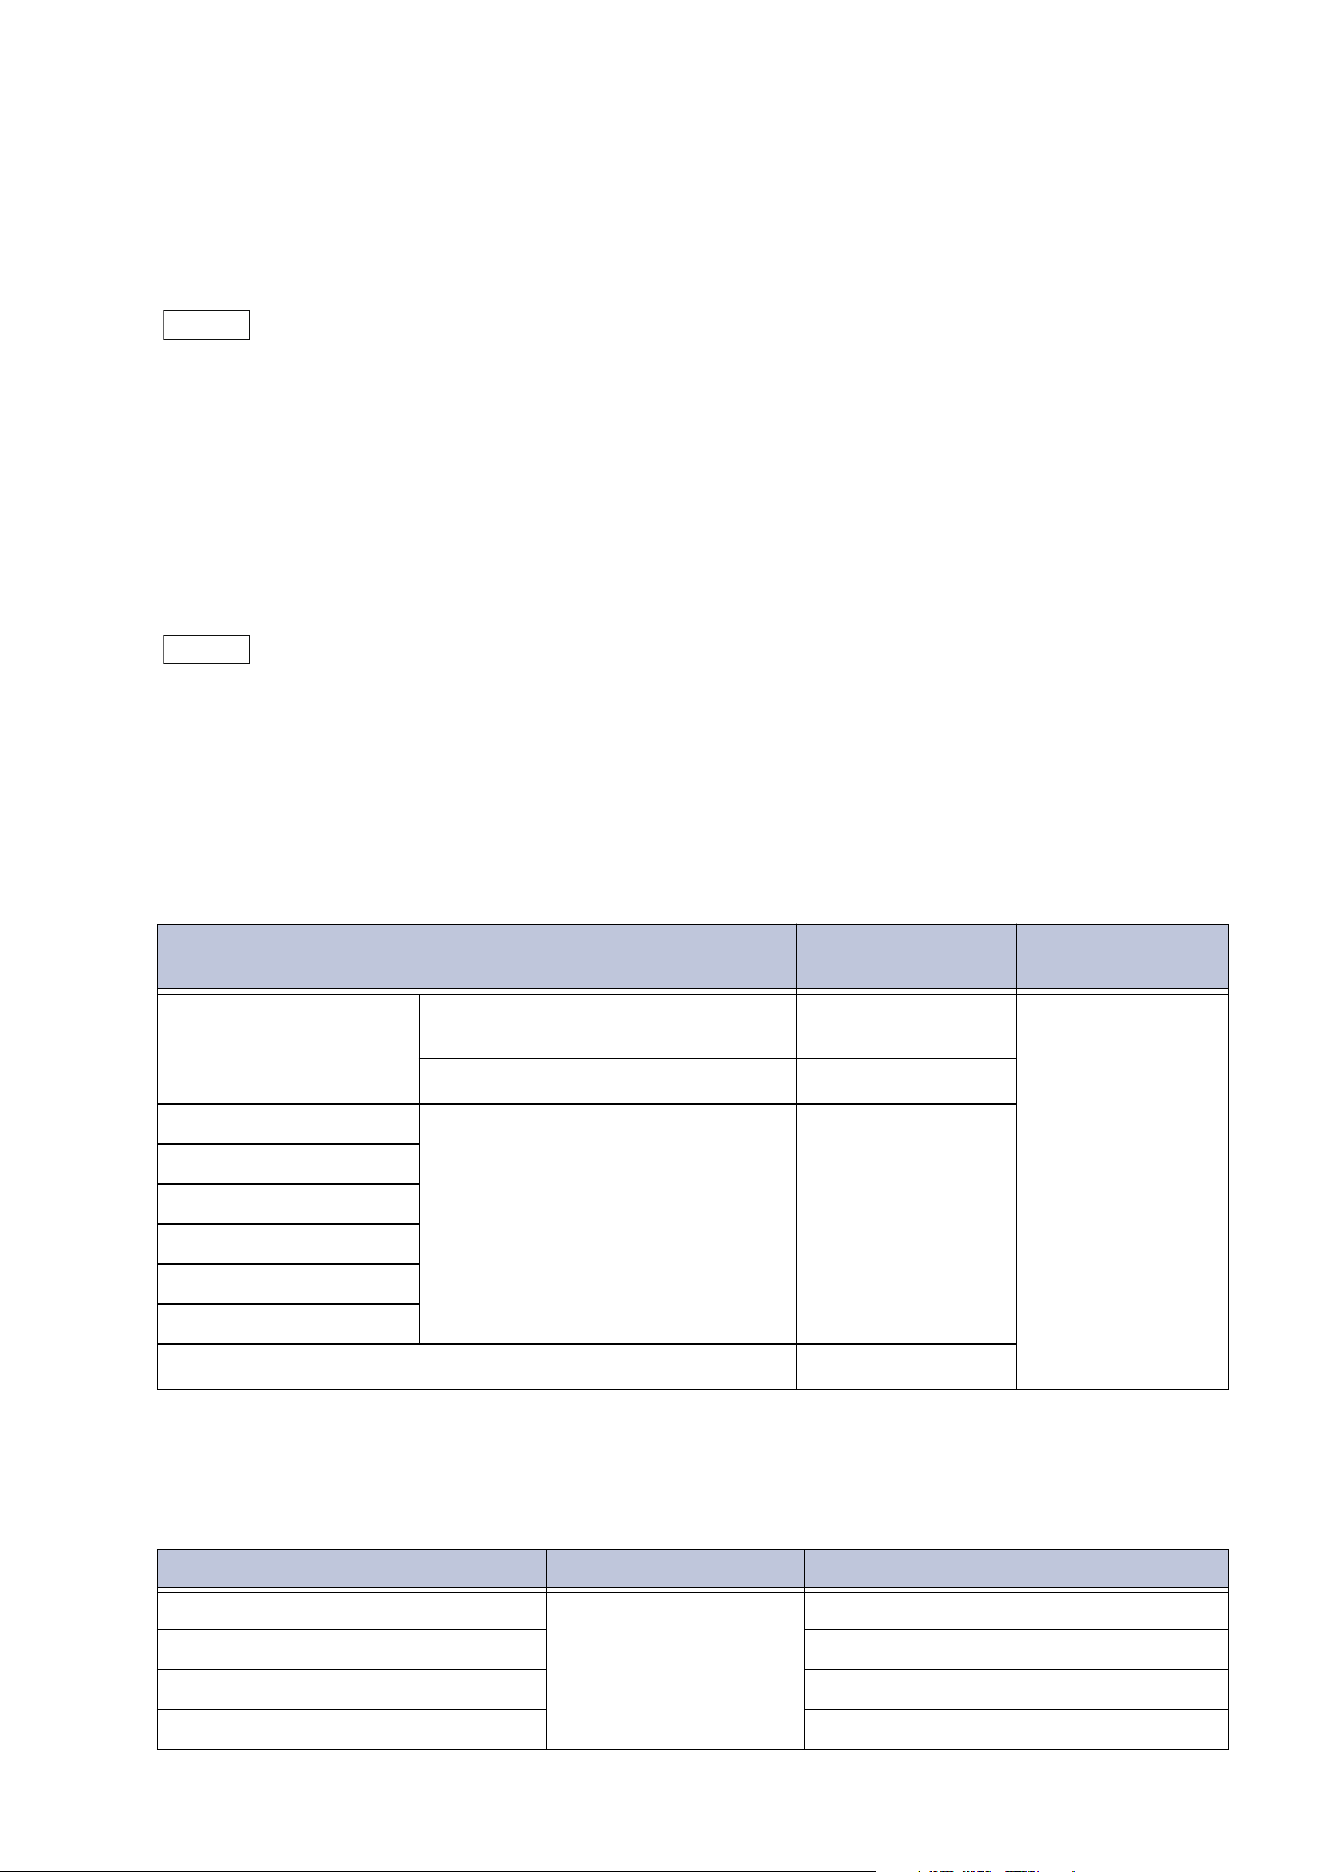
189
11.1 Summary
Network Accounting
Performs accounting using user details managed with remote services.
Job data saved to the machine by the external service is collected and processed by user.
Authentication/Accounting Mode is set to [Network], Authentication becomes “Network
Accounting”.
Note
User information managed in an external service is sent from the external service to the machine and
registered to the machine. When the user information managed in an external service is updated, the
updated user information must be sent from the external service to the machine.
Accounting Using an Authentication Server
With this, accounting is performed using an authentication server.
Job data saved to the machine by the external service is collected and processed by user.
If
you set Authentication/Accounting Mode to [Remote] and [Authentication System] is
[Authentication Agent], this becomes “Accounting Using an Authentication Server”.
Note
If [Authentication System] is other than [Authentication Agent], accounting is not performed with the
authentication server.
Services that Allow for Local Accounting
This section describes information for which accounting is possible by service jobs.
Print
*1 :Printing is possible if [Permissions] > [Permissions] > [Access Control] > [Non-Account Print] is set to [Unlocked] in
Internet Services.
Scanner
Service (Job) Applicable User Management
Items
Normal Print Machine printer drivers Login User Number of sides/
sheets printed
Non-machine printer drivers
*1
Guest User
Secure Print Printing Files Login User
Sample Set
Print Files from Folder
Delayed Print
Charge Print
Private Charge Print
Print Email
*1
Guest User
Service Applicable User Management Items
Email Login User Scanning, sending Emails
Scan to Folder Scanning
Scan Scanning, forwarding files
Scan to USB Scanning
190
11 Authentication and Accounting Feature
Services that Allow Usage Limit or Accounting
Settings for Authentication/Accounting Mode
Services that allow Usage Limit and Accounting settings to be configured are as follows.
When Using [Local] as Authentication/Accounting Mode
: Available; -: Not available
When Using [Network] as Authentication/Accounting Mode
: Available; -: Not available
When Using [Remote] as Authentication/Accounting Mode
: Available; -: Not available
Service Usage Limit by User Aggregation by User
Usage Limit by
Feature
Account Limit
[Copy]
[Print]
[Scan]
Service Usage Limit by User Aggregation by User
Usage Limit by
Feature
Account Limit
[Copy] -
[Print] -
[Scan] -
Service Usage Limit by User Aggregation by User
Usage Limit by
Feature
Account Limit
[Copy] -
[Print] -
[Scan] -
191
11.2 Authentication for Job Flow Sheets and Folders
11.2 Authentication for Job Flow Sheets and
Folders
Conditions for Job Flow Sheet and Folder Use
When using remote accounts or local accounts, changing the authentication method will delete job
flow sheets and folders created by authenticated users.
Job flow sheets and folders will not be deleted even if the authentication method is changed under
the following circumstances.
- When the job flow sheet or folder has been created by the administrator.
- When the job flow sheet or folder was created by a local user while the authentication feature
was not in use.
When Using the Authentication Feature
Note
When using the authentication feature, the following users are able to use folders and job flow sheets.
- Authenticated users and administrators when using [Local] or [Network]
- Authenticated users other than guest users when using [Remote]
Creating Folders
When using the authentication feature, the relationship between creators and users of folders that
can be created/used is as follows.
*1 :Actions only available to administrators.
*2 :This is available if folder use is permitted in authentication feature settings in Administrator Mode.
Creating Job Flow Sheets from the [Send from Folder] Screen
Job flow sheet creators, the users that can use them, and the actions available are as follows.
*1 :Actions only available to administrators.
*2 :The user copying job flow sheets will be the creator of the copied job flow sheets.
Folder Creator Permitted Users Available Actions
Login User Creators/Administrators View, Delete, Change Settings, View Files,
Delete Files, Register Files, Print Files,
View Job Flow Sheets, Associate Job Flow
Sheets, Execute Job Flow Sheets
Administrator
All guest users
*2
/All
Authenticated users/
Administrators
View, Delete
*1
, Change Settings
*1
, View
Files, Delete Files, Register Files, Print
Files, Associate Job Flow Sheets
*1
, View
Job Flow Sheets, Execute Job Flow Sheets
Job Flow Sheet
Creator
Permitted Users Available Actions
Login User Creators/Administrators Edit, View, Copy, Delete, Select, Run,
Associate with Folder
Administrator All authenticated users/
Administrators
Edit
*1
, View, Copy
*2
, Delete
*1
, Select,
Run, Associate with Folder
192
11 Authentication and Accounting Feature
Creating Job Flow Sheets in [Create Job Flow Sheet]
Job flow sheet creators, the users that can use them, and the actions available are as follows.
*1 :Actions only available to administrators.
*2 :The user copying job flow sheets will be the creator of the copied job flow sheets.
When the Authentication Feature is Not Used
Creating Folders
The relationship between creators and users of folders is as follows.
*1 :Actions only available to administrators.
Note
Files registered and printed using Network Scanner Utility 3 are outside the scope of authentication.
Creating Job Flow Sheets from the [Send from Folder] Screen
Job flow sheet creators, the users that can use them, and the actions available are as follows.
*1 :Actions only available to administrators.
*2 :The user copying job flow sheets will be the creator of the copied job flow sheets.
Job Flow Sheet
Creator
Permitted Users Available Actions
Login User Creators/Administrators Edit, View, Copy, Delete, Select, Run
Administrator All authenticated users/
Administrators
Edit
*1
, View, Copy
*2
, Delete
*1
, Select,
Run
Folder Creator Permitted Users Available Actions
Local User All local users/Administrators View, Delete, Change Settings, View
Files, Delete Files, Register Files, Print
Files, View Job Flow Sheets, Associate
Job Flow Sheets, Execute Job Flow
Sheets
Administrator All local users/Administrators
View, Delete
*1
, Change Settings
*1
, View
Files, Delete Files, Register Files, Print
Files, Associate Job Flow Sheets
*1
, View
Job Flow Sheets, Execute Job Flow
Sh
eets
Job Flow Sheet
Creator
Permitted Users Available Actions
Local User All local users/Administrators Edit, View, Copy, Delete, Select, Run,
Associate with Folder
Administrator All local users/Administrators
Edit
*1
, View, Copy
*2
, Delete
*1
, Select,
Run, Associate with Folder
193
11.3 Enabling User Authentication
Creating Job Flow Sheets in [Create Job Flow Sheet]
Job flow sheet creators, the users that can use them, and the actions available are as follows.
*1 :Actions only available to administrators.
*2 :The user copying job flow sheets will be the creator of the copied job flow sheets.
11.3 Enabling User Authentication
When using local accounts, configure settings in the following order.
"Authentication and Accounting Method" (P.193)
"Access Control" (P.194)
"Authorization Groups" (P.187)
"User Registration (Log In to Local Accounts)" (P.196)
When using remote accounts, configure settings in the following order.
"Authentication and Accounting Method" (P.193)
"Access Control" (P.194)
"Authentication System Setup (Log In to Remote Accounts)" (P.200)
Note
[Password for Control Panel Login] to [On].For details, refer to "[Authentication]" (P.158).
It is necessary to log in to Administrator Mode to perform the following settings.
Authentication and Accounting Method
Note
You can set the authentication/accounting method also in [Authentication/Accounting Settings] in
[Accounting].
1. Tap on > [Device] > [Authentication/Accounting] > [Authentication/Security Settings] >
[Authentication] > [Authentication/Accounting Settings].
Job Flow Sheet
Creator
Permitted Users Available Actions
Local User All local users/Administrators View, Edit, Copy, Delete, Select, Run
Administrator All local users/Administrators
View, Edit
*1
, Copy
*2
, Delete
*1
, Select,
Run
194
11 Authentication and Accounting Feature
2. Select [Local] or [Remote], tap on [OK].
Access Control
1. Tap on > [Device] > [Authentication/Accounting] > [Authentication/Security Settings] >
[Authentication] > [Access Control].
2. Tap on [Device Access], select [Unlocked] or [Locked].
3. Tap on [App Access].
4. Configure authentication requirements for actions by service.
Note
If [Locked (Show Icon)] is set, the confirmation screen displays when you tap on the icons on the Home
screen without authentication.
If [Locked (Hide Icon)] is set, the icons for the corresponding function button are not displayed on the
Home screen without authentication.
5. Tap on [<].
6. Tap on [Feature Access].
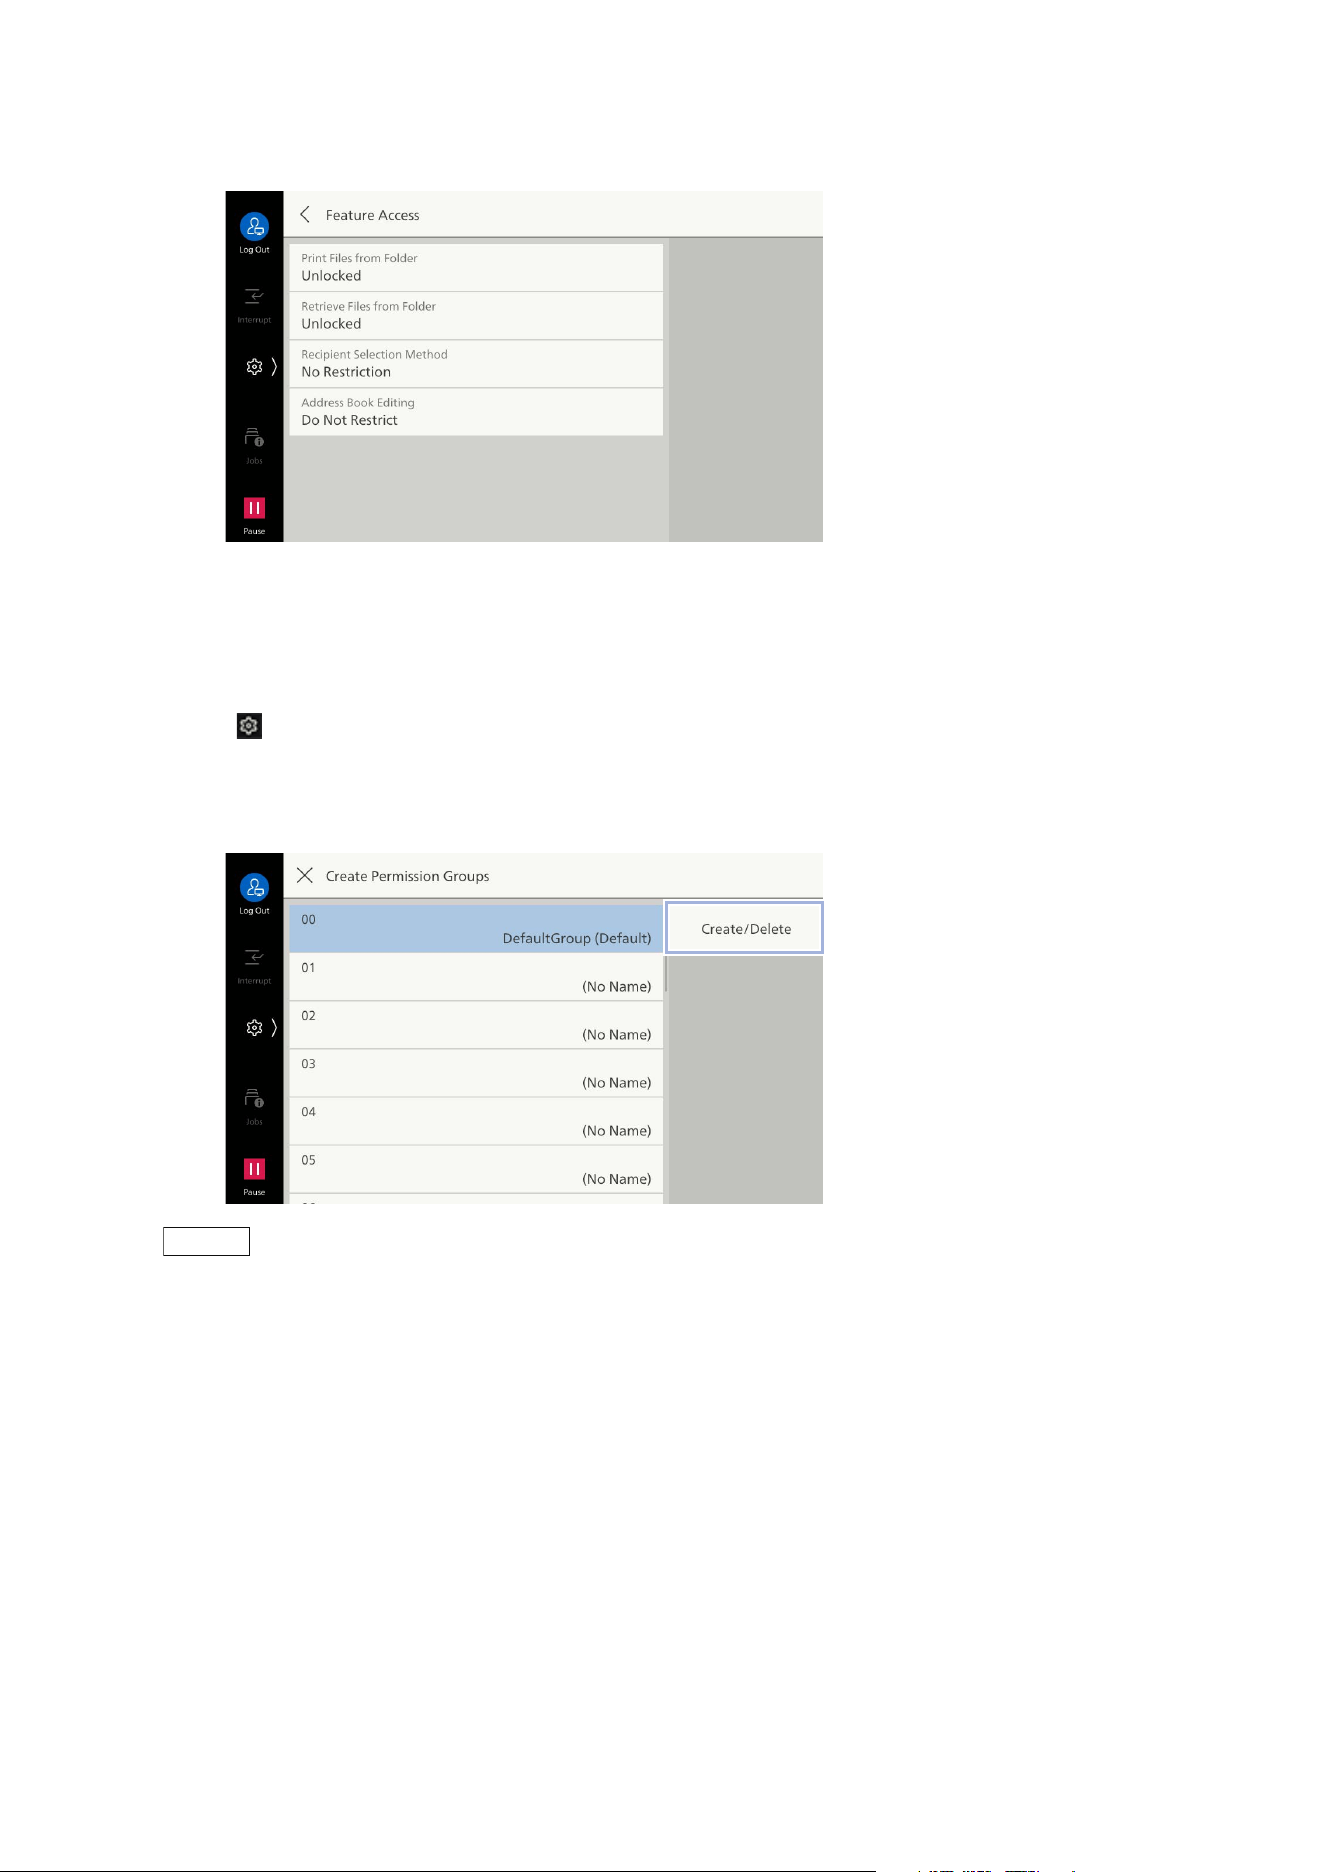
195
11.3 Enabling User Authentication
7. Select [Unlocked] or [Locked] for the feature being changed.
Authorization Groups
Register authorization groups to assign to users.
1. Tap on > [Device] > [Authentication/Accounting] > [Authentication/Security Settings] >
[Authentication] > [Create Permission Groups].
2. Select the authorization group number to register, and then tap on [Create/Delete].
Note
The following users will belong to the No. 00 [DefaultGroup (Default)] (default authorization group).
- Newly created users
- Users that have not yet been authenticated
- Authenticated users for which the [Authentication System] is not set to [Authentication Agent] in
remote accounts
The default authorization group can be changed in the same manner as other authorization groups.
3. Tap on [Group Name], enter the name and then tap on [OK].
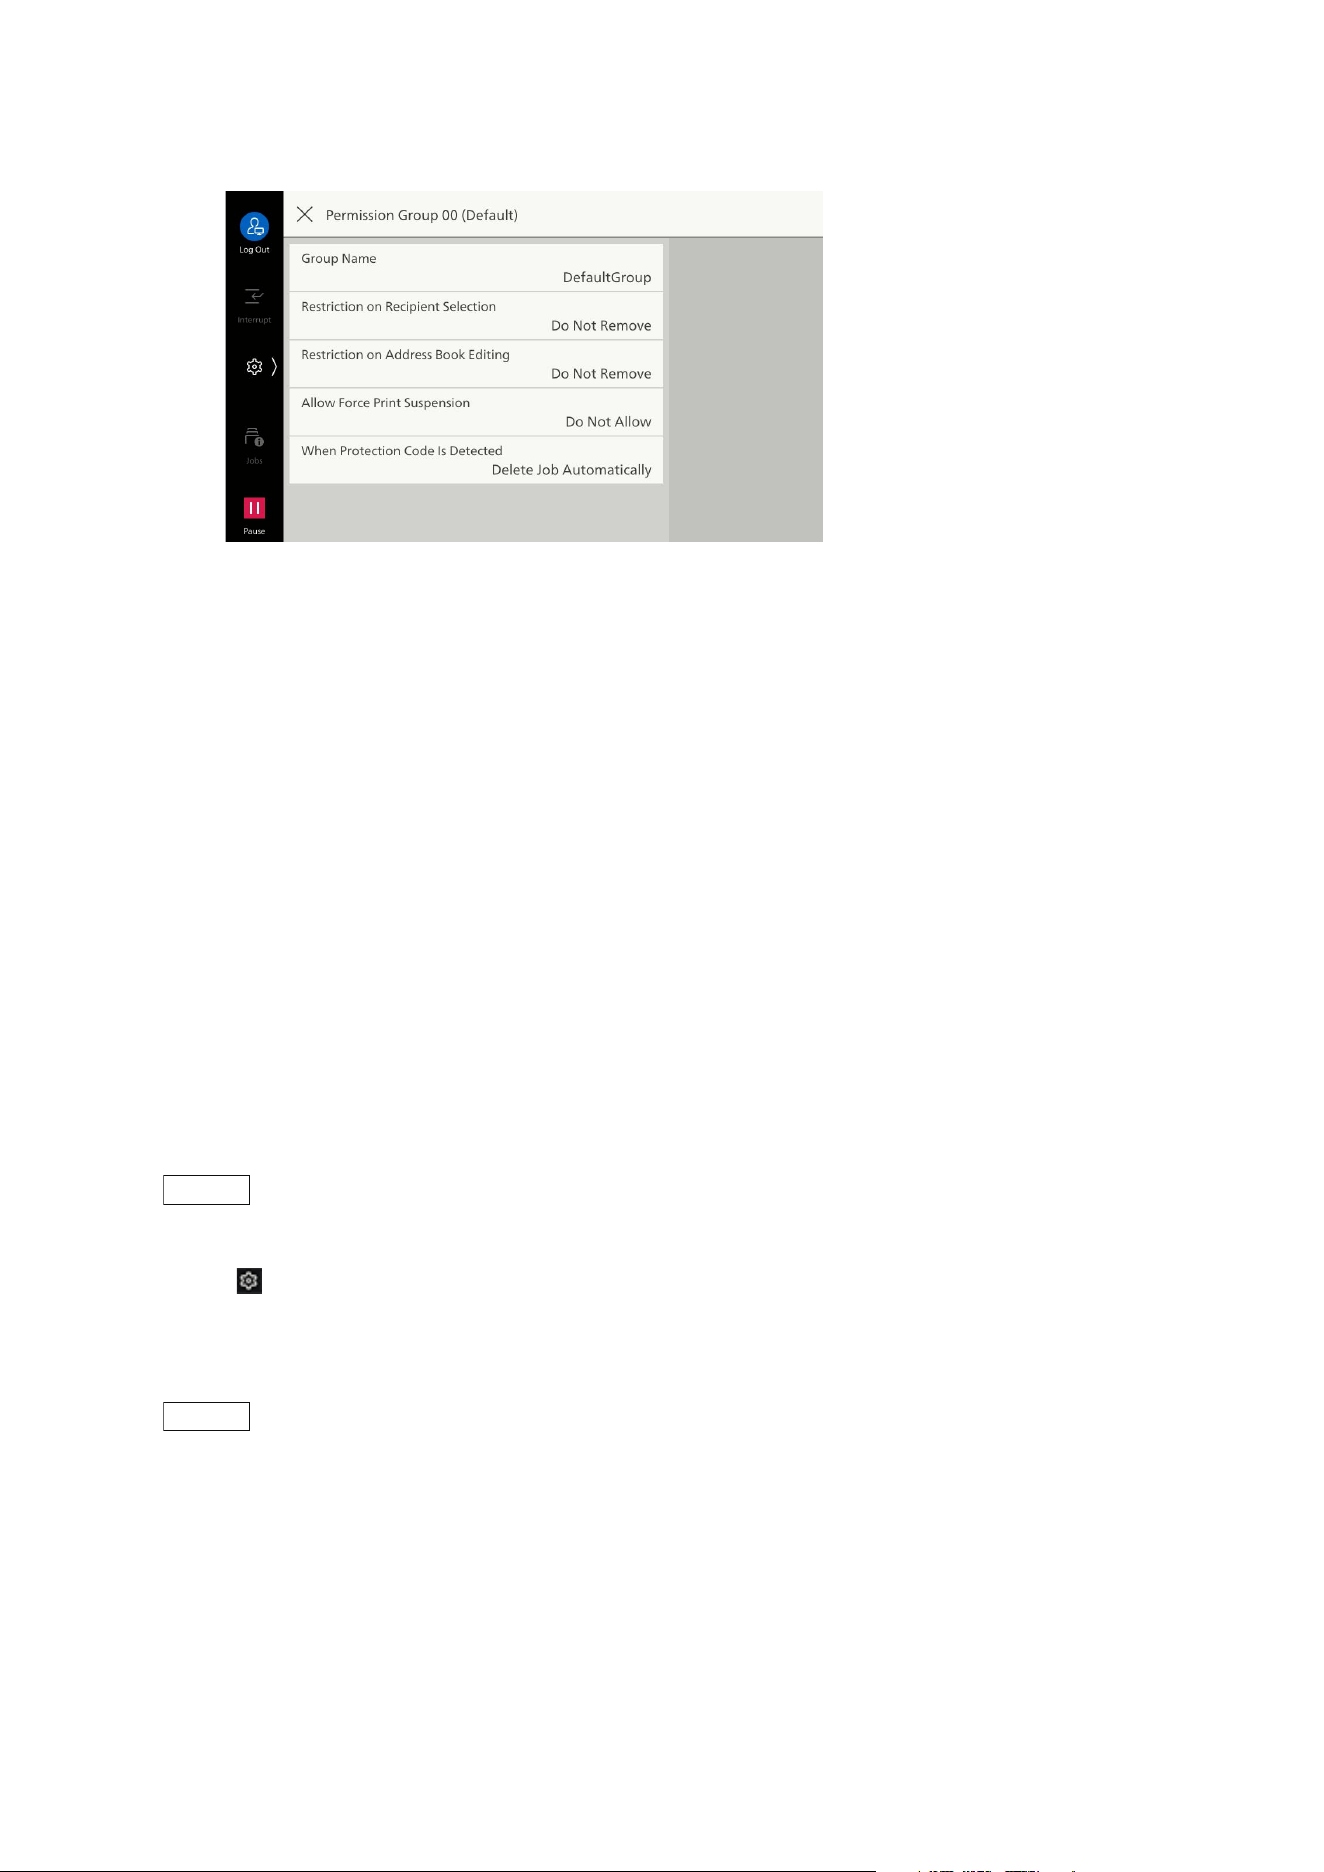
196
11 Authentication and Accounting Feature
4. Tap on the permission to change, and select the setting.
[Restriction on Recipient Selection]
When communications sent to addresses not listed in the Address Book are restricted, this can lift
the restriction.
[Restriction on Address Book Editing]
When editing the Address Book is restricted, this can lift the restriction.
[Allow Force Print Suspension]
When a Force Watermark, Force Secure Watermark, Print Universal Unique ID, Force Annotation or
other forced printing is set, this can temporarily lift the forced printing settings.
[Wh
en Protection Code Is Detected]
If embedded job disabled code is detected, this can temporarily allow the job to continue.
User Registration (Log In to Local Accounts)
Authenticated users are registered to the machine when Log In to Local Accounts is set.
Administrator permissions, service access and account limit settings can be configured for each user.
Note
Users can also be registered in [Authentication/Accounting Settings] under [Accounting].
1. Tap on > [Device] > [Authentication/Accounting] > [Authentication/Security Settings] >
[Authentication] > [Create/View User Accounts].
2. Tap on the field to register a user.
Note
The unique number with 4 digit (user registration number) are assigned to the field to register a user.
3. Enter the User ID and then tap on [OK].
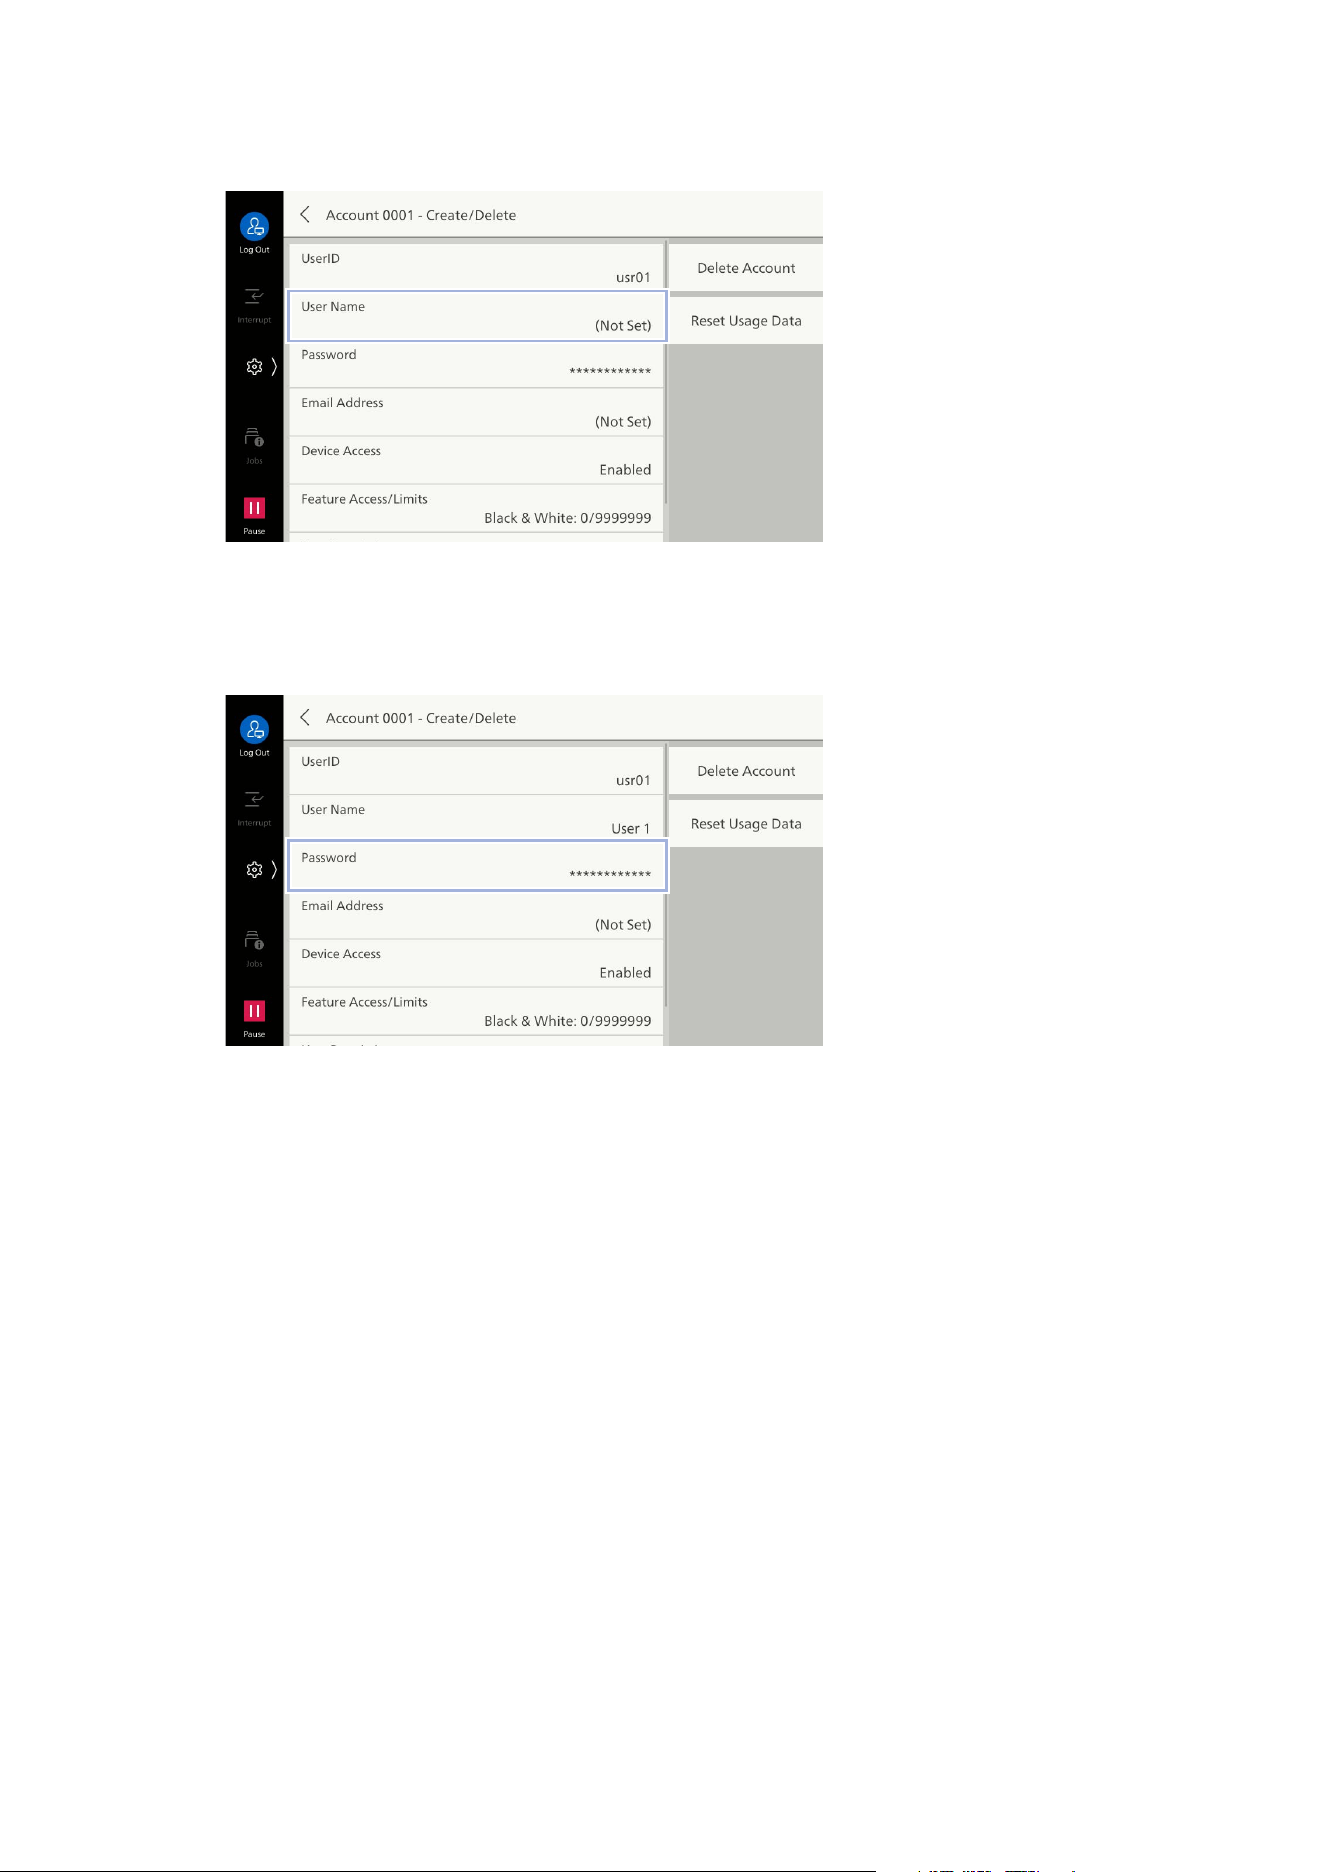
197
11.3 Enabling User Authentication
4. Tap on [User Name].
5. Enter the user display name, and then tap on [OK].
6. If there is a [Password], set the password.
7. Tap on [Enter Password], and then enter the password.
8. Tap on [Next], and then enter the same password.
9. Tap on [OK].
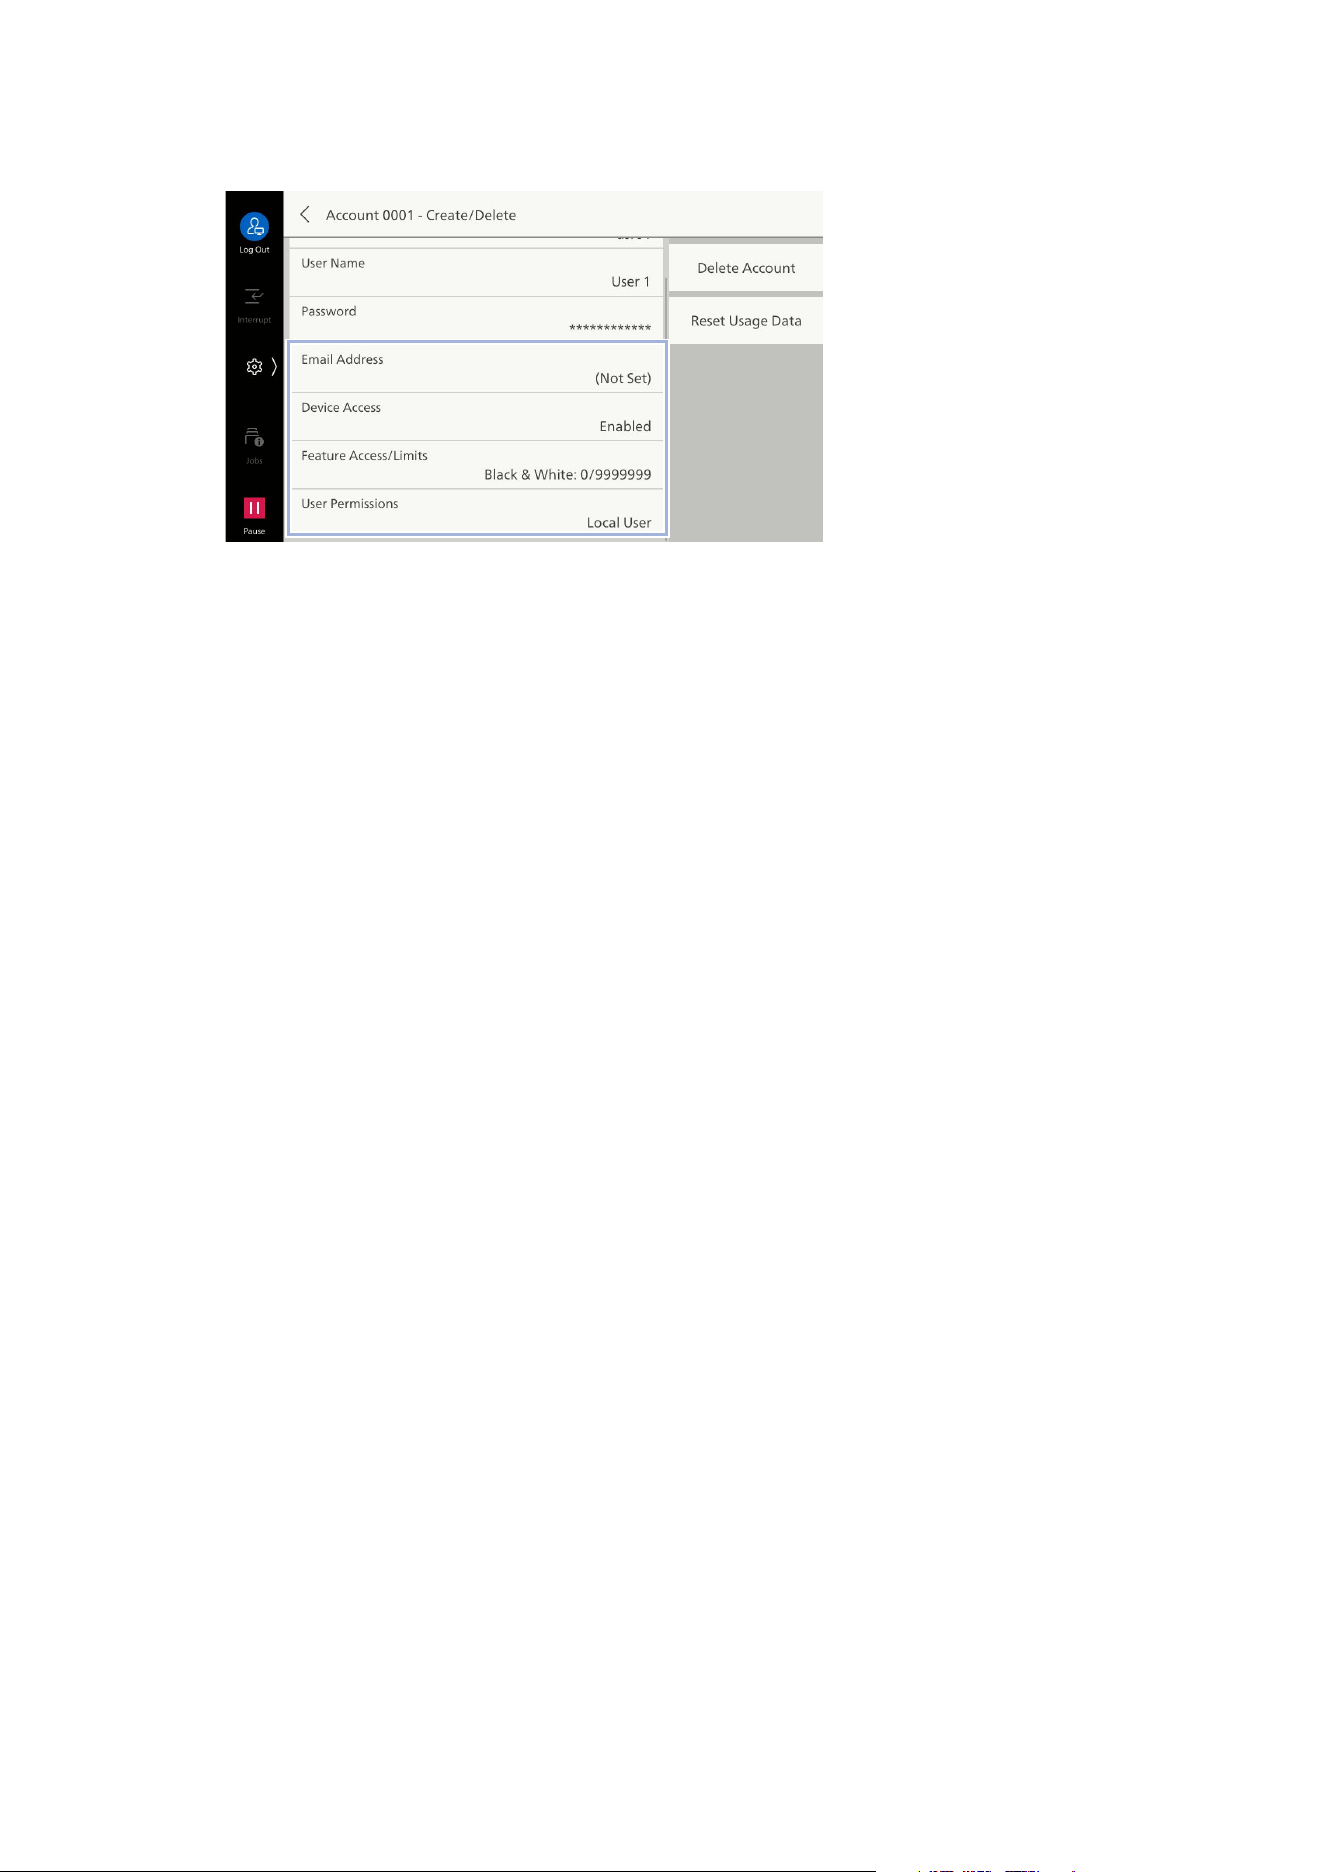
198
11 Authentication and Accounting Feature
10. Set access restrictions and permissions as needed.
[Email Address]
This is used as the default ["From" Address] address when sending Emails when authenticating.
[Device Access]
Allows machine use.
[Feature Access/Limits]
Specify use restrictions and account limit settings for each service. Select the service, and then set
either [Feature Access] or [Account Limit], and tap on [OK].
[User Permissions]
You can grant permissions to users. Configure authorization group settings in [Add to Permission
Gr
oup].
[Local User]
Permissions for regular users who do not have administrator permissions.
[System Administrator]
The same permissions as the administrator can be granted. However, folders and job flow sheets
cannot be modified, and administrator passwords cannot be changed.
[Account Administrator]
The following accounting-related permissions can be granted.
- Registering/deleting/changing (some) user information
- Registering/deleting/changing accounting data
- Changing alternative name for user ID/mask user ID (***)
- Changing alternative name for account ID/mask account ID (***)
- Printing accounting reports
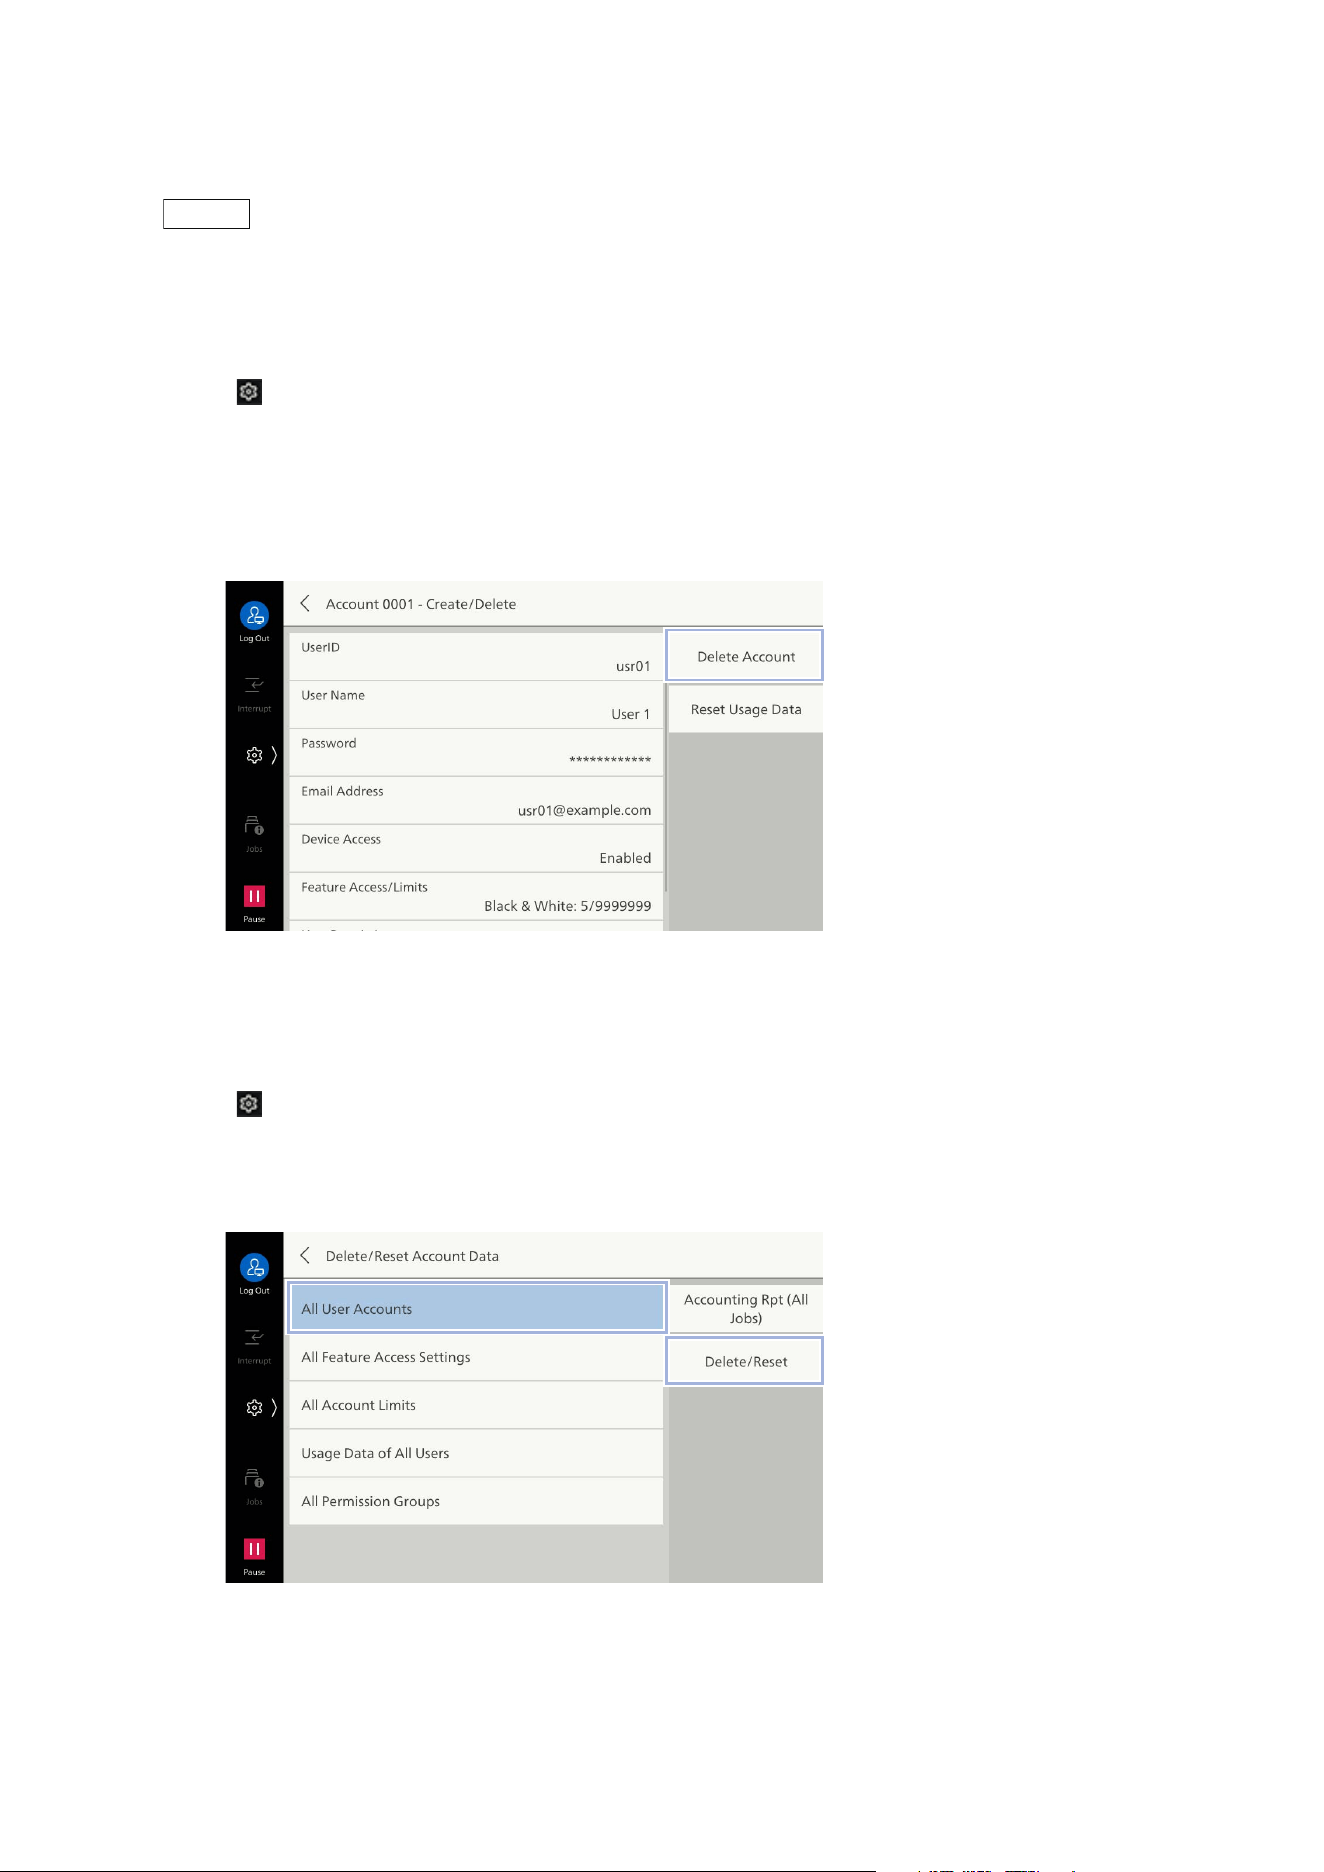
199
11.3 Enabling User Authentication
Deleting Registered Users (Log In to Local Accounts)
Note
Any job flow sheets, folders and files inside folders that the user being deleted is an owner of will also get
deleted.
Deleting Individual Users
1. Tap on > [Device] > [Authentication/Accounting] > [Authentication/Security Settings] >
[Authentication] > [Create/View User Accounts].
2. Select the user registration number to delete.
3. Tap on [Delete Account].
4. Tap on [Delete].
Deleting All Users
1. Tap on > [Device] > [Authentication/Accounting] > [Authentication/Security Settings] >
[Authentication] > [Delete/Reset Account Data].
2. Tap on [All User Accounts] > [Delete/Reset].
3. Tap on [Delete].
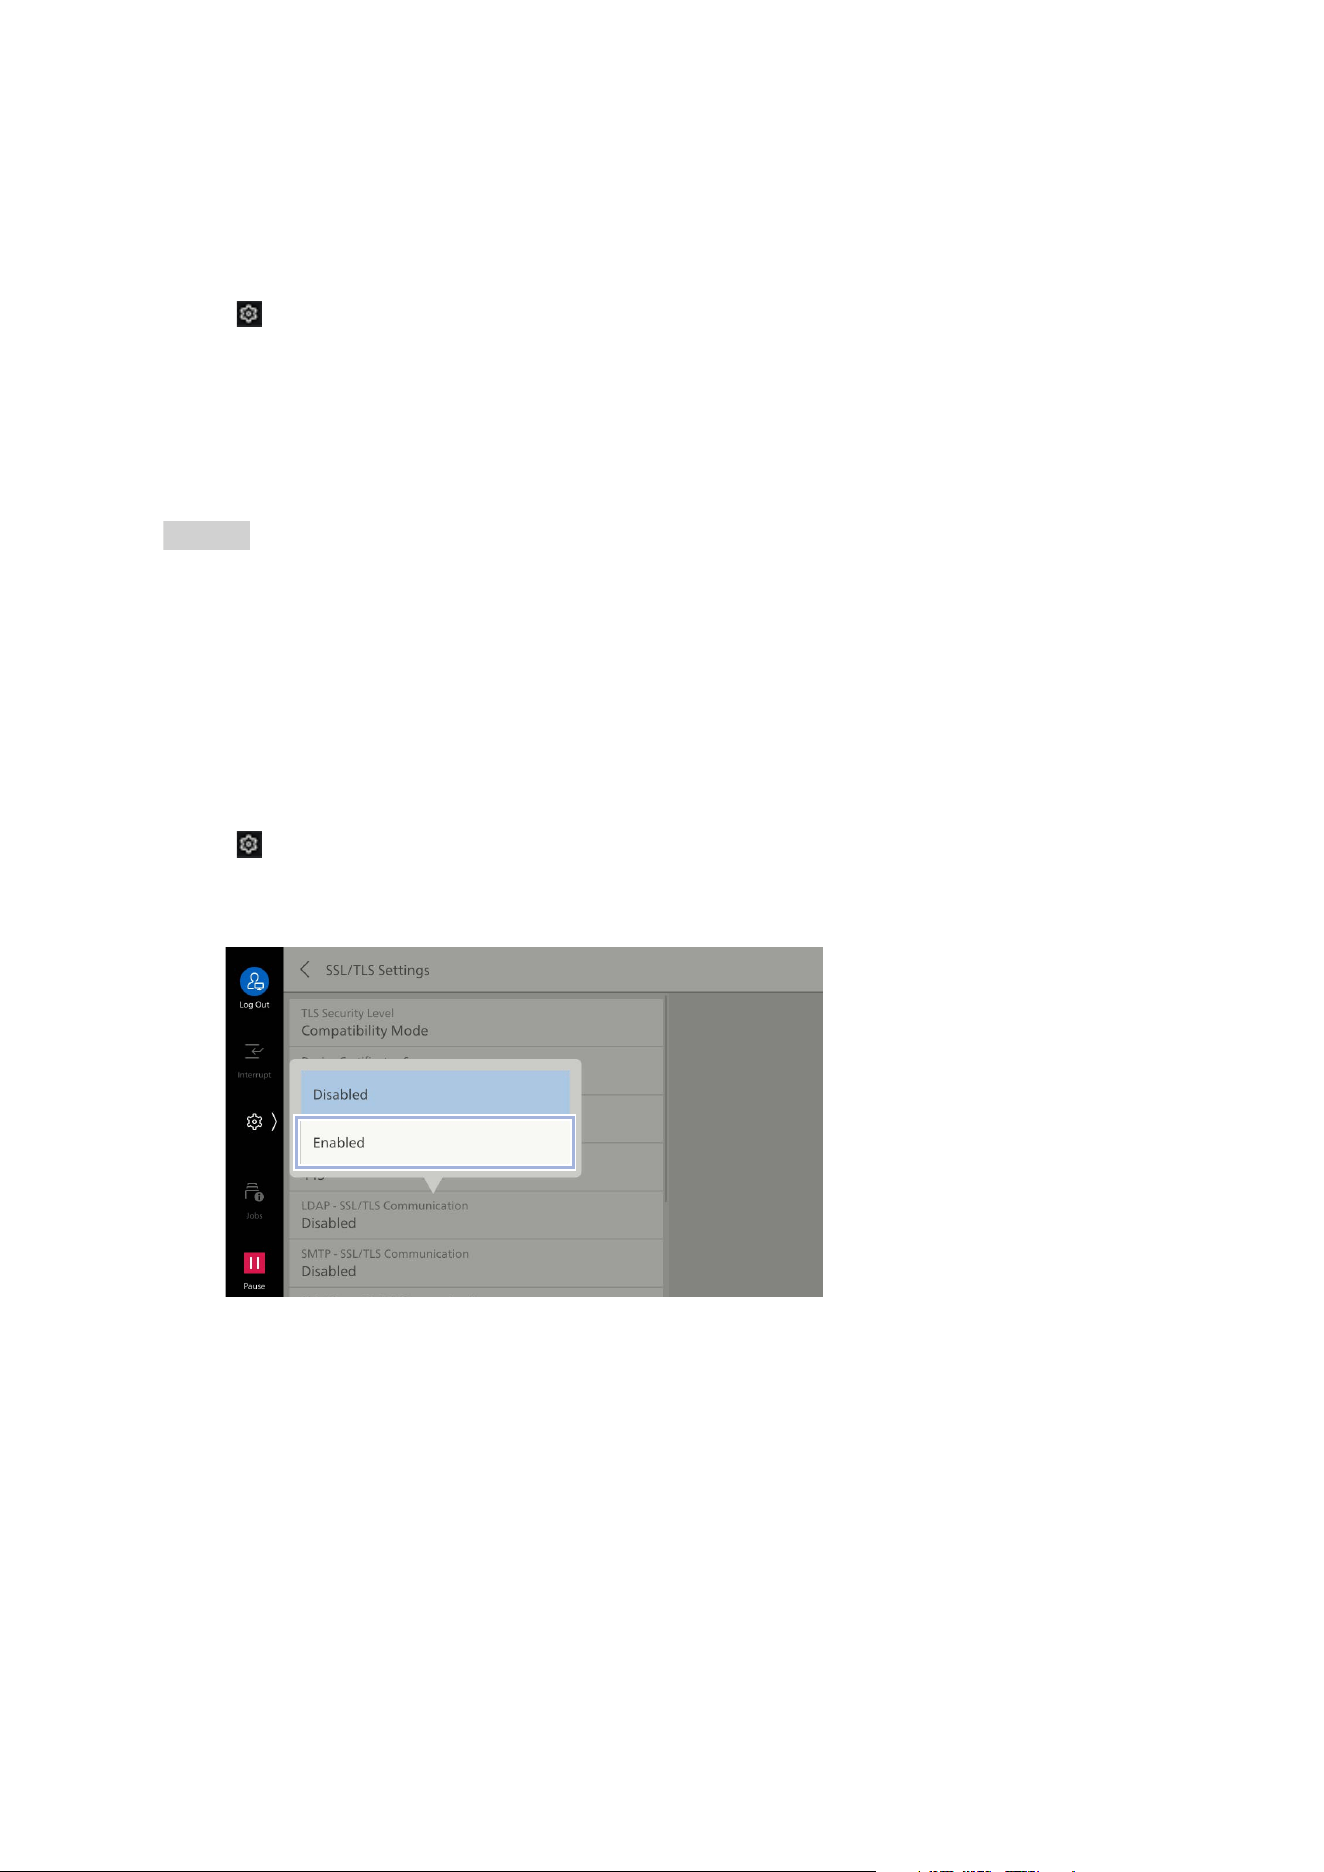
200
11 Authentication and Accounting Feature
Authentication System Setup (Log In to Remote
Accounts)
This registers an external authentication server to the machine.
1. Tap on > [Device] > [Network Settings] > [Remote Authentication / Directory Service] >
[Authentication System Setup] > [Authentication System].
2. Select the type of external authentication server, and then tap on [OK].
3. If an option other than [Authentication Agent] is selected, tap on [<], and then register the
authentication server details.
Refer
Refer to the Help feature in Internet Services when configuring Microsoft Entra ID settings.
Other Settings (LDAP)
Encrypting Communications Between the Machine and the
LDAP Server
1. Tap on > [Device] > [Network Settings] > [Security Settings] > [SSL/TLS Settings].
2. Set [LDAP - SSL/TLS Communication] to [Enabled].
3. Tap on [<] twice.
4. Tap on [Remote Authentication / Directory Service].

201
11.3 Enabling User Authentication
5. Tap on [LDAP Server / Directory Service Settings] > [Primary Server - Port Number].
6. Enter the port number to run LDAPS, and then tap on [OK].
Logging In as an LDAP Server User that has Established a Trust
Relationship in Active Directory
The procedure for logging in to the machine as a user on a trusted domain server is described below,
assuming the following conditions have been met as an example.
The domain name is set to “w2k8adtest.local”.
A trust relationship has been established in [Active Directory Domains and Trusts].
Refer
For more information about [Active Directory Domains and Trusts], refer to the official website of
Microsoft.
1. Tap on > [Device] > [Network Settings] > [Remote Authentication / Directory Service] > [LDAP
Server / Directory Service Settings].
2. Set [LDAP Referrals] to [Enabled].
3. Set [LDAP Referral Hop Limit] as needed.
Note
The maximum number of servers that can be connected is the value set for the [LDAP Referral Hop
Limit]. If this is set to “5”, up to five trust relationship connections can be made.
With regard to [Login Credentials to Search Entries], users must also be qualified to access the trusted
LDAP server.
From a security feature perspective, connections will not be made to unencrypted trusted domains while
LDAPS is in use.
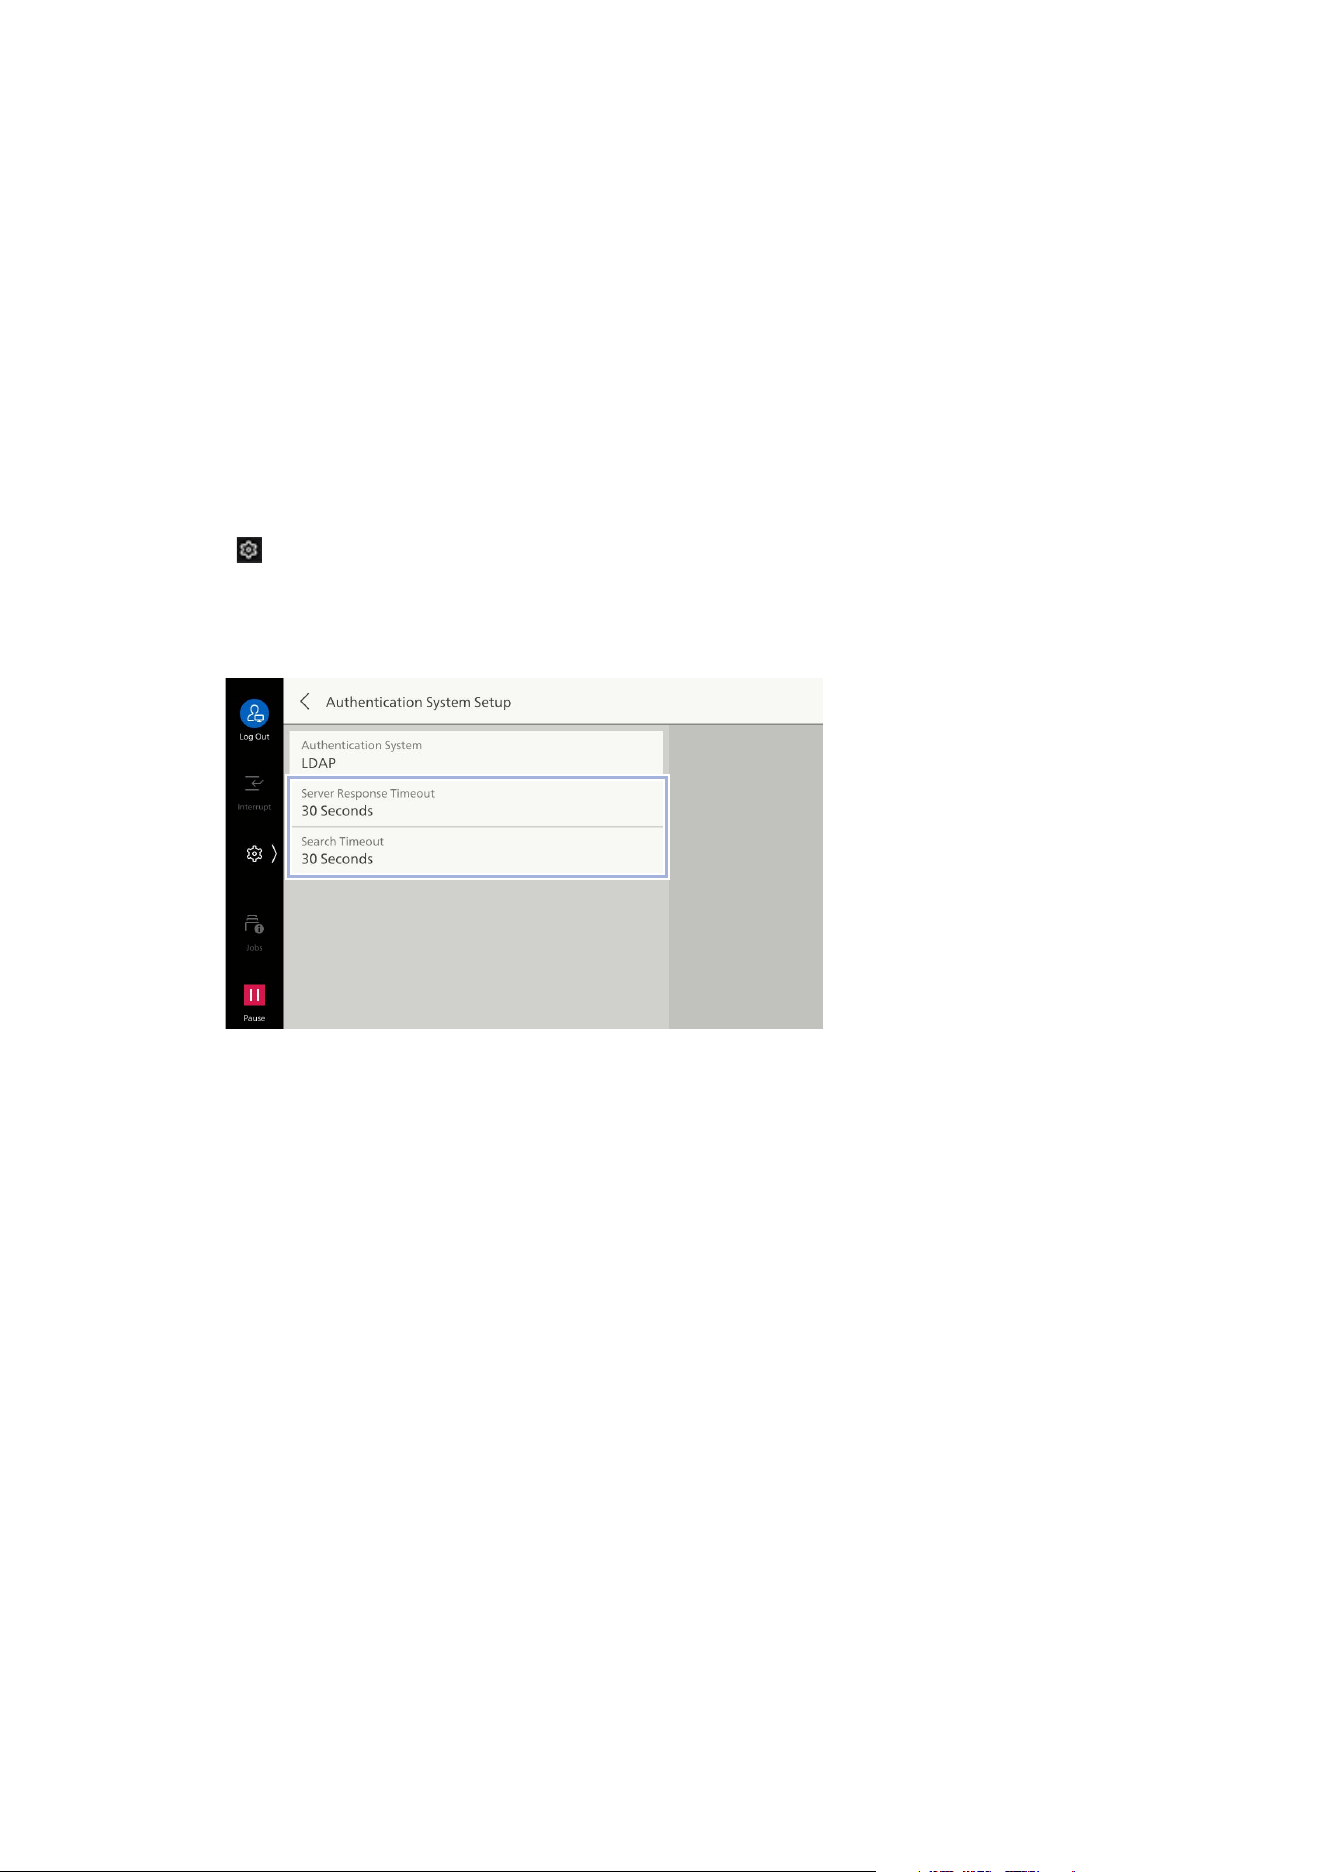
202
11 Authentication and Accounting Feature
If Logging In Takes an Excessive Amount of Time, and the Same
User Succeeds and Fails Login Attempts
This can be thought to be due to the following.
The scope for searching LDAP servers is too broad
There are too many entries contained within the search scope
Review [Search Directory Root] and [Search Scope]. For details, refer to "[LDAP Server / Directory
Service Settings]" (P.143).
Additionally, login failures may be avoided by setting a sufficiently long timeout duration for
con
necting to the LDAP server for the machine. However, as this will not reduce the time required to
log in, this should only be considered a provisional measure.
Follow the procedure below to set the connection timeout duration.
1. Tap on > [Device] > [Network Settings] > [Remote Authentication / Directory Service] >
[Authentication System Setup].
2. Confirm and change the following settings as required.
[Server Response Timeout]
This sets the maximum timeout duration for a response from the server when an authentication
request is sent to the LDAP server.
Change this setting when the network load is thought to be causing the issue.
[Search Timeout]
This sets the maximum timeout duration for a response from the server when an search request is
sent to the LDAP server.
Change this setting when the LDAP server load is thought to be causing the issue.

203
11.4 User Authentication Operations
11.4 User Authentication Operations
Authenticating Login Users
Operate the touch panel display of the machine to authenticate.
Changing a Registered User Password
A registered user can set or change a registered user password using the touch panel display, or
Internet Services.
1. Tap on > [Device] > [Authentication/Accounting] > [User Details Setup] > [Change Password].
2. Enter the current password, and then tap on [OK].
3. Tap on [Enter Password] and then enter the new password.
4. Enter the new password, tap on [Next], and then enter the same password.
5. Tap on [OK].
User Authentication When Using Microsoft Entra ID
Refer
Refer to "Logging in to Authentication Mode" (P.15) for more information.

SHARP CORPORATION
March 2024 Edition 1
GM1977E9-1

