
Frigidaire.com USA 1-800-374-4432 Frigidaire.ca Canada 1-800-265-8352
Espresso Maker
use & care
FREMLIT0124 (April 2024)
Introduction
.......................................................2
Important Safety Information ....................3
Features ..............................................................5
Controls & Operation .....................................6
Care & Cleaning .............................................. 11
Troubleshooting ............................................. 13
Warranty ........................................................... 15
2
INTRODUCTION
This manual is your resource for the use
and care of your product. Please read
it before using your Espresso Machine.
Keep it handy for quick reference. If
something doesn’t seem right, the
troubleshooting section will help you with
common issues.
Visit Owner Support on
www.frigidaire.com
for access to FAQs,
how-to videos and articles, accessories
and cleaning products.
We are here for you! Visit our website,
chat with an agent, or call us if you need
help. If you do need service, we can get
that started for you.
For Peace of Mind Protection, register
you product. Locate your registration
card and/or label on your product with
the photo register icon.
Keep your product info here so it’s easy
to find.
Model Number:
Serial Number:
Purchase Date:
Welcome to our
family
Conforms to UL Std.1082
Certified to CSA Std. CSA C22.2
No.60335-1&60335-2-15
ATTENTION
Please read all instructions related to your
product and keep this manual for your
future reference. Follow all the warnings
and instructions described in this manual
to better use your product and get better
results.
ENVIRONMENT
Frigidaire is committed to oering
products that have less impact on the
environment, thus contributing to the
sustainable development. Electronic
equipment, cells and batteries must be
disposed of separately from ordinary
waste. If your equipment has cells or
batteries, when they are replaced or
discarded, they must be sent to an
Frigidaire Authorized Service so that they
have a suitable destination.
Environmentally sound preparation of
packaging and products at the end of life
is everyone’s responsibility.
Definitions
This is the safety alert symbol. It is
used to alert you to potential personal
injury hazards. Obey all safety messages
that follow this symbol to avoid possible
injury or death.
CAUTION
CAUTION indicates a potentially
hazardous situation which, if not
avoided, may result in minor or
moderate injury.
DANGER
DANGER indicates an imminently
hazardous situation which, if not avoided,
will result in death or serious injury.
IMPORTANT
IMPORTANT indicates installation, oper-
ation or maintenance information which
is important but not hazard-related.
WARNING
WARNING indicates a potentially
hazardous situation which, if not avoided,
could result in death or serious injury.

3
IMPORTANT SAFETY INFORMATION
SAFETY PRECAUTIONS
Read all instructions before using the
electric appliance. The following basic
precautions should always be followed.
• Children shall not play with the
appliance. Cleaning and user
maintenance shall not be performed
by children without supervision.
Close supervision is necessary when
the appliance is being used by or
near children.
• Please keep the appliance and the
power cord out of the reach of
children.
• After unpacking the appliance, keep
the packaging material out of reach
of children.
• This appliance is intended for normal
household use only.
• Check that the supply voltage is the
same as the product label before
connecting it.
• Unplug the appliance and allow it to
cool before cleaning
• Do not use the appliance if the plug,
the main cord or the appliance itself
is damaged. Always make sure that
the plug is inserted properly into a
wall outlet.
• Regularly inspect the appliance
and power cord. If the power cord
is damaged or broken, it must be
replaced by a service agent or
similarly qualified persons to avoid
safety hazards
• Always return the appliance to
an authorized service center for
examination or repair. Do not
attempt to repair the appliance
yourself.
• Keep the power cord away from hot
surfaces or sharp objects to avoid
damage. Do not use an extension
cord. Do not use an outlet under the
counter.
• Do not excessively pinch, bend, twist
or place heavy objects on the power
cord to prevent from exposing or
breaking its shielding. Do not use
the electrical cord to pull or drag the
product
• Do not let cord hang over the edge
of table or counter, or touch hot
surfaces.
• Always attach plug to appliance first,
then plug cord into the wall outlet.
To disconnect, turn the unit o, then
remove plug from wall outlet.
• Never unplug the product from the
outlet by pulling on the electrical
cable, use the plug.
• The accessible surfaces may become
hot during use. Do not touch hot
surfaces. Use handles. Keep hair and
clothing away from heated parts of
the appliance.
• Do not place the appliance on or
near a hot gas or electric burner, or in
a heated oven. Do not use outdoors.
• Always place the appliance on a flat,
level surface.
• To protect against fire, electric
shock and injury to persons, do not
immerse cord, plugs or any other
part of the appliance in water or
other liquid.
• Do not remove the water tank during
the brewing cycle as scalding may
occur.
• Do not remove the filter holder
during the brewing process or when
there’s steam / hot water flowing
from the filter holder as the appliance
is pressurized.
IMPORTANT SAFEGUARDS
WARNING
Avoid steam burns
DANGER
There is risk of scalding from hot water.
• Release pressure through hot water/
steam nozzle before removing filter
holder.

4
IMPORTANT SAFETY INFORMATION
IMPORTANT SAFEGUARDS
FOR HOUSEHOLD USE ONLY
SAVE THESE INSTRUCTIONS FOR
FUTURE REFERENCE.
WARNING
CALIFORNIA RESIDENTS ONLY:
For cancer and reproductive harm
information visit:
www.P65Warnings.ca.gov
WARNING
Avoid spillage on the connector.
• The heating element surface is
subject to residual heat.
• When the steam function is used
there can be some hot water
dripping from the brewing head.
DANGER! The water is hot, there is a
risk for scalding.
• When operating the steam knob
there is a shot of hot water coming
out. Be careful and open the steam
valve slowly. DANGER! The water is
hot, there is a risk for scaling.
• Do not exceed the maximum filling
volume as indicated on the appliance.
• Fill the water tank only with cold
water, never with milk or other
liquids. Always use fresh water to
brew espresso to promise the best
taste.
• Do not use the appliance if the water
tank is empty.
• Do not use the appliance without the
drip tray or drip grid, unless a larger
cup/mug is in use.
• This appliance is intended for
domestic/normal household use only.
Not for commercial use. Do not use
Outdoors. Do not use the appliance
for other than the intended use. The
manufacturer cannot accept any
liability for possible damage caused
by improper or incorrect use.
• The use of accessory attachments
not recommended by the appliance
manufacturer may result in fire,
electric shock or injury to persons.
• T
his appliance is not intended to be
operated by means
of an external timer
or separate remote-control system.
• This appliance is not intended to be
used in household and similar
applications such as:
- staff kitchen areas in shops,
offices and others working
environments;
- farm houses;
- by clients in hotels, motels and
other residential type
environments;
- bed and breakfast type
environments.
This appliance has a polarized plug (one
blade is wider than the other). To reduce
the risk of electric shock, this plug is
intended to fit into a polarized outlet only
one way. If the plug does not fit fully into
the outlet, reverse the plug. If it still does
not fit, contact a qualified electrician. Do
not attempt to modify the plug in any
way.
5
FEATURES
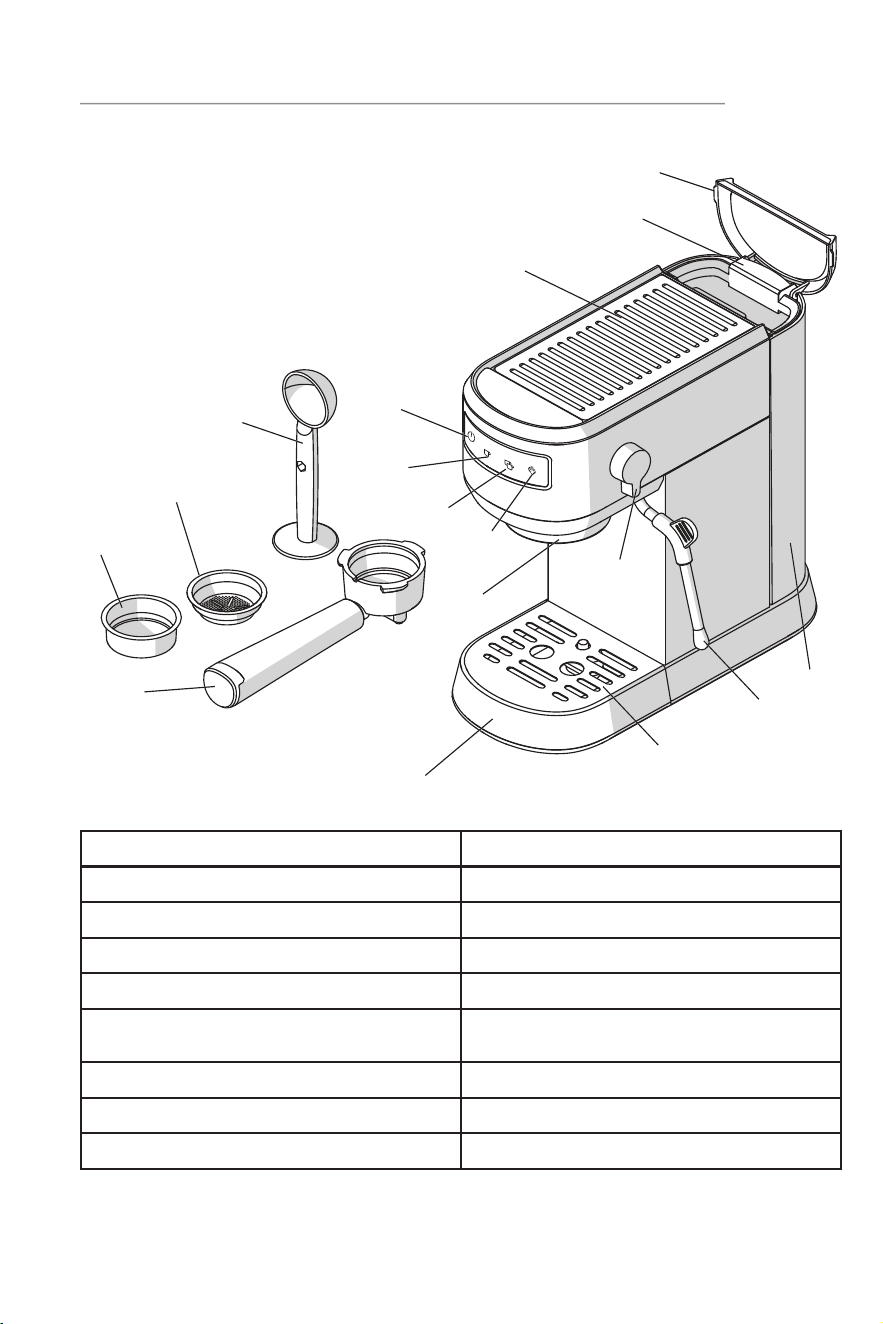
A. Power Button J. Water Tank Lid
B. One-shot Button K. Water Tank Handle
C. Two-shot Button L. Water Tank
D. Steam Button M. Cup Warmer
E. Brewing Head N. Steam Knob
F. One-shot Filter Cup O. Hot Water/Steam Nozzle (Milk
Frother)
G. Two-shot Filter Cup P. Drip Grid
H. Filter Holder Q. Drip Tray
I. Tamper/Measuring Spoon
D
B
C
H
J
K
M
N
O
L
G
F
E
A
I
Q
P
6
CONTROLS & OPERATION
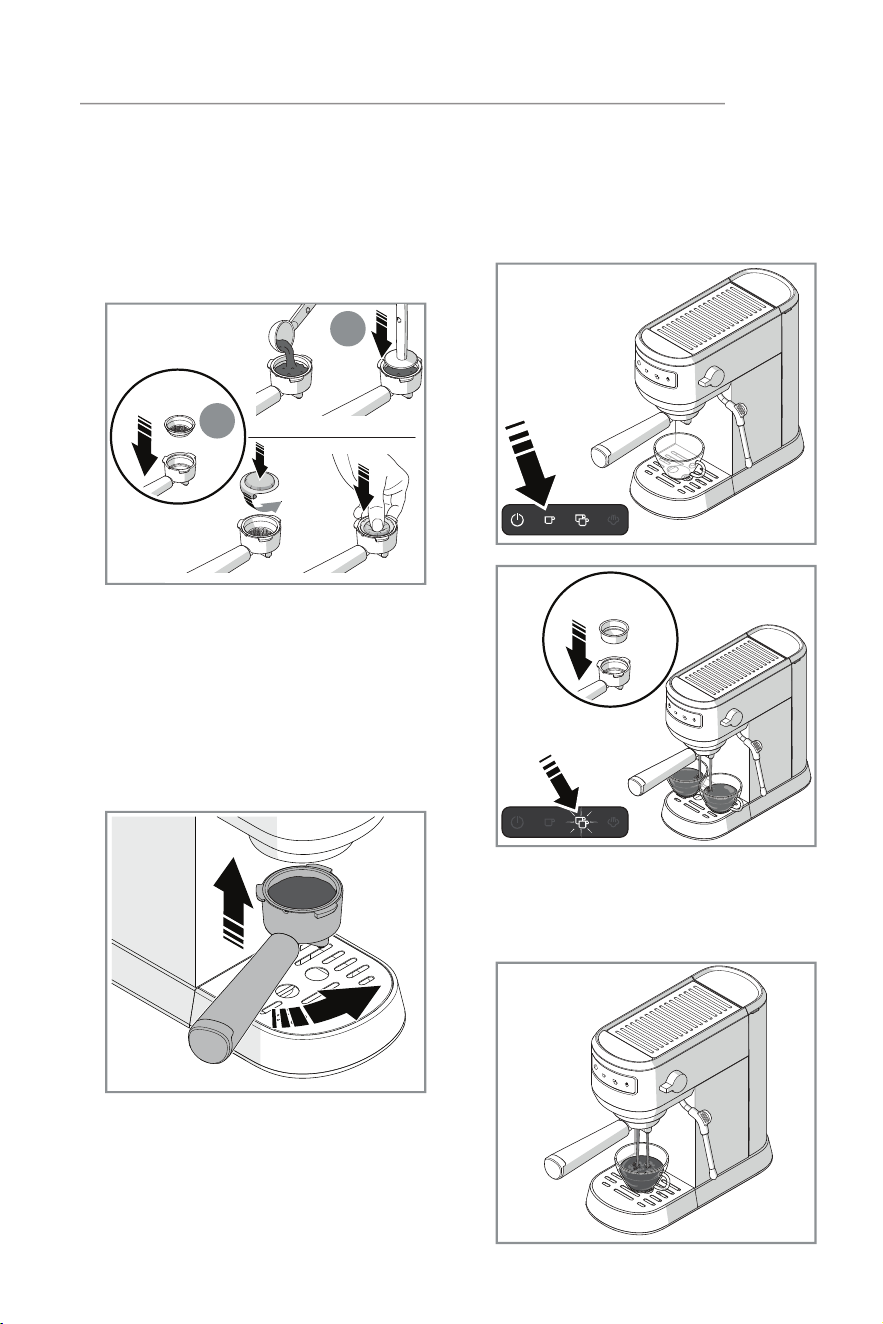
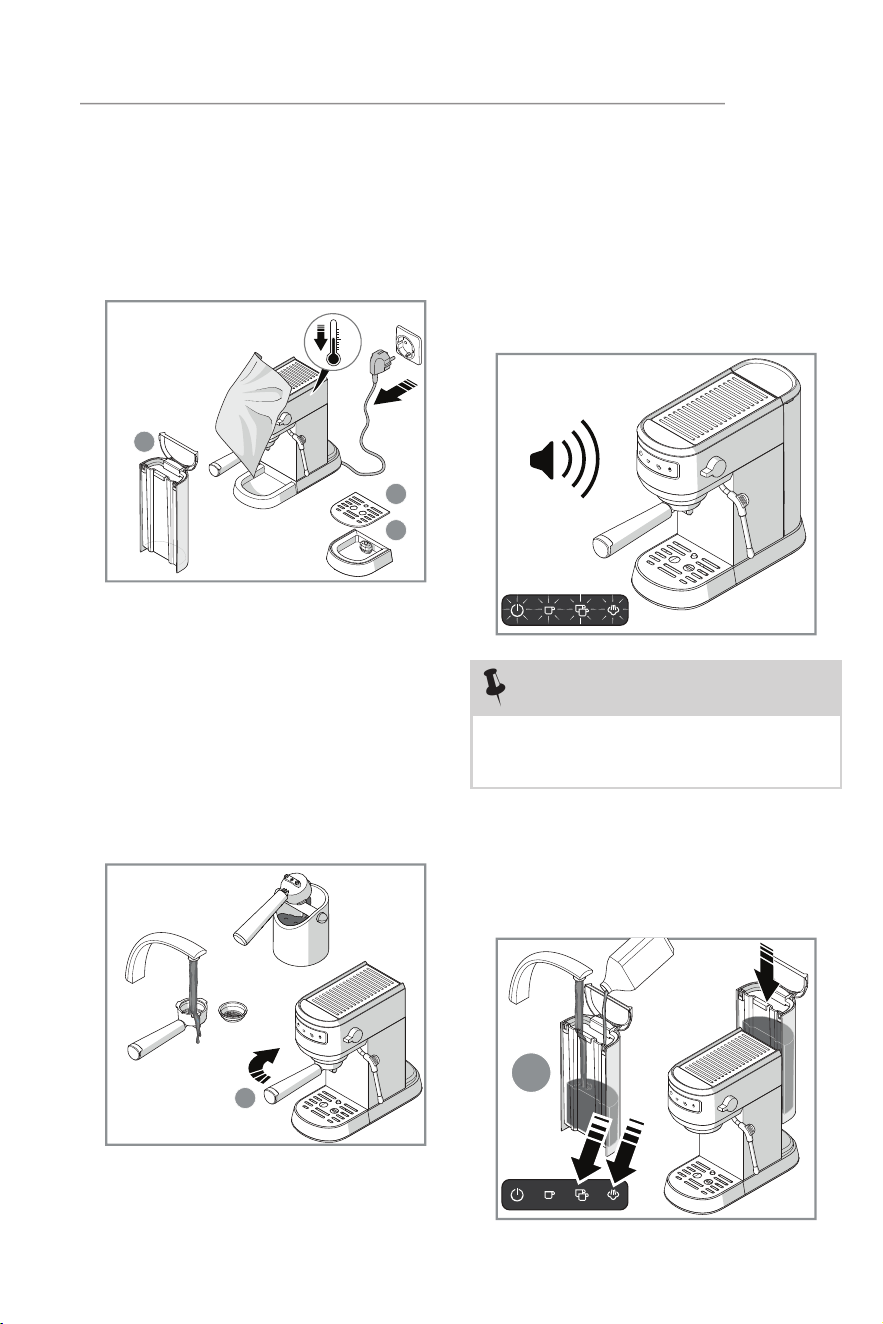
Getting Started
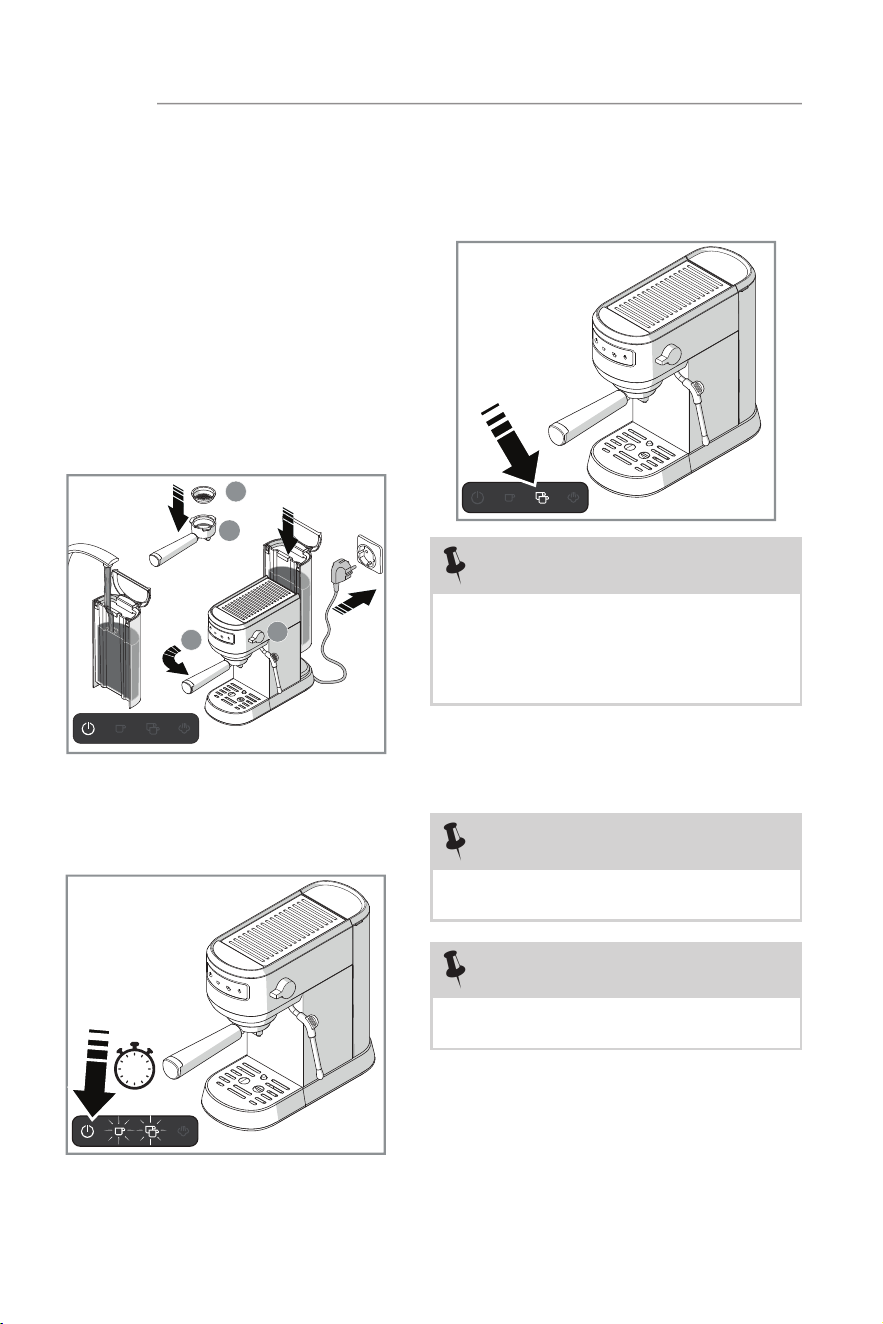
1. Place the machine on a flat surface.
The Power Indicator button lights
up once the machine is plugged
in. Remove the water tank and pull
out the orange water stopper from
the bottom. Fill up the water tank
with fresh, cold water and replace
at the back of the unit. Put filter cup
(F) into filter holder (H) and turn
counter-clockwise from INSERT to
LOCK position. Make sure the steam
knob (O) is at the OFF (horizontal)
position.
F
H
H
O
2. Press the power button. The cup
buttons blink for up to 40 seconds
while the unit warms up.
3. Preheating is complete when the
buttons stop blinking. Press the
Single or Double shot button to start
the brewing process.
NOTE
When water is pumped though the
machine for the first time, you may
hear some noise while any air inside the
machine is released. This process lasts
about 20 seconds.
NOTE
The machine enters standby after 20
minutes of inactivity.
NOTE
Perform steps 1-4 twice before using
the machine for the first time.
4. Once the brew cycle is finished, turn
the Filter Holder (H) clockwise to
remove. The machine is now ready
to use.
7
CONTROLS & OPERATION
Make Espresso
1. Put the one-shot filter (F) or the
two-shot filter (G) into the filter
holder. Add one spoon of ground
espresso for each shot and press it
tight with tamper (I) or thumb.
x1
B
I
2. Turn the Filter Holder counter-
clockwise from the INSERT to LOCK
position to attach it to the brewing
head. If the handle will not lock or is
hard to push into the lock position,
remove some grounds from the
filter and try again. The filter handle
should easily move into the lock
position.
3. Put a warm cup no taller than 3.5"
on the drip tray. When the Power
and Cup buttons are solid, press
either the One or Two-cup button to
start brewing.
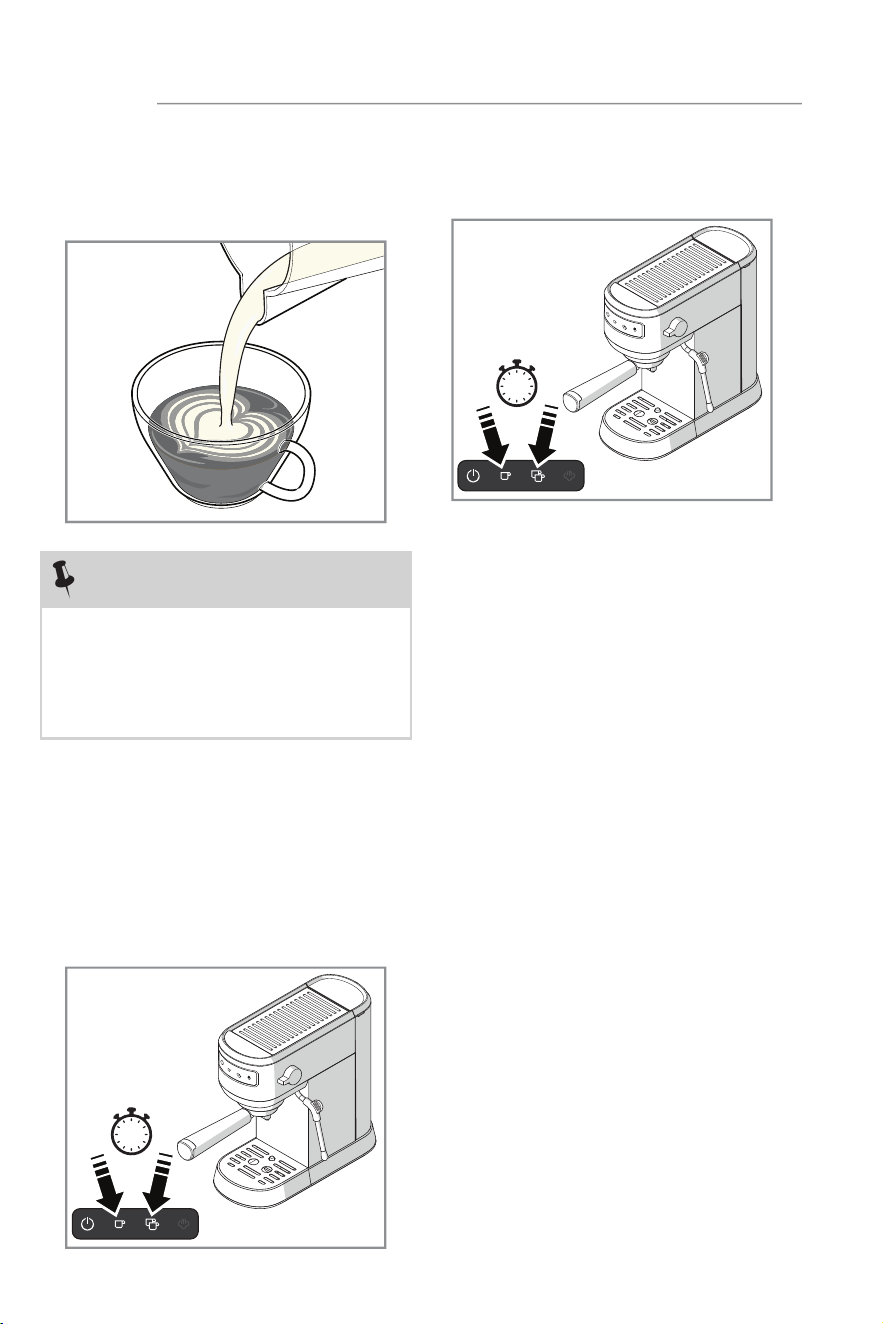
4. The espresso will flow out after a
short moment. Wait 10 seconds for
the espresso to stop dripping and
remove your cup.
x2
8
CONTROLS & OPERATION
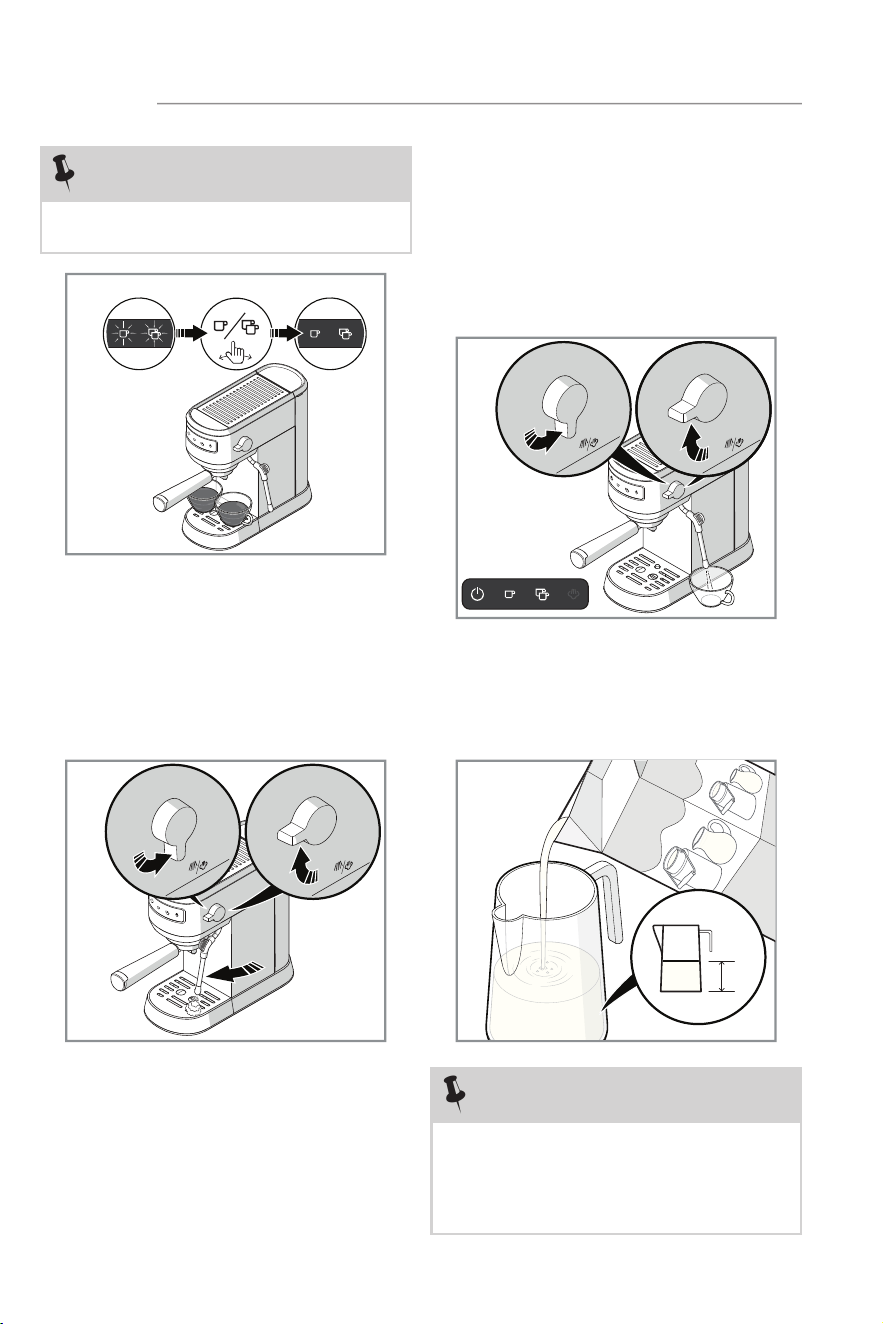
NOTE
Buttons will blink if the boiler is too hot
as a warning it needs to cool down.
NOTE
Make sure the pitcher diameter is larger
than 2.75 (70mm) inches, and that
the pitcher capacity can hold at least
twice the milk volume after frothing is
completed.
½
5. To brew another shot, follow steps
1-4 but be aware that brewing can
only restart once the boiler has
cooled. Turn the Steam knob from
the steam position and release hot
water from steam nozzle. The pump
shuts o once cooled. Turn the knob
o to resume brewing.
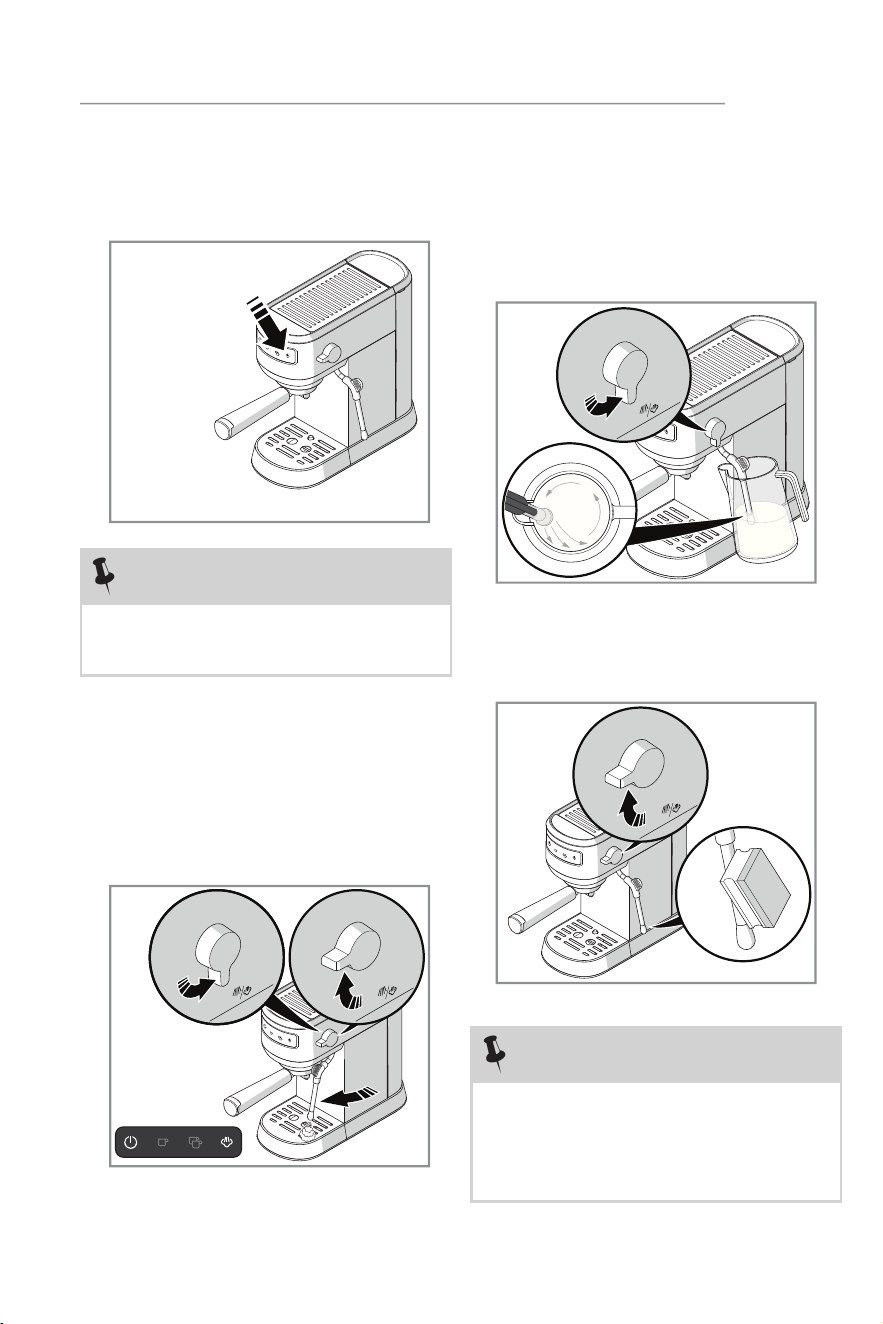
Make Hot Water
1. In Ready Mode when the Power
and Cup buttons are lit, turn the
Steam knob to the on position for
hot water to come out of the steam
nozzle.
2. Turn the knob to the o position
when the desired amount is reached.
Froth Milk and Make Cappuccino/Latte
1. Fill a pitcher with 3.4 oz (100ml for
cappuccino) or 6.75 oz (200 for
latte) milk.
9
CONTROLS & OPERATION
NOTE
Use chilled, NOT HOT, whole milk.
Results will vary based on the milk fat
content.
NOTE
Clean the steam nozzle with a wet
sponge immediately after the steam
stops coming out.
The pump shuts o automatically after
frothing for 3 minutes.
2. Press the Steam button when in
Ready mode. The Steam button
starts blinking while the water is
heating up.
3. The Steam button stops blinking
once the froth function is ready.
Before frothing the milk, ensure the
Steam nozzle is over the drip tray.
Turn the Steam knob to the Steam
position and release steam until
no water comes out, then turn the
Steam knob to the OFF position.
4. Place the pitcher under the steam
nozzle and immerse in milk about
1/4" before turning on the knob.
Make sure the steam nozzle is
positioned so the milk turns in one
direction in the pitcher from top to
bottom.
5. Turn o the knob and remove the
pitcher when the desired level of
foam is reached.
10
CONTROLS & OPERATION
NOTE
After using the steam function, make
sure the boiler has cooled. Press either
of the cup buttons to brew again. If
both cup buttons rapidly blink when
pressed, allow the boiler to cool down,
then attempt to brew again.
6. Pour the frothed milk into the
prepared espresso. Sweeten to taste
and sprinkle the froth with cocoa
powder if desired.
Favorites/Volume
1. In Ready mode when the Power
and Cup buttons are lit, press and
hold the cup buttons for 3 seconds
to enter reset mode. Press a cup
button to set the volume then
press again to confirm and save the
volume level.
2. Press and hold the cup buttons for
3 seconds to restore factory volume
settings.
11
CARE & CLEANING
Cleaning
1. Turn the machine o and unplug the
power cord. Let the machine cool
down completely before cleaning.
Wipe all outer surfaces with a damp
cloth.
Descaling
1. Descaling is recommended when all
indicators blink 5 times with 5 beeps
when powering the machine on. The
descaling warning will repeat 2 more
times each time when you turn on
the appliance if you do not perform
descaling or cancel.
L
Q
P
2. Clean the water tank (L), drip tray (Q)
and drip grid (P) regularly. Never use
caustic or abrasive cleaners, and never
immerse the machine in liquid. Do not
put components in the dishwasher.
3. Turn the Filter Cup Holder(H)
clockwise to detach. Clean out any
coee residue then remove the Filter
Cup from the Filter Holder. Rinse
all parts with clean water and dry
thoroughly.
H
x5
2. Add 10oz (300ml) of water to the
water tank, then add a descaling
agent. You can also use a 1:1 water and
vinegar solution.
10
oz
NOTE
Press and hold both Cup buttons, and
the steam button 3 seconds to cancel
the descaling warning.

12
CARE & CLEANING
Disposal
The packaging materials can be recycled.
Please sort individual components by
type and dispose them in applicable
containers according to local disposal
instructions. Recycling packaging
materials reduces the use of raw materials
and amount of waste in landfill sites. Help
protect the environment by recycling
your packaging.
This symbol on the product or
on its packaging indicates that
the product may not be treated
as household waste. Return the
product to your local recycling
facility or contact your municipal oce.
Electrolux reserves the right to change
products, information and specifications
without notice.
NOTE
Use only an environmentally friendly
descaling agent and always follow the
manufacturer’s instructions.
3. In Ready mode when the Power and
Cup buttons are lit, long press the
Two Cup and Steam Buttons for 3
seconds to start the descaling process.
The Cup and Steam buttons will blink
slowly during descaling. The machine
will return to stand-by mode once
descaling completes.

13
TROUBLESHOOTING
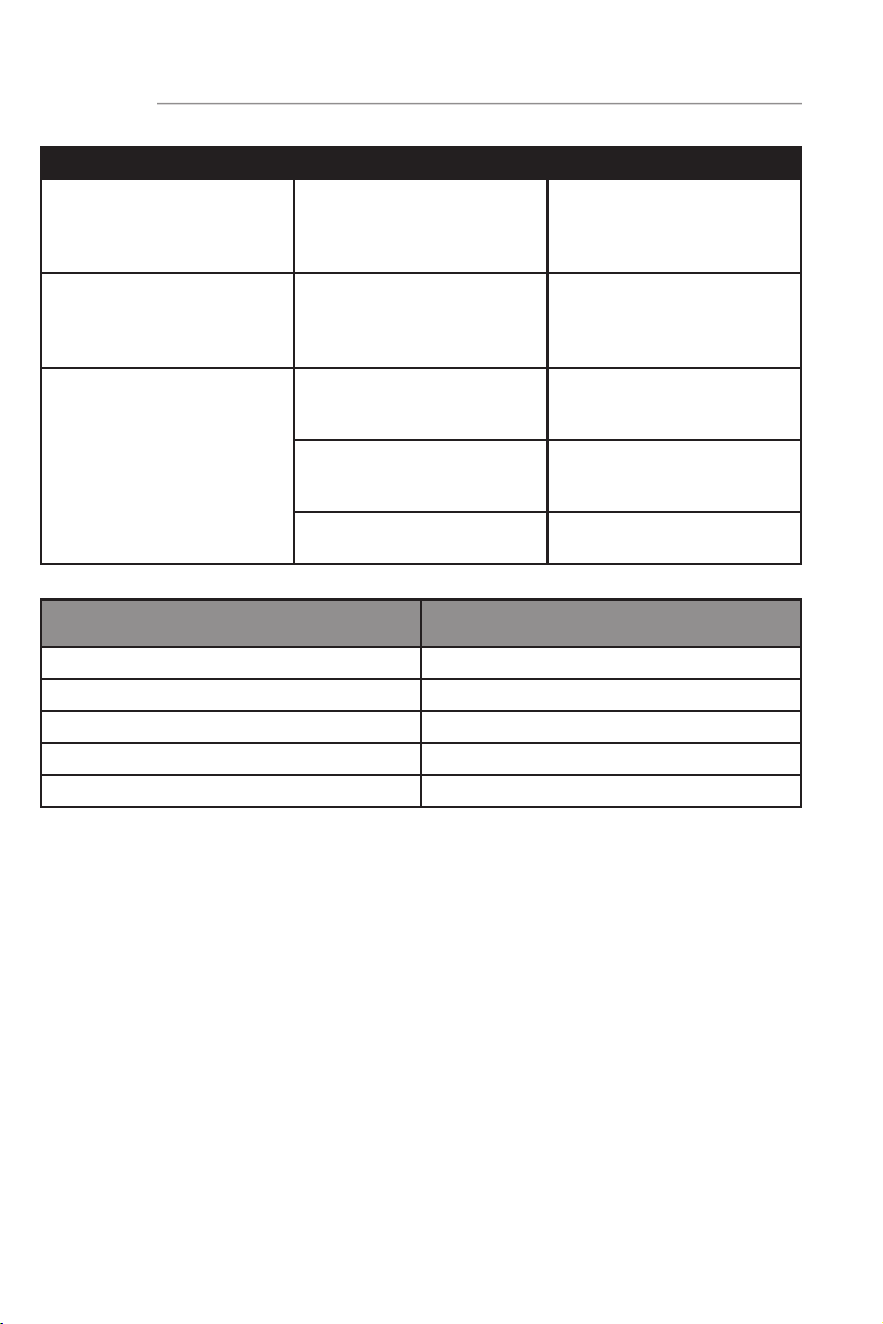
Problem Possible Cause Solution
Water leaking from the
bottom of coee maker
There is too much water in
the drip tray
Clean the drip tray
The coee maker has
malfunctioned
Please contact the
authorized service facility
for repairing
Water leaks outside of
filter cup
Coee grounds on the
filter cup edge when
locked into the brewing
head
Clean the filter cup
Acidic taste exists in
espresso coee
Descaling was not
performed correctly
Clean the machine as
outlined in steps 1-4 in the
Getting Started Section
The coee grounds have
expired
Use fresh coee. Tightly
reseal opened coee and
store it in a refrigerator to
maintain its freshness
The espresso maker does
not respond
The power outlet is not
plugged in
Plug the power cord into
a grounded outlet. If the
appliance still does not
work, please contact
customer service
The steam / milk froth
function does not work
properly
The Steam indicator is
not lit
The steam function can
be used to perform milk
frothing only when the
steam indicator is lit
The container is too big Use a tall cup or
professional milk frothing
pitcher
Skim milk was used Use whole or 2% milk
The Steam indicator is
quickly blinking
The steam knob was not
reset after making steam
for 3 minutes
Reset the steam knob by
turning it to the OFF, and
then Steam position
Cup indicators are quickly
blinking
The steam knob was not
reset after creating steam
for a cup of coee
Reset the steam knob by
turning it to the OFF, and
then Steam position
The steam knob has not
been reset after cooling
down
Boiler temperature is too
high
Allow the machine to cool
down
Cup and Steam indicators
are quickly blinking
The steam knob is not
reset, but the machine is
turned on.
Reset the steam knob by
turning it to the OFF, and
then Steam position
14
TROUBLESHOOTING
Problem Possible Cause Solution
ALL indicators blinking 5
times
Need descaling Descale the machine
Filter holder is too tight to
remove
The filter cup is overfilled Remove some coee
grounds from the filter
cup
Coee flows out too
slowly
Too much coee in the
filter cup
Remove some coee
grounds from the filter
cup
The coee is ground too
finely and tamped too
tightly into the filter cup
Tamp coee grounds with
less force, or grind coee
less finely
The filter cup is blocked Clean the filter cup with
the cleaning pin
Model FREM100SS
Voltage 120V
Frequency 60Hz
Power 1350W
Pressure 20 Bar
Color Stainless Steel

1
LIM
ITED WARRANTY
Your appliance is covered by a one year limited warranty. For one year from your
original date of delivery, Electrolux will pay all costs for repairing or replacing any
parts of this appliance that prove to be defective in materials or workmanship
when such appliance is installed, used and maintained in accordance with the
provided instructions.
Exclusions
This warranty does not cover the following:
1. Products with original serial numbers that have been removed, altered or cannot
be readily determined.
2. Product that has been transferred from its original owner to another party or
removed outside the USA or Canada.
3. Rust on the interior or exterior of the unit.
4. Products purchased “as-is” are not covered by this warranty.
5. Products used in a commercial setting.
6. Service calls which do not involve malfunction or defects in materials or
workmanship, or for appliances not in ordinary household use or used other than
in accordance with the provided instructions.
7. Service calls to correct the installation of your appliance or to instruct you how
to use your appliance.
8. Expenses for making the appliance accessible for servicing, such as removal of
trim, cupboards, shelves, etc., which are not a part of the appliance when it is
shipped from the factory.
9. Service calls to repair or replace appliance light bulbs, air filters, other
consumables, or knobs, handles, or other cosmetic parts.
10. Pickup and delivery costs; your appliance is designed to be repaired in the home.
11. Surcharges including, but not limited to, any after hour, weekend, or holiday
service calls, tolls, ferry trip charges, or mileage expense for service calls to
remote areas, including the state of Alaska.
12. Damages to the finish of appliance or home incurred during transportation or
installation, including but not limited to floors, cabinets, walls, etc.
13. Damages caused by: services performed by unauthorized service companies;
use of parts other than genuine Electrolux parts or parts obtained from persons
other than authorized service companies; or external causes such as abuse,
misuse, inadequate power supply, accidents, fires, or acts of God.
DISCLAIMER OF IMPLIED WARRANTIES; LIMITATION OF REMEDIES
CUSTOMER’S SOLE AND EXCLUSIVE REMEDY UNDER THIS LIMITED WARRANTY SHALL BE REPAIR
OR REPLACEMENT AS PROVIDED HEREIN. CLAIMS BASED ON IMPLIED WARRANTIES, INCLUDING
WARRANTIES OF MERCHANTABILITY OR FITNESS FOR A PARTICULAR PURPOSE, ARE LIMITED
TO ONE YEAR OR THE SHORTEST PERIOD ALLOWED BY LAW, BUT NOT LESS THAN ONE YEAR.
ELECTROLUX SHALL NOT BE LIABLE FOR CONSEQUENTIAL OR INCIDENTAL DAMAGES SUCH
AS PROPERTY DAMAGE AND INCIDENTAL EXPENSES RESULTING FROM ANY BREACH OF THIS
WRITTEN LIMITED WARRANTY OR ANY IMPLIED WARRANTY. SOME STATES AND PROVINCES DO
NOT ALLOW THE EXCLUSION OR LIMITATION OF INCIDENTAL OR CONSEQUENTIAL DAMAGES,
OR LIMITATIONS ON THE DURATION OF IMPLIED WARRANTIES, SO THESE LIMITATIONS OR
EXCLUSIONS MAY NOT APPLY TO YOU. THIS WRITTEN WARRANTY GIVES YOU SPECIFIC LEGAL
RIGHTS. YOU MAY ALSO HAVE OTHER RIGHTS THAT VARY FROM STATE TO STATE.
If You Need Service
Keep your receipt, delivery slip, or some other appropriate payment record to establish
the warranty period should service be required. If service is performed, it is in your best
interest to obtain and keep all receipts. Service under this warranty must be obtained by
contacting Electrolux at the addresses or phone numbers below.
This warranty only applies in the USA, Puerto Rico and Canada. In the USA and Puerto
Rico, your appliance is warranted by Electrolux Major Appliances North America, a
division of Electrolux Home Products, Inc. In Canada, your appliance is warranted by
Electrolux Canada Corp. Electrolux authorizes no person to change or add to any
obligations under this warranty. Obligations for service and parts under this warranty
must be performed by Electrolux or an authorized service company. Product features or
specifications as described or illustrated are subject to change without notice.
US
A & Puerto Rico
1-800 374 4432
Electrolux Home Products, Inc.
10200 David Taylor Drive
Charlotte, NC 28262
C
a
nada
1-800 265 8352
Electrolux Canada Corp.
5855 Terry Fox Way
Mississauga, Ontario,
Canada L5V 3E4
5
welcome home.
Frigidaire.com
1-800-374-4432
Frigidaire.ca
1-800-265-8352
owner support
accessories
service
Our home is your home. Visit us if you
need help with any of these things:
registration
(See your registration card
for more information.)

